Installation and Administration Guide - Product Documentation
144
Virtual Storage Console 6.2.1 for VMware vSphere ® Installation and Administration Guide March 2017 | 215-11519_D0 [email protected]
-
Upload
khangminh22 -
Category
Documents
-
view
0 -
download
0
Transcript of Installation and Administration Guide - Product Documentation

Virtual Storage Console 6.2.1 for VMware vSphere®
Installation and AdministrationGuide
March 2017 | [email protected]


Contents
Changes to this document: February 2016 ................................................ 7How to use this guide .................................................................................... 8Virtual Storage Console for VMware vSphere overview ........................ 11
How VSC for VMware features work with optional plug-ins, virtual appliances .... 12
Provisioning and cloning datastores and virtual machines ....................................... 12
How VSC for VMware vSphere optimizes I/O performance of misaligned
virtual machines ................................................................................................... 13
Methods for migrating virtual machines ................................................................... 13
Backing up and restoring virtual machines and datastores ....................................... 14
Protection of system resources using lock management ........................................... 15
VSC for VMware vSphere architecture .................................................................... 15
Planning your VSC for VMware vSphere installation ............................ 17VSC for VMware vSphere installation overview ..................................... 21
VSC for VMware vSphere supported configurations ............................................... 23
Initial installation of VSC for VMware vSphere ...................................................... 25
Installing VSC for VMware vSphere using the installation wizard .............. 25
Installing VSC for VMware vSphere using silent mode ............................... 26
Considerations when upgrading VSC for VMware vSphere .................................... 26
Removing vSphere Web Client UI extensions from vCenter Server ............ 28
Performing a standard VSC for VMware vSphere upgrade installation ....... 29
Upgrading VSC for VMware vSphere from a 32-bit installation to a 64-
bit installation .......................................................................................... 30
Uninstalling VSC for VMware vSphere using Add/Remove Programs ................... 32
Uninstalling VSC for VMware vSphere using silent mode .......................... 32
Installing plug-ins, virtual appliances supported by VSC forVMware vSphere ................................................................................... 33
NetApp NFS Plug-in for VAAI installation .............................................................. 33
VASA Provider for clustered Data ONTAP installation and registration ................. 33
Configuring your VSC for VMware vSphere environment .................... 35ESX server and guest operating system setup ........................................................... 35
Configuring ESX server multipathing and timeout settings ......................... 35
Timeout values for guest operating systems ................................................. 38
VSC for VMware vSphere configuration .................................................................. 43
Registering VSC for VMware vSphere with vCenter Server ........................ 43
Registering VSC for VMware vSphere with SnapCenter ............................. 44
Registering VASA Provider for ONTAP with VSC for VMware vSphere ... 45
Regenerating an SSL certificate for VSC for VMware vSphere ................... 47
Replacing an SSL certificate for VSC for VMware vSphere with CA-
signed certificates .................................................................................... 48
VSC for VMware vSphere port requirements ............................................... 49
Performing VSC for VMware vSphere tasks across multiple vCenter Servers ........ 50
Table of Contents | 3

Managing connection brokers ................................................................................... 51
Adding connection brokers ........................................................................... 51
Removing connection brokers ....................................................................... 53
Configuring AutoSupport messages for backup jobs ................................................ 53
Configuring email alerts for backup jobs .................................................................. 54
MetroCluster configurations and VSC for VMware vSphere ................................... 55
The preferences files ................................................................................................. 55
Enabling datastore mounting across different subnets .............................................. 55
Setting the frequency of NFS path optimization checks ........................................... 56
Authentication and user management with vCenter RBAC and DataONTAP RBAC ........................................................................................ 57
vCenter Server role-based access control features in VSC for VMware vSphere .... 58
Components of vCenter Server permissions ................................................. 58
Key points about assigning and modifying permissions ............................... 60
Advanced example of using vCenter Server permissions ............................. 61
Standard roles packaged with VSC for VMware vSphere ........................................ 62
Product-level privilege required by VSC for VMware vSphere ............................... 65
Example of how the View privilege affects tasks in VSC for VMware
vSphere .................................................................................................... 65
Data ONTAP role-based access control features in VSC for VMware vSphere ....... 66
Recommended Data ONTAP roles when using VSC for VMware
vSphere .................................................................................................... 67
How to configure Data ONTAP role-based access control for VSC for VMware
vSphere ................................................................................................................ 68
Requirements for performing tasks in VSC for VMware vSphere ........ 70Navigating VSC for VMware vSphere ..................................................... 71Working with storage systems ................................................................... 72
Storage system discovery and credentials overview ................................................. 72
Default credentials simplify administrating storage systems ........................ 73
Tunneled vFiler units and SVMs discovered automatically .......................... 75
Enabling discovery and management of vFiler units .................................... 75
Enabling discovery of vFiler units on private networks ................................ 76
Discovering storage systems and hosts ......................................................... 76
Manually adding storage systems ................................................................. 77
Refreshing the storage system display .......................................................... 78
Removing storage systems from VSC .......................................................... 79
Correcting storage system names displayed as “unknown” ...................................... 80
Managing settings for volumes ................................................................................. 80
MultiStore vFiler units are displayed differently ...................................................... 81
VSC for VMware vSphere behaves differently if SVMs connect directly or use
cluster management LIFs .................................................................................... 82
Direct path access and NFS datastores ...................................................................... 82
Changing NFS data paths to direct access .................................................... 83
Deploying virtual machines on NetApp storage ...................................... 85Provisioning datastores ............................................................................................. 85
4 | VSC 6.2.1 for VMware vSphere Installation and Administration Guide

Cloning virtual machines from a template ................................................................ 88
Increasing storage efficiency by enabling deduplication .......................................... 91
Maintaining your VMware environment ................................................. 93Migrating virtual machines to a new or existing datastore ....................................... 93
Redeploying NFS-based virtual machine clones from a template ............................ 95
Reclaiming space from NFS-based virtual machines ............................................... 97
Mounting datastores on hosts .................................................................................... 97
Resizing datastores .................................................................................................... 98
Destroying datastores ................................................................................................ 99
Optimizing performance by aligning the I/O of misaligned virtualmachines non-disruptively .................................................................. 101
Scanning datastores to determine the alignment status of virtual machines ........... 101
Checking the alignment status of virtual machines ................................................. 102
Aligning the I/O of misaligned virtual machines non-disruptively ......................... 104
Backing up virtual machines and datastores ......................................... 107Backup job specifications ........................................................................................ 108
Backup job requirements ......................................................................................... 108
Creating a backup policy ......................................................................................... 110
Performing an on-demand backup of a virtual machine or datastore ..................... 112
Creating backup jobs ............................................................................................... 113
Scheduling backup jobs that use SnapCenter .............................................. 114
Scheduling backup jobs that use the VSC backup feature .......................... 115
Adding a virtual machine or datastore to an existing backup job ........................... 117
Modifying the job properties of a scheduled backup job ........................................ 118
Suspending an active backup job ............................................................................ 118
Resuming a suspended backup job .......................................................................... 119
Deleting a scheduled backup job ............................................................................. 119
Restoring virtual machines and datastores from backup copies ......... 121Considerations for restore operations using data that was backed up with failed
VMware consistency snapshots ......................................................................... 121
Searching for backup copies ................................................................................... 121
Mounting a backup copy ......................................................................................... 122
Unmounting a backup copy ..................................................................................... 123
Restoring data from backup copies ......................................................................... 124
Attaching a virtual disk to restore a file .................................................................. 125
Detaching a virtual disk ........................................................................................... 126
Troubleshooting ........................................................................................ 128Information at NetApp Support Site ....................................................................... 128
Information at NetApp VSC Communities Forum ................................................. 128
Information available in the Release Notes ............................................................. 128
Uninstall does not remove standard VSC roles ....................................................... 129
Collecting the VSC for VMware vSphere log files ................................................. 129
Updating vCenter credentials for background discovery ........................................ 130
Possible issues with backup and restore operations ................................................ 130
Values that you can override for backup jobs .............................................. 130
Table of Contents | 5

Location of backup event and error logs ..................................................... 132
Email notification for scheduled backup contains a broken link ................ 133
You may have reached the maximum number of NFS volumes
configured in the vCenter ...................................................................... 133
Error writing backup metadata to repository\backups.xml: move failed .... 133
Virtual Storage Console unable to discover datastores on an SVM
(Vserver) without a management LIF ................................................... 133
VMware vSphere does not remove snapshot delta disks during a restore
operation ................................................................................................ 134
Copyright information ............................................................................. 135Trademark information ........................................................................... 136How to send comments about documentation and receive update
notifications .......................................................................................... 137Index ........................................................................................................... 138
6 | VSC 6.2.1 for VMware vSphere Installation and Administration Guide

Changes to this document: February 2016
A number of changes were made to this guide for the 6.2 version of Virtual Storage Console forVMware vSphere (VSC). Previously, this guide was released with the 6.1 version of VSC.
The guide documents the tasks that you can perform with VSC. If new information or correctionsthat affect this guide become available during this VSC release, then this guide is updated with thenew information, and this section lists what has changed.
Any time this guide is updated, a note is added to the Release Notes. It is a good practice to check theonline Release Notes on a regular basis to determine whether there is new information about usingVSC, or whether there are changes to this guide.
The most current versions of the Release Notes and this guide are located on the NetApp SupportSite.
NetApp Support
February 2016 update
In February 2016, this document was updated to add support for the 6.2 release of VSC. Some of thechanges in this release that affect this document include the following:
• Information about removing vSphere Web Client user interface (UI) extensions has been updatedto call out directory differences between vSphere 5.x and vSphere 6.x.
Removing vSphere Web Client UI extensions from vCenter Server on page 28
• If you use backup policies, VSC now displays information about the policy that was used with aspecific backup job.
VSC has added a column containing this information when you perform a mount, restore, orattach operation.
Note: Backup polices are supported only when you register VSC with SnapCenter.
• VSC supports Raw Device Mappings that are hosted on NetApp storage when performing backupand restore operations.
In general, this support is transparent to the user.
VSC also supports VMware virtual volumes (VVOLs) for provisioning operations. You can useVASA Provider for ONTAP to create and manage VVOLs. VVOLs accept storage capability profiles,which you can create and manage from the VASA Provider section of the VSC GUI. The VASAProvider for Clustered Data ONTAP User's Guide provides information for setting up and workingwith VVOLs.
Note: At this time, VSC does not support VVOLs for the following operations: back up, restore,clone, optimize, and migrate.
7

How to use this guide
This guide has been arranged to make it easy for you to quickly get to the information you need.
If you are currently a VSC user, you should check Changes to this document: February 2016 on page7, which summarizes some of the key differences from previous releases and how they affect thisdocumentation.
The guide is organized into parts based on information that different types of users might need. Theseinclude the following broad categories:
Informationcategory
Targetaudience
Where you can find it
Conceptionalinformationabout VSC, itskeycomponents,and how itworks withoptional plug-ins
Administrators,executives, andanyone whoneeds a high-levelunderstandingof how VSCworks
The section “Virtual Storage Console overview” containstopics that provide this information.
Virtual Storage Console overview on page 11
What isinvolved insetting up VSCfor yourenvironment
Administrators “Plan your VSC for VMware installation” provides you witha checklist of issues you should consider before you installVSC.
Plan your VSC for VMware installation on page 17
8

Informationcategory
Targetaudience
Where you can find it
Installation andconfigurationinstructions
Administratorsand VSC users
• The section “VSC for VMware vSphere installationoverview” contains details you need to consider beforestarting your VSC installation as well as instructions forinstalling VSC the first time or upgrading an existingversion of VSC.
VSC for VMware vSphere installation overview on page21
• “VASA Provider for clustered Data ONTAP installationand registration” provides information about how toobtain VASA Provider so that you can use it with VSC.
VASA Provider for clustered Data ONTAP installationand registration on page 33
• “NFS Plug-in for VAAI installation” providesinformation about how to obtain that plug-in so that youcan use it with VSC.
NFS Plug-in for VAAI installation on page 33
• The section “Configuring your VSC for VMwarevSphere environment” provides instructions forconfiguring ESX server settings, guest operating systemtimeouts, regenerating VSC SSL certificates, setting upconnection brokers, configuring AutoSupport and emailalerts for backup jobs, enabling datastores to be mountedacross subnets, and configuring the vCenter ServerHeartbeat feature.
Configuring your VSC for VMware vSphereenvironment on page 35
Role-basedaccess control(RBAC)
Administrators The section “Authentication and user management withvCenter RBAC and Data ONTAP RBAC” explains how VSCworks with RBAC and describes ways that administratorscan manage both vCenter Server and Data ONTAP RBACwhen using VSC.
Authentication and user management with vCenter RBACand Data ONTAP RBAC on page 57
Prerequisites forVSC tasks
Administratorsand VSC users
• “Requirements for performing tasks in VSC for VMwarevSphere” lists some of the requirements that must be inplace before you perform VSC tasks.
Requirements for performing tasks in VSC for VMwarevSphere on page 70
• “Navigating VSC for VMware vSphere” providesinformation about how to access tasks within the newVSC GUI.
Navigating VSC for VMware vSphere on page 71
How to use this guide | 9

Informationcategory
Targetaudience
Where you can find it
VSC tasks Administratorsand VSC users
• The section “Working with storage systems” containsdetails about the tools VSC provides that enable you tomanage storage systems.
Working with storage systems on page 72
• The section “Deploying virtual machines on NetAppstorage” presents a workflow about provisioningdatastores as well as instructions for performingprovisioning and cloning operations.
Deploying virtual machines on NetApp storage on page85
• The section “Optimizing performance by aligning the I/Oof misaligned virtual machines nondisruptively” containsinstructions for tasks that affect checking the alignmentof virtual machines and correcting misalignments.
Optimizing performance by aligning the I/O ofmisaligned virtual machines nondisruptively on page101
• The section “Maintaining your VMware environment”contains tasks such as migrating virtual machines,redeploying virtual machines, reclaiming space fromvirtual machines, and managing datastores by mounting,resizing, and destroying them.
Maintaining your VMware environment on page 93
• The section “Backing up virtual machines anddatastores” provides tasks that enable you to create andwork with backup copies.
Backing up virtual machines and datastores on page 107
• The section “Restoring virtual machines and datastoresfrom backup copies” contains the tasks you must performwhen you want to restore a backup copy.
Restoring virtual machines and datastores from backupcopies on page 121
Troubleshooting Administratorsand VSC users
The section “Troubleshooting” identifies possible issues thatcould affect your VSC installation.
Troubleshooting on page 128
10 | VSC 6.2.1 for VMware vSphere Installation and Administration Guide

Virtual Storage Console for VMware vSphereoverview
Virtual Storage Console for VMware vSphere software is a single vCenter Server plug-in thatprovides end-to-end lifecycle management for virtual machines in VMware environments usingNetApp storage systems.
VSC integrates smoothly with the VMware vSphere Web Client and enables you to use single sign-on (SSO) services. If you have multiple vCenter Servers and each one has a VSC server registered toit, you can manage them from a single Web Client. In addition, the VSC Summary page allows youto quickly check the overall status of your vSphere environment.
Note: The NetApp blue "N" icon in the screens and portlets lets you easily distinguish the NetAppfeatures from the VMware ones.
By running VSC, you can perform the following tasks:
• Manage storage and configure the ESX hostYou can use VSC to add, remove, assign credentials, and set up permissions for storagecontrollers within your VMware environment. In addition, you can manage ESX and ESXiservers connected to NetApp storage. You can set values for host timeouts, NAS, andmultipathing as well as view storage details and collect diagnostic information.
Note: You can also add Storage Virtual Machines (SVMs, formerly known as Vservers).
• Create storage capability profiles and set alarmsWhen you install VASA Provider for clustered Data ONTAP and register it with VSC, you cancreate and use storage capability profiles and VMware virtual volumes (VVOLs). You can also setalarms to warn you when the thresholds for volumes and aggregates are approaching full.
• Provision datastores and clone virtual machinesVSC uses FlexClone technology to let you efficiently create, deploy, and manage the lifecycle ofvirtual machines from an interface that has been integrated into the VMware environment.
• Perform online alignments and migrate virtual machines singularly and in groups into newor existing datastoresYou can use VSC to quickly check the alignment status of virtual machines. If there are alignmentissues with the virtual machines, you can, in most cases, resolve those issues without having topower down the virtual machines.
• Back up and restore virtual machines and datastoresVSC allows you to rapidly back up and restore virtual entities such as virtual machines ordatastores on NetApp storage.
To provide security while performing tasks, VSC supports role-based access control (RBAC) at twolevels:
• vSphere objects, such as virtual machines and datastores.
These objects are managed using vCenter RBAC.
• Data ONTAP storage
Storage systems are managed using Data ONTAP RBAC.
If access control is not an issue, you can log in as administrator and have access to all the featuresthat VSC provides.
Tip: The View privilege is required for all users who do not have administrator privileges. Withoutthis privilege, these users cannot see the VSC GUI.
11

As a vCenter Server plug-in, VSC is available to all vSphere Clients that connect to the vCenterServer. Unlike a client-side plug-in that must be installed on every vSphere Client, you install theVSC software on a Windows server in your data center.
Related concepts
Provisioning and cloning datastores and virtual machines on page 12
How VSC for VMware vSphere optimizes I/O performance of misaligned virtual machines onpage 13
Backing up and restoring virtual machines and datastores on page 14
Authentication and user management with vCenter RBAC and Data ONTAP RBAC on page 57
How VSC for VMware features work with optional plug-ins,virtual appliances
Virtual Storage Console for VMware vSphere supports optional plug-ins and virtual appliances thatwork with VSC features. You can enhance your experience with VSC by registering VSC withSnapCenter and installing NFS Plug-in for VAAI and VASA Provider for clustered Data ONTAP.
If you are running clustered Data ONTAP 8.2.2 or later, you can register VSC with the SnapCenterServer. VSC automatically detects whether your environment supports SnapCenter and enablesSnapCenter features, such as backup policies and restoring individual datastores.
Backup policies enable you to create a set of rules that govern the backup job, such as the schedulefor performing backups and the retention policy. Each VSC instance that registers with theSnapCenter Server can access all of the backup policies, even if a policy was created with a differentinstance of VSC.
VSC cloning and provisioning operations benefit from using the NFS Plug-in for VMware VAAI.The plug-in integrates with VMware Virtual Disk Libraries to provide VMware vStorage APIs forArray Integration (VAAI) features, including copy offload and space reservations. These features canimprove the performance of cloning operations because they do not need to go through the ESXihost.
VASA Provider is a virtual appliance that improves storage management and supports virtualvolumes (VVols). It provides information to the vCenter Server about the NetApp storage systemsbeing used in the VMware environment. Integrating with the vCenter Server this way enables you tomake more informed decisions. For example, you can create storage capability profiles that definedifferent storage Service Level Objectives (SLOs) for your environment. You can then use theseSLOs to select a datastore with the correct storage attributes when provisioning virtual machines.You can also set up alarms to notify you when a volume or aggregate is nearing full capacity or adatastore is no longer in compliance with its associated SLO.
Provisioning and cloning datastores and virtual machinesVirtual Storage Console for VMware vSphere enables you to provision datastores and quickly createmultiple clones of virtual machines in the VMware environment.
The VSC Create Rapid Clones wizard enables you to create multiple clones from one virtual machinetemplate. Cloning from a template saves time and enables you to set up virtual machines that all havethe same configuration.
If you have VASA Provider for clustered Data ONTAP installed, you can use existing storagecapability profiles to ensure that the new storage is configured consistently.
You can also use connection brokers, such as VMware View Server or Citrix XenDesktop, to importvirtual machines into a virtual desktop infrastructure.
12 | VSC 6.2.1 for VMware vSphere Installation and Administration Guide

In addition, it is a good practice to have the NFS Plug-in for VMware VAAI installed before youperform provisioning and cloning operations. The plug-in can improve performance during theoperations.
Note: VSC does not support IPv6. If you have IPv6 configured on a LIF, VSC cannot use anyStorage Virtual Machines (SVMs) from that cluster.
Related concepts
Deploying virtual machines on NetApp storage on page 85
Related tasks
Provisioning datastores on page 85
How VSC for VMware vSphere optimizes I/O performance ofmisaligned virtual machines
Virtual Storage Console for VMware vSphere provides a non-disruptive, interim solution for theperformance penalty introduced by misaligned virtual machines. Rather than align the misalignedVMDKs, which requires downtime, VSC aligns the I/O without requiring downtime by offsetting theVMDKs within optimized datastores.
A virtual machine is misaligned when VMDK partitions do not align with the block boundaries ofthe storage system. As a result, the storage system might read or write to twice as many blocks ofstorage than is necessary.
VSC can scan datastores to determine which virtual machines are misaligned and, if possible,perform an online alignment by non-disruptively migrating the misaligned virtual machines to adatastore that is optimized for the VMDK layout. VSC optimizes the datastore by functionallyaligning I/O to the offset of the largest partition.
Online alignment is a good choice for virtual machines that you cannot take offline. When possible,you should take the virtual machine offline and physically align the VMDK using a tool such asVMware vCenter Converter.
Methods for migrating virtual machinesVirtual Storage Console for VMware vSphere provides two options for virtual machine migration:optimizing I/O performance for a misaligned virtual machine and moving virtual machines from onedatastore to another.
Goal What the migration does Location in the vSphere WebClient
Align I/O of misalignedvirtual machines non-disruptively
Performs an online alignment by non-disruptively migrating the misalignedvirtual machines to a datastore that isoptimized for the VMDK layout.
Virtual Storage Console >Optimization and Migration
Virtual Storage Console for VMware vSphere overview | 13

Goal What the migration does Location in the vSphere WebClient
Migrate virtualmachines to anotherdatastore
Migrates virtual machines to a new orexisting datastore.
Note: If the selected virtualmachines do not have the sameoffset group, the target datastorewill not be optimized for all virtualmachines. VSC creates a datastoreoptimized for the offset group of thelast virtual machine that it migrates.
vCenter > Inventory Lists >Virtual Machines
Related tasks
Optimizing performance by aligning the I/O of misaligned virtual machines non-disruptively onpage 101
Migrating virtual machines to a new or existing datastore on page 93
Backing up and restoring virtual machines and datastoresVirtual Storage Console for VMware vSphere provides backup and restore features that enable you tocreate backup copies of virtual machines and datastores and later restore them. In addition, VSCsupports using SnapCenter to create and restore backup jobs.
You have several options for working with backups:
• Using SnapMirror or SnapVault
• Performing a one-time, on-demand backup
• Scheduling backups to occur on a regular basis
• Specifying a retention policy for the backups
• Adding a virtual machine or datastore to an existing backup
• Modifying the job properties of an existing backup
You can restore a backup copy whenever you need to. The restore feature provides several options,including:
• Restoring a datastore, an entire virtual machine, or particular disks from a virtual machine
• Verifying that the backup copy is correct by mounting it to a different host, checking the backupcontent, unmounting the backup from that host, and then restoring the backup copy to the originallocation
• Powering the virtual machines back on automatically after a restore involving the entire backupcompletes
VSC seamlessly supports backups created using its backup feature and those created usingSnapCenter. VSC automatically uses SnapCenter for backups if you are running clustered DataONTAP 8.2.2 or later and you have registered VSC with SnapCenter. VSC uses its backup feature inthe following situations:
• You are running a version of clustered Data ONTAP prior to 8.2.2
• You are running Data ONTAP operating in 7-Mode
14 | VSC 6.2.1 for VMware vSphere Installation and Administration Guide

• You did not register VSC with SnapCenter
SnapCenter provides features such backup policies. Because the backup policies are part ofSnapCenter, all instances of VSC that are registered with SnapCenter can access them, not just theVSC instance where they were created.
Both VSC backups and SnapCenter backups are displayed on the same page. VSC automaticallychecks your environment before displaying information about the current backups or options forcreating new backups. There are some small differences in the information displayed depending onwhether the backups were created in a VSC environment that supports SnapCenter or a standard VSCenvironment. There are also differences in the options you have for performing backup and restoreoperations.
Note: VSC and SnapCenter use some terms differently. For example, if you log in to SnapCenter,you will see that SnapCenter uses the term datasets while VSC uses the term backup jobs.
Related concepts
Backing up virtual machines and datastores on page 107
Protection of system resources using lock managementVirtual Storage Console for VMware vSphere uses lock management to avoid having simultaneoustasks performed on the same target datastores or virtual machines. As a result, certain alignment,migration, provisioning or cloning, and backup and recovery features that could impact each otherbecome temporarily unavailable if another task is being performed on the target datastore or virtualmachine.
For example, if you are migrating virtual machines, you cannot clone one of the virtual machinesuntil the migration operation completes. If you are provisioning storage, you cannot perform thefollowing backup or restore operations on the target datastore or virtual machine until theprovisioning operation completes:
• Create on-demand backup copies of individual virtual machines, datastores, or a datacenter
• Schedule automated backup copies of individual virtual machines, datastores, or a datacenter
• Recover a datastore, virtual machine, or virtual disk file
• Mount a backup for a file restore session
• Unmount a backup that was previously mounted for a file restore session
Note: When a lock occurs during a mount or unmount operation for a file restore session, thelock is held from when the backup is mounted to the virtual machine until the backup isunmounted.
Before you start an operation, it is a good practice to verify that the target datastore or virtualmachine is not being used by another operation.
VSC for VMware vSphere architectureThe Virtual Storage Console for VMware vSphere architecture includes the storage system runningData ONTAP, the vCenter Server, the VMware vSphere Web client, and the ESX and ESXi hosts.
VSC uses VMware-recommended, web-based architecture. It consists of two major components:
• A graphical user interface (GUI) web application that displays as a plug-in within the vSphereWeb client to provide a single management console for virtualized environments.
Virtual Storage Console for VMware vSphere overview | 15

• A server component that is controlled by the VSC service and hosts Java servlets to handle theGUI and API calls to and from the storage systems and the ESX and ESXi hosts.
When you run VSC, you use the VMware Web vSphere client and the VMware vCenter Server. VSCprovides the following:
• A single VSC plug-in with one user interface and help file
• The VSC server
• The SnapManager for Virtual Infrastructure (SMVI) server
You can also can write applications that communicate with the VSC server. For example, you cancreate this type of application using the PowerShell cmdlets that VSC supports.
The vSphere client and any applications you create use the HTTPS protocol to communicate. TheVSC server and the SMVI server use ZAPI to communicate with the storage systems that are runningData ONTAP.
The vCenter server communicates with the physical servers where ESX or ESXi hosts are running.You can have multiple virtual machines running on the ESX or ESXi hosts. Each virtual machine canrun an operating system and applications. The ESX and ESXi hosts then communicate with thestorage systems.
16 | VSC 6.2.1 for VMware vSphere Installation and Administration Guide

Planning your VSC for VMware vSphereinstallation
Before you install Virtual Storage Console for VMware vSphere (VSC), it is a good practice to planyour installation and decide how you want to configure your VSC environment, including whetheryou want to install other plug-ins or virtual appliances that work with VSC, such as NFS Plug-in forVAAI, VASA Provider, or SnapCenter.
The following is a high-level overview of what you need to consider when you install and configureVSC:
Consider... Explanation...
What are the requirementsfor installing VSC?
You must install the VSC software on a 64-bit Windows server withat least 4 GB of RAM. You must not install it on a client computer.Also, the vCenter Server must be running vSphere 5.5 or later.
In addition, some of the VSC features use products that haveadditional requirements and might require that you purchase asoftware license.
More information:
• Interoperability Matrix, which is available online at
mysupport.netapp.com/matrix
• Installation overview on page 21
• VSC for VMware vSphere supported configurations on page 43
What sort of role-basedaccess control (RBAC) doyou need?
VSC supports both vCenter Server RBAC and Data ONTAP RBAC.
If you plan to run VSC as an administrator, you will have all of thenecessary permissions and privileges for all of the tasks.
If your company requires that you restrict access to vSphere objects,you can assign users to the standard VSC roles to meet the vCenterServer requirements.
You can create the recommended Data ONTAP roles by using the“RBAC User Creator for Data ONTAP” tool, which is available onthe NetApp ToolChest.
If a user attempts to perform a task without the correct privileges andpermissions, the task options are grayed out.
More information:
• Installation overview on page 21
• Standard roles packaged with VSC for VMware vSphere on page62
• Recommended Data ONTAP roles when using VSC for VMwarevSphere on page 67
• Authentication and user management with vCenter RBAC andData ONTAP RBAC on page 57
17

Consider... Explanation...
Is this the first time youhave installed VSC or isthis an upgrade?
Initial installation: The VSC installation wizard automaticallyinstalls the VSC features.
More information:
• Installing VSC for VMware vSphere using the installation wizardon page 25
• Installing VSC for VMware vSphere using silent mode on page26
Upgrade installation: You can upgrade only to the following:
• 64-bit Windows systems
• vSphere 5.5 or later environments
Best practices before an upgrade include the following:
• Important: You must remove the Web Client user interface (UI)extensions from the vCenter Server.
• You should record information about the storage systems that arebeing used and their credentials, especially those storage systemsthat are being used for backup and restore operations.
After the upgrade, you should verify that all of the storagesystems were automatically discovered and that they have thecorrect credentials.
• If you modified any of the standard VSC roles, you should clonethose roles in order to save your changes.
VSC overwrites the standard roles with the current defaults eachtime you restart the VSC service.
• If you made any changes to the VSC preferences file, you shouldrecord those changes.
Each time you install VSC, it overwrites the current preferencesfiles.
More information:
• Upgrade installation of VSC for VMware vSphere on page 26
• Removing vSphere Web Client UI extensions from vCenterServer on page 28
• Performing a standard VSC for VMware vSphere upgradeinstallation on page 29
• Upgrading from a 32-bit installation to a 64-bit installation ofVSC for VMware vSphere on page 30
Have you registered yourVSC installation with thevCenter Server?
After you install VSC, you must register it with the vCenter Server.
More information:
Registering VSC for VMware vSphere with vCenter Server on page43
18 | VSC 6.2.1 for VMware vSphere Installation and Administration Guide

Consider... Explanation...
Are you running clusteredData ONTAP 8.2.2 orlater?
If your storage systems are running clustered Data ONTAP 8.2.2 orlater, you should register VSC with the SnapCenter server. Doing thisgives you access to the SnapCenter backup policies feature.
More information:
• VSC for VMware vSphere supported configurations on page 23
• Registering VSC for VMware vSphere with SnapCenter on page44
• Creating a backup policy on page 110
Are your ports set upcorrectly for VSC?
VSC uses designated ports to enable communication between itscomponents. If you have firewalls enabled, you might need tomanually grant access to specific ports for VSC.
More information:
VSC for VMware vSphere port requirements on page 49
Do you need to regeneratean SSL certificate forVSC?
The SSL certificate is automatically generated when you install VSC.You might need to regenerate it to create a site-specific certificate.
More information:
Regenerating an SSL certificate for VSC on page 47
Were your ESX servervalues set correctly?
Although most of your ESX server values are set by default, it is agood practice to check the values. These values are based on internaltesting. Depending on your environment, you might need to changesome values to improve performance.
More information:
• ESX server and guest operating system setup on page 35
• Configuring ESX server multipathing and timeout settings onpage 35
• ESX host settings set by VSC for VMware vSphere on page 36
Do you need to set up theguest operating systemtimeout values?
The guest operating system (GOS) timeout scripts set the SCSI I/Otimeout values for supported Linux, Solaris, and Windows guestoperating systems to provide correct failover behavior.
More information:
Timeout values for guest operating systems on page 38
Will you be performingprovisioning and cloningtasks using connectionbrokers?
You can add connection brokers to your system and use them toimport virtual machines into a virtual desktop infrastructure.
More information:
Managing connection brokers on page 51
Planning your VSC for VMware vSphere installation | 19

Consider... Explanation...
Do you plan to use storagecapability profiles?
Do you want to set upalarms to warn you when avolume or aggregate is atnearly full capacity orwhen a datastore is nolonger in compliance withits associated storagecapability profile?
To use storage capability profiles or to set up alarms, you must installVASA Provider for clustered Data ONTAP and register VSC with theVASA Provider server. This virtual appliance is installed separatelyfrom VSC. After you install it, you must register VSC with theVASA Provider server to access its features.
More information:
• VASA Provider for clustered Data ONTAP installation on page33
• Registering the VASA Provider for clustered Data ONTAP withVSC for VMware vSphere on page 45
Do you plan to use NFSPlug-in for VAAI?
The plug-in provides VAAI features, such as copy offload and spacereservations, which can improve the performance of someprovisioning and cloning operations.
More information:
NFS Plug-in for VAAI installation on page 33
20 | VSC 6.2.1 for VMware vSphere Installation and Administration Guide
VSC for VMware vSphere installation overview
Although the basic installation of the Virtual Storage Console for VMware vSphere software issimple, you must decide how you want to handle certain options, including whether you need aspecial software license and, if you use role-based access control (RBAC), whether you have thecorrect RBAC privileges.
Installation guidelines
To install VSC, you must have a 64-bit Windows server, and the vCenter Server must be runningvSphere 5.5 or later. For information about which versions of Windows and other features aresupported, see the Interoperability Matrix
mysupport.netapp.com/matrix
Note: You must not install this software on a client computer.
The following are some guidelines for installing the VSC software:
• VSC must be installed on a local disk of the Windows server; you must not attempt to install VSCon a network share.
Note: If you plan to register VSC with SnapCenter, you should install VSC on a different hostfrom the one where SnapCenter is installed.
• The network must be connected between the Windows server running VSC and the managementports of the storage controllers, the ESX/ESXi hosts, and the vCenter Server.
• A reboot is not required to complete the installation; however, vSphere clients must be closed andrestarted to be able to display the VSC plug-in.
• At a minimum, the display must be set to 1,280 by 1,024 pixels to view VSC pages correctly.
• VSC should not be run on the same host server on which vCenter Server is installed.
• You must ensure that vCenter Server 5.5 or later is supported.
Software licenses that might be required
The following software licenses might be required for VSC depending on which features you use:
• The required protocol license (NFS, FCP, iSCSI)
• SnapManager for Virtual Infrastructure (if performing backup and restore operations)
• SnapMirror (required for the provisioning and cloning template distribution feature and for thebackup SnapMirror update option)
• SnapRestore (if performing backup and restore operations)
• A_SIS (if using provisioning and cloning features when configuring deduplication settings)
• MultiStore (if using provisioning and cloning features and working with vFiler units)
• FlexClone
The FlexClone license is required in the following situations:
◦ You are using VSC to clone virtual machines.
◦ You are performing backup and restore operations in NFS environments and your system isrunning a version of Data ONTAP prior to 8.1.
21

You do not need a FlexClone license if you are performing backup and restore operations in NFSenvironments with one of the following versions of Data ONTAP software:
◦ Data ONTAP 8.1 operating in 7-Mode
◦ ONTAP 8.1.1 or later
RBAC access to VSC required for users
VSC supports vCenter Server and Data ONTAP role-based access control (RBAC). As a result, youmust provide users with the appropriate RBAC permissions. The vCenter Server permissionsdetermine whether a user has or does not have access to certain VSC tasks for certain vSphereobjects. The Data ONTAP privileges provide the credentials that are used by the storage systems.
To simplify the process of creating vCenter Server user roles, VSC provides several standard VSCroles for key tasks. These roles contain all the VSC-specific and native vCenter Server privileges thatare required for the tasks. As an administrator, you can assign these roles to users.
Note: You should not edit the standard roles that VSC provides. These roles return to their defaultsettings each time you restart the VSC service. This means that any changes that you made to theseroles will be lost if you modify or upgrade your installation. If you need a privilege that these rolesdo not provide, you can create a role containing that privilege, and then use the Groups feature tocombine that role with the appropriate standard VSC role. Alternatively, you can clone thestandard VSC role, and then modify the cloned role to meet your needs.
Unless your company's security policies require more restrictive permissions, it is a good practice toassign permissions on the root object (also referred to as the root folder). Then, if required, you canrestrict those entities that you do not want to have permissions.
All VSC users must have the View privilege correctly assigned
The VSC-specific View privilege is read-only and enables users to view the menus, tabs, and otherelements of the VSC interface. This privilege must be included in all VSC roles, or the user will notbe to view the VSC interface.
When you are working in an environment that has multiple VSC-vCenter Server instances and youare not an administrator, you must have the View privilege across all the vCenter Servers in thatenvironment. Otherwise, the VMware vSphere Web Client will not load VSC.
The View privilege is used in the standard VSC Read-only role that is assigned to a user. If you wantto limit a user to read-only access to VSC, you can assign that user the VSC Read-only role.
It is a good practice to assign the permission containing the View privilege to the root object.
Confirm that the storage systems and their credentials are available
VSC provides centralized management for storage discovery and credentials. All VSC features usethe credentials that are entered during the initial setup and discovery process.
If you are upgrading from VSC 4.1 or earlier, you should check the storage systems to ensure thatthere are no issues with credentials, especially in regard to backup and recovery operations, after youinstall the backup and restore features.
Ensure the times are synchronized when installing VSC on a different server
If you are not installing VSC on the vCenter Server, you must ensure that the times on the VSCinstallation server and the vCenter Server are synchronized.
The vCenter Server will not accept the certificate of the VSC installation server when the times differon the servers.
For information about synchronizing the server times, see your operating system documentation.
22 | VSC 6.2.1 for VMware vSphere Installation and Administration Guide

VSC for VMware vSphere supported configurationsVirtual Storage Console for VMware vSphere requires the VMware vSphere Web Client and issupported on specific releases of ESX and ESXi, vSphere, Windows Server, and Data ONTAPsoftware. VSC also works with VASA Provider, SnapCenter, and MetroCluster configurations. Youshould always check the Interoperability Matrix, which is online at mysupport.netapp.com/matrix, toensure that VSC supports your environment.
vSphere server configuration
VSC requires that you have vCenter Server 5.5 or later.
If you are installing VSC on a vCenter Server that has a large number of ESX or ESXi hosts, makesure that there is sufficient CPU and memory to support VSC in your environment. If the vCenterServer is consuming all the resources to manage the hosts, the VSC service cannot respond to therequests it receives. The number of resources needed varies based on your system setup.
Windows server configuration
Your Windows system must meet minimum hardware requirements before installing the VSCsoftware.
The memory requirements depend on whether you install VSC on the same machine as the vCenterServer or on a different machine. Memory requirements for 64-bit environments where VSC isinstalled on a separate machine are currently the following:
• Minimum memory requirement: 4 GB RAM
• Recommended memory requirement: 4 GB RAM
Hardware requirements are greater if you are running VSC on the same machine as the vCenterServer. The VMware documentation contains the current list of hardware requirements.
You should be aware of the following requirements before you install the VSC software:
• Supported Microsoft Windows software
• vCenter Server requirements
• ESX host software requirements
• Data ONTAP requirements
Note: IPv6 is not supported on VSC. If the server on which you are installing VSC has IPv6enabled, you should disable IPv6 before installing VSC. IPv6 should not be reenabled after VSC isinstalled.
VMware vSphere Web Client configuration
The client computer that runs the vSphere Web Client software must have a web browser installed.
VSC supports all browsers that the vSphere Web Client supports.
VSC supports having the vSphere Web Client manage multiple vCenter Servers when there is aunique one-to-one pairing between VSC and a vCenter Server.
VSC for VMware vSphere installation overview | 23

VASA Provider and VSC configuration
VSC support for VASA Provider for clustered Data ONTAP is contingent upon using the correctversion of VSC with the correct version for VASA Provider. For example, VSC 6.1 does not supportVASA Provider 6.0.
Information about which version of VSC supports which version of VASA Provider is in the VSCrelease notes.
SnapCenter and VSC configurationYou can set up VSC to work with SnapCenter. VSC automatically checks your environment and usesSnapCenter to perform backup and restore operations when it is supported. If it is not supported,VSC uses its backup and restore features to perform these operations.
Note: You cannot migrate backup jobs created using the VSC backup feature to SnapCenter.
When you use SnapCenter with VSC, you must have the following VSC environment:
• Data ONTAP: Clustered Data ONTAP 8.2.2 or later.
• Configuration: Each VSC instance must be registered with SnapCenter.
Note: You can have multiple instances of VSC registered with the same SnapCenter Server.
• Protocol: All communication between VSC and SnapCenter uses HTTPS.
• Hosts: SnapCenter and VSC should be installed on separate hosts.
Note: For details about installing SnapCenter and its requirements, see the SnapCenterdocumentation.
In addition, there are some considerations that you must keep in mind when you are usingSnapCenter with VSC:
• When you use the VSC dialog box to register VSC with SnapCenter, you should provide a username and password that are associated with SnapCenter administrator credentials.
If you are using VSC to manage SVMs and you are a VSC administrator, you should check theoption in this dialog box to overwrite the SnapCenter SVM credentials with VSC SVMcredentials. You need to do this to make sure that the credentials for the SVMs have the correctprivileges to perform VSC tasks. If you are not using VSC to manage the SVMs, this is not aproblem.
• SnapCenter only allows direct connections to SVMs; however, VSC requires connections tocluster management LIFs or you will not be able to access all of the VSC features.
You can accommodate these requirements by setting up your storage systems in the followingmanner:
◦ In the SnapCenter GUI, add the SVMs as direct connections.
◦ In the VSC GUI, add the cluster LIFs for the storage systems.
Note: Differences between direct connections to SVMs and to cluster management LIFs onpage 82 provides details about which VSC features are not available when you use directconnections to SVMs.
MetroCluster support
VSC supports MetroCluster configurations for clustered Data ONTAP and Data ONTAP operating in7-Mode. For more information about MetroCluster configurations, see MetroCluster for clusteredData ONTAP and VSC for VMware vSphere on page 55.
24 | VSC 6.2.1 for VMware vSphere Installation and Administration Guide

Network security protocol configuration
VSC requires that you have Transport Layer Security (TLS) enabled on the storage systems. If yourstorage systems are running clustered Data ONTAP, TLS is automatically enabled. If your storagesystems are running Data ONTAP operating in 7-Mode, you must manually enable TLS using theoptions.tls.enable.on command. For TLS to take effect on storage systems running DataONTAP operating in 7-Mode, the option httpd.admin.ssl.enable must be set to on.
You can find additional information about TLS in the Data ONTAP documentation.
Initial installation of VSC for VMware vSphereIf this is the first time you are installing Virtual Storage Console for VMware vSphere, you do notneed to worry about upgrade issues. You can install VSC using either the installation wizard or silentmode.
Installing VSC for VMware vSphere using the installation wizard
You can use the installation wizard to install Virtual Storage Console for VMware vSphere. Bydefault, the VSC software installs all of the VSC features.
Before you begin
• You must have administrator privileges on the system where you are installing VSC.
• You must have a 64-bit Windows server.
• Your system must meet the VSC requirements listed in the Interoperability Matrix, which isavailable online at mysupport.netapp.com/matrix.
• If you plan to register VSC with SnapCenter, you must have a host where you install VSC and adifferent host where you install SnapCenter.
Steps
1. Download the VSC installer.
2. Double-click the installer icon and then click Run to start the installation wizard.
3. Follow the instructions in the installation wizard to install the software.
The wizard installs all of the VSC features.
4. Click Finish to complete the installation.
5. At the web page that appears after the installation completes, register VSC with the vCenterServer.
You must provide the vCenter Server host name or IP address and the administrative credentials.
Note: To register VSC with the vCenter Server, you must have administrator privileges foryour Windows login.
VSC for VMware vSphere installation overview | 25

Installing VSC for VMware vSphere using silent mode
You can install Virtual Storage Console for VMware vSphere using silent mode instead of using theinstallation wizard. When you use silent mode, you enter a command that enables you to install all ofthe VSC features at one go.
Before you begin
• You must have administrator privileges on the system where you are installing VSC.
• You must have a 64-bit Windows server.
• Your system must meet the VSC requirements that are listed in the Interoperability Matrix.
• If you plan to register VSC with SnapCenter, you must have a host where you install VSC and adifferent host where you install SnapCenter.
Steps
1. Download the VSC installer.
2. Use the following command format to install VSC:
installer.exe /s /v"/qn /Li logfile ADDLOCAL=ALL INSTALLDIR=\"installationpath\""
This command installs all of the VSC features, including the VSC backup and restore features.
Example
The following example shows a command for a 64-bit host machine:
VSC-6.2.1-win64.exe /s /v"/qn /Li install.log ADDLOCAL=ALL INSTALLDIR=\"C:\Program Files\NetApp\Virtual Storage Console\""
3. On the web page that appears when the installation finishes, register VSC with the vCenterServer.
You must provide the vCenter Server host name or IP address and the administrative credentials.
Note: To register VSC with the vCenter Server, you must have administrator privileges foryour Windows login.
Considerations when upgrading VSC for VMware vSphereYou can perform an upgrade installation as long as your environment meets the Virtual StorageConsole for VMware vSphere requirements. There are several things that you should consider andrecord before you upgrade your version of VSC.
Check for changes to VSC requirements
VSC 6.2.1 requires 64-bit Windows servers. If you have a 32-bit Windows environment, you mustperform special steps and manually move certain data to upgrade to a 64-bit Windows system.
Upgrading from a 32-bit installation to a 64-bit installation of VSC for VMware vSphere on page30.
In addition, VSC 6.2.1 requires that the vCenter Server be running vSphere 5.5 or later. If youattempt to install VSC 6.2.1 on an earlier version of vSphere, you receive an error message. Thismessage varies depending on whether you have thick provisioning enabled. With thick provisioning,the message is similar to the following:
26 | VSC 6.2.1 for VMware vSphere Installation and Administration Guide

The VSC plugin is only available in the vSphere web client.
Without thick provisioning, the error message is the following:
Registration failed with the following message: NVPF-00017: This version of vCenter (5.1.0) found at https://00.00.000.000:443/sdk is not supported. Please upgrade to vCenter 5.5 or later.
For complete information about the VSC requirements, see the Interoperability Matrix.
NetApp Interoperability Matrix Tool
Record storage system information
VSC automatically rediscovers your storage after you perform an upgrade. It is a good practice torecord your storage system information before the upgrade so that you can confirm that all of thestorage systems were rediscovered after the upgrade.
If you are using backup and restore features, it is important to record the storage systems used forthose operations and the credentials associated with them. Prior to VSC 4.2, the Backup andRecovery plug-in managed its own storage system discovery and credentials. Because VSC did notdiscover those storage systems, they might not appear in the list of storage systems that VSCmanages.
After an upgrade, when you check the storage systems used for backup and restore operations, youshould also verify that the systems have at least the minimum credentials required to perform theseoperations. You can use VSC to update the credentials.
If any storage systems are missing after the upgrade, you can select the Update All icon to forceVSC to discover storage systems. If that does not work, you can manually add the storage system byusing the Add icon found on the VSC Storage System page or the Add storage system option foundin the vCenter Server Actions menu.
Note: If the storage system does not have storage mapped to an ESX or ESXi host that a vCenterServer is managing, VSC does not automatically discover it.
Record any changes you made to standard VSC roles
You should not modify the VSC standard roles. If you make changes to these roles, you lose thosechanges when you upgrade your VSC installation or restart the VSC Windows service. These rolesreturn to the current default values each time you install VSC, restart the VSC Windows service, ormodify your VSC installation.
If you made any changes to these roles, you should record the changes. After you upgrade yourinstallation, you can create new roles that reflect those changes.
Note: Instead of editing the standard VSC roles, you should clone them and then edit the clonedroles.
Record any changes you made to the preferences files
The upgrade process overwrites the existing preferences files with new preferences files for featuresthat VSC uses. It is a good practice to record the changes you made to preference files before anupgrade.
For provisioning and cloning tasks, VSC creates a backup of the preferences file, etc/kamino/old_kaminoprefs.xml. If you modified the etc/kamino/kaminoprefs.xml preferences file,you can copy the changes from etc/kamino/old_kaminoprefs.xml to the new file that VSCcreates during the upgrade.
VSC for VMware vSphere installation overview | 27

Unregister VASA Provider
If you are using VASA Provider for clustered Data ONTAP, you must unregister it before youupgrade your VSC software. If you do not unregister it, you might not be able to see the VASAProvider section of the VSC GUI when you register the VASA Provider server in the upgradedinstallation.
From the vSphere Web Client's Home page, click Virtual Storage Console > Configuration >Register/Unregister VASA Vendor Provider. Enter the vpserver password and select Unregister.
Remove UI extensions from the vCenter Server
You must remove the user interface (UI) extensions that are cached on the vCenter Server before youupgrade VSC or VASA Provider.
Removing vSphere Web Client UI extensions from vCenter Server
You must remove the user interface (UI) extensions from vCenter Server before you upgrade orreinstall Virtual Storage Console for VMware vSphere (VSC). These extensions are stored onvCenter Server when you log in to the VMware vSphere Web Client.
About this task
If you attempt to perform an upgrade or reinstall VSC without first removing the UI extensions, somecomponents might not display correctly, or you might receive an error.
After you remove the extensions, you can install VSC. The new UI extensions are then downloadedto vCenter Server the first time you log in to the vSphere Web Client after VSC completes itsregistration.
There are two ways to remove the extensions:
• From VMware vCenter Server Virtual Appliance on page 28
• From Microsoft Windows vCenter Server on page 29
After you remove the UI extensions, it can take several minutes for the vSphere Web Client to restartand initialize correctly.
Removing UI extensions from VMware vCenter Server Virtual Appliance
You can remove the user interface (UI) extensions from VMware vCenter Server Virtual Appliance(vCSA).
Steps
1. In the vCSA window, log in to the vCenter Server as a root user by using a Secure Shell (SSH).
2. Switch to the applicable vsphere-client-serenity directory:
• For vCenter Server 6.x, switch to the cd /etc/vmware/vsphere-client/vc-packages/vsphere-client-serenity directory.
• For vCenter Server 5.x, switch to the cd /var/lib/vmware/vsphere-client/vc-packages/vsphere-client-serenity directory.
3. Stop the vSphere Web Client: service vsphere-client stop
4. Remove the directories containing the UI extensions: rm -rf com.netapp*
This command removes the VSC extension and the VASA Provider extension. You must includethe asterisk (*) at the end of the command.
28 | VSC 6.2.1 for VMware vSphere Installation and Administration Guide

5. Restart the vSphere Web Client: service vsphere-client start
Removing UI extensions from Microsoft® Windows vCenter Server
You can remove the user interface (UI) extensions from Microsoft Windows vCenter Server.
Steps
1. Use administrator credentials to log in to the Microsoft Windows vCenter Server where thevCenter Web Client Service is installed.
2. From the Windows services snap-in, stop the VMware vSphere Web Client Service.
3. Switch to the applicable vCenter UI extensions directory:
The path varies depending on the Virtual Storage Console for VMware vSphere (VSC) versionand vCenter version.
• For vCenter Server 6.x, switch to the cd /ProgramData/VMware/vCenterServer/cfg/vmware-vpx/extensions directory.
You can also use the cd /ProgramData/VMware/vCenterServer/cfg/vsphere-client/vc-packages/vsphere-client-serenity directory.
• For vCenter Server 5.x, switch to the cd /ProgramData/VMware/vSphere WebClient/vc-packages/vsphere-client-serenity directory.
You can also use the cd /Program Files/VMware/Infrastructure/VirtualCenterServer/extensions directory.
4. Delete all of the com.netapp.* folders.
5. Start the VMware vSphere Web Client Service.
Performing a standard VSC for VMware vSphere upgrade installation
If you are using VSC 4.x or later of Virtual Storage Console for VMware vSphere, you can use VSCinstaller to upgrade to a new version. The VSC installer checks the version numbers of each of thecurrently installed VSC component to determine whether you are upgrading to a newer version.
Before you begin
The VSC installer does not support upgrades from the following:
• A stand-alone version of Rapid Cloning Utility (RCU)
• A stand-alone version of SnapManager for Virtual Infrastructure (SMVI)
If you have any of that software installed, you must uninstall it before you can install the currentversion of VSC. If the VSC installer finds RCU or SMVI on the server, it prompts you to uninstallthe software, and then aborts.
You must be logged in with administrator privileges to the machine where you installing VSC.
If you plan to register VSC with SnapCenter, you should have installed VSC and SnapCenter ondifferent hosts.
Important: If you are using VASA Provider for clustered Data ONTAP, you must have unregisteredit from VSC before you install the upgrade.
About this task
The VSC installer automatically upgrades all the installed VSC features to the newer versions.
VSC for VMware vSphere installation overview | 29

Steps
1. Download the installer for VSC.
2. Double-click the installer icon, and then click Run to start the installation wizard.
3. Click Yes on the confirmation prompt.
4. Review your installation options.
By default, the installation wizard installs all of the VSC features.
5. Click Next to start the installation.
The wizard automatically selects all currently installed features and upgrades them.
The installation might take several minutes.
6. Click Finish to complete the installation.
7. At the web page that appears when the installation is complete, register VSC with the vCenterServer.
You must provide the vCenter Server host name or IP address and the administrative credentials.
Note: To register VSC with the vCenter Server, you must have administrator privileges foryour Windows login.
Upgrading VSC for VMware vSphere from a 32-bit installation to a 64-bitinstallation
If you are currently running Virtual Storage Console 4.x for VMware vSphere on a 32-bit Windowsplatform, you can upgrade to VSC 6.2.1, which requires a 64-bit platform. Going to a 64-bit platformrequires that you manually move directories from the 4.x installation to the 6.2.1 installation inaddition to performing the standard upgrade procedures.
Before you begin
• You must have administrator privileges on the system where you are installing VSC.
• You must have a 64-bit Windows server.
• Your system must meet the VSC requirements listed in the Interoperability Matrix.
• If you plan to register VSC with SnapCenter, you must have a host where you install VSC and adifferent host where you install SnapCenter.
Steps
1. Download the VSC software package.
2. (VSC 4.x system) Stop the VSC Windows service.
If you have been using the backup and restore features, you must also stop the SnapManager forVirtual Infrastructure (SMVI) service.
3. (VSC 4.x system) Copy the following VSC 4.x directories and files, which are all relative to theVSC installation directory:
Note: To make moving these files to your VSC 6.2.1 installation easier, you can create a .zipfile to contain them.
• etc\keystore.properties
• etc\nvpf.keystore
30 | VSC 6.2.1 for VMware vSphere Installation and Administration Guide

• etc\nvpf.override
• etc\network-interface.properties
• etc\caster\casterprefs.xml
• etc\caster\derby\
• etc\caster\kaminosdkprefs.xml
• etc\kamino\baselines.ser
• etc\kamino\connectionBrokers.ser
• etc\kamino\vcenters.ser
• etc\kamino\kaminoprefs.xml
• etc\vsc\vsc.xml
• etc\vsc\vscPreferences.xml
• log\
• smvi\server\etc\cred
• smvi\server\etc\keystore
• smvi\server\etc\smvi.keystore
• smvi\server\repository\
4. (VSC 6.2.1 system) Run the VSC 6.2.1 installation program.
This program automatically installs the VSC features.
See the “Software licenses” section for more information about which licenses you might require.
5. (VSC 6.2.1 system) Register VSC with the vCenter Server when the registration web page opens.
For details about how to register VSC or what to do if the registration web page does not open,see the “Registering VSC for VMware vSphere with vCenter Server” section.
6. (VSC 6.2.1 system) Stop the VSC Windows service.
7. (VSC 6.2.1 system) Place the VSC 4.x files into your VSC 6.2.1 installation.
If you created a .zip file to contain these directories and files, you must paste it into the VSC6.2.1 installation directory and then unzip it.
You should paste these files relative to the VSC 6.2.1 installation directory.
8. (VSC 6.2.1 system) Restart the VSC Windows service.
9. (VSC 6.2.1 system) Reregister VSC with the vCenter Server.
10. (VSC 6.2.1 system) Verify that the expected data (storage systems, backup jobs, and so on)appears in VSC after you complete the upgrade from a 32-bit system to VSC 6.2.1.
11. (VSC 4.x system) When your VSC 6.2.1 installation is running and you have verified that it hasthe correct data, uninstall the VSC 4.x program by using one of the following methods:
• Go to the Windows Add or Remove Programs list and remove VSC 4.x.
• Perform a silent uninstallation:
installer.exe /s /v"/qn /Li logfile REMOVE=ALL INSTALLDIR=\"install_path\" "
VSC for VMware vSphere installation overview | 31

Uninstalling VSC for VMware vSphere using Add/RemovePrograms
You can uninstall the VSC for VMware vSphere software from your system using the Windows Addor Remove Programs list.
About this task
The uninstall program removes the entire VSC for VMware vSphere application. You cannot specifywhich capabilities you want to uninstall.
Steps
1. On the Windows server where you installed the VSC for VMware vSphere software, selectControl Panel > Add/Remove Programs (Windows Server 2003) or Control Panel >Programs and Features (Windows Server 2008).
2. Select Virtual Storage Console for VMware vSphere and click Remove to immediately removethe program or click Change to start the installation wizard.
3. If you select Change, then click Yes to confirm that you want to remove the program.
4. In the installation wizard, select the Remove option and click Next.
5. Click Remove to uninstall the VSC for VMware vSphere software.
After the process completes, a confirmation prompt is displayed.
Note: At the confirmation prompt, click Yes to remove all the metadata files from theinstallation directory or click No so that you can manually delete the files in the directory.
Uninstalling VSC for VMware vSphere using silent mode
You can uninstall Virtual Storage Console for VMware vSphere using silent mode instead of theWindows Add/Remove Program. When you use silent mode, you can enter a command that enablesyou to automatically uninstall all the VSC features at once.
Before you begin
You must be logged in with administrator privileges to the machine from which you are uninstallingVSC.
Step
1. Use the following command to uninstall VSC:
installer.exe /s /v"/qn /Li logfileREMOVE=ALL INSTALLDIR=\"installationpath\""
This command removes all the VSC features.
Example
The following is an example of the command you might use if you were uninstalling VSC 6.2from a 64-bit host machine:
VSC-6.2-win64.exe /s /v"/qn /Li uninstall.log REMOVE=ALL
32 | VSC 6.2.1 for VMware vSphere Installation and Administration Guide

Installing plug-ins, virtual appliances supportedby VSC for VMware vSphere
You can install plug-ins and virtual appliances that work with Virtual Storage Console for VMwarevSphere to enhance VSC tasks and storage management. VSC supports both NFS Plug-in forVMware VAAI and VASA Provider for clustered Data ONTAP.
NetApp NFS Plug-in for VAAI installationThe NetApp NFS Plug-in for VMware VAAI is not shipped with Virtual Storage Console forVMware vSphere; however, you can get the plug-in installation package and instructions forinstalling it from the NetApp Support Site at mysupport.netapp.com. You can then go to use theVirtual Storage Console Tools > NFS VAAI page to complete your installation.
The plug-in is a software library that integrates the VMware Virtual Disk Libraries that are installedon the ESXi host. It is a good practice to install the plug-in because VAAI (VMware vStorage APIsfor Array Integration) features such as copy offload and space reservations can improve theperformance of cloning operations.
The plug-in is supported on systems running ESXi 5.0 or later with vSphere 5.0 or later and clusteredData ONTAP 8.1 or later or Data ONTAP 8.1.1 or later operating in 7-Mode.
To download the plug-in, go to the Software Download page on the NetApp Support Site and log in.In the row "NetApp NFS Plug-in for VAAI," select ESXi and click Go!. Continue through the pagesuntil you reach NetApp NFS Plug-in for VMware VAAI Download. This page provides links to boththe installation package and the installation guide.
Follow the VSC installation instructions in Installing the NetApp NFS 1.0.20 Plug-in for VMwareVAAI.
After you install the plug-in, you must reboot the host. VSC then automatically detects the plug-inand uses it. You do not need to perform additional tasks to enable it.
VASA Provider for clustered Data ONTAP installation andregistration
When you install VASA Provider for clustered Data ONTAP, you must deploy it on an ESXi host andthen register it with Virtual Storage Console for VMware vSphere. VSC is the management consolefor VASA Provider and also provides a VASA Provider GUI for certain tasks.
After you register VASA Provider with VSC, you must log out of the VMware vSphere Web Clientand then log back in. You cannot see the VASA Provider GUI that VSC provides until you log backin.
When you have VASA Provider installed and registered, you can perform tasks that pertain toVVOLs, storage capability profiles, alarms, and general VASA Provider maintenance. You must usethe correct VASA Provider user interface for the task:
• To work with VVOLS, you must select the VASA Provider for clustered Data ONTAP option inthe VMware vSphere Web Client Actions menu, not the VSC GUI.
• To register VASA Provider, manage storage capability profiles, map them to datastores, and setthreshold alarms, you must select the VASA Provider for clustered Data ONTAP section of theVSC GUI.
33

• To adjust settings for VASA Provider and perform maintenance tasks, you must use the VASAProvider maintenance menus, which are accessible from the console of the virtual appliance.
The Main Menu provides several options for configuring VASA Provider and performingdiagnostic operations.
If you need to create a support bundle, you should use the Vendor Provider Control Panel screenlocated at https://vm_ip:9083. You can use the maintenance menu to create a support bundle, butthe Vendor Provider Control Panel enables you to create a more complete bundle.
34 | VSC 6.2.1 for VMware vSphere Installation and Administration Guide

Configuring your VSC for VMware vSphereenvironment
Virtual Storage Console for VMware vSphere supports numerous environments. Some of the featuresin these environments might require additional configuration. In some cases, you might need toperform maintenance operations.
Some of the configuration and maintenance work that you might need to perform includes thefollowing:
• Verify your ESX host settings, including UNMAP
• Add timeout values for guest operating systems.
• Manually register VSC.
• Regenerate a VSC SSL certificate.
• Verify that you have the correct port settings.
• Set up connection brokers to work with the provisioning and cloning operations.
• Register VASA Provider and create storage capability profiles and threshold alarms.
• Work with the preferences file to enable datastore mounting across different subnets.
ESX server and guest operating system setupMost of your ESX server values are set by default. It is a good practice to verify the values to ensurethat they are right for your system setup. Virtual Storage Console for VMware vSphere also providesISO files to enable you to set the correct timeout values for guest operating systems.
Configuring ESX server multipathing and timeout settings
Virtual Storage Console for VMware vSphere checks and sets the ESX or ESXi host multipathingand HBA timeout settings that provide proper behavior with NetApp storage systems.
About this task
This process might take a long time, depending on your configuration and system load. The taskprogress is displayed in the Recent Tasks panel. As tasks are completed, the host status Alert iconsare replaced by Normal or Pending Reboot icons.
Steps
1. From the VMware vSphere Web Client Home page, click vCenter > Hosts.
35

2. Right-click a host, and then select Actions > NetApp VSC > Set Recommended Values.
3. In the Recommended Settings pop-up box, select the values that work best with your system.
The standard, recommended values are set by default.
4. Click OK.
ESX host values set by VSC for VMware vSphere
Virtual Storage Console for VMware vSphere sets ESX or ESXi host timeouts and other values toensure best performance and successful failover. The values that VSC sets are based on internalNetApp testing.
VSC sets the following values on an ESX or ESXi host:
ESX advanced configuration
/VMFS/hardwareacceleratedlocking
Set to 1.
NFS settings
Net.TcpipHeapSize
If you are using vSphere 5.0 or later, set to 32.
For all other NFS configurations, set to 30.
36 | VSC 6.2.1 for VMware vSphere Installation and Administration Guide

Net.TcpipHeapMax
If you are using vSphere 5.5 or later, set to 512.
If you are using vSphere 5.0 up to 5.5, set to 128.
For all other NFS configurations, set to 120.
NFS.MaxVolumes
If you are using vSphere 5.0 or later, set to 256.
For all other NFS configurations, set to 64.
NFS41.MaxVolumes
If you are using vSphere 6.0 or later, set to 256.
NFS.MaxQueueDepth
If you are using vSphere 5.0 or later, set to 64.
NFS.HeartbeatMaxFailures
Set to 10 for all NFS configurations.
NFS.HeartbeatFrequency
Set to 12 for all NFS configurations.
NFS.HeartbeatTimeout
Set to 5 for all NFS configurations.
FC/FCoE settings
Path selection policy
Set to RR (round robin) for ESX 4.0 or 4.1 and ESXi 5.x, FC paths with ALUA enabled.Set to FIXED for all other configurations.
Setting this value to RR helps provide load balancing across all active/optimized paths.The value FIXED is for older, non-ALUA configurations and helps prevent proxy I/O. Inother words, it helps keep I/O from going to the other node of a high availability pair (HA)in an environment that has Data ONTAP operating in 7-mode.
Disk.QFullSampleSize
Set to 32 for all configurations. This setting is available with ESXi 5.x and ESX 4.x.Setting this value helps prevent I/O errors.
Note: vSphere 5.1 handles Task Set Full (QFull) conditions differently from vSphere4.x and 5.0. For more information on QFull settings in vSphere 5.1, see knowledgebasearticle 1013944, which is online at kb.netapp.com/support/index?page=content&id=1013944.
Disk.QFullThreshold
Set to 8 for all configurations. This setting is available with ESXi 5.0 and ESX 4.x.Setting this value helps prevent I/O errors.
Note: vSphere 5.1 handles Task Set Full (QFull) conditions differently from vSphere4.x and 5.0. For more information on QFull settings in vSphere 5.1, see knowledgebasearticle 1013944, which is online at kb.netapp.com/support/index?page=content&id=1013944.
Emulex FC HBA timeouts
For ESX 4.0 or 4.1 or ESXi 5.x, use the default value.
QLogic FC HBA timeouts
For ESX 4.0 or 4.1 or ESXi 5.x, use the default value.
Configuring your VSC for VMware vSphere environment | 37

iSCSI settings
Path selection policy
Set to RR (round robin) for all iSCSI paths.
Setting this value to RR helps provide load balancing across all active/optimized paths.
Disk.QFullSampleSize
Set to 32 for all configurations. This setting is available with ESX 4.x and ESXi 5.x.Setting this value helps prevent I/O errors.
Note: vSphere 5.1 handles Task Set Full (QFull) conditions differently from vSphere4.x and 5.0. For more information on QFull settings in vSphere 5.1, see knowledgebasearticle 1013944, which is online at kb.netapp.com/support/index?page=content&id=1013944.
Disk.QFullThreshold
Set to 8 for all configurations. This setting is available with ESX 4.x and ESXi 5.x.Setting this value helps prevent I/O errors.
Note: vSphere 5.1 handles Task Set Full (QFull) conditions differently from vSphere4.x and 5.0. For more information on QFull settings in vSphere 5.1, see knowledgebasearticle 1013944, which is online at kb.netapp.com/support/index?page=content&id=1013944.
QLogic iSCSI HBA IP_ARP_Redirect
Set to ON for all configurations.
QLogic iSCSI HBA timeouts
ql4xportdownretrycount (qla4022 driver), ka_timeout
(qla4xxx driver), and KeepAliveTO timeout settings are set to 14 for iSCSI SAN bootedESX hosts, and set to 60 for non-SAN-boot configurations.
UNMAP parameter turned off in ESX 5.x
On hosts running ESX 5.0, Virtual Storage Console for VMware vSphere automatically turns off theUNMAP (VMFS3.EnableBlockDelete) parameter by setting the value to 0.
On ESX 5.1 hosts, 0 is the default value of the UNMAP parameter. If you change this value to 1 oneither ESX 5.0 or ESX 5.1, VSC automatically resets the value to 0. For this value to take effect, youmust apply the HBA/CNA Adapter Settings on the host.
To avoid any potential performance impact due to UNMAP parameter operations, VMware disabledthis feature beginning with ESXi 5.0 Update 2. VSC disables this feature with all versions of ESXi5.x.
Timeout values for guest operating systems
The guest operating system (GOS) timeout scripts set the SCSI I/O timeout values for supportedLinux, Solaris, and Windows guest operating systems. The timeout values help improve disk I/Obehavior in a failover situation.
These scripts are provided as .ISO files. You can get a copy of the scripts by clicking Tools > GuestOS Tools from the Virtual Storage Console Home page. There are two scripts for each operatingsystem:
• A 60-second script
• A 190-second script
38 | VSC 6.2.1 for VMware vSphere Installation and Administration Guide

In most cases, the recommended value is 60 seconds. Knowledge base article 3013622, which isonline at kb.netapp.com/support/index?page=content&id=3013622, contains information you can usewhen deciding which timeout value to use.
You can mount and run the script from the vSphere client. The Tools panel provides URLs for thescripts.
To get the script containing the timeout values you want for your operating system, you must copythe correct URL from the Guest OS Tools page and mount it as a virtual CD-ROM in the virtualmachine using the vSphere client. Make sure you install the script from a copy of Virtual StorageConsole for VMware vSphere that is registered to the vCenter Server that manages the virtualmachine. After the script has been installed, you can run it from the console of the virtual machine.
Adding the CD-ROM to a virtual machine
To enable installing the guest operating system scripts, you need to add the CD-ROM to a virtualmachine if it does not exist.
Steps
1. In the vSphere Client, select the desired virtual machine and power it off.
2. Right-click the virtual machine and select Manage > VM Hardware.
3. Select CD/DVD Drive in the New device drop-down box and click Add.
4. Select CD/DVD Drive and then click Next.
5. Click Use physical drive.
6. Click Next several times to accept the default values.
7. Click OK to finish adding the CD-ROM.
8. Power on the virtual machine.
Installing guest operating system scripts
The ISO images of the guest operating system scripts are loaded on the Virtual Storage Console forVMware vSphere server. To use them to set the storage timeouts for virtual machines, you mustmount and run them from the vSphere Web Client.
Before you begin
• The virtual machine must be running.
• The CD-ROM must already exist in the virtual machine, or it must have been added.
• The script must be installed from the copy of the VSC registered to the vCenter Server thatmanages the virtual machine.
About this task
If your environment includes multiple vCenter Servers, you must select the server that contains thevirtual machines for which you want to set the storage timeout values.
Steps
1. From the Virtual Storage Console Home page, expand Tools and click Guest OS Tools:
Configuring your VSC for VMware vSphere environment | 39

2. Under Guest OS Tools, press Ctrl-C to copy the link to the ISO image for your guest operatingsystem version to the clipboard.
VSC provides both 60-second timeout scripts and 190-second timeout scripts for Linux,Windows, and Solaris. Select the script for your operating system that provides the timeout valueyou want to use.
3. Return to the vSphere Web Client Home page and select vCenter.
4. Select the desired virtual machine and click the Manage > VM Hardware.
5. Select CD/DVD Drive 1 > Connect to ISO image on local disk.
6. Paste the link you copied into the File Name field and then click Open.
Be sure that the link you are using is from the copy of the VSC running on the vCenter Serverthat manages the virtual machine.
After you finish
Log in to the virtual machine and run the script to set the storage timeout values.
Running the GOS timeout scripts for Linux
The guest operating system timeout scripts set the SCSI I/O timeout settings for RHEL4, RHEL5,RHEL6, RHEL7, SLES9, SLES10, and SLES11. You can specify either a 60-second timeout or a
40 | VSC 6.2.1 for VMware vSphere Installation and Administration Guide
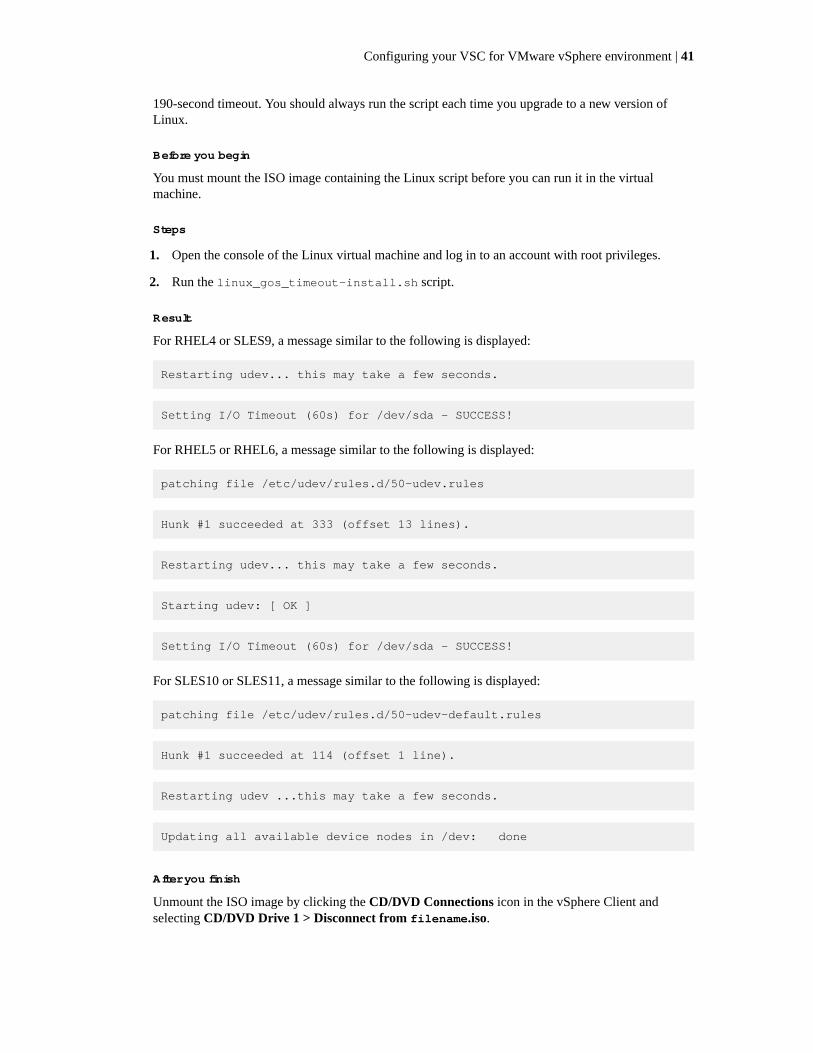
190-second timeout. You should always run the script each time you upgrade to a new version ofLinux.
Before you begin
You must mount the ISO image containing the Linux script before you can run it in the virtualmachine.
Steps
1. Open the console of the Linux virtual machine and log in to an account with root privileges.
2. Run the linux_gos_timeout-install.sh script.
Result
For RHEL4 or SLES9, a message similar to the following is displayed:
Restarting udev... this may take a few seconds.
Setting I/O Timeout (60s) for /dev/sda - SUCCESS!
For RHEL5 or RHEL6, a message similar to the following is displayed:
patching file /etc/udev/rules.d/50-udev.rules
Hunk #1 succeeded at 333 (offset 13 lines).
Restarting udev... this may take a few seconds.
Starting udev: [ OK ]
Setting I/O Timeout (60s) for /dev/sda - SUCCESS!
For SLES10 or SLES11, a message similar to the following is displayed:
patching file /etc/udev/rules.d/50-udev-default.rules
Hunk #1 succeeded at 114 (offset 1 line).
Restarting udev ...this may take a few seconds.
Updating all available device nodes in /dev: done
After you finish
Unmount the ISO image by clicking the CD/DVD Connections icon in the vSphere Client andselecting CD/DVD Drive 1 > Disconnect from filename.iso.
Configuring your VSC for VMware vSphere environment | 41

Running the GOS timeout scripts for Solaris
The timeout scripts set the SCSI I/O timeout settings for Solaris 10. You can specify either a 60-second timeout or a 190-second timeout.
Before you begin
You must mount the ISO image containing the Solaris script before you can run it in the virtualmachine.
Steps
1. Open the console of the Solaris virtual machine and log in to an account with root privileges.
2. Run the solaris_gos_timeout-install.sh script.
Result
For Solaris 10, a message similar to the following is displayed:
Setting I/O Timeout for /dev/s–a - SUCCESS!
After you finish
Unmount the ISO image by clicking the CD/DVD Connections icon in the vSphere Client andselecting CD/DVD Drive 1 > Disconnect from filename.iso.
Running the GOS timeout script for Windows
The timeout scripts set the SCSI I/O timeout settings for Windows guest operating systems. You canspecify either a 60-second timeout or a 190-second timeout. You must reboot the Windows guest OSfor the settings to take effect.
Before you begin
You must mount the ISO image containing the Windows script before you can run it in the virtualmachine.
Steps
1. Open the console of the Windows virtual machine and log in to an account with Administratorprivileges.
2. If the script does not automatically start, open the CD drive and runwindows_gos_timeout.reg.
The Registry Editor dialog is displayed.
3. Click Yes to continue.
The following message is displayed: The keys and values contained in D:\windows_gos_timeout.reg have been successfully added to the registry.
4. Reboot the Windows guest OS.
After you finish
Unmount the ISO image by clicking the CD/DVD Connections icon in the vSphere Client andselecting CD/DVD Drive 1 > Disconnect from filename.iso.
42 | VSC 6.2.1 for VMware vSphere Installation and Administration Guide

VSC for VMware vSphere configurationMost of the Virtual Storage Console for VMware vSphere configuration happens automatically whenyou install the software. In some cases, you might need to register VSC with the vCenter Server orregenerate an SSL certificate.
It can also be helpful to know which VSC ports are available through the firewall.
Registering VSC for VMware vSphere with vCenter Server
After installing the Virtual Storage Console for VMware vSphere software, you must register it withthe vCenter Server. If your environment includes multiple vCenter Servers, you must register eachVSC instance with a single vCenter Server. By default, the registration web page opens when theVSC for VMware vSphere installation finishes.
Before you begin
You must be logged in as a user with administrator privileges to the machine on which you installVSC. If you attempt to register VSC without having administrator privileges, the task does notcomplete correctly.
About this task
If you register VSC to a vCenter Server that is part of a multi-vCenter Server environment, eachinstance of VSC must be registered individually with a vCenter Server.
If you change the credentials of the account that was used to register VSC, then you must register itagain.
IPv6 addresses are not currently supported.
Steps
1. If the registration web page does not open automatically, type the following URL in a webbrowser:
https://localhost:8143/Register.html
localhost must be the computer on which you installed VSC. If you are not performing thisstep from the computer on which you installed VSC, you must replace localhost with the hostname or IP address of that computer.
2. If a security certificate warning appears, choose the option to ignore it or to continue to the website.
The vSphere Plugin Registration web page appears.
3. In the Plugin service information section, select the IP address that the vCenter Server uses toaccess VSC.
This IP address must be accessible from the vCenter Server. If you installed VSC on the vCenterServer computer, this might be the same address as the one you use to access the vCenter Server.
4. Enter the vCenter Server host name or IP address and the administrative credentials to register thevCenter Server with this instance of VSC.
5. Click Register to complete the registration.
If you did not enter the correct user credentials for the vCenter Server, a registration failed errormessage appears. If that happens, you must repeat the previous steps.
Configuring your VSC for VMware vSphere environment | 43

6. If you are registering additional vCenter Servers, repeat steps 3, 4, and 5 to register each instanceof VSC with a vCenter Server.
7. Close the registration page after you complete the registration process, because the web page usedto register with the vCenter Server is not automatically refreshed.
Registering VSC for VMware vSphere with SnapCenter
If your storage systems are running clustered Data ONTAP 8.2.2 or later and you are using VirtualStorage Console for VMware vSphere to perform backup and restore operations, you can registerVSC with SnapCenter. Doing this adds the VSC host to the SnapCenter Server and enables VSC touse SnapCenter to back up virtual machines and datastores.
Before you begin
Your storage systems must be running clustered Data ONTAP 8.2.2 or later.
Recommended: You should have installed VSC and SnapCenter on separate hosts, not the samehost.
About this task
You can register multiple instances of VSC with a single instance of SnapCenter.
By default, VSC uses its backup and restore features instead of SnapCenter in the followingenvironments:
• You are running clustered Data ONTAP 8.2.2 or later, and you do not register VSC withSnapCenter.
• You are running a version of clustered Data ONTAP prior to 8.2.2.
• You are running Data ONTAP operating in 7-Mode.
Steps
1. From the Virtual Storage Console Home page, select Configuration > Configure SnapCenterServer.
2. In the Configure SnapCenter Server dialog box, enter the credentials that VSC must use to login to the SnapCenter Server.
Field Action
Server Enter the host name or IP address of the SnapCenter Server.
Port Enter the port number that VSC and SnapCenter use tocommunicate on.
UserName Enter the user name that VSC should use to access the SnapCenterServer.
This user name should have SnapCenter Server administrativeprivileges.
Password Enter the password that VSC should use to access the SnapCenterServer.
3. If you are a VSC administrator and plan to manage Storage Virtual Machines (SVMs) fromwithin VSC instead of from within SnapCenter, select the Push storage virtual machinecredentials to SnapCenter Server check box.
This check box tells VSC to push the SVMs registered with VSC into SnapCenter. If there areSVMs registered with both VSC and SnapCenter, checking this box causes VSC to overwrite any
44 | VSC 6.2.1 for VMware vSphere Installation and Administration Guide

SnapCenter Data ONTAP credentials and replace them with the VSC Data ONTAP SVMcredentials. The VSC credentials contain the correct privileges for performing VSC tasks. See SVM RBAC role needed when using VSC with SnapCenter on page 45.
Note: The credentials are associated with the user name and password that you use when youregister VSC with SnapCenter.
If you are not using VSC to work with the SVMs, you do not need to select this check box.
SVM RBAC role required when using VSC for VMware with SnapCenter
If you are a Virtual Storage Console for VMware vSphere administrator and plan to manage StorageVirtual Machines (SVMs) from within VSC, you must push the VSC SVM credentials to SnapCenterwhen you register VSC with SnapCenter. The VSC RBAC role for the SVMs provides the privilegesnecessary for the VSC to correctly complete its tasks.
SnapCenter uses the Data ONTAP vsadmin role for SVMs. This role does not contain all theprivileges that VSC tasks require.
You can use the RBAC User Creator for Data ONTAP (RUC) tool to set up a vscadmin role for VSCthat you can assign to the SVMs when you add them to VSC.
NetApp Community Document: RBAC User Creator for Data ONTAP
When you register VSC with SnapCenter, you can select the option to push these RBAC credentialsto SnapCenter, which adds the credentials to the SnapCenter Server. If the SnapCenter Server usesthe same role name as VSC, then VSC overwrites the SnapCenter Server credentials. However, youcan use different role names in VSC and in SnapCenter. For example, you could set up a vscadminrole for VSC by using the RUC tool. Each time you add an SVM to VSC, you can set its credentialsto the vscadmin role. In SnapCenter, you could add the same SVM, but assign it the Data ONTAPvsadmin role. That way, VSC would use the vscadmin role when it worked with the SVM, andSnapCenter would use the vsadmin role.
Registering VASA Provider for ONTAP with VSC for VMware vSphere
After you have installed VASA Provider for ONTAP, you must register it with Virtual StorageConsole for VMware vSphere.
Before you begin
• You must have the IP address or FQDN for VASA Provider.
• You must have the password for the vpserver account for VASA Provider.
About this task
You must register VASA Provider with VSC in order to have access to all the VASA Providerfeatures. You should not use the vCenter Manage > Storage Provider option to register VASAProvider.
Registering VASA Provider normally takes about 30 seconds. If you have an exceptionally largeenvironment, the process can take longer.
If you upgrade VSC, you must first unregister VASA Provider. You will have to re-register VASAProvider with VSC again to have all access.
Steps
1. From the Virtual Storage Console Home page, click Configuration > Register/UnregisterVASA Vendor Provider.
Configuring your VSC for VMware vSphere environment | 45

2. In the Register VASA Vendor Provider dialog box, enter the following information:
• The IP address or the name of the host where you installed VASA Provider
• The password for the VASA Provider's vpserver account
46 | VSC 6.2.1 for VMware vSphere Installation and Administration Guide

3. Click Register All to register VASA Provider with VSC and all the vCenter Servers that are listedin the dialog box.
Unlike VSC, VASA Provider has a 1:All relationship with vCenter Servers. You cannot configureVASA Provider to register with only one vCenter Server in a multiple vCenter Serverenvironment.
A message is displayed stating that VASA Provider was successfully registered.
4. Log out of the vSphere Web Client, and log in again.
Logging back in to the vSphere Web Client enables you to view the VASA Provider interfacewithin VSC. From this interface, you can set up storage capability profiles, assign them todatastores, and set threshold alarms.
Regenerating an SSL certificate for VSC for VMware vSphere
The SSL certificate is generated when you install Virtual Storage Console for VMware vSphere. Thedistinguished name (DN) that is generated for the SSL certificate might not be a common name (CN)("NetApp") that the client machines recognize. By changing the keystore and private key passwords,you can regenerate the certificate and create a site-specific certificate.
Steps
1. Stop the vsc service.
Virtual Storage Console for VMware vSphere Server
2. Stop the smvi service.
NetApp SnapManager for Virtual Infrastructure
There are several ways to stop this service. One way to stop the service is to use the WindowsServices control panel.
3. Connect to the Windows console session or the Windows PowerShell console.
4. Regenerate the SSL certificate with the common host name:
bin\vsc ssl setup -cn <HOST>
For <HOST>, you should enter the host name or the fully qualified domain name of the systemrunning VSC.
Example
The following example executes the command from the installation directory and uses a hostcalled ESXiTester:
C:\Program Files\ NetApp\Virtual Storage Console>bin\vsc ssl setup -cn
ESXiTester
5. At the prompt, enter the default keystore password:
changeit
You will also be prompted to enter a password for the private key (this can be any string youchoose).
The following files are generated:
• keystore file (default: etc\nvpf.keystore)
This is the JKS keystore file.
• keystore properties (default: etc\keystore.properties)
Configuring your VSC for VMware vSphere environment | 47

This file contains the keystore file path, the keystore, and the key passwords. Theadministrator should secure this file and specify http.ssl.keystore.properties in etc\nvpf.override if the keystore properties file needs to be moved.
6. If you are using the VSC provisioning and cloning or optimization and migration features,perform the following steps:
a. Change to the directory where keytool.exe is located:
This directory is under the VSC installation directory. While you can specify a different namefor your installation directory, the default location for keytool.exe is:
C:\Program Files\NetApp\Virtual Storage Console\jre\bin\keytool.exe
b. Create a new file called nvpf.cer:
keytool -export -alias nvpf -keystore nvpf.keystore -file nvpf.cer
c. Import the certificate to the local Java keystore:
c:\Program Files\NetApp\Virtual Storage Console\jre\bin\keytool.exe -import -alias nvpf -file nvpf.cer -keystore "C:\Program Files\NetApp\Virtual Storage Console\jre\lib\security\cacerts"
7. Secure the etc\keystore.properties file.
• If the installation directory is on a network shared directory, move the file to local storage.
• Move the file to storage that is accessible only to the SYSTEM user, which preventsunauthorized users from viewing or modifying the file.
8. Restart the smvi service.
9. Restart the vsc service.
10. You can review and accept the SSL certificate after the vSphere Client receives the certificate byclicking the NetApp icon in the vSphere Client.
11. Import the SSL certificate into the Trusted Root Certification Authorities store to prevent SSLsecurity warnings from appearing every time you launch the vSphere client.
For details, see the documentation for your Windows operating system.
After you finish
If you want to import an existing Certification Authority (CA) signed certificate, see theKnowledgebase article:
https://kb.netapp.com/support/index?page=content&id=1014445&locale=en_US
Replacing an SSL certificate for VSC for VMware vSphere with CA-signedcertificates
Virtual Storage Console (VSC) supports replacing self-signed SSL certificates for ports 8143 and8043 with CA-signed certificates. If you replace or update an SSL certificate for VSC, by default theSSL certificate is updated for both the ports.
Steps
1. Stop the vsc service.
Virtual Storage Console for VMware vSphere Server
2. Stop the smvi service.
NetApp SnapManager for Virtual Infrastructure
48 | VSC 6.2.1 for VMware vSphere Installation and Administration Guide

3. Create a new certificate request to be sent to the Certificate Authority (CA):
C:\Program Files\NetApp\Virtual Storage Console>jre\bin\keytool.exe -certreq -alias nvpf -keystore etc\nvpf.keystore -file etc\myNewCertRequest.csr
4. After the CA returns the signed certificate and the CA certificate, place them in the C:\programfiles\netapp\virtual storage console\etc\ directory.
The signed certificate is newSignedCert.crt, and the CA certificate is meCACert.crt.
5. Import the CA certificate into the keystore:
C:\Program Files\NetApp\Virtual Storage Console>jre\bin\keytool.exe -import -trustcacerts -alias root -file etc\meCACert.crt -keystore etc\nvpf.keystore
6. Import the signed certificate:
C:\Program Files\NetApp\Virtual Storage Console>jre\bin\keytool.exe -import -trustcacerts -alias nvpf -file etc\newSignedCert.crt -keystoreetc\nvpf.keystore
7. Restart the smvi service.
8. Restart the vsc service.
VSC for VMware vSphere port requirements
By default, Virtual Storage Console for VMware vSphere uses designated ports to enablecommunication between its components, which include storage systems and the VMware vCenterServer. If you have firewalls enabled, you must ensure that the firewalls are set to allow exceptions.
For firewalls other than Windows, you must manually grant access to specific ports that VSC uses. Ifyou do not grant access to these ports, an error message such as Unable to communicate withthe server is displayed.
VSC uses the following default ports:
Default port number Description
80 Depending on how you have configured your credentials,the VMware vCenter Server and the storage systemslisten for standard, unencrypted communication viastandard HTTP on this port.
443 Depending on how you have configured your credentials,the VMware vCenter Server and the storage systemslisten for secure communications using secure HTTP(SSL) on this port.
8043 The VSC backup and restore features and the VSCRestore Agent and CLI listen for secure communicationon this port.
8143 VSC listens for secure communication on this port.
9060 VSC listens for communication from the VSCPowerShell Toolkit on this port.
Configuring your VSC for VMware vSphere environment | 49

Performing VSC for VMware vSphere tasks across multiplevCenter Servers
If you are using Virtual Storage Console for VMware vSphere in an environment where a singleVMware vSphere Web Client is managing multiple vCenter Servers, you need to register an instanceof VSC with each vCenter Server so that there is a 1:1 pairing between VSC and the vCenter Server.Doing this enables you to manage all of the servers running vCenter 5.5 or later in both linked modeand non-linked mode from a single vSphere Web Client.
Note: In a multiple vCenter Server environment, you must register each vCenter Server with aninstance of VSC, even if some of the vCenter Servers are not associated with NetApp Storage.
Linked mode is installed automatically during the vCenter Server installation. It uses MicrosoftActive Directory Application Mode (ADAM) to store and synchronize data across multiple vCenterServer systems.
Using the vSphere Web Client to perform VSC tasks across multiple vCenter Servers requires thefollowing:
• You must have installed multiple instances of VSC.
• Each vCenter Server in the VMware inventory must have a single VSC server registered with it ina unique 1:1 pairing.
For example, you can have VSC server A registered to vCenter Server A, VSC server B registeredto vCenter Server B, VSC server C registered to vCenter Server C, and so on.
You cannot have VSC server A registered to both vCenter Server A and vCenter Server B.
Also, if the VMware inventory includes one vCenter Server that does not have a VSC serverregistered to it, you will not be able to see any instances of VSC, even though the VMwareinventory has one or more vCenter Servers that are registered with VSC.
• You must have the VSC-specific View privilege for each vCenter Server that is registered to thesingle sign-on (SSO).
You must also have the correct RBAC permissions.
When you are performing a task that requires you to specify a vCenter Server, the vCenter Serverdrop-down box displays the available vCenter Servers in alphanumeric order. The default vCenterServer is always the first server in the drop-down list.
If the location of the storage is known (for example, when you use the Provisioning wizard and thedatastore is on a host managed by a specific vCenter Server), the vCenter Server list is displayed as aread-only option. This only happens when you use the right-click option to select an item in thevSphere Web Client.
VSC warns you when you attempt to select an object that it does not manage.
You can filter storage systems based on a specific vCenter Server from the VSC summary page. Asummary page appears for every VSC instance registered with a vCenter Server. You can managestorage systems associated with a specific VSC instance and vCenter Server, but you should keep theregistration information for each storage system separate if you are running multiple instances ofVSC.
50 | VSC 6.2.1 for VMware vSphere Installation and Administration Guide

Managing connection brokersYou can use the Connection brokers panel to view and manage the connection brokers available forimporting clone data at the end of the clone operation.
• For VMware View Server, clone data is imported into View Server at the end of the cloneoperation.
• For Citrix XenDesktop, a .csv file is created in the directory c:\program files\netapp\virtual storage console\etc\kamino\exports. See Cloning virtual machines on page88 for details.
To work with connection brokers in Virtual Storage Console for VMware vSphere, you musthave .Net 3.5 available on the system where you have VSC installed. For some versions of Windows,such as Windows 2008, .Net 3.5 is included as part of the installation. For other versions, such asWindows 2003, it is not part of the base install, so you must manually install it.
Adding connection brokers
You can add connection brokers to Virtual Storage Console for VMware vSphere.
Before you begin
• You must have .Net 3.5 available on the system where you have VSC installed.
For some versions of Windows, such as Windows 2008, .Net 3.5 is included as part of theinstallation. For other versions, such as Windows 2003, it is not part of the base install, so youmust manually install it.
• You must ensure that your configuration is supported.
You can do this by checking the Interoperability Matrix, which is available online at mysupport.netapp.com/matrix.
• You must have selected the vCenter Server that you want to use for this task.
Steps
1. From the Virtual Storage Console Home page, select Configuration > Connection brokers.
Configuring your VSC for VMware vSphere environment | 51

2. In the pop-up Connection Brokers box, click Add.
3. In the Add Connection Broker window, specify the following information:
a. For Connection Broker Version, select the connection broker name and version from thedrop-down list.
b. For Domain, enter the domain containing the connection broker.
c. For Connection name (XenDesktop 5.0 only), enter the name given the Citrix XenDesktop5.0 connection.
d. For Hostname or IP Address (VMware View Server only), enter the connection broker hostname or IP address.
e. For Username (VMware View Server only), enter the domain user name.
f. For Password (VMware View Server only), enter the domain password.
52 | VSC 6.2.1 for VMware vSphere Installation and Administration Guide

Removing connection brokers
You can remove a connection broker from the list of available connection brokers.
Steps
1. From the Virtual Storage Console Home page, select Configuration > Connection brokers.
2. In the pop-up Connection Brokers box, click Remove.
3. Click Yes to confirm.
Configuring AutoSupport messages for backup jobsInformation about specific errors that occur during backup and restore operations is automaticallysent to the EMS log files. Enabling AutoSupport messages in Virtual Storage Console for VMwarevSphere ensures that events such as a backup failure because of an error in taking a VMwaresnapshot or making a Snapshot copy are also sent to the EMS logs.
Before you begin
You must have selected the vCenter Server that you want to use for this task.
Steps
1. From the Virtual Storage Console Home page, click Configuration > Backup and RecoveryConfiguration.
2. In the Backup and Recovery Configuration dialog box, select the Enable AutoSupport checkbox to enable AutoSupport messages.
Related tasks
Collecting the VSC for VMware vSphere log files on page 129
Configuring your VSC for VMware vSphere environment | 53

Configuring email alerts for backup jobsBefore you run any backup jobs, you should configure the email alerts that you want the VirtualStorage Console server to send you during the job. The information you provide in the Backup andRecovery Configuration dialog box is then populated in the Schedule Backup wizard so that you donot have to type this information for every backup job.
Before you begin
Make sure you have done the following:
• Selected the vCenter Server that you want to use for this task.
• Gathered the following information:
◦ Email address from which the alert notifications are sent
◦ Email address to which the alert notifications are sent
◦ Host name to configure the SMTP server
• In VSC environments using SnapCenter and using role-based access control (RBAC), confirmedthat the RBAC users have the Data ONTAP event generate-autosupport-log permission.
Steps
1. From the Virtual Storage Console Home page, click Configuration > Backup and RecoveryConfiguration.
2. In the Backup and Recovery Configuration dialog box, specify the email address and SMTPserver from which the alert notifications are sent, as well as the email server to which the alertnotifications are to be sent.
3. Optional: Click Send Test Email to verify that the outgoing email server to which the alertnotifications are to be sent is working correctly.
54 | VSC 6.2.1 for VMware vSphere Installation and Administration Guide

MetroCluster configurations and VSC for VMware vSphereVirtual Storage Console for VMware vSphere supports environments that use MetroClusterconfigurations for clustered Data ONTAP and for Data ONTAP operating in 7-Mode. Most of thissupport is automatic; however, you might notice a few of differences when you use a MetroClusterenvironment.
You must make sure that VSC discovers the storage system controllers at both the primary andsecondary sites. Normally, VSC automatically discovers storage controllers. If you are using a clustermanagement LIF, it is a good practice to confirm that VSC discovered the clusters at both sites.Otherwise, you can manually add the storage controllers to VSC. You can also modify the username-password pairs that VSC uses to connect to them.
When a switchover occurs, the Storage Virtual Machines (SVMs) on the secondary site take over.These SVMs have the -mc suffix appended to their names. If you are performing certain operations,such as provisioning or cloning, when a switchover operation occurs, you will see the name of theSVM where the datastore resides change to include the -mc suffix. This suffix is dropped when theswitchback occurs, and the SVMs on the primary site resume control.
When a switchover or switchback occurs, it can take VSC a few minutes to automatically detect anddiscover the clusters. If this happens while you are performing a VSC operation such as provisioninga datastore or cloning a virtual machine, you might experience a delay.
The preferences filesThe preferences files contain settings that control Virtual Storage Console for VMware vSphereoperations. Under most circumstances, you should not need to modify the settings in these files;however, it is helpful to know which preference files VSC uses.
VSC has several preference files. These files include entry keys and values that determine how VSCperforms operations. The following are some preference files that can be useful:
VSC_install_dir\etc\kamino\kaminoprefs.xml
VSC_install_dir\etc\caster\kaminosdkprefs.xml
VSC_install_dir\etc\vsc\vscPreferences.xml
An example of when you might need to modify the preferences files is if you use iSCSI or NFS andthe subnet is different between your ESX hosts and your storage system. In that situation, if you donot modify settings in the preferences files, provisioning a datastore fails because VSC cannot mountthe datastore.
Enabling datastore mounting across different subnetsIf you use iSCSI or NFS and the subnet is different between your ESX hosts and your storagesystem, you need to modify two settings in the Virtual Storage Console for VMware vSpherepreferences files. Otherwise, provisioning will fail because VSC cannot mount the datastore.
About this task
When datastore provisioning fails, VSC logs the following error:
Unable to continue. No ip addresses found when cross-referencing kernel ip
addresses and addresses on the controller.
Unable to find a matching network to NFS mount volume to these hosts.
Configuring your VSC for VMware vSphere environment | 55

Steps
1. Open the following files in a text editor:
VSC_install_dir\etc\kamino\kaminoprefs.xml
VSC_install_dir\etc\kamino\kaminosdkprefs.xml
2. Update both files as follows:
If you use... Do this...
iSCSI Change the value of the entry keydefault.allow.iscsi.mount.networks from ALL to yourESX host subnet masks.
NFS Change the value of the entry keydefault.allow.nfs.mount.networks from ALL to your ESXhost subnet masks.
The preferences files include example values for these entry keys.
Note: ALL does not mean all networks. It means that all matching networks between the hostand storage system can be used to mount datastores. Specifying subnet masks enablesmounting across the specified subnets only.
3. Save and close the files.
Setting the frequency of NFS path optimization checksBy default, Virtual Storage Console for VMware vSphere checks the optimization of NFS pathsevery five minutes. You can change the frequency of these checks by modifying thevscPreferences.xml file.
Steps
1. In the etc/vsc/vscPreferences.xml file, add the following entry:
<entry key="default.server.path.optimization.sleep"value="value_in_seconds"/>
value_in_seconds is the amount of time, specified in seconds, that you want VSC to waitbefore rechecking the optimization of the NFS paths.
2. Verify that the optimization checks are occurring at the new interval by checking the entries in thelog/vsc.log log file.
The log file contains statements similar to the following that enable you to determine how oftenthe path checks are occurring:
2013-10-17 16:26:58,665 [Thread-16] DEBUG (PathOptimizationManager) - Refreshing controllers and recalculating path optimization details...2013-10-17 16:26:58,667 [Thread-16] DEBUG (PathOptimizationManager) - Path optimization detection complete.
56 | VSC 6.2.1 for VMware vSphere Installation and Administration Guide

Authentication and user management withvCenter RBAC and Data ONTAP RBAC
Role-based access control (RBAC) is a process that enables administrators to control access to anduser actions on vSphere objects and storage systems running Data ONTAP. Virtual Storage Consolefor VMware vSphere supports both vCenter Server RBAC and Data ONTAP RBAC.
The administrator handles setting up the RBAC roles. Depending on your system setup, you mighthave different administrators handling these two types of RBAC:
• vCenter Server RBACThis security mechanism restricts the ability of vSphere users to perform VSC tasks on vSphereobjects, such as virtual machines, datastores, and datacenters.
The vSphere administrator sets up vCenter Server RBAC by assigning permissions to specificvSphere objects, which are listed in the vSphere inventory. In many cases, a VSC task requiresthat more than one object have permissions. For this reason, it is a good practice to assignpermissions on the root object (also referred to as the root folder). You can then restrict thoseentities that do not need permissions.
Note: At a minimum, all users must have the VSC-specific, read-only View privilege assignedto them. Without this privilege, users cannot access the VSC GUI.
• Data ONTAP RBACThis security mechanism restricts the ability of VSC to perform specific storage operations, suchas creating, destroying, or backing up storage for datastores, on a specific storage system.
The storage administrator sets up Data ONTAP RBAC by defining storage credentials consistingof a user name and password in Data ONTAP. The storage credentials map to VSC storageoperations. Then the administrator, usually the storage administrator, sets the storage credentialsin VSC for each storage system that VSC manages. VSC uses a single set of credentials for eachstorage system.
VSC checks the vCenter Server RBAC permissions when a user clicks a vSphere object and initiatesan action. If a user has the correct vCenter Server RBAC permission to perform that task on thatvSphere object, VSC then checks the Data ONTAP credentials for the storage system. If thosecredentials are also confirmed, then VSC allows the user to perform that task.
The following diagram provides an overview of the VSC validation workflow for RBAC privileges(both vCenter and Data ONTAP):
57

1. vSphere user requests a VSC operation.
Note: This is a user, not an administrator.
Note: In a few cases, the Data ONTAP RBAC privileges might have changed after VSC recorded them.
2. VSC checks the vCenter RBAC privileges.
3. If those permissions are OK, VSC checks its record of Data ONTAP privileges for the storage system.
4. If those permissions are OK, VSC uses ZAPI to log into the storage system for a final check of Data ONTAP RBAC privileges.
VSC for VMware vSphere
Storage System
vCenter Server
Related concepts
vCenter Server role-based access control features in VSC for VMware vSphere on page 58
Standard roles packaged with VSC for VMware vSphere on page 62
Data ONTAP role-based access control features in VSC for VMware vSphere on page 66
vCenter Server role-based access control features in VSCfor VMware vSphere
vCenter Server provides role-based access control (RBAC) that enables you to control access tovSphere objects. In Virtual Storage Console for VMware vSphere, vCenter Server RBAC works withData ONTAP RBAC to determine which VSC tasks a specific user can perform on objects on aspecific storage system.
To successfully complete a task, you must have the appropriate vCenter Server RBAC permissions.During a task, VSC checks a user's vCenter Server permissions before checking the user's DataONTAP privileges.
You can set the vCenter Server permissions on the root object (also known as the root folder). Youcan then refine the security by restricting child entities that do not need those permissions.
Components of vCenter Server permissions
The vCenter Server recognizes permissions, not privileges. Each vCenter Server permission consistsof three components.
These components are the following:
• One or more privileges (the role)
The privileges define the tasks that a user can perform.
58 | VSC 6.2.1 for VMware vSphere Installation and Administration Guide

• A vSphere object
The object is the target for the tasks.
• A user or group
The user or group defines who can perform the task.
As the following diagram illustrates, you must have all three elements in order to have a permission.
Note: In this diagram, the gray boxes indicate components that exist in the vCenter Server, and thewhite boxes indicate components that exist in the operating system where the vCenter Server isrunning.
vCenter Admin sets up permissions.
Operating system Admin creates
users and groups.
Permission
Managed Object
Role
Privilege
Group
User
1..*
1..*
Either Group or
User
Privileges
Two kinds of privileges are associated with Virtual Storage Console for VMware vSphere:
• Native vCenter Server privileges
These privileges come with the vCenter Server.
• VSC-specific privileges
These privileges are defined for specific VSC tasks. They are unique to VSC.
Note: For ease of reading, this document refers to the vCenter Server privileges as nativeprivileges, and the privileges that are defined for VSC as VSC-specific privileges. For detailedinformation about VSC-specific privileges, see Virtual Storage Console for VMware vSphereAdvanced RBAC Configuration. For information about vCenter Server native privileges, seeVMware's vSphere Security guide. At the time this document was created, that guide was online atthe following site: NetApp follows the VMware recommendations for creating and usingpermissions.
http://pubs.vmware.com/vsphere-60/topic/com.vmware.ICbase/PDF/vsphere-esxi-vcenter-server-601-security-guide.pdf
VSC tasks require both VSC-specific privileges and vCenter Server native privileges. Theseprivileges constitute the “role” for the user. A permission can have multiple privileges.
Note: To simplify working with vCenter Server RBAC, VSC provides several standard roles thatcontain all the VSC-specific and native privileges that are required to perform VSC tasks.
If you change the privileges within a permission, the user that is associated with that permissionshould log out and then log back in to enable the updated permission.
Authentication and user management with vCenter RBAC and Data ONTAP RBAC | 59

vSphere objects
Permissions are associated with vSphere objects, such as the vCenter Server, ESXi hosts, virtualmachines, datastores, datacenters, and folders. You can assign permissions to any vSphere object.Based on the permission that is assigned to a vSphere object, the vCenter Server determines who canperform which tasks on that object.
Users and groups
You can use Active Directory (or the local vCenter Server machine) to set up users and groups ofusers. You can then use vCenter Server permissions to grant access to these users or groups to enablethem to perform specific VSC tasks.
Note: These vCenter Server permissions apply to VSC vCenter users, not to VSC administrators.By default, VSC administrators have full access to the product and do not require permissionsassigned to them.
Users and groups do not have roles assigned to them. They gain access to a role by being part of avCenter Server permission.
You can assign only one permission to a vCenter user or group. However, you can set up high-levelgroups, and then assign a single user to multiple groups. Doing that allows the user to have all thepermissions that are provided by the different groups. In addition, using groups simplifies themanagement of permissions by eliminating the need to set up the same permission multiple times forindividual users.
Key points about assigning and modifying permissions
There are several key points to keep in mind when you are working with vCenter Server permissions.Whether a Virtual Storage Console for VMware vSphere task succeeds can depend on where youassigned a permission or what actions a user took after a permission was modified.
You only need to set up vCenter Server permissions if you want to limit access to vSphere objectsand tasks. Otherwise, you can log in as an administrator. This login automatically allows you toaccess all vSphere objects.
Note: For detailed information on working with vCenter Server permissions, see the VMwarevSphere Security guide. At the time this document was created, that guide was online at http://pubs.vmware.com/vsphere-60/topic/com.vmware.ICbase/PDF/vsphere-esxi-vcenter-server-601-security-guide.pdf. NetApp follows the VMware recommendations for creating and usingpermissions.
Assigning permissions
Where you assign a permission determines the VSC tasks that a user can perform.
Sometimes, to ensure that a task completes, you must assign the permission at a higher level, such asthe root object. This is the case when a task requires a privilege that does not apply to a specificvSphere object (for example, tracking the task) or when a required privilege applies to a non-vSphereobject (for example, a storage system).
In these cases, you can set up a permission so that it is inherited by the child entities. You can alsoassign other permissions to the child entities. The permission on a child entity always overrides thepermission inherited from the parent entity. This means that you can assign child entity permissionsas a way to restrict the scope of a permission that was assigned to a root object and inherited by thechild entity.
Tip: Unless your company's security policies require more restrictive permissions, it is a goodpractice to assign permissions on the root object (also referred to as the root folder). Then, if youneed to, you can restrict those entities that you do not want to have the permission so that you havemore fine-grained security.
60 | VSC 6.2.1 for VMware vSphere Installation and Administration Guide

Permissions and non-vSphere objects
In some cases, a permission applies to a non-vSphere object. For example, a storage system is not avSphere object. If a privilege applies to a storage system, you must assign the permission containingthat privilege to the VSC root object because there is no vSphere object to which you can assign it.
For example, any permission that includes a privilege such as the VSC privilege "Add/Modify/Skipstorage systems" must be assigned at the root object level.
Modifying permissions
You can modify a permission at any time.
If you change the privileges within a permission, the user associated with that permission should logout and then log back in to enable the updated permission.
Advanced example of using vCenter Server permissions
The privileges you include in a vCenter Server permission determine the role that the Virtual StorageConsole for VMware vSphere user has and the tasks associated with that role. In addition, thevSphere object to which you assign the permission also affects the tasks the user can perform. Thisexample illustrates those points.
Note: Depending on your system setup and company's security requirements, you might either login as administrator and not use vCenter Server RBAC, or you might set permissions on the rootobject (folder). Setting permissions on the root object normally allows all the child objects toinherit those permissions, unless you place a restriction on a child object to exclude it.
If you plan to use a more restrictive implementation of RBAC, the following example illustrates howassigning permissions can affect which tasks you can complete. This example uses two datacenters(Datacenter A and Datacenter B) that are managed by a single vCenter Server. Users of onedatacenter are not allowed to perform tasks in the other datacenter.
For Datacenter A, you create the following vCenter Server permission:
• A user named "Pat"
• The vCenter Server privileges, both VSC-specific and vCenter Server native, required to allow theuser to perform rapid cloning
• A managed object within the vSphere inventory (Datacenter A), which has the "Propagate toChild Objects" check box selected
Because the permissions for rapid cloning are assigned to Datacenter A, VSC displays an errormessage if you attempt to clone a virtual machine from Datacenter B.
If you attempt to clone a virtual machine in Datacenter A, VSC allows you to complete the RapidClone Wizard steps. However, when you click Apply, the Rapid Clone Wizard disappears withoutcompleting the cloning task. The log file includes a message stating that you do not have permissionto create a task.
This clone task failed because the permission was applied to Datacenter A instead of the root object(folder). The task required the native vCenter Server privilege "Create Task." Permissions containingthe "Create Task" privilege must always be applied at the root object level. During the cloning task,Provisioning and Cloning confirmed that "Pat" had permission to work with a virtual machine inDatacenter A. But, as the clone task continued, Provisioning and Cloning asked the vCenter Server tocreate a task to track its progress. The vCenter Server rejected this request because user "Pat" did nothave permission to create tasks on the root object. This caused the task to fail.
If you had assigned the permission at the root object, the privileges would have propagated down tothe child vSphere objects, in this case Datacenter A and Datacenter B. You could have prevented"Pat" from working with a virtual machine in Datastore B by applying a permission restricting "Pat"from accessing Datastore B.
Authentication and user management with vCenter RBAC and Data ONTAP RBAC | 61

For detailed information on working with vCenter Server permissions, see VMware's vSphereSecurity guide. At the time this document was created, that guide was online at http://pubs.vmware.com/vsphere-60/topic/com.vmware.ICbase/PDF/vsphere-esxi-vcenter-server-601-security-guide.pdf. NetApp follows the VMware recommendations for creating and usingpermissions.
Standard roles packaged with VSC for VMware vSphereTo simplify working with vCenter Server privileges and role-based access control (RBAC), VirtualStorage Console for VMware vSphere provides a set of standard VSC roles that enables users toperform key VSC tasks. There is also a read-only role that allows users to view VSC information, butnot perform any tasks.
The standard VSC roles have both the required VSC-specific privileges and the native vCenter Serverprivileges to ensure that tasks complete correctly. In addition, the roles are set up so that they havethe necessary privileges across all supported versions of the vCenter Server.
As an administrator, you can assign these roles to the appropriate users.
Note: VSC returns these roles to their default values (initial set of privileges) each time you restartthe VSC Windows service or modify your installation. If you upgrade VSC, the standard roles areautomatically upgraded to work with that version of VSC.
You can see the VSC standard roles when you click Roles from the VMware vSphere Web ClientHome page.
62 | VSC 6.2.1 for VMware vSphere Installation and Administration Guide

The roles VSC provides allow you to perform the following tasks:
Role Description
VSCAdministrator
Provides all native vCenter Server and VSC-specific privileges necessary toperform all VSC tasks.
VSC Read-only Provides read-only access to all of VSC.
These users cannot perform any VSC actions that are access controlled.
Authentication and user management with vCenter RBAC and Data ONTAP RBAC | 63

Role Description
VSC Provision Provides all native vCenter Server and VSC-specific privileges necessary toprovision storage.
The user can perform the following tasks:
• Create new datastores
• Destroy datastores
• View information about storage capability profiles
The user cannot perform the following tasks:
• Create clones
• Reclaim space
• Distribute templates
VSC Clone Provides all native vCenter Server and VSC-specific privileges necessary toclone storage and view information about storage capability profiles.
The user cannot perform the following tasks:
• Provision storage
• Reclaim space
• Distribute templates
VSC Scan/Migrate
Provides all native vCenter Server and VSC-specific privileges necessary toscan databases and migrate virtual machines and view information aboutstorage capability profiles.
With this role, the user can perform all tasks involving optimizing andmigrating storage.
The user also has access to the configure privilege.
VSC Backup Provides all native vCenter Server and VSC-specific privileges necessary toback up vSphere objects (virtual machines and datastores) and viewinformation about storage capability profiles.
The user also has access to the configure privilege.
The user cannot perform the following task:
• Restore storage
VSC Restore Provides all native vCenter Server and VSC-specific privileges necessary torestore vSphere objects that have been backed up and view information aboutstorage capability profiles.
The user also has access to the configure privilege.
The user cannot perform the following task:
• Back up vSphere objects.
Details about the privileges needed for these roles are included in Virtual Storage Console forVMware vSphere Advanced RBAC Configuration Guide.
64 | VSC 6.2.1 for VMware vSphere Installation and Administration Guide

Product-level privilege required by VSC for VMware vSphereTo access the Virtual Storage Console for VMware vSphere GUI, you must have the product-level,VSC-specific View privilege assigned at the correct vSphere object level. If you log in without thisprivilege, VSC displays an error message when you click the NetApp icon and prevents you fromaccessing VSC.
The following information describes the VSC product-level View privilege:
Privilege Description Assignment level
View You can access the VSC GUI.
This privilege does not enable you toperform tasks within VSC. Toperform any VSC tasks, you musthave the correct VSC-specific andnative vCenter Server privileges forthose tasks.
The assignment leveldetermines which portions ofthe UI you can see.
Assigning the View privilegeat the root object (folder)enables you to enter VSC byclicking the NetApp icon.
You can assign the Viewprivilege to another vSphereobject level; however, doingthat limits the VSC menus thatyou can see and use.
The root object is therecommended place to assignany permission containing theView privilege.
Example of how the View privilege affects tasks in VSC for VMwarevSphere
The View privilege allows you to see the Virtual Storage Console for VMware vSphere GUI. Whereyou assign a permission containing the View privilege determines which parts of the GUI are visible.
Note: Depending on your company's security requirements, you might either log in asadministrator and not use RBAC, or you might set permissions on the root object (folder). Settingpermissions on the root object normally allows all the child objects to inherit those permissions,unless you place a restriction on a child object.
If you plan to implement RBAC in a more restrictive way, the following example illustrates howassigning a permission containing the View privilege can affect which parts of the GUI you canaccess. In this example, the following vCenter Server permission is assigned to Datacenter A:
• A user named "Pat"
• Privileges that include the View privilege
• A managed object within the vSphere inventory (Datacenter A), which has the "Propagate toChild Objects" check box selected
If you log in to VSC as user "Pat", the NetApp icon appears. However, if you click the icon, VSCdisplays an error message. This is because "Pat" only has View permission on Datacenter A. To seethe VSC menus and toolbars, you must navigate to Datacenter A and right-click it.
To access the main VSC GUI and avoid an error message when you click on the icon, you mustassign any permission containing the View privilege to the root object.
Authentication and user management with vCenter RBAC and Data ONTAP RBAC | 65

Data ONTAP role-based access control features in VSC forVMware vSphere
Data ONTAP role-based access control (RBAC) enables you to control access to specific storagesystems and the actions a user can perform on those storage systems. In Virtual Storage Console forVMware vSphere, Data ONTAP RBAC works with vCenter Server RBAC to determine which VSCtasks a specific user can perform on objects on a specific storage system.
VSC uses the credentials (user name and password) that you set up within it to authenticate eachstorage system and determine which storage operations can be performed on that storage system.VSC uses one set of credentials for each storage system. These credentials determine all VSC tasksthat can be performed on that storage system; in other words, the credentials are for VSC, not anindividual VSC user.
Data ONTAP RBAC applies only to accessing storage systems and performing VSC tasks related tostorage, such as cloning virtual machines. If you do not have the appropriate Data ONTAP RBACprivileges for a specific storage system, you cannot perform any tasks on a vSphere object hosted onthat storage system. You can use Data ONTAP RBAC in conjunction with the VSC-specificprivileges to control which VSC tasks a user can perform:
• Monitoring and configuring storage or vCenter Server objects residing on storage
• Provisioning and cloning vSphere objects residing on storage
• Scanning, optimizing, and migrating vSphere objects residing on storage
• Backing up and recovering vSphere objects residing on storage
Using Data ONTAP RBAC with the VSC-specific privileges provides a storage-oriented layer ofsecurity that the storage administrator can manage. As a result, you have more fine-grained accesscontrol than either Data ONTAP or vCenter Server supports alone. For example, with vCenter ServerRBAC, you can allow vCenterUserB, but not vCenterUserA, to provision a datastore on NetAppstorage. However, if the storage system credentials for a specific storage system do not supportcreating storage, then neither vCenterUserB nor vCenterUserA can provision a datastore on thatstorage system.
When you initiate a VSC task, VSC first confirms that you have the correct vCenter Serverpermission for that task. If the vCenter Server permission is not sufficient to allow you to perform thetask, VSC does not need to check the Data ONTAP privileges for that storage system because you didnot pass the initial, vCenter Server security check. As a result, you cannot access the storage system.
If the vCenter Server permission is sufficient, VSC then checks the Data ONTAP RBAC privileges(your Data ONTAP role) associated with the storage system's credentials (the user name andpassword) to determine whether you have sufficient privileges to perform the storage operationsrequired by that VSC task on that storage system. If you have the correct Data ONTAP privileges,you can access the storage system and perform the VSC task. The Data ONTAP roles determine theVSC tasks you can perform on the storage system.
Each storage system has one set of Data ONTAP privileges associated with it.
Using both Data ONTAP RBAC and vCenter Server RBAC provides the following benefits:
• Security
The administrator can control which users can perform which tasks on both a fine-grainedvCenter Server object level and a storage system level.
• Audit information
In many cases, VSC provides an audit trail on the storage system that lets you track events backto the vCenter user who performed the storage modifications.
66 | VSC 6.2.1 for VMware vSphere Installation and Administration Guide

• Usability
You can maintain controller credentials in one place.
Recommended Data ONTAP roles when using VSC for VMware vSphere
There are several recommended Data ONTAP roles that you can set up for working with VirtualStorage Console for VMware vSphere and role-based access control (RBAC). These roles contain theData ONTAP privileges required to perform the necessary storage operations executed by the VSCtasks.
There are several ways to create Data ONTAP roles:
• RBAC User Creator for Data ONTAP
NetApp Community Document: RBAC User Creator for Data ONTAP
• OnCommand System Manager, which can be downloaded for either Windows or Linux platforms
• The CLI (command-line interface), using the security login set of commands
The System Administrator's Guide for Clustered Data ONTAP Administrators containsinformation about using this command.
Each role has a user name/password pair associated with it. These are the role's credentials. If you donot log in using these credentials, you cannot access the storage operations associated with the role.
As a security measure, the VSC-specific Data ONTAP roles are ordered hierarchically. This meansthat the first role is the most restrictive role and has only the privileges associated with the most basicset of VSC storage operations. The next role includes both its own privileges and all of the privilegesassociated with the previous role. Each additional role is less restrictive with regard to the supportedstorage operations.
The following are some of the recommended Data ONTAP RBAC roles when using VSC. After youcreate these roles, you can assign them to users who need to perform tasks related to storage, such asprovisioning and cloning storage and optimizing and migrating virtual machines.
Authentication and user management with vCenter RBAC and Data ONTAP RBAC | 67

1. Discovery
The Discovery role enables you to add storage systems.
2. Create Clones
This role enables you to clone virtual machines. It also includes all of the privileges associatedwith the Discovery roles.
3. Create Storage
This role enables you to create storage. It also includes all of the privileges associated with theprevious two roles.
4. Modify Storage
This role enables you to modify storage. It also includes all of the privileges associated with theprevious three roles.
5. Destroy Storage
This role enables you to destroy storage. It also includes all of the privileges associated with all ofthe above roles.
If you use VSC only to perform backups, then the following Data ONTAP roles are recommended:
1. Discovery
The Discovery role enables you to add storage systems.
2. Backup-Recover
This role enables you to back up information on storage systems that you can recover later. It alsoincludes all of the privileges associated with the Discovery role.
If you are using VASA Provider for clustered Data ONTAP, you should also set up a PBM (policy-based management) role. That role will allow you to manage storage using storage policies. This rolerequires that you also set up the Discovery role.
Each Data ONTAP role that you create can have one user name associated with it. You must log in tothe storage system using the appropriate user name/password pair if you want to perform those role-based tasks on the storage system.
To create new users, you must log in as an administrator on storage systems running clustered DataONTAP or root on storage systems running Data ONTAP operating in 7-Mode.
Details about the privileges needed for these roles are included in Virtual Storage Console forVMware vSphere Advanced RBAC Configuration Guide.
How to configure Data ONTAP role-based access control forVSC for VMware vSphere
You must configure Data ONTAP role-based access control (RBAC) on the storage system if youwant to use it with Virtual Storage Console for VMware vSphere.
From within Data ONTAP, you must perform the following tasks:
• Create the roles.
Note: You can use the "RBAC User Creator for Data ONTAP Tool" to create these roles.
NetApp Community Document: RBAC User Creator for Data ONTAP
• Create a user name and password login (the storage system credentials) in Data ONTAP for eachrole.
You need these storage system credentials to configure the storage systems for VSC. You do thisby entering the credentials in VSC. Each time you log in to a storage system using these
68 | VSC 6.2.1 for VMware vSphere Installation and Administration Guide

credentials, you are presented with the set of VSC functions that you set up in Data ONTAP whenyou created the credentials.
VSC performs a preliminary privilege validation for Data ONTAP RBAC when you log in. VSC doesnot perform the upfront validation if the storage system is directly connected to a Storage VirtualMachine (SVM, formerly known as Vserver) or a vFiler unit. Instead, VSC checks and enforces theprivileges later in the task workflow.
You can use the administrator or root login to access all the VSC tasks; however, it is a good practiceto use the RBAC feature provided by Data ONTAP to create one or more custom accounts withlimited access privileges.
Authentication and user management with vCenter RBAC and Data ONTAP RBAC | 69

Requirements for performing tasks in VSC forVMware vSphere
A few requirements impact many of the tasks that you can perform in Virtual Storage Console forVMware vSphere. You should understand requirements for privileges, running simultaneous tasks,and provisioning and cloning operations.
• Unless you log in as administrator, you must have the appropriate RBAC privileges correctlyassigned to complete tasks.
• VSC must not be performing another operation on the target virtual machine or datastore that canhave a negative impact on the currently executing operation.
If VSC is performing a task on the target virtual machine or datastore, other tasks are temporarilyunavailable.
• (NFS only) Before performing provisioning or cloning operations, you should have enabled theNFS Plug-in for VMware VAAI.
While not required, installing the plug-in is a best practice because it reduces load from the hostand places it on the storage system, which increases cloning efficiency.
Related concepts
Authentication and user management with vCenter RBAC and Data ONTAP RBAC on page 57
Protection of system resources using lock management on page 15
How VSC for VMware features work with optional plug-ins, virtual appliances on page 12
NetApp NFS Plug-in for VAAI installation on page 33
70

Navigating VSC for VMware vSphere
Virtual Storage Console for VMware vSphere integrates smoothly into the VMware vSphere WebClient and vCenter Server.
To help you distinguish between the VSC features and the vSphere Web Client features, the NetAppblue "N" icon appears in the screens and portlets associated with NetApp features.
You can access VSC tasks from both the vCenter and the Virtual Storage Console portions of thevSphere Web Client. Many of the Actions menus includes a NetApp VSC menu.
The Actions menu displays the VSC tasks available based on the object you are interacting with inthe vSphere Web Client. For example, if you right-click on a vSphere cluster, the NetApp VSC menudisplays an option to Provision Datastore.
You can initiate a task by doing any of the following:
• Right-clicking the object to display the Actions menu.
• Selecting the Actions menu from the menu bar.
• Clicking the icon in the menu bar on that page that is associated with the task you want toperform.
You can access data, such as datastores or virtual machines, either by using the navigation panel onthe left side of the screen or by clicking an icon. For example, if you want to clone virtual machines,you can either click the VMs and Templates icon on the vSphere Web Client Home page or you canselect vCenter > VMs and Templates. Both actions take you to the same place.
Many VSC pages provide a filter option. You can use the drop-down list in this option to organize thedisplay to show only the columns with which you want to work. You can also use a text string tofilter information. VSC performs a search based on the string and displays the results in a newwindow. For example, if you enter aa in the filter box and there is a datastore named "AA_tester,"then VSC displays information on that datastore. To return to your previous window, which lists allthe datastores, clear the information in the filter box and press Enter.
If you are new to the vSphere Web Client, here are some tips for navigating through it:
• The Home icon takes you back to the Home view.
• The vCenter icon takes you to the vCenter.
• You can use the back arrow in the navigation pane to return to your previous location.
• The Recent Tasks pane on the right side of the screen lets you monitor the progress of a task thatis under way.
• The Work In Progress pane shows you tasks that have been started and paused. To resume apaused task, click its name.
• The Alarms pane lists the Alarms that have occurred.
71

Working with storage systems
Virtual Storage Console for VMware vSphere provides tools you can use to work with storagesystems.
Using VSC, you perform tasks such as the following:
• Have VSC automatically discover storage systems
• Manually add and remove storage systems
• Set up default credentials for VSC to use when it adds storage systems
• Modify the credentials associated with a storage system
• Use VSC's interface to get a quick view of the storage system details
Storage system discovery and credentials overviewVirtual Storage Console for VMware vSphere provides a single mechanism to discover storagesystems and to set the storage credentials. The credentials provide the necessary Data ONTAPpermissions to enable VSC users to perform tasks using the storage systems.
Before VSC can display and manage storage resources, it must discover the storage systems. As partof the discovery process, you must supply Data ONTAP credentials for your storage systems. Theseare the privileges (or roles) that are associated with the user name and password pair that is assignedto each storage system. These user name and password pairs use Data ONTAP role-based accesscontrol (RBAC) and must be set up from within Data ONTAP. You cannot change their credentialsfrom within VSC. You can, however, define Data ONTAP RBAC roles by using a tool such as“RBAC User Creator for Data ONTAP”.You cannot change their credentials from within VSC.
Note: If you log in as an administrator, you automatically have all privileges for that storagesystem.
When you add a storage system to VSC, you must supply an IP address for the storage system andthe user name and password pair that is associated with that system. You can either set up defaultcredentials that VSC will use during its storage system discovery process, or you can manually entercredentials when the storage system is discovered.
Note: If you have vFiler units on storage systems running Data ONTAP 8.x software, you must setthe httpd.admin.enable option for the vFiler unit to enable discovery.
If your environment includes multiple vCenter Servers, when you add a storage system to VSC fromthe Storage Systems page, the Add Storage System dialog box displays a vCenter Server boxwhere you can specify which vCenter Server the storage system is to be added to. If you add astorage system by right-clicking a datacenter name, you do not have the option to specify a vCenterServer because the server is already associated with that datacenter.
Discovery happens in one of the following ways. In each case, you must supply credentials for anynewly discovered storage system.
• When the VSC Windows service starts, VSC begins its automatic background discovery process.
• You click the Update All icon or select it from the Actions menu (Actions > Netapp VSC >Update All).
Note: IPv6 addresses are not supported.
72

All of the VSC features require specific permissions to perform tasks. You can limit what users cando based on the credentials associated with the Data ONTAP role. All users with the same storagesystem user name and password pair share the same set of storage system credentials and canperform the same operations.
Default credentials simplify administrating storage systems
You can use Virtual Storage Console for VMware vSphere to set default credentials for storagesystems, hosts, and virtual machines. Setting default credentials that are valid for the storage systemmeans that you do not need to manually enter credentials each time VSC adds a storage system.
For example, when VSC discovers a new storage system, it attempts to log in using the defaultcredentials. If the login fails, the storage system status is set to Authentication Failure, and you mustenter credentials manually.
You can set the default credentials by clicking Configuration > Set Default Credentials from theVirtual Storage Console Home page. VSC displays a pop-up box with tabs to let you set credentialsfor the different objects.
If you change the default credentials and select Update All, VSC uses the new credentials andattempts to log in to any storage system that has a status of either "Authentication Failure" or "TLS isnot configured".
Specifying default credentials
You can use Virtual Storage Console for VMware vSphere to create default credentials for a storagesystem, host, and virtual machine.
Before you begin
You must have selected the vCenter Server that you want to use for this task.
About this task
When you set up default credentials, VSC uses them to attempt to log in to a storage system it hasjust discovered.
If the default credentials do not work, you must manually log in.
Steps
1. From the Virtual Storage Console Home page, click Configuration > Set Default Credentials.
Working with storage systems | 73

2. In the Set Default Credentials pop-up box, enter the credentials for the storage system.
Storage system field Explanation
User name/password Storage controller credentials are assigned in Data ONTAP based onthe user name/password pair. This can be the root account or acustom account that uses role-based access control (RBAC).
You cannot use VSC to change the roles associated with that username/password pair. To do that, you must use a tool such as "RBACUser Creator for Data ONTAP."
Use TLS Select this box to enable Transport Layer Security (TLS).
74 | VSC 6.2.1 for VMware vSphere Installation and Administration Guide

Storage system field Explanation
Port The default management port number is 443 if the TLS box isselected and 80 if it is not selected.
These are the Data ONTAP defaults. If you toggle the TLS checkbox, the port number switches between 443 and 80. You can specifya different port number. If you do that, then toggling the TLS checkbox only changes the TLS state in the dialog box.
3. After you enter the information, click OK.
After you finish
If you updated the storage system credentials because a storage system reported AuthenticationFailure Status, select Update Hosts and Storage Systems, which is available from the Actions >NetApp VSC menu. When you do this, VSC tries to connect to the storage system using the newcredentials.
Related tasks
Discovering storage systems and hosts on page 76
Tunneled vFiler units and SVMs discovered automatically
Virtual Storage Console for VMware vSphere automatically supports vFiler and Storage VirtualMachine (SVM, formerly known as Vserver) tunneling for the storage systems. You do not need tomanually add these vFiler units and SVMs.
When you enter information for a cluster administrative LIF or vfiler0, VSC discovers all thesubordinate vFiler units and SVMs.
If you are using VSC's backup and restore features, there are certain environments where thesefeatures can only access the physical storage system, not the vFiler unit, for communication on astorage network. You need to have vFiler tunneling enabled in order to use the backup and restorefeatures to create Snapshot copies.
Enabling discovery and management of vFiler units
If you are using Data ONTAP 8, you must set the httpd.admin.enable option for vFiler units inorder to enable discovery and management with the Virtual Storage Console for VMware vSphere.
About this task
You do not need to perform this task if your vFiler units were created with Data ONTAP 7.x.
Steps
1. From the storage system, enter the following command to switch to a particular vFiler context:
vfiler context vfiler_name
2. Enter the following command in the vFiler context to set the required option that enablesdiscovery in VSC:
options httpd.admin.enable on
3. Repeat these steps for each vFiler unit you want to manage using VSC.
Working with storage systems | 75

Enabling discovery of vFiler units on private networks
If vFiler units are isolated in private networks to which Virtual Storage Console for VMware vSpherehas no network connectivity, you must manually add the vFiler units to VSC.
Before you begin
The VSC server must have network connectivity to the parent of the vFiler unit.
Steps
1. Add a storage system:
If you are staring from... Then do this...
The Virtual Storage ConsoleHome page
a. Click Storage System.
b. Click the Add icon.
The VMware vSphere WebClient Home page
a. Click the Storage icon.
b. Select a datacenter.
c. Click Actions > NetApp VSC > Add Storage System.
2. In the Add Storage System dialog box, enter the management IP address and credentials for thevFiler unit, and then click OK.
When you add storage from the VSC Storage System page, you must also specify the vCenterServer where the storage will be located. The Add Storage System dialog box provides a drop-down list of the available vCenter Servers. VSC does not display this option if you are addingstorage to a datacenter that is already associated with a vCenter Server.
Result
VSC discovers all of the vFiler units that belong to the parent vFiler unit that provides storage toESX hosts.
Discovering storage systems and hosts
When you first run Virtual Storage Console for VMware vSphere in a VMware vSphere Web Client,it discovers ESX and ESXi hosts, their LUNs and NFS exports, and the NetApp storage systems thatown those LUNs and exports. You must then provide the storage system credentials.
About this task
You can discover new storage systems or update information on them to get the latest capacity andconfiguration information at any time. You can also modify the credential that VSC uses to log intothe storage system.
The discovery process also collects information from the ESX and ESXi hosts managed by thevCenter Server. You must ensure that all ESX and ESXi hosts are shown as powered on andconnected.
Steps
1. From the vSphere Web Client Home page, select vCenter.
2. Right-click a datacenter, and select Actions > NetApp VSC > Update Host and Storage Data.
76 | VSC 6.2.1 for VMware vSphere Installation and Administration Guide

VSC displays a Confirm dialog box that warns you that this operation can take a long time.
3. Click OK.
4. Right-click any discovered storage controllers that have the status Authentication Failure, andselect Modify.
5. Fill in the information in the Modify Storage System dialog box.
After you finish
After discovery is complete, use VSC to configure ESX or ESXi host settings for any hostsdisplaying an Alert icon in the Adapter Settings, MPIO Settings, or NFS Settings columns.
Manually adding storage systems
Each time you start the VSC Windows service or select Update All, Virtual Storage Console forVMware vSphere automatically discovers the available storage systems. You can also manually addstorage systems to VSC.
About this task
If you have a large number of storage systems, manually adding a new one might be faster than usingUpdate All to discover it.
If you have a MetroCluster configuration for clustered Data ONTAP, you must make sure that theVSC has access to the storage system controllers on both the primary and secondary sites. You canmanually add the storage systems if VSC has not automatically discovered them.
Working with storage systems | 77
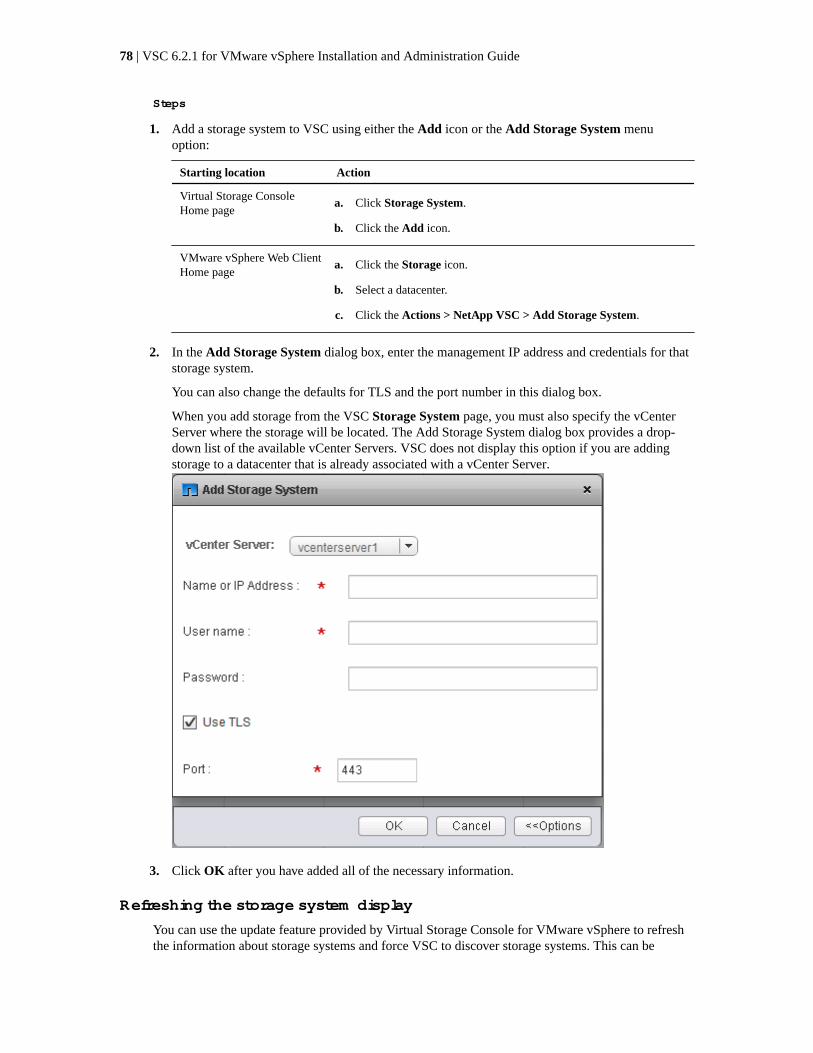
Steps
1. Add a storage system to VSC using either the Add icon or the Add Storage System menuoption:
Starting location Action
Virtual Storage ConsoleHome page
a. Click Storage System.
b. Click the Add icon.
VMware vSphere Web ClientHome page
a. Click the Storage icon.
b. Select a datacenter.
c. Click the Actions > NetApp VSC > Add Storage System.
2. In the Add Storage System dialog box, enter the management IP address and credentials for thatstorage system.
You can also change the defaults for TLS and the port number in this dialog box.
When you add storage from the VSC Storage System page, you must also specify the vCenterServer where the storage will be located. The Add Storage System dialog box provides a drop-down list of the available vCenter Servers. VSC does not display this option if you are addingstorage to a datacenter that is already associated with a vCenter Server.
3. Click OK after you have added all of the necessary information.
Refreshing the storage system display
You can use the update feature provided by Virtual Storage Console for VMware vSphere to refreshthe information about storage systems and force VSC to discover storage systems. This can be
78 | VSC 6.2.1 for VMware vSphere Installation and Administration Guide

especially useful if you changed the default credentials for the storage systems after receiving anauthentication error.
About this task
You should always perform an update operation if you changed the storage system credentials after astorage system reported an Authentication Failure Status. During the update operation, VSC tries toconnect to the storage system using the new credentials.
Depending on your system setup, this task can take a long time to complete.
Steps
1. Go to the Storage page by clicking Storage from either the navigation pane of the VirtualStorage Console Storage page or the icon on the VMware vSphere Web Client Home page.
2. Start the update:
Location Click ...
Virtual Storage Console The Update All icon.
vCenter Actions > NetApp VSC > Update Host and Storage Data
3. Click OK at the Confirm dialog box.
4. Click OK at the Success Message dialog box.
This operation works in the background.
Removing storage systems from VSC
You can remove a skipped or unmanaged storage system that is not attached to a host. When youremove a storage system, it no longer appears in the Virtual Storage Console for VMware vSpheredisplay.
About this task
If a storage system has storage mapped to an ESX or ESXi host managed by VSC and you attempt toremove that storage system, VSC displays an error message and does not remove the storage system.You can only remove storage systems that are not attached to hosts.
Step
1. You can remove a storage system by clicking Storage from either the VSC Home page or theVMware vSphere Web Client Home page.
Starting location Action
Virtual Storage ConsoleHome page
a. Click Storage
b. Right-click a storage system and select Actions > NetApp VSC >Delete
VMware vSphere Web ClientHome page
a. Click the Storage icon
b. Right-click a datastore and select Actions > NetApp VSC > Destroy
The action VSC takes depends on whether the storage system is attached to a host:
Working with storage systems | 79

If the storage systemis ...
VSC...
Not attached to host Removes the storage system
Attached to a host Displays an error message and does not change the storage system
Correcting storage system names displayed as “unknown”If Virtual Storage Console for VMware vSphere displays a storage system name as "unknown", youcan modify the credentials and add the management IP address of the storage system in the ModifyStorage System pop-up box.
About this task
An “unknown” name can occur if an NFS datastore is mounted over a private network.
If you are running clustered Data ONTAP and working with NFS datastores that are mounted usingan NFS data LIF, this issue can occur with either a private network or a public network.
Steps
1. From the Virtual Storage Console Home page, click Storage Systems.
2. Right-click the “unknown” storage system, and then select Modify Storage System.
3. Enter the management IP address of the storage system and the storage system credentials in theModify storage system -unknown- pop-up box.
VSC must have network connectivity to the management port that you specify.
Managing settings for volumesYou can specify advanced settings that apply when you provision new volumes on the storagesystem. These settings are related to features such as enabling thin provisioning and deleting avolume when the last LUN that is contained in it is deleted.
Steps
1. From the Virtual Storage Console Home page, click Storage Systems.
80 | VSC 6.2.1 for VMware vSphere Installation and Administration Guide

2. Right-click the storage system that you want to modify, and select Modify from the Actionsmenu.
3. In the Modify Storage System dialog box, click the Provisioning Options tab.
4. If the storage system properties have been locked to prevent changes, click Enable Editing. Inthe resulting dialog box, enter the user name and password for that storage system. VirtualStorage Console for VMware vSphere will not let you change the settings until you enter thisinformation.
5. After you have enabled editing, select the boxes next to the advanced options, and modify theFlexVol volume efficiency settings to match the settings on the LUN that is being deployed.
Note: If a thin-provisioned LUN is deployed into a FlexVol volume with the volume autogrowor snapshot autodelete option is disabled, it is possible to over-commit the LUN to the volume.This creates an out-of-space condition.
Option Description
Create a new volume for a new LUN Creates a FlexVol volume with the same nameas the LUN. If a volume with that namealready exists, VSC appends a number to thevolume name.
For example: Volname01
Reserve space for volumes that contain thin-provisioned LUNs
Results in having a thin LUN in a thickvolume when a thin LUN is chosen.
Thin provision volume clones Sets the space reservation policy to thinprovisioning for clones that are created fromthis volume.
Delete a volume if the last LUN in it has beendeleted
Destroys the volume when the last LUN on itis deleted.
Buffer space between a volume and a LUN(GB)
Specifies the amount of additional capacity ina volume that contains a LUN-baseddatastore.
6. Click OK when you finish.
MultiStore vFiler units are displayed differentlyVirtual Storage Console for VMware vSphere displays vFiler units differently than physical storagecontrollers.
When you have a vFiler unit created with the optional MultiStore feature of Data ONTAP software,VSC displays the following information:
• The hostname displays a "MultiStore" prefix to identify vFiler units.
• The Supported Protocols column reports the storage protocols actually in use by ESX and ESXihosts instead of the protocols licensed for the storage controller.
Working with storage systems | 81

• The Alert icon in the Status column means that the vFiler unit does not respond to VSC. TheNormal icon means that VSC is able to communicate with the vFiler unit.
• No detailed status is returned for vFiler units. The Status Reason column displays Thiscontroller is a MultiStore vFiler unit. You can connect to the physical controllerthat owns the vFiler unit to get more status information.
• No aggregate information is displayed for vFiler units.Direct vFiler units and direct Storage Virtual Machines (SVMs) do not have aggregates to display.
VSC for VMware vSphere behaves differently if SVMsconnect directly or use cluster management LIFs
Virtual Storage Console for VMware vSphere supports connecting a storage system directly to eithera Storage Virtual Machine (SVM) or to a cluster management LIF. When the storage connectsdirectly to an SVM, not all of the VSC features are supported. To use all of the features, you mustconnect the storage to a cluster management LIF.
In addition, if you have a VSC environment that supports SnapCenter, you must use the VSC GUI toadd the SVMs to VSC as clusters. Otherwise, you will not be able to use all the VSC features.
Note: SnapCenter only performs backups on SVMs, and it requires that the SVMs use directconnections. Using the SnapCenter GUI to add the SVMs as direct connections and the VSC GUIto add the same SVMs as clusters enables you to work around this issue.
VSC supports the following features when the storage system connects to a cluster management LIF.However, VSC does not support these features when the storage system connects directly to an SVM:
• Upfront validation of Role-Based Access Control (RBAC)Although RBAC is fully supported, VSC does not perform the initial privilege validation onstorage that is directly connected to an SVM.
• NFS path checkingWhen you are using clustered Data ONTAP and a cluster management LIF, VSC can query thestorage system to determine whether that storage system is using a direct or indirect path. VSCthen reports this information and supplies information that you can use to set up a direct path.Better performance is typically seen when direct paths are used. If a storage system connectsdirectly to an SVM, VSC cannot query the storage system to determine the path.
• Reports on space that is shared by volumes using data deduplicationVSC cannot check the space shared by volumes that have data deduplication enabled when thestorage system is directly attached to an SVM.
• Load-sharing mirrors updatesVSC cannot update the mirror if you use load-sharing mirrors for the SVM root volume.
• EMS loggingVSC cannot perform EMS logging when the storage system is directly attached to an SVM.
Direct path access and NFS datastoresWhen you are running clustered Data ONTAP, it is possible for a client to access a data LIF with anindirect data path to a FlexVol. Indirect data paths can negatively affect I/O performance and shouldbe corrected. Virtual Storage Console for VMware vSphere provides tools to scan for direct andindirect NFS paths and provide you with the information you need to manually correct paths.
An indirect path can occur when a data LIF is bound to a different physical node than the one thatowns the exported FlexVol. The NFS virtual client does not have the path selection intelligence that is
82 | VSC 6.2.1 for VMware vSphere Installation and Administration Guide
native to physical clients. In order to have a direct data path, the client must access a data LIF that islocal to the node that owns the exported FlexVol.
VSC monitors which LIFs NFS is using to access the volume. You can see whether a LIF uses adirect data path or an indirect data path by clicking the NAS tab in the Related Objects page for astorage system and viewing the Data Path Access column. This column displays the path setting asDirect (green check), Indirect (red exclamation point (!)), N/A, or (unknown).
If the path setting is indirect, you can right-click that row and select the View Direct Data PathChoices option. This option displays the Direct Data Path Choices pop-up, which contains a list ofports using direct paths to access data.
Note: VSC does not check these ports to ensure that they are connected to the network. You mustdo that manually.
Anytime the data path access changes, either to direct from indirect or to indirect from direct, VSCwrites the path information to a log file.
If a direct Storage Virtual Machine (SVM) connection is made, VSC cannot query the storagecontroller to determine the path.
An N/A (not applicable) entry indicates a path to a storage controller running Data ONTAP operatingin 7-Mode, so there is no issue about whether the path is direct.
An unknown path occurs if the discovery data is incomplete.
Changing NFS data paths to direct access
If you have a cluster node that is accessing a data LIF with an indirect data path, you can change thepath to one that is direct. Virtual Storage Console for VMware vSphere provides information aboutthe paths; however, the task of moving the path must be performed by a storage administrator usingeither the storage system console or a NetApp tool such as System Manager.
Before you begin
Only a storage administrator should change the path.
About this task
The need to change paths only occurs when your clustered Data ONTAP configuration has an NFSdatastore using a remote data LIF that is bound to a different physical node than the one that owns theexported FlexVol.
Steps
1. From the Virtual Storage Console Home page, click Storage > <storage system name> >Related Objects > NAS.
2. Right-click a row that has an indirect data path (shown as Indirect) and select the View DirectData Path Choices option.
This option displays the Direct Data Path Choices pop-up, which contains a list of ports to datapaths providing direct access. You cannot use this window to change the path, but you can use itto get information about the available ports.
3. Manually check to make sure the port you want to use is connected to the network.
VSC displays the ports without checking their network connectivity. If you try to use a port that isnot connected to the network, your datastore will go offline.
4. After you have confirmed that the path you want to use is connected to the network, collect theinformation displayed in the Direct Data Path Choices pop-up and give it to a storageadministrator.
Working with storage systems | 83

The Direct Data Path Choices pop-up contains all the information a storage administrator needsto move the LIF.
To create a data path with direct access, you must have the correct credentials.
Note: If multiple datastores are using that LIF, moving the LIF will cause the other datastoresto have data paths with indirect data access.
5. Use either the storage system console or a NetApp tool such as System Manager to change thepath.
Note: Whenever the path value changes, VSC writes the information to a log file.
84 | VSC 6.2.1 for VMware vSphere Installation and Administration Guide

Deploying virtual machines on NetApp storage
You can use Virtual Storage Console for VMware vSphere to deploy virtual machines byprovisioning datastores and then rapidly cloning the virtual machines from a template into theprovisioned datastores.
The following workflow shows how you can provision datastores using the Datastore Provisioningwizard before using the Create Rapid Clones wizard to clone virtual machines. This workflow isbeneficial because the Datastore Provisioning wizard allows you to specify a storage capabilityprofile, which ensures that consistent Service Level Objectives (SLOs) are maintained and simplifiesthe provisioning process, if you use VASA Provider for clustered Data ONTAP.
Provisioning datastoresProvisioning a datastore creates a logical container for your virtual machines and their VMDKs. Youcan provision a datastore and attach it to a single host, to the hosts in a cluster, or to the hosts in adatacenter by using the Datastore Provisioning wizard.
Before you begin
• To provision NFS datastores to vFiler units, you must have added the default vFiler unit (vFiler0)to Virtual Storage Console for VMware vSphere.
• To provision a datastore to a Storage Virtual Machine (SVM, formerly known as Vserver) that isdirectly connected to VSC, you must have added the SVM to VSC using a user account that hasthe appropriate privileges, not the default vsadmin user account or vsadmin role.
85

• If you use NFS or iSCSI and the subnet is different between your ESX hosts and your storagesystem, NFS or iSCSI settings in the VSC preferences file must include the ESX host subnetmasks.
For more information, see Enabling datastore mounting across different subnets on page 55.
About this task
VSC enables you to provision datastores from wizards other than the Datastore Provisioning wizard(for example, from the Create Rapid Clones wizard). Using the Datastore Provisioning wizard,though, is beneficial because it allows you to specify a storage capability profile, which ensuresconsistent Service Level Objectives (SLOs) and simplifies the provisioning process.
VSC creates a datastore on an NFS volume or a LUN. The following happens when you provision adatastore:
• For an NFS datastore, VSC creates an NFS volume on the storage system and updates exportpolicies.
• For a VMFS datastore, VSC creates a new volume (or uses an existing volume, if you selectedthat option), and creates a LUN and an igroup.
Steps
1. From the vSphere Web Client Home page, click Hosts and Clusters.
2. In the navigation pane, expand the datacenter where you want to provision the datastore.
3. Specify the hosts to which you want to mount the datastore:
To make the datastoreavailable to...
Do this...
All hosts in a datacenter Right-click the datacenter and select NetApp VSC > ProvisionDatastore.
All hosts in a cluster Right-click a cluster and select NetApp VSC > Provision Datastore.
A single host Right-click a host and select NetApp VSC > Provision Datastore.
4. Complete the pages in the Datastore Provisioning wizard to create the datastore.
86 | VSC 6.2.1 for VMware vSphere Installation and Administration Guide

a. In the Name and type page, specify a datastore name, datastore type, and select a storagecapability profile, if desired.
You can specify an existing storage capability profile that the wizard will use when definingthe type of storage that you need for your virtual machines. The storage capability profiledetermines the following storage features: availability, disaster recovery, performance,protocol, and space efficiency. Storage capability profiles are available only if you installedand registered the VASA Provider for clustered Data ONTAP. You can select a default storagecapability profile, which ships with the VASA Provider, a profile that you created, or a profilethat was auto-generated. To provision a datastore without a storage capability profile, selectNone.
b. In the Storage system page, specify the storage system that you want to use for the datastore.
Note: When connecting directly to an SVM, the provisioning operation might begin, butlater fail due to insufficient privileges for the SVM user. SVM privileges are not visible toVSC prior to the operation. If the operation fails, you need to modify the privileges for thatSVM user. You can check VSC logs for messages that identify the failed command. Analternative is to use the "RBAC User Creator for Data ONTAP" tool.
c. In the Details page, specify details about the datastore that you want to create.
Most of the fields on this page are self-explanatory. The following table describes fields forwhich you might need guidance:
Field Description
Thinprovision
Allocates space on the volume when data is written, which allows you toprovision more storage than is currently available. If disabled, space isreserved immediately.
You must closely monitor the available space in the containing aggregatebecause thin provisioning can oversubscribe the available space. In an NFSconfiguration, you can enable auto grow to automatically expand the datastorewhen space is needed. Make sure that the value you specify for auto grow islarger than the size of the datastore.
Aggregate Defines the aggregate on which you want to create a new volume. If youselected an SVM that is directly connected to VSC, striped aggregates appearas available; however, they are not supported. Provisioning to a stripedaggregate will fail.
Volume Specifies the volume on which you want to create the datastore. For clusteredData ONTAP, you should not create a datastore in the Storage Virtual Machine(SVM) root volume.
Autogrow
(NFS only) Automatically expands the datastore by the specified incrementwhen space is needed, up to the size limit. This size limit you specify must belarger than the existing datastore.
Datastorecluster
Adds the datastore to a cluster if the Storage Distributed Resource Scheduler(SDRS) feature is enabled on the vCenter Server. Do not mix datastores withvarying offsets in the same cluster and do not mix optimized and non-optimized datastores.
d. In the Ready to complete page, review the summary of your selections and click Finish.
Result
VSC creates the datastore.
Deploying virtual machines on NetApp storage | 87

After you finish
Add virtual machines to the datastore.
Related concepts
Storage system discovery and credentials overview on page 72
How to configure Data ONTAP role-based access control for VSC for VMware vSphere on page68
Cloning virtual machines from a templateSetting up virtual machines can be a lengthy process. If you need to deploy multiple identical virtualmachines, you can save time by setting up a single virtual machine as the template and then rapidlycloning virtual machines from that template.
Before you begin
• You should have created a virtual machine template using VMware vSphere.
• You should have installed the NFS Plug-in for VMware VAAI.While not required, installing the plug-in is a best practice because it reduces load from the hostand places it on the storage system, which increases cloning efficiency.
About this task
Cloning performance is affected by many factors, including the vCenter Server hardwareconfiguration, the number and hardware configuration of the ESX/ESXi hosts, and the current loadon the vCenter Server and the hosts.
Performance can degrade if you request a large number of clones in a single operation. If you need tocreate a large number of clones, consider whether you should perform two cloning operations insteadof one. For example, instead of requesting 2,000 clones in each operation, you might perform twooperations that each request 1,000 clones each.
Steps
1. Power down the virtual machine template.
Powering down the virtual machine is recommended because it enables VSC to check the virtualmachine's alignment and perform the cloning process faster. Checking the alignment is importantbecause you should not clone a functionally aligned or misaligned virtual machine. Doing so canresult in misaligned clones.
For more information about functionally aligned and misaligned virtual machines, see OptimizingI/O performance with online alignment and migration of virtual machines on page 101.
2. From the vSphere Web Client Home page, click VMs and Templates.
88 | VSC 6.2.1 for VMware vSphere Installation and Administration Guide

3. In the navigation pane, expand the datacenter that contains the virtual machine template.
4. Right-click the virtual machine template and select NetApp VSC > Create Rapid Clones.
If VSC warns you that the virtual machine is misaligned or functionally aligned, take the virtualmachine offline and use a tool like VMware vCenter Converter to fix the VMDK alignmentbefore you proceed.
Note: If you do not fix the alignment of a functionally aligned virtual machine, the clones canbe misaligned if the destination datastores are not optimized for the VMDK layout of theclones.
5. Complete the pages in the Create Rapid Clones wizard to clone the virtual machines.
a. In the Clone destination page, select a destination for the clones (a host, host cluster, ordatacenter) and a folder to hold the clones (the default is no folder).
If you choose a cluster or datacenter, VSC spreads the virtual machines evenly across thehosts.
b. In the Clone folder page, select a folder for the clones.
Tip: You can create folders on the VMs and Templates page using vCenter actions.
Note: This page appears if you chose the Select a folder option in the Clone destinationpage.
c. In the Disk format page, select a disk format for the clones.
If you choose the thin provisioned format or the thick format, the wizard warns you that avSphere clone operation might be required, which can take longer.
d. In the Virtual machine details page, specify details about the virtual machine clones.
Most of the fields on this page are self-explanatory. The following table describes fields forwhich you might need guidance:
Field Description
Number ofvirtualprocessors
Specifies the number of virtual CPUs for the virtual machines.
Upgradehardwareversion?
Upgrades the hardware version of the virtual machine clone if thedestination host supports a later version.
Connectionbroker version
Automatically imports clone data into a VMware View Server or createsa .csv file that you can import into Citrix XenDesktop.
Deploying virtual machines on NetApp storage | 89

Field Description
Customizationspecification
Applies a VMware specification to the new virtual machines. Refer toyour VMware documentation for information about customizationspecifications.
Staggerpowering on thevirtual machines
Staggers the start up of virtual machines to avoid overwhelming yoursystem. You should select this option if you have a large number ofvirtual machines. The number of virtual machines to start per minutedepends on your system environment.
Note: If a problem prevents VSC from starting some of the virtualmachines, the delay could result in VSC powering on a large numberof virtual machines at once. For example, if you specify 10 virtualmachines per minute and the start is delayed by five minutes, VSCstarts 50 virtual machines at once. After the delay, VSC starts thespecified number of virtual machines per minute.
e. In the Storage system details page, select the storage system where you want to provision theclones.
f. In the Datastore options page, choose basic mode or advanced mode to specify the datastoreoptions.
The advanced mode is a good choice if you want to distribute configuration files and VMDKfiles across multiple datastores.
g. In the Datastore details page, select existing datastores or create new datastores for theclones.
Most of the fields on this page are self-explanatory. The following table describes fields forwhich you might need guidance when you create new datastores:
Field Description
Number ofdatastores
Specifies the number of datastores to create for the clones. Themaximum is 256. The number of clones must be evenly divisible by thenumber of datastores.
Thin provision Allocates space on the volume when data is written, which allows you toprovision more storage than is currently available. If disabled, space isreserved immediately.
You must closely monitor the available space in the containing aggregatebecause thin provisioning can oversubscribe the available space. In anNFS configuration, you can enable auto grow to automatically expandthe datastore when space is needed. Make sure that the value you specifyfor auto grow is larger than the size of the datastore.
Size (GB) Specifies the size per datastore.
Aggregate Defines the aggregate on which you want to create a new volume. If youselected an SVM that is directly connected to VSC, striped aggregatesappear as available; however, they are not supported. Provisioning to astriped aggregate will fail.
Volume Specifies the volume on which you want to create the datastore. Forclustered Data ONTAP, you should not create a datastore in the StorageVirtual Machine (SVM) root volume.
Auto grow (NFS only) Automatically expands the datastore by the specifiedincrement when space is needed, up to the size limit. This size limit youspecify must be larger than the existing datastore.
90 | VSC 6.2.1 for VMware vSphere Installation and Administration Guide

Field Description
Datastore cluster Adds the datastore to a cluster if the Storage Distributed ResourceScheduler (SDRS) feature is enabled on the vCenter Server. Do not mixdatastores with varying offsets in the same cluster and do not mixoptimized and non-optimized datastores.
h. In the Connection broker page, specify the VMware view or Citrix XenDesktop connectionbroker to which you want to import clone data.
If your connection broker does not appear, you must first add it by going to Virtual StorageConsole > Configuration > Connection Brokers.
Note: This page appears if you chose a connection broker version in the Virtual machinedetails page.
i. In the Ready to complete page, Review the summary of your selections and click Finish.
Result
VSC creates the virtual machine clones and creates a .csv file that includes details about the cloningprocess. The file, named import_generic_timestamp.csv, is created here: VSC_install_dir\etc\kamino\exports
If you chose a VMware View connection broker, VSC automatically imports clone data into theVMware View Server.
If you chose a XenDesktop connection broker, VSC creates a .csv file that you can use to importinto XenDesktop. The file, named xenDesktop_timestamp.csv, is created here:VSC_install_dir\etc\kamino\exports
After you finish
If you chose a XenDesktop connection broker, use the .csv file with the Citrix Access ManagementConsole (XenDesktop 4) to create a new desktop group or with Desktop Studio (XenDesktop 5) tocreate or modify an existing catalog.
Related concepts
How VSC for VMware features work with optional plug-ins, virtual appliances on page 12
NetApp NFS Plug-in for VAAI installation on page 33
Increasing storage efficiency by enabling deduplicationDeduplication is a Data ONTAP feature that reduces physical storage space by eliminating duplicatedata within a volume. Deduplication enables virtual machines to share the same common data in adatastore, similar to how they share system memory. You should enable deduplication if it is notenabled.
About this task
When Virtual Storage Console for VMware vSphere creates a new volume for a datastore, it enablesdeduplication by default. If you created the volume through Data ONTAP or OnCommand SystemManager, deduplication is not enabled by default. Enabling deduplication is a best practice.
For more information about deduplication, refer to the Storage Management Guide for your versionof Data ONTAP.
Deploying virtual machines on NetApp storage | 91

Steps
1. From the vSphere Web Client Home page, click Storage.
2. In the navigation pane, expand the datacenter that contains the datastore.
3. Select the datastore.
4. Click the Summary tab if it does not automatically display.
5. In the Deduplication Details pane, view the State field to determine whether deduplication isenabled or disabled.
6. If deduplication is disabled, at the bottom of the Deduplication Details pane, click Enable.
VSC enables deduplication on the volume. Deduplication runs daily at midnight.
7. Optional: To start deduplication immediately, click Start.
After you finish
You can view the Volume Space Saving field to identify the percentage and amount of storage thatdeduplication saved and the Volume Space Shared field to identify the amount of shared data.
92 | VSC 6.2.1 for VMware vSphere Installation and Administration Guide

Maintaining your VMware environment
You can use Virtual Storage Console for VMware vSphere to maintain your VMware environment bymigrating virtual machines, redeploying virtual machines, reclaiming space from virtual machines,and managing datastores by mounting, resizing, and destroying them.
Migrating virtual machines to a new or existing datastoreMigrating virtual machines moves them from one datastore to another. For example, you might needto migrate a virtual machine to a new datastore to balance disk space usage.
Before you begin
• For NFS datastores, the storage system must be running Data ONTAP 8.1.3 or later.
• The volume on which the datastore resides must not be a SnapLock volume.
• To avoid migration errors, the virtual machines must be part of datastores that have been scannedby Virtual Storage Console for VMware vSphere.
Note: The Optimization and Migration page lists the offset group of a virtual machine, if itscontaining datastore was scanned.
About this task
If the selected virtual machines do not have the same offset group, the target datastore will not beoptimized for all virtual machines. VSC creates a datastore optimized for the offset group of the lastvirtual machine that it migrates.
Steps
1. From the vSphere Web Client Home page, click vCenter Inventory Lists.
2. In the navigation pane, under Inventory Lists, click Virtual Machines.
93

3. In the Objects table, select the virtual machines that you want to migrate.
Migrating multiple virtual machines at one time is I/O intensive. You should limit the number ofvirtual machines that VSC migrates at one time to avoid over-stressing your system.
4. Click Actions > NetApp VSC > Migrate.
5. Click Yes to confirm the action.
6. Complete the pages in the Migrate Virtual Machines wizard to migrate the virtual machines to anew or existing datastore.
a. In the Destination datastore page, specify whether you want to migrate the virtual machinesto an existing datastore or a new datastore.
b. (New datastore) In the Name and type page, specify a datastore name, datastore type (NFS orVMFS), and for a VMFS datastore, the VMFS protocol (FC/FCoE or iSCSI).
c. In the Storage system page, specify the storage system that you want to use for the datastore.
d. (Existing datastore) In the Datastore selection page, select the destination datastore.
e. (New datastore) In the New datastore details page, specify details about the datastore thatyou want to create.
Most of the fields on this page are self-explanatory. The following table describes fields forwhich you might need guidance:
Field Description
Thinprovision
Allocates space on the volume when data is written, which allows you toprovision more storage than is currently available. If disabled, space isreserved immediately.
You must closely monitor the available space in the containing aggregatebecause thin provisioning can oversubscribe the available space. In an NFSconfiguration, you can enable auto grow to automatically expand the datastorewhen space is needed. Make sure that the value you specify for auto grow islarger than the size of the datastore.
Aggregate Defines the aggregate on which you want to create a new volume. If youselected an SVM that is directly connected to VSC, striped aggregates appearas available; however, they are not supported. Provisioning to a stripedaggregate will fail.
94 | VSC 6.2.1 for VMware vSphere Installation and Administration Guide

Field Description
Volume Specifies the volume on which you want to create the datastore. For clusteredData ONTAP, you should not create a datastore in the Storage Virtual Machine(SVM) root volume.
Autogrow
(NFS only) Automatically expands the datastore by the specified incrementwhen space is needed, up to the size limit. This size limit you specify must belarger than the existing datastore.
Datastorecluster
Adds the datastore to a cluster if the Storage Distributed Resource Scheduler(SDRS) feature is enabled on the vCenter Server. Do not mix datastores withvarying offsets in the same cluster and do not mix optimized and non-optimized datastores.
f. In the Ready to complete page, Review the summary of your selections and click Finish.
Result
VSC starts the migration task. You cannot cancel this task.
After you finish
If the old datastore is empty, use it for other virtual machines or destroy it.
Related concepts
Methods for migrating virtual machines on page 13
Redeploying NFS-based virtual machine clones from atemplate
After you clone virtual machines from a template, you might need to patch or update the clonedvirtual machines. You can use Virtual Storage Console for VMware vSphere to redeploy NFS-basedvirtual machine clones from an updated template. Redeploying VMFS-based clones is not supported.
Before you begin
• You must have used VSC when you originally cloned the virtual machines from the template.
• Because redeploying resets the clone to the state of the template, you should first have backed upany needed data.
About this task
To redeploy a cloned virtual machine, VSC powers off the virtual machine. Make sure this is anacceptable time to take the virtual machine offline. VSC can power on the virtual machine after theredeployment is complete, if you select that option.
Steps
1. From the vSphere Web Client Home page, click VMs and Templates.
Maintaining your VMware environment | 95

2. In the navigation pane, expand the datacenter that contains the virtual machine template.
3. Right-click the virtual machine and select NetApp VSC > Redeploy Clones.
4. In the Redeploy Clones dialog box, select the clones, choose their settings, and click OK.
The clones can inherit the VMware specification and power state from the template, or you candefine new settings.
For a large number of virtual machines, stagger the start up of those virtual machines so you donot overwhelm your system.
Note: If a problem prevents VSC from starting some of the virtual machines, the delay couldresult in VSC powering on a large number of virtual machines at once. For example, if youspecify 10 virtual machines per minute and the start is delayed by five minutes, VSC starts 50virtual machines at once. After the delay, VSC starts the specified number of virtual machinesper minute.
5. To confirm that you want to power off and redeploy the selected virtual machines, click OK.
Result
VSC powers off the virtual machines and redeploys them based on the new template. After theredeployment, VSC powers on the virtual machines, if you chose that option.
Related tasks
Cloning virtual machines from a template on page 88
96 | VSC 6.2.1 for VMware vSphere Installation and Administration Guide

Reclaiming space from NFS-based virtual machinesWhen users delete data from a virtual machine, the storage space from NTFS partitions is notimmediately returned to the NFS datastore. You can reclaim the space to return it to the datastore.Reclaiming space from VMFS-based virtual machines is not supported.
Before you begin
• Virtual machine files must be on NFS datastores that are not backed by a qtree on a vFiler unit.
• VMDKs must have NTFS partitions.
• VMware Tools must be installed on the virtual machine.
• ISOs mounted to the virtual machine must be contained in an NFS datastore.
About this task
To reclaim the space, VSC powers off a virtual machine by using VMware Tools. Make sure this isan acceptable time to take the virtual machine offline. After the process completes, VSC returns thevirtual machine to its previous state.
You can perform this task on an individual virtual machine or on a datastore, which reclaims spacefrom all virtual machine disks in a datastore. If you do not want to take all of the virtual machines ina datastore offline, reclaim the space from one virtual machine at a time.
Steps
1. Reclaim space from one or more virtual machines:
To... Do the following...
Reclaim space from allvirtual machines in adatastore
From the vSphere Web Client Home page, click Storage.
Reclaim space from onevirtual machine
From the vSphere Web Client Home page, click VMs and Templates.
2. In the navigation pane, expand the datacenter that contains the datastore or the virtual machine.
3. Right-click the datastore or virtual machine and select NetApp VSC > Reclaim Space.
4. In the Reclaim Space dialog box, click OK.
Result
VSC powers off the virtual machines and starts reclaiming the space.
Do not power on the virtual machines while space reclamation is in progress.
Mounting datastores on hostsMounting a datastore gives a host access to storage. You might need to mount a datastore on a hostafter you add the host to your VMware environment.
Steps
1. From the vSphere Web Client Home page, click Hosts and Clusters.
Maintaining your VMware environment | 97

2. In the navigation pane, expand the datacenter that contains the host.
3. Right-click the host and select NetApp VSC > Mount Datastores.
4. Select the datastores that you want to mount and click OK.
Result
VSC mounts the datastores on the host.
Resizing datastoresResizing a datastore gives you more or less storage for your virtual machine files. You might need tochange the size of a datastore as your infrastructure requirements change.
Before you begin
If you want VSC to resize the containing volume when it resizes the VMFS datastore, you shouldhave enabled the Create new volume for each new LUN option in the VSC provisioning options forthe storage system.
About this task
You can increase or decrease the size of an NFS datastore. You can only increase the size of a VMFSdatastore.
Steps
1. From the vSphere Web Client Home page, click Storage.
98 | VSC 6.2.1 for VMware vSphere Installation and Administration Guide

2. In the navigation pane, expand the datacenter that contains the datastore.
3. Right-click the datastore and select NetApp VSC > Resize.
4. In the Resize dialog box, specify a new size for the datastore and click OK.
Result
VSC resizes the datastore.
Related tasks
Managing settings for volumes on page 80
Destroying datastoresDestroying a datastore returns storage to your storage system and deletes associated objects such asexport policies and igroups. You might need to destroy a datastore when you decommission yourvirtual machines.
About this task
When you destroy a datastore, the virtual machines within that datastore are also destroyed. VirtualStorage Console for VMware vSphere displays a list of the affected virtual machines before youdestroy the datastore.
Steps
1. From the vSphere Web Client Home page, click Storage.
Maintaining your VMware environment | 99

2. In the navigator pane, right-click the datastore and select NetApp VSC > Destroy.
3. Click OK.
Result
VSC destroys the datastore.
100 | VSC 6.2.1 for VMware vSphere Installation and Administration Guide

Optimizing performance by aligning the I/O ofmisaligned virtual machines non-disruptively
Virtual Storage Console for VMware vSphere can scan your datastores to determine the alignmentstatus of virtual machines. You can then use VSC to functionally align the I/O to certain misalignedvirtual machines without having to power them down.
About this task
Online alignment is a good choice for virtual machines that you cannot take offline. When possible,you should take the virtual machine offline and physically align the VMDK using a tool such asVMware vCenter Converter.
Steps
1. Scan datastores to determine the alignment status of virtual machines on page 101
2. Check the alignment status of virtual machines on page 102
3. Align the I/O to any misaligned virtual machines on page 104
Related concepts
Methods for migrating virtual machines on page 13
How VSC for VMware vSphere optimizes I/O performance of misaligned virtual machines onpage 13
Scanning datastores to determine the alignment status ofvirtual machines
You should periodically scan datastores to identify whether any of your virtual machines aremisaligned. A misaligned virtual machine can negatively affect I/O performance.
About this task
• It is a good practice to scan datastores during noncritical production times.
The time required to perform a scan can increase as more virtual machines are scanned.
• Virtual Storage Console for VMware vSphere uses VMware snapshots to scan virtual machinesthat reside in VMFS datastores and then deletes the snapshots when they are no longer needed.
Steps
1. From the vSphere Web Client Home page, click Virtual Storage Console.
2. In the navigation pane, click Optimization and Migration.
101

3. If your environment includes multiple vCenter Servers, you must select the server that containsthe datastores for which you want to scan.
4. Initiate a scan of the datastores:
To... Do this...
Schedule recurring scans a. Click Global Scan Schedule and set a schedule for the scan.
You should schedule the scans during noncritical production times.
b. Click OK.
c. To add or remove datastores from the global scan, select a datastorein the datastores table (the table at the top of the Optimization andMigration page) and click Exclude or Include.
Initiate a one-time scan a. Choose to scan all datastores or specific datastores:
• To scan all datastores, click Scan All.
• To scan one or more datastores, select the datastores and clickScan selected.
b. Click OK to confirm the scan.
Result
VSC scans the datastores according to the options that you selected.
After you finish
Check the alignment status of the virtual machines after VSC finishes scanning them.
Checking the alignment status of virtual machinesCheck the alignment status of a virtual machine to determine whether it is aligned or misaligned. Youshould fix the alignment of a misaligned virtual machine to optimize I/O performance.
Before you begin
You should have scanned your datastores.
Steps
1. In the Optimization and Migration page, select a datastore from the datastores table (the table atthe top of the page).
After you select a datastore, the virtual machines running on that datastore appear in the virtualmachines table (the table at the bottom of the Optimization and Migration page).
2. In the virtual machines table, view the Alignment State column to identify the alignment state ofthe virtual machines on that datastore.
102 | VSC 6.2.1 for VMware vSphere Installation and Administration Guide

Tip: To quickly identify any misaligned virtual machines, select Show only misaligned virtualmachines.
Note: The View Disk Details button shows you the alignment details of a virtual machine'sVMDKs.
The following states can appear in the Alignment State column:
For thisstate...
Do this...
Actuallyaligned
Nothing.
The partitions of the virtual machine's hard disk are aligned to the storagesystem and start at the correct offset.
Functionallyaligned
Nothing.
The partitions of the virtual machine's hard disk are misaligned; however,when residing on an optimized datastore, they align on correct boundaries. Asa result, the virtual machine performs as though it is aligned.
If you want to clone a functionally aligned virtual machine, you should take itoffline and fix the VMDK alignment before you clone it. Otherwise, theclones can be misaligned if the destination datastores are not optimized forthe VMDK layout of the clones.
Misaligned,Offlinealignment only
Power down the virtual machine and align the VMDK using a tool such asVMware vCenter Converter.
The virtual machine is misaligned; however, VSC cannot align it due to eitherof the following:
• The virtual machine has more than one disk with different offsets
• The virtual machine has multiple disks spanning multiple datastores
Misaligned,Onlinemigrationcapable
Use VSC to perform an online alignment.
Other Review the following reasons why VSC cannot determine the alignment stateof the virtual machine:
• It is inaccessible or reports an error during read attempts
• It has a disk size of 0
• It does not have any partitions
• It has independent disks or dynamic disks
3. Repeat steps 1 and 2 for each datastore.
Optimizing performance by aligning the I/O of misaligned virtual machines non-disruptively | 103

Aligning the I/O of misaligned virtual machines non-disruptively
A misaligned virtual machine can negatively affect I/O performance. To correct the misalignment,Virtual Storage Console for VMware vSphere can migrate a virtual machine to a new or existingoptimized datastore so that the I/O is functionally aligned. This process does not require downtime.
Before you begin
• You should have scanned your datastores and found virtual machines with the alignment state"Misaligned, Online migration capable."
• For NFS datastores, the storage system must be running Data ONTAP 8.1.3 or later.
• The volume on which the datastore resides must not be a SnapLock volume.
• You should be aware of the following caveats and limitations with optimized datastores:
◦ You cannot use the vStorage APIs for Array Integration (VAAI) extended copy feature with anoptimized datastore.
◦ For NFS-optimized datastores, using Data ONTAP to perform an NDMP copy, NDMPrestore, or dump restore to the volume can be slower.
◦ Migrating a virtual machine from an optimized datastore to a non-optimized datastore willresult in misaligned I/O to the virtual machine.
About this task
• Migrating multiple virtual machines at one time is I/O intensive.
You should limit the number of virtual machines that you migrate at one time to avoid over-stressing your system.
• The alignment might require more space because deduplication is temporarily turned off whenVSC aligns the virtual machine.
Steps
1. In the Optimization and Migration page, select a datastore on which a misaligned virtualmachine is running.
After you select a datastore, the virtual machines that reside on that datastore appear in the virtualmachines table (the table at the bottom of the Optimization and Migration page).
2. In the virtual machines table, select one or more virtual machines with the status "Misaligned,Online migration capable."
If you select multiple virtual machines, they must have the same offset group (the offset of thelargest disk partition).
You should limit the number of virtual machines that you migrate at one time to avoid over-stressing your system.
104 | VSC 6.2.1 for VMware vSphere Installation and Administration Guide

3. Click Migrate.
4. Complete the pages in the Migrate Virtual Machines wizard to migrate the virtual machine to anoptimized datastore.
a. In the Destination datastore page, specify whether you want to use an existing datastore or anew datastore.
For existing datastores, you will be able to choose from datastores that are optimized for theoffset group of the virtual machine.
b. (New datastore) In the Name and type page, specify a datastore name, datastore type (NFS orVMFS), and for a VMFS datastore, the VMFS protocol (FC/FCoE or iSCSI).
c. In the Storage system page, specify the storage system that you want to use for the datastore.
d. (Existing datastore) In the Datastore selection page, select the destination datastore.
VSC lists the datastores that are optimized for the VMDK layout of the virtual machine. If nodatastores are listed, go back and select the new datastore option.
e. (New datastore) In the New datastore details page, specify details about the datastore thatyou want to create.
Most of the fields on this page are self-explanatory. The following table describes fields forwhich you might need guidance:
Field Description
Thinprovision
Allocates space on the volume when data is written, which allows you toprovision more storage than is currently available. If disabled, space isreserved immediately.
You must closely monitor the available space in the containing aggregatebecause thin provisioning can oversubscribe the available space. In an NFSconfiguration, you can enable auto grow to automatically expand the datastorewhen space is needed. Make sure that the value you specify for auto grow islarger than the size of the datastore.
Aggregate Defines the aggregate on which you want to create a new volume. If youselected an SVM that is directly connected to VSC, striped aggregates appearas available; however, they are not supported. Provisioning to a stripedaggregate will fail.
Volume Specifies the volume on which you want to create the datastore. For clusteredData ONTAP, you should not create a datastore in the Storage Virtual Machine(SVM) root volume.
Autogrow
(NFS only) Automatically expands the datastore by the specified incrementwhen space is needed, up to the size limit. This size limit you specify must belarger than the existing datastore.
Datastorecluster
Adds the datastore to a cluster if the Storage Distributed Resource Scheduler(SDRS) feature is enabled on the vCenter Server. Do not mix datastores withvarying offsets in the same cluster and do not mix optimized and non-optimized datastores.
f. In the Ready to complete page, Review the summary of your selections and click Finish.
Optimizing performance by aligning the I/O of misaligned virtual machines non-disruptively | 105

Result
VSC starts the migration task. You cannot cancel this task.
After you finish
If the old datastore is empty, use it for other virtual machines or destroy it.
106 | VSC 6.2.1 for VMware vSphere Installation and Administration Guide

Backing up virtual machines and datastores
You can back up individual virtual machines and datastores on demand or by setting up an automatedschedule. Virtual Storage Console for VMware vSphere provides several options for working withbackups.
You can set a backup job schedule and specify a retention policy for the backup copy when youcreate a new backup job. If you have registered with SnapCenter, you set this information in thebackup policy. If you are using VSC's built-in backup feature, you set this information using thebackup wizard. You can also change the schedule and retention policy, as well as suspend and resumeor delete a backup job.
Note: The VSC Backup Now option applies to the built-in VSC backup feature. If you haveregistered VSC with SnapCenter, you cannot use this feature. SnapCenter requires that a backupjob exist before you perform the backup.
107

Related tasks
Performing an on-demand backup of a virtual machine or datastore on page 112
Scheduling backup jobs that use the VSC backup feature on page 115
Adding a virtual machine or datastore to an existing backup job on page 117
Backup job specificationsBefore you run a backup job, you must specify certain information to enable it to perform asexpected. This information includes details such as the backup schedule, the backup retention policy,and the alert notifications of backup activity.
If you have registered VSC with SnapCenter, you supply these details in a backup policy. You canthen associate that policy with one or more backup jobs.
If you are using the built-in VSC backup feature, you must specify the information directly in thebackup job. The built-in backup feature does not support backup policies.
When you add a new backup job, you can specify whether you want to initiate either a SnapMirror orSnapVault update on the virtual entities that are to be backed up or to create VMware snapshots forevery backup. If you select virtual machines that span multiple datastores, you can specify that one ormore of the datastores be excluded from the backup.
If you want to use a backup script that is installed on the server with this job, you can choose thescript to run. If you create a prebackup or postbackup script that results in an output file when thescript is run, the output file is saved to the same directory where you initially installed the prebackupor postbackup script. You can specify the hourly, daily, weekly, or monthly schedule that you wantapplied to your backup job, or you can add a backup job without attaching a schedule to the backup.
Note: The technical report “SnapManager 2.0 for Virtual Infrastructure Best Practices” containsinformation about setting up and using backup scripts.
http://www.netapp.com/us/media/tr-3737.pdf
You can specify a retention policy indicating either the maximum number of days or the maximumnumber of backup jobs that are retained.
You can also set up email alerts for this backup job. You must first set the SMTP server and thedestination email addresses to receive an alert notification when an alarm is triggered or the systemstatus changes. You can enable or disable alarms and specify how often you receive email alerts whenan error or warning occurs. The Notify on options in the Schedule Backup wizard include thefollowing:
Always
An alert notification is always sent.
Errors or Warnings
A backup failure or a warning triggers an alert notification.
Errors
A backup failure or partial failure triggers an alert notification.
Never
An alert notification is never sent.
Backup job requirementsWorking with backup jobs requires that you have several licenses: A SnapManager for VirtualInfrastructure (SMVI) license to enable you to use the VSC feature; a SnapRestore license to enable
108 | VSC 6.2.1 for VMware vSphere Installation and Administration Guide

you to perform restore operations; and a SnapMirror and SnapVault license to enable you to use thesefeatures when you set up options for a backup job. SnapMirror and SnapVault relationships also havesome additional requirements.
SnapRestore technology, when used with VSC, must be licensed for the storage systems where thedatastore and virtual machine system images reside.
SnapMirror and SnapVault relationships have the following requirements when used with VSC:
• The volumes containing the active datastore and virtual machine images must be configured asSnapMirror or SnapVault source volumes.
• A SnapMirror relationship:
◦ Is supported on Data ONTAP operating in 7-Mode or ONTAP
◦ When used with ONTAP, the SnapMirror type must be “DP” and the policy type must be“async-mirror”
• A SnapVault relationship:
◦ Is supported only on ONTAP 8.2 or later
◦ Must have a SnapMirror type of “XDP”
◦ Must have a policy type of “vault”
◦ Must have a rule that specifies labels for the VSC backup schedule
• Version-flexible SnapMirror relationships are supported with the following configuration:
◦ Must have a SnapMirror type of “XDP”
◦ Must have a policy type of “mirror-vault”
◦ Must have a rule that specifies labels for the VSC backup schedule
◦ Must have the “_recent” Snapshot naming convention set to False in the smvi.overridefile (for more information about this naming convention, see thesmvi.snapshot.recent.naming option).
Values that you can change in the smvi.override configuration file on page 132
• The SnapVault policy must have a rule that specifies SnapMirror labels for the VSC backupschedule. By default, the following are SnapMirror labels that should be set for the SnapVaultpolicy:
Schedule type Required label
Hourly VSC_JOB_HOURLY
Daily VSC_JOB_DAILY
Weekly VSC_JOB_WEEKLY
Monthly VSC_JOB_MONTHLY
One-time only VSC_ONDEMAND
To use values other than the default values, you must specify the following labels in thesmvi.config file and then specify the same SnapMirror labels when you create the SnapVaultprotection policy.
"snapvault.job.hourly.label"="VSC_XXXX"
"snapvault.job.daily.label"="VSC_XXXX"
"snapvault.job.weekly.label"="VSC_XXXX"
Backing up virtual machines and datastores | 109

"snapvault.job.monthly.label"="VSC_XXXX"
"snapvault.ondemand.label"="VSC_XXXX"
• The source volumes must have a SnapMirror or SnapVault relationship with target volumes on asecond storage system that is licensed for SnapMirror or SnapVault.
• The host names and IP addresses of the SnapMirror or SnapVault source and destination storagesystems must be resolvable for the SMVI server, either through a configured DNS server orthrough host entries added to the host file on the SMVI server.
• Cluster or Storage Virtual Machine (SVM) administrators must create node management LIFs orcluster management LIFs, which are required to update SnapMirror or SnapVault relationships forstorage systems running ONTAP 8.2 or later.
The cluster management LIF is required for storage systems running a version of clustered DataONTAP prior to 8.1.
Creating a backup policyIf your system is running ONTAP 8.2.2 or later, and you have registered Virtual Storage Console forVMware vSphere (VSC) with SnapCenter, you can create a backup policy that specifies guidelinesfor a backup job, including scheduling and retention information. You can then specify that policywhen you create a backup job.
Before you begin
If you are using VSC to manage Storage Virtual Machines (SVMs), then you must have added theSVMs to VSC as cluster management LIFs.
SnapCenter allows only direct connections to SVMs; however, you cannot access all of the VSCfeatures unless you connect VSC to the SVMs by using cluster management LIFs.
When you are using VSC to manage SVMs, you should have set up the following SnapCenter andVSC environments:
• In the SnapCenter graphical user interface (GUI), you must have added the SVMs as directconnections.
• In the VSC GUI, you must have added the SVMs as cluster management LIFs.
About this task
VSC displays policy information only when you are working with backup information in anenvironment that supports SnapCenter. As a result, you might have screens where some of thebackup jobs display options and information about backup policies and others do not because theyuse the VSC backup feature.
You can create multiple policies. If you have an environment with multiple vCenter Server instances,then each instance of VSC that is registered with SnapCenter can access all of the policies.
When you perform a mount, restore, or attach operation, VSC displays information about whichbackup policy was used to create the backup job.
Note: This dialog box enables you to check SnapVault and SnapMirror updates; however, VSCdoes not support both for the same backup job. You can select either SnapVault or SnapMirrorupdates.
Steps
1. From the vSphere Web Client Home page, click vCenter.
110 | VSC 6.2.1 for VMware vSphere Installation and Administration Guide

2. In the NetApp section of the navigation pane, select Backup Policies.
3. On the Backup Policies page, click Create.
4. Select the options that you want in the Details pane of the Create Backup Policy dialog box.
Most of the fields in the wizard are self-explanatory. The following table provides some tips forworking with the fields:
Option Description
vCenter Server If your environment includes multiple vCenter Server instances, you mustselect the server that is associated with this instance of VSC from thedrop-down list.
It does not matter which instance of VSC you use to create a backuppolicy. All backup policies are available to all VSC instances that areregistered with SnapCenter.
Name andDescription
It is a good practice to provide a name and description for the policy sothat you can quickly identify it.
VM consistentsnapshot
You can select this box to create a VMware snapshot each time the backupjob runs.
UpdateSnapMirror afterbackup
You can select this option if you want to start a SnapMirror update on theselected entities concurrent with each backup copy. If you select thisoption, you must ensure that the following conditions are met:
• The entities must reside in volumes that are configured as SnapMirrorsource volumes.
• A destination volume must exist.
• The SnapCenter Server must be able to resolve the host name and IPaddress of the source and destination storage systems.
Create remotebackup afterbackup usingSnapVault
You can select this box to start a remote SnapVault backup of the entitiesthat you are backing up. If you select this option, you must ensure that thefollowing conditions are met:
• The entities must reside in volumes that are configured as SnapVaultsource volumes.
• A destination volume must exist.
Include datastoreswith independentdisks
You can select this box to include any datastores with independent disksthat contain temporary data.
Snapshot label You can use this option to specify a customized label for the SnapVaultprotection policy.
Schedule You can use this option to select a schedule for the backup. You canspecify the backup schedule as hourly, daily, weekly, monthly, or ondemand.
After you select the schedule, you can specify the details. For example, ifyou select hourly backups you can specify details such as the start date andtime.
Backing up virtual machines and datastores | 111

Option Description
Retention You can select this option to indicate how long VSC keeps this backup.You can select one of the following options:
• Maximum Days
You can enter the number of days that you want VSC to keep thisbackup.
• Maximum Backups
You can enter the number of copies of this backup that you want VSCto keep. You can specify up to 254 backup copies. When the maximumlimit is met, VSC deletes the oldest backup.
• Backups Never Expire
If you select this option, VSC keeps the backup until you manuallydelete it.
These options apply to the primary backup only. SnapMirror andSnapVault create backups on a secondary site. If you selected one of thoseoptions, the backup on the secondary site will be retained and will bevisible in the VSC user interface.
5. Optional: Specify the location of any scripts that you want to run before and after the backup onthe Scripts pane of the Create Backup Policy dialog box.
You can also set the default timeout values for the scripts on this pane.
Note: The technical report “SnapManager 2.0 for Virtual Infrastructure Best Practices”contains information about setting up and using backup scripts.
http://www.netapp.com/us/media/tr-3737.pdf
6. Click OK.
Performing an on-demand backup of a virtual machine ordatastore
You can launch a one-time backup operation for a virtual machine or for an entire datastore. Thistype of backup is useful if you do not want to schedule regular backups for a particular virtualmachine or selected datastores or if you need to create a one time, non-scheduled backup to retainimportant changes.
About this task
You can use this feature when you are using the backup feature provided by Virtual Storage Consolefor VMware vSphere. You cannot use this feature when you use VSC with SnapCenter. SnapCenterrequires that a backup job exist before you perform the backup.
Note: VSC supports either SnapMirror updates or SnapVault updates. At this time, it does notsupport both.
Steps
1. From the vSphere Web Client Home page, click VMs and Templates to view virtual machines orclick Storage to view datastores.
112 | VSC 6.2.1 for VMware vSphere Installation and Administration Guide

2. In the navigation pane, expand the datacenter that contains the virtual machine or datastore,depending on whether you are in the VMs and Templates view or the Storage view.
3. Right-click the datastore or virtual machine and select NetApp VSC > Backup > Backup Now.
4. Enter a name for the backup job and manually select the options you want the job to use, whichinclude the following:
• If you want to start a SnapVault update on the selected entities concurrent with every backupcopy, select Initiate SnapVault update.
Note: The SnapVault option is only supported on clustered Data ONTAP 8.2 or later.
For this option to execute successfully, the selected entities must reside in volumes that areconfigured as SnapVault source volumes and a destination volume must also exist.
• If you want to start a SnapMirror update on the selected entities concurrent with every backupcopy, select Initiate SnapMirror update.For this option to execute successfully, the selected entities must reside in volumes that areconfigured as SnapMirror source volumes and a destination volume must also exist.The SnapManager for Virtual Infrastructure server should be able to resolve the host name andIP address of the source and destination storage systems in the snapmirror.conf file.
• If you want to create a VMware snapshot every time the backup job runs, select PerformVMware consistency snapshot.
• If you want to include independent disks from datastores that contain temporary data, selectInclude datastores with independent disks.
5. Click OK.
Creating backup jobsYou can create and schedule backup jobs for an entire datacenter, a datastore, or a virtual machine.You can also view all backup jobs on the Backup Jobs page in the vSphere Web Client and createbackup jobs from this page using the backup job wizard to select a virtual entity.
When you create the backup job, you can perform tasks such as setting a schedule that specifies whenthe backups will occur, setting a retention policy, and creating an automated policy for email alerts.
Virtual Storage Console for VMware vSphere provides two options for handling backup jobs. Itautomatically checks your environment to determine which option to use and which options toprovide you with when you are working with backups.
• For environments running Data ONTAP 8.2.2 or later where you have registered VSC withSnapCenter, VSC uses SnapCenter to perform the backup.One advantage of this option is that you can use the backup policy feature provided bySnapCenter. A backup policy contains the set of rules that govern the backup, such as when thebackup is scheduled and what the retention policy is. You must create the backup policy before
Backing up virtual machines and datastores | 113

you create and schedule the backup. Each instance of VSC that you register with SnapCenter canaccess all of the policies, even if a policy was created with a different instance of VSC.
You can assign multiple policies to a single backup job. Doing this enables you to set up multipleschedules for performing the backup job.
Note: Although VSC seamlessly supports SnapCenter, if you log in to SnapCenter, you willsee that the term datasets in SnapCenter corresponds to the term backup jobs in VSC.
• For environments that have not registered with SnapCenter or that are running either clusteredData ONTAP prior to 8.2.2 or Data ONTAP operating in 7-Mode, VSC uses its standard backupfeature.
The VSC backup feature does not support backup policies, so you must enter the scheduling andretention information each time you create a backup.
Scheduling backup jobs that use SnapCenter
For environments running clustered Data ONTAP 8.2.2 or later where you have registered VirtualStorage Console for VMware vSphere with SnapCenter, VSC automatically uses SnapCenter tocreate backups. VSC always checks your environment before displaying the Schedule Backupwizard, which helps ensure that VSC provides the correct options for your environment.
Before you begin
• The storage systems must be running clustered Data ONTAP 8.2.2 or later.
• VSC must already have been registered with SnapCenter.
• You must have created the backup policies that you want to associate with the backup job.
About this task
When you create a backup job, you can select one or more backup policies to set the backupguidelines, such as the schedule for your backup jobs and the retention policy. The Schedule Backupwizard gives you the option of setting up an automated policy for email alerts.
After you schedule the backup job, you must go to the Backup Jobs page in the vSphere Web Clientto run the job.
Steps
1. Create and schedule a backup job as desired:
To create a backup job... Do this...
For a specific datastore orvirtual machine
a. From the vSphere Web Client Home page, click VMs and Templatesto view virtual machines or click Storage to view datastores.
b. In the navigation pane, expand the datacenter that contains the virtualmachine or datastore, depending on whether you are in the VMs andTemplates view or the Storage view.
c. Right-click the datastore or virtual machine and select NetApp VSC> Backup > Schedule Backup.
You can create a scheduled backup job for an entire datacenter byright-clicking the datacenter and selecting NetApp > Backup >Schedule Backup.
114 | VSC 6.2.1 for VMware vSphere Installation and Administration Guide

To create a backup job... Do this...
Using the backup job wizardto select a datastore or virtualmachine
a. From the vSphere Web Client Home page, click vCenter InventoryLists.
b. In the navigation pane, under NetApp, click Backup Jobs.
c. Click the Add icon on the Backup Jobs page in the vSphere WebClient.
d. If your environment includes multiple vCenter Servers, you mustselect the server that contains the datastores or virtual machines thatyou want to back up.
2. On the first page of the Schedule Backup wizard, enter a name and description for the backupjob that enables you to identify the job easily.
3. On the Spanning Entities page, specify how you want to handle spanned entities.
Spanned entities might be a virtual machine that has multiple VMDKs across multiple datastores.You can exclude all spanned entities, include all spanned entities, or manually select specificspanned entities that you want to include in the backup job.
Note: If you choose to manually select the datastores, you must check the list of includedvirtual machines and update the list if necessary each time you add virtual machines to thedatastore.
4. On the Policies page, select the backup policies that you want to use with this backup.
You can select multiple polices. For example, you might have one policy that schedules dailybackups and another policy that schedules monthly backups.
5. On the Email Alerts page, specify whether you want to receive email alerts about the status ofthe backup job.
6. Review the summary of your selections and click Finish.
Scheduling backup jobs that use the VSC backup feature
If your environment is not registered with SnapCenter, Virtual Storage Console for VMware vSphereautomatically uses its backup feature to create backups. VSC always checks your environment beforedisplaying the Schedule Backup wizard. Doing this enables VSC to provide the correct options foryour environment.
Before you begin
The vSphere Web Client must be connected to a vCenter Server to create backup copies.
About this task
VSC always uses its backup feature if either of the following conditions is true:
• Your storage systems are running either clustered Data ONTAP prior to 8.2.2 or Data ONTAPoperating in 7-Mode.
• Your storage systems are running clustered Data ONTAP 8.2.2 or later, but you did not registerVSC with SnapCenter.
When you create the backup job using the VSC backup feature, you can set a schedule for when thejob executes, specify a retention policy, and create an automated policy for email alerts.
Backing up virtual machines and datastores | 115

Note: VSC supports either SnapMirror updates or SnapVault updates. At this time, it does notsupport both.
After you schedule the backup job, you must go to the Backup Jobs page in the vSphere Web Clientto run it.
Steps
1. To create and schedule a backup job, take one of the following actions:
To... Do this...
Create a backup job for aspecific datastore or virtualmachine
a. From the vSphere Web Client Home page, click VMs and Templatesto view virtual machines or click Storage to view datastores.
b. In the navigation pane, expand the datacenter that contains the virtualmachine or datastore, depending on whether you are in the VMs andTemplates view or the Storage view.
c. Right-click the datastore or virtual machine and select NetApp VSC> Backup > Schedule Backup.
You can create a scheduled backup job for an entire datacenter byright-clicking the datacenter and selecting NetApp > Backup >Schedule Backup.
Create a backup job using thebackup job wizard to select adatastore or virtual machine
a. From the vSphere Web Client Home page, click vCenter InventoryLists.
b. In the navigation pane, under NetApp, click Backup Jobs.
c. Click the Add icon on the Backup Jobs page in the vSphere WebClient.
d. If your environment includes multiple vCenter Servers, you mustselect the server that contains the datastores or virtual machines thatyou want to back up.
2. On the first page of the Schedule Backup wizard, type a name for the backup job and add adescription.
3. Optional: On the Options page, select the options you want for this backup job.
You have the following options:
• If you want to start a SnapVault update on the selected entities concurrent with each backupcopy, select Initiate SnapVault update.
Note: The SnapVault option is only supported on clustered Data ONTAP 8.2 or later.
For this option to execute successfully, the selected entities must reside in volumes that areconfigured as SnapVault source volumes and a destination volume must also exist.
• If you want to start a SnapMirror update on the selected entities concurrent with every backupcopy, select Initiate SnapMirror update.For this option to execute successfully, the selected entities must reside in volumes that areconfigured as SnapMirror source volumes and a destination volume must also exist.The SnapManager for Virtual Infrastructure server should be able to resolve the host name andIP address of the source and destination storage systems in the snapmirror.conf file.
• If you want to create a VMware snapshot every time the backup job runs, select PerformVMware consistency snapshot.
• If you want to include independent disks from datastores that contain temporary data, selectInclude datastores with independent disks.
116 | VSC 6.2.1 for VMware vSphere Installation and Administration Guide

4. From the Spanned Entities page, select the procedure you want to use if an entity, such as avirtual machine with multiple VMDKs, spans multiple datastores.
5. From the Scripts page, select one or more backup scripts.
If an error message appears, indicating that at least one of the selected scripts has been deleted,you can save the backup job without any script in the selected scripts list, thereby removing thedeleted script from the job. Otherwise, the backup job continues to use the deleted script.
6. From the Schedule and Retention page, specify when you want the backup performed and howlong you want to keep it.
7. Review the summary of your selections and click Finish.
8. Go to the Backup Jobs page to select the job, and then choose Run Job Now.
Related tasks
Modifying the job properties of a scheduled backup job on page 118
Suspending an active backup job on page 118
Resuming a suspended backup job on page 119
Deleting a scheduled backup job on page 119
Adding a virtual machine or datastore to an existing backupjob
You can add a new virtual machine or datastore to an existing backup job. If you have already createda backup job with specific schedule and retention properties, you can then add a new datastore orvirtual machine to the existing backup job.
Steps
1. From the vSphere Web Client Home page, click VMs and Templates to view virtual machines orclick Storage to view datastores.
2. In the navigation pane, expand the datacenter that contains the virtual machine or datastoredepending on whether you are in the VMs and Templates view or the Storage view.
3. Right-click the datastore or virtual machine and select NetApp VSC > Backup > Add toBackup Job.
4. In the Add to Backup Job dialog box, select the backup job to which you want to add thedatastore or virtual machine.
5. Click OK.
Backing up virtual machines and datastores | 117

Modifying the job properties of a scheduled backup jobYou can modify the name and description, the datastores and virtual machines that are assigned, thebackup scripts, the user credentials, the schedule, the retention policy, and the email alerts for anexisting backup job using the Modify Backup Job dialog box.
Steps
1. From the vSphere Web Client Home page, click vCenter Inventory Lists.
2. In the navigation pane, under NetApp, click Backup Jobs.
3. Right-click the backup job whose properties you want to modify and select Modify.
4. Click the appropriate tab for the properties that you want to modify for this backup job.
5. Modify backup job properties as necessary, and then click OK to change the properties.
Suspending an active backup jobYou can suspend the scheduled operations of an active backup job without deleting the job. Thisgives you the ability to temporarily halt backup jobs in case of planned maintenance, during periodsof high activity, or for other reasons.
Steps
1. From the vSphere Web Client Home page, click vCenter Inventory Lists.
118 | VSC 6.2.1 for VMware vSphere Installation and Administration Guide

2. In the navigation pane, under NetApp, click Backup Jobs.
3. Right-click the active backup job that you want to suspend and select Suspend.
4. Click OK when you receive the confirmation prompt to suspend the active backup job.
Resuming a suspended backup jobYou can resume and run a suspended backup job at any time after you temporarily halt the backupjob.
Steps
1. From the vSphere Web Client Home page, click vCenter Inventory Lists.
2. In the navigation pane, under NetApp, click Backup Jobs.
3. Right-click the suspended backup job that you want to resume and select Resume.
4. Click OK when you receive the confirmation prompt to resume the suspended backup job.
Deleting a scheduled backup jobYou can select and delete one or more backup jobs from the list of scheduled jobs, but you cannotdelete any backup jobs that are running.
Steps
1. From the vSphere Web Client Home page, click vCenter Inventory Lists.
Backing up virtual machines and datastores | 119

2. In the navigation pane, under NetApp, click Backup Jobs.
3. Select one or more backup jobs that you want to delete.
4. Right-click each selected backup job, and then select Delete.
5. Click OK at the confirmation prompt to delete the scheduled backup job.
120 | VSC 6.2.1 for VMware vSphere Installation and Administration Guide

Restoring virtual machines and datastores frombackup copies
You can restore your virtual machines and datastores from backup copies using Virtual StorageConsole for VMware vSphere. Virtual machines are always restored to the most current datastore;only VMDKs can be restored to an alternate datastore.
Related tasks
Restoring data from backup copies on page 124
Mounting a backup copy on page 122
Unmounting a backup copy on page 123
Considerations for restore operations using data that wasbacked up with failed VMware consistency snapshots
Even if a VMware consistency snapshot for a virtual machine fails, the virtual machine isnevertheless backed up. You can view the backed up entities contained in the backup copy in theRestore wizard and use it for restore operations.
When creating a VMware snapshot, the virtual machine pauses all running processes on the guestoperating system so that file system contents are in a known consistent state when the Data ONTAPSnapshot copy is taken. Despite the VMware snapshot failure, the virtual machine is still included inthe Data ONTAP Snapshot copy.
The Quiesced column can display the following values:
• Yes, if a VMware snapshot operation was successful and the guest operating system wasquiesced.
• No, if a VMware snapshot was not selected or the operation failed because the guest operatingsystem could not be quiesced.
• Not Applicable, for entities that are not virtual machines.
Searching for backup copiesYou can search for and find a specific backup copy of a virtual machine or datastore using theRestore wizard. After you locate a backup copy, you can then restore it.
Steps
1. From the vSphere Web Client Home page, click VMs and Templates to view virtual machines orclick Storage to view datastores.
121

2. In the navigation pane, expand the datacenter that contains the virtual machine or datastore,depending on whether you are in the VMs and Templates view or the Storage view.
3. Right-click the datastore or virtual machine and select NetApp VSC > Restore.
4. Click Advanced Filter in the Restore wizard.
5. Type one or more search terms, and then click OK.
Available criteria for search are the name of the backup job, time range of the backup job,whether the backup job contains a VMware snapshot, or whether the backup job has beenmounted.
Mounting a backup copyYou can mount an existing backup copy onto an ESX server to verify the contents of the backup copybefore completing a restore operation.
About this task
If you have set up your Virtual Storage Console for VMware vSphere environment to useSnapCenter, you can mount either a primary backup copy (P) or a secondary clone backup copy (S)from a different volume. For example, if you created a clone using SnapMirror, VSC gives you theoption of mounting the backup copy from either the primary site or the secondary site.
Steps
1. From the vSphere Web Client Home page, click VMs and Templates to view virtual machines orclick Storage to view datastores.
2. In the navigation pane, expand the datacenter that contains the virtual machine or datastore.
The type of object that you select depends on whether you are in the VMs and Templates viewor the Storage view.
3. Right-click the datastore of the virtual machine, and select NetApp VSC > Mount Backup.
122 | VSC 6.2.1 for VMware vSphere Installation and Administration Guide

4. In the Mount Backup dialog box, select the name of an unmounted backup copy that you want tomount.
In VSC environments that support SnapCenter, you can select individual datastores to mount, oryou can choose to mount all datastores.
The dialog box always displays the primary backup copies for the object, indicated by P. If youused SnapMirror or SnapVault to replicate the backup and your VSC environment supportsSnapCenter, the Mount Backup dialog box also displays a list of the secondary backup copies (S)that are on a different volume. You can select either a primary backup or a secondary backup.
5. Select the name of the ESX server to which you want to mount the backup copy.
You can mount only one backup copy at a time, and you cannot mount a backup that is alreadymounted.
If you are mounting a backup that was created by using SnapCenter, you can specify whichdatastores to mount.
If you are mounting a datastore that was created by using the VSC backup feature, all datastoresresiding in the backup copy, even ones that were added because of spanned VMs, are mounted.
6. Click OK.
Unmounting a backup copyAfter you have verified the contents of a mounted backup copy, you can unmount it from the ESXserver. When you unmount a backup, all of the datastores in that backup copy are unmounted and areno longer visible from the ESX server.
Steps
1. From the vSphere Web Client Home page, click VMs and Templates to view virtual machines orclick Storage to view datastores.
2. In the navigation pane, expand the datacenter that contains the virtual machine or datastoredepending on whether you are in the VMs and Templates view or the Storage view.
3. Right-click the datastore of virtual machine and select NetApp VSC > Unmount Backup.
4. In the Unmount Backup dialog box, select the name of a mounted backup that you want tounmount.
5. Click OK.
Restoring virtual machines and datastores from backup copies | 123

Restoring data from backup copiesYou can restore a datastore, an entire virtual machine, or particular virtual disks of a given virtualmachine. By doing so, you overwrite the existing content with the backup copy you select.
Before you begin
You must have created a backup of the virtual machine before you can restore either the entire virtualmachine or its individual VMDKs.
About this task
If you are restoring a virtual machine to a second ESX server, VSC unregisters the virtual machinefrom the first ESX server and places the restored virtual machine on the second ESX server. BothESX servers must share the same datastore.
If you have set up your Virtual Storage Console for VMware vSphere environment to useSnapCenter, you have the option of restoring the information from either a primary backup copy (P)or a secondary (clone) backup copy (S) on a different volume.
Steps
1. From the vSphere Web Client Home page, click VMs and Templates to view virtual machines orclick Storage to view datastores.
2. In the navigation pane, expand the datacenter that contains the virtual machine or datastore,depending on whether you are in the VMs and Templates view or the Storage view.
3. Right-click the datastore or virtual machine and select NetApp VSC > Restore.
4. In the Restore wizard, select the backup copy that you want to restore from and then click Next.
5. Select one of the following restore options:
Option Description
The entire virtual machine Restores the contents to the last datastore in which it resided from aSnapshot copy with a particular time and date. The Restart VM checkbox is enabled if you select this option and the virtual machine isregistered.
Particular virtual disks Restores the contents of individual VMDKs to the most current oralternate datastore. This option is enabled when you clear The entirevirtual machine option.
6. Select the location of the backed up datastores.
The dialog box always displays the primary backup copies for that object, indicated by P. If youused SnapMirror or SnapVault to replicate the backup and your VSC environment supports
124 | VSC 6.2.1 for VMware vSphere Installation and Administration Guide

SnapCenter, the dialog box also displays a list of the secondary backup copies (S) that are on adifferent volume. You can select either a primary or secondary backup.
7. Click OK.
During the restore operation, the virtual machine is powered down.
You can track the progress of the restore operation from the Recent Tasks pane in the vSphereWeb Client.
Attaching a virtual disk to restore a fileYou can restore a file from a drive instead of restoring the entire drive by performing a VirtualStorage Console for VMware vSphere attach operation. The attach operation creates a clone of yourprimary backup and lists the virtual disks that are included in the backup. You can then restore thedisk that you require.
Before you begin
You must be running clustered Data ONTAP 8.2.2 or later and have registered VSC with SnapCenter.
About this task
You must use the primary backup copy when you execute the attach operation. This operation doesnot work with secondary backup copies.
When you perform an attach operation, VSC clones the selected virtual disk and attaches it to thevirtual machine as a new disk. You must log in to the guest operating system and mount the newlyattached hard disk as a drive. At that point, you can restore the files from the mounted disk inside theguest operating system.
Steps
1. From the vSphere Web Client Home page, click VMs and Templates.
2. In the navigation pane, expand the datacenter that contains the virtual machine.
Restoring virtual machines and datastores from backup copies | 125

3. Right-click the virtual machine, and select NetApp VSC > Attach Virtual Disk.
4. In the top part of the Attach Virtual Disk dialog box, select the backup copy.
VSC displays all the virtual disks that are included in that backup.
5. Select the virtual disk that you want to attach.
If the backup contains multiple virtual disks, you can select more than one virtual disk to attach tothe virtual machine.
6. Click OK.
You can track the progress of the attach operation from the Recent Tasks panel in the vSphereWeb Client.
7. Log in to the guest operating system, and mount the attached disk as a drive.
You can now get the file that you want to restore.
Detaching a virtual diskAfter using a Virtual Storage Console for VMware vSphere (VSC) attach operation to retrieve thefiles that you need, you can disconnect the virtual disks that contained the files by performing a VSCdetach operation. The detach operation checks VSC to see whether there are attached virtual disks.The detach operation displays the attached virtual disks and gives you the option to detach them.
Before you begin
Your system must be running ONTAP 8.2.2 or later.
You must have registered VSC with SnapCenter.
You must have attached disks using a VSC attach operation.
About this task
Attention: The purpose of the VSC attach feature is to enable you to restore one or moreindividual files. When you detach the virtual disk that provided those files, any new data that youadded to that disk after it was attached will be lost. You will not be able to recover that data.
Steps
1. On the vSphere Web Client Home page, click VMs and Templates.
2. In the navigation pane, expand the datacenter that contains the virtual machine.
3. Right-click the virtual machine, and then select NetApp VSC > Detach Virtual Disk.
126 | VSC 6.2.1 for VMware vSphere Installation and Administration Guide

4. In the top part of the Detach Virtual Disk(s) dialog box, select each virtual disk that you want todetach from the virtual machine.
5. Click OK.
6. When VSC prompts you to confirm that you want to detach the selected virtual disks, click OKagain.
Note: After you detach a virtual disk, you cannot recover any data that you added to it.
You can track the progress of the detach operation from the Recent Tasks panel in the vSphereWeb Client.
Restoring virtual machines and datastores from backup copies | 127

Troubleshooting
If you encounter unexpected behavior during the installation or configuration of VSC for VMwarevSphere, you can follow specific troubleshooting procedures to identify and resolve the cause of suchissues.
Information at NetApp Support SiteThe NetApp Virtual Storage Console for VMware vSphere support portal provides self-servicetroubleshooting videos and knowledge base articles in addition to other services.
The NetApp VSC support portal is online at:
http://mysupport.netapp.com/NOW/products/vsc/
Information at NetApp VSC Communities ForumThe NetApp Communities Forum provides information about Virtual Storage Console for VMwarevSphere. When you join the forum you can ask questions and talk with other VSC users.
The NetApp Communities Forum provides information about tools you can use with VSC and newsabout VSC. At the forum, you can do the following:
• Get links to tools, such as the "RBAC User Creator for Data ONTAP."
• Submit general questions about PowerShell cmdlets and APIs that can be used with VSC.
• See the latest NetApp news about VSC, such as when a beta testing program might be available.
It is good practice to check the NetApp Communities Forum periodically.
The NetApp VSC Communities Forum is online at:
http://communities.netapp.com/vsc
Information available in the Release NotesThe Release Notes contain the most up-to-date information about known problems and limitations.The Release Notes also contain information on how to look up information about known bugs.
The Release Notes are updated when there is new information about Virtual Storage Console forVMware vSphere. It is a good practice to check the Release Notes before you install VSC, and anytime you encounter a problem with VSC.
You can access the Release Notes from the NetApp Support Site at
NetApp Support
128

Uninstall does not remove standard VSC rolesWhen you uninstall Virtual Storage Console for VMware vSphere, the standard VSC roles remain.This is expected behavior and does not affect the performance of VSC or your ability to upgrade to anew version of VSC. You can manually delete these roles, if you choose.
While the uninstall program does not remove the roles, it does remove the localized names for theVSC-specific privileges and append the following prefix to them: "XXX missing privilege". Forexample, if you open the vSphere Edit Role dialog box after you install VSC, you will see the VSC-specific privileges listed as XXX missing privilege.<privilege name>.label not foundXXX.
This behavior happens because the vCenter Server does not provide an option to remove privileges.
When you reinstall VSC or upgrade to a newer version of VSC, all the standard VSC roles and VSC-specific privileges are restored.
Collecting the VSC for VMware vSphere log filesYou can collect the Virtual Storage Console for VMware vSphere log files using the Export VSCLogs page. Technical support might ask you to collect the log files to help troubleshoot a problem.
Before you begin
You must have selected the vCenter Server that you want to use for this task.
Steps
1. From the Virtual Storage Console Home page, click Configuration > Export VSC Logs.
This operation can take several minutes.
2. When prompted, save the file to your local computer.
Troubleshooting | 129

After you finish
Send the .zip file to technical support.
Updating vCenter credentials for background discoveryIf the vCenter credentials specified when Virtual Storage Console for VMware vSphere was installedexpire, Monitoring and Host Configuration can no longer run background discovery tasks.Monitoring and Host Configuration then displays an error message. Re-register VSC to enter updatedcredentials.
Before you begin
The vCenter account must be an administrator-level account.
Steps
1. Click the link in the error message about expired credentials, or point a Web browser to theregistration Web page:
https://hostname:8143/Register.html
hostname is the host name or IP address of the server where VSC is installed.
If a security certificate warning is displayed, choose the option to ignore it or to continue to theWeb site.
The Plugin registration Web page is displayed with the current credentials.
2. Enter the new password for the user name shown, or enter a new user name and password.
3. Restart all vCenter Clients.
Possible issues with backup and restore operationsOccasionally you might encounter unexpected behavior during a backup or restore operation. Inmany cases, you can follow troubleshooting procedures to resolve the issues.
This section identifies some issues that have been seen with backup and restore operations.
Values that you can override for backup jobs
To improve operational efficiency, you can modify either the scbr.override configuration file orthe smvi.override configuration file to change the default values. These values control settingssuch as the number of VMware snapshots that are created or deleted during a backup or the amountof time before a backup script stops running.
The file that you modify depends on you Virtual Storage Console for VMware vSphere environment:
• The scbr.override configuration file is used in VSC environments that support SnapCenter.
If this file does not exist, you must create it in the C:\Program Files\NetApp\VirtualStorage Console\etc\scbr directory.
You must restart the VSC Windows service for the changes you make to take effect.
• The smvi.override configuration file is used in environments that use the VSC backup andrestore features.
This file is located in the installation directory at C:\Program Files\NetApp\VSC\smvi\server\etc\smvi.override.
You must restart the server for the changes you make to take effect.
130 | VSC 6.2.1 for VMware vSphere Installation and Administration Guide

Note: For information about setting up and using backup scripts, see the technical report“SnapManager 2.0 for Virtual Infrastructure Best Practices.”
http://www.netapp.com/us/media/tr-3737.pdf
Values that you can change in the scbr.override configuration file
If you have registered VSC with SnapCenter, you can modify the default values for the followingproperties. Each of the default values is shown with the property.
Note: The values that you can override are listed in this section and in the C:\Program Files\NetApp\Virtual Storage Console\etc\scbr\scbr.override-template file.
max.concurrent.ds.storage.query.count=15
Specifies the maximum number of concurrent calls that VSC can make to the SnapCenterServer to discover the storage footprint for the datastores. VSC makes these calls after youregister it to SnapCenter, or when you restart the VSC Windows service.
script.virtual.machine.count.variable.name= VIRTUAL_MACHINES
Specifies the environmental variable name that contains the virtual machine count. Youmust define the variable before you execute any user-defined scripts during a backup job.For example, VIRTUAL_MACHINES=2 means that two virtual machines are being backedup.
script.virtual.machine.info.format= %s|%s|%s|%s|%s
Provides information about the virtual machine. The format for this information, which isset in the environment variable, is the following:
VM name|VM UUID| VM power state (on|off)|VM snapshot taken (true|
false)|IP address(es)
The following is an example of the information you might provide:
VIRTUAL_MACHINE.2=VM 1|564d6769-f07d-6e3b-68b1-f3c29ba03a9a|
POWERED_ON||true|10.0.4.2
script.virtual.machine.info.variable.name=VIRTUAL_MACHINE.%s
Provides the name of the environmental variable that contains information about the nthvirtual machine in the backup. You must set this variable before executing any userdefined scripts during a backup.
For example, the environmental variable VIRTUAL_MACHINE.2 provides informationabout the second virtual machine in the backup.
storage.connection.timeout=600000
When you use VSC with SnapCenter, VSC pushes the storage credentials to theSnapCenter Server. This value specifies the maximum timeout value in milliseconds thatthe SnapCenter Server will wait for a response from the storage system.
vmware.esx.ip.kernel.ip.map
There is no default value. You use this value to map the ESX IP address to the VMkernelIP address. By default, VSC uses the management VMkernel adapter IP address of theESX host. If you want VSC to use a different VMkernel adapter IP address, you mustprovide an override value.
In this example, the management VMkernel adapter IP address is 10.225.10.56; however,VSC uses the specified address of 10.225.20.59.
vmware.esx.ip.kernel.ip.map=10.225.10.56:10.225.20.59,
10.225.85.57:10.225.72.58
Troubleshooting | 131

vmware.max.concurrent.snapshots=6
Specifies the maximum number of concurrent VMware snapshots that VSC performs onthe server.
This number is checked on a per datastore basis.
vmware.query.unresolved.retry.count=10
Specifies the maximum number of times VSC retries sending a query about unresolvedvolumes because of “...time limit for holding off I/O...” errors.
vmware.query.unresolved.retry.delay= 60000
Specifies the maximum amount of time in milliseconds that VSC waits between sendingthe queries regarding unresolved volumes because of “...time limit for holding off I/O...”errors. This error occurs when cloning a VMFS datastore.
vmware.quiesce.retry.count=0
Specifies the maximum number of times VSC retries sending a query about VMwaresnapshots because of “...time limit for holding off I/O...” errors during a backup.
vmware.quiesce.retry.interval=5
Specifies the maximum amount of time in milliseconds that VSC waits between sendingthe queries regarding VMware snapshot “...time limit for holding off I/O...” errors duringa backup.
Values that you can change in the smvi.override configuration file
vmware.max.concurrent.snapshots=6
Specifies six as the default maximum number of VMware snapshots created or deleted perdatastore during a backup.
vmware.quiesce.retry.count=0
Specifies zero as the maximum number of retry attempts for VMware snapshots.
vmware.quiesce.retry.interval=5
Specifies the amount of time, in seconds, between retry attempts for VMware snapshots.
vim.client.log.verbose=true
When the value is true, logs the interactions between the SMVI server and the vCenterserver.
smvi.script.timeout.seconds=120
Specifies the SMVI timeout value for a prebackup or postbackup script, which is when theSMVI server stops waiting for the script to finish running.
smvi.snapshot.recent.naming
Disables the snapshot naming convention that adds the _recent suffix to the latestSnapshot copy. To disable the _recent naming convention, you must add thesmvi.snapshot.recent.naming property, with the value set to false, to thesmvi.override configuration file.
Location of backup event and error logs
Virtual Storage Console logs both server messages and messages between the server and the userinterface, including detailed information about event messages and errors. Reviewing these logs helpsyou troubleshoot any errors that occur during backup or restore operations.
The log files are stored under the installation directory at the following locations:
132 | VSC 6.2.1 for VMware vSphere Installation and Administration Guide

• The server log messages are at C:\Program Files\NetApp\Virtual Storage Console\smvi\server\log\server.log.
• The log messages between the user interface and the server are at C:\Program Files\NetApp\Virtual Storage Console\log\smvi.log.
Email notification for scheduled backup contains a broken link
If you click the link to view the log files in the email notification for a backup job and the IP addressof the network adapters for the SMVI log viewer has been disabled, you receive an error message.
You must always have the IP address of the network adapters for the SMVI log viewer enabled. Youcan enable the IP address in the following ways:
• In Windows 2003, Windows 2008, Windows 2008 R2, and Windows 7 environments, selectControl Panel > Network connections > Network and Sharing Center.
• In Windows Vista and Windows XP environments, select Control Panel > Networkconnections.
You may have reached the maximum number of NFS volumes configured inthe vCenter
This message triggers when you attempt to mount a backup copy of an NFS datastore on a StorageVirtual Machine (SVM, formerly known as Vserver) with the root volume in a load-sharing mirrorrelationship.
The mount operation fails with the following message:
You may have reached the maximum number of NFS volumes configuredin the vCenter. Check the vSphere Client for any error messages.
To prevent this problem, when you add a storage system running clustered Data ONTAP to VirtualStorage Console, you must use the cluster management IP address instead of the SVM IP address.
Error writing backup metadata to repository\backups.xml: move failed
You can get a move failed error message when the backup feature attempts to rename a temporaryfile while simultaneously creating a new backups.xml file with updated backup information. The newfile is saved to the repository folder for the backup and restore features.
If you see this error, you must disable any antivirus programs that are currently scanning therepository folder. For a typical Windows installation, the repository is found at the followinglocation:
C:\Program Files\NetApp\Virtual Storage Console\smvi\server\repository.
Virtual Storage Console unable to discover datastores on an SVM (Vserver)without a management LIF
Running a scheduled backup job fails when a Storage Virtual Machine (SVM, formerly known asVserver) without a management LIF is added in Virtual Storage Console. VSC cannot resolve thisSVM and is unable to discover any datastores or volumes on the SVM on which to perform backupor restore operations.
You must add an SVM with a management LIF before you can perform backup or restore operations.
Troubleshooting | 133

VMware vSphere does not remove snapshot delta disks during a restoreoperation
When you restore a backup of a virtual machine on a Windows 2008 or Windows 2008 R2 system,Virtual Storage Console for VMware vSphere does not always remove all snapshot delta disks.
During a backup, VSC creates the quiesced VMware snapshot, which results in the creation ofsnapshot delta disks. However, if you restore the virtual machine, revert to the VMware snapshottaken during the backup process, and then delete it, not all the delta disk files are deleted.
There is no workaround for this issue.
134 | VSC 6.2.1 for VMware vSphere Installation and Administration Guide

Copyright information
Copyright © 1994–2017 NetApp, Inc. All rights reserved. Printed in the U.S.
No part of this document covered by copyright may be reproduced in any form or by any means—graphic, electronic, or mechanical, including photocopying, recording, taping, or storage in anelectronic retrieval system—without prior written permission of the copyright owner.
Software derived from copyrighted NetApp material is subject to the following license anddisclaimer:
THIS SOFTWARE IS PROVIDED BY NETAPP "AS IS" AND WITHOUT ANY EXPRESS ORIMPLIED WARRANTIES, INCLUDING, BUT NOT LIMITED TO, THE IMPLIEDWARRANTIES OF MERCHANTABILITY AND FITNESS FOR A PARTICULAR PURPOSE,WHICH ARE HEREBY DISCLAIMED. IN NO EVENT SHALL NETAPP BE LIABLE FOR ANYDIRECT, INDIRECT, INCIDENTAL, SPECIAL, EXEMPLARY, OR CONSEQUENTIALDAMAGES (INCLUDING, BUT NOT LIMITED TO, PROCUREMENT OF SUBSTITUTEGOODS OR SERVICES; LOSS OF USE, DATA, OR PROFITS; OR BUSINESS INTERRUPTION)HOWEVER CAUSED AND ON ANY THEORY OF LIABILITY, WHETHER IN CONTRACT,STRICT LIABILITY, OR TORT (INCLUDING NEGLIGENCE OR OTHERWISE) ARISING INANY WAY OUT OF THE USE OF THIS SOFTWARE, EVEN IF ADVISED OF THEPOSSIBILITY OF SUCH DAMAGE.
NetApp reserves the right to change any products described herein at any time, and without notice.NetApp assumes no responsibility or liability arising from the use of products described herein,except as expressly agreed to in writing by NetApp. The use or purchase of this product does notconvey a license under any patent rights, trademark rights, or any other intellectual property rights ofNetApp.
The product described in this manual may be protected by one or more U.S. patents, foreign patents,or pending applications.
RESTRICTED RIGHTS LEGEND: Use, duplication, or disclosure by the government is subject torestrictions as set forth in subparagraph (c)(1)(ii) of the Rights in Technical Data and ComputerSoftware clause at DFARS 252.277-7103 (October 1988) and FAR 52-227-19 (June 1987).
135

Trademark information
Active IQ, AltaVault, Arch Design, ASUP, AutoSupport, Campaign Express, Clustered Data ONTAP,Customer Fitness, Data ONTAP, DataMotion, Element, Fitness, Flash Accel, Flash Cache, FlashPool, FlexArray, FlexCache, FlexClone, FlexPod, FlexScale, FlexShare, FlexVol, FPolicy, Fueled bySolidFire, GetSuccessful, Helix Design, LockVault, Manage ONTAP, MetroCluster, MultiStore,NetApp, NetApp Insight, OnCommand, ONTAP, ONTAPI, RAID DP, RAID-TEC, SANscreen,SANshare, SANtricity, SecureShare, Simplicity, Simulate ONTAP, Snap Creator, SnapCenter,SnapCopy, SnapDrive, SnapIntegrator, SnapLock, SnapManager, SnapMirror, SnapMover,SnapProtect, SnapRestore, Snapshot, SnapValidator, SnapVault, SolidFire, SolidFire Helix,StorageGRID, SyncMirror, Tech OnTap, Unbound Cloud, and WAFL and other names aretrademarks or registered trademarks of NetApp, Inc., in the United States, and/or other countries. Allother brands or products are trademarks or registered trademarks of their respective holders andshould be treated as such. A current list of NetApp trademarks is available on the web.
http://www.netapp.com/us/legal/netapptmlist.aspx
136

How to send comments about documentation andreceive update notifications
You can help us to improve the quality of our documentation by sending us your feedback. You canreceive automatic notification when production-level (GA/FCS) documentation is initially released orimportant changes are made to existing production-level documents.
If you have suggestions for improving this document, send us your comments by email.
To help us direct your comments to the correct division, include in the subject line the product name,version, and operating system.
If you want to be notified automatically when production-level documentation is released orimportant changes are made to existing production-level documents, follow Twitter account@NetAppDoc.
You can also contact us in the following ways:
• NetApp, Inc., 495 East Java Drive, Sunnyvale, CA 94089 U.S.
• Telephone: +1 (408) 822-6000
• Fax: +1 (408) 822-4501
• Support telephone: +1 (888) 463-8277
137

Index
32-bit installationsupgrading VSC to 64-bit installations 30
64-bit installationsupgrading VSC from 32-bit installations 30
A
accountsconfiguring with RBAC 68
active backup jobssuspending 118
alignmentschecking the state of virtual machines 102performing an online alignment 104scanning datastores to determine for virtualmachines 101
architectureVSC 15
attachingvirtual disks 125
AutoSupport messagesenabling for backup jobs 53
B
backing upabout 14
backup copiesfinding 121mounting 122restoring data from 121searching for 121unmounting from ESX servers 123
backup jobsconsiderations for restoring data from backups withfailed VMware consistency snapshots 121creating automated policies for email alerts 113creating for virtual machines, datastores, ordatacenters 113deleting scheduled 119enabling AutoSupport messages for 53modifying job properties of scheduled 118resuming suspended 119retention policies 113scheduling 113scripts 108setting up alert notifications 54SnapMirror and SnapVault requirements 108Snapshot and SnapRestore requirements 108specifications for adding 108suspending 118troubleshooting 130
backup mount errorsYou may have reached the maximum number of NFSvolumes configured in the vCenter 133
backup operationsintroduction to workflow 107on-demand backups 112
backup policiescreating 110setup specifications 108
backup retentionspecifying 108
backup scriptscontrolling the runtime of 130technical report that describes creating 108
C
CD-ROMadding to virtual machine 39
Citrix 51Citrix XenDesktop
adding connection brokers 51importing clone data into 88
clone data 51clone operation 51clones
creating from a template 88importing clone data into connection broker 88redeploying from a template 95
commentshow to send feedback about documentation 137
Communitiesprovide information about VSC 128
concurrent VMware snapshotscontrolling the number created or deleted 130
configurationtroubleshooting 130troubleshooting VSC for VMware vSphere 128VSC for VMware vSphere 43
connection broker 53connection brokers
adding 51importing clone data into 88
Connection brokers panel 51controller
removing skipped or unmanaged 79supports vFiler unit, SVM tunneling 75
copiesunmounting backup, from ESX servers 123
creatingbackup policy 110backup policy in systems running ONTAP 8.2.2 orlater 110
credentialsdefault for storage controllers 73modifying storage system credentials 76overview 72setting for storage system 73upgrade considerations 26using RBAC 68
csv 51custom user accounts
configuring using RBAC 68
138 | VSC 6.2.1 for VMware vSphere Installation and Administration Guide

D
datacenterscreating backup jobs for 113
datastoresadding to existing backup jobs 117backing up with the VSC backup feature 115cloning 12creating backup jobs for 113destroying 99enabling deduplication on 91enabling mounting across subnets 55including in on-demand backups 112migrating virtual machines to 93mounting on hosts 97NFS indirect path 82provisioning 12, 85requirements for backing up 108resizing 98restoring 124restoring virtual disks on 124returning space to (NFS only) 97scanning to determine virtual machine alignment 101scheduling backup jobs using SnapCenter 114searching for backup copies of 121unable to discover on a Storage Virtual Machine 133VSC backup and restore features 14
deduplicationchecking the state of 91enabling 91
default credentialsfor storage controllers 73setting for storage system 73
delta disksnot removed during restore 134
detachingvirtual disks 126
discoveringhosts 76storage systems 76
discoverycorrecting unknown storage system name 80enabling for vFiler units 75, 76manually adding storage systems to VSC 77
Disk.QFullSampleSize 36Disk.QFullThreshold 36disks
detaching virtual 126restoring 125
documentationchanges to this guide 7how to receive automatic notification of changes to137how to send feedback about 137
E
email alert notificationsconfiguring 54
email alertsspecifying for backup jobs 108
email notification errors 133Emulex FC HBA timeouts 36
error logslocations 132reviewing 132
error messagesmove failed 133You may have reached the maximum number of NFSvolumes configured in the vCenter 133
ESX hostsconfiguring multipathing and timeout settings 35restoring virtual disks on VMFS datastores 124settings 36timeout values 38
ESX server and guest operating systemset by default 35
ESX serversmounting backup copies onto 122
event logslocations 132reviewing 132
existing backup copiesmounting 122
F
failed consistency snapshotsconsiderations for restore operations backed up withVMware 121
feedbackhow to send comments about documentation 137
filesattaching virtual disks 125
files, logcollecting 129
G
guest OSinstalling scripts 39setting timeouts for Linux 40setting timeouts for Solaris 42setting timeouts for Windows 42timeout values 38
H
hostsconfiguring multipathing and timeout settings forESX 35discovering 76mounting datastores on 97
httpd.admin.enable option 75
I
informationabout known problems and limitations 128how to send feedback about improvingdocumentation 137locating in this guide 8
information in release notesrelease notes information 128
installation
Index | 139

overview of VSC installation 21planning VSC installation 17troubleshooting VSC for VMware vSphere 128
installation wizardinstalling VSC 25
installingguest operating system (GOS) scripts 39using silent mode 26
installing VSCupgrading from 32-bit to 64-bit 30using installation wizard 25
iSCSIenabling datastore mounting across subnets 55
issuesdatastore discovery 133VMware snapshot delta disks not removed duringrestore 134You may have reached the maximum number of NFSvolumes configured in the vCenter error 133
J
jobscreating backups for virtual machines, datastores, ordatacenters 113modifying job properties of scheduled backup 118
K
kaminoprefs.xmlmodifying to enable datastore mounting acrosssubnets 55
kaminosdkprefs.xmlmodifying to enable datastore mounting acrosssubnets 55
L
Linuxsetting timeouts for guest OS 40
linux_gos_timeout-install.isoguest OS tool 40
locations of log fileslisted 132
lock managementVSC 15
log filescollecting 129
logserrors 132events 132locations 132message 132reviewing 132troubleshooting 132
M
memory requirementsVSC 23
message logslocations 132
reviewing 132MetroCluster configurations
manually adding storage systems to VSC 77using with VSC 55
Microsoft Windows vCenter Serverremoving vSphere Web Client UI extensions from 29
misaligned virtual machineshow VSC optimizes them 13
Modify Backup Job dialog boxusing to modify backup job properties 118
multi-vCenter environmentfor VSC 50
multipathingconfiguring ESX hosts 35
multiple vCenter Serversspecifying a vCenter Server in tasks 50using with VSC 50
MultiStoredisplay differences with vFiler units 81
N
Net.TcpipHeapMax 36Net.TcpipHeapSize 36NetApp Communities
See CommunitiesNetApp Support Site
troubleshooting information 128NFS
enabling datastore mounting across subnets 55NFS datastore backups
mounting a backup fails 133NFS paths
changing frequency of optimization checks 56changing to direct access 83indirect path 82
NFS VAAI Plug-ininstalling 33
NFS.HeartbeatFrequency 36NFS.HeartbeatMaxFailures 36NFS.HeartbeatTimeout 36NFS.MaxVolumes 36
O
objectstorage system 60vSphere 60
objectsstorage systems 58vSphere 58
on-demand backupsperforming 112
OnCommand System ManagerSee System Manager
operationsmounting backup copies 122
optimization checksby setting the frequency of NFS path 56
organizationusing this guide 8
140 | VSC 6.2.1 for VMware vSphere Installation and Administration Guide

P
parametersESX hosts 36
path selection policy 36paths
changing to direct NFS paths 83permission
vCenter Server 60permissions
vCenter Server 58plug-ins
supported with VSC 12ports
VSC communication ports 49preferences files
what they are 55privileges
example of assigning privileges 61example of View privilege 65native vCenter Server 58, 60product level 65Virtual Storage Console 65VSC specific 58, 60
protectionlock management, using 15
protection of system resourcesusing lock management 15
provisioningdatastores 85
provisioning and cloningabout 12
Q
QLogicFC HBA timeouts 36iSCSI HBA IP_ARP_Redirect 36iSCSI HBA timeouts 36
R
RBACabout 57configuring 68considerations when upgrading VSC 26Data ONTAP 66Data ONTAP privileges 57Data ONTAP roles 67standard VSC roles 62vCenter privileges 57vCenter Server 58
registeringVirtual Storage Console with SnapCenter 44Virtual Storage Console with vCenter Server 43
reinstallation prerequisitesremoving vSphere Web Client UI extensions fromMicrosoft Windows vCenter Server 29removing vSphere Web Client UI extensions fromvCSA 28ways to remove vSphere Web Client UI extensions28
release notesinformation available 128
Remove Controller command 79replacing
SSL certificates 48required ports
firewall requirements 49VSC 49
requirementsbackup job 108
resourcesdiscovering and adding 76
restore operationsattaching a virtual disk 125considerations when using data backed up withfailed VMware consistency snapshots 121enabling AutoSupport messages for 53from backup copies 121mounting backup copies 122restoring datastores 124troubleshooting 130
Restore wizardusing to restore virtual machines or disk files 124
restoringabout 14
resumptionof suspended backup jobs 119
role-based access controlSee RBAC
rolesconfiguring with RBAC 68
S
scbr.override filemodifying default values 130purpose 130
Schedule Backup wizardconfiguring alert notifications 54using with SnapCenter to back up virtual machinesor datastores 114using with the VSC backup feature 115
scheduled backup jobsadding a virtual machine or datastore 117deleting 119for virtual machines or datastores 115modifying job properties 118of virtual machines or datastores with SnapCenter114
scriptschoosing for backup jobs 108technical report with information about backupscripts 108
scripts, guest operating system (GOS)installing 39
securityconfiguring using RBAC 68
servers, ESXconfiguring multipathing and timeout settings forESX 35
setting upESX server and guest operating system 35
settings
Index | 141

ESX hosts 36ESX, ESXi host 38
silent modeusing to install VSC for VMware vSphere 26using to uninstall VSC 32
skipped controllerremoving 79
SMTP serverspecifying for alert notifications 54
SMVIlicense requirements 108regenerating SSL certificate 47
SMVI log viewerenabling network adapters 133
smvi.override filemodifying default values 130purpose 130
SnapCenterregistering Virtual Storage Console with 44scheduling backup jobs 114setting up SVMs to work with VSC 82SVM credentials do not support VSC 45VSC requirements 23
SnapMirror requirementsfor backing up datastores and virtual machines 108
SnapRestore requirementsfor backing up datastores and virtual machines 108
snapshot delta disksnot removed during restore 134
Snapshot requirementsfor backing up datastores and virtual machines 108
snapshotsconsiderations for restore operations backed up withfailed VMware consistency 121
SnapVault requirementsfor backing up datastores and virtual machines 108
Solarissetting timeouts for guest OS 42
solaris_gos_timeout-install.isoguest OS tool 42
spanned entitiesbacking up 108
SSL certificateregenerating 47regenerating for SMVI 47
SSL certificatesreplacing 48
storage controllerremoving skipped or unmanaged 79using default credentials 73
storage credentialsoverview 72
Storage Distributed Resource SchedulerSee SDRS
storage resourcesdiscovering and adding 76
storage system discoveryoverview 72
storage system namescorrecting when unknown 80
storage systemsadding to VSC manually 77assigning permissions 58, 60
configuring using RBAC 68discovering and adding 76discovery and credentials overview 72modifying credentials 76RBAC privileges 57setting default credentials 73specifying a vCenter Server 50specifying volume settings 80updating 78VSC and SVMs connections 82
Storage Virtual Machinemanagement LIF 133
suggestionshow to send feedback about documentation 137
supported configurationsmemory requirements 23VSC 23
suspended backup jobsresuming 119
suspensionof active backup jobs 118
SVMsconnecting with VSC storage 82limitations with direct connections to VSC storage82SnapCenter requires direct connections 82VSC credentials required 45
system resourcesprotection using lock management 15
systemsdiscovery and credentials overview 72
T
tasksaccessing from VSC 71
templatescloning new virtual machines from 88redeploying virtual machines from 95
timeout settingsconfiguring ESX hosts 35
timeout valuesESX hosts 36ESX, ESXi host 38recommended values 38setting for guest OS 38
toolssetting Linux guest OS timeouts 40setting Solaris guest OS timeouts 42setting Windows guest OS timeouts 42
troubleshootingbackup and restore operations 130collecting log files 129email notification errors 133error writing backup metadata to repository 133logs 132move failure 133NetApp Support Site 128unable to discover datastores 133VMware snapshot delta disks not removed duringrestore 134You may have reached the maximum number of NFSvolumes configured in the vCenter error 133
142 | VSC 6.2.1 for VMware vSphere Installation and Administration Guide

tunnelingsupported for vFiler units, SVMs 75
Twitterhow to receive automatic notification ofdocumentation changes 137
U
UI extensionsremoving from Microsoft Windows vCenter Server28removing from VMware vCenter Server VirtualAppliance 28
uninstallingVSC for VMware vSphere using Add/RemovePrograms 32VSC using a command line 32VSC using silent mode 32
unknown storage system namescorrecting 80
unmanaged controllerremoving 79
UNMAP parameterturned off 38
update commandforces storage system discovery 72
updatingresource information 76
upgrade considerationsplanning your VSC upgrade 26
upgrade prerequisitesremoving vSphere Web Client UI extensions fromMicrosoft Windows vCenter Server 29removing vSphere Web Client UI extensions fromvCSA 28ways to remove vSphere Web Client UI extensions28
upgradesstandard upgrade for VSC 29
upgrading VSCfrom 32-bit to 64-bit 30planning your upgrade 26
user credentialsbackup job 108
user interfacesinstallation software 33VASA Provider 33
user nameconfiguring custom with RBAC 68
user privilegescontrolling using RBAC 57
V
VASA Providerinstallation software 33registering with VSC 45storage capability profiles 33supported with VSC 12unregistering before VSC upgrade 26user interfaces 33VSC GUI 33
VSC requirement 23vCenter inventory
RBAC privileges 57vCenter object
RBAC privileges 57vCenter Server
permission 60permissions 58registering Virtual Storage Console with 43standard VSC roles 62using with multiple servers with VSC 50
vCSAremoving vSphere Web Client UI extensions from 28
vFiler unitdisplay differences with physical storage controllers81enabling discovery 75tunneling supported 75
vFiler unitsdiscovering on private networks 76
View privilegeexample 61, 65
virtual appliancessupported with VSC 12
virtual disksdetaching 126restoring files 125
virtual entitiesbacking up 108
virtual machineadding CD-ROM 39
virtual machinesadding to existing backup jobs 117aligning I/O non-disruptively 104backing up with the VSC backup feature 115checking the alignment of 102cloning 12cloning from a template 88creating backup jobs for 113deploying 85how VSC optimizes misaligned virtual machines 13including in on-demand backups 112methods for migrating 13migrating a group 93provisioning 12reclaiming space from (NFS only) 97redeploying from a template 95requirements for backing up 108restarting after a restore operation 124restoring 124scanning to determine alignment 101scheduling backup jobs using SnapCenter 114searching for backup copies of 121VSC backup and restore features 14
Virtual Storage Consolechecking optimization of NFS paths 56example of product privilege 61, 65manually adding storage systems to 77privileges 65registering with vCenter Server 43standard roles 62
VMware consistency snapshots
Index | 143

considerations for restore operations backed up withfailed 121
VMware snapshot delta disksnot removed during restore 134
VMware View Serveradding connection brokers 51importing clone data into 88
VMware vSphereinstallation overview of VSC 21
volumesenabling deduplication 91managing settings 80specifying settings 80
VSCaccessing tasks 71architecture 15backup and restore features 14backup operations workflow 107changes to this guide 7configuration tasks 35Data ONTAP RBAC roles 67detaching virtual disks 126firewall port requirements 49how it optimizes misaligned virtual machines 13installation overview 21installing in silent mode 26installing using installation wizard 25lifecycle management for VMware environments 11limitations with direct connections to SVMs 82lock management 15manually adding storage systems to 77memory requirements 23MetroCluster support 23overview 11overwriting SnapCenter credentials for SVMs 45performing initial installations 25planning your installation 17provisioning and cloning 12regenerating an SSL certificate 47registering VASA Provider 45registering with SnapCenter 44required ports 49requirements for performing tasks 70restoring data from backup copies 124selecting a vCenter Server for a task 50SnapCenter requirements 23support for Data ONTAP RBAC 66support for MetroCluster configurations 55support for vCenter Server RBAC 58
supported configurations 23supported plug-ins 12SVMs connections SVMs 82SVMs in a SnapCenter environment 82uninstalling using a command line 32uninstalling using silent mode 32unregistered VASA Provider 26upgrade considerations 26upgrading from 32-bit installations 30upgrading the software 29using multiple vCenter Servers 50using this guide 8VASA Provider requirement 23
VSC CommunitiesSee Communities
VSC for VMware vSphereconfiguration 43uninstalling using Add/Remove Programs 32
Vservertunneling supported 75
VserversSee SVMs
vSphereobject 60objects 58
vSphere Web Client UI extensionsremoving from Microsoft Windows vCenter Server29removing from vCSA 28removing from VMware vCenter Server VirtualAppliance 28ways to remove 28
W
Windowssetting timeouts for guest OS 42
windows_gos_timeout.isoguest OS tool 42
wizardsinstalling VSC for VMware 25restoring virtual machines or disk files 124
X
XenDesktopadding connection brokers 51See also Citrix XenDesktop
144 | VSC 6.2.1 for VMware vSphere Installation and Administration Guide