ownCloud Administration Manual - ownCloud Documentation
641
ownCloud Administration Manual The ownCloud Team Version: 10.7, December 15, 2021
-
Upload
khangminh22 -
Category
Documents
-
view
0 -
download
0
Transcript of ownCloud Administration Manual - ownCloud Documentation
ownCloud Administration Manual
The ownCloud Team
Version: 10.7, December 15, 2021
Table of Contents
Introduction. . . . . . . . . . . . . . . . . . . . . . . . . . . . . . . . . . . . . . . . . . . . . . . . . . . . . . . . . . . . . . . . . . . . . . . . . . . . . 1
ownCloud Videos and Blogs. . . . . . . . . . . . . . . . . . . . . . . . . . . . . . . . . . . . . . . . . . . . . . . . . . . . . . . . . . . . . 1
Target Audience . . . . . . . . . . . . . . . . . . . . . . . . . . . . . . . . . . . . . . . . . . . . . . . . . . . . . . . . . . . . . . . . . . . . . . . 1
Frequently Asked Questions . . . . . . . . . . . . . . . . . . . . . . . . . . . . . . . . . . . . . . . . . . . . . . . . . . . . . . . . . . . . . . 2
I want to upgrade from Community Version to Enterprise Version. What are the changes?. . . . . . 2
How do I transfer files from one user to another?. . . . . . . . . . . . . . . . . . . . . . . . . . . . . . . . . . . . . . . . . . 2
How do I deal with problems caused by using self-signed SSL certificates? . . . . . . . . . . . . . . . . . . . . 2
I’m the admin and I lost my password! What do I do now! . . . . . . . . . . . . . . . . . . . . . . . . . . . . . . . . . . . 2
What is a Federated System?. . . . . . . . . . . . . . . . . . . . . . . . . . . . . . . . . . . . . . . . . . . . . . . . . . . . . . . . . . . . 2
Platform-wide known limitations, excluded files . . . . . . . . . . . . . . . . . . . . . . . . . . . . . . . . . . . . . . . . . . . 2
Installation . . . . . . . . . . . . . . . . . . . . . . . . . . . . . . . . . . . . . . . . . . . . . . . . . . . . . . . . . . . . . . . . . . . . . . . . . . . . . . 3
Manual Installation . . . . . . . . . . . . . . . . . . . . . . . . . . . . . . . . . . . . . . . . . . . . . . . . . . . . . . . . . . . . . . . . . . . . 3
Installing With Docker . . . . . . . . . . . . . . . . . . . . . . . . . . . . . . . . . . . . . . . . . . . . . . . . . . . . . . . . . . . . . . . . . . 3
Example Installation on Ubuntu . . . . . . . . . . . . . . . . . . . . . . . . . . . . . . . . . . . . . . . . . . . . . . . . . . . . . . . . . 3
Linux Package Manager . . . . . . . . . . . . . . . . . . . . . . . . . . . . . . . . . . . . . . . . . . . . . . . . . . . . . . . . . . . . . . . . 3
Deployment Considerations . . . . . . . . . . . . . . . . . . . . . . . . . . . . . . . . . . . . . . . . . . . . . . . . . . . . . . . . . . . . 3
Deployment Recommendations . . . . . . . . . . . . . . . . . . . . . . . . . . . . . . . . . . . . . . . . . . . . . . . . . . . . . . . . . 5
System Requirements. . . . . . . . . . . . . . . . . . . . . . . . . . . . . . . . . . . . . . . . . . . . . . . . . . . . . . . . . . . . . . . . . 18
Configuration Notes and Tips . . . . . . . . . . . . . . . . . . . . . . . . . . . . . . . . . . . . . . . . . . . . . . . . . . . . . . . . . . 20
Installation. . . . . . . . . . . . . . . . . . . . . . . . . . . . . . . . . . . . . . . . . . . . . . . . . . . . . . . . . . . . . . . . . . . . . . . . . . . 24
Troubleshooting. . . . . . . . . . . . . . . . . . . . . . . . . . . . . . . . . . . . . . . . . . . . . . . . . . . . . . . . . . . . . . . . . . . . . . 52
Changing Your ownCloud URL. . . . . . . . . . . . . . . . . . . . . . . . . . . . . . . . . . . . . . . . . . . . . . . . . . . . . . . . . . 52
Installing and Managing Apps . . . . . . . . . . . . . . . . . . . . . . . . . . . . . . . . . . . . . . . . . . . . . . . . . . . . . . . . . . 53
Supported Apps in ownCloud . . . . . . . . . . . . . . . . . . . . . . . . . . . . . . . . . . . . . . . . . . . . . . . . . . . . . . . . . . 56
SELinux Configuration. . . . . . . . . . . . . . . . . . . . . . . . . . . . . . . . . . . . . . . . . . . . . . . . . . . . . . . . . . . . . . . . . 58
Let’s Encrypt SSL Certificates. . . . . . . . . . . . . . . . . . . . . . . . . . . . . . . . . . . . . . . . . . . . . . . . . . . . . . . . . . . 61
Configuration . . . . . . . . . . . . . . . . . . . . . . . . . . . . . . . . . . . . . . . . . . . . . . . . . . . . . . . . . . . . . . . . . . . . . . . . . . 74
Database . . . . . . . . . . . . . . . . . . . . . . . . . . . . . . . . . . . . . . . . . . . . . . . . . . . . . . . . . . . . . . . . . . . . . . . . . . . . 74
Encryption. . . . . . . . . . . . . . . . . . . . . . . . . . . . . . . . . . . . . . . . . . . . . . . . . . . . . . . . . . . . . . . . . . . . . . . . . . . 83
External Storage. . . . . . . . . . . . . . . . . . . . . . . . . . . . . . . . . . . . . . . . . . . . . . . . . . . . . . . . . . . . . . . . . . . . . . 96
Files and Sharing . . . . . . . . . . . . . . . . . . . . . . . . . . . . . . . . . . . . . . . . . . . . . . . . . . . . . . . . . . . . . . . . . . . . 125
Integration . . . . . . . . . . . . . . . . . . . . . . . . . . . . . . . . . . . . . . . . . . . . . . . . . . . . . . . . . . . . . . . . . . . . . . . . . 158
General Topics . . . . . . . . . . . . . . . . . . . . . . . . . . . . . . . . . . . . . . . . . . . . . . . . . . . . . . . . . . . . . . . . . . . . . . 163
Full Text Search . . . . . . . . . . . . . . . . . . . . . . . . . . . . . . . . . . . . . . . . . . . . . . . . . . . . . . . . . . . . . . . . . . . . . 177
Mimetypes Management . . . . . . . . . . . . . . . . . . . . . . . . . . . . . . . . . . . . . . . . . . . . . . . . . . . . . . . . . . . . . 178
Server Configuration. . . . . . . . . . . . . . . . . . . . . . . . . . . . . . . . . . . . . . . . . . . . . . . . . . . . . . . . . . . . . . . . . 182
User . . . . . . . . . . . . . . . . . . . . . . . . . . . . . . . . . . . . . . . . . . . . . . . . . . . . . . . . . . . . . . . . . . . . . . . . . . . . . . . 403
Maintenance. . . . . . . . . . . . . . . . . . . . . . . . . . . . . . . . . . . . . . . . . . . . . . . . . . . . . . . . . . . . . . . . . . . . . . . . . . 437
How to Upgrade Your ownCloud Server . . . . . . . . . . . . . . . . . . . . . . . . . . . . . . . . . . . . . . . . . . . . . . . . 437
Backup and Restore . . . . . . . . . . . . . . . . . . . . . . . . . . . . . . . . . . . . . . . . . . . . . . . . . . . . . . . . . . . . . . . . . 456
Maintenance Mode Configuration . . . . . . . . . . . . . . . . . . . . . . . . . . . . . . . . . . . . . . . . . . . . . . . . . . . . . 462
Data Exporter. . . . . . . . . . . . . . . . . . . . . . . . . . . . . . . . . . . . . . . . . . . . . . . . . . . . . . . . . . . . . . . . . . . . . . . 463
Manually Move a Data Directory. . . . . . . . . . . . . . . . . . . . . . . . . . . . . . . . . . . . . . . . . . . . . . . . . . . . . . . 465
Encryption. . . . . . . . . . . . . . . . . . . . . . . . . . . . . . . . . . . . . . . . . . . . . . . . . . . . . . . . . . . . . . . . . . . . . . . . . . 468
Migrating to a Different Server . . . . . . . . . . . . . . . . . . . . . . . . . . . . . . . . . . . . . . . . . . . . . . . . . . . . . . . . 471
What is the Appliance? . . . . . . . . . . . . . . . . . . . . . . . . . . . . . . . . . . . . . . . . . . . . . . . . . . . . . . . . . . . . . . . . . 476
How to Install the Appliance . . . . . . . . . . . . . . . . . . . . . . . . . . . . . . . . . . . . . . . . . . . . . . . . . . . . . . . . . . 476
Appliance Configuration. . . . . . . . . . . . . . . . . . . . . . . . . . . . . . . . . . . . . . . . . . . . . . . . . . . . . . . . . . . . . . 488
Appliance Maintenance . . . . . . . . . . . . . . . . . . . . . . . . . . . . . . . . . . . . . . . . . . . . . . . . . . . . . . . . . . . . . . 526
Troubleshooting. . . . . . . . . . . . . . . . . . . . . . . . . . . . . . . . . . . . . . . . . . . . . . . . . . . . . . . . . . . . . . . . . . . . . 532
Enterprise Edition . . . . . . . . . . . . . . . . . . . . . . . . . . . . . . . . . . . . . . . . . . . . . . . . . . . . . . . . . . . . . . . . . . . . . 534
Enterprise Clients . . . . . . . . . . . . . . . . . . . . . . . . . . . . . . . . . . . . . . . . . . . . . . . . . . . . . . . . . . . . . . . . . . . 534
Enterprise Collaboration . . . . . . . . . . . . . . . . . . . . . . . . . . . . . . . . . . . . . . . . . . . . . . . . . . . . . . . . . . . . . 534
External Storage . . . . . . . . . . . . . . . . . . . . . . . . . . . . . . . . . . . . . . . . . . . . . . . . . . . . . . . . . . . . . . . . . . . . 538
Enterprise File Management . . . . . . . . . . . . . . . . . . . . . . . . . . . . . . . . . . . . . . . . . . . . . . . . . . . . . . . . . . 572
Enterprise Firewall Configuration . . . . . . . . . . . . . . . . . . . . . . . . . . . . . . . . . . . . . . . . . . . . . . . . . . . . . . 579
Installing & Upgrading ownCloud Enterprise Edition . . . . . . . . . . . . . . . . . . . . . . . . . . . . . . . . . . . . . 585
Enterprise Logging Configuration. . . . . . . . . . . . . . . . . . . . . . . . . . . . . . . . . . . . . . . . . . . . . . . . . . . . . . 591
Enterprise Reporting. . . . . . . . . . . . . . . . . . . . . . . . . . . . . . . . . . . . . . . . . . . . . . . . . . . . . . . . . . . . . . . . . 606
Enterprise Security . . . . . . . . . . . . . . . . . . . . . . . . . . . . . . . . . . . . . . . . . . . . . . . . . . . . . . . . . . . . . . . . . . 610
Enterprise Server Branding . . . . . . . . . . . . . . . . . . . . . . . . . . . . . . . . . . . . . . . . . . . . . . . . . . . . . . . . . . . 613
Enterprise User Management. . . . . . . . . . . . . . . . . . . . . . . . . . . . . . . . . . . . . . . . . . . . . . . . . . . . . . . . . 614
Document Classification and Policy Enforcement . . . . . . . . . . . . . . . . . . . . . . . . . . . . . . . . . . . . . . . . . . 626
Introduction . . . . . . . . . . . . . . . . . . . . . . . . . . . . . . . . . . . . . . . . . . . . . . . . . . . . . . . . . . . . . . . . . . . . . . . . 626
Classification. . . . . . . . . . . . . . . . . . . . . . . . . . . . . . . . . . . . . . . . . . . . . . . . . . . . . . . . . . . . . . . . . . . . . . . . 627
General Approach . . . . . . . . . . . . . . . . . . . . . . . . . . . . . . . . . . . . . . . . . . . . . . . . . . . . . . . . . . . . . . . . . . . 629
Policy Enforcement . . . . . . . . . . . . . . . . . . . . . . . . . . . . . . . . . . . . . . . . . . . . . . . . . . . . . . . . . . . . . . . . . . 631
Access Policies . . . . . . . . . . . . . . . . . . . . . . . . . . . . . . . . . . . . . . . . . . . . . . . . . . . . . . . . . . . . . . . . . . . . . . 632
Logging . . . . . . . . . . . . . . . . . . . . . . . . . . . . . . . . . . . . . . . . . . . . . . . . . . . . . . . . . . . . . . . . . . . . . . . . . . . . 633
Limitations . . . . . . . . . . . . . . . . . . . . . . . . . . . . . . . . . . . . . . . . . . . . . . . . . . . . . . . . . . . . . . . . . . . . . . . . . 633
Troubleshooting. . . . . . . . . . . . . . . . . . . . . . . . . . . . . . . . . . . . . . . . . . . . . . . . . . . . . . . . . . . . . . . . . . . . . . . 634
Path and Filename Length Limitations . . . . . . . . . . . . . . . . . . . . . . . . . . . . . . . . . . . . . . . . . . . . . . . . . 634
Retrieve Log Files and Configuration Settings . . . . . . . . . . . . . . . . . . . . . . . . . . . . . . . . . . . . . . . . . . . 635
Have You Found a Mistake In The Documentation? . . . . . . . . . . . . . . . . . . . . . . . . . . . . . . . . . . . . . . . . 638
IntroductionWelcome to the ownCloud Server Administration Guide. This guide describesadministration tasks for ownCloud, the flexible open source file synchronization andsharing solution. ownCloud includes the ownCloud server, which runs on Linux, clientapplications for Microsoft Windows, Mac OS X and Linux, and mobile clients for theAndroid and Apple iOS operating systems.
Current editions of ownCloud manuals are always available online atdoc.owncloud.com.
ownCloud server is available in three editions:
• The free community-supported server. This is the core server for all editions.• The Standard Subscription for customers who want paid support for the core
Server, without Enterprise applications.• The Enterprise Subscription provides paid support for the Enterprise Edition. This
includes the core Server and Enterprise apps.
ownCloud Videos and Blogs
See the official ownCloud channel and ownClouders community channel on YouTubefor tutorials, overviews, and conference videos. Visit News to stay up to date.
Target Audience
This guide is for users who want to install, administer, and optimize their ownCloudservers. To learn more about the ownCloud Web user interface, and desktop andmobile clients, please refer to their respective manuals:
• ownCloud User Manual• ownCloud Desktop Client• ownCloud Android App• ownCloud iOS App
Unresolved directive in <stdin> -include::modules/admin_manual/pages/release_notes.adoc[leveloffset=+1]
ownCloud Videos and Blogs | 1
Frequently Asked Questions
I want to upgrade from Community Version toEnterprise Version. What are the changes?
In ownCloud Enterprise you will get access to new apps and features, mainly targetedtowards enterprises; apps and features that ensure security, for example.
You can upgrade to the Enterprise version without concern, as your existing files,shares, and users remain as they are.
How do I transfer files from one user to another?
See transferring files to another user.
How do I deal with problems caused by using self-signed SSL certificates?
See the security section of the OCC command.
I’m the admin and I lost my password! What do I donow!
See the reset admin password documentation.
What is a Federated System?
A Federated System is another ownCloud or OpenCloudMesh supporting cloudservice.
Platform-wide known limitations, excluded files
There are known file names that can not be synced with ownCloud, these are:
• Folders and files with a trailing space.• .htaccess.• *.part files.• File names that exceed 253 characters.• client/sync-exclude.list.• Desktop.ini in the root directory.• UNIX/Linux hidden files (files whose names have a leading dot, e.g., .12345.pdf).
Users must activate "sync hidden files" to sync them.
2 | I want to upgrade from Community Version to Enterprise Version. What are the changes?

InstallationYou can install ownCloud in multiple ways, here are our trusted guides:
Manual Installation
This is a thorough guide to installing ownCloud, containing all the information neededfor the prerequisites, the dependencies, the actual installation and the configurationafterwards.
Installing With Docker
This guide will show you how to install ownCloud with Docker Compose using ourYAML file.
Example Installation on Ubuntu
This is an example installation on an Ubuntu Server. This guide takes you from a cleanUbuntu server to a finished ownCloud installation in the minimal steps required. Allcommands are written down and are easy to copy and paste in to your terminal.
Linux Package Manager
This guide shows you how to install ownCloud with the Ubuntu Package Manager.
Deployment Considerations
Hardware
• Solid-state drives (SSDs) for I/O.• Separate hard disks for storage and database, SSDs for databases.• Multiple network interfaces to distribute server synchronisation and backend
traffic across multiple subnets.
Single Machine / Scale-Up Deployment
The single-machine deployment is widely used in the community.
Pros:
• Easy setup: no session storage daemon, use tmpfs and memory caching to enhanceperformance, local storage.
• No network latency to consider.• To scale buy a bigger CPU, more memory, larger hard drive, or additional hard
drives.
Cons:
• Fewer high availability options.• The amount of data in ownCloud tends to continually grow. Eventually a single
machine will not scale; I/O performance decreases and becomes a bottleneck withmultiple up- and downloads, even with solid-state drives.
Manual Installation | 3
Scale-Out Deployment
Provider setup:
• DNS round robin to HAProxy servers (2-n, SSL offloading, cache static resources)• Least load to Apache servers (2-n)• Memcached/Redis for shared session storage (2-n)• Database cluster with single primary, multiple replicas and proxy to split requests
accordingly (2-n)• GPFS or Ceph via phprados (2-n, 3 to be safe, Ceph 10+ nodes to see speed
benefits under load)• In case of clustering, your cluster nodes must have the same ownCloud
configuration including an identical config.php to avoid any potential issues.
Pros:
• Components can be scaled as needed.• High availability.• Test migrations easier.
Cons:
• More complicated to setup.• Network becomes the bottleneck (10GB Ethernet recommended).• Currently DB filecache table will grow rapidly, making migrations painful in case
the table is altered.
A Single primary DB is Single Point of Failure, Does Not Scale
When primary fails another replica can become primary. However, the increasedcomplexity carries some risks: Multi-primary has the risk of split brain, and deadlocks.ownCloud tries to solve the problem of deadlocks with high-level file locking.
Software
Operating System
We are dependent on distributions that offer an easy way to install the variouscomponents in up-to-date versions. ownCloud has a partnership with RedHat andSUSE for customers who need commercial support. Canonical, the parent company ofUbuntu Linux, also offers enterprise service and support. Debian and Ubuntu are freeof cost, and include newer software packages. CentOS is the community-supportedfree-of-cost Red Hat Enterprise Linux clone. openSUSE is community-supported, andincludes many of the same system administration tools as SUSE Linux EnterpriseServer.
Web server
Apache with mod_php is currently the best option. Mod_php is recommended insteadof PHP_FPM, because in scale-out deployments separate PHP pools are not necessary.
Relational Database
More often than not the customer already has an opinion on what database to use. Ingeneral, the recommendation is to use what their database administrator is mostfamiliar with. Taking into account what we are seeing at customer deployments, we
4 | Deployment Considerations

recommend MySQL/MariaDB in a primary-replica deployment with a MySQL proxy infront of them to send updates to primary, and selects to the replica(s).
The second-best option is PostgreSQL (alter table does not lock table, which makesmigration less painful) although we have yet to find a customer who uses a primary-replica setup.
What about the other DBMS?
• Sqlite is adequate for simple testing, and for low-load single-user deployments. It isnot adequate for production systems.
• Microsoft SQL Server is not a supported option.• Oracle DB is the de facto standard at large enterprises and is fully supported with
ownCloud Enterprise Edition only.
File Storage
While many customers are starting with NFS, sooner or later that requires scale-outstorage. Currently the options are GPFS or GlusterFS, or an object store protocol likeS3. S3 also allows access to Ceph Storage.
Session Storage
• Redis is required for transactional file locking Transactional File Locking, providessession persistence, and graphical inspection tools available.
• If you need to scale out Shibboleth you must use Memcached, as Shibboleth doesnot provide an interface to Redis. Memcached can also be used to scale-out shibdsession storage (see Memcache StorageService).
Deployment Recommendations
Introduction
This document is a guide for technical measures to size your physical environmentregarding some general setups described in the scenarios below. It focuses on thesoftware stack and may include some hardware recommendations. You can use anyhardware as long the software is capable of running on it and delivers performancethat meets your needs.
Independent of the technical measures, you can decide at any time theownCloud licensing model - the ownCloud Edition.
General Recommendations
"" What is the best way to install and maintain ownCloud?The answer to that is, as always: 'it depends'. ""
This is because every ownCloud customer has their own particular needs and ITinfrastructure. However, both ownCloud and the LAMP stack are highly configurable.Given that, in this document we present a set of general recommendations, followedby three typical scenarios, and finish up with making best-practice recommendationsfor both software and hardware.
Deployment Recommendations | 5
The recommendations presented here are based on a standardownCloud installation, one without any particular apps, themes, or codechanges. But, server load is dependent upon the number of clients,files, and user activity, as well as other usage patterns. Therefore, theserecommendations are only rules of thumb based on our experience andcustomer feedback.
• Operating system: Linux.• Web server: Apache 2.4.• Database: MySQL/MariaDB with InnoDB storage engine (MyISAM is not supported,
see: MySQL / MariaDB storage engine)• And a recent PHP Version. See System Requirements• Consider setting up a scale-out deployment, or using Federated Cloud Sharing to
keep individual ownCloud instances to a manageable size.
Whatever the size of your organization, always keep one thing in mind:The amount of data stored in ownCloud will only grow - planahead.
ownCloud Administrators Must Have Command Line or Cron Access
We only recommend using hosts that provide the following to ownCloud administrators
• command-line access or• Cron access• ideally both of the above
for three key reasons:
1. Without command-line access, OCC commands, required for administrative taskssuch as repairs and upgrades, are not available.
2. Without Crontab access, you cannot run background jobs reliably. ajax/cron.php isavailable, but it is not reliable enough, because it only runs when people are usingthe web UI. Additionally, ownCloud relies heavily on background jobs especially forlong-running operations, which will likely cause PHP timeouts.
3. Default PHP timeout values are often low. Having low timeout settings can breaklong-running operations, such as moving a huge folder.
Scenario 1: Small Workgroups and Departments
This recommendation applies if you meet the following criteria:
Option Value
Number of users Up to 150 users
Storage size 100 GB to 10TB
High availability level • Zero-downtime backups via Btrfs snapshots• Component failure leads to interruption of service• Alternate backup scheme on other filesystems: nightly
backups• With service interruption
6 | Deployment Recommendations
Recommended System Requirements
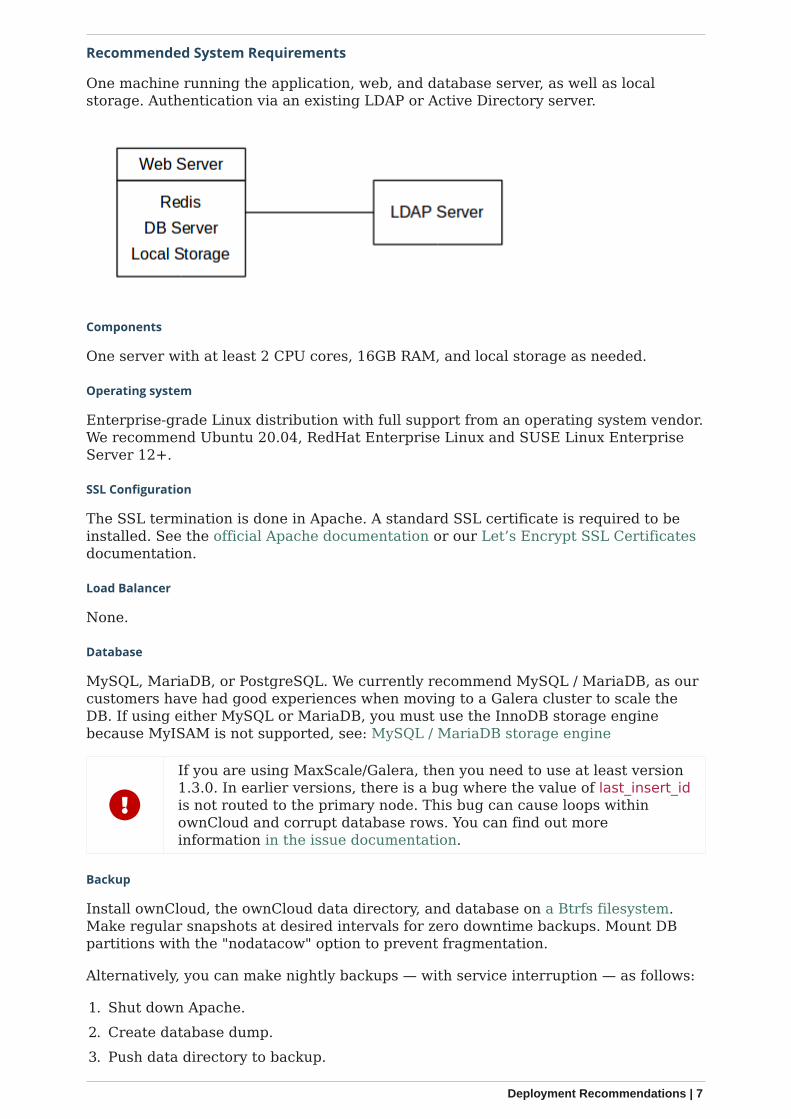
One machine running the application, web, and database server, as well as localstorage. Authentication via an existing LDAP or Active Directory server.
Components
One server with at least 2 CPU cores, 16GB RAM, and local storage as needed.
Operating system
Enterprise-grade Linux distribution with full support from an operating system vendor.We recommend Ubuntu 20.04, RedHat Enterprise Linux and SUSE Linux EnterpriseServer 12+.
SSL Configuration
The SSL termination is done in Apache. A standard SSL certificate is required to beinstalled. See the official Apache documentation or our Let’s Encrypt SSL Certificatesdocumentation.
Load Balancer
None.
Database
MySQL, MariaDB, or PostgreSQL. We currently recommend MySQL / MariaDB, as ourcustomers have had good experiences when moving to a Galera cluster to scale theDB. If using either MySQL or MariaDB, you must use the InnoDB storage enginebecause MyISAM is not supported, see: MySQL / MariaDB storage engine
If you are using MaxScale/Galera, then you need to use at least version1.3.0. In earlier versions, there is a bug where the value of last_insert_idis not routed to the primary node. This bug can cause loops withinownCloud and corrupt database rows. You can find out moreinformation in the issue documentation.
Backup
Install ownCloud, the ownCloud data directory, and database on a Btrfs filesystem.Make regular snapshots at desired intervals for zero downtime backups. Mount DBpartitions with the "nodatacow" option to prevent fragmentation.
Alternatively, you can make nightly backups — with service interruption — as follows:
1. Shut down Apache.2. Create database dump.3. Push data directory to backup.
Deployment Recommendations | 7
4. Push database dump to backup.5. Start Apache.
After these steps have been completed, then, optionally, rsync the backup to either anexternal backup storage or tape backup. See the Maintenance section of theAdministration manual for tips on backups and restores.
Authentication
User authentication via one or several LDAP or Active Directory (AD) servers. SeeUser Authentication with LDAP for information on configuring ownCloud to use LDAPand AD.
Session Management
Redis is recommended and can be used for the session management storage.
Alternatively you can use local session management, see Local Session Management.
Memory Caching
A memory cache speeds up server performance, and ownCloud supports a number ofthem. Refer to Configuring Memory Caching for information on selecting andconfiguring a memory cache.
Storage
Local storage or Network File System (NFS) if already available.
Recommended Licensing Model
• Standard or Enterprise Edition• See ownCloud Server or Enterprise Edition for comparisons of the ownCloud
editions.
Scenario 2: Mid-Sized Enterprises
These recommendations apply if you meet the following criteria:
Option Value
Number of users 150 to 1,000 users.
Storage size Up to 200TB.
High availability level • Every component is fully redundant and can fail withoutservice interruption
• Backups without service interruption
Recommended System Requirements
• 2 to 4 application servers.• A cluster of two database servers.• Storage on an NFS server.• Authentication via an existing LDAP or Active Directory server.• A Redis server for file locking
8 | Deployment Recommendations
Components
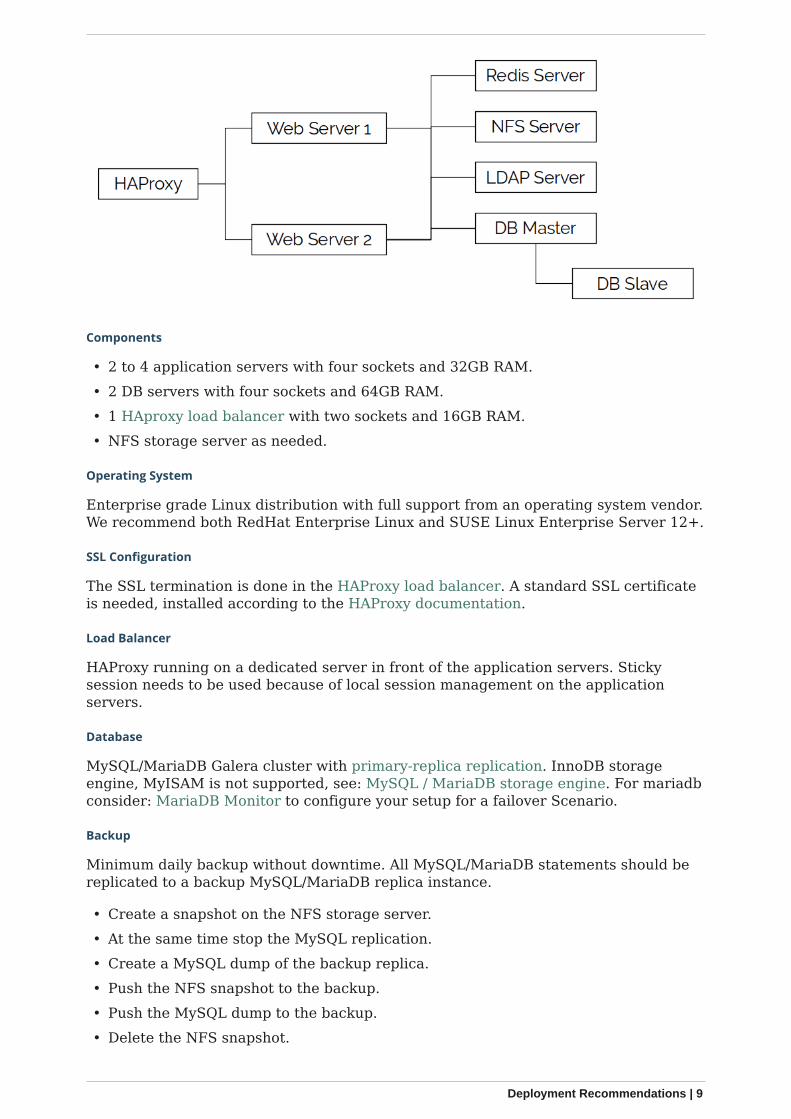
• 2 to 4 application servers with four sockets and 32GB RAM.• 2 DB servers with four sockets and 64GB RAM.• 1 HAproxy load balancer with two sockets and 16GB RAM.• NFS storage server as needed.
Operating System
Enterprise grade Linux distribution with full support from an operating system vendor.We recommend both RedHat Enterprise Linux and SUSE Linux Enterprise Server 12+.
SSL Configuration
The SSL termination is done in the HAProxy load balancer. A standard SSL certificateis needed, installed according to the HAProxy documentation.
Load Balancer
HAProxy running on a dedicated server in front of the application servers. Stickysession needs to be used because of local session management on the applicationservers.
Database
MySQL/MariaDB Galera cluster with primary-replica replication. InnoDB storageengine, MyISAM is not supported, see: MySQL / MariaDB storage engine. For mariadbconsider: MariaDB Monitor to configure your setup for a failover Scenario.
Backup
Minimum daily backup without downtime. All MySQL/MariaDB statements should bereplicated to a backup MySQL/MariaDB replica instance.
• Create a snapshot on the NFS storage server.• At the same time stop the MySQL replication.• Create a MySQL dump of the backup replica.• Push the NFS snapshot to the backup.• Push the MySQL dump to the backup.• Delete the NFS snapshot.
Deployment Recommendations | 9
• Restart MySQL replication.
Authentication
User authentication via one or several LDAP or Active Directory servers. See UserAuthentication with LDAP for information on configuring ownCloud to use LDAP andAD.
Session Management
Redis is recommended and can be used for the session management storage.
Alternatively you can use local session management, see Local Session Management.
Memory Caching
A memory cache speeds up server performance, and ownCloud supports a number ofmemory cache types. Refer to Configuring Memory Caching for information onselecting and configuring a memory cache.
Storage
For accessing a backend storage system via NFS, you can use a dedicated storagesystem like NetApp Hybrid Flash Storage Systems, or other systems like IBM ElasticStorage based on their Power8 servers or RedHat Ceph with their NFS-Ceph gateway.
You may take a look on the NetApp NFS Best Practice and Implementation Guide forbest NFS configuring practices, especially section 9.4 Mount Option Best Practiceswith NFS on page 111 and MySQL Database on NetApp ONTAP which also includesperformance measurements.
Recommended Licensing Model
• Enterprise Edition• See ownCloud Server or Enterprise Edition for comparisons of the ownCloud
editions.
Scenario 3: Large Enterprises and Service Providers
Option Value
Number of users 5,000 to >100,000 users.
Storage size Up to 1 petabyte.
High availability level • Every component is fully redundant and can fail withoutservice interruption
• Backups without service interruption
Recommended System Requirements
• 4 to 20 application/Web servers.• A cluster of two or more database servers.• Storage is an NFS server or an object store that is S3 compatible.• Cloud federation for a distributed setup over several data centers.• Authentication via an existing LDAP or Active Directory server, or SAML.
10 | Deployment Recommendations
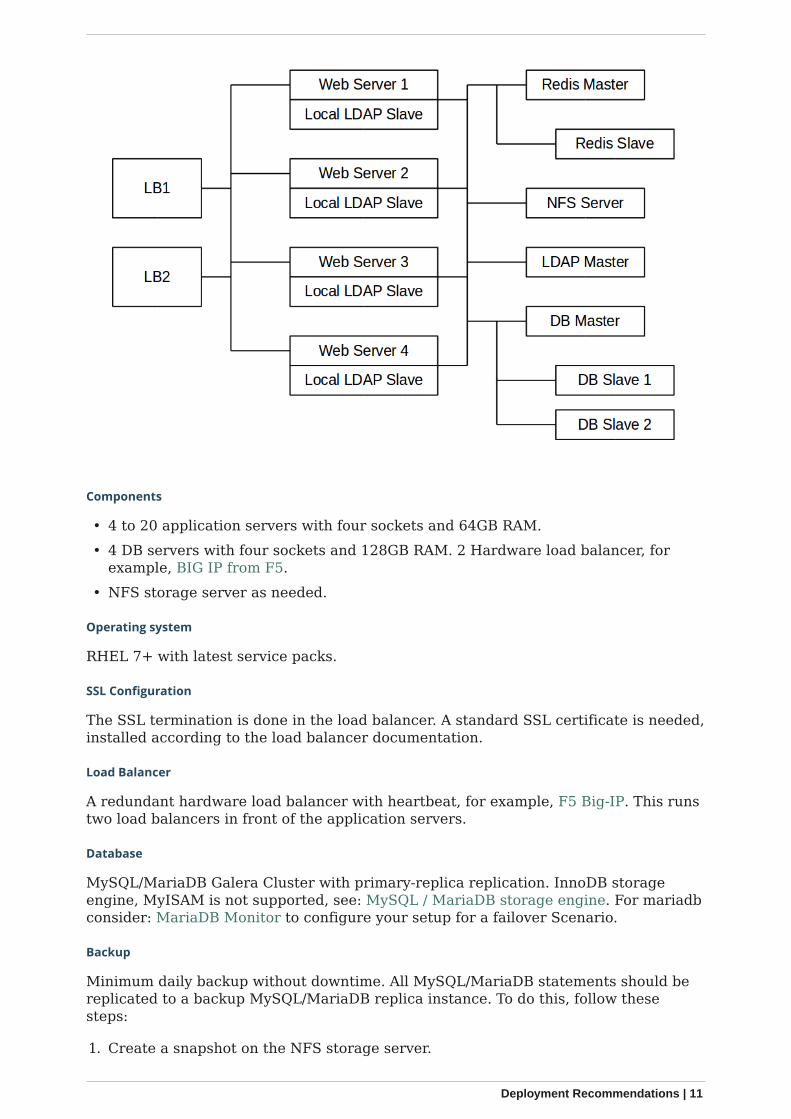
Components
• 4 to 20 application servers with four sockets and 64GB RAM.• 4 DB servers with four sockets and 128GB RAM. 2 Hardware load balancer, for
example, BIG IP from F5.• NFS storage server as needed.
Operating system
RHEL 7+ with latest service packs.
SSL Configuration
The SSL termination is done in the load balancer. A standard SSL certificate is needed,installed according to the load balancer documentation.
Load Balancer
A redundant hardware load balancer with heartbeat, for example, F5 Big-IP. This runstwo load balancers in front of the application servers.
Database
MySQL/MariaDB Galera Cluster with primary-replica replication. InnoDB storageengine, MyISAM is not supported, see: MySQL / MariaDB storage engine. For mariadbconsider: MariaDB Monitor to configure your setup for a failover Scenario.
Backup
Minimum daily backup without downtime. All MySQL/MariaDB statements should bereplicated to a backup MySQL/MariaDB replica instance. To do this, follow thesesteps:
1. Create a snapshot on the NFS storage server.
Deployment Recommendations | 11
2. At the same time stop the MySQL replication.3. Create a MySQL dump of the backup replica.4. Push the NFS snapshot to the backup.5. Push the MySQL dump to the backup.6. Delete the NFS snapshot.7. Restart MySQL replication.
Authentication
User authentication via one or several LDAP or Active Directory servers orSAML/Shibboleth. See User Authentication with LDAP and Shibboleth Integration.
LDAP
Read-only replicas should be deployed on every application server for optimalscalability.
Session Management
Redis should be used for the session management storage.
Caching
Redis for distributed in-memory caching.
Storage
For accessing a backend storage system via NFS, you can use a dedicated storagesystem like NetApp Hybrid Flash Storage Systems or other systems like IBM ElasticStorage based on their Power8 servers or RedHat Ceph with their NFS-Ceph gateway.Optionally, an S3 compatible object store can also be used.
You may take a look on the NetApp NFS Best Practice and Implementation Guide forbest NFS configuring practices, especially section 9.4 Mount Option Best Practiceswith NFS on page 111 and MySQL Database on NetApp ONTAP which also includesperformance measurements.
Recommended Licensing Model
• Enterprise Edition• See ownCloud Server or Enterprise Edition for comparisons of the ownCloud
editions.
Redis Configuration
Redis in a primary-replica configuration is a hot failover setup and is usually sufficient.A replica can be omitted if high availability is provided via other means. If that’s thecase, restarting Redis typically happens fast enough in the event of a failure.Regarding Redis cluster, we don’t, usually, recommend it as it requires a greater levelof both maintenance and management in the case of failure. A single Redis server,however, just needs to be rebooted in the event of failure.
Known Issues
Deadlocks When Using MariaDB Galera Cluster
If you’re using MariaDB Galera Cluster with your ownCloud installation, you mayencounter deadlocks when you attempt to sync a large number of files. You may also
12 | Deployment Recommendations
encounter database errors, such as this one:
SQLSTATE[40001]: Serialization failure: 1213 Deadlock found when trying to getlock; try restarting transaction
The issue, identified by Michael Roth, is caused when MariaDB Galera cluster sendswrite requests to all servers in the cluster; here is a detailed explanation. The solutionis to send all write requests to a single server, instead of all of them.
Set wsrep_sync_wait to 1 on all Galera Cluster nodes
What the parameter does
When enabled, the node triggers causality checks in response to certain types ofqueries. During the check, the node blocks new queries while the database servercatches up with all updates made in the cluster to the point where the check begun.Once it reaches this point, the node executes the original query.
Why enable it
A Galera Cluster write operation is sent to the primary while reads are retrieved fromthe replicas. Since Galera Cluster replication is, by default, not strictly synchronous itcould happen that items are requested before the replication has actually taken place.
This setting is disabled by default. See the Galera Cluster WSREPdocumentation for more details.
General References
• Database High Availability• Performance enhancements for Apache and PHP• How to Set Up a Redis Server as a Session Handler for PHP on Ubuntu 18.04
Local Session Management
Local session management on the application server. PHP sessions are stored in atemporary filesystem, mounted at the operating system-specific session storagelocation. You can find out where that is by running
grep -R 'session.save_path' /etc/php*
and then add it to the /etc/fstab file, for example:
# Retrieve the session save path setting (default or explicit value) for PHP 7.4 # Please change the file path to match your server configurationsession_path=$(\ awk 'match($0, /^;?session.save_path = "(.*)"/, a) { print a[1] }' \ /etc/php/7.4/**/php.ini \ | uniq )
# Set the session save path in /etc/fstabecho "tmpfs $session_path tmpfs defaults,noatime,mode=1777 0 0" >> /etc/fstab
Deployment Recommendations | 13
Network File System (NFS) Deployment Recommendations
ownCloud recommends using NFS for any scenario other than local storage. It hassolid performance and is very stable. This document contains ownCloud’s officialdeployment recommendations.
There can be different scenarios where ownCloud’s storage is located on an NFSmount (primary/secondary). In some scenarios, multiple application servers can usethe same NFS mount point.
It is advised to use network storage like NFS only in un-routed,switched Gigabit or higher environments.
This guide only covers the NFS client side where ownCloud runs.Follow the storage vendors recommendations to configure the NFSserver (storage backend).
General Performance Considerations
Please consider that a network stack runs in ranges of µs while a storage backendusually runs in ranges of ms. Any tuning considerations should therefore first beattempted on the backend storage layout side, especially under high loads.
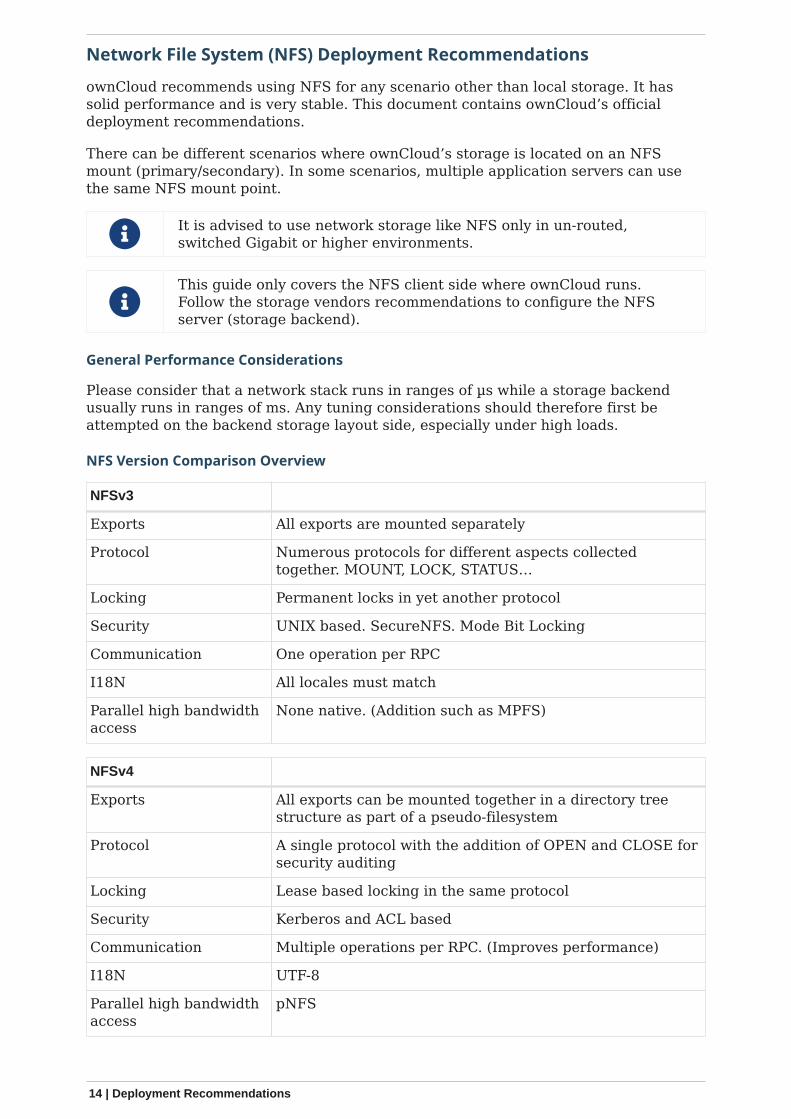
NFS Version Comparison Overview
NFSv3
Exports All exports are mounted separately
Protocol Numerous protocols for different aspects collectedtogether. MOUNT, LOCK, STATUS…
Locking Permanent locks in yet another protocol
Security UNIX based. SecureNFS. Mode Bit Locking
Communication One operation per RPC
I18N All locales must match
Parallel high bandwidthaccess
None native. (Addition such as MPFS)
NFSv4
Exports All exports can be mounted together in a directory treestructure as part of a pseudo-filesystem
Protocol A single protocol with the addition of OPEN and CLOSE forsecurity auditing
Locking Lease based locking in the same protocol
Security Kerberos and ACL based
Communication Multiple operations per RPC. (Improves performance)
I18N UTF-8
Parallel high bandwidthaccess
pNFS
14 | Deployment Recommendations
NFSv4
ownCloud recommends using NFSv4 over previous versions for a number of keyreasons. These are:
• Improved Security: It mandates a strong security architecture. It does not requirerpc.statd or lockd. As a result, it only uses port 2049.
• Improved Reliability: Uses TCP by default.• Improved Performance: It uses Multi-Component Messages, which reduce
network traffic. It is capable of using a 32KB page size, compared to the default,1024 bytes.
• Use of Read/Write Delegations.
NFS Mount Options
See the Ubuntu man pages for a detailed description of the NFS mount options. Thefollowing options are default for NFS except if explicitly set differently whenmounting: rw, suid, dev, exec, auto, nouser, and async.
Depending on the NFS version used, consider the following mount options:
_netdev
Use this option to ensure that the network is enabled, before NFS attempts to mountthese filesystems. This setting is essential when database files are located on an NFSstorage. The database could error or not start correctly, if the mount is not readybefore attempting to access its data files.
You can also use autofs, to ensure that mounts are always availablebefore attempting to access them.
bg
ownCloud recommends using this option. Determines how the mount commandbehaves if an attempt to mount an export fails. If the bg option is specified, a timeoutor failure triggers the mount command to fork a child, which will continue to attemptmounting the export. The parent immediately returns with a zero exit code. This isknown as a "background" mount. This option is useful for continuous operationwithout manual intervention if the network connectivity is temporarily down or thestorage backend must be rebooted.
hard
Default value is hard. For business-critical NFS exports, ownCloud recommends usinghard mounts. ownCloud strongly discourages the use of soft mounts.
retrans
Default value is 3. This option can be tuned when using option soft.
timeo
Default value is 600 (60 seconds). This option can be tuned when using option soft.
sync/async
With the default value of async, the NFS client may delay sending application writes tothe NFS server. In other words, under normal circumstances, data written by anapplication may not immediately appear on the server that hosts the file. syncprovides greater data cache coherence among clients, but at a significant
Deployment Recommendations | 15
performance cost. Having the database like MySQL or Mariadb on NFS, the defaultdatabase option value for innodb_flush_method is fsync, even if it is not explicitly set.This database option forces the mount to immediately write to the NFS server withoutgenerally setting the mount sync option and avoiding this performance penalty. Youmay consider further tuning when using clustered server environments.
tcp
ownCloud recommends using this option. Force using TCP as transport protocol.Alternatively you can use proto=tcp.
Tune the Read and Write Block Sizes
The allowed block sizes are the packet chunk sizes that NFS uses when reading andwriting data. The smaller the size, the greater the number of packets need to be sentto send or receive a file. Conversely, the larger the size, the fewer the number ofpackets need to be sent to send or receive a file. With NFS Version 3 and 4, you canset the rsize and wsize values as high as 65536, when the network transport is TCP.The default value is 32768 and must be a multiple of 4096.
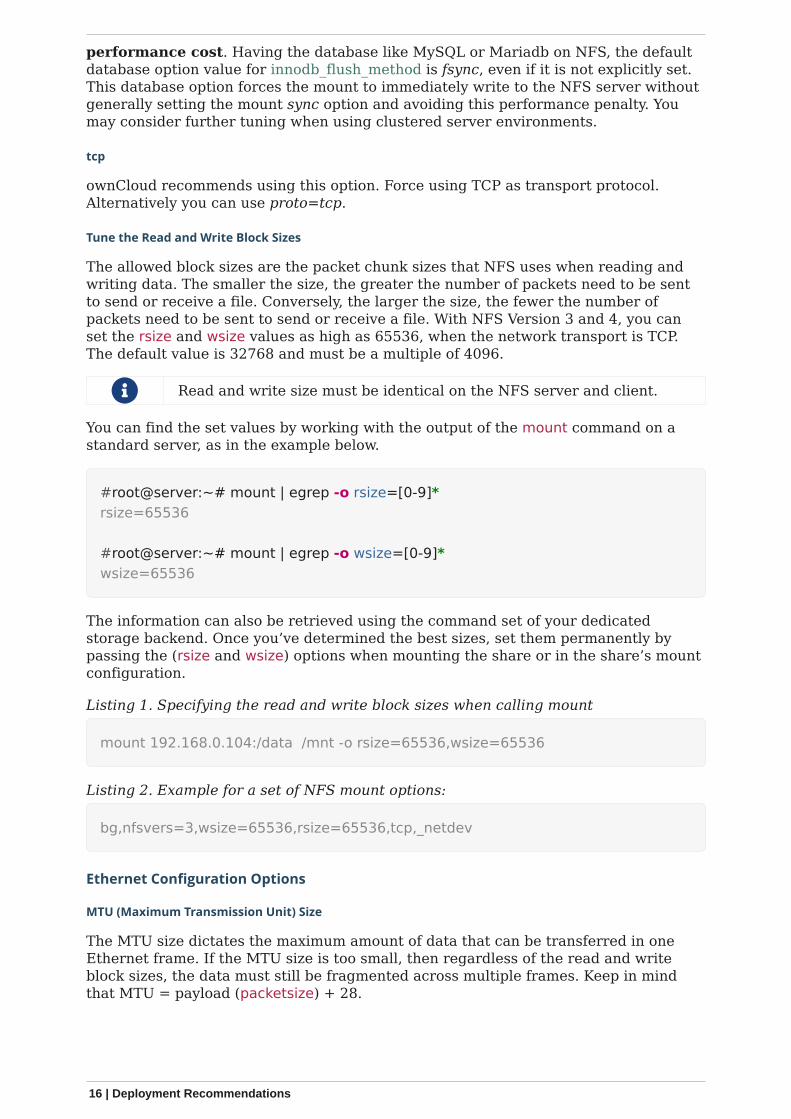
Read and write size must be identical on the NFS server and client.
You can find the set values by working with the output of the mount command on astandard server, as in the example below.
#root@server:~# mount | egrep -o rsize=[0-9]*rsize=65536
#root@server:~# mount | egrep -o wsize=[0-9]*wsize=65536
The information can also be retrieved using the command set of your dedicatedstorage backend. Once you’ve determined the best sizes, set them permanently bypassing the (rsize and wsize) options when mounting the share or in the share’s mountconfiguration.
Listing 1. Specifying the read and write block sizes when calling mount
mount 192.168.0.104:/data /mnt -o rsize=65536,wsize=65536
Listing 2. Example for a set of NFS mount options:
bg,nfsvers=3,wsize=65536,rsize=65536,tcp,_netdev
Ethernet Configuration Options
MTU (Maximum Transmission Unit) Size
The MTU size dictates the maximum amount of data that can be transferred in oneEthernet frame. If the MTU size is too small, then regardless of the read and writeblock sizes, the data must still be fragmented across multiple frames. Keep in mindthat MTU = payload (packetsize) + 28.
16 | Deployment Recommendations
Get the Current Set MTU Size
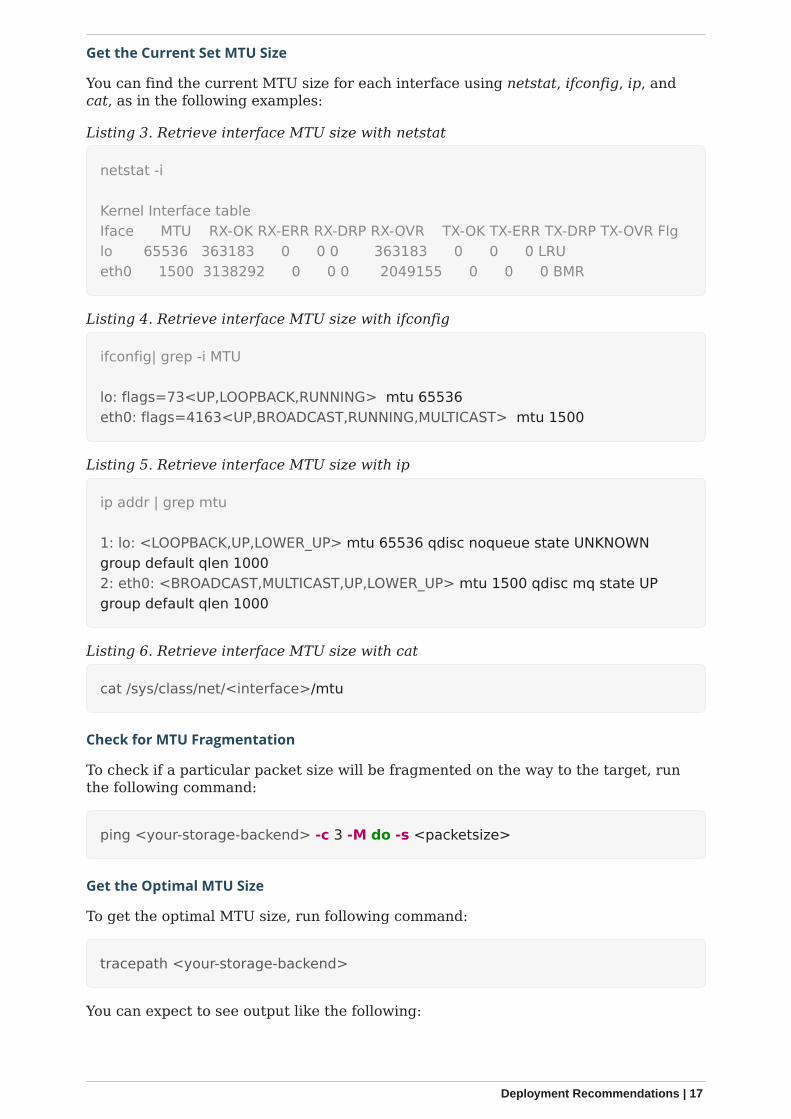
You can find the current MTU size for each interface using netstat, ifconfig, ip, andcat, as in the following examples:
Listing 3. Retrieve interface MTU size with netstat
netstat -i
Kernel Interface tableIface MTU RX-OK RX-ERR RX-DRP RX-OVR TX-OK TX-ERR TX-DRP TX-OVR Flglo 65536 363183 0 0 0 363183 0 0 0 LRUeth0 1500 3138292 0 0 0 2049155 0 0 0 BMR
Listing 4. Retrieve interface MTU size with ifconfig
ifconfig| grep -i MTU
lo: flags=73<UP,LOOPBACK,RUNNING> mtu 65536eth0: flags=4163<UP,BROADCAST,RUNNING,MULTICAST> mtu 1500
Listing 5. Retrieve interface MTU size with ip
ip addr | grep mtu
1: lo: <LOOPBACK,UP,LOWER_UP> mtu 65536 qdisc noqueue state UNKNOWNgroup default qlen 10002: eth0: <BROADCAST,MULTICAST,UP,LOWER_UP> mtu 1500 qdisc mq state UPgroup default qlen 1000
Listing 6. Retrieve interface MTU size with cat
cat /sys/class/net/<interface>/mtu
Check for MTU Fragmentation
To check if a particular packet size will be fragmented on the way to the target, runthe following command:
ping <your-storage-backend> -c 3 -M do -s <packetsize>
Get the Optimal MTU Size
To get the optimal MTU size, run following command:
tracepath <your-storage-backend>
You can expect to see output like the following:
Deployment Recommendations | 17
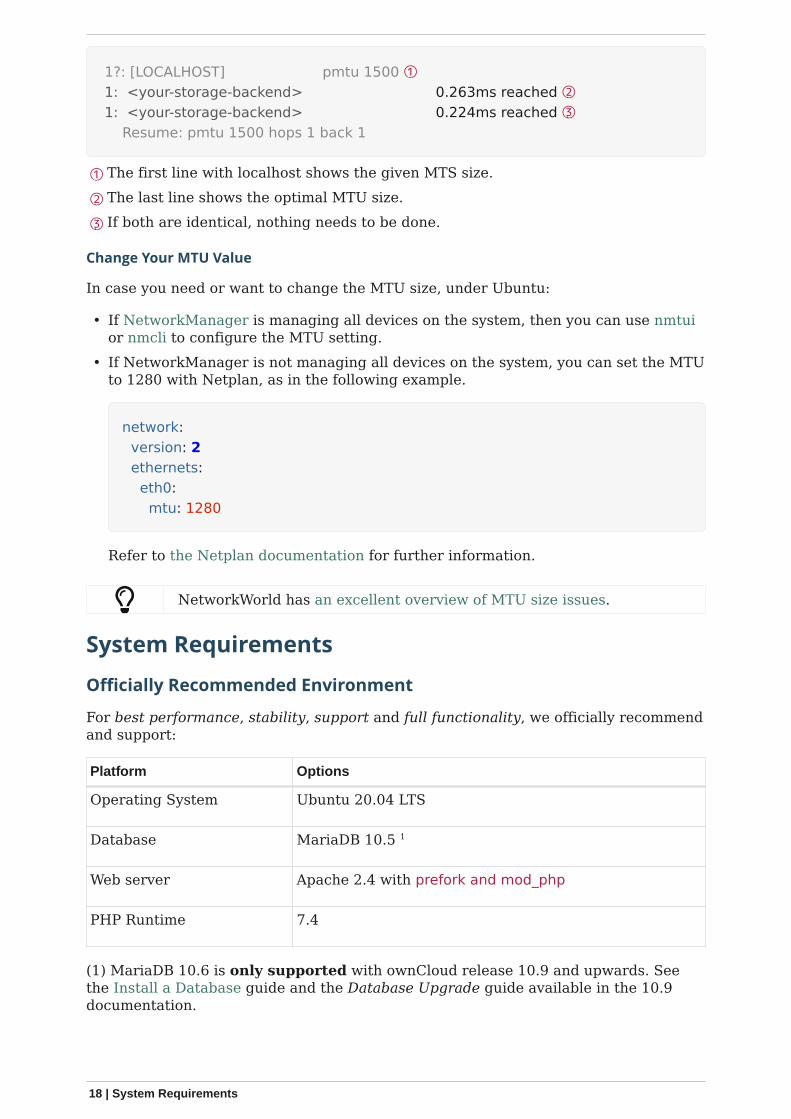
1?: [LOCALHOST] pmtu 1500 ① 1: <your-storage-backend> 0.263ms reached ② 1: <your-storage-backend> 0.224ms reached ③ Resume: pmtu 1500 hops 1 back 1
① The first line with localhost shows the given MTS size.
② The last line shows the optimal MTU size.
③ If both are identical, nothing needs to be done.
Change Your MTU Value
In case you need or want to change the MTU size, under Ubuntu:
• If NetworkManager is managing all devices on the system, then you can use nmtuior nmcli to configure the MTU setting.
• If NetworkManager is not managing all devices on the system, you can set the MTUto 1280 with Netplan, as in the following example.
network: version: 2 ethernets: eth0: mtu: 1280
Refer to the Netplan documentation for further information.
NetworkWorld has an excellent overview of MTU size issues.
System Requirements
Officially Recommended Environment
For best performance, stability, support and full functionality, we officially recommendand support:
Platform Options
Operating System Ubuntu 20.04 LTS
Database MariaDB 10.5 1
Web server Apache 2.4 with prefork and mod_php
PHP Runtime 7.4
(1) MariaDB 10.6 is only supported with ownCloud release 10.9 and upwards. Seethe Install a Database guide and the Database Upgrade guide available in the 10.9documentation.
18 | System Requirements
Officially Supported Environments
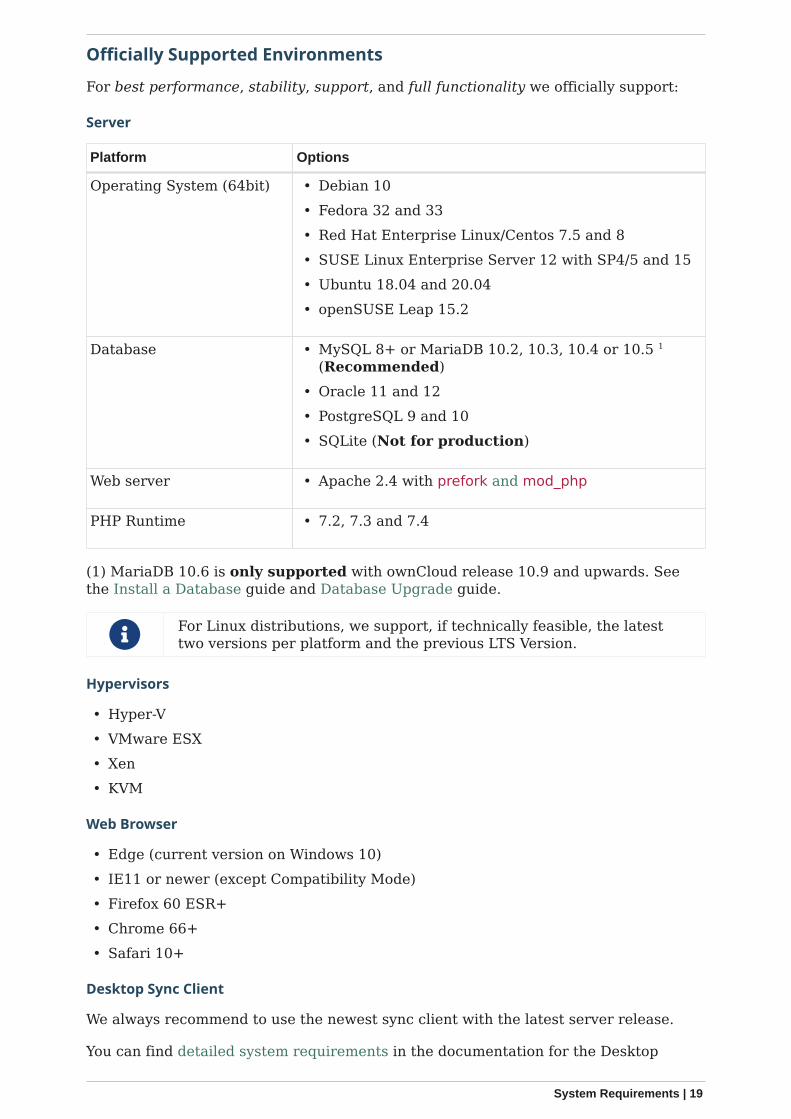
For best performance, stability, support, and full functionality we officially support:
Server
Platform Options
Operating System (64bit) • Debian 10• Fedora 32 and 33• Red Hat Enterprise Linux/Centos 7.5 and 8• SUSE Linux Enterprise Server 12 with SP4/5 and 15• Ubuntu 18.04 and 20.04• openSUSE Leap 15.2
Database • MySQL 8+ or MariaDB 10.2, 10.3, 10.4 or 10.5 1
(Recommended)• Oracle 11 and 12• PostgreSQL 9 and 10• SQLite (Not for production)
Web server • Apache 2.4 with prefork and mod_php
PHP Runtime • 7.2, 7.3 and 7.4
(1) MariaDB 10.6 is only supported with ownCloud release 10.9 and upwards. Seethe Install a Database guide and Database Upgrade guide.
For Linux distributions, we support, if technically feasible, the latesttwo versions per platform and the previous LTS Version.
Hypervisors
• Hyper-V• VMware ESX• Xen• KVM
Web Browser
• Edge (current version on Windows 10)• IE11 or newer (except Compatibility Mode)• Firefox 60 ESR+• Chrome 66+• Safari 10+
Desktop Sync Client
We always recommend to use the newest sync client with the latest server release.
You can find detailed system requirements in the documentation for the Desktop
System Requirements | 19
Synchronization Client.
Mobile Apps
We always recommend to use the newest mobile apps with the latest server release.
You can find detailed system requirements in the documentation for the mobile apps.
• iOS system requirements• Android system requirements
You can find out more in the changelog.
Database Requirements
The following database settings are currently required if you’re running ownCloudtogether with a MySQL or MariaDB database:
• Disabled or BINLOG_FORMAT = MIXED or BINLOG_FORMAT = ROW configuredBinary Logging (See: MySQL / MariaDB with Binary Logging Enabled)
• InnoDB storage engine (The MyISAM storage engine is not supported, see:MySQL / MariaDB storage engine)
• READ COMMITTED transaction isolation level (See: MySQL / MariaDB READCOMMITTED transaction isolation level)
Memory Requirements
Memory requirements for running an ownCloud server are greatly variable, dependingon the numbers of users and files, and volume of server activity. ownCloud officiallyrequires a minimum of 128MB RAM. But, we recommend a minimum of 512MB.
Configuration Notes and Tips
SELinux
See the SELinux Configuration Guide for a suggested configuration for SELinux-enabled distributions such as Fedora and CentOS.
php.ini
Several core PHP settings must be configured correctly, otherwise ownCloud may notwork properly. Known settings causing issues are listed here. Please note that, theremight be other settings which cause unwanted behavior. In general, however, it isrecommended to keep the php.ini settings at their defaults, except when you knowexactly why the change is required, and its implications.
Keep in mind that, changes to php.ini may have to be configured inmore than one ini file. This can be the case, for example, for thedate.timezone setting.
php.ini - Used by the Web server
For PHP version 7.2 onward, replace php_version with the version number installed,e.g., 7.2 in the following examples.
20 | Configuration Notes and Tips
/etc/php/[php_version]/apache2/php.ini
or
/etc/php/[php_version]/fpm/php.ini
or
php.ini - used by the php-cli and so by ownCloud CRON jobs
/etc/php/[php_version]/cli/php.ini
session.auto_start && enable_post_data_reading
Ensure that session.auto_start is set to 0 or Off and enable_post_data_reading to 1 orOn in your configuration. If not, you may have issues logging in to ownCloud via theWebUI, where you see the error: "Access denied. CSRF check failed".
session.save_path
In addition to setting session.auto_start and enable_post_data_reading correctly,ensure that, if session.save_handler is set to files, that session.save_path is set to apath on the filesystem which only the web server process (or process which PHP isrunning as) can read from and write to.
This is especially important if your ownCloud installation is using a shared-hostingarrangement. In these situations, session poisoning can occur if all of the session filesare stored in the same location. Session poisoning is where one web application canmanipulate data in the $_SESSION superglobal array of another.
When this happens, the original application has no way of knowing that this corruptionhas occurred and may not treat the data with any sense of suspicion. You can readthrough a thorough discussion of local session poisoning if you’d like to know more.
post_max_size
Please ensure that you have post_max_size configured with at least the minimumamount of memory for use with ownCloud, which is 512 MB.
Please be careful when you set this value if you use the byte valueshortcut as it is very specific. Use K for kilobyte, M for megabyte and Gfor gigabyte. KB, MB, and GB do not work!
realpath_cache_size
This determines the size of the realpath cache used by PHP. This value should beincreased on systems where PHP opens many files, to reflect the number of fileoperations performed. For a detailed description see realpath-cache-size. This settinghas been available since PHP 5.1.0. Prior to PHP 7.0.16 and 7.1.2, the default was 16KB.
To see your current value, query your phpinfo() output for this key. It is recommendedto set the value if it is currently set to the default of 16 KB. A good reading about thebackground can be found at tideways.io.
Configuration Notes and Tips | 21

How to get a working value
With the assumption of 112 bytes per file path needed, this would allow the cache tohold around 37.000 items with a cache size of 4096K (4M), but only about a hundredentries for a cache size of 16 KB.
It’s a good rule of thumb to always have a realpath cache that can holdentries for all your files paths in memory. If you use symlinkdeployment, then set it to double or triple the amount of files.
The easiest way to get the quantity of PHP files is to use cloc, which can be installedby running sudo apt-get install cloc. The cloc package is available for nearly alldistributions.
sudo cloc /var/www/owncloud --exclude-dir=data --follow-links 12179 text files. 11367 unique files. 73126 files ignored.
http://cloc.sourceforge.net v 1.60 T=1308.98 s (6.4 files/s, 1283.5 lines/s)--------------------------------------------------------------------------------Language files blank comment code--------------------------------------------------------------------------------PHP 4896 96509 285384 558135...
Taking the math from above and assuming a symlinked instance, using factor 3. Forexample: 4896 * 3 * 112 = 1.6MB This result shows that you can run with the PHPsetting of 4M two instances of ownCloud.
Having the default of 16 KB means that only 1/100 of the existing PHP file paths canbe cached and need continuous cache refresh slowing down performance. If you runmore web services using PHP, you have to calculate accordingly.
PHP-FPM
Note that mod_php is used exclusively in the development and QA process of theownCloud server. It’s highly recommended to use mod_php in your productionenvironment for optimal performance and stability. Any issues with the ownCloudserver have to be reproducible with mod_php.
SAML SSO with Shibboleth will not work with php-fpm.
System Environment Variables
When you are using php-fpm, system environment variables like PATH, TMP or othersare not automatically populated in the same way as when using php-cli. A PHP call likegetenv('PATH'); can therefore return an empty result. So you may need to manuallyconfigure environment variables in the appropriate php-fpm ini/config file.
Here are some example root paths for these ini/config files:
Ubuntu/Mint CentOS/Red Hat/Fedora
/etc/php/[php_version]/fpm/ /etc/php-fpm.d/
22 | Configuration Notes and Tips
In both examples, the ini/config file is called www.conf, and depending on thedistribution or customizations which you have made, it may be in a sub-directory.
Usually, you will find some or all of the environment variables already in the file, butcommented out like this:
;env[HOSTNAME] = $HOSTNAME;env[PATH] = /usr/local/bin:/usr/bin:/bin;env[TMP] = /tmp;env[TMPDIR] = /tmp;env[TEMP] = /tmp
Uncomment the appropriate existing entries. Then run printenv PATH to confirm yourpaths, for example:
$ printenv PATH/home/user/bin:/usr/local/sbin:/usr/local/bin:/usr/sbin:/usr/bin:/sbin:/bin:/
If any of your system environment variables are not present in the file then you mustadd them.
When you are using shared hosting or a control panel to manage your ownCloudvirtual machine or server, the configuration files are almost certain to be locatedsomewhere else, for security and flexibility reasons, so check your documentation forthe correct locations.
Please keep in mind that it is possible to create different settings for php-cli and php-fpm, and for different domains and Web sites. The best way to check your settings iswith label-phpinfo.
Maximum Upload Size
If you want to increase the maximum upload size, you will also have to modify yourphp-fpm configuration and increase the upload_max_filesize and post_max_size values.You will need to restart php5-fpm and your HTTP server in order for these changes tobe applied.
.htaccess Notes for Apache
ownCloud comes with its own owncloud/.htaccess file. Because php-fpm can’t readPHP settings in .htaccess these settings and permissions must be set in theowncloud/.user.ini file.
No basic authentication headers were found
This error is shown in your data/owncloud.log file. Some Apache modules likemod_fastcgi, mod_fcgid or mod_proxy_fcgi are not passing the needed authenticationheaders to PHP and so the login to ownCloud via WebDAV, CalDAV and CardDAVclients is failing. Information on how to correctly configure your environment can befound in the forums but we generally recommend not to use these modules andrecommend mod_php instead.
Configuration Notes and Tips | 23
Other Web Servers
• Other HTTP servers• Univention Corporate Server installation
Installation
You can install ownCloud in multiple ways, here are our trusted guides:
Manual Installation
This is a thorough guide to installing ownCloud, containing all the information neededfor the prerequisites, the dependencies, the actual installation and the configurationafterwards.
Installing With Docker
This guide will show you how to install ownCloud with Docker Compose using ourYAML file.
Example Installation on Ubuntu
This is an example installation on an Ubuntu Server. This guide takes you from a cleanUbuntu server to a finished ownCloud installation in the minimal steps required. Allcommands are written down and are easy to copy and paste in to your terminal.
Linux Package Manager
This guide shows you how to install ownCloud with the Ubuntu Package Manager.
Installing with Docker
Introduction
ownCloud can be installed using the official ownCloud Docker image. This officialimage works standalone for a quick evaluation but is designed to be used in a docker-compose setup.
Grant docker command privileges to certain users by adding them to the groupdocker:
sudo usermod -aG docker <your-user>
The changes via usermod only take effect after the docker users log in.So you may have to log out and log in again or possibly reboot beforeyou can run docker commands.
Users not added to the docker group can run docker commands with a preceding sudo.In this section sudo is generally omitted before docker commands since we assumeyou have created a docker user, which is also the only way to run ownCloud’scommand-line interface occ in a docker container. For more information on occ, seesection Using the occ Command.
An example occ command looks like this:
24 | Installation
docker exec --user www-data <owncloud-container-name> php occ <your-command>
Quick Evaluation
The commands and links provided in the following descriptions areintended to showcase basic docker usage, but we cannot takeresponsibility for their proper functioning. If you only want to take apeek and are content with SQLite as database, which is not supportedby ownCloud for production purposes, try the following:
docker run --rm --name oc-eval -d -e OWNCLOUD_DOMAIN=localhost:8080-p8080:8080 owncloud/server
This starts a docker container with the name "oc-eval" in the background (option -d).owncloud/server is the docker image downloaded from Docker Hub. If you don’t startthe container with option -d, the logs will be displayed in the shell. If you are runningit in the background as in the example above, you can display the logs with thecommand:
docker logs oc-eval
With the command docker ps you can list your running docker containers and shouldsee the entry for oc-eval.
You can log in to your ownCloud instance via a browser at http://localhost:8080 withthe preconfigured user admin and password admin.
Access only works with http, not https.
Now, if you like what you see but want a supported installation with MariaDB, youshould remove the eval version before proceeding with the next section.
docker kill oc-eval
This removes the container if you used the option --rm as suggested in the exampleabove. If you omitted that option, you need to first run the command:
docker rm oc-eval
If you now run docker ps again, the entry for oc-eval should be gone.
Docker Compose
The configuration:
• Exposes ports 8080, allowing for HTTP connections.• Uses separate MariaDB and Redis containers.• Mounts the data and MySQL data directories on the host for persistent storage.
Installation | 25
The following instructions assume you install locally. For remote access, the value ofOWNCLOUD_DOMAIN must be adapted.
1. Create a new project directory. Then copy and paste the sample docker-compose.yml from this page into that new directory.
2. Create a .env configuration file, which contains the required configuration settings.
Only a few settings are required, these are:
Setting Name Description Example
OWNCLOUD_VERSION
The ownCloud version latest
OWNCLOUD_DOMAIN The ownCloud domain localhost:8080
OWNCLOUD_ADMIN_USERNAME
The admin username admin
OWNCLOUD_ADMIN_PASSWORD
The admin user’spassword
admin
HTTP_PORT The HTTP port to bindto
8080
OWNCLOUD_ADMIN_USERNAME and OWNCLOUD_ADMIN_PASSWORDwill not change between deploys even if you change the values in the.env file. To change them, you’ll need to do docker volume prune, whichwill delete all your data.
Then, you can start the container, using your preferred Docker command-line tool. Theexample below shows how to use Docker Compose.
# Create a new project directorymkdir owncloud-docker-server
cd owncloud-docker-server
# Copy docker-compose.yml from the GitHub repositorywgethttps://raw.githubusercontent.com/owncloud/docs/master/modules/admin_manual/examples/installation/docker/docker-compose.yml
# Create the environment configuration filecat << EOF > .envOWNCLOUD_VERSION=10.8OWNCLOUD_DOMAIN=localhost:8080OWNCLOUD_ADMIN_USERNAME=adminOWNCLOUD_ADMIN_PASSWORD=adminHTTP_PORT=8080EOF
# Build and start the containerdocker-compose up -d
26 | Installation
When the process completes, check that all the containers have successfully started,by running docker-compose ps. If they are all working correctly, you should see outputsimilar to the one below:
Name Command State Ports
owncloud_mariadb
docker-entrypoint.sh--max …
Up (healthy) 3306/tcp
owncloud_redis
docker-entrypoint.sh --dat…
Up (healthy) 6379/tcp
owncloud_server
/usr/bin/entrypoint /usr/b…
Up (healthy) 0.0.0.0:8080→8080/tcp
In it, you can see that the database, ownCloud and Redis containers are running, andthat ownCloud is accessible via port 8080 on the host machine.
All files stored in this setup are contained in Docker volumes ratherthan a physical filesystem tree. It is the admin’s responsibility to makethe files persistent.
To inspect the volumes run:
docker volume ls | grep ownclouddockerserver
To export the files as a tar archive run:
docker run -v ownclouddockerserver_files:/mnt \ ubuntu tar cf - -C /mnt . > files.tar
Although the containers are up and running, it may still take a fewminutes until ownCloud is fully functional.To inspect the log output:
docker-compose logs --follow owncloud
Wait until the output shows Starting apache daemon… before youaccess the web UI.
Although all important data persists after:
docker-compose down; docker-compose up -d
there are certain details that get lost, e.g., default apps may re-appearafter they were uninstalled.
Logging In
To log in to the ownCloud UI, open http://localhost:8080 in your browser of choice,where you see the standard ownCloud login screen as in the image below.
Installation | 27
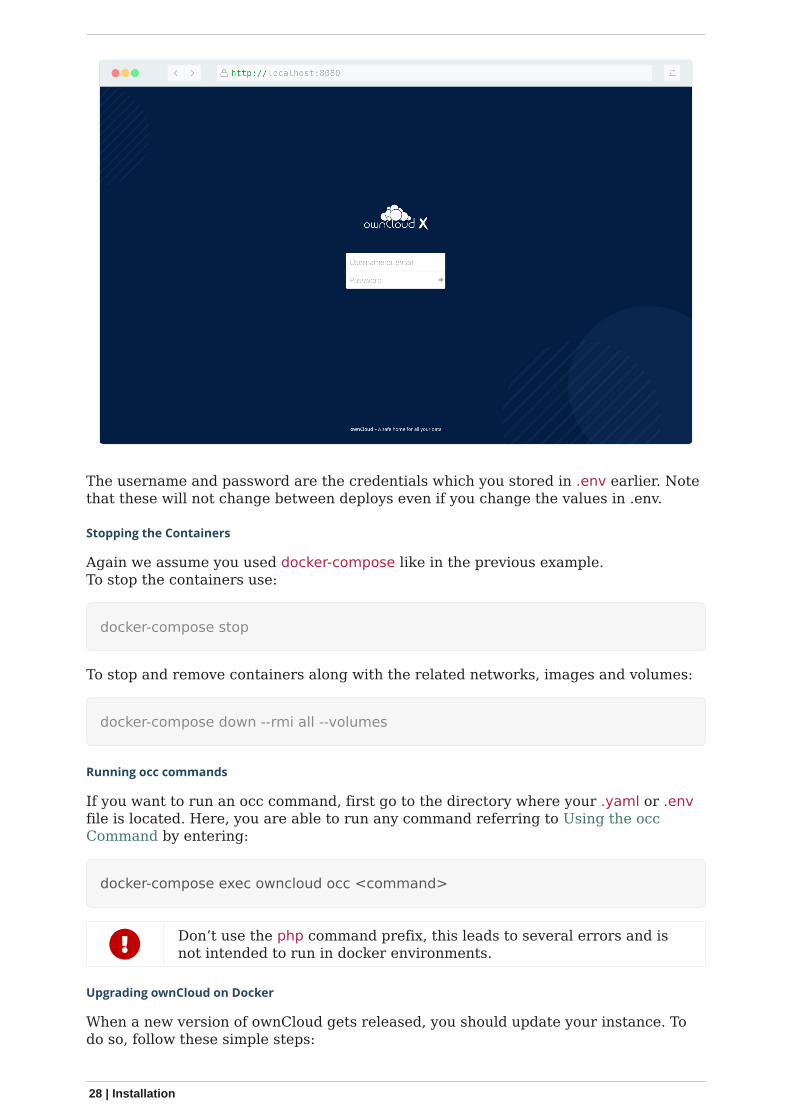
The username and password are the credentials which you stored in .env earlier. Notethat these will not change between deploys even if you change the values in .env.
Stopping the Containers
Again we assume you used docker-compose like in the previous example.To stop the containers use:
docker-compose stop
To stop and remove containers along with the related networks, images and volumes:
docker-compose down --rmi all --volumes
Running occ commands
If you want to run an occ command, first go to the directory where your .yaml or .envfile is located. Here, you are able to run any command referring to Using the occCommand by entering:
docker-compose exec owncloud occ <command>
Don’t use the php command prefix, this leads to several errors and isnot intended to run in docker environments.
Upgrading ownCloud on Docker
When a new version of ownCloud gets released, you should update your instance. Todo so, follow these simple steps:
28 | Installation
1. Go to your docker directory where your .yaml and .env files exist.2. Put ownCloud into maintenance mode with the following command:
docker-compose exec owncloud occ maintenance:mode --on
3. Create a backup in case something goes wrong during the upgrade process, usingthe following command:
docker-compose exec mariadb \ /usr/bin/mysqldump -u root --password=owncloud \ owncloud > owncloud_$(date +%Y%m%d).sql
You need to adjust the password and database name if you havechanged it in your deployment.
4. Shutdown the containers:
docker-compose down
5. Update the version number of ownCloud in your .env file. You can use sed for it, asin the following example.
# Make sure that you adjust the example to match your installation.sed -i 's/^OWNCLOUD_VERSION=.*$/OWNCLOUD_VERSION=<newVersion>/'/compose/*/.env
6. View the file to ensure the change has been implemented.
cat .env
7. Start your docker instance again.
docker-compose up -d
Now you should have the current ownCloud running with docker-compose. Notethat the container will automatically run occ upgrade when starting up. If younotice the container starting over and over again, you can check the update logwith the following command:
docker-compose logs --timestamp owncloud
8. If all went well, end maintenance mode:
docker-compose exec owncloud occ maintenance:mode --off
Installation | 29
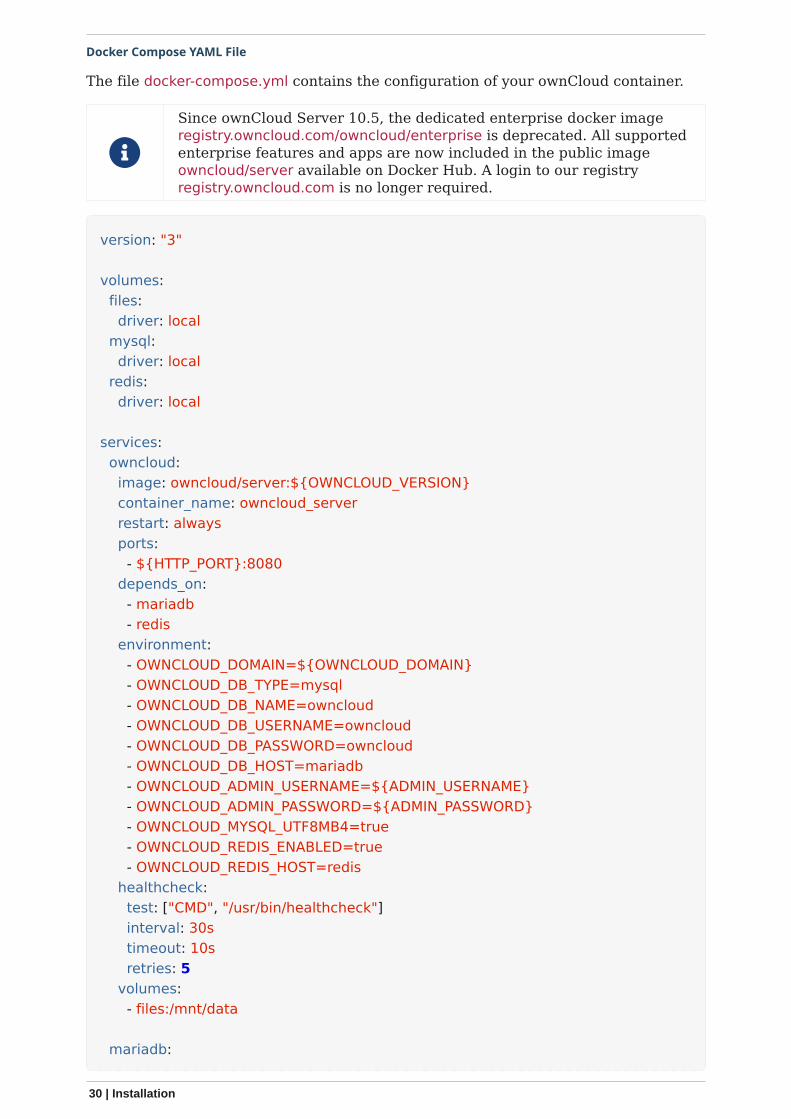
Docker Compose YAML File
The file docker-compose.yml contains the configuration of your ownCloud container.
Since ownCloud Server 10.5, the dedicated enterprise docker imageregistry.owncloud.com/owncloud/enterprise is deprecated. All supportedenterprise features and apps are now included in the public imageowncloud/server available on Docker Hub. A login to our registryregistry.owncloud.com is no longer required.
version: "3"
volumes: files: driver: local mysql: driver: local redis: driver: local
services: owncloud: image: owncloud/server:${OWNCLOUD_VERSION} container_name: owncloud_server restart: always ports: - ${HTTP_PORT}:8080 depends_on: - mariadb - redis environment: - OWNCLOUD_DOMAIN=${OWNCLOUD_DOMAIN} - OWNCLOUD_DB_TYPE=mysql - OWNCLOUD_DB_NAME=owncloud - OWNCLOUD_DB_USERNAME=owncloud - OWNCLOUD_DB_PASSWORD=owncloud - OWNCLOUD_DB_HOST=mariadb - OWNCLOUD_ADMIN_USERNAME=${ADMIN_USERNAME} - OWNCLOUD_ADMIN_PASSWORD=${ADMIN_PASSWORD} - OWNCLOUD_MYSQL_UTF8MB4=true - OWNCLOUD_REDIS_ENABLED=true - OWNCLOUD_REDIS_HOST=redis healthcheck: test: ["CMD", "/usr/bin/healthcheck"] interval: 30s timeout: 10s retries: 5 volumes: - files:/mnt/data
mariadb:
30 | Installation

image: mariadb:10.5 container_name: owncloud_mariadb restart: always environment: - MYSQL_ROOT_PASSWORD=owncloud - MYSQL_USER=owncloud - MYSQL_PASSWORD=owncloud - MYSQL_DATABASE=owncloud command: ["--max-allowed-packet=128M", "--innodb-log-file-size=64M"] healthcheck: test: ["CMD", "mysqladmin", "ping", "-u", "root", "--password=owncloud"] interval: 10s timeout: 5s retries: 5 volumes: - mysql:/var/lib/mysql
redis: image: redis:6 container_name: owncloud_redis restart: always command: ["--databases", "1"] healthcheck: test: ["CMD", "redis-cli", "ping"] interval: 10s timeout: 5s retries: 5 volumes: - redis:/data
Troubleshooting
Admin Settings
When running under docker, the admin user cannot control certain settings in theWebUI, instead they are now controlled by environment variables. Changing thesevariables requires stopping and restarting the container with extra docker -e …parameters or with new entries in the .env file for docker-compose.
Logging
The loglevel is set to the fixed value 2: "Warnings, errors, and fatal issues".
Listing 7. To get the highest log level "Everything" (including debug output), use:
OWNCLOUD_LOGLEVEL=0
Raspberry Pi
If your container fails to start on Raspberry Pi or other ARM devices, you most likelyhave an old version of libseccomp2 on your host. This should only affect distros basedon Rasbian Buster 32 bit. Install a newer version with the following command:
Installation | 31
cd /tmpwget http://ftp.us.debian.org/debian/pool/main/libs/libseccomp/libseccomp2_2.5.1-1_armhf.debsudo dpkg -i libseccomp2_2.5.1-1_armhf.deb
Alternatively you can add the backports repo for Debian Buster:
sudo apt-key adv --keyserver keyserver.ubuntu.com \ --recv-keys 04EE7237B7D453EC 648ACFD622F3D138echo "deb http://deb.debian.org/debian buster-backports main" | \ sudo tee -a /etc/apt/sources.list.d/buster-backports.listsudo apt updatesudo apt install -t buster-backports libseccomp2
In any case, you should restart the container after confirming you havelibseccomp2.4.4 installed.
For more information see: Linux Server Docs
Manual Installation
In this section, you find Installation Guides for manually setting up ownCloud.
Consider the following before deciding on a path of installation:
The Detailed Installation Guide gives more detailed information and describesindividual setup possibilities. It may not fit all audiences as it requires a deeperbackground knowledge. As a bonus, it provides ready to use scripts which need somepreconfiguration to run successfully. The scripts are "as it is" and we cannot take anyresponsibility for them working properly.
The Quick Installation Guides are useful for basic setups. All commands necessary areprovided for you to simply copy&paste, but little information is provided beyond bareinstructions. If you use these guides, ownCloud will be up and running in very littletime, but these basic setups are not recommended for production systems.
Detailed Installation Guide
Introduction
This document describes:
• How to prepare your server• Prerequisites and how to download ownCloud• Installation of ownCloud
The following descriptions focus on the Ubuntu distribution. Even if we try to makethese steps as easy as possible by offering ready to use commands and scripts, youneed to have sufficient knowledge about administrating a server environment whichprovides web services.
32 | Installation

This document does not offer proposals about how to secure yourserver. Therefore, we strongly recommend checking out the Hardeningand Security Guidance before the installation and to keep it on handthroughout.
Prepare Your Server
For more information on the requirements of your server, read the generalprerequisites guide. The following sections describe the procedures in detail.
Ubuntu 18.04 LTS Server
To prepare your Ubuntu 18.04 server for the use with ownCloud, follow the Ubuntu18.04 preparation guide. This guide installs PHP up to version 7.3 only.
Ubuntu 20.04 LTS Server
To prepare your Ubuntu 20.04 server for the use with ownCloud, follow the Ubuntu20.04 preparation guide. This guide installs PHP 7.4
Install a Database
If you do not already have a supported database installed, follow the Manual DatabaseInstallation guide.
Configure the Web Server
To configure your Apache web server for use with ownCloud, follow the Apachepreparation guide.
Installation of ownCloud Binaries
To install ownCloud binaries, you have to download the required package. After doingso, you can perform the following steps manually or use the provided scripts. Thesescripts are convenient since they can also be used for upgrading which eases theprocess a lot.
Download ownCloud
Before downloading ownCloud, change to a directory where you want to save the filetemporarily. This can be, for example /tmp. In further examples, we use tar archives orthe complete ownCloud bundle. The name for the complete archive looks like this:owncloud-complete-yyyymmdd.archive_type.
Download the archive of the latest ownCloud version:
1. Go to the ownCloud Download Page and select the package that fits your needs.You can download either the .tar.bz2 or .zip archive. Based on the example below,copy the link of the selected file and run the following command to download it:
wget https://download.owncloud.org/community/owncloud-complete-yyyymmdd.tar.bz2
2. Download the corresponding checksum file like:
Installation | 33
wget https://download.owncloud.org/community/owncloud-complete-yyyymmdd.tar.bz2.md5 orwget https://download.owncloud.org/community/owncloud-complete-yyyymmdd.tar.bz2.sha256
3. Verify the MD5 or SHA256 sum:
sudo md5sum -c owncloud-complete-yyyymmdd.tar.bz2.md5 < owncloud-complete-yyyymmdd.tar.bz2 orsudo sha256sum -c owncloud-complete-yyyymmdd.tar.bz2.sha256 < owncloud-complete-yyyymmdd.tar.bz2
4. You can also verify the PGP signature:
wget https://download.owncloud.org/community/owncloud-complete-yyyymmdd.tar.bz2.asc
gpg --verify owncloud-complete-yyyymmdd.tar.bz2.asc owncloud-complete-yyyymmdd.tar.bz2
Script-Guided Installation
Use the Script-Guided Installation if you want to easily install or upgrade ownCloud ormanage ownership and permissions. The page contains detailed instructions aboutdownloading and usage.
Using the Script Guided Installation, you can handle many usefulinstallation and update options automatically.
Command Line Installation
Use the following commands if you want to do the basic setup without any changesand physical installation options. Consider using the Script-Guided Installation if youplan on improving your setup from step one.
• Extract the archive contents and run the unpacking command for your tar archive:
tar -xjf owncloud-complete-yyyymmdd.tar.bz2
• tar unpacks to a single owncloud directory. Copy the ownCloud directory to its finaldestination. If you are running the Apache HTTP server, you may safely installownCloud in your Apache document root. Assuming your document root is in/var/www.
cp -r owncloud /var/www
34 | Installation
After the installation, set the correct ownership and permissions. To do so, we suggestusing the scripts from the Script-Guided Installation.
Complete the Installation
After restarting Apache, you must complete your installation by running either theGraphical Installation Wizard or on the command line with the occ command.
After finalizing the installation, re-run the script provided in Script-Guided Installationto secure your .htaccess files. Your ownCloud instance is now ready to use.
Finalize Using the Graphical Installation Wizard
To finalize the installation using the graphical installation wizard, refer to theGraphical Installation Wizard.
Finalize Using the Command Line
If you want to finalize the installation via the command line, use the following examplecommand. The command assumes that you have unpacked the source to/var/www/owncloud/. Replace all the parameters according to your needs.
cd /var/www/owncloud/sudo -u www-data php occ maintenance:install \ --database "mysql" \ --database-name "owncloud" \ --database-user "root"\ --database-pass "password" \ --admin-user "admin" \ --admin-pass "password"
On how to use occ, refer to the occ command reference.
Admins of SELinux-enabled distributions may need to write newSELinux rules to complete their ownCloud installation; see the SELinuxConfiguration Guide for a suggested configuration.
Post Installation Configuration
After installing ownCloud successfully, ownCloud recommends that you perform somepost installation tasks. These tasks help configure background jobs or improveperformance by caching.
At this point, we’d also like to remind you to consult the Hardening andSecurity Guidance section.
Background Jobs
To read more about background jobs and how to configure them, read the BackgroundJob Configuration guide.
Configure Caching
It is recommended to install and enable caching (PHP opcode cache and/or datacache), which significantly improves performance. For more information, read theCaching Configuration guide.
Installation | 35
Notes
Headers
ownCloud has a mechanism to set headers programmatically. Theseheaders are set with the always directive to avoid errors when thereare additional headers set in the web server’s configuration file likehttp.conf. More information on headers can be found in themod_headers documentation.
Managing Trusted Domains
All URLs used to access your ownCloud server must be white-listed in your config.phpfile under the trusted_domains setting. Users are allowed to log in to ownCloud onlywhen they point their browsers to a URL that is listed in the trusted_domains setting.
This setting is important when changing or moving to a new domainname. You may use IP addresses and domain names.
A typical configuration may look like this:
'trusted_domains' => [ 0 => 'localhost', 1 => 'server1.example.com', 2 => '192.168.1.50',],
The loopback address, 127.0.0.1, is automatically white-listed, so as long as you haveaccess to the physical server you can always log in. In the event that a load-balancer isin place, there will be no issues as long as it sends the correct X-Forwarded-Hostheader.
For further information on improving the quality of your ownCloudinstallation, see the configuration notes and tips guide.
Admins of SELinux-enabled distributions such as CentOS, Fedora, andRed Hat Enterprise Linux may need to set new rules to enable installingownCloud. See SELinux Configuration Guide for a suggestedconfiguration.
The Installation Wizard
Introduction
If you are planning to use the installation wizard, we stronglyencourage you to protect it through some form of passwordauthentication or access control. If the installer is left unprotectedwhen exposed to the internet, there is the possibility that a maliciousactor could finish the installation and block you out — or worse. Soplease ensure that only you — or someone from your organization —can access the web installer.
Quick Start
When the ownCloud prerequisites are fulfilled and all ownCloud files are installed, run
36 | Installation
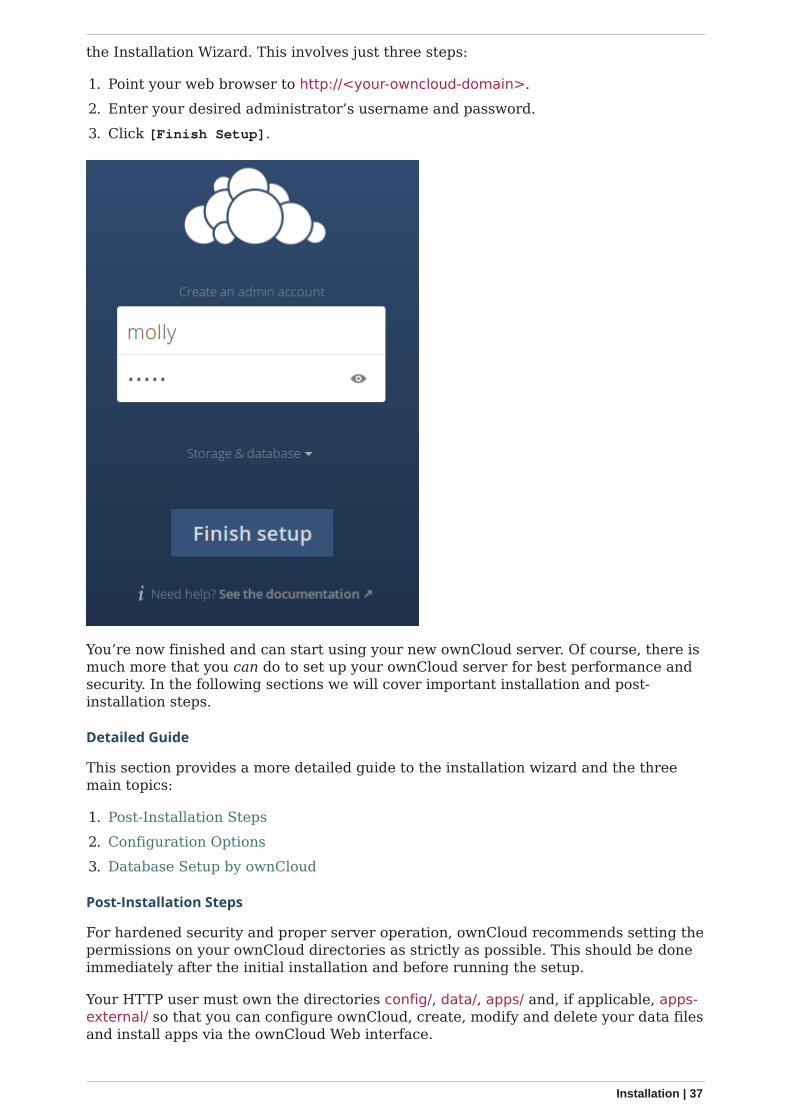
the Installation Wizard. This involves just three steps:
1. Point your web browser to http://<your-owncloud-domain>.2. Enter your desired administrator’s username and password.3. Click [Finish Setup].
You’re now finished and can start using your new ownCloud server. Of course, there ismuch more that you can do to set up your ownCloud server for best performance andsecurity. In the following sections we will cover important installation and post-installation steps.
Detailed Guide
This section provides a more detailed guide to the installation wizard and the threemain topics:
1. Post-Installation Steps2. Configuration Options3. Database Setup by ownCloud
Post-Installation Steps
For hardened security and proper server operation, ownCloud recommends setting thepermissions on your ownCloud directories as strictly as possible. This should be doneimmediately after the initial installation and before running the setup.
Your HTTP user must own the directories config/, data/, apps/ and, if applicable, apps-external/ so that you can configure ownCloud, create, modify and delete your data filesand install apps via the ownCloud Web interface.
Installation | 37
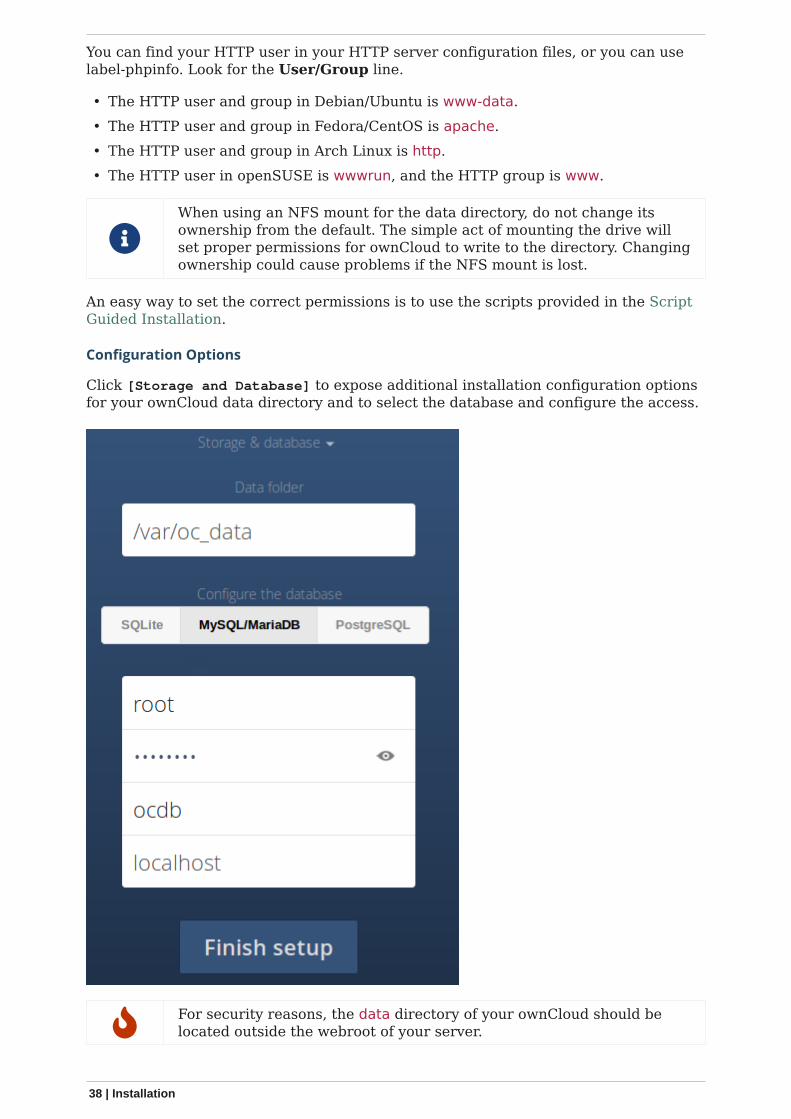
You can find your HTTP user in your HTTP server configuration files, or you can uselabel-phpinfo. Look for the User/Group line.
• The HTTP user and group in Debian/Ubuntu is www-data.• The HTTP user and group in Fedora/CentOS is apache.• The HTTP user and group in Arch Linux is http.• The HTTP user in openSUSE is wwwrun, and the HTTP group is www.
When using an NFS mount for the data directory, do not change itsownership from the default. The simple act of mounting the drive willset proper permissions for ownCloud to write to the directory. Changingownership could cause problems if the NFS mount is lost.
An easy way to set the correct permissions is to use the scripts provided in the ScriptGuided Installation.
Configuration Options
Click [Storage and Database] to expose additional installation configuration optionsfor your ownCloud data directory and to select the database and configure the access.
For security reasons, the data directory of your ownCloud should belocated outside the webroot of your server.
38 | Installation
The location of the data directory can either be defined by entering the path here orwhen installing the ownCloud files. For more information on the latter, see the ScriptGuided Installation.
If you define the path here, the respective setting in your config.php file will beadjusted. Alternatively, you can create a link data pointing to the directory containingthe actual files. In this case, the config.php setting for the data directory remainsunchanged.
ownCloud’s data directory must be exclusive to ownCloud and not bemodified manually by any other process or user.
It is best to configure your data directory location at installation, as it is difficult tomove after installation. You may put it anywhere; in this example is it located in/var/oc_data. This directory must already exist and must be owned by your webserveruser.
Database Setup by ownCloud
Your database and PHP connectors must be installed before you runthe Installation Wizard.
After you enter your administrative login for your database, the installer creates aspecial database user with privileges limited to the ownCloud database.
Afterward, ownCloud only needs this special ownCloud database user and drops theadministrative database login you used before. This new user’s name is based on yourownCloud admin user with an oc_ prefix and given a random password. The ownClouddatabase user and password are written into config.php:
For MySQL/MariaDB:
'dbuser' => 'oc_dbadmin','dbpassword' => 'pX65Ty5DrHQkYPE5HRsDvyFHlZZHcm',
For PostgreSQL:
'dbuser' => 'oc_postgres','dbpassword' => 'pX65Ty5DrHQkYPE5HRsDvyFHlZZHcm',
Click [Finish setup], and you’re ready to start using your new ownCloud server.
Quick Installation Guides
In this section, you find Quick Installation Guides for installing ownCloud manually.
If you’re running Ubuntu 18.04, click here.
For installing ownCloud on Ubuntu 20.04, click here.
Install ownCloud on Ubuntu 18.04
This is an ultra-short guide to installing ownCloud on a fresh installation of Ubuntu18.04. Run the following commands in your terminal to complete the installation.
Installation | 39
Prerequisites
• A fresh installation of Ubuntu 18.04 with SSH enabled.• This guide assumes that you are connected as the root user.• This guide assumes your ownCloud directory is located in /var/www/owncloud/
Preparation
First, ensure that all the installed packages are entirely up to date, and that PHP isavailable in the APT repository. To do so, follow the instructions below:
apt update && \ apt upgrade -y
Create the occ Helper Script
Create a helper script to simplify running occ commands.
FILE="/usr/local/bin/occ"/bin/cat <<EOM >$FILE#! /bin/bash
cd /var/www/owncloudsudo -u www-data /usr/bin/php /var/www/owncloud/occ "\$@"EOM
Make the helper script executable:
chmod +x /usr/local/bin/occ
Install the Required Packages
apt install -y \ apache2 \ libapache2-mod-php \ mariadb-server \ openssl \ php-imagick php-common php-curl \ php-gd php-imap php-intl \ php-json php-mbstring php-mysql \ php-ssh2 php-xml php-zip \ php-apcu php-redis redis-server \ wget
Install the Recommended Packages
40 | Installation

apt install -y \ ssh bzip2 sudo cron rsync curl jq \ inetutils-ping smbclient php-libsmbclient \ php-smbclient coreutils php-ldap
Ubuntu 18.04 includes smbclient 4.7.6, which has a known limitation ofonly using version 1 of the SMB protocol.
Installation
Configure Apache
Change the Document Root
sed -i "s#html#owncloud#" /etc/apache2/sites-available/000-default.conf
service apache2 restart
Create a Virtual Host Configuration
FILE="/etc/apache2/sites-available/owncloud.conf"/bin/cat <<EOM >$FILEAlias /owncloud "/var/www/owncloud/"
<Directory /var/www/owncloud/> Options +FollowSymlinks AllowOverride All
<IfModule mod_dav.c> Dav off </IfModule>
SetEnv HOME /var/www/owncloud SetEnv HTTP_HOME /var/www/owncloud</Directory>EOM
Enable the Virtual Host Configuration
a2ensite owncloud.confservice apache2 reload
Configure the Database
Installation | 41

service mysql startmysql -u root -e "CREATE DATABASE IF NOT EXISTS owncloud; \GRANT ALL PRIVILEGES ON owncloud.* \ TO owncloud@localhost \ IDENTIFIED BY 'password'";
Enable the Recommended Apache Modules
echo "Enabling Apache Modules"
a2enmod dir env headers mime rewrite setenvifservice apache2 reload
Download ownCloud
cd /var/www/wget https://download.owncloud.org/community/owncloud-10.8.0.tar.bz2 && \tar -xjf owncloud-10.8.0.tar.bz2 && \chown -R www-data. owncloud
Install ownCloud
occ maintenance:install \ --database "mysql" \ --database-name "owncloud" \ --database-user "owncloud" \ --database-pass "password" \ --admin-user "admin" \ --admin-pass "admin"
Configure ownCloud’s Trusted Domains
myip=$(hostname -I|cut -f1 -d ' ')occ config:system:set trusted_domains 1 --value="$myip"
Set Up a Cron Job
Set your background job mode to cron
occ background:cron
42 | Installation
echo "*/15 * * * * /var/www/owncloud/occ system:cron" \ > /var/spool/cron/crontabs/www-datachown www-data.crontab /var/spool/cron/crontabs/www-datachmod 0600 /var/spool/cron/crontabs/www-data
If you need to sync your users from an LDAP or Active Directory Server,add this additional Cron job. Every 15 minutes this cron job will syncLDAP users in ownCloud and disable the ones who are not available forownCloud. Additionally, you get a log file in /var/log/ldap-sync/user-sync.log for debugging.
echo "*/15 * * * * /var/www/owncloud/occ user:sync 'OCA\User_LDAP\User_Proxy' -mdisable -vvv >> /var/log/ldap-sync/user-sync.log 2>&1" >/var/spool/cron/crontabs/www-datachown www-data.crontab /var/spool/cron/crontabs/www-datachmod 0600 /var/spool/cron/crontabs/www-datamkdir -p /var/log/ldap-synctouch /var/log/ldap-sync/user-sync.logchown www-data. /var/log/ldap-sync/user-sync.log
Configure Caching and File Locking
Execute these commands:
occ config:system:set \ memcache.local \ --value '\OC\Memcache\APCu'
occ config:system:set \ memcache.locking \ --value '\OC\Memcache\Redis'
service redis-server start
occ config:system:set \ redis \ --value '{"host": "127.0.0.1", "port": "6379"}' \ --type json
Configure Log Rotation
Execute this command to set up log rotation.
Installation | 43
FILE="/etc/logrotate.d/owncloud"sudo /bin/cat <<EOM >$FILE/var/www/owncloud/data/owncloud.log { size 10M rotate 12 copytruncate missingok compress compresscmd /bin/gzip}EOM
Finalise the Installation
Make sure the permissions are correct
cd /var/www/chown -R www-data. owncloud
ownCloud is now installed. You can confirm that it is ready to use by pointingyour web browser to your ownCloud installation.
Install ownCloud on Ubuntu 20.04
Introduction
This is a short guide to installing ownCloud on a fresh installation of Ubuntu 20.04.Run the following commands in your terminal to complete the installation.
This guide can not go into details and has its limits by nature. If youexperience issues like with dependencies of PHP or other relevantthings like the operating system, web server or database, look at theDetailed Installation Guide for more information.
Prerequisites
• A fresh installation of Ubuntu 20.04 with SSH enabled.• This guide assumes that you are working as the root user.• Your ownCloud directory will be located in /var/www/owncloud/
Preparation
First, ensure that all the installed packages are entirely up to date, and that PHP isavailable in the APT repository. To do so, follow the instructions below:
apt update && \ apt upgrade -y
Create the occ Helper Script
Create a helper script to simplify running occ commands.
44 | Installation
FILE="/usr/local/bin/occ"/bin/cat <<EOM >$FILE#! /bin/bashcd /var/www/owncloudsudo -E -u www-data /usr/bin/php /var/www/owncloud/occ "\$@"EOM
Make the helper script executable:
chmod +x /usr/local/bin/occ
Install the Required Packages
apt install -y \ apache2 \ libapache2-mod-php \ mariadb-server \ openssl redis-server wget \ php-imagick php-common php-curl \ php-gd php-imap php-intl \ php-json php-mbstring php-mysql \ php-ssh2 php-xml php-zip \ php-apcu php-redis php-ldap
Note : php 7.4 is the default version installable with Ubuntu 20.04
Install the Recommended Packages
apt install -y \ ssh bzip2 rsync curl jq \ inetutils-ping coreutils
Installation
Configure Apache
Change the Document Root
sed -i "s#html#owncloud#" /etc/apache2/sites-available/000-default.confservice apache2 restart
Create a Virtual Host Configuration
Installation | 45
FILE="/etc/apache2/sites-available/owncloud.conf"/bin/cat <<EOM >$FILEAlias /owncloud "/var/www/owncloud/"
<Directory /var/www/owncloud/> Options +FollowSymlinks AllowOverride All
<IfModule mod_dav.c> Dav off </IfModule>
SetEnv HOME /var/www/owncloud SetEnv HTTP_HOME /var/www/owncloud</Directory>EOM
Enable the Virtual Host Configuration
a2ensite owncloud.confservice apache2 reload
Configure the Database
mysql -u root -e "CREATE DATABASE IF NOT EXISTS owncloud; \GRANT ALL PRIVILEGES ON owncloud.* \ TO owncloud@localhost \ IDENTIFIED BY 'password'";
Enable the Recommended Apache Modules
echo "Enabling Apache Modules"a2enmod dir env headers mime rewrite setenvifservice apache2 reload
Download ownCloud
cd /var/www/wget https://download.owncloud.org/community/owncloud-complete-20210721.tar.bz2 && \tar -xjf owncloud-complete-20210721.tar.bz2 && \chown -R www-data. owncloud
Install ownCloud
46 | Installation
occ maintenance:install \ --database "mysql" \ --database-name "owncloud" \ --database-user "owncloud" \ --database-pass "password" \ --admin-user "admin" \ --admin-pass "admin"
Configure ownCloud’s Trusted Domains
myip=$(hostname -I|cut -f1 -d ' ')occ config:system:set trusted_domains 1 --value="$myip"
Set Up a Cron Job
Set your background job mode to cron
occ background:cron
echo "*/15 * * * * /var/www/owncloud/occ system:cron" \ > /var/spool/cron/crontabs/www-datachown www-data.crontab /var/spool/cron/crontabs/www-datachmod 0600 /var/spool/cron/crontabs/www-data
If you need to sync your users from an LDAP or Active Directory Server,add this additional Cron job. Every 15 minutes this cron job will syncLDAP users in ownCloud and disable the ones who are not available forownCloud. Additionally, you get a log file in /var/log/ldap-sync/user-sync.log for debugging.
echo "*/15 * * * * /var/www/owncloud/occ user:sync 'OCA\User_LDAP\User_Proxy' -mdisable -vvv >> /var/log/ldap-sync/user-sync.log 2>&1" >>/var/spool/cron/crontabs/www-datachown www-data.crontab /var/spool/cron/crontabs/www-datachmod 0600 /var/spool/cron/crontabs/www-datamkdir -p /var/log/ldap-synctouch /var/log/ldap-sync/user-sync.logchown www-data. /var/log/ldap-sync/user-sync.log
Configure Caching and File Locking
Execute these commands:
Installation | 47
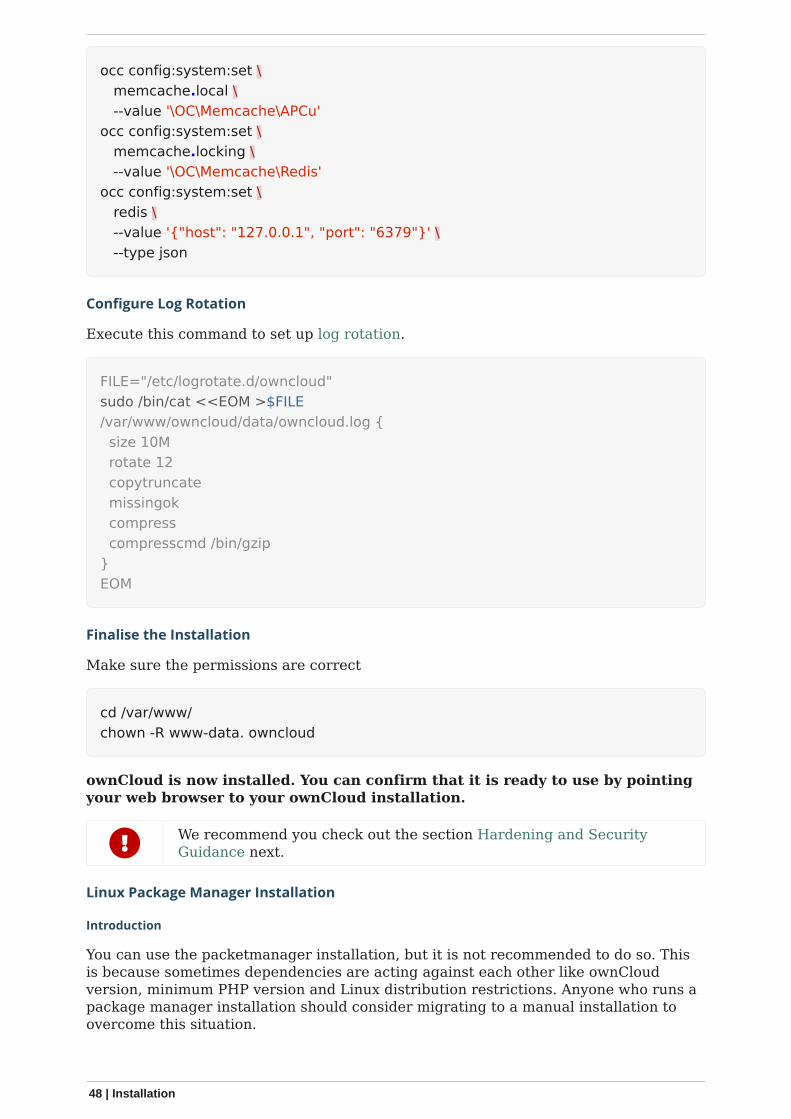
occ config:system:set \ memcache.local \ --value '\OC\Memcache\APCu'occ config:system:set \ memcache.locking \ --value '\OC\Memcache\Redis'occ config:system:set \ redis \ --value '{"host": "127.0.0.1", "port": "6379"}' \ --type json
Configure Log Rotation
Execute this command to set up log rotation.
FILE="/etc/logrotate.d/owncloud"sudo /bin/cat <<EOM >$FILE/var/www/owncloud/data/owncloud.log { size 10M rotate 12 copytruncate missingok compress compresscmd /bin/gzip}EOM
Finalise the Installation
Make sure the permissions are correct
cd /var/www/chown -R www-data. owncloud
ownCloud is now installed. You can confirm that it is ready to use by pointingyour web browser to your ownCloud installation.
We recommend you check out the section Hardening and SecurityGuidance next.
Linux Package Manager Installation
Introduction
You can use the packetmanager installation, but it is not recommended to do so. Thisis because sometimes dependencies are acting against each other like ownCloudversion, minimum PHP version and Linux distribution restrictions. Anyone who runs apackage manager installation should consider migrating to a manual installation toovercome this situation.
48 | Installation
Add the ownCloud Repository
Before you can install owncloud-files, you need to add ownCloud’s repository to yourdistribution’s package manager.
Package managers should only be used for single-server setups. Forproduction environments, we recommend installing from the tararchive.
Available Packages
The recommended package to use is owncloud-complete-files. It only installsownCloud, and does not install Apache, a database, or any of the required PHPdependencies.
Avoid Automatic Upgrades
If you are installing ownCloud using one of the various Linux package managers, westrongly recommend that you avoid automatically updating the owncloud-complete-files package, when running a system update or upgrade and when upgrading otherpackages. That way, there are no surprise changes (whether positive or negative) toyour ownCloud installation.
Here are the ways to do so for APT, Yum, and Zypper.
APT
If you are using APT, use apt-mark hold to mark the owncloud-complete-files packageas held. Here’s an example of how to do so:
apt-mark hold owncloud-complete-files
To see if owncloud-complete-files has already been held, use the showhold command,as in the following example. If it’s printed out to the console, then it’s being held.
apt-mark showhold owncloud-complete-files
To unset owncloud-complete-files as held back, use the unhold command, as in theexample below.
apt-mark unhold owncloud-complete-files
Yum
If you are using Yum, there are two options that you can take to lock packages frombeing upgraded. You can:
1. Add exclude=owncloud-complete-files to /etc/yum.conf2. Use the versionlock plugin for Yum.
The VersionLock Plugin
If the versionlock plugin is not installed, install it by running:
Installation | 49
yum install yum-plugin-versionlock
When it is installed, you can lock owncloud-complete-files run:
yum versionlock add owncloud-complete-files
To confirm that it is locked, run:
yum versionlock list
To unlock owncloud-complete-files, run:
yum versionlock delete owncloud-complete-files
Zypper
If you are using Zypper, use the addlock or al commands. Similar to apt-mark holdthese add a package lock that prevents the package from being modified. The examplebelow shows how to use the command to lock owncloud-complete-files.
zypper addlock owncloud-complete-files
To see if the package has already been locked, use the locks command. If owncloud-complete-files is already locked, then you will see output similar to the below example.
# | Name | Type | Repository--+----------------+---------+-----------1 | owncloud-complete-files | package | (any)
To unlock owncloud-complete-files, if it is already locked, use the removelocks or rlcommands, as in the example below.
zypper removelock owncloud-complete-files
Installing ownCloud Community Edition
First, install your own LAMP stack, as doing so allows you to create your own customLAMP stack without dependency conflicts with the ownCloud package. Then downloadand install from http://download.owncloud.org/download/repositories/production/owncloud/.
The ownCloud server is designed to work with different databases and different web-servers, in a large range of configurations.
This package comes without dependencies so that the installation is most likely tosucceed. It also means unfortunately, that the server will not directly run afterinstalling this package.
50 | Installation
To get started, try:
apt install apache2 libapache2-mod-php mariadb-server openssl apt install php-imagick php-common php-curl php-gd php-imap php-intl apt install php-json php-mbstring php-mysql php-ssh2 php-xml php-zip apt install php-apcu php-redis redis-server wget
mysql -e "CREATE DATABASE IF NOT EXISTS owncloud" mysql -e "GRANT ALLPRIVILEGES ON owncloud.* TO owncloud@localhost IDENTIFIED BY 'password'"; cp/usr/share/doc/*/owncloud-config-apache.conf.default /etc/apache2/sites-available/owncloud.conf a2ensite owncloud; systemctl reload apache2
For more details see: Quick Installation Guide
See the system_requirements for the recommended ownCloud setupand supported platforms.
Do not move the folders provided by these packages after theinstallation, as this will break updates.
What is the Correct Version?
Package versions are composed of a major, a minor, and a patch number, such as 9.0,9.1, 10.0, 10.0.1, and 10.0.2. The second number represents a major release, and thethird number represents a minor release.
Major Releases
If you want to follow either of the most recent major releases, then substitute versionwith either 9.0 or 10.0.
Minor Releases
If you want to follow any of the four most recent patch releases, then substituteversion with one of 10.0.1, 10.0.2, 10.0.3, or 10.0.4. Following a minor release avoidsyou accidentally upgrading to the next major release before you’re ready.
The Latest Stable Version
Alternatively you can use stable for the latest stable version. If you do, you never haveto change it as it always tracks the current stable ownCloud version through all majorreleases.
Installing ownCloud Enterprise Edition
See the enterprise installation guide for instructions on installing ownCloud Enterpriseedition.
Downgrading
Downgrading is not supported and risks corrupting your data! If you want to revert toan older ownCloud version, install it from scratch and then restore your data frombackup. Before doing this, file a support ticket (if you have paid support) or ask forhelp in the ownCloud forums to see if your issue can be resolved without downgrading.
Additional Guides and Notes
See installation_wizard for important steps, such as choosing the best database andsetting correct directory permissions. See the SELinux Configuration Guide for asuggested configuration for SELinux-enabled distributions such as Fedora and
Installation | 51
CentOS.
If your distribution is not listed, your Linux distribution may maintain its ownownCloud packages or you may prefer to install from source.
Archlinux
The current client stable version is in the official community repository, morepackages are in the Arch User Repository.
Note for MySQL/MariaDB environments
Please refer to MySQL / MariaDB with Binary Logging Enabled on how to correctlyconfigure your environment if you have binary logging enabled.
Running ownCloud in a sub-directory
If you’re running ownCloud in a sub-directory and want to use CalDAV or CardDAVclients, make sure you have configured the correct service discovery URLs.
Troubleshooting
If your ownCloud installation fails and you see the following error in your ownCloudlog please refer to MySQL / MariaDB with Binary Logging Enabled for how to resolveit.
An unhandled exception has been thrown: exception ‘PDOException’ with message'SQLSTATE[HY000]: General error: 1665 Cannot execute statement: impossible towrite to binary log since BINLOG_FORMAT = STATEMENT and at least one table usesa storage engine limited to row-based logging. InnoDB is limited to row-loggingwhen transaction isolation level is READ COMMITTED or READ UNCOMMITTED.'
Changing Your ownCloud URL
This admin manual assumes that the ownCloud server is already accessible under theroute /owncloud (which is the default, e.g. https://example.com/owncloud). If you like,you can change this in your web server configuration, for example by changing it fromhttps://example.com/owncloud/ to https://example.com/.
To do so on Debian/Ubuntu Linux, you need to edit these files:
• /etc/apache2/sites-enabled/owncloud.conf• /var/www/owncloud/config/config.php
Edit the Alias directive in /etc/apache2/sites-enabled/owncloud.conf to alias yourownCloud directory to the Web server root:
Alias / "/var/www/owncloud/"
Edit the overwrite.cli.url parameter in /var/www/owncloud/config/config.php:
'overwrite.cli.url' => 'http://localhost/',
When the changes have been made and the file saved, restart Apache. Now you can
52 | Troubleshooting
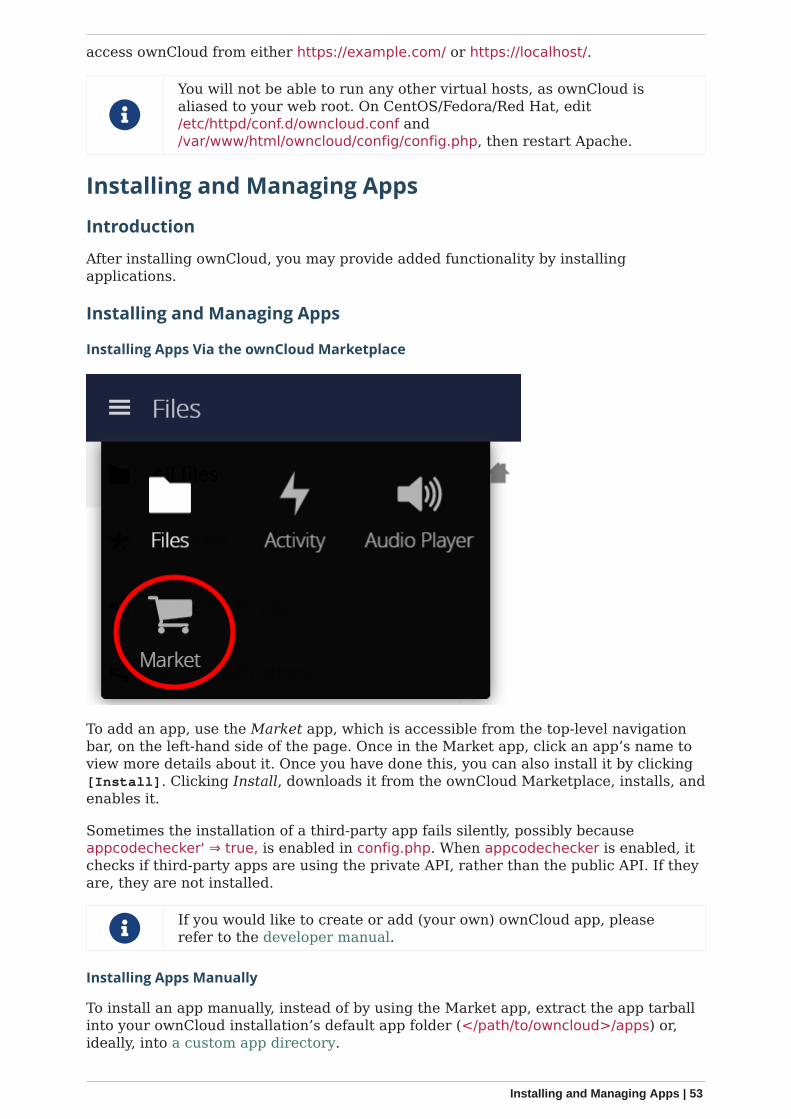
access ownCloud from either https://example.com/ or https://localhost/.
You will not be able to run any other virtual hosts, as ownCloud isaliased to your web root. On CentOS/Fedora/Red Hat, edit/etc/httpd/conf.d/owncloud.conf and/var/www/html/owncloud/config/config.php, then restart Apache.
Installing and Managing Apps
Introduction
After installing ownCloud, you may provide added functionality by installingapplications.
Installing and Managing Apps
Installing Apps Via the ownCloud Marketplace
To add an app, use the Market app, which is accessible from the top-level navigationbar, on the left-hand side of the page. Once in the Market app, click an app’s name toview more details about it. Once you have done this, you can also install it by clicking[Install]. Clicking Install, downloads it from the ownCloud Marketplace, installs, andenables it.
Sometimes the installation of a third-party app fails silently, possibly becauseappcodechecker' ⇒ true, is enabled in config.php. When appcodechecker is enabled, itchecks if third-party apps are using the private API, rather than the public API. If theyare, they are not installed.
If you would like to create or add (your own) ownCloud app, pleaserefer to the developer manual.
Installing Apps Manually
To install an app manually, instead of by using the Market app, extract the app tarballinto your ownCloud installation’s default app folder (</path/to/owncloud>/apps) or,ideally, into a custom app directory.
Installing and Managing Apps | 53
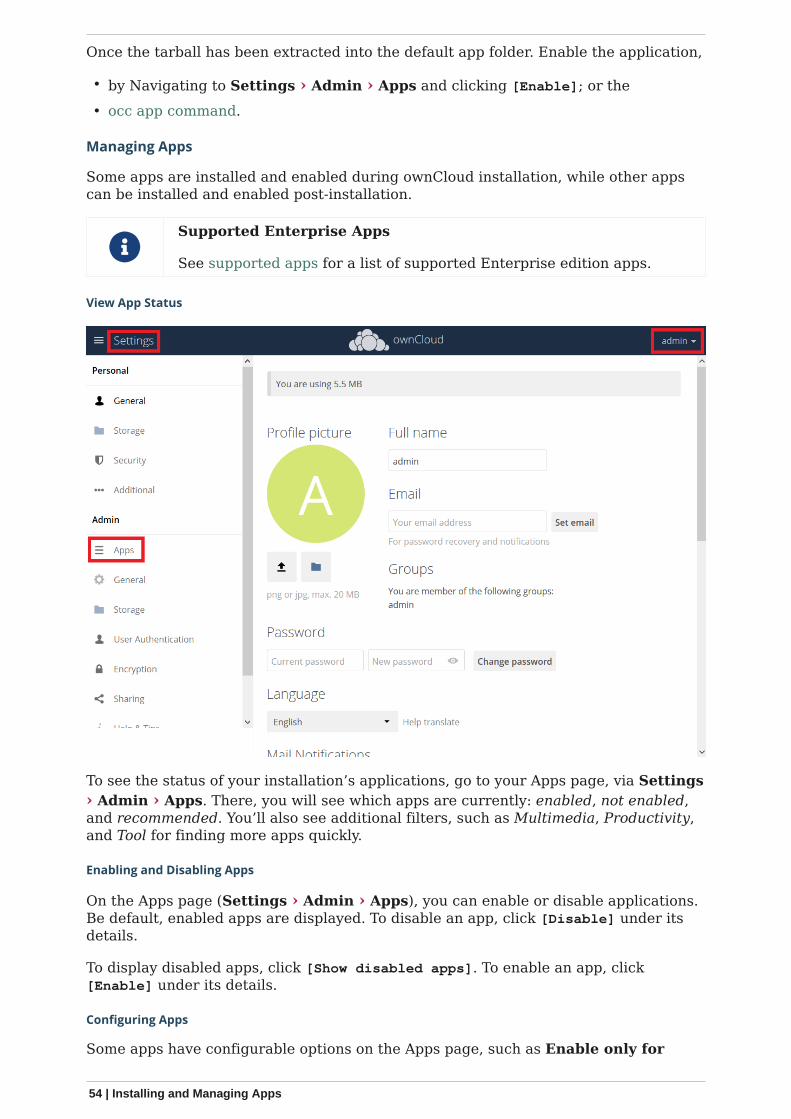
Once the tarball has been extracted into the default app folder. Enable the application,
• by Navigating to Settings › Admin › Apps and clicking [Enable]; or the• occ app command.
Managing Apps
Some apps are installed and enabled during ownCloud installation, while other appscan be installed and enabled post-installation.
Supported Enterprise Apps
See supported apps for a list of supported Enterprise edition apps.
View App Status
To see the status of your installation’s applications, go to your Apps page, via Settings› Admin › Apps. There, you will see which apps are currently: enabled, not enabled,and recommended. You’ll also see additional filters, such as Multimedia, Productivity,and Tool for finding more apps quickly.
Enabling and Disabling Apps
On the Apps page (Settings › Admin › Apps), you can enable or disable applications.Be default, enabled apps are displayed. To disable an app, click [Disable] under itsdetails.
To display disabled apps, click [Show disabled apps]. To enable an app, click[Enable] under its details.
Configuring Apps
Some apps have configurable options on the Apps page, such as Enable only for
54 | Installing and Managing Apps
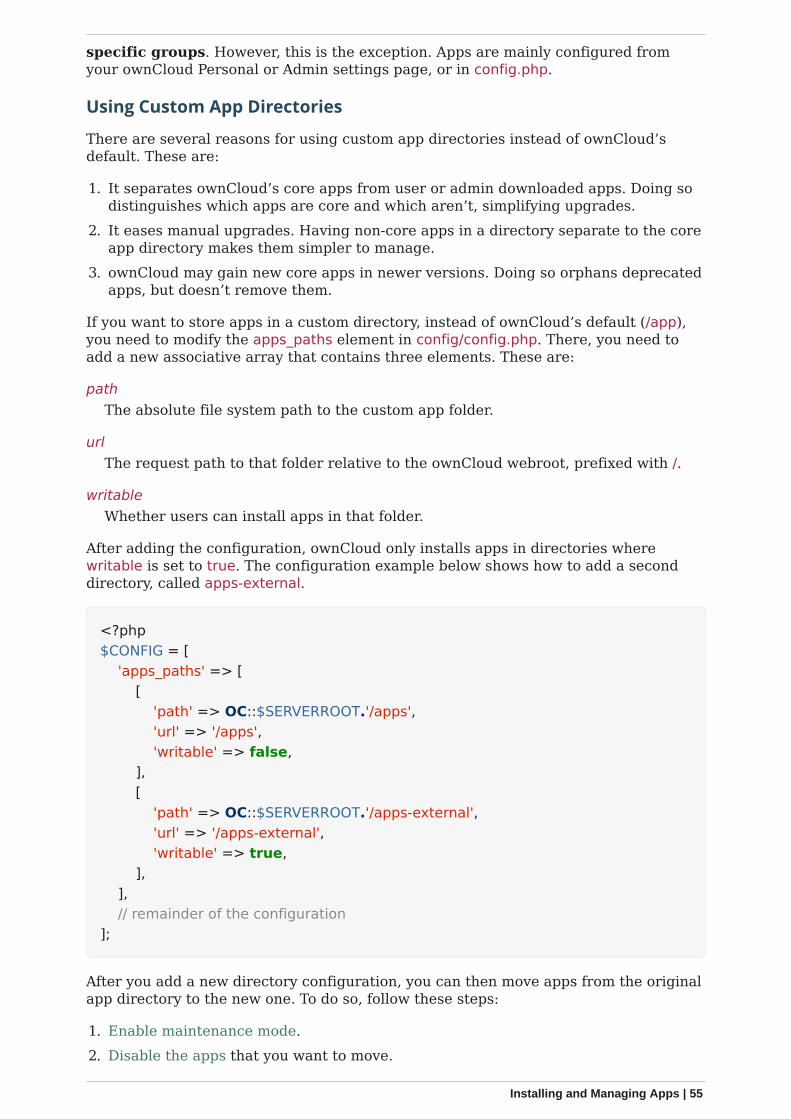
specific groups. However, this is the exception. Apps are mainly configured fromyour ownCloud Personal or Admin settings page, or in config.php.
Using Custom App Directories
There are several reasons for using custom app directories instead of ownCloud’sdefault. These are:
1. It separates ownCloud’s core apps from user or admin downloaded apps. Doing sodistinguishes which apps are core and which aren’t, simplifying upgrades.
2. It eases manual upgrades. Having non-core apps in a directory separate to the coreapp directory makes them simpler to manage.
3. ownCloud may gain new core apps in newer versions. Doing so orphans deprecatedapps, but doesn’t remove them.
If you want to store apps in a custom directory, instead of ownCloud’s default (/app),you need to modify the apps_paths element in config/config.php. There, you need toadd a new associative array that contains three elements. These are:
pathThe absolute file system path to the custom app folder.
urlThe request path to that folder relative to the ownCloud webroot, prefixed with /.
writableWhether users can install apps in that folder.
After adding the configuration, ownCloud only installs apps in directories wherewritable is set to true. The configuration example below shows how to add a seconddirectory, called apps-external.
<?php$CONFIG = [ 'apps_paths' => [ [ 'path' => OC::$SERVERROOT.'/apps', 'url' => '/apps', 'writable' => false, ], [ 'path' => OC::$SERVERROOT.'/apps-external', 'url' => '/apps-external', 'writable' => true, ], ], // remainder of the configuration];
After you add a new directory configuration, you can then move apps from the originalapp directory to the new one. To do so, follow these steps:
1. Enable maintenance mode.2. Disable the apps that you want to move.
Installing and Managing Apps | 55
3. Create a new apps directory and assign it the same user and group, and ownershippermissions as the core apps directory.
4. Move the apps from the old apps directory to the new apps directory.5. Add a new app directory in config/config.php.6. If you’re using a cache, such as Redis or Memcached, ensure that you clear the
cache.7. Re-enable the apps.8. Disable maintenance mode.
Multiple Servers
We recommend having your apps-external and your config directory on a networkstorage in order to prevent conflicts when installing or updating apps.
Supported Apps in ownCloud
AGPL Apps
• Activity• Anti-Virus• Collaborative Tags• Comments• Encryption• External Sites• External Storage• ownCloud WebDAV Endpoint (handles old and new webdav endpoints)• Federated File Sharing (allows file sharing across ownCloud instances)• Federation (allows username auto-complete across ownCloud instances)• Files (cannot be disabled)• Files Media Viewer
Before Files Media Viewer 1.0.4, the Gallery and Files VideoPlayerapps need to be uninstalled before installing the Media Viewerapp. Starting with Files Media Viewer 1.0.4, the Gallery and FilesVideoPlayer apps need to be disabled before using the Files MediaViewer app.
• Files PDF Viewer• Files Sharing• Files TextEditor• Files Trashbin• Files Versions• First Run Wizard• Notifications• Provisioning API• Template Editor (for notification emails)• Update Notifications
56 | Supported Apps in ownCloud
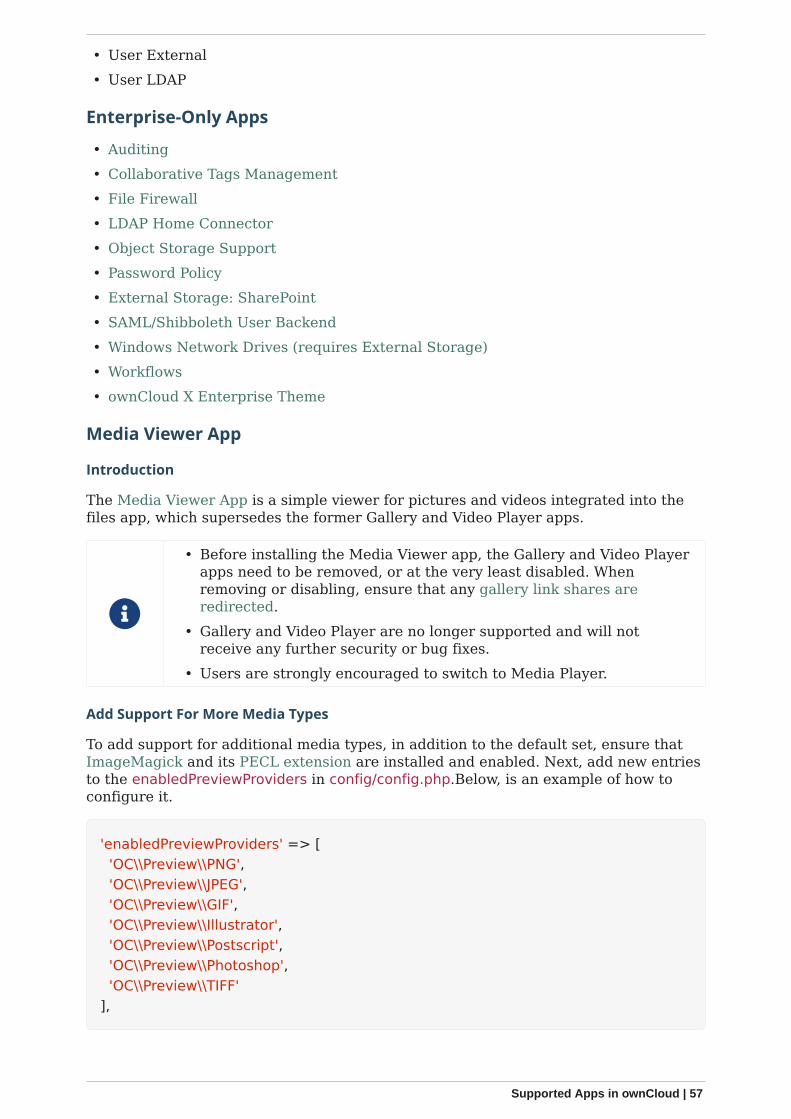
• User External• User LDAP
Enterprise-Only Apps
• Auditing• Collaborative Tags Management• File Firewall• LDAP Home Connector• Object Storage Support• Password Policy• External Storage: SharePoint• SAML/Shibboleth User Backend• Windows Network Drives (requires External Storage)• Workflows• ownCloud X Enterprise Theme
Media Viewer App
Introduction
The Media Viewer App is a simple viewer for pictures and videos integrated into thefiles app, which supersedes the former Gallery and Video Player apps.
• Before installing the Media Viewer app, the Gallery and Video Playerapps need to be removed, or at the very least disabled. Whenremoving or disabling, ensure that any gallery link shares areredirected.
• Gallery and Video Player are no longer supported and will notreceive any further security or bug fixes.
• Users are strongly encouraged to switch to Media Player.
Add Support For More Media Types
To add support for additional media types, in addition to the default set, ensure thatImageMagick and its PECL extension are installed and enabled. Next, add new entriesto the enabledPreviewProviders in config/config.php.Below, is an example of how toconfigure it.
'enabledPreviewProviders' => [ 'OC\\Preview\\PNG', 'OC\\Preview\\JPEG', 'OC\\Preview\\GIF', 'OC\\Preview\\Illustrator', 'OC\\Preview\\Postscript', 'OC\\Preview\\Photoshop', 'OC\\Preview\\TIFF'],
Supported Apps in ownCloud | 57
Support for playing Apple QuickTime (*.mov) does not work in Chrome -however it is supported in Safari and Mozilla.
Look at the sample configuration (config.sample.php) in your configfolder, for more information about this configuration key.
SELinux Configuration
Introduction
Security-Enhanced Linux (SELinux) is a Linux kernel security module that provides amechanism for supporting access control security policies, including mandatory accesscontrols (MAC).
Preparation
When you have SELinux enabled on your Linux distribution, you may run intopermissions problems after a new ownCloud installation, and see permission deniederrors in your ownCloud logs.
The following settings should work for most SELinux systems that use the defaultdistro profiles. Run these commands as root, and remember to adjust the filepaths inthese examples for your installation
semanage fcontext -a -t httpd_sys_rw_content_t'/var/www/html/owncloud/data(/.*)?'semanage fcontext -a -t httpd_sys_rw_content_t'/var/www/html/owncloud/config(/.*)?'semanage fcontext -a -t httpd_sys_rw_content_t'/var/www/html/owncloud/apps(/.*)?'semanage fcontext -a -t httpd_sys_rw_content_t '/var/www/html/owncloud/apps-external(/.*)?'semanage fcontext -a -t httpd_sys_rw_content_t'/var/www/html/owncloud/.htaccess'semanage fcontext -a -t httpd_sys_rw_content_t '/var/www/html/owncloud/.user.ini'
restorecon -Rv '/var/www/html/owncloud/'
If you uninstall ownCloud you need to remove the ownCloud directory labels. To dothis execute the following commands as root after uninstalling ownCloud
semanage fcontext -d '/var/www/html/owncloud/data(/.*)?'semanage fcontext -d '/var/www/html/owncloud/config(/.*)?'semanage fcontext -d '/var/www/html/owncloud/apps(/.*)?'semanage fcontext -d '/var/www/html/owncloud/apps-external(/.*)?'semanage fcontext -d '/var/www/html/owncloud/.htaccess'semanage fcontext -d '/var/www/html/owncloud/.user.ini'
restorecon -Rv '/var/www/html/owncloud/'
If you have customized SELinux policies and these examples do not work, you must
58 | SELinux Configuration
give the HTTP server write access to these directories:
/var/www/html/owncloud/data/var/www/html/owncloud/config/var/www/html/owncloud/apps/var/www/html/owncloud/apps-external
Enable updates via the web interface
To enable updates via the ownCloud web interface, you may need this to enablewriting to the ownCloud directories:
setsebool httpd_unified on
When the update is completed, disable write access:
setsebool -P httpd_unified off
Disallow write access to the whole web directory
For security reasons it’s suggested to disable write access to all folders in /var/www/(default):
setsebool -P httpd_unified off
Allow access to a remote database
An additional setting is needed if your installation is connecting to a remote database:
setsebool -P httpd_can_network_connect_db on
Allow access to LDAP server
Use this setting to allow LDAP connections:
setsebool -P httpd_can_connect_ldap on
Allow access to remote network
ownCloud requires access to remote networks for functions such as Server-to-Serversharing, external storages or the ownCloud Marketplace. To allow this access use thefollowing setting:
setsebool -P httpd_can_network_connect on
SELinux Configuration | 59
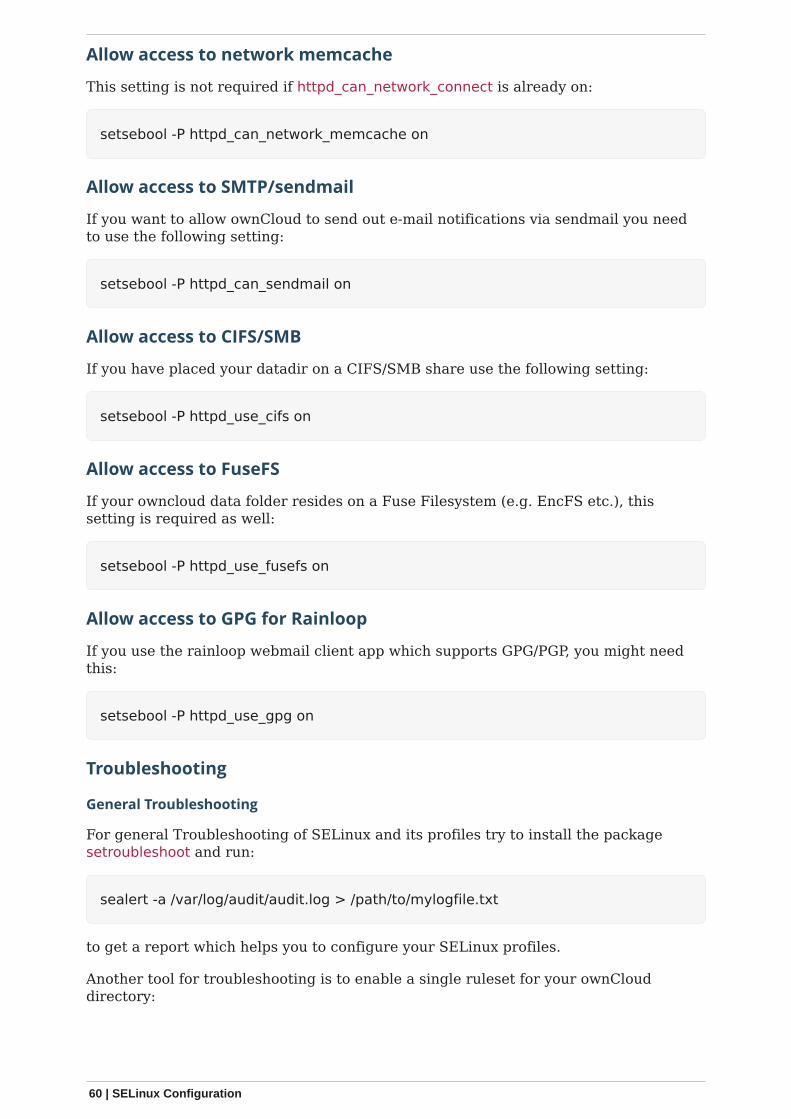
Allow access to network memcache
This setting is not required if httpd_can_network_connect is already on:
setsebool -P httpd_can_network_memcache on
Allow access to SMTP/sendmail
If you want to allow ownCloud to send out e-mail notifications via sendmail you needto use the following setting:
setsebool -P httpd_can_sendmail on
Allow access to CIFS/SMB
If you have placed your datadir on a CIFS/SMB share use the following setting:
setsebool -P httpd_use_cifs on
Allow access to FuseFS
If your owncloud data folder resides on a Fuse Filesystem (e.g. EncFS etc.), thissetting is required as well:
setsebool -P httpd_use_fusefs on
Allow access to GPG for Rainloop
If you use the rainloop webmail client app which supports GPG/PGP, you might needthis:
setsebool -P httpd_use_gpg on
Troubleshooting
General Troubleshooting
For general Troubleshooting of SELinux and its profiles try to install the packagesetroubleshoot and run:
sealert -a /var/log/audit/audit.log > /path/to/mylogfile.txt
to get a report which helps you to configure your SELinux profiles.
Another tool for troubleshooting is to enable a single ruleset for your ownClouddirectory:
60 | SELinux Configuration

semanage fcontext -a -t httpd_sys_rw_content_t '/var/www/html/owncloud(/.*)?'restorecon -RF /var/www/html/owncloud
It is much stronger security to have a more fine-grained ruleset as in the examples atthe beginning, so use this only for testing and troubleshooting. It has a similar effectto disabling SELinux, so don’t use it on production systems.
See this discussion on GitHub to learn more about configuring SELinux correctly forownCloud.
Redis on RHEL 7 & Derivatives
On RHEL 7 and its derivatives, if you are using Redis for both local server cache andfile locking and Redis is configured to listen on a Unix socket instead of a TCP/IP port(which is recommended if Redis is running on the same system as ownCloud) you mustinstruct SELinux to allow daemons to enable cluster mode. You can do this using thefollowing command:
setsebool -P daemons_enable_cluster_mode 1
Let’s Encrypt SSL Certificates
In this section you will find all the details you need to configure ownCloud with Let’sEncrypt.
• Using Let’s Encrypt SSL Certificates• Configure Apache with Let’s Encrypt
Using Let’s Encrypt SSL Certificates
Introduction
This page covers how to configure your web server to use Let’s Encrypt as thecertificate authority for your ownCloud server. Note that Let’s Encrypt is not officiallysupported, and this page is community-maintained.
• For ease of handling, SSL-specific directives have been moved into a separate fileto be included. This can help with first-time certificate issuance as well as withreusing configurations.
• Read the Certbot user guide for details of the commands.• Let’s Encrypt CA issues short-lived certificates valid for 90 days. Make sure you
renew the certificates at least once in this period, because expired certificates needreissuing. A certificate is due for renewal at the earliest 30 days before expiring.Certbot can be forced to renew via options at any time as long as the certificate isvalid.
Raymii.org provides raymii-ssl-url[an excellent introduction to strongSSL security measures with Apache], if you would like to know more.
Requirements & Dependencies
You require a domain name with a valid A-Record pointing back to your server’s IPaddress. In case your server is behind a firewall, ensure that your server is accessiblefrom the internet by adding the required firewall and port forwarding rules.
Let’s Encrypt SSL Certificates | 61
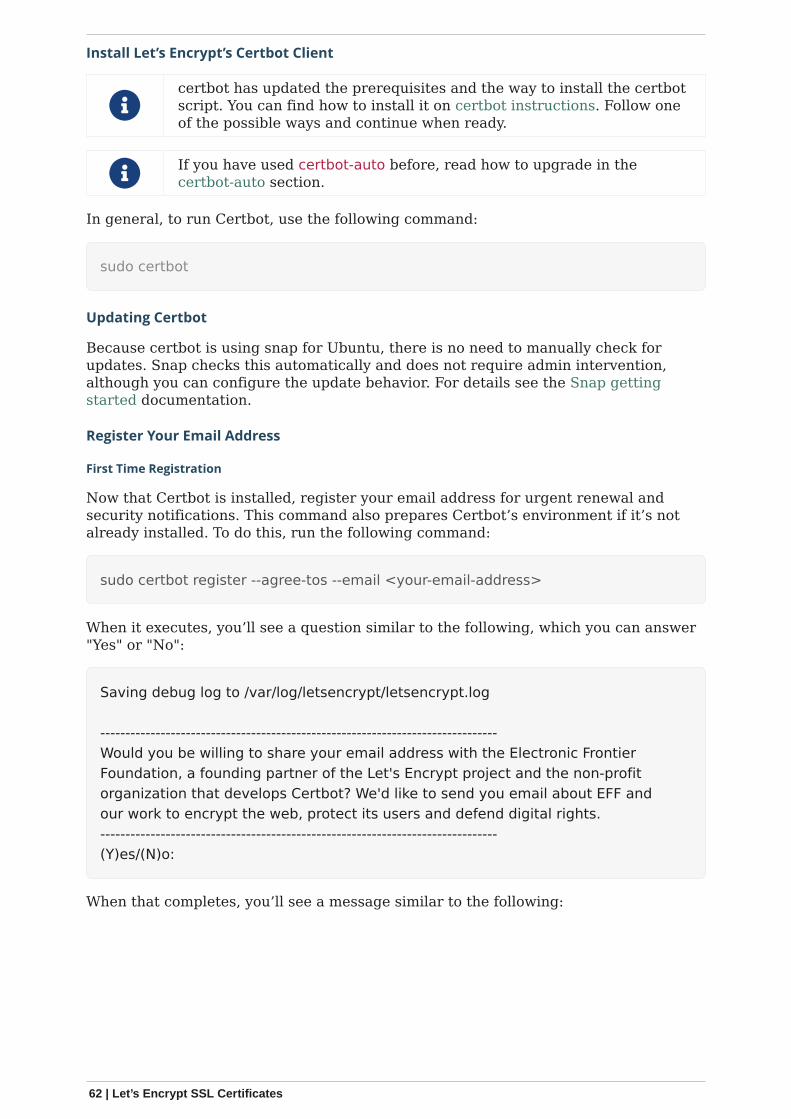
Install Let’s Encrypt’s Certbot Client
certbot has updated the prerequisites and the way to install the certbotscript. You can find how to install it on certbot instructions. Follow oneof the possible ways and continue when ready.
If you have used certbot-auto before, read how to upgrade in thecertbot-auto section.
In general, to run Certbot, use the following command:
sudo certbot
Updating Certbot
Because certbot is using snap for Ubuntu, there is no need to manually check forupdates. Snap checks this automatically and does not require admin intervention,although you can configure the update behavior. For details see the Snap gettingstarted documentation.
Register Your Email Address
First Time Registration
Now that Certbot is installed, register your email address for urgent renewal andsecurity notifications. This command also prepares Certbot’s environment if it’s notalready installed. To do this, run the following command:
sudo certbot register --agree-tos --email <your-email-address>
When it executes, you’ll see a question similar to the following, which you can answer"Yes" or "No":
Saving debug log to /var/log/letsencrypt/letsencrypt.log
-------------------------------------------------------------------------------Would you be willing to share your email address with the Electronic FrontierFoundation, a founding partner of the Let's Encrypt project and the non-profitorganization that develops Certbot? We'd like to send you email about EFF andour work to encrypt the web, protect its users and defend digital rights.-------------------------------------------------------------------------------(Y)es/(N)o:
When that completes, you’ll see a message similar to the following:
62 | Let’s Encrypt SSL Certificates
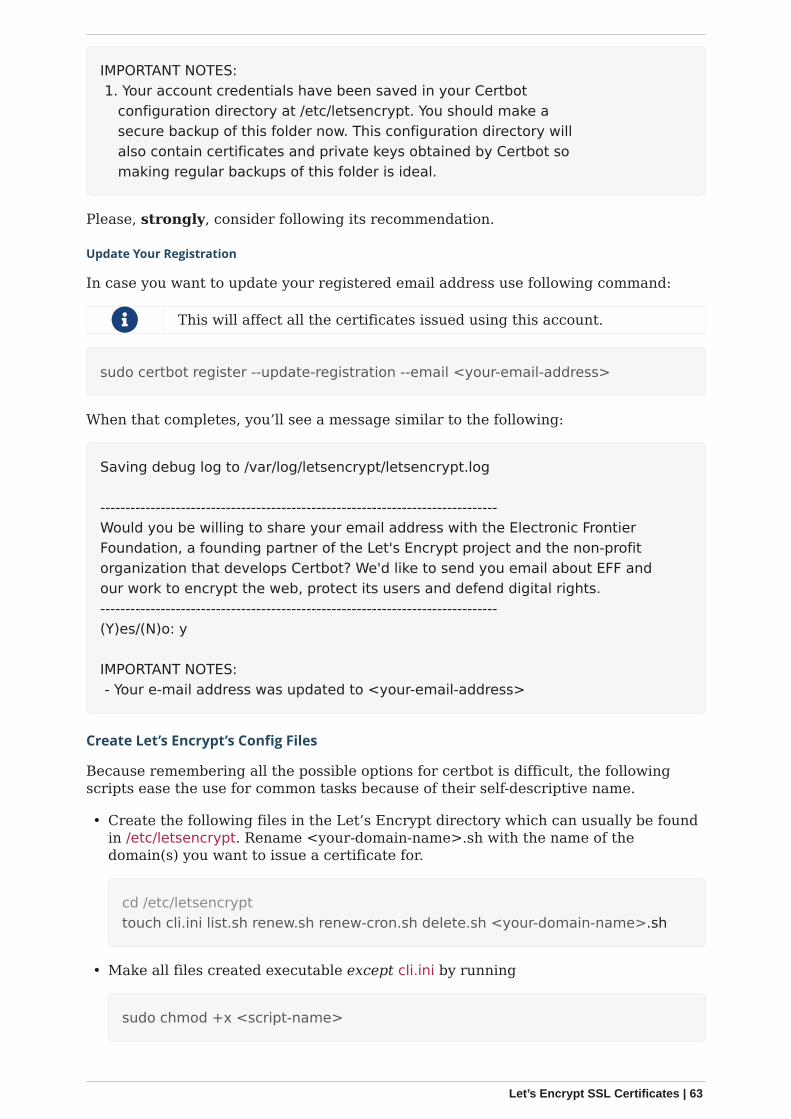
IMPORTANT NOTES: 1. Your account credentials have been saved in your Certbot configuration directory at /etc/letsencrypt. You should make a secure backup of this folder now. This configuration directory will also contain certificates and private keys obtained by Certbot so making regular backups of this folder is ideal.
Please, strongly, consider following its recommendation.
Update Your Registration
In case you want to update your registered email address use following command:
This will affect all the certificates issued using this account.
sudo certbot register --update-registration --email <your-email-address>
When that completes, you’ll see a message similar to the following:
Saving debug log to /var/log/letsencrypt/letsencrypt.log
-------------------------------------------------------------------------------Would you be willing to share your email address with the Electronic FrontierFoundation, a founding partner of the Let's Encrypt project and the non-profitorganization that develops Certbot? We'd like to send you email about EFF andour work to encrypt the web, protect its users and defend digital rights.-------------------------------------------------------------------------------(Y)es/(N)o: y
IMPORTANT NOTES: - Your e-mail address was updated to <your-email-address>
Create Let’s Encrypt’s Config Files
Because remembering all the possible options for certbot is difficult, the followingscripts ease the use for common tasks because of their self-descriptive name.
• Create the following files in the Let’s Encrypt directory which can usually be foundin /etc/letsencrypt. Rename <your-domain-name>.sh with the name of thedomain(s) you want to issue a certificate for.
cd /etc/letsencrypttouch cli.ini list.sh renew.sh renew-cron.sh delete.sh <your-domain-name>.sh
• Make all files created executable except cli.ini by running
sudo chmod +x <script-name>
Let’s Encrypt SSL Certificates | 63
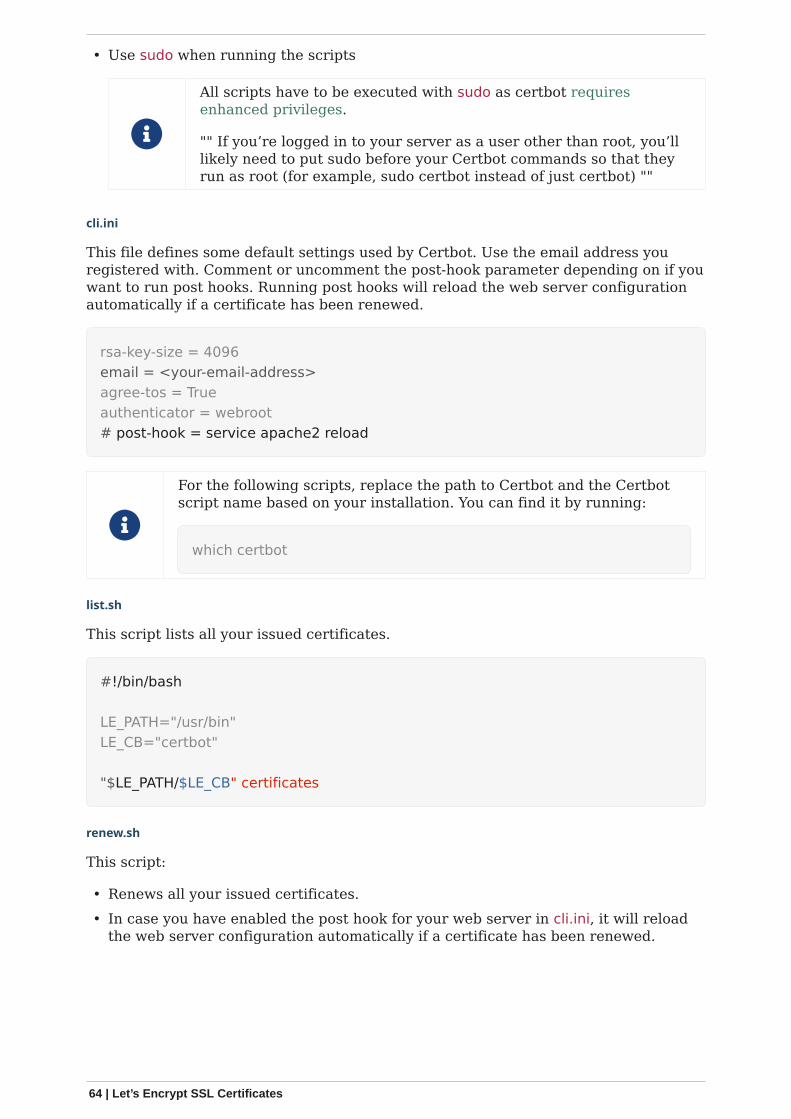
• Use sudo when running the scripts
All scripts have to be executed with sudo as certbot requiresenhanced privileges.
"" If you’re logged in to your server as a user other than root, you’lllikely need to put sudo before your Certbot commands so that theyrun as root (for example, sudo certbot instead of just certbot) ""
cli.ini
This file defines some default settings used by Certbot. Use the email address youregistered with. Comment or uncomment the post-hook parameter depending on if youwant to run post hooks. Running post hooks will reload the web server configurationautomatically if a certificate has been renewed.
rsa-key-size = 4096email = <your-email-address>agree-tos = Trueauthenticator = webroot# post-hook = service apache2 reload
For the following scripts, replace the path to Certbot and the Certbotscript name based on your installation. You can find it by running:
which certbot
list.sh
This script lists all your issued certificates.
#!/bin/bash
LE_PATH="/usr/bin"LE_CB="certbot"
"$LE_PATH/$LE_CB" certificates
renew.sh
This script:
• Renews all your issued certificates.• In case you have enabled the post hook for your web server in cli.ini, it will reload
the web server configuration automatically if a certificate has been renewed.
64 | Let’s Encrypt SSL Certificates
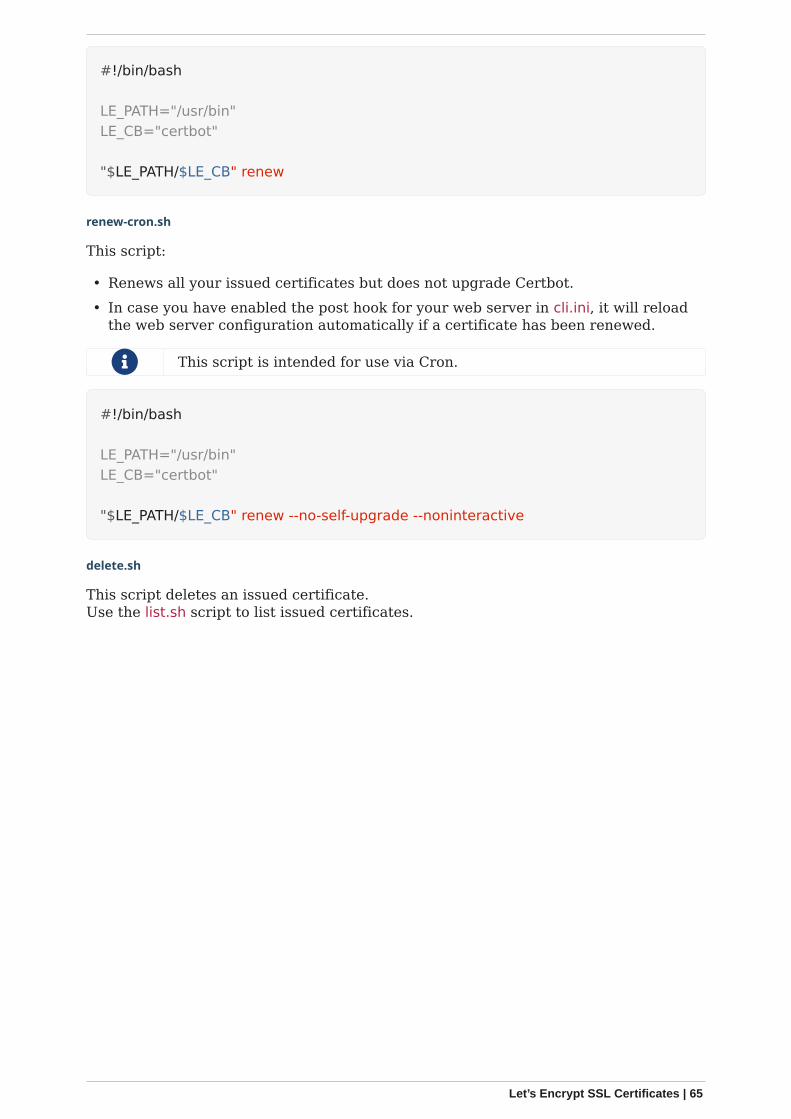
#!/bin/bash
LE_PATH="/usr/bin"LE_CB="certbot"
"$LE_PATH/$LE_CB" renew
renew-cron.sh
This script:
• Renews all your issued certificates but does not upgrade Certbot.• In case you have enabled the post hook for your web server in cli.ini, it will reload
the web server configuration automatically if a certificate has been renewed.
This script is intended for use via Cron.
#!/bin/bash
LE_PATH="/usr/bin"LE_CB="certbot"
"$LE_PATH/$LE_CB" renew --no-self-upgrade --noninteractive
delete.sh
This script deletes an issued certificate.Use the list.sh script to list issued certificates.
Let’s Encrypt SSL Certificates | 65
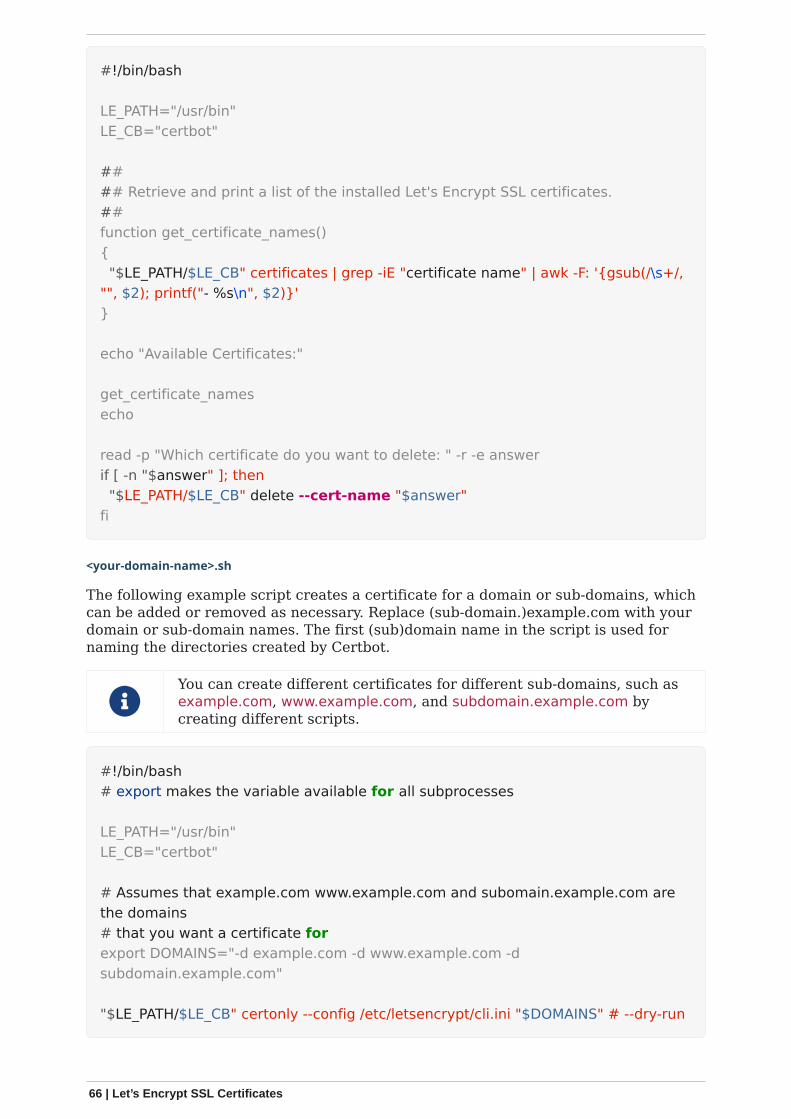
#!/bin/bash
LE_PATH="/usr/bin"LE_CB="certbot"
#### Retrieve and print a list of the installed Let's Encrypt SSL certificates.##function get_certificate_names(){ "$LE_PATH/$LE_CB" certificates | grep -iE "certificate name" | awk -F: '{gsub(/\s+/,"", $2); printf("- %s\n", $2)}'}
echo "Available Certificates:"
get_certificate_namesecho
read -p "Which certificate do you want to delete: " -r -e answerif [ -n "$answer" ]; then "$LE_PATH/$LE_CB" delete --cert-name "$answer"fi
<your-domain-name>.sh
The following example script creates a certificate for a domain or sub-domains, whichcan be added or removed as necessary. Replace (sub-domain.)example.com with yourdomain or sub-domain names. The first (sub)domain name in the script is used fornaming the directories created by Certbot.
You can create different certificates for different sub-domains, such asexample.com, www.example.com, and subdomain.example.com bycreating different scripts.
#!/bin/bash# export makes the variable available for all subprocesses
LE_PATH="/usr/bin"LE_CB="certbot"
# Assumes that example.com www.example.com and subomain.example.com arethe domains # that you want a certificate forexport DOMAINS="-d example.com -d www.example.com -dsubdomain.example.com"
"$LE_PATH/$LE_CB" certonly --config /etc/letsencrypt/cli.ini "$DOMAINS" # --dry-run
66 | Let’s Encrypt SSL Certificates
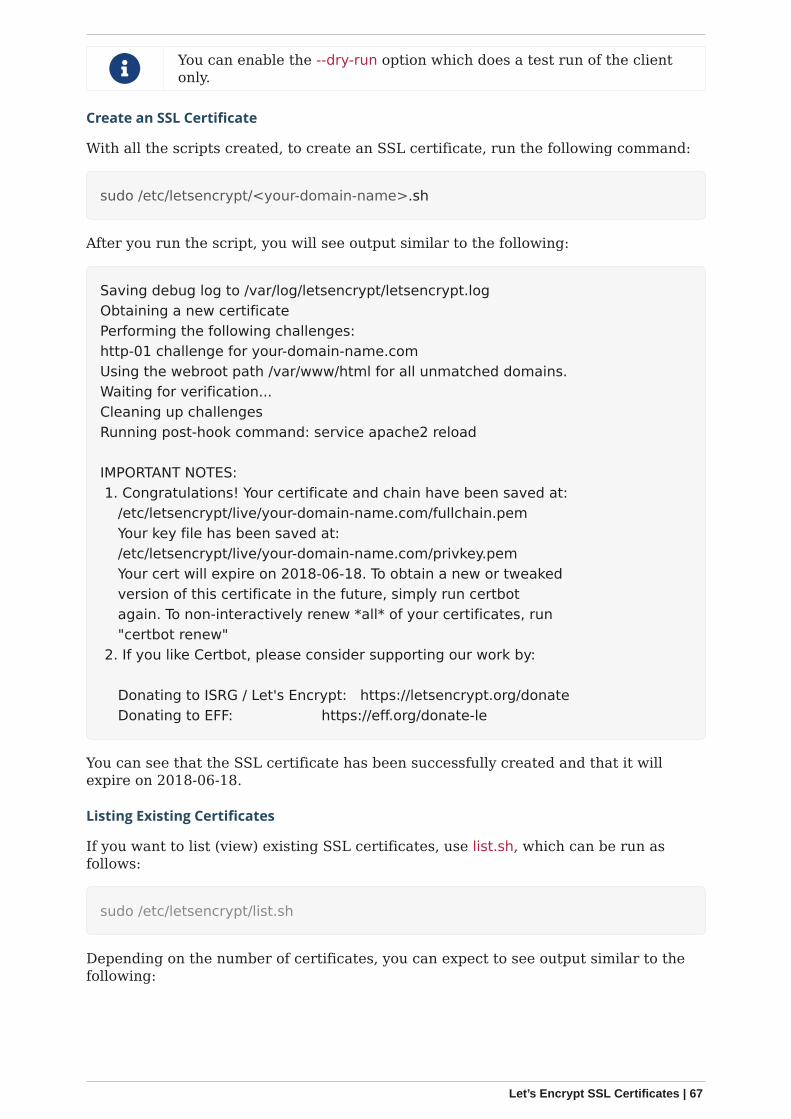
You can enable the --dry-run option which does a test run of the clientonly.
Create an SSL Certificate
With all the scripts created, to create an SSL certificate, run the following command:
sudo /etc/letsencrypt/<your-domain-name>.sh
After you run the script, you will see output similar to the following:
Saving debug log to /var/log/letsencrypt/letsencrypt.logObtaining a new certificatePerforming the following challenges:http-01 challenge for your-domain-name.comUsing the webroot path /var/www/html for all unmatched domains.Waiting for verification...Cleaning up challengesRunning post-hook command: service apache2 reload
IMPORTANT NOTES: 1. Congratulations! Your certificate and chain have been saved at: /etc/letsencrypt/live/your-domain-name.com/fullchain.pem Your key file has been saved at: /etc/letsencrypt/live/your-domain-name.com/privkey.pem Your cert will expire on 2018-06-18. To obtain a new or tweaked version of this certificate in the future, simply run certbot again. To non-interactively renew *all* of your certificates, run "certbot renew" 2. If you like Certbot, please consider supporting our work by:
Donating to ISRG / Let's Encrypt: https://letsencrypt.org/donate Donating to EFF: https://eff.org/donate-le
You can see that the SSL certificate has been successfully created and that it willexpire on 2018-06-18.
Listing Existing Certificates
If you want to list (view) existing SSL certificates, use list.sh, which can be run asfollows:
sudo /etc/letsencrypt/list.sh
Depending on the number of certificates, you can expect to see output similar to thefollowing:
Let’s Encrypt SSL Certificates | 67
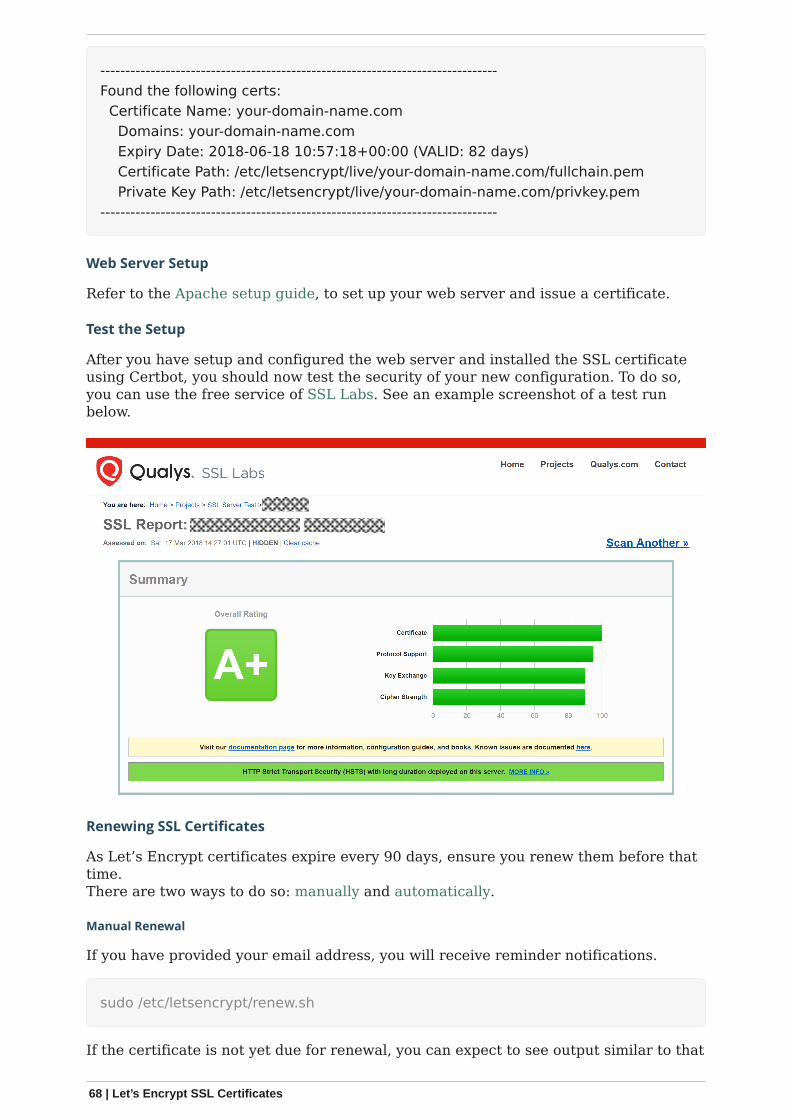
-------------------------------------------------------------------------------Found the following certs: Certificate Name: your-domain-name.com Domains: your-domain-name.com Expiry Date: 2018-06-18 10:57:18+00:00 (VALID: 82 days) Certificate Path: /etc/letsencrypt/live/your-domain-name.com/fullchain.pem Private Key Path: /etc/letsencrypt/live/your-domain-name.com/privkey.pem-------------------------------------------------------------------------------
Web Server Setup
Refer to the Apache setup guide, to set up your web server and issue a certificate.
Test the Setup
After you have setup and configured the web server and installed the SSL certificateusing Certbot, you should now test the security of your new configuration. To do so,you can use the free service of SSL Labs. See an example screenshot of a test runbelow.
Renewing SSL Certificates
As Let’s Encrypt certificates expire every 90 days, ensure you renew them before thattime.There are two ways to do so: manually and automatically.
Manual Renewal
If you have provided your email address, you will receive reminder notifications.
sudo /etc/letsencrypt/renew.sh
If the certificate is not yet due for renewal, you can expect to see output similar to that
68 | Let’s Encrypt SSL Certificates

below:
-------------------------------------------------------------------------------Processing /etc/letsencrypt/renewal/your-domain-name.com.conf-------------------------------------------------------------------------------Cert not yet due for renewal
The following certs are not due for renewal yet: /etc/letsencrypt/live/your-domain-name.com/fullchain.pem (skipped)No renewals were attempted.No hooks were run.
Automatic Renewal via Crontab
Certificates are only renewed if they are due, so you can schedule Cron jobs to renewyour SSL certificates on a more frequent basis. However, a weekly check is sufficient.
To add a new Cron job to auto-renew your certificates, firstly run the followingcommand to edit the job list.
sudo crontab -e
It is essential to use sudo to derive proper permissions.
Then, add the following at the end of the existing configuration:
30 03 * * 6 /etc/letsencrypt/renew-cron.sh
After you save and exit the file, the new job will have been added to the Cron jobscheduler.
If you want to use different values, you can check them e.g. atcrontab.guru and modify the script with your preferred options.
Add Extra Domains to the Certificate
If you want to add an extra domain, like subdomain.example.com, to your certificate,add the domain in the domain shell script above, re-run it and reload the web serverconfig. This can be useful when migrating from a sub-directory for your ownCloudinstance to sub-domain access.
This means you need to comment the include directive (see the relevantweb server setup) and follow the steps afterwards.
Deleting SSL Certificates
If you want to delete an SSL certificate, use the delete.sh script, running it as follows:
sudo /etc/letsencrypt/delete.sh
It will start off by displaying a list of the currently available SSL certificate domain
Let’s Encrypt SSL Certificates | 69
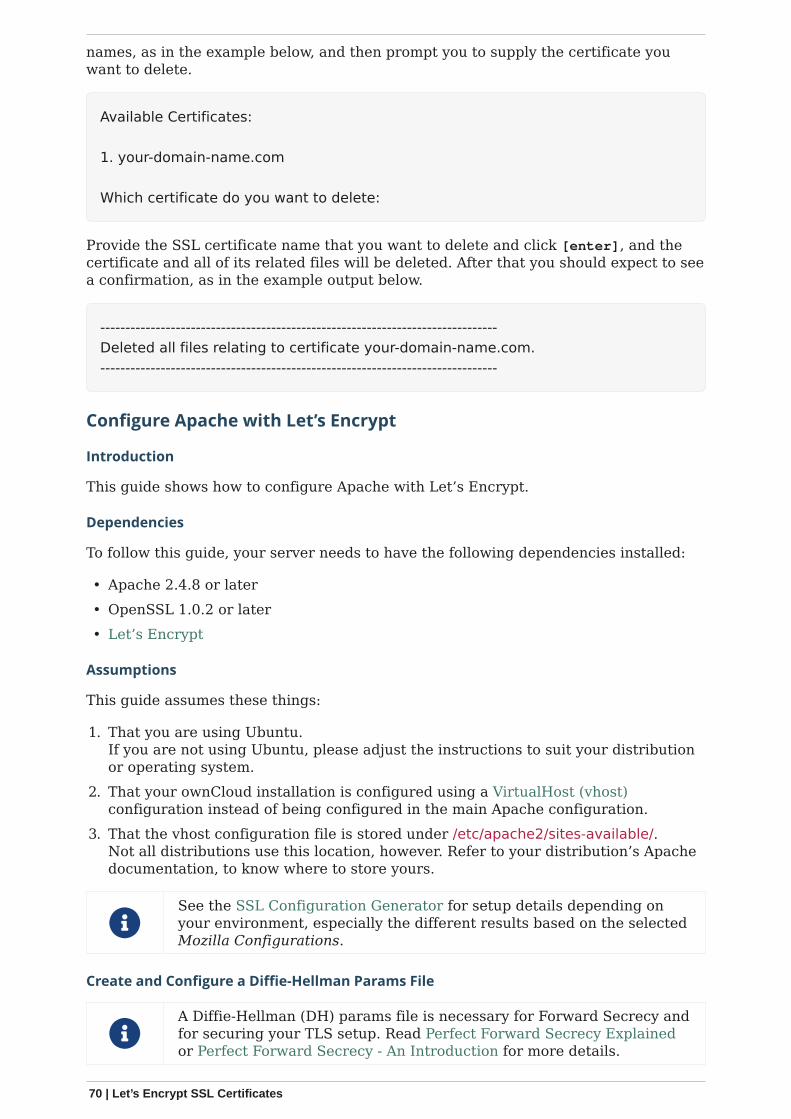
names, as in the example below, and then prompt you to supply the certificate youwant to delete.
Available Certificates:
1. your-domain-name.com
Which certificate do you want to delete:
Provide the SSL certificate name that you want to delete and click [enter], and thecertificate and all of its related files will be deleted. After that you should expect to seea confirmation, as in the example output below.
-------------------------------------------------------------------------------Deleted all files relating to certificate your-domain-name.com.-------------------------------------------------------------------------------
Configure Apache with Let’s Encrypt
Introduction
This guide shows how to configure Apache with Let’s Encrypt.
Dependencies
To follow this guide, your server needs to have the following dependencies installed:
• Apache 2.4.8 or later• OpenSSL 1.0.2 or later• Let’s Encrypt
Assumptions
This guide assumes these things:
1. That you are using Ubuntu.If you are not using Ubuntu, please adjust the instructions to suit your distributionor operating system.
2. That your ownCloud installation is configured using a VirtualHost (vhost)configuration instead of being configured in the main Apache configuration.
3. That the vhost configuration file is stored under /etc/apache2/sites-available/.Not all distributions use this location, however. Refer to your distribution’s Apachedocumentation, to know where to store yours.
See the SSL Configuration Generator for setup details depending onyour environment, especially the different results based on the selectedMozilla Configurations.
Create and Configure a Diffie-Hellman Params File
A Diffie-Hellman (DH) params file is necessary for Forward Secrecy andfor securing your TLS setup. Read Perfect Forward Secrecy Explainedor Perfect Forward Secrecy - An Introduction for more details.
70 | Let’s Encrypt SSL Certificates
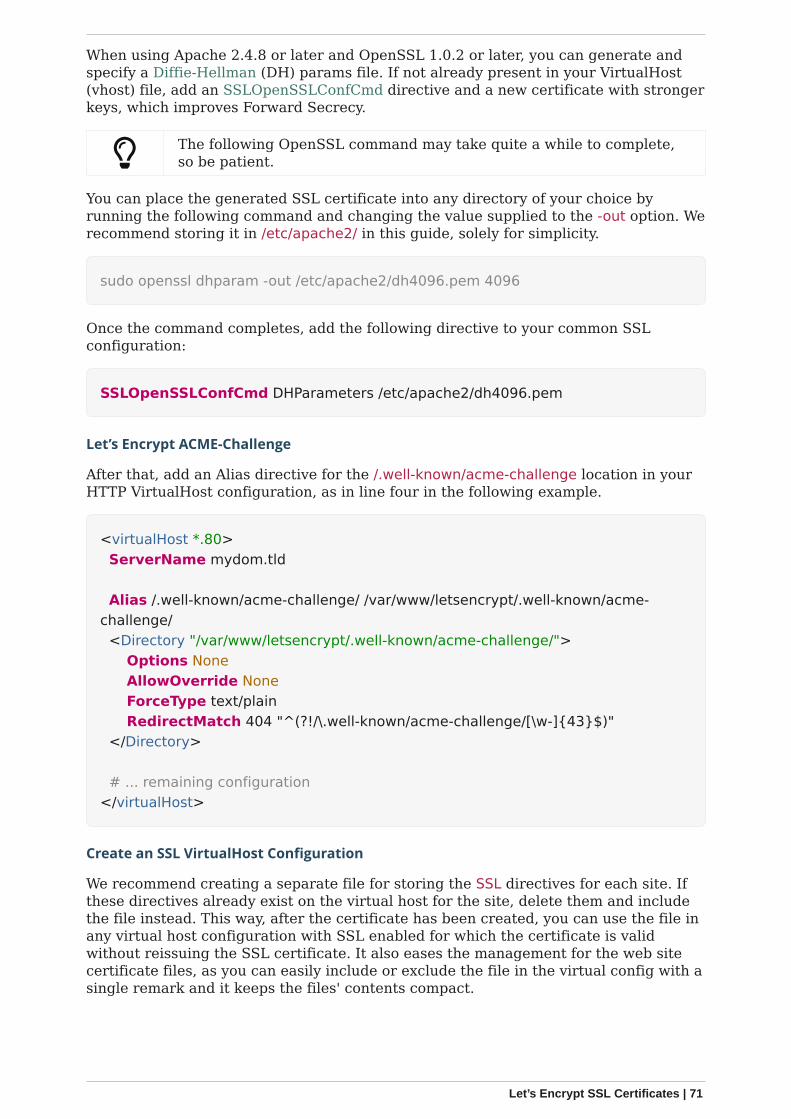
When using Apache 2.4.8 or later and OpenSSL 1.0.2 or later, you can generate andspecify a Diffie-Hellman (DH) params file. If not already present in your VirtualHost(vhost) file, add an SSLOpenSSLConfCmd directive and a new certificate with strongerkeys, which improves Forward Secrecy.
The following OpenSSL command may take quite a while to complete,so be patient.
You can place the generated SSL certificate into any directory of your choice byrunning the following command and changing the value supplied to the -out option. Werecommend storing it in /etc/apache2/ in this guide, solely for simplicity.
sudo openssl dhparam -out /etc/apache2/dh4096.pem 4096
Once the command completes, add the following directive to your common SSLconfiguration:
SSLOpenSSLConfCmd DHParameters /etc/apache2/dh4096.pem
Let’s Encrypt ACME-Challenge
After that, add an Alias directive for the /.well-known/acme-challenge location in yourHTTP VirtualHost configuration, as in line four in the following example.
<virtualHost *.80> ServerName mydom.tld
Alias /.well-known/acme-challenge/ /var/www/letsencrypt/.well-known/acme-challenge/ <Directory "/var/www/letsencrypt/.well-known/acme-challenge/"> Options None AllowOverride None ForceType text/plain RedirectMatch 404 "^(?!/\.well-known/acme-challenge/[\w-]{43}$)" </Directory>
# ... remaining configuration</virtualHost>
Create an SSL VirtualHost Configuration
We recommend creating a separate file for storing the SSL directives for each site. Ifthese directives already exist on the virtual host for the site, delete them and includethe file instead. This way, after the certificate has been created, you can use the file inany virtual host configuration with SSL enabled for which the certificate is validwithout reissuing the SSL certificate. It also eases the management for the web sitecertificate files, as you can easily include or exclude the file in the virtual config with asingle remark and it keeps the files' contents compact.
Let’s Encrypt SSL Certificates | 71
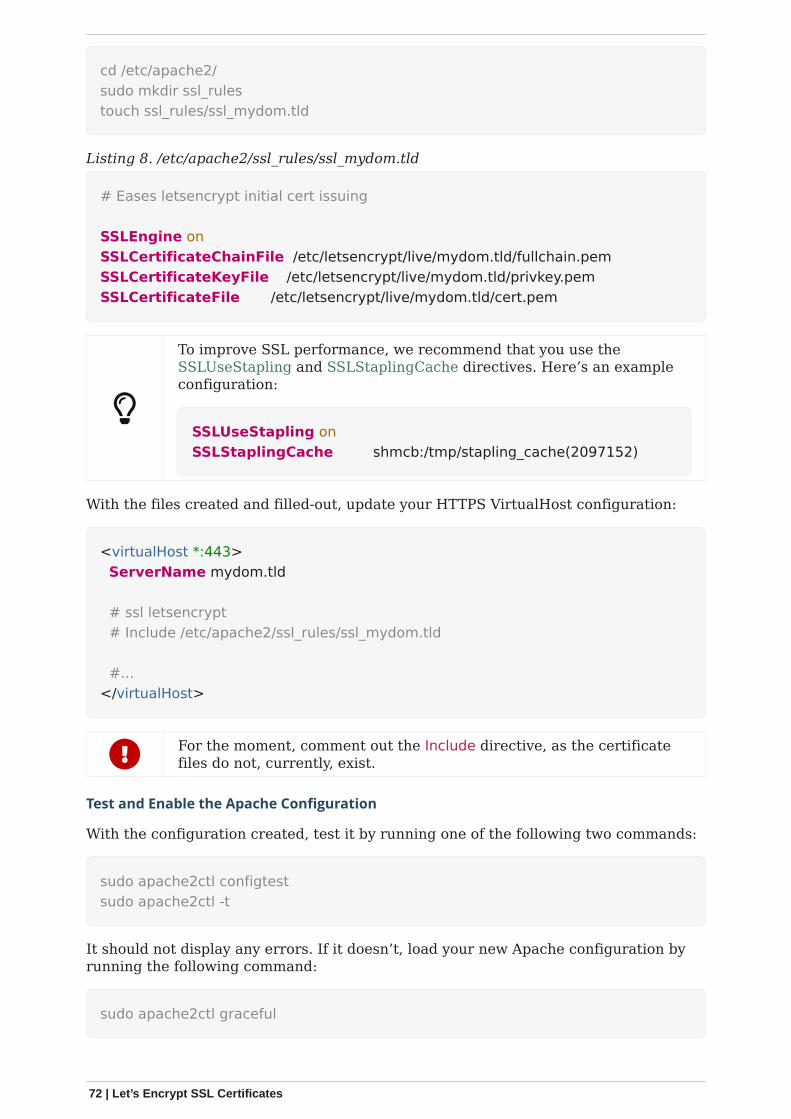
cd /etc/apache2/sudo mkdir ssl_rulestouch ssl_rules/ssl_mydom.tld
Listing 8. /etc/apache2/ssl_rules/ssl_mydom.tld
# Eases letsencrypt initial cert issuing
SSLEngine onSSLCertificateChainFile /etc/letsencrypt/live/mydom.tld/fullchain.pemSSLCertificateKeyFile /etc/letsencrypt/live/mydom.tld/privkey.pemSSLCertificateFile /etc/letsencrypt/live/mydom.tld/cert.pem
To improve SSL performance, we recommend that you use theSSLUseStapling and SSLStaplingCache directives. Here’s an exampleconfiguration:
SSLUseStapling onSSLStaplingCache shmcb:/tmp/stapling_cache(2097152)
With the files created and filled-out, update your HTTPS VirtualHost configuration:
<virtualHost *:443> ServerName mydom.tld
# ssl letsencrypt # Include /etc/apache2/ssl_rules/ssl_mydom.tld
#...</virtualHost>
For the moment, comment out the Include directive, as the certificatefiles do not, currently, exist.
Test and Enable the Apache Configuration
With the configuration created, test it by running one of the following two commands:
sudo apache2ctl configtestsudo apache2ctl -t
It should not display any errors. If it doesn’t, load your new Apache configuration byrunning the following command:
sudo apache2ctl graceful
72 | Let’s Encrypt SSL Certificates
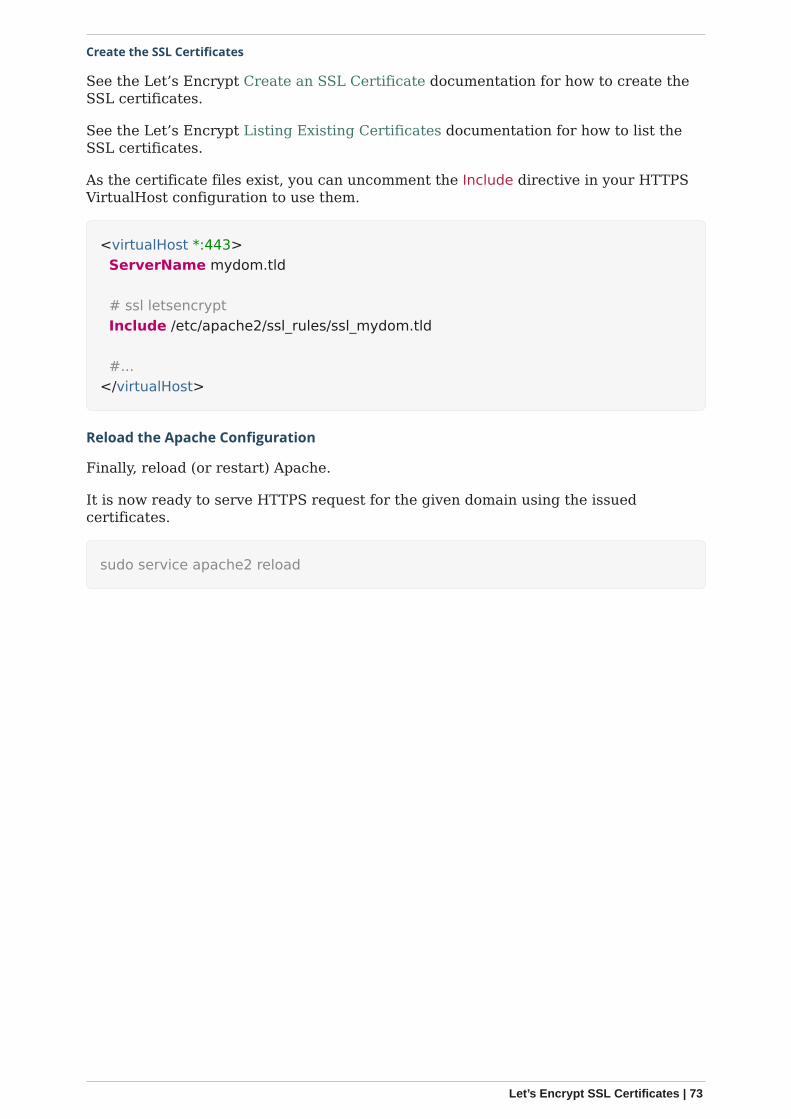
Create the SSL Certificates
See the Let’s Encrypt Create an SSL Certificate documentation for how to create theSSL certificates.
See the Let’s Encrypt Listing Existing Certificates documentation for how to list theSSL certificates.
As the certificate files exist, you can uncomment the Include directive in your HTTPSVirtualHost configuration to use them.
<virtualHost *:443> ServerName mydom.tld
# ssl letsencrypt Include /etc/apache2/ssl_rules/ssl_mydom.tld
#...</virtualHost>
Reload the Apache Configuration
Finally, reload (or restart) Apache.
It is now ready to serve HTTPS request for the given domain using the issuedcertificates.
sudo service apache2 reload
Let’s Encrypt SSL Certificates | 73
ConfigurationIn this section, you will find all the information you need for configuring ownCloud.
Database
In this section, you can find out about
• Converting your Database Type• Database Configuration on Linux
Converting Database Type
Introduction
SQLite is good for testing ownCloud, as well as small, single-user, ownCloud servers.But, it does not scale for large, multi-user sites. If you have an existing ownCloudinstallation which uses SQLite, and you want to convert to a better performingdatabase, such as MySQL, MariaDB or PostgreSQL, you can use the ownCloudcommand line tool: occ.
ownCloud Enterprise edition does not support SQLite.
Preparation
Add the following to your ownCloud config/config.php:
'mysql.utf8mb4' => true,
Add, or adjust, the following in /etc/mysql/mariadb.conf.d/50-server.cnf:
You can do the same for MySQL by replacing mariadb.conf.d/50-server.cnf with mysql.conf.d/mysqld.cnf.
74 | Database
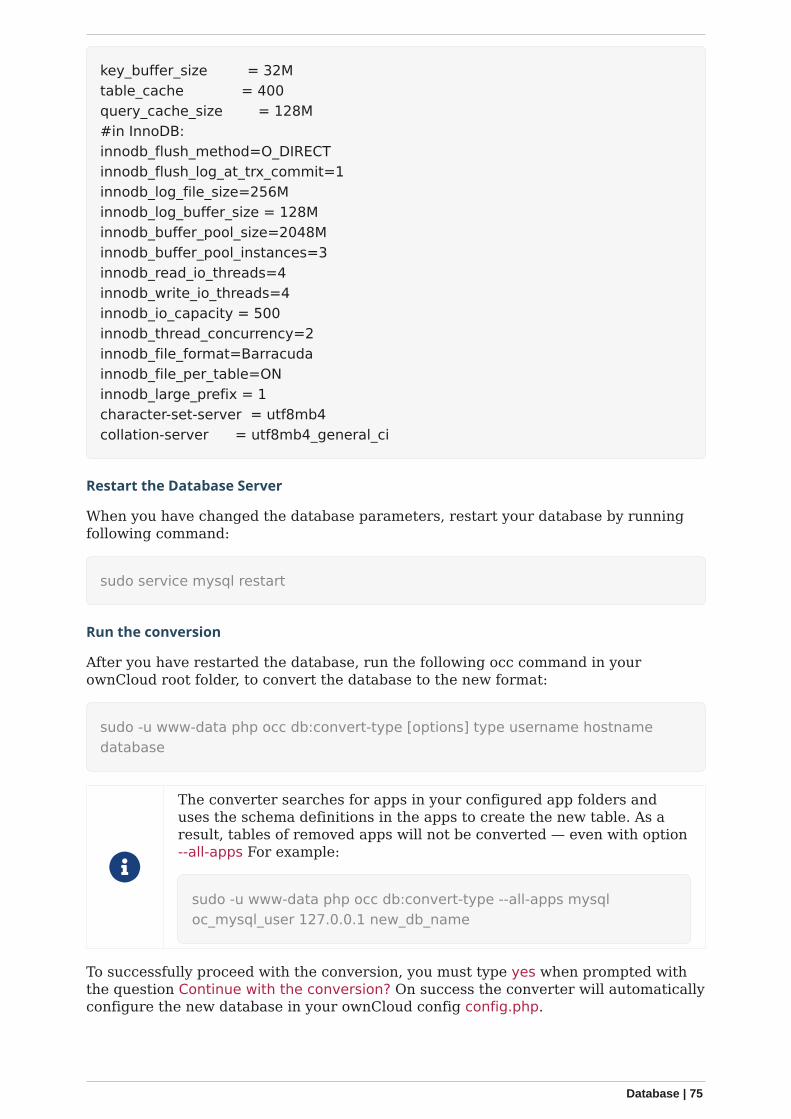
key_buffer_size = 32Mtable_cache = 400query_cache_size = 128M#in InnoDB:innodb_flush_method=O_DIRECTinnodb_flush_log_at_trx_commit=1innodb_log_file_size=256Minnodb_log_buffer_size = 128Minnodb_buffer_pool_size=2048Minnodb_buffer_pool_instances=3innodb_read_io_threads=4innodb_write_io_threads=4innodb_io_capacity = 500innodb_thread_concurrency=2innodb_file_format=Barracudainnodb_file_per_table=ONinnodb_large_prefix = 1character-set-server = utf8mb4collation-server = utf8mb4_general_ci
Restart the Database Server
When you have changed the database parameters, restart your database by runningfollowing command:
sudo service mysql restart
Run the conversion
After you have restarted the database, run the following occ command in yourownCloud root folder, to convert the database to the new format:
sudo -u www-data php occ db:convert-type [options] type username hostnamedatabase
The converter searches for apps in your configured app folders anduses the schema definitions in the apps to create the new table. As aresult, tables of removed apps will not be converted — even with option--all-apps For example:
sudo -u www-data php occ db:convert-type --all-apps mysqloc_mysql_user 127.0.0.1 new_db_name
To successfully proceed with the conversion, you must type yes when prompted withthe question Continue with the conversion? On success the converter will automaticallyconfigure the new database in your ownCloud config config.php.
Database | 75
Unconvertible Tables
If you updated your ownCloud installation then the old tables, which are not usedanymore, might still exist. The converter will tell you which ones.
The following tables will not be converted: oc_permissions
You can ignore these tables. Here is a list of known old tables:
• oc_calendar_calendars• oc_calendar_objects• oc_calendar_share_calendar• oc_calendar_share_event• oc_fscache• oc_log• oc_media_albums• oc_media_artists• oc_media_sessions• oc_media_songs• oc_media_users• oc_permissions• oc_queuedtasks• oc_sharing
Database Configuration on Linux
Introduction
ownCloud requires a database in which administrative data is stored. The followingdatabases are currently supported:
• MySQL / MariaDB• PostgreSQL• Oracle (ownCloud Enterprise edition only)
The MySQL or MariaDB databases are the recommended databaseengines.
After physically installing ownCloud, the setup of the ownclouddatabase is either done with the installation wizard or via the commandline. For more information see the Complete the Installation section inthe Manual Installation documentation.
Requirements
Choosing to use MySQL / MariaDB, PostgreSQL, or Oracle as your database requires,that you install and set up the server software first.
Oracle users, see the Oracle Database Configuration guide.
76 | Database

The steps for configuring a third party database are beyond the scope of thisdocument. Please refer to the documentation below, for your database vendor.
• The MariaDB Knowledge Base• The MySQL documentation• The Oracle Database documentation• The PostgreSQL documentation
MySQL / MariaDB
Enabling Binary Logging
ownCloud is currently using a TRANSACTION_READ_COMMITTED transaction isolationto avoid data loss under high load scenarios (e.g., by using the sync client with manyclients/users and many parallel operations). This requires a disabled or correctlyconfigured binary logging when using MySQL or MariaDB. Your system is affected ifyou see the following in your log file during the installation or update of ownCloud:
An unhandled exception has been thrown: exception `PDOException' with message`SQLSTATE[HY000]: General error: 1665 Cannot execute statement: impossible towrite to binary log since BINLOG_FORMAT = STATEMENT and at least one table usesa storage engine limited to row-based logging. InnoDB is limited to row-loggingwhen transaction isolation level is READ COMMITTED or READ UNCOMMITTED.'
There are two solutions. One is to disable binary logging. Binary logging records allchanges to your database, and how long each change took. The purpose of binarylogging is to enable replication and to support backup operations.
The other is to change the BINLOG_FORMAT = STATEMENT in your databaseconfiguration file, or possibly in your database startup script, to BINLOG_FORMAT =MIXED or BINLOG_FORMAT = ROW. See Overview of the Binary Log and The BinaryLog for detailed information.
Set READ COMMITTED as the Transaction Isolation Level
As discussed above, ownCloud is using the TRANSACTION_READ_COMMITTEDtransaction isolation level. Some database configurations are enforcing othertransaction isolation levels. To avoid data loss under high load scenarios (e.g., by usingthe sync client with many clients/users and many parallel operations), you need toconfigure the transaction isolation level accordingly. Please refer to the MySQLmanual for detailed information.
Configuring the Storage Engine
Since ownCloud 7, only InnoDB is supported as a storage engine. Some shared hostsdo not support InnoDB and only MyISAM. Running ownCloud in such an environmentis not supported.
Parameters
For setting up ownCloud to use any database, use the instructions in the InstallationWizard. You should not have to edit the respective values in the config/config.php.However, in exceptional cases (for example, if you want to connect your ownCloudinstance to a database created by a previous installation of ownCloud), somemodification might be required.
Database | 77
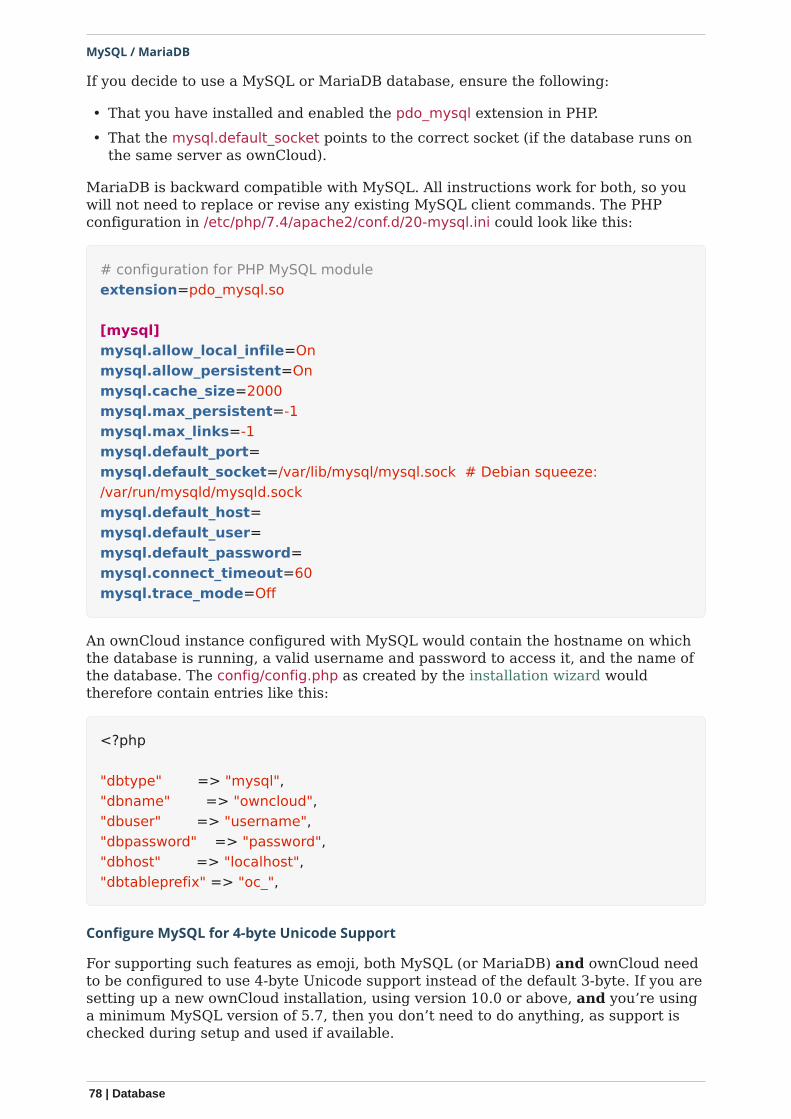
MySQL / MariaDB
If you decide to use a MySQL or MariaDB database, ensure the following:
• That you have installed and enabled the pdo_mysql extension in PHP.• That the mysql.default_socket points to the correct socket (if the database runs on
the same server as ownCloud).
MariaDB is backward compatible with MySQL. All instructions work for both, so youwill not need to replace or revise any existing MySQL client commands. The PHPconfiguration in /etc/php/7.4/apache2/conf.d/20-mysql.ini could look like this:
# configuration for PHP MySQL moduleextension=pdo_mysql.so
[mysql]mysql.allow_local_infile=Onmysql.allow_persistent=Onmysql.cache_size=2000mysql.max_persistent=-1mysql.max_links=-1mysql.default_port=mysql.default_socket=/var/lib/mysql/mysql.sock # Debian squeeze:/var/run/mysqld/mysqld.sockmysql.default_host=mysql.default_user=mysql.default_password=mysql.connect_timeout=60mysql.trace_mode=Off
An ownCloud instance configured with MySQL would contain the hostname on whichthe database is running, a valid username and password to access it, and the name ofthe database. The config/config.php as created by the installation wizard wouldtherefore contain entries like this:
<?php
"dbtype" => "mysql","dbname" => "owncloud","dbuser" => "username","dbpassword" => "password","dbhost" => "localhost","dbtableprefix" => "oc_",
Configure MySQL for 4-byte Unicode Support
For supporting such features as emoji, both MySQL (or MariaDB) and ownCloud needto be configured to use 4-byte Unicode support instead of the default 3-byte. If you aresetting up a new ownCloud installation, using version 10.0 or above, and you’re usinga minimum MySQL version of 5.7, then you don’t need to do anything, as support ischecked during setup and used if available.
78 | Database
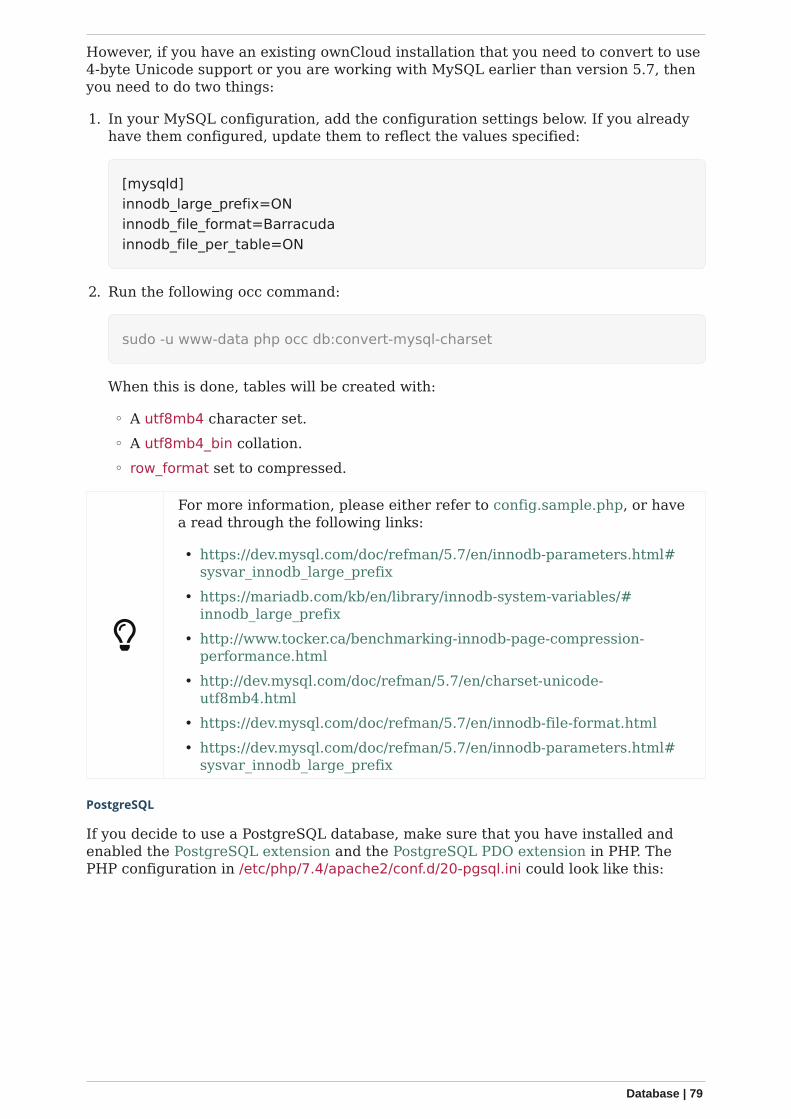
However, if you have an existing ownCloud installation that you need to convert to use4-byte Unicode support or you are working with MySQL earlier than version 5.7, thenyou need to do two things:
1. In your MySQL configuration, add the configuration settings below. If you alreadyhave them configured, update them to reflect the values specified:
[mysqld]innodb_large_prefix=ONinnodb_file_format=Barracudainnodb_file_per_table=ON
2. Run the following occ command:
sudo -u www-data php occ db:convert-mysql-charset
When this is done, tables will be created with:
◦ A utf8mb4 character set.◦ A utf8mb4_bin collation.◦ row_format set to compressed.
For more information, please either refer to config.sample.php, or havea read through the following links:
• https://dev.mysql.com/doc/refman/5.7/en/innodb-parameters.html#sysvar_innodb_large_prefix
• https://mariadb.com/kb/en/library/innodb-system-variables/#innodb_large_prefix
• http://www.tocker.ca/benchmarking-innodb-page-compression-performance.html
• http://dev.mysql.com/doc/refman/5.7/en/charset-unicode-utf8mb4.html
• https://dev.mysql.com/doc/refman/5.7/en/innodb-file-format.html• https://dev.mysql.com/doc/refman/5.7/en/innodb-parameters.html#
sysvar_innodb_large_prefix
PostgreSQL
If you decide to use a PostgreSQL database, make sure that you have installed andenabled the PostgreSQL extension and the PostgreSQL PDO extension in PHP. ThePHP configuration in /etc/php/7.4/apache2/conf.d/20-pgsql.ini could look like this:
Database | 79
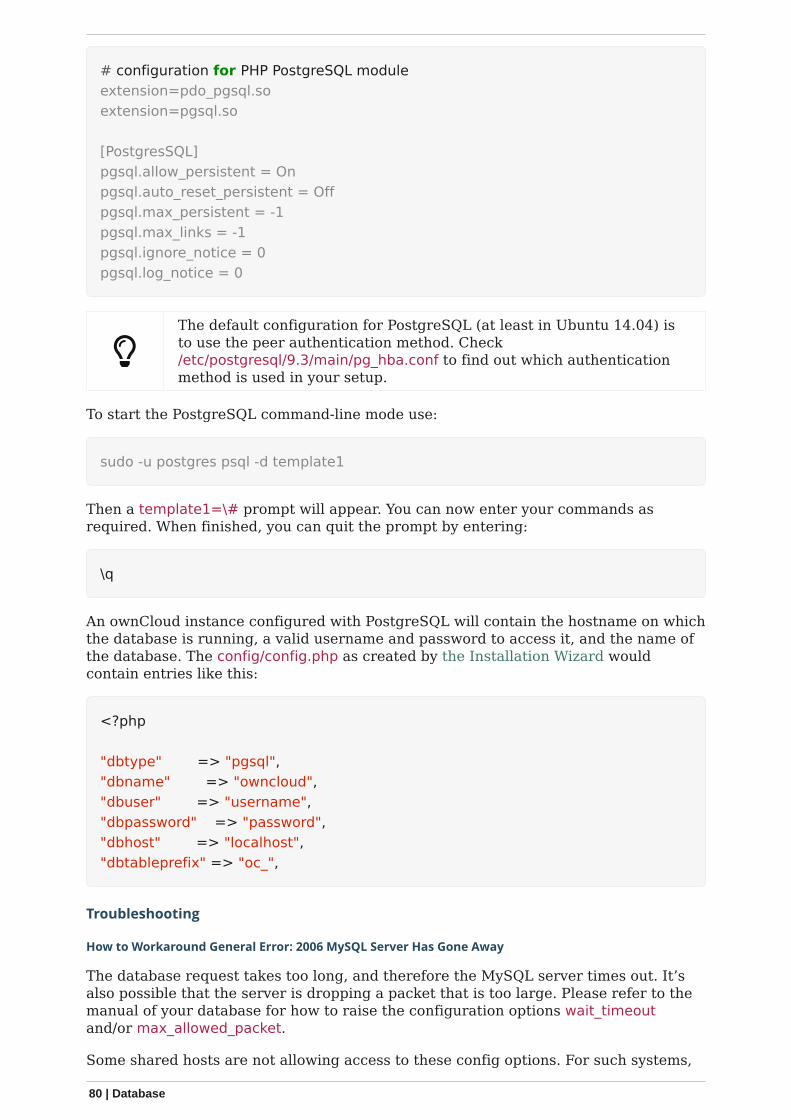
# configuration for PHP PostgreSQL moduleextension=pdo_pgsql.soextension=pgsql.so
[PostgresSQL]pgsql.allow_persistent = Onpgsql.auto_reset_persistent = Offpgsql.max_persistent = -1pgsql.max_links = -1pgsql.ignore_notice = 0pgsql.log_notice = 0
The default configuration for PostgreSQL (at least in Ubuntu 14.04) isto use the peer authentication method. Check/etc/postgresql/9.3/main/pg_hba.conf to find out which authenticationmethod is used in your setup.
To start the PostgreSQL command-line mode use:
sudo -u postgres psql -d template1
Then a template1=\# prompt will appear. You can now enter your commands asrequired. When finished, you can quit the prompt by entering:
\q
An ownCloud instance configured with PostgreSQL will contain the hostname on whichthe database is running, a valid username and password to access it, and the name ofthe database. The config/config.php as created by the Installation Wizard wouldcontain entries like this:
<?php
"dbtype" => "pgsql","dbname" => "owncloud","dbuser" => "username","dbpassword" => "password","dbhost" => "localhost","dbtableprefix" => "oc_",
Troubleshooting
How to Workaround General Error: 2006 MySQL Server Has Gone Away
The database request takes too long, and therefore the MySQL server times out. It’salso possible that the server is dropping a packet that is too large. Please refer to themanual of your database for how to raise the configuration options wait_timeoutand/or max_allowed_packet.
Some shared hosts are not allowing access to these config options. For such systems,
80 | Database
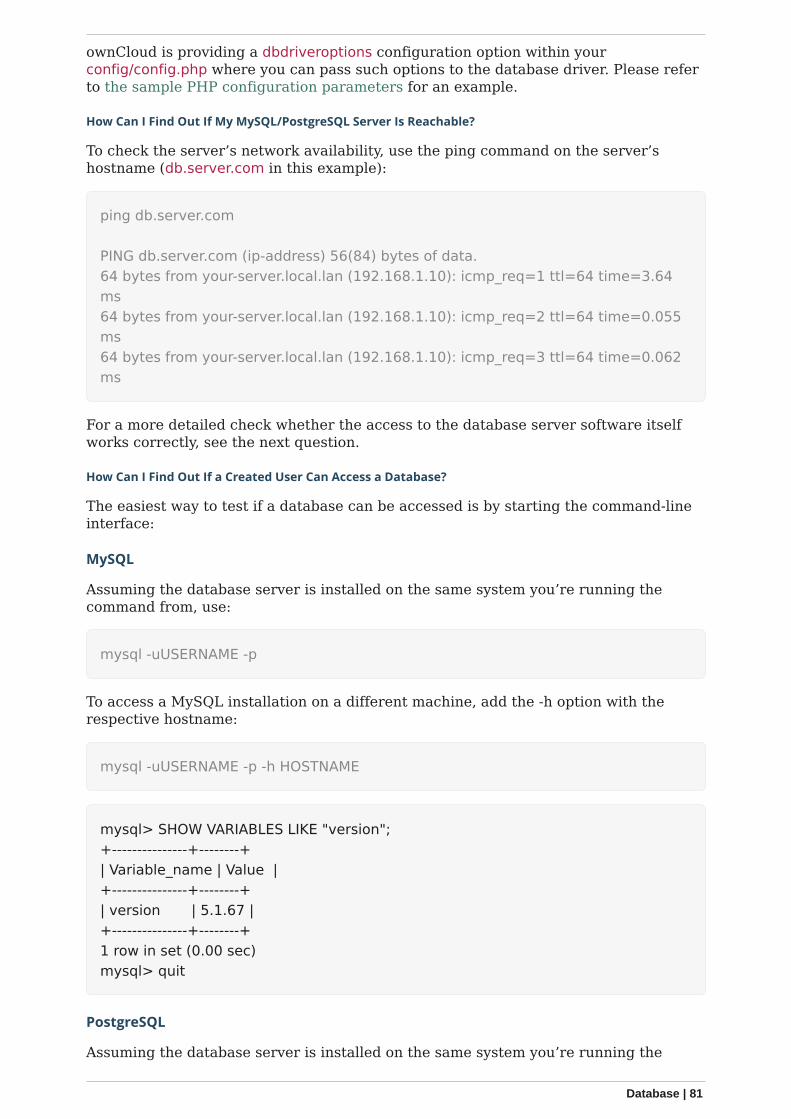
ownCloud is providing a dbdriveroptions configuration option within yourconfig/config.php where you can pass such options to the database driver. Please referto the sample PHP configuration parameters for an example.
How Can I Find Out If My MySQL/PostgreSQL Server Is Reachable?
To check the server’s network availability, use the ping command on the server’shostname (db.server.com in this example):
ping db.server.com
PING db.server.com (ip-address) 56(84) bytes of data.64 bytes from your-server.local.lan (192.168.1.10): icmp_req=1 ttl=64 time=3.64ms64 bytes from your-server.local.lan (192.168.1.10): icmp_req=2 ttl=64 time=0.055ms64 bytes from your-server.local.lan (192.168.1.10): icmp_req=3 ttl=64 time=0.062ms
For a more detailed check whether the access to the database server software itselfworks correctly, see the next question.
How Can I Find Out If a Created User Can Access a Database?
The easiest way to test if a database can be accessed is by starting the command-lineinterface:
MySQL
Assuming the database server is installed on the same system you’re running thecommand from, use:
mysql -uUSERNAME -p
To access a MySQL installation on a different machine, add the -h option with therespective hostname:
mysql -uUSERNAME -p -h HOSTNAME
mysql> SHOW VARIABLES LIKE "version";+---------------+--------+| Variable_name | Value |+---------------+--------+| version | 5.1.67 |+---------------+--------+1 row in set (0.00 sec)mysql> quit
PostgreSQL
Assuming the database server is installed on the same system you’re running the
Database | 81
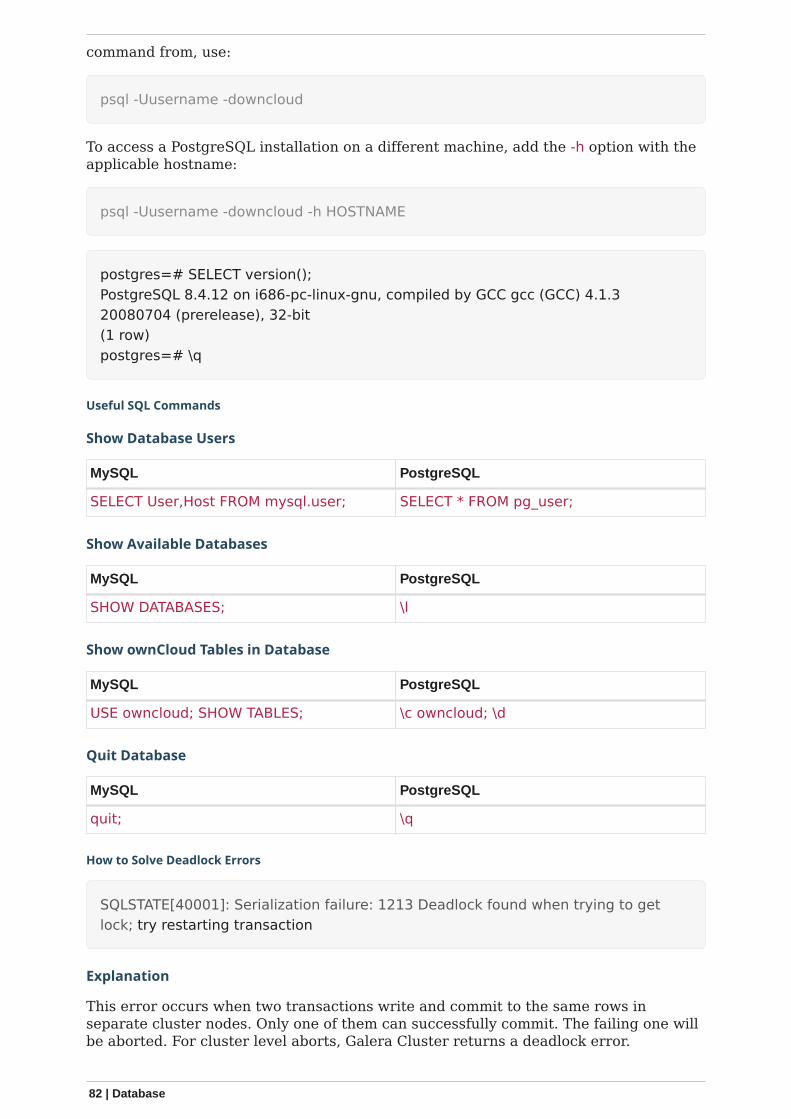
command from, use:
psql -Uusername -downcloud
To access a PostgreSQL installation on a different machine, add the -h option with theapplicable hostname:
psql -Uusername -downcloud -h HOSTNAME
postgres=# SELECT version();PostgreSQL 8.4.12 on i686-pc-linux-gnu, compiled by GCC gcc (GCC) 4.1.320080704 (prerelease), 32-bit(1 row)postgres=# \q
Useful SQL Commands
Show Database Users
MySQL PostgreSQL
SELECT User,Host FROM mysql.user; SELECT * FROM pg_user;
Show Available Databases
MySQL PostgreSQL
SHOW DATABASES; \l
Show ownCloud Tables in Database
MySQL PostgreSQL
USE owncloud; SHOW TABLES; \c owncloud; \d
Quit Database
MySQL PostgreSQL
quit; \q
How to Solve Deadlock Errors
SQLSTATE[40001]: Serialization failure: 1213 Deadlock found when trying to getlock; try restarting transaction
Explanation
This error occurs when two transactions write and commit to the same rows inseparate cluster nodes. Only one of them can successfully commit. The failing one willbe aborted. For cluster level aborts, Galera Cluster returns a deadlock error.
82 | Database
Solution
The solution, for Galera Cluster, would be to send all write requests to a single DBnode, instead of all of them. Here is a useful guide, when using HAProxy.
The same concept applies when MaxScale is used as a DB proxy. It needs to beconfigured to send all write requests to a single DB node instead all of them andbalance read statements across the rest of the nodes. Here is a useful guide on how toconfigure MaxScale with Read/Write splitting.
Enabling Causality Checks
Additionally, to solve this issue, when using Galera Cluster, customers should try to setwsrep_sync_wait=1. When enabled, the node triggers causality checks in response tocertain types of queries. This is disabled by default.
Encryption
In this section you will find all the details you need to configure encryption inownCloud.
Encryption Configuration
Introduction
The primary purpose of the ownCloud server-side encryption is to protect users’ fileswhen they’re located on remote storage sites, such as Dropbox and Google Drive, andto do it smoothly and seamlessly from within ownCloud.
Since ownCloud 9.0, server-side encryption for local and remote storage can operateindependently. This allows you to encrypt a remote storage without also having toencrypt your home storage on your ownCloud server.
Starting with ownCloud 9.0 we support Authenticated Encryption for allnewly encrypted files. See Exploiting unauthenticated encryption modefor more technical information about the impact.
For maximum security, make sure to configure external storage with "Check forchanges: Never". This will let ownCloud ignore new files not added via ownCloud. Thisway, a malicious external storage administrator cannot add new files to the storagewithout your knowledge. However, you may not use this setting if your externalstorage is subject to legitimate external changes.
ownCloud’s server-side encryption encrypts files stored on the ownCloud server andfiles on remote storage sites that are connected to your ownCloud server. Encryptionand decryption are performed on the ownCloud server. All files sent to remote storagewill be encrypted by the ownCloud server and decrypted before serving them to you orany of your users shared them with.
Encryption | 83
• Encrypting files increases their size by roughly 35%. Remember totake this into account when you are both provisioning storage andsetting storage quotas.
• User quotas are based on the unencrypted file size — not theencrypted size. This means that admins need to calculate withhigher disk space requirements on the backend.
• You CANNOT use encryption for your primary storage if the primarystorage is an Amazon S3 compatible object storage. This is disabledby default, also see S3 Compatible Object Storage as PrimaryStorage Location
When files on an external storage are encrypted in ownCloud, you cannot share themdirectly from the external storage services, only through ownCloud sharing. This isbecause the key to decrypt the data never leaves the ownCloud server.
ownCloud’s server-side encryption generates a strong encryption key, which isunlocked by users’ passwords. As a result, your users don’t need to track an extrapassword. All they need to do is log in as they normally would. ownCloud transparentlyencrypts only the contents of files and not filenames and directory structures.
You should regularly back up all encryption keys to prevent permanentdata loss.
The encryption keys are stored in the following directories:
Directory Description
data/files_encryption
Private keys and all other keys necessary to decrypt the filesstored on a system-wide external storage.
data/<user>/files_encryption
Users’ private keys and all other keys necessary to decryptthe users’ files.
You can move the keys to a different location. To do so, refer to theMove Key Location section of the documentation.
When encryption is enabled, all files are encrypted and decrypted by the ownCloudapplication and stored encrypted on your remote storage. This protects your data onexternally hosted storage. The ownCloud admin and the storage admin will see onlyencrypted files when browsing backend storage.
Encryption keys are stored only on the ownCloud server, eliminating exposure of yourdata to third-party storage providers. The encryption application does not protect yourdata if your ownCloud server is compromised, and it does not prevent ownCloudadministrators from reading users’ files.
This would require client-side encryption, which this application does not provide. Ifyour ownCloud server is not connected to any external storage services, it is better touse other encryption tools, such as file-level or whole-disk encryption.
SSL terminates at the same time or before the web server on theownCloud server. Consequently, all files are in an unencrypted statebetween the SSL connection termination and the ownCloud code thatencrypts and decrypts them. This is potentially exploitable by anyonewith administrator access to your server. For more information, read:How ownCloud uses encryption to protect your data.
84 | Encryption
Which Data Is Encrypted and When
The following data is encrypted:
• Users' files in their home directory trees if enabled by the admin.Location: data/<user>/files, see the: occ encryption command set
• External storage if enabled either by the user or by the admin
The following is never encrypted:
• File names or folder structures• Existing files in the trash bin• Existing files in Versions• Image thumbnails• Previews from the Files app• The search index from the full text search app• Third-party app data
Note that there may be other not mentioned files that are not encrypted.
When are files encrypted
If not otherwise decided by the admin, only new and changed files after enablingencryption are encrypted.
An admin can encrypt existing files post enabling encryption via an occencryption command.
Using a Hardware Security Module (HSM)
When using a HSM, see the additional information provided at The HSM (HardwareSecurity Module) Daemon (hsmdaemon)
Encryption Types
ownCloud provides two encryption types:
Master Key: There is only one key (or key pair) and all files are encryptedusing that key pair.
User-Key: Every user has their own private/public key pairs, and theprivate key is protected by the user’s password.
User-Key encryption has been depreciatedwith ownCloud release 10.7
These encryption types are not compatible.
Before Enabling Encryption
Plan very carefully before enabling encryption, because it is not reversible via theownCloud Web interface. If you lose your encryption keys, your files are notrecoverable. Always have backups of your encryption keys stored in a safe location,and consider enabling all recovery options.
You have more options via the occ command’s encryption options.
Encryption | 85
You can’t manage encryption without access to the command line. Ifyour ownCloud installation is on a hosted environment and you don’thave access to the command line, you won’t be able to run occcommands. In this case, don’t enable encryption!
Enable the Encryption App
Before you can use encryption, you must enable the encryption app. You can do thiseither on the command-line or in the Web-UI.
Enable Encryption From the Command-Line
To enable the encryption app, run the following command:
sudo -u www-data php occ app:enable encryption
If the encryption app is successfully enabled, you should see the followingconfirmation:
encryption enabled
Enable Encryption in the Web-UI
To enable encryption in the Web-UI:
1. Go to Settings › Admin › Apps and click on Show disabled apps2. When the disabled apps are rendered, click [Enable] under "Default encryption
module".
Basic Configuration via the Web-UI
You can do basic configuration of encryption via the Web-UI, but it is recommended touse the CLI.
1. Go to Settings › Admin › Encryption, and enable [Enable server-sideencryption].
2. Select the "Default encryption module", either "Master Key" (recommended) or"User-key" (depreciated).
3. When User-specific encryption is enabled, users must log out and log back in totrigger the automatic personal encryption key generation process.
Master-Key-Based Encryption
Enabling Master Key Based Encryption from the Command-Line
To be safe and avoid any issues on a running instance, put your server in single usermode with the following command:
sudo -u www-data php occ maintenance:singleuser --on
Enabling encryption via the command line involves several commands. If not alreadydone, enable the default encryption module app with the following command:
86 | Encryption
sudo -u www-data php occ app:enable encryption
Then enable encryption, using the following command:
sudo -u www-data php occ encryption:enable
After that, enable the master key, using the following command:
sudo -u www-data php occ encryption:select-encryption-type masterkey
The master key mode has to be set up in a newly created instance.
Finally, encrypt all data, using the following command:
sudo -u www-data php occ encryption:encrypt-all --yes
This command is not typically required as the master key is oftenenabled at installation time. As a result when enabling it, there shouldbe no data to encrypt. In case it’s being enabled after the installationand there are files which are unencrypted, encrypt-all can be used toencrypt them. Depending on the amount of existing data and thelocation, this operation can take a long time.
Now you can turn off the single user mode:
sudo -u www-data php occ maintenance:singleuser --off
View Current Encryption Status
Get the current encryption status and the loaded encryption module:
sudo -u www-data php occ encryption:status
Replacing an Existing Master Key
If the master key needs replacement, for example because it has been compromised,an occ command is available. The command is encryption:recreate-master-key. Itreplaces an existing master key with a new one and encrypts the files with the newkey.
Decrypt Master-Key Encryption
You must first put your ownCloud server into single-user mode to prevent any useractivity until encryption is completed.
sudo -u www-data php occ maintenance:singleuser --onSingle user mode is currently enabled
Encryption | 87
Decrypt all user data files, or optionally a single user:
sudo -u www-data php occ encryption:decrypt-all [username]
Disable Encryption
To disable encryption, put your ownCloud server into single-user mode, and thendisable your encryption module with these commands:
sudo -u www-data php occ maintenance:singleuser --onsudo -u www-data php occ encryption:disable
Take it out of single-user mode when you are finished, by using the followingcommand:
sudo -u www-data php occ maintenance:singleuser --off
You may only disable encryption by using the occ EncryptionCommands. Make sure you have backups of all encryption keys,including those for all your users if user key encryption was selected.
User-Key-Based Encryption
Limitations of User-Key-Based Encryption
• Depreciated with ownCloud release 10.7• Users added to groups cannot decrypt files on existing shares.• OnlyOffice will not work.• Impersonate will not work.• OAuth2 will not work.• Elasticsearch will not work.• Users getting access to an external storage which already contains encrypted files
cannot get access to said files for reasons such as the group case above.• When having data shared with a group and group membership changes after the
share is established, subsequently added users will not be able to open the shareddata unless the owner will share it again.
Enabling User-Key-Based Encryption From the Command-line
To avoid any issues on a running instance, put your server in single user mode withthe following command:
sudo -u www-data php occ maintenance:singleuser --on
If not already done, enable the default encryption module app, using the followingcommand:
sudo -u www-data php occ app:enable encryption
88 | Encryption
After that, enable encryption, using the following command:
sudo -u www-data php occ encryption:enable
Then, enable the user-key, using the following command:
sudo -u www-data php occ encryption:select-encryption-type user-keys
Finally, encrypt all data, using the following command:
sudo -u www-data php occ encryption:encrypt-all --yes
Now you can turn off the single user mode:
sudo -u www-data php occ maintenance:singleuser --off
View Current Encryption Status
Get the current encryption status and the loaded encryption module:
sudo -u www-data php occ encryption:status
Enable Users' File Recovery Keys
If users encrypt their files and lose their ownCloud password, they lose access to theirencrypted files as the files will be unrecoverable. It is not possible to reset a user’spassword using the standard reset process if the user’s files are encrypted.
In such a case, you’ll see a yellow banner warning:
"" Please provide an admin recovery password; otherwise, all user data will be lost. ""
To avoid all this, create a Recovery Key. To do so, go to the Encryption section of yourAdmin page and set a recovery key password.
Encryption | 89

You then need to ask your users to opt-in to the Recovery Key. For the users to do this,they need to go to the Personal page and enable the recovery key. This grants theadmin the right to decrypt their data for recovery purposes. If they do not do this, theRecovery Key won’t work for them.
Users who have enabled password recovery you can provide with a new password andrecovery access to their encrypted files by supplying the Recovery Key on their page.
You may change your recovery key password.
90 | Encryption
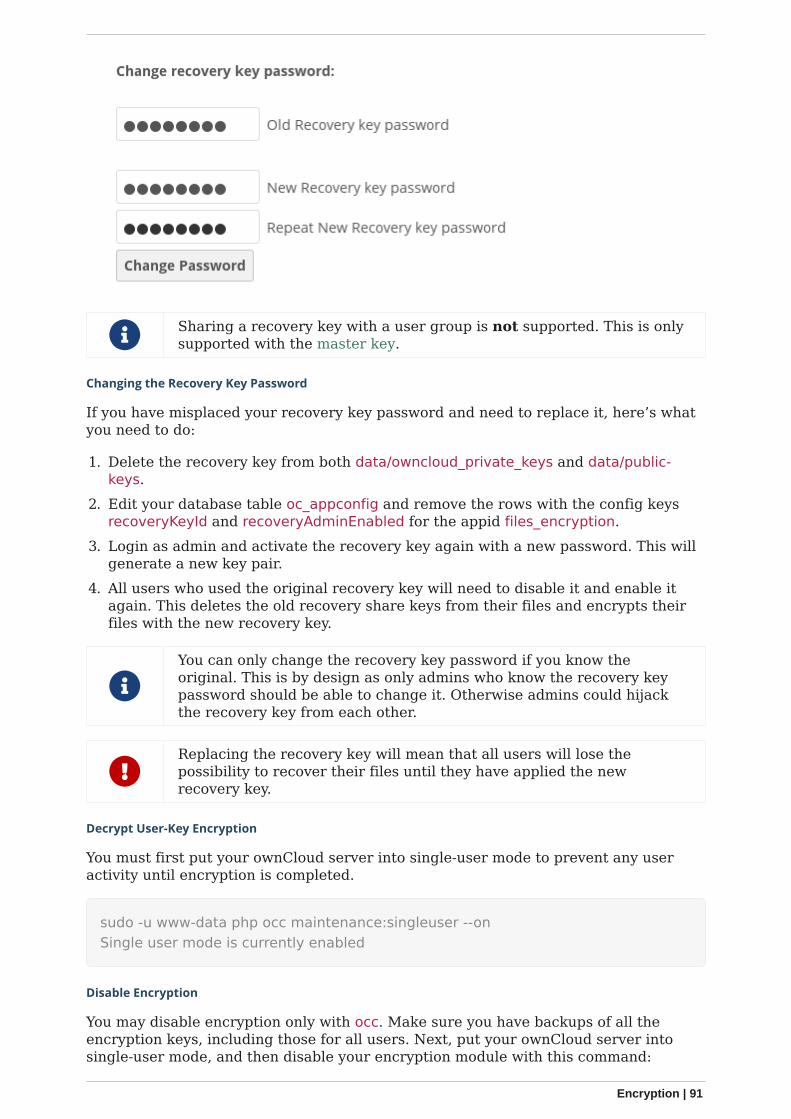
Sharing a recovery key with a user group is not supported. This is onlysupported with the master key.
Changing the Recovery Key Password
If you have misplaced your recovery key password and need to replace it, here’s whatyou need to do:
1. Delete the recovery key from both data/owncloud_private_keys and data/public-keys.
2. Edit your database table oc_appconfig and remove the rows with the config keysrecoveryKeyId and recoveryAdminEnabled for the appid files_encryption.
3. Login as admin and activate the recovery key again with a new password. This willgenerate a new key pair.
4. All users who used the original recovery key will need to disable it and enable itagain. This deletes the old recovery share keys from their files and encrypts theirfiles with the new recovery key.
You can only change the recovery key password if you know theoriginal. This is by design as only admins who know the recovery keypassword should be able to change it. Otherwise admins could hijackthe recovery key from each other.
Replacing the recovery key will mean that all users will lose thepossibility to recover their files until they have applied the newrecovery key.
Decrypt User-Key Encryption
You must first put your ownCloud server into single-user mode to prevent any useractivity until encryption is completed.
sudo -u www-data php occ maintenance:singleuser --onSingle user mode is currently enabled
Disable Encryption
You may disable encryption only with occ. Make sure you have backups of all theencryption keys, including those for all users. Next, put your ownCloud server intosingle-user mode, and then disable your encryption module with this command:
Encryption | 91
sudo -u www-data php occ maintenance:singleuser --onsudo -u www-data php occ encryption:disable
Encryption cannot be disabled without the user’s password or filerecovery key. If you don’t have access to at least one of these thenthere is no way to decrypt all files. Then, take it out of single-user modewhen you are finished with this command:
sudo -u www-data php occ maintenance:singleuser --off
It is possible to disable encryption with the file recovery key if every user has enabledit. In this case, "decrypt all" will decrypt all files of all users.
It is not planned to move this to the next user login or a backgroundjob. If that was done, then login passwords would need to be stored inthe database, which could be a security issue.
Move Key Location
View current location of keys:
sudo -u www-data php occ encryption:show-key-storage-rootCurrent key storage root: default storage location (data/)
You can move the keys to another folder inside your data directory. Moving your keysoutside of your data folder is not supported. The folder must already exist, be ownedby and restricted to root and the webserver group. This example is for Ubuntu Linux.Note that the new folder is relative to your data directory:
mkdir /var/www/owncloud/data/new_keyschown -R root:www-data /var/www/owncloud/data/new_keyschmod -R 0770 /var/www/owncloud/data/new_keyssudo -u www-data php occ encryption:change-key-storage-root new_keysChange key storage root from default storage location to new_keysStart to move keys: 4 [============================]Key storage root successfully changed to new_keys
LDAP and Other External User Back-ends
If you use an external user back-end, such as an LDAP or Samba server, and youchange a user’s password on that back-end, the user will be prompted to change theirownCloud login to match their next ownCloud login. The user will need both their oldand new passwords to do this.
If you have enabled the recovery key, then you can change a user’s password in theownCloud Users panel to match their back-end password, and then — of course —notify the user and give them their new password.
92 | Encryption
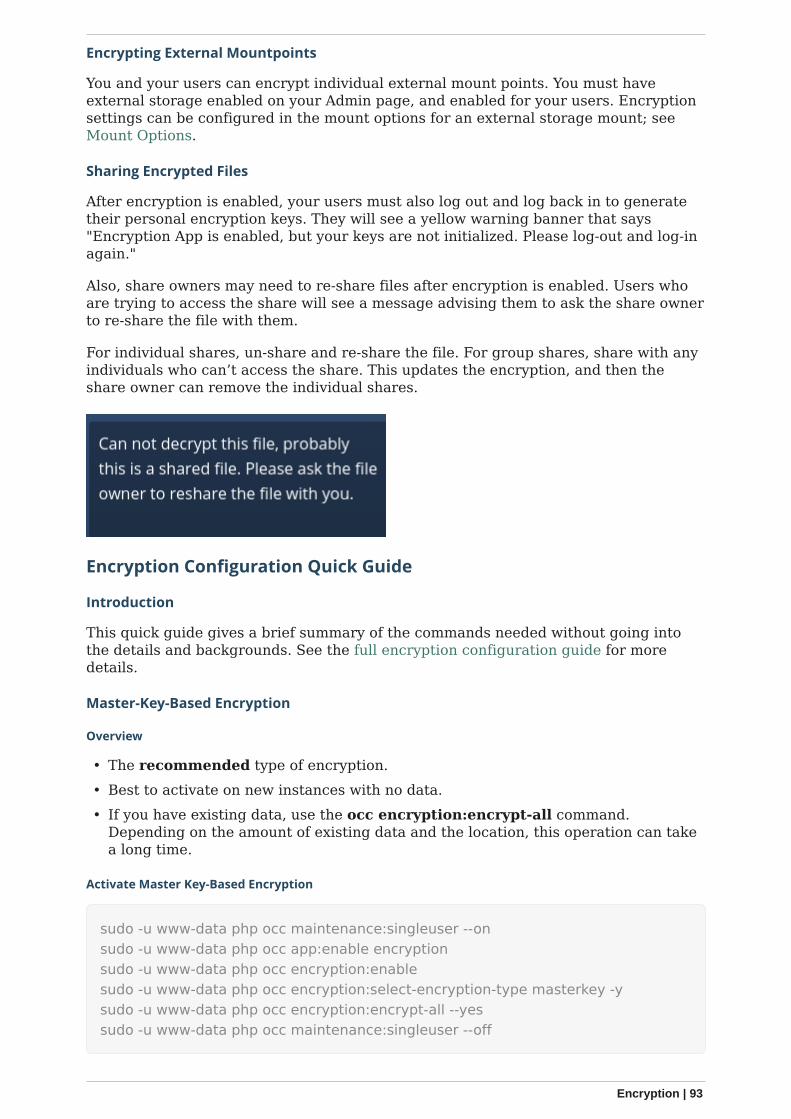
Encrypting External Mountpoints
You and your users can encrypt individual external mount points. You must haveexternal storage enabled on your Admin page, and enabled for your users. Encryptionsettings can be configured in the mount options for an external storage mount; seeMount Options.
Sharing Encrypted Files
After encryption is enabled, your users must also log out and log back in to generatetheir personal encryption keys. They will see a yellow warning banner that says"Encryption App is enabled, but your keys are not initialized. Please log-out and log-inagain."
Also, share owners may need to re-share files after encryption is enabled. Users whoare trying to access the share will see a message advising them to ask the share ownerto re-share the file with them.
For individual shares, un-share and re-share the file. For group shares, share with anyindividuals who can’t access the share. This updates the encryption, and then theshare owner can remove the individual shares.
Encryption Configuration Quick Guide
Introduction
This quick guide gives a brief summary of the commands needed without going intothe details and backgrounds. See the full encryption configuration guide for moredetails.
Master-Key-Based Encryption
Overview
• The recommended type of encryption.• Best to activate on new instances with no data.• If you have existing data, use the occ encryption:encrypt-all command.
Depending on the amount of existing data and the location, this operation can takea long time.
Activate Master Key-Based Encryption
sudo -u www-data php occ maintenance:singleuser --onsudo -u www-data php occ app:enable encryptionsudo -u www-data php occ encryption:enablesudo -u www-data php occ encryption:select-encryption-type masterkey -ysudo -u www-data php occ encryption:encrypt-all --yessudo -u www-data php occ maintenance:singleuser --off
Encryption | 93
View the Encryption Status
sudo -u www-data php occ encryption:status
Decrypt Encrypted Files
Depending on the amount of existing data, this operation can take a long time.
sudo -u www-data php occ maintenance:singleuser --onsudo -u www-data php occ encryption:decrypt-allsudo -u www-data php occ maintenance:singleuser --off
Deactivate Master-Key-Based Encryption
sudo -u www-data php occ encryption:disable# ignore the "already disabled" messagesudo -u www-data php occ app:disable encryption
If the master key has been compromised or exposed, you can replace it. You will needthe current master key for it.
sudo -u www-data php occ encryption:recreate-master-key
User-Key-Based Encryption
User-Key encryption has been depreciated with ownCloud release 10.7
Activate User-Key-Based Encryption
sudo -u www-data php occ maintenance:singleuser --onsudo -u www-data php occ app:enable encryptionsudo -u www-data php occ encryption:enablesudo -u www-data php occ encryption:select-encryption-type user-keyssudo -u www-data php occ encryption:encrypt-all --yessudo -u www-data php occ maintenance:singleuser --off
After User-specific encryption is enabled, users must log out and log back in to triggerthe automatic personal encryption key generation process.
Set a Recovery Key
• Go to Settings › Admin › Encryption.• Set a recovery key password.• Ask the users to opt-in to the recovery key.
If a user decides not to opt-in to the recovery key and forgets or losestheir password, the user’s data cannot be decrypted. This leads topermanent data loss.
94 | Encryption
They need to:
• Go to Settings › Personal › Encryption• Enable the Recovery Key
View the Encryption Status
sudo -u www-data php occ encryption:status
Decrypt Encrypted Files
If you have an ownCloud instance with only a few users, you can use the followingexample to decrypt the files. Note that you have to enter the password for each usermanually. The admin must ensure all users have enabled the recovery password optionin their personal settings page.
sudo -u www-data php occ maintenance:singleuser --onsudo -u www-data php occ encryption:decrypt-all#Choose the "Recovery key" Option#Enter **Recovery Key** for **each user**
# Recovery Key is a password set by the adminsudo -u www-data php occ maintenance:singleuser --off
If you have a large instance with many users, use this to decrypt the files:
• Set the environment variable with e.g. export OC_RECOVERY_PASSWORD=1111,then run this set of commands and replace "1111" with your actual Recovery Key:
export OC_RECOVERY_PASSWORD=1111sudo -u www-data php occ maintenance:singleuser --onsudo -E -u www-data php occ encryption:decrypt-all -m recovery -c yessudo -u www-data php occ maintenance:singleuser --off
Deactivate User-Specific Key-based Encryption
sudo -u www-data php occ encryption:disable
# ignore the "already disabled" messagesudo -u www-data php occ app:disable encryption
Clean up Your Database
Access your ownCloud database and remove the remaining entries that have not beenautomatically removed with this command:
DELETE FROM oc_appconfig WHERE appid='encryption';
Encryption | 95
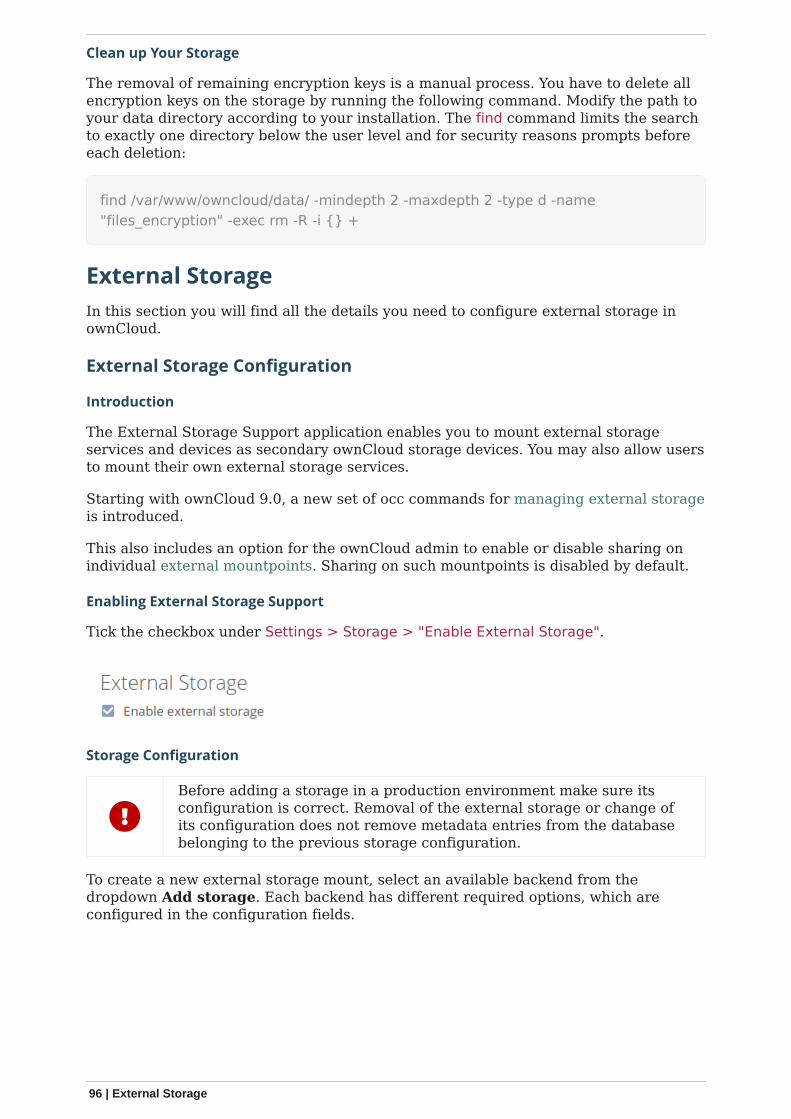
Clean up Your Storage
The removal of remaining encryption keys is a manual process. You have to delete allencryption keys on the storage by running the following command. Modify the path toyour data directory according to your installation. The find command limits the searchto exactly one directory below the user level and for security reasons prompts beforeeach deletion:
find /var/www/owncloud/data/ -mindepth 2 -maxdepth 2 -type d -name"files_encryption" -exec rm -R -i {} +
External Storage
In this section you will find all the details you need to configure external storage inownCloud.
External Storage Configuration
Introduction
The External Storage Support application enables you to mount external storageservices and devices as secondary ownCloud storage devices. You may also allow usersto mount their own external storage services.
Starting with ownCloud 9.0, a new set of occ commands for managing external storageis introduced.
This also includes an option for the ownCloud admin to enable or disable sharing onindividual external mountpoints. Sharing on such mountpoints is disabled by default.
Enabling External Storage Support
Tick the checkbox under Settings > Storage > "Enable External Storage".
Storage Configuration
Before adding a storage in a production environment make sure itsconfiguration is correct. Removal of the external storage or change ofits configuration does not remove metadata entries from the databasebelonging to the previous storage configuration.
To create a new external storage mount, select an available backend from thedropdown Add storage. Each backend has different required options, which areconfigured in the configuration fields.
96 | External Storage
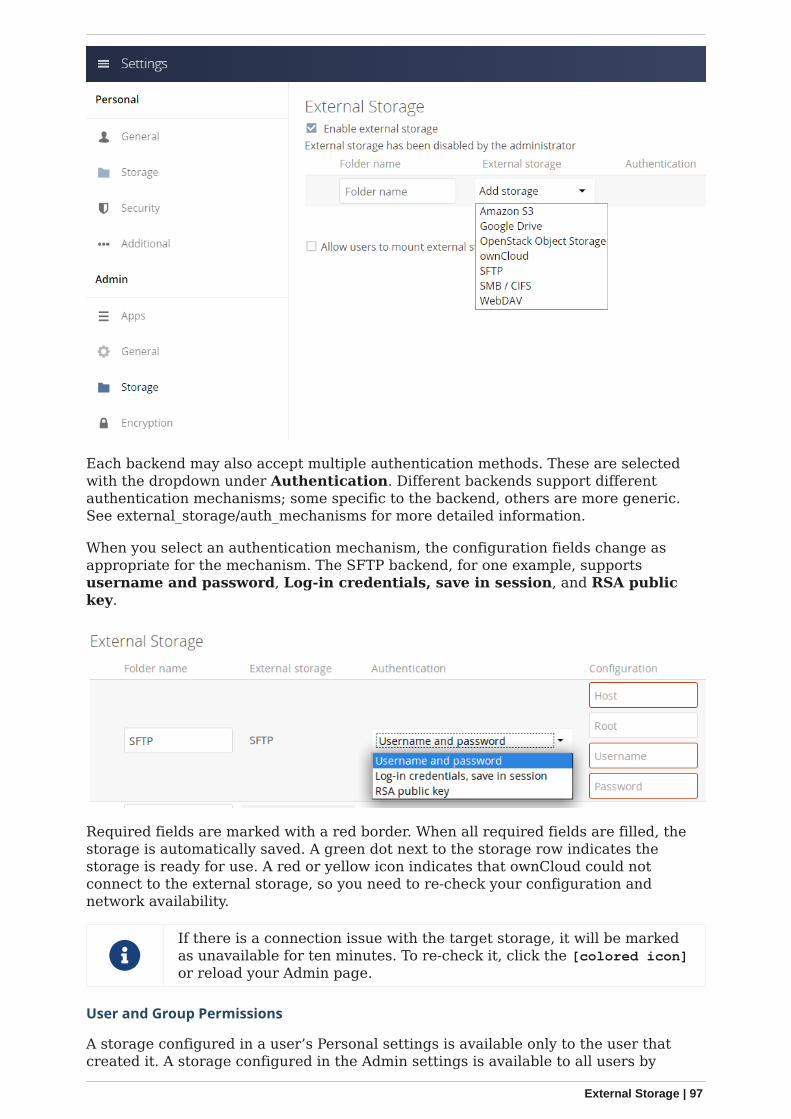
Each backend may also accept multiple authentication methods. These are selectedwith the dropdown under Authentication. Different backends support differentauthentication mechanisms; some specific to the backend, others are more generic.See external_storage/auth_mechanisms for more detailed information.
When you select an authentication mechanism, the configuration fields change asappropriate for the mechanism. The SFTP backend, for one example, supportsusername and password, Log-in credentials, save in session, and RSA publickey.
Required fields are marked with a red border. When all required fields are filled, thestorage is automatically saved. A green dot next to the storage row indicates thestorage is ready for use. A red or yellow icon indicates that ownCloud could notconnect to the external storage, so you need to re-check your configuration andnetwork availability.
If there is a connection issue with the target storage, it will be markedas unavailable for ten minutes. To re-check it, click the [colored icon]or reload your Admin page.
User and Group Permissions
A storage configured in a user’s Personal settings is available only to the user thatcreated it. A storage configured in the Admin settings is available to all users by
External Storage | 97
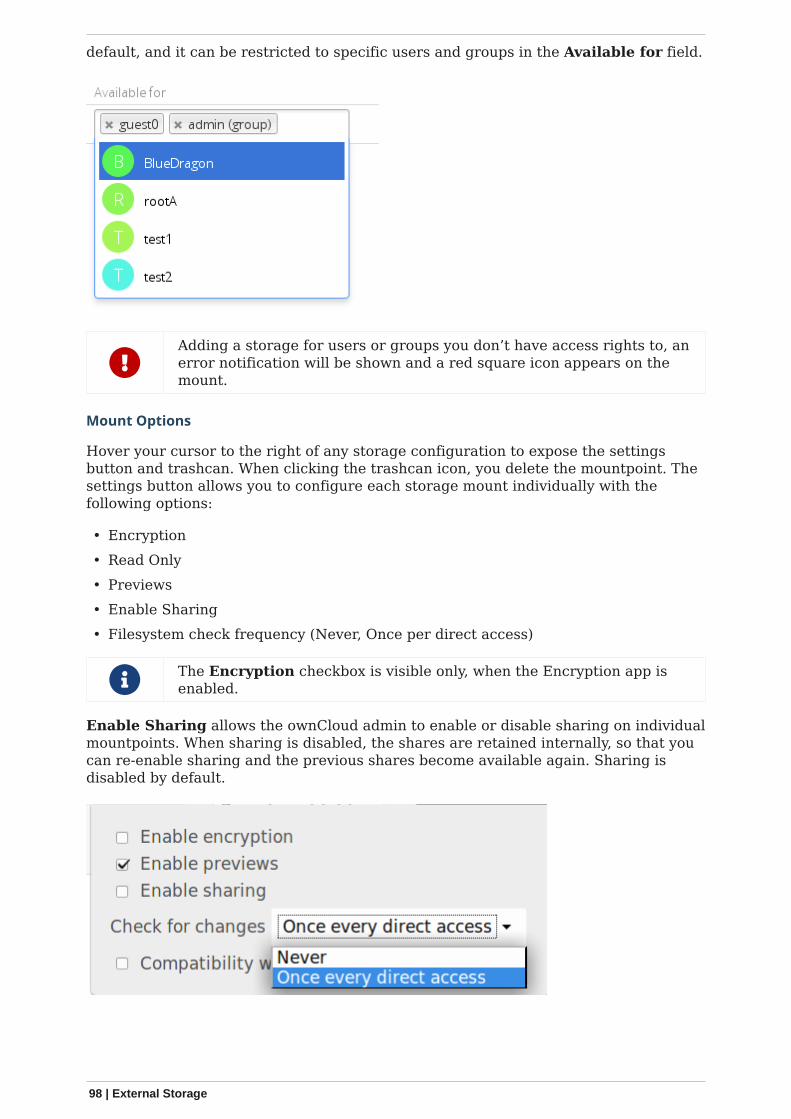
default, and it can be restricted to specific users and groups in the Available for field.
Adding a storage for users or groups you don’t have access rights to, anerror notification will be shown and a red square icon appears on themount.
Mount Options
Hover your cursor to the right of any storage configuration to expose the settingsbutton and trashcan. When clicking the trashcan icon, you delete the mountpoint. Thesettings button allows you to configure each storage mount individually with thefollowing options:
• Encryption• Read Only• Previews• Enable Sharing• Filesystem check frequency (Never, Once per direct access)
The Encryption checkbox is visible only, when the Encryption app isenabled.
Enable Sharing allows the ownCloud admin to enable or disable sharing on individualmountpoints. When sharing is disabled, the shares are retained internally, so that youcan re-enable sharing and the previous shares become available again. Sharing isdisabled by default.
98 | External Storage
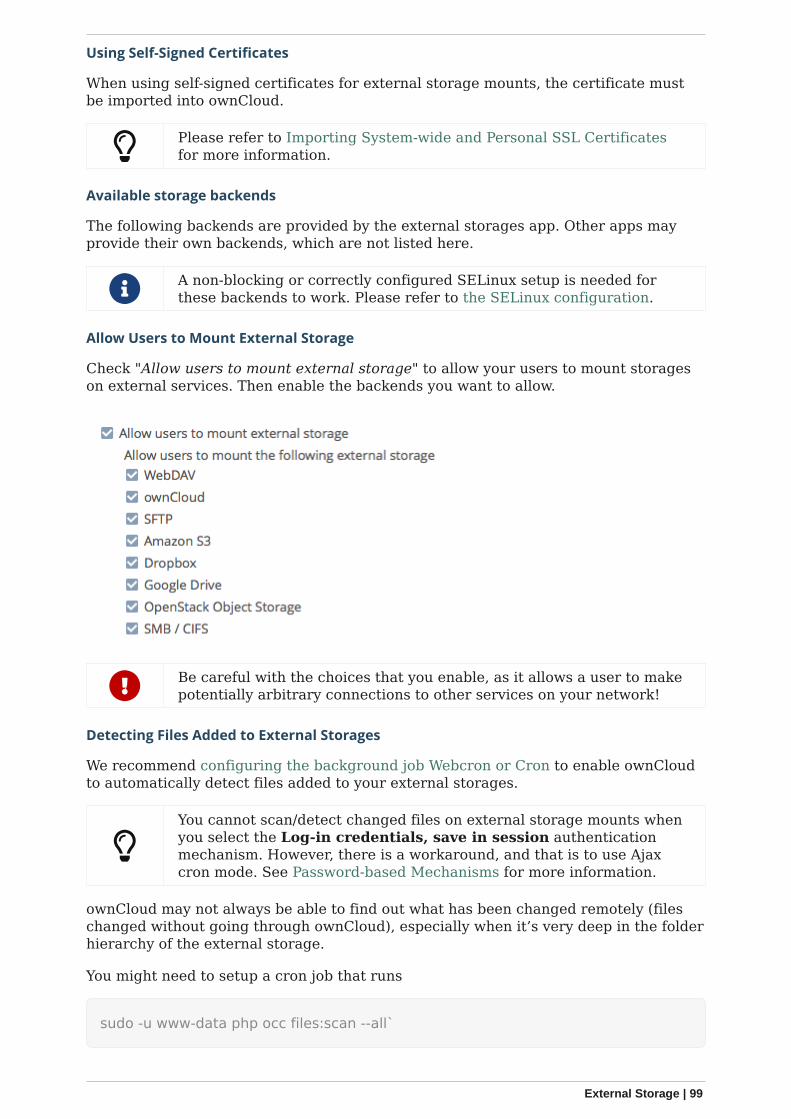
Using Self-Signed Certificates
When using self-signed certificates for external storage mounts, the certificate mustbe imported into ownCloud.
Please refer to Importing System-wide and Personal SSL Certificatesfor more information.
Available storage backends
The following backends are provided by the external storages app. Other apps mayprovide their own backends, which are not listed here.
A non-blocking or correctly configured SELinux setup is needed forthese backends to work. Please refer to the SELinux configuration.
Allow Users to Mount External Storage
Check "Allow users to mount external storage" to allow your users to mount storageson external services. Then enable the backends you want to allow.
Be careful with the choices that you enable, as it allows a user to makepotentially arbitrary connections to other services on your network!
Detecting Files Added to External Storages
We recommend configuring the background job Webcron or Cron to enable ownCloudto automatically detect files added to your external storages.
You cannot scan/detect changed files on external storage mounts whenyou select the Log-in credentials, save in session authenticationmechanism. However, there is a workaround, and that is to use Ajaxcron mode. See Password-based Mechanisms for more information.
ownCloud may not always be able to find out what has been changed remotely (fileschanged without going through ownCloud), especially when it’s very deep in the folderhierarchy of the external storage.
You might need to setup a cron job that runs
sudo -u www-data php occ files:scan --all`
External Storage | 99
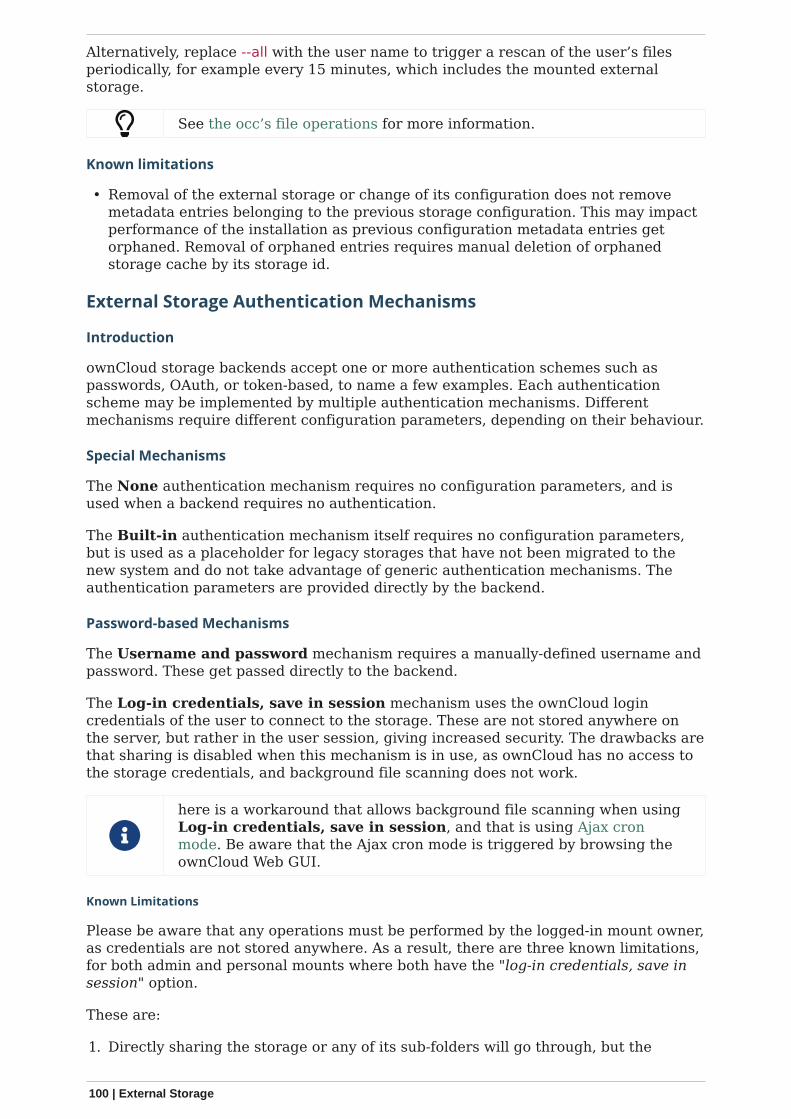
Alternatively, replace --all with the user name to trigger a rescan of the user’s filesperiodically, for example every 15 minutes, which includes the mounted externalstorage.
See the occ’s file operations for more information.
Known limitations
• Removal of the external storage or change of its configuration does not removemetadata entries belonging to the previous storage configuration. This may impactperformance of the installation as previous configuration metadata entries getorphaned. Removal of orphaned entries requires manual deletion of orphanedstorage cache by its storage id.
External Storage Authentication Mechanisms
Introduction
ownCloud storage backends accept one or more authentication schemes such aspasswords, OAuth, or token-based, to name a few examples. Each authenticationscheme may be implemented by multiple authentication mechanisms. Differentmechanisms require different configuration parameters, depending on their behaviour.
Special Mechanisms
The None authentication mechanism requires no configuration parameters, and isused when a backend requires no authentication.
The Built-in authentication mechanism itself requires no configuration parameters,but is used as a placeholder for legacy storages that have not been migrated to thenew system and do not take advantage of generic authentication mechanisms. Theauthentication parameters are provided directly by the backend.
Password-based Mechanisms
The Username and password mechanism requires a manually-defined username andpassword. These get passed directly to the backend.
The Log-in credentials, save in session mechanism uses the ownCloud logincredentials of the user to connect to the storage. These are not stored anywhere onthe server, but rather in the user session, giving increased security. The drawbacks arethat sharing is disabled when this mechanism is in use, as ownCloud has no access tothe storage credentials, and background file scanning does not work.
here is a workaround that allows background file scanning when usingLog-in credentials, save in session, and that is using Ajax cronmode. Be aware that the Ajax cron mode is triggered by browsing theownCloud Web GUI.
Known Limitations
Please be aware that any operations must be performed by the logged-in mount owner,as credentials are not stored anywhere. As a result, there are three known limitations,for both admin and personal mounts where both have the "log-in credentials, save insession" option.
These are:
1. Directly sharing the storage or any of its sub-folders will go through, but the
100 | External Storage
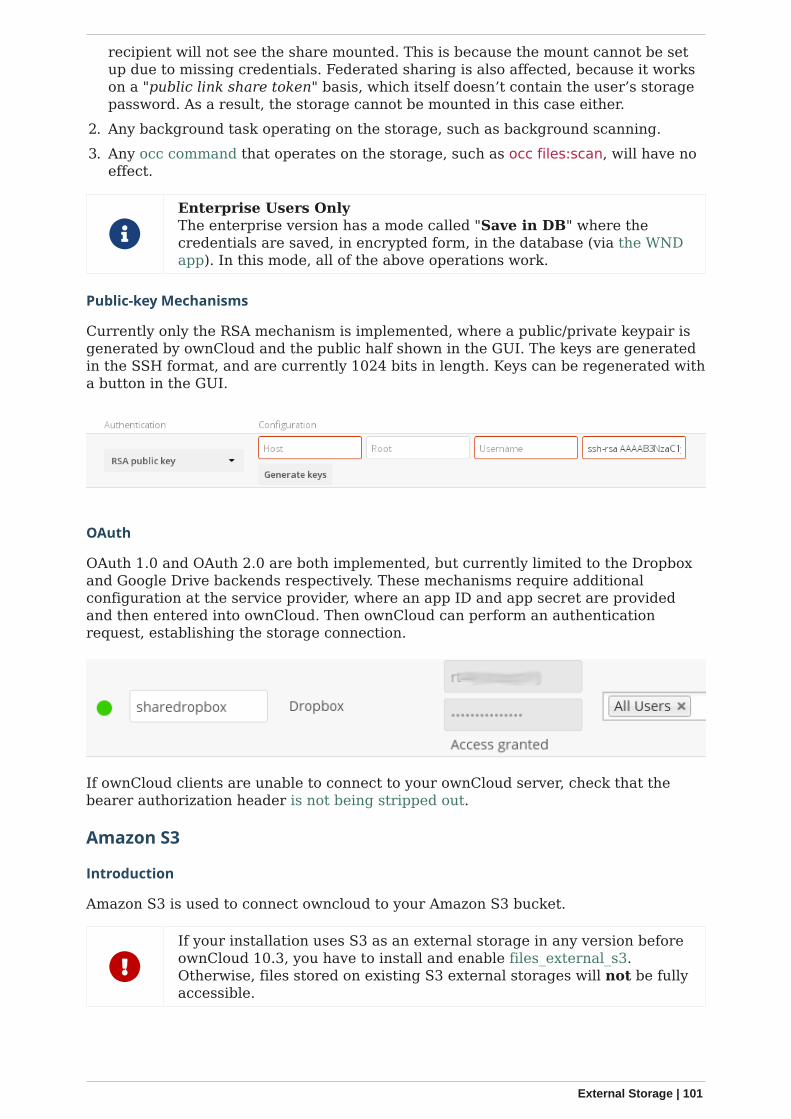
recipient will not see the share mounted. This is because the mount cannot be setup due to missing credentials. Federated sharing is also affected, because it workson a "public link share token" basis, which itself doesn’t contain the user’s storagepassword. As a result, the storage cannot be mounted in this case either.
2. Any background task operating on the storage, such as background scanning.3. Any occ command that operates on the storage, such as occ files:scan, will have no
effect.
Enterprise Users OnlyThe enterprise version has a mode called "Save in DB" where thecredentials are saved, in encrypted form, in the database (via the WNDapp). In this mode, all of the above operations work.
Public-key Mechanisms
Currently only the RSA mechanism is implemented, where a public/private keypair isgenerated by ownCloud and the public half shown in the GUI. The keys are generatedin the SSH format, and are currently 1024 bits in length. Keys can be regenerated witha button in the GUI.
OAuth
OAuth 1.0 and OAuth 2.0 are both implemented, but currently limited to the Dropboxand Google Drive backends respectively. These mechanisms require additionalconfiguration at the service provider, where an app ID and app secret are providedand then entered into ownCloud. Then ownCloud can perform an authenticationrequest, establishing the storage connection.
If ownCloud clients are unable to connect to your ownCloud server, check that thebearer authorization header is not being stripped out.
Amazon S3
Introduction
Amazon S3 is used to connect owncloud to your Amazon S3 bucket.
If your installation uses S3 as an external storage in any version beforeownCloud 10.3, you have to install and enable files_external_s3.Otherwise, files stored on existing S3 external storages will not be fullyaccessible.
External Storage | 101
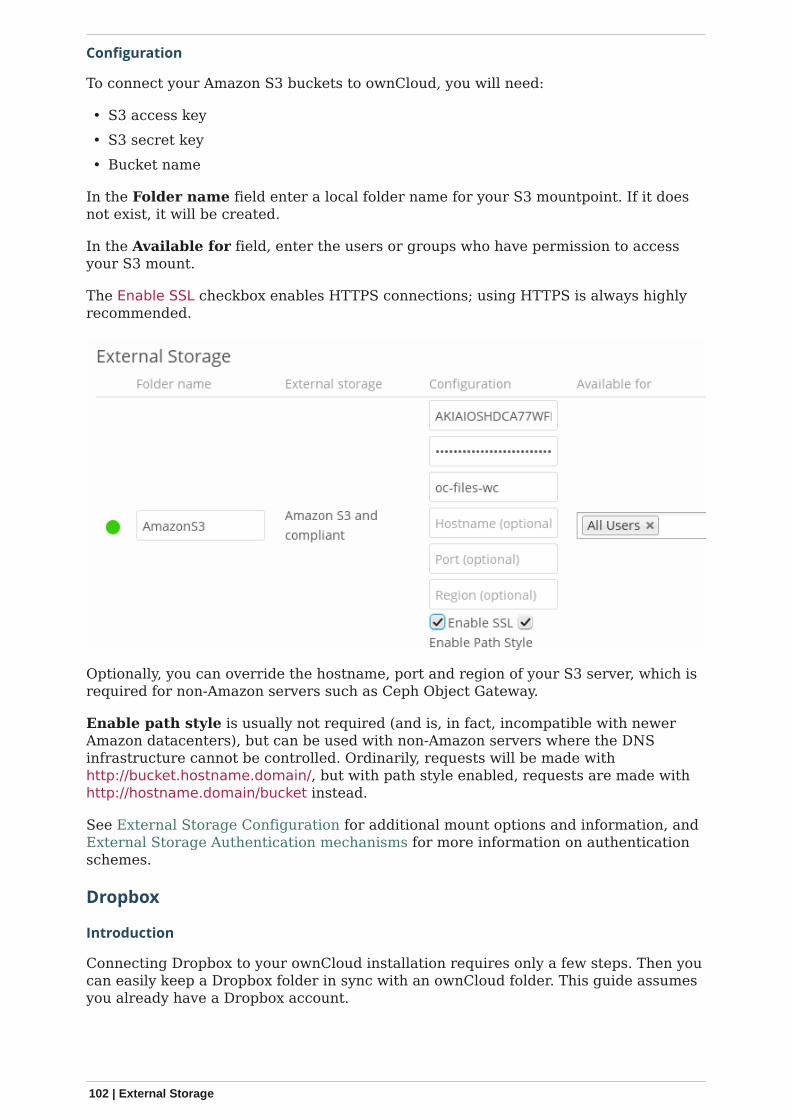
Configuration
To connect your Amazon S3 buckets to ownCloud, you will need:
• S3 access key• S3 secret key• Bucket name
In the Folder name field enter a local folder name for your S3 mountpoint. If it doesnot exist, it will be created.
In the Available for field, enter the users or groups who have permission to accessyour S3 mount.
The Enable SSL checkbox enables HTTPS connections; using HTTPS is always highlyrecommended.
Optionally, you can override the hostname, port and region of your S3 server, which isrequired for non-Amazon servers such as Ceph Object Gateway.
Enable path style is usually not required (and is, in fact, incompatible with newerAmazon datacenters), but can be used with non-Amazon servers where the DNSinfrastructure cannot be controlled. Ordinarily, requests will be made withhttp://bucket.hostname.domain/, but with path style enabled, requests are made withhttp://hostname.domain/bucket instead.
See External Storage Configuration for additional mount options and information, andExternal Storage Authentication mechanisms for more information on authenticationschemes.
Dropbox
Introduction
Connecting Dropbox to your ownCloud installation requires only a few steps. Then youcan easily keep a Dropbox folder in sync with an ownCloud folder. This guide assumesyou already have a Dropbox account.
102 | External Storage
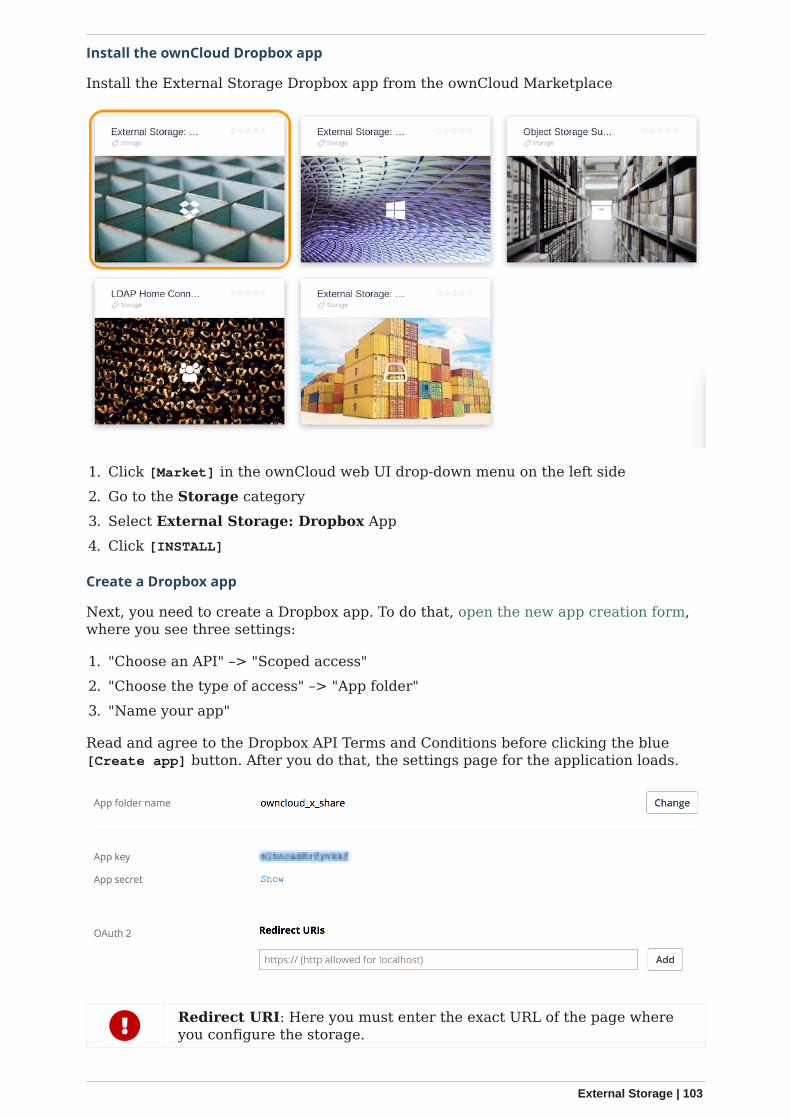
Install the ownCloud Dropbox app
Install the External Storage Dropbox app from the ownCloud Marketplace
1. Click [Market] in the ownCloud web UI drop-down menu on the left side2. Go to the Storage category3. Select External Storage: Dropbox App4. Click [INSTALL]
Create a Dropbox app
Next, you need to create a Dropbox app. To do that, open the new app creation form,where you see three settings:
1. "Choose an API" –> "Scoped access"2. "Choose the type of access" –> "App folder"3. "Name your app"
Read and agree to the Dropbox API Terms and Conditions before clicking the blue[Create app] button. After you do that, the settings page for the application loads.
Redirect URI: Here you must enter the exact URL of the page whereyou configure the storage.
External Storage | 103
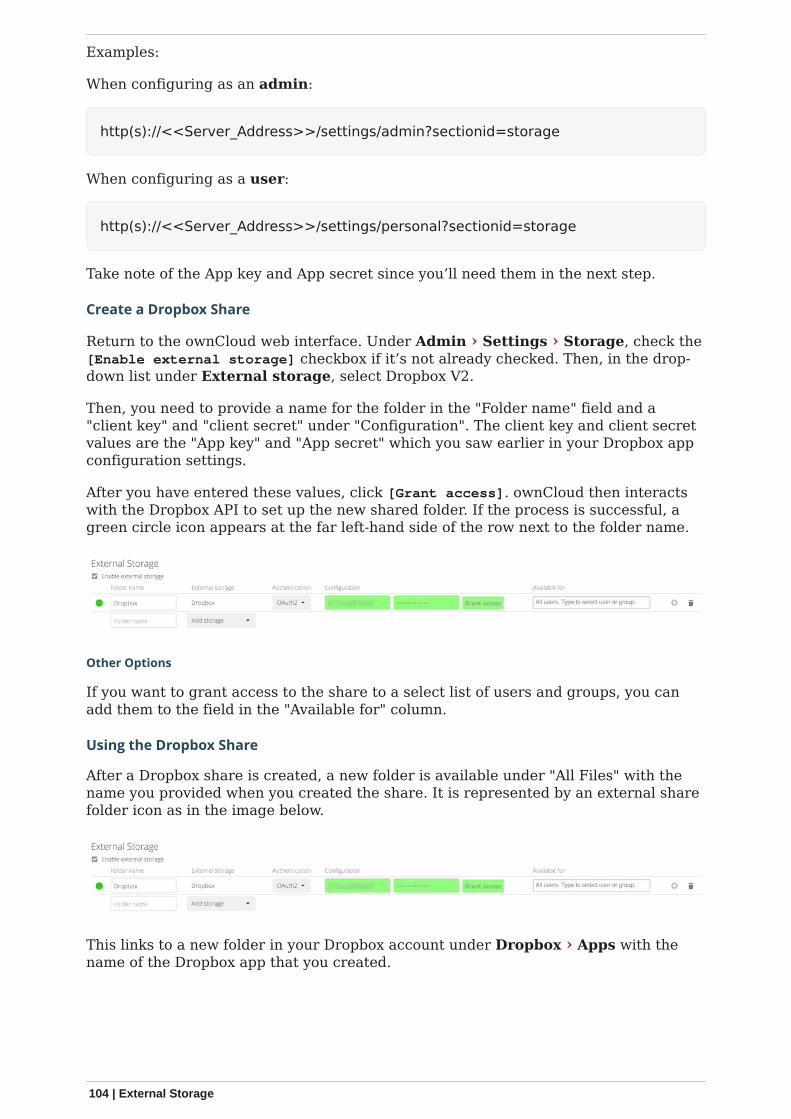
Examples:
When configuring as an admin:
http(s)://<<Server_Address>>/settings/admin?sectionid=storage
When configuring as a user:
http(s)://<<Server_Address>>/settings/personal?sectionid=storage
Take note of the App key and App secret since you’ll need them in the next step.
Create a Dropbox Share
Return to the ownCloud web interface. Under Admin › Settings › Storage, check the[Enable external storage] checkbox if it’s not already checked. Then, in the drop-down list under External storage, select Dropbox V2.
Then, you need to provide a name for the folder in the "Folder name" field and a"client key" and "client secret" under "Configuration". The client key and client secretvalues are the "App key" and "App secret" which you saw earlier in your Dropbox appconfiguration settings.
After you have entered these values, click [Grant access]. ownCloud then interactswith the Dropbox API to set up the new shared folder. If the process is successful, agreen circle icon appears at the far left-hand side of the row next to the folder name.
Other Options
If you want to grant access to the share to a select list of users and groups, you canadd them to the field in the "Available for" column.
Using the Dropbox Share
After a Dropbox share is created, a new folder is available under "All Files" with thename you provided when you created the share. It is represented by an external sharefolder icon as in the image below.
This links to a new folder in your Dropbox account under Dropbox › Apps with thename of the Dropbox app that you created.
104 | External Storage
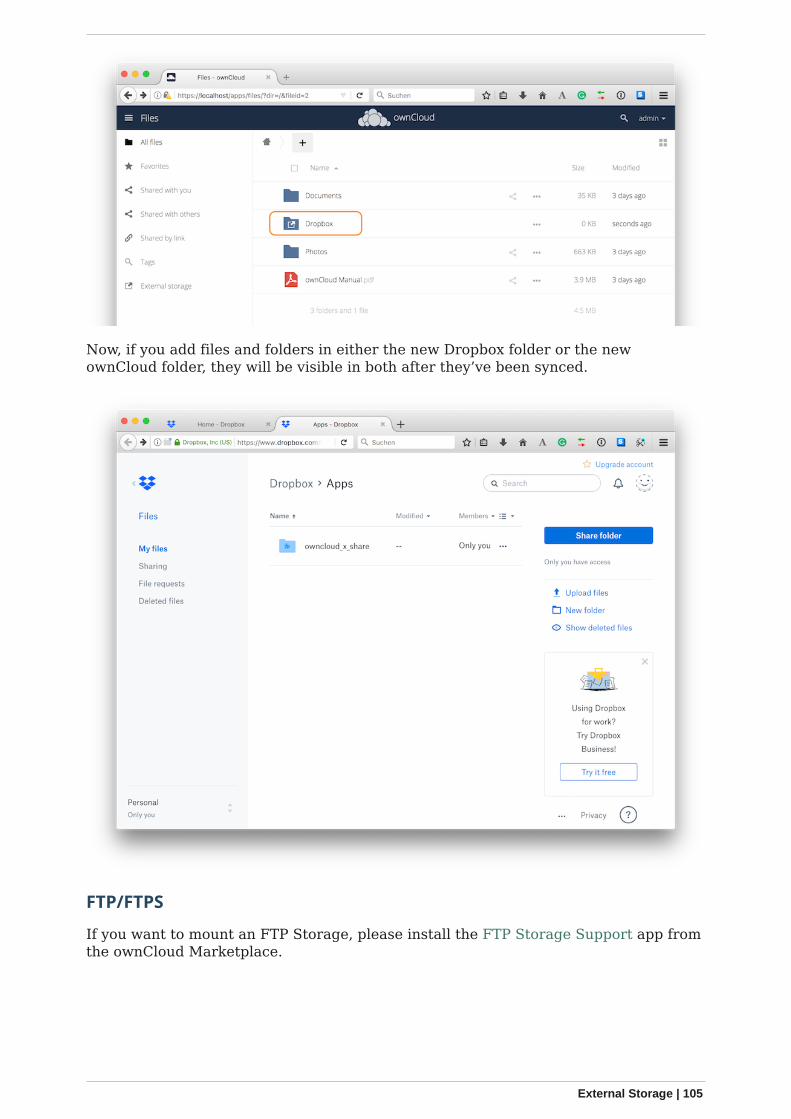
Now, if you add files and folders in either the new Dropbox folder or the newownCloud folder, they will be visible in both after they’ve been synced.
FTP/FTPS
If you want to mount an FTP Storage, please install the FTP Storage Support app fromthe ownCloud Marketplace.
External Storage | 105
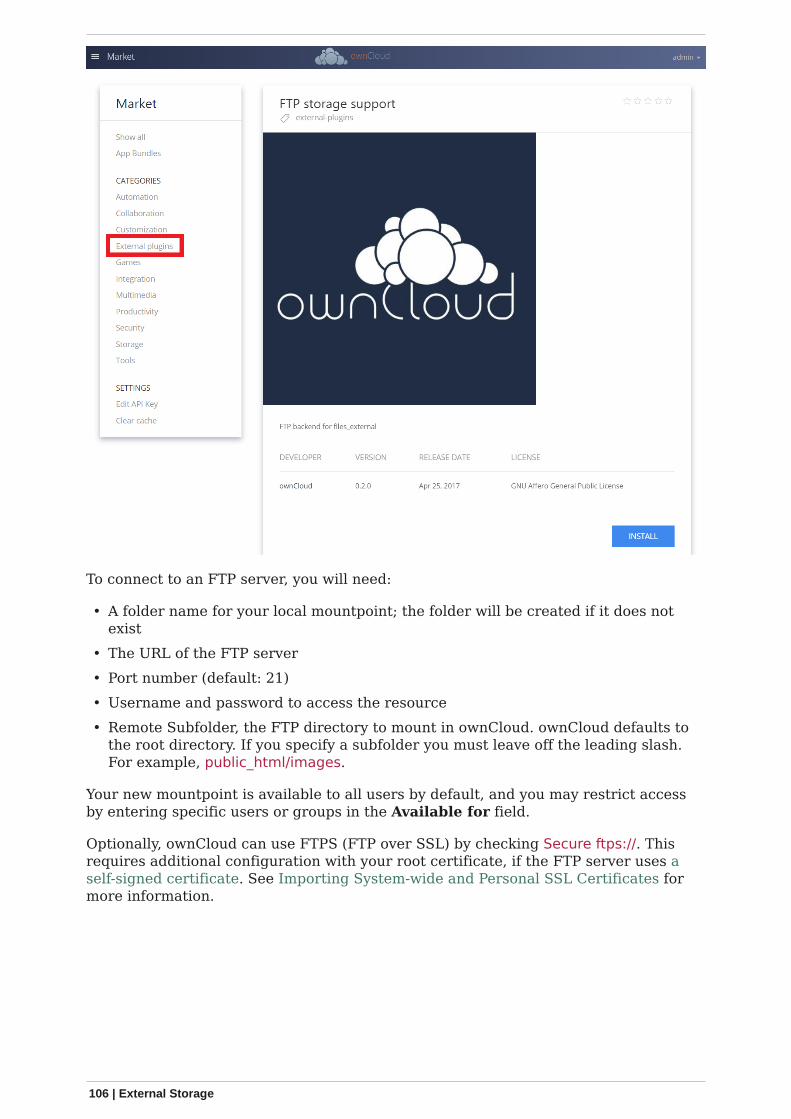
To connect to an FTP server, you will need:
• A folder name for your local mountpoint; the folder will be created if it does notexist
• The URL of the FTP server• Port number (default: 21)• Username and password to access the resource• Remote Subfolder, the FTP directory to mount in ownCloud. ownCloud defaults to
the root directory. If you specify a subfolder you must leave off the leading slash.For example, public_html/images.
Your new mountpoint is available to all users by default, and you may restrict accessby entering specific users or groups in the Available for field.
Optionally, ownCloud can use FTPS (FTP over SSL) by checking Secure ftps://. Thisrequires additional configuration with your root certificate, if the FTP server uses aself-signed certificate. See Importing System-wide and Personal SSL Certificates formore information.
106 | External Storage
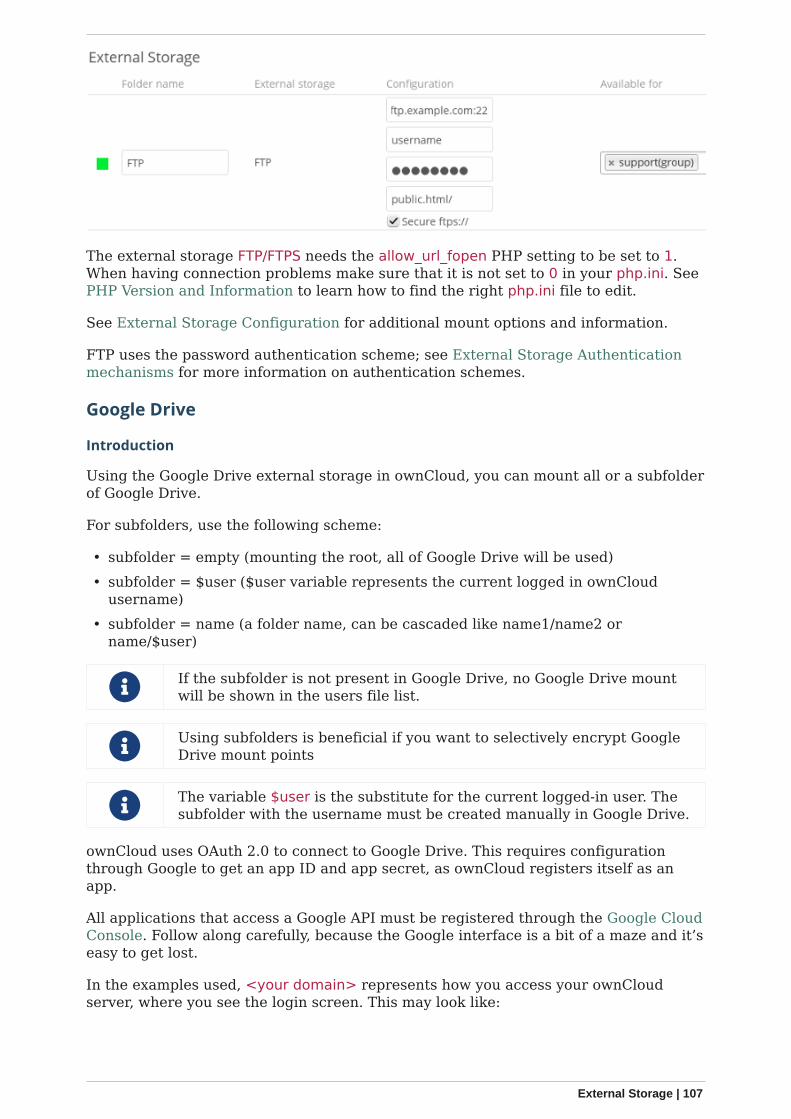
The external storage FTP/FTPS needs the allow_url_fopen PHP setting to be set to 1.When having connection problems make sure that it is not set to 0 in your php.ini. SeePHP Version and Information to learn how to find the right php.ini file to edit.
See External Storage Configuration for additional mount options and information.
FTP uses the password authentication scheme; see External Storage Authenticationmechanisms for more information on authentication schemes.
Google Drive
Introduction
Using the Google Drive external storage in ownCloud, you can mount all or a subfolderof Google Drive.
For subfolders, use the following scheme:
• subfolder = empty (mounting the root, all of Google Drive will be used)• subfolder = $user ($user variable represents the current logged in ownCloud
username)• subfolder = name (a folder name, can be cascaded like name1/name2 or
name/$user)
If the subfolder is not present in Google Drive, no Google Drive mountwill be shown in the users file list.
Using subfolders is beneficial if you want to selectively encrypt GoogleDrive mount points
The variable $user is the substitute for the current logged-in user. Thesubfolder with the username must be created manually in Google Drive.
ownCloud uses OAuth 2.0 to connect to Google Drive. This requires configurationthrough Google to get an app ID and app secret, as ownCloud registers itself as anapp.
All applications that access a Google API must be registered through the Google CloudConsole. Follow along carefully, because the Google interface is a bit of a maze and it’seasy to get lost.
In the examples used, <your domain> represents how you access your ownCloudserver, where you see the login screen. This may look like:
External Storage | 107
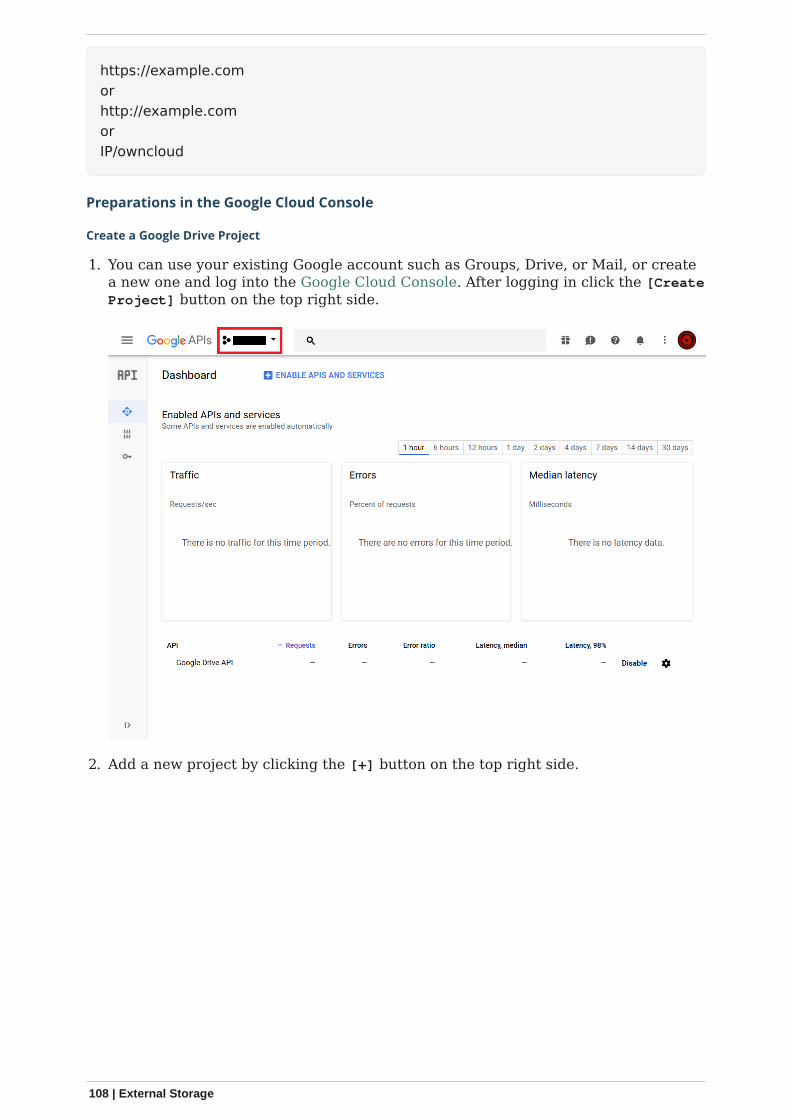
https://example.comorhttp://example.comorIP/owncloud
Preparations in the Google Cloud Console
Create a Google Drive Project
1. You can use your existing Google account such as Groups, Drive, or Mail, or createa new one and log into the Google Cloud Console. After logging in click the [CreateProject] button on the top right side.
2. Add a new project by clicking the [+] button on the top right side.
108 | External Storage
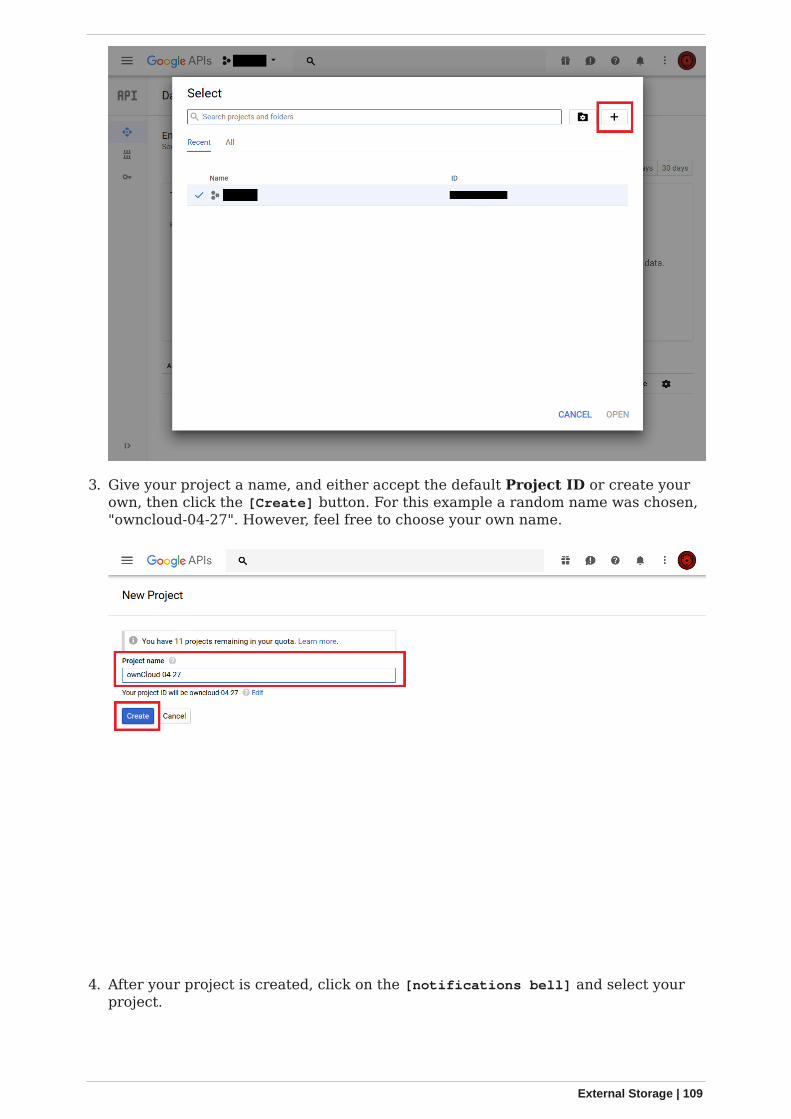
3. Give your project a name, and either accept the default Project ID or create yourown, then click the [Create] button. For this example a random name was chosen,"owncloud-04-27". However, feel free to choose your own name.
4. After your project is created, click on the [notifications bell] and select yourproject.
External Storage | 109
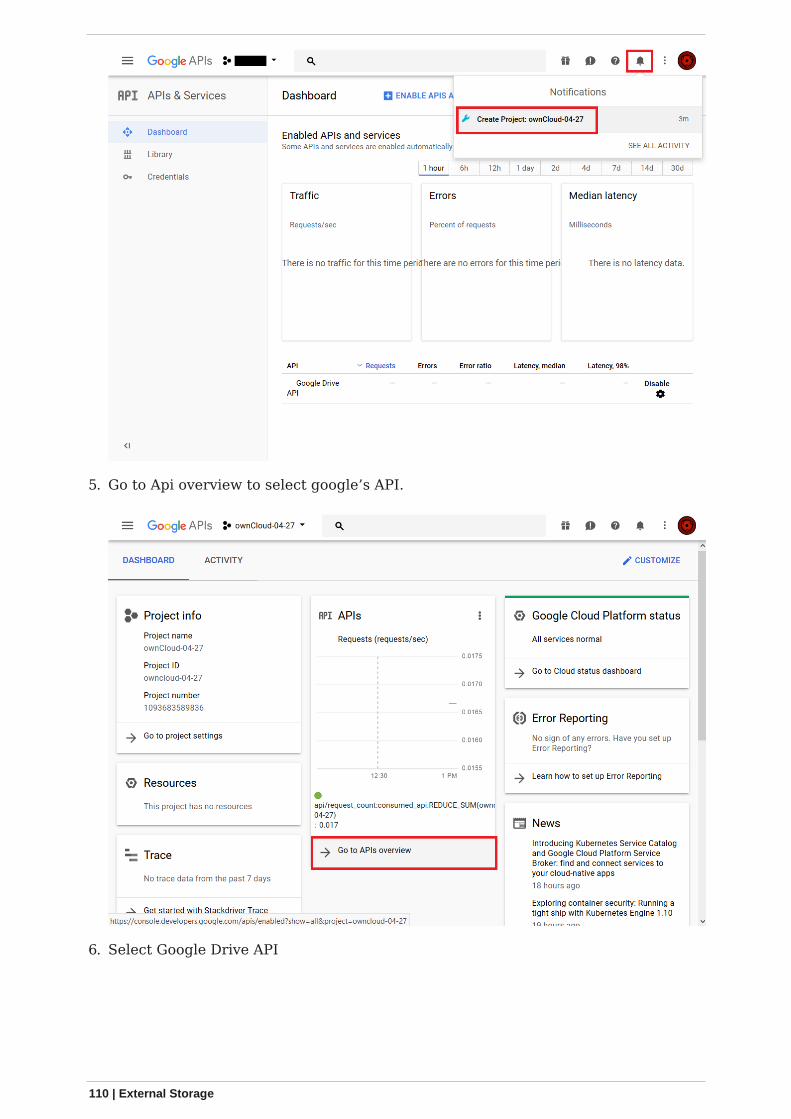
5. Go to Api overview to select google’s API.
6. Select Google Drive API
110 | External Storage
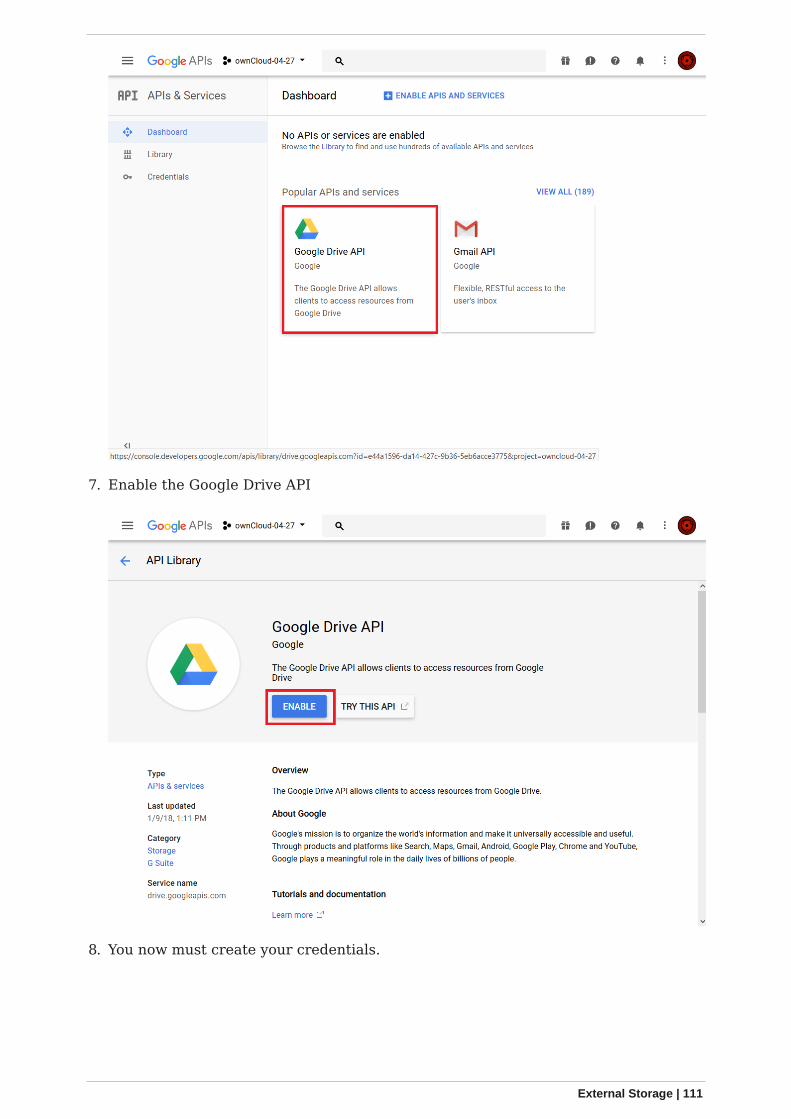
7. Enable the Google Drive API
8. You now must create your credentials.
External Storage | 111
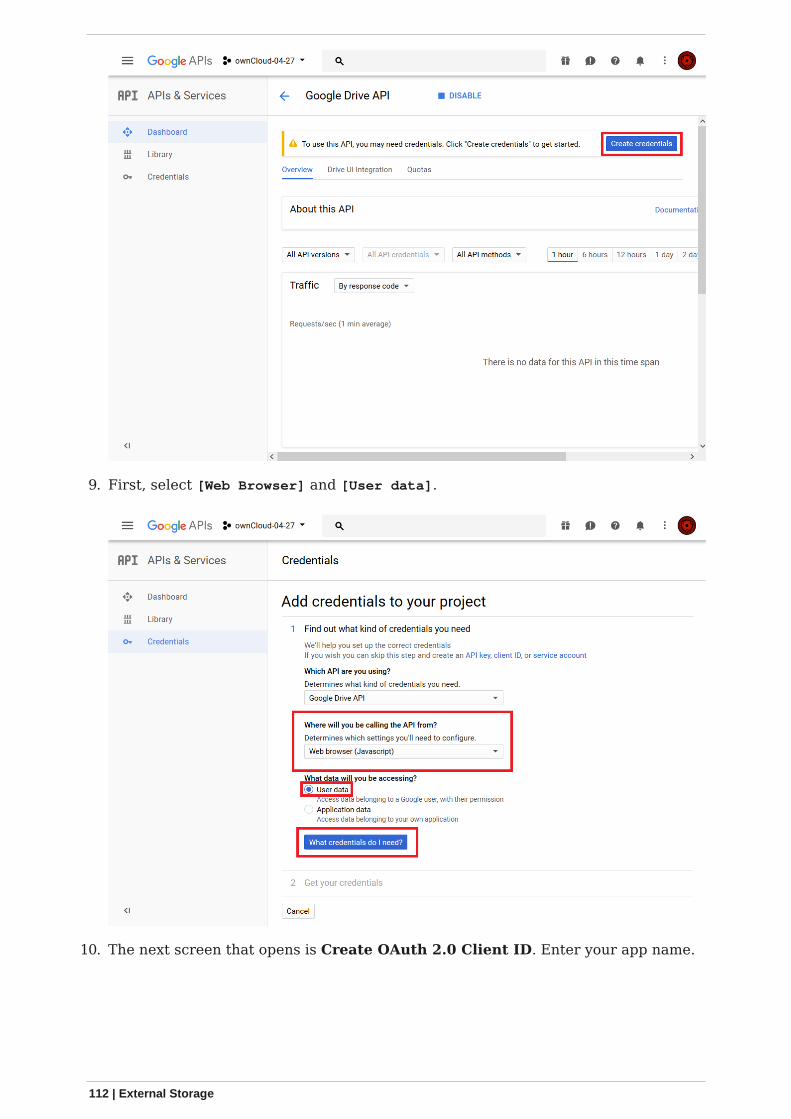
9. First, select [Web Browser] and [User data].
10. The next screen that opens is Create OAuth 2.0 Client ID. Enter your app name.
112 | External Storage
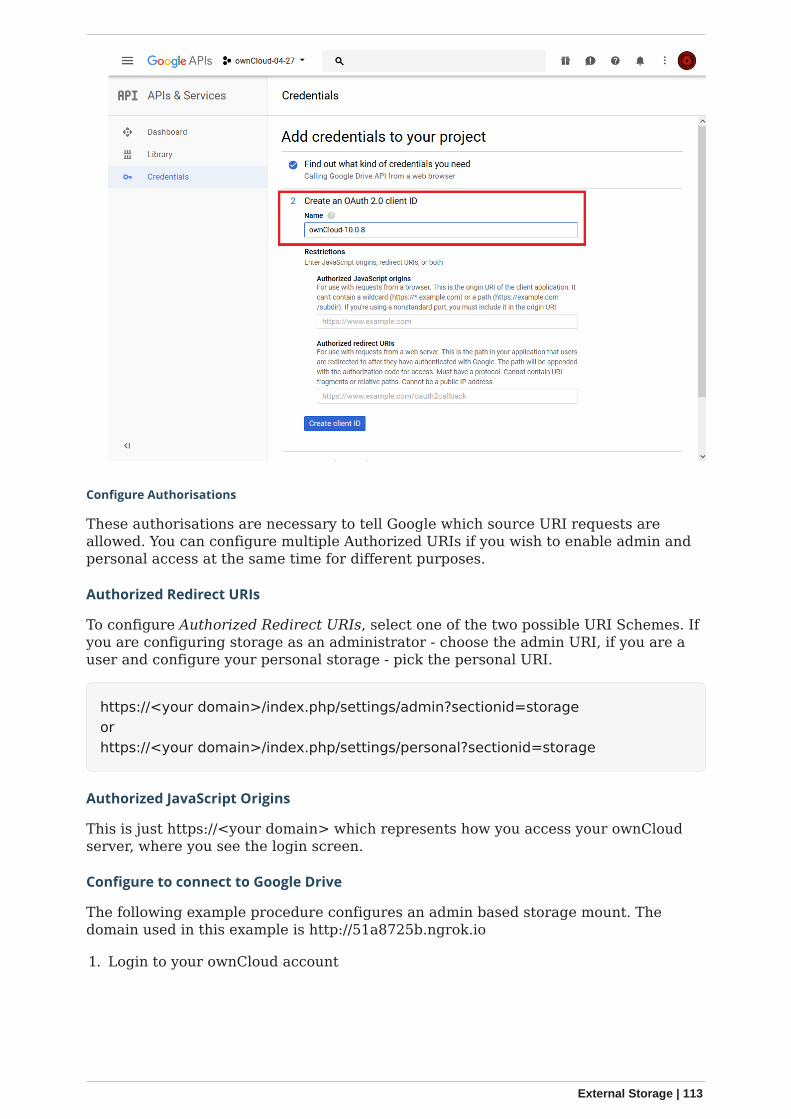
Configure Authorisations
These authorisations are necessary to tell Google which source URI requests areallowed. You can configure multiple Authorized URIs if you wish to enable admin andpersonal access at the same time for different purposes.
Authorized Redirect URIs
To configure Authorized Redirect URIs, select one of the two possible URI Schemes. Ifyou are configuring storage as an administrator - choose the admin URI, if you are auser and configure your personal storage - pick the personal URI.
https://<your domain>/index.php/settings/admin?sectionid=storageorhttps://<your domain>/index.php/settings/personal?sectionid=storage
Authorized JavaScript Origins
This is just https://<your domain> which represents how you access your ownCloudserver, where you see the login screen.
Configure to connect to Google Drive
The following example procedure configures an admin based storage mount. Thedomain used in this example is http://51a8725b.ngrok.io
1. Login to your ownCloud account
External Storage | 113
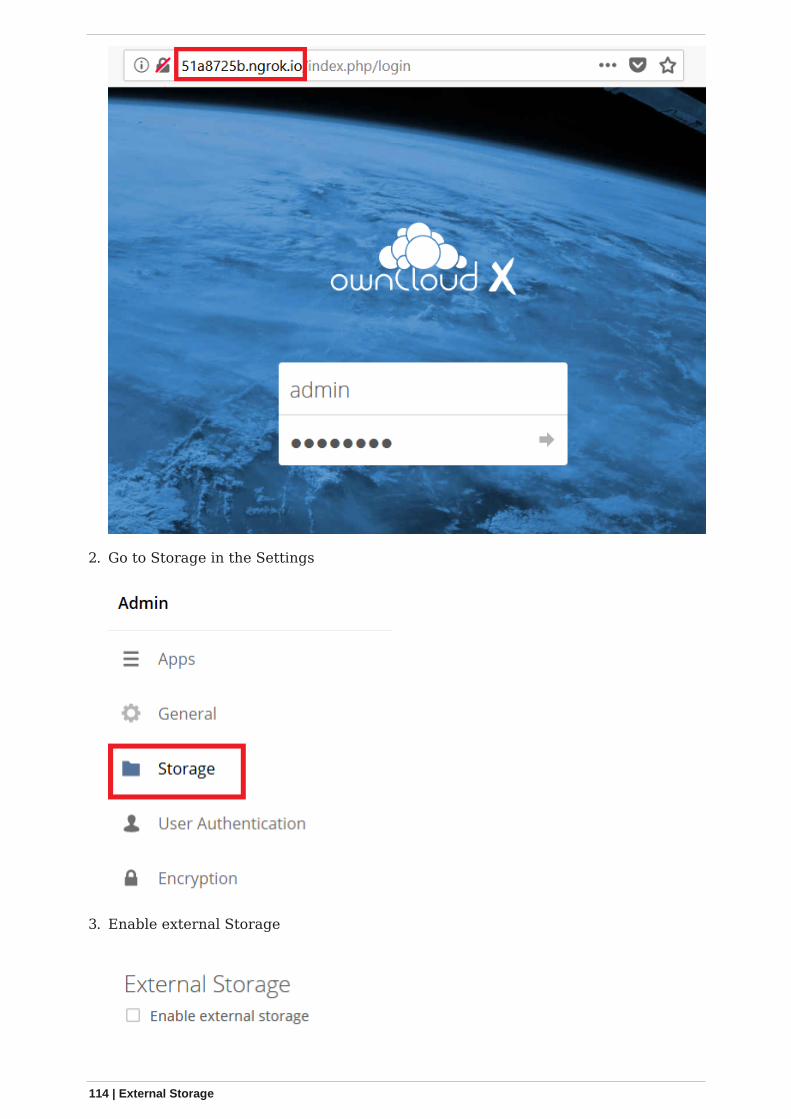
2. Go to Storage in the Settings
3. Enable external Storage
114 | External Storage
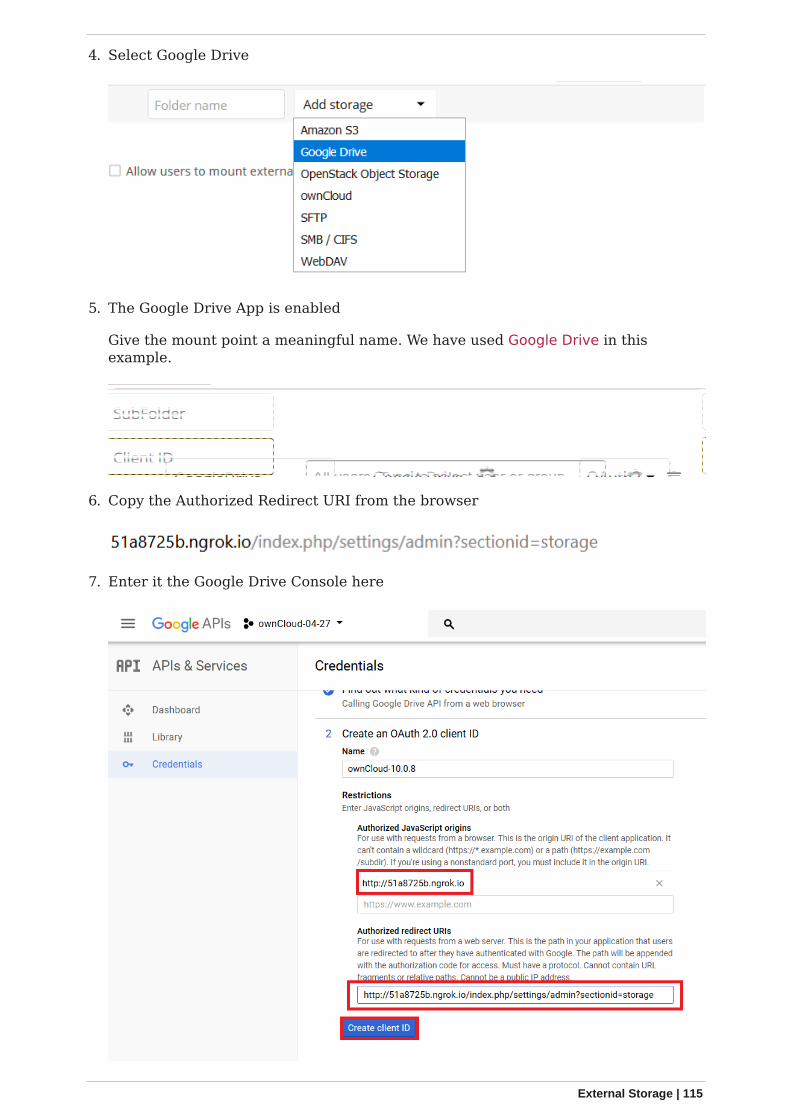
4. Select Google Drive
5. The Google Drive App is enabled
Give the mount point a meaningful name. We have used Google Drive in thisexample.
6. Copy the Authorized Redirect URI from the browser
7. Enter it the Google Drive Console here
External Storage | 115
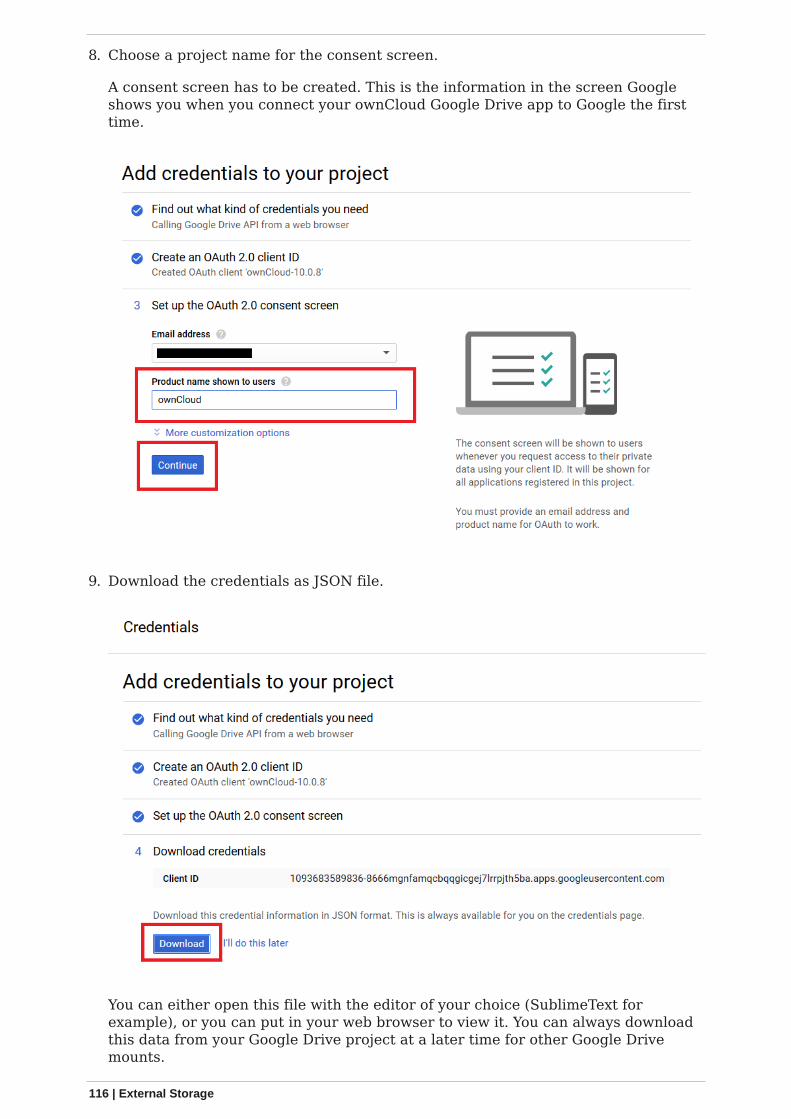
8. Choose a project name for the consent screen.
A consent screen has to be created. This is the information in the screen Googleshows you when you connect your ownCloud Google Drive app to Google the firsttime.
9. Download the credentials as JSON file.
You can either open this file with the editor of your choice (SublimeText forexample), or you can put in your web browser to view it. You can always downloadthis data from your Google Drive project at a later time for other Google Drivemounts.
116 | External Storage
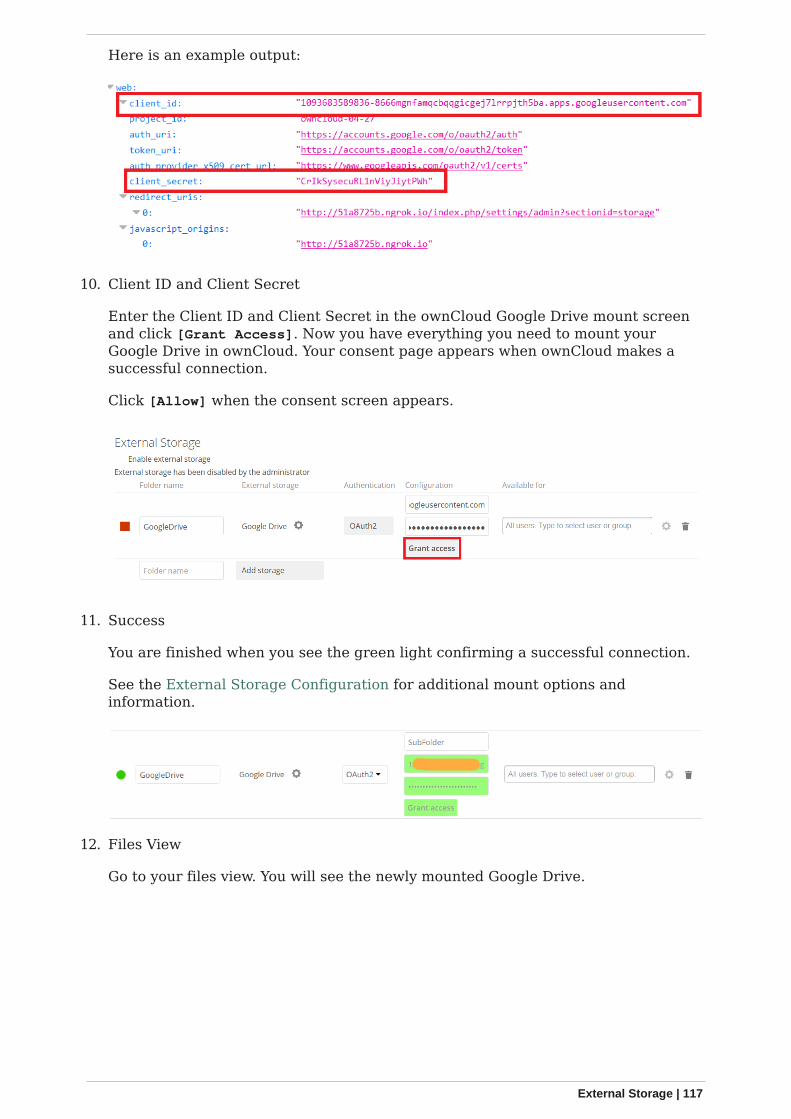
Here is an example output:
10. Client ID and Client Secret
Enter the Client ID and Client Secret in the ownCloud Google Drive mount screenand click [Grant Access]. Now you have everything you need to mount yourGoogle Drive in ownCloud. Your consent page appears when ownCloud makes asuccessful connection.
Click [Allow] when the consent screen appears.
11. Success
You are finished when you see the green light confirming a successful connection.
See the External Storage Configuration for additional mount options andinformation.
12. Files View
Go to your files view. You will see the newly mounted Google Drive.
External Storage | 117
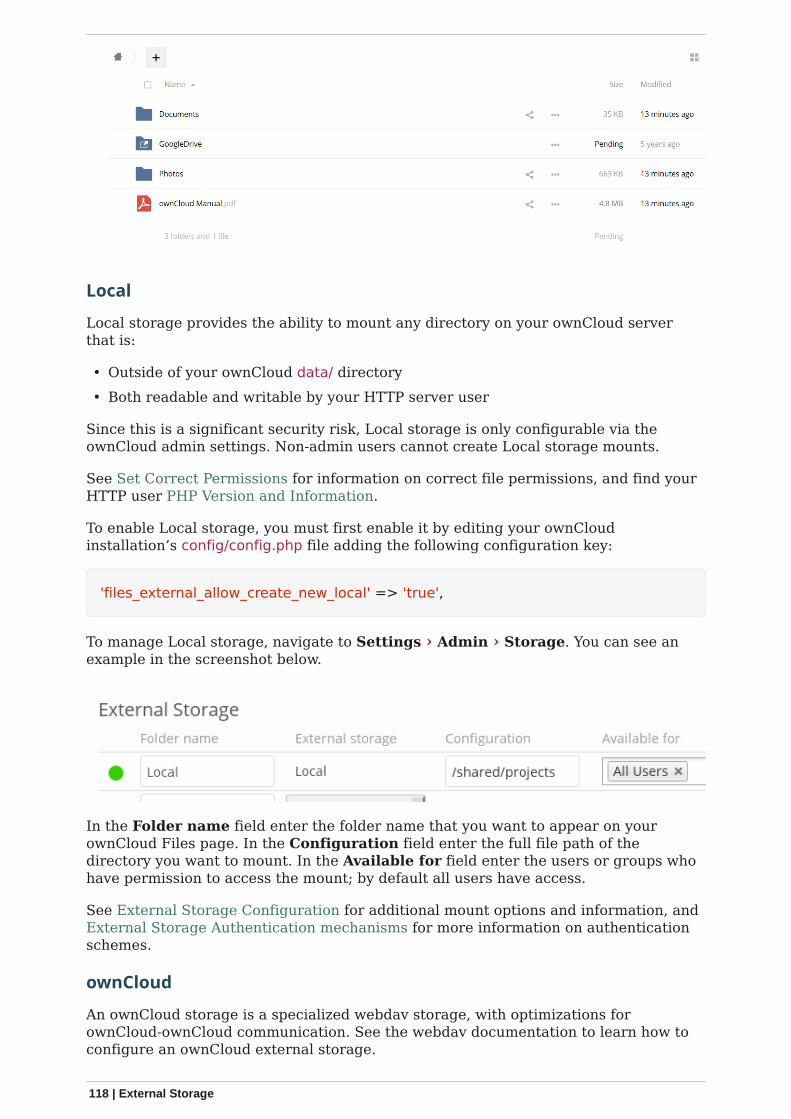
Local
Local storage provides the ability to mount any directory on your ownCloud serverthat is:
• Outside of your ownCloud data/ directory• Both readable and writable by your HTTP server user
Since this is a significant security risk, Local storage is only configurable via theownCloud admin settings. Non-admin users cannot create Local storage mounts.
See Set Correct Permissions for information on correct file permissions, and find yourHTTP user PHP Version and Information.
To enable Local storage, you must first enable it by editing your ownCloudinstallation’s config/config.php file adding the following configuration key:
'files_external_allow_create_new_local' => 'true',
To manage Local storage, navigate to Settings › Admin › Storage. You can see anexample in the screenshot below.
In the Folder name field enter the folder name that you want to appear on yourownCloud Files page. In the Configuration field enter the full file path of thedirectory you want to mount. In the Available for field enter the users or groups whohave permission to access the mount; by default all users have access.
See External Storage Configuration for additional mount options and information, andExternal Storage Authentication mechanisms for more information on authenticationschemes.
ownCloud
An ownCloud storage is a specialized webdav storage, with optimizations forownCloud-ownCloud communication. See the webdav documentation to learn how toconfigure an ownCloud external storage.
118 | External Storage
When filling in the URL field, use the path to the root of the ownCloud installation,rather than the path to the WebDAV endpoint. So, for a server athttps://example.com/owncloud, use https://example.com/owncloud and nothttps://example.com/owncloud/remote.php/dav.
• See External Storage Configuration for additional mount options and information.• See External Storage Authentication Mechanisms for more information on
authentication schemes
S3 Compatible Object Storage as Primary Storage Location
Introduction
Administrators can configure Amazon S3 compatible object storages as the primaryownCloud storage location with the S3 Primary Object Storage app. The referencingname is files_primary_s3. Using files_primary_s3 replaces the default ownCloudowncloud/data directory. However, you need to keep the owncloud/data directory forthe following reasons:
• The ownCloud log file is saved in the data directory.• Legacy apps may not support using anything but the owncloud/data directory.
Even if the ownCloud log file is stored in an alternate location (bychanging the location in config.php), owncloud/data may still berequired for backward compatibility with some apps.
That said, Object Storage Support (objectstore) is still available, but the S3 PrimaryObject Storage app is the preferred and only supported way to provide S3 storagesupport as primary storage. ownCloud provides consulting for migrations fromobjectstore → files_primary_s3.
Consider the following differentiation:
External Storage: S3Integrate S3 object storages as external storages
S3 Primary Object StorageLeverage object storage via S3 as primary storage
OpenStack Swift has been deprecated.
When using files_primary_s3, the Amazon S3 bucket to be used needs to be createdmanually first, according to the Amazon S3 developer documentation and versioningneeds to be enabled for this bucket.
Implications
Read the following implications carefully BEFORE you start using files_primary_s3:
1. Apply this configuration before the first login of any user – including the adminuser; otherwise, ownCloud can no longer find the user’s files.
2. In "object store" mode as primary storage access, ownCloud expects exclusiveaccess to the object store container, because it only stores the binary data for eachfile. While in this mode, ownCloud stores the metadata in the local database forperformance reasons.
3. The current implementation is incompatible with any app that uses direct file I/O
External Storage | 119
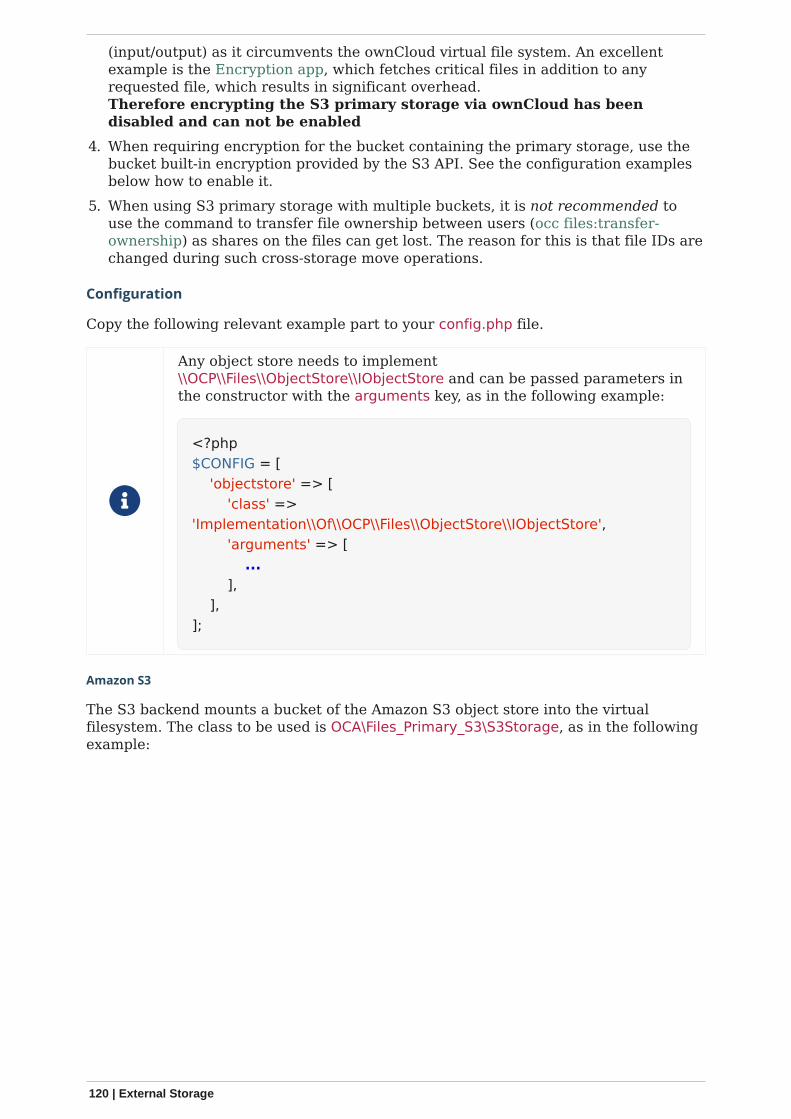
(input/output) as it circumvents the ownCloud virtual file system. An excellentexample is the Encryption app, which fetches critical files in addition to anyrequested file, which results in significant overhead.Therefore encrypting the S3 primary storage via ownCloud has beendisabled and can not be enabled
4. When requiring encryption for the bucket containing the primary storage, use thebucket built-in encryption provided by the S3 API. See the configuration examplesbelow how to enable it.
5. When using S3 primary storage with multiple buckets, it is not recommended touse the command to transfer file ownership between users (occ files:transfer-ownership) as shares on the files can get lost. The reason for this is that file IDs arechanged during such cross-storage move operations.
Configuration
Copy the following relevant example part to your config.php file.
Any object store needs to implement\\OCP\\Files\\ObjectStore\\IObjectStore and can be passed parameters inthe constructor with the arguments key, as in the following example:
<?php$CONFIG = [ 'objectstore' => [ 'class' =>'Implementation\\Of\\OCP\\Files\\ObjectStore\\IObjectStore', 'arguments' => [ ... ], ],];
Amazon S3
The S3 backend mounts a bucket of the Amazon S3 object store into the virtualfilesystem. The class to be used is OCA\Files_Primary_S3\S3Storage, as in the followingexample:
120 | External Storage
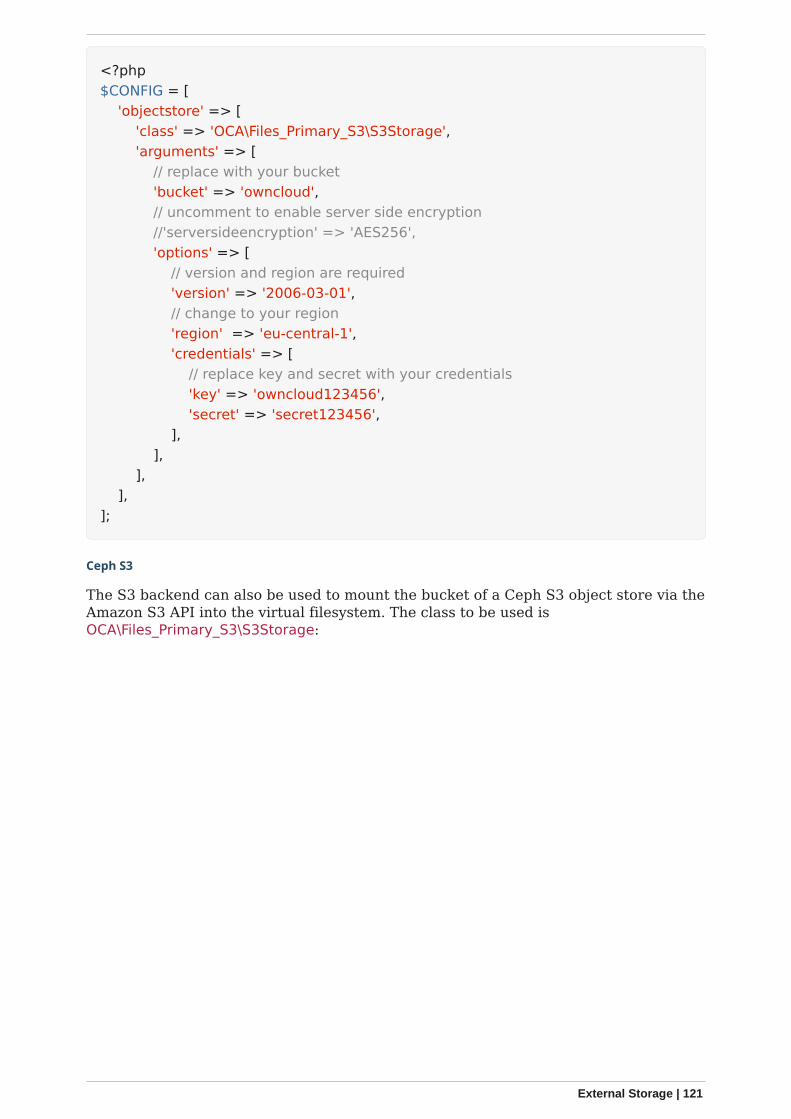
<?php$CONFIG = [ 'objectstore' => [ 'class' => 'OCA\Files_Primary_S3\S3Storage', 'arguments' => [ // replace with your bucket 'bucket' => 'owncloud', // uncomment to enable server side encryption //'serversideencryption' => 'AES256', 'options' => [ // version and region are required 'version' => '2006-03-01', // change to your region 'region' => 'eu-central-1', 'credentials' => [ // replace key and secret with your credentials 'key' => 'owncloud123456', 'secret' => 'secret123456', ], ], ], ],];
Ceph S3
The S3 backend can also be used to mount the bucket of a Ceph S3 object store via theAmazon S3 API into the virtual filesystem. The class to be used isOCA\Files_Primary_S3\S3Storage:
External Storage | 121
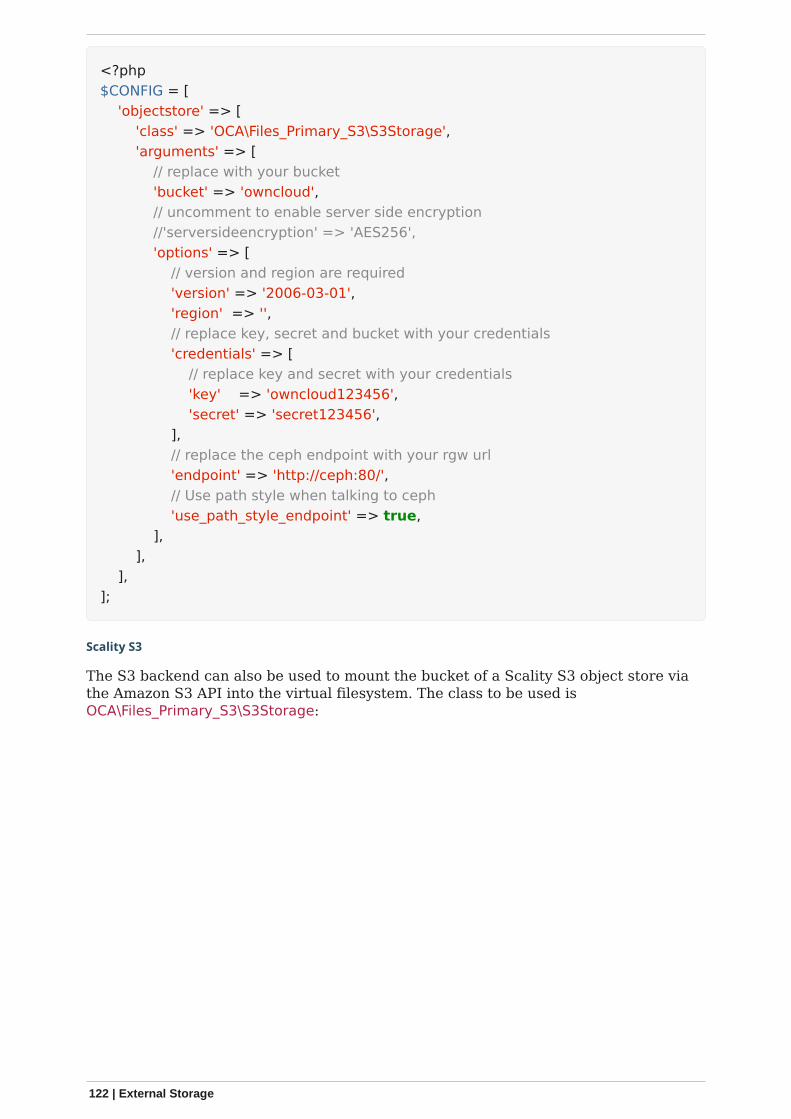
<?php$CONFIG = [ 'objectstore' => [ 'class' => 'OCA\Files_Primary_S3\S3Storage', 'arguments' => [ // replace with your bucket 'bucket' => 'owncloud', // uncomment to enable server side encryption //'serversideencryption' => 'AES256', 'options' => [ // version and region are required 'version' => '2006-03-01', 'region' => '', // replace key, secret and bucket with your credentials 'credentials' => [ // replace key and secret with your credentials 'key' => 'owncloud123456', 'secret' => 'secret123456', ], // replace the ceph endpoint with your rgw url 'endpoint' => 'http://ceph:80/', // Use path style when talking to ceph 'use_path_style_endpoint' => true, ], ], ],];
Scality S3
The S3 backend can also be used to mount the bucket of a Scality S3 object store viathe Amazon S3 API into the virtual filesystem. The class to be used isOCA\Files_Primary_S3\S3Storage:
122 | External Storage
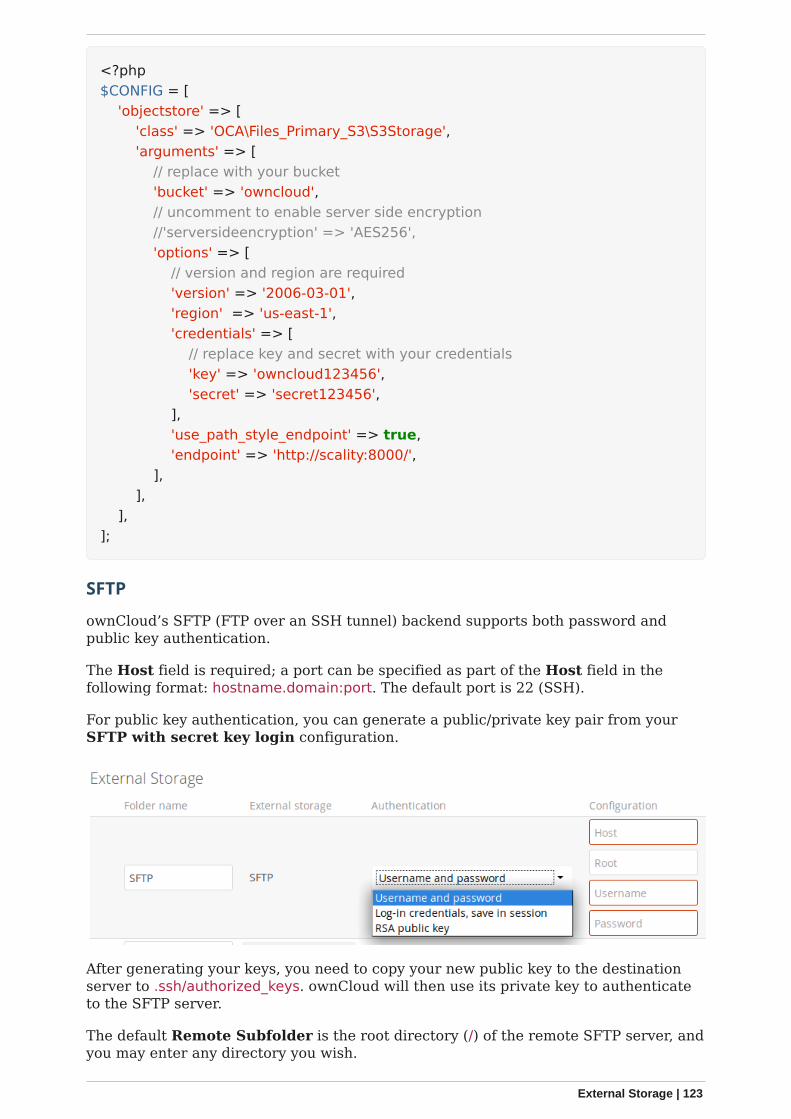
<?php$CONFIG = [ 'objectstore' => [ 'class' => 'OCA\Files_Primary_S3\S3Storage', 'arguments' => [ // replace with your bucket 'bucket' => 'owncloud', // uncomment to enable server side encryption //'serversideencryption' => 'AES256', 'options' => [ // version and region are required 'version' => '2006-03-01', 'region' => 'us-east-1', 'credentials' => [ // replace key and secret with your credentials 'key' => 'owncloud123456', 'secret' => 'secret123456', ], 'use_path_style_endpoint' => true, 'endpoint' => 'http://scality:8000/', ], ], ],];
SFTP
ownCloud’s SFTP (FTP over an SSH tunnel) backend supports both password andpublic key authentication.
The Host field is required; a port can be specified as part of the Host field in thefollowing format: hostname.domain:port. The default port is 22 (SSH).
For public key authentication, you can generate a public/private key pair from yourSFTP with secret key login configuration.
After generating your keys, you need to copy your new public key to the destinationserver to .ssh/authorized_keys. ownCloud will then use its private key to authenticateto the SFTP server.
The default Remote Subfolder is the root directory (/) of the remote SFTP server, andyou may enter any directory you wish.
External Storage | 123
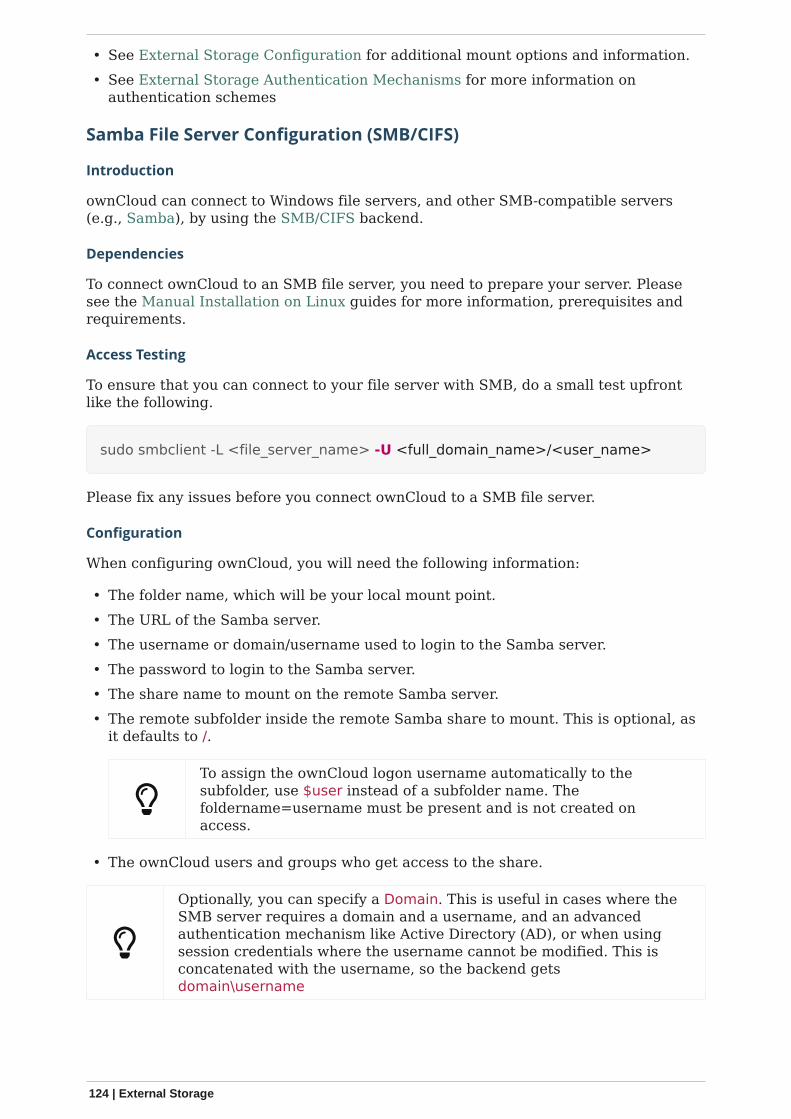
• See External Storage Configuration for additional mount options and information.• See External Storage Authentication Mechanisms for more information on
authentication schemes
Samba File Server Configuration (SMB/CIFS)
Introduction
ownCloud can connect to Windows file servers, and other SMB-compatible servers(e.g., Samba), by using the SMB/CIFS backend.
Dependencies
To connect ownCloud to an SMB file server, you need to prepare your server. Pleasesee the Manual Installation on Linux guides for more information, prerequisites andrequirements.
Access Testing
To ensure that you can connect to your file server with SMB, do a small test upfrontlike the following.
sudo smbclient -L <file_server_name> -U <full_domain_name>/<user_name>
Please fix any issues before you connect ownCloud to a SMB file server.
Configuration
When configuring ownCloud, you will need the following information:
• The folder name, which will be your local mount point.• The URL of the Samba server.• The username or domain/username used to login to the Samba server.• The password to login to the Samba server.• The share name to mount on the remote Samba server.• The remote subfolder inside the remote Samba share to mount. This is optional, as
it defaults to /.
To assign the ownCloud logon username automatically to thesubfolder, use $user instead of a subfolder name. Thefoldername=username must be present and is not created onaccess.
• The ownCloud users and groups who get access to the share.
Optionally, you can specify a Domain. This is useful in cases where theSMB server requires a domain and a username, and an advancedauthentication mechanism like Active Directory (AD), or when usingsession credentials where the username cannot be modified. This isconcatenated with the username, so the backend getsdomain\username
124 | External Storage
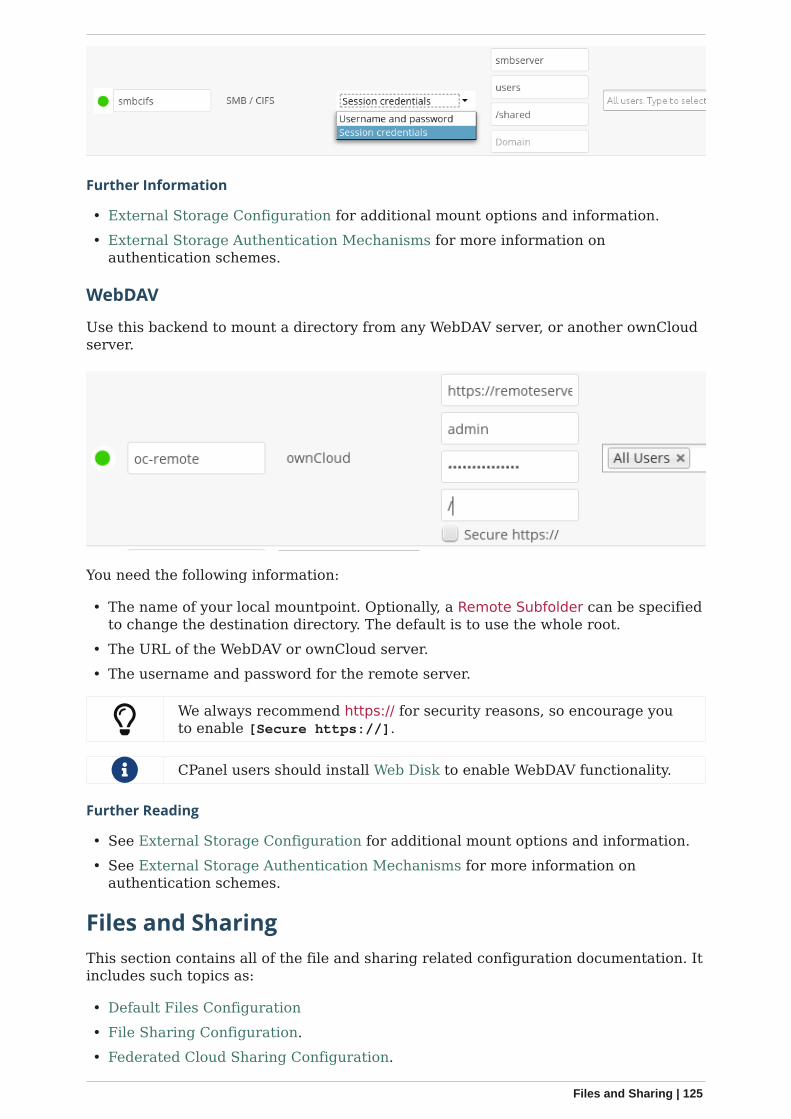
Further Information
• External Storage Configuration for additional mount options and information.• External Storage Authentication Mechanisms for more information on
authentication schemes.
WebDAV
Use this backend to mount a directory from any WebDAV server, or another ownCloudserver.
You need the following information:
• The name of your local mountpoint. Optionally, a Remote Subfolder can be specifiedto change the destination directory. The default is to use the whole root.
• The URL of the WebDAV or ownCloud server.• The username and password for the remote server.
We always recommend https:// for security reasons, so encourage youto enable [Secure https://].
CPanel users should install Web Disk to enable WebDAV functionality.
Further Reading
• See External Storage Configuration for additional mount options and information.• See External Storage Authentication Mechanisms for more information on
authentication schemes.
Files and Sharing
This section contains all of the file and sharing related configuration documentation. Itincludes such topics as:
• Default Files Configuration• File Sharing Configuration.• Federated Cloud Sharing Configuration.
Files and Sharing | 125

• Manual File Locking.
Big File Upload Configuration
System Configuration
• Make sure that the latest version of PHP, supported by ownCloud, is installed.• Disable user quotas, which makes them unlimited.• Your temp file or partition has to be big enough to hold multiple parallel uploads
from multiple users. For example, if the average upload file size is 4GB and theaverage number of users uploading at the same time is 25, then you’ll need 200GBof temp space, as the formula below shows.
2 x 4 GB x 25 users = 200 GB required temp space
Twice as much space is required because the file chunks will be put together into anew file before it is finally moved into the user’s folder.
In Centos and RHEL, Apache has a few more default configurationswithin systemd. You will have to set the temp directory in two places:
1. In php.ini, e.g., sys_temp_dir = "/scratch/tmp"2. In Apache systemd file e.g. sudo systemctl edit httpd and
change/add:
PrivateTmp=false
When done, you need to reload the daemon and restart the service
sudo systemctl daemon-reloadsudo systemctl restart httpd
Please do not change /usr/lib/systemd/system/httpd.service directly,only use sudo systemctl edit httpd. If not doing so, a httpd packageupgrade may revert your changes.
Configuring Your Web Server
ownCloud comes with its own owncloud/.htaccess file. Because php-fpmcan’t read PHP settings in .htaccess these settings must be set in theowncloud/.user.ini file.
Set the following two parameters inside the corresponding php.ini file (see theLoaded Configuration File section of PHP Version and Information to find yourrelevant php.ini files):
php_value upload_max_filesize = 16Gphp_value post_max_size = 16G
Adjust these values for your needs. If you see PHP timeouts in your logfiles, increase
126 | Files and Sharing
the timeout values, which are in seconds, as in the example below:
php_value max_input_time 3600php_value max_execution_time 3600
mod_reqtimeout
1707-update-big-file-upload-docs The mod_reqtimeout Apache module could also stoplarge uploads from completing. If you’re using this module and getting failed uploadsof large files, either disable it in your Apache config or raise the configuredRequestReadTimeout timeouts.
Disable mod_reqtimeout On Ubuntu
On Ubuntu, you can disable the module by running the following command:
a2dismod reqtimeout
Disable mod_reqtimeout On CentOS
On CentOS, comment out the following line in /etc/httpd/conf/httpd.conf:
LoadModule reqtimeout_module modules/mod_reqtimeout.so
When you have done run asdismod or updated /etc/httpd/conf/httpd.conf, restartApache.
There are also several other configuration options in your web serverconfig which could prevent the upload of larger files. Please see yourweb server’s manual, for how to configure those values correctly:
Apache
• LimitRequestBody• SSLRenegBufferSize
Apache with mod_fcgid
• FcgidMaxRequestInMem• FcgidMaxRequestLen
If you are using Apache/2.4 with mod_fcgid, as of February/March2016, FcgidMaxRequestInMem still needs to be significantly increasedfrom its default value to avoid the occurrence of segmentation faultswhen uploading big files. This is not a regular setting but serves as aworkaround for Apache with mod_fcgid bug #51747.
Setting FcgidMaxRequestInMem significantly higher than usual may no longer benecessary, once bug #51747 is fixed.
Configuring PHP
If you don’t want to use the ownCloud .htaccess or .user.ini file, you may configurePHP instead. Make sure to comment out any lines .htaccess about upload size, if you
Files and Sharing | 127
entered any.
If you are running ownCloud on a 32-bit system, any open_basedirdirective in your php.ini file needs to be commented out.
Set the following two parameters inside php.ini, using your own desired file sizevalues, as in the following example:
upload_max_filesize = 16Gpost_max_size = 16G
Tell PHP which temp file you want it to use:
upload_tmp_dir = /var/big_temp_file/
Output Buffering must be turned off in .htaccess or .user.ini or php.ini, or PHP willreturn memory-related errors:
output_buffering = 0
Configuring ownCloud
As an alternative to the upload_tmp_dir of PHP (e.g., if you don’t have access to yourphp.ini) you can also configure a temporary location for uploaded files by using thetempdirectory setting in your config.php.
If you have configured the session_lifetime setting in your config.php. See SampleConfig PHP Parameters, to make sure it is not too low. This setting needs to beconfigured to at least the time (in seconds) that the longest upload will take. If unsure,remove this entirely from your configuration to reset it to the default shown in theconfig.sample.php.
General Upload Issues
Various environmental factors could cause a restriction of the upload size. Examplesare:
• The LVE Manager of CloudLinux which sets an I/O limit.• Some services like Cloudflare are also known to cause uploading issues.• Upload limits enforced by proxies used by your clients.• Other webserver modules like described in General Troubleshooting.
Long-Running Uploads
For very long-running uploads (those lasting longer than 1 hr) to public folders, whenchunking is not in effect, 'filelocking.ttl' should be set to a significantly large value. Ifnot, large file uploads will fail with a file locking error, because the Redis garbagecollection will delete the initially acquired file lock after 1 hour by default.
To estimate a good value, use the following formula:
128 | Files and Sharing
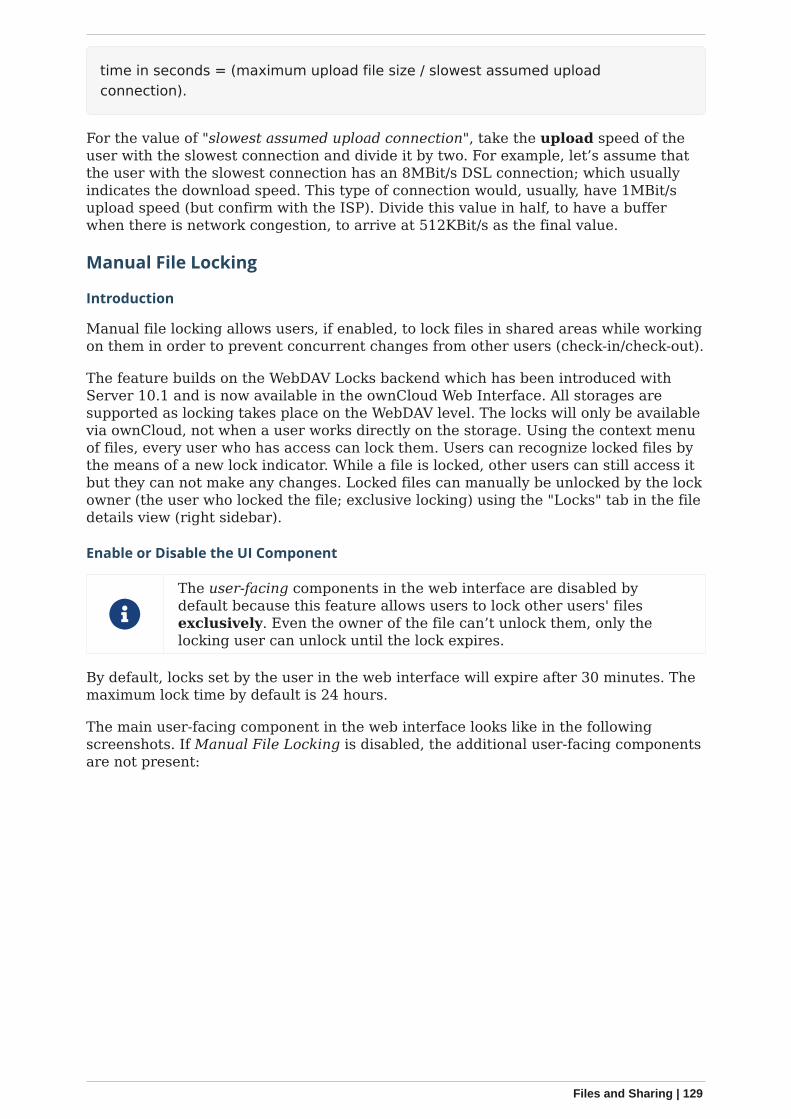
time in seconds = (maximum upload file size / slowest assumed uploadconnection).
For the value of "slowest assumed upload connection", take the upload speed of theuser with the slowest connection and divide it by two. For example, let’s assume thatthe user with the slowest connection has an 8MBit/s DSL connection; which usuallyindicates the download speed. This type of connection would, usually, have 1MBit/supload speed (but confirm with the ISP). Divide this value in half, to have a bufferwhen there is network congestion, to arrive at 512KBit/s as the final value.
Manual File Locking
Introduction
Manual file locking allows users, if enabled, to lock files in shared areas while workingon them in order to prevent concurrent changes from other users (check-in/check-out).
The feature builds on the WebDAV Locks backend which has been introduced withServer 10.1 and is now available in the ownCloud Web Interface. All storages aresupported as locking takes place on the WebDAV level. The locks will only be availablevia ownCloud, not when a user works directly on the storage. Using the context menuof files, every user who has access can lock them. Users can recognize locked files bythe means of a new lock indicator. While a file is locked, other users can still access itbut they can not make any changes. Locked files can manually be unlocked by the lockowner (the user who locked the file; exclusive locking) using the "Locks" tab in the filedetails view (right sidebar).
Enable or Disable the UI Component
The user-facing components in the web interface are disabled bydefault because this feature allows users to lock other users' filesexclusively. Even the owner of the file can’t unlock them, only thelocking user can unlock until the lock expires.
By default, locks set by the user in the web interface will expire after 30 minutes. Themaximum lock time by default is 24 hours.
The main user-facing component in the web interface looks like in the followingscreenshots. If Manual File Locking is disabled, the additional user-facing componentsare not present:
Files and Sharing | 129
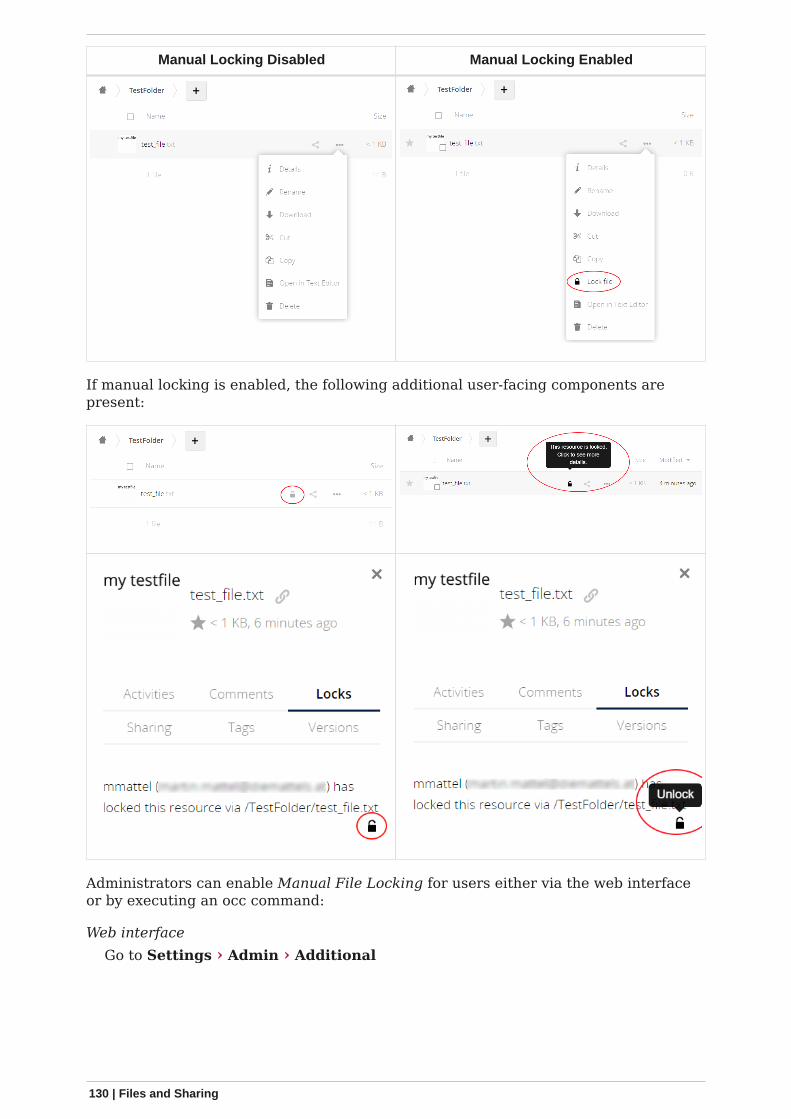
Manual Locking Disabled Manual Locking Enabled
If manual locking is enabled, the following additional user-facing components arepresent:
Administrators can enable Manual File Locking for users either via the web interfaceor by executing an occ command:
Web interfaceGo to Settings › Admin › Additional
130 | Files and Sharing
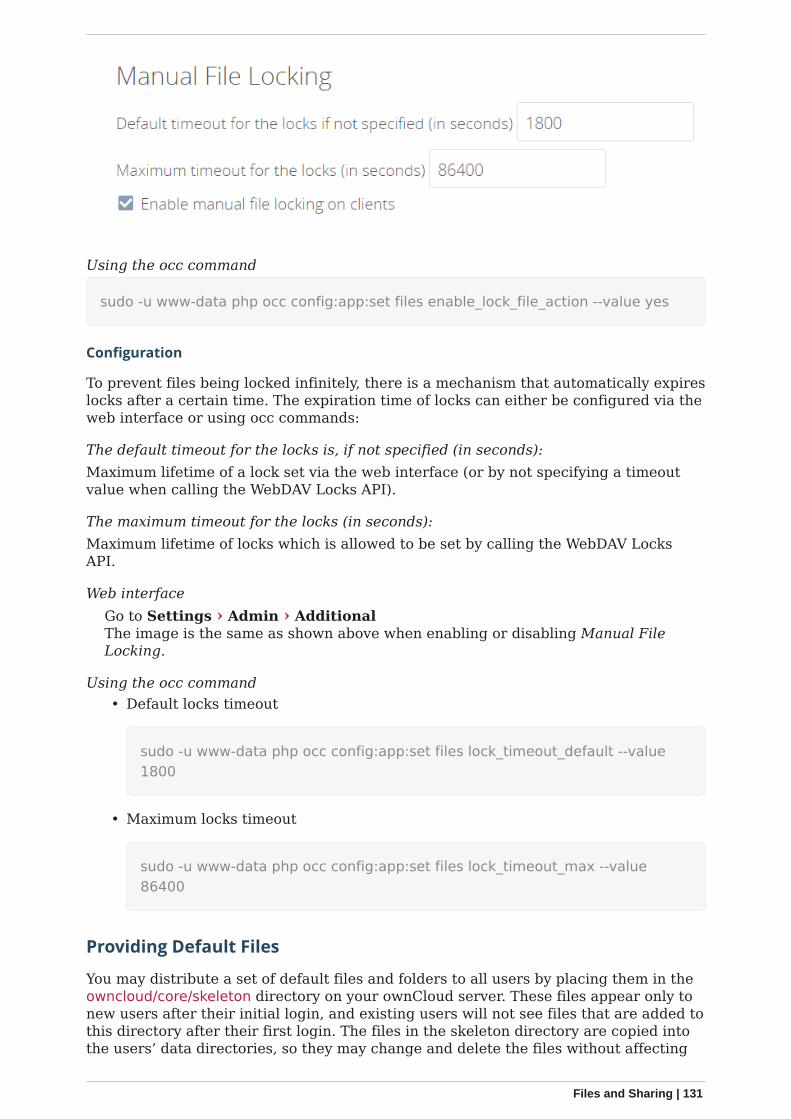
Using the occ command
sudo -u www-data php occ config:app:set files enable_lock_file_action --value yes
Configuration
To prevent files being locked infinitely, there is a mechanism that automatically expireslocks after a certain time. The expiration time of locks can either be configured via theweb interface or using occ commands:
The default timeout for the locks is, if not specified (in seconds):Maximum lifetime of a lock set via the web interface (or by not specifying a timeoutvalue when calling the WebDAV Locks API).
The maximum timeout for the locks (in seconds):Maximum lifetime of locks which is allowed to be set by calling the WebDAV LocksAPI.
Web interfaceGo to Settings › Admin › AdditionalThe image is the same as shown above when enabling or disabling Manual FileLocking.
Using the occ command• Default locks timeout
sudo -u www-data php occ config:app:set files lock_timeout_default --value1800
• Maximum locks timeout
sudo -u www-data php occ config:app:set files lock_timeout_max --value86400
Providing Default Files
You may distribute a set of default files and folders to all users by placing them in theowncloud/core/skeleton directory on your ownCloud server. These files appear only tonew users after their initial login, and existing users will not see files that are added tothis directory after their first login. The files in the skeleton directory are copied intothe users’ data directories, so they may change and delete the files without affecting
Files and Sharing | 131
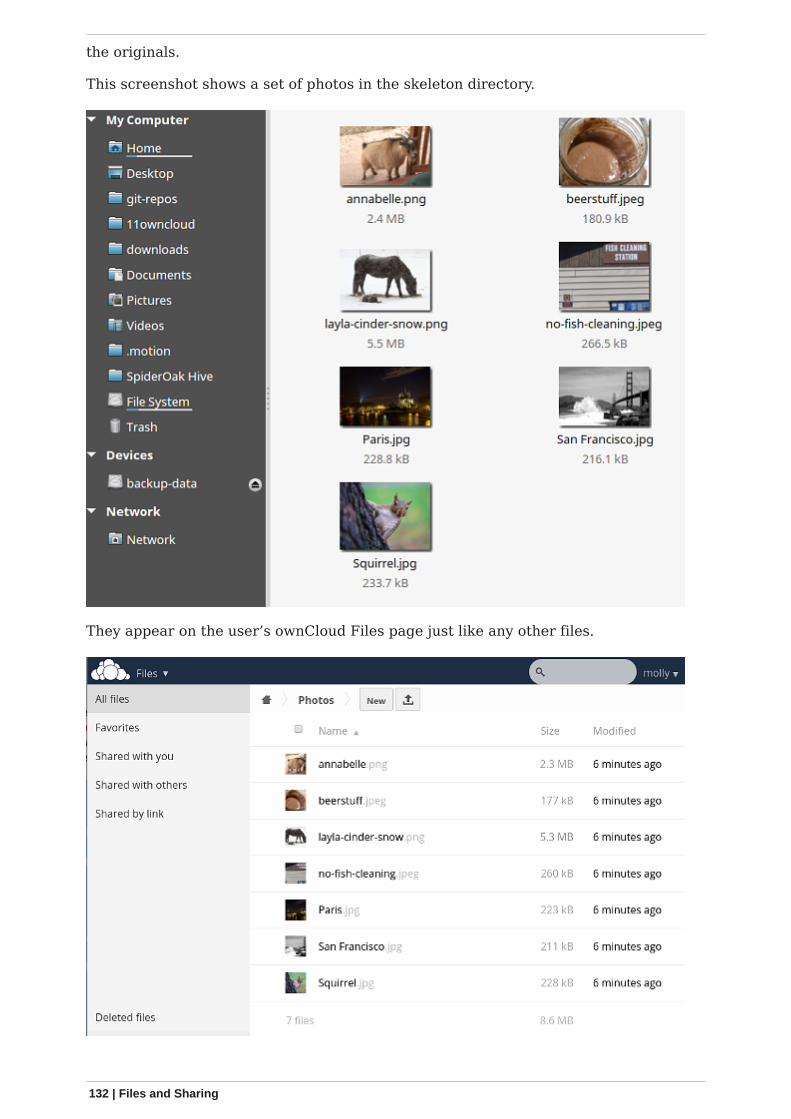
the originals.
This screenshot shows a set of photos in the skeleton directory.
They appear on the user’s ownCloud Files page just like any other files.
132 | Files and Sharing
Additional Configuration
The configuration option skeletondirectory available in your config.php allows you toconfigure the directory where the skeleton files are located.
These files will be copied to the data directory of new users.
Leave this directory empty if you do not want to copy any skeleton files.
The value of the skeletondirectory key must not be empty if you decide to use it inyour config.php.
See Sample Config PHP Parameters for more the complete list ofconfig.php options.
Configuring Federation Sharing
Introduction
Federated Cloud Sharing is managed by the Federation app. When you enable theFederation app you can easily and securely link file shares between ownCloud servers,in effect creating a "cloud" of ownCloud installations.
For security reasons federated sharing strictly requires HTTPS(SSL/TLS).
We strongly recommend using HTTP for development and testingpurposes. However, to do so, you have to set'sharing.federation.allowHttpFallback' ⇒ true, in config/config.php.
Configuration
Follow these steps to establish a trusted connection between two servers.
1. Verify that both servers have SSL certificates. If you open the server URL in yourbrowser and see a lock icon on the left-hand side of the address bar, the certificateis valid.
Lock icon in the address bars in Firefox, Google Chrome, and Safari.
2. Verify that the 'overwrite.cli.url' ⇒ 'https://<SERVER_URL>' setting is configured tothe correct URL, instead of `localhost, in config.php.
3. Reset the federation job in your oc_jobs table. This job is required to get theverification token from the other server to establish a federation connectionbetween two servers. The resetting ensures that it will be executed when we runsystem:cron later.
mysql -u root -e "update oc_jobs set last_run=0 whereclass='OCA\\Federation\\SyncJob';" owncloud;mysql -u root -e "update oc_jobs set last_checked=0 whereclass='OCA\\Federation\\SyncJob';" owncloud;
4. Navigate to admin settings → sharing → Federation5. Add server 1 to the trusted servers on server 2.
Files and Sharing | 133
6. Add server 2 to the trusted servers on server 1.7. Now run the cron job in your ownCloud directory (for example
/var/www/owncloud/).
sudo -u www-data php occ system:cron
8. Now the check should be green9. Sync now your users with
sudo -u www-data php occ dav:sync-system-addressbooksudo -u www-data php occ federation:sync-addressbook
10. Configure automatic acceptance of new federated shares.
sudo -u www-data php occ config:app:set federation auto_accept_trusted --value'0'sudo -u www-data php occ config:app:set federatedfilesharingauto_accept_trusted --value 'yes'
Working With Proxies
There are ownCloud instances that are not connected to the internet. They have nopossibility to reach the public network. Therefore Federation will not work without aproxy.
To set the proxy and proxyuserpwd configuration variables, in config/config.php. proxysets the proxy’s hostname, and proxyuserpwd sets the username and passwordcredentials, in username:password format.
Creating a New Federation Share
Follow these steps to create a new Federation share between two ownCloud servers.This requires no action by the user on the remote server; all it takes is a few steps onthe originating server.
1. Enable the Federation app.2. Then, create a federated share by entering username@serveraddress in the sharing
dialog (for example freda@https://example.com/owncloud). When ownCloud verifiesthe link, it displays it with the (federated) label. Click on this label to establish thelink.
134 | Files and Sharing

3. When the link is successfully completed, you have a single share option, and that iscan edit.
You may disconnect the share at any time by clicking the [trash can] icon.
Federated Sharing Scanner CronJob Configuration
As part of the migration step to 10.5, before enabling the cronjobdescribed below, make sure to remove the system cron job from yourcrontab that executes legacy occ incoming-shares:poll
The Federated Sharing Scanner is a background job used to scan the federated sharesto ensure the integrity of the file cache.
On each run the scanner will select federated shares that satisfy these requirements:
1. ensure that within a single cron run, at max [cronjob_scan_external_batch] scanswill be performed out of all accepted external shares (default 100)
2. a scan of that external share has not been performed within the last[cronjob_scan_external_min_scan] seconds (default 3 hours)
3. the user still exists, and has been active recently, meaning logged in within the last[cronjob_scan_external_min_login] seconds (default 24 hours)
4. there has been a change in the federated remote share root etag or mtime,signaling a mandatory rescan
To enable the cronjob, go to Settings › Admin Settings › Federated Cloud Sharingand enable the checkbox
Files and Sharing | 135

Alternatively you can use the command line:
sudo -u www-data php occ config:app:set files_sharingcronjob_scan_external_enabled --value 'yes'
You can also configure these settings of the cronjob:
1. the minimum amount of time since last login of a user so that a scan is triggered(ensures only active users get fed shares synced)
sudo -u www-data php occ config:app:set files_sharingcronjob_scan_external_min_login --value <integer-seconds>
1. the minimum amount of time since last scanned so that the next scan is triggered(avoid frequent scan when active collaboration)
sudo -u www-data php occ config:app:set files_sharingcronjob_scan_external_min_scan --value <integer-seconds>
1. the maximum number of federated share scans per 10 minutes (scan performedonly if fed share files got updated)
sudo -u www-data php occ config:app:set files_sharing cronjob_scan_external_batch--value <integer-number>
Use the following command to force a run of the scanner cronjob:
sudo -u www-data php occ background:queue:execute --force --accept-warning <id-of-fed-scanner-job>
Known Issues
Persistent Locks Are Not Guaranteed
There is a known bug propagated persistent locks to federated instances. If a usercreates an exclusive lock on a share, no other users should be able to modify it, nor itscontents, and all users should see a lock icon on the share.
However, this isn’t the case. The following functionality has been recorded:
• The user who created the lock sees the lock icon throughout the share.• The top-level of the share for receivers shows the lock icon.• Sub-items of the share do not show the lock icon.
136 | Files and Sharing
• The share and its contents can still be modified by all users; specifically:◦ Sub-items can be deleted.◦ Sub-items can be created.
Tips
VCARD properties
It is possible to configure the VCARD properties that are searched in order to retrievea list of federated users in the share dialog. By default, ownCloud uses CLOUD and FNproperties, however this list may be configured by the admin:
sudo -u www-data php occ config:app:set dav remote_search_properties--value=CLOUD,FN,EMAIL
Possible options are:
• VERSION• UID• FN• N• EMAIL• CLOUD
Listing Federated Shares
In case you want to see which federated shares exist on your server, you can use thiscommand to list them.
Currently there is no ownCloud occ command to list federated shares, that’s why youhave to use these database queries to obtain the information.
Federated shares are saved in your database.
sudo mysql -u <ownCloud_DB_User> -p<ownCloud_DB_Password> -h<ownCloud_DB_Host> <ownCloud_DB_Name>
Incoming shares can be listed with the following query:
select * from oc_share where share_type=6;
Each unique ID gives you an incoming federated share.
Outgoing shares can be listed with the following query: (replace cloud.example.comwith your instance URL)
select * from oc_share_external where remote NOT IN ('https//cloud.example.com');
Each unique ID gives you an outgoing federated share.
Exit the database console with this command:
Files and Sharing | 137
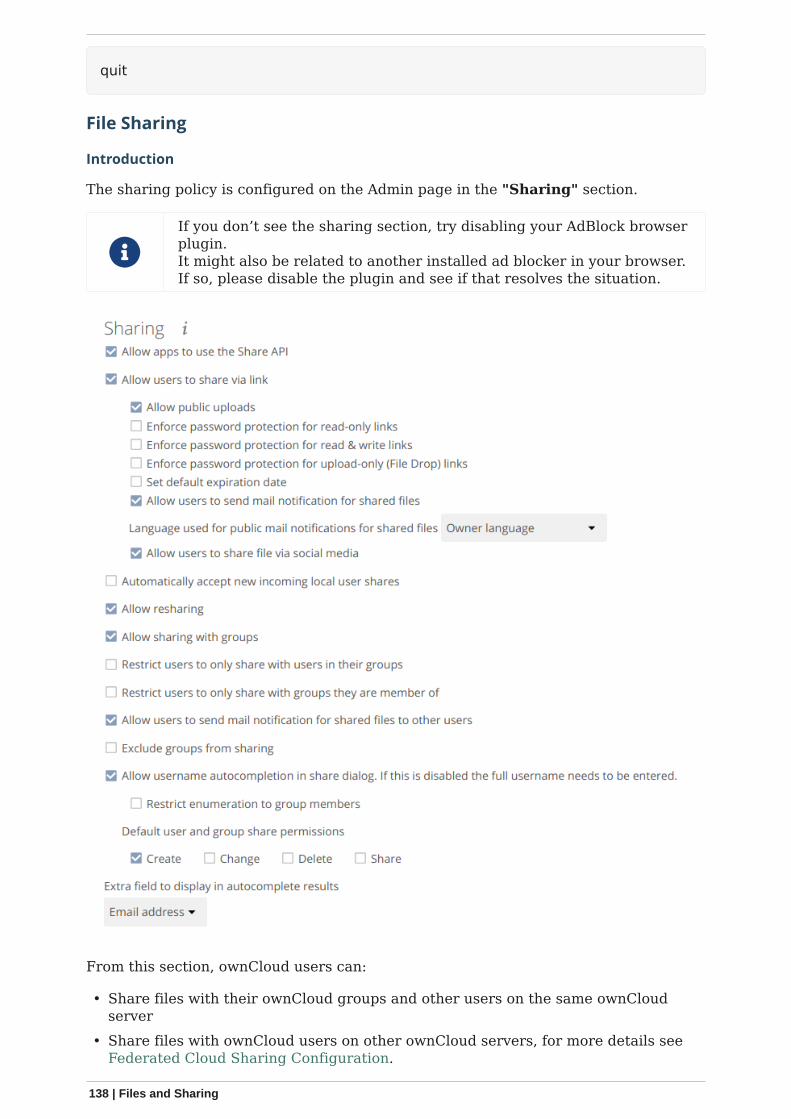
quit
File Sharing
Introduction
The sharing policy is configured on the Admin page in the "Sharing" section.
If you don’t see the sharing section, try disabling your AdBlock browserplugin.It might also be related to another installed ad blocker in your browser.If so, please disable the plugin and see if that resolves the situation.
From this section, ownCloud users can:
• Share files with their ownCloud groups and other users on the same ownCloudserver
• Share files with ownCloud users on other ownCloud servers, for more details seeFederated Cloud Sharing Configuration.
138 | Files and Sharing
• Create public link shares for people who are not ownCloud users.
You have control of a number of user permissions on file shares:
• Allow users to share files• Allow users to create public link shares
◦ Allow public uploads to public link shares◦ Enforce password protection on public link shares◦ Set default expiration date on public link shares◦ Allow users to send mail notification for shared files◦ Set the language used for public mail notification for shared files◦ Allow users to share file via social media
• Set default expiration date for user shares◦ Set the number of days to expire after◦ Enforce as maximum expiration date
• Set default expiration date for group shares◦ Set the number of days to expire after◦ Enforce as maximum expiration date
• Set default expiration date for remote shares◦ Set the number of days to expire after◦ Enforce as maximum expiration date
• Automatically accept new incoming local user shares• Allow resharing• Allow sharing with groups• Restrict users to only share with users in their groups• Restrict users to only share with groups they are a member of• Allow users to send mail notification for shared files to other users• Exclude groups from creating shares• Allow username autocompletion in share dialog
◦ Restrict enumeration to group members• Default user and group share permissions• Extra field to display in autocomplete results
ownCloud includes a Share Link Password Policy app.
Settings Explained
Allow apps to use the Share API
Check this option to enable users to share files. If this is not checked, no users cancreate file shares.
Allow users to share via link
Check this option to enable creating public link shares for people who are notownCloud users via hyperlink.
Files and Sharing | 139
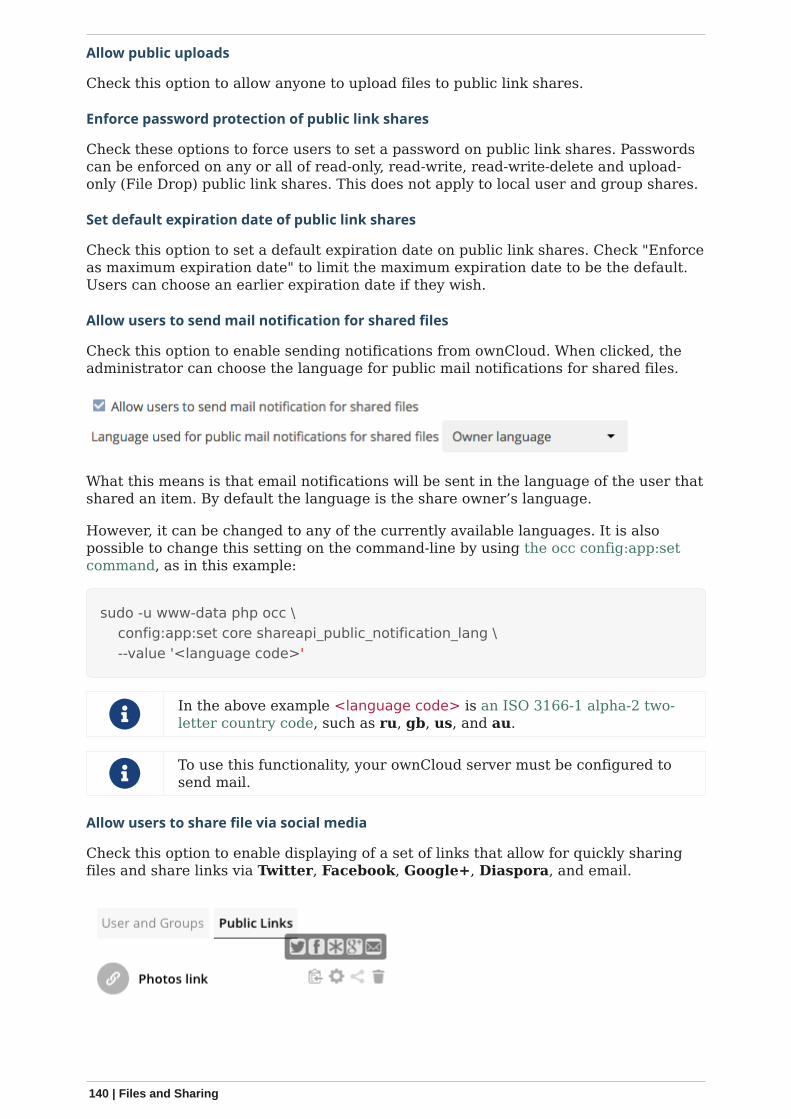
Allow public uploads
Check this option to allow anyone to upload files to public link shares.
Enforce password protection of public link shares
Check these options to force users to set a password on public link shares. Passwordscan be enforced on any or all of read-only, read-write, read-write-delete and upload-only (File Drop) public link shares. This does not apply to local user and group shares.
Set default expiration date of public link shares
Check this option to set a default expiration date on public link shares. Check "Enforceas maximum expiration date" to limit the maximum expiration date to be the default.Users can choose an earlier expiration date if they wish.
Allow users to send mail notification for shared files
Check this option to enable sending notifications from ownCloud. When clicked, theadministrator can choose the language for public mail notifications for shared files.
What this means is that email notifications will be sent in the language of the user thatshared an item. By default the language is the share owner’s language.
However, it can be changed to any of the currently available languages. It is alsopossible to change this setting on the command-line by using the occ config:app:setcommand, as in this example:
sudo -u www-data php occ \ config:app:set core shareapi_public_notification_lang \ --value '<language code>'
In the above example <language code> is an ISO 3166-1 alpha-2 two-letter country code, such as ru, gb, us, and au.
To use this functionality, your ownCloud server must be configured tosend mail.
Allow users to share file via social media
Check this option to enable displaying of a set of links that allow for quickly sharingfiles and share links via Twitter, Facebook, Google+, Diaspora, and email.
140 | Files and Sharing

Set default expiration date for user shares
Check this option to set a default expiration date when sharing with another user. Theuser can change or remove the default expiration date of a share.
Set the number of days to expire after
Set the default number of days that user shares will expire. The default value is 7days.
Enforce as maximum expiration date
Check this option to limit the maximum expiration date to be the default. Users canchoose an earlier expiration date if they wish.
Set default expiration date for group shares
Check this option to set a default expiration date when sharing with a group. The usercan change or remove the default expiration date of a share.
Set the number of days to expire after
Set the default number of days that group shares will expire. The default value is 7days.
Enforce as maximum expiration date
Check this option to limit the maximum expiration date to be the default. Users canchoose an earlier expiration date if they wish.
Set default expiration date for remote shares
Check this option to set a default expiration date when sharing with a remote user.The user can change or remove the default expiration date of a share.
Set the number of days to expire after
Set the default number of days that remote shares will expire. The default value is 7days.
Enforce as maximum expiration date
Check this option to limit the maximum expiration date to be the default. Users canchoose an earlier expiration date if they wish.
Automatically accept new incoming local user shares
Disabling this option activates the "Pending Shares" feature. Users will be notified andhave to accept new incoming user shares before they appear in the file list and areavailable for access giving them more control over their account. More informationabout pending shares can be found in the release notes.
Allow resharing
Check this option to enable users to re-share files shared with them.
Allow sharing with groups
Check this option to enable users to share with groups.
Files and Sharing | 141

Default user and group share permissions
Administrators can define the permissions for user/group shares that are set bydefault when users create new shares. As shares are created instantly after choosingthe recipient, administrators can set the default to e.g. read-only to avoid creatingshares with too many permissions unintentionally.
Restrict users to only share with users in their groups
Check this option to confine sharing within group memberships.
This setting does not apply to the Federated Cloud sharing feature.If Federated Cloud Sharing is enabled, users can still share items withany users on any instances (including the one they are on) via a remoteshare.
Restrict users to only share with groups they are a member of
When this option is enabled, users can only share with groups they are a member of.They can still share with all users of the instance but not with groups they are not amember of. To restrict sharing to users in groups the sharer is a member of the option"Restrict users to only share with users in their groups" can be used. More informationabout more granular sharing restrictions can be found in the release notes.
Allow users to send mail notification for shared files to other users
Check this option to enable users to send an email notification to every ownCloud userthat the file is shared with.
Exclude groups from sharing
Check this option to prevent members of specific groups from creating any file shares.When you check this, you’ll get a dropdown list of all your groups to choose from.Members of excluded groups can still receive shares, but not create any.
Allow username autocompletion in share dialog
Check this option to enable auto-completion of ownCloud usernames.
Restrict enumeration to group members
Check this option to restrict auto-completion of ownCloud usernames to only thoseusers who are members of the same group(s) that the user is in.
Extra field to display in autocomplete results
The autocomplete dropdowns in ownCloud usually show the display name of otherusers when it is set. If it’s not set, they show the user ID / login name, as displaynames are not unique you can run into situations where you can’t distinguish theproposed users. This option enables to add mail addresses or user ID’s to make themdistinguishable.
Blacklist Groups From Receiving Shares
Sometimes it’s necessary or desirable to block groups from receiving shares. Forexample, if a group has a significant number of users (> 5,000) or if it’s a systemgroup, then it can be advisable to block it from receiving shares. In these cases,ownCloud administrators can blacklist one or more groups, so that they do not receiveshares.
To blacklist one or more groups, via the Web UI, under "Admin → Settings →
142 | Files and Sharing
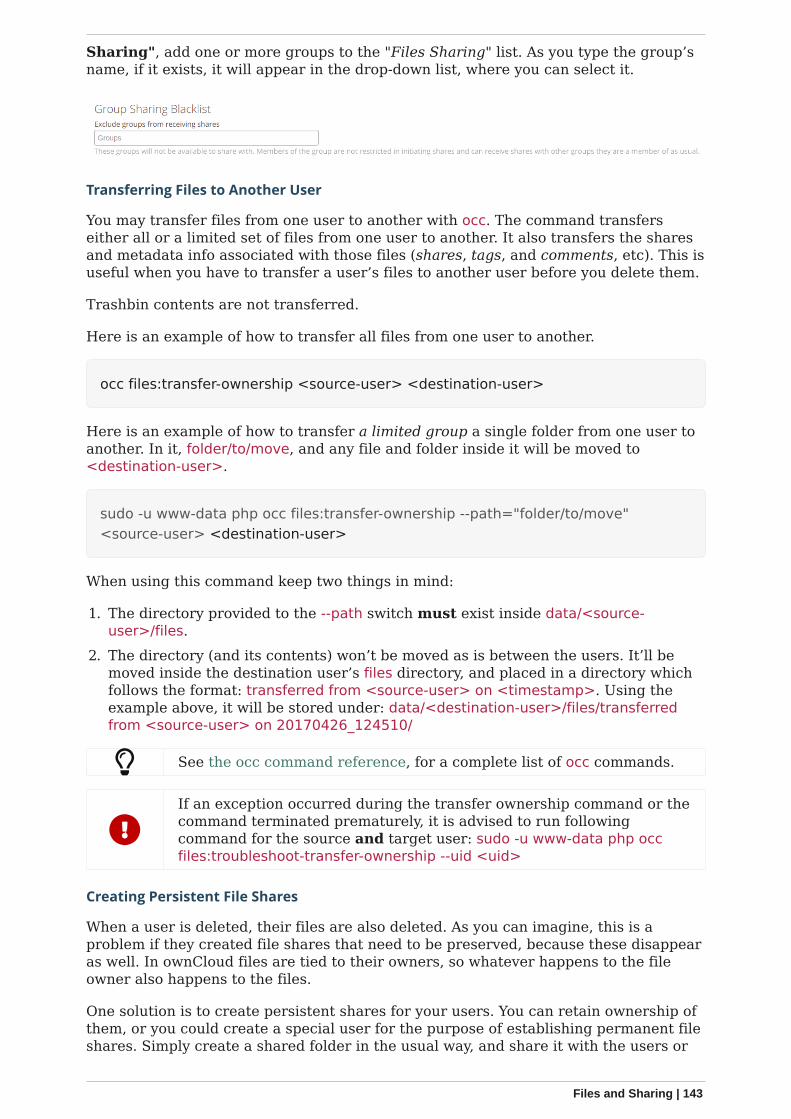
Sharing", add one or more groups to the "Files Sharing" list. As you type the group’sname, if it exists, it will appear in the drop-down list, where you can select it.
Transferring Files to Another User
You may transfer files from one user to another with occ. The command transferseither all or a limited set of files from one user to another. It also transfers the sharesand metadata info associated with those files (shares, tags, and comments, etc). This isuseful when you have to transfer a user’s files to another user before you delete them.
Trashbin contents are not transferred.
Here is an example of how to transfer all files from one user to another.
occ files:transfer-ownership <source-user> <destination-user>
Here is an example of how to transfer a limited group a single folder from one user toanother. In it, folder/to/move, and any file and folder inside it will be moved to<destination-user>.
sudo -u www-data php occ files:transfer-ownership --path="folder/to/move"<source-user> <destination-user>
When using this command keep two things in mind:
1. The directory provided to the --path switch must exist inside data/<source-user>/files.
2. The directory (and its contents) won’t be moved as is between the users. It’ll bemoved inside the destination user’s files directory, and placed in a directory whichfollows the format: transferred from <source-user> on <timestamp>. Using theexample above, it will be stored under: data/<destination-user>/files/transferredfrom <source-user> on 20170426_124510/
See the occ command reference, for a complete list of occ commands.
If an exception occurred during the transfer ownership command or thecommand terminated prematurely, it is advised to run followingcommand for the source and target user: sudo -u www-data php occfiles:troubleshoot-transfer-ownership --uid <uid>
Creating Persistent File Shares
When a user is deleted, their files are also deleted. As you can imagine, this is aproblem if they created file shares that need to be preserved, because these disappearas well. In ownCloud files are tied to their owners, so whatever happens to the fileowner also happens to the files.
One solution is to create persistent shares for your users. You can retain ownership ofthem, or you could create a special user for the purpose of establishing permanent fileshares. Simply create a shared folder in the usual way, and share it with the users or
Files and Sharing | 143
groups who need to use it. Set the appropriate permissions on it, and then no matterwhich users come and go, the file shares will remain. Because all files added to theshare, or edited in it, automatically become owned by the owner of the shareregardless of who adds or edits them.
Create Shares Programmatically
If you need to create new shares using command-line scripts, there are two availableoption.
• occ files_external:create• occ files_external:import
occ files_external:create
This command provides for the creation of both personal (for a specific user) andgeneral shares. The command’s configuration options can be provided either asindividual arguments or collectively, as a JSON object. For more information about thecommand, refer to the the occ files-external documentation.
Personal Share
sudo -u www-data php occ files_external:create /my_share_namewindows_network_drive \ password::logincredentials \ --config={host=127.0.0.1, share='home', root='$user', domain='owncloud.local'} \ --user someuser
sudo -u www-data php occ files_external:create /my_share_namewindows_network_drive \ password::logincredentials \ --config host=127.0.0.1 \ --config share='home' \ --config root='$user' \ --config domain='somedomain.local' \ --user someuser
General Share
sudo -u www-data php occ files_external:create /my_share_namewindows_network_drive \ password::logincredentials \ --config={host=127.0.0.1, share='home', root='$user', domain='owncloud.local'}
144 | Files and Sharing

sudo -u www-data php occ files_external:create /my_share_namewindows_network_drive \ password::logincredentials \ --config host=127.0.0.1 \ --config share='home' \ --config root='$user' \ --config domain='somedomain.local'
occ files_external:import
You can create general and personal shares passing the configuration details via JSONfiles, using the occ files_external:import command.
General Share
sudo -u www-data php occ files_external:import /import.json
Personal Share
sudo -u www-data php occ files_external:import /import.json --user someuser
In the two examples above, here is a sample JSON file, showing all of the availableconfiguration options that the command supports.
{ "mount_point": "\/my_share_name", "storage": "OCA\\windows_network_drive\\lib\\WND", "authentication_type": "password::logincredentials", "configuration": { "host": "127.0.0.1", "share": "home", "root": "$user", "domain": "owncloud.local" }, "options": { "enable_sharing": false }, "applicable_users": [], "applicable_groups": []}
Share Permissions
Permissions Masks
READ 1
UPDATE 2 ("can update" in web UI)
Files and Sharing | 145
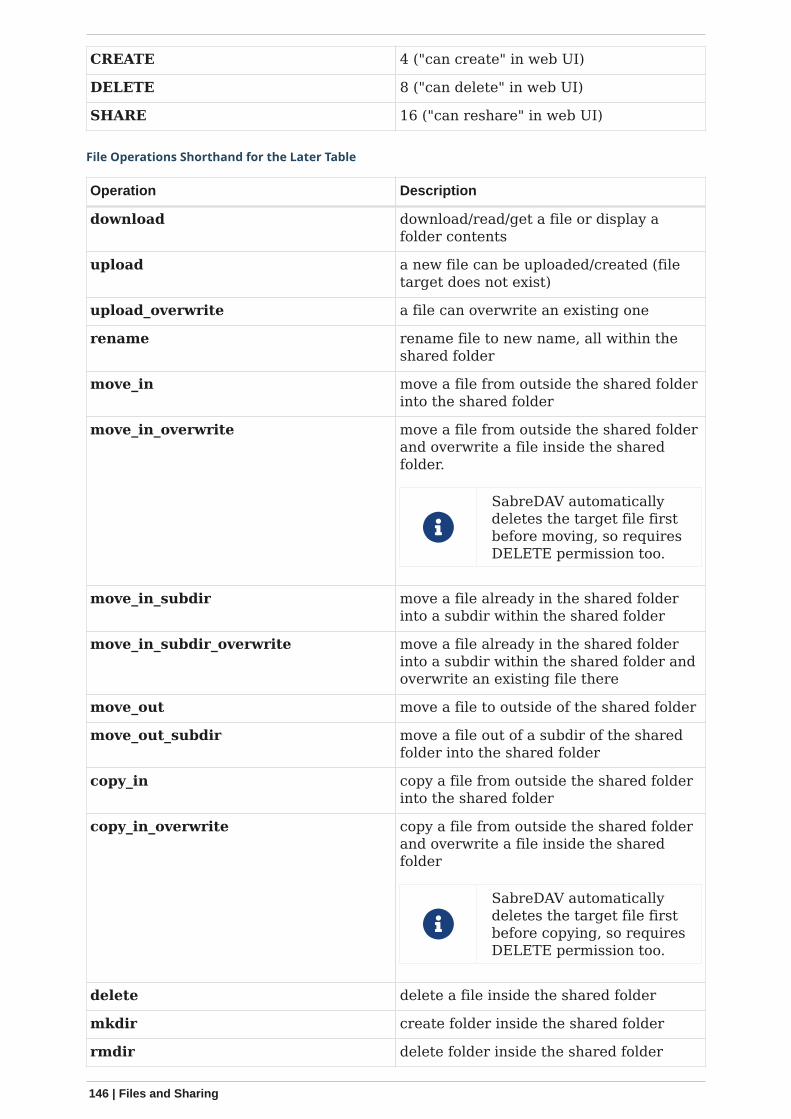
CREATE 4 ("can create" in web UI)
DELETE 8 ("can delete" in web UI)
SHARE 16 ("can reshare" in web UI)
File Operations Shorthand for the Later Table
Operation Description
download download/read/get a file or display afolder contents
upload a new file can be uploaded/created (filetarget does not exist)
upload_overwrite a file can overwrite an existing one
rename rename file to new name, all within theshared folder
move_in move a file from outside the shared folderinto the shared folder
move_in_overwrite move a file from outside the shared folderand overwrite a file inside the sharedfolder.
SabreDAV automaticallydeletes the target file firstbefore moving, so requiresDELETE permission too.
move_in_subdir move a file already in the shared folderinto a subdir within the shared folder
move_in_subdir_overwrite move a file already in the shared folderinto a subdir within the shared folder andoverwrite an existing file there
move_out move a file to outside of the shared folder
move_out_subdir move a file out of a subdir of the sharedfolder into the shared folder
copy_in copy a file from outside the shared folderinto the shared folder
copy_in_overwrite copy a file from outside the shared folderand overwrite a file inside the sharedfolder
SabreDAV automaticallydeletes the target file firstbefore copying, so requiresDELETE permission too.
delete delete a file inside the shared folder
mkdir create folder inside the shared folder
rmdir delete folder inside the shared folder
146 | Files and Sharing
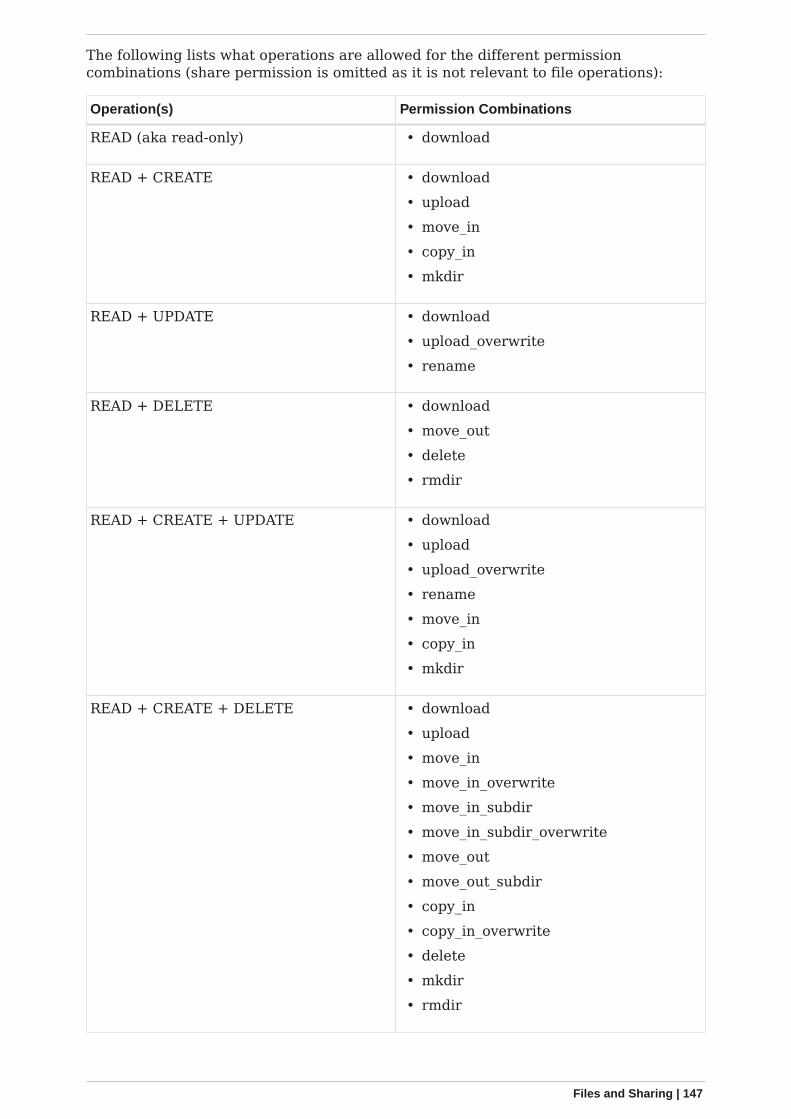
The following lists what operations are allowed for the different permissioncombinations (share permission is omitted as it is not relevant to file operations):
Operation(s) Permission Combinations
READ (aka read-only) • download
READ + CREATE • download• upload• move_in• copy_in• mkdir
READ + UPDATE • download• upload_overwrite• rename
READ + DELETE • download• move_out• delete• rmdir
READ + CREATE + UPDATE • download• upload• upload_overwrite• rename• move_in• copy_in• mkdir
READ + CREATE + DELETE • download• upload• move_in• move_in_overwrite• move_in_subdir• move_in_subdir_overwrite• move_out• move_out_subdir• copy_in• copy_in_overwrite• delete• mkdir• rmdir
Files and Sharing | 147
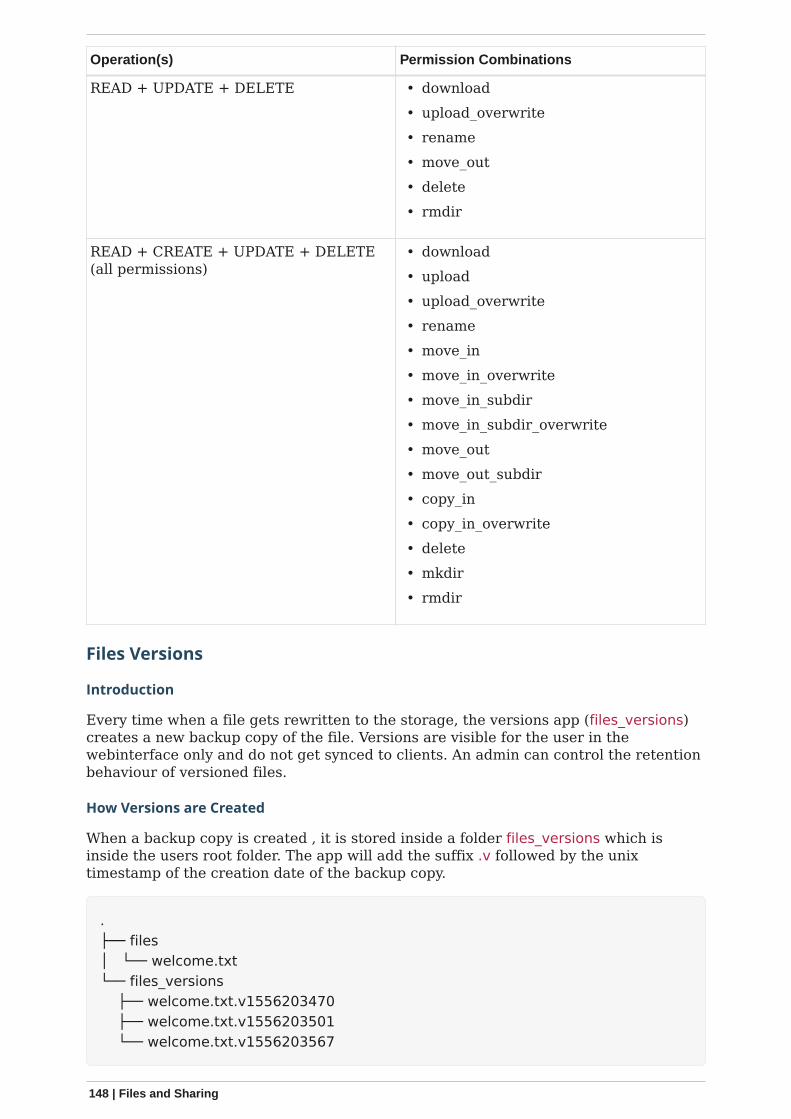
Operation(s) Permission Combinations
READ + UPDATE + DELETE • download• upload_overwrite• rename• move_out• delete• rmdir
READ + CREATE + UPDATE + DELETE(all permissions)
• download• upload• upload_overwrite• rename• move_in• move_in_overwrite• move_in_subdir• move_in_subdir_overwrite• move_out• move_out_subdir• copy_in• copy_in_overwrite• delete• mkdir• rmdir
Files Versions
Introduction
Every time when a file gets rewritten to the storage, the versions app (files_versions)creates a new backup copy of the file. Versions are visible for the user in thewebinterface only and do not get synced to clients. An admin can control the retentionbehaviour of versioned files.
How Versions are Created
When a backup copy is created , it is stored inside a folder files_versions which isinside the users root folder. The app will add the suffix .v followed by the unixtimestamp of the creation date of the backup copy.
.├── files│ └── welcome.txt└── files_versions ├── welcome.txt.v1556203470 ├── welcome.txt.v1556203501 └── welcome.txt.v1556203567
148 | Files and Sharing

File versioning only gets triggered if the change is made via theownCloud ecosystem. It does not get triggered if the change is made ata mounted filesystem directly.
Versions are displayed in the WebUI in the details view in the right sidebar if you clickon the file row in the file listing. You can restore the current file to one of the earlierbackup copies in the list, by clicking on the [restore] icon of the specific version.
How Versions are Deleted
The versions app deletes old file versions automatically to ensure that users do notexceed their storage quotas. This is done by automatic background jobs which cleanup the versions following a specific pattern. This pattern defines the expiration datefor each backup version.
Default Versions Delete Patterns
This is the default pattern used to delete old versions:
• For the last second we keep one version• For the last 10 seconds ownCloud keeps one version every 2 seconds• For the last minute ownCloud keeps one version every 10 seconds• For the last hour ownCloud keeps one version every minute• For the last 24 hours ownCloud keeps one version every hour• For the last 30 days ownCloud keeps one version every day• If the versions are older than 30 days ownCloud keeps one version every week
The versions are adjusted along this pattern every time a new version is created andthe background job was executed.
Files and Sharing | 149
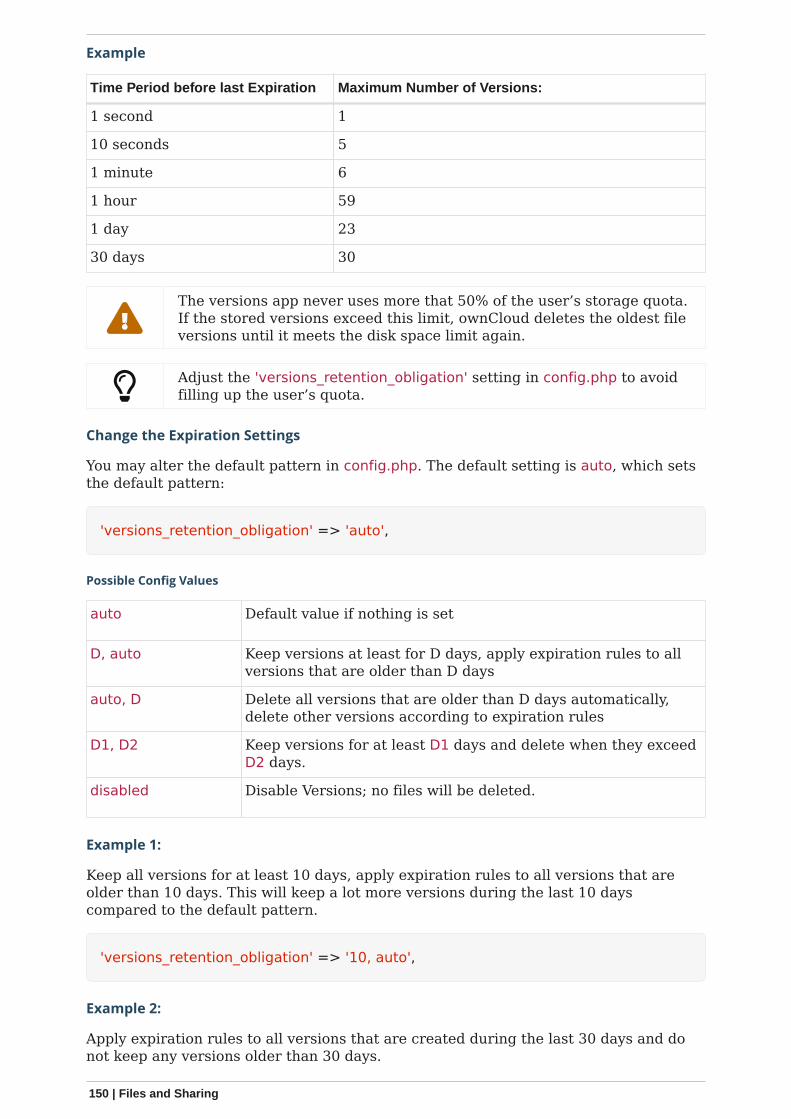
Example
Time Period before last Expiration Maximum Number of Versions:
1 second 1
10 seconds 5
1 minute 6
1 hour 59
1 day 23
30 days 30
The versions app never uses more that 50% of the user’s storage quota.If the stored versions exceed this limit, ownCloud deletes the oldest fileversions until it meets the disk space limit again.
Adjust the 'versions_retention_obligation' setting in config.php to avoidfilling up the user’s quota.
Change the Expiration Settings
You may alter the default pattern in config.php. The default setting is auto, which setsthe default pattern:
'versions_retention_obligation' => 'auto',
Possible Config Values
auto Default value if nothing is set
D, auto Keep versions at least for D days, apply expiration rules to allversions that are older than D days
auto, D Delete all versions that are older than D days automatically,delete other versions according to expiration rules
D1, D2 Keep versions for at least D1 days and delete when they exceedD2 days.
disabled Disable Versions; no files will be deleted.
Example 1:
Keep all versions for at least 10 days, apply expiration rules to all versions that areolder than 10 days. This will keep a lot more versions during the last 10 dayscompared to the default pattern.
'versions_retention_obligation' => '10, auto',
Example 2:
Apply expiration rules to all versions that are created during the last 30 days and donot keep any versions older than 30 days.
150 | Files and Sharing

'versions_retention_obligation' => 'auto, 30',
Example 3:
Do not apply any expiration rules. Delete all versions after 30 days.
'versions_retention_obligation' => '30, 30',
Enterprise File Retention
Enterprise customers have additional tools for managing file retention policies; seeAdvanced File Tagging With the Workflow App.
Transactional File Locking
ownCloud’s Transactional File Locking mechanism locks files to avoid file corruptionduring normal operation. It performs these functions:
• Operates at a higher level than the filesystem, so you don’t need to use a filesystemthat supports locking
• Locks parent directories so they cannot be renamed during any activity on filesinside the directories
• Releases locks after file transactions are interrupted, for example when a syncclient loses the connection during an upload
• Manages locking and releasing locks correctly on shared files during changes frommultiple users
• Manages locks correctly on external storage mounts• Manages encrypted files correctly
Transactional File locking will not prevent multiple users from editing the samedocument, nor give notice that other users are working on the same document.Multiple users can open and edit a file at the same time and Transactional File lockingdoes not prevent this. Rather, it prevents simultaneous file saving.
Transactional file locking is in ownCloud core, and replaces the old FileLocking app. The File Locking app was removed from ownCloud inversion 8.2.1. If your ownCloud server still has the File Locking app,you must visit your Apps page to verify that it is disabled; the FileLocking app and Transactional File Locking cannot both operate at thesame time.
File locking is enabled by default, using the database locking backend. This places asignificant load on your database. Using memcache.locking relieves the database loadand improves performance. Admins of ownCloud servers with heavy workloads shouldinstall a memory cache .
Previews Configuration
Introduction
The ownCloud thumbnail system generates previews of files for all ownCloud apps thatdisplay files, such as the Files app.
The following image shows some examples of previews of various file types.
Files and Sharing | 151
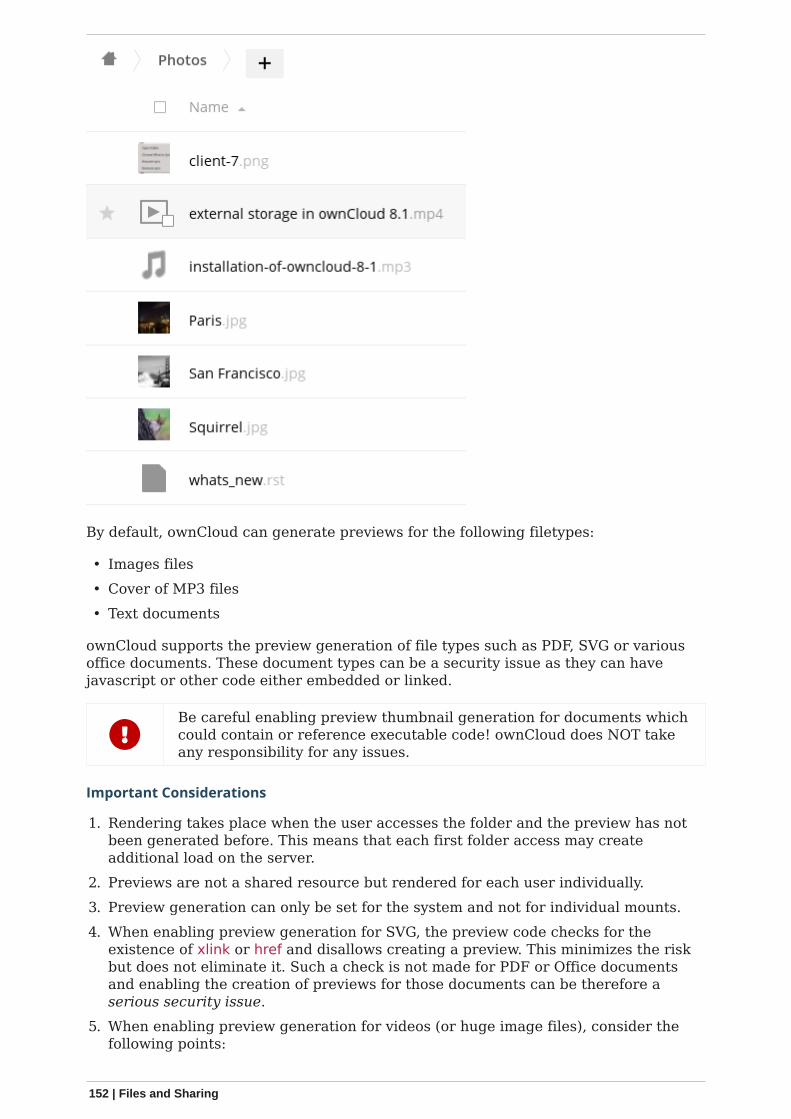
By default, ownCloud can generate previews for the following filetypes:
• Images files• Cover of MP3 files• Text documents
ownCloud supports the preview generation of file types such as PDF, SVG or variousoffice documents. These document types can be a security issue as they can havejavascript or other code either embedded or linked.
Be careful enabling preview thumbnail generation for documents whichcould contain or reference executable code! ownCloud does NOT takeany responsibility for any issues.
Important Considerations
1. Rendering takes place when the user accesses the folder and the preview has notbeen generated before. This means that each first folder access may createadditional load on the server.
2. Previews are not a shared resource but rendered for each user individually.3. Preview generation can only be set for the system and not for individual mounts.4. When enabling preview generation for SVG, the preview code checks for the
existence of xlink or href and disallows creating a preview. This minimizes the riskbut does not eliminate it. Such a check is not made for PDF or Office documentsand enabling the creation of previews for those documents can be therefore aserious security issue.
5. When enabling preview generation for videos (or huge image files), consider thefollowing points:
152 | Files and Sharing
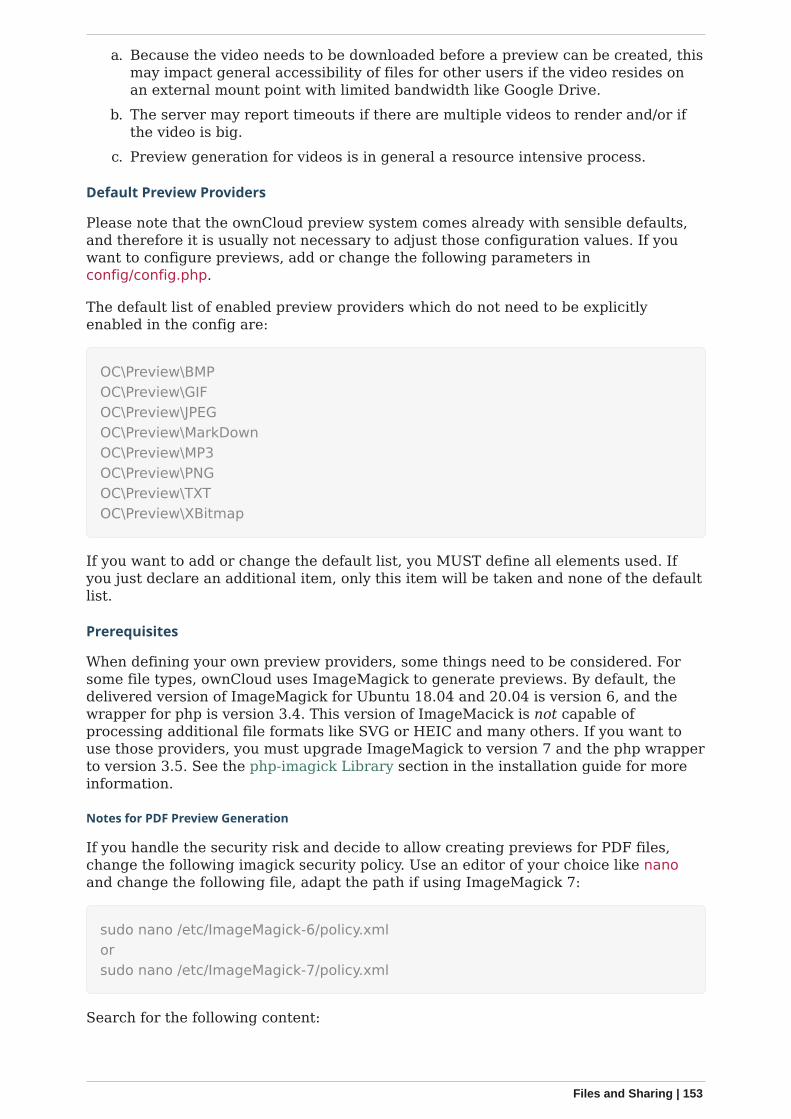
a. Because the video needs to be downloaded before a preview can be created, thismay impact general accessibility of files for other users if the video resides onan external mount point with limited bandwidth like Google Drive.
b. The server may report timeouts if there are multiple videos to render and/or ifthe video is big.
c. Preview generation for videos is in general a resource intensive process.
Default Preview Providers
Please note that the ownCloud preview system comes already with sensible defaults,and therefore it is usually not necessary to adjust those configuration values. If youwant to configure previews, add or change the following parameters inconfig/config.php.
The default list of enabled preview providers which do not need to be explicitlyenabled in the config are:
OC\Preview\BMPOC\Preview\GIFOC\Preview\JPEGOC\Preview\MarkDownOC\Preview\MP3OC\Preview\PNGOC\Preview\TXTOC\Preview\XBitmap
If you want to add or change the default list, you MUST define all elements used. Ifyou just declare an additional item, only this item will be taken and none of the defaultlist.
Prerequisites
When defining your own preview providers, some things need to be considered. Forsome file types, ownCloud uses ImageMagick to generate previews. By default, thedelivered version of ImageMagick for Ubuntu 18.04 and 20.04 is version 6, and thewrapper for php is version 3.4. This version of ImageMacick is not capable ofprocessing additional file formats like SVG or HEIC and many others. If you want touse those providers, you must upgrade ImageMagick to version 7 and the php wrapperto version 3.5. See the php-imagick Library section in the installation guide for moreinformation.
Notes for PDF Preview Generation
If you handle the security risk and decide to allow creating previews for PDF files,change the following imagick security policy. Use an editor of your choice like nanoand change the following file, adapt the path if using ImageMagick 7:
sudo nano /etc/ImageMagick-6/policy.xmlorsudo nano /etc/ImageMagick-7/policy.xml
Search for the following content:
Files and Sharing | 153
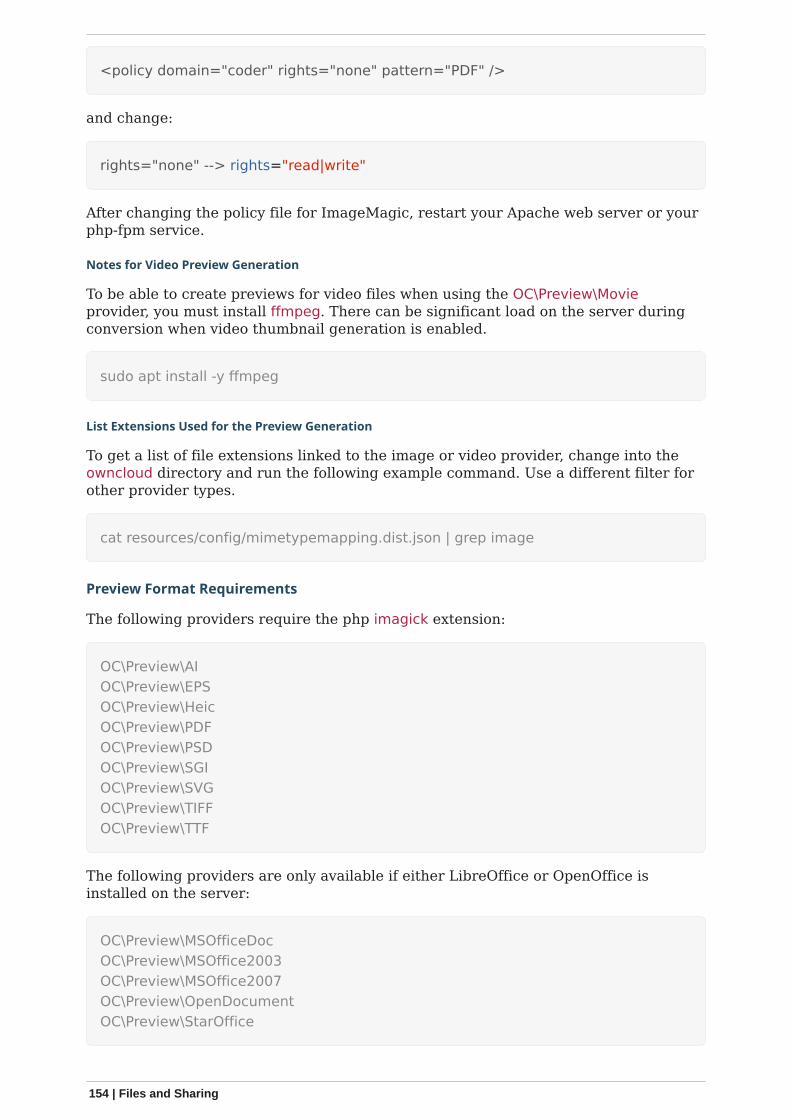
<policy domain="coder" rights="none" pattern="PDF" />
and change:
rights="none" --> rights="read|write"
After changing the policy file for ImageMagic, restart your Apache web server or yourphp-fpm service.
Notes for Video Preview Generation
To be able to create previews for video files when using the OC\Preview\Movieprovider, you must install ffmpeg. There can be significant load on the server duringconversion when video thumbnail generation is enabled.
sudo apt install -y ffmpeg
List Extensions Used for the Preview Generation
To get a list of file extensions linked to the image or video provider, change into theowncloud directory and run the following example command. Use a different filter forother provider types.
cat resources/config/mimetypemapping.dist.json | grep image
Preview Format Requirements
The following providers require the php imagick extension:
OC\Preview\AIOC\Preview\EPSOC\Preview\HeicOC\Preview\PDFOC\Preview\PSDOC\Preview\SGIOC\Preview\SVGOC\Preview\TIFFOC\Preview\TTF
The following providers are only available if either LibreOffice or OpenOffice isinstalled on the server:
OC\Preview\MSOfficeDocOC\Preview\MSOffice2003OC\Preview\MSOffice2007OC\Preview\OpenDocumentOC\Preview\StarOffice
154 | Files and Sharing
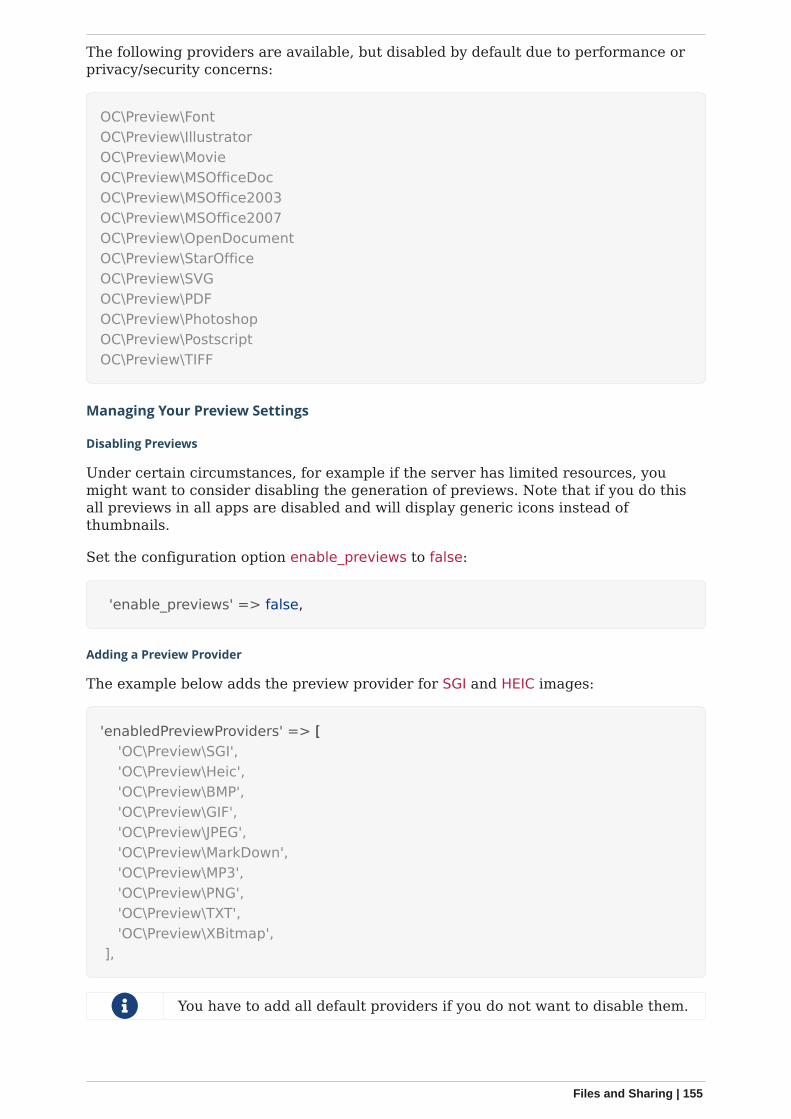
The following providers are available, but disabled by default due to performance orprivacy/security concerns:
OC\Preview\FontOC\Preview\IllustratorOC\Preview\MovieOC\Preview\MSOfficeDocOC\Preview\MSOffice2003OC\Preview\MSOffice2007OC\Preview\OpenDocumentOC\Preview\StarOfficeOC\Preview\SVGOC\Preview\PDFOC\Preview\PhotoshopOC\Preview\PostscriptOC\Preview\TIFF
Managing Your Preview Settings
Disabling Previews
Under certain circumstances, for example if the server has limited resources, youmight want to consider disabling the generation of previews. Note that if you do thisall previews in all apps are disabled and will display generic icons instead ofthumbnails.
Set the configuration option enable_previews to false:
'enable_previews' => false,
Adding a Preview Provider
The example below adds the preview provider for SGI and HEIC images:
'enabledPreviewProviders' => [ 'OC\Preview\SGI', 'OC\Preview\Heic', 'OC\Preview\BMP', 'OC\Preview\GIF', 'OC\Preview\JPEG', 'OC\Preview\MarkDown', 'OC\Preview\MP3', 'OC\Preview\PNG', 'OC\Preview\TXT', 'OC\Preview\XBitmap', ],
You have to add all default providers if you do not want to disable them.
Files and Sharing | 155
Maximum Preview Size
There are two configuration options for setting the maximum size (in pixels) of apreview. These are preview_max_x which represents the x-axis and preview_max_ywhich represents the y-axis. The default value you can reference inconfig/config.sample.php is set to 2048.
The following example would limit previews to a maximum size of 100 px × 100 px:
'preview_max_x' => 100, 'preview_max_y' => 100,
If you want no limit applied for one or both of these values then setthem to null.
Maximum scale factor
If a lot of small pictures are stored on the ownCloud instance and the preview systemgenerates blurry previews, you might want to consider setting a maximum scale factor.By default, pictures are upscaled to 10 times the original size:
'preview_max_scale_factor' => 10,
If you want to disable scaling at all, you can set the config value to `1':
'preview_max_scale_factor' => 1,
If you want to disable the maximum scaling factor, you can set the config value to null:
'preview_max_scale_factor' => null,
Define the JPEG Preview Quality
The JP(E)G image quality can be defined in [%] for displaying thumbnails and imagepreviews for apps like Files or Files Mediaviewer. Note that this setting is fordisplaying only and has no impact on the stored thumbnail / preview quality or size.
'previewJPEGImageDisplayQuality' => -1,
The scale ranges from 1 to 100, where 1 is the lowest and 100 the highest. It defaultsto -1 which is equivalent to approximately 75% of the original image quality. Considerthat any value over 80 may result in an unnecessary increase of the displayed imageand has larger response sizes when requesting images, without much increase of theimage quality. Usually it is not necessary to have a quality setting over 75, but it canbe increased if there is the need to display previews in high quailty with the cost thatevery image requested generates a higher response load. Note that this setting doesnot affect downloading images. Setting a value takes immediate effect and nothingneeds to be regenerated as it is for display requests only.
For more information see: PHP imagejpeg — Output image to browser or file
156 | Files and Sharing

Managing the Trash Bin
The ownCloud Trashbin (files_trashbin) permanently deletes files according to users’storage quotas and file ages. When a user deletes a file it is not immediately removedfrom your ownCloud server, but goes into the Trashbin. Then the user has the optionsto un-delete the file, or to delete it permanently.
As the ownCloud server administrator, you have two occ commands for permanentlydeleting files from the Trashbin manually, without waiting for the normal aging-outprocess:
trashbin trashbin:cleanup Remove deleted files trashbin:expire Expires the users trashbin
The trashbin:cleanup command removes the deleted files of all users, or you mayspecify certain users in a space-delimited list. This example removes all the deletedfiles of all users:
sudo -u www-data php occ trashbin:cleanupRemove all deleted filesRemove deleted files for users on backend Database user1 user2 user3 user4
This example removes the deleted files of user2 and user4:
sudo -u www-data php occ trashbin:cleanup user2 user4 Remove deleted files of user2 Remove deleted files of user4
trashbin:expire deletes only expired files according to the trashbin_retention_obligationsetting in config.php. The default setting is auto, which keeps files in the Trashbin for30 days, then deletes the oldest files as space is needed to keep users within theirstorage quotas. Files may not be deleted if the space is not needed.
Files and Sharing | 157

The default is to delete expired files for all users, or you may list users in a space-delimited list:
sudo -u www-data php occ trashbin:cleanup user1 user2 Remove deleted files of user1 Remove deleted files of user2
See the Deleted Files section in Sample PHP Configuration Parameters, and theTrash Bin section of the occ commands.
Integration
This section is dedicated to integrating ownCloud with other products.
• Microsoft Teams• ownCloud App for Splunk
Integrate ownCloud into Microsoft Teams
Introduction
If you’re using Microsoft Teams in your organization or for private purposes, you willlikely want to access your ownCloud installation from your Microsoft Teams account.For this purpose, we created the Microsoft AppSource app ownCloud Generator forAdmins with which you can generate a customized Microsoft Teams app for yourusers accessing your ownCloud services. Each ownCloud domain accessed requires aseparate generated Microsoft Teams app for your users. The generated app will beavailable in your organization’s app catalog.
As a prerequisite, the OpenID Connect app is required. If you alreadyhave a OpenID Connect configuration made with another service, youhave to reconfigure with Microsoft Azure AD, as only one identityprovider configuration is allowed.
Prerequisites
To get this working, you need to install and/or configure the following components:
Option 1 "Enterprise": With Single Sign-On (SSO) and ownCloud Enterprise Edition
1. Microsoft Azure Active Directory2. ownCloud apps:
a. OpenID Connectb. MS-Teams Bridge App
3. The custom app(s) you have generated with ownCloud Generator for Admins4. Microsoft Teams
Option 2 "Standard": With Basic Authentication and ownCloud Standard Edition
1. ownCloud apps:a. OpenID Connect
2. The custom Microsoft Teams app(s) you have generated with the ownCloudGenerator for Admins
158 | Integration
3. Microsoft Teams
Note: If you are using the Standard Edition, you can skip the following steps thatdescribe the configuration of Azure AD and the MS-Teams Bridge App.
ownCloud
Installation
Assuming you have an ownCloud server version 10.7 or higher already running in yourcompany or for personal use, perform the following steps:
1. Install and enable the MS-Teams Bridge app, minimum required version: v1.0.0.2. Install and enable the OpenID Connect app from the ownCloud marketplace,
minimum required version: v2.0.0.
Configure the MS-Teams Bridge App
You need to configure the MS-Teams Bridge app in two steps:
1. Add a header directive to the Apache .htaccess configuration located in yourownCloud web root in section <IfModule mod_env.c>
Header merge Content-Security-Policy "frame-ancestors 'self'teams.microsoft.com *.teams.microsoft.com"
Using merge, the response header is appended to any existing header of the samename, unless the value to be appended already appears in the header’s comma-delimited list of values. When a new value is merged onto an existing header it isseparated from the existing header with a comma. Merging avoids that headers ofthe same type and content being sent multiple times. This can happen if headersare also set on other locations.
For the time being, if you add the header to the ownCloud’s.htaccess file in the ownCloud web root, you have to manually addthat header again after an ownCloud upgrade.
2. Add a config key to your config.php file
This key is necessary for security reasons. Users will be asked to click a loginbutton each time when accessing the ownCloud app after a fresh start of theirMicrosoft Teams app or after idle time. This behavior is by design. The button namecan be freely set based on your requirements.
'msteamsbridge' => [ "loginButtonName" => "Login to ownCloud with Azure AD",],
3. Enable index.php less URL´s on your web server.
Microsoft
Microsoft Azure and OpenID Connect
Before you start to create your Microsoft Teams App, follow the procedure describedin Example Setup Using Microsoft Azure to configure Microsoft Azure AD and OpenID
Integration | 159
Connect.
Create Your Microsoft Teams App
The following procedure creates an ownCloud app ready to be used by your users withMicrosoft Teams in your environment.
1. In Microsoft Teams AppSource, search for ownCloud Generator for Admins,open the application and follow the guided instructions step by step.
2. Enter the Microsoft App/Client ID for your app. The ID´s to be entered must be theCLIENT-ID from Microsoft Azure.
3. Enter the version of the app you create.
4. Enter the name of the app you create. Take care about how to name your app. Itcannot be changed later on. We recommend naming it ownCloud for Teams foreasy identification.
5. Enter the description of the app you create.
6. Set the AccentColor of the app you create.
7. Enter the URL how you access your owncloud instance likehttps://cloud.example.com.
8. After performing all the steps, click the download button and store the generatedzip file locally.
9. Go back to the app section of Microsoft Teams and upload the generated zip file toyour organization’s app catalogue. Follow the Publish a custom app by uploadingan app package guide for more information.
10. The new app is now available to users in your organization’s app catalog.11. See the following documents on how to pin the app, set the order how apps appear
or how to install apps on behalf of users.
160 | Integration
a. Manage your apps in the Microsoft Teams admin centerb. Manage app setup policies in Microsoft Teams
See the users documentation about their necessary steps how to integrate ownCloudinto Microsoft Teams.
Alternative ownCloud Website Tab
As an alternative to creating an app for Microsoft Teams, it’s also possible to embedownCloud as a Microsoft Teams tab website. Tabs are Teams-aware webpagesembedded in Microsoft Teams. See the What are Microsoft Teams tabs documentationto find out more.
1. Press the [+] plus button at the top of the Teams window.
2. Search for website and add by clicking on it.
3. Add a meaningful name and the following URL replacing "cloud.example.com" withhow you access your ownCloud instance.
https://cloud.example.com/apps/msteamsbridge
Support
If you encounter problems with the integration of ownCloud and Teams, please contactus via eMail at [email protected] or look for answers to those problems at theForum
ownCloud App for Splunk
Introduction
The ownCloud App for Splunk provides a sophisticated reporting and auditing tool forownCloud service operators. It makes use of both ownCloud’s technical logs(owncloud.log), audit logs and the ownCloud Metrics API to provide insights. It showsinformation about users as well as storage and sharing usage across the instance andper user. It also makes audit evaluations quicker and more efficient. The appconfigures Splunk to retrieve and store the data and to provide visualizations, logfiltering tools and pre-defined alerts for certain events.
By aggregating, evaluating and visualizing the data provided by ownCloud, theownCloud App for Splunk allows service providers to gain insights into how theirownCloud platform is used and adopted (e.g., user, storage and sharing growth).Automatically gathering and processing ownCloud data enables a continuous reportingtool to be built up for stakeholders. For auditing purposes, the app provides very fine-grained and flexible tools that allow tracing actions by user, by operation or even by asingle file and more.
Integration | 161
The app makes all relevant ownCloud data available in Splunk. The dashboards andtools can easily be extended or modified. With just a few clicks, they can be adapted tospecific needs, using the filtering and visualization features provided by Splunk.
Prerequisites
To set up the ownCloud App for Splunk, a number of prerequisites have to be fulfilled.
• ownCloud Server has a minimum version of 10.5.• Splunk has a minimum version of 7.2.• The Metrics App is installed, configured and enabled on ownCloud Server.• The Auditing App is installed, configured and enabled on ownCloud Server.• Both components of the ownCloud App for Splunk , the app and the add-on, are
installed and configured. See below for further information on these components.
Setup & Configuration
ownCloud
1. Install and set up the Auditing App as documented. Take note of the log file paths(owncloud.log and admin_audit.log) as those will be required in the Splunkconfiguration below.
2. Install and set up the Metrics App as documented. Take special care to set theMetrics API key as it will be required in the Splunk configuration below.
Splunk
The ownCloud App for Splunk consists of two components that have to be installed andconfigured in Splunk.
• The ownCloud Add-on for Splunk gathers and stores the ownCloud data in Splunk.• The ownCloud App for Splunk adds dashboards and other functionalities to the
Splunk web interface.
Both can be installed from the Splunkbase app store. You will find the necessary initialconfiguration below.
ownCloud Add-on for Splunk (TA_owncloud)
The ownCloud Add-on for Splunk (TA_owncloud) takes care of gathering the data fromownCloud as well as storing and indexing it in Splunk. It requires a Splunk UniversalForwarder to be installed on the ownCloud host.
To get started, please follow the steps below.
1. Create an index for your ownCloud data (e.g., index=owncloud).
The ownCloud Add-on for Splunk does not ship with an index. You have to create anindex on your Splunk instance or Splunk index cluster. For further help, refer to therespective Splunk documentation.
2. Install a Splunk Universal Forwarder on your ownCloud host. For furtherinformation, consult the Splunk documentation.
3. Install the ownCloud Add-on for Splunk◦ If you’re using a standalone Splunk instance, you have to install the ownCloud
Add-on for Splunk.◦ If you’re using a distributed Splunk installation, it depends on your setup:
162 | Integration

◦ Search Heads: Installation of the ownCloud Add-on for Splunk is required.◦ Indexers: Installation of the ownCloud Add-on for Splunk is conditional. It is not
required if you use Heavy Forwarders to collect data. It is required if you useUniversal Forwarders to collect data.
◦ Universal or Heavy Forwarders: Installation of the ownCloud Add-on for Splunkrequired. In addition data and scripted input must be enabled as describedbelow.
4. Enable data and scripted input with a configuration file.
On your Universal Forwarder or Heavy Forwarder instance, you must enable inputusing the configuration files.
1. Copy $SPLUNK_HOME/etc/apps/TA_owncloud/default/inputs.conf.example to$SPLUNK_HOME/etc/apps/TA_owncloud/local directory and rename the file toinputs.conf.
2. Open $SPLUNK_HOME/etc/apps/TA_owncloud/local/inputs.conf for editing.3. Check all index = owncloud settings and change the index name if needed.4. Check the ownCloud logs locations (default: /var/www/owncloud/data/) and change
them to the values you configured on the ownCloud Server.5. Save the $SPLUNK_HOME/etc/apps/TA_owncloud/local/inputs.conf file.6. Copy $SPLUNK_HOME/etc/apps/TA_owncloud/default/owncloud.conf.example to
$SPLUNK_HOME/etc/apps/TA_owncloud/local directory and rename the file toowncloud.conf.
7. Open $SPLUNK_HOME/etc/apps/TA_owncloud/local/owncloud.conf for editing.8. Change the METRICSAPIKEY setting to the Metrics API key value you configured on
the ownCloud Server.9. Change the API_HOST setting to your ownCloud instance domain name or IP
address. This value is used to query the Metrics API for data.10. Save the $SPLUNK_HOME/etc/apps/TA_owncloud/local/owncloud.conf file.11. Restart the Splunk instance.
ownCloud App for Splunk (owncloud_app)
The ownCloud App for Splunk (owncloud_app) adds the dashboards, visualizations andother functionalities to the Splunk web interface based on the indexed data.
• Install the ownCloud App for Splunk from Splunkbase. You only have to install it onSearch Heads.
• If you created a custom index for ownCloud data, you have to modify a macro toinclude this index. You can do this in the Splunk web interface by navigating toSettings › Advanced search › Search macros and changing owncloud-indexes toyour dedicated index (default: index=owncloud).
General Topics
In this section you will find information about:
• Code Signing• General Troubleshooting• Impersonating Users
General Topics | 163
Code Signing
Introduction
ownCloud supports code signing for the core releases, and for ownCloud applications.Code signing gives our users an additional layer of security by ensuring that nobodyother than authorized persons can push updates.
It also ensures that all upgrades have been executed properly, so that no files are leftbehind, and all old files are properly replaced. In the past, invalid updates were asignificant source of errors when updating ownCloud.
All the possible errors and their explanations can be found here
FAQ
Why Did ownCloud Add Code Signing?
By supporting Code Signing we add another layer of security by ensuring that nobodyother than authorized persons can push updates for applications, and ensuring properupgrades.
Do We Lock Down ownCloud?
The ownCloud project is open source and always will be. We do not want to make itmore difficult for our users to run ownCloud. Any code signing errors on upgrades willnot prevent ownCloud from running, but will display a warning on the Admin page. Forapplications that are not tagged "Official" the code signing process is optional.
Not Open Source Anymore?
The ownCloud project is open source and always will be. The code signing process isoptional, though highly recommended. The code check for the core parts of ownCloudis enabled when the ownCloud release version branch has been set to stable.
For custom distributions of ownCloud it is recommended to change the release versionbranch in version.php to something else than "stable".
Is Code Signing Mandatory For Apps?
Code signing is optional for all third-party applications.
Fixing Invalid Code Integrity Messages
A code integrity error message (There were problems with the code integrity check.More information…) appears in a yellow banner at the top of your ownCloud Webinterface:
The yellow banner is only shown for admin users.
Clicking on this link will take you to your ownCloud admin page, which provides thefollowing options:
1. Link to this documentation entry.
164 | General Topics
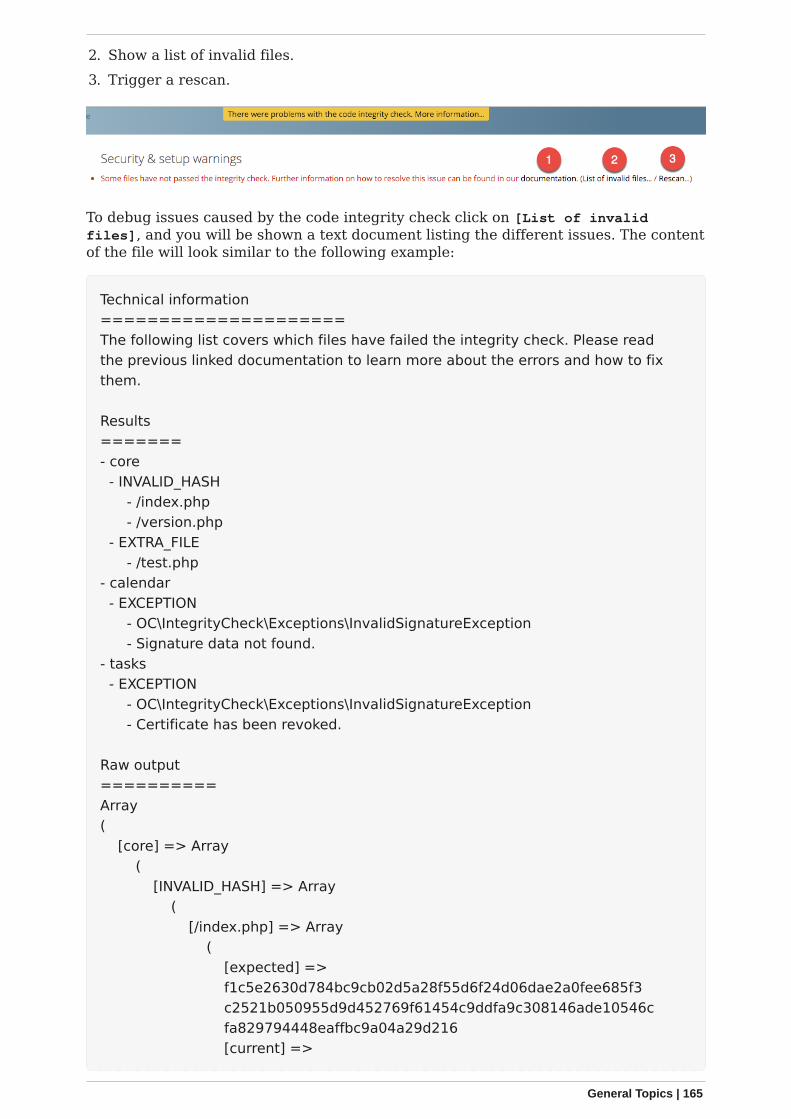
2. Show a list of invalid files.3. Trigger a rescan.
To debug issues caused by the code integrity check click on [List of invalidfiles], and you will be shown a text document listing the different issues. The contentof the file will look similar to the following example:
Technical information=====================The following list covers which files have failed the integrity check. Please readthe previous linked documentation to learn more about the errors and how to fixthem.
Results=======- core - INVALID_HASH - /index.php - /version.php - EXTRA_FILE - /test.php- calendar - EXCEPTION - OC\IntegrityCheck\Exceptions\InvalidSignatureException - Signature data not found.- tasks - EXCEPTION - OC\IntegrityCheck\Exceptions\InvalidSignatureException - Certificate has been revoked.
Raw output==========Array( [core] => Array ( [INVALID_HASH] => Array ( [/index.php] => Array ( [expected] => f1c5e2630d784bc9cb02d5a28f55d6f24d06dae2a0fee685f3 c2521b050955d9d452769f61454c9ddfa9c308146ade10546c fa829794448eaffbc9a04a29d216 [current] =>
General Topics | 165
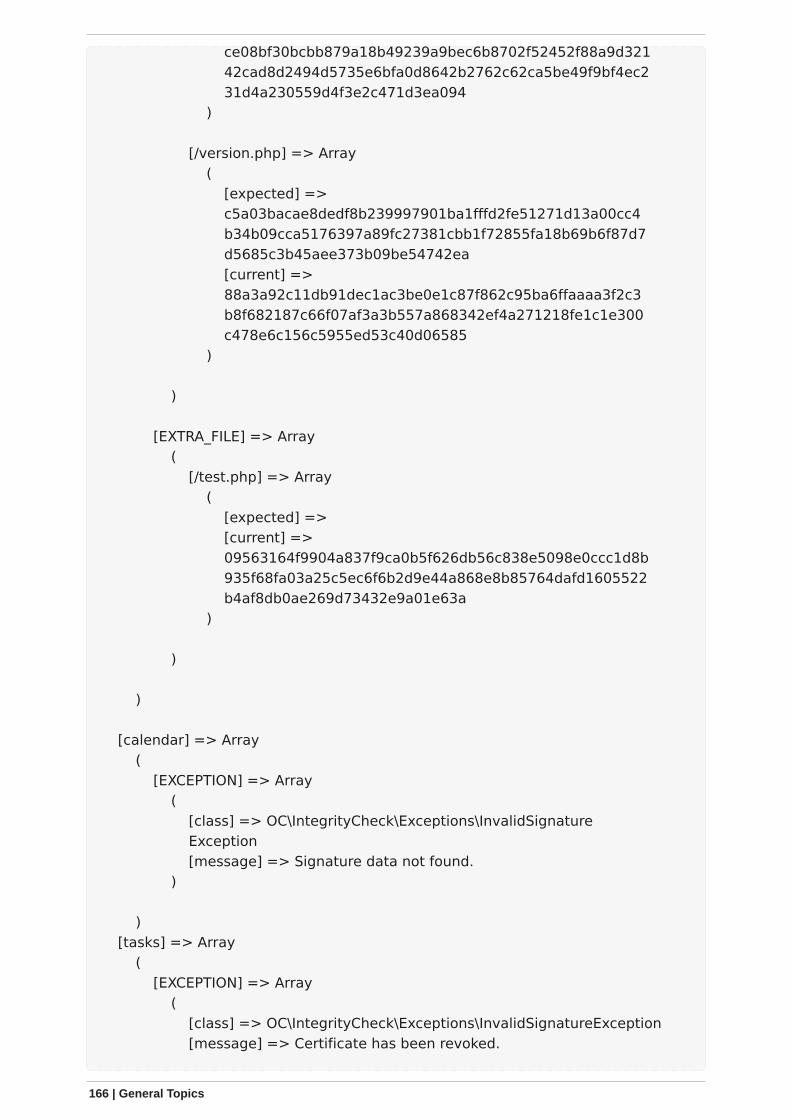
ce08bf30bcbb879a18b49239a9bec6b8702f52452f88a9d321 42cad8d2494d5735e6bfa0d8642b2762c62ca5be49f9bf4ec2 31d4a230559d4f3e2c471d3ea094 )
[/version.php] => Array ( [expected] => c5a03bacae8dedf8b239997901ba1fffd2fe51271d13a00cc4 b34b09cca5176397a89fc27381cbb1f72855fa18b69b6f87d7 d5685c3b45aee373b09be54742ea [current] => 88a3a92c11db91dec1ac3be0e1c87f862c95ba6ffaaaa3f2c3 b8f682187c66f07af3a3b557a868342ef4a271218fe1c1e300 c478e6c156c5955ed53c40d06585 )
)
[EXTRA_FILE] => Array ( [/test.php] => Array ( [expected] => [current] => 09563164f9904a837f9ca0b5f626db56c838e5098e0ccc1d8b 935f68fa03a25c5ec6f6b2d9e44a868e8b85764dafd1605522 b4af8db0ae269d73432e9a01e63a )
)
)
[calendar] => Array ( [EXCEPTION] => Array ( [class] => OC\IntegrityCheck\Exceptions\InvalidSignature Exception [message] => Signature data not found. )
) [tasks] => Array ( [EXCEPTION] => Array ( [class] => OC\IntegrityCheck\Exceptions\InvalidSignatureException [message] => Certificate has been revoked.
166 | General Topics

)
) [web] => Array ( [FILE_MISSING] => Array ( [.htaccess] => Array ( [expected] =>85ad7b1b88ad984f11f7f24f84e6aa9935eb75a36c50bf08efdbc5c295e67b3762a1bfacd8f981fb33e5c7c30d65eff7ebd6a47cb1f0de24e936a71cca2f023e [current] => )
)
)
In above error output it can be seen that:
1. In the ownCloud core (that is, the ownCloud server itself) the files index.php andversion.php do have the wrong version.
2. In the ownCloud core the unrequired extra file /test.php has been found.3. It was not possible to verify the signature of the calendar application.4. The certificate of the task application was revoked.5. The file .htaccess is missing.
You have to do the following steps to solve this:
1. Upload the correct index.php and version.php files from e.g. the archive of yourownCloud version.
2. Delete the test.php file.3. Contact the developer of the application. A new version of the app containing a
valid signature file needs to be released.4. Contact the developer of the application. A new version of the app signed with a
valid signature needs to be released.5. Download the official server tar ball and copy the .htaccess into your instance.
For other means on how to receive support please take a look at the Docs & Guidespage. After fixing these problems verify by clicking [Rescan].
When using a FTP client to upload those files make sure it is using theBinary transfer mode instead of the ASCII transfer mode.
Rescans
Rescans are triggered at installation, and by updates. You may run scans manuallywith the occ command. The first command scans the ownCloud core files, and thesecond command scans the named app. There is not yet a command to manually scanall apps:
General Topics | 167

occ integrity:check-coreocc integrity:check-app $appid
See the occ command to learn more about using occ.
Errors
Please don’t modify the mentioned signature.json itself.
The following errors can be encountered when trying to verify a code signature.
• INVALID_HASH◦ The file has a different hash than specified within signature.json. This usually
happens when the file has been modified after writing the signature data.• FILE_MISSING
◦ The file cannot be found but has been specified within signature.json. Either arequired file has been left out, or signature.json needs to be edited.
• EXTRA_FILE◦ The file does not exist in signature.json. This usually happens when a file has
been removed and signature.json has not been updated. It also happens if youhave placed additional files in your ownCloud installation folder.
• EXCEPTION◦ Another exception has prevented the code verification. There are currently
these following exceptions:▪ Signature data not found.
▪ The app has mandatory code signing enforced but no signature.json filehas been found in its appinfo folder.
▪ Certificate is not valid.▪ The certificate has not been issued by the official ownCloud Code Signing
Root Authority.▪ Certificate is not valid for required scope. (Requested: %s, current: %s)
▪ The certificate is not valid for the defined application. Certificates are onlyvalid for the defined app identifier and cannot be used for others.
▪ Signature could not get verified.▪ There was a problem with verifying the signature of signature.json.
▪ Certificate has been revoked.▪ The certificate which was used to sign the application was revoked.
General Troubleshooting
Introduction
If you have trouble installing, configuring or maintaining ownCloud, please refer toour community support channel:
• The ownCloud Forum
The ownCloud forum have a FAQ category where each topiccorresponds to typical errors or frequently occurring issues.
168 | General Topics
Please understand that this channel essentially consist of users like you helping eachother. Consider helping others when you can in return for the help you get. This is theonly way to keep a community like ownCloud healthy and sustainable!
If you are using ownCloud in a business or otherwise large scale deployment, note thatownCloud GmbH offers the Enterprise Edition with commercial support options.
Bugs
If you think you have found a bug in ownCloud, please:
• Search for a solution (see the options above)• Double-check your configuration
If you can’t find a solution, please use our bugtracker. You can generate aconfiguration report with the occ config command, with passwords automaticallyobscured.
General Troubleshooting
Check the ownCloud System Requirements, especially supported browser versions.When you see warnings about code integrity, refer to Code Signing.
Disable Third-Party Apps
Third-party apps may cause problems during upgrades. To avoid this happening, westrongly encourage administrators to always disable third-party apps before upgrades,and for troubleshooting purposes.
ownCloud Logfiles
In a standard ownCloud installation the log level is set to Normal. To find any issuesyou need to raise the log level to All in your config.php file, or to Everything on yourownCloud Admin page. Please see Logging Configuration for more information onthese log levels.
Some logging - for example JavaScript console logging - needs debugging enabled.Edit config/config.php and change 'debug' ⇒ false, to 'debug' ⇒ true, Be sure to changeit back when you are finished.
For JavaScript issues you will also need to view the javascript console. All majorbrowsers have developer tools for viewing the console. Usually you can access them bypressing F12.
For more information on developer tools for Mozilla Firefox, refer to:https://developer.mozilla.org/en-US/docs/Tools
To learn more about Chrome or Chromium developer tools, go to:https://developer.chrome.com/docs/devtools/
The logfile of ownCloud is located in the data directoryowncloud/data/owncloud.log.
PHP Version and Information
You will need to know your PHP version and configuration details. There are two waysto retrieve this information: using PHP’s phpinfo function and using a set of options toPHP on the command-line.
General Topics | 169
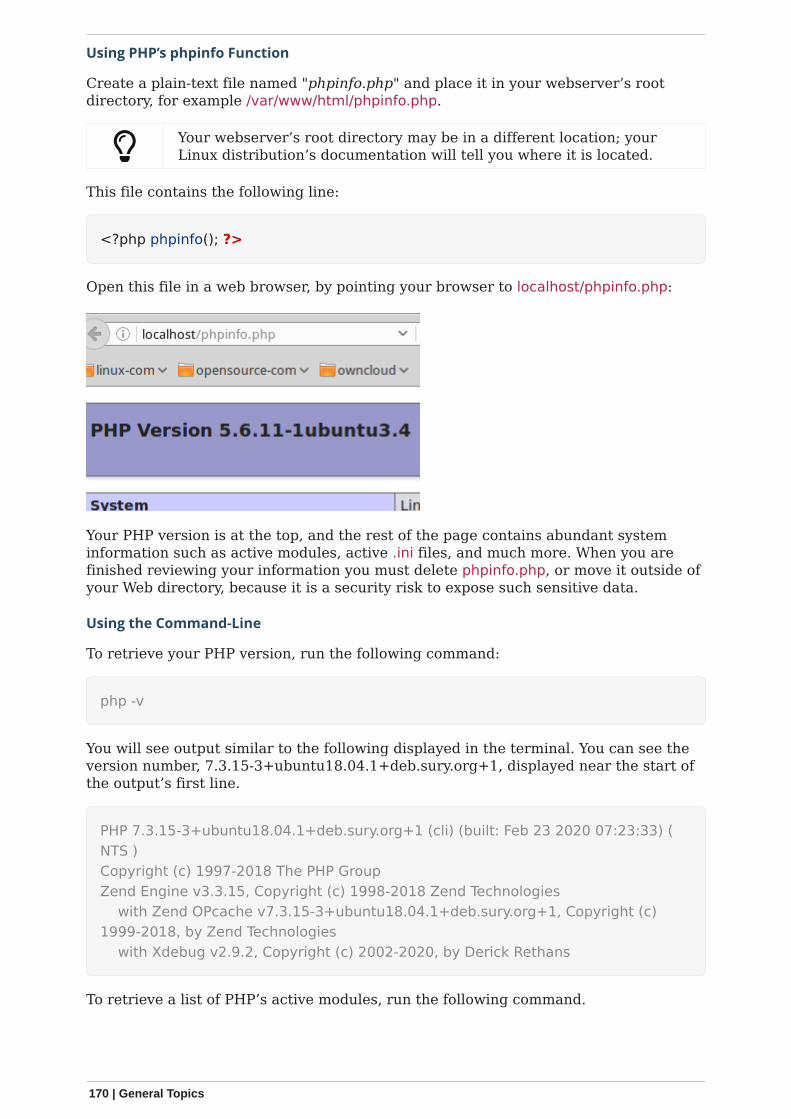
Using PHP’s phpinfo Function
Create a plain-text file named "phpinfo.php" and place it in your webserver’s rootdirectory, for example /var/www/html/phpinfo.php.
Your webserver’s root directory may be in a different location; yourLinux distribution’s documentation will tell you where it is located.
This file contains the following line:
<?php phpinfo(); ?>
Open this file in a web browser, by pointing your browser to localhost/phpinfo.php:
Your PHP version is at the top, and the rest of the page contains abundant systeminformation such as active modules, active .ini files, and much more. When you arefinished reviewing your information you must delete phpinfo.php, or move it outside ofyour Web directory, because it is a security risk to expose such sensitive data.
Using the Command-Line
To retrieve your PHP version, run the following command:
php -v
You will see output similar to the following displayed in the terminal. You can see theversion number, 7.3.15-3+ubuntu18.04.1+deb.sury.org+1, displayed near the start ofthe output’s first line.
PHP 7.3.15-3+ubuntu18.04.1+deb.sury.org+1 (cli) (built: Feb 23 2020 07:23:33) (NTS )Copyright (c) 1997-2018 The PHP GroupZend Engine v3.3.15, Copyright (c) 1998-2018 Zend Technologies with Zend OPcache v7.3.15-3+ubuntu18.04.1+deb.sury.org+1, Copyright (c)1999-2018, by Zend Technologies with Xdebug v2.9.2, Copyright (c) 2002-2020, by Derick Rethans
To retrieve a list of PHP’s active modules, run the following command.
170 | General Topics
php -m
You will see output similar to the following displayed in the terminal.
[PHP Modules]astcalendarCorectypecurldatedomexiffileinfo
To obtain information about PHP’s configuration, you can either retrieve it all at once,by running php -i or retrieve information about individual modules, by running php --rifollowed by the module’s name, such as php --ri curl.
Debugging Sync Issues
The data directory on the server is exclusive to ownCloud and must notbe modified manually.
Disregarding this can lead to unwanted behaviours like:
• Problems with sync clients• Undetected changes due to caching in the database
If you need to directly upload files from the same server please use a WebDAVcommand line client like cadaver to upload files to the WebDAV interface at:
https://example.com/owncloud/remote.php/dav
Common problems / error messages
Some common problems / error messages found in your logfiles as described above:
• SQLSTATE[HY000] [1040] Too many connections → You need to increase theconnection limit of your database, please refer to the manual of your database formore information.
• SQLSTATE[HY000]: General error: 5 database is locked → You’re using SQLite whichcan’t handle a lot of parallel requests. Please consider converting to anotherdatabase like described in converting Database Type.
• SQLSTATE[HY000]: General error: 2006 MySQL server has gone away → Please referto Troubleshooting for more information.
• SQLSTATE[HY000] [2002] No such file or directory → There is a problem accessingyour SQLite database file in your data directory (data/owncloud.db). Please checkthe permissions of this folder/file or if it exists at all. If you’re using MySQL pleasestart your database.
• Connection closed / Operation cancelled or expected filesize 4734206 got 458752 →This could be caused by wrong KeepAlive settings within your Apache config. Makesure that KeepAlive is set to On and also try to raise the limits of KeepAliveTimeout
General Topics | 171
and MaxKeepAliveRequests. On Apache with mod_php using a multi-processingmodule other than prefork could be another reason. Further information is availablein the forums.
• No basic authentication headers were found → This error is shown in yourdata/owncloud.log file. Some Apache modules like mod_fastcgi, mod_fcgid ormod_proxy_fcgi are not passing the needed authentication headers to PHP and sothe login to ownCloud via WebDAV, CalDAV and CardDAV clients is failing. Moreinformation on how to correctly configure your environment can be found at theforums.
OAuth2
ownCloud clients cannot connect to the ownCloud server
If ownCloud clients cannot connect to your ownCloud server, check to see ifPROPFIND requests receive HTTP/1.1 401 Unauthorized responses. If this ishappening, more than likely your webserver configuration is stripping out the bearerauthorization header.
If you’re using the Apache web server, add the following SetEnvIf directive to yourApache configuration, whether in the general Apache config, in a configuration includefile, or in ownCloud’s .htaccess file.
SetEnvIf Authorization "(.*)" HTTP_AUTHORIZATION=$1
Missing Data Directory
During the normal course of operations, the ownCloud data directory may betemporarily unavailable for a variety of reasons. These can include network timeoutson mounted network disks, unintentional unmounting of the partition on which thedirectory sits, or a corruption of the RAID setup. If you have experienced this, here’show ownCloud works and what you can expect.
During normal operation, ownCloud’s data directory contains a hidden file, named.ocdata. The purpose of this file is for setups where the data folder is mounted (such asvia NFS) and for some reason the mount disappeared. If the directory isn’t available,the data folder would, in effect, be completely empty and the .ocdata would bemissing. When this happens, ownCloud will return a 503 Service not available error, toprevent clients believing that the files are gone.
Troubleshooting Web server and PHP problems
Logfiles
When having issues the first step is to check the logfiles provided by PHP, the Webserver and ownCloud itself.
In the following the paths to the logfiles of a default Debian installationrunning Apache2 with mod_php is assumed. On other Web servers,Linux distros or operating systems they can differ.
• The logfile of Apache2 is located in /var/log/apache2/error.log.• The logfile of PHP can be configured in your /etc/php5/apache2/php.ini. You need to
set the directive log_errors to On and choose the path to store the logfile in theerror_log directive. After those changes you need to restart your Web server.
• The logfile of ownCloud is located in the data directory/var/www/owncloud/data/owncloud.log.
172 | General Topics
Web Server and PHP Modules
Lighttpd is not supported with ownCloud — and some ownCloudfeatures may not work at all on Lighttpd.
There are some Web server or PHP modules which are known to cause variousproblems like broken up-/downloads. The following shows a draft overview of thesemodules:
Apache
• libapache2-mod-php5filter (use libapache2-mod-php5 instead)• mod_dav• mod_deflate• mod_evasive• mod_pagespeed• mod_proxy_html (can cause broken PDF downloads)• mod_reqtimeout• mod_security• mod_spdy together with libapache2-mod-php5 / mod_php (use fcgi or php-fpm
instead)• mod_xsendfile / X-Sendfile (causing broken downloads if not configured correctly)
PHP
• eAccelerator
Troubleshooting WebDAV
General troubleshooting
ownCloud uses SabreDAV, and the SabreDAV documentation is comprehensive andhelpful.
See:
• SabreDAV FAQ• Web servers (Lists lighttpd as not recommended)• Working with large files (Shows a PHP bug in older SabreDAV versions and
information for mod_security problems)• 0 byte files (Reasons for empty files on the server)• Clients (A comprehensive list of WebDAV clients, and possible problems with each
one)• Finder, OS X’s built-in WebDAV client (Describes problems with Finder on various
Web servers)
There is also a well maintained FAQ thread available at the ownCloud Forums whichcontains various additional information about WebDAV problems.
Error 0x80070043 The network name cannot be found. while adding a network drive
The windows native WebDAV client might fail with the following error message:
General Topics | 173

Error 0x80070043 "The network name cannot be found." while adding a networkdrive
A known workaround for this issue is to update your web server configuration.
Apache
You need to add the following rule set to your main web server or virtual hostconfiguration, or the .htaccess file in your document root.
# Fixes Windows WebDav client error 0x80070043 "The network name cannot befound."RewriteEngine OnRewriteCond %{HTTP_USER_AGENT} ^(DavClnt)$RewriteCond %{REQUEST_METHOD} ^(OPTIONS)$RewriteRule .* - [R=401,L]
Troubleshooting Contacts & Calendar
Service Discovery
Some clients - especially on iOS/Mac OS X - have problems finding the proper syncURL, even when explicitly configured to use it.
If you want to use CalDAV or CardDAV clients together with ownCloud it is importantto have a correct working setup of the following URLs:
https://example.com/.well-known/carddavhttps://example.com/.well-known/caldav
Those need to be redirecting your clients to the correct DAV endpoints. If runningownCloud at the document root of your Web server the correct URL is:
https://example.com/remote.php/dav
and if running in a subfolder like owncloud:
https://example.com/owncloud/remote.php/dav
For the first case the .htaccess file shipped with ownCloud should do this work foryour when running Apache. You only need to make sure that your Web server is usingthis file.
If your ownCloud instance is installed in a subfolder called owncloud and you’rerunning Apache create or edit the .htaccess file within the document root of your Webserver and add the following lines:
Redirect 301 /.well-known/carddav /owncloud/remote.php/davRedirect 301 /.well-known/caldav /owncloud/remote.php/dav
Now change the URL in the client settings to just use:
https://example.com
174 | General Topics
instead of e.g.
https://example.com/owncloud/remote.php/dav/principals/username.
There are also several techniques to remedy this, which are described extensively atthe Sabre DAV website.
Unable to update Contacts or Events
If you get an error like:
PATCH https://example.com/remote.php/dav HTTP/1.0 501 Not Implemented
it is likely caused by one of the following reasons:
Using Pound reverse-proxy/load balancerCheck if your Pound installation supports the HTTP/1.1 verb. If it does not, updateto the latest version.
Misconfigured Web serverYour Web server is misconfigured and blocks the needed DAV methods. Please referto Troubleshooting WebDAV above for troubleshooting steps.
Client Sync Stalls
One known reason is stray locks. These should expire automatically after an hour. Ifstray locks don’t expire (identified by e.g. repeated file.txt is locked and/orException\\\\FileLocked messages in your data/owncloud.log), make sure that you arerunning system cron and not Ajax cron (See Background Jobs). See https://github.com/owncloud/core/issues/22116 and https://central.owncloud.org/t/file-is-locked-how-to-unlock/985 for some discussion and additional info of this issue.
Other issues
Some services like Cloudflare can cause issues by minimizing JavaScript and loading itonly when needed. When having issues like a not working login button or creating newusers make sure to disable such services first.
Impersonating Users
Introduction
Sometimes you may need to use your ownCloud installation as another user, whetherto help users debug an issue or to get a better understanding of what they see whenthey use their ownCloud account. The ability to do so is a feature delivered via anownCloud app called Impersonate.
This functionality is available only to administrators.
Impersonating a User
When installed, you can then impersonate users; in effect, you will be logged in as saiduser. To do so, go to the Users list, where you will now see a new column availablecalled "Impersonate", as in the screenshot below.
General Topics | 175
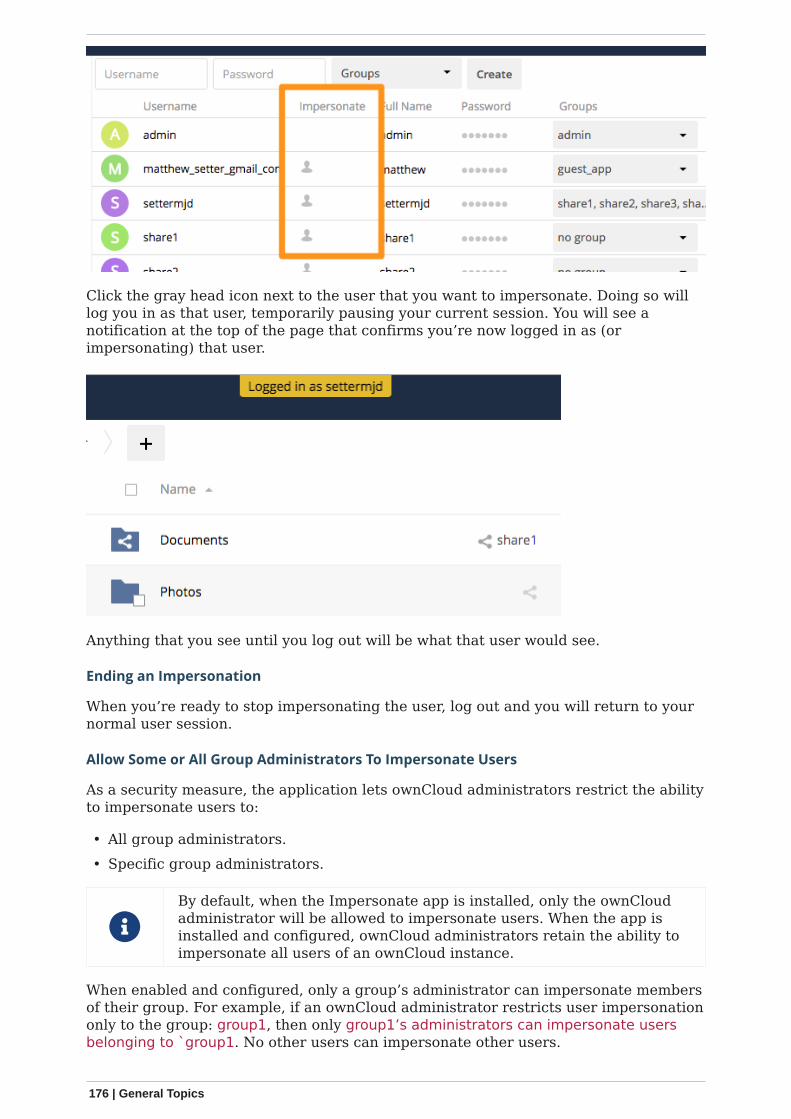
Click the gray head icon next to the user that you want to impersonate. Doing so willlog you in as that user, temporarily pausing your current session. You will see anotification at the top of the page that confirms you’re now logged in as (orimpersonating) that user.
Anything that you see until you log out will be what that user would see.
Ending an Impersonation
When you’re ready to stop impersonating the user, log out and you will return to yournormal user session.
Allow Some or All Group Administrators To Impersonate Users
As a security measure, the application lets ownCloud administrators restrict the abilityto impersonate users to:
• All group administrators.• Specific group administrators.
By default, when the Impersonate app is installed, only the ownCloudadministrator will be allowed to impersonate users. When the app isinstalled and configured, ownCloud administrators retain the ability toimpersonate all users of an ownCloud instance.
When enabled and configured, only a group’s administrator can impersonate membersof their group. For example, if an ownCloud administrator restricts user impersonationonly to the group: group1, then only group1’s administrators can impersonate usersbelonging to `group1. No other users can impersonate other users.
176 | General Topics
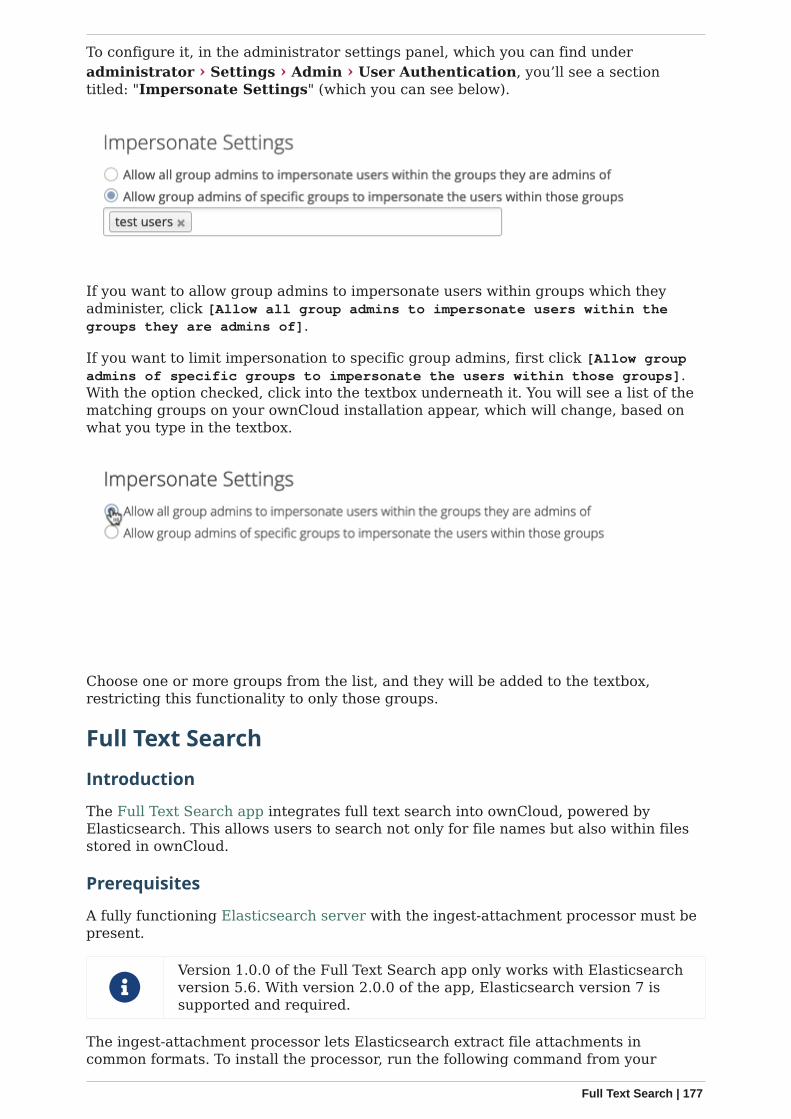
To configure it, in the administrator settings panel, which you can find underadministrator › Settings › Admin › User Authentication, you’ll see a sectiontitled: "Impersonate Settings" (which you can see below).
If you want to allow group admins to impersonate users within groups which theyadminister, click [Allow all group admins to impersonate users within thegroups they are admins of].
If you want to limit impersonation to specific group admins, first click [Allow groupadmins of specific groups to impersonate the users within those groups].With the option checked, click into the textbox underneath it. You will see a list of thematching groups on your ownCloud installation appear, which will change, based onwhat you type in the textbox.
Choose one or more groups from the list, and they will be added to the textbox,restricting this functionality to only those groups.
Full Text Search
Introduction
The Full Text Search app integrates full text search into ownCloud, powered byElasticsearch. This allows users to search not only for file names but also within filesstored in ownCloud.
Prerequisites
A fully functioning Elasticsearch server with the ingest-attachment processor must bepresent.
Version 1.0.0 of the Full Text Search app only works with Elasticsearchversion 5.6. With version 2.0.0 of the app, Elasticsearch version 7 issupported and required.
The ingest-attachment processor lets Elasticsearch extract file attachments incommon formats. To install the processor, run the following command from your
Full Text Search | 177

Elasticsearch installation directory:
bin/elasticsearch-plugin install ingest-attachmentservice elasticsearch restart
Install and Configure the Full Text Search App
To install the app, use the Marketplace app on your ownCloud server or proceedmanually:
1. Download and extract the tarball of the Full Text Search app to the apps directory(or custom apps directory) of your ownCloud instance.
2. Use the occ app:enable command to enable the search_elastic application.
To configure the Full Text Search, go to Settings › Search (admin) and set thehostname (or IP address) and port of the Elasticsearch server and click ["Setupindex"].
Configuring Elasticsearch in ownCloud
The index can also be managed from the command line, via the occsearch:index commands. These commands let administrators create,rebuild, reset, and update the search index.
To find out more about usage, check out the section in the User Manual: Search & FullText Search.
Known Limitations
Currently, the app has the following known limitations:
• Files are shown twice in search results when searching by filename.• If a shared file is renamed by the sharee (share receiver), the sharee cannot find
the file using the new filename.• Search results are not updated when a text file is rolled back to an earlier version.• The app does not return results for federated share files.• The app only works with the default encryption module "Master Key".
Mimetypes Management
Introduction
ownCloud allows you to create aliases for mimetypes and map file extensions to amimetype. These allow administrators the ability to change the existing icons thatownCloud uses to represent certain file types and folders, as well as to use customicons for mimetypes and file extensions which ownCloud doesn’t natively support. Thisis handy in a variety of situations, such as when you might want a custom audio iconfor audio mimetypes, instead of the default file icon.
178 | Mimetypes Management
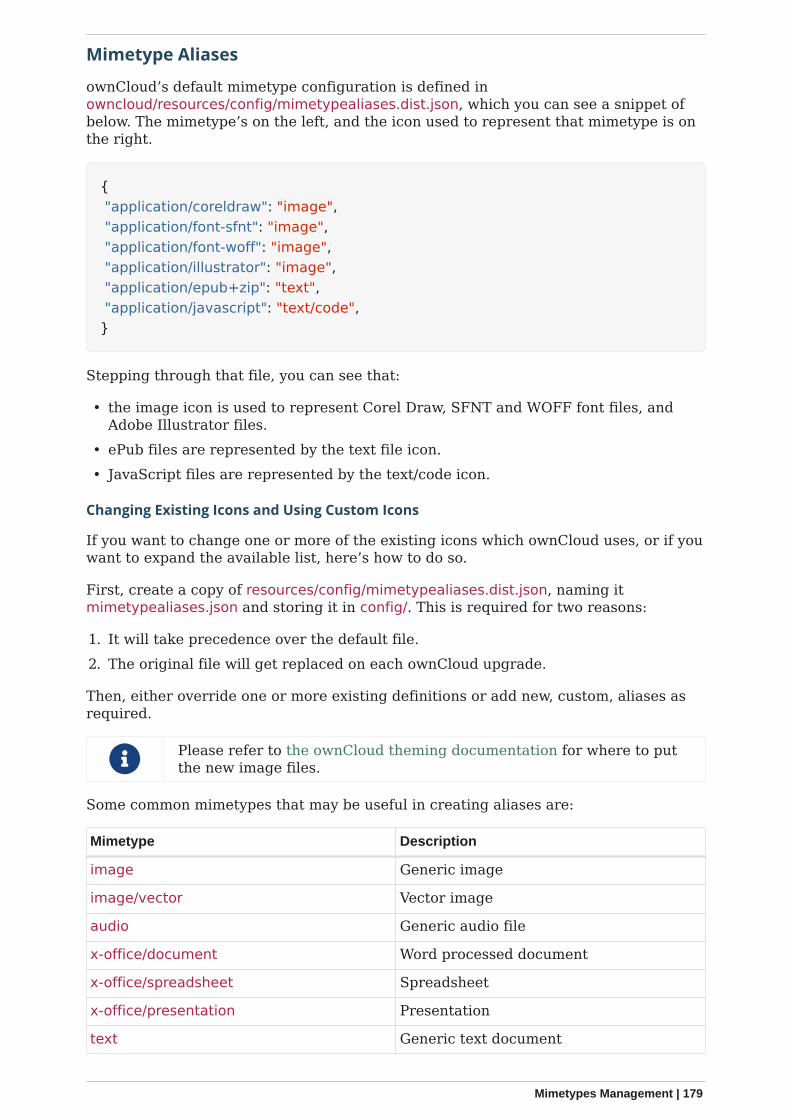
Mimetype Aliases
ownCloud’s default mimetype configuration is defined inowncloud/resources/config/mimetypealiases.dist.json, which you can see a snippet ofbelow. The mimetype’s on the left, and the icon used to represent that mimetype is onthe right.
{ "application/coreldraw": "image", "application/font-sfnt": "image", "application/font-woff": "image", "application/illustrator": "image", "application/epub+zip": "text", "application/javascript": "text/code",}
Stepping through that file, you can see that:
• the image icon is used to represent Corel Draw, SFNT and WOFF font files, andAdobe Illustrator files.
• ePub files are represented by the text file icon.• JavaScript files are represented by the text/code icon.
Changing Existing Icons and Using Custom Icons
If you want to change one or more of the existing icons which ownCloud uses, or if youwant to expand the available list, here’s how to do so.
First, create a copy of resources/config/mimetypealiases.dist.json, naming itmimetypealiases.json and storing it in config/. This is required for two reasons:
1. It will take precedence over the default file.2. The original file will get replaced on each ownCloud upgrade.
Then, either override one or more existing definitions or add new, custom, aliases asrequired.
Please refer to the ownCloud theming documentation for where to putthe new image files.
Some common mimetypes that may be useful in creating aliases are:
Mimetype Description
image Generic image
image/vector Vector image
audio Generic audio file
x-office/document Word processed document
x-office/spreadsheet Spreadsheet
x-office/presentation Presentation
text Generic text document
Mimetypes Management | 179
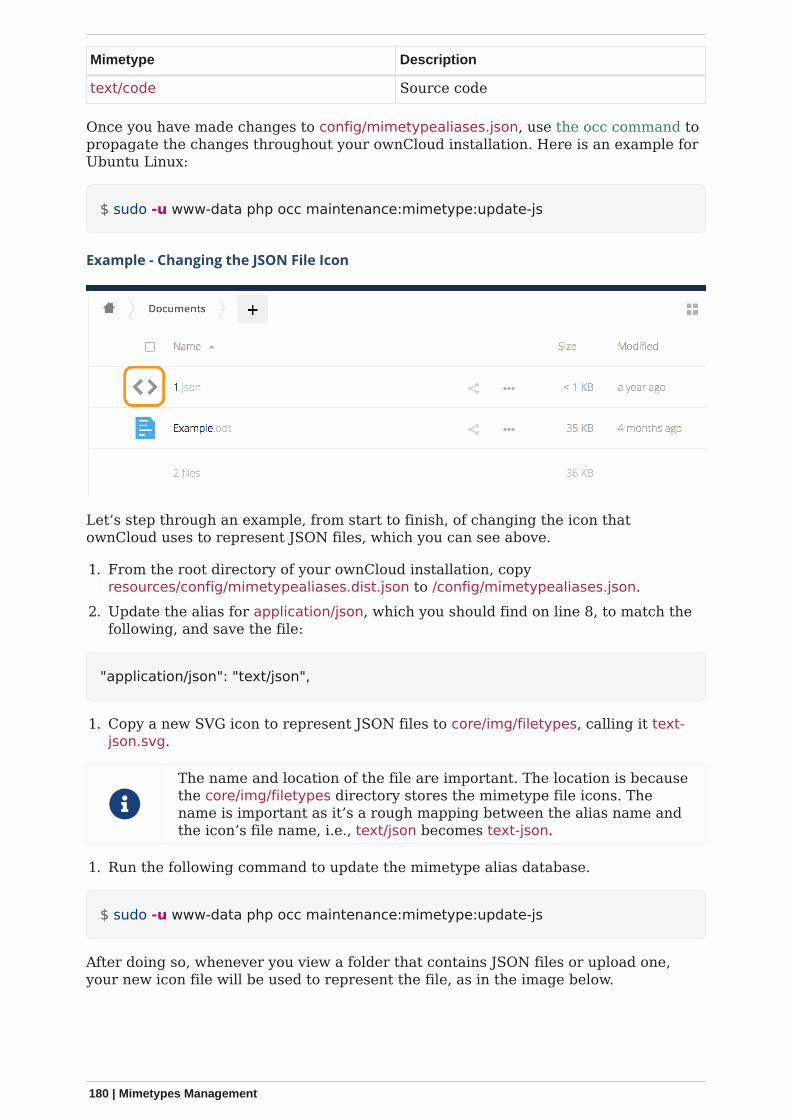
Mimetype Description
text/code Source code
Once you have made changes to config/mimetypealiases.json, use the occ command topropagate the changes throughout your ownCloud installation. Here is an example forUbuntu Linux:
$ sudo -u www-data php occ maintenance:mimetype:update-js
Example - Changing the JSON File Icon
Let’s step through an example, from start to finish, of changing the icon thatownCloud uses to represent JSON files, which you can see above.
1. From the root directory of your ownCloud installation, copyresources/config/mimetypealiases.dist.json to /config/mimetypealiases.json.
2. Update the alias for application/json, which you should find on line 8, to match thefollowing, and save the file:
"application/json": "text/json",
1. Copy a new SVG icon to represent JSON files to core/img/filetypes, calling it text-json.svg.
The name and location of the file are important. The location is becausethe core/img/filetypes directory stores the mimetype file icons. Thename is important as it’s a rough mapping between the alias name andthe icon’s file name, i.e., text/json becomes text-json.
1. Run the following command to update the mimetype alias database.
$ sudo -u www-data php occ maintenance:mimetype:update-js
After doing so, whenever you view a folder that contains JSON files or upload one,your new icon file will be used to represent the file, as in the image below.
180 | Mimetypes Management

Mimetype Mapping
ownCloud allows administrators to map a file extension to a mimetype, e.g., such asmapping files ending in mp3 to audio/mpeg. Which then, in turn, allows ownCloud toshow the audio icon.
The default file extension to mimetype mapping configuration is stored inresources/config/mimetypemapping.dist.json. This is similar toresources/config/mimetypealiases.dist.json, and also returns a basic JSON array.
{ "3gp": ["video/3gpp"], "7z": ["application/x-7z-compressed"], "accdb": ["application/msaccess"], "ai": ["application/illustrator"], "apk": ["application/vnd.android.package-archive"], "arw": ["image/x-dcraw"], "avi": ["video/x-msvideo"], "bash": ["text/x-shellscript"], "json": ["application/json", "text/plain"],}
In the example above, you can see nine mimetypes mapped to file extensions. Each ofthem, except the last (json), maps a file extension to a mimetype. Now take a look atthe JSON example.
In this case, ownCloud will first check if a mimetype alias is defined forapplication/json, in mimetypealiases.json. If it is, it will use that icon. If not, thenownCloud will fall back to using the icon for text/plain.
If you want to update or extend the existing mapping, as with updating the mimetypealiases, create a copy of resources/config/mimetypemapping.dist.json and name itmimetypemapping.json and storing it in config/. Then, in this new file, make anychanges required.
Please refer to the ownCloud theming documentation for where to putthe new image files.
Icon retrieval
When an icon is retrieved for a mimetype, if the full mimetype cannot be found, thesearch will fallback to looking for the part before the slash. Given a file with the
Mimetypes Management | 181
mimetype image/my-custom-image, if no icon exists for the full mimetype, the icon forimage will be used instead. This allows specialized mimetypes to fallback to genericicons when the relevant icons are unavailable.
Server Configuration
In this section you will find all the details you need to configure ownCloud.
Configuring the Activity App
Introduction
You can configure your ownCloud server to automatically send out e-mail notificationsto your users for various events like:
• A file or folder has been shared• A new file or folder has been created• A file or folder has been changed• A file or folder has been deleted
Users can see actions (delete, add, modify) that happen to files they have access to.Sharing actions are only visible to the sharer and recipient.
Enabling the Activity App
The Activity App is shipped and enabled by default. If it is not enabled, go to yourownCloud Apps page to enable it.
Configuring your ownCloud for the Activity App
A working e-mail configuration is required to configure your ownCloudto send out e-mail notifications. Furthermore, it is recommended toconfigure the background job Webcron or Cron.
Email notifications for shared files can be enabled/disabled by administrators with the"Allow users to send mail notifications for shared files to other users", available inSettings › Admin › Sharing. There is also a configuration option activity_expire_daysavailable in your config.php which allows you to clean-up older activities from thedatabase.
Background Jobs
Introduction
A system like ownCloud sometimes requires tasks to be done on a regular basiswithout requiring user interaction or hindering ownCloud’s performance. For thatreason, as a system administrator you can configure background jobs (for example,database clean-ups) to be executed without any user interaction.
These jobs are typically referred to as Cron Jobs. Cron jobs are commands or shell-based scripts that are scheduled to periodically run at fixed times, dates, or intervals.To run Cron jobs with ownCloud, we recommend that you use the occ system:croncommand.
Use the occ background command set to select which scheduler you want to use forcontrolling.
As an example:
182 | Server Configuration
sudo -u www-data php occ background:cron
Is the same as using the Cron section on your ownCloud Admin page.
Cron Jobs
You can schedule Cron jobs in three ways: Cron, Webcron, or AJAX. These can all beconfigured in the admin settings menu. However, the recommended method is to useCron. The following sections describe the differences between each method.
There are a number of things to keep in mind when choosing an automation option:
1. While the default method is AJAX, though the preferred way is to use Cron. Thereason for this distinction is that AJAX is easier to get up and running. As a result,it makes sense (often times) to accept it in the interests of expediency. However,doing so is known to cause issues, such as backlogs and potentially not runningevery job on a heavily-loaded system. What’s more, an increasing amount ofownCloud automation has been migrated from AJAX to Cron in recent versions. Forthis reason, we encourage you to not use it for too long — especially if your site israpidly growing.
2. While Webcron is better than AJAX, it has limitations too. For example, runningWebcron will only remove a single item from the job queue, not all of them. Cron,however, will clear the entire queue.
It’s for this reason that we encourage you to use Cron — if at allpossible.
Cron
Using the operating system Cron feature is the preferred method for executing regulartasks. This method enables the execution of scheduled jobs without the inherentlimitations which the web server might have.
For example, to run a Cron job on a *nix system every 15 minutes (recommended),under the default web server user (often, www-data or wwwrun) you must set up thefollowing Cron job to call the occ background:cron command:
# sudo crontab -u www-data -e*/15 * * * * /usr/bin/php -f /path/to/your/owncloud/occ system:cron
You can verify if the cron job has been added and scheduled by executing:
# sudo crontab -u www-data -l*/15 * * * * /usr/bin/php -f /path/to/your/owncloud/occ system:cron
You have to make sure that PHP is found by Cron; hence why we’vedeliberately added the full path.
Please refer to the crontab man page for the exact command syntax if you don’t wantto have it run every 15 minutes.
There are other methods to invoke programs by the system regularly,e.g., systemd timers
Server Configuration | 183
Webcron
By registering your ownCloud cron.php script address as an external webcron service(for example, easyCron), you ensure that background jobs are executed regularly. Touse this type of service, your external webcron service must be able to access yourownCloud server using the Internet. For example:
URL to call: http[s]://<domain-of-your-server>/owncloud/cron.php
A JAX
The AJAX scheduling method is the default option. However, it is also the leastreliable. Each time a user visits the ownCloud page, a single background job isexecuted. The advantage of this mechanism, however, is that it does not require accessto the system nor registration with a third party service. The disadvantage of thismechanism, when compared to the Webcron service, is that it requires regular visits tothe page for it to be triggered.
Especially when using the Activity App or external storages, where newfiles are added, updated, or deleted one of the other methods should beused.
Parallel Task Execution
Regardless of the approach which you take, since ownCloud 9.1, Cron jobs can be runin parallel. This is done by running background:cron multiple times. Depending on theprocess which you are automating, this may not be necessary. However, for longer-running tasks, such as those which are LDAP related, it may be very beneficial.
There is no way to do so via the ownCloud UI. But, the most direct way to do so, is byopening three console tabs and in each one run
sudo -u www-data php occ system:cron
Each of these processes would acquire their own list of jobs to process withoutoverlapping any other.
Available Background Jobs
A number of existing background jobs are available to be run just for specific tasks.
184 | Server Configuration
These jobs are generally only needed on large instances and can be runas background jobs. If the number of users in your installation rangesbetween 1,000 and 3,000, or if you’re using LDAP and it becomes abottleneck, then admins can delete several entries in the oc_jobs tableand replace them with the corresponding occ command, which you cansee here:
• OCA\\DAV\CardDAV\\SyncJob → occ dav:sync-system-addressbook• OCA\\Federation\\SyncJob → occ federation:sync-addressbooks• OCA\\Files_Trashbin\\BackgroundJob\\ExpireTrash → occ
trashbin:expire• OCA\\Files_Versions\\BackgroundJob\\ExpireVersions → occ
versions:expire
If used, these should be scheduled to run on a daily basis.
While not exhaustive, these include:
CleanupChunks
The CleanupChunks command, occ dav:cleanup-chunks, will clean up outdated chunks(uploaded files) more than a certain number of days old and needs to be added to yourcrontab.
There is no matching background job to delete from the oc_jobs table.
ExpireTrash
The ExpireTrash job, contained in OCA\Files_Trashbin\BackgroundJob\ExpireTrash, willremove any file in the ownCloud trash bin which is older than the specified maximumfile retention time. It can be run, as follows, using the OCC trashbin command:
sudo -u www-data php occ trashbin:expire
ExpireVersions
The ExpireVersions job, contained in OCA\Files_Versions\BackgroundJob\ExpireVersions,will expire versions of files which are older than the specified maximum versionretention time. It can be run, as follows, using the OCC versions command:
sudo -u www-data php occ versions:expire
Please take care when adding ExpireTrash and ExpireVersions as Cronjobs. Make sure that they’re not started in parallel on multiplemachines. Running in parallel on a single machine is fine. But,currently, there isn’t sufficient locking in place to prevent them fromconflicting with each other if running in parallel across multiplemachines.
SyncJob (CardDAV)
The CardDAV SyncJob, contained in OCA\DAV\CardDAV\SyncJob, syncs the local systemaddress book, updating any existing contacts, and deleting any expired contacts. It canbe run, as follows, using the OCC dav command:
Server Configuration | 185
sudo -u www-data php occ dav:sync-system-addressbook
SyncJob (Federation)
OCAFederationSyncJob
It can be run, as follows, using the OCC federation sync command:
sudo -u www-data php occ federation:sync-addressbooks
Troubleshooting
Forbidden error for Scanner.php
If you find a Forbidden error message in your log files, with a reference to theScanner.php file, then you should:
• Check if you have any shares with the status pending.• Configure conditional logging for cron to see more output.
Memory Caching
Introduction
You can significantly improve ownCloud server performance by using memory caching.This is the process of storing frequently requested objects in memory for fasterretrieval later. There are two types of memory caching available:
A PHP opcode Cache (OPcache)An opcode cache stores compiled PHP scripts (opcodes) so they don’t need to beparsed and compiled every time they are called. These compiled PHP scripts arestored in shared memory on the server on which they’re compiled.
A Data CacheA data cache stores copies of data, templates, and other types of information-basedfiles. Depending on the cache implementation, it can be either local or specific toone server or distributed across multiple servers. This cache type is ideal when youhave a scale-out installation.
In addition, we suggest to use External Transactional File Locking which reducesload on the database significantly.
Supported Caching Backends
The caching backends supported by ownCloud are:
• OpcacheThis is an opcode cache only and does not cache any data. Opcache is bundled withPHP from version 5.5.0 and later.
• APCuThis is a data cache only and does not cache any opcode. APCu 4.0.6 and up isrequired.
• RedisThis is an in-memory data structure store (cache) for single and multi-serverownCloud installations, which provides file locking and can be set up in local or
186 | Server Configuration
distributed environments. Consider Redis younger, richer in features and moreconfigurable than memcached. At least version 2.2.6 or higher of the PHP Redisextension is required.
• MemcachedThis is a distributed cache for multi-server ownCloud installations and has no filelocking capabilities.
See the following page to learn more about the Redis vs. Memcached – 2021Comparison.
You may use both a local and a distributed cache. The recommendedownCloud caches are APCu and Redis. If you do not install and enable alocal memory cache you will see a warning on your ownCloud adminpage. If you enable only a distributed cache in your config.php(memcache.distributed) and not a local cache (memcache.local) you willstill see the cache warning.
Cache Directory Location
The cache directory defaults to data/$user/cache where $user is the current user. Youmay use the 'cache_path' directive in your configuration for different locations. Fordetails see the Define the location of the cache folder description.
Cache Types
Opcache
Opcache should be enabled by default in your php installation. To check it, run thefollowing command:
php -r 'phpinfo();' | grep opcache.enable
APCu
The easiest cache to use is APCu, because it is a data cache, very fast and nothingneeds to be configured. APCu can not be used when needed to run on an externalserver.
Installing APCu
# On Ubuntu/Debian/Mint systemssudo apt install php-apcu
With that done, assuming that you don’t encounter any errors, restart Apache and theextension is ready to use.
Redis
Redis is an excellent modern memory cache to use for both distributed caching and asa local cache for transactional file locking, because it guarantees that cached objectsare available for as long as they are needed.
The performance of Redis when used with a socket connection is close to theperformance of APCu.
The Redis PHP module must be at least version 2.2.6 or higher.
Server Configuration | 187
The default shipped Redis version and the php-redis extension forUbuntu 20.04 is 5.x. With Redis version 6, a new authenticationmechanism has been introduced named ACL (Access Control Lists).ownCloud does not currently support Redis ACL´s, but does support thepassword protection available with current Redis versions.
Installing Redis
If you have Ubuntu 16.04 or higher:
sudo apt install redis-server php-redis
The installer will automatically launch Redis and configure it to launch at startup.
After that, assuming that you don’t encounter any errors, restart Apache and theextension is ready to use.
Additional notes for Redis vs. APCu on Memory Caching
APCu is faster at local caching than Redis. If you have enough memory, use APCu formemory caching and Redis for file locking. If you are low on memory, use Redis forboth.
Clearing the Redis Cache
The Redis cache can be flushed from the command-line using the redis-cli tool, as inthe following example:
sudo redis-cliSELECT <dbIndex>FLUSHDB
<dbIndex> is the number of the Redis database where the cache is stored. It is zero bydefault at ownCloud. To check what yours is currently set to for ownCloud, check thedbindex value in config/config.php. To change it, see the Memory caching backendconfiguration
Out of the box, every Redis instance supports 16 databases so<dbIndex> has to be set between 0 and 15.
Please read more about the instructions for the select and flushdb command.
Memcached
Memcached is a reliable old-timer for shared caching on distributed servers. Itperforms well with ownCloud with one exception: it is not suitable to use withTransactional File Locking. This is because it does not store locks, and data candisappear from the cache at any time. Given that, Redis is the best memory cache touse.
Be sure to install the memcached PHP module, and not memcache, asin the following examples. ownCloud supports only the memcachedPHP module.
188 | Server Configuration
Installing Memcached
On Ubuntu/Debian/Mint
On Ubuntu/Debian/Mint run the following command:
sudo apt-get install memcached php-memcached
The installer will automatically start memcached and configure it tolaunch at startup.
Configuration File Paths
PHP Version Filename
7.2 /etc/php/7.2/mods-available/memcached.ini
After that, assuming that you don’t encounter any errors:
1. Restart your Web server2. Add the appropriate entries to config.php (which you can find an example of below)3. Refresh your ownCloud admin page
Clearing the Memcached Cache
The Memcached cache can be flushed from the command line, using a range ofcommon Linux/Unix tools including netcat and telnet. The following example usestelnet to log in, run the flush_all command, and log out:
telnet localhost 11211flush_allquit
Configuring Memory Caching
Memory caches must be explicitly configured in ownCloud by:
1. Installing and enabling your desired cache (whether that be the PHP extensionand/or the caching server).
2. Adding the appropriate entry to ownCloud’s config.php.
See the Memory caching backend configuration for an overview of all possible configparameters, as the examples below only show basic configuration settings. Afterinstalling and enabling your chosen memory cache, verify that it is active by viewingthe PHP configuration details.
Opcache Configuration
Opcache should already be configured with PHP 7, see the opcache documentation fordetails.
APCu Configuration
To use APCu, add this line to config.php:
Server Configuration | 189
'memcache.local' => '\OC\Memcache\APCu',
With that done, refresh your ownCloud admin page, and the cache warning shoulddisappear.
Redis Configuration
Redis is very configurable; consult the Redis documentation to learn more.
Regardless of whether you have setup Redis to use TCP or a Unix socket, werecommend adding the following for best performance. This enables ExternalTransactional File Locking based on Redis:
'filelocking.enabled' => true,'memcache.locking' => '\OC\Memcache\Redis',
Redis Configuration Using TCP
The following example config.php configuration connects to a Redis cache via TCP:
'memcache.local' => '\OC\Memcache\Redis','redis' => [ 'host' => 'localhost', // For a Unix domain socket, use'/var/run/redis/redis.sock' 'port' => 6379, // Set to 0 when using a Unix socket 'timeout' => 0, // Optional, keep connection open forever 'password' => '', // Optional, if not defined no password will be used. 'dbindex' => 0, // Optional, if undefined SELECT will not run and will // use Redis Server's default DB Index.],
Redis Configuration Using Unix Sockets
If Redis is running on the same server as ownCloud, it is recommended to configure itto use Unix sockets. Then, configure ownCloud to communicate with Redis as in thefollowing example.
# Change the host value, based on the socket's location in your distribution'memcache.local' => '\OC\Memcache\Redis','redis' => [ 'host' => '/var/run/redis/redis.sock', 'port' => 0, 'password' => '', // Optional, if not defined no password will be used. 'dbindex' => 0, // Optional, if undefined SELECT will not run and will // use Redis Server's default DB Index.],
If setting up Redis to be accessed via a Unix socket from a webserver user, thenconsider the following:
190 | Server Configuration
1. Make the webserver user www-data member of the group redis in /etc/group, e.g.,redis:x:110:www-data
2. In your Redis configuration (/etc/redis/redis.conf) set unixsocketperm to 770
To see a benchmark comparison, run:
sudo redis-benchmark -q -n 100000sudo redis-benchmark -s /var/run/redis/redis-server.sock -q -n 100000
In the following table, you will see an example gain of about +20% when using socketscompared to TCP on localhost. The values can differ in your environment. Please do alocal check.
Test TCP (requests/s) Socket(requests/s)
Gain (%)
PING_INLINE
15527.95 23518.35 +34
PING_BULK
16946.28 23239.60 +27
SET 18351.99 22789.43 +19
GET 18850.14 22747.95 +17
INCR 18663.68 22914.76 +18
LPUSH 19109.50 24183.79 +21
RPUSH 19076.69 23196.47 +18
LPOP 18460.40 23485.21 +21
RPOP 19058.51 24752.47 +23
SADD 18932.22 22391.40 +15
HSET 18491.12 20785.70 +11
SPOP 19069.41 23282.89 +18
LPUSH 19087.61 23764.26 +20
LRANGE_100
15288.18 17882.69 +15
LRANGE_300
9067.00 10004.00 +10
LRANGE_500
6878.53 7496.25 +8
LRANGE_600
5379.24 6102.77 +12
MSET (10keys)
19297.57 18178.51 -6
Memcached Configuration
This example uses APCu for the local cache, Memcached as the distributed memorycache, and lists all the servers in the shared cache pool with their port numbers:
Server Configuration | 191
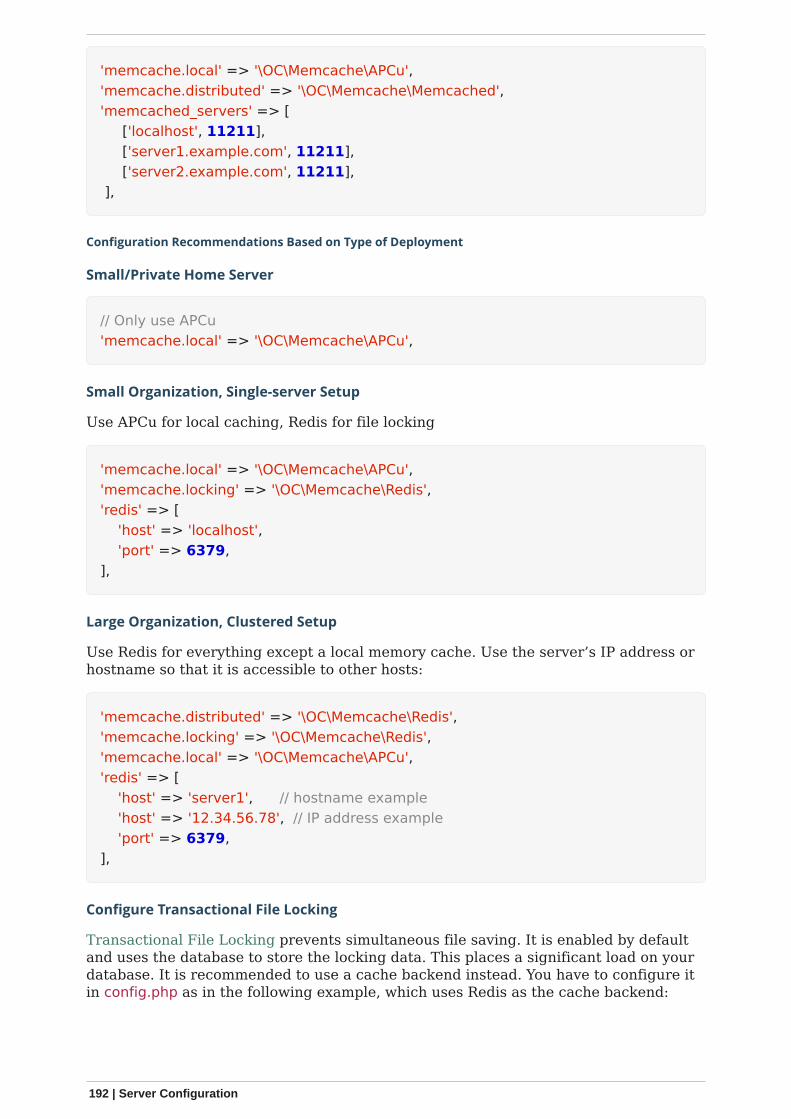
'memcache.local' => '\OC\Memcache\APCu','memcache.distributed' => '\OC\Memcache\Memcached','memcached_servers' => [ ['localhost', 11211], ['server1.example.com', 11211], ['server2.example.com', 11211], ],
Configuration Recommendations Based on Type of Deployment
Small/Private Home Server
// Only use APCu'memcache.local' => '\OC\Memcache\APCu',
Small Organization, Single-server Setup
Use APCu for local caching, Redis for file locking
'memcache.local' => '\OC\Memcache\APCu','memcache.locking' => '\OC\Memcache\Redis','redis' => [ 'host' => 'localhost', 'port' => 6379,],
Large Organization, Clustered Setup
Use Redis for everything except a local memory cache. Use the server’s IP address orhostname so that it is accessible to other hosts:
'memcache.distributed' => '\OC\Memcache\Redis','memcache.locking' => '\OC\Memcache\Redis','memcache.local' => '\OC\Memcache\APCu','redis' => [ 'host' => 'server1', // hostname example 'host' => '12.34.56.78', // IP address example 'port' => 6379,],
Configure Transactional File Locking
Transactional File Locking prevents simultaneous file saving. It is enabled by defaultand uses the database to store the locking data. This places a significant load on yourdatabase. It is recommended to use a cache backend instead. You have to configure itin config.php as in the following example, which uses Redis as the cache backend:
192 | Server Configuration

'filelocking.enabled' => true,'memcache.locking' => '\OC\Memcache\Redis','redis' => [ 'host' => 'localhost', 'port' => 6379, 'timeout' => 0, 'password' => '', // Optional, if not defined no password will be used. ],
For enhanced security, it is recommended to configure Redis to requirea password. See https://redis.io/topics/security for more information.
Caching Exceptions
If ownCloud is configured to use either Memcached or Redis as a memory cache, youmay encounter issues with functionality. When these occur, it is usually a result of PHPbeing incorrectly configured or the relevant PHP extension not being available.
In the table below, you can see all of the known reasons for reduced or brokenfunctionality related to caching.
Setup/Configuration Result
If file locking is enabled, but thelocking cache class is missing,then an exception will appear inthe web UI
The application will not be usable
If file locking is enabled and thelocking cache is configured, butthe PHP module missing.
There will be a white page/exception in web UI. Itwill be a full page issue, and the application willnot be usable
All enabled, but the Redis serveris not running
The application will be usable. But any fileoperation will return a "500 Redis went away"exception
If Memcache is configured forlocal and distributed, but the classis missing
There will be a white page and an exceptionwritten to the logs, This is because autoloadingneeds the missing class. So there is no way toshow a page
Config.php Parameters
Introduction
ownCloud uses the config/config.php file to control server operations.config/config.sample.php lists all the configurable parameters within ownCloud, alongwith example or default values. This document provides a more detailed reference.Most options are configurable on your Admin page, so it is usually not necessary toedit config/config.php.
Server Configuration | 193
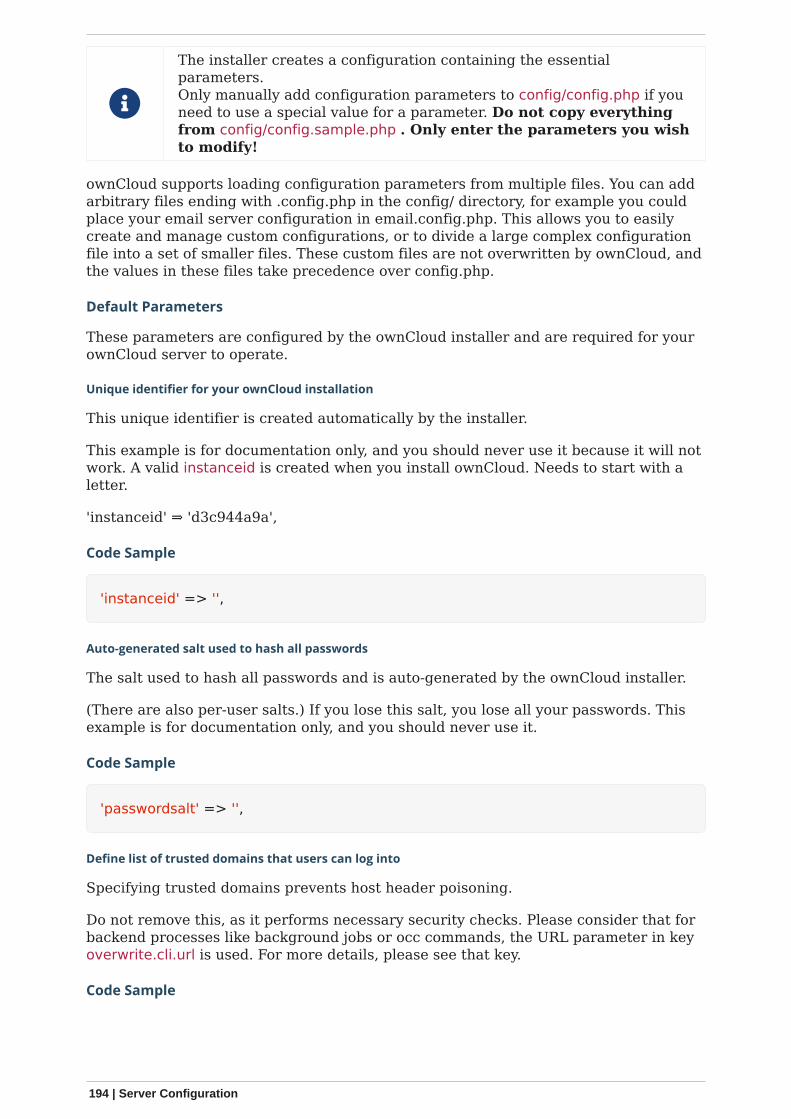
The installer creates a configuration containing the essentialparameters.Only manually add configuration parameters to config/config.php if youneed to use a special value for a parameter. Do not copy everythingfrom config/config.sample.php . Only enter the parameters you wishto modify!
ownCloud supports loading configuration parameters from multiple files. You can addarbitrary files ending with .config.php in the config/ directory, for example you couldplace your email server configuration in email.config.php. This allows you to easilycreate and manage custom configurations, or to divide a large complex configurationfile into a set of smaller files. These custom files are not overwritten by ownCloud, andthe values in these files take precedence over config.php.
Default Parameters
These parameters are configured by the ownCloud installer and are required for yourownCloud server to operate.
Unique identifier for your ownCloud installation
This unique identifier is created automatically by the installer.
This example is for documentation only, and you should never use it because it will notwork. A valid instanceid is created when you install ownCloud. Needs to start with aletter.
'instanceid' ⇒ 'd3c944a9a',
Code Sample
'instanceid' => '',
Auto-generated salt used to hash all passwords
The salt used to hash all passwords and is auto-generated by the ownCloud installer.
(There are also per-user salts.) If you lose this salt, you lose all your passwords. Thisexample is for documentation only, and you should never use it.
Code Sample
'passwordsalt' => '',
Define list of trusted domains that users can log into
Specifying trusted domains prevents host header poisoning.
Do not remove this, as it performs necessary security checks. Please consider that forbackend processes like background jobs or occ commands, the URL parameter in keyoverwrite.cli.url is used. For more details, please see that key.
Code Sample
194 | Server Configuration
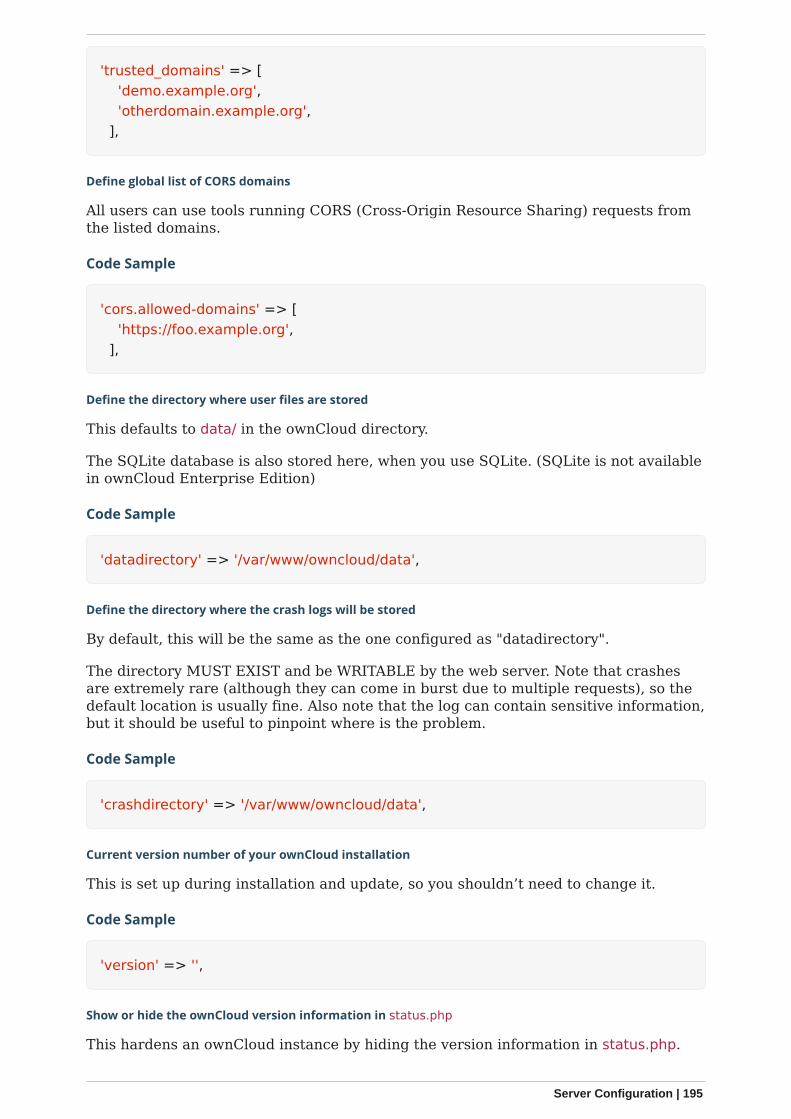
'trusted_domains' => [ 'demo.example.org', 'otherdomain.example.org', ],
Define global list of CORS domains
All users can use tools running CORS (Cross-Origin Resource Sharing) requests fromthe listed domains.
Code Sample
'cors.allowed-domains' => [ 'https://foo.example.org', ],
Define the directory where user files are stored
This defaults to data/ in the ownCloud directory.
The SQLite database is also stored here, when you use SQLite. (SQLite is not availablein ownCloud Enterprise Edition)
Code Sample
'datadirectory' => '/var/www/owncloud/data',
Define the directory where the crash logs will be stored
By default, this will be the same as the one configured as "datadirectory".
The directory MUST EXIST and be WRITABLE by the web server. Note that crashesare extremely rare (although they can come in burst due to multiple requests), so thedefault location is usually fine. Also note that the log can contain sensitive information,but it should be useful to pinpoint where is the problem.
Code Sample
'crashdirectory' => '/var/www/owncloud/data',
Current version number of your ownCloud installation
This is set up during installation and update, so you shouldn’t need to change it.
Code Sample
'version' => '',
Show or hide the ownCloud version information in status.php
This hardens an ownCloud instance by hiding the version information in status.php.
Server Configuration | 195

This can be a legitimate step. Please consult the documentation before enabling this.
Code Sample
'version.hide' => false,
Show or hide the server hostname in status.php
Optional config option, defaults to hidden.
Code Sample
'show_server_hostname' => false,
Show the short hostname in status.php
Optional config option, defaults to use the gethostname() return value.
Code Sample
'use_relative_domain_name' => false,
Identify the database used with this installation
See also config option supportedDatabases
Available: - sqlite (SQLite3 - Not in Enterprise Edition) - mysql (MySQL/MariaDB) -pgsql (PostgreSQL) - oci (Oracle - Enterprise Edition Only)
Code Sample
'dbtype' => 'mysql',
Define the database server host name
For example localhost, hostname, hostname.example.com, or the IP address.
To specify a port use: hostname:##; To specify a Unix socket use:localhost:/path/to/socket.
Code Sample
'dbhost' => '',
Define the ownCloud database name
The name of the ownCloud database which is set during installation.
You should not need to change this.
Code Sample
196 | Server Configuration
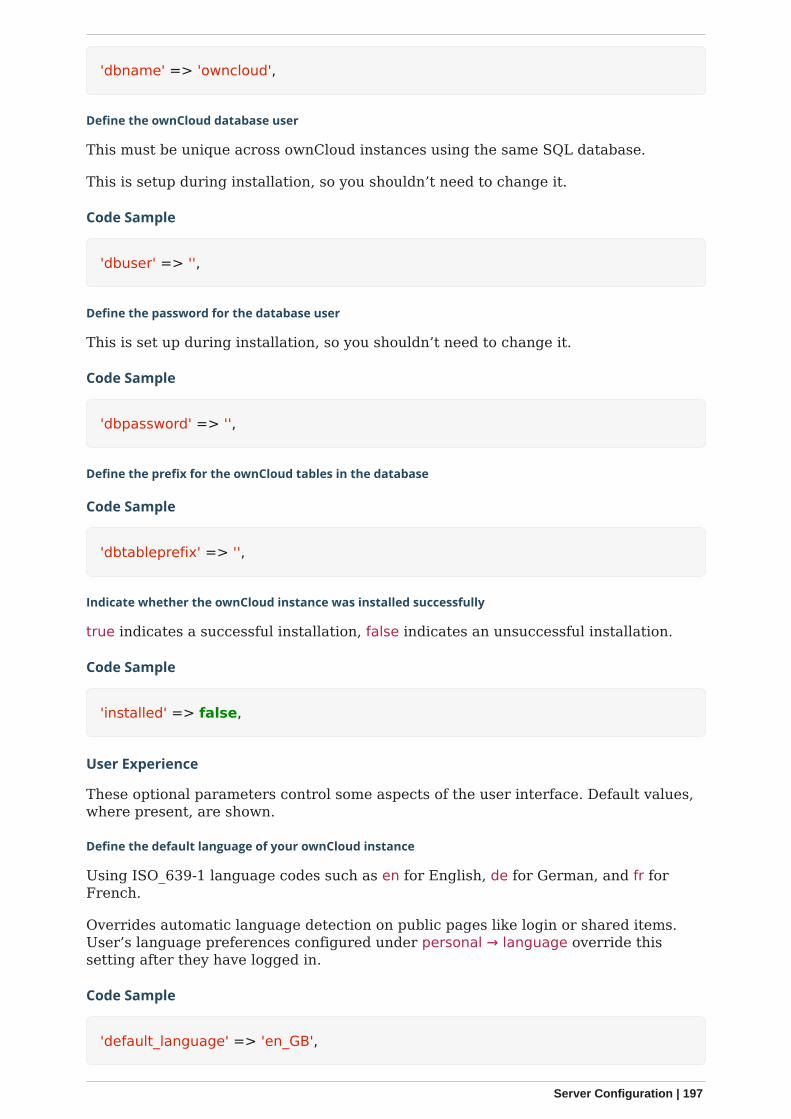
'dbname' => 'owncloud',
Define the ownCloud database user
This must be unique across ownCloud instances using the same SQL database.
This is setup during installation, so you shouldn’t need to change it.
Code Sample
'dbuser' => '',
Define the password for the database user
This is set up during installation, so you shouldn’t need to change it.
Code Sample
'dbpassword' => '',
Define the prefix for the ownCloud tables in the database
Code Sample
'dbtableprefix' => '',
Indicate whether the ownCloud instance was installed successfully
true indicates a successful installation, false indicates an unsuccessful installation.
Code Sample
'installed' => false,
User Experience
These optional parameters control some aspects of the user interface. Default values,where present, are shown.
Define the default language of your ownCloud instance
Using ISO_639-1 language codes such as en for English, de for German, and fr forFrench.
Overrides automatic language detection on public pages like login or shared items.User’s language preferences configured under personal → language override thissetting after they have logged in.
Code Sample
'default_language' => 'en_GB',
Server Configuration | 197
Define the default app to open on user login
Use the app names as they appear in the URL after clicking them in the Apps menu,such as files, documents or calendar etc. You can use a comma-separated list of appnames, so if the first app is not enabled for a user then ownCloud will try the secondone, and so on. If no enabled apps are found it defaults to the Files app.
Code Sample
'defaultapp' => 'files',
Enable or disable avatars or user profile photos
true enables avatars, or user profile photos, false disables them.
These appear on the User page, on user’s Personal pages and are used by some apps(contacts, mail, etc).
Code Sample
'enable_avatars' => true,
Allow or disallow users to change their display names
true allows users to change their display names (on their Personal pages), falseprevents them from changing their display names.
Code Sample
'allow_user_to_change_display_name' => true,
Define the lifetime of the remember login cookie
The remember login cookie is set when the user clicks the remember checkbox on thelogin screen. The default is 15 days, expressed in seconds.
Code Sample
'remember_login_cookie_lifetime' => 60*60*24*15,
Define the lifetime of a session after inactivity
The default is 20 minutes, expressed in seconds.
Code Sample
'session_lifetime' => 60 * 20,
Enable or disable session keep-alive when a user is logged in to the Web UI
Enabling this sends a "heartbeat" to the server to keep it from timing out.
198 | Server Configuration
Code Sample
'session_keepalive' => true,
Enforce token only authentication for apps and clients connecting to ownCloud
If enabled, all access requests using the users password are blocked for enhancedsecurity.
Users have to generate special app-passwords (tokens) for their apps or clients in theirpersonal settings which are further used for app or client authentication. Browserlogon is not affected.
Code Sample
'token_auth_enforced' => false,
Enforce strict login check with user backend
If enabled, strict login check for password in user backend will be enforced, meaningonly the login name typed by the user would be validated. With this configurationenabled, e.g. an additional check for email will not be performed.
Code Sample
'strict_login_enforced' => false,
Define additional login buttons on the logon screen
Provides the ability to create additional login buttons on the logon screen, for e.g.,SSO integration 'login.alternatives' ⇒ [ ['href' ⇒'https://www.testshib.org/Shibboleth.sso/ProtectNetwork?target=https%3A%2F%2Fmy.owncloud.tld%2Flogin%2Fsso-saml%2F', 'name' ⇒ 'ProtectNetwork', 'img' ⇒'/img/PN_sign-in.gif'], ['href' ⇒'https://www.testshib.org/Shibboleth.sso/OpenIdP.org?target=https%3A%2F%2Fmy.owncloud.tld%2Flogin%2Fsso-saml%2F', 'name' ⇒ 'OpenIdP.org', 'img' ⇒'/img/openidp.png'], ]
Code Sample
'login.alternatives' => [],
Enable or disable ownCloud’s built-in CSRF protection mechanism
In some specific setups CSRF protection is handled in the environment, e.g., runningF5 ASM. In these cases the built-in mechanism is not needed and can be disabled.Generally speaking, however, this config switch should be left unchanged.
leave this as is if you’re not sure what it does.
Code Sample
Server Configuration | 199

'csrf.disabled' => false,
Define how to relax same site cookie settings
Possible values: Strict, Lax or None. Setting the same site cookie to None is necessaryin case of OpenID Connect. For more information about the impact of the values see:https://developer.mozilla.org/en-US/docs/Web/HTTP/Headers/Set-Cookie/SameSite#values and https://web.dev/schemeful-samesite/
Code Sample
'http.cookie.samesite' => 'Strict',
Define the directory where the skeleton files are located
These files will be copied to the data directory of new users.
Leave this directory empty if you do not want to copy any skeleton files. A valid pathmust be given for this key otherwise errors will be generated in owncloud.log.
Code Sample
'skeletondirectory' => '/path/to/owncloud/core/skeleton',
Define the user_backends app
Those need to be enabled first and allow you to configure alternate authenticationbackends.
Supported backends are: IMAP (OC_User_IMAP), SMB (OC_User_SMB), and FTP(OC_User_FTP).
Code Sample
'user_backends' => [ [ 'class' => 'OC_User_IMAP', 'arguments' => ['{imap.gmail.com:993/imap/ssl}INBOX'] ] ],
Define a custom link to reset passwords
If your user backend does not allow password resets (e.g. when it’s a read-only userbackend like LDAP), you can specify a custom link, where the user is redirected to,when clicking the "reset password" link after a failed login-attempt.
If you do not want to provide any link, replace the URL with 'disabled'.
Code Sample
200 | Server Configuration
'lost_password_link' => 'https://example.org/link/to/password/reset',
Allow medial search on user account properties
These account properties can be display name, user id, email, and other search terms.
Allows finding 'Alice' when searching for 'lic'. May slow down user search. Disable thisif you encounter slow username search in the sharing dialog.
Code Sample
'accounts.enable_medial_search' => true,
Allow medial search on the group id
Allows finding 'test' in groups when searching for 'es'.
This is only used in the DB group backend (local groups). This won’t be used againstLDAP, Shibboleth or any other group backend.
Code Sample
'groups.enable_medial_search' => true,
Define minimum characters entered before a search returns results
Defines the minimum characters entered before a search returns results for users orgroups in the share autocomplete form. Lower values increase search time especiallyfor large backends.
Any exact matches to a user or group will be returned, even though less than theminimum characters have been entered. The search is case insensitive. For example,entering "tom" will always return "Tom" if there is an exact match.
Code Sample
'user.search_min_length' => 2,
Mail Parameters
These configure the email settings for ownCloud notifications and password resets.
Define the email RETURN address
The return address that you want to appear on emails sent by the ownCloud server.
Example: [email protected], substituting your own domain, of course.
Code Sample
'mail_domain' => 'example.com',
Server Configuration | 201
Define the email FROM address
FROM address that overrides the built-in sharing-noreply and lostpassword-noreplyFROM addresses.
Code Sample
'mail_from_address' => 'owncloud',
Enable or disable SMTP class debugging
Code Sample
'mail_smtpdebug' => false,
Define the mode for sending an email
Modes to use for sending mail: sendmail, smtp, qmail or php.
If you are using local or remote SMTP, set this to smtp.
If you are using PHP mail you must have an installed and working email system on theserver. The program used to send email is defined in the php.ini file.
For the sendmail option you need an installed and working email system on the server,with /usr/sbin/sendmail installed on your Unix system.
For qmail the binary is /var/qmail/bin/sendmail, and it must be installed on your Unixsystem.
Code Sample
'mail_smtpmode' => 'sendmail',
Define the IP address of your mail server host
Depends on mail_smtpmode. May contain multiple hosts separated by a semi-colon.
If you need to specify the port number, append it to the IP address separated by acolon, like this: 127.0.0.1:24.
Code Sample
'mail_smtphost' => '127.0.0.1',
Define the port for sending an email
Depends on mail_smtpmode.
Code Sample
'mail_smtpport' => 25,
202 | Server Configuration

Define the SMTP server timeout
Depends on mail_smtpmode. Sets the SMTP server timeout in seconds.
You may need to increase this if you are running an anti-malware or spam scanner.
Code Sample
'mail_smtptimeout' => 10,
Define the SMTP security style
Depends on mail_smtpmode. Specify when you are using ssl or tls.
Leave empty for no encryption.
Code Sample
'mail_smtpsecure' => '',
Define the SMTP authentication
Depends on mail_smtpmode. Change this to true if your mail server requiresauthentication.
Code Sample
'mail_smtpauth' => false,
Define the SMTP authentication type
Depends on mail_smtpmode. If SMTP authentication is required, choose theauthentication type as LOGIN (default) or PLAIN.
Code Sample
'mail_smtpauthtype' => 'LOGIN',
Define the SMTP authentication username
Depends on mail_smtpauth. Specify the username for authenticating to the SMTPserver.
Code Sample
'mail_smtpname' => '',
Define the SMTP authentication password
Depends on mail_smtpauth. Specify the password for authenticating to the SMTPserver.
Server Configuration | 203
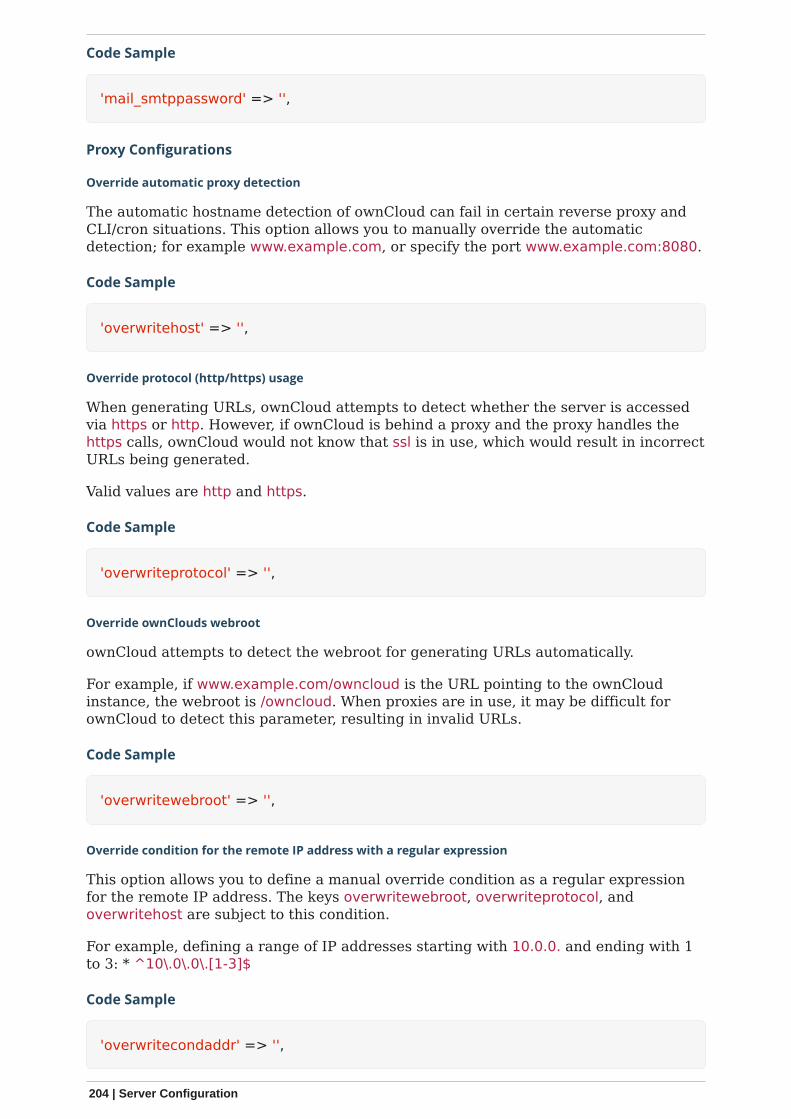
Code Sample
'mail_smtppassword' => '',
Proxy Configurations
Override automatic proxy detection
The automatic hostname detection of ownCloud can fail in certain reverse proxy andCLI/cron situations. This option allows you to manually override the automaticdetection; for example www.example.com, or specify the port www.example.com:8080.
Code Sample
'overwritehost' => '',
Override protocol (http/https) usage
When generating URLs, ownCloud attempts to detect whether the server is accessedvia https or http. However, if ownCloud is behind a proxy and the proxy handles thehttps calls, ownCloud would not know that ssl is in use, which would result in incorrectURLs being generated.
Valid values are http and https.
Code Sample
'overwriteprotocol' => '',
Override ownClouds webroot
ownCloud attempts to detect the webroot for generating URLs automatically.
For example, if www.example.com/owncloud is the URL pointing to the ownCloudinstance, the webroot is /owncloud. When proxies are in use, it may be difficult forownCloud to detect this parameter, resulting in invalid URLs.
Code Sample
'overwritewebroot' => '',
Override condition for the remote IP address with a regular expression
This option allows you to define a manual override condition as a regular expressionfor the remote IP address. The keys overwritewebroot, overwriteprotocol, andoverwritehost are subject to this condition.
For example, defining a range of IP addresses starting with 10.0.0. and ending with 1to 3: * ^10\.0\.0\.[1-3]$
Code Sample
'overwritecondaddr' => '',
204 | Server Configuration
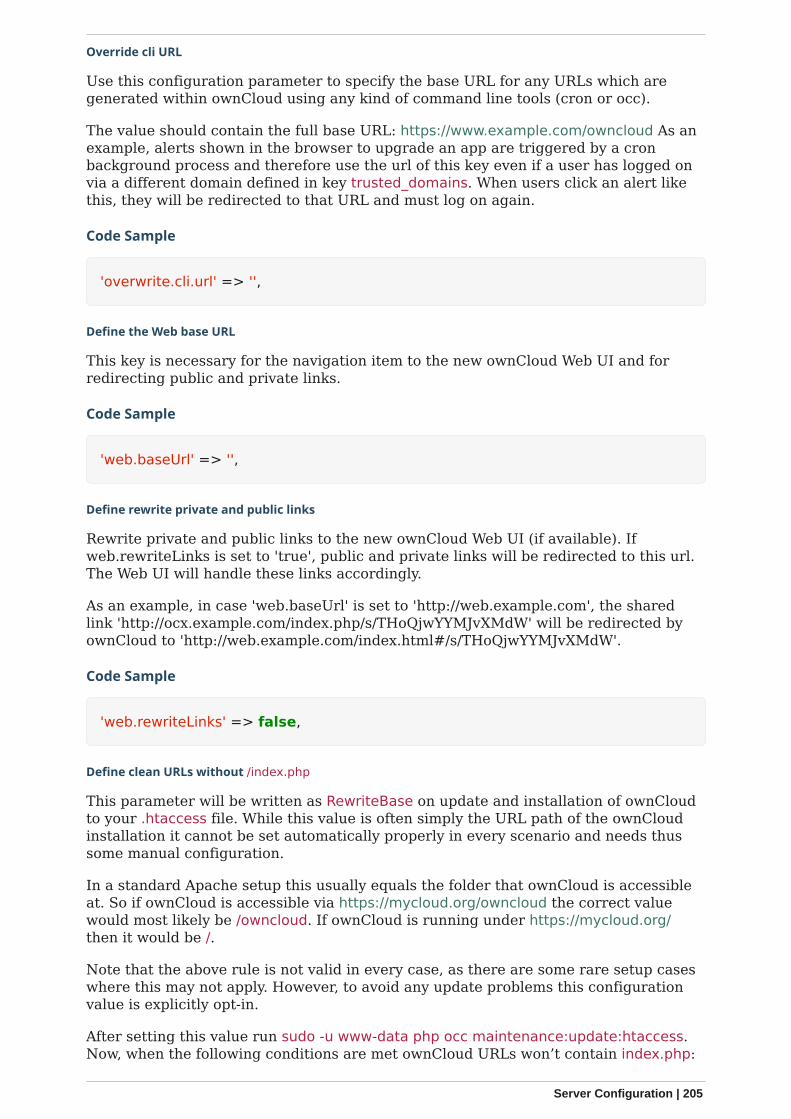
Override cli URL
Use this configuration parameter to specify the base URL for any URLs which aregenerated within ownCloud using any kind of command line tools (cron or occ).
The value should contain the full base URL: https://www.example.com/owncloud As anexample, alerts shown in the browser to upgrade an app are triggered by a cronbackground process and therefore use the url of this key even if a user has logged onvia a different domain defined in key trusted_domains. When users click an alert likethis, they will be redirected to that URL and must log on again.
Code Sample
'overwrite.cli.url' => '',
Define the Web base URL
This key is necessary for the navigation item to the new ownCloud Web UI and forredirecting public and private links.
Code Sample
'web.baseUrl' => '',
Define rewrite private and public links
Rewrite private and public links to the new ownCloud Web UI (if available). Ifweb.rewriteLinks is set to 'true', public and private links will be redirected to this url.The Web UI will handle these links accordingly.
As an example, in case 'web.baseUrl' is set to 'http://web.example.com', the sharedlink 'http://ocx.example.com/index.php/s/THoQjwYYMJvXMdW' will be redirected byownCloud to 'http://web.example.com/index.html#/s/THoQjwYYMJvXMdW'.
Code Sample
'web.rewriteLinks' => false,
Define clean URLs without /index.php
This parameter will be written as RewriteBase on update and installation of ownCloudto your .htaccess file. While this value is often simply the URL path of the ownCloudinstallation it cannot be set automatically properly in every scenario and needs thussome manual configuration.
In a standard Apache setup this usually equals the folder that ownCloud is accessibleat. So if ownCloud is accessible via https://mycloud.org/owncloud the correct valuewould most likely be /owncloud. If ownCloud is running under https://mycloud.org/then it would be /.
Note that the above rule is not valid in every case, as there are some rare setup caseswhere this may not apply. However, to avoid any update problems this configurationvalue is explicitly opt-in.
After setting this value run sudo -u www-data php occ maintenance:update:htaccess.Now, when the following conditions are met ownCloud URLs won’t contain index.php:
Server Configuration | 205

• mod_rewrite is installed• mod_env is installed
Code Sample
'htaccess.RewriteBase' => '/',
Define the URL of your proxy server
Example: proxy.example.com:8081.
Code Sample
'proxy' => '',
Define proxy authentication
The optional authentication for the proxy to use to connect to the internet.
The format is: username:password.
The username and the password need to be urlencoded to avoid breaking the delimitersyntax "username:password@hostname:port
Example: usern@me needs to be encoded as usern%40ame.
Code Sample
'proxyuserpwd' => '',
Deleted Items (trash bin)
These parameters control the Deleted files app.
Define the trashbin retention obligation
If the trash bin app is enabled (default), this setting defines the policy for when filesand folders in the trash bin will be permanently deleted.
The app allows for two settings, a minimum time for trash bin retention, and amaximum time for trash bin retention. Minimum time is the number of days a file willbe kept, after which it may be deleted. Maximum time is the number of days at whichit is guaranteed to be deleted. Both minimum and maximum times can be set togetherto explicitly define file and folder deletion. For migration purposes, this setting isinstalled initially set to auto, which is equivalent to the default setting in ownCloud 8.1and before.
Available values:
• auto default setting. Keeps files and folders in the deleted files for up to 30 days,automatically deleting them (at any time) if space is needed. Note: files may not beremoved if space is not required.
• D, auto keeps files and folders in the trash bin for D+ days, delete anytime if spaceneeded (Note: files may not be deleted if space is not needed)
206 | Server Configuration
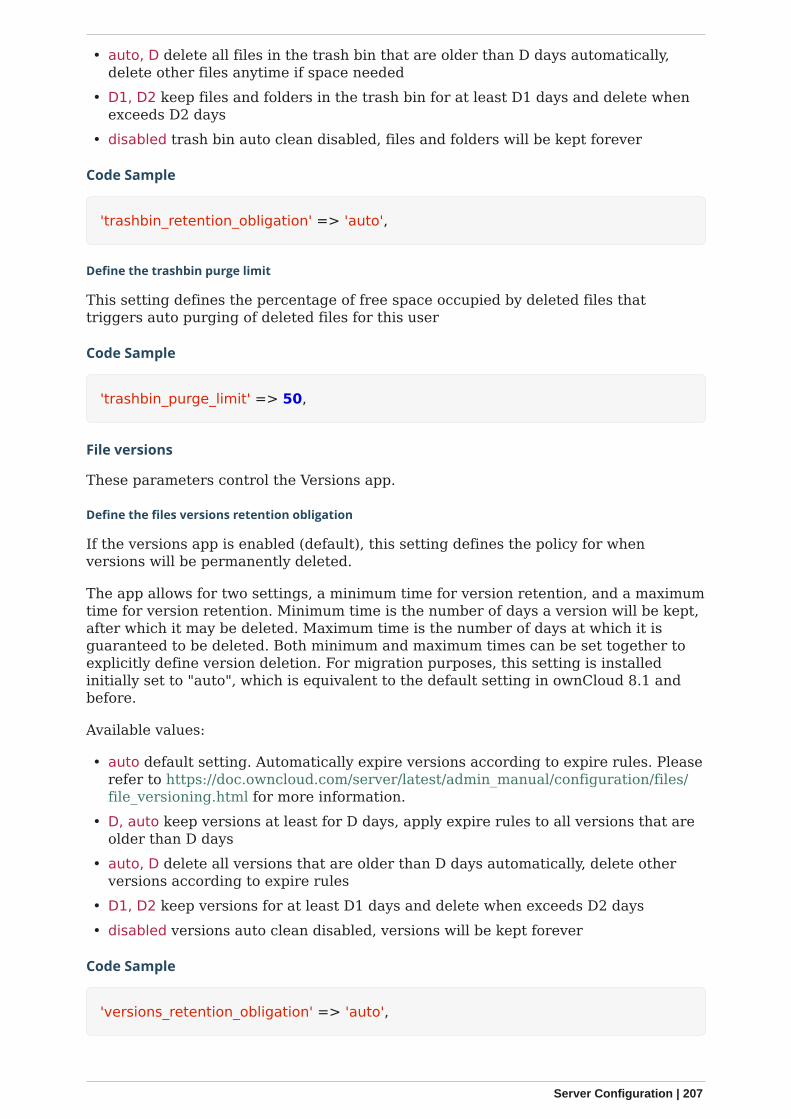
• auto, D delete all files in the trash bin that are older than D days automatically,delete other files anytime if space needed
• D1, D2 keep files and folders in the trash bin for at least D1 days and delete whenexceeds D2 days
• disabled trash bin auto clean disabled, files and folders will be kept forever
Code Sample
'trashbin_retention_obligation' => 'auto',
Define the trashbin purge limit
This setting defines the percentage of free space occupied by deleted files thattriggers auto purging of deleted files for this user
Code Sample
'trashbin_purge_limit' => 50,
File versions
These parameters control the Versions app.
Define the files versions retention obligation
If the versions app is enabled (default), this setting defines the policy for whenversions will be permanently deleted.
The app allows for two settings, a minimum time for version retention, and a maximumtime for version retention. Minimum time is the number of days a version will be kept,after which it may be deleted. Maximum time is the number of days at which it isguaranteed to be deleted. Both minimum and maximum times can be set together toexplicitly define version deletion. For migration purposes, this setting is installedinitially set to "auto", which is equivalent to the default setting in ownCloud 8.1 andbefore.
Available values:
• auto default setting. Automatically expire versions according to expire rules. Pleaserefer to https://doc.owncloud.com/server/latest/admin_manual/configuration/files/file_versioning.html for more information.
• D, auto keep versions at least for D days, apply expire rules to all versions that areolder than D days
• auto, D delete all versions that are older than D days automatically, delete otherversions according to expire rules
• D1, D2 keep versions for at least D1 days and delete when exceeds D2 days• disabled versions auto clean disabled, versions will be kept forever
Code Sample
'versions_retention_obligation' => 'auto',
Server Configuration | 207
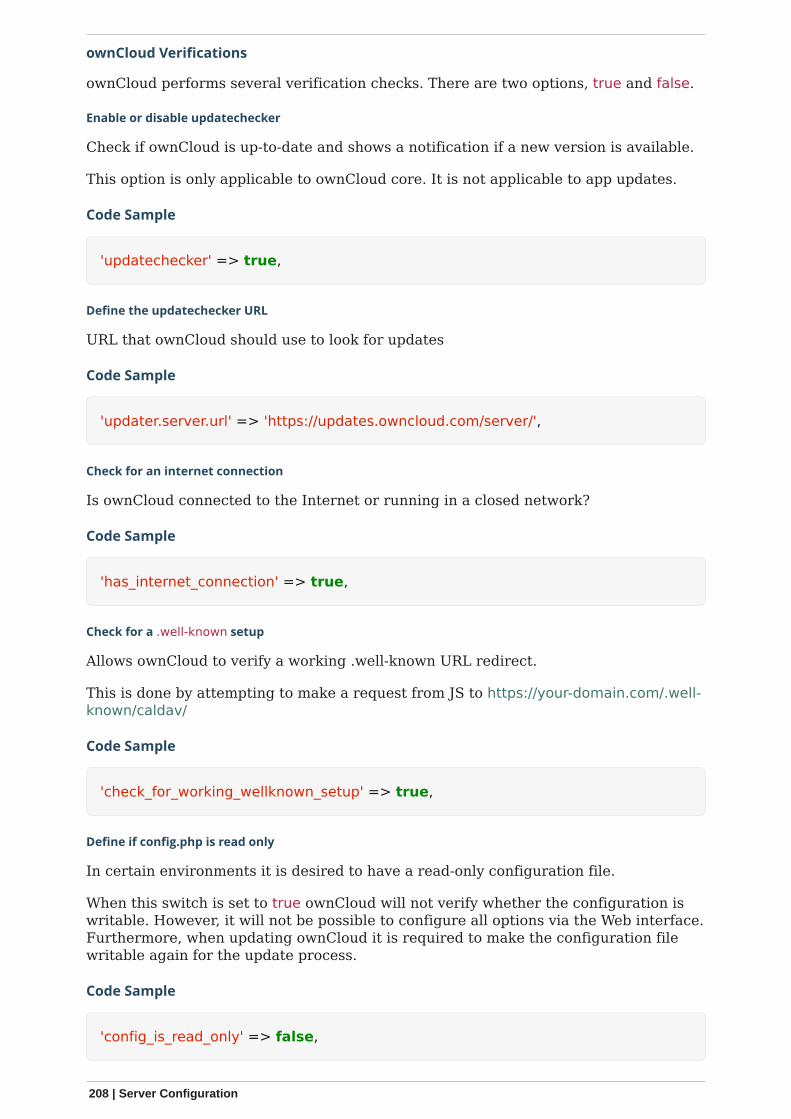
ownCloud Verifications
ownCloud performs several verification checks. There are two options, true and false.
Enable or disable updatechecker
Check if ownCloud is up-to-date and shows a notification if a new version is available.
This option is only applicable to ownCloud core. It is not applicable to app updates.
Code Sample
'updatechecker' => true,
Define the updatechecker URL
URL that ownCloud should use to look for updates
Code Sample
'updater.server.url' => 'https://updates.owncloud.com/server/',
Check for an internet connection
Is ownCloud connected to the Internet or running in a closed network?
Code Sample
'has_internet_connection' => true,
Check for a .well-known setup
Allows ownCloud to verify a working .well-known URL redirect.
This is done by attempting to make a request from JS to https://your-domain.com/.well-known/caldav/
Code Sample
'check_for_working_wellknown_setup' => true,
Define if config.php is read only
In certain environments it is desired to have a read-only configuration file.
When this switch is set to true ownCloud will not verify whether the configuration iswritable. However, it will not be possible to configure all options via the Web interface.Furthermore, when updating ownCloud it is required to make the configuration filewritable again for the update process.
Code Sample
'config_is_read_only' => false,
208 | Server Configuration
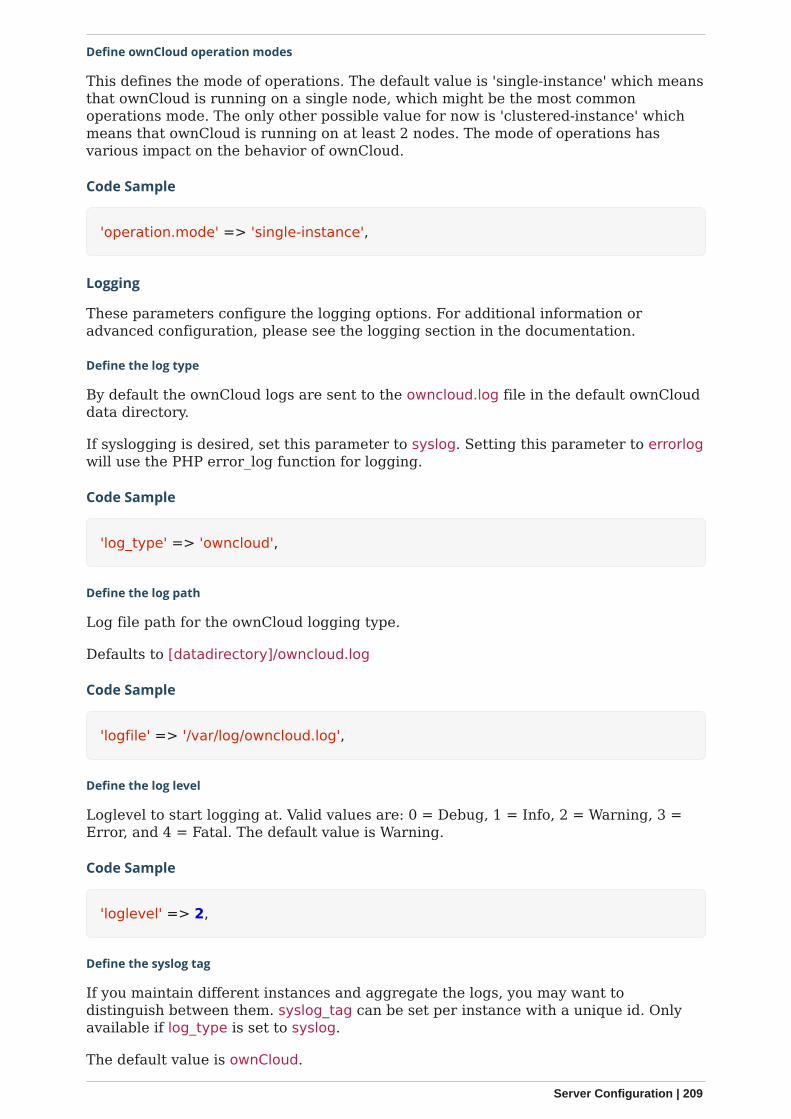
Define ownCloud operation modes
This defines the mode of operations. The default value is 'single-instance' which meansthat ownCloud is running on a single node, which might be the most commonoperations mode. The only other possible value for now is 'clustered-instance' whichmeans that ownCloud is running on at least 2 nodes. The mode of operations hasvarious impact on the behavior of ownCloud.
Code Sample
'operation.mode' => 'single-instance',
Logging
These parameters configure the logging options. For additional information oradvanced configuration, please see the logging section in the documentation.
Define the log type
By default the ownCloud logs are sent to the owncloud.log file in the default ownClouddata directory.
If syslogging is desired, set this parameter to syslog. Setting this parameter to errorlogwill use the PHP error_log function for logging.
Code Sample
'log_type' => 'owncloud',
Define the log path
Log file path for the ownCloud logging type.
Defaults to [datadirectory]/owncloud.log
Code Sample
'logfile' => '/var/log/owncloud.log',
Define the log level
Loglevel to start logging at. Valid values are: 0 = Debug, 1 = Info, 2 = Warning, 3 =Error, and 4 = Fatal. The default value is Warning.
Code Sample
'loglevel' => 2,
Define the syslog tag
If you maintain different instances and aggregate the logs, you may want todistinguish between them. syslog_tag can be set per instance with a unique id. Onlyavailable if log_type is set to syslog.
The default value is ownCloud.
Server Configuration | 209
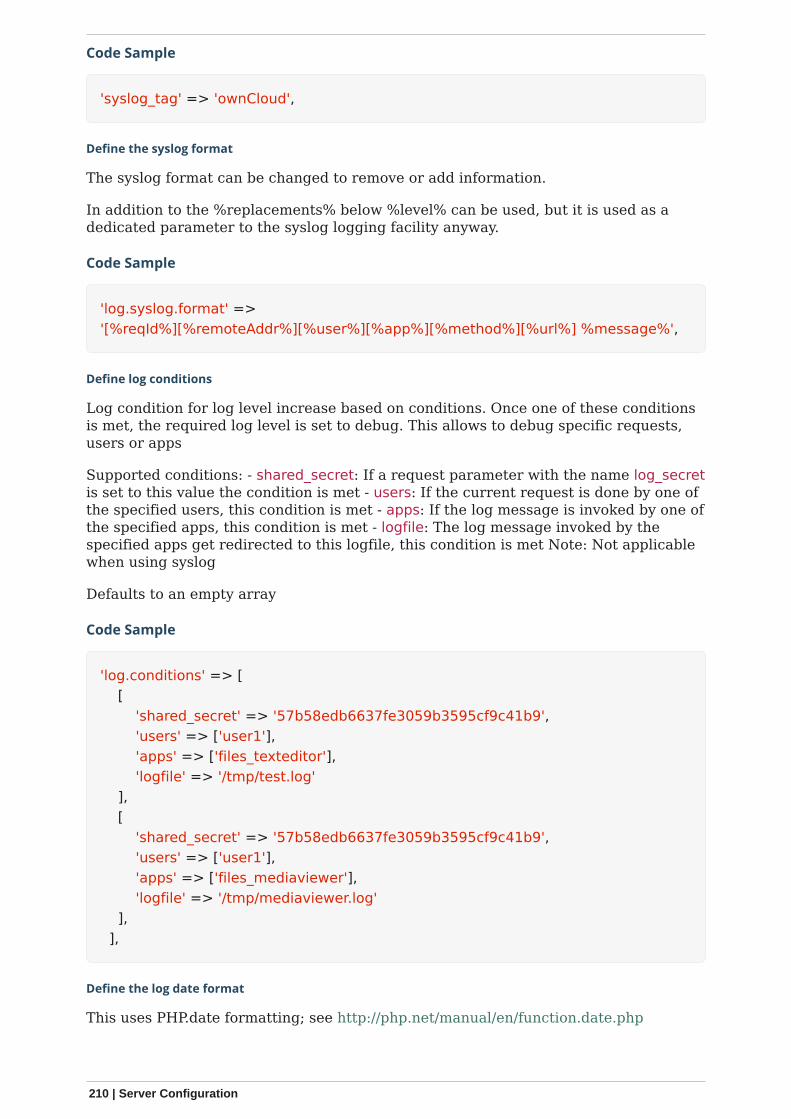
Code Sample
'syslog_tag' => 'ownCloud',
Define the syslog format
The syslog format can be changed to remove or add information.
In addition to the %replacements% below %level% can be used, but it is used as adedicated parameter to the syslog logging facility anyway.
Code Sample
'log.syslog.format' =>'[%reqId%][%remoteAddr%][%user%][%app%][%method%][%url%] %message%',
Define log conditions
Log condition for log level increase based on conditions. Once one of these conditionsis met, the required log level is set to debug. This allows to debug specific requests,users or apps
Supported conditions: - shared_secret: If a request parameter with the name log_secretis set to this value the condition is met - users: If the current request is done by one ofthe specified users, this condition is met - apps: If the log message is invoked by one ofthe specified apps, this condition is met - logfile: The log message invoked by thespecified apps get redirected to this logfile, this condition is met Note: Not applicablewhen using syslog
Defaults to an empty array
Code Sample
'log.conditions' => [ [ 'shared_secret' => '57b58edb6637fe3059b3595cf9c41b9', 'users' => ['user1'], 'apps' => ['files_texteditor'], 'logfile' => '/tmp/test.log' ], [ 'shared_secret' => '57b58edb6637fe3059b3595cf9c41b9', 'users' => ['user1'], 'apps' => ['files_mediaviewer'], 'logfile' => '/tmp/mediaviewer.log' ], ],
Define the log date format
This uses PHP.date formatting; see http://php.net/manual/en/function.date.php
210 | Server Configuration
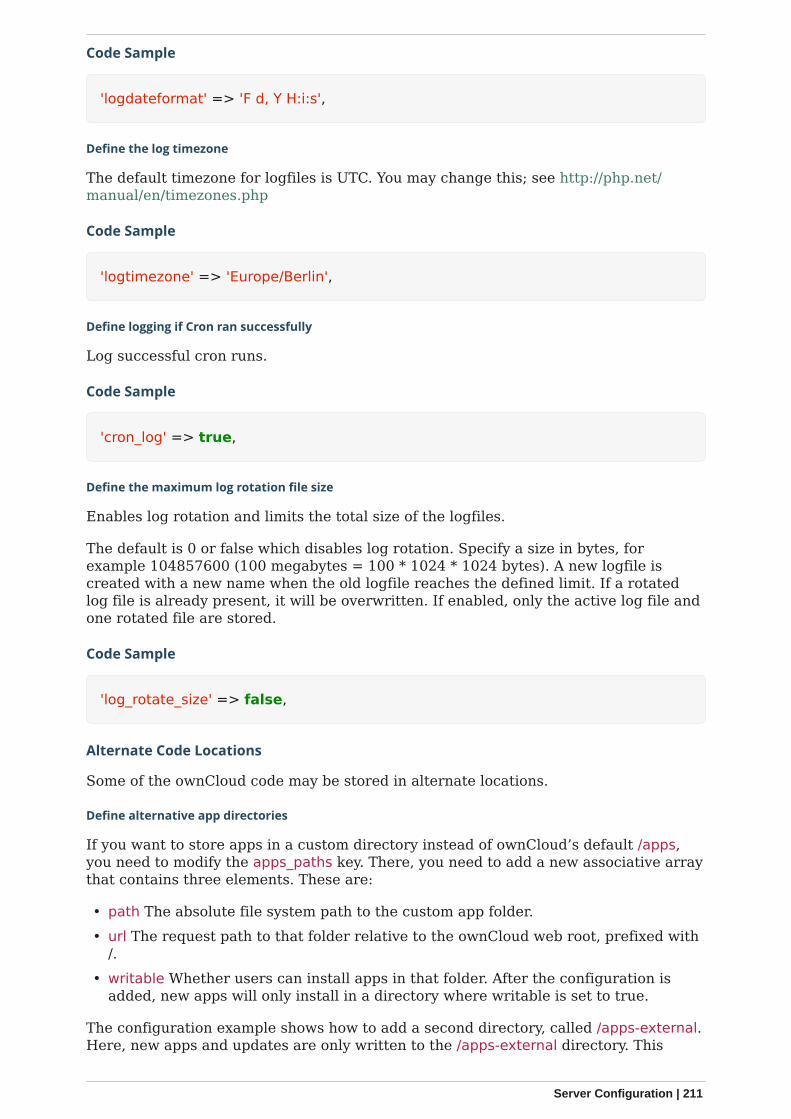
Code Sample
'logdateformat' => 'F d, Y H:i:s',
Define the log timezone
The default timezone for logfiles is UTC. You may change this; see http://php.net/manual/en/timezones.php
Code Sample
'logtimezone' => 'Europe/Berlin',
Define logging if Cron ran successfully
Log successful cron runs.
Code Sample
'cron_log' => true,
Define the maximum log rotation file size
Enables log rotation and limits the total size of the logfiles.
The default is 0 or false which disables log rotation. Specify a size in bytes, forexample 104857600 (100 megabytes = 100 * 1024 * 1024 bytes). A new logfile iscreated with a new name when the old logfile reaches the defined limit. If a rotatedlog file is already present, it will be overwritten. If enabled, only the active log file andone rotated file are stored.
Code Sample
'log_rotate_size' => false,
Alternate Code Locations
Some of the ownCloud code may be stored in alternate locations.
Define alternative app directories
If you want to store apps in a custom directory instead of ownCloud’s default /apps,you need to modify the apps_paths key. There, you need to add a new associative arraythat contains three elements. These are:
• path The absolute file system path to the custom app folder.• url The request path to that folder relative to the ownCloud web root, prefixed with
/.• writable Whether users can install apps in that folder. After the configuration is
added, new apps will only install in a directory where writable is set to true.
The configuration example shows how to add a second directory, called /apps-external.Here, new apps and updates are only written to the /apps-external directory. This
Server Configuration | 211
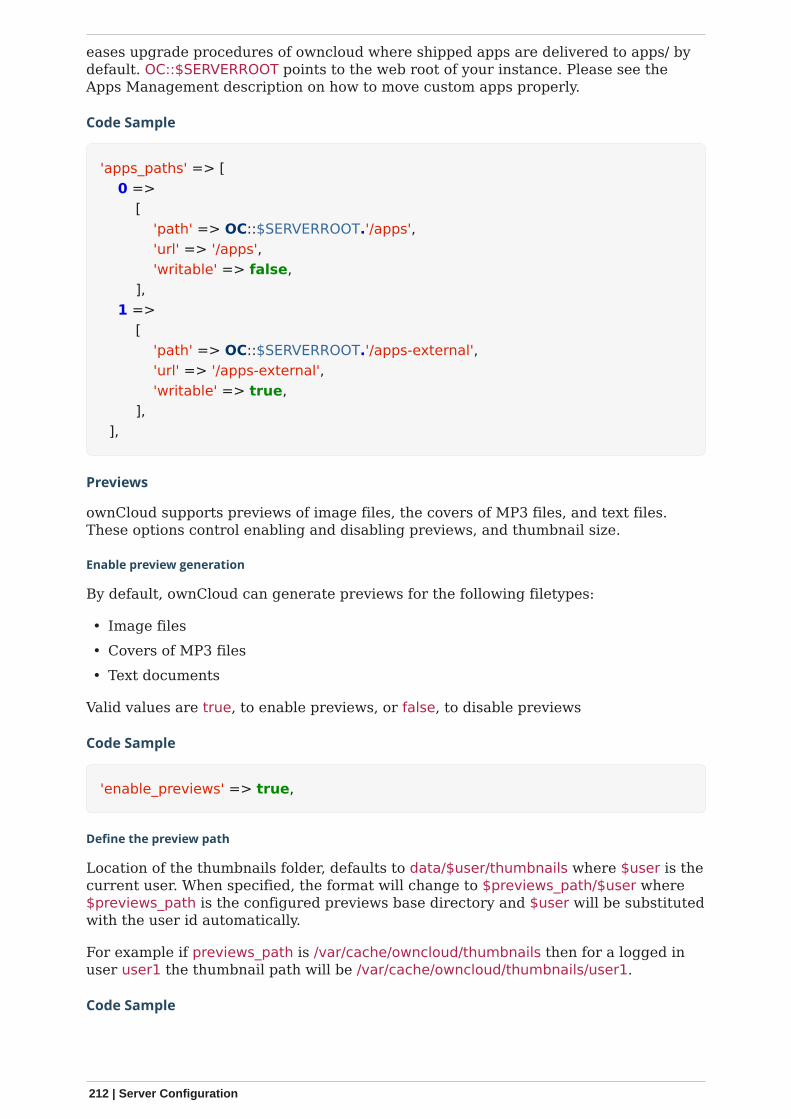
eases upgrade procedures of owncloud where shipped apps are delivered to apps/ bydefault. OC::$SERVERROOT points to the web root of your instance. Please see theApps Management description on how to move custom apps properly.
Code Sample
'apps_paths' => [ 0 => [ 'path' => OC::$SERVERROOT.'/apps', 'url' => '/apps', 'writable' => false, ], 1 => [ 'path' => OC::$SERVERROOT.'/apps-external', 'url' => '/apps-external', 'writable' => true, ], ],
Previews
ownCloud supports previews of image files, the covers of MP3 files, and text files.These options control enabling and disabling previews, and thumbnail size.
Enable preview generation
By default, ownCloud can generate previews for the following filetypes:
• Image files• Covers of MP3 files• Text documents
Valid values are true, to enable previews, or false, to disable previews
Code Sample
'enable_previews' => true,
Define the preview path
Location of the thumbnails folder, defaults to data/$user/thumbnails where $user is thecurrent user. When specified, the format will change to $previews_path/$user where$previews_path is the configured previews base directory and $user will be substitutedwith the user id automatically.
For example if previews_path is /var/cache/owncloud/thumbnails then for a logged inuser user1 the thumbnail path will be /var/cache/owncloud/thumbnails/user1.
Code Sample
212 | Server Configuration
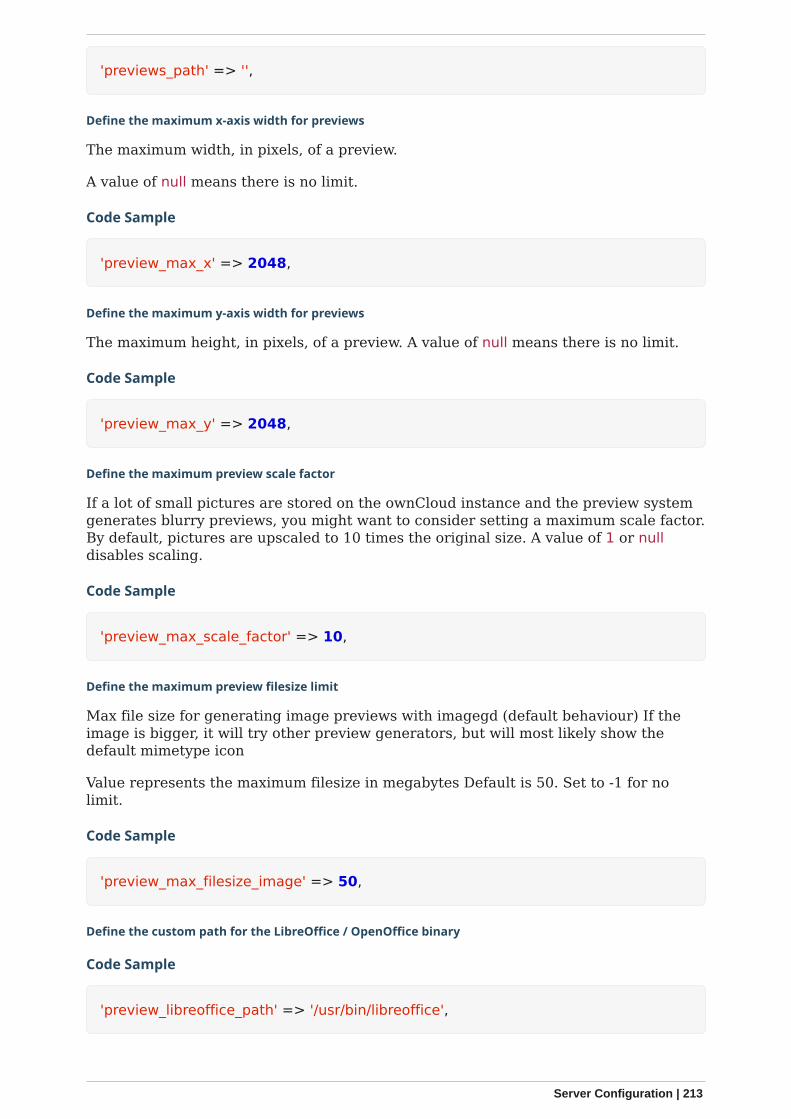
'previews_path' => '',
Define the maximum x-axis width for previews
The maximum width, in pixels, of a preview.
A value of null means there is no limit.
Code Sample
'preview_max_x' => 2048,
Define the maximum y-axis width for previews
The maximum height, in pixels, of a preview. A value of null means there is no limit.
Code Sample
'preview_max_y' => 2048,
Define the maximum preview scale factor
If a lot of small pictures are stored on the ownCloud instance and the preview systemgenerates blurry previews, you might want to consider setting a maximum scale factor.By default, pictures are upscaled to 10 times the original size. A value of 1 or nulldisables scaling.
Code Sample
'preview_max_scale_factor' => 10,
Define the maximum preview filesize limit
Max file size for generating image previews with imagegd (default behaviour) If theimage is bigger, it will try other preview generators, but will most likely show thedefault mimetype icon
Value represents the maximum filesize in megabytes Default is 50. Set to -1 for nolimit.
Code Sample
'preview_max_filesize_image' => 50,
Define the custom path for the LibreOffice / OpenOffice binary
Code Sample
'preview_libreoffice_path' => '/usr/bin/libreoffice',
Server Configuration | 213
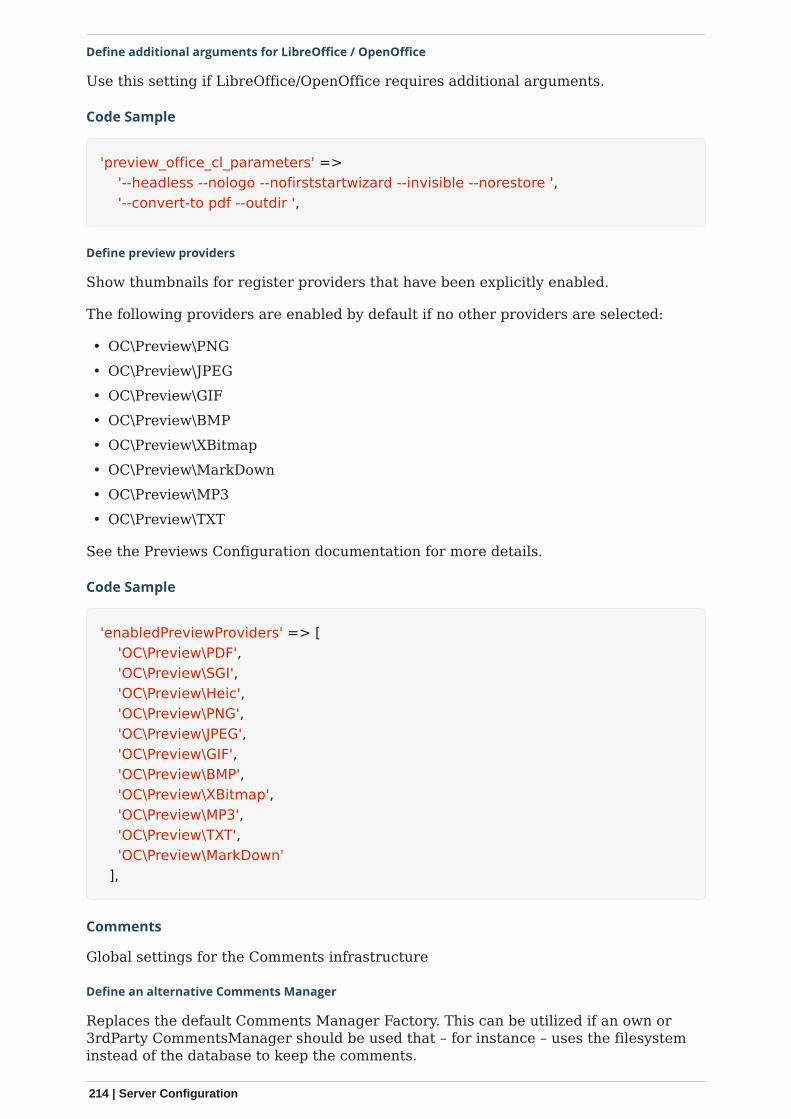
Define additional arguments for LibreOffice / OpenOffice
Use this setting if LibreOffice/OpenOffice requires additional arguments.
Code Sample
'preview_office_cl_parameters' => '--headless --nologo --nofirststartwizard --invisible --norestore ', '--convert-to pdf --outdir ',
Define preview providers
Show thumbnails for register providers that have been explicitly enabled.
The following providers are enabled by default if no other providers are selected:
• OC\Preview\PNG• OC\Preview\JPEG• OC\Preview\GIF• OC\Preview\BMP• OC\Preview\XBitmap• OC\Preview\MarkDown• OC\Preview\MP3• OC\Preview\TXT
See the Previews Configuration documentation for more details.
Code Sample
'enabledPreviewProviders' => [ 'OC\Preview\PDF', 'OC\Preview\SGI', 'OC\Preview\Heic', 'OC\Preview\PNG', 'OC\Preview\JPEG', 'OC\Preview\GIF', 'OC\Preview\BMP', 'OC\Preview\XBitmap', 'OC\Preview\MP3', 'OC\Preview\TXT', 'OC\Preview\MarkDown' ],
Comments
Global settings for the Comments infrastructure
Define an alternative Comments Manager
Replaces the default Comments Manager Factory. This can be utilized if an own or3rdParty CommentsManager should be used that – for instance – uses the filesysteminstead of the database to keep the comments.
214 | Server Configuration
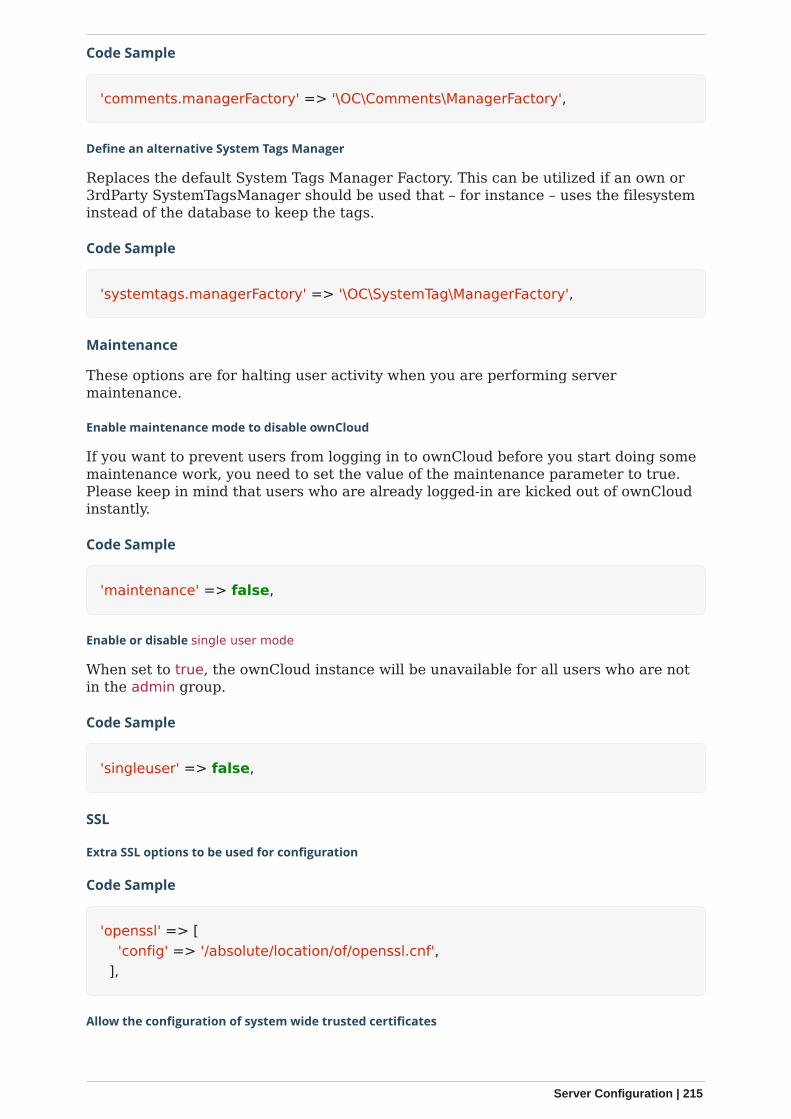
Code Sample
'comments.managerFactory' => '\OC\Comments\ManagerFactory',
Define an alternative System Tags Manager
Replaces the default System Tags Manager Factory. This can be utilized if an own or3rdParty SystemTagsManager should be used that – for instance – uses the filesysteminstead of the database to keep the tags.
Code Sample
'systemtags.managerFactory' => '\OC\SystemTag\ManagerFactory',
Maintenance
These options are for halting user activity when you are performing servermaintenance.
Enable maintenance mode to disable ownCloud
If you want to prevent users from logging in to ownCloud before you start doing somemaintenance work, you need to set the value of the maintenance parameter to true.Please keep in mind that users who are already logged-in are kicked out of ownCloudinstantly.
Code Sample
'maintenance' => false,
Enable or disable single user mode
When set to true, the ownCloud instance will be unavailable for all users who are notin the admin group.
Code Sample
'singleuser' => false,
SSL
Extra SSL options to be used for configuration
Code Sample
'openssl' => [ 'config' => '/absolute/location/of/openssl.cnf', ],
Allow the configuration of system wide trusted certificates
Server Configuration | 215

Code Sample
'enable_certificate_management' => false,
Memory caching backend configuration
Available cache backends:
• \OC\Memcache\APCu APC user backend• \OC\Memcache\ArrayCache In-memory array-based backend (not recommended)• \OC\Memcache\Memcached Memcached backend• \OC\Memcache\Redis Redis backend
Advice on choosing between the various backends:
• APCu should be easiest to install. Almost all distributions have packages. Use thisfor single user environment for all caches.
• Use Redis or Memcached for distributed environments. For the local cache (youcan configure two) take APCu.
Memory caching backend for locally stored data
• Used for host-specific data, e.g. file paths
Code Sample
'memcache.local' => '\OC\Memcache\APCu',
Memory caching backend for distributed data
• Used for installation-specific data, e.g. database caching• If unset, defaults to the value of memcache.local
Code Sample
'memcache.distributed' => '\OC\Memcache\Memcached',
Define Redis connection details
Connection details for Redis to use for memory caching in a single serverconfiguration.
For enhanced security it is recommended to configure Redis to require a password.See http://redis.io/topics/security for more information.
Code Sample
216 | Server Configuration
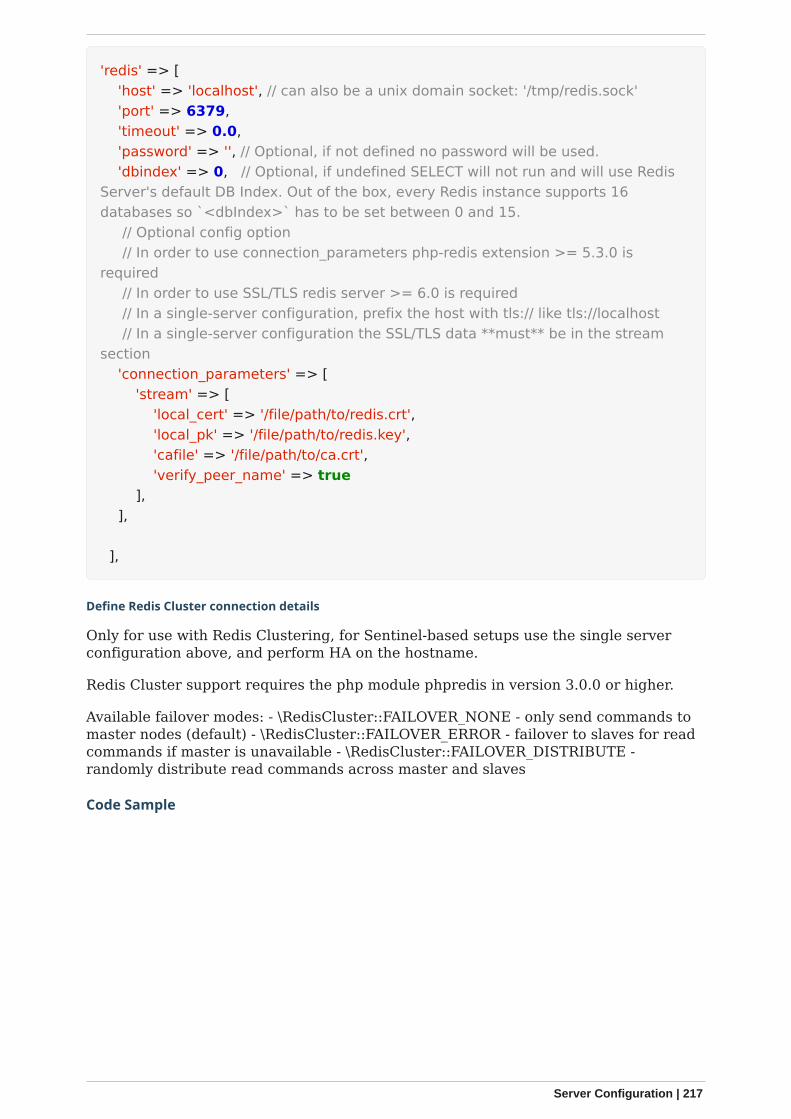
'redis' => [ 'host' => 'localhost', // can also be a unix domain socket: '/tmp/redis.sock' 'port' => 6379, 'timeout' => 0.0, 'password' => '', // Optional, if not defined no password will be used. 'dbindex' => 0, // Optional, if undefined SELECT will not run and will use RedisServer's default DB Index. Out of the box, every Redis instance supports 16databases so `<dbIndex>` has to be set between 0 and 15. // Optional config option // In order to use connection_parameters php-redis extension >= 5.3.0 isrequired // In order to use SSL/TLS redis server >= 6.0 is required // In a single-server configuration, prefix the host with tls:// like tls://localhost // In a single-server configuration the SSL/TLS data **must** be in the streamsection 'connection_parameters' => [ 'stream' => [ 'local_cert' => '/file/path/to/redis.crt', 'local_pk' => '/file/path/to/redis.key', 'cafile' => '/file/path/to/ca.crt', 'verify_peer_name' => true ], ],
],
Define Redis Cluster connection details
Only for use with Redis Clustering, for Sentinel-based setups use the single serverconfiguration above, and perform HA on the hostname.
Redis Cluster support requires the php module phpredis in version 3.0.0 or higher.
Available failover modes: - \RedisCluster::FAILOVER_NONE - only send commands tomaster nodes (default) - \RedisCluster::FAILOVER_ERROR - failover to slaves for readcommands if master is unavailable - \RedisCluster::FAILOVER_DISTRIBUTE -randomly distribute read commands across master and slaves
Code Sample
Server Configuration | 217

'redis.cluster' => [ 'seeds' => [ // provide some/all of the cluster servers to bootstrap discovery, portrequired 'localhost:7000', 'localhost:7001' ], 'timeout' => 0.0, 'read_timeout' => 0.0, 'failover_mode' => \RedisCluster::FAILOVER_DISTRIBUTE, // Optional config option // In order to use connection_parameters php-redis extension >= 5.3.0 isrequired // In order to use SSL/TLS redis server >= 6.0 is required // In a cluster configuration, prefix the seeds with tls:// like tls://localhost:7000 // In a cluster configuration the SSL/TLS data **must not** be in the streamsection 'connection_parameters' => [ 'local_cert' => '/file/path/to/redis.crt', 'local_pk' => '/file/path/to/redis.key', 'cafile' => '/file/path/to/ca.crt', 'verify_peer_name' => true ], ],
Define server details for memcached servers to use for memory caching
Server details for one or more memcached servers to use for memory caching
Code Sample
'memcached_servers' => [ // hostname, port and optional weight. Also see: // http://www.php.net/manual/en/memcached.addservers.php // http://www.php.net/manual/en/memcached.addserver.php ['localhost', 11211], //[other.host.local', 11211], ],
Define connection options for memcached
For more details please see http://apprize.info/php/scaling/15.html
Code Sample
218 | Server Configuration
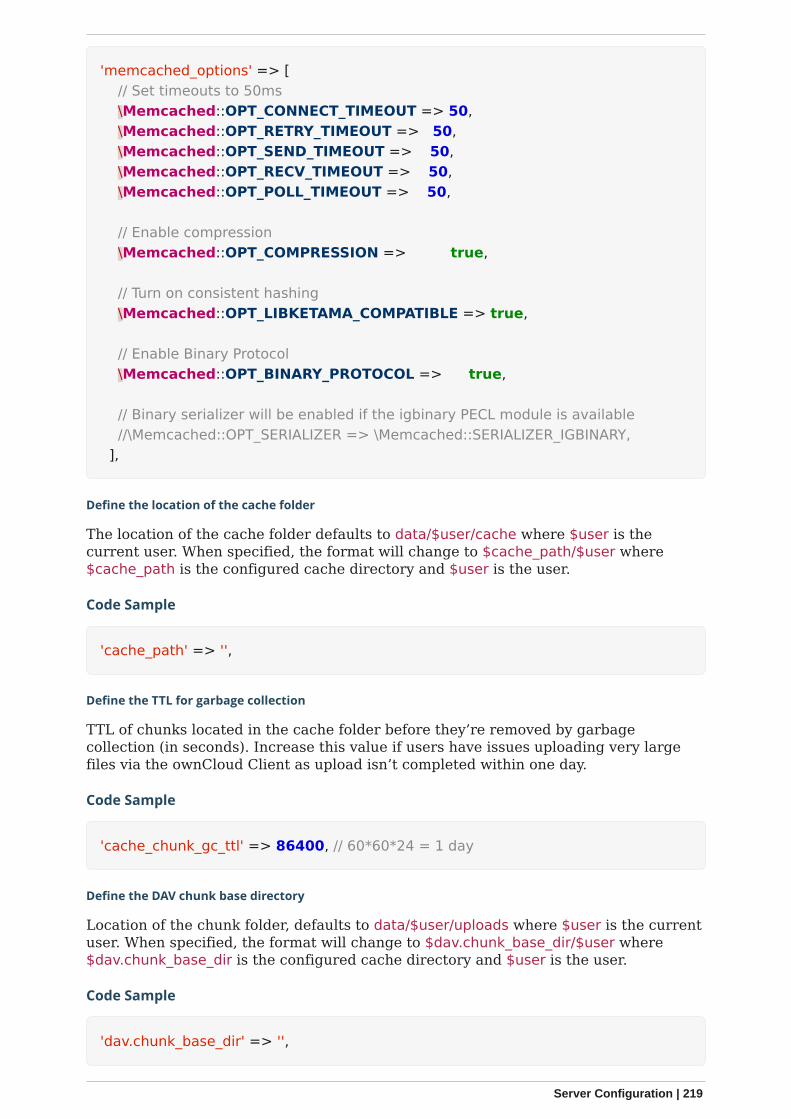
'memcached_options' => [ // Set timeouts to 50ms \Memcached::OPT_CONNECT_TIMEOUT => 50, \Memcached::OPT_RETRY_TIMEOUT => 50, \Memcached::OPT_SEND_TIMEOUT => 50, \Memcached::OPT_RECV_TIMEOUT => 50, \Memcached::OPT_POLL_TIMEOUT => 50,
// Enable compression \Memcached::OPT_COMPRESSION => true,
// Turn on consistent hashing \Memcached::OPT_LIBKETAMA_COMPATIBLE => true,
// Enable Binary Protocol \Memcached::OPT_BINARY_PROTOCOL => true,
// Binary serializer will be enabled if the igbinary PECL module is available //\Memcached::OPT_SERIALIZER => \Memcached::SERIALIZER_IGBINARY, ],
Define the location of the cache folder
The location of the cache folder defaults to data/$user/cache where $user is thecurrent user. When specified, the format will change to $cache_path/$user where$cache_path is the configured cache directory and $user is the user.
Code Sample
'cache_path' => '',
Define the TTL for garbage collection
TTL of chunks located in the cache folder before they’re removed by garbagecollection (in seconds). Increase this value if users have issues uploading very largefiles via the ownCloud Client as upload isn’t completed within one day.
Code Sample
'cache_chunk_gc_ttl' => 86400, // 60*60*24 = 1 day
Define the DAV chunk base directory
Location of the chunk folder, defaults to data/$user/uploads where $user is the currentuser. When specified, the format will change to $dav.chunk_base_dir/$user where$dav.chunk_base_dir is the configured cache directory and $user is the user.
Code Sample
'dav.chunk_base_dir' => '',
Server Configuration | 219
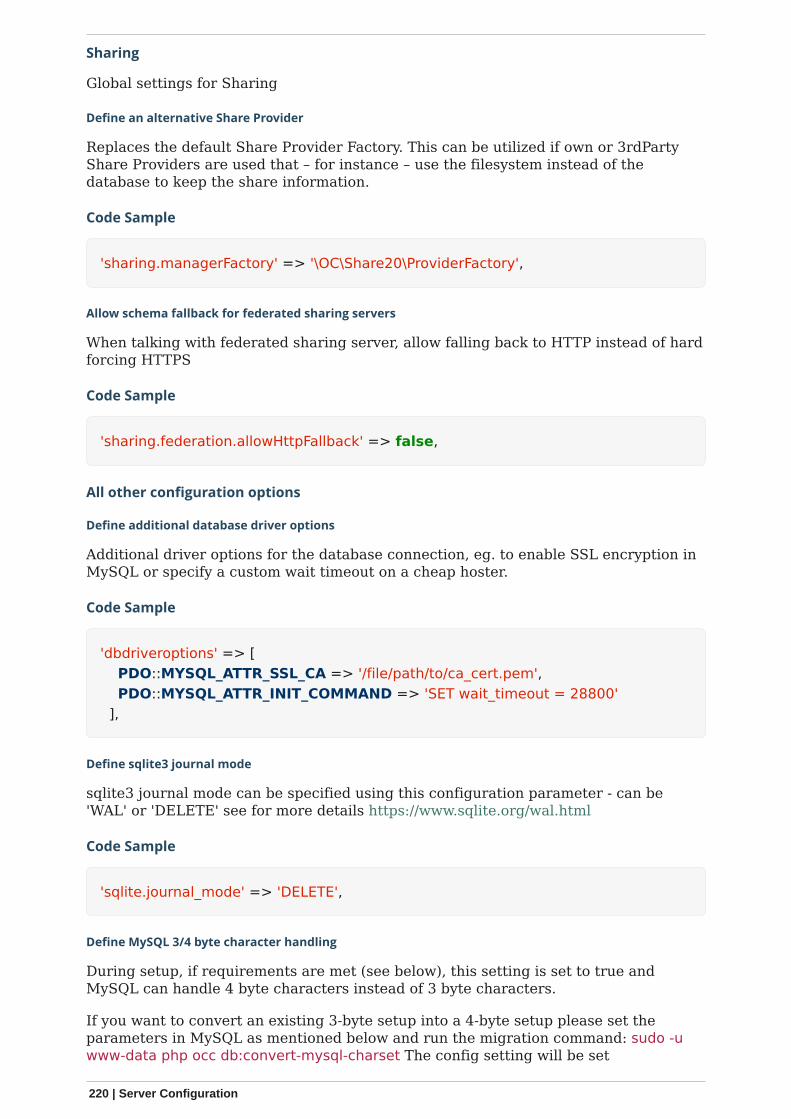
Sharing
Global settings for Sharing
Define an alternative Share Provider
Replaces the default Share Provider Factory. This can be utilized if own or 3rdPartyShare Providers are used that – for instance – use the filesystem instead of thedatabase to keep the share information.
Code Sample
'sharing.managerFactory' => '\OC\Share20\ProviderFactory',
Allow schema fallback for federated sharing servers
When talking with federated sharing server, allow falling back to HTTP instead of hardforcing HTTPS
Code Sample
'sharing.federation.allowHttpFallback' => false,
All other configuration options
Define additional database driver options
Additional driver options for the database connection, eg. to enable SSL encryption inMySQL or specify a custom wait timeout on a cheap hoster.
Code Sample
'dbdriveroptions' => [ PDO::MYSQL_ATTR_SSL_CA => '/file/path/to/ca_cert.pem', PDO::MYSQL_ATTR_INIT_COMMAND => 'SET wait_timeout = 28800' ],
Define sqlite3 journal mode
sqlite3 journal mode can be specified using this configuration parameter - can be'WAL' or 'DELETE' see for more details https://www.sqlite.org/wal.html
Code Sample
'sqlite.journal_mode' => 'DELETE',
Define MySQL 3/4 byte character handling
During setup, if requirements are met (see below), this setting is set to true andMySQL can handle 4 byte characters instead of 3 byte characters.
If you want to convert an existing 3-byte setup into a 4-byte setup please set theparameters in MySQL as mentioned below and run the migration command: sudo -uwww-data php occ db:convert-mysql-charset The config setting will be set
220 | Server Configuration
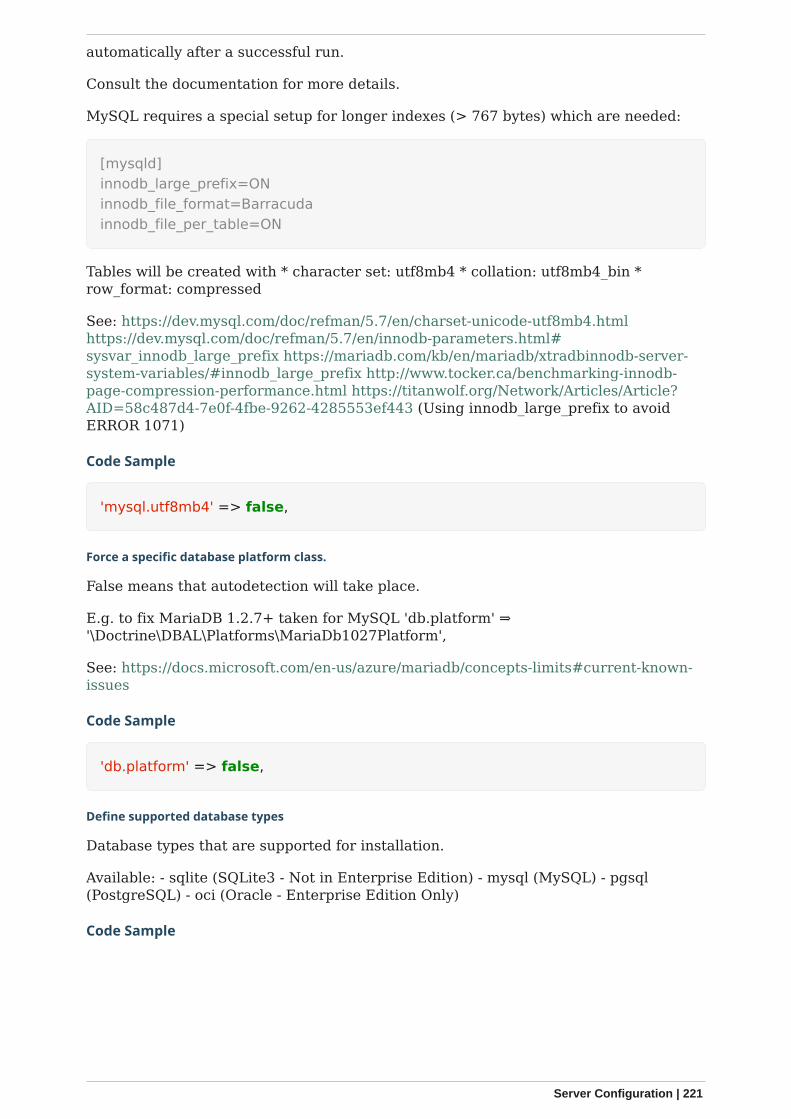
automatically after a successful run.
Consult the documentation for more details.
MySQL requires a special setup for longer indexes (> 767 bytes) which are needed:
[mysqld]innodb_large_prefix=ONinnodb_file_format=Barracudainnodb_file_per_table=ON
Tables will be created with * character set: utf8mb4 * collation: utf8mb4_bin *row_format: compressed
See: https://dev.mysql.com/doc/refman/5.7/en/charset-unicode-utf8mb4.htmlhttps://dev.mysql.com/doc/refman/5.7/en/innodb-parameters.html#sysvar_innodb_large_prefix https://mariadb.com/kb/en/mariadb/xtradbinnodb-server-system-variables/#innodb_large_prefix http://www.tocker.ca/benchmarking-innodb-page-compression-performance.html https://titanwolf.org/Network/Articles/Article?AID=58c487d4-7e0f-4fbe-9262-4285553ef443 (Using innodb_large_prefix to avoidERROR 1071)
Code Sample
'mysql.utf8mb4' => false,
Force a specific database platform class.
False means that autodetection will take place.
E.g. to fix MariaDB 1.2.7+ taken for MySQL 'db.platform' ⇒'\Doctrine\DBAL\Platforms\MariaDb1027Platform',
See: https://docs.microsoft.com/en-us/azure/mariadb/concepts-limits#current-known-issues
Code Sample
'db.platform' => false,
Define supported database types
Database types that are supported for installation.
Available: - sqlite (SQLite3 - Not in Enterprise Edition) - mysql (MySQL) - pgsql(PostgreSQL) - oci (Oracle - Enterprise Edition Only)
Code Sample
Server Configuration | 221
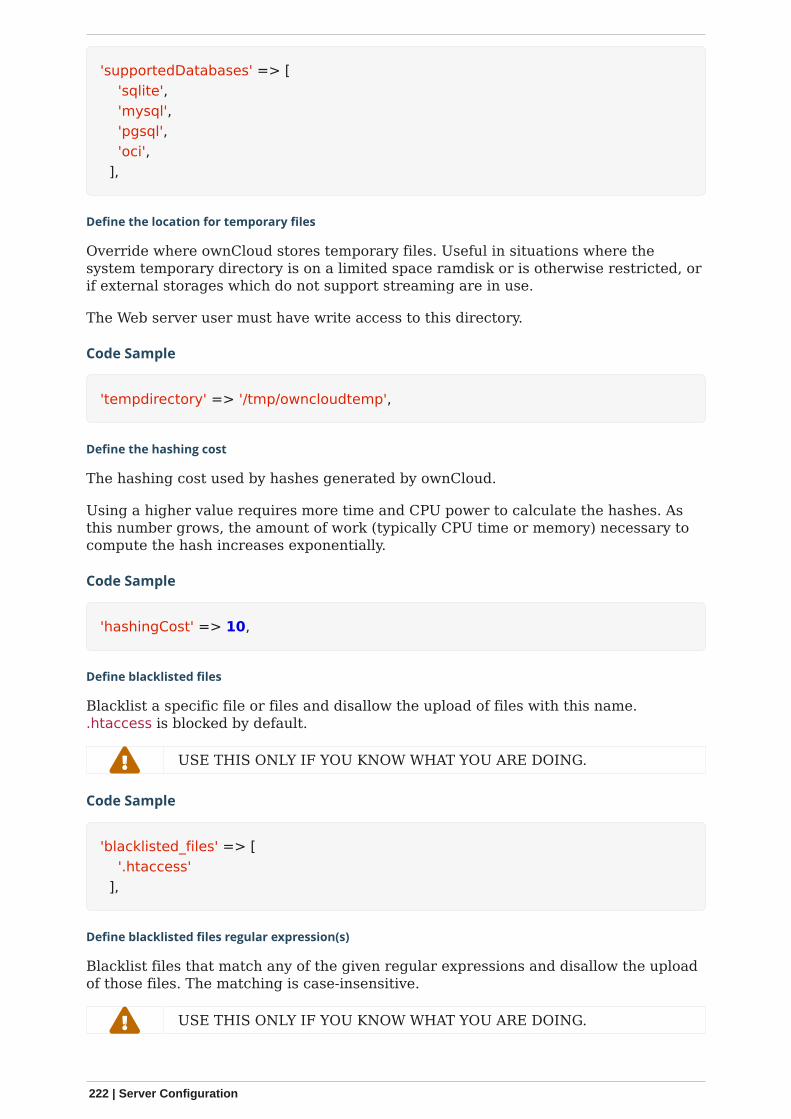
'supportedDatabases' => [ 'sqlite', 'mysql', 'pgsql', 'oci', ],
Define the location for temporary files
Override where ownCloud stores temporary files. Useful in situations where thesystem temporary directory is on a limited space ramdisk or is otherwise restricted, orif external storages which do not support streaming are in use.
The Web server user must have write access to this directory.
Code Sample
'tempdirectory' => '/tmp/owncloudtemp',
Define the hashing cost
The hashing cost used by hashes generated by ownCloud.
Using a higher value requires more time and CPU power to calculate the hashes. Asthis number grows, the amount of work (typically CPU time or memory) necessary tocompute the hash increases exponentially.
Code Sample
'hashingCost' => 10,
Define blacklisted files
Blacklist a specific file or files and disallow the upload of files with this name..htaccess is blocked by default.
USE THIS ONLY IF YOU KNOW WHAT YOU ARE DOING.
Code Sample
'blacklisted_files' => [ '.htaccess' ],
Define blacklisted files regular expression(s)
Blacklist files that match any of the given regular expressions and disallow the uploadof those files. The matching is case-insensitive.
USE THIS ONLY IF YOU KNOW WHAT YOU ARE DOING.
222 | Server Configuration
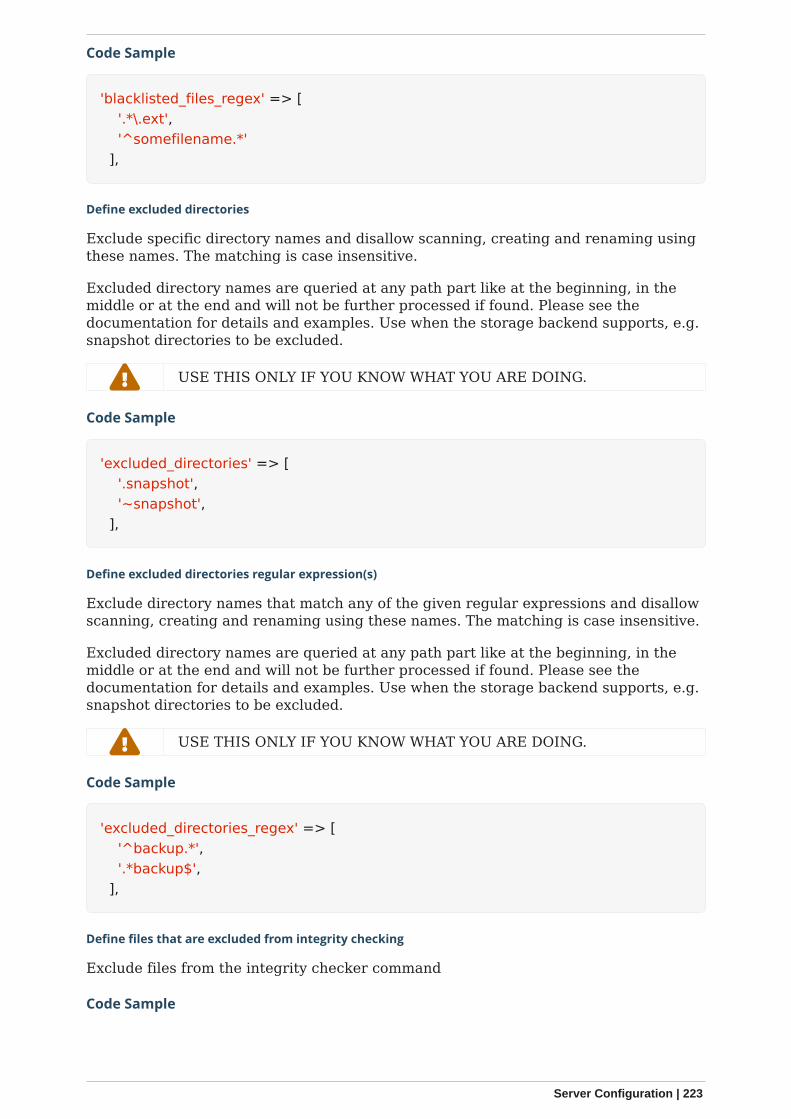
Code Sample
'blacklisted_files_regex' => [ '.*\.ext', '^somefilename.*' ],
Define excluded directories
Exclude specific directory names and disallow scanning, creating and renaming usingthese names. The matching is case insensitive.
Excluded directory names are queried at any path part like at the beginning, in themiddle or at the end and will not be further processed if found. Please see thedocumentation for details and examples. Use when the storage backend supports, e.g.snapshot directories to be excluded.
USE THIS ONLY IF YOU KNOW WHAT YOU ARE DOING.
Code Sample
'excluded_directories' => [ '.snapshot', '~snapshot', ],
Define excluded directories regular expression(s)
Exclude directory names that match any of the given regular expressions and disallowscanning, creating and renaming using these names. The matching is case insensitive.
Excluded directory names are queried at any path part like at the beginning, in themiddle or at the end and will not be further processed if found. Please see thedocumentation for details and examples. Use when the storage backend supports, e.g.snapshot directories to be excluded.
USE THIS ONLY IF YOU KNOW WHAT YOU ARE DOING.
Code Sample
'excluded_directories_regex' => [ '^backup.*', '.*backup$', ],
Define files that are excluded from integrity checking
Exclude files from the integrity checker command
Code Sample
Server Configuration | 223
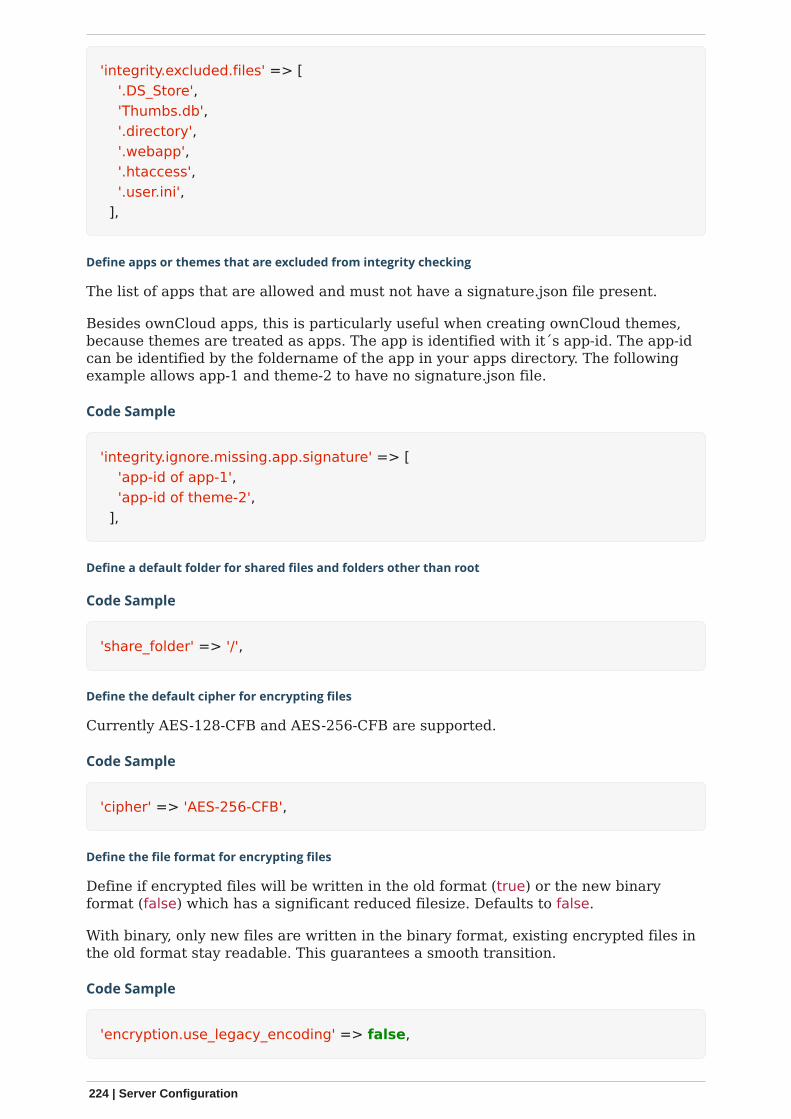
'integrity.excluded.files' => [ '.DS_Store', 'Thumbs.db', '.directory', '.webapp', '.htaccess', '.user.ini', ],
Define apps or themes that are excluded from integrity checking
The list of apps that are allowed and must not have a signature.json file present.
Besides ownCloud apps, this is particularly useful when creating ownCloud themes,because themes are treated as apps. The app is identified with it´s app-id. The app-idcan be identified by the foldername of the app in your apps directory. The followingexample allows app-1 and theme-2 to have no signature.json file.
Code Sample
'integrity.ignore.missing.app.signature' => [ 'app-id of app-1', 'app-id of theme-2', ],
Define a default folder for shared files and folders other than root
Code Sample
'share_folder' => '/',
Define the default cipher for encrypting files
Currently AES-128-CFB and AES-256-CFB are supported.
Code Sample
'cipher' => 'AES-256-CFB',
Define the file format for encrypting files
Define if encrypted files will be written in the old format (true) or the new binaryformat (false) which has a significant reduced filesize. Defaults to false.
With binary, only new files are written in the binary format, existing encrypted files inthe old format stay readable. This guarantees a smooth transition.
Code Sample
'encryption.use_legacy_encoding' => false,
224 | Server Configuration
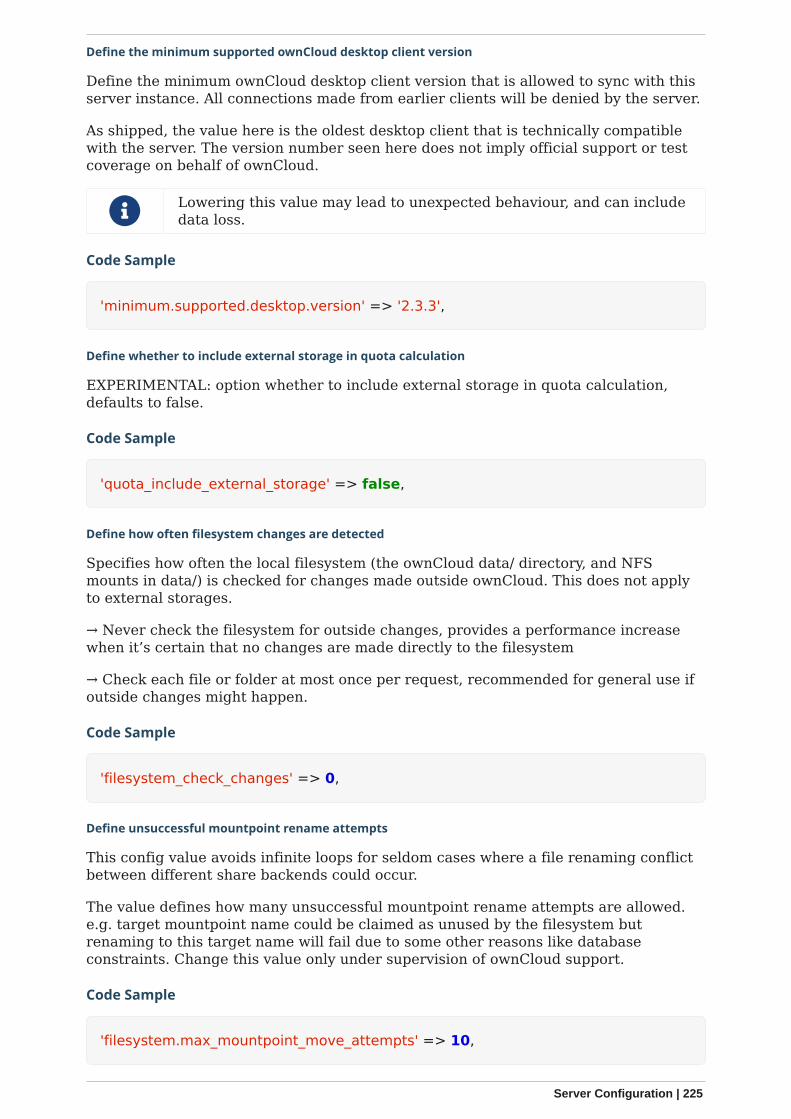
Define the minimum supported ownCloud desktop client version
Define the minimum ownCloud desktop client version that is allowed to sync with thisserver instance. All connections made from earlier clients will be denied by the server.
As shipped, the value here is the oldest desktop client that is technically compatiblewith the server. The version number seen here does not imply official support or testcoverage on behalf of ownCloud.
Lowering this value may lead to unexpected behaviour, and can includedata loss.
Code Sample
'minimum.supported.desktop.version' => '2.3.3',
Define whether to include external storage in quota calculation
EXPERIMENTAL: option whether to include external storage in quota calculation,defaults to false.
Code Sample
'quota_include_external_storage' => false,
Define how often filesystem changes are detected
Specifies how often the local filesystem (the ownCloud data/ directory, and NFSmounts in data/) is checked for changes made outside ownCloud. This does not applyto external storages.
→ Never check the filesystem for outside changes, provides a performance increasewhen it’s certain that no changes are made directly to the filesystem
→ Check each file or folder at most once per request, recommended for general use ifoutside changes might happen.
Code Sample
'filesystem_check_changes' => 0,
Define unsuccessful mountpoint rename attempts
This config value avoids infinite loops for seldom cases where a file renaming conflictbetween different share backends could occur.
The value defines how many unsuccessful mountpoint rename attempts are allowed.e.g. target mountpoint name could be claimed as unused by the filesystem butrenaming to this target name will fail due to some other reasons like databaseconstraints. Change this value only under supervision of ownCloud support.
Code Sample
'filesystem.max_mountpoint_move_attempts' => 10,
Server Configuration | 225
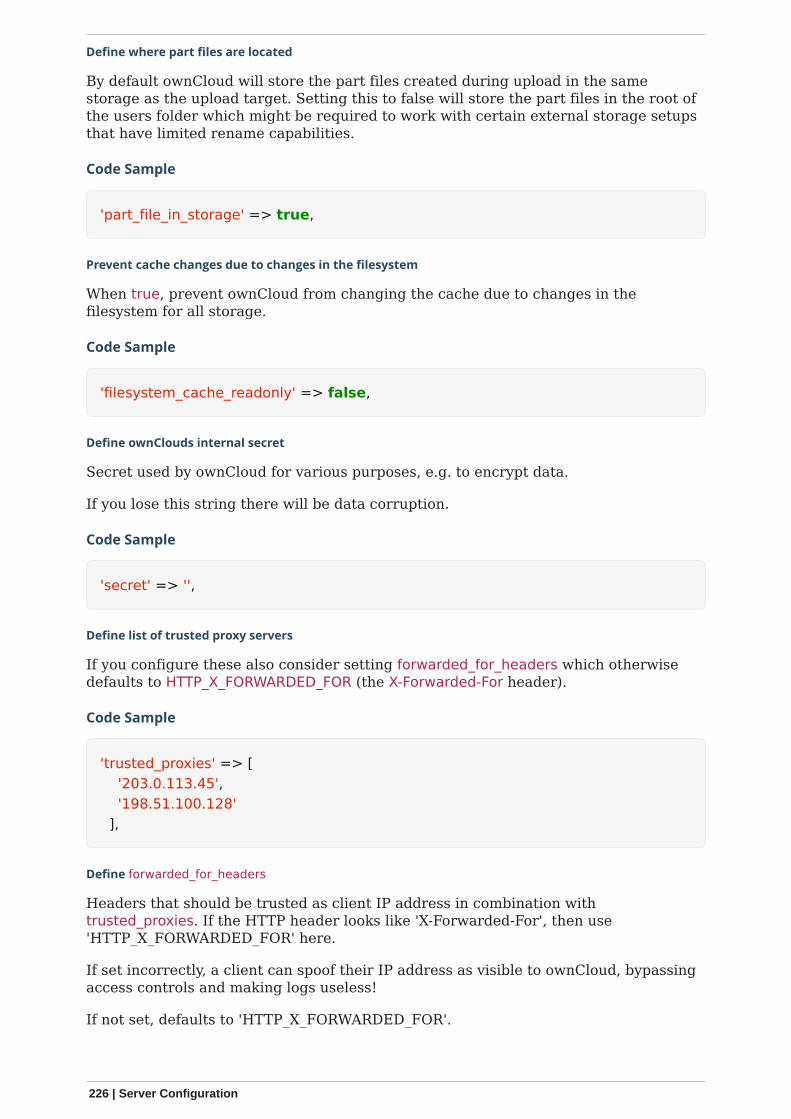
Define where part files are located
By default ownCloud will store the part files created during upload in the samestorage as the upload target. Setting this to false will store the part files in the root ofthe users folder which might be required to work with certain external storage setupsthat have limited rename capabilities.
Code Sample
'part_file_in_storage' => true,
Prevent cache changes due to changes in the filesystem
When true, prevent ownCloud from changing the cache due to changes in thefilesystem for all storage.
Code Sample
'filesystem_cache_readonly' => false,
Define ownClouds internal secret
Secret used by ownCloud for various purposes, e.g. to encrypt data.
If you lose this string there will be data corruption.
Code Sample
'secret' => '',
Define list of trusted proxy servers
If you configure these also consider setting forwarded_for_headers which otherwisedefaults to HTTP_X_FORWARDED_FOR (the X-Forwarded-For header).
Code Sample
'trusted_proxies' => [ '203.0.113.45', '198.51.100.128' ],
Define forwarded_for_headers
Headers that should be trusted as client IP address in combination withtrusted_proxies. If the HTTP header looks like 'X-Forwarded-For', then use'HTTP_X_FORWARDED_FOR' here.
If set incorrectly, a client can spoof their IP address as visible to ownCloud, bypassingaccess controls and making logs useless!
If not set, defaults to 'HTTP_X_FORWARDED_FOR'.
226 | Server Configuration
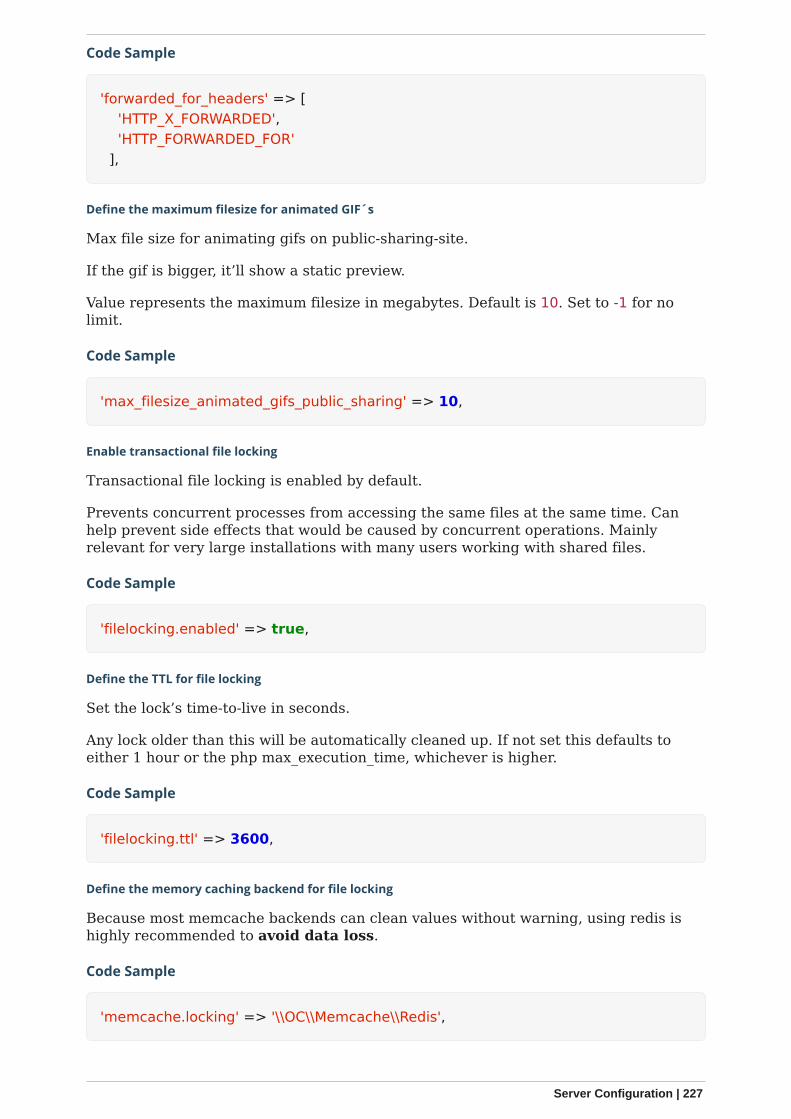
Code Sample
'forwarded_for_headers' => [ 'HTTP_X_FORWARDED', 'HTTP_FORWARDED_FOR' ],
Define the maximum filesize for animated GIF´s
Max file size for animating gifs on public-sharing-site.
If the gif is bigger, it’ll show a static preview.
Value represents the maximum filesize in megabytes. Default is 10. Set to -1 for nolimit.
Code Sample
'max_filesize_animated_gifs_public_sharing' => 10,
Enable transactional file locking
Transactional file locking is enabled by default.
Prevents concurrent processes from accessing the same files at the same time. Canhelp prevent side effects that would be caused by concurrent operations. Mainlyrelevant for very large installations with many users working with shared files.
Code Sample
'filelocking.enabled' => true,
Define the TTL for file locking
Set the lock’s time-to-live in seconds.
Any lock older than this will be automatically cleaned up. If not set this defaults toeither 1 hour or the php max_execution_time, whichever is higher.
Code Sample
'filelocking.ttl' => 3600,
Define the memory caching backend for file locking
Because most memcache backends can clean values without warning, using redis ishighly recommended to avoid data loss.
Code Sample
'memcache.locking' => '\\OC\\Memcache\\Redis',
Server Configuration | 227
Disable the web based updater
The web based updater is enabled by default.
Code Sample
'upgrade.disable-web' => false,
Define whether or not to enable automatic update of market apps
Set to false to disable.
Code Sample
'upgrade.automatic-app-update' => true,
Place this ownCloud instance into debugging mode
Only enable this for local development and not in production environments This willdisable the minifier and outputs some additional debug information
WARNING: Be warned that, if you set this to true, exceptions display stack traces onthe web interface, including passwords, — in plain text!. We strongly encourageyou never to use it in production.
Code Sample
'debug' => false,
Define the data-fingerprint of the current data served
This is a property used by the clients to find out if a backup has been restored on theserver. Once a backup is restored run sudo -u www-data php occ maintenance:data-fingerprint To set this to a new value.
Updating/Deleting this value can make connected clients stall until the user hasresolved conflicts.
Code Sample
'data-fingerprint' => '',
Define if you have copied the sample configuration
This entry is just here to show a warning in case somebody copied the sampleconfiguration.
DO NOT ADD THIS SWITCH TO YOUR CONFIGURATION!
If you, brave person, have read until here be aware that you should not modify ANYsettings in this file without reading the documentation.
228 | Server Configuration
Code Sample
'copied_sample_config' => true,
Enable or disable the files_external local mount option
Set this property to true if you want to enable the files_external local mount option.
Default: false
Code Sample
'files_external_allow_create_new_local' => false,
Enable or disable debug logging for SMB access
Set this property to true if you want to enable debug logging for SMB access.
Code Sample
'smb.logging.enable' => false,
Enable or disable async DAV extensions
Code Sample
'dav.enable.async' => false,
Show the grace period popup
Decide whether show or not the grace period popup. There is no change in thebehaviour of the grace period.
Code Sample
'grace_period.demo_key.show_popup' => true,
Link to get a demo key during active grace period
As admin you will be directed to that web page if you click on the "get a demo key"link in the grace period popup. It’s expected that the web page contains instructionson how to get a valid demo key to be used in the ownCloud server.
If this key isn’t present, ownCloud’s default will be used.
Code Sample
'grace_period.demo_key.link' => 'https://owncloud.com/try-enterprise/',
Server Configuration | 229
Apps Config.php Parameters
Introduction
This document describes parameters for apps maintained by ownCloud that are notpart of the core system. All keys are only valid if the corresponding app is installed andenabled. You must copy the keys needed to the active config.php file.
Multiple configuration files
ownCloud supports loading configuration parameters from multiple files. You can addarbitrary files ending with .config.php in the config/ directory.
Example:
You could place your email server configuration in email.config.php. This allows you toeasily create and manage custom configurations or to divide a large complexconfiguration file into a set of smaller files. These custom files are not overwritten byownCloud, and the values in these files take precedence over config.php.
ownCloud may write configurations into config.php. These configurations may conflictwith identical keys already set in additional config files. Be careful when using thiscapability!
App: Activity
Possible keys: activity_expire_days DAYS
Define the retention for activities of the activity app
Code Sample
'activity_expire_days' => 365,
App: Admin Audit
Possible keys: log.conditions ARRAY
Possible keys: admin_audit.groups ARRAY
Configure the path to the log file
Code Sample
'log.conditions' => [ [ 'apps' => ['admin_audit'], // Adjust the path below, to match your setup 'logfile' => '/var/www/owncloud/data/admin_audit.log' ],],
Filter the groups that messages are logged for
230 | Server Configuration

Code Sample
'admin_audit.groups' => ['group1', 'group2'],
App: Files Antivirus
Possible keys: files_antivirus.av_path STRING
Possible keys: files_antivirus.av_cmd_options STRING
Default path to the clamscan command line anti-virus scanner.
This setting only applies when the operating mode of the files_antivirus app is set toexecutable mode. See the documentation for more details.
Code Sample
'files_antivirus.av_path' => '/usr/bin/clamscan',
Command line options for the clamscan command line anti-virus scanner.
This setting only applies when the operating mode of the files_antivirus app is set toexecutable mode. See the documentation for more details.
Code Sample
'files_antivirus.av_cmd_options' => '',
App: Files Versions
Possible keys: versions_retention_obligation STRING
Use following values to configure the retention behaviour. Replace D with the numberof days.
autoDefault value if nothing is set
D, autoKeep versions at least for D days, apply expiration rules to all versions that areolder than D days
auto, DDelete all versions that are older than D days automatically, delete other versionsaccording to expiration rules
D1, D2Keep versions for at least D1 days and delete when they exceed D2 days
disabledDisable Versions; no files will be deleted.
Pattern to define the expiration date for each backup version created.
Server Configuration | 231
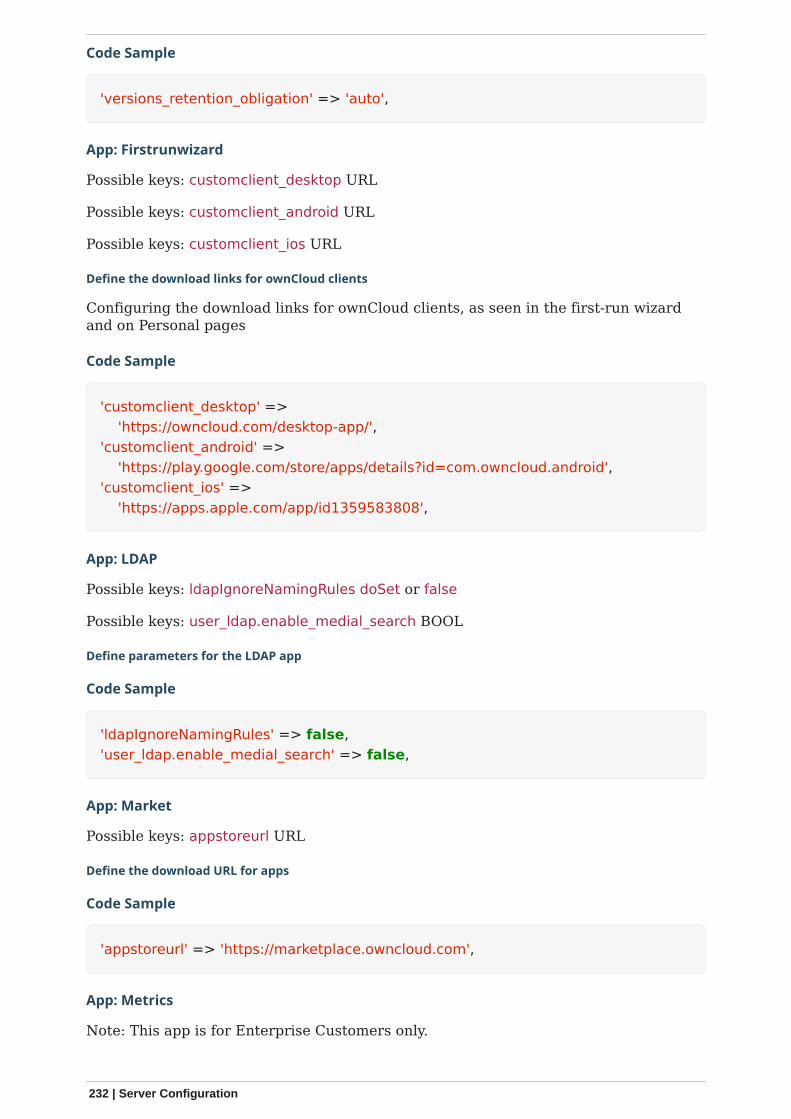
Code Sample
'versions_retention_obligation' => 'auto',
App: Firstrunwizard
Possible keys: customclient_desktop URL
Possible keys: customclient_android URL
Possible keys: customclient_ios URL
Define the download links for ownCloud clients
Configuring the download links for ownCloud clients, as seen in the first-run wizardand on Personal pages
Code Sample
'customclient_desktop' => 'https://owncloud.com/desktop-app/','customclient_android' => 'https://play.google.com/store/apps/details?id=com.owncloud.android','customclient_ios' => 'https://apps.apple.com/app/id1359583808',
App: LDAP
Possible keys: ldapIgnoreNamingRules doSet or false
Possible keys: user_ldap.enable_medial_search BOOL
Define parameters for the LDAP app
Code Sample
'ldapIgnoreNamingRules' => false,'user_ldap.enable_medial_search' => false,
App: Market
Possible keys: appstoreurl URL
Define the download URL for apps
Code Sample
'appstoreurl' => 'https://marketplace.owncloud.com',
App: Metrics
Note: This app is for Enterprise Customers only.
232 | Server Configuration
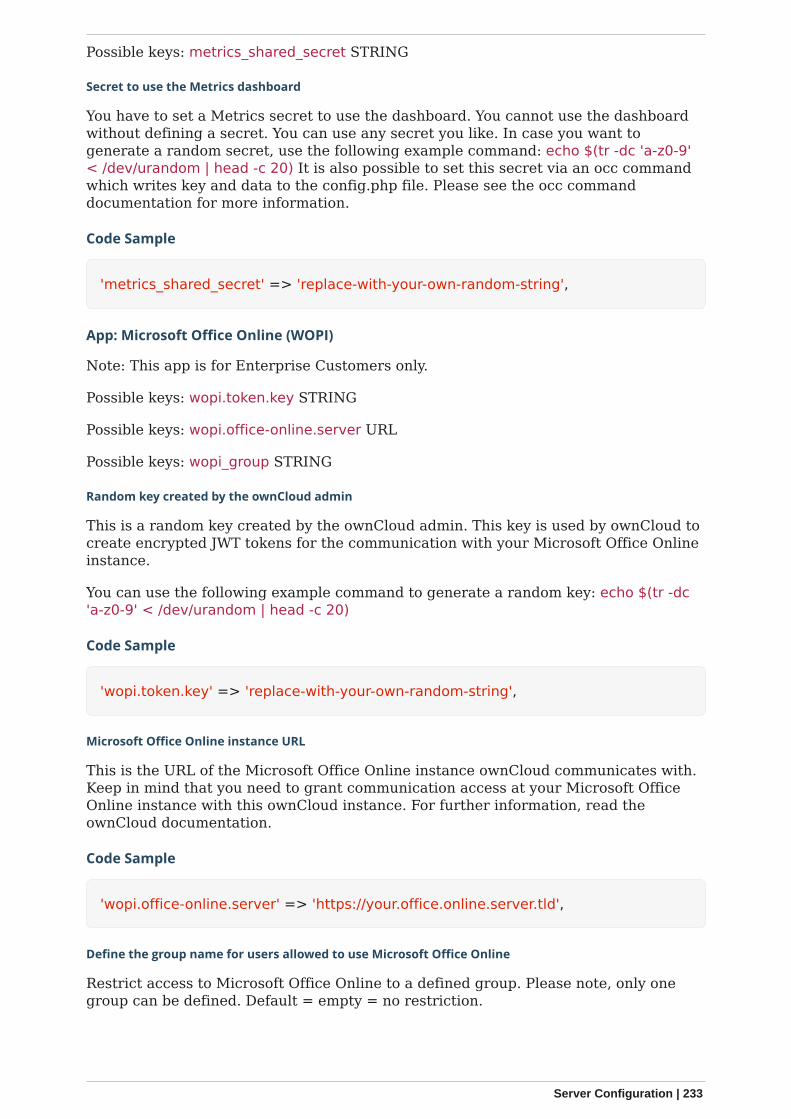
Possible keys: metrics_shared_secret STRING
Secret to use the Metrics dashboard
You have to set a Metrics secret to use the dashboard. You cannot use the dashboardwithout defining a secret. You can use any secret you like. In case you want togenerate a random secret, use the following example command: echo $(tr -dc 'a-z0-9'< /dev/urandom | head -c 20) It is also possible to set this secret via an occ commandwhich writes key and data to the config.php file. Please see the occ commanddocumentation for more information.
Code Sample
'metrics_shared_secret' => 'replace-with-your-own-random-string',
App: Microsoft Office Online (WOPI)
Note: This app is for Enterprise Customers only.
Possible keys: wopi.token.key STRING
Possible keys: wopi.office-online.server URL
Possible keys: wopi_group STRING
Random key created by the ownCloud admin
This is a random key created by the ownCloud admin. This key is used by ownCloud tocreate encrypted JWT tokens for the communication with your Microsoft Office Onlineinstance.
You can use the following example command to generate a random key: echo $(tr -dc'a-z0-9' < /dev/urandom | head -c 20)
Code Sample
'wopi.token.key' => 'replace-with-your-own-random-string',
Microsoft Office Online instance URL
This is the URL of the Microsoft Office Online instance ownCloud communicates with.Keep in mind that you need to grant communication access at your Microsoft OfficeOnline instance with this ownCloud instance. For further information, read theownCloud documentation.
Code Sample
'wopi.office-online.server' => 'https://your.office.online.server.tld',
Define the group name for users allowed to use Microsoft Office Online
Restrict access to Microsoft Office Online to a defined group. Please note, only onegroup can be defined. Default = empty = no restriction.
Server Configuration | 233
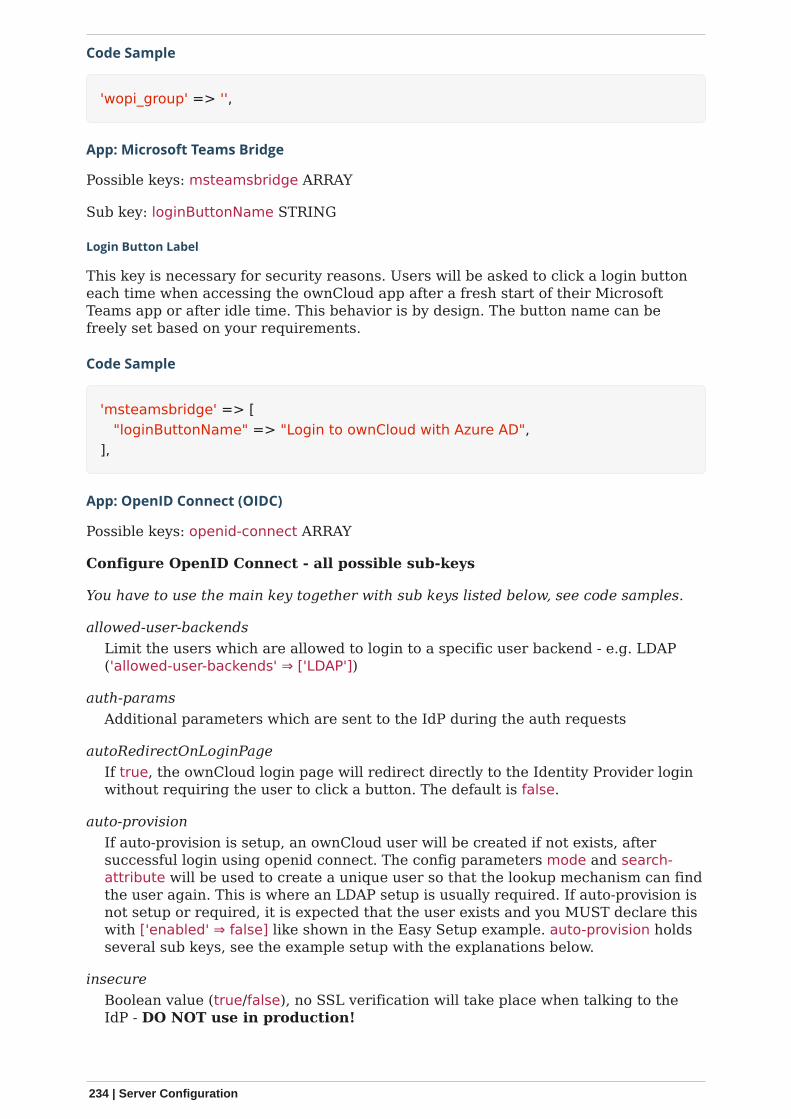
Code Sample
'wopi_group' => '',
App: Microsoft Teams Bridge
Possible keys: msteamsbridge ARRAY
Sub key: loginButtonName STRING
Login Button Label
This key is necessary for security reasons. Users will be asked to click a login buttoneach time when accessing the ownCloud app after a fresh start of their MicrosoftTeams app or after idle time. This behavior is by design. The button name can befreely set based on your requirements.
Code Sample
'msteamsbridge' => [ "loginButtonName" => "Login to ownCloud with Azure AD",],
App: OpenID Connect (OIDC)
Possible keys: openid-connect ARRAY
Configure OpenID Connect - all possible sub-keys
You have to use the main key together with sub keys listed below, see code samples.
allowed-user-backendsLimit the users which are allowed to login to a specific user backend - e.g. LDAP('allowed-user-backends' ⇒ ['LDAP'])
auth-paramsAdditional parameters which are sent to the IdP during the auth requests
autoRedirectOnLoginPageIf true, the ownCloud login page will redirect directly to the Identity Provider loginwithout requiring the user to click a button. The default is false.
auto-provisionIf auto-provision is setup, an ownCloud user will be created if not exists, aftersuccessful login using openid connect. The config parameters mode and search-attribute will be used to create a unique user so that the lookup mechanism can findthe user again. This is where an LDAP setup is usually required. If auto-provision isnot setup or required, it is expected that the user exists and you MUST declare thiswith ['enabled' ⇒ false] like shown in the Easy Setup example. auto-provision holdsseveral sub keys, see the example setup with the explanations below.
insecureBoolean value (true/false), no SSL verification will take place when talking to theIdP - DO NOT use in production!
234 | Server Configuration
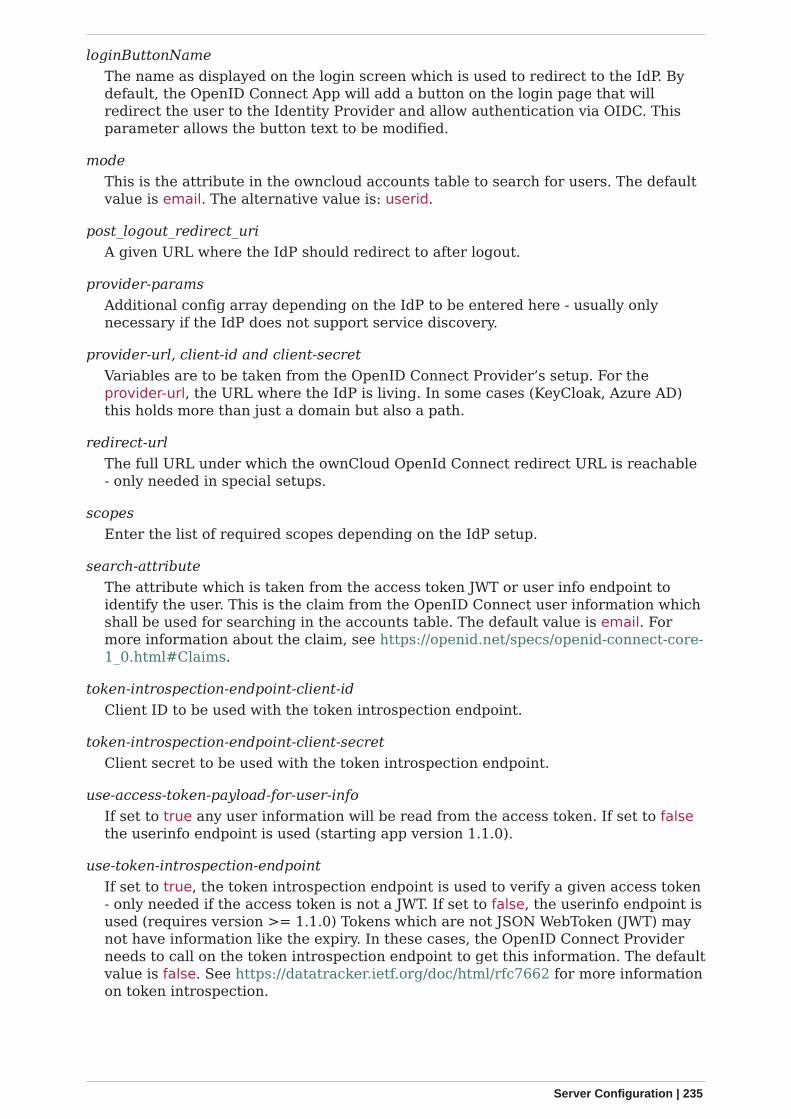
loginButtonNameThe name as displayed on the login screen which is used to redirect to the IdP. Bydefault, the OpenID Connect App will add a button on the login page that willredirect the user to the Identity Provider and allow authentication via OIDC. Thisparameter allows the button text to be modified.
modeThis is the attribute in the owncloud accounts table to search for users. The defaultvalue is email. The alternative value is: userid.
post_logout_redirect_uriA given URL where the IdP should redirect to after logout.
provider-paramsAdditional config array depending on the IdP to be entered here - usually onlynecessary if the IdP does not support service discovery.
provider-url, client-id and client-secretVariables are to be taken from the OpenID Connect Provider’s setup. For theprovider-url, the URL where the IdP is living. In some cases (KeyCloak, Azure AD)this holds more than just a domain but also a path.
redirect-urlThe full URL under which the ownCloud OpenId Connect redirect URL is reachable- only needed in special setups.
scopesEnter the list of required scopes depending on the IdP setup.
search-attributeThe attribute which is taken from the access token JWT or user info endpoint toidentify the user. This is the claim from the OpenID Connect user information whichshall be used for searching in the accounts table. The default value is email. Formore information about the claim, see https://openid.net/specs/openid-connect-core-1_0.html#Claims.
token-introspection-endpoint-client-idClient ID to be used with the token introspection endpoint.
token-introspection-endpoint-client-secretClient secret to be used with the token introspection endpoint.
use-access-token-payload-for-user-infoIf set to true any user information will be read from the access token. If set to falsethe userinfo endpoint is used (starting app version 1.1.0).
use-token-introspection-endpointIf set to true, the token introspection endpoint is used to verify a given access token- only needed if the access token is not a JWT. If set to false, the userinfo endpoint isused (requires version >= 1.1.0) Tokens which are not JSON WebToken (JWT) maynot have information like the expiry. In these cases, the OpenID Connect Providerneeds to call on the token introspection endpoint to get this information. The defaultvalue is false. See https://datatracker.ietf.org/doc/html/rfc7662 for more informationon token introspection.
Server Configuration | 235
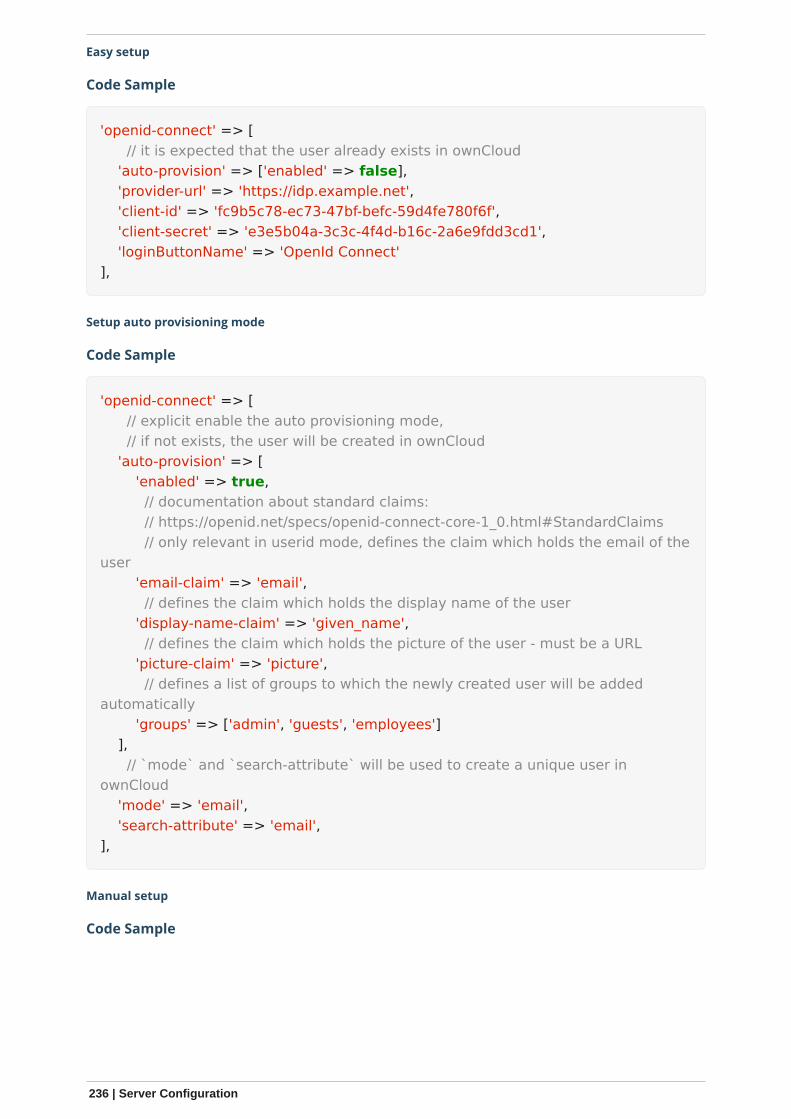
Easy setup
Code Sample
'openid-connect' => [ // it is expected that the user already exists in ownCloud 'auto-provision' => ['enabled' => false], 'provider-url' => 'https://idp.example.net', 'client-id' => 'fc9b5c78-ec73-47bf-befc-59d4fe780f6f', 'client-secret' => 'e3e5b04a-3c3c-4f4d-b16c-2a6e9fdd3cd1', 'loginButtonName' => 'OpenId Connect'],
Setup auto provisioning mode
Code Sample
'openid-connect' => [ // explicit enable the auto provisioning mode, // if not exists, the user will be created in ownCloud 'auto-provision' => [ 'enabled' => true, // documentation about standard claims: // https://openid.net/specs/openid-connect-core-1_0.html#StandardClaims // only relevant in userid mode, defines the claim which holds the email of theuser 'email-claim' => 'email', // defines the claim which holds the display name of the user 'display-name-claim' => 'given_name', // defines the claim which holds the picture of the user - must be a URL 'picture-claim' => 'picture', // defines a list of groups to which the newly created user will be addedautomatically 'groups' => ['admin', 'guests', 'employees'] ], // `mode` and `search-attribute` will be used to create a unique user inownCloud 'mode' => 'email', 'search-attribute' => 'email',],
Manual setup
Code Sample
236 | Server Configuration
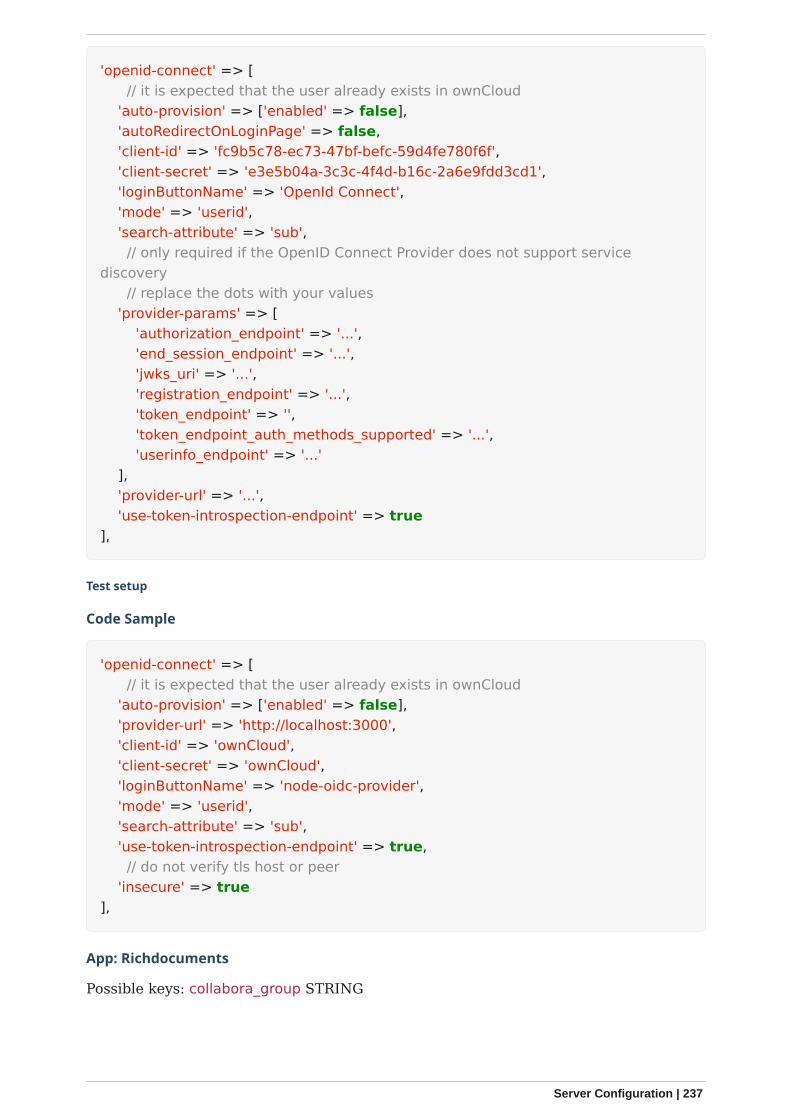
'openid-connect' => [ // it is expected that the user already exists in ownCloud 'auto-provision' => ['enabled' => false], 'autoRedirectOnLoginPage' => false, 'client-id' => 'fc9b5c78-ec73-47bf-befc-59d4fe780f6f', 'client-secret' => 'e3e5b04a-3c3c-4f4d-b16c-2a6e9fdd3cd1', 'loginButtonName' => 'OpenId Connect', 'mode' => 'userid', 'search-attribute' => 'sub', // only required if the OpenID Connect Provider does not support servicediscovery // replace the dots with your values 'provider-params' => [ 'authorization_endpoint' => '...', 'end_session_endpoint' => '...', 'jwks_uri' => '...', 'registration_endpoint' => '...', 'token_endpoint' => '', 'token_endpoint_auth_methods_supported' => '...', 'userinfo_endpoint' => '...' ], 'provider-url' => '...', 'use-token-introspection-endpoint' => true],
Test setup
Code Sample
'openid-connect' => [ // it is expected that the user already exists in ownCloud 'auto-provision' => ['enabled' => false], 'provider-url' => 'http://localhost:3000', 'client-id' => 'ownCloud', 'client-secret' => 'ownCloud', 'loginButtonName' => 'node-oidc-provider', 'mode' => 'userid', 'search-attribute' => 'sub', 'use-token-introspection-endpoint' => true, // do not verify tls host or peer 'insecure' => true],
App: Richdocuments
Possible keys: collabora_group STRING
Server Configuration | 237
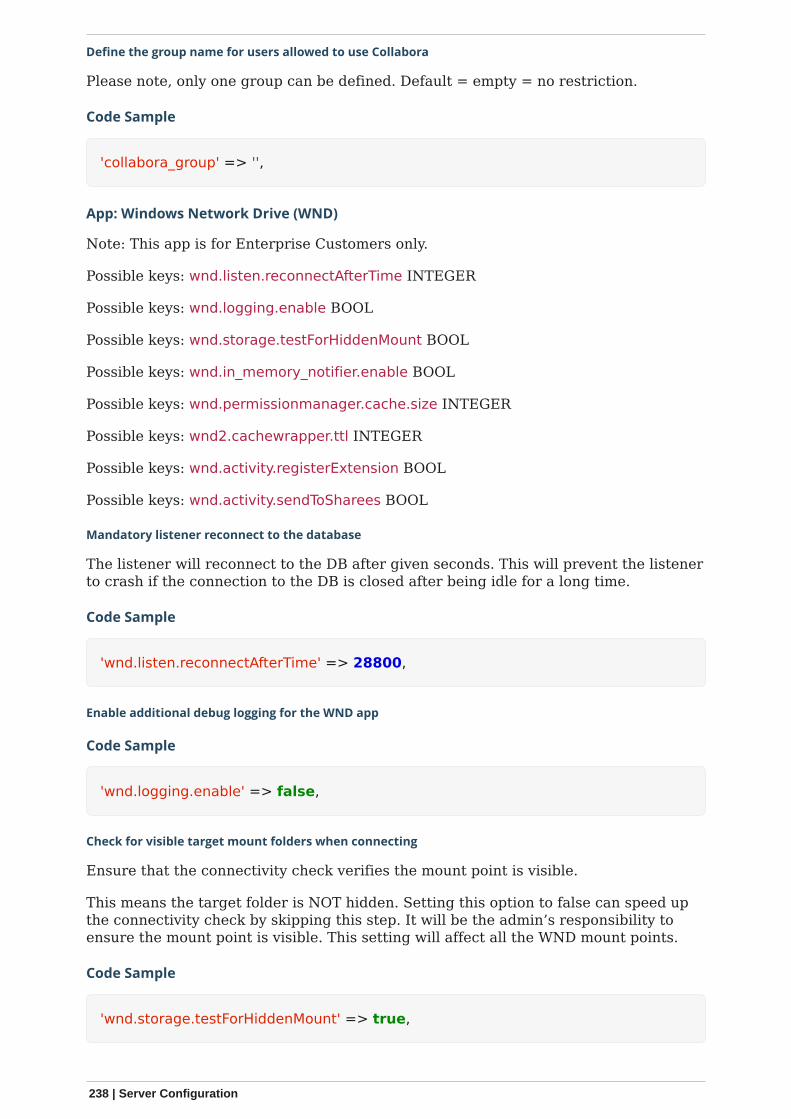
Define the group name for users allowed to use Collabora
Please note, only one group can be defined. Default = empty = no restriction.
Code Sample
'collabora_group' => '',
App: Windows Network Drive (WND)
Note: This app is for Enterprise Customers only.
Possible keys: wnd.listen.reconnectAfterTime INTEGER
Possible keys: wnd.logging.enable BOOL
Possible keys: wnd.storage.testForHiddenMount BOOL
Possible keys: wnd.in_memory_notifier.enable BOOL
Possible keys: wnd.permissionmanager.cache.size INTEGER
Possible keys: wnd2.cachewrapper.ttl INTEGER
Possible keys: wnd.activity.registerExtension BOOL
Possible keys: wnd.activity.sendToSharees BOOL
Mandatory listener reconnect to the database
The listener will reconnect to the DB after given seconds. This will prevent the listenerto crash if the connection to the DB is closed after being idle for a long time.
Code Sample
'wnd.listen.reconnectAfterTime' => 28800,
Enable additional debug logging for the WND app
Code Sample
'wnd.logging.enable' => false,
Check for visible target mount folders when connecting
Ensure that the connectivity check verifies the mount point is visible.
This means the target folder is NOT hidden. Setting this option to false can speed upthe connectivity check by skipping this step. It will be the admin’s responsibility toensure the mount point is visible. This setting will affect all the WND mount points.
Code Sample
'wnd.storage.testForHiddenMount' => true,
238 | Server Configuration
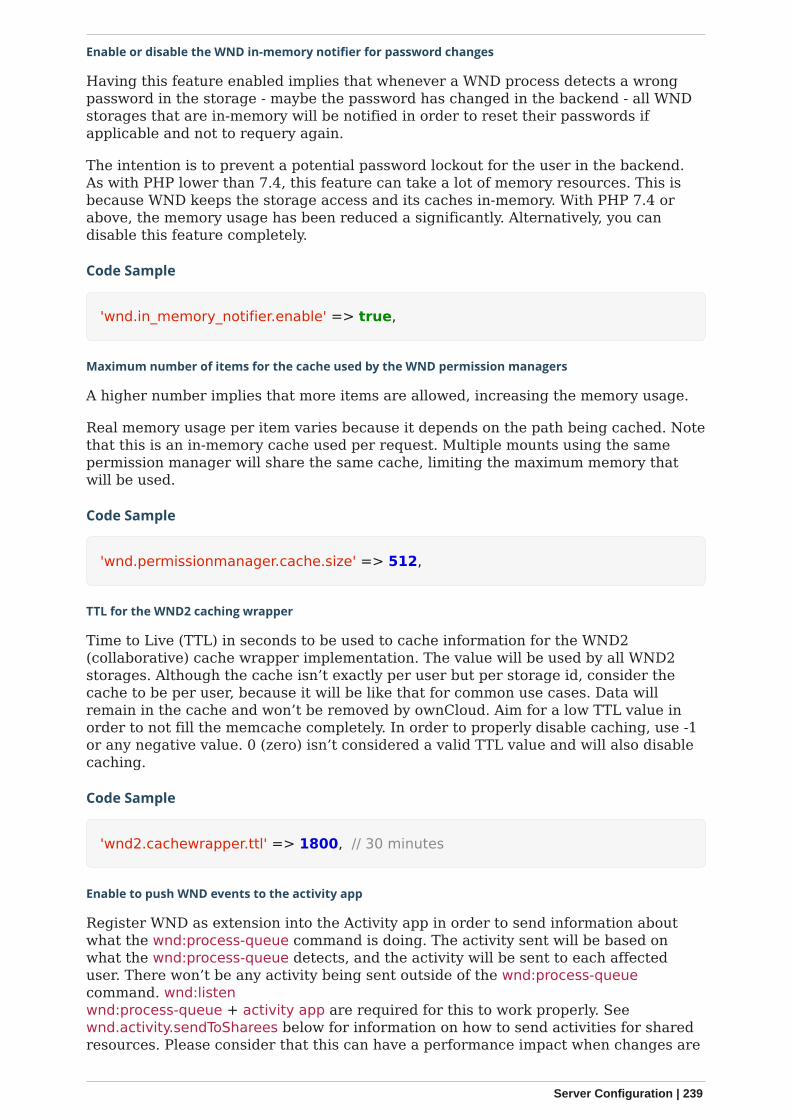
Enable or disable the WND in-memory notifier for password changes
Having this feature enabled implies that whenever a WND process detects a wrongpassword in the storage - maybe the password has changed in the backend - all WNDstorages that are in-memory will be notified in order to reset their passwords ifapplicable and not to requery again.
The intention is to prevent a potential password lockout for the user in the backend.As with PHP lower than 7.4, this feature can take a lot of memory resources. This isbecause WND keeps the storage access and its caches in-memory. With PHP 7.4 orabove, the memory usage has been reduced a significantly. Alternatively, you candisable this feature completely.
Code Sample
'wnd.in_memory_notifier.enable' => true,
Maximum number of items for the cache used by the WND permission managers
A higher number implies that more items are allowed, increasing the memory usage.
Real memory usage per item varies because it depends on the path being cached. Notethat this is an in-memory cache used per request. Multiple mounts using the samepermission manager will share the same cache, limiting the maximum memory thatwill be used.
Code Sample
'wnd.permissionmanager.cache.size' => 512,
TTL for the WND2 caching wrapper
Time to Live (TTL) in seconds to be used to cache information for the WND2(collaborative) cache wrapper implementation. The value will be used by all WND2storages. Although the cache isn’t exactly per user but per storage id, consider thecache to be per user, because it will be like that for common use cases. Data willremain in the cache and won’t be removed by ownCloud. Aim for a low TTL value inorder to not fill the memcache completely. In order to properly disable caching, use -1or any negative value. 0 (zero) isn’t considered a valid TTL value and will also disablecaching.
Code Sample
'wnd2.cachewrapper.ttl' => 1800, // 30 minutes
Enable to push WND events to the activity app
Register WND as extension into the Activity app in order to send information aboutwhat the wnd:process-queue command is doing. The activity sent will be based onwhat the wnd:process-queue detects, and the activity will be sent to each affecteduser. There won’t be any activity being sent outside of the wnd:process-queuecommand. wnd:listenwnd:process-queue + activity app are required for this to work properly. Seewnd.activity.sendToSharees below for information on how to send activities for sharedresources. Please consider that this can have a performance impact when changes are
Server Configuration | 239
sent to many users.
Code Sample
'wnd.activity.registerExtension' => false,
Enable to send WND activity notifications to sharees
The wnd:process-queue command will also send activity notifications to the sharees ifa WND file or folder is shared (or accessible via a share). It’s REQUIRED that thewnd.activity.registerExtension flag is set to true (see above), otherwise this flag will beignored. This flag depends on the wnd.activity.registerExtension and has the samerestrictions.
Code Sample
'wnd.activity.sendToSharees' => false,
App: Workflow / Tagging
Note: This app is for Enterprise Customers only.
Possible keys: workflow.retention_engine STRING
Provide advanced management of file tagging
Enables admins to specify rules and conditions (file size, file mimetype, groupmembership and more) to automatically assign tags to uploaded files. Values: tagbased(default) or userbased.
Code Sample
'workflow.retention_engine' => 'tagbased',
Custom Client Download Repositories
You may configure the URLs to your own download repositories for your ownClouddesktop clients and mobile apps in config/config.php. This example shows the defaultdownload locations:
<?php
"customclient_desktop" => "https://owncloud.com/desktop-app/", "customclient_android" =>"https://play.google.com/store/apps/details?id=com.owncloud.android", "customclient_ios" =>"https://itunes.apple.com/us/app/owncloud/id543672169?mt=8",
Simply replace the URLs with the links to your own preferred download repos.
You may test alternate URLs without editing config/config.php by setting a test URL asan environment variable:
240 | Server Configuration
export OCC_UPDATE_URL=https://test.example.com
When you’re finished testing you can disable the environment variable:
unset OCC_UPDATE_URL
Email Configuration
Introduction
ownCloud is capable of sending emails for a range of reasons. These include:
• Password reset emails• Notifying users of new file shares• Changes in files• Activity notifications
To make use of them, users need to configure which notifications they want to receive.They can do this on their Personal pages.
To be able to send emails, a functioning mail server must be available,whether locally in your network, or remotely.
The Graphical Email Configuration Wizard
The wizard supports two mail server types: SMTP and PHP. Use SMTP for a remoteemail server, and PHP when your mail server is on the same machine as ownCloud.
In most cases the smtp option is best, because it removes the extra step of passingthrough PHP, and you can control all of your mail server options in one place, in yourownCloud’s email server configuration.
Configuring an SMTP Server
To configure ownCloud to interact with an SMTP server, you can either updateconfig/config.php by hand, or use the Graphical Email Configuration Wizard, whichupdates config/config.php for you.
You need the following information from your email server administrator to connectownCloud to a remote SMTP server:
• Encryption type: None, SSL/TLS or STARTTLS.• The From address you want your outgoing ownCloud mails to use.• Whether authentication is required.• Authentication method: None, Login, Plain, or NT LAN Manager.• The server’s IP address or fully-qualified domain name (FQDN).• Login credentials, if required.
Server Configuration | 241
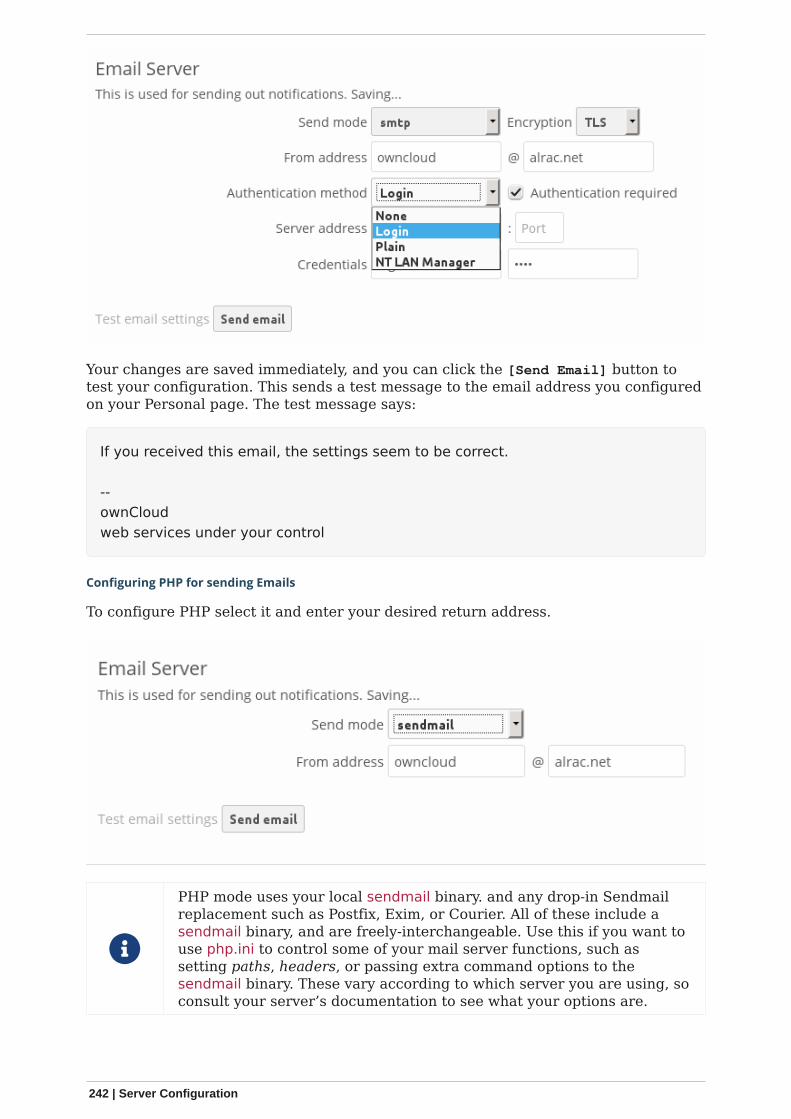
Your changes are saved immediately, and you can click the [Send Email] button totest your configuration. This sends a test message to the email address you configuredon your Personal page. The test message says:
If you received this email, the settings seem to be correct.
--ownCloudweb services under your control
Configuring PHP for sending Emails
To configure PHP select it and enter your desired return address.
PHP mode uses your local sendmail binary. and any drop-in Sendmailreplacement such as Postfix, Exim, or Courier. All of these include asendmail binary, and are freely-interchangeable. Use this if you want touse php.ini to control some of your mail server functions, such assetting paths, headers, or passing extra command options to thesendmail binary. These vary according to which server you are using, soconsult your server’s documentation to see what your options are.
242 | Server Configuration

Setting Mail Server Parameters via config.php
If you prefer, you may set your email server parameters directly in config/config.php.
Supported SMTP sending modes
• SMTP• PHP Mail
Compatibility of sending modes might depend on the installationenvironment. In case of problems with a sending mode, it isrecommended to try other mode configurations.
SMTP
If you want to send email using a local or remote SMTP server it is necessary to enterthe name or IP address of the server, optionally followed by a colon and port number,e.g. :425. If this value is not given the default port 25/tcp will be used unless youchange that by modifying the mail_smtpport parameter. Multiple servers can beentered, separated by semicolons:
'mail_smtpmode' => 'smtp','mail_smtphost' => 'smtp-1.server.dom;smtp-2.server.dom:425','mail_smtpport' => 25,
Or:
'mail_smtpmode' => 'smtp','mail_smtphost' => 'smtp.server.dom','mail_smtpport' => 425,
If a malware or SPAM scanner is running on the SMTP server it might be necessarythat you increase the SMTP timeout to e.g., 30s:
'mail_smtptimeout' => 30,
If the SMTP server accepts insecure connections, the default setting can be used:
'mail_smtpsecure' => '',
If the SMTP server only accepts secure connections you can choose between thefollowing two variants:
SSL/TLS
A secure connection will be initiated using SSL/TLS via SMTPS on the default port465/tcp:
'mail_smtphost' => 'smtp.server.dom:465','mail_smtpsecure' => 'ssl',
Server Configuration | 243

STARTTLS
A secure connection will be initiated using STARTTLS via SMTP on the default port25/tcp:
'mail_smtphost' => 'smtp.server.dom','mail_smtpsecure' => 'tls',
An alternative is the port 587/tcp (recommended):
'mail_smtphost' => 'smtp.server.dom:587','mail_smtpsecure' => 'tls',
Authentication
And finally it is necessary to configure if the SMTP server requires authentication, ifnot, the default values can be taken as is.
'mail_smtpauth' => false,'mail_smtpname' => '','mail_smtppassword' => '',
If SMTP authentication is required you have to set the required username andpassword and can optionally choose between the authentication types LOGIN(default) or PLAIN.
'mail_smtpauth' => true,'mail_smtpauthtype' => 'LOGIN','mail_smtpname' => 'username','mail_smtppassword' => 'password',
PHP Mail
If you want to use PHP mail it is necessary to have an installed and working emailsystem on your server. Which program in detail is used to send email is defined by theconfiguration settings in the php.ini file. On *nix systems this will most likely beSendmail. ownCloud should be able to send email out of the box.
'mail_smtpmode' => 'php','mail_smtphost' => '127.0.0.1','mail_smtpport' => 25,'mail_smtptimeout' => 10,'mail_smtpsecure' => '','mail_smtpauth' => false,'mail_smtpauthtype' => 'LOGIN','mail_smtpname' => '','mail_smtppassword' => '',
244 | Server Configuration
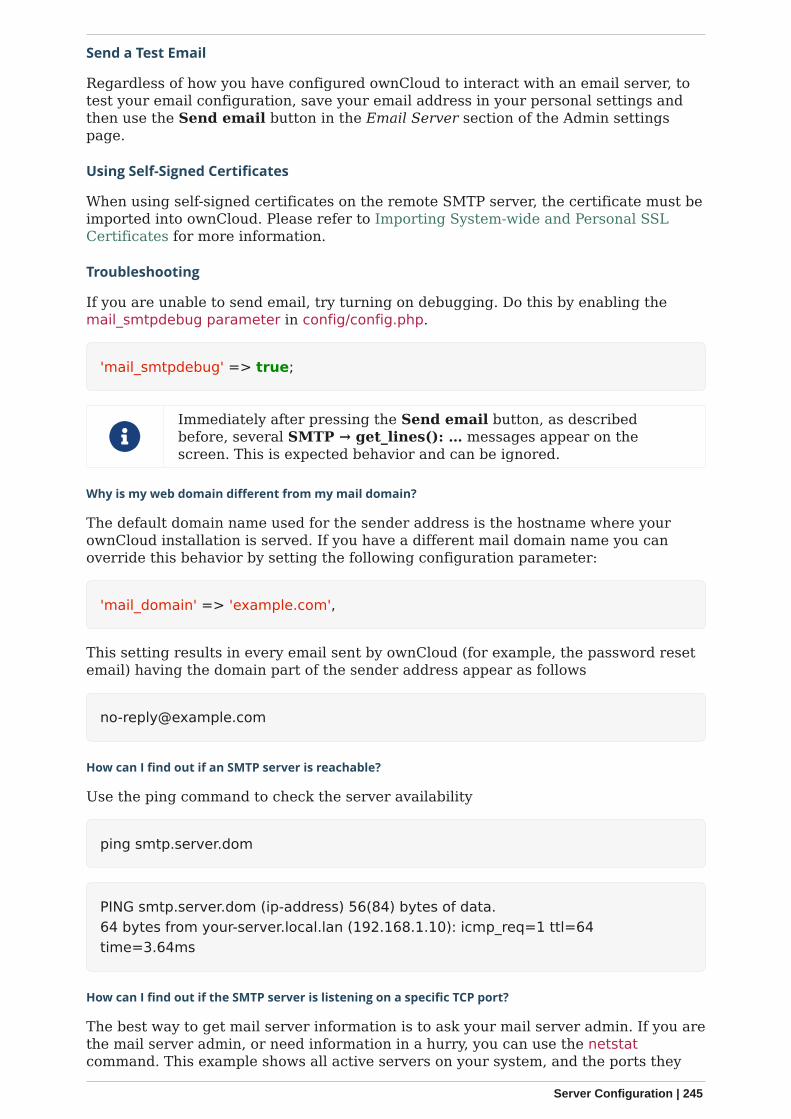
Send a Test Email
Regardless of how you have configured ownCloud to interact with an email server, totest your email configuration, save your email address in your personal settings andthen use the Send email button in the Email Server section of the Admin settingspage.
Using Self-Signed Certificates
When using self-signed certificates on the remote SMTP server, the certificate must beimported into ownCloud. Please refer to Importing System-wide and Personal SSLCertificates for more information.
Troubleshooting
If you are unable to send email, try turning on debugging. Do this by enabling themail_smtpdebug parameter in config/config.php.
'mail_smtpdebug' => true;
Immediately after pressing the Send email button, as describedbefore, several SMTP → get_lines(): … messages appear on thescreen. This is expected behavior and can be ignored.
Why is my web domain different from my mail domain?
The default domain name used for the sender address is the hostname where yourownCloud installation is served. If you have a different mail domain name you canoverride this behavior by setting the following configuration parameter:
'mail_domain' => 'example.com',
This setting results in every email sent by ownCloud (for example, the password resetemail) having the domain part of the sender address appear as follows
How can I find out if an SMTP server is reachable?
Use the ping command to check the server availability
ping smtp.server.dom
PING smtp.server.dom (ip-address) 56(84) bytes of data.64 bytes from your-server.local.lan (192.168.1.10): icmp_req=1 ttl=64time=3.64ms
How can I find out if the SMTP server is listening on a specific TCP port?
The best way to get mail server information is to ask your mail server admin. If you arethe mail server admin, or need information in a hurry, you can use the netstatcommand. This example shows all active servers on your system, and the ports they
Server Configuration | 245
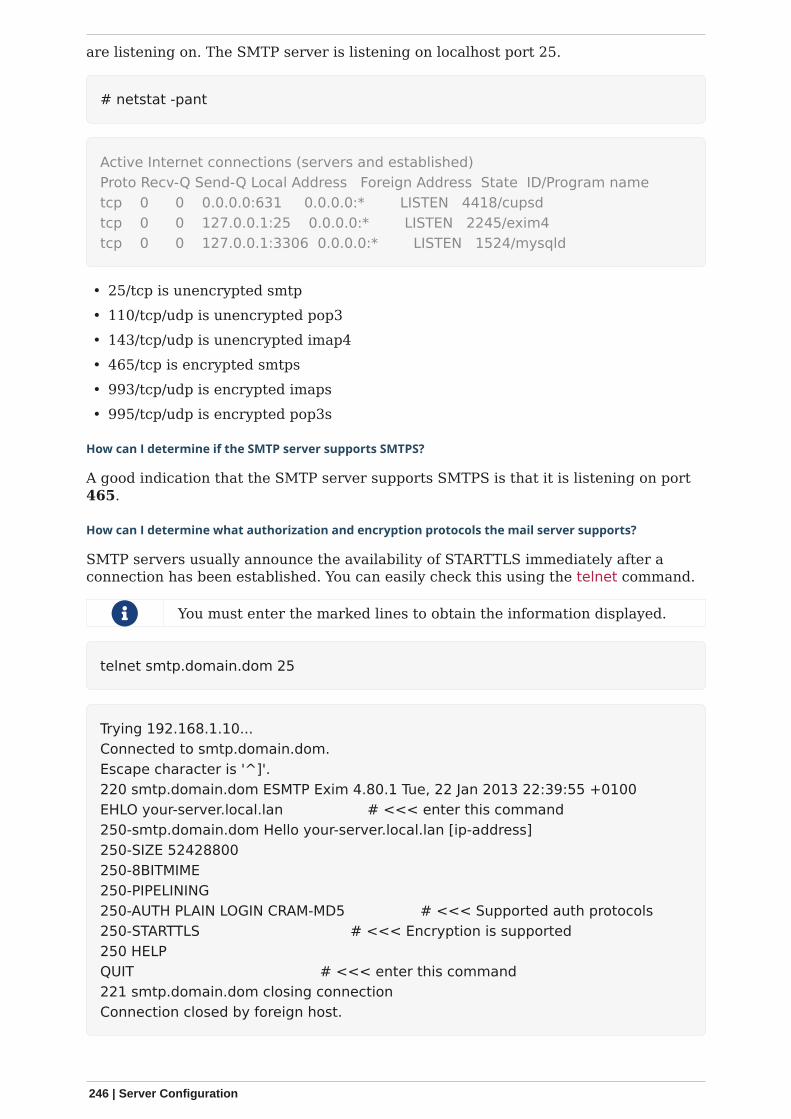
are listening on. The SMTP server is listening on localhost port 25.
# netstat -pant
Active Internet connections (servers and established)Proto Recv-Q Send-Q Local Address Foreign Address State ID/Program nametcp 0 0 0.0.0.0:631 0.0.0.0:* LISTEN 4418/cupsdtcp 0 0 127.0.0.1:25 0.0.0.0:* LISTEN 2245/exim4tcp 0 0 127.0.0.1:3306 0.0.0.0:* LISTEN 1524/mysqld
• 25/tcp is unencrypted smtp• 110/tcp/udp is unencrypted pop3• 143/tcp/udp is unencrypted imap4• 465/tcp is encrypted smtps• 993/tcp/udp is encrypted imaps• 995/tcp/udp is encrypted pop3s
How can I determine if the SMTP server supports SMTPS?
A good indication that the SMTP server supports SMTPS is that it is listening on port465.
How can I determine what authorization and encryption protocols the mail server supports?
SMTP servers usually announce the availability of STARTTLS immediately after aconnection has been established. You can easily check this using the telnet command.
You must enter the marked lines to obtain the information displayed.
telnet smtp.domain.dom 25
Trying 192.168.1.10...Connected to smtp.domain.dom.Escape character is '^]'.220 smtp.domain.dom ESMTP Exim 4.80.1 Tue, 22 Jan 2013 22:39:55 +0100EHLO your-server.local.lan # <<< enter this command250-smtp.domain.dom Hello your-server.local.lan [ip-address]250-SIZE 52428800250-8BITMIME250-PIPELINING250-AUTH PLAIN LOGIN CRAM-MD5 # <<< Supported auth protocols250-STARTTLS # <<< Encryption is supported250 HELPQUIT # <<< enter this command221 smtp.domain.dom closing connectionConnection closed by foreign host.
246 | Server Configuration
Enabling Debug Mode
If you are unable to send email, it might be useful to activate further debug messagesby enabling the mail_smtpdebug parameter:
'mail_smtpdebug' => true,
Immediately after pressing the [Send email] button, as describedbefore, several SMTP → get_lines(): … messages appear on thescreen. This is expected behavior and can be ignored.
Using Email Templates
Most emails sent from ownCloud are based on editable email templates, which are amixture of PHP and HTML. The currently available templates are:
Email Format Description File Location
Activity notificationmail
plaintext
Notification ofactivities that usershave enabled in theNotifications section oftheir Personal pages.
core/templates/mail.php
Lost password mail HTML Password reset emailfor users who losetheir passwords.
core/templates/lostpassword/email.php
New user email HTML settings/templates/email.new_user.php
plaintext
settings/templates/email.new_user_plain_text.php
Public link share email HTML Notify users of newpublic link shares.
core/templates/mail.php
plaintext
core/templates/altmail.php
New file share email HTML Notify users of newfile shares.
core/templates/internalmail.php
plaintext
core/templates/internalaltmail.php
In addition to providing the email templates, this feature enables you to apply any pre-configured themes to the email. To modify an email template to users:
1. Access the Admin page.2. Scroll to the Mail templates section.3. Select a template from the drop-down menu.4. Make any desired modifications to the template.
The templates are written in PHP and HTML, and are already loaded with the relevantvariables such as username, share links, and filenames. You can, if you are careful,edit these — even without knowing PHP or HTML. Don’t touch any of the code, but it’sOK to edit the text portions of the messages.
Server Configuration | 247
For example, this the lost password mail template:
<?php
echo str_replace( '{link}', $_['link'], $l->t('Use the following link to reset your password: {link}'));
You could change the text portion of the template, Use the following link to reset yourpassword: to say something else, such as:
Click the following link to reset your password.If you did not ask for a password reset, ignore this message.
Again, be very careful to change nothing but the message text, because the tiniestcoding error will break the template.
You can edit the templates directly in the template text box, or you cancopy and paste them to a text editor for modification and then copy andpaste them back to the template text box for use when you are done.
Excluding Directories and Blacklisting Files
Introduction
This document describes how to manage blacklisted files and excluded directories.
Definitions of terms
BlacklistedFiles that may harm the ownCloud environment like a foreign .htaccess file.Blacklisting prevents anyone from uploading blacklisted files to the ownCloudserver.
ExcludedExisting directories on your ownCloud server, including directories on externalstorage mounts, that are excluded from being processed by ownCloud. In effect theyare invisible to ownCloud.
Both types are defined in config.php. Blacklisted files and excluded directories are notscanned by ownCloud, not viewed, not synced, and cannot be created, renamed,deleted, or accessed via direct path input from a file manager. Even when a filepath isentered manually via a file explorer, the path cannot be accessed.
For example configurations please see the config.sample.php file.
248 | Server Configuration

Many filesystems do not allow the coexistence of a file and folder withexactly the same name on the same directory level. Therefore nodifferentiation is made in processing files and folders for blacklisting orexcluding, as it would just return a deny at a later stage. With theimplementation made, you get an immediate error message.
Example: The storage backend has a reserved directory name".snapshot" which is excluded by configuration. If you try to add a fileor folder via the browser or sync a file or folder from the client named".snapshot", you will get an immediate ownCloud triggered deny.
Impact on System Performance
If you have a filesystem mounted with 200,000 files and directories and 15 snapshotsin rotation, you would now scan and process 200,000 elements plus 200,000 x 15 =3,000,000 elements additionally. These additional 3,000,000 elements, 15 times morethan the original quantity, would also be available for viewing and synchronisation.Because this is a big and unnecessary overhead, most times confusing to clients,further processing can be eliminated by using excluded directories.
Blacklisted Files
By default, ownCloud blacklists the file .htaccess to secure the running instance,which is important when using Apache as webserver. A foreign .htaccess file couldoverwrite rules defined by ownCloud. There is no explicit need to enter the file name.htaccess as parameter to the blacklisted_files array in config.php, but you can addmore blacklisted file names if necessary. You can also prevent uploading, e.g., Outlook.pst files, with this mechanism to avoid massive backend space allocation.
Excluded Directories
Reasons for Excluding Directories
1. Enterprise storage systems, or special filesystems like ZFS and BtrFS are capableof snapshots. These snapshots are directories and keep point-in-time views of thedataa. Snapshot directories are read-onlyb. There is no common naming convention for these directories, and there most
likely will never be. For example, NetApp uses .snapshot and ~snapshot, EMCe.g., .ckpt, HDS e.g., .latest and ~latest, and the ZFS filesystem uses .zfs
c. It does not make sense for these directories to be visible to users as they areused to ease backup, restoration, and cloning
2. Directories which are part of the mounted filesystem, but must not be useraccessible/visible
3. Manual managed but user invisible backup directories
Example:
If you have a snapshot-capable storage or filesystem where snapshots are enabled andpresented to clients, each directory will contain a "special" visible directory namede.g. .snapshot. Depending on the system, you may find underneath a list of snapshotstaken and in the next lower level the complete set of files and directories which werepresent when the snapshot was created. In most systems, this mechanism is true in alldirectory levels:
Server Configuration | 249
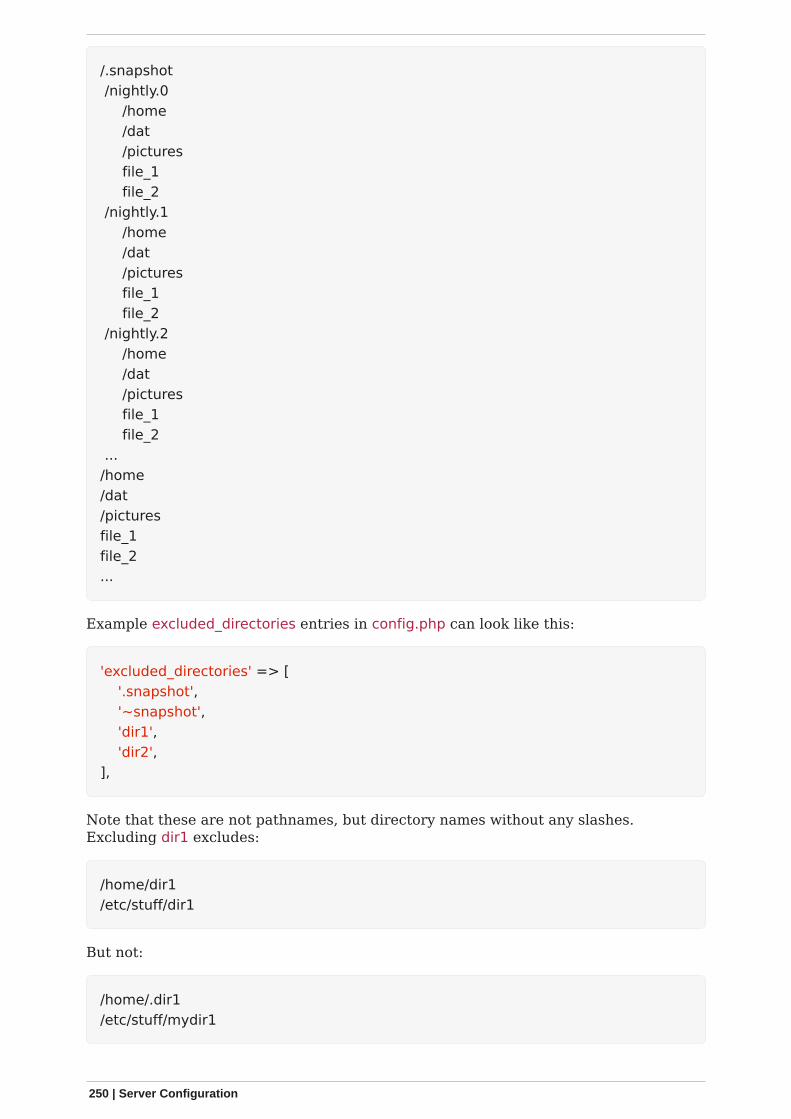
/.snapshot /nightly.0 /home /dat /pictures file_1 file_2 /nightly.1 /home /dat /pictures file_1 file_2 /nightly.2 /home /dat /pictures file_1 file_2 .../home/dat/picturesfile_1file_2...
Example excluded_directories entries in config.php can look like this:
'excluded_directories' => [ '.snapshot', '~snapshot', 'dir1', 'dir2',],
Note that these are not pathnames, but directory names without any slashes.Excluding dir1 excludes:
/home/dir1/etc/stuff/dir1
But not:
/home/.dir1/etc/stuff/mydir1
250 | Server Configuration
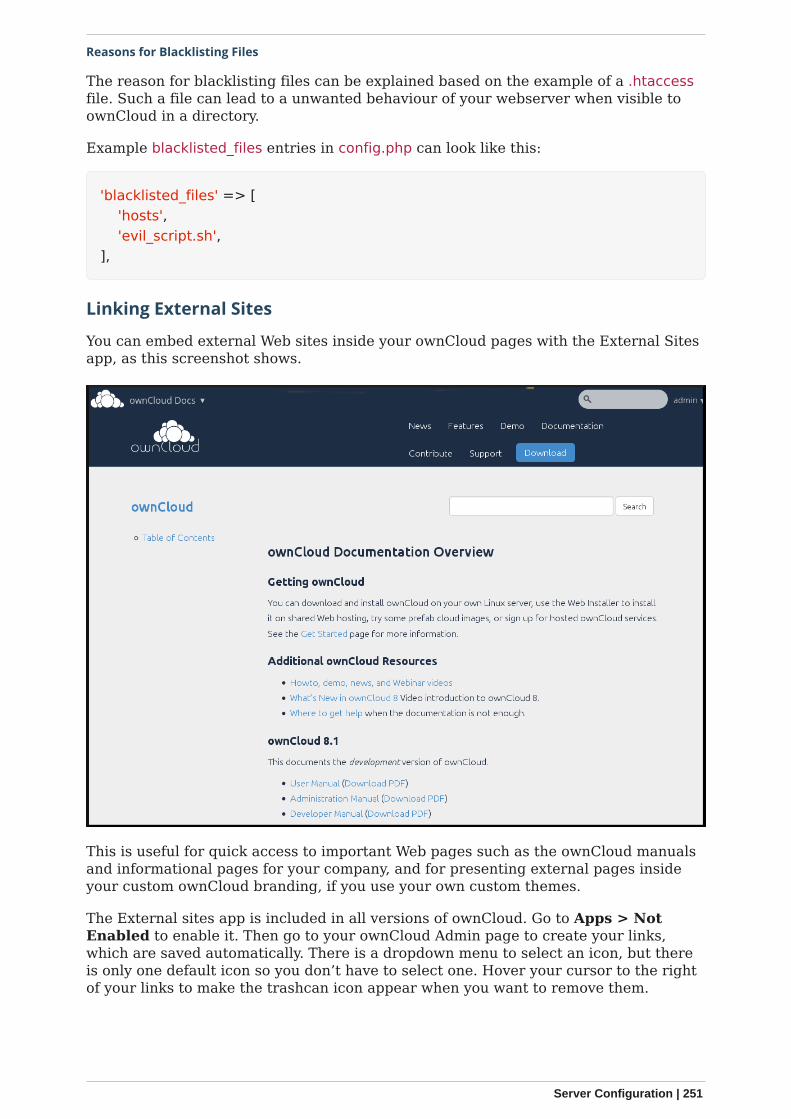
Reasons for Blacklisting Files
The reason for blacklisting files can be explained based on the example of a .htaccessfile. Such a file can lead to a unwanted behaviour of your webserver when visible toownCloud in a directory.
Example blacklisted_files entries in config.php can look like this:
'blacklisted_files' => [ 'hosts', 'evil_script.sh',],
Linking External Sites
You can embed external Web sites inside your ownCloud pages with the External Sitesapp, as this screenshot shows.
This is useful for quick access to important Web pages such as the ownCloud manualsand informational pages for your company, and for presenting external pages insideyour custom ownCloud branding, if you use your own custom themes.
The External sites app is included in all versions of ownCloud. Go to Apps > NotEnabled to enable it. Then go to your ownCloud Admin page to create your links,which are saved automatically. There is a dropdown menu to select an icon, but thereis only one default icon so you don’t have to select one. Hover your cursor to the rightof your links to make the trashcan icon appear when you want to remove them.
Server Configuration | 251
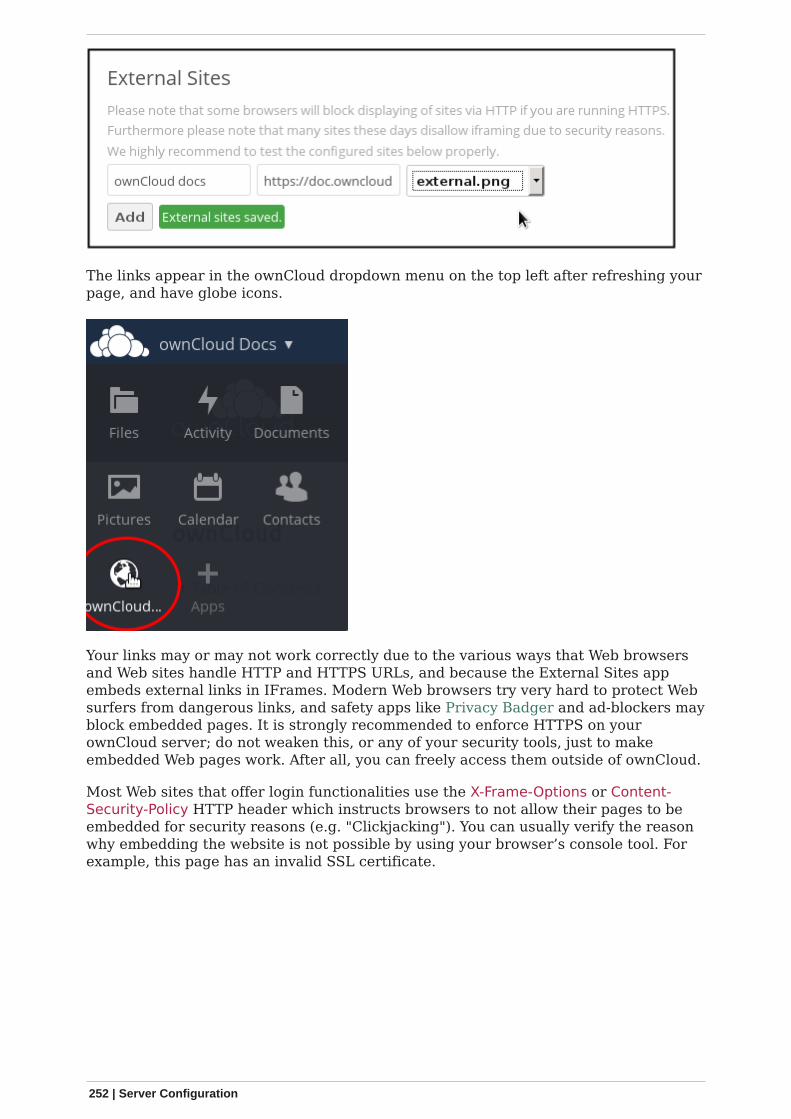
The links appear in the ownCloud dropdown menu on the top left after refreshing yourpage, and have globe icons.
Your links may or may not work correctly due to the various ways that Web browsersand Web sites handle HTTP and HTTPS URLs, and because the External Sites appembeds external links in IFrames. Modern Web browsers try very hard to protect Websurfers from dangerous links, and safety apps like Privacy Badger and ad-blockers mayblock embedded pages. It is strongly recommended to enforce HTTPS on yourownCloud server; do not weaken this, or any of your security tools, just to makeembedded Web pages work. After all, you can freely access them outside of ownCloud.
Most Web sites that offer login functionalities use the X-Frame-Options or Content-Security-Policy HTTP header which instructs browsers to not allow their pages to beembedded for security reasons (e.g. "Clickjacking"). You can usually verify the reasonwhy embedding the website is not possible by using your browser’s console tool. Forexample, this page has an invalid SSL certificate.
252 | Server Configuration

On this page, X-Frame-Options prevents the embedding.
Server Configuration | 253
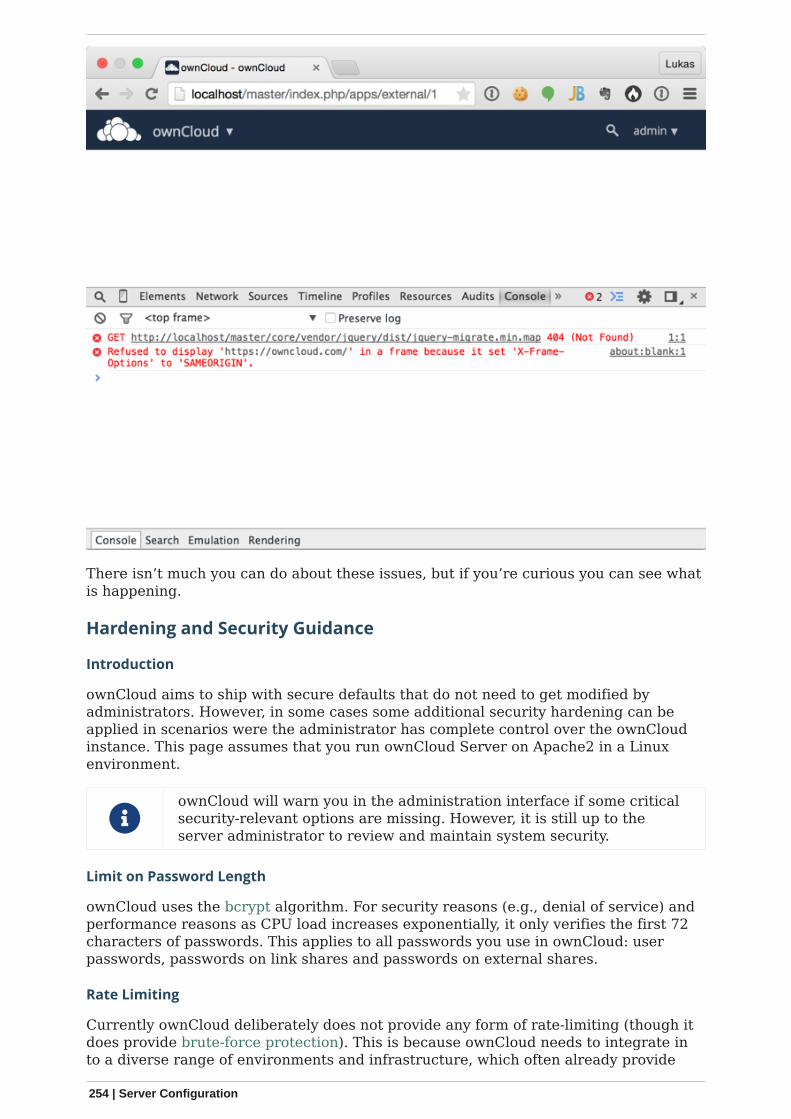
There isn’t much you can do about these issues, but if you’re curious you can see whatis happening.
Hardening and Security Guidance
Introduction
ownCloud aims to ship with secure defaults that do not need to get modified byadministrators. However, in some cases some additional security hardening can beapplied in scenarios were the administrator has complete control over the ownCloudinstance. This page assumes that you run ownCloud Server on Apache2 in a Linuxenvironment.
ownCloud will warn you in the administration interface if some criticalsecurity-relevant options are missing. However, it is still up to theserver administrator to review and maintain system security.
Limit on Password Length
ownCloud uses the bcrypt algorithm. For security reasons (e.g., denial of service) andperformance reasons as CPU load increases exponentially, it only verifies the first 72characters of passwords. This applies to all passwords you use in ownCloud: userpasswords, passwords on link shares and passwords on external shares.
Rate Limiting
Currently ownCloud deliberately does not provide any form of rate-limiting (though itdoes provide brute-force protection). This is because ownCloud needs to integrate into a diverse range of environments and infrastructure, which often already provide
254 | Server Configuration

specialized rate-limiting solutions, e.g., Apache, HAProxy, and F5.
If you are yet to implement a rate-limiting solution for your ownCloud instance, startby retrieving a list of all active routes. This information is obtained by running occ’ssecurity:routes command, as in the following example.
sudo -u www-data php occ security:routes
It should print a list of all the routes as in the following truncated example.
+-----------------------------------------------------------+-----------------+| Path | Methods |+-----------------------------------------------------------+-----------------+| /apps/encryption/ajax/adminRecovery | POST || /apps/encryption/ajax/changeRecoveryPassword | POST || /apps/encryption/ajax/getStatus | GET || /apps/encryption/ajax/setEncryptHomeStorage | POST || /apps/encryption/ajax/updatePrivateKeyPassword | POST || /apps/encryption/ajax/userSetRecovery | POST || /apps/federatedfilesharing/ | GET || /apps/federatedfilesharing/notifications | POST |+-----------------------------------------------------------+-----------------+
With this information, you can begin customizing a rate-limiting solution specific toyour ownCloud installation.
Further Reading
• Rate limiting with Apache◦ mod_evasive◦ mod_ratelimit◦ mod_security◦ Rate limiting with Fail2Ban◦ Fail2Ban Behind A Proxy/Load Balancer
• Rate limiting with HAProxy• Rate limiting with F5
Operating system
Give PHP read access to /dev/urandom
ownCloud uses a RFC 4086 (Randomness Requirements for Security) compliant mixerto generate cryptographically secure pseudo-random numbers. When generating arandom number, ownCloud will request multiple random numbers from differentsources and create from these the final random number.
The random number generator also tries to request random numbers from/dev/urandom, therefore you should allow PHP to read from the device.
If you configure an open_basedir in your php.ini file, make sure toinclude /dev/urandom.
Server Configuration | 255
Enable hardening modules such as SELinux
We also recommend to enable hardening modules such as SELinux where possible.See SELinux Configuration to learn more about SELinux.
Deployment
Place data directory outside of the web root
A simple but efficient way to increase the security of your data is to place your datadirectory outside of the Web root (i.e. outside of /var/www), ideally at the time ofinstallation.
Disable preview image generation
ownCloud is able to generate preview images of common file types such as images ortext files. By default, the preview generation for some file types that we considersecure enough for deployment is enabled. However, administrators should be awarethat these previews are generated using PHP libraries written in C which might bevulnerable to attack vectors.
For high security deployments, we recommend disabling the preview generation bysetting the enable_previews switch to false in config.php. As administrator you are alsoable to manage which preview providers are enabled by modifying theenabledPreviewProviders option switch.
Use HTTPS
Using ownCloud without an encrypted HTTPS connection opens up your server to aman-in-the-middle (MITM) attack and risks the interception of user data andpasswords. It is a best practice, and highly recommended, to always use HTTPS onproduction servers and to never allow unencrypted HTTP.
For information on how to setup HTTPS, consult the documentation of your Webserver. The following examples apply to Apache.
Redirect all unencrypted traffic to HTTPS
To redirect all HTTP traffic to HTTPS, administrators are encouraged to issue apermanent redirect using the 301 status code. Using Apache, this can be achieved byadding a setting such as the following in the Apache VirtualHosts configurationcontaining the <VirtualHost *:80> entry:
Redirect permanent / https://example.com/
Enable HTTP Strict Transport Security
While redirecting all traffic to HTTPS is good, it may not completely prevent man-in-the-middle attacks. Therefore we recommend setting the HTTP Strict TransportSecurity header, which instructs browsers to not allow any connection to theownCloud instance using HTTP, and it attempts to prevent site visitors from bypassinginvalid certificate warnings.
This can be achieved by adding the following settings in the Apache VirtualHost filecontaining the <VirtualHost *:443> entry:
256 | Server Configuration
<IfModule mod_headers.c> Header always set Strict-Transport-Security "max-age=15552000;includeSubDomains"</IfModule>
If you don’t have access to your Apache configuration, it is also possible to add this tothe main .htaccess file shipped with ownCloud. Make sure you’re adding it below theline:
#### DO NOT CHANGE ANYTHING ABOVE THIS LINE ####
This example configuration will make all subdomains only accessible via HTTPS. If youhave subdomains not accessible via HTTPS, remove includeSubDomains.
This requires the mod_headers extension in Apache.
Proper SSL configuration
Default SSL configurations by Web servers are often not state-of-the-art and requirefine-tuning for an optimal performance and security. The available SSL ciphers andoptions depend completely on your environment, therefore we can’t provide a generalrecommendation.
However, We do recommend using the Mozilla SSL Configuration Generator togenerate a configuration suitable for your environment, and the free Qualys SSL LabsTests gives good guidance on whether your SSL server is correctly configured.
Also ensure that HTTP compression is disabled to mitigate the BREACH attack.
Use a dedicated domain for ownCloud
Administrators are encouraged to install ownCloud on a dedicated domain such ascloud.domain.tld instead of domain.tld to benefit from the same-origin policy.
Ensure that your ownCloud instance is installed in a DMZ
As ownCloud supports features such as Federated File Sharing, we do not considerServer Side Request Forgery (SSRF) a threat. Given all our external storage adapters,this can be considered a feature and not a vulnerability.
This means that a user on your ownCloud instance could probe whether other hostsare accessible from the ownCloud network. If you do not want this, you need to ensurethat your ownCloud is installed in a segregated network and proper firewall rules arein place.
Use of Security-Related Headers on the Web server
Basic security headers are provided by ownCloud already in a default environment.These include:
X-Content-Type-Options: nosniffInstructs some browsers to not sniff the MIME type of files. This is used for exampleto prevent browsers from interpreting text files as JavaScript.
Server Configuration | 257
X-XSS-Protection: 0The cross-site scripting filter is deprecated and not used in modern browsersanymore.
X-Robots-Tag: noneInstructs search engines to not index these pages.
X-Frame-Options: SAMEORIGINPrevents embedding of the ownCloud instance within an iframe on other domains toprevent clickjacking and similar attacks.
These headers are hard-coded into the ownCloud server and need no intervention bythe server administrator.
For optimal security, administrators are encouraged to let the Web server deliver theseHTTP headers. To do this, configure Apache to use the .htaccess file and enable thefollowing Apache modules:
• mod_headers• mod_env
Verify this security change by accessing a static resource and check the abovementioned security headers are delivered.
Use Fail2ban
Another approach to hardening ownCloud server is to use an intrusion detectionsystem. An excellent one is Fail2ban. Fail2ban is designed to protect servers frombrute force attacks. It works by scanning log files (such as those for ssh, web, mail,and log servers) for certain patterns, specific to each server, and taking actions shouldthose patterns be found.
Actions include banning the IP from which the detected actions originate. This makesthe process more difficult and prevents DDOS-style attacks. However, after apredefined time period, the banned IP is usually unbanned again.
This helps if the login attempts were genuine, so that users don’t lock themselves outpermanently. An example of such an action is users attempting to brute force log in toa server via ssh. In this case, Fail2ban would look for something similar to thefollowing in /var/log/auth.log:
Mar 15 11:17:37 yourhost sshd[10912]: input_userauth_request: invalid user audra[preauth]Mar 15 11:17:37 yourhost sshd[10912]: pam_unix(sshd:auth): check pass; userunknownMar 15 11:14:51 yourhost sshd[10835]: PAM 2 more authentication failures;logname= uid=0 euid=0 tty=ssh ruser= rhost=221.194.44.231 user=rootMar 15 11:14:57 yourhost sshd[10837]: pam_unix(sshd:auth): authenticationfailure; logname= uid=0 euid=0 tty=ssh ruser= rhost=221.194.44.231 user=rootMar 15 11:14:59 yourhost sshd[10837]: Failed password for root from221.194.44.231 port 46838 ssh2Mar 15 11:15:04 yourhost sshd[10837]: message repeated 2 times: [ Failedpassword for root from 221.194.44.231 port 46838 ssh2]Mar 15 11:15:04 yourhost sshd[10837]: Received disconnect from 221.194.44.231:11: [preauth]
258 | Server Configuration

If you’re not familiar with what’s going on, this snippet highlights anumber of failed login attempts.
Using Fail2ban to secure an ownCloud login
On Ubuntu, you can install Fail2ban using the following commands:
apt update && apt upgradeapt install fail2ban
Fail2ban installs several default filters for Apache and various other services, but nonefor ownCloud. Given that, we have to define our own filter. To do so, you first need tomake sure that ownCloud uses your local timezone for writing log entries; otherwise,fail2ban cannot react appropriately to attacks. To do this, edit your config.php file andadd the following line:
'logtimezone' => 'Europe/Berlin',
Adjust the timezone to the one that your server is located in, based onPHP’s list of supported timezones.
This change takes effect as soon as you save config.php. You can test the change by:
1. entering false credentials at your ownCloud login screen, then2. checking the timestamp of the resulting entry in ownCloud’s log file.
Next, define a new Fail2ban filter rule for ownCloud. To do so, create a new file called/etc/fail2ban/filter.d/owncloud.conf, and insert the following configuration:
[Definition]failregex={.*Login failed: \'.*\' \(Remote IP: \'<HOST>\'\)"}ignoreregex =
This filter needs to be loaded when Fail2ban starts, so a further configuration entry isrequired to be added in /etc/fail2ban/jail.d/defaults-debian.conf, which you can seebelow:
[owncloud]enabled = trueport = 80,443protocol = tcpfilter = owncloudmaxretry = 3bantime = 10800logpath = /var/owncloud_data/owncloud.log
This configuration:
1. Enables the filter rules for TCP requests on ports 80 and 443.2. Bans IPs for 10800 seconds (3 hours).
Server Configuration | 259
3. Sets the path to the log file to analyze for malicious logins
The most important part of the configuration is the logpath parameter.If this does not point to the correct log file, Fail2ban will either notwork properly or refuse to start.
After saving the file, restart Fail2ban by running the following command:
service fail2ban restart
To test that the new ownCloud configuration has been loaded, use the followingcommand:
fail2ban-client status
If "owncloud" is listed in the console output, the filter is both loaded and active. If youwant to test the filter, run the following command, adjusting the path to yourowncloud.log if necessary:
fail2ban-regex /var/owncloud_data/owncloud.log /etc/fail2ban/filter.d/owncloud.conf
The output will look similar to the following if you had one failed login attempt:
fail2ban-regex /var/www/owncloud_data/owncloud.log/etc/fail2ban/filter.d/owncloud.conf
Running tests=============
Use failregex file : /etc/fail2ban/filter.d/owncloud.confUse log file : /var/www/owncloud_data/owncloud.log
Results=======
Failregex: 1 total|- #) [# of hits] regular expression| 1) [1] {.*Login failed: \'.*\' \(Remote IP: \'<HOST>\'\)"}`-
Ignoreregex: 0 total
Date template hits:|- [# of hits] date format| [40252] ISO 8601`-
Lines: 40252 lines, 0 ignored, 1 matched, 40251 missed
260 | Server Configuration
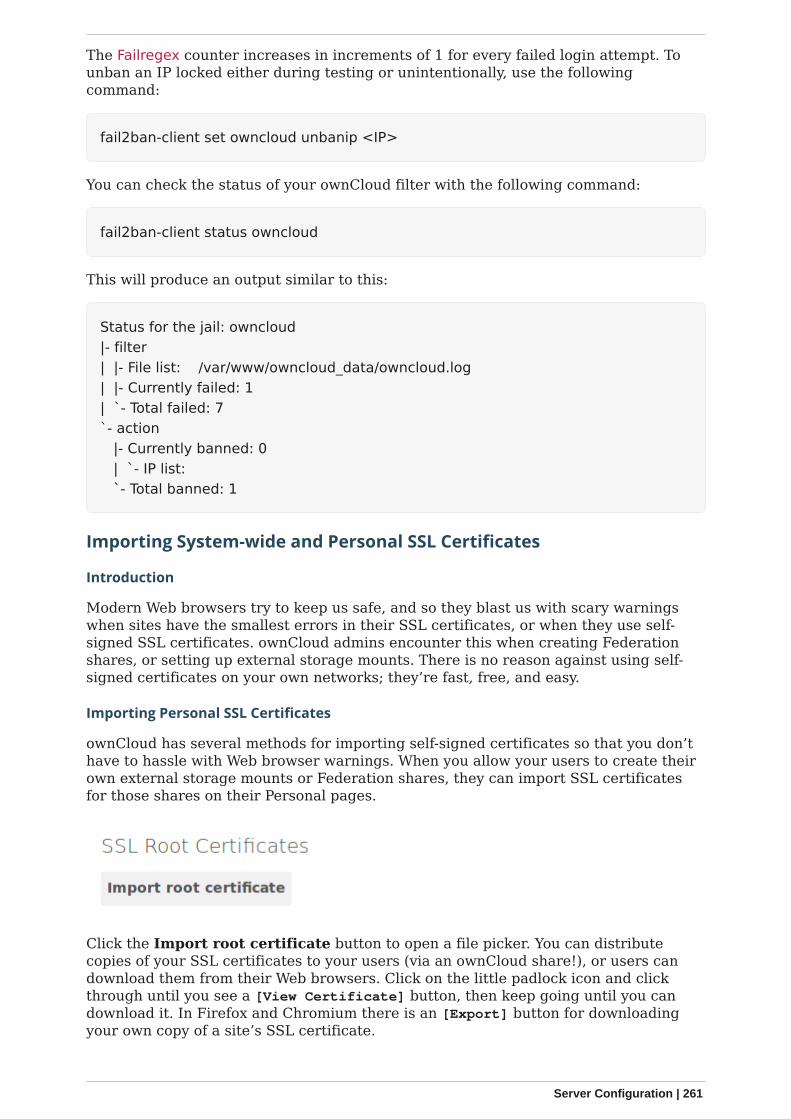
The Failregex counter increases in increments of 1 for every failed login attempt. Tounban an IP locked either during testing or unintentionally, use the followingcommand:
fail2ban-client set owncloud unbanip <IP>
You can check the status of your ownCloud filter with the following command:
fail2ban-client status owncloud
This will produce an output similar to this:
Status for the jail: owncloud|- filter| |- File list: /var/www/owncloud_data/owncloud.log| |- Currently failed: 1| `- Total failed: 7`- action |- Currently banned: 0 | `- IP list: `- Total banned: 1
Importing System-wide and Personal SSL Certificates
Introduction
Modern Web browsers try to keep us safe, and so they blast us with scary warningswhen sites have the smallest errors in their SSL certificates, or when they use self-signed SSL certificates. ownCloud admins encounter this when creating Federationshares, or setting up external storage mounts. There is no reason against using self-signed certificates on your own networks; they’re fast, free, and easy.
Importing Personal SSL Certificates
ownCloud has several methods for importing self-signed certificates so that you don’thave to hassle with Web browser warnings. When you allow your users to create theirown external storage mounts or Federation shares, they can import SSL certificatesfor those shares on their Personal pages.
Click the Import root certificate button to open a file picker. You can distributecopies of your SSL certificates to your users (via an ownCloud share!), or users candownload them from their Web browsers. Click on the little padlock icon and clickthrough until you see a [View Certificate] button, then keep going until you candownload it. In Firefox and Chromium there is an [Export] button for downloadingyour own copy of a site’s SSL certificate.
Server Configuration | 261
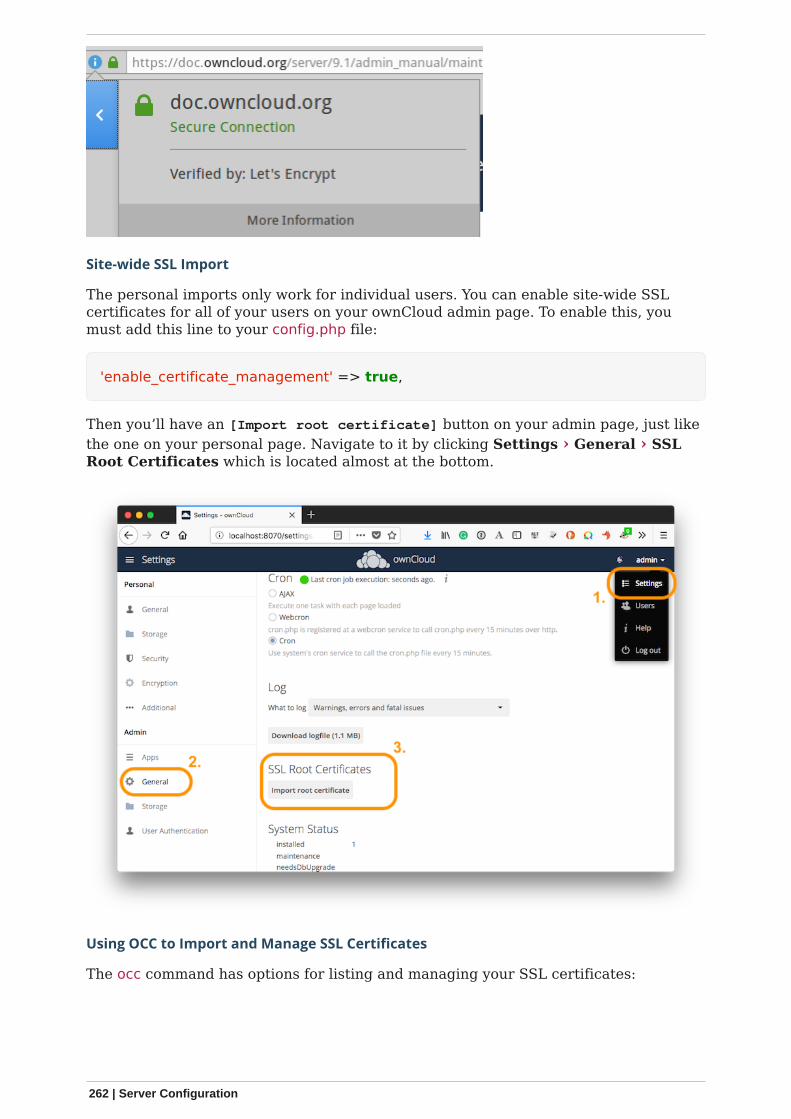
Site-wide SSL Import
The personal imports only work for individual users. You can enable site-wide SSLcertificates for all of your users on your ownCloud admin page. To enable this, youmust add this line to your config.php file:
'enable_certificate_management' => true,
Then you’ll have an [Import root certificate] button on your admin page, just likethe one on your personal page. Navigate to it by clicking Settings › General › SSLRoot Certificates which is located almost at the bottom.
Using OCC to Import and Manage SSL Certificates
The occ command has options for listing and managing your SSL certificates:
262 | Server Configuration

security:certificates list trusted certificatessecurity:certificates:import import trusted certificatesecurity:certificates:remove remove trusted certificate
See Using the occ Command to learn about how to use occ.
Enable index.php-less URLs
Introduction
Since ownCloud 9.0.3 you need to explicitly configure and enable index.php-less URLs(e.g. https://example.com/apps/files/ instead ofhttps://example.com/index.php/apps/files/). The following documentation provides theneeded steps to configure this for the Apache Web server.
Prerequisites
Before being able to use index.php-less URLs you need to enable the mod_rewrite andmod_env Apache modules. Furthermore a configured AllowOverride All directive withinthe vhost of your Web server is needed. Please have a look at the Apache manual forhow to enable and configure these.
Furthermore these instructions are only working when using Apache together with themod_php Apache module for PHP. Other modules like php-fpm or mod_fastcgi areunsupported.
Finally the user running your Web server (e.g. www-data) needs to be able to writeinto the .htaccess file shipped within the ownCloud root directory (e.g.,/var/www/owncloud/.htaccess). If you have applied Set Correct Permissions, the usermight be unable to write into this file and the needed update will fail. You need torevert this strong permissions temporarily by following the steps described in settingpermissions for updating.
Configuration steps
The first step is to configure the overwrite.cli.url and htaccess.RewriteBase config.phpoptions (See config_sample_php_parameters). If you’re accessing your ownCloudinstance via https://example.com/ the following two options need to be added /configured:
'overwrite.cli.url' => 'https://example.com','htaccess.RewriteBase' => '/',
If the instance is accessed via https://example.com/owncloud the followingconfiguration is needed:
'overwrite.cli.url' => 'https://example.com/owncloud','htaccess.RewriteBase' => '/owncloud',
As a second step ownCloud needs to enable index.php-less URLs. This is done:
• during the next update of your ownCloud instance• by manually running the occ command occ maintenance:update:htaccess (See
occ_command)
Server Configuration | 263
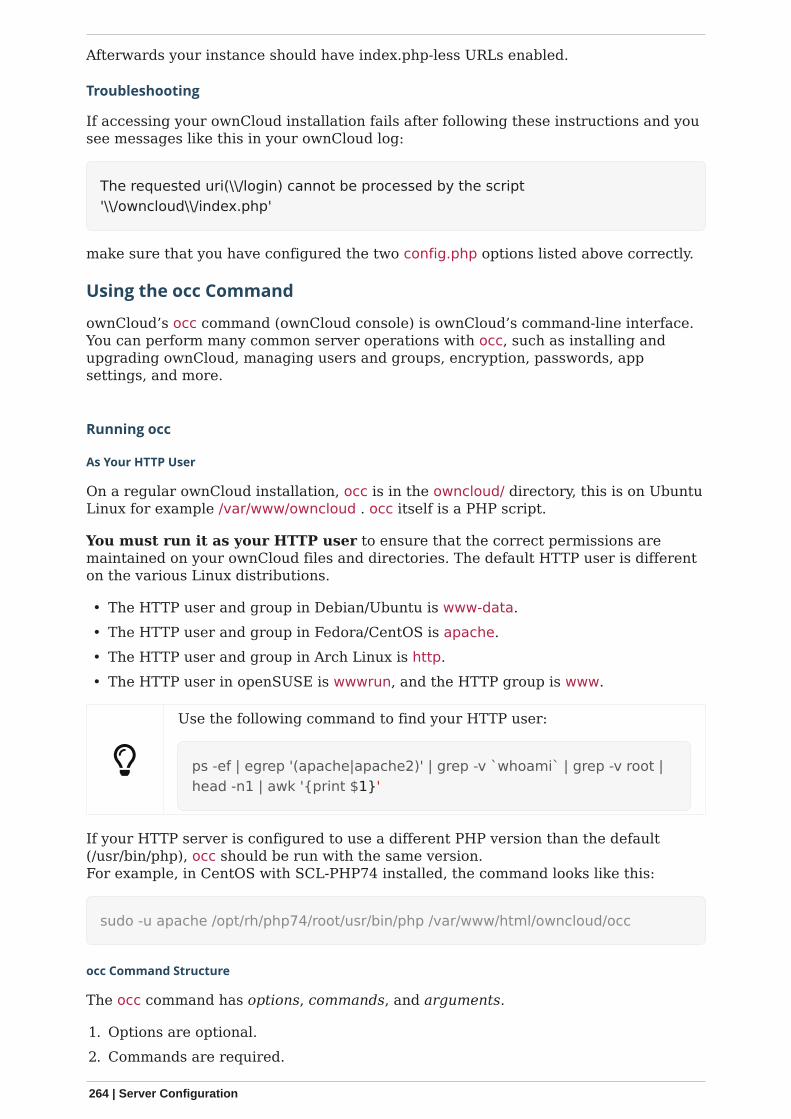
Afterwards your instance should have index.php-less URLs enabled.
Troubleshooting
If accessing your ownCloud installation fails after following these instructions and yousee messages like this in your ownCloud log:
The requested uri(\\/login) cannot be processed by the script'\\/owncloud\\/index.php'
make sure that you have configured the two config.php options listed above correctly.
Using the occ Command
ownCloud’s occ command (ownCloud console) is ownCloud’s command-line interface.You can perform many common server operations with occ, such as installing andupgrading ownCloud, managing users and groups, encryption, passwords, appsettings, and more.
Running occ
As Your HTTP User
On a regular ownCloud installation, occ is in the owncloud/ directory, this is on UbuntuLinux for example /var/www/owncloud . occ itself is a PHP script.
You must run it as your HTTP user to ensure that the correct permissions aremaintained on your ownCloud files and directories. The default HTTP user is differenton the various Linux distributions.
• The HTTP user and group in Debian/Ubuntu is www-data.• The HTTP user and group in Fedora/CentOS is apache.• The HTTP user and group in Arch Linux is http.• The HTTP user in openSUSE is wwwrun, and the HTTP group is www.
Use the following command to find your HTTP user:
ps -ef | egrep '(apache|apache2)' | grep -v `whoami` | grep -v root |head -n1 | awk '{print $1}'
If your HTTP server is configured to use a different PHP version than the default(/usr/bin/php), occ should be run with the same version.For example, in CentOS with SCL-PHP74 installed, the command looks like this:
sudo -u apache /opt/rh/php74/root/usr/bin/php /var/www/html/owncloud/occ
occ Command Structure
The occ command has options, commands, and arguments.
1. Options are optional.2. Commands are required.
264 | Server Configuration
3. Arguments can be required or optional.
The generic syntax is:
occ [options] command [arguments]
Listing 9. Example command running occ in Ubuntu
sudo -u www-data /var/www/owncloud/occ
If your web server is configured to use a different PHP version than the default(/usr/bin/php), the occ command should be run with the same version.
With a Docker Container
If your ownCloud instance is set up in a docker container, you need a user in the groupdocker to perform occ commands. An example command looks like this:
docker exec --user www-data <owncloud-container-name> php occ <your-command>
For more information on docker, refer to section Installing with Docker.
With the ownCloud Appliance
The ownCloud Appliance offers two possibilities to perform occ commands:
1. Log in to the ownCloud instance as root user with the command univention-appshell owncloud. Then use occ commands without a preceding sudo -u www-dataphp.
2. Alternatively, you can use occ on the host system with the command univention-appshell owncloud occ followed by the desired options, commands and arguments.
If you want to find out more about the Appliance, click here.
Example Commands
Running occ with no options lists all commands and options, like this example onUbuntu:
Server Configuration | 265
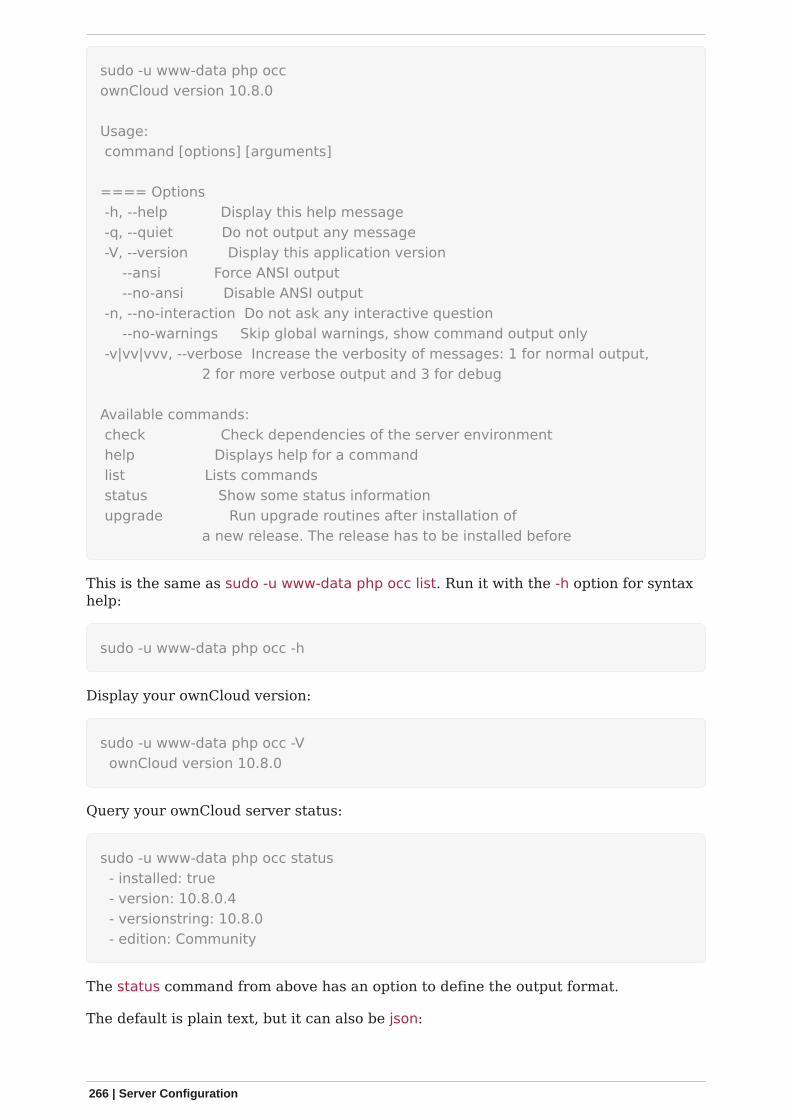
sudo -u www-data php occownCloud version 10.8.0
Usage: command [options] [arguments]
==== Options -h, --help Display this help message -q, --quiet Do not output any message -V, --version Display this application version --ansi Force ANSI output --no-ansi Disable ANSI output -n, --no-interaction Do not ask any interactive question --no-warnings Skip global warnings, show command output only -v|vv|vvv, --verbose Increase the verbosity of messages: 1 for normal output, 2 for more verbose output and 3 for debug
Available commands: check Check dependencies of the server environment help Displays help for a command list Lists commands status Show some status information upgrade Run upgrade routines after installation of a new release. The release has to be installed before
This is the same as sudo -u www-data php occ list. Run it with the -h option for syntaxhelp:
sudo -u www-data php occ -h
Display your ownCloud version:
sudo -u www-data php occ -V ownCloud version 10.8.0
Query your ownCloud server status:
sudo -u www-data php occ status - installed: true - version: 10.8.0.4 - versionstring: 10.8.0 - edition: Community
The status command from above has an option to define the output format.
The default is plain text, but it can also be json:
266 | Server Configuration
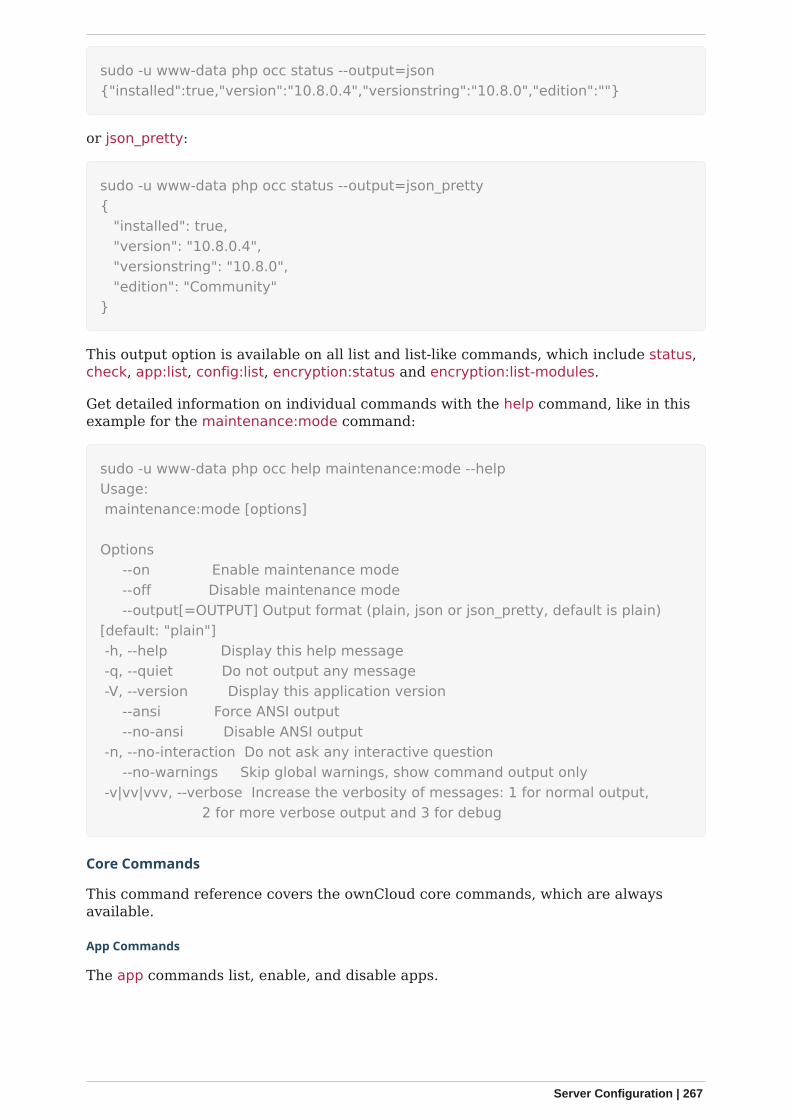
sudo -u www-data php occ status --output=json{"installed":true,"version":"10.8.0.4","versionstring":"10.8.0","edition":""}
or json_pretty:
sudo -u www-data php occ status --output=json_pretty{ "installed": true, "version": "10.8.0.4", "versionstring": "10.8.0", "edition": "Community"}
This output option is available on all list and list-like commands, which include status,check, app:list, config:list, encryption:status and encryption:list-modules.
Get detailed information on individual commands with the help command, like in thisexample for the maintenance:mode command:
sudo -u www-data php occ help maintenance:mode --helpUsage: maintenance:mode [options]
Options --on Enable maintenance mode --off Disable maintenance mode --output[=OUTPUT] Output format (plain, json or json_pretty, default is plain)[default: "plain"] -h, --help Display this help message -q, --quiet Do not output any message -V, --version Display this application version --ansi Force ANSI output --no-ansi Disable ANSI output -n, --no-interaction Do not ask any interactive question --no-warnings Skip global warnings, show command output only -v|vv|vvv, --verbose Increase the verbosity of messages: 1 for normal output, 2 for more verbose output and 3 for debug
Core Commands
This command reference covers the ownCloud core commands, which are alwaysavailable.
App Commands
The app commands list, enable, and disable apps.
Server Configuration | 267
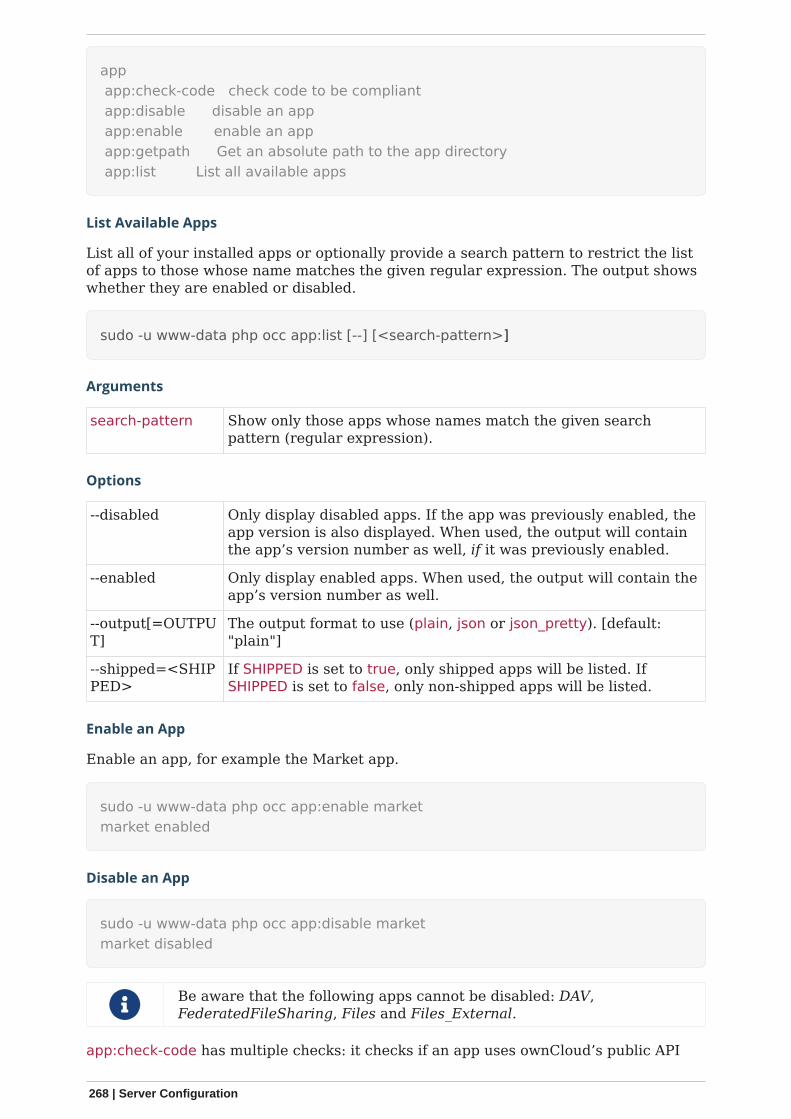
app app:check-code check code to be compliant app:disable disable an app app:enable enable an app app:getpath Get an absolute path to the app directory app:list List all available apps
List Available Apps
List all of your installed apps or optionally provide a search pattern to restrict the listof apps to those whose name matches the given regular expression. The output showswhether they are enabled or disabled.
sudo -u www-data php occ app:list [--] [<search-pattern>]
Arguments
search-pattern Show only those apps whose names match the given searchpattern (regular expression).
Options
--disabled Only display disabled apps. If the app was previously enabled, theapp version is also displayed. When used, the output will containthe app’s version number as well, if it was previously enabled.
--enabled Only display enabled apps. When used, the output will contain theapp’s version number as well.
--output[=OUTPUT]
The output format to use (plain, json or json_pretty). [default:"plain"]
--shipped=<SHIPPED>
If SHIPPED is set to true, only shipped apps will be listed. IfSHIPPED is set to false, only non-shipped apps will be listed.
Enable an App
Enable an app, for example the Market app.
sudo -u www-data php occ app:enable marketmarket enabled
Disable an App
sudo -u www-data php occ app:disable marketmarket disabled
Be aware that the following apps cannot be disabled: DAV,FederatedFileSharing, Files and Files_External.
app:check-code has multiple checks: it checks if an app uses ownCloud’s public API
268 | Server Configuration
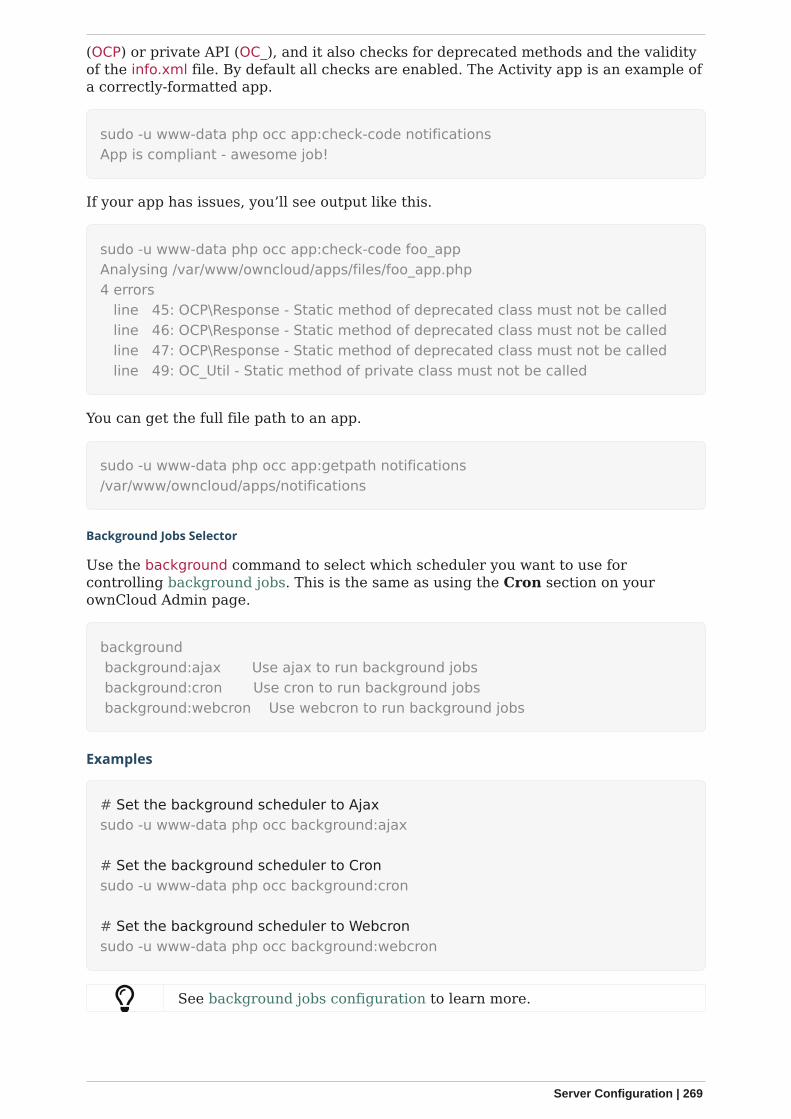
(OCP) or private API (OC_), and it also checks for deprecated methods and the validityof the info.xml file. By default all checks are enabled. The Activity app is an example ofa correctly-formatted app.
sudo -u www-data php occ app:check-code notificationsApp is compliant - awesome job!
If your app has issues, you’ll see output like this.
sudo -u www-data php occ app:check-code foo_appAnalysing /var/www/owncloud/apps/files/foo_app.php4 errors line 45: OCP\Response - Static method of deprecated class must not be called line 46: OCP\Response - Static method of deprecated class must not be called line 47: OCP\Response - Static method of deprecated class must not be called line 49: OC_Util - Static method of private class must not be called
You can get the full file path to an app.
sudo -u www-data php occ app:getpath notifications/var/www/owncloud/apps/notifications
Background Jobs Selector
Use the background command to select which scheduler you want to use forcontrolling background jobs. This is the same as using the Cron section on yourownCloud Admin page.
background background:ajax Use ajax to run background jobs background:cron Use cron to run background jobs background:webcron Use webcron to run background jobs
Examples
# Set the background scheduler to Ajaxsudo -u www-data php occ background:ajax
# Set the background scheduler to Cronsudo -u www-data php occ background:cron
# Set the background scheduler to Webcronsudo -u www-data php occ background:webcron
See background jobs configuration to learn more.
Server Configuration | 269
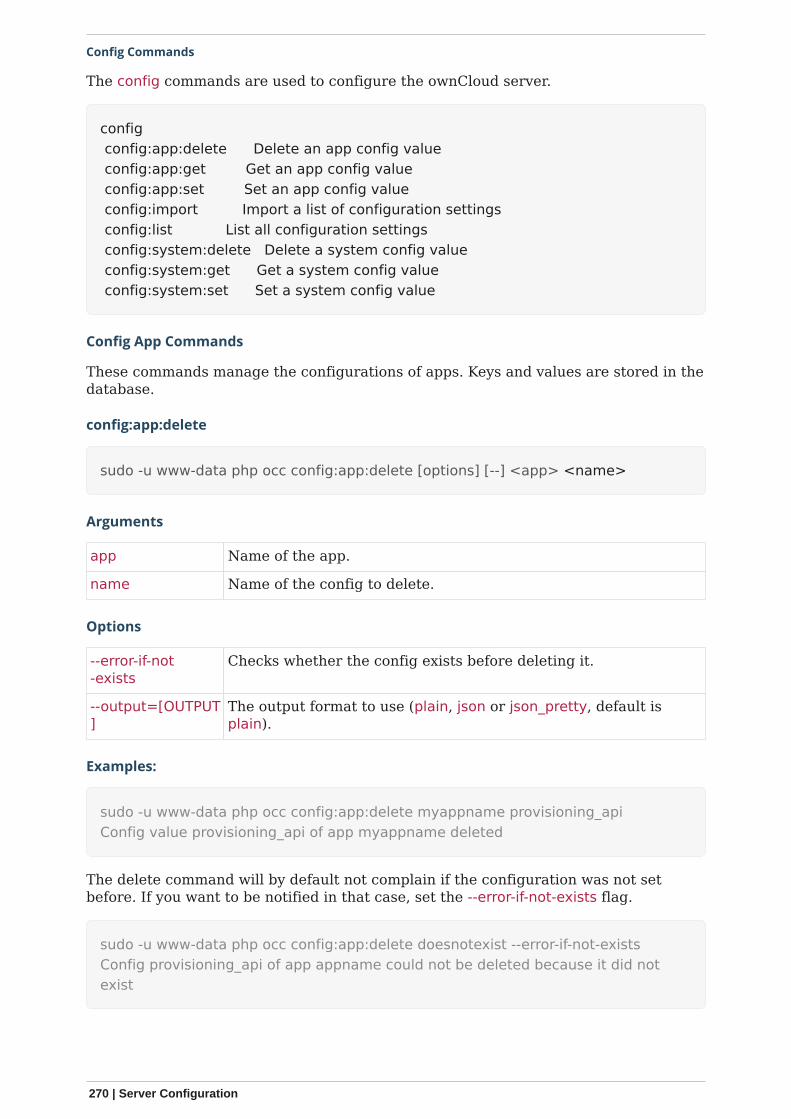
Config Commands
The config commands are used to configure the ownCloud server.
config config:app:delete Delete an app config value config:app:get Get an app config value config:app:set Set an app config value config:import Import a list of configuration settings config:list List all configuration settings config:system:delete Delete a system config value config:system:get Get a system config value config:system:set Set a system config value
Config App Commands
These commands manage the configurations of apps. Keys and values are stored in thedatabase.
config:app:delete
sudo -u www-data php occ config:app:delete [options] [--] <app> <name>
Arguments
app Name of the app.
name Name of the config to delete.
Options
--error-if-not-exists
Checks whether the config exists before deleting it.
--output=[OUTPUT]
The output format to use (plain, json or json_pretty, default isplain).
Examples:
sudo -u www-data php occ config:app:delete myappname provisioning_apiConfig value provisioning_api of app myappname deleted
The delete command will by default not complain if the configuration was not setbefore. If you want to be notified in that case, set the --error-if-not-exists flag.
sudo -u www-data php occ config:app:delete doesnotexist --error-if-not-existsConfig provisioning_api of app appname could not be deleted because it did notexist
270 | Server Configuration
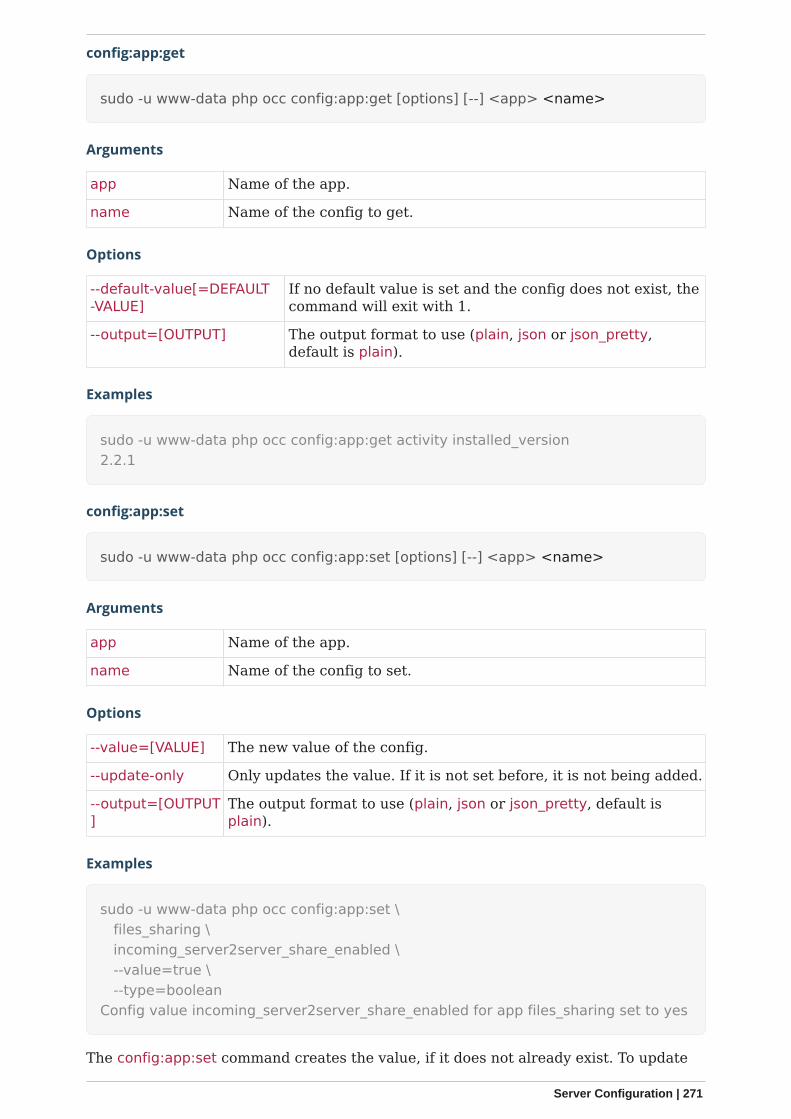
config:app:get
sudo -u www-data php occ config:app:get [options] [--] <app> <name>
Arguments
app Name of the app.
name Name of the config to get.
Options
--default-value[=DEFAULT-VALUE]
If no default value is set and the config does not exist, thecommand will exit with 1.
--output=[OUTPUT] The output format to use (plain, json or json_pretty,default is plain).
Examples
sudo -u www-data php occ config:app:get activity installed_version2.2.1
config:app:set
sudo -u www-data php occ config:app:set [options] [--] <app> <name>
Arguments
app Name of the app.
name Name of the config to set.
Options
--value=[VALUE] The new value of the config.
--update-only Only updates the value. If it is not set before, it is not being added.
--output=[OUTPUT]
The output format to use (plain, json or json_pretty, default isplain).
Examples
sudo -u www-data php occ config:app:set \ files_sharing \ incoming_server2server_share_enabled \ --value=true \ --type=booleanConfig value incoming_server2server_share_enabled for app files_sharing set to yes
The config:app:set command creates the value, if it does not already exist. To update
Server Configuration | 271
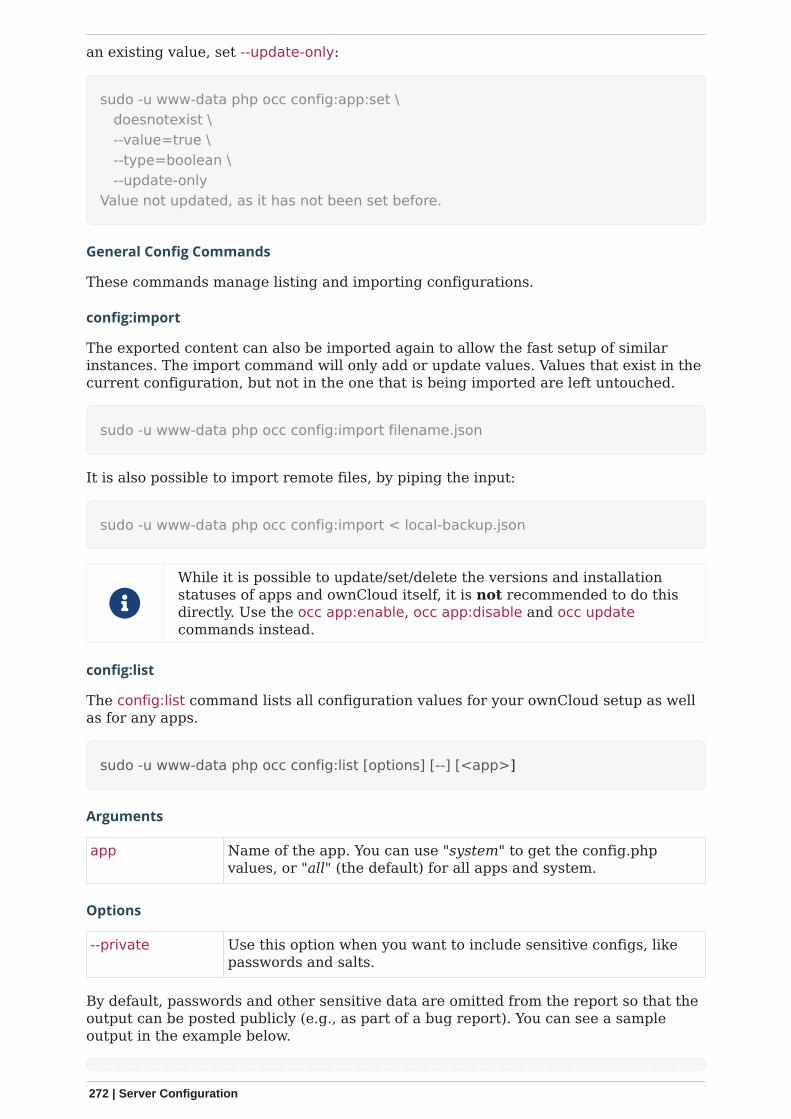
an existing value, set --update-only:
sudo -u www-data php occ config:app:set \ doesnotexist \ --value=true \ --type=boolean \ --update-onlyValue not updated, as it has not been set before.
General Config Commands
These commands manage listing and importing configurations.
config:import
The exported content can also be imported again to allow the fast setup of similarinstances. The import command will only add or update values. Values that exist in thecurrent configuration, but not in the one that is being imported are left untouched.
sudo -u www-data php occ config:import filename.json
It is also possible to import remote files, by piping the input:
sudo -u www-data php occ config:import < local-backup.json
While it is possible to update/set/delete the versions and installationstatuses of apps and ownCloud itself, it is not recommended to do thisdirectly. Use the occ app:enable, occ app:disable and occ updatecommands instead.
config:list
The config:list command lists all configuration values for your ownCloud setup as wellas for any apps.
sudo -u www-data php occ config:list [options] [--] [<app>]
Arguments
app Name of the app. You can use "system" to get the config.phpvalues, or "all" (the default) for all apps and system.
Options
--private Use this option when you want to include sensitive configs, likepasswords and salts.
By default, passwords and other sensitive data are omitted from the report so that theoutput can be posted publicly (e.g., as part of a bug report). You can see a sampleoutput in the example below.
272 | Server Configuration
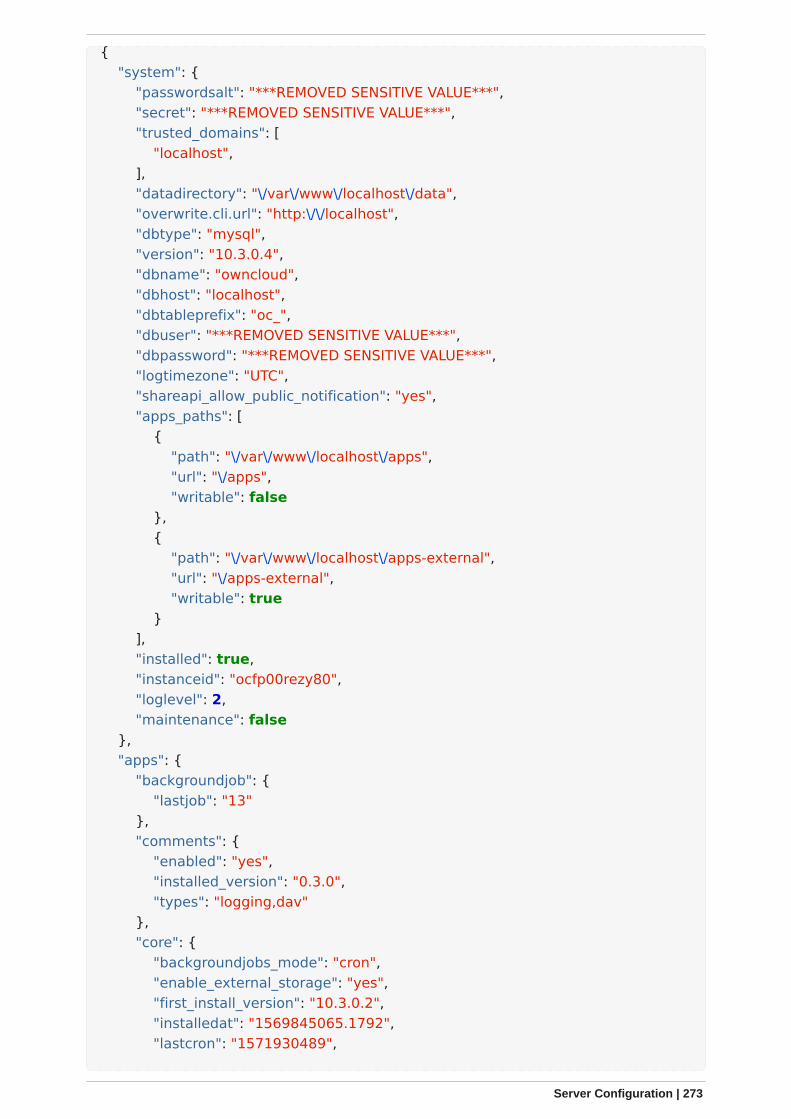
{ "system": { "passwordsalt": "***REMOVED SENSITIVE VALUE***", "secret": "***REMOVED SENSITIVE VALUE***", "trusted_domains": [ "localhost", ], "datadirectory": "\/var\/www\/localhost\/data", "overwrite.cli.url": "http:\/\/localhost", "dbtype": "mysql", "version": "10.3.0.4", "dbname": "owncloud", "dbhost": "localhost", "dbtableprefix": "oc_", "dbuser": "***REMOVED SENSITIVE VALUE***", "dbpassword": "***REMOVED SENSITIVE VALUE***", "logtimezone": "UTC", "shareapi_allow_public_notification": "yes", "apps_paths": [ { "path": "\/var\/www\/localhost\/apps", "url": "\/apps", "writable": false }, { "path": "\/var\/www\/localhost\/apps-external", "url": "\/apps-external", "writable": true } ], "installed": true, "instanceid": "ocfp00rezy80", "loglevel": 2, "maintenance": false }, "apps": { "backgroundjob": { "lastjob": "13" }, "comments": { "enabled": "yes", "installed_version": "0.3.0", "types": "logging,dav" }, "core": { "backgroundjobs_mode": "cron", "enable_external_storage": "yes", "first_install_version": "10.3.0.2", "installedat": "1569845065.1792", "lastcron": "1571930489",
Server Configuration | 273
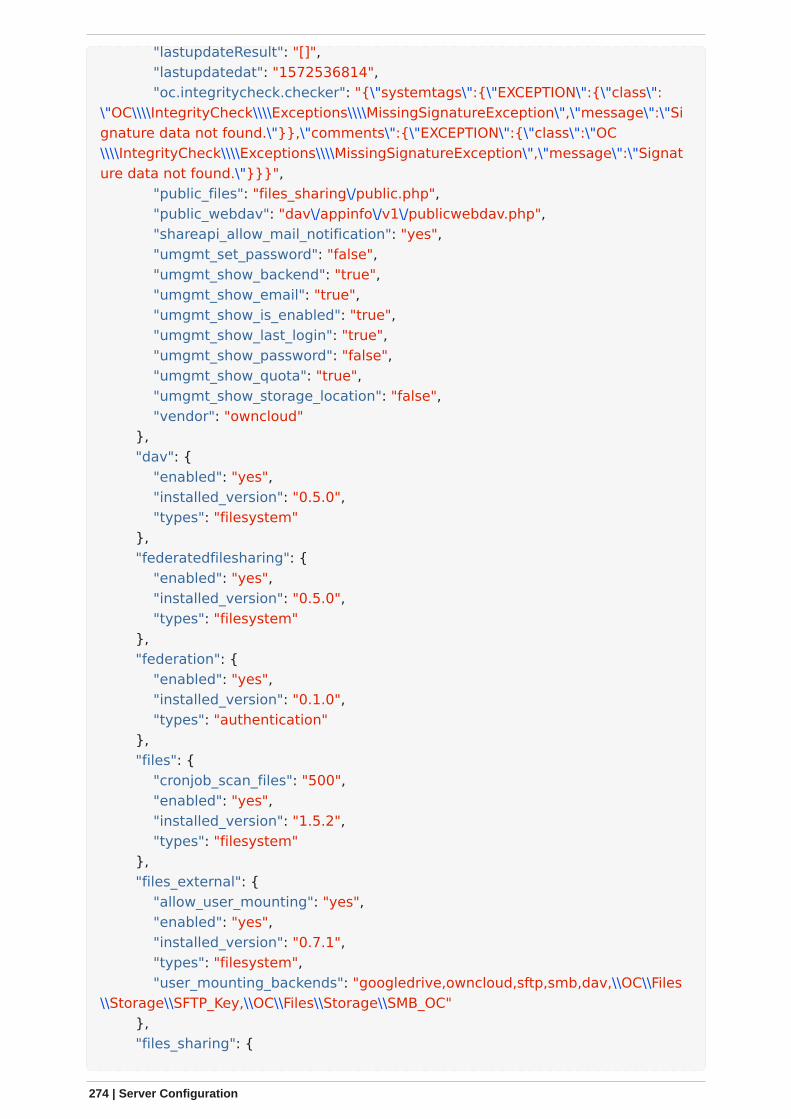
"lastupdateResult": "[]", "lastupdatedat": "1572536814", "oc.integritycheck.checker": "{\"systemtags\":{\"EXCEPTION\":{\"class\":\"OC\\\\IntegrityCheck\\\\Exceptions\\\\MissingSignatureException\",\"message\":\"Signature data not found.\"}},\"comments\":{\"EXCEPTION\":{\"class\":\"OC\\\\IntegrityCheck\\\\Exceptions\\\\MissingSignatureException\",\"message\":\"Signature data not found.\"}}}", "public_files": "files_sharing\/public.php", "public_webdav": "dav\/appinfo\/v1\/publicwebdav.php", "shareapi_allow_mail_notification": "yes", "umgmt_set_password": "false", "umgmt_show_backend": "true", "umgmt_show_email": "true", "umgmt_show_is_enabled": "true", "umgmt_show_last_login": "true", "umgmt_show_password": "false", "umgmt_show_quota": "true", "umgmt_show_storage_location": "false", "vendor": "owncloud" }, "dav": { "enabled": "yes", "installed_version": "0.5.0", "types": "filesystem" }, "federatedfilesharing": { "enabled": "yes", "installed_version": "0.5.0", "types": "filesystem" }, "federation": { "enabled": "yes", "installed_version": "0.1.0", "types": "authentication" }, "files": { "cronjob_scan_files": "500", "enabled": "yes", "installed_version": "1.5.2", "types": "filesystem" }, "files_external": { "allow_user_mounting": "yes", "enabled": "yes", "installed_version": "0.7.1", "types": "filesystem", "user_mounting_backends": "googledrive,owncloud,sftp,smb,dav,\\OC\\Files\\Storage\\SFTP_Key,\\OC\\Files\\Storage\\SMB_OC" }, "files_sharing": {
274 | Server Configuration
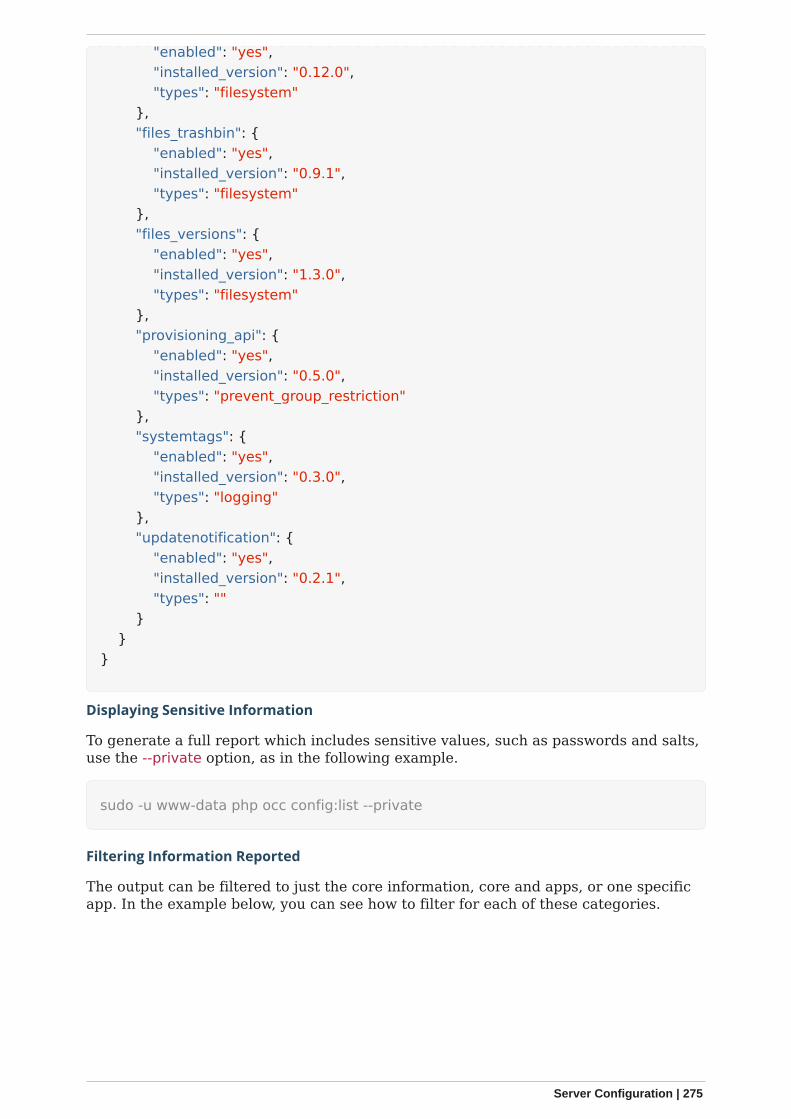
"enabled": "yes", "installed_version": "0.12.0", "types": "filesystem" }, "files_trashbin": { "enabled": "yes", "installed_version": "0.9.1", "types": "filesystem" }, "files_versions": { "enabled": "yes", "installed_version": "1.3.0", "types": "filesystem" }, "provisioning_api": { "enabled": "yes", "installed_version": "0.5.0", "types": "prevent_group_restriction" }, "systemtags": { "enabled": "yes", "installed_version": "0.3.0", "types": "logging" }, "updatenotification": { "enabled": "yes", "installed_version": "0.2.1", "types": "" } }}
Displaying Sensitive Information
To generate a full report which includes sensitive values, such as passwords and salts,use the --private option, as in the following example.
sudo -u www-data php occ config:list --private
Filtering Information Reported
The output can be filtered to just the core information, core and apps, or one specificapp. In the example below, you can see how to filter for each of these categories.
Server Configuration | 275
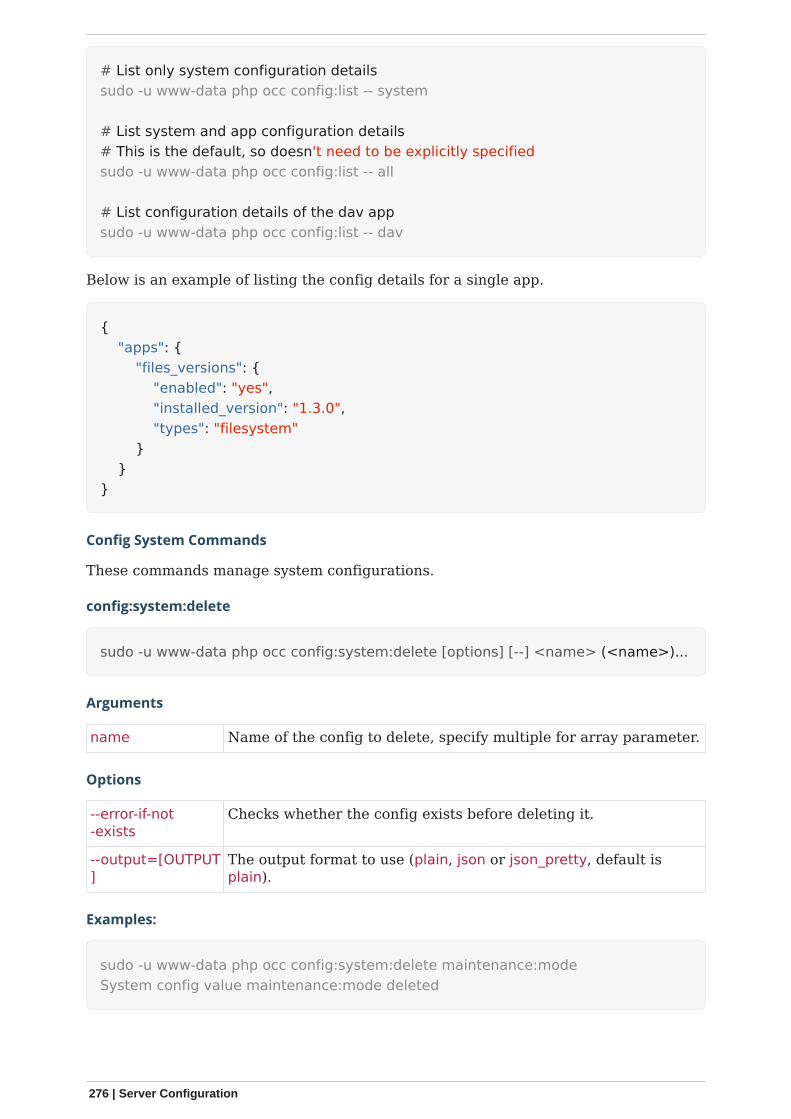
# List only system configuration detailssudo -u www-data php occ config:list -- system
# List system and app configuration details# This is the default, so doesn't need to be explicitly specifiedsudo -u www-data php occ config:list -- all
# List configuration details of the dav appsudo -u www-data php occ config:list -- dav
Below is an example of listing the config details for a single app.
{ "apps": { "files_versions": { "enabled": "yes", "installed_version": "1.3.0", "types": "filesystem" } }}
Config System Commands
These commands manage system configurations.
config:system:delete
sudo -u www-data php occ config:system:delete [options] [--] <name> (<name>)...
Arguments
name Name of the config to delete, specify multiple for array parameter.
Options
--error-if-not-exists
Checks whether the config exists before deleting it.
--output=[OUTPUT]
The output format to use (plain, json or json_pretty, default isplain).
Examples:
sudo -u www-data php occ config:system:delete maintenance:modeSystem config value maintenance:mode deleted
276 | Server Configuration
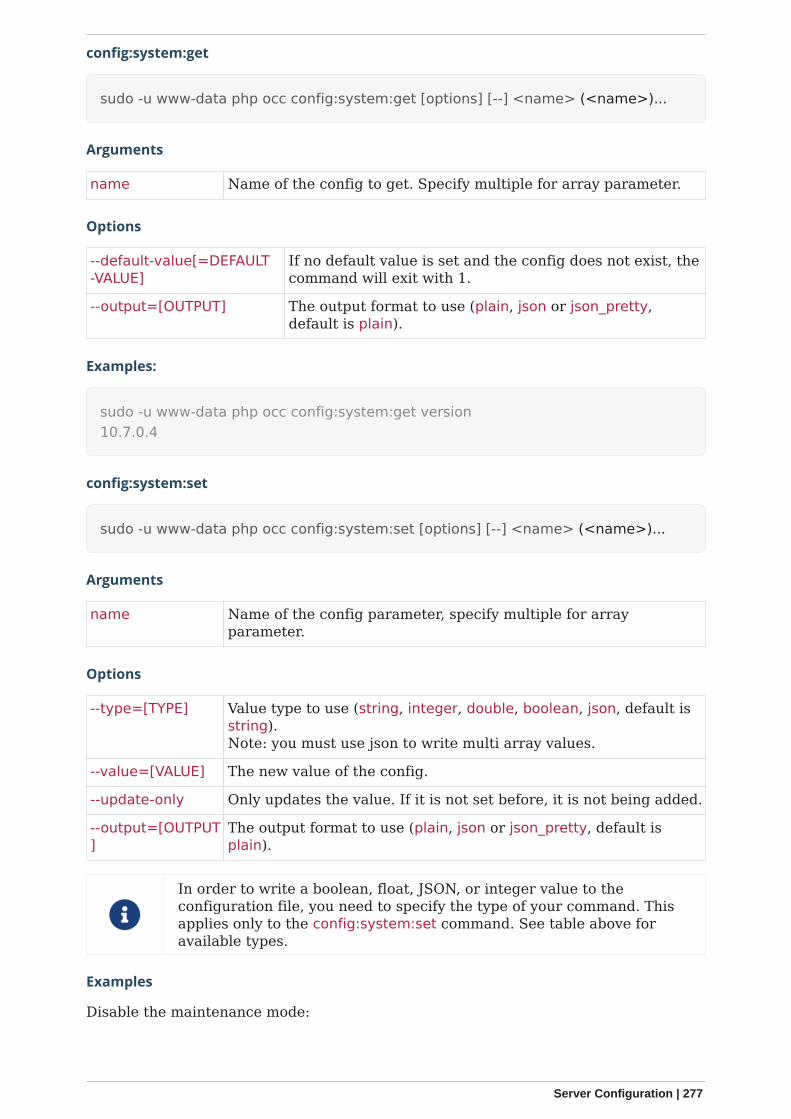
config:system:get
sudo -u www-data php occ config:system:get [options] [--] <name> (<name>)...
Arguments
name Name of the config to get. Specify multiple for array parameter.
Options
--default-value[=DEFAULT-VALUE]
If no default value is set and the config does not exist, thecommand will exit with 1.
--output=[OUTPUT] The output format to use (plain, json or json_pretty,default is plain).
Examples:
sudo -u www-data php occ config:system:get version10.7.0.4
config:system:set
sudo -u www-data php occ config:system:set [options] [--] <name> (<name>)...
Arguments
name Name of the config parameter, specify multiple for arrayparameter.
Options
--type=[TYPE] Value type to use (string, integer, double, boolean, json, default isstring).Note: you must use json to write multi array values.
--value=[VALUE] The new value of the config.
--update-only Only updates the value. If it is not set before, it is not being added.
--output=[OUTPUT]
The output format to use (plain, json or json_pretty, default isplain).
In order to write a boolean, float, JSON, or integer value to theconfiguration file, you need to specify the type of your command. Thisapplies only to the config:system:set command. See table above foravailable types.
Examples
Disable the maintenance mode:
Server Configuration | 277
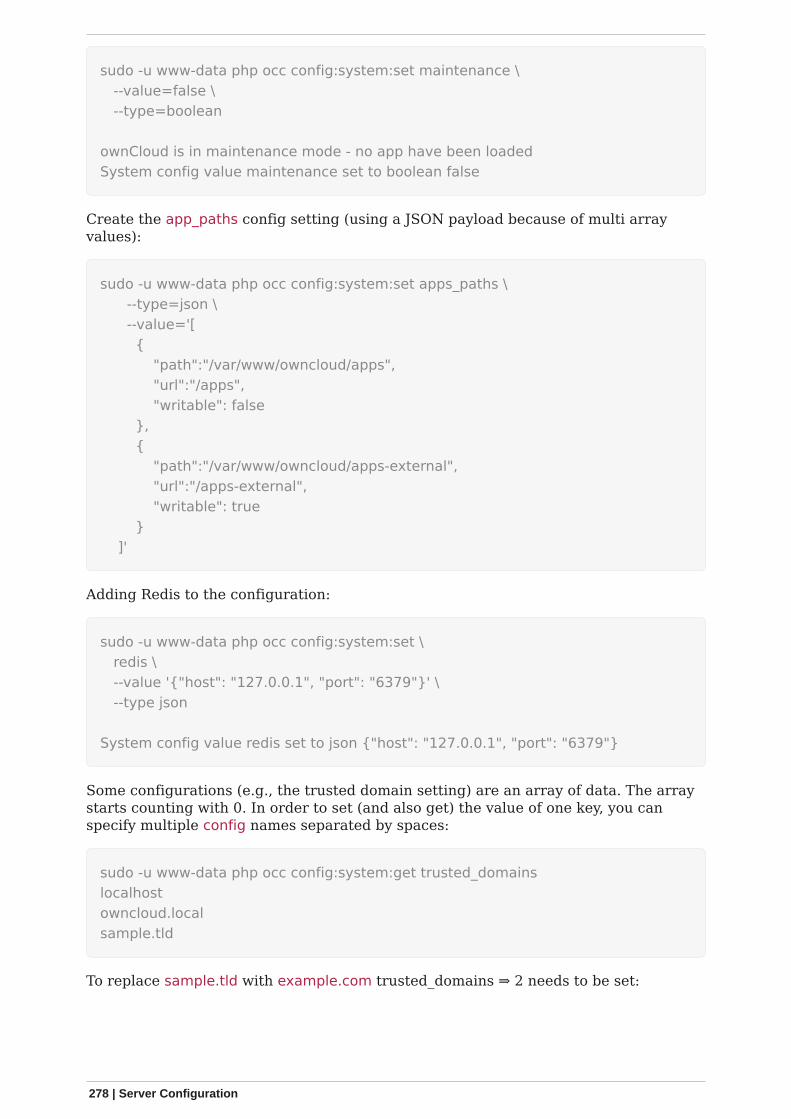
sudo -u www-data php occ config:system:set maintenance \ --value=false \ --type=boolean
ownCloud is in maintenance mode - no app have been loadedSystem config value maintenance set to boolean false
Create the app_paths config setting (using a JSON payload because of multi arrayvalues):
sudo -u www-data php occ config:system:set apps_paths \ --type=json \ --value='[ { "path":"/var/www/owncloud/apps", "url":"/apps", "writable": false }, { "path":"/var/www/owncloud/apps-external", "url":"/apps-external", "writable": true } ]'
Adding Redis to the configuration:
sudo -u www-data php occ config:system:set \ redis \ --value '{"host": "127.0.0.1", "port": "6379"}' \ --type json
System config value redis set to json {"host": "127.0.0.1", "port": "6379"}
Some configurations (e.g., the trusted domain setting) are an array of data. The arraystarts counting with 0. In order to set (and also get) the value of one key, you canspecify multiple config names separated by spaces:
sudo -u www-data php occ config:system:get trusted_domainslocalhostowncloud.localsample.tld
To replace sample.tld with example.com trusted_domains ⇒ 2 needs to be set:
278 | Server Configuration

sudo -u www-data php occ config:system:set trusted_domains 2--value=example.comSystem config value trusted_domains => 2 set to string example.com
sudo -u www-data php occ config:system:get trusted_domainslocalhostowncloud.localexample.com
Config Reports
If you’re working with ownCloud support and need to send them a configurationsummary, you can generate it using the configreport:generate command. Thiscommand generates the same JSON-based report as the Admin Config Report, whichyou can access under admin → Settings → Admin → General → Generate Config Report→ Download ownCloud config report.
From the command-line in the root directory of your ownCloud installation, run it asyour webserver user as follows, (assuming your webserver user is www-data):
sudo -u www-data php occ configreport:generate
This will generate the report and send it to STDOUT. You can optionally pipe the outputto a file and then attach it to an email to ownCloud support, by running the followingcommand:
sudo -u www-data php occ configreport:generate > generated-config-report.txt
Alternatively, you could generate the report and email it all in one command, byrunning:
sudo -u www-data php occ configreport:generate | mail \ -s "configuration report" \ -r <the email address to send from> \ [email protected]
These commands are not available in single-user (maintenance) mode.
Command Line Installation
ownCloud can be installed entirely from the command line. After downloading thetarball and copying ownCloud into the appropriate directories, or after installingownCloud packages (See Linux Package Manager Installation and Manual Installationon Linux) you can use occ commands in place of running the graphical InstallationWizard.
These instructions assume that you have a fully working and configuredwebserver. If not, please refer to the documentation on configuringConfigure the Web Server for detailed instructions.
Apply the correct permissions to your ownCloud directories. Then choose your occ
Server Configuration | 279
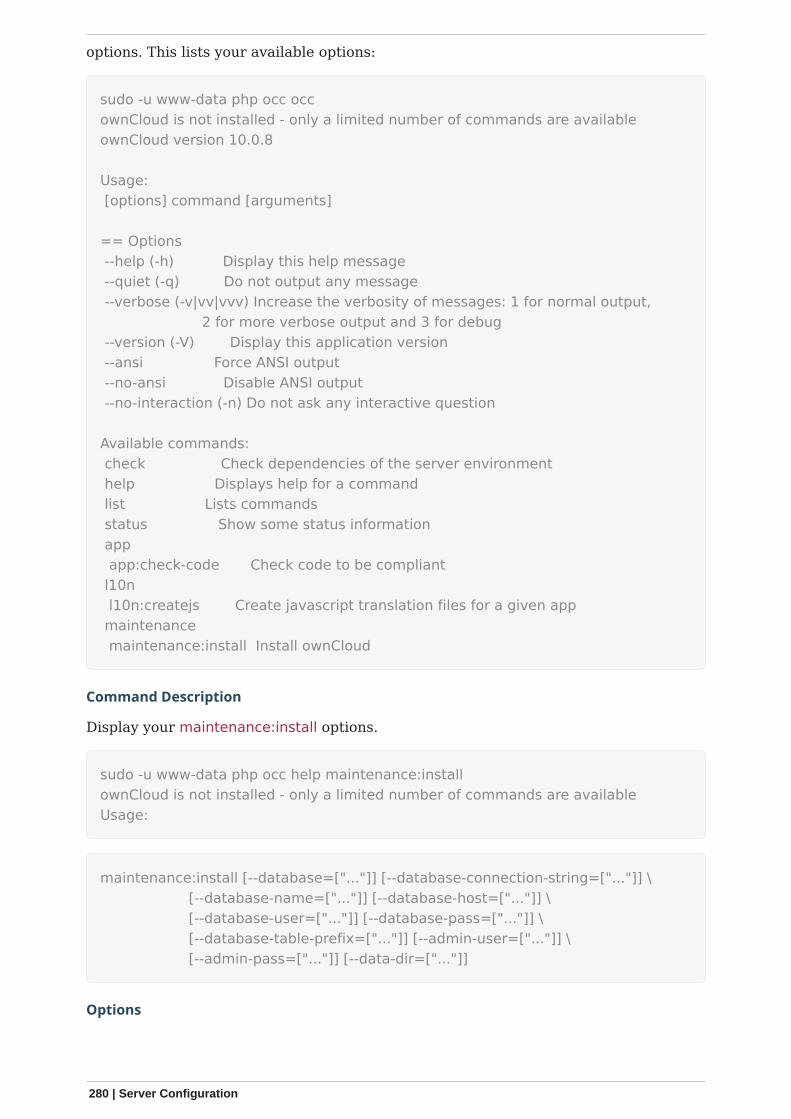
options. This lists your available options:
sudo -u www-data php occ occownCloud is not installed - only a limited number of commands are availableownCloud version 10.0.8
Usage: [options] command [arguments]
== Options --help (-h) Display this help message --quiet (-q) Do not output any message --verbose (-v|vv|vvv) Increase the verbosity of messages: 1 for normal output, 2 for more verbose output and 3 for debug --version (-V) Display this application version --ansi Force ANSI output --no-ansi Disable ANSI output --no-interaction (-n) Do not ask any interactive question
Available commands: check Check dependencies of the server environment help Displays help for a command list Lists commands status Show some status information app app:check-code Check code to be compliant l10n l10n:createjs Create javascript translation files for a given app maintenance maintenance:install Install ownCloud
Command Description
Display your maintenance:install options.
sudo -u www-data php occ help maintenance:installownCloud is not installed - only a limited number of commands are availableUsage:
maintenance:install [--database=["..."]] [--database-connection-string=["..."]] \ [--database-name=["..."]] [--database-host=["..."]] \ [--database-user=["..."]] [--database-pass=["..."]] \ [--database-table-prefix=["..."]] [--admin-user=["..."]] \ [--admin-pass=["..."]] [--data-dir=["..."]]
Options
280 | Server Configuration
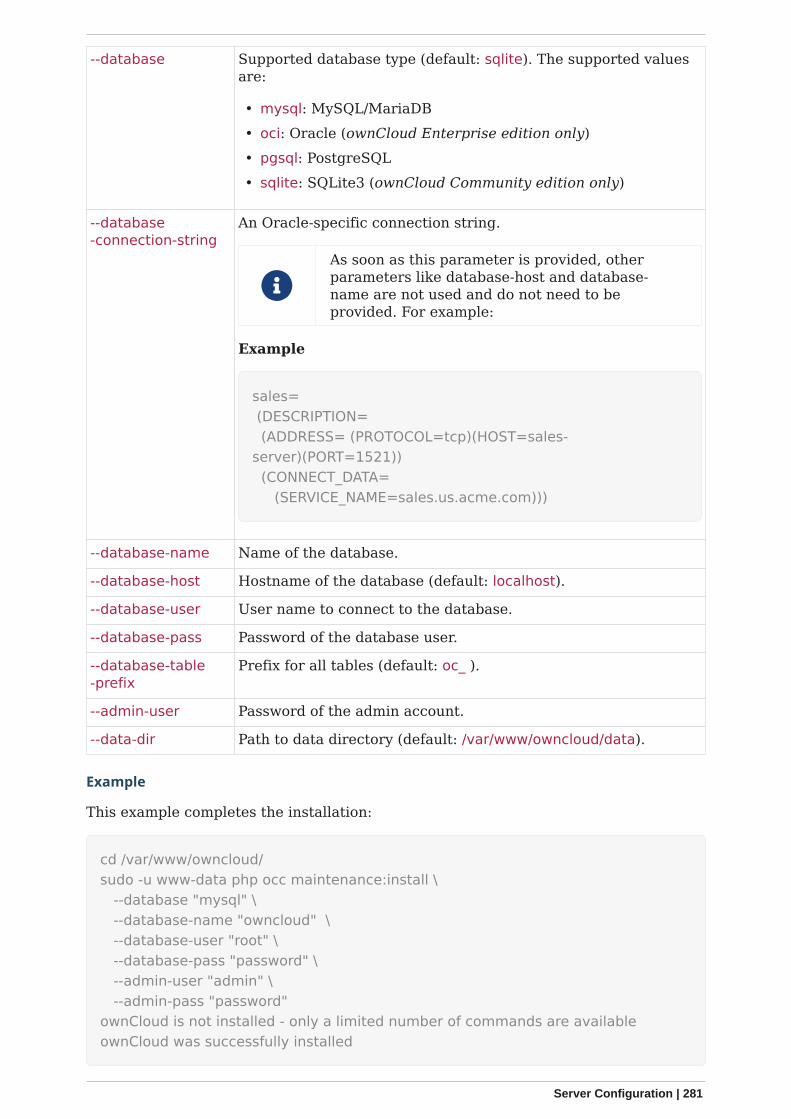
--database Supported database type (default: sqlite). The supported valuesare:
• mysql: MySQL/MariaDB• oci: Oracle (ownCloud Enterprise edition only)• pgsql: PostgreSQL• sqlite: SQLite3 (ownCloud Community edition only)
--database-connection-string
An Oracle-specific connection string.
As soon as this parameter is provided, otherparameters like database-host and database-name are not used and do not need to beprovided. For example:
Example
sales= (DESCRIPTION= (ADDRESS= (PROTOCOL=tcp)(HOST=sales-server)(PORT=1521)) (CONNECT_DATA= (SERVICE_NAME=sales.us.acme.com)))
--database-name Name of the database.
--database-host Hostname of the database (default: localhost).
--database-user User name to connect to the database.
--database-pass Password of the database user.
--database-table-prefix
Prefix for all tables (default: oc_ ).
--admin-user Password of the admin account.
--data-dir Path to data directory (default: /var/www/owncloud/data).
Example
This example completes the installation:
cd /var/www/owncloud/sudo -u www-data php occ maintenance:install \ --database "mysql" \ --database-name "owncloud" \ --database-user "root" \ --database-pass "password" \ --admin-user "admin" \ --admin-pass "password"ownCloud is not installed - only a limited number of commands are availableownCloud was successfully installed
Server Configuration | 281
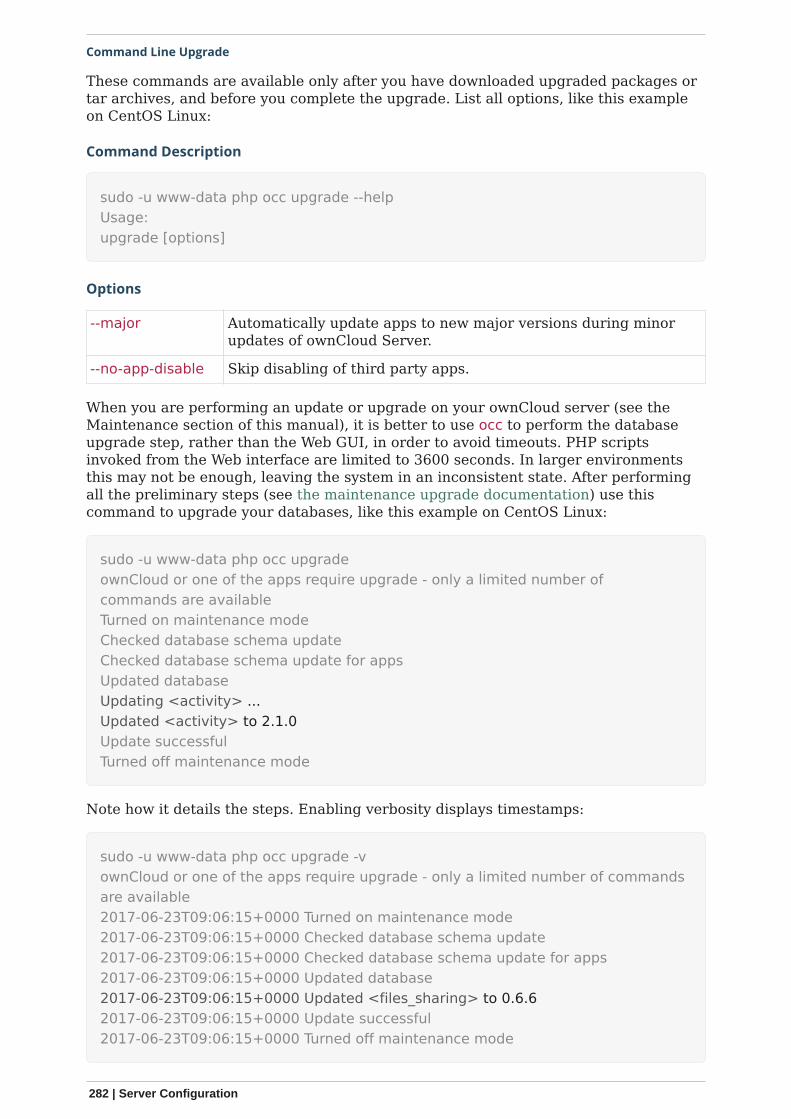
Command Line Upgrade
These commands are available only after you have downloaded upgraded packages ortar archives, and before you complete the upgrade. List all options, like this exampleon CentOS Linux:
Command Description
sudo -u www-data php occ upgrade --helpUsage:upgrade [options]
Options
--major Automatically update apps to new major versions during minorupdates of ownCloud Server.
--no-app-disable Skip disabling of third party apps.
When you are performing an update or upgrade on your ownCloud server (see theMaintenance section of this manual), it is better to use occ to perform the databaseupgrade step, rather than the Web GUI, in order to avoid timeouts. PHP scriptsinvoked from the Web interface are limited to 3600 seconds. In larger environmentsthis may not be enough, leaving the system in an inconsistent state. After performingall the preliminary steps (see the maintenance upgrade documentation) use thiscommand to upgrade your databases, like this example on CentOS Linux:
sudo -u www-data php occ upgradeownCloud or one of the apps require upgrade - only a limited number ofcommands are availableTurned on maintenance modeChecked database schema updateChecked database schema update for appsUpdated databaseUpdating <activity> ...Updated <activity> to 2.1.0Update successfulTurned off maintenance mode
Note how it details the steps. Enabling verbosity displays timestamps:
sudo -u www-data php occ upgrade -vownCloud or one of the apps require upgrade - only a limited number of commandsare available2017-06-23T09:06:15+0000 Turned on maintenance mode2017-06-23T09:06:15+0000 Checked database schema update2017-06-23T09:06:15+0000 Checked database schema update for apps2017-06-23T09:06:15+0000 Updated database2017-06-23T09:06:15+0000 Updated <files_sharing> to 0.6.62017-06-23T09:06:15+0000 Update successful2017-06-23T09:06:15+0000 Turned off maintenance mode
282 | Server Configuration

If there is an error it throws an exception, and the error is detailed in your ownCloudlogfile, so you can use the log output to figure out what went wrong, or to use in a bugreport.
Turned on maintenance modeChecked database schema updateChecked database schema update for appsUpdated databaseUpdating <files_sharing> ...ExceptionServerNotAvailableException: LDAP server is not availableUpdate failedTurned off maintenance mode
DAV Commands
A set of commands to create and sync address books and calendars:
dav dav:cleanup-chunks Cleanup outdated chunks dav:create-addressbook Create a dav address book dav:create-calendar Create a dav calendar dav:sync-birthday-calendar Synchronizes the birthday calendar dav:sync-system-addressbook Synchronizes users to the system address book
These commands are not available in single-user (maintenance) mode.
Cleanup Chunks
dav:cleanup-chunks cleans up outdated chunks (uploaded files) more than a certainnumber of days old. By default, the command cleans up chunks more than 2 days old.However, by supplying the number of days to the command, the range can beincreased.
sudo -u www-data php occ dav:cleanup-chunks [options] [--] [<minimum-age-in-days>]
Arguments
minimum-age-in-days Minimum age of uploads to cleanup (in days - minimum 2 days- maximum 100) [default: 2]
Example
In the example below, chunks older than 10 days will be removed.
Server Configuration | 283
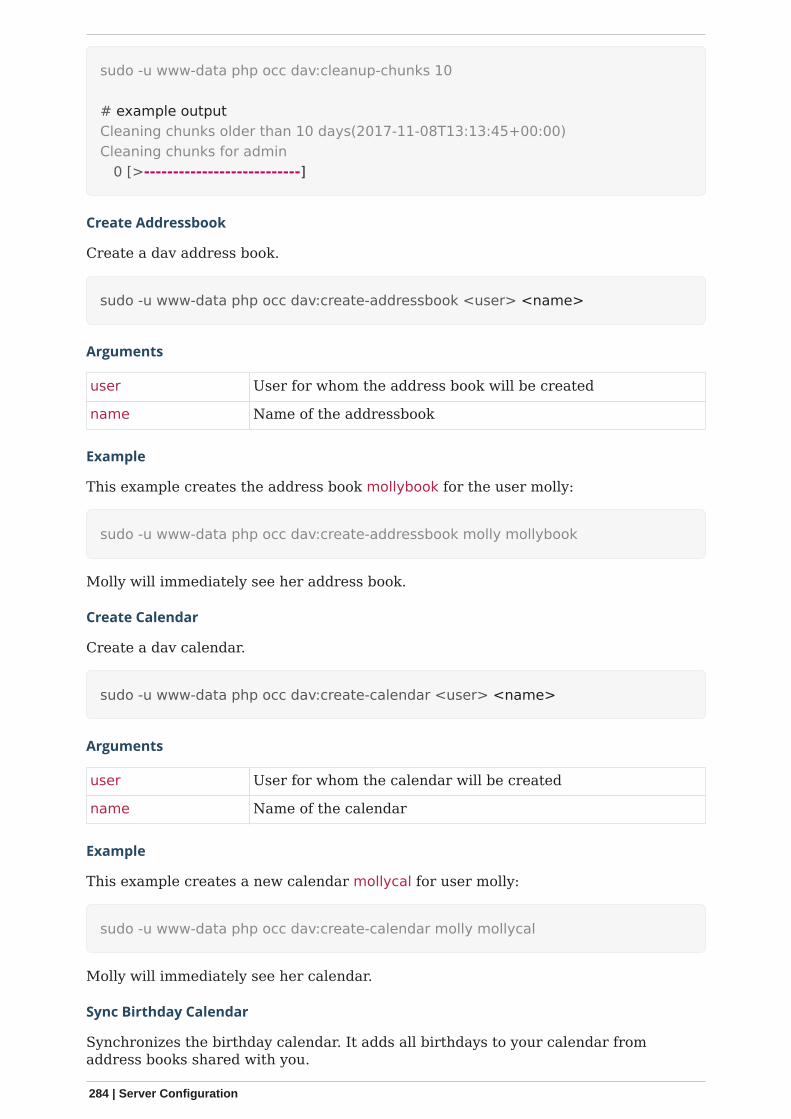
sudo -u www-data php occ dav:cleanup-chunks 10
# example outputCleaning chunks older than 10 days(2017-11-08T13:13:45+00:00)Cleaning chunks for admin 0 [>---------------------------]
Create Addressbook
Create a dav address book.
sudo -u www-data php occ dav:create-addressbook <user> <name>
Arguments
user User for whom the address book will be created
name Name of the addressbook
Example
This example creates the address book mollybook for the user molly:
sudo -u www-data php occ dav:create-addressbook molly mollybook
Molly will immediately see her address book.
Create Calendar
Create a dav calendar.
sudo -u www-data php occ dav:create-calendar <user> <name>
Arguments
user User for whom the calendar will be created
name Name of the calendar
Example
This example creates a new calendar mollycal for user molly:
sudo -u www-data php occ dav:create-calendar molly mollycal
Molly will immediately see her calendar.
Sync Birthday Calendar
Synchronizes the birthday calendar. It adds all birthdays to your calendar fromaddress books shared with you.
284 | Server Configuration
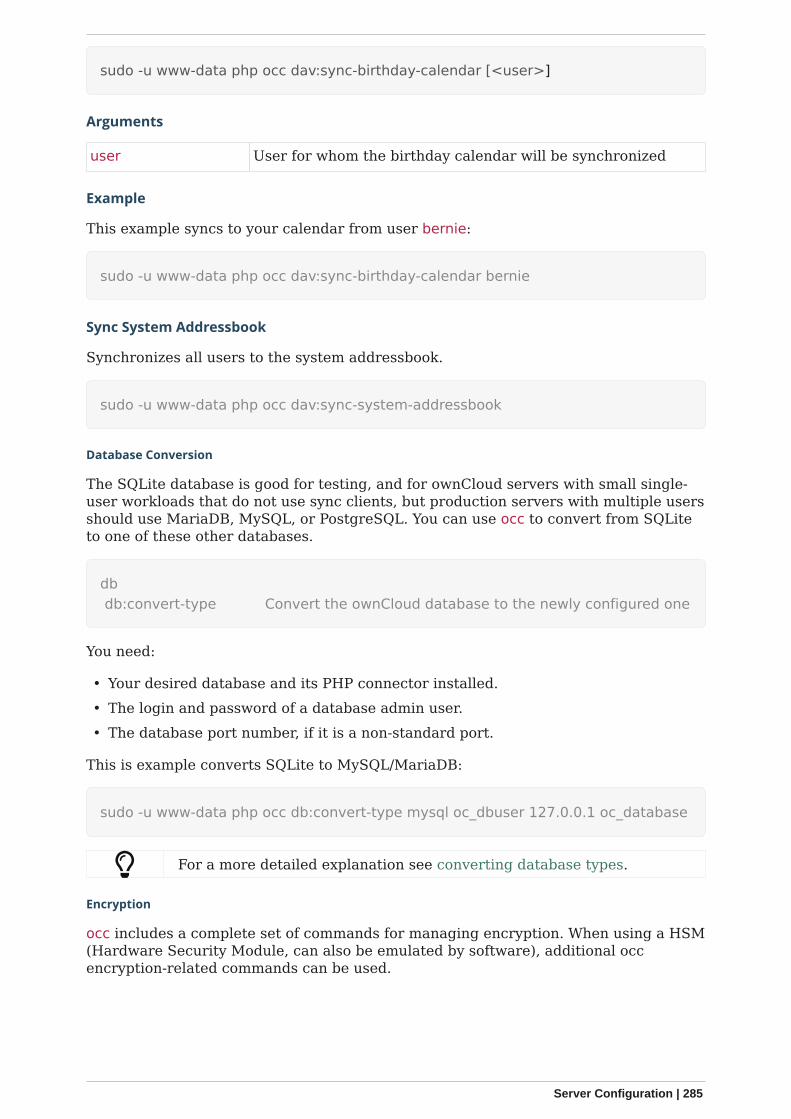
sudo -u www-data php occ dav:sync-birthday-calendar [<user>]
Arguments
user User for whom the birthday calendar will be synchronized
Example
This example syncs to your calendar from user bernie:
sudo -u www-data php occ dav:sync-birthday-calendar bernie
Sync System Addressbook
Synchronizes all users to the system addressbook.
sudo -u www-data php occ dav:sync-system-addressbook
Database Conversion
The SQLite database is good for testing, and for ownCloud servers with small single-user workloads that do not use sync clients, but production servers with multiple usersshould use MariaDB, MySQL, or PostgreSQL. You can use occ to convert from SQLiteto one of these other databases.
db db:convert-type Convert the ownCloud database to the newly configured one
You need:
• Your desired database and its PHP connector installed.• The login and password of a database admin user.• The database port number, if it is a non-standard port.
This is example converts SQLite to MySQL/MariaDB:
sudo -u www-data php occ db:convert-type mysql oc_dbuser 127.0.0.1 oc_database
For a more detailed explanation see converting database types.
Encryption
occ includes a complete set of commands for managing encryption. When using a HSM(Hardware Security Module, can also be emulated by software), additional occencryption-related commands can be used.
Server Configuration | 285
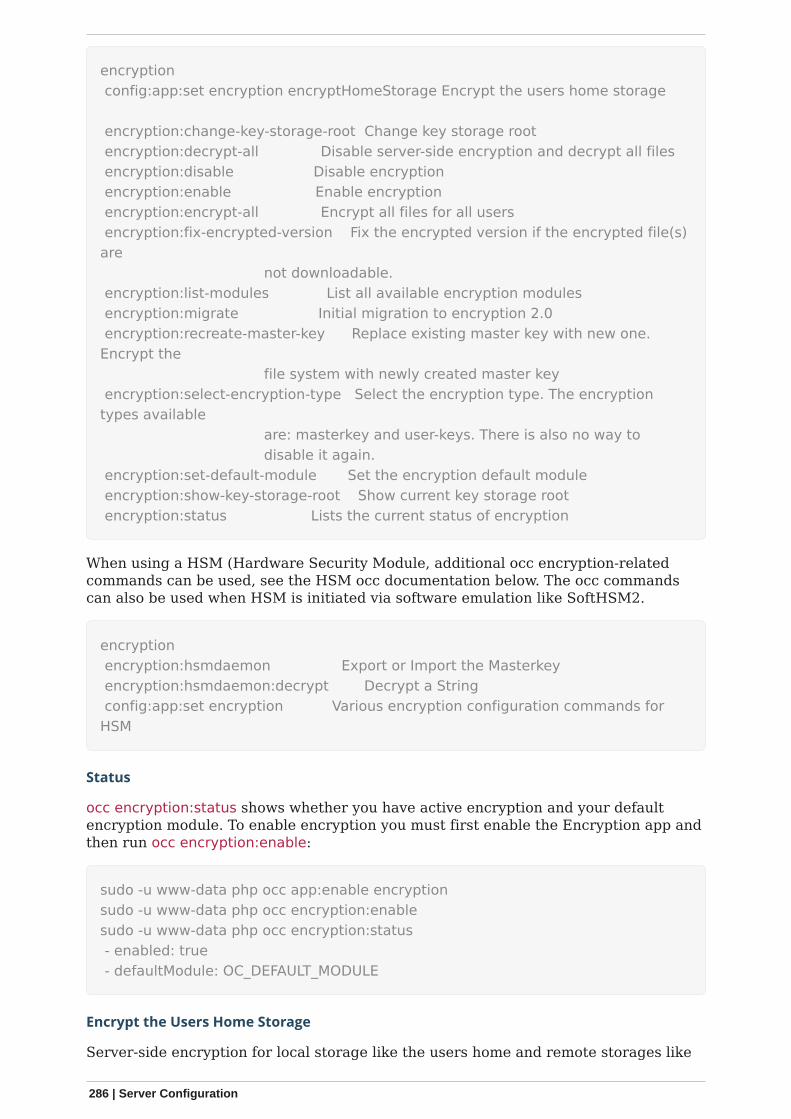
encryption config:app:set encryption encryptHomeStorage Encrypt the users home storage
encryption:change-key-storage-root Change key storage root encryption:decrypt-all Disable server-side encryption and decrypt all files encryption:disable Disable encryption encryption:enable Enable encryption encryption:encrypt-all Encrypt all files for all users encryption:fix-encrypted-version Fix the encrypted version if the encrypted file(s)are not downloadable. encryption:list-modules List all available encryption modules encryption:migrate Initial migration to encryption 2.0 encryption:recreate-master-key Replace existing master key with new one.Encrypt the file system with newly created master key encryption:select-encryption-type Select the encryption type. The encryptiontypes available are: masterkey and user-keys. There is also no way to disable it again. encryption:set-default-module Set the encryption default module encryption:show-key-storage-root Show current key storage root encryption:status Lists the current status of encryption
When using a HSM (Hardware Security Module, additional occ encryption-relatedcommands can be used, see the HSM occ documentation below. The occ commandscan also be used when HSM is initiated via software emulation like SoftHSM2.
encryption encryption:hsmdaemon Export or Import the Masterkey encryption:hsmdaemon:decrypt Decrypt a String config:app:set encryption Various encryption configuration commands forHSM
Status
occ encryption:status shows whether you have active encryption and your defaultencryption module. To enable encryption you must first enable the Encryption app andthen run occ encryption:enable:
sudo -u www-data php occ app:enable encryptionsudo -u www-data php occ encryption:enablesudo -u www-data php occ encryption:status - enabled: true - defaultModule: OC_DEFAULT_MODULE
Encrypt the Users Home Storage
Server-side encryption for local storage like the users home and remote storages like
286 | Server Configuration
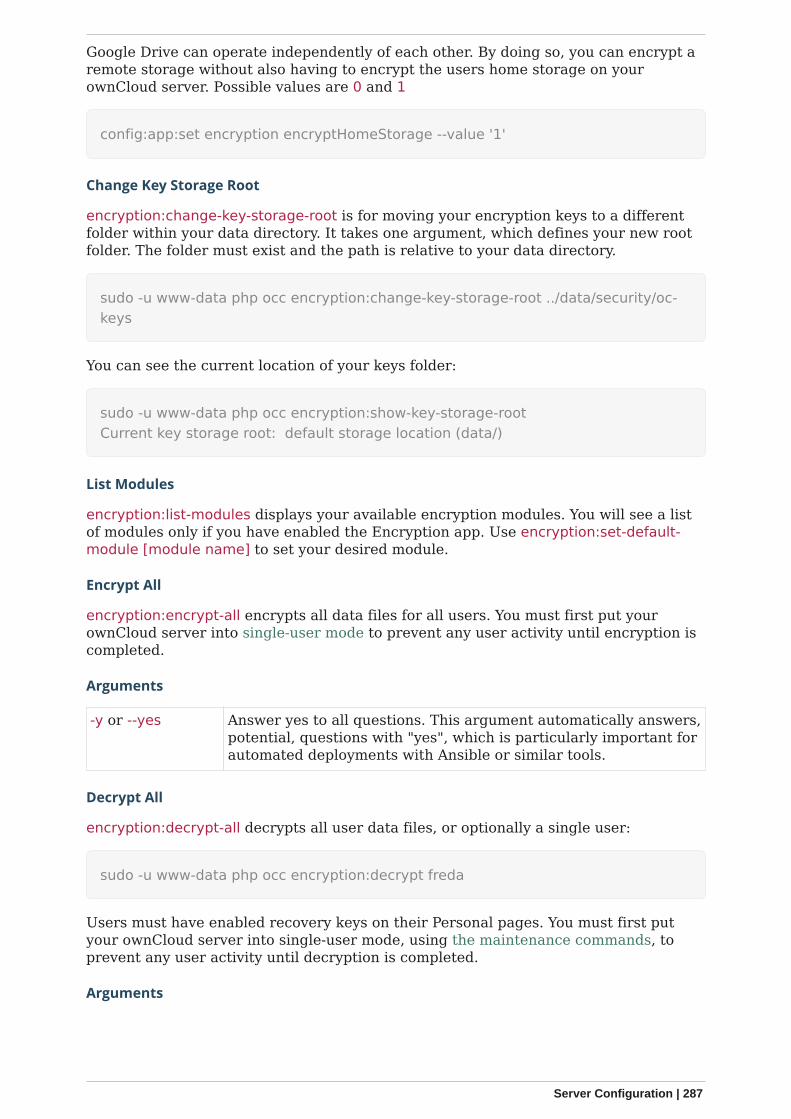
Google Drive can operate independently of each other. By doing so, you can encrypt aremote storage without also having to encrypt the users home storage on yourownCloud server. Possible values are 0 and 1
config:app:set encryption encryptHomeStorage --value '1'
Change Key Storage Root
encryption:change-key-storage-root is for moving your encryption keys to a differentfolder within your data directory. It takes one argument, which defines your new rootfolder. The folder must exist and the path is relative to your data directory.
sudo -u www-data php occ encryption:change-key-storage-root ../data/security/oc-keys
You can see the current location of your keys folder:
sudo -u www-data php occ encryption:show-key-storage-rootCurrent key storage root: default storage location (data/)
List Modules
encryption:list-modules displays your available encryption modules. You will see a listof modules only if you have enabled the Encryption app. Use encryption:set-default-module [module name] to set your desired module.
Encrypt All
encryption:encrypt-all encrypts all data files for all users. You must first put yourownCloud server into single-user mode to prevent any user activity until encryption iscompleted.
Arguments
-y or --yes Answer yes to all questions. This argument automatically answers,potential, questions with "yes", which is particularly important forautomated deployments with Ansible or similar tools.
Decrypt All
encryption:decrypt-all decrypts all user data files, or optionally a single user:
sudo -u www-data php occ encryption:decrypt freda
Users must have enabled recovery keys on their Personal pages. You must first putyour ownCloud server into single-user mode, using the maintenance commands, toprevent any user activity until decryption is completed.
Arguments
Server Configuration | 287
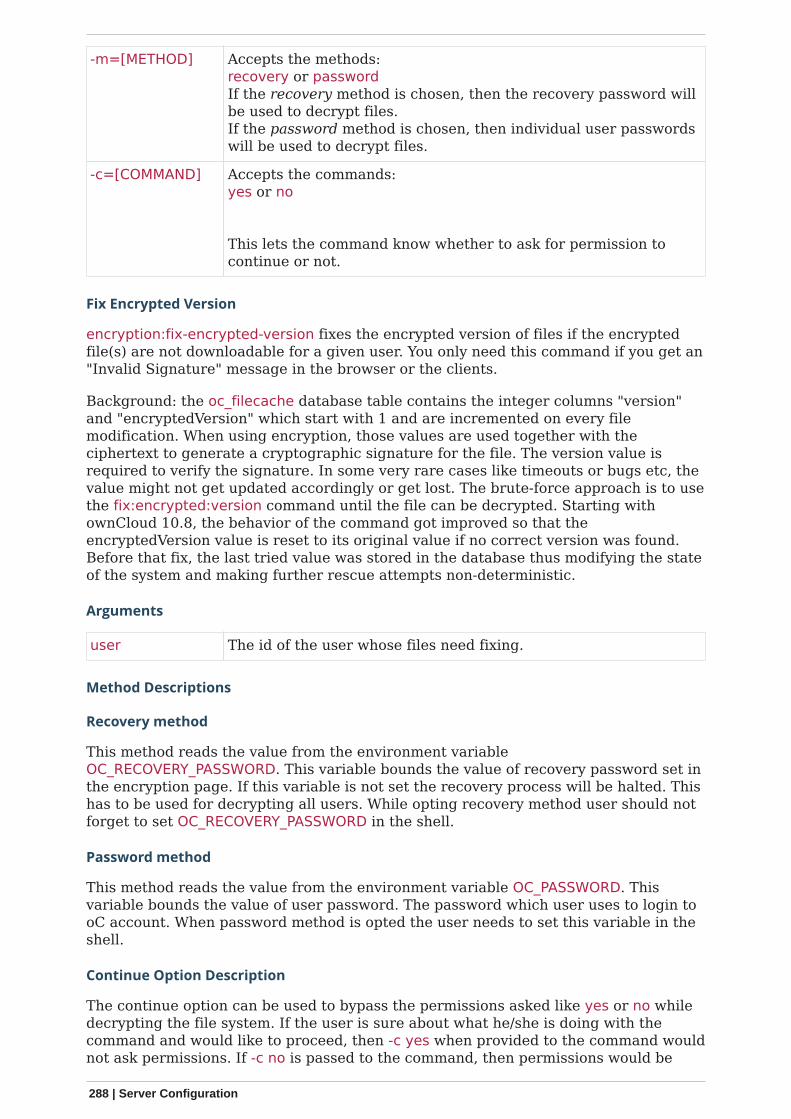
-m=[METHOD] Accepts the methods:recovery or passwordIf the recovery method is chosen, then the recovery password willbe used to decrypt files.If the password method is chosen, then individual user passwordswill be used to decrypt files.
-c=[COMMAND] Accepts the commands:yes or no
This lets the command know whether to ask for permission tocontinue or not.
Fix Encrypted Version
encryption:fix-encrypted-version fixes the encrypted version of files if the encryptedfile(s) are not downloadable for a given user. You only need this command if you get an"Invalid Signature" message in the browser or the clients.
Background: the oc_filecache database table contains the integer columns "version"and "encryptedVersion" which start with 1 and are incremented on every filemodification. When using encryption, those values are used together with theciphertext to generate a cryptographic signature for the file. The version value isrequired to verify the signature. In some very rare cases like timeouts or bugs etc, thevalue might not get updated accordingly or get lost. The brute-force approach is to usethe fix:encrypted:version command until the file can be decrypted. Starting withownCloud 10.8, the behavior of the command got improved so that theencryptedVersion value is reset to its original value if no correct version was found.Before that fix, the last tried value was stored in the database thus modifying the stateof the system and making further rescue attempts non-deterministic.
Arguments
user The id of the user whose files need fixing.
Method Descriptions
Recovery method
This method reads the value from the environment variableOC_RECOVERY_PASSWORD. This variable bounds the value of recovery password set inthe encryption page. If this variable is not set the recovery process will be halted. Thishas to be used for decrypting all users. While opting recovery method user should notforget to set OC_RECOVERY_PASSWORD in the shell.
Password method
This method reads the value from the environment variable OC_PASSWORD. Thisvariable bounds the value of user password. The password which user uses to login tooC account. When password method is opted the user needs to set this variable in theshell.
Continue Option Description
The continue option can be used to bypass the permissions asked like yes or no whiledecrypting the file system. If the user is sure about what he/she is doing with thecommand and would like to proceed, then -c yes when provided to the command wouldnot ask permissions. If -c no is passed to the command, then permissions would be
288 | Server Configuration
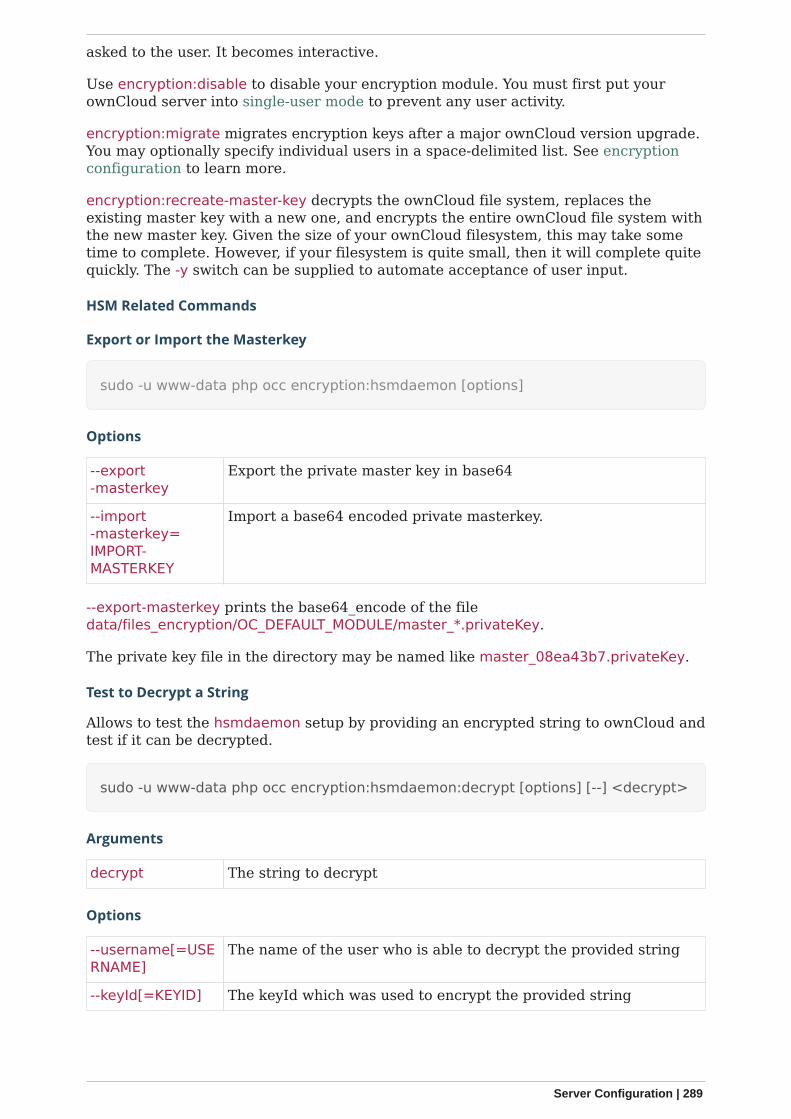
asked to the user. It becomes interactive.
Use encryption:disable to disable your encryption module. You must first put yourownCloud server into single-user mode to prevent any user activity.
encryption:migrate migrates encryption keys after a major ownCloud version upgrade.You may optionally specify individual users in a space-delimited list. See encryptionconfiguration to learn more.
encryption:recreate-master-key decrypts the ownCloud file system, replaces theexisting master key with a new one, and encrypts the entire ownCloud file system withthe new master key. Given the size of your ownCloud filesystem, this may take sometime to complete. However, if your filesystem is quite small, then it will complete quitequickly. The -y switch can be supplied to automate acceptance of user input.
HSM Related Commands
Export or Import the Masterkey
sudo -u www-data php occ encryption:hsmdaemon [options]
Options
--export-masterkey
Export the private master key in base64
--import-masterkey=IMPORT-MASTERKEY
Import a base64 encoded private masterkey.
--export-masterkey prints the base64_encode of the filedata/files_encryption/OC_DEFAULT_MODULE/master_*.privateKey.
The private key file in the directory may be named like master_08ea43b7.privateKey.
Test to Decrypt a String
Allows to test the hsmdaemon setup by providing an encrypted string to ownCloud andtest if it can be decrypted.
sudo -u www-data php occ encryption:hsmdaemon:decrypt [options] [--] <decrypt>
Arguments
decrypt The string to decrypt
Options
--username[=USERNAME]
The name of the user who is able to decrypt the provided string
--keyId[=KEYID] The keyId which was used to encrypt the provided string
Server Configuration | 289
Set the HSM URL
Set the url on which the hsmdaemon REST-API is reachable.
sudo -u www-data php occ config:app:set encryption hsm.url --value'http://127.0.0.1:8513'
Set the JSON Web Token Secret
To access the hsmdaemon API, ownCloud must authenticate with a JWT (JSON WebToken). The given secret is shared between the hsdmdaemon (see thehsmdaemon.toml configuration file) and ownCloud to sign the JWT. See the HSMdocumentation for an example how to generate a secret.
sudo -u www-data php occ config:app:set encryption hsm.jwt.secret --value'7a7d1826-b514-4d9f-afc7-a7485084e8de'
Set the JWT Clockskew
The JWT described above has an expiry timestamp. In case the time clocks onownCloud and hsmdaemon system drift or skew apart, additional time is added to theexpiry time to counteract this situation. Set or change the clockskew only if ownCloudadvises to do so. Defaults to 120, value is in seconds.
sudo -u www-data php occ config:app:set encryption hsm.jwt.clockskew --value'120'
Federation Sync
Synchronize the address books of all federated ownCloud servers.
Servers connected with federation shares can share user address books, and auto-complete usernames in share dialogs. Use this command to synchronize federatedservers:
sudo -u www-data php occ federation:sync-addressbooks
This command is only available when the "Federation" app (federation)is enabled.
File Operations
occ has the following commands for managing files in ownCloud.
290 | Server Configuration
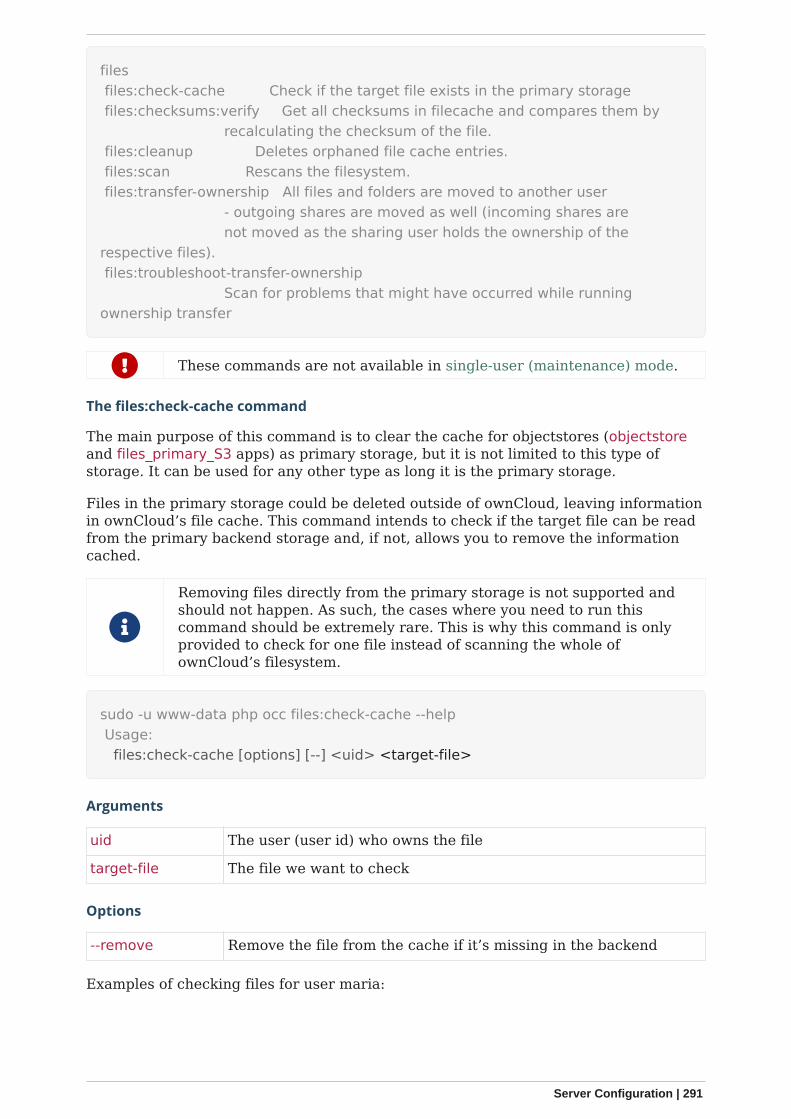
files files:check-cache Check if the target file exists in the primary storage files:checksums:verify Get all checksums in filecache and compares them by recalculating the checksum of the file. files:cleanup Deletes orphaned file cache entries. files:scan Rescans the filesystem. files:transfer-ownership All files and folders are moved to another user - outgoing shares are moved as well (incoming shares are not moved as the sharing user holds the ownership of therespective files). files:troubleshoot-transfer-ownership Scan for problems that might have occurred while runningownership transfer
These commands are not available in single-user (maintenance) mode.
The files:check-cache command
The main purpose of this command is to clear the cache for objectstores (objectstoreand files_primary_S3 apps) as primary storage, but it is not limited to this type ofstorage. It can be used for any other type as long it is the primary storage.
Files in the primary storage could be deleted outside of ownCloud, leaving informationin ownCloud’s file cache. This command intends to check if the target file can be readfrom the primary backend storage and, if not, allows you to remove the informationcached.
Removing files directly from the primary storage is not supported andshould not happen. As such, the cases where you need to run thiscommand should be extremely rare. This is why this command is onlyprovided to check for one file instead of scanning the whole ofownCloud’s filesystem.
sudo -u www-data php occ files:check-cache --help Usage: files:check-cache [options] [--] <uid> <target-file>
Arguments
uid The user (user id) who owns the file
target-file The file we want to check
Options
--remove Remove the file from the cache if it’s missing in the backend
Examples of checking files for user maria:
Server Configuration | 291
sudo -u www-data php occ files:check-cache maria welcome.txt
welcome.txt has been accessed properly
sudo -u www-data php occ files:check-cache maria maria@smbhome/myfile.txt
Ignoring maria@smbhome/myfile.txt because it is shared or not inside the primarystorage
The files:checksums:verify command
ownCloud supports file integrity checking, by computing and matching checksums.Doing so ensures that transferred files arrive at their target in the exact state as theyleft their origin.
In some rare cases, wrong checksums are written to the database which leads tosynchronization issues, such as with the Desktop Client. To mitigate such problems anew command is available: occ files:checksums:verify.
Executing the command recalculates checksums, either for all files of a user or withina specified filesystem path on the designated storage. It then compares them with thevalues in the database. The command also offers an option to repair incorrectchecksum values (-r, --repair).
Executing this command might take some time depending on the filecount.
Below is sample output that you can expect to see when using the command.
sudo -u www-data php occ files:checksums:verify
This operation might take very long.Mismatch for files/welcome.txt: Filecache: SHA1:eeb2c08011374d8ad4e483a4938e1aa1007c089dMD5:368e3a6cb99f88c3543123931d786e21 ADLER32:c5ad3a63 Actual: SHA1:da39a3ee5e6b4b0d3255bfef95601890afd80709MD5:d41d8cd98f00b204e9800998ecf8427e ADLER32:00000001Mismatch for thumbnails/9/2048-2048-max.png: Filecache: SHA1:2634fed078d1978f24f71892bf4ee0e4bd0c3c99MD5:dd249372f7a68c551f7e6b2615d49463 ADLER32:821230d4 Actual: SHA1:da39a3ee5e6b4b0d3255bfef95601890afd80709MD5:d41d8cd98f00b204e9800998ecf8427e ADLER32:00000001
Options
-r, --repair Repair filecache-entry with mismatched checksums.
-u, --user=USER Specific user to check.
292 | Server Configuration
-p, --path=PATH Path to check relative to user folder. [default: ""]. For example, ifthe user’s id was "john" and the --path value was "tree/apple", thecommand would check the ownCloud directory/john/files/tree/apple.
The files:cleanup command
files:cleanup tidies up the server’s file cache by deleting all file entries that have nomatching entries in the storage table.
The files:scan command
The files:scan command
• Scans for new files.• Scans not fully scanned files.• Repairs file cache holes.• Updates the file cache.
File scans can be performed per-user, for a space-delimited list of users, for groups ofusers, and for all users.
sudo -u www-data php occ files:scan --help Usage: files:scan [options] [--] [<user_id>]...
Arguments
user_id Will rescan all files of the given user(s).
Options
--output=[OUTPUT]
The output format to use (plain, json or json_pretty, default isplain).
-p --path=[PATH] Limit rescan to this path, e.g. --path="/alice/files/Music", theuser_id is determined by the path and the user_id parameter and--all are ignored.
--group=[GROUP] Scan user(s) under the group(s). This option can be used as--group=foo --group=bar to scan groups foo and bar (multiplevalues allowed)
-g--groups=[GROUP]
Scan user(s) under the group(s). This option can be used as--groups=foo,bar to scan groups foo and bar (multiple valuesallowed separated by commas)
-q --quiet Do not output any message.
--all Will rescan all files of all known users.
--repair Will repair detached filecache entries (slow).
--unscanned Only scan files which are marked as not fully scanned.
If not using --quiet, statistics will be shown at the end of the scan.
Server Configuration | 293
The --path Option
When using the --path option, the path must be in one of the following formats:
"user_id/files/path""user_id/files/mount_name""user_id/files/mount_name/path"
For example:
--path="/alice/files/Music"
In the example above, the user_id alice is determined implicitly from the pathcomponent given. To get a list of scannable mounts for a given user, use the followingcommand:
sudo -u www-data php occ files_external:list user_id
Mounts are only scannable at the point of origin. Scanning of sharesincluding federated shares is not necessary on the receiver side andtherefore not possible.
Mounts based on session credentials can not be scanned as the userscredentials are not available to the occ command set.
The --path, --all, --group, --groups and [user_id] parameters are exclusive - only onemust be specified.
The --repair Option
As noted above, repairs can be performed for individual users, groups of users, and forall users in an ownCloud installation. What’s more, repair scans can be run even if nofiles are known to need repairing and if one or more files are known to be in need ofrepair. Two examples of when files need repairing are:
• If folders have the same entry twice in the web UI (known as a 'ghost folder'), thiscan also lead to strange error messages in the desktop client.
• If entering a folder doesn’t seem to lead into that folder.
We strongly suggest that you backup the database before running thiscommand.
The --repair option can be run within two different scenarios:
• Requiring a downtime when used on all affected storages at once.• Without downtime, filtering by a specified User Id.
The following commands show how to enable single user mode, run a repair file scanin bulk on all storages, and then disable single user mode. This way is much fasterthan running the command for every user separately, but it requires single user mode.
294 | Server Configuration
sudo -u www-data php occ maintenance:singleuser --onsudo -u www-data php occ files:scan --all --repairsudo -u www-data php occ maintenance:singleuser --off
The following command filters by the storage of the specified user.
sudo -u www-data php occ files:scan USERID --repair
If many users are affected, it could be convenient to create a shellscript, which iterates over a list of User ID’s.
The files:transfer-ownership command
You may transfer all files and outgoing shares from one user to another.
Incoming shares are not transferred.
If the target users don’t exist, they will be created.
This command is useful before removing users.
sudo -u www-data php occ files:transfer-ownership --help Usage: files:transfer-ownership [options] [--] <source-user> <destination-user>
Arguments
source-user owner of files which shall be moved
destination-user user who will be the new owner of the files
Options
--path=[PATH] selectively provide the path to transfer.For example --path="folder_name"
-s,--accept-skipped-shares
always confirm to continue in case of skipped shares.
For example, to move all files from <source-user> to <destination-user>, use thefollowing command:
sudo -u www-data php occ files:transfer-ownership \ <source-user> \ <destination-user>
You can also move a limited set of files from <source-user> to <destination-user> bymaking use of the --path switch, as in the example below. Ownership of folder/to/moveand all files and folders which it contains will be transferred to <destination-user>.
Server Configuration | 295

sudo -u www-data php occ files:transfer-ownership \ --path="folder/to/move" \ <source-user> \ <destination-user>
Please keep the following in mind when using this command:
1. The directory provided to the --path switch must exist inside data/<source-user>/files.
2. The directory and its contents won’t be moved as-is between the users. It will bemoved into the destination user’s files directory, into a directory name whichfollows the format: transferred from <source-user> on <timestamp>. Using theexample above, it will be stored under: data/<destination-user>/files/transferredfrom <source-user> on 20170426_124510/
3. Currently file versions can’t be transferred. Only the latest version of moved fileswill appear in the destination user’s account.
The files:troubleshoot-transfer-ownership command
This command is used to scan for problems, that might have occurred during a run ofownership transfer using the above command files:transfer-ownership. It can also beused to automatically attempt to fix problems. For example, transferred shares thatmay now have an invalid share owner.
By default, the command performs a dry run and displays the problemsfound to the console output.
sudo -u www-data php occ files:troubleshoot-transfer-ownership --help Usage: files:troubleshoot-transfer-ownership [options] [--] [<type>]
Arguments
type "all", "invalid-owner", "invalid-initiator",[default: ""]
Options
-f, --fix perform auto-fix for found problems
-u, --uid=UID scope for particular user
Run the command with one of the type arguments:
sudo -u www-data php occ files:troubleshoot-transfer-ownership \ <all|invalid-owner|invalid-initiator>
The command can attempt to fix the issues with the --fix flag,or execute for a single user using --uid <uid>
296 | Server Configuration
sudo -u www-data php occ files:troubleshoot-transfer-ownership all \ --fix \ --uid=UID
Files External
These commands replace the data/mount.json configuration file used in ownCloudreleases before 9.0. Commands for managing external storage.
files_external files_external:applicable Manage applicable users and groups for a mount files_external:backends Show available authentication and storage backends files_external:config Manage backend configuration for a mount files_external:create Create a new mount configuration files_external:delete Delete an external mount files_external:export Export mount configurations files_external:import Import mount configurations files_external:list List configured mounts files_external:option Manage mount options for a mount files_external:verify Verify mount configuration
These commands replicate the functionality in the ownCloud Web GUI, plus two newfeatures: files_external:export and files_external:import.
Use files_external:export to export all admin mounts to stdout, andfiles_external:export [user_id] to export the mounts of the specified ownCloud user.
These commands are only available when the "External storagesupport" app (files_external) is enabled. It is not available in single-user(maintenance) mode.
files_external:list
List configured mounts.
Usage
files_external:list [--show-password] [--full] [-a|--all] [-s|--short] [--] [<user_id>]
Arguments
user_id User ID to list the personal mounts for, if no user is providedadmin mounts will be listed.
Options
--show-password Show passwords and secrets
--mount-options Show all mount options independent if they are set to their defaultvalue or not
--full Don’t truncate long values in table output
Server Configuration | 297
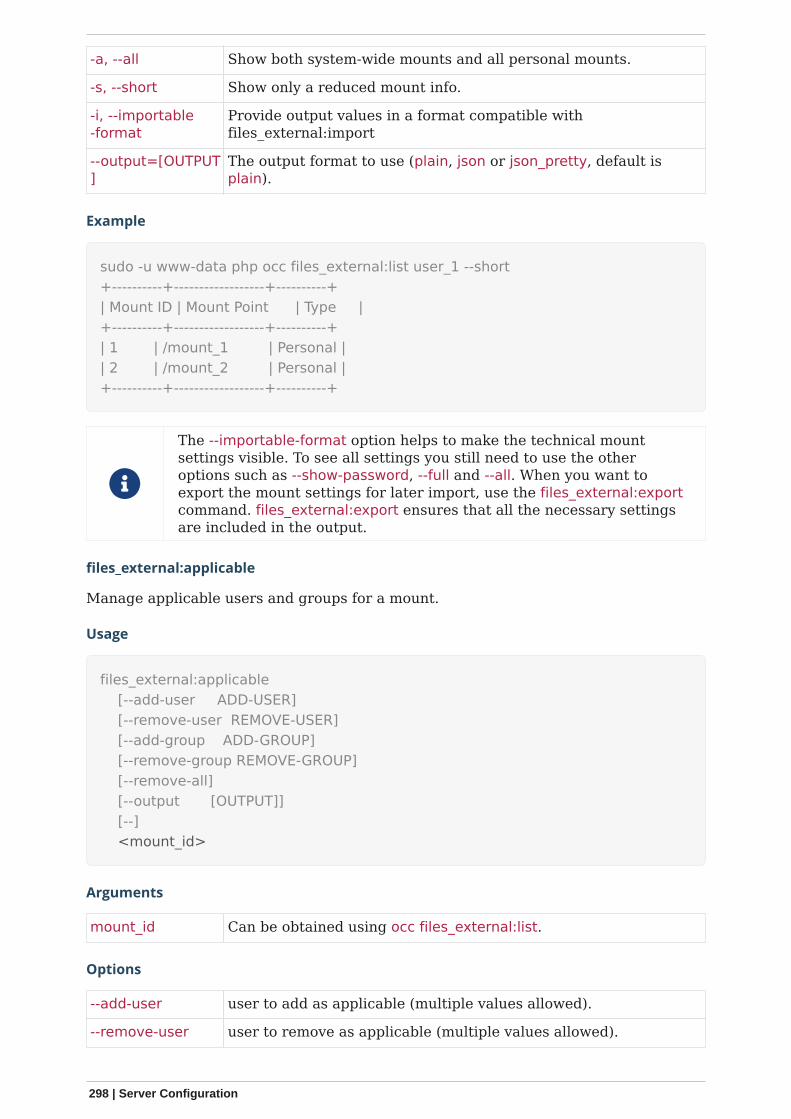
-a, --all Show both system-wide mounts and all personal mounts.
-s, --short Show only a reduced mount info.
-i, --importable-format
Provide output values in a format compatible withfiles_external:import
--output=[OUTPUT]
The output format to use (plain, json or json_pretty, default isplain).
Example
sudo -u www-data php occ files_external:list user_1 --short+----------+------------------+----------+| Mount ID | Mount Point | Type |+----------+------------------+----------+| 1 | /mount_1 | Personal || 2 | /mount_2 | Personal |+----------+------------------+----------+
The --importable-format option helps to make the technical mountsettings visible. To see all settings you still need to use the otheroptions such as --show-password, --full and --all. When you want toexport the mount settings for later import, use the files_external:exportcommand. files_external:export ensures that all the necessary settingsare included in the output.
files_external:applicable
Manage applicable users and groups for a mount.
Usage
files_external:applicable [--add-user ADD-USER] [--remove-user REMOVE-USER] [--add-group ADD-GROUP] [--remove-group REMOVE-GROUP] [--remove-all] [--output [OUTPUT]] [--] <mount_id>
Arguments
mount_id Can be obtained using occ files_external:list.
Options
--add-user user to add as applicable (multiple values allowed).
--remove-user user to remove as applicable (multiple values allowed).
298 | Server Configuration

--add-group group to add as applicable (multiple values allowed).
--remove-group group to remove as applicable (multiple values allowed).
--remove-all Set the mount to be globally applicable.
--output=[OUTPUT]
The output format to use (plain, json or json_pretty, default isplain).
files_external:backends
Show available authentication and storage backends.
Usage
files_external:backends [options] [--] [<type>] [<backend>]
Arguments
type Only show backends of a certain type. Possible values areauthentication or storage.
backend Only show information of a specific backend.
Options
--output=[OUTPUT]
The output format to use (plain, json or json_pretty, default isplain.
files_external:config
Manage backend configuration for a mount.
Usage
files_external:config [options] [--] <mount_id> <key> [<value>]
Arguments
mount_id The ID of the mount to edit.
key Key of the config option to set/get.
value Value to set the config option to, when no value is provided theexisting value will be printed.
Server Configuration | 299
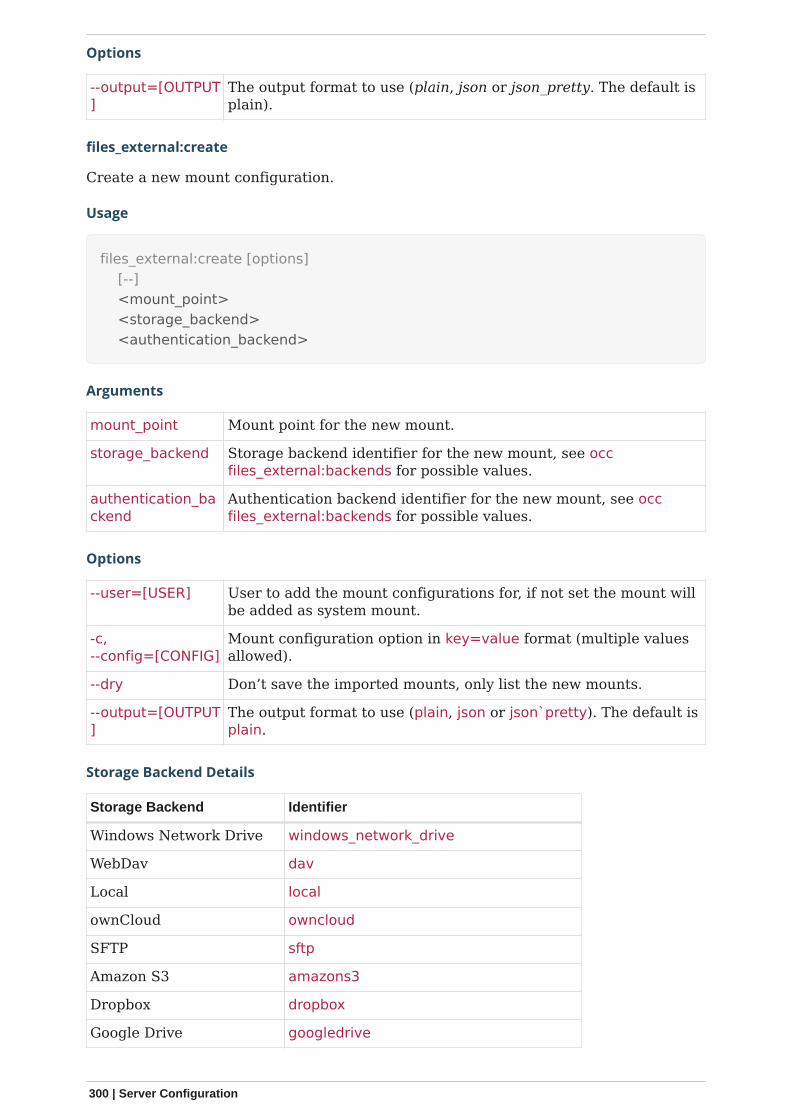
Options
--output=[OUTPUT]
The output format to use (plain, json or json_pretty. The default isplain).
files_external:create
Create a new mount configuration.
Usage
files_external:create [options] [--] <mount_point> <storage_backend> <authentication_backend>
Arguments
mount_point Mount point for the new mount.
storage_backend Storage backend identifier for the new mount, see occfiles_external:backends for possible values.
authentication_backend
Authentication backend identifier for the new mount, see occfiles_external:backends for possible values.
Options
--user=[USER] User to add the mount configurations for, if not set the mount willbe added as system mount.
-c,--config=[CONFIG]
Mount configuration option in key=value format (multiple valuesallowed).
--dry Don’t save the imported mounts, only list the new mounts.
--output=[OUTPUT]
The output format to use (plain, json or json`pretty). The default isplain.
Storage Backend Details
Storage Backend Identifier
Windows Network Drive windows_network_drive
WebDav dav
Local local
ownCloud owncloud
SFTP sftp
Amazon S3 amazons3
Dropbox dropbox
Google Drive googledrive
300 | Server Configuration
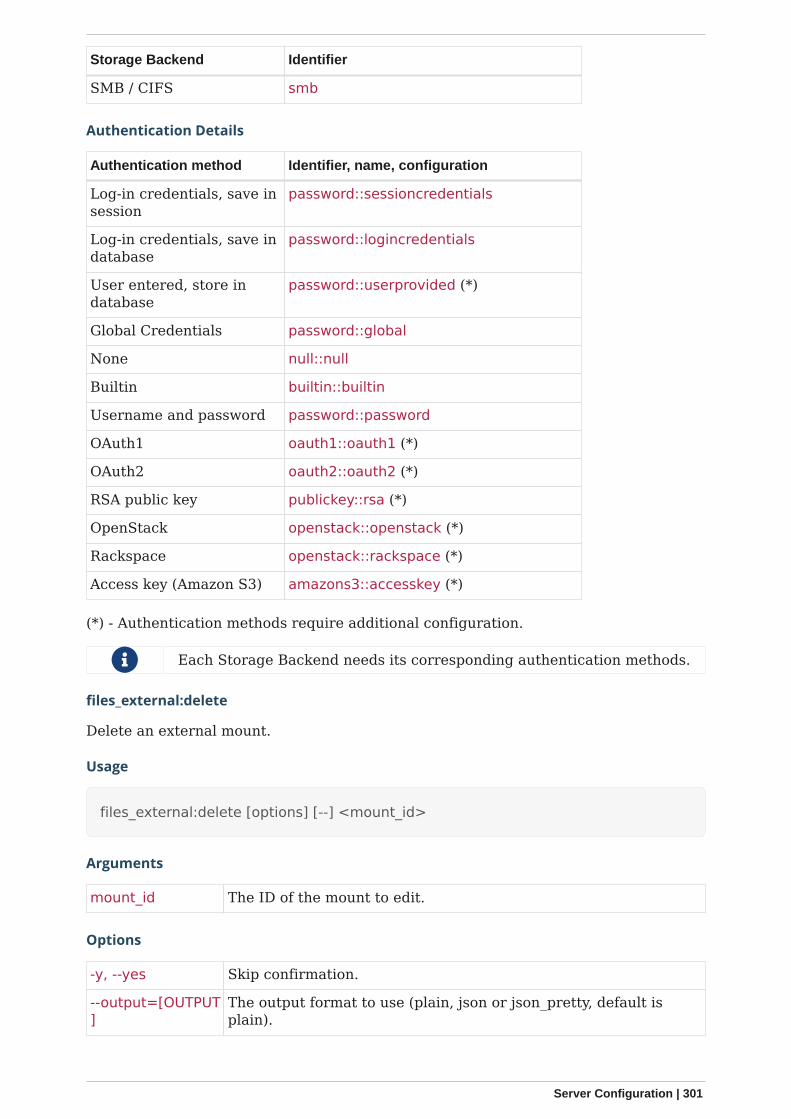
Storage Backend Identifier
SMB / CIFS smb
Authentication Details
Authentication method Identifier, name, configuration
Log-in credentials, save insession
password::sessioncredentials
Log-in credentials, save indatabase
password::logincredentials
User entered, store indatabase
password::userprovided (*)
Global Credentials password::global
None null::null
Builtin builtin::builtin
Username and password password::password
OAuth1 oauth1::oauth1 (*)
OAuth2 oauth2::oauth2 (*)
RSA public key publickey::rsa (*)
OpenStack openstack::openstack (*)
Rackspace openstack::rackspace (*)
Access key (Amazon S3) amazons3::accesskey (*)
(*) - Authentication methods require additional configuration.
Each Storage Backend needs its corresponding authentication methods.
files_external:delete
Delete an external mount.
Usage
files_external:delete [options] [--] <mount_id>
Arguments
mount_id The ID of the mount to edit.
Options
-y, --yes Skip confirmation.
--output=[OUTPUT]
The output format to use (plain, json or json_pretty, default isplain).
Server Configuration | 301
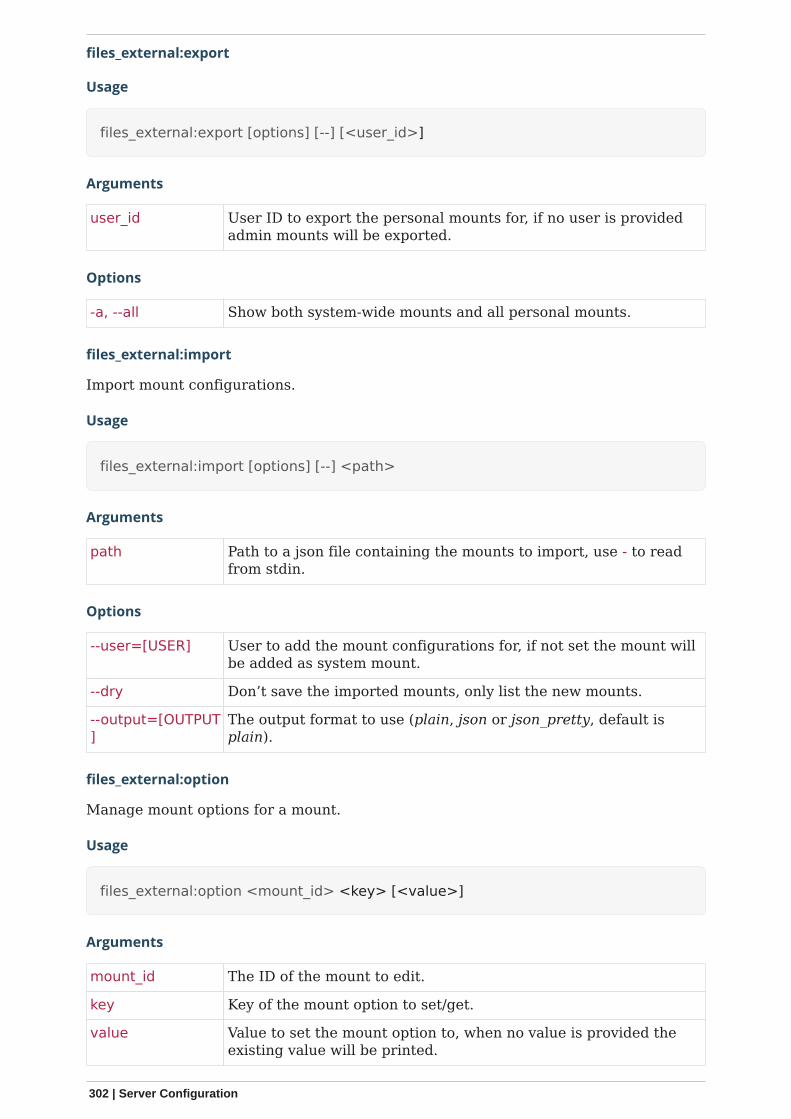
files_external:export
Usage
files_external:export [options] [--] [<user_id>]
Arguments
user_id User ID to export the personal mounts for, if no user is providedadmin mounts will be exported.
Options
-a, --all Show both system-wide mounts and all personal mounts.
files_external:import
Import mount configurations.
Usage
files_external:import [options] [--] <path>
Arguments
path Path to a json file containing the mounts to import, use - to readfrom stdin.
Options
--user=[USER] User to add the mount configurations for, if not set the mount willbe added as system mount.
--dry Don’t save the imported mounts, only list the new mounts.
--output=[OUTPUT]
The output format to use (plain, json or json_pretty, default isplain).
files_external:option
Manage mount options for a mount.
Usage
files_external:option <mount_id> <key> [<value>]
Arguments
mount_id The ID of the mount to edit.
key Key of the mount option to set/get.
value Value to set the mount option to, when no value is provided theexisting value will be printed.
302 | Server Configuration
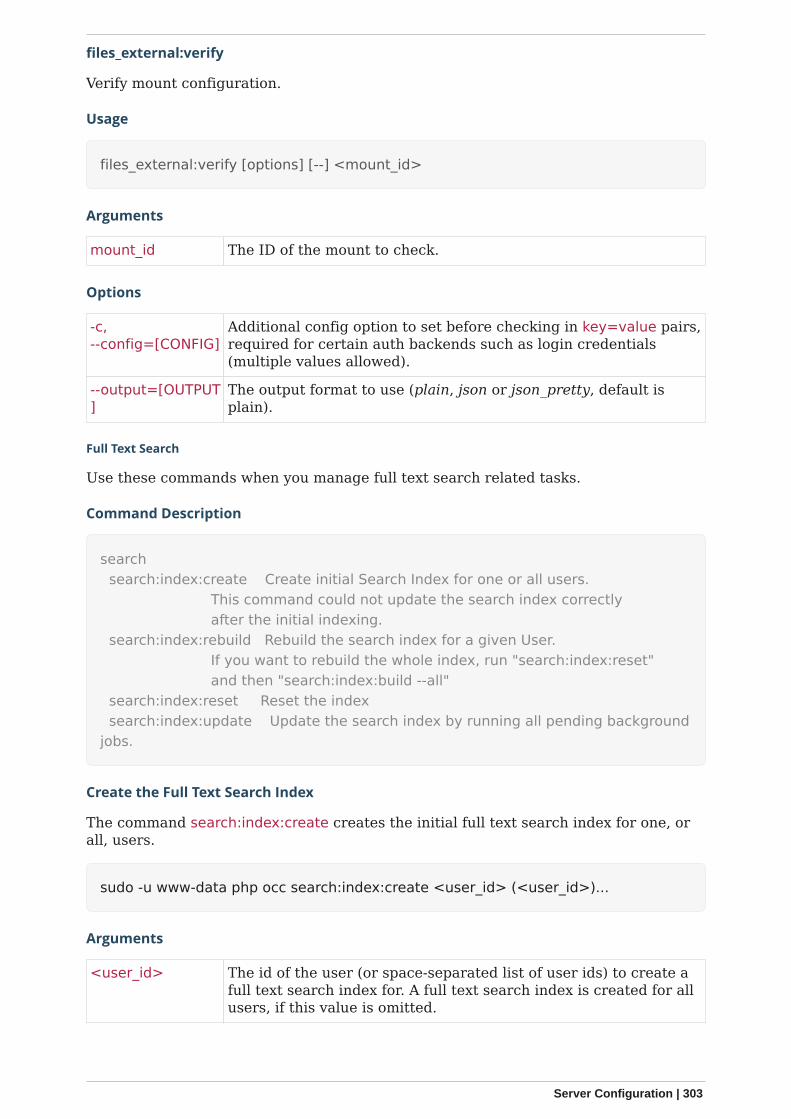
files_external:verify
Verify mount configuration.
Usage
files_external:verify [options] [--] <mount_id>
Arguments
mount_id The ID of the mount to check.
Options
-c,--config=[CONFIG]
Additional config option to set before checking in key=value pairs,required for certain auth backends such as login credentials(multiple values allowed).
--output=[OUTPUT]
The output format to use (plain, json or json_pretty, default isplain).
Full Text Search
Use these commands when you manage full text search related tasks.
Command Description
search search:index:create Create initial Search Index for one or all users. This command could not update the search index correctly after the initial indexing. search:index:rebuild Rebuild the search index for a given User. If you want to rebuild the whole index, run "search:index:reset" and then "search:index:build --all" search:index:reset Reset the index search:index:update Update the search index by running all pending backgroundjobs.
Create the Full Text Search Index
The command search:index:create creates the initial full text search index for one, orall, users.
sudo -u www-data php occ search:index:create <user_id> (<user_id>)...
Arguments
<user_id> The id of the user (or space-separated list of user ids) to create afull text search index for. A full text search index is created for allusers, if this value is omitted.
Server Configuration | 303
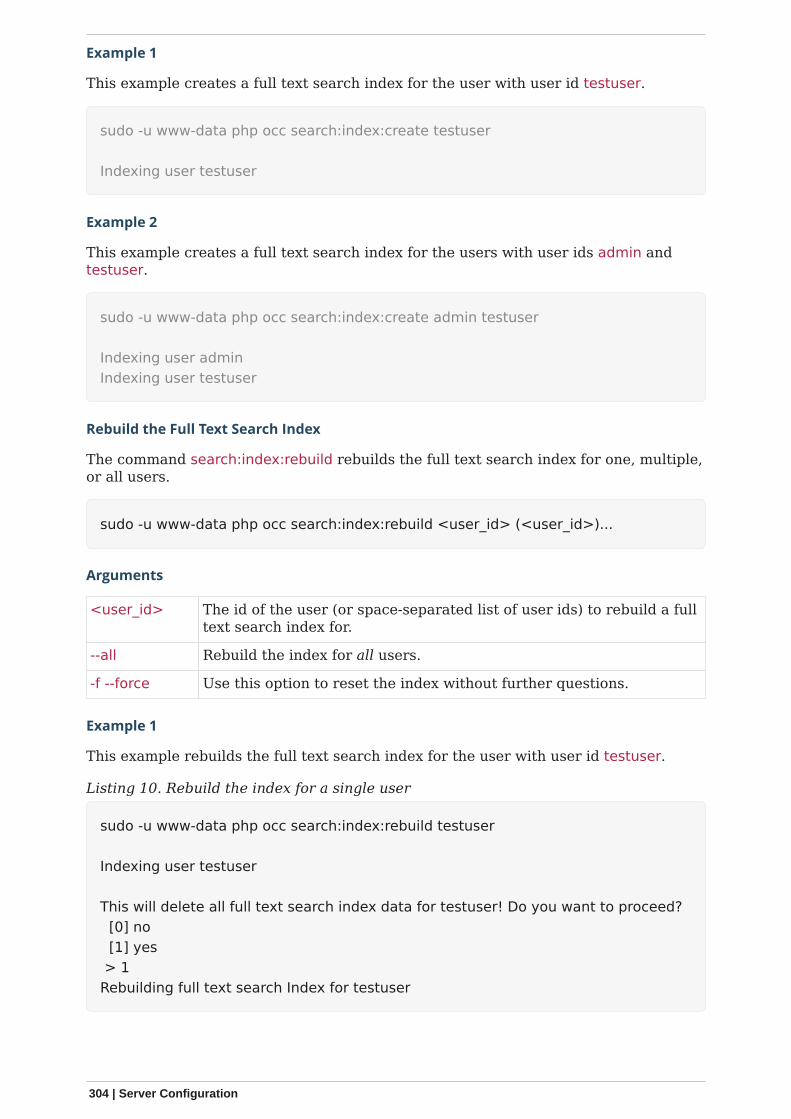
Example 1
This example creates a full text search index for the user with user id testuser.
sudo -u www-data php occ search:index:create testuser
Indexing user testuser
Example 2
This example creates a full text search index for the users with user ids admin andtestuser.
sudo -u www-data php occ search:index:create admin testuser
Indexing user adminIndexing user testuser
Rebuild the Full Text Search Index
The command search:index:rebuild rebuilds the full text search index for one, multiple,or all users.
sudo -u www-data php occ search:index:rebuild <user_id> (<user_id>)...
Arguments
<user_id> The id of the user (or space-separated list of user ids) to rebuild a fulltext search index for.
--all Rebuild the index for all users.
-f --force Use this option to reset the index without further questions.
Example 1
This example rebuilds the full text search index for the user with user id testuser.
Listing 10. Rebuild the index for a single user
sudo -u www-data php occ search:index:rebuild testuser
Indexing user testuser
This will delete all full text search index data for testuser! Do you want to proceed? [0] no [1] yes > 1Rebuilding full text search Index for testuser
304 | Server Configuration
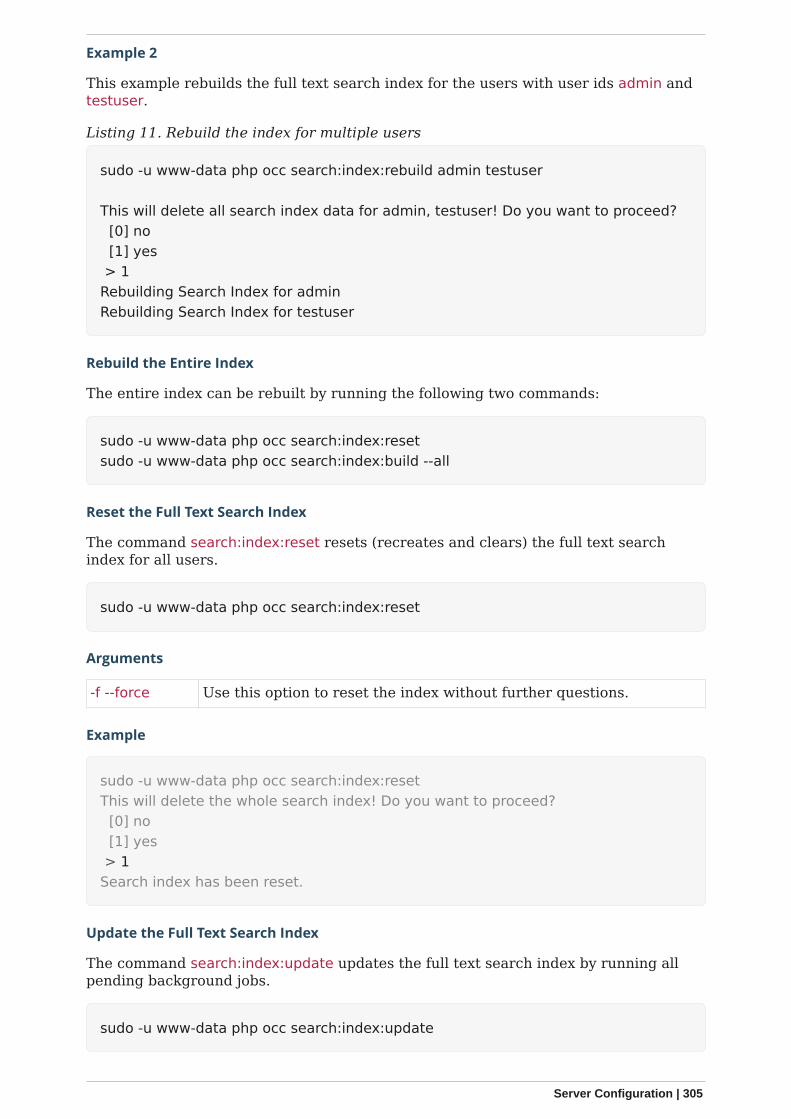
Example 2
This example rebuilds the full text search index for the users with user ids admin andtestuser.
Listing 11. Rebuild the index for multiple users
sudo -u www-data php occ search:index:rebuild admin testuser
This will delete all search index data for admin, testuser! Do you want to proceed? [0] no [1] yes > 1Rebuilding Search Index for adminRebuilding Search Index for testuser
Rebuild the Entire Index
The entire index can be rebuilt by running the following two commands:
sudo -u www-data php occ search:index:resetsudo -u www-data php occ search:index:build --all
Reset the Full Text Search Index
The command search:index:reset resets (recreates and clears) the full text searchindex for all users.
sudo -u www-data php occ search:index:reset
Arguments
-f --force Use this option to reset the index without further questions.
Example
sudo -u www-data php occ search:index:resetThis will delete the whole search index! Do you want to proceed? [0] no [1] yes > 1Search index has been reset.
Update the Full Text Search Index
The command search:index:update updates the full text search index by running allpending background jobs.
sudo -u www-data php occ search:index:update
Server Configuration | 305

Arguments
-q --quiet Suppress all output from the command.
Example
This example updates the full text search index for all users.
sudo -u www-data php occ search:index:updateStart Updating the Elastic search index:No pending jobs found.
Enable and Disable App Mode
To do an initial full indexing without the full text search_elastic app interfering, it canbe put in passive mode.
sudo -u www-data php occ config:app:set search_elastic mode --value passive
When the search_elastic app is in passive mode:
• The administrator will be able to run occ commands.• The search_elastic app will not index any changes by itself.• Search results will still be based on the core search.
Switching back to active mode can be done by running the following command:
sudo -u www-data php occ config:app:set search_elastic mode --value active
Configure Full Text Search to Only Index Metadata
If you only want to use the search_elastic app as a more scalable filenames search, youcan disable content indexing by setting nocontent to true (default is false), as in theexample below.
sudo -u www-data php occ config:app:set search_elastic nocontent --value true
if this setting is reverted to false after being set to true, all files must bereindexed. Setting it to true does not require reindexing.
Group Commands
The group commands provide a range of functionality for managing ownCloud groups.This includes creating and removing groups and managing group membership. Groupnames are case-sensitive, so "Finance" and "finance" are two different groups.
The full list of commands is:
306 | Server Configuration
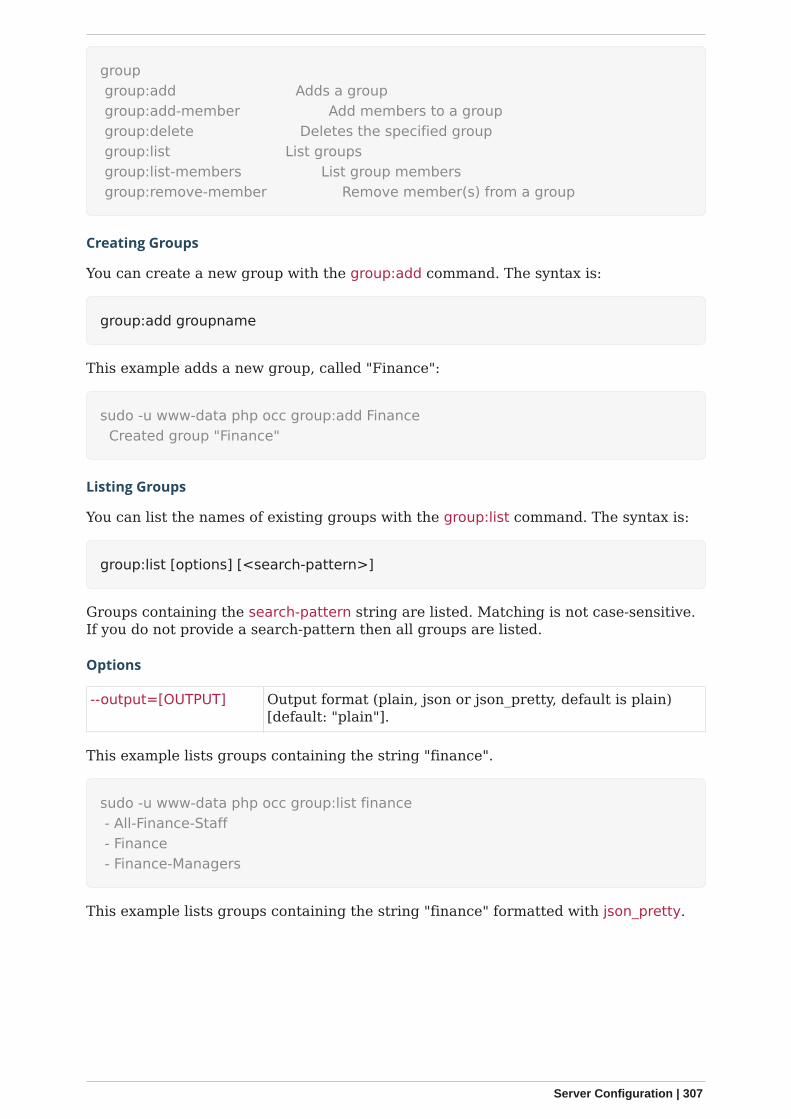
group group:add Adds a group group:add-member Add members to a group group:delete Deletes the specified group group:list List groups group:list-members List group members group:remove-member Remove member(s) from a group
Creating Groups
You can create a new group with the group:add command. The syntax is:
group:add groupname
This example adds a new group, called "Finance":
sudo -u www-data php occ group:add Finance Created group "Finance"
Listing Groups
You can list the names of existing groups with the group:list command. The syntax is:
group:list [options] [<search-pattern>]
Groups containing the search-pattern string are listed. Matching is not case-sensitive.If you do not provide a search-pattern then all groups are listed.
Options
--output=[OUTPUT] Output format (plain, json or json_pretty, default is plain)[default: "plain"].
This example lists groups containing the string "finance".
sudo -u www-data php occ group:list finance - All-Finance-Staff - Finance - Finance-Managers
This example lists groups containing the string "finance" formatted with json_pretty.
Server Configuration | 307
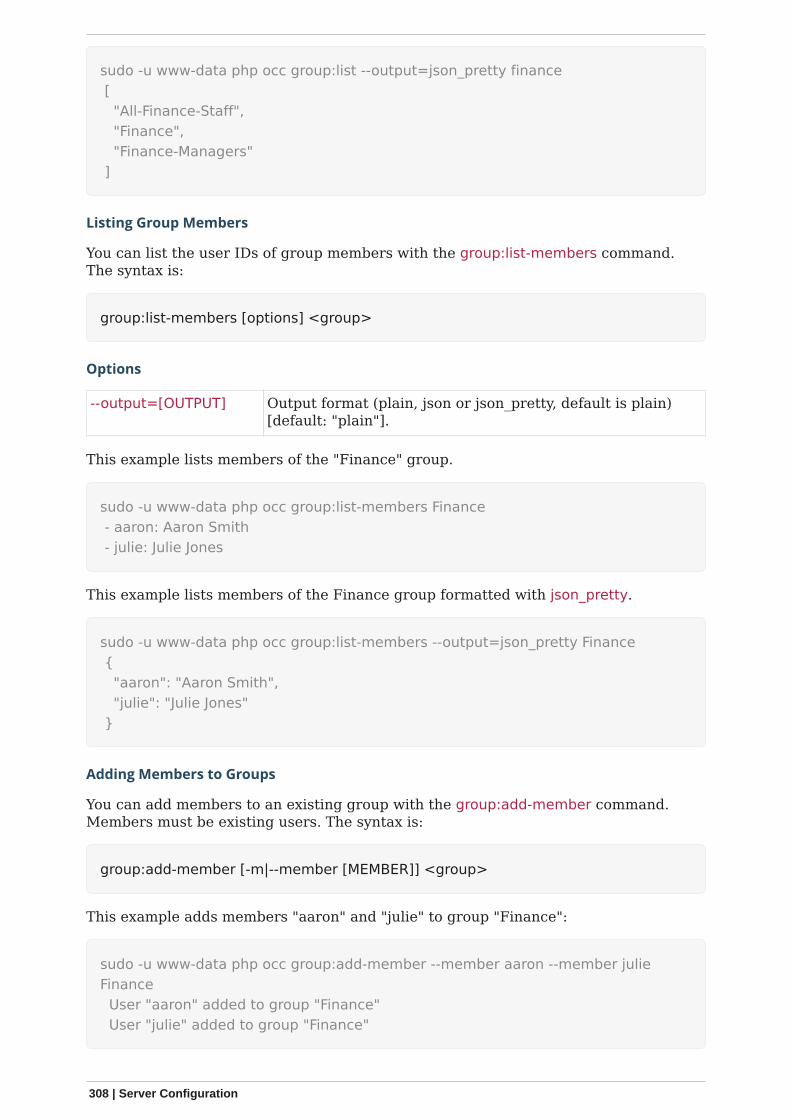
sudo -u www-data php occ group:list --output=json_pretty finance [ "All-Finance-Staff", "Finance", "Finance-Managers" ]
Listing Group Members
You can list the user IDs of group members with the group:list-members command.The syntax is:
group:list-members [options] <group>
Options
--output=[OUTPUT] Output format (plain, json or json_pretty, default is plain)[default: "plain"].
This example lists members of the "Finance" group.
sudo -u www-data php occ group:list-members Finance - aaron: Aaron Smith - julie: Julie Jones
This example lists members of the Finance group formatted with json_pretty.
sudo -u www-data php occ group:list-members --output=json_pretty Finance { "aaron": "Aaron Smith", "julie": "Julie Jones" }
Adding Members to Groups
You can add members to an existing group with the group:add-member command.Members must be existing users. The syntax is:
group:add-member [-m|--member [MEMBER]] <group>
This example adds members "aaron" and "julie" to group "Finance":
sudo -u www-data php occ group:add-member --member aaron --member julieFinance User "aaron" added to group "Finance" User "julie" added to group "Finance"
308 | Server Configuration
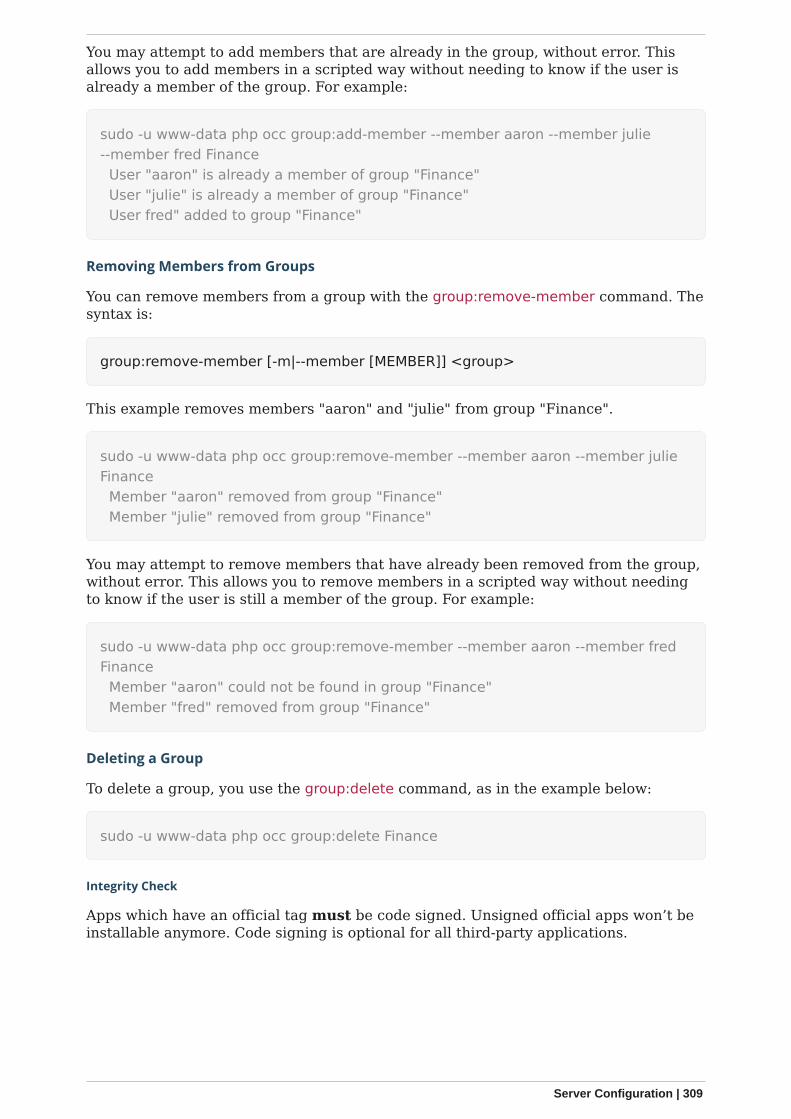
You may attempt to add members that are already in the group, without error. Thisallows you to add members in a scripted way without needing to know if the user isalready a member of the group. For example:
sudo -u www-data php occ group:add-member --member aaron --member julie--member fred Finance User "aaron" is already a member of group "Finance" User "julie" is already a member of group "Finance" User fred" added to group "Finance"
Removing Members from Groups
You can remove members from a group with the group:remove-member command. Thesyntax is:
group:remove-member [-m|--member [MEMBER]] <group>
This example removes members "aaron" and "julie" from group "Finance".
sudo -u www-data php occ group:remove-member --member aaron --member julieFinance Member "aaron" removed from group "Finance" Member "julie" removed from group "Finance"
You may attempt to remove members that have already been removed from the group,without error. This allows you to remove members in a scripted way without needingto know if the user is still a member of the group. For example:
sudo -u www-data php occ group:remove-member --member aaron --member fredFinance Member "aaron" could not be found in group "Finance" Member "fred" removed from group "Finance"
Deleting a Group
To delete a group, you use the group:delete command, as in the example below:
sudo -u www-data php occ group:delete Finance
Integrity Check
Apps which have an official tag must be code signed. Unsigned official apps won’t beinstallable anymore. Code signing is optional for all third-party applications.
Server Configuration | 309
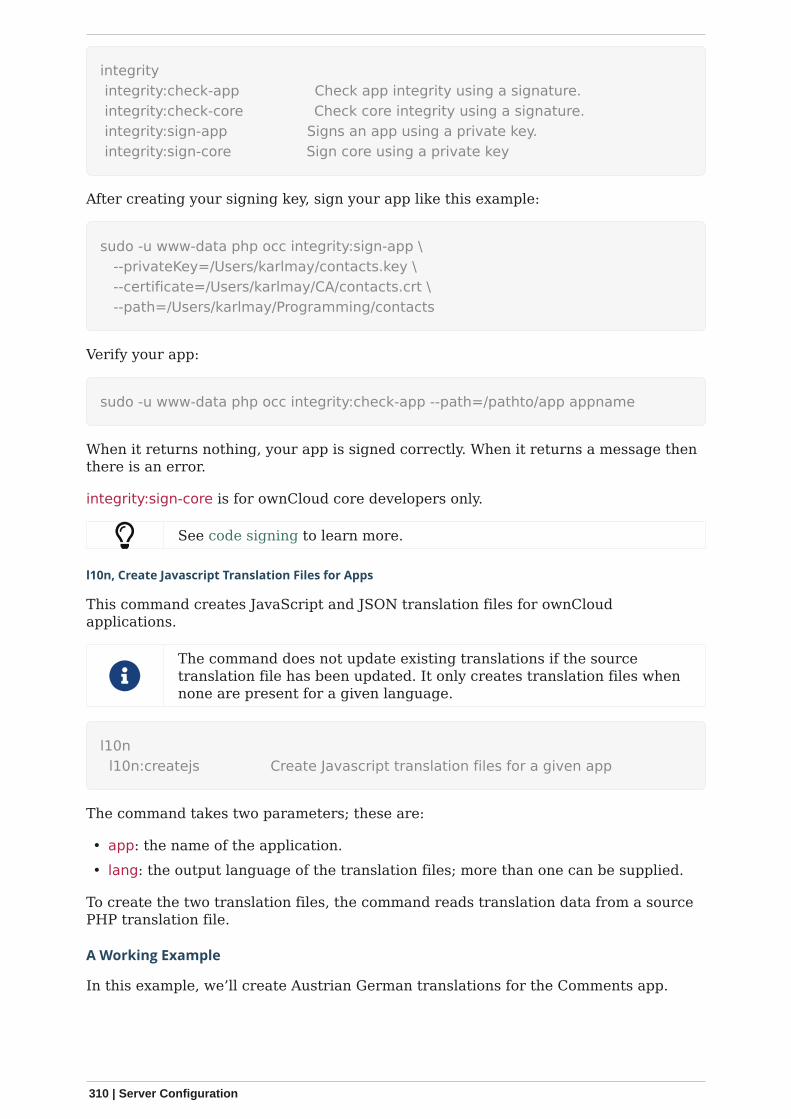
integrity integrity:check-app Check app integrity using a signature. integrity:check-core Check core integrity using a signature. integrity:sign-app Signs an app using a private key. integrity:sign-core Sign core using a private key
After creating your signing key, sign your app like this example:
sudo -u www-data php occ integrity:sign-app \ --privateKey=/Users/karlmay/contacts.key \ --certificate=/Users/karlmay/CA/contacts.crt \ --path=/Users/karlmay/Programming/contacts
Verify your app:
sudo -u www-data php occ integrity:check-app --path=/pathto/app appname
When it returns nothing, your app is signed correctly. When it returns a message thenthere is an error.
integrity:sign-core is for ownCloud core developers only.
See code signing to learn more.
l10n, Create Javascript Translation Files for Apps
This command creates JavaScript and JSON translation files for ownCloudapplications.
The command does not update existing translations if the sourcetranslation file has been updated. It only creates translation files whennone are present for a given language.
l10n l10n:createjs Create Javascript translation files for a given app
The command takes two parameters; these are:
• app: the name of the application.• lang: the output language of the translation files; more than one can be supplied.
To create the two translation files, the command reads translation data from a sourcePHP translation file.
A Working Example
In this example, we’ll create Austrian German translations for the Comments app.
310 | Server Configuration
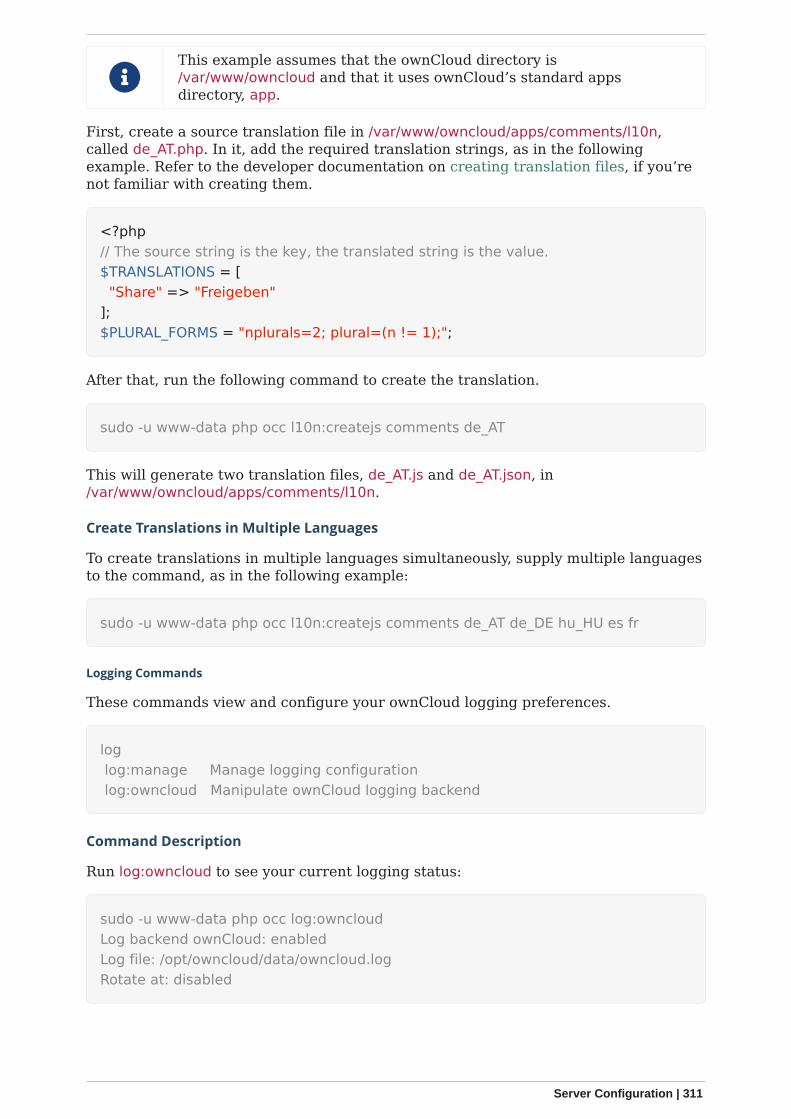
This example assumes that the ownCloud directory is/var/www/owncloud and that it uses ownCloud’s standard appsdirectory, app.
First, create a source translation file in /var/www/owncloud/apps/comments/l10n,called de_AT.php. In it, add the required translation strings, as in the followingexample. Refer to the developer documentation on creating translation files, if you’renot familiar with creating them.
<?php// The source string is the key, the translated string is the value.$TRANSLATIONS = [ "Share" => "Freigeben"];$PLURAL_FORMS = "nplurals=2; plural=(n != 1);";
After that, run the following command to create the translation.
sudo -u www-data php occ l10n:createjs comments de_AT
This will generate two translation files, de_AT.js and de_AT.json, in/var/www/owncloud/apps/comments/l10n.
Create Translations in Multiple Languages
To create translations in multiple languages simultaneously, supply multiple languagesto the command, as in the following example:
sudo -u www-data php occ l10n:createjs comments de_AT de_DE hu_HU es fr
Logging Commands
These commands view and configure your ownCloud logging preferences.
log log:manage Manage logging configuration log:owncloud Manipulate ownCloud logging backend
Command Description
Run log:owncloud to see your current logging status:
sudo -u www-data php occ log:owncloudLog backend ownCloud: enabledLog file: /opt/owncloud/data/owncloud.logRotate at: disabled
Server Configuration | 311
Options
--enable Enable this logging backend.
--file=[FILE] Set the log file path.
--rotate-size=[ROTATE-SIZE]
Set the file size for log rotation, 0 = disabled.
Use the --enable option to turn on logging. Use --file to set a different log file path. Setyour rotation by log file size in bytes with --rotate-size; 0 disables rotation. Runlog:manage to set your logging backend, log level, and timezone: The defaults areowncloud, Warning, and UTC.
Options for log:manage:
--backend=[BACKEND] Set the logging backend [owncloud, syslog, errorlog].
--level=[LEVEL] Set the log level [debug, info, warning, error, fatal].
Log level can be adjusted by entering the number or the name:
sudo -u www-data php occ log:manage --level 4sudo -u www-data php occ log:manage --level error
Setting the log level to debug ( 0 ) can be used for finding the cause ofan error, but should not be the standard as it increases the log file size.
Managing Background Jobs
Use the background:queue command to manage background jobs.
background:queue background:queue:delete Delete a job from the queue background:queue:execute Run a single background job from the queue background:queue:status List queue status
Deleting a Background Job
The command background:queue:delete deletes a queued background job. It requiresthe job id of the job to be deleted.
background:queue:delete <Job ID>
Arguments
Job ID ID of the job to be deleted
Deleting a job cannot be undone. Be sure that you want to delete thejob before doing so.
This example deletes queued background job #12.
312 | Server Configuration
sudo -u www-data php occ background:queue:delete 12
Job has been deleted.
Executing a Background Job
The command background:queue:execute executes a queued background job. Itrequires the job id of the job to be executed.
background:queue:execute [options] [--] <Job ID>
Arguments
Job ID ID of the job to be deleted
Options
-f--force
Force run the job even if within timing interval
--accept-warning No warning about the usage of this command will be displayed
This example executes queued background job #12.
sudo -u www-data php occ background:queue:execute 12
This command is for maintenance and support purposes.This will run the specified background job now. Regular scheduled runs of the jobwillcontinue to happen at their scheduled times.If you still want to use this command please confirm the usage by entering: yesyesFound job: OCA\UpdateNotification\Notification\BackgroundJob with ID 12Running job...Finished in 0 seconds
List Queued Backgroundjobs
The command background:queue:status will list queued background jobs, includingdetails when it last ran.
background:queue:status
This example lists the queue status:
Server Configuration | 313
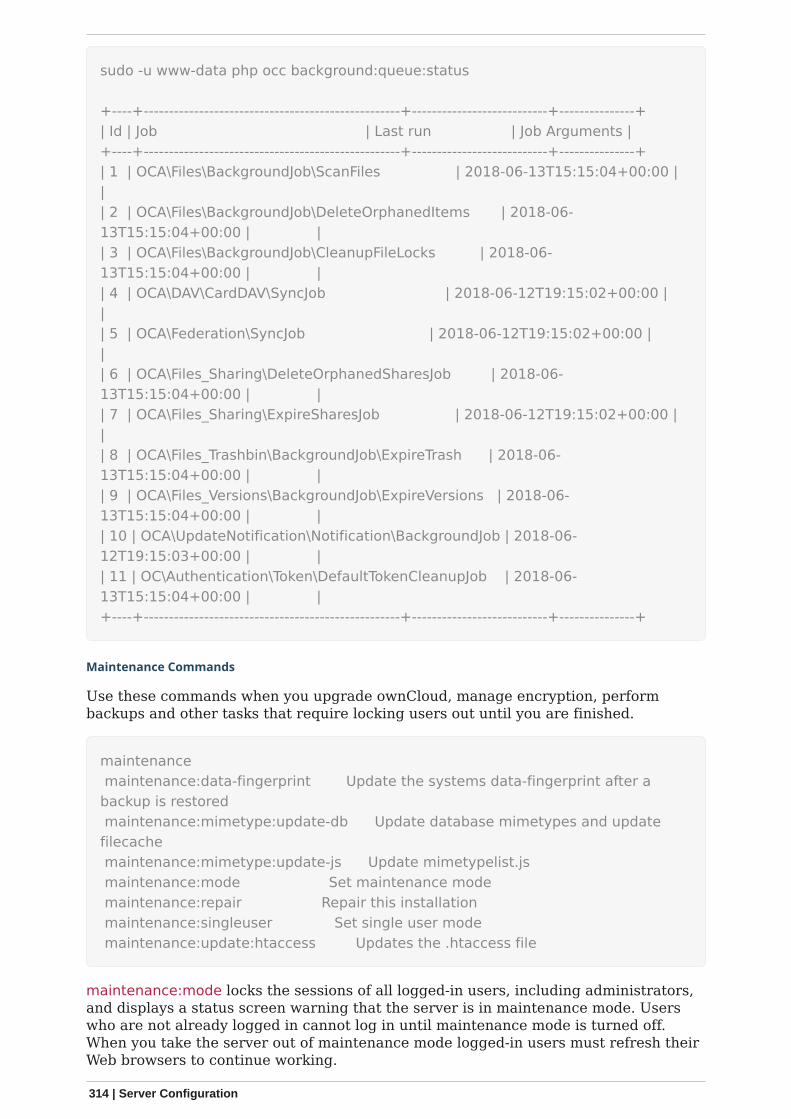
sudo -u www-data php occ background:queue:status
+----+---------------------------------------------------+---------------------------+---------------+| Id | Job | Last run | Job Arguments |+----+---------------------------------------------------+---------------------------+---------------+| 1 | OCA\Files\BackgroundJob\ScanFiles | 2018-06-13T15:15:04+00:00 ||| 2 | OCA\Files\BackgroundJob\DeleteOrphanedItems | 2018-06-13T15:15:04+00:00 | || 3 | OCA\Files\BackgroundJob\CleanupFileLocks | 2018-06-13T15:15:04+00:00 | || 4 | OCA\DAV\CardDAV\SyncJob | 2018-06-12T19:15:02+00:00 ||| 5 | OCA\Federation\SyncJob | 2018-06-12T19:15:02+00:00 ||| 6 | OCA\Files_Sharing\DeleteOrphanedSharesJob | 2018-06-13T15:15:04+00:00 | || 7 | OCA\Files_Sharing\ExpireSharesJob | 2018-06-12T19:15:02+00:00 ||| 8 | OCA\Files_Trashbin\BackgroundJob\ExpireTrash | 2018-06-13T15:15:04+00:00 | || 9 | OCA\Files_Versions\BackgroundJob\ExpireVersions | 2018-06-13T15:15:04+00:00 | || 10 | OCA\UpdateNotification\Notification\BackgroundJob | 2018-06-12T19:15:03+00:00 | || 11 | OC\Authentication\Token\DefaultTokenCleanupJob | 2018-06-13T15:15:04+00:00 | |+----+---------------------------------------------------+---------------------------+---------------+
Maintenance Commands
Use these commands when you upgrade ownCloud, manage encryption, performbackups and other tasks that require locking users out until you are finished.
maintenance maintenance:data-fingerprint Update the systems data-fingerprint after abackup is restored maintenance:mimetype:update-db Update database mimetypes and updatefilecache maintenance:mimetype:update-js Update mimetypelist.js maintenance:mode Set maintenance mode maintenance:repair Repair this installation maintenance:singleuser Set single user mode maintenance:update:htaccess Updates the .htaccess file
maintenance:mode locks the sessions of all logged-in users, including administrators,and displays a status screen warning that the server is in maintenance mode. Userswho are not already logged in cannot log in until maintenance mode is turned off.When you take the server out of maintenance mode logged-in users must refresh theirWeb browsers to continue working.
314 | Server Configuration
sudo -u www-data php occ maintenance:mode --onsudo -u www-data php occ maintenance:mode --off
Putting your ownCloud server into single-user mode allows admins to log in and work,but not ordinary users. This is useful for performing maintenance and troubleshootingon a running server.
sudo -u www-data php occ maintenance:singleuser --onSingle user mode enabled
Turn it off when you’re finished:
sudo -u www-data php occ maintenance:singleuser --offSingle user mode disabled
Run maintenance:data-fingerprint to tell desktop and mobile clients that a serverbackup has been restored. This command changes the ETag for all files in thecommunication with sync clients, informing them that one or more files were modified.After the command completes, users will be prompted to resolve any conflicts betweennewer and older file versions.
Installation Repair Commands
The maintenance:repair command helps administrators repair an installation. Thecommand runs automatically during upgrades to clean up the database. So, while youcan run it manually, there usually isn’t a need to.
Your ownCloud installation needs to be in maintenance mode to use themaintenance:repair command.
Repair Command Options
The maintenance:repair command supports the following options:
Option Description
--ansi Force ANSI output.
--include-expensive Use this option when you want to include resource and loadexpensive tasks.
--list Lists all possible repair steps
--no-ansi Disable ANSI output.
-n --no-interaction Do not ask any interactive question.
--no-warnings Skip global warnings, show command output only.
-q --quiet Do not output any message.
Server Configuration | 315
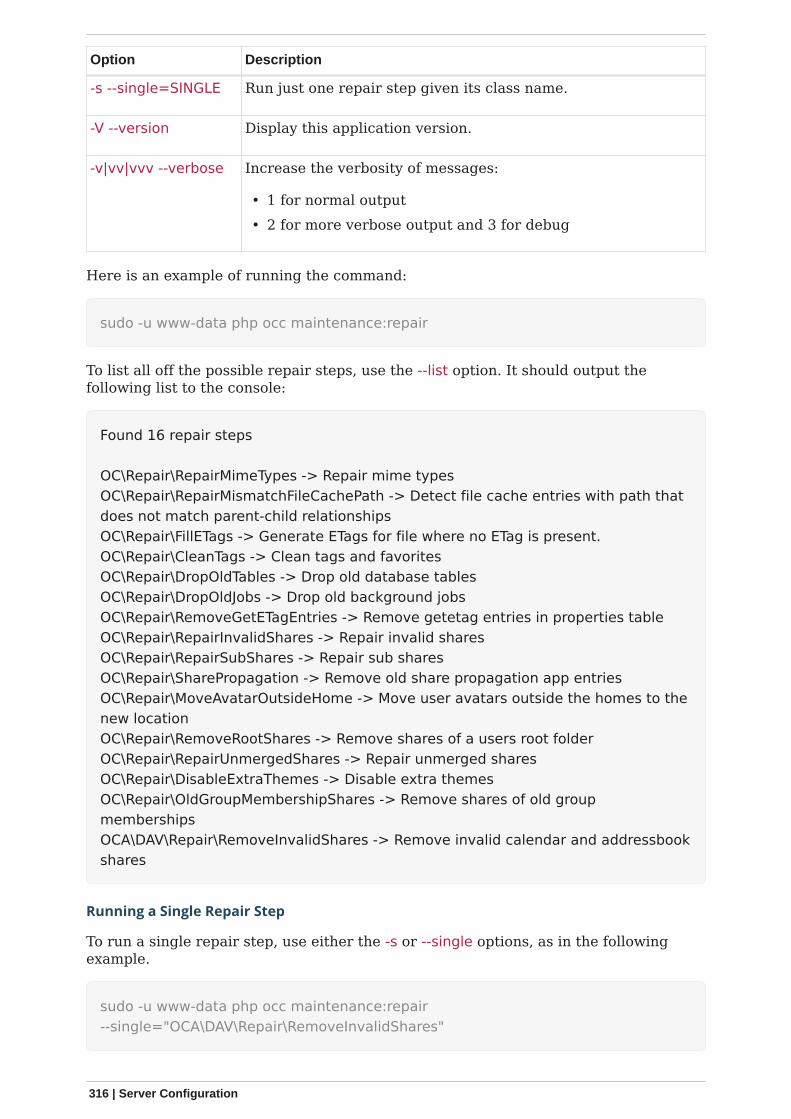
Option Description
-s --single=SINGLE Run just one repair step given its class name.
-V --version Display this application version.
-v|vv|vvv --verbose Increase the verbosity of messages:
• 1 for normal output• 2 for more verbose output and 3 for debug
Here is an example of running the command:
sudo -u www-data php occ maintenance:repair
To list all off the possible repair steps, use the --list option. It should output thefollowing list to the console:
Found 16 repair steps
OC\Repair\RepairMimeTypes -> Repair mime typesOC\Repair\RepairMismatchFileCachePath -> Detect file cache entries with path thatdoes not match parent-child relationshipsOC\Repair\FillETags -> Generate ETags for file where no ETag is present.OC\Repair\CleanTags -> Clean tags and favoritesOC\Repair\DropOldTables -> Drop old database tablesOC\Repair\DropOldJobs -> Drop old background jobsOC\Repair\RemoveGetETagEntries -> Remove getetag entries in properties tableOC\Repair\RepairInvalidShares -> Repair invalid sharesOC\Repair\RepairSubShares -> Repair sub sharesOC\Repair\SharePropagation -> Remove old share propagation app entriesOC\Repair\MoveAvatarOutsideHome -> Move user avatars outside the homes to thenew locationOC\Repair\RemoveRootShares -> Remove shares of a users root folderOC\Repair\RepairUnmergedShares -> Repair unmerged sharesOC\Repair\DisableExtraThemes -> Disable extra themesOC\Repair\OldGroupMembershipShares -> Remove shares of old groupmembershipsOCA\DAV\Repair\RemoveInvalidShares -> Remove invalid calendar and addressbookshares
Running a Single Repair Step
To run a single repair step, use either the -s or --single options, as in the followingexample.
sudo -u www-data php occ maintenance:repair--single="OCA\DAV\Repair\RemoveInvalidShares"
316 | Server Configuration

The step’s name must be quoted, otherwise you will see the followingwarning message appear, and the command will fail: "Repair step notfound. Use --list to show available steps."
Migration Steps Command
You can run migration steps with the migrations command.
sudo -u www-data php occ migrations:execute <app> <version>
Arguments
app Name of the app this migration command shall work on.
version The version to execute.
Example
This example executes the migration step for the core app:
sudo -u www-data php occ migrations:execute core 20181220085457
Mimetype Update Commands
maintenance:mimetype:update-db updates the ownCloud database and file cache withchanged mimetypes found in config/mimetypemapping.json. Run this command aftermodifying config/mimetypemapping.json. If you change a mimetype, runmaintenance:mimetype:update-db --repair-filecache to apply the change to existingfiles.
Notifications
If you want to send notifications to users or groups use the following command.
1 notifications2 notifications:generate Generates a notification.
Command Description
sudo -u www-data php occ notifications:generate [-u|--user USER] [-g|--groupGROUP] [-l|--link <linktext>] [--] <subject> [<message>]
Arguments:
subject The notification subject - maximum 255 characters.
message A more extended message - maximum 4000 characters.
linktext A link to an HTML page.
Server Configuration | 317
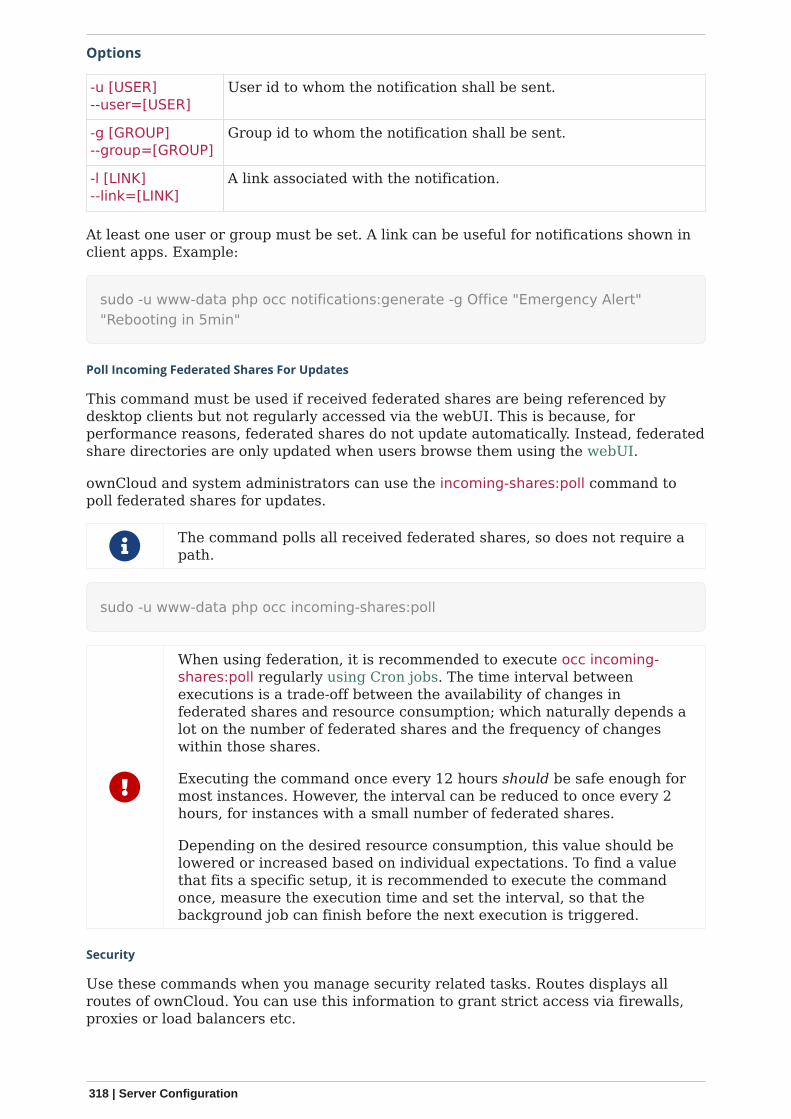
Options
-u [USER]--user=[USER]
User id to whom the notification shall be sent.
-g [GROUP]--group=[GROUP]
Group id to whom the notification shall be sent.
-l [LINK]--link=[LINK]
A link associated with the notification.
At least one user or group must be set. A link can be useful for notifications shown inclient apps. Example:
sudo -u www-data php occ notifications:generate -g Office "Emergency Alert""Rebooting in 5min"
Poll Incoming Federated Shares For Updates
This command must be used if received federated shares are being referenced bydesktop clients but not regularly accessed via the webUI. This is because, forperformance reasons, federated shares do not update automatically. Instead, federatedshare directories are only updated when users browse them using the webUI.
ownCloud and system administrators can use the incoming-shares:poll command topoll federated shares for updates.
The command polls all received federated shares, so does not require apath.
sudo -u www-data php occ incoming-shares:poll
When using federation, it is recommended to execute occ incoming-shares:poll regularly using Cron jobs. The time interval betweenexecutions is a trade-off between the availability of changes infederated shares and resource consumption; which naturally depends alot on the number of federated shares and the frequency of changeswithin those shares.
Executing the command once every 12 hours should be safe enough formost instances. However, the interval can be reduced to once every 2hours, for instances with a small number of federated shares.
Depending on the desired resource consumption, this value should belowered or increased based on individual expectations. To find a valuethat fits a specific setup, it is recommended to execute the commandonce, measure the execution time and set the interval, so that thebackground job can finish before the next execution is triggered.
Security
Use these commands when you manage security related tasks. Routes displays allroutes of ownCloud. You can use this information to grant strict access via firewalls,proxies or load balancers etc.
318 | Server Configuration

Command Description
security:routes [options]
Options
--output=[OUTPUT]
Output format (plain, json or json-pretty, default is plain).
--with-details Adds more details to the output.
Example 1:
sudo -u www-data php occ security:routes
+-----------------------------------------------------------+-----------------+| Path | Methods |+-----------------------------------------------------------+-----------------+| /apps/federation/auto-add-servers | POST || /apps/federation/trusted-servers | POST || /apps/federation/trusted-servers/<id> | DELETE || /apps/files/ | GET || /apps/files/ajax/download.php | |...
Example 2:
sudo -u www-data php occ security:routes --output=json-pretty
[ { "path": "\/apps\/federation\/auto-add-servers", "methods": [ "POST" ] },
Example 3:
sudo -u www-data php occ security:routes --with-details
Server Configuration | 319
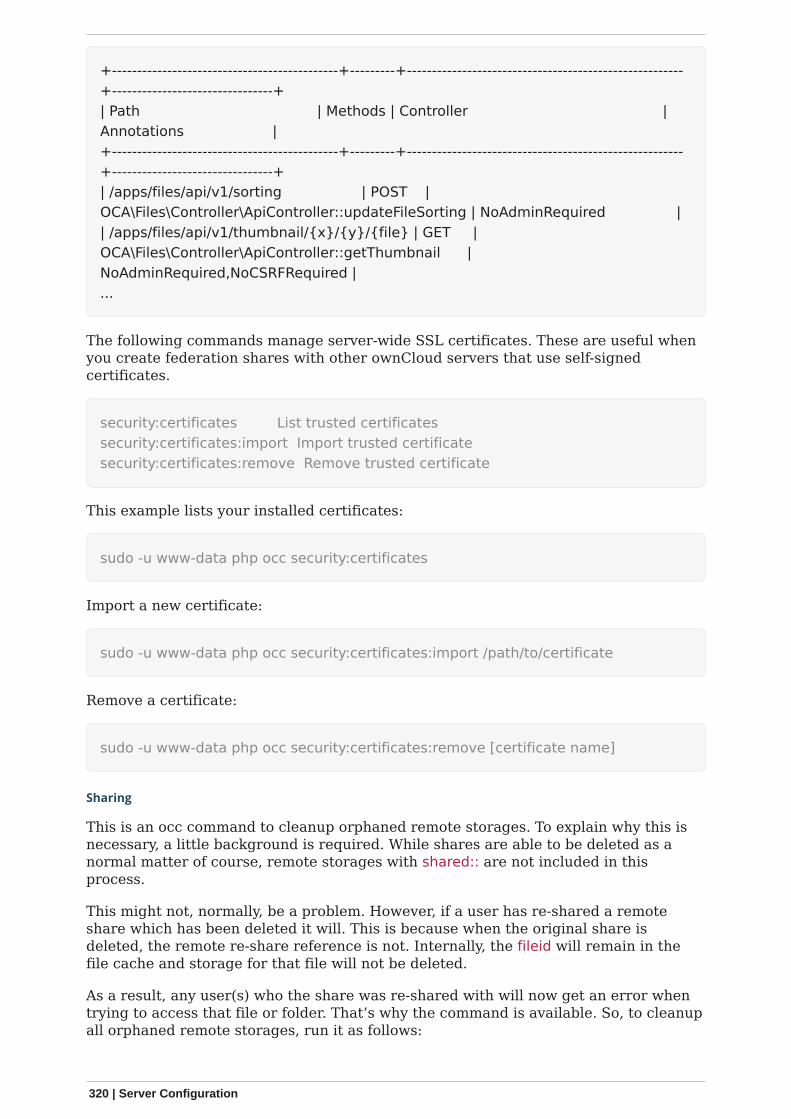
+---------------------------------------------+---------+-------------------------------------------------------+--------------------------------+| Path | Methods | Controller |Annotations |+---------------------------------------------+---------+-------------------------------------------------------+--------------------------------+| /apps/files/api/v1/sorting | POST |OCA\Files\Controller\ApiController::updateFileSorting | NoAdminRequired || /apps/files/api/v1/thumbnail/{x}/{y}/{file} | GET |OCA\Files\Controller\ApiController::getThumbnail |NoAdminRequired,NoCSRFRequired |...
The following commands manage server-wide SSL certificates. These are useful whenyou create federation shares with other ownCloud servers that use self-signedcertificates.
security:certificates List trusted certificatessecurity:certificates:import Import trusted certificatesecurity:certificates:remove Remove trusted certificate
This example lists your installed certificates:
sudo -u www-data php occ security:certificates
Import a new certificate:
sudo -u www-data php occ security:certificates:import /path/to/certificate
Remove a certificate:
sudo -u www-data php occ security:certificates:remove [certificate name]
Sharing
This is an occ command to cleanup orphaned remote storages. To explain why this isnecessary, a little background is required. While shares are able to be deleted as anormal matter of course, remote storages with shared:: are not included in thisprocess.
This might not, normally, be a problem. However, if a user has re-shared a remoteshare which has been deleted it will. This is because when the original share isdeleted, the remote re-share reference is not. Internally, the fileid will remain in thefile cache and storage for that file will not be deleted.
As a result, any user(s) who the share was re-shared with will now get an error whentrying to access that file or folder. That’s why the command is available. So, to cleanupall orphaned remote storages, run it as follows:
320 | Server Configuration
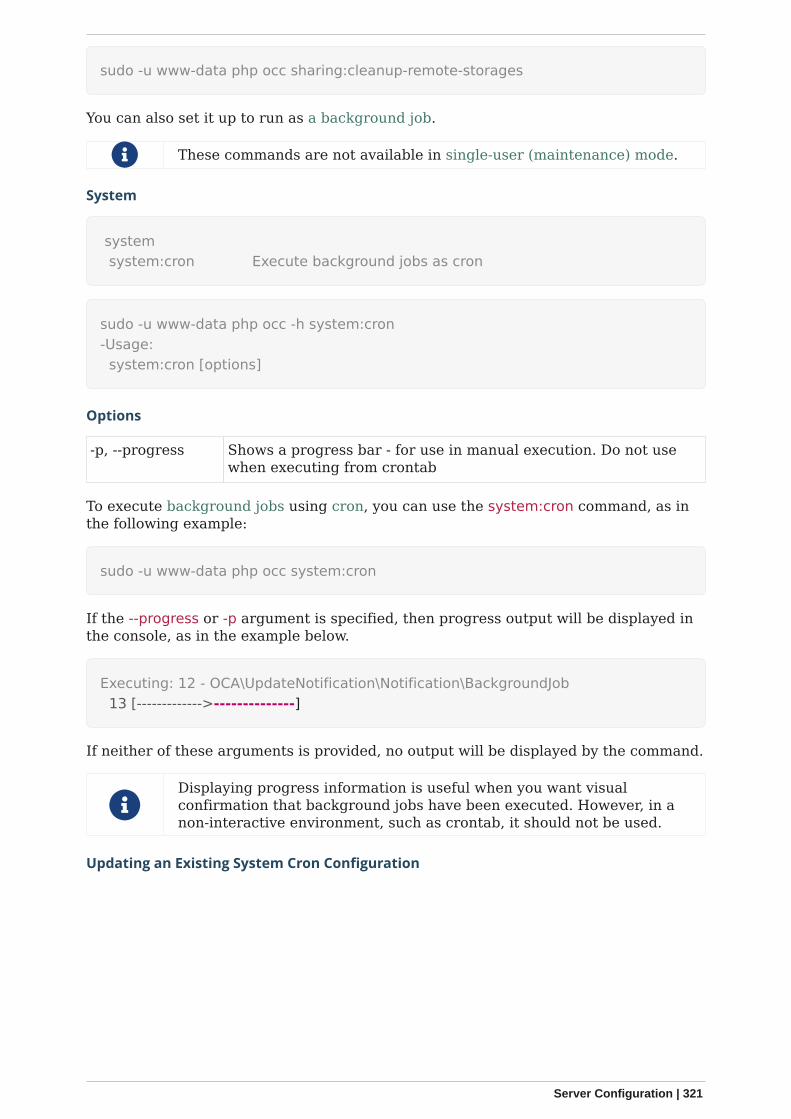
sudo -u www-data php occ sharing:cleanup-remote-storages
You can also set it up to run as a background job.
These commands are not available in single-user (maintenance) mode.
System
system system:cron Execute background jobs as cron
sudo -u www-data php occ -h system:cron-Usage: system:cron [options]
Options
-p, --progress Shows a progress bar - for use in manual execution. Do not usewhen executing from crontab
To execute background jobs using cron, you can use the system:cron command, as inthe following example:
sudo -u www-data php occ system:cron
If the --progress or -p argument is specified, then progress output will be displayed inthe console, as in the example below.
Executing: 12 - OCA\UpdateNotification\Notification\BackgroundJob 13 [------------->--------------]
If neither of these arguments is provided, no output will be displayed by the command.
Displaying progress information is useful when you want visualconfirmation that background jobs have been executed. However, in anon-interactive environment, such as crontab, it should not be used.
Updating an Existing System Cron Configuration
Server Configuration | 321
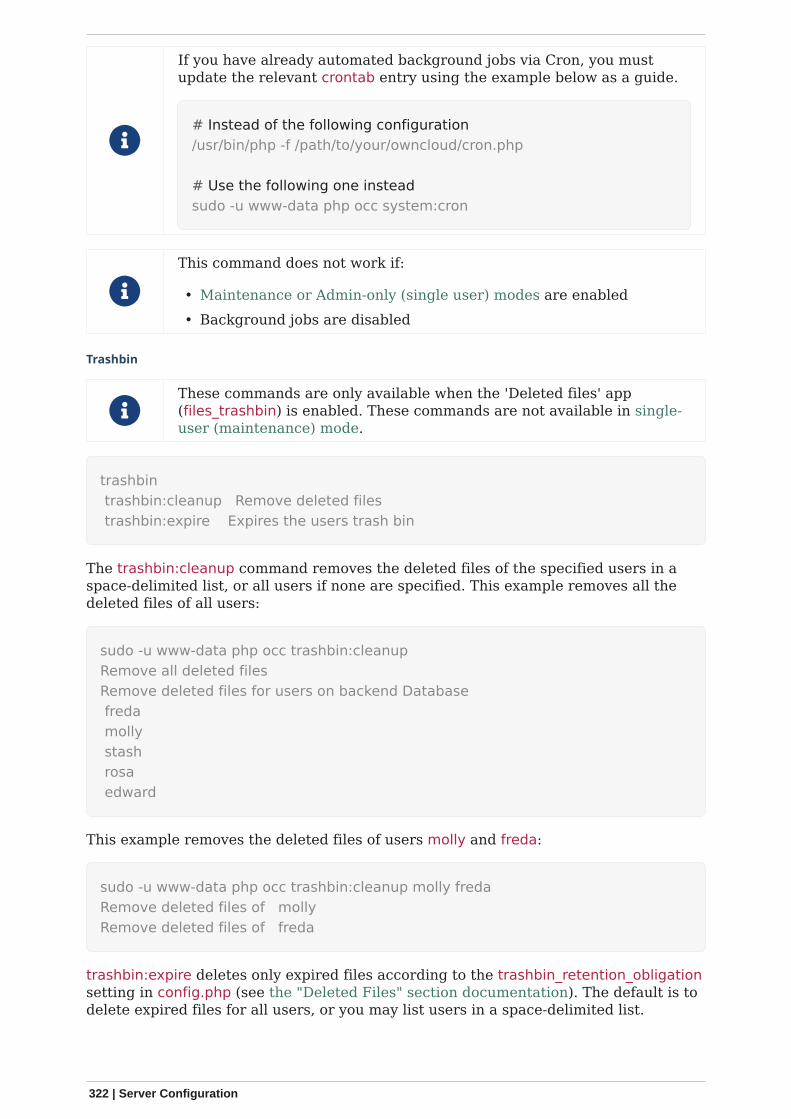
If you have already automated background jobs via Cron, you mustupdate the relevant crontab entry using the example below as a guide.
# Instead of the following configuration/usr/bin/php -f /path/to/your/owncloud/cron.php
# Use the following one insteadsudo -u www-data php occ system:cron
This command does not work if:
• Maintenance or Admin-only (single user) modes are enabled• Background jobs are disabled
Trashbin
These commands are only available when the 'Deleted files' app(files_trashbin) is enabled. These commands are not available in single-user (maintenance) mode.
trashbin trashbin:cleanup Remove deleted files trashbin:expire Expires the users trash bin
The trashbin:cleanup command removes the deleted files of the specified users in aspace-delimited list, or all users if none are specified. This example removes all thedeleted files of all users:
sudo -u www-data php occ trashbin:cleanupRemove all deleted filesRemove deleted files for users on backend Database freda molly stash rosa edward
This example removes the deleted files of users molly and freda:
sudo -u www-data php occ trashbin:cleanup molly fredaRemove deleted files of mollyRemove deleted files of freda
trashbin:expire deletes only expired files according to the trashbin_retention_obligationsetting in config.php (see the "Deleted Files" section documentation). The default is todelete expired files for all users, or you may list users in a space-delimited list.
322 | Server Configuration

Two-Factor Authentication
The following commands only enable or disable the two-factor authentication for aparticular user. See the Two-Factor TOTP section for managing the two-factor appprovided by ownCloud.
If a two-factor provider app is enabled, it is enabled for all users by default but a userhas to opt-in, though the provider can decide whether or not the user has to pass thechallenge. In case a user is losing access to the second factor like a lost or defectphone with two-factor SMS/app verification, the user would now be locked out. To givethe user access to his account, an admin can temporarily disable the two-factor checkfor that user via the occ command. After the issue has been fixed, the admin canreenable two-factor authentication for that user.
The following commands are available for the two-factor authentication:
twofactorauth twofactorauth:disable Disable two-factor authentication for a user. twofactorauth:enable Enable two-factor authentication for a user.
Disable
Disable two-factor authentication for a user:
sudo -u www-data php occ twofactorauth:disable [options] [--] <uid>
Arguments
uid The user (user id) to be disabled for two-factor authentication.
Enable
Enable two-factor authentication for a user:
sudo -u www-data php occ twofactorauth:enable [options] [--] <uid>
Arguments
uid The user (user id) to be (re)enabled for twofactor authentication.
User Commands
The user commands provide a range of functionality for managing ownCloud users.This includes: creating and removing users, resetting user passwords, displaying areport which shows how many users you have, and when a user was last logged in.The full list, of commands is:
Server Configuration | 323
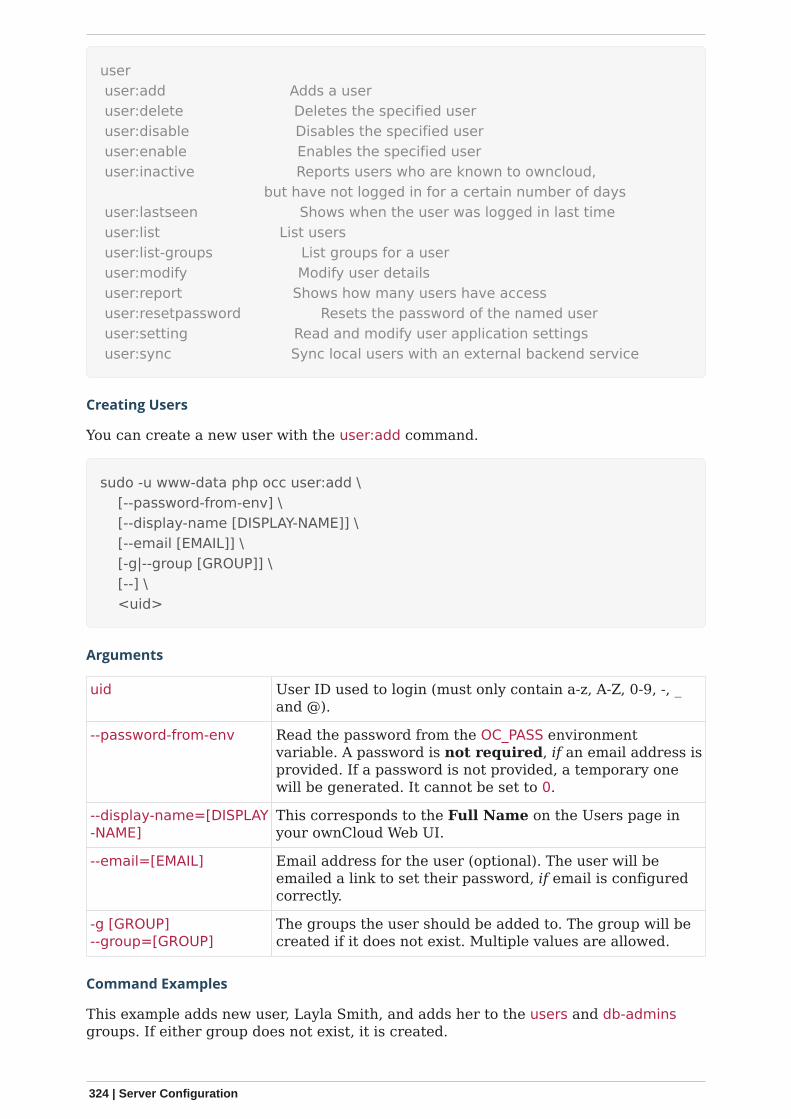
user user:add Adds a user user:delete Deletes the specified user user:disable Disables the specified user user:enable Enables the specified user user:inactive Reports users who are known to owncloud, but have not logged in for a certain number of days user:lastseen Shows when the user was logged in last time user:list List users user:list-groups List groups for a user user:modify Modify user details user:report Shows how many users have access user:resetpassword Resets the password of the named user user:setting Read and modify user application settings user:sync Sync local users with an external backend service
Creating Users
You can create a new user with the user:add command.
sudo -u www-data php occ user:add \ [--password-from-env] \ [--display-name [DISPLAY-NAME]] \ [--email [EMAIL]] \ [-g|--group [GROUP]] \ [--] \ <uid>
Arguments
uid User ID used to login (must only contain a-z, A-Z, 0-9, -, _and @).
--password-from-env Read the password from the OC_PASS environmentvariable. A password is not required, if an email address isprovided. If a password is not provided, a temporary onewill be generated. It cannot be set to 0.
--display-name=[DISPLAY-NAME]
This corresponds to the Full Name on the Users page inyour ownCloud Web UI.
--email=[EMAIL] Email address for the user (optional). The user will beemailed a link to set their password, if email is configuredcorrectly.
-g [GROUP]--group=[GROUP]
The groups the user should be added to. The group will becreated if it does not exist. Multiple values are allowed.
Command Examples
This example adds new user, Layla Smith, and adds her to the users and db-adminsgroups. If either group does not exist, it is created.
324 | Server Configuration
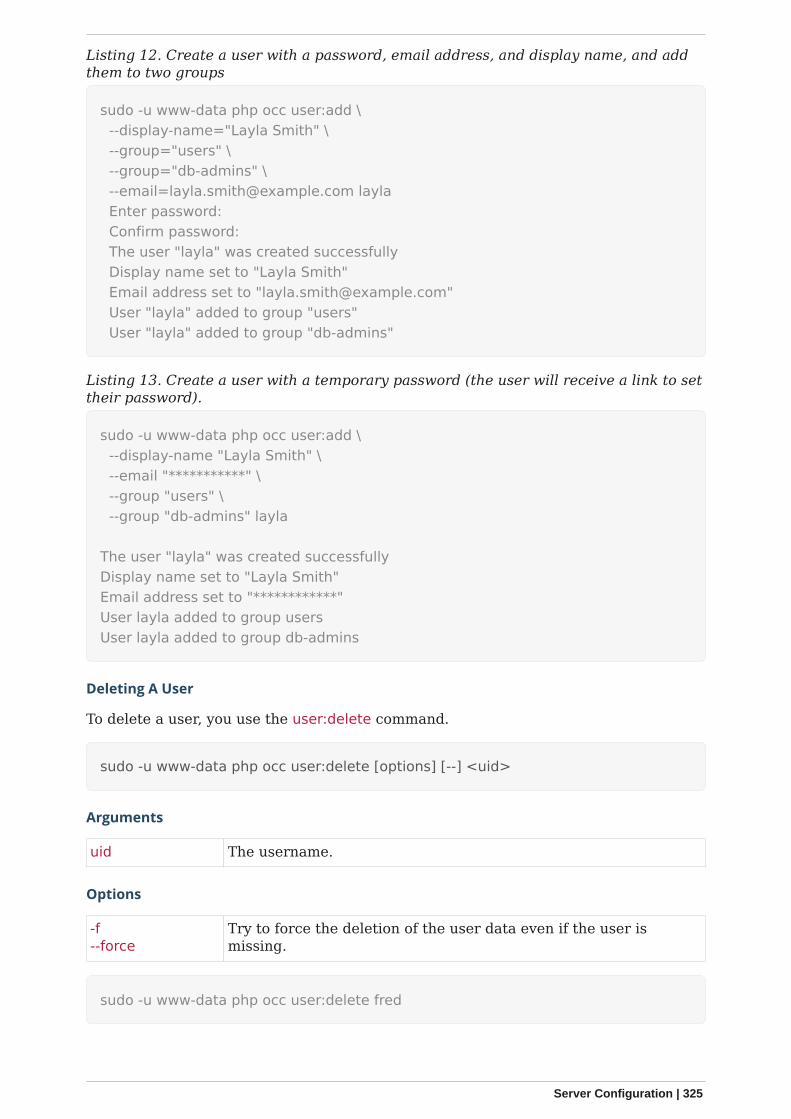
Listing 12. Create a user with a password, email address, and display name, and addthem to two groups
sudo -u www-data php occ user:add \ --display-name="Layla Smith" \ --group="users" \ --group="db-admins" \ [email protected] layla Enter password: Confirm password: The user "layla" was created successfully Display name set to "Layla Smith" Email address set to "[email protected]" User "layla" added to group "users" User "layla" added to group "db-admins"
Listing 13. Create a user with a temporary password (the user will receive a link to settheir password).
sudo -u www-data php occ user:add \ --display-name "Layla Smith" \ --email "***********" \ --group "users" \ --group "db-admins" layla
The user "layla" was created successfullyDisplay name set to "Layla Smith"Email address set to "************"User layla added to group usersUser layla added to group db-admins
Deleting A User
To delete a user, you use the user:delete command.
sudo -u www-data php occ user:delete [options] [--] <uid>
Arguments
uid The username.
Options
-f--force
Try to force the deletion of the user data even if the user ismissing.
sudo -u www-data php occ user:delete fred
Server Configuration | 325
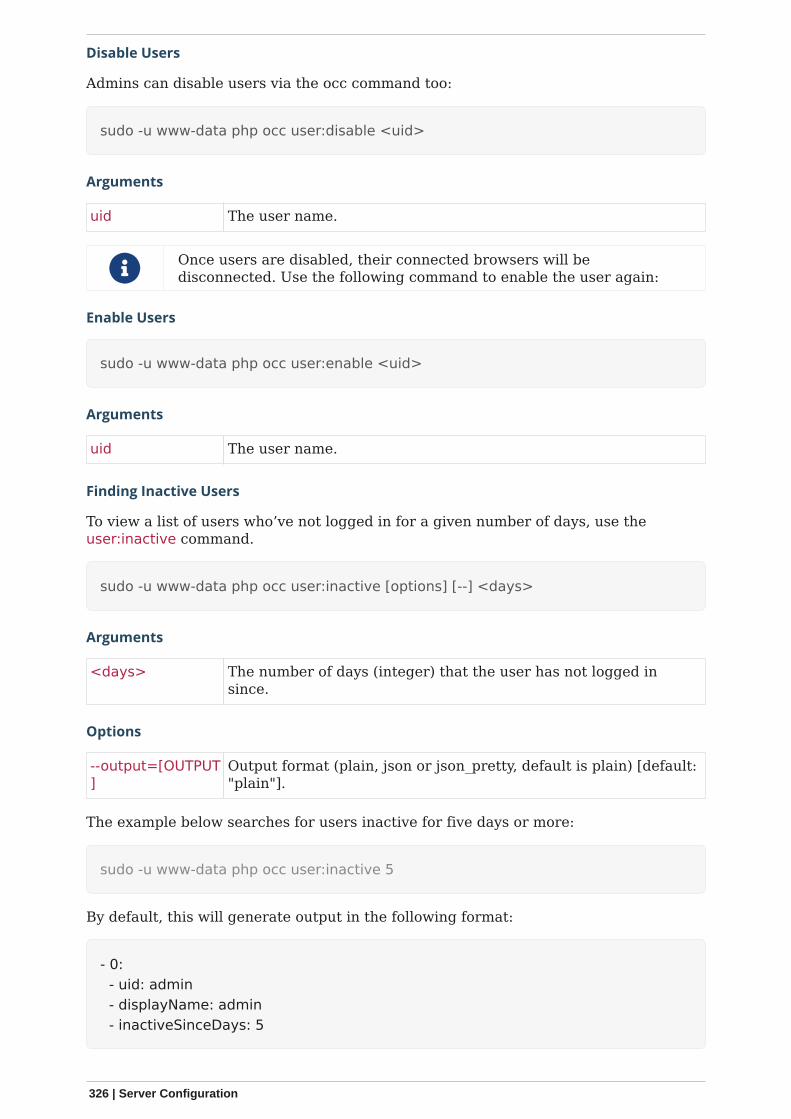
Disable Users
Admins can disable users via the occ command too:
sudo -u www-data php occ user:disable <uid>
Arguments
uid The user name.
Once users are disabled, their connected browsers will bedisconnected. Use the following command to enable the user again:
Enable Users
sudo -u www-data php occ user:enable <uid>
Arguments
uid The user name.
Finding Inactive Users
To view a list of users who’ve not logged in for a given number of days, use theuser:inactive command.
sudo -u www-data php occ user:inactive [options] [--] <days>
Arguments
<days> The number of days (integer) that the user has not logged insince.
Options
--output=[OUTPUT]
Output format (plain, json or json_pretty, default is plain) [default:"plain"].
The example below searches for users inactive for five days or more:
sudo -u www-data php occ user:inactive 5
By default, this will generate output in the following format:
- 0: - uid: admin - displayName: admin - inactiveSinceDays: 5
326 | Server Configuration
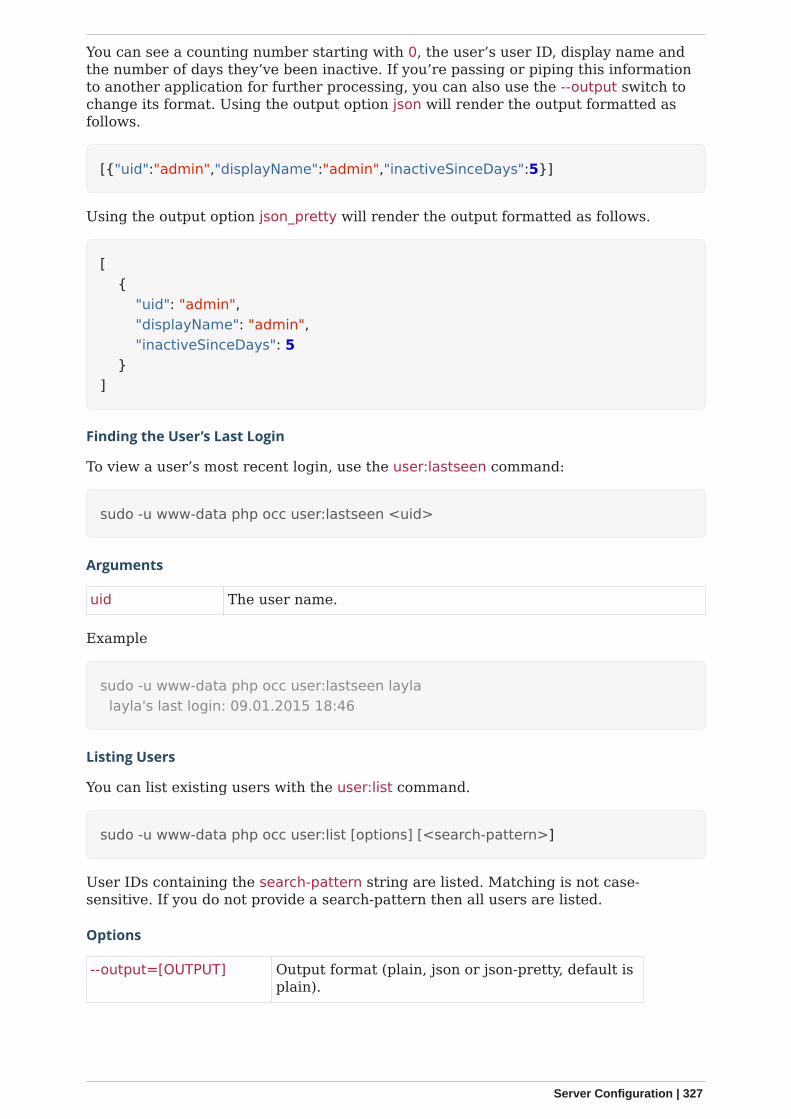
You can see a counting number starting with 0, the user’s user ID, display name andthe number of days they’ve been inactive. If you’re passing or piping this informationto another application for further processing, you can also use the --output switch tochange its format. Using the output option json will render the output formatted asfollows.
[{"uid":"admin","displayName":"admin","inactiveSinceDays":5}]
Using the output option json_pretty will render the output formatted as follows.
[ { "uid": "admin", "displayName": "admin", "inactiveSinceDays": 5 }]
Finding the User’s Last Login
To view a user’s most recent login, use the user:lastseen command:
sudo -u www-data php occ user:lastseen <uid>
Arguments
uid The user name.
Example
sudo -u www-data php occ user:lastseen layla layla's last login: 09.01.2015 18:46
Listing Users
You can list existing users with the user:list command.
sudo -u www-data php occ user:list [options] [<search-pattern>]
User IDs containing the search-pattern string are listed. Matching is not case-sensitive. If you do not provide a search-pattern then all users are listed.
Options
--output=[OUTPUT] Output format (plain, json or json-pretty, default isplain).
Server Configuration | 327
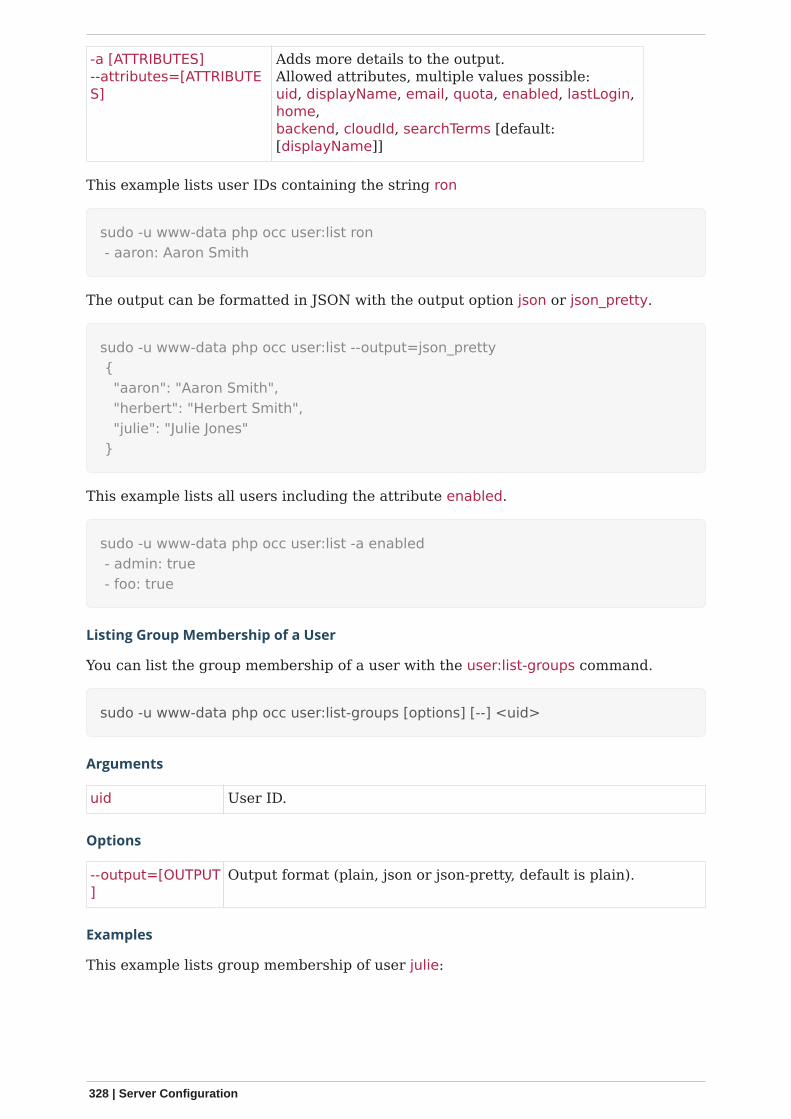
-a [ATTRIBUTES]--attributes=[ATTRIBUTES]
Adds more details to the output.Allowed attributes, multiple values possible:uid, displayName, email, quota, enabled, lastLogin,home,backend, cloudId, searchTerms [default:[displayName]]
This example lists user IDs containing the string ron
sudo -u www-data php occ user:list ron - aaron: Aaron Smith
The output can be formatted in JSON with the output option json or json_pretty.
sudo -u www-data php occ user:list --output=json_pretty { "aaron": "Aaron Smith", "herbert": "Herbert Smith", "julie": "Julie Jones" }
This example lists all users including the attribute enabled.
sudo -u www-data php occ user:list -a enabled - admin: true - foo: true
Listing Group Membership of a User
You can list the group membership of a user with the user:list-groups command.
sudo -u www-data php occ user:list-groups [options] [--] <uid>
Arguments
uid User ID.
Options
--output=[OUTPUT]
Output format (plain, json or json-pretty, default is plain).
Examples
This example lists group membership of user julie:
328 | Server Configuration
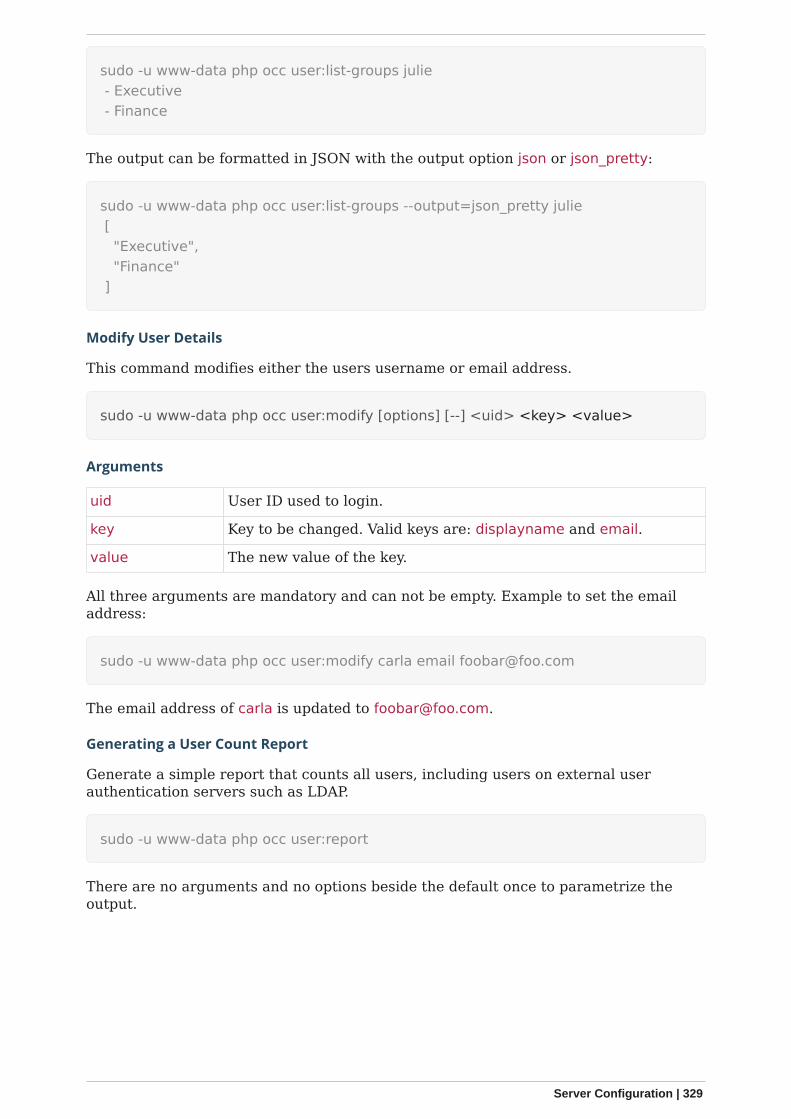
sudo -u www-data php occ user:list-groups julie - Executive - Finance
The output can be formatted in JSON with the output option json or json_pretty:
sudo -u www-data php occ user:list-groups --output=json_pretty julie [ "Executive", "Finance" ]
Modify User Details
This command modifies either the users username or email address.
sudo -u www-data php occ user:modify [options] [--] <uid> <key> <value>
Arguments
uid User ID used to login.
key Key to be changed. Valid keys are: displayname and email.
value The new value of the key.
All three arguments are mandatory and can not be empty. Example to set the emailaddress:
sudo -u www-data php occ user:modify carla email [email protected]
The email address of carla is updated to [email protected].
Generating a User Count Report
Generate a simple report that counts all users, including users on external userauthentication servers such as LDAP.
sudo -u www-data php occ user:report
There are no arguments and no options beside the default once to parametrize theoutput.
Server Configuration | 329

sudo -u www-data php occ user:report+------------------+----+| User Report | |+------------------+----+| Database | 12 || LDAP | 86 || | || total users | 98 || | || user directories | 2 |+------------------+----+
Setting a User’s Password
Resets the password of the named user.
sudo -u www-data php occ user:resetpassword [options] [--] <user>
Password changes automatically log out all connectedbrowsers/devices.
Arguments
uid The user’s name.
Options
--password-from-env Read the password from the OC_PASS environment variable.
--send-email The email ID set while creating the user, will be used to send.link for password reset. This option will also display the linksent to user.
--output-link The link to reset the password will be displayed.
password-from-env allows you to set the user’s password from an environmentvariable. This prevents the password from being exposed to all users via the processlist and will only be visible in the history of the user (root) running the command. Thisalso permits creating scripts for adding multiple new users.
To use password-from-env you must run as "real" root, rather thansudo, because sudo strips environment variables.
To use send-email, the ownCloud instance must have email access fullyconfigured.
Examples
Add a new user, called Fred Jones:
330 | Server Configuration

export OC_PASS=newpasswordsu -s /bin/sh www-data -c 'php occ user:add --password-from-env --display-name="Fred Jones" --group="users" fred'The user "fred" was created successfullyDisplay name set to "Fred Jones"User "fred" added to group "users"
You can reset any user’s password, including administrators (see Reset AdminPassword):
sudo -u www-data php occ user:resetpassword layla Enter a new password: Confirm the new password:Successfully reset password for layla
You may also use password-from-env to reset passwords:
export OC_PASS=newpasswordsu -s /bin/sh www-data -c 'php occ user:resetpassword \ --password-from-env \ layla'Successfully reset password for layla
This example emails a password reset link to the user. Additionally, when the commandcompletes, it outputs the password reset link to the console:
sudo -u www-data php occ user:resetpassword \ --send-email \ --output-link \ laylaThe password reset link is:http://localhost:8080/index.php/lostpassword/reset/form/rQAlCjNeQf3aphA6Hraq2/layla
If the specified user does not have a valid email address set, then the following errorwill be output to the console, and the email will not be sent:
Email address is not set for the user layla
User Application Settings
To manage application settings for a user, use the user:setting command. Thiscommand provides the ability to:
• Retrieve all settings for an application• Retrieve a single setting• Set a setting value
Server Configuration | 331
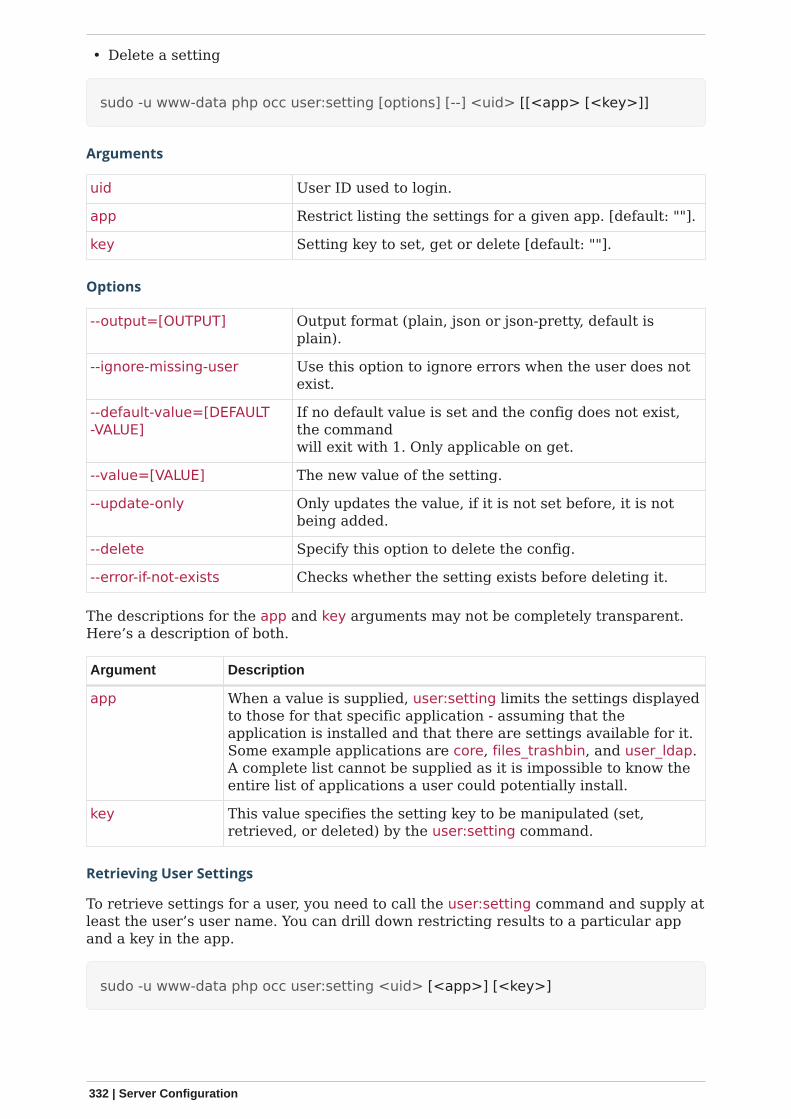
• Delete a setting
sudo -u www-data php occ user:setting [options] [--] <uid> [[<app> [<key>]]
Arguments
uid User ID used to login.
app Restrict listing the settings for a given app. [default: ""].
key Setting key to set, get or delete [default: ""].
Options
--output=[OUTPUT] Output format (plain, json or json-pretty, default isplain).
--ignore-missing-user Use this option to ignore errors when the user does notexist.
--default-value=[DEFAULT-VALUE]
If no default value is set and the config does not exist,the commandwill exit with 1. Only applicable on get.
--value=[VALUE] The new value of the setting.
--update-only Only updates the value, if it is not set before, it is notbeing added.
--delete Specify this option to delete the config.
--error-if-not-exists Checks whether the setting exists before deleting it.
The descriptions for the app and key arguments may not be completely transparent.Here’s a description of both.
Argument Description
app When a value is supplied, user:setting limits the settings displayedto those for that specific application - assuming that theapplication is installed and that there are settings available for it.Some example applications are core, files_trashbin, and user_ldap.A complete list cannot be supplied as it is impossible to know theentire list of applications a user could potentially install.
key This value specifies the setting key to be manipulated (set,retrieved, or deleted) by the user:setting command.
Retrieving User Settings
To retrieve settings for a user, you need to call the user:setting command and supply atleast the user’s user name. You can drill down restricting results to a particular appand a key in the app.
sudo -u www-data php occ user:setting <uid> [<app>] [<key>]
332 | Server Configuration

Arguments
uid User ID used to log in.
app Restrict listing the settings for a given app. [default: ""].
key Setting key to set, get or delete [default: ""].
Examples:
1. Retrieve all settings set for a given user:
sudo -u www-data php occ user:setting layla - core: - lang: en - login: - lastLogin: 1465910968 - settings: - email: [email protected]
Here we see that the user has settings for the application core, when they lastlogged in, and what their email address is.
2. Retrieve all settings set restricted to application core for a given user:
sudo -u www-data php occ user:setting layla core - core: - lang: en
In the output, you can see that one setting is in effect, lang, which is set to en.
3. Retrieve all settings set restricted to application core, key lang for a given user
sudo -u www-data php occ user:setting layla core lang
This will display the value for that setting, such as en.
Setting and Deleting a Setting
sudo -u www-data php occ user:setting [options] [--] <uid> [<app>] [<key>]
In case you want to change the email address, use the user:modifycommand.
Here’s an example of how you would set the language of the user layla.
sudo -u www-data php occ user:setting layla core lang --value=en
Deleting a setting is quite similar to setting a setting. In this case, you supply theusername, application (or setting category) and key as above. Then, in addition, you
Server Configuration | 333
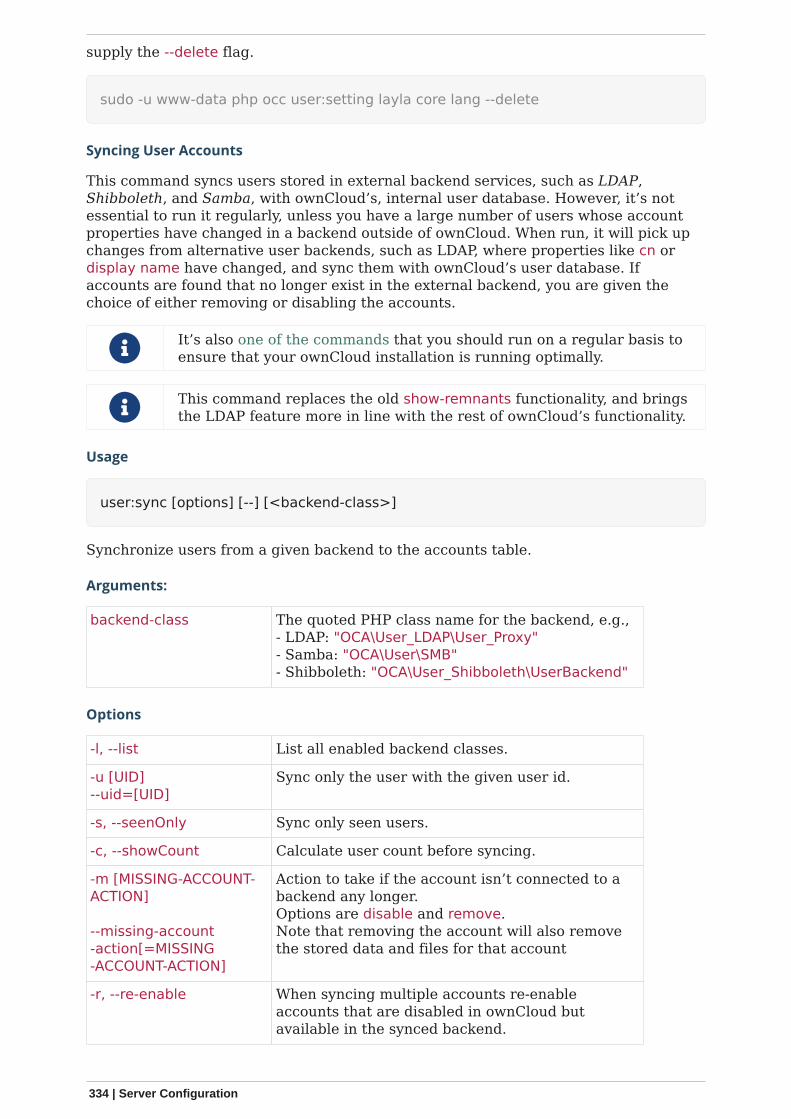
supply the --delete flag.
sudo -u www-data php occ user:setting layla core lang --delete
Syncing User Accounts
This command syncs users stored in external backend services, such as LDAP,Shibboleth, and Samba, with ownCloud’s, internal user database. However, it’s notessential to run it regularly, unless you have a large number of users whose accountproperties have changed in a backend outside of ownCloud. When run, it will pick upchanges from alternative user backends, such as LDAP, where properties like cn ordisplay name have changed, and sync them with ownCloud’s user database. Ifaccounts are found that no longer exist in the external backend, you are given thechoice of either removing or disabling the accounts.
It’s also one of the commands that you should run on a regular basis toensure that your ownCloud installation is running optimally.
This command replaces the old show-remnants functionality, and bringsthe LDAP feature more in line with the rest of ownCloud’s functionality.
Usage
user:sync [options] [--] [<backend-class>]
Synchronize users from a given backend to the accounts table.
Arguments:
backend-class The quoted PHP class name for the backend, e.g.,- LDAP: "OCA\User_LDAP\User_Proxy"- Samba: "OCA\User\SMB"- Shibboleth: "OCA\User_Shibboleth\UserBackend"
Options
-l, --list List all enabled backend classes.
-u [UID]--uid=[UID]
Sync only the user with the given user id.
-s, --seenOnly Sync only seen users.
-c, --showCount Calculate user count before syncing.
-m [MISSING-ACCOUNT-ACTION]
--missing-account-action[=MISSING-ACCOUNT-ACTION]
Action to take if the account isn’t connected to abackend any longer.Options are disable and remove.Note that removing the account will also removethe stored data and files for that account
-r, --re-enable When syncing multiple accounts re-enableaccounts that are disabled in ownCloud butavailable in the synced backend.
334 | Server Configuration
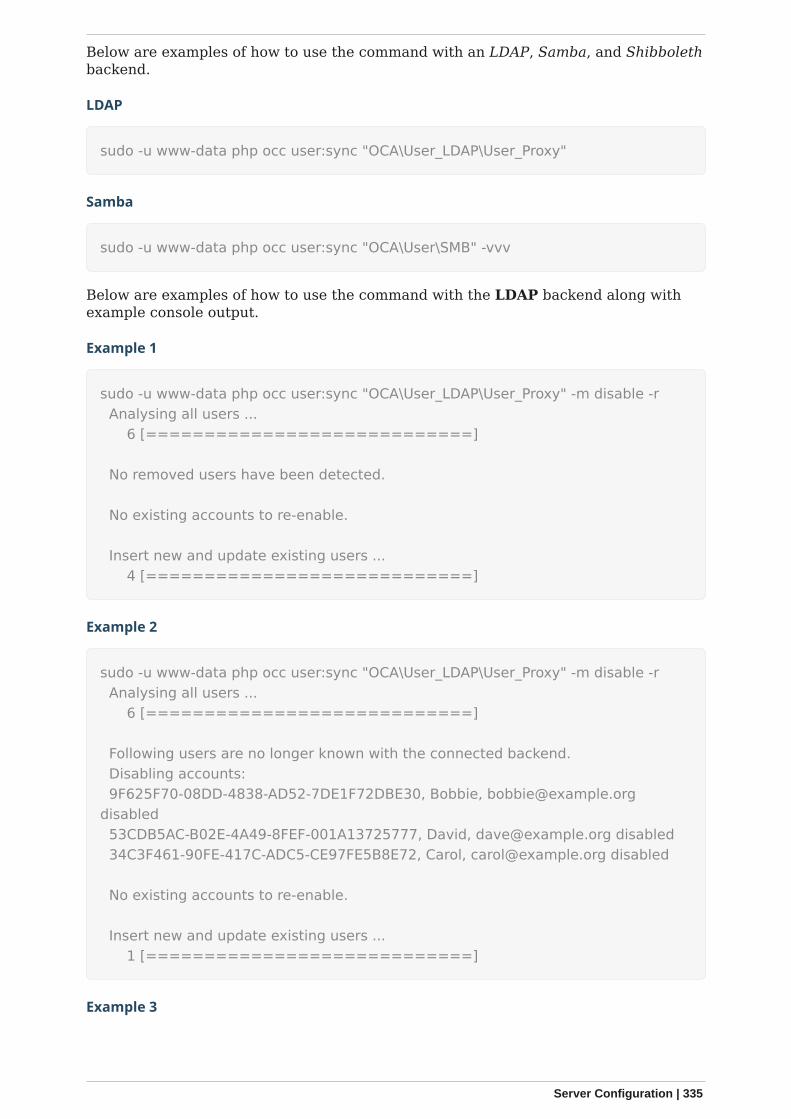
Below are examples of how to use the command with an LDAP, Samba, and Shibbolethbackend.
LDAP
sudo -u www-data php occ user:sync "OCA\User_LDAP\User_Proxy"
Samba
sudo -u www-data php occ user:sync "OCA\User\SMB" -vvv
Below are examples of how to use the command with the LDAP backend along withexample console output.
Example 1
sudo -u www-data php occ user:sync "OCA\User_LDAP\User_Proxy" -m disable -r Analysing all users ... 6 [============================]
No removed users have been detected.
No existing accounts to re-enable.
Insert new and update existing users ... 4 [============================]
Example 2
sudo -u www-data php occ user:sync "OCA\User_LDAP\User_Proxy" -m disable -r Analysing all users ... 6 [============================]
Following users are no longer known with the connected backend. Disabling accounts: 9F625F70-08DD-4838-AD52-7DE1F72DBE30, Bobbie, [email protected] 53CDB5AC-B02E-4A49-8FEF-001A13725777, David, [email protected] disabled 34C3F461-90FE-417C-ADC5-CE97FE5B8E72, Carol, [email protected] disabled
No existing accounts to re-enable.
Insert new and update existing users ... 1 [============================]
Example 3
Server Configuration | 335
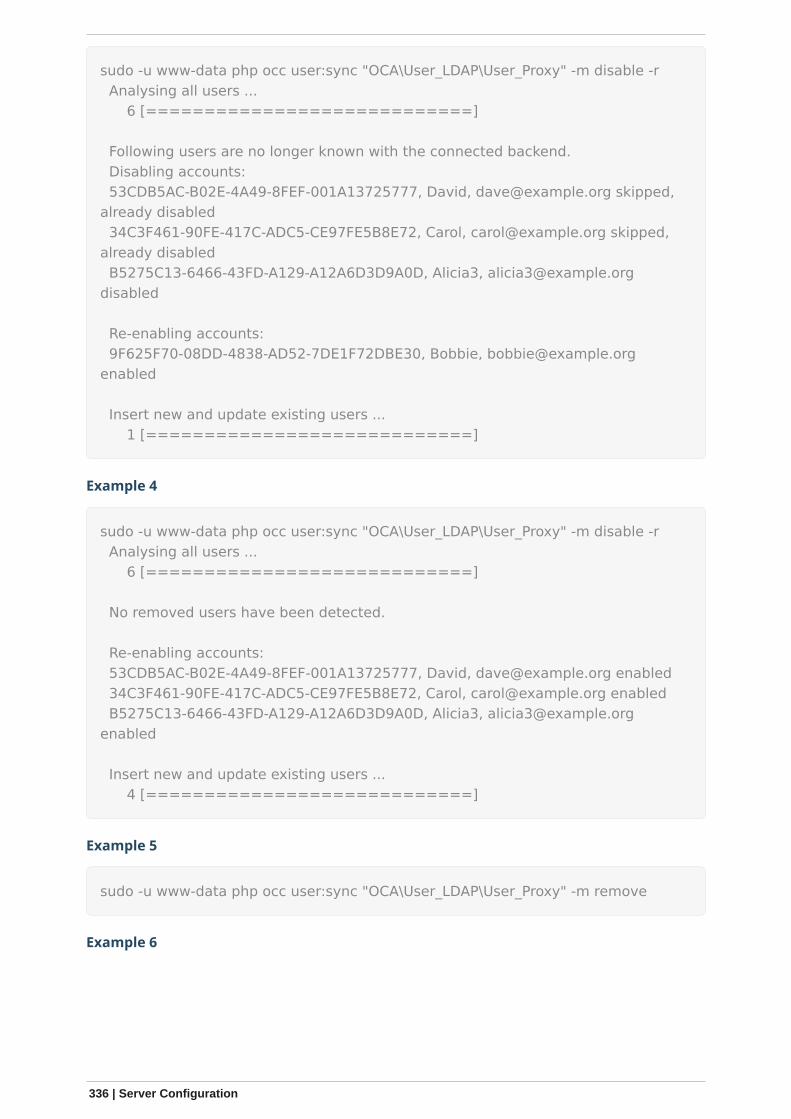
sudo -u www-data php occ user:sync "OCA\User_LDAP\User_Proxy" -m disable -r Analysing all users ... 6 [============================]
Following users are no longer known with the connected backend. Disabling accounts: 53CDB5AC-B02E-4A49-8FEF-001A13725777, David, [email protected] skipped,already disabled 34C3F461-90FE-417C-ADC5-CE97FE5B8E72, Carol, [email protected] skipped,already disabled B5275C13-6466-43FD-A129-A12A6D3D9A0D, Alicia3, [email protected]
Re-enabling accounts: 9F625F70-08DD-4838-AD52-7DE1F72DBE30, Bobbie, [email protected]
Insert new and update existing users ... 1 [============================]
Example 4
sudo -u www-data php occ user:sync "OCA\User_LDAP\User_Proxy" -m disable -r Analysing all users ... 6 [============================]
No removed users have been detected.
Re-enabling accounts: 53CDB5AC-B02E-4A49-8FEF-001A13725777, David, [email protected] enabled 34C3F461-90FE-417C-ADC5-CE97FE5B8E72, Carol, [email protected] enabled B5275C13-6466-43FD-A129-A12A6D3D9A0D, Alicia3, [email protected]
Insert new and update existing users ... 4 [============================]
Example 5
sudo -u www-data php occ user:sync "OCA\User_LDAP\User_Proxy" -m remove
Example 6
336 | Server Configuration
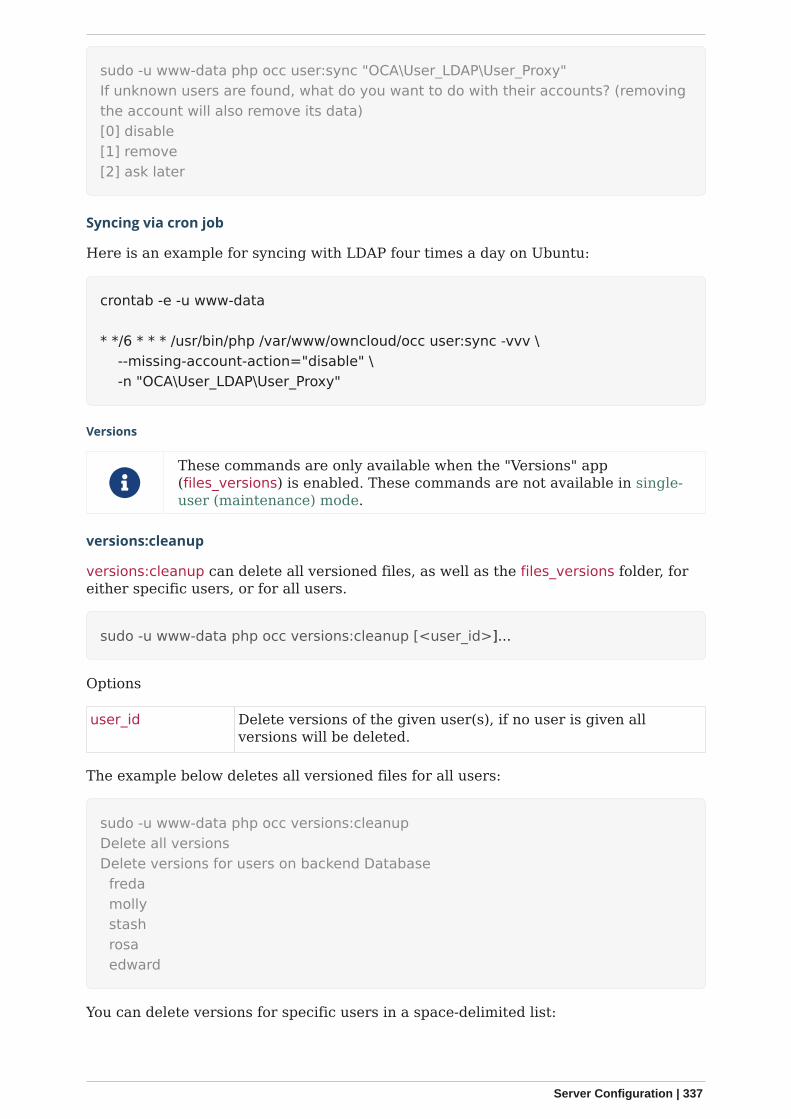
sudo -u www-data php occ user:sync "OCA\User_LDAP\User_Proxy"If unknown users are found, what do you want to do with their accounts? (removingthe account will also remove its data)[0] disable[1] remove[2] ask later
Syncing via cron job
Here is an example for syncing with LDAP four times a day on Ubuntu:
crontab -e -u www-data
* */6 * * * /usr/bin/php /var/www/owncloud/occ user:sync -vvv \ --missing-account-action="disable" \ -n "OCA\User_LDAP\User_Proxy"
Versions
These commands are only available when the "Versions" app(files_versions) is enabled. These commands are not available in single-user (maintenance) mode.
versions:cleanup
versions:cleanup can delete all versioned files, as well as the files_versions folder, foreither specific users, or for all users.
sudo -u www-data php occ versions:cleanup [<user_id>]...
Options
user_id Delete versions of the given user(s), if no user is given allversions will be deleted.
The example below deletes all versioned files for all users:
sudo -u www-data php occ versions:cleanupDelete all versionsDelete versions for users on backend Database freda molly stash rosa edward
You can delete versions for specific users in a space-delimited list:
Server Configuration | 337
sudo -u www-data php occ versions:cleanup freda mollyDelete versions of fredaDelete versions of molly
versions:expire
versions:expire deletes only expired files according to the versions_retention_obligationsetting in config.php (see the File versions section in config_sample_php_parameters).The default is to delete expired files for all users, or you may list users in a space-delimited list.
sudo -u www-data php occ versions:expire [<user_id>]...
Options
user_id Expire file versions of the given user(s), if no user is given fileversions for all users will be expired.
Apps Commands
This command reference covers the ownCloud maintained apps commands, which areonly available if the respective app is installed and enabled.
Activity
The activity command is used for sending automated activity email notifications inownCloud server.
activity activity:send-emails Send all pending activity emails now
Send Emails Now
The activity:send-emails command sends all pending activity emails immediately,regardless of the time they are scheduled.
sudo -u www-data php occ activity:send-emails
Manage Rename and Move Action Notifications
Starting with Activity app version 2.7.0, rename and move action notifications can besent. This feature is disabled by default and must be enabled manually.
Enable Rename and Move Action Notifications
sudo -u www-data php occ config:app:set activityenable_move_and_rename_activities --value "yes"
338 | Server Configuration
Disable Rename and Move Action Notifications
sudo -u www-data php occ config:app:set activityenable_move_and_rename_activities --value "no"
or
sudo -u www-data php occ config:app:delete activityenable_move_and_rename_activities
Anti-Virus
Marketplace URL: Anti-Virus
Use these commands to configure the Anti-Virus app. Parametrisation must be donewith the occ config command set.
List the Current Settings
sudo -u www-data php occ config:list files_antivirus
Set the Setting
To set a new value, use the command below and replace <Key> and value <Value>accordingly.
sudo -u www-data php occ config:app:set files_antivirus <Key> --value=<Value>--update-only
Antivirus Mode [string]
Antivirus Configuration.
Key av_mode
Default 'executable'
Possible Values 'executable''daemon''socket'
Antivirus Socket [string]
Antivirus Socket.
Key av_socket
Default '/var/run/clamav/clamd.ctl'
Antivirus Host [string]
Hostname or IP address of Antivirus Host.
Server Configuration | 339
Key av_host
Default
Antivirus Port [integer]
Port number of Antivirus Host, 1-65535.
Key av_port
Default
Possible Values 1-65535
Antivirus Command Line Options [string]
Extra command line options (comma-separated).
Key av_cmd_options
Default
Antivirus Path to Executable [string]
Path to clamscan executable.
Key av_path
Default '/usr/bin/clamscan'
Antivirus Maximum Filesize [integer]
File size limit, -1 means no limit.
Key av_max_file_size
Default '-1'
Possible Values '-1'integer number
Antivirus Maximum Stream Length [integer]
Max Stream Length.
Key av_stream_max_length
Default '26214400'
Antivirus Action [string]
When infected files were found during a background scan.
Key av_infected_action
Default 'only_log'
Possible Values 'only_log''delete'
340 | Server Configuration

Antivirus Scan Process [string]
Define scan process.
Key av_scan_background
Default 'true'
Possible Values 'true''false'
Auditing
Marketplace URL: Auditing
Tracks various activities and actions of your users and admins. For details, please seethe Auditing documentation.
Ignore all CLI triggered events.
Set or Change Ignore CLI Events
To ignore all CLI triggered events, you can set the following option, defaults to trackcli events:
sudo -u www-data php occ config:app:set \ "admin_audit ignore_cli_events" \ --value "yes"
Get Value of Ignore CLI Events
This command reads the value of admin_audit ignore_cli_events:
sudo -u www-data php occ config:app:get "admin_audit ignore_cli_events"
yes
Delete Ignore CLI Events
This command completely removes the key and the value:
sudo -u www-data php occ config:app:delete "admin_audit ignore_cli_events"
Brute Force Protection
Marketplace URL: Brute-Force Protection
Use these commands to configure the Brute Force Protection app. Parametrisationmust be done with the occ config command set. The combination of uid and IP addressis used to trigger the ban.
List the Current Settings
Server Configuration | 341
sudo -u www-data php occ config:list brute_force_protection
Set the Setting
To set a new value, use the command below and replace <Key> and value <Value>accordingly.
sudo -u www-data php occ config:app:set brute_force_protection <Key> --value=<Value> --update-only
Fail Tolerance [attempts]
Number of wrong attempts to trigger the ban.
Key brute_force_protection_fail_tolerance
Default 3
Time Threshold [seconds]
Time in which the number of wrong attempts must occur to trigger the ban.
Key brute_force_protection_time_threshold
Default 60
Ban Period [seconds]
Time how long the ban will be active if triggered.
Key brute_force_protection_ban_period
Default 300
Calendar
Marketplace URL: Calendar
For commands for managing the calendar, please see the DAV Command section in theocc core command set.
Contacts
Marketplace URL: Contacts
For commands for managing contacts, please see the DAV Command section in the occcore command set.
Data Exporter
This app is only available as a git clone. See the Data Exporter description for moreinformation how to install this app. Import and export users from one ownCloudinstance in to another. The export contains all user-settings, files and shares.
342 | Server Configuration
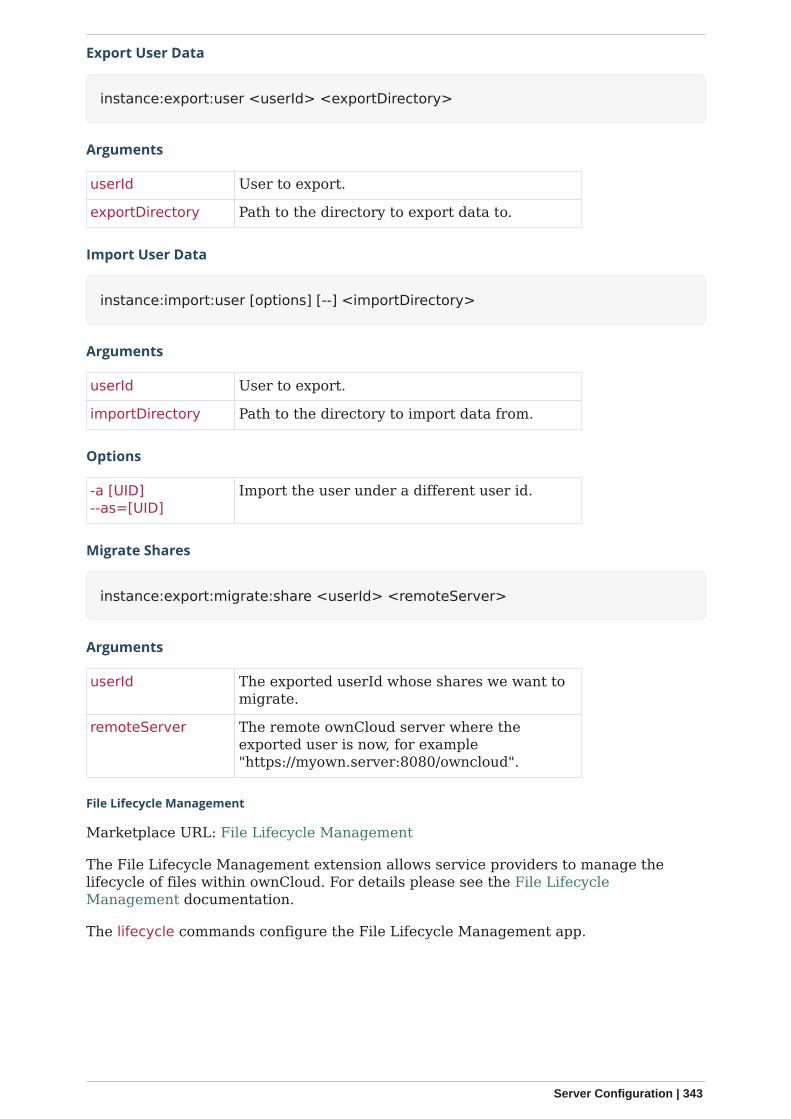
Export User Data
instance:export:user <userId> <exportDirectory>
Arguments
userId User to export.
exportDirectory Path to the directory to export data to.
Import User Data
instance:import:user [options] [--] <importDirectory>
Arguments
userId User to export.
importDirectory Path to the directory to import data from.
Options
-a [UID]--as=[UID]
Import the user under a different user id.
Migrate Shares
instance:export:migrate:share <userId> <remoteServer>
Arguments
userId The exported userId whose shares we want tomigrate.
remoteServer The remote ownCloud server where theexported user is now, for example"https://myown.server:8080/owncloud".
File Lifecycle Management
Marketplace URL: File Lifecycle Management
The File Lifecycle Management extension allows service providers to manage thelifecycle of files within ownCloud. For details please see the File LifecycleManagement documentation.
The lifecycle commands configure the File Lifecycle Management app.
Server Configuration | 343
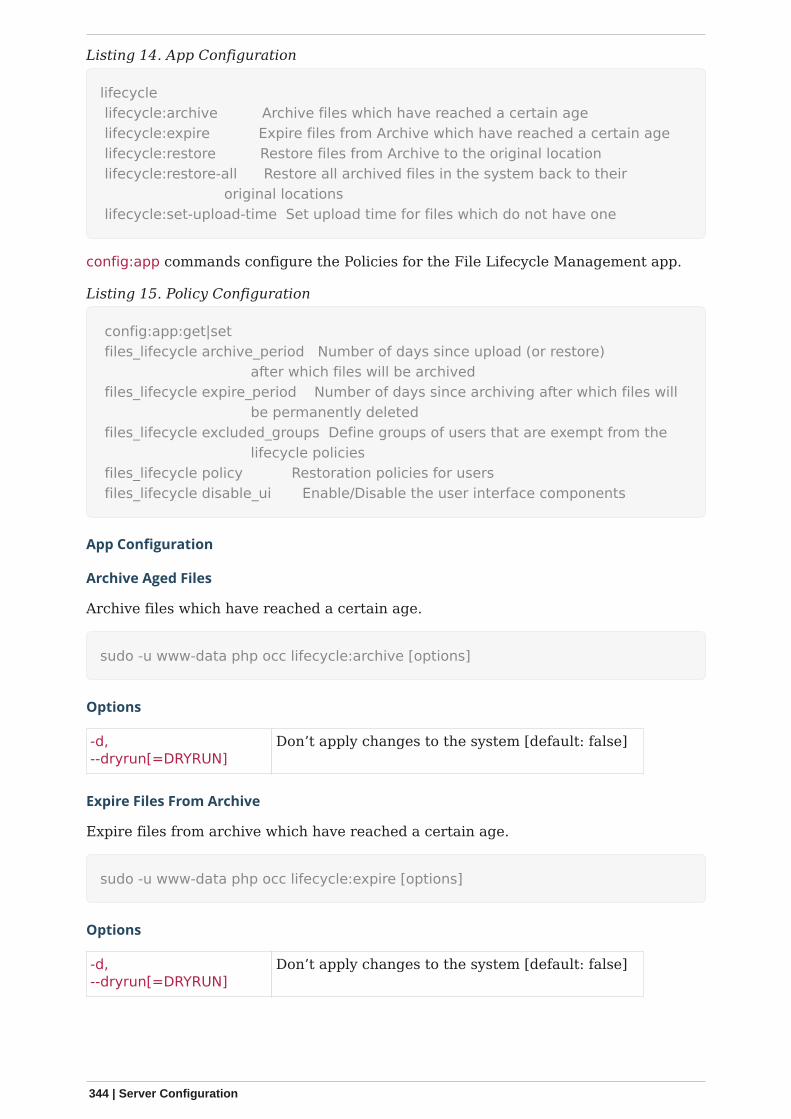
Listing 14. App Configuration
lifecycle lifecycle:archive Archive files which have reached a certain age lifecycle:expire Expire files from Archive which have reached a certain age lifecycle:restore Restore files from Archive to the original location lifecycle:restore-all Restore all archived files in the system back to their original locations lifecycle:set-upload-time Set upload time for files which do not have one
config:app commands configure the Policies for the File Lifecycle Management app.
Listing 15. Policy Configuration
config:app:get|set files_lifecycle archive_period Number of days since upload (or restore) after which files will be archived files_lifecycle expire_period Number of days since archiving after which files will be permanently deleted files_lifecycle excluded_groups Define groups of users that are exempt from the lifecycle policies files_lifecycle policy Restoration policies for users files_lifecycle disable_ui Enable/Disable the user interface components
App Configuration
Archive Aged Files
Archive files which have reached a certain age.
sudo -u www-data php occ lifecycle:archive [options]
Options
-d,--dryrun[=DRYRUN]
Don’t apply changes to the system [default: false]
Expire Files From Archive
Expire files from archive which have reached a certain age.
sudo -u www-data php occ lifecycle:expire [options]
Options
-d,--dryrun[=DRYRUN]
Don’t apply changes to the system [default: false]
344 | Server Configuration
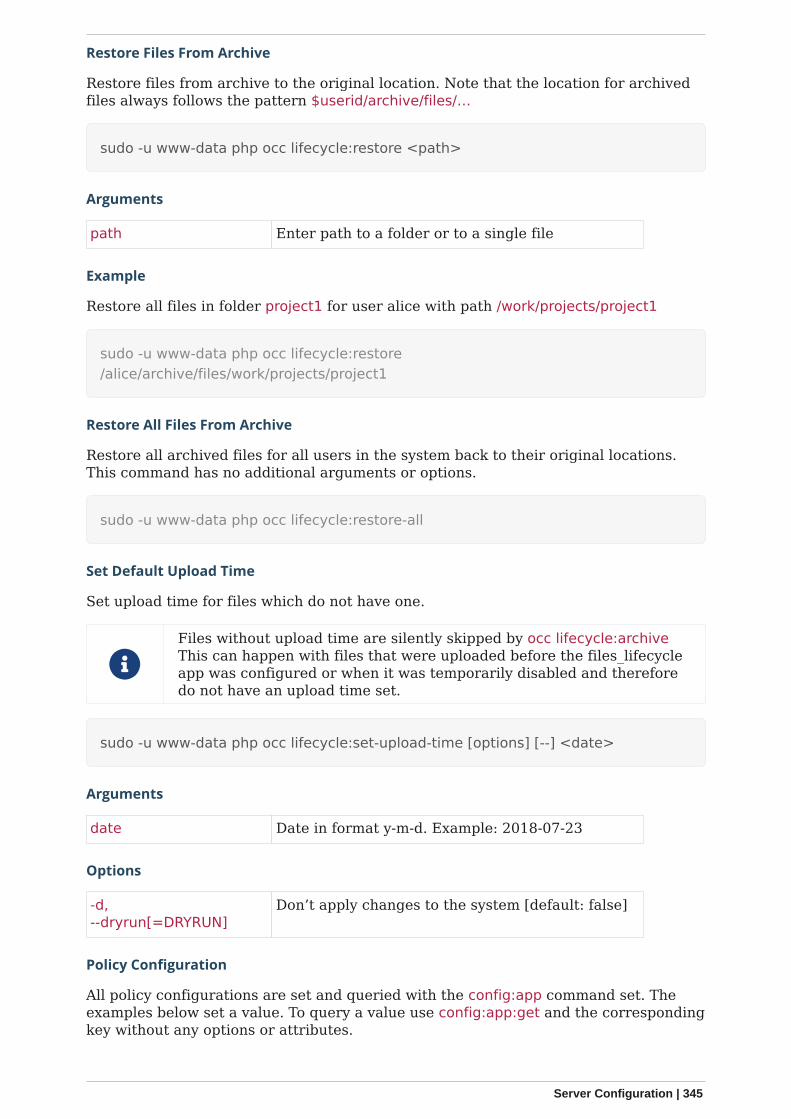
Restore Files From Archive
Restore files from archive to the original location. Note that the location for archivedfiles always follows the pattern $userid/archive/files/…
sudo -u www-data php occ lifecycle:restore <path>
Arguments
path Enter path to a folder or to a single file
Example
Restore all files in folder project1 for user alice with path /work/projects/project1
sudo -u www-data php occ lifecycle:restore/alice/archive/files/work/projects/project1
Restore All Files From Archive
Restore all archived files for all users in the system back to their original locations.This command has no additional arguments or options.
sudo -u www-data php occ lifecycle:restore-all
Set Default Upload Time
Set upload time for files which do not have one.
Files without upload time are silently skipped by occ lifecycle:archiveThis can happen with files that were uploaded before the files_lifecycleapp was configured or when it was temporarily disabled and thereforedo not have an upload time set.
sudo -u www-data php occ lifecycle:set-upload-time [options] [--] <date>
Arguments
date Date in format y-m-d. Example: 2018-07-23
Options
-d,--dryrun[=DRYRUN]
Don’t apply changes to the system [default: false]
Policy Configuration
All policy configurations are set and queried with the config:app command set. Theexamples below set a value. To query a value use config:app:get and the correspondingkey without any options or attributes.
Server Configuration | 345
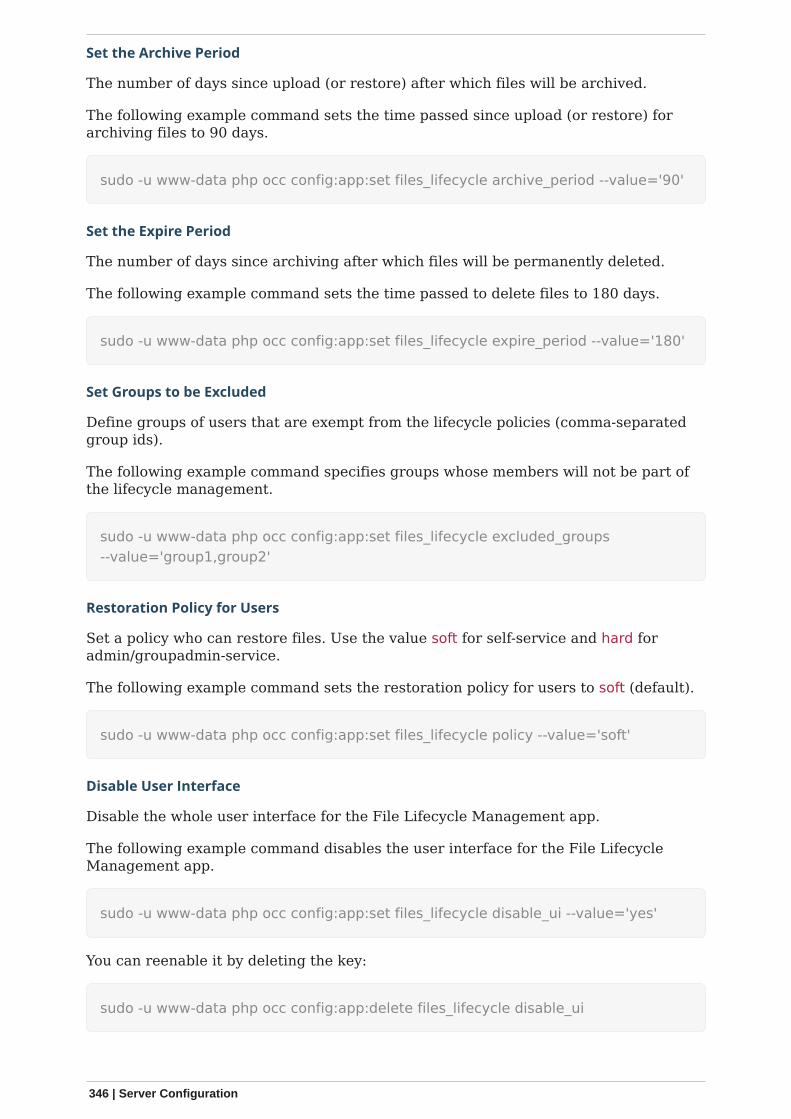
Set the Archive Period
The number of days since upload (or restore) after which files will be archived.
The following example command sets the time passed since upload (or restore) forarchiving files to 90 days.
sudo -u www-data php occ config:app:set files_lifecycle archive_period --value='90'
Set the Expire Period
The number of days since archiving after which files will be permanently deleted.
The following example command sets the time passed to delete files to 180 days.
sudo -u www-data php occ config:app:set files_lifecycle expire_period --value='180'
Set Groups to be Excluded
Define groups of users that are exempt from the lifecycle policies (comma-separatedgroup ids).
The following example command specifies groups whose members will not be part ofthe lifecycle management.
sudo -u www-data php occ config:app:set files_lifecycle excluded_groups--value='group1,group2'
Restoration Policy for Users
Set a policy who can restore files. Use the value soft for self-service and hard foradmin/groupadmin-service.
The following example command sets the restoration policy for users to soft (default).
sudo -u www-data php occ config:app:set files_lifecycle policy --value='soft'
Disable User Interface
Disable the whole user interface for the File Lifecycle Management app.
The following example command disables the user interface for the File LifecycleManagement app.
sudo -u www-data php occ config:app:set files_lifecycle disable_ui --value='yes'
You can reenable it by deleting the key:
sudo -u www-data php occ config:app:delete files_lifecycle disable_ui
346 | Server Configuration
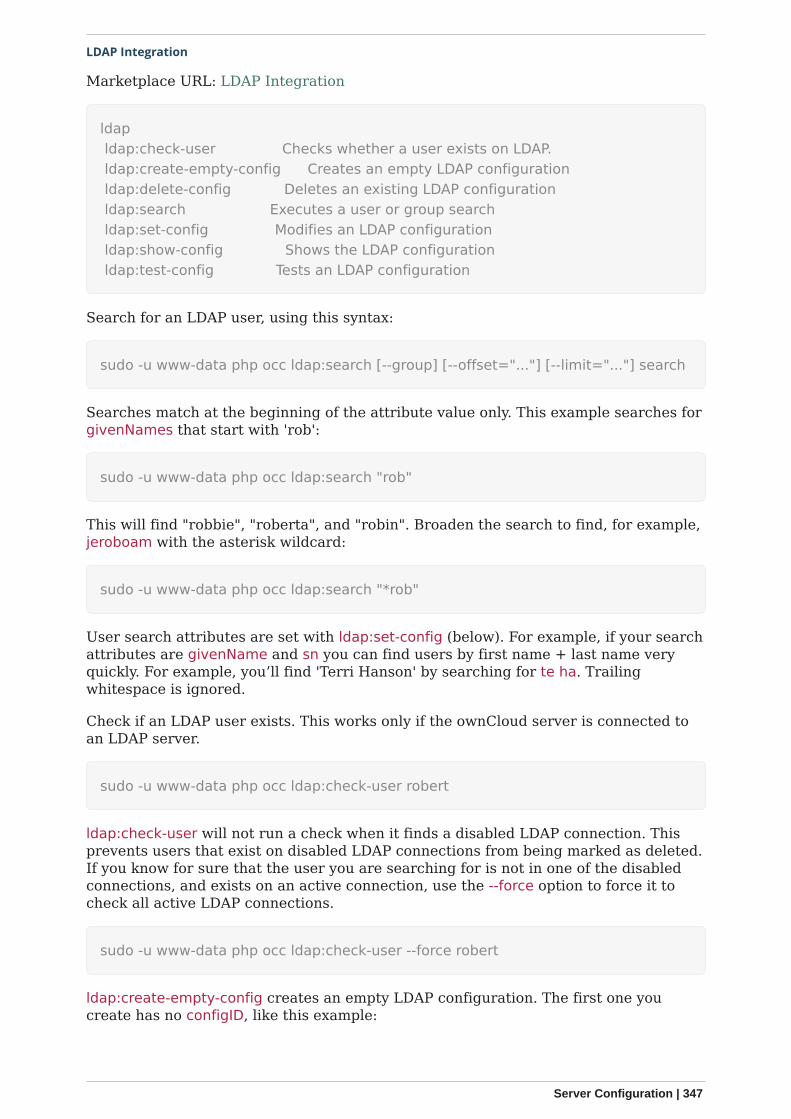
LDAP Integration
Marketplace URL: LDAP Integration
ldap ldap:check-user Checks whether a user exists on LDAP. ldap:create-empty-config Creates an empty LDAP configuration ldap:delete-config Deletes an existing LDAP configuration ldap:search Executes a user or group search ldap:set-config Modifies an LDAP configuration ldap:show-config Shows the LDAP configuration ldap:test-config Tests an LDAP configuration
Search for an LDAP user, using this syntax:
sudo -u www-data php occ ldap:search [--group] [--offset="..."] [--limit="..."] search
Searches match at the beginning of the attribute value only. This example searches forgivenNames that start with 'rob':
sudo -u www-data php occ ldap:search "rob"
This will find "robbie", "roberta", and "robin". Broaden the search to find, for example,jeroboam with the asterisk wildcard:
sudo -u www-data php occ ldap:search "*rob"
User search attributes are set with ldap:set-config (below). For example, if your searchattributes are givenName and sn you can find users by first name + last name veryquickly. For example, you’ll find 'Terri Hanson' by searching for te ha. Trailingwhitespace is ignored.
Check if an LDAP user exists. This works only if the ownCloud server is connected toan LDAP server.
sudo -u www-data php occ ldap:check-user robert
ldap:check-user will not run a check when it finds a disabled LDAP connection. Thisprevents users that exist on disabled LDAP connections from being marked as deleted.If you know for sure that the user you are searching for is not in one of the disabledconnections, and exists on an active connection, use the --force option to force it tocheck all active LDAP connections.
sudo -u www-data php occ ldap:check-user --force robert
ldap:create-empty-config creates an empty LDAP configuration. The first one youcreate has no configID, like this example:
Server Configuration | 347
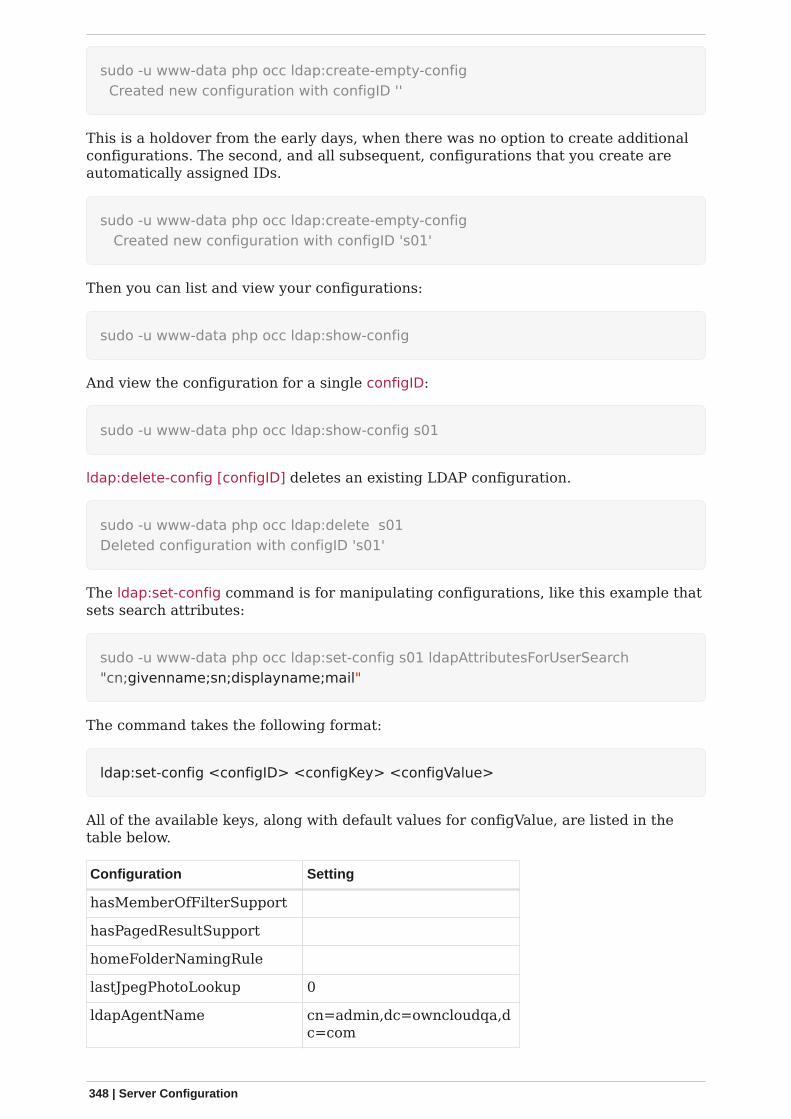
sudo -u www-data php occ ldap:create-empty-config Created new configuration with configID ''
This is a holdover from the early days, when there was no option to create additionalconfigurations. The second, and all subsequent, configurations that you create areautomatically assigned IDs.
sudo -u www-data php occ ldap:create-empty-config Created new configuration with configID 's01'
Then you can list and view your configurations:
sudo -u www-data php occ ldap:show-config
And view the configuration for a single configID:
sudo -u www-data php occ ldap:show-config s01
ldap:delete-config [configID] deletes an existing LDAP configuration.
sudo -u www-data php occ ldap:delete s01Deleted configuration with configID 's01'
The ldap:set-config command is for manipulating configurations, like this example thatsets search attributes:
sudo -u www-data php occ ldap:set-config s01 ldapAttributesForUserSearch"cn;givenname;sn;displayname;mail"
The command takes the following format:
ldap:set-config <configID> <configKey> <configValue>
All of the available keys, along with default values for configValue, are listed in thetable below.
Configuration Setting
hasMemberOfFilterSupport
hasPagedResultSupport
homeFolderNamingRule
lastJpegPhotoLookup 0
ldapAgentName cn=admin,dc=owncloudqa,dc=com
348 | Server Configuration
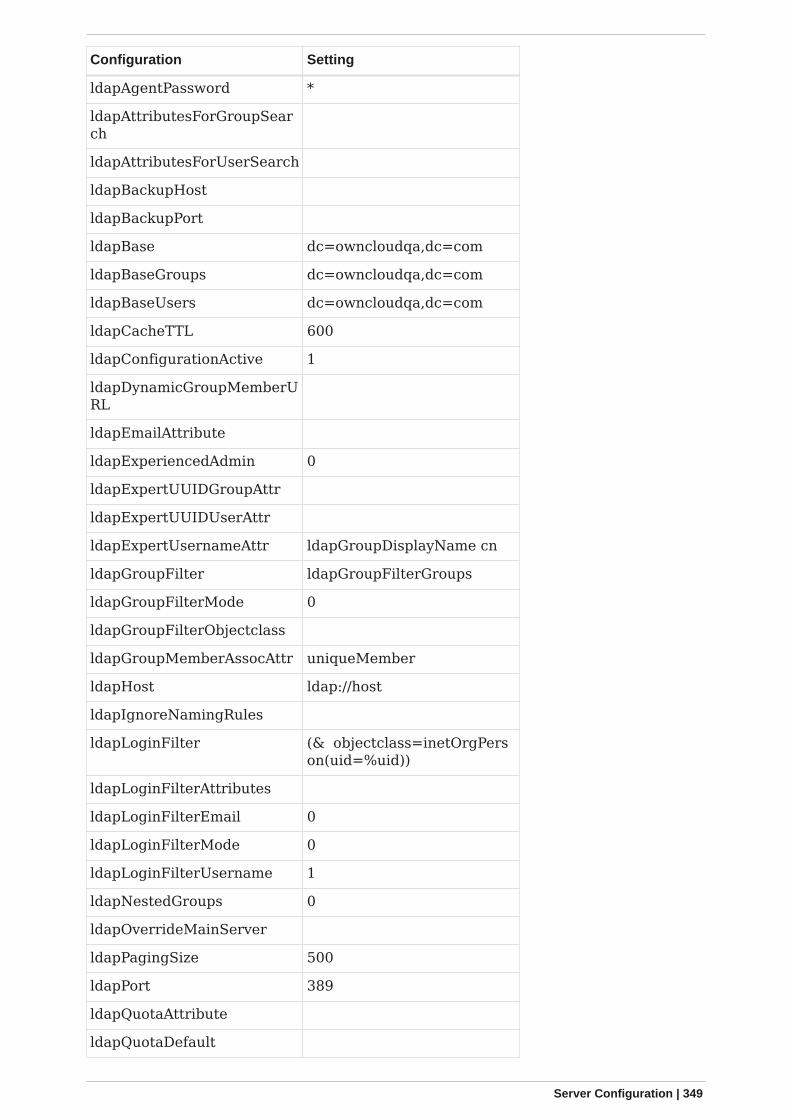
Configuration Setting
ldapAgentPassword *
ldapAttributesForGroupSearch
ldapAttributesForUserSearch
ldapBackupHost
ldapBackupPort
ldapBase dc=owncloudqa,dc=com
ldapBaseGroups dc=owncloudqa,dc=com
ldapBaseUsers dc=owncloudqa,dc=com
ldapCacheTTL 600
ldapConfigurationActive 1
ldapDynamicGroupMemberURL
ldapEmailAttribute
ldapExperiencedAdmin 0
ldapExpertUUIDGroupAttr
ldapExpertUUIDUserAttr
ldapExpertUsernameAttr ldapGroupDisplayName cn
ldapGroupFilter ldapGroupFilterGroups
ldapGroupFilterMode 0
ldapGroupFilterObjectclass
ldapGroupMemberAssocAttr uniqueMember
ldapHost ldap://host
ldapIgnoreNamingRules
ldapLoginFilter (& objectclass=inetOrgPerson(uid=%uid))
ldapLoginFilterAttributes
ldapLoginFilterEmail 0
ldapLoginFilterMode 0
ldapLoginFilterUsername 1
ldapNestedGroups 0
ldapOverrideMainServer
ldapPagingSize 500
ldapPort 389
ldapQuotaAttribute
ldapQuotaDefault
Server Configuration | 349
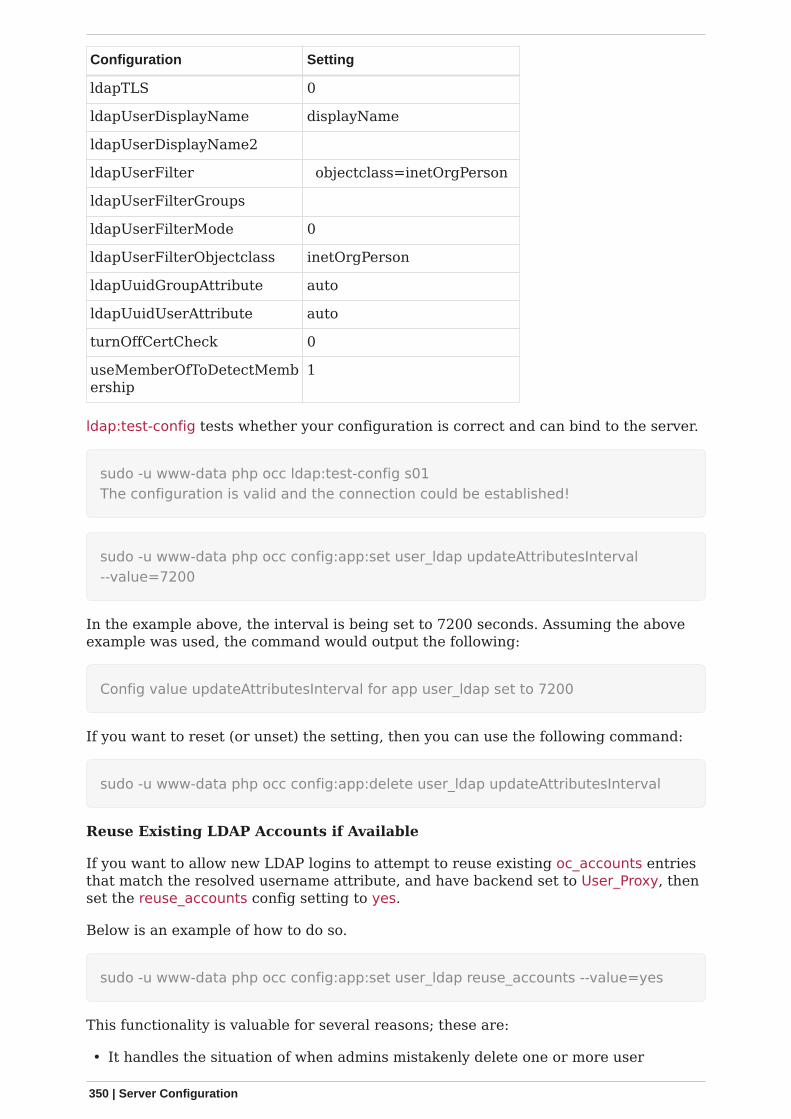
Configuration Setting
ldapTLS 0
ldapUserDisplayName displayName
ldapUserDisplayName2
ldapUserFilter objectclass=inetOrgPerson
ldapUserFilterGroups
ldapUserFilterMode 0
ldapUserFilterObjectclass inetOrgPerson
ldapUuidGroupAttribute auto
ldapUuidUserAttribute auto
turnOffCertCheck 0
useMemberOfToDetectMembership
1
ldap:test-config tests whether your configuration is correct and can bind to the server.
sudo -u www-data php occ ldap:test-config s01The configuration is valid and the connection could be established!
sudo -u www-data php occ config:app:set user_ldap updateAttributesInterval--value=7200
In the example above, the interval is being set to 7200 seconds. Assuming the aboveexample was used, the command would output the following:
Config value updateAttributesInterval for app user_ldap set to 7200
If you want to reset (or unset) the setting, then you can use the following command:
sudo -u www-data php occ config:app:delete user_ldap updateAttributesInterval
Reuse Existing LDAP Accounts if Available
If you want to allow new LDAP logins to attempt to reuse existing oc_accounts entriesthat match the resolved username attribute, and have backend set to User_Proxy, thenset the reuse_accounts config setting to yes.
Below is an example of how to do so.
sudo -u www-data php occ config:app:set user_ldap reuse_accounts --value=yes
This functionality is valuable for several reasons; these are:
• It handles the situation of when admins mistakenly delete one or more user
350 | Server Configuration
mappings, and subsequent logins then create new accounts.• It allows auto-provisioned users with Shibboleth to be moved over to an LDAP
server, but be able to continue using ownCloud.
== This functionality will not work in the following situations:
1. No user or group account exists with the supplied username.2. A user or group account exists, but it uses a different backend. ==
Market
Marketplace URL: Market
The market commands install, uninstall, list, and upgrade applications from theownCloud Marketplace.
market market:install Install apps from the marketplace. If already installed and an update is available the update will be installed. market:uninstall Uninstall apps from the marketplace. market:list Lists apps as available on the marketplace. market:upgrade Installs new app versions if available on the marketplace
The user running the update command, which will likely be yourwebserver user, requires write permission for the /apps respectivelyapps-external folder.
If they don’t have write permission, the command may report that theupdate was successful, but it may silently fail.
These commands are not available in single-user (maintenance) mode. For moredetails please see the Maintenance Commands section in the occ core command set.
Install an Application
Applications can be installed both from the ownCloud Marketplace and from a localfile archive.
Install Apps From The Marketplace
To install an application from the Marketplace, you need to supply the app’s id, whichcan be found in the app’s Marketplace URL. For example, the URL for Two factorbackup codes is https://marketplace.owncloud.com/apps/twofactor_backup_codes. Soits app id is twofactor_backup_codes.
sudo -u www-data php occ market:install <ids> [option]
Arguments
ids Ids of the apps
Server Configuration | 351
Options
-l [LOCAL]--local=[LOCAL]
Optional path to a local app package.
Install Apps From a File Archive
To install an application from a local file archive, you need to supply the path to thearchive, and that you pass the -l switch. Only zip, gzip, and bzip2 archives aresupported.
Usage Example
# Install an app from the marketplace.sudo -u www-data php occ market:install twofactor_backup_codes
# Install an app from a local archive.sudo -u www-data php occ market:install -l /mnt/data/richdocuments-2.0.0.tar.gz
The target directory has to be accessible to the webserver user andyou have to enable the app afterwards with the occ app:enablecommand.
Uninstall an Application
To uninstall an application use the following commands:
sudo -u www-data php occ market:uninstall <ids>
Arguments
ids Ids of the apps
List Apps From The Marketplace
This command lists apps available on the marketplace. It returns the ids of the apps.
sudo -u www-data php occ market:list
Upgrade an Application
Install new app versions if available on the marketplace by using following commands:
sudo -u www-data php occ market:upgrade <ids> [options]
Arguments
ids Ids of the apps
352 | Server Configuration
Options
-l [LOCAL]--local=[LOCAL]
Optional path to a local app package.
--major Allow update to a new major version.
Metrics
Marketplace URL: Metrics
Monitoring and reporting of ownCloud Server. For details please see the Metricsdocumentation.
Set a secret for authenticating requests at the endpoint.
In case you want to generate a random secret, use the following example command:
echo $(tr -dc 'a-z0-9' < /dev/urandom | head -c 20)
Set or change the Secret
Writes the key metrics_shared_secret and the secret to config.php. The name must notbe changed and be exactly as written.
Note: You can also set the config key/value manually into your config.php file.
sudo -u www-data php occ config:system:set \ "metrics_shared_secret" \ --value "your-metrics-secret"
The above command adds the following at the end of config.php:
'metrics_shared_secret' => 'your-metrics-secret',
Get the Secret
This command reads the value of the metrics_shared_secret key from config.php:
sudo -u www-data php occ config:system:get "metrics_shared_secret"
your-metrics-secret
Delete the Secret
This command completely removes the key and the value from config.php:
sudo -u www-data php occ config:system:delete "metrics_shared_secret"
Server Configuration | 353
Password Policy
Marketplace URL: Password Policy
Command to expire a user or group of users’ passwords.
Command Description
sudo -u www-data php occ user:expire-password <uid> [<expiredate>]
Arguments
uid User ID.
expiredate The date and time when a password expires,e.g. 2019-01-01 14:00:00 CET or -1 days.
The expiry date can be provided using any of PHP’s supported date andtime formats.
Options
-a, --all Will add password expiry to all known users. uid and group optionare discarded if the option is provided by user.
-u [UID]--uid=[UID]
The uid of the user to expire the password for.To expire the password of multiple users, pass the -u or --uidoption multiple times, as in this example: --uid "Alice" --uid "Bob".
-g [GROUP]--group=[GROUP]
Add password expiry to user(s) in one or more groups.This option can be used as --group foo --group bar to add expirypasswords for users in multiple groups.
If an expiry date is not supplied, the password will expire with immediate effect. Thisis because the password will be set as being expired 24 hours before the commandwas run. For example, if the command was run at 2018-07-12 13:15:28 UTC, then thepassword’s expiry date will be set to 2018-07-11 13:15:28 UTC.
After the command completes, console output, similar to that below, confirms whenthe user’s password is set to expire.
The password for frank is set to expire on 2018-07-12 13:15:28 UTC.
Command Examples
354 | Server Configuration
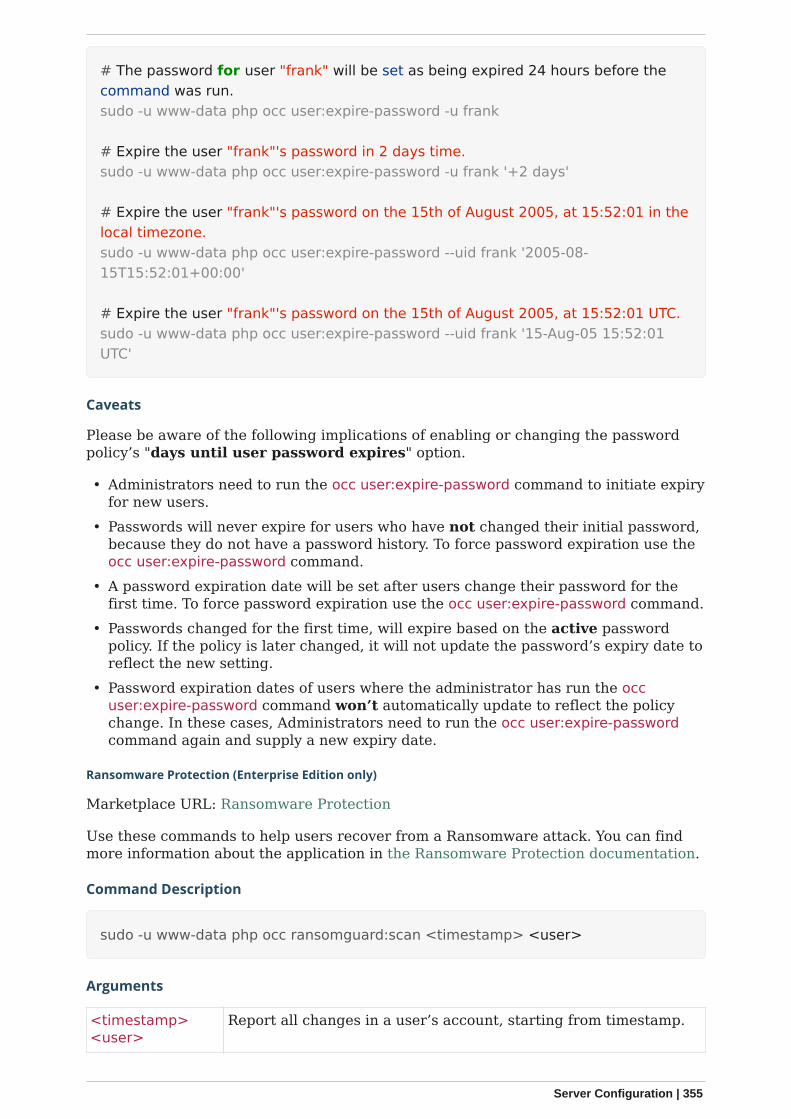
# The password for user "frank" will be set as being expired 24 hours before thecommand was run.sudo -u www-data php occ user:expire-password -u frank
# Expire the user "frank"'s password in 2 days time.sudo -u www-data php occ user:expire-password -u frank '+2 days'
# Expire the user "frank"'s password on the 15th of August 2005, at 15:52:01 in thelocal timezone.sudo -u www-data php occ user:expire-password --uid frank '2005-08-15T15:52:01+00:00'
# Expire the user "frank"'s password on the 15th of August 2005, at 15:52:01 UTC.sudo -u www-data php occ user:expire-password --uid frank '15-Aug-05 15:52:01UTC'
Caveats
Please be aware of the following implications of enabling or changing the passwordpolicy’s "days until user password expires" option.
• Administrators need to run the occ user:expire-password command to initiate expiryfor new users.
• Passwords will never expire for users who have not changed their initial password,because they do not have a password history. To force password expiration use theocc user:expire-password command.
• A password expiration date will be set after users change their password for thefirst time. To force password expiration use the occ user:expire-password command.
• Passwords changed for the first time, will expire based on the active passwordpolicy. If the policy is later changed, it will not update the password’s expiry date toreflect the new setting.
• Password expiration dates of users where the administrator has run the occuser:expire-password command won’t automatically update to reflect the policychange. In these cases, Administrators need to run the occ user:expire-passwordcommand again and supply a new expiry date.
Ransomware Protection (Enterprise Edition only)
Marketplace URL: Ransomware Protection
Use these commands to help users recover from a Ransomware attack. You can findmore information about the application in the Ransomware Protection documentation.
Command Description
sudo -u www-data php occ ransomguard:scan <timestamp> <user>
Arguments
<timestamp><user>
Report all changes in a user’s account, starting from timestamp.
Server Configuration | 355
sudo -u www-data php occ ransomguard:restore <timestamp> <user>
Arguments
<timestamp><user>
Revert all operations in a user account after a point in time.
sudo -u www-data php occ ransomguard:lock <user>
Arguments
<user> Set a user account as read-only for ownCloud and other WebDAVclients when malicious activity is suspected.
sudo -u www-data php occ ransomguard:unlock <user>
Arguments
<user> Unlock a user account after ransomware issues have beenresolved.
OAuth2
Marketplace URL: OAuth2
The oauth2 commands add-client and remove-client, manage OAuth2 clients.
Use these commands to configure the OAuth2 app:
oauth2 oauth2:add-client Adds an OAuth2 client oauth2:remove-client Removes an OAuth2 client
Add a Client
Usage
oauth2:add-client <name> <client-id> <client-secret> <redirect-url> [<allow-sub-domains> [<trusted> [<force-trust>]]]
Arguments
name Name of the client - will be displayed in the authorization page tothe user
client-id Identifier of the client - used by the client during the implicit andauthorization code flow
client-secret Secret of the client - used by the client during the authorizationcode flow
356 | Server Configuration

redirect-url Redirect URL - used in the OAuth flows to post back tokens andauthorization codes to the client
allow-sub-domains Defines if the redirect url is allowed to use sub-domains. Entertrue or false [default: "false"]
trusted Defines if the client is trusted. Enter true or false [default: "false"]
force-trust Trust the client even if the redirect-url is localhost. [default:"false"]
Remove a Client
Usage
oauth2:remove-client <client-id>
Arguments
client-id Identifier of the client - used by the client during the implicit andauthorization code flow
S3 Primary Objectstore
Commands to configure Amazon S3 compatible object storages as the primaryownCloud storage location.
Marketplace URL: S3 Primary Object Storage
List objects, buckets or versions of an object
sudo -u www-data php occ s3:list
Arguments
bucket Name of the bucket; it`s objects will be listed.
object Key of the object; it`s versions will be listed.
Create a bucket as necessary to be used
sudo -u www-data php occ s3:create-bucket
Arguments
bucket Name of the bucket to be created.
Options
update-configuration
If the bucket exists, the configuration will beupdated.
accept-warning No warning about the usage of this commandwill be displayed.
Server Configuration | 357

SAML/SSO Shibboleth Integration (Enterprise Edition only)
Marketplace URL: SAML/SSO Integration
shibboleth:mode sets your Shibboleth mode to notactive, autoprovision, or ssoonly
shibboleth:mode [mode]
Two-Factor TOTP
Marketplace URL: 2-Factor Authentication
The following commands manage the 2-Factor Authentication App. TOTP stands fortime-based one-time password. There is also a core component independent of the 2-Factor Authentication App with which a particular user can be enabled or disabled forthe two-factor authentication. For details see section Two-Factor Authentication.
The following commands are available for the 2-Factor Authentication app:
twofactor_totp twofactor_totp:delete-redundant-secret Delete the redundant secret of non-existing users twofactor_totp:set-secret-verification-status Set secret verification status ofspecified users or all users
Delete Redundant Secrets
Delete the redundant secrets of non-existing users:
sudo -u www-data php occ twofactor_totp:delete-redundant-secret
Set Secret Verification Status
Set secret verification status of specified users or all users:
sudo -u www-data php occ twofactor_totp:set-secret-verification-status [options] [--] <set-verified>
Arguments
set-verified Secret verification status to set. (true or false)
Options
--all Will affect all users that use TOTP
-u, --uid=UID The user’s uid is used.This option can be used as --uid="Alice" --uid="Bob" (multiplevalues allowed)
358 | Server Configuration

Windows Network Drive (WND)
Marketplace URL: External Storage: Windows Network Drives
Integrate Windows and Samba/CIFS shared network drives as external storages. Fordetails please see the Windows Network Drive (WND) documentation.
The wnd commands configure the WND app.
wnd wnd:listen Listen to smb changes and store notifications for laterprocessing wnd:process-queue Process the notifications stored by the wnd:listencommand wnd:set-service-account Sets the service account for the target mount point
Please see the Windows Network Drive Notifications for how to properly setupwnd:listen and wnd:process-queue.
Configure the Listener
Listen to smb changes and store notifications for later processing in the database
sudo -u www-data php occ wnd:listen [options] [--] <host> <share> <username>[<password>]
Arguments
host The hostname or IP address of the server to listento
share The share inside the host to listen to for changes
username The username that will be used to connect to theshare
password The user’s password (will be asked for if it isn’tprovided)
Options
-p,--path=PATH
The path inside the share to watch for changes[default: ""]
--password-file=PASSWORD-FILE
The file containing the password for the account tobe used to listen
--password-trim Trim blank characters from the password
--unbuffering-option=UNBUFFERING-OPTION
Force the usage of that unbuffering option for theunderlying smbclient command. Possible optionsare either "auto", "pty" or "stdbuf" [default: "auto"]
--output[=OUTPUT] The output format to use (plain, json orjson_pretty). [default: "plain"]
Server Configuration | 359

Process Notifications
Process the notifications stored by the wnd:listen command
sudo -u www-data php occ wnd:process-queue [options] [--] <host> <share>
Arguments
host The server whose notifications will be processed
share The share whose notifications will be processed
Options
--output[=OUTPUT] The output format to use (plain, json orjson_pretty). [default: "plain"]
Set the Service Account
Sets the service account for the target mount point. You’ll be asked for the passwordof the service account.
sudo -u www-data php occ wnd:set-service-account [options] [--] <mount-id>
Please see the occ documentation of files_external:list to get the required mount-id.
Arguments
mount-id ID of the mount point. Use "occ files_external:list--short" to find it
Options
--output[=OUTPUT] The output format to use (plain, json orjson_pretty). [default: "plain"]
Language Configuration
In normal cases, ownCloud will automatically detect the language of the Web UI. Ifthis does not work as expected, or you want to make sure that ownCloud always startswith a given language, you can use the default_language configuration parameter.
This parameter can be set in config/config.php
Parameters
'default_language' => 'en',
Keep in mind that this will not affect the language preferences of users, which can beconfigured under Settings › Personal › General › Language once they have loggedin.
More supported languages can be found in directory <ownCloud_root>/settings/l10n.
360 | Server Configuration
List all files with ls *.js. The language code to be used is the filename withoutextension.
Example:
en_GB.js --> en_GB
Refer to Wikipedia for a match of language code to country.
Legal Settings Configuration
Introduction
Because of one or more legal frameworks around the world, some ownCloud instancesmay need to display links to both an Imprint as well as a Privacy Policy on all pages(both in the Web UI and within email templates). An Imprint document is a legallymandated statement of the ownership and authorship of the ownCloud installation.You can think of an Imprint as a rather fancy "About Us" page or an enhanced "Termsand Conditions" page; in Germany, this is known as an "Impressum".
Imprint and Privacy Policy links are shown on all public pages and in e-mail footers. Authenticated pages, such as files app or settings, do notshow them.
Some of the more global legal frameworks prominent are:
• The GDPR General Data Protection Regulation• The Australian Privacy Act 1988• The Canadian Personal Information Protection and Electronic Data Act (PIPEDA)• The California Online Privacy Protection Act (CalOPPA)• The Children’s Online Privacy Protection Rule (COPPA)
If you’re required to link to either one of these, you can specify the link to them in twoways:
• Using the Web UI• Using the Command Line
Using the Web UI
In the Web UI, under Settings › Admin › General, under the heading "Legal", youcan provide a link to an Imprint and a Privacy Policy URL, as you can see in thescreenshot below.
Configuring Imprint and Privacy Policy URLs in the ownCloud Web UI.
Server Configuration | 361
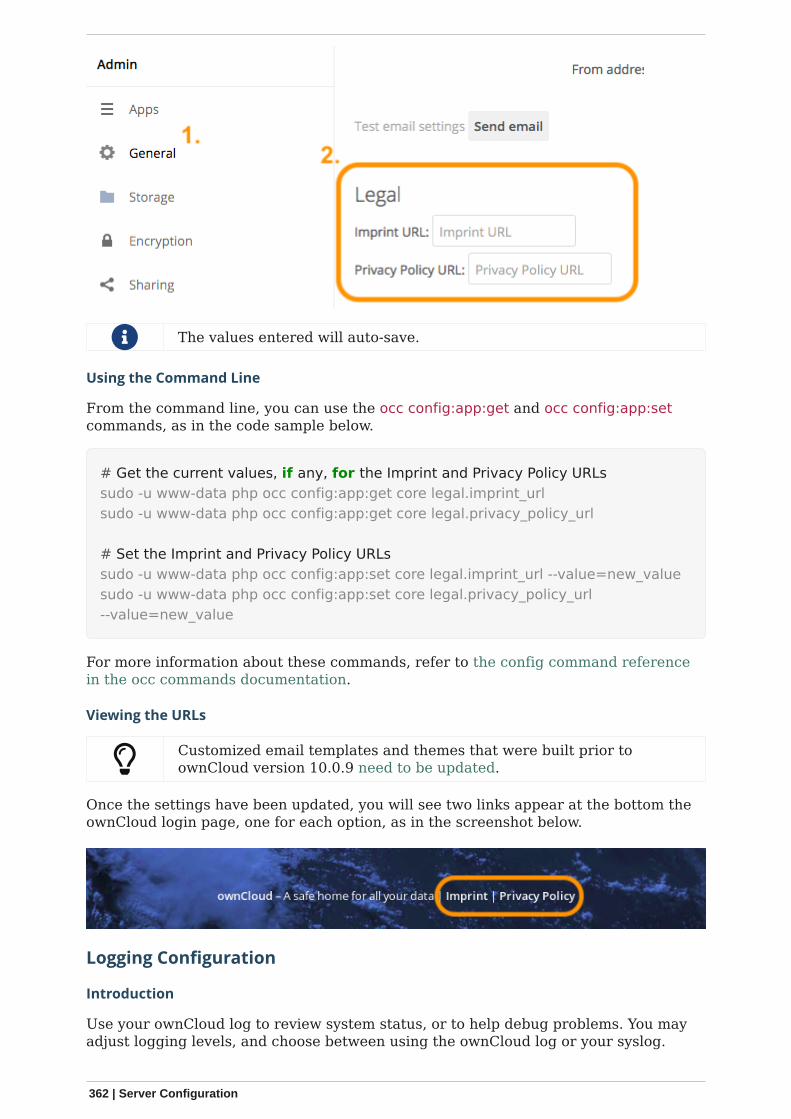
The values entered will auto-save.
Using the Command Line
From the command line, you can use the occ config:app:get and occ config:app:setcommands, as in the code sample below.
# Get the current values, if any, for the Imprint and Privacy Policy URLssudo -u www-data php occ config:app:get core legal.imprint_urlsudo -u www-data php occ config:app:get core legal.privacy_policy_url
# Set the Imprint and Privacy Policy URLssudo -u www-data php occ config:app:set core legal.imprint_url --value=new_valuesudo -u www-data php occ config:app:set core legal.privacy_policy_url--value=new_value
For more information about these commands, refer to the config command referencein the occ commands documentation.
Viewing the URLs
Customized email templates and themes that were built prior toownCloud version 10.0.9 need to be updated.
Once the settings have been updated, you will see two links appear at the bottom theownCloud login page, one for each option, as in the screenshot below.
Logging Configuration
Introduction
Use your ownCloud log to review system status, or to help debug problems. You mayadjust logging levels, and choose between using the ownCloud log or your syslog.
362 | Server Configuration
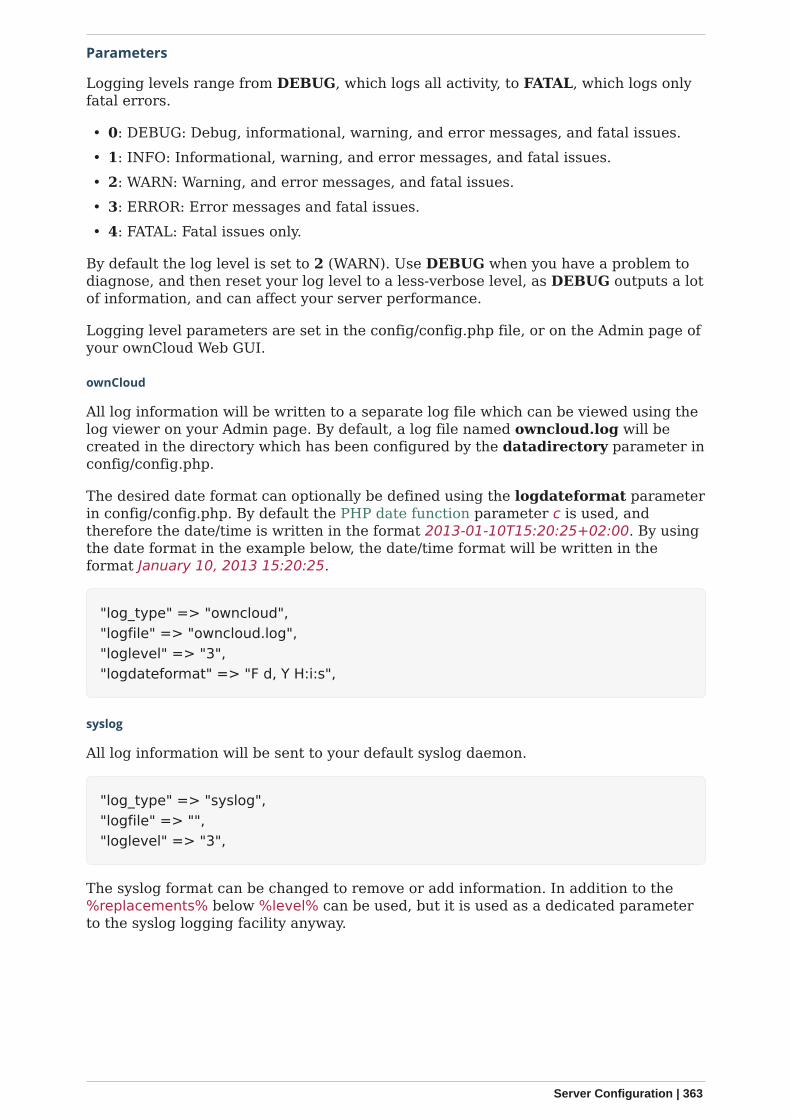
Parameters
Logging levels range from DEBUG, which logs all activity, to FATAL, which logs onlyfatal errors.
• 0: DEBUG: Debug, informational, warning, and error messages, and fatal issues.• 1: INFO: Informational, warning, and error messages, and fatal issues.• 2: WARN: Warning, and error messages, and fatal issues.• 3: ERROR: Error messages and fatal issues.• 4: FATAL: Fatal issues only.
By default the log level is set to 2 (WARN). Use DEBUG when you have a problem todiagnose, and then reset your log level to a less-verbose level, as DEBUG outputs a lotof information, and can affect your server performance.
Logging level parameters are set in the config/config.php file, or on the Admin page ofyour ownCloud Web GUI.
ownCloud
All log information will be written to a separate log file which can be viewed using thelog viewer on your Admin page. By default, a log file named owncloud.log will becreated in the directory which has been configured by the datadirectory parameter inconfig/config.php.
The desired date format can optionally be defined using the logdateformat parameterin config/config.php. By default the PHP date function parameter c is used, andtherefore the date/time is written in the format 2013-01-10T15:20:25+02:00. By usingthe date format in the example below, the date/time format will be written in theformat January 10, 2013 15:20:25.
"log_type" => "owncloud","logfile" => "owncloud.log","loglevel" => "3","logdateformat" => "F d, Y H:i:s",
syslog
All log information will be sent to your default syslog daemon.
"log_type" => "syslog","logfile" => "","loglevel" => "3",
The syslog format can be changed to remove or add information. In addition to the%replacements% below %level% can be used, but it is used as a dedicated parameterto the syslog logging facility anyway.
Server Configuration | 363
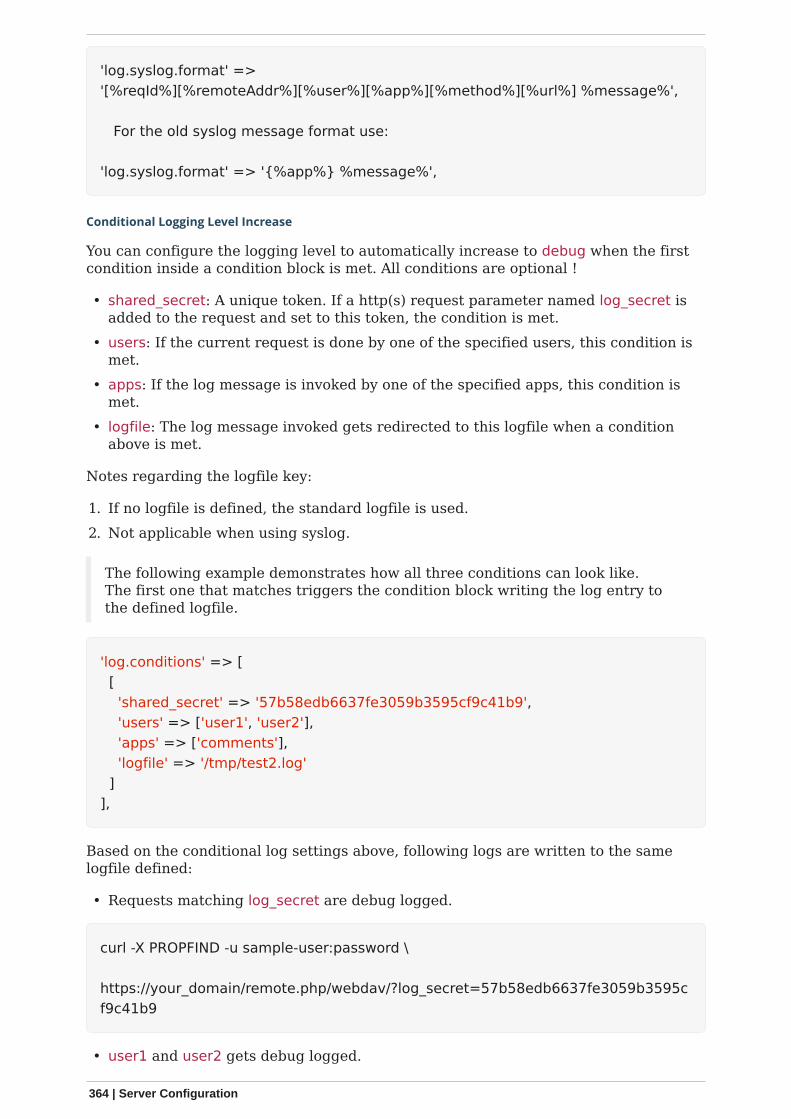
'log.syslog.format' =>'[%reqId%][%remoteAddr%][%user%][%app%][%method%][%url%] %message%',
For the old syslog message format use:
'log.syslog.format' => '{%app%} %message%',
Conditional Logging Level Increase
You can configure the logging level to automatically increase to debug when the firstcondition inside a condition block is met. All conditions are optional !
• shared_secret: A unique token. If a http(s) request parameter named log_secret isadded to the request and set to this token, the condition is met.
• users: If the current request is done by one of the specified users, this condition ismet.
• apps: If the log message is invoked by one of the specified apps, this condition ismet.
• logfile: The log message invoked gets redirected to this logfile when a conditionabove is met.
Notes regarding the logfile key:
1. If no logfile is defined, the standard logfile is used.2. Not applicable when using syslog.
The following example demonstrates how all three conditions can look like.The first one that matches triggers the condition block writing the log entry tothe defined logfile.
'log.conditions' => [ [ 'shared_secret' => '57b58edb6637fe3059b3595cf9c41b9', 'users' => ['user1', 'user2'], 'apps' => ['comments'], 'logfile' => '/tmp/test2.log' ]],
Based on the conditional log settings above, following logs are written to the samelogfile defined:
• Requests matching log_secret are debug logged.
curl -X PROPFIND -u sample-user:password \ https://your_domain/remote.php/webdav/?log_secret=57b58edb6637fe3059b3595cf9c41b9
• user1 and user2 gets debug logged.
364 | Server Configuration
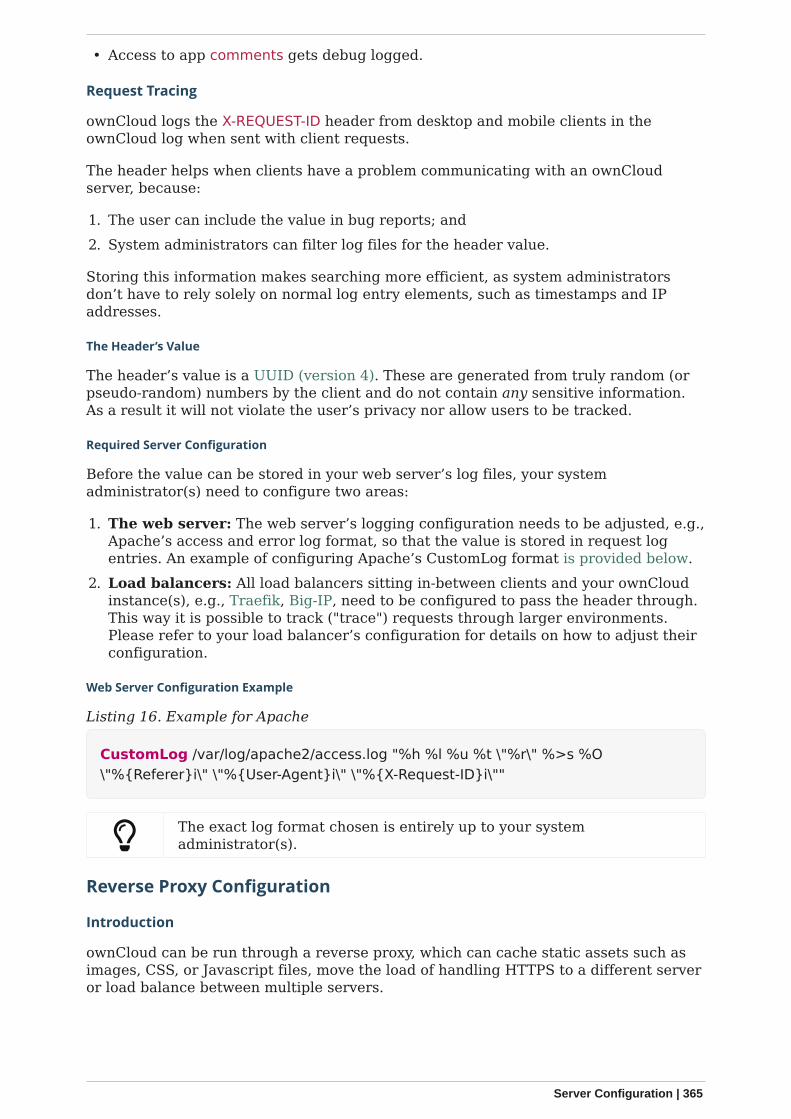
• Access to app comments gets debug logged.
Request Tracing
ownCloud logs the X-REQUEST-ID header from desktop and mobile clients in theownCloud log when sent with client requests.
The header helps when clients have a problem communicating with an ownCloudserver, because:
1. The user can include the value in bug reports; and2. System administrators can filter log files for the header value.
Storing this information makes searching more efficient, as system administratorsdon’t have to rely solely on normal log entry elements, such as timestamps and IPaddresses.
The Header’s Value
The header’s value is a UUID (version 4). These are generated from truly random (orpseudo-random) numbers by the client and do not contain any sensitive information.As a result it will not violate the user’s privacy nor allow users to be tracked.
Required Server Configuration
Before the value can be stored in your web server’s log files, your systemadministrator(s) need to configure two areas:
1. The web server: The web server’s logging configuration needs to be adjusted, e.g.,Apache’s access and error log format, so that the value is stored in request logentries. An example of configuring Apache’s CustomLog format is provided below.
2. Load balancers: All load balancers sitting in-between clients and your ownCloudinstance(s), e.g., Traefik, Big-IP, need to be configured to pass the header through.This way it is possible to track ("trace") requests through larger environments.Please refer to your load balancer’s configuration for details on how to adjust theirconfiguration.
Web Server Configuration Example
Listing 16. Example for Apache
CustomLog /var/log/apache2/access.log "%h %l %u %t \"%r\" %>s %O\"%{Referer}i\" \"%{User-Agent}i\" \"%{X-Request-ID}i\""
The exact log format chosen is entirely up to your systemadministrator(s).
Reverse Proxy Configuration
Introduction
ownCloud can be run through a reverse proxy, which can cache static assets such asimages, CSS, or Javascript files, move the load of handling HTTPS to a different serveror load balance between multiple servers.
Server Configuration | 365
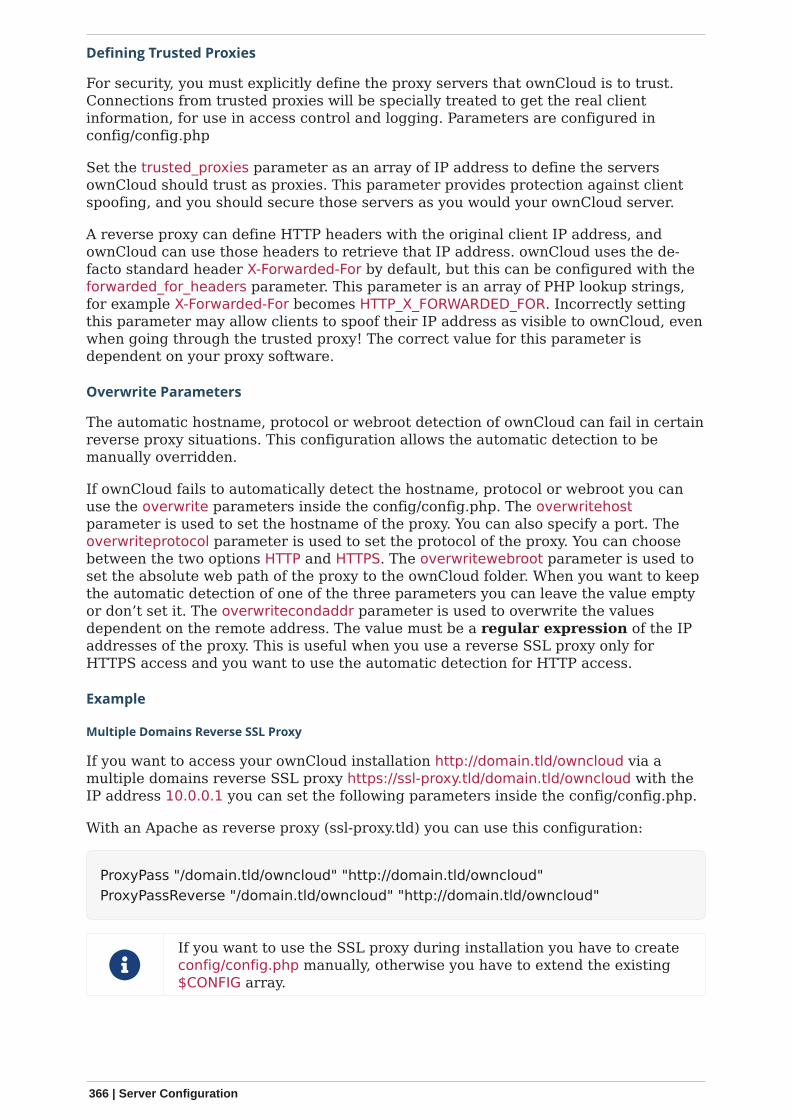
Defining Trusted Proxies
For security, you must explicitly define the proxy servers that ownCloud is to trust.Connections from trusted proxies will be specially treated to get the real clientinformation, for use in access control and logging. Parameters are configured inconfig/config.php
Set the trusted_proxies parameter as an array of IP address to define the serversownCloud should trust as proxies. This parameter provides protection against clientspoofing, and you should secure those servers as you would your ownCloud server.
A reverse proxy can define HTTP headers with the original client IP address, andownCloud can use those headers to retrieve that IP address. ownCloud uses the de-facto standard header X-Forwarded-For by default, but this can be configured with theforwarded_for_headers parameter. This parameter is an array of PHP lookup strings,for example X-Forwarded-For becomes HTTP_X_FORWARDED_FOR. Incorrectly settingthis parameter may allow clients to spoof their IP address as visible to ownCloud, evenwhen going through the trusted proxy! The correct value for this parameter isdependent on your proxy software.
Overwrite Parameters
The automatic hostname, protocol or webroot detection of ownCloud can fail in certainreverse proxy situations. This configuration allows the automatic detection to bemanually overridden.
If ownCloud fails to automatically detect the hostname, protocol or webroot you canuse the overwrite parameters inside the config/config.php. The overwritehostparameter is used to set the hostname of the proxy. You can also specify a port. Theoverwriteprotocol parameter is used to set the protocol of the proxy. You can choosebetween the two options HTTP and HTTPS. The overwritewebroot parameter is used toset the absolute web path of the proxy to the ownCloud folder. When you want to keepthe automatic detection of one of the three parameters you can leave the value emptyor don’t set it. The overwritecondaddr parameter is used to overwrite the valuesdependent on the remote address. The value must be a regular expression of the IPaddresses of the proxy. This is useful when you use a reverse SSL proxy only forHTTPS access and you want to use the automatic detection for HTTP access.
Example
Multiple Domains Reverse SSL Proxy
If you want to access your ownCloud installation http://domain.tld/owncloud via amultiple domains reverse SSL proxy https://ssl-proxy.tld/domain.tld/owncloud with theIP address 10.0.0.1 you can set the following parameters inside the config/config.php.
With an Apache as reverse proxy (ssl-proxy.tld) you can use this configuration:
ProxyPass "/domain.tld/owncloud" "http://domain.tld/owncloud"ProxyPassReverse "/domain.tld/owncloud" "http://domain.tld/owncloud"
If you want to use the SSL proxy during installation you have to createconfig/config.php manually, otherwise you have to extend the existing$CONFIG array.
366 | Server Configuration
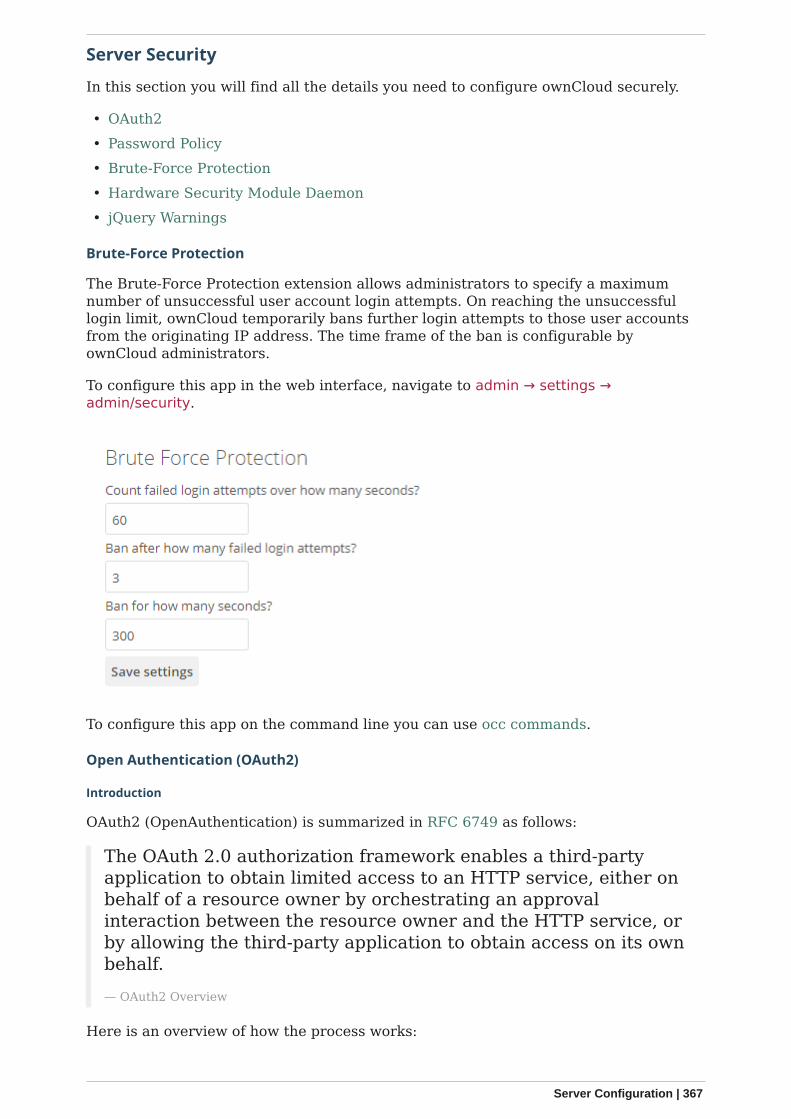
Server Security
In this section you will find all the details you need to configure ownCloud securely.
• OAuth2• Password Policy• Brute-Force Protection• Hardware Security Module Daemon• jQuery Warnings
Brute-Force Protection
The Brute-Force Protection extension allows administrators to specify a maximumnumber of unsuccessful user account login attempts. On reaching the unsuccessfullogin limit, ownCloud temporarily bans further login attempts to those user accountsfrom the originating IP address. The time frame of the ban is configurable byownCloud administrators.
To configure this app in the web interface, navigate to admin → settings →admin/security.
To configure this app on the command line you can use occ commands.
Open Authentication (OAuth2)
Introduction
OAuth2 (OpenAuthentication) is summarized in RFC 6749 as follows:
The OAuth 2.0 authorization framework enables a third-partyapplication to obtain limited access to an HTTP service, either onbehalf of a resource owner by orchestrating an approvalinteraction between the resource owner and the HTTP service, orby allowing the third-party application to obtain access on its ownbehalf.— OAuth2 Overview
Here is an overview of how the process works:
Server Configuration | 367
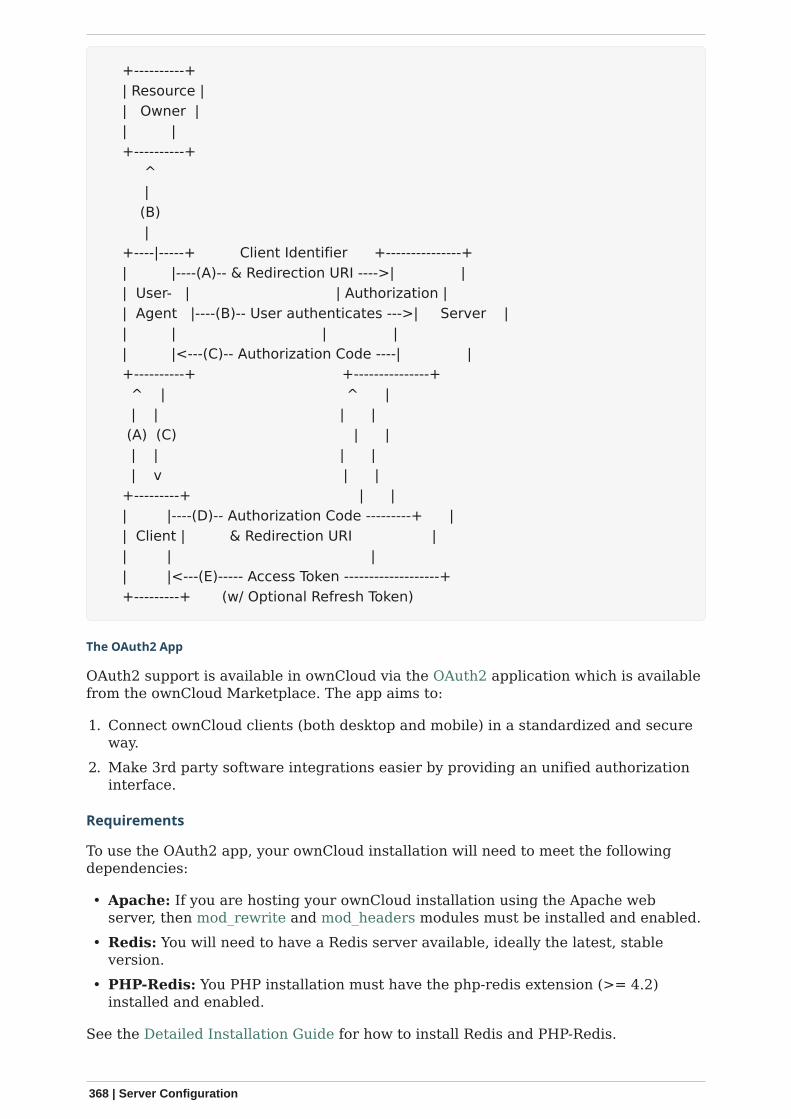
+----------+ | Resource | | Owner | | | +----------+ ^ | (B) | +----|-----+ Client Identifier +---------------+ | |----(A)-- & Redirection URI ---->| | | User- | | Authorization | | Agent |----(B)-- User authenticates --->| Server | | | | | | |<---(C)-- Authorization Code ----| | +----------+ +---------------+ ^ | ^ | | | | | (A) (C) | | | | | | | v | | +---------+ | | | |----(D)-- Authorization Code ---------+ | | Client | & Redirection URI | | | | | |<---(E)----- Access Token -------------------+ +---------+ (w/ Optional Refresh Token)
The OAuth2 App
OAuth2 support is available in ownCloud via the OAuth2 application which is availablefrom the ownCloud Marketplace. The app aims to:
1. Connect ownCloud clients (both desktop and mobile) in a standardized and secureway.
2. Make 3rd party software integrations easier by providing an unified authorizationinterface.
Requirements
To use the OAuth2 app, your ownCloud installation will need to meet the followingdependencies:
• Apache: If you are hosting your ownCloud installation using the Apache webserver, then mod_rewrite and mod_headers modules must be installed and enabled.
• Redis: You will need to have a Redis server available, ideally the latest, stableversion.
• PHP-Redis: You PHP installation must have the php-redis extension (>= 4.2)installed and enabled.
See the Detailed Installation Guide for how to install Redis and PHP-Redis.
368 | Server Configuration
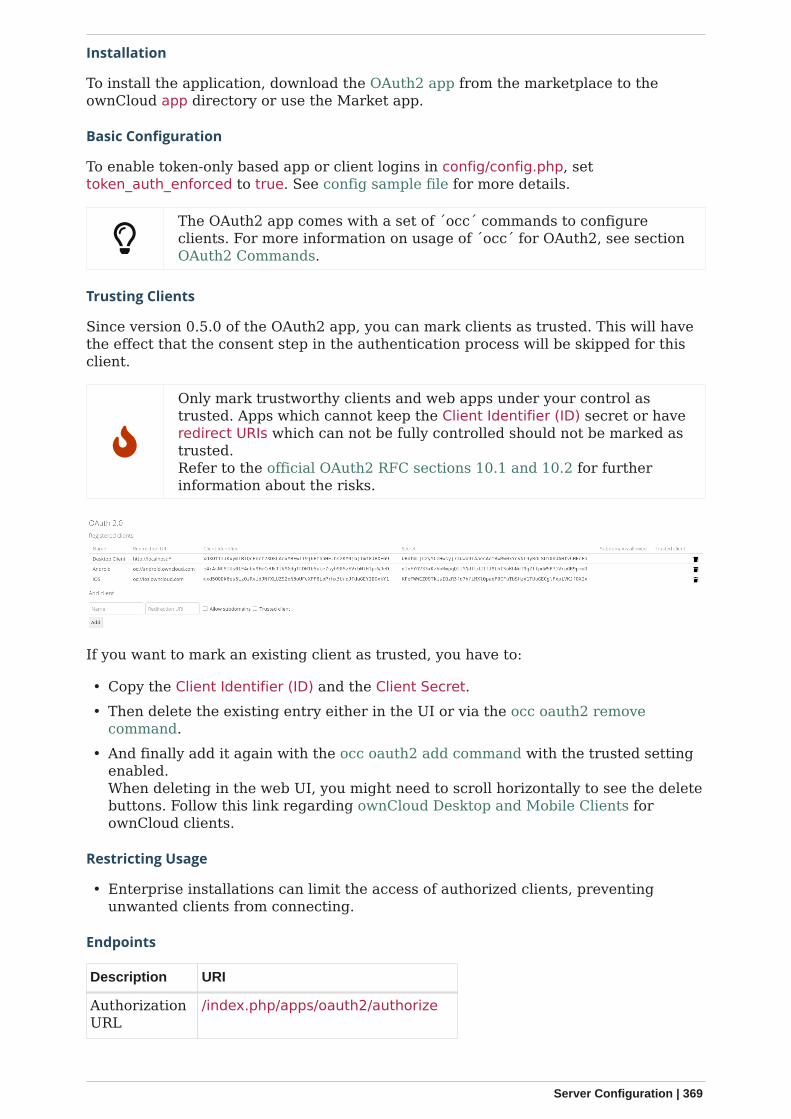
Installation
To install the application, download the OAuth2 app from the marketplace to theownCloud app directory or use the Market app.
Basic Configuration
To enable token-only based app or client logins in config/config.php, settoken_auth_enforced to true. See config sample file for more details.
The OAuth2 app comes with a set of ´occ´ commands to configureclients. For more information on usage of ´occ´ for OAuth2, see sectionOAuth2 Commands.
Trusting Clients
Since version 0.5.0 of the OAuth2 app, you can mark clients as trusted. This will havethe effect that the consent step in the authentication process will be skipped for thisclient.
Only mark trustworthy clients and web apps under your control astrusted. Apps which cannot keep the Client Identifier (ID) secret or haveredirect URIs which can not be fully controlled should not be marked astrusted.Refer to the official OAuth2 RFC sections 10.1 and 10.2 for furtherinformation about the risks.
If you want to mark an existing client as trusted, you have to:
• Copy the Client Identifier (ID) and the Client Secret.• Then delete the existing entry either in the UI or via the occ oauth2 remove
command.• And finally add it again with the occ oauth2 add command with the trusted setting
enabled.When deleting in the web UI, you might need to scroll horizontally to see the deletebuttons. Follow this link regarding ownCloud Desktop and Mobile Clients forownCloud clients.
Restricting Usage
• Enterprise installations can limit the access of authorized clients, preventingunwanted clients from connecting.
Endpoints
Description URI
AuthorizationURL
/index.php/apps/oauth2/authorize
Server Configuration | 369
Description URI
Access TokenURL
/index.php/apps/oauth2/api/v1/token
Protocol Flow
Client Registration
Clients first have to be registered in the web-UI Settings › Admin › Authentication.You need to specify a name for the client (the name is unrelated to the OAuth 2.0protocol and is just used to recognize it later) and the redirection URI. A clientidentifier and client secret are generated when adding a new client, which bothconsist of 64 characters.
Refer to the official client registration RFC from the IETF for further informationabout client registration.
Authorization Request
For every registered client, an authorization request can be made. The client redirectsthe resource owner to the authorization URL and requests authorization. The followingURL parameters have to be specified:
Parameter Required Description
response_type yes Needs to be code because at this time only the authorizationcode flow is implemented.
client_id yes The client identifier obtained when registering the client.
redirect_uri yes The redirection URI specified when registering the client.
state no Can be set by the client "to maintain state between therequest and callback". See `RFC 6749`_ for moreinformation.
Refer to the official authorization request RFC from the IETF for further informationabout client registration.
Authorization Response
After the resource owner’s authorization, the app redirects to the redirect_uri specifiedin the authorization request and adds the authorization code as URL parameter code.An authorization code is valid for 10 minutes.
Refer to the official authorization response RFC from the IETF for further informationabout client registration.
Access Token Request
With the authorization code, the client can request an access token using the accesstoken URL. Client authentication is done using basic authentication with the clientidentifier as username and the client secret as a password. The following URLparameters have to be specified:
Parameter Required Description
grant_type
Either authorization_code orrefresh_token.
370 | Server Configuration
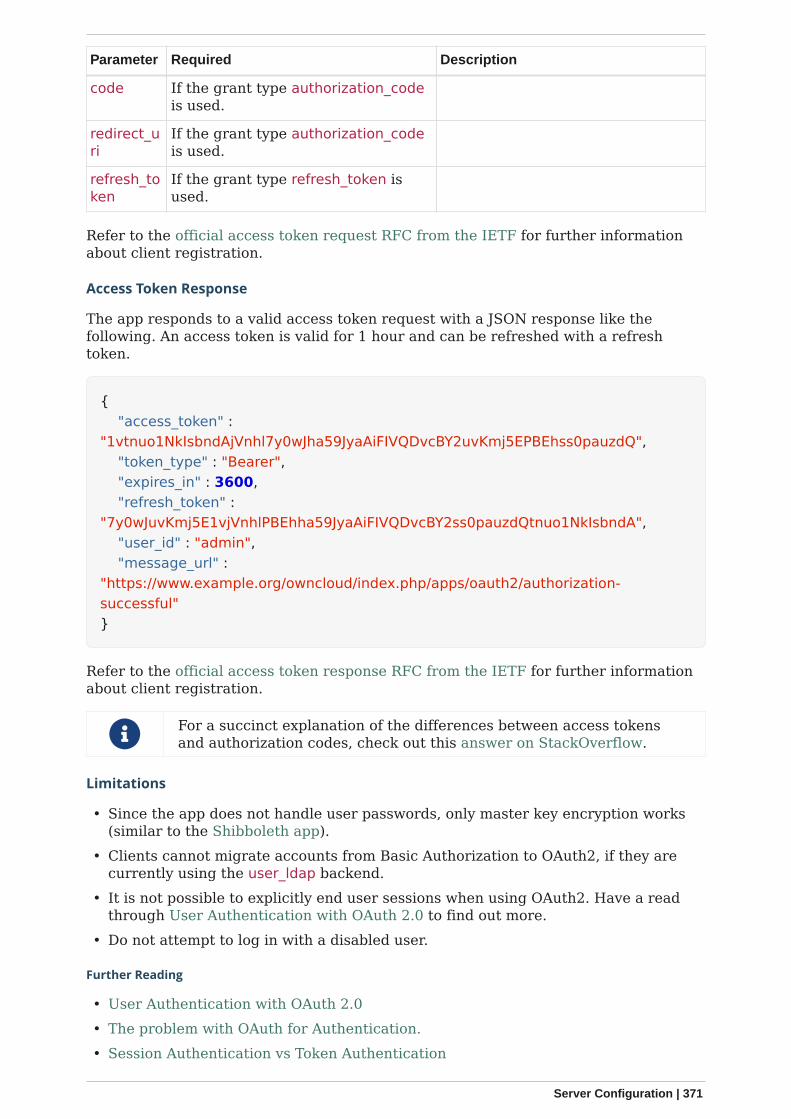
Parameter Required Description
code If the grant type authorization_codeis used.
redirect_uri
If the grant type authorization_codeis used.
refresh_token
If the grant type refresh_token isused.
Refer to the official access token request RFC from the IETF for further informationabout client registration.
Access Token Response
The app responds to a valid access token request with a JSON response like thefollowing. An access token is valid for 1 hour and can be refreshed with a refreshtoken.
{ "access_token" :"1vtnuo1NkIsbndAjVnhl7y0wJha59JyaAiFIVQDvcBY2uvKmj5EPBEhss0pauzdQ", "token_type" : "Bearer", "expires_in" : 3600, "refresh_token" :"7y0wJuvKmj5E1vjVnhlPBEhha59JyaAiFIVQDvcBY2ss0pauzdQtnuo1NkIsbndA", "user_id" : "admin", "message_url" :"https://www.example.org/owncloud/index.php/apps/oauth2/authorization-successful"}
Refer to the official access token response RFC from the IETF for further informationabout client registration.
For a succinct explanation of the differences between access tokensand authorization codes, check out this answer on StackOverflow.
Limitations
• Since the app does not handle user passwords, only master key encryption works(similar to the Shibboleth app).
• Clients cannot migrate accounts from Basic Authorization to OAuth2, if they arecurrently using the user_ldap backend.
• It is not possible to explicitly end user sessions when using OAuth2. Have a readthrough User Authentication with OAuth 2.0 to find out more.
• Do not attempt to log in with a disabled user.
Further Reading
• User Authentication with OAuth 2.0• The problem with OAuth for Authentication.• Session Authentication vs Token Authentication
Server Configuration | 371
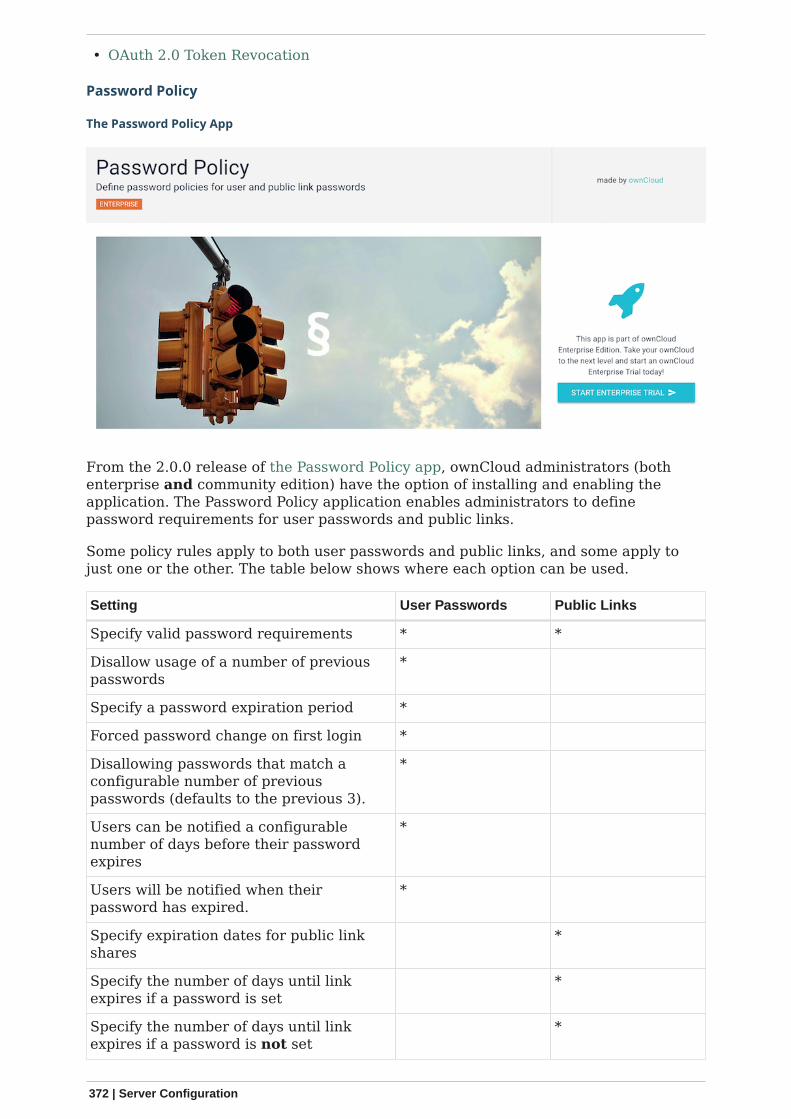
• OAuth 2.0 Token Revocation
Password Policy
The Password Policy App
From the 2.0.0 release of the Password Policy app, ownCloud administrators (bothenterprise and community edition) have the option of installing and enabling theapplication. The Password Policy application enables administrators to definepassword requirements for user passwords and public links.
Some policy rules apply to both user passwords and public links, and some apply tojust one or the other. The table below shows where each option can be used.
Setting User Passwords Public Links
Specify valid password requirements * *
Disallow usage of a number of previouspasswords
*
Specify a password expiration period *
Forced password change on first login *
Disallowing passwords that match aconfigurable number of previouspasswords (defaults to the previous 3).
*
Users can be notified a configurablenumber of days before their passwordexpires
*
Users will be notified when theirpassword has expired.
*
Specify expiration dates for public linkshares
*
Specify the number of days until linkexpires if a password is set
*
Specify the number of days until linkexpires if a password is not set
*
372 | Server Configuration
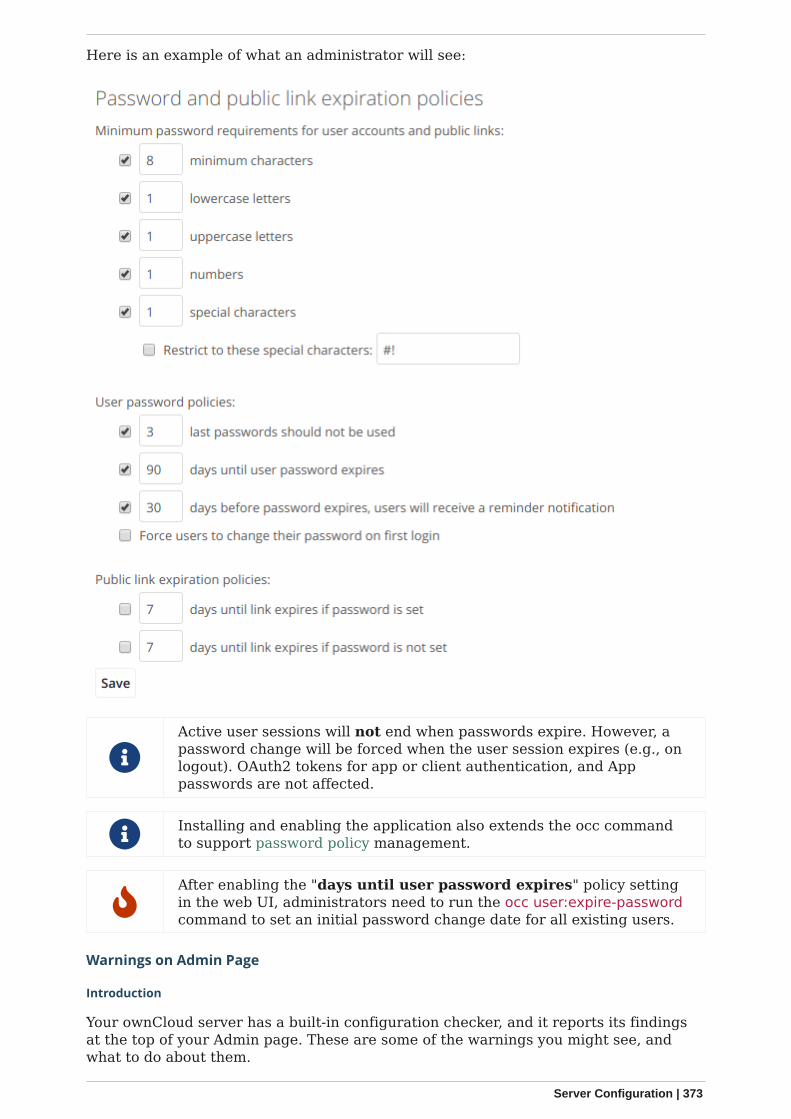
Here is an example of what an administrator will see:
Active user sessions will not end when passwords expire. However, apassword change will be forced when the user session expires (e.g., onlogout). OAuth2 tokens for app or client authentication, and Apppasswords are not affected.
Installing and enabling the application also extends the occ commandto support password policy management.
After enabling the "days until user password expires" policy settingin the web UI, administrators need to run the occ user:expire-passwordcommand to set an initial password change date for all existing users.
Warnings on Admin Page
Introduction
Your ownCloud server has a built-in configuration checker, and it reports its findingsat the top of your Admin page. These are some of the warnings you might see, andwhat to do about them.
Server Configuration | 373

Cache Warnings
No memory cache has been configured. To enhance your performance pleaseconfigure a memcache if available.
ownCloud supports multiple PHP caching extensions:
• APCu• Memcached• Redis (minimum required PHP extension version: 2.2.6)
You will see this warning if you have no caches installed and enabled, or if your cachedoes not have the required minimum version installed; older versions are disabledbecause of performance problems.
If you see {Cache} below version {Version} is installed. for stability and performancereasons we recommend to update to a newer {Cache} version then you need toupgrade, or, if you’re not using it, remove it.
You are not required to use any caches, but caches improve server performance. Seecaching_configuration.
Transactional file locking is disabled
Transactional file locking is disabled, this might lead to issues with race conditions.
Please see Transactional File Locking for how to correctly configure your environmentfor transactional file locking.
Background Jobs
We recommend to enable system cron as any other cron method has possibleperformance and reliability implications.
Further Information can be found in the docs article on Background Jobs
You are accessing this site via HTTP
You are accessing this site via HTTP. We strongly suggest you configure your serverto require using HTTPS instead.
Please take this warning seriously; using HTTPS is a fundamental security measure.You must configure your Web server to support it, and then there are some settings inthe Security section of your ownCloud Admin page to enable. The following pages
374 | Server Configuration
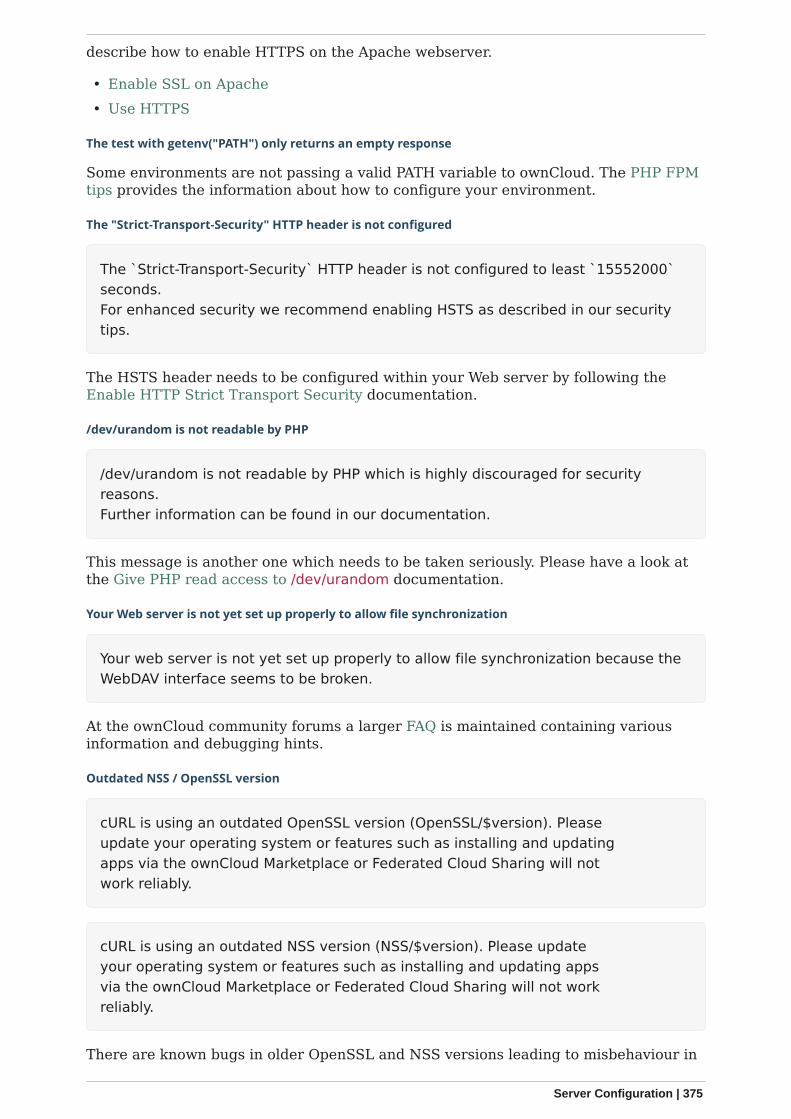
describe how to enable HTTPS on the Apache webserver.
• Enable SSL on Apache• Use HTTPS
The test with getenv("PATH") only returns an empty response
Some environments are not passing a valid PATH variable to ownCloud. The PHP FPMtips provides the information about how to configure your environment.
The "Strict-Transport-Security" HTTP header is not configured
The `Strict-Transport-Security` HTTP header is not configured to least `15552000`seconds.For enhanced security we recommend enabling HSTS as described in our securitytips.
The HSTS header needs to be configured within your Web server by following theEnable HTTP Strict Transport Security documentation.
/dev/urandom is not readable by PHP
/dev/urandom is not readable by PHP which is highly discouraged for securityreasons.Further information can be found in our documentation.
This message is another one which needs to be taken seriously. Please have a look atthe Give PHP read access to /dev/urandom documentation.
Your Web server is not yet set up properly to allow file synchronization
Your web server is not yet set up properly to allow file synchronization because theWebDAV interface seems to be broken.
At the ownCloud community forums a larger FAQ is maintained containing variousinformation and debugging hints.
Outdated NSS / OpenSSL version
cURL is using an outdated OpenSSL version (OpenSSL/$version). Pleaseupdate your operating system or features such as installing and updatingapps via the ownCloud Marketplace or Federated Cloud Sharing will notwork reliably.
cURL is using an outdated NSS version (NSS/$version). Please updateyour operating system or features such as installing and updating appsvia the ownCloud Marketplace or Federated Cloud Sharing will not workreliably.
There are known bugs in older OpenSSL and NSS versions leading to misbehaviour in
Server Configuration | 375
combination with remote hosts using SNI. A technology used by most of the HTTPSwebsites. To ensure that ownCloud will work properly you need to update OpenSSL toat least 1.0.2b or 1.0.1d. For NSS the patch version depends on your distribution andan heuristic is running the test which actually reproduces the bug. There aredistributions such as RHEL/CentOS which have this backport still pending.
Your Web server is not set up properly to resolve /.well-known/caldav/ or /.well-known/carddav/
Both URLs need to be correctly redirected to the DAV endpoint of ownCloud. Pleaserefer to Service Discovery for more info.
Some files have not passed the integrity check
Please refer to the Fixing Invalid Code Integrity Messages documentation how todebug this issue.
Your database does not run with "READ COMMITTED" transaction isolation level
Your database does not run with"READ COMMITTED" transaction isolation level.This can cause problems when multiple actions are executed in parallel.
Please refer to MySQL / MariaDB with Binary Logging Enabled) how to configure yourdatabase for this requirement.
The HSM (Hardware Security Module) Daemon (hsmdaemon)
Introduction
The hsmdaemon is a daemon provided by ownCloud to delegate encryption to an HSM(Hardware Security Module). This can be necessary as PHP cannot directly interfacewith a PKCS11 stack, neither with an API wrapper because none exists, nor via theOpenSSL bindings. Therefore a separate process is needed to decrypt anything withthe private key stored in an HSM.
When using hsmdaemon with an HSM, the keys may still be stored onthe same physical machine as ownCloud.
For hsmdaemon support, you need ownCloud Enterprise Edition >=10.2. We recommend consulting with us when deploying storageencryption with an HSM.
Starting with the Encryption App version 1.5.1, HSM can now workwith both binary and base64 encoding/decoding. If not otherwiseconfigured, binary is the default.
Running exec() to decrypt the key with a command line command to do the encryptionmight leak the HSM credentials if the admin lists the currently running processes. Toprevent that, an HSM daemon will be used that can open a session to the HSM uponstartup.
This daemon will be used by ownCloud to decrypt the current master key uponrequest. The communication happens via UNIX sockets or TCP sockets and isauthorized by a shared token that the daemon stores in the ownCloud database via aREST/JSON route.
ownCloud internally uses OpenSSL to encrypt and decrypt keys and that is extendedto support en-/decrypt operations via the new daemon. The current solution encrypts
376 | Server Configuration
the ownCloud master key with a key from the HSM.
From the technical point of view the Crypt class is extended to handlethe key generation in the HSM device and also to get the key fromHSM. For the read/write operation on a file, the request goes to theHSM and then, based on the keys fetched from HSM, the files areencrypted or decrypted. The keys are not replaced.
How The HSM Daemon Interacts with ownCloud
Upon startup, the daemon will generate a token and send it to ownCloud via a newREST/JSON route. After connecting with the HSM daemon, an unsophisticated, line-based, protocol is used (every line ends with CRLF):
1. ownCloud sends the token read from database.2. The daemon compares the received token with its token and returns an OK line.3. ownCloud then sends the data it wants to decrypt as a Base64-encoded, one-line
string.4. The daemon returns the decrypted data as a Base64-encoded one-line string.
Doing so ensures that an evil admin will need to wiretap the communication betweeneither the database or the HSM daemon and ownCloud.
Quick Overview
HSM support consists of two core parts:
1. An actual HSM PKCS11 module.2. A hsmdaemon that provides a JWT - protected web API for the PKCS11 stack to
generate key pairs and decrypt data.
Deployment Recommendation
We recommend running hsmdaemon on every web server to reduce latency.
Installation
Integrating the hsmdaemon with ownCloud requires 3 steps; these are:
1. Install a PKCS11 Module2. Install and Configure the hsmdaemon3. Configure ownCloud
The installation instructions in this guide have been designed to workwith ownCloud’s supported operating systems. If you are using adifferent operating system or distribution, please adjust the instructionsto suit your environment.
Install a PKCS11 Module
Install Using a Preconfigured PKCS11 Module
At least one PKCS11 library is necessary. This is typically provided by an HSM vendor.If a PKCS11 library is not available, you can use the software HSM - SoftHSM2.
Server Configuration | 377
Initialise the Token
Now we can initialize the token:
sudo softhsm2-util --init-token --slot 0 --label "My token 1"
It will ask for two PINs, an SO and a User pin. See opendnssec for more information.The SO PIN can e.g. be used to re-initialize the token and the user PIN is handed outto the application so it can interact with the token.
Install PKCS11 CLI tools (optional)
To use the PKCS11 API on the CLI, we need to install OpenSC.
• Debian and Ubuntu• openSUSE and SUSE Linux Enterprise Server• Fedora and Red Hat Enterprise Linux and Centos
Initialise on Debian and Ubuntu
To install OpenSC on Debian and Ubuntu, run the following command:
sudo apt install -y opensc
Initialise on openSUSE and SUSE Linux Enterprise Server
To install OpenSC on openSUSE and SUSE Linux Enterprise Server, run the followingcommand:
sudo zypper install -y --auto-agree-with-licenses opensc
Initialise on Fedora and Red Hat Enterprise Linux and Centos
To install OpenSC on Fedora and Red Hat Enterprise Linux and Centos, run thefollowing command:
sudo yum install --assumeyes opensc
List Tokens
You can list available tokens using the pkcs11-tool by running the following command:
sudo pkcs11-tool --module </path/to/libsofthsm2.so> -l --pin <user-pin> -O
The Module Parameter
The module parameter is either the library provided by the HSM vendor or libsofthsm2which was installed with SoftHSM 2. If you are using libsofthsm2, the path tolibsofthsm2.so for each of the supported distributions is available below.
Distribution Path
378 | Server Configuration
Debian and Ubuntu /usr/lib/softhsm/libsofthsm2.so
openSUSE and SUSE Linux EnterpriseServer
/usr/lib64/pkcs11/libsofthsm2.so
Fedora and Red Hat Enterprise Linux andCentos
/usr/lib64/pkcs11/libsofthsm2.so
See the OpenSC Wiki for more information.
Install and Configure the hsmdaemon
Installing hsmdaemon requires several steps. These are:
1. Install the hsmdaemon Binary2. Copy the Config File3. Install the System Service4. Configure the PKCS 11 Module Path5. Configure Slot and Pin6. Test the hsmdaemon7. Configure Other Options
Install the hsmdaemon Binary
After you have obtained the hsmdaemon from ownCloud, you need to move thehsmdaemon binary to a directory located in your system path and make the binaryexecutable:
sudo install -m 755 ./hsmdaemon /usr/local/bin/hsmdaemon
Copy the Config File
The default location where hsmdaemon looks for its config file is/etc/hsmdaemon/hsmdaemon.toml. To create it from the example config file availablein the provided package, run the following commands:
# Create the hsmdaemon configuration directorysudo mkdir /etc/hsmdaemon
# Copy the example config file# Allow only root and users in the root group to read & write the configuration filesudo install -m 640 ./hsmdaemon.toml /etc/hsmdaemon/hsmdaemon.toml
Install the System Service
Now that the binary is available and the configuration file is in place, hsmdaemonmust be installed as a system service. To do so, run it with the install option as in theexample below.
sudo /usr/local/bin/hsmdaemon installsudo service hsmdaemon start
Server Configuration | 379
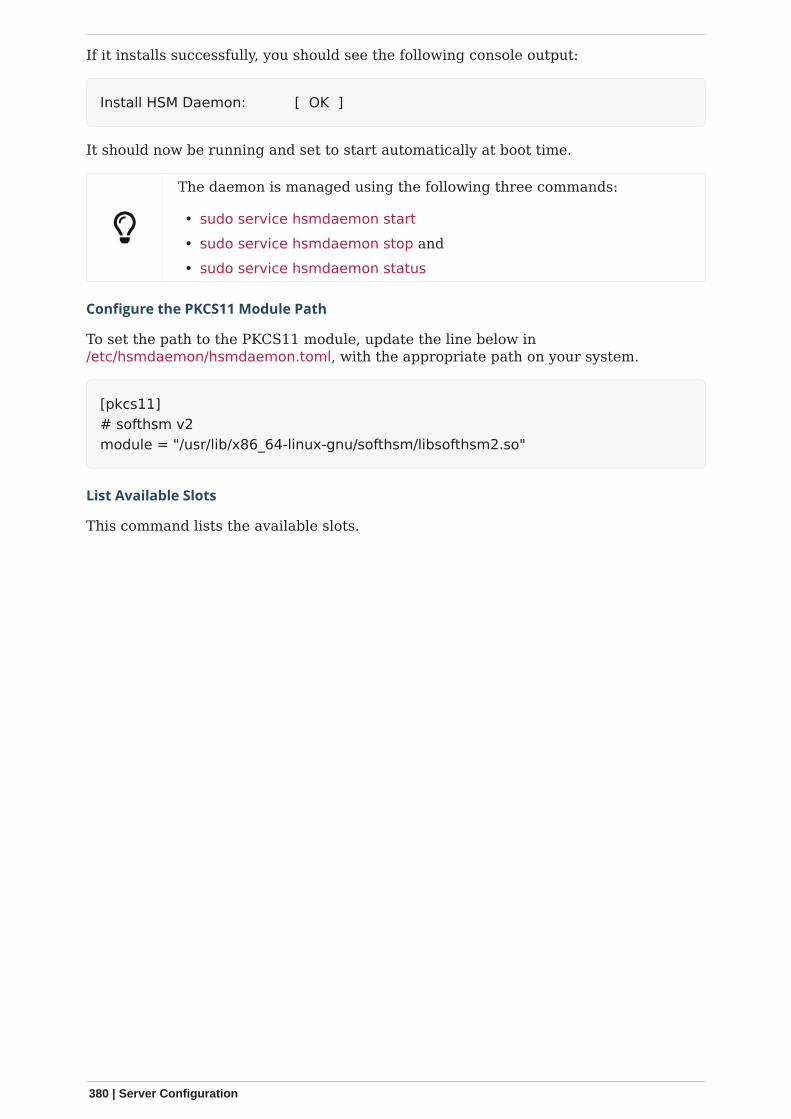
If it installs successfully, you should see the following console output:
Install HSM Daemon: [ OK ]
It should now be running and set to start automatically at boot time.
The daemon is managed using the following three commands:
• sudo service hsmdaemon start• sudo service hsmdaemon stop and• sudo service hsmdaemon status
Configure the PKCS11 Module Path
To set the path to the PKCS11 module, update the line below in/etc/hsmdaemon/hsmdaemon.toml, with the appropriate path on your system.
[pkcs11]# softhsm v2module = "/usr/lib/x86_64-linux-gnu/softhsm/libsofthsm2.so"
List Available Slots
This command lists the available slots.
380 | Server Configuration

sudo hsmdaemon listslots
{"level":"debug","ts":"2019-02-14T09:27:02.068+0100","caller":"hsmdaemon/keymanager.go:27","msg":"initializepkcs11 module","module":"/usr/lib/softhsm/libsofthsm2.so"}{"level":"info","ts":"2019-02-14T09:27:02.087+0100","caller":"hsmdaemon/keymanager.go:65","msg":"Slotsfound","slotIds":[550099622,1989683358,2]}Available slots:Slot: 550099622, Slot info: Description: SoftHSM slot ID 0x20c9daa6 Manufacturer ID: SoftHSM project Hardware version: 2.2 Firmware version: 2.2 Token present: yes Flags: Token info: Manufacturer ID: SoftHSM project Model: SoftHSM v2 Hardware version: 2.2 Firmware version: 2.2 Serial number: e8ba06bca0c9daa6 Initialized: yes User PIN init.: yes Label: oc token without pin MaxSessionCount: 0 SessionCount: 18446744073709551615 MaxRwSessionCount: 0 RwSessionCount: 18446744073709551615 MaxPinLen: 255 MinPinLen: 4 TotalPublicMemory: 18446744073709551615 FreePublicMemory: 18446744073709551615 TotalPrivateMemory: 18446744073709551615 FreePrivateMemory: 18446744073709551615 UTCTime: 2019021408270200 Flags: CKF_RNG CKF_LOGIN_REQUIRED CKF_RESTORE_KEY_NOT_NEEDEDCKF_USER_PIN_COUNT_LOWSlot: 1989683358, Slot info: Description: SoftHSM slot ID 0x7698289e Manufacturer ID: SoftHSM project Hardware version: 2.2 Firmware version: 2.2
See the OpenSC Wiki for more information.
Server Configuration | 381
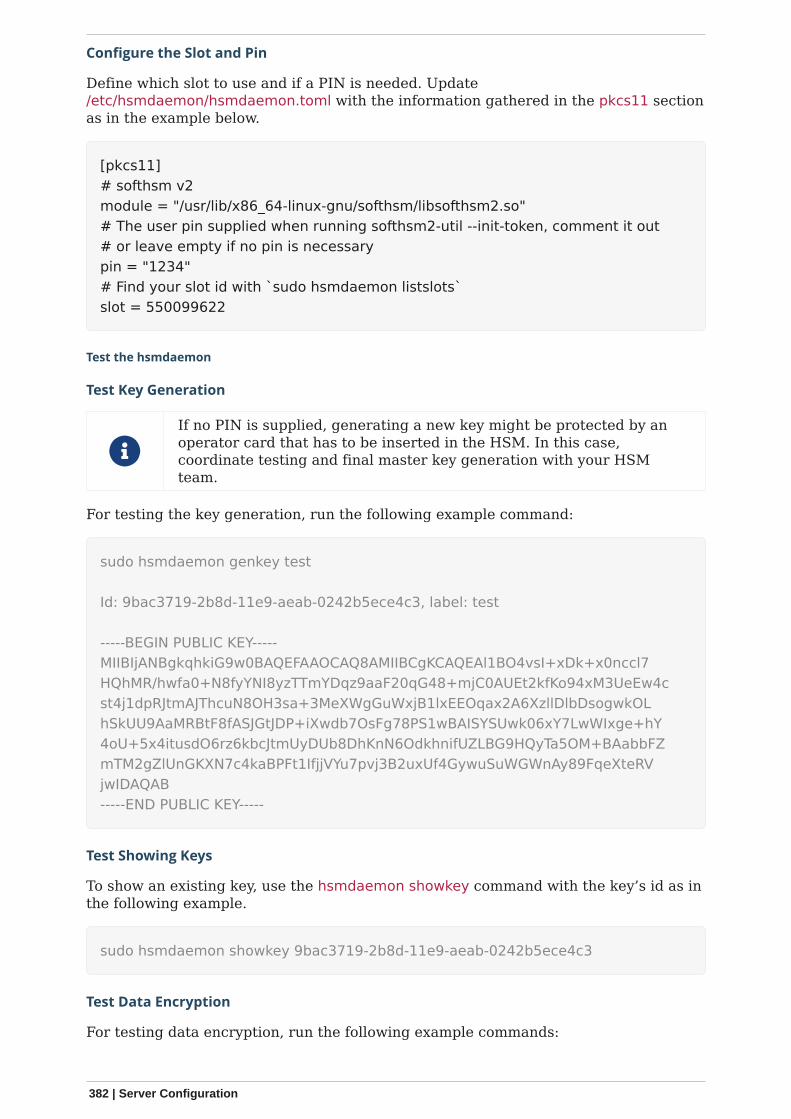
Configure the Slot and Pin
Define which slot to use and if a PIN is needed. Update/etc/hsmdaemon/hsmdaemon.toml with the information gathered in the pkcs11 sectionas in the example below.
[pkcs11]# softhsm v2module = "/usr/lib/x86_64-linux-gnu/softhsm/libsofthsm2.so"# The user pin supplied when running softhsm2-util --init-token, comment it out# or leave empty if no pin is necessarypin = "1234"# Find your slot id with `sudo hsmdaemon listslots`slot = 550099622
Test the hsmdaemon
Test Key Generation
If no PIN is supplied, generating a new key might be protected by anoperator card that has to be inserted in the HSM. In this case,coordinate testing and final master key generation with your HSMteam.
For testing the key generation, run the following example command:
sudo hsmdaemon genkey test
Id: 9bac3719-2b8d-11e9-aeab-0242b5ece4c3, label: test
-----BEGIN PUBLIC KEY-----MIIBIjANBgkqhkiG9w0BAQEFAAOCAQ8AMIIBCgKCAQEAl1BO4vsI+xDk+x0nccl7HQhMR/hwfa0+N8fyYNI8yzTTmYDqz9aaF20qG48+mjC0AUEt2kfKo94xM3UeEw4cst4j1dpRJtmAJThcuN8OH3sa+3MeXWgGuWxjB1lxEEOqax2A6XzllDlbDsogwkOLhSkUU9AaMRBtF8fASJGtJDP+iXwdb7OsFg78PS1wBAISYSUwk06xY7LwWIxge+hY4oU+5x4itusdO6rz6kbcJtmUyDUb8DhKnN6OdkhnifUZLBG9HQyTa5OM+BAabbFZmTM2gZlUnGKXN7c4kaBPFt1IfjjVYu7pvj3B2uxUf4GywuSuWGWnAy89FqeXteRVjwIDAQAB-----END PUBLIC KEY-----
Test Showing Keys
To show an existing key, use the hsmdaemon showkey command with the key’s id as inthe following example.
sudo hsmdaemon showkey 9bac3719-2b8d-11e9-aeab-0242b5ece4c3
Test Data Encryption
For testing data encryption, run the following example commands:
382 | Server Configuration
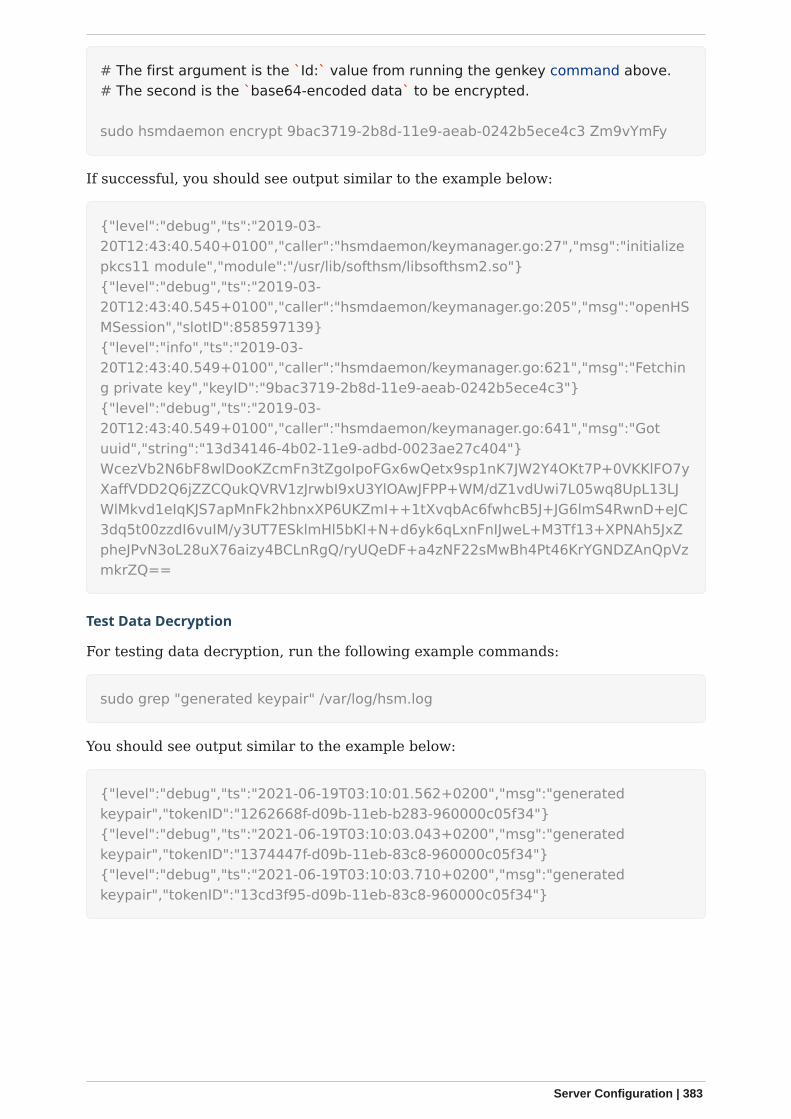
# The first argument is the `Id:` value from running the genkey command above.# The second is the `base64-encoded data` to be encrypted.
sudo hsmdaemon encrypt 9bac3719-2b8d-11e9-aeab-0242b5ece4c3 Zm9vYmFy
If successful, you should see output similar to the example below:
{"level":"debug","ts":"2019-03-20T12:43:40.540+0100","caller":"hsmdaemon/keymanager.go:27","msg":"initializepkcs11 module","module":"/usr/lib/softhsm/libsofthsm2.so"}{"level":"debug","ts":"2019-03-20T12:43:40.545+0100","caller":"hsmdaemon/keymanager.go:205","msg":"openHSMSession","slotID":858597139}{"level":"info","ts":"2019-03-20T12:43:40.549+0100","caller":"hsmdaemon/keymanager.go:621","msg":"Fetching private key","keyID":"9bac3719-2b8d-11e9-aeab-0242b5ece4c3"}{"level":"debug","ts":"2019-03-20T12:43:40.549+0100","caller":"hsmdaemon/keymanager.go:641","msg":"Gotuuid","string":"13d34146-4b02-11e9-adbd-0023ae27c404"}WcezVb2N6bF8wlDooKZcmFn3tZgoIpoFGx6wQetx9sp1nK7JW2Y4OKt7P+0VKKlFO7yXaffVDD2Q6jZZCQukQVRV1zJrwbI9xU3YlOAwJFPP+WM/dZ1vdUwi7L05wq8UpL13LJWlMkvd1eIqKJS7apMnFk2hbnxXP6UKZmI++1tXvqbAc6fwhcB5J+JG6lmS4RwnD+eJC3dq5t00zzdI6vuIM/y3UT7ESklmHl5bKl+N+d6yk6qLxnFnIJweL+M3Tf13+XPNAh5JxZpheJPvN3oL28uX76aizy4BCLnRgQ/ryUQeDF+a4zNF22sMwBh4Pt46KrYGNDZAnQpVzmkrZQ==
Test Data Decryption
For testing data decryption, run the following example commands:
sudo grep "generated keypair" /var/log/hsm.log
You should see output similar to the example below:
{"level":"debug","ts":"2021-06-19T03:10:01.562+0200","msg":"generatedkeypair","tokenID":"1262668f-d09b-11eb-b283-960000c05f34"}{"level":"debug","ts":"2021-06-19T03:10:03.043+0200","msg":"generatedkeypair","tokenID":"1374447f-d09b-11eb-83c8-960000c05f34"}{"level":"debug","ts":"2021-06-19T03:10:03.710+0200","msg":"generatedkeypair","tokenID":"13cd3f95-d09b-11eb-83c8-960000c05f34"}
Server Configuration | 383
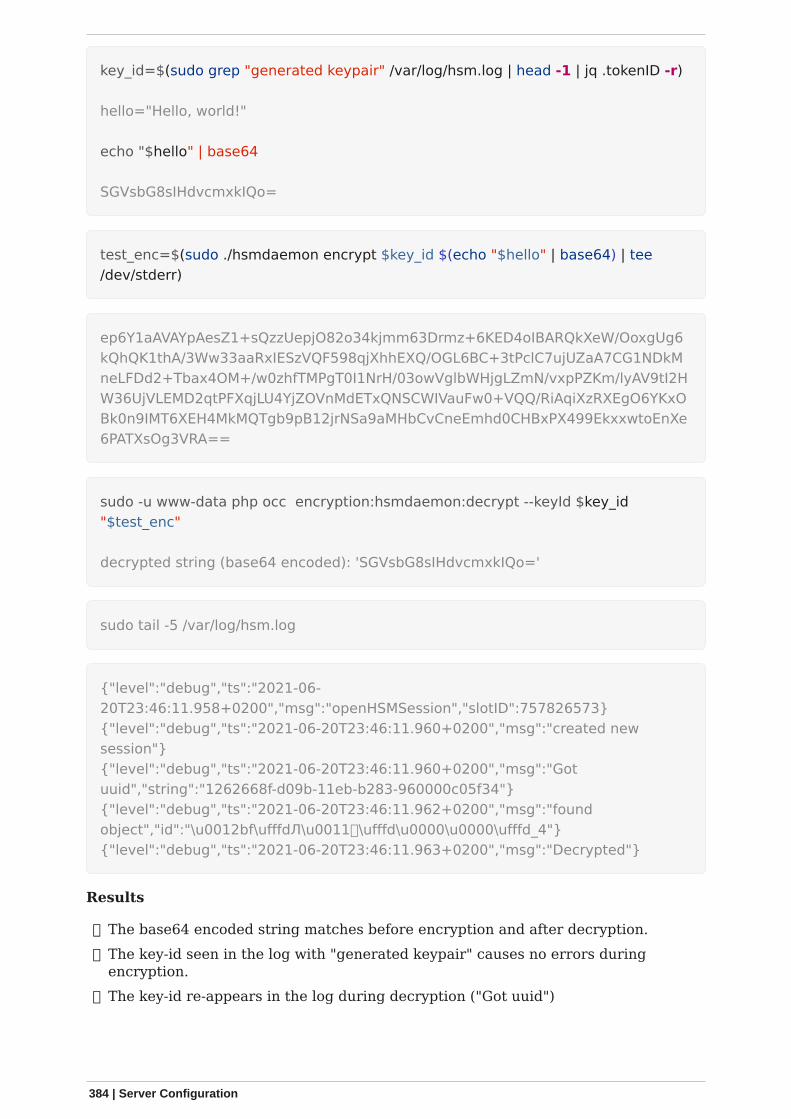
key_id=$(sudo grep "generated keypair" /var/log/hsm.log | head -1 | jq .tokenID -r)
hello="Hello, world!"
echo "$hello" | base64
SGVsbG8sIHdvcmxkIQo=
test_enc=$(sudo ./hsmdaemon encrypt $key_id $(echo "$hello" | base64) | tee/dev/stderr)
ep6Y1aAVAYpAesZ1+sQzzUepjO82o34kjmm63Drmz+6KED4oIBARQkXeW/OoxgUg6kQhQK1thA/3Ww33aaRxIESzVQF598qjXhhEXQ/OGL6BC+3tPclC7ujUZaA7CG1NDkMneLFDd2+Tbax4OM+/w0zhfTMPgT0I1NrH/03owVglbWHjgLZmN/vxpPZKm/lyAV9tI2HW36UjVLEMD2qtPFXqjLU4YjZOVnMdETxQNSCWIVauFw0+VQQ/RiAqiXzRXEgO6YKxOBk0n9IMT6XEH4MkMQTgb9pB12jrNSa9aMHbCvCneEmhd0CHBxPX499EkxxwtoEnXe6PATXsOg3VRA==
sudo -u www-data php occ encryption:hsmdaemon:decrypt --keyId $key_id"$test_enc"
decrypted string (base64 encoded): 'SGVsbG8sIHdvcmxkIQo='
sudo tail -5 /var/log/hsm.log
{"level":"debug","ts":"2021-06-20T23:46:11.958+0200","msg":"openHSMSession","slotID":757826573}{"level":"debug","ts":"2021-06-20T23:46:11.960+0200","msg":"created newsession"}{"level":"debug","ts":"2021-06-20T23:46:11.960+0200","msg":"Gotuuid","string":"1262668f-d09b-11eb-b283-960000c05f34"}{"level":"debug","ts":"2021-06-20T23:46:11.962+0200","msg":"foundobject","id":"\u0012bf\ufffdЛ\u0011벃\ufffd\u0000\u0000\ufffd_4"}{"level":"debug","ts":"2021-06-20T23:46:11.963+0200","msg":"Decrypted"}
Results
☑ The base64 encoded string matches before encryption and after decryption.☑ The key-id seen in the log with "generated keypair" causes no errors during
encryption.☑ The key-id re-appears in the log during decryption ("Got uuid")
384 | Server Configuration
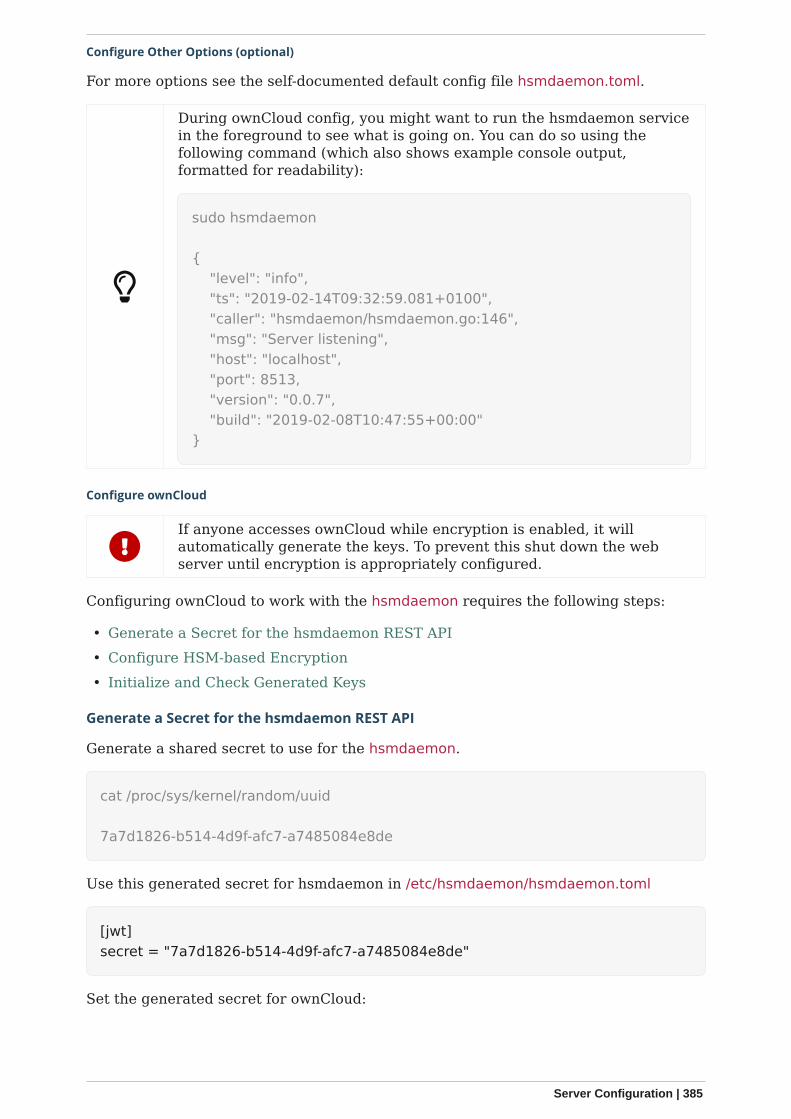
Configure Other Options (optional)
For more options see the self-documented default config file hsmdaemon.toml.
During ownCloud config, you might want to run the hsmdaemon servicein the foreground to see what is going on. You can do so using thefollowing command (which also shows example console output,formatted for readability):
sudo hsmdaemon
{ "level": "info", "ts": "2019-02-14T09:32:59.081+0100", "caller": "hsmdaemon/hsmdaemon.go:146", "msg": "Server listening", "host": "localhost", "port": 8513, "version": "0.0.7", "build": "2019-02-08T10:47:55+00:00"}
Configure ownCloud
If anyone accesses ownCloud while encryption is enabled, it willautomatically generate the keys. To prevent this shut down the webserver until encryption is appropriately configured.
Configuring ownCloud to work with the hsmdaemon requires the following steps:
• Generate a Secret for the hsmdaemon REST API• Configure HSM-based Encryption• Initialize and Check Generated Keys
Generate a Secret for the hsmdaemon REST API
Generate a shared secret to use for the hsmdaemon.
cat /proc/sys/kernel/random/uuid
7a7d1826-b514-4d9f-afc7-a7485084e8de
Use this generated secret for hsmdaemon in /etc/hsmdaemon/hsmdaemon.toml
[jwt]secret = "7a7d1826-b514-4d9f-afc7-a7485084e8de"
Set the generated secret for ownCloud:
Server Configuration | 385
sudo -u www-data php occ config:app:set encryption hsm.jwt.secret --value'7a7d1826-b514-4d9f-afc7-a7485084e8de'
If the command succeeds, you should see the following console output:
Config value hsm.jwt.secret for app encryption set to 7a7d1826-b514-4d9f-afc7-a7485084e8de
Configure HSM-based Encryption
Enable the HSM mode and enable encryption by running the commands in thefollowing example:
sudo -u www-data php occ app:enable encryptionsudo -u www-data php occ config:app:set encryption hsm.url --value'http://localhost:8513'sudo -u www-data php occ encryption:select-encryption-type masterkeysudo -u www-data php occ encryption:enable
If the commands are successful, you should see the following console output:
encryption enabled
Config value hsm.url for app encryption set to http://localhost:8513
Master key successfully enabled.
Encryption enabledDefault module: OC_DEFAULT_MODULE
Initialize and Check Generated Keys
Now start your web server and log in with any user to initialize the keys, have a lookat the output of the hsmdaemon to see key generation and decryption requests. Checkthat the private key /path/to/data/files_encryption/OC_DEFAULT_MODULE/ is less than1000 bytes. If it is not, then something is not configured correctly. You have to wipeall keys and reset the database flags for encryption to get a clean start for theownCloud setup.
jQuery Warnings
While ownCloud is using an older version of jQuery we have fixed the knownvulnerabilities in the patches listed below. We closely follow any security related newsregarding the library for any new issues. The version shipped inside ownCloud issecure.
Fixed issues:
• CVE-2020-11022 / CVE-2020-11023 patched in 10.5.0• CVE-2015-9251 patched in 10.0.9 RC3
386 | Server Configuration
• CVE-2019-11358 patched in 10.8.0• CVE-2016-7103 patched in 10.9.0
If you know about any issues which were not patched yet or which are not included inthis list please notify us at [email protected].
ownCloud Server Tuning
Using Cron to Perform Background Jobs
See Background Jobs for a description and the benefits.
Enable Memory Caching
Caching improves performance by storing data, code, and other objects in memory.Memory cache configuration for ownCloud is no longer automatically available fromownCloud 8.1 but must be installed and configured separately. ownCloud supportsRedis, APCu, and Memcached as memory caching backends. See Memory Caching, forfurther details.
Use Redis-based Transactional File Locking
File locking is enabled by default, using the database locking backend. However, thisplaces a significant load on your database. See the section Transactional File Lockingfor how to configure ownCloud to use Redis-based Transactional File Locking.
Redis Tuning
Redis tuning improves both file locking (if used) and memory caching (when usingRedis). Here is a brief guide for tuning Redis to improve the performance of yourownCloud installation, when working with sizeable instances.
TCP-Backlog
If you raised the TCP-backlog setting, the following warning appears in the Redis logs:
WARNING: The TCP backlog setting of 20480 cannot be enforced because/proc/sys/net/core/somaxconn is set to the lower value of..
If so, please consider that newer versions of Redis have their own TCP-backlog valueset to 511, and that you have to increase if you have many connections. In highrequests-per-second environments, you need a significant backlog to avoid slow clientsconnection issues.
The Linux kernel will silently truncate the TCP-backlog setting to thevalue of /proc/sys/net/core/somaxconn. So make sure to raise both thevalue of somaxconn and tcp_max_syn_backlog, to get the desired effect.
To fix this warning, set the value of net.core.somaxconn to 65535 in /etc/rc.local, sothat it persists upon reboot, by running the following command.
sudo echo sysctl -w net.core.somaxconn=65535 >> /etc/rc.local
After the next reboot, 65535 connections will be allowed, instead of the default value.
Server Configuration | 387
Transparent Huge Pages (THP)
If you are experiencing latency problems with Redis, the following warning mayappear in your Redis logs:
WARNING you have Transparent Huge Pages (THP) support enabled in your kernel.This creates both latency and memory usage issues with Redis.
If so, unfortunately, when a Linux kernel has Transparent Huge Pages enabled, Redisincurs a significant latency penalty after the fork call is used, to persist information todisk. Transparent Huge Pages are the cause of the following issue:
1. A fork call is made, resulting in two processes with shared huge pages beingcreated.
2. In a busy instance, a few event loops cause commands to target a few thousandpages, causing the copy-on-write of almost the entire process memory.
3. Big latency and memory usage result.
As a result, make sure to disable Transparent Huge Pages using the followingcommand:
echo never > /sys/kernel/mm/transparent_hugepage/enabled
Redis Latency Problems
If you are having issues with Redis latency, please refer to the official Redis guide onhow to handle them.
Database Tuning
Using MariaDB/MySQL Instead of SQLite
MySQL or MariaDB are preferred because of the performance limitations of SQLitewith highly concurrent applications, like ownCloud.
See the section Linux Database Configuration for how to configure ownCloud forMySQL or MariaDB. If your installation is already running on SQLite then it is possibleto convert to MySQL or MariaDB using the steps provided in database conversion.
Tune MariaDB/MySQL
A comprehensive guide to tuning MySQL and MariaDB is outside the scope of theownCloud documentation. However, here are three links that can help you find furtherinformation:
• MySQLTuner.• Percona Tools for MySQL• Optimizing and Tuning MariaDB.
Tune PostgreSQL
A comprehensive guide to tuning PostgreSQL is outside the scope of the ownClouddocumentation. However, here are three links that can help you find furtherinformation:
• Five Steps to PostgreSQL Performance
388 | Server Configuration
• Tuning the autovacuum process for tables with huge update workloads(oc_filecache)
SSL / Encryption App
SSL (HTTPS) and file encryption/decryption can be offloaded to a processor’s AES-NIextension. This can both speed up these operations while lowering processingoverhead. This requires a processor with the AES-NI instruction set.
Here are some examples how to check if your CPU / environment supports the AES-NIextension:
• For each CPU core present: grep flags /proc/cpuinfo or as a summary for all cores:grep -m 1 ^flags /proc/cpuinfo If the result contains any aes, the extension ispresent.
• Search e.g. on the Intel web if the processor used supports the extension IntelProcessor Feature Filter. You may set a filter by "AES New Instructions" to get areduced result set.
• For versions of openssl >= 1.0.1, AES-NI does not work via an engine and will notshow up in the openssl engine command. It is active by default on the supportedhardware. You can check the openssl version via openssl version -a
• If your processor supports AES-NI but it does not show up e.g. via grep or coreinfo,it is maybe disabled in the BIOS.
• If your environment runs virtualized, check the virtualization vendor for support.
Webserver Tuning
Tune Apache
Enable HTTP/2 Support
If you want to improve the speed of an ownCloud installation, while at the same timeincreasing its security, you can enable HTTP/2 support for Apache. Please be awarethat most browsers require HTTP/2 to be used with SSL enabled.
Apache Processes
An Apache process uses around 12MB of RAM. Apache should be configured so thatthe maximum number of HTTPD processes times 12MB is lower than the amount ofRAM. Otherwise the system begins to swap and the performance goes down.
Use KeepAlive
The KeepAlive directive enables persistent HTTP connections, allowing multiplerequests to be sent over the same TCP connection. Enabling it reduces latency by asmuch as 50%. We recommend to keep the KeepAliveTimeout between 3 and 5. Highernumbers can block the Server with inactive connections. In combination with theperiodic checks of the sync client the following settings are recommended:
KeepAlive OnKeepAliveTimeout 3MaxKeepAliveRequests 200
Hostname Lookups
Server Configuration | 389
# cat /etc/httpd/conf/httpd.conf ...HostnameLookups off
Log files
Log files should be switched off for maximum performance. To do that, comment outthe CustomLog directive. However, keep ErrorLog set, so errors can be tracked down.
Using Third Party PHP Components
ownCloud uses some third party PHP components to provide some of its functionality.These components are part of the software package and are contained in the/3rdparty folder.
Managing Third Party Parameters
When using third party components, keep the following parameters in mind:
• 3rdpartyroot – Specifies the location of the 3rd-party folder. To change the defaultlocation of this folder, you can use this parameter to define the absolute file systempath to the folder location.
• 3rdpartyurl – Specifies the http web path to the 3rdpartyroot folder, starting at theownCloud web root.
An example of what these parameters might look like is as follows:
<?php
"3rdpartyroot" => OC::$SERVERROOT."/3rdparty","3rdpartyurl" => "/3rdparty",
Virus Scanner Support
Introduction
When sharing files, security is a key aspect. The ownCloud Anti-Virus extension helpsby protecting against malicious software like trojans or viruses. It forwards files thatare being uploaded to the ownCloud server to a malware scanning engine before theyare written to the storage. When a file is recognized as malicious, it can be logged andprevented from being uploaded to the server to ensure that files in ownCloud are freeof malware. More sophisticated rules may be specified as admin in the ownCloudWebinterface Admin › Settings › Security.
Out of the box, the ownCloud Anti-Virus extension works with Clam AntiVirus(ClamAV) as the directly supported virus scanner. It detects all forms of malwareincluding trojans, viruses and worms and scans compressed files, executables, imagefiles, PDF, as well as many other file types. The ownCloud Anti-Virus application relieson the underlying ClamAV virus scanning engine, to which the admin points ownCloudwhen configuring the application. The ClamAV virus definitions need to be kept up todate in order to provide effective protection.
Starting with Anti-Virus version 1.0.0, the app also offers an ICAP integration forEnterprise installations. Admins can integrate their favorite enterprise-grade antivirusscanners through the open standard Internet Content Adaptation Protocol (ICAP).
390 | Server Configuration
With this set up, ownCloud can delegate the scanning of uploaded files to anothermachine, the ICAP server. The ICAP server then checks them and either greenlightsthem or, if malicious code is found, treats the offending file(s) as specified in thesettings and notifies the ownCloud server. ownCloud can then act accordingly andbased on the settings made reject the upload. Offloading the anti-virus scans toanother dedicated server can greatly improve performance compared to running theClamAV virus scanner on the same machine as ownCloud.
ClamAV
ClamAV Feature List
• Operates on all major operating systems, including Windows, Linux, and macOS.• Detects all forms of malware including Trojan horses, viruses, and worms.• Scans compressed files, executables, image files, Flash, PDF, as well as many
others.
What’s more, ClamAV’s Freshclam daemon automatically updates its malwaresignature database at scheduled intervals.
ClamAV Integration Into ownCloud
ownCloud integrates with antivirus tools by connecting to them via:
• A URL• A host name and port• A socket• Streaming the data from the command line via a pipe with a configured executable
In case of ClamAV, ownCloud’s antivirus extension sends files either through a unix-domain socket (which requires clamd running on the same host) or through a pipe tostdin/stdout of the clamscan executable (installed on the same host) or through thenetwork using a host name and port pair (which allows running the clamd daemon onanother server).
Individual chunks are not scanned. The whole file is scanned when it ismoved or saved to the final location.
The information is then parsed, or an exit code is evaluated if no result is available todetermine the response from the scan. In case of an infected upload, the appropriateaction is always to delete the file(s). The choice "delete" or "log" for the infectedcondition only applies to the special case of background scans.
Scanner exit status rules are used to handle errors when ClamAV is runin CLI mode. Scanner output rules are used in daemon/socket modeonly.
Scanning Notes for ClamAV
1. Files are checked when they are uploaded or updated but not when they aredownloaded.
2. ownCloud does not maintain a cache of previously scanned files.3. If the app is either not configured or is misconfigured, then it rejects file uploads.4. If ClamAV is unavailable, then the app rejects file uploads.5. A file size limit applies both to background scans and to file uploads.
Server Configuration | 391

6. After installing ClamAV and the related tools, you will have two configuration files:/etc/freshclam.conf and /etc/clamd.d/scan.conf.
7. We recommend that you enable verbose logging in both clamd.conf andfreshclam.conf initially, to verify correct operation of both.
Installing ClamAV
Install ClamAV on Ubuntu with the following command:
sudo apt install clamav clamav-daemon
This automatically creates the default configuration files and launches the clamd andfreshclam daemons.
Enabling and Running ClamAV
Enable and start the clamd service with following commands.
sudo systemctl daemon-reloadsudo systemctl enable clamav-daemon.servicesudo systemctl start clamav-daemon.service
When successful, an output similar to the following should appear on the terminal:
Synchronizing state of clamav-daemon.service with SysV service script with/lib/systemd/systemd-sysv-install.Executing: /lib/systemd/systemd-sysv-install enable clamav-daemon
ClamAV Virus Database Updates
1. You can manually start the updating process with this command:
sudo freshclam
You should update manually at least once before using ClamAV within ownCloud.The initial update can take several minutes. In case of persisting issues runningfreshclam, you can gently end the process with the following command:
sudo pkill -15 -x freshclam
and retry manually updating again.
2. To automate the update process, run this cron entry for example.
# m h dom mon dow command47 * * * * /usr/bin/freshclam --quiet
392 | Server Configuration
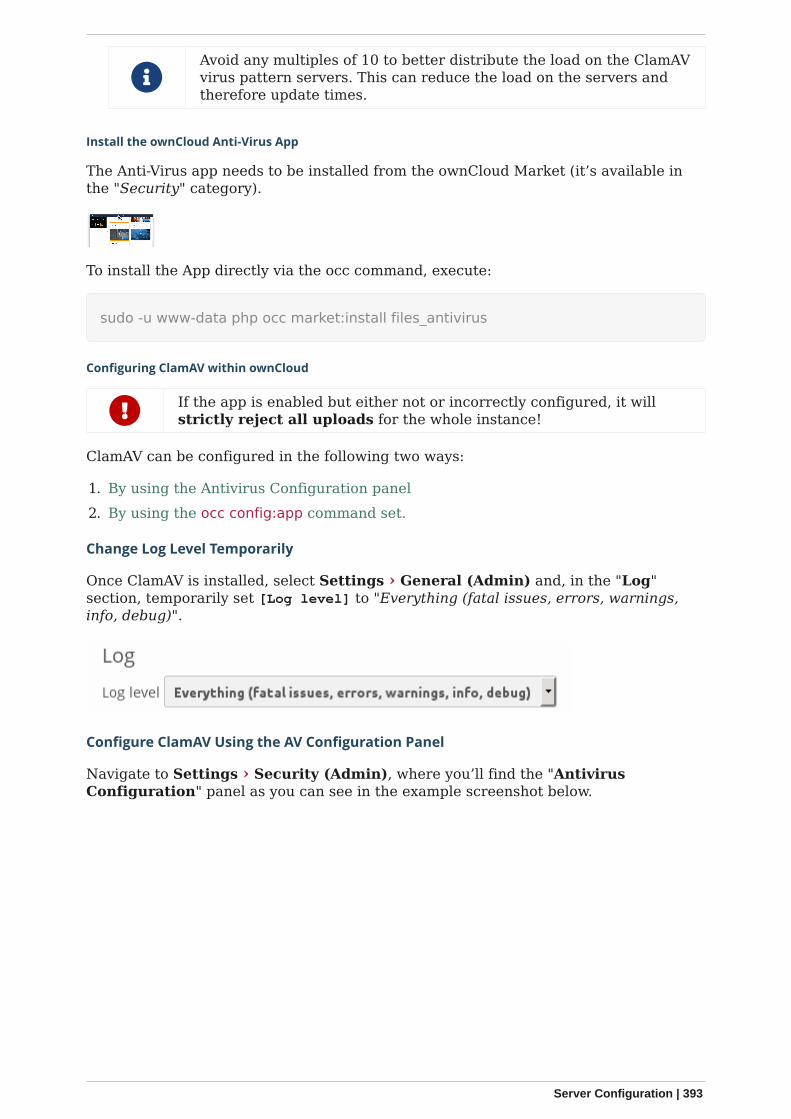
Avoid any multiples of 10 to better distribute the load on the ClamAVvirus pattern servers. This can reduce the load on the servers andtherefore update times.
Install the ownCloud Anti-Virus App
The Anti-Virus app needs to be installed from the ownCloud Market (it’s available inthe "Security" category).
To install the App directly via the occ command, execute:
sudo -u www-data php occ market:install files_antivirus
Configuring ClamAV within ownCloud
If the app is enabled but either not or incorrectly configured, it willstrictly reject all uploads for the whole instance!
ClamAV can be configured in the following two ways:
1. By using the Antivirus Configuration panel2. By using the occ config:app command set.
Change Log Level Temporarily
Once ClamAV is installed, select Settings › General (Admin) and, in the "Log"section, temporarily set [Log level] to "Everything (fatal issues, errors, warnings,info, debug)".
Configure ClamAV Using the AV Configuration Panel
Navigate to Settings › Security (Admin), where you’ll find the "AntivirusConfiguration" panel as you can see in the example screenshot below.
Server Configuration | 393
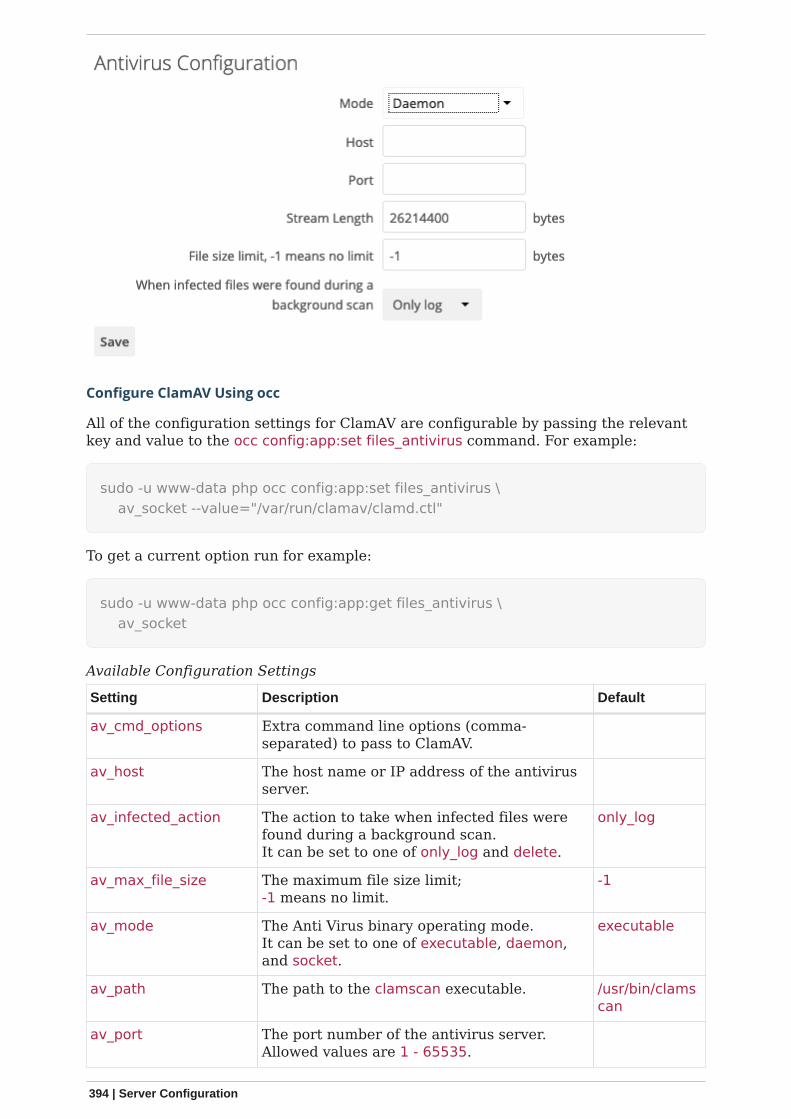
Configure ClamAV Using occ
All of the configuration settings for ClamAV are configurable by passing the relevantkey and value to the occ config:app:set files_antivirus command. For example:
sudo -u www-data php occ config:app:set files_antivirus \ av_socket --value="/var/run/clamav/clamd.ctl"
To get a current option run for example:
sudo -u www-data php occ config:app:get files_antivirus \ av_socket
Available Configuration Settings
Setting Description Default
av_cmd_options Extra command line options (comma-separated) to pass to ClamAV.
av_host The host name or IP address of the antivirusserver.
av_infected_action The action to take when infected files werefound during a background scan.It can be set to one of only_log and delete.
only_log
av_max_file_size The maximum file size limit;-1 means no limit.
-1
av_mode The Anti Virus binary operating mode.It can be set to one of executable, daemon,and socket.
executable
av_path The path to the clamscan executable. /usr/bin/clamscan
av_port The port number of the antivirus server.Allowed values are 1 - 65535.
394 | Server Configuration

Setting Description Default
av_scan_background Should scans run in the background? true
av_socket The name of ClamAV’s UNIX socket file. /var/run/clamav/clamd.ctl
av_stream_max_length The maximum stream length that ClamAV willaccept in bytes (*).
26214400
(*) The Stream Length value sets the number of bytes to read in one pass and defaultsto 26214400 bytes (twenty-six megabytes). This value should be no larger than thePHP memory_limit settings or physical memory if memory_limit is set to -1 (no limit).
Configuration Modes
ClamAV runs in one of three modes:
• Daemon (Socket)• Daemon• Executable
In both daemon modes, background scans are enabled by default. If youwant to disable them, run the command:
sudo -u www-data php occ config:app:set files_antivirusav_scan_background --value 'false'
Daemon (Socket, Same Server)
In Daemon (Socket) mode, ClamAV runs in the background on the same server as theownCloud installation, or the socket can be made available via a share mount. Whenthere is no activity, clamd places a minimal load on your system. Consider that highCPU usage can occur when users upload large volumes of files.
You must run freshclam at least once for ClamAV to generate thesocket.
1. Set [Mode] to "Daemon (Socket)". ownCloud should detect your clamd socket and
Server Configuration | 395
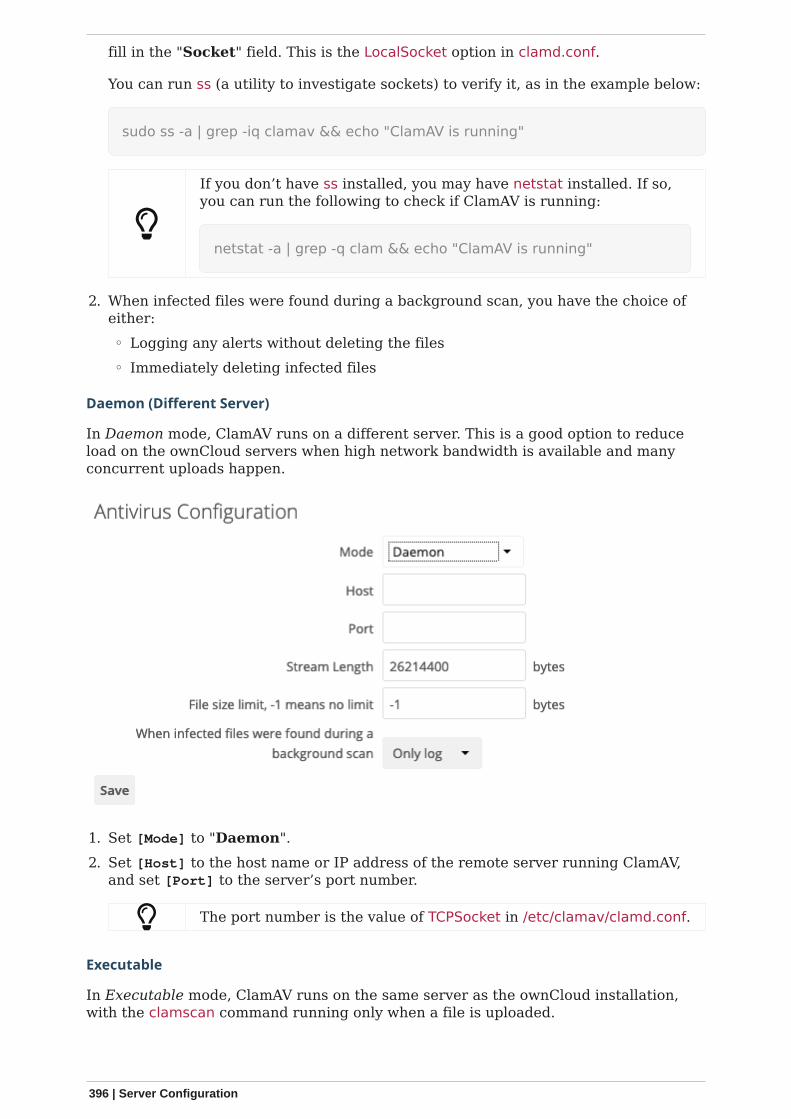
fill in the "Socket" field. This is the LocalSocket option in clamd.conf.
You can run ss (a utility to investigate sockets) to verify it, as in the example below:
sudo ss -a | grep -iq clamav && echo "ClamAV is running"
If you don’t have ss installed, you may have netstat installed. If so,you can run the following to check if ClamAV is running:
netstat -a | grep -q clam && echo "ClamAV is running"
2. When infected files were found during a background scan, you have the choice ofeither:◦ Logging any alerts without deleting the files◦ Immediately deleting infected files
Daemon (Different Server)
In Daemon mode, ClamAV runs on a different server. This is a good option to reduceload on the ownCloud servers when high network bandwidth is available and manyconcurrent uploads happen.
1. Set [Mode] to "Daemon".2. Set [Host] to the host name or IP address of the remote server running ClamAV,
and set [Port] to the server’s port number.
The port number is the value of TCPSocket in /etc/clamav/clamd.conf.
Executable
In Executable mode, ClamAV runs on the same server as the ownCloud installation,with the clamscan command running only when a file is uploaded.
396 | Server Configuration
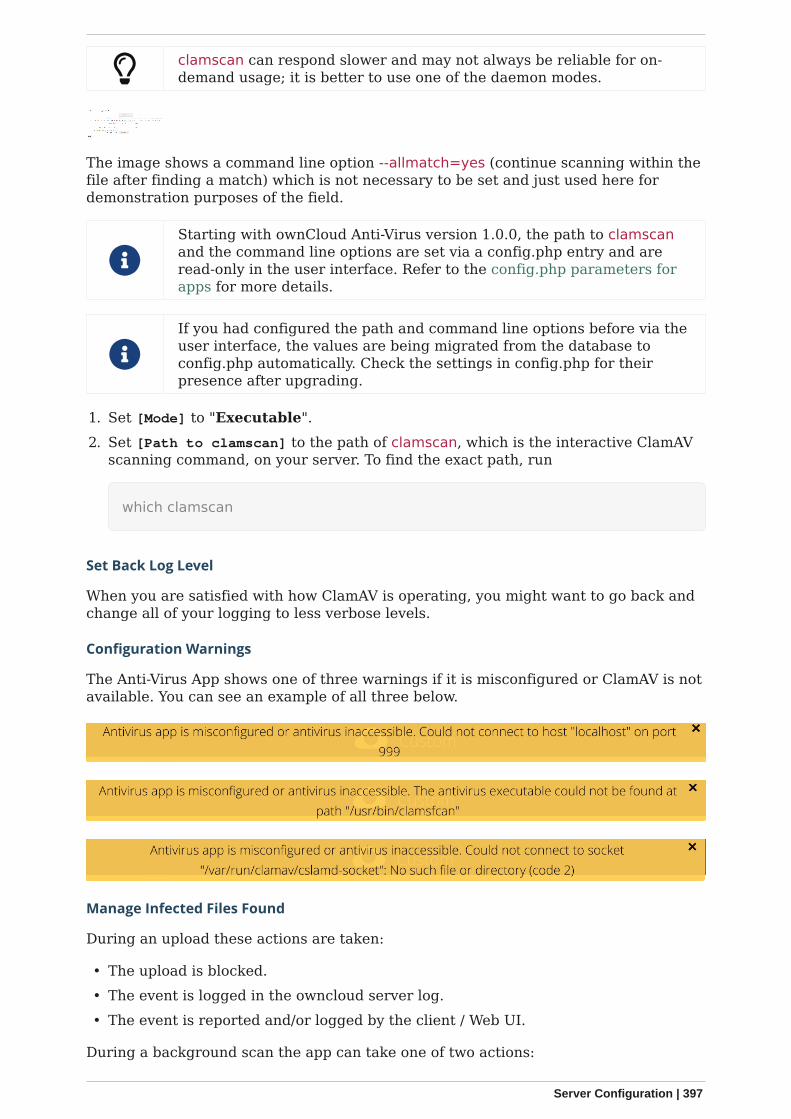
clamscan can respond slower and may not always be reliable for on-demand usage; it is better to use one of the daemon modes.
The image shows a command line option --allmatch=yes (continue scanning within thefile after finding a match) which is not necessary to be set and just used here fordemonstration purposes of the field.
Starting with ownCloud Anti-Virus version 1.0.0, the path to clamscanand the command line options are set via a config.php entry and areread-only in the user interface. Refer to the config.php parameters forapps for more details.
If you had configured the path and command line options before via theuser interface, the values are being migrated from the database toconfig.php automatically. Check the settings in config.php for theirpresence after upgrading.
1. Set [Mode] to "Executable".2. Set [Path to clamscan] to the path of clamscan, which is the interactive ClamAV
scanning command, on your server. To find the exact path, run
which clamscan
Set Back Log Level
When you are satisfied with how ClamAV is operating, you might want to go back andchange all of your logging to less verbose levels.
Configuration Warnings
The Anti-Virus App shows one of three warnings if it is misconfigured or ClamAV is notavailable. You can see an example of all three below.
Manage Infected Files Found
During an upload these actions are taken:
• The upload is blocked.• The event is logged in the owncloud server log.• The event is reported and/or logged by the client / Web UI.
During a background scan the app can take one of two actions:
Server Configuration | 397
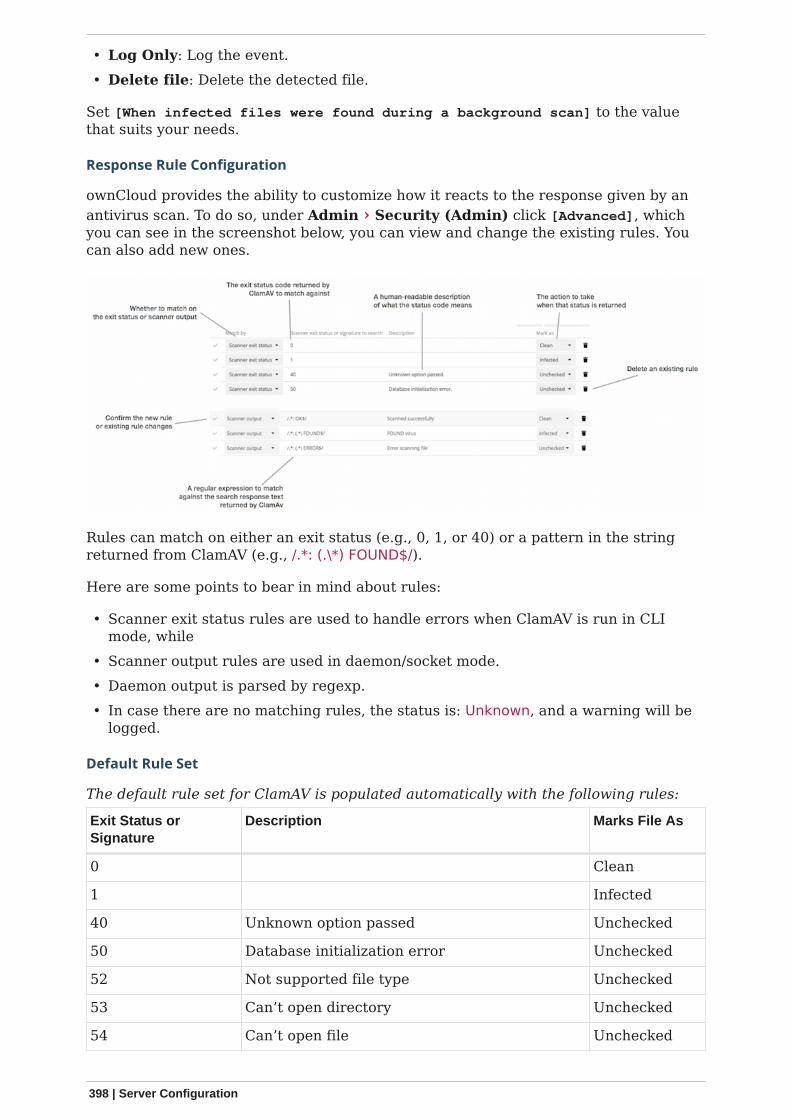
• Log Only: Log the event.• Delete file: Delete the detected file.
Set [When infected files were found during a background scan] to the valuethat suits your needs.
Response Rule Configuration
ownCloud provides the ability to customize how it reacts to the response given by anantivirus scan. To do so, under Admin › Security (Admin) click [Advanced], whichyou can see in the screenshot below, you can view and change the existing rules. Youcan also add new ones.
Rules can match on either an exit status (e.g., 0, 1, or 40) or a pattern in the stringreturned from ClamAV (e.g., /.*: (.\*) FOUND$/).
Here are some points to bear in mind about rules:
• Scanner exit status rules are used to handle errors when ClamAV is run in CLImode, while
• Scanner output rules are used in daemon/socket mode.• Daemon output is parsed by regexp.• In case there are no matching rules, the status is: Unknown, and a warning will be
logged.
Default Rule Set
The default rule set for ClamAV is populated automatically with the following rules:
Exit Status orSignature
Description Marks File As
0 Clean
1 Infected
40 Unknown option passed Unchecked
50 Database initialization error Unchecked
52 Not supported file type Unchecked
53 Can’t open directory Unchecked
54 Can’t open file Unchecked
398 | Server Configuration
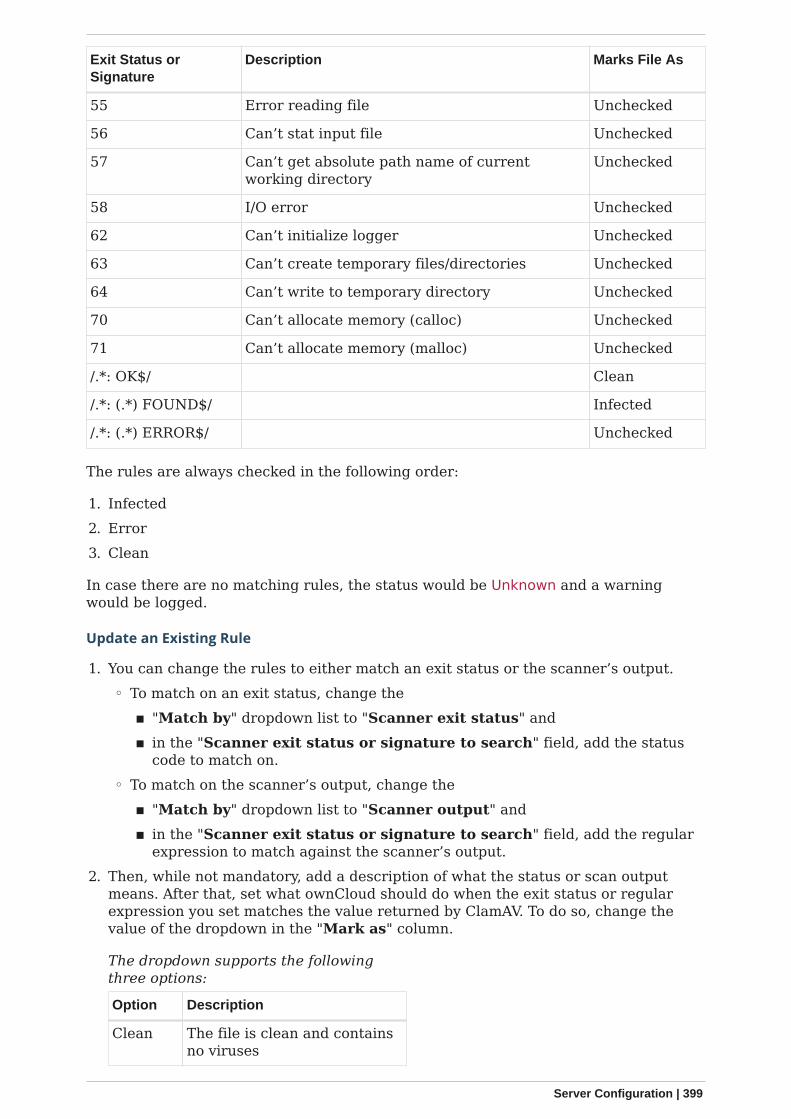
Exit Status orSignature
Description Marks File As
55 Error reading file Unchecked
56 Can’t stat input file Unchecked
57 Can’t get absolute path name of currentworking directory
Unchecked
58 I/O error Unchecked
62 Can’t initialize logger Unchecked
63 Can’t create temporary files/directories Unchecked
64 Can’t write to temporary directory Unchecked
70 Can’t allocate memory (calloc) Unchecked
71 Can’t allocate memory (malloc) Unchecked
/.*: OK$/ Clean
/.*: (.*) FOUND$/ Infected
/.*: (.*) ERROR$/ Unchecked
The rules are always checked in the following order:
1. Infected2. Error3. Clean
In case there are no matching rules, the status would be Unknown and a warningwould be logged.
Update an Existing Rule
1. You can change the rules to either match an exit status or the scanner’s output.◦ To match on an exit status, change the
▪ "Match by" dropdown list to "Scanner exit status" and▪ in the "Scanner exit status or signature to search" field, add the status
code to match on.◦ To match on the scanner’s output, change the
▪ "Match by" dropdown list to "Scanner output" and▪ in the "Scanner exit status or signature to search" field, add the regular
expression to match against the scanner’s output.2. Then, while not mandatory, add a description of what the status or scan output
means. After that, set what ownCloud should do when the exit status or regularexpression you set matches the value returned by ClamAV. To do so, change thevalue of the dropdown in the "Mark as" column.
The dropdown supports the followingthree options:
Option Description
Clean The file is clean and containsno viruses
Server Configuration | 399
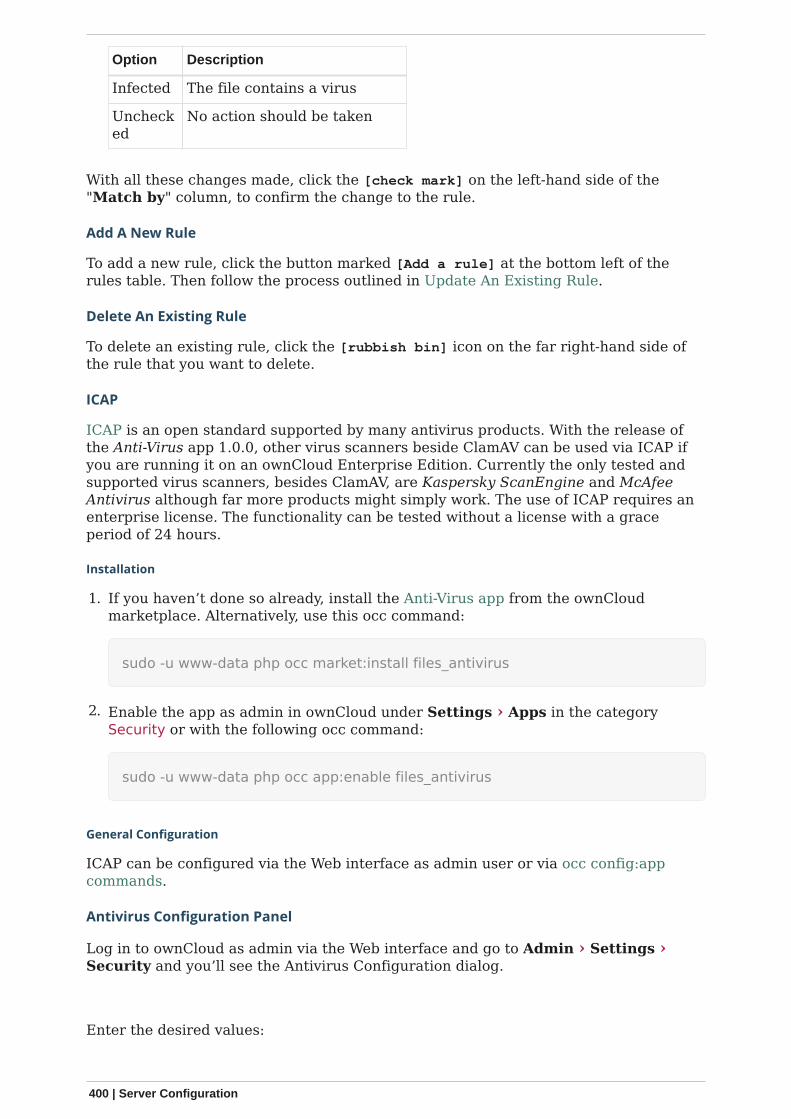
Option Description
Infected The file contains a virus
Unchecked
No action should be taken
With all these changes made, click the [check mark] on the left-hand side of the"Match by" column, to confirm the change to the rule.
Add A New Rule
To add a new rule, click the button marked [Add a rule] at the bottom left of therules table. Then follow the process outlined in Update An Existing Rule.
Delete An Existing Rule
To delete an existing rule, click the [rubbish bin] icon on the far right-hand side ofthe rule that you want to delete.
ICAP
ICAP is an open standard supported by many antivirus products. With the release ofthe Anti-Virus app 1.0.0, other virus scanners beside ClamAV can be used via ICAP ifyou are running it on an ownCloud Enterprise Edition. Currently the only tested andsupported virus scanners, besides ClamAV, are Kaspersky ScanEngine and McAfeeAntivirus although far more products might simply work. The use of ICAP requires anenterprise license. The functionality can be tested without a license with a graceperiod of 24 hours.
Installation
1. If you haven’t done so already, install the Anti-Virus app from the ownCloudmarketplace. Alternatively, use this occ command:
sudo -u www-data php occ market:install files_antivirus
2. Enable the app as admin in ownCloud under Settings › Apps in the categorySecurity or with the following occ command:
sudo -u www-data php occ app:enable files_antivirus
General Configuration
ICAP can be configured via the Web interface as admin user or via occ config:appcommands.
Antivirus Configuration Panel
Log in to ownCloud as admin via the Web interface and go to Admin › Settings ›Security and you’ll see the Antivirus Configuration dialog.
Enter the desired values:
400 | Server Configuration
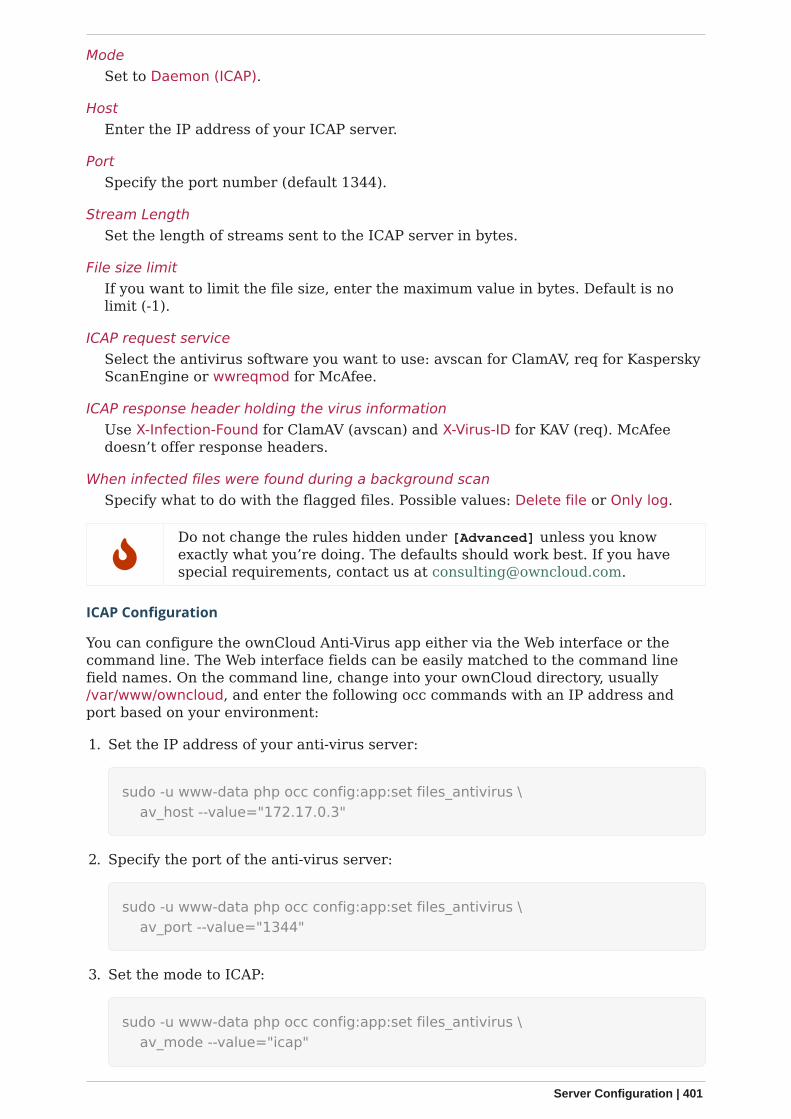
ModeSet to Daemon (ICAP).
HostEnter the IP address of your ICAP server.
PortSpecify the port number (default 1344).
Stream LengthSet the length of streams sent to the ICAP server in bytes.
File size limitIf you want to limit the file size, enter the maximum value in bytes. Default is nolimit (-1).
ICAP request serviceSelect the antivirus software you want to use: avscan for ClamAV, req for KasperskyScanEngine or wwreqmod for McAfee.
ICAP response header holding the virus informationUse X-Infection-Found for ClamAV (avscan) and X-Virus-ID for KAV (req). McAfeedoesn’t offer response headers.
When infected files were found during a background scanSpecify what to do with the flagged files. Possible values: Delete file or Only log.
Do not change the rules hidden under [Advanced] unless you knowexactly what you’re doing. The defaults should work best. If you havespecial requirements, contact us at [email protected].
ICAP Configuration
You can configure the ownCloud Anti-Virus app either via the Web interface or thecommand line. The Web interface fields can be easily matched to the command linefield names. On the command line, change into your ownCloud directory, usually/var/www/owncloud, and enter the following occ commands with an IP address andport based on your environment:
1. Set the IP address of your anti-virus server:
sudo -u www-data php occ config:app:set files_antivirus \ av_host --value="172.17.0.3"
2. Specify the port of the anti-virus server:
sudo -u www-data php occ config:app:set files_antivirus \ av_port --value="1344"
3. Set the mode to ICAP:
sudo -u www-data php occ config:app:set files_antivirus \ av_mode --value="icap"
Server Configuration | 401
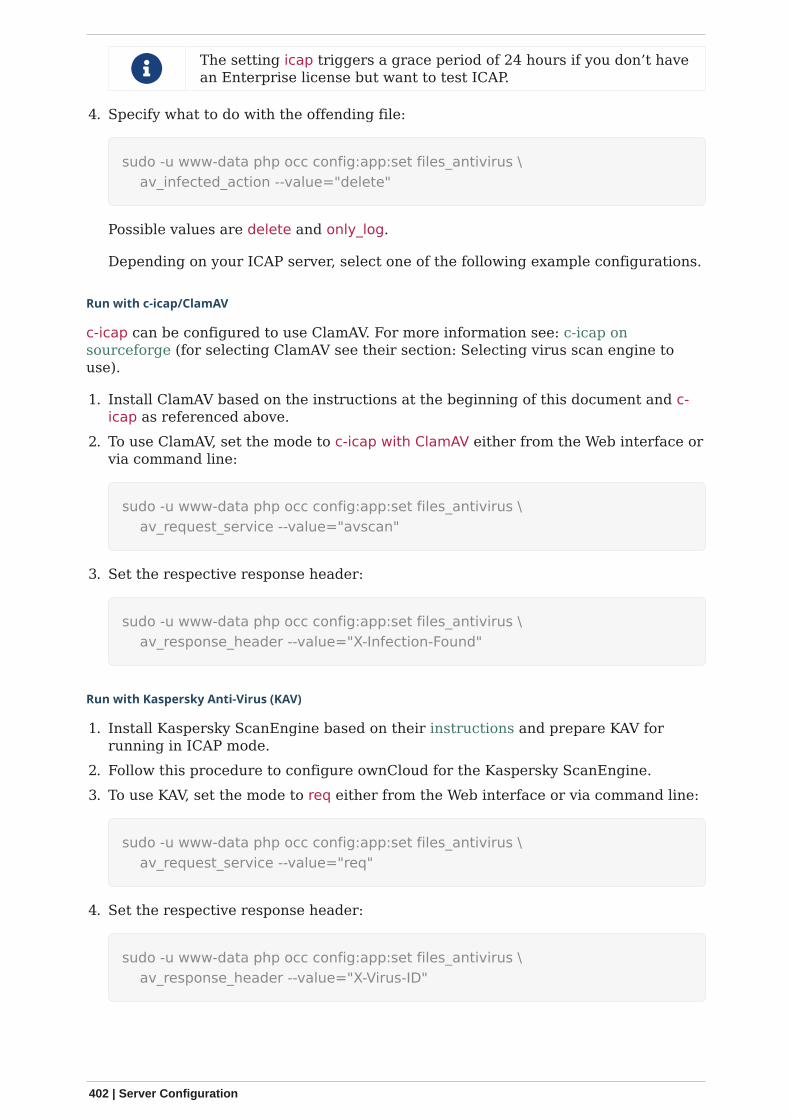
The setting icap triggers a grace period of 24 hours if you don’t havean Enterprise license but want to test ICAP.
4. Specify what to do with the offending file:
sudo -u www-data php occ config:app:set files_antivirus \ av_infected_action --value="delete"
Possible values are delete and only_log.
Depending on your ICAP server, select one of the following example configurations.
Run with c-icap/ClamAV
c-icap can be configured to use ClamAV. For more information see: c-icap onsourceforge (for selecting ClamAV see their section: Selecting virus scan engine touse).
1. Install ClamAV based on the instructions at the beginning of this document and c-icap as referenced above.
2. To use ClamAV, set the mode to c-icap with ClamAV either from the Web interface orvia command line:
sudo -u www-data php occ config:app:set files_antivirus \ av_request_service --value="avscan"
3. Set the respective response header:
sudo -u www-data php occ config:app:set files_antivirus \ av_response_header --value="X-Infection-Found"
Run with Kaspersky Anti-Virus (KAV)
1. Install Kaspersky ScanEngine based on their instructions and prepare KAV forrunning in ICAP mode.
2. Follow this procedure to configure ownCloud for the Kaspersky ScanEngine.3. To use KAV, set the mode to req either from the Web interface or via command line:
sudo -u www-data php occ config:app:set files_antivirus \ av_request_service --value="req"
4. Set the respective response header:
sudo -u www-data php occ config:app:set files_antivirus \ av_response_header --value="X-Virus-ID"
402 | Server Configuration
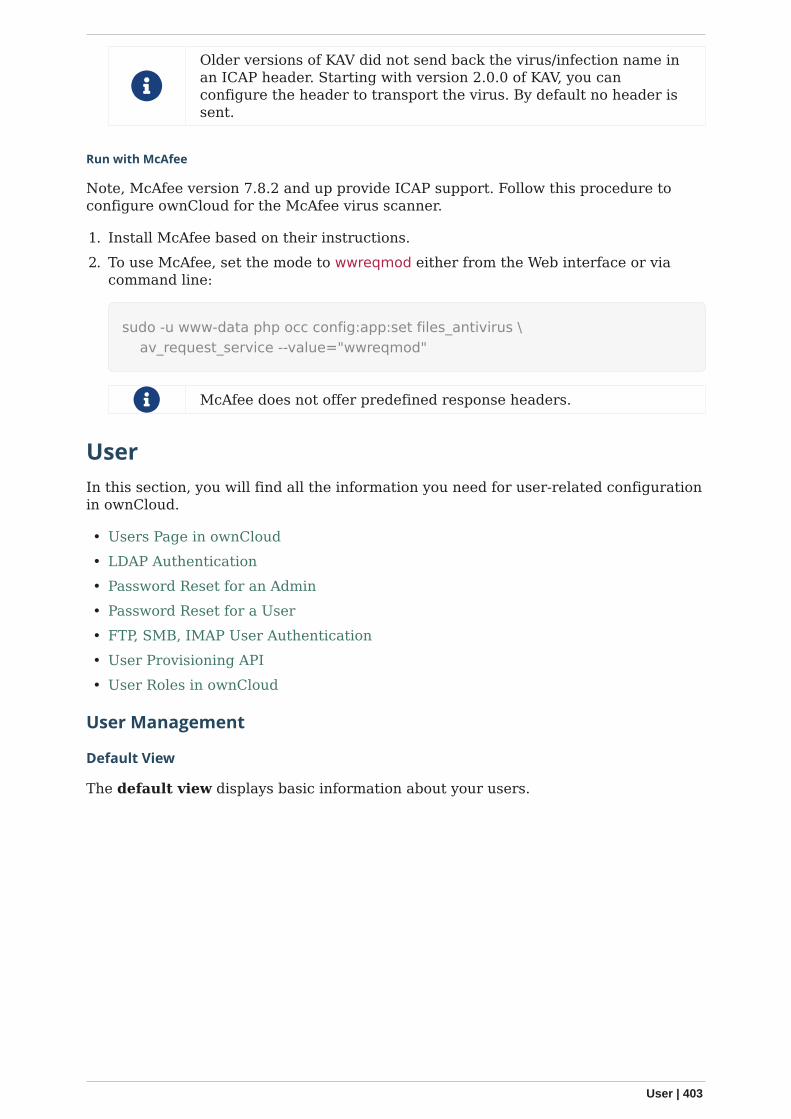
Older versions of KAV did not send back the virus/infection name inan ICAP header. Starting with version 2.0.0 of KAV, you canconfigure the header to transport the virus. By default no header issent.
Run with McAfee
Note, McAfee version 7.8.2 and up provide ICAP support. Follow this procedure toconfigure ownCloud for the McAfee virus scanner.
1. Install McAfee based on their instructions.2. To use McAfee, set the mode to wwreqmod either from the Web interface or via
command line:
sudo -u www-data php occ config:app:set files_antivirus \ av_request_service --value="wwreqmod"
McAfee does not offer predefined response headers.
User
In this section, you will find all the information you need for user-related configurationin ownCloud.
• Users Page in ownCloud• LDAP Authentication• Password Reset for an Admin• Password Reset for a User• FTP, SMB, IMAP User Authentication• User Provisioning API• User Roles in ownCloud
User Management
Default View
The default view displays basic information about your users.
User | 403
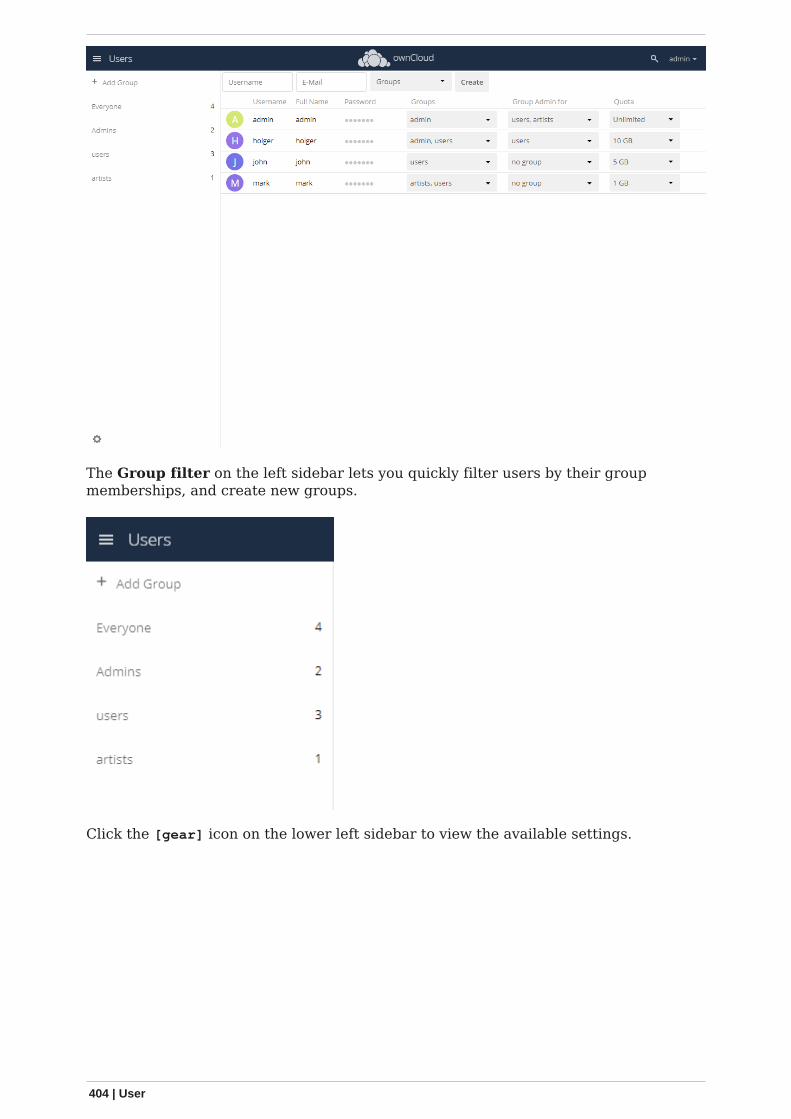
The Group filter on the left sidebar lets you quickly filter users by their groupmemberships, and create new groups.
Click the [gear] icon on the lower left sidebar to view the available settings.
404 | User
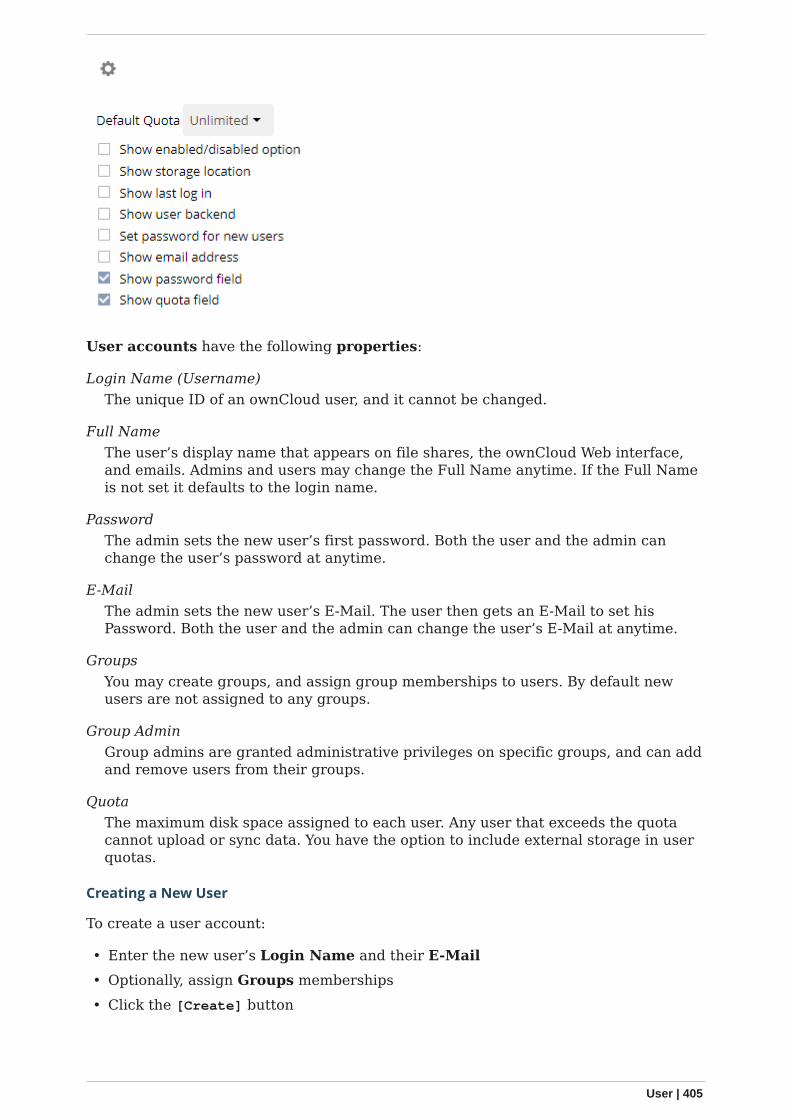
User accounts have the following properties:
Login Name (Username)The unique ID of an ownCloud user, and it cannot be changed.
Full NameThe user’s display name that appears on file shares, the ownCloud Web interface,and emails. Admins and users may change the Full Name anytime. If the Full Nameis not set it defaults to the login name.
PasswordThe admin sets the new user’s first password. Both the user and the admin canchange the user’s password at anytime.
E-MailThe admin sets the new user’s E-Mail. The user then gets an E-Mail to set hisPassword. Both the user and the admin can change the user’s E-Mail at anytime.
GroupsYou may create groups, and assign group memberships to users. By default newusers are not assigned to any groups.
Group AdminGroup admins are granted administrative privileges on specific groups, and can addand remove users from their groups.
QuotaThe maximum disk space assigned to each user. Any user that exceeds the quotacannot upload or sync data. You have the option to include external storage in userquotas.
Creating a New User
To create a user account:
• Enter the new user’s Login Name and their E-Mail• Optionally, assign Groups memberships• Click the [Create] button
User | 405
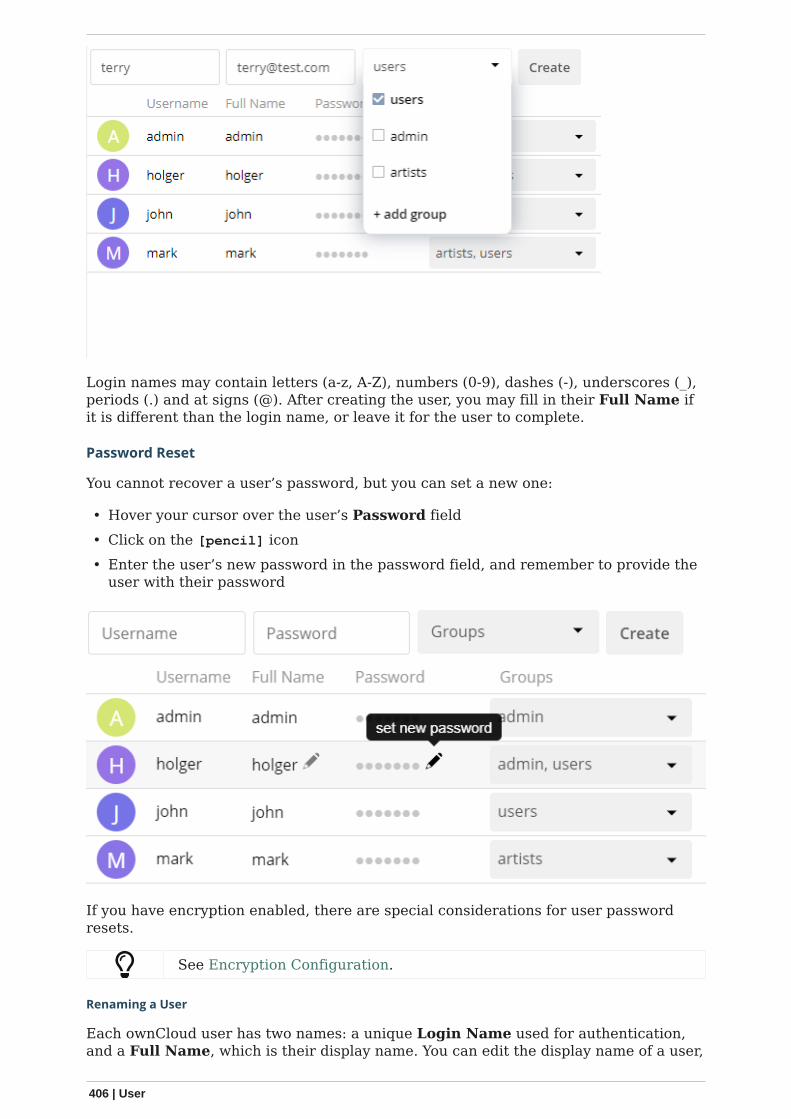
Login names may contain letters (a-z, A-Z), numbers (0-9), dashes (-), underscores (_),periods (.) and at signs (@). After creating the user, you may fill in their Full Name ifit is different than the login name, or leave it for the user to complete.
Password Reset
You cannot recover a user’s password, but you can set a new one:
• Hover your cursor over the user’s Password field• Click on the [pencil] icon• Enter the user’s new password in the password field, and remember to provide the
user with their password
If you have encryption enabled, there are special considerations for user passwordresets.
See Encryption Configuration.
Renaming a User
Each ownCloud user has two names: a unique Login Name used for authentication,and a Full Name, which is their display name. You can edit the display name of a user,
406 | User
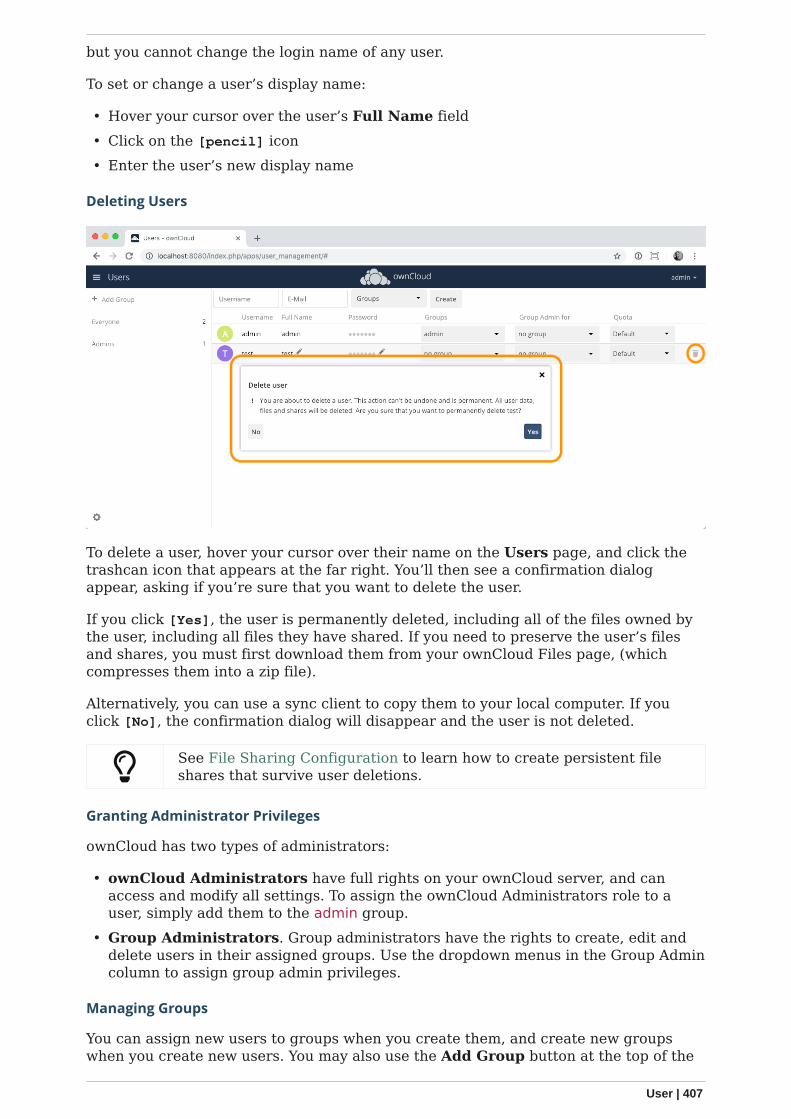
but you cannot change the login name of any user.
To set or change a user’s display name:
• Hover your cursor over the user’s Full Name field• Click on the [pencil] icon• Enter the user’s new display name
Deleting Users
To delete a user, hover your cursor over their name on the Users page, and click thetrashcan icon that appears at the far right. You’ll then see a confirmation dialogappear, asking if you’re sure that you want to delete the user.
If you click [Yes], the user is permanently deleted, including all of the files owned bythe user, including all files they have shared. If you need to preserve the user’s filesand shares, you must first download them from your ownCloud Files page, (whichcompresses them into a zip file).
Alternatively, you can use a sync client to copy them to your local computer. If youclick [No], the confirmation dialog will disappear and the user is not deleted.
See File Sharing Configuration to learn how to create persistent fileshares that survive user deletions.
Granting Administrator Privileges
ownCloud has two types of administrators:
• ownCloud Administrators have full rights on your ownCloud server, and canaccess and modify all settings. To assign the ownCloud Administrators role to auser, simply add them to the admin group.
• Group Administrators. Group administrators have the rights to create, edit anddelete users in their assigned groups. Use the dropdown menus in the Group Admincolumn to assign group admin privileges.
Managing Groups
You can assign new users to groups when you create them, and create new groupswhen you create new users. You may also use the Add Group button at the top of the
User | 407
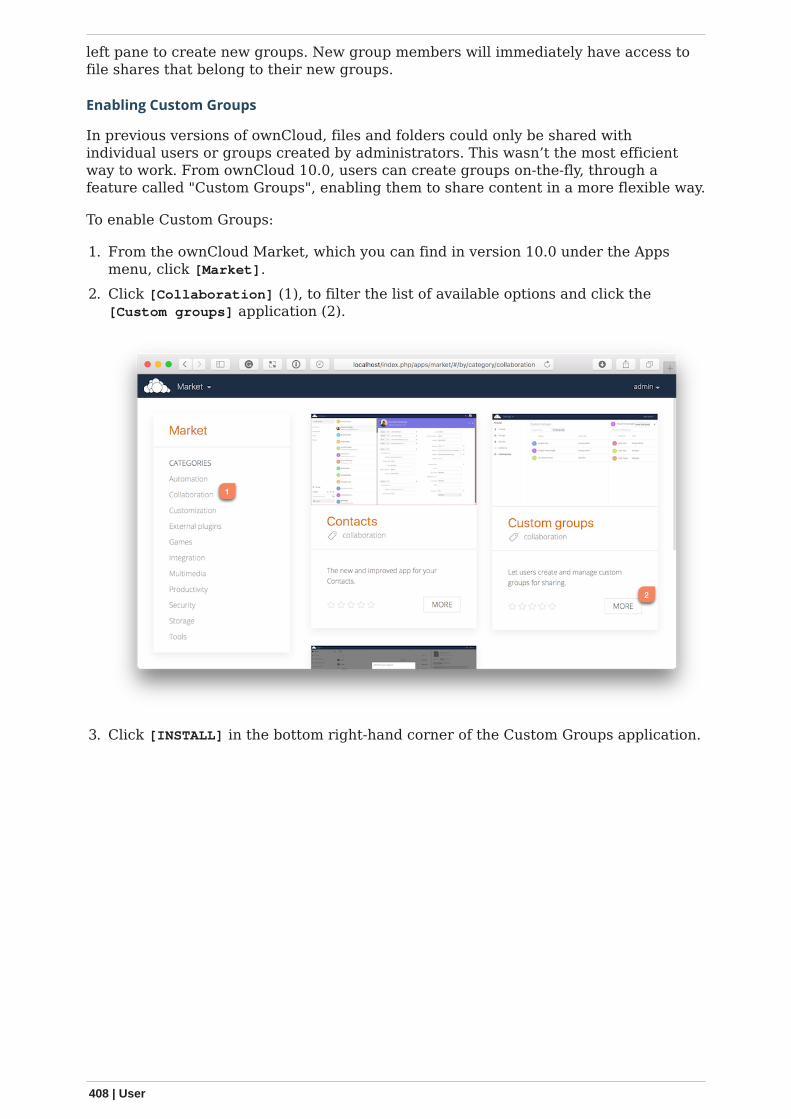
left pane to create new groups. New group members will immediately have access tofile shares that belong to their new groups.
Enabling Custom Groups
In previous versions of ownCloud, files and folders could only be shared withindividual users or groups created by administrators. This wasn’t the most efficientway to work. From ownCloud 10.0, users can create groups on-the-fly, through afeature called "Custom Groups", enabling them to share content in a more flexible way.
To enable Custom Groups:
1. From the ownCloud Market, which you can find in version 10.0 under the Appsmenu, click [Market].
2. Click [Collaboration] (1), to filter the list of available options and click the[Custom groups] application (2).
3. Click [INSTALL] in the bottom right-hand corner of the Custom Groups application.
408 | User
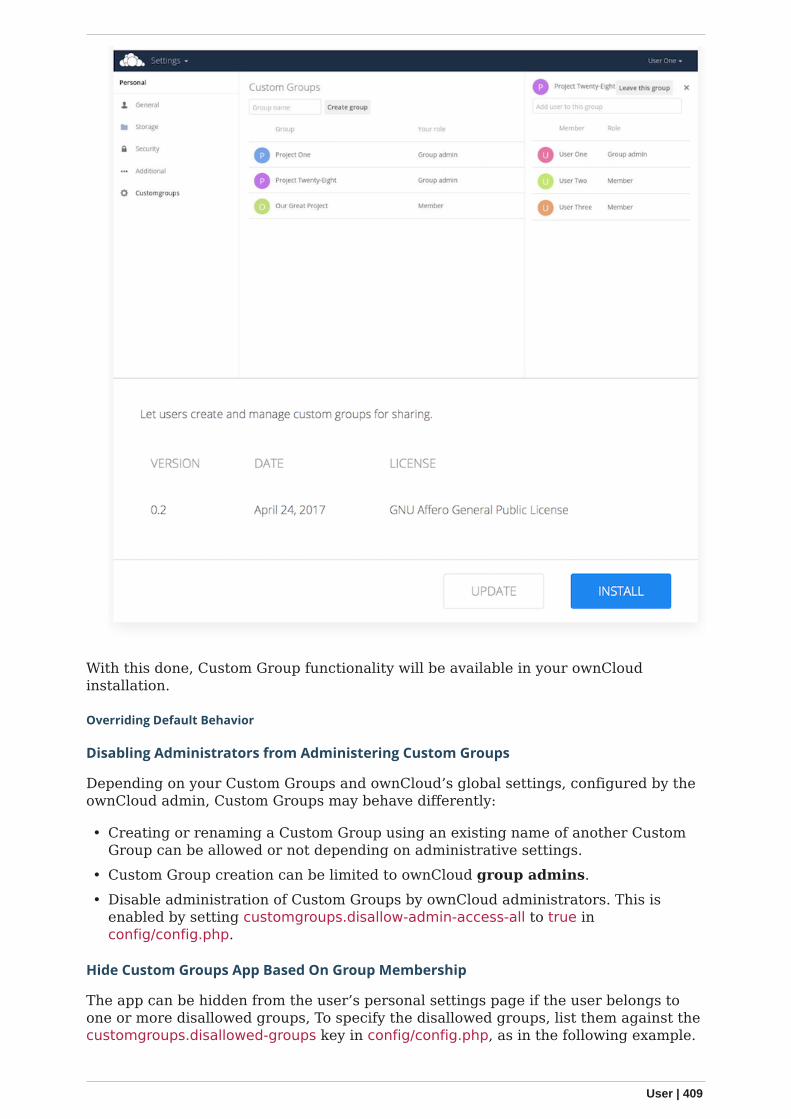
With this done, Custom Group functionality will be available in your ownCloudinstallation.
Overriding Default Behavior
Disabling Administrators from Administering Custom Groups
Depending on your Custom Groups and ownCloud’s global settings, configured by theownCloud admin, Custom Groups may behave differently:
• Creating or renaming a Custom Group using an existing name of another CustomGroup can be allowed or not depending on administrative settings.
• Custom Group creation can be limited to ownCloud group admins.• Disable administration of Custom Groups by ownCloud administrators. This is
enabled by setting customgroups.disallow-admin-access-all to true inconfig/config.php.
Hide Custom Groups App Based On Group Membership
The app can be hidden from the user’s personal settings page if the user belongs toone or more disallowed groups, To specify the disallowed groups, list them against thecustomgroups.disallowed-groups key in config/config.php, as in the following example.
User | 409
// Hide the Custom Groups app for users in the "guest_app" group.'customgroups.disallowed-groups' => ['guest_app'],
Setting Storage Quotas
There are 4 types of quota settings in ownCloud when dealing with LDAP users.
Quota Field
Found in User Authentication › the Advanced Tab › Special Attributes, thissetting overwrites the rest. If set, this is what will be set for an LDAP user’s quota inownCloud.
Quota Default
Found in User Authentication › the Advanced Tab › Special Attributes, this is thefallback option if no quota field is defined.
User Quota
This is what you set in the web UI drop down menu, and is how you set user quota.
Default Quota
This will be set if no quota is set, and is found in Users Tab › Gear Wheel › DefaultQuota. If Quota Field is not set, but Quota Default is, and a systems administratortries to set a quota for an LDAP user with User Quota, it will not work, since it isoverridden by Quota Default.
Click the [gear] icon on the lower left pane to set a default storage quota. This isautomatically applied to new users. You may assign a different quota to any user byselecting from the Quota dropdown, selecting either a preset value or entering acustom value. When you create custom quotas, use the normal abbreviations for yourstorage values such as 500 MB, 5 GB, 5 TB, and so on.
External Storage Quota
You now have a configurable option in config.php that controls whether externalstorage is counted against user’s quotas. This is still experimental, and may not workas expected. The default is to not count external storage as part of user storagequotas. If you prefer to include it, then change the default false to true.:
'quota_include_external_storage' => false,
Storage Space Considerations
Metadata (such as thumbnails, temporary files, and encryption keys) takes up about10% of disk space, but is not counted against user quotas. Users can check their usedand available space on their Personal pages. Only files that originate with users countagainst their quotas, and not files shared with them that originate from other users.For example, if you upload files to a different user’s share, those files count againstyour quota. If you re-share a file that another user shared with you, that file does notcount against your quota, but the originating user’s.
410 | User
Encrypted files are a little larger than unencrypted files; the unencrypted size iscalculated against the user’s quota.
Deleted files that are still in the trash bin do not count against quotas. The trash bin isset at 50% of quota. Deleted file aging is set at 30 days. When deleted files exceed50% of quota then the oldest files are removed until the total is below 50%.
Versions
When version control is enabled, the older file versions are not counted againstquotas.
Public Links
When a user creates a public link share via URL, and allows uploads, any uploadedfiles count against that user’s quota.
ownCloud Roles
The following information is not an in-depth guide, but more of a high-level overviewof each type.
Anonymous
• Is not a regular user.• Has access to specific content made available via public links.
◦ Can be password-protected (optional, enforced, policy-enforced).◦ Can have an expiration date (optional, enforced, enforced dependent on
password).• Has no personal space• Has no file ownership (ownership of uploaded/created files is directed to sharer).• Has no use of clients.• Quota is that of the sharer.• Permissions are those granted by the sharer for specific content, e.g., view-only,
edit, and File Drop.• Can only use file and viewer apps, such as PDF Viewer and Collabora Online.
Guest
• The Guests app is available on the ownCloud Marketplace. You must install andenable it first.
• Is a regular user with restricted permissions, identified via e-mail address.• Has no personal space.• Has no file ownership (ownership of uploaded/created files is directed to sharer).• Has access to shared space. The permissions are granted by the sharer.• Is not bound to the inviting user.
◦ Can log in as long as shares are available.◦ Becomes deactivated when no shares are left; this is the shared with guests
filter.
User | 411

◦ Reactivated when a share is received.◦ Administrators will be able to automate user cleanup ("disabled for x days").
• Can use all clients.• Fully auditable in the enterprise edition.• Can be promoted to group administrator or administrator, but will still have no
personal space.• Apps are specified by the admin (whitelist).
The Shared with Guests FilterThis filter makes it easy for sharers to view and remove their shareswith a guest, which also removes their responsibility for guests. Whenall of a guest’s shares are removed, the guest is then disabled and canno longer login.
Standard User
• Is a regular user (from LDAP, ownCloud user backend, or another backend).• Has personal space. Permissions are granted by the administrator.• Shared space: Permissions as granted by sharer.• Apps: All enabled, might be restricted by group membership.
Federated User
• Is not an internal user.• Can trust a federated system.• Has access to shared space through users on the considered ownCloud system.• Can share data with the considered system (accept-/rejectable).
ownCloud Group Administrator
• Is a regular user, such as from LDAP, an ownCloud user backend, or anotherbackend.
• Can manage users in their groups, such as adding and removing them, andchanging quota of users in the group.
• Can add new users to their groups and can manage guests.• Can enable and disable users.• Can impersonate users in their groups.• Custom group creation may be restricted to group admins.
ownCloud Administrator
• Is a regular user (from LDAP, ownCloud user backend, or another backend).• Can configure ownCloud features via the UI, such as sharing settings, app-specific
configurations, and external storages for users.• Can manage users, such as adding and removing, enabling and disabling, quota
and group management.• Can restrict app usage to groups, where applicable.• Configurable access to log files.• Mounting of external shares and local shares (of external filesystems) is disabled by
default.
412 | User
System Administrator
• Is not an ownCloud user.• Has access to ownCloud code (e.g., config.php and apps folders) and command-line
tool (occ occ).• Configures and maintains the ownCloud environment (PHP, Webserver, DB,
Storage, Redis, Firewall, Cron, and LDAP, etc.).• Maintains ownCloud, such as updates, backups, and installs extensions.• Can manage users and groups, such as via occ.• Has access to the master key when storage encryption is used.• Storage admin: Encryption at rest, which prevents the storage administrator from
having access to data stored in ownCloud.• DB admin: Calendar/Contacts etc. DB entries not encrypted.
Auditor
• Is not an ownCloud user.• Conducts usage and compliance audits in enterprise scenarios.• App logs (especially Auditlog) can be separated from ownCloud log. This separates
the Auditor and Sysadmin roles. An audit.log file can be enabled, which theSysadmin can’t access.
• Best practice: parse separated log to an external analyzing tool.
Resetting a Lost Admin Password
The normal ways to recover a lost password are:
1. Click the password reset link on the login screen; this appears after a failed loginattempt. This works only if you have entered your email address on your Personalpage in the ownCloud Web interface, so that the ownCloud server can email a resetlink to you.
2. Ask another ownCloud server admin to reset it for you.
If neither of these is an option, then you have a third option, and that is using the occcommand. occ is in the owncloud directory, for example /var/www/owncloud/occ. occhas a command for resetting all user passwords, user:resetpassword. It is best to runocc as the HTTP user, as in this example on Ubuntu Linux:
$ sudo -u www-data php occ /var/www/owncloud/occ user:resetpassword adminEnter a new password:Confirm the new password:Successfully reset password for admin
If your ownCloud username is not admin, then substitute your ownCloud username.
You can find your HTTP user in your HTTP configuration file. These are the defaultApache HTTP user:group on Linux distros:
• Centos, Red Hat, Fedora: apache:apache• Debian, Ubuntu, Linux Mint: www-data:www-data• openSUSE: wwwrun:www
User | 413
See Using the occ Command to learn more about using the occ command.
Password changes automatically log out all connectedbrowsers/devices.
Resetting a User Password
The ownCloud login screen displays a Wrong password. Reset it? message after auser enters an incorrect password, and then ownCloud automatically resets theirpassword. However, if you are using a read-only authentication backend such as LDAPor Active Directory, this will not work. In this case you may specify a custom URL inyour config.php file to direct your user to a server than can handle an automatic reset:
'lost_password_link' => 'https://example.org/link/to/password/reset',
Password changes automatically log out all connectedbrowsers/devices.
User Authentication with IMAP, SMB, and FTP
Introduction
You may configure additional user backends in ownCloud’s configuration file(config/config.php) using the following syntax:
<?php
"user_backends" => [ 0 => [ "class" => ..., "arguments" => [ 0 => ... ], ],],
A non-blocking or correctly configured SELinux setup is needed forthese backends to work, if SELinux is enabled on your server. Pleaserefer to the SELinux configuration for further details.
Currently the External user support app (user_external), which is not enabled bydefault, provides three backends. These are:
• IMAP• SMB• FTP
See Installing and Managing Apps for more information.
IMAP
Provides authentication against IMAP servers.
414 | User
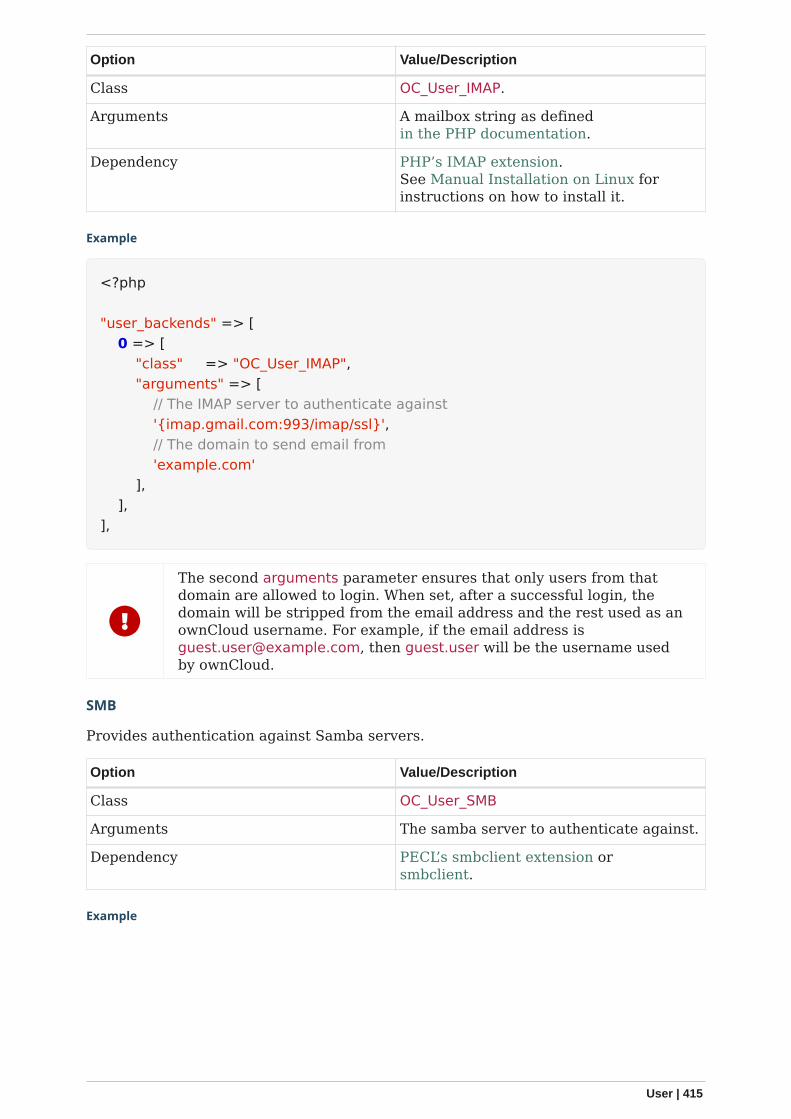
Option Value/Description
Class OC_User_IMAP.
Arguments A mailbox string as definedin the PHP documentation.
Dependency PHP’s IMAP extension.See Manual Installation on Linux forinstructions on how to install it.
Example
<?php
"user_backends" => [ 0 => [ "class" => "OC_User_IMAP", "arguments" => [ // The IMAP server to authenticate against '{imap.gmail.com:993/imap/ssl}', // The domain to send email from 'example.com' ], ],],
The second arguments parameter ensures that only users from thatdomain are allowed to login. When set, after a successful login, thedomain will be stripped from the email address and the rest used as anownCloud username. For example, if the email address [email protected], then guest.user will be the username usedby ownCloud.
SMB
Provides authentication against Samba servers.
Option Value/Description
Class OC_User_SMB
Arguments The samba server to authenticate against.
Dependency PECL’s smbclient extension orsmbclient.
Example
User | 415
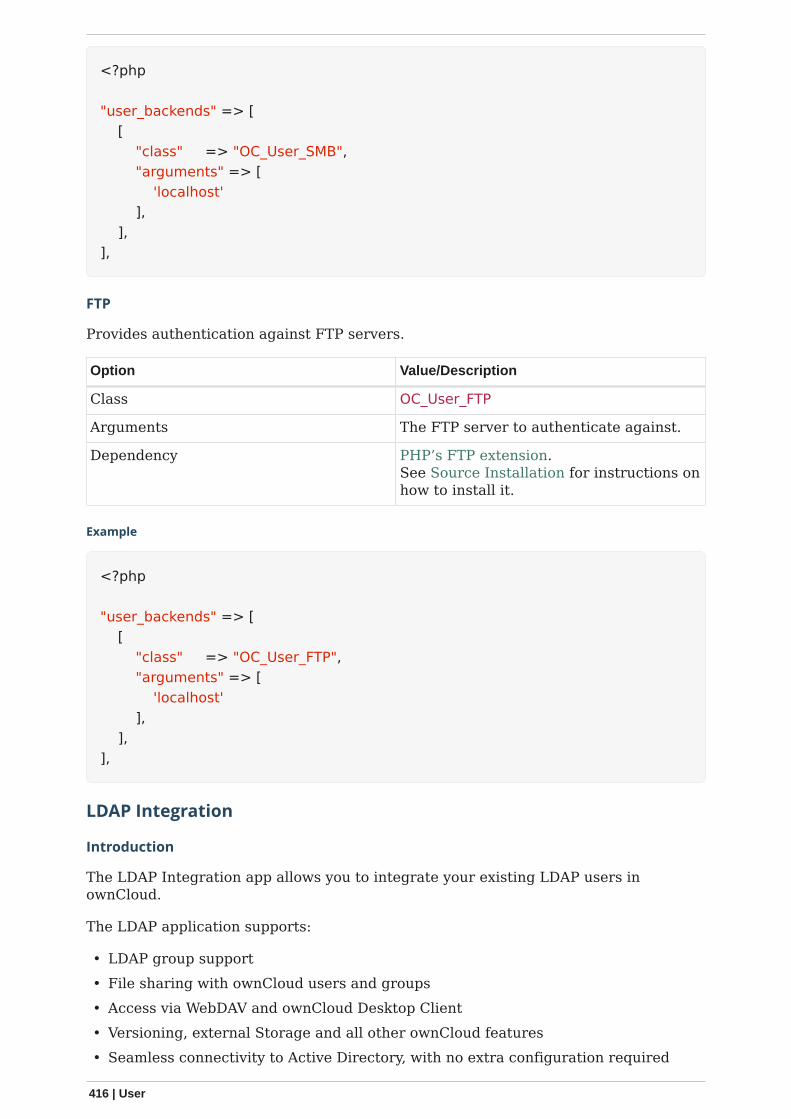
<?php
"user_backends" => [ [ "class" => "OC_User_SMB", "arguments" => [ 'localhost' ], ],],
FTP
Provides authentication against FTP servers.
Option Value/Description
Class OC_User_FTP
Arguments The FTP server to authenticate against.
Dependency PHP’s FTP extension.See Source Installation for instructions onhow to install it.
Example
<?php
"user_backends" => [ [ "class" => "OC_User_FTP", "arguments" => [ 'localhost' ], ],],
LDAP Integration
Introduction
The LDAP Integration app allows you to integrate your existing LDAP users inownCloud.
The LDAP application supports:
• LDAP group support• File sharing with ownCloud users and groups• Access via WebDAV and ownCloud Desktop Client• Versioning, external Storage and all other ownCloud features• Seamless connectivity to Active Directory, with no extra configuration required
416 | User
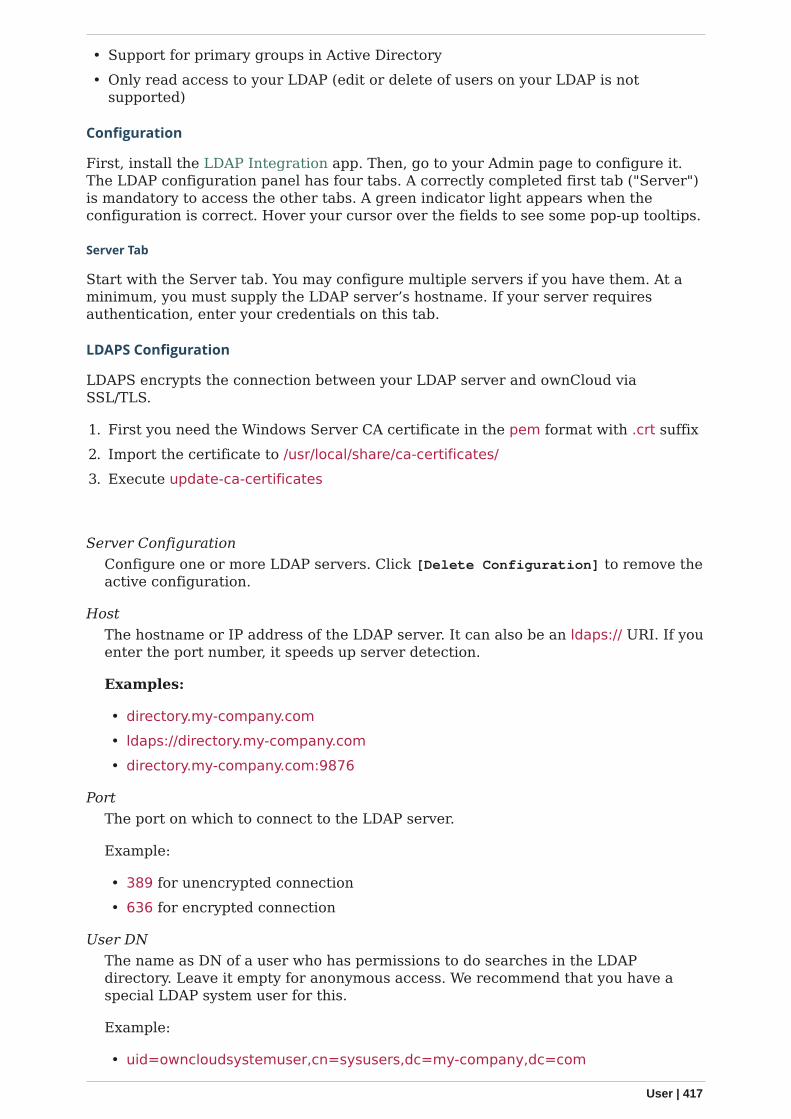
• Support for primary groups in Active Directory• Only read access to your LDAP (edit or delete of users on your LDAP is not
supported)
Configuration
First, install the LDAP Integration app. Then, go to your Admin page to configure it.The LDAP configuration panel has four tabs. A correctly completed first tab ("Server")is mandatory to access the other tabs. A green indicator light appears when theconfiguration is correct. Hover your cursor over the fields to see some pop-up tooltips.
Server Tab
Start with the Server tab. You may configure multiple servers if you have them. At aminimum, you must supply the LDAP server’s hostname. If your server requiresauthentication, enter your credentials on this tab.
LDAPS Configuration
LDAPS encrypts the connection between your LDAP server and ownCloud viaSSL/TLS.
1. First you need the Windows Server CA certificate in the pem format with .crt suffix2. Import the certificate to /usr/local/share/ca-certificates/3. Execute update-ca-certificates
Server ConfigurationConfigure one or more LDAP servers. Click [Delete Configuration] to remove theactive configuration.
HostThe hostname or IP address of the LDAP server. It can also be an ldaps:// URI. If youenter the port number, it speeds up server detection.
Examples:
• directory.my-company.com• ldaps://directory.my-company.com• directory.my-company.com:9876
PortThe port on which to connect to the LDAP server.
Example:
• 389 for unencrypted connection• 636 for encrypted connection
User DNThe name as DN of a user who has permissions to do searches in the LDAPdirectory. Leave it empty for anonymous access. We recommend that you have aspecial LDAP system user for this.
Example:
• uid=owncloudsystemuser,cn=sysusers,dc=my-company,dc=com
User | 417
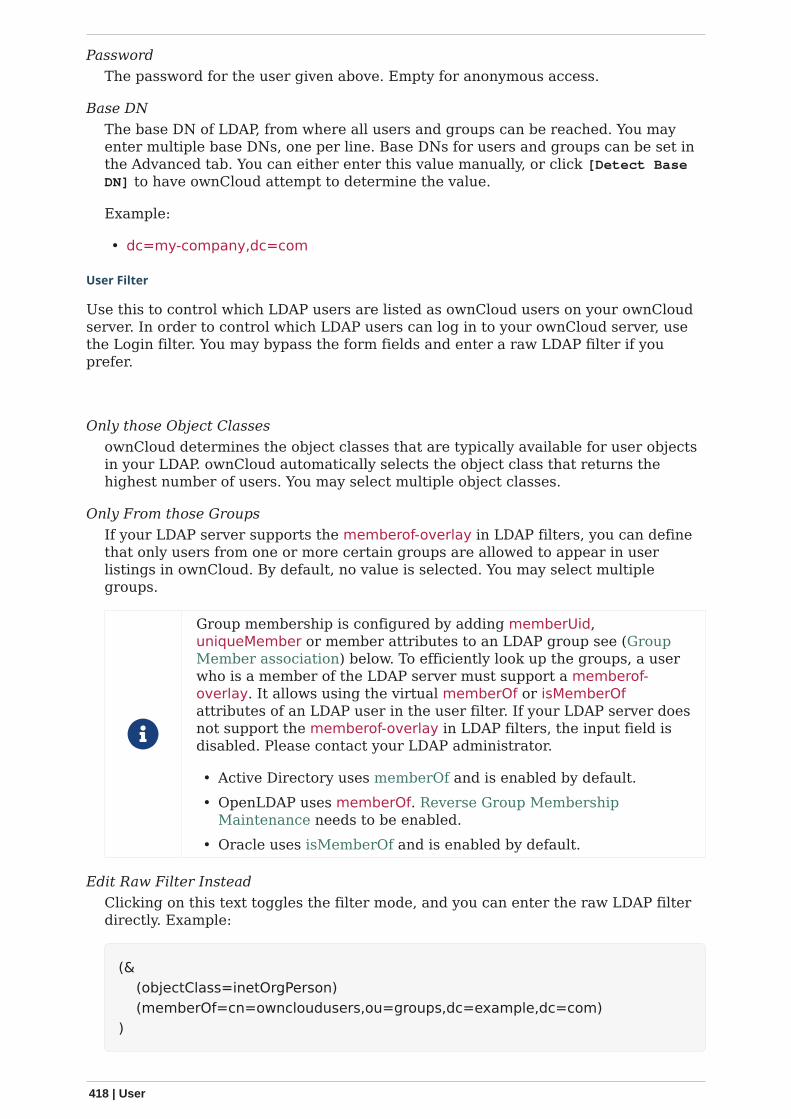
PasswordThe password for the user given above. Empty for anonymous access.
Base DNThe base DN of LDAP, from where all users and groups can be reached. You mayenter multiple base DNs, one per line. Base DNs for users and groups can be set inthe Advanced tab. You can either enter this value manually, or click [Detect BaseDN] to have ownCloud attempt to determine the value.
Example:
• dc=my-company,dc=com
User Filter
Use this to control which LDAP users are listed as ownCloud users on your ownCloudserver. In order to control which LDAP users can log in to your ownCloud server, usethe Login filter. You may bypass the form fields and enter a raw LDAP filter if youprefer.
Only those Object ClassesownCloud determines the object classes that are typically available for user objectsin your LDAP. ownCloud automatically selects the object class that returns thehighest number of users. You may select multiple object classes.
Only From those GroupsIf your LDAP server supports the memberof-overlay in LDAP filters, you can definethat only users from one or more certain groups are allowed to appear in userlistings in ownCloud. By default, no value is selected. You may select multiplegroups.
Group membership is configured by adding memberUid,uniqueMember or member attributes to an LDAP group see (GroupMember association) below. To efficiently look up the groups, a userwho is a member of the LDAP server must support a memberof-overlay. It allows using the virtual memberOf or isMemberOfattributes of an LDAP user in the user filter. If your LDAP server doesnot support the memberof-overlay in LDAP filters, the input field isdisabled. Please contact your LDAP administrator.
• Active Directory uses memberOf and is enabled by default.• OpenLDAP uses memberOf. Reverse Group Membership
Maintenance needs to be enabled.• Oracle uses isMemberOf and is enabled by default.
Edit Raw Filter InsteadClicking on this text toggles the filter mode, and you can enter the raw LDAP filterdirectly. Example:
(& (objectClass=inetOrgPerson) (memberOf=cn=owncloudusers,ou=groups,dc=example,dc=com))
418 | User
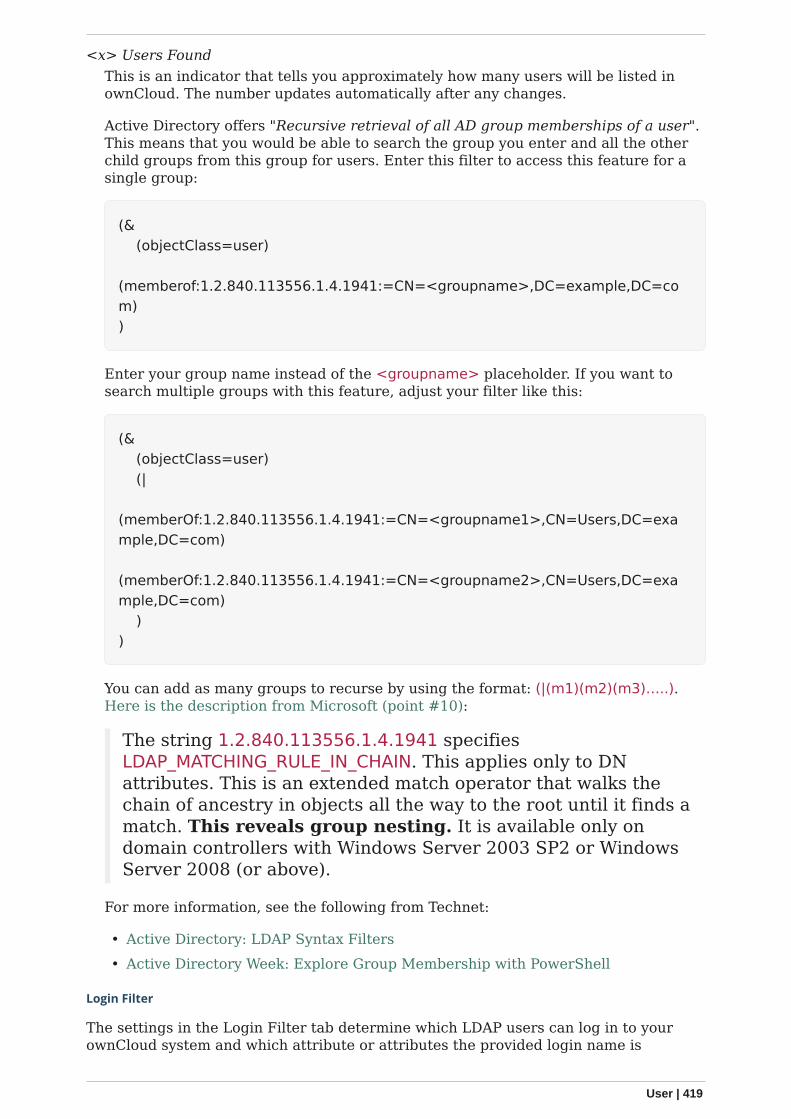
<x> Users FoundThis is an indicator that tells you approximately how many users will be listed inownCloud. The number updates automatically after any changes.
Active Directory offers "Recursive retrieval of all AD group memberships of a user".This means that you would be able to search the group you enter and all the otherchild groups from this group for users. Enter this filter to access this feature for asingle group:
(& (objectClass=user) (memberof:1.2.840.113556.1.4.1941:=CN=<groupname>,DC=example,DC=com))
Enter your group name instead of the <groupname> placeholder. If you want tosearch multiple groups with this feature, adjust your filter like this:
(& (objectClass=user) (| (memberOf:1.2.840.113556.1.4.1941:=CN=<groupname1>,CN=Users,DC=example,DC=com) (memberOf:1.2.840.113556.1.4.1941:=CN=<groupname2>,CN=Users,DC=example,DC=com) ))
You can add as many groups to recurse by using the format: (|(m1)(m2)(m3)…..).Here is the description from Microsoft (point #10):
The string 1.2.840.113556.1.4.1941 specifiesLDAP_MATCHING_RULE_IN_CHAIN. This applies only to DNattributes. This is an extended match operator that walks thechain of ancestry in objects all the way to the root until it finds amatch. This reveals group nesting. It is available only ondomain controllers with Windows Server 2003 SP2 or WindowsServer 2008 (or above).
For more information, see the following from Technet:
• Active Directory: LDAP Syntax Filters• Active Directory Week: Explore Group Membership with PowerShell
Login Filter
The settings in the Login Filter tab determine which LDAP users can log in to yourownCloud system and which attribute or attributes the provided login name is
User | 419
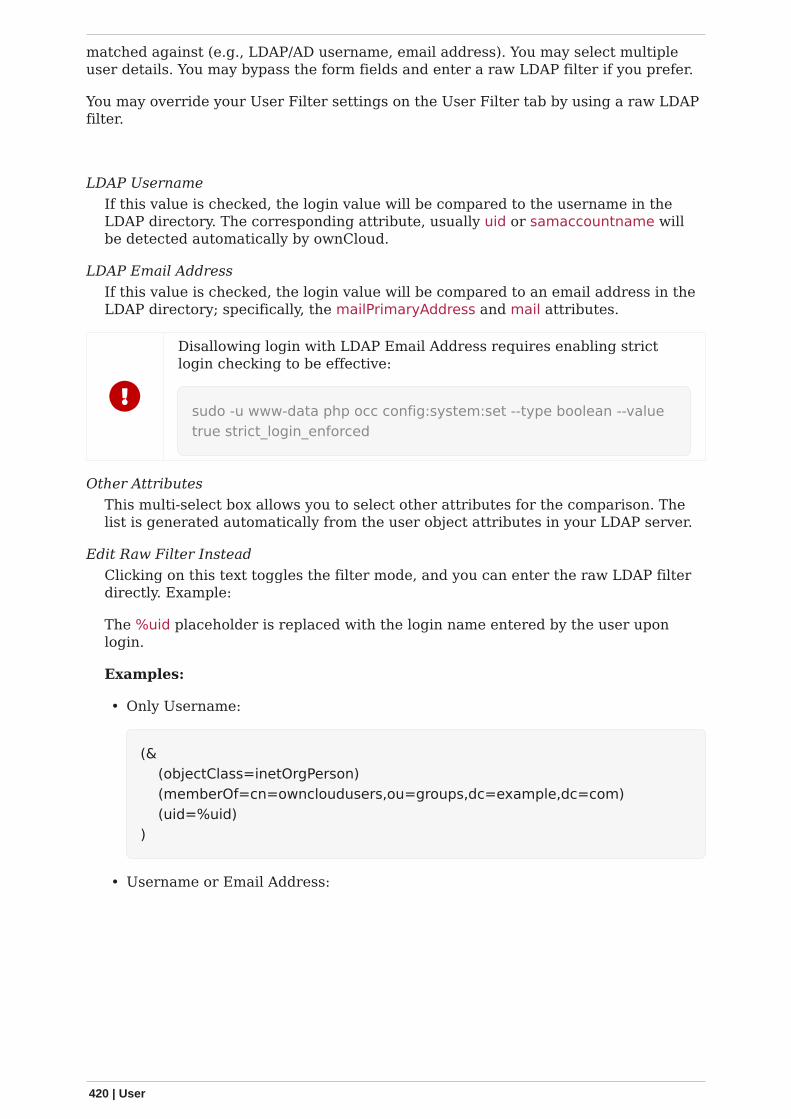
matched against (e.g., LDAP/AD username, email address). You may select multipleuser details. You may bypass the form fields and enter a raw LDAP filter if you prefer.
You may override your User Filter settings on the User Filter tab by using a raw LDAPfilter.
LDAP UsernameIf this value is checked, the login value will be compared to the username in theLDAP directory. The corresponding attribute, usually uid or samaccountname willbe detected automatically by ownCloud.
LDAP Email AddressIf this value is checked, the login value will be compared to an email address in theLDAP directory; specifically, the mailPrimaryAddress and mail attributes.
Disallowing login with LDAP Email Address requires enabling strictlogin checking to be effective:
sudo -u www-data php occ config:system:set --type boolean --valuetrue strict_login_enforced
Other AttributesThis multi-select box allows you to select other attributes for the comparison. Thelist is generated automatically from the user object attributes in your LDAP server.
Edit Raw Filter InsteadClicking on this text toggles the filter mode, and you can enter the raw LDAP filterdirectly. Example:
The %uid placeholder is replaced with the login name entered by the user uponlogin.
Examples:
• Only Username:
(& (objectClass=inetOrgPerson) (memberOf=cn=owncloudusers,ou=groups,dc=example,dc=com) (uid=%uid))
• Username or Email Address:
420 | User
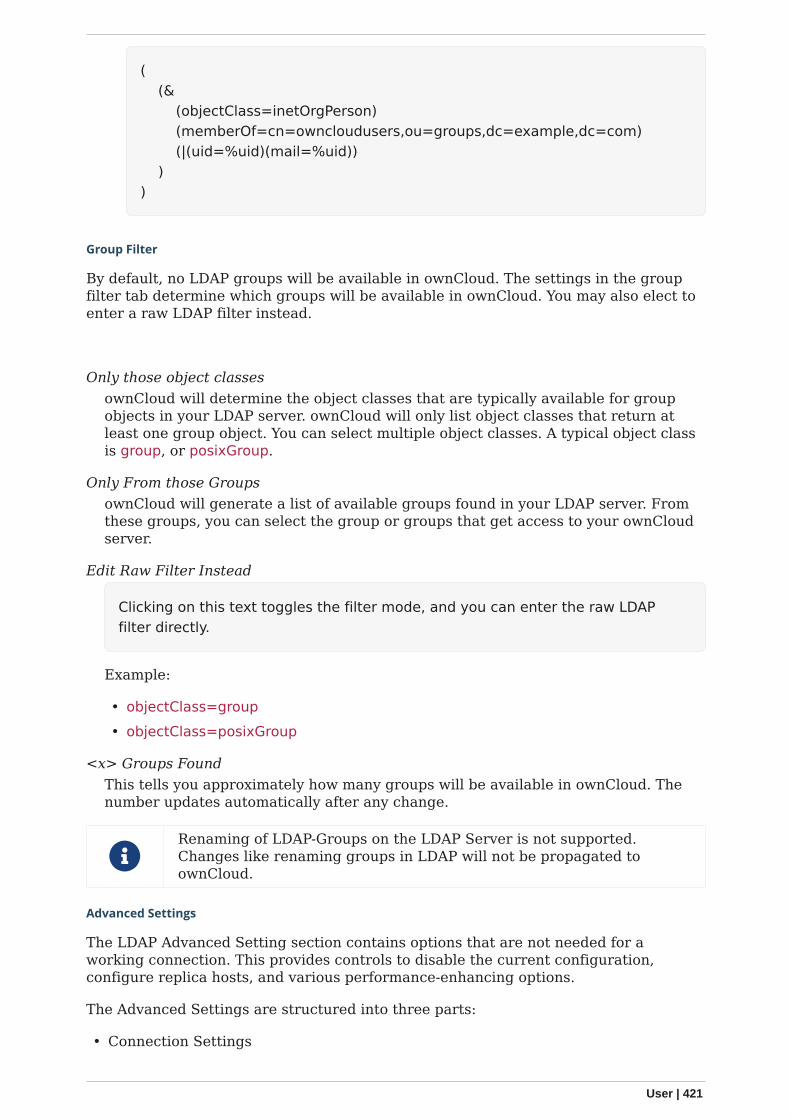
( (& (objectClass=inetOrgPerson) (memberOf=cn=owncloudusers,ou=groups,dc=example,dc=com) (|(uid=%uid)(mail=%uid)) ))
Group Filter
By default, no LDAP groups will be available in ownCloud. The settings in the groupfilter tab determine which groups will be available in ownCloud. You may also elect toenter a raw LDAP filter instead.
Only those object classesownCloud will determine the object classes that are typically available for groupobjects in your LDAP server. ownCloud will only list object classes that return atleast one group object. You can select multiple object classes. A typical object classis group, or posixGroup.
Only From those GroupsownCloud will generate a list of available groups found in your LDAP server. Fromthese groups, you can select the group or groups that get access to your ownCloudserver.
Edit Raw Filter Instead
Clicking on this text toggles the filter mode, and you can enter the raw LDAPfilter directly.
Example:
• objectClass=group• objectClass=posixGroup
<x> Groups FoundThis tells you approximately how many groups will be available in ownCloud. Thenumber updates automatically after any change.
Renaming of LDAP-Groups on the LDAP Server is not supported.Changes like renaming groups in LDAP will not be propagated toownCloud.
Advanced Settings
The LDAP Advanced Setting section contains options that are not needed for aworking connection. This provides controls to disable the current configuration,configure replica hosts, and various performance-enhancing options.
The Advanced Settings are structured into three parts:
• Connection Settings
User | 421
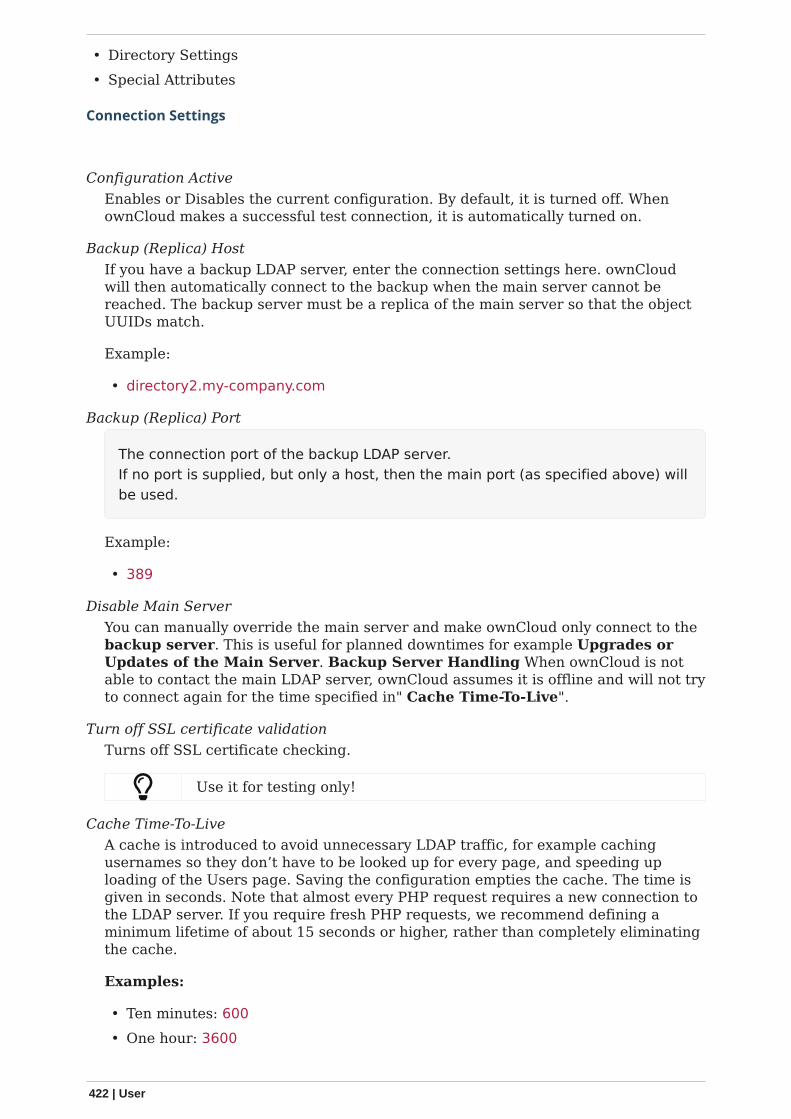
• Directory Settings• Special Attributes
Connection Settings
Configuration ActiveEnables or Disables the current configuration. By default, it is turned off. WhenownCloud makes a successful test connection, it is automatically turned on.
Backup (Replica) HostIf you have a backup LDAP server, enter the connection settings here. ownCloudwill then automatically connect to the backup when the main server cannot bereached. The backup server must be a replica of the main server so that the objectUUIDs match.
Example:
• directory2.my-company.com
Backup (Replica) Port
The connection port of the backup LDAP server.If no port is supplied, but only a host, then the main port (as specified above) willbe used.
Example:
• 389
Disable Main ServerYou can manually override the main server and make ownCloud only connect to thebackup server. This is useful for planned downtimes for example Upgrades orUpdates of the Main Server. Backup Server Handling When ownCloud is notable to contact the main LDAP server, ownCloud assumes it is offline and will not tryto connect again for the time specified in" Cache Time-To-Live".
Turn off SSL certificate validationTurns off SSL certificate checking.
Use it for testing only!
Cache Time-To-LiveA cache is introduced to avoid unnecessary LDAP traffic, for example cachingusernames so they don’t have to be looked up for every page, and speeding uploading of the Users page. Saving the configuration empties the cache. The time isgiven in seconds. Note that almost every PHP request requires a new connection tothe LDAP server. If you require fresh PHP requests, we recommend defining aminimum lifetime of about 15 seconds or higher, rather than completely eliminatingthe cache.
Examples:
• Ten minutes: 600• One hour: 3600
422 | User
See the Caching section below for detailed information on how the cache operates.
Directory Settings
User Display Name FieldThe attribute that should be used as display name in ownCloud.
Examples:
• displayName• givenName• sn
2nd User Display Name FieldAn optional second attribute displayed in brackets after the display name, forexample using the mail attribute displays as Molly Foo ([email protected]).
Examples:
• mail• userPrincipalName• sAMAccountName
Base User TreeThe base DN of LDAP, from where all users can be reached. This must be a completeDN, regardless of what you have entered for your Base DN in the Basic setting. Youcan specify multiple base trees, one on each line.
Examples:
• cn=programmers,dc=my-company,dc=com• cn=designers,dc=my-company,dc=com
User Search AttributesThese attributes are used when searches for users are performed, for example inthe share dialogue. The user display name attribute is the default. You may listmultiple attributes, one per line.
If an attribute is not available on a user object, the user will not be listed, and willbe unable to login. This also affects the display name attribute. If you override thedefault you must specify the display name attribute here.
Examples:
• displayName• mail
Group Display Name FieldThe attribute that should be used as ownCloud group name. ownCloud allows alimited set of characters (a-zA-Z0-9.-_@). Once a group name is assigned it cannotbe changed.
Examples:
• cn
User | 423
Base Group TreeThe base DN of LDAP, from where all groups can be reached. This must be acomplete DN, regardless of what you have entered for your Base DN in the Basicsetting. You can specify multiple base trees, one in each line.
Examples:
• cn=barcelona,dc=my-company,dc=com• cn=madrid,dc=my-company,dc=com
Group Search AttributesThese attributes are used when a search for groups is done, for example in theshare dialogue. By default the group display name attribute as specified above isused. Multiple attributes can be given, one in each line.
If you override the default, the group display name attribute will not be taken intoaccount, unless you specify it as well.
Examples:
• cn• description
Group Member AssociationThe attribute that is used to indicate group memberships, i.e., the attribute used byLDAP groups to refer to their users. ownCloud detects the value automatically. Youshould only change it if you have a very valid reason and know what you are doing.
Examples:
• member with FDN for Active Directory or for objectclass groupOfNames groups• memberUid with RDN for objectclass posixGroup groups• uniqueMember with FDN for objectclass groupOfUniqueNames groups
The Group Member association is used to efficiently query users of acertain group, e.g., on the userManagement page or when resolvingall members of a group share.
Dynamic Group Member URLThe LDAP attribute that on group objects contains an LDAP search URL thatdetermines what objects belong to the group. An empty setting disables dynamicgroup membership functionality. See Configuring Dynamic Groups for more details.
Nested GroupsThis makes the LDAP connector aware that groups could be stored inside existinggroup records. By default a group will only contain users, so enabling this optionisn’t necessary. However, if groups are contained inside groups, and this option isnot enabled, any groups contained within other groups will be ignored and notreturned in search results.
Paging Chunk SizeThis sets the maximum number of records able to be returned in a response whenownCloud requests data from LDAP. If this value is greater than the limit of theunderlying LDAP server (such as 3000 for Microsoft Active Directory) the LDAPserver will reject the request and the search request will fail. Given that, it isimportant to set the requested chunk size to a value no larger than that which theunderlying LDAP server supports.
424 | User
Special Attributes
Quota FieldThe name of the LDAP attribute to retrieve the user quota limit from. You have todecide which LDAP attribute you want to use and set a value to it in the AttributeEditor.
Quota DefaultOverride ownCloud’s default quota for LDAP users who do not have a quota set inthe Quota Field.
1. After installation ownCloud uses an unlimited quota by default.2. Administrators can modify this value, at any time, in the user management page.3. However, when an LDAP quota is set it will override any values set in ownCloud.4. If an LDAP per/attribute quota is set in the active directory, it will override the
LDAP Quota Default value.
Administrators are not allowed to modify the user quota limit in theuser management page when steps 3 or 4 are in effect. At this point,updates are only possible via LDAP. See the LDAP Schema forownCloud Quota
Quota PriorityIf set, this is the current Quota Priority:
1. Quota Field overrides LDAP Quota Default2. LDAP Quota Default overrides ownCloud Default Quota3. ownCloud Default Quota overrides Unlimited Quota
Email FieldSet the user’s email from an LDAP attribute, e.g., mail. Leave it empty for defaultbehavior.
User Home Folder Naming RuleBy default, the ownCloud server creates the user directory in your ownCloud datadirectory and gives it the ownCloud username, e.g.,/var/www/owncloud/data/5a9df029-322d-4676-9c80-9fc8892c4e4b, if your datadirectory is set to /var/www/owncloud/data.
It is possible to override this setting and name it after an LDAP attribute value, e.g.,attr:cn. The attribute can return either an absolute path, e.g., /mnt/storage43/alice,or a relative path which must not begin with a /, e.g., CloudUsers/CookieMonster.This relative path is then created inside the data directory (e.g.,/var/www/owncloud/data/CloudUsers/CookieMonster).
Since ownCloud 8.0.10 and up the home folder rule is enforced. This means thatonce you set a home folder naming rule (get a home folder from an LDAP attribute),it must be available for all users. If it isn’t available for a user, then that user willnot be able to login. Also, the filesystem will not be set up for that user, so their fileshares will not be available to other users. For older versions you may enforce thehome folder rule with the occ command, like this example on Ubuntu:
User | 425

sudo -u www-data php occ config:app:set user_ldapenforce_home_folder_naming_rule --value=1
Since ownCloud 10.0 the home folder naming rule is only applied when firstprovisioning the user. This prevents data loss due to re-provisioning the users homefolder in case of unintentional changes in LDAP.
Expert Settings
Please check both the advanced and expert configurations carefullybefore using in production.
In "Expert Settings", fundamental behavior can be adjusted to your needs. Theconfiguration should be well-tested before starting production use.
Internal UsernameThe internal username is the identifier in ownCloud for LDAP users. By default itwill be created from the UUID attribute. The UUID attribute ensures that theusername is unique, and that characters do not need to be converted. Only thesecharacters are allowed: [\a-\zA-\Z0-\9_.@-]. Other characters are replaced with theirASCII equivalents, or are simply omitted.
The LDAP backend ensures that there are no duplicate internal usernames inownCloud, i.e., that it is checking all other activated user backends (including localownCloud users). On collisions, a random number (between 1000 and 9999) will beattached to the retrieved value. For example, if "alice" exists, the next usernamemay be alice_1337.
The internal username is the default name for the user home folder in ownCloud. Itis also a part of remote URLs, for instance for all *DAV services.
You can override all of this with the "Internal Username" setting. Leave it emptyfor default behavior. Changes will affect only newly mapped LDAP users.
Examples:
• uid
Override UUID DetectionBy default, ownCloud auto-detects the UUID attribute. The UUID attribute is usedto uniquely identify LDAP users and groups. The internal username will be createdbased on the UUID, if not specified otherwise.
You can override the setting and pass an attribute of your choice. You must makesure that the attribute of your choice can be fetched for both users and groups andthat it is unique. Leave it empty for default behavior. Changes will have effect onlyon newly mapped LDAP users and groups.
It also will take effect when a user or group’s DN changes and an old UUID wascached, which will result in a new user. Because of this, the setting should beapplied before putting ownCloud in production use and clearing the bindings the(see User and Group Mapping` section below).
Examples:
• cn
426 | User

Username-LDAP User MappingownCloud uses usernames as keys to store and assign data. In order to preciselyidentify and recognize users, each LDAP user will have an internal username inownCloud. This requires a mapping from an ownCloud username to an LDAP user.
The created username is mapped to the UUID of the LDAP user. Additionally, theDN is cached to reduce LDAP interaction, but it is not used for identification. If theDN changes, the change will be detected by ownCloud by checking the UUID value.
The same is valid for groups. The internal ownCloud name is used all over inownCloud. Clearing the mappings will have leftovers everywhere. Never clear themappings in a production environment, but only in a testing or experimental server.
Clearing the mappings is not configuration sensitive, it affects allLDAP configurations!
Testing the Configuration
The "Test Configuration" button checks the values as currently given in the inputfields. You do not need to save before testing. By clicking on the button, ownCloud willtry to bind to the ownCloud server using the settings currently given in the inputfields. If the binding fails you’ll see a yellow banner with the error message:
The configuration is invalid. Please have a look at the logs for further details.
When the configuration test reports success, save your settings and check if the usersand groups are fetched correctly on the Users page.
Syncing Users
While users who match the login and user filters can log in, only synced users will befound in the sharing dialog. Whenever users log in, their display name, email, quota,avatar and search attributes will be synced to ownCloud. If you want to keep themetadata up to date you can set up a cron job, using the occ user:sync command.Versions of ownCloud before 10.0 imported all users when the users page was loaded,but this is no longer the case.
During initial sync, make sure to check the ownCloud log for errors thatcould indicate a possible misconfiguration.
We recommend creating a Cron job, to automate regularly syncingLDAP users with your ownCloud database. If you have many users, youdo not have to sync all of them to update a small number of users. Youcan use the OCS User Sync API to sync individual users. It provides away to trigger user sync from outside of ownCloud.
How Often Should the Job Run?
This depends on the amount of users and speed of the update, but we recommend atleast once per day. You can run it more frequently, but doing so may generate toomuch load on the server.
User | 427
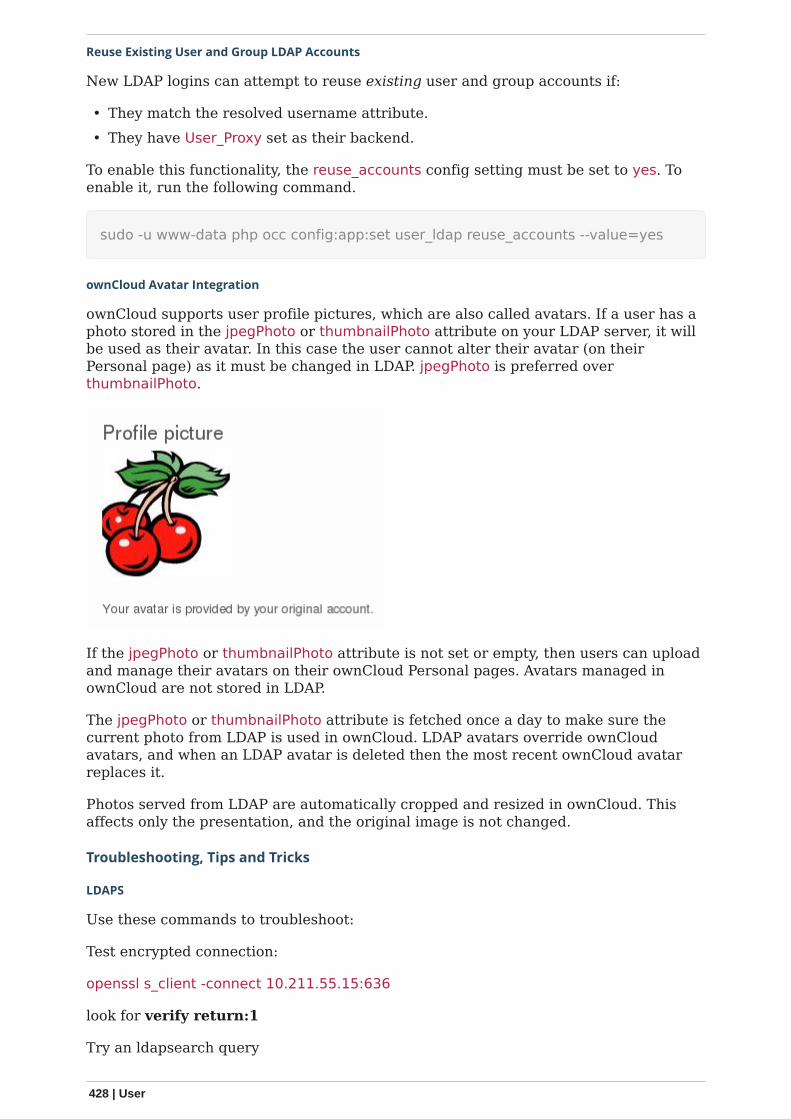
Reuse Existing User and Group LDAP Accounts
New LDAP logins can attempt to reuse existing user and group accounts if:
• They match the resolved username attribute.• They have User_Proxy set as their backend.
To enable this functionality, the reuse_accounts config setting must be set to yes. Toenable it, run the following command.
sudo -u www-data php occ config:app:set user_ldap reuse_accounts --value=yes
ownCloud Avatar Integration
ownCloud supports user profile pictures, which are also called avatars. If a user has aphoto stored in the jpegPhoto or thumbnailPhoto attribute on your LDAP server, it willbe used as their avatar. In this case the user cannot alter their avatar (on theirPersonal page) as it must be changed in LDAP. jpegPhoto is preferred overthumbnailPhoto.
If the jpegPhoto or thumbnailPhoto attribute is not set or empty, then users can uploadand manage their avatars on their ownCloud Personal pages. Avatars managed inownCloud are not stored in LDAP.
The jpegPhoto or thumbnailPhoto attribute is fetched once a day to make sure thecurrent photo from LDAP is used in ownCloud. LDAP avatars override ownCloudavatars, and when an LDAP avatar is deleted then the most recent ownCloud avatarreplaces it.
Photos served from LDAP are automatically cropped and resized in ownCloud. Thisaffects only the presentation, and the original image is not changed.
Troubleshooting, Tips and Tricks
LDAPS
Use these commands to troubleshoot:
Test encrypted connection:
openssl s_client -connect 10.211.55.15:636
look for verify return:1
Try an ldapsearch query
428 | User
ldapsearch \-H ldaps://ad16.oc.local:636 \-D "cn=Administrator,cn=users,dc=oc,dc=local" \-b "dc=oc,dc=local" \-w MyPassword
Check:
/etc/ldap/ldap.conf /etc/openldap/ldap.conf
look for
TLS_CACERT /etc/ssl/certs/ca-certificates.crt
Turn off certificate validation for testing:
TLS_REQCERT ALLOW
Microsoft Active Directory
Compared to earlier ownCloud versions, no further tweaks need to be done to makeownCloud work with Active Directory. ownCloud will automatically find the correctconfiguration in the set-up process.
memberOf / Read MemberOf Permissions
If you want to use memberOf within your filter you might need to give your queryinguser the permissions to use it. For Microsoft Active Directory this is described here.
Duplicating Server Configurations
In case you have a working configuration and want to create a similar one or"snapshot" configurations before modifying them you can do the following:
1. Go to the "Server" tab2. On "Server Configuration" choose "Add Server Configuration"3. Answer the question "Take over settings from recent server configuration?"
with "yes".4. (optional) Switch to "Advanced" tab and uncheck "Configuration Active" in the
"Connection Settings", so the new configuration is not used on Save5. Click [Save]
Now you can modify and enable the configuration.
Filter out Deactivated Users
With this filter you can filter out the deactivated users and show only active users.
!(userAccountControl:1.2.840.113556.1.4.803:=2)
Here is what the full filter can look like.
User | 429
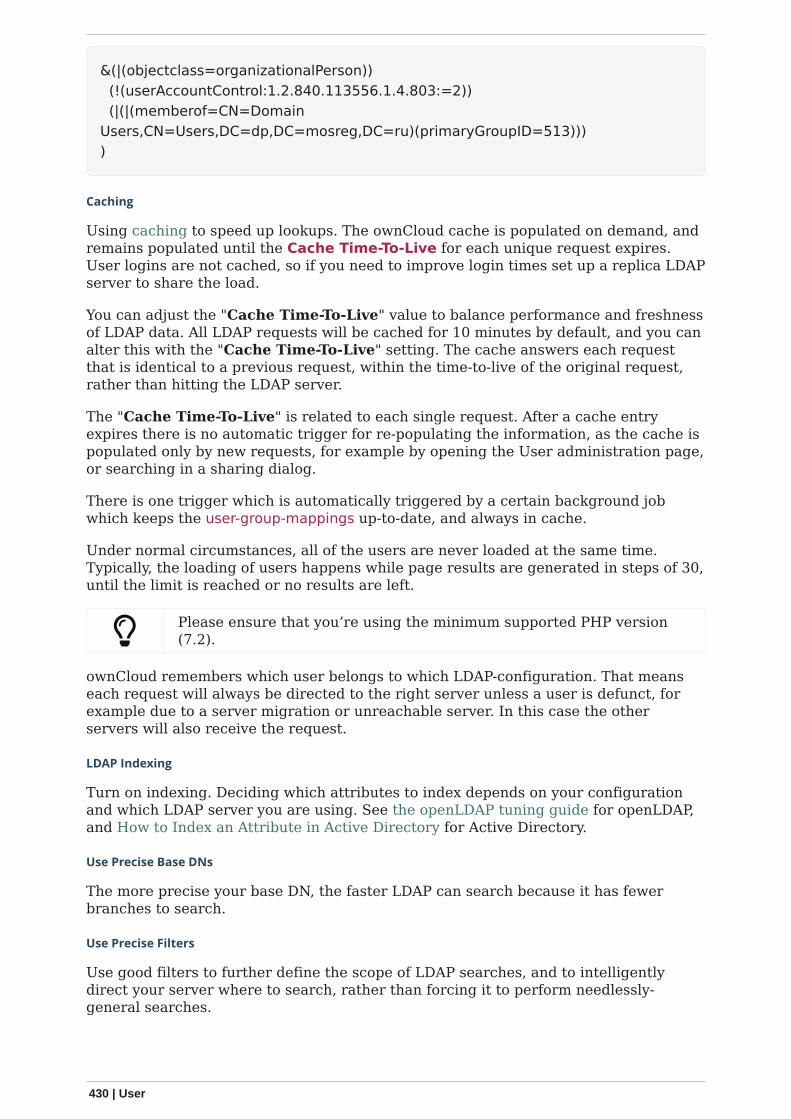
&(|(objectclass=organizationalPerson)) (!(userAccountControl:1.2.840.113556.1.4.803:=2)) (|(|(memberof=CN=DomainUsers,CN=Users,DC=dp,DC=mosreg,DC=ru)(primaryGroupID=513))))
Caching
Using caching to speed up lookups. The ownCloud cache is populated on demand, andremains populated until the Cache Time-To-Live for each unique request expires.User logins are not cached, so if you need to improve login times set up a replica LDAPserver to share the load.
You can adjust the "Cache Time-To-Live" value to balance performance and freshnessof LDAP data. All LDAP requests will be cached for 10 minutes by default, and you canalter this with the "Cache Time-To-Live" setting. The cache answers each requestthat is identical to a previous request, within the time-to-live of the original request,rather than hitting the LDAP server.
The "Cache Time-To-Live" is related to each single request. After a cache entryexpires there is no automatic trigger for re-populating the information, as the cache ispopulated only by new requests, for example by opening the User administration page,or searching in a sharing dialog.
There is one trigger which is automatically triggered by a certain background jobwhich keeps the user-group-mappings up-to-date, and always in cache.
Under normal circumstances, all of the users are never loaded at the same time.Typically, the loading of users happens while page results are generated in steps of 30,until the limit is reached or no results are left.
Please ensure that you’re using the minimum supported PHP version(7.2).
ownCloud remembers which user belongs to which LDAP-configuration. That meanseach request will always be directed to the right server unless a user is defunct, forexample due to a server migration or unreachable server. In this case the otherservers will also receive the request.
LDAP Indexing
Turn on indexing. Deciding which attributes to index depends on your configurationand which LDAP server you are using. See the openLDAP tuning guide for openLDAP,and How to Index an Attribute in Active Directory for Active Directory.
Use Precise Base DNs
The more precise your base DN, the faster LDAP can search because it has fewerbranches to search.
Use Precise Filters
Use good filters to further define the scope of LDAP searches, and to intelligentlydirect your server where to search, rather than forcing it to perform needlessly-general searches.
430 | User
ownCloud LDAP Internals
Some parts of how the LDAP backend works are described here.
User and Group Mapping
In ownCloud, the user or group name is used to have all relevant information in thedatabase assigned. To work reliably, a permanent internal user name and group nameare created and mapped to the LDAP DN and UUID. If the DN changes in LDAP, it willbe detected, and there will be no conflicts.
Those mappings are done in the database table ldap_user_mapping andldap_group_mapping. The user name is also used for the user’s folder (except ifsomething else is specified in User Home Folder Naming Rule), which contains filesand meta data.
The internal user name and a visible display name are separated. This is not the casefor group names yet, as a group name cannot be altered.
That means that your LDAP configuration should be good and ready before putting itinto production. The mapping tables are filled early, but as long as you are testing, youcan empty the tables any time.
Do not do this in production.
Handling with Backup Server
When ownCloud is not able to contact the main LDAP server, ownCloud assumes it isoffline and will not try to connect again for the time specified in "Cache Time-To-Live".If you have a backup server configured ownCloud will connect to it instead. When youhave scheduled downtime, check [Disable Main Server] to avoid unnecessaryconnection attempts.
User Two-Factor Authentication
Introduction
With two-factor authentication (2FA), users can access their ownCloud web accountsonly by using a trusted device like their mobile phone. When users want to sign in,they need to provide two pieces of information (factors):
• the password,• the six-digit verification code that’s automatically displayed on the trusted device or
sent to the phone number.
Setting Up 2FA
To provide 2FA functionality, an app like the 2-Factor Authentication needs to beinstalled and enabled.
If a two-factor provider app is enabled, it is enabled for all users by default but a userhas to opt-in, though the provider can decide whether or not the user has to pass thechallenge.
Troubleshooting
Tasks for the User
Because the user has to opt-in, see the Security section in Personal Settings link fortasks on the user side.
User | 431
Second Factor is Inaccessible
In case a user loses access to the second factor, e.g. by breaking or losing the phonewith two-factor SMS/app verification, the user is locked out. To give the user access tothe account again, an admin can temporarily disable the two-factor check for that uservia the occ commands for Two-Factor Authentication. After the issue has been fixed,the admin can reenable two-factor authentication for that user.
Manage Secrets
If owncloud’s 2-Factor Authentication is used, the admin can manage the secrets viaocc Two-Factor TOTP commands.
User Auth Open Authentication (OAuth2)
Introduction
OAuth2 (Open Authentication) is the open industry-standard protocol for secureauthorization of clients. It can be used as a way for users to grant web services orapplications access to their data stored in ownCloud. The use of OAuth2 in ownCloudgreatly enhances security while facilitating the integration of third party applicationsor web services:
• Connect ownCloud clients (Desktop, Android, iOS) through a standardized andsecure authorization flow.
• Provide a user authorization interface for developers to facilitate the integration ofownCloud in third party applications.
Benefits Provided by the OAuth2 Interface
• No user passwords are being stored in ownCloud clients or third party webapplications
Instead of connecting clients with username/password, a user only needs to providethe information once in the browser. The respective client is then provided with aunique access token which is used for future connections to the ownCloud server.ownCloud clients or third party applications never get to know the actual logincredentials.
• The use of different access tokens per client provides the ability to selectivelyrevoke user sessions
When using OAuth2 a unique access token is generated for each device or third partyapplication. Users can check their authorized clients in the personal settings and havethe ability to selectively invalidate access tokens when e.g. a device is lost. Thisstrengthens control and access security significantly.
The OAuth2 App
OAuth2 functionality is available in ownCloud via the OAuth2 application which isavailable from the ownCloud Marketplace. For more information on how to set it up,see section Open Authentication (OAuth2)
When using OAuth2, never try to log in with a disabled user.
User Provisioning API
432 | User
Introduction
The User Provisioning API provides instruction sets to communicate with the userbackend. External systems can use this API to create, edit, delete and query userattributes.
Using the User Provisioning API
See User Provisioning API for available API endpoints and detailed examples.
Guests App
Introduction
Share with external users conveniently just by entering an email address in thesharing dialog. Recipients receive an email containing an activation link. They can login using their email address as user name and the password they chose duringactivation. Guests may even use the ownCloud desktop clients and mobile apps toconnect to ownCloud and work on shared contents.
Guest users do not have storage space and can only work on contentthat is shared with them.
Installation
Install and enable the Guests app if not already installed with your bundle. The Guestsapp requires the email settings to be configured in your ownCloud setup, because youneed to be able to invite your guests by email.
Configuration
Check your Guests app’s configuration in Settings › Admin › Sharing. There you canchange the Guest’s group name and add to or exclude apps from the app whitelist ofthe Guests app. Guests cannot access apps that are not on that list.
Troubleshooting
If for some reason you don’t see all the buttons, try a different browser to exclude apossible script or adblocking add-on as a cause. If for example you as a guest usercannot open a PDF document via your ownCloud but you can download it - check thewhitelist in the configuration settings described above. You have to explicitly specifythat the guest users can access the required app.
OpenID Connect (OIDC)
Introduction
OpenID Connect is an open standard for single sign-on, identity and accessmanagement. With ownCloud it can be used for user authentication and clientauthorization against an external identity provider(IdP).
Benefits of using ownCloud with OpenID Connect
• Increased security by shifting user authentication to an external identity provider.• Seamless integration into single sign-on (SSO) environments as well as with third
party products.• Centralized client management within the identity provider.• Enterprise-grade security through the use of authentication security features (e.g.,
User | 433
multi-factor authentication) and policies (e.g., automatic token expiration oncertain conditions) provided by identity providers.
ownCloud only supports one configured identity provider which is thenvalid for all requests.
Supported Identity Providers
ownCloud Server can work with identity providers (IdP) that support OpenID Connect.There are many identity providers available and the OpenID Connect implementationsvary a lot in terms of supported features as well as configuration needs.
The currently supported products are - Microsoft Azure AD - Microsoft ADFS -PingIdentity PingFederate - cidaas - Keycloak - Kopano Konnect
Please get in touch with ownCloud Consulting if you need help with a specific identityprovider product.
Prerequisites
Setting up ownCloud Server to work with OpenID Connect requires a couple ofcomponents to work together:
• An external identity provider configured to work with the ownCloud components• A distributed memcache setup - such as Redis or Memcached - is required to
operate this app. Follow the caching documentation on how to set it up.• The OpenID Connect App installed on ownCloud Server• Configuration settings in config.php on ownCloud Server
◦ 'http.cookie.samesite' => 'None',
See config.sample.php and Schemeful Same-Site for examples and details.
◦ Settings for the OpenID Connect App
See config.apps.sample.php for examples and details.
• Service discovery for the ownCloud Clients
Set Up Service Discovery
1. Webserver Service Discovery Information
In order to allow the ownCloud Clients (Desktop/Android/iOS) to make use ofOpenID Connect, the webserver serving ownCloud Server needs to provide servicediscovery information under the following static path:
https://cloud.example.com/.well-known/openid-configuration
2. App Service Discovery Information
When enabled, the OpenID Connect App provides the service discovery informationon the endpoint:
https://cloud.example.com/index.php/apps/openidconnect/config
3. Webserver Rewrite Rule
434 | User
To make the endpoint available under the static service discovery path, it isrecommended to put a RewriteRule in place using .htaccess (the Apache modulesproxy and proxy_http have to be enabled):
RewriteRule ^\.well-known/openid-configuration/index.php/apps/openidconnect/config [P]
Depending on the respective infrastructure setup there can be otherways to solve this. In any case, please make sure not to use redirectrules as this will violate the OpenID Connect specification.
If you use the .htaccess file in the ownCloud web root, you have tomanually add that rewrite rule again after any ownCloud upgrade.
4. Once service discovery is available as described above, the ownCloud clients willattempt to connect via OpenID Connect.
Example Setup Using Kopano Konnect
Follow this link to see Example Setup Using Kopano Konnect.
Example Setup Using Microsoft Azure
Follow this link to see Example Setup Using Microsoft Azure.
ownCloud Desktop and Mobile Clients
ownCloud desktop and mobile clients detect whether OIDC is available (servicediscovery) and use this login method when a new account is created.
The desktop and mobile apps (clients) have a default client ID andsecret hard-coded, which are used for ownCloud’s oauth2 app. Whenusing Kopano as IDP, it does not pre-define a client ID and secret. Youcan use the default ones of the client to configure Kopano properly.With some IDPs like MS-Azure, these and other required parameterscome from the IDP and must be coded into the client. Note that eachIDP has different requirements. Get in touch with ownCloud for abranding subscription to customize the clients according to your needs.
Client Support for OIDC
Following owncloud clients support OIDC
ownCloud Client Release with OIDCsupport
Desktop >= 2.7.0
Android >= 2.15
iOS >= 1.2
Migrate Clients from Basic Authentication to OIDC
If your users are logged in to their desktop and mobile clients via basic authentication(username/password) against ownCloud Server and you are not using OAuth2 toauthorize the ownCloud clients, a migration to OIDC can be conducted as follows:
User | 435
1. Make sure you have a working OIDC configuration based on the above sections.2. Enable the OpenID Connect App.3. Enable token-only authentication.
Once the OpenID Connect App is enabled, token-only authentication is enforced andservice discovery is properly set up, the ownCloud clients will ask the users to re-authenticate. After a successful re-authentication, the migration is done.
To connect legacy clients, users have to generate special app passwords (tokens).
Migrate Clients from OAuth2 to OIDC
If you use OAuth2 for client authorization, a migration to OIDC can be conducted asfollows:
1. Make sure you have a working configuration based on the above sections.2. Enable the OpenID Connect App (while having the OAuth2 App still enabled).3. Disable the OAuth2 App.
Once the OAuth2 App is disabled and service discovery is properly set up, theownCloud Clients will ask the users to re-authenticate. After a successful re-authentication, the migration is done.
Migrate Web Login (and Client Login) from SAML to OIDC
If you are using SAML/SSO, a migration to OIDC depends on your identity providerand is not straight forward. Please get in touch with ownCloud Consulting to plan themigration.
436 | User

MaintenanceIn this section, you will find all that you need to help you maintain your ownCloudinstallation.
How to Upgrade Your ownCloud Server
Introduction
We recommend that you keep your ownCloud server up to date. When an update isavailable for your ownCloud server, you will see a notification at the top of yourownCloud Web interface. When you click the [notification], it will bring you here.
Before beginning an upgrade, please keep the following points in mind:
• Review the release notes for important information about the needed migrationsteps during that upgrade to help ensure a smooth upgrade process.
• Check ownCloud’s mandatory requirements (such as PHP versions and extensions),which can change from one version to the next. Ensure that you review them andupdate your server(s), if required, before upgrading ownCloud.
• Upgrading is disruptive, as your ownCloud server will be put into maintenancemode.
• Large installations may take several hours to complete the upgrade.• Review any installed third-party apps for compatibility with the new ownCloud
release.• Downgrading is not supported as it risks corrupting your data. If you want to
revert to an older ownCloud version, make a new, fresh installation and thenrestore your data from backup. Before attempting this, file a support ticket (if youhave paid support) or ask for help in the ownCloud forums to resolve your issuewithout downgrading.
How to Upgrade Your ownCloud Server | 437
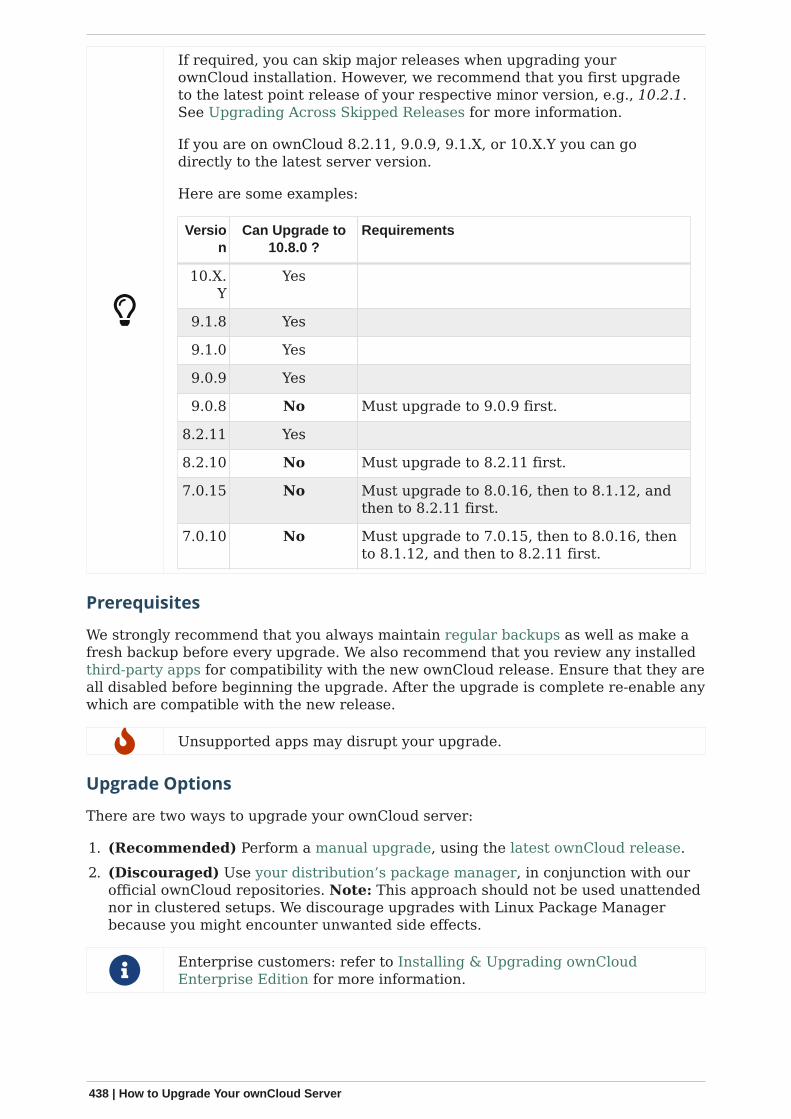
If required, you can skip major releases when upgrading yourownCloud installation. However, we recommend that you first upgradeto the latest point release of your respective minor version, e.g., 10.2.1.See Upgrading Across Skipped Releases for more information.
If you are on ownCloud 8.2.11, 9.0.9, 9.1.X, or 10.X.Y you can godirectly to the latest server version.
Here are some examples:
Version
Can Upgrade to10.8.0 ?
Requirements
10.X.Y
Yes
9.1.8 Yes
9.1.0 Yes
9.0.9 Yes
9.0.8 No Must upgrade to 9.0.9 first.
8.2.11 Yes
8.2.10 No Must upgrade to 8.2.11 first.
7.0.15 No Must upgrade to 8.0.16, then to 8.1.12, andthen to 8.2.11 first.
7.0.10 No Must upgrade to 7.0.15, then to 8.0.16, thento 8.1.12, and then to 8.2.11 first.
Prerequisites
We strongly recommend that you always maintain regular backups as well as make afresh backup before every upgrade. We also recommend that you review any installedthird-party apps for compatibility with the new ownCloud release. Ensure that they areall disabled before beginning the upgrade. After the upgrade is complete re-enable anywhich are compatible with the new release.
Unsupported apps may disrupt your upgrade.
Upgrade Options
There are two ways to upgrade your ownCloud server:
1. (Recommended) Perform a manual upgrade, using the latest ownCloud release.2. (Discouraged) Use your distribution’s package manager, in conjunction with our
official ownCloud repositories. Note: This approach should not be used unattendednor in clustered setups. We discourage upgrades with Linux Package Managerbecause you might encounter unwanted side effects.
Enterprise customers: refer to Installing & Upgrading ownCloudEnterprise Edition for more information.
438 | How to Upgrade Your ownCloud Server
Manual ownCloud Upgrade
Introduction
This document describes how to manually upgrade your ownCloud installation. Postpreparing the upgrade, you can decide between two paths upgrading your instance:
Script Guided UpgradeThis upgrade automates most of the tasks to be done including setting the correctownership and permissions.
Manual Step-by-Step UpgradeUsing this type of upgrade, you have to do all the step manually but can handle specialsetups.
In this description we assume that your ownCloud installation waslocated in the default directory: /var/www/owncloud and the newrelease will reside there as well. The path might differ, depending onyour installation.
General Preparation
There are several steps necessary before you can start with upgrading your owncloudinstance.
Enable Maintenance Mode
Put your server in maintenance mode and disable Cron jobs. Doing so prevents newlogins, locks the sessions of logged-in users, and displays a status screen so that usersknow what is happening.
In a clustered environment, check that all nodes are in maintenancemode.
Prevent Browser Access
With those steps completed, stop your webserver to prevent users trying to accessownCloud via the web. As an alternative, you can stop serving the virtual host forownCloud.
# Stop the web serversudo service apache2 stop
Backup the Database
First, backup ownCloud and the server database as described in section Backing upownCloud. This is independent of the next upgrade steps but important in casesomething goes wrong.
Review Third-Party Apps
Review any installed third-party apps for compatibility with the new ownCloud release.Ensure that they are all disabled before beginning the upgrade. Third party apps areall apps that are not distributed by ownCloud or not listed in Supported Apps inownCloud.
1. Disable Apps via Command Line
How to Upgrade Your ownCloud Server | 439
# This command lists all apps by <app-id> and app versionsudo -u www-data php occ app:list
# This command disables the app with the given <app-id>sudo -u www-data php occ app:disable <app-id>
2. Disable via BrowserGo to Settings › Admin › Apps and disable all third-party apps.
Backup Manual Changes in .htaccess
If you have made changes in .htaccess located at the webroot of ownCloud, you mustbackup these changes. Only backup the changes made but not the complete file as thisfile will be recreated on upgrades and may contain different settings provided byownCloud. Manual changes in .htaccess can be necessary when you e.g. IntegrateownCloud into Microsoft Teams.
Download the Latest Release
Download the latest ownCloud server release to where your previous installation was,in this example the default directory /var/www/.
cd /var/www/sudo wget https://download.owncloud.org/community/owncloud-10.8.0.tar.bz2
Script Guided Upgrade
When using the script guided upgrade, the script from the Script-Guided Installation isused from installing ownCloud. The scripts asks questions and beside otherparameters, the upgrade an existing installation is selected.
Follow the script documentation for details installing and using it.
The script is most convenient if you use links for your apps, apps-external and your data directory, as it takes care of recreating the links.You will be asked about this when you run the script. If you’re usingregular directories, these are created, but content must be moved orcopied manually before finalizing the upgrade. If you aren’t using theapps-external directory, you must manually take care of copying onlythose apps which are not part of the new source.
When the script has finished, continue with the Upgrade step described below.
When the upgrade has finished, you can re-run this script to secure the .htaccess files.
Manual Step-by-Step Upgrade
Move Current ownCloud Directory
Although you have already made a backup, move your current ownCloud directory to adifferent location for easy access later:
440 | How to Upgrade Your ownCloud Server
# This example assumes Ubuntu Linux and MariaDB# Rename ownCloud directorysudo mv /var/www/owncloud /var/www/backup_owncloud
Extract the New Source
Extract the new server release in the location where your previous ownCloudinstallation used to be.
sudo tar -xf owncloud-10.8.0.tar.bz2
With the new source files now in place of where the old ones used to be, copy theconfig.php file from your old ownCloud directory to your new ownCloud directory:
sudo cp /var/www/backup_owncloud/config/config.php/var/www/owncloud/config/config.php
If you keep your data/ directory inside your owncloud/ directory, move it from your oldversion of ownCloud to your new version:
sudo mv /var/www/backup_owncloud/data /var/www/owncloud/data
If you keep your data outside of your owncloud directory, then you don’t have to doanything with it, because its location is configured in your original config.php, andnone of the upgrade steps touch it.
Copy Relevant config.php Content
Copy, or make sure that all relevant config.php content from the backup is present inthe new installation.
Market and Marketplace App Upgrades
Before getting too far into the upgrade process, consider how the Market app and itsconfiguration options affect the upgrade process. The Market app — and other appsfrom the Marketplace — will not be updated when you upgrade ownCloud ifupgrade.automatic-app-update is set to true in config.php.
In addition, if there are installed apps (whether compatible or incompatible with thenext version, or missing source code) and the Market app is enabled but there is nointernet connection available, these apps will need to be manually updated once theupgrade is finished.
Copy Old Apps
If you are using third party or enterprise applications, look in your new/var/www/owncloud/apps/ or /var/www/owncloud/apps-external/ directory to see if theyare present. If not, copy them from your old instance to your new one.
Make sure that all app directories that are defined in the apps_pathssection of your config.php file do exist in your new /var/www/owncloud/directory.
How to Upgrade Your ownCloud Server | 441
Permissions
To finalize the preparation of the upgrade, you need to set the correct ownership andpermissions of the new ownCloud files and folders.
Listing 17. Set correct ownership
sudo chown -R www-data:www-data /var/www/owncloud
Set correct permissionsUse chmod depending on files and directories with different permissions:
• For all files use 0640• For all directories use 0750
If you have configured a script for guided installations, you can use it for this step aswell.
Finalize the Upgrade
Start the Upgrade
With the apps disabled and ownCloud in maintenance mode, start the upgrade processfrom the command line:
# Here is an example on Ubuntu Linux.# Execute this within the ownCloud root folder.sudo -u www-data php occ upgrade
The upgrade operation can take anywhere from a few minutes to a few hours,depending on the size of your installation. When it is finished you will see either asuccess message or an error message that indicates why the process did not completesuccessfully.
Reapply any manual changes made to the .htaccess file located in the owncloudwebroot.
Strong Permissions for .htaccess
Set strong permissions for the .htaccess files• Use chmod with 0640 for the .htaccess files.
If you have configured a script for guided installations, you can use it for this step aswell.
Disable Maintenance Mode
Assuming your upgrade succeeded, disable maintenance mode.
# Disable maintenance mode using the occ command.sudo -u www-data php occ maintenance:mode --off
Enable Browser Access
With all that done, restart your web server, or alternatively re-enable the virtual hostserving ownCloud:
442 | How to Upgrade Your ownCloud Server
sudo service apache2 start
Check the Upgrade
With maintenance mode disabled and the web server running, login via the webinterface and perform the following steps:
1. Check that the version number reflects the new installation.It can be reviewed at the bottom of Settings › Admin › General.
2. Check that your other settings are correct.3. Go to the Settings › Admin › Apps page and review the core apps to make sure
the right ones are enabled.4. After the upgrade is complete, re-enable any third-party apps that are compatible
with the new release. Use occ app:enable <app-id> or go to Settings › Admin ›Apps › "Show disabled apps" and enable all compatible third-party apps.
Install or enable unsupported apps at your own risk.
Rollback
If you need to rollback your upgrade, see the Restoring ownCloud documentation.
Troubleshooting
When upgrading ownCloud and you are running MySQL or MariaDB with binarylogging enabled, your upgrade may fail with these errors in your MySQL/MariaDB log:
An unhandled exception has been thrown:exception 'PDOException' with the message 'SQLSTATE[HY000]: General error: 1665Cannot execute statement: impossible to write to binary log sinceBINLOG_FORMAT = STATEMENT and at least one table uses a storage engine limitedtorow-based logging. InnoDB is limited to row-logging when transaction isolation levelis READ COMMITTED or READ UNCOMMITTED.'
Please refer to MySQL / MariaDB on how to correctly configure your environment.
In the unlikely case that files do not show up in the web-ui after the upgrade, use thefiles:scan command to make them visible again. Here is an example of how to do so:
sudo -u www-data php occ files:scan --all
See the Docs & Guides page for further resources for both home and enterprise users.
Sometimes, ownCloud can get stuck in an upgrade. This is usually due to the processtaking too long and running into a PHP time-out. Stop the upgrade process this way:
sudo -u www-data php occ maintenance:mode --off
Then start the manual process:
How to Upgrade Your ownCloud Server | 443
sudo -u www-data php occ upgrade
If this does not work properly, try the repair function:
sudo -u www-data php occ maintenance:repair
Upgrade ownCloud From Packages
Upgrade Steps
The alternative to a manual upgrade is configuring your system to use ownCloud’sOpen Build Service repository. Then stay current by using your Linux packagemanager to install fresh ownCloud packages. However, you should exclude theownCloud package during system upgrades. For more information, check out thesection on Linux Package Manager Installation
This approach should not be used unattended nor in clustered setups.
In general, we discourage upgrades with a Linux package manager because you mightencounter unwanted side effects and you’ll have to manage the PHP installationseparately. For further information on upgrading PHP, see section Prepare Your Server
If you want to proceed anyway, read the release notes for important information first.
Before installing upgraded packages, perform the following steps:
• Disable all third-party apps.• Make a fresh backup.
Now you can upgrade your ownCloud packages, then run sudo -u www-data php occupgrade.
The optional parameter to skip migration tests was removed inownCloud 10.0. See Testing a Migration for background information.
After the upgrade is finished, perform the following actions:
• Apply Set Correct Permissions to your ownCloud directories.• Take your ownCloud server out of maintenance mode.• Re-enable third-party apps.
444 | How to Upgrade Your ownCloud Server
If required, you can skip major releases when upgrading yourownCloud installation. However, we recommend that you first upgradeto the latest point release of your respective minor version, e.g., 10.2.1.See Upgrading Across Skipped Releases for more information.
If you are on ownCloud 8.2.11, 9.0.9, 9.1.X, or 10.X.Y you can godirectly to the latest server version.
Here are some examples:
Version
Can Upgrade to10.8.0 ?
Requirements
10.X.Y
Yes
9.1.8 Yes
9.1.0 Yes
9.0.9 Yes
9.0.8 No Must upgrade to 9.0.9 first.
8.2.11 Yes
8.2.10 No Must upgrade to 8.2.11 first.
7.0.15 No Must upgrade to 8.0.16, then to 8.1.12, andthen to 8.2.11 first.
7.0.10 No Must upgrade to 7.0.15, then to 8.0.16, thento 8.1.12, and then to 8.2.11 first.
When upgrading from oC 9.0 to 9.1 with existing Calendars or Addressbooks please have a look at the release notes for important informationabout the needed migration steps during that upgrade.
Upgrading Only ownCloud or the Complete System
Upgrading ownCloud from our Open Build Service repository like any normal Linuxupgrade. For example, on Debian or Ubuntu Linux this is the standard system upgradecommand:
sudo apt-get update && apt-get upgrade
Or you can upgrade just ownCloud with this command:
sudo apt-get update && apt-get install owncloud-files
On Fedora, CentOS, and Red Hat Linux use yum to see all available updates:
sudo yum check-update
You can apply all available updates with this command:
How to Upgrade Your ownCloud Server | 445
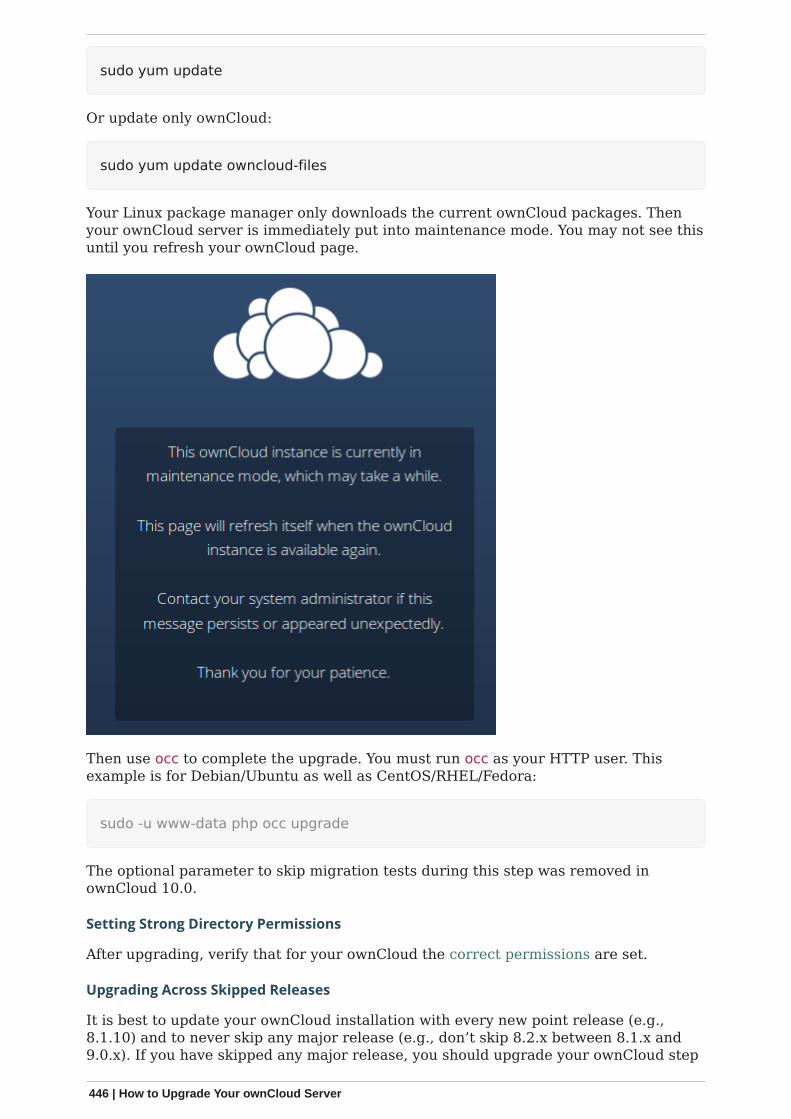
sudo yum update
Or update only ownCloud:
sudo yum update owncloud-files
Your Linux package manager only downloads the current ownCloud packages. Thenyour ownCloud server is immediately put into maintenance mode. You may not see thisuntil you refresh your ownCloud page.
Then use occ to complete the upgrade. You must run occ as your HTTP user. Thisexample is for Debian/Ubuntu as well as CentOS/RHEL/Fedora:
sudo -u www-data php occ upgrade
The optional parameter to skip migration tests during this step was removed inownCloud 10.0.
Setting Strong Directory Permissions
After upgrading, verify that for your ownCloud the correct permissions are set.
Upgrading Across Skipped Releases
It is best to update your ownCloud installation with every new point release (e.g.,8.1.10) and to never skip any major release (e.g., don’t skip 8.2.x between 8.1.x and9.0.x). If you have skipped any major release, you should upgrade your ownCloud step
446 | How to Upgrade Your ownCloud Server
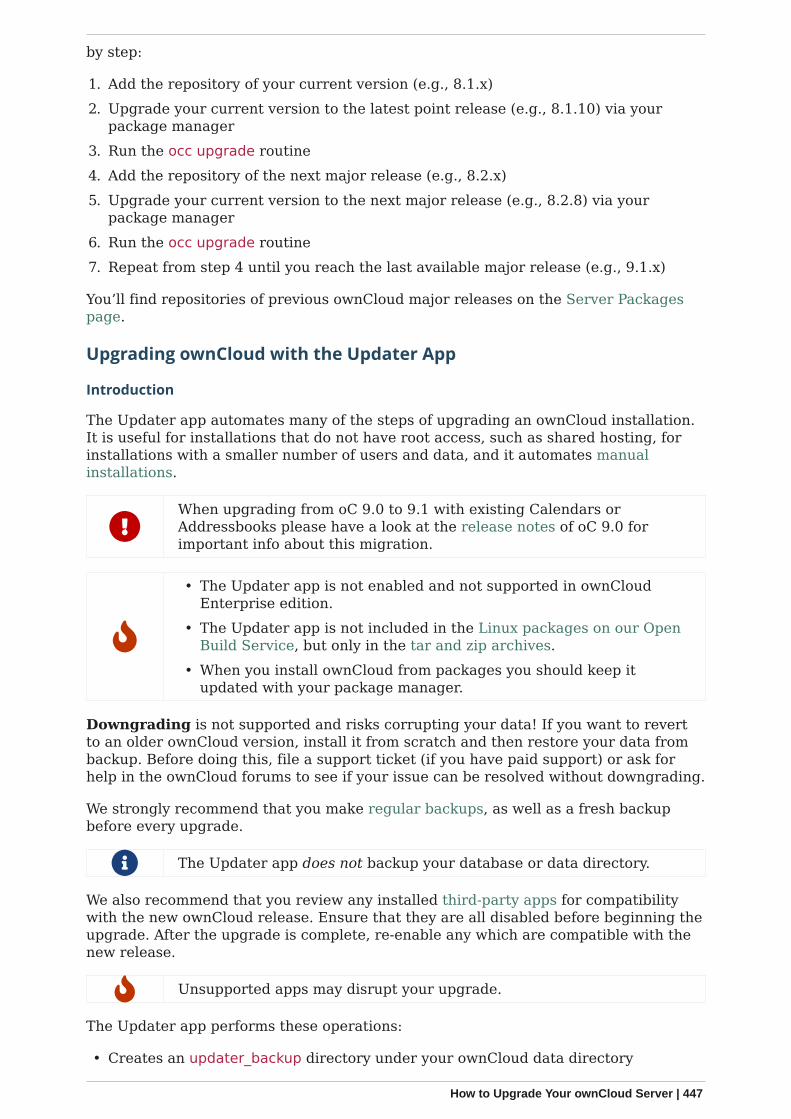
by step:
1. Add the repository of your current version (e.g., 8.1.x)2. Upgrade your current version to the latest point release (e.g., 8.1.10) via your
package manager3. Run the occ upgrade routine4. Add the repository of the next major release (e.g., 8.2.x)5. Upgrade your current version to the next major release (e.g., 8.2.8) via your
package manager6. Run the occ upgrade routine7. Repeat from step 4 until you reach the last available major release (e.g., 9.1.x)
You’ll find repositories of previous ownCloud major releases on the Server Packagespage.
Upgrading ownCloud with the Updater App
Introduction
The Updater app automates many of the steps of upgrading an ownCloud installation.It is useful for installations that do not have root access, such as shared hosting, forinstallations with a smaller number of users and data, and it automates manualinstallations.
When upgrading from oC 9.0 to 9.1 with existing Calendars orAddressbooks please have a look at the release notes of oC 9.0 forimportant info about this migration.
• The Updater app is not enabled and not supported in ownCloudEnterprise edition.
• The Updater app is not included in the Linux packages on our OpenBuild Service, but only in the tar and zip archives.
• When you install ownCloud from packages you should keep itupdated with your package manager.
Downgrading is not supported and risks corrupting your data! If you want to revertto an older ownCloud version, install it from scratch and then restore your data frombackup. Before doing this, file a support ticket (if you have paid support) or ask forhelp in the ownCloud forums to see if your issue can be resolved without downgrading.
We strongly recommend that you make regular backups, as well as a fresh backupbefore every upgrade.
The Updater app does not backup your database or data directory.
We also recommend that you review any installed third-party apps for compatibilitywith the new ownCloud release. Ensure that they are all disabled before beginning theupgrade. After the upgrade is complete, re-enable any which are compatible with thenew release.
Unsupported apps may disrupt your upgrade.
The Updater app performs these operations:
• Creates an updater_backup directory under your ownCloud data directory
How to Upgrade Your ownCloud Server | 447
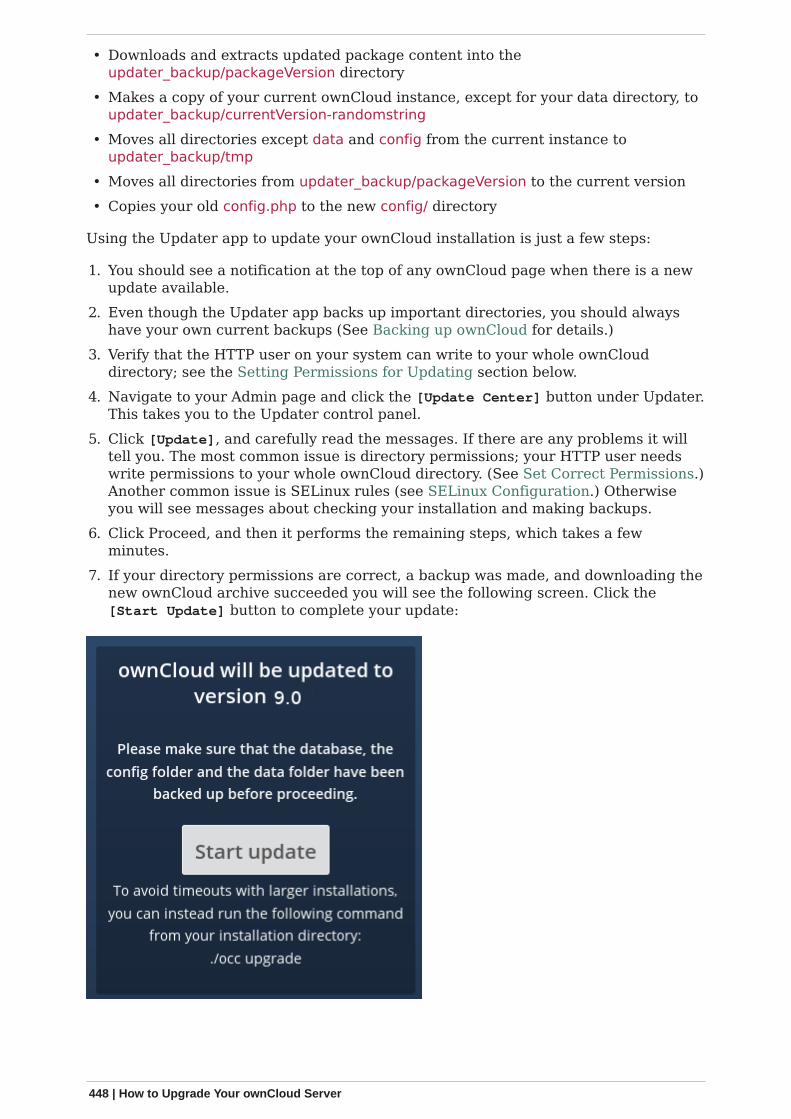
• Downloads and extracts updated package content into theupdater_backup/packageVersion directory
• Makes a copy of your current ownCloud instance, except for your data directory, toupdater_backup/currentVersion-randomstring
• Moves all directories except data and config from the current instance toupdater_backup/tmp
• Moves all directories from updater_backup/packageVersion to the current version• Copies your old config.php to the new config/ directory
Using the Updater app to update your ownCloud installation is just a few steps:
1. You should see a notification at the top of any ownCloud page when there is a newupdate available.
2. Even though the Updater app backs up important directories, you should alwayshave your own current backups (See Backing up ownCloud for details.)
3. Verify that the HTTP user on your system can write to your whole ownClouddirectory; see the Setting Permissions for Updating section below.
4. Navigate to your Admin page and click the [Update Center] button under Updater.This takes you to the Updater control panel.
5. Click [Update], and carefully read the messages. If there are any problems it willtell you. The most common issue is directory permissions; your HTTP user needswrite permissions to your whole ownCloud directory. (See Set Correct Permissions.)Another common issue is SELinux rules (see SELinux Configuration.) Otherwiseyou will see messages about checking your installation and making backups.
6. Click Proceed, and then it performs the remaining steps, which takes a fewminutes.
7. If your directory permissions are correct, a backup was made, and downloading thenew ownCloud archive succeeded you will see the following screen. Click the[Start Update] button to complete your update:
448 | How to Upgrade Your ownCloud Server
If you have a large ownCloud installation and have shell access, youshould use the occ upgrade command, running it as your HTTP user,instead of clicking the [Start Update] button, in order to avoid PHPtimeouts.
This example is for Ubuntu Linux:
sudo -u www-data php occ upgrade
The optional parameter to skip migration tests during this step was removed inownCloud 10.0.
1. It runs for a few minutes, and when it is finished displays a success message, whichdisappears after a short time.
Refresh your Admin page to verify your new version number. In the Updater section ofyour Admin page you can see the current status and backups. These are backups ofyour old and new ownCloud installations, and do not contain your data files. If yourupdate works and there are no problems you can delete the backups from this screen.
If the update fails, then you must update manually.
Setting Permissions for Updating
For hardened security, we highly recommend setting the permissions on yourownCloud directory as strictly as possible, immediately after the initial installation.However, these strict permissions will prevent the Updater app from working, as itneeds your whole ownCloud directory to be owned by the HTTP user.
So to set the appropriate permissions for updating, run the code below. Replace theocpath variable with the path to your ownCloud directory, and replace the htuser andhtgroup variables with your HTTP user and group.
#!/bin/bash# Sets permissions of the owncloud instance for updating
ocpath='/var/www/owncloud'htuser='www-data'htgroup='www-data'
chown -R ${htuser}:${htgroup} ${ocpath}
You can find your HTTP user in your HTTP server configuration files. Or you can usePHP Version and Information. Look for the User/Group line.
• The HTTP user and group in Debian/Ubuntu is www-data.• The HTTP user and group in Fedora/CentOS is apache.• The HTTP user and group in Arch Linux is http.• The HTTP user in openSUSE is wwwrun, and the HTTP group is www.
After the update is completed, re-apply the strong directory permissions immediately.
How to Upgrade Your ownCloud Server | 449
Command Line Options
The Updater app includes command-line options to automate updates, to createcheckpoints and to roll back to older checkpoints. You must run it as your HTTP user.This example on Ubuntu Linux displays command options:
sudo -u www-data php occ updater/application.php list
See usage for commands, like this example for the upgrade:checkpoint command:
sudo -u www-data php occ updater/application.php upgrade:checkpoint -h
You can display a help summary:
sudo -u www-data php occ updater/application.php --help
When you run it without options it runs a system check:
sudo -u www-data php occ owncloud/updater/application.phpownCloud updater 1.0 - CLI based ownCloud server upgradesChecking system health.- file permissions are ok.Current version is 9.0.0.12No updates found online.Done
Create a checkpoint:
sudo -u www-data php occ updater/application.php upgrade:checkpoint --createCreated checkpoint 9.0.0.12-56d5e4e004964
List checkpoints:
sudo -u www-data php occ updater/application.php upgrade:checkpoint --list[source,console]
Restore an earlier checkpoint:
sudo -u www-data php occ updater/application.php \ upgrade:checkpoint --restore=9.0.0.12-56d5e4e004964
Add a line like this to your crontab to automatically create daily checkpoints:
2 15 * * * sudo -u www-data php occ /path/to/owncloud/updater/application.phpupgrade:checkpoint --create > /dev/null 2>&1
450 | How to Upgrade Your ownCloud Server
updater.secret value in config.php
When running the updater, you will be prompted to add a hashed secret into yourconfig.php file. On the updater web interface, you then need to enter the unhashedsecret into the web form.
In case you forgot your password/secret, you can re-create it by changing config.php.You can run this on your shell:
php -r 'echo password_hash("Enter a random password here",PASSWORD_DEFAULT)."\n";'
Please replace Enter a random password here with your own. Then add this into yourconfig.php:
'updater.secret' => 'The value you got from the above hash command',
Upgrade PHP on RedHat 7 and CentOS 7
Introduction
You should almost always upgrade to the latest version of PHP supported byownCloud, if and where possible. And if you’re on a version of PHP older than 7.2 youmust upgrade. This guide takes you through upgrading your installation of PHP to oneof the supported PHP versions (7.2, 7.3 and 7.4) on Red Hat or CentOS 7.
Upgrade PHP to Version 7.1
To upgrade to PHP 7.1 you first need to subscribe to the Red Hat Software Collectionschannel repository to download and install the PHP 7.1 package in RHEL 7 (if you’venot done this already). This documentation uses the same command as you will findthere.
Ensure that you have subscription-manager installed. If you don’t, yet,have it installed, do so with the following command:
# Install subscription manageryum install --assumeyes subscription-manager
# Add the required repositories for the PHP packagessubscription-manager repos --enable rhel-server-rhscl-7-rpms
Install the Required Packages
Then, proceed by installing the required PHP 7.1 packages. You can use the commandbelow to save you time.
How to Upgrade Your ownCloud Server | 451

yum install \ rh-php71 \ rh-php71-php \ rh-php71-php-cli \ rh-php71-php-curl \ rh-php71-php-devel \ rh-php71-php-gd \ rh-php71-php-intl \ rh-php71-php-ldap \ rh-php71-php-mbstring \ rh-php71-php-mysqlnd \ rh-php71-php-opcache rh-php71-php-pdo \ rh-php71-php-pear \ rh-php71-php-xml \ rh-php71-php-xmlrpc \ rh-php71-php-zip
Enable PHP 7.1 and Disable PHP 5.6
Next, you need to enable PHP 7.1 and disable PHP 5.6 system-wide. To enable PHP 7.1system-wide, run the following command:
cp /opt/rh/rh-php71/enable /etc/profile.d/rh-php71.sh source /opt/rh/rh-php71/enable
Then, you need to disable loading of the PHP 5.6 Apache modules. You can do thiseither by changing their names, as in the example below, or deleting the files.
mv /etc/httpd/conf.d/php.conf /etc/httpd/conf.d/php56.offmv /etc/httpd/conf.modules.d/10-php.conf /etc/httpd/conf.modules.d/10-php56.off
Update the Apache Configuration Files
With that done, you next need to copy the PHP 7.1 Apache modules into place; thatbeing the two Apache configuration files and the shared object file.
cp /opt/rh/httpd24/root/etc/httpd/conf.d/rh-php71-php.conf /etc/httpd/conf.d/cp /opt/rh/httpd24/root/etc/httpd/conf.modules.d/15-rh-php71-php.conf/etc/httpd/conf.modules.d/cp /opt/rh/httpd24/root/etc/httpd/modules/librh-php71-php7.so /etc/httpd/modules/
Upgrade PHP to Version 7.2
To upgrade to PHP 7.2 you first need to subscribe to the Red Hat Software Collectionschannel repository to download and install the PHP 7.2 package in RHEL 7 (if you’venot done this already). This documentation uses the same command as you will findthere.
452 | How to Upgrade Your ownCloud Server
Ensure that you have subscription-manager installed. If you don’t, yet,have it installed, do so with the following command:
# Install subscription manageryum install --assumeyes subscription-manager
# Add the required repositories for the PHP packagessubscription-manager repos --enable rhel-server-rhscl-7-rpms
Install the Required Packages
Then, proceed by installing the required PHP 7.2 packages. You can use the commandbelow to save you time.
yum install \ rh-php72 \ rh-php72-php \ rh-php72-php-cli \ rh-php72-php-curl \ rh-php72-php-devel \ rh-php72-php-gd \ rh-php72-php-intl \ rh-php72-php-ldap \ rh-php72-php-mbstring \ rh-php72-php-mysqlnd \ rh-php72-php-opcache rh-php72-php-pdo \ rh-php72-php-pear \ rh-php72-php-xml \ rh-php72-php-xmlrpc \ rh-php72-php-zip
Enable PHP 7.2 and Disable PHP 5.6
Next, you need to enable PHP 7.2 and disable PHP 5.6 system-wide. To enable PHP 7.2system-wide, run the following command:
cp /opt/rh/rh-php72/enable /etc/profile.d/rh-php72.sh source /opt/rh/rh-php72/enable
Then, you need to disable loading of the PHP 5.6 Apache modules. You can do thiseither by changing their names, as in the example below, or deleting the files.
mv /etc/httpd/conf.d/php.conf /etc/httpd/conf.d/php56.offmv /etc/httpd/conf.modules.d/10-php.conf /etc/httpd/conf.modules.d/10-php56.off
How to Upgrade Your ownCloud Server | 453
Update the Apache Configuration Files
With that done, you next need to copy the PHP 7.2 Apache modules into place; thatbeing the two Apache configuration files and the shared object file.
cp /opt/rh/httpd24/root/etc/httpd/conf.d/rh-php72-php.conf /etc/httpd/conf.d/cp /opt/rh/httpd24/root/etc/httpd/conf.modules.d/15-rh-php72-php.conf/etc/httpd/conf.modules.d/cp /opt/rh/httpd24/root/etc/httpd/modules/librh-php72-php7.so /etc/httpd/modules/
Upgrade PHP to Version 7.3
To upgrade to PHP 7.3 you first need to subscribe to the Red Hat Software Collectionschannel repository to download and install the PHP 7.3 package in RHEL 7 (if you’venot done this already). This documentation uses the same command as you will findthere.
Ensure that you have subscription-manager installed. If you don’t, yet,have it installed, do so with the following command:
# Install subscription manageryum install --assumeyes subscription-manager
# Add the required repositories for the PHP packagessubscription-manager repos --enable rhel-server-rhscl-7-rpms
Install the Required Packages
Then, proceed by installing the required PHP 7.3 packages. You can use the commandbelow to save you time.
yum install \ rh-php73 \ rh-php73-php \ rh-php73-php-cli \ rh-php73-php-curl \ rh-php73-php-devel \ rh-php73-php-gd \ rh-php73-php-intl \ rh-php73-php-ldap \ rh-php73-php-mbstring \ rh-php73-php-mysqlnd \ rh-php73-php-opcache rh-php73-php-pdo \ rh-php73-php-pear \ rh-php73-php-xml \ rh-php73-php-xmlrpc \ rh-php73-php-zip
454 | How to Upgrade Your ownCloud Server
Enable PHP 7.3 and Disable PHP 5.6
Next, you need to enable PHP 7.3 and disable PHP 5.6 system-wide. To enable PHP 7.3system-wide, run the following command:
cp /opt/rh/rh-php73/enable /etc/profile.d/rh-php73.sh source /opt/rh/rh-php73/enable
Then, you need to disable loading of the PHP 5.6 Apache modules. You can do thiseither by changing their names, as in the example below, or deleting the files.
mv /etc/httpd/conf.d/php.conf /etc/httpd/conf.d/php56.offmv /etc/httpd/conf.modules.d/10-php.conf /etc/httpd/conf.modules.d/10-php56.off
Update the Apache Configuration Files
With that done, you next need to copy the PHP 7.3 Apache modules into place; thatbeing the two Apache configuration files and the shared object file.
cp /opt/rh/httpd24/root/etc/httpd/conf.d/rh-php73-php.conf /etc/httpd/conf.d/cp /opt/rh/httpd24/root/etc/httpd/conf.modules.d/15-rh-php73-php.conf/etc/httpd/conf.modules.d/cp /opt/rh/httpd24/root/etc/httpd/modules/librh-php73-php7.so /etc/httpd/modules/
Restart Apache
Finally, you need to restart Apache to make the changes permanent, as in thecommand below.
service httpd restart
Upgrade Marketplace Applications
Introduction
To upgrade Marketplace applications, please refer to the documentation below, asapplicable for your ownCloud setup.
Single-Server Environment
To upgrade Marketplace applications when running ownCloud in a single serverenvironment, you can use the Market app, specifically by running market:upgrade.This will install new versions of your installed apps if updates are available in themarketplace.
The user running the update command, which will likely be yourwebserver user, needs write permission for the /apps folder. If theydon’t have write permission, the command may report that the updatewas successful, however it may silently fail.
How to Upgrade Your ownCloud Server | 455
Clustered / Multi-Server Environment
The Market app, both the UI and command line, are not, currently, designed tooperate on clustered installations. Given that, you will have to update the applicationson each server in the cluster individually. There are several ways to do this. But here isa concise approach:
1. Download the latest server release from the Download Server Packages page.2. Download your installed apps from the ownCloud marketplace.3. Combine them together into one installation source, such as a Docker or VM image,
or an Ansible script, etc.4. Apply the combined upgrade across all the cluster nodes in your ownCloud setup.
Backup and Restore
In this section, you will find all that you need to backup and restore your ownCloudinstallation.
Backing up ownCloud
Introduction
Depending on how the ownCloud instance has been installed, you may need slightlydifferent steps to do a backup. You may also use different methods as the datadirectory can be huge. This document is intended as a guideline, but the way youimplement it depends on your setup.
In any case, you need the following components to be backed up:
1. The config/ directory.2. The data/ directory.
Note that the data/ directory may not only contain user files but also keys forencryption.
3. The apps/ directory.Note that this is only necessary if you are not using the apps-external/ directory andhave added own apps or themes.
4. The apps-external/ directory.Note that this is only necessary if it exists and is in use.
5. The ownCloud database.6. The custom theme files, if you had any. See Theming ownCloud.
Note that theme files are usually located in either the apps/ or apps-external/directory.
If you have customized user home directories or a custom location forencryption keys, you have to manually take care of backing them upand restoring them to the same location.
Prerequisites
To ensure a consistent backup, stop your web server to prevent users from trying toaccess ownCloud via the web. As an alternative, you can stop serving the virtual hostfor ownCloud:
sudo service apache2 stop
456 | Backup and Restore
Backup Scenarios
Tarball Installation1. If you have installed ownCloud from a tarball, you can safely backup the entire
installation, with the exception of your ownCloud database. Databases cannot becopied, instead you must use the database tools to make a correct backup.
2. You can also back up only the directories mentioned above and the database. Toavoid issues, you have to use the same tarball version as the ownCloud versionwhen restoring.
Package InstallationIf you have installed your ownCloud server from our Open Build Service packages(or from distro packages, which is deprecated), do not back up your ownCloudserver files, which are the other files in your owncloud/ directory such as core/,3rdparty/, lib/, etc. If you restore these files from backup they may not be in syncwith the current package versions and in that case will fail the code integrity checkand may also cause other errors.
Backup Directories
If possible, simply copy the directories from your ownCloud installation to your backuplocation, for example by running the following command from the owncloud directory.The following example command copies all directories mentioned above:
rsync -Aax config data apps apps-external /oc-backupdir/
You can also back up the full ownCloud directory which eases the restore as you do notneed to install ownCloud first.
There are many ways to backup normal files. Use whatever method you areaccustomed to.
Backup the Database
You can’t just copy a database, but must use the database tools to make a correctdatabase dump.
Before backing up the database, set your ownCloud instance into maintenance mode:
sudo -u www-data php occ maintenance:mode --on
This guide uses a backup file name like owncloud-dbbackup_<timestamp>.bak.
MySQL/MariaDB
Depending on the database version and the setup, username and password may not benecessary. The general command to back up MySQL/MariaDB looks like this:
sudo mysqldump --single-transaction -h [server] \ -u [username] -p [password] \ [db_name] > owncloud-dbbackup_`date +"%Y%m%d"`.bak
Example, replace username and password according your setup:
Backup and Restore | 457
sudo mysqldump --single-transaction -h localhost \ -u username -p password \ owncloud > owncloud-dbbackup_`date +"%Y%m%d"`.bak
SQLite
sqlite3 data/owncloud.db .dump > owncloud-dbbackup_`date +"%Y%m%d"`.bak
PostgreSQL
PGPASSWORD="password" pg_dump [db_name] \ -h [server] -U [username] \ -f owncloud-dbbackup_`date +"%Y%m%d"`.bak
Backup Cron Jobs
Use this if you want to protect against an accidental deletion of cron entries, plan torestore to a different server like a physical migration or you need to set up a serverfrom scratch.
sudo crontab -u www-data -l > www-data_crontab.bak
Final Tasks
Reactivate Your Instance
Perform the following tasks to reactivate your ownCloud instance:
Listing 18. Bring back ownCloud into normal operation mode
sudo -u www-data php occ maintenance:mode --off
Enable browser accessStart your web server, or alternatively enable the virtual host serving ownCloud:
sudo service apache2 start
Restoring ownCloud
Introduction
Depending how the ownCloud instance has been installed, you may need slightlydifferent steps to restore it from a backup.
In any case, you need the following components from your backup:
1. The config/ directory.2. The data/ directory.
Note that the data/ directory may not only contain user files, but also keys for
458 | Backup and Restore
encryption.3. The apps/ directory.
Note that this is only necessary if you are not using the apps-external/ directory andhave added own apps or themes.
4. The apps-external/ directory.Note that this is only necessary if it exists and is in use.
5. The ownCloud database.6. The custom theme files, if you had any. See Theming ownCloud.
Note that theme files are usually located in either the apps/ or apps-external/directory.
If you have customized user home directories or a custom location forencryption keys, you have to manually take care of backing them upand restoring them to the same location.
Prerequisites
To ensure a secure restore process, stop your web server to prevent users fromaccessing ownCloud via the web. As an alternative, you can stop serving the virtualhost for ownCloud:
sudo service apache2 stop
Restore Scenarios
Tarball Installation1. If you have installed ownCloud from a tarball, you can safely restore the entire
installation from the backup, with the exception of your ownCloud database.Databases cannot be copied, instead you must use the database tools to make acorrect restoration.
2. You may also install a new instance from a tarball and restore the directoriesnamed above and the database. To avoid issues, use the same tarball version asthe ownCloud version from the backup.
Package InstallationIf you have installed ownCloud from packages, start with a fresh ownCloud packageinstallation in a new, empty directory. Then restore the above items from yourBackup.
Only copy those files and folders from the apps/ backup directorywhich are NOT present after the installation. Do not overwrite itemsof the apps/ directory in the new installation. This will prevent afailing code integrity check and other errors.
After you have completed restoring files, see how to Set Correct Permissions.
Restore Directories
If possible, simply copy the directories from your backup to your new ownCloudenvironment, for example by running the following command from the backupdirectory. The following example command copies all directories mentioned above:
sudo rsync -Aax config data apps apps-external /var/www/owncloud/
Backup and Restore | 459
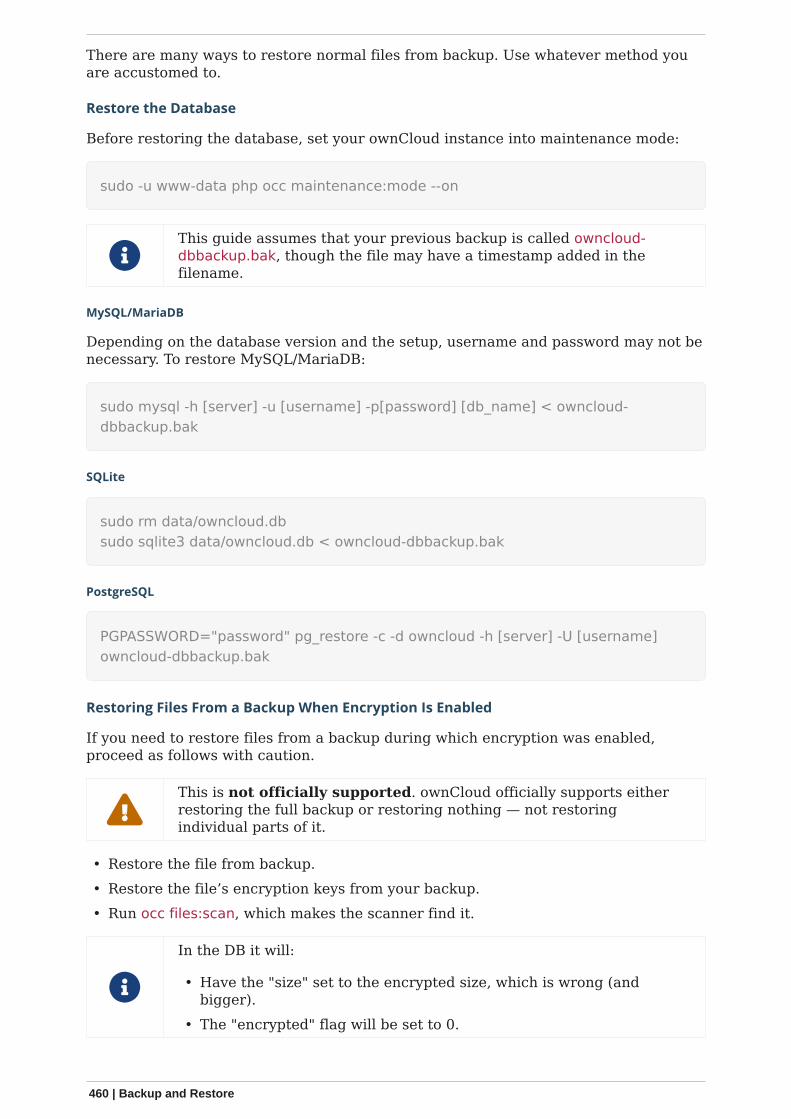
There are many ways to restore normal files from backup. Use whatever method youare accustomed to.
Restore the Database
Before restoring the database, set your ownCloud instance into maintenance mode:
sudo -u www-data php occ maintenance:mode --on
This guide assumes that your previous backup is called owncloud-dbbackup.bak, though the file may have a timestamp added in thefilename.
MySQL/MariaDB
Depending on the database version and the setup, username and password may not benecessary. To restore MySQL/MariaDB:
sudo mysql -h [server] -u [username] -p[password] [db_name] < owncloud-dbbackup.bak
SQLite
sudo rm data/owncloud.dbsudo sqlite3 data/owncloud.db < owncloud-dbbackup.bak
PostgreSQL
PGPASSWORD="password" pg_restore -c -d owncloud -h [server] -U [username]owncloud-dbbackup.bak
Restoring Files From a Backup When Encryption Is Enabled
If you need to restore files from a backup during which encryption was enabled,proceed as follows with caution.
This is not officially supported. ownCloud officially supports eitherrestoring the full backup or restoring nothing — not restoringindividual parts of it.
• Restore the file from backup.• Restore the file’s encryption keys from your backup.• Run occ files:scan, which makes the scanner find it.
In the DB it will:
• Have the "size" set to the encrypted size, which is wrong (andbigger).
• The "encrypted" flag will be set to 0.
460 | Backup and Restore
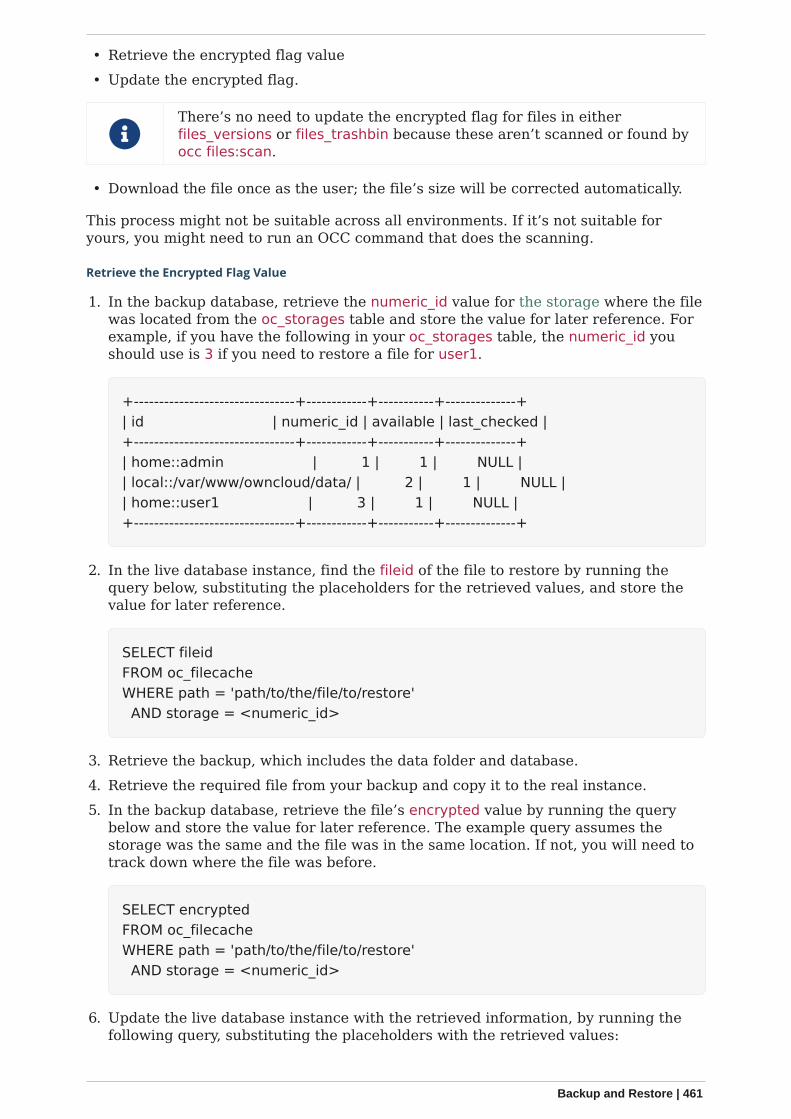
• Retrieve the encrypted flag value• Update the encrypted flag.
There’s no need to update the encrypted flag for files in eitherfiles_versions or files_trashbin because these aren’t scanned or found byocc files:scan.
• Download the file once as the user; the file’s size will be corrected automatically.
This process might not be suitable across all environments. If it’s not suitable foryours, you might need to run an OCC command that does the scanning.
Retrieve the Encrypted Flag Value
1. In the backup database, retrieve the numeric_id value for the storage where the filewas located from the oc_storages table and store the value for later reference. Forexample, if you have the following in your oc_storages table, the numeric_id youshould use is 3 if you need to restore a file for user1.
+--------------------------------+------------+-----------+--------------+| id | numeric_id | available | last_checked |+--------------------------------+------------+-----------+--------------+| home::admin | 1 | 1 | NULL || local::/var/www/owncloud/data/ | 2 | 1 | NULL || home::user1 | 3 | 1 | NULL |+--------------------------------+------------+-----------+--------------+
2. In the live database instance, find the fileid of the file to restore by running thequery below, substituting the placeholders for the retrieved values, and store thevalue for later reference.
SELECT fileidFROM oc_filecacheWHERE path = 'path/to/the/file/to/restore' AND storage = <numeric_id>
3. Retrieve the backup, which includes the data folder and database.4. Retrieve the required file from your backup and copy it to the real instance.5. In the backup database, retrieve the file’s encrypted value by running the query
below and store the value for later reference. The example query assumes thestorage was the same and the file was in the same location. If not, you will need totrack down where the file was before.
SELECT encryptedFROM oc_filecacheWHERE path = 'path/to/the/file/to/restore' AND storage = <numeric_id>
6. Update the live database instance with the retrieved information, by running thefollowing query, substituting the placeholders with the retrieved values:
Backup and Restore | 461
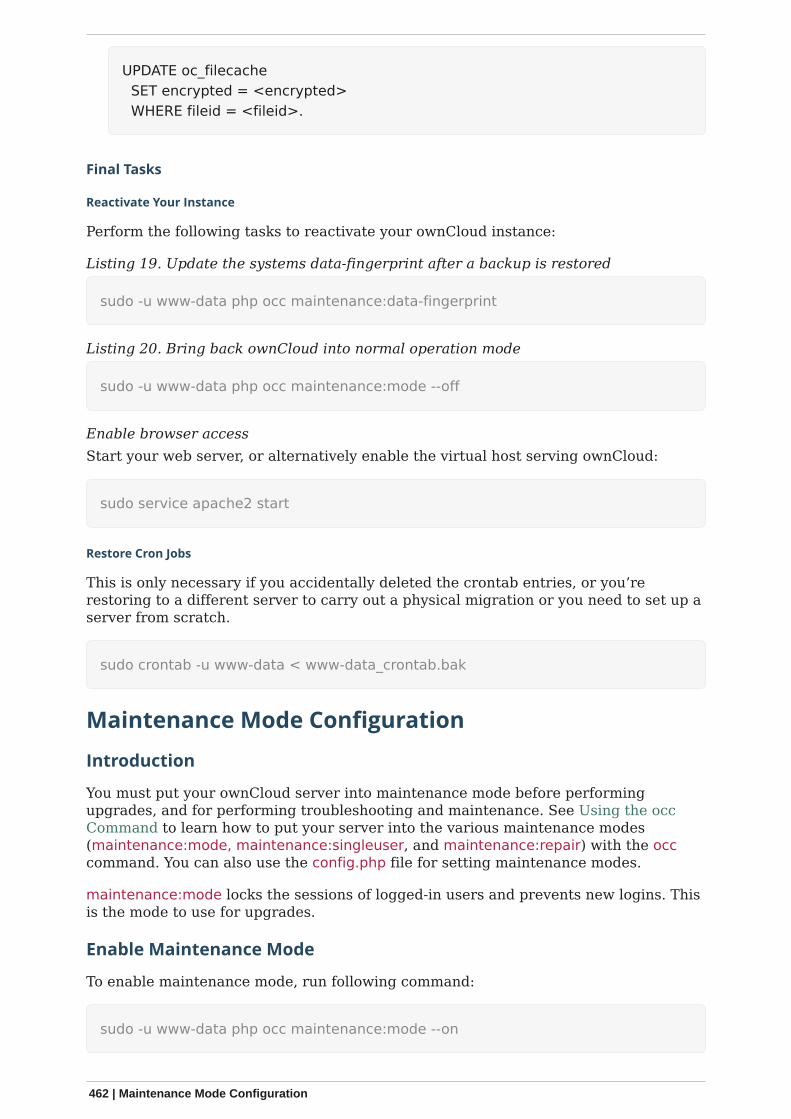
UPDATE oc_filecache SET encrypted = <encrypted> WHERE fileid = <fileid>.
Final Tasks
Reactivate Your Instance
Perform the following tasks to reactivate your ownCloud instance:
Listing 19. Update the systems data-fingerprint after a backup is restored
sudo -u www-data php occ maintenance:data-fingerprint
Listing 20. Bring back ownCloud into normal operation mode
sudo -u www-data php occ maintenance:mode --off
Enable browser accessStart your web server, or alternatively enable the virtual host serving ownCloud:
sudo service apache2 start
Restore Cron Jobs
This is only necessary if you accidentally deleted the crontab entries, or you’rerestoring to a different server to carry out a physical migration or you need to set up aserver from scratch.
sudo crontab -u www-data < www-data_crontab.bak
Maintenance Mode Configuration
Introduction
You must put your ownCloud server into maintenance mode before performingupgrades, and for performing troubleshooting and maintenance. See Using the occCommand to learn how to put your server into the various maintenance modes(maintenance:mode, maintenance:singleuser, and maintenance:repair) with the occcommand. You can also use the config.php file for setting maintenance modes.
maintenance:mode locks the sessions of logged-in users and prevents new logins. Thisis the mode to use for upgrades.
Enable Maintenance Mode
To enable maintenance mode, run following command:
sudo -u www-data php occ maintenance:mode --on
462 | Maintenance Mode Configuration
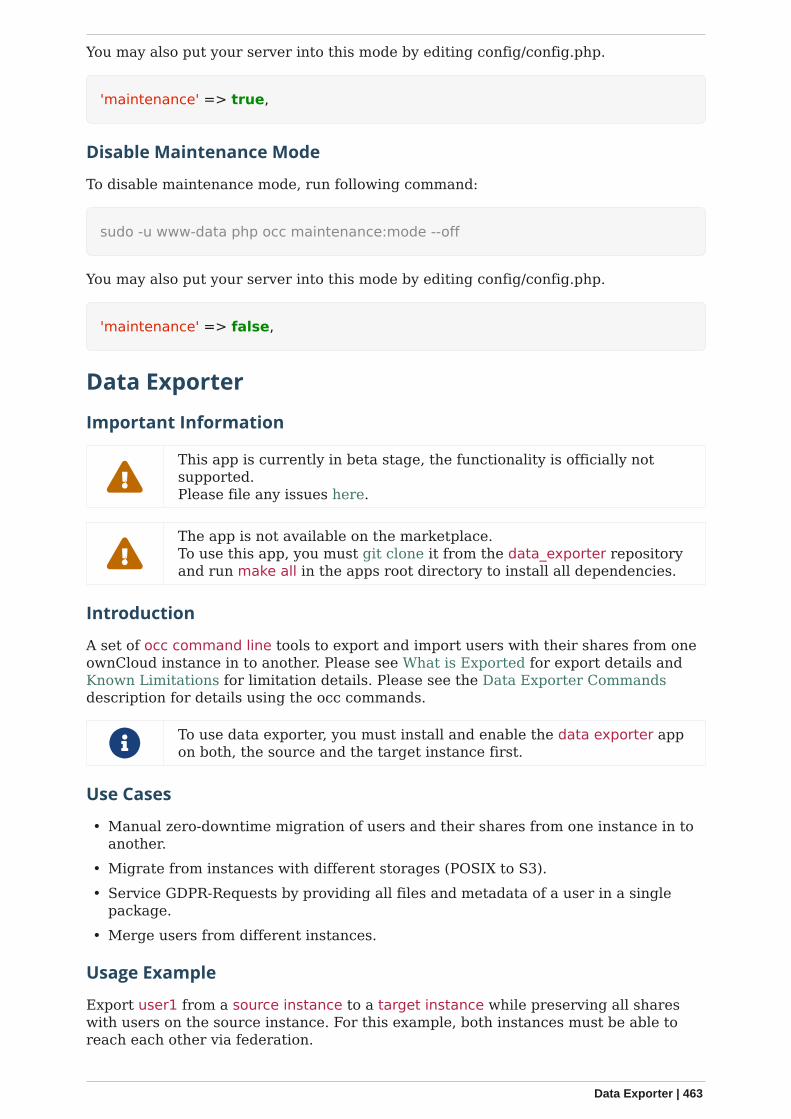
You may also put your server into this mode by editing config/config.php.
'maintenance' => true,
Disable Maintenance Mode
To disable maintenance mode, run following command:
sudo -u www-data php occ maintenance:mode --off
You may also put your server into this mode by editing config/config.php.
'maintenance' => false,
Data Exporter
Important Information
This app is currently in beta stage, the functionality is officially notsupported.Please file any issues here.
The app is not available on the marketplace.To use this app, you must git clone it from the data_exporter repositoryand run make all in the apps root directory to install all dependencies.
Introduction
A set of occ command line tools to export and import users with their shares from oneownCloud instance in to another. Please see What is Exported for export details andKnown Limitations for limitation details. Please see the Data Exporter Commandsdescription for details using the occ commands.
To use data exporter, you must install and enable the data exporter appon both, the source and the target instance first.
Use Cases
• Manual zero-downtime migration of users and their shares from one instance in toanother.
• Migrate from instances with different storages (POSIX to S3).• Service GDPR-Requests by providing all files and metadata of a user in a single
package.• Merge users from different instances.
Usage Example
Export user1 from a source instance to a target instance while preserving all shareswith users on the source instance. For this example, both instances must be able toreach each other via federation.
Data Exporter | 463
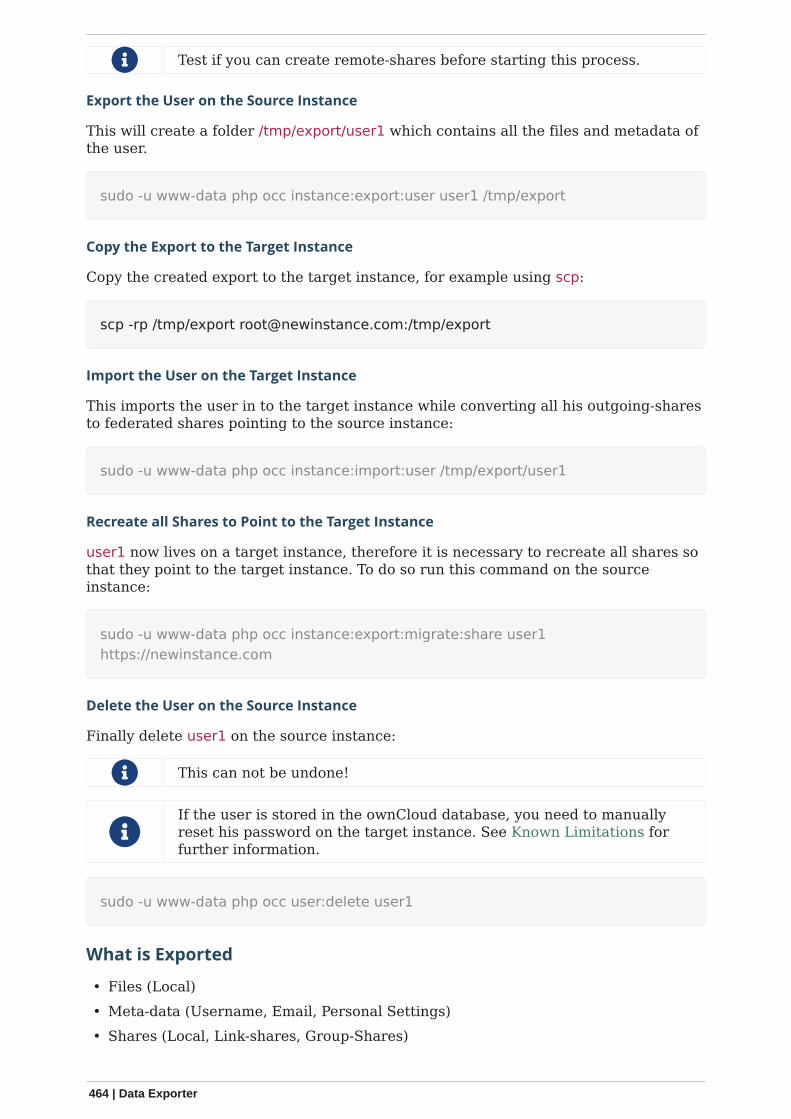
Test if you can create remote-shares before starting this process.
Export the User on the Source Instance
This will create a folder /tmp/export/user1 which contains all the files and metadata ofthe user.
sudo -u www-data php occ instance:export:user user1 /tmp/export
Copy the Export to the Target Instance
Copy the created export to the target instance, for example using scp:
scp -rp /tmp/export [email protected]:/tmp/export
Import the User on the Target Instance
This imports the user in to the target instance while converting all his outgoing-sharesto federated shares pointing to the source instance:
sudo -u www-data php occ instance:import:user /tmp/export/user1
Recreate all Shares to Point to the Target Instance
user1 now lives on a target instance, therefore it is necessary to recreate all shares sothat they point to the target instance. To do so run this command on the sourceinstance:
sudo -u www-data php occ instance:export:migrate:share user1https://newinstance.com
Delete the User on the Source Instance
Finally delete user1 on the source instance:
This can not be undone!
If the user is stored in the ownCloud database, you need to manuallyreset his password on the target instance. See Known Limitations forfurther information.
sudo -u www-data php occ user:delete user1
What is Exported
• Files (Local)• Meta-data (Username, Email, Personal Settings)• Shares (Local, Link-shares, Group-Shares)
464 | Data Exporter
• Versions
Known Limitations
• External storages, comments and tags are not exported• If a user is stored in the ownCloud database (not-LDAP etc.) the password must be
manually reset by the admin as passwords can not be migrated.• Versions import in to S3 does not preserve the version timestamp.• Import alias (import using another username) currently does not work and breaks
share-import.• Shares import requires federation to be correctly setup between both servers and
share-api to be enabled.• A share’s state will always be "accepted" regardless of the state in the old server.• Remote shares from both directions need to be manually accepted.• Federated shares from other servers are not migrated.• Password protected link-shares are not imported correctly, user needs to reset the
password.• Group shares require the group to be present on the target-system or else the
share will be ignored silently.• If link-shares require a password on the new server but do so on the old the import
process will crash.
As this is an early version some limitations might be fixed in the future while otherscan not be circumvented.
Manually Move a Data Directory
Introduction
If you need to move your ownCloud data directory from its current location to anotherlocation — without using a symbolic link — this section steps through how to do so.
Assumptions
This guide assumes that:
• The current folder is: /var/www/owncloud/data• The new folder is: /mnt/owncloud/data• You’re using Apache as your webserver• The ownCloud database name is owncloud
Please change the paths above to reflect your environment.
Description of Steps
The following steps are necessary to move the data directory.
1. Stop Apache2. Enable maintenance mode for your instance3. Use Rsync to sync the files from the current to the new directory4. Double-check the directory permissions on the new directory
Manually Move a Data Directory | 465

5. Change the ownCloud configuration to point to the new data directory6. Disable maintenance mode for your instance7. Restart Apache
Look at each section below for a detailed description.
Apache and Rsync
To save time, here are the commands which you can copy/paste for Apache and rsync:
sudo service apache2 stop
sudo service apache2 start
sudo rsync -avz /var/www/owncloud/data /mnt/owncloud
Check your commands for how to start or stop your webserver if youare not on Ubuntu/Debian.
Enable and Disable Maintenance Mode
It is necessary to enable maintenance mode to avoid running cron jobs. To enablemaintenance mode, run the following command.
sudo -u www-data php occ maintenance:mode --on
To disable maintenance mode of your instance run the following command:
sudo -u www-data php occ maintenance:mode --off
Fix Hard-coded Database Path Variables
Open a database command line client to enter database commands and activate yourownCloud database.
use owncloud;
Update the oc_storages Table
Run the SQL below:
UPDATE oc_storages SET id='local::/mnt/owncloud/data/' WHERE id='local::/var/www/owncloud/data/';
Update the oc_accounts Table
You next need to update the home column in the oc_accounts table. This columncontains the absolute path for user folders, e.g., /mnt/owncloud/data/my_user/files.
466 | Manually Move a Data Directory
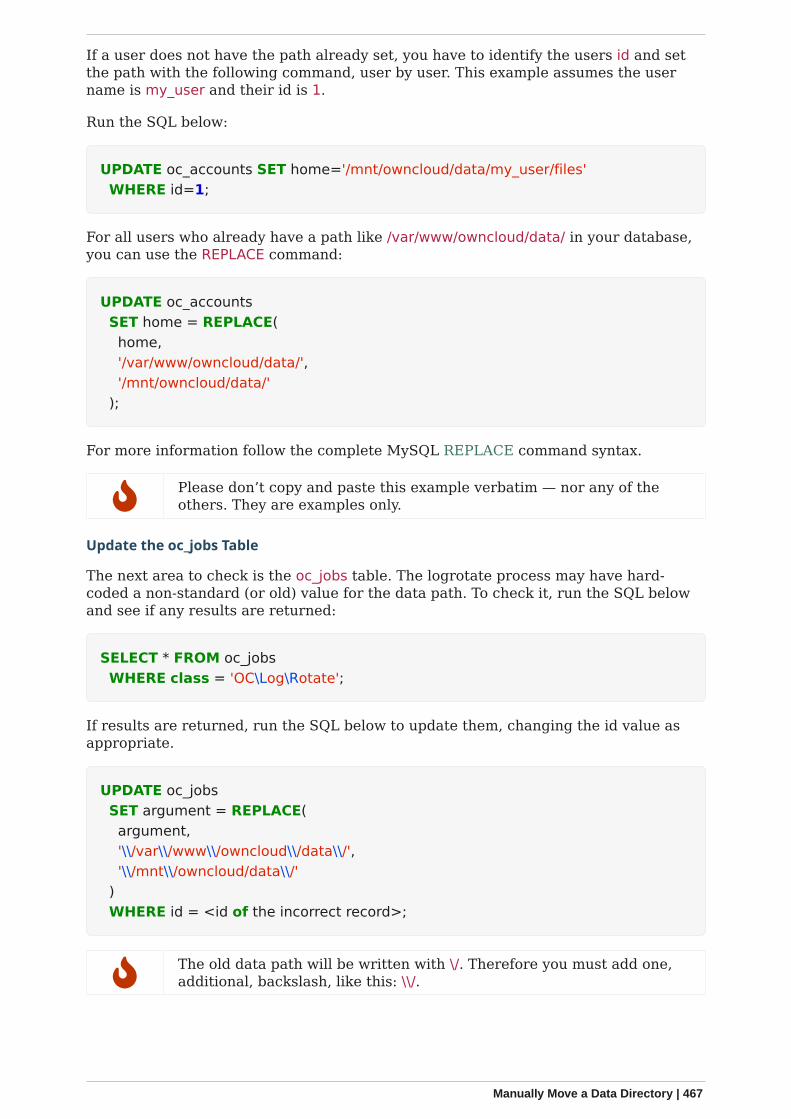
If a user does not have the path already set, you have to identify the users id and setthe path with the following command, user by user. This example assumes the username is my_user and their id is 1.
Run the SQL below:
UPDATE oc_accounts SET home='/mnt/owncloud/data/my_user/files' WHERE id=1;
For all users who already have a path like /var/www/owncloud/data/ in your database,you can use the REPLACE command:
UPDATE oc_accounts SET home = REPLACE( home, '/var/www/owncloud/data/', '/mnt/owncloud/data/' );
For more information follow the complete MySQL REPLACE command syntax.
Please don’t copy and paste this example verbatim — nor any of theothers. They are examples only.
Update the oc_jobs Table
The next area to check is the oc_jobs table. The logrotate process may have hard-coded a non-standard (or old) value for the data path. To check it, run the SQL belowand see if any results are returned:
SELECT * FROM oc_jobs WHERE class = 'OC\Log\Rotate';
If results are returned, run the SQL below to update them, changing the id value asappropriate.
UPDATE oc_jobs SET argument = REPLACE( argument, '\\/var\\/www\\/owncloud\\/data\\/', '\\/mnt\\/owncloud/data\\/' ) WHERE id = <id of the incorrect record>;
The old data path will be written with \/. Therefore you must add one,additional, backslash, like this: \\/.
Manually Move a Data Directory | 467
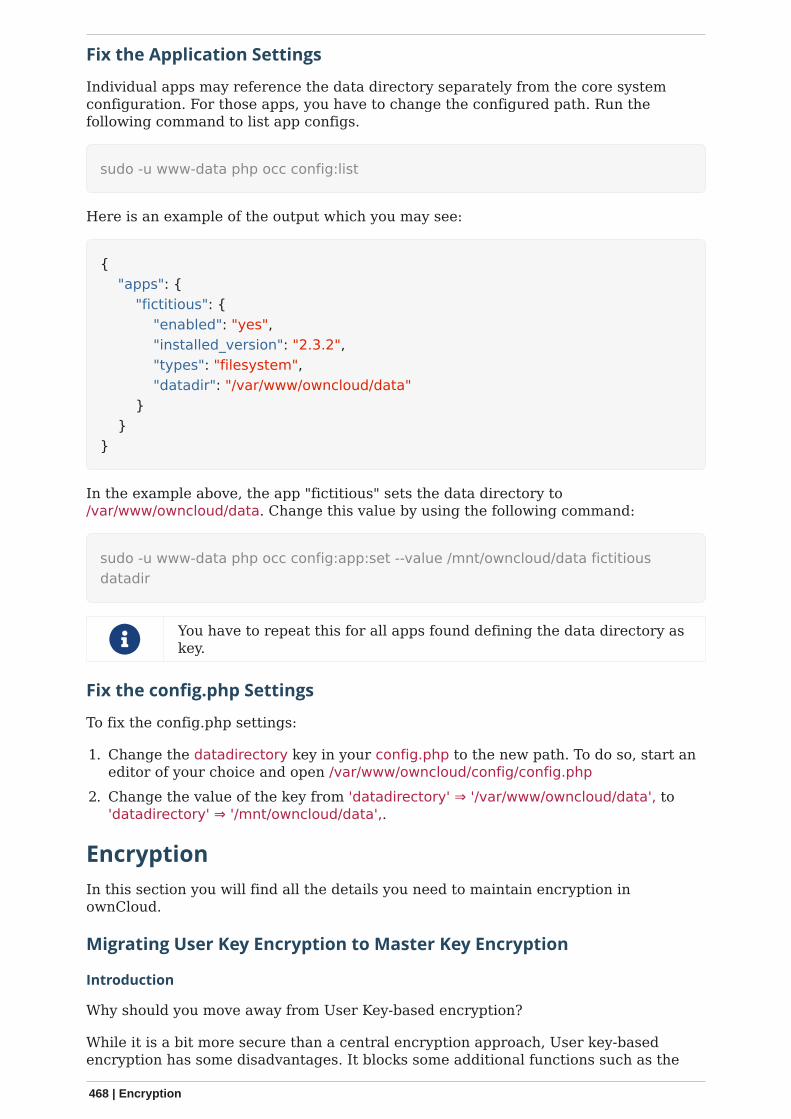
Fix the Application Settings
Individual apps may reference the data directory separately from the core systemconfiguration. For those apps, you have to change the configured path. Run thefollowing command to list app configs.
sudo -u www-data php occ config:list
Here is an example of the output which you may see:
{ "apps": { "fictitious": { "enabled": "yes", "installed_version": "2.3.2", "types": "filesystem", "datadir": "/var/www/owncloud/data" } }}
In the example above, the app "fictitious" sets the data directory to/var/www/owncloud/data. Change this value by using the following command:
sudo -u www-data php occ config:app:set --value /mnt/owncloud/data fictitiousdatadir
You have to repeat this for all apps found defining the data directory askey.
Fix the config.php Settings
To fix the config.php settings:
1. Change the datadirectory key in your config.php to the new path. To do so, start aneditor of your choice and open /var/www/owncloud/config/config.php
2. Change the value of the key from 'datadirectory' ⇒ '/var/www/owncloud/data', to'datadirectory' ⇒ '/mnt/owncloud/data',.
Encryption
In this section you will find all the details you need to maintain encryption inownCloud.
Migrating User Key Encryption to Master Key Encryption
Introduction
Why should you move away from User Key-based encryption?
While it is a bit more secure than a central encryption approach, User key-basedencryption has some disadvantages. It blocks some additional functions such as the
468 | Encryption
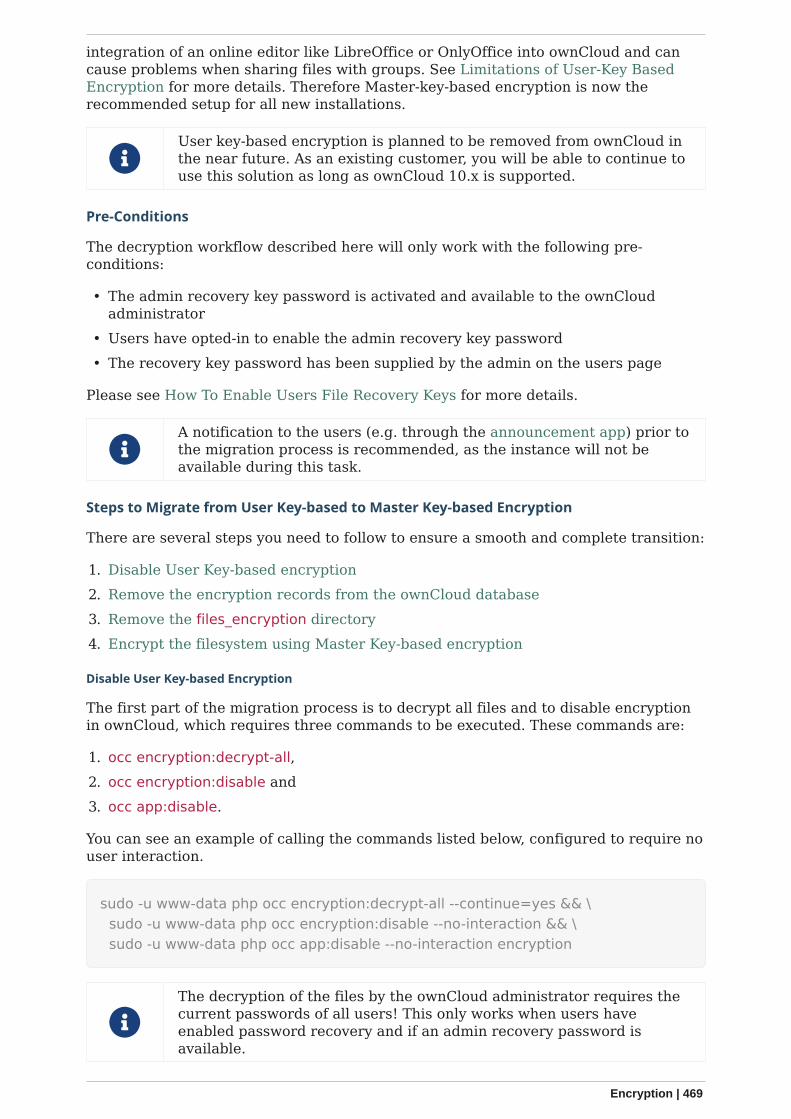
integration of an online editor like LibreOffice or OnlyOffice into ownCloud and cancause problems when sharing files with groups. See Limitations of User-Key BasedEncryption for more details. Therefore Master-key-based encryption is now therecommended setup for all new installations.
User key-based encryption is planned to be removed from ownCloud inthe near future. As an existing customer, you will be able to continue touse this solution as long as ownCloud 10.x is supported.
Pre-Conditions
The decryption workflow described here will only work with the following pre-conditions:
• The admin recovery key password is activated and available to the ownCloudadministrator
• Users have opted-in to enable the admin recovery key password• The recovery key password has been supplied by the admin on the users page
Please see How To Enable Users File Recovery Keys for more details.
A notification to the users (e.g. through the announcement app) prior tothe migration process is recommended, as the instance will not beavailable during this task.
Steps to Migrate from User Key-based to Master Key-based Encryption
There are several steps you need to follow to ensure a smooth and complete transition:
1. Disable User Key-based encryption2. Remove the encryption records from the ownCloud database3. Remove the files_encryption directory4. Encrypt the filesystem using Master Key-based encryption
Disable User Key-based Encryption
The first part of the migration process is to decrypt all files and to disable encryptionin ownCloud, which requires three commands to be executed. These commands are:
1. occ encryption:decrypt-all,2. occ encryption:disable and3. occ app:disable.
You can see an example of calling the commands listed below, configured to require nouser interaction.
sudo -u www-data php occ encryption:decrypt-all --continue=yes && \ sudo -u www-data php occ encryption:disable --no-interaction && \ sudo -u www-data php occ app:disable --no-interaction encryption
The decryption of the files by the ownCloud administrator requires thecurrent passwords of all users! This only works when users haveenabled password recovery and if an admin recovery password isavailable.
Encryption | 469
configuration/files/encryption/encryption_configuration.pdf#limitations-of-user-key-based-encryption

Remove the Encryption Records from the ownCloud Database
Once your ownCloud files are unencrypted, and encryption has been disabled, youneed to remove the encryption records from the database. There is, currently, no occcommand to handle this, so it has to be done manually. Specifically, you need toremove all records from the oc_appconfig table where the appid column is set toencryption.
In the examples below, you can see how to do this using MySQL. If you are not usingMySQL, please use the commands specific to your database vendor.
SELECT * FROM `oc_appconfig` WHERE `appid` LIKE 'encryption'
Remove the files_encryption Directory
With the database updated, next, the files_encryption directory needs to be removed.Below is an example of how to do so, to save you time.
cd <your owncloud root directory>find ./data* -name files_encryption -exec rm -rvf {} \;
Encrypt the Filesystem Using Master Key-based Encryption
Now, your ownCloud files can be encrypted using Master Key-based encryption. Thisrequires the following steps:
1. The encryption app needs to be enabled2. Encryption needs to be enabled3. The encryption type needs to be set to Master Key4. Re-encryption of the ownCloud filesystem.
The following example shows how to do this on the command line.
sudo -u www-data php occ app:enable encryption && \ sudo -u www-data php occ encryption:enable && \ sudo -u www-data php occ encryption:select-encryption-type masterkey -y && \ sudo -u www-data php occ encryption:encrypt-all --yes
Verify the Encrypted Files
With the files encrypted using Master Key-based encryption, you should now verifythat everything worked properly. To do so, run a SELECT query in your database whichreturns all files from the oc_appconfig table where the appid column is set toencryption. You should see a number of records, as in the output of the example below.
470 | Encryption
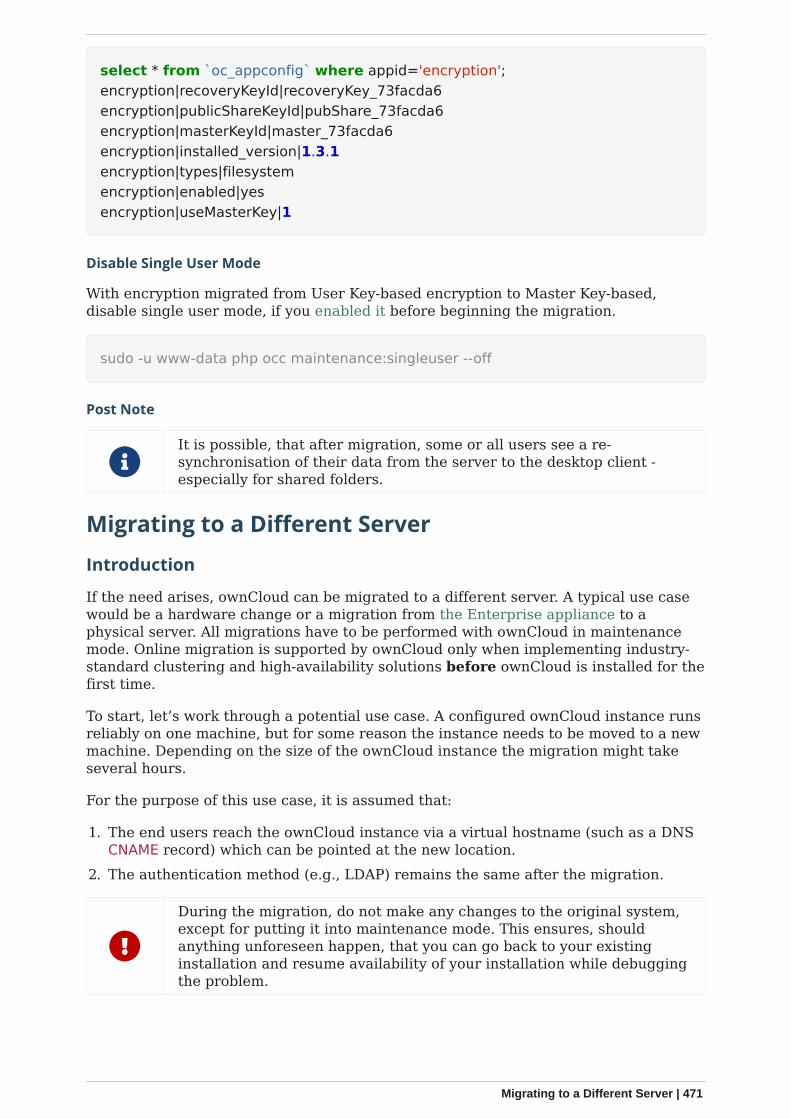
select * from `oc_appconfig` where appid='encryption';encryption|recoveryKeyId|recoveryKey_73facda6encryption|publicShareKeyId|pubShare_73facda6encryption|masterKeyId|master_73facda6encryption|installed_version|1.3.1encryption|types|filesystemencryption|enabled|yesencryption|useMasterKey|1
Disable Single User Mode
With encryption migrated from User Key-based encryption to Master Key-based,disable single user mode, if you enabled it before beginning the migration.
sudo -u www-data php occ maintenance:singleuser --off
Post Note
It is possible, that after migration, some or all users see a re-synchronisation of their data from the server to the desktop client -especially for shared folders.
Migrating to a Different Server
Introduction
If the need arises, ownCloud can be migrated to a different server. A typical use casewould be a hardware change or a migration from the Enterprise appliance to aphysical server. All migrations have to be performed with ownCloud in maintenancemode. Online migration is supported by ownCloud only when implementing industry-standard clustering and high-availability solutions before ownCloud is installed for thefirst time.
To start, let’s work through a potential use case. A configured ownCloud instance runsreliably on one machine, but for some reason the instance needs to be moved to a newmachine. Depending on the size of the ownCloud instance the migration might takeseveral hours.
For the purpose of this use case, it is assumed that:
1. The end users reach the ownCloud instance via a virtual hostname (such as a DNSCNAME record) which can be pointed at the new location.
2. The authentication method (e.g., LDAP) remains the same after the migration.
During the migration, do not make any changes to the original system,except for putting it into maintenance mode. This ensures, shouldanything unforeseen happen, that you can go back to your existinginstallation and resume availability of your installation while debuggingthe problem.
Migrating to a Different Server | 471
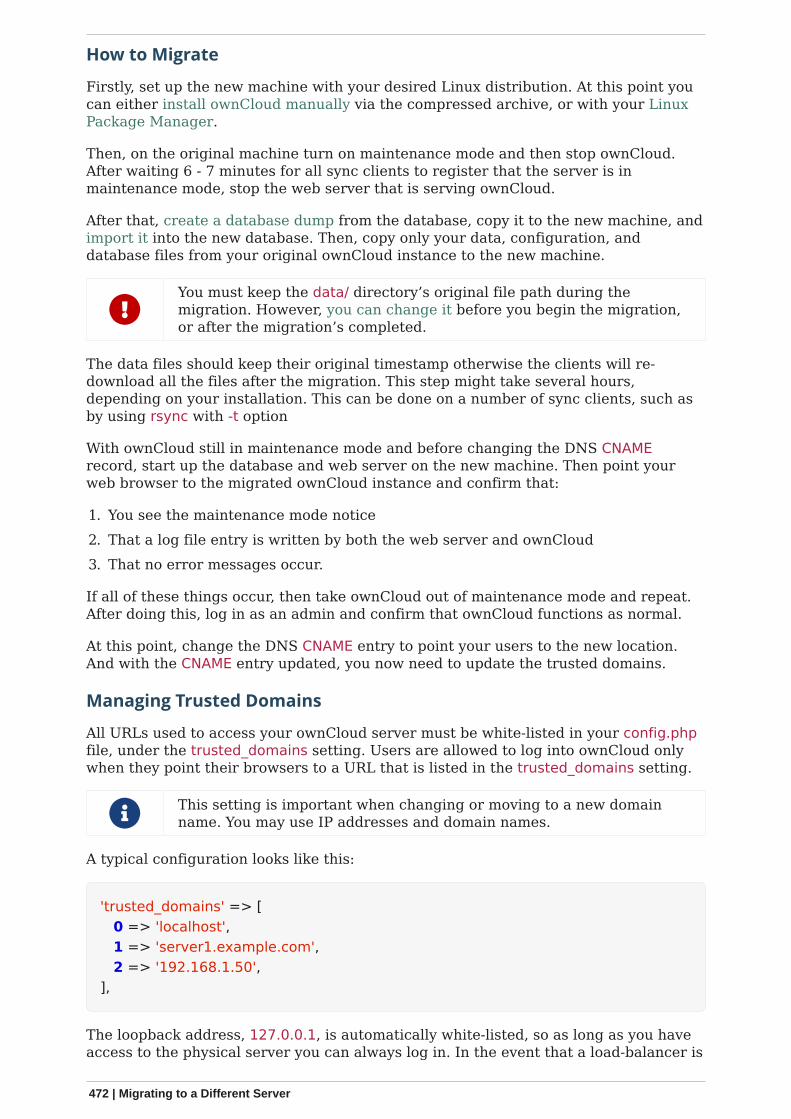
How to Migrate
Firstly, set up the new machine with your desired Linux distribution. At this point youcan either install ownCloud manually via the compressed archive, or with your LinuxPackage Manager.
Then, on the original machine turn on maintenance mode and then stop ownCloud.After waiting 6 - 7 minutes for all sync clients to register that the server is inmaintenance mode, stop the web server that is serving ownCloud.
After that, create a database dump from the database, copy it to the new machine, andimport it into the new database. Then, copy only your data, configuration, anddatabase files from your original ownCloud instance to the new machine.
You must keep the data/ directory’s original file path during themigration. However, you can change it before you begin the migration,or after the migration’s completed.
The data files should keep their original timestamp otherwise the clients will re-download all the files after the migration. This step might take several hours,depending on your installation. This can be done on a number of sync clients, such asby using rsync with -t option
With ownCloud still in maintenance mode and before changing the DNS CNAMErecord, start up the database and web server on the new machine. Then point yourweb browser to the migrated ownCloud instance and confirm that:
1. You see the maintenance mode notice2. That a log file entry is written by both the web server and ownCloud3. That no error messages occur.
If all of these things occur, then take ownCloud out of maintenance mode and repeat.After doing this, log in as an admin and confirm that ownCloud functions as normal.
At this point, change the DNS CNAME entry to point your users to the new location.And with the CNAME entry updated, you now need to update the trusted domains.
Managing Trusted Domains
All URLs used to access your ownCloud server must be white-listed in your config.phpfile, under the trusted_domains setting. Users are allowed to log into ownCloud onlywhen they point their browsers to a URL that is listed in the trusted_domains setting.
This setting is important when changing or moving to a new domainname. You may use IP addresses and domain names.
A typical configuration looks like this:
'trusted_domains' => [ 0 => 'localhost', 1 => 'server1.example.com', 2 => '192.168.1.50',],
The loopback address, 127.0.0.1, is automatically white-listed, so as long as you haveaccess to the physical server you can always log in. In the event that a load-balancer is
472 | Migrating to a Different Server

in place, there will be no issues as long as it sends the correct X-Forwarded-Hostheader.
Example Migration
The following is an example migration with assumptions to make this migration work:
• Ubuntu 16.04+• SSH with PermitRootLogin set to yes• Database used is MySQL / MariaDB
Preparation
If not already available on the new server, make sure SSH is installed:
sudo apt install ssh -y
Next, edit ssh-config and enable root ssh login.
nano /etc/ssh/sshd_configPermitRootLogin yes
And then restart SSH.
sudo service ssh restart
Lastly, install ownCloud on the new server.
Migration
Enable Maintenance Mode
The first step is to enable maintenance mode. To do that, use the following commands:
cd /var/www/owncloud/sudo -u www-data php occ maintenance:mode --on
After that’s done, then wait a few minutes and stop your web server, in this caseApache:
sudo service apache2 stop
Transfer the Database
Now, you have to transfer the database from the old server to the new one. To do that,first backup the database.
Migrating to a Different Server | 473
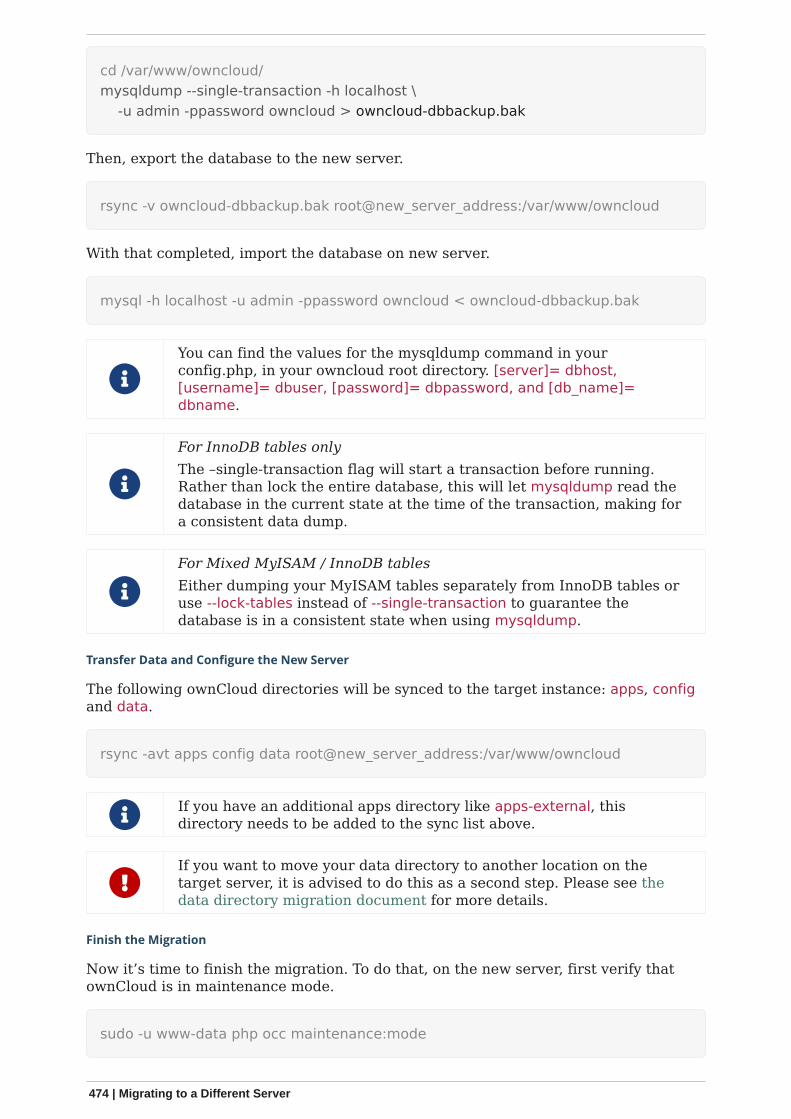
cd /var/www/owncloud/mysqldump --single-transaction -h localhost \ -u admin -ppassword owncloud > owncloud-dbbackup.bak
Then, export the database to the new server.
rsync -v owncloud-dbbackup.bak root@new_server_address:/var/www/owncloud
With that completed, import the database on new server.
mysql -h localhost -u admin -ppassword owncloud < owncloud-dbbackup.bak
You can find the values for the mysqldump command in yourconfig.php, in your owncloud root directory. [server]= dbhost,[username]= dbuser, [password]= dbpassword, and [db_name]=dbname.
For InnoDB tables onlyThe –single-transaction flag will start a transaction before running.Rather than lock the entire database, this will let mysqldump read thedatabase in the current state at the time of the transaction, making fora consistent data dump.
For Mixed MyISAM / InnoDB tablesEither dumping your MyISAM tables separately from InnoDB tables oruse --lock-tables instead of --single-transaction to guarantee thedatabase is in a consistent state when using mysqldump.
Transfer Data and Configure the New Server
The following ownCloud directories will be synced to the target instance: apps, configand data.
rsync -avt apps config data root@new_server_address:/var/www/owncloud
If you have an additional apps directory like apps-external, thisdirectory needs to be added to the sync list above.
If you want to move your data directory to another location on thetarget server, it is advised to do this as a second step. Please see thedata directory migration document for more details.
Finish the Migration
Now it’s time to finish the migration. To do that, on the new server, first verify thatownCloud is in maintenance mode.
sudo -u www-data php occ maintenance:mode
474 | Migrating to a Different Server
Next, start up the database and web server on the new machine.
sudo service mysql startsudo service apache2 start
With that done, point your web browser to the migrated ownCloud instance, andconfirm that you see the maintenance mode notice, and that no error messages occur.If both of these occur, take ownCloud out of maintenance mode.
sudo -u www-data php occ maintenance:mode --off
And finally, log in as admin and confirm normal function of ownCloud. If you have adomain name, and you want an SSL certificate, we recommend certbot.
Reverse the Changes to ssh-config
Now you need to reverse the change to ssh-config. Specifically, set PermitRootLogin tono and restart ssh. To do that, run the following command:
This is a security measure and improves SSH security.
sudo service ssh restart
Update DNS and Trusted Domains
Finally, update the DNS’ CNAME entry to point to your new server. If you have not onlymigrated physically from server to server but have also changed your ownCloudserver’s domain name, you also need to update the domain in the Trusted Domainsetting in config.php, on the target server.
Migrating to a Different Server | 475
What is the Appliance?If you don’t know a lot about Linux, only have a small IT staff, or are your IT staff— even if that’s only in your spare time — the ownCloud X Appliance will let you getstarted using ownCloud quickly and easily.
The Appliance:
• Provides a pre-packaged, easy to deploy ownCloud, ready for you in most popularvirtual machine formats, including ESX, VirtualBox, KVM and VMware.
• Contains the ownCloud 10 virtual image, and all the additional software you needto get up and running on ownCloud in minutes; this includes: ownCloud X Serverand Enterprise Apps, Apache 2, PHP, and MySQL.
• Scales up to 500 users. Depending on the intensity and pattern of use, this can varyfrom 400 up to 600 users.
Some configurations, such as SAML IDPs, or LDAP or AD instances, may needadditional configuration to connect.
How to Install the Appliance
Introduction
The installation process is a little involved, but not too much. To keep it succinct, youneed to:
• Download and Launch the appliance• Step through the Configuration Wizard• Activate the configured appliance• After that, you can access the running instance of ownCloud and further
Administrate it to suit your needs.
It’s recommended to setup the appliance with a working DHCP Serverand access to the internet.
The appliance has to be activated with a license that you will receivefrom Univention via email. This license has to be imported into theappliance via the web interface.
Download the Appliance
First off, you need to download the ownCloud X Appliance from the ownCloudAppliance download page. You can select various appliance types to download likeESXi, VirtualBox, QCOW2 (KVM) and VMWARE.
Fill out the form to download the documentation which will be delivered directly inyour inbox. Alternatively you can view it online.
476 | How to Install the Appliance
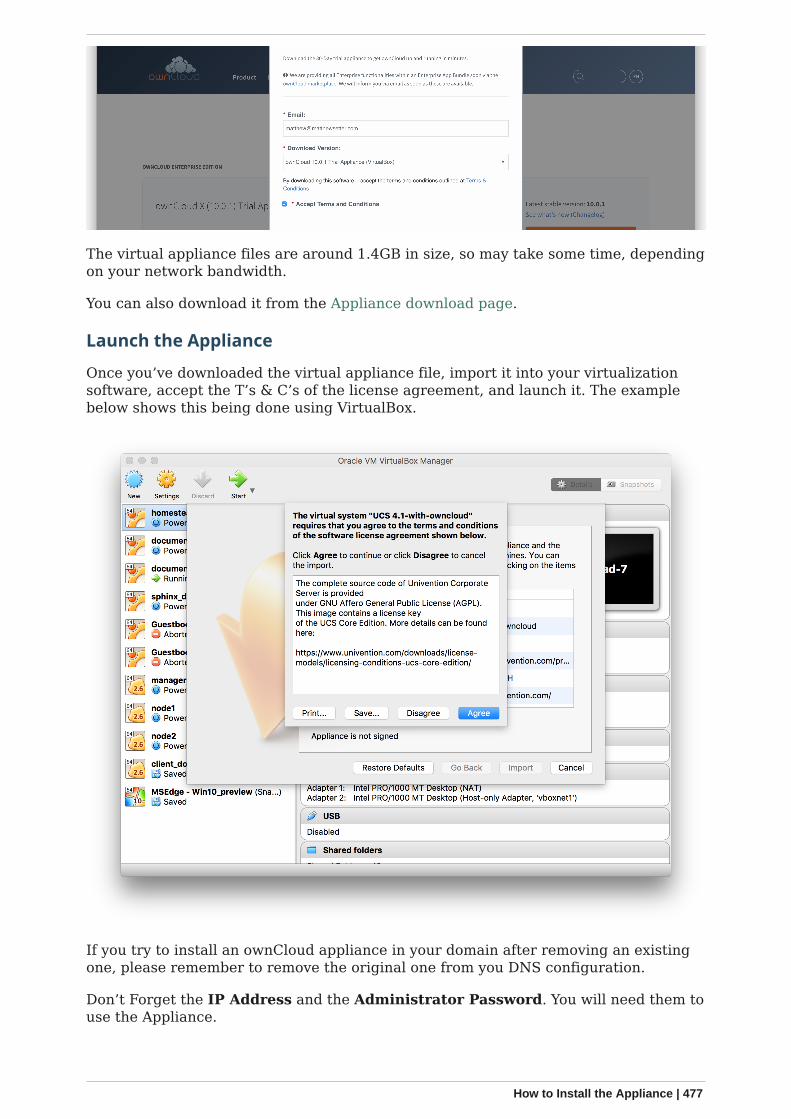
The virtual appliance files are around 1.4GB in size, so may take some time, dependingon your network bandwidth.
You can also download it from the Appliance download page.
Launch the Appliance
Once you’ve downloaded the virtual appliance file, import it into your virtualizationsoftware, accept the T’s & C’s of the license agreement, and launch it. The examplebelow shows this being done using VirtualBox.
If you try to install an ownCloud appliance in your domain after removing an existingone, please remember to remove the original one from you DNS configuration.
Don’t Forget the IP Address and the Administrator Password. You will need them touse the Appliance.
How to Install the Appliance | 477
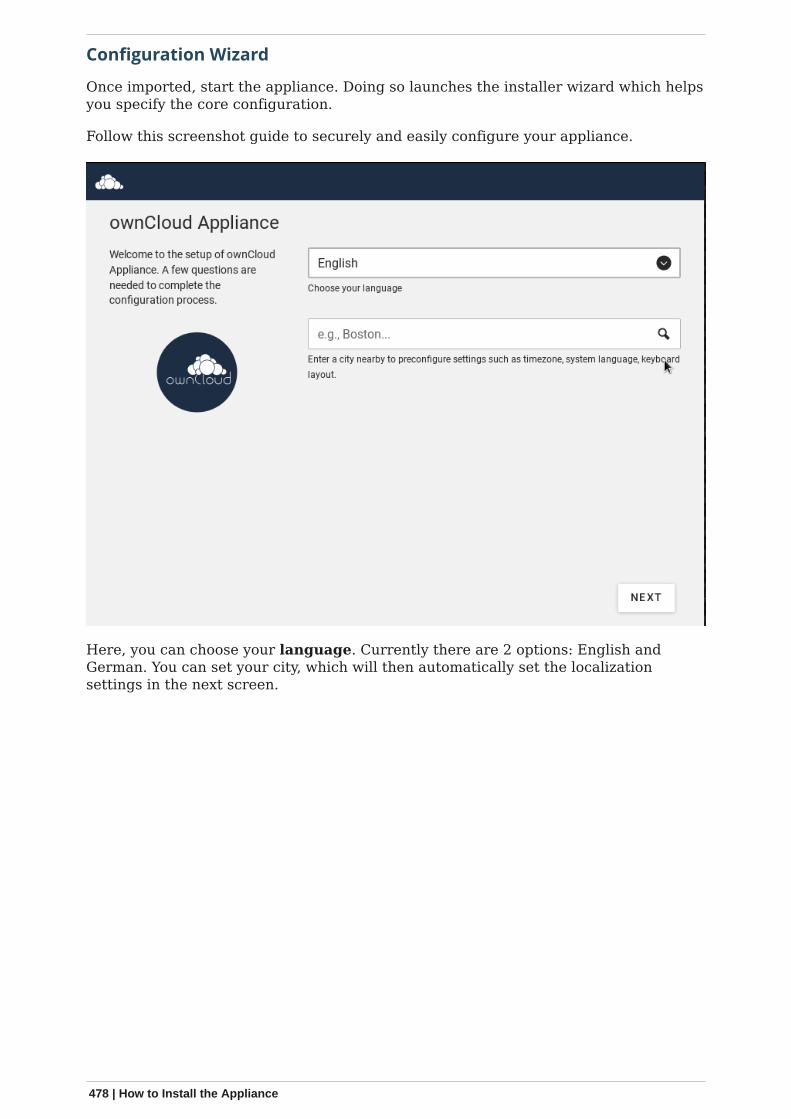
Configuration Wizard
Once imported, start the appliance. Doing so launches the installer wizard which helpsyou specify the core configuration.
Follow this screenshot guide to securely and easily configure your appliance.
Here, you can choose your language. Currently there are 2 options: English andGerman. You can set your city, which will then automatically set the localizationsettings in the next screen.
478 | How to Install the Appliance
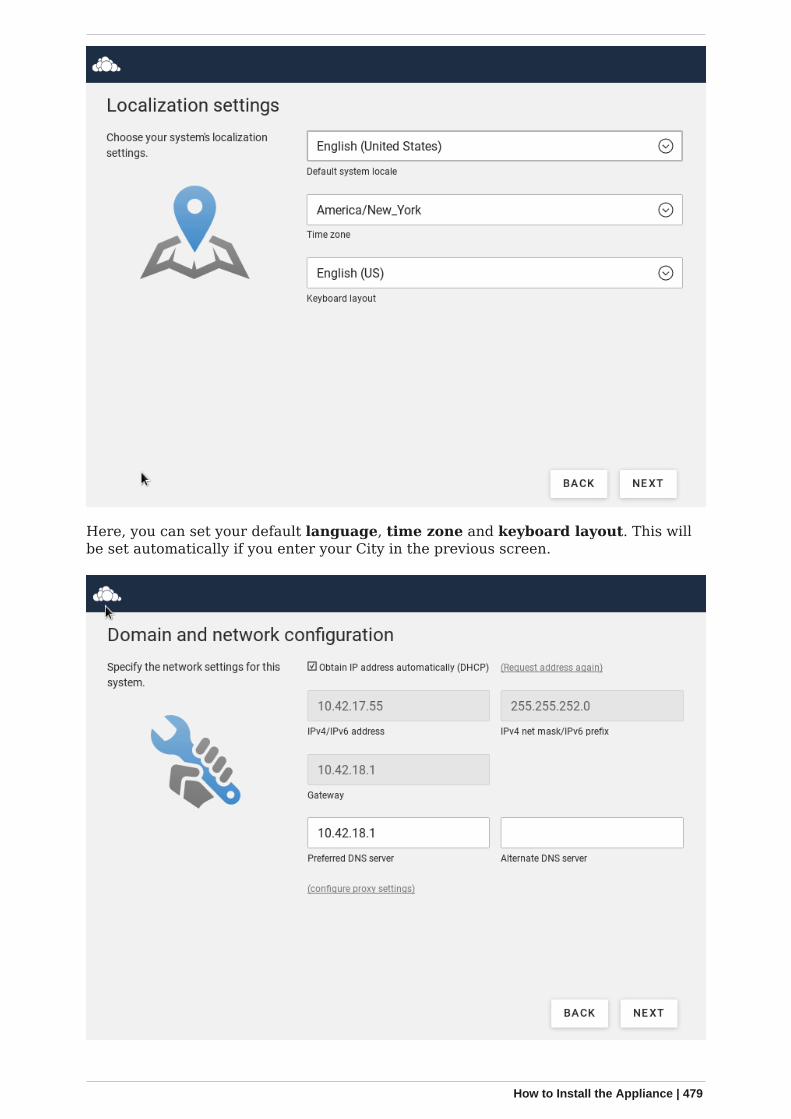
Here, you can set your default language, time zone and keyboard layout. This willbe set automatically if you enter your City in the previous screen.
How to Install the Appliance | 479
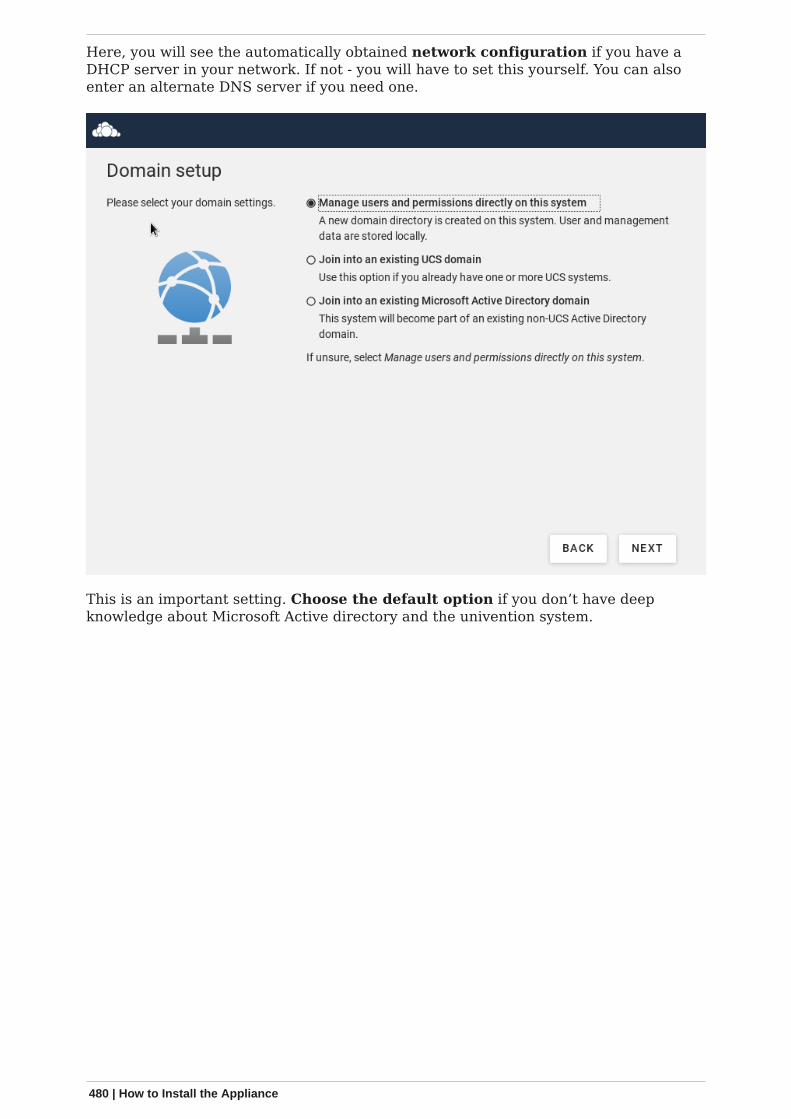
Here, you will see the automatically obtained network configuration if you have aDHCP server in your network. If not - you will have to set this yourself. You can alsoenter an alternate DNS server if you need one.
This is an important setting. Choose the default option if you don’t have deepknowledge about Microsoft Active directory and the univention system.
480 | How to Install the Appliance
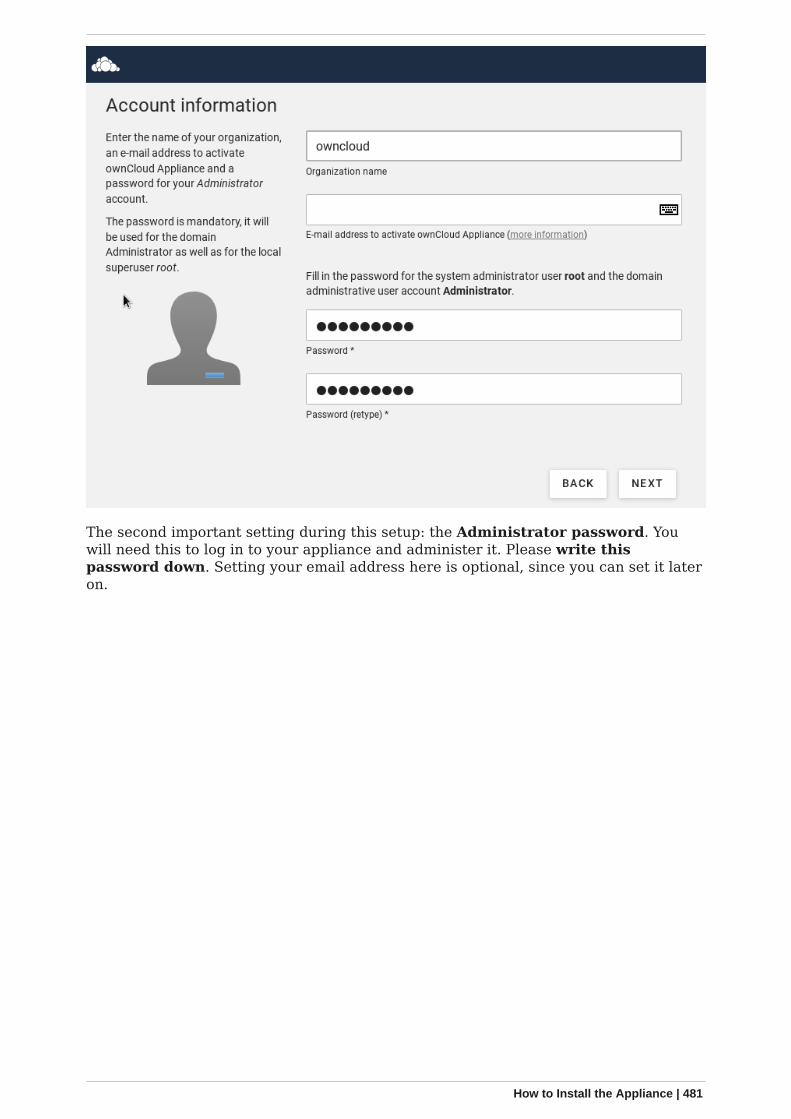
The second important setting during this setup: the Administrator password. Youwill need this to log in to your appliance and administer it. Please write thispassword down. Setting your email address here is optional, since you can set it lateron.
How to Install the Appliance | 481
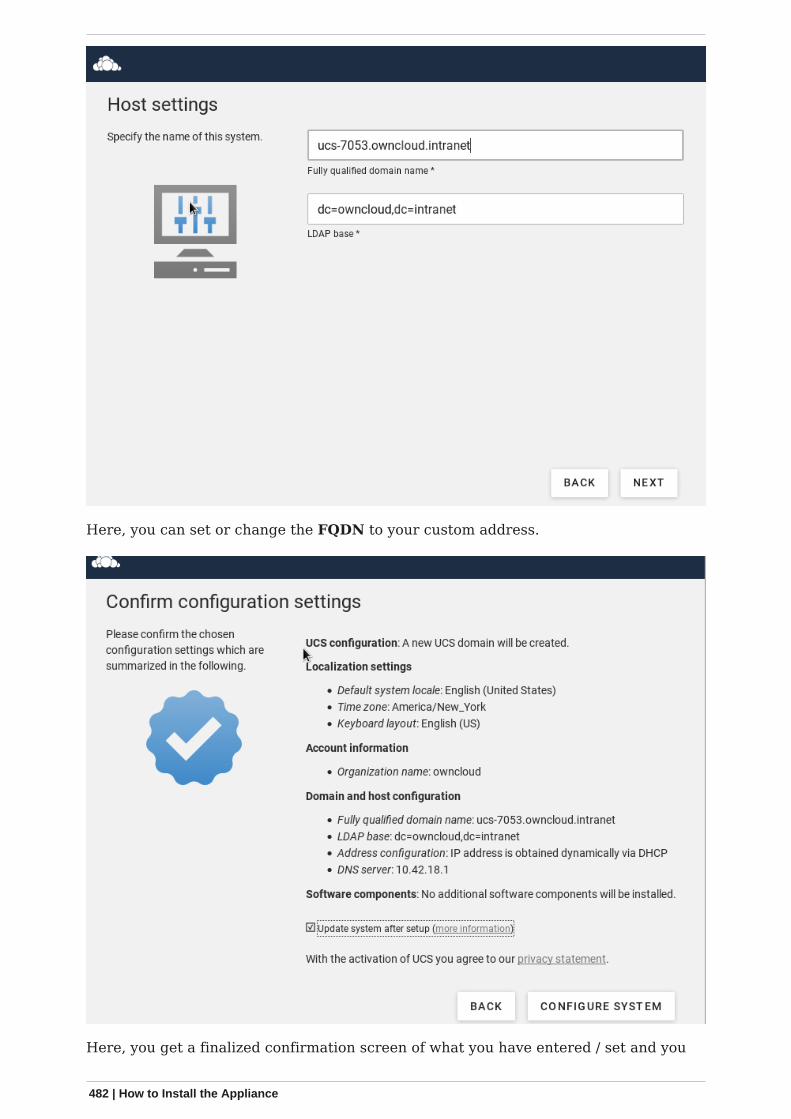
Here, you can set or change the FQDN to your custom address.
Here, you get a finalized confirmation screen of what you have entered / set and you
482 | How to Install the Appliance
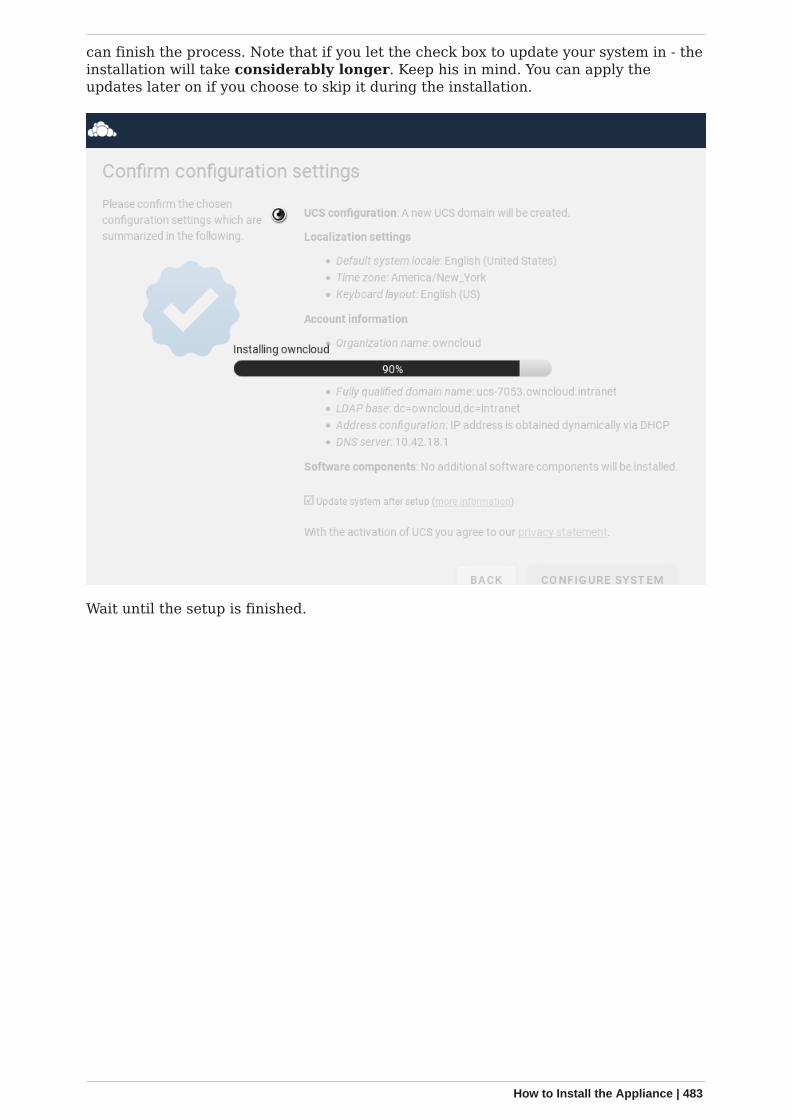
can finish the process. Note that if you let the check box to update your system in - theinstallation will take considerably longer. Keep his in mind. You can apply theupdates later on if you choose to skip it during the installation.
Wait until the setup is finished.
How to Install the Appliance | 483
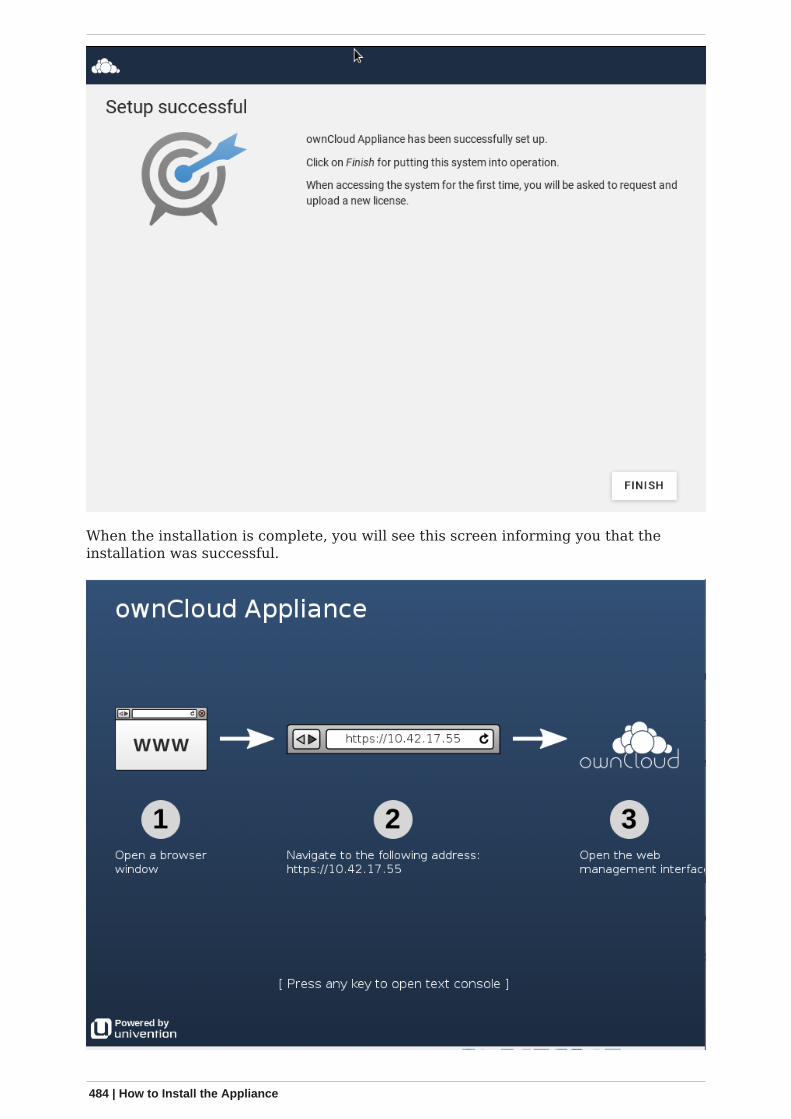
When the installation is complete, you will see this screen informing you that theinstallation was successful.
484 | How to Install the Appliance
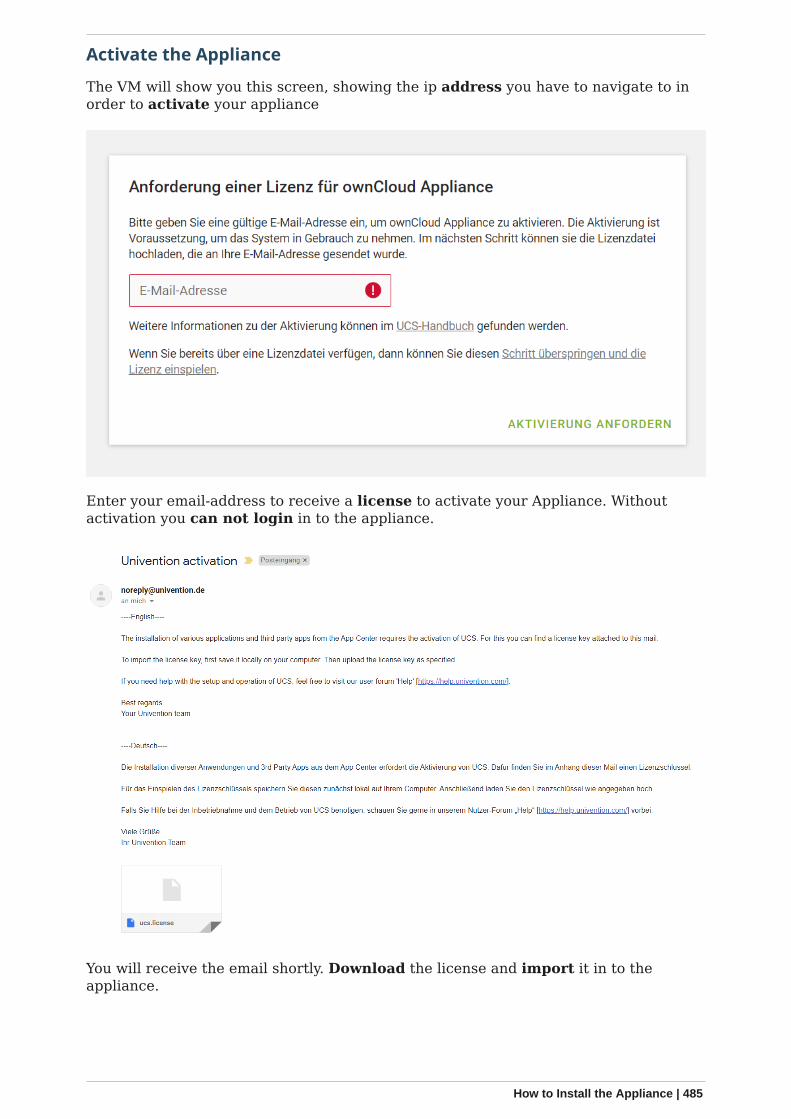
Activate the Appliance
The VM will show you this screen, showing the ip address you have to navigate to inorder to activate your appliance
Enter your email-address to receive a license to activate your Appliance. Withoutactivation you can not login in to the appliance.
You will receive the email shortly. Download the license and import it in to theappliance.
How to Install the Appliance | 485
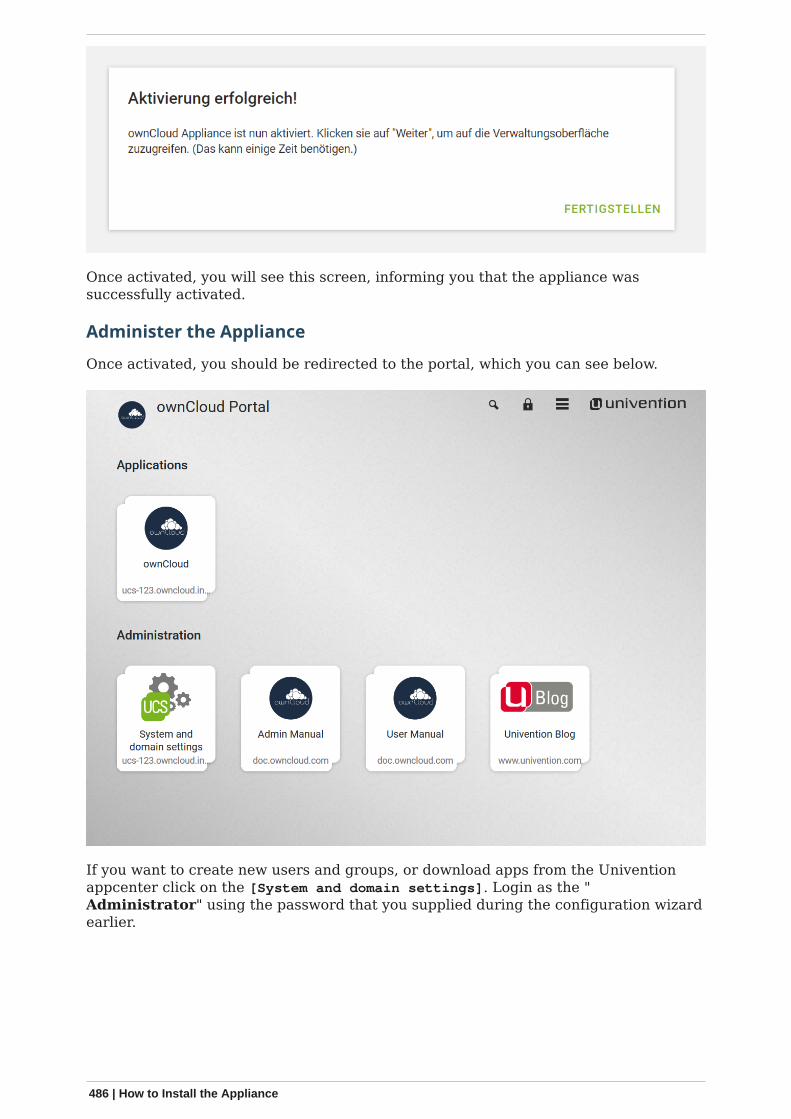
Once activated, you will see this screen, informing you that the appliance wassuccessfully activated.
Administer the Appliance
Once activated, you should be redirected to the portal, which you can see below.
If you want to create new users and groups, or download apps from the Univentionappcenter click on the [System and domain settings]. Login as the "Administrator" using the password that you supplied during the configuration wizardearlier.
486 | How to Install the Appliance
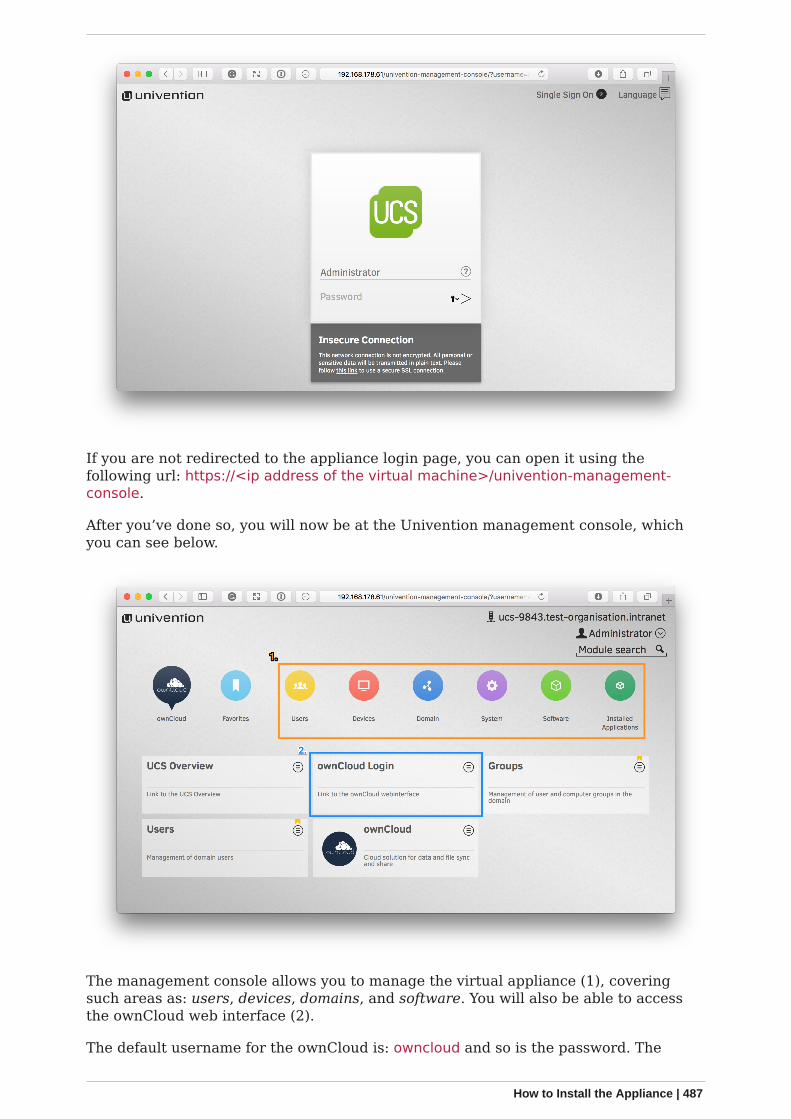
If you are not redirected to the appliance login page, you can open it using thefollowing url: https://<ip address of the virtual machine>/univention-management-console.
After you’ve done so, you will now be at the Univention management console, whichyou can see below.
The management console allows you to manage the virtual appliance (1), coveringsuch areas as: users, devices, domains, and software. You will also be able to accessthe ownCloud web interface (2).
The default username for the ownCloud is: owncloud and so is the password. The
How to Install the Appliance | 487
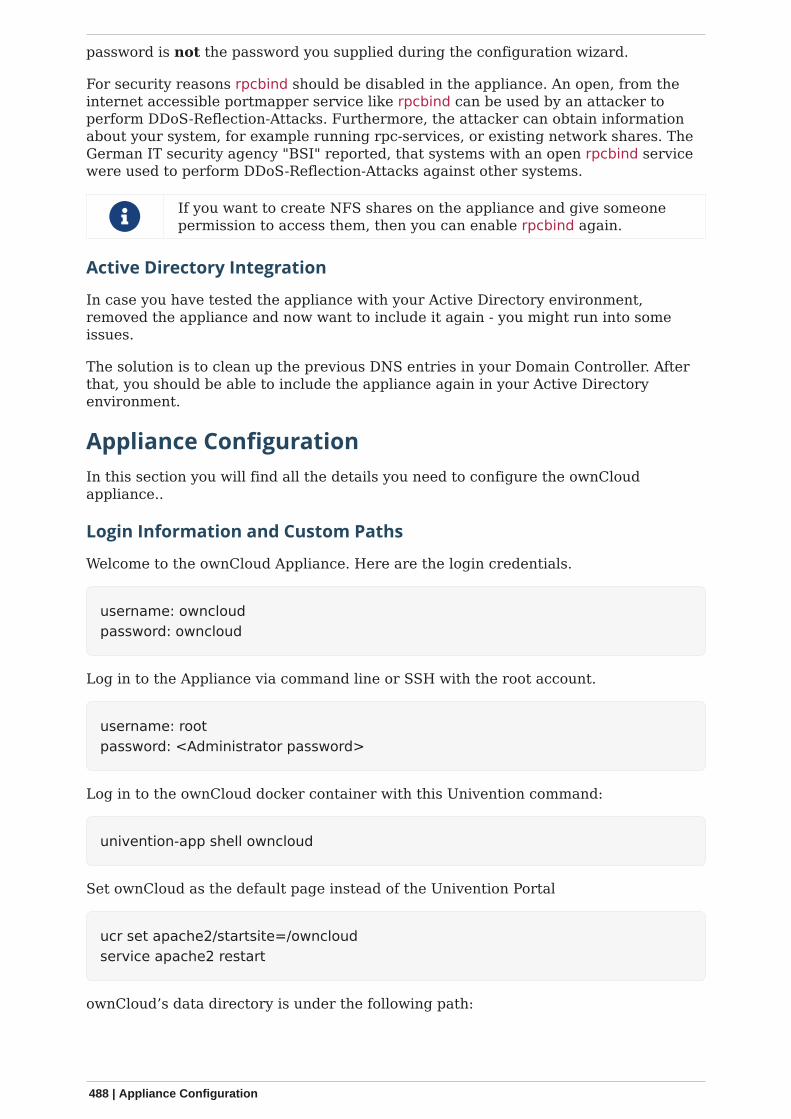
password is not the password you supplied during the configuration wizard.
For security reasons rpcbind should be disabled in the appliance. An open, from theinternet accessible portmapper service like rpcbind can be used by an attacker toperform DDoS-Reflection-Attacks. Furthermore, the attacker can obtain informationabout your system, for example running rpc-services, or existing network shares. TheGerman IT security agency "BSI" reported, that systems with an open rpcbind servicewere used to perform DDoS-Reflection-Attacks against other systems.
If you want to create NFS shares on the appliance and give someonepermission to access them, then you can enable rpcbind again.
Active Directory Integration
In case you have tested the appliance with your Active Directory environment,removed the appliance and now want to include it again - you might run into someissues.
The solution is to clean up the previous DNS entries in your Domain Controller. Afterthat, you should be able to include the appliance again in your Active Directoryenvironment.
Appliance Configuration
In this section you will find all the details you need to configure the ownCloudappliance..
Login Information and Custom Paths
Welcome to the ownCloud Appliance. Here are the login credentials.
username: owncloudpassword: owncloud
Log in to the Appliance via command line or SSH with the root account.
username: rootpassword: <Administrator password>
Log in to the ownCloud docker container with this Univention command:
univention-app shell owncloud
Set ownCloud as the default page instead of the Univention Portal
ucr set apache2/startsite=/owncloudservice apache2 restart
ownCloud’s data directory is under the following path:
488 | Appliance Configuration
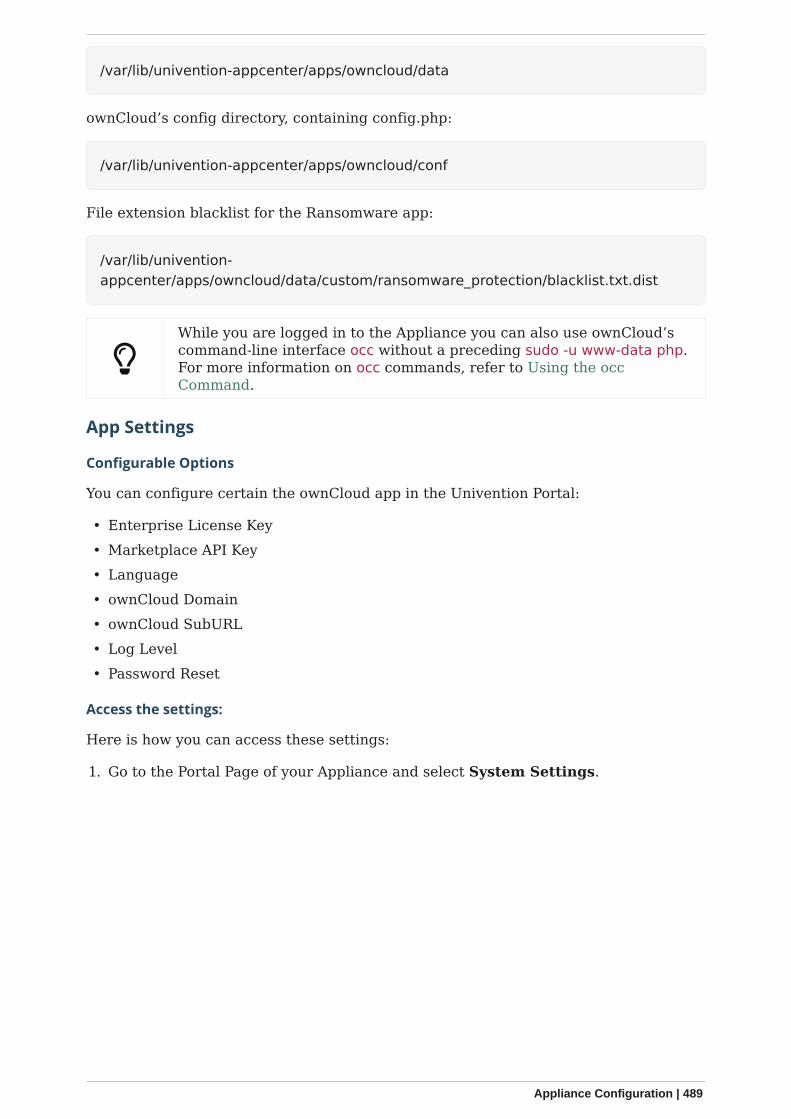
/var/lib/univention-appcenter/apps/owncloud/data
ownCloud’s config directory, containing config.php:
/var/lib/univention-appcenter/apps/owncloud/conf
File extension blacklist for the Ransomware app:
/var/lib/univention-appcenter/apps/owncloud/data/custom/ransomware_protection/blacklist.txt.dist
While you are logged in to the Appliance you can also use ownCloud’scommand-line interface occ without a preceding sudo -u www-data php.For more information on occ commands, refer to Using the occCommand.
App Settings
Configurable Options
You can configure certain the ownCloud app in the Univention Portal:
• Enterprise License Key• Marketplace API Key• Language• ownCloud Domain• ownCloud SubURL• Log Level• Password Reset
Access the settings:
Here is how you can access these settings:
1. Go to the Portal Page of your Appliance and select System Settings.
Appliance Configuration | 489
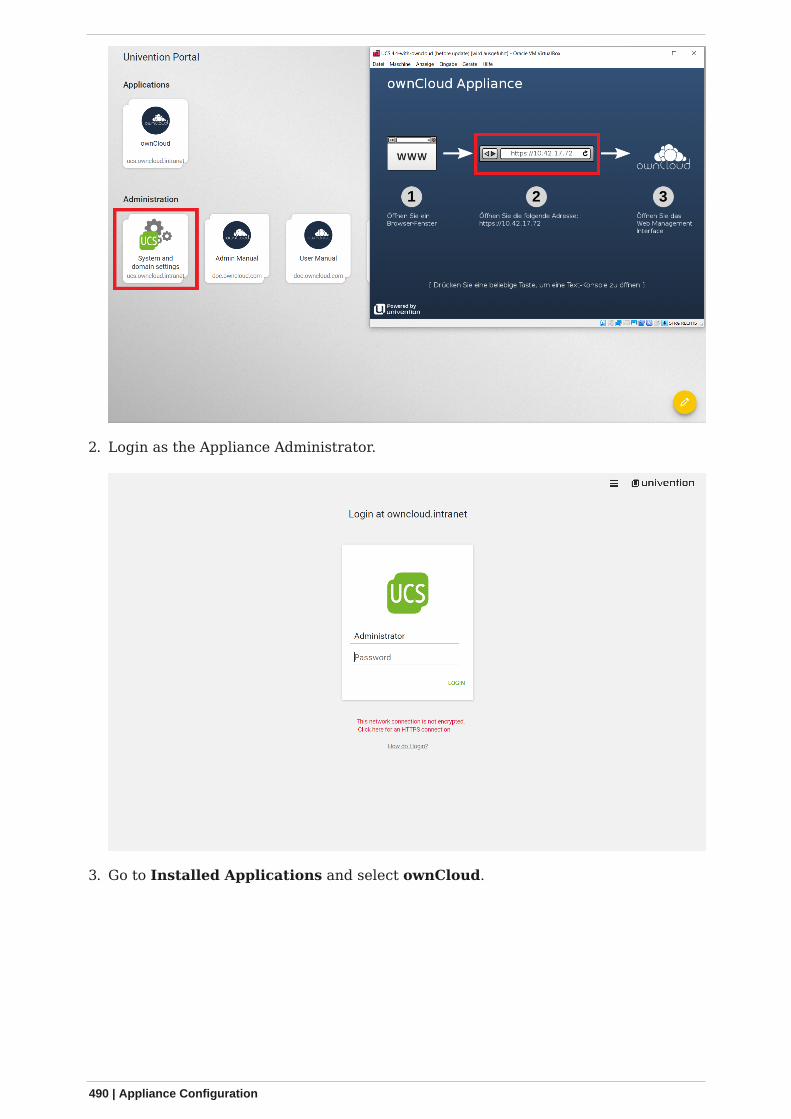
2. Login as the Appliance Administrator.
3. Go to Installed Applications and select ownCloud.
490 | Appliance Configuration
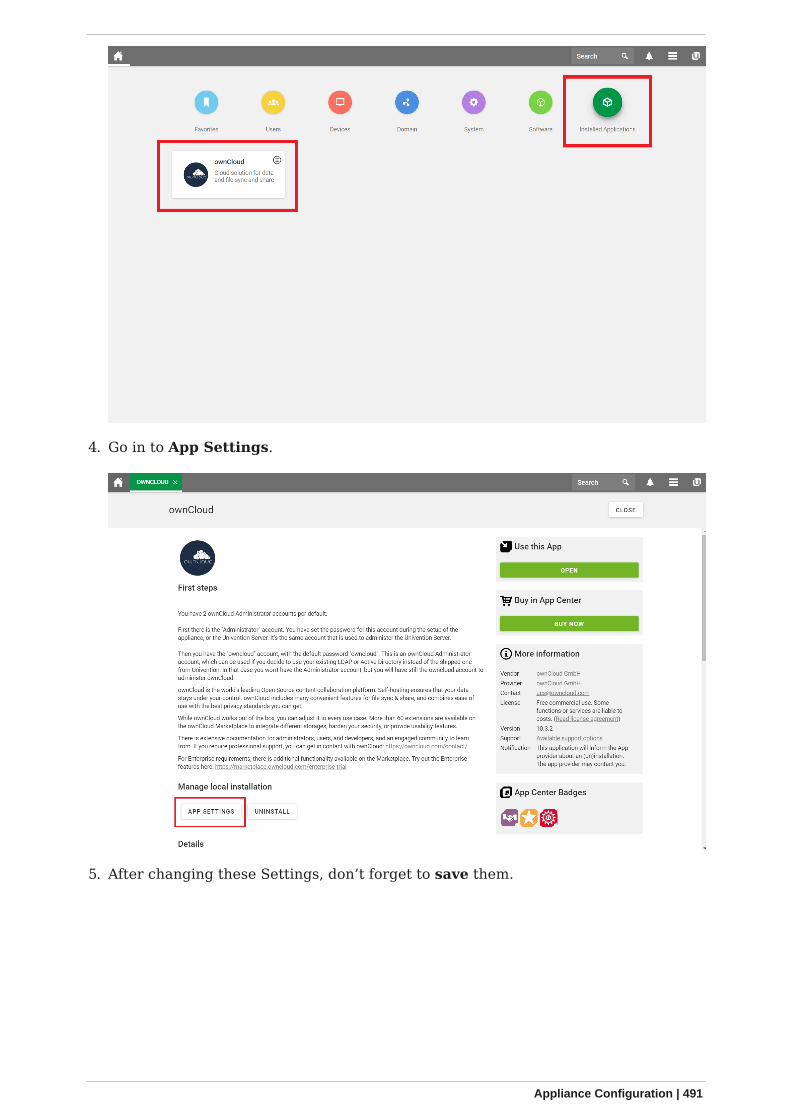
4. Go in to App Settings.
5. After changing these Settings, don’t forget to save them.
Appliance Configuration | 491

How to add certificates
If you want to use your own SSL certificates for the appliance, you have to follow thesethree steps:
1. Create the certificates and deposit them on your appliance.2. Connect to your appliance either directly on the command line of your virtual
machine or via ssh connection to your appliance.3. Execute the following commands:
ucr set apache2/ssl/certificate="/etc/myssl/cert.pem"ucr set apache2/ssl/key="/etc/myssl/private.key"
Remember to adjust the path and filename to match your certificate.
Once you’ve completed these steps, restart Apache using the following command:
sudo service apache2 restart
Now your certificates will be used to access your appliance. If you want to limit theaccess to your server exclusively to HTTPS, use this command:
sudo ucr set apache2/force_https=yes
For further information please visit our partner site at Univention.
Firewall Protected Environment
If you are considering setting up the appliance in an environment with a firewall,please create rules that permit access to the following hosts. If your DNS is not
492 | Appliance Configuration
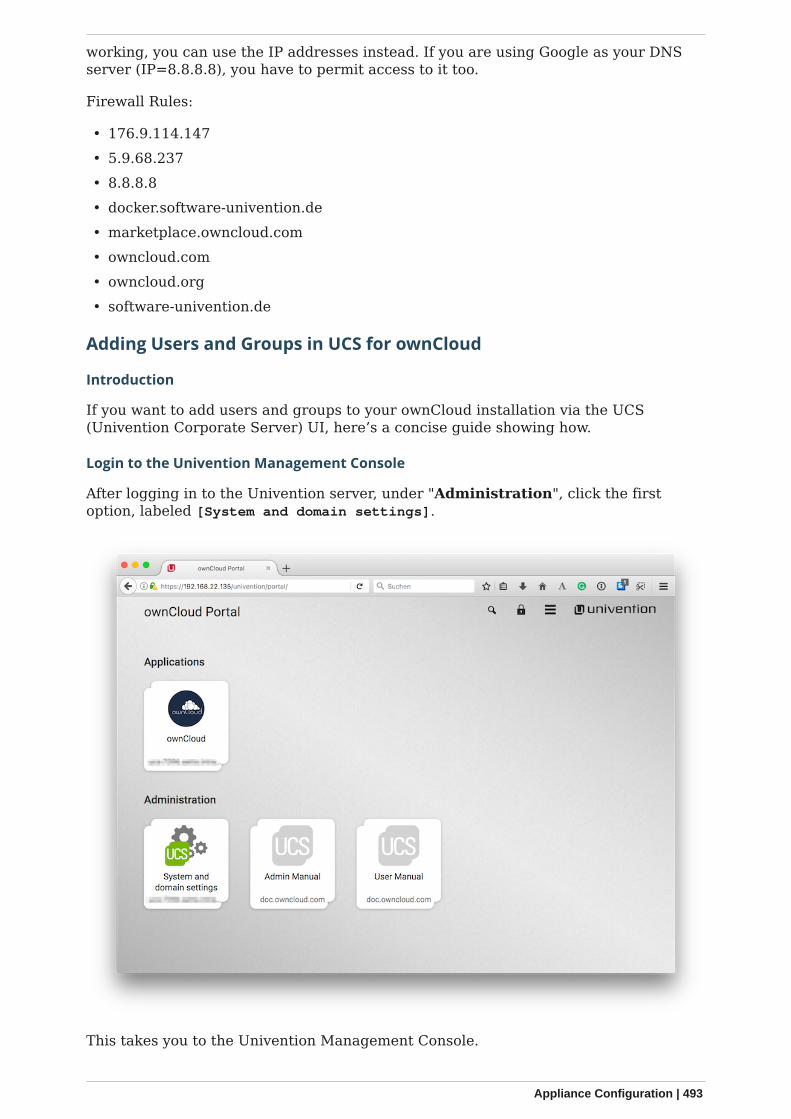
working, you can use the IP addresses instead. If you are using Google as your DNSserver (IP=8.8.8.8), you have to permit access to it too.
Firewall Rules:
• 176.9.114.147• 5.9.68.237• 8.8.8.8• docker.software-univention.de• marketplace.owncloud.com• owncloud.com• owncloud.org• software-univention.de
Adding Users and Groups in UCS for ownCloud
Introduction
If you want to add users and groups to your ownCloud installation via the UCS(Univention Corporate Server) UI, here’s a concise guide showing how.
Login to the Univention Management Console
After logging in to the Univention server, under "Administration", click the firstoption, labeled [System and domain settings].
This takes you to the Univention Management Console.
Appliance Configuration | 493
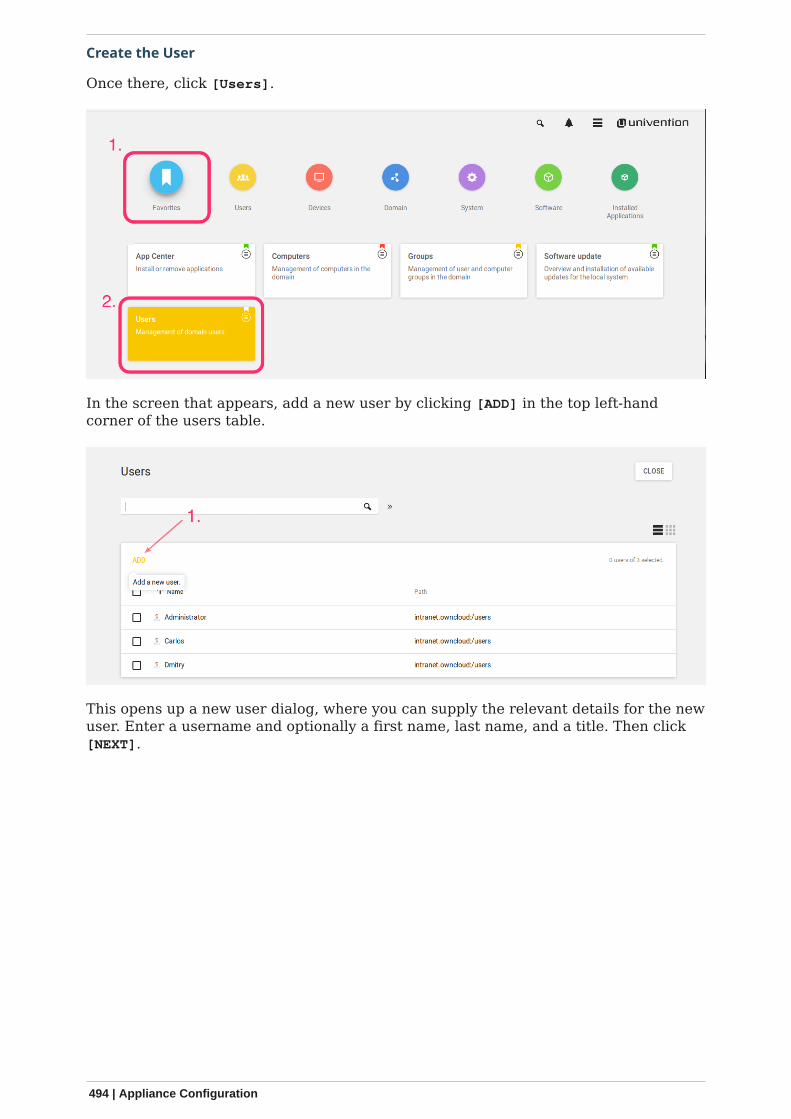
Create the User
Once there, click [Users].
In the screen that appears, add a new user by clicking [ADD] in the top left-handcorner of the users table.
This opens up a new user dialog, where you can supply the relevant details for the newuser. Enter a username and optionally a first name, last name, and a title. Then click[NEXT].
494 | Appliance Configuration

In the next dialog that appears, enter and confirm the password. You can, optionally,choose some further options, if desired. Then click [CREATE USER].
The new user will have been created, so click the [CLOSE] button, in the top right-hand corner, to go back to "Favorites".
Appliance Configuration | 495
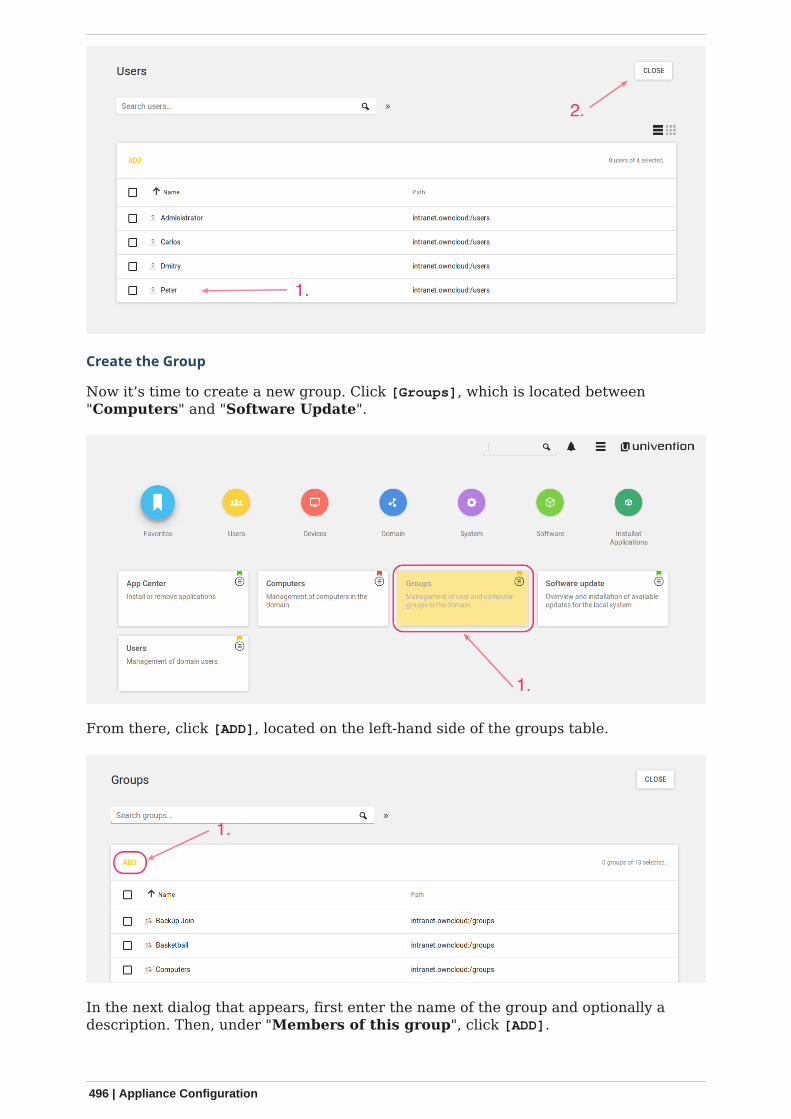
Create the Group
Now it’s time to create a new group. Click [Groups], which is located between"Computers" and "Software Update".
From there, click [ADD], located on the left-hand side of the groups table.
In the next dialog that appears, first enter the name of the group and optionally adescription. Then, under "Members of this group", click [ADD].
496 | Appliance Configuration

This opens up an "Add objects" (or "Add new group" ) dialog. Find the user, in thelist at the bottom, that you want to add to the group, check the checkbox next to theirname, and click [ADD].
After that, click on [ownCloud] in the left-hand side navigation, and check the option[ownCloud enabled]. And lastly, click [CREATE GROUP].
Appliance Configuration | 497
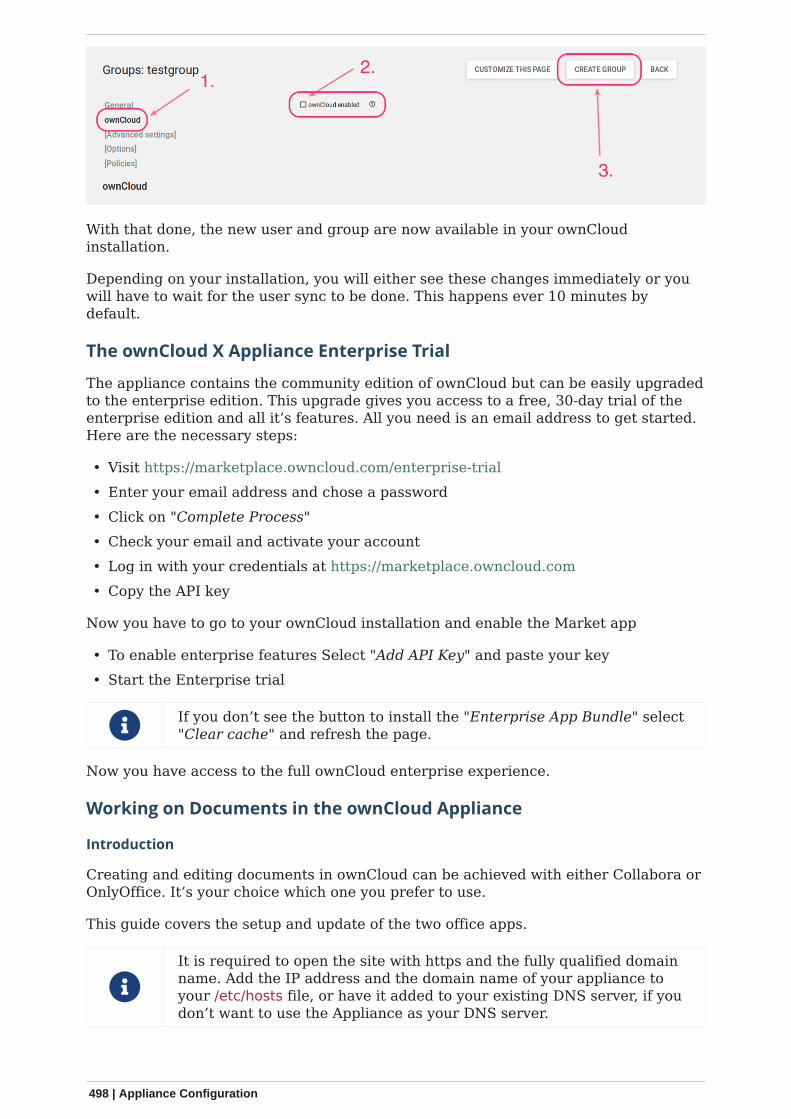
With that done, the new user and group are now available in your ownCloudinstallation.
Depending on your installation, you will either see these changes immediately or youwill have to wait for the user sync to be done. This happens ever 10 minutes bydefault.
The ownCloud X Appliance Enterprise Trial
The appliance contains the community edition of ownCloud but can be easily upgradedto the enterprise edition. This upgrade gives you access to a free, 30-day trial of theenterprise edition and all it’s features. All you need is an email address to get started.Here are the necessary steps:
• Visit https://marketplace.owncloud.com/enterprise-trial• Enter your email address and chose a password• Click on "Complete Process"• Check your email and activate your account• Log in with your credentials at https://marketplace.owncloud.com• Copy the API key
Now you have to go to your ownCloud installation and enable the Market app
• To enable enterprise features Select "Add API Key" and paste your key• Start the Enterprise trial
If you don’t see the button to install the "Enterprise App Bundle" select"Clear cache" and refresh the page.
Now you have access to the full ownCloud enterprise experience.
Working on Documents in the ownCloud Appliance
Introduction
Creating and editing documents in ownCloud can be achieved with either Collabora orOnlyOffice. It’s your choice which one you prefer to use.
This guide covers the setup and update of the two office apps.
It is required to open the site with https and the fully qualified domainname. Add the IP address and the domain name of your appliance toyour /etc/hosts file, or have it added to your existing DNS server, if youdon’t want to use the Appliance as your DNS server.
498 | Appliance Configuration
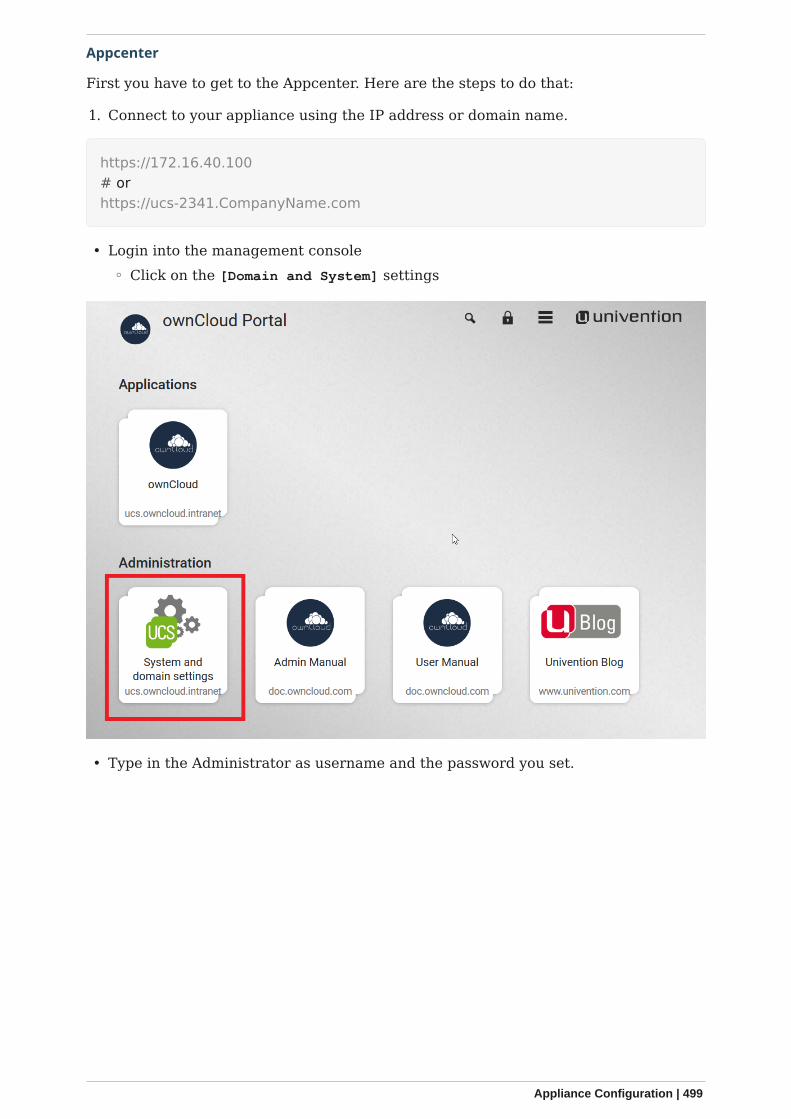
Appcenter
First you have to get to the Appcenter. Here are the steps to do that:
1. Connect to your appliance using the IP address or domain name.
https://172.16.40.100# orhttps://ucs-2341.CompanyName.com
• Login into the management console◦ Click on the [Domain and System] settings
• Type in the Administrator as username and the password you set.
Appliance Configuration | 499

• Now you can access the Appcenter".
From here on it’s your choice to install Collabora or OnlyOffice.
500 | Appliance Configuration

How to Install Collabora
• Install Collabora in UCS.
Appliance Configuration | 501
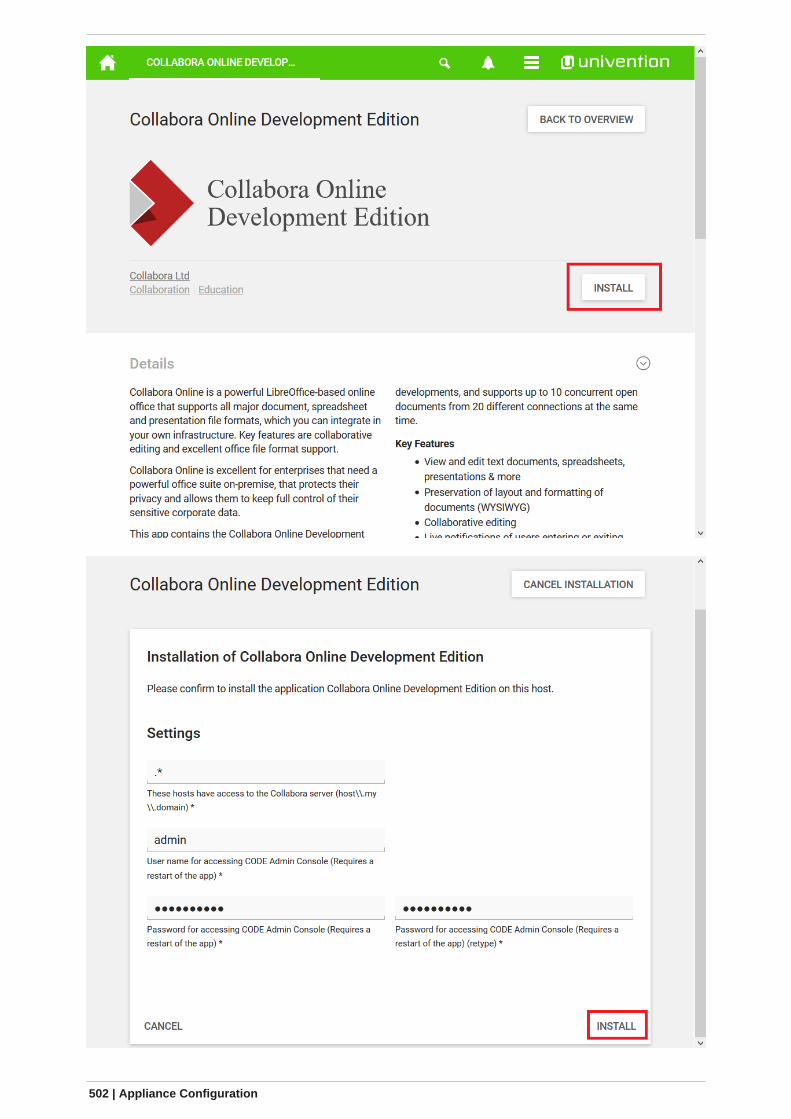
502 | Appliance Configuration
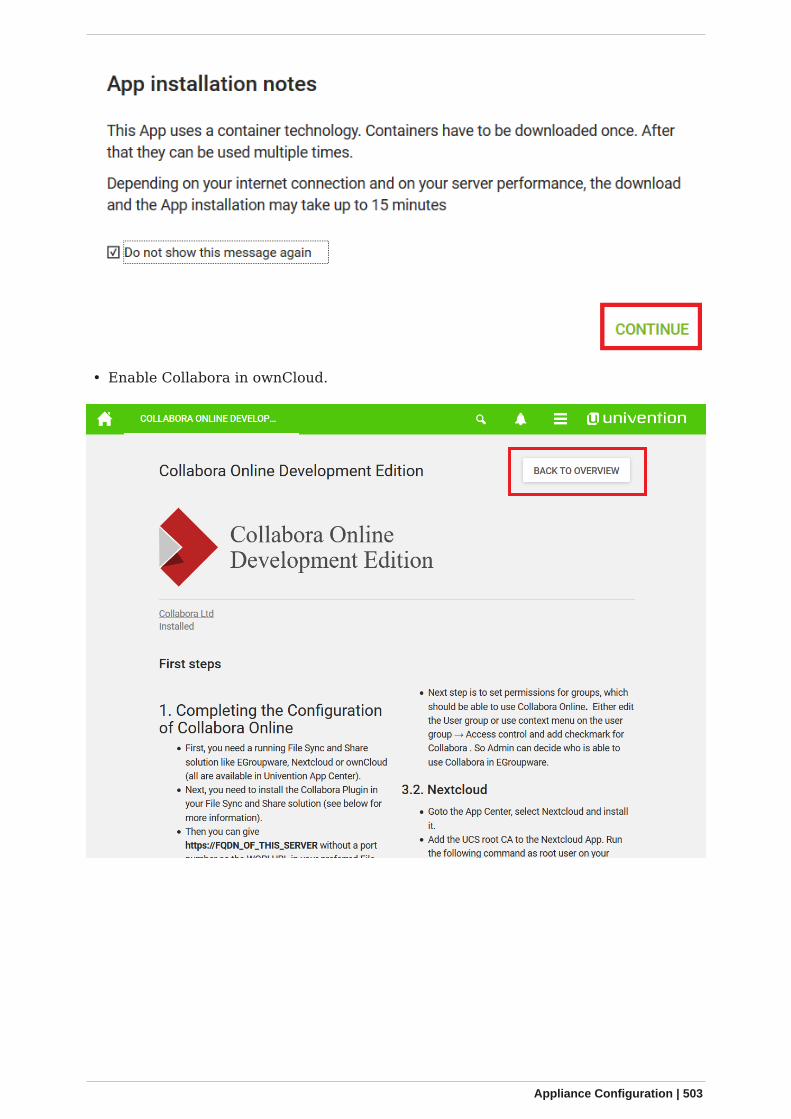
• Enable Collabora in ownCloud.
Appliance Configuration | 503

504 | Appliance Configuration
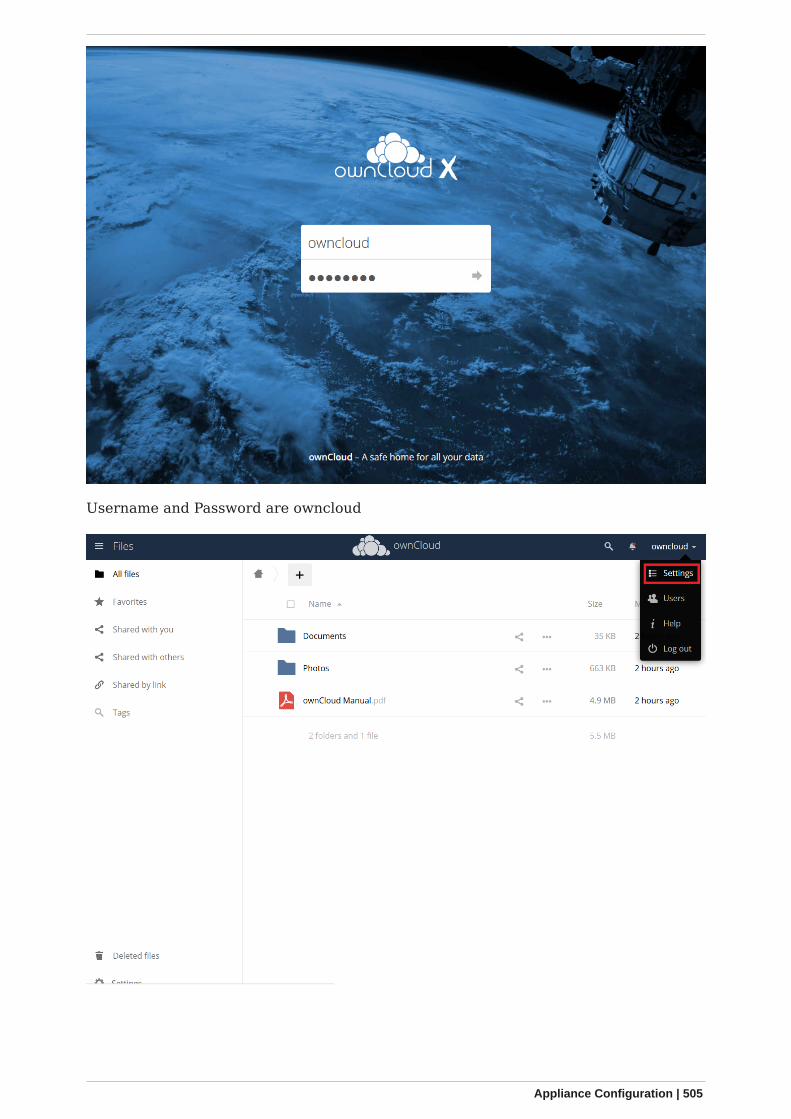
Username and Password are owncloud
Appliance Configuration | 505
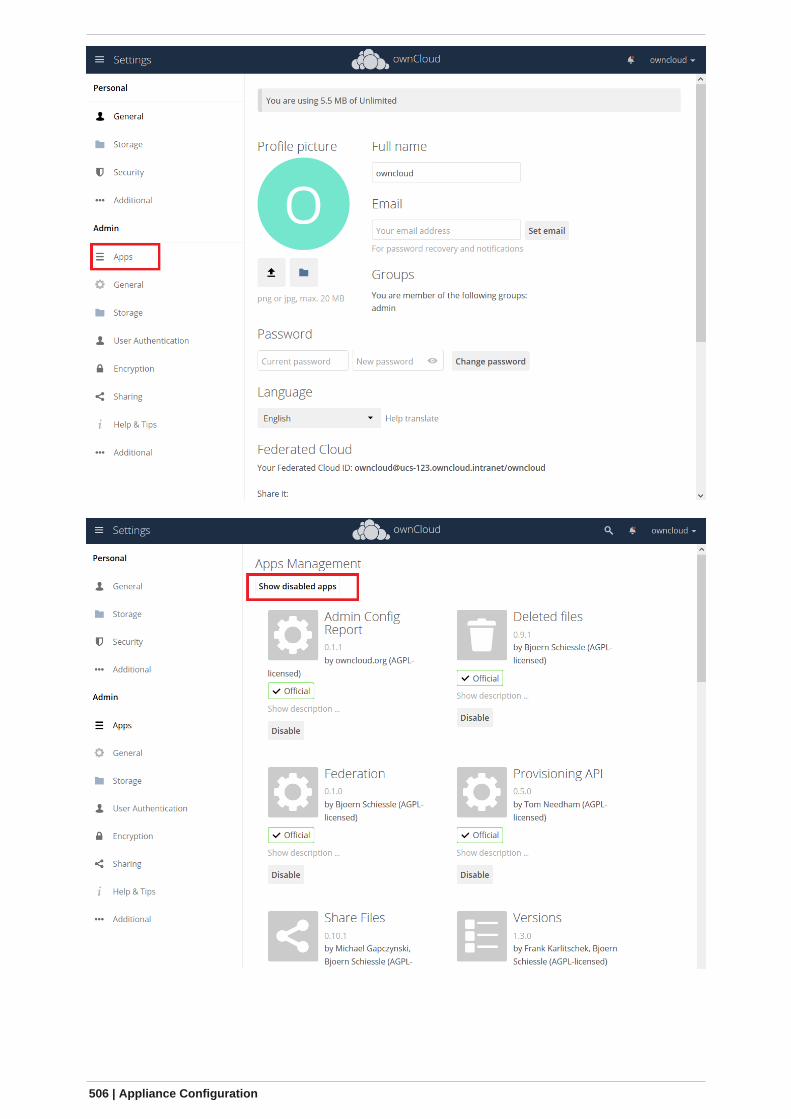
506 | Appliance Configuration
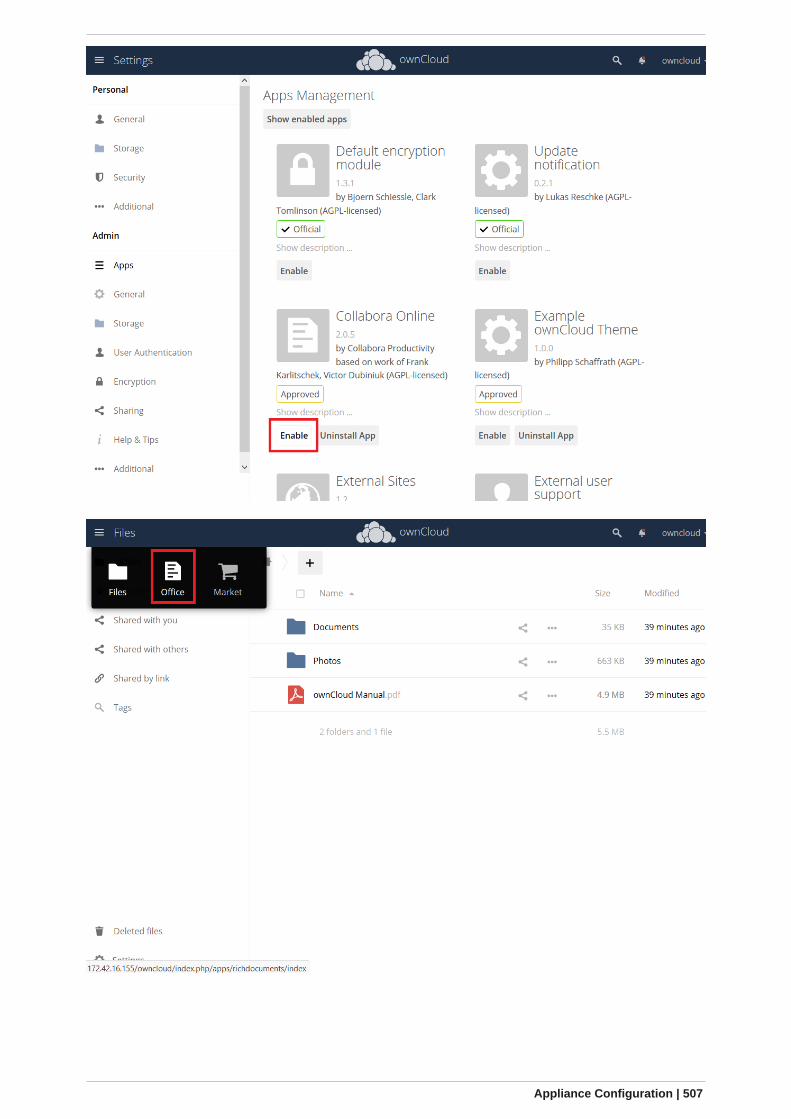
Appliance Configuration | 507
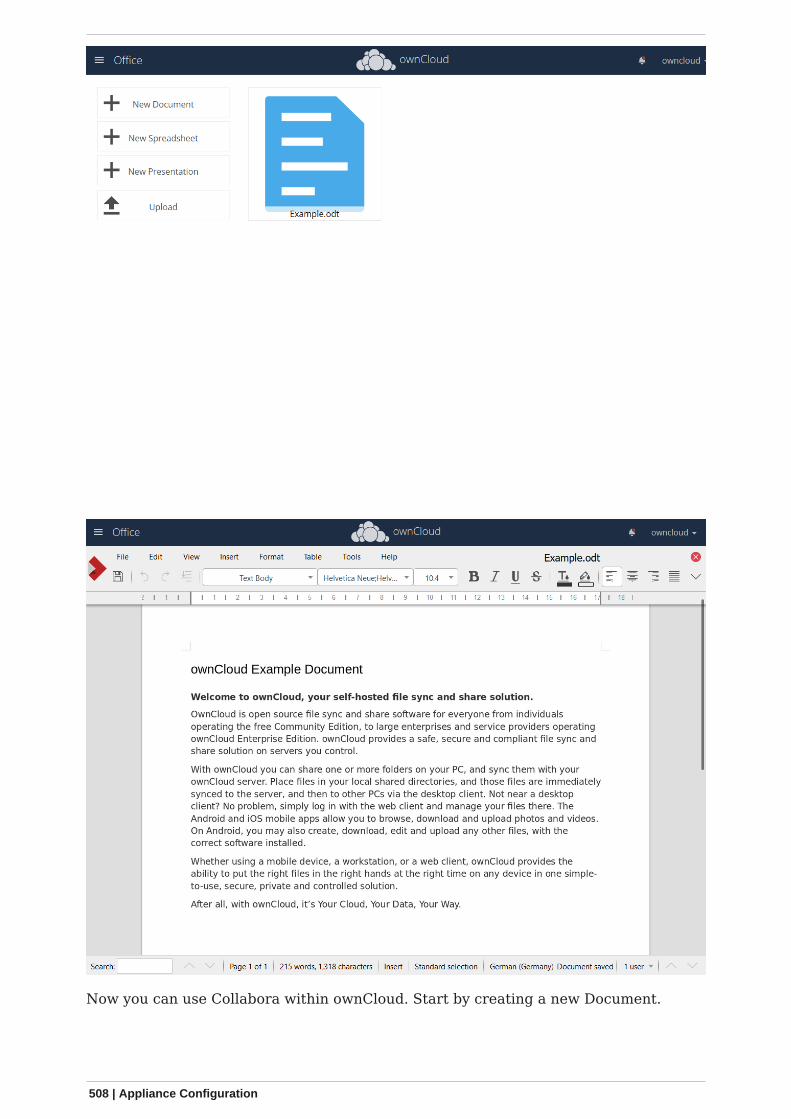
Now you can use Collabora within ownCloud. Start by creating a new Document.
508 | Appliance Configuration

How to Install OnlyOffice
• Search for "OnlyOffice" or select it from the application list in the Appcenter.
• Install OnlyOffice.
Appliance Configuration | 509

510 | Appliance Configuration

After the installation is complete, return to the Appcenter overview
• Install the ownCloud OnlyOffice connector App◦ Go to ownCloud
Appliance Configuration | 511
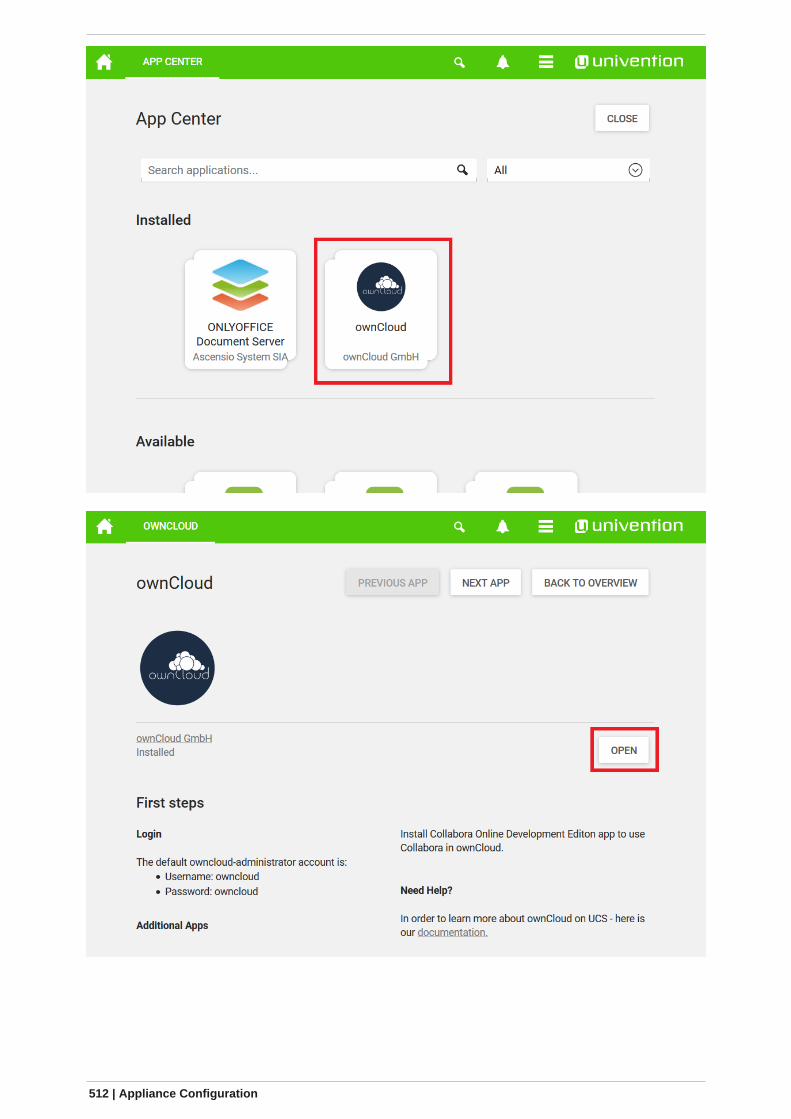
512 | Appliance Configuration
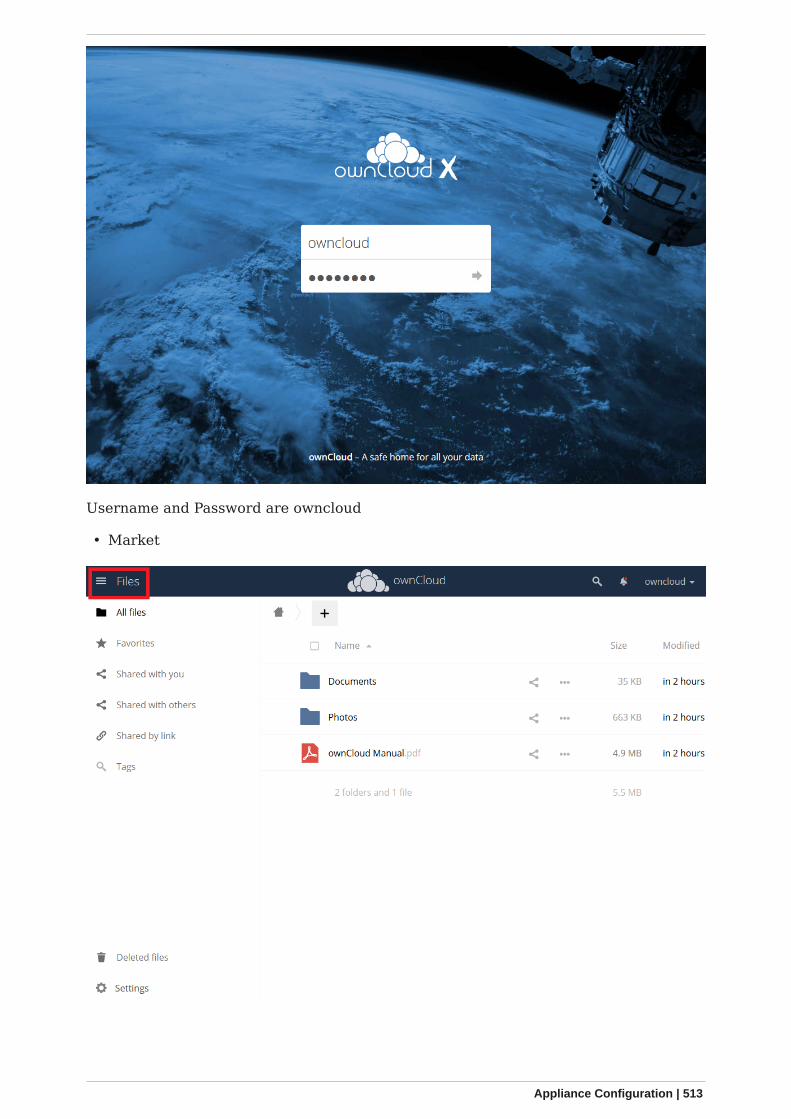
Username and Password are owncloud
• Market
Appliance Configuration | 513
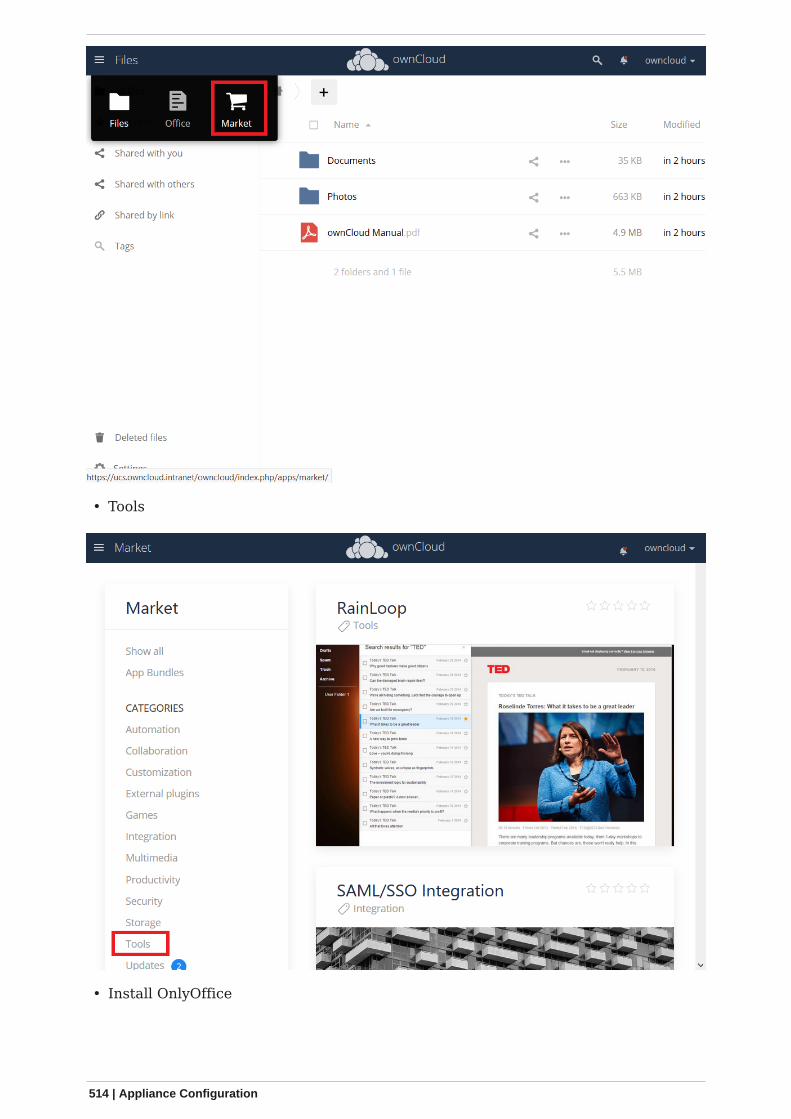
• Tools
• Install OnlyOffice
514 | Appliance Configuration
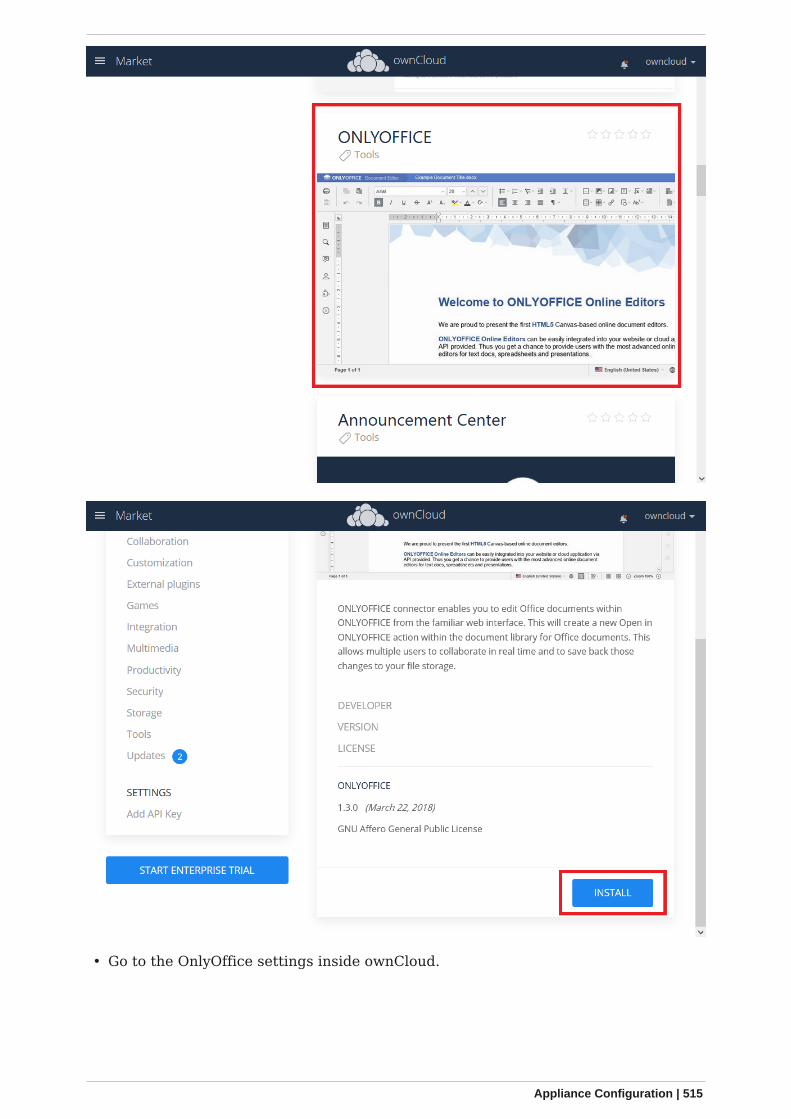
• Go to the OnlyOffice settings inside ownCloud.
Appliance Configuration | 515
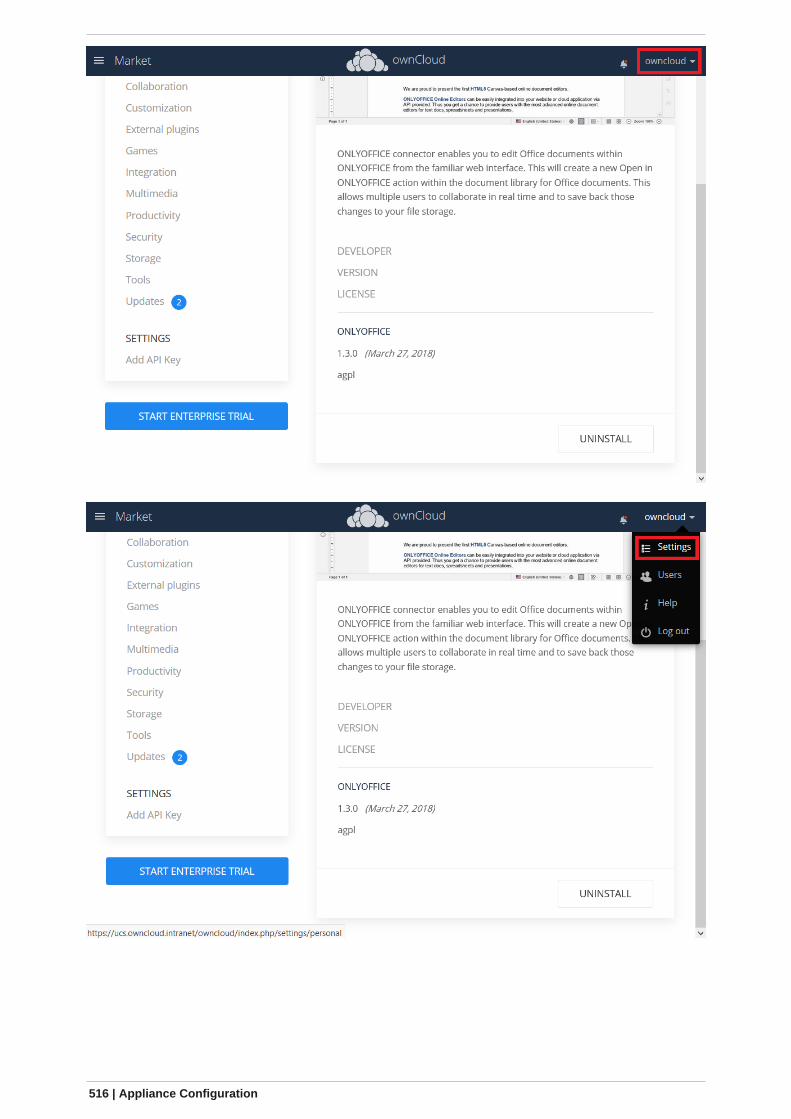
516 | Appliance Configuration
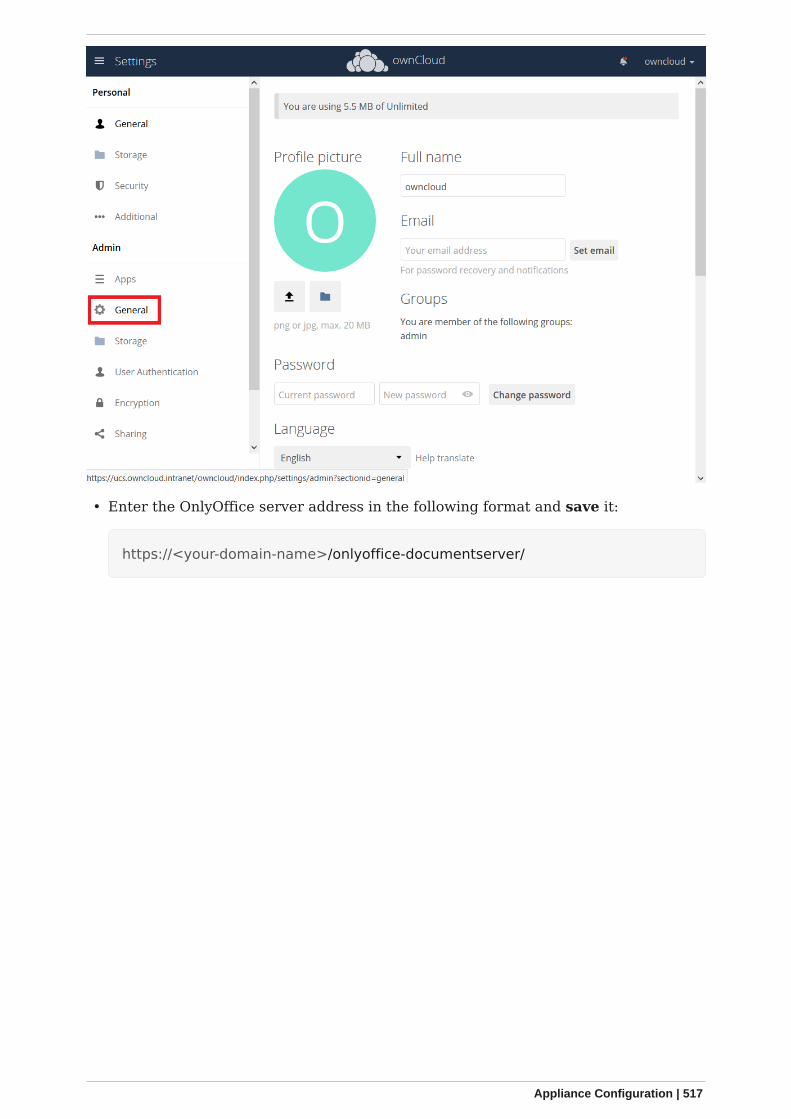
• Enter the OnlyOffice server address in the following format and save it:
https://<your-domain-name>/onlyoffice-documentserver/
Appliance Configuration | 517
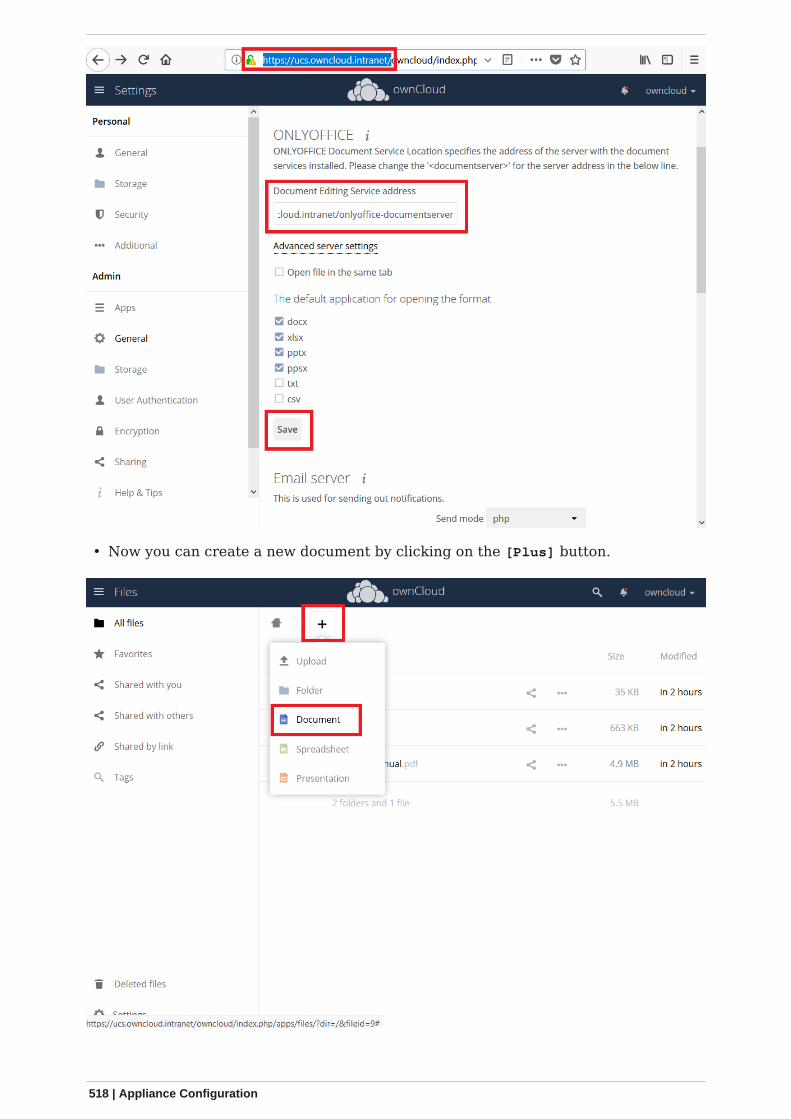
• Now you can create a new document by clicking on the [Plus] button.
518 | Appliance Configuration
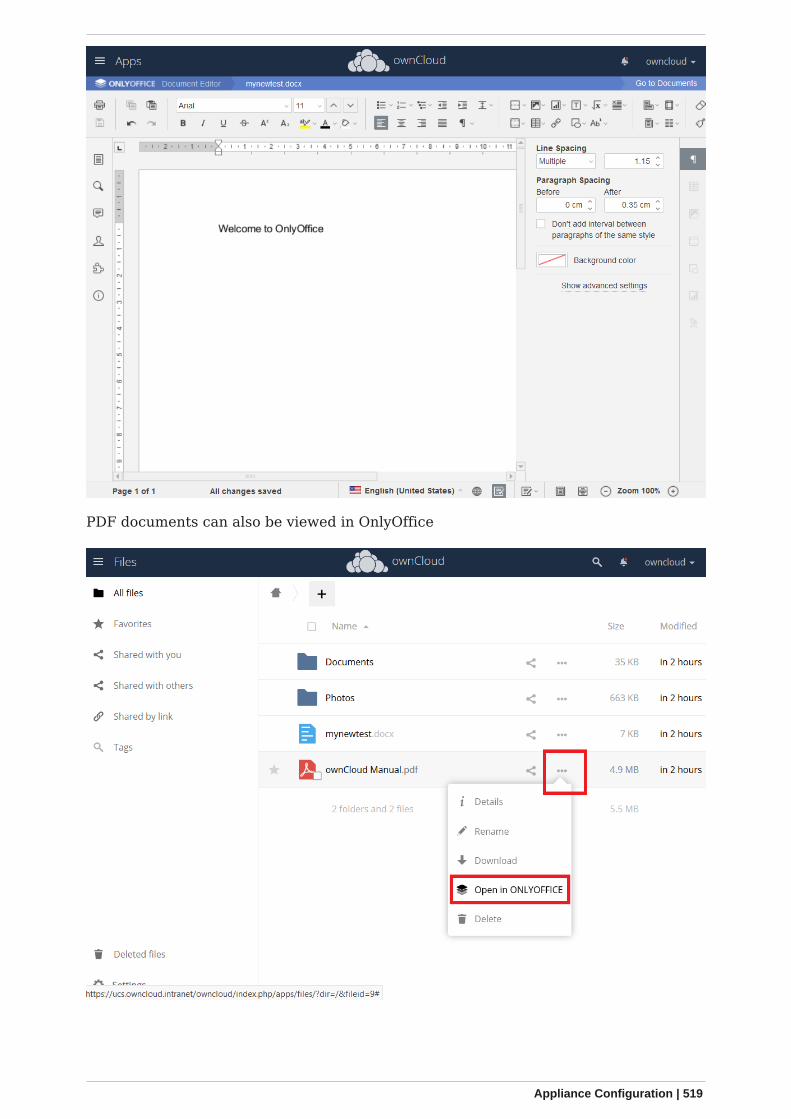
PDF documents can also be viewed in OnlyOffice
Appliance Configuration | 519
Updating
When a new App release is available you should update the Office App. Here are therequired steps:
• Select Software update• Check if an Update is available• Select on the App name• Upgrade the App
ONLYOFFICE Enterprise Edition
If you purchased the ONLYOFFICE Enterprise Edition and received the license.lic file,you need to import it:
/var/lib/univention-appcenter/apps/onlyoffice-ie/Data/license.lic
Now your ONLYOFFICE instance is registered and you have access to the enterprisefeatures.
Additional information can be found in the ONLYOFFICE Documentation
Troubleshooting
If you are not able to open documents: Check the defined Collabora Online Server inyour ownCloud settings by navigating to (Settings > Admin > Additional > Collabora-Online) and make sure that the server address is configured correctly. It should beconfigured with the domain name of your appliance. If you find localhost:port beingconfigured, remove it and replace it with the domain name of your appliance withoutany port.
WND in the Appliance
Introduction
Here are the steps to configure WND in the Appliance.
Windows Network Drive is available only in the Enterprise Edition ofownCloud.
You will need both of the following described steps for each share.
The steps need to be done in / on the docker host (appliance virtualmachine) and not inside the docker container
WND Listener
Create a service following the instructions below that checks the share for changes:
• For each WND mount point distinguished by a SERVER - SHARE pair,◦ place one copy of a file with following content under
/etc/systemd/system/owncloud-wnd-listen-SERVER-SHARE.service◦ replacing the all upper case words SERVER, SHARE, USER and PASSWORD◦ in both, the filename and in the contents below with their respective values.
Take care to also adjust the paths in WorkingDirectory and ExecStart according
520 | Appliance Configuration

to your installation.
[Unit]Description=ownCloud WND Listener for SERVER SHAREAfter=docker.serviceRequires=docker.service[Service]User=rootGroup=rootWorkingDirectory=/rootExecStart=/usr/bin/univention-app shell owncloud occ wnd:listen -vvv SERVERSHARE USER PASSWORDType=simpleStandardOutput=journalStandardError=journalSyslogIdentifier=%nKillMode=processRestartSec=1Restart=always[Install]WantedBy=multi-user.target
• Run once for each created file the following commands:
sudo systemctl enable owncloud-wnd-listen-SERVER-SHARE.servicesudo systemctl start owncloud-wnd-listen-SERVER-SHARE.service
WND Process Queue
Create or add a crontab file in /etc/cron.d/oc-wnd-process-queue.
• Make a crontab entry to run a script iterating over all SERVER SHARE pairs with anappropriate occ wnd:process-queue command. The commands must be strictlysequential. This can be done by using flock -n and tuning the -c parameter of occwnd:process-queue
0 */15 * * * root /usr/bin/univention-app shell owncloud occ wnd:process-queue-vvv SERVER SHARE
Further Reading
Please see also:
• The ownCloud forum and the• Windows Network Drive Configuration documentation.
Install Antivirus Software in the ownCloud Appliance
Appliance Configuration | 521
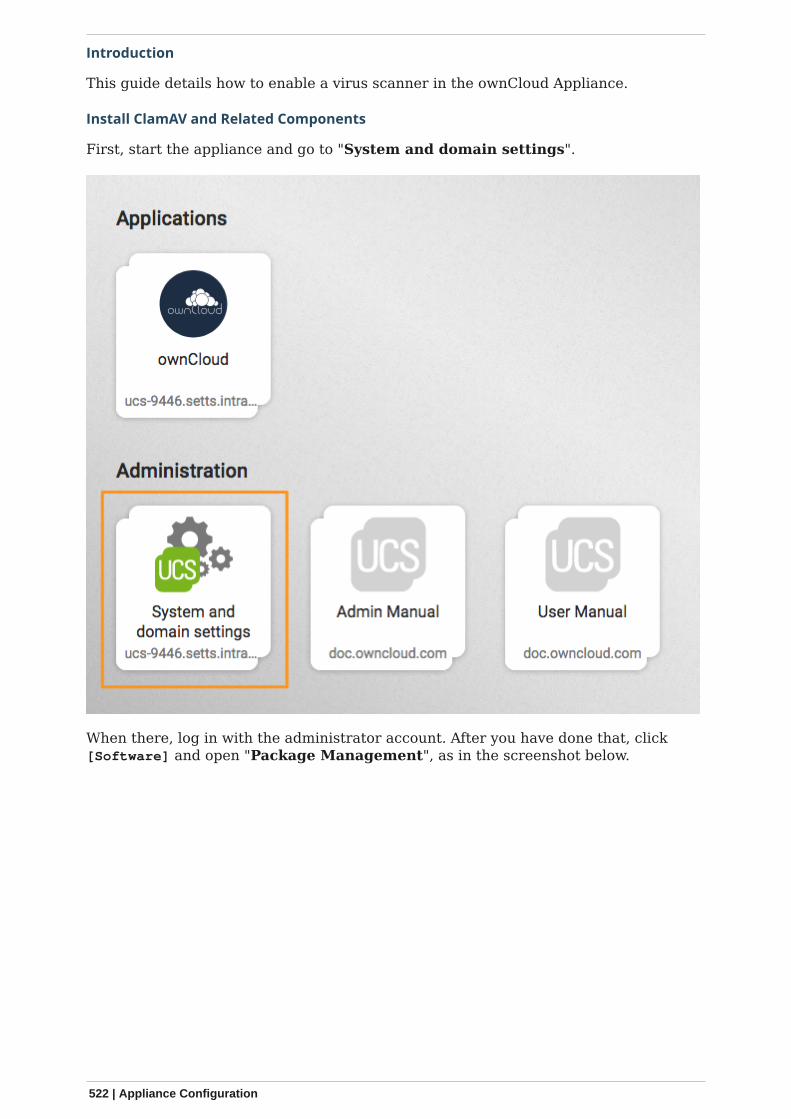
Introduction
This guide details how to enable a virus scanner in the ownCloud Appliance.
Install ClamAV and Related Components
First, start the appliance and go to "System and domain settings".
When there, log in with the administrator account. After you have done that, click[Software] and open "Package Management", as in the screenshot below.
522 | Appliance Configuration

From there, you first need to install ClamAV. To do this, in the third field, next to theone containing the text "Package name", type in the phrase: "clamav" (1). Doing sofilters the list of packages to only those matching that phrase. In the filtered list ofpackages, check the checkboxes next to "clamav" (2), "clamav-freshclam", and"clamav-daemon".
After doing that, click [INSTALL] (3) above the listed packages, next to "SHOWDETAILS'".
After you do so, a confirmation dialog appears, as in the screenshot below, asking forconfirmation to install the packages. Confirm the choice by again clicking [INSTALL].
The installation should only take a few minutes.
Appliance Configuration | 523
Configure ownCloud to Use ClamAV
Start the ClamAV service:
systemctl enable clamav-daemon.servicesystemctl start clamav-daemon.service
Next you need to configure ClamAV in your ownCloud instance. Please refer to theClamAV documentation for instructions on how to do that.
Troubleshooting
"" If you try to update the ClamAV virus database manually, by entering freshclam, andsee the error below, it means that freshclam is already updating the database. ""
ERROR: /var/log/clamav/freshclam.log is locked by another processERROR: Problem with internal logger (UpdateLogFile =/var/log/clamav/freshclam.log).
Updates are run based on the configured time interval in the applicable Cron job. Inthe example below, the update would run every 47 minutes:
# m h dom mon dow command47 * * * * /usr/bin/freshclam --quiet
If there are errors running the freshclam process, check if a process is blocking thelog file, by running the following command:
lsof /var/log/clamav/freshclam.log
If you want to refresh the ClamAV database manually, follow these steps:
# Gently end the freshclam process with this command:sudo pkill -15 -x freshclam
# Start the refresh process again with this command:sudo freshclam
When the app is enabled — but is not configured or has an incorrectconfiguration — it will reject all uploads for the entire instance. Toavoid this situation, make sure the ClamAV service is running and youhave the execution mode correctly configured in ownCloud.
Configure index.php-less URLs
Introduction
If you want URLs without the trailing "index.php", e.g., https://example.com/apps/files/instead of https://example.com/index.php/apps/files/, you can enable it by followingthese steps:
524 | Appliance Configuration
Prerequisites:
Log in to the Docker container running ownCloud, and execute the following commandon the host system of the appliance:
univention-app shell owncloud
Your web server needs to have the following modules enabled: mod_rewrite andmod_env. If you have not yet enabled these modules, or are not sure if you have,execute these commands:
a2enmod env rewrite
You need an owncloud.conf in your /etc/apache2/sites-available/ directory.
Open /etc/apache2/sites-available/owncloud.conf in nano, Vim, or your editor of choice,and paste the following:
Alias /owncloud "/var/www/owncloud/"
<Directory /var/www/owncloud/> Options +FollowSymlinks AllowOverride All
<IfModule mod_dav.c> Dav off </IfModule>
SetEnv HOME /var/www/owncloud SetEnv HTTP_HOME /var/www/owncloud
</Directory>
Then create a symlink to /etc/apache2/sites-enabled, as follows:
ln -s /etc/apache2/sites-available/owncloud.conf /etc/apache2/sites-enabled/owncloud.conf
Enable index.php-less URLs
Adjust your config.php to look like the following:
'overwrite.cli.url' => 'https://example.com/owncloud','htaccess.RewriteBase' => '/owncloud',
Execute the command:
occ maintenance:update:htaccess
Appliance Configuration | 525
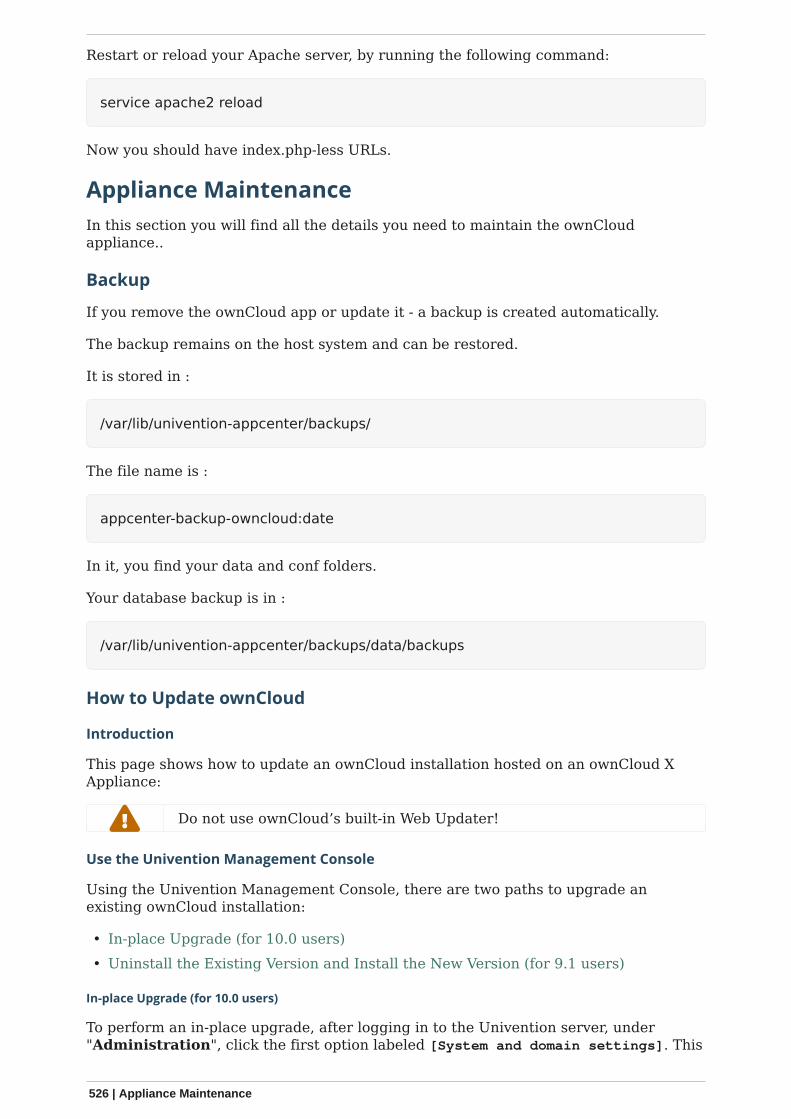
Restart or reload your Apache server, by running the following command:
service apache2 reload
Now you should have index.php-less URLs.
Appliance Maintenance
In this section you will find all the details you need to maintain the ownCloudappliance..
Backup
If you remove the ownCloud app or update it - a backup is created automatically.
The backup remains on the host system and can be restored.
It is stored in :
/var/lib/univention-appcenter/backups/
The file name is :
appcenter-backup-owncloud:date
In it, you find your data and conf folders.
Your database backup is in :
/var/lib/univention-appcenter/backups/data/backups
How to Update ownCloud
Introduction
This page shows how to update an ownCloud installation hosted on an ownCloud XAppliance:
Do not use ownCloud’s built-in Web Updater!
Use the Univention Management Console
Using the Univention Management Console, there are two paths to upgrade anexisting ownCloud installation:
• In-place Upgrade (for 10.0 users)• Uninstall the Existing Version and Install the New Version (for 9.1 users)
In-place Upgrade (for 10.0 users)
To perform an in-place upgrade, after logging in to the Univention server, under"Administration", click the first option labeled [System and domain settings]. This
526 | Appliance Maintenance

takes you to the Univention Management Console. From there, click the [Software]shortcut (1), and then click [Software update] (2).
This will load the Software update management panel, after a short time scanning foravailable updates. If an update is available, under "App Center updates" you will see"There are App Center updates available". If one is, as in the image below, click[ownCloud] which takes you to the ownCloud application.
When there, part-way down the page you’ll see the "Manage local installation"section. Under there, click [UPGRADE].
Before the upgrade starts, a prompt appears titled "App Installation notes". This isnothing to be concerned about. So check the checkbox [Do not show this message
Appliance Maintenance | 527
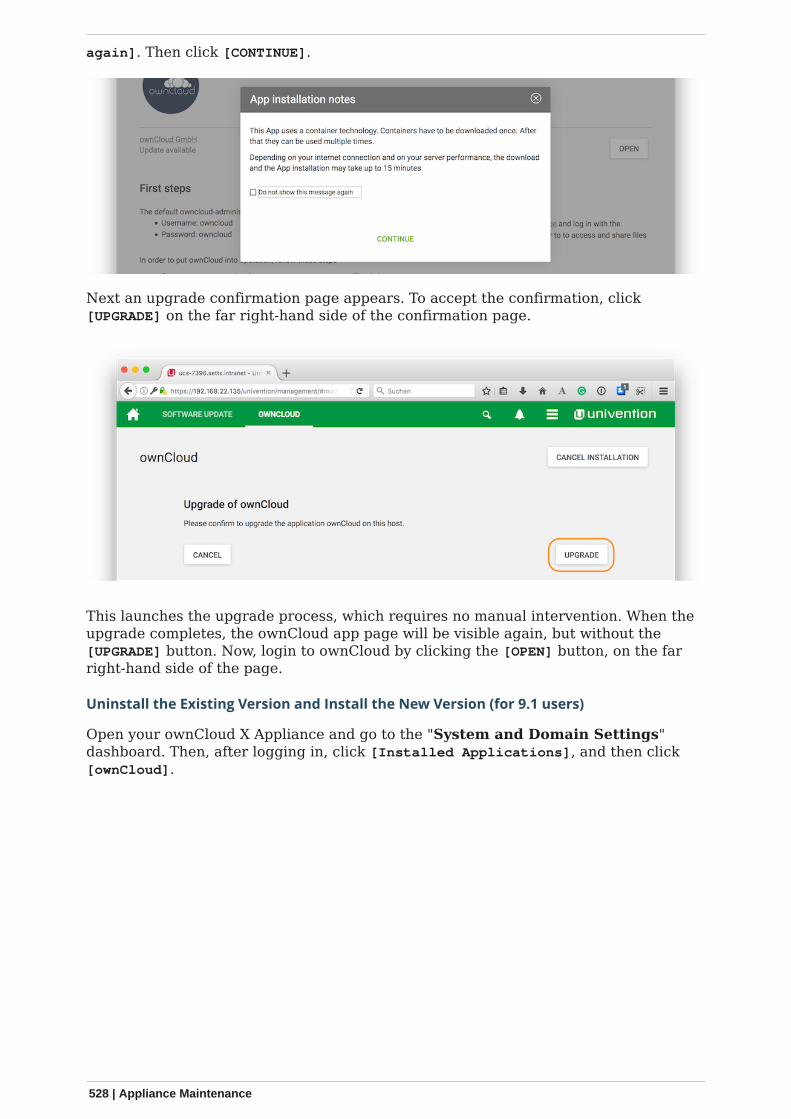
again]. Then click [CONTINUE].
Next an upgrade confirmation page appears. To accept the confirmation, click[UPGRADE] on the far right-hand side of the confirmation page.
This launches the upgrade process, which requires no manual intervention. When theupgrade completes, the ownCloud app page will be visible again, but without the[UPGRADE] button. Now, login to ownCloud by clicking the [OPEN] button, on the farright-hand side of the page.
Uninstall the Existing Version and Install the New Version (for 9.1 users)
Open your ownCloud X Appliance and go to the "System and Domain Settings"dashboard. Then, after logging in, click [Installed Applications], and then click[ownCloud].
528 | Appliance Maintenance
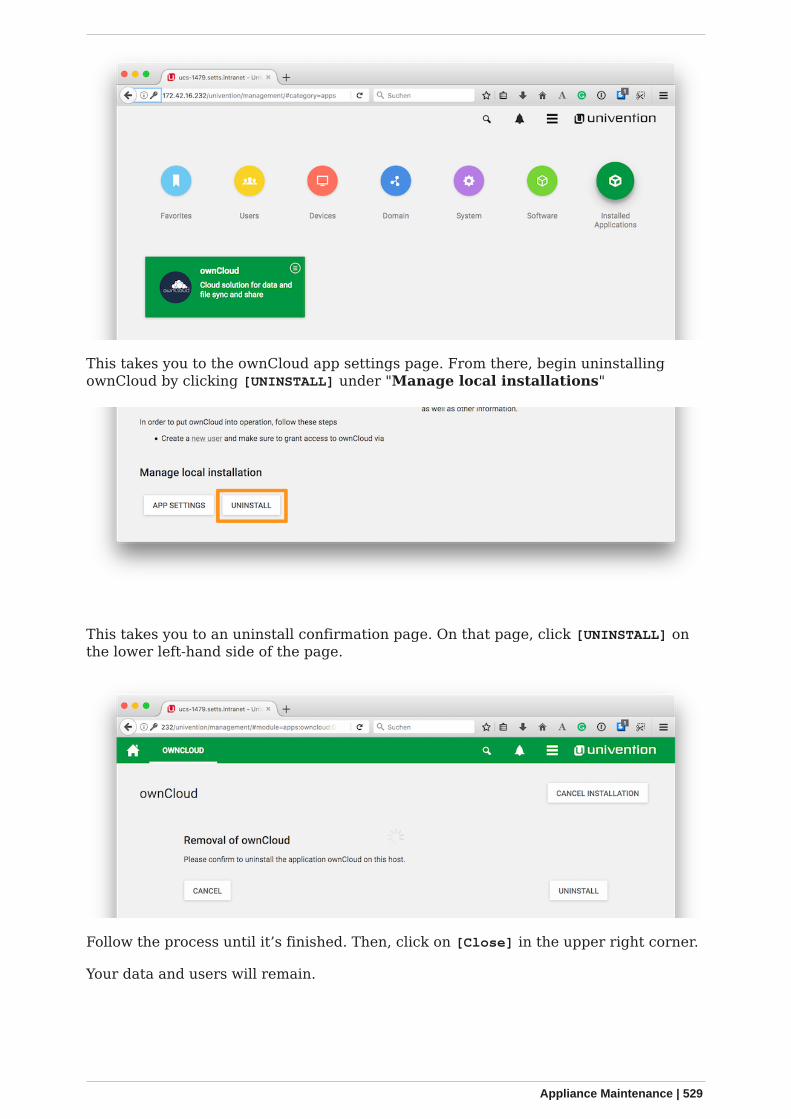
This takes you to the ownCloud app settings page. From there, begin uninstallingownCloud by clicking [UNINSTALL] under "Manage local installations"
This takes you to an uninstall confirmation page. On that page, click [UNINSTALL] onthe lower left-hand side of the page.
Follow the process until it’s finished. Then, click on [Close] in the upper right corner.
Your data and users will remain.
Appliance Maintenance | 529

Following that, go to "Software - Appcenter", and search for ownCloud. At themoment, two matching results will be returned. Pick the one that does not contain aversion number.
To confirm the version number, scroll to the bottom of the page, and in the Moreinformation section, look for the version string, next to Installed version, as in thescreenshot below.
If it is the right version, click [INSTALL]. Then the License Agreement is displayed. Ifyou agree to it, click [ACCEPT LICENSE]. This will display an installation confirmationscreen. To confirm the installation, click [INSTALL].
530 | Appliance Maintenance
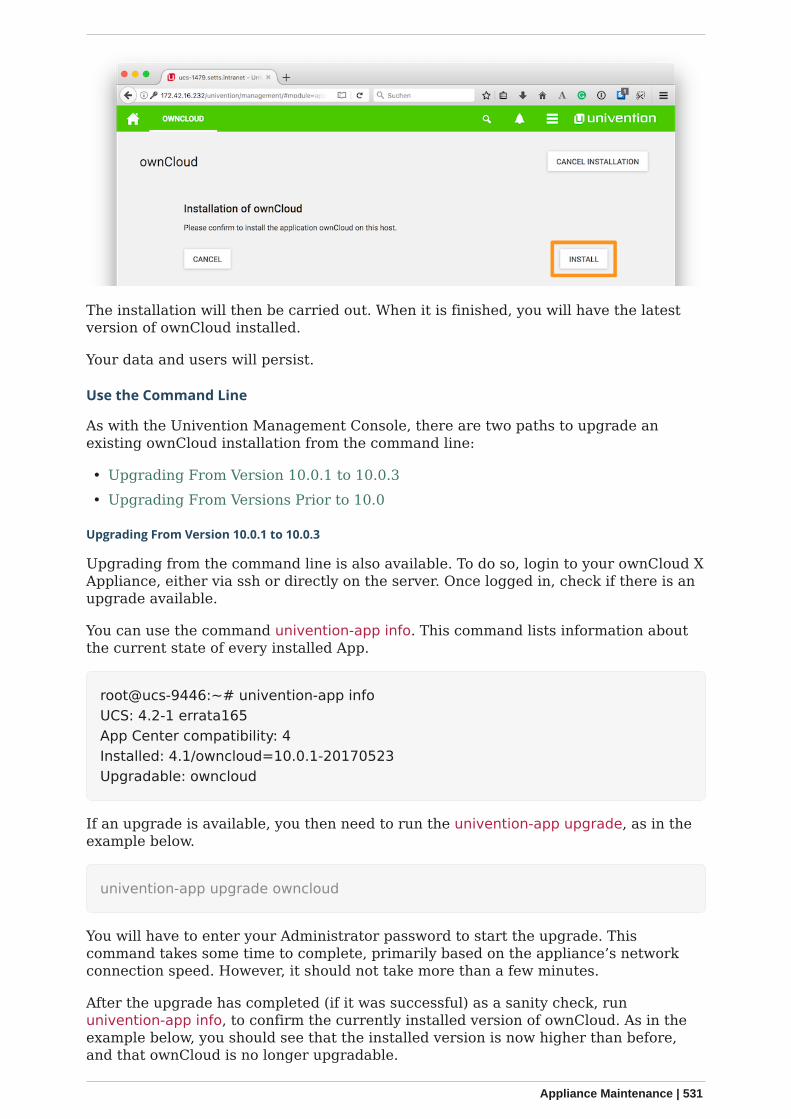
The installation will then be carried out. When it is finished, you will have the latestversion of ownCloud installed.
Your data and users will persist.
Use the Command Line
As with the Univention Management Console, there are two paths to upgrade anexisting ownCloud installation from the command line:
• Upgrading From Version 10.0.1 to 10.0.3• Upgrading From Versions Prior to 10.0
Upgrading From Version 10.0.1 to 10.0.3
Upgrading from the command line is also available. To do so, login to your ownCloud XAppliance, either via ssh or directly on the server. Once logged in, check if there is anupgrade available.
You can use the command univention-app info. This command lists information aboutthe current state of every installed App.
root@ucs-9446:~# univention-app infoUCS: 4.2-1 errata165App Center compatibility: 4Installed: 4.1/owncloud=10.0.1-20170523Upgradable: owncloud
If an upgrade is available, you then need to run the univention-app upgrade, as in theexample below.
univention-app upgrade owncloud
You will have to enter your Administrator password to start the upgrade. Thiscommand takes some time to complete, primarily based on the appliance’s networkconnection speed. However, it should not take more than a few minutes.
After the upgrade has completed (if it was successful) as a sanity check, rununivention-app info, to confirm the currently installed version of ownCloud. As in theexample below, you should see that the installed version is now higher than before,and that ownCloud is no longer upgradable.
Appliance Maintenance | 531
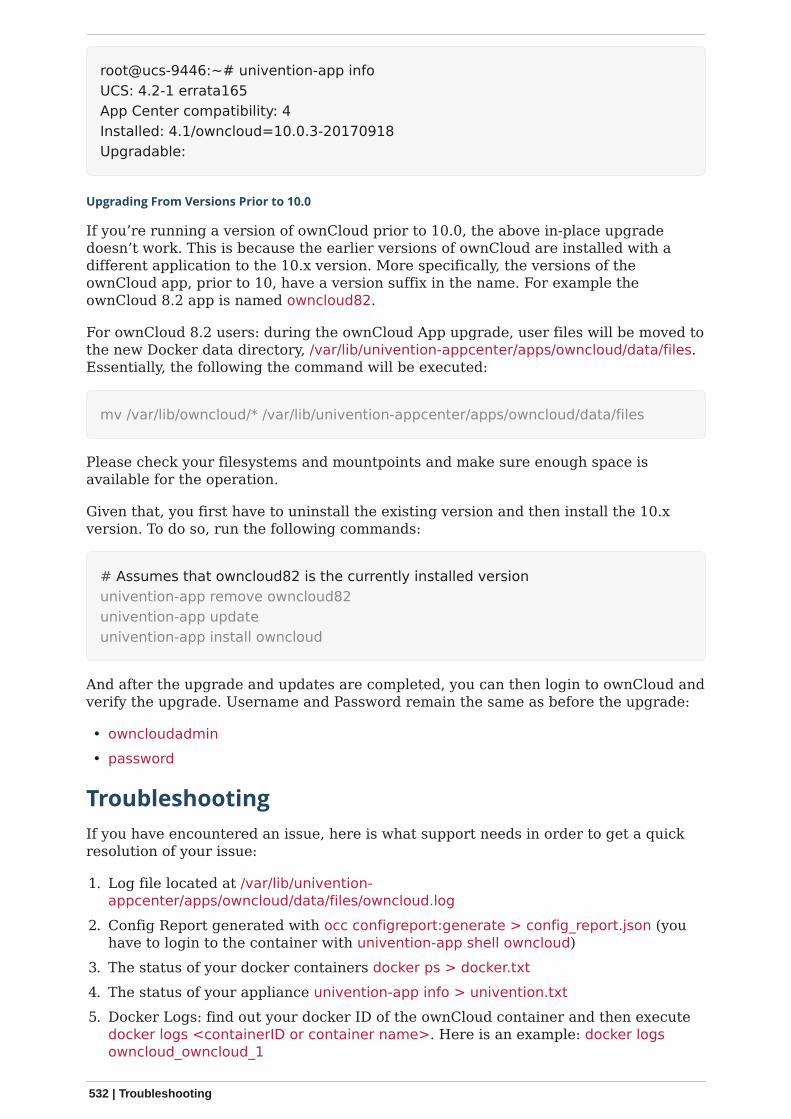
root@ucs-9446:~# univention-app infoUCS: 4.2-1 errata165App Center compatibility: 4Installed: 4.1/owncloud=10.0.3-20170918Upgradable:
Upgrading From Versions Prior to 10.0
If you’re running a version of ownCloud prior to 10.0, the above in-place upgradedoesn’t work. This is because the earlier versions of ownCloud are installed with adifferent application to the 10.x version. More specifically, the versions of theownCloud app, prior to 10, have a version suffix in the name. For example theownCloud 8.2 app is named owncloud82.
For ownCloud 8.2 users: during the ownCloud App upgrade, user files will be moved tothe new Docker data directory, /var/lib/univention-appcenter/apps/owncloud/data/files.Essentially, the following the command will be executed:
mv /var/lib/owncloud/* /var/lib/univention-appcenter/apps/owncloud/data/files
Please check your filesystems and mountpoints and make sure enough space isavailable for the operation.
Given that, you first have to uninstall the existing version and then install the 10.xversion. To do so, run the following commands:
# Assumes that owncloud82 is the currently installed versionunivention-app remove owncloud82univention-app updateunivention-app install owncloud
And after the upgrade and updates are completed, you can then login to ownCloud andverify the upgrade. Username and Password remain the same as before the upgrade:
• owncloudadmin• password
Troubleshooting
If you have encountered an issue, here is what support needs in order to get a quickresolution of your issue:
1. Log file located at /var/lib/univention-appcenter/apps/owncloud/data/files/owncloud.log
2. Config Report generated with occ configreport:generate > config_report.json (youhave to login to the container with univention-app shell owncloud)
3. The status of your docker containers docker ps > docker.txt4. The status of your appliance univention-app info > univention.txt5. Docker Logs: find out your docker ID of the ownCloud container and then execute
docker logs <containerID or container name>. Here is an example: docker logsowncloud_owncloud_1
532 | Troubleshooting
Restore a snapshot to get your appliance to a functional state again.
Troubleshooting | 533
Enterprise EditionIn this section, you will find all the information you need for managing ownCloudEnterprise Edition.
Enterprise Clients
In this section you will find all the details you need to configure ownCloud enterpriseclients.
Creating Branded Client Apps
Overview
ownBrander is an ownCloud build service that is exclusive to Enterprise customers forcreating branded Android and iOS ownCloud sync apps, and branded ownClouddesktop sync clients. You build your apps with the ownBrander app on yourCustomer.owncloud.com account, and within 24-48 hours the completed, customizedapps are loaded into your account. You must supply your own artwork, and you’ll findall the specifications and required elements in ownBrander.
Building a Branded Desktop Sync Client
See Building Branded ownCloud Clients for instructions on building your own brandeddesktop sync client, and for setting up an automatic update service.
Your users may run both a branded and un-branded desktop sync client side-by-side.Both clients run independently of each other, and do not share account information orfiles.
Building a Branded iOS App
Building and distributing your branded iOS ownCloud app involves a large number ofinterdependent steps. The process is detailed in the Building Branded ownCloudClients manual. Follow these instructions exactly and in order, and you will have a nicebranded iOS app that you can distribute to your users.
Building a Branded Android App
Building and distributing your branded Android ownCloud app is fairly simple, and theprocess is detailed in Building Branded ownCloud Clients.
Custom Client Download Repositories
See Custom Client Download Repositories to learn how to test and configure customdownload repository URLs for your branded clients.
Enterprise Collaboration
In this section you will find all the details you need to configure enterprisecollaboration in ownCloud.
Secure View
534 | Enterprise Clients
Introduction
Collabora Online allows you to work with all kinds of Collabora office documentsdirectly in your browser. This application can connect to a Collabora Online (or other)server (WOPI-like client) where ownCloud is the WOPI host.
When Collabora Online is properly setup and integrated into ownCloud Server, SecureView functionality is available. Secure View is a mode where users can placelimitations on files and folders that are shared.
These limitations include:
• No copying• No downloading• No editing• Watermarking• Optional printing and exporting to PDF with watermarks included, which can be
adjusted
Documents never leave the server when shared with Secure View.
Collabora Online Server opens them and streams the files to the user’sbrowser with watermark applied (much like a video stream).Consequently, there’s no way to extract the original document from thebrowser.
Secure View is enforced on a received share if at least 1 share hasSecure View enabled
If a file or folder has been shared multiple times to different groupswith different permissions, Secure View will be enforced if at least 1received share has Secure View enabled as a result of membership inthe group. This restriction propagates to any reshares.
Prerequisites
• ownCloud 10.3 or above• Enterprise Edition• ownCloud Collabora Online app Version 2.2.0 or above• Collabora Online Server 4.0.10 or above, set up and integrated
This functionality does not work with Public Links.
Configure ownCloud for Collabora Online / Secure View
To configure ownCloud for the use with Collabora, you need to setup a WOPI serverand configure ownCloud to connect with this server.
How to Enable Secure View
To enable Secure View, navigate to Settings › Admin › Additional (Admin) ›Collabora Online. At the bottom of the Collabora Online section, enable [EnableSecure View].
Once enabled, default share permissions for all users can, optionally, be enabled.Currently, these default share permissions are:
Enterprise Collaboration | 535
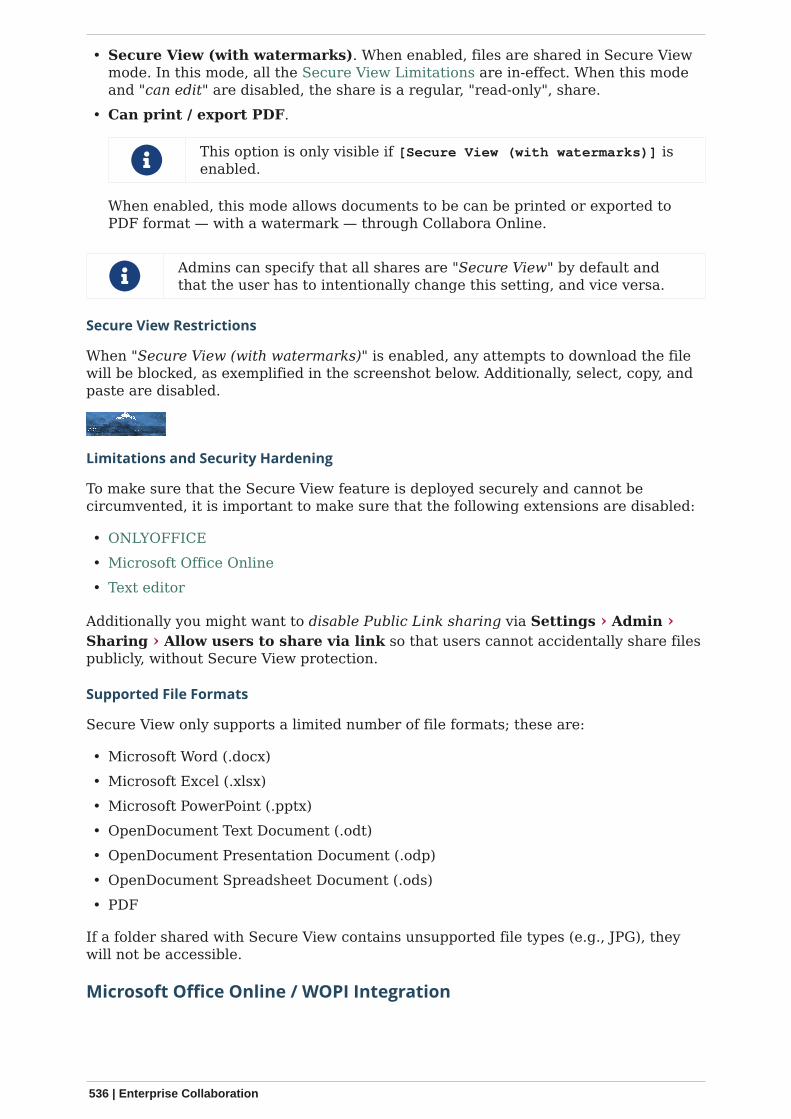
• Secure View (with watermarks). When enabled, files are shared in Secure Viewmode. In this mode, all the Secure View Limitations are in-effect. When this modeand "can edit" are disabled, the share is a regular, "read-only", share.
• Can print / export PDF.
This option is only visible if [Secure View (with watermarks)] isenabled.
When enabled, this mode allows documents to be can be printed or exported toPDF format — with a watermark — through Collabora Online.
Admins can specify that all shares are "Secure View" by default andthat the user has to intentionally change this setting, and vice versa.
Secure View Restrictions
When "Secure View (with watermarks)" is enabled, any attempts to download the filewill be blocked, as exemplified in the screenshot below. Additionally, select, copy, andpaste are disabled.
Limitations and Security Hardening
To make sure that the Secure View feature is deployed securely and cannot becircumvented, it is important to make sure that the following extensions are disabled:
• ONLYOFFICE• Microsoft Office Online• Text editor
Additionally you might want to disable Public Link sharing via Settings › Admin ›Sharing › Allow users to share via link so that users cannot accidentally share filespublicly, without Secure View protection.
Supported File Formats
Secure View only supports a limited number of file formats; these are:
• Microsoft Word (.docx)• Microsoft Excel (.xlsx)• Microsoft PowerPoint (.pptx)• OpenDocument Text Document (.odt)• OpenDocument Presentation Document (.odp)• OpenDocument Spreadsheet Document (.ods)• PDF
If a folder shared with Secure View contains unsupported file types (e.g., JPG), theywill not be accessible.
Microsoft Office Online / WOPI Integration
536 | Enterprise Collaboration
About
The WOPI (Web Application Open Platform Interface) app, which is bundled withownCloud Enterprise Edition, is the connector between ownCloud server andMicrosoft Office Online Server.
It allows Microsoft Office Online users to collaboratively work with Office documentsin ownCloud in the browser, by connecting ownCloud with your Microsoft OfficeOnline Server via the WOPI protocol. To use it, you need to have a running MicrosoftOffice Online Server in your data center.
Please bear in mind:
• WOPI is only available for ownCloud enterprise. It is not available inthe community version.
• Out-of-the box only the on-premise version of Microsoft Office OnlineServer is supported.
• This app requires at minimum ownCloud Version 10.1 and php 7.1.
If you want to integrate the Office 365 (cloud) version of MicrosoftOffice Online, you need to get in touch with us.
Preparing the Environment
You need an Office Online Server installed.
All involved servers (OfficeOnline Server and the ownCloud server) need to beaccessible by HTTPS with valid certificates.
Configuring the WOPI App in ownCloud
To configure the WOPI app in your ownCloud installation, add the followingconfiguration to config/config.php, and adjust it based on the details of your setup:
'wopi.token.key' => 'replace-with-your-own-random-string','wopi.office-online.server' => 'https://your.office.online.server.tld',
Restrict Usage to Users in a Specific Group
Microsoft Office Online access can be restricted to users in a specific group, by use ofthe wopi_group configuration key (in config/config.php), as in the following example.
'wopi_group' => 'admin'
In the example above, only users in the admin group would be able to access MicrosoftOffice Online.
If the key is not defined, then all users have access to this MicrosoftOffice Online service connected via WOPI.
Locking the Document
If you open a document with Microsoft Office Online in ownCloud, it makes use of theWebDAV file locking functionality available in ownCloud server. The idea is to lock thefile so other users with access can’t make changes to the document while you’re
Enterprise Collaboration | 537
editing it.
In other words, the feature ensures that you are the "master editor". Your changes willalways be the "master state". Other users can make changes, e.g., with the desktopclient, but those will create conflict files for them, which can be resolved afterward.When you close the document, Microsoft Office Online unlocks the file so others canedit it.
You can always click on the lock icon next to your file name and unlock it manuallyusing the button in the sidebar.
Lock Timeout
If a user is editing a file and loses their internet connection, the lock will timeout,freeing the lock after 30 minutes. Refer to the WOPI documentation for furtherinformation.
Known Issues
Document Locks Are Not Released When Using Google Chrome
When editing a document with Google Chrome (and Chromium) via ownCloud inMicrosoft Office Online, the document lock is not released when the document isclosed. The document lock is only released after the 30-minute timeout or a manuallock release. To mitigate the issue, try to remember to manually unlock the documentbefore closing it.
More information about this issue is available in the following links:
• The file is locked for shared use• The file is locked when using Office Online within SharePoint Online
Troubleshooting
Checklist if something is not working:
1. Client can reach the ownCloud Server (browse to web page and log in)2. Client can reach the Office Online Server (via hosting/discovery url with https)3. ownCloud Server can reach the Office Online Server (via hosting/discovery url
with https)4. Office Online Server can reach ownCloud Server (browse to web page and log
in)
Make sure TLS 1.2 is being used:
• Enable TLS 1.2 Support in Chrome• Enable TLS 1.2 Support in Microsoft Office Online Server
External Storage
In this section you will find all the details you need to configure enterprise externalstorage in ownCloud.
Enterprise-Only Authentication Options
In ownCloud 9.0+, there are five authentication backends for external storage mounts:
• Username and password
538 | External Storage
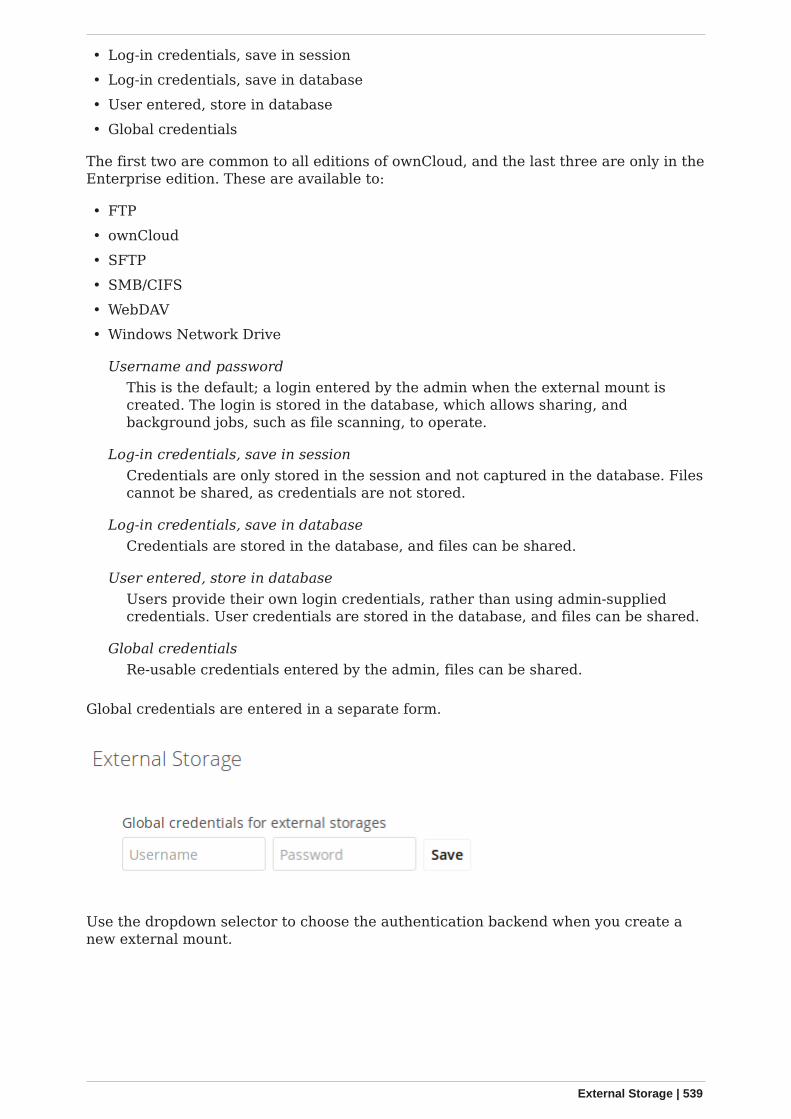
• Log-in credentials, save in session• Log-in credentials, save in database• User entered, store in database• Global credentials
The first two are common to all editions of ownCloud, and the last three are only in theEnterprise edition. These are available to:
• FTP• ownCloud• SFTP• SMB/CIFS• WebDAV• Windows Network Drive
Username and passwordThis is the default; a login entered by the admin when the external mount iscreated. The login is stored in the database, which allows sharing, andbackground jobs, such as file scanning, to operate.
Log-in credentials, save in sessionCredentials are only stored in the session and not captured in the database. Filescannot be shared, as credentials are not stored.
Log-in credentials, save in databaseCredentials are stored in the database, and files can be shared.
User entered, store in databaseUsers provide their own login credentials, rather than using admin-suppliedcredentials. User credentials are stored in the database, and files can be shared.
Global credentialsRe-usable credentials entered by the admin, files can be shared.
Global credentials are entered in a separate form.
Use the dropdown selector to choose the authentication backend when you create anew external mount.
External Storage | 539
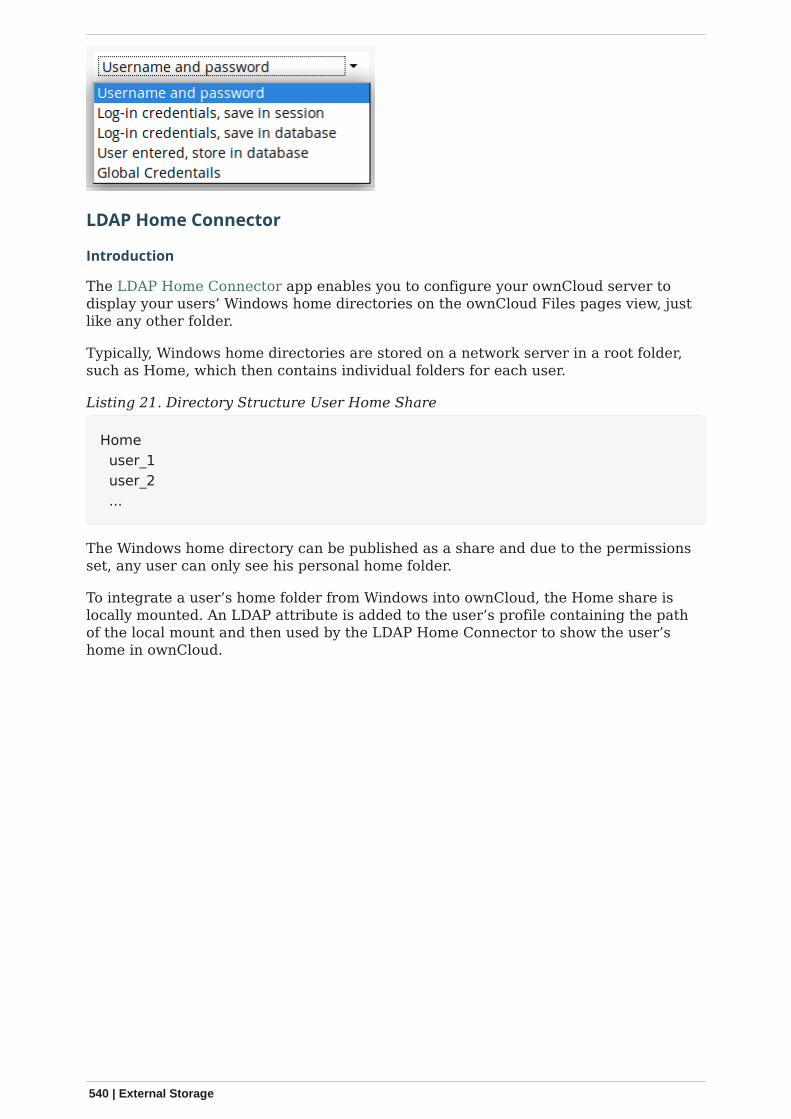
LDAP Home Connector
Introduction
The LDAP Home Connector app enables you to configure your ownCloud server todisplay your users’ Windows home directories on the ownCloud Files pages view, justlike any other folder.
Typically, Windows home directories are stored on a network server in a root folder,such as Home, which then contains individual folders for each user.
Listing 21. Directory Structure User Home Share
Home user_1 user_2 ...
The Windows home directory can be published as a share and due to the permissionsset, any user can only see his personal home folder.
To integrate a user’s home folder from Windows into ownCloud, the Home share islocally mounted. An LDAP attribute is added to the user’s profile containing the pathof the local mount and then used by the LDAP Home Connector to show the user’shome in ownCloud.
540 | External Storage
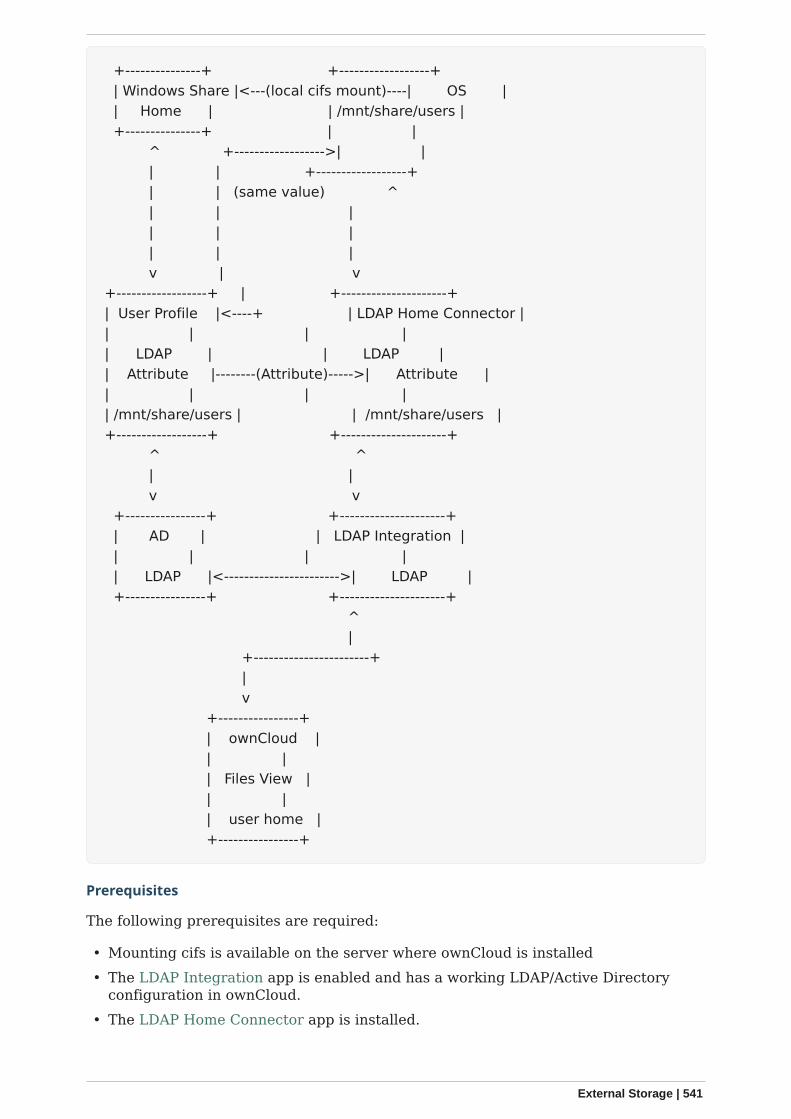
+---------------+ +------------------+ | Windows Share |<---(local cifs mount)----| OS | | Home | | /mnt/share/users | +---------------+ | | ^ +------------------>| | | | +------------------+ | | (same value) ^ | | | | | | | | | v | v +------------------+ | +---------------------+ | User Profile |<----+ | LDAP Home Connector | | | | | | LDAP | | LDAP | | Attribute |--------(Attribute)----->| Attribute | | | | | | /mnt/share/users | | /mnt/share/users | +------------------+ +---------------------+ ^ ^ | | v v +----------------+ +---------------------+ | AD | | LDAP Integration | | | | | | LDAP |<----------------------->| LDAP | +----------------+ +---------------------+ ^ | +-----------------------+ | v +----------------+ | ownCloud | | | | Files View | | | | user home | +----------------+
Prerequisites
The following prerequisites are required:
• Mounting cifs is available on the server where ownCloud is installed• The LDAP Integration app is enabled and has a working LDAP/Active Directory
configuration in ownCloud.• The LDAP Home Connector app is installed.
External Storage | 541
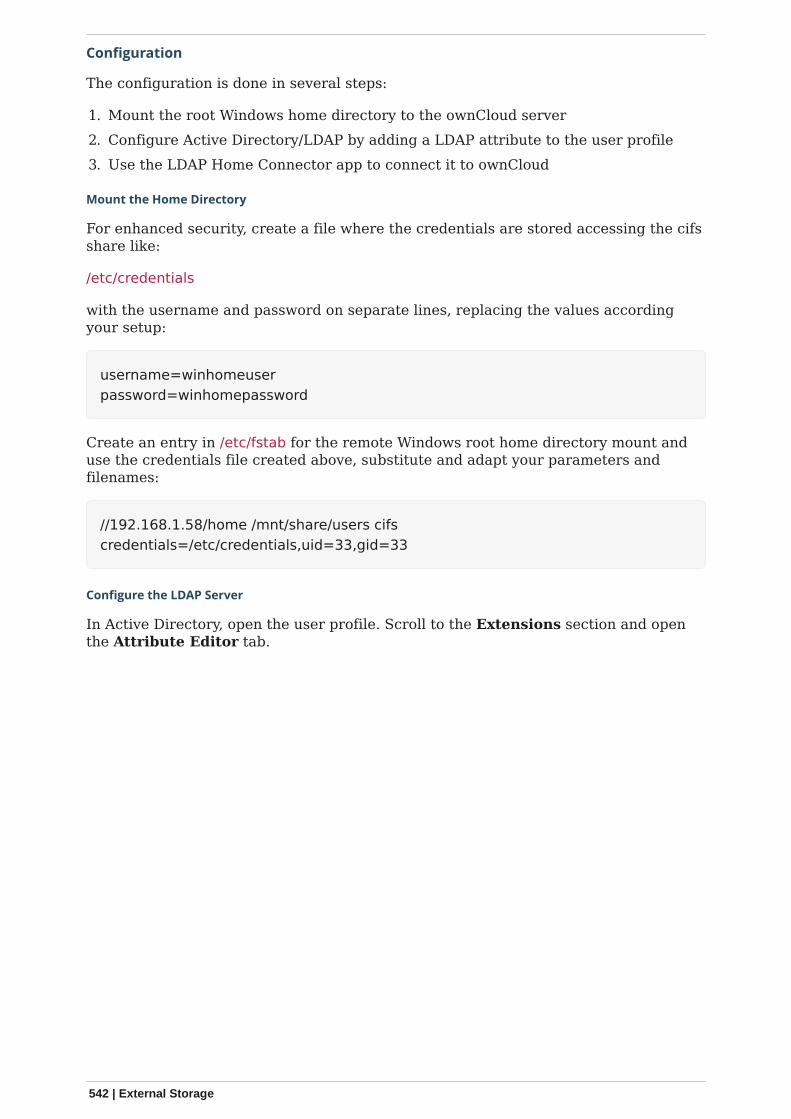
Configuration
The configuration is done in several steps:
1. Mount the root Windows home directory to the ownCloud server2. Configure Active Directory/LDAP by adding a LDAP attribute to the user profile3. Use the LDAP Home Connector app to connect it to ownCloud
Mount the Home Directory
For enhanced security, create a file where the credentials are stored accessing the cifsshare like:
/etc/credentials
with the username and password on separate lines, replacing the values accordingyour setup:
username=winhomeuserpassword=winhomepassword
Create an entry in /etc/fstab for the remote Windows root home directory mount anduse the credentials file created above, substitute and adapt your parameters andfilenames:
//192.168.1.58/home /mnt/share/users cifscredentials=/etc/credentials,uid=33,gid=33
Configure the LDAP Server
In Active Directory, open the user profile. Scroll to the Extensions section and openthe Attribute Editor tab.
542 | External Storage
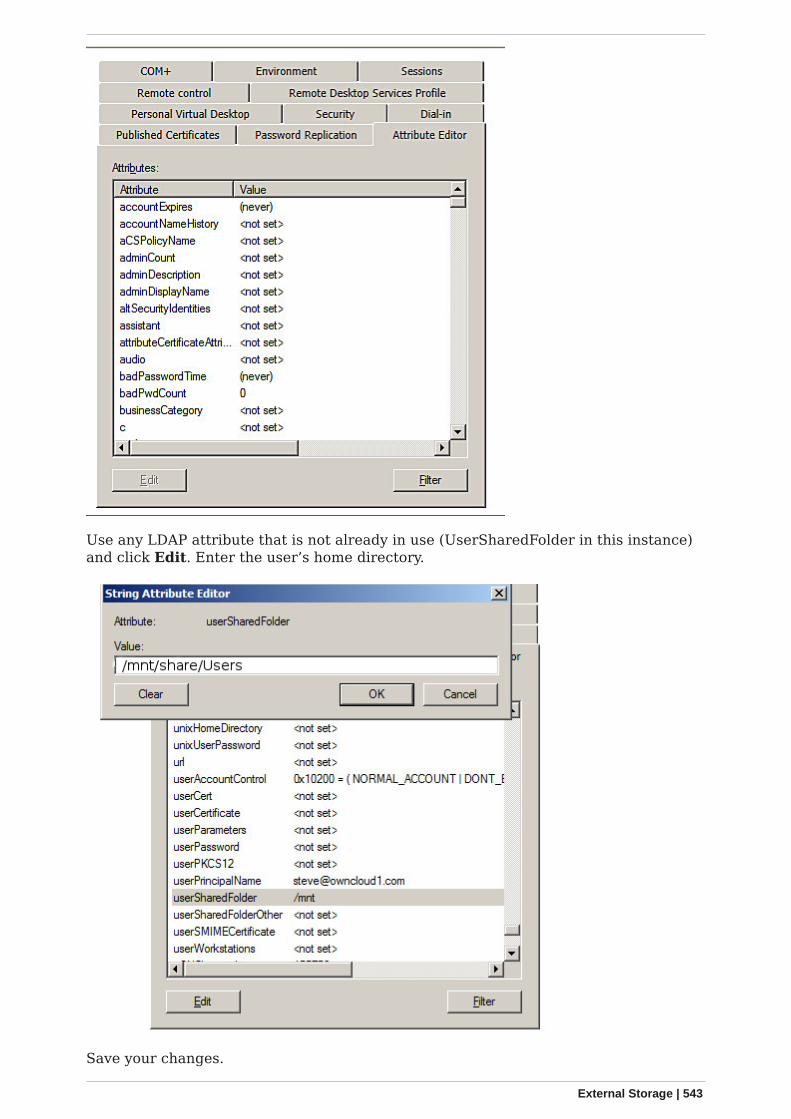
Use any LDAP attribute that is not already in use (UserSharedFolder in this instance)and click Edit. Enter the user’s home directory.
Save your changes.
External Storage | 543
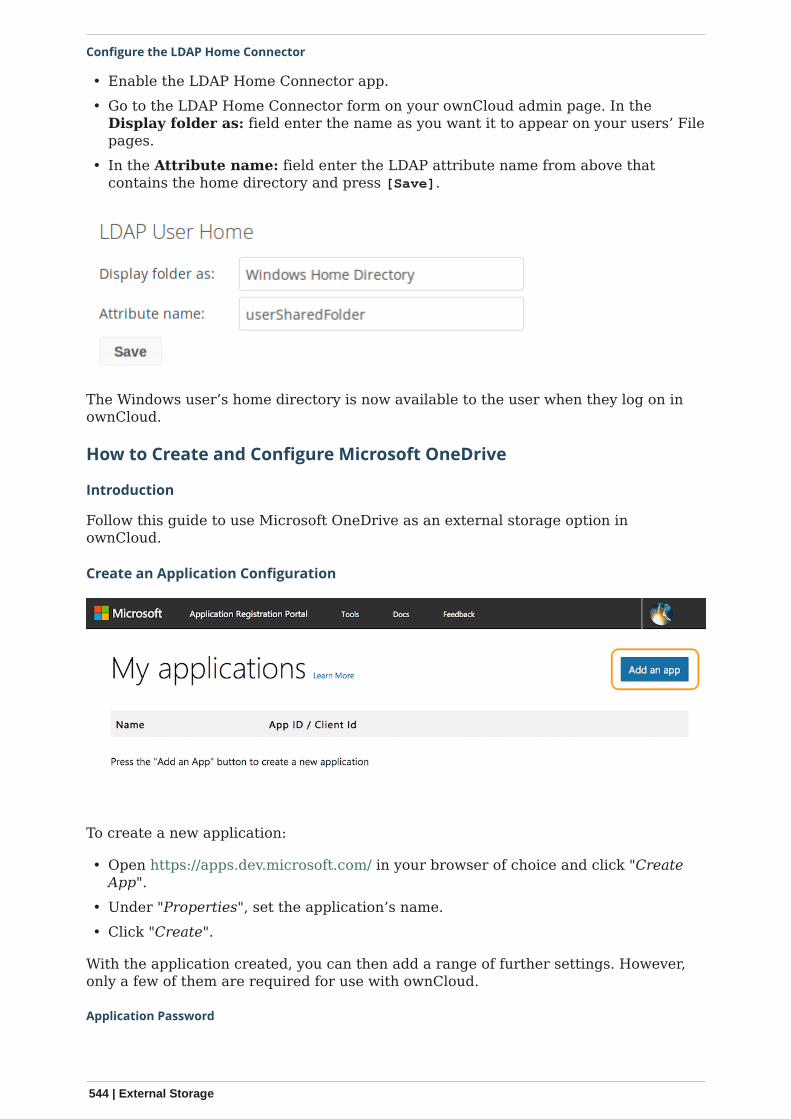
Configure the LDAP Home Connector
• Enable the LDAP Home Connector app.• Go to the LDAP Home Connector form on your ownCloud admin page. In the
Display folder as: field enter the name as you want it to appear on your users’ Filepages.
• In the Attribute name: field enter the LDAP attribute name from above thatcontains the home directory and press [Save].
The Windows user’s home directory is now available to the user when they log on inownCloud.
How to Create and Configure Microsoft OneDrive
Introduction
Follow this guide to use Microsoft OneDrive as an external storage option inownCloud.
Create an Application Configuration
To create a new application:
• Open https://apps.dev.microsoft.com/ in your browser of choice and click "CreateApp".
• Under "Properties", set the application’s name.• Click "Create".
With the application created, you can then add a range of further settings. However,only a few of them are required for use with ownCloud.
Application Password
544 | External Storage
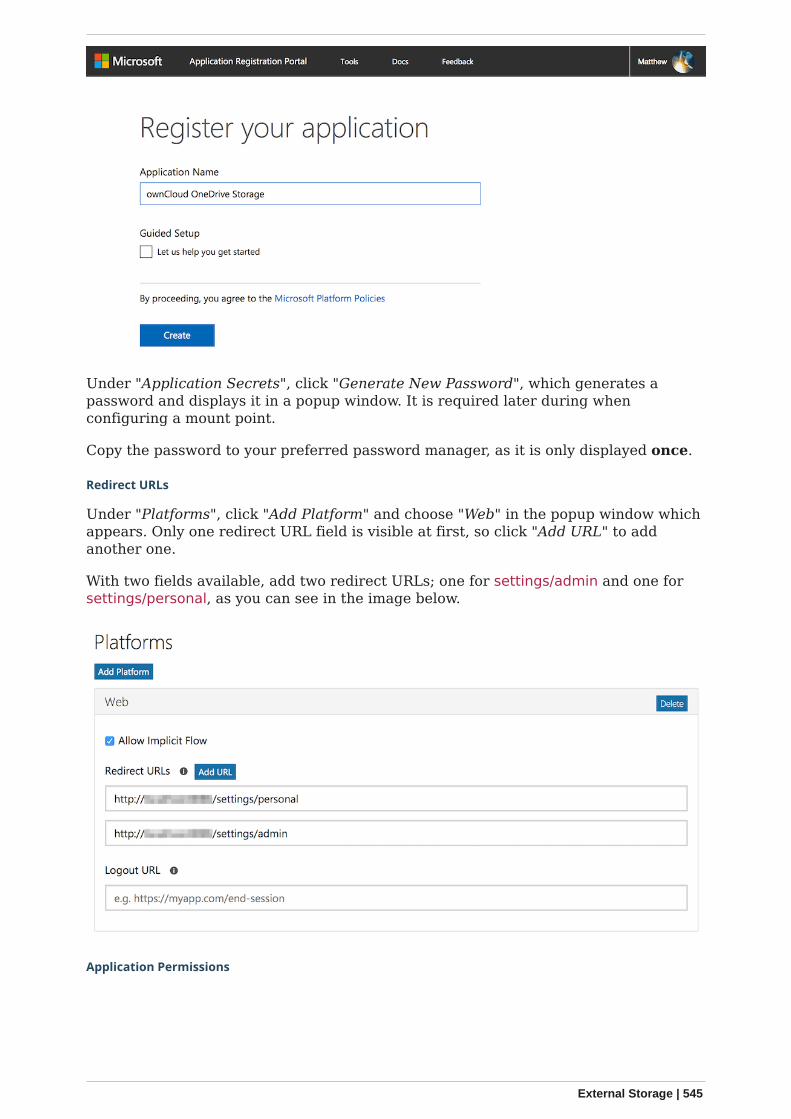
Under "Application Secrets", click "Generate New Password", which generates apassword and displays it in a popup window. It is required later during whenconfiguring a mount point.
Copy the password to your preferred password manager, as it is only displayed once.
Redirect URLs
Under "Platforms", click "Add Platform" and choose "Web" in the popup window whichappears. Only one redirect URL field is visible at first, so click "Add URL" to addanother one.
With two fields available, add two redirect URLs; one for settings/admin and one forsettings/personal, as you can see in the image below.
Application Permissions
External Storage | 545
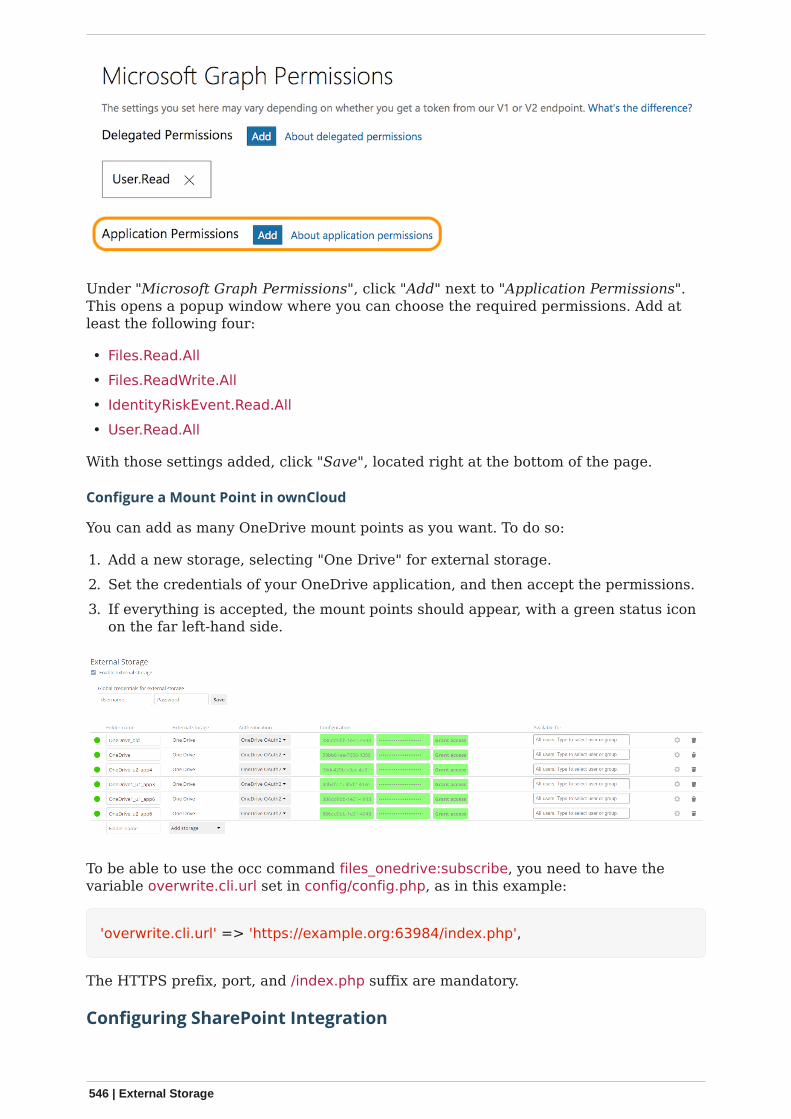
Under "Microsoft Graph Permissions", click "Add" next to "Application Permissions".This opens a popup window where you can choose the required permissions. Add atleast the following four:
• Files.Read.All• Files.ReadWrite.All• IdentityRiskEvent.Read.All• User.Read.All
With those settings added, click "Save", located right at the bottom of the page.
Configure a Mount Point in ownCloud
You can add as many OneDrive mount points as you want. To do so:
1. Add a new storage, selecting "One Drive" for external storage.2. Set the credentials of your OneDrive application, and then accept the permissions.3. If everything is accepted, the mount points should appear, with a green status icon
on the far left-hand side.
To be able to use the occ command files_onedrive:subscribe, you need to have thevariable overwrite.cli.url set in config/config.php, as in this example:
'overwrite.cli.url' => 'https://example.org:63984/index.php',
The HTTPS prefix, port, and /index.php suffix are mandatory.
Configuring SharePoint Integration
546 | External Storage
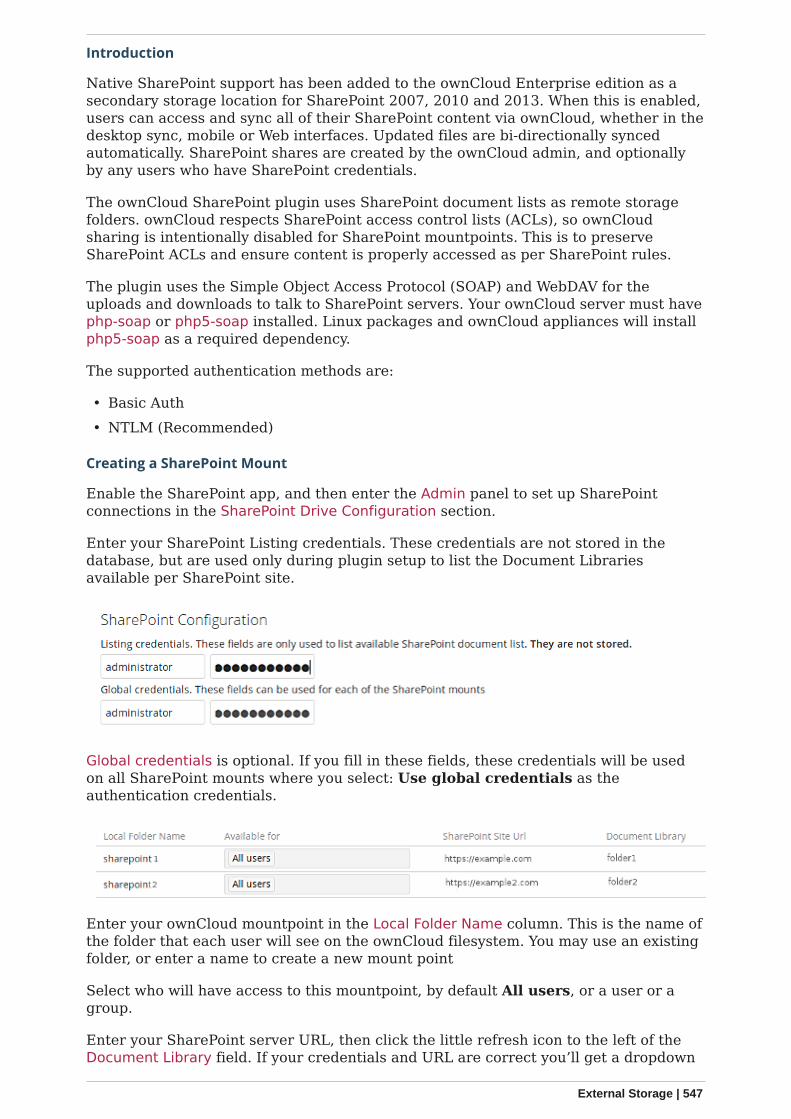
Introduction
Native SharePoint support has been added to the ownCloud Enterprise edition as asecondary storage location for SharePoint 2007, 2010 and 2013. When this is enabled,users can access and sync all of their SharePoint content via ownCloud, whether in thedesktop sync, mobile or Web interfaces. Updated files are bi-directionally syncedautomatically. SharePoint shares are created by the ownCloud admin, and optionallyby any users who have SharePoint credentials.
The ownCloud SharePoint plugin uses SharePoint document lists as remote storagefolders. ownCloud respects SharePoint access control lists (ACLs), so ownCloudsharing is intentionally disabled for SharePoint mountpoints. This is to preserveSharePoint ACLs and ensure content is properly accessed as per SharePoint rules.
The plugin uses the Simple Object Access Protocol (SOAP) and WebDAV for theuploads and downloads to talk to SharePoint servers. Your ownCloud server must havephp-soap or php5-soap installed. Linux packages and ownCloud appliances will installphp5-soap as a required dependency.
The supported authentication methods are:
• Basic Auth• NTLM (Recommended)
Creating a SharePoint Mount
Enable the SharePoint app, and then enter the Admin panel to set up SharePointconnections in the SharePoint Drive Configuration section.
Enter your SharePoint Listing credentials. These credentials are not stored in thedatabase, but are used only during plugin setup to list the Document Librariesavailable per SharePoint site.
Global credentials is optional. If you fill in these fields, these credentials will be usedon all SharePoint mounts where you select: Use global credentials as theauthentication credentials.
Enter your ownCloud mountpoint in the Local Folder Name column. This is the name ofthe folder that each user will see on the ownCloud filesystem. You may use an existingfolder, or enter a name to create a new mount point
Select who will have access to this mountpoint, by default All users, or a user or agroup.
Enter your SharePoint server URL, then click the little refresh icon to the left of theDocument Library field. If your credentials and URL are correct you’ll get a dropdown
External Storage | 547
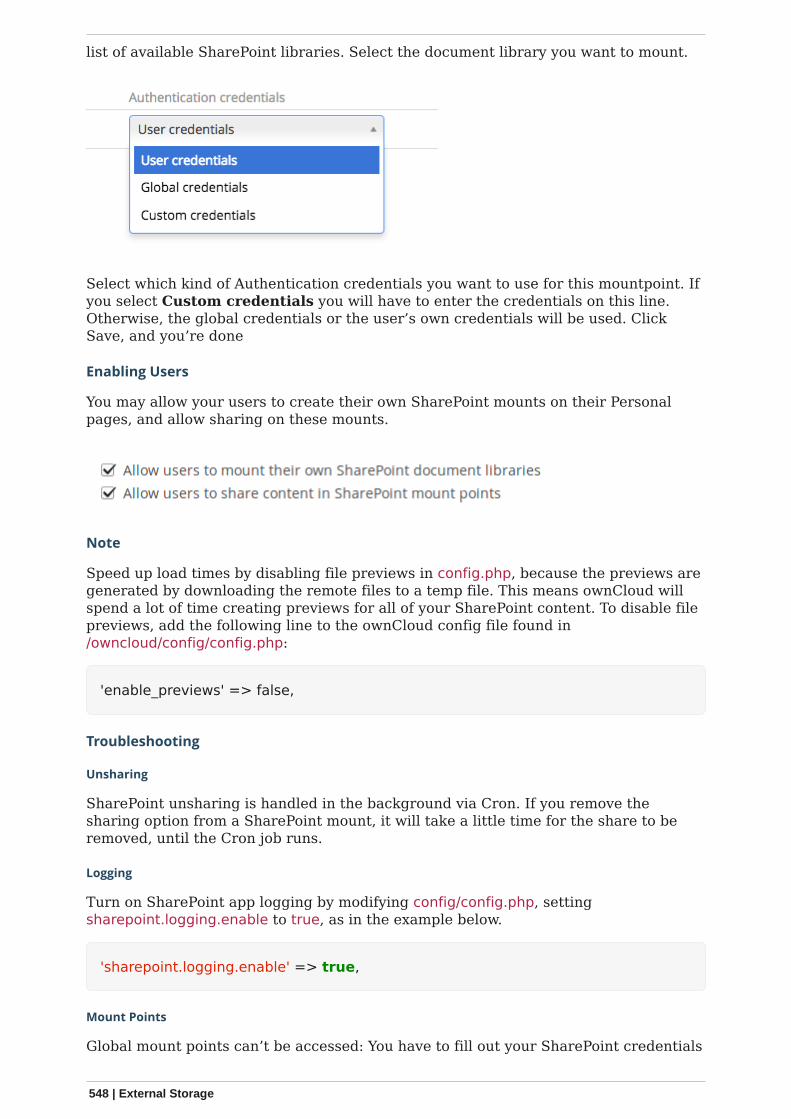
list of available SharePoint libraries. Select the document library you want to mount.
Select which kind of Authentication credentials you want to use for this mountpoint. Ifyou select Custom credentials you will have to enter the credentials on this line.Otherwise, the global credentials or the user’s own credentials will be used. ClickSave, and you’re done
Enabling Users
You may allow your users to create their own SharePoint mounts on their Personalpages, and allow sharing on these mounts.
Note
Speed up load times by disabling file previews in config.php, because the previews aregenerated by downloading the remote files to a temp file. This means ownCloud willspend a lot of time creating previews for all of your SharePoint content. To disable filepreviews, add the following line to the ownCloud config file found in/owncloud/config/config.php:
'enable_previews' => false,
Troubleshooting
Unsharing
SharePoint unsharing is handled in the background via Cron. If you remove thesharing option from a SharePoint mount, it will take a little time for the share to beremoved, until the Cron job runs.
Logging
Turn on SharePoint app logging by modifying config/config.php, settingsharepoint.logging.enable to true, as in the example below.
'sharepoint.logging.enable' => true,
Mount Points
Global mount points can’t be accessed: You have to fill out your SharePoint credentials
548 | External Storage
as User on the personal settings page, or in the popup menu. These credentials areused to mount all global mount points.
Personal mount points can’t be accessed: You have to fill your SharePoint credentialsas User on the personal settings page in case your personal mount point doesn’t haveits own credentials.
A user can’t update the credentials: Verify that the correct credentials are configured,and the correct type, either global or custom.
Windows Network Drive (WND)
Introduction
The External Storage: Windows Network Drives app creates a control panel in yourAdmin page for seamlessly integrating Windows and Samba/CIFS shared networkdrives as external storages.
Any Windows file share and Samba servers on Linux and other Unix-type operatingsystems use the SMB/CIFS file-sharing protocol. The files and directories on theSMB/CIFS server will be visible on your Files page just like your other ownCloud filesand folders.
Compared to standard SMB access, WND has advanced features like:
1. User lockout prevention and password reset2. More authentication mechanisms against the backend3. Listen to change information triggered by the backend4. Enhanced ACL support5. Collaborative WND (CWND)
Brief Description of Advanced Features:User lockout prevention and password reset
Depending on the Windows or Samba policy, users could get locked out of theiraccount if they enter a wrong password a number of times. The lockout preventiontries to avoid this from happening by resetting the password if it is wrong. In thecase of ownCloud’s standard SMB connector the password won’t be reset. It couldhappen that users get locked out of the file server.
More authentication mechanisms against the backendPlease see the details about the Enterprise-Only Authentication Options
Listen to change information triggered by the backendNative Windows File Servers provide the ability to send change notificationsregarding modified files and folders somewhere in a share. Samba can send filenotifications as well, as long as all the file actions are performed through the SMBprotocol. However, it won’t work if the action is performed directly inside thefilesystem used by Samba. This mechanism then updates the ownCloud databaseand provides the changes made to accessing users. Users do not need to manuallycheck for changes in all possible locations of their mount. Changes processed arealso propagated to sync clients automatically.
Enhanced ACL supportWith enhanced ACL support, both SMB and WND evaluate the file attributes(whether the file is hidden or read-only) to decide what ownCloud permissions thefile or folder should have in ownCloud. On top of this, WND can also evaluate theACLs by using the ocLdapPermissionManager in the mount point configuration. This
External Storage | 549
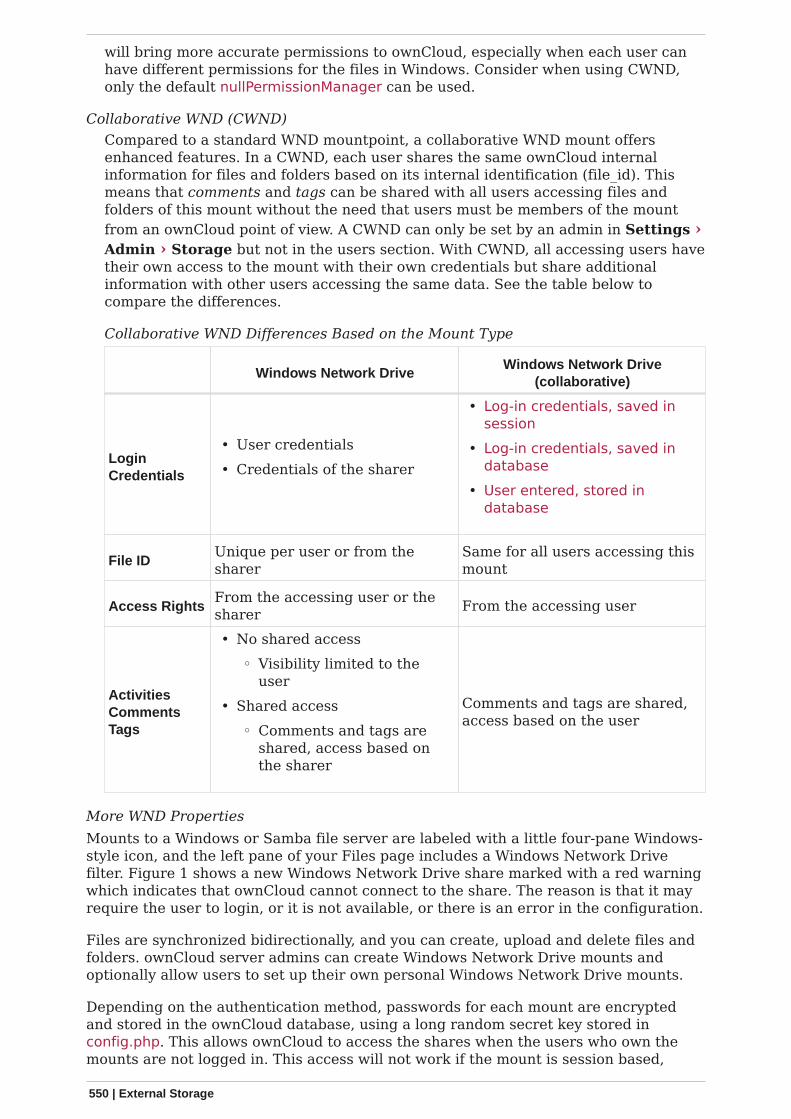
will bring more accurate permissions to ownCloud, especially when each user canhave different permissions for the files in Windows. Consider when using CWND,only the default nullPermissionManager can be used.
Collaborative WND (CWND)Compared to a standard WND mountpoint, a collaborative WND mount offersenhanced features. In a CWND, each user shares the same ownCloud internalinformation for files and folders based on its internal identification (file_id). Thismeans that comments and tags can be shared with all users accessing files andfolders of this mount without the need that users must be members of the mountfrom an ownCloud point of view. A CWND can only be set by an admin in Settings ›Admin › Storage but not in the users section. With CWND, all accessing users havetheir own access to the mount with their own credentials but share additionalinformation with other users accessing the same data. See the table below tocompare the differences.
Collaborative WND Differences Based on the Mount Type
Windows Network DriveWindows Network Drive
(collaborative)
LoginCredentials
• User credentials• Credentials of the sharer
• Log-in credentials, saved insession
• Log-in credentials, saved indatabase
• User entered, stored indatabase
File IDUnique per user or from thesharer
Same for all users accessing thismount
Access RightsFrom the accessing user or thesharer From the accessing user
ActivitiesCommentsTags
• No shared access◦ Visibility limited to the
user• Shared access
◦ Comments and tags areshared, access based onthe sharer
Comments and tags are shared,access based on the user
More WND PropertiesMounts to a Windows or Samba file server are labeled with a little four-pane Windows-style icon, and the left pane of your Files page includes a Windows Network Drivefilter. Figure 1 shows a new Windows Network Drive share marked with a red warningwhich indicates that ownCloud cannot connect to the share. The reason is that it mayrequire the user to login, or it is not available, or there is an error in the configuration.
Files are synchronized bidirectionally, and you can create, upload and delete files andfolders. ownCloud server admins can create Windows Network Drive mounts andoptionally allow users to set up their own personal Windows Network Drive mounts.
Depending on the authentication method, passwords for each mount are encryptedand stored in the ownCloud database, using a long random secret key stored inconfig.php. This allows ownCloud to access the shares when the users who own themounts are not logged in. This access will not work if the mount is session based,
550 | External Storage
where passwords are not stored and are available only for the current active session.
Figure 1. Windows Network Drive share on your Files page
Installation
Install the External Storage: Windows Network Drives app from the ownCloud MarketApp or ownCloud Marketplace. To make it work, a few dependencies have to beinstalled.
• A Samba client. This is included in all Linux distributions. On Debian, Ubuntu, andother Debian derivatives it is called smbclient. On SUSE, Red Hat, CentOS, andother Red Hat derivatives it is samba-client.
• php-smbclient (version 0.8.0+). It should be included in most Linux distributions.You can use eduardok/libsmbclient-php, if your distribution does not provide it.
• which and stdbuf. These should be included in most Linux distributions.
To install and configure the necessary packages, see the Prepare Your Server sectionof the manual installation documentation.
For more information on SMB/CIFS in ownCloud, refer to the Sambafile server configuration documentation.
If you encounter errors when using the WND app likeNT_STATUS_REVISION_MISMATCH, please get in touch [email protected].
ownCloud requires at least Samba 4.7.8 or Samba 4.8.1 on theownCloud server, when:
1. The Windows Network Drive Listener is used; and2. The remote Windows/Samba file server requires at least version 2.0
of the SMB protocol.
The Windows Network Drive Listener only supports version 1 of theSMB protocol (SMB1) with earlier Samba versions.
Background
A Samba server, often a Microsoft Windows Server, can enforce theminimum and maximum protocol versions used by connecting clients.However, in light of the WannaCry ransomware attack, Microsoftpatched Windows Server to only allow SMB2 as minimum protocol bydefault, as SMB1 is insecure.
The ownCloud windows network drive listener utilizes the SMBnotification feature which works well with SMB1 in conjunction withmost Samba versions. However, when the minimum protocol a serveraccepts is SMB2, ownCloud requires Samba 4.7.8+ (4.8+ etc.) to beable to properly work, as prior versions of Samba had a bug that brokethis feature.
External Storage | 551
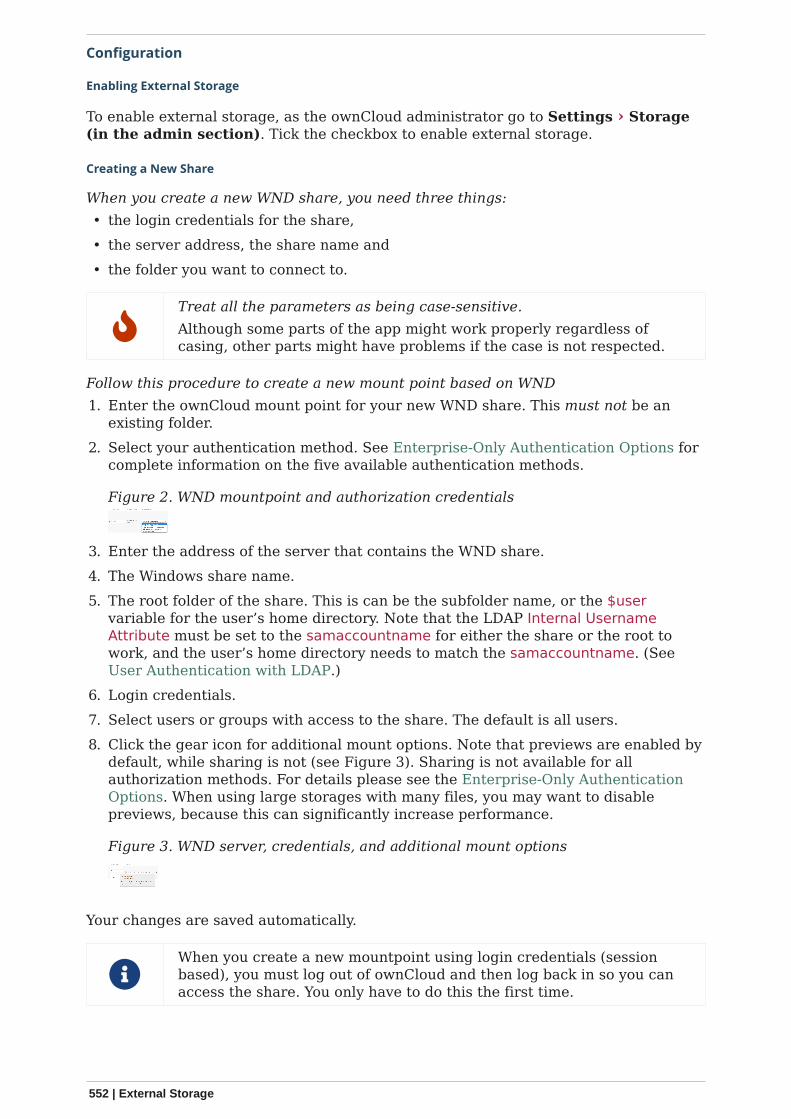
Configuration
Enabling External Storage
To enable external storage, as the ownCloud administrator go to Settings › Storage(in the admin section). Tick the checkbox to enable external storage.
Creating a New Share
When you create a new WND share, you need three things:• the login credentials for the share,• the server address, the share name and• the folder you want to connect to.
Treat all the parameters as being case-sensitive.Although some parts of the app might work properly regardless ofcasing, other parts might have problems if the case is not respected.
Follow this procedure to create a new mount point based on WND1. Enter the ownCloud mount point for your new WND share. This must not be an
existing folder.2. Select your authentication method. See Enterprise-Only Authentication Options for
complete information on the five available authentication methods.
Figure 2. WND mountpoint and authorization credentials
3. Enter the address of the server that contains the WND share.4. The Windows share name.5. The root folder of the share. This is can be the subfolder name, or the $user
variable for the user’s home directory. Note that the LDAP Internal UsernameAttribute must be set to the samaccountname for either the share or the root towork, and the user’s home directory needs to match the samaccountname. (SeeUser Authentication with LDAP.)
6. Login credentials.7. Select users or groups with access to the share. The default is all users.8. Click the gear icon for additional mount options. Note that previews are enabled by
default, while sharing is not (see Figure 3). Sharing is not available for allauthorization methods. For details please see the Enterprise-Only AuthenticationOptions. When using large storages with many files, you may want to disablepreviews, because this can significantly increase performance.
Figure 3. WND server, credentials, and additional mount options
Your changes are saved automatically.
When you create a new mountpoint using login credentials (sessionbased), you must log out of ownCloud and then log back in so you canaccess the share. You only have to do this the first time.
552 | External Storage
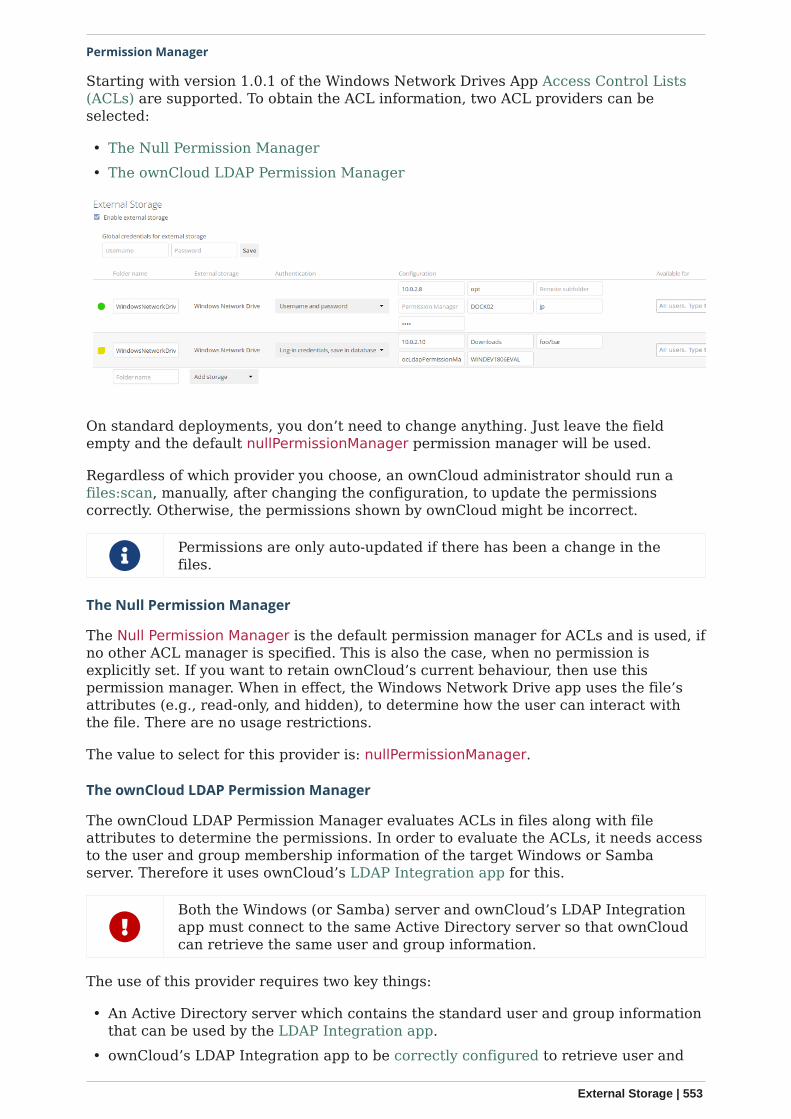
Permission Manager
Starting with version 1.0.1 of the Windows Network Drives App Access Control Lists(ACLs) are supported. To obtain the ACL information, two ACL providers can beselected:
• The Null Permission Manager• The ownCloud LDAP Permission Manager
On standard deployments, you don’t need to change anything. Just leave the fieldempty and the default nullPermissionManager permission manager will be used.
Regardless of which provider you choose, an ownCloud administrator should run afiles:scan, manually, after changing the configuration, to update the permissionscorrectly. Otherwise, the permissions shown by ownCloud might be incorrect.
Permissions are only auto-updated if there has been a change in thefiles.
The Null Permission Manager
The Null Permission Manager is the default permission manager for ACLs and is used, ifno other ACL manager is specified. This is also the case, when no permission isexplicitly set. If you want to retain ownCloud’s current behaviour, then use thispermission manager. When in effect, the Windows Network Drive app uses the file’sattributes (e.g., read-only, and hidden), to determine how the user can interact withthe file. There are no usage restrictions.
The value to select for this provider is: nullPermissionManager.
The ownCloud LDAP Permission Manager
The ownCloud LDAP Permission Manager evaluates ACLs in files along with fileattributes to determine the permissions. In order to evaluate the ACLs, it needs accessto the user and group membership information of the target Windows or Sambaserver. Therefore it uses ownCloud’s LDAP Integration app for this.
Both the Windows (or Samba) server and ownCloud’s LDAP Integrationapp must connect to the same Active Directory server so that ownCloudcan retrieve the same user and group information.
The use of this provider requires two key things:
• An Active Directory server which contains the standard user and group informationthat can be used by the LDAP Integration app.
• ownCloud’s LDAP Integration app to be correctly configured to retrieve user and
External Storage | 553
group information from the same Active Directory / LDAP server as the one that theWindows or Samba server uses.
The ownCloud LDAP Integration app must configure thesAMAccountName to be the ownCloud server’s username.
Some groups, such as everyone might not be handled properly. This isbecause such groups don’t exist in the LDAP server, or might not befound if the domain is different, such as nt authority\system orbuiltin\domain-users.
The value to select for this provider is: ocLdapPermissionManager.
WND Notifications
The SMB protocol supports registering for notifications of file changes on remoteWindows SMB storage servers. Notifications are more efficient than polling forchanges, as polling requires scanning the whole mounted SMB storage. While fileschanged through the ownCloud Web Interface or sync clients are automaticallyrecognized by ownCloud, recognition is not possible when files are changed directly onremote SMB storage mounts. When using the listener, files changed on the SMBbackend are recognized and a notification is stored in the database. The process-queue job reads these stored notifications and initiates further actions.
The capability of the listener depends on the ability of the usedSMB/CIFS storage backend to provide notifications. While Windows fileservers have no limitations, some vendors may have restrictions. Pleasecheck these with your storage provider. It may be possible, thatnotifications for Samba only work for the target folder you’re listeningto, but not for any sub structures. If you’re listening on the "/top" folder,you may not receive notifications for "/top/middle/bottom" folder. In thiscase, you have to setup listeners for every existing folder and also forany new folders that will be created. With Windows file servers, you willreceive notifications for every file or subfolder inside the folder you’relistening to.
WND Listener Setup
The WND listener for ownCloud 10 includes two different commands that need to beexecuted:
• wnd:listen Listen to changes and save them in the database• wnd:process-queue Process saved listener changes from the database
wnd:listen
This command listens to changes for each host and share configured and stores allnotifications gathered in the database. It is intended to run this command as a service.The command requires the Windows/Samba account and the host/share the listenerwill listen to. The command does not produce any output by default, unless an errorhappens. Each stored notification will be further processed by the wnd:process-queueand will be removed from the database after processing.
You can increase the command’s verbosity by using -vvv. Doing sodisplays the listeners activities including a timestamp and thenotifications received. A read-only permission for the used accountshould be enough, but may need to be increased.
554 | External Storage

The simplest way, useful for initial testing is, to start the wnd:listen process manually,as follows:
sudo -u www-data php occ wnd:listen <host> <share> <username>
The password is an optional parameter and you will be asked for it if you didn’tprovide it as in the example above. In order to start wnd:listen without any userinteraction like as service, provide the password from a password file.
sudo -u www-data php occ wnd:listen <host> <share> <username> \ --password-file=/my/secret/password/file \ --password-trim
For additional options to provide the password, check Password Options
Note that the password must be in plain text inside the file. Neither spaces nornewline characters will be removed from the contents of the file by default, unless the--password-trim option is added. The password file must be readable by the apacheuser (or www-data). Also make sure that the password file is outside of any directoryhandled by apache (web-readable) for security reasons. You may use the same locationwhen using flock in Execution Serialization below.
You should be able to run any of those commands, and/or wrap them into a systemdservice or any other startup service, so that the wnd:listen command is automaticallystarted post booting.
wnd:process-queue
This command processes the stored notifications for a given host and share. Thisprocess is intended to be run periodically as a Cron job, or via a similar mechanism.The command will process the notifications stored by the wnd:listen process, showingonly errors by default. If you need more information, increase the verbosity by callingwnd:process-queue -vvv.
As a simple example, you can check the following:
sudo -u www-data php occ wnd:process-queue <host> <share>
You can run that command, even if there are no notifications to be processed.
Depending on your requirements, you can wrap that command in a Cron job so it’s runevery 5 minutes for example.
WND Listener Service Configuration
Create a service for systemd following the instructions below that checks forprocessable notifications:
• Replace the all upper case words SERVER, SHARE, USER andPASSWORD in both, the filename and in the contents below withtheir respective values.
• Take care to also adjust the paths in WorkingDirectory and ExecStartaccording to your installation.
External Storage | 555
• For each WND mount point distinguished by a SERVER - SHARE pair:◦ Create a file for each SERVER-SHARE pair named owncloud-wnd-listen-SERVER-
SHARE.service and locate it in /etc/systemd/system/◦ Password: For security reasons, create a file readable only by www-data and
outside the directories handled by apache (let’s suppose in /opt/mypass). The filemust contain only the password for the share. In this example our file is:"/opt/mypass". The listener will read the contents of the file and use them as thepassword for the account. This way, only root and the apache user should haveaccess to the password.
◦ --password-trim removes blank characters from the password file added by3rdparty software or other services.
[Unit]Description=ownCloud WND Listener for SERVER SHAREAfter=syslog.targetAfter=network.targetRequires=apache2.service[Service]User=www-dataGroup=www-dataWorkingDirectory=/var/www/owncloudExecStart=/usr/bin/php ./occ wnd:listen -vvv SERVER SHARE USER --password-file=/opt/mypass --password-trimType=simpleStandardOutput=journalStandardError=journalSyslogIdentifier=%nKillMode=processRestartSec=3Restart=always[Install]WantedBy=multi-user.target
• Run the following command, once for each created file:
sudo systemctl daemon-reloadsudo systemctl enable owncloud-wnd-listen-SERVER-SHARE.servicesudo systemctl start owncloud-wnd-listen-SERVER-SHARE.service
• To list all systemd wnd listeners for ownCloud run the following command,assuming you use the naming convention described above:
systemctl list-units | grep owncloud-wnd-listen
• Please re-run the following commands if you are changing the contents of aparticular listener service:
556 | External Storage
sudo systemctl daemon-reloadsudo systemctl restart owncloud-wnd-listen-SERVER-SHARE.service
For more information about configuring services for systemd, read How To UseSystemctl to Manage Systemd Services and Units
WND Process Queue Configuration
Create or add a crontab file in /etc/cron.d/oc-wnd-process-queue.
The commands must be strictly sequential. This can be done by usingflock -n and tuning the -c (chunk-size) parameter of occ wnd:process-queue, see the wnd occ commands description and the ExecutionSerialization below.
• Make a crontab entry to run a script iterating over all SERVER SHARE pairs with anappropriate occ wnd:process-queue command.
* * * * * sudo -u www-data /usr/bin/php /var/www/owncloud/occ wnd:process-queue <HOST> <SHARE>
Execution Serialization
Parallel runs of wnd:process-queue might lead to a user lockout. The reason for this isthat several wnd:process-queue might use the same wrong password because it hasn’tbeen updated by the time they fetch it.
It’s recommended to force the execution serialization of the wnd:process-queuecommand. You might want to use Anacron, which seems to have an option for thisscenario, or wrap the command with flock.
If you need to serialize the execution of the wnd:process-queue, check the followingexample with flock
flock -n /opt/my-lock-file sudo -u www-data php occ wnd:process-queue <host><share>
In that case, flock will try to get the lock of that file and won’t run the command if itisn’t possible. For our case, and considering that file isn’t being used by any otherprocess, it will run only one wnd:process-queue at a time. If someone tries to run thesame command a second time while the previous one is running, the second will failand won’t be executed.
The lock file /opt/my-lock-file itself will be created as an empty file by the flockcommand if it does not yet exist, but after it has been created the lock file doesn’tchange. Only an flock will be applied and removed. The file won’t be removed after thescript completes.
You can use flock also in cron, see the example below:
External Storage | 557
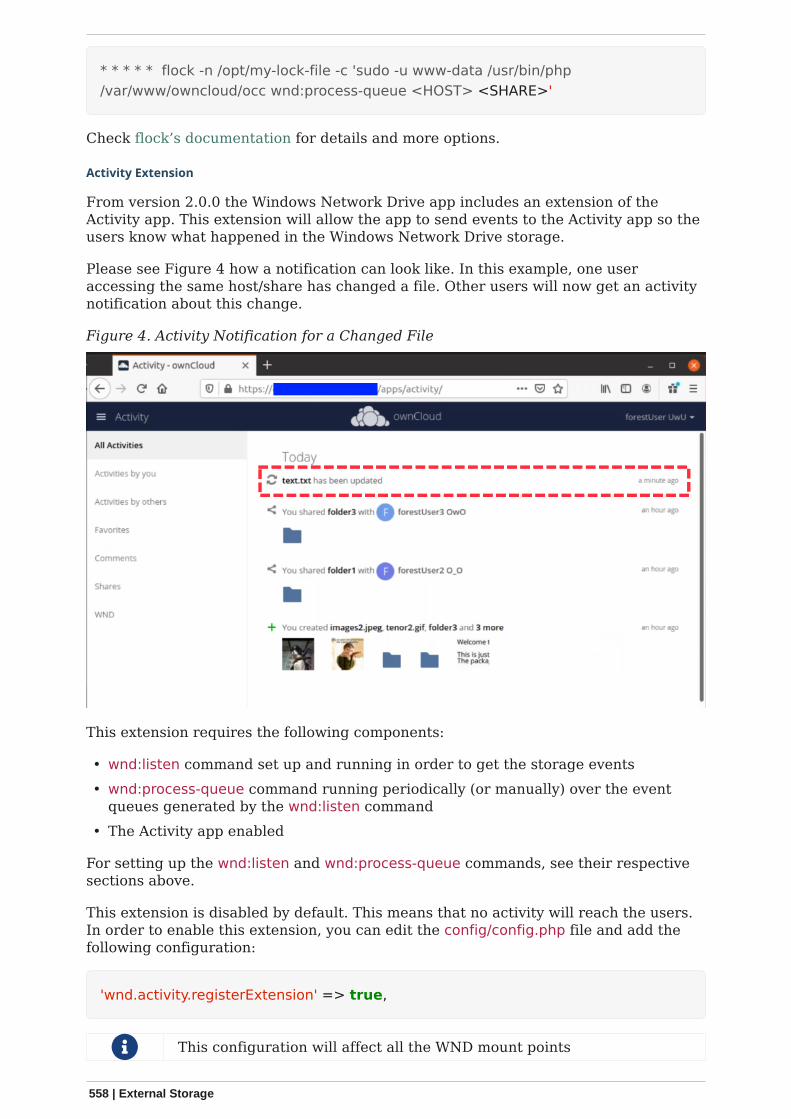
* * * * * flock -n /opt/my-lock-file -c 'sudo -u www-data /usr/bin/php/var/www/owncloud/occ wnd:process-queue <HOST> <SHARE>'
Check flock’s documentation for details and more options.
Activity Extension
From version 2.0.0 the Windows Network Drive app includes an extension of theActivity app. This extension will allow the app to send events to the Activity app so theusers know what happened in the Windows Network Drive storage.
Please see Figure 4 how a notification can look like. In this example, one useraccessing the same host/share has changed a file. Other users will now get an activitynotification about this change.
Figure 4. Activity Notification for a Changed File
This extension requires the following components:
• wnd:listen command set up and running in order to get the storage events• wnd:process-queue command running periodically (or manually) over the event
queues generated by the wnd:listen command• The Activity app enabled
For setting up the wnd:listen and wnd:process-queue commands, see their respectivesections above.
This extension is disabled by default. This means that no activity will reach the users.In order to enable this extension, you can edit the config/config.php file and add thefollowing configuration:
'wnd.activity.registerExtension' => true,
This configuration will affect all the WND mount points
558 | External Storage
The events that will be shown to the users are based on what the wnd:process-queuedetects and changes in the ownCloud’s FS. Since the command includes someoptimizations, some events might be inaccurate in some scenarios. For example, ifmultiple files are added in the same folder, there won’t be multiple "file added" eventsbut only one "folder modified" in the parent folder.
The events are expected to reach only to the affected users. This filters out the userswho cannot access the mount point, and also the users who do not have enoughpermissions in the Network Drive (Windows, Samba) to access that file.
As part of the Activity app configuration, users can decide which events they want tobe notified about and how, in the activity stream or via email.
Users who can access the Windows Network Drive storage via share won’t receiveactivity notifications by default. You can add the following configuration in theconfig/config.php file to enable sending the activity notification to those users.
'wnd.activity.sendToSharees' => true,
wnd.activity.sendToSharees key depends on thewnd.activity.registerExtension key to take effect.
Collaborative WND
CWND can only be set by an admin in Settings › Admin › Storage. This mount typecannot be selected by users in the user section. To prepare access for your mountpoint using the CWND mount type, you must provide a Service Account (SA) which isan ordinary SMB user granting read access to the share you want to mount. You canuse one SA for all CWND mounts or separate ones. The SA is used to gather thecontents of a share used by the WND Listener and provides a common file_id to allaccessing users, while the accessing users can only access those files and folders forwhich they’ve been granted rights.
1. As an admin, go to Settings › Admin › Storage and create a new CWND basedmount point.
Figure 5. Add a Collaborative Windows Network Drive Mount
2. Chose any name for the mount point that fits your needs.3. Select user login type.
The following three are sensible and working selections for CWND:
a. Log-in credentials, saved in sessionb. Log-in credentials, saved in databasec. User entered, stored in database [1]
[1] Must be used if user authentication is made with OIDC
Figure 6. Select How User Logs in to the Mount Point
External Storage | 559
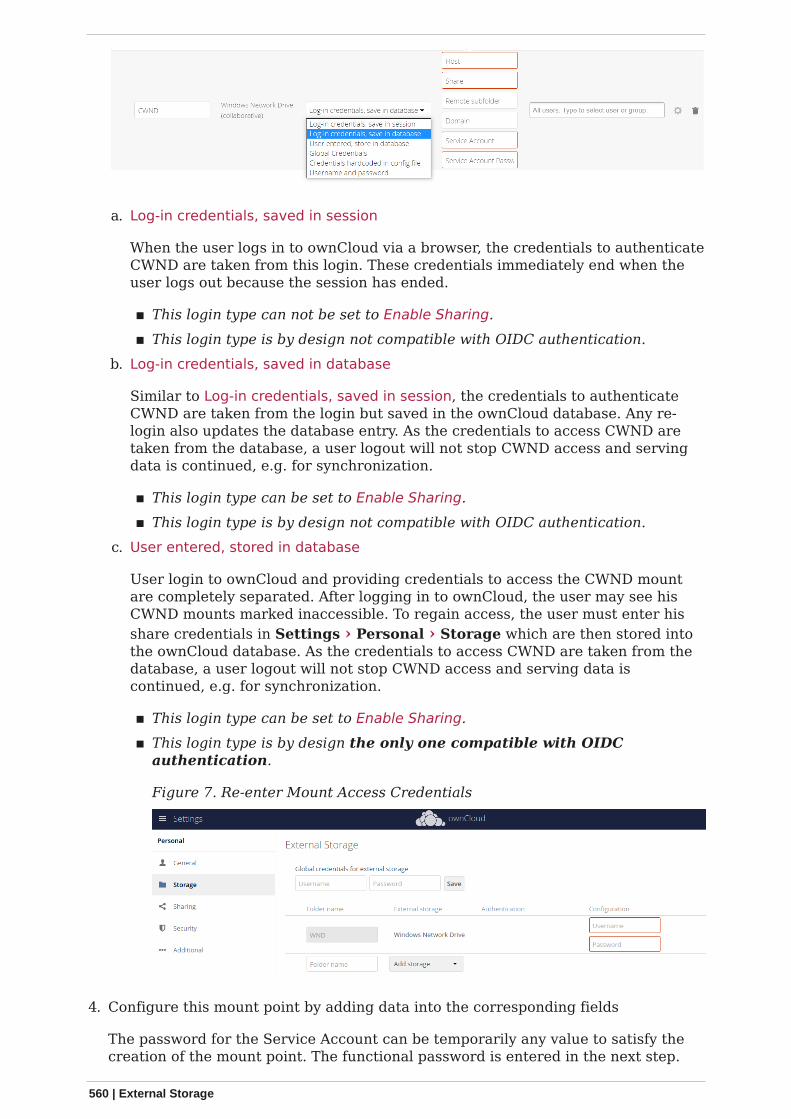
a. Log-in credentials, saved in session
When the user logs in to ownCloud via a browser, the credentials to authenticateCWND are taken from this login. These credentials immediately end when theuser logs out because the session has ended.
▪ This login type can not be set to Enable Sharing.▪ This login type is by design not compatible with OIDC authentication.
b. Log-in credentials, saved in database
Similar to Log-in credentials, saved in session, the credentials to authenticateCWND are taken from the login but saved in the ownCloud database. Any re-login also updates the database entry. As the credentials to access CWND aretaken from the database, a user logout will not stop CWND access and servingdata is continued, e.g. for synchronization.
▪ This login type can be set to Enable Sharing.▪ This login type is by design not compatible with OIDC authentication.
c. User entered, stored in database
User login to ownCloud and providing credentials to access the CWND mountare completely separated. After logging in to ownCloud, the user may see hisCWND mounts marked inaccessible. To regain access, the user must enter hisshare credentials in Settings › Personal › Storage which are then stored intothe ownCloud database. As the credentials to access CWND are taken from thedatabase, a user logout will not stop CWND access and serving data iscontinued, e.g. for synchronization.
▪ This login type can be set to Enable Sharing.▪ This login type is by design the only one compatible with OIDC
authentication.
Figure 7. Re-enter Mount Access Credentials
4. Configure this mount point by adding data into the corresponding fields
The password for the Service Account can be temporarily any value to satisfy thecreation of the mount point. The functional password is entered in the next step.
560 | External Storage

Figure 8. Enter Connection Info and the Service Account
When everything has been entered correctly, the mount point gets a green buttonon the left.
5. Enter the Password of the Service Account
First get the <mount id> of the newly created mount point by running thecommand below in a shell:
sudo -u www-data php occ files_external:list --short
This will produce an output like the following:
+----------+-------------+------------------+-------------------+------+-------+| Mount ID | Mount Point | Applicable Users | Applicable Groups | Auth | Type |+----------+-------------+------------------+-------------------+------+-------+| 1 | /SFTP | All | | User | Admin || 2 | /CWND | All | | User | Admin |+----------+-------------+------------------+-------------------+------+-------+
Use the <mount-id> number of your freshly created CWND mount for the nextcommand:
sudo -u www-data php occ wnd:set-service-account <mount-id>
This command will ask you for the password of the used Service Account and storesit encrypted in the database.
If the password for the SA changes, you have to redo this step foreach CWND mount point.
Troubleshooting
If you encounter issues using Windows network drive, then try the followingtroubleshooting steps:
First check the connection to the share by using smbclient on the command line of theownCloud server. Here is an example:
smbclient -U Username -L //Servername
Take the example of attempting to connect to the host MyHost, the share namedMyData using occ wnd:listen replacing user and password accordingly. Running the
External Storage | 561
following command would work:
sudo -u www-data php occ wnd:listen MyHost MyData user password
The command is case-sensitive, and that it must match the informationfrom the mount point configuration.
libsmbclient Issues
If your Linux distribution ships with libsmbclient 3.x, which is included in the Sambaclient, you may need to set up the HOME variable in Apache to prevent a segmentationfault. If you have libsmbclient 4.1.6 and higher, it doesn’t seem to be an issue, so youwon’t have to change your HOME variable. To set up the HOME variable on Ubuntu,modify the /etc/apache2/envvars file:
unset HOMEexport HOME=/var/www
In Red Hat/CentOS, modify the /etc/sysconfig/httpd file and add the following line toset the HOME variable in Apache:
export HOME=/usr/share/httpd
By default, CentOS has activated SELinux, and the httpd process can not makeoutgoing network connections. This will cause problems with the curl, ldap and sambalibraries. You’ll need to get around this to make this work. First, check the status:
getsebool -a | grep httpdhttpd_can_network_connect --> off
Then enable support for network connections:
setsebool -P httpd_can_network_connect 1
In openSUSE, modify the /usr/sbin/start_apache2 file:
export HOME=/var/lib/apache2
Restart Apache, open your ownCloud Admin page and start creating SMB/CIFSmounts.
Basic Setup for One ownCloud Server
1. Go to the admin settings and set up the required WND mounts. Be aware though,that there are some limitations. These are:a. ownCloud needs access to the Windows account password for the mounts to
update the file cache properly. This means that "login credentials, saved insession" won’t work with the listener. ownCloud suggests to use "logincredentials, saved in DB" as the best replacement instead.
562 | External Storage
b. The $user placeholder for the share name, such as //host/$user/path/to/root,providing a share which is accessible per/user won’t work with the listener. Thisis because the listener won’t scale, as you’ll need to setup one listener per/shareequals one listener per user. As a result, you’ll end up with too many listeners.An alternative is, to provide a common share for the users and use the $userplaceholder in the root, such as //host/share/$user/folder.
2. Start the wnd:listen process if it’s not already started, ideally running it as aservice. If it isn’t running, no notification are stored. The listener stores thenotifications. Any change in the mount point configuration, such as adding orremoving new mounts, and logins by new users, won’t affect the behavior, so thereis no need to restart the listener in those cases.
In case you have several mount point configurations, note that each listenerattaches to one host and share. If there are several mount configurations targetingdifferent shares, you’ll need to spawn one listener for each. For example, if youhave one configuration with 10.0.0.2/share1 and another with 10.0.0.2/share2,you’ll need to spawn 2 listeners, one for the first configuration and another for thesecond.
3. Run the wnd:process-queue periodically, usually via a Cron job. The commandprocesses all the stored notifications for a specific host and share. If you haveseveral, you could set up several Cron jobs, one for each host and share withdifferent intervals, depending on the load or update urgency. As a simple example,you could run the command every 2 minutes for one server and every 5 minutes foranother.
As said, the command processes all the stored notifications, squeeze them and scanthe resulting folders. The process might crash if there are too many notifications, or ifit has too many storages to update. The --chunk-size option will help by making thecommand process all the notifications in buckets of that size.
On the one hand the memory usage is reduced, on the other hand there is morenetwork activity. We recommend using the option with a value high enough to processa large number of notifications, but not so large to crash the process. Between 200and 500 should be fine, and we’ll likely process all the notifications in one go.
Password Options
There are several ways to supply a password:
1. Interactively in response to a password prompt.
sudo -u www-data php occ wnd:listen <host> <share> <username>
2. Sent as a parameter to the command.
sudo -u www-data php occ wnd:listen <host> <share> <username><password>
3. Read from a file, using the --password-file switch to specify the file to read from.Note, that the password must be in plain text inside the file, and neither spaces nornewline characters will be removed from the file by default, unless the --password-trim option is added. The password file must be readable by the apache user (orwww-data)
External Storage | 563
sudo -u www-data php occ wnd:listen <host> <share> <username> \ --password-file=/my/secret/password/file
sudo -u www-data php occ wnd:listen <host> <share> <username> \ --password-file=/my/secret/password/file \ --password-trim
If you use the --password-file switch, the entire contents of the filewill be used for the password, so please be careful with newlines.
If using --password-file make sure that the file is only readable bythe apache / www-data user and inaccessible from the web. Thisprevents tampering or leaking of the information. The passwordwon’t be leaked to any other user using ps.
4. Using 3rd party software to store and fetch the password. When using this option,the 3rd party app needs to show the password as plaintext on standard output.
Reduce WND Notifier Memory Usage
The WND in-memory notifier for password changes provides the ability to notify allaffected WND storages to reset their passwords. This feature is intended to prevent apassword lockout for the user in the backend. However, this functionality can consumea significant amount of memory. To disable it, add the following configuration to yourconfig/config.php.:
'wnd.in_memory_notifier.enable' => false,
The password will be reset on the next request, regardless of the flagsetting.
3rd Party Software Examples
Third party password managers or processes can be integrated. The only requirementis that they have to provide the password in plain text somehow. If not, additionaloperations might be required to get the password as plain text and inject it in thelistener.
plainpass
This provides a bit more security because the /tmp/plainpass password as shown belowshould be owned by root and only root should be able to read the file (0400permissions); Apache, particularly, shouldn’t be able to read it. It’s expected that rootwill be the one to run this command.
cat /tmp/plainpass | sudo -u www-data php occ wnd:listen <host> <share><username> --password-file=-
base64
Similar to plainpass, the content in this case gets encoded in the Base64 format.
564 | External Storage
There’s not much security, but it has additional obfuscation.
base64 -d /tmp/encodedpass | \ sudo -u www-data php occ wnd:listen <host> <share> <username> --password-file=-
pass
Example using "pass"
• You can go through manage passwords from the command line to set up thekeyring for whoever will fetch the password (probably root) and then usesomething like the following:
pass the-password-name | sudo -u www-data php occ wnd:listen <host> <share><username> --password-file=-
HashiCorp Vault
This example uses Vault as the secrets store. See HCP Vault on how to setup thesecrets store. Then use something like the following:
vault kv get -field=password secret/samba | sudo -u www-data php occ wnd:listen<host> <share> <username> --password-file=-
Use Vault’s ACLs to limit access to the token. Destroy the token after starting theservice during boot with systemd.
Password Option Precedence
If both the argument and the option are passed, e.g.,
sudo -u www-data php occ wnd:listen <host> <share> <username> <password>--password-file=/tmp/pass`
then the --password-file option will take precedence.
Optimizing wnd:process-queue
Do not use this option if the process-queue is fast enough. The optionhas some drawbacks, specifically regarding password changes in thebackend.
wnd:process-queue creates all the storages that need to be updated from scratch. Todo so, we need to fetch all the users from all the backends (currently only the onesthat have logged in at least once because the others won’t have the storages that we’llneed updates).
To optimize this, wnd:process-queue make use of two switches: –serializer-type and–serializer-param. These serialize storages for later use, so that future executions don’tneed to fetch the users, saving precious time — especially for large organizations.
External Storage | 565
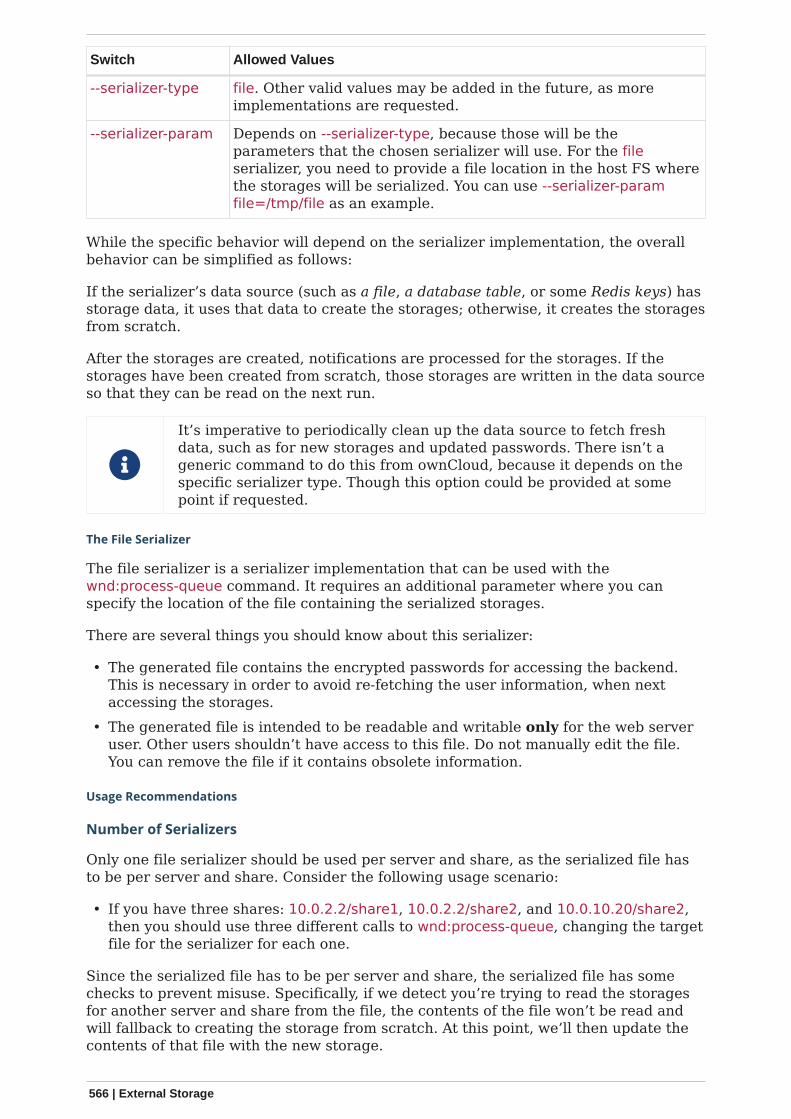
Switch Allowed Values
--serializer-type file. Other valid values may be added in the future, as moreimplementations are requested.
--serializer-param Depends on --serializer-type, because those will be theparameters that the chosen serializer will use. For the fileserializer, you need to provide a file location in the host FS wherethe storages will be serialized. You can use --serializer-paramfile=/tmp/file as an example.
While the specific behavior will depend on the serializer implementation, the overallbehavior can be simplified as follows:
If the serializer’s data source (such as a file, a database table, or some Redis keys) hasstorage data, it uses that data to create the storages; otherwise, it creates the storagesfrom scratch.
After the storages are created, notifications are processed for the storages. If thestorages have been created from scratch, those storages are written in the data sourceso that they can be read on the next run.
It’s imperative to periodically clean up the data source to fetch freshdata, such as for new storages and updated passwords. There isn’t ageneric command to do this from ownCloud, because it depends on thespecific serializer type. Though this option could be provided at somepoint if requested.
The File Serializer
The file serializer is a serializer implementation that can be used with thewnd:process-queue command. It requires an additional parameter where you canspecify the location of the file containing the serialized storages.
There are several things you should know about this serializer:
• The generated file contains the encrypted passwords for accessing the backend.This is necessary in order to avoid re-fetching the user information, when nextaccessing the storages.
• The generated file is intended to be readable and writable only for the web serveruser. Other users shouldn’t have access to this file. Do not manually edit the file.You can remove the file if it contains obsolete information.
Usage Recommendations
Number of Serializers
Only one file serializer should be used per server and share, as the serialized file hasto be per server and share. Consider the following usage scenario:
• If you have three shares: 10.0.2.2/share1, 10.0.2.2/share2, and 10.0.10.20/share2,then you should use three different calls to wnd:process-queue, changing the targetfile for the serializer for each one.
Since the serialized file has to be per server and share, the serialized file has somechecks to prevent misuse. Specifically, if we detect you’re trying to read the storagesfor another server and share from the file, the contents of the file won’t be read andwill fallback to creating the storage from scratch. At this point, we’ll then update thecontents of that file with the new storage.
566 | External Storage
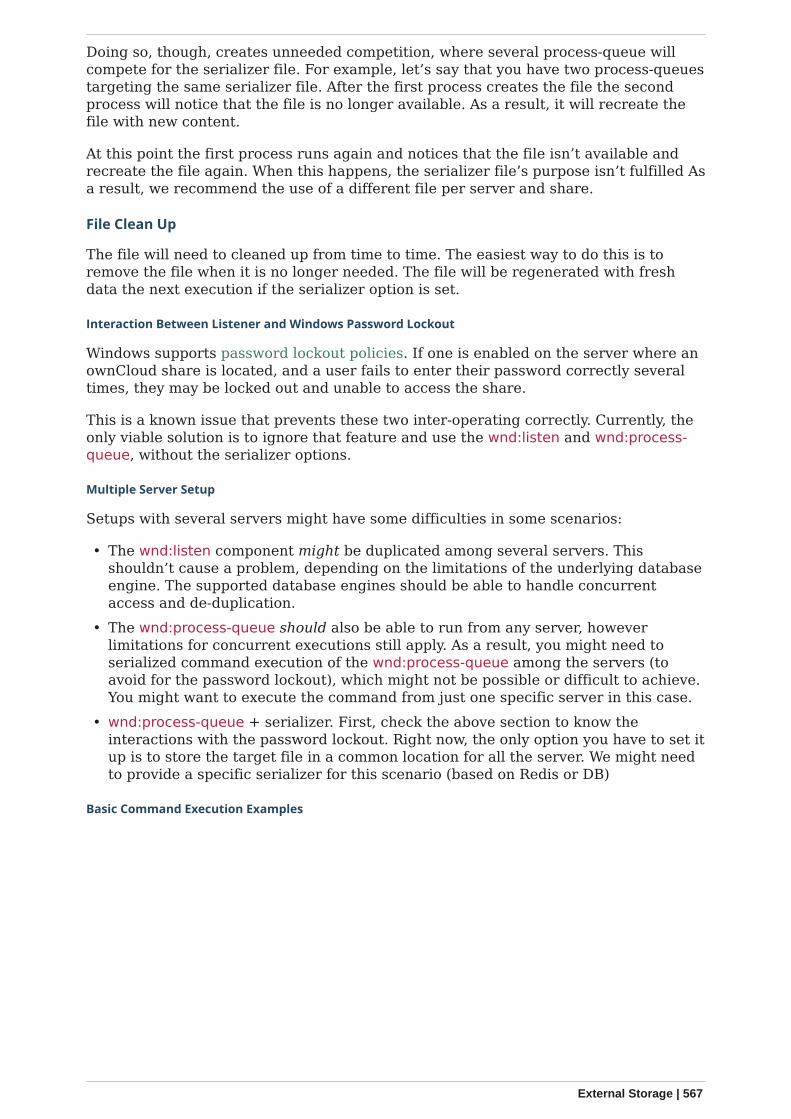
Doing so, though, creates unneeded competition, where several process-queue willcompete for the serializer file. For example, let’s say that you have two process-queuestargeting the same serializer file. After the first process creates the file the secondprocess will notice that the file is no longer available. As a result, it will recreate thefile with new content.
At this point the first process runs again and notices that the file isn’t available andrecreate the file again. When this happens, the serializer file’s purpose isn’t fulfilled Asa result, we recommend the use of a different file per server and share.
File Clean Up
The file will need to cleaned up from time to time. The easiest way to do this is toremove the file when it is no longer needed. The file will be regenerated with freshdata the next execution if the serializer option is set.
Interaction Between Listener and Windows Password Lockout
Windows supports password lockout policies. If one is enabled on the server where anownCloud share is located, and a user fails to enter their password correctly severaltimes, they may be locked out and unable to access the share.
This is a known issue that prevents these two inter-operating correctly. Currently, theonly viable solution is to ignore that feature and use the wnd:listen and wnd:process-queue, without the serializer options.
Multiple Server Setup
Setups with several servers might have some difficulties in some scenarios:
• The wnd:listen component might be duplicated among several servers. Thisshouldn’t cause a problem, depending on the limitations of the underlying databaseengine. The supported database engines should be able to handle concurrentaccess and de-duplication.
• The wnd:process-queue should also be able to run from any server, howeverlimitations for concurrent executions still apply. As a result, you might need toserialized command execution of the wnd:process-queue among the servers (toavoid for the password lockout), which might not be possible or difficult to achieve.You might want to execute the command from just one specific server in this case.
• wnd:process-queue + serializer. First, check the above section to know theinteractions with the password lockout. Right now, the only option you have to set itup is to store the target file in a common location for all the server. We might needto provide a specific serializer for this scenario (based on Redis or DB)
Basic Command Execution Examples
External Storage | 567
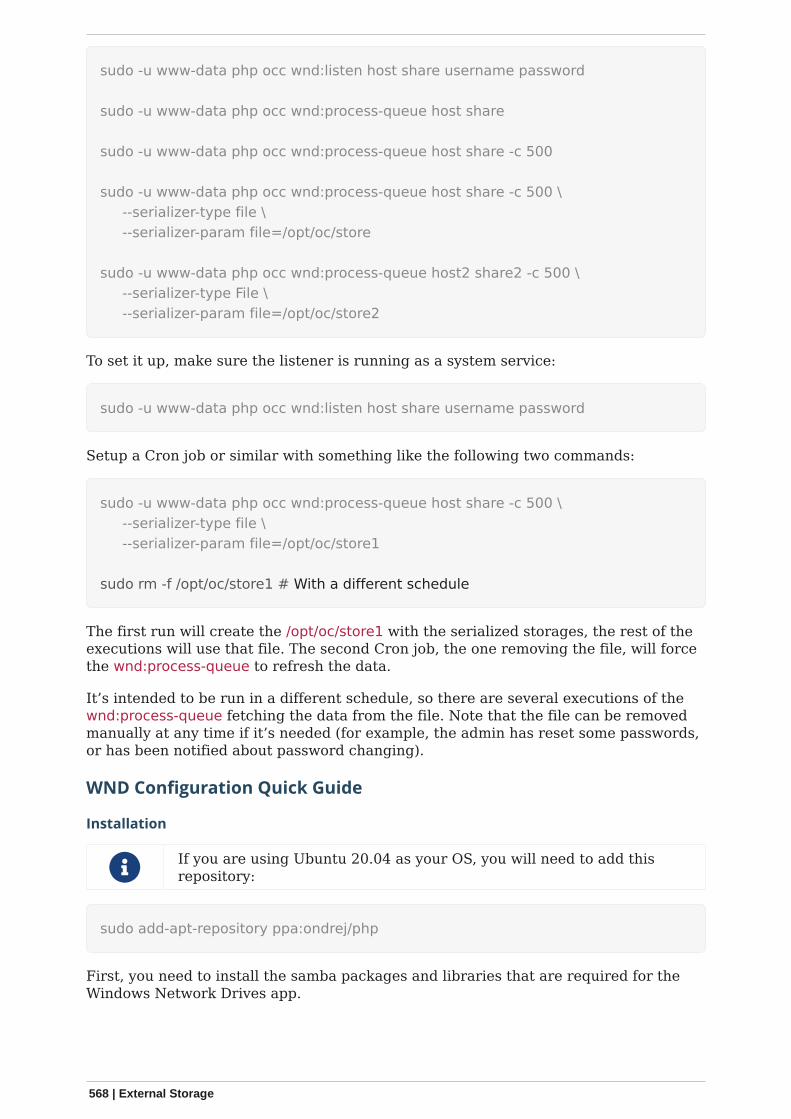
sudo -u www-data php occ wnd:listen host share username password
sudo -u www-data php occ wnd:process-queue host share
sudo -u www-data php occ wnd:process-queue host share -c 500
sudo -u www-data php occ wnd:process-queue host share -c 500 \ --serializer-type file \ --serializer-param file=/opt/oc/store
sudo -u www-data php occ wnd:process-queue host2 share2 -c 500 \ --serializer-type File \ --serializer-param file=/opt/oc/store2
To set it up, make sure the listener is running as a system service:
sudo -u www-data php occ wnd:listen host share username password
Setup a Cron job or similar with something like the following two commands:
sudo -u www-data php occ wnd:process-queue host share -c 500 \ --serializer-type file \ --serializer-param file=/opt/oc/store1
sudo rm -f /opt/oc/store1 # With a different schedule
The first run will create the /opt/oc/store1 with the serialized storages, the rest of theexecutions will use that file. The second Cron job, the one removing the file, will forcethe wnd:process-queue to refresh the data.
It’s intended to be run in a different schedule, so there are several executions of thewnd:process-queue fetching the data from the file. Note that the file can be removedmanually at any time if it’s needed (for example, the admin has reset some passwords,or has been notified about password changing).
WND Configuration Quick Guide
Installation
If you are using Ubuntu 20.04 as your OS, you will need to add thisrepository:
sudo add-apt-repository ppa:ondrej/php
First, you need to install the samba packages and libraries that are required for theWindows Network Drives app.
568 | External Storage
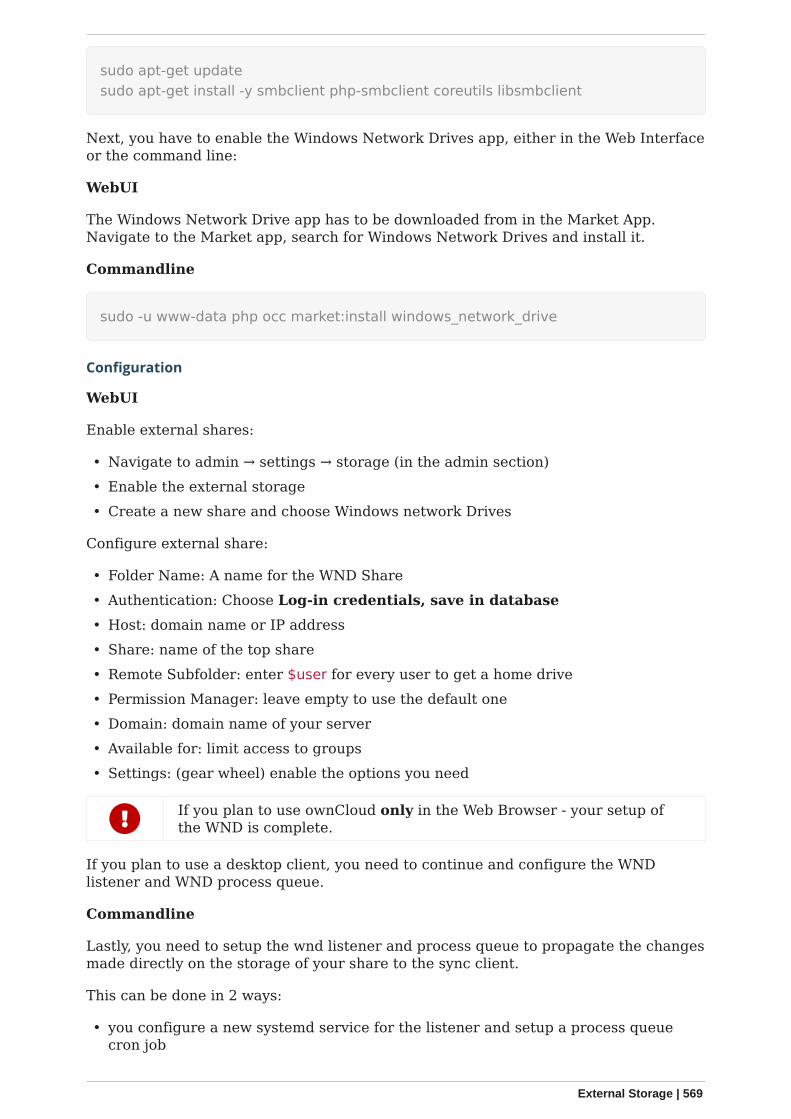
sudo apt-get updatesudo apt-get install -y smbclient php-smbclient coreutils libsmbclient
Next, you have to enable the Windows Network Drives app, either in the Web Interfaceor the command line:
WebUI
The Windows Network Drive app has to be downloaded from in the Market App.Navigate to the Market app, search for Windows Network Drives and install it.
Commandline
sudo -u www-data php occ market:install windows_network_drive
Configuration
WebUI
Enable external shares:
• Navigate to admin → settings → storage (in the admin section)• Enable the external storage• Create a new share and choose Windows network Drives
Configure external share:
• Folder Name: A name for the WND Share• Authentication: Choose Log-in credentials, save in database• Host: domain name or IP address• Share: name of the top share• Remote Subfolder: enter $user for every user to get a home drive• Permission Manager: leave empty to use the default one• Domain: domain name of your server• Available for: limit access to groups• Settings: (gear wheel) enable the options you need
If you plan to use ownCloud only in the Web Browser - your setup ofthe WND is complete.
If you plan to use a desktop client, you need to continue and configure the WNDlistener and WND process queue.
Commandline
Lastly, you need to setup the wnd listener and process queue to propagate the changesmade directly on the storage of your share to the sync client.
This can be done in 2 ways:
• you configure a new systemd service for the listener and setup a process queuecron job
External Storage | 569
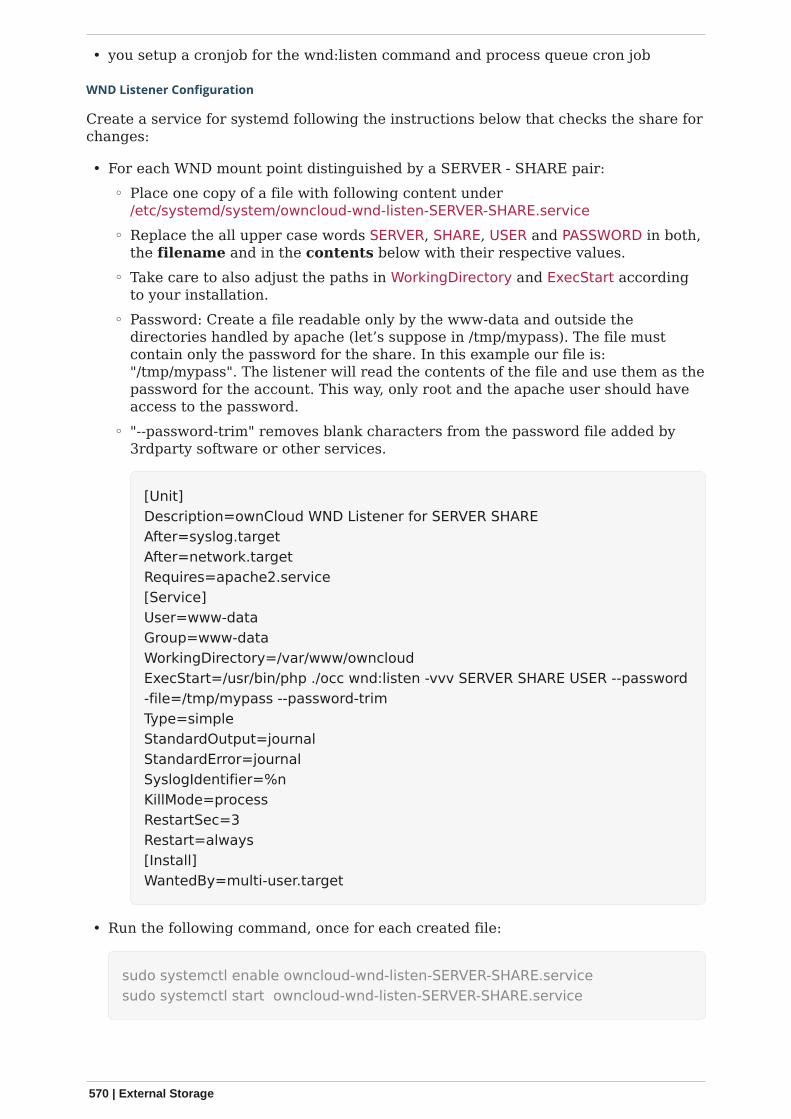
• you setup a cronjob for the wnd:listen command and process queue cron job
WND Listener Configuration
Create a service for systemd following the instructions below that checks the share forchanges:
• For each WND mount point distinguished by a SERVER - SHARE pair:◦ Place one copy of a file with following content under
/etc/systemd/system/owncloud-wnd-listen-SERVER-SHARE.service◦ Replace the all upper case words SERVER, SHARE, USER and PASSWORD in both,
the filename and in the contents below with their respective values.◦ Take care to also adjust the paths in WorkingDirectory and ExecStart according
to your installation.◦ Password: Create a file readable only by the www-data and outside the
directories handled by apache (let’s suppose in /tmp/mypass). The file mustcontain only the password for the share. In this example our file is:"/tmp/mypass". The listener will read the contents of the file and use them as thepassword for the account. This way, only root and the apache user should haveaccess to the password.
◦ "--password-trim" removes blank characters from the password file added by3rdparty software or other services.
[Unit]Description=ownCloud WND Listener for SERVER SHAREAfter=syslog.targetAfter=network.targetRequires=apache2.service[Service]User=www-dataGroup=www-dataWorkingDirectory=/var/www/owncloudExecStart=/usr/bin/php ./occ wnd:listen -vvv SERVER SHARE USER --password-file=/tmp/mypass --password-trimType=simpleStandardOutput=journalStandardError=journalSyslogIdentifier=%nKillMode=processRestartSec=3Restart=always[Install]WantedBy=multi-user.target
• Run the following command, once for each created file:
sudo systemctl enable owncloud-wnd-listen-SERVER-SHARE.servicesudo systemctl start owncloud-wnd-listen-SERVER-SHARE.service
570 | External Storage

WND Process Queue Configuration
Create or add a crontab file in /etc/cron.d/oc-wnd-process-queue.
• Make a crontab entry to run a script iterating over all SERVER SHARE pairs with anappropriate occ wnd:process-queue command. The commands must be strictlysequential. This can be done by using flock -n and tuning the -c parameter of occwnd:process-queue
* * * * * sudo -u www-data /usr/bin/php /var/www/owncloud/occ wnd:process-queue<HOST> <SHARE>
Execution Serialization
Parallel runs of wnd:process-queue might lead to a user lockout. The reason for this, isthat several wnd:process-queue might use the same wrong password because it hasn’tbeen updated by the time they fetch it.
It’s recommended to force the execution serialization of the wnd:process-queuecommand. You might want to use Anacron, which seems to have an option for thisscenario, or wrap the command with flock.
If you need to serialize the execution of the wnd:process-queue, check the followingexample with flock
* * * * * flock -n /tmp/wnd001 occ wnd:process-queue server1 share1* * * * * flock -n /tmp/wnd002 occ wnd:process-queue server1 share2* * * * * flock -n /tmp/wnd003 occ wnd:process-queue server2 share3
Troubleshooting
• process queue will not work if there is a backslash in the share path configured inwebui.
If you encounter issues using Windows network drive, then try the followingtroubleshooting steps:
Check the connection to the share by using smbclient on the command line of theownCloud server. Here is an example:
smbclient -U Username -L //Servername
Take the example of attempting to connect to the share named MyData using occwnd:listen. Running the following command would work:
sudo -u www-data php occ wnd:listen MyHost MyData svc_owncloud password
The command is case-sensitive, and it must match the information from the mountpoint configuration.
• When the output of the occ process-queue .. command shows 0 Storages found,then this means, that there was no corresponding external storage configurationfound, because:
External Storage | 571
1. The casing between calling the process queue and the web interface does notexactly match.
2. The authentication method is not correctly configured, it needs to be Log-incredentials, save in database
Enterprise File Management
In this section you will find all the details you need to configure enterprise filemanagement in ownCloud..
Advanced File Tagging With the Workflow App
Introduction
The Workflow App enables admins to specify rules and conditions (file size, filemimetype, group membership and more) to automatically assign tags to uploadedfiles. Based on those tags automated file operations ('Workflow actions') like FileRetention (automated file retention periods) can be conducted. The app has threeparts:
• Tag Manager• Automatic Tagging• Retention
The Workflow App should be enabled by default (Apps page), and the threeconfiguration modules will be visible on your ownCloud Admin page. See Tagging Filesin the ownCloud User manual to learn how to apply and filter tags on files.
Tag Manager
To use tag management, administrators need to install and enable theCollaborative Tags Management app.
The Tag Manager is used for creating new tags, editing existing tags, and deletingtags. Tags may be marked as Visible, Static, Restricted, or Invisible.
VisibleAll users may see, rename, and apply these tags to files and folders.
StaticOnly users in the specified groups can assign and un-assign the tag to a file.However, only admins can rename and edit the tag.
RestrictedTags are assignable and editable only to the user groups that you select. Otherusers can filter files by restricted tags, but cannot tag files with them or renamethem. The tags are marked (restricted).
InvisibleTags are visible only to ownCloud admins.
To access this functionality, select Settings › Admin › Workflow & Tags.
572 | Enterprise File Management
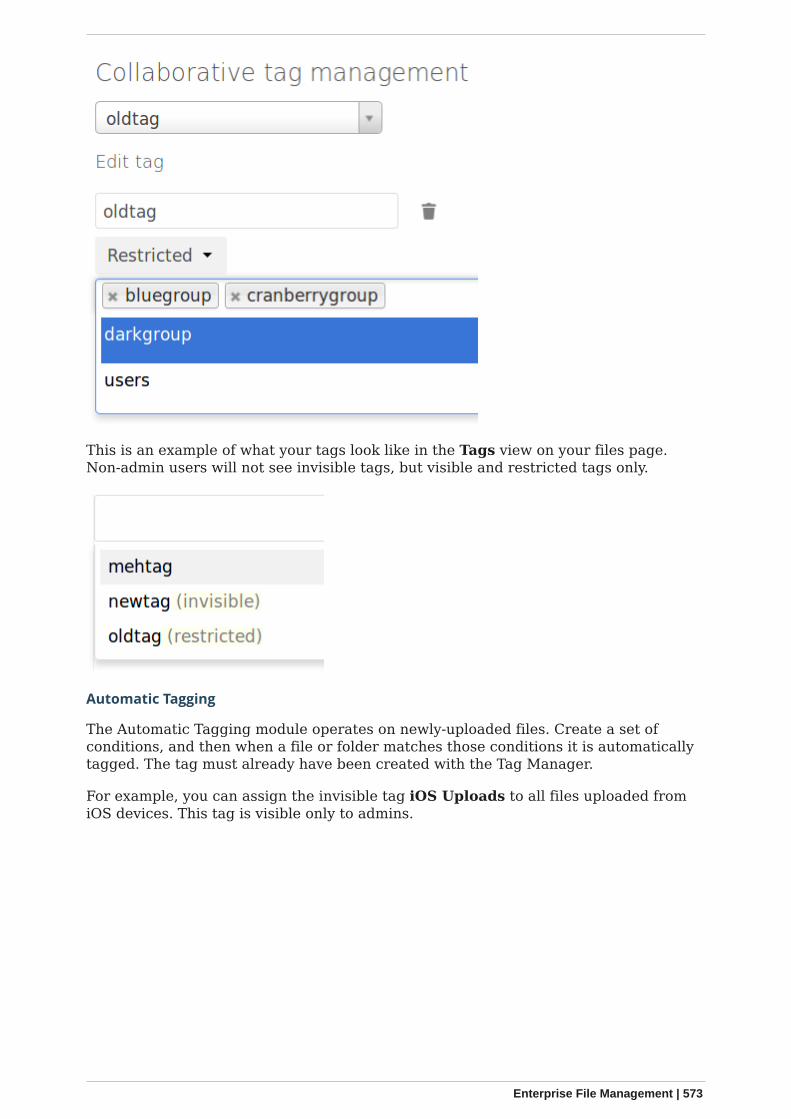
This is an example of what your tags look like in the Tags view on your files page.Non-admin users will not see invisible tags, but visible and restricted tags only.
Automatic Tagging
The Automatic Tagging module operates on newly-uploaded files. Create a set ofconditions, and then when a file or folder matches those conditions it is automaticallytagged. The tag must already have been created with the Tag Manager.
For example, you can assign the invisible tag iOS Uploads to all files uploaded fromiOS devices. This tag is visible only to admins.
Enterprise File Management | 573
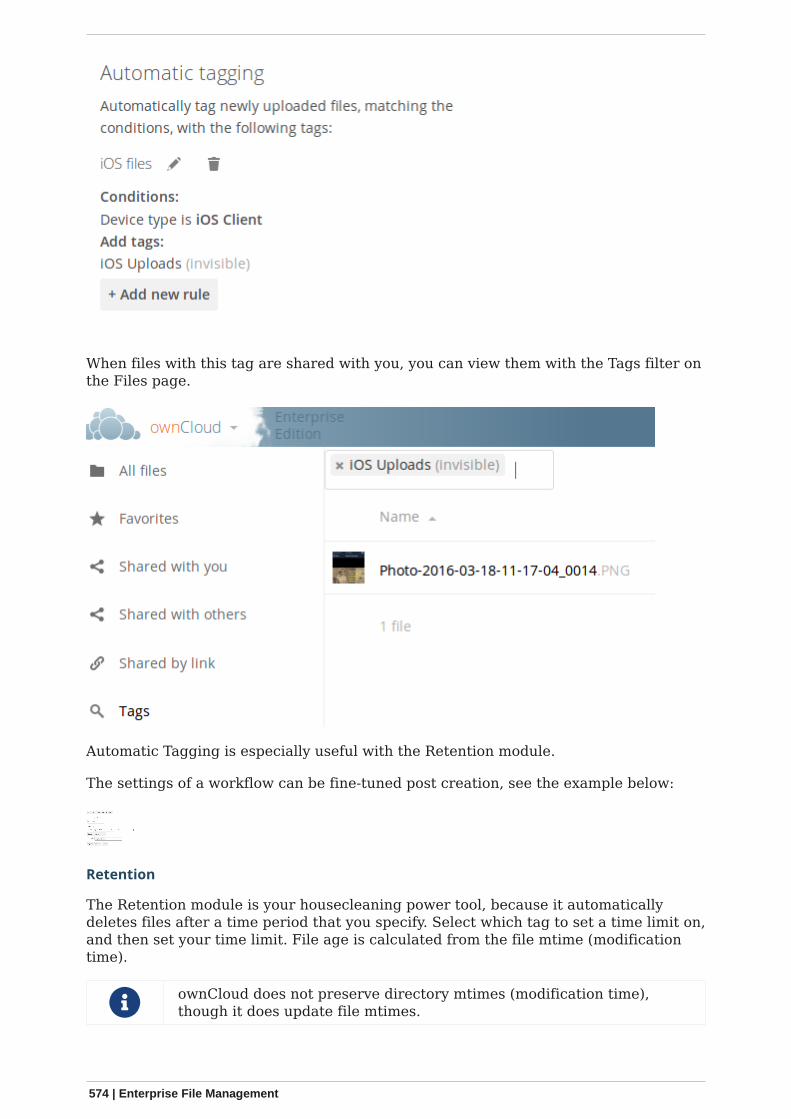
When files with this tag are shared with you, you can view them with the Tags filter onthe Files page.
Automatic Tagging is especially useful with the Retention module.
The settings of a workflow can be fine-tuned post creation, see the example below:
Retention
The Retention module is your housecleaning power tool, because it automaticallydeletes files after a time period that you specify. Select which tag to set a time limit on,and then set your time limit. File age is calculated from the file mtime (modificationtime).
ownCloud does not preserve directory mtimes (modification time),though it does update file mtimes.
574 | Enterprise File Management

For best performance, retention tags should be applied high in your file hierarchy. Ifsubfolders have the same tags as their parent folders, their tags must also beprocessed, so it will take a little longer.
Retention Engines
There are two retention engines that further allow you to fine-tune your retentionsettings:
TagBasedRetentionThis is the default setting and checks files that have a particular tag assigned. Thenit checks (depth-first) the children of the tagged item, before continuing with theother tagged items. Children that have already been checked will not be checked asecond time.
This is optimised for processing smaller numbers of files that have multipleretention tags.
UserBasedRetentionExamines files per user. It first iterates over all files and folders (siblings first), thenexamines the tags for those items and checks their respective retention periods.This is optimised for many files with few retention tags.
You can define the way that the retention engine behaves by adding the followingconfig.php setting. The value can be either tagbased (default) or userbased.
'workflow.retention_engine' => 'userbased',
File Lifecycle Management
Introduction
The File Lifecycle Management extension allows service providers to manage thelifecycle of files within ownCloud to
• keep storage usage under control by limiting the time users can work with filesbefore they are cleaned up automatically
• comply with regulations (like GDPR or company policies) by imposing automatedretention and deletion policies for files that contain e.g., personal data and mayonly be stored in the company for a certain period of time.
To impose a workflow of Use ⇒ Archive ⇒ Delete, the extension equips ownCloud witha dedicated archive and allows administrators to define rules for automated archiving(days passed since upload) and subsequent deletion of files (days passed sincearchiving). Only files are archived as folders do not consume storage space andexisting folder structures should be kept available. The archiving and deletionprocesses are controlled by background jobs.
Enterprise File Management | 575

Depending on the desired level of enforcement, the extension provides two policies tocontrol the restoration of files from the archive if they are still needed:
• Soft policy: Users can restore files in self-service• Hard policy: Only administrators or group administrators can restore files on
request
Users can view the lifecycle status for a file and see when the file is scheduled forarchiving or deletion. All lifecycle events of a file are displayed transparently. They canbe tracked for individual files as well as for a whole user account using the Activitystream.
To stay informed, users can also receive regular Activity summaries by email. Forauditing purposes, the extension integrates with the Auditing app to provide all eventsof interest in the logs.
Setup & Configuration
See the lifecycle occ command set for details when using the command line.
Archive Location
By default, archived files are stored within the ownCloud data directory but outsidethe users' files directories so that they are not accessible using the Web UI and otherclients.
Type Location
User files /<datadir>/$userid/files
Archived files /<datadir>/$userid/archive/files/
Setting Upload Times for Existing Files
File Lifecycle Management uses the upload time of files (server time at which theyfirst appeared on the ownCloud server) to determine when to archive them. AsownCloud Server generally does not store this metadata, the File LifecycleManagement extension takes care of this when it is enabled.
When File Lifecycle Management is set up on an existing ownCloud installation, youtherefore have to set an upload time for all files that existed before the extension hasbeen enabled. The same applies if it was temporarily disabled. Only then can thearchiving policies work. To set an upload time for all files that do not yet have one, youcan use the occ command lifecycle:set-upload-time.
Files without an upload time will not be considered for archiving.
You only have to conduct this process once when setting up FileLifecycle Management on an installation with existing files or if it wastemporarily disabled . Files added after enabling File LifecycleManagement will be tracked automatically.
Example to set missing upload time values to November, 1st 2019:
576 | Enterprise File Management
sudo -u www-data php occ lifecycle:set-upload-time 2019-11-01
The extension only considers files. Folder structures are kept available.
Policy Configuration
Overview
File Lifecycle Management uses policies to determine which files to archive and when,as well as when to expire the files from archive. In addition, a soft and a hard policyare available to control whether users can restore archived files in self-service or not.
Three options are available for controlling the archiving and expiration policies, all setvia the config:app:set occ command under the files_lifecycle app:
• archive_period - The number of days passed after upload (or restore) that files willbe archived
• expire_period - The number of days passed after archiving that files will bepermanently deleted
• excluded_groups - Allows defining groups of users that are exempt from theLifecycle policies (comma-separated group ids)
Example to set the time passed since upload (or restore) for archiving files to 90 days:
sudo -u www-data php occ config:app:set files_lifecycle archive_period --value='90'
To query existing values, use this example command:
sudo -u www-data php occ config:app:get files_lifecycle archive_period
Restoration Policies for Users
Soft Policy
The soft policy aims at use cases where users should be allowed to restore files fromthe archive in self-service if they are still needed. It imposes a soft archivingenforcement but on the other hand relieves IT departments when archived files needto be restored. The soft policy is used by default. To switch from the hard policy to thesoft policy, use this occ command:
sudo -u www-data php occ config:app:set files_lifecycle policy --value='soft'
Hard Policy
The hard policy is designed to enforce strict controls on user data, forcing archivingafter the defined time and requiring escalated permissions in order to restore. If thearchived data is still needed, users need to get in contact with a privileged managerand request the restoration.
Enterprise File Management | 577
When the hard policy is in place only administrators (or also groupadministrators, depending on the configuration) are able to restore filesfrom the archive by impersonating the respective users. TheImpersonate app has to be installed and enabled as a prerequisite.Apart from that, system administrators can also use occ commands torestore data from the archive (see section Restoring Files).
To put the hard policy in place, use this occ command:
sudo -u www-data php occ config:app:set files_lifecycle policy --value='hard'
Archive and Expiration Background Jobs
To put File Lifecycle Management into actual operation, there are two occ commandsfor archiving files and for permanently deleting them from the archive. Scanning thedatabase for files that are due for archiving or expiration, given the chosen policies,can take some time. For this reason, these jobs are delegated to specific occcommands which should be executed using CRON on a daily schedule.
Archiving Background Job
To move files scheduled for archiving (days since upload/restore > archive_time) intothe archive, execute the following occ command:
sudo -u www-data php occ lifecycle:archive
There is a dry-run mode (append -d) that simulates the execution of thiscommand to allow checking the configuration before putting the actualprocess in place.
Archive Expiration Background Job
To permanently delete files from the archive that have met the policy rules (days sincearchiving > expire_period), execute the following occ command:
sudo -u www-data php occ lifecycle:expire
There is a dry-run mode (append -d) that simulates the execution of thiscommand to allow checking the configuration before putting the actualprocess in place.
Restoring Files
If archived files are still needed, users can restore them in self-service (soft policy) orhave to request the restoration via privileged managers (hard policy).
When files have been restored, they can again be used for the sameamount of time as they were initially available.
Apart from that, system administrators can restore files from the archive using the occcommand lifecycle:restore:
578 | Enterprise File Management
Restoration by Path
When a user alice requests to restore all files, e.g., in the folder/work/projects/project1, a system administrator can execute the following command:
sudo -u www-data php occ lifecycle:restore/alice/archive/files/work/projects/project1
Restoring All Files from All Archives
File Lifecycle Management provides a way to restore all files from all archives back totheir owners' file directories. To do this, system administrators can use the restore-allocc command:
sudo -u www-data php occ lifecycle:restore-all
The command will restore all files from all users and report on the progress.
There is a dry-run mode (append -d) that simulates the execution of thiscommand to allow checking the configuration before putting the actualprocess in place.
Enabling/Disabling the User Interface Components
In some scenarios it can be desired to disable the whole user interface for this app.This can be done by setting the following configuration value:
sudo -u www-data php occ config:app:set files_lifecycle disable_ui --value='yes'
To enable the user interface components again, this config value needs to be removed:
sudo -u www-data php occ config:app:delete files_lifecycle disable_ui
Audit Events
During archiving, restoring and expiration, Audit events are emitted. Logging those tothe audit.log requires the minimum version 2.0.0 of the Auditing app.
Further Notes about Archived Files
• File shares will disappear after archiving. When restoring archived files, shares willalso be restored.
• Users' archives currently can’t be transferred with the occ command transfer-ownership
• Files within a user’s trash bin are not archived. The regular trash bin deletionpolicies have to be used to take care of those.
• Archived files count towards the user’s quota
Enterprise Firewall Configuration
In this section you will find all the details you need to configure enterprise firewall
Enterprise Firewall Configuration | 579
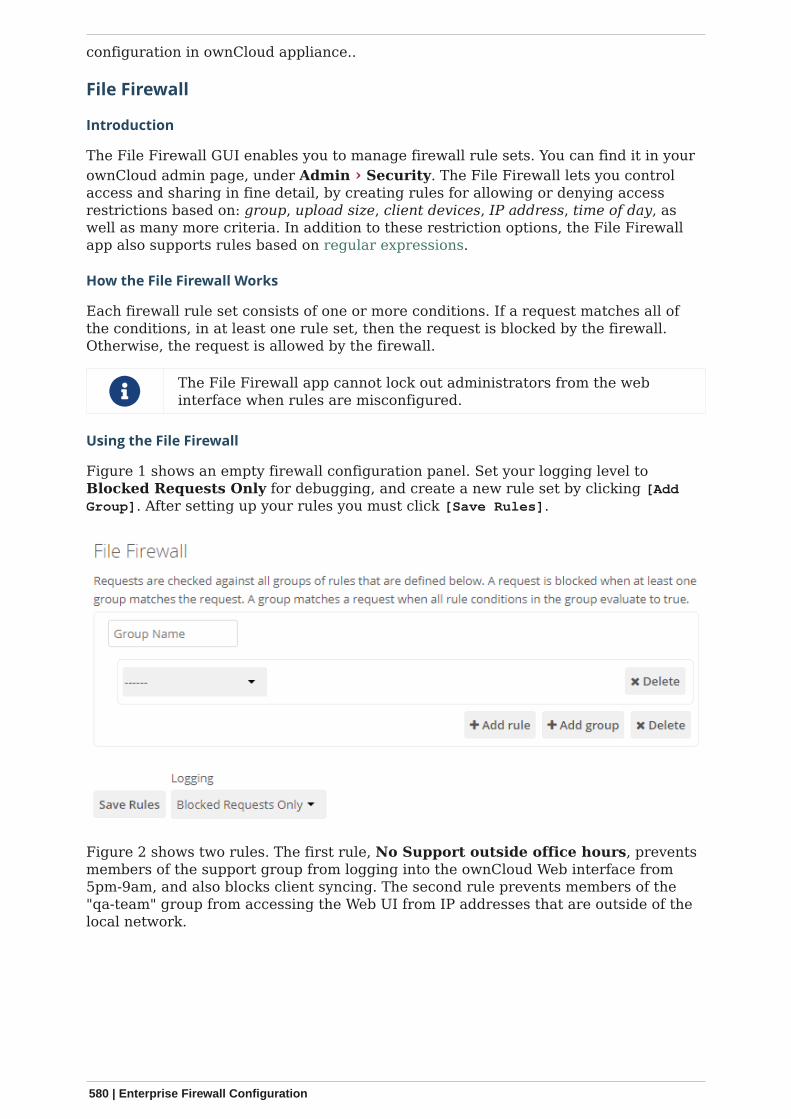
configuration in ownCloud appliance..
File Firewall
Introduction
The File Firewall GUI enables you to manage firewall rule sets. You can find it in yourownCloud admin page, under Admin › Security. The File Firewall lets you controlaccess and sharing in fine detail, by creating rules for allowing or denying accessrestrictions based on: group, upload size, client devices, IP address, time of day, aswell as many more criteria. In addition to these restriction options, the File Firewallapp also supports rules based on regular expressions.
How the File Firewall Works
Each firewall rule set consists of one or more conditions. If a request matches all ofthe conditions, in at least one rule set, then the request is blocked by the firewall.Otherwise, the request is allowed by the firewall.
The File Firewall app cannot lock out administrators from the webinterface when rules are misconfigured.
Using the File Firewall
Figure 1 shows an empty firewall configuration panel. Set your logging level toBlocked Requests Only for debugging, and create a new rule set by clicking [AddGroup]. After setting up your rules you must click [Save Rules].
Figure 2 shows two rules. The first rule, No Support outside office hours, preventsmembers of the support group from logging into the ownCloud Web interface from5pm-9am, and also blocks client syncing. The second rule prevents members of the"qa-team" group from accessing the Web UI from IP addresses that are outside of thelocal network.
580 | Enterprise Firewall Configuration

All other users are not affected, and can log in anytime from anywhere.
Available Conditions
User Group
The user (is|is not) a member of the selected group.
User Agent
The User-Agent of the request (matches|does not match) the given string.
User Device
A shortcut for matching all known (android | ios | desktop) sync clients by their UserAgent string.
Request Time
The time of the request (has to|must not) be in a single range from beginning time toend time.
Request URL
The full page URL (has to contain) with a given string.
Request Type
The request (is a public link share|other) request.
Enterprise Firewall Configuration | 581

Request IP Range (IPv4) and IP Range (IPv6)
The request’s REMOTE_ADDR header (is|is not) matching the given IP range.
File Size Upload
When a file is uploaded the size has to be (less|greater or equal) to the given size.
File Mimetype Upload
Block a request based on the mimetype of a file being uploaded. The match can be thecomplete mimetype, part of the mimetype from the start or end of the mimetype.Negative matches are also supported; i.e., all mimetypes that don’t match the suppliedmimetype, or all mimetypes that don’t start or end with the partial mimetype supplied.
The full list of conditions is (File mimetype upload):
• is• is not• begins with• doesn’t begin with• ends with• doesn’t end with
The complete list of available mimetypes which ownCloud supports isavailable in the ownCloud core source.
Common Mimetypes
suffix mimetype
avi video/x-msvideo
exe application/x-ms-dos-executable
flv video/x-flv
mp4 video/mp4
mkv video/x-matroska
msi application/x-msi
php application/x-php
System File Tag
One of the parent folders or the file itself (is|is not) tagged with a System tag.
Regular Expression
The File Firewall supports regular expressions, allowing you to create custom rulesusing the following conditions:
• IP Range (IPv4)• IP Range (IPv6)• User agent• User group
582 | Enterprise Firewall Configuration
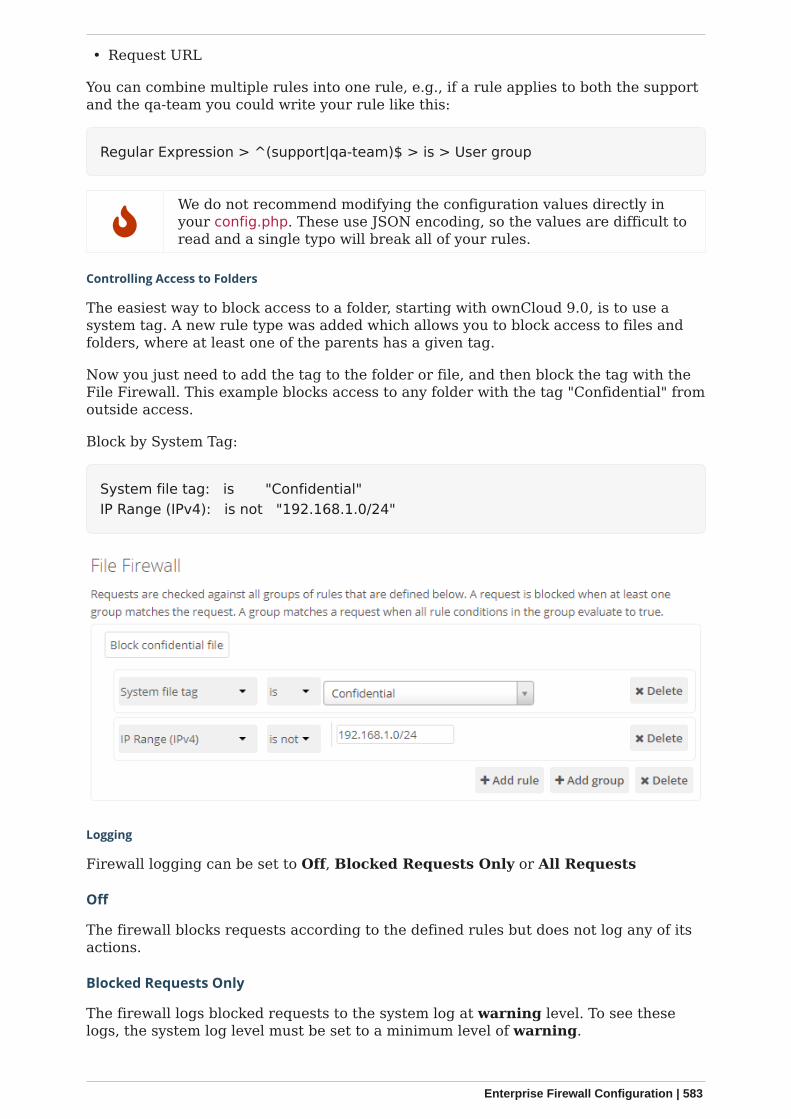
• Request URL
You can combine multiple rules into one rule, e.g., if a rule applies to both the supportand the qa-team you could write your rule like this:
Regular Expression > ^(support|qa-team)$ > is > User group
We do not recommend modifying the configuration values directly inyour config.php. These use JSON encoding, so the values are difficult toread and a single typo will break all of your rules.
Controlling Access to Folders
The easiest way to block access to a folder, starting with ownCloud 9.0, is to use asystem tag. A new rule type was added which allows you to block access to files andfolders, where at least one of the parents has a given tag.
Now you just need to add the tag to the folder or file, and then block the tag with theFile Firewall. This example blocks access to any folder with the tag "Confidential" fromoutside access.
Block by System Tag:
System file tag: is "Confidential"IP Range (IPv4): is not "192.168.1.0/24"
Logging
Firewall logging can be set to Off, Blocked Requests Only or All Requests
Off
The firewall blocks requests according to the defined rules but does not log any of itsactions.
Blocked Requests Only
The firewall logs blocked requests to the system log at warning level. To see theselogs, the system log level must be set to a minimum level of warning.
Enterprise Firewall Configuration | 583
All Requests
The firewall logs blocked and successful requests to the system log at warning andinfo levels respectively. To see all these logs, the system log level must be set to aminimum level of info.
Logging all requests can generate a large amount of log data. It isrecommended to only select all requests for short-term checking of rulesettings.
Custom Configuration for Branded Clients
If you are using branded ownCloud clients, you may define firewall.branded_clients inyour config.php to identify your branded clients in the firewall "User Device" rule.
The configuration is a User-Agent ⇒ Device map. Device must be one of the following:
• android• android_branded• ios• ios_branded• desktop• desktop_branded
The User-Agent is always compared all lowercase. By default the agent is comparedwith equals. When a trailing or leading asterisk, , is found, the agent is compared withstarts with or ends with. If the agent has both a leading and a trailing , the string mustappear anywhere. For technical reasons the User-Agent string must be at least 4characters, including wildcards. When you build your branded client you have theoption to create a custom User Agent.
In this example configuration you need to replace the example User Agent strings, forexample 'android_branded', with your own User Agent strings:
// config.php
'firewall.branded_clients' => array( 'my ownbrander android user agent string' => 'android_branded', 'my ownbrander second android user agent string' => 'android_branded', 'my ownbrander ios user agent string' => 'ios_branded', 'my ownbrander second ios user agent string' => 'ios_branded', 'my ownbrander desktop user agent string' => 'desktop_branded', 'my ownbrander second desktop user agent string' => 'desktop_branded',),
The Web UI dropdown then expands to the following options:
• Android Client - always visible• iOS Client - always visible• Desktop Client - always visible• Android Client (Branded) - visible when at least one android_branded is defined• iOS Client (Branded) - visible when at least one ios_branded is defined
584 | Enterprise Firewall Configuration
• Desktop Client (Branded) - visible when at least one desktop_branded is defined• All branded clients - visible when at least one of android_branded, ios_branded or
desktop_branded is defined• All non-branded clients - visible when at least one of android_branded, ios_branded
or desktop_branded is defined• Others (Browsers, etc.) - always visible
Then these options operate this way:
• The * Client options only match android, ios and desktop respectively.• The * Client (Branded) options match the *_branded agents equivalent.• All branded clients matches: android_branded, ios_branded and desktop_branded• All non-branded clients matches: android, ios and desktop
Installing & Upgrading ownCloud Enterprise Edition
Introduction
After you have completed your initial installation of ownCloud as detailed in theREADME, follow the instructions in The Installation Wizard to finish setting upownCloud. To upgrade your Enterprise server, refer to How to Upgrade Your ownCloudServer.
Manual Installation
Download the ownCloud archive from your account at https://customer.owncloud.com/owncloud, then follow the instructions at Manual Installation on Linux.
SELinux
Linux distributions that use SELinux need to take some extra steps so that ownCloudwill operate correctly under SELinux. Please see SELinux Configuration for somerecommended configurations.
License Keys
Introduction
You need to install a license key to use ownCloud Enterprise Edition. There are twotypes of license keys: one is a free 30-day trial key. The other is a full license key forEnterprise customers.
You can download and try ownCloud Enterprise for 30 days for free, which auto-generates a free 30-day key. When this key expires your ownCloud installation is notremoved, so if you become an Enterprise customer you can enter your new key toregain access. See How to Buy ownCloud for sales and contact information.
Configuration
Once you get your Enterprise license key, it needs to be copied to your ownCloudconfiguration file config/config.php like in this example:
'license-key' => 'test-20150101-XXXXXXXXXXXXXXXXXXXXXXXXXXXXXXXXXXXXXXXXXXX-YYYYYY',
Installing & Upgrading ownCloud Enterprise Edition | 585
It is also possible to activate your Enterprise Edition on the webUI. Open owncloudand navigate to:
settings > admin-settings > general
Copy your license key into the field Enter a new license: and click Save to confirm.
Each running instance of ownCloud requires a license key. Keys will work acrossupgrades without issue, so new keys will not be required when you upgrade yourownCloud Enterprise to a new version.
Supported ownCloud Enterprise Edition Apps
See Supported Apps in ownCloud for a list of supported apps.
3rd party and unsupported apps must be disabled before performing asystem upgrade. Then install the upgraded versions, and after theupgrade is complete re-enable them.
Oracle Database Setup & Configuration
Introduction
This document will cover the setup and preparation of the ownCloud server to supportthe use of Oracle as a backend database.
Outline of Steps
This document will cover the following steps:
• Setup of the ownCloud user in Oracle: This involves setting up a user space inOracle for setting up the ownCloud database.
• Installing the Oracle Instant Client on the Web server (facilitating the connection tothe Oracle Database).
• Compiling and installing the Oracle PHP Plugin oci8 module• Pointing ownCloud at the Oracle database in the initial setup process
The document assumes that you already have your Oracle instance running, and haveprovisioned the needed resources. It also assumes that you have installed ownCloudwith all of the prerequisites.
Configuring Oracle
Setting up the User Space for ownCloud
Step one, if it has not already been completed by your DBA (DataBase Administrator),provision a user space on the Oracle instance for ownCloud. This can be done bylogging in as a DBA and running the script below:
CREATE USER owncloud IDENTIFIED BY password;ALTER USER owncloud DEFAULT TABLESPACE users TEMPORARY TABLESPACEtemp QUOTA unlimited ON users;GRANT create session, create table, create procedure, create sequence,create trigger, create view, create synonym, alter session TO owncloud;
586 | Installing & Upgrading ownCloud Enterprise Edition
Substitute an actual password for password. Items like TableSpace, Quota etc., will bedetermined by your DBA (database administrator).
Add OCI8 Client Packages
Installation of the OCI8 client is dependent on your distribution. Given that, please usethe relevant section below to find the relevant instructions to install the client.
Ubuntu
If you’re using Ubuntu, we recommend that you use this very thorough guide from theUbuntu Community Wiki to install the OCI8 extension.
This should work for other Debian-based distributions, however yourmileage may vary.
RedHat / Centos / Fedora
To install the OCI8 extension on a RedHat-based distribution, you first need todownload two Oracle Instant Client packages:
• Instant Client Package - Basic (oracle-instantclient12.2-basic-12.2.0.1.0-1.x86_64.rpm)
• Instant Client Package - SDK (oracle-instantclient12.2-devel-12.2.0.1.0-1.x86_64.rpm)
Then, to install them, use the following commands:
rpm --install oracle-instantclient12.2-basic-12.2.0.1.0-1.x86_64.rpm \ oracle-instantclient12.2-devel-12.2.0.1.0-1.x86_64.rpm
Install the OCI8 PHP Extension
With the Oracle packages installed you’re now ready to install PHP’s OCI8 extension.
Provide: instantclient,/usr/lib/oracle/12.2/client64/lib when requested, orlet it auto-detect the location (if possible).
pecl install oci8
With the extension installed, you now need to configure it, by creating a configurationfile for it. You can do so using the command below, substituting FILE_PATH with onefrom the list below the command.
cat << EOF > FILE_PATH; Oracle Instant Client Shared Object extensionextension=oci8.soEOF
Configuration File Paths
Installing & Upgrading ownCloud Enterprise Edition | 587
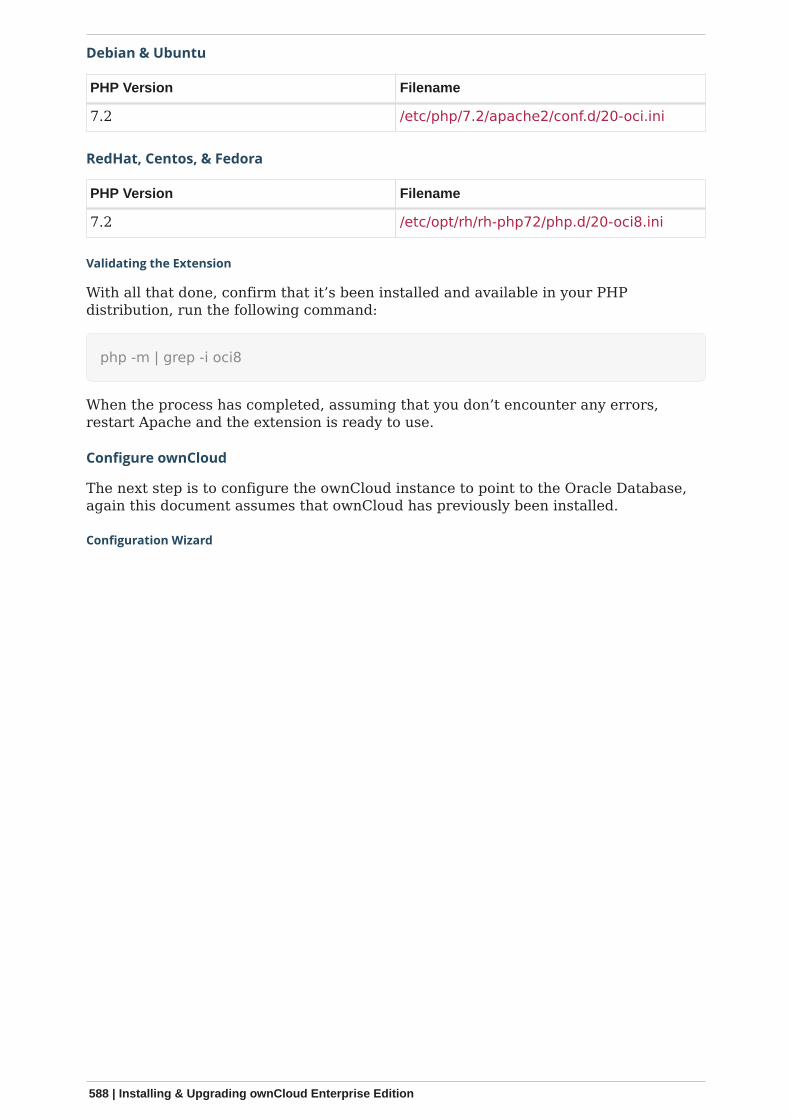
Debian & Ubuntu
PHP Version Filename
7.2 /etc/php/7.2/apache2/conf.d/20-oci.ini
RedHat, Centos, & Fedora
PHP Version Filename
7.2 /etc/opt/rh/rh-php72/php.d/20-oci8.ini
Validating the Extension
With all that done, confirm that it’s been installed and available in your PHPdistribution, run the following command:
php -m | grep -i oci8
When the process has completed, assuming that you don’t encounter any errors,restart Apache and the extension is ready to use.
Configure ownCloud
The next step is to configure the ownCloud instance to point to the Oracle Database,again this document assumes that ownCloud has previously been installed.
Configuration Wizard
588 | Installing & Upgrading ownCloud Enterprise Edition
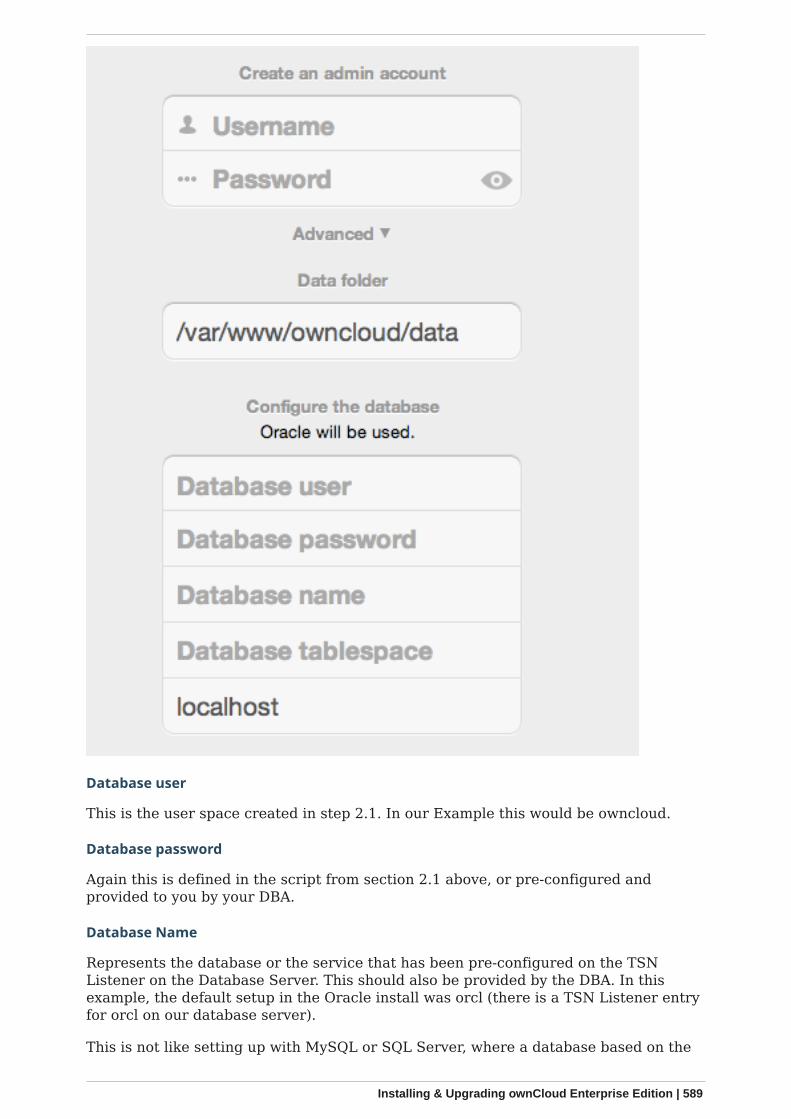
Database user
This is the user space created in step 2.1. In our Example this would be owncloud.
Database password
Again this is defined in the script from section 2.1 above, or pre-configured andprovided to you by your DBA.
Database Name
Represents the database or the service that has been pre-configured on the TSNListener on the Database Server. This should also be provided by the DBA. In thisexample, the default setup in the Oracle install was orcl (there is a TSN Listener entryfor orcl on our database server).
This is not like setting up with MySQL or SQL Server, where a database based on the
Installing & Upgrading ownCloud Enterprise Edition | 589

name you give is created. The oci8 code will call this specific service and it must beactive on the TSN Listener on your Oracle Database server.
Database Table Space
Provided by the DBA. In this example the users table space (as is seen in the usercreation script above), was used.
Configuration File
Assuming all of the steps have been followed to completion, the first run wizard shouldcomplete successfully, and an operating instance of ownCloud should appear.
The configuration file should look something like this:
Useful SQL Commands
Is my Database Reachable?
On the machine where your Oracle database is installed, type:
sqlplus username
SQL> select * from v$version;
BANNER--------------------------------------------------------------------------------Oracle Database 11g Express Edition Release 11.2.0.2.0 - 64bit ProductionPL/SQL Release 11.2.0.2.0 - ProductionCORE 11.2.0.2.0 ProductionTNS for Linux: Version 11.2.0.2.0 - ProductionNLSRTL Version 11.2.0.2.0 - Production
SQL> exit
Show Database Users:
Oracle : SELECT * FROM all_users;
Show available Databases:
Oracle : SELECT name FROM v$database; (requires DBA privileges)
Show ownCloud Tables in Database:
Oracle : SELECT table_name FROM user_tables;
Quit Database:
590 | Installing & Upgrading ownCloud Enterprise Edition
Oracle : quit
Enterprise Logging Configuration
In this section you will find all the details you need to configure enterprise loggingconfiguration in ownCloud.
Auditing
Introduction
The Auditing app is an Enterprise only app and available on the marketplace. It tracesuser and admin actions. In particular the events:
• Login and logout events of users• File system operations (create / delete / move; including actions on the trash bin
and versioning)• Sharing operations (user / group sharing, sharing via link, changing permissions,
calls to sharing API from clients)• Custom Groups events• File tagging operations (add / remove tags)• File commenting operations (create / update / delete)• User management operations (creation / deletion / activation / deactivation of
users, group management)• User settings changes• Impersonation events• Enabling / disabling of ownCloud Apps• Executions of OCC commands (CLI)
You may also want to check out the ownCloud App for Splunk. For moreinformation, read this section.
Installation and Enabling
Download the Auditing app from the marketplace and enable it in the ownCloud appsettings.
Figure 1 Auditing
Enterprise Logging Configuration | 591

Configuration
It is advised to redirect messages into a separate file. To do so, add these lines toconfig.php and adjust the target path accordingly. Note that the target path must bewriteable for the web server user:
'log.conditions' => [ [ 'apps' => ['admin_audit'], 'logfile' => '/var/www/owncloud/data/admin_audit.log' ]]
All messages regardless of log level will be logged there.
To ignore all CLI triggered events (default is to include them), set the following option:
sudo -u www-data php occ config:app:set admin_audit ignore_cli_events--value='yes'
Grouped Logging
With each log message, a number of users are calculated to be the 'audit context'. Thisis the list of users which are related to the log message. Additionally, each log messageincludes a list of groups that the users are a member of, to enable filtering / splittingof the log messages at a later date. In cases when users are members of many groups,to reduce the data output, the group list can be filtered by adding the following to yourconfig.php. Change the groups needed accordingly:
'admin_audit.groups' => [ 'group1', 'group2']
592 | Enterprise Logging Configuration
When the filter is configured, only the filtered list of groups will be output inauditGroups, else, all groups that the auditUsers are a member of are output.
View and Download Logs
If you have configured a different logfile than the default, you mustdownload it manually.
To download your logfile on your admin page. Click Settings › Admin › Downloadlogfile. The default location for manually downloading the standard ownCloud log isdata/owncloud.log.
See Logging Configuration and File Tagging for more information onlogging and tagging.
Connect with Splunk Cloud
Install the Universal Forwarder
Connect to the deployment server, change input-prd-your-server-here according yoursetup:
splunk set deploy-poll input-prd-your-server-here.cloud.splunk.com:8089
Install the Splunk Cloud credentials
splunk install app path/to/splunkclouduf.spl -auth admin:changeme
Monitor the admin_audit.log
To Monitor the ownCloud Splunk audit log, add this to inputs.conf, assuming you usethe custom logging path/file from above:
[monitor://var/www/owncloud/data/admin_audit.log] disabled = false sourcetype = _json index = main
Finally, configure the following props.conf to ensure the time field is correctly usedand the fields are extracted.
[_json] INDEXED_EXTRACTIONS = json KV_MODE = json TIMESTAMP_FIELDS = [Time] category = Structured
Extra Fields
The audit app listens for internal ownCloud events and hooks and produces a rich setof audit entries useful for reporting on usage of your ownCloud server.
Log entries are based upon the internal ownCloud logging system, but utilise extrafields to hold relevant data fields related to the specific event. Each event will containthe following data at a minimum:
Enterprise Logging Configuration | 593
Key Type Description
remoteAddr string The remote client IP
user string The UID of the user performing the action,or IP x.x.x.x., cron, CLI, unknown
url string The process request URI
method string The HTTP request method
userAgent string The HTTP request user agent
time string The time of the event e.g.: 2018-05-08T08:26:00+00:00
app string Always admin_audit
message string Sentence explaining the action
action string Unique action identifier e.g.:file_delete or public_link_created
CLI boolean If the action was performed from the CLI
level integer The log level of the entry (usually 1 for audit events)
Output
Files
file_create
When a file is created.
Key Type Description
path string The full path to the create file
owner string The UID of the owner of the file
fileId string The newly created files identifier
file_read
When a file is read.
Key Type Description
path string The full path to the file
owner string The UID of the owner of the file
fileId string The files identifier
file_update
Key Type Description
path string The full path to the updated file
owner string The UID of the owner of the file
fileId string The updated files identifier
594 | Enterprise Logging Configuration
file_delete
Key Type Description
path string The full path to the updated file
owner string The UID of the owner of the file
fileId string The updated files identifier
file_copy
Key Type Description
oldPath string The full path to the source file
path string The full path to the new file
sourceOwner string The UID of the owner of the source file
owner string The UID of the owner of the file
sourceFileId string The source files identifier
fileId string The new files identifier
file_rename
Key Type Description
oldPath string The original path file
path string The new path file
fileId string The files identifier
file_trash_delete
Key Type Description
owner string The UID of the owner of the file
path string The full path to the deleted file
file_trash_restore
Key Type Description
owner string The UID of the owner of the file
fileId string The restored files identifier
oldPath string The original path to the file
newPath string The new path to the file
owner string The UID of the owner of the file
file_version_delete
Key Type Description
path string The full path to the version file deleted
Enterprise Logging Configuration | 595
Key Type Description
trigger string The delete trigger reasoning
file_version_restore
Key Type Description
path string The full path to the file being restored to the new version
revision string The revision of the file restored
Users
user_created
Key Type Description
targetUser string The UID of the created user
user_password_reset
Key Type Description
targetUser string The UID of the user
group_member_added
Key Type Description
targetUser string The UID of the user
group string The GID of the group
user_deleted
Key Type Description
targetUser string The UID of the user
group_member_removed
Key Type Description
targetUser string The UID of the user
group string The GID of the group
user_state_changed
Key Type Description
targetUser string The UID of the user
enabled boolean If the user is enabled or not
group_created
596 | Enterprise Logging Configuration
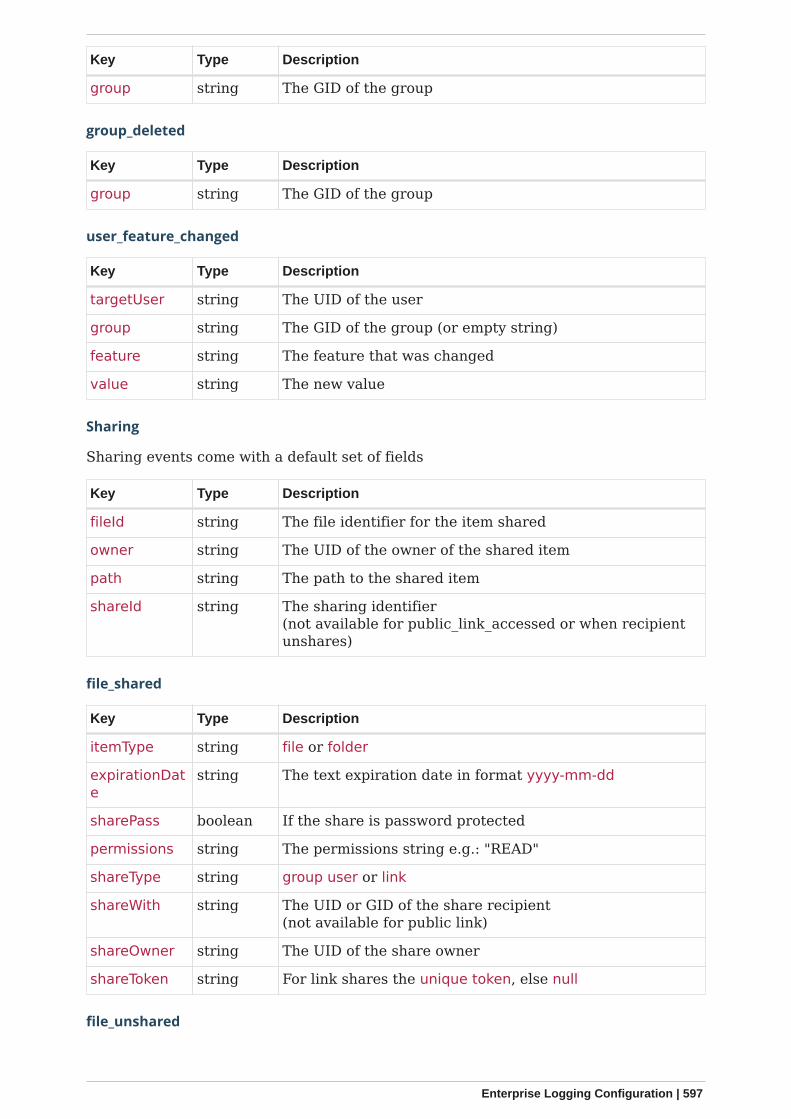
Key Type Description
group string The GID of the group
group_deleted
Key Type Description
group string The GID of the group
user_feature_changed
Key Type Description
targetUser string The UID of the user
group string The GID of the group (or empty string)
feature string The feature that was changed
value string The new value
Sharing
Sharing events come with a default set of fields
Key Type Description
fileId string The file identifier for the item shared
owner string The UID of the owner of the shared item
path string The path to the shared item
shareId string The sharing identifier(not available for public_link_accessed or when recipientunshares)
file_shared
Key Type Description
itemType string file or folder
expirationDate
string The text expiration date in format yyyy-mm-dd
sharePass boolean If the share is password protected
permissions string The permissions string e.g.: "READ"
shareType string group user or link
shareWith string The UID or GID of the share recipient(not available for public link)
shareOwner string The UID of the share owner
shareToken string For link shares the unique token, else null
file_unshared
Enterprise Logging Configuration | 597
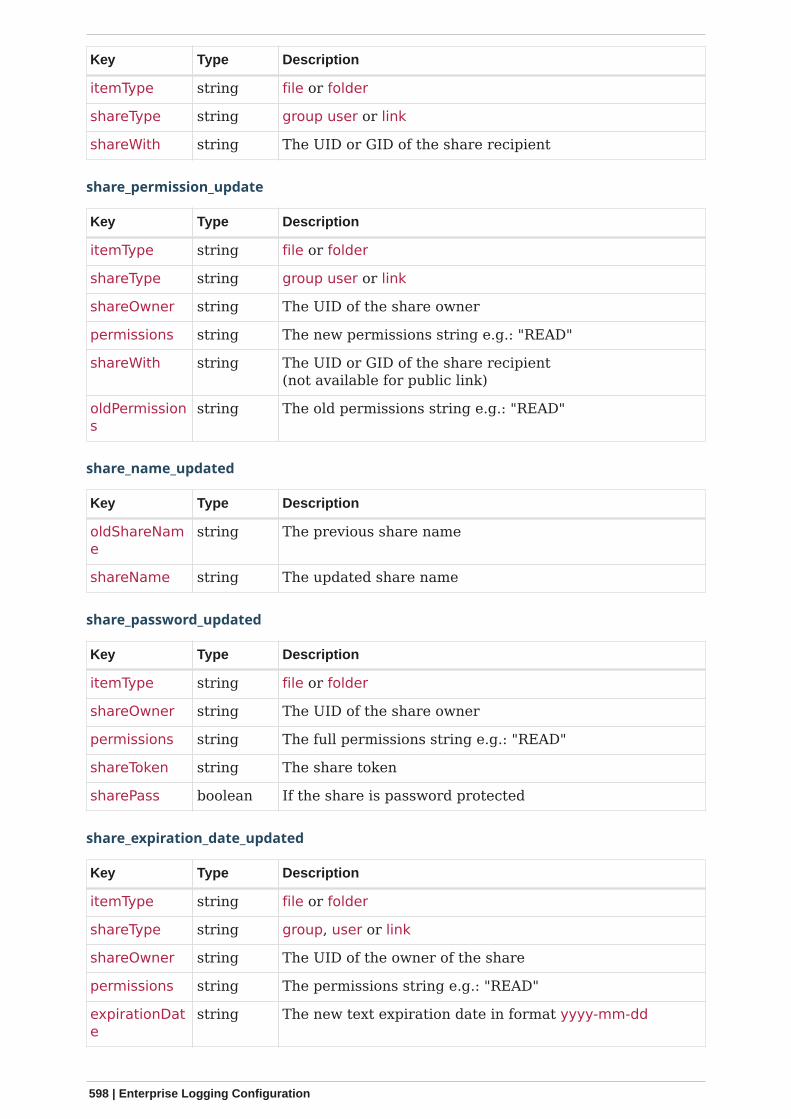
Key Type Description
itemType string file or folder
shareType string group user or link
shareWith string The UID or GID of the share recipient
share_permission_update
Key Type Description
itemType string file or folder
shareType string group user or link
shareOwner string The UID of the share owner
permissions string The new permissions string e.g.: "READ"
shareWith string The UID or GID of the share recipient(not available for public link)
oldPermissions
string The old permissions string e.g.: "READ"
share_name_updated
Key Type Description
oldShareName
string The previous share name
shareName string The updated share name
share_password_updated
Key Type Description
itemType string file or folder
shareOwner string The UID of the share owner
permissions string The full permissions string e.g.: "READ"
shareToken string The share token
sharePass boolean If the share is password protected
share_expiration_date_updated
Key Type Description
itemType string file or folder
shareType string group, user or link
shareOwner string The UID of the owner of the share
permissions string The permissions string e.g.: "READ"
expirationDate
string The new text expiration date in format yyyy-mm-dd
598 | Enterprise Logging Configuration
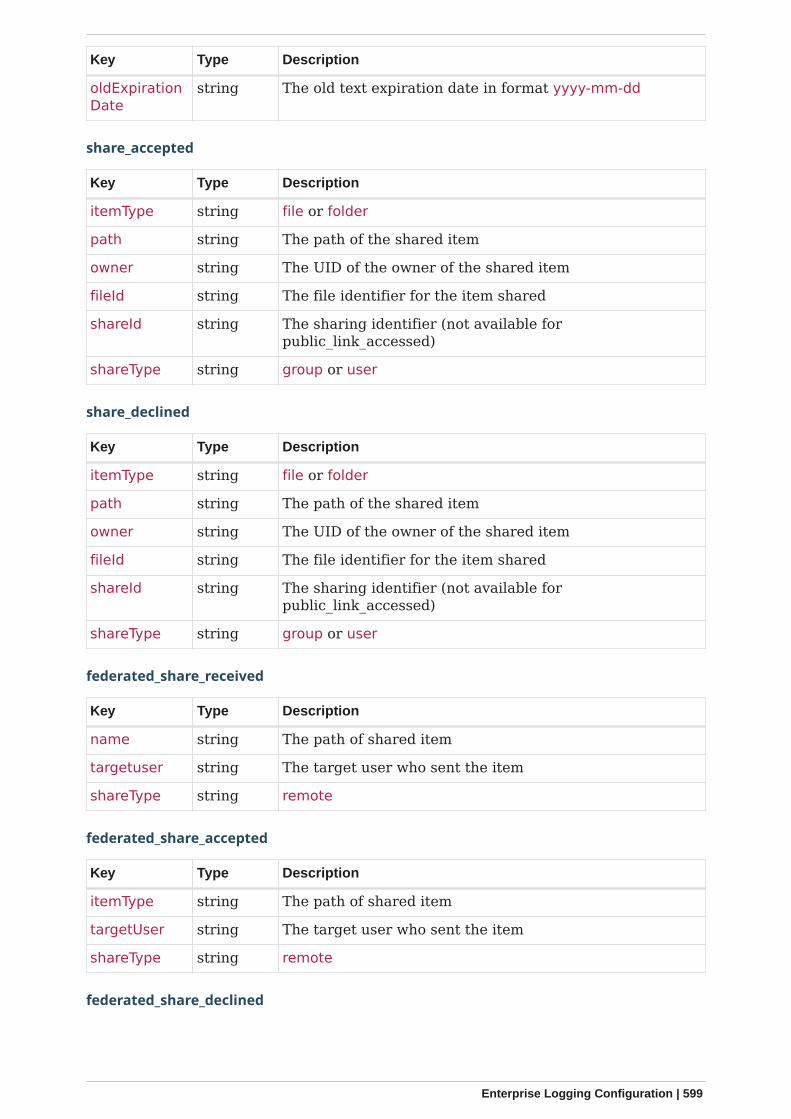
Key Type Description
oldExpirationDate
string The old text expiration date in format yyyy-mm-dd
share_accepted
Key Type Description
itemType string file or folder
path string The path of the shared item
owner string The UID of the owner of the shared item
fileId string The file identifier for the item shared
shareId string The sharing identifier (not available forpublic_link_accessed)
shareType string group or user
share_declined
Key Type Description
itemType string file or folder
path string The path of the shared item
owner string The UID of the owner of the shared item
fileId string The file identifier for the item shared
shareId string The sharing identifier (not available forpublic_link_accessed)
shareType string group or user
federated_share_received
Key Type Description
name string The path of shared item
targetuser string The target user who sent the item
shareType string remote
federated_share_accepted
Key Type Description
itemType string The path of shared item
targetUser string The target user who sent the item
shareType string remote
federated_share_declined
Enterprise Logging Configuration | 599
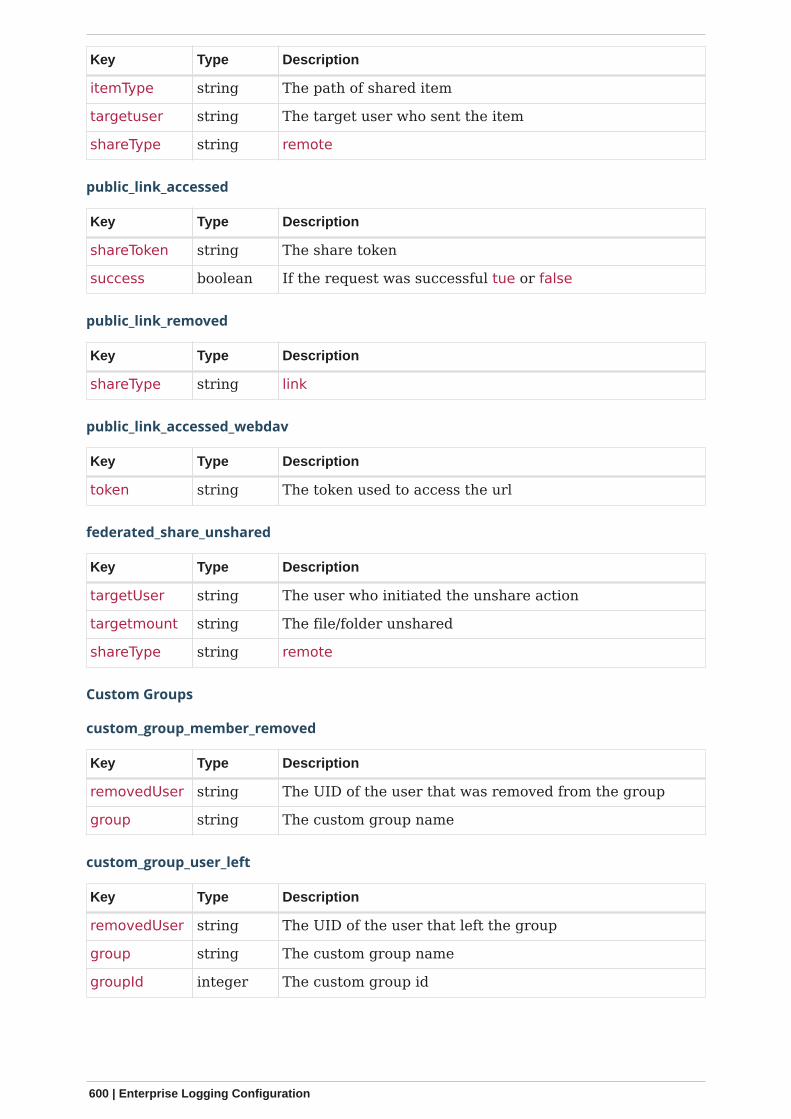
Key Type Description
itemType string The path of shared item
targetuser string The target user who sent the item
shareType string remote
public_link_accessed
Key Type Description
shareToken string The share token
success boolean If the request was successful tue or false
public_link_removed
Key Type Description
shareType string link
public_link_accessed_webdav
Key Type Description
token string The token used to access the url
federated_share_unshared
Key Type Description
targetUser string The user who initiated the unshare action
targetmount string The file/folder unshared
shareType string remote
Custom Groups
custom_group_member_removed
Key Type Description
removedUser string The UID of the user that was removed from the group
group string The custom group name
custom_group_user_left
Key Type Description
removedUser string The UID of the user that left the group
group string The custom group name
groupId integer The custom group id
600 | Enterprise Logging Configuration
custom_group_user_role_changed
Key Type Description
targetUser string The UID of the user that changed role
group string The custom group name
groupId integer The custom group id
roleNumber integer The new role number: 0 = member, 1= admin
custom_group_renamed
Key Type Description
oldGroup string The old custom group name
group string The new custom group name
groupId integer The custom group id
custom_group_created
Key Type Description
group string The custom group name created
groupId string The custom group id
addedUser string The UID of the user added
admin boolean true or false
Comments
All comment events have the same data:
Key Type Description
commentId string The comment identifier
path string The path to the file that the comment is attached to
fileId string The file identifier
Config
config_set
Key Type Description
settingName string The key
settingValue string The new value
oldValue string The old value
created boolean If the setting is created for the first time
config_delete
Enterprise Logging Configuration | 601
Key Type Description
settingName string The key
Console
command_executed
Key Type Description
command string The exact command that was executed
Tags
tag_created
Key Type Description
tagName string The tag name
tag_deleted
Key Type Description
tagName string The tag name
tag_updated
Key Type Description
oldTag string The old tag name
tagName string The new tag name
tag_assigned
Key Type Description
tagName string The tag name
fileId string The file identifier to which the tag was assigned
path string The path to the file
tag_unassigned
Key Type Description
tagName string The tag name
fileId string The file identifier from which the tag was unassigned
path string The path to the file
Apps
app_enabled
602 | Enterprise Logging Configuration
Key Type Description
targetApp string The app ID of the enabled app
groups string [] Array of group IDs if the app was enabled for certaingroups
app_disabled
Key Type Description
targetApp string The app ID of the disabled app
Auth
user_login
Key Type Description
success boolean If the login was successful
login string The attempted login value
user_logout
File Lifecycle
(requires at least v1.0.0)
lifecycle_archived
Key Type Description
path string The path to the file that was archived
owner string The UID of the owner of the file that was deleted
fileId integer The file ID for the file that was archived
lifecycle_restored
Key Type Description
path string The path to the file that was restored
fileId integer The file ID for the file that was restored
lifecycle_expired
Key Type Description
fileId integer The file id of the file that was expired
update_user_preference_value
Key Type Description
key string The key
value string The value associated with the key
Enterprise Logging Configuration | 603
Key Type Description
appname string The name of the app
user string The UID of the user who has the preference key-value forthe app
user_preference_set
Key Type Description
key string The key
value string The value associated with the key
appname string The name of the app
user string The UID of the user who has the preference key-value forthe app
remove_user_preference_key
Key Type Description
key string The key
appname string The name of the app
user string The UID of the user whose preference key is deleted forthe app
remove_preferences_of_user
Key Type Description
user string The UID of the user whose user preferences are deleted
delete_all_user_preference_of_app
Key Type Description
appname string The name of the app whose user preferences are deleted
Impersonate
impersonated
Key Type Description
user string The current user who did an impersonate action
targetUser string The user who is being impersonated
impersonate_logout
Key Type Description
user string The user who performed impersonate action
604 | Enterprise Logging Configuration
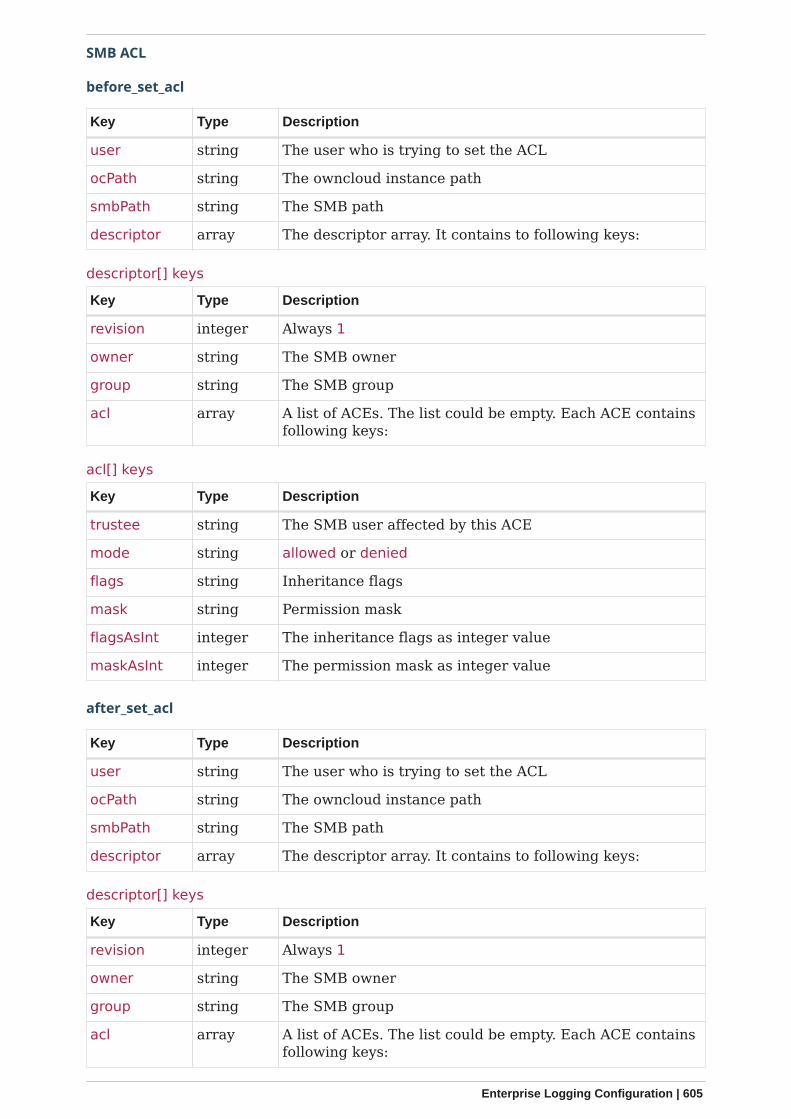
SMB ACL
before_set_acl
Key Type Description
user string The user who is trying to set the ACL
ocPath string The owncloud instance path
smbPath string The SMB path
descriptor array The descriptor array. It contains to following keys:
descriptor[] keys
Key Type Description
revision integer Always 1
owner string The SMB owner
group string The SMB group
acl array A list of ACEs. The list could be empty. Each ACE containsfollowing keys:
acl[] keys
Key Type Description
trustee string The SMB user affected by this ACE
mode string allowed or denied
flags string Inheritance flags
mask string Permission mask
flagsAsInt integer The inheritance flags as integer value
maskAsInt integer The permission mask as integer value
after_set_acl
Key Type Description
user string The user who is trying to set the ACL
ocPath string The owncloud instance path
smbPath string The SMB path
descriptor array The descriptor array. It contains to following keys:
descriptor[] keys
Key Type Description
revision integer Always 1
owner string The SMB owner
group string The SMB group
acl array A list of ACEs. The list could be empty. Each ACE containsfollowing keys:
Enterprise Logging Configuration | 605
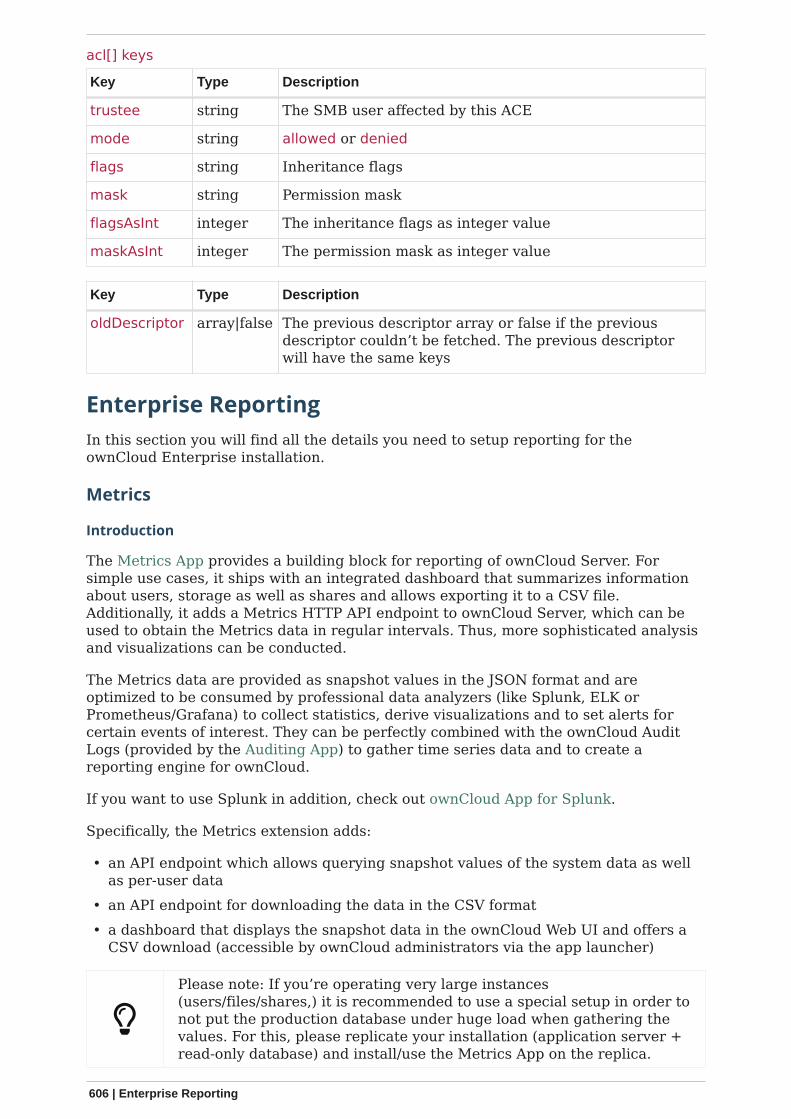
acl[] keys
Key Type Description
trustee string The SMB user affected by this ACE
mode string allowed or denied
flags string Inheritance flags
mask string Permission mask
flagsAsInt integer The inheritance flags as integer value
maskAsInt integer The permission mask as integer value
Key Type Description
oldDescriptor array|false The previous descriptor array or false if the previousdescriptor couldn’t be fetched. The previous descriptorwill have the same keys
Enterprise Reporting
In this section you will find all the details you need to setup reporting for theownCloud Enterprise installation.
Metrics
Introduction
The Metrics App provides a building block for reporting of ownCloud Server. Forsimple use cases, it ships with an integrated dashboard that summarizes informationabout users, storage as well as shares and allows exporting it to a CSV file.Additionally, it adds a Metrics HTTP API endpoint to ownCloud Server, which can beused to obtain the Metrics data in regular intervals. Thus, more sophisticated analysisand visualizations can be conducted.
The Metrics data are provided as snapshot values in the JSON format and areoptimized to be consumed by professional data analyzers (like Splunk, ELK orPrometheus/Grafana) to collect statistics, derive visualizations and to set alerts forcertain events of interest. They can be perfectly combined with the ownCloud AuditLogs (provided by the Auditing App) to gather time series data and to create areporting engine for ownCloud.
If you want to use Splunk in addition, check out ownCloud App for Splunk.
Specifically, the Metrics extension adds:
• an API endpoint which allows querying snapshot values of the system data as wellas per-user data
• an API endpoint for downloading the data in the CSV format• a dashboard that displays the snapshot data in the ownCloud Web UI and offers a
CSV download (accessible by ownCloud administrators via the app launcher)
Please note: If you’re operating very large instances(users/files/shares,) it is recommended to use a special setup in order tonot put the production database under huge load when gathering thevalues. For this, please replicate your installation (application server +read-only database) and install/use the Metrics App on the replica.
606 | Enterprise Reporting
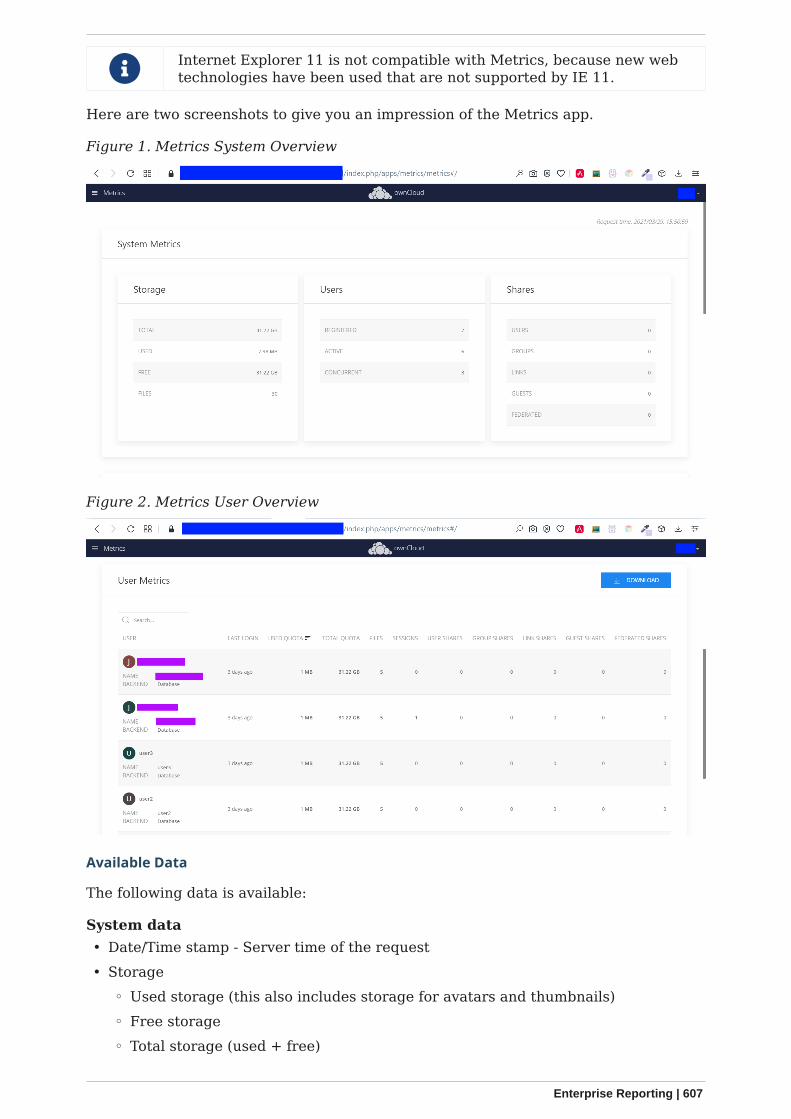
Internet Explorer 11 is not compatible with Metrics, because new webtechnologies have been used that are not supported by IE 11.
Here are two screenshots to give you an impression of the Metrics app.
Figure 1. Metrics System Overview
Figure 2. Metrics User Overview
Available Data
The following data is available:
System data• Date/Time stamp - Server time of the request• Storage
◦ Used storage (this also includes storage for avatars and thumbnails)◦ Free storage◦ Total storage (used + free)
Enterprise Reporting | 607
◦ Number of files• Number of users
◦ registered (total number of known users)◦ active (number of users with lastLogin less than two weeks ago)◦ concurrent (number of users with at least one active session)
• Shares◦ Number of user shares◦ Number of group shares◦ Number of guest shares◦ Number of link shares◦ Number of federated shares
Per-user data• User ID• Display name• User backend• Last login• Active sessions• Quota
◦ Quota limit◦ Quota usage
• Number of files• Shares
◦ Number of user shares◦ Number of group shares◦ Number of guest shares◦ Number of link shares◦ Number of federated shares
Usage
Authorization
To get started, you have to set a secret for authenticating requests at the endpoint.
See the following example on how to set it:
sudo -u www-data php occ config:system:set "metrics_shared_secret" --value"<your-metrics-secret>"
Please make up a passphrase here referred to as <your-metrics-secret>. You have to set the Metrics secret to use the dashboard.
This token gets stored in config.php as metrics_shared_secret, whichcould also be done manually instead of using this occ command.
608 | Enterprise Reporting
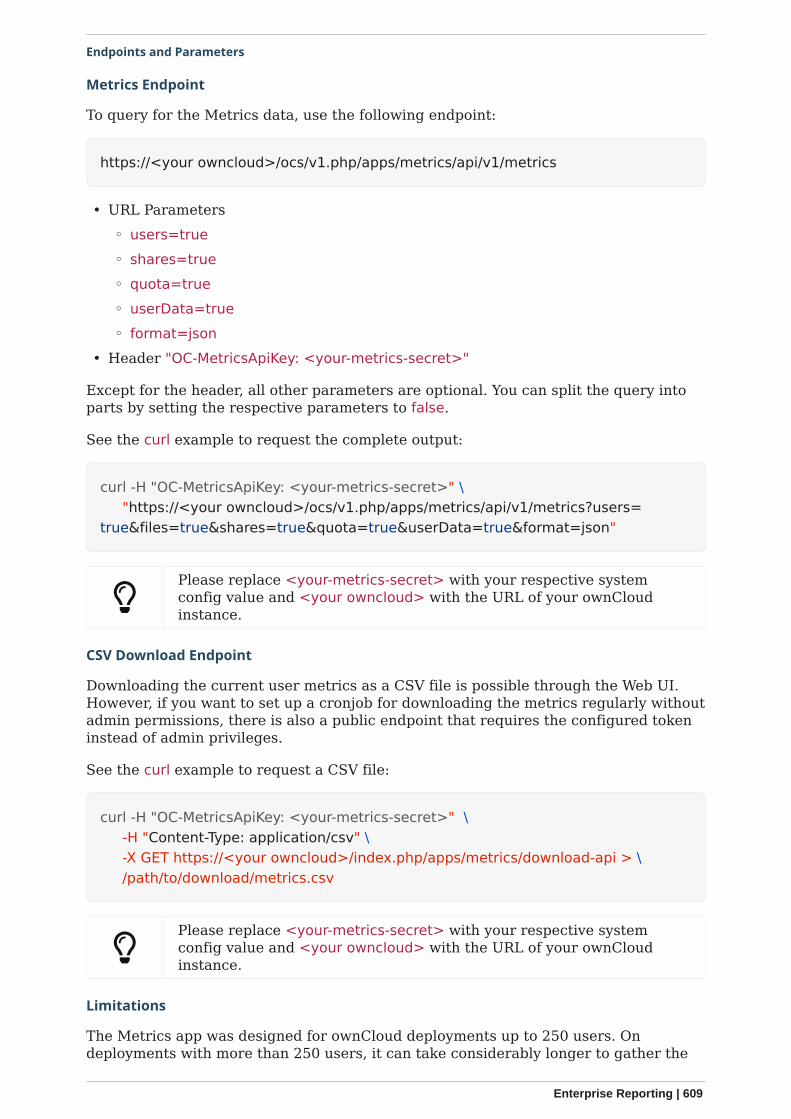
Endpoints and Parameters
Metrics Endpoint
To query for the Metrics data, use the following endpoint:
https://<your owncloud>/ocs/v1.php/apps/metrics/api/v1/metrics
• URL Parameters◦ users=true◦ shares=true◦ quota=true◦ userData=true◦ format=json
• Header "OC-MetricsApiKey: <your-metrics-secret>"
Except for the header, all other parameters are optional. You can split the query intoparts by setting the respective parameters to false.
See the curl example to request the complete output:
curl -H "OC-MetricsApiKey: <your-metrics-secret>" \ "https://<your owncloud>/ocs/v1.php/apps/metrics/api/v1/metrics?users=true&files=true&shares=true"a=true&userData=true&format=json"
Please replace <your-metrics-secret> with your respective systemconfig value and <your owncloud> with the URL of your ownCloudinstance.
CSV Download Endpoint
Downloading the current user metrics as a CSV file is possible through the Web UI.However, if you want to set up a cronjob for downloading the metrics regularly withoutadmin permissions, there is also a public endpoint that requires the configured tokeninstead of admin privileges.
See the curl example to request a CSV file:
curl -H "OC-MetricsApiKey: <your-metrics-secret>" \ -H "Content-Type: application/csv" \ -X GET https://<your owncloud>/index.php/apps/metrics/download-api > \ /path/to/download/metrics.csv
Please replace <your-metrics-secret> with your respective systemconfig value and <your owncloud> with the URL of your ownCloudinstance.
Limitations
The Metrics app was designed for ownCloud deployments up to 250 users. Ondeployments with more than 250 users, it can take considerably longer to gather the
Enterprise Reporting | 609
requested data. To reduce the time needed, exclude userData and quota.
Enterprise Security
In this section you will find all the details you need to configure enterprise security inownCloud.
Ransomware Protection
Introduction
Ransomware is an ever-present threat, both for large enterprises as well as forindividuals. Once infected, a whole hard disk (or just parts of it) can becomeencrypted, leading to unrecoverable data loss.
Once this happens, attackers usually ask victims to pay a ransom, often viacryptocurrencies such as Bitcoin, in exchange for the decryption key required todecrypt their data.
While paying the ransom works in some cases, it is not recommended, as there is noguarantee that the attackers will supply the key after payment is made. To helpmitigate such threats and ensure ongoing access to user data, ownCloud provides theRansomware Protection app.
It is essential to be aware that user data needs to be synchronized withyou ownCloud Server using the ownCloud Desktop synchronizationclient. Data that is not synchronized and stored in ownCloud cannot beprotected.
About Ransomware Protection
The app is tasked with detecting, preventing, and reverting anomalies. Anomalies arefile operations (including create, update, delete, and move) not intentionallyconducted by the user. It aims to do so in two ways: prevention, and protection.
Prevention: Blocking Common Ransomware File Extensions
Like other forms of cyberattack, ransomware has a range of diverse characteristics.On the one hand it makes them hard to detect and on the other it makes them evenharder to prevent. Recent ransomware attacks either encrypt a user’s files and add aspecific file extension to them (e.g., .crypt), or they replace the original files with anencrypted copy and add a particular file extension.
File Extension Blacklist
The first line of defense against such threats is a blacklist that blocks write access tofile extensions known to originate from ransomware.
Ransomware Protection ships with a static extension list of more than 3,000 fileextensions. As new extensions are regularly created, this list also needs to be regularlyreviewed and updated. Future releases of Ransomware Protection will include anupdated list and the ability to update the list via syncing with FSRM’s API by using anocc command
Please check the provided ransomware blacklist! It is stronglyrecommended to check the provided ransomware blacklist to ensurethat it fits your needs. In some cases, the patterns might be too genericand result in false positives.
610 | Enterprise Security
File Blocking
The second line of defense is file blocking. As files are uploaded, they are comparedagainst the file extension blacklist. If a match is found, the upload is denied.
File blocking is always enabled.
Account Locking
The third line of defense is account locking. If a client uploads a file matching apattern in the ransomware blacklist, the account is locked (set as read-only) for clientaccess (create, change, move, and delete operations). Doing this prevents further,malicious, changes.
Following this, clients receive an error (403 Access Forbidden) which notifies the userthat the account is locked by Ransomware Protection.
Write access (e.g., moving and deleting files) is still possible for userswhen they log in with their web browser.
When an account is locked, administrators can unlock the account using the occransomguard:unlock command. Administrators can also manually lock user accounts,using the occ ransomguard:lock command.
When an account is locked, it will still be fully usable from theownCloud web UI. However, ownCloud clients (as well as otherWebDAV clients) will see the account as set to read-only mode.
Users will see a yellow notification banner in the ownCloud web UI directing them toSettings › Personal › Security (Ransomware detected: Your account is locked (read-only) for client access to protect your data. Click here to unlock.), where additionalinformation is displayed and users can unlock their account when ransomware issuesare resolved locally.
Locking is enabled by default. If this is not desired, an administratorcan disable it in the Settings › Admin › Security panel.
Protection: Data Retention and Rollback
While Ransomware Prevention mitigates risks of a range of ransomware attacks, it isnot a future-proof solution, because ransomware is becoming ever-more sophisticated.There are known attacks that change file extensions randomly or keep themunchanged which makes them harder to detect.
Ultimately there is a consensus that only one solution can provide future-proofprotection from ransomware attacks: retaining data and providing the means to rollback to a particular point in time.
ownCloud Ransomware Protection will, therefore, record all changes on an ownCloudServer and allow administrators to rollback user data to a particular point in time,making use of ownCloud’s integrated Versioning and Trash bin features.
Doing so allows all user data that is synchronized with the server to be rolled back toits state before the attack occurred. A combination of Ransomware prevention andprotection reduces risks to a minimum acceptable level.
Enterprise Security | 611

Other Elements of Ransomware Protection
Name Command (if applicable) Description
Ransomware Prevention(Blocker)
First line of defense againstransomware attacks.Ransomware Protectionuses a file name patternblacklist to preventuploading files that havefile extensions associatedwith ransomware (e.g..crypt) thereby preservingthe original files on theownCloud Server.
Ransomguard Scanner occ ransomguard:scan<timestamp> <user>
A command to scan theownCloud database forchanges in order todiscover anomalies in auser’s account and theirorigin. It enables anadministrator to determinethe point in time whenundesired actionshappened as a prerequisitefor restoration.
Ransomguard Restorer occ ransomguard:restore<timestamp> <user>
A command foradministrators to revert alloperations in a useraccount that occurred aftera certain point in time.
Ransomguard Lock occ ransomguard:lock<user>
Set a user account as read-only for ownCloud andother WebDAV clients. Thisprevents any furtherchanges to the account.
Ransomguard Unlock occ ransomguard:unlock<user>
Unlock a user accountwhich was set to read-only.
<timestamp> must be in the Linux timestamp format.
Requirements
Mandatory
1. File Firewall rule (previous approach for ransomware protection). If youhave configured the File Firewall rule which was provided as a preliminaryprotection mechanism, please remove it. The functionality (Blocking) is covered byRansomware Protection in an improved way.
2. Ransomware Protection. Ransomware protection needs to be in operation beforean attack occurs, as it needs to record file operations to be able to revert them, incase of an attack.
3. ownCloud Versions App. Required to restore older file versions. The capabilitiesof Ransomware Protection depend on its configuration regarding version retention.
4. ownCloud Trash Bin App. Required to restore deleted files. The capabilities of
612 | Enterprise Security
Ransomware Protection depend on its configuration regarding trash bin retention.
Optional
1. Activity app. For viewing activity logs.
Limitations
• Ransomware Protection works with master-key based storage encryption. Withcredential-based storage encryption, only Ransomware Prevention (Blocking)works.
• Rollback is not based on snapshots:◦ The trash bin retention policy may delete files, making them unrecoverable. To
avoid this, set trashbin\_retention\_obligation to disabled, or choose aconservative policy for trash bin retention. However, please be aware that thismay increase storage requirements.
◦ Trash bin items may be deleted by the user making them unrecoverable byRansomware Protection ⇒ Users need to know this.
◦ Versions have a built-in thin-out policy which makes it possible that required fileversions are unrecoverable by Ransomware Protection. To help avoid this, setversions\_retention\_obligation to disabled or choose a conservative policy forversion retention. Please be aware that this might increase your storage needs.
• A specific version of a file that is needed for rollback might have been manuallyrestored, making this version potentially unrecoverable by Ransomware Protection.Currently, after restoration the restored version is not a version anymore, e.g., theversion is not present in versioning.
• Recovery capabilities in received shared folders are currently limited. Changed filecontents and deletions can be restored but MOVE operations can’t. The case whena ransomware attack renames files in a received shared folder is therefore not yetcovered.
• Contents in secondary storages, such as Windows network drives, Dropbox, andGoogle Drive, are unrecoverable by Ransomware Protection, because they do nothave versioning or trash bin enabled in ownCloud.
• Rolling files forward is not currently supported or tested. Therefore it is vital to:◦ Carefully decide the point in time to rollback to.◦ To have proper backups to be able to conduct the rollback again, if necessary.
Enterprise Server Branding
In this section you will find all the details you need to configure enterprise serverbranding in ownCloud.
Enterprise Server Branding
ownBrander is an ownCloud build service that is exclusive to Enterprise editioncustomers for creating branded ownCloud clients and servers. You may brand yourownCloud server using ownBrander to easily build a custom theme, using your ownlogo and artwork. ownCloud has always been theme-able, but it was a manual processthat required editing CSS and PHP files. Now Enterprise customers can useownBrander, which provides an easy graphical wizard.
You need an Enterprise subscription, an account on customer.owncloud.com, and theownBrander app enabled on your account. When you complete the steps in the wizardthe ownBrander service builds your new branded theme, and in 24-48 hours you’ll seeit in your account.
Enterprise Server Branding | 613
When you open the ownBrander app, go to the Web tab. You will see an introductionand the wizard, which starts with uploading your logo. You will need a number ofimages in specific sizes and formats, and the wizard tells you what you need. Exampleimages are on the right, and you can click to enlarge them.
If you see errors when you upload SVG files, such as "Incorrect extension. File typeimage/svg+xml is not correct", "This SVG is invalid", or "Error uploading file: Incorrectsize", try opening the file in Inkscape then save as "Plain SVG" and upload your SVGimage again.
The wizard has two sections. The first section contains all the required elements: logosand other artwork, colors, naming, and your enterprise URL. The Suggested sectioncontains optional items such as additional logo placements and custom URLs.
When you are finished, click the Generate Web Server button. If you want to changeanything, go ahead and change it and click the Generate Web Server button. Thiswill override your previous version, if it has not been created yet.In 24-48 hours you’llfind your new branded theme in the Web folder in your Customer.owncloud.comaccount.
Inside the Web folder you’ll find a themes folder. Copy this to your owncloud/themesdirectory. You may name your themes folder anything you want, for examplemyBrandedTheme. Then configure your ownCloud server to use your branded themeby entering it in your config.php file:
"theme" => "myBrandedTheme"
If anything goes wrong with your new theme, comment out this line to re-enable thedefault theme until you fix your branded theme. The branded theme follows the samefile structure as the default theme, and you may further customize it by editing thesource files.
Always edit only your custom theme files. Never edit the default theme files.
Enterprise User Management
In this section you will find all the details you need to configure enterprise usermanagement in ownCloud.
• Shibboleth Integration• SAML 2.0 Based SSO
Shibboleth Integration
Introduction
The ownCloud Shibboleth user backend application integrates ownCloud with aShibboleth Service Provider (SP) and allows operations in federated and single-sign-on(SSO) infrastructures. Setting up Shibboleth has two big steps:
1. Enable and configure the Apache Shibboleth module.2. Enable and configure the ownCloud Shibboleth app.
614 | Enterprise User Management
The Apache Shibboleth module
Currently supported installations are based on the native Apache integration. Theindividual configuration of the service provider is highly dependent on the operatingsystem, as well as on the integration with the Identity Providers (IdP), and requirecase-by-case analysis and installation.
A good starting point for the service provider installation can be found in the officialShibboleth Wiki.
A successful installation and configuration will populate Apache environment variableswith at least a unique user id which is then used by the ownCloud Shibboleth app tologin a user.
Apache Configuration
This is an example configuration as installed and operated on a Linux server runningthe Apache 2.4 Web server. These configurations are highly operating system specificand require a high degree of customization.
The ownCloud instance itself is installed in /var/www/owncloud/. Further Shibbolethspecific configuration as defined in /etc/apache2/conf.d/shib.conf.
Enterprise User Management | 615

# Load the Shibboleth module.LoadModule mod-shib /usr/lib64/shibboleth/mod_shib_24.so
# Ensure handler will be accessible<Location /Shibboleth.sso> AuthType None Require all granted</Location>
# always fill env with shib variable for logout url<Location /> AuthType shibboleth ShibRequestSetting requireSession false Require shibboleth</Location>
# authenticate only on the login page<Location ~ "^(/index.php)?/login"> # force internal users to use the IdP <If "-R '192.168.1.0/24'"> AuthType shibboleth ShibRequestSetting requireSession true require valid-user </If> # allow basic auth for e.g. guest accounts <Else> AuthType shibboleth ShibRequestSetting requireSession false require shibboleth </Else></Location>
# shib session for css, js and woff not needed## WARNING!!!: The following lines could potentially override other locationstatements# made in other Apache config-files depending on include-order. # Please double-check your Apache config by consulting the Apache debug-log.<Location ~ "/.*\.(css|js|woff)"> AuthType None Require all granted</Location>
To allow users to login via the IdP, add a login alternative with the login.alternativesoption in config/config.php. Depending on the ownCloud Shibboleth app mode, youmay need to revisit this configuration.
The ownCloud Shibboleth App
After enabling the Shibboleth app on your Apps page, you need to choose the app
616 | Enterprise User Management
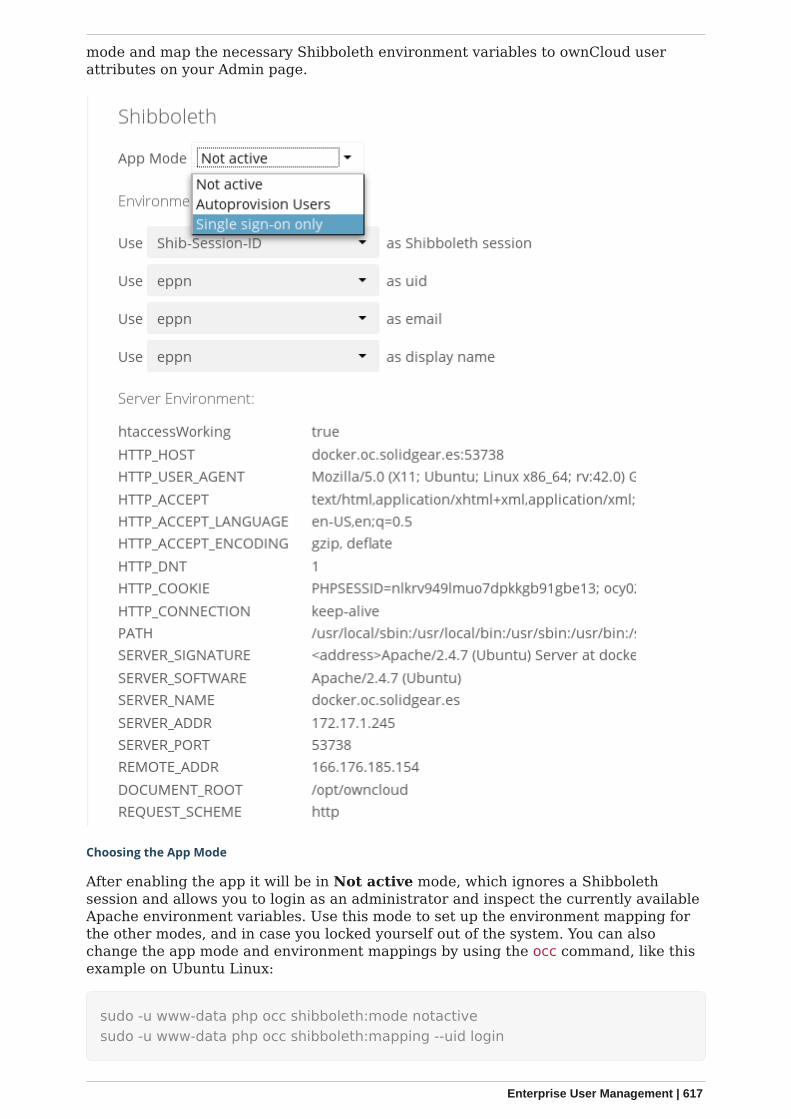
mode and map the necessary Shibboleth environment variables to ownCloud userattributes on your Admin page.
Choosing the App Mode
After enabling the app it will be in Not active mode, which ignores a Shibbolethsession and allows you to login as an administrator and inspect the currently availableApache environment variables. Use this mode to set up the environment mapping forthe other modes, and in case you locked yourself out of the system. You can alsochange the app mode and environment mappings by using the occ command, like thisexample on Ubuntu Linux:
sudo -u www-data php occ shibboleth:mode notactivesudo -u www-data php occ shibboleth:mapping --uid login
Enterprise User Management | 617

In Single sign-on only mode the app checks if the environment variable for theShibboleth session, by default Shib-Session-Id, is set. If that is the case it will takethe value of the environment variable as the uid, by default eppn, and check if a user isknown by that uid. In effect, this allows another user backend, e.g., the LDAP app, toprovide the displayname, email and avatar.
As an example the IdP can send the userPrincipalName which the Apache Shibbolethmodule writes to a custom Apache environment variable called login. The ownCloudShibboleth app reads that login environment variable and tries to find an LDAP userwith that username. For this to work userPrincipalName needs to be added to theAdditional Search Attributes in the LDAP directory settings on the advanced tab.We recommend using a scoped login attribute like userPrincipalName or mail becauseotherwise the search might find multiple users and prevent login.
In many scenarios Shibboleth is not intended to hide the user’s password from theservice provider, but only to implement SSO. If that is the case it is sufficient to protectthe ownCloud base URL with Shibboleth. This will send Web users to the IdP but allowdesktop and mobile clients to continue using username and password, preventingpopups due to an expired Shibboleth session lifetime.
In Autoprovision Users mode the app will not ask another user backend, but insteadprovision users on the fly by reading the two additional environment variables fordisplay name and email address.
In ownCloud 8.1 the Shibboleth environment variable mapping wasstored in apps/user_shibboleth/config.php. This file was overwritten onupgrades, preventing a seamless upgrade procedure. In ownCloud 8.2+the variables are stored in the ownCloud database, making Shibbolethautomatically upgradeable.
618 | Enterprise User Management
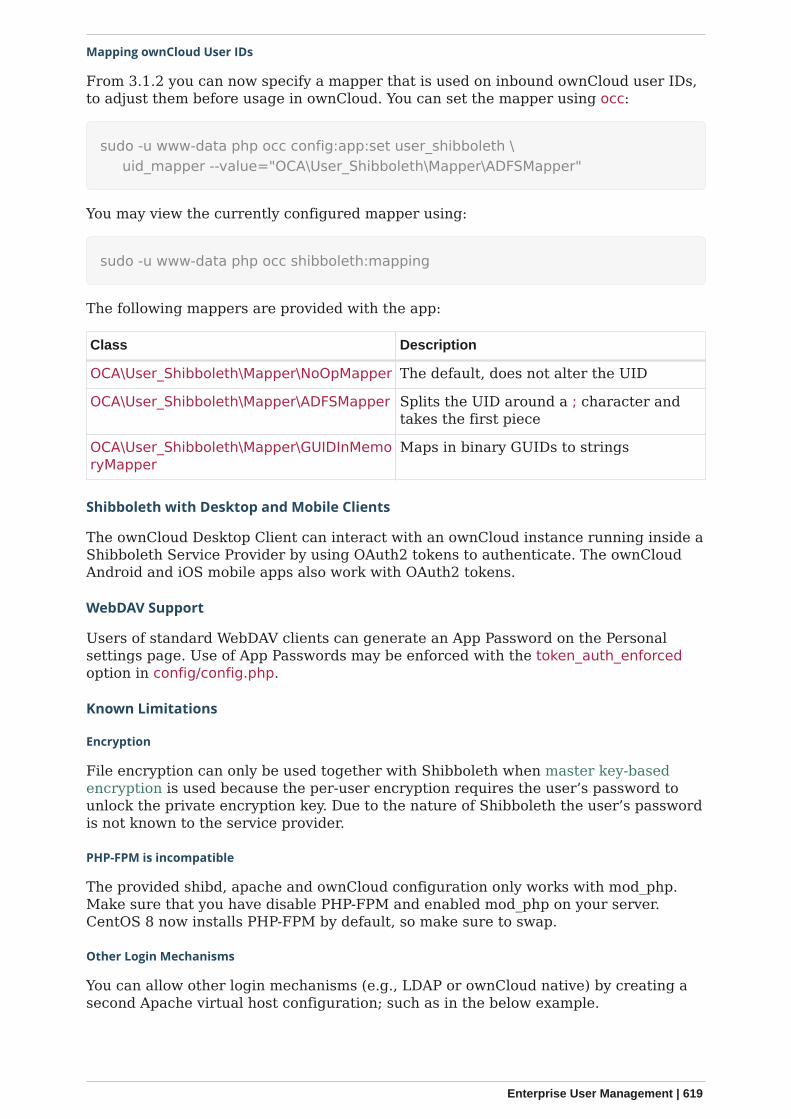
Mapping ownCloud User IDs
From 3.1.2 you can now specify a mapper that is used on inbound ownCloud user IDs,to adjust them before usage in ownCloud. You can set the mapper using occ:
sudo -u www-data php occ config:app:set user_shibboleth \ uid_mapper --value="OCA\User_Shibboleth\Mapper\ADFSMapper"
You may view the currently configured mapper using:
sudo -u www-data php occ shibboleth:mapping
The following mappers are provided with the app:
Class Description
OCA\User_Shibboleth\Mapper\NoOpMapper The default, does not alter the UID
OCA\User_Shibboleth\Mapper\ADFSMapper Splits the UID around a ; character andtakes the first piece
OCA\User_Shibboleth\Mapper\GUIDInMemoryMapper
Maps in binary GUIDs to strings
Shibboleth with Desktop and Mobile Clients
The ownCloud Desktop Client can interact with an ownCloud instance running inside aShibboleth Service Provider by using OAuth2 tokens to authenticate. The ownCloudAndroid and iOS mobile apps also work with OAuth2 tokens.
WebDAV Support
Users of standard WebDAV clients can generate an App Password on the Personalsettings page. Use of App Passwords may be enforced with the token_auth_enforcedoption in config/config.php.
Known Limitations
Encryption
File encryption can only be used together with Shibboleth when master key-basedencryption is used because the per-user encryption requires the user’s password tounlock the private encryption key. Due to the nature of Shibboleth the user’s passwordis not known to the service provider.
PHP-FPM is incompatible
The provided shibd, apache and ownCloud configuration only works with mod_php.Make sure that you have disable PHP-FPM and enabled mod_php on your server.CentOS 8 now installs PHP-FPM by default, so make sure to swap.
Other Login Mechanisms
You can allow other login mechanisms (e.g., LDAP or ownCloud native) by creating asecond Apache virtual host configuration; such as in the below example.
Enterprise User Management | 619
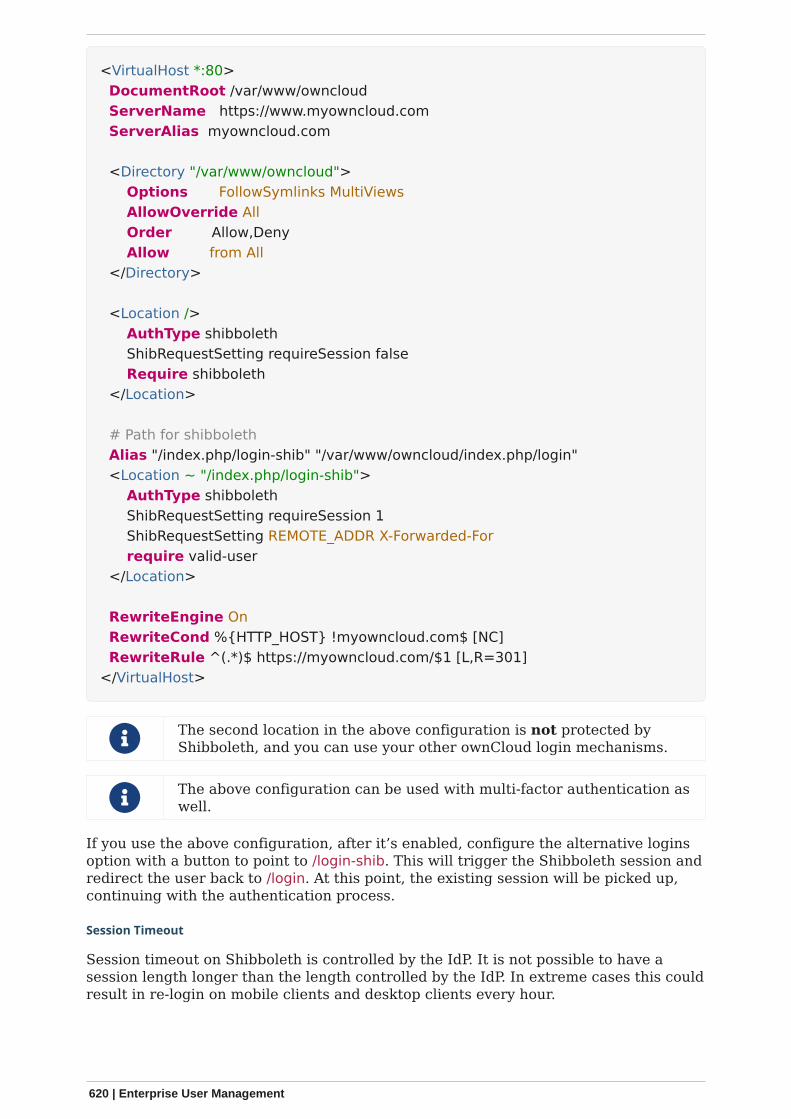
<VirtualHost *:80> DocumentRoot /var/www/owncloud ServerName https://www.myowncloud.com ServerAlias myowncloud.com
<Directory "/var/www/owncloud"> Options FollowSymlinks MultiViews AllowOverride All Order Allow,Deny Allow from All </Directory>
<Location /> AuthType shibboleth ShibRequestSetting requireSession false Require shibboleth </Location>
# Path for shibboleth Alias "/index.php/login-shib" "/var/www/owncloud/index.php/login" <Location ~ "/index.php/login-shib"> AuthType shibboleth ShibRequestSetting requireSession 1 ShibRequestSetting REMOTE_ADDR X-Forwarded-For require valid-user </Location>
RewriteEngine On RewriteCond %{HTTP_HOST} !myowncloud.com$ [NC] RewriteRule ^(.*)$ https://myowncloud.com/$1 [L,R=301]</VirtualHost>
The second location in the above configuration is not protected byShibboleth, and you can use your other ownCloud login mechanisms.
The above configuration can be used with multi-factor authentication aswell.
If you use the above configuration, after it’s enabled, configure the alternative loginsoption with a button to point to /login-shib. This will trigger the Shibboleth session andredirect the user back to /login. At this point, the existing session will be picked up,continuing with the authentication process.
Session Timeout
Session timeout on Shibboleth is controlled by the IdP. It is not possible to have asession length longer than the length controlled by the IdP. In extreme cases this couldresult in re-login on mobile clients and desktop clients every hour.
620 | Enterprise User Management
UID Considerations and Windows Network Drive Compatibility
To log in LDAP users via SAML for Single Sign On the user in LDAP must be uniquelyresolvable by searching for the username that was sent in the SAML token. For this towork the LDAP attribute containing the username needs to be added to theAdditional Search Attributes in the LDAP directory settings on the advanced tab.We recommend using a scoped login attribute like userPrincipalName or mail becauseotherwise the search might find multiple users and prevent login.
user_shibboleth will do the authentication, and user_ldap will provide user details suchas email and displayname.
SAML 2.0 Based SSO with Active Directory Federation Services (ADFS)and mod-shib
Preparation
Before you can setup SAML 2.0 based Single Sign-On with Active Directory FederationServices (ADFS) and mod-shib, ask your ADFS admin for the relevant server URLs.These are:
• The SAML 2.0 single sign-on service URL, e.g., https://<ADFS serverFQDN>/ADFS/ls
• The IdP metadata URL, e.g., https://<ADFS serverFQDN>/FederationMetadata/2007-06/FederationMetadata.xml
Then, make sure that the web server is accessible with a trusted certificate:
sudo a2enmod sslsudo a2ensite default-sslsudo service apache2 restart
Installation
Firstly, install mod-shib. You can do this using the following command:
sudo apt-get install libapache2-mod-shib2
This will install packages needed for mod-shib, including shibd. Then, generatecertificates for the shibd daemon by running the following command:
sudo shib-keygen
Download and Filter the ADFS Metadata
The metadata provided by ADFS cannot be automatically imported, and must becleaned up before using it with the file based MetadataProvider. To do so, useadfs2fed.php, as in the following command:
Enterprise User Management | 621
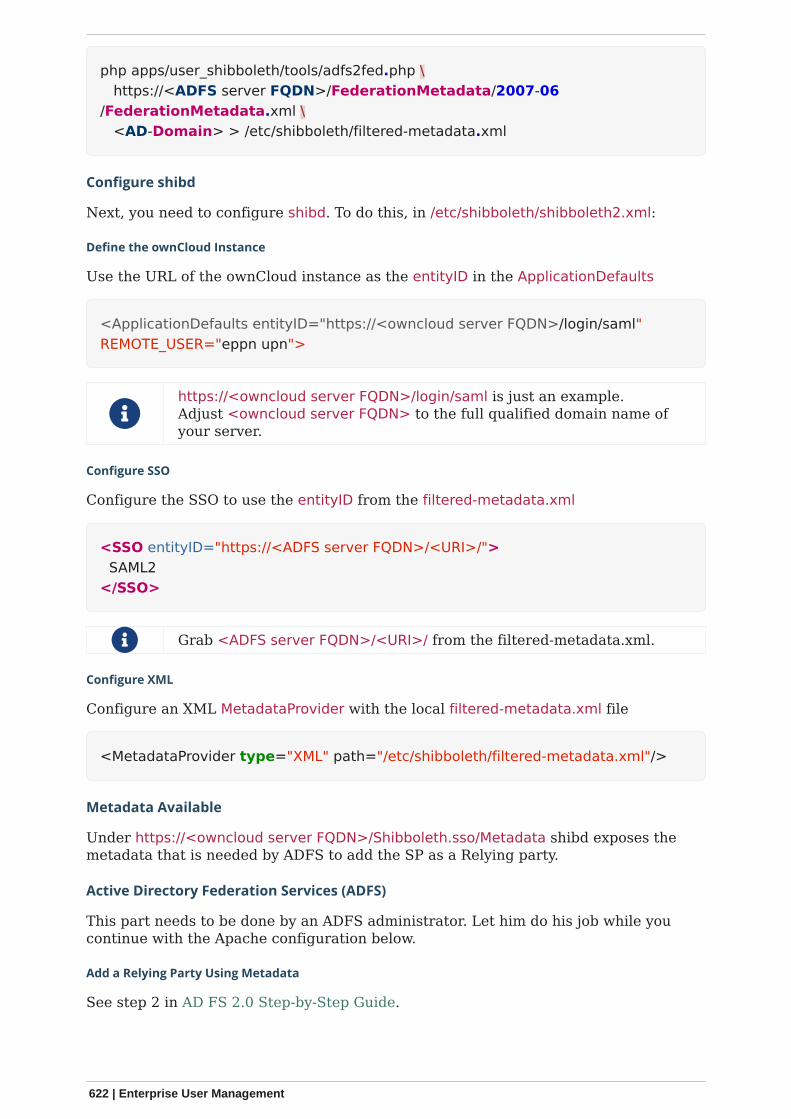
php apps/user_shibboleth/tools/adfs2fed.php \ https://<ADFS server FQDN>/FederationMetadata/2007-06/FederationMetadata.xml \ <AD-Domain> > /etc/shibboleth/filtered-metadata.xml
Configure shibd
Next, you need to configure shibd. To do this, in /etc/shibboleth/shibboleth2.xml:
Define the ownCloud Instance
Use the URL of the ownCloud instance as the entityID in the ApplicationDefaults
<ApplicationDefaults entityID="https://<owncloud server FQDN>/login/saml"REMOTE_USER="eppn upn">
https://<owncloud server FQDN>/login/saml is just an example.Adjust <owncloud server FQDN> to the full qualified domain name ofyour server.
Configure SSO
Configure the SSO to use the entityID from the filtered-metadata.xml
<SSO entityID="https://<ADFS server FQDN>/<URI>/"> SAML2</SSO>
Grab <ADFS server FQDN>/<URI>/ from the filtered-metadata.xml.
Configure XML
Configure an XML MetadataProvider with the local filtered-metadata.xml file
<MetadataProvider type="XML" path="/etc/shibboleth/filtered-metadata.xml"/>
Metadata Available
Under https://<owncloud server FQDN>/Shibboleth.sso/Metadata shibd exposes themetadata that is needed by ADFS to add the SP as a Relying party.
Active Directory Federation Services (ADFS)
This part needs to be done by an ADFS administrator. Let him do his job while youcontinue with the Apache configuration below.
Add a Relying Party Using Metadata
See step 2 in AD FS 2.0 Step-by-Step Guide.
622 | Enterprise User Management
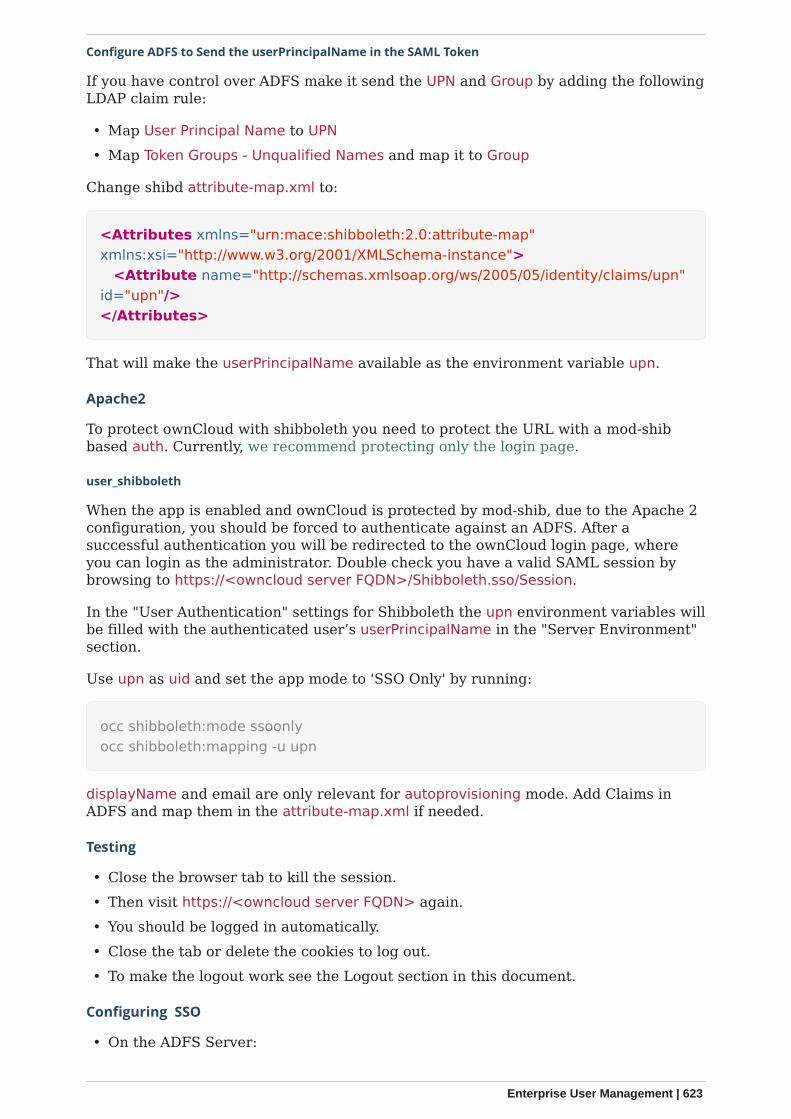
Configure ADFS to Send the userPrincipalName in the SAML Token
If you have control over ADFS make it send the UPN and Group by adding the followingLDAP claim rule:
• Map User Principal Name to UPN• Map Token Groups - Unqualified Names and map it to Group
Change shibd attribute-map.xml to:
<Attributes xmlns="urn:mace:shibboleth:2.0:attribute-map"xmlns:xsi="http://www.w3.org/2001/XMLSchema-instance"> <Attribute name="http://schemas.xmlsoap.org/ws/2005/05/identity/claims/upn"id="upn"/></Attributes>
That will make the userPrincipalName available as the environment variable upn.
Apache2
To protect ownCloud with shibboleth you need to protect the URL with a mod-shibbased auth. Currently, we recommend protecting only the login page.
user_shibboleth
When the app is enabled and ownCloud is protected by mod-shib, due to the Apache 2configuration, you should be forced to authenticate against an ADFS. After asuccessful authentication you will be redirected to the ownCloud login page, whereyou can login as the administrator. Double check you have a valid SAML session bybrowsing to https://<owncloud server FQDN>/Shibboleth.sso/Session.
In the "User Authentication" settings for Shibboleth the upn environment variables willbe filled with the authenticated user’s userPrincipalName in the "Server Environment"section.
Use upn as uid and set the app mode to 'SSO Only' by running:
occ shibboleth:mode ssoonlyocc shibboleth:mapping -u upn
displayName and email are only relevant for autoprovisioning mode. Add Claims inADFS and map them in the attribute-map.xml if needed.
Testing
• Close the browser tab to kill the session.• Then visit https://<owncloud server FQDN> again.• You should be logged in automatically.• Close the tab or delete the cookies to log out.• To make the logout work see the Logout section in this document.
Configuring SSO
• On the ADFS Server:
Enterprise User Management | 623
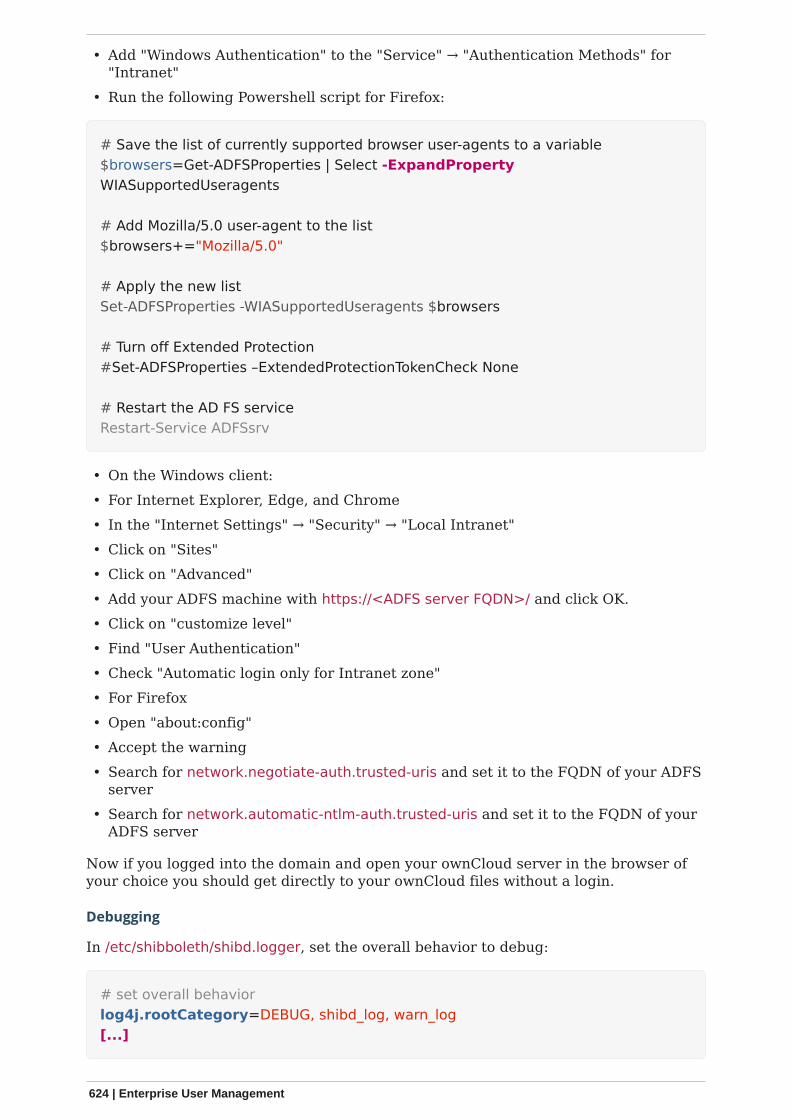
• Add "Windows Authentication" to the "Service" → "Authentication Methods" for"Intranet"
• Run the following Powershell script for Firefox:
# Save the list of currently supported browser user-agents to a variable$browsers=Get-ADFSProperties | Select -ExpandPropertyWIASupportedUseragents
# Add Mozilla/5.0 user-agent to the list$browsers+="Mozilla/5.0"
# Apply the new listSet-ADFSProperties -WIASupportedUseragents $browsers
# Turn off Extended Protection#Set-ADFSProperties –ExtendedProtectionTokenCheck None
# Restart the AD FS serviceRestart-Service ADFSsrv
• On the Windows client:• For Internet Explorer, Edge, and Chrome• In the "Internet Settings" → "Security" → "Local Intranet"• Click on "Sites"• Click on "Advanced"• Add your ADFS machine with https://<ADFS server FQDN>/ and click OK.• Click on "customize level"• Find "User Authentication"• Check "Automatic login only for Intranet zone"• For Firefox• Open "about:config"• Accept the warning• Search for network.negotiate-auth.trusted-uris and set it to the FQDN of your ADFS
server• Search for network.automatic-ntlm-auth.trusted-uris and set it to the FQDN of your
ADFS server
Now if you logged into the domain and open your ownCloud server in the browser ofyour choice you should get directly to your ownCloud files without a login.
Debugging
In /etc/shibboleth/shibd.logger, set the overall behavior to debug:
# set overall behaviorlog4j.rootCategory=DEBUG, shibd_log, warn_log[...]
624 | Enterprise User Management

After a restart /var/log/shibbloeth/shibd.log will show the parsed SAML requests andalso which claims / attributes were found and mapped, or why not.
Browsers
• For Chrome there is a SAML Chrome Panel that allows checking the SAMLmessages in the developer tools reachable via F12.
• For Firefox there is SAML tracer• In the Network tab of the developer extension make sure that "preserve logs" is
enabled in order to see the redirects without wiping the existing network requests
Logout
In SAML scenarios the session is held on the SP as well as the IdP. Killing the SPsession will redirect you to the IdP where you are still logged in, causing anotherredirect that creates a new SP session, making logout impossible. Killing only the IdPsession will allow you to use the SP session until it expires.
There are multiple ways to deal with this:
1. By default ownCloud shows a popup telling the user to close the browser tab. Thatkills the SP session. If the whole browser is closed the IdP may still use a Kerberos-based authentication to provide SSO in effect making logout impossible.
2. Hide the logout action in the personal menu via CSS. This forces users to log out atthe IdP.
OAuth2
In upcoming versions the clients will use OAuth2 to obtain a device specific token toprevent session expiry, making the old /oc-shib/remote.php/nonshib-webdav obsolete
Further Reading
• ADFS 2.0 Step-by-Step Guide: Federation with Shibboleth 2 and the InCommonFederation
• ADFS: How to Invoke a WS-Federation Sign-Out• Shibboleth Service Provider Integration with ADFS• adfs2fed Python Script• AD FS 2.0 Step-by-Step Guide: Federation with Shibboleth 2 and the InCommon
Federation• Shibboleth Basic Configuration (Version 2.4 and Above)• Shibboleth XML MetadataProvider• Shibboleth NativeSPServiceSSO
Enterprise User Management | 625
Document Classification and PolicyEnforcement
Introduction
When dealing with large amounts of data in an enterprise, it is essential to havemechanisms in place that allow you to stay in control of data flows. To implement suchmechanisms the first step to take is to define guidelines that describe how the contentof different security levels have to be treated.
Depending on the industry, such information security guidelines can originate fromregulatory requirements, from recommendations of industry associations, or they canbe self-imposed if there’s no external factor but internal risk managementrequirements that demand special treatment for specific information.
The leading information security standard ISO 27001 defines guidelines for managinginformation security which can be certified. More specifically:
1. Information should enter an asset inventory (A.8.1.1)2. Information should be classified (A.8.2.1)3. Information should be labeled (A.8.2.2)4. Information should be handled in a secure way (A.8.2.3)
As the leading international standard and certification for information security, ISO27001 covers 75-80% of the GDPR. This makes it the ideal framework choice tosupport GDPR compliance requirements. Please see the GDPR to ISO-27001 MappingGuide as an example to match the mentioned ISO Controls to the relevant GeneralData Protection Regulation (GDPR) articles.
Once the guidelines are set up, they need to be put into practice. First of all, highlysensitive data needs to be separated from less sensitive data. This is, usually, done byoutlining the security levels present in the enterprise, and defining the criteria forinformation to qualify for each of these security levels.
Typically used security levels are "Public", "Internal", "Confidential", and "StrictlyConfidential", but the requirements are usually determined individually. For example,if you are seeking GDPR compliance, then administrators can add additional ones,such as "No PID (Personally Identifiable Information)", "PID", and "Special PID".
The actual separation of information can then be done by requiring users to classifydocuments according to the security levels before they leave their workstation, or byusing other criteria to assign classification levels to data during further processing.
Based on the classification level, information can then be labeled and policies can beenforced to ensure that information is handled in a secure way - and in compliancewith corporate guidelines.
ownCloud can boost productivity with unique collaboration features. Firstly, there’s"Document Classification and Policy Enforcement". This adds the capability to ensurethat sensitive data is handled as required by information security guidelines.
Specifically, it enables ownCloud providers to:
• Comply with information security standards, such as ISO 27001/2 as recommendedby the German Association of the Automotive Industry (VDA) and get certified towork securely within your value chain.
• Handle data in compliance with GDPR
626 | Introduction

• Manage risks effectively and cover potential data breaches.• Separate information based on metadata.• Display the data classification levels to raise user awareness.• Prevent human mistakes when dealing with sensitive information.• Fulfil corporate data protection requirements.
Classification
Employing document classification and respective policies in ownCloud generallyinvolves three steps, which are outlined in detail below.
1. Create tags for classification2. Configure rules for classification (tagging)3. Associate policies to the classification rules
Tags for Classification
Document classification levels in ownCloud are represented via Collaborative Tags.Different categories of tags can be used to achieve different behaviors for users; theseare detailed in the table below.
Table 1. Tag Categories Available in ownCloud
Tag Name Description
Visible These tags are not available for classification based on metadata andfeature policies because users can edit and delete them, which isundesirable in many cases
Restricted These tags can be created by administrators using Collaborative TagsManagement. This category is recommended as it enables users torecognize the classification level of files and to be able to filteraccordingly. Additionally, certain groups of users can have the privilegeto edit and assign or unassign these tags.
Static These tags can be created by administrators using Collaborative TagsManagement. This category is recommended as it enables users torecognize the classification level of files and to be able to filteraccordingly. Additionally this tag category should be used for manualclassification as users in specified groups can only assign and unassignthem but only administrators can edit or delete them. This wayadministrators can provide a tag linked to a classification policy thatspecified users can then impose on files.
Invisible These tags can be created by administrators using Collaborative TagsManagement. This category is recommended when users should not beable to recognize the classification level of files or to be able to filteraccordingly.
For setting up each classification rule, create a separate tag using Collaborative TagsManagement, which you can later assign to classification rules and/or policies.
Automated Classification Based on Document Metadata
Automated classification based on document metadata consists of two parts:
1. The actual classification metadata is embedded in documents using Office suitefeatures
Classification | 627

2. Document metadata is evaluated on file upload via the web interface and allownCloud Clients. Automated classification in ownCloud therefore takes place onfile upload. Existing files containing classification metadata currently can’t beclassified subsequently, except via manual user interaction.
Office Suite Features for Document Classification
Microsoft Office can be extended with the NovaPath addon, to provide classificationcapabilities. Currently Microsoft Office formats (docx, dotx, xlsx, xltx, pptx, ppsx andpotx) are supported LibreOffice provides an integrated classification manager (TSCP).
To use automated classification based on document metadata, install and enable theDocument Classification extension. The configuration depends on the tools and theclassification framework in use.
Administrators can find examples and generalized configuration instructions below.
Basic Examples for Classification and Policy Enforcement
Microsoft Office with Add-Ons
Microsoft Office does not provide classification capabilities out-of-the-box. To extend it,we recommend the Microsoft Azure Information Protection or NovaPath add-ons.These extensions come with easy-to-use default classification categories, and providethe flexibility to set up custom classification schemes as desired.
Let’s assume you want to use the default classification framework provided byNovaPath. In addition, let’s assume that you take the classification level for documentsclassified as Confidential over to ownCloud to set up a policy that prevents saiddocuments from being accessed by users in the group "Trainees".
This is how you set up an automated classification and the access policy in ownCloud:
• As an ownCloud administrator, navigate to Settings › Workflows & Tags. Addinga group with special privileges for the tag is optional.
• Within "User Management", create the group "Trainees" and add some users.• Set up the classification rule in the panel "Document Classification and Feature
Policies" in the same section, and set the following two properties:◦ Property XPath = //property[@name='Klassifizierung']/vt:lpwstr◦ Property Value = Confidential
Take care, the property and value fields are case-sensitive!
• For "Tag", choose [Class: Confidential].• Don’t tick a policy checkbox as you don’t want to set up a feature policy but an
access policy.• Hit [Save].• Set up the access policy in Settings › Security.• In the panel "File Firewall" enter a name for the group of rules, e.g., Confidential
(optional). Hint: first click [Add group] if you already have other rules configured.• From the drop-down menu, choose [System file] tag. In the tag picker, choose[Class: Confidential]. Now you should have [System file tag] [is] [Class:Confidential].
• To add the group restriction, click [Add rule], choose [User group] from thedrop-down menu. In the group picker drop-down, choose [Trainees]. Now you
628 | Classification
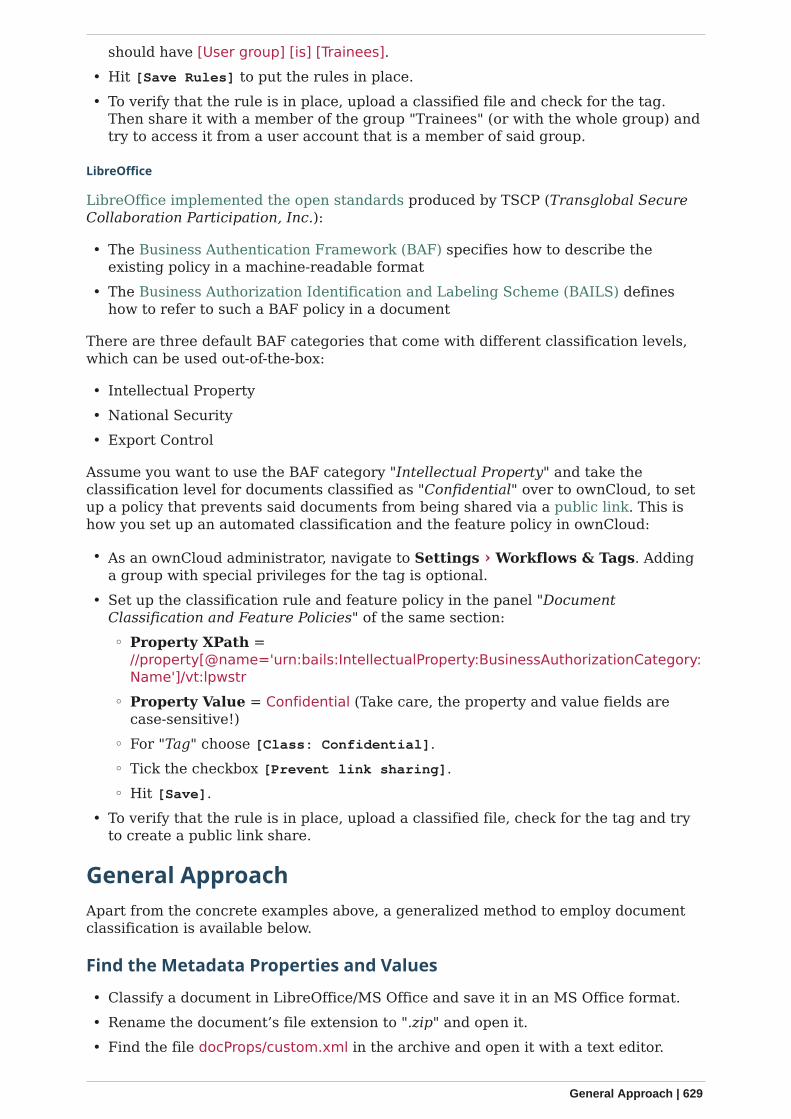
should have [User group] [is] [Trainees].• Hit [Save Rules] to put the rules in place.• To verify that the rule is in place, upload a classified file and check for the tag.
Then share it with a member of the group "Trainees" (or with the whole group) andtry to access it from a user account that is a member of said group.
LibreOffice
LibreOffice implemented the open standards produced by TSCP (Transglobal SecureCollaboration Participation, Inc.):
• The Business Authentication Framework (BAF) specifies how to describe theexisting policy in a machine-readable format
• The Business Authorization Identification and Labeling Scheme (BAILS) defineshow to refer to such a BAF policy in a document
There are three default BAF categories that come with different classification levels,which can be used out-of-the-box:
• Intellectual Property• National Security• Export Control
Assume you want to use the BAF category "Intellectual Property" and take theclassification level for documents classified as "Confidential" over to ownCloud, to setup a policy that prevents said documents from being shared via a public link. This ishow you set up an automated classification and the feature policy in ownCloud:
• As an ownCloud administrator, navigate to Settings › Workflows & Tags. Addinga group with special privileges for the tag is optional.
• Set up the classification rule and feature policy in the panel "DocumentClassification and Feature Policies" of the same section:◦ Property XPath =
//property[@name='urn:bails:IntellectualProperty:BusinessAuthorizationCategory:Name']/vt:lpwstr
◦ Property Value = Confidential (Take care, the property and value fields arecase-sensitive!)
◦ For "Tag" choose [Class: Confidential].◦ Tick the checkbox [Prevent link sharing].◦ Hit [Save].
• To verify that the rule is in place, upload a classified file, check for the tag and tryto create a public link share.
General Approach
Apart from the concrete examples above, a generalized method to employ documentclassification is available below.
Find the Metadata Properties and Values
• Classify a document in LibreOffice/MS Office and save it in an MS Office format.• Rename the document’s file extension to ".zip" and open it.• Find the file docProps/custom.xml in the archive and open it with a text editor.
General Approach | 629
• Within custom.xml, find the property that contains the classification level value.• Note down the classification property and value.• Repeat the steps for all classification properties and values you want to set up
classification rules for in ownCloud.
Set Up Classification Rules
• As an ownCloud administrator, navigate to Settings › Workflows & Tags• In the panel Document Classification and Feature Policies set up the rules:
◦ Property XPath: Enter the XPath that identifies the classification property.Below you find a generalized example where classification-property is aplaceholder for the property to evaluate.
//property[@name='classification-property']/vt:lpwstr
◦ Property Value: Enter the value that triggers the classification rule when itmatches with the metadata of an uploaded document, e.g., Confidential. Takecare, the property and value fields are case-sensitive.
◦ Tag: Choose the tag to apply to files when a match occurs.• Repeat the steps to create classification rules for all desired properties and values
Automated Classification Based on File or User Properties
Apart from automated classification based on document metadata, uploaded files mayalso be classified according to criteria inherent to files or to the users uploading them,making use of the Workflow extension.
• Administrators may add rules for automated classification of files according to afile’s size or file type.
• File uploads by specific users, devices, or source networks can be used asindicators for classification.
• Furthermore, administrators can define shared folders to automatically classifyfiles uploaded to such folders, by tagging the respective folder and creating aWorkflow rule based on the chosen System file tag.
• Additionally, the rules may be linked to achieving a more granular classificationbehavior (e.g., PDF files uploaded by a specific group of users should be classifiedas Confidential).
Assume you want to automatically classify all PDF documents uploaded by users thatare members of the "Management" group. You can construct a workflow rule usingthe following steps:
• Within user management create the group "Management" and add some users.• Navigate to Settings › Workflows & Tags.• In the Collaborative Tags Management panel, create a tag of type "Static" and call
it Class: Confidential. Adding a group with special privileges for the tag is optional.• In the panel "Workflow" you can now set up the classification rules. Hit [Add newworkflow] and specify a useful name. Now configure the conditions that trigger theclassification once they are met. For that choose "User group" from the drop-downmenu, click [+], then choose "File mimetype" and click [+] again. Then you have toprovide the group "Management" and the MIME type for PDF (application/pdf) inthe respective fields.
630 | General Approach
• Select the tag [Class: Confidential] to be added when the rules match.• Click [Add workflow] to save and enable it.
For more information, please check the options available for auto-tagging and consult the Workflow Extension documentation. For filesclassified with the Workflow extension, administrators can imposefeature and access policies as described in the next section.
Manual Classification
As a further measure, it is possible to supply tags for users to autonomously classify alltypes of files in their own or shared spaces.
• As an ownCloud administrator, create a group within user management and add theusers that should be able to classify files.
• Then navigate to Settings › Workflows & Tags.• In the Collaborative Tags Management panel, create a tag of type "Static" and give
it a meaningful name. Then assign the group you created, in the beginning, to giveits users special privileges for the tag.
• Users that are not a member of the specified group(s) will only be able to see therespective tag but can’t alter or assign/un-assign it.
For files that are classified manually, administrators can impose feature and accesspolicies as described in the next section.
Policy Enforcement
ownCloud currently provides two types of policies that can be enforced based onclassification, Feature and Access policies. These policies can be imposedindependently of the classification mechanism. The following sections illustrate theavailable policies and explain how they can be applied to classified contents.
Feature Policies
Feature policies are restrictions that prevent users from using a feature or force themto use it in a certain way. They are provided by the Document Classification extension,which currently supports the following policies:
• Prevent Upload• Prevent Link Sharing• Unprotected Links Expire After X Days
Prevent Upload
To follow guidelines that prevent data of certain classification levels (e.g., "strictlyconfidential") from being used in ownCloud at all, the "Prevent upload" policy is theright instrument to use. To impose such policies, tick the checkbox associated with theclassification rule for the respective classification level.
When trying to upload documents caught by the policy, users will get an errormessage: A policy prohibits uploading files classified as '<tag>', where <tag> is the tagchosen for the classification rule.
Even though the server won’t accept the uploaded files, in the end, it ismandatory to configure a tag for the classification rule to work.
Policy Enforcement | 631

Prevent Link Sharing
The prevent link sharing policy is tasked to ensure that classified data of certainconfidentiality levels can’t be shared publicly. This way, users can collaborate on thedata internally, but it can’t leave the company via ownCloud. To enable such policies,tick the checkbox associated with the classification rule for the respectiveclassification level.
Documents with the associated classification level:
• Can’t be shared via link (public links on single files and folders containing classifiedfiles); and
• Can’t be moved to a publicly shared folder.
In all cases the user will see an error message containing the reasoning and therespective file(s): The file(s) "<file1>, <file2>" can’t be shared via public link(classified as <tag>), where <tag> is the tag chosen for the classification rule.
Unprotected Links Expire After X Days
The policy Unprotected links expire after X days enables administrators to definepublic link expiration policies depending on the classification levels of the data that isshared via public links without password protection.
This makes it possible, for instance, to allow documents classified as public to beshared via public links for 30 days while documents classified as internal requirepublic links to expire after seven days. To enable such policies, just define anexpiration period associated with the classification rule for the respectiveclassification level.
The Password Policy extension also provides options to enforce publiclink expiration depending on whether the user sets a password or not.
The option "X days until link expires if password is not set" is mutually exclusive withthis policy. When you enable the Password Policy option, it will always be dominantand effectively override the policy discussed in this section. In contrast, the PasswordPolicy option "X days until link expires if password is set" can be used in parallel.
The Sharing settings option provides the means to define a generalpublic link expiration policy. This option currently is also mutuallyexclusive and will always override the policy discussed in this section.
Setting Up Policies Without Automated Classification Based onDocument Metadata
All policies can also be enforced when using Manual Classification or AutomatedClassification based on File or User Properties. For this, specify the tag thatdetermines the files that the policy should apply to and leave the fields for "PropertyXPath" and "Property Value" empty. Then choose the desired policy and click [Save].
Access Policies
Access policies are restrictions that prevent users or groups of users from accessingspecific resources even though they appear in their file list, e.g., via a share fromanother user. They are provided by the File Firewall extension which currentlysupports policies to prevent access to classified documents.
To link access policies with classification levels, the bottom line of such policies is the
632 | Access Policies

associated classification tag ([System file tag] [is] [<tag>]). It can, for instance, becombined with the following conditions to realize exclusive ([is]) or inclusive ([is not])policies:
Documents with the respective classification tag can’t be accessed:
• User group: by users that are a member of the configured group (or can only beaccessed by users that are a member of the configured group when using the [isnot] operator).
• User device: from the configured device(s) (or only from the configured deviceswhen using the [is not] operator)
• Request time: within the configured time frame (or only within the configured timeframe when using the [is not] operator)
• IP Range (Source network): from the configured IP range (or only from theconfigured IP range when using the [is not] operator)
Logging
When classified documents are uploaded, log entries will be written to ownCloud’s logfile, (data/owncloud.log). For this, it is possible to additionally specify anothermetadata property that will be used to add its value to the log entries in the form of a"Document ID".
With this, it is possible to filter the log according to a document identifier or toforward classification events for certain documents to external log analyzers. To set itup, add the desired property XPath to the "Document ID XPath" field of the respectiverule as you did for the classification property.
Each uploaded file will generate three entries with different log levels. See someexemplary entries below:
INFO: `"Checking classified file 'confidential.xlsx' with document id '2'"`INFO: `"Alice uploaded a classified file 'confidential.xlsx' with document class'Confidential'"`DEBUG: `"Assigning tag 'Class: Confidential' to 'confidential.xlsx'"`
Limitations
Automated Classification Based on Document Metadata: HandlingClassification Changes for Existing Files
• When a formerly classified document is replaced with a new version that does notcontain classification metadata, the classification tag will remain assigned, andconfigured policies will still apply. In this case, it is recommended to either deletethe original or upload the new version with a different name.
• When a formerly unclassified document is replaced with a new version that doescontain classification metadata, the classification tag will be assigned. However,when the policy "Prevent upload" is set up in addition, the original file will bedeleted, and the new version will be rejected due to the policy.
Logging | 633
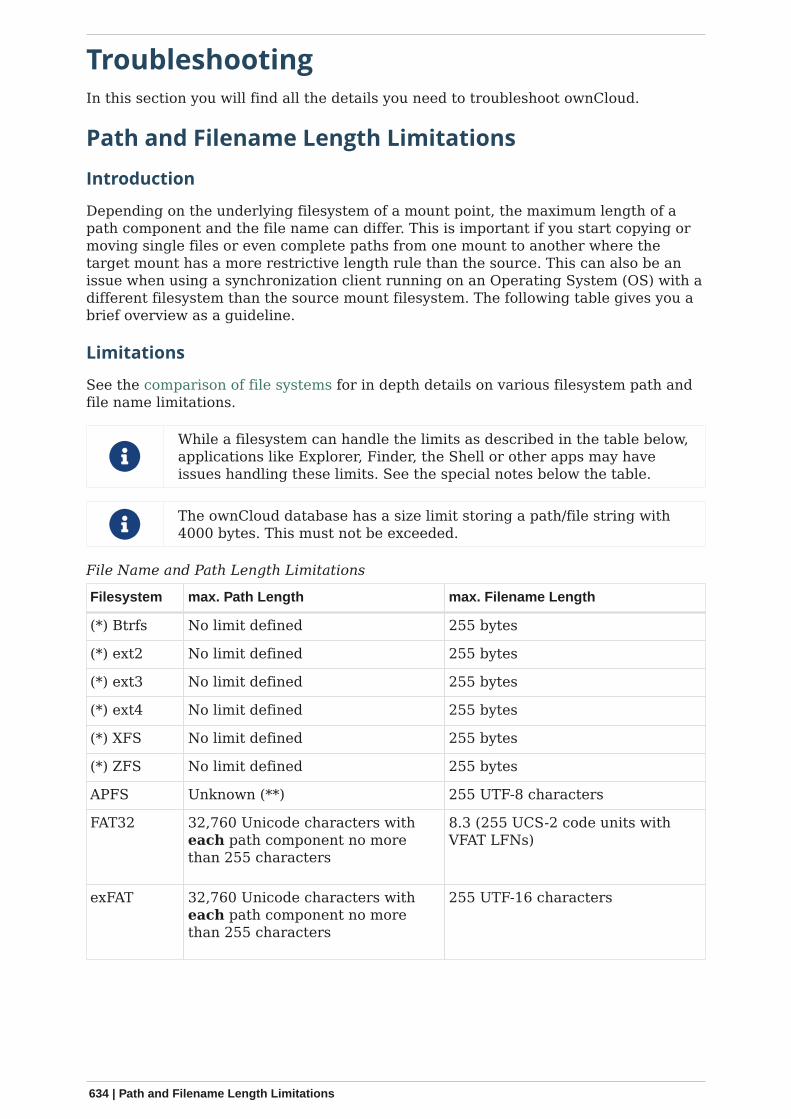
TroubleshootingIn this section you will find all the details you need to troubleshoot ownCloud.
Path and Filename Length Limitations
Introduction
Depending on the underlying filesystem of a mount point, the maximum length of apath component and the file name can differ. This is important if you start copying ormoving single files or even complete paths from one mount to another where thetarget mount has a more restrictive length rule than the source. This can also be anissue when using a synchronization client running on an Operating System (OS) with adifferent filesystem than the source mount filesystem. The following table gives you abrief overview as a guideline.
Limitations
See the comparison of file systems for in depth details on various filesystem path andfile name limitations.
While a filesystem can handle the limits as described in the table below,applications like Explorer, Finder, the Shell or other apps may haveissues handling these limits. See the special notes below the table.
The ownCloud database has a size limit storing a path/file string with4000 bytes. This must not be exceeded.
File Name and Path Length Limitations
Filesystem max. Path Length max. Filename Length
(*) Btrfs No limit defined 255 bytes
(*) ext2 No limit defined 255 bytes
(*) ext3 No limit defined 255 bytes
(*) ext4 No limit defined 255 bytes
(*) XFS No limit defined 255 bytes
(*) ZFS No limit defined 255 bytes
APFS Unknown (**) 255 UTF-8 characters
FAT32 32,760 Unicode characters witheach path component no morethan 255 characters
8.3 (255 UCS-2 code units withVFAT LFNs)
exFAT 32,760 Unicode characters witheach path component no morethan 255 characters
255 UTF-16 characters
634 | Path and Filename Length Limitations
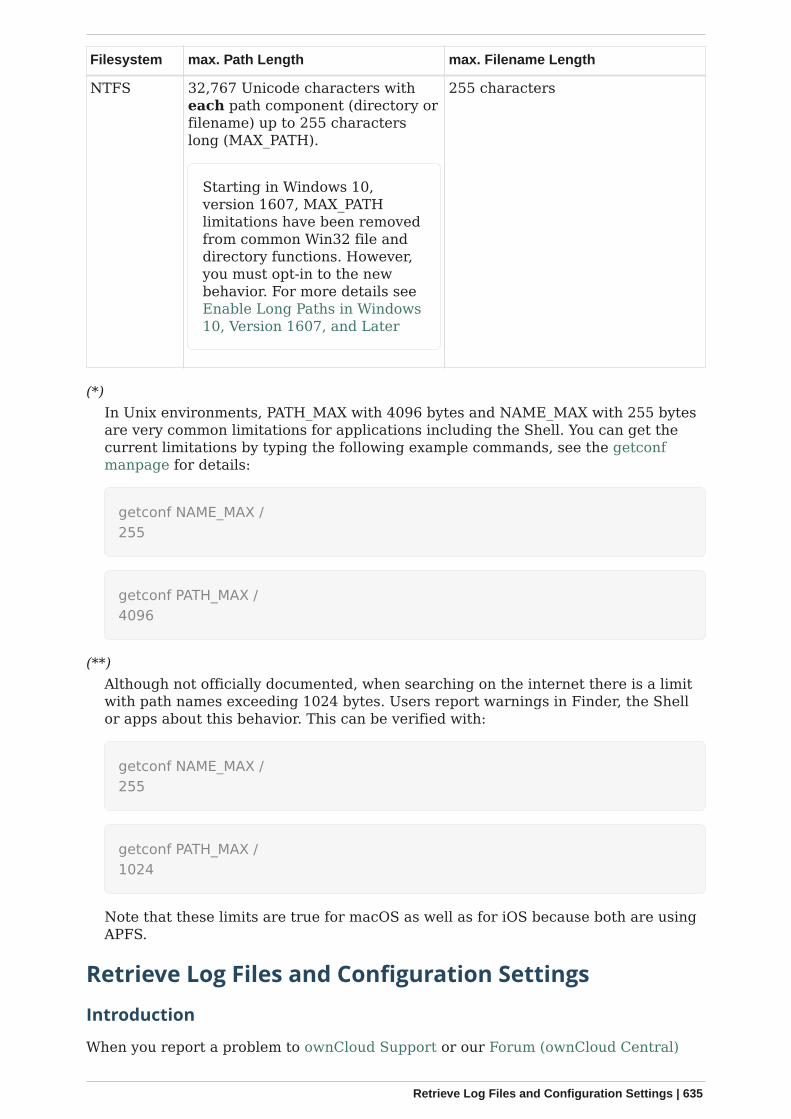
Filesystem max. Path Length max. Filename Length
NTFS 32,767 Unicode characters witheach path component (directory orfilename) up to 255 characterslong (MAX_PATH).
Starting in Windows 10,version 1607, MAX_PATHlimitations have been removedfrom common Win32 file anddirectory functions. However,you must opt-in to the newbehavior. For more details seeEnable Long Paths in Windows10, Version 1607, and Later
255 characters
(*)In Unix environments, PATH_MAX with 4096 bytes and NAME_MAX with 255 bytesare very common limitations for applications including the Shell. You can get thecurrent limitations by typing the following example commands, see the getconfmanpage for details:
getconf NAME_MAX /255
getconf PATH_MAX /4096
(**)Although not officially documented, when searching on the internet there is a limitwith path names exceeding 1024 bytes. Users report warnings in Finder, the Shellor apps about this behavior. This can be verified with:
getconf NAME_MAX /255
getconf PATH_MAX /1024
Note that these limits are true for macOS as well as for iOS because both are usingAPFS.
Retrieve Log Files and Configuration Settings
Introduction
When you report a problem to ownCloud Support or our Forum (ownCloud Central)
Retrieve Log Files and Configuration Settings | 635
you will be asked to provide certain log files or configurations for our engineers (orother users). These are essential in better understanding your issue, your specificconfiguration, and the cause of the problem.
Here are instructions for how to collect them.
Generate a Config Report
You can use the webUI or the command line to generate a config report. The webUIincludes the web server environment, while the command line generated one doesn’tas it can’t access it. Therefore, if possible, always generate it through the webUI.Please note that you have to have the configreport app enabled. Check if it’s alreadyenabled by going to the apps section of the admin settings. You can enable this appusing the following commands:
# Install it, if it’s not already installedsudo -u www-data php occ market:install configreport
# Or enable it, if it’s already installedsudo -u www-data php occ:app enable configreport
Generate via webUI
To generate a config report using the webUI, navigate to:Settings › Admin › General › "Generate Config report" › "Download ownCloudconfig report".
Generate via Command Line
To generate a config report from the command line, run the following command fromthe root directory of your ownCloud installation:
sudo -u www-data php occ configreport:generate > config_report.txt
ownCloud Server Log File
Generate via webUI
You can use the webUI to download your ownCloud Server log file. To do so, navigateto:Settings › Admin › General › Log › "Download logfile".
Generate via Command Line
If the log file is too big, you will need to transfer it from the command line. Thelocation of the log file can be found in your config.php. It’s in your data directory.
'datadirectory' => '/var/www/owncloud/data',
You also can specify a different location of the log file.
'logfile' => '/home/www-data/owncloud.log',
636 | Retrieve Log Files and Configuration Settings

Note that the web server user has to have rights to write in that directory.
LDAP Config
Assuming that LDAP is used, viewing the LDAP configuration is important whenchecking for errors between your ownCloud instance and your LDAP server. To get theoutput file, execute this command:
sudo -u www-data php occ ldap:show-config > ldap_config.txt
Retrieve Log Files and Configuration Settings | 637
Have You Found a Mistake In TheDocumentation?If you have found a mistake in the documentation, no matter how large or small,please let us know by creating a new issue in the docs repository.
638 | Have You Found a Mistake In The Documentation?