DynamiX Documentation
122
DynamiX Documentation
-
Upload
independent -
Category
Documents
-
view
1 -
download
0
Transcript of DynamiX Documentation

DynamiX Documentation
DynamiX Documentation
Getting Started1
How To Install DynamiX 71.1
Setting a Home Page 91.2
Video Tutorials 101.3
Image Resizing Script / External Image Support 111.4
Language Translation 121.5
How to add a Gallery 131.6
How to add Testimonials 161.7
Creating the Demo Homepage 201.8
General Settings2
Screen Cast 322.1
Word Press Custom Menu / Extended Menu 332.2
Full Widget Footer / Drop Panel 352.3
Side Bars 362.4
Branding Image 372.5
Timthumb Image Resizing Script 382.6
JW Player Configuration 392.7
Twitter 402.8
Troubleshooting3
Images Not Showing 423.1
Blog Settings4
Blog Settings Screencast 454.1
Archive / Index Posts Configuration 464.2
Archive / Index Pages Image Configuration 474.3
Single Post Image Configuration 484.4
Archive / Index Page Layout Configuration 494.5
Blog Templates 504.6
Header Settings5
Header Settings Screencast 525.1
Menu / Branding Settings 535.2
Drop Panel Options 545.3
Footer Settings6
Footer Settings Screencast 566.1
Footer Options 576.2
Gallery Slide Sets System7
Gallery Slide Sets Screencast 597.1
Gallery Slide Sets 607.2
Post Options8
Post Content Configuration 648.1
Social Options 658.2
Shortcode Generator 668.3
Post / Page Layout Configuration 678.4
Post Image Gallery Options 688.5
Page Options9
Page Content Configuration 729.1
Social Options 739.2
Shortcode Generator 749.3
Post / Page Layout Configuration 759.4
Add Post / Slide Set Gallery 769.5
Blog Categories 799.6

Galleries10
External Galleries 8110.1
Internal Galleries 8210.2
Shortcode Generator & Contact Form11
General Shortcodes 8411.1
Post / Slide Set Gallery 8511.2
Columns 8611.3
Styled Boxes 8711.4
Buttons 8811.5
Horizontal Break 8911.6
Block Quotes 9011.7
Highlight 9111.8
Image Shortcode 9211.9
Video Shortcode 9311.10
Tabs 9411.11
Accordion 9511.12
List 9611.13
Reveal Content 9711.14
Drop Caps 9811.15
Recent Posts 9911.16
BuddyPress12
BuddyPress 10112.1
Child Theme13
Child Theme 10313.1
Skin Settings14
DynamiX Skins 10614.1
Font Settings 10714.2
Cufon Font Settings 10814.3
Add Custom CSS 10914.4
Custom Skin + 11014.5
Custom Skin Creator15
Custom Skin Creator Screencast 11215.1
Custom Skin Creator PSD (Photoshop Required) 11315.2
Source & Credits16
Source & Credits 11816.1
Contact Details17
Contact Details 12017.1
Demo Data18
Demo Data 12218.1

DynamiX Documentation - 6
Getting Started
DynamiX Documentation - 7
How To Install DynamiX
Step One
To install a theme from ThemeForest correctly, you MUST unzip the file provided by ThemeForest.
Step Two
Now zip (compress) JUST the DynamiX folder.
(DO NOT include the DynamiX-Wordpress, PSD, Licensing or DynamiX-Demo-Data Folders.)
Step Three *optional*
Do the same for DynamiX-Child if you wish to use the Child Theme
(Only use the Child Theme if you intend to make changes to the CSS).
Checking the Theme is Installed Correctly
Goto Wordpress Admin -> Appearance -> Themes. Deactivate the DynamiX theme and check
the location path i.e. themes/DynamiX.
If the Theme is installed within a separate folder for example:
themes/DynamiX-Wordpress/DynamiX, the theme is installed in-correctly.
How to Resolve and Install via FTP
If you have installed the theme incorrectly via the WordPress Admin, you may need to access
the theme folder via FTP and remove the theme and re-upload.
FTP is the preferred method for installing themes, DO NOT upload the zip file provided by
themeforest directly via the WP admin, you will encounter issues.
Visit the Envato information page here.
DynamiX Child Theme
A Child theme is also included with this theme, upload this folder within the same location as
above. i.e. themes/DynamiX-Child. You will require the main DynamiX folder as this is the core.
The purpose of the child theme is to allow you to make modifications to the CSS

DynamiX Documentation - 8
DynamiX-Child/style.css and add any custom functions DynamiX-Child/functions.php file
without affecting the DynamiX core files. This means that any future DynamiX updates can be
uploaded to the core folder and will not affect your modifications.

DynamiX Documentation - 9
Setting a Home Page
Step One
Setting a home page is a WordPress Setting, login to your WordPress admin and navigate to
Settings -> Reading -> Front Page Displays.
Step Two
Select Static Page then select the page you want to appear as the home page from the Front
Page select menu.
DynamiX Documentation - 10
Video Tutorials
Video Tutorials
General Settings
http://www.youtube.com/watch?v=GAwnV0-GJWA
Blog Settings
http://www.youtube.com/watch?v=4Vjh_kDsR24
Drop Panel / Footer Settings
http://www.youtube.com/watch?v=FnIieYfVrGw
Shortcode Generator
http://www.youtube.com/watch?v=Llvoeng0DcE
Gallery Slideset System
http://www.youtube.com/watch?v=0-MUgzysMLY
Language Translation
http://www.youtube.com/watch?v=tr4Z5AEoUzk
How to create the home page Part 1
http://www.youtube.com/watch?v=kNbz1892acE
How to create the home page Part 2
http://www.youtube.com/watch?v=TXulV6DA81Y
How to create a custom skin
http://www.youtube.com/watch?v=1GKJKmdXF-s

DynamiX Documentation - 11
Image Resizing Script / External Image Support
How to resize script
Image Resizing Script / External Image Support
Image resizing script Timthumb is bundled with DynamiX – this version supports external images,
however a safe list is required. Locate the section of code shown below in DynamiX → lib →
scripts → timthumb.php and add to the safelist the domains you wish to allow access to.

DynamiX Documentation - 12
Language Translation
How to translate the DynamiX theme
Language Translation
DynamiX is translation ready, included with the theme is the required files for the translating the
theme into any language. Please watch the following screencast on how to translate the DynamiX
theme using a wordpress plugin (codestyling localization).
Language Translation Screencast
http://www.youtube.com/watch?v=tr4Z5AEoUzk
The required files are located in the DynamiX/languages/ folder.
DynamiX Documentation - 13
How to add a Gallery
Edit the Gallery Page
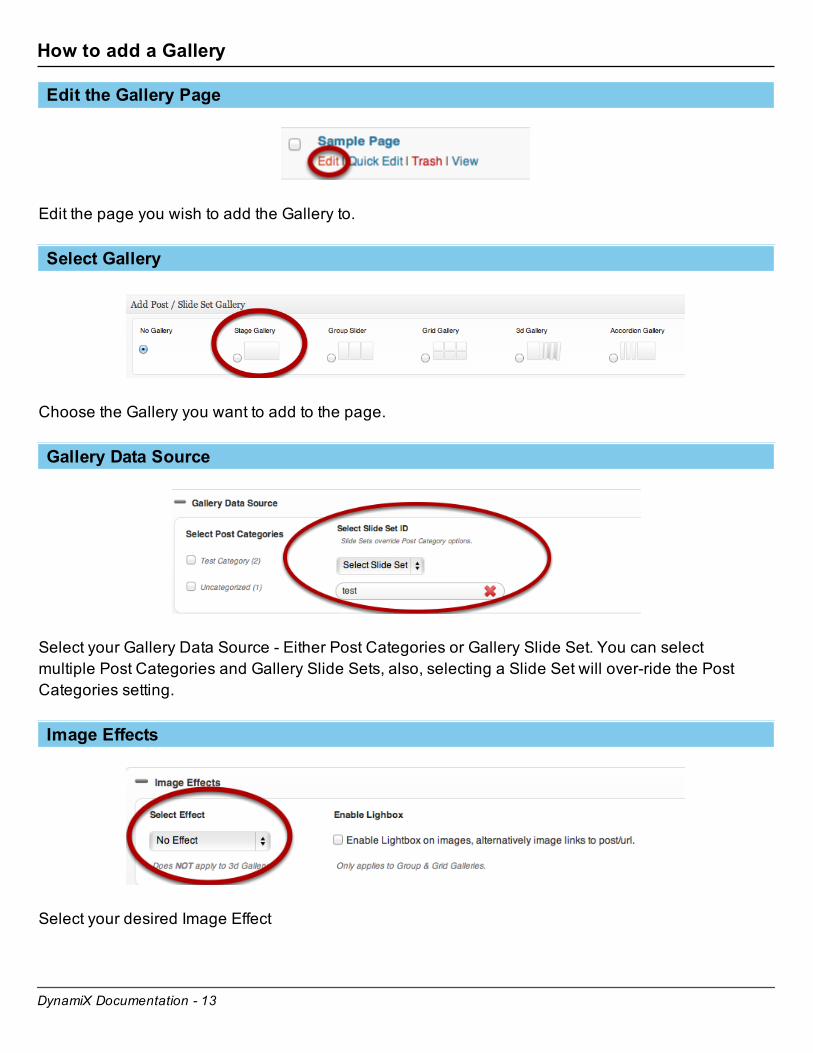
Edit the page you wish to add the Gallery to.
Select Gallery
Choose the Gallery you want to add to the page.
Gallery Data Source
Select your Gallery Data Source - Either Post Categories or Gallery Slide Set. You can select
multiple Post Categories and Gallery Slide Sets, also, selecting a Slide Set will over-ride the Post
Categories setting.
Image Effects
Select your desired Image Effect
DynamiX Documentation - 14
Additional Settings
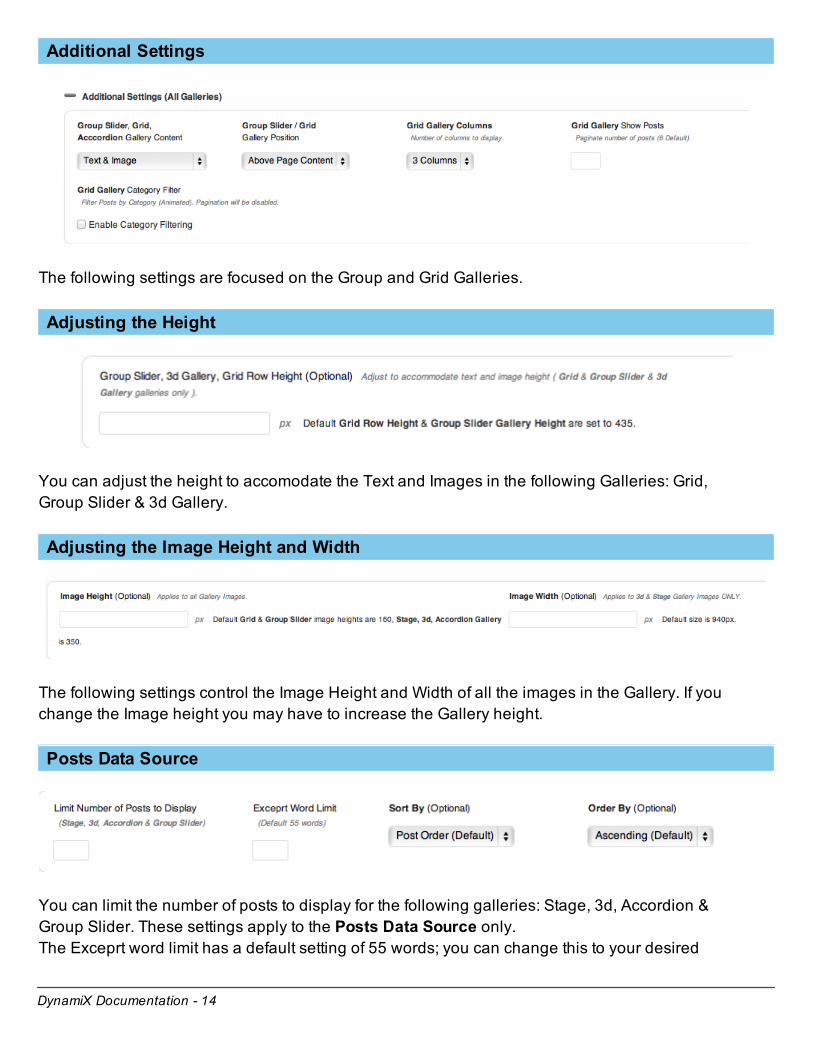
The following settings are focused on the Group and Grid Galleries.
Adjusting the Height
You can adjust the height to accomodate the Text and Images in the following Galleries: Grid,
Group Slider & 3d Gallery.
Adjusting the Image Height and Width
The following settings control the Image Height and Width of all the images in the Gallery. If you
change the Image height you may have to increase the Gallery height.
Posts Data Source
You can limit the number of posts to display for the following galleries: Stage, 3d, Accordion &
Group Slider. These settings apply to the Posts Data Source only.
The Exceprt word limit has a default setting of 55 words; you can change this to your desired
DynamiX Documentation - 15
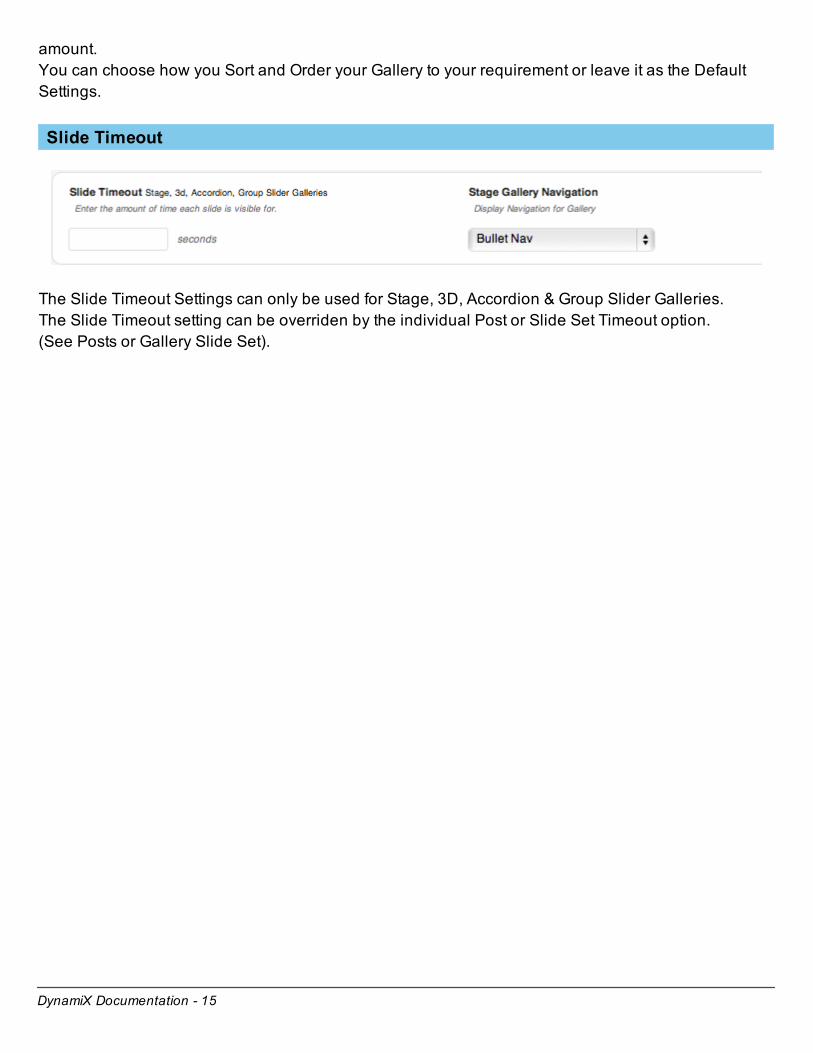
amount.
You can choose how you Sort and Order your Gallery to your requirement or leave it as the Default
Settings.
Slide Timeout
The Slide Timeout Settings can only be used for Stage, 3D, Accordion & Group Slider Galleries.
The Slide Timeout setting can be overriden by the individual Post or Slide Set Timeout option.
(See Posts or Gallery Slide Set).
DynamiX Documentation - 16
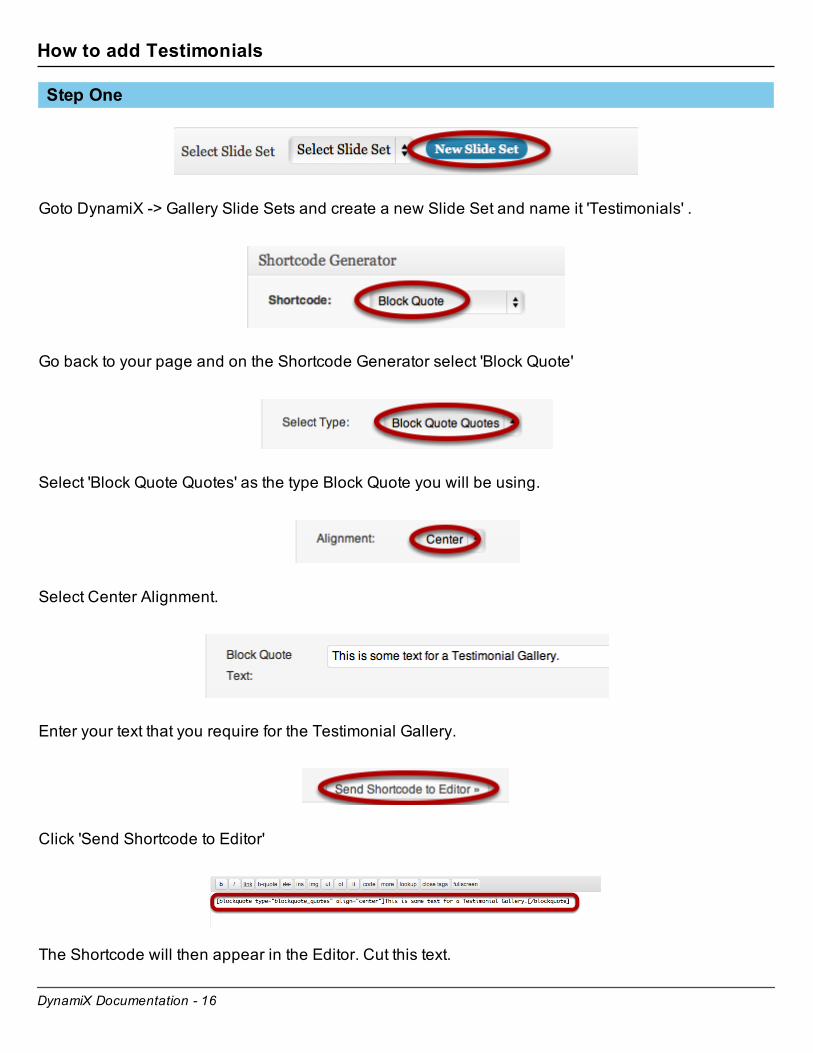
How to add Testimonials
Step One
Goto DynamiX -> Gallery Slide Sets and create a new Slide Set and name it 'Testimonials' .
Go back to your page and on the Shortcode Generator select 'Block Quote'
Select 'Block Quote Quotes' as the type Block Quote you will be using.
Select Center Alignment.
Enter your text that you require for the Testimonial Gallery.
Click 'Send Shortcode to Editor'
The Shortcode will then appear in the Editor. Cut this text.

DynamiX Documentation - 17
Go back to the Gallery Slide Set and select 'Add New Slide'. Then Paste your text into the
Description.
See Example Below:
[blockquote type="blockquote_quotes" align="center"]This is some text for a Testimonial
Gallery.[/blockquote]
Change the Stage Content from 'Image Only' to 'Text Only'.
Then Select 'Save Slide Set'
Goto Appearance -> Widgets and drag the 'DynamiX Widget Gallery' into column where you
require the widget to be placed.
DynamiX Documentation - 18
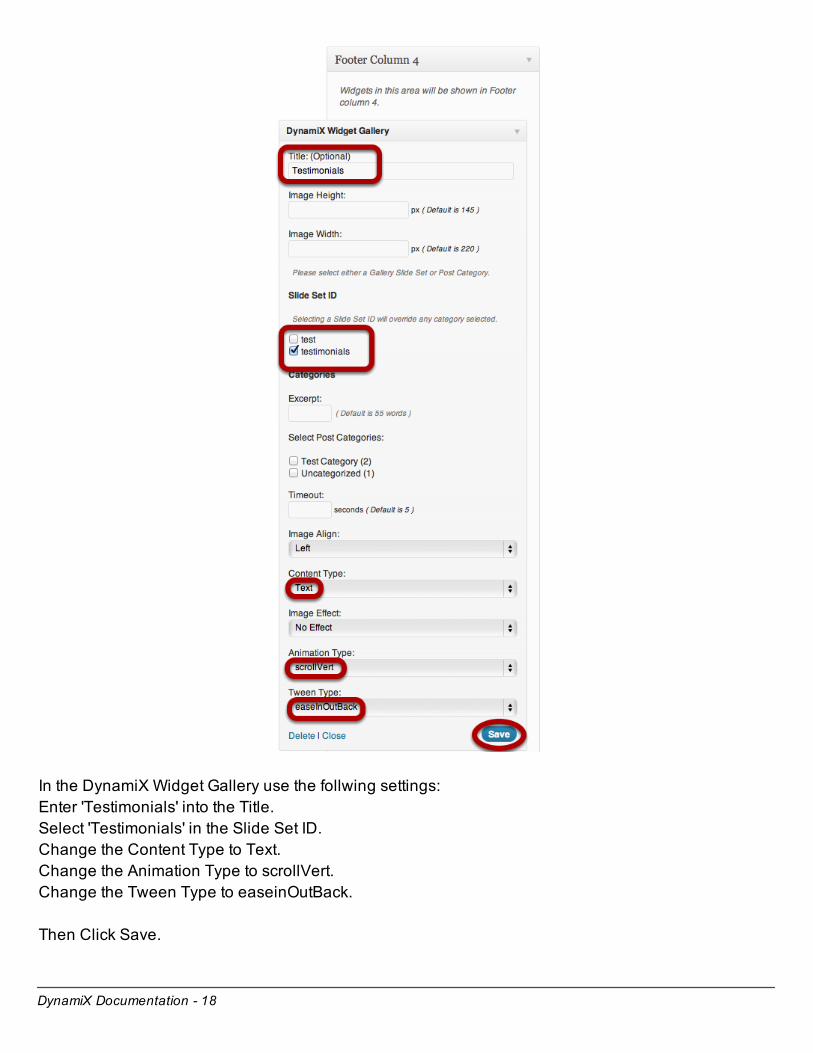
In the DynamiX Widget Gallery use the follwing settings:
Enter 'Testimonials' into the Title.
Select 'Testimonials' in the Slide Set ID.
Change the Content Type to Text.
Change the Animation Type to scrollVert.
Change the Tween Type to easeinOutBack.
Then Click Save.
DynamiX Documentation - 19
Finally
Go back to your Preview Page, Refresh and you will see your Testimonials animation.

DynamiX Documentation - 20
Creating the Demo Homepage
A guide on how to create the home page - the code for the shortcodes can be found at the end.
Add a new Page and name it 'Home'
Under Page Content Configuration use the following Settings:
In the Menu Description enter 'Beginning' .
In the Page Title enter 'BLANK' - This will stop the Page Title being displayed.

DynamiX Documentation - 21
Click 'Disable Content Border'
Select Outer Skin to 'Dark Grey'
Under Page Layout Confguration select 'Full Width'
Under Add Post / Slide Set Gallery select '3d Gallery'
Select either Post Gallery or Gallery Slide Set
If your photos are out of proportion, you can adjust the Group Slider, 3d Galeery, Grid Row Height.

DynamiX Documentation - 22
To create the Columns on the Homepage, select Columns under the Shortcode Generator.
At this point you can manually enter text / content into the Column Content but for the purpose of
this tutorial leave the fields blank.
Now Click Send Shortcode to Editor
In the Editor click between the First Columns Opening and Closing Tag.
Select Accordion and the Number of Panels you wish the Accordion to have.
DynamiX Documentation - 23
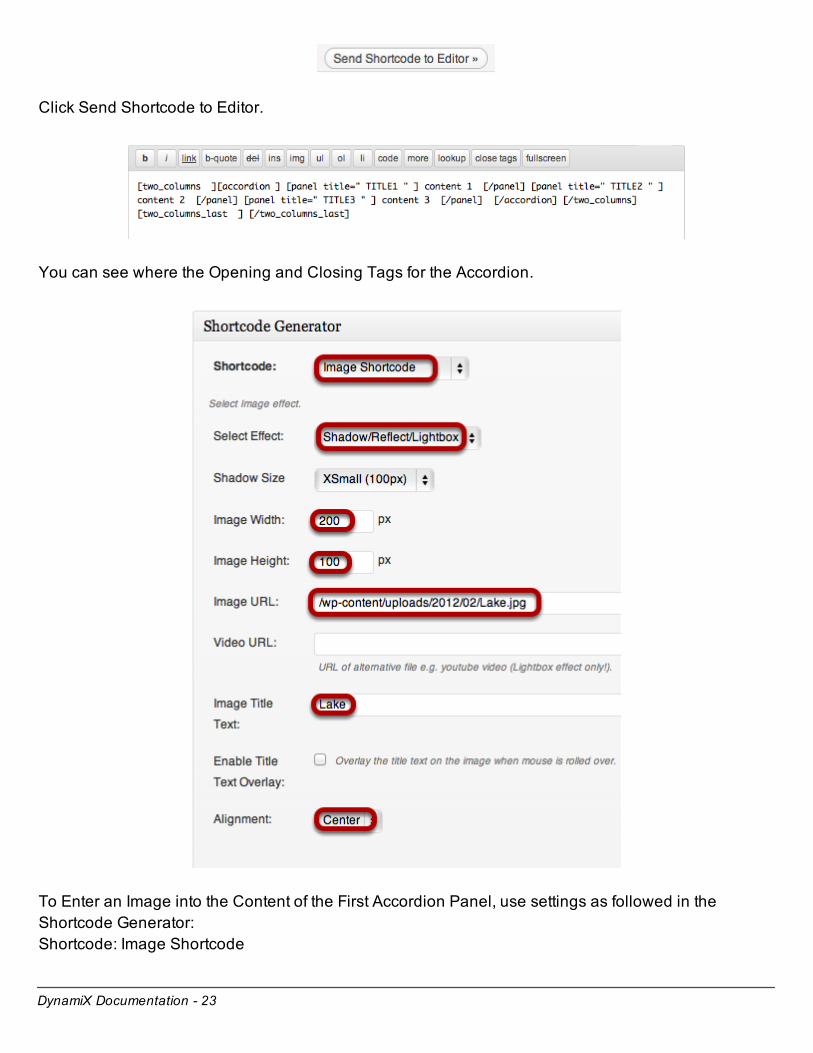
Click Send Shortcode to Editor.
You can see where the Opening and Closing Tags for the Accordion.
To Enter an Image into the Content of the First Accordion Panel, use settings as followed in the
Shortcode Generator:
Shortcode: Image Shortcode
DynamiX Documentation - 24
Select Effect: Shadow/Reflect/Lightbox
Shadow Size: XSmall (100px)
Image Width: 200px
Image Height 100px
Enter the URL of the Image you wish to use.
Give the Image a Title
Alignment: Center
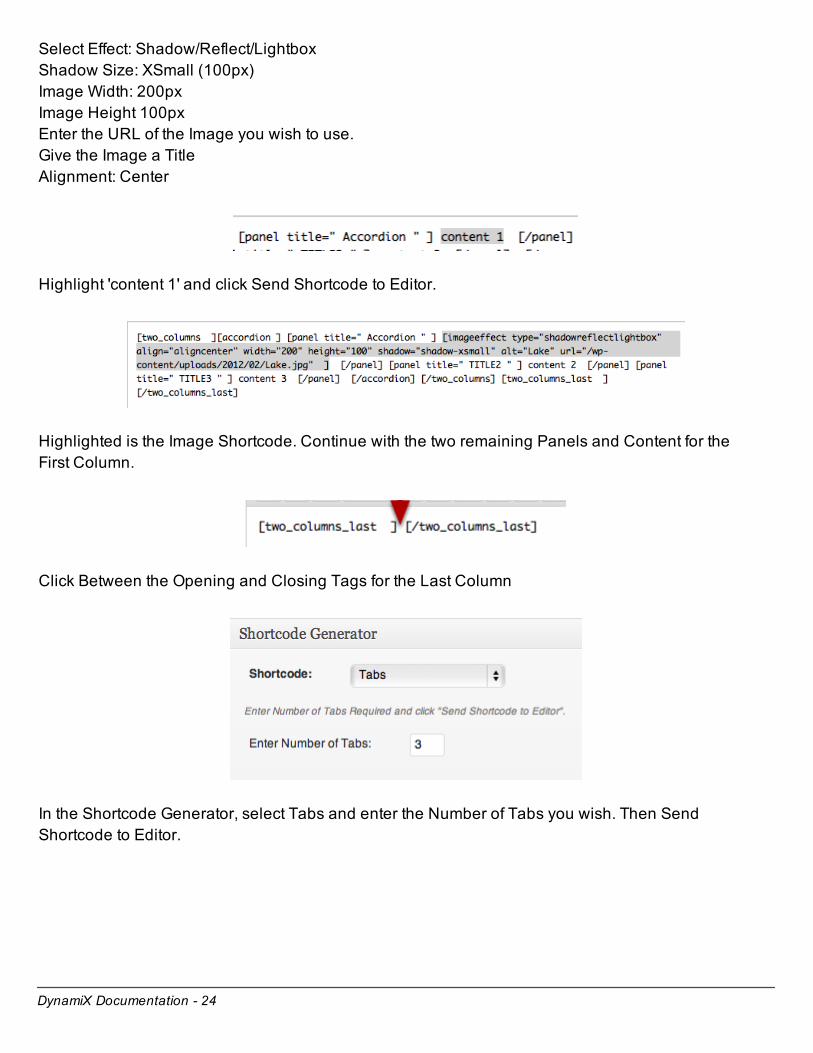
Highlight 'content 1' and click Send Shortcode to Editor.
Highlighted is the Image Shortcode. Continue with the two remaining Panels and Content for the
First Column.
Click Between the Opening and Closing Tags for the Last Column
In the Shortcode Generator, select Tabs and enter the Number of Tabs you wish. Then Send
Shortcode to Editor.
DynamiX Documentation - 25
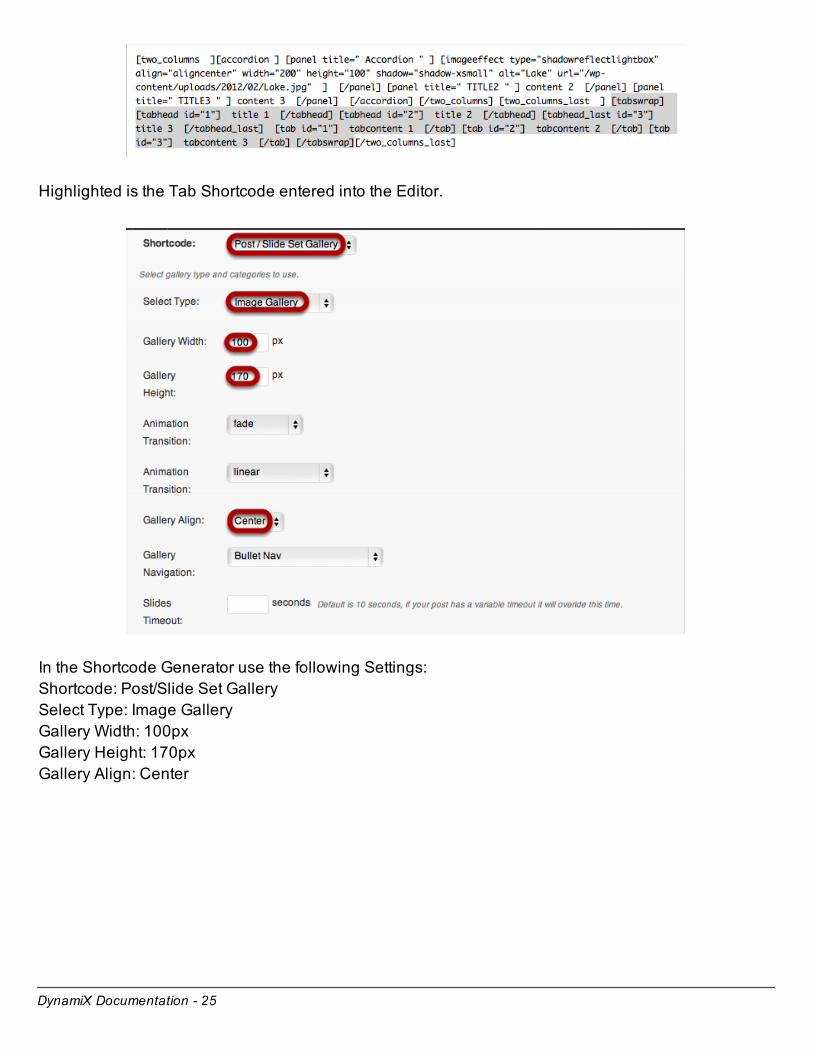
Highlighted is the Tab Shortcode entered into the Editor.
In the Shortcode Generator use the following Settings:
Shortcode: Post/Slide Set Gallery
Select Type: Image Gallery
Gallery Width: 100px
Gallery Height: 170px
Gallery Align: Center
DynamiX Documentation - 26
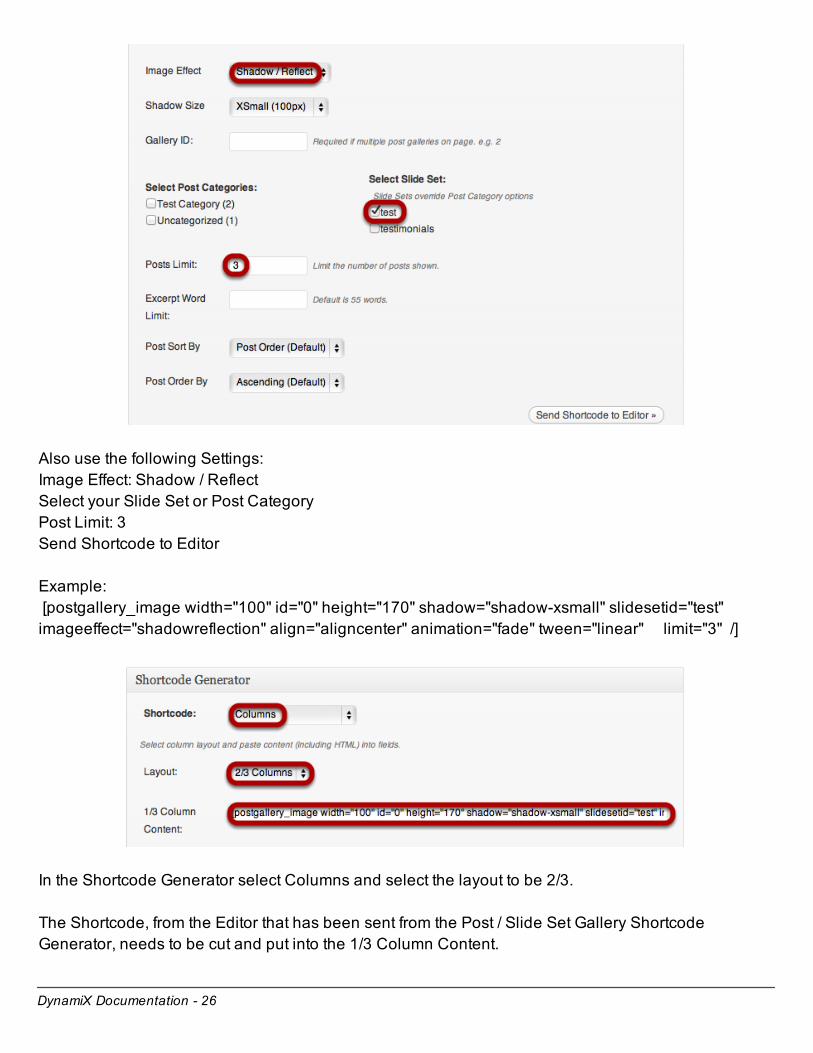
Also use the following Settings:
Image Effect: Shadow / Reflect
Select your Slide Set or Post Category
Post Limit: 3
Send Shortcode to Editor
Example:
[postgallery_image width="100" id="0" height="170" shadow="shadow-xsmall" slidesetid="test"
imageeffect="shadowreflection" align="aligncenter" animation="fade" tween="linear" limit="3" /]
In the Shortcode Generator select Columns and select the layout to be 2/3.
The Shortcode, from the Editor that has been sent from the Post / Slide Set Gallery Shortcode
Generator, needs to be cut and put into the 1/3 Column Content.
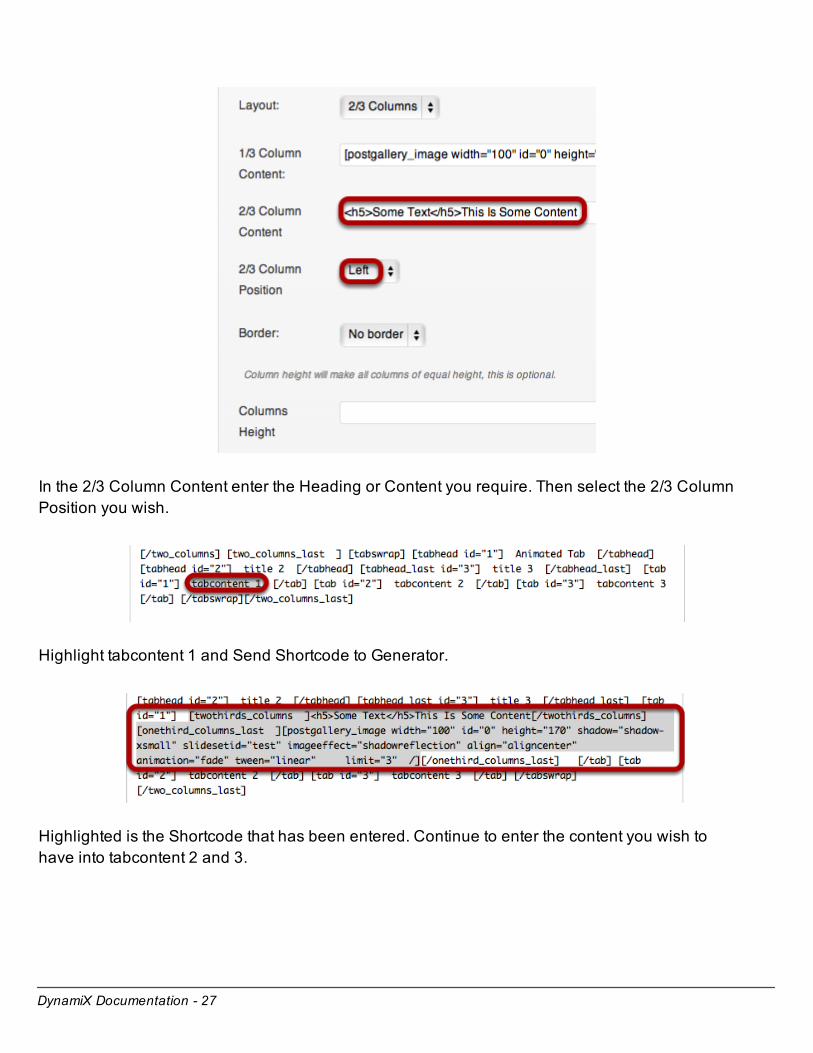
DynamiX Documentation - 27
In the 2/3 Column Content enter the Heading or Content you require. Then select the 2/3 Column
Position you wish.
Highlight tabcontent 1 and Send Shortcode to Generator.
Highlighted is the Shortcode that has been entered. Continue to enter the content you wish to
have into tabcontent 2 and 3.
DynamiX Documentation - 28
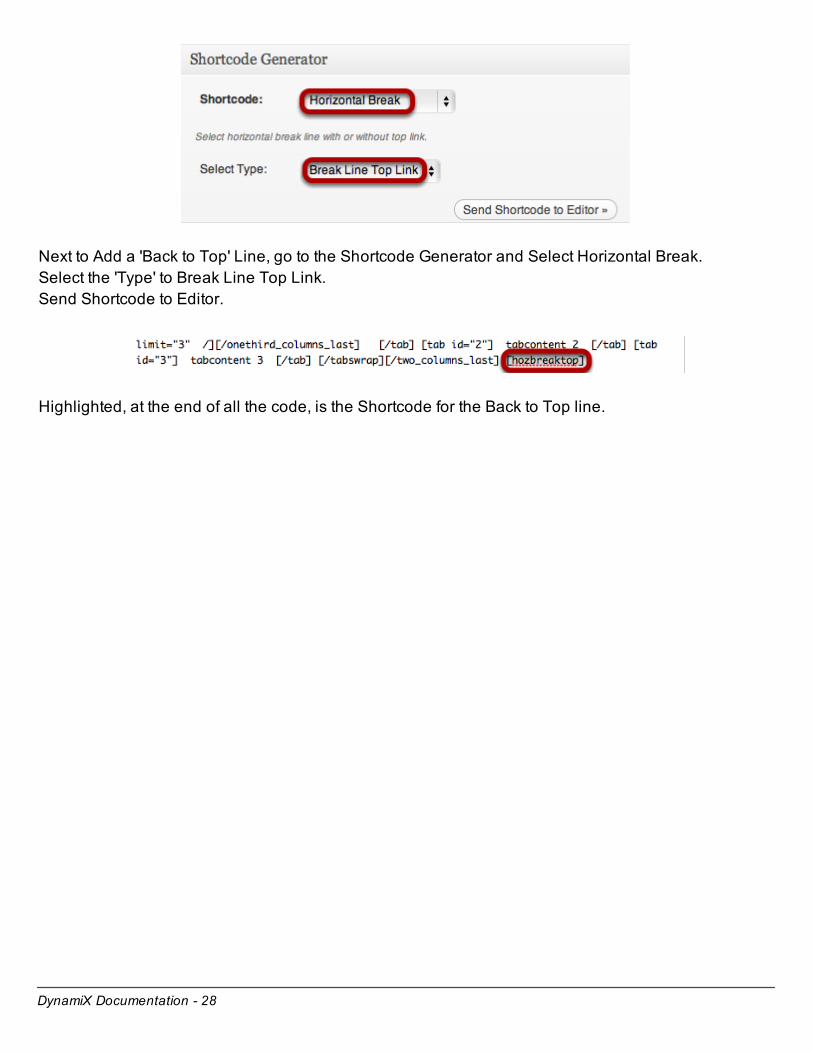
Next to Add a 'Back to Top' Line, go to the Shortcode Generator and Select Horizontal Break.
Select the 'Type' to Break Line Top Link.
Send Shortcode to Editor.
Highlighted, at the end of all the code, is the Shortcode for the Back to Top line.

DynamiX Documentation - 29
Next to add a Slider Gallery, use the following Settings in the Shortcode Generator:
Shortcode: Post / Slide
Select Type: Slider Gallery
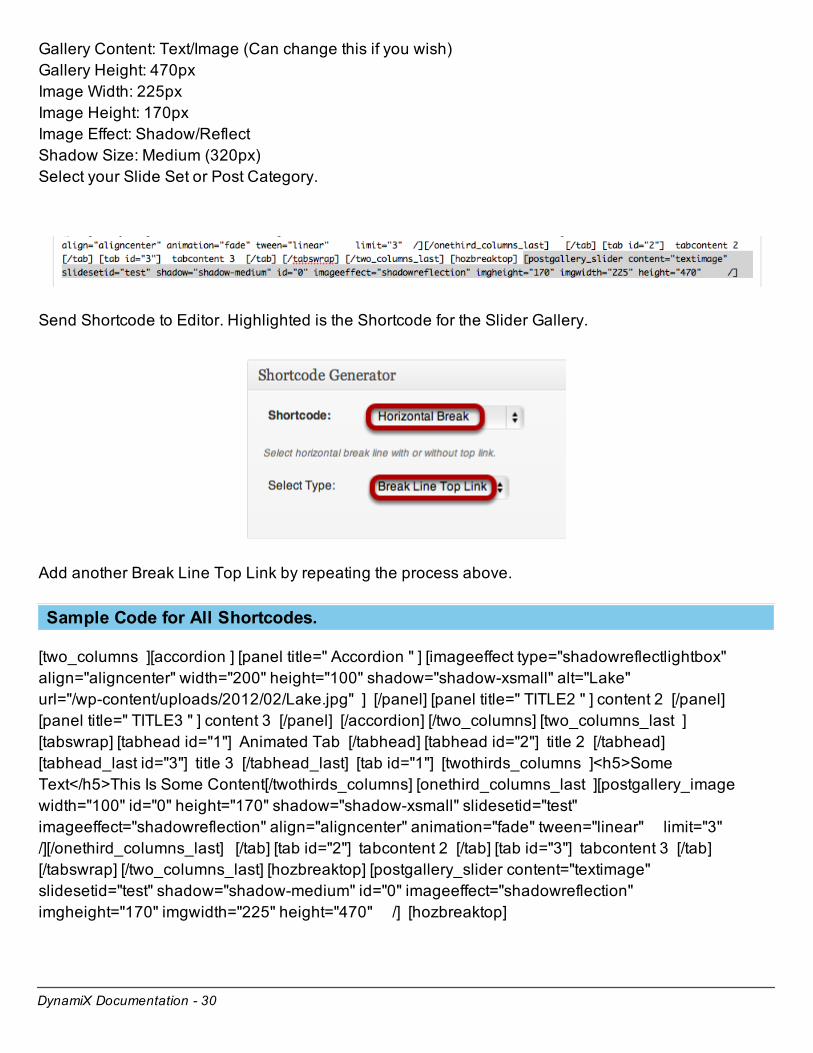
DynamiX Documentation - 30
Gallery Content: Text/Image (Can change this if you wish)
Gallery Height: 470px
Image Width: 225px
Image Height: 170px
Image Effect: Shadow/Reflect
Shadow Size: Medium (320px)
Select your Slide Set or Post Category.
Send Shortcode to Editor. Highlighted is the Shortcode for the Slider Gallery.
Add another Break Line Top Link by repeating the process above.
Sample Code for All Shortcodes.
[two_columns ][accordion ] [panel title=" Accordion " ] [imageeffect type="shadowreflectlightbox"
align="aligncenter" width="200" height="100" shadow="shadow-xsmall" alt="Lake"
url="/wp-content/uploads/2012/02/Lake.jpg" ] [/panel] [panel title=" TITLE2 " ] content 2 [/panel]
[panel title=" TITLE3 " ] content 3 [/panel] [/accordion] [/two_columns] [two_columns_last ]
[tabswrap] [tabhead id="1"] Animated Tab [/tabhead] [tabhead id="2"] title 2 [/tabhead]
[tabhead_last id="3"] title 3 [/tabhead_last] [tab id="1"] [twothirds_columns ]<h5>Some
Text</h5>This Is Some Content[/twothirds_columns] [onethird_columns_last ][postgallery_image
width="100" id="0" height="170" shadow="shadow-xsmall" slidesetid="test"
imageeffect="shadowreflection" align="aligncenter" animation="fade" tween="linear" limit="3"
/][/onethird_columns_last] [/tab] [tab id="2"] tabcontent 2 [/tab] [tab id="3"] tabcontent 3 [/tab]
[/tabswrap] [/two_columns_last] [hozbreaktop] [postgallery_slider content="textimage"
slidesetid="test" shadow="shadow-medium" id="0" imageeffect="shadowreflection"
imgheight="170" imgwidth="225" height="470" /] [hozbreaktop]

DynamiX Documentation - 31
General Settings
DynamiX Documentation - 32
Screen Cast
Link to General Settings Screencast
General Settings Screen Cast
http://www.youtube.com/watch?v=GAwnV0-GJWA
DynamiX Documentation - 33
Word Press Custom Menu / Extended Menu
How to add a Custom Menu / Extended Menu
Introduction
Click enable if you have WP 3.0 or greater. Then goto WP Admin → Appearance → Menus →
Create your menu and select your Custom Menu in the top left hand corner (Theme Locations).
Drop Panel Menu Item
To initiate the Drop Panel using WP Custom Menu, got to WP Admin → Appearance → Menus
and click "Screen Options" (Top Right) and switch on "CSS Classes". Now create a new Custom
Link with the URL left as http:// and give the link a name e.g. Contact Us.
Once the link is added to the menu, you need to remove the URL and paste droppaneltrigger into
the CSS Classes field. Now your menu item will act as a drop panel trigger.
Main Menu Description
To add a menu description simply add text to the "Title Attribute".
Extended Menu
The Extended Menu allows the user to have more than one column within the drop down menus.
To enable this feature, make sure the user has 'Wordpress Custom Menus' enabled. If unsure,
navigate to 'General Settings' and find 'Wordpress Custom Menus' and enable it.
After this, navigate to Apperance → Menus.
Click on 'Screen Options' at the top right of the page and check the box for 'CSS Classes'. Close
'Screen Options'
To enable Extended Menus, click on a top level menu item (the menu items on main navigation -
NOT a drop menu item) and locate the CSS Classes field.
By adding in the text extended-menu this enables a second column. To enable three columns add
a space and enter the text three-columns. The column widths are set to 200px.
DynamiX Documentation - 34
Enabling Descriptions
To enable descriptions, go to 'Screen Options' within 'Appearance → Menus' and check the
Descriptions check box. Go back into DynamiX Menu → General Settings → WordPress Custom
Menu → Enable WP Custom Menu Descriptions and check Enable. This will allow descriptions to
be shown. Save and continue.
By default, WordPress automatically assigns a description. You will need to remove this default
description as it will be too much for the menu, navigate back to Apperance → Menus and expand
the desired child menu and delete the exsisting description then add your own in. This could be
text or a shortcode including an image gallery shortcode for example. Once descriptions are
enabled. NOTE! Not all shortcodes are designed to be placed within the Extended Menus.
DynamiX Documentation - 35
Full Widget Footer / Drop Panel
How to drag and drop Widgets into the Footer / Drop Panel Columns
Footer / Drop Panel
Enable this option to drag and drop Widgets into the Footer / Drop Panel columns.
Once enabled goto WP → Admin Appearance → Widgets. Panels should be present representing
each column of the Drop Panel and Footer.
Note any previous data stored in the Footer and Drop Panel will be replaced with the new widget
system.

DynamiX Documentation - 36
Side Bars
How to enter Side Bars
Side Bars
This option allows you to select how many sidebars you wish to create. Default is Two. See
Wordpress Admin→ Appearance → Widgets once you have entered the amount of sidebars you
require.

DynamiX Documentation - 37
Branding Image
How to upload a Branding Image
Branding Image
If you wish to upload your logo, please enter the URI of your image. Alternatively if you haven't
uploaded one already select the Upload button and upload your logo to the media library then
copy the URI of the image in the box.
The recommended dimensions for the image are (W) 225px * (H) 50px.
If this is left empty the theme will automatically display the Blog Title and Tagline – set in Settings
→ General.

DynamiX Documentation - 38
Timthumb Image Resizing Script
Timthumb Image Resizing Script
Timthumb image resizing script is enabled by default, if you do not want to have your images
resized, you can disable it here.
DynamiX Documentation - 39
JW Player Configuration
JW Player Configuration
To play most Video / Audio formats with DynamiX, it's recommended to use JW Player embed
option.
JW Player can be embedded into the Grid, Stage, Accordion, Group Slider Galleries and the Video
Shortcode.
JW Player must be downloaded form http://www.longtailvideo.com/players/
Within the downloaded zip you will find the following files: jwplayer.js, player.swf, upload these
files (via FTP or WP Media Library) and copy and paste the file URL's into the relevant fields
(important).
Once this is complete JW Player can be selected from the embed option in both Posts → Embed
Video / Timeout Options and Gallery Slide Set → Embed Type.
JW Player in Lightbox
To play JW Player within lightboxes specify the path of your JW Player flash file. e.g.
/wp-content/uploads/2011/03/player.swf then add the video path using the flashvars variable. e.g.
?flashvars=file=/wp-content/uploads/2011/03/InsideJob-Sample.mp4
So the full path looks similar to the following. (note! this is just an example - you'll need to modify to
represent the paths to your own files).
/wp-content/uploads/2011/03/player.swf?flashvars=file=/wp-content/uploads/2011/03/InsideJob-Sample.mp4
Check the autoplay check option in either Gallery Slide Set or Posts → Embed Video / Timeout
Options to automatically start the video.
DynamiX Documentation - 40
How to enable Twitter
Enter your Twitter account details and how many tweets you wish to display. The theme will cycle
through your latest tweets. Enter a label e.g. DynamiX Tweets.
The Twitter pod can be enabled per page, under Pages in the Wordpress admin ( See lower Right
hand area).

DynamiX Documentation - 41
Troubleshooting
DynamiX Documentation - 42
Images Not Showing
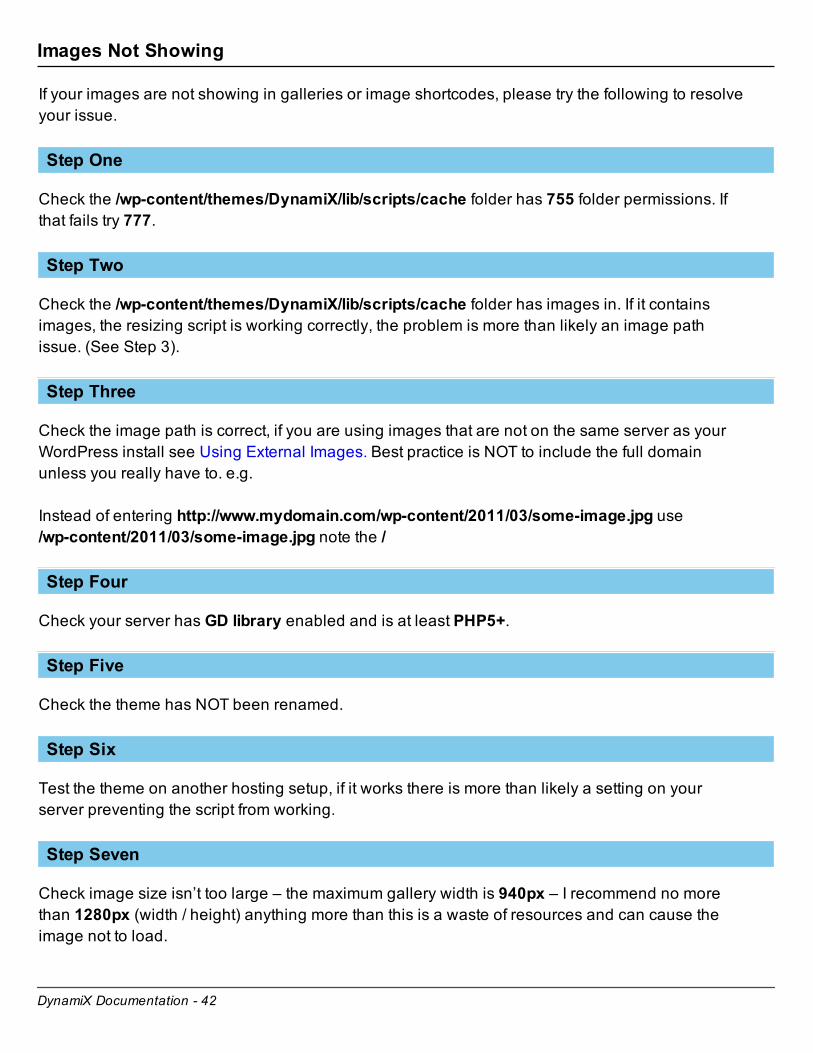
If your images are not showing in galleries or image shortcodes, please try the following to resolve
your issue.
Step One
Check the /wp-content/themes/DynamiX/lib/scripts/cache folder has 755 folder permissions. If
that fails try 777.
Step Two
Check the /wp-content/themes/DynamiX/lib/scripts/cache folder has images in. If it contains
images, the resizing script is working correctly, the problem is more than likely an image path
issue. (See Step 3).
Step Three
Check the image path is correct, if you are using images that are not on the same server as your
WordPress install see Using External Images. Best practice is NOT to include the full domain
unless you really have to. e.g.
Instead of entering http://www.mydomain.com/wp-content/2011/03/some-image.jpg use
/wp-content/2011/03/some-image.jpg note the /
Step Four
Check your server has GD library enabled and is at least PHP5+.
Step Five
Check the theme has NOT been renamed.
Step Six
Test the theme on another hosting setup, if it works there is more than likely a setting on your
server preventing the script from working.
Step Seven
Check image size isn’t too large – the maximum gallery width is 940px – I recommend no more
than 1280px (width / height) anything more than this is a waste of resources and can cause the
image not to load.

DynamiX Documentation - 43
Step Eight
If the issue still persists, disable Timthumb from the DynamiX -> General Settings page and contact
your web hosting company to check they support the Timthumb script.

DynamiX Documentation - 44
Blog Settings
DynamiX Documentation - 45
Blog Settings Screencast
Link to Blog Settings Screencast
Blog Settings Screen Cast
http://www.youtube.com/watch?v=4Vjh_kDsR24
DynamiX Documentation - 46
Archive / Index Posts Configuration
Post View Type
Display your posts in normal or grid view. This will affect all archive, index and blog pages.
Post Content
Select post content type. This will determine what parts of the post you wish to display in the
archive, index and blog pages. This does not affect the single post.
Excerpt Limit
If you select a Post Content type to include excerpt please enter the limit of words you want to use.
Postmeta Data
Choose where to display Comments and Date information.
DynamiX Documentation - 47
Archive / Index Pages Image Configuration
Image Behaviour
Select the behaviour of the image, if set to Normal the image will act as a link – select lightbox and
the image will display within a lightbox when clicked.
Image Effect
Select the effect you want to apply to the image.
Image Height
Enter a height value for all the images to be set by. This will automatically determine the width of
the image if the image field is left blank.
Image Width
This is optional, if you want to set a default width for all images enter the value here.
NOTE
The settings above do NOT affect Full Post Content Type.
DynamiX Documentation - 48
Single Post Image Configuration
Image Behaviour
Select the behaviour of the image, if set to Normal the image will act as a link – select lightbox and
the image will display within a lightbox when clicked.
Image Effect
Select the effect you want to apply to the image.
Image Height
Enter a height value for all the images to be set by. This will automatically determine the width of
the image if the image field is left blank.
Image Width
This is optional, if you want to set a default width for all images enter the value here.
NOTE
The settings above do NOT affect Full Post Content Type.
DynamiX Documentation - 49
Archive / Index Page Layout Configuration
Page Configuration
Select page configuration for Archive / Index Pages (Blog Template page is defined the same as a
normal page layout)
Column Configuration
Select column configuration for Archive / Index Pages.
DynamiX Documentation - 50
Blog Templates
How to add a Blog
Adding a Blog
To add a BLOG page to your website goto Pages → Page Attributes → Template → Blog or Grid
Blog
Your page now acts like a blog. You can select which categories you wish to display by selecting
categories from the Blog Categories meta box (Bottom Right of Pages).
Adding Content to a Blog
You can add content above your blog by entering information into the “Editor” like a normal page.
This also includes adding galleries.

DynamiX Documentation - 51
Header Settings
DynamiX Documentation - 52
Header Settings Screencast
Link to Header Settings Screencast
Header Settings Screencast
http://www.youtube.com/watch?v=FnIieYfVrGw
DynamiX Documentation - 53
Menu / Branding Settings
Menu / Branding Settings
Menu / Branding settings.
The user can change the position of the branding to either -
- Option 1 - Branding Left / Menu Right
- Option 2 - Branding Right / Menu Left
Branding Settings
Branding Top Margin is the distance the user wants the branding to sit from the top of the header.
DynamiX Documentation - 54
Drop Panel Options
Select Number of Columns
By default the Drop Panel is split into 4 columns - this can be adjusted by changing this option.
Enable / Disable
By default the Drop Panel is enabled. You can disable it and leave the Search bar or disable both
Drop Panel and Search bar.
Menu Trigger Name / Menu Trigger Description
Menu Trigger Name / Menu Trigger Description adds a Menu item to trigger the Drop Panel. These
options only appear when WP Custom Menu is disabled.
If you are using WP Custom menu and you require a Menu item to trigger the Drop Panel, please
follow the instructions below.
Drop Panel Menu Item (WP Custom Menu)
To initiate the Drop Panel using WP Custom Menu, got to WP Admin → Appearance → Menus
and click "Screen Options" (Top Right) and switch on "CSS Classes". Now create a new Custom
Link with the URL left as http:// and give the link a name e.g. Contact Us.
Once the link is added to the menu, you need to remove the URL so it's blank and paste
droppaneltrigger into the CSS Classes field. Now your menu item will act as a drop panel trigger.
DynamiX Documentation - 55
Footer Settings

DynamiX Documentation - 56
Footer Settings Screencast
Link to Footer Settings Screencast
Footer Settings Screencast
http://www.youtube.com/watch?v=FnIieYfVrGw
DynamiX Documentation - 57
Footer Options
Select Number of Columns
By default the Footer is split into 4 columns - this can be adjusted by changing this option.
Lower Footer Options
The Lower Footer can be disabled if required.
This area can contain text and HTML in both left and right sections. This is also an ideal place to
enter your Google Analytics Code.
DynamiX Documentation - 58
Gallery Slide Sets System

DynamiX Documentation - 59
Gallery Slide Sets Screencast
Link to Gallery Slide Sets Screencast
Gallery Slide Sets Screencast
http://www.youtube.com/watch?v=0-MUgzysMLY
DynamiX Documentation - 60
Gallery Slide Sets
Gallery Slide Sets
The system has the same options as the post gallery. You MUST give each Slide Set a unique id
otherwise the data can not be identified.
Complete the relevant fields you require. For just images, complete the Image URL and the Title
field.
The description is HTML only, this means you will need to enter HTML in order to obtain
paragraphs.
Basic HTML which is essential to creating paragraphs is <p>paragraph text</p>. Use this code for
each paragraph you wish to have. Please search in google for other HTML formatting.
To create a new Slide, simply click the Add New Slide. The order of your images can be changed
by dragging the slide up and down. (Note slides can NOT be dragged to other slide sets).
Once you have completed your slide set, goto your Page → Add Post / Slide Set Gallery or
Shortcode Generator → Post / Slide Set Gallery → Data Source and select your Slide Set.
Select your relevant Slide Set from the drop menu. (Note, selecting a Slide Set overrides the post
category – disable the slide set to enable the category option. )
Image URL
Enter the URL of the of the Image you wish to associate the post with. This image will appear in the
Galleries and Archive/Post pages (see Show Image/Video in Post & Archive). Click "Get Image"
button to upload/select an image in the media library.
If you do not enter an image into this field the Galleries will automatically detect the first image in
the post and use that.
Video URL
As with the Image File, enter the URL of the Video file, from YouTube etc. The video file requires
an Image File to use as a thumbnail.
Title
Enter a title which acts as an Image Alternate Text and Slide Title.
DynamiX Documentation - 61
Descriptions
Enter a description - this can contain shortcodes and HTML.
Embed Type
To embed a video within the gallery slide, select the relevant video type from this select menu.
Autoplay
Enabling this option will auto play the video within the gallery slide.
Timeout
This option overides the default timeout setting for this slide only. For example if the default time for
all slides is 10 seconds and you enter 30 seconds in this option, this slide only will display for 30
seconds.
Link URL
This allows you to link the image/title to a URL ( Within your website or external ). To open the link
into a new window add target_blank to the CSS Classes field.
Disable Link Text
This option removes the "Read More" text but still allows the post image/title to link.
Image Crop
DynamiX uses timthumb to resize it's images – one of it's options allows the image to be cropped
or zoomed. Default is Cropped.
Stage Content
This option allows you to select what content is show in the Gallery, Image Only, Text & Image Left
Align, Text & Image Right Align, Text Only. Text Only uses the description field.
Title Overlay
If you wish to overlay the gallery image with the Post Title / Post Sub Title text, select an option
from this list. There are various options to suit the image the text is overlaying, including light or
dark text.

DynamiX Documentation - 62
CSS Classes
Add custom CSS Classes to your galleries. e.g. add target_blank to open the link url in a new
window.
Filter Category
This applies to the Grid Gallery Only. Select a Category for this slide to appear in. (Create the
Categories using the "New Filter Category" field.
3d Gallery Settings - Pieces
Number of pieces to which the image is sliced.
3d Gallery Settings - Time
Time for one cube to turn.
3d Gallery Settings - Transition
Choose from various Tweener effects.
3d Gallery Settings - Delay
Delay between the start of one cube to the start of the next cube.
3d Gallery Settings - DepthOffset
The offset during transition on the z-axis. Value between 100 and 1000 are recommended. But go
for experiments.
3d Gallery Settings - CubeDistance
The distance between the cubes during transition. Values between 5 and 50 are recommended.
But go for experiments.

DynamiX Documentation - 63
Post Options
DynamiX Documentation - 64
Post Content Configuration
Post Title
If you wish to display a title other than the given one for the post name enter this here.
Alternatively enter the text BLANK to block the page title from displaying.
Post Sub Title
Enter a page Sub Title if required, this will appear directly underneath the main Post Title.
Enable Text Resizer
Enable this option to display the text resizer icons which allows the user to increase or decrease
the size of the font within the main content.
Hide Breadcrumbs
Disable the breadcrumbs from displaying on this post only.
Diable Content Border
Disable the Content Border for this post only.
Publish Author Name
Publish the author name that created this post.

DynamiX Documentation - 65
Social Options
Social Options
Social Options allows you to add various Social Networking links to your Page or Post. It also
allows you to add a Twitter Feed to the page – this will cycle through your latest tweets. See
General Settings → Twitter from the DynamiX menu.
Twitter can be placed either above or beneath the content.
Social Networking icons can also be placed within the content of the Page/Post.
Each social networking icon added to the page will link that page and attempt to post it on the
social networking site. The colours of the icon are determinded by the font colour set in General
Settings → Font Settings from the DynamiX menu.
Diable Heart Icon
Selecting this option will display the Social Networking icons directly on the page without the
"Heart" graphic.

DynamiX Documentation - 66
Shortcode Generator
Shortcode Generator
Add Shortcodes to your Post/Page. See Shortcode Generator

DynamiX Documentation - 67
Post / Page Layout Configuration
Post / Page Layout Configuration
Select the ideal layout configuration for the post / page you are creating – the columns are
numbered and coloured to easily identify with selecting a sidebar for that column.
Sidebar Configuration
If you have selected a layout configuration with columns this panel will allow you to configure that
column with a sidebar. See General Settings → Sidebars from the DynamiX menu to create more
than the default 2. To populate your sidebars see WP Admin → Appearance → Widgets.
The option is also available to make that column borderless.
If a layout only contains one column the yellow column (Column 2) option will be ignored.
DynamiX Documentation - 68
Post Image Gallery Options
Post Image Gallery Options
Always ensure you save your post within a relevant category e.g. home images, portfolio, video
work etc – this will help identify your posts when creating a Gallery.
Image / Video Source
URL of Image File
Enter the URL of the of the Image you wish to associate the post with. This image will appear in the
Galleries and Archive/Post pages (see Show Image/Video in Post & Archive). Click "Get Image"
button to upload/select an image in the media library.
If you do not enter an image into this field the Galleries will automatically detect the first image in
the post and use that.
URL of Video File
As with the Image File, enter the URL of the Video file, from YouTube etc. The video file requires
an Image File to use as a thumbnail.
Embed Video / Timeout Options
Embed Video Type
To embed a video within the gallery slide, select the relevant video type from this select menu.
Autoplay Video
Enabling this option will auto play the video within the gallery slide.
Stage Gallery Slide Timeout
This option overides the default timeout setting for this slide only. For example if the default time for
all slides is 10 seconds and you enter 30 seconds in this option, this slide only will display for 30
seconds.
Additional Settings
Enter post order number
If you wish to change the order of the images within the post galleries you can enter an order
number. 0 being first then increment by adding a number afterwards. It MUST begin with a 0 then
the number e.g. 01,02,03.
Show Image/Video in Post & Archive
If you wish to display your Image File as part of the post in the Archive and Single Post pages then
DynamiX Documentation - 69
select this option. If this option is enabled it will display the image within the post and enable the
Lightbox effect. If you have a Video file also associated with the post it will use the Image as a
thumbnail and then open the video within the Lightbox.
Image Orientation
This option applies to Archive / Index / Blog pages. Default is landscape, if your image is portrait
change this option.
CSS Classes
Add custom CSS Classes to your galleries. e.g. add target_blank to open the link url in a new
window.
Link Image to Alternative URL
This option is for Galleries ONLY! - this allows you to link the image to an alternative URL ( Within
your website or external ). e.g. The image advertises a Service – link the image to a Services page.
Disable Gallery Image Link
If you wish to just display an image within a gallery without linking to the post it is associated with
or any other URL then enable this option.
Disable Read More Only
This option removes the "Read More" text but still allows the post image/title to link.
Image Crop Settings
DynamiX uses timthumb to resize it's images – one of it's options allows the image to be cropped
or zoomed. Default is Cropped.
Stage Gallery Settings
These settings ONLY apply to the Stage Gallery Settings.
Gallery Image Content
This option allows you to select what content is show in the Gallery, Image Only, Text & Image Left
Align, Text & Image Right Align.
Display Post Title On Image
If you wish to overlay the gallery image with the Post Title / Post Sub Title text, select an option
from this list. There are various options to suit the image the text is overlaying, including light or
dark text.
DynamiX Documentation - 70
3d Gallery Options
Pieces
Number of pieces to which the image is sliced.
Time
Time for one cube to turn.
Transition
Choose from various Tweener effects.
Delay
Delay between the start of one cube to the start of the next cube.
DepthOffset
The offset during transition on the z-axis. Value between 100 and 1000 are recommended. But go
for experiments.
CubeDistance
The distance between the cubes during transition. Values between 5 and 50 are recommended.
But go for experiments.

DynamiX Documentation - 71
Page Options
DynamiX Documentation - 72
Page Content Configuration
Menu Description
This field allows you to enter a description of the page which will appear in the Menu Navigation.
Page Title
If you wish to display a title other than the given one for the page name enter this here. This is
ideal for page titles too large for the menu. Alternatively enter the text BLANK to block the page title
from displaying.
Page Sub Title
Enter a page Sub Title if required, this will appear directly underneath the main Page Title.
Hide Breadcrumbs
Disable the breadcrumbs from displaying on this post only.
Hide Content
This is ideal if you wish to just display a Post Gallery on the page without any other text/content.
Disable Content Border
Use this to disable the main border which surrounds the page content. Ideal if you wish to format
the page differently – You can use the Shortcode Generator → Styled Boxes → General to add the
same border type around selected content only.
Publish Author Name / Date
Selecting these options will display the Publish Date and Author Name on the page.
Enable Text Resizer
Enable this option to display the text.
Page Skins
If you wish to assign a skin to a specific page, you can do so by selecting a Outer Skin option and
Inner Skin option. (This will override the global skin setting).
DynamiX Documentation - 73
Social Options
Social Options
Social Options allows you to add various Social Networking links to your Page or Post. It also
allows you to add a Twitter Feed to the page – this will cycle through your latest tweets. See
General Settings → Twitter from the DynamiX menu.
Twitter can be placed either above or beneath the content.
Social Networking icons can also be placed within the content of the Page/Post.
Each social networking icon added to the page will link that page and attempt to post it on the
social networking site. The colours of the icon are determinded by the font colour set in General
Settings → Font Settings from the DynamiX menu.
Disable Heart Icon
Selecting this option will display the Social Networking icons directly on the page without the
"Heart" graphic.
DynamiX Documentation - 74
Shortcode Generator
Shortcode Generator
Add Shortcodes to your Post/Page. See Shortcode Generator
DynamiX Documentation - 75
Post / Page Layout Configuration
Post / Page Layout Configuration
Select the ideal layout configuration for the post / page you are creating – the columns are
numbered and coloured to easily identify with selecting a sidebar for that column.
Sidebar Configuration
If you have selected a layout configuration with columns this panel will allow you to configure that
column with a sidebar. See General Settings → Sidebars from the DynamiX menu to create more
than the default 2. To populate your sidebars see WP Admin → Appearance → Widgets.
The option is also available to make that column borderless.
If a layout only contains one column the yellow column (Column 2) option will be ignored.
DynamiX Documentation - 76
Add Post / Slide Set Gallery
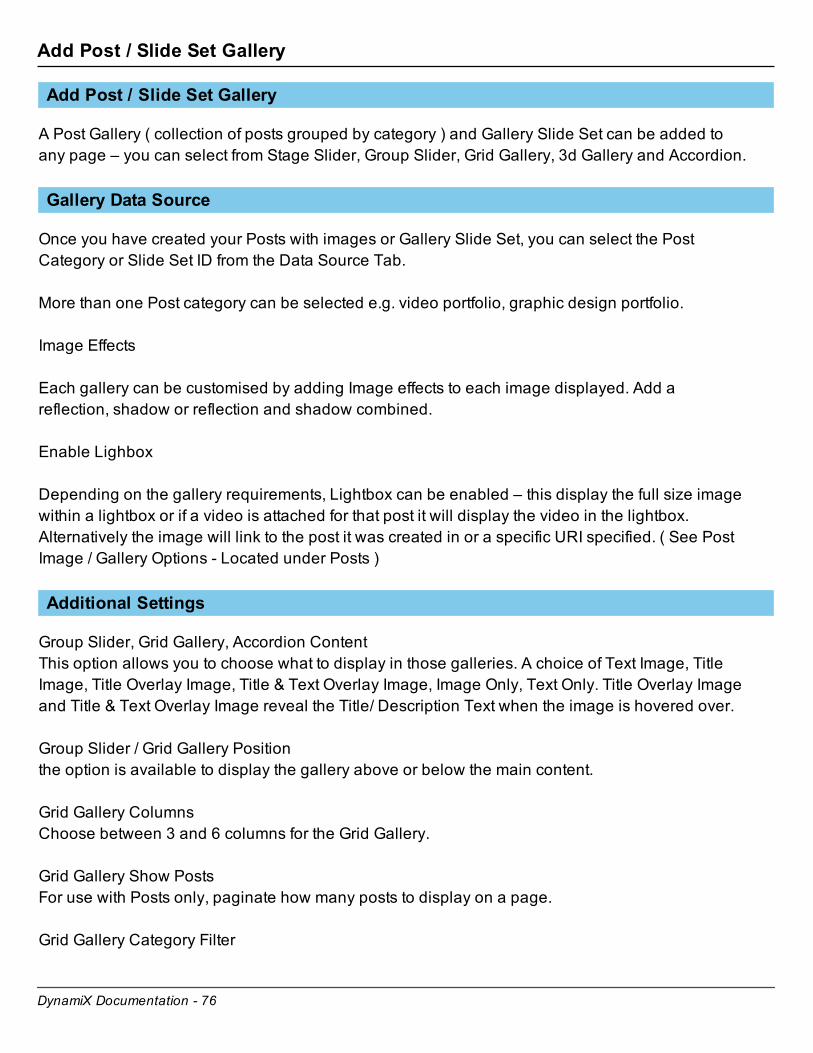
Add Post / Slide Set Gallery
A Post Gallery ( collection of posts grouped by category ) and Gallery Slide Set can be added to
any page – you can select from Stage Slider, Group Slider, Grid Gallery, 3d Gallery and Accordion.
Gallery Data Source
Once you have created your Posts with images or Gallery Slide Set, you can select the Post
Category or Slide Set ID from the Data Source Tab.
More than one Post category can be selected e.g. video portfolio, graphic design portfolio.
Image Effects
Each gallery can be customised by adding Image effects to each image displayed. Add a
reflection, shadow or reflection and shadow combined.
Enable Lighbox
Depending on the gallery requirements, Lightbox can be enabled – this display the full size image
within a lightbox or if a video is attached for that post it will display the video in the lightbox.
Alternatively the image will link to the post it was created in or a specific URI specified. ( See Post
Image / Gallery Options - Located under Posts )
Additional Settings
Group Slider, Grid Gallery, Accordion Content
This option allows you to choose what to display in those galleries. A choice of Text Image, Title
Image, Title Overlay Image, Title & Text Overlay Image, Image Only, Text Only. Title Overlay Image
and Title & Text Overlay Image reveal the Title/ Description Text when the image is hovered over.
Group Slider / Grid Gallery Position
the option is available to display the gallery above or below the main content.
Grid Gallery Columns
Choose between 3 and 6 columns for the Grid Gallery.
Grid Gallery Show Posts
For use with Posts only, paginate how many posts to display on a page.
Grid Gallery Category Filter
DynamiX Documentation - 77
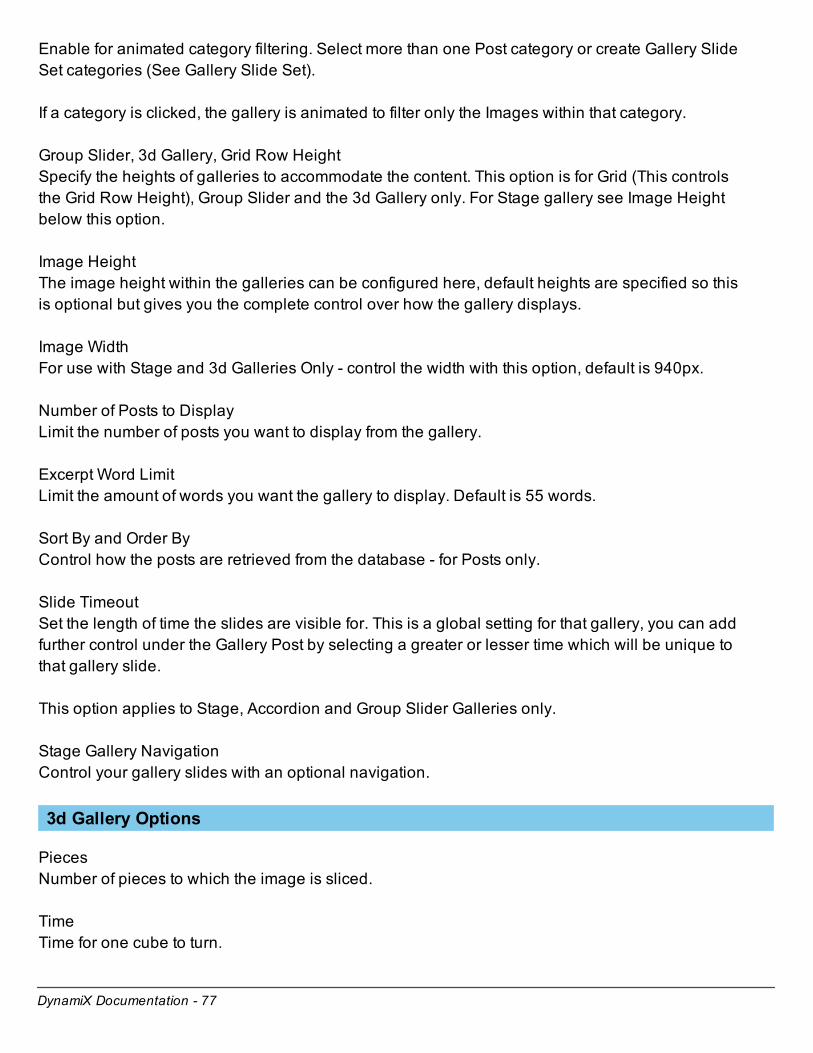
Enable for animated category filtering. Select more than one Post category or create Gallery Slide
Set categories (See Gallery Slide Set).
If a category is clicked, the gallery is animated to filter only the Images within that category.
Group Slider, 3d Gallery, Grid Row Height
Specify the heights of galleries to accommodate the content. This option is for Grid (This controls
the Grid Row Height), Group Slider and the 3d Gallery only. For Stage gallery see Image Height
below this option.
Image Height
The image height within the galleries can be configured here, default heights are specified so this
is optional but gives you the complete control over how the gallery displays.
Image Width
For use with Stage and 3d Galleries Only - control the width with this option, default is 940px.
Number of Posts to Display
Limit the number of posts you want to display from the gallery.
Excerpt Word Limit
Limit the amount of words you want the gallery to display. Default is 55 words.
Sort By and Order By
Control how the posts are retrieved from the database - for Posts only.
Slide Timeout
Set the length of time the slides are visible for. This is a global setting for that gallery, you can add
further control under the Gallery Post by selecting a greater or lesser time which will be unique to
that gallery slide.
This option applies to Stage, Accordion and Group Slider Galleries only.
Stage Gallery Navigation
Control your gallery slides with an optional navigation.
3d Gallery Options
Pieces
Number of pieces to which the image is sliced.
Time
Time for one cube to turn.

DynamiX Documentation - 78
Transition
Choose from various Tweener effects.
Delay
Delay between the start of one cube to the start of the next cube.
DepthOffset
The offset during transition on the z-axis. Value between 100 and 1000 are recommended. But go
for experiments.
CubeDistance
The distance between the cubes during transition. Values between 5 and 50 are recommended.
But go for experiments.
The width of the image for the Stage Gallery should be at least 940px.
Accordion Gallery Options
Accordion Auto Rotate
Enable to auto rotate through each accordion panel.Set the timeout using the Slide Timeout option
Accordion Startup Mini Titles
This option is enabled by default, it displays the Title overlaying each image when the gallery has
loaded.

DynamiX Documentation - 79
Blog Categories
Blog
To add a BLOG page to your website goto Page Attributes → Template → Blog or Grid Blog
Your page now acts like a blog. You can select which categories you wish to display by selecting
categories from the Blog Categories meta box.
Add Content to your Blog
You can add content above your blog by entering information into the “Editor” like a normal page.
This also includes adding galleries.

DynamiX Documentation - 80
Galleries
DynamiX Documentation - 81
External Galleries
External Galleries
To create an External Gallery (Outside of the main content) you can do so by going to Pages →
Add Post / Slide Set Gallery. See Page Options for details on what the options do.
Stage Gallery
http://dynamix.creativeworkz.co.uk/galleries-2/stage/
Group Slider
http://dynamix.creativeworkz.co.uk/galleries-2/group-slider/
Grid Gallery
http://dynamix.creativeworkz.co.uk/4-columns-sortable/
3d Gallery
http://dynamix.creativeworkz.co.uk/3d-slider/
Accordion Gallery
http://dynamix.creativeworkz.co.uk/accordion-gallery/
DynamiX Documentation - 82
Internal Galleries
Internal Galleries
To create an Internal Gallery (Inside of the main content) you can do so by going to Shortcode
Generator → Post / Slide Set Gallery. See Shortcode Generator for details on what the options do.
Choose from the following Galleries
Image Gallery
Group Slider
Grid Gallery
Accordion Gallery
See this page for examples http://dynamix.creativeworkz.co.uk/shortcodes/post-galleries/

DynamiX Documentation - 83
Shortcode Generator &
Contact Form
DynamiX Documentation - 84
General Shortcodes
Contact Form
Below is the shortcode for the contact form (If you intend to add more than one contact form, you
must change the ID).
[enquiry_form id="footercontact" emailto="[email protected]" thankyou="thanks, we'll be in
touch soon!" /]
Shortcode Generator Screencast
http://www.youtube.com/watch?v=Llvoeng0DcE
The Shortcode Generator was designed to allow the user to create complex shortcodes without
having to type all the individual values. Itallows the user to select a Shortcode they wish to add
and enter values into the specific fields.
The Shortcodes provided are as follows;
Post / Slide Set Gallery
Columns
Styled Boxes
Buttons
Horizontal Break
Block Quote
Highlight
Image Shortcode
Video Shortcode
Tabs
Accordion
List
Reveal Content
Drop Caps
Recent Posts
Once you have entered the values simply click the "Send Shortcode to Editor" button which
automatically generates all the code for you within the editor.
DynamiX Documentation - 85
Post / Slide Set Gallery
Post / Slide Set Gallery
Add a Post or Gallery Slide Set Gallery by using this shortcode – this allows you to add a gallery
anywhere on your website. They can be placed anywhere in the main content, sidebars (Using
Text Widget), Drop Panel and the Footer.
Select Type
There are three types of Post Gallery's you can add
Image Gallery
Slider Gallery
Grid Gallery
Accordion Gallery
Each has it's own options and can be highly customised adding image effects and specific heights
to suit the types of images used. Simply select a Post Category or Gallery Slide Set containing the
images you wish to display. Under Slider Gallery and Grid Gallery you can select the type of
content to display.
It's recommended that you open a page and experiment with the settings to achieve your perfect
configuration.
View this page for examples (click view code under each gallery to get shortcode)
http://dynamix.creativeworkz.co.uk/shortcodes/post-galleries/

DynamiX Documentation - 86
Columns
Columns
Select this option to generate a range of columns.
Content can be pasted into the individual fields or select the options you require and manually
enter the content between the relevant parts of the shortcode.
The columns have the option of having a border and the height can be specified in pixels to create
an equal length.
View this page for examples http://dynamix.creativeworkz.co.uk/shortcodes/columns/
DynamiX Documentation - 87
Styled Boxes
Styled Boxes
Select from a range of styled boxes, each comes with it's own icon aside from General and
Shadow.
The width can be specified in pixels along with the alignment.
Paste the content into the "Box Content" field and press the "Send Shortcode to Editor" button.
View this page for examples http://dynamix.creativeworkz.co.uk/shortcodes/styled-boxes/

DynamiX Documentation - 88
Buttons
Buttons
Button shortcode allows you to add buttons to your page with a range of colours shown above.
There are two types of button "Button" and "Drop Panel Trigger". The first is a normal button which
allows you to add a URI. The latter being a button which triggers the Drop Panel. e.g. You create a
contact us form in the Drop Panel and somewhere on the page create a "Drop Panel Trigger"
button, this will trigger the panel to drop down.
A width and button text can be specified for both.
View this page for examples http://dynamix.creativeworkz.co.uk/shortcodes/button-shortcodes/

DynamiX Documentation - 89
Horizontal Break
Horizontal Break
The horizontal break has two options - "Break Line" and "Break Line Top Link". This adds a
horizontal break line across the page. The latter adds a top link to navigate the user back to the top.
View this page for examples http://dynamix.creativeworkz.co.uk/shortcodes/general-styling/

DynamiX Documentation - 90
Block Quotes
Block Quotes
There are two types of Block Quotes, "Block Quote Line" and "Block Quote Quotes". The first
displays a line to separate to the left or right of the text (dependant on alignment) and the latter
displays quotes surrounding the text.
View this page for examples http://dynamix.creativeworkz.co.uk/shortcodes/general-styling/

DynamiX Documentation - 91
Highlight
Highlight
Select a the highlight shortcode if you wish to add a highlight to a selection of text. There are two
types available – black and the current link color you have selected.
Select the Type and enter the text you wish to highlight.
View this page for examples http://dynamix.creativeworkz.co.uk/shortcodes/general-styling/
DynamiX Documentation - 92
Image Shortcode
Image Shortcode
The Image Shortcode allows you to add effects to an image.
Enter the URL of the image you want to apply the effect to and select from one of the effects
available.
A lightbox can be added to the image with the option to link to a video URI (Youtube etc).
Enable Title Text Overlay
This displays the title over the image when the image is hovered over.
View this page for examples http://dynamix.creativeworkz.co.uk/shortcodes/image-effects/
DynamiX Documentation - 93
Video Shortcode
Video Shortcode
Select from a range of Video Embed Types
YouTube, Vimeo, Flash and JW Player.
JW Player
You must ensure the JW Player files are installed first. (See General Settings). There are unique
options for JW Player:
JW Player Image URL - Whilst the video is buffering or loading JW Player can use a holding image.
Video ID - If you plan on having more than one JW Player Video Shortcode on a page, ensure you
enter a unique ID.
View this page for examples http://dynamix.creativeworkz.co.uk/shortcodes/video-shortcodes/

DynamiX Documentation - 94
Tabs
Tabs
Add a jQuery Tab Shortcode to your page - enter the amount of Tabs you require and click Send
Shortcode to Editor and change the default Titles and Content.
View this page for an example http://dynamix.creativeworkz.co.uk/tabs/

DynamiX Documentation - 95
Accordion
Accordion
Add a jQuery Accordion Shortcode to your page - enter the amount of Panels you require and click
Send Shortcode to Editor and change the default Titles and Content.
View this page for an example http://dynamix.creativeworkz.co.uk/accordion/
DynamiX Documentation - 96
List
List
Add a List shortcode to your page, select the color, type and items you require and click Send
Shortcode to Editor.
View this page for examples http://dynamix.creativeworkz.co.uk/lists/

DynamiX Documentation - 97
Reveal Content
Reveal Content
The Reveal Content Shortcode reveals content when it's clicked on. Enter the Title (e.g. view
code), the content you wish to reveal and if required the width and alignment. Shortcode example
below.
[reveal title="view this text" ]this is some text to be revealed[/reveal]
DynamiX Documentation - 98
Drop Caps
Drops Caps
Choose between two types of Drop Caps, the Color and enter the text you want to appear as a
Drop Cap.
View this page for examples http://dynamix.creativeworkz.co.uk/drop-caps/

DynamiX Documentation - 99
Recent Posts
Recent Posts
Display Recent Posts on your post/page or sidebar (copy and paste shortcode into text widget).
Select the Categories you want and choose from the various options.
View this page for examples http://dynamix.creativeworkz.co.uk/shortcodes/recent-posts/

DynamiX Documentation - 100
BuddyPress

DynamiX Documentation - 101
BuddyPress
BuddyPress
DynamiX supports the BuddyPress Plugin, this allows you to use your WP site as usual but with
the added features of BuddyPress. To activate BuddyPress you need to download the BuddyPress
plugin via the Wordpress Admin → Plugins → Add New.
Once activated DynamiX automatically enables BuddyPress features. You can create
Groups by clicking on My Account → Groups → My Groups → Create Group.
See the http://buddypress.org site for help setting up
Add BP Pages to Custom Menu
To add BP pages to your WP Custom Menu, simply add the URL's of what you require, examples
below.
Link to Groups Overview
/groups/
Link to Group Example
/groups/your-group-name/
Link to Group Forum Example
/groups/your-group-name/forum/
Link to Registration
/register/
Forums Overview
/forums/
NOTE
No support is given for how to use or install BuddyPress – the only support given is for any CSS
issues.

DynamiX Documentation - 102
Child Theme
DynamiX Documentation - 103
Child Theme
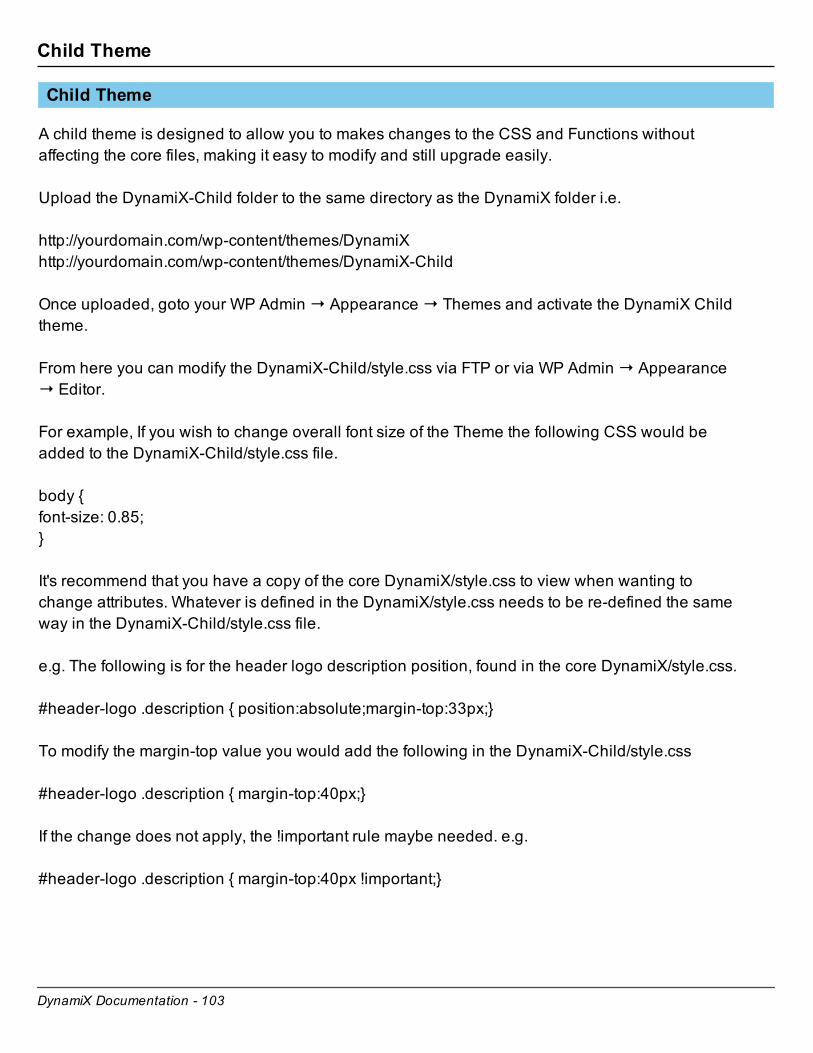
Child Theme
A child theme is designed to allow you to makes changes to the CSS and Functions without
affecting the core files, making it easy to modify and still upgrade easily.
Upload the DynamiX-Child folder to the same directory as the DynamiX folder i.e.
http://yourdomain.com/wp-content/themes/DynamiX
http://yourdomain.com/wp-content/themes/DynamiX-Child
Once uploaded, goto your WP Admin → Appearance → Themes and activate the DynamiX Child
theme.
From here you can modify the DynamiX-Child/style.css via FTP or via WP Admin → Appearance
→ Editor.
For example, If you wish to change overall font size of the Theme the following CSS would be
added to the DynamiX-Child/style.css file.
body {
font-size: 0.85;
}
It's recommend that you have a copy of the core DynamiX/style.css to view when wanting to
change attributes. Whatever is defined in the DynamiX/style.css needs to be re-defined the same
way in the DynamiX-Child/style.css file.
e.g. The following is for the header logo description position, found in the core DynamiX/style.css.
#header-logo .description { position:absolute;margin-top:33px;}
To modify the margin-top value you would add the following in the DynamiX-Child/style.css
#header-logo .description { margin-top:40px;}
If the change does not apply, the !important rule maybe needed. e.g.
#header-logo .description { margin-top:40px !important;}
DynamiX Documentation - 104
Custom Style Sheet
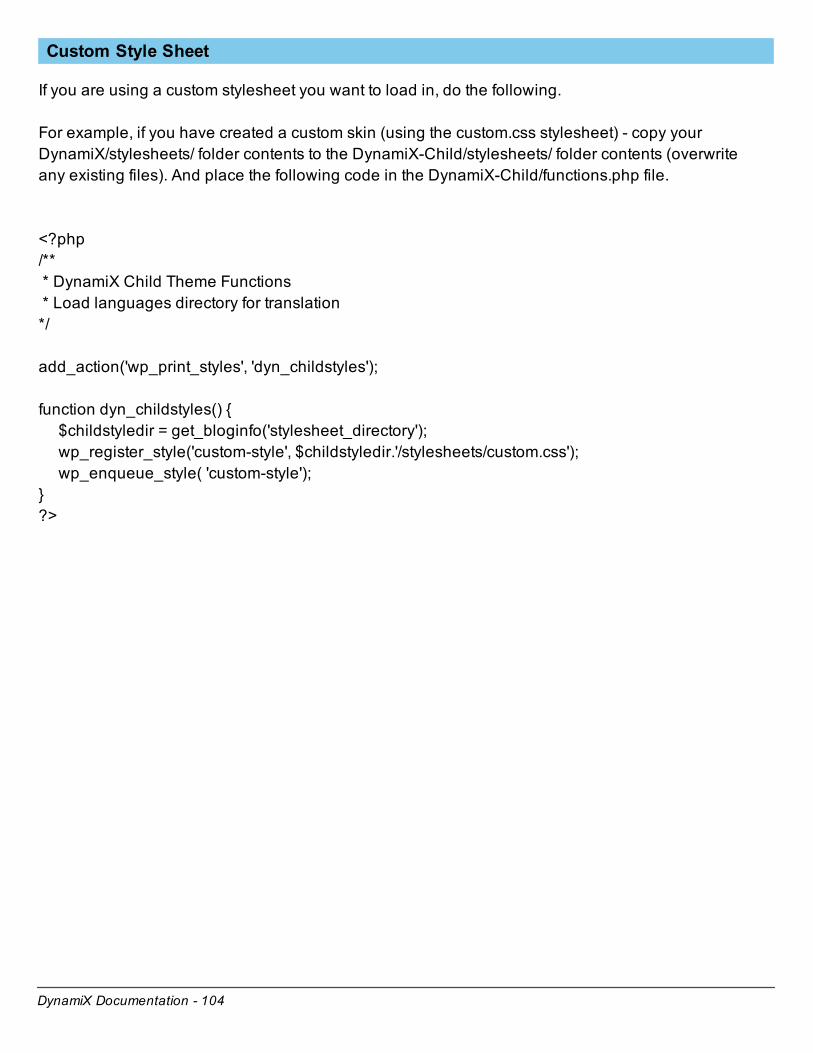
If you are using a custom stylesheet you want to load in, do the following.
For example, if you have created a custom skin (using the custom.css stylesheet) - copy your
DynamiX/stylesheets/ folder contents to the DynamiX-Child/stylesheets/ folder contents (overwrite
any existing files). And place the following code in the DynamiX-Child/functions.php file.
<?php
/**
* DynamiX Child Theme Functions
* Load languages directory for translation
*/
add_action('wp_print_styles', 'dyn_childstyles');
function dyn_childstyles() {
$childstyledir = get_bloginfo('stylesheet_directory');
wp_register_style('custom-style', $childstyledir.'/stylesheets/custom.css');
wp_enqueue_style( 'custom-style');
}
?>

DynamiX Documentation - 105
Skin Settings
DynamiX Documentation - 106
DynamiX Skins
DynamiX Skins
The theme is split into two skins – select one of the 10 Outer Skin colours which affects the
Header/Footer parts of the theme. The Inner Skin has two options – Light & Dark which affects the
body of the theme.
Skins can also change per page – see Page Content Configuration within Pages in the Wordpress
admin.

DynamiX Documentation - 107
Font Settings
Font Settings
If you wish to override the default font settings for the theme, use the options shown in section to
change the Font, Colors etc. For Colors enter a hexadecimal code without the # into each option.
DynamiX Documentation - 108
Cufon Font Settings
Cufon Font Settings
To disable the Cufón text replacement script select Disable. For more information on the script see
http://cufon.shoqolate.com/generate/ .
By default the Cufón script will affect all H1 → H6 tags – this can be modified by selecting which
areas you wish to affect.
This theme is bundled with Lucida Sans Unicode font - you can upload your own font using the
upload button, this will upload the font to the media library and then copy the URI into the box.
New fonts can be created at http://cufon.shoqolate.com/generate/.
The default Cufón gradient colours can also be overridden by entering a hexadecimal code – this
is broken down by theme areas. The colours go from top to bottom.
DynamiX Documentation - 109
Add Custom CSS
Add Custom CSS
Enter Custom CSS into the text box - it's recommended that you only use this option if you are
familiar with CSS.
DynamiX Documentation - 110
Custom Skin +
Custom Skin +
If you wish to add a Custom Skin to the Theme, use the Custom Skin + settings, this allows you
define the Header, Header Gallery (pages with Stage, 3d galleries enabled), Footer and Menu
styling.

DynamiX Documentation - 111
Custom Skin Creator
DynamiX Documentation - 112
Custom Skin Creator Screencast
Custom Skin Creator Screen Cast
http://www.youtube.com/watch?v=1GKJKmdXF-s
DynamiX Documentation - 113
Custom Skin Creator PSD (Photoshop Required)
There are several PSD files included with this theme and fully sliced. They are designed to help
you create further colour schemes easily if required.
Each of the outer skin colour variations are included.
Locate and open the custom skin creator under the folder DynamiX/PSD/custom-skin-creator.psd
Step One
Enable slices under View → Show → Slices
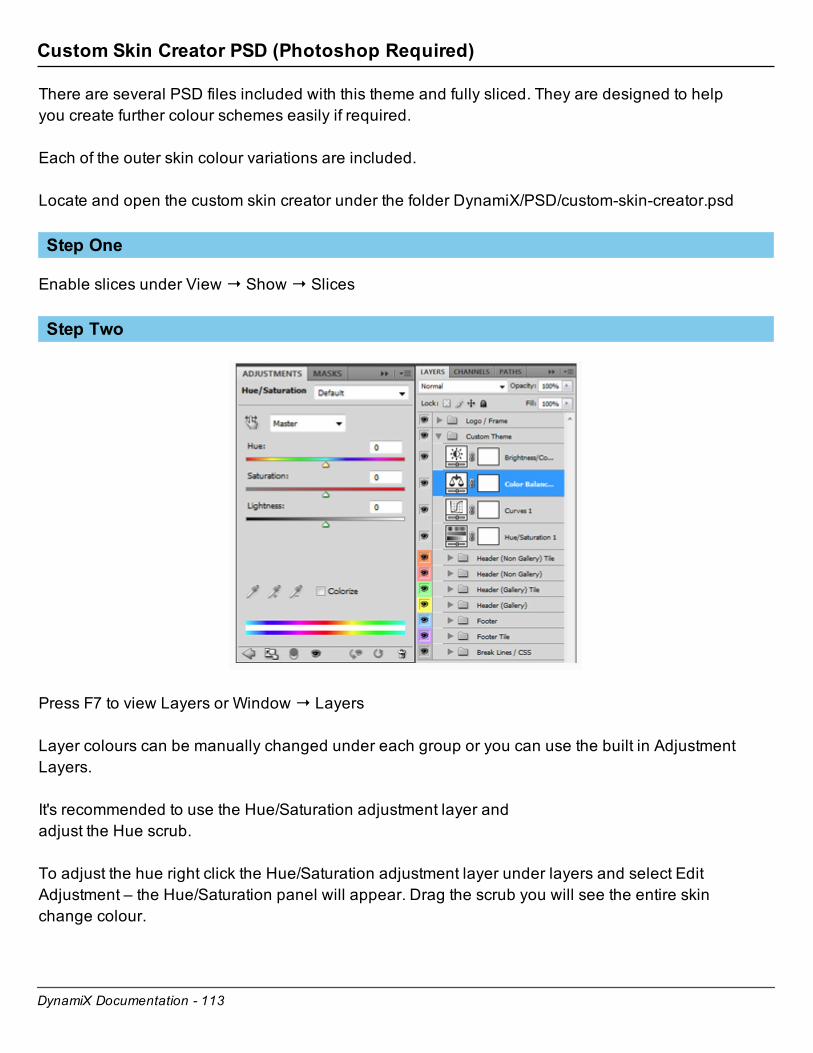
Step Two
Press F7 to view Layers or Window → Layers
Layer colours can be manually changed under each group or you can use the built in Adjustment
Layers.
It's recommended to use the Hue/Saturation adjustment layer and
adjust the Hue scrub.
To adjust the hue right click the Hue/Saturation adjustment layer under layers and select Edit
Adjustment – the Hue/Saturation panel will appear. Drag the scrub you will see the entire skin
change colour.
DynamiX Documentation - 114
Once you are happy with the colour, you need to open the following file
DynamiX/stylesheets/custom.css
Step Three
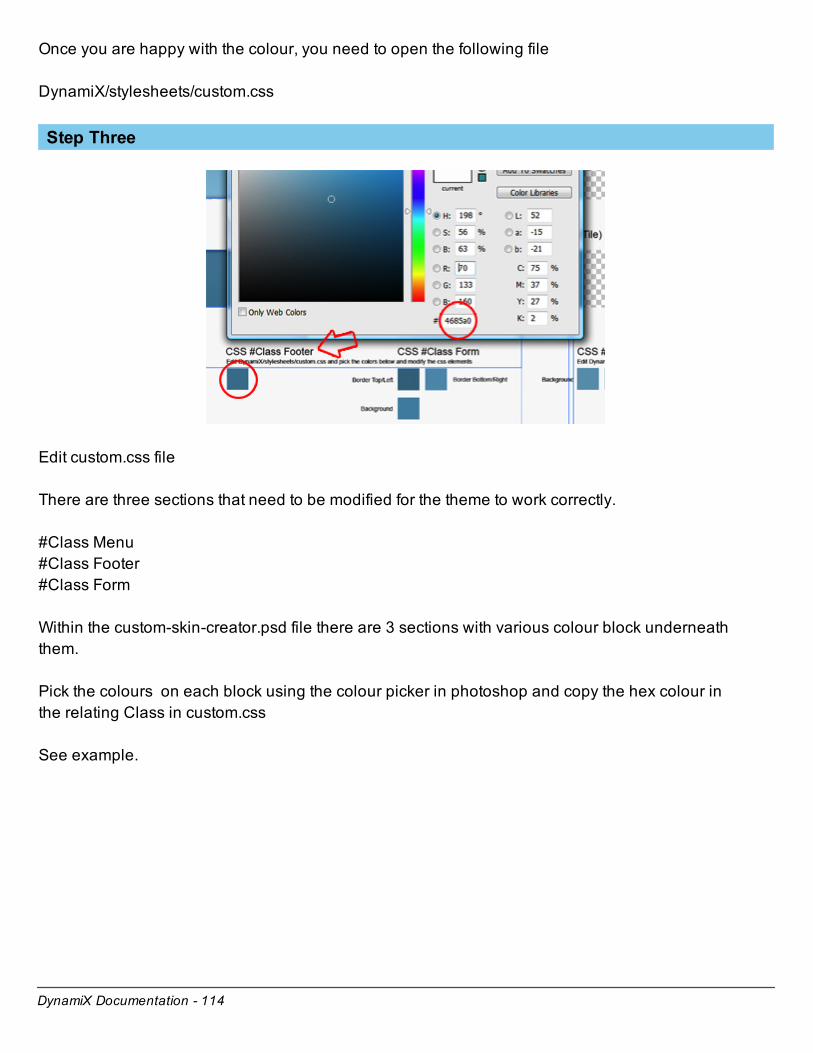
Edit custom.css file
There are three sections that need to be modified for the theme to work correctly.
#Class Menu
#Class Footer
#Class Form
Within the custom-skin-creator.psd file there are 3 sections with various colour block underneath
them.
Pick the colours on each block using the colour picker in photoshop and copy the hex colour in
the relating Class in custom.css
See example.
DynamiX Documentation - 115
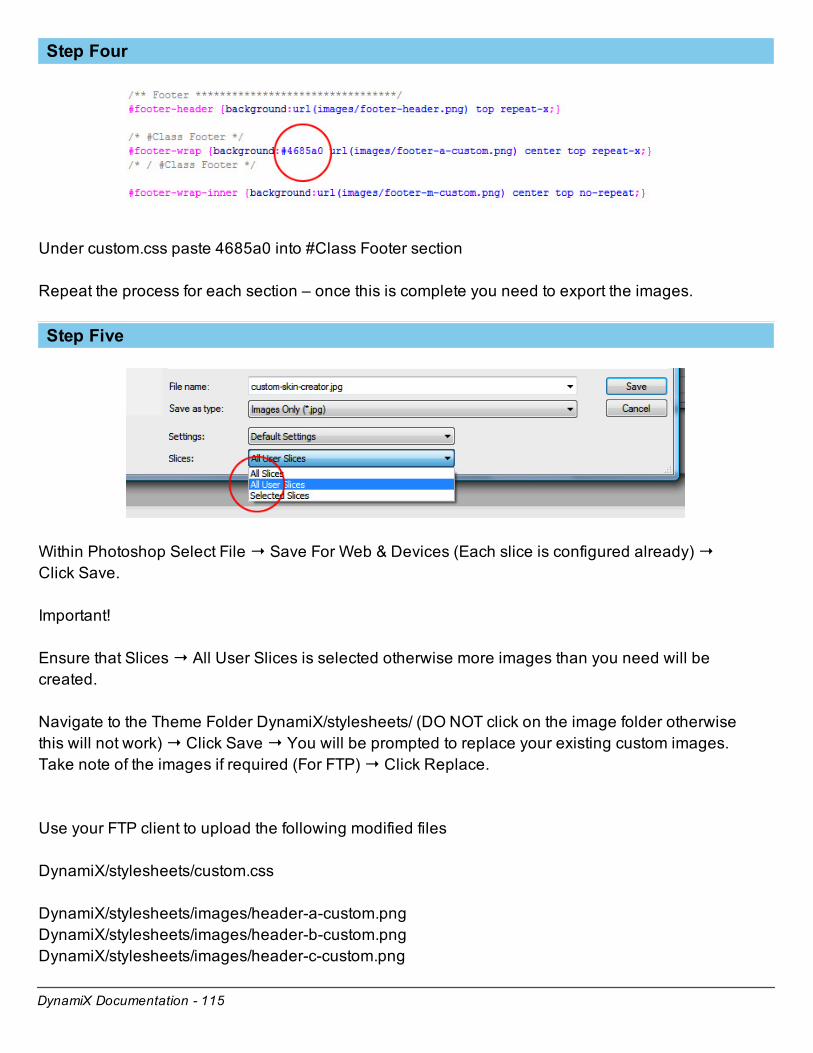
Step Four
Under custom.css paste 4685a0 into #Class Footer section
Repeat the process for each section – once this is complete you need to export the images.
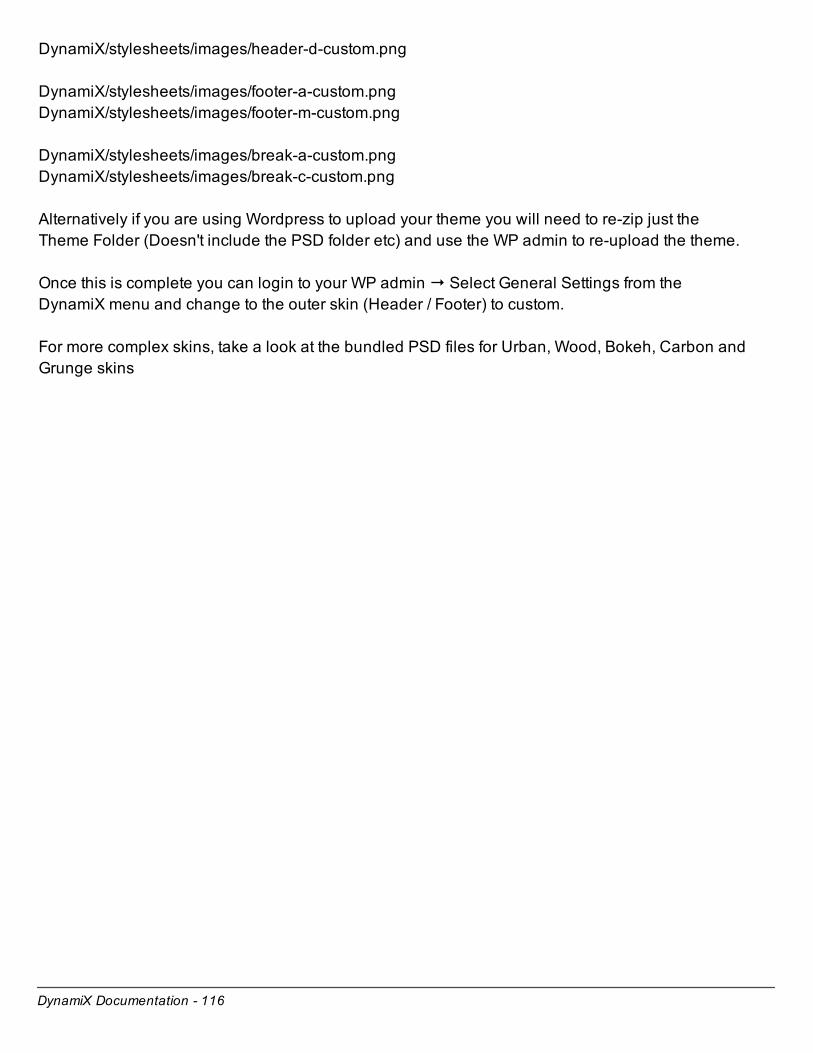
Step Five
Within Photoshop Select File → Save For Web & Devices (Each slice is configured already) →
Click Save.
Important!
Ensure that Slices → All User Slices is selected otherwise more images than you need will be
created.
Navigate to the Theme Folder DynamiX/stylesheets/ (DO NOT click on the image folder otherwise
this will not work) → Click Save → You will be prompted to replace your existing custom images.
Take note of the images if required (For FTP) → Click Replace.
Use your FTP client to upload the following modified files
DynamiX/stylesheets/custom.css
DynamiX/stylesheets/images/header-a-custom.png
DynamiX/stylesheets/images/header-b-custom.png
DynamiX/stylesheets/images/header-c-custom.png
DynamiX Documentation - 116
DynamiX/stylesheets/images/header-d-custom.png
DynamiX/stylesheets/images/footer-a-custom.png
DynamiX/stylesheets/images/footer-m-custom.png
DynamiX/stylesheets/images/break-a-custom.png
DynamiX/stylesheets/images/break-c-custom.png
Alternatively if you are using Wordpress to upload your theme you will need to re-zip just the
Theme Folder (Doesn't include the PSD folder etc) and use the WP admin to re-upload the theme.
Once this is complete you can login to your WP admin → Select General Settings from the
DynamiX menu and change to the outer skin (Header / Footer) to custom.
For more complex skins, take a look at the bundled PSD files for Urban, Wood, Bokeh, Carbon and
Grunge skins

DynamiX Documentation - 117
Source & Credits
DynamiX Documentation - 118
Source & Credits
Pretty Photo
http://www.no-margin-for-errors.com/projects/prettyphoto-jquery-lightbox-clone/
Timthumb
http://www.darrenhoyt.com/2008/04/02/timthumb-php-script-released/
Reflection
http://www.digitalia.be/
Cufón text replacement script
http://cufon.shoqolate.com/generate/
Kwicks Basic Script
http://www.jeremymartin.name/projects.php?project=kwicks
Piecemaker
http://www.modularweb.net/

DynamiX Documentation - 119
Contact Details

DynamiX Documentation - 120
Contact Details
If you are experiencing any difficulties with this theme please join the support forum @
http://support.creativeworkz.co.uk or contact me via this contact form @
http://themeforest.net/user/cwz000 – ENJOY!! :)

DynamiX Documentation - 121
Demo Data
DynamiX Documentation - 122
Demo Data
Note The demo data does not include the images and sidebar data from the demo site, it does
include the page structures, gallery settings, menus etc.
If you would like to import the data from the demo site, goto the Wordpress Admin → Tools →
Import → Wordpress
You may be required to install a plugin (Wordpress Importer) - install this plugin.
Click Choose File → Navigate to the DynamiX-Wordpress folder on your computer →
DynamiX-Wordpress → DynamiX-Demo-Data → dynamix-demo-data.xml→ Click Upload file and
import. Select the relevantoptions you want to import.