Sentinel Administration Guide - Micro Focus
344
Sentinel TM Administration Guide August 2021
-
Upload
khangminh22 -
Category
Documents
-
view
0 -
download
0
Transcript of Sentinel Administration Guide - Micro Focus

SentinelTM
Administration GuideAugust 2021

Legal Notice© Copyright 2001-2021 Micro Focus or one of its affiliates.
The only warranties for products and services of Micro Focus and its affiliates and licensors (“Micro Focus”) are set forth in the express warranty statements accompanying such products and services. Nothing herein should be construed as constituting an additional warranty. Micro Focus shall not be liable for technical or editorial errors or omissions contained herein. The information contained herein is subject to change without notice.
Contains Confidential Information. Except as specifically indicated otherwise, a valid license is required for possession, use or copying. Consistent with FAR 12.211 and 12.212, Commercial Computer Software, Computer Software Documentation, and Technical Data for Commercial Items are licensed to the U.S. Government under vendor's standard commercial license.
2

Contents
About this Book and the Library 13
Part I Getting Started 15
1 Understanding Sentinel Applications 17
2 Adding a License Key 19Adding a License Key By Using the Sentinel Main Interface . . . . . . . . . . . . . . . . . . . . . . . . . . . . . . . . . . . . . . 19Adding a License Key through the Command Line . . . . . . . . . . . . . . . . . . . . . . . . . . . . . . . . . . . . . . . . . . . . . . 19
3 Security Considerations 21Basic Security Considerations . . . . . . . . . . . . . . . . . . . . . . . . . . . . . . . . . . . . . . . . . . . . . . . . . . . . . . . . . . . . . . 21
Traditional Installation. . . . . . . . . . . . . . . . . . . . . . . . . . . . . . . . . . . . . . . . . . . . . . . . . . . . . . . . . . . . . . . 21Appliance Installation . . . . . . . . . . . . . . . . . . . . . . . . . . . . . . . . . . . . . . . . . . . . . . . . . . . . . . . . . . . . . . . 22
Securing Sentinel Data . . . . . . . . . . . . . . . . . . . . . . . . . . . . . . . . . . . . . . . . . . . . . . . . . . . . . . . . . . . . . . . . . . . . 22Best Practices . . . . . . . . . . . . . . . . . . . . . . . . . . . . . . . . . . . . . . . . . . . . . . . . . . . . . . . . . . . . . . . . . . . . . . . . . . . 22
Changing Passwords . . . . . . . . . . . . . . . . . . . . . . . . . . . . . . . . . . . . . . . . . . . . . . . . . . . . . . . . . . . . . . . . 22Enforcing Password Policies for Users . . . . . . . . . . . . . . . . . . . . . . . . . . . . . . . . . . . . . . . . . . . . . . . . . . 23Securing Communication with Collector Managers and Event Sources . . . . . . . . . . . . . . . . . . . . . . . 24Securing Communication for Traditional Storage . . . . . . . . . . . . . . . . . . . . . . . . . . . . . . . . . . . . . . . . . 24Auditing Sentinel . . . . . . . . . . . . . . . . . . . . . . . . . . . . . . . . . . . . . . . . . . . . . . . . . . . . . . . . . . . . . . . . . . . 24Determining if Data was Tampered . . . . . . . . . . . . . . . . . . . . . . . . . . . . . . . . . . . . . . . . . . . . . . . . . . . . 24Using CA Signed Certificates . . . . . . . . . . . . . . . . . . . . . . . . . . . . . . . . . . . . . . . . . . . . . . . . . . . . . . . . . . 28Using Multi-factor Authentication . . . . . . . . . . . . . . . . . . . . . . . . . . . . . . . . . . . . . . . . . . . . . . . . . . . . . 31
Network Communication Options . . . . . . . . . . . . . . . . . . . . . . . . . . . . . . . . . . . . . . . . . . . . . . . . . . . . . . . . . . . 31Communication between Sentinel, Collector Manager, and Correlation Engine . . . . . . . . . . . . . . . . 32Communication between Sentinel and the Sentinel Control Center and Solution Designer Client Applications . . . . . . . . . . . . . . . . . . . . . . . . . . . . . . . . . . . . . . . . . . . . . . . . . . . . . . . . . . . . . . . . . . 33Enabling Higher Versions of TLS for Communication . . . . . . . . . . . . . . . . . . . . . . . . . . . . . . . . . . . . . . 33Communication between the Server and the Database . . . . . . . . . . . . . . . . . . . . . . . . . . . . . . . . . . . 33Communication with Web Browsers . . . . . . . . . . . . . . . . . . . . . . . . . . . . . . . . . . . . . . . . . . . . . . . . . . . 34Communication between Sentinel and Elasticsearch. . . . . . . . . . . . . . . . . . . . . . . . . . . . . . . . . . . . . . 34Communication between the Database and Other Clients . . . . . . . . . . . . . . . . . . . . . . . . . . . . . . . . . 34
Sensitive Data Locations. . . . . . . . . . . . . . . . . . . . . . . . . . . . . . . . . . . . . . . . . . . . . . . . . . . . . . . . . . . . . . . . . . . 35Implementing Intruder Detection and Lockout Mechanisms . . . . . . . . . . . . . . . . . . . . . . . . . . . . . . . . . . . . . 36Applying Updates for Security Vulnerabilities in Embedded Third-Party Products . . . . . . . . . . . . . . . . . . . . 37Securing Communication with Elasticsearch . . . . . . . . . . . . . . . . . . . . . . . . . . . . . . . . . . . . . . . . . . . . . . . . . . 37
Part II Configuring Roles and Users 39
4 Configuring Roles and Users 41Overview . . . . . . . . . . . . . . . . . . . . . . . . . . . . . . . . . . . . . . . . . . . . . . . . . . . . . . . . . . . . . . . . . . . . . . . . . . . . . . . 41Creating Roles . . . . . . . . . . . . . . . . . . . . . . . . . . . . . . . . . . . . . . . . . . . . . . . . . . . . . . . . . . . . . . . . . . . . . . . . . . . 43
Contents 3

4 Con
Creating a Role . . . . . . . . . . . . . . . . . . . . . . . . . . . . . . . . . . . . . . . . . . . . . . . . . . . . . . . . . . . . . . . . . . . . . 43Configuring Password Complexity . . . . . . . . . . . . . . . . . . . . . . . . . . . . . . . . . . . . . . . . . . . . . . . . . . . . . . . . . . . 47Creating Users . . . . . . . . . . . . . . . . . . . . . . . . . . . . . . . . . . . . . . . . . . . . . . . . . . . . . . . . . . . . . . . . . . . . . . . . . . . 48
5 Authentication Methods 51Enablement Considerations . . . . . . . . . . . . . . . . . . . . . . . . . . . . . . . . . . . . . . . . . . . . . . . . . . . . . . . . . . . . . . . . 51LDAP Authentication Against a Single LDAP Server Or Domain . . . . . . . . . . . . . . . . . . . . . . . . . . . . . . . . . . . 53
Overview . . . . . . . . . . . . . . . . . . . . . . . . . . . . . . . . . . . . . . . . . . . . . . . . . . . . . . . . . . . . . . . . . . . . . . . . . 54Prerequisites . . . . . . . . . . . . . . . . . . . . . . . . . . . . . . . . . . . . . . . . . . . . . . . . . . . . . . . . . . . . . . . . . . . . . . 54Setting Up LDAP Authentication. . . . . . . . . . . . . . . . . . . . . . . . . . . . . . . . . . . . . . . . . . . . . . . . . . . . . . . 55Logging in by Using LDAP User Credentials . . . . . . . . . . . . . . . . . . . . . . . . . . . . . . . . . . . . . . . . . . . . . . 57Configuring Multiple LDAP Servers for Failover . . . . . . . . . . . . . . . . . . . . . . . . . . . . . . . . . . . . . . . . . . 58
LDAP Authentication Against Multiple LDAP Servers Or Domains . . . . . . . . . . . . . . . . . . . . . . . . . . . . . . . . . 59Prerequisites . . . . . . . . . . . . . . . . . . . . . . . . . . . . . . . . . . . . . . . . . . . . . . . . . . . . . . . . . . . . . . . . . . . . . . 60Enabling Strong Authentication . . . . . . . . . . . . . . . . . . . . . . . . . . . . . . . . . . . . . . . . . . . . . . . . . . . . . . . 60Configuring LDAP Servers Or Domains Properties . . . . . . . . . . . . . . . . . . . . . . . . . . . . . . . . . . . . . . . . 61Configuring LDAP Servers Or Domains As Authentication Sources . . . . . . . . . . . . . . . . . . . . . . . . . . . 62Logging In With LDAP User Credentials . . . . . . . . . . . . . . . . . . . . . . . . . . . . . . . . . . . . . . . . . . . . . . . . . 68
Prerequisites for MFA, Kerberos, and OAuth . . . . . . . . . . . . . . . . . . . . . . . . . . . . . . . . . . . . . . . . . . . . . . . . . . 69Sentinel DNS Name is Case-Sensitive. . . . . . . . . . . . . . . . . . . . . . . . . . . . . . . . . . . . . . . . . . . . . . . . . . . 69LDAP and Active Directory . . . . . . . . . . . . . . . . . . . . . . . . . . . . . . . . . . . . . . . . . . . . . . . . . . . . . . . . . . . 69Edit Sentinel Server Hosts File . . . . . . . . . . . . . . . . . . . . . . . . . . . . . . . . . . . . . . . . . . . . . . . . . . . . . . . . 69Edit OSP Configuration Properties . . . . . . . . . . . . . . . . . . . . . . . . . . . . . . . . . . . . . . . . . . . . . . . . . . . . . 70Edit Sentinel Configuration Properties. . . . . . . . . . . . . . . . . . . . . . . . . . . . . . . . . . . . . . . . . . . . . . . . . . 71Update All Computers That Access Sentinel . . . . . . . . . . . . . . . . . . . . . . . . . . . . . . . . . . . . . . . . . . . . . 71Ensure All Users Have a Valid Email ID. . . . . . . . . . . . . . . . . . . . . . . . . . . . . . . . . . . . . . . . . . . . . . . . . . 72Using LDAP with SSL . . . . . . . . . . . . . . . . . . . . . . . . . . . . . . . . . . . . . . . . . . . . . . . . . . . . . . . . . . . . . . . . 72Restart Sentinel . . . . . . . . . . . . . . . . . . . . . . . . . . . . . . . . . . . . . . . . . . . . . . . . . . . . . . . . . . . . . . . . . . . . 72Configuring Sentinel In High Availability . . . . . . . . . . . . . . . . . . . . . . . . . . . . . . . . . . . . . . . . . . . . . . . . 72
Kerberos Authentication . . . . . . . . . . . . . . . . . . . . . . . . . . . . . . . . . . . . . . . . . . . . . . . . . . . . . . . . . . . . . . . . . . 73Configuring the Sentinel Server for Kerberos Authentication . . . . . . . . . . . . . . . . . . . . . . . . . . . . . . . 74Configuring the Kerberos User Account in Active Directory . . . . . . . . . . . . . . . . . . . . . . . . . . . . . . . . 74Configuring Browsers to Use Integrated Windows Authentication . . . . . . . . . . . . . . . . . . . . . . . . . . . 77
Multi-factor Authentication . . . . . . . . . . . . . . . . . . . . . . . . . . . . . . . . . . . . . . . . . . . . . . . . . . . . . . . . . . . . . . . . 78Using Advanced Authentication . . . . . . . . . . . . . . . . . . . . . . . . . . . . . . . . . . . . . . . . . . . . . . . . . . . . . . . 78Configuring Sentinel in FIPS Mode to use Advanced Authentication . . . . . . . . . . . . . . . . . . . . . . . . . 81Using Other SAML 2.0 IDP Software . . . . . . . . . . . . . . . . . . . . . . . . . . . . . . . . . . . . . . . . . . . . . . . . . . . 82Configuring Sentinel in FIPS Mode to use SAML 2.0 IDP . . . . . . . . . . . . . . . . . . . . . . . . . . . . . . . . . . . 83
OAuth Authentication. . . . . . . . . . . . . . . . . . . . . . . . . . . . . . . . . . . . . . . . . . . . . . . . . . . . . . . . . . . . . . . . . . . . . 84Creating Credentials for the Google Web Application . . . . . . . . . . . . . . . . . . . . . . . . . . . . . . . . . . . . . 84Configuring the Sentinel Server for OAuth Authentication . . . . . . . . . . . . . . . . . . . . . . . . . . . . . . . . . 84Configuring Sentinel in FIPS Mode to Use Google OAuth . . . . . . . . . . . . . . . . . . . . . . . . . . . . . . . . . . 85
Troubleshooting . . . . . . . . . . . . . . . . . . . . . . . . . . . . . . . . . . . . . . . . . . . . . . . . . . . . . . . . . . . . . . . . . . . . . . . . . 86An Invalid OAuth2 Request was Received . . . . . . . . . . . . . . . . . . . . . . . . . . . . . . . . . . . . . . . . . . . . . . . 86Invalid Host Header Name or Request URL Domain Name . . . . . . . . . . . . . . . . . . . . . . . . . . . . . . . . . 86Login Redirects to the Standard Login Page . . . . . . . . . . . . . . . . . . . . . . . . . . . . . . . . . . . . . . . . . . . . . 86
Part III Collecting and Routing Event Data 89
6 Configuring Agentless Data Collection 91Before You Begin . . . . . . . . . . . . . . . . . . . . . . . . . . . . . . . . . . . . . . . . . . . . . . . . . . . . . . . . . . . . . . . . . . . . . . . . . 91
tents
Resolving Hostnames and IP Addresses . . . . . . . . . . . . . . . . . . . . . . . . . . . . . . . . . . . . . . . . . . . . . . . . . . . . . . 92Configuring Data Collection for Syslog Event Sources . . . . . . . . . . . . . . . . . . . . . . . . . . . . . . . . . . . . . . . . . . . 92
Parsing Logic for Syslog Messages . . . . . . . . . . . . . . . . . . . . . . . . . . . . . . . . . . . . . . . . . . . . . . . . . . . . . 93Configuring Syslog Servers . . . . . . . . . . . . . . . . . . . . . . . . . . . . . . . . . . . . . . . . . . . . . . . . . . . . . . . . . . . 93Configuring Client Authentication for the SSL Syslog Server . . . . . . . . . . . . . . . . . . . . . . . . . . . . . . . . 94
Configuring Data Collection for the Novell Audit Server . . . . . . . . . . . . . . . . . . . . . . . . . . . . . . . . . . . . . . . . . 96Specifying the Audit Server Settings . . . . . . . . . . . . . . . . . . . . . . . . . . . . . . . . . . . . . . . . . . . . . . . . . . . 96Setting the Audit Server Options . . . . . . . . . . . . . . . . . . . . . . . . . . . . . . . . . . . . . . . . . . . . . . . . . . . . . . 97
Configuring Data Collection for Other Event Sources . . . . . . . . . . . . . . . . . . . . . . . . . . . . . . . . . . . . . . . . . .100Accessing Event Source Management . . . . . . . . . . . . . . . . . . . . . . . . . . . . . . . . . . . . . . . . . . . . . . . . .100Viewing Data in Event Source Management . . . . . . . . . . . . . . . . . . . . . . . . . . . . . . . . . . . . . . . . . . . .101Searching for Event Sources . . . . . . . . . . . . . . . . . . . . . . . . . . . . . . . . . . . . . . . . . . . . . . . . . . . . . . . . .106Installing Plug-Ins. . . . . . . . . . . . . . . . . . . . . . . . . . . . . . . . . . . . . . . . . . . . . . . . . . . . . . . . . . . . . . . . . .107Updating a Connector or a Collector Plug-In. . . . . . . . . . . . . . . . . . . . . . . . . . . . . . . . . . . . . . . . . . . .108Adding Components to Sentinel. . . . . . . . . . . . . . . . . . . . . . . . . . . . . . . . . . . . . . . . . . . . . . . . . . . . . .108Connecting to Event Sources . . . . . . . . . . . . . . . . . . . . . . . . . . . . . . . . . . . . . . . . . . . . . . . . . . . . . . . .110Exporting Configurations. . . . . . . . . . . . . . . . . . . . . . . . . . . . . . . . . . . . . . . . . . . . . . . . . . . . . . . . . . . .114Importing Configurations . . . . . . . . . . . . . . . . . . . . . . . . . . . . . . . . . . . . . . . . . . . . . . . . . . . . . . . . . . .115Debugging . . . . . . . . . . . . . . . . . . . . . . . . . . . . . . . . . . . . . . . . . . . . . . . . . . . . . . . . . . . . . . . . . . . . . . .115Troubleshooting . . . . . . . . . . . . . . . . . . . . . . . . . . . . . . . . . . . . . . . . . . . . . . . . . . . . . . . . . . . . . . . . . . .119
Managing Event Sources . . . . . . . . . . . . . . . . . . . . . . . . . . . . . . . . . . . . . . . . . . . . . . . . . . . . . . . . . . . . . . . . .119Viewing the Event Sources Page. . . . . . . . . . . . . . . . . . . . . . . . . . . . . . . . . . . . . . . . . . . . . . . . . . . . . .119Changing the Data Logging Status of Event Sources . . . . . . . . . . . . . . . . . . . . . . . . . . . . . . . . . . . . . .122
7 Configuring Agent-Based Data Collection 125
8 Configuring ArcSight SmartConnectors for Data Collection 127
9 Managing Event Sources 129Viewing the Event Sources Page . . . . . . . . . . . . . . . . . . . . . . . . . . . . . . . . . . . . . . . . . . . . . . . . . . . . . . . . . . .129
Viewing Event Sources . . . . . . . . . . . . . . . . . . . . . . . . . . . . . . . . . . . . . . . . . . . . . . . . . . . . . . . . . . . . .129Configuring Event Sources . . . . . . . . . . . . . . . . . . . . . . . . . . . . . . . . . . . . . . . . . . . . . . . . . . . . . . . . . .131Viewing Collector Managers . . . . . . . . . . . . . . . . . . . . . . . . . . . . . . . . . . . . . . . . . . . . . . . . . . . . . . . . .131Viewing Event Source Servers. . . . . . . . . . . . . . . . . . . . . . . . . . . . . . . . . . . . . . . . . . . . . . . . . . . . . . . .132Viewing Collector Plug-Ins . . . . . . . . . . . . . . . . . . . . . . . . . . . . . . . . . . . . . . . . . . . . . . . . . . . . . . . . . .132
Filtering Event Sources . . . . . . . . . . . . . . . . . . . . . . . . . . . . . . . . . . . . . . . . . . . . . . . . . . . . . . . . . . . . . . . . . . .133Filtering Event Sources by Name . . . . . . . . . . . . . . . . . . . . . . . . . . . . . . . . . . . . . . . . . . . . . . . . . . . . .133Filtering Event Sources by Health Status . . . . . . . . . . . . . . . . . . . . . . . . . . . . . . . . . . . . . . . . . . . . . . .134Filtering by Event Sources Event Search Results . . . . . . . . . . . . . . . . . . . . . . . . . . . . . . . . . . . . . . . . .134Filtering Event Sources by Collector Managers . . . . . . . . . . . . . . . . . . . . . . . . . . . . . . . . . . . . . . . . . .134Filtering Event Sources by Event Source Servers. . . . . . . . . . . . . . . . . . . . . . . . . . . . . . . . . . . . . . . . .134Filtering Event Sources by Collector Plug-Ins. . . . . . . . . . . . . . . . . . . . . . . . . . . . . . . . . . . . . . . . . . . .135Changing the Data Logging Status of Event Sources . . . . . . . . . . . . . . . . . . . . . . . . . . . . . . . . . . . . . .135Changing the Associated Collector Plug-In for Event Sources . . . . . . . . . . . . . . . . . . . . . . . . . . . . . .135
10 Configuring Event Routing Rules 137Creating an Event Routing Rule . . . . . . . . . . . . . . . . . . . . . . . . . . . . . . . . . . . . . . . . . . . . . . . . . . . . . . . . . . . .137Ordering Event Routing Rules . . . . . . . . . . . . . . . . . . . . . . . . . . . . . . . . . . . . . . . . . . . . . . . . . . . . . . . . . . . . .138Activating or Deactivating an Event Routing Rule . . . . . . . . . . . . . . . . . . . . . . . . . . . . . . . . . . . . . . . . . . . . .139
Contents 5

6 Con
11 Mapping Events 141Overview . . . . . . . . . . . . . . . . . . . . . . . . . . . . . . . . . . . . . . . . . . . . . . . . . . . . . . . . . . . . . . . . . . . . . . . . . . . . . .141
Maps . . . . . . . . . . . . . . . . . . . . . . . . . . . . . . . . . . . . . . . . . . . . . . . . . . . . . . . . . . . . . . . . . . . . . . . . . . . .141Mapping Events . . . . . . . . . . . . . . . . . . . . . . . . . . . . . . . . . . . . . . . . . . . . . . . . . . . . . . . . . . . . . . . . . . .142
Default Maps . . . . . . . . . . . . . . . . . . . . . . . . . . . . . . . . . . . . . . . . . . . . . . . . . . . . . . . . . . . . . . . . . . . . . . . . . . .144Accessing Map Definitions . . . . . . . . . . . . . . . . . . . . . . . . . . . . . . . . . . . . . . . . . . . . . . . . . . . . . . . . . . . . . . . .145Adding Map Definitions . . . . . . . . . . . . . . . . . . . . . . . . . . . . . . . . . . . . . . . . . . . . . . . . . . . . . . . . . . . . . . . . . .145Adding a Number Range Map Definition . . . . . . . . . . . . . . . . . . . . . . . . . . . . . . . . . . . . . . . . . . . . . . . . . . . .147Updating Map Data. . . . . . . . . . . . . . . . . . . . . . . . . . . . . . . . . . . . . . . . . . . . . . . . . . . . . . . . . . . . . . . . . . . . . .150
Updating Map Data from the Sentinel Control Center . . . . . . . . . . . . . . . . . . . . . . . . . . . . . . . . . . . .150Updating Map Data by Using the Command Line . . . . . . . . . . . . . . . . . . . . . . . . . . . . . . . . . . . . . . . .150
Using Maps for Event Configuration . . . . . . . . . . . . . . . . . . . . . . . . . . . . . . . . . . . . . . . . . . . . . . . . . . . . . . . .151Renaming Event Fields . . . . . . . . . . . . . . . . . . . . . . . . . . . . . . . . . . . . . . . . . . . . . . . . . . . . . . . . . . . . . . . . . . .152
12 Linking to Additional Sentinel Systems 153Benefits . . . . . . . . . . . . . . . . . . . . . . . . . . . . . . . . . . . . . . . . . . . . . . . . . . . . . . . . . . . . . . . . . . . . . . . . . . . . . . .153Prerequisite . . . . . . . . . . . . . . . . . . . . . . . . . . . . . . . . . . . . . . . . . . . . . . . . . . . . . . . . . . . . . . . . . . . . . . . . . . . .153Configuring Sentinel Link . . . . . . . . . . . . . . . . . . . . . . . . . . . . . . . . . . . . . . . . . . . . . . . . . . . . . . . . . . . . . . . . .153
Part IV Configuring Data Storage 155
13 Configuring Traditional Storage 157Raw Data Storage . . . . . . . . . . . . . . . . . . . . . . . . . . . . . . . . . . . . . . . . . . . . . . . . . . . . . . . . . . . . . . . . . . . . . . .157
Raw Data Representation . . . . . . . . . . . . . . . . . . . . . . . . . . . . . . . . . . . . . . . . . . . . . . . . . . . . . . . . . . .159Disabling Raw Data Collection . . . . . . . . . . . . . . . . . . . . . . . . . . . . . . . . . . . . . . . . . . . . . . . . . . . . . . .162
Event Data . . . . . . . . . . . . . . . . . . . . . . . . . . . . . . . . . . . . . . . . . . . . . . . . . . . . . . . . . . . . . . . . . . . . . . . . . . . . .162Configuring Secondary Storage Locations. . . . . . . . . . . . . . . . . . . . . . . . . . . . . . . . . . . . . . . . . . . . . . . . . . . .164
Supported Storage Options. . . . . . . . . . . . . . . . . . . . . . . . . . . . . . . . . . . . . . . . . . . . . . . . . . . . . . . . . .164Types of Secondary Storage . . . . . . . . . . . . . . . . . . . . . . . . . . . . . . . . . . . . . . . . . . . . . . . . . . . . . . . . .165Configuring Secondary Storage . . . . . . . . . . . . . . . . . . . . . . . . . . . . . . . . . . . . . . . . . . . . . . . . . . . . . .165Changing the Secondary Storage Location . . . . . . . . . . . . . . . . . . . . . . . . . . . . . . . . . . . . . . . . . . . . .169
Configuring Disk Space Usage . . . . . . . . . . . . . . . . . . . . . . . . . . . . . . . . . . . . . . . . . . . . . . . . . . . . . . . . . . . . .170Verifying and Downloading Raw Data Files. . . . . . . . . . . . . . . . . . . . . . . . . . . . . . . . . . . . . . . . . . . . . . . . . . .170Configuring Data Synchronization . . . . . . . . . . . . . . . . . . . . . . . . . . . . . . . . . . . . . . . . . . . . . . . . . . . . . . . . . .171
Overview . . . . . . . . . . . . . . . . . . . . . . . . . . . . . . . . . . . . . . . . . . . . . . . . . . . . . . . . . . . . . . . . . . . . . . . .171Creating Data Synchronization Policies . . . . . . . . . . . . . . . . . . . . . . . . . . . . . . . . . . . . . . . . . . . . . . . .174Managing Data Synchronization Policies . . . . . . . . . . . . . . . . . . . . . . . . . . . . . . . . . . . . . . . . . . . . . . .178
Viewing Primary and Secondary Storage Capacity. . . . . . . . . . . . . . . . . . . . . . . . . . . . . . . . . . . . . . . . . . . . .178Using Sequential-Access Storage for Long Term Data Storage . . . . . . . . . . . . . . . . . . . . . . . . . . . . . . . . . . .179
Determining What Data You Need to Copy to Tape . . . . . . . . . . . . . . . . . . . . . . . . . . . . . . . . . . . . . .179Backing Up Data. . . . . . . . . . . . . . . . . . . . . . . . . . . . . . . . . . . . . . . . . . . . . . . . . . . . . . . . . . . . . . . . . . .179Configuring Storage Utilization. . . . . . . . . . . . . . . . . . . . . . . . . . . . . . . . . . . . . . . . . . . . . . . . . . . . . . .180Configuring Data Retention. . . . . . . . . . . . . . . . . . . . . . . . . . . . . . . . . . . . . . . . . . . . . . . . . . . . . . . . . .180Copying Data to Tape . . . . . . . . . . . . . . . . . . . . . . . . . . . . . . . . . . . . . . . . . . . . . . . . . . . . . . . . . . . . . .180Restoring Data . . . . . . . . . . . . . . . . . . . . . . . . . . . . . . . . . . . . . . . . . . . . . . . . . . . . . . . . . . . . . . . . . . . .181
14 Configuring Data Retention Policies 185Rules for Applying a Retention Policy . . . . . . . . . . . . . . . . . . . . . . . . . . . . . . . . . . . . . . . . . . . . . . . . . . . . . . .185
tents

Raw Data Retention Policy . . . . . . . . . . . . . . . . . . . . . . . . . . . . . . . . . . . . . . . . . . . . . . . . . . . . . . . . . . . . . . . .186Event Data Retention Policies . . . . . . . . . . . . . . . . . . . . . . . . . . . . . . . . . . . . . . . . . . . . . . . . . . . . . . . . . . . . .186
Creating Event Data Retention Policies . . . . . . . . . . . . . . . . . . . . . . . . . . . . . . . . . . . . . . . . . . . . . . . .186Configuring the Retention Period for the Event Associations Data . . . . . . . . . . . . . . . . . . . . . . . . . .187
Data Deletion Policy for Traditional Storage . . . . . . . . . . . . . . . . . . . . . . . . . . . . . . . . . . . . . . . . . . . . . . . . . .187
15 Re-indexing Event Data Partitions 189Overview . . . . . . . . . . . . . . . . . . . . . . . . . . . . . . . . . . . . . . . . . . . . . . . . . . . . . . . . . . . . . . . . . . . . . . . . . . . . . .189Deciding When to Re-Index or Restore Data . . . . . . . . . . . . . . . . . . . . . . . . . . . . . . . . . . . . . . . . . . . . . . . . .189Scheduling Re-indexing. . . . . . . . . . . . . . . . . . . . . . . . . . . . . . . . . . . . . . . . . . . . . . . . . . . . . . . . . . . . . . . . . . .190Re-indexing By Using the Web Interface . . . . . . . . . . . . . . . . . . . . . . . . . . . . . . . . . . . . . . . . . . . . . . . . . . . . .190Re-Indexing in the Offline Mode . . . . . . . . . . . . . . . . . . . . . . . . . . . . . . . . . . . . . . . . . . . . . . . . . . . . . . . . . . .191
Using the Offline Tool On the Sentinel Server . . . . . . . . . . . . . . . . . . . . . . . . . . . . . . . . . . . . . . . . . . .191Using the Re-Indexing Tool On a Separate Machine . . . . . . . . . . . . . . . . . . . . . . . . . . . . . . . . . . . . .192
Part V Integrating with External Systems 195
16 Configuring Actions 197Overview . . . . . . . . . . . . . . . . . . . . . . . . . . . . . . . . . . . . . . . . . . . . . . . . . . . . . . . . . . . . . . . . . . . . . . . . . . . . . .197Understanding the Action Manager Interface . . . . . . . . . . . . . . . . . . . . . . . . . . . . . . . . . . . . . . . . . . . . . . . .198Managing Actions . . . . . . . . . . . . . . . . . . . . . . . . . . . . . . . . . . . . . . . . . . . . . . . . . . . . . . . . . . . . . . . . . . . . . . .199
Adding an Action . . . . . . . . . . . . . . . . . . . . . . . . . . . . . . . . . . . . . . . . . . . . . . . . . . . . . . . . . . . . . . . . . .200Debugging Actions. . . . . . . . . . . . . . . . . . . . . . . . . . . . . . . . . . . . . . . . . . . . . . . . . . . . . . . . . . . . . . . . .201
Managing Action Plug-Ins. . . . . . . . . . . . . . . . . . . . . . . . . . . . . . . . . . . . . . . . . . . . . . . . . . . . . . . . . . . . . . . . .202Understanding the Action Plug-In Manager Interface . . . . . . . . . . . . . . . . . . . . . . . . . . . . . . . . . . . .202Importing an Action Plug-In . . . . . . . . . . . . . . . . . . . . . . . . . . . . . . . . . . . . . . . . . . . . . . . . . . . . . . . . .203
17 Configuring Integrators 205Overview . . . . . . . . . . . . . . . . . . . . . . . . . . . . . . . . . . . . . . . . . . . . . . . . . . . . . . . . . . . . . . . . . . . . . . . . . . . . . .205Managing Integrators . . . . . . . . . . . . . . . . . . . . . . . . . . . . . . . . . . . . . . . . . . . . . . . . . . . . . . . . . . . . . . . . . . . .206
Configuring the Default Integrators . . . . . . . . . . . . . . . . . . . . . . . . . . . . . . . . . . . . . . . . . . . . . . . . . . .206Adding an Integrator . . . . . . . . . . . . . . . . . . . . . . . . . . . . . . . . . . . . . . . . . . . . . . . . . . . . . . . . . . . . . . .209Viewing Integrator Health Details . . . . . . . . . . . . . . . . . . . . . . . . . . . . . . . . . . . . . . . . . . . . . . . . . . . .209
Managing Integrator Plug-Ins. . . . . . . . . . . . . . . . . . . . . . . . . . . . . . . . . . . . . . . . . . . . . . . . . . . . . . . . . . . . . .211Importing an Integrator Plug-In . . . . . . . . . . . . . . . . . . . . . . . . . . . . . . . . . . . . . . . . . . . . . . . . . . . . . .211
18 Integrating Identity Information 213Overview . . . . . . . . . . . . . . . . . . . . . . . . . . . . . . . . . . . . . . . . . . . . . . . . . . . . . . . . . . . . . . . . . . . . . . . . . . . . . .213Integration with Identity Management Systems . . . . . . . . . . . . . . . . . . . . . . . . . . . . . . . . . . . . . . . . . . . . . .214Leveraging Identity Information . . . . . . . . . . . . . . . . . . . . . . . . . . . . . . . . . . . . . . . . . . . . . . . . . . . . . . . . . . .216
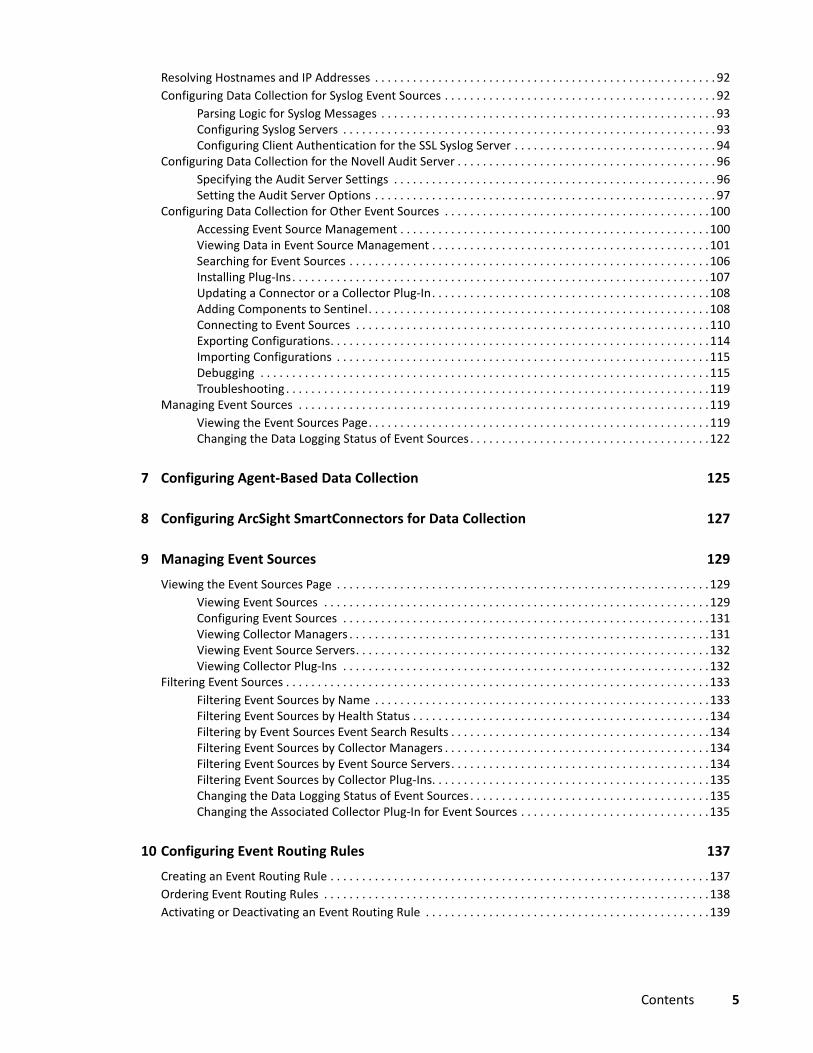
19 Integrating Sentinel with ArcSight Intelligence 217Overview . . . . . . . . . . . . . . . . . . . . . . . . . . . . . . . . . . . . . . . . . . . . . . . . . . . . . . . . . . . . . . . . . . . . . . . . . . . . . .217
Prerequisites . . . . . . . . . . . . . . . . . . . . . . . . . . . . . . . . . . . . . . . . . . . . . . . . . . . . . . . . . . . . . . . . . . . . .217Data Ingestion to ArcSight Intelligence . . . . . . . . . . . . . . . . . . . . . . . . . . . . . . . . . . . . . . . . . . . . . . . . . . . . . .218
Supported/Relevant Data Sources . . . . . . . . . . . . . . . . . . . . . . . . . . . . . . . . . . . . . . . . . . . . . . . . . . . .218Forwarding Real-Time Sentinel Events to the Transformation Hub of ArcSight Intelligence. . . . . .219
Contents 7
8 Con
Forwarding Older Sentinel Events to Transformation Hub . . . . . . . . . . . . . . . . . . . . . . . . . . . . . . . .219Generating External Certificate . . . . . . . . . . . . . . . . . . . . . . . . . . . . . . . . . . . . . . . . . . . . . . . . . . . . . .220Adding Transformation Hub Certificate in FIPS Mode . . . . . . . . . . . . . . . . . . . . . . . . . . . . . . . . . . . .221
Retrieving Entity Information from ArcSight Intelligence . . . . . . . . . . . . . . . . . . . . . . . . . . . . . . . . . . . . . . .221FlexConnector Installation and Configuration. . . . . . . . . . . . . . . . . . . . . . . . . . . . . . . . . . . . . . . . . . .222
20 Configuring Threat Intelligence Data Sources 225Adding Threat Intelligence Data Sources . . . . . . . . . . . . . . . . . . . . . . . . . . . . . . . . . . . . . . . . . . . . . . . . . . . .225Understanding How Sentinel Processes Data . . . . . . . . . . . . . . . . . . . . . . . . . . . . . . . . . . . . . . . . . . . . . . . . .226Managing Feeds from Threat Intelligence Solution Pack. . . . . . . . . . . . . . . . . . . . . . . . . . . . . . . . . . . . . . . .227
Part VI Monitoring Your Network 229
21 Configuring Data Federation 231Overview . . . . . . . . . . . . . . . . . . . . . . . . . . . . . . . . . . . . . . . . . . . . . . . . . . . . . . . . . . . . . . . . . . . . . . . . . . . . . .231Configuring Servers for Data Federation. . . . . . . . . . . . . . . . . . . . . . . . . . . . . . . . . . . . . . . . . . . . . . . . . . . . .233
Enabling Data Federation . . . . . . . . . . . . . . . . . . . . . . . . . . . . . . . . . . . . . . . . . . . . . . . . . . . . . . . . . . .233Using the Administrator Credentials to Add a Data Source Server . . . . . . . . . . . . . . . . . . . . . . . . . .233Using the Opt-in Password to Add a Data Source Server . . . . . . . . . . . . . . . . . . . . . . . . . . . . . . . . . .234
Searching for Events . . . . . . . . . . . . . . . . . . . . . . . . . . . . . . . . . . . . . . . . . . . . . . . . . . . . . . . . . . . . . . . . . . . . .236Managing the Data Federation Search Results. . . . . . . . . . . . . . . . . . . . . . . . . . . . . . . . . . . . . . . . . . . . . . . .237Viewing the Search Activities . . . . . . . . . . . . . . . . . . . . . . . . . . . . . . . . . . . . . . . . . . . . . . . . . . . . . . . . . . . . . .238Running Reports . . . . . . . . . . . . . . . . . . . . . . . . . . . . . . . . . . . . . . . . . . . . . . . . . . . . . . . . . . . . . . . . . . . . . . . .238Viewing Alerts . . . . . . . . . . . . . . . . . . . . . . . . . . . . . . . . . . . . . . . . . . . . . . . . . . . . . . . . . . . . . . . . . . . . . . . . . .239Editing the Data Source Server Details . . . . . . . . . . . . . . . . . . . . . . . . . . . . . . . . . . . . . . . . . . . . . . . . . . . . . .239Troubleshooting . . . . . . . . . . . . . . . . . . . . . . . . . . . . . . . . . . . . . . . . . . . . . . . . . . . . . . . . . . . . . . . . . . . . . . . .239
Permission Denied. . . . . . . . . . . . . . . . . . . . . . . . . . . . . . . . . . . . . . . . . . . . . . . . . . . . . . . . . . . . . . . . .240Connection Down . . . . . . . . . . . . . . . . . . . . . . . . . . . . . . . . . . . . . . . . . . . . . . . . . . . . . . . . . . . . . . . . .240Unable to View Raw Data . . . . . . . . . . . . . . . . . . . . . . . . . . . . . . . . . . . . . . . . . . . . . . . . . . . . . . . . . . .240Problems While Adding Data Source . . . . . . . . . . . . . . . . . . . . . . . . . . . . . . . . . . . . . . . . . . . . . . . . . .240Some Events Are Only Visible from the Local System. . . . . . . . . . . . . . . . . . . . . . . . . . . . . . . . . . . . .241Cannot Run Reports on the Data Source Servers . . . . . . . . . . . . . . . . . . . . . . . . . . . . . . . . . . . . . . . .241Different Users Get Different Results . . . . . . . . . . . . . . . . . . . . . . . . . . . . . . . . . . . . . . . . . . . . . . . . . .241Cannot Set the Admin Role as the Search Proxy Role. . . . . . . . . . . . . . . . . . . . . . . . . . . . . . . . . . . . .241Error Logs . . . . . . . . . . . . . . . . . . . . . . . . . . . . . . . . . . . . . . . . . . . . . . . . . . . . . . . . . . . . . . . . . . . . . . . .241
22 Visualizing IP Flow Communications 243Configuring IP Flow Data Collection . . . . . . . . . . . . . . . . . . . . . . . . . . . . . . . . . . . . . . . . . . . . . . . . . . . . . . . .243Visualizing and Analyzing IP Flow Data . . . . . . . . . . . . . . . . . . . . . . . . . . . . . . . . . . . . . . . . . . . . . . . . . . . . . .243
23 Viewing Compliance to Configuration Policies 245Receiving Compliance Details from Secure Configuration Manager . . . . . . . . . . . . . . . . . . . . . . . . . . . . . .245
24 Viewing Change Guardian Events 247
25 Configuring Alert Notifications 249Understanding Alerts . . . . . . . . . . . . . . . . . . . . . . . . . . . . . . . . . . . . . . . . . . . . . . . . . . . . . . . . . . . . . . . . . . . .249
tents

Overview . . . . . . . . . . . . . . . . . . . . . . . . . . . . . . . . . . . . . . . . . . . . . . . . . . . . . . . . . . . . . . . . . . . . . . . . . . . . . .249Configuring Alert Creation . . . . . . . . . . . . . . . . . . . . . . . . . . . . . . . . . . . . . . . . . . . . . . . . . . . . . . . . . . . . . . . .250Visualizing and Analyzing Alerts. . . . . . . . . . . . . . . . . . . . . . . . . . . . . . . . . . . . . . . . . . . . . . . . . . . . . . . . . . . .252Managing Alerts . . . . . . . . . . . . . . . . . . . . . . . . . . . . . . . . . . . . . . . . . . . . . . . . . . . . . . . . . . . . . . . . . . . . . . . .252
Filtering Alerts . . . . . . . . . . . . . . . . . . . . . . . . . . . . . . . . . . . . . . . . . . . . . . . . . . . . . . . . . . . . . . . . . . . .252Configuring Alert Retention Policies . . . . . . . . . . . . . . . . . . . . . . . . . . . . . . . . . . . . . . . . . . . . . . . . . .253
Part VII Managing Solution Packs 255
26 Using Solution Packs 257Overview . . . . . . . . . . . . . . . . . . . . . . . . . . . . . . . . . . . . . . . . . . . . . . . . . . . . . . . . . . . . . . . . . . . . . . . . . . . . . .257Solution Pack Components . . . . . . . . . . . . . . . . . . . . . . . . . . . . . . . . . . . . . . . . . . . . . . . . . . . . . . . . . . . . . . .258Using the Import Plug-In Wizard to Import a Solution Pack . . . . . . . . . . . . . . . . . . . . . . . . . . . . . . . . . . . . .259Using the Solution Manager. . . . . . . . . . . . . . . . . . . . . . . . . . . . . . . . . . . . . . . . . . . . . . . . . . . . . . . . . . . . . . .260
Launching the Solution Manager . . . . . . . . . . . . . . . . . . . . . . . . . . . . . . . . . . . . . . . . . . . . . . . . . . . . .260Solution Manager Interface . . . . . . . . . . . . . . . . . . . . . . . . . . . . . . . . . . . . . . . . . . . . . . . . . . . . . . . . .260
Installing and Managing Solution Packs . . . . . . . . . . . . . . . . . . . . . . . . . . . . . . . . . . . . . . . . . . . . . . . . . . . . .263Viewing the Contents of a Solution Pack . . . . . . . . . . . . . . . . . . . . . . . . . . . . . . . . . . . . . . . . . . . . . . .263Installing Content from Solution Packs . . . . . . . . . . . . . . . . . . . . . . . . . . . . . . . . . . . . . . . . . . . . . . . .263Configuring Controls . . . . . . . . . . . . . . . . . . . . . . . . . . . . . . . . . . . . . . . . . . . . . . . . . . . . . . . . . . . . . . .264Implementing a Control . . . . . . . . . . . . . . . . . . . . . . . . . . . . . . . . . . . . . . . . . . . . . . . . . . . . . . . . . . . .266Testing a Control . . . . . . . . . . . . . . . . . . . . . . . . . . . . . . . . . . . . . . . . . . . . . . . . . . . . . . . . . . . . . . . . . .267Uninstalling a Control . . . . . . . . . . . . . . . . . . . . . . . . . . . . . . . . . . . . . . . . . . . . . . . . . . . . . . . . . . . . . .267Viewing Solution Pack Status . . . . . . . . . . . . . . . . . . . . . . . . . . . . . . . . . . . . . . . . . . . . . . . . . . . . . . . .268Deleting a Solution Pack . . . . . . . . . . . . . . . . . . . . . . . . . . . . . . . . . . . . . . . . . . . . . . . . . . . . . . . . . . . .269
Installing an Edited Solution Pack . . . . . . . . . . . . . . . . . . . . . . . . . . . . . . . . . . . . . . . . . . . . . . . . . . . . . . . . . .270Solution Designer . . . . . . . . . . . . . . . . . . . . . . . . . . . . . . . . . . . . . . . . . . . . . . . . . . . . . . . . . . . . . . . . . . . . . . .270
27 Creating Solution Packs 271Accessing the Solution Designer . . . . . . . . . . . . . . . . . . . . . . . . . . . . . . . . . . . . . . . . . . . . . . . . . . . . . . . . . . .271Creating a Solution Pack . . . . . . . . . . . . . . . . . . . . . . . . . . . . . . . . . . . . . . . . . . . . . . . . . . . . . . . . . . . . . . . . . .271Adding Content to a Solution Pack . . . . . . . . . . . . . . . . . . . . . . . . . . . . . . . . . . . . . . . . . . . . . . . . . . . . . . . . .272
Sentinel Content . . . . . . . . . . . . . . . . . . . . . . . . . . . . . . . . . . . . . . . . . . . . . . . . . . . . . . . . . . . . . . . . . .272Using Placeholders . . . . . . . . . . . . . . . . . . . . . . . . . . . . . . . . . . . . . . . . . . . . . . . . . . . . . . . . . . . . . . . .274File Attachments . . . . . . . . . . . . . . . . . . . . . . . . . . . . . . . . . . . . . . . . . . . . . . . . . . . . . . . . . . . . . . . . . .274
Initializing Dynamic Lists Through Solution Pack . . . . . . . . . . . . . . . . . . . . . . . . . . . . . . . . . . . . . . . . . . . . . .274Documenting a Solution Pack . . . . . . . . . . . . . . . . . . . . . . . . . . . . . . . . . . . . . . . . . . . . . . . . . . . . . . . . . . . . .275
Description . . . . . . . . . . . . . . . . . . . . . . . . . . . . . . . . . . . . . . . . . . . . . . . . . . . . . . . . . . . . . . . . . . . . . . .275Implementation Steps . . . . . . . . . . . . . . . . . . . . . . . . . . . . . . . . . . . . . . . . . . . . . . . . . . . . . . . . . . . . . .275Testing Steps. . . . . . . . . . . . . . . . . . . . . . . . . . . . . . . . . . . . . . . . . . . . . . . . . . . . . . . . . . . . . . . . . . . . . .275
Synchronizing Content . . . . . . . . . . . . . . . . . . . . . . . . . . . . . . . . . . . . . . . . . . . . . . . . . . . . . . . . . . . . . . . . . . .276Handling Inter-control Dependency . . . . . . . . . . . . . . . . . . . . . . . . . . . . . . . . . . . . . . . . . . . . . . . . . . . . . . . .276Managing a Solution Pack . . . . . . . . . . . . . . . . . . . . . . . . . . . . . . . . . . . . . . . . . . . . . . . . . . . . . . . . . . . . . . . .276
Adding a Node to a Control. . . . . . . . . . . . . . . . . . . . . . . . . . . . . . . . . . . . . . . . . . . . . . . . . . . . . . . . . .277Moving Nodes . . . . . . . . . . . . . . . . . . . . . . . . . . . . . . . . . . . . . . . . . . . . . . . . . . . . . . . . . . . . . . . . . . . .277
Contents 9
10 Con
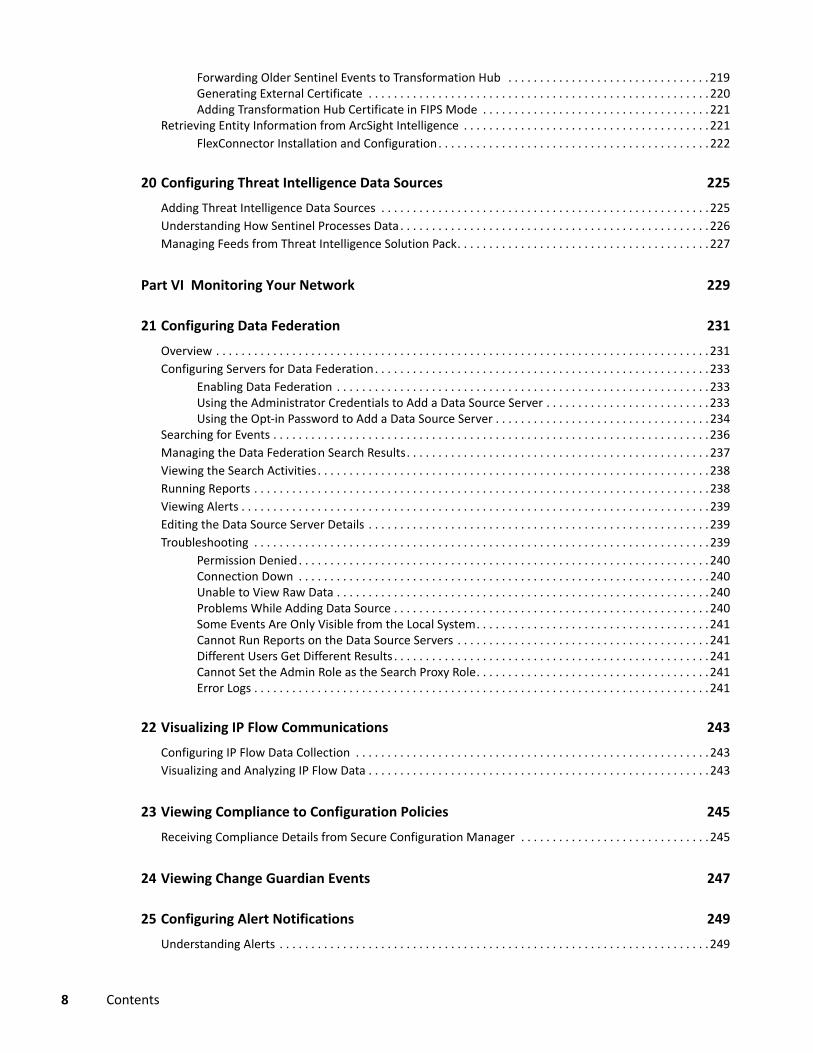
Part VIII Managing Your Sentinel Environment 279
28 Managing Active Searches and Reports 281
29 Monitoring the Events Per Second Rate 283Viewing the Operational EPS . . . . . . . . . . . . . . . . . . . . . . . . . . . . . . . . . . . . . . . . . . . . . . . . . . . . . . . . . . . . . .283Viewing a Graphical Representation of the Events Per Second Rate . . . . . . . . . . . . . . . . . . . . . . . . . . . . . .284
Viewing the Events Per Second Rate of Event Source Servers . . . . . . . . . . . . . . . . . . . . . . . . . . . . .284
30 Monitoring Sentinel Health 285
31 Configuring Sentinel for High Availability 287
32 Configuring Alert Generation 289
33 Configuring the Report Retention Period 291
34 Generating a Report in CSV and PDF Format 293
35 Backing Up and Restoring Data 295Parameters for the Backup and Restore Utility Script . . . . . . . . . . . . . . . . . . . . . . . . . . . . . . . . . . . . . . . . . .296Running the Backup and Restore Utility Script . . . . . . . . . . . . . . . . . . . . . . . . . . . . . . . . . . . . . . . . . . . . . . . .297Restoring Dashboards After Restoring Data from a Different Sentinel Server. . . . . . . . . . . . . . . . . . . . . . .299
36 Updating Sentinel Clients 301
37 Customizing Sentinel Settings 303Customizing Elasticsearch Settings in Traditional Storage . . . . . . . . . . . . . . . . . . . . . . . . . . . . . . . . . . . . . . .303Configuring the Number of Incidents to be Listed in the Incidents List . . . . . . . . . . . . . . . . . . . . . . . . . . . .304Configuring the Number of Alert Trigger Events to be Attached with the Incident . . . . . . . . . . . . . . . . . .304Optimizing the Operating System . . . . . . . . . . . . . . . . . . . . . . . . . . . . . . . . . . . . . . . . . . . . . . . . . . . . . . . . . .304Configuring the Resources for Event Partition Compression. . . . . . . . . . . . . . . . . . . . . . . . . . . . . . . . . . . . .305Setting the Grace Period to Close Event Data Partitions . . . . . . . . . . . . . . . . . . . . . . . . . . . . . . . . . . . . . . . .305Compressing the Storage Index on Primary Partition . . . . . . . . . . . . . . . . . . . . . . . . . . . . . . . . . . . . . . . . . .305Configuring Memory for the Sentinel Server . . . . . . . . . . . . . . . . . . . . . . . . . . . . . . . . . . . . . . . . . . . . . . . . .306Setting the Raw Data Limit . . . . . . . . . . . . . . . . . . . . . . . . . . . . . . . . . . . . . . . . . . . . . . . . . . . . . . . . . . . . . . . .307Configuring the Number of Trigger Events to be Associated with a Correlated Event . . . . . . . . . . . . . . . .307Configuring the Number of Trigger Events to be Displayed in the Alert View . . . . . . . . . . . . . . . . . . . . . . .307Maintaining Custom Settings in XML Files . . . . . . . . . . . . . . . . . . . . . . . . . . . . . . . . . . . . . . . . . . . . . . . . . . .308Customizing the Default Search Field . . . . . . . . . . . . . . . . . . . . . . . . . . . . . . . . . . . . . . . . . . . . . . . . . . . . . . .308Configuring the Proxy Port . . . . . . . . . . . . . . . . . . . . . . . . . . . . . . . . . . . . . . . . . . . . . . . . . . . . . . . . . . . . . . . .309Enabling the Use of Special Characters in Event Field Values . . . . . . . . . . . . . . . . . . . . . . . . . . . . . . . . . . . .309Configuring the Number of User Identities to be Displayed for People Search. . . . . . . . . . . . . . . . . . . . . .309Configuring the Report Generation Idle Timeout Period. . . . . . . . . . . . . . . . . . . . . . . . . . . . . . . . . . . . . . . .310Customizing Incident Probability Refresh Interval . . . . . . . . . . . . . . . . . . . . . . . . . . . . . . . . . . . . . . . . . . . . .310
tents
38 Rebranding Reports 311
39 Generating an Audit Event when a List Item Expires From a Dynamic List 313
Part IX Appendix 315
A Command Line Utilities 317Managing the Sentinel Services. . . . . . . . . . . . . . . . . . . . . . . . . . . . . . . . . . . . . . . . . . . . . . . . . . . . . . . . . . . .317Sentinel Scripts . . . . . . . . . . . . . . . . . . . . . . . . . . . . . . . . . . . . . . . . . . . . . . . . . . . . . . . . . . . . . . . . . . . . . . . . .318Running the Report Development Utility . . . . . . . . . . . . . . . . . . . . . . . . . . . . . . . . . . . . . . . . . . . . . . . . . . . .319Getting the .jar Version Information . . . . . . . . . . . . . . . . . . . . . . . . . . . . . . . . . . . . . . . . . . . . . . . . . . . . . . . .320Changing the Hostname of a Sentinel Server . . . . . . . . . . . . . . . . . . . . . . . . . . . . . . . . . . . . . . . . . . . . . . . . .320Importing or Exporting Event Association Data . . . . . . . . . . . . . . . . . . . . . . . . . . . . . . . . . . . . . . . . . . . . . . .321Managing the Internal Database . . . . . . . . . . . . . . . . . . . . . . . . . . . . . . . . . . . . . . . . . . . . . . . . . . . . . . . . . . .322
Commands . . . . . . . . . . . . . . . . . . . . . . . . . . . . . . . . . . . . . . . . . . . . . . . . . . . . . . . . . . . . . . . . . . . . . . .322Options . . . . . . . . . . . . . . . . . . . . . . . . . . . . . . . . . . . . . . . . . . . . . . . . . . . . . . . . . . . . . . . . . . . . . . . . . .323
Cleaning Up the Internal Database . . . . . . . . . . . . . . . . . . . . . . . . . . . . . . . . . . . . . . . . . . . . . . . . . . . . . . . . .323Prerequisites . . . . . . . . . . . . . . . . . . . . . . . . . . . . . . . . . . . . . . . . . . . . . . . . . . . . . . . . . . . . . . . . . . . . .323Using the clean_db.sh Script . . . . . . . . . . . . . . . . . . . . . . . . . . . . . . . . . . . . . . . . . . . . . . . . . . . . . . . .323
Managing the Sentinel Server . . . . . . . . . . . . . . . . . . . . . . . . . . . . . . . . . . . . . . . . . . . . . . . . . . . . . . . . . . . . .325Commands . . . . . . . . . . . . . . . . . . . . . . . . . . . . . . . . . . . . . . . . . . . . . . . . . . . . . . . . . . . . . . . . . . . . . . .325Options . . . . . . . . . . . . . . . . . . . . . . . . . . . . . . . . . . . . . . . . . . . . . . . . . . . . . . . . . . . . . . . . . . . . . . . . . .325
B Troubleshooting 327Mitre Fields Become Non-indexed Fields for Admin User in the alert.alert Index . . . . . . . . . . . . . . . . . . .327Collector Manager Logs Display the Copying back to Persist Queue Error . . . . . . . . . . . . . . . . . . . . . . . . .328Event Visualization Dashboards Take a Longer Time to Load Data . . . . . . . . . . . . . . . . . . . . . . . . . . . . . . . .328Unable to View Alerts in the Dashboard and Alert Views . . . . . . . . . . . . . . . . . . . . . . . . . . . . . . . . . . . . . . .328Unable to Connect to Sentinel Agent Manager Database . . . . . . . . . . . . . . . . . . . . . . . . . . . . . . . . . . . . . . .329Customizing Logging Settings in Sentinel . . . . . . . . . . . . . . . . . . . . . . . . . . . . . . . . . . . . . . . . . . . . . . . . . . . .329Customizing Logging Settings in Elasticsearch . . . . . . . . . . . . . . . . . . . . . . . . . . . . . . . . . . . . . . . . . . . . . . . .330Sentinel Control Center Does Not Launch When Identity Manager Designer is Installed on the Client Computer . . . . . . . . . . . . . . . . . . . . . . . . . . . . . . . . . . . . . . . . . . . . . . . . . . . . . . . . . . . . . . . . . . . . . . . .330Error While Installing Correlation Rules . . . . . . . . . . . . . . . . . . . . . . . . . . . . . . . . . . . . . . . . . . . . . . . . . . . . .330Sentinel High Availability Installation in FIPS 140-2 Mode Displays an Error . . . . . . . . . . . . . . . . . . . . . . . .330Sentinel Services Might Not Start Automatically After the Installation . . . . . . . . . . . . . . . . . . . . . . . . . . . . 330Sentinel Does Not Configure the Sentinel Appliance Network Interface By Default. . . . . . . . . . . . . . . . . .331New Incoming Alerts Incorrectly Appear to be Selected When You Modify Existing Alerts. . . . . . . . . . . .331Error When Configuring the NFS Storage After Upgrading Sentinel Appliance to Version 7.3 SP1 and Later . . . . . . . . . . . . . . . . . . . . . . . . . . . . . . . . . . . . . . . . . . . . . . . . . . . . . . . . . . . . . . . . . . . . . . . . . . . . . .331Cannot Receive Events from Secure Configuration Manager After Upgrading Sentinel to Version 7.3 SP1 and Later. . . . . . . . . . . . . . . . . . . . . . . . . . . . . . . . . . . . . . . . . . . . . . . . . . . . . . . . . . . . . . . . . . . . . . . . . . .331Cannot Receive Events from Sentinel UNIX Agent 7.4 After Upgrading Sentinel to Version 7.3 SP1 and Later . . . . . . . . . . . . . . . . . . . . . . . . . . . . . . . . . . . . . . . . . . . . . . . . . . . . . . . . . . . . . . . . . . . . . . . . . . . . . .332Cannot Create Reports by Using Sentinel SDK . . . . . . . . . . . . . . . . . . . . . . . . . . . . . . . . . . . . . . . . . . . . . . . .332Data Synchronization Fails While Synchronizing IPv6 Addresses in Human Readable Format. . . . . . . . . .332Mapping Conflict Warning in the Kibana Search . . . . . . . . . . . . . . . . . . . . . . . . . . . . . . . . . . . . . . . . . . . . . .332
Contents 11

12 Con
40 Configuring Sentinel for Multitenancy 33540.1 Understanding MSSP Models . . . . . . . . . . . . . . . . . . . . . . . . . . . . . . . . . . . . . . . . . . . . . . . . . . . . . . . .335
40.1.1 SOC Outsourcing Model . . . . . . . . . . . . . . . . . . . . . . . . . . . . . . . . . . . . . . . . . . . . . . . . . . . . .33540.1.2 Hybrid Model . . . . . . . . . . . . . . . . . . . . . . . . . . . . . . . . . . . . . . . . . . . . . . . . . . . . . . . . . . . . .33740.1.3 Full SaaS or Cloud Model . . . . . . . . . . . . . . . . . . . . . . . . . . . . . . . . . . . . . . . . . . . . . . . . . . . .338
40.2 Configuring Multitenancy . . . . . . . . . . . . . . . . . . . . . . . . . . . . . . . . . . . . . . . . . . . . . . . . . . . . . . . . . . .33940.2.1 Creating Tenants . . . . . . . . . . . . . . . . . . . . . . . . . . . . . . . . . . . . . . . . . . . . . . . . . . . . . . . . . . .33940.2.2 Associating Incoming Events with a Tenant . . . . . . . . . . . . . . . . . . . . . . . . . . . . . . . . . . . . .33940.2.3 Setting Up Retention Policies for Data Segregation. . . . . . . . . . . . . . . . . . . . . . . . . . . . . . .34040.2.4 Providing Data Access for Tenants. . . . . . . . . . . . . . . . . . . . . . . . . . . . . . . . . . . . . . . . . . . . .34040.2.5 Configuring Sentinel Functions . . . . . . . . . . . . . . . . . . . . . . . . . . . . . . . . . . . . . . . . . . . . . . .341
40.3 Role-Based Access Control and Multitenancy for Visualization. . . . . . . . . . . . . . . . . . . . . . . . . . . . .34340.3.1 Use Case . . . . . . . . . . . . . . . . . . . . . . . . . . . . . . . . . . . . . . . . . . . . . . . . . . . . . . . . . . . . . . . . .343
40.4 Decommissioning Tenants . . . . . . . . . . . . . . . . . . . . . . . . . . . . . . . . . . . . . . . . . . . . . . . . . . . . . . . . . .344
tents

About this Book and the Library
The Administration Guide provides the administration information and tasks required to manage a Sentinel deployment.
Intended AudienceThis guide is intended for Sentinel administrators and consultants.
Other Information in the LibraryThe library provides the following information resources:
Installation and Configuration Guide The Installation and Configuration Guide provides an introduction to Sentinel and explains how to install and configure Sentinel.
User Guide Provides conceptual information about Sentinel. This book also provides an overview of the user interfaces and step-by-step guidance for many tasks.
About this Book and the Library 13

14 About this Book and the Library

I IGetting Started
Sentinel is a Security Information and Event Management (SIEM) system that receives information from many sources throughout an enterprise, standardizes it, prioritizes it and presents it to you to make threat, risk and policy related decisions. For detailed information about Sentinel and its components, see “Understanding Sentinel” in the Sentinel Installation and Configuration Guide.
This section provides information about the following:
Chapter 1, “Understanding Sentinel Applications,” on page 17 Chapter 2, “Adding a License Key,” on page 19 Chapter 3, “Security Considerations,” on page 21
Getting Started 15

16 Getting Started

1 1Understanding Sentinel Applications
There are different tools to help you take advantage of all of the features Sentinel has to offer. For more information about these tools, see “Introduction to the Sentinel Interface” in the Sentinel User Guide.
Understanding Sentinel Applications 17

18 Understanding Sentinel Applications

2 2Adding a License Key
You can add a license key when installing Sentinel. This section provides information about adding the license key after the Sentinel installation.
If you are using the temporary license key, you must add the enterprise license key before the temporary key expires to avoid any interruption in the Sentinel functionality. For information about how to purchase the license, see the Sentinel Product Web site.
You can add a license key either by using the Sentinel Main interface or through the command line.
“Adding a License Key By Using the Sentinel Main Interface” on page 19 “Adding a License Key through the Command Line” on page 19
Adding a License Key By Using the Sentinel Main Interface1 Log in to Sentinel as a user in the administrator role:https://IP_AddressOrDNS_Sentinel_server:8443Where IP_AddressOrDNS_Sentinel_server is the IP address or DNS name of the Sentinel serverand 8443 is the default port for the Sentinel server.
2 Click the Sentinel Main icon.3 Click About > Licenses.4 In the Licenses section, click Add License. 5 Specify the license key in the Key field. After you specify the license, the following information is
displayed in the Preview section:Features: The features that are available with the license.Hostname: This field is for internal Novell use only.Serial: This field is for internal Novell use only.EPS: Event rate built into the license key. Beyond this rate, Sentinel generates warnings but will continue to collect data. Expires: Expiry date of the license. You must specify a valid license key before the expiry date to prevent an interruption in functionality.
6 Click Save.
Adding a License Key through the Command LineIf you are using the Sentinel traditional installation, you can add the license through the command line by using the softwarekey.sh script.
1 Log in to the Sentinel server as root.2 Change to the /opt/novell/sentinel/bin directory.
Adding a License Key 19

3 Enter the following command to change to the novell user:su novell
4 Specify the following command to run the softwarekey.sh script.
./softwarekey.sh5 Enter 1 to insert the license key.6 Specify the license key, then press Enter.
20 Adding a License Key

3 3Security Considerations
This section provides information on how to securely maintain your Sentinel environment.
“Basic Security Considerations” on page 21 “Securing Sentinel Data” on page 22 “Best Practices” on page 22 “Network Communication Options” on page 31 “Sensitive Data Locations” on page 35 “Implementing Intruder Detection and Lockout Mechanisms” on page 36 “Applying Updates for Security Vulnerabilities in Embedded Third-Party Products” on page 37 “Securing Communication with Elasticsearch” on page 37
Basic Security ConsiderationsSentinel has undergone security hardening before being released. This section describes some of the hardening mechanisms used in Sentinel.
“Traditional Installation” on page 21 “Appliance Installation” on page 22
Traditional Installation All unnecessary ports are turned off. Whenever possible, a service port listens only for local connections and does not allow remote
connections. Files are installed with least privileges so that the least number of users can read the files. Default passwords are not used. Reports against the database are run as a user that only has SELECT permissions on the
database. All web interfaces require HTTPS. All communication over the network uses SSL by default and is configured to require
authentication. User account passwords are encrypted by default when they are stored on the file system or in
the database.
Security Considerations 21
Appliance InstallationIn addition to the points mentioned in “Traditional Installation” on page 21, the appliance has undergone the following additional hardening:
Only the minimally required packages are installed. The firewall is enabled by default and all unnecessary ports are closed in the firewall
configuration. Sentinel is automatically configured to monitor the local operating systems syslog messages for
audit purposes.
Securing Sentinel DataBecause of the highly sensitive nature of data in Sentinel, you must keep the computer physically secure and in a secure area of the network. To collect data from event sources outside the secure network, use Collector Managers. For more information, see the Sentinel Installation and Configuration Guide.
Sentinel is compatible with disk encryption technologies. These technologies provide a higher level of data privacy when they are used on file systems where Sentinel stores its data. However, software-based encryption technologies, such as dm-crypt, have a significant CPU overhead, and they can dramatically reduce the performance of Sentinel by 50% or more. However, hardware-based encryption technologies have a much lower impact on the performance of the rest of the system and are available from leading hard drive manufacturers.
Best PracticesUse the following best practices to secure your Sentinel server:
“Changing Passwords” on page 22 “Enforcing Password Policies for Users” on page 23 “Securing Communication with Collector Managers and Event Sources” on page 24 “Securing Communication for Traditional Storage” on page 24 “Auditing Sentinel” on page 24 “Determining if Data was Tampered” on page 24 “Using CA Signed Certificates” on page 28 “Using Multi-factor Authentication” on page 31
Changing PasswordsTo increase security, you can change the passwords of the system users created during the installation of Sentinel. There are three types of users:
“Administration Users” on page 23 “Operating System Users” on page 23 “Application and Database Users” on page 23
22 Security Considerations

Administration UsersThe admin user is the administrator user for Sentinel applications. The password is set during the installation process.
Operating System UsersThe Sentinel server installation creates a novell system user and a novell group that owns the installed files within the install_directory. The user’s home directory is set to /home/novell. The novell user does not have a password and cannot log in to the operating system unless you assign a password after installation.
Application and Database UsersSentinel application users are native database users and their passwords are protected by the native database platform, unless you have configured LDAP authentication. These users have only read access to certain tables in the database so that they can execute queries against the database. Users authenticated by LDAP do not have read access on the database.
dbauser: The dbauser is created as a superuser who can manage the database and is typically the user who can log in to pgAdmin for troubleshooting purposes. The password for the dbauser is the same as the admin user password specified during installation. The password must meet PostgreSQL database password standards.
appuser: The appuser is used to connect to the database for regular operations that do not require a superuser. The password for the appuser is the same as the password for the admin user specified during installation.
To modify the password for admin, dbauser, or appuser, use the configure.sh script. For more information, see Appendix A, “Command Line Utilities,” on page 317. When you change the password by using the script, Sentinel updates the password in all relevant places without any manual intervention. However, if you try to change the password by any other method, the password does not get updated in all of the relevant files and some parts of Sentinel might stop working.
NOTE: There is also a PostgreSQL database user that owns the entire database, including system database tables. By default, the PostgreSQL database user is set to NOLOGIN, so that no one can log in as the PostgreSQL user.
Enforcing Password Policies for UsersTo achieve robust password policy enforcement in Sentinel, use Sentinel's built-in password complexity policy enforcement capability. For more information about configuring password complexity, see “Configuring Password Complexity” on page 47.
You can also use an LDAP directory to authenticate Web application users. To enable this option by using the Sentinel Main interface, see “LDAP Authentication Against a Single LDAP Server Or Domain” on page 53. This option has no effect on accounts used by back-end services, which continue to authenticate through PostgreSQL.
Security Considerations 23

Securing Communication with Collector Managers and Event SourcesYou can configure Sentinel to securely collect data from various event sources. However, secured data collection is determined by the specific protocols supported by the event source. For example, the Check Point LEA, Syslog, and Audit Connectors can be configured to encrypt their communication with event sources.
For more information about the possible security features that you can enable, see the Sentinel Plug-ins Web site.
Securing Communication for Traditional StorageFor secondary storage, you must consider the security implications before deciding the type of secondary storage location to use. If you are using CIFS or NFS servers as secondary storage locations to store the Sentinel event data and raw data, remember that these protocols do not offer data encryption. An alternative is to use direct attached storage (Primary, formerly known as local or SAN), which does not have the same security vulnerabilities. If you choose to use CIFS or NFS, it is important to configure the CIFS or NFS server to maximize the security of your data.
For more information about configuring the secondary storage location server settings, see “Configuring Secondary Storage Locations” on page 164.
Auditing SentinelSentinel generates audit events for many actions performed manually and also for actions performed internally for system activities. Sentinel tags these events with the Sentinel tag. To include these events in a report, perform a search by using the rv145:Sentinel query and select include system events. However, you must have the necessary permissions to view system events. For more information, see Chapter 4, “Configuring Roles and Users,” on page 41.
Sentinel provides reports that are preconfigured to include only the events tagged with the Sentinel tag.
A well-audited Sentinel system not only audits events occurring within Sentinel, but also the infrastructure on which Sentinel is running. You can set up data collection from the computers and the devices that make up the Sentinel infrastructure and tag them with the Sentinel tag to enable a complete auditing of the systems that can affect the behavior of Sentinel. For appliance installations, Sentinel is automatically configured to monitor the local operating system’s syslog messages for audit purposes.
Determining if Data was TamperedThere are two approaches to verify that the event was not tampered while in storage.
24 Security Considerations

Event Data ApproachThe event data approach involves proving that a particular event of interest has not been tampered with. At a high level, this involves verifying that the partition that the event is stored in has not been tampered. Since Sentinel computes integrity hashes at the partition level and not the per-event level, the integrity check must be done at the partition level.
You can verify the integrity of event data by checking if the data in the secondary storage location has been tampered. Immediately after an event data partition is copied from primary storage to secondary storage, a hash is computed on the copy of the partition in the secondary storage. You can verify the integrity of event data using the hash.
The hash is computed as follows:
1. In the event partition, the data in the following files are concatenated in the following order:a. index.sqfsb. All the files in the events.evt directory, in alphabetical order.
2. The concatenation of the files is hashed using the SHA-256 algorithm.3. The hash is base64 encoded. The base64 encoded hash value is stored in the row associated
with the event partition under the HASH column of the IXLOG_PART table. The event partition directory name is stored under the NAME column of the IXLOG_PART table.
After the event partition is copied to the secondary storage, the hash value populates in the HASH column of the IXLOG_PART table. You can determine if the integrity of the event partition has been compromised by recomputing the hash of the event partition and comparing it with the HASH value in the IXLOG_PART table.
NOTE: This approach depends on the concept that the hash is stored separately and securely from the event data. The hash is stored in the authenticated Sentinel database whereas the event data is stored on the file system (not within the database). You can further protect the hashes by taking regular backups of the Sentinel database and storing the backups in an even more secure location. You can retrieve the hashes later to check the event data integrity.
To verify whether the event data was tampered:
1 Determine the partition the event is stored in:1a Export the event of interest to a CSV file and including the RetentionPolicyID (rv171) field
in the export.1b Note down the value in the RetentionPolicyID (rv171) field. It is a unique ID of the
retention policy under which the event is stored.1c Find the exact partition by executing database queries by running the following command
as the novell user on the Sentinel server:
db.sh sql SIEM dbauser "select name, part_date, hash, state, part_id, ret_pol_id from IXLOG_PART where ret_pol_id='<retention_policy_ID>'"where <retention_policy_ID> is the value in the RetentionPolicyID (rv171) field determined in Step 1b.
Security Considerations 25

1d Determine the exact partition by comparing the value in the EventTime field of the event with the partition dates. The partition dates are in UTC. If you are viewing the EventTime in your local time, you need to convert the time to UTC to find the right partition date.
2 Find the hash stored in the database for the partition by running the following command:
db.sh sql SIEM dbauser "select name, hash, state from IXLOG_PART where name='<partition_name>'"where <partition_name> is the name of the partitionThe hash value is in base64 format. You need to convert the hash value to hexadecimal to compare it with the value returned by sha256sum.
3 Convert the hash value found into hexadecimal.
echo "<hash>" | base64 -d - | hexdump -e '/1 "%02x" 'For example,
echo "lUrp+hejhDbyb59ZRpoQ88vpA8eiZfI2ySVCibMoDXo=" | base64 -d - |hexdump -e '/1 "%02x" '
4 Calculate the hash of an event partition by executing the following command in the partition directory.
cat index.sqfs events.evt/* | sha256sum5 Compare the hash values calculated in Step 2 and Step 3. If they match, the event partition has
not been tampered with. If they do not match, the integrity of the file has been compromised.
Raw Data ApproachThe raw data approach involves finding the raw data associated with the normalized event and proving the raw data has not been tampered.
Sentinel stores the raw data files in one of the following locations:
Primary storage location: <Sentinel data directory>/rawdata/online Secondary storage location: <Sentinel secondary storage directory>/rawdata_archive
If your secondary storage is NFS or CIFS, the NFS/CIFS share is automatically mounted to the /var/opt/novell/sentinel/data/archive_remote directory on the Sentinel server. If the secondary storage is SAN, the NFS/CIFS share is mounted to the configured directory.
Each raw data file is a .gz compressed file.
To identify the raw data associated with the normalized event:
1 Perform the steps described in section, Event Data Approach. These steps are important because the data in the event is required to find the associated raw data record.
2 In the event, find the value in the following fields: RawDataRecordId: The ID of the raw data record that was normalized to create the event
is stored in this field. For example, B926DF62-462C-1031-8FE2-000C29E90B7D.
26 Security Considerations
EventSourceID: The ID of the event source the data came from. For example, 9DA14E20-4595-1031-BE22-000C29E90B7D. In some cases, the display name is shown for the EventSourceID, such as: sles11sp2:Syslog:Map Output (universal).
SentinelProcessTime: the time when Sentinel processed the data. This information is useful as an approximation of which raw data log file the data is stored in.
3 In the Sentinel Main interface, click Storage > Download Raw Data. 4 Identify the event source in the list that exactly matches the EventSourceID.5 Using the SentinelProcessTime, find the raw data files that have a date that is approximately
around this time.6 Download the raw data files that might have the raw data record.7 Open the file and search for the RawDataRecordId.8 After identifying the right raw data file, verify the integrity of the file by clicking Verify Integrity.
To determine if the deleted raw data files were tampered:
Verify the sequence number of JSON records. All JSON records have the same ChainID with a monotonically increasing ChainSequence number starting with zero. There are no gaps or missing numbers in the ChainID sequence. If a new ChainID is present, its ChainSequence begins with zero.If there are gaps in the sequence of numbers, the records were either tampered or were manually deleted.
Verify the RawDataHash against the RawData. To do this, convert the RawData value to a sequence of bytes in UTF-8 format. Calculate a 256 SHA digest against those bytes. Convert the digest to a HEX string, and compare the string with the value in RawDataHash. If they are not identical, either the RawData or the RawDataHash file was tampered.
If, for example, you want to compute the hash of a file on the file system on Linux, specify a command similar to the following:
sha256sum F6673C60-573A-102D-ADE0-003048306A7C/2010-06/15-1600.gzFor example, if you want to query the database for the hash of a file, you can specify a command similar to the following:
db.sh sql SIEM dbauser "select FILE_HASH from RAW_DATA_FILES_INFO where FILE_NAME='/F6673C60-573A-102D-ADE0-003048306A7C/2010-06/15-1600.gz';"However, there is a possibility that a person tampered the files in such a way that the tampering cannot be detected, because the person also recomputed the sequence number or the RawDataHash. To determine if the raw data files were tampered, you can also use the hash key values of each raw data file stored in the database. The Sentinel server calculates a hash key value for every raw data file and stores it in the RAW_DATA_FILES_INFO in the database.
The table has the following columns:
FILE_NAME: This column contains the relative file name in the following format:
<Event Source UUID>/<Date>/<RawDataFile>
STATE: This column indicates if the raw data file is in the primary storage location or the secondary storage location. If the value is ARCHIVED, the raw data file is in the secondary storage location. If the value is ONLINE or COMPRESSED, the raw data file is in the primary storage location. If the value is DELETED, it indicates that the file is deleted from the disk and was not present either in primary or in secondary storage location.
Security Considerations 27

FILE_HASH: The hash value is computed when the files are closed for writing. Therefore, only files in the COMPRESSED or ARCHIVED state have a hash value.The FILE_HASH column contains a SHA256 hash key value computed over the contents of the file. The file is treated as a stream of binary bytes to compute the hash. The hash is stored as a HEX string (lowercase).
To determine if a file is tampered, compute the SHA-256 hash, convert it to a HEX string (lowercase), then compare this computed value with the hash value stored in the RAW_DATA_FILES_INFO. If the values are different, it indicates that either the file or the database has been tampered.
To determine if the files were deleted in an unauthorized way, you can scan the records in the RAW_DATA_FILES_INFO and look for files whose STATE value is ARCHIVED, ONLINE, or COMPRESSED. You can ignore those marked DELETED. If the STATE value is ARCHIVED, the raw data file should be in the secondary storage location. If the STATE value is ONLINE or COMPRESSED, the raw data file should be in the primary storage location or the secondary storage location.
Using CA Signed CertificatesSentinel uses several digital, public-key certificates as part of establishing secure TLS/SSL communications. During the initial configuration of Sentinel, these certificates are self-signed. In some circumstances, it might be necessary to obtain certificates digitally signed by a certificate authority (CA).
You can replace the self-signed certificate with a certificate signed by a well-known CA, such as VeriSign, Thawte, or Entrust. You can also replace the self-signed certificate with a certificate digitally signed by a less common CA, such as a CA within your company or organization.
NOTE: There are many well-known CAs and identifying which CAs are most commonly used varies with country.
This section provides information about various certificates used in Sentinel, instructions about configuring the TLS/SSL certificates to get them digitally signed by a CA, and then importing the digitally signed certificates into Sentinel:
“Types of Certificates” on page 28 “Configuring the TLS/SSL Certificates” on page 29 “Using a Signed Certificate on Distributed Components” on page 31
Types of Certificates “Web Server Certificate” on page 28 “Java Messaging Service Certificates” on page 29 “SSL Proxy Server Certificate” on page 29
Web Server CertificateThe web server certificate is used for the following purposes:
With web browsers to connect to the Sentinel Main interface. Establish trust relationships for the REST API calls between Sentinel instances. For example, it is
used when configuring Data Federation.
28 Security Considerations

If the web server certificate is not signed by a well-known CA and you connect to the Sentinel Main interface, Sentinel displays the Connection is Untrusted message.
Java Messaging Service CertificatesThe Java Messaging Service (JMS) certificates include the following:
Broker Certificate Client Certificate
The JMS certificates are used to establish secure communications between various components of Sentinel, including the Sentinel server and remote Collector Managers.
SSL Proxy Server CertificateThe Client Proxy Server certificate is used to establish secure communication between the Sentinel server and client applications, such as the Sentinel Control Center or the Solution Designer. This certificate is not used with the Sentinel Main interface.
Configuring the TLS/SSL CertificatesConfiguring the TLS/SSL certificates involves the following steps:
“Generating a Certificate Signing Request” on page 29 “Getting the CSR Signed by the CA” on page 29 “Importing the Digitally Signed Certificates into Sentinel” on page 30
Generating a Certificate Signing RequestTo obtain a digitally signed certificate, you must first generate a certificate signing request (CSR), which is presented to the CA. To generate one or more CSRs, perform the following steps on the Sentinel server:
1 Log in to the Sentinel server as the novell user.2 Create a certificate pair by using the following command:
/opt/novell/sentinel/jdk/jre/bin/keytool -genkey -alias webserver -validity <days> -storetype JKS -keyalg RSA -keysize 2048 -storepass password -keypass password -keystore .webserverkeystore.jks -dname "CN=<certificate_common_name>,OU=<organization_unit>, O=<organization>, L=<city or town>, ST=<state>, C=<country>" -ext san=dns:<domain_name> && /opt/novell/sentinel/jdk/jre/bin/keytool -certreq -alias webserver -file .webserverkeystore.csr -keystore .webserverkeystore.jks -storepass password -ext san=dns:<domain_name>The above command generates a CSR using the PKCS#10 format.
The certificate signing requests are now saved in the specified file.
Getting the CSR Signed by the CA1 Submit the CSRs to the CA for signature.2 Obtain the signed certificate files from the CA.
Security Considerations 29

The details of how this is done depend on the CA. For more information, consult your CA.
Importing the Digitally Signed Certificates into SentinelCopy the files that contains the digital certificates signed by the CA to the Sentinel server. If the files are signed by an enterprise or organizational CA rather than a well-known CA, you must copy the CA's self-signed root certificate to the Sentinel server.
You must import the intermediate, root, and signed certificates. You can specify the desired alias names for the intermediate and root certificates. However, the signed certificate must be imported with the same alias that was used while creating a certificate pair, which is webserver.
The default keystore password is password. If you have changed the keystore password, specify the changed password.
To import the certificate files to the Sentinel server:
1 Log in to the Sentinel server as the novell user.2 Back up the default self-signed certificate:
cp /etc/opt/novell/sentinel/config/.webserverkeystore.jks /etc/opt/novell/sentinel/config/.webserverkeystore.jks_bkp
3 Copy the CA signed certificate to the Sentinel server:
cp <CA_signed_certificate> /etc/opt/novell/sentinel/config/.webserverkeystore.jks
4 Import the intermediate certificate:
/opt/novell/sentinel/jdk/jre/bin/keytool -importcert -alias <alias_name> -file /opt/cert/intermediate.pem -keystore /etc/opt/novell/sentinel/config/.webserverkeystore.jks -storepass <keystore_password>
5 Import the root certificate:
/opt/novell/sentinel/jdk/jre/bin/keytool -importcert -alias <alias_name> -file /opt/cert/root.pem -keystore /etc/opt/novell/sentinel/config/.webserverkeystore.jks -storepass <keystore_password>
6 Import the signed certificate:
/opt/novell/sentinel/jdk/jre/bin/keytool -importcert -alias webserver -file /opt/cert/signedcert.pem -keystore /etc/opt/novell/sentinel/config/.webserverkeystore.jks -storepass <keystore_password>
7 (Optional) Verify whether all the certificates are imported successfully:
/opt/novell/sentinel/jdk/jre/bin/keytool -list -keystore /etc/opt/novell/sentinel/config/.webserverkeystore.jks
8 Restart Sentinel:rcsentinel restart
30 Security Considerations

Using a Signed Certificate on Distributed ComponentsYou can use the same signed certificate you have used on Sentinel on the distributed components such as Collector Manager and Correlation Engine. To do this, synchronize Sentinel certificate with the distributed components.
To synchronize the signed certificate with the distributed components after you have successfully configured it for Sentinel using the steps provided in “Configuring the TLS/SSL Certificates” on page 29, run the configure.sh script on each distributed component.
1 Log in to the distributed component computer to which you want to synchronize the signed certificate as the novell user.
2 Go to the /opt/novell/sentinel/setup directory.3 Run the following command:configure.shFor more information about the configure.sh script, see the description in Table A-2 on page 319.
This ensures that the distributed components use the same signed certificate that Sentinel uses, and avoids any conflict.
Using Multi-factor AuthenticationBy default, Sentinel uses single-factor authentication, which matches a password to a user name in the database. Sentinel also supports multi-factor authentication, which is a more advanced method of authentication that uses a combination of at least two factors. For example, a combination of a password and a token or a smart card and a fingerprint. For more information, see “Multi-factor Authentication” on page 78.
For more information about the various authentication methods Sentinel supports, see Chapter 5, “Authentication Methods,” on page 51.
Network Communication OptionsVarious components of Sentinel communicate across the network, and there are different types of communication protocols used throughout the system. All of these communication mechanisms affect the security of your system.
“Communication between Sentinel, Collector Manager, and Correlation Engine” on page 32 “Communication between Sentinel and the Sentinel Control Center and Solution Designer
Client Applications” on page 33 “Enabling Higher Versions of TLS for Communication” on page 33 “Communication between the Server and the Database” on page 33 “Communication with Web Browsers” on page 34 “Communication between Sentinel and Elasticsearch” on page 34 “Communication between the Database and Other Clients” on page 34
Security Considerations 31

Communication between Sentinel, Collector Manager, and Correlation EngineThe communication between Sentinel server, Correlation Engine, and Collector Manager is by default over SSL through ActiveMQ. The processes use the following configuration information in the ${esecurity.config.home}/config/configuration.xml:
<jms brokerURL="failover://(ssl://${activemq.ip.server}:${activemq.port.userapps}?wireFormat.maxInactivityDuration=30000)?randomize=false" interceptors="compression" keystore="${esecurity.config.home}/config/.activemqclientkeystore.jks" keystorePassword="${sentinel.keystore.password}" password-file="${esecurity.config.home}/config/activemqusers.properties" username="${activemq.client.username}"/>The jms strategy shown in this XML snippet defines how the Sentinel process connects to the server. This snippet defines the client-side settings of the connection.
Table 3-1 XML Entries in the configuration.xml File
XML Entry Description
ssl:// Indicates that SSL is used for secure connection. You should not modify this value.
${activemq.ip.server} The hostname or IP address where the Java message service (JMS) server is running.
${activemq.port.userapps}
The port that the JMS server is listening on. The default value is 61616.
?wireFormat.maxInactivityDuration=30000)?randomize=false"
This is where ActiveMQ configuration parameters are passed to the transport mechanism. These entries should be modified only if you are an ActiveMQ expert.
interceptors="compression"
Enables compression over the connection. You should not modify this value.
keystore="${esecurity.config.home}/config/.activemqclientkeystore.jks"
The path to the Java keystore that is used to check if the server is trusted.
keystorePassword="${sentinel.keystore.password}"
The password to the Java keystore file.
password-file="${esecurity.config.home}/config/activemqusers.properties"
The location of the file containing the password to present to ActiveMQ for authenticating the connection.
username="${activemq.client.username}"
The user name to present to ActiveMQ for authenticating the connection. This corresponds to a ActiveMQ user name in the password-file.
32 Security Considerations

The server-side settings are defined in the /etc/opt/novell/sentinel/config/activemq.xml file. For instructions about how to edit the activemq.xml file, see the ActiveMQ Web site (http://activemq.apache.org/). However, modifying of the server-side settings is not supported.
Communication between Sentinel and the Sentinel Control Center and Solution Designer Client ApplicationsThe Sentinel Control Center and Solution Designer client applications use SSL communication through the SSL proxy server by default.
The client applications use SSL by reading the following information in /etc/opt/novell/sentinel/config/configuration.xml:
<strategy active="yes" id="proxied_client" location="com.esecurity.common.communication.strategy.proxystrategy.ProxiedClientStrategyFactory"> <transport type="ssl"> <ssl host="10.0.0.1" port="10013" keystore="./novell/sentinel/.proxyClientKeystore" /> </transport> </strategy>
Enabling Higher Versions of TLS for CommunicationSome Sentinel components allow TLSv1.0 for communication. To improve the security posture and to prevent known vulnerabilities, you can disable TLSv1.0.
Perform the following steps on Sentinel server, Collector Manager, and Correlation Engine:
1 Log in as the novell user.2 Edit the /opt/novell/sentinel/jdk/jre/lib/security/java.security file. 3 Add TLSv1 to the list of disabled algorithms as follows:
jdk.tls.disabledAlgorithms=SSLv3, TLSv1, RC4, MD5withRSA, DH keySize < 768
4 Restart the Sentinel services.
IMPORTANT: If you are using Agent Manager for host-based data collection, you must use Agent Manager 8.2 and later and enable a higher version of TLS on the Agent Manager server. For steps to enable a higher version of TLS on the Agent Manager server, see Enabling Sentinel Agent Manager to Communicate using TLS 1.2.
Communication between the Server and the Database The protocol used for communication between the server and the database is defined by a JDBC driver.
Sentinel uses the PostgreSQL driver to connect to the PostgreSQL database, which is a Java Type IV implementation. This driver supports encryption for data communication.
Security Considerations 33

NOTE: Turning on encryption has a negative impact on the performance of the system. Therefore, this security concern needs to be weighed against your performance needs. The database communication is not encrypted by default for this reason. Lack of encryption is not a major concern because communication with the database occurs over the localhost network interface.
Communication with Web BrowsersThe web server is by default configured to communicate via HTTPS. For more information, see the Jetty documentation (http://wiki.eclipse.org/Jetty/Howto/Configure_SSL).
Communication between Sentinel and ElasticsearchElasticsearch cluster nodes can be accessed by various clients. Sentinel provides a security plug-in that authenticates and authorizes access to Elasticsearch. The plug-in uses either a SAML token or a whitelist for validation depending on how the clients connect. For more information about securing Elasticsearch using this plug-in, see Configuring Elasticsearch for Event Visualization in the Sentinel Installation and Configuration Guide.
Communication between the Database and Other ClientsYou can configure the PostgreSQL SIEM database to allow connections from any client computer that uses pgAdmin or another third-party application.
The PostgreSQL database is compiled with the --with-openssl flag. You can configure it to use encrypted communication, although that is not the default setting. Typically all database communication in Sentinel is performed locally and not over the network.
To allow pgAdmin to connect from any client computer, add the following line in the /var/opt/novell/sentinel/3rdparty/postgresql/data/pg_hba.conf file:
host all all 0.0.0.0/0 md5If you want to limit the client connections that are allowed to run and connect to the database through pgAdmin, specify the IP address of the host in the above line. The following line in the pg_hba.conf file is an indicator to PostgreSQL to accept connections from the local computer so that pgAdmin is allowed to run only on the server.
host all all 127.0.0.1/32 md5To allow connections from other client computers, you can add additional host entries in the pg_hba.conf file.
To provide maximum security, by default, PostgreSQL only allows connections from the local computer.
34 Security Considerations

Sensitive Data LocationsFor certain components, passwords must be stored so that they are available to the components when the system needs to connect to a resource such as a database or an event source. In this case, the password is first encrypted to avoid unauthorized access to the clear-text password.
Even if the password is encrypted, you must ensure that the access to the stored password data is protected to avoid password exposure. For example, you can set permissions to ensure that files with sensitive data are not readable by other users.
Database credentials are stored in the /etc/opt/novell/sentinel/config/obj-component.ConnectionManager.properties file.
username=appuserdatabase=SIEMpassword=<password>The following database tables store passwords (/certificate) in encrypted format. You must limit access to these tables.
EVT_SRC: column: evt_src_config column data evt_src_collector: column: evt_src_collector_props evt_src_grp: column: evt_src_default_config md_config: column: data integrator_config: column: integrator_properties md_view_config: column: view_data esec_content: column: content_context, content_hash esec_content_grp_content: column: content_hash sentinel_plugin: column: content_pkg, file_hash
Sentinel stores both configuration data and event data in the following locations:
Table 3-2 Locations for Configuration Data and Event Data
Components Location for Configuration Data Location for Event Data
Sentinel server The database tables and file system at /etc/opt/novell/sentinel/config.
This configuration information includes the encrypted database, event source, integrators, and passwords.
The database (for example, CORRELATED_EVENTS and EVT_RPT_* tables) and the file system at /var/opt/novell/sentinel/data/eventdata, /var/opt/novell/sentinel/data/rawdata, /var/opt/novell/sentinel/data/server.cache, /var/opt/novell/sentinel/data/map_data, and /var/opt/novell/sentinel/3rdparty/postgresql.
Security Considerations 35

Implementing Intruder Detection and Lockout Mechanisms
Sentinel supports intruder detection and lockout to prevent potential brute-force attacks. Sentinel provides several configurable parameters that help you implement intruder detection and lockout mechanisms.
failedAuthDelay: Specifies the duration in milliseconds that a subsequent authentication request must wait after a failed authentication for a specific user. The default value is 2000 (2 seconds). If the value is 0, the delay is disabled. This wait period is calculated for each user. If an authentication request for User A fails, it does not cause a delay for an authentication request for User B.
intruderDetectInterval: Specifies the time period in milliseconds in which consecutive failed authentication requests for a user must occur for Sentinel to identify the failures as a possible intruder detection. For example, if the value is 300000 (5 minutes) and four failed authentication requests happen within 4 minutes, but the 5th consecutive request happens 5:01 (minutes:seconds) later than the 1st failed request, Sentinel does not consider the requests suspicious. If the value is 360000 (6 minutes) and the same sequence of failed requests happen, Sentinel considers the requests to be suspicious. The default value for this parameter is 300000 (5 minutes).
intruderDetectMaxFailedAttempts: Specifies the number of consecutive, failed authentication requests that must occur for Sentinel to consider a user name during the intruderDetectInterval for the requests as suspicious. If the value is 0 then intruder detection and lockout is disabled. The default value for this parameter is 5.
intruderDetectLockPeriod: Specifies the duration that a Sentinel user account remains locked when the user account is automatically locked in response to a suspicious series of failed authentication requests. If the value is 0, automatically locked accounts are not automatically unlocked. They must be unlocked manually by an administrator. The default value for this parameter is 900000 (15 minutes).
intruderDetectAdminAutoLock: Specifies whether or not the Sentinel admin account is subject to automatic locking in response to a series of failed authentication requests. The default is false since a denial-of-service attack exists in which an attacker can continually lock the built-in admin account, unless there is a separate administrator account.
The values listed above are defined in the AuthenticationService component of the /etc/opt/novell/sentinel/config/server.xml file. To customize the AuthenticationService component, see “Maintaining Custom Settings in XML Files” on page 308.
Collector Manager The file system at /etc/opt/novell/sentinel/config. The most sensitive configuration information is the client key pair used to connect to the message bus.
Event data might be cached on the file system during error conditions such as the message bus being down or event overflow. This event data is stored in the /var/opt/novell/sentinel/data/collector_mgr.cache directory.
Components Location for Configuration Data Location for Event Data
36 Security Considerations

Applying Updates for Security Vulnerabilities in Embedded Third-Party Products
Sentinel contains embedded third-party products such as JRE, Jetty, PostgreSQL, and ActiveMQ. Sentinel includes patches to address the security vulnerabilities (CVE) for these products when updates for Sentinel are released.
However, each of these products has its own release cycle, which means that there might be CVEs that are discovered before a Sentinel update is released. You need to separately review the CVEs for each embedded third-party product, and decide whether to apply these updates to your Sentinel system outside of the Sentinel updates.
If you decide to apply patches to address these CVEs outside of a Sentinel update, contact Technical Support.
Securing Communication with ElasticsearchFrom the 8.4.0.0 version of Sentinel, the in-built Elasticsearch is bundled with an X-Pack security plug-in, out of the box. X-Pack plugin is an Elastic Stack extension that provides security and other capabilities. With this change, Sentinel now only communicates with Elasticsearch (which is used to store alerts and event data) over SSL. Also, all the Elasticsearch node-to-node cluster communications too are now mandated over SSL, thereby making the data transfer across Elasticsearch nodes more secure. This enhanced security setting is now mandated from Sentinel 8.4.0.0 onwards and the users are expected to complete few manual steps like certificate configuration, as part of their install/upgrade process.
For more information about securing communication with Elasticsearch, see the Configuring Elasticsearch for Event Visualization section.
Security Considerations 37

38 Security Considerations

II IIConfiguring Roles and Users
This section provides information about configuring roles and users that can use Sentinel.
Chapter 4, “Configuring Roles and Users,” on page 41 Chapter 5, “Authentication Methods,” on page 51
Configuring Roles and Users 39

40 Configuring Roles and Users
4 4Configuring Roles and Users
In Sentinel, you can add, edit, and delete roles. You can also grant different permissions at the role level, and edit the details of user and role profiles.
“Overview” on page 41 “Creating Roles” on page 43 “Configuring Password Complexity” on page 47 “Creating Users” on page 48
OverviewYou can create different user roles and assign them different permissions. Role assignment helps you control users access to functionality, data access based on fields in the incoming events, or both. Each role can contain any number of users. Users belonging to the same role inherit the permissions of the role they belong to. You can set multiple permissions for a role.
Sentinel has the following roles by default:
Administrator: A user in this role has administrative rights in the Sentinel system. You cannot delete users in this role. Administrative rights include the ability to perform user administration, data collection, data storage, search operations, rules, report, dashboard, and license management.
You cannot modify or delete the administrator role.
Database Administrator: A user in this role has access to events coming from database event sources. The Collector parsing the data from the event source determines the type of the event source (database). A user in this role can view data that matches filter rv32:"DB" and search data targets.
Data Proxy User: This is a system role for proxy users. This role is critical to setting up another Sentinel system to access your local Sentinel system using the Data Federation feature.
Incident Administrator: A user in this role can manage incidents in the system and control incidents being handled by other users.
Network Administrator: A user in this role can administer network infrastructure devices, such as routers, switches, and VPNs. This role has access to events coming from devices in the category NETD or VPN (as determined by the Collector parsing the data) or from event sources with the Network tag. Set the Network tag on network infrastructure event sources to allow users in this role to view the events. A user in this role can view data that matches filter rv32:"NETD" OR rv32:"VPN" OR rv145:"Network", and can search data targets.
Network Security Administrator: A user in this role can administer network security infrastructure devices, such as firewalls, Ides, and Web proxies. This role has access to events coming from devices in the category AV, FW, or IDS (as determined by the Collector parsing the data) or from event sources with the NetworkSecurity tag. Set the NetworkSecurity tag on network infrastructure
Configuring Roles and Users 41

event sources to allow users in this role to view the events. A user in this role can view data that matches filter rv32:"AV" OR rv32:"FW" OR rv32:"IDS" OR rv145:"NetworkSecurity", and can search data targets.
Operator A user in this role can manage alerts, view Security Intelligence Dashboards, share alert and event views, run reports, view and rename reports, and delete report results. The Threat Response dashboard allows Operators to triage alerts quickly and efficiently.
PCI Compliance Auditor: A user in this role has access to view events that are tagged with at least one of the regulation tags such as PCI, SOX, HIPAA, NERC, FISMA, GLBA, NISPOM, JSOX, and ISO/IEC_27002:2005, and can view system events, view the Sentinel configuration data, and search data targets.
Report Administrator: A user in this role can run reports, view, rename and delete report results, add and delete report templates and report results, run reports on configuration database, export all reports, and save search results as a report. A Report Administrator can also tag report templates and report results. The Report Administrator can search report templates and report results based on these tags.
Security Policy Administrator: A user in this role can implement the security policies within the system for users to access anomaly detection, correlation, incident remediation, and iTRAC workflows.
System Event Monitor: A user in this role can monitor the Sentinel system for errors or outages. This role has access only to events coming from Sentinel systems. A user in this role can also access data coming from event sources that Sentinel is dependent on. For example, you can tag operating systems on which Sentinel and the Collector Managers are running with a Sentinel event source tag so that the users in this role can monitor problems in the operating systems. A user in this role can view data that matches filter rv145:"Sentinel", view system events, and search data targets.
Unix Administrator: A user in this role has access to events from operating system event sources that are not Windows computers.The type of the event source is determined by verifying the Collector parsing data and also by verifying if a Windows tag is present. A user in this role can view data that matches filter (rv32:"OS" NOT (("Microsoft?Active?Directory*" NOT msg:"Microsoft?Active?Directory*") OR ("Microsoft?Windows*" NOT msg:"Microsoft?Windows*"))) NOT rv145:"Windows" and search data targets.
User: A user in this role can manage dashboards, run reports, view and rename reports, and delete report results.
Windows Administrator: A user in this role can administer Windows computers. This role has access to data generated by Windows event sources. The type of the event source is determined by verifying the Collector parsing the data. If data from a Windows event source is not being processed by the Active Directory or the Windows Collector, add the Windows tag to event sources to indicate that Windows data is being collected from the event source. This enables the Windows administrator to access the data. A user in this role can view data that matches filter (rv32:"OS" AND (("Microsoft?Active?Directory*" NOT msg:"Microsoft?Active?Directory*") OR ("Microsoft?Windows*" NOT msg:"Microsoft?Windows*"))) OR rv145:"Windows" and search data targets.
42 Configuring Roles and Users

Creating RolesRoles allow you define what a user can manage and what data they can view. Permissions are granted to the role, and then the user is assigned to the role.
Creating a Role1 From Sentinel Main, click Users.2 Select a tenant from the Tenant drop-down list to assign a tenant to the role.
Users created under this role will have access to view events from the selected tenant.3 Click Create in the Roles section to create a new role.4 Use the following information to create the role:
Role name: Specify a unique name for the role. A role name should not exceed 40 characters. Description: Specify a description of the role. Users with this role can: Select the permissions that a role grants to users assigned to the role. View all event data: Select this option to allow users to view all the data in the Sentinel
system. If you select this option, you must select one or more of the following permissions: Manage Correlation Engine/Rules: Allows users to manage Correlation rules and all
data associated with these rules. The Correlation feature is displayed in the Sentinel Main interface only if this permission is selected.
Manage and View Security Intelligence Dashboards: Allows user to view, create, and manage the Security Intelligence dashboards and the data displayed in the dashboards. The Security Intelligence option is displayed in the Sentinel Main interface only if this permission is selected.
View Security Intelligence Dashboards: Allows user to view the Security Intelligence dashboards and the data displayed in the dashboards. The Security Intelligence option is displayed in the Sentinel Main interface only if this permission is selected.
View the following data: Select this option to allow users to view only selected data in the Sentinel system. Only events matching the filter: Allows users to view only the events returned by the
specified search query. For example, if you set the filter value to sev:5, users with this permission can view only events of severity five in a search.For more information about using filters, see “Configuring Filters” in the Sentinel User Guide.Select one or more of the following permissions to use when viewing the filtered data:
Search Data Targets: When this permission is set on a role, all members of that role can perform searches on Sentinel systems that are in a distributed location. For more information on distributed searching and reporting, see Chapter 21, “Configuring Data Federation,” on page 231.
View asset data: Allows users to view asset data. View asset vulnerability data: Allows users to view vulnerability data. View data in the embedded database: Allows users to view the data in the
embedded database.
Configuring Roles and Users 43

View people browser: Allows users to view the data in the Identity Browser. View system events: Allows users to view the Sentinel system events.
Allow users to access reports: Select this option to allow users to access and manage reports. Manage reports: Allows users to create, modify, run, and delete reports. Import reports: Allows users to import reports. Run reports: Allows users to only run reports.
Allow users to manage alerts: Select this option to allow users to view and manage alerts. Select either of the following options: Manage all alerts: Allows users to view and edit all the alerts and configure alert
creation. Manage only alerts that match the following criteria: Allows users to view and edit
the alerts that match the specified criteria. This permission also allows users to configure alert creation.
Create and use Alert Views: Allows non-administrator users to create private alert views and view shared alert views. For more information, see “Creating an Alert View” in the Sentinel User Guide. After you select this permission, you can assign the following permissions: Share Alert Views: Allows users to share their alert views as follows:
Non-administrator users of the default tenant can share their alert views with other users.
Users of a non-default tenant can share their alert views with other users of the same tenant.
Edit Alert Views: Assigns the Share Alert Views permission and allows users to edit shared alert views as follows: Non-administrator users of the default tenant can edit shared alert views. Users of a non-default tenant can edit shared alert views except public alert
views. Create and use Event Views: Allows non-administrator users to create private event views
and view shared event views. For more information, see “Viewing Events ” in the Sentinel User Guide. After you select this permission, you can assign the following permissions: Share event views: Allows users to share their event views as follows:
Non-administrator users of the default tenant can share their event views with other users.
Users of a non-default tenant can share their event views with other users of the same tenant.
Edit Event Views: Assigns the Share Event Views permission and allows users to edit shared event views as follows: Non-administrator users of the default tenant can edit shared event views. Users of a non-default tenant can edit shared event views except public event
views.
44 Configuring Roles and Users

Visualization: Visualization allows users in the role to view/hide/edit various options in the visual analytics page: Discover: Discover option enables users to search and explore their data in the
Sentinel.Select one of the followings permissions that enable users to manage Discover: View: Enables users to view the visual analytics Discover options. Hide: Enables users to hide the visual analytics Discover options. Edit: Enables users to edit the visual analytics Discover options.
Dashboard: A Dashboard is a collection of panels that helps user to analyze their data by adding a variety of panels such as visualizations, maps, markdown, and more.Select one of the followings permissions that enable users to manage Dashboard: View: Enables users to view the visual analytics Dashboard. Hide: Enables users to hide the visual analytics Dashboard. Edit: Enables users to edit the visual analytics Dashboard.
Management: Management is the option to manage all things including index patterns, advanced settings and more.Select one of the followings permissions that enable users to manage Management: View: Enables users to view the visual analytics Management options. Hide: Enables users to hide the visual analytics Management options. Edit: Enables users to edit the visual analytics Management options.
DevTools: DevTools contains tools that helps user to interact with their data by executing the commands.Select one of the followings permissions that enable users to manage DevTools: View: Enables users to view the visual analytics DevTools options. Hide: Enables users to hide the visual analytics DevTools options.
Incidents: Select one of the followings permissions that enable users to manage incidents: View incidents assigned to user: Allows a user to view any incident that is assigned to
them. View or create incidents an add events to incidents: Allows users to create incidents
and add events to the incidents. Create, modify and execute actions on assigned incidents: Allows users to create,
modify, and execute actions on incidents that are assigned to them. Manage all aspects of incidents: create, modify and delete: Allows users to manage
all incidents. Sharing: Allows users in the role to share filters, and reports with other users.
This permission is not available for tenants. Edit Home Dashboard: Assigns the Share Home dashboard permission and allows users to
edit shared dashboards as follows: Non-administrator users of the default tenant can edit shared dashboards. Users of a non-default tenant can edit shared dashboards except public dashboards.
Configuring Roles and Users 45

Share Home Dashboard: Allows users to share their dashboards as follows: Non-administrator users of the default tenant can share their dashboards with other
users. Users of a non-default tenant can share their dashboards with other users of the same
tenant. Miscellaneous: Assign miscellaneous permissions as necessary:
Edit knowledge base: Allows users to view and edit the knowledge base in the Alert Details page.
Manage Tags: When this permission is set on a role, all members of this role can create, delete, and modify tags, and associate tags to different event sources. For more information about tags, see “Configuring Tags” in the Sentinel User Guide.
Manage roles and users: Allows non-administrator users to administer specific roles and users. For example, in a multitenancy environment, the MSSP administrator can delegate the responsibility of administering a tenant's roles and users to the tenant, thus reducing the load on the MSSP administrator.
Proxy for Authorized Data Requestors: When this permission is set on a role, the members of this role can accept searches from remote data sources. For more information, see Chapter 21, “Configuring Data Federation,” on page 231.
Send events and attachments: Allows users to send events and attachments from Change Guardian and Secure Configuration Manager to Sentinel.
Share search filters: When this permission is set on a role, all members of this role can share search filters that they have created. For more information about sharing filters, see “Configuring Filters” in the Sentinel User Guide.
Solution Designer access: When this permission is set on a role, all members of this role can access Solution Designer. For more information, see “Solution Designer” on page 270.
View and execute event actions: When this permission is set on a role, all members of this role can view events and execute actions on the selected events. For more information, see “Manually Performing Actions on Events” in the Sentinel User Guide.
View detailed internal system state data: When this permission is set on a role, all members of this role can view detailed internal system state data by using a JMX client.
View knowledge base: Allows users to view the knowledge base in the Alert Details page.
5 Click Save.
To create users for this role, see “Creating Users” on page 48.
46 Configuring Roles and Users

Configuring Password ComplexityA complex password improves security by preventing password guessing attacks. Sentinel provides a set of password validation rules that help you maintain a complex password for all local user passwords. You can select the desired validation rules as applicable for your environment.
You can configure the password validation rules in the /etc/opt/novell/sentinel/config/passwordrules.properties file. The validation rules apply only to the local user passwords and not LDAP user passwords. For existing users, validation rules apply only after the users update their password.
By default, all the validation rules are disabled and commented with #. To enable validation rules, uncomment the rules, specify the values for the rules, and save the file.
The following table describes the password complexity validation rules:
Table 4-1 Password Complexity Rules
Validation Rule Description
MINIMUM_PASSWORD_LENGTH Specifies the minimum number of characters required in a password.
MAXIMUM_PASSWORD_LENGTH Specifies the maximum number of characters allowed in a password.
UNIQUE_CHARACTER_LENGTH Specifies the minimum number of unique characters required in a password.
For example, if the UNIQUE_CHARACTER_LENGTH value is 6 and a user specifies the password as "aaaabbccc", the Sentinel does not validate the password because it contains only 3 unique characters a, b, and c.
LOWER_CASE_CHARACTERS_COUNT Specifies the minimum number of lowercase characters required in a password.
UPPER_CASE_CHARACTERS_COUNT Specifies the minimum number of uppercase characters required in a password.
ALPHABET_CHARACTERS_COUNT Specifies the minimum number of alphabetic characters required in a password.
NUMERIC_CHARACTERS_COUNT Specifies the minimum number of numeric characters required in a password.
NON_ALPHA_NUMERIC_CHARACTERS_COUNT
Specifies the minimum number of non-alphanumeric or special characters required in a password. The rule considers only the following non-alphanumeric characters:
` ~ ! @ # $ % ^ & * ( ) - _ = + [ { ] } \ | ; : ' " < , > . / ?
Configuring Roles and Users 47

Creating UsersAdding a user in the Sentinel system creates an application user who can then log in to Sentinel. You also assign roles when you create the user.
1 From Sentinel Main, click Users.2 Click Create in the Users section.3 Specify the name and email address of the user.
The fields with an asterisk (*) are mandatory, and the user name must be unique. A user name cannot exceed 30 characters, and you can use extended characters when you create it.
4 Select a role for the user.5 Select the authentication type:
Local: Select this option for the server to authenticate the user login against the internal database. By default, the Local option is selected.Directory: The Directory option is enabled only if you have configured the Sentinel server for LDAP authentication. Select this option for the server to authenticate the user login against an LDAP directory.
6 (Conditional) If you specified Local for the authentication type in Step 5, specify any user name in the Username field and continue with Step 8.
7 (Conditional) If you specified Directory for the authentication type in Step 5, specify the user name according to the settings you used when you configured LDAP, then continue with Step 10. If you selected Yes for Anonymous Search: The user name must be the same as the LDAP
directory user name. If you selected No for Anonymous Search and did not specify the domain name: The
user name does not need to be the same as the LDAP directory user name. You must also specify the LDAP User DN. If Base DN was set, the Base DN is appended to the relative user DN to construct the absolute user DN.For example, if the Base DN was set to o=netiq and the absolute user DN is cn=sentinel_ldap_user,o=netiq only the relative user DN for example, cn=sentinel_ldap_user can be specified.When some reserved special characters are used as literals in an LDAP User DN, they must be escaped with a backslash (\). The following characters must be escaped: A space or '#' character occurring at the beginning of the string
RESTRICTED_WORDS_IN_PASSWORD Specifies the words that are not allowed in a password. The restricted words are case-insensitive. You can specify multiple words separated by a comma.
For example,RESTRICTED_WORDS_IN_PASSWORD= admin,password,test
Validation Rule Description
48 Configuring Roles and Users

A space character occurring at the end of the string Any one of the characters, +, “, \, <, > or ;
For more information, see LDAPv3 Distinguished Names.For example, if the LDAP User DN contains a ',' (comma) as a literal, specify the LDAP User DN as follows:
CN=Test\,User,CN=Users,DC=netiq,DC=comeDirectory or Active Directory might require additional characters to be escaped. Refer the eDirectory or Active Directory documentation for any additional characters to be escaped.
If you selected No for Anonymous Search and specified the domain name: The user name must be the same as the LDAP directory user name.
8 Specify a password in the Password field.
NOTE: For local user password, ensure that the password adheres to the password complexity validation rules. For more information, see “Configuring Password Complexity” on page 47.
9 Re-enter the password in the Verify field.10 The Title, Office #, Ext, Mobile #, and Fax. fields are optional. The phone number fields allow any
format. Make sure you enter a valid phone number so that the user can be contacted directly.11 Click Save.
Configuring Roles and Users 49

50 Configuring Roles and Users

5 5Authentication Methods
Authentication comprises the following three factors:
Something that you know, such as a password, a PIN, or security questions. Something that you have, such as a smart card, a token, or a mobile phone. Something that you are, such as biometrics (fingerprint or iris).
By default, Sentinel uses single-factor authentication (SFA), which matches a password (“something that you know”) to a user name in the database. Sentinel Administrators can configure different types of strong and multi-factor techniques for all its users.
In addition to the default SFA authentication, Sentinel supports the following types of authentication:
LDAP Authentication: Allows users to log in to Sentinel with their LDAP directory credentials. For more information, see “LDAP Authentication Against a Single LDAP Server Or Domain” on page 53 and “LDAP Authentication Against Multiple LDAP Servers Or Domains” on page 59.
Kerberos Authentication: Uses secret-key cryptography to provide strong authentication. For more information, see “Kerberos Authentication” on page 73.
Multi-factor Authentication (MFA): A more advanced method of authentication that uses a combination of at least two factors. For example, a combination of a password and a token or a smart card and a fingerprint. For more information, see “Multi-factor Authentication” on page 78.
OAuth Authentication: Allows users to log in to Sentinel using providers such as Google or Facebook. For more information, see “OAuth Authentication” on page 84.
An administrator can switch to a different authentication method at any time. Once the administrator enables an authentication method, Sentinel requires all users to use the authentication process associated with the selected authentication method.
NOTE: Only Sentinel administrators can configure or enable authentication methods.
Enablement ConsiderationsBefore you enable a different authentication method, be aware of the following:
If your environment contains multiple Sentinel servers, all servers must use the same authentication method. If the servers use different authentication methods, some Sentinel features, such as distributed search, remote alerts, and Data Federation, do not work.
When you enable MFA, Sentinel is not compatible with the following software: Secure Configuration Manager 6.2 Change Guardian 4.2.1
Authentication Methods 51

Identity Manager Sentinel and Cisco ISE pxGrid Integration utility
When you enable MFA, the installation processes for the following components prompt you for an OAuth client ID and OAuth client secret: Remote Collector Manager Remote Correlation Engine
When you map the LDAP user to the Sentinel user, ensure the LDAP user DN field in Sentinel contains the full DN of the LDAP user in the same case. For example, if the LDAP DN in LDAP directory is CN=doej,CN=Users,DC=mycompany,DC=com, the LDAP user DN field must also contain CN=doej,CN=Users,DC=mycompany,DC=com.
For any Sentinel administrator, ensure the logon name contains no spaces between the first name and last name. For example, JohnSmith. If the logon name has a space, such as John Smith, the administrator will not be able to install the following: Remote Collector Manager Remote Correlation Engine
When you enable MFA, using a previously downloaded .jnlp file to launch either Sentinel Control Center or Solution Designer is disabled for security reasons. Instead, use the web console to launch Sentinel Control Center or Solution Designer. For more information, see Sentinel Control Center or “Accessing the Solution Designer” on page 271.
If you are using Sentinel in FIPS mode, Kerberos authentication is not supported. When you enable MFA, the following utility scripts must specify the OAuth client ID and OAuth
client secret: backup_util.sh convert_to_fips.sh configure.sh rest_client.sh
To retrieve the OAuth client ID and OAuth client secret, go to the following URL:https://Hostname:port/SentinelAuthServices/oauth/clientsWhere: Hostname is the host name of the Sentinel server. Port is the port Sentinel uses (typically 8443).
The specified URL uses your current Sentinel session to retrieve the OAuth client ID and OAuth client secret.You can create any number of client IDs and clients. To create a new client ID and client secret, use a RESTful API to send a POST request with the following settings: Header: application/json URL: https://Hostname:port/SentinelAuthServices/oauth/clients
Where: Hostname is the host name of the Sentinel server. Port is the port Sentinel uses (typically 8443).
Payload:
52 Authentication Methods

{appname:"<appname>"}
To delete a client ID and client secret, use a RESTful API to send a DELETE request to the following URL:https://Hostname:port/SentinelAuthServices/oauth/clients/<clientID>Where: Hostname is the host name of the Sentinel server. Port is the port Sentinel uses (typically 8443). <clientID> is the client ID you want to delete.
When you run the backup_util.sh script, use the mapped LDAP logon credentials of the Sentinel administrator wherever the user name and password are required.For example:./backup_util.sh -m backup -s -A -b -c -e -l -r -w -u myusername -p mypassword -f fullbackup_up.tar.gzWhere myusername and mypassword are the mapped LDAP credentials for the Sentinel administrator.
If you create a backup of Sentinel configurations when either MFA or Kerberos is enabled, you must restore the backup on the same computer.
When you enable Kerberos, logging into Windows also logs you in to Sentinel. When you launch Sentinel, your browser bypasses the Sentinel login window and automatically proceeds to the Sentinel landing page. When users log out of Sentinel, they can log back in at any point in time during the same Windows session by specifying the Sentinel URL.
LDAP Authentication Against a Single LDAP Server Or Domain
You can configure a Sentinel server for LDAP authentication to enable users to log in to Sentinel with their LDAP directory credentials.
NOTE: Sentinel LDAP authentication has been tested with Novell eDirectory and Microsoft Active Directory. Other LDAP compliant directories might be used, but have not been tested. If an issue is encountered with a directory that has not been tested, support will be provided to the extent that the issue can be reproduced on one of the tested directories.
“Overview” on page 54 “Prerequisites” on page 54 “Setting Up LDAP Authentication” on page 55 “Logging in by Using LDAP User Credentials” on page 57 “Configuring Multiple LDAP Servers for Failover” on page 58
Authentication Methods 53

OverviewLDAP authentication can be performed either using an SSL connection or an unencrypted connection to the LDAP server.
You can configure the Sentinel server for LDAP authentication either with or without using anonymous searches on the LDAP directory.
NOTE: If anonymous search is disabled on the LDAP directory, you must not configure the Sentinel server to use anonymous search.
Anonymous: When you create Sentinel LDAP user accounts, the directory user name must be specified and the user distinguished name (DN) does not need to be specified.
When the LDAP user logs in to Sentinel, the Sentinel server performs an anonymous search on the LDAP directory based on the specified user name, finds the corresponding DN, then authenticates the user login against the LDAP directory by using the DN.
Non Anonymous: When you create Sentinel LDAP user accounts, the user DN must be specified along with the user name. When the LDAP user logs in to Sentinel, the Sentinel server authenticates the user login against the LDAP directory by using the specified user DN and does not perform any anonymous search on the LDAP directory. There is an additional approach applicable only for Active Directory. For more information, see “Domain Name:” on page 56.
Prerequisites “Exporting the LDAP Server CA Certificate” on page 54 “Enabling Anonymous Search in the LDAP Directory” on page 55
Exporting the LDAP Server CA CertificateIf you want to connect to the LDAP server by using an SSL connection and the LDAP server certificate is not signed by a well-known certificate authority (CA), you must export the LDAP server CA certificate to a Base64-encoded file.
eDirectory: See “Exporting an Organizational CA's Self-Signed Certificate”.
To export an eDirectory CA certificate in iManager, the Novell Certificate Server plug-ins for iManager must be installed.
Active Directory: See “How to enable LDAP over SSL with a third-party certification authority” (http://support.microsoft.com/kb/321051).
54 Authentication Methods

Enabling Anonymous Search in the LDAP DirectoryTo perform LDAP authentication using anonymous search, you must enable anonymous search in the LDAP directory. By default, anonymous search is enabled in eDirectory and is disabled in Active Directory.
eDirectory: See ldapBindRestrictions in section Attributes on the LDAP Server Object (http://www.novell.com/documentation/edir88/edir88/data/agq8auc.html).
Active Directory: Enabling anonymous binds for Active Directory requires two steps. These steps are the same for both Windows 2003 and Windows 2008 Active Directory. Enable Anonymous LDAP Operations: By default, anonymous LDAP operations are
disabled in Active Directory. You must enable anonymous LDAP operations in Active Directory by setting the dsHeuristics attribute to an appropriate value.For more information, see Anonymous LDAP operations in Windows 2003 AD (http://www.petri.co.il/anonymous_ldap_operations_in_windows_2003_ad.htm).
Assign Permissions to the ANONYMOUS LOGON User: The Read and List Contents permissions must be assigned to the ANONYMOUS LOGON user.For more information, see Granting anonymous read access (http://www.petri.co.il/anonymous_ldap_operations_in_windows_2003_ad.htm).
Setting Up LDAP Authentication1 From Sentinel Main, click Users.2 On the Users page, click the LDAP Settings tab.3 Specify the following to configure LDAP authentication:
Host: Specify the hostname or the IP address of the LDAP server.
NOTE: If you are enabling SSL, you need to specify the hostname of the LDAP server, and this hostname should be resolvable in Sentinel (either by adding LDAP server host entry in /etc/hosts file or through DNS server).
This is a required field if you select the SSL option.SSL: Select this option if you want to connect to the LDAP server by using a Secure Socket Layer (SSL) connection.Port: Specify the port number for the LDAP connection. The default SSL port number is 636 and the default non-SSL port number is 389.Certificate File Path: Specify the path of the CA certificate file for the LDAP server.This field should be used only if you selected the SSL option and if the LDAP server certificate is not signed by well-known CA and is not trusted by default.Anonymous Search: Select Yes to perform anonymous searches or select No if you do not want to perform anonymous searches on the LDAP directory.Base DN: Specify the root container to search for users, such as o=netiq for eDirectory or cn=users,dc=example,dc=co for Active Directory. If Anonymous Search is Yes: Specify the root container in the LDAP directory to search for
users.
Authentication Methods 55

This is optional for eDirectory, and mandatory for Active Directory. For eDirectory, if the Base DN is not specified, the entire directory is searched to locate the users.
If Anonymous Search is No: Specify the root container in the LDAP directory that contains the users. This is mandatory if you are using Active Directory and if you set a domain name. For all other cases, this is optional.
Search Attribute: Specify the LDAP attribute holding the user login name. This is used to search for users. For example: eDirectory:
uid Active Directory:
sAMAccountNameThis field is available only if you selected Yes for Anonymous Search.Domain Name: Specify the name of the Active Directory domain.This is an additional approach applicable only for Active Directory for performing LDAP authentication without using anonymous search.When you specify the Domain Name, username@domainname (userPrincipalName) is used to authenticate the user before searching for the LDAP user object. For example, test.example.comThis field is applicable only for Active Directory and is available only if you selected No for Anonymous Search.
NOTE: If Base DN is set and Domain Name is not set, the Base DN is appended to the relative user DN to construct the absolute user DN. For example, if the Base DN is set to o=netiq and the absolute user DN is cn=sentinel_ldap_user,o=netiq when the LDAP user account is created, only the relative user DN of cn=sentinel_ldap_user can be specified.
4 Click Test Connection to test whether the LDAP connection is successful. 4a Specify the test credentials to connect to the LDAP server:
If Anonymous Search is Yes: Specify the user name and password.If you selected No for Anonymous Search and did not specify the Domain Name: Specify the user DN and password. The user DN can be relative to the Base DN. The User DN is based on the RFC 2253 standard. According to RFC 2253, when some reserved special characters are used as literals in a User DN, they must be escaped with a backslash (\). The following characters must be escaped: A space or # character occurring at the beginning of the string A space character occurring at the end of the string One of the characters , +, ", \, <, > or ;
For more information, see RFC 2253 (http://www.ietf.org/rfc/rfc2253.txt).For example, if the User DN contains a comma (,) as a literal, specify the User DN as follows:
56 Authentication Methods

CN=Test\,User,CN=Users,DC=netiq,DC=comeDirectory or Active Directory might require additional characters to be escaped. Refer the eDirectory or Active Directory documentation for any additional characters to be escaped. If you selected No for Anonymous Search and specified the Domain Name: Specify the user name and password.
4b Click Test to test the LDAP connection. A message is displayed that indicates whether the connection is successful. If there is an error, review the configuration details you provided and test the connection again.You can determine the cause of the failure by examining the /var/opt/novell/sentinel/log/server0.0.log file. You must ensure that the test connection is successful before saving the LDAP settings.
5 Click Save to save the LDAP settings. On successful configuration: The LdapLogin section of the /etc/opt/novell/sentinel/config/auth.login
file is updated. For example:
LdapLogin { com.sun.security.auth.module.LdapLoginModule requiredjava.naming.ldap.factory.socket="com.esecurity.common.communication.ProxyLdapSSLSocketFactory" userProvider="ldap://10.0.0.1:636/o=netiq" userFilter="(&(uid={USERNAME})(objectclass=user))" useSSL=true;};
The LDAP server CA certificate, if provided, is added to a keystore named /etc/opt/novell/sentinel/config/.ldapkeystore.jks.
After saving the LDAP settings successfully, you can create LDAP user accounts to enable users to log in to Sentinel by using their LDAP directory credentials.
NOTE: You can also configure the Sentinel server for LDAP authentication by running the ldap_auth_config.sh script in the /opt/novell/sentinel/setup directory.
The script also supports command line options. To view the command line options, run the script as follows:
/opt/novell/sentinel/setup/ldap_auth_config.sh --help
Logging in by Using LDAP User CredentialsAfter you successfully configure the Sentinel server for LDAP authentication, you can create Sentinel LDAP user accounts. For more information on creating LDAP user accounts, see “Creating Users” on page 48.
After you create the LDAP user account, you can log in to the Sentinel by using your LDAP user name and password.
Authentication Methods 57

Configuring Multiple LDAP Servers for FailoverTo configure one or more LDAP servers as failover servers for LDAP authentication:
1 Log in to the Sentinel server as root user.2 Switch to the novell user:
su - novell3 Change to the /etc/opt/novell/sentinel/config directory:
cd /etc/opt/novell/sentinel/config/4 Open the auth.login file for editing:
vi auth.login5 Update the userProvider in the LdapLogin section to specify multiple LDAP URLs. Separate
each URL by a blank space.For example:
userProvider="ldap://primary_server_IP:port/BaseDN ldap://failover_server_IP:port/BaseDN" For Active Directory, ensure that the BaseDN in the LDAP URL is not blank. For more information on specifying multiple LDAP URLs, see the description of the userProvider option in “Class LdapLogin Module” (http://java.sun.com/javase/6/docs/jre/api/security/jaas/spec/com/sun/security/auth/module/LdapLoginModule.html).
6 Save the changes.
If you are using an SSL connection to the LDAP server and if the LDAP server certificate is not signed by a well-known CA, you must perform the following additional steps:
1 Export the certificate of each failover LDAP server and copy the certificate file to the /etc/opt/novell/sentinel/config directory on the Sentinel server. For more information, see “Exporting the LDAP Server CA Certificate” on page 54.
2 Ensure that you set the necessary ownership and permissions of the certificate file for each LDAP server.
chown novell:novell /etc/opt/novell/sentinel/config/<cert-file>chmod 600 /etc/opt/novell/sentinel/config/<cert-file>
3 Add each LDAP server certificate to the keystore named .ldapkeystore.jks.
/opt/novell/sentinel/jdk/jre/bin/keytool -importcert -noprompt -trustcacerts -file <certificate-file> -alias <alias_name> -keystore /etc/opt/novell/sentinel/config/.ldapkeystore.jks -storepass passwordReplace <certificate-file> is the LDAP certificate filename and <alias_name> with the alias name for the certificate to be added.
58 Authentication Methods

IMPORTANT: Ensure that you specify the alias. If no alias is specified, the keytool takes mykey as the alias by default. When you import multiple certificates into the keystore without specifying an alias, the keytool reports an error that the alias already exists.
In some environments, the Sentinel server might not connect to the failover LDAP server if the Sentinel server times out before it finds that the primary LDAP server is down. In such cases, perform the following additional steps to ensure that the Sentinel server connects to the failover LDAP server without timing out:
1 Open the sysct1.conf file for editing:
vi /etc/sysctl.conf2 Ensure that the net.ipv4.tcp_syn_retries value is set to 3. If the entry does not exist, add
the entry. Save the file:
net.ipv4.tcp_syn_retries = 33 Execute the following commands for the changes to take effect:
/sbin/sysctl -p/sbin/sysctl -w net.ipv4.route.flush=1
4 Open the server.conf file for editing:
vi /etc/opt/novell/sentinel/config/server.conf5 Set the Sentinel server time out value to 60 seconds by appending a new parameter in the Java
Additional Parameters section as follows:
wrapper.java.additional.53=-Desecurity.remote.timeout=606 Restart the Sentinel server:
/etc/init.d/sentinel restart
LDAP Authentication Against Multiple LDAP Servers Or Domains
You can now configure LDAP authentication against multiple LDAP severs or domains for unique users. The procedures in this section consider three servers or domains for as examples. You can add the required number of servers or domains.
“Prerequisites” on page 60 “Enabling Strong Authentication” on page 60 “Configuring LDAP Servers Or Domains Properties” on page 61 “Configuring LDAP Servers Or Domains As Authentication Sources” on page 62 “Logging In With LDAP User Credentials” on page 68
Authentication Methods 59

Prerequisites Complete the prerequisites listed in “Enablement Considerations” on page 51. (Conditional) Edit the Sentinel server Hosts file. If the Sentinel server is not a member of the
enterprise domain, update the /etc/hosts file with the fully qualified domain name (FQDN) of the Sentinel server.
Update the hosts file on all the client machines that access Sentinel: 1. Open the hosts file:
Windows: Browse to C:\Windows\System32\Drivers\etc directory. Linux: Go to /etc directory.
2. Add the following entry:<sentinel_ip> <sentinel_fqdn> <sentinel_hostname> Where:<sentinel_ip> is the IP address of the Sentinel server.<sentinel_fqdn> is the FQDN of the Sentinel server.<sentinel_hostname> is the host name of the Sentinel server.For example:1.2.3.4 sentinel.mycompany.com sentinel
Ensure that all LDAP users have an email ID and that the email ID is populated in the mail attribute in the LDAP directory.
(Conditional) If you are using LDAP with SSL and you want the Sentinel server to communicate with LDAP servers over the SSL port (default 636), perform the following: If the Sentinel server is running in non-FIPS mode, import the CA certificate chain of each
LDAP server into the Sentinel server keystore:1. Log in to the Sentinel server as root.2. Execute the following commands:
cd /opt/novell/sentinel/jdk/jre/bin./keytool -importcert -file <cert_file_path> -keystore /etc/opt/novell/sentinel/config/.webserverkeystore.jks -alias <alias>Where:<cert_file_path> is the path of the certificate file you want to import.<alias> is the alias name you want to assign to the certificate in the Sentinel keystore.
If the Sentinel server is running in FIPS mode, import the CA certificate chain of each LDAP server into the Sentinel FIPS keystore. For more information about importing certificates in FIPS mode, see Importing Certificates into FIPS Keystore Database.
Enabling Strong Authentication1 Log in as root user to the Sentinel server.2 Open the /etc/opt/novell/sentinel/config/configuration.properties file.
60 Authentication Methods

3 Set strong.authentication.enabled=true4 Add admin.user.auth.dn=<ldap_dn_for_sentinel_admin_user>
Where <ldap_dn_for_sentinel_admin_user> is the LDAP User DN to which the Sentinel admin user will be mapped to. You can specify the DN of a LDAP User in any of the LDAP servers or domains. For example, admin.user.auth.dn=CN=Administrator,CN=Users,DC=mycompany,DC=com
5 (Conditional) If you are using Sentinel in High Availability (HA) mode, add sentinel.ha.cluster.hostname=<cluster_virtual_fqdn>Where <cluster_virtual_fqdn> is the virtual FQDN of the HA cluster.
Configuring LDAP Servers Or Domains Properties1 Log in as the root user to the Sentinel server.2 Open the /etc/opt/osp-configuration.properties file.3 Add the following properties to configure the details of the first LDAP server or domain:
NOTE: Ensure that there are no extra spaces when you add the following properties.
com.netiq.sentinel.osp.ldap.host=<ldap_host>Where <ldap_host> is the IP address or hostname of the LDAP server.
com.netiq.sentinel.osp.ldap.port=<ldap_port>Where <ldap_port> is the port number of the LDAP connection. The default SSL port number is 636 and the default non-SSL port number is 389.
com.netiq.sentinel.osp.ldap.use-ssl=true/falseWhere true/false specifies whether the LDAP connection uses SSL or not.
com.netiq.sentinel.osp.ldap.dir-type=<ldap_directory_type>Where <ldap_directory_type> is the directory type of the LDAP server. For example, the directory type of Active Directory is AD and the directory type of eDirectory is edir.
com.netiq.sentinel.osp.as.naming-attr=<naming_attribute>Where <naming_attribute> is the naming attribute of the LDAP server. Naming attribute is the LDAP attribute that contains the user login name and is used in the LDAP search filter while searching for users. For example, the naming attribute for Active Directory can be sAMAccountName and the naming attribute for eDirectory can be uid or cn.
com.netiq.sentinel.osp.as.admins-container-dn=<admins_container_dn>Where <admins_container_dn> is the DN of the container for admin users in the LDAP server. For example, CN=Users,DC=mycompany,DC=com.
com.netiq.sentinel.osp.as.users-container-dn=<users_container_dn>Where <users_container_dn> is the DN of the container for users in the LDAP server. For example, CN=Users,DC=mycompany,DC=com.
com.netiq.sentinel.osp.ldap.admin-dn=<ldap_admin_dn>Where <ldap_admin_dn> is the DN of the admin user in the LDAP server. For example, CN=Administrator,CN=Users,DC=mycompany,DC=com.
com.netiq.sentinel.osp.ldap.admin-pwd=<ldap_admin_pwd>
Authentication Methods 61
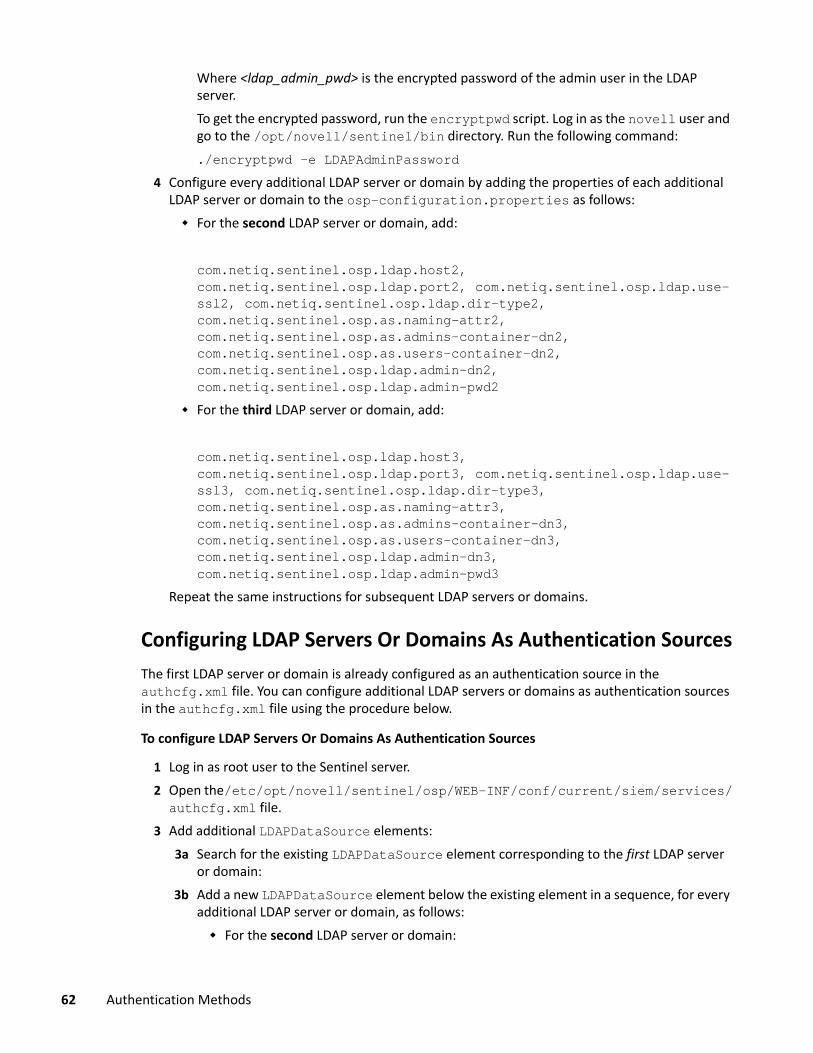
Where <ldap_admin_pwd> is the encrypted password of the admin user in the LDAP server. To get the encrypted password, run the encryptpwd script. Log in as the novell user and go to the /opt/novell/sentinel/bin directory. Run the following command:./encryptpwd -e LDAPAdminPassword
4 Configure every additional LDAP server or domain by adding the properties of each additional LDAP server or domain to the osp-configuration.properties as follows: For the second LDAP server or domain, add:
com.netiq.sentinel.osp.ldap.host2, com.netiq.sentinel.osp.ldap.port2, com.netiq.sentinel.osp.ldap.use-ssl2, com.netiq.sentinel.osp.ldap.dir-type2, com.netiq.sentinel.osp.as.naming-attr2, com.netiq.sentinel.osp.as.admins-container-dn2, com.netiq.sentinel.osp.as.users-container-dn2, com.netiq.sentinel.osp.ldap.admin-dn2, com.netiq.sentinel.osp.ldap.admin-pwd2
For the third LDAP server or domain, add:
com.netiq.sentinel.osp.ldap.host3, com.netiq.sentinel.osp.ldap.port3, com.netiq.sentinel.osp.ldap.use-ssl3, com.netiq.sentinel.osp.ldap.dir-type3, com.netiq.sentinel.osp.as.naming-attr3, com.netiq.sentinel.osp.as.admins-container-dn3, com.netiq.sentinel.osp.as.users-container-dn3, com.netiq.sentinel.osp.ldap.admin-dn3, com.netiq.sentinel.osp.ldap.admin-pwd3
Repeat the same instructions for subsequent LDAP servers or domains.
Configuring LDAP Servers Or Domains As Authentication SourcesThe first LDAP server or domain is already configured as an authentication source in the authcfg.xml file. You can configure additional LDAP servers or domains as authentication sources in the authcfg.xml file using the procedure below.
To configure LDAP Servers Or Domains As Authentication Sources
1 Log in as root user to the Sentinel server.2 Open the/etc/opt/novell/sentinel/osp/WEB-INF/conf/current/siem/services/authcfg.xml file.
3 Add additional LDAPDataSource elements:3a Search for the existing LDAPDataSource element corresponding to the first LDAP server
or domain: 3b Add a new LDAPDataSource element below the existing element in a sequence, for every
additional LDAP server or domain, as follows: For the second LDAP server or domain:
62 Authentication Methods

<LDAPDataSource displayName="LDAP Datasource2" id="ds-ldap2" adminName="${com.netiq.sentinel.osp.ldap.admin-dn2}" adminPassword="${com.netiq.sentinel.osp.ldap.admin-pwd2}" dirType="${com.netiq.sentinel.osp.ldap.dir-type2}" > <Server secureConnection="${com.netiq.sentinel.osp.ldap.use-ssl2}" host="${com.netiq.sentinel.osp.ldap.host2}" maxConnections="${com.netiq.sentinel.osp.ldap.max-connections2:31}" port="${com.netiq.sentinel.osp.ldap.port2}" /> </LDAPDataSource>
For the third LDAP server or domain:
<LDAPDataSource displayName="LDAP Datasource3" id="ds-ldap3" adminName="${com.netiq.sentinel.osp.ldap.admin-dn3}" adminPassword="${com.netiq.sentinel.osp.ldap.admin-pwd3}" dirType="${com.netiq.sentinel.osp.ldap.dir-type3}" > <Server secureConnection="${com.netiq.sentinel.osp.ldap.use-ssl3}" host="${com.netiq.sentinel.osp.ldap.host3}" maxConnections="${com.netiq.sentinel.osp.ldap.max-connections3:31}" port="${com.netiq.sentinel.osp.ldap.port3}" /> </LDAPDataSource>
Repeat these instructions for the subsequent LDAP servers or domains.
Authentication Methods 63

4 Add additional LDAPAuthenticationSource elements:4a Search for the existing LDAPAuthenticationSource element corresponding to the first
LDAP server or domain. 4b Add a new LDAPAuthenticationSource element below the existing element in a
sequence, for every additional LDAP server or domain, as follows: For the second LDAP server or domain:
<LDAPAuthenticationSource displayName="LDAP Authentication Source2" id="as-ldap2" restrictToContexts="${com.netiq.sentinel.osp.as.restrict-to-contexts2:false}" > <Reference refId="ds-ldap2" type="DataSource"/> <!-- NamingAttr values for LDAP define which attributes are used in an LDAP search filter when search for a user object --> <NamingAttr name="${com.netiq.sentinel.osp.as.naming-attr2:cn}"/> <NamingAttr name="mail"/> <!-- Context values define the base context(s) in which to search for users. Each context will be searched in order --> <Context context="${com.netiq.sentinel.osp.as.users-container-dn2}" decorator="search" order="0" scope="${com.netiq.sentinel.osp.as.scope2:subtree}"/> <Context context="${com.netiq.sentinel.osp.as.admins-container-dn2}" decorator="search" order="1" scope="${com.netiq.sentinel.osp.as.scope2:subtree}"/> <AttributeMapping> <AttributeMapEntry localName="userDN" nativeName="{$dn}"/> <!-- The "dn" entry is for use in admin-defined SelectExpression instances ("{$dn}" is a predefined "pseudo" attr name) --> <AttributeMapEntry localName="dn" nativeName="{$dn}"/> <AttributeMapEntry localName="userName" nativeName="${com.netiq.sentinel.osp.as.naming-attr2:cn}"/> <AttributeMapEntry localName="saml2-mapping-attr" nativeName="${com.netiq.sentinel.osp.login.saml2.mapping-attr2:mail}"/> </AttributeMapping> </LDAPAuthenticationSource>
64 Authentication Methods

For the third LDAP server or domain:
<LDAPAuthenticationSource displayName="LDAP Authentication Source3" id="as-ldap3" restrictToContexts="${com.netiq.sentinel.osp.as.restrict-to-contexts3:false}" > <Reference refId="ds-ldap3" type="DataSource"/> <!-- NamingAttr values for LDAP define which attributes are used in an LDAP search filter when search for a user object --> <NamingAttr name="${com.netiq.sentinel.osp.as.naming-attr3:cn}"/> <NamingAttr name="mail"/> <!-- Context values define the base context(s) in which to search for users. Each context will be searched in order --> <Context context="${com.netiq.sentinel.osp.as.users-container-dn3}" decorator="search" order="0" scope="${com.netiq.sentinel.osp.as.scope3:subtree}"/> <Context context="${com.netiq.sentinel.osp.as.admins-container-dn3}" decorator="search" order="1" scope="${com.netiq.sentinel.osp.as.scope3:subtree}"/> <AttributeMapping> <AttributeMapEntry localName="userDN" nativeName="{$dn}"/> <!-- The "dn" entry is for use in admin-defined SelectExpression instances ("{$dn}" is a predefined "pseudo" attr name) --> <AttributeMapEntry localName="dn" nativeName="{$dn}"/> <AttributeMapEntry localName="userName" nativeName="${com.netiq.sentinel.osp.as.naming-attr3:cn}"/> <AttributeMapEntry localName="saml2-mapping-attr" nativeName="${com.netiq.sentinel.osp.login.saml2.mapping-attr3:mail}"/> </AttributeMapping> </LDAPAuthenticationSource>
Repeat these instructions for the subsequent LDAP servers or domains.5 Add additional PrincipalMapping elements:
5a Search for the existing PrincipalMapping element corresponding to the first LDAP server or domain.
5b Add a new PrincipalMapping element below the existing element in a sequence, for every additional LDAP server or domain, as follows: For the second LDAP server or domain:
Authentication Methods 65

<PrincipalMapping id="ldap-mapping2" displayName="LDAP User to Sentinel User Mapping2" enabled="true" > <Reference refId="as-ldap2" type="AuthenticationSource" decorator="srcId"/> <Reference refId="as-sentinel" type="AuthenticationSource" decorator="destId"/> <And> <Or> <Equal sourceAttrName="userDN" targetAttrName="userDN"/> <Equal sourceAttrName="userName" targetAttrName="userName"/> </Or> <Equal targetAttrName="authSource">LDAP</Equal> </And> </PrincipalMapping>
For the third LDAP server or domain:
<PrincipalMapping id="ldap-mapping3" displayName="LDAP User to Sentinel User Mapping3" enabled="true" > <Reference refId="as-ldap3" type="AuthenticationSource" decorator="srcId"/> <Reference refId="as-sentinel" type="AuthenticationSource" decorator="destId"/> <And> <Or> <Equal sourceAttrName="userDN" targetAttrName="userDN"/> <Equal sourceAttrName="userName" targetAttrName="userName"/> </Or> <Equal targetAttrName="authSource">LDAP</Equal> </And> </PrincipalMapping>
Repeat these instructions for the subsequent LDAP servers or domains.6 Add references to the LDAPAuthenticationSource elements created earlier:
In the existing PasswordAuthentication element whose id="np-auth", there is an existing Reference element whose refId="as-ldap". Add additional Reference elements below this element to refer to the LDAPAuthenticationSource elements created earlier in Step 4 on page 64 as follows:
66 Authentication Methods
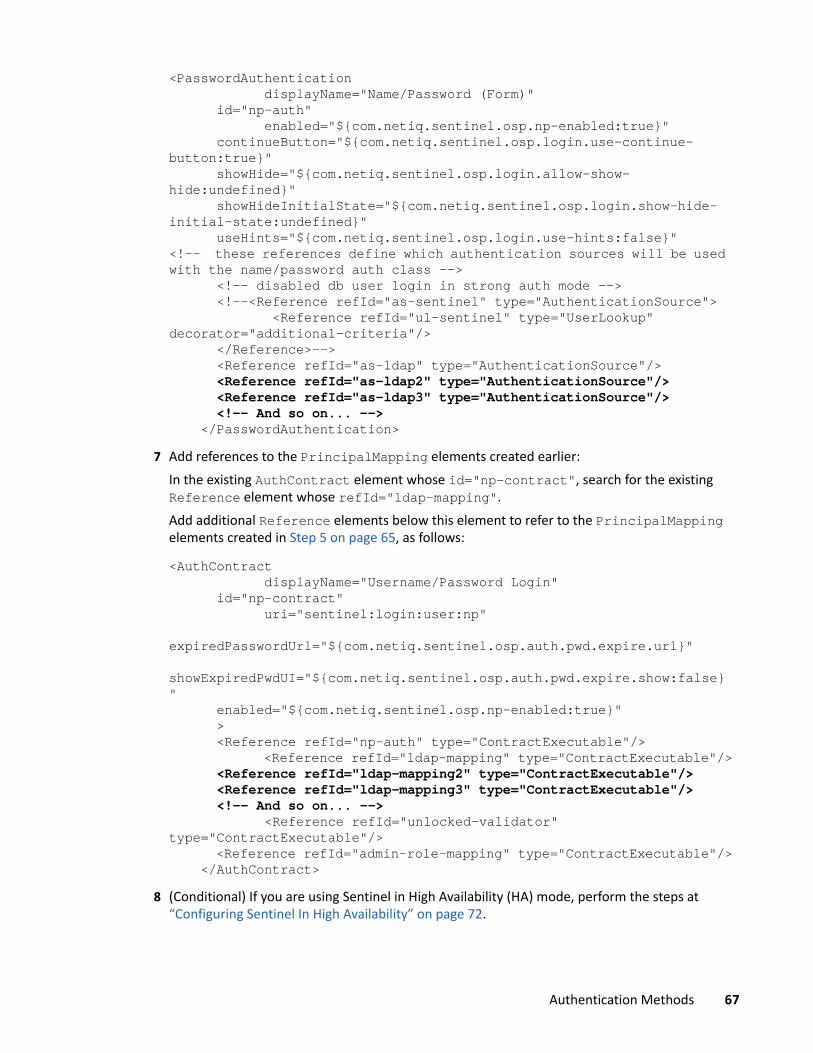
<PasswordAuthentication displayName="Name/Password (Form)" id="np-auth" enabled="${com.netiq.sentinel.osp.np-enabled:true}" continueButton="${com.netiq.sentinel.osp.login.use-continue-button:true}" showHide="${com.netiq.sentinel.osp.login.allow-show-hide:undefined}" showHideInitialState="${com.netiq.sentinel.osp.login.show-hide-initial-state:undefined}" useHints="${com.netiq.sentinel.osp.login.use-hints:false}"<!-- these references define which authentication sources will be used with the name/password auth class --> <!-- disabled db user login in strong auth mode --> <!--<Reference refId="as-sentinel" type="AuthenticationSource"> <Reference refId="ul-sentinel" type="UserLookup" decorator="additional-criteria"/> </Reference>--> <Reference refId="as-ldap" type="AuthenticationSource"/> <Reference refId="as-ldap2" type="AuthenticationSource"/> <Reference refId="as-ldap3" type="AuthenticationSource"/> <!-- And so on... --> </PasswordAuthentication>
7 Add references to the PrincipalMapping elements created earlier:In the existing AuthContract element whose id="np-contract", search for the existing Reference element whose refId="ldap-mapping". Add additional Reference elements below this element to refer to the PrincipalMapping elements created in Step 5 on page 65, as follows:
<AuthContract displayName="Username/Password Login" id="np-contract" uri="sentinel:login:user:np" expiredPasswordUrl="${com.netiq.sentinel.osp.auth.pwd.expire.url}" showExpiredPwdUI="${com.netiq.sentinel.osp.auth.pwd.expire.show:false}" enabled="${com.netiq.sentinel.osp.np-enabled:true}" > <Reference refId="np-auth" type="ContractExecutable"/> <Reference refId="ldap-mapping" type="ContractExecutable"/> <Reference refId="ldap-mapping2" type="ContractExecutable"/> <Reference refId="ldap-mapping3" type="ContractExecutable"/> <!-- And so on... --> <Reference refId="unlocked-validator" type="ContractExecutable"/> <Reference refId="admin-role-mapping" type="ContractExecutable"/> </AuthContract>
8 (Conditional) If you are using Sentinel in High Availability (HA) mode, perform the steps at “Configuring Sentinel In High Availability” on page 72.
Authentication Methods 67

9 For the above configuration changes to take effect, restart the Sentinel server:rcsentinel restart
Logging In With LDAP User Credentials1 Specify the following URL in your web browser to launch Sentinel: https://<hostname>:<port>/sentinel/views/main.htmlWhere <hostname> is the host name of the Sentinel server.<port> is the Sentinel web server port (8443 by default).
NOTE: After you enable LDAP authentication against multiple LDAP servers or domains, you can only use the hostname in the URL, and not the IP address.
2 Log in to Sentinel with the value of the naming attribute of the LDAP user to which you mapped the Sentinel admin user. You mapped the Sentinel admin user to a corresponding LDAP user DN in Step 4 on page 61 and configured the LDAP naming attribute when “Configuring LDAP Servers Or Domains Properties” on page 61.
NOTE: After you enabled LDAP authentication against multiple LDAP servers or domains, you cannot use the user name admin to log in to Sentinel as the admin user.
For example, consider you had set admin.user.auth.dn=CN=Administrator,CN=Users,DC=mycompany,DC=com in Step 4 on page 61 and configured the LDAP naming attribute as sAMAccountName in “Configuring LDAP Servers Or Domains Properties” on page 61. Log in to Sentinel as Administrator, which is the sAMAccountName of the LDAP User whose DN is CN=Administrator,CN=Users,DC=mycompany,DC=com
3 Create a Sentinel user account for every LDAP user who will access Sentinel: 3a In Sentinel Main, click Users > Users and Roles. 3b Specify the Email and LDAP User DN. For more information, see “Creating Users” on
page 48. For example, specify Email as [email protected] and LDAP User DN as CN=john,CN=Users,DC=mycompany,DC=com.
4 Log in to Sentinel by specifying the value of the LDAP naming attribute of the users created in the Step 3 on page 68.For example, you specified a LDAP User DN as CN=john,CN=Users,DC=mycompany,DC=com in Step 3 on page 68 and configured the LDAP naming attribute as sAMAccountName in “Configuring LDAP Servers Or Domains Properties” on page 61. You can log in as john, which is the sAMAccountName of the LDAP user whose DN is CN=john,CN=Users,DC=mycompany,DC=com.
68 Authentication Methods

Prerequisites for MFA, Kerberos, and OAuth This section covers the prerequisites your environment must meet before you enable any of the supported authentication methods.
Before you configure the Sentinel server to use either MFA or Kerberos, complete the following:
“Sentinel DNS Name is Case-Sensitive” on page 69 “LDAP and Active Directory” on page 69 “Edit Sentinel Server Hosts File” on page 69 “Edit OSP Configuration Properties” on page 70 “Edit Sentinel Configuration Properties” on page 71 “Update All Computers That Access Sentinel” on page 71 “Ensure All Users Have a Valid Email ID” on page 72 “Using LDAP with SSL” on page 72 “Restart Sentinel” on page 72 “Configuring Sentinel In High Availability” on page 72
Sentinel DNS Name is Case-SensitiveThe Sentinel DNS name is case-senstive. Ensure you specify the DNS name with the correct case each time the configuration procedure request it.
LDAP and Active DirectoryEnsure that your environment uses LDAP authentication and Active Directory. For more information about configuring LDAP authentication, see “LDAP Authentication Against a Single LDAP Server Or Domain” on page 53.
NOTE: After you configure your environment to use MFA, the Email ID and User DN fields are required. As a result, existing Sentinel users will not be able to log in to Sentinel. You must update all users with valid email ID and User DN.
When you create new users, ensure that they have a valid email ID and User DN.
Edit Sentinel Server Hosts File(Conditional) If the Sentinel server is not a member of the enterprise domain, you need to update the /etc/hosts file with the fully qualified domain name (FQDN) of the Sentinel server.
Authentication Methods 69

Edit OSP Configuration PropertiesAfter you enable MFA or Kerberos, the Sentinel admin will not be able to create ‘local’ users. The admin will be able to create only ‘directory’ users. This prerequisite gives the admin the permissions to create new ‘directory’ users.
In the /etc/opt/novell/sentinel/config directory, open the osp-configuration.properties file and ensure the following property values:
com.netiq.sentinel.osp.as.naming-attr=LDAPProviderNameWhere LDAPProviderName is the name attribute of your LDAP provider. For example, the name attribute for Active Directory is sAMAccountName.
com.netiq.sentinel.osp.ldap.dir-type=LDAPDirectoryTypeWhere LDAPDirectoryType is the directory type of your LDAP provider. For example, the directory type for Active Directory is AD.
com.netiq.sentinel.osp.as.admins-container-dn=AdminContainerDNWhere AdminContainerDN is the container DN for the admin user in Sentinel. For example, CN=Users,DC=mycompany,DC=com.
com.netiq.sentinel.osp.ldap.host=LDAP_IPWhere LDAP_IP is the IP address of the LDAP server.
com.netiq.sentinel.osp.ldap.port=LDAP_PortWhere LDAP_Port is the port number for the LDAP connection. The default SSL port number is 636 and the default non-SSL port number is 389.
com.netiq.sentinel.osp.ldap.use-ssl=true/falseWhere true/false specifies whether LDAP uses SSL.(Conditional) If this value is true, you must use the keytool command to import the LDAP server certificate into the /etc/opt/novell/sentinel/config/.webserverkeystore.jks file.For example:/opt/novell/sentinel/jdk/jre/bin/keytool -importcert -alias <AliasName> -file <FileName>.cer -keystore /etc/opt/novell/sentinel/config/.webserverkeystore.jks Where: <AliasName> is the new alias name you want to assign to the certificate in the Sentinel
keystore. <FileName> is the name of the certificate file you want to import.
com.netiq.sentinel.osp.as.users-container-dn=UserContainerDNWhere UserContainerDN is the container DN for the users in Sentinel. For example, CN=Users,DC=mycompany,DC=com.
com.netiq.sentinel.osp.ldap.admin-dn=AdminDNWhere AdminDN is the DN for the admin user in Sentinel. For example, CN=Administrator,CN=Users,DC=mycompany,DC=com.
com.netiq.sentinel.osp.ldap.admin-pwd=LDAPAdminPassword
70 Authentication Methods

Where LDAPAdminPassword is the encrypted password for the LDAP server administrator.
NOTE: To encrypt the password, run the encryptpwd script as the novell user:./encryptpwd -e LDAPAdminPasswordThe script is located in the /opt/novell/sentinel/bin directory.
Edit Sentinel Configuration PropertiesIn the /etc/opt/novell/sentinel/config directory, open the configuration.properties file and complete the following steps:
1 Set strong.authentication.enabled=true2 Add admin.user.auth.dn=LDAP_DN_ForSentinelAdminUser
Where LDAP_DN_ForSentinelAdminUser is the mapped LDAP DN for the admin user in Sentinel.
NOTE: When you install Sentinel, the installation process creates the admin user by default as an out-of-the-box user. To enable MFA or Kerberos authentication and use the admin user again, you must map the admin user to a corresponding LDAP DN. Once you enable Kerberos authentication, you cannot use the out-of-the-box admin user to log in to Sentinel. Instead, you must use the mapped LDAP DN to log in to Sentinel.
3 (Conditional) If you are using Sentinel in High Availability (HA) mode, Add sentinel.ha.cluster.hostname=FQDN_Virtual_Hostname.Where FQDN_Virtual_Hostname is the FQDN of the HA virtual IP address in all nodes of the HA cluster.
Update All Computers That Access SentinelOn every computer your users will use to access Sentinel, go to C:\Windows\System32\Drivers\etc and complete the following steps:
1 Open the hosts file.2 Add the following entry:Sentinel_IP FQDN_Sentinel_server HostnameWhere: Sentinel_IP is the IP address of the Sentinel server. FQDN_Sentinel_server is the FQDN of the Sentinel server. Hostname is the host name of the Sentinel server.
For example:
127.0.0.1 rbpm.mycompany.com rbpm
Authentication Methods 71

Ensure All Users Have a Valid Email IDMFA and Kerberos Ensure that all Sentinel users (including the admin) have a valid registered email ID in LDAP. To add a registered LDAP email ID to every Sentinel user account, use the Users tab in Sentinel.
OAuth Ensure that all Sentinel users (including the admin) have a valid registered email ID with the same email provider as the OAuth IDP. For example, if you use Google, all users must have valid gmail IDs.
Using LDAP with SSLIf Sentinel uses MFA, Kerberos, or OAuth, and needs to integrate with an LDAP server that uses SSL, complete the following:
1 Import the certificate file for AD and LDAP to the Sentinel server keystore.In a command prompt, go to /opt/novell/sentinel/jdk/jre/bin and use the following command:./keytool -importcert -file FileName.cer -keystore /etc/opt/novell/sentinel/config/.webserverkeystore.jks -alias AliasNameWhere: FileName is the name of the certificate file you want to import. AliasName is the new alias name you want to assign to the certificate in the Sentinel
keystore.2 Go to the /etc/opt/novell/sentinel/config directory and complete the following steps:
2a Open the osp-configuration.properties file.2b Ensure the following:
com.netiq.sentinel.osp.ldap.port=636com.netiq.sentinel.osp.ldap.use-ssl=true
3 Log in to the Sentinel server as the novell user, then run the following command:
touch /etc/opt/novell/sentinel/3rdparty/jetty/contexts/osp.xml
Restart SentinelAfter you have completed all the prerequisites, restart Sentinel. Use the following command:
rcsentinel restart
Configuring Sentinel In High Availability(Conditional) If you are using Sentinel in High Availability (HA) mode, complete the following steps:
1 Log in to the active node of the HA cluster and run the following command:csync2 -x -v
72 Authentication Methods

2 (Conditional) If the cluster does not start correctly, perform the following steps:2a Manually copy the /etc/corosync/corosync.conf file from node01 to node02, or
run the csync2 -x -v on node01, or manually set the cluster up on node02 through YaST.
2b (Conditional) If the csync2 -x -v command you run in the previous step fails to synchronize all the files, perform the following procedure:2b1 Clear the csync2 database (in the /var/lib/csync2 directory) on all the nodes.2b2 Run the following command on all servers to update the csync2 database to match the
filesystem, but without marking anything as needing to be synchronized to other servers:csync2 -cIr /
2b3 Run the following command to find all the differences between authoritative server and remote servers, and mark for synchronization:csync2 -TUXI
2b4 Run the following command to reset the database to force the current server to be winner on any conflicts:csync2 -fr /
2b5 Run the following command to start a synchronization to all the other servers:csync2 -xr /
2b6 Run the following command to verify that all the files are synchronized:csync2 -TThis command will not list any files if the synchronization is successful.
2c Run the following command on node02:For SLES 11 SP4: /etc/rc.d/openais start For SLES 12 SP1 and later: systemctl start pacemaker.service(Conditional) If the xinetd service does not properly add the new csync2 service, the script will not function properly. The xinetd service is required so that the other node can sync the cluster configuration files down to this node. If you see errors like csync2 run failed, you may have this problem.To resolve this issue, execute the kill -HUP `cat /var/run/xinetd.init.pid command and then re-run the sleha-join script.
2d Run crm_mon on each cluster node to verify that the cluster is running properly. You can also use 'hawk', the web console, to verify the cluster. The default login name ishacluster and the password is linux.
Kerberos AuthenticationThis section provides instructions for configuring Sentinel to work with Kerberos authentication.
Before you continue, ensure that you have met all prerequisites. For more information, see “Prerequisites for MFA, Kerberos, and OAuth” on page 69.
Authentication Methods 73

NOTE: Before you continue, ensure that you have read the enablement considerations and met all prerequisites. For more information, see “Enablement Considerations” on page 51 and “Prerequisites for MFA, Kerberos, and OAuth” on page 69.
“Configuring the Sentinel Server for Kerberos Authentication” on page 74 “Configuring the Kerberos User Account in Active Directory” on page 74 “Configuring Browsers to Use Integrated Windows Authentication” on page 77
Configuring the Sentinel Server for Kerberos AuthenticationTo use Kerberos authentication in Sentinel, you must complete the following steps on the Sentinel server.
1 Log in to the Sentinel server as the novell user.2 Go to the /etc/opt/novell/sentinel/config directory and complete the following steps:
2a Open the osp-configuration.properties file.2b Add the following properties:
com.netiq.sentinel.osp.krb.enabled=truecom.netiq.sentinel.osp.login.method=krb
Configuring the Kerberos User Account in Active DirectoryTo use Kerberos authentication in Sentinel, you need to create a new Active Directory user account for the Sentinel server. The user account name must use the DNS name of the Sentinel server. Use the Active Directory administration tools to configure Active Directory for Kerberos authentication.
NOTE: For domain or realm references, use uppercase format. For example @MYCOMPANY.COM.
1 As an Administrator in Active Directory, use the Microsoft Management Console (MMC) to create a new user account with the DNS name of the Sentinel server.For example, if the DNS name of the Sentinel server is rbpm.mycompany.com, ensure the following:First name: rbpmUser logon name: HTTP_rbpm.mycompany.com
NOTE: The slash character ( / ) is not supported during user creation. After you save the user account, edit the user account and replace / with an underscore ( _ ).
Pre-windows logon name: rbpmSet password: Specify the appropriate passwordPassword never expires: TRUEUser must change password at next logon: FALSEThis account supports Kerberos AES 128 bit encryption: TRUEThis account supports Kerberos AES 256 bit encryption: TRUE
74 Authentication Methods

Do not require Kerberos preauthentication: TRUE2 To associate the new user with the Service Principal Name (SPN), complete the following steps:
2a Open a cmd shell.2b Run the following command:
setspn -A HTTP/DNS_Sentinel_server@WINDOWS-DOMAIN userID For example:
setspn -A HTTP/[email protected] rbpm3 To generate the keytab file, complete the following steps:
3a At the command prompt, enter the following:
ktpass /out filename.keytab /princ servicePrincipalName /mapuser userPrincipalName /pass password /crypto AES256-SHA1 /ptype KRB5_NT_PRINCIPALFor example:
ktpass /out rbpm.keytab /princ HTTP/[email protected] /mapuser rbpm /pass Passw0rd /crypto AES256-SHA1 /ptype KRB5_NT_PRINCIPAL
IMPORTANT: For domain or realm references, use uppercase format. For example, @MYCOMPANY.COM.
3b Copy the filename.keytab file to the /etc/opt/novell/sentinel/config directory on the Sentinel server, and then change the file permission to novell.
4 Log in to the Sentinel server as the novel user.5 Go to the /etc/opt/novell/sentinel/config directory and create krb5.conf.6 Open krb5.conf and add the following:
Authentication Methods 75

# Default Kerberos Realm[libdefaults]default_realm = <WINDOWS-DOMAIN>kdc_timeout = 15000max_retries = 2udp_preference_limit = 1admin_server = <DomainControllerIPAddress>default_tkt_enctypes = aes256-cts-hmac-sha1-96 aes128-cts-hmac-sha1-96default_tgs_enctypes = aes256-cts-hmac-sha1-96 aes128-cts-hmac-sha1-96permitted_enctypes = aes256-cts-hmac-sha1-96 aes128-cts-hmac-sha1-96
# Define Kerberos Realms. Each realm needs to be in its own section[realms]<WINDOWS-DOMAIN> = {kdc = <DomainControllerIPAddress>}# Define Domain to Kerberos Realm mapping for each realm[domain_realm]<Windows-Domain> = <WINDOWS-DOMAIN># Logging[logging]kdc = FILE:/home/novell/kdc.logadmin_server = FILE:/home/novell/admin.logdefault = SYSLOG:NOTICE:DAEMON
7 In the /etc/opt/novell/sentinel/config directory, open the auth.login file and add the following entry:
com.sun.security.jgss.krb5.accept {com.sun.security.auth.module.Krb5LoginModule requireddebug="true"refreshKrb5Config="true"doNotPrompt="true"principal="HTTP/<DNS_Sentinel_server>@<WINDOWS-DOMAIN>"useKeyTab="true"keyTab="/etc/opt/novell/sentinel/config/<filename>.keytab"useTicketCache="false"storeKey="true";};
8 (Optional) To enable debug logs for troubleshooting, complete the following steps:8a In the /etc/opt/novell/sentinel/config directory, open the server.conf file.8b Ensure the following:
wrapper.java.additional.50=-Dsun.security.krb5.debug=true com.netiq.sentinel.osp.logging.level=ALL
9 Ensure that user mapping are correct between AD, LDAP, and Sentinel.10 Restart the Sentinel server:
rcsentinel restart11 (Conditional) If you are running Sentinel in an HA environment, log in to the active node of the
HA cluster and run the following command:csync2 -x -v
76 Authentication Methods

Configuring Browsers to Use Integrated Windows AuthenticationTo use Kerberos authentication in Sentinel, any browser you use to access Sentinel must use Integrated Windows Authentication.
NOTE: You must perform this procedure for each user’s computer.
Internet Explorer1 In the Internet Options dialog box, click Security.2 Click Trusted Sites > Sites.3 Add the DNS name of the Sentinel server.
For example: https://rbpm.mycompany.com4 Click Add, then click Close.5 Click Custom level.6 Under User Authentication, select Automatic logon with current user name and password.7 Click OK.8 Repeat this procedure for each end-user computer.
Mozilla Firefox1 In the browser’s address field, type about:config.2 Set the Value of the following Preferences to the Windows domain name, such as
.mycompany.com: network.automatic-ntlm-auth.trusted-uris network.negotiate-auth.trusted-uris
3 Repeat this procedure for each end-user computer.
Google Chrome1 Go to Settings, and then click Show advanced settings.2 Under Network, click Change proxy settings.3 In the Internet Properties dialog box, click Security.4 Click Trusted Sites > Sites.5 Add the DNS name of the Sentinel server.
For example: https://rbpm.mycompany.com6 Click Add, then click Close.7 Click Custom level.8 Under User Authentication, select Automatic logon with current user name and password.9 Click OK.
10 Repeat this procedure for each end-user computer.
Authentication Methods 77

Multi-factor AuthenticationSentinel supports MFA by integrating with any identity provider (IDP) software that supports the following:
Multi-factor authentication SAML 2.0
For example, if you integrate Sentinel with Advanced Authentication™ in your environment, Advanced Authentication handles authentication while Sentinel handles authorization.
NOTE: Before you continue, ensure that you have read the enablement considerations and met all prerequisites. For more information, see “Enablement Considerations” on page 51 and “Prerequisites for MFA, Kerberos, and OAuth” on page 69.
“Using Advanced Authentication” on page 78 “Configuring Sentinel in FIPS Mode to use Advanced Authentication” on page 81 “Using Other SAML 2.0 IDP Software” on page 82 “Configuring Sentinel in FIPS Mode to use SAML 2.0 IDP” on page 83
Using Advanced AuthenticationThis section provides the steps to integrate Sentinel with Advanced Authentication.
NOTE: Ensure that you are using a supported version of Advanced Authentication. For information about which versions of Advanced Authentication are supported, see Sentinel System Requirements.
1 Log in to the Sentinel server as the novell user.2 In the /etc/opt/novell/sentinel/config directory, open the osp-configuration.properties file and add the following properties: com.netiq.sentinel.osp.login.method = saml2 com.netiq.sentinel.osp.saml2.enabled = true com.netiq.sentinel.osp.login.saml2.metadata-url = https://IDP_IPAddress/osp/a/TOP/auth/saml2/metadataWhere IDP_IPAddress is the IP address for the server where Advanced Authentication is installed.
com.netiq.sentinel.osp.login.saml2.mapping-attr=mail com.netiq.sentinel.osp.as.duplicate-resolution-naming-attr=mail
3 Run the following command:touch /etc/opt/novell/sentinel/3rdparty/jetty/contexts/osp.xml
4 To establish a trust relationship between Sentinel and Advanced Authentication, you need to generate a .jks file for the keystore that contains a self-signed certificate for Advanced Authentication.
78 Authentication Methods

NOTE: You cannot use the existing Advanced Authentication certificate because it does not contain a subject alternative name.
Complete the following steps:4a Go to the /opt/novell/sentinel/jdk/jre/bin directory.4b Create the .jks file for Advanced Authentication. Use the following command:
./keytool -genkey -keyalg RSA -alias AliasName -keystore FileName.jks -storepass Password -validity 360 -keysize 2048 -ext SAN=dns:Domain_Name,dns:IDP_DNS_Name,ip:IDP_IPAddressWhere: AliasName is the alias you want to assign to the certificate. FileName is the name of the .jks file you want to create. Password is the password to access the Advanced Authentication server. Domain_Name is the domain name of the Advanced Authentication server. IDP_DNS_Name is DNS name of the Advanced Authentication server. IDP_IPAddress is the IP address of the Advanced Authentication server.
For example:./keytool -genkey -keyalg RSA -alias selfsigned1 -keystore AA.jks -storepass password -validity 360 -keysize 2048 -ext SAN=dns:aff.com,dns:aucore-7941,ip:10.10.10.10
4c Provide the appropriate answers to the questions the keytool command displays.5 To import to the new keystore file to the Advanced Authentication keystore, you must convert it
to .pfx format. Complete the following steps:5a Go to the /opt/novell/sentinel/jdk/jre/bin directory.5b Run the following command:
./keytool -importkeystore -srckeystore FileName.jks -srcstoretype JKS -srcstorepass Password -destkeystore FileName1.pfx -deststoretype PKCS12 -deststorepass Password1Where: FileName is the name of the file you want to convert. Password is the password to access the JKS keystore. FileName1 is the name of the file you want to create. Password1 is the password you used to create the .jks file.
For example:./keytool -importkeystore -srckeystore AA.jks -srcstoretype JKS -srcstorepass password -destkeystore test.pfx -deststoretype PKCS12 -deststorepass password1
6 To export the self-signed certificate from FileName.jks to a .cer file, complete the following steps:6a Go to the /opt/novell/sentinel/jdk/jre/bin directory.6b Use the following command:
Authentication Methods 79

./keytool -exportcert -keystore FileName.jks -alias AliasName -file FileName1.cerWhere: FileName is the name of the file you want to convert. AliasName is the alias name you assigned to the certificate. FileName1 is the name of the file you want to create.
For example:./keytool -exportcert -keystore AA.jks -alias selfsigned1 -file myAA.cer
7 To import the new certificate file to the Sentinel server keystore, complete the following steps.7a Go to the /opt/novell/sentinel/jdk/jre/bin directory.7b Use the following command:
./keytool -importcert -file FileName.cer -keystore /etc/opt/novell/sentinel/config/.webserverkeystore.jks -alias AliasNameWhere: FileName is the name of the certificate file you want to import. AliasName is the new alias name you want to assign to the certificate in the Sentinel
keystore.For example:./keytool -importcert -file myAA.cer -keystore /etc/opt/novell/sentinel/config/.webserverkeystore.jks -alias myAA
8 Log in to Advanced Authentication and complete the following steps:8a Navigate to Server Options.8b Upload the .pfx file you created previously, using the password you used for creating the
.jks file.8c (Conditional) For Advanced Authentication 5.6 or prior, enable WebAuth.
You do not have to enable WebAuth in Advanced Authentication 6.0 or later because it is enabled by default.
9 On the Sentinel server, run the following command:touch /etc/opt/novell/sentinel/3rdparty/jetty/contexts/osp.xml
10 To retrieve the SAML metadata from Sentinel, complete the following steps:10a In the /etc/opt/novell/sentinel/osp/WEB-INF/conf/current/siem/
services directory, open the authcfg.xml file and modify the following property:failOnError="false"
10b In your web browser, go to the following URL:https://DNS_Sentinel_server:Port/osp/a/siem/auth/saml2/spmetadataWhere DNS_Sentinel_server is the FQDN of the Sentinel server and Port is the port Sentinel uses (typically 8443).
10c Copy the SAML metadata and save it in a new sentinel.xml file.
80 Authentication Methods

11 In Advanced Authentication, complete the following steps:11a Navigate to Events.11b Create a new event named SAML and upload the sentinel.xml file.11c (Optional) Create a new chain of authentication factors to replace the default Password
only chain.11d Specify the IP address of the Advanced Authentication server in one of the following ways:
For Advanced Authentication 5.6 or prior versions: 1. Navigate to Policies. 2. Edit the SAML 2.0 policy. 3. Specify the IP address of the Advanced Authentication server.
For Advanced Authentication 6.0 and later: 1. Navigate to Policies. 2. Edit the Web Authentication policy.3. Specify the IP address of the Advanced Authentication server.
Navigate to Policies and edit the SAML 2.0 policy and specify the IP address of the Advanced Authentication server.
11e Navigate to Repositories and add the LDAP repository.12 (Conditional) Ensure that you add any additional authenticators that are required for the
authentication chain. The default authentication chain includes the Email, OTP, LDAP password, Mobile ID, and RADIUS authentication methods. For more information, see the Advanced Authentication Administration Guide.
13 (Conditional) If your authentication chain includes any authentication methods other than the default methods, have all users go to the Advanced Authentication Self-Service Portal (https://IDP_IP/account, where IDP_IP is the IP address of the Advanced Authentication server) and enroll in the additional authenticator methods, as defined in the authentication chain. For example, finger prints, retinal scans, or security questions. For more information, see the Advanced Authentication User Guide.
14 (Conditional) If you are using Sentinel in High Availability (HA) mode, log in to the active node of the HA cluster and run the following command:csync2 -x -v
Configuring Sentinel in FIPS Mode to use Advanced Authentication
1 Log in to the Sentinel server.2 Browse to the Sentinel bin directory.3 To import the Advanced Authentication certificate to the NSS database, complete the following
steps:3a Copy the Advanced Authentication certificate to the Sentinel server.3b Import the Advanced Authentication certificate to the Sentinel server. Use the following
command:./convert_to_fips.sh -i /<location to certificate/certificate_file>
Authentication Methods 81

For example:./convert_to_fips.sh -i /opt/aaf.crt
4 Run the following script:./create_mfa_fips_keys.sh <nss_password/password_file>Where nss_password is the password for the NSS database and password_file is the file that stores the NSS password. Specify only one of these.
5 Update the /etc/hosts file with the hostname of the Advanced Authentication server.6 In the /etc/opt/novell/sentinel/config directory, open the osp-configuration.properties file and modify the following property:com.netiq.sentinel.osp.login.saml2.metadata-url=https\://<IDP_Hostname>/osp/a/TOP/auth/saml2/metadataWhere <IDP_Hostname> is the host name for the Advanced Authentication server.
7 Restart the Sentinel server:
rcsentinel restart8 (Conditional) If you are using Sentinel in High Availability (HA) mode, log in to the active node of
the HA cluster and run the following command:csync2 -x -v
Using Other SAML 2.0 IDP SoftwareThis section provides the steps to integrate Sentinel with any other SAML 2.0 IDP software.
1 Log in to the Sentinel server as the novell user.2 In the /etc/opt/novell/sentinel/config directory, open the osp-configuration.properties file and add the following new properties: com.netiq.sentinel.osp.login.method = saml2 com.netiq.sentinel.osp.saml2.enabled = true com.netiq.sentinel.osp.login.saml2.metadata-url = https://IDP_IPAddress
Where IDP_IPAddress is the IP address for the server where your IDP software is installed. com.netiq.sentinel.osp.login.saml2.mapping-attr = mail com.netiq.sentinel.osp.as.duplicate-resolution-naming-attr = mail com.netiq.sentinel.osp.logout.saml2.landing-page=internal
3 On the Sentinel server, run the following command:touch /etc/opt/novell/sentinel/3rdparty/jetty/contexts/osp.xml
4 To retrieve the SAML metadata from Sentinel, go to the following URL:https://Sentinel_IP:Port/osp/a/siem/auth/saml2/spmetadataWhere Sentinel_IP is the IP address of the Sentinel server and Port is the port Sentinel uses (typically 8443).
5 Use the metadata to configure your IDP. For detailed instructions, see the documentation for your IDP software.
82 Authentication Methods

6 To establish a trust relationship between Sentinel and your IDP software, you need to create self-signed certificates for both Sentinel and your IDP software. For detailed instructions about creating and importing certificates in your IDP software, see the documentation for your IDP software.
7 On the Sentinel server, go to the /opt/novell/sentinel/jdk/jre/bin directory.8 Import the new certificate file to the Sentinel server keystore. Use the following command:./keytool -importcert -file FileName.cer -keystore /etc/opt/novell/sentinel/config/.webserverkeystore.jks -alias AliasNameWhere: FileName is the name of the certificate file you want to import. AliasName is the new alias name you want to assign to the certificate in the Sentinel
keystore.9 (Conditional) If you are using Sentinel in High Availability (HA) mode, log in to the active node of
the HA cluster and run the following command:csync2 -x -v
Configuring Sentinel in FIPS Mode to use SAML 2.0 IDP1 Log in to the Sentinel server.2 Browse to the Sentinel bin directory.3 Run the following script:create_mfa_fips_keys.sh <nss_password/password_file>Where nss_password is the password for the NSS database and password_file is the file that stores the NSS password. Specify only one of these.
4 Update the /etc/hosts file with the hostname of your IDP server.5 In the /etc/opt/novell/sentinel/config directory, open the osp-configuration.properties file and modify the following property:com.netiq.sentinel.osp.login.saml2.metadata-url=https\://<IDP_Hostname>/osp/a/TOP/auth/saml2/metadataWhere <IDP_Hostname> is the host name for your IDP server.
6 To import the IDP server certificate to the NSS database, complete the following steps:6a Copy the IDP server certificate to the Sentinel server.6b Import the IDP server certificate to the Sentinel server. Use the following command:
/usr/bin/certutil -A -d sql:/etc/opt/novell/sentinel/3rdparty/nss -t "CT,CT,CT" -n SAMLIDP -i /<location to certificate>/FileName.crtFor example:/usr/bin/certutil -A -d sql:/etc/opt/novell/sentinel/3rdparty/nss -t "CT,CT,CT" -n SAMLIDP -i /root/SAMLIDP.crt
7 Run the following command:touch /etc/opt/novell/sentinel/3rdparty/jetty/contexts/osp.xml
Authentication Methods 83

8 (Conditional) If you are using Sentinel in High Availability (HA) mode, log in to the active node of the HA cluster and run the following command:csync2 -x -v
OAuth AuthenticationOAuth authentication allows users to log in to Sentinel using OAuth 2.0 providers such as Google or Facebook. This section provides instructions for configuring Sentinel to work with Google as the OAuth provider.
NOTE: By design, OAuth authentication does not support single logout. To completely log out of a Sentinel session when you are using OAuth authentication, you must clear your browser cache and cookies.
NOTE: Before you continue, ensure that you have read the enablement considerations and met all prerequisites. For more information, see “Enablement Considerations” on page 51 and “Prerequisites for MFA, Kerberos, and OAuth” on page 69.
Creating Credentials for the Google Web Application1 In your browser, go to https://console.developers.google.com/.2 Create the credentials for a web application. For more information, click the Help button on the
toolbar to see the Google documentation.
Configuring the Sentinel Server for OAuth Authentication1 Log in to the Sentinel server as the novell user.2 Run the following command:touch /etc/opt/novell/sentinel/3rdparty/jetty/contexts/osp.xml
3 In the /etc/opt/novell/sentinel/config directory, open the osp-configuration.properties file and add the following new properties: com.netiq.sentinel.osp.login.method=google com.netiq.sentinel.osp.google.enabled=true com.netiq.sentinel.osp.google.client-secret=google app secret
Where google app secret is the Google client secret. com.netiq.sentinel.osp.google.client-id=google app client id
Where google app client id is the Google client ID. com.netiq.sentinel.osp.instance-data-enabled=true com.netiq.sentinel.osp.as.scope=subtree com.netiq.sentinel.osp.instance-data-enabled=true
4 Import the Google certificates to the Sentinel keystore. In a command prompt, go to /opt/novell/sentinel/jdk/jre/bin and use the following command for each certificate:
84 Authentication Methods

./keytool -importcert -file <google.crt> -keystore /etc/opt/novell/sentinel/config/.webserverkeystore.jks -alias googleWhere <google.crt> is the name of the Google certificate you want to import.
NOTE: You must run this command separately for each of the Google certificates.
5 Restart the Sentinel server. Use the following command:rcsentinel restart
6 (Conditional) If you are using Sentinel in High Availability (HA) mode, log in to the active node of the HA cluster and run the following command:
csync2 -x -v
Configuring Sentinel in FIPS Mode to Use Google OAuthTo import the Google server chain certificates to the NSS database, complete the following steps:
1 Copy the Google certificate to the Sentinel server.2 Run the following script:create_mfa_fips_keys.sh <nss_password/password_file>Where nss_password is the password for the NSS database and password_file is the file that stores the NSS password. Specify only one of these.
3 Import the Google certificates to the Sentinel server. Use the following command for each certificate: /usr/bin/certutil -A -d sql:/etc/opt/novell/sentinel/3rdparty/nss -t "CT,CT,CT" -n google -i /<location to certificate>/FileName.crtFor example:/usr/bin/certutil -A -d sql:/etc/opt/novell/sentinel/3rdparty/nss -t "CT,CT,CT" -n google -i /root/sai/google.crt
NOTE: You must run this command separately for each of the Google certificates.
4 Restart the Sentinel server. Use the following command:rcsentinel restart
5 (Conditional) If you are using Sentinel in High Availability (HA) mode, log in to the active node of the HA cluster and run the following command:csync2 -x -v
Authentication Methods 85
TroubleshootingThis section helps you troubleshoot issues that might occur when using a non-default authentication method.
“An Invalid OAuth2 Request was Received” on page 86 “Invalid Host Header Name or Request URL Domain Name” on page 86 “Login Redirects to the Standard Login Page” on page 86
An Invalid OAuth2 Request was ReceivedIssue: Sentinel displays the following error message:
The service may be disabled or an invalid request was made to an active service. Please contact your system administrator. (An invalid OAuth2 request was received.)Fix: You need to correct one or more settings for the current authentication method. For detailed information, check the osp-sentinel-<date>.log file in the /var/opt/novell/sentinel/log/osp directory.
Invalid Host Header Name or Request URL Domain NameIssue: Sentinel displays the following error message:
Unrecognized interface. Invalid Host Header Name or Request URL Domain Name.Fix: Ensure the FQDN is set properly. On the Sentinel server, update the /etc/hosts file with the following:
Sentinel_IP FQDN_Sentinel_server HostnameWhere:
Sentinel_IP is the IP address of the Sentinel server. FQDN_Sentinel_server is the FQDN of the Sentinel server. Hostname is the host name of the Sentinel server.
For example:
127.0.0.1 rbpm.mycompany.com rbpm
NOTE: You can use the $hostname command to verify whether the host name is correct.
For detailed information, check the osp-sentinel-<date>.log file in the /var/opt/novell/sentinel/log/osp directory.
Login Redirects to the Standard Login PageIssue: Sentinel displays the following error message:
86 Authentication Methods

Integrated Windows Authentication is not properly configured in your environment. You will be redirected to the standard login page in 5 seconds.Fix 1: Clear your browser cache and remove all cookies.
Fix 2: If Fix 1 does not work, ensure the Sentinel server time is synchronized with NTP, and then restart the Sentinel server.
Authentication Methods 87

88 Authentication Methods

III IIICollecting and Routing Event Data
This section provides information about collecting and routing events.
Chapter 6, “Configuring Agentless Data Collection,” on page 91 Chapter 7, “Configuring Agent-Based Data Collection,” on page 125 Chapter 8, “Configuring ArcSight SmartConnectors for Data Collection,” on page 127 Chapter 9, “Managing Event Sources,” on page 129 Chapter 10, “Configuring Event Routing Rules,” on page 137 Chapter 11, “Mapping Events,” on page 141 Chapter 12, “Linking to Additional Sentinel Systems,” on page 153
Collecting and Routing Event Data 89

90 Collecting and Routing Event Data

6 6Configuring Agentless Data Collection
Sentinel can collect data from a wide range of event sources, such as intrusion detection systems, firewalls, operating systems, routers, databases, switches, mainframes, antivirus applications, and Novell applications. A modular architecture divides the task of protocol-level connections (Connectors) and the parsing logic (Collectors) for specific event sources.
Sentinel supports a wide variety of Connectors and also includes a variety of Collectors. The configuration required to integrate a new event source with Sentinel varies, depending on the type of event source and the communication method selected.
You should review the Collector and Connector documentation for any new event source integration to ensure that all available features are enabled.
The configuration required to integrate a new event source with Sentinel varies depending on the type of event source and the communication method selected.
“Before You Begin” on page 91 “Resolving Hostnames and IP Addresses” on page 92 “Configuring Data Collection for Syslog Event Sources” on page 92 “Configuring Data Collection for the Novell Audit Server” on page 96 “Configuring Data Collection for Other Event Sources” on page 100 “Managing Event Sources” on page 119
Before You Begin Determine the Collector and Connector plug-ins installed in the system by clicking Plug-ins >
Catalog. You can see the plug-ins versions and other metadata, which helps you determine whether you have the latest version of a plug-in. If you want a later version of a plug-in, download the plug-in from the Sentinel Plug-ins Web site.
For information about editing Collectors that are already included in Sentinel, see the Sentinel Plug-ins SDK Web site.
Configuring Agentless Data Collection 91

Resolving Hostnames and IP AddressesEvents include either IP addresses or hostnames, by default. You can configure Sentinel to resolve IP addresses to hostnames or vice versa so that events include both IP addresses and the corresponding hostnames. You can also configure Sentinel to include both IPv4 and IPv6 IP addresses. This additional information helps you to easily relate events from devices reporting IP addresses and other devices reporting hostnames when analyzing events and alerts.
You can configure Sentinel to resolve hostnames to IP addresses or vice versa by editing the configuration.properties file. These two options can be enabled independently. Both successful and failed lookups are cached for a short period to minimize lookups to the DNS server and maximize event throughput.
To resolve hostnames and IP addresses in an event:
1 Log in to the Sentinel server as novell user.2 Open the <sentinel_install_directory>/etc/opt/novell/sentinel/config/configuration.properties file.
3 (Conditional) To resolve hostnames to IP addresses, add the enrich.event.host_ip_lookup property and set the value to true as follows:enrich.event.host_ip_lookup=trueThis includes the corresponding IP addresses of the hostnames in events. If the hostname resolution returns both IPv4 and IPv6 addresses, only the IPV4 address is included in an event, by default. To include the IPV6 address in the event, add the event.host_ip_lookup.prefer.ipv6 property and set the value to true as follows:event.host_ip_lookup.prefer.ipv6=true
4 (Conditional) To resolve IP addresses to hostnames, add the enrich.event.ip_host_lookup property and set the value to true as follows:enrich.event.ip_host_lookup=trueThis includes the corresponding hostnames of the IP addresses in events.
5 Restart Sentinel to apply the changes made to the configuration.properties file.
Configuring Data Collection for Syslog Event SourcesSentinel is preconfigured to accept Syslog data from Syslog event sources that send data over TCP (port 1468), UDP (port 1514), or SSL (port 1443). You can also configure Sentinel to listen on additional ports. To collect Syslog data, configure your Syslog event sources to send data to one of these ports.
The following sections describe how you can configure the event sources to send data to Sentinel and how you can configure new Syslog ports to receive data:
“Parsing Logic for Syslog Messages” on page 93 “Configuring Syslog Servers” on page 93 “Configuring Client Authentication for the SSL Syslog Server” on page 94
92 Configuring Agentless Data Collection
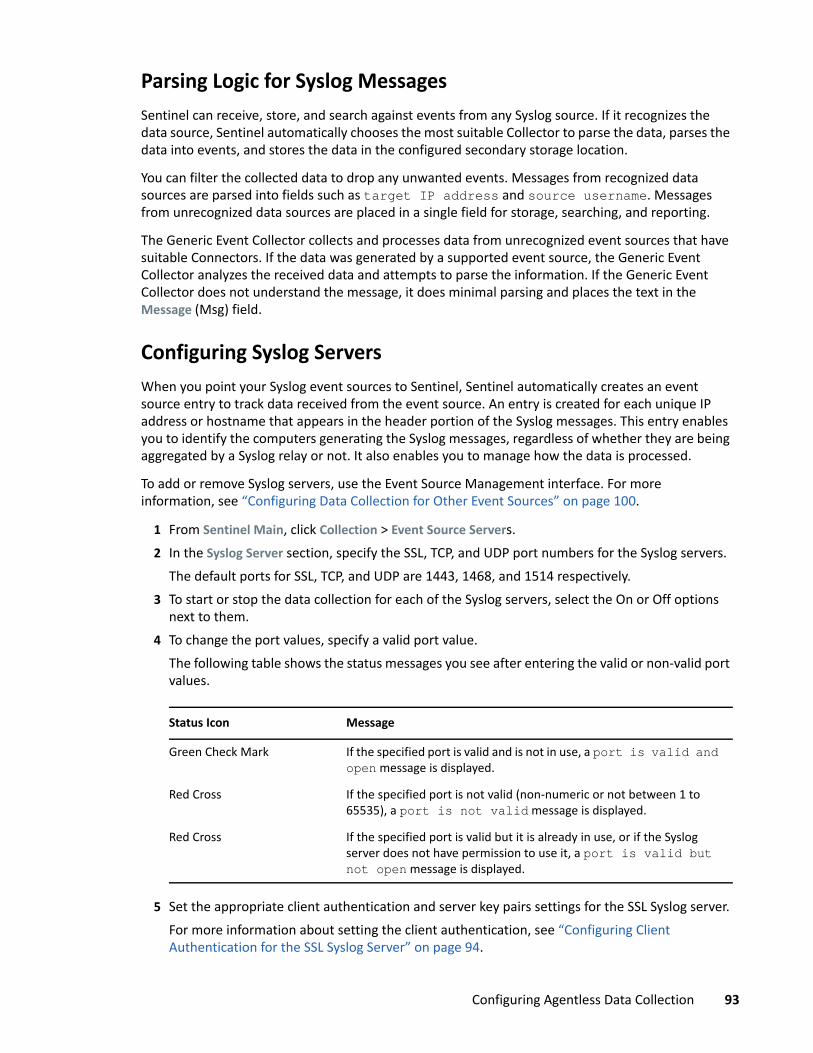
Parsing Logic for Syslog MessagesSentinel can receive, store, and search against events from any Syslog source. If it recognizes the data source, Sentinel automatically chooses the most suitable Collector to parse the data, parses the data into events, and stores the data in the configured secondary storage location.
You can filter the collected data to drop any unwanted events. Messages from recognized data sources are parsed into fields such as target IP address and source username. Messages from unrecognized data sources are placed in a single field for storage, searching, and reporting.
The Generic Event Collector collects and processes data from unrecognized event sources that have suitable Connectors. If the data was generated by a supported event source, the Generic Event Collector analyzes the received data and attempts to parse the information. If the Generic Event Collector does not understand the message, it does minimal parsing and places the text in the Message (Msg) field.
Configuring Syslog ServersWhen you point your Syslog event sources to Sentinel, Sentinel automatically creates an event source entry to track data received from the event source. An entry is created for each unique IP address or hostname that appears in the header portion of the Syslog messages. This entry enables you to identify the computers generating the Syslog messages, regardless of whether they are being aggregated by a Syslog relay or not. It also enables you to manage how the data is processed.
To add or remove Syslog servers, use the Event Source Management interface. For more information, see “Configuring Data Collection for Other Event Sources” on page 100.
1 From Sentinel Main, click Collection > Event Source Servers.2 In the Syslog Server section, specify the SSL, TCP, and UDP port numbers for the Syslog servers.
The default ports for SSL, TCP, and UDP are 1443, 1468, and 1514 respectively.3 To start or stop the data collection for each of the Syslog servers, select the On or Off options
next to them.4 To change the port values, specify a valid port value.
The following table shows the status messages you see after entering the valid or non-valid port values.
5 Set the appropriate client authentication and server key pairs settings for the SSL Syslog server.For more information about setting the client authentication, see “Configuring Client Authentication for the SSL Syslog Server” on page 94.
Status Icon Message
Green Check Mark If the specified port is valid and is not in use, a port is valid and open message is displayed.
Red Cross If the specified port is not valid (non-numeric or not between 1 to 65535), a port is not valid message is displayed.
Red Cross If the specified port is valid but it is already in use, or if the Syslog server does not have permission to use it, a port is valid but not open message is displayed.
Configuring Agentless Data Collection 93

The SSL Syslog server is automatically restarted if any changes are made here.6 (Optional) Click Reset to restore the previous settings.7 Click Save to save the new settings.
The Save button is disabled until you specify a valid port for all of the servers.
Configuring Client Authentication for the SSL Syslog ServerThe client authentication settings determine how strictly the SSL Syslog server verifies the identity of Syslog event sources that are attempting to send their data.You should use a strict client authentication policy that is applicable in your environment to prevent rogue Syslog event sources from sending undesired data into Sentinel.
Open: No authentication is required. Sentinel does not request, require, or validate a certificate from the event source.
Loose: A valid X.509 certificate is required from the event source, but the certificate is not validated. It does not need to be signed by a certificate authority.
Strict: A valid X.509 certificate is required from the event source, and it must be signed by a trusted certificate authority. If the event source does not present a valid certificate, Sentinel does not accept its event data.
“Creating a Trust Store” on page 94 “Importing a Certificate into the Trust Store” on page 95 “Server Key Pair” on page 95
Creating a Trust StoreFor strict authentication, you must have a trust store that contains the public certificate of the certificate authority (CA) that signed the event source certificate. After you have a DER or PEM certificate, you can create the trust store by using the TruststoreCreator utility that comes with Sentinel.
1 Log in to the Sentinel server as novell user.2 Go to the /var/opt/novell/sentinel/data/updates/done folder.3 Use the following command to extract the syslog_connector.zip file: unzip syslog_connector.zip
4 Copy the TruststoreCreator.sh or TruststoreCreator.bat file to the machine that has the certificates.orCopy the certificates to the computer with the TruststoreCreator utility.
5 Run the TruststoreCreator.sh utility as follows:TruststoreCreator.sh -keystore /tmp/my.keystore -password password1 -certs /tmp/cert1.pem,/tmp/cert2.pemIn this example, the TruststoreCreator utility creates a keystore file called my.keystore that contains two certificates (cert1.pem and cert2.pem). It is protected by the password password1. The keystore file must be imported into the trust store.
94 Configuring Agentless Data Collection

Importing a Certificate into the Trust StoreFor strict authentication, the administrator can import a certificate by using the Import button. This helps ensure that only authorized event sources are sending data to Sentinel. The trust store must include public certificate of the certificate authority (CA) that signed the event source certificate.
The following procedure must be run on the computer that has the trust store on it. You can open a web browser on the computer with the trust store or move the trust store to any computer with a web browser.
NOTE: If the CA is signed by another CA, you must import the chain of CA certificates until the root CA.
To import a trust store:
1 From Sentinel Main, click Collection > Event Source Servers.2 In the Syslog Server section, select the Strict option under Client authentication.3 Click Browse and browse to the trust store file (for example, my.keystore)4 Specify the password for the truststore file.5 Click Import.6 (Optional) Click Details to see more information about the trust store.7 (Optional) Click Reset to restore the previous settings.8 Click Save.
After the trust store is successfully imported, you can click Details to see the certificates included in the trust store.
Server Key PairSentinel is installed with a built-in certificate, which is used to authenticate the Sentinel server to the event sources. This certificate can be overridden with a certificate signed by a public certificate authority (CA).
To replace the built-in certificate:
1 From Sentinel Main, click Collection > Event Source Servers.2 In the Syslog Server section, under Server key pairs, select Custom.3 Click Browse and browse to the trust store file.4 Specify the password for the trust store file.5 Click Import.6 (Optional) If there is more than one public-private key pair associated with the file, select the
desired key pair, then click OK.7 (Optional) Click Details to see more information about the server key pair.8 (Optional) Click Reset to restore the previous settings.9 Click Save.
Configuring Agentless Data Collection 95

Configuring Data Collection for the Novell Audit ServerMany Novell products send data to Sentinel by using a Platform Agent. Data is received by an Event Source Server called the Audit Server, which is packaged with Sentinel. The Audit Server is similar in many ways to a Syslog server.
The following sections describe the procedure to configure the Audit Server port to receive data and also to set the Audit Server options:
“Specifying the Audit Server Settings” on page 96 “Setting the Audit Server Options” on page 97
Specifying the Audit Server SettingsTo specify the data collection settings for the Audit Server:
1 From Sentinel Main, click Collection > Event Source Servers.2 In the Audit Server section, select the On or Off options to start or stop the data collection for
the Audit Server.3 In the Audit Server section, specify the port on which the Sentinel server listens to messages
from the event sources. For more information about setting the port, see “Port Configuration and Port Forwarding for the Audit Server” on page 97.
4 Set the appropriate client authentication and server key pairs settings. For more information about client authentication, see “Client Authentication for the Audit Server” on page 98.The Audit server and all related Audit Connectors are automatically restarted if any changes are made here.
5 Select the Sentinel server behavior when the number of events received exceeds the buffer capacity.
WARNING: If you select Drop oldest messages, there is no supported method to recover dropped messages,
6 Select Idle Connection to disconnect event sources that have not sent data for a certain period of time.The event source connections are automatically re-created when they start sending data again.
7 Specify the number of minutes before an idle connection is disconnected.8 (Optional) Select Event Signatures to receive a signature with the event.
To receive a signature, the Platform Agent on the event source must be configured properly. For information on validating event signatures, see the Signing Events section in the Audit Platform Agent Guide.
9 (Optional) Click Reset to restore the previous settings.10 Click Save to save the new settings.
The Save button is disabled until a valid port is specified for the server.
96 Configuring Agentless Data Collection

These settings might affect data collection for several servers (for example, multiple eDirectory instances). However, they do not start or stop services on the event source computers. Changes on this page take effect immediately.
To view the health of the Audit Server and its event sources, see “Managing Event Sources” on page 119.
Setting the Audit Server OptionsAdministrators can change the settings for how Sentinel listens for data from the event source applications, set the port on which Sentinel listens, and select the type of authentication between the event source and Sentinel.
“Port Configuration and Port Forwarding for the Audit Server” on page 97 “Client Authentication for the Audit Server” on page 98
Port Configuration and Port Forwarding for the Audit ServerBy default, Sentinel listens on port 1289 for messages from the server. When the port is changed, the system checks whether the specified port is valid and open.
Binding to ports lower than 1024 requires root privileges, so you should use a port higher than 1024. You can change the source devices to send data to a higher port or use port forwarding on the Sentinel server.
To change the Platform Agent to send data to a different port:
1 Log in to the event source computer.2 Open the logevent file for editing. The file location depends on the operating system:
Linux: /etc/logevent.conf Windows: C:\WINDOWS\logevent.cfg NetWare: SYS:\etc\logevent.cfg Solaris: /etc/logevent.conf
3 Set the LogEnginePort parameter to the desired port.4 Save the file.5 Restart the Platform Agent.
The method varies by operating system and application. Restart the computer or refer to the application-specific documentation on the Documentation Web site (http://www.netiq.com/documentation) for more instructions.
To configure port forwarding on the Sentinel server:
1 Log in to the Sentinel server operating system as root (or su to root).2 Open the /etc/init.d/boot.local file for editing.3 Add the following command at the end of the bootup process:
iptables -A PREROUTING -t nat -p protocol --dport incoming port -j DNAT --to-destination IP:rerouted port
Configuring Agentless Data Collection 97

Replace protocol with tcp or udp, incoming port with the port where the messages are arriving, and IP:rerouted port with the IP address of the local computer and an available port above 1024.
4 Save the changes.5 Reboot the server. If you cannot reboot immediately, run the iptables command in Step 3
from a command line.
Client Authentication for the Audit ServerThe event sources send their data over an SSL connection, and the Client authentication setting for the Sentinel server determines what kind of authentication is performed for the certificates from the Audit Server on the event sources.
Open: No authentication is required. Sentinel does not request, require, or validate a certificate from the Event Source.
Loose: A valid X.509 certificate is required from the Event Source, but the certificate is not validated. It does not need to be signed by a certificate authority.
Strict: A valid X.509 certificate is required from the Event Source, and it must be signed by a trusted certificate authority. If the Event Source does not present a valid certificate, Sentinel does not accept its event data.
“Creating a Trust store” on page 98 “Importing a Certificate into the Trust Store” on page 99 “Server Key Pair” on page 99
Creating a Trust storeFor strict authentication, you must have a trust store that contains the public certificate of the certificate authority (CA) that signed the event source certificate. After you have a DER or PEM certificate, you can create the trust store by using the CreateTrust store utility that comes with Sentinel.
1 Log in to the Sentinel server as novell.2 Go to /var/opt/novell/sentinel/data/updates/done.3 Unzip the audit_connector.zip file:unzip audit_connector.zip
4 Copy TruststoreCreator.sh or TruststoreCreator.bat to the computer with the certificatesorCopy the certificates to the computer with the TruststoreCreator utility
5 Run the TruststoreCreator.sh utility:TruststoreCreator.sh -keystore /tmp/my.keystore -password password1 -certs /tmp/cert1.pem,/tmp/cert2.pemIn this example, the TruststoreCreator utility creates a keystore file called my.keystore that contains two certificates (cert1.pem and cert2.pem). It is protected by the password password1.
98 Configuring Agentless Data Collection

Importing a Certificate into the Trust StoreFor strict authentication, the administrator can import a certificate. This helps ensure that only authorized event sources are sending data to Sentinel. The trust store must include public certificate of the certificate authority (CA) that signed the event source certificate.
The following procedure must be run on the machine that has the trust store on it. You can open a web browser on the machine with the trust store or move the trust store to any machine with a web browser.
NOTE: If the CA is signed by another CA, then you must import the chain of CA certificates until the root CA.
1 From Sentinel Main, click Collection > Event Source Servers.2 In the Audit Server section, select the Strict option under Client authentication.3 Click Browse and browse to the trust store file (for example, my.keystore)4 Specify the password for the trust store file.5 Click Import.6 (Optional) Click Details to see more information about the trust store.7 (Optional) Click Reset to restore the previous settings.8 Click Save.
After the trust store is imported successfully, you can click Details to see the certificates included in the trust store.
Server Key PairSentinel is installed with a built-in certificate, which is used to authenticate the Sentinel server to the event sources. This certificate can be overridden with a certificate signed by a public certificate authority (CA).
To replace the built-in certificate:
1 From Sentinel Main, click Collection > Event Source Servers.2 In the Audit Server section, under Server key pairs, select Custom.3 Click Browse and browse to the trust store file.4 Specify the password for the trust store file.5 Click Import.6 (Optional) If there is more than one public-private key pair in the file, select the desired key pair
and click OK.7 (Optional) Click Details to see more information about the server key pair.8 (Optional) Click Reset to restore the previous settings.9 Click Save.
Configuring Agentless Data Collection 99

Configuring Data Collection for Other Event SourcesThe Event Source Management (Live View) interface provides a set of tools to manage and monitor connections between Sentinel and the event sources that provide data to Sentinel. The graphical interface shows the current event sources and the software components that are processing data from that event source. Each component can be easily deployed to integrate the devices in the enterprise, and it can be monitored in real time within the Event Source Management interface. Some Connectors and Collectors must be configured in Event Source Management, such as the WMS connector for Windows, Database connectors, and SDEE connectors for Cisco devices.
NOTE: If you are using openSUSE11.1, update your JRE to the latest version. Then use the Java Web Start (javaws) launcher command to launch the Event Source Management.
You can perform the following tasks through the Event Source Management window:
Add or modify connections to event sources by using Configuration wizards. View the real-time status of the connections to event sources. Import or export configuration of event sources to or from the Live View. View and configure Connectors and Collectors that are installed. Import or export Connectors and Collectors from or to a centralized repository. Monitor data flowing through the Collectors and Connectors. Design, configure, and create the components of the event source hierarchy, and execute
required actions by using these components.
“Accessing Event Source Management” on page 100 “Viewing Data in Event Source Management” on page 101 “Searching for Event Sources” on page 106 “Installing Plug-Ins” on page 107 “Updating a Connector or a Collector Plug-In” on page 108 “Adding Components to Sentinel” on page 108 “Connecting to Event Sources” on page 110 “Exporting Configurations” on page 114 “Importing Configurations” on page 115 “Debugging” on page 115 “Troubleshooting” on page 119
Accessing Event Source Management1 From Sentinel Main, click Applications > Launch Control Center.
orFrom Sentinel Main, click Collection > Advanced > Launch Control Center.
2 Log in to the Sentinel Control Center.3 In toolbar, click Event Source Management > Live View.
100 Configuring Agentless Data Collection
Viewing Data in Event Source ManagementIn the Event Source Management, you can view configuration data in different views:
“Graphical ESM View” on page 101 “Table ESM View” on page 103 “How the Components Are Displayed” on page 104 “Component Status Indicators” on page 105 “Right-Click Menus” on page 105
Graphical ESM ViewThe graphical view is the default view in Event Source Management. In the graphical view, you can view the status of a Collector and access the configuration settings of Collectors and Collector objects as a graph of connected nodes.
Configuring Agentless Data Collection 101

Figure 6-1 Graphical View
By default, the Health Monitor Display frame displays in the graphical view. The data can be displayed in several different layouts. The default layout in graph is the Hierarchic Left to Right layout. You can change between these layouts by selecting the layout format from the drop-down list in the toolbar.
TIP: Click in the graphical ESM view and use the “+” or “-”sign to zoom in or zoom out, or use the mouse wheel to zoom in and zoom out.
In the graphical view, the lines connecting the components are color-coded to indicate data flow.
Green Line: Indicates that data is flowing between the components.
Grey Line: Indicates that the connection is not live and there is no data flow.
102 Configuring Agentless Data Collection
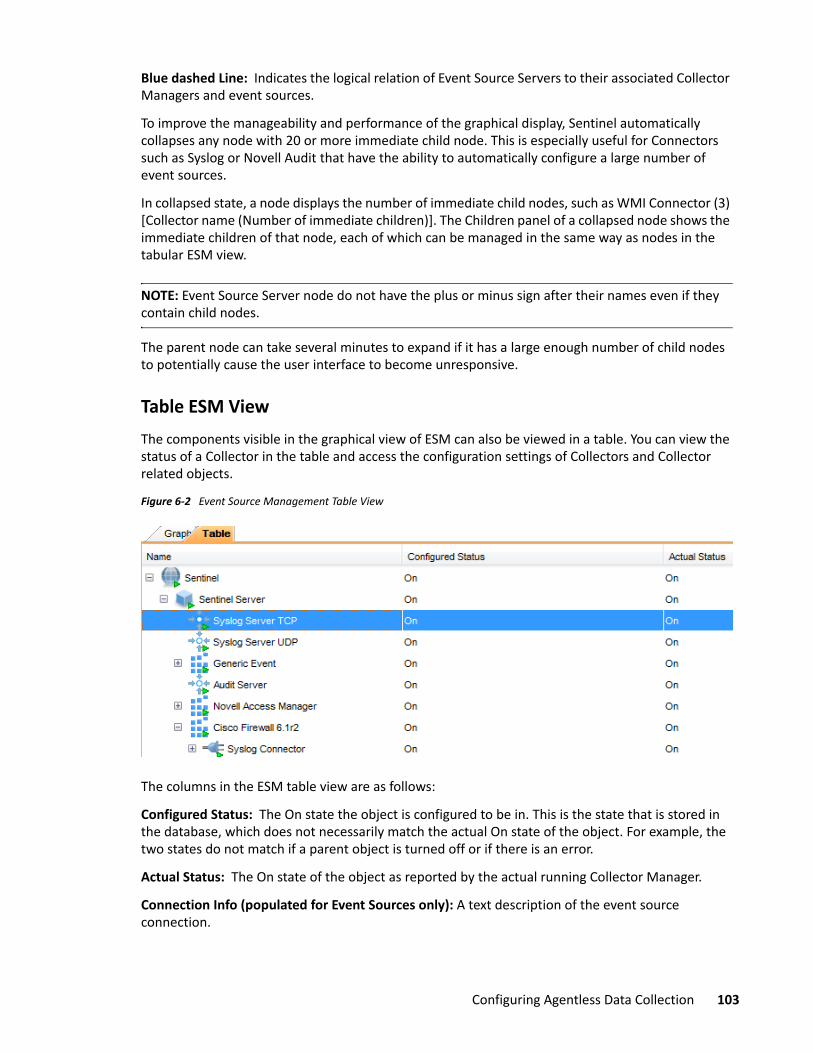
Blue dashed Line: Indicates the logical relation of Event Source Servers to their associated Collector Managers and event sources.
To improve the manageability and performance of the graphical display, Sentinel automatically collapses any node with 20 or more immediate child node. This is especially useful for Connectors such as Syslog or Novell Audit that have the ability to automatically configure a large number of event sources.
In collapsed state, a node displays the number of immediate child nodes, such as WMI Connector (3) [Collector name (Number of immediate children)]. The Children panel of a collapsed node shows the immediate children of that node, each of which can be managed in the same way as nodes in the tabular ESM view.
NOTE: Event Source Server node do not have the plus or minus sign after their names even if they contain child nodes.
The parent node can take several minutes to expand if it has a large enough number of child nodes to potentially cause the user interface to become unresponsive.
Table ESM ViewThe components visible in the graphical view of ESM can also be viewed in a table. You can view the status of a Collector in the table and access the configuration settings of Collectors and Collector related objects.
Figure 6-2 Event Source Management Table View
The columns in the ESM table view are as follows:
Configured Status: The On state the object is configured to be in. This is the state that is stored in the database, which does not necessarily match the actual On state of the object. For example, the two states do not match if a parent object is turned off or if there is an error.
Actual Status: The On state of the object as reported by the actual running Collector Manager.
Connection Info (populated for Event Sources only): A text description of the event source connection.
Configuring Agentless Data Collection 103

Error: A text description of an error that occurred in the running object.
TIP: Use the Table and Graph tabs to change to tabular and graphical views.
How the Components Are DisplayedESM displays the information on the Collectors and other components in a hierarchy specific to ESM.
Table 6-1 Components of the ESM Hierarchy
Sentinel The single Sentinel icon represents the main Sentinel Server that manages all events collected by the Sentinel system.
The Sentinel object is installed automatically through the Sentinel installer.
Collector Manager or the Sentinel Server
The Collector Manager display name in the ESM is Sentinel Server.
Each icon represents another instance of a Collector Manager process. Multiple Collector Manager processes can be installed throughout the enterprise. As each Collector Manager process connects to Sentinel, the objects are automatically created in ESM.
Collector Collectors instantiate the parsing logic for data from a particular event source. Each Collector icon in ESM refers to a deployed Collector script as well as the runtime configuration of a set of parameters for that Collector.
Connector Connectors are used to provide the protocol-level communication with an event source, using industry standards like Syslog, JDBC, and so forth. Each instance of a Connector icon in ESM represents the Connector code as well as the runtime configuration of that code.
Event Source Server
An Event Source Server (ESS) is considered part of a Connector, and is used when the data connection with an event source is inbound rather than outbound. The ESS represents the daemon or server that listens for these inbound connections. The ESS caches the received data, and one or more Connectors connect to the ESS to retrieve a set of data for processing. The Connector requests only the data from its configured event source (defined in the metadata for the event source) that matches additional filters.
Event Source The event source represents the actual source of data for Sentinel. Unlike other components, this is not a plug-in, but is a container for metadata, including runtime configuration about the event source. In some cases a single event source can represent many real sources of event data, such as if multiple devices are writing to a single file.
104 Configuring Agentless Data Collection

Component Status IndicatorsIndicators are used to represent various states as follows:
Table 6-2 Component Status Indicators
Right-Click MenusThe Health Monitor Display View provides a set of right-click menus that helps you execute a set of actions, as described below:
The right-click actions available depend on the object you click.
Status Details: View all information known about the status of the selected object.
Start: Run an object.
The selected object starts only after the parent nodes starts and is running.
Stop: Stops the running object.
Edit: Modifies the editable information (Filter information, Object name and so on).
Debug: Debugs the Collector. You must stop the running Collector before you debug it.
Move: Moves the selected object from its current parent object to another parent object. You can move objects from a Live View to the scratch pad and vice versa.
Clone: Creates a new object that has its configuration information pre-populated with the settings of the currently selected object. This allows you to quickly create a large number of similar event sources without retyping the same information over and over again. You can clone objects from Live View to the scratch pad and vice versa. Cloning an object copies all the settings except the Run status. New objects created using the Clone command are always in the Stopped state after creation.
Stopped Indicates that the component is stopped.
Running Indicates that the component is running.
Warning Indicates that a warning is associated with the component. At this time, this warning indicator is primarily used to show when the configured state and actual state of a component differ. (That is, a component is configured to be running, but the actual state of the component is stopped.)
Error Indicates that an error is associated with the component. See the individual component’s status display for details about the error.
Reporter Time is Skewed
Indicates when the time of a component differs from the main server’s time. (The difference is greater than a predefined time threshold.)
Debug Indicates that the component is in Debug mode. Only a Collector can be in Debug mode.
Unknown Indicates that the status of the object in the ESM panel is not yet known.
Configuring Agentless Data Collection 105

Remove: Deletes a selected object from the system.
Contract: Collapses the child nodes into this node. This option is only available on parent nodes that are currently expanded.
Expand: Expands the child nodes of this node. This option is only available on parent nodes that are currently collapsed.
Add Collector: Opens an Add Collector Wizard that guides you through the process of adding a Collector to the selected Collector Manager.
Add Connector: Opens an Add Connector Wizard that guides you through the process of adding a Connector to the selected Collector.
Add Event Source: Opens an Add Event Source Wizard that guides you through the process of adding an event source to the selected Connector.
Open Raw Data Tap: Lets you view the live stream of raw data from an event source or flowing through the selected object.
Zoom: In the graphical view, zoom in on the selected object.
Show in Tabular/Graphical View: Lets you switch between the graphical view and the tabular view and automatically selects the object that is selected in the current view. When switching to the graphical view, it also zooms in on the selected object.
Raw Data Filter: Filters the raw data flowing through the selected node. The raw data filter is available on Collectors, Connectors, and event sources. If a filter specifies to drop data, the data to be dropped is not passed to the parent node and is not converted into events.
Import Configuration: Imports the configuration of ESM objects.
Export Configuration: Exports the configuration of ESM objects
Add Event Source Server: Adds an Event Source Server to the selected Collector Manager
Add Collector Manager: In Scratch pad mode, you can add a Collector Manager to the scratch pad by using this option. In the Live view, Collector Manager objects are created automatically as each Collector Manager connects to the Sentinel system.
When you select multiple objects in the ESM panel and right-click, the following options are available:
Start: Starts all objects
Stop: Stops all objects
Remove selected objects: Removes the selected objects along with their children.
Searching for Event SourcesYou can use the Attribute Filter panel to search for event sources.
1 Access Event Source Management.For more information, see “Accessing Event Source Management” on page 100.
2 In the Attribute Filter panel, use the following information to display objects you want:
106 Configuring Agentless Data Collection
Search: Specify the name of the objects you want displayed.Limit to: Select the types of objects to display.Status: Select the status of the objects to display.As you define each filter, the display is automatically updated.
Installing Plug-InsAlthough some Sentinel components are preinstalled with the Sentinel system, you should also check the Sentinel Plug-ins Web site to download the latest versions on the plug-ins.
“Installing a Connector Plug-In” on page 107 “Installing a Collector Plug-In” on page 107
Installing a Connector Plug-In1 Access Event Source Management.
For more information, see “Accessing Event Source Management” on page 100.2 In the toolbar, click Tools > Import plug-in.3 Select Import Collector Script or Connector plug-in package file (.zip, .clz, .cnz).4 Click Next.5 Click Browse. 6 Browse to and select the Connector plug-in package file, then click Open.7 Click Next.8 (Conditional) If the Connector already exists in the plug-in repository, select to replace the
existing plug-in with the new plug-in by clicking Next.9 (Conditional) In the plug-in details window, select Deployed Plug-ins to deploy the plug-in from
this window.For more information, see “Access Event Source Management.” on page 111.
10 Click Finish.When you add a plug-in to Sentinel, it is placed in the plug-in repository, which enables Sentinel components on other machines to start using the plug-in without adding the plug-in separately.
Installing a Collector Plug-In1 Access Event Source Management.
For more information, see “Accessing Event Source Management” on page 100.2 In the toolbar, click Tools > Import plug-in.3 Select Import Collector Script or Connector plug-in package file (.zip, .clz, .cnz.).
orSelect Import Collector Script from directory.
4 Click Next.5 Click Browse.
Configuring Agentless Data Collection 107

6 Browse to and select the Collector script from a file or directory, then click Open.7 Click Next to display the plug-in details window.8 Select Deploy Plug-in to deploy the plug-in from this window.
For more information on the deployment procedure, see “Access Event Source Management.” on page 111.
9 Click Finish.
Updating a Connector or a Collector Plug-InIf a new version of a Connector or Collector is released, you can update the Sentinel system and any deployed instances of the Connector or Collector.
1 Access Event Source Management.For more information, see “Accessing Event Source Management” on page 100.
2 In the toolbar, click Tools > Import plug-in.3 Select Import Collector Script or Connector plug-in package file (.zip, .clz, .cnz.).
orSelect Import Collector Script from directory.
4 Click Next.5 Click Browse.6 Browse to and select the Connector or Collector plug-in package file, then click Open.7 Click Next.8 Click Next to update an already-imported Connector or Collector.9 In the plug-in details window, select Update Deployed Plug-ins to update any currently deployed
plug-ins that use this Connector or Collector. 10 Click Finish.
When you add a plug-in to Sentinel, it is placed in the plug-in repository, which enables Sentinel components on other machines to start using the plug-in without adding the plug-in separately.
Adding Components to SentinelAfter the plug-ins are installed in the Event Source Management, you must add the different components to your Sentinel solution.
“Adding a Collector” on page 108 “Adding a Connector” on page 109 “Adding an Event Source” on page 109 “Adding an Event Source Server” on page 109
Adding a Collector1 Access Event Source Management.
For more information, see “Accessing Event Source Management” on page 100.
108 Configuring Agentless Data Collection

2 In the main ESM display, locate the Collector Manager where the Collector will be associated.3 Right-click the Collector Manager, then select Add Collector.4 Follow the prompts in the Add Collector Wizard.
These prompts are unique for each Collector. For details, see the specific Collector documentation at the Sentinel Plug-ins Web page (http://support.novell.com/products/sentinel/secure/sentinelplugins.html).
5 Click Finish.
The Collector Script enables the ESM panel to prompt you for parameter values as well as enable Event Source Management to automatically select supported connection methods that work well with the Collector script.
Adding a Connector1 Access Event Source Management.
For more information, see “Accessing Event Source Management” on page 100.2 In the main ESM display, locate the Collector where the new Connector will be associated3 Right-click the Collector, then select Add Connector.4 Follow the prompts in the Add Connector Wizard.
These prompts are unique for each Connector. For details, see the specific Connector documentation at the Sentinel Plug-ins Web page (http://support.novell.com/products/sentinel/secure/sentinelplugins.html).
5 Click Finish.
Adding an Event Source1 Access Event Source Management.
For more information, see “Accessing Event Source Management” on page 100.2 In the main ESM display, locate the Connector where the new event source will be associated.3 Right-click the Connector, then select Add Event Source.
These prompts unique for each event source that is associated with the Connector. For details, see the specific Connector documentation at the Sentinel Plug-ins Web page (http://support.novell.com/products/sentinel/secure/sentinelplugins.html).
4 Follow the prompts in the Add Event Source Wizard.5 Click Finish.
Adding an Event Source ServerCertain event source Connectors (such as the Syslog Connector) require a process to collect data from the actual data source. These processes are called Event Source Servers. They collect data from the data source and then serve it to the event source Connector. Event Source Servers must be added and associated to any event source Connectors that require a server.
1 Access Event Source Management.For more information, see “Accessing Event Source Management” on page 100.
Configuring Agentless Data Collection 109

2 Right-click the Collector Manager, then select Add Event Source Server.3 Select a Connector that supports your device, then click Next.
If you do not have any connectors in the list that supports your device, click Install More Connectors. For more information on installing a Connector plug-in, see “Installing a Collector Plug-In” on page 107.
4 Configure the various parameters for the server that is associated with the selected Connector. For example, Syslog Connector, NAudit Connector, and so on.These parameters are unique for each Connector. For details, see the specific Connector documentation at the Sentinel Plug-ins Web page (http://support.novell.com/products/sentinel/secure/sentinelplugins.html).
5 Click Next.6 Specify a name for the Event Source Server.7 (Optional) If you want this server to run, select Run.8 Click Finish.
In the Health Monitor Display frame, the Event Source Server is displayed with a dashed line showing which the Collector Manager it is associated with.
This Add Event Source Server Wizard can also be initiated from within the Add Connector Wizard if a compatible Event Source Server has not yet been added.
Connecting to Event SourcesThere are many different ways to add an event source. The following procedures walk you through the process.
“Prerequisites” on page 110 “Connecting to the Event Source” on page 111 “Creating a New Collector and Connector” on page 112 “Using an Existing Collector” on page 113 “Using an Existing Connector” on page 114
PrerequisitesMake sure you have the following prerequisites:
Collector Script: Collector scripts can be downloaded from the Sentinel Plug-ins Web site (http://support.novell.com/products/sentinel/secure/sentinelplugins.html) or built with the Collector Builder.
Connector: Connectors can be downloaded from the Sentinel Plug-ins Web site (http://support.novell.com/products/sentinel/secure/sentinelplugins.html). There are also some Connectors included in the installed Sentinel system, but there might be more recent versions on the Web site.
110 Configuring Agentless Data Collection

Documentation: Check the documentation for each Connector and Collector, because they have different configuration steps for the event source. The documentation is located on the Sentinel Plug-ins Web site (http://support.novell.com/products/sentinel/secure/sentinelplugins.html). Make sure you download the documentation when you download the Connector and Collector.
Event Source Configuration: You must have configuration information for the event source.
Connecting to the Event Source1 Access Event Source Management.
For more information, see “Accessing Event Source Management” on page 100.2 In the toolbar, click Tools > Connect to Event Source.
The event source types are for the compatible Collector parsing scripts are listed here.3 Select the desired Event Source.
You can click Add More to import an event source not listed. 4 After the event source is selected, click Next.5 Select a Collector script from the list.
You can click Install More Scripts to install additional Collector scripts that support your Event Source.For more information on installing a Collector script, see “Installing a Collector Plug-In” on page 107.
6 Click Next.7 Select a connection method from the list.
There are many different types of Connectors. Depending on the type of Connector you select, there are additional configuration screens.You can click Install More Connectors to install additional Connectors.For more information, see “Installing a Connector Plug-In” on page 107 to install connectors.
8 Click Next.9 Use the following information to select how to mange the event source connection, then
proceed to Step 10. “Creating a New Collector and Connector” on page 112 “Using an Existing Collector” on page 113 “Using an Existing Connector” on page 114
Based on the existing Collectors and Connectors in your system that are compatible with your new event source, one or more of these options might be unavailable.
10 Use the following information to configure the event source:Name: Specify a unique name for the event source.Run: Select Run if you want the event source to run automatically.Details: Allows you to see the details of the plug-in.Alert if no data received in specified time period: Select this option to receive notifications if no data is received during the specified time period.
Configuring Agentless Data Collection 111

Limit Data Rate: Use this option to limit the maximum number of records the Connector receives per second.Number of Threads: (Optional) Specify the number of CPU threads to use to process data. Using multiple threads allows the collector to process more events per second.You can view the actual number of threads the collector is using in the Health statistics in the Sentinel Main interface.Trust Event Source Time: (Optional) Select this option to set the event time to the time the event occurred, rather than the time Sentinel received the data.You can also set this option while configuring an event source. If the Trust Event Source Time option is selected, all data flowing through the Collector has the event time set to the time the event occurred, even if the event sources do not have this option selected.Set Filters: Allows you to set filters on the data in the event source.
11 Click Next.12 Click Test Connection to test the event source.
12a Click the Data tab to view the data in the event source.It takes a few seconds for the raw data to be displayed in the Data tab.
12b Specify the maximum number of rows to control the number of raw data records obtained at one time.
12c Click the Error tab to view if there are any errors in the configuration of the event source.12d Click Stop to stop the test.
13 Click Finish.
The Collector parsing script is executed on the same system as the Collector Manager that you select here.
Creating a New Collector and ConnectorUse the following information to create a new Collector and Connector to manage the event source connection. This procedure is a continuation of Step 9 on page 111.
1 Select Create a new Collector and Connector, then click Next.2 Select the Collector Manager you want to use, then click Next.3 Change any of the Collector properties, then click Next.4 Use the following information to configure the Collector:
Name: Specify a unique name for the Collector.Run: Select Run if you want to run the Collector automatically.Details: Allows you to view the details of the plug-in.Alert if no data received in specified time period: Select this option to receive notifications if no data is received during the specified time period.Lime Data Rate: Use this option to limit the maximum number of records the Collector receives per second.Trust Event Source Time: (Optional) Select this option to set the event time to the time the event occurred, rather than the time Sentinel received the data.
112 Configuring Agentless Data Collection

You can also set this option while configuring an event source. If the Trust Event Source Time option is selected, all data flowing through the Collector has the event time set to the time the event occurred, even if the event sources do not have this option selected.Set Filters: Allows you to set filters on the data in the Collector.
5 Click Next.There is a different configuration page displayed depending on the type of Connector you selected in Step 7 on page 111. For the Connector-specific documentation, see the Sentinel Plug-ins Web site.
6 Use the following information to configure the Connector:Name: Specify a unique name for the Connector.Run: Select Run if you want to run the Connector automatically.Details: Allows you to view the details of the plug-in.Alert if no data received in specified time period: Select this option to receive notifications if no data is received during the specified time period.Limit Data Rate: You can limit the maximum number of records the Connector receives per second.Set Filters: Allows you to set filters on the data in the Connector.Copy Raw Data to a file: Select this option, then specify a location where you want to copy the raw data coming from the event source.
7 Click Next, then continue with Step 10 on page 111.
Using an Existing CollectorIf you are using an existing Collector, but want to create a new Connector to manage the Event Source connection, use the following information to complete the procedure from Step 9 on page 111.
1 Select Use an Existing Collector, then click Next.2 Select the Collector you want to use, then click Next.
There is a different configuration page displayed depending on the type of Connector you selected in Step 7 on page 111. For the Connector-specific documentation, see the Sentinel Plug-ins Web site.
3 Use the following information to configure the Connector:Name: Specify a unique name for the Connector.Run: Select Run if you want to run the Connector automatically.Details: Allows you to view the details of the plug-in.Alert if no data received in specified time period: Select this option to receive notifications if no data is received during the specified time period.Limit Data Rate: Use this option to limit the maximum number of records the Connector receives per second.Set Filters: Allows you to set filters on the data in the Connector.
Configuring Agentless Data Collection 113

Copy Raw Data to a file: Select this option, then specify a location where you to want copy the raw data coming from the event source.
4 Click Next, the continue with Step 10 on page 111.
Using an Existing ConnectorIf you are using an existing Connector, but want to create a new Collector to manage the event source connection, use the following information to continue the procedure from Step 9 on page 111.
1 Select Use an Existing Connector, then click Next.2 Select the Collector Manager you want to use, then click Next.3 Change any of the Collector properties, then click Next.4 Use the following information to configure the Collector:
Name: Specify a unique name for the Collector.Run: Select Run if you want to run the Collector automatically.Details: Allows you to view the details of the plug-in.Alert if no data received in specified time period: Select this option to receive notifications if no data is received during the specified time period.Lime Data Rate: Use this option to limit the maximum number of records the Collector receives per second.Trust Event Source Time: (Optional) Select this option to set the event time to the time the event occurred, rather than the time Sentinel received the data.You can also set this option while configuring an event source. If the Trust Event Source Time option is selected, all data flowing through the Collector has the event time set to the time the event occurred, even if the event sources do not have this option selected.Set Filters: Allows you to set filters on the data in the Collector.
5 Click Next, then continue with Step 10 on page 111.
Exporting ConfigurationsEvent Source Management allows you to export the configuration of Event Source Management objects along with the associated Collector scripts and the Connector plug-ins. You can export the configuration at Sentinel level or at individual objects’ level such as Collector Manager, Collector and Connector. However, exporting the configuration at Collector Manager level allows you to easily import the configuration to individual Collector Manager.
1 Access Event Source Management.For more information, see “Accessing Event Source Management” on page 100.
2 Right-click the Collector Manager, then click Export Configuration.3 Select which nodes you want to export, then click Next.4 Select the Collector scripts to export, then click Next.5 Select the Connector plug-ins to export, then click Next.6 Click Browse, then browse to a location to save the export.
114 Configuring Agentless Data Collection

7 Specify a file name, then click Save.The export information is saved as a .zip file.
8 Click Next.9 Review the items to be exported, then click Finish.
Importing ConfigurationsEvent Source Management allows you to import the configuration files that you export. The configuration files contain configuration information for Event Source Management objects along with the associated Collector scripts and Connector plug-ins.
1 Access Event Source Management.For more information, see “Accessing Event Source Management” on page 100.
2 Right-click the Collector Manager, then click Import Configuration.3 Click Browse and browse to and select the configuration file, then click Open.
The configuration files are .zip files.4 Click Next.5 Select the nodes to import, then click Next.6 Select the Collector scripts to import, then click Next.7 Select the Connector plug-ins to import, then click Next.8 Review the items to import, then click Finish.
DebuggingSentinel's Collectors are designed to be easily customizable and to be created by customers and partners.The debugging interface analyzes the Collector code running in place on the Collector Manager.
For more information on customizing or creating new Collectors, obtain the Developer's Kit for Sentinel at the Sentinel SDK Web site.
“Collector Workspace and Collector Directory” on page 115 “Debugging JavaScript Collectors” on page 116 “Generating a Flat File using the Raw Data Tap” on page 118
Collector Workspace and Collector DirectoryCollectors are simple text scripts that are run by a Collector Manager. The handling of these scripts is a bit complex:
1. The code for all Collectors is stored in a plug-in repository on the central Sentinel server when the Collectors are imported.
Location: sentinel/data/plugin_repository on the Sentinel server.2. The runtime configuration for the Collector (when it is configured to run on a particular
Collector Manager) is stored separately in the Sentinel database.
Configuring Agentless Data Collection 115

3. When a Collector is actually started in the Collector Manager, the Collector plug-in is deployed to the Collector Manager, the runtime configuration is applied, and the code is started. Any pre-existing instance of the Collector code on that Collector Manager is overwritten.Location: sentinel/data/collector_mgr.cache/collector_instances on each Collector Manager.
4. In order to edit a Collector, you need to use the ESM Debugger Download button, which copies the Collector to the local Collector workspace on the client machine (the machine where you are running Sentinel Control Center). Edits are made against that local copy and then uploaded back into the central plug-in repository.Location: sentinel/data/collector_workspace on the client application machine.
Debugging JavaScript CollectorsThe debugger for JavaScript Collectors can be used to debug any JavaScript Collector.
1 Access Event Source Management.For more information, see “Accessing Event Source Management” on page 100.
2 Select a Collector to debug in the Live View.3 Select the debug mode:
Live Mode: Requires that the Collector Manager is currently running. For more information, see “Live Mode” on page 117.Stand-alone Mode: Allows you to run the Collector in debug mode without a Collector Manager running. For more information, see “Stand-alone Mode” on page 117.
4 Right-click the Collector and select Stop, then click Debug.
The following describe how to use the JavaScript debug window:
Debug: Launches the JavaScript file in this window.
Upload/Download: Upload or download a JavaScript file here. You can download an existing JavaScript file, edit it, and upload it again to continue debugging.
Context: Displays the variable that the debugger is pointing to and its value.
Expression: Watch the values of a selected parameter here.
You can use the following options when debugging a Collector:
116 Configuring Agentless Data Collection

“Hot Keys” on page 117 “Live Mode” on page 117 “Stand-alone Mode” on page 117
Hot KeysWhen the source code window has the focus in the debugger, you can use the following hot keys:
Ctrl+F to find a string in the source code Ctrl+G to go to a line number Ctrl+M to find the parenthesis or brace that matches the selected parenthesis or brace
You can also open a script file, set break-point, step through the script code, and watch variables and methods values at each step.
Live Mode Live debug mode requires that the Collector Manager associated with the Collector is running. In Live debug mode, Input to the script comes from actual event sources connected to the
Collector. To get data from a specific event source, you must right-click and start the desired event source via the Event Source Management display. Starting or stopping event sources can be done any time during the debug session. If no event source is started during the debug session, no data is available in the buffer for the Collector and you see the Collector script’s readData method blocking.
In Live debug mode, output from the script is via live Sentinel Events.When you are in Live debug mode, the script engine is executed on the local computer rather than the actual computer that the associated Collector Manager is running on. The Connectors and event sources still runs on the same box as the Collector Manager. When you are running debug mode, data is automatically routed from the event sources to the script engine running in debug on the local box.
Stand-alone Mode Stand-alone debug mode allows you to debug a Collector even if the associated Collector
Manager is not running.
Run Starts debugging.
Pause Pauses debugging.
Step Into Steps to the next line in the script.
Step Over Steps over a function.
Step Out Steps out of a function.
Stop Stops debugging.
Configuring Agentless Data Collection 117

For stand-alone mode, input to the script comes from an input file rather than a live event source. Specify the path to a raw data file that is used as input. For Collectors that use a DB Connector, the input file is a text file with log data in nvp format and for a Collector that uses the File Connector, the input file is a text file with log data in CSV format.
For stand-alone mode, Output from the script is to an output file rather than to live events. You must specify the path to the output file that the script uses for output. If you specify an output file that does not exist, the system creates the file for you.
To debug in Stand-alone mode:
1 In Event Source Management, right-click the Collector to debug.2 Select Stop.3 Select Debug.4 Select Stand-alone Mode, then specify a path for the input and output files.
If you specify an output file that does not exist, the system creates the file for you.5 Click OK to display the Debug Collector window. 6 In the Debug Collector window, click Run.
In the Source text area, the source code of the Collector appears and stops at the first line of the text script.
7 Click the left side bar to toggle a breakpoint in the script code.8 Click Step Into to go to the next breakpoint.9 Click Pause to pause debugging whenever you want.
10 After debugging is complete, click Stop to stop debugging.11 Click the Upload/Download tab in the debugger window.12 Click Download, then specify a location to download the script file.13 Open the file with any JavaScript editor, then make your edits.14 Save the file, then click Upload.15 Debug the uploaded script to have a Collector Script ready to use.
Generating a Flat File using the Raw Data TapOccasionally when debugging, it might be helpful to view Connector output data. In addition to the Raw Data Tap right-click option for nodes in the Sentinel Control Center, Sentinel also includes an option to save the raw data from a Connector to a file for further analysis.
To save raw data from a deployed Connector to a file:
1 Access Event Source Management.For more information, see “Accessing Event Source Management” on page 100.
2 Right-click the Connector node, then click Edit.3 Click the Configure Connector tab.4 Select the Copy Raw Data to a file.5 Specify (or browse to and select) a path on the Collector Manager machine where the raw data
is saved.
118 Configuring Agentless Data Collection

IMPORTANT: The account running the Sentinel service on the Collector Manager machine must have permissions to write to the file location.
TroubleshootingIf the help does not launch, there is a cache file on the local machine that is running the Event Source Management that must be deleted.
1 Exit Event Source Management and the Sentinel Control Center.2 On the local machine running Event Source Management, search for the .novell directory.3 Delete the sentinel subdirectory in the .novell directory.4 Launch Event Source Management, then click Help.
For more information, see “Accessing Event Source Management” on page 100.
Managing Event SourcesThe Event Sources interface displays the health of the event source and the volume of data being received from it in events per second. The event sources page lists all the event sources, such as Syslog, Audit, File, and Database, that are configured in the Event Source Management interface.
You can refine the displayed event sources by selecting Collector Managers, Event Source Servers, and Collector plug-ins. You can also specify a filter on the event source name and select particular event source health states you want to view. All of these selections and filters are stored on a per-user basis, so that each time you log into the Sentinel server you can view event sources that match your last selections.You can also perform filtering based on tags. For more information, see “Configuring Tags” in the Sentinel User Guide.
“Viewing the Event Sources Page” on page 119 “Changing the Data Logging Status of Event Sources” on page 122
Viewing the Event Sources PageThe Event Sources page consists of different sections that allow you to perform different functions.
Collector Managers: Lists all the Collector Managers associated with the Sentinel system. It also displays the state and details about the Collector Managers.
Event Source Servers: Lists all the Event Source Servers associated with the Sentinel system. It also displays the state of the Event Source Servers.
Collector Plug-ins: Lists all the Collector plug-ins associated with the Sentinel system. You can also view the details about the installed plug-ins.
The Event Sources section in the right pane lists the event sources based on the options selected from the left pane.
Configuring Agentless Data Collection 119

NOTE: The Event Sources page shows event sources that were already configured or automatically detected. To manually configure additional event sources, use the Event Source Management user interface described in “Configuring Data Collection for Other Event Sources” on page 100.
“Viewing Event Sources” on page 120 “Viewing Collector Managers” on page 121 “Viewing Event Source Servers” on page 121 “Viewing Collector Plug-Ins” on page 122
Viewing Event Sources1 From Sentinel Main, click Collection > Event Sources.
The Event Sources page is displayed.Each column in the Event Source section has different information:Health Icon: The colored icon indicates the event source health. Green: Indicates that the event source is healthy and Sentinel has received data from it. Red: Indicates that the Sentinel server is reporting an error about connecting to or
receiving data from this event source. Gray: Indicates that the event source is turned off. Sentinel is not processing any data from
it. Orange: Indicates that the event source is running with some warnings.
You can sort the event sources based on their health status.Name: Displays the name given to the Event Source by the system (if it was auto-created) or by a user. For Syslog Event Sources, if the Event Source was auto-created by the system, the name is a combination of the hostname/IP address and the Collector connection mode the event source is using. You can rename any Event Source at any time through the Event Source Management interface.You can sort the Event Sources in alphabetical order based on their names. Collector Plug-in: Displays the name of the Collector plug-in that the event source is connected to. This is the name of the Collector plug-in, not the name of the Collector instance. You can sort the event sources based on Collector plug-in name.Store raw data: Indicates whether the raw data from the associated event source should be stored. Yes: If Store raw data is set to Yes, all the data from the event source is saved and events are
generated. When it is set to Yes, data is always saved, regardless of whether a filter is set on the event source using the Event Source Management user interface. However, if a filter is set, events might not be generated if the filter causes the data to be ignored.You can sort the event sources based on the store raw data status.
No: If Store raw data is set to No, all the data received from the event source is not stored. This means that the data is not saved and events are not generated.
Create Date: Specifies the date and time when the event source was created. You can sort the event sources based on when they were created.
120 Configuring Agentless Data Collection
EPS: Displays the events per second value received from the event source. You can sort the event sources based on their events per second value. If you see a value of less than one (<1) in this column, it indicates that the EPS rate is greater than zero, but less than one.
2 To select or deselect an event source, select the check box next to the event source. To select all the available event sources, select the check box at the top of the column.
3 To sort the event sources by Health, Name, Collector Plug-in, Store raw data, Create Date, and EPS values, click the column header. The selected column header is displayed in bold.When you first click a column header, the event sources are arranged in ascending order. A blue down-arrow is displayed to indicate that the sort order is ascending. When you click the column header for the second time, the sort order is changed to descending, and a blue up-arrow is displayed to indicate that the sort order is descending.
4 To view additional information about an event source, click the Name or EPS value of an event source. A dialog box displays the additional information.
Viewing Collector Managers1 From Sentinel Main, click Collection > Event Sources.
The Collector Manager section is displayed in the Event Sources page.Health: Indicates the health of the Collector Managers. You can sort the Collector Managers based on their health status.Name: Displays the names of the Collector Managers. You can sort the Collector Managers in alphabetical order based on their names.EPS: Displays the events per second value received from the event sources. You can sort the Collector Managers based on the events per second value.
2 To select or deselect a Collector Manager, select the check box next to the Collector Manager. To select all the available Collector Managers, select the check box located at the top of the column.The right pane displays the list of event sources connected to the selected Collector Managers.If none of the Collector Managers are selected, thee event sources table displays all the configured event sources.
3 To sort the Collector Managers by Health, Name, and EPS values, click the column header. The selected column header displays in bold text.
4 To get additional information about the Collector Managers, click the Name or EPS value column. A dialog box displays the additional information.
Viewing Event Source Servers1 From Sentinel Main, click Collection > Event Sources.
The Event Source Servers section is displayed.Health: Indicates the health of the Event Source Server. You can sort the Event Source Servers based on their health status.
Configuring Agentless Data Collection 121

Name: Displays the names of the Event Source Server used to parse the data from the event sources (for example, Syslog Server SSL). You can sort the event source server in alphabetical order based on their names.EPS: Displays the events per second value received from the event sources. You can sort the event source servers based on the events per second value.
2 To sort the Event Source Servers by Health, Name, and EPS values, click the column header. The selected column header displays in bold text.
3 To view additional details, click the Name or EPS value column. A dialog box displays the additional information.
Viewing Collector Plug-Ins1 From Sentinel Main, click Collection > Event Sources.
Health: Indicates the aggregate health of all event sources that are connected to the Collector plug-in. With the exception of the green icon (healthy state), the icon does not necessarily mean that all event sources connected to the Collector plug-in are in the state indicated by the icon. The red icon (error state) indicates that one or more event sources connected to the Collector plug-in are in an error state. To get a detailed information, click the Name or EPS column value to view help information. Name: Displays the names of the Collector plug-in used to parse the data from the event sources (for example, Cisco Firewall 6.1r1).This is the name of the Collector plug-in, not the name of the Collector instance. You can sort the event sources based on Collector plug-in name.EPS: Displays the events per second value received from the event sources. You can sort the Collector based on the events per second value.
2 To select or deselect the Collector plug-ins, select the check box next to the Collector plug-in. To select all the available Collector plug-ins, select the check box at the top of the column.
3 To sort the Collector plug-ins by Name or EPS values, click the appropriate column header. The selected column header displays in bold text.The Collector Instances field displays the number of instances of the Collector plug-in. Clicking the Collector Instances field displays a Collectors window with a list of Collector instances associated with the Collector plug-in:
4 Click the Collector Plug-in column to display a dialog box with additional information about the Collector plug-in.
Changing the Data Logging Status of Event Sources1 From Sentinel Main, click Collection > Event Sources.2 To change the data logging status for one or more event sources, select the event sources from
the list.3 Click the Configure button from the Settings drop-down, then click Edit to edit the store raw
data settings.
122 Configuring Agentless Data Collection

Yes: If Yes is selected, the selected event sources forward events received to the Collectors they are connected to.No: If No is selected, the selected event sources drop all the events received. Messages are not sent to the Collectors they are connected to.If you select a large number of event sources to change, it might take some time to complete. The Event Sources list does not show the store raw data status (Yes or No) until after the changes are complete and the display is refreshed from the database.
Configuring Agentless Data Collection 123

124 Configuring Agentless Data Collection

7 7Configuring Agent-Based Data Collection
Agent Manager provides host-based data collection that complements agentless data collection by allowing you to:
Access logs not available from the network Operate in tightly-controlled network environments Improve security posture by limiting attack surface on critical servers Provide enhanced reliability of data collection during times of network interruption
Agent Manager allows you to deploy agents, manage agent configuration, and act as a collection point for events flowing into Sentinel. For more information about Agent Manager, see the Agent Manager documentation.
Configuring Agent-Based Data Collection 125

126 Configuring Agent-Based Data Collection

8 8Configuring ArcSight SmartConnectors for Data Collection
Sentinel leverages ArcSight SmartConnector to collect events from various types of event sources not directly supported by Sentinel. SmartConnectors collect events from supported devices, normalizes events into the Common Event Format (CEF), and forwards them to Sentinel through the Syslog Connector. The Connector then forwards the events to Universal Common Event Format Collector for parsing.
For more information about configuring Sentinel with SmartConnectors, see the Universal Common Event Format Collector documentation on the Sentinel Plug-ins Website.
Configuring ArcSight SmartConnectors for Data Collection 127

128 Configuring ArcSight SmartConnectors for Data Collection
9 9Managing Event Sources
The Event Sources interface displays the health of the event source and the volume of data being received from it in events per second. The event sources page lists all the event sources, such as Syslog, Audit, File, and Database, which are configured in the Event Source Management interface.
You can refine the displayed event sources by selecting Collector Managers, Event Source Servers, and Collector plug-ins. You can also specify a filter on the event source name and select particular event source health states you want to view. All of these selections and filters are stored on a per-user basis, so that each time you log into the Sentinel server you can view event sources that match your last selections.You can also perform filtering based on tags. For more information, see “Configuring Tags” in the Sentinel User Guide.
“Viewing the Event Sources Page” on page 129 “Filtering Event Sources” on page 133
Viewing the Event Sources PageThe Event Sources page consists of different sections that allow you to perform different functions.
Collector Managers: Lists all the Collector Managers associated with the Sentinel system. It also displays the state and details about the Collector Managers.
Event Source Servers: Lists all the Event Source Servers associated with the Sentinel system. It also displays the state of the Event Source Servers.
Collector Plug-ins: Lists all the Collector plug-ins associated with the Sentinel system. You can also view the details about the installed plug-ins.
The Event Sources section in the right pane lists the event sources based on the options selected from the left pane.
NOTE: The Event Sources page shows event sources that were already configured or automatically detected. To manually configure additional event sources, use the Event Source Management user interface described in “Configuring Data Collection for Other Event Sources” on page 100.
“Viewing Event Sources” on page 129 “Configuring Event Sources” on page 131 “Viewing Collector Managers” on page 131 “Viewing Event Source Servers” on page 132 “Viewing Collector Plug-Ins” on page 132
Viewing Event Sources1 From Sentinel Main, click Collection > Event Sources.
Managing Event Sources 129

Each column in the Event Source section has different information:Health Icon: The colored icon indicates the event source health. Green: Indicates that the event source is healthy and Sentinel has received data from it. Red: Indicates that the Sentinel server is reporting an error about connecting to or
receiving data from this event source. Gray: Indicates that the event source is turned off. Sentinel is not processing any data from
it. Orange: Indicates that the event source is running with some warnings.
You can sort the event sources based on their health status.Name: Displays the name given to the Event Source by the system (if it was auto-created) or by a user. For Syslog Event Sources, if the Event Source was auto-created by the system, the name is a combination of the hostname/IP address and the Collector connection mode the event source is using. You can rename any Event Source at any time through the Event Source Management interface.You can sort the Event Sources in alphabetical order based on their names. Collector Plug-in: Displays the name of the Collector plug-in that the event source is connected to. This is the name of the Collector plug-in, not the name of the Collector instance. You can sort the event sources based on Collector plug-in name.Store raw data: Indicates whether Sentinel stores raw data from the associated event source. Yes: Sentinel stores all data received from the event source regardless of filter set on the
event source. No: Sentinel does not store the data received from the event source and does not generate
events. You can sort the event sources based on the Store raw data status.
Parse: Indicates whether Sentinel parses the data received from the event source. All: Sentinel parses all the data received from the event source. Filtered: Sentinel parses only the filtered data received from the event source. None: Sentinel does not parse the data received from the event source.
NOTE: If the Store raw data option is set to No, Sentinel does not parse the data.
Create Date: Specifies the date and time when the event source was created. You can sort the event sources based on when they were created.EPS: Displays the events per second value received from the event source. You can sort the event sources based on their events per second value. If you see a value of less than one (<1) in this column, it indicates that the EPS rate is greater than zero, but less than one.
2 To select or deselect an event source, select the check box next to the event source. To select all the available event sources, select the check box at the top of the column.
3 To sort the event sources by Health, Name, Collector Plug-in, Drop Data, Create Date, and EPS values, click the column header. The selected column header is displayed in bold.
130 Managing Event Sources

When you first click a column header, the event sources are arranged in ascending order. A blue down-arrow is displayed to indicate that the sort order is ascending. When you click the column header for the second time, the sort order is changed to descending, and a blue up-arrow is displayed to indicate that the sort order is descending.
4 To view additional information about an event source, click the Name or EPS value of an event source. A dialog box displays the additional information.
Configuring Event Sources1 From Sentinel Main, click Collection > Event Sources.2 In the Event Sources tab, select one or more event source.
NOTE: If you select multiple event sources, the settings apply to all the selected event sources.
3 Click the Settings icon. Start: Sentinel starts collecting raw data received from the event sources. Sentinel starts
only the event sources that are in the stopped state. If the event sources are already in the start state, they remain unchanged.
Stop: Sentinel stops collecting raw data received from the event sources. Sentinel stops only the event sources that are in the start state. If the event sources already in the stopped state, they remain unchanged.
Delete: Deletes the selected event sources. Collector Plug-in: Select the Collector plug-in to connect to the event sources. Tags: Select the tags to set on the event sources. Configure: Select Configure to set the following options in the Configure Event Sources
window: No data alert: Click Edit to configure notifications if Sentinel does not receive data
from the event sources. Alert if no data received in specified time period: Select this option to receive
notifications if no data is received during the specified time period. Send repeated alerts every time period: Select this option to receive repeated
notifications at every time interval (specified in the time period). Time zone: Select the time zone for the event source. Trust event source time (Optional) Select this option to set the event time to the time
the event occurred, rather than the time Sentinel received the data. Store raw data: Select Yes to store the raw data from the event sources. If you select
No, Sentinel does not store the raw data.Click Save to apply the selected settings.
Viewing Collector Managers1 From Sentinel Main, click Collection > Event Sources.
The Collector Manager section is displayed in the Event Sources page.
Managing Event Sources 131

Health: Indicates the health of the Collector Managers. You can sort the Collector Managers based on their health status.Name: Displays the names of the Collector Managers. You can sort the Collector Managers in alphabetical order based on their names.EPS: Displays the events per second value received from the event sources. You can sort the Collector Managers based on the events per second value.
2 To select or deselect a Collector Manager, select the check box next to the Collector Manager. To select all the available Collector Managers, select the check box located at the top of the column.The right pane displays the list of event sources connected to the selected Collector Managers.If none of the Collector Managers are selected, thee event sources table displays all the configured event sources.
3 To sort the Collector Managers by Health, Name, and EPS values, click the column header. The selected column header displays in bold text.
4 To get additional information about the Collector Managers, click the Name or EPS value column. A dialog box displays the additional information.
Viewing Event Source Servers1 From Sentinel Main, click Collection > Event Sources.
The Event Source Servers section is displayed.Health: Indicates the health of the Event Source Server. You can sort the Event Source Servers based on their health status.Name: Displays the names of the Event Source Server used to parse the data from the event sources (for example, Syslog Server SSL). You can sort the event source server in alphabetical order based on their names.EPS: Displays the events per second value received from the event sources. You can sort the event source servers based on the events per second value.
2 To sort the Event Source Servers by Health, Name, and EPS values, click the column header. The selected column header displays in bold text.
3 To view additional details, click the Name or EPS value column. A dialog box displays the additional information.
Viewing Collector Plug-Ins1 From Sentinel Main, click Collection > Event Sources.
Health: Indicates the aggregate health of all event sources that are connected to the Collector plug-in. With the exception of the green icon (healthy state), the icon does not necessarily mean that all event sources connected to the Collector plug-in are in the state indicated by the icon. The red icon (error state) indicates that one or more event sources connected to the Collector plug-in are in an error state. To get a detailed information, click the Name or EPS column value to view help information.
132 Managing Event Sources

Name: Displays the names of the Collector plug-in used to parse the data from the event sources (for example, Cisco Firewall 6.1r1).This is the name of the Collector plug-in, not the name of the Collector instance. You can sort the event sources based on Collector plug-in name.EPS: Displays the events per second value received from the event sources. You can sort the Collector based on the events per second value.
2 To select or deselect the Collector plug-ins, select the check box next to the Collector plug-in. To select all the available Collector plug-ins, select the check box at the top of the column.
3 To sort the Collector plug-ins by Name or EPS values, click the appropriate column header. The selected column header displays in bold text.The Collector Instances field displays the number of instances of the Collector plug-in. Clicking the Collector Instances field displays a Collectors window with a list of Collector instances associated with the Collector plug-in:
4 Click the Collector Plug-in column to display a dialog box with additional information about the Collector plug-in.
Filtering Event Sources1 From Sentinel Main, click Collection > Event Sources.2 Select the desired criteria to filter event sources.
You can use one or more of the following options to filter the event sources:
“Filtering Event Sources by Name” on page 133 “Filtering Event Sources by Health Status” on page 134 “Filtering by Event Sources Event Search Results” on page 134 “Filtering Event Sources by Collector Managers” on page 134 “Filtering Event Sources by Event Source Servers” on page 134 “Filtering Event Sources by Collector Plug-Ins” on page 135 “Changing the Data Logging Status of Event Sources” on page 135 “Changing the Associated Collector Plug-In for Event Sources” on page 135
Filtering Event Sources by NameTo filter the event sources by name, type a name value in the filter text box, then click Filter.
Matching is case insensitive. The name value can contain wildcard characters. Use * to match zero or more characters and use ? to match one character. If no wildcard characters are specified in the name value, it is assumed that the name value is intended to mean contains <name value>, or *<name value>*.
For example, an event source value of abc is interpreted as *abc*. Some examples of common filter types are:
If the event source name starts with abc, enter the filter value as abc*.
Managing Event Sources 133

If the event source name ends with abc, enter the filter value as *abc. If the event source name contains abc, enter the filter value as abc or *abc*.
The Event Source table displays the list of event sources whose names match the value entered in the filter input box.
Filtering Event Sources by Health StatusTo view the event sources based on the health status, select the Healthy, Warning, Error, or Offline check boxes.
The Event Source table displays the list of event sources with the selected health states.
If none of the health states are selected, health state filtering is not performed. It is essentially equivalent to selecting all four health states.
In the Event Source section, click the Next, Previous, First, and Last arrow links to scroll through all the event sources. The event source section displays 30 Event Sources per page.
Filtering by Event Sources Event Search ResultsTo view the event search result for an event source, select the event source from the list and click the Search link.
A search is performed using the universally unique identifier (UUID) of the event source (for example, rv24:"2CBFB8A0-F24B-102C-A498-000C").
If multiple event sources are selected for search, the rv24:<UUID> expressions are combined with the OR operator in the search filter expression.
Filtering Event Sources by Collector ManagersTo display the event sources connected to particular Collector Managers, select one or more Collector Managers from the Collector Managers section.
If none of the Collector Managers are selected, event source filtering is not performed based on the Collector Managers. This is not the same as selecting all Collector Managers, because it also includes event sources that are not connected to any Collector Manager.
To select or deselect Event Source Servers, select the check boxes next to the Event Source Servers.
Filtering Event Sources by Event Source ServersTo display only event sources connected to particular Event Source Servers, select one or more Event Source servers from the Event Source Servers section.
If none of the Event Source Servers are selected, event source filtering is not performed based on the Event Source servers. This is not the same as selecting all Event Source Servers, because it also includes event sources that are not connected to any Event Source Server.
To select or deselect Event Source Servers, select the check boxes next to the Event Source Servers.
134 Managing Event Sources

Filtering Event Sources by Collector Plug-InsTo display only those event sources connected to particular Collector plug-ins, select one or more Collector plug-ins from the Collectors Plug-ins section.
If none of the Collector plug-ins are selected, event source filtering is not performed based on the Collector plug-in. It is essentially equivalent to selecting all of the Collector plug-ins.
Changing the Data Logging Status of Event Sources1 From Sentinel Main, click Collection > Event Sources.2 To change the data logging status for one or more event sources, select the event sources from
the list.3 Click the Configure button in the table, then select edit option for the Store raw data.
Yes: If Yes is selected, the selected event sources forward events received to the Collectors they are connected to.No: If No is selected, the selected event sources drop all the events received. Messages are not sent to the Collectors the selected event sources are connected to.If you select a large number of event sources to change, it might take some time to complete. The Event Sources list does not show the store raw data state (Yes or No) until after the changes are complete and the display is refreshed from the database.
Changing the Associated Collector Plug-In for Event Sources1 From Sentinel Main, click Collection > Event Sources.2 Select the event sources from the list, then click the Configure button in the toolbar.3 Select the Collector Plug-in option.
The Set Collector Plug-in window is displayed with the Collector Plug-in Name and Supported Devices information.
4 Select a new Collector plug-in, then click Set. The event sources are connected to the selected Collector plug-in. If you select a large number of event sources to change, it might take some time to complete. The Event Sources list does not show the new Collector plug-in until after the changes are complete and the display is refreshed from the database.
Managing Event Sources 135

136 Managing Event Sources

10 10Configuring Event Routing Rules
You can configure event routing rules to evaluate and filter all incoming events and deliver selected events to designated output actions. For example, each severity 5 event can be logged to a file.
You can configure event routing rules to filter events based on one or more of the searchable fields. You can associate each event routing rule with one or more of the configured actions. You can also assign tags to group the events logically.
Sentinel evaluates the event routing rules on a first-match basis in top-down order and applies the first matched event routing rule to events that match the filter criteria.
“Creating an Event Routing Rule” on page 137 “Ordering Event Routing Rules” on page 138 “Activating or Deactivating an Event Routing Rule” on page 139
Creating an Event Routing RuleYou can create a filter-based event routing rule and then assign one or more configured actions that are executed to handle or output the events that meet the event routing rule criteria.
1 From Sentinel Main, click Routing.2 Click Create, then use the following information to create a new event routing rule:
Name: Specify a unique name for the event routing rule.Filter: Select a saved filter to use in creating event routing rule. This filter determines which events are stored in the event store. For more information, see “Configuring Filters” in the Sentinel User Guide.Select tag: (Optional) Select a tag for tagging the filter. The tag makes the filter more specific. For more information, see “Configuring Tags” in the Sentinel User Guide.Route to the following services: Select where the information is routed. The options are: All: Routes the event to all services including Correlation, Security Intelligence, and
Anomaly Detection. Event store only: Routes the event to the event store only.
The option to route only specific events for correlation is available in the Correlation Engine.
None (drop): Drops or ignores the events.Perform the following actions: (Optional) Select an action to be performed on every event that meets the filter criteria. The following default actions are available for event routing rules: Log to File: For configuration information, see “Configuring the File Integrator” on
page 206. Log to Syslog: For configuration information, see “Configuring the Syslog Integrator” on
page 209
Configuring Event Routing Rules 137

Send Events via Sentinel Link: For configuration information, see “Configuring the Sentinel Link Integrator” on page 207.
Send SNMP Trap: For configuration information, see “Configuring the SNMP Integrator” on page 208.
NOTE: When you associate an action with routing rules, ensure that you write rules that match a small percentage of events, if the rule triggers a Javascript action. If the rules trigger actions frequently, the system might backlog the actions framework. This can slow down the EPS and might affect the performance of the Sentinel system. If the rule triggers non-Javascript actions like Sentinel Link, then there is no limitation.
For the actions to work, you must have configured the Integrator associated with each action for your environment.The actions listed here are different than the actions displayed in the Event Actions tab in the Sentinel Main interface, and are distinguished by the <EventRouting> attribute in the package.xml file created by the developer.Adding or Removing Actions: You can add more than one action to perform on the events that meet the filter criteria:
Click to select additional actions to be performed.
Click to remove the selected action for this event routing rule. 3 Click Save to save the event routing rule.
The newly created event routing rule appears at the end of the rules list under the Event Routing Rules tab. By default, this new event routing rule is active.
Ordering Event Routing RulesWhen there is more than one event routing rule, the event routing rules can be reordered by dragging them to a new location. Events are evaluated by event routing rules in the specified order until a match is made, so you should order the event routing rules accordingly. More narrowly defined event routing rules and more important event routing rules should be placed at the beginning of the list.
The first routing rule that matches the event based on the filter is processed. For example, if an event passes the filter for two routing rules, only the first rule is applied. The default routing rule cannot be reordered. It always appears at the end.
1 From Sentinel Main, click Routing.2 Mouse over the icon to the left of the event routing rule numbering to enable drag-and-drop.
The cursor changes.3 Drag the event routing rule to the correct place in the ordered list.
When the event routing rules are ordered, a success message is displayed.
138 Configuring Event Routing Rules

Activating or Deactivating an Event Routing RuleNew event routing rules are activated by default. If you deactivate an event routing rule, incoming events are no longer evaluated according to that event routing rule. If there are already events in the queue for one or more actions, it might take some time to clear the queue after the event routing rule is deactivated. If the On check box next to the event routing rule is selected, the event routing rule is activated. If the On check box is not selected, the event routing rule is deactivated.
1 From Sentinel Main, click Routing.2 To activate the event routing rule, select the check box next to each event routing rule in the
Enabled column.If the event routing rule is activated, a success message is displayed.
3 To deactivate the event routing rule, select the check box next to each event routing rule in the Enabled column.When the event routing rule is deactivated, a success message is displayed.
Configuring Event Routing Rules 139

140 Configuring Event Routing Rules

11 11Mapping Events
Sentinel provides the ability to use mapping to inject additional information into events. This increases Sentinel’s ability to analyze events, execute correlation rules, or provide detailed reports.
“Overview” on page 141 “Default Maps” on page 144 “Accessing Map Definitions” on page 145 “Adding Map Definitions” on page 145 “Adding a Number Range Map Definition” on page 147 “Updating Map Data” on page 150 “Using Maps for Event Configuration” on page 151 “Renaming Event Fields” on page 152
OverviewThere are two major components of mapping:
“Maps” on page 141 “Mapping Events” on page 142
MapsA map is a collection of keys and associated values defined in a simple text CSV (comma-separated value) file format. You can enrich your event data by using maps to add additional information such as host and identity details to the incoming events from your source devices. This additional information can be used for advanced correlation and reporting. The system supports several built-in maps as well as custom user-defined maps. For more information, see “Using Maps for Event Configuration” on page 151.
Maps that are defined in Sentinel are stored in two ways:
Built-in maps are stored in the database, updated via APIs in Collector code, and automatically exported the Mapping service.
Custom maps are stored as CSV files and can be updated on the file system or via the Map Data Configuration UI, then loaded by the Mapping service.
In both cases, the CSV files are kept on the central Sentinel server but changes to the maps are distributed to each Collector Manager and applied locally. This distributed processing ensures that mapping activity does not overload the main server.
Mapping Events 141
Mapping EventsEvent Mapping is a mechanism that allows you to add data to an event by using data already in the event to reference and pull in data from an outside source.
Because virtually any data set can be made into a map, Event Mapping is useful for incorporating data from elsewhere in your organization into the event stream. Some opportunities that Event Mapping provides are:
Regulatory compliance monitoring Policy compliance Response prioritization Enabling security data to be analyzed related to business operations Enhancing accountability
When an Event Mapping is defined, it is applied system-wide to all events from all Collectors. Sentinel automatically distributes map data to all processes that perform event mappings and also keeps the map data in these processes up-to-date.
Event Mapping has four main parts:
Controller: Stores all map information Distributor: Automatically redistributes modified maps to those processes that register for the
map Monitor: A monitor to detect changes in map source data Generator: Generates maps from source data
One application of Event Mapping is Sentinel's Asset Data functionality. Asset information is collected and stored in the Sentinel database asset schema and is represented by a Physical Asset entry. Soft assets, such as services and applications, are represented by an entry that is linked to a Physical Asset. The primary automated update mechanism for asset data is through an asset Collector reading data from a scanner such as Nmap. The asset Collector automates the retrieval of asset information by reading asset data from the scanner and populating the asset schema tables with this data. For Event Mapping, asset information is mapped from the destination IP and source IP.
There are two types of data sources:
External: A Collector populates that value in the event ID. Referenced from Map: Data is retrieved from a map to populate the event ID.
142 Mapping Events
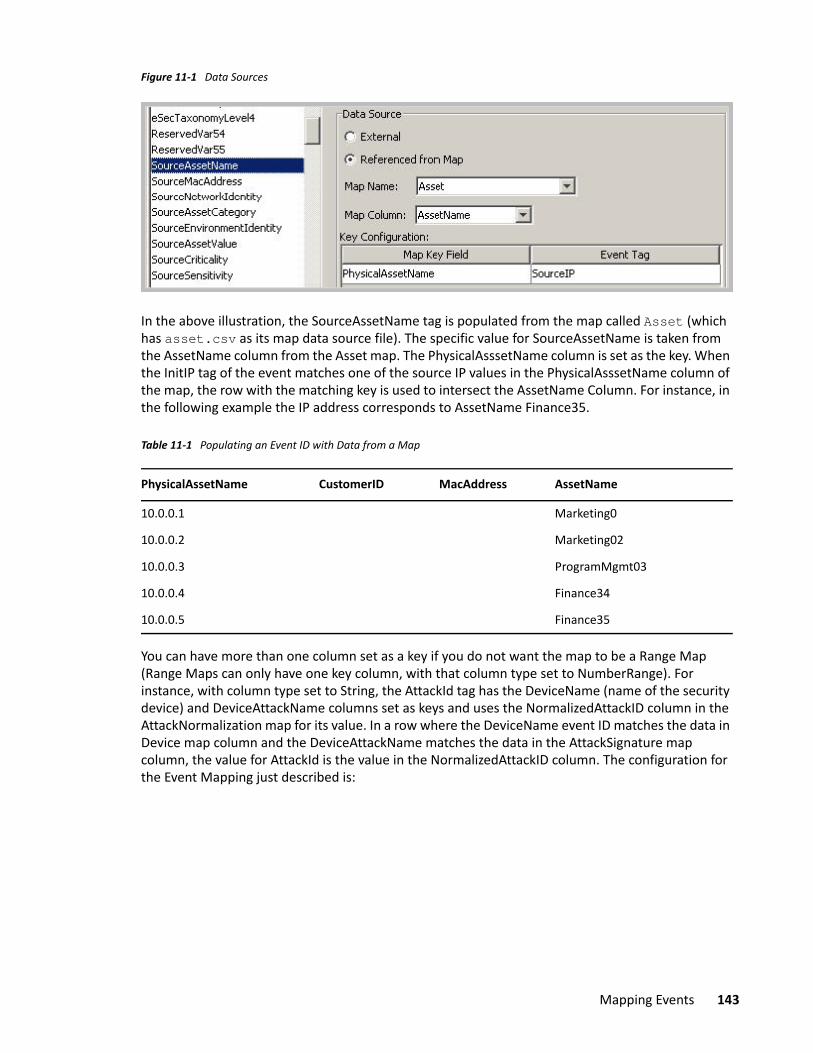
Figure 11-1 Data Sources
In the above illustration, the SourceAssetName tag is populated from the map called Asset (which has asset.csv as its map data source file). The specific value for SourceAssetName is taken from the AssetName column from the Asset map. The PhysicalAsssetName column is set as the key. When the InitIP tag of the event matches one of the source IP values in the PhysicalAsssetName column of the map, the row with the matching key is used to intersect the AssetName Column. For instance, in the following example the IP address corresponds to AssetName Finance35.
Table 11-1 Populating an Event ID with Data from a Map
You can have more than one column set as a key if you do not want the map to be a Range Map (Range Maps can only have one key column, with that column type set to NumberRange). For instance, with column type set to String, the AttackId tag has the DeviceName (name of the security device) and DeviceAttackName columns set as keys and uses the NormalizedAttackID column in the AttackNormalization map for its value. In a row where the DeviceName event ID matches the data in Device map column and the DeviceAttackName matches the data in the AttackSignature map column, the value for AttackId is the value in the NormalizedAttackID column. The configuration for the Event Mapping just described is:
PhysicalAssetName CustomerID MacAddress AssetName
10.0.0.1 Marketing0
10.0.0.2 Marketing02
10.0.0.3 ProgramMgmt03
10.0.0.4 Finance34
10.0.0.5 Finance35
Mapping Events 143

Figure 11-2 Event Mapping Configuration
Table 11-2 Device and Attack Signature Corresponds to Asset Name
Default MapsMaps defined in this tool work together with the Referenced from Map data source setting for individual fields. The following built-in maps are available:
Identity: Contains information about identities and the accounts associated with them. Data is added to the Identity map through the Collector API (http://www.novell.com/developer/develop_to_sentinel.html) and Identity Tracking Module for Sentinel. Data is then extracted to the identityAccountMap.csv file. Keys: User name and domain, TenantName (mapped to both Initiator and Target users). Data added to event: User identity (an internal GUID), full name, department, workforce
ID, and email address. Asset: Contains information about hosts in the environment. Data is added to the Asset map
using a Collector API (http://www.novell.com/developer/develop_to_sentinel.html) and Collectors such as the Generic Asset Collector, stored in the database, and then extracted to the asset.csv file. Keys: IP address and TenantName (mapped to Initiator, Target, Observer, and Reporter
hosts).
Device Attack Signature Normalized Attack ID
Secure BackDoorProbe (TCP 1234) 3 Trojan: Backdoor.Subeven
Secure BackDoorProbe (TCP 1999) 3 Trojan: Backdoor.Subeven
Dragon RWALLD: SYSLOG-FORMAT 4 Sun Microsystems Solaris rwall Elevated
Snort RPC TCP rwalld request 4 Sun Microsystems Solaris rwall Elevated
Snort RPC UDP rwalld request 4 Sun Microsystems Solaris rwall Elevated
Snort WEB-IIS foxweb.dll access 12 Microsoft Exchange Server Arbitrary Code
RealSecure SMTP_Exchange_Verb_DoS 12 Microsoft Exchange Server Arbitrary Code
144 Mapping Events

Data added to event: Host identity (an internal GUID), function, class, department, and criticality.
Country: Contains information about which physical location hosts reside in, including country, latitude, and longitude. Data is downloaded from a commercial IP location database and added to the IpToCountry.csv file using the IP2Location Feed plug-in. For more information, see the IP2Location Feed documentation on the Sentinel Plug-ins Website. Keys: IP address and TenantName (mapped to Initiator, Target, and Observer hosts). Data added to event: Country, latitude, and longitude.
CustomerHierarchy: Contains a hierarchical list of tenants that are generating event data. This can be used by security providers that collect data for multiple third parties or departments to provide a hierarchic namespace for users and hosts. Data is added to the customerhierachy.csv file manually. Keys: TenantName. Data added to event: TenantHierarchy fields.
Threat Intelligence: Sentinel populates the Threat_Intelligence.csv file when Sentinel process the threat intelligence data sources. For more information about threat intelligence data sources, see “Configuring Threat Intelligence Data Sources” on page 225. Keys: IP address Data added to event: Reputation score, Threat types, Unique Identifier.
NOTE: For map files that have a large number of entries, the map.h2.db file in the /var/opt/novell/sentinel/tmp directory may grow in size and would eventually stop growing. For example, when the IP2Location feed plug-in updates the IpToCountry.csv file, the map.h2.db file may grow up to 20 to 25 GB.
Accessing Map Definitions1 Access the Sentinel Control Center.2 Click the Configuration tab.3 In the menu bar, click Configuration > Map Data Configuration.
The main Mapping GUI displays a list of the maps that have been defined for the system. Default Sentinel maps cannot be edited or deleted.
Adding Map Definitions1 Access the map definitions.
For more information, see “Accessing Map Definitions” on page 145.2 Click Add, then use the following information to create the map definition:
Name: Specify the name of the map definition.
Mapping Events 145

NOTE: If you specify a map name that already exists, Sentinel displays a confirmation message. You can either specify that the existing map name can be overwritten, or provide a new map name.
File Name: Select whether the file is local or remote, then browse to and select your map definition. Local File: Allows you to browse for your file on your local file system (on the machine
where Sentinel Control Center was launched). Remote File: Allows you to select from existing map source data files on the Sentinel
server. The remote file points to /var/opt/novell/sentinel/data/map_data.Map Definition: Use the following information to define the map. As you configure each setting and filter, the data preview is automatically updated to allow you to preview your data and ensure your data is being parsed as expected. Delimiter: Character used to separate the data into rows in the map data source file.
Usually a comma, but other delimiters such as pipe, tab, and semicolon are supported. You can also specify other delimiters in the Other field.
Start at row: Some input map files contain header rows that do not contain real data. This option specifies the number of rows to skip from the top of the map data source file.
Column names: Specify the column names. These names are used later to configure which columns are matched against event fields and which columns are injected into event data.
Key columns: A key is a unique identifier for the row of data in the map data. If more than one column is selected as a key, then all event fields must match each of the corresponding selected key columns.When a column is set as a key, it does not appear in the Column drop-down field.
Column types: Specify the data type for the column. The currently supported data types are: String: A string is treated as a simple sequence of characters, and can include any
characters except the specified delimiter. Use strings for any data including numeric fields.
Number Range: A number range (NumberRange) is a range of numbers. For example, 10 through 200 is represented as 10-200. To use the range map functionality, a map definition must have only one key column and the key column must be of type NumberRange. If there are any other key columns, or if the key column is of a different type, the mapping service does not consider the map to be a range map. For more information, see “Adding a Number Range Map Definition” on page 147.
Active columns: When a column is marked as active, the data in the column is distributed to processes using maps. All key columns must be active. Only active columns (but not key columns) can be selected as the Map Column under the Event Configuration tab.
Column filtering: A row can be explicitly included or excluded based on matching criteria for a particular column. This can be used to exclude rows from the map source data that are not needed or that interfere with your mapping.
3 After you finish configuring all parameters and filters for the definition, click Finish.4 (Conditional) If you selected Local File above, you are prompted to upload your file. Specify a
file name, then click OK.
146 Mapping Events

You can have more than one column set as a key if you do not want the map to be a Range Map (Range Maps can only have one key column, with that column type set to NumberRange). For instance, with column type set to String, the AttackId tag has the DeviceName (name of the security device) and DeviceAttackName columns set as keys and uses the NormalizedAttackID column in the AttackNormalization map for its value. In a row where the DeviceName event ID matches the data in Device map column and the DeviceAttackName matches the data in the AttackSignature map column, the value for AttackId is the value in the NormalizedAttackID column.
Adding a Number Range Map DefinitionTo use the range map functionality, a map definition can have one key column of type NumberRange and zero or more other key columns of type String. For example, you can create a map that lists the allowed maintenance time for each individual server in an enterprise, for which you need to match both the hostname and the time range. If there are any other key columns, or if the key column is of a different type, the mapping service does not consider the map to be a range map.
To create a range map, select a single column to be the key of the map and select NumberRange as the type of the column. The format of the data in a column of type NumberRange must be “m-n”, where m is the minimum number in the range and n is the maximum number in the range (for example, 10-200). The maximum number in the range is not included in the range (m,n). This means a range of 10-200 only uses numbers equal to 10 to 199. An example set of data has the first column defined as the key column:
1-2,AA2-4,AA4-12,BB10-20,BB30-31,BB100-200,AA110-120,CCWhen the source CSV file is loaded into the system, any common or overlapping number ranges are collapsed into a single entry as follows:
Table 11-3 Transformation
FROM TO
1-2, AA 1-4, AA
2-4, AA 4-20, BB
4-12, BB 30-31, BB
10-20, BB 100-110, AA
30-31, BB 110-120, CC
100-200, AA 120-200, AA
110-120, CC
Mapping Events 147

Figure 11-3 Number Range Map Definition
An example event configuration on the above map might look like this:
Figure 11-4 Event Configuration
In the scenario above, CustomerVar97 must contain a numeric value. That value is compared against each NumberRange defined in the RangeMap until a match is found. The corresponding row from the map is returned and used to set CustomerVar89, as follows:
CustomerVar97 = 1; CustomerVar89 will be set to AACustomerVar97 = 4; CustomerVar89 will be set to BBCustomerVar97 = 300; CustomerVar89 will not be setFor Sentinel event fields that are defined as having an IP address or Date datatype, Sentinel internally converts those fields to an integer representation of the values of that field.
Fields that are defined as IP address fields are:
SourceIP (sip) TargetIP (dip) SourceTranslateIP (sxip) TargetTranslateIP (dxip) ObserverIP (obsip)
148 Mapping Events

Fields that are defined as Data fields are:
EventTime (dt) ObserverEventTime (det) SentinelProcessTime (spt) BeginTime (bngt) EndTime (endt) CustomerVar11 to CustomerVar20 (cv11 to cv20) ReservedVar11 to ReservedVar20 (rv11 to rv20)
IP address ranges are automatically converted into decimal integer ranges. The following example shows a numerical range equivalent to an IP range of 10.0.0.0 to 10.0.2.255.
167772160-167772415,AAA167772416-167772671,BBB167772672-167772927,CCCUsing the same setup as the previous example, if:
In Key Configuration, the Event ID used for comparison is set to TargetIP for the range Map Key field.
The Map column returned from the map to set CustomerVar89 is defined as a value, as displayed in the second column below.
If an event contains a target IP of 10.0.1.14 (equivalent to numerical value of 167772430), the output for column CustomerVar89 within the event is BBB.
Dates are represented as an integer number of seconds since midnight January 1, 1970. Data and time ranges can be used in maps in a similar fashion as the IP address sample above.
Sentinel supports the following number ranges:
Range from negative number to negative number (for example, -234-34) Range from negative number to positive number (for example, -234-34) Range from positive number to positive number (for example, 234-236) Single number range (negative) (for example, -234). In this case, the min and the max will both
be -234. Single number range (positive) (for example, 234). In this case, the min and the max will both be
234. Range from negative number to max number (for example, -234-). In this case, the min will be -
234 and the max will be (2^63 - 1). Range from positive number to max number (for example, 234-). In this case, the min will be
234 and the max will be (2^63 - 1).
NOTE: In all cases, the min must be less than or equal to the max (for example, “-234- -235” is NOT valid).
Mapping Events 149

Updating Map DataUpdating allows you to replace the map source data file of a map on the server with another file. Your new map source data file must have the same delimiter, number of columns, and overall structure as the existing map data source file in order for the map to function properly after the update. The new map source data file should differ from the existing file only by the values that appear in the columns. If the new map source data file has a different structure than the existing file, use the Edit feature to update the map definition.
Map updates can be performed on demand from the Sentinel Control Center. To set up an automated process to update map data, you can run an equivalent process from the command line using map_updater.sh.There are two map locations: the location referenced by the Event Map Configuration (which is a user-defined location) and the location where Sentinel stores its internal representation of the map (/var/opt/novell/sentinel/data/map_data). The internal representation of the map should never be manually updated.
Updating Map Data from the Sentinel Control CenterTo update the map data from the Sentinel Control Center:
1 If you haven’t already done so, create a CSV file containing the new map source data. This file can be generated (for example, from a data dump script), created manually, or be an edited version of the existing map data source file. If necessary, you can obtain the existing map data source file from /var/opt/novell/sentinel/data/map_data.
2 Access a map definition. For more information, see “Accessing Map Definitions” on page 145.
3 Expand the folder of interest and select the mapping, then click Update.4 Select the new map data source file by clicking Browse and selecting the file with the new map
data.After you select the file, the data from the new map data source file displays under the New tab. The map data you are replacing is under the Current tab.
5 Deselect or leave the default setting for Backup Existing Data On Server. Enabling this option puts a backup of the existing map data source file in the /var/opt/novell/sentinel/data/map_data folder. The prefix of the name of the backup map data source file is the name of the existing map data source file. The end of the filename includes a set of random numbers followed by the .bak suffix. For example: vuln_attacks10197.bak.
6 Click OK.The data from the new map data source file is uploaded to the server, replacing the contents of the existing map data source file. After the source data is completely uploaded, the map data is regenerated and distributed to map clients such as, Collector Manager.
Updating Map Data by Using the Command Line1 If you haven’t already done so, create a file containing the new map source data.
150 Mapping Events

This file can be generated (for example, from a data dump script), created manually from scratch, or be an edited version of the existing map data source file. If needed, you can obtain the existing map data source file from one of the following locations
<install_directory>/data/map_data2 Log into the Sentinel database.3 Find the UUID for the map in the MD_CONFIG table (refer to the CONFIG_ID column for the
appropriate map listed in the VALUE column).4 On the Sentinel Server machine, log in as esecadm.5 Run the following command:
map_updater.sh <uuid> <source path> [nobackup]6 The data from the new map data source file is uploaded to the server, replacing the contents of
the existing map data source file. After the source data is completely uploaded, the map data is regenerated and distributed to map clients (for example, Collector Manager).
Unless the optional -nobackup argument is added, the previous map data is saved in a backup file on the server. Enabling this option results in a backup of the existing map data source file being put in the <install_directory>/data/map_data folder. The prefix of the name of the backup map data source file is the name of the existing map data source file. The end of the filename contains a set of random numbers followed by the .bak suffix. For example: vuln_attacks10197.bak.
Using Maps for Event ConfigurationAfter you have created a map, you must decide where the mapped data is injected into the event. You must configure each event to use mapping:
1 Access the Configuration tab in the Sentinel Control Center. 2 Click Event Configuration in the navigation pane.
orIn the toolbar, click Configuration > Event Configuration.
3 Select an entry from the Event Columns, then use the following information to configure the event using a map:Name: Displays the name of the event ID selected in the Event Columns field.Referenced from Map: Click Referenced from Map to configure the event ID to be populated with data from a map.The default option of External keeps the value the Collector put in the event ID (if any).Map Column: Click the Map Name drop-down list, then select one of the available maps.The maps listed are the default maps or a map you have created.Map Column: Click the Map Column field drop-down list, then select a Map Column name.Depending on your Map Name choice in the previous step, these values vary. All other choices: Names of active columns within the map definition that are not set as a
key (for example, CustomerId column in Asset or NormalizedAttackId column in AttackNormalization)
Mapping Events 151

_EXIST_ : This is a special Map Column that exists in every map. If this Map Column is selected, a 1 is placed in the event ID if the key is in the map data. If the key is not in the map data, a 0 is placed in the event ID.
Key Configuration: For each row in the table, select the event ID in the Event ID column that is matched against the map key column specified in the corresponding Map Key Field column. The rows in the Key Configuration table depend on the Map Name selected.A key is a unique identifier for the row of data in the map data.
4 Click Apply.Clicking Apply saves the changes you made for the currently selected event column in a temporary buffer. If you don't click Apply, the changes you made to the previously selected event column are lost when you select a different event column. Changes aren’t be saved to the server until you click Save.
5 If you want to edit the event mapping of another event column, repeat the steps above. Remember to click Apply after editing the event mapping of each event column.
6 Click Save.Clicking Save saves your changes to the server. The save function saves all changes stored in the temporary buffer when you clicked Apply.
Renaming Event FieldsThe Event Configuration window allows you to rename the event field. When you do this, the event names are changed in the Sentinel Control Center and the Sentinel Main interface.
Renaming event fields does not change the event ID in Collector scripts or in internal Sentinel representations of the event. For example, if you rename the event name BeginTime to StartTime, the ID will still remain as bgnt. Any references to this ID in Correlation or Filters still work, even if they were originally written using bgnt.
To rename an event field:
1 Access the Configuration tab in the Sentinel Control Center.2 Click Event Configuration in the navigation pane.
orIn the menu bar, click Configuration > Event Configuration.
3 Select an entry in the Event Fields column.4 Specify a new value for the event name in the Name field.5 Click Apply, then click Save.6 Close and launch Sentinel Control Center for the changes to be visible.
152 Mapping Events
12 12Linking to Additional Sentinel Systems
Sentinel Link is a mechanism that provides the ability to hierarchically link multiple Sentinel systems, including Sentinel Log Manager, Sentinel, and Sentinel Rapid Deployment. You can hierarchically link two or more Sentinel systems to forward filtered events from one Sentinel system to another for further evaluation.
“Benefits” on page 153 “Prerequisite” on page 153 “Configuring Sentinel Link” on page 153
Benefits Multiple Sentinel servers, local or distributed, can be linked in a hierarchical manner. In this
setup, Sentinel servers can manage a large volume of data, retaining raw data and event data locally, while forwarding important events to a central Sentinel server for consolidation.
One or more Sentinel servers can forward important data to either a Sentinel server, Sentinel Log Manager server, or a Sentinel Rapid Deployment server. These systems provide real-time visualization of data, advanced correlation and actions, workflow management, and integration with identity management systems.
Multiple Sentinel, Sentinel Log Manager, or Sentinel Rapid Deployment servers can be hierarchically linked to monitor the consolidated event information.
One or more Sentinel, Sentinel Log Manager, or Sentinel Rapid Deployment servers can forward important events to a Sentinel server for event consolidation.
PrerequisiteBefore you forward events from the sender machine, ensure that the Sentinel Link server is up and running on the receiver machine.
Configuring Sentinel LinkIn a Sentinel Link Solution setup, the Sentinel system that forwards the events is called the sender and the Sentinel system that receives the events is called the receiver. You can simultaneously link multiple Sentinel systems to a single receiver system.
To configure a Sentinel link, you need to configure at least two systems: the sender machine and the receiver machine. For further details on configuring Sentinel Link, see the Sentinel Link Overview Guide (http://www.novell.com/documentation/sentinel70/sentinel_link_overview/data/bookinfo.html).
Linking to Additional Sentinel Systems 153

154 Linking to Additional Sentinel Systems

IV IVConfiguring Data Storage
Sentinel receives two separate but similar data streams from the Collector Managers: raw data and event data.
Raw Data
Raw data files are unprocessed events received by the Connector and sent directly to the Sentinel message bus.This data is written to the Sentinel server. Sentinel receives all raw data without being filtered. When the event is sent to the message bus, the following additional information is also sent without altering the original event:
SHA-256 hash of the event Chaining indicator, which is reset to 0 whenever the Sentinel event source is restarted Raw Data ID (in s_rv25) Event source, Connector, Collector, and Collector Manager node IDs
Because the raw data is not searched or used to generate reports, the data is not indexed.
Event Data
Event data is created as a result of a Collector parsing and normalizing raw data.
You can set filtering rules on the event source, Connector, and Collector, which selectively prevent the Collector from parsing raw data. Filtering rules avoid the overhead of parsing and normalizing data you do not need for further processing or analysis, and free up hardware resources for more important tasks. These rules do not affect the storage of the raw data. However, event data can be dropped after it is created by the parsing and normalization logic of the Collector by configuring an event routing rule to selectively drop the event data. This is useful when it is more convenient to define the rule on normalized data rather than non-normalized (raw) data. For more information, see Chapter 10, “Configuring Event Routing Rules,” on page 137.
This section provides information about how you must configure your data storage to collect and store raw data and event data.
Chapter 13, “Configuring Traditional Storage,” on page 157 Chapter 14, “Configuring Data Retention Policies,” on page 185 Chapter 15, “Re-indexing Event Data Partitions,” on page 189
Configuring Data Storage 155

156 Configuring Data Storage

13 13Configuring Traditional Storage
Sentinel stores raw data and compressed event data on the primary location. You can configure Sentinel to store the data in a secondary location for long-term storage.
The data files are deleted from the primary and secondary storage locations on a configured schedule. Raw data retention is governed by a single raw data retention policy. Data retention is governed by a set of event data retention policies. All of these policies are configured by the Sentinel administrator.
“Raw Data Storage” on page 157 “Event Data” on page 162 “Configuring Secondary Storage Locations” on page 164 “Configuring Disk Space Usage” on page 170 “Verifying and Downloading Raw Data Files” on page 170 “Configuring Data Synchronization” on page 171 “Viewing Primary and Secondary Storage Capacity” on page 178 “Using Sequential-Access Storage for Long Term Data Storage” on page 179
Raw Data StorageSentinel compresses the raw data and stores it in protected partitions that are based on the time and the event source. New raw data files are created every hour. The data is moved from the primary, compressed, file-based storage to a user-configured, compressed secondary storage location on a regular basis.
Sentinel stores the raw data files in one of the following locations:
Primary storage location: <Sentinel data directory>/rawdata/online Secondary storage location: <Sentinel archive directory>/rawdata_archive
The compressed raw data files are moved from the primary storage to the secondary storage location.
The following table describes the directory structure of the raw data in the primary storage under the installation directory:
Table 13-1 Raw Data Directory Structure
Directory Structure Description
/data The primary directory for all data storage.
/data/rawdata The subdirectory where all raw data is stored.
Configuring Traditional Storage 157

If the raw data files are stored in the primary storage location, the full path name of the file is in the following format:
<Sentinel data directory>/rawdata/online/<event source UUID>/<Date>/<RawDataFile>For example:
/var/opt/novell/sentinel/data/rawdata/online/A75CF6A0-4948-102D-A615-000C29A9C3DB/2010-05/24-0600.gzIn this example, /var/opt/novell/sentinel/data is the data directory for Sentinel.
/data/rawdata/online
The directory where all the raw data in the primary storage is stored.
/data/rawdata/online/EventSource UUID
There is one subdirectory for each event source under the online subdirectory. That subdirectory contains all raw data received from that event source.
The subdirectory name is the universally unique identifier (UUID) of the event source (for example, E20D0840-1E0A-102C-9F30-000C2949BA91).
/data/rawdata/online/EventSource UUID/Month
Data in the event source subdirectory is partitioned by month. Each month has its own subdirectory.
The subdirectory name is in the yyyy-mm format. For example, 2009-05 indicates May 2009.
/data/rawdata/online/EventSource UUID/Month/1 Hour Data Files
Each file in the Month directory contains data received during a specific one-hour period. Most data in the file has a time stamp that is within the one-hour period.
The name of the file indicates the day of the month and the one-hour period that is represented.
The filename format is dd-hhmm.extension.
dd is the day of the month.
hh is the hour of the day.
mm is the minute of the hour.
The extension is either.gz. or .open.
NOTE: Raw data files are compressed and have the extension .gz. However, when the raw data file is being written into, the raw data file appears with the extension.open.
For example:
A filename of 08-0000.gz indicates that the file contains compressed data received on the 8th day of the month between 12.00 a.m. and 01.00 a.m.
A filename of 08-1300.open indicates that the file contains data received on the 8th day of the month between 01.00 p.m. and 02.00 p.m.
Directory Structure Description
158 Configuring Traditional Storage

If the raw data files are stored in the secondary storage location, the full path name would be as follows:
<Sentinel archive directory>/rawdata_archive/<event source UUID>/<Date>/<RawDataFile>For example:
/sentinel_archive_data/rawdata_archive/A75CF6A0-4948-102D-A615-000C29A9C3DB/2010-05/24-0600.gzIn this example, /sentinel_archive_data is the secondary storage directory configured by the user.
Raw Data RepresentationEach raw data event is represented as a single line in a raw data file. Each line is a JSON object with the following format:
{ "EventDate": "<date>", "EventRecordID:" "<event record uuid>", "RawData": "<raw data>", "RawDataHash": "<SHA256 hash of raw data, in hex format>", "EventSourceManagerID", "<uuid of event source manager>", "CollectorID", "<uuid of collector>", "EventSourceID:", "<uuid of event source>", "ChainID", "<chain ID>", "ChainSequence", "<Sequence number>" }The following table describes each of the fields in the raw data event:
Table 13-2 Raw Data Representation
Field Name Description
EventDate The date and time when Sentinel received this event and not the date and time when the event occurred.
Example: “05/24/2010 06:15:06.676”
EventRecordID The unique ID identifying the raw data record.
Example: "595829C0-1C8F-102C-A922-000C2949BA91"
If an event was generated as a result of parsing a raw data record, this ID is set in the event RecordID field. Because of filtering, not all raw data records result in an event.
RawData The original raw data received by the event source.
Configuring Traditional Storage 159

RawDataHash The SHA-256 hash of the RawData value represented as a HEX string. The hash is calculated by converting the RawData value to a UTF-8 string and then performing the hash over that string.
To detect tampering, each raw data event is stored with a SHA-256 hash value.
Example: cc661009e2f3dc565c0c7fe25b705219004dcd8132c0b0a7e987bfdcb55e49cf
EventSourceID The UUID of the event source from which the raw data originated.
Example: A2A0C600-1C6C-102C-A781-000C2949BA91
EventSourceGroupID The UUID of the event source group (Connector) to which the event source was connected when the raw data was received.
Example: A2A0C600-1C6C-102C-A77A-000C2949BA91
Different raw events from the same event source can have different event source group IDs, because event sources can be moved from one Connector to another.
CollectorID The UUID of the Collector that the Connector and event source were connected to when the raw data was received.
Different raw events from the same event source can have different Collector IDs, because event sources and event source groups can be moved from one Collector to another.
Example: A2A0C600-1C6C-102C-A779-000C2949BA91
EventSourceManagerID The UUID of the Event Source Manager (Collector Manager) object where this raw data was received.
Example: C76D2820-C395-1029-BB86-001321B5C0B3
ChainID A random number that identifies a raw data chain. Whenever an event source is stopped and restarted between generation of raw data events, a new ChainID number is generated.
To detect tampering, each raw data event is stored with a ChainID and a ChainSequence number.
Example: 1241630654754
Field Name Description
160 Configuring Traditional Storage

The following examples show three raw data records:
{ "EventDate":"05\/24\/2010 06:15:06.676", "EventRecordID":"A75CF6A0-4948-102D-A61C-000C29A9C3DB", "RawData":"Sep 22 10:22:00 testhost Message #100", "RawDataHash":"7003c0e0be4ddf43a3b49026a37483f59c7f839950f581ec9fde5dea43da90f5", "EventSourceManagerID":"C76D2820-C395-1029-BB86-001321B5C0B3", "CollectorID":"A75CF6A0-4948-102D-A613-000C29A9C3DB", "EventSourceGroupID":"A75CF6A0-4948-102D-A614-000C29A9C3DB", "EventSourceID":"A75CF6A0-4948-102D-A615-000C29A9C3DB", "ChainID":"1274696106664", "ChainSequence":"0" } { "EventDate":"05\/24\/2010 06:15:07.358", "EventRecordID":"A75CF6A0-4948-102D-A624-000C29A9C3DB", "RawData":"Sep 22 10:22:00 testhost Message #99", "RawDataHash":"f5681ba965144d2d22b13188767d94540b5fe57904afcee5821854bde2afca72", "EventSourceManagerID":"C76D2820-C395-1029-BB86-001321B5C0B3", "CollectorID":"A75CF6A0-4948-102D-A613-000C29A9C3DB", "EventSourceGroupID":"A75CF6A0-4948-102D-A614-000C29A9C3DB", "EventSourceID":"A75CF6A0-4948-102D-A615-000C29A9C3DB", "ChainID":"1274696106664", "ChainSequence":"1"
ChainSequence A sequence number within a particular raw data chain.
The raw data events in a given raw data chain must have an uninterrupted sequence of numbers starting with 0. In addition, all raw data events in a given raw data chain must appear sequentially in the files, with no other chains intermixed. If a raw data chain can span files, the sequence should continue uninterrupted into the file that represents every hour during which raw data was received.
Example: 4
If no raw data is received for the one-hour period, the file records only from the next arrival of raw data. Nonetheless, the raw data chain sequence should continue uninterrupted until a new raw data chain begins. A new raw data chain is signaled by a changed ChainID value, and a ChainSequence value of zero (0).
Field Name Description
Configuring Traditional Storage 161

} { "EventDate":"05\/24\/2010 06:15:07.988", "EventRecordID":"A75CF6A0-4948-102D-A62A-000C29A9C3DB", "RawData":"Sep 22 10:22:00 testhost Message #98", "RawDataHash":"98435b5dba95633699b88d07782109876e8ceb4169d567602f2c92657118645d", "EventSourceManagerID":"C76D2820-C395-1029-BB86-001321B5C0B3", "CollectorID":"A75CF6A0-4948-102D-A613-000C29A9C3DB", "EventSourceGroupID":"A75CF6A0-4948-102D-A614-000C29A9C3DB", "EventSourceID":"A75CF6A0-4948-102D-A615-000C29A9C3DB", "ChainID":"1274696106664", "ChainSequence":"2" }
Disabling Raw Data CollectionBy default, raw data collection is enabled for the Collector Manager on the Sentinel server. Collecting raw data can impact the performance of the server or the remote Collector Manager. Perform the following procedure on any Collection Manager where you want to disable raw data collection:
1 Open the /etc/opt/novell/sentinel/config/event-router.properties file in a text editor.This is the default location of the file.
2 Change esecurity.router.event.rawdata.send=true to esecurity.router.event.rawdata.send=false.
3 Save the file, then restart the Collector Manager.
Event DataSentinel closes the event data partitions after one day, and no more events are written to the closed partitions. Even though the duration for event data partitions is one day, a grace period of 10 minutes is given to accommodate events arriving late. You can change the grace period as necessary. For more information, see “Setting the Grace Period to Close Event Data Partitions” on page 305.
By default, after the partitions are closed, Sentinel copies a compressed copy of the partition to secondary storage, but also retains the uncompressed copy on primary storage as a fast-access cache for searching. When the primary storage reaches its maximum disk usage, Sentinel deletes the copy in the primary storage and the copy in the secondary storage remains online for searching.
NOTE: However, if disk space in primary storage is at a premium, you can compress these partitions as soon as they are closed to save the disk space on the primary storage. This requires additional I/O to compress and store on the primary partition, which means that the supported EPS rate will be significantly lower. Also, searches on these partitions will be slower. Therefore, this option is only suitable for lower EPS rates and if you want to get the most out of primary storage space. For information about compressing the storage index on primary partitions, see “Compressing the Storage Index on Primary Partition” on page 305.
The partitions are laid out as follows:
162 Configuring Traditional Storage

Primary storage: Open partitions + Most recent N days of closed partitions
Open partitions: The partitions that new data is being written to. Most recent N days of closed partitions: As many of the most recently written closed partitions
that can fit in primary storage.
Secondary storage: Most recent N days of closed partitions + The rest of the online data
The rest of the online data: The older closed partitions that primary storage no longer has room to hold. This data is online (searchable), just like the data in primary storage.
NOTE: Because of the above design consideration, the secondary storage size must be always larger than the primary storage size.
Sentinel stores the primary storage partitions in the /var/opt/novell/sentinel/data/eventdata directory, which is on the local file system. Sentinel creates partitions based on the dates and retention policies.
A central partition index is maintained in the database that keeps track of all the existing partitions and their location.
The following table describes the directory structure under the installation directory where event data is stored:
Table 13-3 Event Data Directory Structure
Directory Structure Description
/data The primary directory for all data storage.
/data/eventdata The subdirectory where all event data is stored.
/data/eventdata/events/YYYYMMDD_<classid>
A partition consists of the events for a single day (midnight-midnight UTC) within a given data retention class and is held within a subdirectory named YYYYMMDD_<class-id>.
YYYYMMDD: is the UTC date stamp.
<class_id>: is a UUID identifier associated with the data retention class.
/data/eventdata/events/YYYYMMDD_<class_id>/events.evt
events.evt contains the binary event data for the partition. The format of the binary event data is stored as a Reliable Persistent Random Access Compressed Stream.
/data/eventdata/events/YYYYMMDD_<class_id>/index
The index directory contains the Lucene index for the partition.
/data/eventdata/exported_associations
This directory contains the event associations data. It includes both the correlated event association data and the incident event association data.
Configuring Traditional Storage 163

Configuring Secondary Storage LocationsAll closed event data files are copied from the primary storage location to the secondary storage location. The original files are retained on primary storage to facilitate faster searches. However, if the primary storage disk space usage nears a user-defined threshold, duplicate data files on the primary storage area are deleted from the primary storage and remain only on secondary storage.
“Supported Storage Options” on page 164 “Types of Secondary Storage” on page 165 “Configuring Secondary Storage” on page 165 “Changing the Secondary Storage Location” on page 169
Supported Storage OptionsSentinel supports the following types of storage options:
SAN: The Storage Area Network (SAN) option includes storage that is attached directly to the Sentinel computer. This option provides the best combination of performance, security, and reliability.
CIFS: The Common Internet File System (CIFS) is a native Windows protocol. It is also known as the Server Message Block (SMB) protocol in later implementations. The latest implementation from Microsoft is referred to as SMB 2.
NFS: The NFS protocol requires significant configuration to optimize performance and security, and it is recommended only if you already have a well-established NFS infrastructure in your environment. If the secondary storage is an NFS server, additional configuration is necessary to ensure that the Sentinel server has the necessary permissions. For more information, see “Exporting the Secondary Storage Volume” on page 167.
WARNING: Only one Sentinel server should be configured to use a particular secondary storage directory (remote share). Configuring the same secondary storage location across multiple Sentinel servers might cause system failure.
The primary storage must use a different partition than the partition that is used for the secondary storage.
The system monitors the disk usage of both primary storage and secondary storage, freeing space on primary storage when it fills up. If both storage locations share the same underlying file system partition, the way in which the partition usage changes as a result of deleting data confuses the system and could result in undesirable behavior.
The event data is first copied to secondary storage rather than moved, because there is an assumption that these are two different disk partitions. If they are in same disk partition instead of being on the different disk partition, the storage usage monitoring is confused by how the usage is changing and could result in undesirable behavior.
164 Configuring Traditional Storage

Types of Secondary StorageYou can enable and configure secondary storage for raw data and event data stored on the Sentinel server.
“Raw Data Storage” on page 165 “Event Data Storage” on page 165
Raw Data Storage Raw data files are compressed and have the .gz extension. When the data is currently being written into, the raw data file appears with the .open extension.
If secondary storage is configured and enabled, Sentinel copies the compressed raw data files to the configured secondary storage location every 15 minutes.
Event Data StorageIf secondary storage is enabled, Sentinel moves the closed files to secondary storage every midnight UTC and also whenever the server starts. These files are compressed in the primary storage location, but the file indexes are compressed before moving to the secondary storage. If the secondary storage location is not configured or if there is any problem while moving the closed files, Sentinel attempts to move the files to secondary storage every 60 seconds until it succeeds.
Configuring Secondary StorageThe NFS, CIFS/SMB, and SAN must be configured so that Sentinel has read and write permissions.
For CIFS/SMB and NFS, if multiple Sentinel instances are moving the closed partitions to the same secondary storage location, ensure that each Sentinel instance has its own unique directory on that secondary storage location.
“Configuring a SAN/Local Directory as a Secondary Storage Location” on page 165 “Configuring an CIFS/SMB Server as a Secondary Storage Location” on page 166 “Configuring an NFS Server as a Secondary Storage Location” on page 166
Configuring a SAN/Local Directory as a Secondary Storage LocationConfiguring a SAN/Local directory as a secondary storage location is the preferable configuration for best performance, security, and reliability.
1 From Sentinel Main, click Storage > Events.2 From the Data Storage Location section, select SAN (locally mounted) as the secondary storage
location.3 In the Location field, specify the local directory path or the location on which the storage area
network (SAN) is mounted. You must have the novell permissions to specify the location.The SAN partition must be manually mounted before the location is specified.
Configuring Traditional Storage 165

4 Click Test to check if the write permissions for the specified location are available.5 Click Save to configure the specified secondary storage location.
Configuring an CIFS/SMB Server as a Secondary Storage Location1 From Sentinel Main, click Storage > Events.2 In the Data Storage Location section, select CIFS. 3 Specify the following information:
Server: Specify the IP address or hostname of the computer where the CIFS server, also known as the SMB server, is configured.Share: Specify the share name of the SMB or CIFS server. The mounted shares are unmounted when the server stops and are mounted again when the server starts. If the configured share unmounts, the Sentinel server detects this and mounts it again.Username: Specify the user name (if one is assigned) to access the share.Password: Specify the password (if one is assigned) to access the share.Mount Options: Specifies the options that are used while mounting the secondary storage location of the SMB or the CIFS server.You can specify new mount options. For more information about the available NFS mount options, see the mount.cifs (8) - Linux man page (http://linux.die.net/man/8/mount.cifs).The default mount options are file_mode=0660,dir_mode=0770.
4 (Optional) Click Restore Defaults to restore the default mount options. 5 Click Test to mount the SMB or CIFS server and to check the write permissions on the server. 6 Click Save to configure the specified secondary storage location.
Configuring an NFS Server as a Secondary Storage LocationNFS servers are fast and efficient. Setting up correctly requires significant configuration and testing. Using an NFS server as a secondary storage location is recommended only when you have a well-established NFS infrastructure in your environment.
“Exporting the Secondary Storage Volume” on page 167 “Squashing User IDs” on page 168 “Testing NFS Exports” on page 168 “Configuring NFS as a Secondary Storage Location” on page 169
166 Configuring Traditional Storage

Exporting the Secondary Storage VolumeYou must configure an NFS server with a storage area large enough to accommodate the planned storage needs for Sentinel secondary storage. You need to export (share) this storage directory so that Sentinel can access it. The procedure to export the secondary storage depends on the technology used by your NFS server.
The following are some examples for several common systems:
1 Identify a volume on the NFS server with sufficient space to hold the Sentinel secondary storage data.
2 Create a new directory on that volume to store the Sentinel data. For example, /sentinel-secondary.
3 Create a novell user and novell group on the NFS server with the same user ID and group ID as the corresponding user/group on the Sentinel server. For example, user ID 1000 and group ID 1000. If this is not possible, see “Squashing User IDs” on page 168.
4 Change the directory ownership to be owned by novell user and novell group:chown novell:novell /sentinel-secondary
5 Change the directory permissions to remove the group and other read/write/execute permissions:chmod og-rw /sentinel-secondary
6 Export the directory using the appropriate NFS server configuration. You can use a GUI client or refer to the appropriate settings or commands for various popular servers. Set read and write access for sharing the Sentinel server. List the specific Sentinel server
hostname or IP address to restrict access. Use root_squash (which maps root users who attempt to access the share to an
anonymous user ID) to prevent access by root. You can also explore additional security and performance options, such as async by using
TCP, and so on depending on the capabilities of your NFS server.
The following table describes an example of exporting the /sentinel-secondary directory from the nfs-server to the sentinel-server.
System Type Configured location
Linux Use YaST or add /sentinel-secondary sentinel-server(rw,root_squash) to the /etc/exports file.
Solaris Add /usr/bin/share -F nfs -i sec=sys,rw=sentinel-server,nosuid /sentinel-secondary to the /etc/dfs/dfstab file.
HP-UX Add /sentinel-secondary -access=sentinel-server to the /etc/exports file.
NetApp Add /sentinel-secondary -nosuid,sec=sys,rw=sentinel-server to the /etc/exports file.
Configuring Traditional Storage 167

Squashing User IDsIn certain circumstances, it is not possible or desirable to create new user IDs on the NFS server that match the user IDs in use by the Sentinel server. The NFS protocol uses the user ID as an important component for granting permissions to read and write the data during the export. Most NFS servers do not provide flexible and specific ways to re-map user IDs used on the Sentinel system to different user IDs on the NFS server.
An alternate solution involves mapping all source user IDs to an anonymous user ID specified by the NFS server. For example, any user ID that attempts to access the NFS export. This reduces security allowing any user to read or write the Sentinel data on the export (subject to the IP-based access permissions of the export). This is called squashing. In most cases, the root user is re-mapped and most other users are not. In this case, you need to re-map the novell user and all other users.
The following table describes an example of re-mapping the novell user with ID 1000 on the Sentinel server to a local user on the NFS server with the ID 2000 who must have permission to the /secondary-storage directory.
Testing NFS ExportsYou can test the NFS export outside of Sentinel by using the standard Linux mount command to mount the export on the Sentinel server. To do so, log in to the Sentinel server as the root user and enter the following command:
mount -t nfs nfs-server:/sentinel-secondary /mntThe above command mounts the export on the /mnt directory. You can see the mount in the list by re-issuing the mount command without options. You may not be able to perform any file actions using the root user instead use the novell user (su novell) to perform the file operations. Use umount /mnt command before you attempt to set up the secondary storage within Sentinel.
For more information about NFS security recommendations, see Chapter 3, “Security Considerations,” on page 21.
System Type Configured location
Linux Use YaST or add /sentinel-secondary sentinel-server(rw,all_squash,anonuid=2000) to the /etc/exports file.
Solaris Add /usr/bin/share -F nfs -i sec=sys,rw=sentinel-server,anon=2000,nosuid /sentinel-secondary to the /etc/dfs/dfstab file.
If the user ID 1000 is in use on the NFS server, this may not work. In that case use sec=none.
HP-UX Add /sentinel-secondary -access=sentinel-server,anon=2000 to the /etc/exports file
If the user ID 1000 is in use on the NFS server, the above may not work.
NetApp Add /sentinel-secondary -nosuid,sec=none,anon=2000,rw=sentinel-server to the /etc/exports file
168 Configuring Traditional Storage

Configuring NFS as a Secondary Storage LocationConfigure the secondary storage as follows:
1 From Sentinel Main, click Storage > Events.2 In the Data Storage Location section, select the NFS option. 3 Specify the following information:
Server: Specify the IP address or hostname of the computer where the NFS server is configured.Share: Specify the share name of the NFS server.The mounted shares are unmounted when the server stops and are mounted again when the server starts. If the configured share unmounts, the Sentinel server detects this and mounts it again.Mount Options: Specifies the options that are used while mounting the secondary storage location of the NFS server.You can also specify new mount options. For more information about the available NFS mount options, see the NFS documentation.The default mount options are soft,proto=tcp,retrans=1,timeo=60.
4 (Optional) Click Restore Defaults to restore the default mount options. 5 Click Test to verify the configuration of the NFS server and to check the write permissions on the
server. This procedures tests a subset of all the settings that are necessary for the NFS server and client.
6 Click Save to configure the specified secondary storage location.
Changing the Secondary Storage Location1 From Sentinel Main, click Storage > Events.2 In the Data Storage Location section, select Change Location. The Change Location option is
displayed only if the secondary storage location is configured.3 Click Change Location. 4 Select the option to disable data collection.
You can select this option to avoid filling the primary storage before Sentinel moves the data to the new location. If this option is not selected and if the primary storage is filled before the new data storage location is configured, Sentinel deletes the oldest data to make space for the incoming data.
5 Configure the new data storage location. For more information about configuring the NIFS or SMB/CIFS or primary/SAN secondary storage locations, see “Configuring Secondary Storage” on page 165.
6 Click Save to save the changes and configure the new secondary storage location.7 Manually copy the files from the old secondary storage location to the new secondary storage
location.8 After copying the files, select Copy Done to start data storage at the new location.
Configuring Traditional Storage 169

Configuring Disk Space UsageIf secondary storage is enabled, Sentinel copies the event data to the secondary storage location after two days, and a local copy remains on the primary storage until the free space on the local storage needed for storing newer event data.
Sentinel moves the raw data to the secondary storage location after approximately one hour.
To configure disk space usage:
1 From Sentinel Main, click Storage > Events.In the Disk Space Usage section, the Primary storage size field displays the total storage size currently used by Sentinel.
2 Specify the primary storage utilization values in the following fields: Start deleting data from primary storage when __% full: Specify the threshold at which the
event data deletion process should start. Reserve disk space for about a days' worth of event data so that the deletion process has sufficient time to complete. Also, if any other processes need to be able to store data to the same partition, those processes should have sufficient space to do so.
Stop when __% full: Specify the threshold below which the disk space cleanup process should stop. The amount of freed disk space should be sufficient to store an additional full days' worth of event data.
Sentinel stores as much event data on primary storage as possible to ensure that searches run as quickly as possible. The values specified here help to ensure that primary event storage does not get too full, but that as much data as possible is available on that partition for faster searching. The cleanup process runs once a day, checks the “start deleting” threshold and, if disk space usage is higher than that threshold, begins deleting older event data first until the disk space usage is below the second threshold.The Secondary storage size field specifies the value of the secondary storage space.
NOTE: This field is displayed only if you have enabled secondary storage.
3 (Conditional) If you have enabled secondary storage, specify the secondary storage utilization value in the Use __% of total secondary storage size field. This is the threshold at which Sentinel stops using the secondary storage disk space.
Verifying and Downloading Raw Data FilesThe raw data files for each event source are compressed and moved to secondary storage every hour and the file hash is computed for secondary storage files. The file hash is used to check the integrity of the files in the secondary storage.
1 From Sentinel Main, click Storage > Download Raw Data.2 In the Event source hierarchy field, select the desired Collector and Connector combination from
the drop-down list.3 In the Event Source field, select the event source from the drop-down list.
The Event Source field displays the list of associated event sources (hostnames or IP addresses) after the Event source hierarchy field is populated.
170 Configuring Traditional Storage
4 In the table, click Select All to select all the files in the table. orSelect each file separately.The table displays the list of primary and secondary storage raw data files for the selected event source. The Verify Integrity and Download options are enabled only when you select a file from the table.
5 Click Verify Integrity to verify the integrity of the selected files in the secondary storage by comparing the hash values for the selected files in the secondary storage.Sentinel computes the hash and updates the database for the files in the secondary storage, but not for the local raw data files. Because the raw data files are updated until they are moved to secondary storage, the hash value cannot be computed or updated for these files. It is not possible to check the integrity of the local raw data files.
6 Select the raw data file, click Download to download the selected secondary storage and local raw data files. The selected files are downloaded in the form of a ZIP file that contains a .csv (comma separated values) file. If the secondary storage files are selected, the ZIP file also contains a hash file corresponding to each of the secondary storage files downloaded.Sentinel uses the SHA-256 algorithm to generate the file hash. The generated hash is Base64 encoded.
7 Select Save File and click OK.
Configuring Data SynchronizationSentinel provides the ability to synchronize data to an external database, so that you can use third-party or custom reporting systems to search the data in the external database with more advanced tools than what are provided in Sentinel.
“Overview” on page 171 “Creating Data Synchronization Policies” on page 174 “Managing Data Synchronization Policies” on page 178
OverviewSentinel can store the data in an external database by synchronizing a subset of the data that Sentinel gathers.
Sentinel uses the following process to synchronize data:
1. Sentinel gathers the events from the Event Sources through the Connectors.2. Sentinel uses Collectors to normalize the event data.3. The normalized event data is then sent to the Sentinel message bus.4. The event data is then stored and indexed in the file system in the primary storage.
Configuring Traditional Storage 171

5. The data synchronization policies allow events in the primary storage to be copied and stored in PostgreSQL and external SQL databases.
a. User-defined data synchronization policies synchronize the filtered event data to an external SQL database. For information about the certified databases, see Sentinel System Requirements.
b. Report Data Definitions (RDD) generate system data synchronization policies that are used to copy event data into tables in the internal PostgreSQL database. These data synchronization policies cannot be edited or deleted. Reports that rely on an RDD will search internal database tables for events instead of the primary storage. These kinds of reports search internal tables instead of the event store because they utilize more complex SQL SELECT statements that need to join event data to the data in other tables in the internal database.
172 Configuring Traditional Storage

Figure 13-1 Data Synchronization
Sentinel allows you to partition tables if they are in the internal PostgreSQL database. When you choose to partition a table in the internal PostgreSQL database, a new table partition is created for each days worth of data.
NOTE: The supported version of PostgreSQL is 12.1
1
2
3
4
5a 5b
Message Bus
User Defined
External EventStore
InternalDatabase
Report Data Definition (RDD)
Primary Storage
Event Sources
Collecting and Normalizing Data
File System (Lucene)
Data SynchronizationPolicies
MSSQLOr Oracle Database
Configuring Traditional Storage 173

Partitions are only used with RDD data sync policies. Partitioning has advantages and disadvantages:
Advantages If a retention period is in force, old data can be deleted quickly. When data has aged, it is much
quicker to drop a partition than it is to delete individual table records. Reports that query on the event time field might be quicker, because it is only necessary to
search the partitions that have the specified event times.
Disadvantages Reports that do not query on event time might be slower where there are multiple of partitions,
because every partition must be searched. Each partition causes one or more schema items to be created and managed by the database
system. If there is no retention period, the number of partitions just keeps growing.
Creating Data Synchronization PoliciesWhen Sentinel syncs data to an external database, it is not as fast when it writes to the file system. Therefore, you need to ensure that you use filters on the data sync policies to synchronize only the most important data. Consider the following factors based on your business needs for data sync policies:
The CPU, RAM, and disk capacity of the Sentinel system Number of EPS scaled per system Number of searches and reports running on a Sentinel system Filters added to the data sync policies
Populating IP addresses in Human Readable FormatBy default, Sentinel populates IP address fields in hexadecimal format for efficiency reasons. You can choose to populate the IP address fields in human readable format automatically, by performing the following steps:
1 Log on to the Sentinel server as the novell user.2 Open the /etc/opt/novell/sentinel/config/configuration.properties file and
set the datasync.saveIPinDottedNotation property to true.3 Restart the Sentinel server.
Enabling SSL Communication for Data SynchronizationYou can establish an SSL connection to synchronize data with external databases. Sentinel does not perform certificate validation or authentication.
To enable SSL communication, performing the following steps:
1 Log in to the Sentinel server as the novell user.2 Open the /etc/opt/novell/sentinel/config/configuration.properties file.
174 Configuring Traditional Storage
3 If the jsse.enableCBCProtection property is not listed, add this property and set it to false as follows:
jsse.enableCBCProtection=false4 Open the /etc/opt/novell/sentinel/config/databasePlatforms.xml file.5 Identify the database platform for which you need to enable SSL connection.6 Set the JDBC property as follows:
For MSSQL: Set the SSL property to require as follows:
<JDBCProperties>
<Property name="ssl" value="require"/>
</JDBCProperties>For PostgreSQL: Set the SSLOFF property to false as follows
<JDBCProperties>
<Property name="ssloff" value="false"/>
</JDBCProperties>For Oracle: Set the SSLOFF property to false as follows:
<JDBCProperties>
<Property name="ssloff" value="false"/>
</JDBCProperties>7 Restart the Sentinel server.
Creating a Data Synchronization Policy Prerequisite for IBM DB2: By default, Sentinel includes the JDBC driver for all the certified
databases except for IBM Db2. For Db2, you must manually copy the JDBC driver from the Db2 server to the Sentinel server.
1. Copy the db2jcc4.jar file from the Db2 server to the following location on the Sentinel sever:#/opt/novell/sentinel/lib/
2. Change the owner of the file to novell, using the following command:chown novell:novell <filename>
3. Configure the server.conf file. a. In the /etc/opt/novell/sentinel/config directory, open the server.conf
file.b. Add the following java classpath property:
Configuring Traditional Storage 175

wrapper.java.classpath.7=/opt/novell/sentinel/lib/db2jar fileFor example, wrapper.java.classpath.7=/opt/novell/sentinel/lib/db2jcc4-9.7.0.0.jar
4. Restart the Sentinel server:rcsentinel restart
To create a data synchronization policy:
1 Log in to Sentinel as a user in the administrator role. 2 From Sentinel Main, click Storage > Data Synchronization.3 Click Create to create a new data synchronization policy.4 Use the following information to create the data synchronization policy:
Filter query: Select a saved filter to use in the data synchronization policy.This filter determines which events are stored in the external database. For more information, see “Configuring Filters” in the Sentinel User Guide.Policy name: Specify a name for the data synchronization policy.Retention period: Specify how many days to retain the events in the external database.Start data synchronization time: Specify when to start synchronizing events to the external database.Batch size: Specify how many events are sent to the external database at once.Sleep period: Specify the length of time that the data synchronization process sleeps before checking to see if there are more events to process.Schedule: Select when the data is synchronized to the external database. All the time: Synchronizes events to the external database constantly. Custom: Allows you to configure specific time periods to perform data synchronization so
that it does not occur when the system is busy.If you select Custom, specify the following information to set the custom synchronization time: Day of the Week: Select the day of the week, or select Everyday. Start time: Specify the time to start the synchronization process. You can enter 24:00
hour time and it is converted to 12:00 hour time. Duration: Specify the synchronization period in minutes.
If you do not see the data in the database tables immediately, you need to wait for the next synchronization cycle.
5 Use the following information to define the connection to the external database:Database type: Select the type of external database.Host name: Specify the host name of the server where the external database is installed.Port: Specify the port used to connect to the external database.User name: Specify the name of the user that authenticates to the external database.Password: Specify the password of the database user.Database: Specify a unique name for the external database. For Oracle database, you can either use the Database name or the Service name.
176 Configuring Traditional Storage

Field Mapping: Allows you to map fields in the event to fields in the external database. “Creating a Table for Event Data Synchronization” on page 177 “Using an Existing Table for Event Data Synchronization” on page 177
6 Click Save to create the data synchronization policy.
Creating a Table for Event Data Synchronization1 Complete Step 2 through Step 4 in “Creating Data Synchronization Policies” on page 174.2 Click Field Mapping.3 Select Create table.4 Use the following information to create the table:
Table name: Specify a name for the table.Table Space (Optional): Specify a tablespace for the table.Index Space (Optional): Specify a tablespace for the index.Summarize Events: Select this option if you want a summary of events during a specific period.Summary Period (Minutes): If you selected Summarize Events, you must specify the amount of time in minutes to summarize events.
5 Map the fields in the table to the desired fields.6 Click Create Table.7 Click Save.
Using an Existing Table for Event Data Synchronization1 Complete Step 2 through Step 4 in “Creating Data Synchronization Policies” on page 174.2 Click Field Mapping.3 Select Select existing table.
Starting from Sentinel 8.x, the size of the Message (msg) event field has been increased from 4000 to 8000 characters to accommodate more information in the field. If you are creating a data synchronization policy that synchronizes the Message (msg) event field to an external database, you must increase the size of the Message (msg) field’s mapped column in the external table accordingly.
NOTE: The above update is applicable only if you are upgrading previous versions of Sentinel to 8.x.
4 Browse to a select an existing table you want to use, then click OK.5 (Optional) Select the Summarize Events option if you want a summary of events during a specific
period.6 (Optional) If you selected Summarize Events, specify the amount of time in minutes to
summarize events.7 Change the field mappings for the desired fields.8 Click Save.
Configuring Traditional Storage 177
Setting Retention Period in Default RDD PoliciesBy default, the retention period value is set to 30 days for all RDD policies that do not have retention period specified. However, you can change the retention period value.
To change the default retention period value:
1 Log on to the Sentinel server as the novell user.2 Open the /etc/opt/novell/sentinel/config/configuration.properties file.3 Add the default.global.datasync.retentionperiod property and set it to the required
value.
NOTE: If you set the value of this property to zero, the RDD table entries are never deleted.
4 Restart the Sentinel server.
Managing Data Synchronization PoliciesYou can edit, delete, and view the status of each data synchronization policy you create on the Data Synchronization page. If your policy is a custom synchronization policy and you perform a resynchronization, the data synchronizes during the next synchronization cycle.
Event Views use data synchronization policies to display data dynamically and more accurately. Data synchronization policies related to Event Views remain enabled and active while being used by an Event View. If there are no data requests from an Event View for a given data synchronization policy within a specified time period, the data synchronization policy will be automatically deleted.
To specify the time period for which an Event View related data synchronization policy should remain active:
1 Log in to the Sentinel server as the novell user.2 Open the /etc/opt/novell/sentinel/config/configuration.properties file.3 Set the desired time in hours for the sentinel.realtime.datasynctimeout property.4 Save the modified configuration.properties file.5 Restart Sentinel.
Viewing Primary and Secondary Storage CapacityThe Health page displays primary and secondary data capacity. For more information about configuring secondary storage, see “Configuring Secondary Storage Locations” on page 164.
To view the primary storage and secondary storage capacity:
1 From Sentinel Main, click Storage > Health.
The Health page of Sentinel also displays the current storage capacity and also forecasts the storage capacity for both primary and secondary storage.
178 Configuring Traditional Storage

WARNING: When the system is running out of primary disk storage space, a warning message is displayed and a system audit event is logged. To avoid data loss, you must increase the primary storage space.
Using Sequential-Access Storage for Long Term Data Storage
Sentinel requires data to be on a storage system that supports random access, such as data on your typical hard drive. It does not support directly interfacing with the data stored on tape.
You can search the raw data by using tools such as egrep or a text editor, but this search might not be sufficient for your requirements. The search mechanism provided by Sentinel on event data is more powerful than these tools.
The high-level approach to configure Sentinel is to retain data for a longer duration so you can perform searches and run reports on the data you regularly need to access, and to copy the data to tape before Sentinel deletes it. To search or run reports on data that was copied to tape, but deleted from Sentinel, copy the data from the tape back to Sentinel.
“Determining What Data You Need to Copy to Tape” on page 179 “Backing Up Data” on page 179 “Configuring Storage Utilization” on page 180 “Configuring Data Retention” on page 180 “Copying Data to Tape” on page 180 “Restoring Data” on page 181
Determining What Data You Need to Copy to Tape There are two types of data in Sentinel: raw data and event data.
If you want to perform searches or reports on the data, copy both the raw data and the event data to tape so that you can copy both sets of data back into Sentinel when the data is needed. If you want to store data only to comply with legal requirements, copy only the raw data to the tape.
Backing Up DataEvents should be moved to secondary storage regularly. The following types of data can be backed up in Sentinel:
Configuration Data: This option includes non-event or raw data backup. It is faster because it contains small amount of data, including all the installation directories except the data directory.
Data: This option backs up all the data in the primary storage and secondary storage directories. This option takes a longer time to finish.
Secondary storage directories can be located on a remote computer.
Configuring Traditional Storage 179

Best practices for data backup include the following:
Periodically export all the Event Source Management configurations and save them. When the environment is relatively stable, you can generate a full Event Source Management export including the entire tree of the Event Source Management components. This action captures the plug-ins and the configuration of each node. You must back up the resulting .zip file and move it to secondary storage.
If changes such as updating plug-ins or adding nodes are made to Event Source Management later, you must export the configuration and save it again.
Back up the entire installation directory so there is no risk of manual mistakes and the process is quicker.
Configuring Storage UtilizationYou should configure primary and secondary storage space to store data before the data is deleted from the Sentinel server. While configuring the storage space, ensure that your storage system is not 100% utilized to avoid undesirable behaviors such as data corruption. Additionally, you should also have additional space in your secondary storage to copy data from tape back into Sentinel. You can do this by decreasing the archive utilization setting.
Configuring Data RetentionYou can configure the duration for the data to remain on the disk before it is deleted. If your hard drive storage space is not sufficient to store data long enough to meet your legal requirements, you can use tape storage to store data beyond the specified duration.
You must configure data retention policies so that the data that you want to search and report is retained within the Sentinel server until you no longer need it. Additionally, a data retention policy should ensure that Sentinel is not prematurely deleting the data because of storage utilization limits. If the storage utilization limit is exceeded and you notice that the data is being prematurely deleted, change the data retention policy to expand the data storage space.
Copying Data to Tape You can set up a process to copy raw data and event data to tape, depending on the data that you need.The following sections describe how each type of data is stored in Sentinel so that you can set up copy operations to copy the data out of Sentinel onto tape.
“Copying Raw Data to Tape” on page 181 “Copying Event Data to Tape” on page 181
180 Configuring Traditional Storage

Copying Raw Data to Tape Raw data partitions are individual files. They are created every hour. Raw data files are compressed and have the.gz extension.
The directory hierarchy in which the raw data files are placed is organized by the event source and the date of the raw data. You can use this hierarchy to periodically copy a batch of raw data files to tape. For more information on raw data directory hierarchy, see Table 13-1, “Raw Data Directory Structure,” on page 157.
You cannot copy files that are in the process of being compressed. You must wait until the raw data files are compressed and moved to secondary storage before copying them to tape.The presence of a .log file with the same name as the zip file indicates that the file is still in the process of being compressed.You must also ensure that the raw data files are copied to the tape before the interval configured in the Raw Data Retention policy expires so that the data is not lost.
Copying Event Data to TapeEvent data partitions are created every 24 hours. Event data is stored in the data/eventdata directory with subdirectory names prefixed with the year, month, and day when the partition was created (yyyymmdd). For example, the path to a complete event data partition, relative to the installation directory, is data/eventdata/20090101_408E7E50-C02E-4325-B7C5-2B9FE4853476. You can use this hierarchy to know when a partition is closed. Subdirectories whose date is at least 48 hours old should be in the closed state.
For more information about the event data directory hierarchy, see Table 13-3, “Event Data Directory Structure,” on page 163.
You should wait until event data partitions have been copied to secondary storage before copying them to tape. Before you copy, ensure that the directory is not currently being copied from primary storage. To do this, see if there is a primary storage directory partition of the same name. If the corresponding primary storage directory partition is not present, the secondary storage directory partition is not being copied. If the corresponding primary storage directory partition is still present, sure that all of the files in the primary storage directory partition are also in the secondary storage directory partition and that they are all of the same size. If they are all present and of the same size, it is highly likely that they are not currently being copied.
Restoring DataThe event data restoration feature enables you to restore old or deleted event data. You can also restore the data from other systems. You can select and restore the event partitions in the Sentinel Main interface. You can also control when these restored event partitions expire.
NOTE: The Data Restoration feature is a licensed feature. This feature is not available with the free or trial licenses. For more information, see “Understanding License Information” in the Sentinel Installation and Configuration Guide.
“Enabling Event Data for Restoration” on page 182 “Viewing Event Data Available for Restoration” on page 182
Configuring Traditional Storage 181

“Restoring Event Data” on page 182 “Configuring Restored Event Data to Expire” on page 183
Enabling Event Data for RestorationTo enable event data for restoration, you must copy the event data directories that you want to restore to one of the following locations:
For primary storage, you can copy the event data directories to /var/opt/novell/sentinel/data/eventdata/events/.
For secondary storage, you can copy the event data directories to /var/opt/novell/sentinel/data/archive_remote/<sentinel_server_UUID>/eventdata_archive.To determine the Sentinel server UUID, perform a search in the Web interface, in the Search results, click All for any local event. The value of the SentinelID attribute is the UUID of your Sentinel server.
Viewing Event Data Available for Restoration1 From Sentinel Main, click Storage > Events.
The Data Restoration section does not initially display any data.2 Click Find Data to search and display all event data partitions available for restoration.
The Data Restoration table chronologically lists all the event data that can be restored. The table displays the date of the event data, the name of event directory, and the location. The Location column indicates whether the event directory was found in the primary storage directory of Sentinel or in the configured secondary storage directory.
3 Continue with “Restoring Event Data” on page 182 to restore the event data.
Restoring Event Data1 Select the check box in the Restore column next to the partition that you want to restore.
The Restore Data button is enabled when the Data Restoration section is populated with the restorable data.
2 Click Restore Data to restore the selected partitions. The selected events are moved to the Restored Data section. It might take approximately 30 seconds for the Restored Data section to reflect the restored event partitions.
3 (Optional) Click Refresh to search for more restorable data.4 To configure the restored event data to expire according to data retention policy, continue with
“Configuring Restored Event Data to Expire” on page 183.
Restoring Event Data Where UID and GID are not the Same on the Source and the Destination ServerThere may be a scenario where the secondary storage data if the novell user ID (UID) and the group ID (GID) are not the same on both the source (server that has the secondary storage data) and destination (server where the secondary storage data is being restored). In such a scenario, you need to unsquash and squash the squash file system.
182 Configuring Traditional Storage

To unsquash and squash the file system:
1 Copy the partition that you want to restore on the Sentinel server where you want to restore the data at the following location: /var/opt/novell/sentinel/data/archive_remote/<sentinel_server_UUID>/eventdata_archive/<partition_ID>
2 Log in to the Sentinel server where you want to restore the data, as the root user.3 Change to the directory where you copied the partition that you want to restore:cd /var/opt/novell/sentinel/data/archive_remote/<sentinel_server_UUID>/eventdata_archive/<partition_ID>
4 Unsquash the index.sqfs file:
unsquashfs index.sqfsThe index.sqfs file is unsquashed and the squashfs-root folder is created.
5 Assign permission for novell user and novell group to the <partition_ID> folder:
chown -R novell:novell <partition_ID>6 Remove the index:
rm -r index.sqfs7 Switch to novell user:
su novell8 Squash the squashfs-root folder:
mksquashfs squashfs-root/ index.sqfs9 Restore the partitions. For more information, see “Restoring Event Data.”
Configuring Restored Event Data to ExpireThe restored partitions do not expire by default, according to any data retention policy checks.To enable the restored partitions to return to the normal state and also to allow them to expire according to the data retention policy, select Set to Expire for data that you want to expire according to the data retention policy, then click Apply.
The restored partitions that are set to expire are removed from the Restored Data table and returned to normal processing.
It might take about 30 seconds for the Restored Data table to reflect the changes.
Configuring Traditional Storage 183

184 Configuring Traditional Storage

14 14Configuring Data Retention Policies
The data retention policies control when data should be deleted from the system. A retention policy contains a filter that is used to identify the events for which the retention policy applies and the minimum and maximum number of days these events should be kept in the system.
You can configure one or more data retention policies to control the duration for which specific types of events are retained in Sentinel. Except for the Raw Data Retention policy, all of the configured policies apply to the event data.
The configured retention policies are displayed in the data retention policy table. By default, the data retention policy table is refreshed every 30 seconds to reflect the changes made by multiple administrators.
NOTE: For traditional storage, data retention policies are applied in addition to the configured disk space usage parameters, as described in “Configuring Disk Space Usage” on page 170. These policies are a logical overlay, whereas the disk space usage configuration is related to the physical memory space usage.
“Rules for Applying a Retention Policy” on page 185 “Raw Data Retention Policy” on page 186 “Event Data Retention Policies” on page 186 “Data Deletion Policy for Traditional Storage” on page 187
Rules for Applying a Retention PolicyAn event could match the filter criteria of multiple data retention policies.
To determine which data retention policy will apply to an event and, therefore, how long an event will be retained before deleting it from the data storage, apply the following rules:
1. If an event meets the criteria of only one data retention policy filter, that data retention policy is applied to the event.
2. If an event does not meet the criteria for any of the data retention policies, the default data retention policy is applied to that event.
3. If an event meets the criteria for more than one of the data retention policies, the following guidelines are used to determine which data retention policy should be applied: If the maximum retention period of a policy is shorter than the others, that policy is
applied. (If the maximum retention period is not specified for a policy, the policy is considered to have a long maximum retention period.)
If multiple matching policies have the same shortest maximum retention period, the policy with the longest minimum retention period is applied.
If multiple matching policies have the same shortest maximum retention period and the same longest minimum retention period, the system arbitrarily applies one of the policies.
Configuring Data Retention Policies 185

Raw Data Retention PolicyThe raw data retention policy controls the duration for which the raw data is kept in the system before it is deleted.The raw data retention policy cannot be deleted or disabled. However, you can modify the Keep at most and Keep at Least values, which determine the maximum and minimum number of days to keep the raw data file.
The process to delete raw data files runs every time the server is started, every hour because that is when the raw data files are closed, and whenever the Keep at most value is changed. All the files exceeding the retention time are removed permanently from the data storage.
Event Data Retention PoliciesThe event data retention policies control the duration for which different types of event data are kept in the system before being deleted.
Creating Event Data Retention PoliciesTo create a data retention policy:
1 From Sentinel Main, click Storage > Events.2 In the Data Retention section, click Create. 3 Use the following information to create the data retention policy.
Policy name: Specify a name for the retention policy. The policy name must be unique and must contain alphanumeric characters. Criteria: Specify the data retention policy criteria, or the filter value. Use the same syntax as searches. Click the Build criteria icon to build a new criteria from available system objects containing criteria. You can also use existing criteria by clicking the Select and append criteria icon.Keep at least: Specify the minimum number of days to retain the events in the system. The value must be a valid positive integer. Sentinel might retain the data for more number of days than this value (up to the Keep at most value, if specified) if disk space is available. This setting allows Sentinel to preferentially delete event data that is no longer needed when disk space must be freed.Keep at most: (Optional) Specify the maximum number of days for which the events should be retained in the system. The value must be a valid positive integer and must be greater than or equal to the Keep at least value. Sentinel ensures that partitions that contain this kind of data will never be retained for longer than this value (assuming Sentinel is running and has access) for privacy or compliance reasons.If no value is specified, Sentinel retains events of this type until the disk space usage policies remove them.
4 Click Save. The newly created policy is displayed in the data retention table.The table also contains the following additional columns:
186 Configuring Data Retention Policies

Size: Displays the amount of space used to store the events for each retention policy.Events: Displays the number of events for the selected retention policy.The policies are sorted in alphabetical order by policy name. The default retention policy is always shown as the last policy in the list.
Configuring the Retention Period for the Event Associations DataBy default, Sentinel retains the event associations data that is present in the exported associations (/var/opt/novell/sentinel/data/eventdata/exported_associations) directory for 14 days.
NOTE: Event associations data is available only in traditional storage.
However, you can change this retention period by performing the following steps:
1 Log in to the Sentinel server as the novell user.2 Open the /etc/opt/novell/sentinel/config/configuration.properties file.3 Add the following line in the file:sentinel.exportedAssociations.retention.period=<retention period>For example, if you want to set the Export Association files retention period to 90 days:sentinel.exportedAssociations.retention.period=90
4 Save the modified configuration.properties file.5 Restart Sentinel.
Data Deletion Policy for Traditional StorageSentinel deletes the data types in their listed order until the required space is available.
1. All partitions (both primary storage and secondary storage) are deleted as soon as the Keep at most time limit of their retention policy is reached.
2. Partitions that are successfully moved to secondary storage. The oldest partition is deleted first until none are left or until the desired amount of space is available.
3. Partitions that are not yet moved to secondary storage, but have reached their retention policy's Keep at most time limit. The partitions that are close to the Keep at most limit are deleted first, until none are left or until the desired amount of space is available. If at least half of the desired space is not yet free, partitions are deleted early, on the assumption that incoming data is more important than old data.
4. Partitions that are not yet moved to secondary storage that have reached their retention policy's Keep at most time limit. The partitions that are close to the Keep at most limit are moved first, until none are left or at least half of the desired amount of space is available, but the current UTC day partitions are not deleted.
Configuring Data Retention Policies 187

188 Configuring Data Retention Policies
15 15Re-indexing Event Data Partitions
If indexing libraries are upgraded during the Sentinel upgrade, the underlying data formats also get updated and the data cannot be searched. To enable the data to be searched, you must re-index all event data partitions in the system after the upgrade.
“Overview” on page 189 “Deciding When to Re-Index or Restore Data” on page 189 “Scheduling Re-indexing” on page 190 “Re-indexing By Using the Web Interface” on page 190 “Re-Indexing in the Offline Mode” on page 191
OverviewAll event data partitions in the system need to be indexed so that they become searchable. After upgrading Sentinel, if the partitions are not re-indexed, then the existing event data will not be available for Sentinel operations. Because of this, results of search, report, historical views, or other jobs will be inconsistent.
For example, for reports that have information for the past three months, the event data for that period must be re-indexed, before starting report jobs. Else, the generated reports might not be accurate
Re-indexing is required only for the existing event data partitions and not for the new incoming events.
Re-indexing event data is different from event data restoration. Re-indexing is a process of recreating event data partition indexes, which is needed because of underlying indexing library upgrades, whereas event data restoration restores data from other systems.
The Event Data Partition page displays a pie chart, which indicates the number, percentage, and size of partitions that were indexed or need to be indexed, across both primary and secondary storage. You can either select all the data or select data for a date range to re-index.
You can re-index event data partition either through the web interface or through a tool, which enables re-indexing in the offline mode. You can re-index event data partitions by using both methods simultaneously.
Deciding When to Re-Index or Restore DataThe following table provides scenarios to help you decide when to re-index or restore data.
Re-indexing Event Data Partitions 189

Table 15-1 Deciding when to re-index or restore data
Scheduling Re-indexingRe-indexing uses both CPU and disk bandwidth. If re-indexing of event data partition is performed during peak hours, it might take more time than expected or might add load on the existing jobs. Hence, we recommend you to perform re-indexing during a scheduled maintenance time or during off-peak hours.
If there are many event data partitions to re-index, to optimize the time taken to re-index, select the date range for event data partitions which contain events that need to be searchable and reportable for priority operations. You can re-index the rest of the event data partitions as per your requirement.
(Conditional) If event visualization is enabled in the Sentinel, before scheduling re-indexing task you must ensure that, the elasticsearch is left intact. See “Mapping Conflict Warning in the Kibana Search” on page 332 for more information.
Re-indexing By Using the Web Interface1 From Sentinel Main, click Storage > Event Partition Administration.
NOTE: You can also access the Event Partition Administration page from the Sentinel landing page. Click the Event Partition Administration link in the warning message at the top of the landing page.
2 Select either Primary Storage or Secondary Storage, depending on the type of event partition that you want to re-index.
3 Select the event partitions to re-index, by clicking one of the following options for Date Range:
All: Selects all the partitions in the disk for re-indexing.Date Range: Selects all the event partitions within the specified From and To dates for re-
indexing.4 Click Start Re-indexing.
The approximate time required to complete the operation is displayed depending on the storage type and the event data time range selected.
Scenario Action
After upgrading to 8.3.x Re-index the event data partition, and then restore the data.
After moving an event data partition from the Sentinel server version prior to 8.3.1.
Re-index the event data partition. In this scenario, re-indexing of event data partition also handles restoration of data.
Move an event data partition from one Sentinel 8.3.1.0 server to another Sentinel server running on version 8.3.1.0 or later.
No re-indexing of event data partition is required. You can only restore data.
Event data partitions created on Sentinel 8.3.1.0. No re-indexing of event data partition is required.
190 Re-indexing Event Data Partitions

The operation summary page displays the status and details about the completed operations.
After the re-indexing operation completes, all log files related to the operation will be available in the following log file:
<sentinel_installation_path>/var/opt/novell/sentinel/log/reindex0.0.log
Re-Indexing in the Offline ModeYou can also use a tool to re-index event data partition, in the offline mode. The tool uses minimal number of resources without affecting any of the existing processes. Re-indexing operation in the offline mode takes longer when compared to reindexing by using the online mode.
You can run the tool outside the Sentinel server. However, you must copy the Java files and the Sentinel libraries folder to the machine from which you want to run the re-indexing tool.
Before you proceed, ensure that you have the following information:
The path to the folder where Java is located. For Sentinel installation, the path is: <sentinel_installation_path>/opt/novell/sentinel/jdk/jre/bin/java.
The path to folder where Sentinel libraries are present. For Sentinel installation, the path is: <sentinel_installation_path>/opt/novell/sentinel/lib.
The location of event data partitions. For Sentinel installation, the path is:<sentinel_installation_path>/var/opt/novell/sentinel/data/eventdata/events/ for primary partitions.<Sentinel secondary storage directory>/eventdata_archive/ for secondary partitions.
Using the Offline Tool On the Sentinel ServerTo use the offline tool from the Sentinel Server:
1 Log in to the Sentinel server. 2 Run the following command:
<sentinel_installation_path>/opt/novell/sentinel/jdk/jre/bin/java -cp /opt/novell/sentinel/lib/ccsapp- <sentinel_version>-RELEASE.jaresecurity.ccs.comp.event.indexedlog.IndexedLogRebuild -forcerebuild <partition-directory>/<partition_ID>where, <sentinel_version> refers to the release version of Sentinel. forcerebuild is an optional parameter. If this option is not specified, the tool creates a backup of index folder and temporary files, which occupies additional disk-space.<partition-directory> refers to the path where all the partitions are present.For example, location of primary partition:
<sentinel_installation_path>/var/opt/novell/sentinel/data/eventdata/events/
Re-indexing Event Data Partitions 191

For example, location of secondary partition:
<sentinel_installation_path>/var/opt/novell/sentinel/data/archive_remote/<sentinel_server_UUID>/eventdata_archive/<partition_ID> refers to the ID of the partition in the following format: 0200428_6E1CCA35-4BD4-102D-91CD-000C2907C76D or 20200428_6E1CCA35-4BD4-102D-91CD-000C2907C76D_20200607. If there are more than one partition, specify the IDs separated by space. You can also use the wild cards for ID such as, 202004*. For example, to re-index a single event data partition on primary storage, specify the following command:
<sentinel_installation_path>/opt/novell/sentinel/jdk/jre/bin/java -cp /opt/novell/sentinel/lib/ccsapp-<sentinel_version>-RELEASE.jar esecurity.ccs.comp.event.indexedlog.IndexedLogRebuild -forcerebuild /var/opt/novell/sentinel/data/eventdata/events/20200428_6E1CCA35-4BD4-102D-91CD-000C2907C76DTo re-index multiple event data partitions of April 2020 on primary storage, specify the following command:
<sentinel_installation_path>/opt/novell/sentinel/jdk/jre/bin/java -cp /opt/novell/sentinel/lib/ccsapp-<sentinel_version>-RELEASE.jar esecurity.ccs.comp.event.indexedlog.IndexedLogRebuild -forcerebuild /var/opt/novell/sentinel/data/eventdata/events/202004*
NOTE: After completing the re-indexing for secondary partitions, remove the Index directory from each re-indexed partitions directory.
3 Restore the re-indexed partitions. For information about restoring data, see “Restoring Data” on page 181.
Using the Re-Indexing Tool On a Separate Machine To use the offline tool from a separate machine:
1 Log in to the system. 2 Create a folder to copy java files and Sentinel libraries from the Sentinel server.3 Copy the Java files from the Sentinel server to the folder created in Step 2.
For Sentinel installation, the Java path is: <sentinel_installation_path>/opt/novell/sentinel/jdk/jre/*.
4 Copy the Sentinel libraries from the Sentinel server to the folder created in Step 2.For Sentinel installation, the Sentinel library path is: <sentinel_installation_path>/opt/novell/sentinel/lib/*.
5 Go to the folder created in Step 2 and run the following command:
192 Re-indexing Event Data Partitions

java -cp ccsapp- <sentinel_version>-RELEASE.jaresecurity.ccs.comp.event.indexedlog.IndexedLogRebuild -forcerebuild <partition_directory>/<partition_ID>where, <sentinel_version> refers to the release version of Sentinel. forcerebuild is an optional parameter. If this option is not specified, the tool creates a backup of index folder and temporary files, which occupies additional disk-space.<partition_directory> refers to the path where all the partitions are present.<partition_ID> refers to the ID of the partition in the following format: 0200428_6E1CCA35-4BD4-102D-91CD-000C2907C76D or 20200428_6E1CCA35-4BD4-102D-91CD-000C2907C76D_20200607. If there are more than one partition, specify the IDs separated by space. You can also use wild cards for ID such as, 202004*. For example, to re-index a single event data partition, specify the following command:
java -cp ccsapp-<sentinel_version>-RELEASE.jar esecurity.ccs.comp.event.indexedlog.IndexedLogRebuild -forcerebuild /<Path to event partition folder>/20200428_6E1CCA35-4BD4-102D-91CD-000C2907C76DTo re-index multiple event data partitions for April 2020, specify the following command:
java -cp ccsapp-<sentinel_version>-RELEASE.jar esecurity.ccs.comp.event.indexedlog.IndexedLogRebuild -forcerebuild /<Path to event partition folder>/202004*
6 The event data partitions must be placed in either the primary or secondary storage paths for Sentinel.
NOTE: After completing the re-indexing for secondary partitions, remove the Index directory from each re-indexed partitions directory.
7 Restore the re-indexed partitions. For information about restoring data, see “Restoring Data” on page 181.
Re-indexing Event Data Partitions 193

194 Re-indexing Event Data Partitions

V VIntegrating with External Systems
This section provides information about integrating Sentinel with external systems.
Chapter 16, “Configuring Actions,” on page 197 Chapter 17, “Configuring Integrators,” on page 205 Chapter 18, “Integrating Identity Information,” on page 213 Chapter 19, “Integrating Sentinel with ArcSight Intelligence,” on page 217 Chapter 20, “Configuring Threat Intelligence Data Sources,” on page 225
Integrating with External Systems 195

196 Integrating with External Systems

16 16Configuring Actions
An Action is a configured instance of an Action plug-in. Actions are used to execute some type of action in Sentinel, either manually or automatically. Actions can be triggered by routing rules, by manually executing an event or incident operation, and by correlation rules.
“Overview” on page 197 “Understanding the Action Manager Interface” on page 198 “Managing Actions” on page 199 “Managing Action Plug-Ins” on page 202
OverviewSentinel provides a list of pre-configured Actions that should be useful in most standard situations. You can use the default Actions and reconfigure them as necessary, or you can add new Actions.
NOTE: Only users in the administrator role can configure and manage Actions.
An Action can be executed on its own, or it can make use of an Integrator instance configured from an Integrator plug-in. Integrators provide the ability to connect to an external system, such as an LDAP, SMTP, or SOAP server, to execute an action.
The general process for using an Action to perform remediation is shown in the following figure:
Figure 16-1 Actions Workflow
1. Determine the best type of Action plug-in that should be used to perform your desired action.2. Configure the appropriate Action plug-in with appropriate parameter settings for your
environment. For more information, see “Adding an Action” on page 200.
321
Configure theIntegrator
Execute actions manually
Associate actions with rules
4
Select the desiredAction
Configure theAction
Configuring Actions 197
3. If the Action requires an Integrator, configure the appropriate Integrator. To determine the required Integrators for an Action, see the documentation that is available with the Action on the Sentinel Plug-ins Web site. Alternatively, you can view a specific Action’s documentation by clicking the Help button while configuring that Action in the Action Manager.
4. For information on configuring the Integrator, see “Managing Integrators” on page 206.5. Execute actions manually or associate actions to rules for the action to fire automatically when
the rule fires: For information on executing an action in an Incident, see “Executing Incident Actions ” in
the Sentinel User Guide. For information on executing an action on events that meet the event routing rule criteria,
see “Creating an Event Routing Rule” on page 137. For information on executing actions on events in Search results, see “Assigning Actions to
Events” in the Sentinel User Guide. For information on associating an action to a Correlation rule, see “Associating Actions to a
Rule” in the Sentinel User Guide.
Understanding the Action Manager InterfaceThe Action Manager allows you to configure actions that can be executed in various contexts throughout the Sentinel system. You can also use the Action Manager to manage Actions and Action plug-ins
198 Configuring Actions

Figure 16-2 Action Manager
The Action Manager window lists the pre-configured actions. You can configure these Actions further as necessary.
Actions: To configure an Action, select the desired action, then click View/Edit. Add: Allows you to add an action. For more information, see “Adding an Action” on page 200. Manage Plug-ins: Allows you to import new and updated action plug-ins, and manage the
action plug-ins. For more information, see “Managing Action Plug-Ins” on page 202.
Managing ActionsAn Action is a configured instance of an Action plug-in.There can be one or more instances of an Action plug-in with different parameters or settings. A few Actions are available by default. You can also add additional actions as required.
“Adding an Action” on page 200 “Debugging Actions” on page 201
Configuring Actions 199

Adding an Action1 Launch the Sentinel Control Center. 2 Launch the Action Manager:
If the Configuration menu is not enabled, click the Configuration tab, then click the Configuration menu > Action Manager or click the .icon in the toolbar.
If the Configuration menu is enabled, click the Configuration menu > Action Manager or click the .icon in the toolbar.
3 Click . 4 To create an Action, select an existing Action plug-in from the available action types in the
Action drop-down. Alternatively, you can import another plug-in by clicking the Add Action Plug-in button. The parameters for the selected plug-in are displayed. For Actions provided by Sentinel, more information about configuration and the available parameters are available in the help file for the Action.
5 (Conditional) If the selected Action plug-in requires an Integrator, the Add Integrator button is displayed to allow you to add the Integrator for this action. Click Add Integrator and select the appropriate Integrator for the action.
6 Specify the attribute values for the type of action selected.You can reference an event field value by specifying the event field name enclosed in % or $ appropriately. For example, in the Send Email action, if you want to reference the TenantName event field from the correlated event in the subject attribute, you can specify the parameter as %TenantName%. If you want to reference an event field value from the last event that triggered the correlated event, you can specify the parameter as $TenantName$.Similarly, you can reference the correlation rule metadata by specifying the parameters %RuleName%, %RuleDescription%, %RuleId%, or %RuleLg% in actions or in custom correlation events.
7 Click Save.8 Execute actions manually or associate actions to Correlation rules for the action to fire
automatically when the rule fires: For information on executing an action in an Incident, see “Executing Incident Actions ” in
the Sentinel User Guide. For information on executing an action on events that meet the event routing rule criteria,
see “Creating an Event Routing Rule” on page 137. For information on associating an action to a Correlation rule, see “Associating Actions to a
Rule” in the Sentinel User Guide.
Each individual Action plug-in defines where it can be used and what data it requires as input. Every Action plug-in has certain performance characteristics relating to how quickly it can execute, reset, and be ready for the next event. When an Action instance is created, it inherits the characteristics of the selected Action plug-in. For better performance, not all Actions are available for all the different Action modes in Sentinel. For example, Actions based on the Send E-mail Action plug-in do not appear in Event Routing rules because you might not want to receive messages with a large event stream every time the rule fires.
200 Configuring Actions

For information on where an Action plug-in can be used, refer to the Action Modes section in the specific Action plug-in document.
Debugging ActionsYou can debug the Action files from the Sentinel Control Center by using the Action debugging option. The debugger is a local debugger that executes scripts on which the Sentinel Control Center is running. The debugger instantiates a debug session from the Sentinel server machine.
Only actions that are executed in an Incident can be debugged. Therefore, a prerequisite to debug an action is to execute that action in an Incident. For more information, see “Executing Incident Actions ” in the Sentinel User Guide.
The Action debugger has the following controls:
Table 16-1 Debugger Controls
To debug an action:
1 Execute an action in an Incident.For more information, see “Executing Incident Actions ” in the Sentinel User Guide.
2 In the Sentinel Control Center toolbar, click the Action Debugging icon.
3 Click to start the debugging process. The debugger panel displays the source code and positions the cursor on the first line of the script. You can debug the script as many times as needed. To debug the script by using a different incident, close the Debug JavaScript Correlation Action window and repeat the debugging process.
Action Description
Run Runs the script until the next breakpoint is encountered.
Step In Steps into a function, one line at a time.
Pause Pauses the running script.
Stop Stops the script.
Step Over Steps over a function to the next line in the script.
Step Out Steps out of the function to the next line in the script.
Configuring Actions 201

Managing Action Plug-InsThe Sentinel system includes several Action plug-ins by default, but you can download updates, documentation, and additional Actions from the Sentinel Plug-ins Web site. For more information on specific Actions, see the documentation that is available with the Action. Alternatively, you can view a specific Action’s documentation by clicking the Help button while configuring that Action in the Action Manager.
Although common Action plug-ins can be obtained from the Sentinel Plug-ins Web site, you can create and manage your own Action plug-ins. New Action plug-ins can be developed by using the Sentinel Plug-in SDK.
“Understanding the Action Plug-In Manager Interface” on page 202 “Importing an Action Plug-In” on page 203
Understanding the Action Plug-In Manager InterfaceThe Action Plug-in Manager window lists the available Action plug-ins and allows you to import and manage action plug-ins.
Figure 16-3 Action Plug-In Manager
The Action Plug-in Manager window includes the following options:
Add : Allows you to import or update an Action plug-in. Delete : Allows you to delete an Action plug-in.
NOTE: You can delete an Action plug-in only if there are no Action instances configured to use it. For example, if an Action is referenced by an Integrator, the Action cannot be deleted.
Refresh : Refreshes the list of plug-ins. View Details : Displays the plug-in details such as the version number, release date, and a
brief description of the Action. Add Auxiliary file : Allows you to add an auxiliary file to the Action plug-in. Auxiliary files are
occasionally required if a specific file is not available within the plug-in for licensing reasons, or if you want to customize or extend the Action in some way.
202 Configuring Actions

Importing an Action Plug-InYou can download and import an action plug-in package file or you can import an action plug-in file that is in a directory.
When you import a file from a directory, it is important to define the required objects correctly so that the Actions are available for the appropriate Sentinel features.
“Downloading and Importing an Action Plug-In” on page 203 “Importing an Action Plug-In File from a Directory” on page 203
Downloading and Importing an Action Plug-In1 Download the appropriate Integrator plug-in from the Sentinel Plug-Ins Web site.2 Launch the Sentinel Control Center. 3 Launch the Action Manager:
If the Configuration menu is not enabled, click the Configuration tab, then click the Configuration menu > Action Manager or click the .icon in the toolbar.
If the Configuration menu is enabled, click the Configuration menu > Action Manager or click the .icon in the toolbar.
4 Click Manage Plug-ins, then click the Import icon. 5 To import an Action plug-in package file, select Import an Action plug-in file (.zip, acz), then click
Next.6 Click Browse to select the location of the package file.
The file must be in .zip of acz format.7 .(Conditional) If you have selected an Action file that already exists, the Replace Existing Plug-in
window is displayed. Click Next to replace the existing plug-ins.8 Review the plug-in details, then click Finish.
Importing an Action Plug-In File from a Directory1 Download the appropriate Integrator plug-in from the Sentinel Plug-Ins Web site.2 Launch the Sentinel Control Center. 3 Launch the Action Manager:
If the Configuration menu is not enabled, click the Configuration tab, then click the Configuration menu > Action Manager or click the .icon in the toolbar.
If the Configuration menu is enabled, click the Configuration menu > Action Manager or click the .icon in the toolbar.
4 Click Manage Plug-ins, then click the Import icon. 5 Select Import an Action plug-in from directory. 6 Click Browse to select the location of the directory, then click Next.7 Review the details and make changes as necessary.
Configuring Actions 203
If you have selected an Action file that already exists, the Replace Existing Plug-in window is displayed. Click Next to replace the existing plug-ins.
8 Select the objects you want to associate with the action, then click Next. This affects where the Action is available in the Sentinel interface.
9 (Optional) Customize the plug-in by adding or editing the parameters.For example, if you want to include the attachment option for the Send E-mail action, you can add a parameter named “Attachment” and configure it appropriately. Also, you must modify the code in the action script to handle the new parameter.
10 Click Add to add parameters that can be set when an Action is configured. This option should be used for any file that expects to receive information as parameters.10a Specify the parameter name.
The name used here should be identical to the one used in the JavaScript API method scriptEnv.getParameter("<name>") in the script that is being imported.
10b Select the parameter type from the Type drop-down list. String: Passes the string value to the parameter. Boolean: The parameter can take a True or False value. Integrator: Select an Integrator for the action. Event Tag: Select an Event Tag for the parameters. Severity: Select a severity for the parameters.
NOTE: The Options area is available only for the String type parameters.
10c (Optional) Specify a description.10d Click Next.
11 Review the plug-in details, then click Finish.
204 Configuring Actions

17 17Configuring Integrators
“Overview” on page 205 “Managing Integrators” on page 206 “Managing Integrator Plug-Ins” on page 211
OverviewIntegrators are plug-ins that can be used in Sentinel to extend the features and functionality of Sentinel remediation actions. Integrators allow Sentinel to connect to external systems, such as an LDAP server, SMTP server, or SOAP server. Actions use Integrators to interact with other systems. For example, you can set an attribute in eDirectory, an LDAP server, to enable or disable a user, edit details, and so on. You can also start an Identity Manager workflow, such as a provisioning request, by using SOAP calls.
The general process for using an Integrator to perform remediation actions involves the following steps:
1. Determine the best type of Integrator to access the external system with which you want to interact.
2. Import and configure the appropriate Integrator to connect to the external system. Or, you can use the Integrators that are configured by default.
3. Configure the appropriate Action. Or, you can use the Actions that are configured by default.For more information, see Chapter 16, “Configuring Actions,” on page 197.
4. Perform additional configuration, if desired, to associate the action with a deployed correlation rule or an event menu action.
5. The action is executed: When an associated correlation rule fires. When you execute actions on the selected events in the Sentinel Main interface > Event
Actions tab. When you execute actions on the selected Incident in the Sentinel Control Center >
Incidents > Actions > Execute Incident Action.
For more information on specific Integrators, see the documentation that is available with the Integrators. Alternatively, you can view a specific Integrator’s documentation by clicking the Help button in the Integrator Manager after configuring that Integrator.
NOTE: Only users in the administrator role can configure and manage Integrators.
Configuring Integrators 205

Managing IntegratorsAn Integrator is a configured instance of an Integrator plug-in.There can be one or more instances of an Integrator plug-in with different parameters or settings. A few Integrators are available by default. You can also add additional Integrators as required.
“Configuring the Default Integrators” on page 206 “Adding an Integrator” on page 209 “Viewing Integrator Health Details” on page 209
Configuring the Default IntegratorsThe default Integrators installed with Sentinel are not configured. To use these default Integrators with the actions in your Sentinel system, you must configure the Integrators for your environment.
“Configuring the File Integrator” on page 206 “Configuring the Sentinel Link Integrator” on page 207 “Configuring the Sentinel Mail Integrator” on page 208 “Configuring the SNMP Integrator” on page 208 “Configuring the Syslog Integrator” on page 209
Configuring the File IntegratorThe File Integrator is used with the Log to File action.
1 Access the Sentinel Control Center.2 Launch the Integrator Manager:
If the Configuration menu is not enabled, click the Configuration tab, then click the Configuration menu > Integrator Manager or click the icon in the toolbar.
If the Configuration menu is enabled, click the Configuration menu > Integrator Manager or click the icon in the toolbar.
3 Select File in the Integrators column, then click the File Configuration tab.4 Change the default filename and location where the events are stored.
By default, the location is ../data/log_to_file_events.txt.5 Click Save.
206 Configuring Integrators

Configuring the Sentinel Link IntegratorThe Sentinel Link Integrator is used to connect multiple Sentinel systems. For more information, see Chapter 12, “Linking to Additional Sentinel Systems,” on page 153.
1 Access the Sentinel Control Center.2 Launch the Integrator Manager:
If the Configuration menu is not enabled, click the Configuration tab, then click the Configuration menu > Integrator Manager or click the icon in the toolbar.
If the Configuration menu is enabled, click the Configuration menu > Integrator Manager or click the icon in the toolbar.
3 Select Sentinel Link in the Integrators column, then click the Sentinel Link Connector tab.4 Use the following information to configure the Sentinel Link Integrator:
Host Name: Specify the hostname or IP address of the destination Sentinel system where a Sentinel Link Connector is configured.Port Number: Specify the port number for the destination Sentinel system. The default port is 1290.Encrypted (HTTPS)/Not Encrypted (HTTP): Select whether the connection to the destination Sentinel system is encrypted or not encrypted. If you selected Encrypted, there are addition fields to configure: Server Validation Mode: Select one of the following:
None: The Integrator does not validate the receiver's certificate. Strict: The Integrator always verifies the receiver's certificate when connecting to the
receiver. If this option is selected, the Integrator immediately attempts to retrieve the receiver's certificate over the network and validate that it is issued by an authorized CA. If the certificate is not validated, it is still presented to the user to accept or reject. The certificate is considered to be valid if the user accepts it. When a validated certificate is acquired, it is stored in the Integrator's configuration. From now on, the Integrator allows communication only with a receiver that provides that certificate during the initial connection setup.
Integrator Key Pair: Select one of the following: None: The receiver system does not validate the sender certificates. Select this option
if the receiver's client authentication type is configured to Open. Custom: The receiver system validates the sender certificates. Select this option if the
receiver's client authentication type is configured to Strict. If the receiver system performs a strict validation, it imports a trust store, which contains all the sender certificates that it trusts. After selecting this option, click the Import Key Pair button to import a key pair. The key pair you import must match one of the certificates that is included in the trust store that is imported by the receiver system.
5 Click Save.
Configuring Integrators 207

Configuring the Sentinel Mail IntegratorAll Sentinel events that meet the filter criteria for which the Send an E-mail action is defined are sent to the associated SMTP relay and email addresses by the Sentinel Mail Integrator.
To configure the Sentinel Mail Integrator:
1 Access the Sentinel Control Center.2 Launch the Integrator Manager:
If the Configuration menu is not enabled, click the Configuration tab, then click the Configuration menu > Integrator Manager or click the icon in the toolbar.
If the Configuration menu is enabled, click the Configuration menu > Integrator Manager or click the icon in the toolbar.
3 Select Sentinel Mail in the Integrators column, then click the Connection tab.4 Use the following information to configure the Sentinel Mail Integrator:
Host: Specify the hostname or IP address of an available SMTP server. Port: Specify the port number of an available SMTP server. The default port is 25.From (default): Specify an address to using or sending the email messages are sent. The default value is [email protected]: If the SMTP server requires authentication, specify a user name.Password: Specify the password for authentication to the SMTP server.
5 Click Save.
Configuring the SNMP IntegratorAll Sentinel events that meet the filter criteria for which the Send SNMP Traps action is defined are sent to the specified SNMP addresses.
To configure the SNMP Integrator:
1 Access the Sentinel Control Center.2 Launch the Integrator Manager:
If the Configuration menu is not enabled, click the Configuration tab, then click the Configuration menu > Integrator Manager or click the icon in the toolbar.
If the Configuration menu is enabled, click the Configuration menu > Integrator Manager or click the icon in the toolbar.
3 Select snmp in the Integrators column, then click the Server Configuration tab.4 Use the following information to configure the SNMP server:
Host: Specify the IP address or hostname of the SNMP server you want to send the trap to.Port: Specify the port number for the SNMP server. The default port is 162.Community String (Password): Specify the community string (password) to access the SNMP management system. If no community string is specified, the Integrator sets the default value to public.
208 Configuring Integrators

OID: Specify the desired ASNL object ID you want to associate with this message. If no object ID is specified, the Novell Audit internal OID is used (2.16.840.1.113719.1.347.3.1).
5 Click Save.
Configuring the Syslog IntegratorAll Sentinel events that meet the filter criteria for the Send to Syslog action are sent to the specified syslog server.
To configure the Syslog Integrator:
1 Access the Sentinel Control Center.2 Launch the Integrator Manager:
If the Configuration menu is not enabled, click the Configuration tab, then click the Configuration menu > Integrator Manager or click the icon in the toolbar.
If the Configuration menu is enabled, click the Configuration menu > Integrator Manager or click the icon in the toolbar.
3 Select Syslog in the Integrators column, then click the Server Configuration tab.4 Use the following information to configure the syslog Integrator.
Host: Specify the host name or IP address of the syslog server.Protocol: Select the protocol used to connect to the syslog server.Port: Specify the port number used to connect to the syslog server.Default Facility: Select the default facility for the syslog server from the drop-down list. The facility allows you to classify the syslog messages.Stream Encoding: Select the encoding standard for the syslog Integrator.
5 Click Save.
Adding an IntegratorThe specific steps to configure an Integrator depend on the type of Integrator. The steps are described in detail in documents that come with the Integrators. Documentation for installed plug-ins can be viewed by selecting an Integrator in the Integrator Manager and clicking Help. Or, you can refer to the document that comes with the Integrator plug-in.
Viewing Integrator Health Details1 Launch the Sentinel Control Center.2 Launch the Integrator Manager:
(Conditional) If the Configuration menu is not enabled, click the Configuration tab, then click the Configuration menu > Integrator Manager or click the icon in the toolbar.
(Conditional) If the Configuration menu is enabled, click the Configuration menu > Integrator Manager or click the icon in the toolbar.
3 In the Integrator Manager window, select an Integrator from the left pane.
Configuring Integrators 209

4 Click see details.
The Health Details window displays the Refresh Health State, time of last occurrence, its method calls and the related events of the selected Integrator configuration. Integrator API Calls: Indicates the status of the connection and the method calls used from
the API of the selected integrator. For more information on the JavaScript plug-in, see Chapter 16, “Configuring Actions,” on page 197. Call Success Count: Displays the number of times the connection was established
successfully and the methods were called successfully from the API. Time of Last Occurrence displays the time when the connection and the method call were successful.
Call Failure (but Connection Success) Count: Displays the number of times the connection was established successfully but the method call failed. Time of Last Occurrence displays the last time when the connection was successful and the method call failed.
Connection Failure Count: Displays the number of times the connection failed. Time of Last Occurrence displays the last time when the connection and method call failed.
NOTE: The most recent success or failure time is shown in the overall health status for the configured Integrator.
210 Configuring Integrators

Integrator Health Details: Provides information about the success of the API methods called in the JavaScript action files associated with the Integrator. It provides information specific to the methods called. Method Name: Name of the API method used in the JavaScript.
Success Count: Number of times the API method executed successfully.Time of Last Successful Call: The time at which the method was last successfully executed.Average Successful Run Time: Average time to make a successful method call.Error Count: Number of times the API method failed.Time of Last Error Call: The time at which the method call failed.Average Error Run Time: Average time to make a failed method call.
NOTE: The most recent success or failure time is shown in the overall health status of the method.
Managing Integrator Plug-InsSentinel includes several Integrators plug-ins by default, but you can download updates and additional Integrators from the Sentinel Plug-ins Web site.
“Importing an Integrator Plug-In” on page 211
Importing an Integrator Plug-In1 Download the appropriate Integrator plug-in from the Sentinel Plug-Ins Web site.2 Launch the Sentinel Control Center. 3 Launch the Integrator Manager:
If the Configuration menu is not enabled, click the Configuration tab, then click the Configuration menu > Integrator Manager or click the icon in the toolbar.
If the Configuration menu is enabled, click the Configuration menu > Integrator Manager or click the icon in the toolbar.
4 Click Manage Plug-Ins.
5 In the Integrator Plug-in Manager window, click the icon. 6 In the Plug-in Import Type window, select Import an Integrator plug-in file (.zip), then click Next. 7 In the Choose Plug-in Package File window, click Browse to locate the Integrator zip file you
want to import to the plug-in repository, then click Open. 8 (Conditional) If you have selected an Integrator file that already exists, the Replace Existing
Plug-in window is displayed. Click Next to replace the existing plug-ins. 9 Click Next.
10 In the Plug-in Details window, select Launch Integrator Configuration Wizard to deploy the plug-in after importing it.
11 Click Finish.
Configuring Integrators 211

After importing the Integrator plug-in, you must configure the Integrator plug-in for your environment. For more information, see “Configuring the Default Integrators” on page 206.
212 Configuring Integrators

18 18Integrating Identity Information
This chapter provides information about integrating Sentinel with identity management systems.
“Overview” on page 213 “Integration with Identity Management Systems” on page 214 “Leveraging Identity Information” on page 216
OverviewUsers in an IT environment have multiple accounts and sometimes multiple account identifiers per user. Normally, if a user has multiple account identifiers, Sentinel treats each identifier as a unique account.
This means a user could log in to Active Directory and an LDAP directory and Sentinel tracks these events, but Sentinel does not realize these events are related to the same user account.
In order to overcome this issues, Sentinel provides an integration framework to identity management systems to track the identities of for each user account and what events those identities have performed.
This integration provides functionality on several levels:
The Identity Browser provides the ability to look up the following information about a user: Contact information Accounts associated with that user Most recent authentication events Most recent access events Most recent permissions changes
The Identity Browser lets you do a lookup from events Reports and Correlation rules provide an integrated view of a user's true identity, even across
multiple systems on which the user has separate accounts. For example, accounts like COMPANY\testuser; > cn=testuser,ou=engineering,o=company, and [email protected] can be mapped to the actual person who owns the accounts.
By displaying information about the people initiating a given action or people affected by an action, incident response times are improved and behavior-based analysis is enabled.
Sentinel provides an optional integration with Identity Manager. The figures and descriptions in this section are based on Identity Manager.
Sentinel synchronizes identity information with major identity management systems and stores local copies of key information about each identity. The following table summarizes the commonly used information provided:
Integrating Identity Information 213

The identities stored by Sentinel are then linked with accounts created on endpoint systems by the identity management system. This helps Sentinel associate the correct identity information with the native events from those endpoint system. Some identity information is injected directly into the inbound event by using the mapping service. The remaining identity information, such as photograph and contact information, is accessible through the Identity Browser.
The identity information injected into the event can be used for correlation and for performing actions on the identities that are associated with detected activity. For example, Sentinel is able to see multiple failed logins from a given person and not just an account. A detected violation could trigger disabling activities for all accounts associated with an identity.
Integration with Identity Management SystemsYou can integrate Sentinel with Identity Manager. For other identity systems, similar integration can be achieved by writing an identity synchronization collector that uses the Identity API. For more information, see the Plug-in SDK Web site for Sentinel.
The examples and illustrations in this section use Identity Manager to explain how integration works among identity management systems.
Sentinel integration with Identity Manager is provided using the Identity Manager driver called the Identity Tracking Module for Sentinel. Standard event collection must also be set up with the systems to which Identity Manager has provisioned accounts using the Collectors available at the Sentinel Plug-ins Web site.
After Sentinel and Identity Manager are installed, the Identity Tracking Module for Sentinel sends identity and account information from the Identity Vault to the Sentinel REST API, which populates the Sentinel database.
Name Description
AccountGUID Auto-generated internal ID
Name User name that references the account, generally provided by the user to log in.
ID The numeric or other identifier that represents the account in the event source. This ID is used for resolution when the user name is not available.
Authority The realm within which this account is unique. Collectors calculate the realm based on event information.
Status The status of the account
IdentityGUID A reference to the identity that owns this account
214 Integrating Identity Information

Figure 18-1 Sentinel Integration with IDM
The time required to initially populate the Sentinel database depends on the amount of data in the Identity Vault; identity information including photographs requires significantly more time to load.
The Identity Tracking Module for Sentinel also keeps the identity information synchronized as information is updated in the Identity Vault during normal Identity Manager operations.
After the identity and account information are loaded, a map named IdentityAccount is automatically generated in /var/opt/novell/sentinel/data/map_data. The map contains the following information:
Account Name Authority Customer Name Identity GUID Full Name Department Job Title
IdentityVault
Active Directory
Driver
Identity Tracking Module
for Sentinel
AccountsTable
IdentityTable
Active DirectoryDomain
JohnSmith
jsmith
LDAP Driver
LDAPDatabase
jsmith
REST API
ActiveDirectoryCollector
Driver/Application
DirXML-Accounts
AccountIdentifier Type
Account IdentifierSample Data
ADADADADLDAP
sAMAccountNameuserPrincipalNameDNassociationDN
[email protected]=John Smith,cn=users,dc=company,dc=com5de77f84f3ab534babbf13edd6540d77cn=jsmith,cn=users,dc=company,dc=com
Custom Events
Windows System Events
SentinelIT Environment
Identity Manager
Integrating Identity Information 215

Manager GUID Account Status
IMPORTANT: An identity can have multiple accounts but one account cannot be assigned to multiple identities.
The identity map is automatically applied to all events from Collectors to look for an identical match between the information in the event and key fields in the map. The table below shows the fields that are populated if all of the map key fields and event data exactly match. These mappings are automatically configured and are not editable.
NOTE: To find a match, the event fields and map key fields must match exactly. This might require modifications to existing Collectors to enable them to parse or concatenate data to make these fields match the data from the Identity Vault.
After these fields are added to the event by the mapping service, they are used by Correlation rules, remediation actions, and reports in the Identity Tracking Solution Pack. In addition to using the content included in the Solution Pack, users can also perform the following actions:
Create Correlation rules based on identity in addition to account name. This allows you to look for similar events from a single user, which provides a more comprehensive view than looking at events from a single account
Create reports that show identity, including all accounts associated with a user Use the Identity Browser to get more information about users and their activities
Leveraging Identity InformationFor information about searching and viewing user profiles of the identities synchronized from the identity management system, see “Searching and Viewing User Identities” in the Sentinel User Guide.
Label Populated by which Column from IdentityAccount Map
InitUserDepartment Department
InitUserFullName Full Name
InitUserIdentity Identity GUID
TargetUserDepartment Department
TargetUserFullName Full Name
TargetUserIdentity Identity GUID
216 Integrating Identity Information

19 19Integrating Sentinel with ArcSight Intelligence
This chapter provides information about integrating Sentinel with ArcSight Intelligence.
“Overview” on page 217 “Data Ingestion to ArcSight Intelligence” on page 218 “Retrieving Entity Information from ArcSight Intelligence” on page 221
OverviewSentinel can integrate with ArcSight Intelligence version 6.3 by enabling the configuration in Sentinel's web UI. For this to happen, it is important to install Intelligence version 6.3 in your environment, for more information refer to Intelligence document. Once ArcSight Intelligence has been installed, go to the Integration section in the web UI, under which you can find Intelligence Integration tab.
ArcSight Intelligence is a user and entity behavioral analytics solution that uses data science and advanced analytics to identify the top risky entities and behaviors occurring in your organization. Intelligence first establishes the normal behavior for your organizational entities and then uses advanced analytics, to identify the anomalous behaviors by any entities and provides an appropriate risk score to each such entities.
Sentinel provides a way to Integrate with ArcSight Intelligence. Sentinel supports integration with ArcSight Intelligence 6.3. This integration facilitates Sentinel's event logs to be processed against the ArcSight Intelligence analytics engine. The analytics engine will then use advance unsupervised machine learning algorithms to compute risk scores of the analyzed entities and users from their anomalous activities. Sentinel will be able to pull this risk score data for further processing in its own environment.
This data adds a lot of contextual value to Sentinel, specially in the use case of correlation, reports, and event views. Sentinel also provides out-of-the-box widgets and dashboards which project these analytics data as readable information.
PrerequisitesTo perform the integration, you must install Transformation Hub, Vertica, and ArcSight Intelligence for the data ingestion to ArcSight Intelligence. Refer to Intelligence document.
Make sure that the below versions of collector and connector are deployed in Sentinel:
Blue-Coat_ProxySG-Appliances_2011.1r6 Microsoft_Active-Directory-and-Windows_2011.1r8 Citrix_NetScaler_2011.1r5 Syslog-2021.1r1
Integrating Sentinel with ArcSight Intelligence 217

Data Ingestion to ArcSight IntelligenceFor ArcSight intelligence to be able to run analytics to identify risky entities and behaviors, Sentinel event data must be forwarded to the Transformation Hub. Intelligence then runs analytics on the event data and generates the risk scores.
Sentinel provides an effortless method to configure the communication that carries out data ingestion to ArcSight Intelligence. This configuration facilitates forwarding of new incoming events as well as older Sentinel events to Transformation Hub.
Supported/Relevant Data SourcesYou can configure one or more data sources to forward its events to ArcSight Intelligence. Currently, Sentinel supports four data source types (also called event types) to be forwarded to ArcSight Intelligence (Access, Active Directory, VPN, Web Proxy) which provide data of relevance to the Intelligence analytics models. The data source type of events that are forwarded to Intelligence can be selected from the Intelligence Integration tab under the Integration panel of the Sentinel UI.
Below mentioned are the criteria definition for the various supported data sources:
Access: The Access schema represents events collected from Identity and Access Management (IAM) solutions where users access resources such as servers or file shares.
Supported event types: Any Sentinel event for which,
• TargetDataName is defined and has a value OR• TargetDataContainer is defined and has a valueAnd for which one of the following criteria is fulfilled:
• VendorEventCode = 4656 and XDASOutcomeName = XDAS_OUT_SUCCESS or XDAS_OUT_FAILURE • VendorEventCode = 4663 and XDASOutcomeName = XDAS_OUT_SUCCESS• VendorEventCode = 4664 and XDASOutcomeName = XDAS_OUT_SUCCESS• VendorEventCode = 5140 and XDASOutcomeName = XDAS_OUT_SUCCESS • VendorEventCode = 5145 and XDASOutcomeName = XDAS_OUT_SUCCESS or XDAS_OUT_FAILURE
Active Directory: The Active Directory schema represents events collected from IAM solutions that identify successful and failed logins to authentication targets. These authentication targets include domain controllers/servers, resources, and file shares.Supported event types: Any Sentinel event for which,
• VendorEventCode = 4624 and XDASOutcomeName = XDAS_OUT_SUCCESS• VendorEventCode = 4625 and XDASOutcomeName = XDAS_OUT_FAILURE• VendorEventCode = 4648 and XDASOutcomeName = XDAS_OUT_SUCCESS• VendorEventCode = 4768 and XDASOutcomeName = XDAS_OUT_SUCCESS or XDAS_OUT_FAILURE• VendorEventCode = 4769 and XDASOutcomeName = XDAS_OUT_SUCCESS or XDAS_OUT_FAILURE• VendorEventCode = 4771 and XDASOutcomeName = XDAS_OUT_FAILURE• VendorEventCode = 4776 and XDASOutcomeName = XDAS_OUT_SUCCESS or XDAS_OUT_FAILURE
218 Integrating Sentinel with ArcSight Intelligence

VPN: The VPN schema represents events collected from IAM solutions or from other VPN devices such as Citrix Netscaler that identify VPN events.Supported event types: Any Sentinel event for which,
• VendorEventCode = SSLVPN LOGIN or AAA LOGIN_FAILED• Product Name = Citrix Netscaler
Web Proxy: Web Proxy data are raw events that capture network traffic, primarily web surfing, from a collection of human users.Supported event types: Any Sentinel event for which,
• Product Name = Blue Coat Web Proxy
Forwarding Real-Time Sentinel Events to the Transformation Hub of ArcSight IntelligenceConfigure ArcSight Intelligence Integration in the Intelligence Integration tab under the Integration panel of the Sentinel UI to automatically forward new incoming events in Sentinel.
Use the following information to configure the integration:
Tenant: Select a tenant to associate it with the configuration. You cannot revert the tenant configuration unless you re-install Sentinel.
Enable: Check box to enable forwarding Sentinel events to specified Intelligence configuration. Name: Specify a unique name for the configuration. Master Hostname: Specify the Hostnames and port numbers of the Master Transformation Hub
nodes. Worker Hostname: Specify the Hostnames and port numbers of the Worker Transformation
Hub nodes. In case of a single node setup, provide the same hostname as master. IP Address or Hostname: Specify the IP addresses or host names and port numbers of the
Transformation Hub nodes. You can specify a comma-separated list of multiple transformation Hub IP addresses or Hostnames. Sentinel forwards data to the first address it can connect to.
Selected Data Sources: Select one or more data source filters that serve as the criteria used to select events for processing/ingestion. Refer to the above section for more details.
Certificate Directory Path: Specify the path to the exclusive custom directory of the Sentinel Server created in the “Generating External Certificate” on page 220 section containing Transformation Hub certificate, key, and Certification Authority (CA).
Forwarding Older Sentinel Events to Transformation Hub Once Arcsight Intelligence Integration is configured, older Sentinel events in the existing event data partitions can be forwarded using the data uploader tool by following the below steps:
1. Navigate to the directory <sentinel_installation_path>/opt/novell/sentinel/bin.
2. Switch to the novell user:
su novell
Integrating Sentinel with ArcSight Intelligence 219

3. Run data uploader tool to forward data present in existing partitions to Transformation Hub with the required parameters: -from: From date range in the format YYYYMMDD -to: To date range in the format YYYYMMDD -masterurl: The hostname and port number of the Master Transformation Hub node.
NOTE: Transformation Hub runs a confluent Schema Registry on a default port 32081
-workerurl: The hostname and port number of the Worker Transformation Hub node -certdir: The path to the exclusive custom directory of the Sentinel Server created in the
“Generating External Certificate” on page 220 section containing Transformation Hub certificate, key, and Certification Authority (CA).
Example:
./data_uploader.sh -from=<YYYYMMDD> -to=<YYYYMMDD> -masterurl=<hostname>:32081 -workerurl=<hostname>:9093 -certdir=<path to cert directory>
Generating External CertificateIn order to ensure secure trusted communication between Sentinel and the Transformation Hub, encrypted communication with mutual SSL authentication is configured by default.
For the same, a server key pair needs to be generated by the Transformation Hub issuing CA, which can be later used by the Sentinel Server in order to initiate the communication.
To generate certificate for portals perform the below steps in the CDF Transformation Hub server:
1. Export the following access token dependencies, which you can remove later if not needed to invoke vault anymore.
export PASSPHRASE=$(kubectl get secret vault-passphrase -n core -o json 2>/dev/null | jq -r '.data.passphrase')export ENCRYPTED_ROOT_TOKEN=$(kubectl get secret vault-credential -n core -o json 2>/dev/null | jq -r '.data."root.token"')export VAULT_TOKEN=$(echo ${ENCRYPTED_ROOT_TOKEN} | openssl aes-256-cbc -md sha256 -a -d -pass pass:"${PASSPHRASE}")
2. Request Vault to generate the certificate for your external access host.
/opt/arcsight/kubernetes/bin/vault write -tls-skip-verify -format=json RE/issue/coretech common_name=SENTINEL_HOST
3. From the output generated above, create three different files as explained below:a. server.crt (create this .crt file by copying contents under the key "certificate":".
Once done, the server.crt file should contain a string starting with -----BEGIN CERTIFICATE---- and ending with -----END CERTIFICATE----)
220 Integrating Sentinel with ArcSight Intelligence

b. server.key (create this .key file by copying contents under the key "private_key": ". Once done, the server.key file should contain a string starting with -----BEGIN RSA PRIVATE KEY---- and ending with -----END RSA PRIVATE KEY----)
c. issuingca.crt (create this .crt file by copying contents under the key "issuing_ca":". Once done, the issuingca.crt file should contain a string starting with ----BEGIN CERTIFICATE----- and ending with -----END CERTIFICATE----)
Once created, copy these three files to any custom directory in Sentinel server.4. In the Sentinel server go to the above created custom directory which contains the three files
and run the commands below:
awk '{gsub(/\\n/,"\n")}1' server.key > tmp && mv -f tmp server.keysed -i 's/\\n//g' server.keyawk '{gsub(/\\n/,"\n")}1' issuingca.crt > tmp && mv -f tmp issuingca.crtsed -i 's/\\n//g' issuingca.crtawk '{gsub(/\\n/,"\n")}1' server.crt > tmp && mv -f tmp server.crtsed -i 's/\\n//g' server.crt The above commands formats the certificate files in that directory to the desire format. Now copy the entire directory and its content (server.crt, server.key, issuingca.crt) into the same directory path in the Collector Manager's server. It is important to recreate the same directory path for this folder in the Collector Manager as in the Sentinel server.
Adding Transformation Hub Certificate in FIPS ModeIf Sentinel is in FIPS mode, the Transformation Hub’s issuing CA certificate needs to be added into the FIPS keystore of the Sentinel server and Remote Collector Managers (RCM).
Perform the following steps to add a CA certificate in the FIPS keystore.
1. Add the issuingca.crt certificate generated in the “Generating External Certificate” on page 220 section to the FIPS keystore of the Sentinel server using the below command:
./convert_to_fips.sh -i <sentinel_installation_path>/<custom-directory-containing-cdf-generated-certificates>/issuingca.crt
2. Add the same issuingca.crtcertificate to the all the FIPS keystore of the RCM server using the below command:
./convert_to_fips.sh -i <rcm_installation_path>/<custom-directory-containing-cdf-generated-certificates>/issuingca.crt
Retrieving Entity Information from ArcSight IntelligenceTo enable Sentinel to receive the analysed entities from Intelligence, you need to install and configure the ArcSight REST FlexConnector. The REST FlexConnector provides a configurable method to collect events from Intelligence and send them to Sentinel. It uses the OAuth2 authentication to
Integrating Sentinel with ArcSight Intelligence 221
get permission to receive events from Intelligence. The events collected by the FlexConnector are in JSON format. With the help of JSON parser files, these events are converted into a format that can be understood and received by Sentinel.
FlexConnector Installation and ConfigurationYou need to install REST FlexConnector to communicate with ArcSight Intelligence and to retrieve back the risk score data.
PrerequisitesComplete the prerequisites steps mentioned in the ArcSight Intelligence document, before you begin with REST FlexConnector installation and configuration.
Installing and Configuring the REST FlexConnectorTo install and configure a REST FlexConnector, see ArcSight FlexConnector REST Developer Guide.
Ensure the following when you install and configure the REST FlexConnector:
Select ArcSight FlexConnector REST as the Connector Type. Import the OSP certificate in the REST FlexConnector. Refer to “Importing the OSP Certificate in
the REST FlexConnector” on page 222. When adding the parameters information, specify the following:
For the Configuration File field, specify entities to collect and parse the entities data. For the Events URL field, specify https://<ip address or hostname of Intelligence>/interset/api/search/0/topRisky?count=100 to collect and parse the entities data.
For the Authentication Type field, select OAuth2. For the OAuth2 Client Properties File field, browse to the location where you have created
and saved the OAuth2.properties file, then select the file. When configuring the destination, select CEF Syslog as the destination. When adding the parameters information, specify Ip/Host and Port of the Sentinel’s Syslog
server (Protocol and port will be changed as per TCP, UDP, and SSL). Make Preserve Raw Event to Yes in the Smart Connector by modifying the destination settings to
Processing.
Click Done for the Smart Connector installation.
Importing the OSP Certificate in the REST FlexConnectorIn order to ensure secure trusted communication between the REST FlexConnector and the Transformation Hub, the OSP issuer certificate (CA) needs to be imported in the REST FlexConnector.
To import the OSP certificate in the REST FlexConnector:
1. Navigate to the exclusive custom certificate directory created in the “Generating External Certificate” on page 220 section where the issuingca.crt is present.
222 Integrating Sentinel with ArcSight Intelligence

2. Copy the contents of the issuingca.crt file in a new file, name the file as issuingca.cer, and save it in the desired location of the Smart connector machine (for example, C:\Users\<user_name>\Desktop\).
3. Do the following to import the OSP CA certificate to the FlexConnector truststore cacerts:a. Open a command window and navigate to the following location:
cd $ARCSIGHT_HOME\current\jre\bin\b. Execute the following command:
keytool -importcert -file "<location_of_issuingca.cer>\issuingca.cer" -keystore "$ARCSIGHT_HOME\current\jre\lib\security\cacerts" -storepass changeit
c. When you run this command, you are prompted to provide your input for the following message: Trust this certificate [no]: Specify Yes.
FlexConnector Post-Installation TaskAfter you install and configure the FlexConnector and before you run the FlexConnector, perform the following steps to format the data to be received, so that it can be understood by Sentinel.
1. Add a value in the property agents[0].queryfrequency in file <SmartConnector Installation location>\ArcSightSmartConnectors\current\user\agent.properties to fetch the entity details from Intelligence server. By default, it is 30000 milliseconds. User can change it as per their requirement.
2. Create a new JSON parser file as entities.jsonparser.properties in the ARCSIGHT_HOME\user\agent\flexagent location and copy the following content to the file.
trigger.node.location=/datatoken.count=12
token[0].name=entityHashtoken[0].type=Stringtoken[0].location=entityHash
token[1].name=entityTypetoken[1].type=Stringtoken[1].location=entityTypetoken[2].name=entityNametoken[2].type=Stringtoken[2].location=entityNametoken[3].name=risktoken[3].type=Integertoken[3].location=risktoken[4].name=riskChangetoken[4].type=Integertoken[4].location=riskChangetoken[5].name=storyCounttoken[5].type=Integertoken[5].location=storyCounttoken[6].name=lastActivity
Integrating Sentinel with ArcSight Intelligence 223

token[6].type=Stringtoken[6].location=lastActivitytoken[7].name=tagstoken[7].type=Stringtoken[7].format=__uri()token[7].location=tagstoken[8].name=otherNametoken[8].type=Stringtoken[8].location=../../tags/nametoken[9].name=sourcetoken[9].type=Stringtoken[9].location=../sourcetoken[10].name=desctoken[10].type=Stringtoken[10].location=../tags/descriptiontoken[11].name=scrollIdtoken[11].type=Stringtoken[11].location=/scrollId
event.name=__stringConstant("Interset Risky User Information")event.deviceEventClassId=__stringConstant("IRU")event.deviceVendor=__stringConstant("Micro Focus")event.deviceProduct=__stringConstant("Interset")event.deviceSeverity=2#Agent Severityseverity.map.low.if.deviceSeverity=2
224 Integrating Sentinel with ArcSight Intelligence
20 20Configuring Threat Intelligence Data Sources
There are several threat intelligence data sources that provide information about existing or emerging threats to an organization’s security. Sentinel supports IP lists data sources. A typical data source might provide a list of known compromised hosts, and when Sentinel receives events from those hosts, the associated event source becomes a suspect. For example, you can download lists of known Zeus botnet IP addresses. You can leverage the data sources in correlation rules to detect communications to known botnets in your network.
Many of these data sources are updated daily. Sentinel provides the ability to download this data into a map file, update it at scheduled intervals or as needed, and incorporate the relevant threat information into correlation rules.
“Adding Threat Intelligence Data Sources” on page 225 “Understanding How Sentinel Processes Data” on page 226 “Managing Feeds from Threat Intelligence Solution Pack” on page 227
Adding Threat Intelligence Data SourcesBy default, Sentinel provides the most common threat intelligence data sources. You can add your own data sources as necessary. To add threat intelligence data sources, navigate to Sentinel Main and click Integration > Threat Intelligence Sources.
NOTE
The out-of-the-box threat feeds are open source feeds. Micro Focus does not maintain or update these feeds. For a better threat protection, Micro Focus recommends you to purchase paid commercial threat feeds that are maintained and frequently updated by the respective vendors.
You can add threat intelligence data sources from any of the following sources:
URL: Specify the URL from where you want to download threat intelligence information. Since these data sources are updated at regular intervals by external sources, you can configure Sentinel to download the data at regular intervals. You can use the URL option for data feeds that are open and do not require authentication. For commercial data feeds that require authentication, use the File configuration option described below.
Some of the data source URLs including the ones that are available out-of-the-box use HTTPS connection to download the feeds from their data source server. If Sentinel is in FIPS mode, the certificates used by the data source server for secure communication must be added to the Sentinel FIPS keystore database.
1. Download the certificates from the data source server and save them in individual files with the .cer extension.
Configuring Threat Intelligence Data Sources 225

2. Import the certificates into the Sentinel FIPS keystore.For more information about importing the certificate, see “Importing Certificates into FIPS Keystore Database” in the Sentinel Installation and Configuration Guide.
File: If you want to subscribe to commercial feeds that require authentication, you can download feeds at regular intervals to a file and use that file as the data source. For Sentinel to process the data, you must place the file in the <sentinel_data_directory>/data/feed_data directory and then add the file as a data source. You can use the following file formats: CSV: Allows you to assign threat types and reputation score to individual IP addresses. TXT: Allows you to specify only a list of IP addresses.
Sentinel processes the data in the file the first time you add it as a data source and thereafter every time you update the file or the data source.
Threat Plug-in: You can create your own plug-ins by using the preview version of the Sentinel SDK, which is available on the Sentinel Plug-ins Website.
NOTE: If you are using the curl command in the plug-in to download data from the data source, ensure that the curl package version is minimum curl4-7.37.0-28.1.x86_64. The plug-in does not work if your operating system has a lower version of this package. For example, as of the publication date of this document, SLES 11 SP4 has a lower version of the curl package. SLES 12 SP1 and later have the required version of the curl package.
While adding a data source, you can select an appropriate threat type for the data source. By default, Sentinel populates several common threat types in a drop-down list from which you can select. You can also add your own threat type to the list by updating the configuration.properties file as follows:
1 Log in to the Sentinel server as the novell user.2 Open the /etc/opt/novell/sentinel/config/configuration.properties file.3 Add the feeds.custom.threattypes property with the desired value as follows: feeds.custom.threattypes=<threat_type>Where <threat_type> is the name of the threat type you want to add. You can add multiple threat types separated by a comma.
4 Restart the Sentinel server.
Understanding How Sentinel Processes DataSentinel downloads the data from the data sources to a map file, <sentinel_data_directory>/data/map_data/Threat_Intelligence.csv. Each data source is differentiated by a unique ID. When the SourceIP or the Target IP of an incoming event matches with any of the IP addresses in the map file, Sentinel enriches the event with threat information by adding the following source or target event fields accordingly:
SourceHostThreatSource (shts) TargetHostThreatSource (thts) SourceHostThreatType (rv198)
226 Configuring Threat Intelligence Data Sources
TargetHostThreatType (rv199) SourceHostReputationScore (rv158) TargetHostReputationScore (rv159)
If the IP addresses are listed in more than one data source, Sentinel considers the values for the above event fields from the data source that has a higher priority.
You can also assign reputation scores to indicate the reputation of a threat intelligence source, based on the threat type and the data source. A higher score indicates a better reputation. After assigning a reputation score, you can determine the events that need to be enriched with the reputation score.
To assign a reputation score:
1 Go to Integration > Threat Intelligence Sources.2 Enter a score between 0 and 100 in the Source reputation score field.
Depending on the IP address (source or target) present in the event field, Sentinel enriches the corresponding SourceHostReputationScore (rv158) or TargetHostReputationScore (rv159) field with the specified value.
3 In the Enrich events only with reputation scores less than or equal to field, specify the score based on which you want to enrich events.
4 Click Save.
For example, if you do not want to enrich internal feed data, set the Source reputation score to 80 and set the Enrich events only with reputation scores less than or equal to field to 70.
Sentinel provides the Threat Intelligence Solution Pack out-of-the-box, which includes correlation rules that detect communications to or from these IP addresses in your network. In upgrade installations, you must manually upgrade the Threat Intelligence Solution Pack in Solution Manager to get these latest correlation rules.
You can also create your own correlation rules as necessary. For more information, see “Correlating Event Data” in the Sentinel User Guide.
Managing Feeds from Threat Intelligence Solution PackThe Threat Intelligence Solution Pack in previous versions of Sentinel includes data sources such as Palevo tracker and ZeuS tracker. The option to schedule downloads and manage these data feeds was available in the Plug-ins > Feeds user interface. Starting from Sentinel 8.1, the option to manage these threat intelligence data sources is available in the Integration > Threat Intelligence Sources user interface. Sentinel adds these data sources by default. You just need to schedule the download interval for these data sources.
You can uninstall the previously installed Palevo and Zeus feed plug-ins in the Plug-ins > Catalog user interface.
Configuring Threat Intelligence Data Sources 227

228 Configuring Threat Intelligence Data Sources

VI VIMonitoring Your Network
You can configure Sentinel to analyze your events, detect patterns, set up baselines, configure workflows to act on the events, manage and remediate threats, visualize network activities, and more. For more information about using these features, see the Sentinel User Guide.
This section provides information about the following:
Chapter 21, “Configuring Data Federation,” on page 231 Chapter 22, “Visualizing IP Flow Communications,” on page 243 Chapter 23, “Viewing Compliance to Configuration Policies,” on page 245 Chapter 24, “Viewing Change Guardian Events,” on page 247 Chapter 25, “Configuring Alert Notifications,” on page 249
Monitoring Your Network 229

230 Monitoring Your Network

21 21Configuring Data Federation
The Sentinel Data Federation feature enables you to search for events, view alerts, and run reports not only on your local Sentinel server, but also on other Sentinel and Sentinel Log Manager servers distributed across the globe.
“Overview” on page 231 “Configuring Servers for Data Federation” on page 233 “Searching for Events” on page 236 “Managing the Data Federation Search Results” on page 237 “Viewing the Search Activities” on page 238 “Running Reports” on page 238 “Viewing Alerts” on page 239 “Editing the Data Source Server Details” on page 239 “Troubleshooting” on page 239
OverviewThe Data Federation feature facilitates searching events, viewing alerts, and reporting event data from local and remote Sentinel servers. When you are working with multiple servers, you can perform a search or run a report on just one server and have it automatically run a search or report across the selected remote servers. The server on which the search is initiated is referred to as the authorized requestor, and the remote servers are referred to as the data sources or data source servers.
When you run a search or report on the authorized requestor, search queries are sent to each selected data source server. The data source server authenticates the authorized requestor server, using a password that is exchanged during configuration. Event or alert data is returned to the authorized requestor, where it is merged, sorted, and rolled up for presentation. Individual search results display the data source servers from which they were received. The search status for each server is available for viewing and troubleshooting.
Figure 21-1 shows how you can set up the Sentinel servers across the globe for data federation, which enables distributed search and reporting.
Configuring Data Federation 231

Figure 21-1 Data Federation
232 Configuring Data Federation

Configuring Servers for Data FederationTo configure an authorized requestor for data federation, you must first enable data federation on the authorized requestor server.
After you enable data federation, you need to add data source servers to the authorized requestor server. If you know the administrator user name and password for the data source server, you can add the data source server directly from the authorized requestor.
If you do not know the administrator user name and password for a data source server, you can set up the authorized requestor with an opt-in password that allows administrators of data source servers to add their data source servers to the authorized requestor. When you do this, administrators of data source servers do not need to share their user names and passwords with you. You must share the opt-in password with the data source server administrator.
“Enabling Data Federation” on page 233 “Using the Administrator Credentials to Add a Data Source Server” on page 233 “Using the Opt-in Password to Add a Data Source Server” on page 234
Enabling Data Federation1 From Sentinel Main, click Integration > Sentinel.2 Select Local server and other data sources in the Data Sources section.3 Do one of the following to add data source servers to your authorized requestor:
If you are the administrator of the authorized requestor and you know the administrator user name and password on the data source server, continue with “Using the Administrator Credentials to Add a Data Source Server” on page 233.
If you are the administrator of the authorized requestor and you do not know the administrator user name and password on the data source server, you can set an opt-in password to allow administrators of data source servers to add their data source servers to the authorized requestor. Continue with “Using the Opt-in Password to Add a Data Source Server” on page 234.
Using the Administrator Credentials to Add a Data Source ServerIf you are the administrator of the authorized requestor and you know the administrator user name and password on the data source server, you can add the data source server while you are logged in to your authorized requestor server.
IMPORTANT: You should ensure that the data source server that you add is able to communicate with the authorized requestor. The data source server should be able to communicate through TCP/IP. The IP address or host name of the data source server must be accessible through firewalls, NATs,
Configuring Data Federation 233

etc. You can use the ping command to ensure that there is communication from both ways. If there is a communication failure between the servers, an error is displayed in the extended status page. For more information, see “Managing the Data Federation Search Results” on page 237.
1 If you are continuing from “Enabling Data Federation” on page 233, skip to Step 3; otherwise, continue to Step 2.
2 From Sentinel Main, click Integration > Sentinel.3 Select Local server and other data sources in the Data Sources section.4 Click the Add a data source link.5 Specify the following information:
IP Address/DNS Name: IP address or the DNS name of the data source server.Port: Port number of the data source server. The default port number is 8443. The data source server and authorized requestor do not need to be on the same port. User Name: User name to log in to the data source server. This must be a user with administrator privileges. Password: Password associated with the user name.
6 Click Login, then click Accept after verifying that the certificate information is correct.7 Use the following information to configure the data source server:
The Add a data source page displays a lists of the various proxy roles on the data source server.Name: Specify a descriptive name that you want to give to the data source.This helps you to easily identify the data source server by a name instead of by its IP address or DNS name.Search Proxy Role: Select a search proxy role that you want to assign to the authorized requestor.When the authorized requestor makes search requests to the data source server, the proxy role's security filter is used when performing the search. Only events that pass the proxy role's security filter are returned to the authorized requestor server.Only roles that have the Proxy for Authorized Requestors permission are listed. This permission is required for the data source server to accept and process incoming search requests from the authorized requestor server.
8 Click OK.The server information is listed in the Data Sources list.
You can now search events, view event reports, and view alerts from the data source server. For more information, see “Searching for Events” on page 236, “Running Reports” on page 238, and “Viewing Alerts” on page 239 respectively.
Using the Opt-in Password to Add a Data Source ServerIn organizations where administrative control of Sentinel servers is decentralized, it might violate the security policy to share administrator passwords. However, Sentinel allows you to share a limited-purpose opt-in password to add data source servers, which is more secure than requiring full
234 Configuring Data Federation

administrator credentials. If you are not the administrator of the data source server, you can set an opt-in password in the authorized requestor server, then provide the opt-in password to the data source server administrators to allow them to opt in to the authorized requestor server.
When a data source server opts in to the authorized requestor, a message is sent to the authorized requestor server requesting that it be added to the list of data source servers maintained by the authorized requestor server. The request authorizes the authorized requestor to access data on the data source server. The authorized requestor requires an opt-in password to verify that the opt-in request has originated from a valid data source server. During the opt-in process, the authorized requestor and the data source server exchange the appropriate password, which allows the data source server to authenticate the search requests from the authorized requestor.
This procedure is similar to adding a data source server, but it is done from the data source server instead of the authorized requestor server.
“Setting the Opt-In Password” on page 235 “Authorizing an Authorized Requestor Server” on page 235
Setting the Opt-In Password1 Log in to the authorized requestor server as an administrator.2 Click Integration in the toolbar, and then click Sentinel.
The Data Federation page that is displayed has two sections: Data Sources and Authorized Requestors.
3 In the Data Sources section, select Local server and other data sources.4 Click Set Opt-in Password.5 Specify the opt-in password, then click Set Password.6 Continue with “Authorizing an Authorized Requestor Server” on page 235 to add the data
source server to the authorized requestor.
Authorizing an Authorized Requestor Server1 Log in to the data source server as an administrator.2 Click Integration in the toolbar, and then click Sentinel.
The Data Federation page that is displayed has two sections: Data Sources and Authorized Requestors.
3 In the Authorized Requestors section, check the Allow authorized requestors to access data from your server box.
4 Click the Add link.The Add authorized requestors page is displayed.
5 Specify the following information:IP Address/DNS Name: The IP address or the DNS name of the authorized requestor.Port: Port number of the authorized requestor. This is the port number on which the authorized requestor listens for incoming opt-in requests. The default port number is 8443. Opt-in Password: The opt-in password that you configured on the authorized requestor. You must obtain this password from the administrator of the authorized requestor.
Configuring Data Federation 235

6 Click OK.The Confirm Certificate page is displayed.
7 Verify the certificate information, then click Accept.The Add authorized requestors page is displayed that lists the various proxy roles on the data source servers.
8 In the Name field, specify a descriptive name that you want to give to the authorized requestor server.This helps you to easily identify the authorized requestor server by a name instead of by its IP address or DNS name.
9 Select a proxy role that you want to assign to the authorized requestor. When the authorized requestor makes search requests to the data source server, the proxy role's security filter is used when performing the search. Only events that pass the proxy role's security filter are returned to the authorized requestor.Only roles in the data source server that have the Proxy for Authorized Requestors permission are listed. This permission is required for the data source server to accept and process incoming search requests from the authorized requestor.
10 Click OK.The authorized requestor is added to Authorized Requestors list and is enabled by default.The data source server is also added in the Data Sources list in the authorized requestor server. Alternatively, you can click the Refresh link to see the data source server in the Data Sources list.
Searching for EventsSearching for events in a distributed environment is similar to how you perform a search on your local server, except that you perform the search on the selected data source servers and can also include your local server.
1 Log in to the authorized requestor server as a user with Search Remote Data Sources permission.
2 Click New Search.3 Click the Data sources link under the Search field.
A dialog box is displayed that lists the data source servers that you have added, including the local server. The data source servers that are disabled are also displayed, but they are dimmed.
4 Select the check boxes next to the data source servers on which you want to perform a search, then click OK.
5 Specify the search criteria in the search field, then click Search.If you do not specify any search criteria, the authorized requestor server runs a default search for all events with severity 0 to 5.The Search Results page displays the events from the selected data source servers and the local server (if selected). The search results are filtered through the combination of the security filter and permissions of the logged-in user and the security filter and permissions of the search proxy role on the data source servers. For information on the distributed search results, see “Managing the Data Federation Search Results” on page 237.
236 Configuring Data Federation

Managing the Data Federation Search ResultsThe Search Results page displays the events from the selected data source servers and the local server, based on the search criteria you specified. Each event displays the data source server information from which the event is being retrieved.
You can expand the event results to see the details by clicking the All link.
For non-internal events, the get raw data link is displayed. You can view the raw data only if your role's security filter is set to view all event data.
NOTE: For search results that come from the data source servers, the role that is used to retrieve raw data is not the role of the logged-in user that is performing the search on the authorized requestor server, but the role that is assigned to the authorized requestor server on the data source server.
You can view the status of the search in the extended status page while a search is in progress as well as when the search has finished. To access the extended status page, click the Displaying N of M events from X data sources link that appears at the top of the refinement panel.
The extended status page displays the following information:
Data Source Name: The descriptive name of the data source server. If you did not specify a descriptive name for the data source server, this field displays the IP address or DNS name of the data source server.
Events Available: Indicates the number of events that have actually been retrieved from the data source server. The value is displayed as N of M events available, where N is the number of events that have been retrieved so far and M is the total number of events on the data source server that match the search criteria.
Retrieval Rate (EPS): An approximate rate of how fast the events were retrieved from a specific data source server.
Status: Displays the error messages, if any (generally in red). In addition to error messages, this field also displays the status of the search. Running: Indicates that the search is still running on the data source server. Buffering events for display: Indicates that the search is finished on the data source server,
but the authorized requestor server is retrieving events from the data source server and buffering them for display.
Paused buffering events for display: Indicates that the search is finished on the data source server, and the authorized requestor has paused while retrieving events from the data source. The authorized requestor reads ahead a few pages from the last page that you scrolled down to. When it has buffered enough pages ahead, it pauses so that events are not buffered unnecessarily.
Searching, paused buffering events for display: This is similar to pausing and buffering events for display, except that the search is not yet complete on the data source server.
Done buffering: Indicates that the search is complete on the data source server, and all of the results are retrieved by the authorized requestor and queued for display.
You can further refine the distributed search results and perform various actions based on your requirements. For more information, see “Searching Events” in the Sentinel User Guide.
Configuring Data Federation 237

Viewing the Search ActivitiesYou can view the search activities that are being done on the data source server by the authorized requestor server. You can see what queries are being done and how frequently they are being done. Based on the search activity, you might want to assign a more/less restrictive proxy role or even disable access to the data source server.
You can also refine the search activity query. For example, you can change the date range to see what queries have been performed today or yesterday or in the last hour, or you can drill down to see the queries that were made by particular users on the authorized requestor.
1 Log in to the data source server as an administrator.2 Click Integration in the toolbar, and then click Sentinel.
The Data Federation page that is displayed has two sections: Data Sources and Authorized Requestors.
3 In the Authorized Requestors section, a list of authorized requestor servers is displayed. Click the Search Activities link for the authorized requestor server for which you want to view the search activities.The search activities page is displayed that lists the audit events that are retrieved from all of the distributed search requests the data source server has received from that particular authorized requestor.
Running ReportsRunning reports in a distributed environment is similar to running reports on your local server, except that you select the data source servers from which you want to view the reports while specifying the report parameters.
1 Log in to the authorized requestor sever as a user with Search Remote Data Sources permission.2 From the Reports section, select the report you want to run, then click Run.
The Run Report page is displayed. 3 Click the Data sources link.
A page is displayed that lists the data source servers that you have added, including the local server. The data source servers that are disabled are also displayed, but they are dimmed.
4 Select the data source servers from which you want to view the reports, then click OK.5 Specify the other parameters for the report.
For more information on these parameters, see “Reporting” in the Sentinel User Guide.6 Click Run.
A report results entry is created and listed under the selected report. For more information on managing reports, see “Reporting” in the Sentinel User Guide.
238 Configuring Data Federation
Viewing AlertsViewing alerts in a distributed environment is similar to viewing alerts from your local server, except that you select the data source servers from which you want to view alerts while creating alert views.
To view alerts from data source servers, you must log in to the authorized requestor server as a user with Search Remote Data Sources permission.
For information about creating alert views, see “Creating an Alert View” in the Sentinel User Guide.
When you create an alert view with data source servers specified as data sources, you can view the alerts from the data source servers in that alert view. For information about viewing alerts, see “Viewing and Triaging Alerts” in the Sentinel User Guide.
NOTE: In distributed environments, you can view alerts only from Sentinel data sources and not from Sentinel Log Manager data sources, because Sentinel Log Manager does not support alerts.
Editing the Data Source Server Details1 Log in to the authorized requestor as an administrator.2 Click Integration in the toolbar, and then click the Sentinel tab.
In the Data Sources section, a list of data source servers is displayed under the Data Source Servers list.
3 Click the Edit link for the data source server for which you want to modify the details, then edit the information.You can edit the name of the data source server and the port number.
4 (Optional) To change the proxy role on the data source server as necessary:4a Click View/Change.4b Log in to the data source server.4c Select a proxy role, then click OK.
5 Click Save.
TroubleshootingYou can perform some basic troubleshooting to ensure that you have successfully configured the authorized requestor for data federation. This section lists the most common issues and the probable causes for these issues.
“Permission Denied” on page 240 “Connection Down” on page 240 “Unable to View Raw Data” on page 240 “Problems While Adding Data Source” on page 240 “Some Events Are Only Visible from the Local System” on page 241
Configuring Data Federation 239

“Cannot Run Reports on the Data Source Servers” on page 241 “Different Users Get Different Results” on page 241 “Cannot Set the Admin Role as the Search Proxy Role” on page 241 “Error Logs” on page 241
Permission DeniedAfter doing a distributed search, check the extended status page to view the search status. If the search is not successful, check the following possible causes:
The data source server administrator might have disabled data federation on the data source server. To enable data federation on the data source server, see Step 3 in “Authorizing an Authorized Requestor Server” on page 235.
The data source server administrator might have disabled the authorized requestor server for data federation. Ensure that the authorized requestor server is enabled in the data source server. Fore more information, see “Authorizing an Authorized Requestor Server” on page 235.
The role that you used for connecting might not have the Search Data Targets permission.
Connection Down Network issues in your organization. Sentinel servers or Sentinel services might be down. Connection time-out. The IP address or the port number of the data source server has changed, but the authorized
requestor configuration might not be updated.
Unable to View Raw DataThe Proxy group that is assigned to the authorized requestor might not have the view all events permission to view the raw data.
Problems While Adding Data SourceThe authorized requestor server and data source server might not be communicating with each other. Ensure that the firewall and NAT are set up properly to allow communication in both directions. Ping both ways to test.
240 Configuring Data Federation

Some Events Are Only Visible from the Local SystemYou might not be able to view the events from the data source servers for one of the following reasons:
The trial license might be expired. You must purchase an enterprise license to reactivate this feature to view the events from the data source servers.
The user who has logged in to the authorized requestor has one set of permissions on the local data such as view all data, view system events, security filter settings, and so on. The search proxy group has another set of permissions, possibly more restrictive. Therefore, certain types of data, such as raw data, system events, and PCI events, might be returned only from the local system and not the data source server.
Cannot Run Reports on the Data Source Servers The trial license might be expired. You must purchase an enterprise license to reactivate this feature to run the reports from the data source servers.
Different Users Get Different ResultsDifferent users might have different security filters or other permissions and therefore get different results from a distributed search.
Cannot Set the Admin Role as the Search Proxy RoleThis is by design, for security reasons. Because the data viewing rights for the admin are unrestricted, it is not desirable to allow the admin role to be the search proxy role.
Error LogsYou can also determine the cause of a search failure by examining the log file on the authorized requestor server. The default location for the log file is /var/opt/novell/sentinel/log. For example, you might see one of the following messages:
Invalid console host name 10.0.0.1 Error sending target request to console host 10.0.0.1Error getting certificate for console host 10.0.0.1 Authentication credentials in request to opt-in to console 10.0.0.2 were rejected Request to opt-in to console 10.0.0.2 was not authorized Error sending target request to console host 10.0.0.1
Configuring Data Federation 241

242 Configuring Data Federation

22 22Visualizing IP Flow Communications
To perform a complete investigation and analysis of a security event, you might want to monitor the entire network activities in detail. Sentinel leverages ArcSight SmartConnectors that help you monitor your enterprise network by collecting IP Flow data (IPFIX, JFlow, sFlow, and so on) in your network. SmartConnectors collect IP Flow data from network devices such as routers, switches, and firewalls.
IP Flow data describes basic information about all the network connections between hosts, including transmitted packets and bytes. This helps you to visualize the behavior of individual hosts or the entire network.
“Configuring IP Flow Data Collection” on page 243 “Visualizing and Analyzing IP Flow Data” on page 243
Configuring IP Flow Data CollectionYou can leverage IP Flow data when analyzing and visualizing events. IP Flow data is collected as events and therefore are considered for EPS count. To configure IP Flow data collection, install and configure the ArcSight SmartConnector. While configuring, ensure that you configure the relevant SmartConnectors that collect IP Flow data.
For more information, see the Universal Common Event Format Collector documentation on the Sentinel Plug-ins Website.
Visualizing and Analyzing IP Flow DataFor information about visualizing and analyzing IP Flow data, see “Visualizing and Analyzing IP Flow Communications” in the Sentinel User Guide.
Visualizing IP Flow Communications 243

244 Visualizing IP Flow Communications

23 23Viewing Compliance to Configuration Policies
Sentinel is a compliance monitoring system that helps you verify whether your enterprise is compliant with internal policies, information security standards such as PCI DSS and ISO 27000 series, and government regulations such as Sarbanes-Oxley, HIPAA, GLBA, and FISMA.
Sentinel extends its compliance monitoring capability by integrating seamlessly with your existing security management solutions, such as Secure Configuration Manager (SCM). Integration with SCM helps you to assess system configurations against regulatory requirements, security best practices, and corporate IT policies to demonstrate compliance and manage information security risk. This integration helps you to view the security and audit information from both Sentinel and SCM in a single interface.
Sentinel is auto-configured to receive SCM events. Ensure that SCM is configured to send events to Sentinel. For more information, see “Integrating Secure Configuration Manager with Sentinel” in the Secure Configuration Manager User Guide.
Receiving Compliance Details from Secure Configuration Manager
You must configure Sentinel to receive compliance details associated with the Secure Configuration Manager events.
NOTE: When configuring SCM to send compliance information to Sentinel, SCM administrator can configure it in the following two ways:
To send compliance information as an event. To send compliance information as an event, with an attached report.
If SCM administrator configures to send compliance information as an event with attachment, you do not need to perform any configuration in Sentinel to receive compliance information from SCM. Perform the following procedure only if SCM administrator has configured to send compliance information just as an event.
To receive compliance details from Secure Configuration Manager:
1 In the Sentinel Main interface, click Integration > SCM. In the SCM Servers page, the list of SCM servers that are configured to send compliance details is displayed.
2 To add an SCM server to send compliance details to Sentinel, click Add and specify the following information in the Add SCM Server window: IP address/DNS name: SCM server IP address or host name. Port: The port on which SCM core service listens.
Viewing Compliance to Configuration Policies 245

Protocol: The security protocol that the SCM core service uses. User name: SCM server user name. Password: SCM server password.
3 Click Save to save the configuration.If the connection is valid, the SCM server displays the certificate information in the Confirm Certificate window.
4 Click Accept to accept the server certificate.Sentinel establishes a connection with the SCM server. SCM server details are displayed in the SCM Servers page.
5 (Optional) You can perform the following actions by clicking appropriate links in the Action column in the table: Click Edit to edit the SCM server details. Click Delete to delete the SCM server. Click Validate to validate the SCM server configuration.
For information about viewing Secure Configuration Manager events and the associated compliance details, see “Viewing Compliance to Configuration Policies ” in the Sentinel User Guide.
246 Viewing Compliance to Configuration Policies

24 24Viewing Change Guardian Events
You can extend Sentinel’s threat monitoring capability by integrating Sentinel with Change Guardian. Change Guardian gives you the security intelligence you need to rapidly identify and respond to privileged-user activities that could signal a security breach or result in compliance gaps. It helps security teams detect and respond to potential threats in real-time through intelligent alerting of authorized and unauthorized access and changes to critical files, systems, and applications.
To receive Change Guardian events, the Change Guardian administrator must configure the Change Guardian server to send events to Sentinel. For more information, see “Managing Event Destinations” in the Change Guardian User Guide.
For information about viewing Change Guardian events, see “Viewing Secure Configuration Manager Events and Compliance Details” in the Sentinel User Guide.
You can also view Change Guardian reports, by importing reports from Change Guardian. For more information, see “Creating Reports” in the Sentinel User Guide.
Viewing Change Guardian Events 247

248 Viewing Change Guardian Events

25 25Configuring Alert Notifications
This chapter provides information about configuring and monitoring threat detection notifications by using alerts in Sentinel.
“Understanding Alerts” on page 249 “Overview” on page 249 “Configuring Alert Creation” on page 250 “Visualizing and Analyzing Alerts” on page 252 “Managing Alerts” on page 252
Understanding AlertsAn event, which is generated externally, represents some activity that might not be always exceptional. But a set of similar or comparable events in a given period, might indicate a potential threat. Sentinel helps you correlate events by using correlation rules, which helps you take appropriate actions to mitigate any problems. However, to receive instant notification about such potential threats, you can configure correlation rules to create alerts.
Alerts notify you about potential threats against some IT resource. In addition to potential threats, alerts can also indicate any performance thresholds, such as system memory full or IT resources not responding. Alerts help you to analyze the events and identities to determine the root cause of potential threats.
Alerts provide some high-level details of an event that allow you to quickly drill down to event details and determine whether it's a potential threat or a false positive. If the alert seems to be a potential threat, you can optionally escalate that alert to an incident. You can attach multiple events, host information, vulnerabilities, and even arbitrary attachments to an incident that may help analysts in further investigation of the incident.
OverviewThe following figure provides an overview of creating and monitoring alerts:
Figure 25-1 Alert Overview
1. Configure correlation rules to create alerts when a correlation rule fires.
Alert
Alert Creation
Role - based Access
Visualization and Monitoring Triage Maintenance
Correlation Rule
Retention PolicyREST APIExternal Systems
Closed
Configuring Alert Notifications 249

Correlation rules create alerts. Alerts contain almost the same information as the correlated event and also includes some additional information specific to alerts, such as owner, state, and priority.
As subsequent instances of the same alert are detected, Sentinel associates the trigger events to the existing alert to avoid duplication of alerts.
For more information, see “Configuring Alert Creation” on page 250.2. View and monitor alerts displayed in charts and the table. As you monitor alerts, you can assign
alerts to different users and roles, track the alert from origination to resolution, annotate the correlation rule by adding information to the knowledge base, and so on. For more information, see “Visualizing and Analyzing Alerts” on page 252.
3. If the potential threat that caused the alert is critical such that it needs immediate action or the threat indicates any security compromise, escalate the threat by creating an incident. For more information, see “Escalating Alerts to an Incident” in the Sentinel User Guide.
4. Configure alert retention policies to set the duration to automatically close and delete the alerts from Sentinel. For more information, see “Configuring Alert Retention Policies” on page 253.
Configuring Alert CreationYou can create alerts in Sentinel in either of the following ways:
Associate the Create alerts action to a correlation rule. Sentinel generates an alert when the correlation rule fires.
Create alerts by using the REST API. For more information, see the API documentation in any of the following ways: Click Help > APIs > API reference > Alert Create Method. Go to <Sentinel Server IP address >SentinelRESTServices/apidoc/en/api-ref/Alerts/alert-create.html
Sentinel automatically rolls up identical and/or duplicate instances of an alert as follows:
1. When a new alert is created, Sentinel initializes the Occurrences field value in the alert to 1. 2. Subsequent instances of the same alert are rolled up into the existing alert until the existing
alert is closed. After the existing alert is closed, if a new instance of the same alert is detected, a new alert is created.When rolling up alerts, Sentinel performs the following activities: Increments the value of the Occurrences field by one. Associates trigger events of the new alert instance to the existing alert.
Sentinel determines the sameness of alerts by comparing the existing alert fields with the fields of the new alert instance. When comparing the alerts, Sentinel considers all fields except unique and date/time fields.
3. Multiple open alerts with identical fields can exist if one or more alerts are re-opened from the closed state. In this case, Sentinel chooses the most recently created alert for roll up.
Rolling up of alerts helps in reducing the number of open and duplicate alerts in Sentinel.
250 Configuring Alert Notifications

When the alert is created by a correlation rule, the fields of the correlated event are copied to the alert. The Create alerts action also sets the following properties on the alert: Owner, Priority, and State. Therefore, you can control the alert output by customizing the correlated event. To customize the correlated event, see “Customizing Correlated Event” in the Sentinel User Guide.
TIP: If there are too many distinct alerts, you can reduce the number of unique fields in the correlated event output to create a more generalized alert, so that the subsequent alert instances are rolled up. Similarly, if the alerts are too generic, you can increase the number of unique fields in the correlated event output to create distinct alerts.
For example, consider a correlation rule that generates a correlated event with severity 5 whenever User A logs in to the system and the Create Alerts action is associated to the correlation rule. When the correlation rule fires, Sentinel creates an alert with severity 5. Subsequent alert instances triggered by this correlation rule are identical to the existing alert. Therefore, Sentinel rolls up the alert instances into the existing alert. If the severity field value of the correlated event is customized to 3, Sentinel generates a new alert with severity 3 instead of rolling up the alert instance to the existing alert.
To associate the Create alert action to a Correlation rule:
1 In the Correlation panel, select the correlation rule to which you want to associate the Create Alerts action, and click the Edit icon.
2 In the correlation rule builder, in the Actions section, select Create alert.3 To configure the alert, click Configure.4 Specify the following details in the Configure Alert window:
Owner: You can specify a user or a role as the owner of the alert. If you specify a role as the owner of the alert, all the users in that role are owners for the alert. One of the users in that role can acknowledge the alert to notify that they have taken the ownership of the alert and are investigating the issue.
NOTE: When assigning an alert to a user or a role, ensure that the role or the user has the Manage Alerts permission.
Priority: Priority indicates the importance of the alert. State: State indicates the status of the alert in the alert resolution cycle.
New: This is the default state of the newly created alerts. Investigating: Indicates that the alert has been triaged and the investigation for the
alert is in progress. Closed: Indicates that there will not be further activity on the alert and based on the
alert retention policy, the alert will be deleted.5 Click Save.6 Click Save Rule.
Configuring Alert Notifications 251

Visualizing and Analyzing AlertsSentinel provides a graphical and tabular representation of alerts created by correlation rules. Visualizing alerts helps you identify and analyze potential threats against your IT resources. For more information about visualization and analyzing alerts, see “Visualizing and Analyzing Alerts” in Sentinel User Guide.
Managing AlertsYou can define rules to store only specific alerts in the database so that the database does not get overloaded. You can also define retention policies to automatically close and delete alerts after a specific duration.
This section provides information about the following:
“Filtering Alerts” on page 252 “Configuring Alert Retention Policies” on page 253
Filtering AlertsYou can configure alert routing rules to filter the alerts and choose to either store the alerts in the Sentinel database or drop the filtered alerts. For example, if you want to exclude the alerts involving the initiator user Albert, you can configure the rule criteria to drop all the alerts with the initiator user name Albert.
Sentinel evaluates the alert routing rules on a first-match basis in top-down order and applies the first matched alert routing rule to alerts that match the filter criteria. If no routing rule matches the alerts, Sentinel applies the default rule against the alerts. The default routing rule stores all the alerts generated in Sentinel.
Creating an Alert Routing RuleTo create an alert routing rule to filter the alerts:
1 From Sentinel Main, click Routing > Alert Routing Rules > Create.2 Specify the following information:
Name: Specify a name for the alert routing rule. Criteria: Specify the criteria to filter alerts. Action: Select either of the following options:
Store: Stores the filtered alerts in the alert store. Drop: Drops or ignores the alerts that match the specified criteria.
WARNING: If you select Drop, the filtered alerts are lost permanently.
Enable: Allows you to enable the alert routing rule. By default, this option is deselected.3 Click Save to save the alert routing rule.
252 Configuring Alert Notifications

Ordering Alert Routing RulesWhen there is more than one alert routing rule, you can reorder the alert routing rules by dragging them to a new position or by using the Reorder option. Alert routing rules evaluate alerts in the specified order until a match is made, so you should order the alert routing rules accordingly. Place more narrowly defined alert routing rules and more important alert routing rules at the beginning of the list.
Sentinel processes the first routing rule that matches the alert based on the criteria. For example, if an alert passes the criteria for two routing rules, only the first rule is applied. The default routing rule always appears at the end.
1 From Sentinel Main, click Routing > Alert Routing Rules.2 Perform either of the following:
Drag the alert routing rule to the desired position in the ordered list. Click Reorder, specify the desired position in the ordered list, and click Save.
Configuring Alert Retention PoliciesThe alert retention policies control when the alerts should be closed and deleted from Sentinel. You can configure the alert retention policies to set the duration to automatically close and delete the alerts from Sentinel.
To configure the alert retention policy:
1 From Sentinel Main, click Storage > Alerts Retention. 2 Specify the following information:
Specify the number of days from the date of creation of alerts, after which the alert status is set to closed.
Specify the number of days from the date of closure of alerts, after which the alerts are deleted from Sentinel.
3 Click Save to save the alert retention policy.
Sentinel checks for closure and deletion of alerts once every day, at midnight.
Configuring Alert Notifications 253

254 Configuring Alert Notifications

VII VIIManaging Solution Packs
This section provides information about using the built-in solution packs and creating your own solution packs.
Chapter 26, “Using Solution Packs,” on page 257 Chapter 27, “Creating Solution Packs,” on page 271
Managing Solution Packs 255

256 Managing Solution Packs

26 26Using Solution Packs
Solution Packs allow partners and customers to create and easily manage solutions to specific business problems.
“Overview” on page 257 “Solution Pack Components” on page 258 “Using the Import Plug-In Wizard to Import a Solution Pack” on page 259 “Using the Solution Manager” on page 260 “Installing and Managing Solution Packs” on page 263 “Installing an Edited Solution Pack” on page 270 “Solution Designer” on page 270
OverviewSolution Packs provide a framework within which sets of content can be packaged into controls, each of which is designed to enforce a specific business or technical policy. The control can use any of the detection, filtering, alerting, and response features of Sentinel, as well as provide documentation on control status and enforcement. By managing the set of content as a unit within the control, the Solution Pack solves dependency problems and simplifies implementation.
Controls within a Solution Pack can include the following types of content:
Correlation rule deployments, including deployment status and associated Correlation rules, Correlation actions, JavaScript plug-ins and integrators, and Dynamic Lists
Reports Filters Searches iTRAC workflows, including associated roles Event enrichment, including map definitions and event meta tag configuration Other associated files added when the Solution Pack is created, such as documentation,
example report PDFs, or sample map files.
For example, a Solution Pack can package content related to governance and regulatory compliance into a comprehensible and easily enforceable framework that is easy to deploy.
Solution Packs are created with the Solution Designer application. Using this tool, a user creates the Solution Pack, associated controls and documentation, and then associates Sentinel content with each control. The entire package is then exported as a ZIP file. For more information on creating a Solution Pack and adding content to it, see “Solution Designer” on page 270.
The ZIP file containing the Solution Pack is first imported into an existing Sentinel system by using the Solution Packs Manager in the Sentinel Control Center. You then use the Solution Manager to install the imported Solution Pack.
Using Solution Packs 257
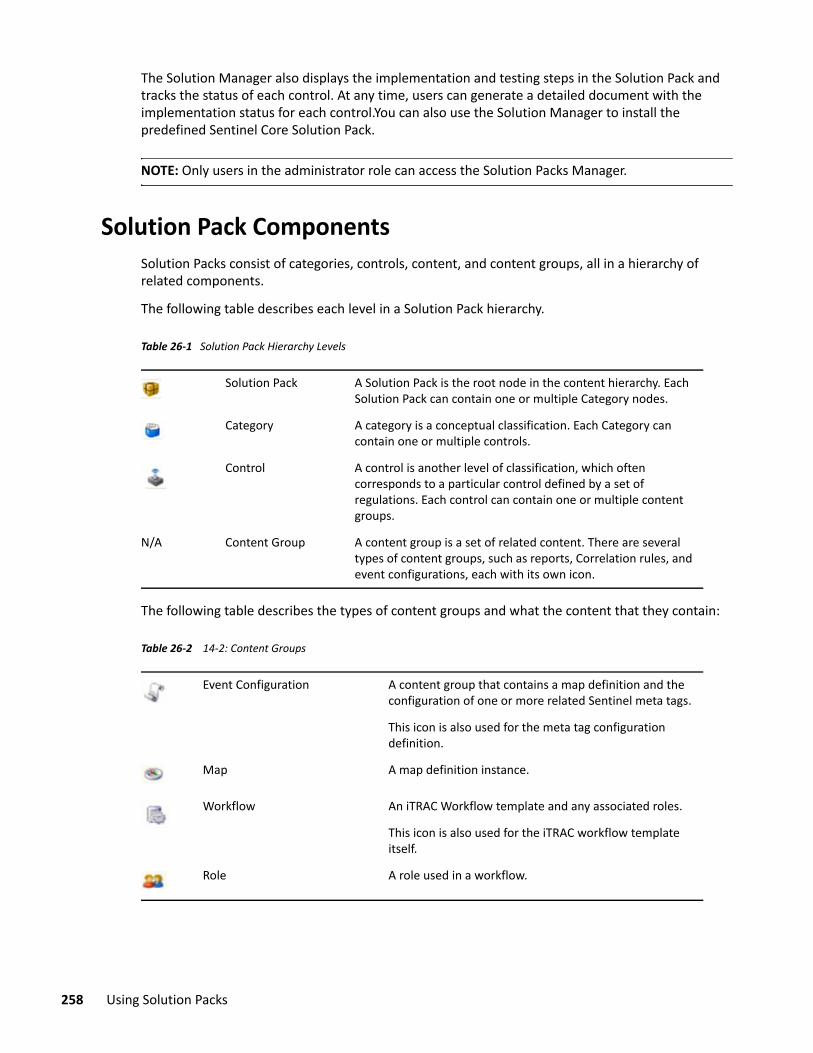
The Solution Manager also displays the implementation and testing steps in the Solution Pack and tracks the status of each control. At any time, users can generate a detailed document with the implementation status for each control.You can also use the Solution Manager to install the predefined Sentinel Core Solution Pack.
NOTE: Only users in the administrator role can access the Solution Packs Manager.
Solution Pack Components Solution Packs consist of categories, controls, content, and content groups, all in a hierarchy of related components.
The following table describes each level in a Solution Pack hierarchy.
Table 26-1 Solution Pack Hierarchy Levels
The following table describes the types of content groups and what the content that they contain:
Table 26-2 14-2: Content Groups
Solution Pack A Solution Pack is the root node in the content hierarchy. Each Solution Pack can contain one or multiple Category nodes.
Category A category is a conceptual classification. Each Category can contain one or multiple controls.
Control A control is another level of classification, which often corresponds to a particular control defined by a set of regulations. Each control can contain one or multiple content groups.
N/A Content Group A content group is a set of related content. There are several types of content groups, such as reports, Correlation rules, and event configurations, each with its own icon.
Event Configuration A content group that contains a map definition and the configuration of one or more related Sentinel meta tags.
This icon is also used for the meta tag configuration definition.
Map A map definition instance.
Workflow An iTRAC Workflow template and any associated roles.
This icon is also used for the iTRAC workflow template itself.
Role A role used in a workflow.
258 Using Solution Packs
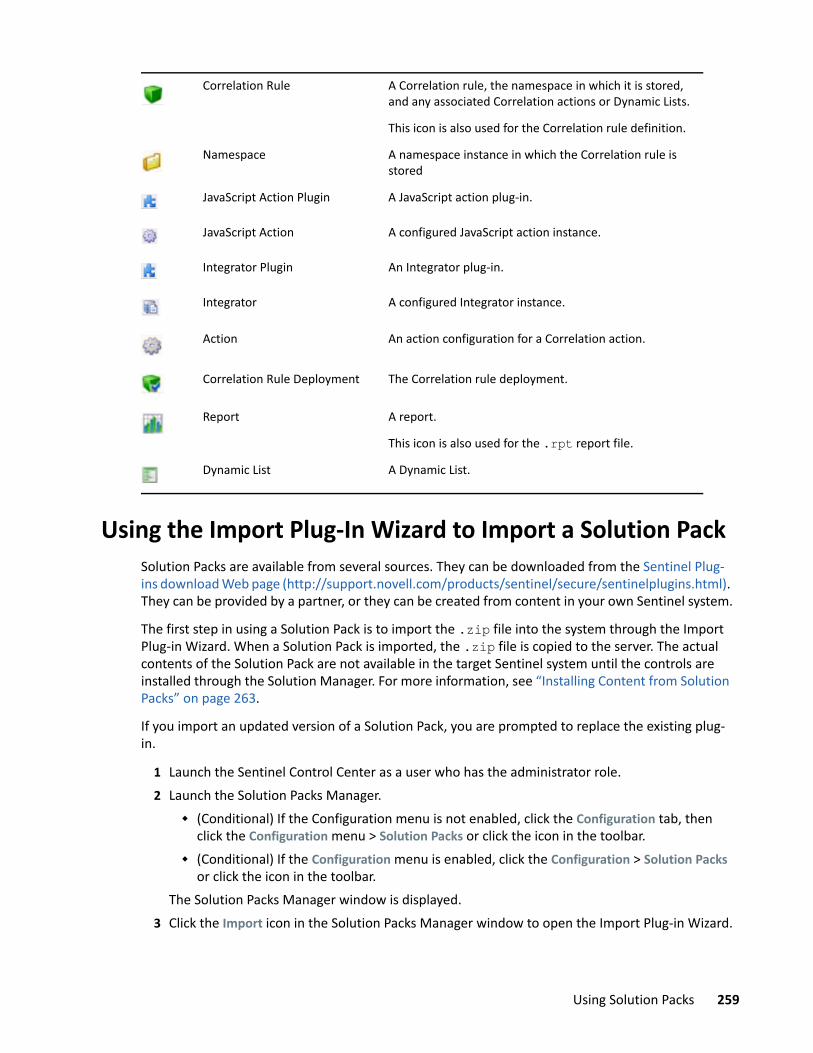
Using the Import Plug-In Wizard to Import a Solution PackSolution Packs are available from several sources. They can be downloaded from the Sentinel Plug-ins download Web page (http://support.novell.com/products/sentinel/secure/sentinelplugins.html). They can be provided by a partner, or they can be created from content in your own Sentinel system.
The first step in using a Solution Pack is to import the .zip file into the system through the Import Plug-in Wizard. When a Solution Pack is imported, the .zip file is copied to the server. The actual contents of the Solution Pack are not available in the target Sentinel system until the controls are installed through the Solution Manager. For more information, see “Installing Content from Solution Packs” on page 263.
If you import an updated version of a Solution Pack, you are prompted to replace the existing plug-in.
1 Launch the Sentinel Control Center as a user who has the administrator role.2 Launch the Solution Packs Manager.
(Conditional) If the Configuration menu is not enabled, click the Configuration tab, then click the Configuration menu > Solution Packs or click the icon in the toolbar.
(Conditional) If the Configuration menu is enabled, click the Configuration > Solution Packs or click the icon in the toolbar.
The Solution Packs Manager window is displayed.3 Click the Import icon in the Solution Packs Manager window to open the Import Plug-in Wizard.
Correlation Rule A Correlation rule, the namespace in which it is stored, and any associated Correlation actions or Dynamic Lists.
This icon is also used for the Correlation rule definition.
Namespace A namespace instance in which the Correlation rule is stored
JavaScript Action Plugin A JavaScript action plug-in.
JavaScript Action A configured JavaScript action instance.
Integrator Plugin An Integrator plug-in.
Integrator A configured Integrator instance.
Action An action configuration for a Correlation action.
Correlation Rule Deployment The Correlation rule deployment.
Report A report.
This icon is also used for the .rpt report file.
Dynamic List A Dynamic List.
Using Solution Packs 259
4 Select Import Solution package plugin file (.zip), then click Next to display the Choose Plugin Package File window.
5 Use the Browse button to the locate the Solution Pack to import to the plug-in repository. Select a .zip file and click Open.
6 Click Next.If you selected a solution pack that already exists, the Replace Existing Plugin window displays.
7 If you want to replace the existing plug-in, click Next.The Plug-in Details window displays the details of the plug-in to be imported.
8 Select the Launch Solution Manager check box if you want to install the plug-in after importing the Solution Pack.If you select the Launch Solution Manager check box, the Solution Manager displays the Solution Pack that is imported.
9 Click Finish.
Using the Solution ManagerYou can use the Solution Manager for several different tasks:
Installing a control and the child content for the control into the Sentinel system. When the content is initially installed, its status is Not Implemented.
Implementing a control by configuring event source systems and Sentinel to use the content associated with the control. Solution Packs include detailed documentation describing implementation steps.
Testing a control to verify the content associated with the control. Solution Packs include detailed documentation describing testing steps.
“Launching the Solution Manager” on page 260 “Solution Manager Interface” on page 260
Launching the Solution ManagerYou can launch the Solution Manager by:
Selecting Launch Solution Manager in the Import Plugin Wizard. Double-clicking the imported Solution Pack in the Solution Packs Manager. In the Solution Packs Manager window, select a Solution Pack and then click the Open with
Solution Manager icon.
Solution Manager InterfaceThe Solution Manager window is divided into two panels that contain information about the extracted Solution Pack, along with comparison information, status information, and documentation:
260 Using Solution Packs

Figure 26-1 Solution Manager
“Content Panel” on page 261 “Content Comparison” on page 262 “Out Of Sync Status” on page 262 “Documentation Panel” on page 262
Content PanelThe Content panel provides information about the extracted Solution Pack files. This panel displays a hierarchical view of the category, control, content group, and various types of content. All parent nodes reflect the overall state of the controls they contain. This means that parent nodes have an inherited status based on their child content.
The Content panel has the following columns:
Name: Displays the name of the node. Installed: Indicates whether the content is installed in the target Sentinel system. If not, this
column is blank. State: This column is available for the control node. This column contain a list with the following
values: Not Implemented: The default state when the control is first imported. Implemented: Indicates that you have fully implemented the content by using the
associated documentation. Tested: Indicates that you have fully tested the content for this control by using the
associated documentation.
Using Solution Packs 261

NOTE: Because of the regulatory significance of implementing controls, status changes for each control are tracked for auditing purposes.
Content ComparisonWhen the Solution Pack is opened, the Solution Manager compares the contents of the Solution Pack to other Solution Pack content from different Solution Packs or previous versions of the same Solution Pack.
Table 26-3 Content Status
Out Of Sync StatusThe Out of Sync icon indicates that content in the newly opened Solution Pack differs from a version that was previously installed by another Solution Pack (either a different Solution Pack or a previous version of the same Solution Pack). The name, definition, or description of the content might be different.
NOTE: The Solution Manager only compares content from different Solution Packs (or different versions of the same Solution Pack) for installed content. It does not compare content that has not yet been installed. It also does not compare Solution Pack content to content in the target system, so manual changes to content in the Sentinel Control Manager are not reflected in Solution Manager.
Documentation PanelThe Documentation panel displays descriptive information provided to describe the Solution Pack when it was created in the Solution Designer. For more information on the Solution Designer, see “Solution Designer” on page 270.
The following informational tabs, populated and edited in the Solution Designer, are available:
Description: A description of the selected node. You can view attachments and their descriptions in the Description tab.
You can add text to the External ID field to refer to specific regulations or corporate IDs. Implementation: Instructions for implementing the selected control. Testing: Instructions for testing the selected control. Notes: Use this tab for any notes related to the control, including user comments on the testing
or implementation process.
Installed Indicates that the content is already installed in the target Sentinel system.
The version is the same in the opened Solution Pack and the previously installed Solution Pack.
Out of Sync Indicates that a different version of the content is already installed in the target Sentinel system. A difference in name, definition, or description could trigger an Out of Sync status.
262 Using Solution Packs
Installing and Managing Solution Packs “Viewing the Contents of a Solution Pack” on page 263 “Installing Content from Solution Packs” on page 263 “Configuring Controls” on page 264 “Implementing a Control” on page 266 “Testing a Control” on page 267 “Uninstalling a Control” on page 267 “Viewing Solution Pack Status” on page 268 “Deleting a Solution Pack” on page 269
Viewing the Contents of a Solution PackTo use the Solution Manager and view the contents of a Solution Pack, a user must belong to the administrator role.
1 Click the Configuration menu and select Solution Packs to display the Solution Packs Manager window:
2 Double-click a Solution Pack in the Solution Packs window to display the Solution Manager.
Installing Content from Solution PacksTo use the content of a Solution Pack in the Sentinel Control Center, you must install the Solution Pack or selected controls in a Sentinel System (also known as the “target” Sentinel system).
When you install either a Solution Pack or an individual control, all of the child nodes are installed. Only fully defined controls can be installed. For controls that contain placeholders, the Install option is disabled.
1 In the Solution Packs Manager window, double-click a Solution Pack to open the Solution Manager.Alternatively, you can select a Solution Pack that you want to install and click Open with Solution Manager icon.For more information, see “Launching the Solution Manager” on page 260.
2 Select a Solution Pack or a control that you want to install. Click Install.Alternatively, right-click a Solution Pack or control and select Install.The Install Control Wizard opens. If you select a Solution Pack, all the controls in that Solution Pack display. If you select an individual control, then that control is displayed in the Install Control Wizard window.
3 Click Next to display the Install Content window.If Correlation rules and actions are included in the Solution Pack, you need to proceed through several additional screens until you reach the Install Content window. For more information, see “Correlation Rules and Actions” on page 264.
4 Click Install.5 After the installation is complete, click Finish.
Using Solution Packs 263

If the installation fails for any content item in the control, the Solution Manager rolls back all the content in that control to Uninstalled. In this situation, create a new content or Solution Pack using the Solution Designer, import it and then try installing it
6 Configure the control, then implement it according to the instructions in the documentation for the control. For information on configuring the controls or content you just installed, continue with
“Configuring Controls” on page 264. For information on implementing the control in order to use the content, continue with
“Implementing a Control” on page 266.
Correlation Rules and ActionsCorrelation rules are deployed to a specific Correlation Engine. During the control installation, a screen shows the Correlation Engines in the target Sentinel system and the rules that are already running on those engines. Based on the number and complexity of the rules running on the engines, you can decide where you will deploy the Correlation rule.
Correlation rules deploy in an Enabled or Disabled state, depending on their status in the source Sentinel system when the Solution Pack was created.
If an Execute Script Correlation action is associated with the Correlation rule, the Solution Manager attempts to install the associated JavaScript code on all Correlation Engines. If a Correlation Engine is idle, you can still deploy the rule. However, the status of the rule will be disabled in the Sentinel Main interface after importing.
If an Execute Command Correlation action is associated with the Correlation rule, the Solution Manager installs the command and its arguments, but the script or utility must be manually configured on the Correlation Engine. This might require installing the utility, configuring permissions, or manually copying a script file to the proper directory on the Correlation Engine.
In a default installation, the proper directory for the script file is /opt/novell/sentinel/bin/actions.
If a JavaScript Action is associated with the Correlation rule, the Solution Manager installs the Action configuration, the Action plug-in, and the associated integrator configuration and Integrator plug-in (if it is needed).
Configuring Controls “Duplicate Content within a Solution Pack” on page 265 “Content with the Same Name in the Target Sentinel System” on page 265 “Resolving Out of Sync Content” on page 265 “Copying a Map File” on page 266
264 Using Solution Packs

Duplicate Content within a Solution PackIf two separate controls contain identical content and one control is installed successfully, the status of the duplicate content in the other control is changed to Installed. The remaining child nodes in the second control stay uninstalled.
Each content item is only installed once. If the same content item (for example, an iTRAC workflow or a Correlation rule) is included in more than one control, it is only installed once. Therefore, if you install one of those controls, the content displays with an installed status in the other control. In this scenario, the Solution Manager might show that the content for the second control is only partially installed.
Content with the Same Name in the Target Sentinel SystemIf the Solution Manager detects content with the same name but a different unique identifier in the target Sentinel system, the Solution Manager installs the content with a unique ID appended to the name. For example, the rule from the Solution Pack might be named Unauthorized Firewall Change (1). The existing rule in the Sentinel system is unchanged.
NOTE: To prevent confusion for end users, rename one of these rules.
Resolving Out of Sync ContentOut of Sync status indicates that a different version of the content in the Solution Pack has been installed in the Sentinel target system by another Solution Pack or a previous version of the same Solution Pack. The Solution Manager only compares content from different Solution Packs (or different versions of the same Solution Pack) for installed content. Before you implement a control, you need to resolve this out of sync status.
1 Open the Solution Pack in the Solution Manager for which you want to resolve the out of sync content.
2 Select the out of sync content (not the control or category) in the Solution Manager.3 Select the content, right-click, then select Out of synchronization content detail.
A message displays information about which Solution Pack is the source of the out of sync content.
4 Compare the content in the two Solution Packs to determine which version you want to keep.5 Uninstall the control from the Solution Pack that you do not want to keep. For more
information, see “Uninstalling a Control” on page 267.Resolve the out of sync issue before installing the new Solution Pack.
6 Reinstall the control with the content you want to keep.7 Implement and test as necessary.
Using Solution Packs 265

Copying a Map FileIf the Solution Pack that you install contains a Map control, you need to copy the associated .csv file to the system where you are importing and installing the Solution Pack. This file is used by the mapping service for event enrichment. Data from this .csv file is used to populate the tag when specified conditions are met for all incoming events.
When you create a Solution Pack using a Map control, the map definition file (.csv) that is used to create the Map is not bundled in the Solution Pack. Therefore, when you install this Solution Pack on any other Sentinel server, you do not get the expected behavior This is because this Map looks for the required information in the map definition file (.csv) in the var/opt/novell/sentinel/data/map_data folder of the Sentinel Server to populate the tag. If the correct .csv file is not there, the Map control does not work properly.
You must copy the map definition file that you used to create the Map to the var/opt/novell/sentinel/data/map_data folder whenever you install any Solution Pack that has a Map control.
Implementing a ControlThe steps on how to implement a control is added when the Solution Pack is created in the Solution Designer. The steps might include instructions for the following types of implementation actions:
Scheduling automatic report execution. Enabling auditing on source devices. Copying an attached script for an Execute Command Correlation Action to the appropriate
location on the correlation engines.
You only need to follow the instructions that are in the Implementation tab for the control.
To implement a control:
1 Open a Solution Pack in Solution Manager.For more information, see “Launching the Solution Manager” on page 260.
2 Select a control.3 Click the Implementation tab in the Documentation panel.4 Follow all of the instructions in the Implementation tab.5 Add notes to the Notes tab of the Documentation panel as necessary to document progress or
necessary changes from the recommended implementation steps.6 When the implementation is complete, select the control and change the status drop-down to
Implemented.7 An audit event is generated and sent to the Sentinel Control Center.
Because of potential legal and regulatory implications, the status for a control should only be changed after all of the implementation steps have been successfully completed.
266 Using Solution Packs

Testing a ControlAfter a control is implemented, the content should be tested to verify that it is working as expected. Testing might require steps such as running a report or generating a failed login. The testing instructions for each control are added when the Solution Pack is created in the Solution Designer.
To test a control:
1 Open a Solution Pack in Solution Manager.For more information, see “Launching the Solution Manager” on page 260.
2 Select a control.3 Click the Testing tab in the Documentation panel.4 Follow all of the instructions in the Testing tab.5 Add notes to the Notes tab of the Documentation panel as necessary to document progress or
necessary changes from the recommended testing steps.6 When the testing is complete, select the control and change the status drop-down to Tested.7 An audit event is generated and sent to the Sentinel Control Center.
Because of potential legal and regulatory implications, the status for a control should only be changed after all of the testing steps have been successfully completed.
Uninstalling a ControlControls are often used to meet legal or regulatory requirements. After they are implemented and tested, controls can be uninstalled after careful consideration.
When a control is uninstalled, the status for the control reverts to Not Implemented and child content is deleted from the Sentinel system. There are a few exceptions and special cases:
Dependencies are checked to ensure that no content that is still in use is deleted. Some examples of this include a Dynamic List that is used by a Correlation rule created in the target Sentinel system, a report that is used in a control that is still installed, an iTRAC workflow template that is used in a Solution Pack that is still installed, or a folder that still contains other content.
Reports (.rpt files) copied to a local system cannot be removed if the uninstall is performed from a Sentinel Control Center on a different machine.
JavaScript files associated with Execute Script Correlation actions remain on the Correlation Engines.
Maps (.csv files) and the data they contain are not deleted. Roles associated with workflows are not deleted. iTRAC workflow processes that are already in progress continue until completion even if the
iTRAC workflow is uninstalled.
To uninstall a control:
1 Open a Solution Pack in Solution Manager.For more information, see “Launching the Solution Manager” on page 260.
2 Right-click the control you want to uninstall and select Uninstall.
Using Solution Packs 267

Alternatively, click the Uninstall icon. The Controls To Uninstall window appears.3 Click Next.
If the control you are uninstalling includes one or more reports, you are prompted whether to uninstall the reports from the server. Ideally, this information was recorded on the Notes tab when the reports were installed.
4 Click Next to display the Uninstall Content window.5 Click Uninstall. The selected contents are uninstalled.
Local reports cannot be uninstalled from a different Sentinel Control Center machine than the one that was used for the installation, or if the files were copied to a new location after installation. If the Solution Manager cannot find the .rpt files in the expected location, a message is logged in the Sentinel Control Center log file.
6 Click Finish.
Viewing Solution Pack StatusThere are several sources of information about the status of a Solution Pack.
“Viewing the Status in the Solution Manager” on page 268 “Generating Status Documentation” on page 268 “Audit Events in the Sentinel Control Center” on page 269
Viewing the Status in the Solution ManagerYou can view the status of Solution Pack contents in the Solution Manager. For more information, see “Launching the Solution Manager” on page 260.
None/Blank: No status indicator for a control indicates that the associated content has not been installed yet.
Not Implemented: When none or some of the contents of a control are installed, the control is in the Not Implemented state. If the same content is installed by another control, a control might be Not Implemented even if some of its child content is Installed.
Implemented: Indicates that a user has completed all of the implementation steps and manually set the control status to Implemented. For more information, see “Implementing a Control” on page 266.
Tested: Indicates that a user has completed all of the testing steps and manually set the control status to Tested. For more information, see “Testing a Control” on page 267.
Out of Sync: Indicates that a different version of the content in the Solution Pack has been installed in the Sentinel target system by another Solution Pack or a previous version of the same Solution Pack. For more information, see “Out Of Sync Status” on page 262
Generating Status DocumentationThe information about the Solution Pack can be exported in PDF format. The report contains details about every node in the Solution Pack, including the category, control, and content group.
268 Using Solution Packs

To generate Solution Pack status documentation:
1 Open a Solution Pack in the Solution Manager for which you want to generate a status report.2 Click Create PDF. The Report Options window displays.
Show status information: Select this option to show deployment status for each control (Not Installed, Not Implemented, Implemented, or Tested) and whether it’s Out of Sync.
Include content nodes: Select this option to include information about the child content for each control in the documentation.
3 Select Show status and Show individual content if desired.4 To view the documentation, click Preview.
(Conditional) If this is the first time a PDF has been opened from the Sentinel Control Center, you might need to locate Acrobat Reader.
5 (Conditional) Click Browse, and locate the Acrobat Reader, then click OK.The report is opened in the PDF format.
6 To save the PDF, click Browse. Navigate the location where you want to save the PDF and specify a filename.
7 Click Save.
Audit Events in the Sentinel Control CenterAll major actions related to Solution Packs and controls are audited by the Sentinel system, with information about which user performed the action. The following events are visible in the Sentinel Control Center and are stored in the Sentinel database:
Solution Pack is imported. Control is installed. Control status is changed to Implemented. Control status is changed to Tested. Control status is changed to Not Implemented. Control is uninstalled. Notes are modified for a control. Solution Pack is deleted.
Deleting a Solution PackSolution Packs are often used to meet legal or regulatory requirements. After they are implemented and tested, Solution Packs can be deleted after careful consideration. All deletions are audited by the Sentinel system and sent to both the Sentinel Control Center and the Sentinel database.
You cannot delete a Solution Pack without uninstalling the controls first. For more information, see “Uninstalling a Control” on page 267. If you do not uninstall the controls and try to delete a solution pack, you are notified that content is still deployed.
1 Open the Solution Packs Manager.2 Select the Solution Pack that you want to remove, then click Remove.
Using Solution Packs 269

You are prompted to delete the Solution Pack.3 Click Yes to delete.
Installing an Edited Solution PackWhen a Solution Pack is modified and saved through the Save or Save As options in the Solution Designer, it is considered to be a new version of the original Solution Pack. When the new version is imported, it replaces any older versions of the original Solution Pack. There is no immediate impact on any installed content in the target Sentinel system.
After the new Solution Pack is installed, its behavior varies, depending on the status of the original Solution Pack’s content.
If the content from the original Solution Pack was not installed yet, the content is simply replaced. When a user installs content, the new content is installed to the target Sentinel system.
If the content from the original Solution Pack was installed (Not Implemented), Implemented, or Tested, the original content is compared to the new content.
If the content version is the same, the original content is still valid and no action is necessary. If the content version is different, the content status is set to Out of Sync. You must decide how
to resolve the synchronization issue. For more information, see “Out Of Sync Status” on page 262.
If the content did not exist in the original Solution Pack, it is displayed in Solution Manager as not installed. You can install, implement, and test the new content.
If the content existed in the original Solution Pack but has been deleted from the modified Solution Pack, it does not appear in the Solution Manager.
NOTE: The Solution Manager only handles differences in the contents of Solution Packs. It does not recognize manual content changes that are performed after content is installed.
Solution DesignerYou can use the Solution Designer to package and export different contents, such as a Correlation rule with associated actions and Dynamic Lists. These items can be selected and packaged with their configuration to a .zip file. You can then view or select the content of the file in the Solution Manager. For more information, see Chapter 27, “Creating Solution Packs,” on page 271.
270 Using Solution Packs

27 27Creating Solution Packs
You can use the Solution Designer to package and export different contents, such as a Correlation rule with associated actions and dynamic lists. The content can be selected and packaged with its configuration in a ZIP file. You can then view or select the content of the ZIP file by using the Solution Manager. For more information on the Solution Manager, see Chapter 26, “Using Solution Packs,” on page 257.
To use the Solution Designer, you must have the correct permission. All roles contain the permission for the Solution Designer except for the PCI Compliance Audit role and the Search Proxy User role. For more information, see Chapter 4, “Configuring Roles and Users,” on page 41.
“Accessing the Solution Designer” on page 271 “Creating a Solution Pack” on page 271 “Adding Content to a Solution Pack” on page 272 “Initializing Dynamic Lists Through Solution Pack” on page 274 “Documenting a Solution Pack” on page 275 “Synchronizing Content” on page 276 “Handling Inter-control Dependency” on page 276 “Managing a Solution Pack” on page 276
Accessing the Solution Designer1 From Sentinel Main, click Applications.2 Click Launch Designer.
2a When prompted, download solution_designer.zip and extract it. 2b Run the launcher_solutiondesigner.exe file on a Windows machine or the
launcher_solutiondesigner.sh file on a Linux machine.3 Click Yes to accept the security certificate.4 Specify a user name and password of a user with permission to access the Solution Designer.5 Click Login.6 Click Accept or Accept Permanently to accept the security certificate.
Creating a Solution PackYou can use the Solution Designer to create a Solution Pack with existing content objects (for example, Actions, Event Actions, Filters, Searches, Correlation Rules, Dynamic Lists, or iTRAC workflow templates) from Sentinel. The Solution Designer analyzes the dependencies for a content object and include all necessary components in the Solution Pack. For example, a Correlation Rule deployment includes a Correlation Rule definition, one or more actions, and the ability to create an
Creating Solution Packs 271

incident using a workflow. The Solution Designer includes the Correlation Rule, the associated correlation actions, the iTRAC template, and the roles associated with the iTRAC template in the Solution Pack.
IMPORTANT: To add a content object to a Solution Pack, it must already exist in Sentinel. Content objects cannot be created in the Solution Designer.
To create a new Solution Pack:
1 Access the Solution Designer.For more information, see “Accessing the Solution Designer” on page 271.
2 Click File > New.An empty Solution Pack is displayed in the Solution Pack panel.
3 Add Categories, Controls, Content Groups, and content placeholders.For detailed instructions, see “Adding Content to a Solution Pack” on page 272.
4 Add file attachments to the hierarchy nodes as desired.For detailed instructions, see “File Attachments” on page 274.
5 Click File > Save.6 Browse to and select a location to save the Solution Pack, then specify a name for the Solution
Pack.7 Click Save to save the Solution Pack.
The Solution Pack is saved in a .zip format.
Although you can save a Solution Pack with empty placeholders, you cannot install controls in the Solution Manager unless all placeholders have been filled with content.
Adding Content to a Solution PackA vital part of creating a Solution Pack is adding content to the controls. Each control can have one or more types of content associated with it.
“Sentinel Content” on page 272 “Using Placeholders” on page 274 “File Attachments” on page 274
Sentinel ContentThe same general procedure is used to add all types of Sentinel content to a Solution Pack. The Sentinel content palette includes the following:
Actions Correlation Rule deployments, including their deployment status (enabled or disabled) and
associated Correlation rules, Correlation Actions, and Dynamic Lists Event Actions Reports
272 Creating Solution Packs

Filters Searches iTRAC workflows, including associated roles Event enrichment, including map definitions and event metatag configuration Other associated files added when the Solution Pack is created, such as documentation,
example report PDFs, or sample map files.
Adding Sentinel Content to a ControlTo add Sentinel content to a control:
1 Access the Solutions Designer.2 Open or create a Solution Pack.3 Click the appropriate panel to display the available content:
Actions Correlation Event Actions Event Enrichment Filters iTRAC Jasper Reports Searches
4 Drag the item and drop it into the control.If you try to drag and drop pre-existing content in the Solution Designer, the existing content is highlighted. After you drop the content, a message prompt indicates that similar content exists.
Setting Content PropertiesYou can set properties to a content to indicate it is designed for specific Sentinel platforms. Content that is designed in newer versions of Sentinel might not be supported in older versions because of changes in the Sentinel schema. If you try to install a Control on an unsupported Sentinel platform, the installation does not proceed and shows an “Out of date” error.
To set the properties:
1 Right-click a content, then select Properties.2 (Conditional) For Correlation rules, select Automatically deploy during installation to deploy
Correlation rules automatically during the solution pack installation.3 Select Minimum Required Versions, and then specify the Sentinel versions.4 Click Apply.
Creating Solution Packs 273

Using PlaceholdersIf the user is not ready to associate content with a control, an empty placeholder can be used instead.
1 Click the Correlation, Event Actions, Actions, Filters, Event Enrichment, iTRAC, or Jasper Report button in the Content Palette to open the panel for the type of placeholder you want to add.
2 Drag and drop the placeholder to the appropriate control in the Solution Pack panel.3 Rename the placeholder, if desired.
To replace a placeholder with content:
1 Click the Correlation, Event Actions, Filters, Event Enrichment, iTRAC, or Jasper Report button in the Content Palette to open the panel for the type of placeholder you want to add.
2 Drag and drop the appropriate Content Group from the Content Palette to the placeholder in the Solution Pack panel or select the appropriate Content Group, then click Add Selected Content.
You can set properties for placeholders to indicate whether a placeholder is designed for specific Sentinel platforms. Placeholders that are designed in newer versions of Sentinel might not be supported in older versions because of changes in the Sentinel schema. If you try to install a placeholder on an unsupported Sentinel platform, the install does not proceed and shows an “Out of date” error.
To set the properties:
1 Right-click the placeholder, then select Properties.2 Select Minimum Required Versions, then specify the Sentinel versions.3 Click Apply.
File AttachmentsYou can attach a file or files to any node in the hierarchy. The content in the attachment is included in the Solution Pack. These files can include anything useful for a user who must deploy the Solution Pack, such as a PDF view of a report, sample map data for event enrichment, or a script for an Execute Command Correlation Action. These files can be added, deleted, viewed, renamed, or saved to the local machine.
Initializing Dynamic Lists Through Solution PackThe Correlation rules in solution packs require some data in the Dynamic Lists for it to work properly. The solution pack framework includes the ability to automatically populate the Dynamic Lists with data when you install a solution pack.
To populate a Dynamic List when you install a solution pack:
1 Create a text file with the values you want to add to the Dynamic List. Add each different value on a separate line.
2 In the Solution Designer, expand the Correlation content, and then select the Dynamic List.
274 Creating Solution Packs

3 Click Add a new attachment in the Attachment panel, and attach the file that you created in Step 1.All the list items in the Dynamic List never expire. For more information, see “Configuring Dynamic Lists” in the Sentinel User Guide.
Documenting a Solution PackThe Solution Designer provides three different categories of documentation to help you create the documentation for the Solution Pack you are creating.
“Description” on page 275 “Implementation Steps” on page 275 “Testing Steps” on page 275
DescriptionAllows you to provide a detailed description about the Solution Pack for your users.
Implementation StepsLets you add the steps required to implement the content in the target Sentinel system to the Implementation tab of the Documentation panel. The steps might include instructions for the following types of implementation actions:
Populating a .csv file that is used by the mapping service for event enrichment. Scheduling automatic report execution Enabling auditing on source devices. Copying an attached script for an Execute Command Correlation Action to the appropriate
location on the correlation engines.
After the content implementation, the content should be tested to verify that it is working as expected.
Testing StepsLets you add the steps required to test the content in the target Sentinel system to the Testing tab of the Documentation panel. The steps can include instructions for the following types of testing activities:
Running a report and verifying that data is returned. Generating a failed login in a critical server and verifying that a correlated event is created and
assigned to an iTRAC workflow.
Creating Solution Packs 275

Synchronizing ContentIf you modify the content in the source system, the content in the source system and the content in the original Solution Pack can be out of synchronization. To synchronize the content, do one of the following:
For content with no dependencies, drag and drop the content from the Content Palette onto the control.
The modified content is immediately updated. For example, a report has no dependencies. For content with dependencies, the dependencies are checked and updates are made when you
click the Synchronize All Content icon or when you save the Solution Pack. However, you need to ensure that the system that you are connected to has the latest content.
To synchronize specific content based on any content group, right-click the content or a content group and click Synchronize this content. Using this menu ensures that only the content and the contents within that group are synchronized.
When an action uses the Send Email action, this action always appears as Out of Synchronization. This is expected and does not cause an error.
Handling Inter-control DependencyYou can specify any control as a required control in the Solution Designer. This ensures that the control marked as required is also installed when a user chooses to install any other control first. For example, you can mark the global setup control as a required control, which is then installed when the user installs any other control from a solution pack.
You can also specify if you want to overwrite an existing control during installation. For example, if you include a newer version of a White Label Template and want to ensure that this newer version is automatically installed with a new install of solution pack, you can enable the overwrite properties.
To mark a control as required:
1 In the Solution Designer, select the control that you want to mark as required.2 Right-click the control and select Properties.3 (Conditional) Select Required if you want to ensure that this control is also installed while
installing any specific control from a solution pack.4 (Conditional) Select Enable Overwrite if you want to automatically install this control with a new
install of solution pack. 5 Click Apply.
Managing a Solution PackAll content in a Solution Pack is hierarchically organized into categories, controls, and content groups.
“Adding a Node to a Control” on page 277 “Moving Nodes” on page 277
276 Creating Solution Packs

Adding a Node to a Control1 Select a node in the Solution Pack panel.2 Right-click the node, then select Create
orClick Create in the Solution Pack panel heading.
Moving NodesCategory, control, and content group nodes can be created in any order and then reordered or moved to a different parent in the hierarchy.
To move a node to another branch in the hierarchy, drag and drop a node to its new parent node. A control can be moved to a new category. A content group can be moved to a new control.
To reorder a node, drag and drop it on top of the node it should appear after in the Solution Pack.
Creating Solution Packs 277

278 Creating Solution Packs

VIII VIIIManaging Your Sentinel Environment
This section provides information about managing your Sentinel server.
Chapter 28, “Managing Active Searches and Reports,” on page 281 Chapter 29, “Monitoring the Events Per Second Rate,” on page 283 Chapter 30, “Monitoring Sentinel Health,” on page 285 Chapter 31, “Configuring Sentinel for High Availability,” on page 287 Chapter 32, “Configuring Alert Generation,” on page 289 Chapter 33, “Configuring the Report Retention Period,” on page 291 Chapter 34, “Generating a Report in CSV and PDF Format,” on page 293 Chapter 35, “Backing Up and Restoring Data,” on page 295 Chapter 36, “Updating Sentinel Clients,” on page 301 Chapter 37, “Customizing Sentinel Settings,” on page 303 Chapter 38, “Rebranding Reports,” on page 311 Chapter 39, “Generating an Audit Event when a List Item Expires From a Dynamic List,” on
page 313
Managing Your Sentinel Environment 279

280 Managing Your Sentinel Environment
28 28Managing Active Searches and Reports
Sentinel provides an option to monitor and manage active searches and reports on the Sentinel server for the purpose of resource management. You can view all the searches and reports currently active on the Sentinel server, determine which long-running searches or reports are no longer needed, and stop them as necessary.
Sentinel helps you monitor search and report activities and determine whether a search or a report is not retrieving events as expected or whether a search or a report is retrieving more than the expected events, which might indicate that the search or the report needs to be tuned. It also helps you determine if too many searches or reports are running, and helps identify long-running searches and reports that might slow down the system. Searches and reports that consume a lot of memory are a potential liability to a healthy system and should be carefully reviewed to ensure that the search query is specified properly. You can also stop the searches and reports that are no longer needed and thereby free up system resources.
To manage active searches:
1 From Sentinel Main, click Storage > Search Jobs.The Search Jobs lists all the active event search jobs running in the system, including searches that are initiated when users perform activities, such as: Run a search in the Search interface. View events that fire a correlation rule. View events processed when testing a correlation rule. Generate a report or drill down into report results. Select filters to view events that match the filter criteria. Select tags to view the events that are tagged with the specified criteria. View events from the dashboard, anomaly, continuation breakdown, and so forth.
The Search Jobs page refreshes every 30 seconds. You can view the following search details. Mouse over each field for information on what the field indicates: Duration: The time spent to search events in the event store. Status: Whether a search job is pending, running, finished, finished with errors, or
canceled. Owner: The user who initiated the search. For search jobs initiated by the system, the
owner is indicated as “System.” Type: Indicates the following:
System: Search jobs that are run for maintenance purposes. For example, to clean up invalid references to events from the database.
User: Search jobs started by users either through the Search interface or through the REST API.
Reports: Search jobs started by users, but used for getting event results for reports.
Managing Active Searches and Reports 281

Data sync: Search jobs started to support the Data Synchronization feature. Distributed: Search jobs initiated by a remote server.
Start: The time the search started searching for events. Accessed: The time elapsed since the search was initiated. More: Provides detailed information such as the IP address of the machine that initiated
the search, events processed, search criteria, and so forth.2 (Conditional) To stop any active search jobs, select the search jobs you want to stop, then click
Stop selected.
To manage active reports:
1 From Sentinel Main, click Storage > Report Jobs.2 (Conditional) To stop any report jobs, select the report jobs you want to stop, then click Stop
selected.3 (Conditional) To delete any report jobs, select the report jobs you want to delete, then click
Delete selected
282 Managing Active Searches and Reports

29 29Monitoring the Events Per Second Rate
Sentinel helps you monitor the events per second (EPS) received for processing. You can use this information to generate reports for auditing purposes, such as verifying license compliance and EPS trends.
“Viewing the Operational EPS” on page 283 “Viewing a Graphical Representation of the Events Per Second Rate” on page 284
Viewing the Operational EPSSentinel provides an Operational EPS graph that displays the average EPS rate received by Sentinel before applying filters at the event source, Connector, or Collector level. You can monitor the EPS rate reaching a single Sentinel server or multiple Sentinel servers distributed across your organization. You can also view the EPS rate in day or hour granularity.
NOTE: To view the EPS rate received by other systems, you need to configure other Sentinel servers as search targets. For more information, see Chapter 21, “Configuring Data Federation,” on page 231.
Understanding the operational EPS rate helps you determine whether the EPS rate is as expected and in compliance with the license. You can also generate reports to analyze the EPS rate over a specified time period and from specific Sentinel servers in your organization.
To view the operational EPS:
1 From Sentinel Main, click About > Licenses.2 (Optional) To view the consolidated EPS rate received by other Sentinel servers distributed
across your organization, select the IP address or hostname of the desired systems. 3 (Optional) Click Day or Hour to view the EPS rate for the last 7 days or for the last 24 hours.4 (Optional) To export the data to a CSV file, click Export Report.
4a Specify the time period for which you want to view the EPS rate, then click OK.5 (Optional) To view the EPS rate of events filtered and processed by Sentinel, click Collection >
Overview.The Overview graph displays the EPS rate of events filtered and processed by Sentinel, and that actually make it to the event store. For more information, see “Viewing a Graphical Representation of the Events Per Second Rate” on page 284.
Monitoring the Events Per Second Rate 283

Viewing a Graphical Representation of the Events Per Second Rate
1 From Sentinel Main, click Collection.2 In the Overview section, view the events per second (eps) value of the incoming events in the
last one minute.The graph shows the 90-day statistics of all the events coming to the Sentinel server. The graph also includes an EPS indicator that enables you to determine whether the current EPS rate is exceeding the licensed EPS rate or is close to the licensed EPS rate.
Viewing the Events Per Second Rate of Event Source Servers 1 From Sentinel Main, click Collection > Event Sources.
The EPS column of the Event Source Servers section specifies the events per second value received from all the Event Source Servers.
284 Monitoring the Events Per Second Rate
30 30Monitoring Sentinel Health
The Sentinel Health page provides information such as CPU utilization, processing, queue status, garbage collection, and so on about various components of Sentinel. The health page enables you to assess the health of Sentinel and also helps you find out the components that are potentially causing decrease in the overall Sentinel performance. You can view the Sentinel Health page in Sentinel Main interface > Storage > Health tab.
The Component information section provides information about the CPU utilization by various components of Sentinel. The CPU utilization is expressed in the percentage of time. High percentage of CPU utilization, such as more than 60%, might indicate a potential problem with the processing of the particular component. You can investigate further to troubleshoot the component and optimize the Sentinel performance.
The General Information section provides information about the processing of data such as events, alerts, and audit events, alert creation, queue status, garbage collection, and so on. Certain components of Sentinel are combined with a queue. While processing the data, each component stores the incoming data into the corresponding queues. If the particular component is slow or unable to process the data, the data starts accumulating into the queue and the queue size increases. Increase in the queue size of a component indicates potential problem with the processing in the component. Therefore, if the Sentinel performance slows down, you can inspect the queue sizes in the General Information section to find out the component causing decrease in sentinel performance, and then troubleshoot the component. For example, if the Events queued for Correlation increases beyond 70%, it indicates a problem in the correlation rules evaluating the events. You can modify the correlation rules accordingly.
Monitoring Sentinel Health 285

286 Monitoring Sentinel Health

31 31Configuring Sentinel for High Availability
You can install Sentinel in an Active-Passive High Availability mode, which allows Sentinel to fail over to a redundant cluster node in case of hardware or software failure. Consulting and partners can help you implement Sentinel high availability and disaster recovery. For more information about configuring Sentinel for High Availability, see “Upgrading Sentinel in High Availability” in the Sentinel Installation and Configuration Guide.
Configuring Sentinel for High Availability 287

288 Configuring Sentinel for High Availability
32 32Configuring Alert Generation
This section provides information about configuring the default alert generation settings to maintain the stability and optimize performance of Sentinel if large number of alerts are triggered by correlation rules.
When a correlation rule fires, which is configured to create an alert, the correlation engine generates the alert and sends it to Sentinel. By default, Sentinel limits the rate of alerts generation in the local or remote correlation engine to 0.5 alerts per second. To customize the rate of alert generation in the correlation engine, modify the following parameter in the configuration.properties file:
sentinel.alert.max.ratepersec=.5If the alert generation rate is increased to more than 0.5 alerts per second, the correlation engine stores the additional alerts in a queue. The maximum number of alerts that can be stored in the queue is 10,000. If the number of alerts stored in the queue exceeds the limit, Sentinel starts dropping the alerts and generates an audit event. Increasing the rate of alert generation might impact the overall Sentinel performance. You can view the updated queue size information in the Sentinel Main interface > Storage > Health > General Information section.
To view the audit event, search the query (evt:BufferOverLimit) AND (sres:Alert-Buffer) in the search interface. After the alerts queue limit is reached, Sentinel generates audit events every ten minutes. The audit events provide information about the number of alerts dropped after a specific time interval and the total number of dropped alerts so far. You can customize the frequency of audit events creation by adding the following parameter in the configuration.properties file:
sentinel.pqueue.audit.interval= <time in seconds>
Configuring Alert Generation 289

290 Configuring Alert Generation

33 33Configuring the Report Retention Period
Sentinel automatically deletes old report to optimize the usage of disk space. Sentinel performs the auto deletion of reports once per day, the same time the event partitions are processed. You can define the report retention period as desired. You can also define how many reports should be deleted at a time and whether the auto deletion should start the first time you start the Sentinel server.
In new installations of Sentinel, the default report retention period is 60 days. In upgrade installations of Sentinel, the default report retention period is 365 days.
To configure auto deletion of reports:
1 Log in to the Sentinel server as an administrator user.2 Open the /etc/opt/novell/sentinel/config/configuration.properties file.
Configuring the reports retention period: New installations of Sentinel include the report.result.retention.period property. For upgrade installations of Sentinel, you need to manually add the report.result.retention.period property.Set the desired value for the report.result.retention.period property.For example, report.result.retention.period=70. Here, 70 represents the number of days the reports are retained before deleting it.Configuring the number of reports to be deleted at a time: By default, the number of report results deleted at a time is 50.Set the desired value for the report.result.retention.period.limit property.For example, report.result.retention.period.limit=90. Here, 90 represents the number of report results deleted at a time.Configuring the server to delete reports every time you start the server: report.result.retention.period.loop=true
3 Restart the Sentinel server.
Configuring the Report Retention Period 291

292 Configuring the Report Retention Period

34 34Generating a Report in CSV and PDF Format
By default, Sentinel generates reports in either CSV or PDF format. You can also generate reports in both CSV and PDF formats by making additional configurations to the Sentinel server.
To generate a report in CSV format:
1 Log in to the Sentinel server as novell user.2 Change to the /etc/opt/novell/sentinel/config directory:
cd /etc/opt/novell/sentinel/config/3 Open the obj-component.JasperReportingComponent.properties file for editing:
vi obj-component.JasperReportingComponent.properties4 Edit the following entries:
reporting.csv.enable=true reporting.csv.outputdir=<the directory where the reports must be stored>
The novell user must have read/write permissions on the specified directory.5 (Conditional) To email both the CSV and PDF format of the report, edit the following entry:reporting.csv.email=true
6 Restart the Sentinel server.
When you generate a report, it is stored in the CSV format in the directory specified in the reporting.csv.outputdir attribute.
Generating a Report in CSV and PDF Format 293

294 Generating a Report in CSV and PDF Format
35 35Backing Up and Restoring Data
The Sentinel backup and restore utility is a script that backs up the Sentinel data and also lets you restore the data at any given point in time. This utility helps you back up only the Sentinel data in Sentinel server. This utility is not applicable for Collector Manager, Correlation Engine, and operating system configuration data.
You can use the backup and restore utility in the following scenarios:
System Failure: In this scenario, you must first reinstall Sentinel and then use the backup_util.sh script with the restore parameter to restore the most recent data that you backed up.
Data Loss: In this scenario, use the backup_util.sh script with the restore parameter to restore the most recent data that you had backed up.
You can back up the following data:
Configuration data: Data stored in the config, data, 3rdparty/postgresql, and 3rdparty/jetty directories, and the data in the Sentinel database. This data includes configuration files, property files, and keystore files. For traditional storage, it also includes correlation rules and dynamic lists. The Sentinel database contains various configuration information related to users, plug-ins, Collectors, Connectors, and filters.
NOTE: The configuration data is critical and you should always include the configuration data in the backup.
Event data: Dynamic event data and raw event data stored in the data/eventdata and /var/opt/novell/sentinel/data/rawdata directories. The event data also includes event associations stored in the /var/opt/novell/sentinel/data/eventdata/exported_associations directory. The event associations data includes correlated event association data and the incident event association data.
Secondary storage data: The closed event data files that have been moved to the secondary storage.
Runtime data: Dynamic file-based queues used by plug-ins, Sentinel Link, and other Sentinel components. This includes the data in the data/plugindata and the /var/opt/novell/sentinel/data/sentinel_link.queues directories.
Security Intelligence data: The Security Intelligence data stored in the PostgreSQL database. Sentinel logs: Log files generated by Sentinel and stored in the /var/opt/novell/sentinel/log directory.
NOTE:
Backing Up and Restoring Data 295

You can restore data only on the same version of Sentinel in which the data was backed up because there might be changes between Sentinel versions, which might make the data incompatible. Similarly, you can restore data only on the same type of data storage using which the data was backed up. For example, data that you back up in traditional storage can be restored only in traditional storage.
Parameters for the Backup and Restore Utility ScriptThe following lists the various command line parameters that you can use with the backup_util.sh script:
Table 35-1 Backup and Restore Script Parameters
Parameters Description
-m backup Backs up of the specified data.
-m restore Restores the specified data. The restore mode of the script is interactive and allows you to specify the data to be restored from the backup file.
-m info Displays information for the specified backup file.
-m simple_event_backup Backs up events located in a specified directory.
-m simple_event_restore Restores events into a specified directory.
-c Backs up the configuration data. It also backs up the default event visualizations and dashboards.It does not back up any custom event visualizations and dashboards. You have to manually export the custom dashboards and visualizations. For more information, see Managing Saved Searches, Visualizations, and Dashboards section in Kibana documentation.
-e Backs up the event data. All event partitions are backed up except the current online partition. If the backup is being performed with the Sentinel server shut down, the current online partition is also included in the backup.
-dN Backs up the event data for the specified number of days. The -dN option backs up the primary storage event data stored for the last N days. Based on the current data retention policy settings, many days of events might be stored on the system. Backing up all of the event data might not always be necessary and might not be desirable. This option allows you to specify how many days to include when backing up the event data. For example, -d7 includes only the event data from the last week in the backup. -d0 just includes the data for the current day. -d1 includes the data from the current day and previous day. -d2 includes the data from the current day and two days ago.
Online backups (that is, backups performed while the system is running) only back up the closed event partitions, which means partitions one day old or older. For online backups, a value of -d1 is the appropriate specification for the number of days.
296 Backing Up and Restoring Data

Running the Backup and Restore Utility Script1 Complete the following prerequisites:
Ensure that the time and timezone is same on both the source machine from where the backup is taken and the destination machine where the restoration of data will happen.
Ensure that the IP address of both the source and destination machines are the same.
-u Specifies the user name to use when backing up the event associations data. If the user name is not specified, "admin" is used as the default value.
This parameter is required only when backing up the event associations data.
NOTE: If your environment uses multi-factor authentication (MFA), specify the LDAP user name. For more information about MFA, see “Multi-factor Authentication” on page 78.
-p Specifies the user password when backing up the event associations data.
This parameter is required only when backing up the event associations data.
NOTE: If your environment uses MFA, specify the LDAP user name. For more information about MFA, see “Multi-factor Authentication” on page 78.
-x Specifies a file name that contains the user password when backing up the event associations. This is an alternative to the -p option.
This parameter is required only when backing up the event associations data.
-f Enables you to specify the location and name of the backup file.
-l Includes the log files in the backup. By default, the log files are not backed up unless you specify this option.
-r Includes the runtime data in the backup. Runtime data can only be backed up if the Sentinel server is shut down, because the data is dynamic. This means that this parameter can only be used in combination with the -s option (described below). If -s is not specified, this parameter is ignored.
-b Backs up the baseline Security Intelligence data.
-A Backs up alerts and the events that triggered the alert.
-s Shuts down the Sentinel server before performing the backup. Shutting down the server is necessary to back up certain dynamic data such as the Runtime data and the current primary storage partitions. By default, the server is not shut down before performing the backup. If this option is used, the server restarts automatically after the backup is complete.
-w Backs up the raw event data.
-z Only available with the simple_event_backup and simple_event_restore options. Specifies the location of the event data directory, such as where the event data is collected during a simple_event_backup and where the event data is placed during a simple_event_restore.
Parameters Description
Backing Up and Restoring Data 297

2 Open a console, and navigate to the /opt/novell/sentinel/bin directory as the novell user.
3 Enter backup_util.sh, along with the necessary parameters for the data that you want to back up or restore.
NOTE: If you backed up the data by using the -i or -A options, you must restore the configuration data along with alerts. Otherwise, if you restore only alerts data, all the alerts show as remote alerts because the alerts configuration data is not restored.
For more information on the different parameters, see Table 35-1. The following table lists examples of how to specify the parameters:
Syntax Action
backup_util.sh -m backup -c -e -l -r -w -s -u admin -x <mypassword.txt> -f /var/opt/novell/sentinel/data/<my_full_backup>.tar.gz
Shuts down the Sentinel server and performs a full system backup.
backup_util.sh -m backup -c -e -l -w -u admin -x <mypassword.txt> -f /var/opt/novell/sentinel/data/<my_weekly_backup>.tar.gz
Performs an online backup without shutting down the server. This backup includes everything except online event data and dynamic runtime data.
backup_util.sh -m backup -b -c -e -d7 -u admin -x <mypassword.txt> -f /var/opt/novell/sentinel/data/<my_weekly_backup>.tar.gz
Performs an online backup with event data just from the last week. This backup includes configuration data, the baseline Security Intelligence collections, and the event data for the last 7 days. Event data older than 7 days is not backed up because that data can be extracted selectively, if necessary, from an older backup.
backup_util.sh -m backup -c -f /var/opt/novell/sentinel/data/config_backup.tar.gz
Performs a local backup of the configuration data. This is a minimal backup of the system without any event data.
backup_util.sh -m backup -e -f /var/opt/novell/sentinel/data/events_backup.tar.gz
Performs a local backup of the event data. This is a minimal backup of the primary storage event data.
298 Backing Up and Restoring Data

4 (Conditional) If you have restored any data, restart the server because the script might make several modifications to the database.
5 (Conditional) For traditional storage, use the Data Restoration feature to restore the extracted partitions. For more information, see “Restoring Data” on page 181.
Restoring Dashboards After Restoring Data from a Different Sentinel Server
When you restore data from a different Sentinel server, the following dashboards are not displayed: Alerts, Threat Hunting, and User Activities. To display these dashboards, you must configure your Sentinel server.
To restore dashboards:
1 Ensure that the time and timezone are same in both the source machine from where you take the backup and the destination machine where you restore the data.
backup_util.sh -m backup -e -d5 -f /var/opt/novell/sentinel/data/events_5days_backup.tar.gz
Performs a local backup of the event data from the last 5 days. This is a minimal backup of the primary storage event data from the last five days.
backup_util.sh -m info -f /var/opt/novell/sentinel/data/config_backup.tar.gz
Displays the backup information for the specified backup file.
backup_util.sh -m simple_event_backup -e -z /opt/archives/archive_dir -f /opt/archives/archive_backup.tar.gz
Performs a backup of event data on the machine where the secondary storage directory is located.
If the /opt/archives/archive_dir is not located in the server, you might need to copy the backup_util.sh script to the machine where the secondary storage is located and then run the simple_event_backup command from that machine.
Alternatively, you can also use any 3rd party backup tool to backup the event directories on secondary storage.
backup_util.sh -m restore -f /var/opt/novell/sentinel/data/config_backup.tar.gz
Restores the data from the specified filename.
backup_util.sh -m simple_event_restore -z /opt/archives/archivedir -f /opt/archives/archive_backup.tar.gz
Restores the secondary storage data.
Syntax Action
Backing Up and Restoring Data 299
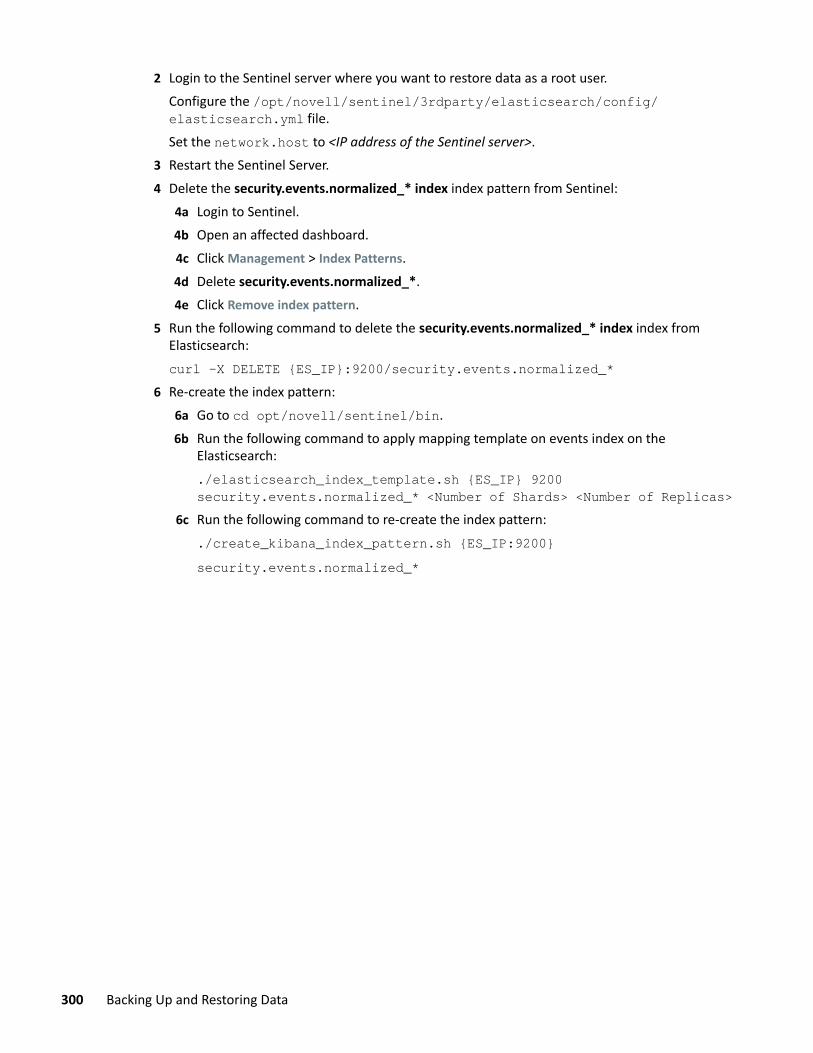
2 Login to the Sentinel server where you want to restore data as a root user.Configure the /opt/novell/sentinel/3rdparty/elasticsearch/config/elasticsearch.yml file.Set the network.host to <IP address of the Sentinel server>.
3 Restart the Sentinel Server.4 Delete the security.events.normalized_* index index pattern from Sentinel:
4a Login to Sentinel.4b Open an affected dashboard.4c Click Management > Index Patterns.4d Delete security.events.normalized_*.4e Click Remove index pattern.
5 Run the following command to delete the security.events.normalized_* index index from Elasticsearch:curl -X DELETE {ES_IP}:9200/security.events.normalized_*
6 Re-create the index pattern:6a Go to cd opt/novell/sentinel/bin.6b Run the following command to apply mapping template on events index on the
Elasticsearch:./elasticsearch_index_template.sh {ES_IP} 9200 security.events.normalized_* <Number of Shards> <Number of Replicas>
6c Run the following command to re-create the index pattern:./create_kibana_index_pattern.sh {ES_IP:9200} security.events.normalized_*
300 Backing Up and Restoring Data

36 36Updating Sentinel Clients
Sentinel clients include Collector Manager and Correlation Engine. You must update Sentinel clients’ configuration when you change the Sentinel server or change the IP address or port number of your current Sentinel server.
To update Sentinel clients:
1 Log in as novell user to the Sentinel client computer you want update.2 Run the following script:/opt/novell/sentinel/setup/configure.sh
3 Specify the number for the language you want to use for the installation.The end user license agreement is displayed in the selected language.
4 Press the Spacebar to read through the license agreement.5 Enter yes or y to accept the license agreement and continue with the installation.
The installation might take a few seconds to load the installation packages and prompt for theconfiguration type.
6 When prompted, specify the appropriate option to proceed with the Standard or Customconfiguration.
7 Enter the default Communication Server Hostname or IP Address of the machine on whichSentinel is installed.
8 Conditional) If you chose Custom configuration, specify the following:8a Sentinel server communication channel port number.8b Sentinel Web server port number.
9 When prompted to accept the certificate, run the following command in the Sentinel server toverify the certificate:For FIPS mode:/opt/novell/sentinel/jdk/jre/bin/keytool -list -keystore/etc/opt/novell/sentinel/config/.activemqkeystore.jksFor Non-FIPS mode:/opt/novell/sentinel/jdk/jre/bin/keytool -list -keystore/etc/opt/novell/sentinel/config/nonfips_backup/.activemqkeystore.jksCompare the certificate output with the Sentinel server certificate displayed in Step 7.
NOTE: If the certificate does not match, the installation stops. Run the installation setup again and check the certificates.
10 Accept the certificate if the certificate output matches the Sentinel server certificate.
Updating Sentinel Clients 301

11 Specify credentials of any user in Administrator role.12 (Conditional) If you chose Custom configuration, enter yes or y to enable FIPS 140-2 mode in
Sentinel and continue with the FIPS configuration.
The Sentinel client will start once the configuration is complete.
302 Updating Sentinel Clients

37 37Customizing Sentinel Settings
This section provides information about configuring the default Sentinel settings to optimize the performance.
“Customizing Elasticsearch Settings in Traditional Storage” on page 303 “Configuring the Number of Incidents to be Listed in the Incidents List” on page 304 “Configuring the Number of Alert Trigger Events to be Attached with the Incident” on page 304 “Optimizing the Operating System” on page 304 “Configuring the Resources for Event Partition Compression” on page 305 “Setting the Grace Period to Close Event Data Partitions” on page 305 “Compressing the Storage Index on Primary Partition” on page 305 “Configuring Memory for the Sentinel Server” on page 306 “Setting the Raw Data Limit” on page 307 “Configuring the Number of Trigger Events to be Associated with a Correlated Event” on
page 307 “Configuring the Number of Trigger Events to be Displayed in the Alert View” on page 307 “Maintaining Custom Settings in XML Files” on page 308 “Customizing the Default Search Field” on page 308 “Configuring the Proxy Port” on page 309 “Enabling the Use of Special Characters in Event Field Values” on page 309 “Configuring the Number of User Identities to be Displayed for People Search” on page 309 “Configuring the Report Generation Idle Timeout Period” on page 310 “Customizing Incident Probability Refresh Interval” on page 310
Customizing Elasticsearch Settings in Traditional StorageWhen you scale Elasticsearch by adding additional nodes in traditional storage, you must update the Elasticsearch configuration.
To modify Elasticsearch configuration:
1 Log in to the Sentinel server as the novell user. 2 Open the /etc/opt/novell/sentinel/config/elasticsearch-index.properties
file.3 Add the external Elasticsearch nodes IP addresses to the property ServerList.
For example: ServerList=<ElasticSearch IP1>:<Port>,<ElasticSearch IP2>:<Port>
Customizing Sentinel Settings 303

Configuring the Number of Incidents to be Listed in the Incidents List
When you escalate an alert to an incident and click Select an existing incident, Sentinel displays a list of existing incidents for you to select. By default, Sentinel displays 500 incidents for optimal performance of the user interface. You can configure the number of incidents you want to view by default. However, the user interface may get less responsive.
To configure the number of incidents you want to view in the list:
1 Log in to the Sentinel server as the novell user. 2 Open the /etc/opt/novell/sentinel/config/ui-configuration.properties file.3 Set the desired value for the webui.escalateAlertMaxIncidentsToShow property.4 Restart the Sentinel server.
Configuring the Number of Alert Trigger Events to be Attached with the Incident
When you escalate alerts to an incident, Sentinel attaches the alert trigger events to the incident. By default, Sentinel attaches a maximum of 25 trigger events per alert. You can change the default setting. However, there may be performance issues if the number is too high.
To configure the maximum number of trigger events to be attached to the incident:
1 Log in to the Sentinel server as the novell user. 2 Open the /etc/opt/novell/sentinel/config/configuration.properties file.3 Set the desired value to the sentinel.incident.alert.events.max property.4 Restart the Sentinel server.
Optimizing the Operating SystemSentinel sets a default limit of 65536 open files for the Sentinel processes. This is sufficient for most installations. However, there might be some scenarios that may cause the Sentinel server to need more open files, such as running a large number of searches or reports concurrently, or running searches and reports that span unusually large time ranges. In such cases you might consider increasing the default open files limit to allow more than 65536 open files.
NOTE: For optimal performance, do not decrease the default limit.
Perform the following steps to change the open file limits:
1 Log in to the Sentinel server as the root user.2 Open the /etc/security/limits.conf file.3 Change the value in the following lines:
novell soft nofile 65536
304 Customizing Sentinel Settings

novell hard nofile 65536
NOTE: Setting the soft limits is optional, however, setting the hard limits is mandatory.
4 Save the changes.5 Restart the Sentinel server.
Configuring the Resources for Event Partition CompressionYou can specify the number of processors for mksquashfs to use when compressing the index on the event data. This capability enables the mksquashfs utility to make more use of additional CPUs that may be available on some systems.
1 Log in to the system as the root user. 2 Open the /etc/opt/novell/sentinel/config/configuration.properties file.3 Add or edit the mksquashfs.numprocessors property and specify the desired value. This
value specifies the number of processors you want to allow mksquashfs to use.
mksquashfs.numprocessors=44 Save the changes.5 Restart the Sentinel server.
Setting the Grace Period to Close Event Data PartitionsThe event data partitions are closed after one day, and no more events are written to them. Even though the duration for event data partitions is one day, a grace period of 10 minutes is given to accommodate events arriving late.
You can change the default value as necessary. To customize the grace time period to close a partition, perform the following steps:
1 Log in to the system as the root user.2 Open the /etc/opt/novell/sentinel/config/configuration.properties file.3 Edit the sentinel.events.online.opengraceminutes property to specify the desired
value.By default, Sentinel does not set any value to this property. If no value is set, Sentinel considers10 minutes as the grace time period to close a partition.
4 Restart the Sentinel server.
Compressing the Storage Index on Primary PartitionYou can compress the partitions in primary storage as soon as they are closed to save disk space. This requires additional I/O to compress and store on the primary partition, which means that the supported EPS rate will be significantly lower. Also, searches on these partitions will be slower. Therefore, this option is only suitable for lower EPS rates and if you want to get the most out of primary storage space.
Customizing Sentinel Settings 305

To compress the storage index on the primary partition:
1 Log in to the system as the root user.2 Open the /etc/opt/novell/sentinel/config/configuration.properties file.3 Set the localstorage.indexes.compress property to true.4 Restart the Sentinel server.
Configuring Memory for the Sentinel ServerBy default, the Sentinel server consumes 75% of the computer memory. The setmemory.sh script in Sentinel dynamically calculates and allocates the default memory settings for the Sentinel server based on the amount of physical memory. The setmemory.sh script is located in the /opt/novell/sentinel/bin directory.
To make changes to the default memory settings, you must create a setmemory.properties file. The default location of this file is /etc/opt/novell/sentinel/config/setmemory.properties.
You can set the following configuration parameters in the setmemory.properties file:
JAVA_MEM_SERVER: The maximum heap memory allocated to the Java process. The maximum setting for this parameter is 24576 (or 24 GB). Removing or increasing this limit can have a detrimental effect on system performance, including a reduced event rate (EPS).
JAVA_MEM_REPORT_PROCESS: The maximum memory allocated to the report processes. The maximum setting for this parameter is 16384 (or 16 GB). Removing or increasing this limit can have a detrimental effect on system performance, including a reduced event rate (EPS).
JAVA_MEM_BROKER: The maximum amount of memory allocated for the message bus broker. This affects how many connections the message bus broker can accept. By default, this value is 10% of the remaining allocated memory for the Sentinel server.
BROKER_MAX_CON: The maximum number of connections the message bus broker can accept. By default, this value is 10% of the remaining allocated memory for the Sentinel server.
CORRELATION_INPUT_BUFFER_MAX_SIZE: The memory allocated to hold the Correlation events. By default, this value is 10% of the remaining allocated memory for the Sentinel server. On the remote Correlation Engine, this value is 50% of the allocated memory for the Sentinel server.
When the server starts, these memory settings in the setmemory.properties file override the default settings.
306 Customizing Sentinel Settings

Setting the Raw Data LimitSentinel now sets a limit of 100,000 when copying raw data to prevent raw data from unnecessarily consuming the disk space and causing the system to become unstable. When the limit reaches 100,000, Sentinel automatically deselects the Copy Raw Data to a file option in the Connector configuration window and stops copying the raw data. If you want to collect the raw data again, edit the Connector and select the Copy Raw Data to a file option.
You can also change the default value as necessary.
1 Log in to the system as novell user.2 Open the /etc/opt/novell/sentinel/config/server.conf file.3 Edit the wrapper.java.additional.60=-DMAX_DUMP_SIZE=10000 property to the
desired value.4 Restart the Sentinel server.
Configuring the Number of Trigger Events to be Associated with a Correlated Event
When a correlation rule fires, it creates a correlated event and the corresponding trigger events are associated with the correlated event. If the correlation rule is defined to execute the associated action at specified intervals, Sentinel creates only one correlated event and for all subsequent firings of the rule in the specified interval, it updates all the trigger events to the existing correlated event. In such a case, if the correlation rule is not written carefully, the correlated event will be associated with a large number of trigger events, which might impact the Sentinel server stability.
To limit the number of updates to the correlated event, you can define the maximum number of trigger events to be associated with the correlated event. The default limit is 100. When the number of trigger events exceed the defined limit, the correlated event is not further updated with the trigger events. Sentinel generates the audit event, CorrelatedEventUpdate, to indicate the suppression of further correlation updates.
To define the maximum number of trigger events to be associated with a correlated event, set the maxCorrelationEventUpdates property in the /etc/opt/novell/sentinel/config/server.xml file to the desired value. For more information about modifying the server.xml file, see “Maintaining Custom Settings in XML Files” on page 308.
Configuring the Number of Trigger Events to be Displayed in the Alert View
When the correlation rules generates an alert, it associates the trigger events to the alert for further investigation and reference. By default, the Alert Details page displays 10,000 events per alert. You can define the number of trigger events you want to view per alert.
To define the number of trigger events you want to view per alert:
1 Log in to the Sentinel server as the novell user.2 Open the /etc/opt/novell/sentinel/config/configuration.properties file.
Customizing Sentinel Settings 307

3 Set the desired value for the sentinel.alert.max.attachedevents property.The maximum limit is 840,000.
4 Restart the Sentinel server.
Maintaining Custom Settings in XML FilesThe server.xml, collector_mgr.xml, and correlation_engine.xml files include advanced configuration options. If you need to modify the default values, it is important to set the values using the instructions described in this section because these XML files automatically get replaced during upgrade, which results in any modifications getting overwritten.
Consider an example where you want to customize the tokenExpireTime property in the AuthenticationService component below, which is present in the server.xml file:
<obj-component id="AuthenticationService"> <class>esecurity.ccs.comp.auth.AuthenticationService</class> <property name="handler">esecurity.login.request</property> <property name="maxThreads">100</property> <property name="tokenExpireTime">86400000</property> </obj-component>To ensure that the modifications do not get overwritten during the upgrade, create a file in the /etc/opt/novell/sentinel/config/ directory with its name in the format: obj-component.<obj-component id>.properties. In the properties file, set the property to the value you desire in the format <property name>=<value>.
In the case of the AuthenticationService component, create the file as: obj-component.AuthenticationService.properties and set the tokenExpireTime property as: tokenExpireTime=90000000.
The values in the obj-component.AuthenticationService.properties file overwrites any default values set in the server.xml file. The properties files do not get overwritten during the upgrade.
Customizing the Default Search Field In Sentinel, _data is the default search field. You can customize the set of event fields that are concatenated in the default search field by adding indexedlog.datafield.ids property in the configuration.properties file. This helps you to add or remove the event fields from the default search based on your requirements.
To customize the default search field:
1 Log in to the Sentinel server as the novell user.2 Open the /etc/opt/novell/sentinel/config/configuration.properties file.3 Add the indexedlog.datafield.ids property and set it to the required event fields.
308 Customizing Sentinel Settings

For example, indexedlog.datafield.ids=evt,msg,sun,iuid,dun,tuid,sip,sp,dip,dp,rv42,shn,rv35,rv41,dhn,rv45,obsip,sn,obsdom,obssvcname,ttd,ttn,rv36,fn,ei,rt1,rv43,rv40,isvcc,repip.
4 Restart the Sentinel server.
Configuring the Proxy PortTo safeguard the Sentinel proxy port from potential attacks, configure the size of the data sent to the proxy port, the number of client connections, and the read timeout period.
To configure these properties:
1 Log in as novell user and open the /etc/opt/novell/sentinel/config/configuration.properties file.
2 Set the proxied.client.max.payload.size property to the maximum data size for the proxy port.Default value is 1 GB. If the data exceeds the specified limit, Sentinel stops the data transfer.
3 Set the proxied.client.max.connections property to the maximum number of times a client can try to send data to the proxy port. Default value is 10.
4 Set the proxied.client.read.timeout property to the maximum time period after which the data transfer stops. Default value is 30 seconds.
5 Save the configuration.properties file and restart Sentinel.
Enabling the Use of Special Characters in Event Field ValuesPerform the following steps to enable usage of special characters in event fields:
1 Log in as novell user and open the etc/opt/novell/sentinel/config/configuration.properties file.
2 Set the indexedLog.tokenizedField.enableSplCharSrch property to true.3 Restart Sentinel.
Configuring the Number of User Identities to be Displayed for People Search
By default, Sentinel displays 500 user identities per search when you search for user identities in the People navigation panel. You can configure the number of user identities you want to view per search.
To configure the number of user identities you want to view per search:
1 Log in to the Sentinel server as the novell user. 2 Open the /etc/opt/novell/sentinel/config/ui-configuration.properties file.
Customizing Sentinel Settings 309

3 Set the desired value for the webui.numberOfIdentitiesToLoad property.4 Restart the Sentinel server.
Configuring the Report Generation Idle Timeout PeriodBy default, the idle timeout period for the report generation process is 15 minutes. You can configure the idle timeout period by performing the following procedure:
1 Log in to the Sentinel server as the novell user.2 Open the /etc/opt/novell/sentinel/config/configuration.properties file.3 Set a desired value of the sentinel.report.idle.timeout.mins property in minutes. 4 Restart the Sentinel server.
Customizing Incident Probability Refresh IntervalThe Incident probability displays the probability of an alert being escalated to an incident. This value is based on alerts that were escalated 3 hours ago. This value is refreshed every 3 hours. You can configure the refresh interval by performing the following procedure:
To configure the refresh interval:
1 Log in to the Sentinel server as the novell user.2 Open the /etc/opt/novell/sentinel/config/configuration.properties file.3 If the sentinel.incident.recommendation.modelgeneration.interval property is
not listed, add this property and set the value in minutes.
NOTE: Configuring the refresh interval to less than 3 hours takes up lot of memory and may result in performance issues.
4 Restart the Sentinel server.
310 Customizing Sentinel Settings

38 38Rebranding Reports
Sentinel provides the white label report template that is available under the Sentinel Core Solution Pack. Sentinel uses this template to generate reports. You can customize the template to have your own header, footer and logo to suit your organization needs.
To customize the template, perform the following:
1 In the Reports and Searches panel, select the Sentinel Core White Label Template report definition, and then click Export.
2 Save the file to your local computer.3 Create a new folder.4 Extract the file contents to the new folder by using any ZIP extraction tool.5 In the new folder, open the resources folder. In this folder, you can modify the following files:
Header/Footer.jrxml: Contains the report layout descriptions. You can modify the layout of fields, text, or images in the header and footer, but you must ensure that the overall size of the header and footer does not change. You can manually edit the XML file or use iReport to modify them.
Header/Footer*.properties: Contains the text in the layout file, which localized into various languages. You can modify the strings that appear in the header or footer by editing this file. Ensure that the new strings do no exceed the space allocated to them. For information about editing the .properties file, see Oracle Java documentation.
Logo.jpg: Contains the logo that appears in the footer. You can replace this file with another image. Ensure that the size of the new image is exactly the same size of the existing image.
6 Use a ZIP tool to re-zip the modified report template.7 In the Reports and Searches panel, click Import reports or searches, browse to this zip file, and
then click Import.
NOTE: If the folder structure is different than the original ZIP file, the import process displays an error. Ensure that you do not modify the folder structure after making the changes.
8 Schedule any report definition and view the report to ensure that the changes are applied correctly.
Rebranding Reports 311

312 Rebranding Reports

39 39Generating an Audit Event when a List Item Expires From a Dynamic List
You can now configure Sentinel to generate an audit event when a list item expires from the dynamic list.
To generate an audit event:
1 Log in to the Sentinel server as the novell user.2 Open the /etc/opt/novell/sentinel/config/configuration.properties file.3 Set the lists.listItem.expiry.auditEvent property to true.4 Restart the Sentinel server.
Generating an Audit Event when a List Item Expires From a Dynamic List 313

314 Generating an Audit Event when a List Item Expires From a Dynamic List

IX IXAppendix
This appendix provides information about managing some of the Sentinel activities by using the command line and troubleshooting instructions.
Appendix A, “Command Line Utilities,” on page 317 Appendix B, “Troubleshooting,” on page 327
Appendix 315

316 Appendix

A ACommand Line Utilities
The command line utilities included with Sentinel are useful for managing and configuring many lower level functions of the system.
“Managing the Sentinel Services” on page 317 “Sentinel Scripts” on page 318 “Running the Report Development Utility” on page 319 “Getting the .jar Version Information” on page 320 “Changing the Hostname of a Sentinel Server” on page 320 “Importing or Exporting Event Association Data” on page 321 “Managing the Internal Database” on page 322 “Cleaning Up the Internal Database” on page 323 “Managing the Sentinel Server” on page 325
Managing the Sentinel ServicesThere is a command line utility included with Sentinel is useful for managing and configuring many lower level functions of the system. The utility is located in /usr/sbin/rcsentinel.
The utility has the following options to manage the Sentinel services:
rcsentinel start: Starts the Sentinel service.
rcsentinel stop: Stops the Sentinel service.
rcsentinel status: Displays the status of the Sentinel service.
rcsentinel restart: Restarts the Sentinel service.
rcsentinel try-restart: Restarts the Sentinel service if the Sentinel service is running.
rcsentinel force-reload: Forces the Sentinel service to reload the Sentinel configuration.
rcsentinel startdb: Starts the PostgreSQL database.
rcsentinel stopdb: Stops the PostgreSQL database.
rcsentinel force_stopdb: Forces the PostgreSQL database to stop.
rcsentinel startSIdb: Starts the Security Intelligence database.
rcsentinel stopSIdb: Stops the Security Intelligence database.
rcsentinel version: Displays the version of the Sentinel service.
rcsentinel -p, --priority=<integer>: Specifies the process priority.
rcsentinel -h, --help: Displays all options for the rcsentinel utility.
Command Line Utilities 317

rcsentinel -l, --log-file=FILE: Sends log messages to a file.
rcsentinel -q, --quiet: Displays fewer messages.
rcsentinel -v, --verbose: Displays more messages.
Sentinel ScriptsSentinel provides operational scripts that are appropriate for use during normal operations. These scripts are located in the following directories:
/opt/novell/sentinel/bin /opt/novell/sentinel/setup
For most scripts that require arguments, running the scripts without arguments provides details about how to use the arguments.
Table A-1, “Operational Scripts in /opt/novell/sentinel/bin,” on page 318 Table A-2, “Operational Scripts in /opt/novell/sentinel/setup,” on page 319
Table A-1 Operational Scripts in /opt/novell/sentinel/bin
Script File Description
backup_util.sh Use this script to back up and restore Sentinel event data and configuration data. For more information, see Chapter 35, “Backing Up and Restoring Data,” on page 295.
db.sh Allows you to manage the PostgreSQL database without Sentinel running. For more information, see “Managing the Internal Database” on page 322.
clean_db.sh Allows you to clean up data from the PostgreSQL database without Sentinel running. For more information, see “Cleaning Up the Internal Database” on page 323.
softwarekey.sh Use this script to add and view a license key through the command line.
event_assoc_data.sh Use this script to import or export the event association data. For more information, see “Importing or Exporting Event Association Data” on page 321
server.sh Use this script to manually manage the Sentinel server with this script. For more information, see “Managing the Sentinel Server” on page 325.
report_dev_setup.sh Use this utility to set up the report development environment. For more information, see “Running the Report Development Utility” on page 319.
updateServerLocale.sh
This utility provides an option to change the language of Sentinel server process. The Sentinel server messages that are displayed on the user interface appear in the language selected by this script.
If the appliance language is changed through WebYaST, you can use this script to change the language of the Sentinel process in the server.
318 Command Line Utilities
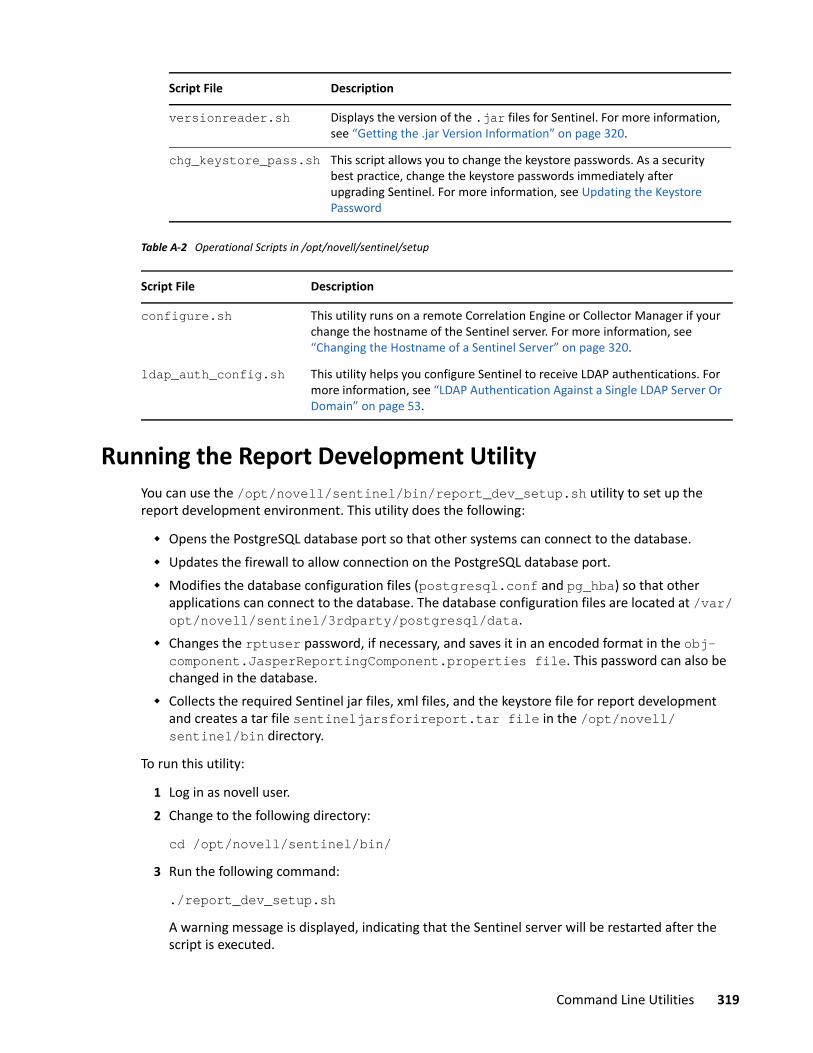
Table A-2 Operational Scripts in /opt/novell/sentinel/setup
Running the Report Development UtilityYou can use the /opt/novell/sentinel/bin/report_dev_setup.sh utility to set up the report development environment. This utility does the following:
Opens the PostgreSQL database port so that other systems can connect to the database. Updates the firewall to allow connection on the PostgreSQL database port. Modifies the database configuration files (postgresql.conf and pg_hba) so that other
applications can connect to the database. The database configuration files are located at /var/opt/novell/sentinel/3rdparty/postgresql/data.
Changes the rptuser password, if necessary, and saves it in an encoded format in the obj-component.JasperReportingComponent.properties file. This password can also be changed in the database.
Collects the required Sentinel jar files, xml files, and the keystore file for report development and creates a tar file sentineljarsforireport.tar file in the /opt/novell/sentinel/bin directory.
To run this utility:
1 Log in as novell user.2 Change to the following directory:
cd /opt/novell/sentinel/bin/3 Run the following command:
./report_dev_setup.shA warning message is displayed, indicating that the Sentinel server will be restarted after the script is executed.
versionreader.sh Displays the version of the .jar files for Sentinel. For more information, see “Getting the .jar Version Information” on page 320.
chg_keystore_pass.sh This script allows you to change the keystore passwords. As a security best practice, change the keystore passwords immediately after upgrading Sentinel. For more information, see Updating the Keystore Password
Script File Description
configure.sh This utility runs on a remote Correlation Engine or Collector Manager if your change the hostname of the Sentinel server. For more information, see “Changing the Hostname of a Sentinel Server” on page 320.
ldap_auth_config.sh This utility helps you configure Sentinel to receive LDAP authentications. For more information, see “LDAP Authentication Against a Single LDAP Server Or Domain” on page 53.
Script File Description
Command Line Utilities 319

4 To continue running the script, press 1.5 Specify the root password when prompted.
The script opens the database port, updates the firewall configuration files, and modifies the configuration files and database files.
6 When you are prompted to change the rptuser password, continue without changing the password.orSpecify a password for rptuser and reconfirm the password.The rptuser password is randomly generated during the installation of Sentinel. It is a recommended practice to change it here.The Sentinel server restarts.
For information or help on commands, use the following command:
./report_dev_setup.sh -h
Getting the .jar Version InformationYou can gather version information for Sentinel .jar files for troubleshooting purposes:
1 Log in to the Sentinel server as an administrator.2 Go to the /opt/novell/sentinel/bin directory.3 At the command line, specify the ./versionreader.sh <path/jar file name>.
Running the script without any arguments gives the version of the installed Sentinel server. For more information on the arguments that can be used, use the --help command.
Changing the Hostname of a Sentinel ServerIf the hostname of the Sentinel server changes, you must update any remote Correlation Engines or Collector Managers to point to the updated hostname. To do this, you run the configure.sh script on each remote machine.
The configure.sh script is located in /opt/novell/sentinel/setup. Run this script on each remote machine to update the hostname and IP address of the Sentinel server in the remote machine’s configuration files.
The configure.sh file also allows you to change the password of the appuser. The appuser is an internal Sentinel identity that is used to establish a connection and interact with the PostgreSQL database.
320 Command Line Utilities

Importing or Exporting Event Association DataSentinel provides the event_assoc_data.sh script that allows you to export event association data from the database to the file system, as well as import previously exported event association data from the file system back into the database. The script is event_assoc_data.sh located in the /opt/novell/sentinel/bin directory.
There are two types of event association data:
Incident events: There is a record in the database for every event that is associated with an incident, including what partition the event came from. When a partition is deleted, all incident events records for the partition are exported to a file on the file system, and the records are then deleted from the database. The file name is incidents_events.json.
Correlated events: There is a record in the database for every trigger event that is associated with a correlated event. The record also indicates what partition the correlated event belongs to. When a partition is deleted, all correlated event records for the partition are exported to a file on the file system, and the records are then deleted from the database. The file name is correlated_events.json.
When you export event association data, it is saved to the files in the following default directory structure /var/opt/novell/sentinel/data/eventdata/exported_associations/<partition name>/*.jsonWhen a partition is restored from backup, the system automatically attempts to import the event association records for the partition. The .json file must be restored to the correct directory structure when the event association records are restored. If these files are not restored, the event association records are not imported, but the partitions are restored without this information. The event association records for the partitions are not available.
You can use the following options with for the event_assoc_data.sh file:
-i, --import: Imports event association data. This option works only on partitions that are currently in the restored state, but have not yet imported the event association data.
-x, --export: Exports event association data. This option works only on partitions that are currently in the deleted state, but have not exported their event association data.
-d, --days=<integer>: Specify the last number of days of the partitions.
-s, --startdate=<date>: Specify a start date and end date to select partitions in the specified date range.
-e, --enddate=<date>: Specify an end date and start date to select partitions in the specified date range.
--date=<date>: The utility selects the partitions with the specified date. You can use this option multiple times to select multiple dates.
-u, --user=<user name>: Specify the name of the user with administrative privileges to the Sentinel server.
-p, --password=<user password>: Specify the password of the administrative user.
--host=<host name>: Specify the host name or IP address of the Sentinel server.
Command Line Utilities 321

--port=<port>: Specify the port number for communication to the Sentinel server. If this option isn’t specified, the default port of 8443 (HTTPS) or 8000 (HTTP) is used.
--https: If this option is used, the utility communicates over HTTPS.
--http: If this option is used, the utility communicates over HTTP.
-h, --help: Displays the help options.
-l, --log file=FILE: Logs messages from the utility to the file name specified in the parameter.
--no-banner: Suppresses banner messages.
-q, --quiet: Displays fewer messages.
-v, --verbose: Displays more messages.
Managing the Internal DatabaseSentinel provides a db.sh script that allows you to manage the internal database. You can use this script if you need to start the database without starting Sentinel so you can perform maintenance tasks. You can also use this script to run SQL commands against the internal database.
The script db.sh is located in the /opt/novell/sentinel/bin directory. The script has commands and options. You must be logged in as the user that installed Sentinel for the script to work. The command must come first, followed by the option.
For example: ./db.sh status --log-file=sentinel_status.txtThis command writes the status of the internal database to the log file named sentinel_status.txt.
“Commands” on page 322 “Options” on page 323
CommandsYou can use the following commands with the db.sh script.
start: Starts the internal database without starting the Sentinel server.
stop: Stops the internal database.
force_stop: Forces the database to stop when the Sentinel service is still running.
status: Displays the status of the internal database.
sql <db name> <user name> <sql statement>: Allows you to send SQL commands to the internal database.
restart: Restarts the internal database.
force_restart: Forces the database to restart when the Sentinel service is still running.
try-restart: Tries to restart the internal database.
reload: Reloads the internal database.
322 Command Line Utilities

force-reload: Forces a reload of the database.
OptionsYou can use the following options with the db.sh script. The options must start with a - or -- to be executed.
-w, --wait=<seconds>: Allows you to specify the amount of time to wait for the database to start or stop.
-h, --help: Displays help information for the script.
-l, --log-file=FILE: Logs messages to the specified file name.
--no banner: Suppresses banner messages.
-q, --quiet: Displays fewer messages.
-v, verbose: Displays more messages.
Cleaning Up the Internal DatabaseSentinel provides a clean_db.sh script that allows you to clean up redundant data from the Sentinel database. You can delete data such as incidents, identities, assets, Advisor data, and vulnerabilities individually. You can run this script even without Sentinel running. For example, an improperly configured correlation rule might create hundreds of unwanted incidents in the database. Or, the identity information might encounter an error when someone attempts to delete the IdentityAccountMap.csv file. In such a situation, you can use this script to remove the unusable identity information.
The script clean_db.sh is located in the /opt/novell/sentinel/bin directory.
WARNING: Because this script is designed to delete information from your database, it should be used carefully and only after understanding the implications.
“Prerequisites” on page 323 “Using the clean_db.sh Script” on page 323
Prerequisites Ensure that you have permission to run the script. Only the user who installed Sentinel has
permission to run this script. Ensure that the database is started and is running.
Using the clean_db.sh Script1 In the Terminal mode, log in to Sentinel by using the credentials that were used to install
Sentinel.This script cannot be run by the root user.
Command Line Utilities 323

2 Go to <install_directory>/bin, then specify clean_db.sh to run the script.The following menu is displayed:
Which objects would you like to cleanup?(1) Incidents(2) Identities(3) Assets(4) Advisor(5) Vulnerabilities(6) Incidents and Identities(7) All(q) Quit without action
3 At the prompt, indicate which objects you want to remove from the database.4 Specify the following information to connect to the PostgreSQL database:
Database server hostname (Press ENTER for default localhost)=>Database name (Press ENTER for default SIEM) => Database username (press ENTER for default dbauser) =>The database connection is verified before proceeding to the next step. If the connection was not successful, the script exits.
5 (Conditional) If you select 1 to delete Incidents data, several options are displayed. Select one of the options and specify the required information: Delete Incidents By Query: Specify a custom SELECT query. For example:
select inc_id from incidents where inc_id=500Ensure that SELECT statement does not include quotation marks.
Delete Incidents By Id: Specify the ID of the Incident that you want to delete. For example:
101 Quit without action: Specify q to exit from the script.
6 You are prompted to confirm data cleanup. Specify start to start the data cleanup or specify abort to quit without performing the data cleanup.The results of the data cleanup are written to the log file.You should review the log file for any errors and retry.If Identities data is being cleaned up, the script cleans up the Identities information from the database tables, and deletes the Identity Account Map file (identityAccountMap.csv).
NOTE: If you have a distributed Sentinel install, you might need to manually connect to the main Sentinel server to delete the identityAccountMap.csv file.
324 Command Line Utilities

Managing the Sentinel ServerYou can use the server.sh script to manually manage the Sentinel server. This script is located in the default directory of /opt/novell/sentinel/bin. The script has commands and options. The command must come first, followed by the option.
“Commands” on page 325 “Options” on page 325
CommandsYou can use the following commands with the server.sh script:
start: Starts the Sentinel server.
stop: Stops the Sentinel server.
status: Displays the status of the Sentinel server.
restart: Restarts the Sentinel server.
try-restart: Tries to restart the Sentinel server.
force-reload: Forces a reload of the Sentinel server.
startdb: Starts the internal Sentinel database.
stopdb: Stops the internal Sentinel database.
force_stopdb: Forces the internal database to stop.
version: Displays the version of the Sentinel server.
OptionsYou can use the following options with the server.sh script:
-p, --priority=<integer>: Specifies the process priority for the Sentinel server.
-h, --help: Displays the help options.
-l, --log-file=FILE: Logs messages to a file you specify.
--no-banner: Suppresses banner messages.
-q, --quiet: Displays fewer messages.
-v, --verbose: Displays more messages.
Command Line Utilities 325

326 Command Line Utilities

B BTroubleshooting
This section helps you troubleshoot issues that might occur when using Sentinel.
“Mitre Fields Become Non-indexed Fields for Admin User in the alert.alert Index” on page 327 “Collector Manager Logs Display the Copying back to Persist Queue Error” on page 328 “Event Visualization Dashboards Take a Longer Time to Load Data” on page 328 “Unable to View Alerts in the Dashboard and Alert Views” on page 328 “Unable to Connect to Sentinel Agent Manager Database” on page 329 “Customizing Logging Settings in Sentinel” on page 329 “Customizing Logging Settings in Elasticsearch” on page 330 “Sentinel Control Center Does Not Launch When Identity Manager Designer is Installed on the
Client Computer” on page 330 “Error While Installing Correlation Rules” on page 330 “Sentinel High Availability Installation in FIPS 140-2 Mode Displays an Error” on page 330 “Sentinel Services Might Not Start Automatically After the Installation” on page 330 “Sentinel Does Not Configure the Sentinel Appliance Network Interface By Default” on page 331 “New Incoming Alerts Incorrectly Appear to be Selected When You Modify Existing Alerts” on
page 331 “Error When Configuring the NFS Storage After Upgrading Sentinel Appliance to Version 7.3 SP1
and Later” on page 331 “Cannot Receive Events from Secure Configuration Manager After Upgrading Sentinel to Version
7.3 SP1 and Later” on page 331 “Cannot Receive Events from Sentinel UNIX Agent 7.4 After Upgrading Sentinel to Version 7.3
SP1 and Later” on page 332 “Cannot Create Reports by Using Sentinel SDK” on page 332 “Data Synchronization Fails While Synchronizing IPv6 Addresses in Human Readable Format” on
page 332 “Mapping Conflict Warning in the Kibana Search” on page 332
Mitre Fields Become Non-indexed Fields for Admin User in the alert.alert Index
Issue: Mitre fields are in an unknown state for the admin user (alone) in the alert.alert index pattern. In all other places, the Mitre fields are indexed, even if it is a tenant user and in the alert.alert index pattern.
Troubleshooting 327

Fix: For the admin users belonging to the default tenant, the MitreAttackName and MitreID fields, have unknown field types, hence the appropriate field-description icon is unknown. This problem is due to the Kibana-cache and can be resolved by clicking on refresh icon located at Stack Management > Index patterns > alerts.alerts
Collector Manager Logs Display the Copying back to Persist Queue Error
Issue: When the Elasticsearch nodes are down or when the disk space in all the Elasticsearch nodes are almost full, Collector Manager displays the following error in the logs:
|SEVERE|I/O dispatcher 21|esecurity.ccs.comp.event.visualization.EventVisualizationProcessor$3.onFailureFailed to forward <number> events in this batch, copying back to persist queueAs a result, Collector Manager starts buffering events and eventually may result in memory dump issue on the Collector Manager.
Fix: Perform any of the following:
Ensure that all the nodes are up and running. Increase the disk space in Elasticsearch nodes. Add additional nodes in the Elasticsearch cluster.
Event Visualization Dashboards Take a Longer Time to Load Data
Issue: Event visualization dashboards do not display data and the following message is displayed in the Elasticsearch cluster log:
java.lang.OutOfMemoryError: Java heap spaceFix: Perform any of the following:
Increase Elasticsearch heap size in the /etc/elasticsearch/jvm.options file. Increase the number of shards by modifying the es.num.shards property. For more information,
see “Performance Tuning for Elasticsearch” in the Sentinel Installation and Configuration Guide.
Unable to View Alerts in the Dashboard and Alert ViewsIssue: The alert dashboard and the charts in the alert view do not refresh or display new alerts. However, the table in the alert view displays the newly generated alerts. This issue could happen because of a corrupt alert index.
328 Troubleshooting

Fix: Re-index all the alerts as follows:
1 Login as root user.2 Go to the/<Sentinel_installation_path>/var/opt/novell/sentinel/bin
directory.3 To switch to novell user, run the following script: su novell
4 To start the alert synchronization process, run the following script: ./reSyncAlert.sh
The alert index is rebuilt. The alert dashboard and the charts in the alert view display all the alerts.
Unable to Connect to Sentinel Agent Manager DatabaseIssue: SQL connection from Sentinel to Agent Manager database fails, and Sentinel displays the following error message:
Login failed. The login is from an untrusted domain and cannot be used with Windows authentication.Fix: Update the SQL connection security settings in the Agent Manager. For more information, see “Updating Security Settings for SQL Connection” in the Sentinel Agent Manager User Guide.
Customizing Logging Settings in SentinelBy default, Sentinel generates and maintains INFO level logs for all Sentinel components. The log files are located in the /var/opt/novell/sentinel/log folder.
You can customize the logging settings as necessary in the respective files:
Sentinel server: /etc/opt/novell/sentinel/config/server_log.prop Collector Manager: /etc/opt/novell/sentinel/config/collector_mgr_log.prop Correlation Engine: /etc/opt/novell/sentinel/config/correlation_engine_log.prop
For information about configuring logging settings, see the documentation embedded in the respective files.
To customize logging settings in third-party components such as ActiveMQ, Jetty, and PostgreSQL, see the documentation for the respective components.
NOTE: Changing the log levels to ALL or FINEST results in verbose logs and may slow down the system performance.
Troubleshooting 329

Customizing Logging Settings in ElasticsearchIf there are authentication failures or other Elasticsearch related errors when searching and visualizing events or when indexing events in the Spark job, you can increase the logging level to DEBUG in Elasticsearch. For more information, see Elasticsearch documentation.
Sentinel Control Center Does Not Launch When Identity Manager Designer is Installed on the Client Computer
Issue: Sentinel Control Center does not launch when Identity Manager Designer is installed on the client computer and Designer uses the system JRE. Designer needs to add some supporting jar files like xml-apis.jar to the lib/endorsed directory. Some of the classes in the xml-apis.jar file override the corresponding classes in the system JRE that is used by the Sentinel Control Center.
Fix: Configure Designer to use its own JRE.
Error While Installing Correlation RulesIssue: Solution Manager does not install correlation rules when a correlation rule with an identical name already exists on the system. A NullPointerException error is logged in the console.
Workaround: Ensure that all correlation rules have a unique name.
Sentinel High Availability Installation in FIPS 140-2 Mode Displays an Error
Issue: If FIPS 140-2 mode is enabled, the Sentinel High Availability installation displays the following error:
Sentinel server configuration.properties file is not correct. Check the configuration file and then run the convert_to_fips.sh script again to enable FIPS mode in Sentinel server.However, the installation completes successfully.
Workaround: The error is expected and you can safely ignore it. Although the installer displays the error, the Sentinel High Availability configuration works successfully in FIPS 140-2 mode.
Sentinel Services Might Not Start Automatically After the Installation
Issue: On systems with more than 2 TB disk space, Sentinel might not start automatically after the installation.
Workaround: As a one-time activity, start the Sentinel services manually by specifying the following command:
rcsentinel start
330 Troubleshooting

Sentinel Does Not Configure the Sentinel Appliance Network Interface By Default
Issue: When installing Sentinel Appliance, the network interface is not configured by default.
Workaround: To configure the network Interface:
1 In the Network Configuration page, click Network Interfaces.2 Select the network interface and click Edit.3 Select Dynamic Address and then select either DHCP or Static assigned IP Address. 4 Click Next and then OK.
New Incoming Alerts Incorrectly Appear to be Selected When You Modify Existing Alerts
Issue: When you click Select All in alerts views to select alerts, deselect few alerts, and modify them, new incoming alerts are also selected in the refreshed alert views. This results in wrong count of alerts selected for modification, and also it appears as if you are modifying new incoming alerts too. However, only the originally selected alerts are modified.
Workaround: No new alerts will appear in the alert view if you create the alert view with a custom time range.
Error When Configuring the NFS Storage After Upgrading Sentinel Appliance to Version 7.3 SP1 and Later
Issue: Sentinel displays an error when you try to configure NFS as secondary storage location after you Sentinel appliance to version 7.3 SP1 and later.
Workaround: After upgrading the Sentinel appliance, restart the SLES operating system using the following command:
init 6
Cannot Receive Events from Secure Configuration Manager After Upgrading Sentinel to Version 7.3 SP1 and Later
Issue: Sentinel uses the Diffie-Hellman protocol to communicate with Secure Configuration Manager. As part of fixing the Logjam vulnerability, the certificate key size for the Diffie-Hellman protocol in Sentinel has been increased to 2048. However, Secure Configuration Manager uses the default certificate key size; that is, 1024. Because of this mismatch, Secure Configuration Manager can no longer communicate with Sentinel.
Workaround: Upgrade Secure Configuration Manager to version 6.1. For more information, see the Secure Configuration Manager 6.1 Release Notes.
Troubleshooting 331

Cannot Receive Events from Sentinel UNIX Agent 7.4 After Upgrading Sentinel to Version 7.3 SP1 and Later
Issue: The security vulnerability fixes included in Sentinel 7.3 SP1 involved changes to the communication mechanism for a secured connection. These changes are not compatible with Sentinel UNIX Agent 7.4. Therefore, Sentinel cannot receive events from Sentinel UNIX Agent 7.4.
Fix: One of the following:
Install Security Agent for UNIX 7.4 Hotfix 7017336. Upgrade the Sentinel UNIX Agent to version 7.5, which is compatible with Sentinel 7.3 SP1 and
later.
Cannot Create Reports by Using Sentinel SDKIssue: You cannot create reports by using Sentinel SDK.
Workaround: To create reports by using Sentinel SDK, perform the steps mentioned in Knowledgebase Article 7017293.
Data Synchronization Fails While Synchronizing IPv6 Addresses in Human Readable Format
Issue: Data synchronization fails when you try to synchronize IPv6 address fields in a human readable format to external databases. For information about configuring Sentinel to populate the IP address fields in human readable dot notation format, see “Creating Data Synchronization Policies” on page 174. (Bug 913014)Workaround: To fix this issue, manually change the maximum size of the IP address fields to at least 46 characters in the target database, and re-synchronize the database.
Mapping Conflict Warning in the Kibana SearchIssue: Kibana is reporting the following mapping conflict warning:
Mapping conflict! A field is defined as several types (string,integer, etc) across the indices that match this pattern. You may still be able to use these conflict fields in parts of Kibana, but they will be unavailable for functions that require Kibana to know their type.Correcting this issue will require reindexing your data.To view the issue in Kibana, perform the following:
1. Launch the Kibana page.2. Click the Management tab.3. Under Kibana section, select Index Patterns.4. Select security.events.normalized_*5. Ensure that, there are 632 fields indexed and there is no mapping conflict warning.
332 Troubleshooting

Workaround: Perform the following, if the number of fields indexed are less than 632 or to fix the Kibana mapping conflict warning:
1. Delete the below index pattern from the Kibana Management tab:
security.events.normalized_*2. Switch to the following bin directory:
cd <sentinel-installation-path>/opt/novell/sentinel/bin3. Switch to the novell user:
su novell4. Delete indices by following the below command from the Sentinel’s elasticsearch:
./elasticsearchRestClient.sh {sentinel_ip} {port used for elasticsearch} DELETE security.events.normalized_*
5. Run the following command to apply mapping template on events index in the Sentinel’s elasticsearch:
./elasticsearch_index_template.sh {sentinel-ip} {port used for elasticsearch} security.events.normalized_* 6 1
6. Run the following command to create the Index pattern in the Kibana:
./create_kibana_index_pattern.sh http://{localhost}:5601 security.events.normalized_* {tenant-name}
Troubleshooting 333

334 Troubleshooting

40 40Configuring Sentinel for Multitenancy
To reduce the total cost of ownership associated with managing security data from several organizations where data sharing across them is not allowed, some users prefer to use Sentinel in a multitenant mode where each organization's data is in a logical silo, preventing one organization from seeing the data of another. A logical silo, as opposed to a physical silo, allows the same hardware and software instances to be used to manage the data from multiple organizations while preserving data privacy. One typical user of this approach are Managed Security Service Providers (MSSPs), which might use this approach to keep their costs low while providing security monitoring for many customers. Multiple MSSP models are possible, ranging from Cloud-based services to outsourced Security Operating Center (SOC) monitoring.
In MSSP environments, the MSSP (Sentinel administrator) administers the Sentinel system and the MSSP's customers, often referred to as tenants, utilize a portion of the system's processing power to perform their security monitoring. Each tenant's data is stored alongside other tenant's data, while the system keeps track of the data that belongs to each tenant and preserves data privacy. Some form of logical separation is important to ensure that one tenant does not see another tenant's data. Only the MSSP should have the ability to see the data across all tenants. Sentinel provides multitenancy capabilities that enable the security monitoring of multiple tenants to be handled by a single instance of hardware and software while preserving data privacy.
Section 40.1, “Understanding MSSP Models,” on page 335 Section 40.2, “Configuring Multitenancy,” on page 339 Section 40.3, “Role-Based Access Control and Multitenancy for Visualization,” on page 343 Section 40.4, “Decommissioning Tenants,” on page 344
40.1 Understanding MSSP ModelsThis section provides information about the various MSSP models.
Section 40.1.1, “SOC Outsourcing Model,” on page 335 Section 40.1.2, “Hybrid Model,” on page 337 Section 40.1.3, “Full SaaS or Cloud Model,” on page 338
40.1.1 SOC Outsourcing ModelTenants host the Sentinel infrastructure in their own datacenter, but the MSSP monitors that implementation from their own SOC. This model provides greater flexibility for tenants by letting them control their own Sentinel instance, but get the benefit of expert monitoring from the MSSP.
Configuring Sentinel for Multitenancy 335

Figure 40-1 SOC Outsourcing Model
Agent ManagerCentral Computer
SENTINEL AGENTS
NETWORK DEVICES
NetFlow Collector Manager
Monitoring andAnalyzing
Collector Manager
EVENT SOURCES
Sentinel Server
MSSP Setup
Tenant SetupData
Warehouse
336 Configuring Sentinel for Multitenancy

40.1.2 Hybrid ModelTenants host data collection nodes (typically Collector Managers) in their environment, but all the data is forwarded to the MSSP's SOC. The MSSP SOC hosts the Sentinel implementation. The benefit in this model is that tenants can collect data more thoughtfully and securely while leveraging compression and encryption facilities offered by Sentinel while transmitting events over the network to the MSSP SOC.
Figure 40-2 Hybrid Model
Agent ManagerCentral Computer
SENTINEL AGENTS
NETWORK DEVICES
NetFlow Collector Manager
Monitoring andAnalyzing
EVENT SOURCES
Sentinel Server
MSSP Setup
Tenant Setup
Collector Manager
Data Warehouse
Configuring Sentinel for Multitenancy 337

40.1.3 Full SaaS or Cloud ModelIn the Sentinel as a Service (SaaS) or Cloud model, tenants forward the event data to the MSSP. The MSSP hosts all Sentinel components, including the Collector Managers. The key benefit is that there is less impact on the tenant environment and the tenant does not need to host any hardware or software. However, tenants should take special measures to ensure that events are transmitted securely to the MSSP.
In an MSSP environment, multiple tenants can deliver data to a single Sentinel instance. Alternatively, the MSSP can also dedicate a Sentinel instance to each tenant.
Figure 40-3 Full SaaS or Cloud Model
Agent ManagerCentral Computer
SENTINEL AGENTS
NETWORK DEVICES
NetFlow Collector Manager
Collector Manager
Sentinel Server
MSSP Setup
Tenant Setup
EVENT SOURCES
Monitoring andAnalyzing
Data Warehouse
338 Configuring Sentinel for Multitenancy

40.2 Configuring MultitenancyThis section provides information about configuring multitenancy in Sentinel.
Section 40.2.1, “Creating Tenants,” on page 339 Section 40.2.2, “Associating Incoming Events with a Tenant,” on page 339 Section 40.2.3, “Setting Up Retention Policies for Data Segregation,” on page 340 Section 40.2.4, “Providing Data Access for Tenants,” on page 340 Section 40.2.5, “Configuring Sentinel Functions,” on page 341
40.2.1 Creating TenantsYou can create tenants in the Tenants interface and then associate the tenant name to events when configuring Sentinel for data collection.
To create tenants:
1 From Sentinel Main, click Users > Tenants.2 In the Create New Tenant field, specify the tenant name and click Create Tenant.
By default, tenants are enabled and you can associate tenants to events when collecting data.
You can also create tenants when configuring the Collector for data collection. For more information, see “Associating Incoming Events with a Tenant.”
40.2.2 Associating Incoming Events with a TenantMultitenancy starts with properly identifying the data coming from each tenant. If each tenant hosts their own Sentinel infrastructure (outsourced SOC model), no action is required.
For all other MSSP models, every incoming event should include the tenant name in the TenantName (rv39) field. This is handled at the Collector level as a Collector property. The implication is that all the data that passes through a single Collector must belong to a single tenant. If there are multiple tenants sending data from the same type of event source, you should deploy individual instances of the appropriate Collector for each tenant to split the data and specify the TenantName in the Collector parameter. The Collector then adds the TenantName to the event field as specified by the parameter. The Collector also generates a unique ID for each tenant in the tid (TenantID) field.
You can assign a tenant name to events when configuring the Collector for data collection. Each tenant must have a dedicated Collector so that their data can be identified with their tenant name. You can have multiple event sources forward data to one Collector, however, all event sources for the Collector must be from one tenant.
Assigning the Tenant Name to EventsTo assign a tenant name:
1 Access Event Source Management.For more information, see “Accessing Event Source Management” on page 100.
2 Locate the Collector Manager that is associated with the Collector.
Configuring Sentinel for Multitenancy 339

3 Right-click the Collector Manager, then select Add Collector.4 In the Configure Collector Property tab, specify the tenant name in the Tenant Name field.
For more information about data collection, see Chapter 6, “Configuring Agentless Data Collection,” on page 91.
The tenant information that you add in the Collector sets up a namespace, which you can use to configure other functions of Sentinel. For example, the identity and host (asset) information that Sentinel receives is transferred to maps for the mapping Service. In the case of the Identity Manager Sentinel Driver, you can set the tenant name in the driver parameter. This means that the mapping service and identity services can function properly even if the same IP addresses or user account names are present in more than one tenant environment.
For information about mapping, see Chapter 11, “Mapping Events,” on page 141. For information about Identity Manager Sentinel Driver, see the Driver for Sentinel Implementation guide.
40.2.3 Setting Up Retention Policies for Data SegregationIf tenants host their own Sentinel server or if you host separate Sentinel server instances for each tenant, data segregation is straightforward. If you have a centralized Sentinel server for multiple tenants, you can design data retention policies to split each tenant data into separate partitions.
You should define at least one retention policy to segregate event data from different tenants into different folders for each tenant. When creating retention policies for each tenant, specify the Criteria as tid:"tenant_ID" where tenant_ID is the ID of the tenant.
Each retention policy creates a separate partition so that you can manage it separately. Sentinel saves the event file in a folder in the format YYYYMMDD_<Data Retention Policy ID>. Therefore, with an unique retention policy for each tenant, you can achieve event data segregation on the folder level.
Setting up a data retention policy helps you in the following ways:
Flexibility to define data retention parameters for each tenant according to their requirements. Ensures that each tenant data is physically separated in different folders.
NOTE: The recommendations above apply to parsed event data. Sentinel automatically segregates raw data if you configured individual Collector instances for each tenant.
For more information about data retention policies, see Chapter 14, “Configuring Data Retention Policies,” on page 185.
40.2.4 Providing Data Access for TenantsTenants who host their own Sentinel server (SOC outsourcing model), will probably create their own users and roles to provide or limit data access. For all other MSSP models, the MSSP decides whether tenants should have access to the Sentinel system and if so, to what data.
If each tenant has a unique Sentinel instance, you can use standard role definitions and users for the tenant. For more information, see Chapter 4, “Configuring Roles and Users,” on page 41.
340 Configuring Sentinel for Multitenancy

If multiple tenants have access to the same Sentinel instance, it is important to configure the system to restrict access appropriately. Sentinel provides the ability to define tenants, tenant-specific roles, and tenant-specific users. When creating roles, you can select the relevant tenant name for the role. Users in that role can see data and real-time views specific to only the tenant they belong to. You can assign the default tenant for MSSP employees who need to view multiple tenants' data, which gives them access to data and real-time views of all the tenants.
Tenant roles, and the users assigned to them, have a tenant-specific filter built in by default. You can add additional security filters (for example, a filter for operating system events only) as needed. The intersection of the tenant and security filters applies to searches, reports, real-time views, and dashboards.
You can also delegate the responsibility of administering a tenant's roles and users to the tenant by assigning the Manage roles and users permission to the tenant. For more information, see Chapter 4, “Configuring Roles and Users,” on page 41.
You can now restrict the access of the visual analytics features like Discover, Dashboard, DevTools, and Management by giving the appropriate visualization permissions. For more information about the visualization permissions, see “Creating a Role” on page 43.
40.2.5 Configuring Sentinel FunctionsThis section provides information about configuring various Sentinel functions for multi-tenancy.
“Setting Up Filters for Each Tenant” on page 341 “Setting Up Dynamic Lists” on page 341 “Setting Up Correlation Rules” on page 342 “Creating Real-time Views” on page 343
Setting Up Filters for Each TenantYou can create a filter for each tenant to use in constructing more complex criteria, which you can use in searches and other places the criteria is called for. When you create a filter, specify the Criteria as tid:"tenant_ID" (where tenant_ID is the ID of the tenant). For more information about creating filters, see “Configuring Filters” in the Sentinel User Guide.
Setting Up Dynamic ListsYou can set up the following types of dynamic lists:
Dynamic lists that are global to all tenants. For example, you might want to create a black list of well-known bad IP address ranges.
Dynamic lists that are specific to particular tenants. For example, a list of important assets or privileged accounts. In this case, you should create the following: A separate dynamic list for each tenant A separate correlation rule for each tenant to refer to the specific dynamic list A separate action to write to a specific dynamic list
For information about creating dynamic lists, see “Configuring Dynamic Lists” in the Sentinel User Guide.
Configuring Sentinel for Multitenancy 341

Setting Up Correlation Rules
WARNING: In any MSSP model where multiple tenants send data to the same Sentinel instance, you must configure correlation rules correctly to ensure that the TenantID field is populated. This ensures that automatic tenant filtering applies to keep correlated events and alerts private. If TenantID is not populated, there is a risk of one tenant seeing another tenant’s data.
Guidelines for a Single TenantThe following guidelines apply if you want to create a correlation rule that should run only for a single tenant:
For correlation rules that fire based on a single event, append AND tid="Tenant_ID" to the correlation rule criteria. The correlated event automatically populates the TenantID field in the correlated event output.
For correlation rules that fire based on multiple events, gate rules, and sequence rules, append AND tid="Tenant_ID" to the rule criteria. Set the TenantID field to the ID of the tenant in the correlated event output.
You can use tenant-specific (for example, “Tenant A Critical Servers”) or cross-tenant (MSSP) dynamic lists.
You can use a tenant-specific action (for example, “Send email to Tenant A”) or an MSSP action (for example, “Send email to MSSP analyst”).
Guidelines for Multiple TenantsThe following guidelines apply if you want to create a correlation rule that runs for all tenants and creates output that is viewable by each individual tenant.
For rules that fire based on a single event, you do not need to filter by tenant. The correlated event automatically populates the TenantID field based on the trigger event.
For rules that fire based on multiple events, gate rules, and sequence rules, you do not need to filter by tenant. You should group by the TenantID field. The correlated event automatically populates the TenantID field.
You can add a filter that includes multiple tenants if the rule should only be run for a subset of tenants.
Use only cross-tenant (MSSP) dynamic lists. For example, Known Bad Source IPs. Use only cross-tenant (MSSP) actions. For example, Send email to MSSP analyst.
Guidelines for Multiple Tenants and Are Visible Only to the MSSP The following guidelines apply if you want to create a correlation rule that runs across all tenants and creates output that is viewable only by the MSSP (Sentinel Administrator).
For rules that fire based on a single or multiple events, gate rules, and sequence rules, you do not need to filter by tenant. You do not need to group by the TenantName field since you want the rule to run across tenants. Set the TenantName field to default in the correlated event output to ensure only the MSSP users will see the events and alerts.
You can add a filter that includes multiple tenants if the rule should be run only across a subset of tenants.
342 Configuring Sentinel for Multitenancy

Use only cross-tenant (MSSP) dynamic lists. For example, Known Bad Source IPs. Use only cross-tenant (MSSP) actions. For example, Send email to MSSP analyst.
For more information about creating correlation rules, see “Correlating Event Data” in the Sentinel User Guide.
Creating Real-time ViewsWhen creating real-time views such as event views and alert views, you can specify the tenant name for which you want to view data. This is applicable only for MSSP employees assigned to the default tenant since they need to view multiple tenants' data. Roles assigned to specific tenants automatically have the tenant's filter applied and can view only the data specific to their tenant.
For more information, see the specific chapters in the Sentinel User Guide.
40.3 Role-Based Access Control and Multitenancy for VisualizationSentinel leverages Kibana, a browser-based analytics and search dashboard, which helps you to visualize events and alerts in dashboard. From the 8.4.0.0 version of the Sentinel, Role-Based Access Control (RBAC) and multitenancy are supported for the visualization features in the Sentinel. With the RBAC, you can provide the right access to the right users based on their permission level for accessing the visualization features. For more information about the visualization permissions, see “Creating a Role” on page 43. The multitenancy in the visualization provides greater flexibility for tenants by letting them control their dashboards or visualizations.
40.3.1 Use CaseConsider the user is a banking application. They have 10 branches in different states. The manager of the branch must monitor only the activity specific to his or her branch and, he or she should not access the other branch's user information. There are different levels of employees in the bank like the manager, assistant manager, cashier, and other employees. Each of them must see what they are allowed to see. For example, a regular employee should not be allowed to see the Management option and, he or she should be given permission only to see the user dashboard and should not be allowed to Edit it.
Solution Consider each branch of the bank as a tenant. Use multitenancy in the visualization, not to allow an employee of a specific branch of the bank
to access the user-related data or the dashboard of another branch. A branch admin/manager can create his or her own custom domain which can only be accessed by that branch employee and not by others.
RBAC in the visualization can help the admin of the branch to assign proper permissions for the employees, based on their employment level. So that they get access only to the features they are supposed to see. A regular employee can be given View-only permission for the visualization features so that he or she can only see the dashboard but cannot Edit or Delete it.
Configuring Sentinel for Multitenancy 343

40.4 Decommissioning TenantsIf a tenant's contract ends, you can restrict tenant access to the Sentinel server by disabling the tenant. When you disable a tenant:
All users associated with that tenant can no longer access the Sentinel server or use any of the REST APIs.
Data collection continues until the tenant stops sending data or until you have disabled the relevant data collection nodes.
MSSP users associated with the default tenant will no longer see the disabled tenant in Sentinel functions where they could choose a tenant. For example, when creating real-time views or setting the tenancy for a role.
You can still see the disabled tenant in the Tenants interface and when you select Show disabled.
You cannot delete tenants because MSSP employees may want to run reports for a disabled tenant or verify whether they are still receiving events from a disabled tenant.
To disable a tenant:
1 From Sentinel Main, click Users > Tenants.2 In the list of tenants, click Disable for the tenant that you want to disable.
344 Configuring Sentinel for Multitenancy