Micro Focus Vibe 4.0.8 User Guide
190
Vibe 4.0.8 User Guide March 2021
-
Upload
khangminh22 -
Category
Documents
-
view
0 -
download
0
Transcript of Micro Focus Vibe 4.0.8 User Guide

Vibe 4.0.8User Guide
March 2021

Legal NoticeCopyright © 2018 - 2021 Micro Focus or one of its affiliates.
The only warranties for products and services of Micro Focus and its affiliates and licensors (“Micro Focus”) are as may be set forth in the express warranty statements accompanying such products and services. Nothing herein should be construed as constituting an additional warranty. Micro Focus shall not be liable for technical or editorial errors or omissions contained herein. The information contained herein is subject to change without notice.
2

Contents
About This Guide 13
1 Getting Started 15About Micro Focus Vibe . . . . . . . . . . . . . . . . . . . . . . . . . . . . . . . . . . . . . . . . . . . . . . . . . . . . . . . . . . . . . . . . . . . 15
Micro Focus Vibe Is Collaboration Software . . . . . . . . . . . . . . . . . . . . . . . . . . . . . . . . . . . . . . . . . . . . . 15Micro Focus Vibe Is Social Networking Software . . . . . . . . . . . . . . . . . . . . . . . . . . . . . . . . . . . . . . . . . 16
Accessing Micro Focus Vibe . . . . . . . . . . . . . . . . . . . . . . . . . . . . . . . . . . . . . . . . . . . . . . . . . . . . . . . . . . . . . . . . 17Accessing Micro Focus Vibe from a Web Browser . . . . . . . . . . . . . . . . . . . . . . . . . . . . . . . . . . . . . . . . 17Accessing Micro Focus Vibe from Your File System . . . . . . . . . . . . . . . . . . . . . . . . . . . . . . . . . . . . . . . 17Accessing Micro Focus Vibe from a Mobile Device. . . . . . . . . . . . . . . . . . . . . . . . . . . . . . . . . . . . . . . . 17
Starting Micro Focus Vibe. . . . . . . . . . . . . . . . . . . . . . . . . . . . . . . . . . . . . . . . . . . . . . . . . . . . . . . . . . . . . . . . . . 18Getting to Know the Micro Focus Vibe Interface and Its Features . . . . . . . . . . . . . . . . . . . . . . . . . . . . . . . . . 18
Understanding the Masthead. . . . . . . . . . . . . . . . . . . . . . . . . . . . . . . . . . . . . . . . . . . . . . . . . . . . . . . . . 18Understanding the Navigation Panel . . . . . . . . . . . . . . . . . . . . . . . . . . . . . . . . . . . . . . . . . . . . . . . . . . . 19Understanding the Action Toolbar . . . . . . . . . . . . . . . . . . . . . . . . . . . . . . . . . . . . . . . . . . . . . . . . . . . . . 19Understanding the Relevance Tabs in the Home Page of Your Personal Workspace . . . . . . . . . . . . . 20Understanding the Content Area . . . . . . . . . . . . . . . . . . . . . . . . . . . . . . . . . . . . . . . . . . . . . . . . . . . . . . 21
Setting Up Your Personal Workspace . . . . . . . . . . . . . . . . . . . . . . . . . . . . . . . . . . . . . . . . . . . . . . . . . . . . . . . . 21Modifying Your Profile. . . . . . . . . . . . . . . . . . . . . . . . . . . . . . . . . . . . . . . . . . . . . . . . . . . . . . . . . . . . . . . 21Branding Your Workspace . . . . . . . . . . . . . . . . . . . . . . . . . . . . . . . . . . . . . . . . . . . . . . . . . . . . . . . . . . . . 22
Changing Your Password. . . . . . . . . . . . . . . . . . . . . . . . . . . . . . . . . . . . . . . . . . . . . . . . . . . . . . . . . . . . . . . . . . . 23Creating a Team Workspace. . . . . . . . . . . . . . . . . . . . . . . . . . . . . . . . . . . . . . . . . . . . . . . . . . . . . . . . . . . . . . . . 23Using Micro Focus Vibe Folders . . . . . . . . . . . . . . . . . . . . . . . . . . . . . . . . . . . . . . . . . . . . . . . . . . . . . . . . . . . . . 24
Discussion. . . . . . . . . . . . . . . . . . . . . . . . . . . . . . . . . . . . . . . . . . . . . . . . . . . . . . . . . . . . . . . . . . . . . . . . . 24Blog . . . . . . . . . . . . . . . . . . . . . . . . . . . . . . . . . . . . . . . . . . . . . . . . . . . . . . . . . . . . . . . . . . . . . . . . . . . . . . 24Calendar . . . . . . . . . . . . . . . . . . . . . . . . . . . . . . . . . . . . . . . . . . . . . . . . . . . . . . . . . . . . . . . . . . . . . . . . . . 25Guestbook . . . . . . . . . . . . . . . . . . . . . . . . . . . . . . . . . . . . . . . . . . . . . . . . . . . . . . . . . . . . . . . . . . . . . . . . 25Files . . . . . . . . . . . . . . . . . . . . . . . . . . . . . . . . . . . . . . . . . . . . . . . . . . . . . . . . . . . . . . . . . . . . . . . . . . . . . . 25Milestones . . . . . . . . . . . . . . . . . . . . . . . . . . . . . . . . . . . . . . . . . . . . . . . . . . . . . . . . . . . . . . . . . . . . . . . . 25Micro-Blog . . . . . . . . . . . . . . . . . . . . . . . . . . . . . . . . . . . . . . . . . . . . . . . . . . . . . . . . . . . . . . . . . . . . . . . . 25Mirrored Files. . . . . . . . . . . . . . . . . . . . . . . . . . . . . . . . . . . . . . . . . . . . . . . . . . . . . . . . . . . . . . . . . . . . . . 25Photo Album . . . . . . . . . . . . . . . . . . . . . . . . . . . . . . . . . . . . . . . . . . . . . . . . . . . . . . . . . . . . . . . . . . . . . . 26Surveys . . . . . . . . . . . . . . . . . . . . . . . . . . . . . . . . . . . . . . . . . . . . . . . . . . . . . . . . . . . . . . . . . . . . . . . . . . . 26Tasks . . . . . . . . . . . . . . . . . . . . . . . . . . . . . . . . . . . . . . . . . . . . . . . . . . . . . . . . . . . . . . . . . . . . . . . . . . . . . 26Wiki . . . . . . . . . . . . . . . . . . . . . . . . . . . . . . . . . . . . . . . . . . . . . . . . . . . . . . . . . . . . . . . . . . . . . . . . . . . . . . 26
Displaying Help Documentation . . . . . . . . . . . . . . . . . . . . . . . . . . . . . . . . . . . . . . . . . . . . . . . . . . . . . . . . . . . . 26
2 Navigating the Micro Focus Vibe Interface 27Navigating the Workspace Tree . . . . . . . . . . . . . . . . . . . . . . . . . . . . . . . . . . . . . . . . . . . . . . . . . . . . . . . . . . . . . 27Viewing and Revisiting Recent Places . . . . . . . . . . . . . . . . . . . . . . . . . . . . . . . . . . . . . . . . . . . . . . . . . . . . . . . . 27Viewing and Revisiting Recent Entries . . . . . . . . . . . . . . . . . . . . . . . . . . . . . . . . . . . . . . . . . . . . . . . . . . . . . . . 27Managing Your Favorite Places . . . . . . . . . . . . . . . . . . . . . . . . . . . . . . . . . . . . . . . . . . . . . . . . . . . . . . . . . . . . . 28
Adding a Favorite Place . . . . . . . . . . . . . . . . . . . . . . . . . . . . . . . . . . . . . . . . . . . . . . . . . . . . . . . . . . . . . . 28Accessing Your Favorite Places . . . . . . . . . . . . . . . . . . . . . . . . . . . . . . . . . . . . . . . . . . . . . . . . . . . . . . . . 28Editing Your Favorite Places . . . . . . . . . . . . . . . . . . . . . . . . . . . . . . . . . . . . . . . . . . . . . . . . . . . . . . . . . . 28
Contents 3

4 Con
Accessing Your Teams . . . . . . . . . . . . . . . . . . . . . . . . . . . . . . . . . . . . . . . . . . . . . . . . . . . . . . . . . . . . . . . . . . . . . 28Using Tags . . . . . . . . . . . . . . . . . . . . . . . . . . . . . . . . . . . . . . . . . . . . . . . . . . . . . . . . . . . . . . . . . . . . . . . . . . . . . . 29
Tagging Workspaces or Folders . . . . . . . . . . . . . . . . . . . . . . . . . . . . . . . . . . . . . . . . . . . . . . . . . . . . . . . 29Tagging Entries . . . . . . . . . . . . . . . . . . . . . . . . . . . . . . . . . . . . . . . . . . . . . . . . . . . . . . . . . . . . . . . . . . . . . 29Locating Tagged Items . . . . . . . . . . . . . . . . . . . . . . . . . . . . . . . . . . . . . . . . . . . . . . . . . . . . . . . . . . . . . . . 30Choosing Between Personal Tags and Global Tags . . . . . . . . . . . . . . . . . . . . . . . . . . . . . . . . . . . . . . . . 30
3 Getting Informed 31Accessing Micro Focus Vibe from Your Mobile Device . . . . . . . . . . . . . . . . . . . . . . . . . . . . . . . . . . . . . . . . . . 31Finding What’s New . . . . . . . . . . . . . . . . . . . . . . . . . . . . . . . . . . . . . . . . . . . . . . . . . . . . . . . . . . . . . . . . . . . . . . 32
Viewing New Entries . . . . . . . . . . . . . . . . . . . . . . . . . . . . . . . . . . . . . . . . . . . . . . . . . . . . . . . . . . . . . . . . 32Marking an Entry as Unread . . . . . . . . . . . . . . . . . . . . . . . . . . . . . . . . . . . . . . . . . . . . . . . . . . . . . . . . . . 33Commenting on a New Entry . . . . . . . . . . . . . . . . . . . . . . . . . . . . . . . . . . . . . . . . . . . . . . . . . . . . . . . . . 33Sharing a New Entry . . . . . . . . . . . . . . . . . . . . . . . . . . . . . . . . . . . . . . . . . . . . . . . . . . . . . . . . . . . . . . . . 34Subscribing to a New Entry . . . . . . . . . . . . . . . . . . . . . . . . . . . . . . . . . . . . . . . . . . . . . . . . . . . . . . . . . . . 34Tagging a New Entry . . . . . . . . . . . . . . . . . . . . . . . . . . . . . . . . . . . . . . . . . . . . . . . . . . . . . . . . . . . . . . . . 34Editing and Deleting a New Entry. . . . . . . . . . . . . . . . . . . . . . . . . . . . . . . . . . . . . . . . . . . . . . . . . . . . . . 35Displaying Only Unread Entries . . . . . . . . . . . . . . . . . . . . . . . . . . . . . . . . . . . . . . . . . . . . . . . . . . . . . . . 35Pausing Updates on the What’s New Page . . . . . . . . . . . . . . . . . . . . . . . . . . . . . . . . . . . . . . . . . . . . . . 35Configuring How Many Entries Are Displayed on a Page . . . . . . . . . . . . . . . . . . . . . . . . . . . . . . . . . . . 35
Finding What’s Unread . . . . . . . . . . . . . . . . . . . . . . . . . . . . . . . . . . . . . . . . . . . . . . . . . . . . . . . . . . . . . . . . . . . . 35Searching for Information . . . . . . . . . . . . . . . . . . . . . . . . . . . . . . . . . . . . . . . . . . . . . . . . . . . . . . . . . . . . . . . . . 36
Using Basic Search . . . . . . . . . . . . . . . . . . . . . . . . . . . . . . . . . . . . . . . . . . . . . . . . . . . . . . . . . . . . . . . . . . 36Searching for Specific People, Places, or Tagged Items . . . . . . . . . . . . . . . . . . . . . . . . . . . . . . . . . . . . 39Using Advanced Search . . . . . . . . . . . . . . . . . . . . . . . . . . . . . . . . . . . . . . . . . . . . . . . . . . . . . . . . . . . . . . 40Searching for Items That Have Been Moved to the Trash . . . . . . . . . . . . . . . . . . . . . . . . . . . . . . . . . . 41Saving and Reusing Searches . . . . . . . . . . . . . . . . . . . . . . . . . . . . . . . . . . . . . . . . . . . . . . . . . . . . . . . . . 42Locating a Subject-Matter Expert . . . . . . . . . . . . . . . . . . . . . . . . . . . . . . . . . . . . . . . . . . . . . . . . . . . . . . 43Locating a Relevant Workspace or Folder . . . . . . . . . . . . . . . . . . . . . . . . . . . . . . . . . . . . . . . . . . . . . . . 43
Accessing Shared Files and Folders . . . . . . . . . . . . . . . . . . . . . . . . . . . . . . . . . . . . . . . . . . . . . . . . . . . . . . . . . . 43Accessing Your Personal Files and Folders (My Files). . . . . . . . . . . . . . . . . . . . . . . . . . . . . . . . . . . . . . . . . . . . 43Finding What’s Unread . . . . . . . . . . . . . . . . . . . . . . . . . . . . . . . . . . . . . . . . . . . . . . . . . . . . . . . . . . . . . . . . . . . . 44Accessing Public Files and Folders . . . . . . . . . . . . . . . . . . . . . . . . . . . . . . . . . . . . . . . . . . . . . . . . . . . . . . . . . . . 44Following and Unfollowing Places and People of Interest. . . . . . . . . . . . . . . . . . . . . . . . . . . . . . . . . . . . . . . . 45
Following Workspaces and Folders . . . . . . . . . . . . . . . . . . . . . . . . . . . . . . . . . . . . . . . . . . . . . . . . . . . . 45Following People . . . . . . . . . . . . . . . . . . . . . . . . . . . . . . . . . . . . . . . . . . . . . . . . . . . . . . . . . . . . . . . . . . . 45Viewing the Workspaces, Folders, and People You Are Following. . . . . . . . . . . . . . . . . . . . . . . . . . . . 46Viewing Activity from the Workspaces, Folders, and People You Are Following . . . . . . . . . . . . . . . . 46Unfollowing Workspaces, Folders, or People . . . . . . . . . . . . . . . . . . . . . . . . . . . . . . . . . . . . . . . . . . . . 47
Viewing Recent Contributions . . . . . . . . . . . . . . . . . . . . . . . . . . . . . . . . . . . . . . . . . . . . . . . . . . . . . . . . . . . . . . 48Viewing Assigned Tasks . . . . . . . . . . . . . . . . . . . . . . . . . . . . . . . . . . . . . . . . . . . . . . . . . . . . . . . . . . . . . . . . . . . 48Viewing Calendar Events . . . . . . . . . . . . . . . . . . . . . . . . . . . . . . . . . . . . . . . . . . . . . . . . . . . . . . . . . . . . . . . . . . 49Sharing Workspaces, Folders, and Entries . . . . . . . . . . . . . . . . . . . . . . . . . . . . . . . . . . . . . . . . . . . . . . . . . . . . 49Using Micro-Blogs . . . . . . . . . . . . . . . . . . . . . . . . . . . . . . . . . . . . . . . . . . . . . . . . . . . . . . . . . . . . . . . . . . . . . . . . 49
Posting a Micro-Blog . . . . . . . . . . . . . . . . . . . . . . . . . . . . . . . . . . . . . . . . . . . . . . . . . . . . . . . . . . . . . . . . 49Viewing the Micro-Blog Entries of People You Are Following . . . . . . . . . . . . . . . . . . . . . . . . . . . . . . . 50Viewing the Micro-Blog Entries of Vibe Users You Are Not Following . . . . . . . . . . . . . . . . . . . . . . . . 50
Subscribing to a Folder or Entry. . . . . . . . . . . . . . . . . . . . . . . . . . . . . . . . . . . . . . . . . . . . . . . . . . . . . . . . . . . . . 51Subscribing to a Folder . . . . . . . . . . . . . . . . . . . . . . . . . . . . . . . . . . . . . . . . . . . . . . . . . . . . . . . . . . . . . . 52Subscribing to an Entry . . . . . . . . . . . . . . . . . . . . . . . . . . . . . . . . . . . . . . . . . . . . . . . . . . . . . . . . . . . . . . 52Selecting Notification Types and Delivery Destinations . . . . . . . . . . . . . . . . . . . . . . . . . . . . . . . . . . . . 52Adding and Modifying Delivery Destinations . . . . . . . . . . . . . . . . . . . . . . . . . . . . . . . . . . . . . . . . . . . . 53
tents

Overriding Higher-Level Notification Settings . . . . . . . . . . . . . . . . . . . . . . . . . . . . . . . . . . . . . . . . . . . . 53Using Remote Applications . . . . . . . . . . . . . . . . . . . . . . . . . . . . . . . . . . . . . . . . . . . . . . . . . . . . . . . . . . . . . . . . 53Viewing Live Feeds . . . . . . . . . . . . . . . . . . . . . . . . . . . . . . . . . . . . . . . . . . . . . . . . . . . . . . . . . . . . . . . . . . . . . . . 54
Setting Up a Live Feed . . . . . . . . . . . . . . . . . . . . . . . . . . . . . . . . . . . . . . . . . . . . . . . . . . . . . . . . . . . . . . . 54Viewing New Entries in Your Live Feed . . . . . . . . . . . . . . . . . . . . . . . . . . . . . . . . . . . . . . . . . . . . . . . . . 54Using the Notification Area to View the Number of New Entries . . . . . . . . . . . . . . . . . . . . . . . . . . . . 55Displaying a News Feed in the GroupWise Client . . . . . . . . . . . . . . . . . . . . . . . . . . . . . . . . . . . . . . . . . 55
Viewing Folders as RSS or Atom Feeds . . . . . . . . . . . . . . . . . . . . . . . . . . . . . . . . . . . . . . . . . . . . . . . . . . . . . . . 55Synchronizing Tasks and Calendars to a Desktop Application . . . . . . . . . . . . . . . . . . . . . . . . . . . . . . . . . . . . . 55
Synchronizing Tasks Folders and Calendar Folders . . . . . . . . . . . . . . . . . . . . . . . . . . . . . . . . . . . . . . . . 55Synchronizing Task and Calendar Items When Entries Are Created . . . . . . . . . . . . . . . . . . . . . . . . . . 56
4 Sharing Entries, Folders, and Workspaces 57Understanding Shared-Access Rights . . . . . . . . . . . . . . . . . . . . . . . . . . . . . . . . . . . . . . . . . . . . . . . . . . . . . . . . 57Understanding Sharing Options. . . . . . . . . . . . . . . . . . . . . . . . . . . . . . . . . . . . . . . . . . . . . . . . . . . . . . . . . . . . . 58Sharing Entries, Folders, and Workspaces . . . . . . . . . . . . . . . . . . . . . . . . . . . . . . . . . . . . . . . . . . . . . . . . . . . . 58Distributing a Link to a File . . . . . . . . . . . . . . . . . . . . . . . . . . . . . . . . . . . . . . . . . . . . . . . . . . . . . . . . . . . . . . . . . 60
Copying a File Link . . . . . . . . . . . . . . . . . . . . . . . . . . . . . . . . . . . . . . . . . . . . . . . . . . . . . . . . . . . . . . . . . . 61Emailing a File Link. . . . . . . . . . . . . . . . . . . . . . . . . . . . . . . . . . . . . . . . . . . . . . . . . . . . . . . . . . . . . . . . . . 61Editing or Removing a File Link. . . . . . . . . . . . . . . . . . . . . . . . . . . . . . . . . . . . . . . . . . . . . . . . . . . . . . . . 62
Sharing with People Outside Your Organization. . . . . . . . . . . . . . . . . . . . . . . . . . . . . . . . . . . . . . . . . . . . . . . . 62Logging in As an External User to See a Shared Item . . . . . . . . . . . . . . . . . . . . . . . . . . . . . . . . . . . . . . 63Making Files Accessible to the Public. . . . . . . . . . . . . . . . . . . . . . . . . . . . . . . . . . . . . . . . . . . . . . . . . . . 63
Viewing Items You Have Shared. . . . . . . . . . . . . . . . . . . . . . . . . . . . . . . . . . . . . . . . . . . . . . . . . . . . . . . . . . . . . 64Viewing Items Others Have Shared with You . . . . . . . . . . . . . . . . . . . . . . . . . . . . . . . . . . . . . . . . . . . . . . . . . . 64Hiding Items in the Shared with Me and Shared by Me Views . . . . . . . . . . . . . . . . . . . . . . . . . . . . . . . . . . . . 65
Hiding Shared Items . . . . . . . . . . . . . . . . . . . . . . . . . . . . . . . . . . . . . . . . . . . . . . . . . . . . . . . . . . . . . . . . 65Displaying Hidden Items . . . . . . . . . . . . . . . . . . . . . . . . . . . . . . . . . . . . . . . . . . . . . . . . . . . . . . . . . . . . . 65Displaying Only Hidden Items. . . . . . . . . . . . . . . . . . . . . . . . . . . . . . . . . . . . . . . . . . . . . . . . . . . . . . . . . 65
Modifying or Removing a Share. . . . . . . . . . . . . . . . . . . . . . . . . . . . . . . . . . . . . . . . . . . . . . . . . . . . . . . . . . . . . 66Obtaining URLs (Permalinks) of Shared Entries, Folders, and Workspaces . . . . . . . . . . . . . . . . . . . . . . . . . . 67
5 Managing and Using Workspaces 69General Workspace Management . . . . . . . . . . . . . . . . . . . . . . . . . . . . . . . . . . . . . . . . . . . . . . . . . . . . . . . . . . . 69
Creating a New Workspace . . . . . . . . . . . . . . . . . . . . . . . . . . . . . . . . . . . . . . . . . . . . . . . . . . . . . . . . . . . 70Sharing a Workspace . . . . . . . . . . . . . . . . . . . . . . . . . . . . . . . . . . . . . . . . . . . . . . . . . . . . . . . . . . . . . . . . 70Modifying a Workspace. . . . . . . . . . . . . . . . . . . . . . . . . . . . . . . . . . . . . . . . . . . . . . . . . . . . . . . . . . . . . . 70Deleting a Workspace . . . . . . . . . . . . . . . . . . . . . . . . . . . . . . . . . . . . . . . . . . . . . . . . . . . . . . . . . . . . . . . 71Recovering a Workspace from the Trash . . . . . . . . . . . . . . . . . . . . . . . . . . . . . . . . . . . . . . . . . . . . . . . . 71Copying a Workspace . . . . . . . . . . . . . . . . . . . . . . . . . . . . . . . . . . . . . . . . . . . . . . . . . . . . . . . . . . . . . . . 72Moving a Workspace . . . . . . . . . . . . . . . . . . . . . . . . . . . . . . . . . . . . . . . . . . . . . . . . . . . . . . . . . . . . . . . . 72Adding a Sub-Workspace . . . . . . . . . . . . . . . . . . . . . . . . . . . . . . . . . . . . . . . . . . . . . . . . . . . . . . . . . . . . 72Adding Additional Folders to a Workspace . . . . . . . . . . . . . . . . . . . . . . . . . . . . . . . . . . . . . . . . . . . . . . 73Generating Activity Reports for a Workspace . . . . . . . . . . . . . . . . . . . . . . . . . . . . . . . . . . . . . . . . . . . . 73Configuring Sharing Rights for a Workspace . . . . . . . . . . . . . . . . . . . . . . . . . . . . . . . . . . . . . . . . . . . . . 74Defining a User-Friendly URL for a Workspace or Folder . . . . . . . . . . . . . . . . . . . . . . . . . . . . . . . . . . . 75Setting a Data Quota for a Workspace. . . . . . . . . . . . . . . . . . . . . . . . . . . . . . . . . . . . . . . . . . . . . . . . . . 75Customizing the Workspace View . . . . . . . . . . . . . . . . . . . . . . . . . . . . . . . . . . . . . . . . . . . . . . . . . . . . . 75Branding a Workspace. . . . . . . . . . . . . . . . . . . . . . . . . . . . . . . . . . . . . . . . . . . . . . . . . . . . . . . . . . . . . . . 76Displaying YouTube Videos in a Workspace. . . . . . . . . . . . . . . . . . . . . . . . . . . . . . . . . . . . . . . . . . . . . . 76
Managing Your Personal Workspace . . . . . . . . . . . . . . . . . . . . . . . . . . . . . . . . . . . . . . . . . . . . . . . . . . . . . . . . . 76
Contents 5

6 Con
Using the What’s New Tab . . . . . . . . . . . . . . . . . . . . . . . . . . . . . . . . . . . . . . . . . . . . . . . . . . . . . . . . . . . 77Viewing Recently Posted and Recently Visited Entries . . . . . . . . . . . . . . . . . . . . . . . . . . . . . . . . . . . . . 77Using the Tasks and Calendars Tab. . . . . . . . . . . . . . . . . . . . . . . . . . . . . . . . . . . . . . . . . . . . . . . . . . . . . 77Using the Accessories Tab . . . . . . . . . . . . . . . . . . . . . . . . . . . . . . . . . . . . . . . . . . . . . . . . . . . . . . . . . . . . 78Viewing Your Profile Information . . . . . . . . . . . . . . . . . . . . . . . . . . . . . . . . . . . . . . . . . . . . . . . . . . . . . . 78
Managing a Team Workspace . . . . . . . . . . . . . . . . . . . . . . . . . . . . . . . . . . . . . . . . . . . . . . . . . . . . . . . . . . . . . . 78Creating a Team Workspace . . . . . . . . . . . . . . . . . . . . . . . . . . . . . . . . . . . . . . . . . . . . . . . . . . . . . . . . . . 78Adding Additional Team Members to Your Workspace . . . . . . . . . . . . . . . . . . . . . . . . . . . . . . . . . . . . 80Sending Email to Team Members and Announcing the Workspace after Its Creation . . . . . . . . . . . 80Viewing Team Members . . . . . . . . . . . . . . . . . . . . . . . . . . . . . . . . . . . . . . . . . . . . . . . . . . . . . . . . . . . . . 80Allowing Visitors to Your Team Workspace . . . . . . . . . . . . . . . . . . . . . . . . . . . . . . . . . . . . . . . . . . . . . . 81
Managing a Discussions Workspace . . . . . . . . . . . . . . . . . . . . . . . . . . . . . . . . . . . . . . . . . . . . . . . . . . . . . . . . . 81Managing a Project Management Workspace . . . . . . . . . . . . . . . . . . . . . . . . . . . . . . . . . . . . . . . . . . . . . . . . . 81Managing a Landing Page. . . . . . . . . . . . . . . . . . . . . . . . . . . . . . . . . . . . . . . . . . . . . . . . . . . . . . . . . . . . . . . . . . 82Understanding Global Workspaces . . . . . . . . . . . . . . . . . . . . . . . . . . . . . . . . . . . . . . . . . . . . . . . . . . . . . . . . . . 82
6 Managing and Using Folders 83Creating a New Folder . . . . . . . . . . . . . . . . . . . . . . . . . . . . . . . . . . . . . . . . . . . . . . . . . . . . . . . . . . . . . . . . . . . . 83Sharing a Folder . . . . . . . . . . . . . . . . . . . . . . . . . . . . . . . . . . . . . . . . . . . . . . . . . . . . . . . . . . . . . . . . . . . . . . . . . 84Modifying a Folder . . . . . . . . . . . . . . . . . . . . . . . . . . . . . . . . . . . . . . . . . . . . . . . . . . . . . . . . . . . . . . . . . . . . . . . 84Deleting a Folder . . . . . . . . . . . . . . . . . . . . . . . . . . . . . . . . . . . . . . . . . . . . . . . . . . . . . . . . . . . . . . . . . . . . . . . . . 84Recovering a Folder from the Trash. . . . . . . . . . . . . . . . . . . . . . . . . . . . . . . . . . . . . . . . . . . . . . . . . . . . . . . . . . 85Copying a Folder . . . . . . . . . . . . . . . . . . . . . . . . . . . . . . . . . . . . . . . . . . . . . . . . . . . . . . . . . . . . . . . . . . . . . . . . . 85Moving a Folder . . . . . . . . . . . . . . . . . . . . . . . . . . . . . . . . . . . . . . . . . . . . . . . . . . . . . . . . . . . . . . . . . . . . . . . . . 86Importing Files into a Folder . . . . . . . . . . . . . . . . . . . . . . . . . . . . . . . . . . . . . . . . . . . . . . . . . . . . . . . . . . . . . . . 86
Dragging and Dropping Files . . . . . . . . . . . . . . . . . . . . . . . . . . . . . . . . . . . . . . . . . . . . . . . . . . . . . . . . . . 86Dragging and Dropping Folders . . . . . . . . . . . . . . . . . . . . . . . . . . . . . . . . . . . . . . . . . . . . . . . . . . . . . . . 87Importing Files into the Files Folder by Creating a Folder Entry . . . . . . . . . . . . . . . . . . . . . . . . . . . . . 87Importing Files as Entry Attachments . . . . . . . . . . . . . . . . . . . . . . . . . . . . . . . . . . . . . . . . . . . . . . . . . . 87
Downloading the Information for a Folder as a CSV File . . . . . . . . . . . . . . . . . . . . . . . . . . . . . . . . . . . . . . . . . 87Generating an Activity Report on a Folder . . . . . . . . . . . . . . . . . . . . . . . . . . . . . . . . . . . . . . . . . . . . . . . . . . . . 87
Generating a User Activity Report . . . . . . . . . . . . . . . . . . . . . . . . . . . . . . . . . . . . . . . . . . . . . . . . . . . . . 88Generating an Entry Access Activity Report . . . . . . . . . . . . . . . . . . . . . . . . . . . . . . . . . . . . . . . . . . . . . 88
Subscribing to Email Notifications from a Folder . . . . . . . . . . . . . . . . . . . . . . . . . . . . . . . . . . . . . . . . . . . . . . . 89Setting Up a Folder to Receive Entries Via Email . . . . . . . . . . . . . . . . . . . . . . . . . . . . . . . . . . . . . . . . . . . . . . . 89Adding Entries to a Folder Via Email . . . . . . . . . . . . . . . . . . . . . . . . . . . . . . . . . . . . . . . . . . . . . . . . . . . . . . . . . 89Configuring Folder Columns. . . . . . . . . . . . . . . . . . . . . . . . . . . . . . . . . . . . . . . . . . . . . . . . . . . . . . . . . . . . . . . . 90
Showing and Hiding Columns . . . . . . . . . . . . . . . . . . . . . . . . . . . . . . . . . . . . . . . . . . . . . . . . . . . . . . . . . 90Renaming Columns . . . . . . . . . . . . . . . . . . . . . . . . . . . . . . . . . . . . . . . . . . . . . . . . . . . . . . . . . . . . . . . . . 91Reordering Columns . . . . . . . . . . . . . . . . . . . . . . . . . . . . . . . . . . . . . . . . . . . . . . . . . . . . . . . . . . . . . . . . 91Adjusting the Column Width . . . . . . . . . . . . . . . . . . . . . . . . . . . . . . . . . . . . . . . . . . . . . . . . . . . . . . . . . 91Restoring Column Defaults . . . . . . . . . . . . . . . . . . . . . . . . . . . . . . . . . . . . . . . . . . . . . . . . . . . . . . . . . . . 92
Changing the Folder View . . . . . . . . . . . . . . . . . . . . . . . . . . . . . . . . . . . . . . . . . . . . . . . . . . . . . . . . . . . . . . . . . 92Configuring the Number of Entries to Display on a Folder Page. . . . . . . . . . . . . . . . . . . . . . . . . . . . . . . . . . . 92Branding a Folder . . . . . . . . . . . . . . . . . . . . . . . . . . . . . . . . . . . . . . . . . . . . . . . . . . . . . . . . . . . . . . . . . . . . . . . . 93Setting a Data Quota for a Folder . . . . . . . . . . . . . . . . . . . . . . . . . . . . . . . . . . . . . . . . . . . . . . . . . . . . . . . . . . . 93Displaying YouTube Videos in a Folder . . . . . . . . . . . . . . . . . . . . . . . . . . . . . . . . . . . . . . . . . . . . . . . . . . . . . . . 93Using Filters on Folders. . . . . . . . . . . . . . . . . . . . . . . . . . . . . . . . . . . . . . . . . . . . . . . . . . . . . . . . . . . . . . . . . . . . 93
Creating a Filter . . . . . . . . . . . . . . . . . . . . . . . . . . . . . . . . . . . . . . . . . . . . . . . . . . . . . . . . . . . . . . . . . . . . 94Applying an Existing Filter . . . . . . . . . . . . . . . . . . . . . . . . . . . . . . . . . . . . . . . . . . . . . . . . . . . . . . . . . . . . 94Modifying a Filter. . . . . . . . . . . . . . . . . . . . . . . . . . . . . . . . . . . . . . . . . . . . . . . . . . . . . . . . . . . . . . . . . . . 94
tents

Copying a Filter . . . . . . . . . . . . . . . . . . . . . . . . . . . . . . . . . . . . . . . . . . . . . . . . . . . . . . . . . . . . . . . . . . . . 94Deleting a Filter . . . . . . . . . . . . . . . . . . . . . . . . . . . . . . . . . . . . . . . . . . . . . . . . . . . . . . . . . . . . . . . . . . . . 95
Listing Folder Entries and Pages. . . . . . . . . . . . . . . . . . . . . . . . . . . . . . . . . . . . . . . . . . . . . . . . . . . . . . . . . . . . . 95
7 Working with Specific Folder Types 97Working with Discussion Folders . . . . . . . . . . . . . . . . . . . . . . . . . . . . . . . . . . . . . . . . . . . . . . . . . . . . . . . . . . . . 97
Sorting Discussion Entries by Column Title . . . . . . . . . . . . . . . . . . . . . . . . . . . . . . . . . . . . . . . . . . . . . . 98Pinning Discussion Entries . . . . . . . . . . . . . . . . . . . . . . . . . . . . . . . . . . . . . . . . . . . . . . . . . . . . . . . . . . . 98Viewing Discussion Entries . . . . . . . . . . . . . . . . . . . . . . . . . . . . . . . . . . . . . . . . . . . . . . . . . . . . . . . . . . . 98Customizing Columns in Discussions Folders . . . . . . . . . . . . . . . . . . . . . . . . . . . . . . . . . . . . . . . . . . . . 98
Working with Blog Folders . . . . . . . . . . . . . . . . . . . . . . . . . . . . . . . . . . . . . . . . . . . . . . . . . . . . . . . . . . . . . . . . . 98Using the Blog Toolbar . . . . . . . . . . . . . . . . . . . . . . . . . . . . . . . . . . . . . . . . . . . . . . . . . . . . . . . . . . . . . . 99Organizing Your Blog Folder . . . . . . . . . . . . . . . . . . . . . . . . . . . . . . . . . . . . . . . . . . . . . . . . . . . . . . . . . . 99
Working with Calendar Folders . . . . . . . . . . . . . . . . . . . . . . . . . . . . . . . . . . . . . . . . . . . . . . . . . . . . . . . . . . . .100Changing the View of Your Calendar Folder . . . . . . . . . . . . . . . . . . . . . . . . . . . . . . . . . . . . . . . . . . . .100Viewing All Calendar Events for Which You Are Scheduled . . . . . . . . . . . . . . . . . . . . . . . . . . . . . . . .101Synchronizing Vibe Calendars of Your Choice . . . . . . . . . . . . . . . . . . . . . . . . . . . . . . . . . . . . . . . . . . .101Viewing Today’s Calendar Items from All of the Calendars You Are Following. . . . . . . . . . . . . . . . .102Synchronizing Your Calendar with a Desktop Application . . . . . . . . . . . . . . . . . . . . . . . . . . . . . . . . .102Configuring a Landing Page to Display All Calendar Events Assigned to the User Who Views the Page . . . . . . . . . . . . . . . . . . . . . . . . . . . . . . . . . . . . . . . . . . . . . . . . . . . . . . . . . . . . . . . . . . . . . . . . .102Importing Calendars . . . . . . . . . . . . . . . . . . . . . . . . . . . . . . . . . . . . . . . . . . . . . . . . . . . . . . . . . . . . . . .103
Working with Guestbook Folders . . . . . . . . . . . . . . . . . . . . . . . . . . . . . . . . . . . . . . . . . . . . . . . . . . . . . . . . . .103Working with Files Folders . . . . . . . . . . . . . . . . . . . . . . . . . . . . . . . . . . . . . . . . . . . . . . . . . . . . . . . . . . . . . . . .104
Adding Files to a Files Folder and Other WebDAV-Enabled Folders . . . . . . . . . . . . . . . . . . . . . . . . .104Customizing Columns in Files Folders . . . . . . . . . . . . . . . . . . . . . . . . . . . . . . . . . . . . . . . . . . . . . . . . .105
Working with Milestones Folders . . . . . . . . . . . . . . . . . . . . . . . . . . . . . . . . . . . . . . . . . . . . . . . . . . . . . . . . . .105Working with Micro-Blog Folders . . . . . . . . . . . . . . . . . . . . . . . . . . . . . . . . . . . . . . . . . . . . . . . . . . . . . . . . . .105Working with Mirrored Files Folders . . . . . . . . . . . . . . . . . . . . . . . . . . . . . . . . . . . . . . . . . . . . . . . . . . . . . . . .105Working with Photo Album Folders. . . . . . . . . . . . . . . . . . . . . . . . . . . . . . . . . . . . . . . . . . . . . . . . . . . . . . . . .106
Organizing Your Photo Album. . . . . . . . . . . . . . . . . . . . . . . . . . . . . . . . . . . . . . . . . . . . . . . . . . . . . . . .106Synchronizing Photo Albums . . . . . . . . . . . . . . . . . . . . . . . . . . . . . . . . . . . . . . . . . . . . . . . . . . . . . . . .107Viewing and Managing Photo Entries . . . . . . . . . . . . . . . . . . . . . . . . . . . . . . . . . . . . . . . . . . . . . . . . .108
Working with Surveys Folders . . . . . . . . . . . . . . . . . . . . . . . . . . . . . . . . . . . . . . . . . . . . . . . . . . . . . . . . . . . . .108Participating in a Survey . . . . . . . . . . . . . . . . . . . . . . . . . . . . . . . . . . . . . . . . . . . . . . . . . . . . . . . . . . . .108Creating a Survey . . . . . . . . . . . . . . . . . . . . . . . . . . . . . . . . . . . . . . . . . . . . . . . . . . . . . . . . . . . . . . . . . .108Modifying a Survey . . . . . . . . . . . . . . . . . . . . . . . . . . . . . . . . . . . . . . . . . . . . . . . . . . . . . . . . . . . . . . . .110Checking the Results of a Survey . . . . . . . . . . . . . . . . . . . . . . . . . . . . . . . . . . . . . . . . . . . . . . . . . . . . .110
Working with Tasks Folders . . . . . . . . . . . . . . . . . . . . . . . . . . . . . . . . . . . . . . . . . . . . . . . . . . . . . . . . . . . . . . .110Sorting Tasks in Your Tasks Folder by Task Characteristics . . . . . . . . . . . . . . . . . . . . . . . . . . . . . . . . .111Filtering the Task List . . . . . . . . . . . . . . . . . . . . . . . . . . . . . . . . . . . . . . . . . . . . . . . . . . . . . . . . . . . . . . .111Modifying Tasks in the Task List . . . . . . . . . . . . . . . . . . . . . . . . . . . . . . . . . . . . . . . . . . . . . . . . . . . . . .111Creating Tasks in a Specific Location in the Task List. . . . . . . . . . . . . . . . . . . . . . . . . . . . . . . . . . . . . .112Creating Linked Tasks. . . . . . . . . . . . . . . . . . . . . . . . . . . . . . . . . . . . . . . . . . . . . . . . . . . . . . . . . . . . . . .112Changing the Order of Tasks . . . . . . . . . . . . . . . . . . . . . . . . . . . . . . . . . . . . . . . . . . . . . . . . . . . . . . . . .113Managing Sub-Tasks . . . . . . . . . . . . . . . . . . . . . . . . . . . . . . . . . . . . . . . . . . . . . . . . . . . . . . . . . . . . . . .114Synchronizing the Vibe Tasks Folders of Your Choice . . . . . . . . . . . . . . . . . . . . . . . . . . . . . . . . . . . . .116Changing the View of Your Tasks Folder . . . . . . . . . . . . . . . . . . . . . . . . . . . . . . . . . . . . . . . . . . . . . . .117Viewing All Tasks That Are Assigned to You. . . . . . . . . . . . . . . . . . . . . . . . . . . . . . . . . . . . . . . . . . . . .117Viewing All Tasks That Are Assigned to a Specific Team, Group, or Individual User . . . . . . . . . . . .118Configuring a Landing Page to Display All Tasks Assigned to the User Who Views the Page . . . . .119Importing Tasks . . . . . . . . . . . . . . . . . . . . . . . . . . . . . . . . . . . . . . . . . . . . . . . . . . . . . . . . . . . . . . . . . . .119
Working with Wiki Folders . . . . . . . . . . . . . . . . . . . . . . . . . . . . . . . . . . . . . . . . . . . . . . . . . . . . . . . . . . . . . . . .120
Contents 7

8 Con
Organizing Your Wiki Folder . . . . . . . . . . . . . . . . . . . . . . . . . . . . . . . . . . . . . . . . . . . . . . . . . . . . . . . . .120Creating a New Wiki Topic . . . . . . . . . . . . . . . . . . . . . . . . . . . . . . . . . . . . . . . . . . . . . . . . . . . . . . . . . .122Creating a New Wiki Page . . . . . . . . . . . . . . . . . . . . . . . . . . . . . . . . . . . . . . . . . . . . . . . . . . . . . . . . . . .122Using the Wiki Home Page . . . . . . . . . . . . . . . . . . . . . . . . . . . . . . . . . . . . . . . . . . . . . . . . . . . . . . . . . .123Sorting Wiki Pages . . . . . . . . . . . . . . . . . . . . . . . . . . . . . . . . . . . . . . . . . . . . . . . . . . . . . . . . . . . . . . . . .123Finding a Wiki Page . . . . . . . . . . . . . . . . . . . . . . . . . . . . . . . . . . . . . . . . . . . . . . . . . . . . . . . . . . . . . . . .124Formatting Your Wiki Page . . . . . . . . . . . . . . . . . . . . . . . . . . . . . . . . . . . . . . . . . . . . . . . . . . . . . . . . . .124
Creating Folder Content . . . . . . . . . . . . . . . . . . . . . . . . . . . . . . . . . . . . . . . . . . . . . . . . . . . . . . . . . . . . . . . . . .125
8 Working with Folder Entries 127Creating a Folder Entry . . . . . . . . . . . . . . . . . . . . . . . . . . . . . . . . . . . . . . . . . . . . . . . . . . . . . . . . . . . . . . . . . . .128
Filling In the Entry Form . . . . . . . . . . . . . . . . . . . . . . . . . . . . . . . . . . . . . . . . . . . . . . . . . . . . . . . . . . . .128Composing an Entry Description . . . . . . . . . . . . . . . . . . . . . . . . . . . . . . . . . . . . . . . . . . . . . . . . . . . . .129
Linking to a Folder or Folder Entry . . . . . . . . . . . . . . . . . . . . . . . . . . . . . . . . . . . . . . . . . . . . . . . . . . . . . . . . .130Linking to an Entry in the Current Folder. . . . . . . . . . . . . . . . . . . . . . . . . . . . . . . . . . . . . . . . . . . . . . .130Linking to Another Folder or an Entry in Another Folder . . . . . . . . . . . . . . . . . . . . . . . . . . . . . . . . . .130Linking to an External Page on the Web . . . . . . . . . . . . . . . . . . . . . . . . . . . . . . . . . . . . . . . . . . . . . . .131
Commenting on a Folder Entry . . . . . . . . . . . . . . . . . . . . . . . . . . . . . . . . . . . . . . . . . . . . . . . . . . . . . . . . . . . .131Sharing a Folder Entry. . . . . . . . . . . . . . . . . . . . . . . . . . . . . . . . . . . . . . . . . . . . . . . . . . . . . . . . . . . . . . . . . . . .131Modifying a Folder Entry . . . . . . . . . . . . . . . . . . . . . . . . . . . . . . . . . . . . . . . . . . . . . . . . . . . . . . . . . . . . . . . . .132
Modifying All Sections of an Entry . . . . . . . . . . . . . . . . . . . . . . . . . . . . . . . . . . . . . . . . . . . . . . . . . . . .132Modifying the Description Section of an Entry . . . . . . . . . . . . . . . . . . . . . . . . . . . . . . . . . . . . . . . . . .132
Reserving a Folder Entry. . . . . . . . . . . . . . . . . . . . . . . . . . . . . . . . . . . . . . . . . . . . . . . . . . . . . . . . . . . . . . . . . .132Moving a Folder Entry . . . . . . . . . . . . . . . . . . . . . . . . . . . . . . . . . . . . . . . . . . . . . . . . . . . . . . . . . . . . . . . . . . .133
Moving a Single Entry . . . . . . . . . . . . . . . . . . . . . . . . . . . . . . . . . . . . . . . . . . . . . . . . . . . . . . . . . . . . . .133Moving Multiple Entries . . . . . . . . . . . . . . . . . . . . . . . . . . . . . . . . . . . . . . . . . . . . . . . . . . . . . . . . . . . .133
Copying a Folder Entry . . . . . . . . . . . . . . . . . . . . . . . . . . . . . . . . . . . . . . . . . . . . . . . . . . . . . . . . . . . . . . . . . . .134Copying a Single Entry . . . . . . . . . . . . . . . . . . . . . . . . . . . . . . . . . . . . . . . . . . . . . . . . . . . . . . . . . . . . . .134Copying Multiple Entries . . . . . . . . . . . . . . . . . . . . . . . . . . . . . . . . . . . . . . . . . . . . . . . . . . . . . . . . . . . .134
Deleting a Folder Entry . . . . . . . . . . . . . . . . . . . . . . . . . . . . . . . . . . . . . . . . . . . . . . . . . . . . . . . . . . . . . . . . . . .134Deleting a Single Entry . . . . . . . . . . . . . . . . . . . . . . . . . . . . . . . . . . . . . . . . . . . . . . . . . . . . . . . . . . . . .135Deleting Multiple Entries . . . . . . . . . . . . . . . . . . . . . . . . . . . . . . . . . . . . . . . . . . . . . . . . . . . . . . . . . . .135
Recovering a Folder Entry from the Trash. . . . . . . . . . . . . . . . . . . . . . . . . . . . . . . . . . . . . . . . . . . . . . . . . . . .136Marking a Folder Entry as Read . . . . . . . . . . . . . . . . . . . . . . . . . . . . . . . . . . . . . . . . . . . . . . . . . . . . . . . . . . . .136
Marking an Individual Entry as Read . . . . . . . . . . . . . . . . . . . . . . . . . . . . . . . . . . . . . . . . . . . . . . . . . .136Marking All Entries in a Folder as Read . . . . . . . . . . . . . . . . . . . . . . . . . . . . . . . . . . . . . . . . . . . . . . . .136
Marking a Folder Entry as Unread . . . . . . . . . . . . . . . . . . . . . . . . . . . . . . . . . . . . . . . . . . . . . . . . . . . . . . . . . .137Marking an Individual Entry as Unread . . . . . . . . . . . . . . . . . . . . . . . . . . . . . . . . . . . . . . . . . . . . . . . .137Marking All Entries in a Folder as Unread . . . . . . . . . . . . . . . . . . . . . . . . . . . . . . . . . . . . . . . . . . . . . .137
Notifying Others about a Folder Entry . . . . . . . . . . . . . . . . . . . . . . . . . . . . . . . . . . . . . . . . . . . . . . . . . . . . . .137Sharing an Entry. . . . . . . . . . . . . . . . . . . . . . . . . . . . . . . . . . . . . . . . . . . . . . . . . . . . . . . . . . . . . . . . . . .137Sending an Email about an Entry . . . . . . . . . . . . . . . . . . . . . . . . . . . . . . . . . . . . . . . . . . . . . . . . . . . . .137
Subscribing to a Folder Entry . . . . . . . . . . . . . . . . . . . . . . . . . . . . . . . . . . . . . . . . . . . . . . . . . . . . . . . . . . . . . .138Tagging a Folder Entry . . . . . . . . . . . . . . . . . . . . . . . . . . . . . . . . . . . . . . . . . . . . . . . . . . . . . . . . . . . . . . . . . . .139Working with Files in a Folder Entry . . . . . . . . . . . . . . . . . . . . . . . . . . . . . . . . . . . . . . . . . . . . . . . . . . . . . . . .139
Creating a File Entry. . . . . . . . . . . . . . . . . . . . . . . . . . . . . . . . . . . . . . . . . . . . . . . . . . . . . . . . . . . . . . . .140Attaching Files to a Folder Entry. . . . . . . . . . . . . . . . . . . . . . . . . . . . . . . . . . . . . . . . . . . . . . . . . . . . . .140Viewing Files in Read-Only Mode. . . . . . . . . . . . . . . . . . . . . . . . . . . . . . . . . . . . . . . . . . . . . . . . . . . . .141Editing Files Accessed through a Web Browser. . . . . . . . . . . . . . . . . . . . . . . . . . . . . . . . . . . . . . . . . .142Editing Vibe Files Directly in Microsoft Office . . . . . . . . . . . . . . . . . . . . . . . . . . . . . . . . . . . . . . . . . . .142Editing Files Synchronized on Your Desktop . . . . . . . . . . . . . . . . . . . . . . . . . . . . . . . . . . . . . . . . . . . .142Downloading Files . . . . . . . . . . . . . . . . . . . . . . . . . . . . . . . . . . . . . . . . . . . . . . . . . . . . . . . . . . . . . . . . .142
tents

Obtaining the WebDAV URL for a File . . . . . . . . . . . . . . . . . . . . . . . . . . . . . . . . . . . . . . . . . . . . . . . . .143Adding a Note about a File or File Version. . . . . . . . . . . . . . . . . . . . . . . . . . . . . . . . . . . . . . . . . . . . . .144Setting the File Status . . . . . . . . . . . . . . . . . . . . . . . . . . . . . . . . . . . . . . . . . . . . . . . . . . . . . . . . . . . . . .144Using Version Control with Files . . . . . . . . . . . . . . . . . . . . . . . . . . . . . . . . . . . . . . . . . . . . . . . . . . . . . .144
Viewing the History of an Entry . . . . . . . . . . . . . . . . . . . . . . . . . . . . . . . . . . . . . . . . . . . . . . . . . . . . . . . . . . . .147Viewing Previous Versions of an Entry. . . . . . . . . . . . . . . . . . . . . . . . . . . . . . . . . . . . . . . . . . . . . . . . .147Comparing Versions of an Entry . . . . . . . . . . . . . . . . . . . . . . . . . . . . . . . . . . . . . . . . . . . . . . . . . . . . . .148Reverting an Entry to a Previous Version. . . . . . . . . . . . . . . . . . . . . . . . . . . . . . . . . . . . . . . . . . . . . . .148
Generating Reports about a Folder Entry . . . . . . . . . . . . . . . . . . . . . . . . . . . . . . . . . . . . . . . . . . . . . . . . . . . .148Generating Activity Reports . . . . . . . . . . . . . . . . . . . . . . . . . . . . . . . . . . . . . . . . . . . . . . . . . . . . . . . . .148Generating Workflow History Reports . . . . . . . . . . . . . . . . . . . . . . . . . . . . . . . . . . . . . . . . . . . . . . . . .149
Displaying YouTube Videos in a Folder Entry . . . . . . . . . . . . . . . . . . . . . . . . . . . . . . . . . . . . . . . . . . . . . . . . .149Displaying Images in a Folder Entry. . . . . . . . . . . . . . . . . . . . . . . . . . . . . . . . . . . . . . . . . . . . . . . . . . . . . . . . .150Rating a Folder Entry . . . . . . . . . . . . . . . . . . . . . . . . . . . . . . . . . . . . . . . . . . . . . . . . . . . . . . . . . . . . . . . . . . . .150Configuring the Display Style of Entries . . . . . . . . . . . . . . . . . . . . . . . . . . . . . . . . . . . . . . . . . . . . . . . . . . . . .150Printing a Folder Entry . . . . . . . . . . . . . . . . . . . . . . . . . . . . . . . . . . . . . . . . . . . . . . . . . . . . . . . . . . . . . . . . . . .151Enabling Alternate Folder Entry Types . . . . . . . . . . . . . . . . . . . . . . . . . . . . . . . . . . . . . . . . . . . . . . . . . . . . . .151Creating Custom Folder Entry Forms. . . . . . . . . . . . . . . . . . . . . . . . . . . . . . . . . . . . . . . . . . . . . . . . . . . . . . . .151Displaying Folder Entries on a Landing Page. . . . . . . . . . . . . . . . . . . . . . . . . . . . . . . . . . . . . . . . . . . . . . . . . .151
9 Managing Accessories 153Creating an Accessory. . . . . . . . . . . . . . . . . . . . . . . . . . . . . . . . . . . . . . . . . . . . . . . . . . . . . . . . . . . . . . . . . . . .153
Locating the Accessory Panel . . . . . . . . . . . . . . . . . . . . . . . . . . . . . . . . . . . . . . . . . . . . . . . . . . . . . . . .153Adding the Accessory . . . . . . . . . . . . . . . . . . . . . . . . . . . . . . . . . . . . . . . . . . . . . . . . . . . . . . . . . . . . . .154Setting Up the Accessory . . . . . . . . . . . . . . . . . . . . . . . . . . . . . . . . . . . . . . . . . . . . . . . . . . . . . . . . . . .156
Modifying an Accessory . . . . . . . . . . . . . . . . . . . . . . . . . . . . . . . . . . . . . . . . . . . . . . . . . . . . . . . . . . . . . . . . . .160Modifying an Accessory That Has a Border . . . . . . . . . . . . . . . . . . . . . . . . . . . . . . . . . . . . . . . . . . . . .160Modifying an Accessory That Doesn’t Have a Border. . . . . . . . . . . . . . . . . . . . . . . . . . . . . . . . . . . . .160
Deleting an Accessory. . . . . . . . . . . . . . . . . . . . . . . . . . . . . . . . . . . . . . . . . . . . . . . . . . . . . . . . . . . . . . . . . . . .161Deleting an Accessory That Has a Border . . . . . . . . . . . . . . . . . . . . . . . . . . . . . . . . . . . . . . . . . . . . . .161Deleting an Accessory That Doesn’t Have a Border . . . . . . . . . . . . . . . . . . . . . . . . . . . . . . . . . . . . . .161
Minimizing an Accessory . . . . . . . . . . . . . . . . . . . . . . . . . . . . . . . . . . . . . . . . . . . . . . . . . . . . . . . . . . . . . . . . .161Minimizing an Accessory That Has a Border . . . . . . . . . . . . . . . . . . . . . . . . . . . . . . . . . . . . . . . . . . . .161Minimizing an Accessory That Doesn’t Have a Border . . . . . . . . . . . . . . . . . . . . . . . . . . . . . . . . . . . .161
Minimizing the Accessory Panel . . . . . . . . . . . . . . . . . . . . . . . . . . . . . . . . . . . . . . . . . . . . . . . . . . . . . . . . . . .162Hiding or Displaying the Accessory Panel in a Folder. . . . . . . . . . . . . . . . . . . . . . . . . . . . . . . . . . . . . . . . . . .162Repositioning Accessories . . . . . . . . . . . . . . . . . . . . . . . . . . . . . . . . . . . . . . . . . . . . . . . . . . . . . . . . . . . . . . . .162Establishing a Default Layout . . . . . . . . . . . . . . . . . . . . . . . . . . . . . . . . . . . . . . . . . . . . . . . . . . . . . . . . . . . . . .162Providing a Title for the Accessory Panel . . . . . . . . . . . . . . . . . . . . . . . . . . . . . . . . . . . . . . . . . . . . . . . . . . . .163
10 Connecting With Your Co-Workers 165Sending Email from within Vibe. . . . . . . . . . . . . . . . . . . . . . . . . . . . . . . . . . . . . . . . . . . . . . . . . . . . . . . . . . . .165
Informing Others about a Folder or Workspace . . . . . . . . . . . . . . . . . . . . . . . . . . . . . . . . . . . . . . . . .165Informing Others about an Entry . . . . . . . . . . . . . . . . . . . . . . . . . . . . . . . . . . . . . . . . . . . . . . . . . . . . .166Configuring Folders to Send Email Notifications to Other Users . . . . . . . . . . . . . . . . . . . . . . . . . . . .166
Sending an Instant Message from within Vibe . . . . . . . . . . . . . . . . . . . . . . . . . . . . . . . . . . . . . . . . . . . . . . . .166Using Skype from within Vibe . . . . . . . . . . . . . . . . . . . . . . . . . . . . . . . . . . . . . . . . . . . . . . . . . . . . . . . . . . . . .167
Setting Up Your Skype Address in Vibe . . . . . . . . . . . . . . . . . . . . . . . . . . . . . . . . . . . . . . . . . . . . . . . .167Contacting Other Vibe Users with Skype . . . . . . . . . . . . . . . . . . . . . . . . . . . . . . . . . . . . . . . . . . . . . . .167
Filling Out the Send E-Mail Page . . . . . . . . . . . . . . . . . . . . . . . . . . . . . . . . . . . . . . . . . . . . . . . . . . . . . . . . . . .167
Contents 9

10 Con
Using the Vibe Clipboard . . . . . . . . . . . . . . . . . . . . . . . . . . . . . . . . . . . . . . . . . . . . . . . . . . . . . . . . . . . . . . . . .168Adding Names to the Clipboard . . . . . . . . . . . . . . . . . . . . . . . . . . . . . . . . . . . . . . . . . . . . . . . . . . . . . .168Removing Names from the Clipboard . . . . . . . . . . . . . . . . . . . . . . . . . . . . . . . . . . . . . . . . . . . . . . . . .169Using the Names on Your Clipboard. . . . . . . . . . . . . . . . . . . . . . . . . . . . . . . . . . . . . . . . . . . . . . . . . . .169
11 Using Workflows 171Manually Starting and Stopping a Workflow . . . . . . . . . . . . . . . . . . . . . . . . . . . . . . . . . . . . . . . . . . . . . . . . .171
Manually Starting a Workflow . . . . . . . . . . . . . . . . . . . . . . . . . . . . . . . . . . . . . . . . . . . . . . . . . . . . . . .171Manually Stopping a Workflow . . . . . . . . . . . . . . . . . . . . . . . . . . . . . . . . . . . . . . . . . . . . . . . . . . . . . .171
Manually Transitioning a Workflow after It Starts . . . . . . . . . . . . . . . . . . . . . . . . . . . . . . . . . . . . . . . . . . . . .172
12 Using Vibe on Your Mobile Device 173
13 Managing Vibe Files from Your Desktop 175
14 Working with Vibe Files in Microsoft Office 177
A What’s New in Micro Focus Vibe 4 179Sharing Improvements . . . . . . . . . . . . . . . . . . . . . . . . . . . . . . . . . . . . . . . . . . . . . . . . . . . . . . . . . . . . . . . . . . .179Folder Look and Feel Improvements . . . . . . . . . . . . . . . . . . . . . . . . . . . . . . . . . . . . . . . . . . . . . . . . . . . . . . . .179Browser History Support . . . . . . . . . . . . . . . . . . . . . . . . . . . . . . . . . . . . . . . . . . . . . . . . . . . . . . . . . . . . . . . . .179Download Folder Contents as a CSV File. . . . . . . . . . . . . . . . . . . . . . . . . . . . . . . . . . . . . . . . . . . . . . . . . . . . .180Mark All Entries in a Folder as Read or Unread . . . . . . . . . . . . . . . . . . . . . . . . . . . . . . . . . . . . . . . . . . . . . . .180Enhanced Drag-and-Drop Functionality . . . . . . . . . . . . . . . . . . . . . . . . . . . . . . . . . . . . . . . . . . . . . . . . . . . . .180Enhancements to Filters . . . . . . . . . . . . . . . . . . . . . . . . . . . . . . . . . . . . . . . . . . . . . . . . . . . . . . . . . . . . . . . . . .180
Apply Multiple Filters to a Folder . . . . . . . . . . . . . . . . . . . . . . . . . . . . . . . . . . . . . . . . . . . . . . . . . . . . .180Copy Filters from One Folder to Add to Another Folder . . . . . . . . . . . . . . . . . . . . . . . . . . . . . . . . . .180
Ability to Hide Accessories in a Folder . . . . . . . . . . . . . . . . . . . . . . . . . . . . . . . . . . . . . . . . . . . . . . . . . . . . . .180Enhanced Pinning for Discussion Entries . . . . . . . . . . . . . . . . . . . . . . . . . . . . . . . . . . . . . . . . . . . . . . . . . . . .181Unfollow People and Places From the What’s New Area . . . . . . . . . . . . . . . . . . . . . . . . . . . . . . . . . . . . . . .181Vibe Desktop Application Improvements . . . . . . . . . . . . . . . . . . . . . . . . . . . . . . . . . . . . . . . . . . . . . . . . . . . .181New Change Password Dialog . . . . . . . . . . . . . . . . . . . . . . . . . . . . . . . . . . . . . . . . . . . . . . . . . . . . . . . . . . . . .181Mobile App Look and Feel Improvements . . . . . . . . . . . . . . . . . . . . . . . . . . . . . . . . . . . . . . . . . . . . . . . . . . .181
B Troubleshooting 183You Have Exceeded Your Data Quota and Cannot Add Any Files or Attachments to the Vibe Site . . . . . .183You Are Unable to Change Your Vibe Password . . . . . . . . . . . . . . . . . . . . . . . . . . . . . . . . . . . . . . . . . . . . . . .184Vibe Interface Is Not Displayed Correctly . . . . . . . . . . . . . . . . . . . . . . . . . . . . . . . . . . . . . . . . . . . . . . . . . . . .184Understanding Mirrored Folders . . . . . . . . . . . . . . . . . . . . . . . . . . . . . . . . . . . . . . . . . . . . . . . . . . . . . . . . . . .184Too Many Sign-Ins for WebDAV . . . . . . . . . . . . . . . . . . . . . . . . . . . . . . . . . . . . . . . . . . . . . . . . . . . . . . . . . . . .185WebDAV Phantom Folders . . . . . . . . . . . . . . . . . . . . . . . . . . . . . . . . . . . . . . . . . . . . . . . . . . . . . . . . . . . . . . . .185Unable to Open Pictures from WebDAV in Microsoft Office Picture Manager . . . . . . . . . . . . . . . . . . . . . .185Unable to Move Files and Folders within the WebDAV Interface . . . . . . . . . . . . . . . . . . . . . . . . . . . . . . . . .186Troubleshooting Your Mobile Device. . . . . . . . . . . . . . . . . . . . . . . . . . . . . . . . . . . . . . . . . . . . . . . . . . . . . . . .186
Your Browser Does Not Automatically Direct You to the Mobile Interface. . . . . . . . . . . . . . . . . . . .186You Are Unable to View YouTube Videos from Your Mobile Device . . . . . . . . . . . . . . . . . . . . . . . . .186
tents

C Accessibility for People with Disabilities 189New Windows Opened without Notification . . . . . . . . . . . . . . . . . . . . . . . . . . . . . . . . . . . . . . . . . . . . . . . . .189Text Added to a Page Is Not Conveniently Available . . . . . . . . . . . . . . . . . . . . . . . . . . . . . . . . . . . . . . . . . . .189Drop-Down List Access . . . . . . . . . . . . . . . . . . . . . . . . . . . . . . . . . . . . . . . . . . . . . . . . . . . . . . . . . . . . . . . . . . .189
Contents 11

12

About This Guide
The Micro Focus Vibe 4 User Guide explains how to use the Micro Focus Vibe product.
This guide includes the following topics:
Chapter 1, “Getting Started,” on page 15 Chapter 2, “Navigating the Micro Focus Vibe Interface,” on page 27 Chapter 3, “Getting Informed,” on page 31 Chapter 4, “Sharing Entries, Folders, and Workspaces,” on page 57 Chapter 5, “Managing and Using Workspaces,” on page 69 Chapter 6, “Managing and Using Folders,” on page 83 Chapter 7, “Working with Specific Folder Types,” on page 97 Chapter 8, “Working with Folder Entries,” on page 127 Chapter 9, “Managing Accessories,” on page 153 Chapter 10, “Connecting With Your Co-Workers,” on page 165 Chapter 11, “Using Workflows,” on page 171 Chapter 12, “Using Vibe on Your Mobile Device,” on page 173 Chapter 13, “Managing Vibe Files from Your Desktop,” on page 175 Chapter 14, “Working with Vibe Files in Microsoft Office,” on page 177 Appendix A, “What’s New in Micro Focus Vibe 4,” on page 179 Appendix B, “Troubleshooting,” on page 183 Appendix C, “Accessibility for People with Disabilities,” on page 189
AudienceThis guide is intended for new Micro Focus Vibe users.
FeedbackWe want to hear your comments and suggestions about this manual and the other documentation included with this product. Please use the comment on this topic feature at the bottom of each page of the online documentation.
Documentation UpdatesFor the most recent version of this manual, visit the Micro Focus Vibe 4 Documentation website (http://www.novell.com/documentation/vibe4).
About This Guide 13

Additional Documentation and ResourcesYou can find more information in the Micro Focus Vibe documentation, which is accessible from the Micro Focus Vibe 4 Documentation website (http://www.novell.com/documentation/vibe4).
To access the Micro Focus Vibe User Guide from within Micro Focus Vibe, click your linked name in the upper right corner of each Vibe page, then click Help.
See the Micro Focus Vibe Resource Library (http://www.novell.com/products/vibe-onprem/resource-library/) for additional information and resources, including downloadable custom forms and workflows, relevant articles, and more.
14 About This Guide

1 1Getting Started
When you begin to use Micro Focus Vibe, the first thing you might want to do is set up your personal workspace and create a team workspace. This section explains how to get started with Vibe by accomplishing these important tasks.
“About Micro Focus Vibe” on page 15 “Accessing Micro Focus Vibe” on page 17 “Starting Micro Focus Vibe” on page 18 “Getting to Know the Micro Focus Vibe Interface and Its Features” on page 18 “Setting Up Your Personal Workspace” on page 21 “Changing Your Password” on page 23 “Creating a Team Workspace” on page 23 “Using Micro Focus Vibe Folders” on page 24 “Displaying Help Documentation” on page 26
As you use this guide to help you accomplish tasks in Vibe, you might discover that you are unable to complete the tasks as the sections describe. If you encounter a problem, it is probably because you have not been granted appropriate rights. You should consult with your Vibe administrator.
For more information on rights and access control in Vibe, see “Controlling Access” in the Micro Focus Vibe 4.0.8 Advanced User Guide.
About Micro Focus Vibe “Micro Focus Vibe Is Collaboration Software” on page 15 “Micro Focus Vibe Is Social Networking Software” on page 16
Micro Focus Vibe Is Collaboration SoftwareCollaboration through Vibe facilitates online work, creating a “virtual meeting space.”
You experience an increase in team synergy when using Vibe:
You and your teammates can work together without being in the same room or working at your computers at the same time. Someone can post a note or document to a folder, and, at their convenience, teammates can comment on the work, review and edit files, and further develop the idea. With Vibe, teamwork is ongoing and seamless.
When you are working online, the “presence” feature of Vibe enables you to see which teammates are currently online, and enables you to start a chat session by using Novell Messenger, make a Skype phone call, and so on.
Getting Started 15

Ideas are formed together, interactively, with your teammates. By the time you hold a meeting in the conference room, the team has already been part of the formation of the idea, and teammates are more likely to understand it, buy into it, and assist with its implementation. Vibe becomes a “pre-meeting” meeting.
Documents are reviewed earlier in the process, which allows for easier modifications and adjustments. Vibe also makes it easier to co-author documents, because of workflow processes that automate drafting and review, and because of Vibe access control that easily designates writers and reviewers.
Your collaborative process is preserved and publicly accessible in Vibe. No more searching through email folders in a frantic effort to “catch someone up” on a lengthy email discussion. To review past discussions and decisions, or to review a previous version of a document, you can use the powerful search capability of Vibe to locate historical information quickly and easily.
You can use various Vibe tools in combination—a milestones folder, tasks, workflow, discussions, chat, online meetings—to track progress against goals for multiple teams working on a large project.
Micro Focus Vibe Is Social Networking SoftwareThe out-of-the-box Micro Focus Vibe tools provide powerful enhancements to online collaboration. In addition, when you use the tools in combination and apply structure to content design, Vibe becomes a powerful knowledge-management and enterprise social networking tool. Knowledge management involves the efficient development, management, access, and distribution of organizational knowledge. Enterprise social networking involves the efficient connection of knowledgeable people needed to form teams, make decisions, and complete work.
Consider these examples:
When people use their personal workspaces to provide detailed information about themselves, the purpose of the workspace moves beyond merely contact data (phone numbers, email addresses, and so on). It enables searches for various subject-matter experts. Also, Vibe analyzes its search results, telling you which people discuss your search topic the most and in which places these conversations are happening. It is easy to see pockets of expertise associated with your area of interest.
Experts can rate entries in Vibe by using a five-star rating system (one star indicating the least impressive, and five stars the most impressive), providing an additional tool for determining the quality of information.
Vibe provides tools, such as wikis (information coauthored by all participants), blogs (chronological journal entries allowing for comments from readers), workflow (an online representation of a business process), and tags (categorical labels applied to items). People can use these tools to create and organize information organically, over time, in ways that map best to the team’s natural work style. Through these tools, teams literally move their business processes online and automate their work.
Vibe provides work-area summaries, called accessories, that provide a snapshot of a potentially large amount of information, highlighting the most relevant data. For example, the accessory can present entries submitted by an expert on a given subject, or it can summarize task-completion information by providing a milestone overview.
16 Getting Started

Accessing Micro Focus VibeMicro Focus Vibe provides three convenient access methods:
“Accessing Micro Focus Vibe from a Web Browser” on page 17 “Accessing Micro Focus Vibe from Your File System” on page 17 “Accessing Micro Focus Vibe from a Mobile Device” on page 17
Accessing Micro Focus Vibe from a Web BrowserYou can access Micro Focus Vibe from a web browser. This guide focuses on this access method.
Accessing Micro Focus Vibe from Your File System You can access Micro Focus Vibe directly from the file system on your computer (Windows or Mac).
For more information, see the Micro Focus Vibe Desktop for Windows Quick Start (http://www.novell.com/documentation/vibe4/vibe4_qs_desktop/data/vibe4_qs_desktop.html) and the Micro Focus Vibe Desktop for Mac Quick Start (http://www.novell.com/documentation/vibe4/vibe4_qs_desktopmac/data/vibe4_qs_desktop.html).
Accessing Micro Focus Vibe from a Mobile DeviceThere are native iOS and Android mobile apps for accessing the Vibe site. Accessing Vibe through a web browser on a mobile device is not supported. Instead, download the Vibe mobile app that is compatible with your mobile device.
For more information, see the Micro Focus Vibe Mobile Quick Start (https://www.novell.com/documentation/vibe4/vibe4_qs_mobile/data/vibe4_qs_mobile.html).
The following image shows Vibe on an iOS device. The look and feel differs on Android devices.
Getting Started 17

Starting Micro Focus Vibe1 Launch a web browser (such as Mozilla Firefox or Internet Explorer).2 Go to the URL of your organization’s Micro Focus Vibe site.3 In the User ID field, specify your Vibe user name.4 In the Password field, specify your Vibe password.
If you do not know your Vibe user name and password, contact your Vibe administrator.5 Click OK.
Getting to Know the Micro Focus Vibe Interface and Its Features
When you first launch Micro Focus Vibe, you see the What’s New page. This page shows you what’s new in your teams, favorite places, and more. For more information about the What’s New page, see “Finding What’s New” on page 32.
“Understanding the Masthead” on page 18 “Understanding the Navigation Panel” on page 19 “Understanding the Action Toolbar” on page 19 “Understanding the Relevance Tabs in the Home Page of Your Personal Workspace” on page 20 “Understanding the Content Area” on page 21
Understanding the MastheadThe Masthead contains the following features:
18 Getting Started

Name Link: Click your linked name in the upper right corner of any Vibe page to view the following options:
Data Quota information: (Conditional) Your current data quota and the amount of your quota that you have used are displayed.
If this option is not displayed, the Vibe administrator has not restricted you to a data quota. For more information about data quota in Vibe, see “Managing Your Data Quota” in the Micro Focus Vibe 4.0.8 Advanced User Guide.
View Profile: Displays your Vibe profile. Personal Preferences: Displays your personal preferences. You can configure the following
personal preferences: Entry Display: Specify the default behavior when clicking a file name. For more
information, see “Configuring the Display Style of Entries” on page 150. Items per Folder Page: Specify how many entries you want to appear on a given page. For
more information, see “Configuring the Number of Entries to Display on a Folder Page” on page 92.
Hide ‘Public’ Collection: If applicable, select this option to hide the Public icon in the masthead so that it is no longer displayed in the web client. For more information about viewing files that have been shared with the public, see “Accessing Public Files and Folders” on page 44.
Live Feed: Displays live feeds of the latest entries in your teams, places you are following, or across the entire site. For more information, see “Viewing Live Feeds” on page 54.
Change Password: (Non-LDAP users only) Specify your current and new password. For more information, see “Changing Your Password” on page 23.
Help: Displays the Vibe Web Application User Guide. Download Vibe Applications: (Conditional) Displays the Vibe desktop app download page.
If this option is not available, the Vibe administrator has not enabled it. Vibe Resource Library: (Admin only) Displays the Vibe Resource Library, which includes
additional information and resources, including downloadable custom forms and workflows, relevant articles, and more.
Ideas Portal: (Admin only) Links to the Micro Focus ideas portal. Sign out: Signs you out of the Vibe site.
Understanding the Navigation PanelThe Navigation panel contains a navigation tree that displays the current workspace and all sub-workspaces and sub-folders.
Understanding the Action ToolbarThe Action toolbar contains the following features:
Expand/Contract Navigation Panel Icon: Hides and displays the left Navigation panel.
Expand/Contract Masthead Icon: Hides and displays the Masthead.
Getting Started 19

Workspace Toolbar Icon: Displays the Workspace toolbar, which enables you to quickly navigate to any location where you have rights.
My Workspace: Displays your personal workspace.
What’s New: Displays the What’s New page, where you can quickly see what’s new in your teams, favorite places, and more.
For more information, see “Finding What’s New” on page 32.
My Favorites: enables you to add a place as a favorite, or to quickly visit your favorite places on the Vibe site.
For more information, see “Managing Your Favorite Places” on page 28.
My Teams: Displays links to all of the team workspaces where you are a member.
Recent Places: Displays the places that you have most recently visited.
For more information, see “Viewing and Revisiting Recent Places” on page 27.
View: enables you to accomplish various tasks, such as seeing what’s new or unread in the workspace or folder, viewing who has access, viewing the Vibe clipboard, and accessing the Vibe Trash.
Search: enables you to search the entire site or specific areas within the site for entries, places, and people.
Click the Search Options icon if you want to narrow your search to only people, places, or a tags. You can also save your searches or perform Advanced Searches.
For more information about searching in Vibe, see “Searching for Information” on page 36.
Understanding the Relevance Tabs in the Home Page of Your Personal WorkspaceThe home page of your personal workspace contains various tabs that are designed to help facilitate your work. Use these tabs as a central location where you can quickly be informed of new entries, upcoming tasks, your daily meetings, and more.
What’s New: Displays new entries in your teams, in places you are following, or across the entire site.
Recent: Lists your recent posts and entries that you have recently visited. You can view who has recently visited your workspace and see your personal tags.
Tasks and Calendars: Shows the tasks that are assigned to you, lists the calendars that you are following, and displays today’s events on those calendars.
Accessories: Contains an Accessory panel that lists entries from your Guestbook, Blog, and Photo Album folders. You can manage these accessories as described in Chapter 9, “Managing Accessories,” on page 153.
20 Getting Started

Understanding the Content AreaThe Content Area in Vibe is where the majority of information is displayed, such as workspaces, folders, and entries.
Setting Up Your Personal WorkspaceBefore you take advantage of all of the features and functionality of Micro Focus Vibe, you might want to customize your personal workspace.
“Modifying Your Profile” on page 21 “Branding Your Workspace” on page 22
Modifying Your ProfileYou might need to manually update your profile in order for important contact information to be seen, such as your email address, phone number, time zone, and picture.
Another reason to modify your profile is to publicize your skills and past experience to other Vibe users. One advantage of Vibe is the ability to find experts on any subject within your organization. You, as a Vibe user, have the ability to be a subject-matter expert.
NOTE: If you are unable to modify your personal information (such as your Vibe password) as described in this section, it is probably because your personal information is being synchronized from an external directory server. You must consult your Vibe administrator to make changes.
1 Click your linked name in the upper right corner of any Vibe page.
2 Click View Profile.3 Click Edit, make any necessary changes, then click OK.
Getting Started 21

Branding Your WorkspaceAdding a personal brand to your workspace can enhance the appearance of your workspace and make you feel more at home.
1 Navigate to your personal workspace.
2 Next to the workspace name, click the Configure icon , then click Brand Workspace. The Workspace/Folder Branding dialog box is displayed.
3 Specify the following information to create your desired brand:Use Branding Image: Select this option if you want to use the drop-down list to select an existing image, or click the Browse icon to browse to an image on your computer’s file system. Use Advanced Branding: Select this option, then click Advanced if you want to create a brand that includes advanced features, such as a YouTube video.You can add a YouTube video in your branding section by inserting a Media object. For more information about displaying YouTube videos in Vibe, see “Displaying YouTube Videos in a Folder Entry” on page 149.Background Image: Click the Browse icon to browse to an image on your computer’s file system. The provided drop-down list contains images only if you are branding a team workspace and if you have attached images to the workspace, as described in “Modifying a Workspace” on page 70. The background image is displayed behind your regular branding.Stretch Image: Stretches the background image so that it occupies the entire branding area. If you stretch your background image, the image overrides any background color that you have set.Background Color: Adds a background color that occupies the entire branding area. To change the background color, click the color name to the right of this field, select the new color, then click OK.If you added a background image and stretched the image, the background color is not displayed.Text Color: Changes the text color of the workspace name in the upper right corner of the branding area. To change the text color, click the color name to the right of this field, select the new color, then click OK.Clear branding: Click this option to clear all of your current branding selections.
4 Click OK.Your workspace now displays the brand that you created.
For more information about creating a brand for workspaces and folders, see “Branding a Folder or Workspace” in the Micro Focus Vibe 4.0.8 Advanced User Guide.
22 Getting Started

Changing Your PasswordOnly local and external users can change their passwords as described in this section. If you cannot change your Vibe password as described in this section, contact your Vibe administrator.
1 Click your linked name in the upper right corner of any Vibe page.2 Click Change Password.
The Change Password dialog box is displayed.3 Specify your current password, then specify and confirm the new password.4 Click OK.
Creating a Team WorkspaceBy default, everyone in Micro Focus Vibe has rights to create a team workspace.
Team workspaces are the most common type of workspaces. They facilitate team objectives by enabling team members to quickly share files, share ideas, and work together more efficiently and effectively.
To create a team workspace:
1 Click the Browse icon in the Action toolbar, then expand Home Workspace in the Workspace tree. The Home Workspace directory is the highest-level folder in the workspace tree, and might be named something specific to your organization.
2 Click Team Workspaces.The Teams page is displayed.
3 Click New Workspace.The New Workspace page is displayed.If you do not see the New Workspace option, your site administrator has not permitted you to create a new workspace at this level. Continue to expand the workspace tree, following the path of your organizational unit, click the name of the directory where you want to create the
new team workspace, then, next to the workspace name, click the Configure icon . Click New Workspace. Ensure that you select Team Workspace in the Workspace section. Or, follow the steps in “Creating a Team Workspace inside of an Existing Team Workspace” on page 79.
4 Specify the following information:Workspace Title: Provide a title for the workspace. Workspace: Select Team Workspace. Team Members: Specify the team members.You can specify individual users, entire groups, or add names that are on your clipboard. For more information about using the Vibe clipboard, see “Using the Vibe Clipboard” on page 168.Workspace Folders: Select the folders that you want the workspace to contain.
Getting Started 23
If you later decide that you want to add additional folders, you can add them at any time. For information on how to add folders to a workspace, see “Creating a New Folder” on page 83.
5 Click OK to create the new workspace.
For information on how to create a team workspace inside of an existing workspace, see “Creating a Team Workspace inside of an Existing Team Workspace” on page 79.
Using Micro Focus Vibe FoldersMicro Focus Vibe includes multiple types of folders that enable you to organize the various kinds of information in your workspaces.
“Discussion” on page 24 “Blog” on page 24 “Calendar” on page 25 “Guestbook” on page 25 “Files” on page 25 “Milestones” on page 25 “Micro-Blog” on page 25 “Mirrored Files” on page 25 “Photo Album” on page 26 “Surveys” on page 26 “Tasks” on page 26 “Wiki” on page 26
For more detailed information about each type of Vibe folder, see Chapter 7, “Working with Specific Folder Types,” on page 97.
DiscussionUse discussions as a way of obtaining comments and feedback to questions and thoughts that you might have. You can start general discussion threads in the Discussion folder in your personal workspace. For discussion threads that are more specific to a project and team, start the discussion thread in the Discussion folder of an appropriate team workspace.
For more information on Discussion folders, see “Working with Discussion Folders” on page 97.
BlogBlogs are a good way to express your thoughts about topics that are important to you. For example, if you are working on a project and are responsible for a certain aspect of that project, you can update your team on your individual progress by posting a blog in the Blog folder in the team workspace.
For more information on Blog folders, see “Working with Blog Folders” on page 98.
24 Getting Started
CalendarVibe enables you to create a Calendar folder in any workspace that you desire. You can maintain a personal calendar in your personal workspace, and then add separate calendars in your team workspaces to keep track of events that are specific to that team.
For more information on Calendar folders, see “Working with Calendar Folders” on page 100.
GuestbookThe Guestbook folder in Vibe is a place to store all of your guestbook entries. By default, users can sign your Guestbook by clicking the Overview tab on the home page of your personal workspace. This is a quick way for your friends and co-workers to communicate with you.
For more information on Guestbook folders, see “Working with Guestbook Folders” on page 103.
FilesFiles folders in Vibe make it easy to store and keep track of your files. You can store personal files in the Files folder in your personal workspace, and team-related files in your individual team folders. This makes it easy to share files with your teammates and others who might be interested in viewing them.
For more information on Files folders, see “Working with Files Folders” on page 104.
MilestonesMilestones folders track the progress of several Tasks folders. Milestones folders are most often used in those workspaces, although they can also be used in other workspaces. For more information, see “Managing a Project Management Workspace” on page 81.
Micro-BlogThe Micro-Blog folder in Vibe is a place to store all of your micro-blog entries. Use the Micro-Blog feature to capture quick personal notes, or to inform others of what you are currently working on. This provides a greater transparency, so those you work with know what you are doing, and how they might offer assistance to help you accomplish your tasks.
You can navigate to someone else’s Micro-Blog folder to see what they have been working on, and possibly provide help by sharing your knowledge and experience.
For more information on the Micro-Blog feature, see “Using Micro-Blogs” on page 49.
Mirrored FilesMirrored Files folders use a reference to a file system on an external server, instead of the Vibe file system where other Vibe information is stored. Mirrored Files folders can reference any WebDAV or local file path.
For more information about Mirrored Files folders, see “Working with Mirrored Folders” in the Micro Focus Vibe 4.0.8 Advanced User Guide.
Getting Started 25

Photo AlbumPhoto albums store and display pictures. You can store your personal photos in the Photo Album in your personal workspace, and team-related photos in the Photo Album of the team workspace.
For more information on Photo Album folders, see “Working with Photo Album Folders” on page 106.
SurveysSurveys folders store surveys that you or other Vibe users have created. Surveys enable you to poll team members, or any other Vibe users, about issues that are important to you, your team, or your company.
For more information on Surveys folders, see “Working with Surveys Folders” on page 108.
TasksTasks folders keep track of the progress made in completing work assignments. Vibe enables you to create a Tasks folder in any workspace that you desire. You can maintain a personal Tasks folder in your personal workspace, and then add separate Tasks folders in your team workspaces to keep track of tasks that are specific to that team.
For more information on Tasks folders, see “Working with Tasks Folders” on page 110.
WikiWiki folders contain wiki entries. A wiki is a set of related entries coauthored by folder participants. For example, the best-known wiki on the Internet is Wikipedia. Other examples of possible wiki content are glossaries, or policies and procedures.
For more information on Wiki folders, see “Working with Wiki Folders” on page 120.
Displaying Help Documentation1 Click your linked name in the upper right corner of each Vibe page, then click the Help icon .
When you click this icon, Vibe displays the Vibe User Guide in a new browser window.
26 Getting Started

2 2Navigating the Micro Focus Vibe Interface
Micro Focus Vibe provides various methods of navigating the interface.
“Navigating the Workspace Tree” on page 27 “Viewing and Revisiting Recent Places” on page 27 “Viewing and Revisiting Recent Entries” on page 27 “Managing Your Favorite Places” on page 28 “Accessing Your Teams” on page 28 “Using Tags” on page 29
Navigating the Workspace TreeYou can access the Workspace tree from any page within Micro Focus Vibe. Located in the upper left corner of the Vibe interface, the Workspace tree icon displays the path of all of the workspaces and folders that contain the place you are currently viewing, without leaving the current page.
To navigate to another workspace or folder:
1 Click the Workspace tree icon . 2 Expand Home Workspace.3 Navigate to and click the linked name of the desired location in the Workspace tree.
Vibe displays the desired location.
Viewing and Revisiting Recent PlacesMicro Focus Vibe provides a list of folders and workspaces that you have recently visited in the Vibe site. You can quickly revisit the places you have most recently accessed.
1 Click Recent Places in the Action toolbar, then click the place that you want to revisit.
By default, Vibe stores your 20 most-recently visited places.
Viewing and Revisiting Recent EntriesMicro Focus Vibe enables you to view and quickly revisit the entries that you have recently posted and recently visited.
1 Click My Workspace in the Action toolbar.2 Click the Recent tab.
In the left column, Vibe displays the entries that you have recently posted.
Navigating the Micro Focus Vibe Interface 27
In the middle column, Vibe displays the entries that you have recently visited.In the right column, Vibe displays those who have visited your workspace.
Managing Your Favorite PlacesMicro Focus Vibe enables you to easily add, access, and edit your favorite places in the Vibe site.
“Adding a Favorite Place” on page 28 “Accessing Your Favorite Places” on page 28 “Editing Your Favorite Places” on page 28
Adding a Favorite Place1 Navigate to a workspace or folder that you want to add as a favorite.2 Click My Favorites in the Action toolbar.3 Click Add This Place.
Accessing Your Favorite Places1 Click My Favorites in the Action toolbar.2 Click the linked title of the place that you want to visit.
Editing Your Favorite PlacesYou can edit your favorite places by reordering their position in the list, or by deleting them.
1 Click My Favorites in the Action toolbar. 2 Click Edit Favorites.
The Edit Favorites dialog box is displayed.3 Select the item you want to edit.4 Click Move Up, Move Down, or Delete.5 Click OK.
Accessing Your TeamsMicro Focus Vibe makes it easy to quickly access team workspaces where you are a member.
1 Click My Teams in the Action toolbar.All of the teams of which you are a member are displayed.
2 Click the linked title of the team workspace that you want to visit.
28 Navigating the Micro Focus Vibe Interface

Using TagsTags are keywords that categorize a workspace, folder, or entry. Tagging functionality in Micro Focus Vibe enables you to create virtual containers for places and entries. Like folders in your email, you can categorize information, and then come back to it at a later time.
“Tagging Workspaces or Folders” on page 29 “Tagging Entries” on page 29 “Locating Tagged Items” on page 30 “Choosing Between Personal Tags and Global Tags” on page 30
Tagging Workspaces or Folders1 Navigate to the workspace or folder that you want to tag.
2 Click the Configure icon next to the workspace or folder title, then click Tag this Workspace or Tag this Folder, depending on whether you want to tag a workspace or folder. The Tag this Workspace or Tag this Folder dialog box is displayed.
3 Select either Personal Tag or Global Tag, depending on whether you want this tag to be visible to only yourself or to the entire community.For more information about the difference between personal and community tags, see “Choosing Between Personal Tags and Global Tags” on page 30.
4 Begin typing the name of the tag that you want to apply to the workspace or folder.This field uses type-to-find functionality, so if a tag already exists with the desired name, it appears in the drop-down list. If the name does not appear in the drop-down list, you are creating a new tag.
TIP: To see a list of existing tags, click inside the provided field, then press the Spacebar.
5 (Conditional) To apply an existing tag, select the tag when it appears in the drop-down list.
6 (Conditional) To create a new tag, specify the name of the tag, then click the Add icon . The workspace or folder is now marked with the tag that you specified, and the tag is displayed in the Tag this Workspace dialog box.
7 Click OK.
Tagging Entries1 In the entry that you want to tag, click the Tags tab.2 Click Add Tags.3 Select either Personal Tag or Global Tag, depending on whether you want this tag to be visible to
only yourself or to the entire community.For more information about the difference between personal and community tags, see “Choosing Between Personal Tags and Global Tags” on page 30.
4 Begin typing the name of the tag that you want to apply to the workspace or folder.
Navigating the Micro Focus Vibe Interface 29

This field uses type-to-find functionality, so if a tag already exists with the desired name, it appears in the drop-down list. If the name does not appear in the drop-down list, you are creating a new tag.
TIP: To see a list of existing tags, click inside the provided field, then press the Spacebar.
5 (Conditional) To apply an existing tag, select the tag when it appears in the drop-down list.
6 (Conditional) To create a new tag, specify the name of the tag, then click the Add icon . The entry is now marked with the tag that you specified, and the tag is displayed in the Tag this Entry dialog box.
7 Click OK.
Locating Tagged ItemsVibe enables you to locate all places and entries that have a particular tag.
1 Click the Search Options icon . The Search Options dialog box is displayed.
2 Select Tags.3 In the provided field, specify the name of the tag that you are searching for.
To see a list of existing tags, click inside the provided field, then press the Spacebar.4 Select the tag from the drop-down list.
Vibe displays all of the places and entries that have been tagged with the tag that you specified.
Choosing Between Personal Tags and Global TagsPersonal Tags: Personal tags are for your use only. When you create a personal tag, it can be used and viewed only by you.
Global Tags: Global tags can be used and viewed by anyone who has rights to view the workspace, folder, or entry where a global tag is implemented. For example, if you create a global tag on the Files folder in your team workspace, then anyone with View rights to the Files folder can use the tag you created to tag other places with the same tag name. They can also use Vibe Search and Find features to locate entries that have been tagged with that tag name.
You can tag places and entries with a global tag only if you have appropriate rights.
For more information on using Search to locate tagged items, see “Using Advanced Search” on page 40.
30 Navigating the Micro Focus Vibe Interface

3 3Getting Informed
Micro Focus Vibe provides numerous methods to help keep you informed of what’s going on in your teams and in your organization.
“Accessing Micro Focus Vibe from Your Mobile Device” on page 31 “Finding What’s New” on page 32 “Finding What’s Unread” on page 35 “Searching for Information” on page 36 “Accessing Shared Files and Folders” on page 43 “Accessing Your Personal Files and Folders (My Files)” on page 43 “Finding What’s Unread” on page 44 “Accessing Public Files and Folders” on page 44 “Following and Unfollowing Places and People of Interest” on page 45 “Viewing Recent Contributions” on page 48 “Viewing Assigned Tasks” on page 48 “Viewing Calendar Events” on page 49 “Sharing Workspaces, Folders, and Entries” on page 49 “Using Micro-Blogs” on page 49 “Subscribing to a Folder or Entry” on page 51 “Using Remote Applications” on page 53 “Viewing Live Feeds” on page 54 “Viewing Folders as RSS or Atom Feeds” on page 55 “Synchronizing Tasks and Calendars to a Desktop Application” on page 55
Accessing Micro Focus Vibe from Your Mobile DeviceMicro Focus Vibe includes a mobile interface that is supported on the following mobile devices:
For more information about using Vibe on your mobile phone, see the Micro Focus Vibe Mobile Quick Start (https://www.novell.com/documentation/vibe4/vibe4_qs_mobile/data/vibe4_qs_mobile.html).
Platform Requirement
Android 4.4 and later
Mac iOS 13 or later
Getting Informed 31

Finding What’s NewOne key to effective and efficient teamwork is knowing what people are working on and what they are saying. Vibe enables you to view and act on new entries by using the What’s New page. You can view new entries for various categories, comment on entries, and more.
To perform actions on entries, you must have appropriate rights. For more information about rights, see “Controlling Access” in the Micro Focus Vibe 4.0.8 Advanced User Guide.
“Viewing New Entries” on page 32 “Marking an Entry as Unread” on page 33 “Commenting on a New Entry” on page 33 “Sharing a New Entry” on page 34 “Subscribing to a New Entry” on page 34 “Tagging a New Entry” on page 34 “Editing and Deleting a New Entry” on page 35 “Displaying Only Unread Entries” on page 35 “Pausing Updates on the What’s New Page” on page 35 “Configuring How Many Entries Are Displayed on a Page” on page 35
Viewing New EntriesBy default, the What’s New page is displayed when you first access the Vibe site. If the What’s New page is not displayed, or if you navigate away from it, you can easily access it to view new entries.
1 Click What’s New in the Action toolbar from any folder or workspace in Vibe.By clicking the appropriate category in the What’s New navigation panel on the left side of the page, you can view new entries for any of the following categories: Current Folder or Workspace: Displays new entries in the folder or workspace that you are
in when you click What’s New in the Action toolbar. My Files: Displays new entries in your My Files area.
For information about My Files, see “Accessing Your Personal Files and Folders (My Files)” on page 43.
Shared with Me: Displays new entries in your Shared with Me area.For information about Shared with Me, see “Accessing Shared Files and Folders” on page 43.
Shared by Me: Displays new entries in your Shared by Me area.For information about Shared by Me, see “Accessing Shared Files and Folders” on page 43.
Public: Displays new entries that have been shared with the public.For information about viewing files that have been shared with the public, see “Accessing Public Files and Folders” on page 44.
My Favorites: Displays new entries in your favorite places.For information on how to add places as favorites, see “Adding a Favorite Place” on page 28.
32 Getting Informed
My Teams: Displays new entries in your teams.For more information on how to create a team workspace, see “Creating a Team Workspace” on page 78.
Followed People: Displays new entries that have been added by the people you are following.To quickly unfollow a person, expand Followed People, hover over the person’s name who you want to stop following, then click the x.For information on how to follow people, see “Following People” on page 45.
Followed Places: Displays new entries that have been added to the places you are following.To quickly unfollow a place, expand Followed Places, hover over the place that you want to stop following, then click the x.For information on how to follow places, see “Following Workspaces and Folders” on page 45.
Site Wide: Displays new entries that have been added anywhere in the Vibe site.2 (Optional) If a category contains sub-categories, you can expand the category in the What’s
New navigation panel to view new entries in a more specific location. For example, if you are a member of multiple teams, you can expand My Teams and click a specific team to see what’s new in that team workspace.
Marking an Entry as UnreadAfter you view an entry from the What’s New page, the entry is marked as Read. You can mark an entry as Unread, directly from the What’s New page.
1 Click the Actions drop-down arrow next to the entry that you want to mark as Unread. 2 Click Mark as unread.
You can mark the entry as Read by clicking the Actions drop-down arrow next to the entry, and then clicking Mark as read.
For information about how to display only unread entries on the What’s New page, see “Displaying Only Unread Entries” on page 35.
Commenting on a New EntryYou can comment on entries directly from the What’s New page.
1 Click the Actions drop-down arrow next to the entry that you want to comment on. 2 Click Comment.
A comment field is opened inline on the What’s New page.3 Specify your comment in the provided field, then click Send.
Getting Informed 33

Sharing a New EntryYou can share entries directly from the What’s New page.
1 Click the Actions drop-down arrow next to the entry that you want to share. 2 Click Share.
The Share this Entry dialog box is displayed.3 Continue with Step 3 in “Sharing Entries, Folders, and Workspaces” on page 58.
Subscribing to a New EntryYou can subscribe to entries directly from the What’s New page.
1 Click the Actions drop-down arrow next to the entry that you want to subscribe to. 2 Click Subscribe.
The Subscribe to Entry dialog box is displayed.3 Select the email addresses or phone numbers where you want the notifications to be sent. You
can subscribe to full emails, emails without attachments, or text messages.
You can update the email addresses and phone numbers that Vibe uses to send you notifications by modifying your personal profile, as described in “Modifying Your Profile” on page 21.
Tagging a New EntryYou can tag an entry directly from the What’s New page.
1 Click the Actions drop-down arrow next to the entry that you want to tag. 2 Click Tag.
The Tag this Entry dialog box is displayed.3 Select either Personal Tag or Global Tag, depending on whether you want this tag to be visible to
only yourself or to the entire community.For more information about the difference between personal and community tags, see “Choosing Between Personal Tags and Global Tags” on page 30.
4 Begin typing the name of the tag that you want to apply to the entry.This field uses type-to-find functionality, so if a tag already exists with the desired name, it appears in the drop-down list. If the name does not appear in the drop-down list, you are creating a new tag.To see a list of existing tags, click inside the provided field, then press the Spacebar.
5 Finish typing the name of the tag, or select it from the drop-down list, then click the Add icon .
The entry is now marked with the tag that you specified.6 Click OK.
For more information about tags, see “Using Tags” on page 29.
34 Getting Informed
Editing and Deleting a New EntryYou can edit and delete entries directly from the What’s New page.
1 Click the title of the entry or comment that you want to edit or delete.The entry is displayed.
2 Click Modify or Delete in the Entry toolbar.3 (Optional) Close the entry by clicking the X icon in the upper right corner of the entry to return
to the What’s New page.
Displaying Only Unread EntriesYou can display only unread entries on the What’s New page. By default, all entries are displayed.
1 On the What’s New page, click Showing all entries in the upper right corner.2 Click Show unread.
For information about how to mark entries as Unread after you have read them, see “Marking an Entry as Unread” on page 33.
Pausing Updates on the What’s New PageBy default, the What’s New page is automatically updated with the latest comments and entries every 60 seconds. You can temporarily stop the What’s New page from updating. This can be helpful if you need more time to look at current entries.
1 Click the Pause icon in the upper right corner of the What’s New page.
To resume updates on the What’s New page, click the Play icon .
Configuring How Many Entries Are Displayed on a PageYou can configure how many entries you want to show on a single page in the Vibe interface by modifying your personal preferences, as described in “Configuring the Number of Entries to Display on a Folder Page” on page 92.
Finding What’s UnreadMicro Focus Vibe enables you to view unread entries in any workspace or folder.
1 Navigate to the workspace or folder where you want to view all unread entries.2 Click View > What’s Unread in Workspace in the Action toolbar to see what’s unread in a
workspace.orClick View > What’s Unread in Folder in the Action toolbar to see what’s unread in a folder.Vibe displays all of the entries that you have not yet read.
Getting Informed 35

Searching for InformationSearch functionality in Micro Focus Vibe enables you to accomplish the following tasks:
Discover what information is available about a particular topic. Quickly navigate to a workspace (personal, team, etc.), folder, or tagged item that you know
exists on the Vibe site. Locate a subject-matter expert. Locate a relevant workspace or folder.
The following topics describe Search functionality:
“Using Basic Search” on page 36 “Searching for Specific People, Places, or Tagged Items” on page 39 “Using Advanced Search” on page 40 “Searching for Items That Have Been Moved to the Trash” on page 41 “Saving and Reusing Searches” on page 42 “Locating a Subject-Matter Expert” on page 43 “Locating a Relevant Workspace or Folder” on page 43
Using Basic SearchTo perform a basic search:
1 Type the words or quoted phrases into the Search field, then press Enter.
Vibe enables you to refine your basic search in the following ways:
Search Capability Function Example
AND, OR, and NOT between two terms
Searches for Vibe entries where two terms or phrases:
Both exist (AND) Either exist (OR) One exists but not the other
(NOT)
By default, Vibe uses AND when you do not specify an operator between two terms.
sales NOT figure searches for Vibe entries that contain the term “sales” but not the term “figure.”
Double quotation marks surrounding a phrase
Groups words together to make a phrase.
"marketing meeting notes"
36 Getting Informed

Field name followed by a colon, followed by brackets that contain a date range
Searches a specific field that contains values within a specific date range.
birthDate:{20070503* TO 20100608*} searches all entries whose birthDate field contains values greater than 5/3/2007 and less than 6/8/2010. Use curly brackets if you want to exclude the beginning and ending dates from the search, as in the above example. Or, use square brackets if you want to include the beginning and ending dates that you specify. For example, birthDate:[20070503* TO 20100608*] searches all entries whose birthDate field contains values of 5/3/2007 or greater and 6/8/2010 or less.
The search field name (birthDate) is the same as the internal data element name that you can obtain from the Form and View Designer for entry definitions. (For more information, see “Creating a Custom Folder Entry Form” in the Micro Focus Vibe 4.0.8 Advanced User Guide.)
Asterisk (*) after word fragments
(You cannot put an asterisk before word fragments)
Searches for words that begin with the word fragment that you specify.
work* searches for words such as “workspace” and “workshop.”
*space does not search for words ending in “space,” such as “workspace.”
Question mark (?) as a replacement for any single character
Replaces any single character in your search. You can use multiple question marks to replace multiple characters.
t??e returns all results containing the words “true,” “tree,” and so forth.
You cannot use a question mark as the first character in a search.
Tilde (~) after a term Searches for approximate matches for a single word.
roam~ finds matches such as “foam” and “roams.”
Tilde (~) after a group of words, followed by a number
Searches for instances of the words that you specify that are within a certain distance.
"marketing notes"~5 searches for instances where the words “marketing” and “notes” appear within 5 words of each other.
Search Capability Function Example
Getting Informed 37
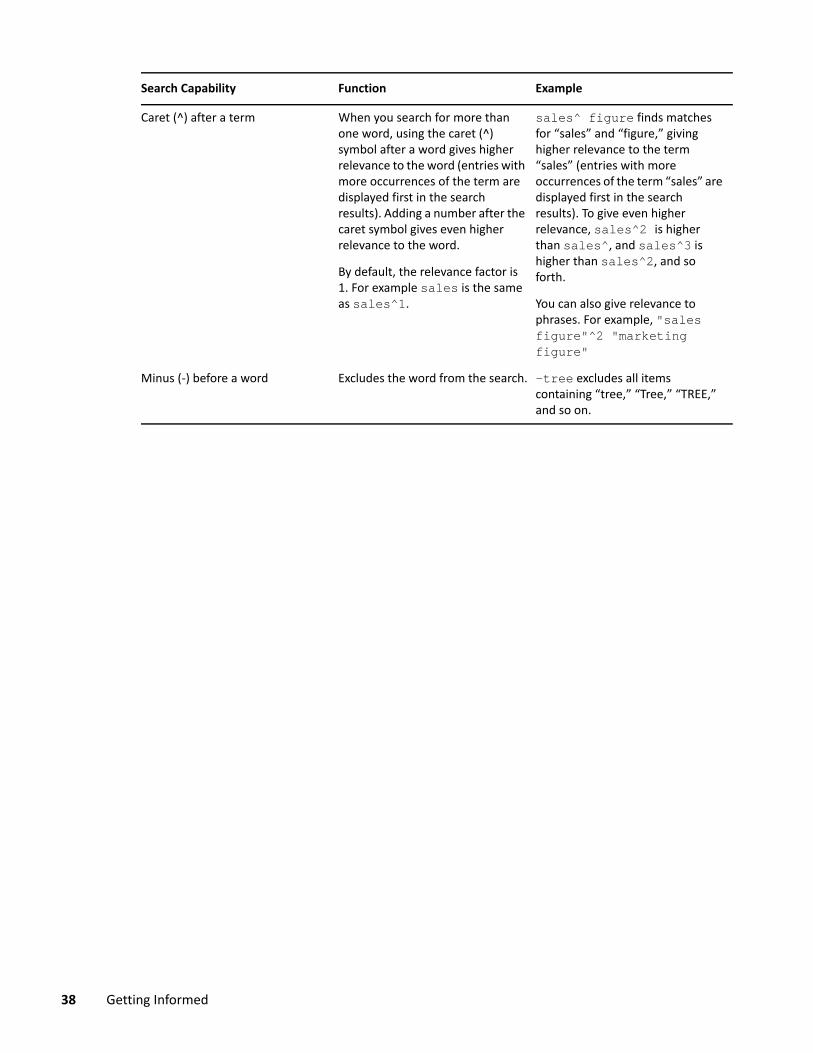
Caret (^) after a term When you search for more than one word, using the caret (^) symbol after a word gives higher relevance to the word (entries with more occurrences of the term are displayed first in the search results). Adding a number after the caret symbol gives even higher relevance to the word.
By default, the relevance factor is 1. For example sales is the same as sales^1.
sales^ figure finds matches for “sales” and “figure,” giving higher relevance to the term “sales” (entries with more occurrences of the term “sales” are displayed first in the search results). To give even higher relevance, sales^2 is higher than sales^, and sales^3 is higher than sales^2, and so forth.
You can also give relevance to phrases. For example, "sales figure"^2 "marketing figure"
Minus (-) before a word Excludes the word from the search. -tree excludes all items containing “tree,” “Tree,” “TREE,” and so on.
Search Capability Function Example
38 Getting Informed

Click the Search Options icon to refine your search to include only people, places, or tags, as described in “Searching for Specific People, Places, or Tagged Items” on page 39.
You can also select one of your saved searches.
Searching for Specific People, Places, or Tagged ItemsTo refine your search to include only people, places, or tags:
1 Click the Search Options icon . 2 Select one of the following options:
People: enables you to quickly navigate to a user’s personal workspace.
Field name followed by a colon, followed by what you want to search for
Searches a specific field. When searching a specific field, you must search on the data name of the field. Data names resemble the true names found in the interface.
Fields you can search on:
_creationDate_creatorName_modificationDate_modificationName_ownerName_ownerTitle_workflowState_fileName_fileStatus_fileExt_rating_loginName_groupNamefirstNamemiddleNamelastNameemailAddresstxtEmailAddressmobileEmailAddresstitledescription
When searching in a specific field, the field name is always case-sensitive, even for a case-insensitive search.
title:meeting finds instances of the word “meeting” in the entry Title field.
description:meeting finds instances of the word “meeting” in the entry Description field.
emailAddress:jchavez* finds instances of “jchavez” in the Email Address field.
Search Capability Function Example
Getting Informed 39

Places: enables you to quickly navigate to any folder or workspace within Vibe. For example, if you want to locate a colleague’s Blog folder, simply type blog, and then specify the name of your colleague. The appropriate place is listed in the drop-down list.
Tags: enables you to locate any workspaces, folders, or entries that have been tagged. Specify the name of the tag that you are searching for, and click the name in the drop-down list. Vibe displays all of the workspaces, folders, and entries that have been tagged with that particular tag.Vibe displays all personal tags, and all community tags for which you have appropriate rights.
3 In the provided field, begin typing the name of the person, place, or tag that you are searching for.Vibe applies type-to-find functionality. As you type, Vibe lists items matching what you have typed so far (all items matching “d,” then all items matching “di,” for example).If there is more than one panel of choices, you can click the left-arrow and right-arrow icons to review your choices.
4 Click the name of the person, place, or tag when it appears in the drop-down list.The person, place, or tagged items are displayed.
Using Advanced SearchAdvanced Search enables you to narrow your search based on various criteria.
1 Click the Search Options icon . 2 Click Advanced Search.
You can also perform an advanced search from the Search Results page.
1 Click Advanced Search.
If your search requires more than one criterion, click Add to add another field for your use.
Click the X icon next to a criterion to remove it from the search.
Text: Enter the specific text that you are searching for.
For more information about the various ways that you can refine a text-based search, see “Using Basic Search” on page 36.
Search Entire Site: Searches the entire site. This option is already selected if you just performed a site-wide search.
Search My Files: Searches only files and folders that are located in your My Files area.
Search Shared with Me: Searches only files and folders that are located in your Shared with Me area.
Search Shared by Me: Searches only files and folders that are located in your Shared by Me area.
Places: This section enables you to restrict your search to a particular place. Expand the tree by clicking the plus sign (+) next to the Home Workspace, then navigate to and select the workspace or folder that you want to search.
40 Getting Informed

Search All Sub Places: Searches everything below what you selected in the Workspace tree.
Search deleted items: Search for items that have been moved to the trash. The search returns only items that are in the Trash. Items that have been deleted (purged) from the Vibe system cannot be searched.
Items Per Page: Select how many results you want to display on each Search Results page.
Words Per Item: Select the number of words to display for each search result.
Sort by: Select how you want to sort your search results. You can sort search results by the following categories:
Relevance: When you select Relevance, the most relevant results are displayed at the top of the list.
Date: When you select Date, the results that were most recently added or modified that match the search criteria are displayed at the top of the list.
Rating: When you select Rating, entries that have the highest rating are displayed at the top of the list. For more information on rating entries, see “Rating a Folder Entry” on page 150.
Reply Count: When you select Reply Count, entries that have the most replies are displayed at the top of the list.
Sort by (secondary): enables you to sort your search results by a secondary category.
If you want to sort by only one category, select the same category that you selected in the Sort by drop-down list.
Authors: Search for items based on the author.
Tags: Search for items that are tagged, whether they are community or personal tags. For more information on tags, see “Using Tags” on page 29.
Workflow: Search for items that have a particular workflow applied to them.
Entry Attributes: Search for entries based on an element that the user selected in the entry, such as a select box or a radio button. For example, select Task Entry, then in the next field that appears, select Due Date. In the third field that appears, select a day to perform a search for all tasks due on that particular day.
Last Activity in Days: Select to search for items that have been active in the last 1, 3, 7, 30, or 90 days.
Creation Dates: Search for items based on when the items were created. In the fields provided, specify the start and end dates of the desired interval.
Modification Dates: Search for items based on when the items were last modified. In the fields provided, specify the start and end dates of the desired interval.
Item Type: Select the type of item you are searching for.
Searching for Items That Have Been Moved to the TrashVibe enables you to search for items that have been moved to the Trash on the Vibe site. After you find the item that you’re searching for, you can view the item by clicking it. For information on how to recover the item, see “Recovering a Workspace from the Trash” on page 71, “Recovering a Folder
Getting Informed 41

from the Trash” on page 85, or “Recovering a Folder Entry from the Trash” on page 136. You can recover the item only if you have appropriate rights. If you want to recover the item but you do not have appropriate rights, contact the user who created the item and ask them to recover it.
For more information on recovering items in Vibe, see “Restoring Items from the Trash” in the Micro Focus Vibe 4.0.8 Advanced User Guide.
To search for an item that has been moved to the Trash:
1 Click the Search Options icon . The Search Options dialog box is displayed.
2 Click Advanced Search.3 Select Search deleted items.4 (Optional) Narrow your search in any of the ways described in “Using Advanced Search” on
page 40.If you decide not to narrow your search, all items that have been deleted from Vibe are displayed.Deleted (purged) items cannot be displayed.
5 Click Search.
Saving and Reusing SearchesVibe enables you to save searches, so that you can reuse them in the future.
“Saving Your Search” on page 42 “Accessing Saved Searches” on page 42
Saving Your Search1 After you have performed a search that you want to save, click View > Saved Searches in the
Action toolbar.The Saved Searches dialog box is displayed.
2 In the Manage Saved Searches section, specify the name of the search that you want to save, then click Save > Close.
Accessing Saved Searches
1 Click the Search Options icon . The Search Options dialog box is displayed.
2 In the Saved Searches drop-down list, click the saved search that you want to access.
42 Getting Informed

Locating a Subject-Matter ExpertVibe enables you to locate subject-matter experts by providing a list of users who have written the most concerning a particular topic.
1 Perform a basic or advanced search, as described in “Using Basic Search” on page 36 and “Using Advanced Search” on page 40.The Search Results page is displayed with a list of entries that match your search criteria.
2 Click View > Top Ranked in the Action toolbar.A list of top-ranked places and top-ranked people is displayed. The users at the top of the Top Ranked People section have made the most posts to the Vibe site concerning the particular topic that you searched. Click a user’s name to navigate to the user’s personal workspace.
Locating a Relevant Workspace or FolderVibe enables you to locate workspaces and folders that contain information about a particular topic.
1 Perform a basic or advanced search, as described in “Using Basic Search” on page 36 and “Using Advanced Search” on page 40.The Search Results page is displayed with a list of entries that match your search criteria.
2 Click View > Top Ranked in the Action toolbar.A list of top-ranked places and top-ranked people is displayed. The places at the top of the Top Ranked Places section contain the most information about the particular topic that you searched. Click the name of the workspace or folder to quickly navigate there.
Accessing Shared Files and FoldersFiles and folders that you have shared with others are stored in one convenient location. Files and Folders that others have shared with you are stored in another location.
You can view files and folders that others have shared with you or that you have shared with others.
1 Click My Workspace in the Action toolbar.
2 In the Navigation Panel, click Shared with Me to see files and folders that have been shared
with you. Click Shared by Me to see files and folders that you have shared with others.
For more information about sharing, as well as how to view shared files and folders, see Chapter 4, “Sharing Entries, Folders, and Workspaces,” on page 57.
Accessing Your Personal Files and Folders (My Files)Any Files folders or Photo Album folders that are located in your personal workspace are displayed in your My Files area. This is a convenient way to access these types of folders in a single location. You can also add File entries and Photo entries directly to your My Files area.
Getting Informed 43

To access your My Files:
1 Click My Workspace in the Action toolbar.
2 In the Navigation Panel, click My Files .
NOTE: The My Files Storage folder (located in your personal workspace) is the actual location where files that you add directly to your My Files area are stored. You can add files directly to this folder or to the My Files area.
The My Files Storage folder is created at the time that you first access your My Files area.
Finding What’s UnreadMicro Focus Vibe enables you to view unread entries in any workspace or folder.
1 Navigate to the workspace or folder where you want to view all unread entries.2 Click View > What’s Unread in Workspace in the Action toolbar to see what’s unread in a
workspace.orClick View > What’s Unread in Folder in the Action toolbar to see what’s unread in a folder.Vibe displays all of the entries that you have not yet read.
Click Mark These Read to mark all unread entries as read. These entries no longer appear when you click What’s Unread in this workspace or folder.
Accessing Public Files and FoldersPublic files are files that have been shared with the public. The ability to make files and folders available to the public must be enabled by your Vibe administrator.
To access public files and folders:
1 In the masthead, click Public .
You can hide this option so that it is no longer displayed in the web client:
1 Click your linked name in the upper right corner of any Vibe page.2 Click Personal Preferences, then select Hide ‘Public’ Collection.3 Click OK.
For information about how to make a file or folder publicly available, see Chapter 4, “Sharing Entries, Folders, and Workspaces,” on page 57.
Users who do not have a Vibe user account can enter the Vibe site as a guest user (as described in “Accessing Micro Focus Vibe from a Web Browser” on page 17) and view all items that have been shared with the public.
44 Getting Informed
Following and Unfollowing Places and People of InterestMicro Focus Vibe enables you to follow workspaces, folders, or people. When you follow something or someone in Vibe, you can easily see activity generated in the specific place that you are following, or by the specific person that you are following.
“Following Workspaces and Folders” on page 45 “Following People” on page 45 “Viewing the Workspaces, Folders, and People You Are Following” on page 46 “Viewing Activity from the Workspaces, Folders, and People You Are Following” on page 46 “Unfollowing Workspaces, Folders, or People” on page 47
Following Workspaces and Folders “Following Workspaces” on page 45 “Following Folders” on page 45
Following Workspaces1 Navigate to the global or team workspace that you want to follow.
2 Click lick the Configure icon next to the workspace title, then click Follow this Workspace.
Following Folders1 Navigate to the folder that you want to follow.
2 Click the Configure icon next to the folder title, then click Follow this Folder.
Following People “Using the Workspace to Follow Someone” on page 45 “Using the Presence Icon to Follow Someone” on page 46
Using the Workspace to Follow Someone1 Navigate to the personal workspace of the user who you want to follow.
2 Click the Configure icon next to the workspace title, then click Follow this Person. orOn the user’s profile page, click Follow.
Getting Informed 45

Using the Presence Icon to Follow Someone
1 Click the Presence icon or linked name of the user you want to follow. The Presence icon is displayed next to a user’s name wherever the user has posted or commented on a Vibe entry. When you click a user’s presence icon, the Profile Quick View is displayed.
2 Click Follow.
Viewing the Workspaces, Folders, and People You Are FollowingYou can quickly see which workspaces, folders, and people you are currently following:
1 Navigate to the home page of your personal workspace.2 Click the What’s New tab.3 Select People and Places being Followed.4 On the right side of the page, the workspaces, folders, and people you are following are
displayed.
Viewing Activity from the Workspaces, Folders, and People You Are FollowingIf you are currently following a workspace, folder, or person, Vibe enables you to easily see activity generated in the specific place that you are following, or by the specific person that you are following.
1 Click What’s New in the Action toolbar.2 Click Followed Places to view new entries that have been posted to the places you are following.
orClick Followed People to view new entries that have been contributed by the people you are following.
46 Getting Informed

Staying up-to-date on another Vibe user’s micro-blog entries is another reason that you might want to follow a person in Vibe. For information on the various and convenient ways that you can view the micro-blog entries of people you are following, see “Viewing the Micro-Blog Entries of People You Are Following” on page 50.
Unfollowing Workspaces, Folders, or PeopleIf you are currently following someone or some place in Vibe, it is easy to stop following that person or place.
“Unfollowing a Person” on page 47 “Unfollowing a Workspace or Folder” on page 48
Unfollowing a Person “Using the Workspace to Unfollow Someone” on page 47 “Using the Presence Icon to Unfollow Someone” on page 47
Using the Workspace to Unfollow Someone1 Navigate to the personal workspace of the user who you want to stop following.
2 Click the Configure icon next to the workspace title, then click Stop Following this Person. orOn the user’s profile page, click Following.
Using the Presence Icon to Unfollow Someone
1 Click the Presence icon or linked name of the user you want to stop following. The Presence icon is displayed next to a user’s name wherever the user has posted or commented on a Vibe entry. When you click a user’s presence icon, the Profile Quick View is displayed.
2 Click Following.
Getting Informed 47
Unfollowing a Workspace or Folder “Unfollowing Workspaces” on page 48 “Unfollowing Folders” on page 48
Unfollowing Workspaces1 Navigate to the workspace that you want to stop following.
2 Click the Configure icon next to the workspace title, then click Stop Following this Workspace.
Unfollowing Folders1 Navigate to the folder that you want to stop following.
2 Click the Configure icon next to the folder title, then click Stop Following this Folder.
Viewing Recent ContributionsMicro Focus Vibe enables you to quickly revisit entries that you recently posted or recently visited.
1 Navigate to the home page of your personal workspace.2 Click the Recent tab.
The left column lists all of the entries that you have most recently posted. The right column lists all of the entries that you have most recently visited.
Viewing Assigned TasksTo help you keep track of tasks that have been assigned to you, Micro Focus Vibe provides a quick, easy way to view tasks.
1 Navigate to the home page of your personal workspace.2 Click the Tasks and Calendars tab.
In the left column, Vibe displays the tasks that are assigned to you. You can sort them by tasks due within two weeks, or any tasks that are currently assigned to you.
For information on how to view all tasks that are assigned to you in a full interactive task view, see “Viewing Your Tasks in a Full Interactive View” on page 117.
48 Getting Informed

Viewing Calendar EventsTo help you keep track of your calendar events, Micro Focus Vibe enables you to view all of the calendar events for which you are scheduled on the current day.
1 Navigate to the home page of your personal workspace.2 Click the Tasks and Calendars tab.
The right section of the page displays today’s schedule with all of the calendar events from all of the calendars you are following.
Sharing Workspaces, Folders, and EntriesMicro Focus Vibe enables you to share workspaces, folders, and entries with other Vibe users. This is a quick and easy way to refer a co-worker to a place on the Vibe site.
For more information, see Chapter 4, “Sharing Entries, Folders, and Workspaces,” on page 57.
Using Micro-BlogsUse the Micro-Blog feature to capture quick personal notes, or to inform others of what you are currently working on. This provides a greater transparency, so those you work with know what you are doing, and how they might offer assistance to help you accomplish your tasks.
Micro-blogs differ from regular blogs because their purpose is not to present an entire topic or argument, but rather to give a quick snippet of information from the author of the micro-blog. Micro-blogs should be only one or two short sentences.
For more information on traditional blogs within Micro Focus Vibe, see “Working with Blog Folders” on page 98.
“Posting a Micro-Blog” on page 49 “Viewing the Micro-Blog Entries of People You Are Following” on page 50 “Viewing the Micro-Blog Entries of Vibe Users You Are Not Following” on page 50
Posting a Micro-Blog1 Navigate to the home page of your personal workspace.2 In the What are you working on? field, specify your micro-blog entry, then click Share.
Getting Informed 49

Viewing the Micro-Blog Entries of People You Are FollowingYou can view the micro-blog entries of people you are following in three convenient ways:
“Setting Up a Live Feed to View the Micro-Blog Entries of People You Are Following” on page 50 “Using the Relevance Tabs in Your Personal Workspace to View the Micro-Blog Entries of People
You Are Following” on page 50 “Using Your Mobile Device to View the Micro-Blog Entries of People You Are Following” on
page 50
For information on how to follow people in Vibe, see “Following Workspaces and Folders” on page 45.
Setting Up a Live Feed to View the Micro-Blog Entries of People You Are FollowingLike Twitter, Vibe enables you to see live feeds for the micro-blog entries of the people you are following.
For information on how to set up a live micro-blog feed, see “Setting Up a Live Feed” on page 54.
Using the Relevance Tabs in Your Personal Workspace to View the Micro-Blog Entries of People You Are Following
1 Navigate to your personal workspace.2 Click the Micro-Blogs and Shared Items tab.
The Micro-Blogs being Followed column lists the micro-blog entries of the people you are currently following.
Using Your Mobile Device to View the Micro-Blog Entries of People You Are FollowingVibe enables you to use your mobile device to view the micro-blog entries of the people you are following, as described in “Viewing the Newest Micro-Blog Entries of People You’re Following” in the Micro Focus Vibe Mobile Quick Start (https://www.novell.com/documentation/vibe4/vibe4_qs_mobile/data/vibe4_qs_mobile.html).
Viewing the Micro-Blog Entries of Vibe Users You Are Not Following “Viewing a User’s Micro-Blog Entries by Using the Presence Icon” on page 51 “Viewing a User’s Micro-Blog Entries by Navigating to His or Her Personal Workspace” on
page 51
50 Getting Informed

Viewing a User’s Micro-Blog Entries by Using the Presence Icon
Vibe enables you to view a user’s micro-blog entries by clicking the user’s Presence icon , located next to his or her name in an entry.
1 Click the Presence icon of the user whose micro-blog entries you want to view. The Profile Quick View is displayed.
2 Click Micro-Blog.
Viewing a User’s Micro-Blog Entries by Navigating to His or Her Personal WorkspaceYou can navigate to a user’s personal workspace to view the micro-blog entries.
1 Navigate to the personal workspace of the user whose micro-blog entries you want to view.2 In the Navigation panel, click the Micro-Blog folder.
The user’s micro-blog entries are listed in the folder.
Subscribing to a Folder or EntryYou can configure Micro Focus Vibe to send you email notifications for folders and their sub-folders, or for individual entries. This is called “subscribing” to a folder or entry. Also, folder owners can configure Vibe to send email notifications to you (as described in “Configuring Folders to Send Email Notifications to Other Users” in the Micro Focus Vibe 4.0.8 Advanced User Guide). However, because a user’s individual subscription settings override those of the folder owner, you can override any higher-level configurations.
If you are particularly interested in a specific folder or entry, you might want to subscribe to that folder or entry. When you subscribe to a folder or entry, Vibe notifies you of the activity that takes place in the folder or entry.
“Subscribing to a Folder” on page 52 “Subscribing to an Entry” on page 52 “Selecting Notification Types and Delivery Destinations” on page 52
Getting Informed 51

“Adding and Modifying Delivery Destinations” on page 53 “Overriding Higher-Level Notification Settings” on page 53
Subscribing to a Folder1 Navigate to the folder that you want to subscribe to.
2 Click the Configure icon next to the folder title, then click Subscribe to Folder. The Subscribe dialog box is displayed.
3 Continue with “Selecting Notification Types and Delivery Destinations” on page 52.
Subscribing to an Entry1 Click the drop-down arrow next to the entry that you want to subscribe to, then click Subscribe.
The Subscribe dialog box is displayed.2 Continue with “Selecting Notification Types and Delivery Destinations” on page 52.
Selecting Notification Types and Delivery DestinationsThis form enables you to choose which type of notification that you want to receive, as well as the email address or phone number that you want the notifications to be sent to.
1 Select an email address or phone number where you want the notifications to be sent.You can select multiple email or phone number delivery destinations for each notification type by simply pressing Ctrl and selecting the email addresses or phone numbers.You can select these delivery destinations in any of the provided sections, which represent the email notification types:Digest Email: (Available for folders only) Vibe sends one message that summarizes all of the activity in the folder and its sub-folders. Vibe sends digest notifications at a schedule established by your site administrator.Email only: Vibe sends one message for every new or changed entry. The email messages do not include files that might be attached to the new or changed entries. Vibe sends all types of individual notifications every five minutes.Email with Attachments: (Includes Attachments) Vibe sends one message for every new or changed entry, and messages include attached files.Text Message: Vibe sends a message suitable for viewing as a text message. The content of the message includes only the linked title of the new or changed entry. Vibe sends text-message notifications up to every five minutes.
2 (Optional) Select Override preset notifications with these selections if you want your selections to override those made by the administrator or folder owner.For more information, see “Overriding Higher-Level Notification Settings” on page 53.
3 Click OK.
52 Getting Informed

Adding and Modifying Delivery DestinationsYou can add and modify your email and phone number contact information in your Personal Profile.
1 Navigate to the home page of your personal workspace, then click the Profile link next to your avatar (picture).
2 Click Edit.3 Specify the appropriate delivery destination information in the E-Mail, Mobile E-Mail, and Text
Messaging E-Mail fields.4 Click OK.
Now, when you select your notification types and delivery destinations as described in “Selecting Notification Types and Delivery Destinations” on page 52, the new or modified contact information is displayed.
Overriding Higher-Level Notification SettingsIf a folder owner or administrator has configured a folder to send you email notifications, you can override the higher-level settings.
1 Navigate to the folder where you want to override the higher-level notification settings.
2 Click the Configure icon next to the folder title, then click Subscribe to Folder. 3 Select the kinds of notification that you want to receive.4 Select Override preset notifications with these selections.5 Click OK.
If you want to receive no email notifications:
1 Navigate to the folder where you want to override the higher-level notification settings.
2 Click the Configure icon next to the folder title, then click Subscribe to Folder. 3 Ensure that no email address is selected in any of the sections.4 Select Override preset notifications with these selections.5 Click OK.
Using Remote ApplicationsRemote applications communicate with a third-party online application, and send information from that third-party application back to Micro Focus Vibe.
For example, your Vibe administrator could create a remote application for Twitter that displays all of your Twitter entries in Vibe.
Remote applications are very customizable, and are set up by your Vibe administrator. Consult your Vibe administrator if you have a request for a new remote application.
Getting Informed 53

For information on displaying remote applications that have been enabled by your Vibe administrator, see “Managing Remote Applications” in the Micro Focus Vibe 4.0.8 Advanced User Guide.
You can also display remote applications as folder and workspace accessories, as described in “Creating an Accessory” on page 153.
Viewing Live FeedsMicro Focus Vibe enables you to view live feeds of the latest entries in your teams, followed places, or across the entire site, so you can be up-to-date in real time without entering the Vibe site. And, like Twitter, you can see live feeds for the micro-blog entries of the people you are following.
“Setting Up a Live Feed” on page 54 “Viewing New Entries in Your Live Feed” on page 54 “Using the Notification Area to View the Number of New Entries” on page 55 “Displaying a News Feed in the GroupWise Client” on page 55
Setting Up a Live FeedTo set up a live feed from your Vibe site:
1 Click your linked name in the upper right corner of the Vibe site, then click the Live Feed icon .
The live feed is displayed.2 In the Show drop-down list, select from the following options:
My Teams: Displays the most recent entries of members of your various teams. All Followed: Displays the most recent entries that have been posted to the places that you
are currently following, as well as the entries for the people you are currently following. Site Wide: Displays the most recent entries that have been posted to the Vibe site. Micro-Blogs: Displays the most recent micro-blog entries of the people that you are
currently following.3 (Optional) Minimize the live feed window.
The live feed window is displayed in your desktop notification area.
Viewing New Entries in Your Live Feed1 Open the live feed window that you minimized (located in your desktop notification area).
The live feed is automatically updated every five minutes. To instantly update the feed and see the most recent entries, click the Refresh icon .
54 Getting Informed

Using the Notification Area to View the Number of New EntriesIn the Firefox web browser, you can view how many new entries have been posted since the last time the live feed was refreshed.
1 Look at the notification area of the feed window that you minimized. The number of new entries is displayed on the left. If there are no new entries, no number is displayed.
Displaying a News Feed in the GroupWise ClientYou can display your Vibe news feed in the GroupWise client. This enables you to keep up with the latest Vibe additions without leaving GroupWise.
For information on how to do this, see “Creating a New Panel” in “Getting Organized” in the GroupWise 18 Client User Guide.
Viewing Folders as RSS or Atom FeedsRSS and Atom enable you to set up feeds to Micro Focus Vibe folders and view those feeds in one convenient location.
You can set up a Vibe folder to be accessed by an RSS or Atom reader, so the Vibe folder sends new or modified folder entries to your RSS or Atom reader. This is an easy way to stay informed on activity in a certain folder.
For more information, see“Viewing Vibe Folders as RSS or Atom Feeds” in the Micro Focus Vibe 4.0.8 Advanced User Guide.
Synchronizing Tasks and Calendars to a Desktop Application
iCal functionality in Micro Focus Vibe enables you to synchronize Vibe tasks and calendars with any desktop application that supports the iCal format (for example, Google and Outlook). You can synchronize tasks and calendars in the following ways:
“Synchronizing Tasks Folders and Calendar Folders” on page 55 “Synchronizing Task and Calendar Items When Entries Are Created” on page 56
Synchronizing Tasks Folders and Calendar FoldersYou can synchronize Vibe Tasks folders and Calendar folders to other task lists and calendars that support the iCal format.
1 Navigate to the Tasks folder or Calendar folder that you want to synchronize to your desktop calendar application.
2 Click the Footer toolbar, located at the bottom of the folder page.3 In the iCal URL section in the provided table, select and copy the iCal URL.
Getting Informed 55
You use this link to export Vibe calendar data for inclusion in another calendar that supports the iCal format.
4 Paste the iCal URL into the required section of the desktop calendar application.Consult the documentation for the desktop application for instructions on where to paste the iCal URL and complete the synchronization.
Synchronizing Task and Calendar Items When Entries Are CreatedWhen you create a task or calendar entry in Vibe, you can configure Vibe to send an email notification and iCal task/appointment to all of the users, groups, or teams that you associated with the task or calendar entry.
1 When creating the entry, select Send an E-Mail Notification to Assignees, or Send an E-Mail Notification to Attendees, depending on whether you are creating a task or a calendar entry.
iCal tasks and appointments appear in the recipients’ main task list or calendar if the email application supports iCal. When users mark a task Accepted or Completed, an email message is sent to the original entry creator, notifying the entry creator of the change. However, the change in status is not reflected in Vibe.
For more information on how to create an entry in Vibe, see “Creating a Folder Entry” on page 128.
56 Getting Informed

4 4Sharing Entries, Folders, and Workspaces
Micro Focus Vibe enables you to share workspaces, folders, and entries with other Vibe users as well as users external to your organization.
This functionality must first be enabled by your Vibe administrator and by the workspace owner. After the Vibe administrator has enabled the ability to share, folder and workspace owners can enable or disable this ability on their individual folders and workspaces (as described in “Configuring Sharing Rights for a Workspace” on page 74). If you cannot share files and folders as described in this section, the ability has not been enabled.
“Understanding Shared-Access Rights” on page 57 “Understanding Sharing Options” on page 58 “Sharing Entries, Folders, and Workspaces” on page 58 “Distributing a Link to a File” on page 60 “Sharing with People Outside Your Organization” on page 62 “Viewing Items You Have Shared” on page 64 “Viewing Items Others Have Shared with You” on page 64 “Hiding Items in the Shared with Me and Shared by Me Views” on page 65 “Modifying or Removing a Share” on page 66 “Obtaining URLs (Permalinks) of Shared Entries, Folders, and Workspaces” on page 67
Understanding Shared-Access RightsShared-access rights are how you define which users are allowed to do what with the entries, folders, and workspaces that you share with them.
You can grant users the following rights when you share entries, folders, and workspaces with them:
Viewer: Users can view individual entries, folders, and workspaces that are shared with them; users can view the contents of the folders and workspaces that are shared with them.
Editor: Users can view and modify individual entries, folders, and workspaces that are shared with them; users can modify the contents of the folders and workspaces that are shared with them.
Contributor (Applies to Folders and Workspaces, not Entries): Users can rename or delete the shared folder or workspace. Users can create entries in the folder or workspace, rename existing entries, modify entries, move entries, and delete entries inside the folder or workspace.
Allow re-share with: If you want to allow the share recipient to share the item with other users, you can select from the following re-share rights:
Internal users: Can re-share items with internal Vibe users. External users: Can re-share items with external Vibe users. Public: Can re-share items with the public.
Sharing Entries, Folders, and Workspaces 57

File Link: Can re-share items by distributing a File Link, as described in “Distributing a Link to a File” on page 60.
Understanding Sharing OptionsVibe provides various methods of making files and folders available to others. How you decide to make files available might depend on various factors, such as the sensitivity of the information you are distributing or the relevance of information to certain individuals.
Sharing with individual users and groups: Sharing enables you to share files and folders with specific users and groups internal to your organization or with specific users external to your organization. When you share an entry, folder, or workspace, you define the shared-access rights that users have to the item. For example, you might give a user Viewer access only. Or, you might give a user Editor access to an entry and allow them to re-share the entry with others.
Sharing with specific users and groups provides the greatest level of security for your entries, folders, and workspaces. Users receive a notification about the shared item and the item is displayed in their Shared with Me area.
For more information, see “Sharing Entries, Folders, and Workspaces” on page 58. Sharing with the Public: When you share an item with the Public, any person with the URL to
the Vibe site can view the file in the Public area.For information about how to share files and folders with the Public, see “Sharing Entries, Folders, and Workspaces” on page 58.
Distributing a File Link: (File entries only) You can distribute a link (URL) to a file entry. When you distribute a link to a file, any user with the link can access the file. However, the file is not displayed in the Public area, so users must have direct access to the link in order to view the file.For information about how to distribute a File Link, see “Distributing a Link to a File” on page 60.
Sharing Entries, Folders, and WorkspacesYou can share workspaces, folders, and entries with internal and external users:
1 Navigate to the workspace or folder that you want to share, or navigate to the folder that contains the entries that you want to share.
2 Sharing a workspace or folder: Click the Configure icon next to the workspace or folder title, then click Share this Workspace or Share this Folder. Sharing multiple entries (Files, Discussions, and Tasks folders only): Select one or more items that you want to share, then click Share. (In Files folders, click Share again.)Sharing single entries: Click the drop-down arrow next to the entry, folder, or workspace that you want to share, then click Share Entry. orIf the drop-down arrow is not available, open the entry, then click Actions > Share this Entry.The Share dialog box is displayed.
58 Sharing Entries, Folders, and Workspaces

3 You can share with internal Vibe users, external users, and the public: To share with internal Vibe users, begin typing the name of the user, group, or team with
whom you want to share the item, then click the name when it appears in the drop-down list.
To share with users external to your organization, specify a user’s email address, then press Enter. Or
Click the External User icon , then specify the user’s email address and click OK. Your Vibe administrator must enable this functionality. To see if you have rights to share with external users, hover over the Information icon next to the input field. For more information about sharing with external users, see “Sharing with People Outside Your Organization” on page 62.
To share with the public, click Make Public in the upper right corner of the Share dialog box.Users who do not have a Vibe user account can enter the Vibe site as a guest user (as described in “Accessing Micro Focus Vibe from a Web Browser” on page 17) and view all items that have been shared with the public.External users do not have access to view items that have been shared with the public. In order for external users to view items that have been shared with the public, they must log in to the Vibe site as the Guest user.Your Vibe administrator must enable this functionality. To see if you have rights to share with the public, hover over the Information icon next to the input field.
To quickly share with many users, you can copy user email addresses from one location and paste them into the Add a user, group or email address field on the Share dialog box.Email addresses can be for internal or external users and must be separated by a comma (,) or a space.
4 In the Shared With column, click the name of the users or groups whose share settings you want to modify. You can select multiple users and modify the share settings simultaneously.The share settings for the user you most recently added to the Shared With column are already displayed.
5 Select the access rights that you want to grant to the user or group.You cannot modify access rights when sharing with the public or when distributing a File Link. Viewer: Users can view individual entries, folders, and workspaces that are shared with
them; users can view the contents of the folders and workspaces that are shared with them.This is the only option available when sharing with the public or when distributing a File Link.
Editor: Users can view and modify individual entries, folders, and workspaces that are shared with them; users can modify the contents of the folders and workspaces that are shared with them.
Contributor (Applies to Folders and Workspaces, not Entries): Users can rename or delete the shared folder or workspace. Users can create entries in the folder or workspace, rename existing entries, modify entries, move entries, and delete entries inside the folder or workspace.
Sharing Entries, Folders, and Workspaces 59

6 In the Allow re-share with section, select whether you want them to be able to share with internal users, external users, the public, or via a File Link.
7 In the Expires field, select from the following options: Never: The share never expires. On: Select a given day for the rights to expire.
Rights expire at the beginning of the day that you select. After: Specify a certain number of days for the rights to remain active.
Each day is counted as a 24-hour period from the time that you set the expiration.8 If you want to include a personal note in the share, specify a note in the Note field.
Only the users and groups that you share with can read the note.The share note cannot exceed 255 characters in length.
9 Select from the following notification options: All recipients: All recipients in the share list are notified. Only newly added recipients: Only recipients that you add to the share list are notified. New and modified recipients: Only new recipients and recipients whose share rights you
are modifying are notified. None: No notifications are sent.
Notifications contain the following information: A link to the shared item The note that was entered specifically for the user that the item is being shared with (see
Step 8) When the share expires (See Step 8)
10 Click OK.A notification is displayed, stating that an email was successfully sent to the users, groups, or teams that you specified.
Distributing a Link to a FileYou can distribute a link (URL) to a file. When you distribute a link to a file, any user with the link can access the file. However, the file is not displayed in the Public area, so users must have direct access to the link in order to access the file.
“Copying a File Link” on page 61 “Emailing a File Link” on page 61 “Editing or Removing a File Link” on page 62
60 Sharing Entries, Folders, and Workspaces

Copying a File LinkYou can copy the File Link and distribute it in whatever manner you prefer. For example, you might copy the link and send it as part of an instant message or text message.
1 Navigate to the file for which you want to copy the File Link.
2 Click the drop-down arrow next to the entry, then click Copy Link. orSelect multiple files, then click Share > Copy Link. The Copy File Link dialog box is displayed.
3 (Conditional) If a link has not been previously generated for the file, click Get File Link.4 Copy either of the following links. Separate links are available for each file that you selected.
View File Link: This link displays the file in a web browser in an HTML view. If the file type cannot be displayed in a web browser, this link is not available.Download File Link: Depending on browser settings, users are either prompted to download or open the file, or the file is automatically displayed in the browser. This link allows users to access the file directly.
5 Click Close.
Emailing a File LinkYou can email a File Link either by using Vibe’s built-in email system or by using your default email client (such as Novell GroupWise).
“Using Vibe’s Built-In Email System to Email a File Link” on page 61 “Using Your Default Email Client to Email a File Link” on page 62
Using Vibe’s Built-In Email System to Email a File Link1 Navigate to the file for which you want to email the File Link.
2 Click the drop-down arrow next to the entry, then click Email Link using Vibe. orSelect multiple files, then click Share > Email Link using Vibe. The Email File Link dialog box is displayed.
3 Specify the email address where you want to send the File Link, a personal message to include, and when the link will expire.
4 Click Send.The following links are included in the email:View: This link displays the file in a web browser in an HTML view. If the file type cannot be displayed in a web browser, this link is not available.Download: Depending on browser settings, users are either prompted to download or open the file, or the file is automatically displayed in the browser. This link allows users to access the file directly.
Sharing Entries, Folders, and Workspaces 61
Using Your Default Email Client to Email a File Link1 Navigate to the file for which you want to email the File Link.
2 Click the drop-down arrow next to the entry, then click Email Link. A new email is displayed, with the following URLs included in the message body:View: This link displays the file in a web browser in an HTML view. If the file type cannot be displayed in a web browser, this link is not available.Download: Depending on browser settings, users are either prompted to download or open the file, or the file is automatically displayed in the browser. This link allows users to access the file directly.
3 Specify the users who you want to email, then send it.
Editing or Removing a File LinkAfter a File Link has been distributed either by copying the link or by emailing it, you can modify it if you have appropriate rights. You can modify the expiration date or note associated with the link, or you can remove the link so that the file is no longer accessible to users who have access to the file via the link.
“Editing the Expiration Date or Deleting the File Link” on page 62 “Editing the Note Associated with a File Link” on page 62
Editing the Expiration Date or Deleting the File Link1 Navigate to the file for which you want to edit the File Link.
2 Click the drop-down arrow next to the entry, then click Edit Link. The Edit File Link dialog box is displayed.
3 (Conditional) To edit the expiration date for the File Link, click the drop-down arrow next to the Expires field, then select the day that the link will expire or the number of days before the link expires.
4 (Conditional) To delete the File Link, click Delete > Yes.
Editing the Note Associated with a File LinkTo edit a note associated with a File Link, you must also have Share rights on the file. To edit the note, you modify the File Link via the Share dialog, as described in “Modifying or Removing a Share” on page 66.
You can also modify the expiration date or delete the File Link via the Share dialog.
Sharing with People Outside Your OrganizationNOTE: This functionality must first be enabled by your Vibe administrator before you can share with users outside your organization.
62 Sharing Entries, Folders, and Workspaces

Vibe enables you to designate specific users who are not part of your organization and grant them access to view and collaborate on your corporate entries, folders, and workspaces.
When you share an item with a user external to your organization, a Vibe account is automatically created for that user by using the user’s email address. The user must then register on the Vibe site.
“Logging in As an External User to See a Shared Item” on page 63 “Making Files Accessible to the Public” on page 63
Logging in As an External User to See a Shared ItemWhen a user external to the Vibe site receives a shared item, a Vibe account is automatically created for that user by using the user’s email address.
The user must then register on the Vibe site in order to log in.
At least one unexpired item must be shared with you for you to be able to log in to the Vibe site.
1 In the email notification that you received notifying you about the shared item, click the link to the shared item.
2 On the Vibe login page, specify your first and last name, then create a password. Your User ID is your email address where the shared item was sent and cannot be changed.
3 Click Register.You are authenticated to the Vibe system, and the shared item is displayed.
4 (Optional) In addition to items that have been shared with them, external users can view all items that have been made publicly available by clicking Public in the sidebar. The ability to make files and folders available to the public must be enabled by your Vibe administrator.
Making Files Accessible to the PublicYou can make files and folders available for public access outside your organization. For information about how to share files or folders with the public, see “Sharing Entries, Folders, and Workspaces” on page 58.
The following types of users can see items that have been shared with the public:
All internal users Users who log in to the Vibe system as the Guest user
Users who do not have a Vibe user account can enter the Vibe site as a guest user (as described in “Accessing Micro Focus Vibe from a Web Browser” on page 17) and view all items that have been shared with the public.
NOTE: External users do not have access to view items that have been shared with the public. In order for external users to view items that have been shared with the public, they must log in to the Vibe site as the Guest user.
Sharing Entries, Folders, and Workspaces 63
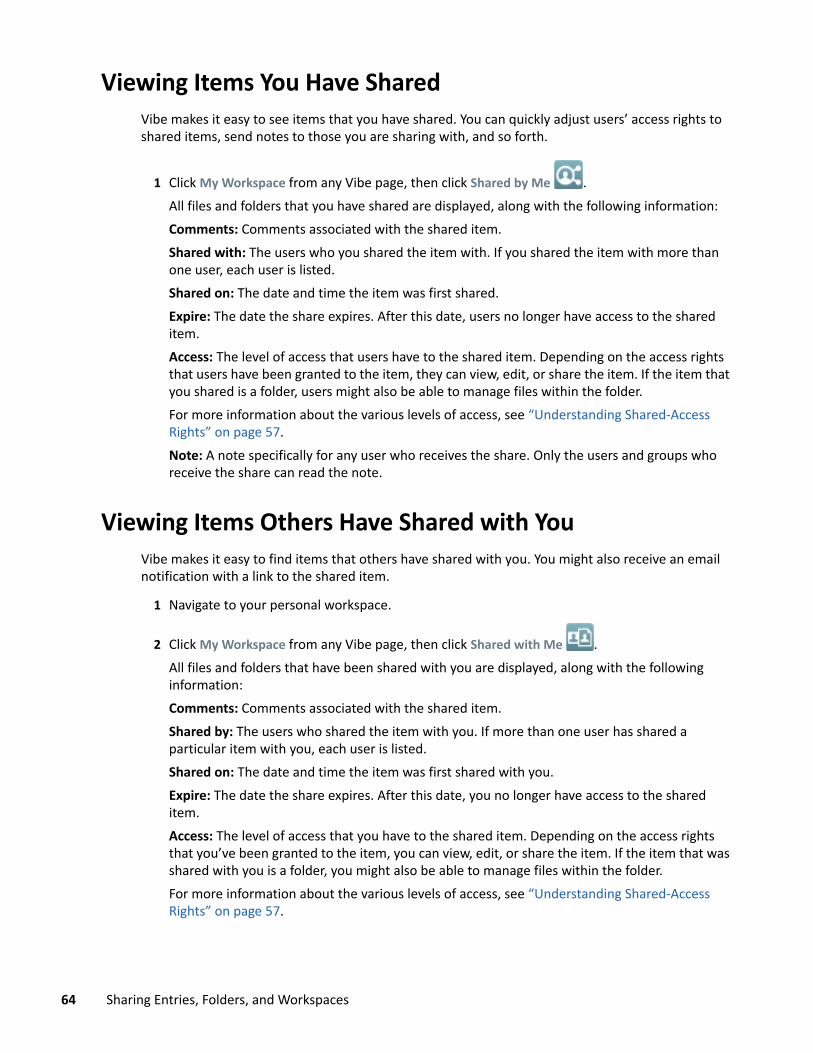
Viewing Items You Have SharedVibe makes it easy to see items that you have shared. You can quickly adjust users’ access rights to shared items, send notes to those you are sharing with, and so forth.
1 Click My Workspace from any Vibe page, then click Shared by Me . All files and folders that you have shared are displayed, along with the following information:Comments: Comments associated with the shared item.Shared with: The users who you shared the item with. If you shared the item with more than one user, each user is listed.Shared on: The date and time the item was first shared.Expire: The date the share expires. After this date, users no longer have access to the shared item.Access: The level of access that users have to the shared item. Depending on the access rights that users have been granted to the item, they can view, edit, or share the item. If the item that you shared is a folder, users might also be able to manage files within the folder.For more information about the various levels of access, see “Understanding Shared-Access Rights” on page 57.Note: A note specifically for any user who receives the share. Only the users and groups who receive the share can read the note.
Viewing Items Others Have Shared with YouVibe makes it easy to find items that others have shared with you. You might also receive an email notification with a link to the shared item.
1 Navigate to your personal workspace.
2 Click My Workspace from any Vibe page, then click Shared with Me . All files and folders that have been shared with you are displayed, along with the following information: Comments: Comments associated with the shared item.Shared by: The users who shared the item with you. If more than one user has shared a particular item with you, each user is listed.Shared on: The date and time the item was first shared with you.Expire: The date the share expires. After this date, you no longer have access to the shared item.Access: The level of access that you have to the shared item. Depending on the access rights that you’ve been granted to the item, you can view, edit, or share the item. If the item that was shared with you is a folder, you might also be able to manage files within the folder.For more information about the various levels of access, see “Understanding Shared-Access Rights” on page 57.
64 Sharing Entries, Folders, and Workspaces

Note: A note specifically for you and any other user who receives the share. Only the users and groups who receive the share can read the note.
Hiding Items in the Shared with Me and Shared by Me Views
You can hide files and folders that have been shared with you or that you have shared with others. Hidden files and folders are no longer displayed by default in your Shared with Me and Shared by Me views in the web client, the Vibe desktop application, and the Vibe mobile app.
After you have marked shared items as hidden, you can manage them by displaying hidden items in addition to items that have not been hidden, or you can display only hidden items.
“Hiding Shared Items” on page 65 “Displaying Hidden Items” on page 65 “Displaying Only Hidden Items” on page 65
Hiding Shared ItemsTo hide items in your Shared with Me and Shared by Me views:
1 Navigate to the Shared with Me or Shared by Me view.2 Select the check box next to the files and folders that you want to hide, then click More > Hide
Selected Shares.
Displaying Hidden ItemsYou can display hidden items in your Shared with Me and Shared by Me views. This means that hidden items are displayed in addition to items that have not been hidden.
1 Navigate to the Shared with Me or Shared by Me view where the hidden items are located.
2 Click the drop-down arrow in the upper right corner of the view, next to the filter, then click Show Hidden Shares.
3 (Optional) To make hidden files and folders visible again, select the check box next to the files and folders that you want to make visible, then click More > Unhide Selected Shares.
Displaying Only Hidden ItemsYou can display only hidden items in your Shared with Me and Shared by Me views. This means that items that have not been marked as Hidden are not displayed.
1 Navigate to the Shared with Me or Shared by Me view where the hidden items are located.
2 Click the drop-down arrow in the upper right corner of the view, next to the filter, then select Show Hidden Shares.
3 Click the drop-down arrow in the upper right corner of the view, next to the filter, then deselect Show Unhidden Shares.
Sharing Entries, Folders, and Workspaces 65

Modifying or Removing a ShareIf you have granted a user access to a file through sharing, you can modify or revoke the user’s access.
1 Click Shared by Me from any Vibe page. 2 Sharing a workspace or folder: Click the Configure icon next to the workspace or folder title
being shared with one or more users whose access you want to modify or remove, then click Share this Workspace or Share this Folder. Sharing multiple entries (Files, Discussions, and Tasks folders only): Select one or more items being shared with one or more users whose access you want to modify or remove, then click Share. (In Files folders, click Share again.)Sharing single entries: Click the drop-down arrow next to the entry, folder, or workspace being shared with one or more users whose access you want to modify or remove, then click Share Entry. orIf the drop-down arrow is not available, open the entry, then click Actions > Share this Entry.The Share dialog box is displayed.
3 (Conditional) To modify user access:3a Select the users whose access rights you want to change, then select the new level of
access in the Access Rights section.You can choose from the following rights: Viewer: Users can view individual entries, folders, and workspaces that are shared
with them; users can view the contents of the folders and workspaces that are shared with them.
Editor: Users can view and modify individual entries, folders, and workspaces that are shared with them; users can modify the contents of the folders and workspaces that are shared with them.
Contributor (Applies to Folders and Workspaces, not Entries): Users can rename or delete the shared folder or workspace. Users can create entries in the folder or workspace, rename existing entries, modify entries, move entries, and delete entries inside the folder or workspace.
3b In the Allow re-share with section, select whether you want them to be able to share with internal users, external users, the public, or via a File Link.
3c In the Expires field, select from the following options: Never: The share never expires. On: Select a given day for the rights to expire.
Rights expire at the beginning of the day that you select. After: Specify a certain number of days for the rights to remain active.
Each day is counted as a 24-hour period from the time that you set the expiration.3d If you want to include a personal note in the share, specify a note in the Note field.
66 Sharing Entries, Folders, and Workspaces

Only the users and groups that you share with can read the note.The share note cannot exceed 255 characters in length.
4 (Conditional) To remove user access, select the share that you want to remove, then click Delete.
5 Click OK.
Obtaining URLs (Permalinks) of Shared Entries, Folders, and Workspaces
Vibe assigns URLs to each entry, folder, and workspace in the Vibe system. You can use these URLs (called Permalinks) as a quick way to either point users to a file or folder or to download a file that is located in the Vibe system.
IMPORTANT: Users must already have access to the entry, folder, or workspace via an individual share or a public share in order to access the item from a permalink. Just because a user has a permalink to an entry, folder, and workspace does not necessarily mean that user has access to view the item or to download it. To grant access to an entry, folder, and workspace, you should either share it (as described in “Sharing Entries, Folders, and Workspaces” on page 58) or distribute a File Link (as described in “Distributing a Link to a File” on page 60).
You can also provide a shortened URL. See “Defining a User-Friendly URL for a Workspace or Folder” on page 75.
To obtain a permalink for an entry, folder, and workspace:
1 Navigate to and open the entry, folder, and workspace for which you want to obtain the permalink.
2 (Conditional) If you want the permalink for a file that is an attachment, click the Attachments tab.Only Files folders can contain files that are not attachments.
3 (Conditional) To obtain a permalink for a file, click the drop-down arrow next to the file, then click View Details.
4 (Conditional) To obtain a permalink for a folder or workspace, click the folder or workspace name.
5 Click the Permalinks link at the bottom of the page.6 Copy one of the available permalinks. After a user clicks the permalink, the function of the
permalink differs depending on which link is used:Permalink: Links to the file or folder in Vibe. Users who are not already logged in are prompted to log in, unless the file or folder is shared with the public.File Download Permalink: (Does not apply to folders or workspaces) Depending on browser settings, users are either prompted to download or open the file, or the file is automatically opened. This link allows users to access the file directly.
Sharing Entries, Folders, and Workspaces 67

68 Sharing Entries, Folders, and Workspaces
5 5Managing and Using Workspaces
Your Micro Focus Vibe site is made up of various workspaces. Workspaces are designated areas where people can work together to accomplish tasks. Vibe supports multiple types of workspaces, including personal workspaces, where you can store items such as your personal files, calendars, and tasks; and team workspaces, where you can collaborate with team members by sharing ideas, files, and more. Other useful types of workspaces are also available for you to use.
You can see the structure of the workspaces in your Vibe site by clicking the Workspace tree icon , expanding Home Workspace, and browsing the Workspace tree.
“General Workspace Management” on page 69 “Managing Your Personal Workspace” on page 76 “Managing a Team Workspace” on page 78 “Managing a Discussions Workspace” on page 81 “Managing a Project Management Workspace” on page 81 “Managing a Landing Page” on page 82 “Understanding Global Workspaces” on page 82
General Workspace ManagementThis section contains task information that applies to all types of workspaces.
“Creating a New Workspace” on page 70 “Sharing a Workspace” on page 70 “Modifying a Workspace” on page 70 “Deleting a Workspace” on page 71 “Recovering a Workspace from the Trash” on page 71 “Copying a Workspace” on page 72 “Moving a Workspace” on page 72 “Adding a Sub-Workspace” on page 72 “Adding Additional Folders to a Workspace” on page 73 “Generating Activity Reports for a Workspace” on page 73 “Configuring Sharing Rights for a Workspace” on page 74 “Defining a User-Friendly URL for a Workspace or Folder” on page 75 “Setting a Data Quota for a Workspace” on page 75 “Customizing the Workspace View” on page 75 “Branding a Workspace” on page 76 “Displaying YouTube Videos in a Workspace” on page 76
Managing and Using Workspaces 69

Creating a New WorkspaceMicro Focus Vibe enables you to create new workspaces in any workspace where you have appropriate rights.
1 Navigate to the workspace where you want to create the new workspace.
2 Click the Configure icon next to the workspace title, then click New Workspace. The New Workspace page is displayed.
3 Specify the appropriate information for the page.Workspace Title: Specify a title for the workspace.If you leave this field blank, the workspace is titled Workspace.Workspace: Select the type of workspace that you want to create.Fill in any additional information fields that display when you select the workspace type.Team Members: (Conditional) This section is displayed only if you are creating a team workspace. Use this section to specify users and groups that you want to include as members of your team workspace.Workspace Folders: Use this section to select the folders that you want the workspace to contain.Announcement: (Optional) Create an announcement message to be sent to all members of the team.If you are not creating a team workspace, this message is sent to all team members of the parent workspace.
4 Click OK.
Sharing a WorkspaceFor information about sharing workspaces in Vibe, see Chapter 4, “Sharing Entries, Folders, and Workspaces,” on page 57.
Modifying a WorkspaceAfter creating a workspace, you can modify the workspace title and description, change the icon that represents the workspace, and upload attachments to the workspace.
1 Navigate to the workspace that you want to modify.
2 Click the Configure icon next to the workspace title, then click Edit Workspace. 3 Modify the workspace as desired, then click OK.
70 Managing and Using Workspaces

Deleting a Workspace
IMPORTANT: Deleting a workspace renders the workspace and all folders and entries within the workspace unrecoverable; they are permanently deleted from the Vibe site.
1 Navigate to the workspace that you want to delete.
2 Click the Configure icon next to the workspace title, then click Delete Workspace. The Delete dialog box is displayed.
3 (Conditional) To move the workspace to the trash, select Move to trash, then click OK. Selecting this option removes the workspace from its current location without permanently deleting it from the Vibe system. You can undelete the workspace as described in “Recovering a Workspace from the Trash” on page 71.
4 (Conditional) To permanently delete the workspace, select Delete.
IMPORTANT: Deleted items cannot be recovered.
5 (Conditional) If the workspace contains mirrored folders, you can select to delete the source files of the folders, and also all of the mirrored folders’ sub-folders.For more information on working with mirrored folders, see “Working with Mirrored Folders” in the Micro Focus Vibe 4.0.8 Advanced User Guide.
6 Click OK.
Recovering a Workspace from the TrashVibe enables you to recover a workspace that you previously moved to the Trash, restoring it to its previous location.
1 Navigate to the workspace where the workspace previously resided before it was moved to the Trash.For example, if you want to restore a team workspace that was in the Team Workspaces directory, navigate to the Team Workspaces directory.
TIP: If you want to see everything that has been moved to the Trash in the Vibe site, navigate to the highest level workspace. (By default this is the Home Workspace directory.)
2 Click the Trash folder in the Navigation panel.orClick View > View Trash in the Action toolbar.The Trash page displays all workspaces, folders, and entries that have been deleted in or below the current workspace. Items that have been purged are not displayed because they are unrecoverable.
3 Select the workspace that you want to restore. Also, select any folders that the workspace contained that you also want to restore.
4 Click Restore.The workspace and any folders that you selected are restored to their previous location.
Managing and Using Workspaces 71

For more information about undeleting, see “Restoring Items from the Trash” in the Micro Focus Vibe 4.0.8 Advanced User Guide.
Copying a Workspace
NOTE: When copying a workspace, only items within the workspace (workspaces, folders, and entries) that you have rights to view are copied. After the workspace is copied to the new location, it assumes the access rights of the workspace where it was copied.
1 Navigate to the workspace that you want to copy.
2 Click the Configure icon next to the workspace title, then click Copy Workspace. The Copy Workspace page is displayed.
3 In the Destination Folder field, begin typing the name of the workspace where you want to copy the workspace, then click it when it appears in the drop-down list.or
Click the Browse icon next to the Destination Folder field, then browse to and select the workspace where you want to copy the workspace.
4 Click OK.
Moving a WorkspaceVibe enables you to move a workspace into any folder or workspace where you have appropriate rights.
1 Navigate to the workspace that you want to move.
2 Click the Configure icon next to the workspace title, then click Move Workspace. The Move Workspace page is displayed.
3 In the Destination Folder field, begin typing the name of the workspace where you want to move the workspace, then click it when it appears in the drop-down list.or
Click the Browse icon next to the Destination Folder field, then browse to and select the workspace where you want to move the workspace.
4 Click OK.
Adding a Sub-WorkspaceVibe enables you to create sub-workspaces inside of existing workspaces.
1 Navigate to the workspace where you want to add the sub-workspace.
2 Click the Configure icon next to the workspace title, then click New Workspace. The New Workspace page is displayed.
3 Specify the information.
72 Managing and Using Workspaces

Workspace title: Specify a title for the workspace.If you leave this field blank, the workspace is titled Workspace.Team Members: (Conditional) This section is displayed only if you are creating a team workspace. Use this section to specify users and groups that you want to include as members of your team workspace.Workspace: Select the type of workspace that you want to create.Fill in any additional information fields that display when you select the workspace type.Workspace Folders: Use this section to select the folders that you want the workspace to contain.Announcement: (Optional) Create an announcement message to be sent to all members of the team.If you are not creating a team workspace, this message is sent to all team members of the parent workspace.
4 Click OK.
Adding Additional Folders to a WorkspaceVibe enables you to add additional folders to your workspace at any time.
1 Navigate to the workspace where you want to add the new folders.
2 Click the Configure icon next to the workspace title, then click New Folder. The New Folder page is displayed.
3 Specify the following information:Folder Title: Specify a title for the folder.If you do not provide a title, the folder is given the default folder name. For example, a Discussion folder is named Discussion.Folder: Select the type of folder that you want to create.For information about each type of folder, see Chapter 7, “Working with Specific Folder Types,” on page 97.
4 Click OK.
Generating Activity Reports for a WorkspaceVibe enables you to generate reports about the activity that has occurred in a particular workspace.
1 Navigate to the workspace that you want to generate the activity report for.2 Click View > Activity Report.
The Folder Activity page is displayed.3 Specify the following information:
Report on Activity Between: Select the date range for which you want to generate the activity report.
Managing and Using Workspaces 73

Report Workspace or Folder Activity: Select this option to see how many views, adds, modifies, and deletes have been made in the folder. You can generate a report for the following categories of users: Team Members: View the workspace activity of individual team members only. All Users: View the workspace activity of all Vibe users. This option shows the name of
each user who has had some type of activity in the workspace. Summary: View a summary of all the activity that has occurred in the workspace. This
option does not list individual users.Report on Workflow State: Select this option to view the activity of a workflow. You can select to show the average amount of time the workflow spent in each state, or show the number of entries that are currently in each state.Select the Folders for Reporting: Select the folders about which you want to generate the activity report. If you select the workspace, then Vibe generates an activity report that includes all folders in the workspace.
4 Click OK.Vibe launches the report in a spreadsheet. For information regarding the columns in this spreadsheet, see “Generating Activity Reports” on page 148.
Configuring Sharing Rights for a WorkspaceBy default, workspaces outside of users’ personal workspaces are not configured to allow content to be shared. If you want users to be able to share content from a workspace, you must configure it accordingly.
To configure the sharing rights for a workspace:
1 Navigate to the workspace where you want to configure the sharing rights.
2 Click the Configure icon next to the workspace title, then click Workspace Share Rights. The Set Workspace Sharing Rights dialog box is displayed. Select Allow next to any share rights that you want to grant to all the selected workspaces, and select Clear next to any share rights that you do not want to grant.The following share rights are available:Internal Users: Allows users to share items with internal users.External Users: Allows users to share items with users external to the organization. Users external to the organization receive an email notification with a link to the shared item, and they can then log in to the Vibe site. For more information, see “Sharing with People Outside Your Organization” on page 62.Public: Allows users to make items publicly available. This means that anyone with the correct URL to the shared item can access the shared item without logging in to the Vibe site.This functionality must be enabled by your Vibe administrator.File Link: Allows users to share a link to a file in Vibe. Any user with the link can then access the file. However, the file is not displayed in the Public area, so users must have direct access to the link in order to access the file.For more information about File Links, see “Distributing a Link to a File” on page 60.
74 Managing and Using Workspaces

Allow Re-Sharing of granted rights: When users share a file or folder, they can give the users they are sharing with the ability to re-share the file or folder. The user receiving the share can share the file only if that user has been given administrative rights to share the file or folder.
IMPORTANT: When selecting this option, be aware that if one user's access rights to an item are removed, it does not remove the access rights of the user with whom the item was re-shared.For example, suppose User A shares an item with User B and grants re-share rights. User B then shares the item with User C. If User A revokes User B's access rights to the item, User C continues to have access to the shared item.
Defining a User-Friendly URL for a Workspace or FolderA user-friendly URL for your workspace or folder can make it easier for others to navigate to the workspace or folder.
1 Navigate to the workspace where you want to define the URL.
2 Click the Configure icon next to the workspace title, then click Configure Views, URLs and Controls.
3 Click the Simple URLs and E-mail Addresses tab.4 In the Define simple URLs for this folder or workspace section, select one of the predefined
global keywords from the Define URL drop-down list.Unless you are a site administrator, your URL must begin with one of these predefined global keywords.
5 In the provided field, specify the desired URL for the folder or workspace.6 Click Add > Close.
To delete a defined URL, select the URL in the Currently defined URLs section, then click Delete selected URLs.
Defining a user-friendly URL for a folder can also enable users to email folder entries into the folder, as described in “Setting Up a Folder to Receive Entries Via Email” on page 89.
Setting a Data Quota for a WorkspaceThe Vibe administrator can allow you to set your own data quotas for your workspaces and folders. For more information, see “Setting a Data Quota for Workspaces and Folders” in the Micro Focus Vibe 4.0.8 Advanced User Guide.
Customizing the Workspace ViewVibe enables you to customize the layout of your workspace. For more information, see “Creating Custom Workspace Views” in the Micro Focus Vibe 4.0.8 Advanced User Guide.
Managing and Using Workspaces 75
Branding a WorkspaceBranding a workspace is a good way to make the workspace more unique and identifiable. When you brand a workspace, the brand is also applied to all sub-workspaces and sub-folders.
For more information on branding, see “Branding a Folder or Workspace” in the Micro Focus Vibe 4.0.8 Advanced User Guide.
Displaying YouTube Videos in a WorkspaceThis section describes how to display YouTube videos in the Description section of the workspace. For information on how to display YouTube videos in the Branding section of a workspace, see “Branding a Folder or Workspace” in the Micro Focus Vibe 4.0.8 Advanced User Guide.
To display a YouTube video in the Description section of a workspace:
1 Navigate to the workspace where you want to display the YouTube video.
2 Click the Configure icon next to the folder title, then click Edit Workspace. 3 Click in the Description section, then click Insert > Media. 4 In the General tab, paste the URL of the YouTube video that you want to post.5 In the Dimensions fields, do not make any changes if you want to keep the default YouTube
dimensions.6 Click OK to display the video in the workspace.
For more information about other places where you can display YouTube videos in Vibe, see “Displaying YouTube Videos in a Folder Entry” on page 149.
Managing Your Personal WorkspaceYour personal workspace in Micro Focus Vibe is a place where you can store your personal files, blogs, photos, and all other types of Vibe folder entries.
Your personal workspace also includes relevance tabs that help you easily keep track of tasks and calendar events, get informed on new entries, view shared items, and more.
The relevance tabs are located in the home page of your personal workspace. These tabs enable you to get quick access to important information that pertains directly to you.
“Using the What’s New Tab” on page 77 “Viewing Recently Posted and Recently Visited Entries” on page 77 “Using the Tasks and Calendars Tab” on page 77 “Using the Accessories Tab” on page 78 “Viewing Your Profile Information” on page 78
76 Managing and Using Workspaces

Using the What’s New TabThe What’s New tab enables you to find new content in your teams, in the places you are following, or across the entire site.
1 In the home page of your personal workspace, click the What’s New tab.2 Select My Teams, Places being followed, or Site Wide, depending on where you want Vibe to
search for new items.All of the new items recently added are displayed in the left side of the page, in the What’s New section.
Viewing Recently Posted and Recently Visited EntriesVibe enables you to view which entries you have recently posted, and which entries you have recently visited. This can help you prioritize what you are working on, or quickly locate an entry that you have recently created or viewed.
1 In the home page of your personal workspace, click the Recent tab.The left section of the page displays the entries that you have recently posted, and the center section of the page displays the entries that you have recently visited.
Using the Tasks and Calendars TabUse the Tasks and Calendars tab to accomplish the following tasks:
“Viewing Your Tasks” on page 77 “Viewing Today’s Calendar Events” on page 77
Viewing Your TasksTo help you keep track of tasks that have been assigned to you, Vibe provides a quick, easy way to view tasks.
1 In the home page of your personal workspace, click the Tasks and Calendars tab.In the left column, Vibe displays the tasks that are assigned to you. You can sort these tasks by tasks due within two weeks, or any tasks that are currently assigned to you.
Viewing Today’s Calendar EventsTo help you keep track of your calendar events, Vibe enables you to view all of the calendar events for which you are scheduled on the current day.
1 In the home page of your personal workspace, click the Tasks and Calendars tab.The right section of the page displays today’s schedule with all of the calendar events from all of the calendars you are following.For information on how to follow a calendar, see “Following Workspaces and Folders” on page 45.
Managing and Using Workspaces 77

Using the Accessories TabThe Accessories tab contains an accessory panel. You can use this accessory panel to make items in your personal workspace more visible. For example, by default, the Accessory tab contains a Guestbook accessory that references the Guestbook folder in your personal workspace. By displaying this accessory in the Accessories tab, you don’t need to view the Guestbook folder in order to see who has signed your Guestbook.
By default, a Task, Guestbook, Blog, and Photo Album accessory exist in this accessory panel, but you can add more as you desire. For information on how to add additional accessories, see “Creating an Accessory” on page 153.
Viewing Your Profile Information1 In the home page of your personal workspace, click the Profile link next to your name and
avatar.or
Click your Presence icon , located next to any entry that you have created. Your personal profile information is displayed.
For information on modifying your profile information, see “Modifying Your Profile” on page 21.
Managing a Team WorkspaceTeam workspaces are the key to helping you and your team work together to accomplish tasks and meet objectives.
As the owner of a workspace, you are primarily responsible for workspace administration. You can create other containers for information (sub-workspaces and folders), adjust access controls to determine who can do what in the workspace, and provide some initial content to assist team members to get started.
“Creating a Team Workspace” on page 78 “Adding Additional Team Members to Your Workspace” on page 80 “Sending Email to Team Members and Announcing the Workspace after Its Creation” on
page 80 “Viewing Team Members” on page 80 “Allowing Visitors to Your Team Workspace” on page 81
Creating a Team WorkspaceBy default, everyone in Micro Focus Vibe has rights to create a team workspace.
Team workspaces are the most common type of workspaces. They facilitate team objectives by enabling team members to quickly share files, share ideas, and work together more efficiently and effectively.
78 Managing and Using Workspaces

Vibe enables you to create a highly visible team workspace in the Team Workspaces directory, or you can create a nested team workspace, which is a team workspace inside of an existing team workspace.
“Creating a Highly Visible Team Workspace” on page 79 “Creating a Team Workspace inside of an Existing Team Workspace” on page 79
Creating a Highly Visible Team WorkspaceIf you want your team workspace to be highly visible and easy to find in the workspace tree, create the team workspace in the Team Workspaces directory, as described in “Creating a Team Workspace” on page 23.
Creating a Team Workspace inside of an Existing Team WorkspaceVibe enables you to create nested workspaces, which are workspaces inside of other workspaces. You can create a team workspace inside of any existing workspace where you have appropriate rights.
You might want to do this if you are not concerned about having high visibility in the workspace tree, and if the team workspace that you want to create consists mostly of members who already belong to a certain workspace.
1 Navigate to the workspace where you want to create the new team workspace.
2 Click the Configure icon next to the workspace title, then click New Workspace. The New Workspace page is launched.
3 In the Workspace section, select Team Workspace.You can also create a basic workspace, a project management workspace, and a discussions workspace.
4 Specify the following information:Workspace Title: Specify a title for the workspace.Workspace: Select Team Workspace.Team Members: Specify the team members.You can specify individual users or entire groups, or add names that are on your clipboard. For more information about using the Vibe clipboard, see “Using the Vibe Clipboard” on page 168. You can also click Team Members. This displays a list of all of the members of the team workspace where you are creating your new team workspace. Select the names of the users that you want to include in your new team workspace.Workspace Folders: Select the folders that you want the workspace to contain.If you later decide that you want to add additional folders, you can add them at any time.For information on how to add folders to an existing workspace, see “Adding Additional Folders to a Workspace” on page 73.Announcement: (Optional) Select the check box, then type a message in the Announcement Text field.
Managing and Using Workspaces 79
This message informs team members about the existence of the workspace, and can also explain the value of the workspace.
5 Click OK to create the new workspace.
Adding Additional Team Members to Your WorkspaceAfter you create your workspace, you can add other Vibe users who need to join your team.
1 Navigate to the team workspace where you want to add the additional team members.
2 Click the Configure icon next to the folder title, then click Edit Team. The Add or Delete Team Members page is launched.
3 (Conditional) If this workspace is currently inheriting its team membership from a parent folder, click Yes.
4 In the Users field, specify the names of the individual users that you want to add to the team.You can also specify entire groups in the Groups field, or you can add names that are on your clipboard by clicking Clipboard User Names. For more information about using the Vibe clipboard, see “Using the Vibe Clipboard” on page 168.
5 Click OK.
You can announce the workspace to the new team members. For information on how to do this, see “Sending Email to Team Members and Announcing the Workspace after Its Creation” on page 80.
Sending Email to Team Members and Announcing the Workspace after Its CreationVibe enables you to send email messages to your entire team. Also, if new team members join the team after the team workspace has already been created, you can use this functionality to announce the workspace to the new team members.
To send mail to team members:
1 Navigate to the team workspace.
2 Click the Configure icon next to the workspace title, then click E-Mail Team. The Send E-Mail page is displayed.
3 Fill in the appropriate fields.For information on filling in the rest of the Send E-Mail form, see “Filling Out the Send E-Mail Page” on page 167.
4 Click OK.
Viewing Team Members “Viewing Team Members from Any Page within The Workspace” on page 81 “Viewing Team Members in an Accessory from the Workspace Home Page” on page 81
80 Managing and Using Workspaces

Viewing Team Members from Any Page within The WorkspaceYou can view the members of the team from any folder within the workspace:
1 On any page within the workspace, click the Configure icon next to the folder title, then click View Team.
Viewing Team Members in an Accessory from the Workspace Home PageAccessories are sections at the top of workspaces and folders that provide summary information for you. For more information on working with accessories, see Chapter 9, “Managing Accessories,” on page 153.
By default, Vibe includes a team-membership accessory on the home page of your workspace. This accessory displays all team members.
Allowing Visitors to Your Team WorkspaceBy default, only team members can view and participate in the workspaces and folders contained in the team workspace. There might be times when you want to allow other people to visit your team workspace (which, by default, means that they can read entries and comment on them, but they cannot create entries).
For information on how to allow visitors to your team workspace, see “Allowing Visitors to Your Team Workspace” in the Micro Focus Vibe 4.0.8 Advanced User Guide.
Managing a Discussions WorkspaceCreate a Discussions workspace if you want a place to store multiple discussion forums. This can help organize your Micro Focus Vibe site, so users know where they should go if they are looking for a particular discussion forum.
For more information on Discussions workspaces, see “Creating and Managing a Discussions Workspace” in the Micro Focus Vibe 4.0.8 Advanced User Guide.
Managing a Project Management WorkspaceProject Management workspaces are optimized for managing a project.
Project Management workspaces include special accessories that help a leader to track the progress of task completion for a potentially large project. Although Project Management workspaces can contain any type of folder, they are specifically designed to work in conjunction with Tasks and Milestones folders.
For more information on Project Management workspaces, see “Creating and Managing a Project Management Workspace” in the Micro Focus Vibe 4.0.8 Advanced User Guide.
Managing and Using Workspaces 81

Managing a Landing PageMicro Focus Vibe enables you to configure a workspace to have a landing page. When you create a workspace landing page, you can populate it with entries that exist within the workspace.
For information on how to create a landing page on a workspace, see “Creating and Managing Landing Pages” in the Micro Focus Vibe 4.0.8 Advanced User Guide.
Understanding Global WorkspacesGlobal workspaces contain information that might be of interest throughout your organization.
For more information on global workspaces, see “Creating Global Workspaces” in the Micro Focus Vibe 4.0.8 Administration Guide.
82 Managing and Using Workspaces

6 6Managing and Using Folders
The topics in this section describe how to perform management functions for all types of folders in Micro Focus Vibe.
Most functions are the same, regardless of the type of folder that you are managing. However, some management functions are unique to individual folder types. These functions are described in Chapter 7, “Working with Specific Folder Types,” on page 97.
“Creating a New Folder” on page 83 “Sharing a Folder” on page 84 “Modifying a Folder” on page 84 “Deleting a Folder” on page 84 “Recovering a Folder from the Trash” on page 85 “Copying a Folder” on page 85 “Moving a Folder” on page 86 “Importing Files into a Folder” on page 86 “Downloading the Information for a Folder as a CSV File” on page 87 “Generating an Activity Report on a Folder” on page 87 “Subscribing to Email Notifications from a Folder” on page 89 “Setting Up a Folder to Receive Entries Via Email” on page 89 “Adding Entries to a Folder Via Email” on page 89 “Configuring Folder Columns” on page 90 “Changing the Folder View” on page 92 “Configuring the Number of Entries to Display on a Folder Page” on page 92 “Branding a Folder” on page 93 “Setting a Data Quota for a Folder” on page 93 “Displaying YouTube Videos in a Folder” on page 93 “Using Filters on Folders” on page 93 “Listing Folder Entries and Pages” on page 95
Creating a New FolderMicro Focus Vibe enables you to create folders and sub-folders in any workspace or folder where you have appropriate rights.
1 Navigate to the workspace or folder where you want to create the new folder.
2 Click the Configure icon next to the workspace title, then click New Folder. or
Managing and Using Folders 83

To create a sub-folder, click the Configure icon next to the folder title, then click New Folder. The New Folder page is displayed.
3 Specify the following information:Folder Title: Specify a title for the folder.If you do not provide a title, the folder is given the default folder name. For example, a Discussion folder is named Discussion.Folder: Select the type of folder that you want to create.For information about each type of folder, see Chapter 7, “Working with Specific Folder Types,” on page 97.
4 Click OK.
Sharing a FolderFor information about sharing folders in Vibe, see Chapter 4, “Sharing Entries, Folders, and Workspaces,” on page 57.
Modifying a FolderYou can modify the folder title and description, and change the icon that represents the folder, after the folder has been created.
1 Navigate to the folder that you want to modify.
2 Click the Configure icon next to the folder title, then click Edit Folder. 3 Modify the folder as desired, then click OK.
Deleting a Folder1 Navigate to the folder that you want to delete.
2 Click the Configure icon next to the folder title, then click Delete Folder. The Delete Folder page is displayed.
3 (Conditional) To move the folder to the trash, select Move to trash, then click OK. Selecting this option removes the folder from its current location without permanently deleting it from the Vibe system. You can undelete the folder as described in “Recovering a Folder from the Trash” on page 85.
4 (Conditional) To permanently delete the folder, select Delete.
IMPORTANT: Deleted items cannot be recovered.
5 (Conditional) If the folder is a mirrored folder, you can select to delete the source files of the folder, and also all of the mirrored folders’ sub-folders.
84 Managing and Using Folders

For more information on working with mirrored folders, see “Working with Mirrored Folders” in the Micro Focus Vibe 4.0.8 Advanced User Guide.
6 Click OK.
Recovering a Folder from the TrashMicro Focus Vibe enables you to recover a folder that you previously moved to the Trash, restoring it to its previous location.
1 Navigate to the folder or workspace where the folder previously resided before it was moved to the Trash.For example, if you want to restore a Blog folder that was in your personal workspace, navigate to your personal workspace.
TIP: If you want to see everything that has been deleted in the Vibe site, navigate to the highest level workspace. (By default this is the Home Workspace directory.)
2 Click the Trash icon , located in the Navigation panel. The Trash page displays all workspaces, folders, and entries that have been deleted in or below the current workspace or folder. Items that have been purged are not displayed because they are unrecoverable.
3 Select the folder that you want to restore.4 Click Restore.
The folder is restored to its previous location. Contents of the folder are not automatically restored.
For more information about undeleting, see “Restoring Items from the Trash” in the Micro Focus Vibe 4.0.8 Advanced User Guide.
Copying a FolderNOTE: When copying a folder, only items within the folder (folders and entries) that you have rights to view are copied. After the folder is copied to the new location, it assumes the access rights of the location where it was copied.
1 Navigate to the folder that you want to copy.
2 Click the Configure icon next to the folder title, then click Copy Folder. The Copy Folder page is displayed.
3 In the Destination Folder field, begin typing the name of the workspace or folder where you want to copy the folder, then click it when it appears in the drop-down list.or
Click the Browse icon next to the Destination Folder field, then browse to and select the workspace or folder where you want to copy the workspace.
4 Click OK.
Managing and Using Folders 85

NOTE: Copying a Mirrored Files sub-folder into a Files folder is not supported.
Moving a FolderMicro Focus Vibe enables you to move a folder into any folder or workspace where you have appropriate rights.
1 Navigate to the folder that you want to move.
2 Click the Configure icon next to the folder title, then click Move Folder. The Move Folder page is displayed.
3 In the Destination Folder field, begin typing the name of the workspace or folder where you want to move the folder, then click it when it appears in the drop-down list.or
Click the Browse icon next to the Destination Folder field, then browse to and select the workspace or folder where you want to move the folder.
4 Click OK.
Importing Files into a FolderMicro Focus Vibe enables you to import files from any location and add them to a folder in your workspace.
“Dragging and Dropping Files” on page 86 “Dragging and Dropping Folders” on page 87 “Importing Files into the Files Folder by Creating a Folder Entry” on page 87 “Importing Files as Entry Attachments” on page 87
Dragging and Dropping FilesVibe enables you to drag files from any location, and drop them into any Vibe folder.
If you are adding files to a Vibe Files folder, the behavior can be different. For more information about adding files to a Files folder, see “Adding Files to a Files Folder and Other WebDAV-Enabled Folders” on page 104.
1 Navigate to the folder where you want to add the files.2 Drag a file from one location, such as your desktop, and drop it into the Vibe folder. (When
viewing a workspace or a parent folder, you can also drop the file onto the folder icon.)orClick Add Files in the Folder Entry toolbar, then click Browse and browse to the file to add it.A new entry is created with the file as an entry attachment. The name of the document is automatically the name of the entry.
86 Managing and Using Folders

Dragging and Dropping FoldersIf you need to drag and drop at the folder level, we recommend that you install and use the Vibe Desktop. For more information, see Micro Focus Vibe Desktop for Windows Quick Start and the Micro Focus Vibe Desktop for Mac Quick Start.
Importing Files into the Files Folder by Creating a Folder EntryBecause Files folders require each file to have a unique name, Files folders behave differently from other types of Vibe folders. For specific information about importing files into a Vibe Files folder, see “Adding Files to a Files Folder and Other WebDAV-Enabled Folders” on page 104.
You can import single files into a Files folder by browsing your computer’s file system and creating a new file entry, if the file that you want to import has a unique name from all other files in the Files folder.
For information about how to create a new folder entry, see “Creating a Folder Entry” on page 128.
Importing Files as Entry AttachmentsIf you want to attach files to a folder entry, you can attach the file when you are creating the entry, as described in “Creating a Folder Entry” on page 128, or you can modify an existing entry to attach the file, as described in “Attaching Files to a Folder Entry” on page 140.
Downloading the Information for a Folder as a CSV FileYou can download the information of a folder. The information for any subfolders that are contained in the folder are not downloaded.
1 Navigate to the folder from which you want to download the content.
2 Click the Configure icon next to the folder title, then click Download Folder Contents as CSV File. A CSV file is downloaded. You can open the CSV file in a spreadsheet editor such as Microsoft Excel to view the contents. The CSV file includes various information about each entry in the folder, such as the ID, tile, author, creation date, description, and more.
Generating an Activity Report on a FolderYou can generate a report that tells you the user activity in the folder, or you can generate a report that tells you how many entries in the folder have individual access control settings.
You must have appropriate rights to generate these reports. If you do not have appropriate rights, these options are not available to you.
“Generating a User Activity Report” on page 88 “Generating an Entry Access Activity Report” on page 88
Managing and Using Folders 87
Generating a User Activity Report1 Navigate to the folder about which you want to generate the activity report.2 Click View > Activity Reports in the Action toolbar.
The Activity Reports page is displayed.3 Click User Activity Report.
The Folder Activity page is displayed.4 Select the date range for which you want to generate the activity report.5 Choose between the following options:
Report Workspace or Folder Activity: Select this option to see how many views, adds, modifies, and deletes have been made in the folder. You can generate a report for the following categories of users: Team Members: View the folder activity of individual team members only. All Users: View the folder activity of all Micro Focus Vibe users. This option shows the
name of each user who has had some type of activity in the folder. Summary: View a summary of all the activity that has occurred in the folder. This option
does not list individual users.Report on Workflow State: Select this option if you want to view a report on workflows in the folder. You can select to show the average time entries spent in each workflow state, or the number of entries that are currently in each state.
6 In the Select the Folders for Reporting section, navigate to and select the folders for which you want to generate the report. You can select multiple folders.
7 Click OK.Vibe launches the report in a spreadsheet. For information regarding the columns in this spreadsheet, see “Generating Activity Reports” on page 148.
You can run activity reports on individual entries. For information on how to do this, see “Generating Reports about a Folder Entry” on page 148.
Generating an Entry Access Activity ReportBecause users can set access controls on individual entries, as discussed in “Controlling Access to Entries” in the Micro Focus Vibe 4.0.8 Advanced User Guide, folder owners can generate reports that specify how many entries in the folder have individual access control settings that differ from the folder access controls. Also, folder owners can see how many entries are hidden from them.
1 Navigate to the folder about which you want to generate the activity report.2 Click View > Activity Reports in the Action toolbar.
The Activity Reports page is displayed.3 Click Entry Access Report.
The Entry Access Report page is displayed. It contains the following information: Entries in the folder: Displays how many entries exist in the folder.
88 Managing and Using Folders

Entries with an entry-level access control setting: Displays how many entries contain unique entry-level access controls that differ from the access controls that exist on the folder.
Hidden entries: Displays how many hidden entries exist in the folder. Hidden entries are entries that the folder owner does not have rights to view, because the entry creator has restricted rights by setting an entry-level access control, as described in “Controlling Access to Entries” in the Micro Focus Vibe 4.0.8 Advanced User Guide.As a folder owner, if you discover that there are hidden entries within a folder, you can request the Vibe administrator to inspect the entries to ensure that there is no inappropriate or invalid content.
Creation Date: Displays the date that the hidden entry was created. Author: Displays the name of the user who authored the hidden entry.
4 Click Close to exit the activity report.
Subscribing to Email Notifications from a FolderYou can configure a folder to send you email notifications to inform you about activity that takes place in the folder.
For information on how to subscribe to receive email notifications from a folder, see “Subscribing to a Folder or Entry” on page 51.
Setting Up a Folder to Receive Entries Via EmailBefore you can add email and text message entries to a folder, as described in “Adding Entries to a Folder Via Email” on page 89, you first need to set up the folder to allow such entries.
For information on how to do this, see “Enabling Folders to Receive Entries through Email” in the Micro Focus Vibe 4.0.8 Advanced User Guide.
Adding Entries to a Folder Via EmailMicro Focus Vibe enables you to email entries into folders. This is useful if you don’t have access to the Vibe site and you still want to create an entry. You can also text-message entries into folders, so when you don’t have access to a computer or the Internet, you can still capture thoughts and contribute to conversations.
NOTE: When you email an appointment that contains HTML to a Vibe calendar, the HTML is stripped out of the appointment, and Vibe displays the appointment in plain text.
To email entries into folders, you must have sufficient rights to create entries in the folder, as described in “Creating a Folder Entry” on page 128.
You must also know the previously defined email address for the folder.
Managing and Using Folders 89

To see the email address of a folder:
1 Navigate to the folder where you want to add entries via email.2 Click the Footer toolbar, located at the bottom of the folder page.
In the E-Mail Addresses section of the provided table, the email address of the folder is displayed.This is the email address that you use to make entries to the folder via email.
If you are the folder owner and want to define an email address for the folder, see “Enabling Folders to Receive Entries through Email” in the Micro Focus Vibe 4.0.8 Advanced User Guide for instructions.
Configuring Folder ColumnsVibe enables you to configure table columns in folders where these columns appear. Folders that display columns by default are Files folders, Mirrored Files folders, and Discussions folders.
You can configure any type of folder to display folder columns by changing the folder view to be a Files, Mirrored Files, or Discussions folder view, as described in “Changing the Folder View” on page 92.
“Showing and Hiding Columns” on page 90 “Renaming Columns” on page 91 “Reordering Columns” on page 91 “Adjusting the Column Width” on page 91 “Restoring Column Defaults” on page 92
Showing and Hiding ColumnsBy default, the following columns are available:
Title: Displays the title of the entry. Comments: Displays how many comments have been made on the entry. Size: Displays the file size of the entry. Download: enables you to download the file to your local workstation. VIEW: enables you to view the file in the HTML format. State: Shows the workflow state of the file. Author: Displays the author of the entry. Date: Displays when the entry was last modified or commented on.
You can add the following columns:
Number (No.): Displays the number of the entry (“1” indicates that the entry was created first). Rating: Displays the rating that users have given the entry.
90 Managing and Using Folders

To show or hide table columns in the Files folder:
1 Navigate to the folder where you want to show or hide the table columns.
2 Click the Configure icon next to the Filter List, then click Edit Column Layout. The Edit Column Layout dialog box is displayed.
3 Select Show for the columns that you want to show, and deselect Show for those you want to hide.
4 (Optional) Select Set the default folder columns for all users if you want all users to see only the columns that you have selected.
5 Click OK.
Renaming Columns1 Navigate to the folder where you want to rename the table columns.
2 Click the Configure icon next to the search field, then click Edit Column Layout. 3 In the Custom Label field next to the column that you want to rename, specify the new column
name in the available field.4 (Optional) Select Set the default folder columns for everyone if you want all users to see only the
columns that you have selected.5 Click OK.
Reordering Columns1 Navigate to the folder where you want to reorder the table columns.
2 Click the Configure icon next to the search field, then click Edit Column Layout. 3 Select the column you want to reorder.4 Click the Up Arrow and Down Arrow icons in the Order column to move the column up or down.5 (Optional) Select Set the default folder columns for everyone if you want all users to see only the
columns that you have selected.6 Click OK.
Adjusting the Column Width1 Navigate to the folder where you want to resize the table columns.
2 Click the Configure icon next to the search field, then click Edit Column Sizes. 3 Click and move the slider for the column you want to resize.4 When the column is the desired width, release the mouse.
Managing and Using Folders 91

Restoring Column DefaultsYou can restore the column defaults if you have made changes to the columns that you no longer want to retain.
1 Navigate to the folder where you want to reorder the table columns.
2 Click the Configure icon next to the search field, then click Edit Column Layout. 3 Click Restore Default Settings.
Changing the Folder ViewMicro Focus Vibe enables you to change the view of a folder. For example, if you are viewing your Calendar folder in the default Calendar view, you can change the view to the Tasks folder view. You can also change the default view of the folder, so that no other options are available to those who want to view the folder.
Anyone who has access to a folder can change the view of the folder, if the folder owner or someone with appropriate rights has configured the folder to allow alternate folder views.
If you are the owner of a folder and you want to allow alternate views on a folder, or if you want to change the default view of a folder, see “Managing Folder Views” in the Micro Focus Vibe 4.0.8 Advanced User Guide.
To change the view of a folder after the folder owner has configured it to support alternate folder views:
1 Navigate to the folder where you want to change the view.
2 Click the Configure icon next to the folder title, then click Folder Options. The Folder Options dialog box is displayed.
3 In the View Options section, select the view that you want the folder to be displayed as, then click OK.The folder view is changed to the view that you specified.
Configuring the Number of Entries to Display on a Folder Page
You can select how many entries per page you want to be displayed in each folder on the Micro Focus Vibe site.
1 Click your linked name in the upper right corner of the Vibe interface, then click the Personal Preferences icon . The Personal Preferences dialog box is displayed.
2 In the Entries per Folder Page field, specify the maximum number of entries that you want to be displayed on each page in the Vibe site.The default is 25.
3 Click OK.
92 Managing and Using Folders

Branding a FolderBranding a folder is a good way to make the folder more unique and identifiable. When you brand a folder, the brand is applied to all sub-workspaces and sub-folders.
For more information on branding, see “Branding a Folder or Workspace” in the Micro Focus Vibe 4.0.8 Advanced User Guide.
Setting a Data Quota for a FolderThe Vibe administrator can allow you to set your own data quotas for your workspaces and folders. For more information, see “Setting a Data Quota for Workspaces and Folders” in the Micro Focus Vibe 4.0.8 Advanced User Guide.
Displaying YouTube Videos in a FolderThis section describes how to display YouTube videos in the Description section of the folder. For information on how to display YouTube videos in the Branding section of a folder, see “Branding a Folder or Workspace” in the Micro Focus Vibe 4.0.8 Advanced User Guide.
To display a YouTube video in the Description section of a folder:
1 Navigate to the folder where you want to display the YouTube video.
2 Click the Configure icon next to the folder title, then click Edit Folder. 3 Click in the Description section, then click Insert > Media. 4 In the General tab, paste the URL of the YouTube video that you want to post.5 In the Dimensions fields, do not make any changes if you want to keep the default YouTube
dimensions.6 Click OK to display the video in the folder.
For more information about other places where you can display YouTube videos in Micro Focus Vibe, see “Displaying YouTube Videos in a Folder Entry” on page 149.
Using Filters on FoldersMany types of folders in Micro Focus Vibe provide a filter that helps you quickly sift through information in your folder.
“Creating a Filter” on page 94 “Applying an Existing Filter” on page 94 “Modifying a Filter” on page 94 “Copying a Filter” on page 94 “Deleting a Filter” on page 95
Managing and Using Folders 93

Creating a FilterIn the Filter section, Vibe enables you to create multiple filters in your folder. You can easily apply those filters to help you quickly sift through your entries.
1 Navigate to the folder where you want to create the filter.2 Click the drop-down arrow next to the Filter List field, then click Manage Filters.3 Click Add a New Filter.
This form is nearly identical to the one used for advanced searches. See “Using Advanced Search” on page 40 for information regarding the various fields in this form.In addition to the elements explained in “Using Advanced Search” on page 40, you must consider the following elements when creating a filter:Filter Name: Specify a name for the filter.Make This Filter Available to Everyone: Select this option if you want the filter to be available to all users who visit the folder. If this option is not selected, the filter is available only to the user who created it.
4 Click OK.
Applying an Existing Filter1 Navigate to the folder where you have already created the filter that you want to apply.2 Click the drop-down arrow next to the Filter List field, then click the name of the filter to apply.
The filter is applied to the folder.3 Repeat Step 2 to apply multiple filters to the folder.
After you apply a filter, items that do not match the filter criteria in that folder are not displayed in the folder listing. To remove a filter, click the x next to the filter name.
Modifying a Filter1 Navigate to the folder where you want to modify a filter that has already been created.2 Click the drop-down arrow next to the Filter List field, then click Manage Filters.3 In the Personal Filters section, click the drop-down list and select the filter that you want to
modify.4 Click Modify.5 Make the modifications that you desire, then click OK.
Copying a FilterYou can re-use a filter by copying it from one folder to another.
1 Navigate to the folder where you want to copy the filter.2 Click the drop-down arrow next to the Filter List field, then click Copy Filters.
The Copy Filters dialog box is displayed.
94 Managing and Using Folders

3 In the Copy Filters From field, begin typing the name of the folder from which you want to copy a filter, then click the name when it appears in the drop-down list.orClick the Browse icon next to the Copy Filters From field, then browse to and select the folder from which you want to copy a filter.
4 Select one or more filters to copy, then click OK.
Deleting a Filter1 Navigate to the folder where you want to delete a filter that has already been created.2 Click the drop-down arrow next to the Filter List field, then click Manage Filters.3 In the Personal Filters section, click the drop-down list and select the filter that you want to
delete.4 Click Delete, then click OK to confirm that you want to delete the filter.
Listing Folder Entries and PagesMany types of folders in Micro Focus Vibe provide an Entry Listing toolbar that enables you to search for entries individually, or navigate among pages of listings. Some of these tools are useful only if there is more than one page of entries. The available tools include:
Entry: Specify the number (displayed in the # column) of the entry that you want to view, then click Go.
Previous/Next Arrows: enables you to scroll through the pages of the folder.
Page: Type a page number in this text box, then click Go to display the entries on that page of listings.
Managing and Using Folders 95

96 Managing and Using Folders

7 7Working with Specific Folder Types
Micro Focus Vibe provides various kinds of folders that enable you and your teams to accomplish specific tasks.
Many folder management functions are the same for all types of folders. For information on how to perform general folder management functions, see Chapter 6, “Managing and Using Folders,” on page 83.
This section describes how to perform tasks that are unique to each folder type.
“Working with Discussion Folders” on page 97 “Working with Blog Folders” on page 98 “Working with Calendar Folders” on page 100 “Working with Guestbook Folders” on page 103 “Working with Files Folders” on page 104 “Working with Milestones Folders” on page 105 “Working with Micro-Blog Folders” on page 105 “Working with Mirrored Files Folders” on page 105 “Working with Photo Album Folders” on page 106 “Working with Surveys Folders” on page 108 “Working with Tasks Folders” on page 110 “Working with Wiki Folders” on page 120 “Creating Folder Content” on page 125
Working with Discussion FoldersUse discussions as a way of obtaining comments and feedback to questions and thoughts that you might have. You can start general discussion threads in the Discussion folder in your personal workspace. For discussion threads that are more specific to a project or team, start the discussion thread in the Discussion folder of the appropriate workspace.
Starting a discussion thread is often more effective than sending individual users an email, because other interested parties and knowledge holders can easily join the discussion, without waiting for the email to be forwarded partway through the discussion.
By default, the Discussion folder is sorted with the most recent discussions appearing first in the list of discussion entries.
“Sorting Discussion Entries by Column Title” on page 98 “Pinning Discussion Entries” on page 98 “Viewing Discussion Entries” on page 98 “Customizing Columns in Discussions Folders” on page 98
Working with Specific Folder Types 97

Sorting Discussion Entries by Column TitleYou can organize your discussion entries by any of the column titles, which are Entry Number (No.), Title, State, Author, Date, or Rating.
To sort discussion entries by column titles:
1 Click the title of the column that represents how you want to sort your discussions.The Sort icon is displayed next to the column title that represents how the discussions are being sorted.
2 Click the column title again to reverse the sort order for the discussions.
Pinning Discussion EntriesMicro Focus Vibe enables you to pin discussion entries, which makes them easy to view in the future by bringing them to the top of the list of discussion entries. This is like placing a bookmark on a discussion entry that you want to keep track of.
1 In a Discussion folder, click the gray Pin icon next to a discussion entry that you are interested in. You can pin multiple discussion entries.
2 Click the gray Pin icon in the Action toolbar to display only items that have been pinned. Pinned discussion entries are sorted alphabetically by title.
Viewing Discussion Entries1 Click the title of the discussion entry.
The discussion entry is opened either in the Content Area or in a dialog box, as described in “Configuring the Display Style of Entries” on page 150.
Customizing Columns in Discussions FoldersFor information on how to customize the columns that appear in Discussions folders, see “Configuring Folder Columns” on page 90.
Working with Blog FoldersBlogs are a good way to express your thoughts about topics that are important to you. For example, if you are working on a project and are responsible for a certain aspect of that project, you can update your team on your individual progress by posting a blog in the Blog folder in the team workspace.
“Using the Blog Toolbar” on page 99 “Organizing Your Blog Folder” on page 99
98 Working with Specific Folder Types
Using the Blog ToolbarUnlike other folder views, the Blog folder provides the Blog toolbar on each entry. The toolbar is displayed at the bottom of any blog entry, and enables you to do several actions without opening the entry:
Add Comment: enables you to quickly add a comment to an entry. View Comments: Opens a list containing all of the comments that have been made on the
entry. Send to Friend: enables you to email the blog entry to anybody who might be interested in
viewing it. Subscribe: enables you to send notifications to yourself when activity takes place in this entry.
For more information, see “Subscribing to a Folder or Entry” on page 51.
Organizing Your Blog FolderThere are various ways that you can organize your Blog folder.
“Creating a New Blog Page” on page 99 “Sorting Blog Entries” on page 99 “Using the Archives Section” on page 100
Creating a New Blog PageYou can organize your Blog folder into separate Blog pages. Blog pages are displayed in the Blog sidebar, located in the right section of the Blog folder, above the Archives section. Also, in the Navigation panel, you can expand your Blog folder to view your Blog pages.
To create a new Blog page:
1 In a Blog folder, click New Blog Page in the Folder Entry toolbar.2 In the Title field, specify the name of the new Blog page that you want to create.3 Click OK.
Sorting Blog EntriesYou can sort your blog entries by Entry Number (No.), Title, State, Author, Created/Modified.
1 Click the Sort by drop-down list in the Folder Entry toolbar.2 Select how you want to sort the entries in your Blog folder.
Working with Specific Folder Types 99

Using the Archives SectionThe Blog sidebar in the Blog folder includes an Archives section that displays each month of the year that blogs were created. When you first enter a Blog folder, all of the blog entries are displayed in the main viewing area. Selecting an archived month simply filters the entries in the folder to display only entries that were created in that month.
You can use the Archives section to quickly navigate to a specific blog entry if you know the month when it was created. Or, you can view all of the blog entries that were created in any given month.
1 In the Archives section, click the month the blog was created.The most recent month is displayed at the top of the Archives section.In the main viewing area of the Blog folder, Micro Focus Vibe displays all of the blog entries that were created in that month.
2 (Optional) You can further navigate to the blog you are looking for by clicking the name of the Blog page where the blog is stored.The blog is displayed in the Content Area.
Working with Calendar FoldersMicro Focus Vibe enables you to create a Calendar folder in any workspace that you desire. You can maintain a personal calendar in your personal workspace, and then add separate calendars in your team workspaces to keep track of events that are specific to that team.
“Changing the View of Your Calendar Folder” on page 100 “Viewing All Calendar Events for Which You Are Scheduled” on page 101 “Synchronizing Vibe Calendars of Your Choice” on page 101 “Viewing Today’s Calendar Items from All of the Calendars You Are Following” on page 102 “Synchronizing Your Calendar with a Desktop Application” on page 102 “Configuring a Landing Page to Display All Calendar Events Assigned to the User Who Views the
Page” on page 102 “Importing Calendars” on page 103
Changing the View of Your Calendar FolderYou can customize the Calendar folder view in various ways:
Click Work day or Full day to specify whether Vibe should display all hours in the day, or only regular working hours.
Use the left-arrow icon and right-arrow icon to specify the next or previous folder page. For example, if you are currently viewing three days of information, clicking the arrows shows you the previous or next three days of information.
Click the calendar applet to jump to a specific month and day.
Click the Today icon to jump to the current day.
100 Working with Specific Folder Types

Click the appropriate icon to specify the amount of time displayed on a single folder page (1 day , 3 days , 5 days , 7 days , 14 days , or one month ).
Click the Calendar Settings icon to specify the following options: The day of the week that the calendar starts (Saturday, Sunday, or Monday). The time your work day starts.
Click the Show drop-down list to display one of the following views: Assigned Events: Displays all calendar events that are currently assigned to you.
For more information, see “Viewing All Calendar Events for Which You Are Scheduled” on page 101.
Calendar Events by Date: (Default) Displays all entries in the calendar on the day that the event is scheduled for.
Calendar Events by Creation Date: Displays entries on the day that the entry was created. This includes file entries that were added to the Calendar folder using the Add Files option.
Calendar Events by Activity Date: Displays entries on the day that the entry was last modified. This includes file entries that were added to the Calendar folder using the Add Files option.
Viewing All Calendar Events for Which You Are ScheduledVibe enables you to display all past and future calendar events for which you are scheduled in one convenient location. These are any events for which you are assigned, either individually, or through team or group membership.
1 Navigate to the calendar folder in your personal workspace.2 In the Show drop-down list, select All Assigned Events.
All calendar events that are assigned to you in the Vibe system are displayed in the calendar.
Synchronizing Vibe Calendars of Your ChoiceVibe enables you to synchronize the Vibe calendars of your choice, and display them in a single, summarized calendar in the Accessory Panel. This eliminates the need to check multiple calendars.
1 Navigate to the workspace or folder where you want to display the calendar.2 Click the Accessory Panel drop-down list.3 Click Add an Accessory.4 In the Accessory Scope section, select where you want the accessory to be displayed.
Personal accessory for this page only: This accessory appears only to you and only on the currently displayed workspace or folder page.Personal accessory for all workspaces and folders: This accessory appears only to you, but it appears on all workspace and folder pages that you view.Community accessory for this page: This accessory appears only on this page, and it appears to everyone who views the current page. Only workspace and folder owners are allowed to establish community accessories.
5 In the Accessory Type section, select Calendar Summary.
Working with Specific Folder Types 101

6 Click OK.The Accessory Setup page is displayed.
7 In the Title field, provide a title for the calendar.8 In the Display Style section, select whether you want the calendar to have a border.9 In the Select the Calendar Folder(s) to be Shown section, navigate the workspace tree and select
all of the calendars that you want to be included in the Calendar Summary accessory. Vibe takes the calendar events from all of the Calendar folders that you select here, and displays them in a single, convenient calendar in the Accessory Panel.
10 Click Apply > Close.The Calendar Summary accessory is displayed in the Accessory Panel on the pages where you configured it to be shown, as explained in Step 4.
Viewing Today’s Calendar Items from All of the Calendars You Are FollowingVibe enables you to view all of your calendar events for the current day, in one synchronized view. This view displays events from the calendars that you are following, and displays only those events for which you are scheduled.
1 Navigate to the home page of your personal workspace.2 Click the Tasks and Calendars tab.
The right section of the page displays today’s schedule with all of the calendar events from all of the calendars you are following.
For information on how to follow a calendar in Vibe, see “Following Workspaces and Folders” on page 45.
Synchronizing Your Calendar with a Desktop ApplicationVibe provides iCal URLs for Calendar folders, so you can synchronize your Vibe Calendar folder to your desktop application.
For information on using iCal to synchronize your calendar with a desktop application, see “Synchronizing Tasks and Calendars to a Desktop Application” on page 55.
Configuring a Landing Page to Display All Calendar Events Assigned to the User Who Views the PageIf you are responsible for a maintaining a landing page for a workspace, you can configure the landing page to display the calendar events that are assigned to that particular user. For more information, see “Adding Content to Your Landing Page” in the Micro Focus Vibe 4.0.8 Advanced User Guide.
102 Working with Specific Folder Types

Importing CalendarsVibe enables you to import calendars from other software applications. You can import calendars from Outlook or from other applications that export to files of .ical, .ics, .ifb, and .icalendar formats.
You can import calendars as a single file, or you can import a list of calendars from a URL.
“Importing Calendars as a Single File” on page 103 “Importing Calendars from a URL” on page 103
Importing Calendars as a Single File1 Navigate to the Calendar folder where you want to import the calendar.
2 Click the Configure icon next to the folder title, then click Folder Options. The Folder Options dialog box is displayed.
3 In the Calendar Import Options section, select From iCalendar File.4 Click OK.
The Import Calendar from File dialog box is displayed.5 Click Choose File, then browse to and select the task that you want to import.6 Click Upload.
Importing Calendars from a URL1 Navigate to the Calendar folder where you want to import the calendar.
2 Click the Configure icon next to the folder title, then click Folder Options. The Folder Options dialog box is displayed.
3 In the Calendar Import Options section, select By URL.4 Click OK.
The Import Calendar by URL dialog box is displayed.5 In the provided field, specify the URL where there is a list of calendars that you want to import.6 Click OK.
Working with Guestbook FoldersThe Guestbook folder in Micro Focus Vibe is a place to store all of your guestbook entries. By default, guestbook signatures are displayed in the Accessories tab of a user’s personal workspace. Signing the Guestbook is a quick way for your friends and co-workers to communicate with you.
To sign another user’s Guestbook:
1 Navigate to the user’s Guestbook folder.2 In the upper right corner of the folder, click Sign the guestbook.3 In the Title section, provide a title for the signature.
Working with Specific Folder Types 103

4 In the Description section, compose your message.5 (Optional) In the Attachments section, add any attachments.6 Click OK.
Working with Files FoldersFiles folders in Micro Focus Vibe make it easy to store and keep track of your files. You can store personal files in the Files folder in your personal workspace, and team-related files in your team folders. This makes it easy to share files with your teammates and others who might be interested in viewing them.
“Adding Files to a Files Folder and Other WebDAV-Enabled Folders” on page 104 “Customizing Columns in Files Folders” on page 105
Adding Files to a Files Folder and Other WebDAV-Enabled FoldersFiles folders behave differently from other types of Vibe folders. With most types of Vibe folders, Vibe enables you to add multiple files with the same name to a single folder, if each file is added as a separate entry. Files folders, however, require each file to have a unique name. Folders that have been configured to support WebDAV also require each file to have a unique name.
For information about how to configure a folder to support WebDAV, see “Configuring a Folder to Support WebDAV” in the Micro Focus Vibe 4.0.8 Advanced User Guide.
When you add a file to a Files folder or a WebDAV-enabled folder, and the file has the same name as a file that has already been added to the folder, you see the following behavior, depending on the method you use to add the file:
“Adding a File as a New File Entry” on page 104 “Adding a File by Dragging and Dropping” on page 105 “Adding a File through WebDAV” on page 105
Adding a File as a New File EntryWhen you add a file as a new file entry in your Files folder, and a file with the same name already exists in the folder, a status message informs you that a file with the same name already exists, and you are not allowed to upload the file.
For information about how to add a new file entry to your Files folder when the file entry has a unique name, see “Creating a Folder Entry” on page 128.
104 Working with Specific Folder Types

Adding a File by Dragging and DroppingWhen you add a file by dragging and dropping a file into a Files folder, and a file with the same name already exists in the folder, the newly uploaded file replaces the existing file, and the existing file is stored as a previous version.
For information about how to drag and drop a file into a Vibe folder, see “Dragging and Dropping Files” on page 86.
For more information about file versioning, see “Using Version Control with Files” on page 144.
Adding a File through WebDAVWhen you add a file to a WebDAV-enabled folder, and a file with the same name already exists in the folder, the newly uploaded file replaces the existing file, and the existing file is stored as a previous version.
For more information about file versioning, see “Using Version Control with Files” on page 144.
Customizing Columns in Files FoldersFor information on how to customize the columns that appear in Files folders, see “Configuring Folder Columns” on page 90.
Working with Milestones FoldersMilestones folders track the progress of several Tasks folders. Milestones folders are most often used in those workspaces, although they can also be used in other workspaces. For more information, see “Managing a Project Management Workspace” on page 81.
Working with Micro-Blog FoldersThe Micro-Blog folder in Micro Focus Vibe is a place to store all of your micro-blog entries. Use micro-blog entries to display your status to your co-workers. You can navigate to someone else’s Micro-Blog folder to see what they have been working on, and possibly provide help by sharing your knowledge and experience.
For more information on the Micro-Blog feature, see “Using Micro-Blogs” on page 49.
Working with Mirrored Files FoldersMirrored Files folders use a file system on an external server, instead of the Micro Focus Vibe file system where other Vibe information is stored. Mirrored Files folders can use any WebDAV or local file path.
For more information about Mirrored Files folders, see “Working with Mirrored Folders” in the Micro Focus Vibe 4.0.8 Administration Guide.
Working with Specific Folder Types 105
For information on how to customize the columns that appear in Files folders, see “Configuring Folder Columns” on page 90.
Working with Photo Album FoldersPhoto albums store and display pictures. You can store your personal photos in the Photo Album folder in your personal workspace, and team-related photos in the Photo Album folder of the team workspace.
“Organizing Your Photo Album” on page 106 “Synchronizing Photo Albums” on page 107 “Viewing and Managing Photo Entries” on page 108
Organizing Your Photo Album “Creating New Photo Albums within the Folder” on page 106 “Sorting Photo Entries” on page 106 “Using the Archives Section” on page 107
Creating New Photo Albums within the FolderYou can organize your Photo Album folder into separate photo albums. Photo albums are displayed in the Photo Album sidebar, located in the right section of the Photo Album folder. Also, in the Navigation panel, you can expand your Photo Album folder to view all of your photo albums in the folder.
To create a new photo album in your Photo Album folder:
1 Click New Photo Album in the Folder Entry toolbar.The New Photo Album page is displayed.
2 In the Folder Title field, specify the name of the new photo album that you want to create.3 Click OK.
Sorting Photo EntriesYou can organize your photo album entries by Creation Date, Title, or Created/Modified.
1 Click the Sort by drop-down list in the Folder Entry toolbar.2 Select how you want to sort the entries in your Photo Album folder.
106 Working with Specific Folder Types

Using the Archives SectionThe Photo Album sidebar in the Photo Album folder includes an Archives section that displays each month of the year that photos were created. When you first enter a Photo Album folder, all of the photo album entries are displayed in the main viewing area. Selecting an archived month simply filters the entries in the folder to display only entries that were created in that month.
You can use the Archives section to quickly navigate to a specific photo entry if you know the month when it was created. Or, you can view all of the photo entries that were created in any given month.
1 In the Archives section, click the month when the photo was created.The most recent month is displayed at the top of the Archives section.In the Content Area of the Photo Album folder, Micro Focus Vibe displays all of the photo entries that were created in that month.
2 (Optional) You can further navigate to the photo entry you are looking for by clicking the name of the Photo Album where the photo entry is stored.The photo entry is displayed in the main viewing area.
Synchronizing Photo AlbumsVibe enables you to synchronize the Vibe photo albums of your choice, and display them in a single, summarized photo album (called a Photo Gallery) in the Accessory Panel.
1 Navigate to the workspace or folder where you want to display the Photo Gallery.2 Click the Accessory Panel drop-down list.3 Click Add an Accessory.4 In the Accessory Scope section, select where you want the accessory to be displayed.
Personal accessory for this page only: This accessory appears only to you and only on the currently displayed workspace or folder page.Personal accessory for all workspaces and folders: This accessory appears only to you, but it appears on all workspace and folder pages that you view.Community accessory for this page: This accessory appears only on this page, and it appears to everyone who views the current page. Only workspace and folder owners are allowed to establish community accessories.
5 In the Accessory Type section, select Photo Gallery.6 Click OK.
The Accessory Setup page is displayed.7 In the Title field, provide a title for the photo gallery.8 In the Display Style section, select whether you want the photo gallery to have a border.9 In the Number of Photos to Show field, specify how many results you want to display at any one
time in the photo list.10 Select whether you want photos to be shown big or small.11 In the Select the Photo Album(s) to be Shown section, navigate the workspace tree and select all
of the photo albums that you want to be included in the Photo Gallery accessory.
Working with Specific Folder Types 107

Vibe takes the photos from all of the Photo Album folders that you select here, and displays them in a single, convenient Photo Gallery in the Accessory Panel.
12 Click Apply > Close.The Photo Gallery accessory is displayed in the Accessory Panel on the pages where you configured it to be displayed, as explained in Step 4.
Viewing and Managing Photo Entries “Viewing Photos” on page 108 “Managing Photo Entries” on page 108
Viewing PhotosTo view a photo in a full-sized view in a separate window, click the thumbnail picture.
To scroll through an album that contains multiple photos, simply click the navigation arrows.
Managing Photo EntriesTo manage a photo entry, including deleting, modifying, and commenting, click the linked title of the photo entry.
Working with Surveys FoldersSurveys folders store surveys that you or other Micro Focus Vibe users have created. Surveys enable you to poll team members, or any other Vibe users, about issues that are important to you, your team, or your entire organization.
“Participating in a Survey” on page 108 “Creating a Survey” on page 108 “Modifying a Survey” on page 110 “Checking the Results of a Survey” on page 110
Participating in a Survey1 Navigate to the Surveys folder that contains the survey that you want to participate in.2 Click the entry title of the survey.3 Provide answers to the survey questions, then click Vote.
Creating a SurveyWhen you create a survey, you become its moderator. Depending on the access control settings that you set for the survey, the moderator can have more rights than regular users.
1 Navigate to the Surveys folder where you want to create the survey.2 Click New Survey in the Folder Entry toolbar.
108 Working with Specific Folder Types

The Survey page is launched. 3 Fill in the Title, Description, and Attachments sections as described in “Filling In the Entry Form”
on page 128.4 In the Due Date section, specify the date when you want to stop all voting on the survey. After
the date that you specify, users cannot cast a vote.5 Select one of the following options for the first question of your survey:
Multiple Choice: Multiple Answers: Adds a multiple-choice question, and enables users to select more than one answer.
Multiple Choice: Single Answer: Adds a multiple-choice question, and restricts users to only one answer.
Written Reply: Adds a written reply question, and provides users with a field where they can specify their written response.
6 (Optional) Select Answer to this question is required, if you want to require users to answer the question.
7 (Optional) Click Add More Answers, if you want to add more answer possibilities for a multiple-choice question. (This option does not exist for Written Reply questions.)
8 (Optional) Click the Move Up icon or Move Down icon to change the order of questions in the survey. The question numbers are modified to reflect the new order. When you click OK to create the survey (or to update the survey if you are modifying a survey), the questions appear in the order that you chose.
9 Repeat Step 5 through Step 7 to add additional questions to your survey.10 Specify the following access control settings:
Who Can See Vote Results Before Due Time: When users have access to view the vote results before the survey is due, they can see how other participants have voted so far. You can enable all users to have this ability, the moderator and those users who have already voted, or only the moderator.Who Can See Vote Results After Due Time: When users have access to view the vote results after the survey is due, they can see how other participants have voted, but only after they have cast a vote and the voting is closed. You can enable all users to have this ability, the moderator and those users who have voted, or only the moderator.Who Can See Who Has Voted and How: When users have access to see who has voted and how, they can see how other individual users have voted. Using this option is not recommended if your users want their votes to remain confidential. You can enable all users to have this ability, the moderator and those users who have voted, or only the moderator.Allow Votes to be changed or removed before due date: Select this option if you want to grant users the ability to change or remove their votes before the survey is due. Users who are logged in as Guest cannot have this ability.
11 Click OK.
Working with Specific Folder Types 109

Modifying a SurveyYou can modify a survey just as you can any other type of entry in Vibe. You can reword questions, add answers, change the order of questions, and so forth.
1 Open the survey that you want to modify, then click Modify.2 You can modify the options that are described in “Creating a Survey” on page 108.
Checking the Results of a SurveyAfter you have voted, you can check the results by viewing the entry again.
1 Navigate to and open the survey where you want to check the voting results.2 Click View Voting Details, located near the bottom of the survey entry.
Vibe displays the percentage of votes cast for each survey question.
Working with Tasks FoldersTasks folders keep track of the progress made in completing work assignments. Micro Focus Vibe enables you to create Tasks folders in any workspace that you desire. You can maintain a personal Tasks folder in your personal workspace, and then add separate Tasks folders in your team workspaces to keep track of tasks that are specific to that team.
“Sorting Tasks in Your Tasks Folder by Task Characteristics” on page 111 “Filtering the Task List” on page 111 “Modifying Tasks in the Task List” on page 111 “Creating Tasks in a Specific Location in the Task List” on page 112 “Creating Linked Tasks” on page 112 “Changing the Order of Tasks” on page 113 “Managing Sub-Tasks” on page 114 “Synchronizing the Vibe Tasks Folders of Your Choice” on page 116 “Changing the View of Your Tasks Folder” on page 117 “Viewing All Tasks That Are Assigned to You” on page 117 “Viewing All Tasks That Are Assigned to a Specific Team, Group, or Individual User” on page 118 “Configuring a Landing Page to Display All Tasks Assigned to the User Who Views the Page” on
page 119 “Importing Tasks” on page 119
110 Working with Specific Folder Types

Sorting Tasks in Your Tasks Folder by Task CharacteristicsVibe enables you to sort the tasks in your task list by number, task name, priority, due date, status, assignee, and percent done. By default, the task list is sorted by the No. column. When you sort the task list by a different column, the No. column automatically becomes a secondary sort. For example, when you sort the task list by priority, tasks are sorted by priority first and by number second. Within each task group that is sorted by priority, tasks are sorted by number.
When you sort the task list as described in this section, tasks are displayed in a flat view (sub-tasks are no longer displayed as indented beneath the main task). To display sub-tasks as indented again, sort on the No. column in ascending order.
To sort tasks:
1 Navigate to the Tasks folder where you want to sort your tasks.2 At the top of the task list, click the title of the column heading by which you want to sort the
tasks.Tasks in the Tasks folder are sorted according to the column title that you click. The No. column automatically becomes a secondary sort.
Filtering the Task ListYou can quickly locate a task by using the filter. This is helpful if the task list contains many task entries.
1 In the upper right corner of the task list, click inside the Search Name field, specify the title of a task entry that you are searching for, then press Enter.
Modifying Tasks in the Task ListYou can modify individual tasks and sub-tasks directly from the task list. You can modify the priority, status, due date, and the percent done.
1 Click the down-arrow icon in the Priority, Status, Due Date, or Closed-% Done columns for the task that you want to modify.
2 Click the new priority, status, or percent done in the drop-down list. orIf you are modifying the due date, make the modifications in the Due Date dialog box, then click OK.In Vibe 3.1 and later, when you mark a task as Completed (in the Status column) or 100% (in the Closed-% Done column), the date and time when the task was marked Completed is displayed in the Closed-% Done column. Nothing is displayed in this column if the task was marked Completed or 100% in a version prior to 3.1.
You can modify other aspects of a task entry as described in “Modifying All Sections of an Entry” on page 132.
Working with Specific Folder Types 111

Creating Tasks in a Specific Location in the Task ListWhen you create new task entries as described in “Creating a Folder Entry” on page 128, the new task entry appears at the bottom of the task list. You can create a task entry at a specific location in the task list.
1 Click the No. column in the task list to ensure that tasks are sorted by number in ascending order.You might need to click the No. column a second time if the column is sorted in descending order the first time you click it.Sorting the task list by the No. column in ascending order displays a drop-down arrow to the right of each task in the task list.
2 Click the drop-down arrow next to the task where you want to create a sub-task, then click New Task Above or New Task Below, depending on where you want the task to be located in the task list.
3 Fill out the entry form, then click OK to finish creating the sub-task.For more information about filling in the entry form, see “Filling In the Entry Form” on page 128.The task is created at the appropriate location in the task list.
Creating Linked TasksBefore you link tasks with other tasks, ensure that you understand how task linking works in Vibe.
“Understanding Linked Tasks” on page 112 “Linking Sub-Tasks with Other Tasks” on page 112
Understanding Linked TasksA linked task is a task that is due a designated number of days after either the start date or the due date of the task that precedes it. Only sub-tasks can be linked. The first sub-task beneath a main task can be linked with the start date of the main task. Subsequent sub-tasks can be linked with the due date of the sub-task that precedes them in the task list.
For example, sub-task A begins when the main task begins, and the due date of sub-task A is the start date of the main task plus whatever the duration is for sub-task A. The due date of sub-task B is the due date of sub-task A plus the duration of sub-task B, and so forth.
To link a sub-task with either the main task or another sub-task, you must set the duration of the sub-task when you are creating or modifying the sub-task. You do this in the Duration field on the entry form. (For more information about setting the task duration, see “Linking Sub-Tasks with Other Tasks” on page 112.)
Linking Sub-Tasks with Other TasksTo link a sub-task with another task:
1 Create a sub-task.
112 Working with Specific Folder Types
Ensure that the position of the sub-task in the task list is directly beneath the main task or sub-task that you want it to be linked with.For more information about how to create a sub-task and change its position in the task list, see “Creating Sub-Tasks” on page 114.
2 Modify the sub-task that you want to link with either the main task or sub-task by clicking the title of the sub-task, then clicking Modify.The entry form is displayed.
3 In the Time Period section of the entry form, ensure that the Start fields and End fields are blank.
4 In the Duration field, specify the number of days before the sub-task is due.For sub-tasks that are linked to the main task, this number begins after the start date of the main task. For sub-tasks that are linked with other sub-tasks, this number begins after the due date of the sub-task that precedes it in the task list.
Changing the Order of TasksTasks appear in the order that they are created when tasks are sorted by number in ascending order in the task list. (For more information on the various ways that you can sort tasks, see “Sorting Tasks in Your Tasks Folder by Task Characteristics” on page 111.)
You can change the order that tasks appear in the task list. When you change the order of a task, all sub-tasks that are associated with the main task are also moved. Sub-tasks cannot be moved outside of the main task in the task list unless you first make the sub-task a main task, as described in “Making a Sub-Task a Main Task” on page 115.
“Reordering Tasks One Number at a Time” on page 113 “Reordering a Single Task Anywhere in the Task List with a Single Click” on page 114
Reordering Tasks One Number at a TimeYou can change the order of a single task, or multiple tasks simultaneously.
1 Click the No. column in the task list to ensure that tasks are sorted by number in ascending order.You might need to click the No. column a second time if the column is sorted in descending order the first time you click it.Sorting the task list by the No. column in ascending order activates the arrow icons that are located above the task list.
2 Select the task that you want to move up or down in the task list.You can select multiple tasks for convenience.
3 Click the up-arrow and down-arrow icons to move the task up and down in the task list.
Working with Specific Folder Types 113

Reordering a Single Task Anywhere in the Task List with a Single ClickYou can quickly move a task to any location within the task list.
1 Click the number of the task in the No. column.2 Specify the number where you want the task to be moved to in the task list.3 Press Enter.
Managing Sub-TasksSub-tasks allow you to break down a larger task into smaller components. Multiple users can be assigned to multiple sub-tasks in order to accomplish a main task. When all sub-tasks are marked Complete, the main task is also marked Complete.
“Creating Sub-Tasks” on page 114 “Making a Main Task a Sub-Task” on page 115 “Making a Sub-Task a Main Task” on page 115 “Viewing Sub-Tasks” on page 115 “Deleting Sub-Tasks and Tasks That Contain Sub-Tasks” on page 115
Creating Sub-TasksWhen you create a sub-task, ensure that you provide a meaningful name. This is necessary because sub-tasks are not always displayed in a hierarchical view in the task list. For more information, see “Viewing Sub-Tasks” on page 115.
To create a sub-task:
1 Click the No. column in the task list to ensure that tasks are sorted by number in ascending order.You might need to click the No. column a second time if the column is sorted in descending order the first time you click it.Sorting the task list by the No. column in ascending order displays a drop-down arrow to the right of each task in the task list.
2 Click the drop-down arrow next to the task where you want to create a sub-task, then click New Subtask.
3 Fill out the entry form, then click OK to finish creating the sub-task.For more information about filling in the entry form, see “Filling In the Entry Form” on page 128.The sub-task is created beneath the task where you create it.
114 Working with Specific Folder Types
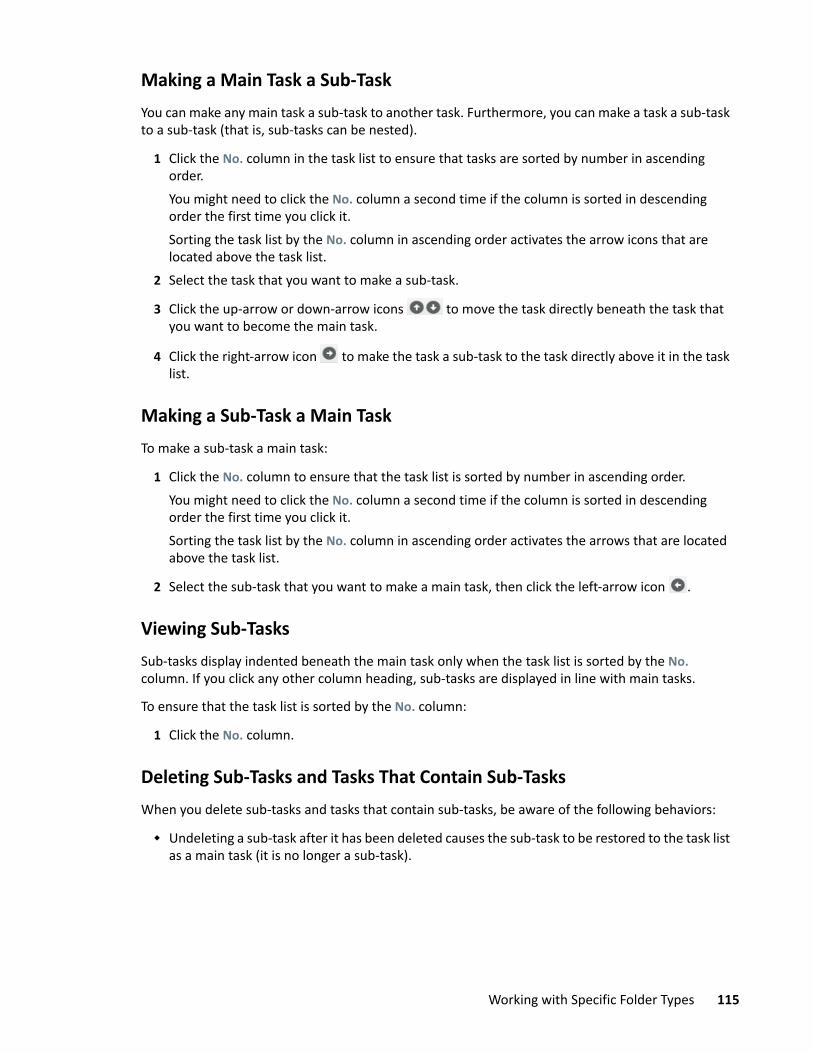
Making a Main Task a Sub-TaskYou can make any main task a sub-task to another task. Furthermore, you can make a task a sub-task to a sub-task (that is, sub-tasks can be nested).
1 Click the No. column in the task list to ensure that tasks are sorted by number in ascending order.You might need to click the No. column a second time if the column is sorted in descending order the first time you click it.Sorting the task list by the No. column in ascending order activates the arrow icons that are located above the task list.
2 Select the task that you want to make a sub-task.
3 Click the up-arrow or down-arrow icons to move the task directly beneath the task that you want to become the main task.
4 Click the right-arrow icon to make the task a sub-task to the task directly above it in the task list.
Making a Sub-Task a Main TaskTo make a sub-task a main task:
1 Click the No. column to ensure that the task list is sorted by number in ascending order.You might need to click the No. column a second time if the column is sorted in descending order the first time you click it.Sorting the task list by the No. column in ascending order activates the arrows that are located above the task list.
2 Select the sub-task that you want to make a main task, then click the left-arrow icon .
Viewing Sub-TasksSub-tasks display indented beneath the main task only when the task list is sorted by the No. column. If you click any other column heading, sub-tasks are displayed in line with main tasks.
To ensure that the task list is sorted by the No. column:
1 Click the No. column.
Deleting Sub-Tasks and Tasks That Contain Sub-TasksWhen you delete sub-tasks and tasks that contain sub-tasks, be aware of the following behaviors:
Undeleting a sub-task after it has been deleted causes the sub-task to be restored to the task list as a main task (it is no longer a sub-task).
Working with Specific Folder Types 115

For more information about undeleting entries, see “Recovering a Folder Entry from the Trash” on page 136.
Deleting a main task that contains sub-tasks deletes only the main task. Any sub-tasks associated with the main task are retained in the task list and become main tasks (they are no longer sub-tasks).
Synchronizing the Vibe Tasks Folders of Your ChoiceVibe enables you to synchronize the Vibe Tasks folders of your choice and display them in a single, summarized task list in the Accessory Panel. You can display tasks that are assigned to specific users, groups, or teams.
1 Navigate to the page where you want to display the task list.2 Click the Accessory Panel drop-down list.3 Click Add an Accessory.4 In the Accessory Scope section, select where you want the accessory to be displayed.
Personal accessory for this page only: This accessory appears only to you and only on the currently displayed workspace or folder page.Personal accessory for all workspaces and folders: This accessory appears only to you, but it appears on all workspace and folder pages that you view.Community accessory for this page: This accessory appears only on this page, and it appears to everyone who views the current page. Only workspace and folder owners are allowed to establish community accessories.
5 In the Accessory Type section, select Task Summary.6 Click OK.
The Accessory Setup page is displayed.7 In the Title field, provide a title for the task list.8 In the Display Style section, select whether you want the task list to have a border.9 In the Number of Results to be Shown field, specify how many results you want to display at any
one time in the task list.10 In the Show Only the Tasks Assigned To section, specify the specific users, groups, or teams
whose tasks you want to display.11 In the Select the Task Folder(s) to be Shown section, navigate the workspace tree and select all
of the Tasks folders that you want to be included in the task list. Vibe takes the tasks from all of the Tasks folders that you select here, and displays them in a single, convenient task list in the Accessory Panel.
12 Click Apply > Close.The Task Summary accessory is displayed in the Accessory Panel on the pages where you configured it to be shown in Step 4.
116 Working with Specific Folder Types

Changing the View of Your Tasks FolderThe View setting in the Tasks folder enables you to choose the kinds of tasks that you want to display in the task list.
1 Click the View drop-down in the upper right corner of the task list.2 Click one of the following options for the tasks that you want to display in the task list:
All Entries: Displays all tasks. Completed: Displays tasks that have the status of Closed. Today: Displays tasks that have a due date of today. Week: Displays tasks that have a due date sometime in the next seven days. Month: Displays tasks that have a due date sometime in the next 30 days. All Active: Displays tasks that are currently active.
The following options are available only in user workspaces: Assigned Tasks: Displays all tasks assigned to the owner of the workspace, regardless of
where the tasks are located in Vibe. From Folder: Displays all tasks that are in the current folder.
For more information, see “Viewing Your Tasks in a Full Interactive View” on page 117.
Viewing All Tasks That Are Assigned to YouVibe enables you to display all of the tasks that are assigned to you, whether they are assigned personally to you, or assigned to a group or team of which you are a member.
“Viewing Your Tasks in a Full Interactive View” on page 117 “Viewing Summaries of All Your Assigned Tasks” on page 117 “Viewing Summaries of Your Assigned Tasks That Are Due within the Next Two Weeks” on
page 118
Viewing Your Tasks in a Full Interactive ViewVibe enables you to view a full interactive view of all of your assigned tasks.
1 Navigate to a Tasks folder in your personal workspace.2 Click the View drop-down list in the upper right corner of the task list, then click Assigned Tasks.
Vibe displays all tasks that are currently assigned to you.
For information about how to modify tasks from the task list by using the interactive view, see “Modifying Tasks in the Task List” on page 111.
Viewing Summaries of All Your Assigned Tasks1 Navigate to the home page of your personal workspace.2 Click the Tasks and Calendars tab.
Working with Specific Folder Types 117

The left section of the page displays all of the tasks that are assigned to you, whether they are assigned personally to you, or assigned to a group or team of which you are a member.
3 Select Due Anytime.Vibe displays a summarized view of all tasks that are assigned to you.
Viewing Summaries of Your Assigned Tasks That Are Due within the Next Two Weeks
1 Navigate to the home page of your personal workspace.2 Click the Tasks and Calendars tab.
The left section of the page displays all of the tasks that are assigned to you, whether they are assigned personally to you or assigned to a group or team of which you are a member.
3 Select Due Within 2 Weeks.Vibe displays a summarized view of all tasks that are due within the next two weeks and are assigned to you.
Viewing All Tasks That Are Assigned to a Specific Team, Group, or Individual UserVibe enables you to view all tasks located in the Vibe site that are assigned to a specific team, group, or individual user, and display them in a single, summarized task list in the Accessory Panel.
1 Navigate to the page where you want to display the task list.2 Click the Accessory Panel drop-down list.3 Click Add an Accessory.4 In the Accessory Scope section, select where you want the accessory to be displayed.
Personal accessory for this page only: This accessory appears only to you and only on the currently displayed workspace or folder page.Personal accessory for all workspaces and folders: This accessory appears only to you, but it appears on all workspace and folder pages that you view.Community accessory for this page: This accessory appears only on this page, and it appears to everyone who views the current page. Only workspace and folder owners are allowed to establish community accessories.
5 In the Accessory Type section, select Task Summary.6 Click OK.
The Accessory Setup page is displayed.7 In the Title field, provide a title for the task list.8 In the Display Style section, select whether you want the task list to have a border.9 In the # of Results to be Shown section, specify how many results you want to display at any one
time in the task list.10 In the Show Only the Tasks Assigned To section, specify the specific users, groups, or teams
whose tasks you want to display.11 In the Select the Task Folder(s) to be Shown section, do not select anything.
118 Working with Specific Folder Types

Vibe takes the tasks from the entire Vibe site that are associated to the user, group, or team that you specified in Step 10, and displays them in a single, convenient task list in the Accessory Panel.
12 Click Apply > Close.The Task Summary accessory is displayed in the Accessory Panel on the pages where you configured it to be shown, as explained in Step 4.
Configuring a Landing Page to Display All Tasks Assigned to the User Who Views the PageIf you are responsible for a maintaining a landing page for a workspace, you can configure the landing page to display the tasks that are assigned to that particular user. For more information, see “Adding Content to Your Landing Page” in the Micro Focus Vibe 4.0.8 Advanced User Guide.
Importing TasksVibe enables you to import tasks from other software applications. You can import tasks from Outlook or from other applications that export to files of .ical, .ics, .ifb, and .icalendar formats.
You can import tasks as a single file, or you can import a list of tasks from a URL.
“Importing Tasks as a Single File” on page 119 “Importing Tasks from a URL” on page 119
Importing Tasks as a Single File1 Navigate to the Tasks folder where you want to import the task.
2 Click the Configure icon next to the folder title, then click Folder Options. The Folder Options dialog box is displayed.
3 In the Task Import Options section, select From iCalendar File.4 Click OK.
The Import Tasks from File dialog box is displayed.5 Click Choose File, then browse to and select the task that you want to import.6 Click Upload.
Importing Tasks from a URL1 Navigate to the Tasks folder where you want to import the task.
2 Click the Configure icon next to the folder title, then click Folder Options. The Folder Options dialog box is displayed.
3 In the Task Import Options section, select By URL.4 Click OK.
Working with Specific Folder Types 119

The Import Tasks by URL dialog box is displayed.5 In the provided field, specify the URL where there is a list of tasks that you want to import.6 Click OK.
Working with Wiki FoldersA wiki is a set of related entries coauthored by folder participants. For example, the best-known wiki on the Internet is Wikipedia. Other examples of possible wiki content are glossaries, and policies or procedures.
“Organizing Your Wiki Folder” on page 120 “Creating a New Wiki Topic” on page 122 “Creating a New Wiki Page” on page 122 “Using the Wiki Home Page” on page 123 “Sorting Wiki Pages” on page 123 “Finding a Wiki Page” on page 124 “Formatting Your Wiki Page” on page 124
Organizing Your Wiki FolderWikis in Micro Focus Vibe are organized into Wiki Topics (folders), with each Wiki Topic containing individual Wiki pages.
Depending on the content that you are planning to have in your Wiki, you can organize your Vibe Wiki in either of the following ways:
Adding Wiki folders to a Vibe workspace
You can organize your Wikis with multiple high-level folders in a single workspace. You might want to do this if the information in each Wiki folder is not related.
For information on how to add additional Wiki folders in a workspace, see “Adding Additional Folders to a Workspace” on page 73.
Adding Wiki Topics (folders) to an existing Wiki folder (Recommended)You can organize your Wikis with multiple Topics (folders) within a single Wiki folder. Organizing your Wikis in this way makes it easy for those who access the Wiki to go from topic to topic in a single, convenient interface.
This section describes how to organize Wikis with multiple Wiki Topics within a Wiki folder.
“Understanding Wiki Folder Organization” on page 121 “Understanding Wiki Page Organization” on page 121
120 Working with Specific Folder Types

Understanding Wiki Folder OrganizationLike other types of Vibe folders, you can create sub-folders within a main Wiki folder, as described in “Creating a New Wiki Topic” on page 122. However, unlike other types of Vibe folders, when you create Wiki Topics inside a Wiki folder, the main Wiki folder and the Wiki Topics inside that folder are considered equal, with none considered as higher in the folder hierarchy. The Wiki folder and the Wiki Topics within that folder are displayed side-by-side in the Wiki Topics section.
Understanding Wiki Page OrganizationPages are where information is contained within Wiki Topics. You can add a page to any Wiki Topic, as described in “Creating a New Wiki Page” on page 122.
Wiki pages are contained within Wiki Topics. You can view pages by selecting the Wiki Topic where the page is contained, in the Wiki Topics section, then clicking the page.
Working with Specific Folder Types 121

Creating a New Wiki TopicYou can organize your Wiki pages (Wiki entries) into separate Wiki Topics (Wiki folder and Wiki sub-folders). Wiki Topics are displayed in the Topics and Pages tab, in the Wiki Topics section. Also, in the Navigation panel, you can expand your Wiki folder to view your Wiki Topics.
You can use the Topics and Pages tab to create a new Wiki Topic:
1 In the Wiki folder where you want to create the new Wiki Topic, click the Topics and Pages tab.2 Click New Wiki Topic.
The New Wiki Topic page is displayed.3 In the Title field, specify the name of the new Wiki Topic that you want to create.4 Click OK.
You can also use the Action toolbar to create a new Wiki Topic:
1 In the Wiki folder where you want to create the new Wiki Topic, click the Configure icon next to the folder title, then click New Folder. The New Folder page is displayed.
2 In the Folder Title field, specify the name of the new Wiki Topic that you want to create.3 In the Folder section, select Wiki.4 Click OK.
You delete a Wiki Topic in the same way that you delete any folder in Vibe. For information on how to delete a Vibe folder, see “Deleting a Folder” on page 84.
Creating a New Wiki PageWiki pages (Wiki entries) make up the content that is available in a Wiki Topic. You can make any page within a Wiki Topic the home page for the Wiki Topic where the page resides, as described in “Using the Wiki Home Page” on page 123.
To create a new Wiki page:
1 In the Wiki folder where you want to create the new Wiki page, click the Topics and Pages tab.2 In the Wiki Topics section, select the Wiki Topic where you want to create the new Wiki page.3 Click New Wiki Page.
The Wiki page is displayed.4 In the Title field, specify the name of the new Wiki page that you want to create.5 In the Description section, specify the content for your Wiki page.6 Click OK.
You delete a Wiki page in the same way that you delete any folder entry in Vibe. For information on how to delete a folder entry, see “Deleting a Folder Entry” on page 134.
122 Working with Specific Folder Types

Using the Wiki Home PageThe home page is the first page users see when they access the Wiki Topic. You should define a home page for each Wiki Topic.
“Setting a Wiki Home Page” on page 123 “Navigating to Your Wiki Home Page” on page 123
Setting a Wiki Home PageVibe enables you to set any Wiki page to be the home page for the Wiki Topic where the page resides.
1 Navigate to and open the Wiki page that you want to set as the home page for your Wiki Topic.2 Click Actions > Set Wiki Home Page, then click OK.
The Wiki page is now set as the home page for the Wiki Topic. When users access the Wiki Topic, this is the page they see first.
Navigating to Your Wiki Home PageWhen a home page is defined, it is automatically displayed when you first access the Wiki Topic. If you are viewing a Wiki Topic in the Topics and Pages tab, only the title of the home page is displayed (in bold), along with all of the other Wiki pages that belong to the Wiki Topic.
1 Navigate to the Wiki Topic where you want to display the home page.The home page for the Wiki Topic is displayed.
2 (Conditional) If the home page is not already displayed, click the Page tab.
Sorting Wiki PagesYou can organize your Wiki Topics to display pages by Title, Author, Created/Modified, or Rating.
To sort Wiki pages:
1 Click the Topics and Pages tab.2 Click the Wiki Topic that contains the pages that you want to sort.3 In the table, click the column heading that represents how you want to sort the pages in your
Wiki Topic. Click the column heading a second time to reverse the order. Title: Lists pages in alphabetical order according to the title. Author: Lists pages in alphabetical order according to the author. Created/Modified: Lists pages in order according to when the page was created or last
modified. Rating: Lists pages according to each page’s rating.
For more information on rating, see “Rating a Folder Entry” on page 150.
Working with Specific Folder Types 123

Finding a Wiki PageWiki pages are contained within Wiki Topics. You can view entries by selecting the Wiki Topic where the page is contained, in the Wiki Topics section.
For Wiki Topics that contain many pages, you can use the Find Page field.
1 Select the Wiki Topic that contains the Wiki page that you are searching for.2 In the Find Page field in the upper right corner, begin typing the name of the Wiki page that you
are looking for. Click the name of the Wiki page when it appears in the drop-down list.
Formatting Your Wiki PageAfter you create a new Wiki page in your Wiki Topic, you can add section headings and links. (For information on creating a page, see “Creating a New Wiki Page” on page 122.)
“Creating Sections and Subsections” on page 124 “Linking to Another Wiki Page” on page 125
Creating Sections and SubsectionsYou can create section and subsection headings in a Wiki page by enclosing text in the equals sign.
Sections and subsections are displayed as bold and are more prominent than regular text. Also, a table of contents with links to each section is displayed above the first section heading in the Wiki page.
Example Description
==Section name== Creates a section heading in the Wiki page.
===Subsection name=== Creates a subsection heading in the Wiki page.
124 Working with Specific Folder Types

Linking to Another Wiki PageIf you know the exact title of the Wiki page that you want to link to, you can enter [[title]] in the Description section of the page that you are linking from to create a link to another page. For more information about linking within Vibe, see “Linking to a Folder or Folder Entry” on page 130.
Creating Folder ContentFor information about creating and managing content within folders, see Chapter 8, “Working with Folder Entries,” on page 127.
Working with Specific Folder Types 125

126 Working with Specific Folder Types

8 8Working with Folder Entries
Folder entries in Micro Focus Vibe are individual sections or parts that are used to populate folders with information.
“Creating a Folder Entry” on page 128 “Linking to a Folder or Folder Entry” on page 130 “Commenting on a Folder Entry” on page 131 “Sharing a Folder Entry” on page 131 “Modifying a Folder Entry” on page 132 “Reserving a Folder Entry” on page 132 “Moving a Folder Entry” on page 133 “Copying a Folder Entry” on page 134 “Deleting a Folder Entry” on page 134 “Recovering a Folder Entry from the Trash” on page 136 “Marking a Folder Entry as Read” on page 136 “Marking a Folder Entry as Unread” on page 137 “Notifying Others about a Folder Entry” on page 137 “Subscribing to a Folder Entry” on page 138 “Tagging a Folder Entry” on page 139 “Working with Files in a Folder Entry” on page 139 “Viewing the History of an Entry” on page 147 “Generating Reports about a Folder Entry” on page 148 “Displaying YouTube Videos in a Folder Entry” on page 149 “Displaying Images in a Folder Entry” on page 150 “Rating a Folder Entry” on page 150 “Configuring the Display Style of Entries” on page 150 “Printing a Folder Entry” on page 151 “Enabling Alternate Folder Entry Types” on page 151 “Creating Custom Folder Entry Forms” on page 151 “Displaying Folder Entries on a Landing Page” on page 151
Working with Folder Entries 127

Creating a Folder EntryMicro Focus Vibe enables you to create folder entries in any folder where you have appropriate rights. If you do not have appropriate rights in a folder, you are not able to create an entry as described in this section.
1 Navigate to the folder where you want to create the entry.2 In the Folder Entry toolbar, click New, then click the type of entry that you are adding. For
example, to add a blog entry in the Blog folder, click Blog Entry.The Blog Entry page is launched.
3 Specify the appropriate information in the Entry page. For more detailed information on the fields, see “Filling In the Entry Form” on page 128.
4 Click OK.The entry is added to the folder.
Filling In the Entry FormAlthough the process for creating a folder entry is similar for each type of entry (file entry, calendar entry, discussion entry, and so forth), the Entry form can vary considerably.
Because Vibe is highly customizable, field names in the Entry form can be defined and changed by Vibe administrators and other Vibe users who create forms. This section contains a list of named fields for the various default entry types. For more information on creating custom forms, see “Designing Custom Folder Entry Forms” in the Micro Focus Vibe 4.0.8 Advanced User Guide.
Title: Provide a title for the entry.
Location: Specify the location for the event.
Description: Provide a description of the entry. This is the body of the entry where you add the main content. Descriptions can be simple text, or they can be more complex, with tables, videos, and more. For more information on creating an entry description, see “Composing an Entry Description” on page 129.
Event: Specify the start and end time, whether you want the entry to adjust for the time zone of attendees, how you want your status to be displayed during this event (Free, Busy, Tentative, or Out of Office), and if you want the entry to repeat (Does not repeat, Daily, Weekly, Monthly, or Yearly).
Time Period: Specify the start time, end time, and duration of the task. You can specify only a start time, a start time and an end time, a start time and a duration, or only a duration. For more information, see “Creating Linked Tasks” on page 112.
Priority: Specify the priority of the entry.
Attendee: Specify individual attendees whom you want to invite to the calendar event.
Clipboard User Names: Use names that are on your clipboard to invite users to the event. For more information about the Vibe clipboard, see “Using the Vibe Clipboard” on page 168.
128 Working with Folder Entries

Groups: Specify groups that you want to be associated with the entry. When you specify a group, each member of the group is associated with the entry. For example, if you are scheduling a meeting and you specify a group to attend the meeting, each member of the group is considered to be an attendee.
Teams: Specify teams that you want to be associated with the entry. When you specify a team, each member of the team is associated with the entry. For example, if you are assigning a task to a team, each member of the team is responsible for completing the task.
Send an E-Mail Notification to Assignees/Attendees: Select this option if you want Vibe to send an email notification and iCal task/appointment to all of the users, groups, or teams that you associated with the entry.
For more information on iCal functionality in Vibe, see “Synchronizing Tasks and Calendars to a Desktop Application” on page 55.
Status: Select the current state for the task, such as In Process, Completed, and so forth.
Completed: Select the percentage of the task that is complete.
Attachments: allows you to browse your file system and attach a file to the entry. Click Add more files to add additional attachments.
Photo: allows you to browse to and upload a photo.
Due Date: The last day the entry is active.
Survey: allows you to set parameters for your survey, such as whether to allow multiple answers, single answers, or written replies, who can see the vote results before the survey is due, who can see vote results after the survey is due, and who can see participant names. It also provides an option to allow voters to change or remove their votes.
For more detailed instructions on creating a survey, see “Creating a Survey” on page 108.
Subscribe to This Entry: You can configure Vibe to send you notifications when activity takes place in this entry. For more information, see “Subscribing to a Folder or Entry” on page 51.
Send E-Mail When Entry is Submitted: To ensure that certain co-workers are aware of your entry, you can send them an email directly from Vibe, notifying them that an entry has been created. For more information, see “Filling Out the Send E-Mail Page” on page 167.
Composing an Entry DescriptionYou can add section headings and other types of elements that provide enhanced functionality to the description section of entries. (For information on creating an entry, see “Creating a Folder Entry” on page 128.)
“Creating Sections and Subsections in Entries” on page 129 “Adding Various Elements to Your Entry Description” on page 130
Creating Sections and Subsections in EntriesYou can create section and subsection headings in an entry description by enclosing text in the equals sign.
Working with Folder Entries 129

Sections and subsections are displayed as bold and are more prominent than regular text. Also, a table of contents with links to each section is displayed above the first section heading in the entry description.
Adding Various Elements to Your Entry DescriptionYou create entry descriptions using the HTML editor included in Vibe. Descriptions can include simple text, or they can be more complex, with sections, tables, videos, and other standard HTML elements.
Linking to a Folder or Folder EntryMany locations in Vibe (such as when you create an entry or an advanced brand) allow you to include a link to another folder or entry in your Vibe site, or to anywhere else on the Internet.
“Linking to an Entry in the Current Folder” on page 130 “Linking to Another Folder or an Entry in Another Folder” on page 130 “Linking to an External Page on the Web” on page 131
Linking to an Entry in the Current Folder
1 In the Description section of the Entry form, click the drop-down arrow by the Link icon and select Vibe page. Vibe displays a window that allows you to specify the entry to which you want to link.
2 In the Entry title field, begin typing the title, then select it from the list that appears.3 Click OK.
Linking to Another Folder or an Entry in Another Folder
1 In the Description section of the Entry form, click the drop-down arrow by the Link icon and select Vibe page. Vibe displays a window that allows you to specify the entry to which you want to link.
2 Click the Change link.3 In the Workspace/Folder field, start typing the name of the folder that you want to link to, or
the name of the folder that contains the entry that you want to link to.4 When the desired folder appears in the drop-down list, click it.
Example Description
==Section name== Creates a section heading in the Wiki page.
===Subsection name=== Creates a subsection heading in the Wiki page.
130 Working with Folder Entries

5 (Optional) If you want to link to an entry, begin typing the Entry title then click the complete name of the entry that you want to link to.
6 When you have specified the target, click OK.The linked title of your chosen entry is inserted into the Description box.
Linking to an External Page on the Web1 In the Description section of the Add Entry form, select the text that you want to convert into a
link.
2 Click the Insert/edit link icon .Vibe displays a window that allows you to specify the entry to which you want to link.
3 Fill in the following fields:URL: Specify the URL of the page that you want to link to.Text to Display: The text you want displayed for the link.Title: Specify a title for the link.Target: Specify whether you want to open the link in the same window, or open the link in a new window.
4 Click OK.
Commenting on a Folder EntryPeople often post a folder entry to generate ideas and obtain feedback. Micro Focus Vibe allows you to comment on any type of entry, so you can share your ideas and provide input.
1 Navigate to and open the entry that you want to comment on.2 Click Comment in the Entry toolbar.
For entries in Discussion folders, click Reply.3 In the Description field, specify your comment.4 (Optional) Click Browse to attach a file to your comment.5 Click OK.
Your comment is displayed in the Comments tab as the last comment in the list of comments.
For Blog entries, you can use the Blog toolbar to make comments. For information on using the Blog toolbar, see “Using the Blog Toolbar” on page 99.
For information on how to comment on an entry from the What’s New page, see “Commenting on a New Entry” on page 33.
Sharing a Folder EntryFor information about sharing entries in Vibe, see Chapter 4, “Sharing Entries, Folders, and Workspaces,” on page 57.
Working with Folder Entries 131

Modifying a Folder EntryIf you have appropriate rights, Micro Focus Vibe allows you to modify a folder entry after it has been created. You can modify all sections of an entry, or the Description section only.
“Modifying All Sections of an Entry” on page 132 “Modifying the Description Section of an Entry” on page 132
Modifying All Sections of an Entry1 Navigate to and open the entry that you want to modify.2 Click Modify in the Entry toolbar.3 Modify the entry as necessary.
You can modify the title or description of the entry. You can also subscribe to the entry, or send an email when the entry is submitted.
4 When you have finished modifying the entry, click OK.
Modifying the Description Section of an Entry1 Navigate to and open the entry that you want to modify.2 In the lower right corner of the Description section, click Edit.3 Use the provided HTML editor to modify the Description section.4 Click OK.
Reserving a Folder EntryWhen you reserve a folder entry in Micro Focus Vibe, other users who might want to modify, move, copy, or delete the entry are unable to do so for as long as you have the entry reserved.
This does not apply to users accessing the entry through WebDAV.
1 Navigate to and open the entry that you want to lock.2 Click Actions > Reserve Entry in the Entry toolbar.
The entry is now reserved for your use. Nobody else can modify, move, copy, or delete the entry.When you finish modifying the entry, click Actions > Unreserve Entry in the Entry toolbar to make it available to be modified by other users.
132 Working with Folder Entries

Moving a Folder EntryMicro Focus Vibe allows you to move a folder entry into any folder where you have appropriate rights. If you do not have sufficient rights, this option is not available to you.
You can move a single entry, or move multiple entries at the same time.
“Moving a Single Entry” on page 133 “Moving Multiple Entries” on page 133
Moving a Single Entry1 Navigate to and open the entry that you want to move.2 Click Actions > Move in the Entry toolbar.3 In the Find the Destination Folder field, begin typing the name of the folder where you want to
move the entry, then click the folder name when it appears.orIn the Select the Destination Folder or Workspace section, use the Workspace tree to navigate to and select the folder where you want to move the entry.The Current Save Location section shows you the path where the entry is currently located.
4 To move the entry to the location specified, click OK.
Moving Multiple EntriesYou can move multiple entries simultaneously only from Files folders, Discussion folders, and Tasks folders.
1 Navigate to the Files, Discussion, or Tasks folder that contains the entries that you want to move.
2 Select the entries that you want to move.3 Click More > Move.4 In the Destination Folder section, use the Workspace tree to navigate to and select the folder
where you want to move the entries.orIn the Destination Folder field, begin typing the name of the folder where you want to move the entries, then click the folder name when it appears.
5 Click OK.
Working with Folder Entries 133

Copying a Folder EntryMicro Focus Vibe allows you to copy a folder entry from one folder and paste it into any folder where you have appropriate rights. If you do not have sufficient rights, this option is not available to you.
You can copy a single entry, or copy multiple entries simultaneously.
“Copying a Single Entry” on page 134 “Copying Multiple Entries” on page 134
Copying a Single Entry1 Navigate to and open the entry that you want to copy.2 Click Actions > Copy in the Entry toolbar.3 In the Find the Destination Folder field, begin typing the name of the folder where you want to
copy the entry, then click the folder name when it appears.orIn the Select the Destination Folder or Workspace section, use the Workspace tree to navigate to and select the folder where you want to copy the entry.The Current Save Location section shows you the path where the entry is currently located.
4 To copy the entry into the location specified, click OK.
Copying Multiple EntriesYou can copy multiple entries simultaneously only from Files folders, Discussion folders, and Tasks folders.
1 Navigate to the Files, Discussion, or Tasks folder that contains the entries that you want to copy.2 Select the entries that you want to copy.3 Click More > Move.4 In the Destination Folder section, use the Workspace tree to navigate to and select the folder
where you want to copy the entries.orIn the Destination Folder field, begin typing the name of the folder where you want to copy the entries, then click the folder name when it appears.
5 Click OK.
Deleting a Folder Entry “Deleting a Single Entry” on page 135 “Deleting Multiple Entries” on page 135
134 Working with Folder Entries

Deleting a Single EntryYou can delete a folder entry if you have appropriate rights to do so. If you do not have sufficient rights, this option is not available to you.
1 Navigate to and open the entry that you want to delete.2 Click Delete in the Entry toolbar.3 (Conditional) To move the entry to the trash, select Move to trash, then click OK.
Selecting this option removes the entry from its current location without permanently deleting it from the Vibe system. You can undelete the entry as described in “Recovering a Folder Entry from the Trash” on page 136.
4 (Conditional) To permanently delete the entry, select Delete.
IMPORTANT: Deleted items cannot be recovered.
5 Click OK.
Deleting Multiple EntriesYou can delete multiple entries within a folder if you have appropriate rights to do so. If you do not have sufficient rights, this option is not available to you.
Deleting multiple entries is supported only in Discussion, Files, and Tasks folders.
TIP: If you want to delete multiple entries in a folder that does not support multiple deletion of entries (such as a Blog folder), you can view the folder as a Discussion, Files, or Tasks folder if the folder owner makes these views available. For information on how to change the view of a folder after the folder owner has made alternate views available, see “Changing the Folder View” on page 92.
1 Navigate to the Files folder that contains the entries that you want to delete.2 Select one or more entries that you want to delete.3 Click Delete.4 (Conditional) To move the entries to the trash, select Move to trash, then click OK.
Selecting this option removes the entries from their current location without permanently deleting them from the Vibe system. You can undelete the entry as described in “Recovering a Folder Entry from the Trash” on page 136.
5 (Conditional) To permanently delete the entries, select Delete.
IMPORTANT: Deleted items cannot be recovered.
6 Click OK.
Working with Folder Entries 135

Recovering a Folder Entry from the TrashMicro Focus Vibe allows you to retrieve an entry from the trash and restore it to its previous location..
1 Navigate to the folder where the deleted entry previously resided.For example, if you want to restore an entry that was in your Blog folder in your personal workspace, navigate to the Blog folder in your personal workspace.
TIP: If you want to see everything that has been deleted in the Vibe site, navigate to the highest level workspace. (By default this is the Home Workspace directory.)
2 Click the Trash icon in the Navigation panel. The Trash page displays all workspaces, folders, and entries that have been deleted in or below the current folder. Items that have been deleted are not displayed because they are unrecoverable.
3 Select the entry that you want to undelete.4 Click Restore.
The entry is restored to its previous location. If the folder or workspace containing this entry has also been deleted, it is restored when you restore the entry.
For more information about undeleting, see “Restoring Items from the Trash” in the Micro Focus Vibe 4.0.8 Advanced User Guide.
Marking a Folder Entry as Read “Marking an Individual Entry as Read” on page 136 “Marking All Entries in a Folder as Read” on page 136
Marking an Individual Entry as Read1 Navigate to the folder that contains the
entry that you want to mark as Read.2 Do one of the following:
Open the entry by clicking on the title. Click the drop-down arrow next to the entry that you want to mark as Read, then click
Mark as read. Click the blue circle to the left of the unread entry.
Marking All Entries in a Folder as Read1 Navigate to the folder that contains the entries that you want to mark as Read.
2 Click the Configure icon next to the folder name, then click Mark Folder Contents as Read.
136 Working with Folder Entries

Marking a Folder Entry as Unread “Marking an Individual Entry as Unread” on page 137 “Marking All Entries in a Folder as Unread” on page 137
Marking an Individual Entry as Unread1 Navigate to the location of the entries that you want to mark as Unread.2 Select one or more entries, then click More > Mark as Unread.
Marking All Entries in a Folder as Unread1 Navigate to the folder that contains the entries that you want to mark as Unread.
2 Click the Configure icon next to the folder name, then click Mark Folder Contents as Unread.
Notifying Others about a Folder EntryWhen viewing a folder entry, you might think of a co-worker who also needs the information. Micro Focus Vibe provides various ways to inform your friends and co-workers about entries that you think they might be interested in.
These options are functional only if you have an email account assigned to you in Vibe. To assign an email account to your Vibe profile, see “Adding and Modifying Delivery Destinations” on page 53.
“Sharing an Entry” on page 137 “Sending an Email about an Entry” on page 137
NOTE: Notifying another Vibe user about an entry does not automatically grant the user access rights to view the entry. If the user does not already have access rights to view the entry, you can modify the access control settings of the entry, as described in “Controlling Access to Entries” in the Micro Focus Vibe 4.0.8 Advanced User Guide.
Sharing an EntryFor information about sharing an entry, see Chapter 4, “Sharing Entries, Folders, and Workspaces,” on page 57.
Sending an Email about an EntryYou can send a notification email about a folder entry when you create the entry, or after the entry has already been created.
“Sending an Email When You Create the Entry” on page 138 “Sending an Email After the Entry Is Created” on page 138
Working with Folder Entries 137

Sending an Email When You Create the Entry1 In the entry creation form when you are creating an entry, click Send E-Mail When Entry is
Submitted.2 Fill in the appropriate fields.
For information on filling in the rest of the Send E-Mail form, see “Filling Out the Send E-Mail Page” on page 167.
3 Click OK to create the entry and send the email.
Sending an Email After the Entry Is CreatedYou do not need to be the author of the entry to send this type of email.
1 Navigate to and open the entry that you want to inform others about via email.2 Click Send e-mail to contributors in the entry’s Footer toolbar.
The Send E-Mail page is displayed.A link to this entry is automatically created and is visible in the body of the received message.
3 Fill in the appropriate fields.For information on filling in the rest of the Send E-Mail form, see “Filling Out the Send E-Mail Page” on page 167.
4 Click OK to send the notification.
For Blog entries, you can use the Blog toolbar to send an email about the entry. For information on using the Blog toolbar, see “Using the Blog Toolbar” on page 99.
Subscribing to a Folder EntryIf you are particularly interested in a specific folder entry, you can subscribe to that entry. When you subscribe to an entry, Micro Focus Vibe notifies you of any activity that takes place in the entry.
1 Click the drop-down arrow next to the entry that you want to subscribe to, then click Subscribe.orNavigate to and open the entry that you want to subscribe to, then in the Footer toolbar of the entry, click Subscribe to This Entry.The Subscribe dialog box is displayed.
2 Continue with “Selecting Notification Types and Delivery Destinations” on page 52.3 Select the type of email notification that you want to receive, then click OK.
For more information on subscribing to entries, see “Subscribing to a Folder or Entry” on page 51.
For Blog entries, you can use the Blog toolbar to subscribe to the entry. For information on using the Blog toolbar, see “Using the Blog Toolbar” on page 99.
138 Working with Folder Entries

Tagging a Folder EntryTags are keywords that categorize a workspace, folder, or folder entry. The tagging functionality in Micro Focus Vibe allows you to create virtual containers for places and entries. Like folders in your email, you can categorize information, and then come back to it at a later time.
1 In the entry that you want to tag, click the Tags tab.2 Click Add Tags.3 Select either Personal Tag or Global Tag, depending on whether you want this tag to be visible to
only yourself or to the entire community.For more information about the difference between personal and community tags, see “Choosing Between Personal Tags and Global Tags” on page 30.
4 Begin typing the name of the tag that you want to apply to the workspace or folder.This field uses type-to-find functionality, so if a tag already exists with the desired name, it appears in the drop-down list. If the name does not appear in the drop-down list, you are creating a new tag.
TIP: To see a list of existing tags, click inside the provided field, then press the Spacebar.
5 (Conditional) To apply an existing tag, select the tag when it appears in the drop-down list.
6 (Conditional) To create a new tag, specify the name of the tag, then click the Add icon . The entry is now marked with the tag that you specified, and the tag is displayed in the Tag this Entry dialog box.
7 Click OK.
For more information on tagging, see “Using Tags” on page 29.
Working with Files in a Folder EntryIn addition to working with files within Vibe as described in the following sections, you can also use the Micro Focus Vibe Add-in and Micro Focus Vibe Desktop to work with Vibe files directly from Microsoft Office or to synchronize Vibe files with your desktop. You can create files, edit files, and much more. For more information, see the Micro Focus Vibe Add-In Quick Start (http://www.novell.com/documentation/vibe34/vibe34_qs_office/data/vibe34_qs_office.html) and the Micro Focus Vibe Desktop Quick Start (http://www.novell.com/documentation/vibe33/vibe33_qs_desktop/data/vibe33_qs_desktop.html).
“Creating a File Entry” on page 140 “Attaching Files to a Folder Entry” on page 140 “Viewing Files in Read-Only Mode” on page 141 “Editing Files Accessed through a Web Browser” on page 142 “Editing Vibe Files Directly in Microsoft Office” on page 142 “Editing Files Synchronized on Your Desktop” on page 142 “Downloading Files” on page 142 “Obtaining the WebDAV URL for a File” on page 143
Working with Folder Entries 139

“Adding a Note about a File or File Version” on page 144 “Setting the File Status” on page 144 “Using Version Control with Files” on page 144
Creating a File EntryMicro Focus Vibe allows you to create file entries in designated Files folders. Creating a file entry is different from attaching a file to another type of folder entry. File entries in Vibe Files folders contain a primary file. Other files can be associated to the file entry as attachments, but there is only one primary file.
You can create file entries in multiple ways:
In the same way that you create any other type of folder entry in Vibe, as described in “Creating a Folder Entry” on page 128.
By importing files into the folder, as described in “Importing Files into a Folder” on page 86. By creating the file on your workstation and synchronizing the file through Vibe Desktop, as
described in the Micro Focus Vibe Desktop Quick Start (http://www.novell.com/documentation/vibe4/vibe4_qs_desktop/data/vibe4_qs_desktop.html).
By creating the file in Microsoft Office and saving the file to Vibe directly from Microsoft Office, as described in the Micro Focus Vibe Add-In Quick Start (http://www.novell.com/documentation/vibe4/vibe4_qs_office/data/vibe4_qs_office.html).
For more information about the difference between Files folders and other types of Vibe folders when you add files, see “Adding Files to a Files Folder and Other WebDAV-Enabled Folders” on page 104.
Attaching Files to a Folder EntryVibe provides various alternatives to add attachments to an entry.
“Dragging and Dropping Files” on page 140 “Uploading a Single File” on page 141
Dragging and Dropping FilesYou can attach a file to an entry by dragging it from another location and dropping it into the entry.
1 Navigate to and open the entry where you want to attach the file.2 Click the Attachments tab.3 Click Drag and Drop Files.
The Drag and Drop Files dialog box is displayed.4 Drag the file that you want to upload and drop it onto the folder icon in the Drag and Drop Files
dialog box.Vibe displays an opening and closing folder to signify that your dropped files are being uploaded as attachments.
You can also copy and paste files into the folder icon.
140 Working with Folder Entries
Uploading a Single File1 Navigate to and open the entry where you want to attach the file.2 Click the Attachments tab.3 Click Upload a Single File.
The Upload a Single File dialog box is displayed.4 Click Choose File, then browse to and select the file that you want to attach.5 Click OK.
Viewing Files in Read-Only ModeVibe allows you to easily view files that are associated with entries. Files can be associated with entries in one of two ways:
Files can be attached to an entry. Files can be a primary file for the entry.
Primary files can exist only in entries in Files folders.
The following sections describe how to view files in a text editor or in HTML format:
“Viewing a File in a Text Editor” on page 141 “Viewing the File in HTML Format” on page 141
Viewing a File in a Text EditorWhen you view a file in a text editor, the file is opened in Read-Only mode.
1 Navigate to and open the entry that contains the file that you want to view.2 (Conditional) If the file that you want to view is an attachment, click the Attachments tab.
Only Files folders can contain files that are not attachments.3 Next to the file that you want to view, click File Actions > View This File.
orClick the name of the file.
Viewing the File in HTML FormatIf you want to quickly view a file, you can view it in HTML format.
Some file types cannot be viewed in HTML format, such as PNG, JPG, GIF, and PDF.
1 Navigate to and open the entry that contains the file that you want to view.2 (Conditional) If the file that you want to view is an attachment, click the Attachments tab.
Only Files folders can contain files that are not attachments.3 Next to the file that you want to view, click File Actions > View This File as HTML.
Working with Folder Entries 141

Editing Files Accessed through a Web BrowserIf you access Vibe through a Web Browser and you have LibreOffice or Microsoft Office installed, you can edit files by clicking File Actions > Edit This File.
The following requirements apply:
You must have the latest version of LibreOffice or Microsoft Office 2013 or later installed on your workstation.
If you have Microsoft Office installed, you can open the file using functionality called “MS URI.” This works on both Mac and Windows workstations but only with Microsoft Office.
If you have LibreOffice installed, and if your administrator has enabled support for an alternate functionality called “Vibe URI,” you can download and install a workstation-specific application, from your Vibe server’s Applications Downloads page, that will let you open, edit, and save files in Vibe.Availability and specific functionality of Vibe edit-in-place is controlled by your Vibe administrators, so contact them if you have further questions.
Editing Vibe Files Directly in Microsoft OfficeIf you use Microsoft Office on Windows, consider downloading and installing the Vibe Add-in for MS Office for a better editing experience than accessing files through a web browser.
The Vibe Add-in for MS Office allows you to open and edit files directly in your MS Office applications.
For more information about editing files when the Vibe Add-in is installed, see the Micro Focus Vibe Add-In Quick Start (http://www.novell.com/documentation/vibe4/vibe4_qs_office/data/vibe4_qs_office.html).
Editing Files Synchronized on Your DesktopIf you download and install the Vibe Desktop and if your Vibe administrator allows the functionality, you can synchronize files to your desktop and edit and view them as you do other local files. Changes that you make are synchronized with your Vibe server.
For more information, see the Micro Focus Vibe Desktop for Windows Quick Start and the Micro Focus Vibe Desktop for Mac Quick Start.
Downloading FilesYou can download files that are associated with an entry. You can download a single file, or all files that are associated with the entry. Files are downloaded in a .zip file.
“Downloading Single Files” on page 143 “Downloading All Files” on page 143 “Downloading Files from a File Folder” on page 143
142 Working with Folder Entries

Downloading Single Files1 Navigate to and open the entry that contains the file that you want to download.2 Next to the file, click File Actions > Download This File in a Zip File.
Downloading All Files1 Navigate to and open the entry that contains the files that you want to download.2 Next to any file within the entry, click File Actions > Download All Files.
orClick the Attachments tab, then click Download All Files.
Downloading Files from a File Folder1 Navigate to the File folder where you want to download the files.2 Select the files that you want to download, then click More > Download as Zip.
or
Click the Configure icon next to the folder title, then click Download All Files as Zip.
Obtaining the WebDAV URL for a FileWhen you know a file’s WebDAV URL, you can open the file directly from an editing application such as Microsoft Office, or directly from the command line.
To obtain the WebDAV URL for a file:
1 Navigate to and open the entry that contains the file for which you want to obtain the WebDAV URL.
2 (Conditional) If the file for which you want to obtain the WebDAV URL is an attachment, click the Attachments tab.Only Files folders can contain files that are not attachments.
3 Next to the file, click File Actions > WebDAV URL.The WebDAV URL is displayed for you to copy.
After you have obtained the WebDAV URL for the file, you can specify the URL in a document editor such as Microsoft Office to open the file. Refer to the documentation for your specific document editor for instructions on how to accomplish this.
Working with Folder Entries 143
Adding a Note about a File or File VersionYou might want to add a note about a particular file or version of a file. File notes are displayed directly below the file name in the Attachments and File Versions tabs. File notes can make it easier for users to know exactly what the file contains without opening it. They can also be an easy way to differentiate one version of a file from another.
1 Navigate to and open the entry that contains the attached file or file version for which you want to add a note.
2 (Conditional) If the file for which you want to add a note is an attachment, click the Attachments tab.Only Files folders can contain files that are not attachments.
3 Next to the file for which you want to add a note, click File Actions > Edit File Note.The Add a File Note page is displayed.
4 Specify the note that you want to add, then click OK.
Setting the File StatusIf you have multiple versions of a file, you might want to set a status for each version to help keep track of which is the official version, which versions are just drafts, and so forth. Files can have the status of Official, Draft, or Obsolete.
1 Navigate to and open the entry that contains the attached file or file version for which you want to set the file status.
2 Click the File Versions tab.3 In the Status column next to the file for which you want to set the status, click the current
status, then click the status that you want to set for the file.
Using Version Control with FilesWhen you modify a file in Vibe, Vibe saves the previous version of the file, and makes it available for easy reference. This includes files that are stored in Vibe Files folders, or any files that are saved as attachments to a folder entry.
“Creating a New Version of a File” on page 145 “Incrementing the Major Version Number of a File” on page 146 “Accessing a Previously Saved Version of a File” on page 146 “Promoting a Previous File Version to Be the Current Version” on page 146 “Deleting Existing Versions of a File” on page 147 “Setting a Maximum Number of Allowed Versions” on page 147
144 Working with Folder Entries

Creating a New Version of a FileWhen you edit and save a file, Vibe creates a new version of the file and saves the old version. For information about how to edit a file, see “Editing Files Accessed through a Web Browser” on page 142.
You can also use the drag-and-drop functionality to create a new version of an attached file or a new version of a file entry in a Files folder, as described in the following sections:
“Dragging and Dropping a File to Update a File Entry Attachment” on page 145 “Dragging and Dropping a File to Update the Primary File of a File Entry” on page 145
Dragging and Dropping a File to Update a File Entry AttachmentIn order to create a new version of an existing entry attachment, the file that you drag and drop must have the same name as the existing entry attachment for which you want to create a new version.
1 Navigate to and open the entry that contains the file attachment for which you want to create a new version.
2 Click the Attachments tab, then click Drag and Drop Files.3 Drag a file from one location, such as your desktop, and drop it onto the folder icon in the drag-
and-drop window.The document is added as a new version of the existing entry attachment. Older versions are displayed in the File Versions tab in the entry.
Dragging and Dropping a File to Update the Primary File of a File EntryOnly Files folders allow you to create updated versions of folder entries as described in this section. For more information about the difference between Files folders and other types of Vibe folders in regards to adding files, see “Adding Files to a Files Folder and Other WebDAV-Enabled Folders” on page 104.
In order to create a new version of an existing file in the Files folder, the file that you drag and drop must have the same name as the existing file for which you want to create a new version.
1 Navigate to the folder where you want to import the new version of the file.A file with the same name must already exist in the folder as a file entry.
2 Drag a file from one location, such as your desktop, and drop it into the folder area.3 When the File Conflicts dialog box appears, click Version Files.
The document is added as a new version of the existing file entry. Older versions are displayed in the File Versions tab in the entry.
Working with Folder Entries 145

Incrementing the Major Version Number of a FileBy default, when you create new versions of a file, Vibe tracks the versions with minor version numbers. For example, 1.0, 1.1, 1.2, and so forth. You can increment the major version number of the most recent version of a file. For example, version 1.2 becomes version 2.0.
If the folder has been configured to automatically delete old file versions, as described in “Automatically Deleting Minor File Versions That Exceed the Allowed Maximum” in “Managing Folders” in the Micro Focus Vibe 4.0.8 Advanced User Guide, incrementing a minor version of a file to be a major version preserves the version from being deleted.
To increment the major version number of a file:
1 Navigate to and open the entry that contains the file for which you want to increment the major version number.
2 (Conditional) If the file for which you want to increment the major version number is an attachment, click the Attachments tab.Only Files folders can contain files that are not attachments.
3 Next to the file for which you want to increment the major version, click File Actions > Increment Major Version Number.The Increment Major Version Number page is displayed.
4 Click OK.
Accessing a Previously Saved Version of a File1 Navigate to and open the entry that contains the file for which you want to access a previous
version.2 Click the File Versions tab.
All of the previously saved versions of each file that are associated with the entry are listed in reverse chronological order. Vibe displays information such as the date, file size, and the person who modified the file.
Promoting a Previous File Version to Be the Current VersionYou can promote a previous version of a file to be the current version. The current version is the main file in the file entry. Additional versions are located below the main version in the File Versions tab.
1 Navigate to and open the entry where the file version resides that you want to promote to be the current version.
2 Click the Entry History tab.3 Next to the file version that you want to promote to be the current version, click Promote To
Current, then click OK.
You can revert the entire entry to a previous version (such as the title and description of the entry), as described in “Reverting an Entry to a Previous Version” on page 148.
146 Working with Folder Entries

Deleting Existing Versions of a File
IMPORTANT: Files and file versions that are deleted from the Vibe site cannot be recovered.
1 Navigate to and open the entry that contains the file for which you want to access a previous version.
2 Click the File Versions tab.All of the previously saved versions of each file that are associated with the entry are listed in reverse chronological order. Vibe displays information such as the date, file size, and the person who modified the file.
3 To delete multiple versions simultaneously, select the file versions that you want to delete, then click Delete Selected Versions.orTo delete a single version, click File Actions next to the version that you want to delete, then click Delete This Version.
4 Click OK to confirm the deletion.
Setting a Maximum Number of Allowed VersionsIf you are a folder or workspace owner, you can set a maximum number of versions that are allowed for each file. For more information, see “Limiting File Versions for Folders and Workspaces by Configuring Automatic Deletion” in the Micro Focus Vibe 4.0.8 Advanced User Guide.
Viewing the History of an EntryMicro Focus Vibe allows you to view the history of an entry. You can view the various versions of an entry, compare two versions to see what changes were made, and revert the entry to a previous version.
“Viewing Previous Versions of an Entry” on page 147 “Comparing Versions of an Entry” on page 148 “Reverting an Entry to a Previous Version” on page 148
Viewing Previous Versions of an EntryYou can view version information about the entry, such as when it was created, when it was edited, and who edited it.
1 Navigate to and open the entry where you want to view the previous versions.2 Click the Entry History tab.
For each version of the entry, you see the version number, the date the entry was modified, the user who modified the entry, and the way in which the entry changed.You can click the date of the entry to view what the entry looked like on that date.
Working with Folder Entries 147

Comparing Versions of an EntryWhen you compare two versions of an entry you see additions and deletions that have been made to the Title and Description sections of an entry. You cannot compare the contents of files that are attached to the entry.
1 Navigate to and open the entry where you want to compare two versions.2 Click the Entry History tab.3 Select the two versions that you want to compare, then click Compare.
Vibe displays the additions highlighted in green, and the deletions marked with strikeout.
Reverting an Entry to a Previous VersionWhen you or another user modifies an entry, as described in “Modifying a Folder Entry” on page 132, the latest version of the entry is displayed in Vibe.
If you are no longer satisfied with the latest version of an entry, you can revert to a previous version.
1 Navigate to and open the entry that you want to revert to a previous version.2 Click the Entry History tab.3 Locate the version that you want to revert to, then click Promote To Current.
The Promote To Current page is displayed. You can view how the entry looks in this version.4 Click OK to make this version of the entry the current version.
To keep an accurate history, the version that you revert to also retains its position in the Entry History list.
Generating Reports about a Folder EntryMicro Focus Vibe allows you to generate reports about a folder entry. If you do not have sufficient rights, the option is not available to you.
“Generating Activity Reports” on page 148 “Generating Workflow History Reports” on page 149
Generating Activity Reports1 Navigate to and open the entry that you want to generate an activity report about.2 Click Reports > Activity Report in the Entry toolbar.
Vibe launches a spreadsheet that displays the entry activity.
Activity reports contain the following kinds of information:
User: Shows the users who have had some kind of activity in the entry. Views: Displays how many times the user has viewed the entry. Adds: Displays who created the entry. Edits: Displays who has edited the entry.
148 Working with Folder Entries

Deletes: Displays who deleted the entry. This column lists only entries that have been both deleted and purged.To acquire this information, you must run the report at the folder level, as described in “Generating an Activity Report on a Folder” on page 87.
Pre-deletes: Displays who deleted the entry. This column lists entries that have been deleted but not yet purged.To acquire this information, you must either run the report at the folder level, as described in “Generating an Activity Report on a Folder” on page 87, or navigate to the Trash folder to view the entry, as described in “Recovering a Folder Entry from the Trash” on page 136.
Restores: Displays who restored the entry.
Generating Workflow History Reports1 Navigate to and open the entry that you want to generate a report about.2 Click Reports > Workflow History in the Entry toolbar.
Vibe opens a new page that displays the workflow history of the entry.
Workflow history reports contain the following kinds of information:
Event: Displays the order of the actions that have been performed concerning the workflow. Date: Displays the date the entry was modified for the workflow. Modified by: Displays the user who modified the entry for the workflow. Operation: Displays the operation that was performed. Process: Name of the original workflow. Parallel Workflow Thread: Name of the workflow thread that is parallel to this workflow. State: State of the workflow process.
Displaying YouTube Videos in a Folder EntryMicro Focus Vibe allows you to post YouTube videos in a folder entry, as well as in the following locations throughout the Vibe site:
In a workspace or folder brand, as described in “Branding a Folder or Workspace” in the Micro Focus Vibe 4.0.8 Advanced User Guide.
In a workspace description, as described in “Displaying YouTube Videos in a Workspace” on page 76.
In a folder description, as described in “Displaying YouTube Videos in a Folder” on page 93. On a landing page, as described in “Displaying YouTube Videos on a Landing Page” in the Micro
Focus Vibe 4.0.8 Advanced User Guide.
To display a YouTube video in folder entry:
1 Navigate to the folder where you want to display the YouTube video.
2 Click the Configure icon next to the folder title, then click Edit Folder. 3 Click in the Description section, then click Insert > Media.
Working with Folder Entries 149

4 In the General tab, paste the URL of the YouTube video that you want to post.5 In the Dimensions fields, do not make any changes if you want to keep the default YouTube
dimensions.6 Click OK to display the video in the folder.
Displaying Images in a Folder EntryThis section describes how to add images to the Description section of an entry. For information on how to attach images to an entry, see “Attaching Files to a Folder Entry” on page 140.
1 Navigate to the folder where you want to post the image.2 Create a new folder entry by clicking the appropriate item in the Folder Entry toolbar. For
example, to add a blog entry in the Blog folder, click New Blog Entry.orOpen an existing folder entry that you want to modify, then click Modify in the Entry toolbar.The Entry page is launched.
3 From within the Description section, click Insert > Image. 4 Using the dialog box that appears, you can browse to or drag-and-drop an image file, select an
image that is already added to the entry as an attachment, and control other display properties, such as the image border.
5 When you have finished specifying the image properties, click OK.
Rating a Folder EntryMicro Focus Vibe allows you to rate folder entries by using a five-star rating system (one star indicating the least impressive, and five stars the most impressive), which gives you an additional tool for determining the quality of information.
1 Navigate to and open the entry that you want to rate.2 Click the star that represents your evaluation.
For example, to give an entry a rating of three stars, click the third star from the left.
To the right of the stars, Vibe displays the average rating for the entry, and how many users have rated the entry.
You can rate an entry as many times as you want, but Vibe records only your most recent rating.
Configuring the Display Style of EntriesYou can select how you want your Micro Focus Vibe entries to be displayed.
1 Click your linked name in the upper right corner of the Vibe interface, then click the Personal Preferences icon . The Personal Preferences dialog box is displayed.
150 Working with Folder Entries

2 In the Entry Display drop-down list, select one of the following options: Display Entries in Content Area: (Default) When you click an entry, Vibe displays the entry
in the Content Area.This is the default style.
Display Entries in a Dialog: When you click an entry, the entry is displayed in a dialog box on the current Vibe page.
3 Click OK.
Printing a Folder EntryMicro Focus Vibe allows you to print the content of a folder entry.
1 Navigate to the entry that you want to print.
2 In the Entry toolbar, click the Print icon . 3 Configure your printer settings, then click Print.
Enabling Alternate Folder Entry TypesMicro Focus Vibe allows you to configure a folder to allow you to create folder entry types that you cannot create by default in a specific type of folder. For example, if you want your tasks to appear in your Calendar folder, you can configure your Calendar folder to allow you to create task entries.
For information about how to enable alternate folder entry types, see “Enabling Alternate Folder Entry Types” in the Micro Focus Vibe 4.0.8 Advanced User Guide.
Creating Custom Folder Entry FormsMicro Focus Vibe allows you to create custom folder entry forms, so you can display fields that are specific to your organization and business requirements.
For instructions on how to create custom entry forms, see “Designing Custom Folder Entry Forms” in the Micro Focus Vibe 4.0.8 Advanced User Guide.
Displaying Folder Entries on a Landing PageWhen you configure a workspace to have a landing page, you populate that landing page with entries that exist within that workspace.
For information on how to display entries on a landing page, see “Adding Content to Your Landing Page” in the Micro Focus Vibe 4.0.8 Advanced User Guide.
Working with Folder Entries 151

152 Working with Folder Entries

9 9Managing Accessories
Accessories are subsections of a workspace or folder page in Micro Focus Vibe that enhance the use of pages in various ways. Accessories do not contain new information; instead, they point to existing information, organizing and presenting it in a summarized way that makes your work easier by making the most useful information more accessible and easy to consume.
For a list of different accessories that you can create, see Step 6 in “Adding the Accessory” on page 154.
“Creating an Accessory” on page 153 “Modifying an Accessory” on page 160 “Deleting an Accessory” on page 161 “Minimizing an Accessory” on page 161 “Minimizing the Accessory Panel” on page 162 “Hiding or Displaying the Accessory Panel in a Folder” on page 162 “Repositioning Accessories” on page 162 “Establishing a Default Layout” on page 162 “Providing a Title for the Accessory Panel” on page 163
Creating an AccessoryTo create an accessory, you locate the panel where you want it to display, add the accessory, and then set it up.
“Locating the Accessory Panel” on page 153 “Adding the Accessory” on page 154 “Setting Up the Accessory” on page 156
Locating the Accessory PanelAccessories display in an area called the Accessory Panel, which is located in different sections of the page, depending on whether you are in a workspace or a folder.
“Locating the Accessory Panel in Workspaces” on page 153 “Locating the Accessory Panel in Folders” on page 154
Locating the Accessory Panel in WorkspacesThe location of the Accessory Panel differs, depending on the type of workspace that you are viewing.
Project Management Workspace: Upper right corner of the workspace.
Managing Accessories 153

Personal Workspace: In the Accessories tab, in the upper right corner of the page.
Team Workspace: Upper right corner of the workspace.
Discussions Workspace: Upper right corner of the workspace.
Basic Workspace: Upper right corner of the workspace.
Landing Page: By default, the Accessory Panel is not displayed on a landing page.
You can add an Accessory Panel element to any location in your landing page by modifying the default landing page view (if you are the Vibe administrator or if you have administrative rights), or by creating a new landing page view. For more information on how to add an Accessory Panel to a landing page, see “Adding Accessories to Your Landing Page” in the Micro Focus Vibe 4.0.8 Advanced User Guide.
Locating the Accessory Panel in FoldersFor folders, the Accessory Panel is located in the upper right corner of the folder page, above the content of the folder. If the Accessory Panel is not visible, you need to unhide it as described in “Hiding or Displaying the Accessory Panel in a Folder” on page 162.
By default, the accessory panel is not displayed in folders when no accessories exist. To display the
Accessory Panel, click the Configure icon next to the Filter List, then click Show Accessories.
You can create a custom folder view on your folder that contains an accessory panel, as described in “Creating Custom Folder Views” in the Micro Focus Vibe 4.0.8 Advanced User Guide.
Adding the Accessory1 Navigate to the workspace or folder where you want to add the accessory.
2 (Conditional) If the accessory panel is not displayed in a folder, click the Configure icon next to the Filter List, then click Show Accessories.
3 Click the Accessory Panel drop-down list.If you are unable to find the Accessory Panel, see “Locating the Accessory Panel” on page 153.If you currently have no accessories, only the Add an Accessory item appears in the list.
4 Click Add an Accessory.5 In the Accessory Scope section, select where you want the accessory to be displayed.
Personal Accessory for This Page Only: This accessory appears only to you and only on the currently displayed workspace or folder page.Personal Accessory for all Workspaces and Folders: This accessory appears only to you, but it appears on all workspace and folder pages that you view.Community Accessory for This Page: This accessory appears only on this page, and it appears to everyone who views the current page. Only workspace and folder owners are allowed to establish community accessories.
6 In the Accessory Type section, select the type of accessory that you want to display.
154 Managing Accessories

Accessory Name Description Setup Information
Search Results enables you to configure a search, and then apply that search to any Micro Focus Vibe page that you desire, across the entire site or only on the page where the accessory is displayed.
See “Search Results” on page 157.
Workspace Tree enables you to display a customized Workspace tree. Unlike the main Workspace tree, you can configure the Workspace Tree accessory to start on any workspace that you desire.
See “Workspace Tree” on page 157.
Formatted Text (HTML Editor)
enables you to use the HTML editor to compose a message and display it in the Accessory Panel.
See “Formatted Text (HTML Editor)” on page 157.
Embedded Web Page (iframe)
enables you to display any web page as an accessory in a workspace or folder. For example, if a team you are working on often refers to a specific website, you could create an Embedded Web Page accessory in the team workspace, so team members don’t need to navigate separately to the website.
See “Embedded Web Page (iframe)” on page 157.
Buddy List enables you to specify certain Vibe users with whom you communicate often, so you can quickly contact them by using their Presence icon, or access their workspaces by clicking a linked name.
See “Buddy List” on page 158.
Team Members enables you to display all members of the team in the folder or workspace where you currently are.
See “Team Members” on page 158.
Photo Gallery enables you to display photos from any Photo Album that you desire.
See “Photo Gallery” on page 158.
Blog Summary enables you to synchronize the Vibe Blog folders of your choice, and display them in a single, summarized Blog folder in the Accessory Panel.
See “Blog Summary” on page 158.
Guestbook enables you to use the Accessory Panel to display the contents of a Guestbook folder. Unlike other accessories, such as the Calendar Summary and Task Summary, you can display the contents of only one Guestbook folder in each Guestbook accessory.
See “Guestbook” on page 159.
Task Summary enables you to synchronize the Vibe Tasks folders of your choice, and display them in a single, summarized task list in the Accessory Panel. This eliminates the need to check multiple Tasks folders. You can display tasks that are assigned to specific users, groups, or teams.
For more information, see “Synchronizing the Vibe Tasks Folders of Your Choice” on page 116 and “Viewing All Tasks That Are Assigned to a Specific Team, Group, or Individual User” on page 118.
See “Task Summary” on page 159.
Managing Accessories 155

7 Click OK.The Accessory Setup page is displayed.
8 To finish creating the accessory, continue with “Setting Up the Accessory” on page 156 for specific information on filling in the Accessory Setup page for each type of accessory.
Setting Up the AccessoryUse the steps in this section to set up an accessory after you have completed the steps in “Adding the Accessory” on page 154.
This section contains specific information on filling in the Accessory Setup page for each type of accessory.
“Search Results” on page 157 “Workspace Tree” on page 157 “Formatted Text (HTML Editor)” on page 157 “Embedded Web Page (iframe)” on page 157 “Buddy List” on page 158 “Team Members” on page 158 “Photo Gallery” on page 158 “Blog Summary” on page 158 “Guestbook” on page 159 “Task Summary” on page 159 “Wiki Home Page” on page 159
Wiki Home Page enables you to display the wiki home page of any Wiki folder (Wiki Topic) as an accessory.
For information on how to set a wiki home page for a Wiki Topic, see “Setting a Wiki Home Page” on page 123.
See “Wiki Home Page” on page 159.
Calendar Summary enables you to synchronize the Vibe calendars of your choice, and display them in a single, summarized calendar in the Accessory Panel. This eliminates the need to check multiple calendars.
For more information, see “Synchronizing Vibe Calendars of Your Choice” on page 101.
See “Calendar Summary” on page 160.
Remote Application enables you to add a remote application as an accessory, if the application has been enabled by your administrator.
For more information on remote applications, see “Using Remote Applications” on page 53.
See “Remote Application” on page 160.
Accessory Name Description Setup Information
156 Managing Accessories

“Calendar Summary” on page 160 “Remote Application” on page 160
Search Results1 In the Accessory Setup page, specify the following information:
Title: Specify a title for the Search Results accessory.Display Style: Specify whether you want a border around the accessory.Advanced Search: For information on all of the Advanced Search options, see “Using Advanced Search” on page 40.
2 Click Apply > Close.
Workspace Tree1 In the Accessory Setup page, specify the following information:
Title: Specify a title for the Workspace Tree accessory.Display Style: Specify whether you want a border around the accessory.Starting Point for the Tree: Select whether you want to start at the current workspace, or select a starting workspace in the workspace tree. If you want to select a starting workspace, select Select a Starting Workspace and then navigate to and select the workspace in the workspace tree.Expand the First Level of the Tree: Select Yes if you want the first level of the tree to always be expanded. Select No if you want to manually expand the tree.
2 Click Apply > Close.
Formatted Text (HTML Editor)1 In the Accessory Setup page, specify the following information:
Title: Specify a title for the Formatted Text (HTML Editor) accessory.Display Style: Specify whether you want a border around the accessory.Enter the HTML to be Shown: Create your HTML message in the HTML editor provided.This message is displayed in your Formatted Text accessory.
2 Click Apply > Close.
Embedded Web Page (iframe)1 In the Accessory Setup page, specify the following information:
Title: Specify a title for the Embedded Web Page (iframe) accessory.Display Style: Specify whether you want a border around the accessory.Iframe URL: Specify the URL of the web page that you want to display in this accessory.Iframe height in pixels: Specify the height for your embedded web page.
Managing Accessories 157
If you don’t specify anything in this field, Vibe uses the default height (about 200 pixels).2 Click Apply > Close.
Buddy List1 In the Accessory Setup page, specify the following information:
Title: Specify a title for the Buddy List accessory.Display Style: Specify whether you want a border around the accessory.Configure Buddy List: Specify the users, groups, and team members that you want to add to your buddy list.
2 Click Apply > Close.
Team Members1 In the Accessory Setup page, specify the following information:
Title: Specify a title for the Team Members accessory.Display Style: Specify whether you want a border around the accessory.Number of Results to be Shown: Specify the number of team members that you want to be shown at one time.
2 Click Apply > Close.
Photo Gallery1 In the Accessory Setup page, specify the following information:
Title: Specify a title for the Photo Gallery accessory.Display Style: Specify whether you want a border around the accessory.Number of Photos to be Shown: Specify the number of photos that you want to display at any one time in your photo gallery.Image Size: Select whether you want to display big images or small images.Select the Photo Album(s) to be Shown: Use the workspace tree to browse to and select the photo albums that you want to be displayed in the accessory.
2 Click Apply > Close.
Blog Summary1 In the Accessory Setup page, specify the following information:
Title: Specify a title for the Blog Summary accessory.Display Style: Specify whether you want a border around the accessory.Number of Results to be Shown: Specify the number of Blog results that you want to show in the Blog Summary.Number of Words of Summary to be Shown: Specify the number of words that you want to display for each Blog Summary.
158 Managing Accessories

Select the blog(s) to be shown: Use the Workspace tree to navigate to and select the Blog folders that you want to display in the Blog Summary.
2 Click Apply > Close.
Guestbook1 In the Accessory Setup page, specify the following information:
Title: Specify a title for the Guestbook accessory.Display Style: Specify whether you want a border around the accessory.Number of Results to be Shown: Specify the number of Guestbook results that you want to show in the Guestbook accessory.Number of Words of Summary to be Shown: Specify the number of words that you want to display for each Guestbook entry.Select the guestbook to be shown: Use the Workspace tree to navigate to and select the Guestbook folder that you want to display in the Guestbook accessory.
2 Click Apply > Close.
Task Summary1 In the Accessory Setup page, specify the following information:
Title: Specify a title for the Task Summary accessory.Display Style: Specify whether you want a border around the accessory.Number of Results to be Shown: Specify the number of task results that you want to show in the Task Summary accessory.Show Only the Tasks Assigned To: Specify the users, groups, or teams who are the assignees of the tasks that you want to display.Select the Task Folder(s) to be Shown: Use the Workspace tree to navigate to and select the Task Summary folder that you want to display in the Task Summary accessory.
2 Click Apply > Close.
Wiki Home Page1 In the Accessory Setup page, specify the following information:
Title: Specify a title for the Wiki Home Page accessory.Display Style: Specify whether you want a border around the accessory.Select the Wiki to be Shown: Use the Workspace tree to navigate to and select the Wiki folder that you want to display in the Wiki Home Page accessory.In the Wiki Home Page accessory, Vibe displays the wiki entry that you have configured to be the wiki home page for the Wiki folder (Wiki Topic) that you select here.
2 Click Apply > Close.
Managing Accessories 159

Calendar Summary1 In the Accessory Setup page, specify the following information:
Title: Specify a title for the Calendar Summary accessory.Display Style: Specify whether you want a border around the accessory.Select the Calendar Folder(s) to be Shown: Use the Workspace tree to navigate to and select the Calendar folders that you want to display in the Calendar Summary accessory.
2 Click Apply > Close.
Remote ApplicationYou can set up a remote application as an accessory if your administrator has enabled the application.
1 In the Accessory Setup page, specify the following information:Title: Specify a title for the Remote Application accessory.Display Style: Specify whether you want a border around the accessory.Remote Application: From the provided drop-down list, select the remote application that you want to display in the accessory.
2 Click Apply > Close.
Modifying an AccessoryYou can modify an accessory after you have created it.
“Modifying an Accessory That Has a Border” on page 160 “Modifying an Accessory That Doesn’t Have a Border” on page 160
Modifying an Accessory That Has a Border1 Click the Modify icon in the accessory’s title bar. 2 Make the modifications that you desire, then click Apply > Close.
Modifying an Accessory That Doesn’t Have a Border1 Click the Accessory Panel drop-down list > Show Hidden Borders and Controls.
The accessory’s title bar is displayed.
2 Click the Modify icon in the accessory’s title bar. 3 Make the modifications that you desire, then click Apply > Close.
160 Managing Accessories
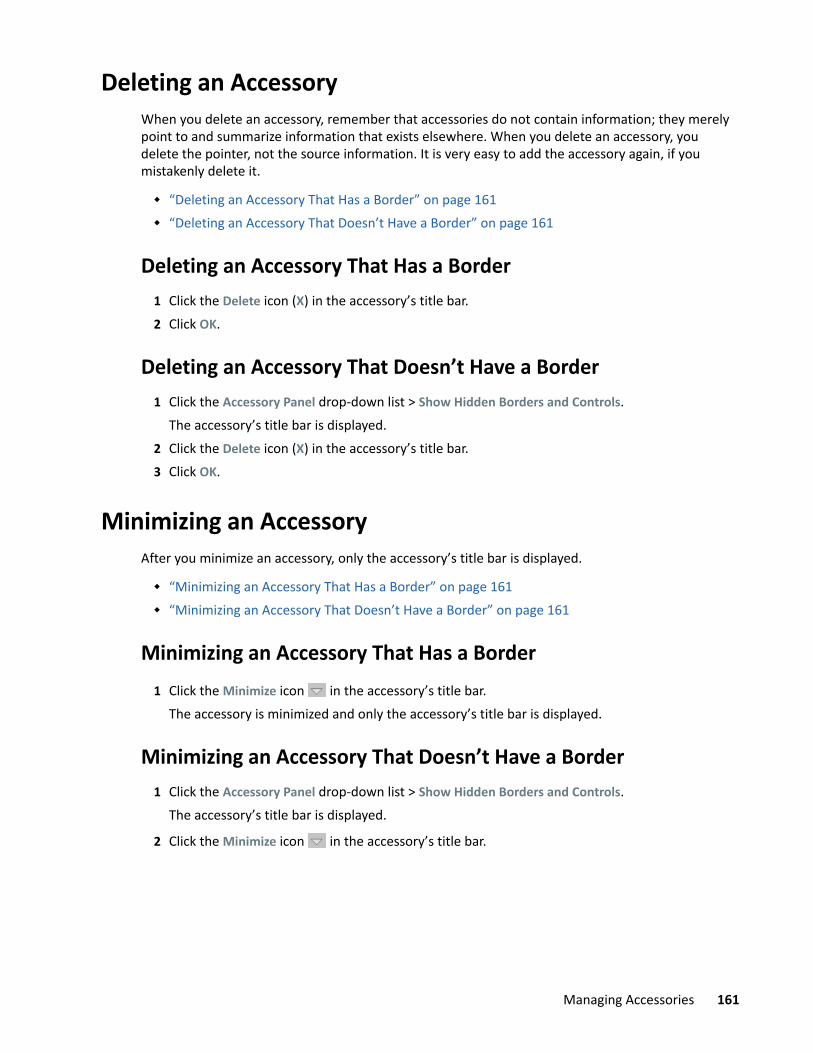
Deleting an AccessoryWhen you delete an accessory, remember that accessories do not contain information; they merely point to and summarize information that exists elsewhere. When you delete an accessory, you delete the pointer, not the source information. It is very easy to add the accessory again, if you mistakenly delete it.
“Deleting an Accessory That Has a Border” on page 161 “Deleting an Accessory That Doesn’t Have a Border” on page 161
Deleting an Accessory That Has a Border1 Click the Delete icon (X) in the accessory’s title bar.2 Click OK.
Deleting an Accessory That Doesn’t Have a Border1 Click the Accessory Panel drop-down list > Show Hidden Borders and Controls.
The accessory’s title bar is displayed.2 Click the Delete icon (X) in the accessory’s title bar.3 Click OK.
Minimizing an AccessoryAfter you minimize an accessory, only the accessory’s title bar is displayed.
“Minimizing an Accessory That Has a Border” on page 161 “Minimizing an Accessory That Doesn’t Have a Border” on page 161
Minimizing an Accessory That Has a Border1 Click the Minimize icon in the accessory’s title bar.
The accessory is minimized and only the accessory’s title bar is displayed.
Minimizing an Accessory That Doesn’t Have a Border1 Click the Accessory Panel drop-down list > Show Hidden Borders and Controls.
The accessory’s title bar is displayed.
2 Click the Minimize icon in the accessory’s title bar.
Managing Accessories 161

Minimizing the Accessory PanelYou can minimize the entire Accessory Panel. This hides all of the accessories that are in the Accessory Panel on the current page.
1 Click the Minimize icon , located to the right of the Accessory Panel drop-down list.
Hiding or Displaying the Accessory Panel in a FolderYou can hide or show the Accessory Panel in a folder:
1 Navigate to the folder where you want to show or hide the Accessory Panel.
2 To hide the Accessory Panel, click the Configure icon next to the Filter List, then click Hide Accessories. or
To display the Accessory Panel, click the Configure icon next to the Filter List, then click Show Accessories.
Repositioning AccessoriesOn pages where you have more than one accessory, you can reposition accessories within the Accessory Panel.
1 In the title bar of the accessory that you want to move, click the arrow icons , depending on whether you want to move the accessory up or down in the Accessory Panel.
Establishing a Default LayoutWhen you create accessories for every page that you view or for a community accessories panel, the accessories are displayed in the reverse order in which they were created. Micro Focus Vibe enables you to rearrange the order of the accessories within the panel, allowing you to determine an optimal default order in which the defined accessories appear. (If you are not the owner of the community accessory, you can override higher-level settings by personalizing the order of the accessories within the community panel, as described in “Repositioning Accessories” on page 162.)
To change the layout of a global personal accessory panel or a community accessory panel:
1 Click the Accessory Panel drop-down list.2 Click Set Default Layout for Community Accessories, or Set Default Layout for Personal Global
Accessories, depending on which type of layout you want to set.The Configure the Accessory Panel page is displayed.
3 In the title bar of the accessory that you want to move, click the arrow icons , depending on whether you want to move the accessory up or down in the Accessory Panel.
4 Click Close.
162 Managing Accessories

Providing a Title for the Accessory Panel1 Click the Accessory Panel drop-down list.2 Click Set the accessory panel’s title.3 Specify the following information:
New Title: Provide a title for your Accessory Panel.Accessory Panel Title Scope: Select whether you want the new name to apply to your personal Accessory Panel for this page only, your personal Accessory Panel for all pages, or the community Accessory Panel for this place only.
4 Click OK.
Managing Accessories 163

164 Managing Accessories

10 10Connecting With Your Co-Workers
Micro Focus Vibe enables you to directly connect with your co-workers.
“Sending Email from within Vibe” on page 165 “Sending an Instant Message from within Vibe” on page 166 “Using Skype from within Vibe” on page 167 “Filling Out the Send E-Mail Page” on page 167 “Using the Vibe Clipboard” on page 168
Sending Email from within VibeMicro Focus Vibe enables you to send email messages to your co-workers from a variety of places within Vibe, and for a variety of reasons.
“Informing Others about a Folder or Workspace” on page 165 “Informing Others about an Entry” on page 166 “Configuring Folders to Send Email Notifications to Other Users” on page 166
Informing Others about a Folder or WorkspaceVibe enables you to send an email message to inform others about a specific folder or workspace.
This option is functional only if you have an email account assigned to you in Vibe. To assign an email account to your Vibe profile, see “Adding and Modifying Delivery Destinations” on page 53.
1 Navigate to the folder or workspace that you want to inform others about via email.
2 Click the Configure icon next to the workspace or folder title, then click one of the following options: Email Team: Emails team members who are associated with this folder or workspace. Send e-mail to contributors: Emails all users who have added entries or comments to the
current page.The Send Email page is displayed.A link to this folder or workspace is automatically created in the Message field.
3 Fill in the appropriate fields.For information on filling in the rest of the Send E-Mail form, see “Filling Out the Send E-Mail Page” on page 167.
4 Click OK.
Connecting With Your Co-Workers 165

Informing Others about an EntryYou can send an email notification to inform other Vibe users about a new or existing folder entry. For information on how to do this, see “Notifying Others about a Folder Entry” on page 137.
These options are functional only if you have an email account assigned to you in Vibe. To assign an email account to your Vibe profile, see “Adding and Modifying Delivery Destinations” on page 53.
Configuring Folders to Send Email Notifications to Other UsersIf you are the owner of a folder, you can configure that folder to send email notifications to specific Vibe users.
For information on how to do this, see “Configuring Folders to Send Email Notifications to Other Users” in the Micro Focus Vibe 4.0.8 Advanced User Guide.
Sending an Instant Message from within VibeNovell Vibe 3 and later supports the use of Novell Messenger to display presence information in Vibe. Before you can see Messenger presence in Vibe as described in this section, your Vibe administrator must enable these integrations, as described in “Configuring Presence” in the Vibe 4.0.8 Installation Guide.
To send an instant message to another Vibe user:
1 Click a user’s presence icon . Presence is displayed in the following locations in Vibe: In a folder entry next to a user’s name In a user’s profile In the home page of a user’s personal workspace
The Profile Quick View is displayed.
2 Click IM.
166 Connecting With Your Co-Workers

Using Skype from within VibeMicro Focus Vibe enables you to communicate with other Vibe users through Skype, without leaving the Vibe interface.
“Setting Up Your Skype Address in Vibe” on page 167 “Contacting Other Vibe Users with Skype” on page 167
Setting Up Your Skype Address in VibeAfter Skype has been configured by your Vibe administrator, you must specify your Skype name in your personal profile.
1 In the home page of your personal workspace, click the Profile link next to your name and avatar.or
Click your Presence icon , located next to any entry that you have created or modified, then click Profile.
2 In the Profile page, click Edit.The User page is displayed.
3 In the Skype Name field, specify your Skype user name.4 Click OK.
Contacting Other Vibe Users with SkypeYou can use Skype to contact only those users who have specified a Skype name in their personal profiles. For information on how to modify your personal profile, see “Setting Up Your Skype Address in Vibe” on page 167.
To contact a Vibe user by using Skype:
1 Click the Presence icon of the user you want to call by using Skype. orNavigate to the profile page of the user you want to call by using Skype.
2 In the Skype section, click Call me.The Skype application is launched.For information on how to use Skype, see the Skype documentation.
Filling Out the Send E-Mail PageWhen you send email from within Vibe, Vibe displays the Send E-Mail page. This page contains the following fields and options:
Add E-Mail Addresses: Specify users’ individual email addresses. You must separate multiple email addresses with commas; do not include spaces between addresses.
Connecting With Your Co-Workers 167

Your e-mail address: Select your name if you want to include yourself in the email.
Users: Use type-to-find functionality to specify individual users to whom you want to send the email.
Groups: Use type-to-find functionality to specify individual groups to whom you want to send the email.
Clipboard User Names: Click this option to include all users whose names are currently on your clipboard.
For more information on using the Vibe clipboard, see “Using the Vibe Clipboard” on page 168.
Team Members: Click this option to include all team members.
CC: Click this option to specify users to whom you want to send a carbon copy of the message.
BCC: Click this option to specify users to whom you want to send a blind copy of the message.
Subject: Specify the subject of your email message.
Message/Additional Text Sent with the Entry: Specify the main content of your email message.
Include Attachments: (This option is not available when you send an email from a folder or workspace.) Select this option if you want to include any attachments that are attached to the entry from where you are sending the email.
Using the Vibe ClipboardThe clipboard in Micro Focus Vibe is a tool that you can use to gather people’s names as you visit places within Vibe. Later, when using a tool that requires you to specify user names, you can easily reference the names on your clipboard. For example, you can put a name on the clipboard, and then when you want to send an email message from Vibe, you refer to the clipboard to specify the name of the user to whom you want to send the email.
Names remain on the clipboard until you remove them or until you log out.
“Adding Names to the Clipboard” on page 168 “Removing Names from the Clipboard” on page 169 “Using the Names on Your Clipboard” on page 169
Adding Names to the Clipboard “Adding Users from the Current Page” on page 168 “Adding Team Members” on page 169
Adding Users from the Current PageVibe enables you to add all users to the clipboard who have created content on the current page, or who have modified an entry on the current page.
1 Navigate to the page where you want to add users to the clipboard.2 Click View > Clipboard.
168 Connecting With Your Co-Workers
The Clipboard dialog box is displayed.3 Click Add People From Page.
Those users who have added or modified entries on this page are displayed and added to the clipboard.If you are in the home page of a user’s personal workspace, clicking this option adds the owner of the personal workspace.
4 Click Close.
Adding Team MembersVibe enables you to add all team members to the clipboard from the team workspace where you currently are.
You must be in a team workspace to add team members to the clipboard.
1 Navigate to the team workspace where you want to add team members to the clipboard.2 Click View > Clipboard.
The Clipboard dialog box is displayed.3 Click Add Team Members.
All members of the team are added to the clipboard.4 Click Close.
Removing Names from the ClipboardYou can easily remove names from the Vibe clipboard after you have added them.
1 In the Clipboard dialog box, select the names that you want to delete.You can simultaneously select all names by clicking Select All. Click Clear All to deselect all names.
2 Click Remove Selected Names.3 Click Close.
Using the Names on Your ClipboardThere are various places in Vibe where you can use the names that are stored on your clipboard:
When you send email When you create a new team workspace When you add additional team members to a workspace
Connecting With Your Co-Workers 169

170 Connecting With Your Co-Workers

11 11Using Workflows
Workflows in Micro Focus Vibe can improve efficiency in your organization by automating common business processes.
Before you can use a workflow, it must first be created and enabled. Workflows can be created and enabled by folder owners for use in a folder, or they can be created and enabled by Vibe administrators for use across the entire Vibe site. For information on how to create and enable a workflow, see “Creating and Managing Workflows” in the Micro Focus Vibe 4.0.8 Advanced User Guide.
Because workflow creators can control who has rights to perform certain functions concerning the workflow, you might not have appropriate rights to work with workflows as described in this section. For more information on setting access controls on workflows, see “Adding Access Controls to a Workflow” in the Micro Focus Vibe 4.0.8 Advanced User Guide.
“Manually Starting and Stopping a Workflow” on page 171 “Manually Transitioning a Workflow after It Starts” on page 172
Manually Starting and Stopping a WorkflowIf a workflow has been enabled for use in a folder where you are creating an entry, the workflow either automatically starts when you create the entry, or you can manually start it after the entry is created, depending on how the folder owner or site administrator enabled the workflow.
“Manually Starting a Workflow” on page 171 “Manually Stopping a Workflow” on page 171
Manually Starting a Workflow1 Navigate to and open the entry where you want to start the workflow.2 In the Entry toolbar, click Actions > Start Workflow for the workflow that you want to start.
Multiple workflows can be enabled in the same folder, so multiple workflows might appear in the drop-down list.
3 Click OK when you are prompted about whether you really want to start the workflow.
Manually Stopping a Workflow1 Navigate to and open the entry where you want to stop the workflow.2 In the Entry toolbar, click Actions > Stop Workflow for the workflow that you want to stop.
Multiple workflows can be active on the same entry, so multiple workflows might appear in the drop-down list.
3 Click OK when you are prompted about whether you really want to stop the workflow.
Using Workflows 171

Manually Transitioning a Workflow after It StartsWorkflows can be configured to automatically transition to another workflow state after the entry is modified, after someone has commented or replied to the entry, after a specified amount of time, or various other options.
Workflows can also be configured to be manually transitioned. If a workflow has been configured to be manually transitioned, and if you have appropriate rights, then you can manually transition the workflow from one workflow state to another.
1 Navigate to and open the entry that you want to transition to another workflow state.The workflow must already be started on the entry.
2 In the Workflow section, click the drop-down arrow and select the workflow state that you want to transition the entry to, then click OK.
172 Using Workflows

12 12Using Vibe on Your Mobile Device
Micro Focus Vibe supports using Vibe from your mobile device. Native applications are available to download for iOS, Android, Kindle Fire, and BlackBerry devices. For more information, see the Micro Focus Vibe Mobile Quick Start (https://www.novell.com/documentation/vibe4/vibe4_qs_mobile/data/vibe4_qs_mobile.html).
Using Vibe on Your Mobile Device 173

174 Using Vibe on Your Mobile Device

13 13Managing Vibe Files from Your Desktop
You can synchronize your Micro Focus Vibe files with the file system on your computer, and then modify the files without accessing the Vibe site directly. Additions and modifications are synchronized between Vibe and your computer.
For more information, see the Micro Focus Vibe Desktop for Windows Quick Start (http://www.novell.com/documentation/vibe4/vibe4_qs_desktop/data/vibe4_qs_desktop.html) or the Micro Focus Vibe Desktop for Mac Quick Start (http://www.novell.com/documentation/vibe4/vibe4_qs_desktopmac/data/vibe4_qs_desktopmac.html).
Managing Vibe Files from Your Desktop 175

176 Managing Vibe Files from Your Desktop

14 14Working with Vibe Files in Microsoft Office
Micro Focus Vibe enables you to work with documents on the Vibe site without leaving Microsoft Office. You can easily browse to a document that is located on the Vibe site, open the document, edit it, then save it back to the Vibe site, directly from Microsoft Office.
You can work directly from Microsoft Word, Excel, or PowerPoint documents.
For more information about this functionality, see the Vibe Add-In Quick Start (http://www.novell.com/documentation/vibe4/vibe4_qs_office/data/vibe4_qs_office.html).
Working with Vibe Files in Microsoft Office 177

178 Working with Vibe Files in Microsoft Office

A AWhat’s New in Micro Focus Vibe 4
If you are new to Vibe 4, you’ll find new features, a fresh user interface, and significant updates. This section provides a list of major feature changes first introduced in the 4.0 release. Later changes are mentioned in “New in Vibe 4 Releases” in the Micro Focus Vibe 4.0.8 Release Notes.
For a list of advanced features that are new in Micro Focus Vibe, see “What’s New in Vibe 4.0” in the Micro Focus Vibe 4.0.8 Advanced User Guide.
“Sharing Improvements” on page 179 “Folder Look and Feel Improvements” on page 179 “Browser History Support” on page 179 “Download Folder Contents as a CSV File” on page 180 “Mark All Entries in a Folder as Read or Unread” on page 180 “Enhanced Drag-and-Drop Functionality” on page 180 “Enhancements to Filters” on page 180 “Ability to Hide Accessories in a Folder” on page 180 “Enhanced Pinning for Discussion Entries” on page 181 “Unfollow People and Places From the What’s New Area” on page 181 “Vibe Desktop Application Improvements” on page 181 “New Change Password Dialog” on page 181 “Mobile App Look and Feel Improvements” on page 181
Sharing ImprovementsMicro Focus Vibe 4.0 provides a more complete and intuitive way to share workspaces, folders, and entries.
For more information, see Chapter 4, “Sharing Entries, Folders, and Workspaces,” on page 57.
Folder Look and Feel ImprovementsMicro Focus Vibe 4.0 includes an improved look and feel for most types of folders. Photo Album and Wiki folders remain unchanged.
Browser History SupportMicro Focus Vibe 4.0 provides support for leveraging browser history. For example, back, forward, and refresh buttons work as expected when using Vibe 4.0.
What’s New in Micro Focus Vibe 4 179

Download Folder Contents as a CSV FileMicro Focus Vibe 4.0 enables you to download all folder entries of a folder as a CSV file. The CSV file does not include any attached files.
For more information, see “Downloading the Information for a Folder as a CSV File” on page 87.
Mark All Entries in a Folder as Read or UnreadMicro Focus Vibe 4.0 enables you to simultaneously mark all entries in a folder as Read or Unread.
For more information, see “Marking All Entries in a Folder as Read” on page 136 and “Marking All Entries in a Folder as Unread” on page 137.
Enhanced Drag-and-Drop FunctionalityMicro Focus Vibe 4.0 provides easier, more intuitive drag-and-drop functionality. Simply drag a file from your workstation and drop it into any folder or area in Vibe.
For more information, see “Dragging and Dropping Files” on page 86.
Enhancements to Filters “Apply Multiple Filters to a Folder” on page 180 “Copy Filters from One Folder to Add to Another Folder” on page 180
Apply Multiple Filters to a FolderMicro Focus Vibe 4.0 enables you to apply multiple filters to a folder.
For more information, see “Applying an Existing Filter” on page 94.
Copy Filters from One Folder to Add to Another FolderMicro Focus Vibe 4.0 enables you to copy filters that have already been created on one folder to be used in another folder.
For more information, see “Copying a Filter” on page 94.
Ability to Hide Accessories in a FolderMicro Focus Vibe 4.0 enables you to hide the Accessory Panel in a folder.
After upgrading to Vibe 4.0, the Accessory Panel is displayed by default for folders that have preconfigured accessories. For folders that do not have preconfigured accessories, the Accessory Panel is hidden by default.
For more information, see “Hiding or Displaying the Accessory Panel in a Folder” on page 162.
180 What’s New in Micro Focus Vibe 4

Enhanced Pinning for Discussion EntriesMicro Focus Vibe 4.0 provides an enhanced way of pinning discussion entries.
For more information, see “Pinning Discussion Entries” on page 98.
Unfollow People and Places From the What’s New AreaMicro Focus Vibe 4.0 enables you to easily unfollow a person or place from the What’s New area.
For more information, see “Viewing New Entries” on page 32.
Vibe Desktop Application ImprovementsMicro Focus Vibe Desktop includes the following enhancements:
Ability to create, delete, move, and rename folders Ability to delete, move, and rename files Performance and stability improvements
For more information about using Vibe Desktop, see Micro Focus Vibe Desktop Quick Start for Windows (https://www.novell.com/documentation/vibe4/vibe4_qs_desktop/data/vibe4_qs_desktop.html) and the Micro Focus Vibe Desktop Quick Start for Mac (https://www.novell.com/documentation/vibe4/vibe4_qs_desktopmac/data/vibe4_qs_desktop.html).
New Change Password DialogMicro Focus Vibe 4.0 makes it easier for local and external users to change their password.
For more information, see “Changing Your Password” on page 23.
Mobile App Look and Feel ImprovementsThe Micro Focus Vibe mobile app includes an improved look and feel.
For more information about using the mobile app, see the Micro Focus Vibe Mobile Quick Start (https://www.novell.com/documentation/vibe4/vibe4_qs_mobile/data/vibe4_qs_mobile.html).
What’s New in Micro Focus Vibe 4 181

182 What’s New in Micro Focus Vibe 4

B BTroubleshooting
The following sections provide guidance for difficulties you might encounter when using Micro Focus Vibe:
“You Have Exceeded Your Data Quota and Cannot Add Any Files or Attachments to the Vibe Site” on page 183
“You Are Unable to Change Your Vibe Password” on page 184 “Vibe Interface Is Not Displayed Correctly” on page 184 “Understanding Mirrored Folders” on page 184 “Too Many Sign-Ins for WebDAV” on page 185 “WebDAV Phantom Folders” on page 185 “Unable to Open Pictures from WebDAV in Microsoft Office Picture Manager” on page 185 “Unable to Move Files and Folders within the WebDAV Interface” on page 186 “Troubleshooting Your Mobile Device” on page 186
You Have Exceeded Your Data Quota and Cannot Add Any Files or Attachments to the Vibe Site
Problem: When you try to add files and attachments to the Micro Focus Vibe site, you are unable to do so because you have exceeded your data quota.
You can remove superfluous files and attachments that are counting toward your data quota by deleting items that you have previously moved to the Trash. Workspaces, folders, and entries that do not contain attached documents do not count toward your data quota.
IMPORTANT: Items deleted from the Trash cannot be recovered. Before you delete an item from the Trash, verify that you no longer want this item to exist on the Vibe site.
1 Navigate to the folder or workspace where you moved the items to the Trash that you now want to delete from the Vibe site.
2 Click the Trash icon , located in the Navigation panel. 3 Select the item that you want to delete.4 Click Delete > OK.
For more information about deleted items from the Trash, see “Making Disk Space Available by Deleting Items from the Trash” in the Micro Focus Vibe 4.0.8 Advanced User Guide.
For information on how to view your current disk space usage as it relates to your data quota, see “Viewing Your Data Quota” in the Micro Focus Vibe 4.0.8 Advanced User Guide.
Troubleshooting 183

You Are Unable to Change Your Vibe PasswordProblem: You are unable to change your Micro Focus Vibe password as described in section “Modifying Your Profile” on page 21.
If you are unable to modify your Vibe password, it is probably because your personal information is being synchronized from an external directory server. You must consult your Vibe administrator to make any changes.
Vibe Interface Is Not Displayed CorrectlyProblem: When you access Micro Focus Vibe 3 after upgrading from a previous version, the Vibe interface is not displayed correctly.
You must clear your browser cache after upgrading to Vibe 3 from a previous version.
For example, if you are using Mozilla Firefox, click Tools > Clear Cache in the browser toolbar.
For information about how to clear the browser cache for other browsers, consult the documentation for your specific browser.
Understanding Mirrored FoldersProblem: You are not sure if you want to use mirrored folders, because you do not understand how they work.
A mirrored folder is a library folder within Micro Focus Vibe that is synchronized with a folder located on a system drive outside of Vibe. When you perform basic actions (adding sub-folders and files, modifying files, deleting folders and files) by using the Vibe interface or by accessing the file on the drive, the change is reflected in the other interface. The advantage to using mirrored files is that you can apply Vibe tools to files on a drive, including tools such as text search, workflow, and discussion (in the form of comments applied to the entry in the library folder).
Vibe supports two types of external folders:
A directory on a file system A folder accessible through WebDAV
Consider the following tips for using mirrored files:
When you specify the path to the system folder, specify the full (absolute) path to the folder. After creating the mirrored folder, you cannot alter the path name, and you cannot reconfigure
the Vibe library folder to be a non-mirrored folder. To initialize the new mirrored folder, click Manage > Modify this folder, and use the Synchronize
tool.For more information on how to synchronize a mirrored folder, see “Synchronizing a Mirrored Folder” in the Micro Focus Vibe 4.0.8 Advanced User Guide.
Do not attach additional files to entries in a mirrored folder. Behavior regarding additional attachments is unpredictable.
184 Troubleshooting

Synchronization occurs only through manually using the Vibe menu items; you cannot schedule synchronization.
When you delete a file on the server, Vibe deletes the entire entry in the library folder (not just the attached file).
Adding and deleting sub-folders adds and deletes sub-folders in the other system. When you delete a sub-folder, you delete all of its contents in both places.For more information about Mirrored Files folders, see “Working with Mirrored Folders” in the Micro Focus Vibe 4.0.8 Advanced User Guide.
Too Many Sign-Ins for WebDAVProblem: When you use WebDAV, you must specify your Micro Focus Vibe user name and password more than once.
This is expected behavior for WebDAV. WebDAV requires that you sign in each time you access a separate program (for example, your web browser and Vibe). It might ask you to sign in again to access a file.
If you are using Windows Authentication, you might not experience this problem.
WebDAV Phantom FoldersProblem: When you use Micro Focus Vibe to access a WebDAV folder, you might see a link to a sub-folder that does not exist (a phantom folder). Clicking the link to the phantom folder returns you to your current folder (therefore, it has no effect).
This error is caused by an interaction between WebDAV and Windows Explorer. It does not occur consistently, and there is no Vibe solution for this problem. Simply ignore phantom folders if you encounter them.
Unable to Open Pictures from WebDAV in Microsoft Office Picture Manager
Problem: When you are attempting to open pictures from WebDAV in Microsoft Office Picture Manager, you see the following error message:
Picture Manager is unable to open pictures over the Internet that are not from a Windows SharePoint Services picture library. Please specify a valid picture library and try again.This message occurs because Microsoft Office Picture Manager does not support the standard WebDAV protocol.
Troubleshooting 185

To work around this problem:
1 Copy the picture file to your local machine, then open the file using whatever photo viewer you want.
Unable to Move Files and Folders within the WebDAV Interface
Problem: You cannot drag and drop or otherwise move files from one folder to another within the WebDAV interface.
Moving files and folders within the WebDAV interface is not supported in Micro Focus Vibe. If you want to move files and folders within Vibe, you must use the regular Vibe interface, as described in “Moving a Folder” on page 86 and “Moving a Folder Entry” on page 133.
Troubleshooting Your Mobile DeviceThe following sections provide guidance for difficulties you might encounter when accessing Micro Focus Vibe from a mobile device:
“Your Browser Does Not Automatically Direct You to the Mobile Interface” on page 186 “You Are Unable to View YouTube Videos from Your Mobile Device” on page 186
Your Browser Does Not Automatically Direct You to the Mobile InterfaceProblem: When you access Vibe from your mobile device, the regular Vibe interface is displayed rather than the Vibe mobile interface. Because the regular Vibe interface is not optimized for mobile devices, this can make accomplishing tasks in Vibe difficult.
Some mobile device browsers do not automatically direct you to the Vibe mobile interface.
You can resolve this problem by manually accessing the Vibe mobile interface from your mobile device:
1 Launch a browser on your mobile device.2 Specify the URL for your Vibe site, followed by /mobile.
For example: http://host/mobile.The Vibe mobile interface is displayed.
You Are Unable to View YouTube Videos from Your Mobile DeviceProblem: You are unable to view YouTube videos when you access Vibe from a mobile device, such as a BlackBerry.
186 Troubleshooting

If you are unable to view YouTube videos when you access Vibe from your mobile device, your device is probably not properly configured. To fix this problem:
1 Launch a web browser, then navigate to the YouTube mobile interface (http://m.youtube.com).2 Click the Help link, located near the bottom of the page.3 Follow the instructions for optimizing YouTube Mobile for your device.
Troubleshooting 187

188 Troubleshooting

C CAccessibility for People with Disabilities
Users with disabilities can use assistive technology such as a screen reader to access pages in Micro Focus Vibe. Assistive technology users must adapt to the following Vibe functionality:
“New Windows Opened without Notification” on page 189 “Text Added to a Page Is Not Conveniently Available” on page 189 “Drop-Down List Access” on page 189
New Windows Opened without NotificationWhen you click certain areas in Micro Focus Vibe, the Vibe interface opens new windows. However, Vibe does not notify the assistive technology user that it is opening a new window. As assistive technology users become familiar with Vibe, they identify and remember where new windows are opened.
Text Added to a Page Is Not Conveniently AvailableFor some actions, Micro Focus Vibe adds text to a page that is already displayed. However, assistive technology software is not able to recognize that new text has been added unless the page is refreshed. After the page refreshes, the newly added text is available at the bottom of the page. The assistive technology user must move to the bottom of the page and then move backwards up through the new content.
Drop-Down List AccessIn fields where you type text and a drop-down list appears, press Enter to move the focus into the list. Press Tab to move down through the list, then press Enter to select an item in the list.
Accessibility for People with Disabilities 189

190 Accessibility for People with Disabilities