Web Services Tutorial - Micro Focus Supportline
48
Web Services Tutorial Version 6.1, December 2003
-
Upload
khangminh22 -
Category
Documents
-
view
0 -
download
0
Transcript of Web Services Tutorial - Micro Focus Supportline
Web Services TutorialVersion 6.1, December 2003

IONA, IONA Technologies, the IONA logo, Orbix, Orbix/E, Orbacus, Artix, Orchestrator, Mobile Orchestrator, Enterprise Integrator, Adaptive Runtime Technology, Transparent Enterprise Deployment, and Total Business Integration are trademarks or registered trademarks of IONA Technologies PLC and/or its subsidiaries.Java and J2EE are trademarks or registered trademarks of Sun Microsystems, Inc. in the United States and other countries. CORBA is a trademark or registered trademark of the Object Management Group, Inc. in the United States and other countries. All other trademarks that appear herein are the property of their respective owners.While the information in this publication is believed to be accurate, IONA Technologies PLC makes no warranty of any kind to this material including, but not limited to, the implied warranties of merchantability and fitness for a particular purpose. IONA Technologies PLC shall not be liable for errors contained herein, or for incidental or consequential damages in connection with the furnishing, performance or use of this material.
COPYRIGHT NOTICENo part of this publication may be reproduced, stored in a retrieval system or transmitted, in any form or by any means, photocopying, recording or otherwise, without prior written consent of IONA Technologies PLC. No third party intellectual property right liability is assumed with respect to the use of the information contained herein. IONA Technologies PLC assumes no responsibility for errors or omissions contained in this book. This publica-tion and features described herein are subject to change without notice.
Copyright © 2001–2003 IONA Technologies PLC. All rights reserved.
All products or services mentioned in this manual are covered by the trademarks, service marks, or product names as designated by the companies who market those products.
Updated: 15-Dec-2003
M 3 1 3 9

Contents
Chapter 1 Introduction 1Chapter 2 Building a Web Service 3How Web Service Builder Works 4Sample Application 5Building a Web Service From a JAR 7Naming the Web Service 9Including Supporting Classes 11Selecting the Web Service’s Implementation 15Selecting the Web Service’s Methods 17Defining WSDL Namespaces 19
Chapter 3 Deploying and Listing Web Services 21Deploying a Web Service Application 22Listing Web Service Information 24
Chapter 4 Generating and Using a J2SE Client 31Generating a J2SE Client 32Compiling the Client 36Running a J2SE Client 37
Chapter 5 Review 39
iii

CONTENTS
iv
CHAPTER 1
IntroductionThis tutorial shows how to transform an existing Java application to a Web service. Orbix provides the tools to build, deploy, manage, and use a Web service.
Tutorial steps This tutorial takes you through a complete example, so you learn the processes of creating a Web service. This includes how to use the key tools and what to supply to them, what components are used where in the development process, and what files and information are created.
Each chapter in this tutorial describes a stage in creating a Web service:
• Chapter 2: “Building a Web Service” on page 3
• Chapter 3: “Deploying and Listing Web Services” on page 21
• Chapter 4: “Generating and Using a J2SE Client” on page 31
Updated documentation The latest documentation updates can be found at http://www.iona.com/docs/.
Additional resources The IONA knowledge base (http://www.iona.com/support/kb/) contains helpful articles written by IONA experts about this and other products.
The IONA update center (http://www.iona.com/support/update/) contains the latest releases and patches for IONA products.
1

CHAPTER 1 | Introduction
2
CHAPTER 2
Building a Web ServiceWeb Service Builder is a graphical tool that walks you through the steps to make your application a Web service.
Web Service Builder creates the files that a Web service requires, based on the application that you specify, and other information that you provide. This tutorial uses an existing Java application with one Java class.
In this chapter The following sections describe the stages to build a Web service from a Java application:
How Web Service Builder Works page 4
Sample Application page 5
Building a Web Service From a JAR page 7
Naming the Web Service page 9
Including Supporting Classes page 11
Selecting the Web Service’s Implementation page 15
Selecting the Web Service’s Methods page 17
Defining WSDL Namespaces page 19
3
CHAPTER 2 | Building a Web Service
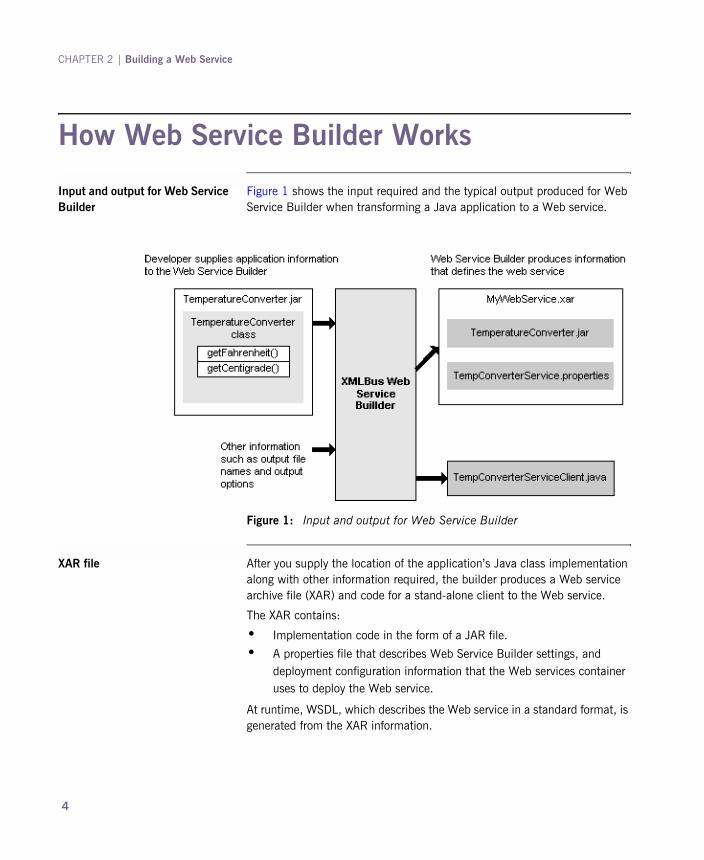
How Web Service Builder Works
Input and output for Web Service Builder
Figure 1 shows the input required and the typical output produced for Web Service Builder when transforming a Java application to a Web service.
XAR file After you supply the location of the application’s Java class implementation along with other information required, the builder produces a Web service archive file (XAR) and code for a stand-alone client to the Web service.
The XAR contains:
• Implementation code in the form of a JAR file.
• A properties file that describes Web Service Builder settings, and deployment configuration information that the Web services container uses to deploy the Web service.
At runtime, WSDL, which describes the Web service in a standard format, is generated from the XAR information.
Figure 1: Input and output for Web Service Builder
4
Sample Application
Sample Application
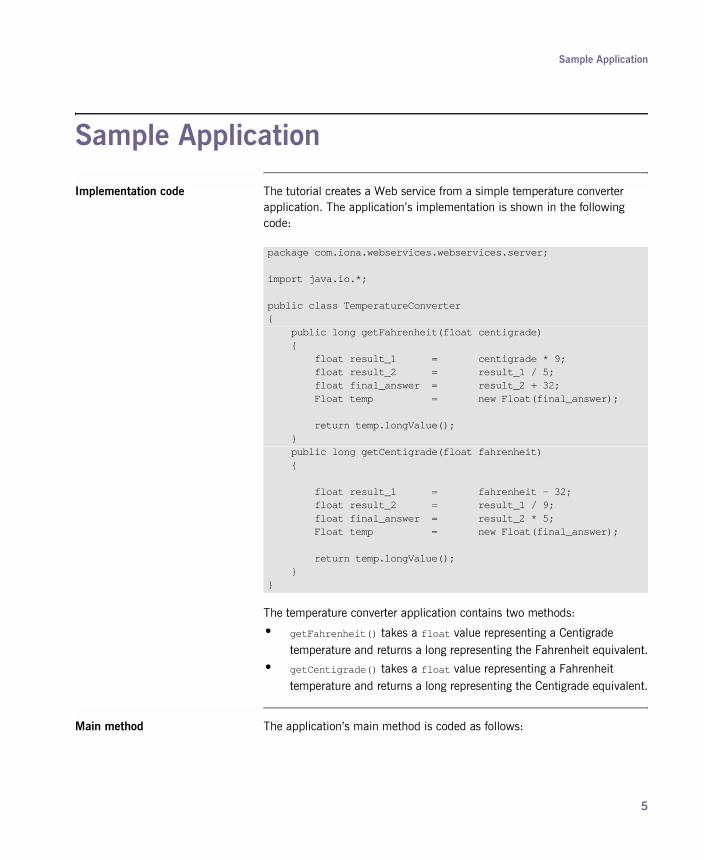
Implementation code The tutorial creates a Web service from a simple temperature converter application. The application’s implementation is shown in the following code:
The temperature converter application contains two methods:
• getFahrenheit() takes a float value representing a Centigrade temperature and returns a long representing the Fahrenheit equivalent.
• getCentigrade() takes a float value representing a Fahrenheit temperature and returns a long representing the Centigrade equivalent.
Main method The application’s main method is coded as follows:
package com.iona.webservices.webservices.server;
import java.io.*;
public class TemperatureConverter{
public long getFahrenheit(float centigrade){
float result_1 = centigrade * 9;float result_2 = result_1 / 5;float final_answer = result_2 + 32;Float temp = new Float(final_answer);
return temp.longValue();}public long getCentigrade(float fahrenheit){
float result_1 = fahrenheit - 32;float result_2 = result_1 / 9;float final_answer = result_2 * 5;Float temp = new Float(final_answer);
return temp.longValue();}
}
5

CHAPTER 2 | Building a Web Service
package com.iona.webservices.webservices.server;import java.io.*;
public class TemperatureConverterTest{
public static void main(String args[]){try{
byte[] b = new byte[1000];
System.out.println("Please Enter a Number: \n");int length = System.in.read(b);
ByteArrayOutputStream bout =new ByteArrayOutputStream();
bout.write(b);
String request = bout.toString();Float floatObj = new Float(request);
TemperatureConverter converter =new TemperatureConverter();
long fTemp =converter.getFahrenheit(floatObj.floatValue());
System.out.println(request.trim()+" "+"Degrees Centigrade converted to Fahrenheit: "+ fTemp+" \n"
);
long cTemp =converter.getCentigrade(floatObj.floatValue());
System.out.println(request.trim()+" "+"Degrees Fahrenheit converted to Centegrade: "+ cTemp
);
}catch(IOException io){
io.printStackTrace();}}
}
6

Building a Web Service From a JAR
Building a Web Service From a JAR
Steps Follow these steps to start building a Web service from a JAR.
1 At a command line, enter itws_builder or use the IONA central toolbar to start up the Web Service Builder. Figure 2 shows the tool’s opening page.
Figure 2: Web Service Builder
7
CHAPTER 2 | Building a Web Service
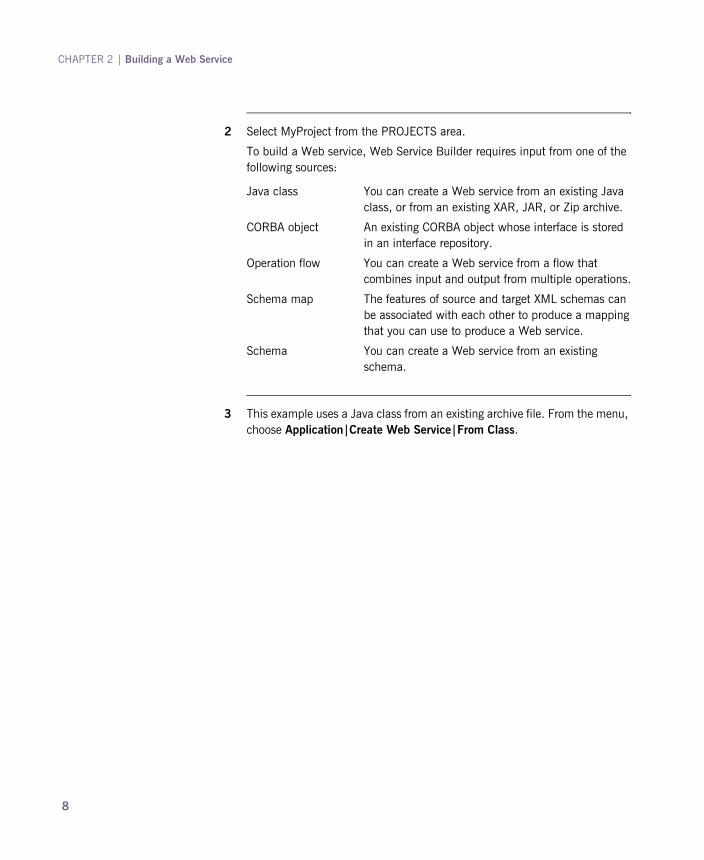
2 Select MyProject from the PROJECTS area.
To build a Web service, Web Service Builder requires input from one of the following sources:
3 This example uses a Java class from an existing archive file. From the menu, choose Application|Create Web Service|From Class.
Java class You can create a Web service from an existing Java class, or from an existing XAR, JAR, or Zip archive.
CORBA object An existing CORBA object whose interface is stored in an interface repository.
Operation flow You can create a Web service from a flow that combines input and output from multiple operations.
Schema map The features of source and target XML schemas can be associated with each other to produce a mapping that you can use to produce a Web service.
Schema You can create a Web service from an existing schema.
8

Naming the Web Service
Naming the Web Service
Steps The following steps identify the Web service in your environment. Figure 3 shows the first of the five windows that guide you through creation of this Web service.
1 Enter the following value for XAR Application Name:
TempConverter
Figure 3: Naming the Web service’s XAR and application
9
CHAPTER 2 | Building a Web Service
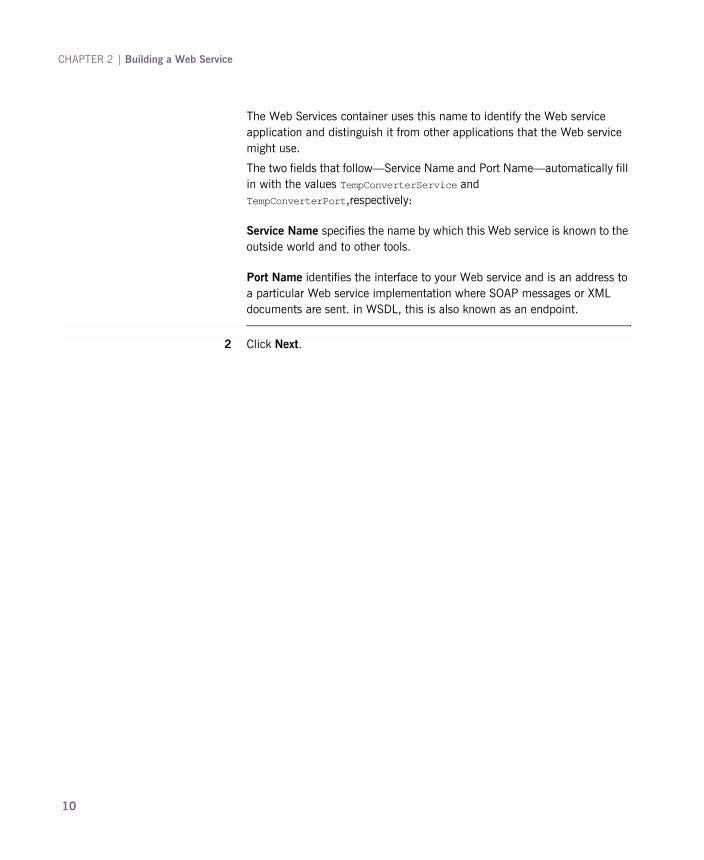
The Web Services container uses this name to identify the Web service application and distinguish it from other applications that the Web service might use.
The two fields that follow—Service Name and Port Name—automatically fill in with the values TempConverterService and TempConverterPort,respectively:
Service Name specifies the name by which this Web service is known to the outside world and to other tools.
Port Name identifies the interface to your Web service and is an address to a particular Web service implementation where SOAP messages or XML documents are sent. in WSDL, this is also known as an endpoint.
2 Click Next.
10
Including Supporting Classes
Including Supporting Classes
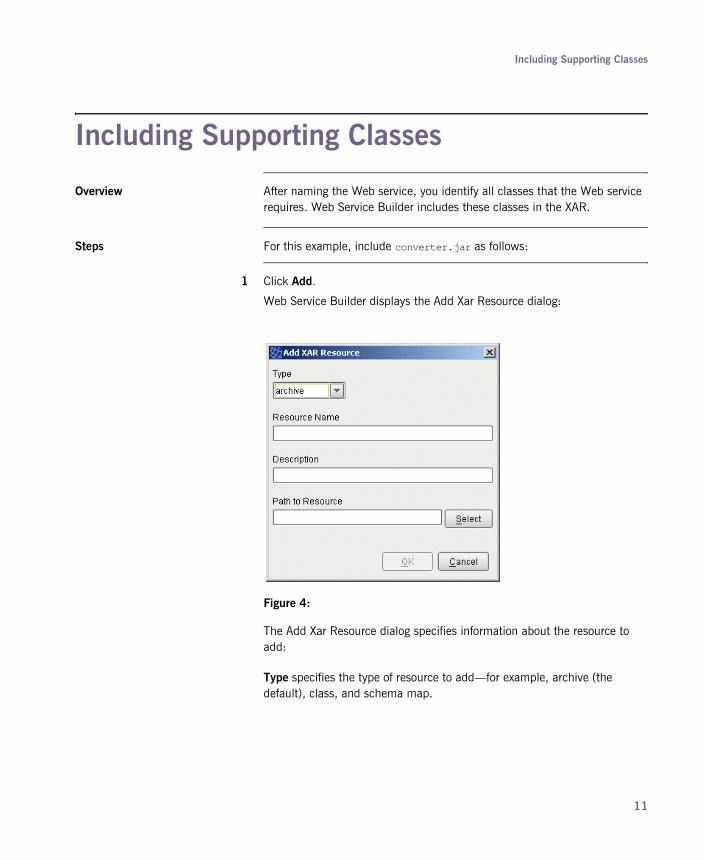
Overview After naming the Web service, you identify all classes that the Web service requires. Web Service Builder includes these classes in the XAR.
Steps For this example, include converter.jar as follows:
1 Click Add.
Web Service Builder displays the Add Xar Resource dialog:
The Add Xar Resource dialog specifies information about the resource to add:
Type specifies the type of resource to add—for example, archive (the default), class, and schema map.
Figure 4:
11

CHAPTER 2 | Building a Web Service
Resource Name optionally specifies the name that you assign to this resource.
Description provides a description of the resource.
Path to Resource specifies the resource’s file path. You can set this field by clicking Select and browsing to the desired resource file.
2 Click Select, and browse the system directories to find converter.jar in the demos directory: your-installation\demos\webservices\TemperatureConverter\lib:
3 Select converter.jar.
12

Including Supporting Classes
4 Set the other Add XAR Resource fields as shown:
Figure 5:
13

CHAPTER 2 | Building a Web Service
5 Click OK. The selected jar is included in the XAR:
In addition to the implementation class, the application might require other supporting classes. You can repeat the previous steps to add more supporting files.
6 After you add all desired entries to the XAR, click Next.
Figure 6: Including a JAR.
14

Selecting the Web Service’s Implementation
Selecting the Web Service’s Implementation
Steps Follow these steps to select the Web service’s implementation code:
1 Click Select and browse the packages and classes that are in the resources you added earlier. Find and select the class to use as the endpoint class:
Figure 7: Selecting an endpoint class
Note: Only classes that use supported data types are displayed even though the archive might contain other classes.
15

CHAPTER 2 | Building a Web Service
2 For this example, select the TemperatureConverter class and click OK:
3 Click Next.
Figure 8: Selecting a class from an archive
16

Selecting the Web Service’s Methods
Selecting the Web Service’s MethodsAfter selecting the implementation class, you identify the methods that the Web service will support. A Web service can use all methods defined in the application’s class, or a subset of those defined in the class.
Steps Follow these steps:
1 Select the methods to use for your Web service. For this example, select getFahrenheit() and getCentigrade().
2 For each selected method, the panel on the right lists the interaction style and encoding to use on the SOAP message.
Figure 9: Selecting Web service methods
Note: Methods that use unsupported data types are displayed in gray.
17

CHAPTER 2 | Building a Web Service
For both methods, select RPC and SOAP:
SOAP attachments can also be associated with a method’s return value. SOAP attachments can transport binary data or large XML documents—for example, image files.
3 Click Next.
RPC In a remote procedure call (RPC) style of interaction, the SOAP request has the form of a method call. In a document style of interaction, the SOAP request is a complete XML document.
SOAP With SOAP encoding, the SOAP message is constructed according to the SOAP specification encoding rules.
If you select Literal encoding, the SOAP message is constructed according to an XML Schema.
18
Defining WSDL Namespaces
Defining WSDL Namespaces
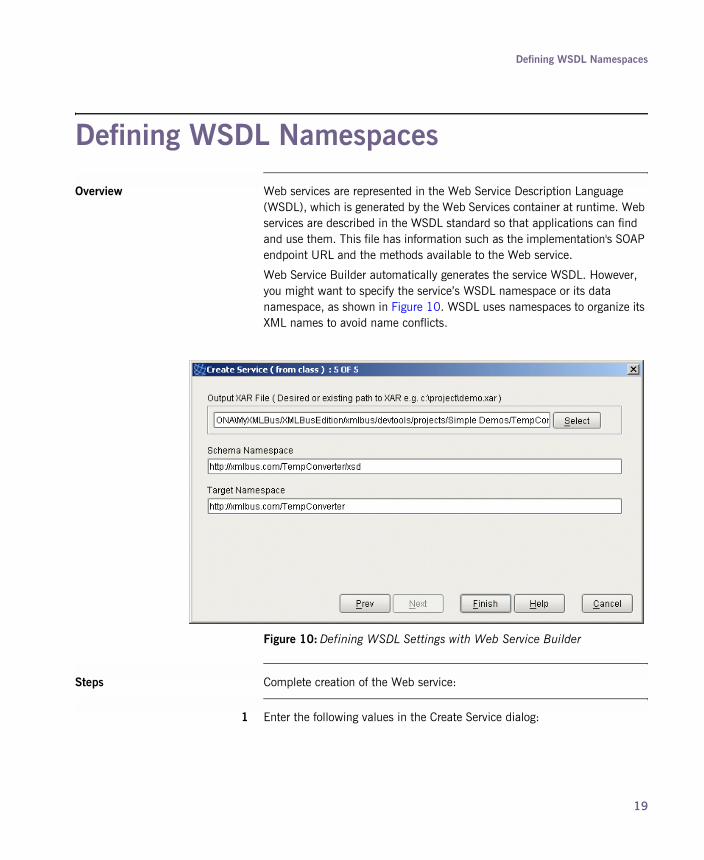
Overview Web services are represented in the Web Service Description Language (WSDL), which is generated by the Web Services container at runtime. Web services are described in the WSDL standard so that applications can find and use them. This file has information such as the implementation's SOAP endpoint URL and the methods available to the Web service.
Web Service Builder automatically generates the service WSDL. However, you might want to specify the service’s WSDL namespace or its data namespace, as shown in Figure 10. WSDL uses namespaces to organize its XML names to avoid name conflicts.
Steps Complete creation of the Web service:
1 Enter the following values in the Create Service dialog:
Figure 10: Defining WSDL Settings with Web Service Builder
19

CHAPTER 2 | Building a Web Service
Output XAR File: accept the default value, which is constructed from the application name.
Schema Namespace: accept the default value, which is constructed from the Java implementation class name
The Schema namespace is used for the names of XML Schema types in the Web service's WSDL.
Target Namespace: accept the default value, which is constructed from the Java implementation class name.
The target namespace is used for the names of messages and the port type, binding and service defined in the Web service's WSDL. Complex data types such as arrays require the target namespace.
2 Click Finish. Web Service Builder creates the information needed to deploy your Web service and stores it in the specified XAR.
3 Click OK, then Close, to return to Web Service Builder’s main window.
Figure 11: Completion of XAR processing.
20
CHAPTER 3
Deploying and Listing Web ServicesUse Web Service Builder to deploy Web service applications into the Web Service Container so they are available to clients.
The Web Services container is the runtime component for your Web services. Use Web Services Manager tool to access the Web Services container to view and manage Web services. This tool lets you undeploy any Web service application, view each Web service’s methods, activate or deactivate a Web service’s endpoints, among other things.
In this chapter This chapter includes the following tasks:
Deploying a Web Service Application page 22
Listing Web Service Information page 24
21
CHAPTER 3 | Deploying and Listing Web Services
Deploying a Web Service Application
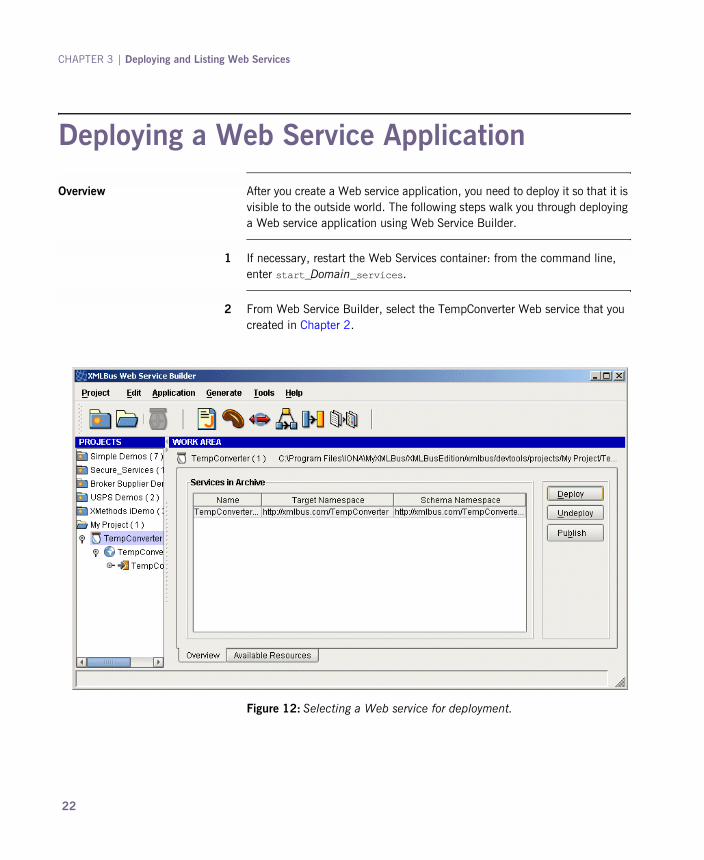
Overview After you create a Web service application, you need to deploy it so that it is visible to the outside world. The following steps walk you through deploying a Web service application using Web Service Builder.
1 If necessary, restart the Web Services container: from the command line, enter start_Domain_services.
2 From Web Service Builder, select the TempConverter Web service that you created in Chapter 2.
Figure 12: Selecting a Web service for deployment.
22

Deploying a Web Service Application
3 Select Application|Deploy:
4 Select the XARs that you wish to deploy. In this example, only TempConverter is available for deployment and should be checked.
5 When all of the desired XARs are checked, click Deploy.
Figure 13: Specifying Web Services to Deploy
23

CHAPTER 3 | Deploying and Listing Web Services
Listing Web Service Information
Overview Web Services Manager lets you perform the following management tasks:
• List deployed Web service applications.
• Undeploy Web service applications.
• List Web services within an application.
• List Web service methods.
• Activate and deactivate Web services.
• List a Web service’s WSDL file.
• Test a Web service.
1 Start the Web Services Manager
• Launch the Web Services Manager from the IONA Central Toolbar, or
• Enter the following URL into a Web browser:http://localhost:53205/xmlbus/container?admin=true
• In a secure domain, enter the following URL into a Web browser:https://HostName:53206/xmlbus/container?admin=true
24

Listing Web Service Information
Figure 14 shows Web Services Manager’s opening page.
2 Select the TempConverter application. You can also list the services that the application provides, and undeploy a Web service application.
Figure 14: The Web Services Manager
25

CHAPTER 3 | Deploying and Listing Web Services
3 Click List Services to display the Web service that the TempConverter application provides. Most applications provide a one-to-one mapping between the application and a Web service as shown in Figure 15.
4 Select the TempConverterService service.
Figure 15: Listing Web Services with Web Services Manager
26

Listing Web Service Information
5 Click List Endpoints to display the endpoint details:
A Web service’s WSDL contains endpoints that describe where the implementation runs on a particular server. Use Web Services Manager to view and manage a Web service’s endpoints.
Endpoint information displayed includes the following:
Figure 16: Endpoint Details with Web Services Manager
WSDL The full WSDL URL, which is a selectable link that displays the WSDL file.
Status An indicator as to whether the endpoint is enabled to receive messages. You can select the Enabled link to disable endpoint activation. You can select the Disabled link to reenable the endpoint again.
TEST Lets you test enabled Web services.
27

CHAPTER 3 | Deploying and Listing Web Services
6 Click on the TEST link to test the Web service. Your browser displays the following dialog:
7 Select the desired operation—in this case, getCentigrade()—and click Get Test Form.
Your browser displays a dialog for supplying the operation’s parameters:
Figure 17: Testing a Web Service
Figure 18: Supplying Web Service Input Parameters
28

Listing Web Service Information
8 Enter any float value and click Invoke Operation. A dialog displays with the operation’s return value, and the request and response SOAP messages. In the following case, the return value of -8 (degrees Centigrade) is calculated from an input value of 17 (degrees Fahrenheit):
Figure 19: Obtaining a Web Service’s Return Value
29

CHAPTER 3 | Deploying and Listing Web Services
30

CHAPTER 4
Generating and Using a J2SE ClientYou can compile and run auto-generated client code to create an application that uses the Web service. You can also incorporate the appropriate portions of the client code into your own applications for seamless interaction with the Web service.
In this chapter the following topics are covered in this chapter:
Generating a J2SE Client page 32
Compiling the Client page 36
Running a J2SE Client page 37
31

CHAPTER 4 | Generating and Using a J2SE Client
Generating a J2SE Client
Overview After you deploy a Web service, you need a way to access it. Web Service Builder can generate three types of client code:
J2ME client: A Java 2 Micro Edition (J2ME) client that can access the Web service.
You can compile and run the J2ME client application to access the Web service’s methods. This client has hard-coded values such as the endpoint URL of the Web service.
J2SE RPC client: A Java 2 Platform, Standard Edition (J2SE) client application that invokes a remote procedure call upon the Web service.
JTSE DOM client: A Java 2 Platform, Standard Edition (J2SE) client application that supplies an XML document to the Web service, for processing by a DOM handler.
Both J2SE client types consist of an interface class that is created at compile time, and an implementation class that is created and instantiated at runtime based on the Java 1.3 proxy scheme.
Steps Follow these steps to generate a J2SE RPC client.
1 From Web Service Builder, select the TempConverter application from the PROJECTS panel.
32

Generating a J2SE Client
2 From Web Service Builder, select Generate|Generate a Client from a XAR:
3 You can choose from one of the following client types:
• J2SE RPC Client: Generates a client that invokes remote procedure calls on a Web service.
• J2SE DOM Client: Generates a client that supplies an XML document to a Web service that uses a DOM handler to process that document.
• J2ME Client: Generates a J2ME client application that can access Web service’s methods from devices like a WAP-enabled phone or a palmtop computer
• Skeleton: Generates client skeleton code, which you must later implement.
For this example, accept the default choice J2SE RPC client.
Figure 20: Specifying a Web service client type
33

CHAPTER 4 | Generating and Using a J2SE Client
4 In the Output Directory Selection field, you can specify the output directory where Web Service Builder puts the generated files. For this example, use your-installation\bin\clients.
5 Click Next. The following window displays:
6 Specify the service WSDL from which to generate the client. In this case, only one service—TempConverterService—is available to choose.
Figure 21: Selecting WSDL to generate a Web service client
34

Generating a J2SE Client
Click Next. The following window displays:
7 Use the Services and Available Ports drop-down lists to select the service and port to use in the client code. For this example, select TempConverterService and TempConverterPort.
8 Click Finish. Web Service Builder generates two files:
• TempConverterProxyDemo.java is the J2SE client test program.
• TempConverterInterface.java is the J2SE client interface from which a developer can build a Web service client.
\
Figure 22: Selecting service and port for a Web service client
35

CHAPTER 4 | Generating and Using a J2SE Client
Compiling the Client
Overview To compile and run properly, the clients that are generated by Web Service Builder require certain environment variables. Follow these steps to compile a generated J2SE client:
1 Make sure your PATH system environment variable includes a valid Java Developer’s Kit. For example:
2 From a system prompt, set the client environment by running the itws_clientenv.bat script (Windows) or sourcing the itws_clientenv script (UNIX) in install-root/asp/Version/bin.
3 Compile the J2SE client’s generated code to create the class files. For this example, run the following command:
javac TempConverterProxyDemo.java TempConverterInterface.java
C:\jdk1.3.1\bin
36

Running a J2SE Client
Running a J2SE Client
Usage options Run the J2SE client demo without arguments to display the usage options and a list of the methods available in the Web service. For example:
Executing an operation The following command runs the J2SE client with an operation and argument:
java TempConverterProxyDemo getFahrenheit 35
• java TempConverterProxyDemo executes the J2SE client test application.
• getFahrenheit 35 represents one of the Web service’s methods and appropriate arguments. In this example an input value of 35 degrees Centigrade returns the corresponding Fahrenheit value of 95 degrees.
set classpath=.;%classpath%java TempConverterProxyDemoSyntax is: TempConverterProxyDemo [-debug] [-url soapurl]
[-wsdl wsdllocation] operation [args...]operation is one of:
getCentigradegetFahrenheit
37

CHAPTER 4 | Generating and Using a J2SE Client
38

CHAPTER 5
ReviewIn this tutorial you learned how to take an existing Java application class and use Web Service Builder to generate all the information necessary to transform the application into a Web service.
Steps to build a Web service Building a Web service was described in “Building a Web Service” on page 3 and required these steps:
Step Action
1 “Building a Web Service From a JAR” on page 7
2 “Naming the Web Service” on page 9
3 “Selecting the Web Service’s Implementation” on page 15
4 “Selecting the Web Service’s Methods” on page 17
5 “Including Supporting Classes” on page 11
6 “Defining WSDL Namespaces” on page 19
39
CHAPTER 5 | Review
Deploying a Web service application
You used Web Service Builder to deploy the Web service. You then learned how to manage the Web service using Web Services Manager. These steps were as follows:
Using a client This tutorial also used Web Service Builder to generate and compile a J2SE client to the Web service. You then learned how to access the Web service using this generated client. The developer tasks to use the client were described in “Generating and Using a J2SE Client” on page 31.
Step Action
1 “Deploying a Web Service Application” on page 22
2 “Listing Web Service Information” on page 24
40

Index
Aarchive file 4create service from 8
CClass, selecting with the Web Service Builder 16Classes, including in the XAR 11client code
compiling 31generating 32J2ME 32J2SE 32running 31
CORBA objectcreate service from 8
Ddeploy 22, 23
Eendpoint
details 27list 27URL 19
environment variables 36PATH 36
GgetCentigrade() method 5getFahrenheit() method 5
Iimplementation
selecting a class from an archive 16selecting for the Web Service 15selecting methods 17selecting operations 17
Input 4input, confirming Web Service Builder 33
JJ2ME client 32J2SE client 32Java 1.3 proxy scheme 32Java class
create service from 8
PPATH environment variable 36properties file 4proxy client, see J2SE client
SSOAP Endpoint URL 19SOAP style 17source
CORBA object 8Java class 8
Uundeploy 25
WWeb service
deploying 22, 23listing deployed 26selecting implementation 15undeploying 25
Web Service Builder 7defining WSDL settings 19input, confirming 33input and output 4selecting methods 17selecting operations 17specifying output 23starting 7
Web Service Description Language 19Web Services Container 4Web Services Manager 21, 25
endpoint details with the 27listing Web services 26
41

INDEX
starting 24WSDL 19
file 4namespace 20
WSDL information, defining 19WSDL URL 27
XXAR 4
application name 9
42

INDEX
43

INDEX
44