Micro Focus Application Lifecycle Management Tutorial
151
Software Version: 12.60 ALM Tutorial Go to HELP CENTER ONLINE http://admhelp.microfocus.com/alm Document Release Date: August 2018 | Software Release Date: August 2018
-
Upload
khangminh22 -
Category
Documents
-
view
1 -
download
0
Transcript of Micro Focus Application Lifecycle Management Tutorial

Software Version: 12.60
ALM
Tutorial
Go to HELP CENTER ONLINEhttp://admhelp.microfocus.com/alm
Document Release Date: August 2018 | Software Release Date: August 2018

Legal Notices
DisclaimerCertain versions of software and/or documents (“Material”) accessible here may contain branding from Hewlett-
Packard Company (now HP Inc.) and Hewlett Packard Enterprise Company. As of September 1, 2017, the Material
is now offered by Micro Focus, a separately owned and operated company. Any reference to the HP and Hewlett
Packard Enterprise/HPE marks is historical in nature, and the HP and Hewlett Packard Enterprise/HPE marks are
the property of their respective owners.
WarrantyThe only warranties for products and services of Micro Focus and its affiliates and licensors (“Micro Focus”) are set
forth in the express warranty statements accompanying such products and services. Nothing herein should be
construed as constituting an additional warranty. Micro Focus shall not be liable for technical or editorial errors or
omissions contained herein. The information contained herein is subject to change without notice.
Restricted Rights LegendContains Confidential Information. Except as specifically indicated otherwise, a valid license is required for
possession, use or copying. Consistent with FAR 12.211 and 12.212, Commercial Computer Software, Computer
Software Documentation, and Technical Data for Commercial Items are licensed to the U.S. Government under
vendor's standard commercial license.
Copyright Notice© Copyright 2002 - 2018 Micro Focus or one of its affiliates.
Trademark NoticesAdobe™ is a trademark of Adobe Systems Incorporated.
Microsoft® and Windows® are U.S. registered trademarks of Microsoft Corporation.
UNIX® is a registered trademark of The Open Group.
Oracle and Java are registered trademarks of Oracle and/or its affiliates.
TutorialALM
ALM (12.60) Page 2 of 151

Contents
ALM 1
Welcome to this Tutorial 6How This Tutorial is Organized 6Before You Begin 7
Chapter 1: Introducing ALM 9The ALM Process 10Starting ALM 10ALMWindow 11TheMercury Tours SampleWeb Site 14
Chapter 2: Specifying Releases and Cycles 19Defining Releases and Cycles 20Viewing Releases and Cycles 21
Chapter 3: Specifying Requirements 23Defining Requirements 24Viewing Requirements 26Converting Requirements to Tests 29
Chapter 4: Planning Tests 32Developing a Test Plan Tree 33Designing Test Steps 34Defining Test Parameters 36Defining Test Configurations 39Creating and Viewing Coverage 41
Creating Coverage 42Analyzing Coverage 44
Copying Test Steps 47Generating Automated Test Scripts 48
Chapter 5: Running Tests 50Test Set Types 51Defining Test Sets 52
Defining a Functional Test Set 52Defining a Default Test Set 55
Adding Tests to a Test Set 60Adding Tests to a Functional Test Set 60
TutorialALM
ALM (12.60) Page 3 of 151

Adding Tests to a Default Test Set 61Defining a Build Verification Suite 64Setting Schedules and Conditions for Test Runs 66Running Tests 71
Running Tests in a Functional Test Set 71Running a Functional Test Set in the Test Labmodule 71Scheduling a Functional Test Set in the Timeslots Module 72Running Tests in a Default Test Set Manually 73Running with Sprinter 74Running with Manual Runner 75Running Tests in a Default Test Set Automatically 78
Viewing and Analyzing Test Results 79Viewing Test Results in the Test Runs Module 80Viewing Functional Test Set Results in the Test Set Runs Tab 80Viewing Test Results in the Test Runs Tab 81Viewing Test Results in the Test Instance Properties Dialog Box 82Viewing Test Coverage 83Viewing Coverage Progress 85
Chapter 6: Adding and Tracking Defects 87How to Track Defects 88Adding New Defects 88Matching Defects 90Updating Defects 91Linking Defects to Tests 93Creating Favorite Views 95
Chapter 7: Alerting on Changes 99Triggering an Alert 100Creating Follow Up Alerts 102
Chapter 8: Analyzing ALM Data 104Generating Project Reports 105Generating Graphs 109
Generating Entity Graphs in the Analysis View Module 110Generating Business View Graphs in the Analysis View Module 113Generating PredefinedGraphs 116Sharing Graphs 117
Generating Business View Excel Reports 119Generating Dashboard Pages 123
Chapter 9: Creating Libraries and Baselines 128
TutorialALM
ALM (12.60) Page 4 of 151

Creating Libraries 129Creating Baselines 130Comparing Baselines 131
Chapter 10: Customizing Projects 135Starting Project Customization 136Adding a New Project User 138Assigning a User to a User Group 140Defining a User-Defined Field 142Creating a Project List 144Creating Business Views 147
Send Us Feedback 150
TutorialALM
ALM (12.60) Page 5 of 151

Welcome to this TutorialWelcome to Application Lifecycle Management (ALM). ALM empowers organizations tomanage the core application lifecycle, from requirements through deployment, grantingapplication teams the crucial visibility and collaboration needed for predictable,repeatable, and adaptable delivery of modern applications.
This tutorial is a self-paced guide that instructs you how to use the ALM application toorganize and manage all phases of the application lifecycle. To successfully completethis tutorial, you should perform the tutorial in the order in which the information ispresented.
How This Tutorial is OrganizedThis tutorial contains the following lessons:
Chapter Description
"Introducing ALM"on page 9
Introduces you to the application lifecycle management process,and familiarizes you with the ALM user interface and the sampleMercury Tours Web site.
"SpecifyingReleases andCycles" onpage 19
Shows you how to define releases and cycles and monitor theirprogress and quality.
"SpecifyingRequirements" onpage 23
Shows you how to define requirements, view the requirementstree, and convert requirements to tests.
"Planning Tests"on page 32
Shows you how to create a test plan tree, define test steps,define test configurations, link test configurations torequirements, and automate manual tests.
"Running Tests"on page 50
Shows you how to define test sets, schedule test runs, and runmanual and automated tests.
"Adding andTracking Defects"on page 87
Shows you how to add new defects, update defects, andmanage defects.
"Alerting onChanges" onpage 99
Shows you how to keep track of changes made to yourrequirements, tests, and defects as you perform your projecttesting.
TutorialWelcome to this Tutorial
ALM (12.60) Page 6 of 151

Chapter Description
"Analyzing ALMData" on page 104
Shows you how to monitor the application lifecycle managementprocess by creating reports and graphs.
"Creating Librariesand Baselines" onpage 128
Shows you how to create libraries and baselines, and how tocompare baselines to track changes in your project.
"CustomizingProjects" onpage 135
Shows you how to set up project users, and how to createproject fields and lists.
Before You BeginTo work with this tutorial, consider the following specifications:
Specification Description
ALM Editions ALM is available in several editions which provide subsets of ALMfunctionality. For details, see ALM Editions.
This tutorial assumes that you are working in ALM Edition or QualityCenter Enterprise Edition. To determine which edition you are using,contact your ALM site administrator.
ALM DemoProject
l The demo project is available from Marketplace After downloadingthe ALM Demo file, import it using Site Administration. For detailson importing projects, see the Micro Focus Application LifecycleManagement Administrator Guide.
l To ensure that you get the same results as the ones specified in thistutorial, make sure that you work on a new copy of the ALM_Demoproject. For details, contact your ALM site administrator.
l ALM projects can be version controlled. Some of the screenshots inthis tutorial assume a version-controlled project, and displayadditional icons and options. For details on version control, see theMicro Focus Application Lifecycle Management User Guide.
l This tutorial also contains steps related to functional testing.Functional testing is relevant only if you are using ALM Edition withthe Lab Management extension enabled. For details on enablingproject extensions, see the Micro Focus Application LifecycleManagement Administrator Guide. Running automated tests alsoassumes that you have a working UFT host set up for your project.For details, see Micro Focus Unified Functional Testing below.
TutorialWelcome to this Tutorial
ALM (12.60) Page 7 of 151

Specification Description
MercuryTours
l Mercury Tours is a sample application that simulates a Web-basedsite for reserving flights, hotel rooms, car rentals, cruises, andvacation deals.
l Mercury Tours is available at http://newtours.demoaut.com/.
UnifiedFunctionalTesting
l To run the automated tests in this tutorial, Unified FunctionalTesting (UFT) must be installed.
l To integrate ALM with UFT, download and install the Micro FocusUFT add-in and the ALM Connectivity tool from the ApplicationLifecycle Management Tools page.
Sprinter l To run manual tests in this tutorial, you can use Manual Runner,Sprinter, or both. For enhanced functionality and a variety of tools toassist in the manual testing process, run manual tests with Sprinter.
l To run tests with Sprinter, download and install the Sprinter add-infrom Marketplace.
TutorialWelcome to this Tutorial
ALM (12.60) Page 8 of 151

Chapter 1: Introducing ALMALM helps you organize and manage all phases of the application lifecyclemanagement process, including defining releases, specifying requirements, planningtests, executing tests, and tracking defects.
• The ALMProcess 10• Starting ALM 10• ALMWindow 11• TheMercury Tours SampleWeb Site 14
ALM (12.60) Page 9 of 151

The ALM ProcessThe application lifecycle management process with ALM includes the following phases:
Phase Description
Specifyreleases andcycles
Develop a release-cycle management plan to help you manageapplication releases and cycles efficiently.
Specifyrequirements
Define requirements to meet your business and testing needs.
Design a testplan and designtests
Based on the project requirements, you can build test plans anddesign tests.
Run tests Create a subset of the tests in your project designed to achievespecific test goals. Execute scheduled tests to diagnose andresolve problems.
Submit andtrack defects
Submit defects and track their repair progress.
Analyze data Throughout the process, you can generate reports and graphs toassist you in “go/no-go” decisions about your application readiness.
Starting ALMStart ALM from your Web browser using the ALM URL.
To start ALM:
TutorialChapter 1: Introducing ALM
ALM (12.60) Page 10 of 151
1. Verify tutorial prerequisites.Before you begin the lessons in this tutorial, verify that you have the appropriateprerequisites. For details, see "Before You Begin" on page 7.
2. Open the Application Lifecycle Management Options window.Open your Web browser and type your ALM URL:http://<ALM server name>[<:port number>]/qcbin. Contact your system administratorif you do not have the correct path.The Application Lifecycle Management Options window opens.
3. Open ALM.Each time ALM is run, it checks the version. If it detects a newer version, itdownloads the necessary files to your machine.The ALM Login window opens.
Note: If ALM was configured for external authentication, the Name andPassword fields do not appear in this window. Continue with step 5.
4. Type a user name and authenticate.In the Login Name box, type alex_alm.Skip the Password box. A password was not assigned.Click the Authenticate button. ALM verifies your user name and password anddetermines which domains and projects you can access.
5. Log in to the project.In the Domain list, select DEFAULT.In the Project list, select ALM_Demo. If more than one ALM_Demo project is listed,contact your ALM site administrator to determine which project to use.Click the Login button.The first time you run ALM, the Welcome page opens. From the Welcome page, youcan directly access the ALM documentation and feature movies.When you log in to a project, the ALMmain window opens and displays the modulein which you were last working. In the upper-right corner of the window, the domainname, project name, and your user name are displayed.
ALMWindowIn this exercise, you will explore the ALMmodules and their common elements. You willalso learn how to navigate the online help.
To explore the ALM window:
1. Explore the ALMmodules.Click the following sidebar buttons:
TutorialChapter 1: Introducing ALM
ALM (12.60) Page 11 of 151

Button Description
Includes the following modules:l Analysis View. Enables you to create graphsand reports.
l Dashboard View. Enables you to createdashboard pages, in which you can viewmultiple graphs in a single display.
Includes the following modules:l Releases. Enables you to define releases andcycles for the application management process.
l Libraries. Enables you to define libraries to trackchanges in your project, reuse entities in aproject, or share entities across multipleprojects.
Includes the following modules:l Requirements. Enables you to managerequirements in a hierarchical tree-structure.Requirements can be linked to otherrequirements, tests, or defects.
l Business Models. Enables you to importbusiness process models, and test the qualityof the models and their components. Access tothis module is dependent on your ALM license.
TutorialChapter 1: Introducing ALM
ALM (12.60) Page 12 of 151

Button Description
Includes the following modules:l Test Resources. Enables you to manage testresources in a hierarchical tree-structure. Testresources can be associated with tests.
l Business Components. Depending on your ALMlicense, you may also have access to theBusiness Components module. This moduleenables subject matter experts to drive thequality optimization process using BusinessProcess Testing, the Micro Focus testautomation solution. For details, refer to theMicro Focus Business Process Testing UserGuide.
l Test Plan. Enables you to develop and managetests in a hierarchical tree-structure. Tests canbe linked to requirements and defects.
l Test Lab. Enables you to manage and run tests.After running tests, you can analyze the results.
l Test Runs. Enables you to view the results ofexecuted tests.
Enables you to add defects, determine repairpriorities, repair open defects, and analyze thedata.
2. Explore the common ALM elements.All the ALMmodules have common elements. For example, click the Defectssidebar button.Each of the ALMmodules contains the following key elements:l ALM common toolbar. This toolbar is accessible from all modules and contains thefollowing buttons:
Button Description
Navigates to your previous/next view in ALM.
Provides commands that you can run from each of the ALMmodules.
TutorialChapter 1: Introducing ALM
ALM (12.60) Page 13 of 151

Button Description
Enables you to open the ALM online help and additional onlineresources. It also enables you to display version information foreach ALM client component.
<domain,project,user>
Details of the current domain, project, and user.
Logs you out of your current project and returns you to theApplication Lifecycle Management Login window.
l Module menu bar. Displays the menus from which you select commands in thecurrent ALM module.
l Module toolbar. This is located below the menu bar. It contains buttons forfrequently used commands in the current ALM module.
3. View ALM help topics.a. To view the help topic of the Defects module window, click the Defects sidebar
button. The Defects module is displayed. Click . The help topic opens in aseparate window.
b. To view the Application Lifecycle Management Help Center home page, clickthe masthead or click Help Center Home under Explore in the footer. The ALMHelp Center home page opens.The ALM Help consists of guides and references, available online, in PDFformat, or both.
c. Select Get Started > Content & PDFs to display the available resources.d. Click the Close ( ) button.
The Mercury Tours Sample Web SiteMercury Tours is the sample Web application used in this tutorial. It simulates a Web-based application for reserving flights, hotel rooms, car rentals, cruises, and vacationdeals. Before continuing with the tutorial, familiarize yourself with this application.
To explore Mercury Tours:
1. Open the Mercury Tours application.Open a separate instance of your Web browser, and go to the following URL:http://newtours.demoaut.com/The Mercury Tours home page opens.
TutorialChapter 1: Introducing ALM
ALM (12.60) Page 14 of 151
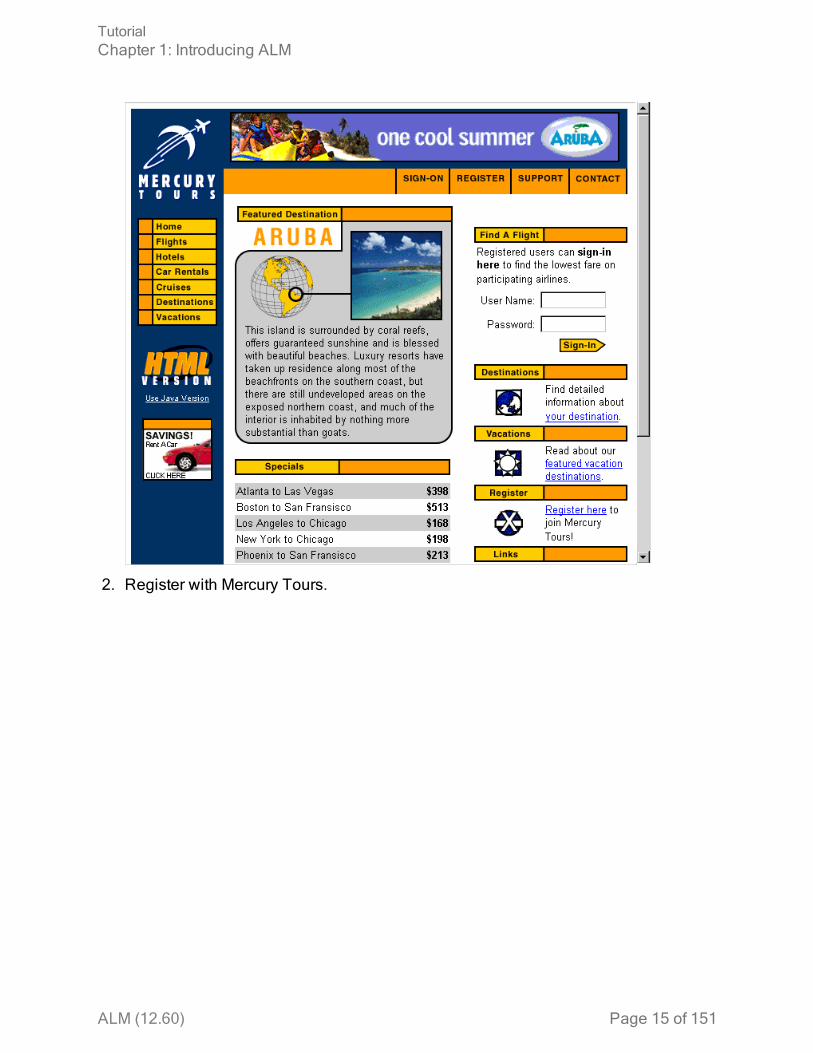
2. Register with Mercury Tours.
TutorialChapter 1: Introducing ALM
ALM (12.60) Page 15 of 151

a. Click Register. The Register page opens.
b. Under User Information, enter any user name and password, and confirm yourpassword. (Other information is not required.)
c. Click Submit. Mercury Tours confirms your registration.3. Log on to Mercury Tours.
TutorialChapter 1: Introducing ALM
ALM (12.60) Page 16 of 151

a. Click Sign-on. The Sign-on page opens.
b. Type your registered user name and password. Click Submit. The Flight Finderpage opens.
TutorialChapter 1: Introducing ALM
ALM (12.60) Page 17 of 151

4. Reserve a flight.Follow the on-screen instructions to reserve a flight.
5. End your Mercury Tours session.Click Sign-off.
TutorialChapter 1: Introducing ALM
ALM (12.60) Page 18 of 151

Chapter 2: Specifying Releases andCyclesYou begin the application lifecycle management process by specifying releases andcycles. A release represents a group of changes in one or more applications that will beavailable for distribution at the same time. Each release can contain a number of cycles.A cycle represents a development and QA cycle based on the project timeline. Thereleases and cycles have defined start and end dates.
You can organize and track your upcoming releases by defining a hierarchical releasetree containing releases and cycles. In this lesson, you will add a release to an existingrelease tree, and then add cycles to the release.
In this lesson, you will learn about:
• Defining Releases and Cycles 20• Viewing Releases and Cycles 21
ALM (12.60) Page 19 of 151

Defining Releases and CyclesIn this exercise, you will define a release and then add cycles to the release. Releasesand cycles each have start dates and end dates. The date range for a cycle must becontained within the date range of the release.
To define a release and its cycles:
1. Open the ALM_Demo project.If the ALM_Demo project is not already open, log in to the project. For details, see"Starting ALM" on page 10.
2. Display the Releases module.On the ALM sidebar, under Management, select Releases.
3. Create a new release folder.a. In the releases tree, select the root Releases folder. Click the New Release Folder
button. The New Release Folder dialog box opens.b. In the Release Folder Name box, type Service Packs.c. Click OK. The Service Packs release folder is added to the releases tree.d. In the Description box in the right pane, type the following description for the
release folder: This folder contains service pack releases.4. Add a release.
a. In the releases tree, make sure that the new Service Packs release folder isselected.
b. Click the New Release button. The New Release dialog box opens.c. In the Name box, type Service Pack 1.d. In the Start Date box, click the down arrow and select yesterday’s date. In the End
Date box, click the down arrow and select the date two months from today’s date.e. In the Description box, type the following description for the release: This release
is the first service pack release.f. Click OK. The Service Pack 1 release is added to the Service Packs releasefolder.
5. Add a cycle to the release.a. In the releases tree, make sure that the Service Pack 1 release is selected.b. Click the New Cycle button. The New Cycle dialog box opens.c. In the Name box, type Cycle 1 - New Features.d. In the Start Date box, click the down arrow and select yesterday’s date. In the End
Date box, click the down arrow and select the date a month from today’s date.e. In the Description box, type the following description for the cycle: This cycle tests
new features added for this service pack.
TutorialChapter 2: Specifying Releases and Cycles
ALM (12.60) Page 20 of 151

f. Click OK. The Cycle 1 - New Features cycle is added to the Service Pack 1release.
6. Add a second cycle to the release.a. In the releases tree, right-click the Service Pack 1 release and choose New Cycle.
The New Cycle dialog box opens.b. In the Name box, type Cycle 2 - Full.c. In the Start Date box, click the down arrow and select the date one month and a
day from today’s date. In the End Date box, click the down arrow and select thedate two month from today’s date.
d. In the Description box, type the following description for the cycle: This cycle fullytests all application features.
e. Click OK. The Cycle 2 - Full cycle is added to the Service Pack 1 release.
Viewing Releases and CyclesYou can view the status of your releases and cycles. ALM shows a high-level overviewof the progress of the currently selected release or cycle. It also shows the number ofdefects opened over the course of the currently selected release or cycle. You can alsoview the number of outstanding defects.
In this exercise you will learn how to display the progress and graphs of a selectedrelease and cycle.
To view releases and cycles:
1. Make sure the Releases module is displayed.On the ALM sidebar, under Management, select Releases.
2. Display the Progress graph for the Service Pack 1 release.In the releases tree, select the Service Pack 1 release, located in the Service Packsrelease folder. In the right pane, click the Status tab. The Progress tab is displayedby default.
TutorialChapter 2: Specifying Releases and Cycles
ALM (12.60) Page 21 of 151
The Progress tab displays the progress of the release based on requirementcoverage, elapsed and remaining time, and actual and remaining test instances torun. As you have not yet created requirements or tests, the information in theCoverage Progress graph indicates 0% progress.
3. Display the Progress graph for a cycle.In the releases tree, select the Cycle 1 - New Features cycle, located in the ServicePack 1 release.In the right pane, click the Progress tab. You can see that the information available issimilar to that available for the release, but at the cycle level. As in the case of therelease, you have not yet created requirements and tests, therefore the informationin the Coverage Progress graph indicates 0% progress.
TutorialChapter 2: Specifying Releases and Cycles
ALM (12.60) Page 22 of 151
Chapter 3: Specifying RequirementsRequirements describe in detail what needs to be solved or achieved to meet theobjectives of your application under development.
You define the requirements in ALM by creating a requirements tree in theRequirements module. This is a hierarchically graphical representation of yourrequirements. You can group and sort requirements in the tree, monitor the progress inmeeting requirements, and generate detailed reports and graphs.
In this lesson, you will create requirements in an existing requirements tree. You willthen assign the requirements to a cycle in the releases tree. You will also learn how toconvert requirements to tests.
In this lesson, you will learn about:
• Defining Requirements 24• Viewing Requirements 26• Converting Requirements to Tests 29
ALM (12.60) Page 23 of 151

Defining RequirementsIn this exercise, you will define requirements for testing the functionality of reservingcruises in Mercury Tours.
To define a requirement:
1. Open the ALM_Demo project.If the ALM_Demo project is not already open, log in to the project. For details, see"Starting ALM" on page 10.
2. Display the Requirements module.a. On the ALM sidebar, under Requirements, select Requirements.b. Choose View > Requirements Tree to display requirements in a tree.
3. Select the Mercury Tours Application requirement.Expand the Requirements root requirement and select the Mercury Tours Applicationrequirement.
4. Create a new requirement.a. Click the New Requirement button. The New Requirement dialog box opens.
b. In the Name box, type Cruise Reservation.c. In the Requirement Type box, select Functional. Each requirement belongs to a
requirement type. The requirement type to which a requirement belongsdetermines which fields are available for the requirement. Your projectadministrator can modify existing types and add new types.
d. In the Details tab, type or select the following:Priority: 4-Very HighProduct: Mercury Tours Web Site
e. Click Submit.
TutorialChapter 3: Specifying Requirements
ALM (12.60) Page 24 of 151

f. Click Close to close the New Requirement dialog box. The Cruise Reservationrequirement is added to the requirements tree under the Mercury ToursApplication requirement.
5. Add the Cruise Search child requirement.a. In the requirements tree, make sure that the new Cruise Reservation requirement
is selected.b. Click the New Requirement button to add a requirement below Cruise Reservation.
The New Requirement dialog box opens.c. In the Name box, type Cruise Search.d. In the Requirement Type box, select Functional.e. In the Details tab, type or select the following:
Priority: 4-Very HighProduct: Mercury Tours Web Site
f. Click Submit.g. Click Close to close the New Requirement dialog box. The Cruise Search
requirement is added as a child of the Cruise Reservation requirement.6. Add the Cruise Booking child requirement.
a. In the requirements tree, make sure that the Cruise Reservation requirement isselected.
b. Click the New Requirement button to add a requirement below Cruise Reservation.The New Requirement dialog box opens.
c. In the Name box, type Cruise Booking.d. In the Requirement Type box, select Functional.e. In the Details tab, type or select the following:
Priority: 4-Very HighProduct: Mercury Tours Web Site
f. Click Submit.g. Click Close to close the New Requirement dialog box. The Cruise Booking
requirement is added as a child of the Cruise Reservation requirement.
TutorialChapter 3: Specifying Requirements
ALM (12.60) Page 25 of 151

7. Assign the requirements to a cycle.a. In the requirements tree, select Cruise Reservation.b. Choose Requirements > Assign to Cycle. The Select Cycles dialog box opens.
c. Locate the Service Packs releases folder. Under Service Pack, select the checkbox for the Cycle 1 - New Features cycle.
d. Click OK to close the releases tree.e. Click Yes to assign the requirement and its sub-requirements to the cycle.
8. Assign additional requirements to a cycle.a. In the requirements tree, under Mercury Tours Application, select Online Travel
Booking Services.b. Choose Requirements > Assign to Cycle. In the Select Cycles dialog box, locate
the Service Packs releases folder. Under Service Pack 1, select the check box forthe Cycle 1 - New Features cycle. Click OK.
c. Version Control: If the Check Out dialog box opens, click OK.d. Click Yes to assign the requirement and its sub-requirements to the cycle.
Viewing RequirementsYou can change the way requirements are displayed. In this exercise, you will learnhow to zoom in and out of the requirements tree, rearrange the requirement order, anddisplay and filter requirements in the requirements grid.
To view requirements:
1. Make sure the Requirements module is displayed.a. If the Requirements module is not displayed, on the ALM sidebar, under
Requirements, select Requirements.b. Choose View > Requirements Tree to display requirements in a tree..
TutorialChapter 3: Specifying Requirements
ALM (12.60) Page 26 of 151

2. Zoom in and out of the requirements tree.a. Select Cruise Reservation in the requirements tree.b. To zoom in, click Zoom and choose Zoom In. The requirements tree displays only
the child requirements of Cruise Reservation.
c. To reverse the zoom-in action and display the entire requirements tree, clickZoom and choose Zoom Out To Root.
3. Rearrange the order of requirements in the requirements tree.ALM adds requirements to the requirements tree in order of creation. To rearrangethe order, select the Cruise Search requirement and click the Move Down button. TheCruise Search requirement moves down below the Cruise Booking requirement.
4. View requirements in the requirements grid.Choose View > Requirements Grid to display requirements in a flat nonhierarchicalview. Each line in the grid displays a separate requirement.
TutorialChapter 3: Specifying Requirements
ALM (12.60) Page 27 of 151

5. Define a filter to view requirements created on a specific date.a. Click the Filter button. The Filter dialog box opens.
b. For the Creation Date field, click the Filter Condition box. Click the down arrowbutton. The Select Filter Condition dialog box opens, displaying today’s date inthe calendar.
c. Select the date on which you added requirements.d. Click OK to close the Select Filter Condition dialog box.e. Click OK to apply your chosen filter.
TutorialChapter 3: Specifying Requirements
ALM (12.60) Page 28 of 151

f. The Requirements Grid displays the requirements you added.
Converting Requirements to TestsAfter you create the requirements tree, you can use the requirements as a basis fordefining your test plan tree in the Test Plan module.
You can use the Convert to Tests wizard to assist you when designing your test plantree. The wizard enables you to convert selected requirements or all requirements in therequirements tree to subjects or tests in the test plan tree.
In this exercise, you will convert the Cruise Reservation requirement to a subject in thetest plan tree, and the child requirements of Cruise Reservation to tests in the CruiseReservation subject folder.
To convert a requirement to a test:
1. Make sure the Requirements module is displayed.If the Requirements module is not displayed, on the ALM sidebar, underRequirements, select Requirements.
2. Select a requirement.a. Choose View > Requirements Tree to display requirements in a tree.b. In the requirements tree, select Cruise Reservation.
3. Open the Convert to Tests wizard.Choose Requirements > Convert to Tests. The Step 1 dialog box opens.
4. Choose an automatic conversion method.Select the second option, Convert lowest child requirements to tests, to convert theselected requirement to a subject folder, and its subrequirements to tests.
5. Start the conversion process.a. Click Next to begin converting the requirements. When the conversion process is
complete, the results are displayed in the Step 2 dialog box.b. Click Next. The Step 3 dialog box opens.
6. Choose the destination subject path.
TutorialChapter 3: Specifying Requirements
ALM (12.60) Page 29 of 151

a. In the Subject box, click the down arrow button. A dialog box displaying the testplan tree opens.
b. In the test plan tree, select the Cruises subject.
c. Click OK to close the Select Destination Subject dialog box. The Subject boxnow indicates this test plan.
7. Finalize the conversion process.Click Finish. The Required Test Fields dialog box opens and displays the missingrequired fields of the Cruise Booking test.
8. Specify the required test fields.a. Select the following:
Level: BasicPriority: 4-Very HighReviewed: Reviewed
b. Click OK. The Required Test Fields dialog box reopens and displays themissing required fields of the Cruise Search test.
c. Select the same values entered for the Cruise Booking test. Click OK.d. Click OK to close the Convert to Tests wizard.
9. View the tests in the test plan tree.a. On the ALM sidebar, under Testing, select Test Plan.b. Choose View > Test Plan Tree to display the test plan tree.c. Expand Cruises. The test plan tree displays Cruise Reservation under Cruises.d. Expand Cruise Reservation. The test plan tree displays the Cruise Booking and
TutorialChapter 3: Specifying Requirements
ALM (12.60) Page 30 of 151

Cruise Search tests.
TutorialChapter 3: Specifying Requirements
ALM (12.60) Page 31 of 151

Chapter 4: Planning TestsAfter you define your requirements, you need to determine your testing goal and outlinethe strategy for achieving your goal.
After you determine your testing goal, you build a test plan tree, which hierarchicallydivides your application into testing units, or subjects. For each subject in the test plantree, you define tests that contain steps. For each test step, you specify the actions to beperformed on your application and the expected result.
ALM enables you to use the same test to test different use-cases, each with its own testconfiguration. Each test configuration uses a different set of data. You define the data byadding test parameter values for each test configuration. A test parameter is a variablethat can be assigned a value.
When you create a test, a single test configuration with the same name as the test iscreated simultaneously. You can create as many additional test configurations asneeded.
It is essential that the tests in your test plan comply with your requirements. To helpensure compliance throughout the application lifecycle management process, addcoverage between tests and requirements. For finer granularity, you add coveragebetween test configurations and requirements.
In this lesson, you will learn about:
• Developing a Test Plan Tree 33• Designing Test Steps 34• Defining Test Parameters 36• Defining Test Configurations 39• Creating and Viewing Coverage 41• Copying Test Steps 47• Generating Automated Test Scripts 48
ALM (12.60) Page 32 of 151

Developing a Test Plan TreeThe typical application is too large to test as a whole. The Test Plan module enablesyou to divide your application according to functionality. You divide your application intounits, or subjects, by creating a test plan tree. The test plan tree is a graphicalrepresentation of your test plan, displaying your tests according to the hierarchicalrelationship of their functions. After you define subjects in the tree, you decide whichtests to create for each subject, and add them to the tree.
In this exercise, you will add a subject and a test to the test plan tree in the Test Planmodule.
To develop a test plan tree:
1. Open the ALM_Demo project.If the ALM_Demo project is not already open, log in to the project. For details, see"Starting ALM" on page 10.
2. Display the Test Plan module.On the ALM sidebar, under Testing, select Test Plan.
3. Add a subject folder to the test plan tree.a. Select the Subject folder and click the New Folder button. The New Test Folder
dialog box opens.b. In the Test Folder Name box, type Payment Methods. Click OK. The new folder is
added to the test plan tree.c. In the Description tab in the right pane, type a description of the subject: This
folder contains tests that verify the payment methods.4. Add a test to the subject folder.
a. Select the Payment Methods folder and click the New Test button. The New Testdialog box opens.
TutorialChapter 4: Planning Tests
ALM (12.60) Page 33 of 151

b. In the Test Name box, type a name for the test: Credit Cards.c. In the Type box, selectMANUAL to create a manual test.d. In the Details tab, select the following:
Level: BasicReviewed: Not ReviewedPriority: 4-Very High
e. In the Description tab, type a description for the test: The test verifies credit cardtypes.
f. Click OK. The new test is added to the test plan tree under the Payment Methodsfolder.
Designing Test StepsAfter you add a test to the test plan tree and define basic test information, you define teststeps—detailed, step-by-step instructions that specify how to execute the test. A stepincludes the actions to be performed on your application and the expected results. Youcan create test steps for both manual and automated tests. For manual tests, youcomplete test planning by designing the test steps. Using your plan, you can begin testexecution immediately. For automated tests, you create automated test scripts usingMicro Focus testing tools, custom testing tools, or third-party testing tools.
In this exercise, you add test steps to the Credit Cards test. This test verifies the creditcard type used to book a flight.
To design a test step:
1. Make sure the Test Planmodule is displayed.If the Test Plan module is not displayed, on the ALM sidebar, under Testing, selectTest Plan.
2. Display the Credit Cards test.Expand the Payment Methods folder, and select the Credit Cards test.
3. Open the Design Step Details dialog box.a. Click the Design Steps tab.b. Click the New Step button. The Design Step Details dialog box opens.
TutorialChapter 4: Planning Tests
ALM (12.60) Page 34 of 151

In the Step Name box, a step name is displayed. The default name is thesequential number of the test step.
4. Define the first test step.In the Design Step Details dialog box, type the following:Step Name: Step 1: Log in to Mercury Tours.Description:1. Enter URL.2. Log in.Expected Result: User is logged in to Mercury Tours.
5. Close the Design Step Details dialog box.Click OK.
6. Add the remaining test steps.For each of the following test steps, click the New Step button to open the Design StepDetails dialog box, type the required information, and click OK to close the Design StepDetails dialog box:
Step Name Description Expected Result
Step 2: Select a flightdestination.
1. Click the Flights button.2. Enter flight details and
preference.3. Click Continue.
Flight details andpreference are entered.
Step 3: Enter departureand return flight.
1. Select departure andreturn flights.
2. Click Continue.
The flights are selected.
TutorialChapter 4: Planning Tests
ALM (12.60) Page 35 of 151

Step Name Description Expected Result
Step 4: Enter passengerdetails.
Enter first name, last name,and meal preference.
Passenger details areentered.
Step 5: Enter credit carddetails.
1. Enter credit card type.2. Enter credit card number.3. Enter expiration date.
Credit card details areentered.
Step 6: Enter addresses. Enter billing and deliveryaddresses.
Addresses are entered.
Step 7: Complete thepurchase.
Click Secure Purchase. Purchase completed.
Step 8: Log out. Click the Log Out button. User logs out of MercuryTours.
The Design Steps tab displays the design steps.
Defining Test ParametersTo increase the flexibility of your tests, you can add parameters to your tests. Thisenables you to run the same test repeatedly with different data each time.
When working with a manual test, you can add parameters to the design steps fromwithin the test or you can add parameters by calling them from other tests. This is usefulif you have common steps you often want to perform as part of other tests.
TutorialChapter 4: Planning Tests
ALM (12.60) Page 36 of 151

When working with an automated test, you can define parameters for a test script fromwithin the test or you can load parameters from a shared test resource file.
When defining a test configuration, you define data by setting test parameter values foreach test configuration.
In "Designing Test Steps" on page 34, you defined steps for the Credit Cards test. In thisexercise, you will add parameters to enhance this test.
To define test parameters:
1. Display the Parameters tab for the Credit Cards test.a. In the test plan tree, expand the Payment Methods folder, and select the Credit
Cards test.b. Click the Parameters tab.
2. Add a parameter.a. Click the New Parameter button. The Test Parameter Details dialog box opens.
b. Type the following:Parameter Name: Credit card type.Default Value: American Express, Visa, or MasterCard.
c. Click OK to close the Test Parameter Details dialog box. The parameter is addedto the Parameters tab.
3. Add an additional parameter.a. Click the New Parameter button. The Test Parameter Details dialog box opens.b. Type the following:
Parameter Name: Credit card number.Default Value:1111-2222-3333-4444.
TutorialChapter 4: Planning Tests
ALM (12.60) Page 37 of 151

c. Click OK to close the Test Parameter Details dialog box. The parameter is addedto the Parameters tab.
4. Assign parameters to the test steps.a. Click the Design Steps tab.b. Click the Description box of Step 5.c. Place the cursor after 1. Enter credit card type and click the Insert Parameter
button. The Parameters dialog box opens.
d. Select the Credit Card Type parameter. Click OK.e. Place the cursor after 2. Enter credit card number and click the Insert Parameter
button. The Parameters dialog box opens. Select the Credit Card Numberparameter. Click OK.
TutorialChapter 4: Planning Tests
ALM (12.60) Page 38 of 151

f. The parameters are added to your design step.
Defining Test ConfigurationsYou can reuse a test to test different use-cases. For each use-case you create a testconfiguration that uses a different data set. When working with a manual test, the dataset of a test configuration contains values for your defined test parameters. Whenworking with a UFT or a business process test, the data set can use an external testresource file.
In the following exercise, you will create a test configuration for each of the followingcredit cards: American Express, Visa, and MasterCard. You will then define the actualparameter values to be used when running these instances.
To define test configurations:
1. Display the Test Configurations tab for the Credit Cards test.a. In the test plan tree, expand the Payment Methods folder, and select the Credit
Cards test.
TutorialChapter 4: Planning Tests
ALM (12.60) Page 39 of 151

b. Click the Test Configurations tab.
By default, ALM created the Credit Cards test configuration.2. Rename the test configuration name to American Express.
a. Under Name, click Credit Cards. Type American Express.b. Under Description, type: Test configuration for American Express.
3. Assign data to the test configuration.a. Click the Data tab.b. Under Actual Value, click the top cell. Click the arrow and click in the box. Type:
2222-3333-4444-5555. Click OK.c. Under Actual Value, click the second cell. Click the arrow and click in the box.
Type: American Express. Click OK.
4. Add a new test configuration for Visa.a. Click the New Test Configuration button. The New Test Configuration dialog box
opens.b. Type the following:
Name: VisaDescription: Test configuration for Visa.
c. Click OK. The test configuration is added to the Test Configuration tab.
TutorialChapter 4: Planning Tests
ALM (12.60) Page 40 of 151
d. Make sure the Visa test configuration is selected.e. Click the Data tab. Under Actual Value, click the top cell. Click the arrow and click
in the box. Type: 3333-4444-5555-6666. Click OK.f. Under Actual Value, click the second cell. Click the arrow and click in the box.Type: Visa. Click OK.
5. Add a new test configuration for MasterCard.a. Click the New Test Configuration button. The New Test Configuration dialog box
opens.b. Type the following:
Name: MasterCardDescription: Test configuration for MasterCard.
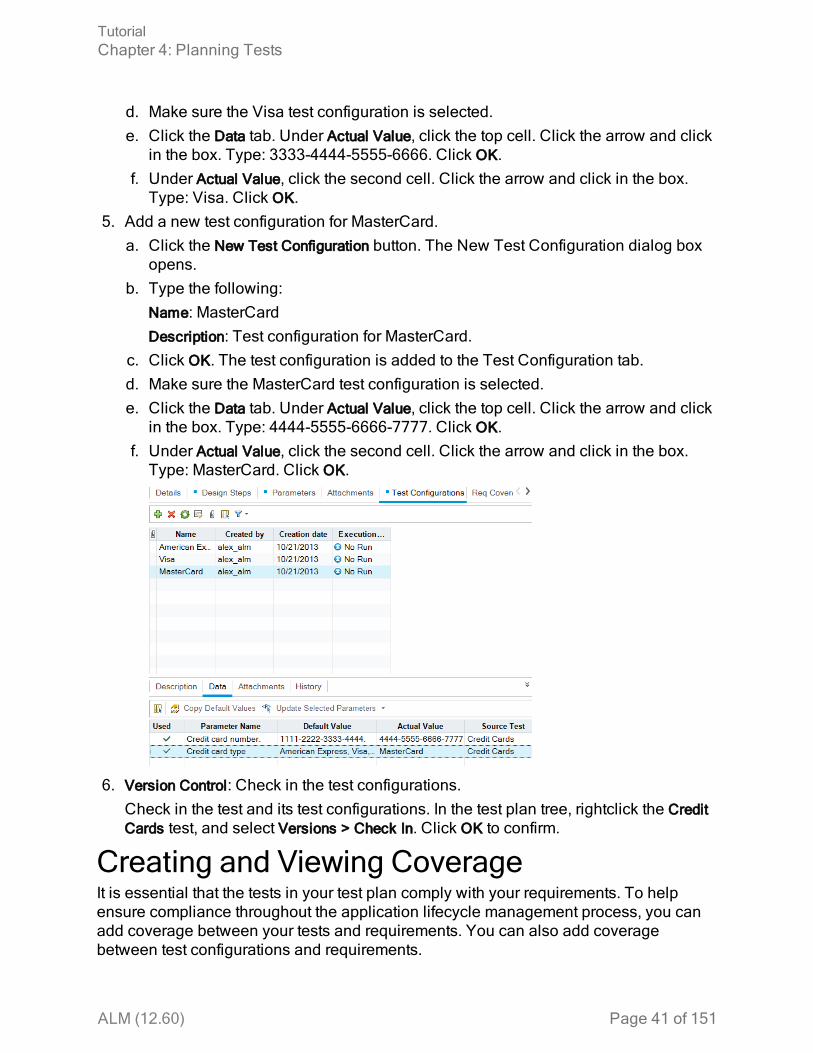
c. Click OK. The test configuration is added to the Test Configuration tab.d. Make sure the MasterCard test configuration is selected.e. Click the Data tab. Under Actual Value, click the top cell. Click the arrow and click
in the box. Type: 4444-5555-6666-7777. Click OK.f. Under Actual Value, click the second cell. Click the arrow and click in the box.Type: MasterCard. Click OK.
6. Version Control: Check in the test configurations.Check in the test and its test configurations. In the test plan tree, rightclick the CreditCards test, and select Versions > Check In. Click OK to confirm.
Creating and Viewing CoverageIt is essential that the tests in your test plan comply with your requirements. To helpensure compliance throughout the application lifecycle management process, you canadd coverage between your tests and requirements. You can also add coveragebetween test configurations and requirements.
TutorialChapter 4: Planning Tests
ALM (12.60) Page 41 of 151
You can create coverage from the Test Plan module and the Requirements module. Atest or a test configuration can cover more than one requirement, and a requirement canbe covered by more than one test or test configuration.
In these exercises, you will learn about the following:
• Creating Coverage 42• Analyzing Coverage 44
Creating CoverageIn this exercise, you will create the Credit Cards requirement and then create coverageby associating it to the Credit Cards test.
To create coverage:
1. Display the Requirements module.a. On the ALM sidebar, under Requirements, select Requirements.b. Choose View > Requirement Details. The Requirement Details view is displayed.
2. Create the Credit Card requirement.a. Select the Mercury Tours Application folder.b. Click the New Folder button. In the New Requirement Folder dialog box, type:
Payments. Click OK.c. Select the Payments folder and click the New Requirement button. The New
Requirement dialog box opens.d. In the Name box, type Credit Cards.e. In the Requirement Type box, select Functional.f. Click Submit. Click Close. The new requirement is added to the requirementstree.
3. Display the Test Coverage tab.a. In the requirements tree, make sure that the Credit Cards requirement is selected.b. In the right pane, click the Test Coverage tab.
TutorialChapter 4: Planning Tests
ALM (12.60) Page 42 of 151

4. Display the Test Plan Tree pane.Click the Select Tests button to show the test plan tree on the right.
5. Select the Credit Cards test in the test plan tree.a. In the Test Plan Tree pane, expand the Payment Methods folder, and select the
Credit Cards test.b. If the Test Configurations pane is not displayed, click the Show button on the
bottom of the pane. Under the Test Configurations pane, you can see that thetest contains three test configurations.
6. Add the test to the coverage grid.In the Test Plan Tree pane, click the Add to Coverage button. The Credit Cards test isadded to the coverage grid.
7. Display the Test Configuration Status tab.Click the Test Configuration Status tab.
TutorialChapter 4: Planning Tests
ALM (12.60) Page 43 of 151

The Test Configuration Status tab shows the associated test configurations andtheir status.
Tip: To add selected configurations of a test to the requirement's testcoverage, add coverage from the Test Configurations pane.
8. Hide the test plan tree.Click the Close button above the tests plan tree.
9. Version Control: Check in the Payments folder and the Credit Cards requirement.a. In the test plan tree, right-click the Payments folder, and select Versions > Check
In. Click OK to confirm.b. Right-click the Credit Cards requirement, and select Versions > Check In. Click OK
to confirm.
Analyzing CoverageAfter you create test coverage, you can use the Coverage Analysis view in theRequirements module to analyze the breakdown of child requirements according to testcoverage.
In this exercise, you will analyze the Application Client System requirement.
TutorialChapter 4: Planning Tests
ALM (12.60) Page 44 of 151
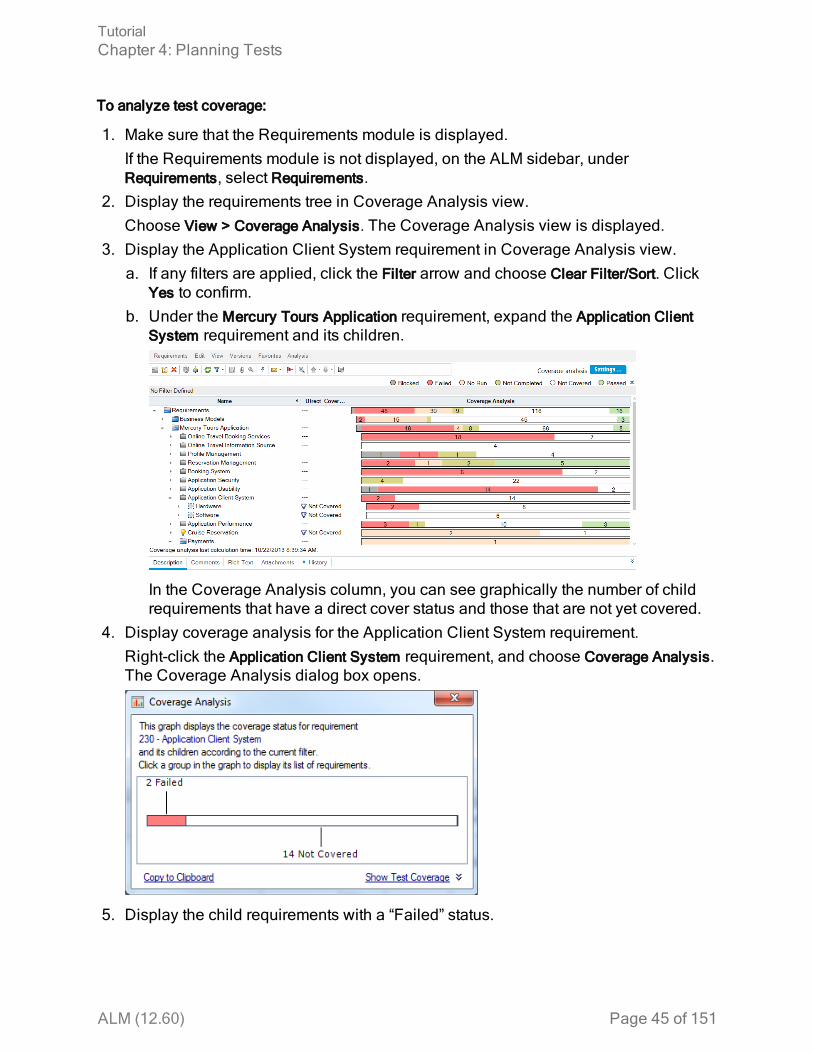
To analyze test coverage:
1. Make sure that the Requirements module is displayed.If the Requirements module is not displayed, on the ALM sidebar, underRequirements, select Requirements.
2. Display the requirements tree in Coverage Analysis view.Choose View > Coverage Analysis. The Coverage Analysis view is displayed.
3. Display the Application Client System requirement in Coverage Analysis view.a. If any filters are applied, click the Filter arrow and choose Clear Filter/Sort. Click
Yes to confirm.b. Under the Mercury Tours Application requirement, expand the Application Client
System requirement and its children.
In the Coverage Analysis column, you can see graphically the number of childrequirements that have a direct cover status and those that are not yet covered.
4. Display coverage analysis for the Application Client System requirement.Right-click the Application Client System requirement, and choose Coverage Analysis.The Coverage Analysis dialog box opens.
5. Display the child requirements with a “Failed” status.
TutorialChapter 4: Planning Tests
ALM (12.60) Page 45 of 151

Click the red Failed area of the graph. The child requirements with a “Failed” statusare listed.…
6. Display test coverage for the requirement.a. Click the Show Test Coverage link to extend the Coverage Analysis dialog box
and display the Test Coverage Chart.
TutorialChapter 4: Planning Tests
ALM (12.60) Page 46 of 151

This pie chart graphically displays the full test coverage for the requirement,grouped according to test status.
b. Click the Passed section of the chart to open the Tests Coverage dialog box anddisplay the list of tests with the selected status. Close the Test Coverage dialogbox.
7. Close the Coverage Analysis dialog box.Click the Close button.
Copying Test StepsYou can copy steps from another test in the same project or from a different project. Inthis exercise, you will copy the test steps from the HTML Page Layout test and paste theminto a newly created test.
To copy a test step:
1. Display the Test Planmodule.a. On the ALM sidebar, under Testing, select Test Plan.b. If the test plan tree view is not displayed, select View > Test Plan Tree.
2. Create a new test.a. In the test plan tree, expand the Mercury Tours Site folder.b. Select the HTML Pages folder and click the New Test button. The New Test
dialog box opens.c. In the Test Name box, type a name for the test: New HTML Page Layout.d. In the Type box, selectMANUAL to create a manual test.e. In the Details tab, select the following:
Level: BasicReviewed: Not ReviewedPriority: 4-Very High
f. Click OK. The new test is added to the test plan tree under the HTML Pagesfolder.
3. Display the Design Steps tab for the HTML Page Layout test.a. In the HTML Pages folder, select the HTML Page Layout test.b. Click the Design Steps tab.
4. Select the steps that you want to copy.Position the mouse pointer in the gray sidebar on the left. The mouse pointerchanges to a pointing hand. Select all rows.
TutorialChapter 4: Planning Tests
ALM (12.60) Page 47 of 151

5. Copy the selected steps.Click the Copy Steps button.
6. Paste the steps into the New HTML Page Layout test.a. In the test plan tree, select the New HTML Page Layout test.b. In the Design Steps tab, click the Paste Steps button. The test steps are copied to
the Design Steps tab.
Generating Automated Test ScriptsTest planning involves deciding which tests to automate. If you choose to execute testsmanually, the tests are ready for execution as soon as you define the test steps. If youchoose to automate tests, you can generate test scripts and complete them using otherMicro Focus testing tools (for example, UFT).
Consider these issues when deciding whether to automate a test.
Do Automate Do Not Automate
Tests that run with each new version of your applicationto check the stability of basic functionality across theentire application (regression tests).
Tests that are executedonly once.
Tests that use multiple data values for the sameoperation (data-driven tests).
Tests that requireimmediate execution.
TutorialChapter 4: Planning Tests
ALM (12.60) Page 48 of 151

Do Automate Do Not Automate
Tests that are run many times (stress tests) and tests thatcheck a multi-user client/server system (load tests).
Tests that check howeasy the application is touse (usability tests).
Tests that do not havepredictable results.
In this exercise, you will generate a UFT test script for the Address Options test.
Note: For prerequisites to working with a UFT test, see "Before You Begin" onpage 7.
To generate an automated test script:
1. Make sure the test plan tree view is displayed.If the test plan tree view is not displayed, select View > Test Plan Tree.
2. Locate the Address Options manual test.a. Select the Subject folder at the root of the test plan tree and choose Edit > Find.
The Find dialog box opens.b. In Value To Find, type Book.c. In the Search for, select Folders.d. Click Find. The Search Results dialog box opens and displays a list of possible
matches.e. Double-click the Flight Reservation\Book Flight folder to highlight the folder in the
test plan tree. Click Close to close the Search Results dialog box.f. In the test plan tree, expand the Book Flight folder and select the Address Optionstest.
3. Display the Design Steps tab.In the right pane, click the Design Steps tab.
4. Generate a test script.a. Click the Generate Script button.b. Choose QUICKTEST_TEST to generate a UFT test.c. Version Control: If a check out message box opens, click OK.The steps in the Address Options test are used to create the automated test script.
5. View the test script.a. Click the Test Script tab.b. To display and modify your test script in UFT, click the Launch Unified Functional
Testing button.
TutorialChapter 4: Planning Tests
ALM (12.60) Page 49 of 151

Chapter 5: Running TestsThroughout the application lifecycle management process, you can run automated andmanual tests to locate defects and assess the quality of your application.
You start by creating test sets and choosing which tests to include in each set. A test setcontains a subset of the tests in an ALM project designed to achieve specific test goals.
After you define test sets, you can begin to execute your tests. Some tests can be runautomatically and some can be run manually.
When you run a test automatically, ALM opens the selected testing tool, which runs thetest, and imports the test results to ALM.
When you run a test manually, you execute the test steps you defined in test planning.You pass or fail each step, depending on whether the actual results match the expectedoutput.
If you are using ALM Edition with the Lab Management extension enabled, you can useserver-side execution to reserve testing resources for automated tests. Server-sideexecution occurs on remote testing hosts, can be scheduled or immediate, and does notrequire user intervention.
ALM enables you to control the execution of tests in a test set by setting conditions andscheduling the date and time for executing your tests.
After test execution, you can use ALM to view and analyze the results of your tests.
In this lesson, you will learn about:
• Test Set Types 51• Defining Test Sets 52• Adding Tests to a Test Set 60• Defining a Build Verification Suite 64• Setting Schedules and Conditions for Test Runs 66• Running Tests 71• Viewing and Analyzing Test Results 79
ALM (12.60) Page 50 of 151

Test Set TypesAfter you design tests in the Test Plan module, you create a test sets tree in the Test Labmodule. A test sets tree enables you to organize your testing needs by grouping testsets in folders and organizing them in different hierarchical levels in the Test Labmodule. You assign each test set folder to a cycle. This enables you to group togethertest sets that will be run during the same cycle and analyze the progress of the cycle asyou run your tests.
When defining a test set, you add instances of your selected tests to the test set. Eachtest instance contains a defined test configuration.
ALM provides the following types of test sets:
l Functional test sets include automatic tests that check the application under testfunctions as expected. Tests in a Functional test set are scheduled in a timeslot to runon a server, without requiring user supervision. Available for: ALM Edition with the LabManagement Extension enabled.
l Default test sets can include automatic and manual tests, and are used to check thatthe application under test functions as expected. Tests in a Default test set arecontrolled from the user’s machine and require the supervision of the tester.
l Performance test sets include performance tests which check that the applicationunder test can withstand load and demand. Tests in a Performance test set arescheduled in a timeslot to run on a server, without requiring user supervision.Available for: ALM Edition and Performance Center Edition only.
Note: For the purposes of this tutorial, we will only use Functional and Default testsets. The usage of Performance tests is covered in the Performance CenterQuick Start guide.
To decide which types of test sets to create, consider the goals you defined at thebeginning of the application lifecycle management process.
When creating and combining different groups of test sets, consider issues such as thecurrent state of the application and the addition or modification of new features.Following are examples of general categories of test sets you can create:
Test Set Description
Sanity Checks entire application at a basic level—focusing on breadth, ratherthan depth—to verify that the application is functional and stable. This setincludes fundamental tests that contain positive checks, validating thatthe application is functioning properly. For example, in the MercuryTours application, you could test whether the application opens andenables you to log in.
TutorialChapter 5: Running Tests
ALM (12.60) Page 51 of 151
Test Set Description
Regression Tests the system in a more in-depth manner than a sanity set. This setcan include both positive and negative checks. Negative tests attempt tofail an application to demonstrate that the application is not functioningproperly.
Advanced Tests both breadth and depth. This set covers the entire application,and also tests the application’s advanced options. You can run this setwhen there is ample time for testing.
Function Tests a subsystem of an application. This could be a single feature or agroup of features. For example, in the Mercury Tours application, afunction set could test all activities related to booking a flight.
Defining Test SetsIn this exercise, you will define the Mercury Tours Site test set. You will also set failurerules for the test set to instruct ALM how to proceed in the event that an automated testin the test set fails. Depending on whether you are an ALM Edition user, you can eitherdefine a Functional test set or a Default test set.
Note:
l If you are using ALM Edition with the Lab Management extension enabled,define a Functional test set. See "Defining a Functional Test Set" below.
l If you are not using ALM Edition with Lab Management, define a Default testset. See "Defining a Default Test Set" on page 55.
Defining a Functional Test SetFunctional test sets contain automatic tests. Tests in a Functional test set run usingautomated server-side execution.
To define a Functional test set:
1. Display the Test Labmodule.On the ALM sidebar, under Testing, select Test Lab.
2. Add a folder to the test sets tree.a. In the test sets tree in the left pane, select the Root folder.b. Click the New Folder button. The New Test Set Folder dialog box opens.c. In the Folder Name box, type Service Pack 1 and click OK.
3. Create subfolders for the test set folder.
TutorialChapter 5: Running Tests
ALM (12.60) Page 52 of 151

Select the Service Pack 1 folder and repeat the previous step to create twosubfolders, named Cycle 1 - New Features, and Cycle 2 - Full.
4. Assign the test set folders to a cycle.a. Right-click the Cycle 1 - New Features test set folder and select the Assign to
Cycle button. The Select Cycles dialog box opens.b. Expand the Service Packs releases folder. In the Service Pack 1 release, select
the Cycle 1 - New Features cycle (created in Lesson 2, "Specifying Releases andCycles" on page 19).
c. Click OK. The icon for the folder in the test sets tree changes to show that thefolder has been assigned to a cycle.
d. Right-click the Cycle 2 - Full test sets folder and choose Assign to Cycle. Assignthe folder to the Cycle 2 - Full cycle, located in the Service Pack 1 release in thereleases tree.
5. Add a test set to the Cycle 1 - New Features test set folder.a. In the test sets tree, select Cycle 1- New Features.b. Click the New Test Set button. The New Test Set dialog box opens.
c. Enter the following:
TutorialChapter 5: Running Tests
ALM (12.60) Page 53 of 151
Name: Mercury Tours SiteDescription: This test set includes automatic tests that run on remote testing hostsand verify the functionality of the Mercury Tours site.
d. Select Functional in the Type field.e. Click OK. The Mercury Tours Site test set is added to the test sets tree in the left
pane.6. Define the Mercury Tours Site test set details.
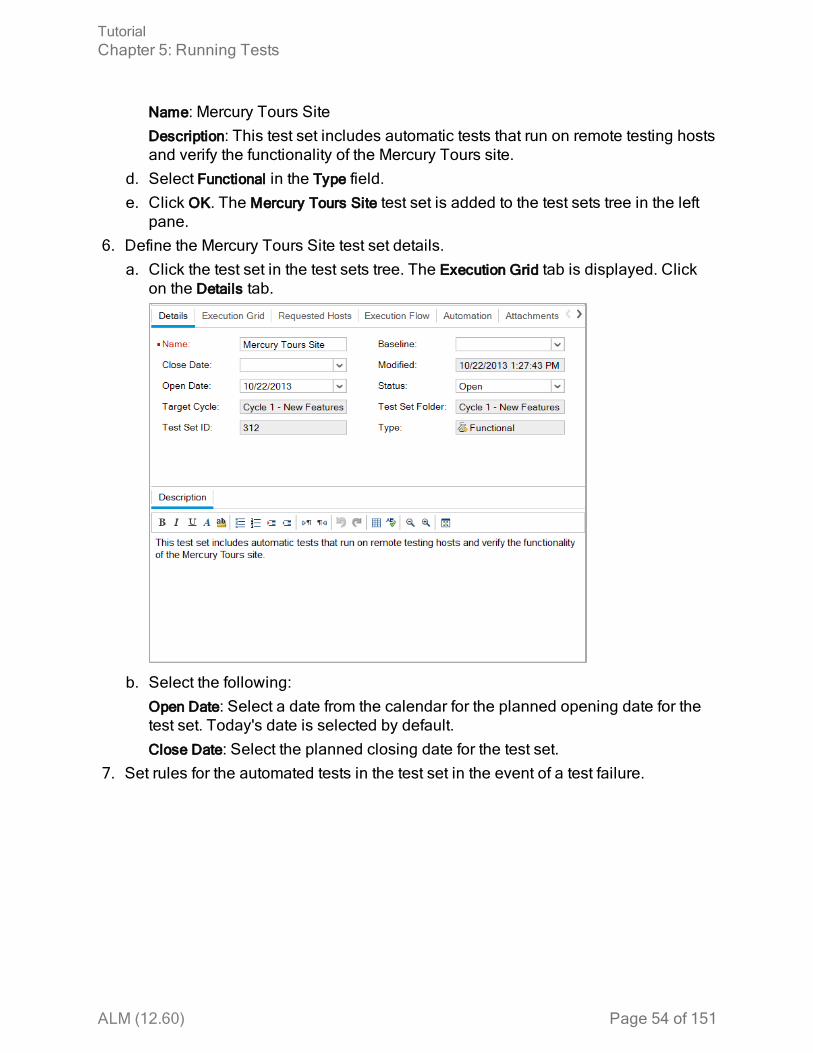
a. Click the test set in the test sets tree. The Execution Grid tab is displayed. Clickon the Details tab.
b. Select the following:Open Date: Select a date from the calendar for the planned opening date for thetest set. Today's date is selected by default.Close Date: Select the planned closing date for the test set.
7. Set rules for the automated tests in the test set in the event of a test failure.
TutorialChapter 5: Running Tests
ALM (12.60) Page 54 of 151

a. Click the Automation tab.
b. In the On Automatic Test Failure section, perform the following:o Select the Rerun test check box.o SetMaximum test reruns to 1.
8. Instruct ALM to send an email to specific users if certain events occur.Under Notification, perform the following:a. Select the check box to send an email notification if any test in the test set fails.b. To: Enter your email address.c. Message: Type the following:
This test failed. Please review the test results and submit a defect.
Defining a Default Test SetDefault test sets contain automatic and manual tests. You start and control tests in aDefault test set using your local machine.
Note: In this exercise, you define a Default test set. If you are using ALM Editionwith Lab Management enabled, you already defined a Functional test set. Youcan proceed to "Adding Tests to a Test Set" on page 60.
To define a Default test set:
1. Display the Test Labmodule.On the ALM sidebar, under Testing, select Test Lab.
2. Add a folder to the test sets tree.
TutorialChapter 5: Running Tests
ALM (12.60) Page 55 of 151

a. In the test sets tree in the left pane, select the Root folder.b. Click the New Folder button. The New Test Set Folder dialog box opens.c. In the Folder Name box, type Service Pack 1 and click OK.
3. Create subfolders for the test set folder.Select the Service Pack 1 folder and repeat the previous step to create twosubfolders, named Cycle 1 - New Features, and Cycle 2 - Full.
4. Assign the test set folders to a cycle.a. Right-click the Cycle 1 - New Features test set folder and select the Assign to
Cycle button. The Select Cycles dialog box opens.b. Expand the Service Packs releases folder. In the Service Pack 1 release, select
the Cycle 1 - New Features cycle (created in Lesson 2, "Specifying Releases andCycles" on page 19).
c. Click OK. The icon for the folder in the test sets tree changes to show that thefolder has been assigned to a cycle.
d. Right-click the Cycle 2 - Full test sets folder and choose Assign to Cycle. Assignthe folder to the Cycle 2 - Full cycle, located in the Service Pack 1 release in thereleases tree.
5. Add a test set to the Cycle 1 - New Features test set folder.a. In the test sets tree, select Cycle 1- New Features.b. Click the New Test Set button. The New Test Set dialog box opens.
TutorialChapter 5: Running Tests
ALM (12.60) Page 56 of 151

c. Enter the following:Name: Mercury Tours SiteDescription: This test set includes automatic and manual tests that verify thefunctionality of the Mercury Tours site.
d. Select Default in the Type field.e. Click OK. The Mercury Tours Site test set is added to the test sets tree in the left
pane.6. Define the Mercury Tours Site test set details.
a. Click the test set in the test sets tree. The Execution Grid tab is displayed. Clickon the Details tab.
TutorialChapter 5: Running Tests
ALM (12.60) Page 57 of 151

b. Select the following:Open Date: Select a date from the calendar for the planned opening date for thetest set. Today's date is selected by default.Close Date: Select the planned closing date for the test set.
TutorialChapter 5: Running Tests
ALM (12.60) Page 58 of 151

7. Set rules for the automated tests in the test set in the event of a test failure.a. Click the Automation tab.
b. Perform the following:o On Automatic Test Failure: Select the Rerun test check box. In Maximum testreruns, set to 1.
o On final failure: Make sure that the Do nothing option is selected.8. Instruct ALM to send an email to specific users if certain events occur.
Under Notification, perform the following:a. Send email in the event of: Select the first check box to send email notification if
any test in the test set fails.b. To: Enter your email address.c. Message: Type the following:
This test failed. Please review the test results and submit a defect.
TutorialChapter 5: Running Tests
ALM (12.60) Page 59 of 151
Adding Tests to a Test SetAfter you define a test set, select tests for inclusion in the test set. ALM adds instances ofthe selected tests to the test set. Each instance contains a defined test configuration. Inthis exercise, you will add tests to the Mercury Tours Site test set.
Note:
l If you are using ALM Edition with Lab Management enabled, add a test to yourFunctional test set. See "Adding Tests to a Functional Test Set" below.
l If you are not using ALM Edition with Lab Management, add a test to yourDefault test set. See "Adding Tests to a Default Test Set" on the next page.
Adding Tests to a Functional Test SetIn this exercise, you add an automatic test to the Mercury Tours Site test set.
To add automatic tests to a Functional test set:
1. Display the Execution Grid tab.a. If the Test Lab module is not displayed, on the ALM sidebar, under Testing,
select Test Lab.b. Click the Execution Grid tab if it is not yet displayed.
2. Select the Mercury Tours Site test set.In the test sets tree, expand the Cycle 1 - New Features test set folder under ServicePack 1. Select the Mercury Tours Site test set.
3. Display the right pane if it is not already displayed.
TutorialChapter 5: Running Tests
ALM (12.60) Page 60 of 151

Click the Select Tests button. The right pane displays the Test Plan Tree andRequirements Tree tabs.
The Test Plan Tree tab enables you to select tests from the test plan tree to add to thetest set. The Requirements Tree tab enables you to select tests coveringrequirements to add to the test set.
4. Add the Number of Passengers test to the test set.a. Under the Flight Reservation folder, expand the Flight Finder folder.b. Drag the Number of Passengers test from the test plan tree to the Execution Grid
to add it to the test set.5. Close the right pane.
Click the Close button.
Adding Tests to a Default Test Set
Note: In this exercise, you add tests to a Default test set. If you are using ALMEdition with Lab Management, you already added tests to a Functional test set.Proceed to "Defining a Build Verification Suite" on page 64.
To add manual tests to a Default test set:
1. Display the Execution Grid tab.a. If the Test Lab module is not displayed, on the ALM sidebar, under Testing,
select Test Lab.b. Click the Execution Grid tab if it is not yet displayed.
2. Select the Mercury Tours Site test set.
TutorialChapter 5: Running Tests
ALM (12.60) Page 61 of 151

In the test sets tree, expand the Cycle 1 - New Features test set folder under ServicePack 1. Select the Mercury Tours Site test set.
3. Display the right pane if it is not already displayed.Click the Select Tests button. The right pane displays the Test Plan Tree andRequirements Tree tabs.
The Test Plan Tree tab enables you to select tests from the test plan tree to add to thetest set. The Requirements Tree tab enables you to select tests coveringrequirements to add to the test set.
4. Add the Credit Card test to the test set.a. In the Test Plan Tree tab, expand the Payment Methods folder and select the Credit
Cards test.
TutorialChapter 5: Running Tests
ALM (12.60) Page 62 of 151

b. If the Test Configurations pane is not displayed, click the Show button on thebottom of the pane. Under the Test Configurations pane, you can see the threetest configurations for the selected test.
c. To include all test configurations, in the Test Plan Tree tab, click the Add Tests toTest Set button. The instances are added to the test set.
5. Add several tests from the Book Flight folder to the test set.a. Under the Flight Reservation folder, expand the Book Flight folder.b. Select the Passenger Name test.c. Press the CTRL key and select the following tests: Credit Card Number, Credit
Card Expiration Date, Credit Card Owner, and Billing And Delivery Address. Clickthe Add Tests to Test Set button. The Parameter Values dialog box opens.
d. Click Close. The instances are added to the test set.6. Add the Number of Passengers test to the test set.
a. Under the Flight Reservation folder, expand the Flight Finder folder.b. Drag the Number of Passengers test from the test plan tree to the Execution Grid
to add it to the test set.7. Close the right pane.
Click the Close button.
TutorialChapter 5: Running Tests
ALM (12.60) Page 63 of 151

Defining a Build Verification SuiteNote: The Build Verification module is available only if you are using ALM Editionwith the Lab Management extension enabled. If you are not using ALM Editionwith Lab Management, proceed to "Setting Schedules and Conditions for TestRuns" on page 66.
The Build Verification module enables you to define a group of Functional test setsbundled together with a single Performance test. This group of test sets is called a buildverification suite. When run together, the build verification suite checks the overall statusof your build.
You can create a small suite to run immediately after a build in the middle of the day,create a suite with a few Functional test sets to run once every hour, or create a largesuite to run for several hours every night.
Build verification suites are a key component in Micro Focus's Continuous Deliverysolution. They facilitate an automated, end-to-end deployment and testing frameworkthat makes application development more efficient, reliable, and quick.
In this exercise, you will create a build verification suite that includes Functional testsets.
To define a build verification suite:
1. Display the Build Verificationmodule.On the ALM sidebar, under Testing, select Build Verification.
2. Add a folder to the Build Verification Suites tree.a. In the Build Verification Suites tree in the left pane, select the root Build
Verification Suites folder.b. Click the New Folder button. The New Build Verification Suite Folder dialog box
TutorialChapter 5: Running Tests
ALM (12.60) Page 64 of 151

opens.c. In the Folder Name box, type Mercury Tours Build Verification and click OK.
3. Add a build verification suite to the Mercury Tours Build Verification set folder.a. In the build verification suites tree, selectMercury Tours Build Verification.b. Click the New Build Verification Suite button. The New Build Verification Suite
dialog box opens.
c. Type the following:Name: Mercury Tours Verification - HourlyDescription: This build verification suite includes test sets that run on an hourlybasis to verify the stability of the Mercury Tours site functionality.
d. Click OK. The Mercury Tours Verification - Hourly build verification suite is addedto the test sets tree in the left pane.
4. Open the Functional Test Sets tab.In the build verification suites tree, selectMercury Tours Verification - Hourly. SelectFunctional Test Sets from the tabs in the right pane.
5. Add a Functional test set to the build verification suite.Click the Select Test Sets button. The right pane displays the Test Sets Tree tab. TheTest Sets Tree tab enables you to select test sets from the test set tree to add to thebuild verification suite.Add the Mercury Tours Site test set to the build verification suite.a. Under the Service Pack 1 folder, expand the Cycle 1 - New Features folder.b. Drag the Mercury Tours Site test set from the test sets tree to the Functional Test
Sets tab to add it to the build verification suite.You can now schedule a timeslot to run this build verification suite.
TutorialChapter 5: Running Tests
ALM (12.60) Page 65 of 151

Setting Schedules and Conditions for TestRunsThe Execution Flow tab enables you to specify a date and time to execute a testinstance and set conditions for it. A condition is based on the results of another specifiedtest instance in the Execution Flow. By setting conditions, you can postpone theexecution of a test instance until another specified test instance finishes running orpasses. You can also set the sequence in which to execute the test instances.
For example, you can determine that Test 2 will run only if Test 1 passed, and Test 3will run only if Test 2 passed. Test 1 is scheduled to run at 9:00 AM on a specified date.The Execution Flow displays the tests and their conditions in a diagram.
A blue line arrow indicates that the test instance is to be executed after theprevious test instance, with no conditions. A green line arrow indicates thatthe test instance is to be executed only if the previous test instance has status Passed. Ablack line arrow indicates that the test instance is to be executed only if theprevious test instance has finished running. When a test instance is time-dependent, aTime Dependency icon is added to the diagram.
In this exercise, you will create a new Default test set and add to it three test instancesthat verify the login procedure on the Sign-On page of the Mercury Tours site. Then, youwill set the conditions for each instance and specify when each one is to be run.
To schedule a test run in the Execution Flow tab:
1. Make sure the Test Lab module is displayed.On the ALM sidebar, under Testing, select Test Lab.
2. Create a new test set.a. In the test sets tree, choose the Service Pack 1 folder and click the New Test Set
button. The New Test Set dialog box opens.b. Type the following:
TutorialChapter 5: Running Tests
ALM (12.60) Page 66 of 151

Name: Test Run ScheduleDescription: This test set is used to explain how to schedule a test run.
c. Click OK. The Test Run Schedule test set is added to the test sets tree in the leftpane.
3. Add tests from the Sign-On/Sign-Off folder to the Test Run Schedule test set.a. Click the Execution Flow tab. If the right pane is not already displayed, click the
Select Tests button. The Test Plan Tree tab and the Requirements Tree tab aredisplayed.
b. In the Test Plan Tree tab, under the Profiling folder, expand the Sign-On/Sign-Offfolder.
c. Press the CTRL key and select the following tests: Sign-On Page, Sign-On UserName, and Sign-On Password. Click the Add Tests to Test Set button. TheParameter Values dialog box opens.
d. Click Close. The test instances are added to the test set.
4. Add an execution condition to the Sign-On User Name test.a. In the Execution Flow tab diagram, right-click the Sign-On User Name test
instance and choose Test Run Schedule. The Run Schedule dialog box opensand displays the Execution Conditions tab.
TutorialChapter 5: Running Tests
ALM (12.60) Page 67 of 151

b. Click New Execution Condition. The New Execution Condition dialog box opens.
c. In the Test dropdown list, select [1]Sign-On Page.d. Select Passed from the list on the right to instruct ALM to execute the Sign-On
User Name test instance only if the Sign-On Page test instance finishes executingand passes.
TutorialChapter 5: Running Tests
ALM (12.60) Page 68 of 151

e. Click OK. The condition is added to the Run Schedule dialog box.
5. Add a time dependency condition to the Sign-On User Name test instance.a. Click the Time Dependency tab.
b. Click Run At Specified Time. Select the Date check box and select tomorrow’sdate.
TutorialChapter 5: Running Tests
ALM (12.60) Page 69 of 151

c. Click OK to close the Run Schedule dialog box. Your conditions are displayed inthe Execution Flow diagram.
6. Add an execution condition to the Sign-On Password test.Add the same execution condition as described in Step 4 for the Sign-On Passwordtest. This time select Sign-On User Name from the Test box in the New ExecutionCondition dialog box.
7. Add a time dependency condition to the Sign-On Password test.a. Add the same time dependency condition as described in Step 5 for the Sign-On
Password test.b. Click OK to close the Run Schedule dialog box. Your conditions are displayed in
the Execution flow diagram.
TutorialChapter 5: Running Tests
ALM (12.60) Page 70 of 151
Running TestsIn this exercise, you will define the Mercury Tours Site test set. You will also set failurerules for the test set to instruct ALM how to proceed in the event that an automated testin the test set fails. Depending on whether you are an ALM Edition user, you can eitherdefine a Functional test set or a Default test set.
Note:
l If you are using ALM Edition with the Lab Management extension enabled, runa test in your Functional test set. See "Running Tests in a Functional Test Set"below
l If you are not using ALM Edition with Lab Management, run a test in yourDefault test set. See "Running Tests in a Default Test Set Manually" onpage 73 and "Running Tests in a Default Test Set Automatically" on page 78.
Running Tests in a Functional Test SetWhen you run tests from a Functional test set, ALM uses Lab Management to executethe tests on remote testing hosts equipped with the testing tools. Lab Managementupdates ALM with the results of your tests. You can run all tests in a Functional test setor run specific tests. You can use the Execution Grid tab to run a test set immediately.You can also use the Timeslots module to reserve resources for a test to run in thefuture.
You can run build verification suites in the same way as test sets. You use the BuildVerification module to run a build verification suite immediately, and you use theTimeslots module to reserve resources for a build verification suite to run in the future.
In these exercises, you will learn about the following:
l "Running a Functional Test Set in the Test Lab module" belowl "Scheduling a Functional Test Set in the Timeslots Module" on the next page
Running a Functional Test Set in the Test LabmoduleYou can run tests from a Functional test set immediately using the Execution Grid.
In this exercise, you will run the Mercury Tours Site test set in the Test Lab module.
To run a Functional test set in the Test Lab module:
1. Make sure the Test Lab module is displayed.On the ALM sidebar, under Testing, select Test Lab.
TutorialChapter 5: Running Tests
ALM (12.60) Page 71 of 151

2. Select the Mercury Tours Site test set.In the test set tree, expand the Cycle 1 - New Features test set folder under ServicePack 1. Select the Mercury Tours Site test set.
3. Open the Run Functional Test Set dialog box.Click the Run Test Set button. The Run Functional Test Set dialog box opens.
4. Run the test set.Click the Run button. ALM uses Lab Management to execute your test on a testinghost with the required testing tool.
5. View the progress of the run.ALM opens the Execution Report page, which displays the current state and resultsof the tests you executed. You can refresh the page, stop tests, and view an EventLog for the entire run.
6. Close the Execution Report.After the test run is complete, close the Execution Report page.
Scheduling a Functional Test Set in the TimeslotsModuleYou can reserve resources for the execution of a Functional test set using the Timeslotsmodule.
In this exercise, you schedule the Mercury Tours Site test set in the Timeslots module.
To schedule a Functional test set in the Timeslots module:
1. Make sure the Timeslots module is displayed.On the ALM sidebar, under Testing, select Timeslots.
2. Create a new Timeslot.On the Timeslots toolbar, click the New Timeslot button. The Timeslot Reservationdialog box opens.
3. Schedule your Functional test set.a. In the Run field, select Functional Test Set.b. In the Start field, select Automatically.c. In the Name field, type Mercury Tours Nightly.d. Click the [none] link in Select a test set, and select the Mercury Tours Site test set.e. Use the Start Time and End Time fields to schedule the test set to run from 20:00
to 22:00.f. A host is automatically added to the Requested Hosts grid.
TutorialChapter 5: Running Tests
ALM (12.60) Page 72 of 151

g. Click the Calculate Availability button to check that the timeslot is valid.
4. Submit the timeslot.Click Submit.
Running Tests in a Default Test Set ManuallyWhen you run a test manually, you follow the test steps and perform operations on yourapplication. Then, you compare the expected results with the actual outcome and recordthe results. You can execute a manual test as many times as needed. The results arestored separately for each run.
Note: In these exercises, you run Default test sets. If you are using ALM Editionwith Lab Management, you already ran a Functional test set. To continue in thetutorial, proceed to "Viewing and Analyzing Test Results" on page 79.
You can run both manual and automated tests manually as part of a Default test set.You can also choose to run a single test or to run an entire test set.
You run manual tests in ALM using Sprinter, Micro Focus’s solution for manual testing. Ifyou are not working with Sprinter, you run tests manually using Manual Runner.
In these exercises, you will learn about the following:
l "Running with Sprinter" on the next pagel "Running with Manual Runner" on page 75
TutorialChapter 5: Running Tests
ALM (12.60) Page 73 of 151
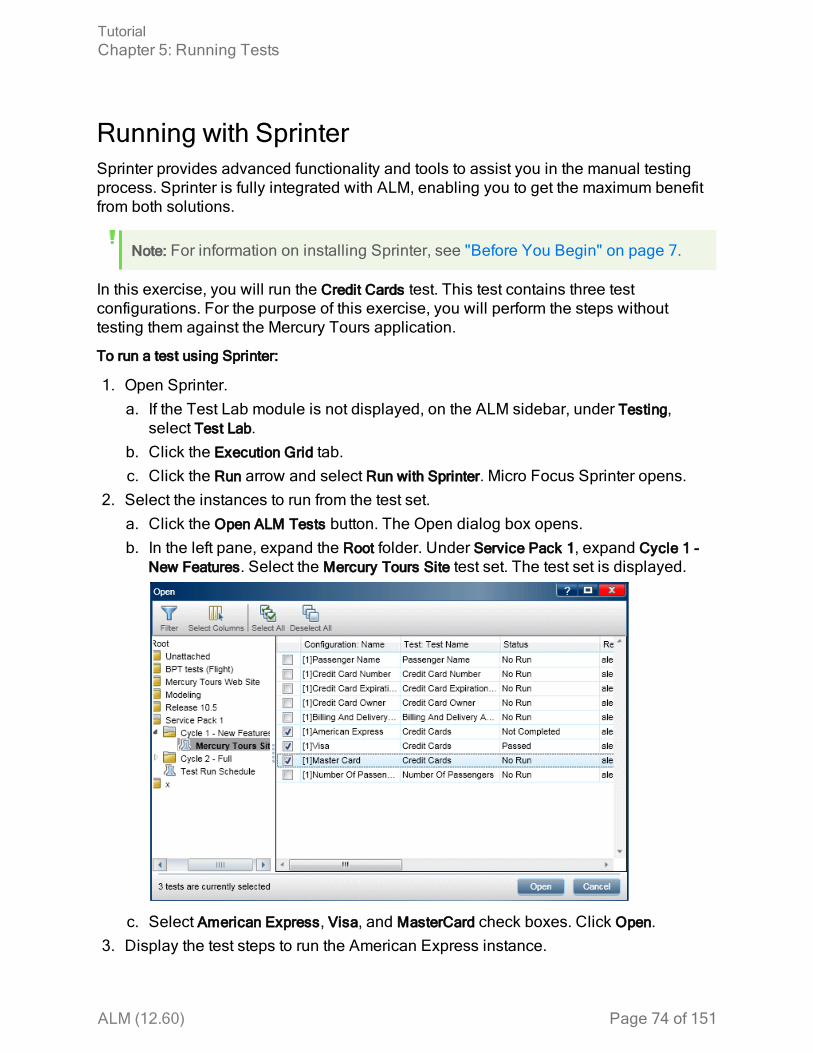
Running with SprinterSprinter provides advanced functionality and tools to assist you in the manual testingprocess. Sprinter is fully integrated with ALM, enabling you to get the maximum benefitfrom both solutions.
Note: For information on installing Sprinter, see "Before You Begin" on page 7.
In this exercise, you will run the Credit Cards test. This test contains three testconfigurations. For the purpose of this exercise, you will perform the steps withouttesting them against the Mercury Tours application.
To run a test using Sprinter:
1. Open Sprinter.a. If the Test Lab module is not displayed, on the ALM sidebar, under Testing,
select Test Lab.b. Click the Execution Grid tab.c. Click the Run arrow and select Run with Sprinter. Micro Focus Sprinter opens.
2. Select the instances to run from the test set.a. Click the Open ALM Tests button. The Open dialog box opens.b. In the left pane, expand the Root folder. Under Service Pack 1, expand Cycle 1 -
New Features. Select the Mercury Tours Site test set. The test set is displayed.
c. Select American Express, Visa, and MasterCard check boxes. Click Open.3. Display the test steps to run the American Express instance.
TutorialChapter 5: Running Tests
ALM (12.60) Page 74 of 151

Click the Run the Active Test button. The Steps pane is displayed.4. Perform the first step.
a. Click the Actual Result button. In the Actual Result dialog box, type: The MercuryTours site opens. Click OK.
b. Click the Passed Selected Step button.5. Perform the second step.
a. Click the Actual Result button. In the Actual Result dialog box, type: Flight detailsand preference are entered. Click OK.
b. Click the Passed Selected Step button.6. Pass the remaining steps.
Click the Passed Selected Step arrow and select Pass All.7. Continue on to the Visa instance.
Click Next Test. Sprinter advances to the next instance in the test list.8. Pass all steps of the Visa instance.
Click the Passed Selected Step arrow and select Pass All.9. Continue on to the MasterCard instance.
Click Next Test. Sprinter advances to the next instance in the test list.10. Pass all steps of the MasterCard instance.
Click the Passed Selected Step arrow and select Pass All.11. Fail the last step on the MasterCard instance.
Select Step 8 and click the Fail Selected Step button.12. End the run and view run results.
a. In the upper-right side of your screen, click Run Control. The Run Control paneopens.
b. Click the End Run button.c. Under Tests, you view the run results.
13. View results in the Execution Grid tab.Close Sprinter.The test run results are displayed in the execution grid. The Last Run Report panedisplays run results of each test step.
Running with Manual RunnerIf Sprinter is not installed you can run tests manually using Manual Runner.
In this exercise, you will run the Credit Cards test. This test contains three testconfigurations. For the purpose of this exercise, you will perform the steps withouttesting them against the Mercury Tours application.
TutorialChapter 5: Running Tests
ALM (12.60) Page 75 of 151

To run a test using Manual Runner:
1. Make sure the Cycle 1 - New Features test set folder is displayed in the ExecutionGrid.a. If the Test Lab module is not displayed, on the ALM sidebar, under Testing,
select Test Lab.b. In the test set tree, expand the Cycle 1 - New Features test set folder under Service
Pack 1. Select the Mercury Tours Site test set.c. Click the Execution Grid tab.
2. Select the instances to run from the test set.Press the CTRL key and select the following instances in the Execution Grid:American Express, Visa, and MasterCard.
3. Open Manual Runner.Click the Run arrow and select Run with Manual Runner. The Manual Runner dialogbox opens.
4. Start the test run.Click the Begin Run button. The Manual Runner dialog box opens.
5. Perform the first step.a. In the Actual box, type: The Mercury Tours site opens.b. Click the Pass Selected button. Step 2 is displayed.
6. Perform the second step.a. In the Actual box, type: Flight details and preference are entered.b. Click the Pass Selected button. Step 3 is displayed.
TutorialChapter 5: Running Tests
ALM (12.60) Page 76 of 151

7. Pass the remaining steps.Click the Passed Selected arrow and select Pass All.
8. End the run.Click the End Run button to end your test run.
9. Continue on to the Visa instance.Click the Begin Run button. The Manual Runner dialog box opens. Note the name ofthe instance in the title bar.
10. Pass all steps of the Visa instance.Click the Passed Selected arrow and select Pass All.
11. End the run.Click the End Run button to end your test run.
12. Continue on to the MasterCard instance.Click the Begin Run button. The Manual Runner dialog box opens. Note the name ofthe instance in the title bar.
13. Fail all steps of the MasterCard instance.Click the Fail Selected arrow and select Fail All.
14. End the run.Click the End Run button to end your test run.
15. View the run results in the Execution Grid.Following the execution of your tests, you can view the run results of your last run inthe Execution Grid.
16. View the results of each test step in the Last Run Report pane.a. Select one of the recently run instances. If the Last Run Report pane is not
displayed, click the Show button on the bottom of the pane. The Last Run Reportpane is displayed below the Execution Grid.
TutorialChapter 5: Running Tests
ALM (12.60) Page 77 of 151

b. Click each step to view its description, as well as the expected and actualresults.
Running Tests in a Default Test Set AutomaticallyWhen you run an automated test from a Default test set, ALM automatically opens theselected testing tool, which runs the test on your local machine or on remote hosts, andimports the results to ALM.
You can run all tests in a test set or run specific tests. You can run tests from theExecution Grid tab or the Execution Flow tab.
In this exercise, you will run a UFT test.
Note: For prerequisites to running a UFT test, see "Before You Begin" on page 7.
To run a test automatically:
1. Make sure the Test Lab module is displayed.On the ALM sidebar, under Testing, select Test Lab.
2. Select the Number of Passengers test.a. In the test sets tree, expand the Mercury Tours Web Site test set folder. Under
Functionality And UI, select the Mercury Tours Functionality test set.b. Click the Execution Grid tab.c. Select the Number of Passengers test.
3. Open the Automatic Runner dialog box.
TutorialChapter 5: Running Tests
ALM (12.60) Page 78 of 151
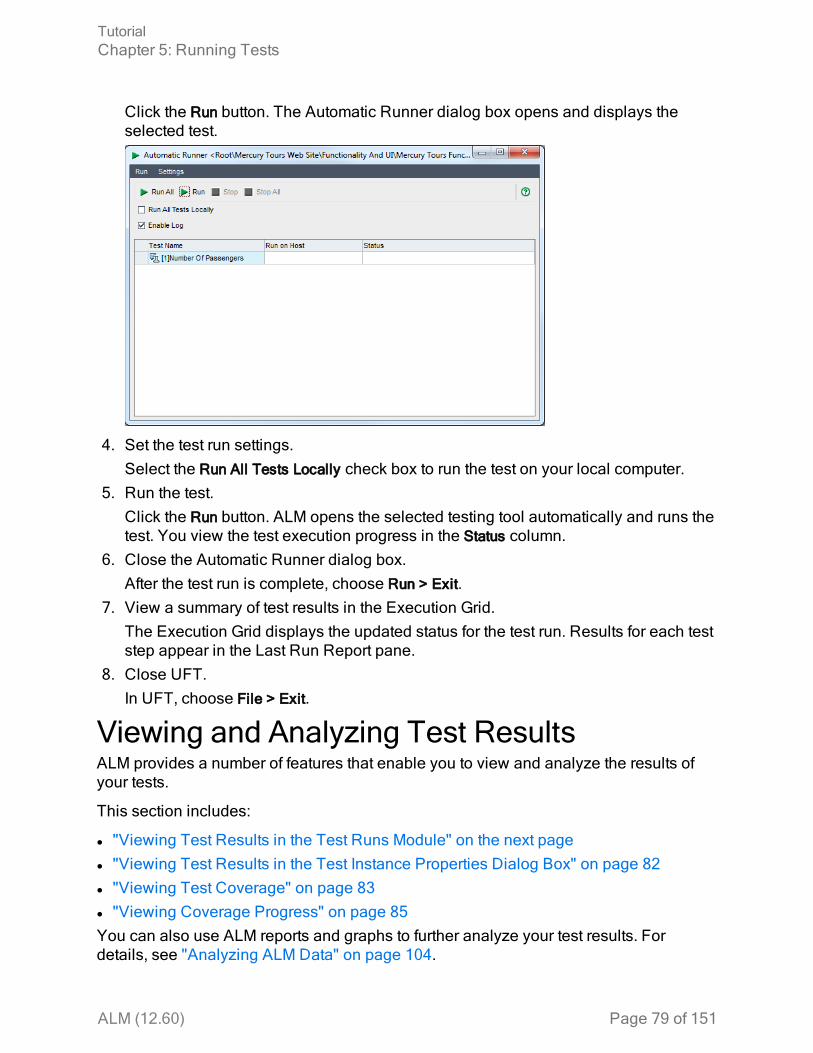
Click the Run button. The Automatic Runner dialog box opens and displays theselected test.
4. Set the test run settings.Select the Run All Tests Locally check box to run the test on your local computer.
5. Run the test.Click the Run button. ALM opens the selected testing tool automatically and runs thetest. You view the test execution progress in the Status column.
6. Close the Automatic Runner dialog box.After the test run is complete, choose Run > Exit.
7. View a summary of test results in the Execution Grid.The Execution Grid displays the updated status for the test run. Results for each teststep appear in the Last Run Report pane.
8. Close UFT.In UFT, choose File > Exit.
Viewing and Analyzing Test ResultsALM provides a number of features that enable you to view and analyze the results ofyour tests.
This section includes:
l "Viewing Test Results in the Test Runs Module" on the next pagel "Viewing Test Results in the Test Instance Properties Dialog Box" on page 82l "Viewing Test Coverage" on page 83l "Viewing Coverage Progress" on page 85You can also use ALM reports and graphs to further analyze your test results. Fordetails, see "Analyzing ALM Data" on page 104.
TutorialChapter 5: Running Tests
ALM (12.60) Page 79 of 151

Viewing Test Results in the Test Runs ModuleYou can view results for a test in the Test Runs module. You can use the grid tocompare the results of recent test runs with previous test runs.
In the below exercise, you will learn how to view test run information in the Test Runsmodule.
Viewing Functional Test Set Results in the Test SetRuns TabIf you are using ALM Edition with Lab Management enabled, you can view the results ofyour Functional test set runs in the Test Set Runs tab.
To view test set results in the Test Set Runs tab:
1. Make sure the Test Runs module is displayed.On the ALM sidebar, under Testing, select Test Runs.
2. View detailed test results from the Test Set Run Details dialog box.Click the Test Set Runs tab. Select the Mercury Tours Site test set run in the grid andclick the Test Set Run Details button. The Test Set Run Details dialog box opens,containing details about the test set run.
3. Close the Test Set Run Details dialog box.Click the Close button.
4. View test run information in the Execution Report page.
TutorialChapter 5: Running Tests
ALM (12.60) Page 80 of 151

Select the Mercury Tours Site test run and click the Show Report button. TheExecution Report page opens. The Execution Report page displays informationabout the overall test set run and detailed information about each test instance run.
Viewing Test Results in the Test Runs TabIn this exercise, you view the results of individual test instance runs.
To view test results in the Test Runs tab:
1. Make sure the Test Runs module is displayed.On the ALM sidebar, under Testing, select Test Runs.
2. View detailed test results from the Test Run Details dialog box.Make sure the Test Runs tab is displayed. Select the American Express test run andclick the Test Run Details button. The Test Run Details dialog box opens.
3. View other test run information in the Test Run Details dialog box.a. Click Report to display results and test step details of the run.b. Click Linked Defects to list the defects linked to the run.c. Click History to list the changes made to the run.
4. Close the Test Set Run Details dialog box.Click the Close button.
TutorialChapter 5: Running Tests
ALM (12.60) Page 81 of 151

Viewing Test Results in the Test Instance PropertiesDialog BoxYou can view results for a test in the Test Instance Properties dialog box. This includesdetails of a test’s runs, attachments, linked defects, and history.
To view test results in the Test Instance Properties dialog box:
1. Make sure the Test Lab module is displayed.On the ALM sidebar, under Testing, select Test Lab.
2. Make sure the Cycle 1 - New Features test set folder is displayed.a. In the test set tree, expand the Cycle 1 - New Features test set folder under Service
Pack 1. Select the Mercury Tours Site test set.b. Click the Execution Grid tab.
3. Select American Express in the Execution Grid.In the Execution Grid tab, select American Express.
4. View detailed test results from the Test Instance Details dialog box.Click the Test Instance Details button. The Test Instance Details dialog box opens.
5. View test run information.Click Runs. The run details are displayed.
6. View other test run information in the Test Instance Details dialog box.a. Click Execution Settings to view parameters used to run the instance. Note that
any changes that you make are implemented in the next test run.
TutorialChapter 5: Running Tests
ALM (12.60) Page 82 of 151

b. Click Linked Defects. This view lists the defects linked to the currently selectedtest instance. You can view, add, and remove defect links.
c. Click History to view a list of changes made to the test run fields.7. Close the Test Instance Details dialog box.
Click the Close button.
Viewing Test CoverageYou previously saw how you can use the Coverage Analysis view to analyze thebreakdown of child requirements according to their tests coverage (see "AnalyzingCoverage" on page 44).
In this exercise, you will learn how to filter the tests included in the coverage analysis bycycle.
To view test coverage:
1. Display the Coverage Analysis view in the Requirements module.a. On the ALM sidebar, under Requirements, select Requirements.b. Choose View > Coverage Analysis. The Coverage Analysis view is displayed.
2. Filter the coverage analysis by cycle.a. On the upper-right side of the window, click the Settings button. The Analysis
Settings dialog box opens.b. Select Execution Analysis. Click the arrow. In the releases tree, expand the
release folder Service Packs and the release Service Pack 1. Select the Cycle 1 -New Features check box and click OK.
c. Click OK to close the Analysis Settings dialog box.
TutorialChapter 5: Running Tests
ALM (12.60) Page 83 of 151

d. Expand the Payments requirement. In the Coverage Analysis column, you cansee that the requirement has failed. This is because the Credit Cards test thatcovers the requirement failed.
3. Display test coverage details for the Credit Cards requirement.a. Right-click the Credit Cards requirement, and choose Coverage Analysis. The
Coverage Analysis dialog box opens.b. Click the Show Test Coverage link to extend the Coverage Analysis dialog box
and display the Test Coverage Chart.
TutorialChapter 5: Running Tests
ALM (12.60) Page 84 of 151

c. This pie chart graphically displays the full test coverage for the requirement,grouped according to test status.
d. Click the pie chart to open the Test Coverage dialog box.
The dialog box shows the failed test together with the test run status of each testconfiguration.
e. Close the Test Coverage dialog box.4. Close the Coverage Analysis dialog box.
Click the Close button.
Viewing Coverage ProgressYou were previously introduced to the Progress tab in the Releases module (see"Viewing Releases and Cycles" on page 21).
In this exercise, you will view the graphs and statistics that now reflect the results oftests you ran in previous exercises.
To view coverage progress:
1. Display the Releases module.On the ALM sidebar, under Management, select Releases.
2. View the effect of your test runs on the Progress tab.
TutorialChapter 5: Running Tests
ALM (12.60) Page 85 of 151

In the releases tree, expand the release folder Service Packs and the release ServicePack 1. Select Cycle 1 - New Features and click the Progress tab.
The top pane shows information such as the total and remaining days in the cycle,total test instances for the cycle, and actual and remaining test instances to run.The bottom pane displays the Coverage Progress graph. Planned coverage indicatesthe percentage of tests planned to be run each day within a cycle. Executed coverageindicates the percentage of tests that ran each day within a cycle. Passed coverageindicates the percentage of tests that ran successfully each day within a cycle.
TutorialChapter 5: Running Tests
ALM (12.60) Page 86 of 151

Chapter 6: Adding and Tracking DefectsLocating and repairing defects is an essential phase in application development.Defects can be detected and submitted by users in all stages of the application lifecyclemanagement process. Using ALM, you can submit defects detected in the applicationand track them until they have been repaired and retested.
In this lesson, you will learn about:
• How to TrackDefects 88• Adding New Defects 88• Matching Defects 90• Updating Defects 91• Linking Defects to Tests 93• Creating Favorite Views 95
ALM (12.60) Page 87 of 151

How to Track DefectsWhen you submit a defect to an ALM project, it is tracked through these stages: New,Open, Fixed, and Closed. A defect may also be Rejected or it may be Reopened after itis fixed.
When you initially report the defect to an ALM project, it is assigned the status New, bydefault. A quality assurance or project manager reviews the defect and determineswhether or not to consider the defect for repair. If the defect is denied, it is assigned thestatus Rejected. If the defect is accepted, the quality assurance or project managerdetermines a repair priority, changes its status to Open, and assigns it to a member ofthe development team. A developer repairs the defect and assigns it the status Fixed.You then retest the application, making sure that the defect does not recur.
If the defect recurs, the quality assurance or project manager assigns it the statusReopened. If the defect is repaired, the quality assurance or project manager assigns itthe status Closed.
Adding New DefectsYou can add a new defect to an ALM project at any stage of the application lifecyclemanagement process. In this exercise, you will submit a defect connected to the FlightConfirmation test.
To add a defect:
1. Open the ALM_Demo project.If the ALM_Demo project is not already open, log in to the project. For details, see"Starting ALM" on page 10.
2. Display the Defects module.On the ALM sidebar, select Defects. The Defects Grid displays defect data in a grid.Each row in the grid displays a separate defect record.
TutorialChapter 6: Adding and Tracking Defects
ALM (12.60) Page 88 of 151

3. Open the New Defect dialog box.Click the New Defect button. The New Defect dialog box opens.
4. Describe the defect.Enter the following data in the specified fields. Scroll down the dialog box asnecessary.Summary: Missing information on Flight Confirmation page.Category: DefectSeverity: 2-MediumSubject: Flight Reservation > Flight ConfirmationDescription: The defect was detected on the Flight Confirmation page. Passengerdetails and meal preferences are not displayed
5. Determine the cycle in which the defect was detected.a. In the Detected in Cycle box, click the arrow. The releases tree opens. Expand
the tree. In the Mercury Tours Application releases folder, in the Release 10.5release, select the Cycle 1 - New Features cycle.
b. Click OK to close the releases tree.You can see that ALM automatically assigns the value Release 10.5 to theDetected in Release field. This is because Cycle 1 - New Features is part of theRelease 10.5 release.
6. Attach the URL address for the Mercury Tours page where the defect was detected.a. On the New Defect dialog box sidebar, click Attachments. The Attachment page
opens.b. Click the URL button. The Attach Uniform Resource Locator (URL) dialog box
opens.
TutorialChapter 6: Adding and Tracking Defects
ALM (12.60) Page 89 of 151

c. Type the URL address of the Mercury Tours page:http://newtours.demoaut.com/
d. Click OK. A link to the Mercury Tours page is displayed above the Descriptionbox.
7. Add the defect to the ALM project.a. Click the Submit button. The defect is added to the Defects Grid.b. Click Close to close the New Defect dialog box.
Matching DefectsIdentifying matching defects enables you to eliminate duplicate or similar defects in yourproject. Each time you add a new defect, ALM stores lists of keywords from the Summaryand Description fields. When you search for similar defects, keywords in these fields arematched against other defects. Note that keywords must be more than two characterslong, and letter case does not affect your results.
In this exercise, you will match defects by comparing a selected defect with all otherexisting defects in the ALM_Demo project.
To match defects:
1. Make sure that the Defects module is displayed.If the Defects module is not displayed, on the ALM sidebar, select Defects.
2. Select the Defect.a. If a filter is applied to the grid, click the Set Filter/Sort arrow and choose Clear
Filter/Sort to clear the filter.b. In the Defects Grid, select the defect you added in "Adding New Defects" on
page 88.3. Find similar defects.
Click the Find Similar Defects button. The results are displayed in the Similar Defectspane at the bottom of the window, sorted by the percentage of detected similarity.Note that there are no duplicate defects in the project for the selected defect.
Close the Similar Defects pane.
TutorialChapter 6: Adding and Tracking Defects
ALM (12.60) Page 90 of 151

Updating DefectsTracking the repair of defects in a project requires that you periodically update defects.You can do so directly in the Defects Grid or in the Defect Details dialog box. The abilityto update some defect fields depends on your permission settings. After you haveupdated defects, you can view the quality status of your release in the Releasesmodule.
In this exercise, you will update your defect information by changing the severity of adefect, assigning the defect to a cycle, and adding a comment. You will then see howupdating defects is reflected in the Quality tab of the Releases module.
In addition, you will practice updating multiple records simultaneously.
To update defects:
1. Make sure that the Defects module is displayed.If the Defects module is not displayed, on the ALM sidebar, select Defects.
2. Open the Defect Details dialog box.In the Defects Grid, select the defect you added in "Adding New Defects" onpage 88. Click the Defect Details button. The Defect Details dialog box opens.
3. Change the severity level of the defect.In the Severity box, select 5-Urgent.
4. Determine the cycle in which the defect will be fixed.a. In the Target Cycle box, click the arrow. The releases tree opens. Expand the
tree. In the Mercury Tours Application releases folder, in the Release 10.5 release,
TutorialChapter 6: Adding and Tracking Defects
ALM (12.60) Page 91 of 151

select the Cycle 4 a - Full cycle.b. Click OK to close the releases tree.
You can see that ALM automatically assigns the value Release 10.5 to the TargetRelease field. This is because the Cycle 4 a - Full cycle is part of the Release 10.5release.
5. Add a new comment to explain the change in the severity level.a. Click the Add Comment button. A new section is added to the Comments box,
displaying your user name and the current date.b. Type: This defect should be fixed in the next service pack.
6. View the Attachments.Click Attachments on the sidebar. Note that the URL attachment is listed.
7. View Linked Entities.Click Linked Entities on the sidebar to view entities that have been linked to thedefect. Linked entities can include requirements, tests, test sets, test instances, runs,run steps, and other defects. There are currently no linked entities. You will learnhow to link a defect to a test in "Linking Defects to Tests" on the next page.
8. View the History.Click History on the sidebar to view the history of changes made to the defect. Foreach change, the grid displays the date and time of the change and the name of theuser who made the change. You can expand a change to view a list of fieldsmodified during the change. For each field, the grid displays the old value and thenew value.
9. Close the Defect Details dialog box.Click OK to exit the dialog box.
10. Update defects directly in the Defects Grid.a. In the Defects Grid, select defect 35.b. Click the Detected in Cycle box and click the arrow. In the releases tree, expand
the release folder Mercury Tours Application and the release Release 10.5. Selectthe Cycle 1 - New Features cycle and click OK.
c. Drag the horizontal scroll bar to the right until the Target Cycle column comes intoview. Click the Target Cycle box, and click the arrow. In the releases tree, expandthe release folder Mercury Tours Application and the release Release 10.5. Selectthe Cycle 1 - New Features cycle and click OK.
11. Update multiple records simultaneously.a. In the Defects Grid, select defect 35.b. Hold down the CTRL key, and select defect 36. Now both defects 35 and 36 are
selected.c. Select Edit > Update Selected. The Update Selected dialog box opens.d. Click the arrow adjacent to the Update Field box, and select Assigned To. Notice
TutorialChapter 6: Adding and Tracking Defects
ALM (12.60) Page 92 of 151
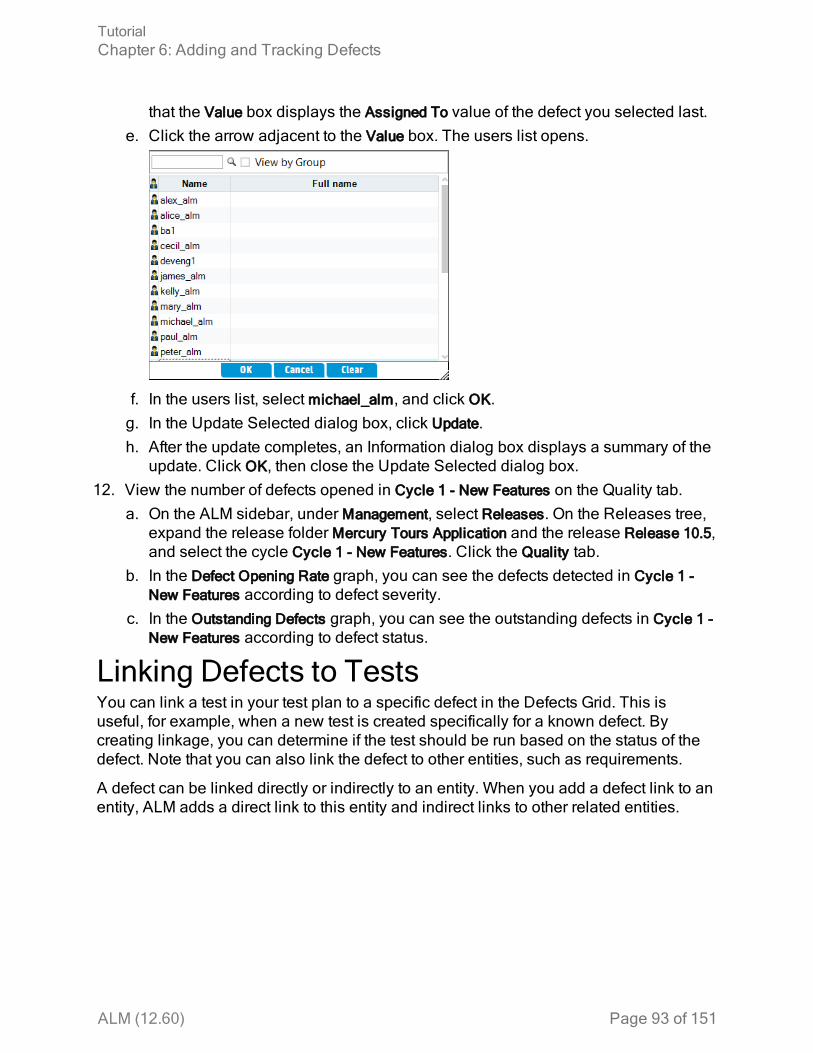
that the Value box displays the Assigned To value of the defect you selected last.e. Click the arrow adjacent to the Value box. The users list opens.
f. In the users list, selectmichael_alm, and click OK.g. In the Update Selected dialog box, click Update.h. After the update completes, an Information dialog box displays a summary of the
update. Click OK, then close the Update Selected dialog box.12. View the number of defects opened in Cycle 1 - New Features on the Quality tab.
a. On the ALM sidebar, under Management, select Releases. On the Releases tree,expand the release folder Mercury Tours Application and the release Release 10.5,and select the cycle Cycle 1 - New Features. Click the Quality tab.
b. In the Defect Opening Rate graph, you can see the defects detected in Cycle 1 -New Features according to defect severity.
c. In the Outstanding Defects graph, you can see the outstanding defects in Cycle 1 -New Features according to defect status.
Linking Defects to TestsYou can link a test in your test plan to a specific defect in the Defects Grid. This isuseful, for example, when a new test is created specifically for a known defect. Bycreating linkage, you can determine if the test should be run based on the status of thedefect. Note that you can also link the defect to other entities, such as requirements.
A defect can be linked directly or indirectly to an entity. When you add a defect link to anentity, ALM adds a direct link to this entity and indirect links to other related entities.
TutorialChapter 6: Adding and Tracking Defects
ALM (12.60) Page 93 of 151

The following diagram illustrates the flow of indirect linkage:
For instance, when you link a defect to a run step, it adds an indirect link to its run, testinstance, test set, and test. If the same test is covered by a requirement, an indirect linkis also added to the requirement. Note that the indirect linkage is a one-directional flow.For example, if you link a defect to a run, it is not indirectly linked to its run steps.
In this exercise, you will link your defect to the Flight Confirmation test in the Test Planmodule, and view the linked test in the Defects Grid.
To link a defect to a test:
1. Display the Test Plan module.On the ALM sidebar, under Testing, select Test Plan.
2. Select the Flight Confirmation test.In the test plan tree, under Flight Reservation, expand the Flight Confirmation testsubject, and select the Flight Confirmation test. Click the Linked Defects tab.
3. Add a linked defect.a. In the Linked Defects tab, click the Link Existing Defect arrow and choose Select.
The Defects to Link dialog box opens.
TutorialChapter 6: Adding and Tracking Defects
ALM (12.60) Page 94 of 151

b. Select the defect you added in "Adding New Defects" on page 88 and click theLink button. Your defect is added to the Linked Defects grid.
Tip: If you cannot find your defect in the Defects to Link dialog box, clickthe Set Filter/Sort arrow and choose Clear Filter/Sort to clear the filter that isapplied to the grid.
4. View the linked test in the Defects Grid.a. On the ALM sidebar, select Defects.b. In the Defects Grid, click the defect ID of the defect you added in "Adding New
Defects" on page 88. The Defect Details dialog box opens.c. Click Linked Entities on the sidebar, and select the Others tab. The Flight
Confirmation test is linked to your defect.d. Click OK to close the Defect Details dialog box.
Creating Favorite ViewsA favorite view is a view of an ALM window configured with the settings you applied toit. For example, in the Defects Grid, you may want to apply a filter to display only thedefects that were detected by you, are assigned to you, or have the status “Not Closed”.
In this exercise, you will create a favorite view in the Defects Grid.
To create a favorite view:
TutorialChapter 6: Adding and Tracking Defects
ALM (12.60) Page 95 of 151

1. Make sure that the Defects module is displayed.If the Defects module is not displayed, on the ALM sidebar, select Defects.
2. Define a filter to view defects you detected that are not closed.a. Click the Set Filter/Sort button. The Filter defects dialog box opens.
b. For the Detected By field, click the Filter Condition box. Click the arrow. The SelectFilter Condition dialog box opens.
c. Under Name, select the [CurrentUser] variable, or select your ALM login namefrom the list. Click OK to close the Select Filter Condition dialog box.
d. For the Status field, click the Filter Condition box. Click the arrow. The SelectFilter Condition dialog box opens.
e. In the right pane, click the logical expression Not.
TutorialChapter 6: Adding and Tracking Defects
ALM (12.60) Page 96 of 151
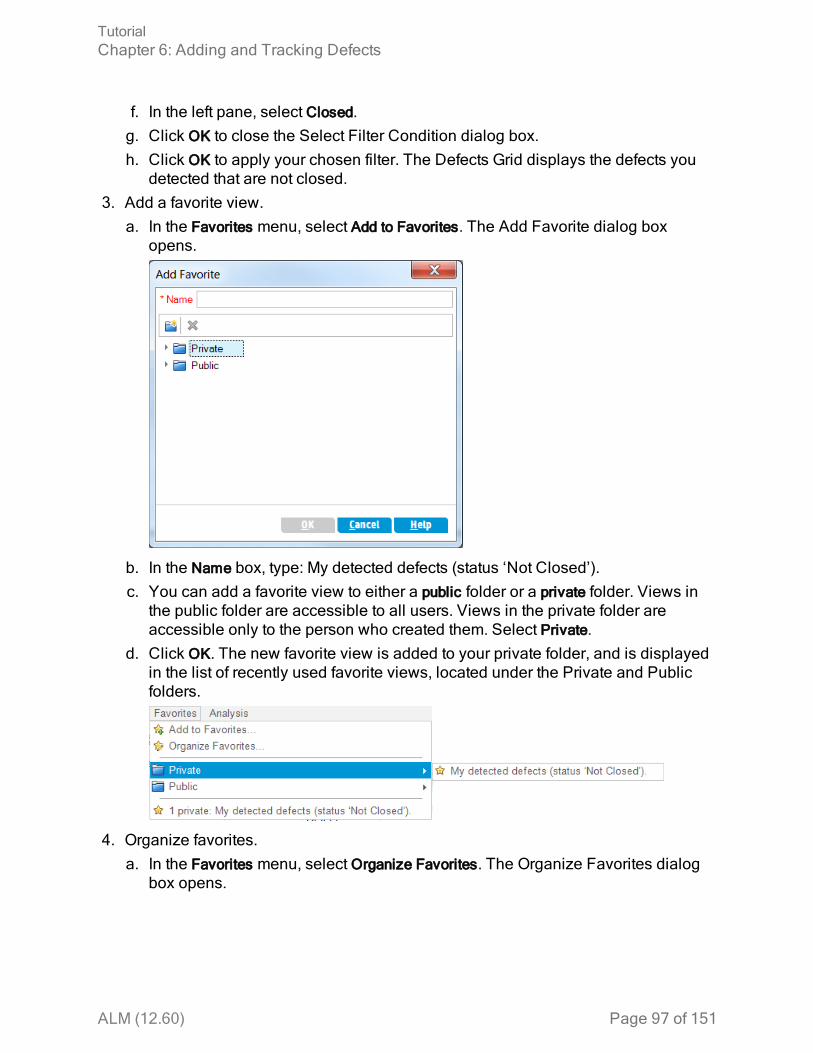
f. In the left pane, select Closed.g. Click OK to close the Select Filter Condition dialog box.h. Click OK to apply your chosen filter. The Defects Grid displays the defects you
detected that are not closed.3. Add a favorite view.
a. In the Favorites menu, select Add to Favorites. The Add Favorite dialog boxopens.
b. In the Name box, type: My detected defects (status ‘Not Closed’).c. You can add a favorite view to either a public folder or a private folder. Views in
the public folder are accessible to all users. Views in the private folder areaccessible only to the person who created them. Select Private.
d. Click OK. The new favorite view is added to your private folder, and is displayedin the list of recently used favorite views, located under the Private and Publicfolders.
4. Organize favorites.a. In the Favorites menu, select Organize Favorites. The Organize Favorites dialog
box opens.
TutorialChapter 6: Adding and Tracking Defects
ALM (12.60) Page 97 of 151

b. Double-click the Public folder.c. Click the New Folder button. The New Favorite Folder dialog box opens.d. In the Favorite Folder Name box, type QA defects, and click OK. The QA defects
folder is added as a sub-folder to the Public folder.
e. Drag the following favorites into the QA defects folder:o QA Bug Verificationo QA Team Member - My Fixed and Rejected defects
f. Click Yes to confirm, and close the Organize Favorites dialog box.
TutorialChapter 6: Adding and Tracking Defects
ALM (12.60) Page 98 of 151

Chapter 7: Alerting on ChangesYou can instruct ALM to create alerts automatically and send emails to notify thoseresponsible when certain changes occur in your project that may impact the applicationlifecycle management process. You can also add your own follow-up alerts.
To generate automatic notification alerts, your ALM project administrator must activatealert rules in Project Customization. Alert rules are based on associations you make inALM between requirements, tests, and defects. When an entity in your project changes,ALM alerts any associated entities that may be impacted by the change. The alerts canbe seen by all users. ALM also notifies the person responsible for the entity at the time ofthe change of any associated entities that may be impacted by the change.
ALM also enables you to add your own follow-up flag to a specific requirement, test, testinstance, or defect to remind you to follow up on an issue. When the follow-up datearrives, ALM sends you an email reminder.
In this lesson, you will learn about:
• Triggering an Alert 100• Creating Follow Up Alerts 102
ALM (12.60) Page 99 of 151

Triggering an AlertWhen a requirement, test, test instance, or defect in your project changes, ALM cannotify those responsible for any associated entities. You can associate tests withrequirements (see "Creating and Viewing Coverage" on page 41) and defects with otherALM entities (see "Linking Defects to Tests" on page 93). In addition, you can createtraceability links between requirements. For details on creating traceability linksbetween requirements, see the Application Lifecycle Management User Guide.
ALM can generate alerts for these changes:
What changed?
Which associatedentities areflagged?
Who isnotified?
Requirement (excluding change of Direct CoverStatus and risk-based quality management fields)
Tests Testdesigners
Requirements Requirementauthors
Defect status changed to Fixed Test instances Responsibletesters
Test ran successfully Defects Usersassigned todefects
In this exercise, you will trigger alerts for tests by changing the associated requirement.You will modify the View Reservations requirement and then you will view the flaggedtests.
To trigger an alert:
1. Display the requirements tree.a. On the ALM sidebar, under Requirements, select Requirements.b. In the Requirements module, select View > Requirement Details.
2. Select the requirement that you want to change.Under Reservation Management, select the View Reservations requirement.
3. View the associated tests.To view the tests that will be impacted by the change, click the Test Coverage tab.The tab displays the associated tests.
4. Change the priority of the View Reservations requirement.a. Click the Details tab.b. Click the down arrow adjacent to the Priority box and select 5-Urgent.
TutorialChapter 7: Alerting on Changes
ALM (12.60) Page 100 of 151
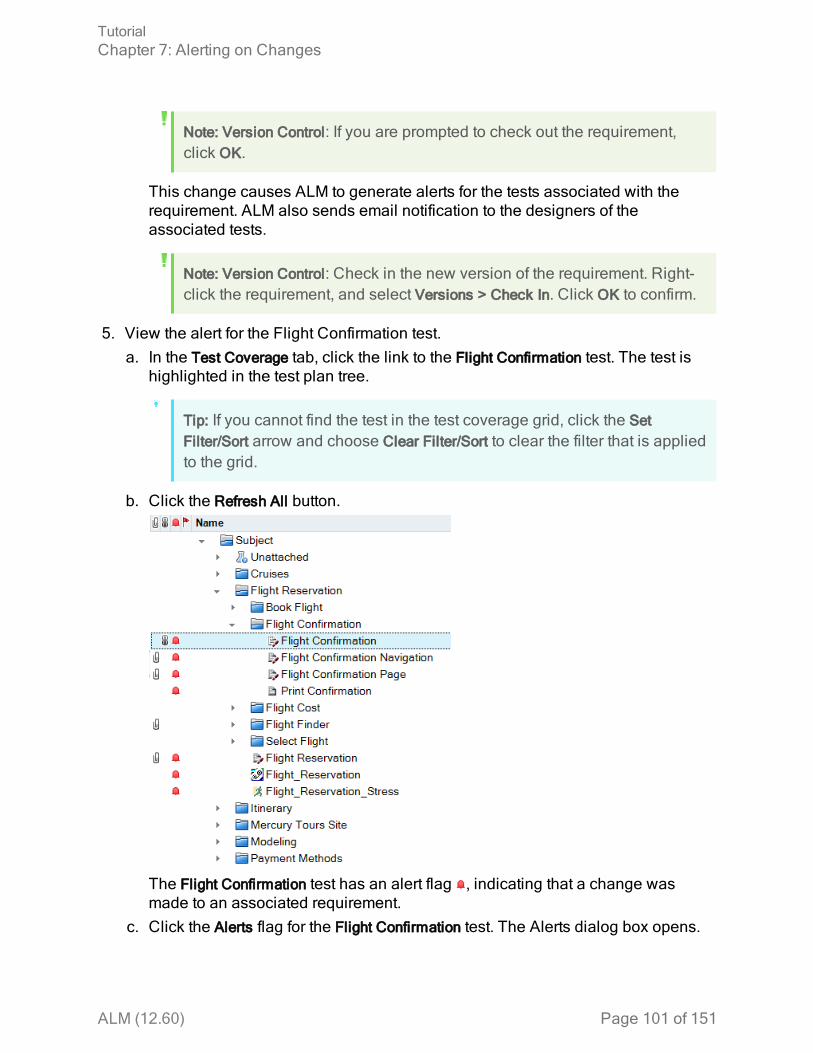
Note: Version Control: If you are prompted to check out the requirement,click OK.
This change causes ALM to generate alerts for the tests associated with therequirement. ALM also sends email notification to the designers of theassociated tests.
Note: Version Control: Check in the new version of the requirement. Right-click the requirement, and select Versions > Check In. Click OK to confirm.
5. View the alert for the Flight Confirmation test.a. In the Test Coverage tab, click the link to the Flight Confirmation test. The test is
highlighted in the test plan tree.
Tip: If you cannot find the test in the test coverage grid, click the SetFilter/Sort arrow and choose Clear Filter/Sort to clear the filter that is appliedto the grid.
b. Click the Refresh All button.
The Flight Confirmation test has an alert flag , indicating that a change wasmade to an associated requirement.
c. Click the Alerts flag for the Flight Confirmation test. The Alerts dialog box opens.
TutorialChapter 7: Alerting on Changes
ALM (12.60) Page 101 of 151

The alert indicates the requirement and the change that triggered the alert. It alsoindicates the name of the person to whom ALM sends email notification of thischange.
Note: Version Control: The alert states that the version status has changedto Checked In. It does not indicate which fields have been modified. Youcan then compare the new version with the previous version.
d. Click OK.6. View the alerts of the other associated tests.
In the test plan tree, view the alerts of the following tests: Itinerary > Itinerary Pageand Itinerary > View Reservations > Review Reservations.
Creating Follow Up AlertsALM enables you to add your own alerts to remind you to follow up on outstandingissues. In this exercise, you will add a follow-up flag to a defect whose status you wantto check one week from today.
When you add a follow-up flag, ALM also adds an information bar that reminds youabout the follow-up alert. When the follow-up date arrives, ALM sends you an emailreminder, and changes the flag icon from gray to red.
Follow-up flags are specific to your user name, meaning that only you can see yourfollow-up alerts.
To create a follow up alert:
1. Display the Defects module.On the ALM sidebar, select Defects.
2. Select the defect that you want to flag with a follow up reminder.In the Defects Grid, select a defect.
3. Create the follow up alert.
TutorialChapter 7: Alerting on Changes
ALM (12.60) Page 102 of 151

a. Click the Flag for Follow Up button. The Flag For Follow Up dialog box opens.
b. Perform the following:Follow up by: Select the date one week from today.Description: Type: Remind me about this defect on this date.
c. Click OK. The flag icon is added to the defect record.
TutorialChapter 7: Alerting on Changes
ALM (12.60) Page 103 of 151

Chapter 8: Analyzing ALM DataALM reports and graphs help you assess your application lifecycle managementprocess. You can generate reports and graphs at any time during the process.
Project reports enable you to design and generate versatile reports containinginformation from the ALM project.
You can create graphs or project reports either in the Analysis View module, or duringyour work in the Requirements, Test Plan, Test Lab, Business Components, or Defectsmodules. In either case, you can save the graphs and reports in the Analysis Viewmodule for future reference.
Using the Dashboard View module, you can also create dashboard pages that displaymultiple graphs side-by-side.
In this lesson, you will learn about:
• Generating Project Reports 105• Generating Graphs 109• Generating Business View Excel Reports 119• Generating Dashboard Pages 123
ALM (12.60) Page 104 of 151

Generating Project ReportsProject reports enable you to compile versatile reports of project data.
In a project report, you define sections and sub-sections, each listing records of aspecified ALM entity.
To each report section, you assign a template that determines the fields and layout ofthe section. You also assign document and style templates that determine the overallreport appearance.
In this exercise, you will create a report of tests with their linked defects.
To generate a project report:
1. Open the ALM_Demo project.If the ALM_Demo project is not already open, log in to the project. For details, see"Starting ALM" on page 10.
2. Display the Analysis View module.On the ALM sidebar, under Dashboard, select Analysis View.
3. Add a folder to the Private root folder.a. In the tree, select the Private folder.b. Click the New Folder button. The New Folder dialog box opens.c. Under Folder Name, type My_Analysis_Items.d. Click OK. The new folder is added as a sub-folder of the Private folder. The
Details tab displays the folder name and the user who created the folder.e. In the Description tab, type This folder includes my demo analysis items.
4. Create a project report.a. Click the New Item button and select New Project Report. The New Project Report
dialog box opens.b. In the Project Report Name box, type Reviewed tests and linked defects.c. Click OK. A new project report is added to the folder you created. Notice that the
icon represents a project report.
TutorialChapter 8: Analyzing ALM Data
ALM (12.60) Page 105 of 151

The Configuration tab is selected.
5. Add a main section to report.a. Click the Add Report Section button. The Add Report Section dialog box opens.b. Under Type, select Tests. The default section name Tests displays in the Name
field.
c. Click OK. The Tests section is added to the report tree, under the Document rootfolder.
6. Add a sub-section to the report.a. In the report tree, right-click the Tests section, and select Add Report Section.
In the Add Report Section dialog box, you can select an entity related to the mainsection.
b. Under Type, select Defects. The Relationship field describes the nature of therelationship between the tests and defects. The default section name LinkedDefects displays in the Name field.
TutorialChapter 8: Analyzing ALM Data
ALM (12.60) Page 106 of 151
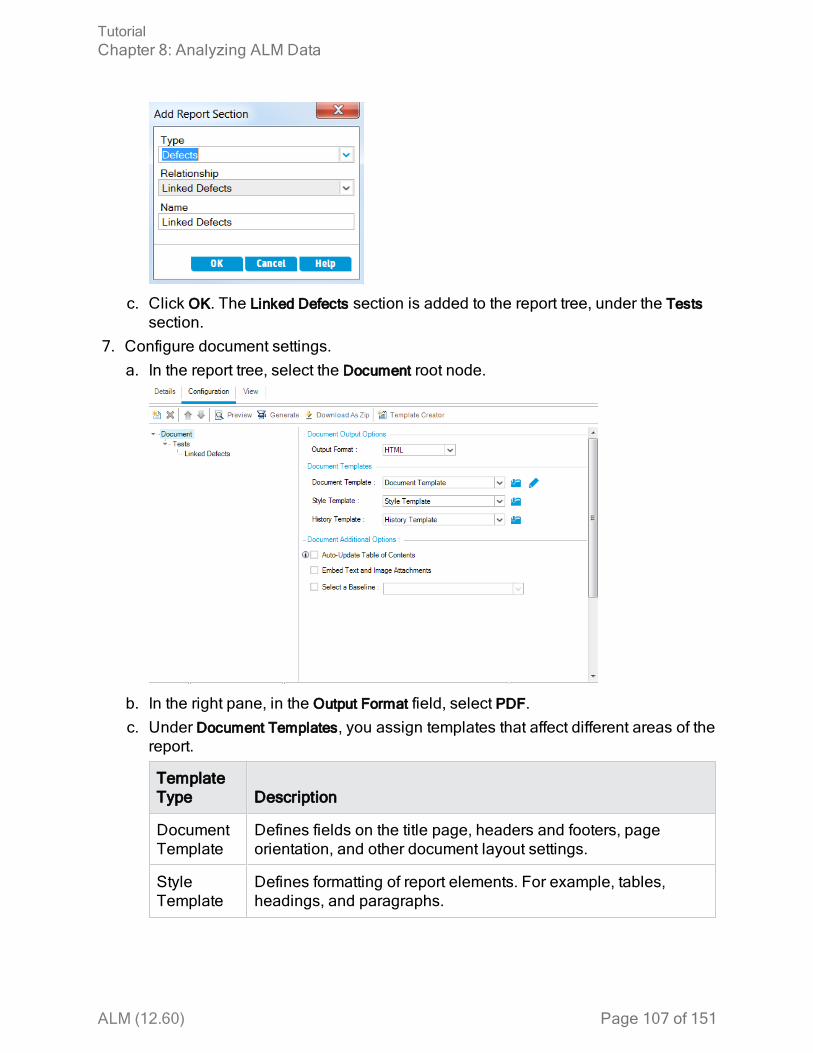
c. Click OK. The Linked Defects section is added to the report tree, under the Testssection.
7. Configure document settings.a. In the report tree, select the Document root node.
b. In the right pane, in the Output Format field, select PDF.c. Under Document Templates, you assign templates that affect different areas of the
report.
TemplateType Description
DocumentTemplate
Defines fields on the title page, headers and footers, pageorientation, and other document layout settings.
StyleTemplate
Defines formatting of report elements. For example, tables,headings, and paragraphs.
TutorialChapter 8: Analyzing ALM Data
ALM (12.60) Page 107 of 151

TemplateType Description
HistoryTemplate
Defines the style in which history information is displayed inreport sections.
Default templates are assigned to the different template types. Additionaltemplates can be designed by the project administrator in Project Customization.
d. Click the Edit Document Field Values button alongside the Document Templatefield. The Edit Document Template Field Values dialog box opens.
The dialog box enables you to type values for fields in areas such as the titlepage, headers and footers, as defined in the document template.
e. For each field name, type the following values:
Field Name Field Value
Project ALM Demo Project
Title1 Interim Report
summary An interim report of reviewed tests and their linked defects.
Author Alex ALM
f. Click OK.
TutorialChapter 8: Analyzing ALM Data
ALM (12.60) Page 108 of 151

8. Configure the Tests report section.a. In the report tree, select the Tests section.
b. Under Report Section Details, in the Name field, rename the section ReviewedTests. The section name is used as the section title in the report.
c. Under Template Details, make sure Project Template is selected.d. Click the arrow, and select Test Template created by Alice. The template you
assign to the section determines the section format, and the entity fieldsdisplayed in the section.
e. Under Filter, click the Set Filter/Sort button. The Filter Tests dialog box opens.f. Click the arrow adjacent to the Reviewed field.g. In the Select Filter Condition dialog box, select Reviewed, and click OK.h. Click OK to close the Filter Tests dialog box.
9. Configure the Linked Tests report section.a. Select the Linked Defects section.b. Click the arrow alongside Project Template, and select Defect Tabular Template.
Tabular templates display records in rows of a table.10. Generate the report.
Click Generate. A dialog box opens, displaying the progress of the report generation.When the report is ready, a PDF reader opens, displaying the report results.
Generating GraphsYou can create graphs in the Analysis View module, that display data from theRequirements, Test Plan, Test Lab, Business Components, and Defects modules. You
TutorialChapter 8: Analyzing ALM Data
ALM (12.60) Page 109 of 151

can also create predefined graphs directly from the Requirements, Test Plan, Test Lab,Business Components, and Defects modules. In either case, you can use a graphwizard to guide you through the stages of creating a graph.
You can create two types of graphs, entity graphs or business view graphs. Entitygraphs display data directly from the various modules. Business view graphs are basedon project entities, and ensure that only information that is relevant to a businessconsumer is contained in the graph.
After creating a graph, you can share the graph for viewing in a Web browser outsideALM.
This section includes:
• Generating Entity Graphs in the Analysis View Module 110• Generating Business View Graphs in the Analysis View Module 113• Generating PredefinedGraphs 116• Sharing Graphs 117
Generating Entity Graphs in the Analysis ViewModuleIn the Analysis View module, you can create graphs and configure them according toyour specifications. You can also create a graph using the graph wizard. The graphwizard takes you through the steps involved in creating a graph and defining its settings.
You create graphs in either a public folder or a private folder. Graphs in a public folderare accessible to all users. Graphs in a private folder are accessible only to the user whocreated them.
In this exercise, you will use the graph wizard to generate an entity graph thatsummarizes the defects by status and priority level.
To generate an entity graph in the Analysis View module:
1. Make sure the Analysis View module is displayed.If the Analysis View module is not displayed, on the ALM sidebar, under Dashboard,select Analysis View.
2. Open the graph wizard.Click the New Item button and select Graph Wizard. The graph wizard opens to theSelect Graph Type page.
3. Select the graph type.Select Entity Graph.
4. Select the entity type.a. Click Next. The Select Entity Type page opens.b. Under Entity, select Defects.
TutorialChapter 8: Analyzing ALM Data
ALM (12.60) Page 110 of 151

c. Under Graph Type, make sure Summary Graph is selected.5. Select the projects to include.
a. Click Next. The Select Projects page opens.b. You can include data from multiple projects in the graph. For this exercise, we
will use only the current project. Make sure Use Current Project is selected.6. Define a filter to view defects with high to urgent priority.
a. Click Next. The Select Filter page opens.b. Under Filter Selection, select Define a new filter. Click the Filter button. The Filter
defects dialog box opens.c. Click the down arrow adjacent to the Priority field. The Select Filter Condition
dialog box opens.d. In the right pane, select the logical expression >=.e. In the left pane, select 3-High. The condition appears as follows:
f. Click OK to close the Select Filter Condition dialog box.7. Define a filter to view defects that are not closed.
a. Click the down arrow adjacent to the Status field. The Select Filter Conditiondialog box opens.
b. In the right pane, select the logical expression Not.c. In the left pane, select Closed. The condition appears as follows:
d. Click OK to close the Select Filter Condition dialog box.e. Click OK to close the Filter defects dialog box.
8. Set the graph attributes.a. Click Next. The Select Graph Attributes page opens.b. Under Group By field, make sure that it is set to <None>.c. Under X-axis field, select Priority to view the number of defects by priority.
9. Generate the Graph.Click Finish. The graph is displayed in the graph window.
TutorialChapter 8: Analyzing ALM Data
ALM (12.60) Page 111 of 151

The graph shows a summary of defects with High to Urgent priority, whose status isnot Closed.
10. Save the graph in the Analysis View module.a. Click Add to Analysis Tree. The New Graph dialog box opens.
b. Expand the Private folder, and selectMy_Analysis_Items.c. Click Save. The Defects Summary graph is saved in the analysis tree, and
displayed in the View tab.11. Display additional defect details.
TutorialChapter 8: Analyzing ALM Data
ALM (12.60) Page 112 of 151

a. Click a bar in the graph. The Drill Down Results dialog box opens and displaysthe defects that belong to the bar.
b. Close the Drill Down Results dialog box.12. Display other graph views.
a. Click the Pie Chart button to display the graph as a pie chart.b. Click the Data Grid button to display the data as a grid.
Generating Business View Graphs in the AnalysisView ModuleIn this exercise, you will use the graph wizard to generate a business view graph thatsummarizes the requirements by status and priority level.
To generate a business view graph in the Analysis View module:
1. Make sure the Analysis View module is displayed.If the Analysis View module is not displayed, on the ALM sidebar, under Dashboard,select Analysis View.
2. Open the graph wizard.Click the New Item button and select Graph Wizard. The graph wizard opens to theSelect Graph Type page.
3. Select the graph type.Select Business View Graph.
4. Select the business view.a. Click Next. The Select Business View page opens.b. Select Requirements.
5. Select the projects to include.
TutorialChapter 8: Analyzing ALM Data
ALM (12.60) Page 113 of 151

a. Click Next. The Select Projects page opens.b. You can include data from multiple projects in the graph. For this exercise, we
will use only the current project. Make sure Use Current Project is selected.6. Define a filter to view requirements with high to urgent priority.
a. Click Next. The Select Filter page opens.b. Click the down arrow in the Criteria column adjacent to the Priority field. The
Select Filter Condition dialog box opens.c. In the right pane, select the logical expression >=.d. In the left pane, select 3-High. The condition appears as follows:
e. Click OK to close the Select Filter Condition dialog box.7. Define a filter to view defects that are not closed.
a. Click the down arrow in the Criteria column adjacent to the Reviewed field. TheSelect Filter Condition dialog box opens.
b. In the left pane, select Not Reviewed. The condition appears as follows:
c. Click OK to close the Select Filter Condition dialog box.8. Set the graph attributes.
a. Click Next. The Select Graph Attributes page opens.b. Under X-axis, select Priority and under Y-axis, select Count to view the number of
requirements by priority.c. Under Grouped By, make sure that it is set to <None>.
9. Generate the Graph.Click Finish. The graph is displayed in the graph window.
TutorialChapter 8: Analyzing ALM Data
ALM (12.60) Page 114 of 151
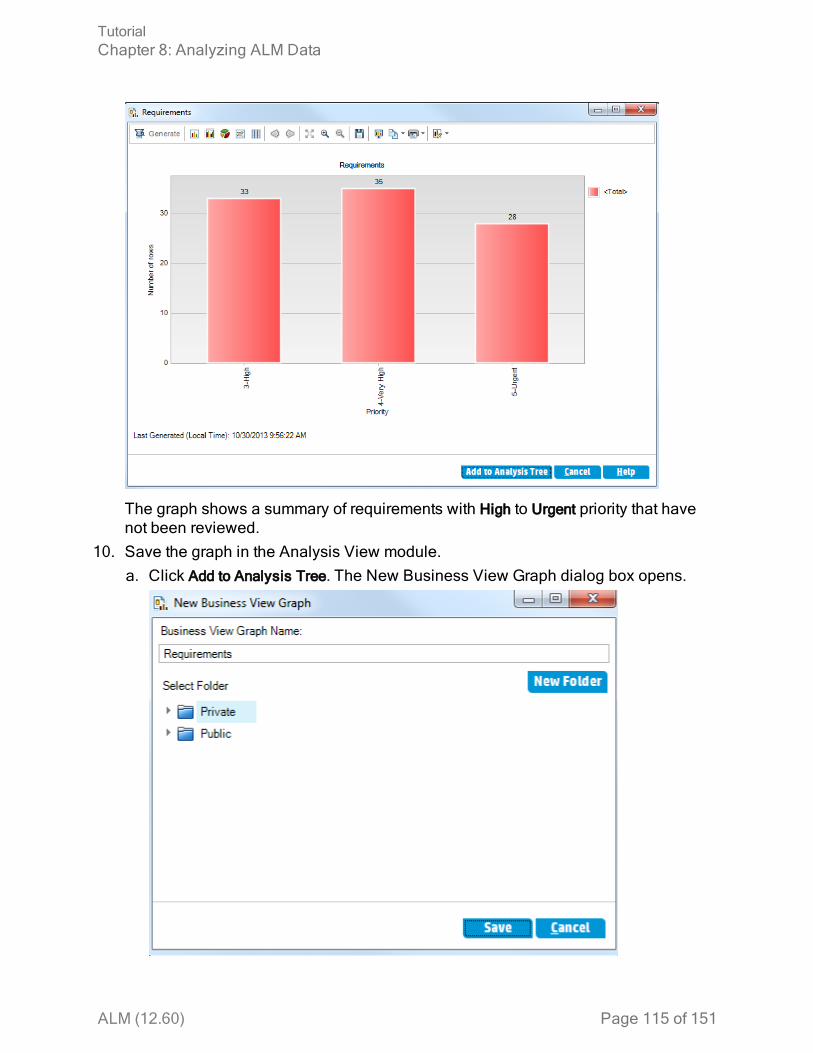
The graph shows a summary of requirements with High to Urgent priority that havenot been reviewed.
10. Save the graph in the Analysis View module.a. Click Add to Analysis Tree. The New Business View Graph dialog box opens.
TutorialChapter 8: Analyzing ALM Data
ALM (12.60) Page 115 of 151

b. Expand the Private folder, and selectMy_Analysis_Items.c. Click Save. The Requirements graph is saved in the analysis tree, and displayed
in the View tab.11. Display other graph views.
a. Click the Pie Chart button to display the graph as a pie chart.b. Click the Data Grid button to display the data as a grid.
Generating Predefined GraphsYou can create predefined graphs during your work in the Requirements, Test Plan,Test Lab, Business Components, and Defects modules. Predefined graphs enable youto create several types of graphs in each module, using the existing module filter. Youcan use predefined graphs for one-time reference, or save them in the Analysis Viewmodule, where you can continue to configure their data and appearance.
In this exercise, you will generate a summary graph from the Defects module.
To generate a predefined graph:
1. Display the Defects module.On the ALM sidebar, select Defects.
2. Clear the Defects grid filter.Click the Set Filter/Sort arrow, and choose Clear Filter/Sort to clear the filter that isapplied to the grid.
3. Generate a report.Choose Analysis > Graphs > Defects Summary - Group by Status. The graph windowopens, displaying the selected graph.
TutorialChapter 8: Analyzing ALM Data
ALM (12.60) Page 116 of 151

The graph shows the number of defects that exist in your project, according to thepeople to whom they are assigned. Defects in the graph’s columns are groupedaccording to their status.
4. Close the graph window.Click the Cancel button.
Sharing GraphsYou can allow ALM users or others to view read-only versions of graphs outside ALM.Each time you access the graph outside ALM, it displays the most up-to-dateinformation.
In this exercise, you will share the Defects Summary graph you created in theGenerating Entity Graphs in the Analysis View Module exercise.
To share a graph:
1. Display the Analysis View module.On the ALM sidebar, under Dashboard, select Analysis View.
2. Share the Defects Summary graph.a. In the Private folder, under My_Analysis_Items, select Defects Summary Graph -
Group by ‘Priority’.b. Right-click and select Share Analysis Item. The Share Analysis Item dialog box
opens.
TutorialChapter 8: Analyzing ALM Data
ALM (12.60) Page 117 of 151

c. Select Copy Analysis Item Public URL. This option allows others to view the graphwithout entering ALM user credentials.
d. Click OK. A URL of the graph is saved to the clipboard.3. View the graph outside ALM.
a. Open a Web browser window.b. In the address bar, paste the clipboard content, and press ENTER. The graph is
displayed in the Web browser.
TutorialChapter 8: Analyzing ALM Data
ALM (12.60) Page 118 of 151

Below the graph, the Last Generated date and time is displayed, and a link to theitem in ALM.
Generating Business View Excel ReportsYou can create Excel reports based on business views. A business view is a data layerthat exists on top of the database and which reflects only those project entity fields thatrepresent information that is useful from a business perspective. Business views can bebased on single entities, such an Baselines or Defects, while others can represent morecomplex relationships between entities, such as Defects With Linked Requirements.Thereports are created and configured in Microsoft Excel, and uploaded to the AnalysisView module.
In this exercise, you will use Microsoft Excel to generate a business view Excel reportthat summarizes the defects by status and priority level.
To generate a business view Excel report in the Analysis View module:
1. Make sure the Analysis View module is displayed.If the Analysis View module is not displayed, on the ALM sidebar, under Dashboard,select Analysis View.
2. Create a new business view Excel report.a. In the Private folder, select the My_Analysis_Items folder.b. Click the New Item button and select New Business View Excel Report. The New
TutorialChapter 8: Analyzing ALM Data
ALM (12.60) Page 119 of 151

Business View Excel Report dialog box opens.c. In the Business View Excel Report Name box, type High Priority Open Defects.d. Click OK. A new business view Excel report is added to the folder you created.
Notice that the icon represents a business view Excel report.The Configuration tab is selected.
3. Open Excel.a. Click Install Addin. The ALM Business Views Microsoft Excel Add-in is installed
in Excel.b. Click New Excel. Microsoft Excel opens with the ALM tab in the ribbon.c. In the ALM tab, click Login. The ALM login window opens. Log in exactly as you
logged in to ALM at the beginning of the tutorial.4. Generate the business view report in Excel.
a. Click Add. The Add Worksheet dialog box opens.
b. Select Defects.c. Click OK. A new business view Excel worksheet is added and the Worksheet
TutorialChapter 8: Analyzing ALM Data
ALM (12.60) Page 120 of 151

Configuration pane is opened.
5. Configure the business view report.a. In the Filter tab, select Priority in the Field Name column.b. In the associated Criteria column, click the arrow. The Select Filter Condition
dialog box opens.c. Click 4-Very High, Or, and 5-Urgent.d. Click OK.
TutorialChapter 8: Analyzing ALM Data
ALM (12.60) Page 121 of 151

e. Select Status in the Field Name column.f. In the associated Criteria column, click the arrow. The Select Filter Conditiondialog box opens.
g. Click Not, Closed, And, Not, and Rejected.h. Click OK. The business view Excel report shows only those defects whose
priority is Very High or Urgent and whose status is not Closed and not Rejected.6. Save the new report in ALM.
a. Click Save and select Save to ALM. The Save Business View Excel Reportdialog box opens.
b. In the Select Folder box, browse to the My_Analysis_Items folder and select theHigh Priority Open Defects report. The Business View Excel Report Name box isautomatically valued with High Priority Open Defects.
c. Click Save.d. Click Yes in the Replace Confirm message. The report is saved to ALM.
7. Generate the report in ALM.a. Return to the Analysis View module in ALM.b. Click Refresh. The High Priority Open Defects report is selected with the
Configuration tab open.c. Click Generate. The Download Excel File dialog box opens.d. Browse to the location on your client machine where you want to save the Excel
report, enter High Priority Open Defects in the File name field, and click Save.The report opens in Excel with the latest data included.
TutorialChapter 8: Analyzing ALM Data
ALM (12.60) Page 122 of 151

Generating Dashboard PagesUsing the Dashboard module, you can arrange and view multiple graphs on a singledashboard page. You select the graphs to include in the dashboard page from thegraphs in the analysis tree. You can arrange and resize the graphs on the page.
You create dashboard pages in either a public folder or a private folder. Dashboardpages in a public folder are accessible to all users. Dashboard pages in a private folderare accessible only to the user who created them.
In this exercise, you will create a dashboard page for the defect graphs in the publicfolder.
To generate a dashboard page:
1. Display the Dashboard View module.On the ALM sidebar, under Dashboard, select Dashboard View.
2. Add a page to the Public folder.a. In the tree, select the Public folder.b. Click the New Page button. The New Dashboard Page dialog box opens.c. In the Dashboard Page Name field, type Summary of Defects page.d. Click OK.A dashboard page is added to the dashboard tree under the Public
folder.3. Select the graphs that you want to include in the dashboard page.
a. Click the Configuration tab.b. In the Graphs Tree pane, expand the Public folder.
TutorialChapter 8: Analyzing ALM Data
ALM (12.60) Page 123 of 151

c. Expand the Defects folder. The folder includes four graphs.
d. Double-click the first graph. A placeholder for the graph is created in theConfiguration tab displaying the graph’s title.
TutorialChapter 8: Analyzing ALM Data
ALM (12.60) Page 124 of 151

e. Add the other three graphs to the dashboard page.
4. Rearrange the dashboard page.a. Select the second placeholder and drag it upwards so that it is alongside the first
placeholder.
TutorialChapter 8: Analyzing ALM Data
ALM (12.60) Page 125 of 151

b. Select the fourth placeholder and drag it upwards so that it is alongside the thirdplaceholder.
5. View the dashboard page.a. Click the View tab. ALM generates and displays the graphs in the View tab.
The dashboard page displays the unresolved defects per cycle, per person, perseverity, and per subject.
b. To view the dashboard page in full-screen mode, click the View Page in Full
TutorialChapter 8: Analyzing ALM Data
ALM (12.60) Page 126 of 151

Screen button, located in the upper-right corner of the page.c. To return to the standard view, click the Close button, located in the upper-right
corner of the page.
TutorialChapter 8: Analyzing ALM Data
ALM (12.60) Page 127 of 151

Chapter 9: Creating Libraries andBaselinesA library represents a set of entities in a project and the relationships between them. Theentities in a library can include requirements, tests, test resources, and businesscomponents. A baseline is a snapshot of the library at a specific point in time. Baselinesenable you to keep track of changes made to your project over time.
You create libraries in the Libraries module.
You can compare baselines at all stages of the application lifecycle managementprocess. For example, you can compare two baselines in a library to review changesmade to tests in the library over time. You can also compare a baseline to the currententities in the library.
In this lesson, you will create a library of tests and requirements. You will then comparetwo baselines in the library to review changes made to tests in the library over time.
In this lesson, you will learn about:
• Creating Libraries 129• Creating Baselines 130• Comparing Baselines 131
ALM (12.60) Page 128 of 151

Creating LibrariesIn this exercise, you will add a library of tests and requirements to ALM. To perform thisexercise you must log in as alex_alm.
To create a library:
1. Make sure to log in to ALM_Demo as alex_alm.Open the ALM Login window. In the Login Name box, type alex_alm. Skip thePassword box.For details, see "Starting ALM" on page 10.
2. Display the Libraries module.On the ALM sidebar, under Management, select Libraries.
3. Create a library folder.a. In the libraries tree, select the root Libraries folder. Click the New Folder button.
The New Library Folder dialog box opens.b. In the Library Folder Name box, type Folder1.c. Click OK. The Folder1 folder is added to the libraries tree.d. In the Description box in the right pane, type the following description for the
library folder: This folder contains a library of tests and requirements.4. Add a library to your library folder.
a. Click the Create Library button. The New Library dialog box opens on the Contentpage.
b. In the Name box, type Library1.c. In the Requirements tab, expand the Requirements root folder. Select the check
box adjacent to the Mercury Tours Application folder, to include the folder in the
TutorialChapter 9: Creating Libraries and Baselines
ALM (12.60) Page 129 of 151

library.d. Click the Tests tab. Make sure the Tests in selected folders option is selected.
Expand the Subject root folder, and select the Mercury Tours Site folder to includein the library.
e. Click Details on the sidebar. In the Description box, type This library includestests and requirements.
f. Click OK. The new library is added to the libraries tree.
Creating BaselinesA baseline is a snapshot of your library at a specific point in time. You can use abaseline to mark any significant milestone in the application lifecycle managementprocess. A baseline includes all the entities defined in the library, includingrequirements, tests, test resources, and business components. Baselines also includethe relationships between the entities in the library, such as traceability and coverage.Baselines enable you to keep track of changes made to your project over time.
In the following exercise, you will create an initial baseline that will later be compared toanother baseline to evaluate the impact of changes.
To create a baseline:
1. Make sure the Libraries module is displayed.If the Libraries module is not displayed, on the ALM sidebar, under Management,select Libraries.
2. Add a baseline to your library.a. In the libraries tree, select the Library1 library.b. Click the Create Baseline button. The Baseline Verification dialog box opens, and
a verification process begins.
TutorialChapter 9: Creating Libraries and Baselines
ALM (12.60) Page 130 of 151

The Verification results window displays the results of the library sizeverification. The process checks that the size of the library does not exceed thelimit defined in Site Administration.
c. Click Continue. The New Baseline dialog box opens.d. In the Baseline Name field, type Baseline1. Click OK. The baseline is added to
the libraries tree, and the creation process begins.
The baseline is created in a background process, and may take some time. Youcan continue working in ALM during the baseline creation process.
e. In the Details tab, click the Description pane and type Baseline of tests andrequirements.
3. View the baseline log file.In the Details tab, click the View Log button. The Log: Create Baseline dialog boxopens and displays the progress. Click Close to close the dialog box.The View Log button is no longer displayed.
Comparing BaselinesYou can compare two baselines in a library. For example, you can compare baselinesat different stages of development to assess the impact of changes made torequirements in your project. You can then update the relevant tests in your projectaccordingly.
You can also compare a baseline to the current entities in the library. For example,suppose you create a baseline at the start of a new release. Over time, changes aremade to requirements in the library. To determine whether product development is
TutorialChapter 9: Creating Libraries and Baselines
ALM (12.60) Page 131 of 151

proceeding as planned, you can compare requirements in the initial baseline with thecurrent requirements in the library.
In the following exercise, you will add test coverage to a requirement and then createanother baseline. You will then compare your two baselines to evaluate the impact ofthe changes.
To compare baselines:
1. Modify a requirement.a. On the ALM sidebar, under Requirements, select Requirements.b. Select View > Requirement Details.c. In the requirements tree, under Mercury Tours Application, expand Application
Usability. Select Keyboard Support.d. Click the Test Coverage tab. The Test Coverage tab displays coverage for this
requirement.e. If the Test Plan Tree tab on the right is not displayed, click the Select Tests
button.f. In the Test Plan Tree tab, expand the Mercury Tours Site and HTML Pages subjectfolders.
g. Double-click the HTML Page Source test. The test is added to the coverage grid.2. Create a new baseline.
Repeat Steps 1 and 2 in "Creating Baselines" on page 130. Name your newbaseline Baseline2.
3. Select a baseline with which to compare.a. In the libraries tree, select Baseline1. Click the Compare To button, and select
Select Baseline to compare the baseline with another baseline. The SelectBaseline dialog box opens.
b. Click the arrow and select Baseline2 from the list. Click OK.c. Click OK to close the Select Baseline dialog box. Click Yes to close the Warning
dialog box. The Compare Baselines Tool dialog box opens.
TutorialChapter 9: Creating Libraries and Baselines
ALM (12.60) Page 132 of 151

The baselines are displayed in separate panes, with the more recently createdbaseline displayed in the right pane. In each pane, the library’s entities aredisplayed in the same hierarchical tree structure as defined in the specificmodule.
4. View requirement changes between the baselines.a. Click the Go To Next Change button in the right pane to view the change.
TutorialChapter 9: Creating Libraries and Baselines
ALM (12.60) Page 133 of 151

Differences between the two baselines are indicated in the Changes column. Thetool indicates that there is a difference in the Keyboard Support requirementbetween the baselines.
b. To compare the modified requirement between baselines, select KeyboardSupport and click the Compare Entities button on the toolbar. The CompareEntities dialog box opens.
c. Click the Test Coverage button on the sidebar.
The Test Coverage view displays details of the entity in each baseline.d. Click Close.
TutorialChapter 9: Creating Libraries and Baselines
ALM (12.60) Page 134 of 151

Chapter 10: Customizing ProjectsIn the previous lessons, you learned how to use ALM to help you manage all phases ofthe application lifecycle management process, including specifying releases and cycles,specifying requirements, planning tests, running tests, and tracking defects.
In this lesson, you will learn how to customize your ALM project to meet the needs ofyour team. You can control access to a project by defining the users who can access theproject and by specifying the types of tasks each user can perform. When new membersare added to your team, you assign them to the projects that they will be using, andspecify the tasks that they can perform.
You can also customize your ALM project by modifying system fields or by adding user-defined fields. System fields are ALM default fields. You cannot add or delete systemfields, you can only modify them. User fields are fields that you can define. You can add,modify, and delete user-defined fields.
Fields can be associated with system and user-defined lists. A list contains the valuesthat the user can enter in a field. For example, if you are running tests on two differentdatabase servers, you can add a Database field to your project. You can then create aselection list containing the values Oracle and Microsoft SQL, and associate the list withthe Database field.
In this lesson, you will learn about:
• Starting Project Customization 136• Adding a New Project User 138• Assigning a User to a User Group 140• Defining a User-Defined Field 142• Creating a Project List 144• Creating Business Views 147
ALM (12.60) Page 135 of 151

Starting Project CustomizationYou customize your ALM projects using the Project Customization window. In thisexercise, you will log in to the Project Customization window with project administratorprivileges.
To start project customization:
1. Open the ALM Login window.Make sure that the ALM Login window is open. For details, see "Starting ALM" onpage 10.
2. Type a user name with project administrator privileges and authenticate.a. In the Login Name box, type alex_alm.b. Skip the Password box. A password was not assigned to this user name.c. Click the Authenticate button. ALM verifies your user name and password and
determines which domains and projects you can access.3. Log in to the project.
a. In the Domain list, select Default.b. In the Project list, select ALM_Demo.c. Click the Login button.
The ALMmain window opens and displays the module in which you were lastworking.
4. Open the Project Customization window.
a. On the ALMmasthead, click and select Customize. The ProjectCustomization window opens.By default, the Project Customization window contains the following links:
Option Description
UserProperties
Enables you to change your user properties. For example, youcan change your email address. You can also change yourpassword.
ProjectUsers
Enables you to add and remove users from an ALM project.You can also assign users to user groups to restrict useraccess privileges.
Groups andPermissions
Enables you to assign privileges to user groups by specifyingpermission settings.
TutorialChapter 10: Customizing Projects
ALM (12.60) Page 136 of 151

Option Description
ModuleAccess
Enables you to control the modules that each user group canaccess. By preventing users from accessing unnecessarymodules, you can better utilize your ALM licenses.
ProjectEntities
Enables you to modify the behavior of ALM system fields ordefine user-defined fields that are unique to your project. Forexample, if you are running tests on several builds of anapplication, you can add a Detected in Build user-defined fieldto the New Defect dialog box. You can then associate it with aselection list containing the values for this field.
RequirementTypes
Enables you to customize the definitions for requirement types.
Risk-BasedQualityManagement
Enables you to customize settings for risk-based qualitymanagement.
Project Lists Enables you to add customized lists to a project. A list containsvalues that the user can enter in system or user-defined fields.For example, for the Detected in Build field, you can create aselection list containing the values Build1, Build2, and Build3.
Automail Enables you to set up automatic mail notification rules to informusers via email each time changes are made to specifieddefects.
Alert Rules Enables you to activate alert rules for your project. Thisinstructs ALM to create alerts and send emails when changesoccur in the project.
Workflow Enables you to generate scripts that perform commonlyneeded customizations on dialog box fields in the Defectsmodule. In addition, you can write scripts to customize dialogboxes in other modules, and control the actions that users canperform.
ProjectPlanningand Tracking
Enables you to create and customize the project planning andtracking (PPT) KPIs.
TutorialChapter 10: Customizing Projects
ALM (12.60) Page 137 of 151

Option Description
ProjectReportTemplates
Enables you to create and customize report templates thatproject users can assign to template based reports.
BusinessProcessTesting
Enables you to configure Business Process Testing andBusiness Process Testing Enterprise Edition.
BusinessViews
Enables you to create business views that can be used as abasis for creating reports in the Analysis View module.
Sprinter Enables you to configure settings for working with Sprinter formanual testing in ALM.
Adding a New Project UserYou can control access to an ALM project by defining the users who can log in to theproject, and by specifying the types of tasks each user may perform.
For each project, you select project users from the ALM site users list. This list is createdin Site Administration.
From Project Customization, you add users to a project and assign them to user groups.Each user group has access to certain ALM tasks.
In this exercise, you will add a new project user to the ALM_Demo project.
Note: For the purpose of the exercise, we will first remove a user from the project,and then add the user to the project again.
To add a new project user:
1. Make sure that you are logged in to ALM as a project administrator.For details on how to open the Project Customization window, see "Starting ProjectCustomization" on page 136.
2. Open the Project Users page.In the Project Customization window, click the Project Users link. The Project Userspage opens and displays a list of users that have been assigned to the project.
TutorialChapter 10: Customizing Projects
ALM (12.60) Page 138 of 151

3. Remove a user.In the Project Users list, select cecil_alm, and click Remove User. Click Yes toconfirm.
4. Add a new user name.a. Click the Add User down arrow.
You can add an existing user from the list of site users by typing the user’s nameor by selecting the user from the list of site users. You can also create a new userand add the new user to the project.
b. Select Add User by Name. The Add User dialog box opens.c. In the User Name box, type cecil_alm and click OK.
The new user is added to the Project Users list and the user properties aredisplayed in the Details tab. User personal settings are defined in Site
TutorialChapter 10: Customizing Projects
ALM (12.60) Page 139 of 151

Administration.
Assigning a User to a User GroupTo enable users to do their job, and to protect a project from unauthorized access, ALMenables you to assign each user to a specific user group. Each group has access tocertain ALM tasks. You can use the predefined user groups with their defaultpermissions or you can customize your own user groups with unique sets ofpermissions.
In this exercise, you will assign the new user cecil_alm to the QATester user group.
To assign a user to a user group:
1. Make sure that the Project Users page is displayed.If the Project Users page is not already open, click the Project Users link in theProject Customization window.
TutorialChapter 10: Customizing Projects
ALM (12.60) Page 140 of 151

2. Select cecil_alm from the Project Users list.In the Project Users list, select cecil_alm.
3. Display user’s membership in user groups.Click the Membership tab. The user groups to which cecil_alm belongs and does notbelong are displayed.
TutorialChapter 10: Customizing Projects
ALM (12.60) Page 141 of 151

4. Assign cecil_alm to the QATester group.Under Not Member of, select QATester and click the right arrow button to move thegroup to Member of.
5. Remove cecil_alm from the Viewer group.a. Under Member of, select Viewer and click the left arrow button to move the group
to Not Member of.b. Click Save to save the changes to the Project Users page. Click OK.
Defining a User-Defined FieldYou can define user-defined fields that are unique to your project, or modify the behaviorof ALM system fields.
The fields are stored in ALM project entities. For example, the Defect entity containsdata entered in the Defects module.
In the following exercise, you will add the Database user-defined field to the Defect entity.This field indicates the server database in use when testing an application.
To add a user-defined field:
TutorialChapter 10: Customizing Projects
ALM (12.60) Page 142 of 151
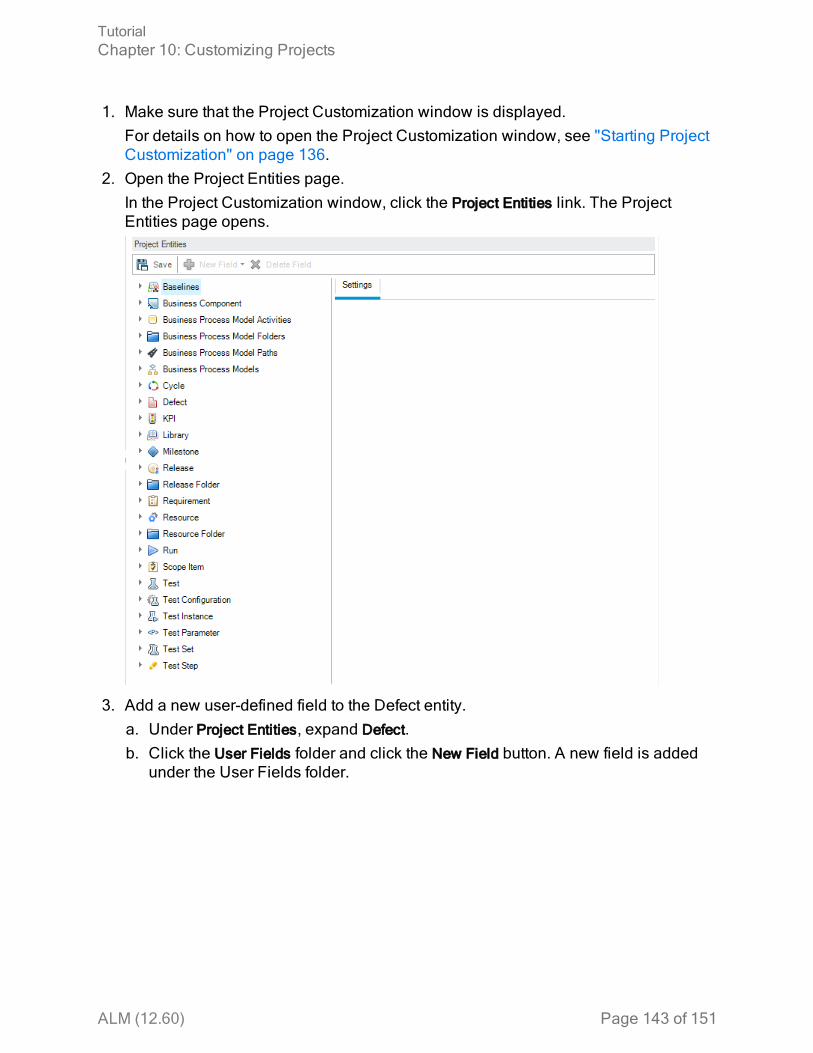
1. Make sure that the Project Customization window is displayed.For details on how to open the Project Customization window, see "Starting ProjectCustomization" on page 136.
2. Open the Project Entities page.In the Project Customization window, click the Project Entities link. The ProjectEntities page opens.
3. Add a new user-defined field to the Defect entity.a. Under Project Entities, expand Defect.b. Click the User Fields folder and click the New Field button. A new field is added
under the User Fields folder.
TutorialChapter 10: Customizing Projects
ALM (12.60) Page 143 of 151

BG_USER_nn indicates a user-defined field under the Defect entity.4. Rename the default field name.
a. In the Label box, instead of the default name, type Database.b. Click Save.c. Click OK.
Creating a Project ListYou can associate fields with system and user-defined lists. A list contains values thatthe user can enter in a field.
In the previous exercise you added the Database field. In the following exercise you willcreate a list and assign it to the Database field. You will then open the New Defectdialog box to view the new field.
To create a project list:
1. Make sure that the Project Customization window is displayed.For details on how to open the Project Customization window, see "Starting ProjectCustomization" on page 136.
2. Open the Project Lists page.In the Project Customization window, click the Project Lists link. The Project Listspage opens.
TutorialChapter 10: Customizing Projects
ALM (12.60) Page 144 of 151

3. Create a new list.a. Click New List. The New List dialog box opens.b. In the List Name box, type DB. Click OK to close the New List dialog box.
4. Add Items to your list.
TutorialChapter 10: Customizing Projects
ALM (12.60) Page 145 of 151

a. Click New Item. The New Item dialog box opens. Type Oracle and click OK.b. Repeat the same procedure and add MS SQL to the DB list.
c. Click Save to save the changes to the Project Lists page. Click OK.5. Assign the list to the Database field.
a. In the Project Customization window, click the Project Entities link. The ProjectEntities page opens.
b. Under Project Entities, expand Defect.c. Expand the User Fields folder and select Database.d. Under Settings, in the Type list, select Lookup List to set the field type as a drop-
down list. The Lookup list section is displayed below the field settings.
TutorialChapter 10: Customizing Projects
ALM (12.60) Page 146 of 151

e. Under Lookup List, select the DB list.f. Click Save to save the changes to the Project Entities page. Click OK.
6. View the new user-defined field in the New Defect dialog box.a. Click the Return button located on the upper-right corner of the window.b. In the Customization Changes dialog box, selectMajor Change, and click OK.
The Project Customization window closes, and you return to your ALM project.c. In the Defects module, click the New Defect button. The New Defect dialog box
opens.
The Database field is displayed in the New Defect dialog box. You may need todrag the scroll bar down to display the field.
d. Click the down arrow and view the database types you defined. Click Close.
Creating Business ViewsBusiness views are a semantic data layer that can be used as a basis for the variousALM reporting tools. Business views are based on project entities, and ensure that onlyinformation that is relevant to a business consumer is contained in the report.
In the following exercise you will create a business view for creating graph reports.
To create a business view:
1. Make sure that the Project Customization window is displayed.For details on how to open the Project Customization window, see "Starting ProjectCustomization" on page 136.
2. Open the Business Views page.
TutorialChapter 10: Customizing Projects
ALM (12.60) Page 147 of 151
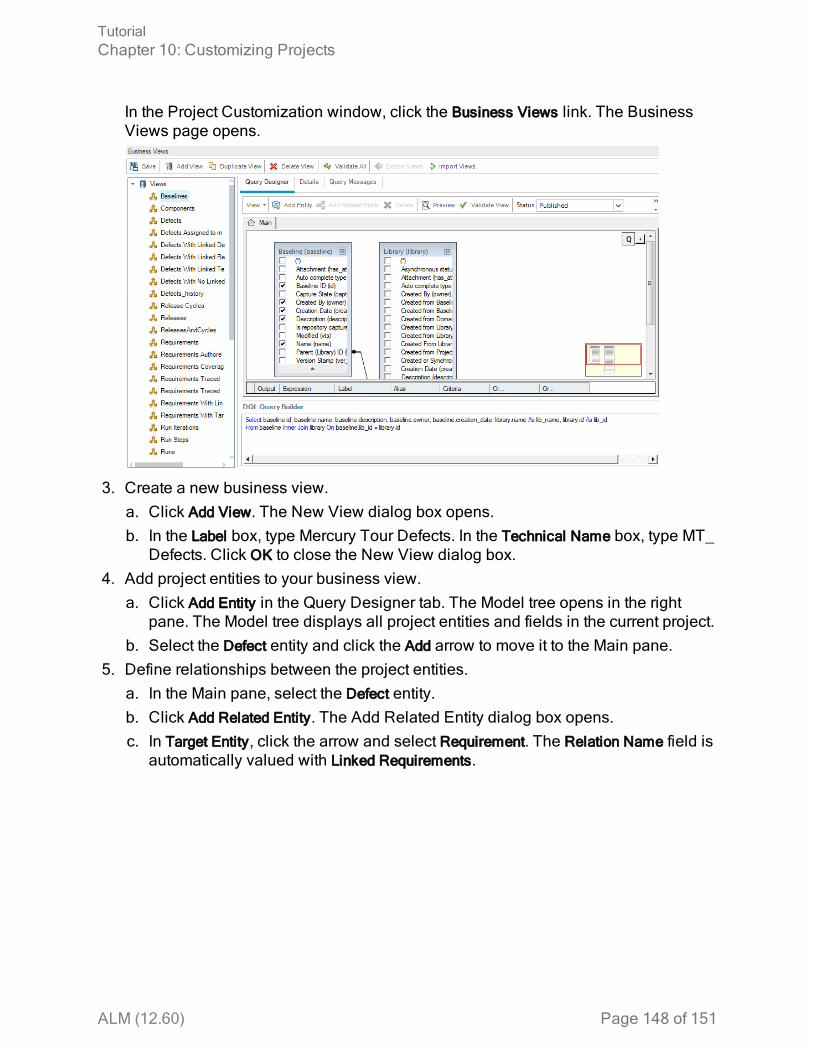
In the Project Customization window, click the Business Views link. The BusinessViews page opens.
3. Create a new business view.a. Click Add View. The New View dialog box opens.b. In the Label box, type Mercury Tour Defects. In the Technical Name box, type MT_
Defects. Click OK to close the New View dialog box.4. Add project entities to your business view.
a. Click Add Entity in the Query Designer tab. The Model tree opens in the rightpane. The Model tree displays all project entities and fields in the current project.
b. Select the Defect entity and click the Add arrow to move it to the Main pane.5. Define relationships between the project entities.
a. In the Main pane, select the Defect entity.b. Click Add Related Entity. The Add Related Entity dialog box opens.c. In Target Entity, click the arrow and select Requirement. The Relation Name field is
automatically valued with Linked Requirements.
TutorialChapter 10: Customizing Projects
ALM (12.60) Page 148 of 151

d. Click OK.
6. Preview the new business view.a. Click Validate. Any validation warning or error messages are shown in the bottom
pane.b. Click Preview. The Query Results are shown in the bottom pane.c. Change the Status to Published.d. Click Save.
TutorialChapter 10: Customizing Projects
ALM (12.60) Page 149 of 151

Send Us FeedbackLet us know how we can improve your experience with the Tutorial.Send your email to: [email protected]
ALM (12.60) Page 150 of 151