IBM Security Key Lifecycle Manager : Administering
406
IBM Security Key Lifecycle Manager Version 4.0 Administering IBM
-
Upload
khangminh22 -
Category
Documents
-
view
3 -
download
0
Transcript of IBM Security Key Lifecycle Manager : Administering

IBM Security Key Lifecycle ManagerVersion 4.0
Administering
IBM

Note
Before you use this information and the product it supports, read the information in “Notices” on page397.
Copyright statement
Note: This edition applies to version 4.0 of IBM® Security Key Lifecycle Manager (product number 5724-T60) and to allsubsequent releases and modifications until otherwise indicated in new editions.© Copyright International Business Machines Corporation 2008, 2019.US Government Users Restricted Rights – Use, duplication or disclosure restricted by GSA ADP Schedule Contract withIBM Corp.
Contents
Chapter 1. Administering....................................................................................... 1Administering groups, users, and roles.......................................................................................................1
Default user roles, user groups, and users............................................................................................ 1Assigning permissions............................................................................................................................6Creating a group..................................................................................................................................... 8Creating a user in a group.................................................................................................................... 10Validating user tasks............................................................................................................................ 12Password policy....................................................................................................................................13Changing the password policy............................................................................................................. 14Changing user passwords.................................................................................................................... 15Resetting a password...........................................................................................................................16Changing IBM Security Key Lifecycle Manager user password.......................................................... 17Changing the IBM Security Key Lifecycle Manager host name...........................................................18LDAP configuration...............................................................................................................................19
Administering IBM Security Key Lifecycle Manager................................................................................. 32Updating the database password........................................................................................................ 32Definitions for HOME and other directory variables............................................................................ 35Changing the IBM Security Key Lifecycle Manager host name...........................................................36Starting the IBM Security Key Lifecycle Manager server.................................................................... 37Stopping the IBM Security Key Lifecycle Manager server.................................................................. 37Restarting the IBM Security Key Lifecycle Manager server................................................................ 38Timestamp formats.............................................................................................................................. 39
Configuring audit and debug information................................................................................................. 39Audit files .............................................................................................................................................39Configuring the level of audit information........................................................................................... 40Generating audit records in syslog format.......................................................................................... 42Archiving transactional data of keys served to clients........................................................................43Setting up debug logging......................................................................................................................44Downloading log files........................................................................................................................... 46
Configuring for data redundancy...............................................................................................................46Configuring backup and restore...........................................................................................................47Configuring replication......................................................................................................................... 66Configuring a Multi-Master cluster...................................................................................................... 85
Configuring IBM Security Key Lifecycle Manager................................................................................... 120Creating a server certificate...............................................................................................................120Specifying port and timeout settings.................................................................................................122Specifying key serving parameters....................................................................................................124Setting the session timeout interval..................................................................................................126Setting the maximum transaction timeout........................................................................................127Changing the language of the browser interface.............................................................................. 127
Configuring security.................................................................................................................................128Truststore configuration.................................................................................................................... 128Hardware Security Module usage in IBM Security Key Lifecycle Manager...................................... 131Master key management................................................................................................................... 134Configuring compliance for FIPS in IBM Security Key Lifecycle Manager........................................135Configuring IBM Security Key Lifecycle Manager for Suite B compliance........................................136Configuring compliance for NIST SP 800-131A in IBM Security Key Lifecycle Manager................ 137
Exporting and importing keys..................................................................................................................139Exporting a key by using the graphical user interface...................................................................... 140Uploading a keystore file................................................................................................................... 141Importing a key by using the graphical user interface......................................................................142
iii
Managing client device certificates.........................................................................................................142Accepting pending devices................................................................................................................ 143Uploading a client device certificate to IBM Security Key Lifecycle Manager server...................... 145Importing a client device certificate by using the graphical user interface..................................... 146Modifying a client device certificate by using the graphical user interface......................................147Deleting a client device certificate by using the graphical user interface........................................147
Managing device groups..........................................................................................................................147Creating a device group..................................................................................................................... 147Creating a role for a new device group.............................................................................................. 149Exporting a device group................................................................................................................... 150Uploading an export file of a device group........................................................................................151Importing a device group...................................................................................................................152Downloading an export file of a device group................................................................................... 153Deleting a device group export file.................................................................................................... 154Resolving the import conflicts........................................................................................................... 155Viewing device group export and import history.............................................................................. 155Viewing device group export and import summary information...................................................... 155Moving devices between device groups............................................................................................156
Managing the server certificate...............................................................................................................159Exporting an SSL/KMIP server certificate......................................................................................... 159Downloading an SSL or KMIP server certificate................................................................................161Copying a certificate between IBM Security Key Lifecycle Manager servers...................................161
Managing and serving keys, certificates, and other cryptographic objects...........................................1623592 tape drive management........................................................................................................... 163DS5000 management........................................................................................................................ 179DS8000 storage image management................................................................................................188GPFS (IBM Spectrum Scale) file management..................................................................................203LTO tape drive management..............................................................................................................206PEER_TO_PEER management........................................................................................................... 225Using KMIP to manage and serve keys, certificates, and other cryptographic objects...................228Using REST APIs to manage and serve keys, certificates, and other cryptographic objects.......... 232Managing clients and their cryptographic objects............................................................................ 233
Administering...........................................................................................................................................239
Notices..............................................................................................................397Terms and conditions for product documentation.................................................................................398Trademarks..............................................................................................................................................399
iv

Chapter 1. AdministeringAdministration is the set of tasks by which you prepare and then monitor the IBM Security Key LifecycleManager environment.
The administrative activities include the following tasks:
• Setting up and maintaining IBM Security Key Lifecycle Manager system• Setting up the master and clone systems for replication• Administering the groups, users, and roles• Administering devices, KMIP objects, and Hardware Security Module• Running operational tasks such as data backup, data restore, and export/import of device groups• Other miscellaneous administrative tasks
Before you begin, familiarize yourself with the concepts and terminologies that are mentioned in thissection. See the Overview, Planning, and Installing and configuring sections for the related information.
Administering groups, users, and rolesYou can limit the range of activities that administrators can carry out in your organization.
For long-term efficiency, consider creating a group and then assigning roles and users to the group, ratherthan assigning roles directly to an individual user. You gain ease in changing roles for persons with similarduties, and avoid rework if a user is assigned to another department.
For example, you might specify this range of activities:
• No access is available for some roles. For example, your organization might want to separate the dutiesthat back up and restore files.
• Some tasks are hidden on WebSphere® Integrated Solutions Console.• Administration can occur only to LTO tape drives.
Default user roles, user groups, and usersWhen you install IBM Security Key Lifecycle Manager, some users, user groups, and user roles areavailable out-of-the-box in WebSphere Application Server. Users in the default user groups can have a setof permissions that allow them to perform specific operations in IBM Security Key Lifecycle Manager.
Default roles
The following list provides the default user roles in IBM Security Key Lifecycle Manager and theirassociated tasks:Admin Security Manager*
Manage users and groups from within the administrative console, determine who has access tomodify users and groups using administrative role mapping, and map users and groups toadministrative roles.
Administrator*
Access sensitive data including server password, Lightweight Third Party Authentication (LTPA)password and keys, and so on. Has operator and configurator permissions.
Auditor*
View and modify the configuration settings for the security auditing subsystem.Configurator*
Change the WebSphere Application Server configuration, and has monitor permissions.
© Copyright IBM Corp. 2008, 2019 1
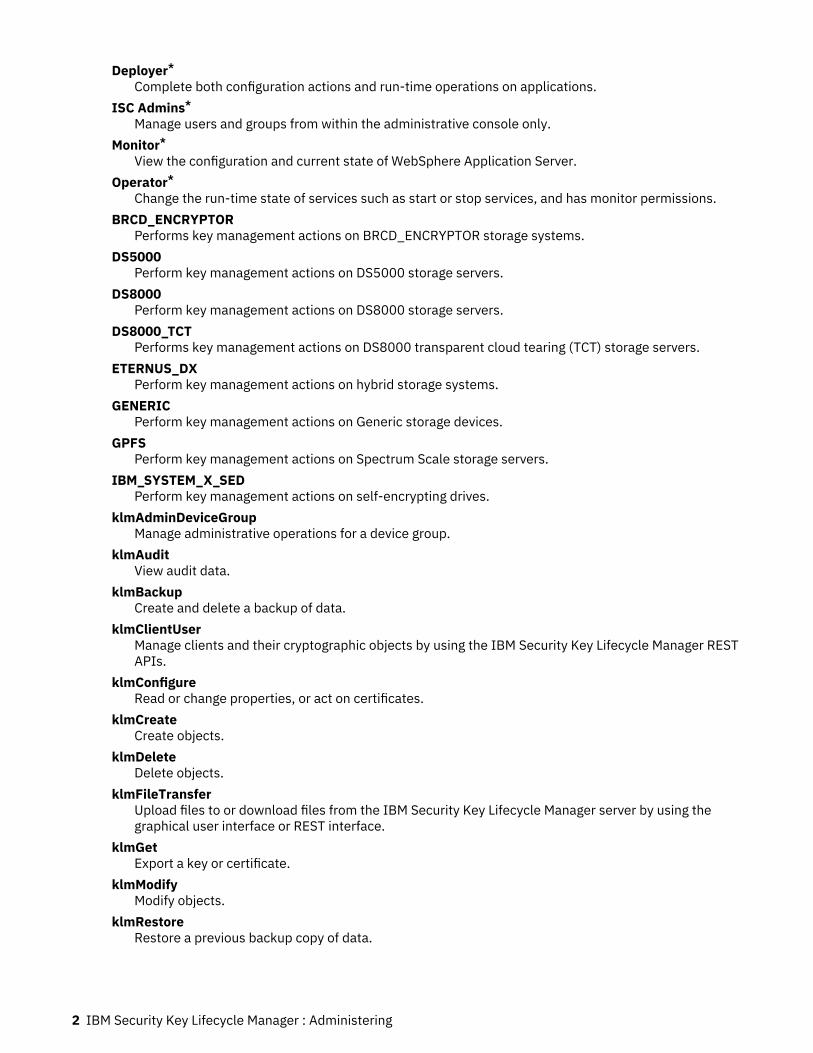
Deployer*
Complete both configuration actions and run-time operations on applications.ISC Admins*
Manage users and groups from within the administrative console only.Monitor*
View the configuration and current state of WebSphere Application Server.Operator*
Change the run-time state of services such as start or stop services, and has monitor permissions.BRCD_ENCRYPTOR
Performs key management actions on BRCD_ENCRYPTOR storage systems.DS5000
Perform key management actions on DS5000 storage servers.DS8000
Perform key management actions on DS8000 storage servers.DS8000_TCT
Performs key management actions on DS8000 transparent cloud tearing (TCT) storage servers.ETERNUS_DX
Perform key management actions on hybrid storage systems.GENERIC
Perform key management actions on Generic storage devices.GPFS
Perform key management actions on Spectrum Scale storage servers.IBM_SYSTEM_X_SED
Perform key management actions on self-encrypting drives.klmAdminDeviceGroup
Manage administrative operations for a device group.klmAudit
View audit data.klmBackup
Create and delete a backup of data.klmClientUser
Manage clients and their cryptographic objects by using the IBM Security Key Lifecycle Manager RESTAPIs.
klmConfigureRead or change properties, or act on certificates.
klmCreateCreate objects.
klmDeleteDelete objects.
klmFileTransferUpload files to or download files from the IBM Security Key Lifecycle Manager server by using thegraphical user interface or REST interface.
klmGetExport a key or certificate.
klmModifyModify objects.
klmRestoreRestore a previous backup copy of data.
2 IBM Security Key Lifecycle Manager : Administering
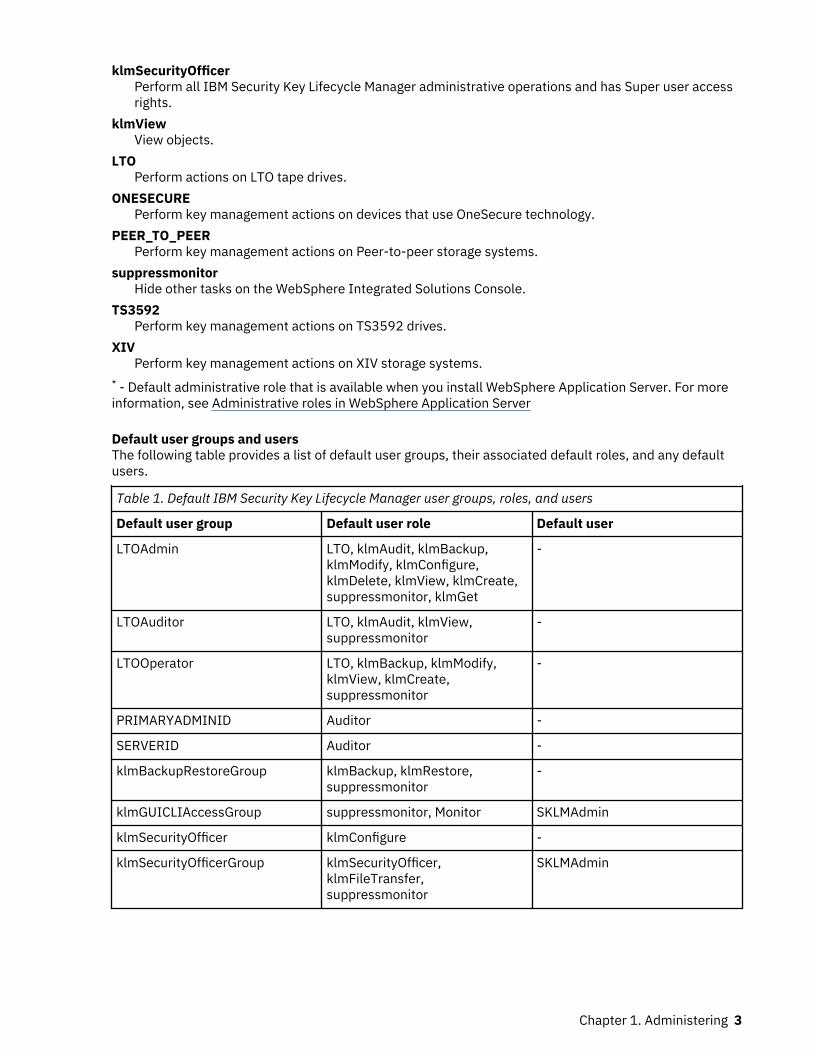
klmSecurityOfficerPerform all IBM Security Key Lifecycle Manager administrative operations and has Super user accessrights.
klmViewView objects.
LTOPerform actions on LTO tape drives.
ONESECUREPerform key management actions on devices that use OneSecure technology.
PEER_TO_PEERPerform key management actions on Peer-to-peer storage systems.
suppressmonitorHide other tasks on the WebSphere Integrated Solutions Console.
TS3592Perform key management actions on TS3592 drives.
XIVPerform key management actions on XIV storage systems.
* - Default administrative role that is available when you install WebSphere Application Server. For moreinformation, see Administrative roles in WebSphere Application Server
Default user groups and usersThe following table provides a list of default user groups, their associated default roles, and any defaultusers.
Table 1. Default IBM Security Key Lifecycle Manager user groups, roles, and users
Default user group Default user role Default user
LTOAdmin LTO, klmAudit, klmBackup,klmModify, klmConfigure,klmDelete, klmView, klmCreate,suppressmonitor, klmGet
-
LTOAuditor LTO, klmAudit, klmView,suppressmonitor
-
LTOOperator LTO, klmBackup, klmModify,klmView, klmCreate,suppressmonitor
-
PRIMARYADMINID Auditor -
SERVERID Auditor -
klmBackupRestoreGroup klmBackup, klmRestore,suppressmonitor
-
klmGUICLIAccessGroup suppressmonitor, Monitor SKLMAdmin
klmSecurityOfficer klmConfigure -
klmSecurityOfficerGroup klmSecurityOfficer,klmFileTransfer,suppressmonitor
SKLMAdmin
Chapter 1. Administering 3
User rolesIBM Security Key Lifecycle Manager provides a super user (klmSecurityOfficer andklmGUICLIAccessGroup) role and the means to specify more limited administrative roles to meet theneeds of your organization. By default, the SKLMAdmin user ID has the klmSecurityOfficer role.
For backup and restore tasks, IBM Security Key Lifecycle Manager also installs theklmBackupRestoreGroup to which no user IDs initially belong. Installing IBM Security Key LifecycleManager creates predefined administrator, operator, and auditor groups to manage LTO tape drives.
The WASAdmin user ID has the authority to create and assign these roles, and to change the password ofany IBM Security Key Lifecycle Manager administrator. To set administration limits for IBM Security KeyLifecycle Manager, use the WASAdmin user ID on the WebSphere Integrated Solutions Console to createroles, users, and groups. Assign roles and users to a group. For example, you might create a group andassign both users and a role that limits user activities to administer only LTO tape drives. You must assigna role to a new user before that user attempts to log in to IBM Security Key Lifecycle Manager.
Before you begin, complete the following tasks:
• Determine the limits on device administration that your organization requires.
For example, you might determine that a specific device group has its own administration.• Estimate how many administrative users might be needed over an interval of time. For ease of use,
consider specifying a group and a role to specify their tasks.
For example, you might specify a group that has a limited range of permissions to manage only 3592tape drives.
Available permissionsInstalling IBM Security Key Lifecycle Manager creates the SKLMAdmin user ID, which has theklmSecurityOfficer role as the default super user. The installation process also deploys predefinedpermissions to the WebSphere Application Server list of administrative roles.
A permission from IBM Security Key Lifecycle Manager enables an action or the use of a device group. Arole in IBM Security Key Lifecycle Manager is one or more permissions. However, in the WebSphereApplication Server graphical user interface, the term role includes both IBM Security Key LifecycleManager permissions and roles.
IBM Security Key Lifecycle Manager installation creates the following default groups.klmSecurityOfficerGroup
Installation assigns the klmSecurityOfficer role to this group. The klmSecurityOfficer rolereplaces the previous klmApplicationRole role in the group that was named klmGroup.klmSecurityOfficerGroup replaces klmGroup.
The klmSecurityOfficer role has:
• Root access to the entire set of permissions and device groups that are described in Table 2 on page5 and Table 3 on page 6.
• Permission to any role or device group that might be created.• The suppressmonitor role.
The WebSphere Application Server provides the suppressmonitor role to hide tasks in the leftpane of the WebSphere Integrated Solutions Console that an IBM Security Key Lifecycle Manageradministrator does not use. Hidden items are associated with the application server, includingWebSphere Application Server administrative tasks in the Security, Troubleshooting, andUsers and Groups folders.
klmBackupRestoreGroupBack up and restore IBM Security Key Lifecycle Manager.
LTOAdminAdminister devices in the LTO device family with actions that include create, view, modify, delete, get(export), back up, and configure.
4 IBM Security Key Lifecycle Manager : Administering
LTOOperatorOperate devices in the LTO device family with actions that include create, view, modify, and back up.
LTOAuditorAudit devices in the LTO device family with actions that include view and audit.
klmGUICLIAccessGroupProvides IBM Security Key Lifecycle Manager graphical user interface and command-line interfaceaccess to the users. Every product user must be a part of this group.
Note: Along with this access to the group, the users must be provided other accesses to be afunctional product user.
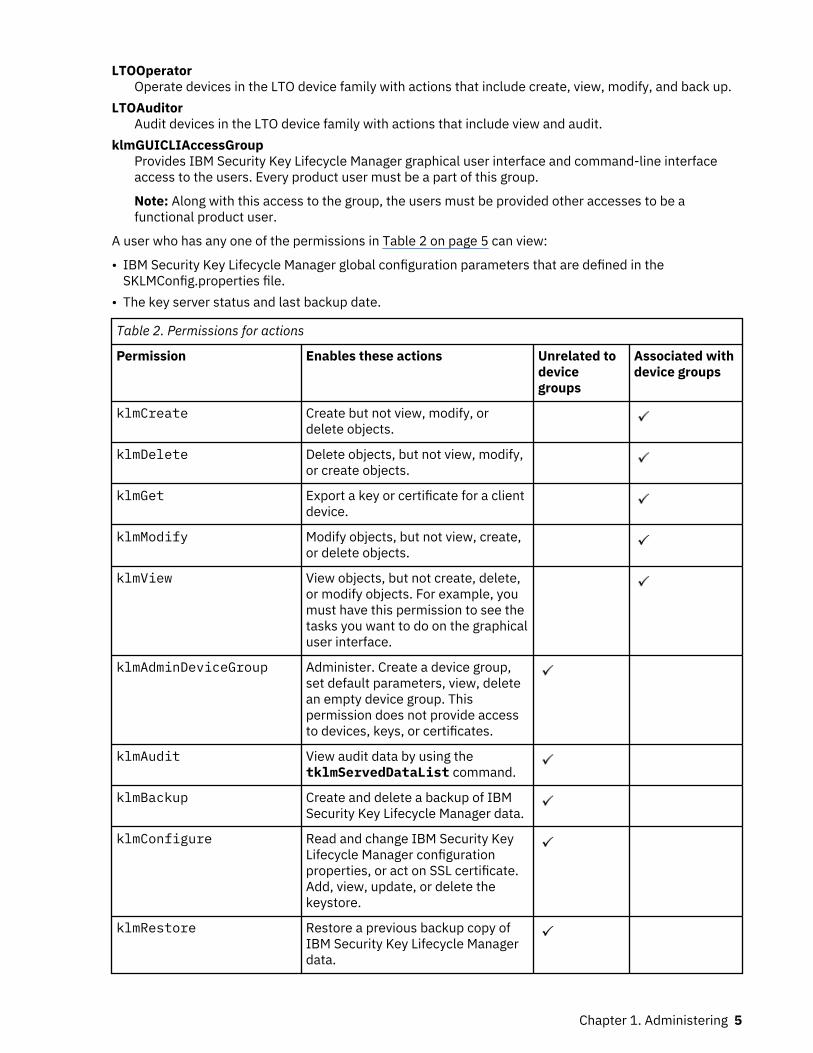
A user who has any one of the permissions in Table 2 on page 5 can view:
• IBM Security Key Lifecycle Manager global configuration parameters that are defined in theSKLMConfig.properties file.
• The key server status and last backup date.
Table 2. Permissions for actions
Permission Enables these actions Unrelated todevicegroups
Associated withdevice groups
klmCreate Create but not view, modify, ordelete objects.
klmDelete Delete objects, but not view, modify,or create objects.
klmGet Export a key or certificate for a clientdevice.
klmModify Modify objects, but not view, create,or delete objects.
klmView View objects, but not create, delete,or modify objects. For example, youmust have this permission to see thetasks you want to do on the graphicaluser interface.
klmAdminDeviceGroup Administer. Create a device group,set default parameters, view, deletean empty device group. Thispermission does not provide accessto devices, keys, or certificates.
klmAudit View audit data by using thetklmServedDataList command.
klmBackup Create and delete a backup of IBMSecurity Key Lifecycle Manager data.
klmConfigure Read and change IBM Security KeyLifecycle Manager configurationproperties, or act on SSL certificate.Add, view, update, or delete thekeystore.
klmRestore Restore a previous backup copy ofIBM Security Key Lifecycle Managerdata.
Chapter 1. Administering 5

The klmSecurityOfficer role also has root access to permissions for all device groups.
Table 3. Device groups
Permission Allows actions on these objects
LTO LTO device family
TS3592 3592 device family
DS5000 DS5000 device family
DS8000® DS8000 device family
BRCD_ENCRYPTOR BRCD_ENCRYPTOR device group
ONESECURE ONESECURE device group
ETERNUS_DX ETERNUS_DX device group
XIV XIV device group
IBM_SYSTEM_X_SED IBM_SYSTEM_X_SED device group
GPFS (IBM Spectrum Scale) GPFS device family
GENERIC Objects in the GENERIC device family.
userdevicegroup A user-defined instance such as myLTO that you manually create,based on a predefined device family such as LTO.
Assigning permissionsYou can map an administrative group to a limited set of permissions.
About this task
This task uses the WASAdmin user ID on the WebSphere Integrated Solutions Console to map a group toa limited set of actions to administer DS5000 storage servers.
For more information about the commands that map groups to roles, see the IBM WebSphere ApplicationServer documentation (http://www.ibm.com/support/knowledgecenter/en/SSAW57_9.0.0/com.ibm.websphere.nd.multiplatform.doc/ae/rxml_atauthorizationgroup.html).
Procedure
1. Log in to WebSphere Integrated Solutions Console.
• Graphical user interface:
a. On the browser Welcome page, type a user ID of WASAdmin and a password value, such aswasadminpw.
b. In the graphical user interface, click Users and Groups > Administrative group roles.c. Click Add.
• Command-line interface
a. Go to the <WAS_HOME>/bin directory. For example,Windows
cd drive:\Program Files\IBM\WebSphere\AppServer\binLinux
cd /opt/IBM/WebSphere/AppServer/binb. Start the wsadmin interface by using an authorized user ID, such as WASAdmin. For example,
6 IBM Security Key Lifecycle Manager : Administering
Windows
wsadmin.bat -username WASAdmin -password wasadminpw -lang jython
Linux
./wsadmin.sh -username WASAdmin -password wasadminpw -lang jython
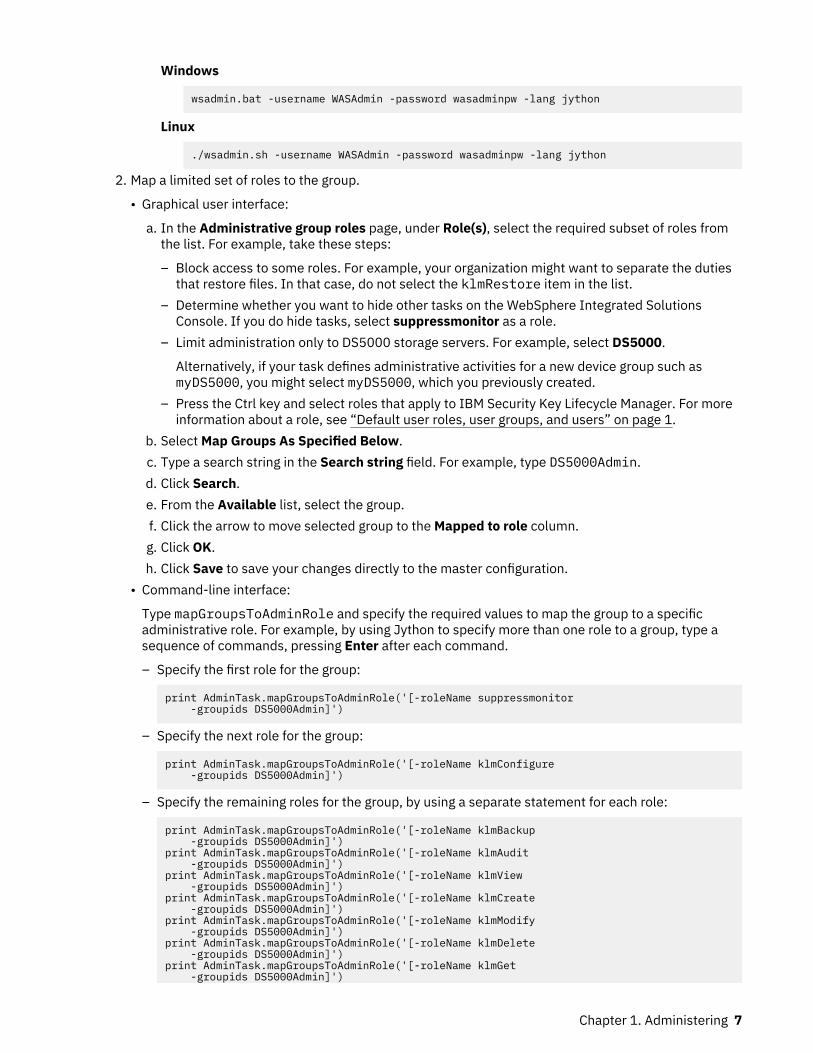
2. Map a limited set of roles to the group.
• Graphical user interface:
a. In the Administrative group roles page, under Role(s), select the required subset of roles fromthe list. For example, take these steps:
– Block access to some roles. For example, your organization might want to separate the dutiesthat restore files. In that case, do not select the klmRestore item in the list.
– Determine whether you want to hide other tasks on the WebSphere Integrated SolutionsConsole. If you do hide tasks, select suppressmonitor as a role.
– Limit administration only to DS5000 storage servers. For example, select DS5000.
Alternatively, if your task defines administrative activities for a new device group such asmyDS5000, you might select myDS5000, which you previously created.
– Press the Ctrl key and select roles that apply to IBM Security Key Lifecycle Manager. For moreinformation about a role, see “Default user roles, user groups, and users” on page 1.
b. Select Map Groups As Specified Below.c. Type a search string in the Search string field. For example, type DS5000Admin.d. Click Search.e. From the Available list, select the group.f. Click the arrow to move selected group to the Mapped to role column.g. Click OK.h. Click Save to save your changes directly to the master configuration.
• Command-line interface:
Type mapGroupsToAdminRole and specify the required values to map the group to a specificadministrative role. For example, by using Jython to specify more than one role to a group, type asequence of commands, pressing Enter after each command.
– Specify the first role for the group:
print AdminTask.mapGroupsToAdminRole('[-roleName suppressmonitor -groupids DS5000Admin]')
– Specify the next role for the group:
print AdminTask.mapGroupsToAdminRole('[-roleName klmConfigure -groupids DS5000Admin]')
– Specify the remaining roles for the group, by using a separate statement for each role:
print AdminTask.mapGroupsToAdminRole('[-roleName klmBackup -groupids DS5000Admin]')print AdminTask.mapGroupsToAdminRole('[-roleName klmAudit -groupids DS5000Admin]')print AdminTask.mapGroupsToAdminRole('[-roleName klmView -groupids DS5000Admin]')print AdminTask.mapGroupsToAdminRole('[-roleName klmCreate -groupids DS5000Admin]')print AdminTask.mapGroupsToAdminRole('[-roleName klmModify -groupids DS5000Admin]')print AdminTask.mapGroupsToAdminRole('[-roleName klmDelete -groupids DS5000Admin]')print AdminTask.mapGroupsToAdminRole('[-roleName klmGet -groupids DS5000Admin]')
Chapter 1. Administering 7

print AdminTask.mapGroupsToAdminRole('[-roleName DS5000 -groupids DS5000Admin]')
where:
- authorizationGroupNameThe name of the authorization group. If you do not specify this parameter, the cell levelauthorization group is assumed. (String, optional)
- roleNameThe name of the administrative role. (String, required)
- groupidsThe list of group IDs that are mapped to the administrative role. (String[])
3. Save your work.
• Graphical user interface:
Confirm completion of your task, by using the prompt that the graphical user interface provides.• Command-line interface:
Save your configuration. For example, by using Jython, type:
print AdminConfig.save()
4. Ensure that the roles that you saved to the group were assigned.
• Graphical user interface
Exit and reenter the Administrative group roles page. The additional roles appear.• Command-line interface
Using Jython syntax, type:
print AdminTask.listGroupIDsOfAuthorizationGroup()
What to do next
Next, specify other groups that your organization might require. For example, specify an administrativegroup to do operator tasks.
Creating a groupYou can create a group that you intend to use to specify limits for some system administrators. You mustmodel the group after the predefined LTO groups.
About this task
This task uses the WASAdmin user ID on the WebSphere Integrated Solutions Console to create anadministrative group.
Note: To access IBM Security Key Lifecycle Manager graphical user interface or command-line interface,the user must be assigned to this group: klmGUICLIAccessGroup
For more information about the commands that create groups and users, see the IBM WebSphereApplication Server documentation (http://www.ibm.com/support/knowledgecenter/en/SSAW57_9.0.0/com.ibm.websphere.nd.multiplatform.doc/ae/rxml_atwimmgt.html).
You can use WebSphere Integrated Solutions Console to create child groups with different permissionswithin a parent group. However, IBM Security Key Lifecycle Manager recognizes the permissions of onlythe parent group, not the permissions of its child groups.
8 IBM Security Key Lifecycle Manager : Administering
Procedure
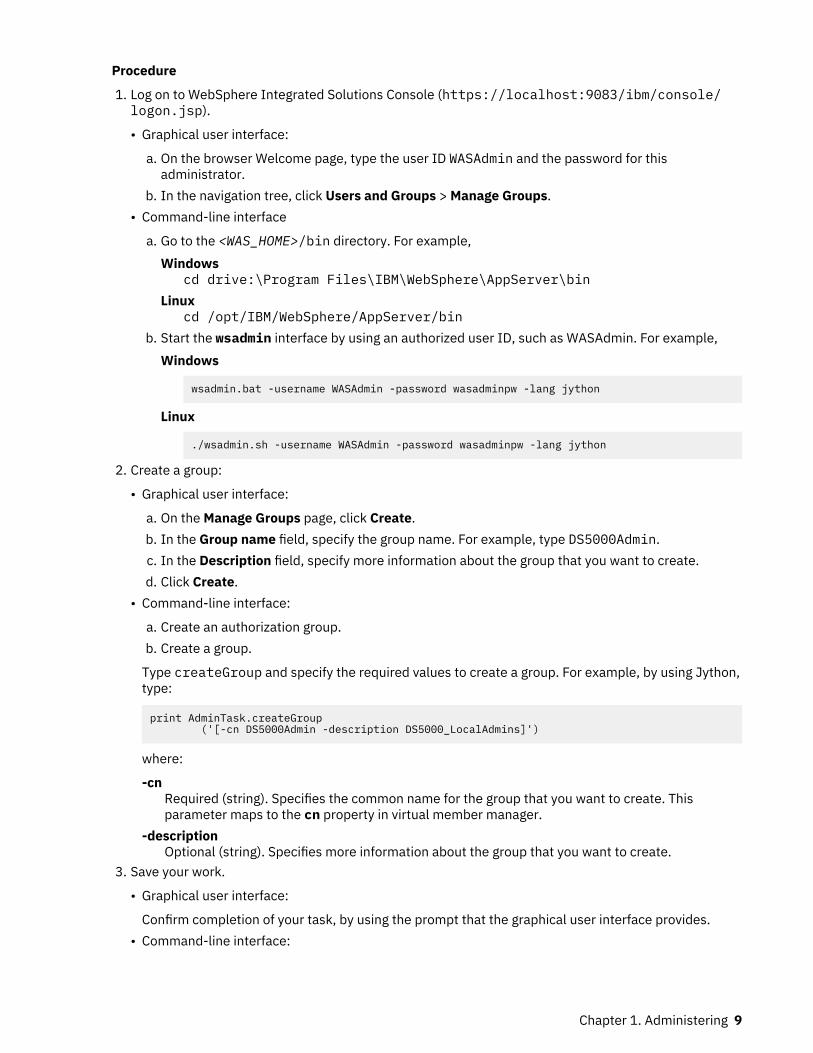
1. Log on to WebSphere Integrated Solutions Console (https://localhost:9083/ibm/console/logon.jsp).
• Graphical user interface:
a. On the browser Welcome page, type the user ID WASAdmin and the password for thisadministrator.
b. In the navigation tree, click Users and Groups > Manage Groups.• Command-line interface
a. Go to the <WAS_HOME>/bin directory. For example,Windows
cd drive:\Program Files\IBM\WebSphere\AppServer\binLinux
cd /opt/IBM/WebSphere/AppServer/binb. Start the wsadmin interface by using an authorized user ID, such as WASAdmin. For example,
Windows
wsadmin.bat -username WASAdmin -password wasadminpw -lang jython
Linux
./wsadmin.sh -username WASAdmin -password wasadminpw -lang jython
2. Create a group:
• Graphical user interface:
a. On the Manage Groups page, click Create.b. In the Group name field, specify the group name. For example, type DS5000Admin.c. In the Description field, specify more information about the group that you want to create.d. Click Create.
• Command-line interface:
a. Create an authorization group.b. Create a group.
Type createGroup and specify the required values to create a group. For example, by using Jython,type:
print AdminTask.createGroup ('[-cn DS5000Admin -description DS5000_LocalAdmins]')
where:
-cnRequired (string). Specifies the common name for the group that you want to create. Thisparameter maps to the cn property in virtual member manager.
-descriptionOptional (string). Specifies more information about the group that you want to create.
3. Save your work.
• Graphical user interface:
Confirm completion of your task, by using the prompt that the graphical user interface provides.• Command-line interface:
Chapter 1. Administering 9

Save your configuration. For example, by using Jython, type:
print AdminConfig.save()
What to do next
Next, assign one or more permissions or roles to the group.
Creating a user in a groupCreate a user and assign membership for the user to a group of system administrators.
About this task
This task uses the WASAdmin user ID on the WebSphere Integrated Solutions Console to create a userand add the user to a group.
Note: To access IBM Security Key Lifecycle Manager graphical user interface or command-line interface,the user must be assigned to this group: klmGUICLIAccessGroup
For more information about the commands that create groups and users, see the IBM WebSphereApplication Server documentation (http://www.ibm.com/support/knowledgecenter/en/SSAW57_9.0.0/com.ibm.websphere.nd.multiplatform.doc/ae/rxml_atwimmgt.html).
Procedure
1. Log on to the WebSphere Integrated Solutions Console.
• Graphical user interface:
a. On the browser Welcome page, type a user ID of WASAdmin and a password value such aswasadminpw.
b. In the navigation tree, click Users and Groups > Manage Users.• Command-line interface
a. Go to the <WAS_HOME>/bin directory. For example,Windows
cd drive:\Program Files\IBM\WebSphere\AppServer\binLinux
cd /opt/IBM/WebSphere/AppServer/binb. Start the wsadmin interface by using an authorized user ID, such as WASAdmin. For example,
Windows
wsadmin.bat -username WASAdmin -password wasadminpw -lang jython
Linux
./wsadmin.sh -username WASAdmin -password wasadminpw -lang jython
2. Create a user, specifying membership in the new group.
• Graphical user interface:
a. On the Manage Users page, click Create.b. On the Create a User page, specify required information such as the user ID and password. For
example, type myAdmin as a user ID, and mypwd as the password.c. Click Create.d. Click the link to the new user ID to display the user properties.e. On the User Properties dialog, click Groups.
10 IBM Security Key Lifecycle Manager : Administering

f. Click Add.g. On the Add a User to Groups dialog, click Search.h. In the table of groups, select the group that you previously created and click Add.i. Read the confirmation message that the user was added to the group and click Close.
• Command-line interface:
a. First, create the user. Type createUser and specify the required values to create a user. Forexample, by using Jython, type:
print AdminTask.createUser ('[-uid myAdmin -password tempPass -confirmPassword tempPass -cn myAdmin -sn JDoe]')
where:
-uidSpecifies the unique ID for the user that you want to create. (String, required)
-passwordSpecifies the password for the user. (String, required)
-confirmPasswordSpecifies the password again to validate how it was entered for the password parameter.(String, optional)
-cnSpecifies the first name or given name of the user. (String, optional)
-snSpecifies the last name or family name of the user. (String, optional)
b. Add the user as a member of the group. For example, in Jython type:
print AdminTask.addMemberToGroup('[-memberUniqueName uid=myAdmin,o=defaultWIMFileBasedRealm -groupUniqueName cn=DS5000Admin,o=defaultWIMFileBasedRealm]')
where:memberUniqueName uniqueName
Specifies the unique name value for the user or group that you want to add to the specifiedgroup.
groupUniqueName uniqueNameSpecifies the unique name value for the group to which you want to add the user.
3. Verify that the user is a member of the group.
• Graphical user interface:
a. In the navigation tree, click Users and Groups > Manage Users.b. On the Manage Users page, in the User ID column, click the entry for the new user ID.c. On the User Properties dialog, click the Groups tab. Verify that the user is a member of the new
group.• Command-line interface:
For example, by using Jython, type:
print AdminTask.getMembersOfGroup('[-uniqueName cn=DS5000Admin,o=defaultWIMFileBasedRealm]')
4. Save your work.
• Graphical user interface:
Confirm completion of your task, by using the prompt that the graphical user interface provides.• Command-line interface:
Chapter 1. Administering 11

Save your configuration. For example, by using Jython, type:
print AdminConfig.save()
5. If you used the command-line interface to create the user, run the stopServer and startServercommands to restart the IBM Security Key Lifecycle Manager server. Then, log in as the new user.
What to do next
Next, validate that the user can do authorized tasks. Log out as WASAdmin. Log in as the new user andconfirm that you can do tasks by using IBM Security Key Lifecycle Manager.
Validating user tasksValidate that a new user in an administrative group can carry out tasks.
About this task
This task validates that a user in a group can do tasks that group membership provides. For example, theuser can administer DS5000 storage servers.
Note: To access IBM Security Key Lifecycle Manager graphical user interface or command-line interface,the user must be assigned to this group: klmGUICLIAccessGroup
For more information about the commands that map groups to roles, see the IBM WebSphere ApplicationServer documentation (http://www.ibm.com/support/knowledgecenter/en/SSAW57_9.0.0/com.ibm.websphere.nd.multiplatform.doc/ae/rxml_atauthorizationgroup.html).
Procedure
Verify that the user can do a set of tasks that group membership provides.
• Graphical user interface:
a. Log out of the WASAdmin user ID.b. Log in to the graphical user interface as an authorized user in the group. For example, log in asmyAdmin.
c. On the Key and Device Management table, verify that the only administrative choice is DS5000.
Alternatively, if your earlier tasks defined administrative activities for a new device group such asmyDS5000, verify that the only administrative choice is myDS5000.
d. Select the device and click Go to > Manage keys and devices.e. Alternatively, right-click the device and select Manage keys and devices.f. On the management page for DS5000, complete a task. For example, add a new key group.
• Command-line interface:
a. Log out of wsadmin as wasadmin.b. In the WAS_HOME/bin directory, start a new wsadmin session by using Jython. Then, log on towsadmin with an authorized user ID, such as the new myAdmin user ID as shown in the followingexample.
– Go to the <WAS_HOME>/bin directory.Windows
cd drive:\Program Files\IBM\WebSphere\AppServer\binLinux
cd /opt/IBM/WebSphere/AppServer/bin– Start the wsadmin interface by using an authorized user ID.
12 IBM Security Key Lifecycle Manager : Administering
Windows
wsadmin.bat -username myAdmin -password password -lang jython
Linux
./wsadmin.sh -username myAdmin -password password -lang jython
c. Add an example key group. For example, type:
print AdminTask.tklmGroupCreate ('[-name GROUP-DS5000-abcd2de9 -type keygroup -usage DS5000]')
Alternatively, send the following HTTP request by using a REST client:
POST https://localhost:<port>/SKLM/rest/v1/keygroups/newGroupContent-Type: application/jsonAccept : application/jsonAuthorization: SKLMAuth authId=139aeh34567m{"usage":"DS500"}
What to do next
Next, specify other groups that your organization might require. For example, specify a group to dooperator or auditor tasks.
Password policyThe password policy applies to all passwords in IBM Security Key Lifecycle Manager. For example,passwords for users, export files, backup files, replication backup files, and so on. The policy is specifiedin the SKLM_DATA/config/TKLMPasswordPolicy.xml file.
The policy does not apply to the initial passwords that are created for default users such as SKLMAdmin.These default users are created during IBM Security Key Lifecycle Manager installation.
The password policy applies to changes to passwords for default users, and to new and changedpasswords for new users. Policy checking is done only when you create or change a user profile. You mustassign a role to a new user before that user attempts to log in to IBM Security Key Lifecycle Manager.
The password policy is enabled by default. You can use an XML or ASCII editor to change this file. Todisable the policy, change the value of the enabled parameter in the policy file to false:
PasswordPolicy enabled="true"
IBM Security Key Lifecycle Manager supports these password rules:
Table 4. Password rules. Password policy rules
Rule Default value
Minimum length 6
Maximum length 20
Note: Ensure that the value does notexceed 127.
Minimum number of numeric characters 2
Minimum number of alphabetic characters 3
Maximum number of consecutive occurrences of the samecharacter
2
Upper-case characters At least 1
Lower-case characters At least 1
Chapter 1. Administering 13
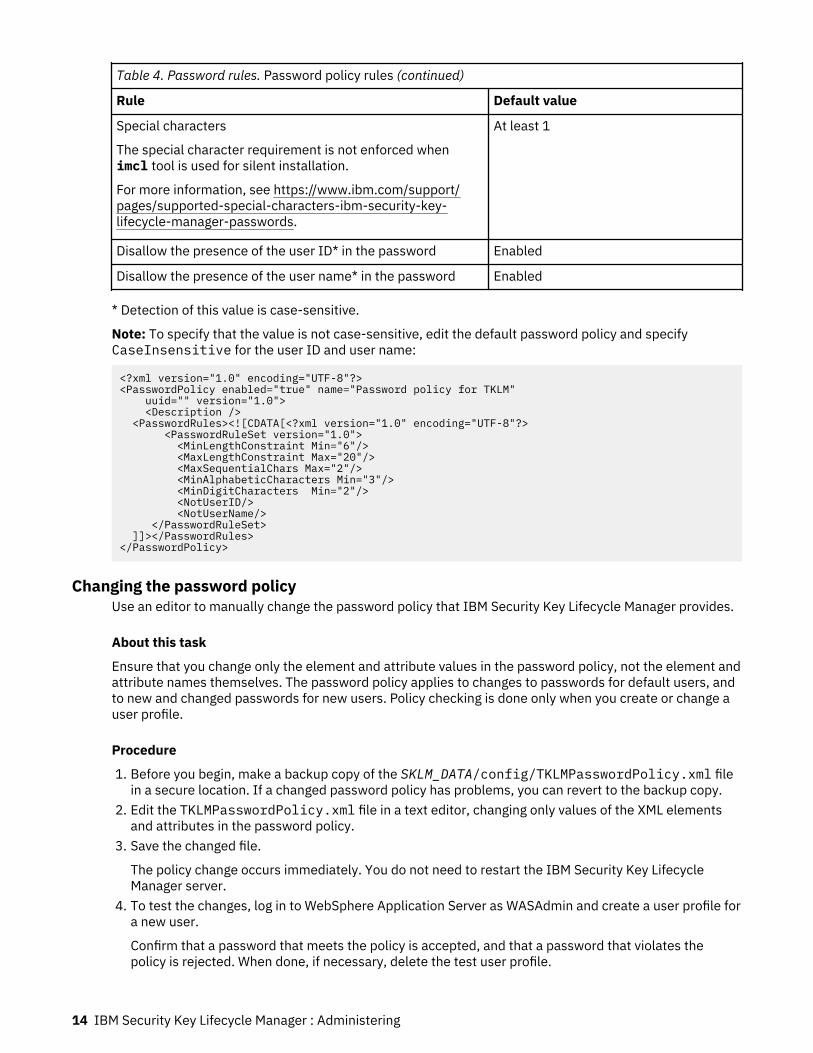
Table 4. Password rules. Password policy rules (continued)
Rule Default value
Special characters
The special character requirement is not enforced whenimcl tool is used for silent installation.
For more information, see https://www.ibm.com/support/pages/supported-special-characters-ibm-security-key-lifecycle-manager-passwords.
At least 1
Disallow the presence of the user ID* in the password Enabled
Disallow the presence of the user name* in the password Enabled
* Detection of this value is case-sensitive.
Note: To specify that the value is not case-sensitive, edit the default password policy and specifyCaseInsensitive for the user ID and user name:
<?xml version="1.0" encoding="UTF-8"?><PasswordPolicy enabled="true" name="Password policy for TKLM" uuid="" version="1.0"> <Description /> <PasswordRules><![CDATA[<?xml version="1.0" encoding="UTF-8"?> <PasswordRuleSet version="1.0"> <MinLengthConstraint Min="6"/> <MaxLengthConstraint Max="20"/> <MaxSequentialChars Max="2"/> <MinAlphabeticCharacters Min="3"/> <MinDigitCharacters Min="2"/> <NotUserID/> <NotUserName/> </PasswordRuleSet> ]]></PasswordRules></PasswordPolicy>
Changing the password policyUse an editor to manually change the password policy that IBM Security Key Lifecycle Manager provides.
About this task
Ensure that you change only the element and attribute values in the password policy, not the element andattribute names themselves. The password policy applies to changes to passwords for default users, andto new and changed passwords for new users. Policy checking is done only when you create or change auser profile.
Procedure
1. Before you begin, make a backup copy of the SKLM_DATA/config/TKLMPasswordPolicy.xml filein a secure location. If a changed password policy has problems, you can revert to the backup copy.
2. Edit the TKLMPasswordPolicy.xml file in a text editor, changing only values of the XML elementsand attributes in the password policy.
3. Save the changed file.
The policy change occurs immediately. You do not need to restart the IBM Security Key LifecycleManager server.
4. To test the changes, log in to WebSphere Application Server as WASAdmin and create a user profile fora new user.
Confirm that a password that meets the policy is accepted, and that a password that violates thepolicy is rejected. When done, if necessary, delete the test user profile.
14 IBM Security Key Lifecycle Manager : Administering
Changing user passwordsUse the WebSphere Integrated Solutions Console to change the password of an IBM Security KeyLifecycle Manager user. The changed password must comply with the password policy that IBM SecurityKey Lifecycle Manager provides.
About this task
Log in to the WebSphere Integrated Solutions Console with the WASAdmin user ID to change thepassword of a user, including the password of the SKLMAdmin user ID.
For more information about the commands that create groups and users, see the IBM WebSphereApplication Server documentation (http://www.ibm.com/support/knowledgecenter/en/SSAW57_9.0.0/com.ibm.websphere.nd.multiplatform.doc/ae/rxml_atwimmgt.html).
Procedure
1. Log on to the WebSphere Integrated Solutions Console.
• Graphical user interface:
a. On the browser Welcome page, type a user ID of WASAdmin and a password value, such aswasadminpw.
b. In the navigation tree, click Users and Groups > Manage Users.• Command-line interface
a. Go to the <WAS_HOME>/bin directory. For example,Windows
cd drive:\Program Files\IBM\WebSphere\AppServer\binLinux
cd /opt/IBM/WebSphere/AppServer/binb. Start the wsadmin interface by using an authorized user ID, such as WASAdmin. For example,
Windows
wsadmin.bat -username WASAdmin -password wasadminpw -lang jython
Linux
./wsadmin.sh -username WASAdmin -password wasadminpw -lang jython
2. Change the password for a user.
• Graphical user interface:
a. On the Manage Users > Search for Users dialog, click Search.b. In the search criteria table, double-click a selected user ID. For example, double-click myAdmin
as a user ID.c. On the User Properties dialog, change the value of the Password and Confirm password fields.d. Click OK.
• Command-line interface:
a. Type updateUser and specify the required values. For example, by using Jython, type on oneline:
print AdminTask.updateUser('-uniqueName uid=test2,o=defaultWIMFileBasedRealm -password secret12 -confirmPassword secret12')
Where,
Chapter 1. Administering 15
-uniqueNameSpecifies the unique name for the user with a password that you want to create. (String,required)
You might use the searchUsers command to verify that the name correctly identifies theuser before you change the password.
-passwordSpecifies the password for the user. (String, required)
The new password must comply with the password policy that IBM Security Key LifecycleManager provides.
-confirmPasswordSpecifies the password again to validate how it was entered for the password parameter.(String, optional)
What to do next
Next, validate that the user can log in. Log out as WASAdmin. Log in as the user and confirm that thechanged password is accepted.
Resetting a passwordYou must be the administrator to reset a password for the IBM Security Key Lifecycle Manager orWebSphere Application Server.
About this taskYou can reset the password on the computer on which IBM Security Key Lifecycle Manager runs. Usethese steps only when the password of the user is lost. In all other cases, use the graphical user interfaceto update the password.
Procedure
1. Log in with the a local administrator user ID.2. Back up the WAS_HOME/profiles/KLMProfile/config/cells/SKLMCell/fileRegistry.xml
file. Changing the value of the password changes this registry file.3. Change the password.
• Windows
a. Start a wsadmin session by using the Jython syntax. For example, type:
WAS_HOME/bin/wsadmin.bat -conntype none -profileName KLMProfile -lang jython
b. Reset the password for the SKLMAdmin user ID:
wsadmin>print AdminTask.changeFileRegistryAccountPassword ('-userId SKLMAdmin -password newpassword')
Note:
– Only the WASAdmin user ID or another user ID with WebSphere Application Serveradministrator authority can change passwords by using theAdminTask.changeFileRegistryAccountPassword command.
– Passwords that you create by using theAdminTask.changeFileRegistryAccountPassword command are not validated againstthe configured password policy that IBM Security Key Lifecycle Manager provides.
After a lost password reset, the user must set the password by using the graphical userinterface.
c. Save the change and exit:
16 IBM Security Key Lifecycle Manager : Administering

wsadmin>print AdminConfig.save() wsadmin>exit
• Linux
a. Start a wsadmin session by using the Jython syntax. For example, type on one line:
WAS_HOME/bin/wsadmin.sh -conntype none -profileName KLMProfile -lang jython
b. Reset the password for the SKLMAdmin user ID:
wsadmin>print AdminTask.changeFileRegistryAccountPassword ('-userId SKLMAdmin -password newpassword')
Note:
– Only the WASAdmin user ID or another user ID with IBM Security Key Lifecycle Manageradministrator authority can change passwords by using theAdminTask.changeFileRegistryAccountPassword command.
– Passwords that you create by using theAdminTask.changeFileRegistryAccountPassword command are not validated againstthe configured password policy that IBM Security Key Lifecycle Manager provides.
After a lost password reset, the user must set the password by using the graphical userinterface.
c. Save the change and exit:
wsadmin>print AdminConfig.save() wsadmin>exit
4. Stop and start the server.
• StopWindows
stopServer.bat server1
Linux
./stopServer.sh server1
• StartWindows
startServer.bat server1
Linux
./startServer.sh server1
5. Verify that you can log in as the specified administrator with the new password.
Changing IBM Security Key Lifecycle Manager user passwordYou can use the IBM Security Key Lifecycle Manager application user ID to change the user password.The changed password must comply with the password policy that IBM Security Key Lifecycle Managerprovides.
About this task
For more information about the commands to change passwords, see the WebSphere Application Serverdocumentation (http://www.ibm.com/support/knowledgecenter/SSAW57_9.0.0/com.ibm.websphere.nd.multiplatform.doc/ae/rxml_atwimmgt.html).
Chapter 1. Administering 17
Procedure
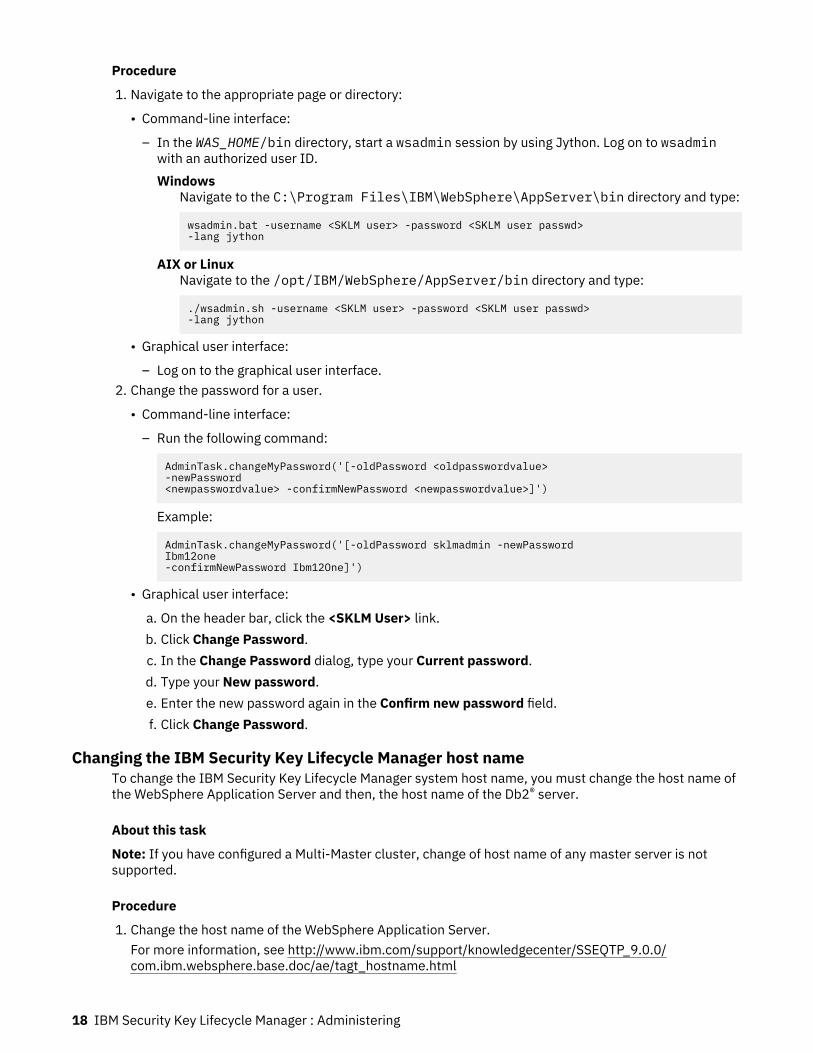
1. Navigate to the appropriate page or directory:
• Command-line interface:
– In the WAS_HOME/bin directory, start a wsadmin session by using Jython. Log on to wsadminwith an authorized user ID.Windows
Navigate to the C:\Program Files\IBM\WebSphere\AppServer\bin directory and type:
wsadmin.bat -username <SKLM user> -password <SKLM user passwd> -lang jython
AIX or LinuxNavigate to the /opt/IBM/WebSphere/AppServer/bin directory and type:
./wsadmin.sh -username <SKLM user> -password <SKLM user passwd> -lang jython
• Graphical user interface:
– Log on to the graphical user interface.2. Change the password for a user.
• Command-line interface:
– Run the following command:
AdminTask.changeMyPassword('[-oldPassword <oldpasswordvalue> -newPassword <newpasswordvalue> -confirmNewPassword <newpasswordvalue>]')
Example:
AdminTask.changeMyPassword('[-oldPassword sklmadmin -newPassword Ibm12one -confirmNewPassword Ibm12One]')
• Graphical user interface:
a. On the header bar, click the <SKLM User> link.b. Click Change Password.c. In the Change Password dialog, type your Current password.d. Type your New password.e. Enter the new password again in the Confirm new password field.f. Click Change Password.
Changing the IBM Security Key Lifecycle Manager host nameTo change the IBM Security Key Lifecycle Manager system host name, you must change the host name ofthe WebSphere Application Server and then, the host name of the Db2® server.
About this task
Note: If you have configured a Multi-Master cluster, change of host name of any master server is notsupported.
Procedure
1. Change the host name of the WebSphere Application Server.For more information, see http://www.ibm.com/support/knowledgecenter/SSEQTP_9.0.0/com.ibm.websphere.base.doc/ae/tagt_hostname.html
18 IBM Security Key Lifecycle Manager : Administering
2. Change the host name of the Db2 server.For more information, see http://www.ibm.com/support/docview.wss?rs=71&context=SSEPGG&context=SSEPDU&context=SSVGXH&context=SSVGZB&context=SSFHEG&context=SSYK8P&context=SSTLZ9&q1=db2+change+hostname&uid=swg21258834&loc=en_US&cs=utf-8&lang=en
LDAP configurationYou can configure IBM Security Key Lifecycle Manager users in any of the LDAP repositories, such as IBMSecurity Directory Server or Microsoft Active Directory to access IBM Security Key Lifecycle Managerserver.
You must add and configure LDAP user repository to the federated repository of WebSphere ApplicationServer. IBM Security Key Lifecycle Manager uses application groups to enforce the role-basedauthorization for IBM Security Key Lifecycle Manager functions. For an IBM Security Key LifecycleManager user to run IBM Security Key Lifecycle Manager functions in an LDAP user repository, the usermust be a member of a specific IBM Security Key Lifecycle Manager application group.
When you install IBM Security Key Lifecycle Manager, the application groups and users are created in adefault file based repository in the WebSphere Application Server federated repository. When an LDAPuser repository is added to the WebSphere Application Server federated repository, you must make LDAPuser as a member of IBM Security Key Lifecycle Manager application groups. You cannot make LDAPusers as member of the groups in the default file based repository.
Cross repository group membership is not possible between a file-based repository and an LDAPrepository. However, cross repository group membership is possible across an LDAP repository and adatabase-based repository. So, create a database-based repository and create all the IBM Security KeyLifecycle Manager application groups in this repository. The application groups that existed in file-basedrepository are removed.
When the database-based repository is created and the IBM Security Key Lifecycle Manager applicationgroups are added to this repository, the user in an LDAP repository can be made members of IBM SecurityKey Lifecycle Manager application groups in the database-based repository. Then, the user can log on toIBM Security Key Lifecycle Manager application and run IBM Security Key Lifecycle Manager applicationfunctions.
To integrate LDAP with IBM Security Key Lifecycle Manager, use any of the following configurationmethods:
• By using WebSphere Integrated Solutions Console. For more information, see Integrating LDAP by usingWebSphere Integrated Solutions Console.
• By running the LDAP configuration scripts. For more information, see Running the LDAP configurationscripts.
LDAP integration by using WebSphere Integrated Solutions ConsoleBefore you integrate LDAP with IBM Security Key Lifecycle Manager by using WebSphere IntegratedSolutions Console, you must run the backup tasks.
Prerequisites for LDAP integration
You might need to restore the following data to the state as before the LDAP configuration steps were run:
• WebSphere Application Server configuration data for IBM Security Key Lifecycle Manager• IBM Security Key Lifecycle Manager application data
Run the following steps to back up the data.
1. Backup IBM Security Key Lifecycle Manager profile (KLMProfile) in WebSphere Application Server:
a. In the WAS_HOME/bin directory, stop the WebSphere Application Server application.b. Run the following command.
Chapter 1. Administering 19
Windows<WAS_HOME>\bin\manageProfiles.bat -backupProfile -profileNameKLMProfile -backupFile <path to a file>
C:\Program Files\IBM\WebSphere\AppServer\bin\manageProfiles.bat backupProfile -profileName KLMProfile -backupFile :\SKLM_WAS_ProfileBackup
Linux<WAS_HOME>/bin/manageprofiles.sh -backupProfile -profileName KLMProfile-backupFile <path to a file>
/opt/IBM/WebSphere/AppServer/bin/manageprofiles.sh -backupProfile profileName KLMProfile -backupFile /root/SKLM_WAS_ProfileBackup
c. Start WebSphere Application Server.2. Backup IBM Security Key Lifecycle Manager application data.
Use the graphical user interface, command-line interface, or REST interface to back up critical files forIBM Security Key Lifecycle Manager.
For more information about the manageprofiles command, see http://www.ibm.com/support/knowledgecenter/SSEQTP_9.0.0/com.ibm.websphere.base.doc/ae/rxml_manageprofiles.html.
Integrating LDAP by using WebSphere Integrated Solutions ConsoleYou can configure IBM Security Key Lifecycle Manager users in any of the LDAP repositories, such as IBMSecurity Directory Server or Microsoft Active Directory to access IBM Security Key Lifecycle Managerserver and call server APIs and CLIs.
Before you beginFor prerequisite information, see “LDAP configuration” on page 19
Procedure
1. Add LDAP repository to the federated repository. For the instructions, see “Adding LDAP repository tothe federated repository” on page 21.
2. Create the database for LDAP configuration.
a. Open the DB2 command window.b. Run the following command to create the database.
db2 create database USERDB40 using codeset UTF-8 territory US
3. Update the data source from the WebSphere Integrated Solutions Console with jndi name jdbc/wimXADS. For the instructions, see “Updating a data source from WebSphere Integrated SolutionsConsole” on page 22.
4. Restart WebSphere Application Server.5. Copy db2jcc.jar and db2jcc_license_cu.jar from the DB2SKLMV40 directory to theWAS_HOME/lib directory.
Note: Ensure that the non-administrator or non-root user account has access to the db2jcc.jarand db2jcc_license_cu.jar files.
DB2SKLMV40 path:Windows
drive:\Program Files\IBM\DB2SKLMV40\javaLinux
path/IBM/DB2SKLMV40/java
Default definition of WAS_HOME variable is typically:
20 IBM Security Key Lifecycle Manager : Administering

WindowsC:\Program Files\IBM\WebSphere\AppServer
Linux/opt/IBM/WebSphere/AppServer
6. Create database-based repository to hold all the IBM Security Key Lifecycle Manager applicationgroups. For the instructions, see “Creating a database-based repository” on page 22.
7. From WebSphere Integrated Solutions Console, add security role to user/group mapping and mapadministrator role to klmGUICLIAccessGroup . For the instructions, see “Adding security user rolesfrom WebSphere Integrated Solutions Console” on page 24.
8. Restart WebSphere Application Server.9. Add LDAP users to IBM Security Key Lifecycle Manager application groups. For the instructions, see
“Adding LDAP users to IBM Security Key Lifecycle Manager application groups” on page 2410. Take the IBM Security Key Lifecycle Manager application backup. The data in the database-based
repository is also backed up.
What to do nextAfter LDAP is configured, you must run the subsequent tasks. For more information, see “Post-LDAPconfiguration tasks to support LDAP integration” on page 28
Adding LDAP repository to the federated repositoryYou must add LDAP repository to the federated repository to configure an LDAP repository, such as IBMSecurity Directory Server or Microsoft Active Directory in the federated repository.
About this taskFor more information about configuring LDAP settings in a federated repository configuration, see http://www-01.ibm.com/support/knowledgecenter/api/redirect/wasinfo/v8r5/topic/com.ibm.websphere.base.doc/ae/twim_ldap_settings.html.
Procedure
1. Log on to WebSphere Integrated Solutions Console (https://localhost:9083/ibm/console/logon.jsp) as wasadmin user.
2. In the navigation bar, click Security > Global security.3. Under User account repository, select Federated repositories from the Available realm definitions
drop-down list.4. Click Configure.5. In the Global security > Federated repositories page, click Add Repositories (LDAP, custom,etc...).6. In the Global security > Federated repositories > Repository reference page, select LDAP
Repository from the New Repository drop-down list.7. In the Global security > Federated repositories > Repository reference > New page, specify name
of the LDAP repository and other details according to your requirements.8. Click OK.9. Click Save to save the configuration.
10. In the Global security > Federated repositories > Repository reference page, specify the value forUnique distinguished name of the base (or parent) entry in federated repositories.
11. Click OK.12. In the Global security > Federated repositories page, select the link to the LDAP repository that you
created.13. In the Global security > Federated repositories > <LDAP Repository Name> page, under Additional
Properties, select Federated repositories entity types to LDAP object classes mapping link.
Chapter 1. Administering 21

In the Global security > Federated repositories > <LDAP Repository Name> > Federatedrepositories entity types to LDAP object classes mapping page, ensure that each entity type listedis mapped to the correct object classes. Modify the values according to your requirements.
14. In the Global security > Federated repositories page, select the link to the LDAP repository that youcreated. Under Additional Properties, select Group attribute definition.
15. In the Global security > Federated repositories > <LDAP Repository Name> > Group attributedefinition page, under Additional Properties, select Member Attributes.
16. In the Global security > Federated repositories > <LDAP Repository Name> > Group attributedefinition > Member attributes page, ensure that uniqueMember member attribute is mapped tothe correct object class. If this attribute is not present, create an attribute and map it to the correctobject class.
What to do nextCreate a data source from WebSphere Integrated Solutions Console.
Updating a data source from WebSphere Integrated Solutions ConsoleYou must update data source for the database-based repository to hold IBM Security Key LifecycleManager application groups. The database-based repository uses the tables that are created in the IBMSecurity Key Lifecycle Manager application database.
Procedure
1. Log on to update the data source from WebSphere Integrated Solutions Console (https://localhost:9083/ibm/console/logon.jsp) as a wasadmin user.
2. In the navigation bar, click Resources > JDBC > Data sources.3. Click WIM Data Source to edit the database values.4. Update the database name with USERDB40 under the Common and required data source properties
section.5. Click OK.6. Click Save to save the configuration.
Creating a database-based repositoryCreate a database-based repository to hold all the IBM Security Key Lifecycle Manager application groupsand to remove all the IBM Security Key Lifecycle Manager application groups from file-based repository.You must add the IBM Security Key Lifecycle Manager application groups to database-based repositoryand update the WebSphere Application Server federated repository with LDAP repository.
Procedure
1. Go to the <WAS_HOME>\bin folder.2. Run the following commands:
wsadmin.bat -user wasadmin user -password wasadmin passwd -lang jython -f SKLM_INSTALL_HOME\bin\LDAPIntegration\createDBRepos.py WAS_HOME LDAP_DBNAME SKLM_DBUSER SKLM_DBUSERPASSWD SKLM_DBPORT#
Notes:
• On Linux platforms, use wsadmin.sh instead of wsadmin.bat.• During IBM Security Key Lifecycle Manager installation, if you use the defaults,
LDAP_DBNAME = USERDB40SKLM_DBUSER = SKLMDB40SKLM_DBPORT# = 50060
SKLM_DBUSERPASSWD is the IBM Security Key Lifecycle Manager database password that youspecified during the installation.
22 IBM Security Key Lifecycle Manager : Administering

• During IBM Security Key Lifecycle Manager installation, if you use the defaults,
LDAP_DBNAME = USERDB40SKLM_DBUSER = SKLMDB40SKLM_DBPORT# = 50060
SKLM_DBUSERPASSWD is the IBM Security Key Lifecycle Manager database password that youspecified during the installation.
• All the .py python scripts are present in the <SKLM_INSTALL_HOME>\bin\LDAPIntegrationdirectory.
<SKLM_INSTALL_HOME> path typically,Windows
C:\Program Files\IBM\SKLMV40Linux
/opt/IBM/SKLMV403. Run the following command.
wsadmin.bat -user <wasadmin user> -password <wasadmin passwd> -lang jython -f <SKLM_INSTALL_HOME>\bin\LDAPIntegration\removeGroupsFromDefRepos.py
4. From the WebSphere Integrated Solutions Console, modify Security role to user/groupmapping for removing the administrator role mapping to klmGUICLIAccessGroup.
a. Log on to WebSphere Integrated Solutions Console (https://localhost:9083/ibm/console/logon.jsp).
b. In the navigation bar, click Applications > Application Types > Application Types > WebSphereenterprise applications.
c. Click the sklm_kms link.d. In the Enterprise Applications > sklm_kms page, under the Detail Properties section, click the
Security role to user/group mapping link.e. In the Enterprise Applications > sklm_kms > Security role to user/group mapping page, select
the administrator role.f. Click Map Groups.g. Select klmGUICLIAccessGroup from the list and click the left arrow button to remove
klmGUICLIAccessGroup from the list.h. Click OK.i. Click the Save link to save the configuration.
5. Restart WebSphere Application Server6. Run the following command.
wsadmin.bat -user <wasadmin user> -password <wasadmin passwd> -lang jython -f <SKLM_INSTALL_HOME>\bin\LDAPIntegration\addGroupsToDBRepos.py
7. Run the following command.
wsadmin.bat -user <wasadmin user> -password <wasadmin passwd> -lang jython -f <SKLM_INSTALL_HOME>\bin\LDAPIntegration\updateLDAPReposConfig.py <LDAPRepos Name - name used earlier when LDAP repos was created>
What to do nextAdd security role to user/group mapping and map administrator role to klmGUICLIAccessGroup.
Chapter 1. Administering 23
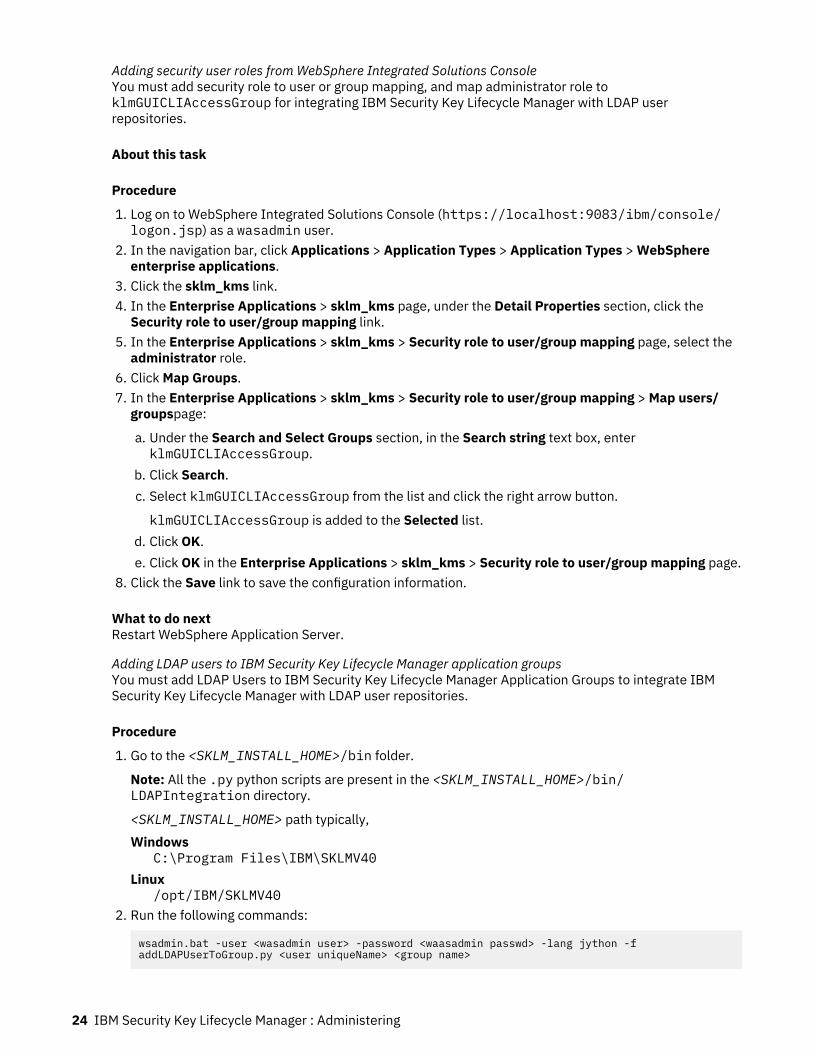
Adding security user roles from WebSphere Integrated Solutions ConsoleYou must add security role to user or group mapping, and map administrator role toklmGUICLIAccessGroup for integrating IBM Security Key Lifecycle Manager with LDAP userrepositories.
About this task
Procedure
1. Log on to WebSphere Integrated Solutions Console (https://localhost:9083/ibm/console/logon.jsp) as a wasadmin user.
2. In the navigation bar, click Applications > Application Types > Application Types > WebSphereenterprise applications.
3. Click the sklm_kms link.4. In the Enterprise Applications > sklm_kms page, under the Detail Properties section, click the
Security role to user/group mapping link.5. In the Enterprise Applications > sklm_kms > Security role to user/group mapping page, select the
administrator role.6. Click Map Groups.7. In the Enterprise Applications > sklm_kms > Security role to user/group mapping > Map users/
groupspage:
a. Under the Search and Select Groups section, in the Search string text box, enterklmGUICLIAccessGroup.
b. Click Search.c. Select klmGUICLIAccessGroup from the list and click the right arrow button.
klmGUICLIAccessGroup is added to the Selected list.d. Click OK.e. Click OK in the Enterprise Applications > sklm_kms > Security role to user/group mapping page.
8. Click the Save link to save the configuration information.
What to do nextRestart WebSphere Application Server.
Adding LDAP users to IBM Security Key Lifecycle Manager application groupsYou must add LDAP Users to IBM Security Key Lifecycle Manager Application Groups to integrate IBMSecurity Key Lifecycle Manager with LDAP user repositories.
Procedure
1. Go to the <SKLM_INSTALL_HOME>/bin folder.
Note: All the .py python scripts are present in the <SKLM_INSTALL_HOME>/bin/LDAPIntegration directory.
<SKLM_INSTALL_HOME> path typically,Windows
C:\Program Files\IBM\SKLMV40Linux
/opt/IBM/SKLMV402. Run the following commands:
wsadmin.bat -user <wasadmin user> -password <waasadmin passwd> -lang jython -f addLDAPUserToGroup.py <user uniqueName> <group name>
24 IBM Security Key Lifecycle Manager : Administering
Notes: On Linux platforms, use wsadmin.sh instead of wsadmin.bat
The user unique name is the Unique Name component in LDAP registry. For example:
uid=001,c=in,ou=bluepages,o=ibm.com
For an LDAP user who needs IBM Security Key Lifecycle Manager admin access, the user must bemade member of klmGUICLIAccessGroup and klmSecurityOfficerGroup. To do so, run thefollowing commands:
wsadmin.bat -user <wasadmin user> -password <wasadmin passwd> -lang jython -f <SKLM_INSTALL_HOME>\bin\LDAPIntegration\addLDAPUserToGroup.py <user uniqueName> klmGUICLIAccessGroup
wsadmin.bat -user <wasadmin user> -password <wasadmin passwd> -lang jython -f <SKLM_INSTALL_HOME>\bin\LDAPIntegration\addLDAPUserToGroup.py <user uniqueName> klmSecurityOfficerGroup
What to do nextTake IBM Security Key Lifecycle Manager application backup.
Running the LDAP configuration scriptsRun the LDAP configuration scripts to easily integrate IBM Security Key Lifecycle Manager with LDAP forconfiguring IBM Security Key Lifecycle Manager users in any of the LDAP repositories, such as IBMSecurity Directory Server or Microsoft Active Directory.
About this task
Procedure
1. Open the config.py properties file and update the values for the properties as per yourrequirements.
Note: To run the scripts with default configuration, you must set the following properties:
• ip• port• LDAP_server_type• backupPassword
For a description of all the properties, see LDAP integration by using configuration scripts.Windows
SKLM_INSTALL_HOME\bin\LDAPIntegration\config.pyC:\Program Files\IBM\SKLMV40\bin\LDAPIntegration\config.py
LinuxSKLM_INSTALL_HOME/bin/LDAPIntegration/config.py/opt/IBM/SKLMV40/bin/LDAPIntegration/config.py
2. Create the database for LDAP configuration.
a. Open the DB2 command window.b. Run the following command to create the database.
db2 create database USERDB40 using codeset UTF-8 territory US
3. Update the data source from the WebSphere Integrated Solutions Console with jndi name jdbc/wimXADS. For the instructions, see “Updating a data source from WebSphere Integrated SolutionsConsole” on page 22.
4. Create database-based repository to hold all the IBM Security Key Lifecycle Manager applicationgroups.
Chapter 1. Administering 25

a. Go to the <WAS_HOME>\bin folder.Windows
C:\Program Files\IBM\WebSphere\AppServer\binLinux
/opt/IBM/WebSphere/AppServer/binb. Open a command prompt and run the following commands.
wsadmin.bat -user <wasadmin user> -password <wasadmin passwd> -lang jython -f <SKLM_INSTALL_HOME>\bin\LDAPIntegration\createDBRepos.py <WAS_HOME> <LDAP_DBNAME> <SKLM_DBUSER> <SKLM_DBUSERPASSWD> <SKLM_DBPORT#>
Notes: On Linux platforms, use wsadmin.sh instead of wsadmin.bat
During IBM Security Key Lifecycle Manager installation, if you use the defaults,
LDAP_DBNAME = USERDB40SKLM_DBUSER = sklmdb40SKLM_DBPORT# = 50060
SKLM_DBUSERPASSWD is the IBM Security Key Lifecycle Manager database password that youspecified during the installation.
5. Run the configuration scripts sklmLDAPConfigure and addLDAPUserToGroup.Windows
Go to the SKLM_INSTALL_HOME\bin\LDAPIntegration directory and run the following scripts:
sklmLDAPConfigure.bat WAS_HOME SKLM_INSTALL_HOME WAS_ADMIN WASAdmin_PASSWORD SKLM_ADMIN SKLM_ADMIN_PASS DB2_install_directoryaddLDAPUserToGroup.bat WAS_HOME SKLM_INSTALL_HOME WAS_ADMIN WASADMIN_PASS USER_UNIQUE_NAME SKLM_ADMIN SKLM_ADMIN_PASS
For example:
sklmLDAPConfigure.bat "c:\Program Files\IBM\WebSphere\AppServer" "c:\Program Files\IBM\SKLMV40" wasadmin WAS@admin123 sklmadmin SKLM@admin123 "c:\Program Files\IBM\DB2SKLMV40"addLDAPUserToGroup.bat "c:\Program Files\IBM\WebSphere\AppServer" "c:\Program Files\IBM\SKLMV40" wasadmin WAS@admin123 "uid=001,c=in,ou=bluepages,o=ibm.com" sklmadmin SKLM@admin123
LinuxGo to the SKLM_INSTALL_HOME/bin/LDAPIntegration directory and run the following scripts:
sklmLDAPConfigure.sh WAS_HOME SKLM_INSTALL_HOME WAS_ADMIN WASAdmin_PASSWORD SKLM_ADMIN SKLM_ADMIN_PASS DB2_install_directoryaddLDAPUserToGroup.sh WAS_HOME SKLM_INSTALL_HOME WAS_ADMIN WASADMIN_PASS USER_UNIQUE_NAME SKLM_ADMIN SKLM_ADMIN_PASS
For example:
sklmLDAPConfigure.sh "/opt/IBM/WebSphere/AppServer" "/opt/IBM/SKLMV40" wasadmin WAS@admin123 sklmadmin SKLM@admin123 "/opt/IBM/DB2SKLMV40"addLDAPUserToGroup.sh "/opt/IBM/WebSphere/AppServer" "/opt/IBM/SKLMV40" wasadmin WAS@admin123 "uid=001,c=in,ou=bluepages,o=ibm.com" sklmadmin SKLM@admin123
WAS_HOMEThe directory where WebSphere Application Server for IBM Security Key Lifecycle Manager isinstalled.Windows
drive:\Program Files\IBM\WebSphere\AppServerLinux
path/IBM/WebSphere/AppServerSKLM_INSTALL_HOME
The directory where IBM Security Key Lifecycle Manager is installed.
26 IBM Security Key Lifecycle Manager : Administering
Windowsdrive:\Program Files\IBM\SKLMV40
LinuxWAS_ADMIN
User name of WebSphere Application Server for IBM Security Key Lifecycle Manager.WAS_PASS
Password of WebSphere Application Server for IBM Security Key Lifecycle Manager.USER_UNIQUE_NAME
The LDAP user for whom you want to assign IBM Security Key Lifecycle Manager administratorrole.
SKLM_ADMINAdministrator for IBM Security Key Lifecycle Manager.
SKLM_ADMIN_PASSPassword for IBM Security Key Lifecycle Manager administrator.
DB2_install_directoryThe directory where DB2 is installed.Windows
drive:\Program Files\IBM\DB2SKLMV40Linux
path/IBM/DB2SKLMV40For non-root installation on Linux , the path is: <non_root_user_home _directory>/sqllib
What to do nextAfter the LDAP configuration, you must run the subsequent tasks. For more information, see “Post-LDAPconfiguration tasks to support LDAP integration” on page 28
LDAP integration by using configuration scriptsYou can run the configuration scripts from a command-line to integrate IBM Security Key LifecycleManager with LDAP by using the default configuration settings that are defined in the config.pyproperties file.
The following example shows the properties that are defined in the config.py file.
import string, sysLDAP_server_type="IDS"login_id="uid"ip="9.x.x.x"port="389"gr_name="Group"pr_name="PersonAccount"gr_obj_class="groupOfUniqueNames"pr_obj_class="person"mem_name="uniqueMember"mem_obj_class="groupOfUniqueNames"base_entry="o=ibm.com"scope="direct"backupPassword="<changeit>"
The following table provides description for the config.py file properties.
Property Description
LDAP_server_type Type of the LDAP server that is being used. By default, IDS isspecified.
login_id Property name that is used for login. For example, uid and mail.
ip IP address or host name for the primary LDAP server.
Chapter 1. Administering 27

Property Description
port Port number for the LDAP server.
gr_name Name of the group entity type.
pr_name Name of the entity type.
gr_obj_class Object class for the entity type.
pr_obj_class Object class for the entity type.
mem_name Name of the LDAP attribute that is used as the group memberattribute. For example, member or uniqueMember.
mem_obj_class Group object class that contains the member attribute. For example,groupOfNames or groupOfUniqueNames. If you do not define thisparameter, the member attribute applies to all group object classes.
base_entry LDAP base entity
scope Scope of the member attribute. Specify any of the following values forthe parameter.direct
Member attribute that contains only the direct members.Therefore, this value refers to the member directly contained bythe group and not contained through the nested group. Forexample, if Group1 contains Group2 and Group2 containsUser1, then Group2 is a direct member of Group1 but User1 isnot a direct member of Group1. Both member and uniqueMemberare direct member attributes.
nestedMember attribute that contains direct members and the nestedmembers.
backupPassword Password to encrypt the backup key that is used to back up the IBMSecurity Key Lifecycle Manager data.
By default, <changeit> is specified. You must modify this valuebefore you run the LDAP configuration scripts.
You must specify this password to decrypt and restore the backupfiles.
If you discover problems during LDAP integration when the scripts are used to run the configuration task,you might need to review the following log files that are at <SKLM_INSTALL_HOME>/bin/LDAPIntegration to diagnose the problems.
• sklmldapconf.log• ldaplog.out
For more information about how to run the configuration scripts, see Running the LDAP configurationscripts.
Post-LDAP configuration tasks to support LDAP integrationAfter LDAP configuration, you might need to complete extra tasks to ensure successful integration of IBMSecurity Key Lifecycle Manager with LDAP user repositories.
Important notes after the LDAP configuration
1. After the LDAP configuration, sklmadmin user that existed in the default file-based user repositorycannot access IBM Security Key Lifecycle Manager application.
28 IBM Security Key Lifecycle Manager : Administering

2. After the LDAP configuration, you must use wsadmin commands to create groups and to assign IBMSecurity Key Lifecycle Manager roles. You cannot use WebSphere Integrated Solutions Console. Runthe following steps to add a group and assign a role to the group:
a. Go to <WAS_HOME>/bin.b. Log on to wsadmin by using the following command:
wsadmin.bat -user <wasadmin user> -password <wasadmin passwd>-lang jython
c. To create a group and assign the role, run the following command:
AdminTask.createGroup<'[-cn <groupname> -parent "o=sklmrepdb.ibm"]'> AdminTask.mapGroupsToAdminRole<'[-roleName <role> -groupids <groupname>]'>
3. After the LDAP configuration, you might want to restore the IBM Security Key Lifecycle Managerconfiguration in WebSphere Application Server to the state as before the LDAP configuration. Torestore the configuration, run the following steps:
a. Stop WebSphere Application Server.b. Stop WebSphere Application Server related processes, if any.c. Restore WebSphere Application Server profile configuration that was taken before the LDAP
configuration:
1) Manually delete the KLMProfile folder at <WAS_HOME>/profiles/KLMProfile.2) Run the -validateAndUpdateRegistry option of the manageProfiles command.
Windows<WAS_HOME>\bin\manageProfiles.bat -validateAndUpdateRegistry
For example: C:\Program Files\IBM\WebSphere\AppServer\bin\manageProfiles.bat -validateAndUpdateRegistry
Linux<WAS_HOME>/bin/manageprofiles.sh -validateAndUpdateRegistry
For example: /opt/IBM/WebSphere/AppServer/bin/manageprofiles.sh -validateAndUpdateRegistry
3) Restore the profile:Windows
<WAS_HOME>\bin\manageProfiles.bat -restoreProfile -backupFile <pathto profile backup file>
For example: C:\Program Files\IBM\WebSphere\AppServer\bin\manageProfiles.bat -restoreProfile -backupFileC:\SKLM_WAS_ProfileBackup
Linux<WAS_HOME>/bin/manageprofiles.sh -restoreProfile -backupFile <path toprofile backup file>
For example: /opt/IBM/WebSphere/AppServer/bin/manageprofiles.sh -restoreProfile -backupFile /root/SKLM_WAS_ProfileBackup
For information about the manageProfiles command, see http://www.ibm.com/support/knowledgecenter/SSEQTP_9.0.0/com.ibm.websphere.base.doc/ae/rxml_manageprofiles.html.
4) Start WebSphere Application Server.5) Restore IBM Security Key Lifecycle Manager backup that was taken before the LDAP
configuration, if needed.
Chapter 1. Administering 29
4. You must not restore IBM Security Key Lifecycle Manager application backup that is taken before theLDAP configuration after the LDAP configuration is done unless Step 3 in the Important notes afterthe LDAP configuration section is followed.
5. After the LDAP configuration, the tables are created in the IBM Security Key Lifecycle Managerdatabase for the database-based repository. The IBM Security Key Lifecycle Manager groups arestored in these tables. If the IBM Security Key Lifecycle Manager server is configured for thereplication and the replication happens to the configured clones, the groups in the database-basedrepository are also replicated on the clone. This is because the database tables of the database-basedrepository are also replicated to the clones.
6. If the IBM Security Key Lifecycle Manager server (master) that is configured to integrate with LDAPrepositories and replication is enabled, when replication happens to the configured clones where LDAPis not configured, you can configure LDAP on the clone or not. If LDAP configuration must be done onthe clone, run the following steps on the clone:
a. Copy db2jcc.jar,db2jcc4.jar and db2jcc_license_cu.jar from the DB2SKLMV40 folderto the <WAS_HOME>/lib folder.
Default definition of <WAS_HOME> variable is typically:Windows
C:\Program Files\IBM\WebSphere\AppServerLinux
/opt/IBM/WebSphere/AppServer
b. Go to <WAS_HOME>/bin.
1) Log on to wsadmin by using the following command:
wsadmin.bat -user <WASADMIN_USER> -password <WASADMIN_PASSWORD> -lang jython
2) Run the following command:
AdminTask.deleteIdMgrDBTables<'[-schemaLocation "<WAS_HOME>/etc/wim/setup" -databaseType db2 -dbURL "jdbc:db2://localhost:<SKLMDB_PORT>/<LDAPDB_NAME>" -dbDriver com.ibm.db2.jcc.DB2Driver -dbAdminId <SKLMDBADMIN_USER> -dbAdminPassword <SKLMDBADMIN_PASSWORD> -reportSqlError true]'>
c. Follow the procedure to setup/configure LDAP integration as was done on the master IBM SecurityKey Lifecycle Manager server. For the integration steps, see “Integrating LDAP by using WebSphereIntegrated Solutions Console” on page 20.
7. After the replication between an IBM Security Key Lifecycle Manager server that is configured for LDAPintegration and a clone that is not configured for LDAP integration, if you inadvertently run the normalLDAP integration configuration on the clone, the Step 5 in “Integrating LDAP by using WebSphereIntegrated Solutions Console” on page 20 fails. You must run these steps:
a. Go to <WAS_HOME>/bin.
1) Log on to wsadmin:
wsadmin.bat -user <wasadmin user> -password <wasadmin passwd> -lang jython
2) Run the following command:
AdminTask.deleteIdMgrDBTables<'[-schemaLocation "<WAS_HOME>/etc/wim/setup" -databaseType db2 -dbURL "jdbc:db2://localhost:<SKLMDB_PORT>/<LDAP_DBNAME>" -dbDriver com.ibm.db2.jcc.DB2Driver -dbAdminId <SKLMDB2ADMINUSER> -dbAdminPassword <SKLMDB2ADMINUSER_PASSWORD> -reportSqlError true]'>
b. Run steps 5 - 9 in “Integrating LDAP by using WebSphere Integrated Solutions Console” on page20.
30 IBM Security Key Lifecycle Manager : Administering

Changing DB2 administrator password on LDAP configured serversIf there is a password expiration restriction in effect, you must change the DB2 password for the user IDbefore the expiration period expires.
About this task
If IBM Security Key Lifecycle Manager server is configured with LDAP, you must run the following steps forchanging the Db2 administrator password.
Procedure
1. Ensure that the Allow operations if some of the repositories are down check box is selected.
a. Log on to the WebSphere Integrated Solutions Console.b. Click Security > Global security.c. In User account repository > Available realm definitions, select Federated repositories from the
drop-down list.d. Click Configure.e. Select the Allow operations if some of the repositories are down check box.
2. Run the steps that are described in the following topics to change the DB2 administrator password.Windows
Run the steps 3 - 5 in the “Updating Db2 password on a Windows system” on page 34 topic.Linux
Run the steps 1- 3 in the “Updating Db2 password on a Linux or AIX system” on page 34 topic.3. Update the federated repository settings for the DB repository connection. Also, change the DB2
administrator password by using the updateIdMgrDBRepository AdminTask command.
a. Using the wsadmin interface that the WebSphere Application Server provides, specify the Jythonsyntax.Windows
wsadmin.bat -username WASAdmin -password mypwd -lang jython
Linux
./wsadmin.sh -username WASAdmin -password mypwd -lang jython
b. Run the command, for example:
print AdminTask.updateIdMgrDBRepository ('[-id id_name -dbAdminPasswword new_password]')
Where id_name is SKLMDBRepos
print AdminConfig.save()
For more information, see https://www.ibm.com/support/knowledgecenter/SSAW57_9.0.0/com.ibm.websphere.nd.multiplatform.doc/ae/rxml_atidmgrrepositoryconfig.html#rxml_atidmgrrepositoryconfig__cmd46.
4. Run the steps that are described in the following topics to change the password of the WebSphereApplication Server data source.Windows
Run the steps 7 - 8 in the “Updating Db2 password on a Windows system” on page 34 topic.Linux
Run the steps 5 - 6 in the “Updating Db2 password on a Linux or AIX system” on page 34 topic.5. Restart the server. For instructions about how to stop and start the server, see “Restarting the IBM
Security Key Lifecycle Manager server” on page 38.
Chapter 1. Administering 31
Administering IBM Security Key Lifecycle ManagerAfter the installation and configuration of IBM Security Key Lifecycle Manager, you can use the followinginformation to maintain and administer it.
Updating the database passwordThe database password that you set on the computer that hosts the IBM Security Key Lifecycle Managerserver must be the same as that is configured in IBM Security Key Lifecycle Manager.
Updating Db2 password for a stand-alone IBM Security Key Lifecycle Manager serverAfter you change or reset the Db2 password on the computer that hosts the IBM Security Key LifecycleManager server, you must update the password in IBM Security Key Lifecycle Manager so that IBMSecurity Key Lifecycle Manager can continue to connect to the Db2 database.
About this task
The password of the Db2 Administrator user must be the same as that of the Db2 data source passwordin WebSphere Application Server.
You need to change the Db2 password at the operating system level in accordance with the passwordexpiration policy as defined by your organization. If the password expires, the IBM Security Key LifecycleManager graphical user interface displays a data-loading error. You must then reset the Db2 passwordand update it in IBM Security Key Lifecycle Manager. To update the password on the operating system,you must be the database instance owner on an AIX or Linux system, or the Local Administrator on aWindows system.
Procedure
1. Update the Db2 password on the operating system.For more information, see:
• “Updating Db2 password on a Windows system” on page 34• “Updating Db2 password on a Linux or AIX system” on page 34
2. Change the Db2 data source password that is configured in WebSphere Application Server:
• Using graphical user interface
a. Log in to the graphical user interface.b. On the header bar, click SKLM User and select Change Database Password.
SKLM User is the user with which you have logged into the graphical user interface.c. In the Change Database Password window, type the new password.d. Click Submit.
• Using REST interface
a. Open a REST client.b. Obtain a unique user authentication identifier to access IBM Security Key Lifecycle Manager REST
services. For more information about the authentication process, see “Authentication process forREST services” on page 239.
c. Run “Update Db2 Password on Standalone Server REST Service” on page 279.
ResultsDb2 password is updated and IBM Security Key Lifecycle Manager server agent can connect to the Db2database.
32 IBM Security Key Lifecycle Manager : Administering
Updating Db2 password for IBM Security Key Lifecycle Manager Multi-Master clusterThe Db2 password on the computers that host the IBM Security Key Lifecycle Manager master servers ina Multi-Master cluster must be the same. After you change or reset this password at the operating systemlevel, you must update it in IBM Security Key Lifecycle Manager as well so that IBM Security Key LifecycleManager can continue to connect to the Db2 database.
About this task
The password of the Db2 Administrator user must be the same as that of the Db2 data source passwordin WebSphere Application Server.
You need to change the Db2 password at the operating system level in accordance with the passwordexpiration policy as defined by your organization. If the password expires, the IBM Security Key LifecycleManager graphical user interface displays a data-loading error. You must then reset the Db2 passwordand update it in IBM Security Key Lifecycle Manager. To update the password on the operating system,you must be the database instance owner on an AIX or Linux system, or the Local Administrator on aWindows system.
Note: The password of the Db2 Administrator user must be the same on all the master servers of the IBMSecurity Key Lifecycle Manager Multi-Master cluster.
Procedure
On every master server (HADR and non-HADR)1. Set the Db2PasswordChangeActivity property in the MMConfig.properties file to true.
For instructions, see “Update Config Property REST Service” on page 288.2. Update the Db2 password on the operating system.
For more information, see:
• “Updating Db2 password on a Windows system” on page 34• “Updating Db2 password on a Linux or AIX system” on page 34
On any master server3. Change the Db2 data source password that is configured in WebSphere Application Server:
• Using graphical user interface
a. Log in to the graphical user interface.b. On the header bar, click SKLM User and select Change Database Password.
SKLM User is the user with which you have logged into the graphical user interface.c. In the Change Database Password window, type the new password.d. Click Submit.
• Using REST interface
a. Open a REST client.b. Obtain a unique user authentication identifier to access IBM Security Key Lifecycle Manager REST
services. For more information about the authentication process, see “Authentication process forREST services” on page 239.
c. Run “Update Db2 Password in Multi-Master Cluster REST Service” on page 294.On every master server (HADR and non-HADR)4. Set the Db2PasswordChangeActivity property in the MMConfig.properties file to false.
For instructions, see “Update Config Property REST Service” on page 288.
ResultsDb2 password is updated and IBM Security Key Lifecycle Manager server agent can connect to the Db2database.
Chapter 1. Administering 33
Updating Db2 password on a Windows systemOn Windows systems, the Db2 Administrator user ID and password are subject to the security policy thatis active on the system. If a password expiration restriction is in effect, you must change the loginpassword and Db2 password for the Administrator user ID before the expiration period ends.
In addition, the login password for the Db2 Administrator user ID and the Db2 data source password thatis used by WebSphere Application Server must be the same. When you change one, you must change theother. For information about the supported special characters in a password, see https://www.ibm.com/support/pages/supported-special-characters-ibm-security-key-lifecycle-manager-passwords.
Run the following steps to change the Db2 database password:
1. Open the Windows user management tool by opening the Control Panel and clicking Administrativetools > Computer Management > Local Users and Groups > Users.
2. Change the password for the IBM Security Key Lifecycle Manager database owner.3. Open the Windows Services console by opening the Control Panel and clicking Administrative Tools >
Computer Management.4. Change the password for the following services from the Logon tab of the Properties dialog box.
• DB2® - DB2SKLMV40 - sklminstance
For example, the value of sklminstance might be:
DB2 - DBSKLMV40 - SKLMDB40
• IBM WebSphere Application Server V9.0 - SKLM40Server5. Stop and restart the following services:
• Db2 License Server (DBSKLMV40)• Db2 Management Service (DBSKLMV40)• DB Remote Command Server (DBSKLMV40)• Db2 Governor (DBSKLMV40)• WAS Service - IBM Security Key Lifecycle Manager (IBM WebSphere Application ServerV9.0 - SKLM40Server)
Db2 password is updated on the system.
Updating Db2 password on a Linux or AIX systemOn Linux or AIX systems, you might want to change the password for the Db2 Administrator user ID. Thelogin password for the Db2 Administrator user ID and the Db2 password for the user ID must be thesame.
The IBM Security Key Lifecycle Manager installation program installs Db2 and prompts the installingperson for a password for the user named sklmdb40. Additionally, the Db2 application creates anoperating system user entry named sklmdb40. For example, the password for this user might expire,requiring you to resynchronize the password for both user IDs.
Note: Run all the Db2 specific commands as a sklmdb user, and run the WebSphere Application Servercommands as a root user.
Before you can change the password for the Db2 Administrator user ID, you must change the passwordfor the user at the operating system level.
In addition, the login password for the Db2 Administrator user ID and the Db2 data source password thatis used by WebSphere Application Server must be the same. When you change one, you must change theother. For information about the supported special characters in a password, see https://www.ibm.com/support/pages/supported-special-characters-ibm-security-key-lifecycle-manager-passwords.
1. Log in to the IBM Security Key Lifecycle Manager server as root.
34 IBM Security Key Lifecycle Manager : Administering
2. Change user to the sklmdb40 system user entry. Type:
su sklmdb40
3. Change the password. Type:
passwd
Specify the new password.4. Exit back to root.
exit
Db2 password is updated on the system.
Definitions for HOME and other directory variablesYou can customize the HOME directory for your specific implementation. Substitute the definition of thedirectory variable appropriately.
The following table contains default definitions that are used in this information to represent the HOMEdirectory level for various product installation paths.
Table 5. HOME and other directory variables
Directory variable Default definition Description
DB_HOME Windows systemsdrive:\Program Files\IBM\DB2SKLMV40
AIX and Linux systems/opt/IBM/DB2SKLMV40
The directory that contains the Db2application for IBM Security KeyLifecycle Manager.
DB_INSTANCE_HOME Windowsdrive\db2adminID
For example, if the value of drive isC: and the default Db2administrator is sklmdb40,DB_INSTANCE_HOME isC:\SKLMDB40.
Linux and AIX®/home/db2adminID
The directory that contains the Db2database instance for IBM SecurityKey Lifecycle Manager.
WAS_HOME Windowsdrive:\Program Files\IBM\WebSphere\AppServer
Linux and AIXpath/IBM/WebSphere/AppServer
For example: /opt/IBM/WebSphere/AppServer
The WebSphere Application Serverhome directory.
SKLM_HOME WindowsWAS_HOME\products\sklm
Linux and AIXWAS_HOME/products/sklm
The IBM Security Key LifecycleManager home directory.
Chapter 1. Administering 35
Table 5. HOME and other directory variables (continued)
Directory variable Default definition Description
SKLM_INSTALL_HOME Windowsdrive:\Program Files\IBM\SKLMV40
Linux and AIXpath/IBM/SKLMV40
The directory that contains the IBMSecurity Key Lifecycle Managerlicense and migration files.
SKLM_DATA WindowsWAS_HOME\products\sklm\dataC:\Program Files\IBM\WebSphere\AppServer\products\sklm\data
Linux and AIXWAS_HOME\products\sklm/data/opt/IBM/WebSphere/AppServer/products/sklm/data
The directory that contains the filesthat are exported from IBMSecurity Key Lifecycle Managersuch as backup files, exportedcertificates, and device groupexport files. Also, you must savethe files that you want to importinto IBM Security Key LifecycleManager in this directory.
IM_INSTALL_DIR Windowsdrive:\Program Files\IBM\Installation Manager
Linux and UNIX/opt/ibm/InstallationManager
The directory where IBMInstallation Manager is installed.
IM_DATA_DIR Windowsdrive:\ProgramData\IBM\Installation Manager
Linux and UNIX/var/ibm/InstallationManager
The data directory, which is used tostore information about productsthat are installed with InstallationManager.
Note: ProgramData\ is a hiddenfolder, and to see it you mustmodify your view preferences inExplorer to show hidden files andfolders.
Changing the IBM Security Key Lifecycle Manager host nameTo change the IBM Security Key Lifecycle Manager system host name, you must change the host name ofthe WebSphere Application Server and then, the host name of the Db2 server.
About this task
Note: If you have configured a Multi-Master cluster, change of host name of any master server is notsupported.
Procedure
1. Change the host name of the WebSphere Application Server.For more information, see http://www.ibm.com/support/knowledgecenter/SSEQTP_9.0.0/com.ibm.websphere.base.doc/ae/tagt_hostname.html
2. Change the host name of the Db2 server.
36 IBM Security Key Lifecycle Manager : Administering
For more information, see http://www.ibm.com/support/docview.wss?rs=71&context=SSEPGG&context=SSEPDU&context=SSVGXH&context=SSVGZB&context=SSFHEG&context=SSYK8P&context=SSTLZ9&q1=db2+change+hostname&uid=swg21258834&loc=en_US&cs=utf-8&lang=en
Starting the IBM Security Key Lifecycle Manager serverStart Db2 and then start WebSphere Application Server to start the IBM Security Key Lifecycle Managerserver.
Before you beginEnsure that you are the database instance owner on AIX or Linux systems, or the Local Administrator onWindows systems.
Procedure
1. Start Db2.Run the following command:Windows
db2start
AIX or Linux
db2start
2. Start WebSphere Application Server.Run the following command:Windows
cd C:\Program Files\IBM\WebSphere\AppServer\binstartServer.bat server1
AIX or Linux
/opt/IBM/WebSphere/AppServer/bin/startServer.sh server1
Stopping the IBM Security Key Lifecycle Manager serverTo stop the IBM Security Key Lifecycle Manager server, stop the WebSphere Application Server and thenstop Db2.
Before you beginEnsure that you are the database instance owner on AIX or Linux systems, or the Local Administrator onWindows systems.
Procedure
1. Stop WebSphere Application Server.Run the following command:Windows
cd C:\Program Files\IBM\WebSphere\AppServer\bin.\stopServer.bat server1 -username wasadmin -password mysecretpwd
AIX or Linux
/opt/IBM/WebSphere/AppServer/bin/stopServer.sh server1 -username wasadmin -password mysecretpwd
Chapter 1. Administering 37
2. Stop Db2.Run the following command:Windows
set DB2INSTANCE=sklmdb40db2stop
AIX or Linux
su -sklmdb40db2stop
Restarting the IBM Security Key Lifecycle Manager serverRestart of the server causes the server to read its configuration and accept the configuration changes, ifany. To restart the IBM Security Key Lifecycle Manager server, you can use the graphical user interface,REST service, or run the server restart scripts.
About this task
To restart server, use the <IBM Security Key Lifecycle Manager User> link on welcome page header bar,Restart Server REST Service, or run the stopServer and startServer scripts.
Procedure
• Using graphical user interfacea) Log on to the graphical user interface.b) On the Welcome page header bar, click the <IBM Security Key Lifecycle Manager User> link.
For example, click the SKLMAdmin link.c) Click Restart Server.d) Click OK.
Note: The IBM Security Key Lifecycle Manager server is unavailable for a few minutes while the restartoperation is in progress.
• Using REST interfacea) Open a REST client.b) Obtain a unique user authentication identifier to access IBM Security Key Lifecycle Manager REST
APIs. For more information about the authentication process, see “Authentication process for RESTservices” on page 239.
c) Run the “Restart Server REST Service” on page 292.Sample request:
POST https://localhost:port/SKLM/rest/v1/ckms/servermanagement/restartServer
• Using scriptsa) Go to the WAS_HOME\bin directory.
Windows
C:\Program Files\IBM\WebSphere\AppServer\bin
Linux
/opt/IBM/WebSphere/AppServer/bin
b) Stop the server.
38 IBM Security Key Lifecycle Manager : Administering
Windows
stopServer.bat server1 -username wasadmin -password mypwd
Linux
./stopServer.sh server1 -username wasadmin -password mypwd
Because the administrative security for WebSphere Application Server is enabled, you mustspecify the user ID and password of the WebSphere Application Server administrator asparameters to the stopServer script. If these parameters are omitted, you are prompted tospecify the values.
c) Start the server.Windows
startServer.bat server1
Linux
./startServer.sh server1
What to do next
Determine whether IBM Security Key Lifecycle Manager is running. For example, open IBM Security KeyLifecycle Manager in a web browser and log in.
Timestamp formatsIBM Security Key Lifecycle Manager supports Coordinated Universal Time (UTC) time syntax.
Following examples shows the IST time stamp in UTC format (GMT + 5:30).IBM Security Key Lifecycle Manager database
Timestamps are stored in the IBM Security Key Lifecycle Manager database in UTC format.
2018-03-22 05:52:07.0
User interfaceTimestamp values are displayed in the IBM Security Key Lifecycle Manager user interface by usingtime zone of the browser.
Last backup:Mar 22 2018, 05:51:24 AM IST (GMT+05:30)
Log filesTimestamp values in all the log files are displayed by using time zone of the server with UTC offset. Inthe following example, time stamp is shown for IST time zone.
Mar 22, 2018 11:31:40 AM +0500
Configuring audit and debug informationYou can modify the default audit and debug log settings in IBM Security Key Lifecycle Manager as per yourrequirements.
Audit filesIBM Security Key Lifecycle Manager has a default directory for audit data. The file location depends on thevalue of Audit.handler.file.name property in SKLM_DATA/config/SKLMConfig.propertiesfile.
The default value is shown in the following example.
Chapter 1. Administering 39
Audit.handler.file.name=logs/audit/sklm_audit.log
Configuring the level of audit informationDepending on your need, you can change the default setting that IBM Security Key Lifecycle Manageruses to collect audit information.
About this task
You can use the Audit page to change the audit information levels (Low, Medium, or High) that are writtento the audit log. Alternatively, you can use the following CLI commands or the REST interfaces to list orchange the Audit.event.types property in the SKLMConfig.properties file:
• tklmConfigGetEntry and tklmConfigUpdateEntry• Get Single Config Property REST Service and Update Config Property RESTService
Your role must have the permission to the configure action.
Procedure
1. Go to the appropriate page or directory:
• Graphical user interface:
Log on to the graphical user interface. Click IBM Security Key Lifecycle Manager > Configuration >Audit and Debug.
• Command-line interface
a. Go to the <WAS_HOME>/bin directory. For example,Windows
cd drive:\Program Files\IBM\WebSphere\AppServer\binLinux
cd /opt/IBM/WebSphere/AppServer/binb. Start the wsadmin interface by using an authorized user ID, such as SKLMAdmin. For example,
Windows
wsadmin.bat -username SKLMAdmin -password mypwd -lang jython
Linux
./wsadmin.sh -username SKLMAdmin -password mypwd -lang jython
• REST interface:
– Open a REST client.2. Change the value for the audit information level:
• In the graphical user interface, select a low, medium, or high value for the Audit setting, then clickOK.Low
Stores minimal audit records.
Selecting Low sets the following property values in the SKLMConfig.properties file:
– Audit.event.types = runtime, authorization, authorization_terminate,resource_management, key_management
– Audit.event.outcome = failure
Medium (default)Stores an intermediate number of audit records.
40 IBM Security Key Lifecycle Manager : Administering
Selecting Medium sets the following property values in the SKLMConfig.properties file:
– Audit.event.types = runtime,authorization,authorization_terminate,resource_management, key_management
– Audit.event.outcome = success,failure
HighStores the maximum number of audit records.
Selecting High sets the following property values in the SKLMConfig.properties file:
– Audit.event.types = all– Audit.event.outcome = success,failure
• Command-line interface:
a. Type the tklmConfigGetEntry command on one line to get the current value of the targetproperty in the SKLMConfig.properties file. For example, to determine which event types areincluded in the audit log, type on one line:
wsadmin>print AdminTask.tklmConfigGetEntry ('[-name Audit.event.types]')
An example response might be:
All
b. Specify the required change. For example, to limit the selection to two event types to store in theaudit log, type on one line:
print AdminTask.tklmConfigUpdateEntry ('[-name Audit.event.types -value runtime,audit_management]')
• REST interface:
a. Obtain a unique user authentication identifier to access IBM Security Key Lifecycle Manager RESTservices. For more information about the authentication process, see “Authentication process forREST services” on page 239.
b. To run Get Single Config Property REST Service, send the HTTP GET request. Pass theuser authentication identifier that you obtained in Step a along with the request message asshown in the following example.
GET https://localhost:<port>/SKLM/rest/v1/configProperties/Audit.event.typesContent-Type: application/jsonAccept : application/jsonAuthorization: SKLMAuth userAuthId=139aeh34567mAccept-Language : en
Success response might be:
Status Code : 200 OKContent-Language: en{"property":"Audit.event.types","value":"all"}
c. Specify the required change. For example, you can use Update Config Property RESTService to limit the selection to two event types to store in the audit log by sending thefollowing HTTP request:
PUT https://localhost:<port>/SKLM/rest/v1/configPropertiesContent-Type: application/jsonAccept: application/jsonAuthorization: SKLMAuth authId=139aeh34567mAccept-Language: en{ "Audit.event.types": "runtime,audit_management"}
Chapter 1. Administering 41
3. Restart the server. For instructions about how to stop and start the server, see “Restarting the IBMSecurity Key Lifecycle Manager server” on page 38.
What to do next
You might rerun an operation that previously returned an error. Then, examine the audit log for moreinformation. For detailed information about audit records, see the "Audit records on distributed systems"topic in IBM Security Key Lifecycle Manager documentation.
Generating audit records in syslog formatYou can use the IBM Security Key Lifecycle Manager graphical user interface to configure and generatethe audit records in syslog format and send them to a syslog server.
About this task
The audit log messages are written to a configured local audit file in syslog format when:
• Syslog format is enabled for the audit messages.• Syslog format is enabled, and syslog server host name and the port number are not specified.• Syslog format is enabled, syslog server host name and port number are specified, but the server host
name or port number is not reachable.
Procedure
1. Log on to the graphical user interface.2. Click IBM Security Key Lifecycle Manager > Configuration > Audit and Debug.3. Select Use syslog format.4. Specify the server host name or IP address in Syslog server host.5. Specify the port number on which the syslog server listens for requests in Syslog server port.6. If you need the secure transfer of audit information to the syslog server by using the SSL/TLS transport
protocol, select Use SSL/TLS.7. Click OK.
What to do nextAfter you enabled syslog format for audit records with the necessary parameters, you must run thefollowing steps only if you select Use SSL/TLS:
1. If the IBM Security Key Lifecycle Manager SSL server certificate is not already created, create thecertificate. To create the certificate, you can use the SSL / KMIP for Key Serving page on graphicaluser interface, Create Certificate REST Service, or tklmCertCreate CLI command.
2. Export the IBM Security Key Lifecycle Manager SSL server certificate to a file. To export the certificate,you can use Certificate Export REST Service or tklmCertExport CLI command.
To export the server certificate, obtain the server certificate alias from Step 1 if the certificate is notalready created. If the certificate is already created, from the graphical user interface, go to AdvancedConfiguration > Server Certificates. Alias is the Certificates column value for the certificate that ismarked as In Use.
3. Obtain the syslog server certificate as a file, import it, and trust the syslog server certificate in IBMSecurity Key Lifecycle Manager server. Use tklmCertImport CLI command or CertificateImport REST Service to import the certificate by using SYSLOG usage.
4. Import the IBM Security Key Lifecycle Manager server certificate to syslog server. Use the certificatefile that is created in Step 2.
5. Set the IBM Security Key Lifecycle Manager SSL server certificate alias in the configuration propertiesfile.
42 IBM Security Key Lifecycle Manager : Administering
Note: This step is not required if the IBM Security Key Lifecycle Manager SSL server certificate iscreated by using the graphical user interface.
For example,Command-line interface
print AdminTask.tklmConfigUpdateEntry('[-name config.keystore.ssl.certalias -value <alias of the server certificate that is created in Step 1>]')
REST interface
PUT https://localhost:<port>/SKLM/rest/v1/configPropertiesContent-Type: application/jsonAccept : application/jsonAuthorization: SKLMAuth userAuthId=139aeh34567mAccept-Language : en{ "config.keystore.ssl.certalias" : "<alias of the server certificate that is created in Step 1>"}
6. Restart the server. For instructions about how to stop and start the server, see “Restarting the IBMSecurity Key Lifecycle Manager server” on page 38.
Archiving transactional data of keys served to clientsIBM Security Key Lifecycle Manager stores the transactional data of keys that are served to clients in adatabase table. To prevent the database table from overflowing, you can regularly archive thistransactional data. During the backup, restore, and replication operations, IBM Security Key LifecycleManager automatically archives the transactional data to avoid process failure because of databaseoverflow.
About this taskYou can run the “Archive Served Data List REST Service” on page 297 to archive the data. This RESTservice purges the records in the database table and stores the transactional data in a comma-separatedvalues (CSV) file.
The CSV file and a checksum file are included in a JAR file that is saved in the SKLM_DATA\DevAuditArchives folder.
The JAR and CSV file names have a date and time stamp as suffix (ServedData_datetimestamp.jar).For example: SKLM_DATA\ServedDataListArchives\ServedData_20190606160311+0530.jar
Note: If you run the “Served Data List REST Service” on page 305 after you archive the database table,zero records are retrieved from the table because it is purged.
During the backup, restore, and replication operations, IBM Security Key Lifecycle Manager checks thenumber of records in the database table. If the number of records is equal to or greater than 100000, the“Archive Served Data List REST Service” on page 297 is automatically triggered and data is archived. Ifyou do not have many key serving transactions, you can disable this auto-archival operation by setting thefollowing property in the SKLMConfig.properties file on the server:
enableServedDataArchive=false
By default, this property is set as true:
enableServedDataArchive=true
Procedure
• To archive the transactional data of keys that are served to clientsa) Open a REST client.
Chapter 1. Administering 43

b) Obtain a unique user authentication identifier to access IBM Security Key Lifecycle Manager RESTservices. For more information about the authentication process, see “Authentication process forREST services” on page 239.
c) Run “Archive Served Data List REST Service” on page 297.• To disable the auto-archival of transactional data of keys that are served to clients during backup,
restore, and replication processesa) Open a REST client.b) Obtain a unique user authentication identifier to access IBM Security Key Lifecycle Manager REST
services. For more information about the authentication process, see “Authentication process forREST services” on page 239.
c) Run “Update Config Property REST Service” on page 288 as follows:
PUT https://localhost:port/SKLM/rest/v1/configProperties{ "enableServedDataArchive" : "false"}
Setting up debug loggingYou can change the default setting that IBM Security Key Lifecycle Manager uses to collect debuginformation. Debug log files provide additional information to analyze and troubleshoot IBM Security KeyLifecycle Manager problems.
About this task
You can use the Debug section of the Audit page to specify settings for generating debug information.Alternatively, you can use the following CLI commands or the REST interfaces to list or change the debugproperty in the SKLMConfig.properties file:
• tklmConfigGetEntry and tklmConfigUpdateEntry• Get Single Config Property REST Service and Update Config Property RESTService
Your role must have the permission to the configure action.
Note: Enabling debug logging might affect IBM Security Key Lifecycle Manager performance. Enable thisoption only under the guidance of your IBM support representative.
Procedure
1. Go to the appropriate page or directory:
• Graphical user interface:
Log on to the graphical user interface. Click IBM Security Key Lifecycle Manager > Configuration >Audit and Debug.
• Command-line interface
a. Go to the <WAS_HOME>/bin directory. For example,Windows
cd drive:\Program Files\IBM\WebSphere\AppServer\binLinux
cd /opt/IBM/WebSphere/AppServer/binb. Start the wsadmin interface by using an authorized user ID, such as SKLMAdmin. For example,
Windows
wsadmin.bat -username SKLMAdmin -password mypwd -lang jython
44 IBM Security Key Lifecycle Manager : Administering
Linux
./wsadmin.sh -username SKLMAdmin -password mypwd -lang jython
• REST interface:
– Open a REST client.2. Change the settings to generate debug information:
• In the graphical user interface:
a. Select Enable debug to set the following property values in the SKLMConfig.properties file:
debug=all
b. Click OK.• Command-line interface:
a. Type the tklmConfigGetEntry command on one line to get the current value of the targetproperty in the SKLMConfig.properties file. For example, to determine the value of debug,type on one line:
wsadmin>print AdminTask.tklmConfigGetEntry ('[-name debug]')
An example response might be:
none
b. Specify a new value for the property. For example, to specify the value all for generating debuglogs, type on one line:
print AdminTask.tklmConfigUpdateEntry ('[-name debug -value all]')
• REST interface:
a. Obtain a unique user authentication identifier to access IBM Security Key Lifecycle Manager RESTservices. For more information about the authentication process, see “Authentication process forREST services” on page 239.
b. To run Get Single Config Property REST Service, send the HTTP GET request. Pass theuser authentication identifier that you obtained in Step a along with the request message asshown in the following example.
GET https://localhost:<port>/SKLM/rest/v1/configProperties/debugContent-Type: application/jsonAccept : application/jsonAuthorization: SKLMAuth userAuthId=139aeh34567mAccept-Language : en
Success response might be:
Status Code : 200 OKContent-Language: en{"property":"debug","value":"none"}
c. Specify a new value for the property. Then, send the following HTTP request:
PUT https://localhost:<port>/SKLM/rest/v1/configPropertiesContent-Type: application/jsonAccept: application/jsonAuthorization: SKLMAuth authId=139aeh34567mAccept-Language: en{ "debug": "all"}
3. A success indicator varies, depending on the interface:
Chapter 1. Administering 45
Downloading log filesLog files contain status and error messages that are useful in analyzing and troubleshooting IBM SecurityKey Lifecycle Manager problems. You can download the log files from the graphical user interface.
Before you begin
• Ensure that your user ID has the required role (klmFileTransfer or klmSecurityOfficer) totransfer files from and to the server.
• Only for Internet Explorer browser: Ensure that the value of the File download property is set toEnable.
To access this property, go to Internet options > Security > Local intranet zone or Trusted sites >Downloads.
Procedure
1. Log in to the IBM Security Key Lifecycle Manager graphical user interface.2. Click Configuration > Audit and Debug.3. In the Debug section, click Download log files.
The log files are downloaded in the default download directory location of your browser.
Configuring for data redundancyIBM Security Key Lifecycle Manager provides three methods to achieve data redundancy: Backup andrestore, replication, and Multi-Master cluster.
Overview
Each of these methods caters to specific use cases:Backup and Restore
Backup and Restore is a basic, manual method of data replication. Using this method, you can back upcryptographic objects (key materials), configuration files, and other critical information on an IBMSecurity Key Lifecycle Manager server and then restore the backed-up data to create an exact copy ofthe IBM Security Key Lifecycle Manager server.For more information, see “Configuring backup and restore” on page 47.
ReplicationReplication is an automated Backup and Restore mechanism. With this method, you can back upcryptographic objects (key materials), configuration files, and other critical information on a server(master server), and then replicate or restore this backed up data to another server (clone server)automatically, and on a regular basis.Replication ensures near real-time data synchronization with continuous key and certificateavailability to encrypting devices because even when the master server is not available, the cloneservers can continue to serve the keys and certificates. You can install the master and clone servers ingeographically different locations and achieve a disaster recovery solution.For more information, see “Configuring replication” on page 66.
Multi-Master clusterA Multi-Master cluster is an advanced configuration method. The cluster consists of multiple IBMSecurity Key Lifecycle Manager servers. Each server is called a master server. All the master serverspoint to a single data source that is configured for Db2 high availability disaster recovery.Multi-Master cluster ensures real-time availability of the latest data to all the masters in the cluster.Use this method only if you need to achieve consistent and continuous availability of “real-time” data.For more information, see “Configuring a Multi-Master cluster” on page 85.
46 IBM Security Key Lifecycle Manager : Administering

Quick comparison of the methods
The following table compares the different methods on key aspects:
Backup and Restore Replication Multi-Master cluster
Overview Creating full copy orcopies of data andstoring them offsite.
Automated copying andmoving of data to one ormultiple sites.
Creating a cluster ofservers that point to asingle data source thatis configured for Db2high availability disasterrecovery (HADR).
Working Manual. Relies onsnapshots which arecopies of the data that istaken at apredetermined point intime.
Automated. Datagenerated on masterserver is periodicallybacked up and sent tothe clone server.
Automated. Real-timedata synchronization inthe Db2 HADR cluster.
Objective Disaster recovery withmanual intervention.
Automated disasterrecovery.
High availability acrosssites.
Supports highavailability
No Partially
Clone servers operate inread-only mode.Support uninterruptedkey serving.
Yes
Supports disasterrecovery
Yes Yes Yes
Deployment One IBM Security KeyLifecycle Manager server
2 - 21 IBM Security KeyLifecycle Managerservers
2 - 21 IBM Security KeyLifecycle Managerservers
Configurationcomplexity
Low.
Basic and simplemethod.
Low.
Requires a one-timeconfiguration.
High.
Requires knowledge ofDb2 HADR.
Configuring backup and restoreIBM Security Key Lifecycle Manager provides a set of operations to back up and restore current, activefiles and data.
IBM Security Key Lifecycle Manager creates cross-platform backup files in a manner that is independentof operating systems and directory structure of the server. You can restore the backup files to anoperating system that is different from the one it was backed up from. For example, you can restore abackup file that is taken on a Linux system and restore it on a Windows system.
You can use the cross-platform backup utility to run backup operation on earlier versions of IBM SecurityKey Lifecycle Manager and IBM Tivoli Key Lifecycle Manager to back up critical data. You can restorethese backup files on current version of IBM Security Key Lifecycle Manager across operating systems.
Note: In IBM Security Key Lifecycle Manager, Version 3.0 and later, the Solaris operating system is notsupported. If you are using IBM Security Key Lifecycle Manager on Solaris systems, use the cross-platform backup utility to back up the data. You can then run the restore operation to restore data on aIBM Security Key Lifecycle Manager, Version 3.0 or later system that is deployed on any of the supportedoperating systems, such as Windows, Linux, or AIX.
Backed up files include the following data:
Chapter 1. Administering 47
• Data in the IBM Security Key Lifecycle Manager database tables• Truststore and keystore with the master key• IBM Security Key Lifecycle Manager configuration files
Your role must have permissions to back up or to restore files.
Failure to back up your critical data properly might result in unrecoverableloss of all access to your encrypted data. Do not encrypt your backup file, orstore a backup file on an encrypting device. Failure to back up data might also result in alater inconsistency of the key manager and potential data loss on the storage device.
The IBM Security Key Lifecycle Manager backup and restore operations support the use of AES 256-bitkey length for data encryption/decryption to conform to the PCI DSS (Payment Card Industry DataSecurity Standard) standards for increased data security.
Encryption methods to back up IBM Security Key Lifecycle Manager data
IBM Security Key Lifecycle Manager supports the following encryption methods for backups:Password-based encryption
During the backup process, a password is specified to encrypt the backup key, and you must specifythe same encryption password to decrypt and restore the backup files.
HSM-based encryptionYou can configure IBM Security Key Lifecycle Manager to use Hardware Security Module (HSM) forstoring the master encryption key. During the backup process, the backup key is encrypted by themaster key, which is stored in HSM. During the restore process, the master key in HSM decrypts thebackup key. Then, the backup key is used to restore backup contents.
High-performance backup and restore
High-performance backup and restore provide backup and restoration of large amounts of encryptionkeys. You can configure IBM Security Key Lifecycle Manager for high-performance backup and restoreoperations by setting the following parameter in the SKLMConfig.properties configuration file.
enableHighScaleBackup=true
When IBM Security Key Lifecycle Manager is configured for high-performance backup and restore, IBMDB2 native backup technology is used to run the backup and restore operation for more efficiency.However, with this configuration, you can restore the backup only in an identical operating environment.The operating system, middleware components, and directory structures must be identical on bothsystems.
You cannot create a cross-platform compatible backup file if IBM Security Key Lifecycle Manager isconfigured for high-performance backup and restore activities. For information about how to back uplarge amount of data, see “Backing up large amount of data” on page 55.
Backup and restore runtime requirementsBacking up and restoring data from backup files for IBM Security Key Lifecycle Manager have severalruntime requirements.
Prevent timeout failure by increasing the time interval that is allowed for backup and restore transactionsfor large key populations. Specify a larger value for the totalTranLifetimeTimeout setting in this file:
WAS_HOME/profiles/KLMProfile/config/cells/SKLMCell/nodes/SKLMNode/servers/server1/server.xml
Additionally, these conditions must be true:
• Ensure that the task occurs during a time interval that allows a halt to key serving activity.• For a backup task, the IBM Security Key Lifecycle Manager server must be running in a normal
operational state. The IBM Security Key Lifecycle Manager database instance must be available.
48 IBM Security Key Lifecycle Manager : Administering

• For a restore task, the IBM Security Key Lifecycle Manager database instance must be accessiblethrough the IBM Security Key Lifecycle Manager data source.
Before you start a restore task for the password-based encryption backups, ensure that you have thepassword that was used when the backup file was created.
• Use the following guidelines to restore HSM-based encryption backups:
– Ensure that the same HSM partition is present with all its key entries intact on the system where thebackup file is restored.
– Master key that was used for the backup key encryption must be intact to restore the backup file. Ifthe master key is refreshed, all the older backups are inaccessible or unusable.
– You must connect to the same HSM and the master key for backup and restore operationsirrespective of whether you use HSM-based encryption or password-based encryption.
• Ensure that the directories, which are associated with the tklm.backup.dir property exist. Also,ensure read and write access to these directories for the system and IBM Security Key LifecycleManager administrator accounts under which the IBM Security Key Lifecycle Manager server and theDb2 server run.
Backing up data with password-based encryptionYou must specify an encryption password to back up IBM Security Key Lifecycle Manager data. Use thesame password to decrypt and restore the backup files.
About this task
You can use the Backup and Restore page. Alternatively, you can use the tklmBackupRun command orBackup Run REST Service to back up critical data. Your role must have the permission to back upfiles.
IBM Security Key Lifecycle Manager creates backup files in a manner that is independent of operatingsystems and directory structure of the server. You can restore the backup files to an operating systemthat is different from the one it was backed up from.
Note: Backup success messages are system wide. Two administrators might run backup tasks thatoverlap in time. During this interval, the administrator who starts a second task that fails might see a falsesuccess message from the first backup task.
Procedure
1. Go to the appropriate page or directory.Graphical user interface
a. Log on to the graphical user interface.b. On the Welcome page, click Administration > Backup and Restore.
Command-line interface
a. Go to the WAS_HOME/bin directory. For example,Windows
cd drive:\Program Files\IBM\WebSphere\AppServer\binLinux
cd /opt/IBM/WebSphere/AppServer/binb. Start the wsadmin interface by using an authorized user ID, such as SKLMAdmin. For example,
Windows
wsadmin.bat -username SKLMAdmin -password mypwd -lang jython
Chapter 1. Administering 49
Linux
./wsadmin.sh -username SKLMAdmin -password mypwd -lang jython
REST interfaceOpen a REST client.
2. Create a backup file.You can run only one backup or restore task at a time.Graphical user interface
a. On the Backup and Restore table, the Backup repository location field displays the default<SKLM_DATA> directory path, where the backup file is saved, for example, C:\ProgramFiles\IBM\WebSphere\AppServer\products\sklm\data. For the definition of<SKLM_DATA>, see “Definitions for HOME and other directory variables” on page 35. ClickBrowse to specify a backup repository location under <SKLM_DATA> directory.
Directory path in the Backup repository location field changes based on the value that you setfor the tklm.backup.dir property in the SKLMConfig.properties file.
b. Click Create Backup.c. On the Create Backup page, specify information such as a value for the encryption password
and backup description. A read-only backup file location is displayed in the Backup locationfield. Ensure that you retain the encryption password for future use in case you restore thebackup.
d. Click Create Backup.
Command-line interfaceType tklmBackupRun, the backup location, encryption password, and any other necessaryinformation to create a backup file. For example:
print AdminTask.tklmBackupRun ('[-password myBackupPwd]')
REST interface
a. Obtain a unique user authentication identifier to access IBM Security Key Lifecycle ManagerREST services. For more information about the authentication process, see “Authenticationprocess for REST services” on page 239.
b. To run Backup Run REST Service, send the HTTP POST request. Pass the userauthentication identifier that you obtained in Step a along with the request message as shownin the following example.
POST https://localhost:<port>/SKLM/rest/v1/ckms/backupsContent-Type: application/jsonAccept : application/jsonAuthorization: SKLMAuth authId=139aeh34567mAccept-Language : en{"backupDirectory":"/sklmbackup1","password":"myBackupPwd"}
3. A message indicates that the backup file was created, or that the backup operation succeeded.
The time stamp on a backup file has a Greenwich Mean Time (GMT) offset represented in RFC 822format. The file name contains a +hhmm or -hhmm element to specify a timezone ahead of or behindGMT. For example, a file name might be sklm_v3.0.1.0_20170123144220-0800_backup.jar,where -0800 indicates that the timezone is eight hours behind GMT.
What to do next
Retain the encryption password for future use in case you restore the backup. Review the directory thatcontains the backup files to ensure that the backup file exists. Do not edit a file in the backup JAR file. Thefile that you attempt to edit becomes unreadable.
50 IBM Security Key Lifecycle Manager : Administering
Backing up data with password-based encryption when HSM is configuredYou must set the enablePBEInHSM=true property in the SKLMConfig.properties file to back updata with password-based encryption when Hardware Security Module (HSM) is configured.
Before you beginEnsure that IBM Security Key Lifecycle Manager is configured to use HSM for storing the master key byusing steps in the “Configuring HSM parameters” on page 132 topic.
About this task
When HSM is configured, during the backup process, the master key in HSM encrypts the backup key.HSM-based encryption is the default method for the backups when HSM is configured to store the masterkey. For information about HSM-based encryption, see “HSM-based encryption for backups” on page248. Your role must have the permission to back up files.
Note: Backup success messages are system wide. Two administrators might run backup tasks thatoverlap in time. During this interval, the administrator who starts a second task that fails might see a falsesuccess message from the first backup task.
Procedure
1. Set the enablePBEInHSM=true property in the <SKLM_HOME>/config/SKLMConfig.propertiesfile.Command-line interface
a. Go to the WAS_HOME/bin directory. For example,Windows
cd drive:\Program Files\IBM\WebSphere\AppServer\binLinux
cd /opt/IBM/WebSphere/AppServer/binb. Start the wsadmin interface by using an authorized user ID, such as SKLMAdmin. For example,
Windows
wsadmin.bat -username SKLMAdmin -password mypwd -lang jython
Linux
./wsadmin.sh -username SKLMAdmin -password mypwd -lang jython
c. Run the tklmConfigUpdateEntry CLI command to set enablePBEInHSM property in theSKLMConfig.properties configuration file.
print AdminTask.tklmConfigUpdateEntry ('[-name enablePBEInHSM -value true]')
REST interface
a. Open a REST client.b. Obtain a unique user authentication identifier to access IBM Security Key Lifecycle Manager
REST services. For more information about the authentication process, see “Authenticationprocess for REST services” on page 239.
c. Run Update Config Property REST Service to set enablePBEInHSM property in theSKLMConfig.properties configuration file. Pass the user authentication identifier that youobtained in Step b along with the request message as shown in the following example.
PUT https://localhost:<port>/SKLM/rest/v1/configPropertiesContent-Type: application/jsonAccept : application/jsonAuthorization: SKLMAuth userAuthId=139aeh34567m
Chapter 1. Administering 51
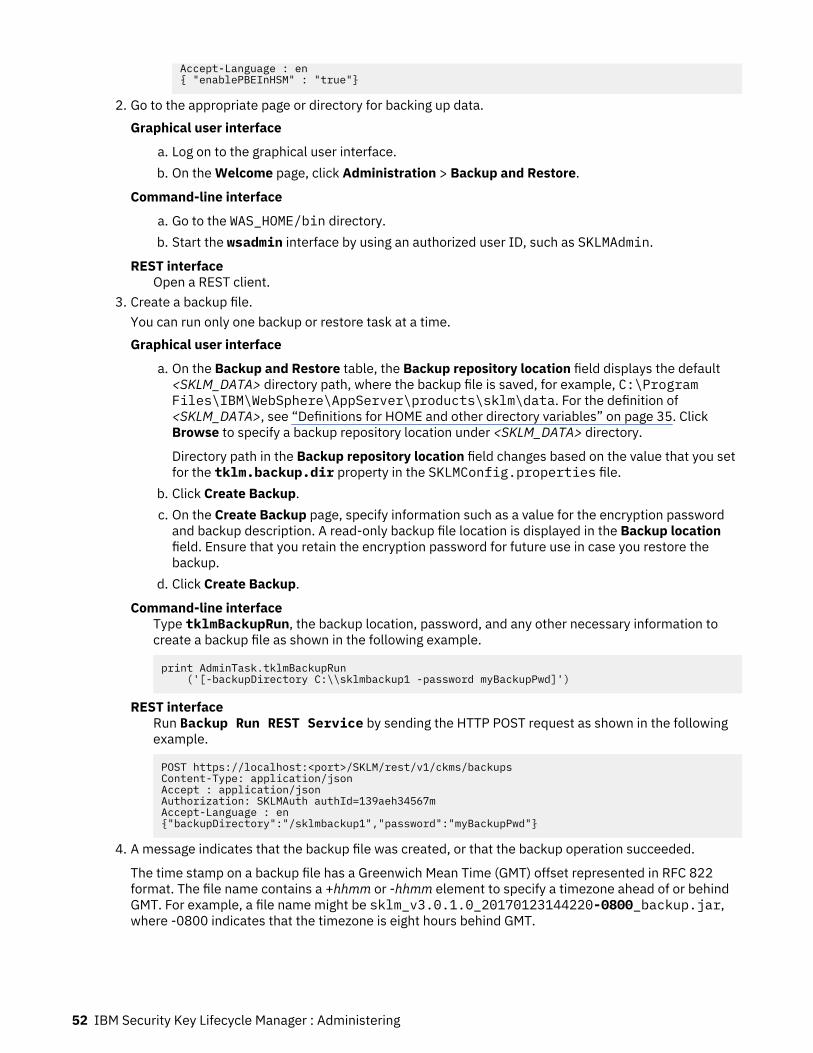
Accept-Language : en{ "enablePBEInHSM" : "true"}
2. Go to the appropriate page or directory for backing up data.Graphical user interface
a. Log on to the graphical user interface.b. On the Welcome page, click Administration > Backup and Restore.
Command-line interface
a. Go to the WAS_HOME/bin directory.b. Start the wsadmin interface by using an authorized user ID, such as SKLMAdmin.
REST interfaceOpen a REST client.
3. Create a backup file.You can run only one backup or restore task at a time.Graphical user interface
a. On the Backup and Restore table, the Backup repository location field displays the default<SKLM_DATA> directory path, where the backup file is saved, for example, C:\ProgramFiles\IBM\WebSphere\AppServer\products\sklm\data. For the definition of<SKLM_DATA>, see “Definitions for HOME and other directory variables” on page 35. ClickBrowse to specify a backup repository location under <SKLM_DATA> directory.
Directory path in the Backup repository location field changes based on the value that you setfor the tklm.backup.dir property in the SKLMConfig.properties file.
b. Click Create Backup.c. On the Create Backup page, specify information such as a value for the encryption password
and backup description. A read-only backup file location is displayed in the Backup locationfield. Ensure that you retain the encryption password for future use in case you restore thebackup.
d. Click Create Backup.
Command-line interfaceType tklmBackupRun, the backup location, password, and any other necessary information tocreate a backup file as shown in the following example.
print AdminTask.tklmBackupRun ('[-backupDirectory C:\\sklmbackup1 -password myBackupPwd]')
REST interfaceRun Backup Run REST Service by sending the HTTP POST request as shown in the followingexample.
POST https://localhost:<port>/SKLM/rest/v1/ckms/backupsContent-Type: application/jsonAccept : application/jsonAuthorization: SKLMAuth authId=139aeh34567mAccept-Language : en{"backupDirectory":"/sklmbackup1","password":"myBackupPwd"}
4. A message indicates that the backup file was created, or that the backup operation succeeded.
The time stamp on a backup file has a Greenwich Mean Time (GMT) offset represented in RFC 822format. The file name contains a +hhmm or -hhmm element to specify a timezone ahead of or behindGMT. For example, a file name might be sklm_v3.0.1.0_20170123144220-0800_backup.jar,where -0800 indicates that the timezone is eight hours behind GMT.
52 IBM Security Key Lifecycle Manager : Administering
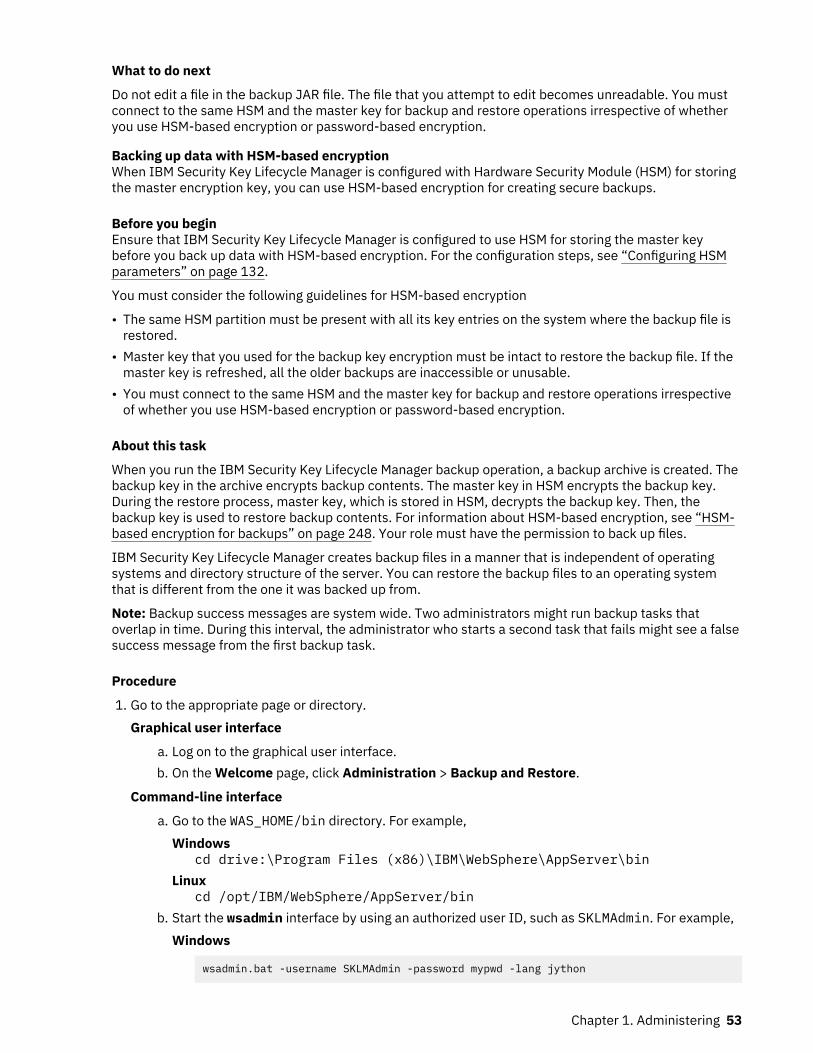
What to do next
Do not edit a file in the backup JAR file. The file that you attempt to edit becomes unreadable. You mustconnect to the same HSM and the master key for backup and restore operations irrespective of whetheryou use HSM-based encryption or password-based encryption.
Backing up data with HSM-based encryptionWhen IBM Security Key Lifecycle Manager is configured with Hardware Security Module (HSM) for storingthe master encryption key, you can use HSM-based encryption for creating secure backups.
Before you beginEnsure that IBM Security Key Lifecycle Manager is configured to use HSM for storing the master keybefore you back up data with HSM-based encryption. For the configuration steps, see “Configuring HSMparameters” on page 132.
You must consider the following guidelines for HSM-based encryption
• The same HSM partition must be present with all its key entries on the system where the backup file isrestored.
• Master key that you used for the backup key encryption must be intact to restore the backup file. If themaster key is refreshed, all the older backups are inaccessible or unusable.
• You must connect to the same HSM and the master key for backup and restore operations irrespectiveof whether you use HSM-based encryption or password-based encryption.
About this task
When you run the IBM Security Key Lifecycle Manager backup operation, a backup archive is created. Thebackup key in the archive encrypts backup contents. The master key in HSM encrypts the backup key.During the restore process, master key, which is stored in HSM, decrypts the backup key. Then, thebackup key is used to restore backup contents. For information about HSM-based encryption, see “HSM-based encryption for backups” on page 248. Your role must have the permission to back up files.
IBM Security Key Lifecycle Manager creates backup files in a manner that is independent of operatingsystems and directory structure of the server. You can restore the backup files to an operating systemthat is different from the one it was backed up from.
Note: Backup success messages are system wide. Two administrators might run backup tasks thatoverlap in time. During this interval, the administrator who starts a second task that fails might see a falsesuccess message from the first backup task.
Procedure
1. Go to the appropriate page or directory.Graphical user interface
a. Log on to the graphical user interface.b. On the Welcome page, click Administration > Backup and Restore.
Command-line interface
a. Go to the WAS_HOME/bin directory. For example,Windows
cd drive:\Program Files (x86)\IBM\WebSphere\AppServer\binLinux
cd /opt/IBM/WebSphere/AppServer/binb. Start the wsadmin interface by using an authorized user ID, such as SKLMAdmin. For example,
Windows
wsadmin.bat -username SKLMAdmin -password mypwd -lang jython
Chapter 1. Administering 53

Linux
./wsadmin.sh -username SKLMAdmin -password mypwd -lang jython
REST interfaceOpen a REST client.
2. Create a backup file.You can run only one backup or restore task at a time.Graphical user interface
a. On the Backup and Restore table, the Backup repository location field displays the default<SKLM_DATA> directory path, where the backup file is saved, for example, C:\ProgramFiles\IBM\WebSphere\AppServer\products\sklm\data. For the definition of<SKLM_DATA>, see “Definitions for HOME and other directory variables” on page 35. ClickBrowse to specify a backup repository location under <SKLM_DATA> directory.
Directory path in the Backup repository location field changes based on the value that you setfor the tklm.backup.dir property in the SKLMConfig.properties file.
b. Click Create Backup.c. On the Create Backup page, specify a description. A read-only backup file location is displayed
in the Backup location field.d. Click Create Backup.
Command-line interfaceType tklmBackupRun, the backup location, and any other necessary information to create abackup file. For example:
print AdminTask.tklmBackupRun ('[-backupDirectory C:\\sklmbackup1]')
REST interface
a. Obtain a unique user authentication identifier to access IBM Security Key Lifecycle ManagerREST services. For more information about the authentication process, see “Authenticationprocess for REST services” on page 239.
b. To run Backup Run REST Service, send the HTTP POST request. Pass the userauthentication identifier that you obtained in Step a along with the request message as shownin the following example.
POST https://localhost:<port>/SKLM/rest/v1/ckms/backupsContent-Type: application/jsonAccept : application/jsonAuthorization: SKLMAuth authId=139aeh34567mAccept-Language : en{"backupDirectory":"/sklmbackup1"}
3. A message indicates that the backup file was created, or that the backup operation succeeded.
The time stamp on a backup file has a Greenwich Mean Time (GMT) offset represented in RFC 822format. The file name contains a +hhmm or -hhmm element to specify a timezone ahead of or behindGMT. For example, a file name might be sklm_v3.0.1.0_20170123144220-0800_backup.jar,where -0800 indicates that the timezone is eight hours behind GMT.
What to do next
Do not edit a file in the backup JAR file. The file that you attempt to edit becomes unreadable. Master keythat was used for the backup key encryption must be intact to restore the backup file. If the master key isrefreshed, all the older backups are inaccessible or unusable.
54 IBM Security Key Lifecycle Manager : Administering

Backing up large amount of dataYou can configure IBM Security Key Lifecycle Manager to backup and replicate to back up or replicatelarge number of encryption keys. The enableHighScaleBackup property in theSKLMConfig.properties configuration file is used.
About this task
You can use the Backup and Restore page to back up data. Alternatively, you can use thetklmBackupRun command or Backup Run REST Service. Your role must have the permission toback up files.
Note:
• You cannot create a cross-platform compatible backup file if IBM Security Key Lifecycle Manager isconfigured for high performance backup and restore activities. You can use the backup file to restoredata in an identical operating environment. The operating system, middleware components, anddirectory structures must be identical on both systems.
• The db2restore.log file is created during restore process only when IBM Security Key LifecycleManager is configured for high performance backup and restore operations.
Procedure
1. Set the enableHighScaleBackup=true property in the <SKLM_HOME>/config/SKLMConfig.properties file.Command-line interface
a. Go to the <WAS_HOME>/bin directory. For example,Windows
cd drive:\Program Files (x86)\IBM\WebSphere\AppServer\binLinux
cd /opt/IBM/WebSphere/AppServer/binb. Start the wsadmin interface by using an authorized user ID, such as SKLMAdmin. For example,
Windows
wsadmin.bat -username SKLMAdmin -password mypwd -lang jython
Linux
./wsadmin.sh -username SKLMAdmin -password mypwd -lang jython
c. Run the tklmConfigUpdateEntry command to set enableHighScaleBackup property inthe SKLMConfig.properties configuration file.
print AdminTask.tklmConfigUpdateEntry ('[-name enableHighScaleBackup -value true]')
REST interface
a. Open a REST client.b. Obtain a unique user authentication identifier to access IBM Security Key Lifecycle Manager
REST services. For more information about the authentication process, see “Authenticationprocess for REST services” on page 239.
c. Run Update Config Property REST Service to set enableHighScaleBackup propertyin the SKLMConfig.properties configuration file. Pass the user authentication identifier thatyou obtained in Step b along with the request message as shown in the following example.
PUT https://localhost:<port>/SKLM/rest/v1/configPropertiesContent-Type: application/jsonAccept : application/jsonAuthorization: SKLMAuth userAuthId=139aeh34567m
Chapter 1. Administering 55

Accept-Language : en{ "enableHighScaleBackup" : "true"}
2. Go to the appropriate page or directory for backing up data.Graphical user interface
a. Log in to the graphical user interface.b. On the Welcome page, click Administration > Backup and Restore.
Command-line interface
a. Go to the <WAS_HOME>/bin directory.b. Start the wsadmin interface by using an authorized user ID, such as SKLMAdmin.
REST interfaceOpen a REST client.
3. Create a backup file. Only one backup or restore task can run at a time.Graphical user interface
a. On the Backup and Restore table, the Backup repository location field displays the default<SKLM_DATA> directory path, where the backup file is saved, for example, C:\ProgramFiles\IBM\WebSphere\AppServer\products\sklm\data. For the definition of<SKLM_DATA>, see “Definitions for HOME and other directory variables” on page 35. ClickBrowse to specify a backup repository location under <SKLM_DATA> directory.
Directory path in the Backup repository location field changes based on the value that you setfor the tklm.backup.dir property in the SKLMConfig.properties file.
b. Click Create Backup.c. On the Create Backup page, specify information such as a value for the encryption password
and backup description. A read-only backup file location is displayed in the Backup locationfield. Ensure that you retain the encryption password for future use in case you restore thebackup.
Note: If HSM-based encryption is used for the backups, you need not specify the password.d. Click Create Backup.
Command-line interface
Type tklmBackupRun and specify the needed values to create a backup file as shown in thefollowing example.
print AdminTask.tklmBackupRun ('[-password myBackupPwd]')
REST interfaceRun Backup Run REST Service by sending the HTTP POST request as shown in the followingexample.
POST https://localhost:<port>/SKLM/rest/v1/ckms/backupsContent-Type: application/jsonAccept : application/jsonAuthorization: SKLMAuth userAuthId=139aeh34567mAccept-Language : en{"backupDirectory":"/sklmbackup1","password":"myBackupPwd"}
4. A message is displayed to indicate that the backup file was created, or that the backup operationsucceeded.
The time stamp on a backup file has a Greenwich Mean Time (GMT) offset represented in RFC 822format. The file name contains a +hhmm or -hhmm element to specify a timezone ahead of or behindGMT. For example, a file name might be sklm_v3.0.1.0_20170123144220-0800_backup.jar,where -0800 indicates that the timezone is eight hours behind GMT.
56 IBM Security Key Lifecycle Manager : Administering
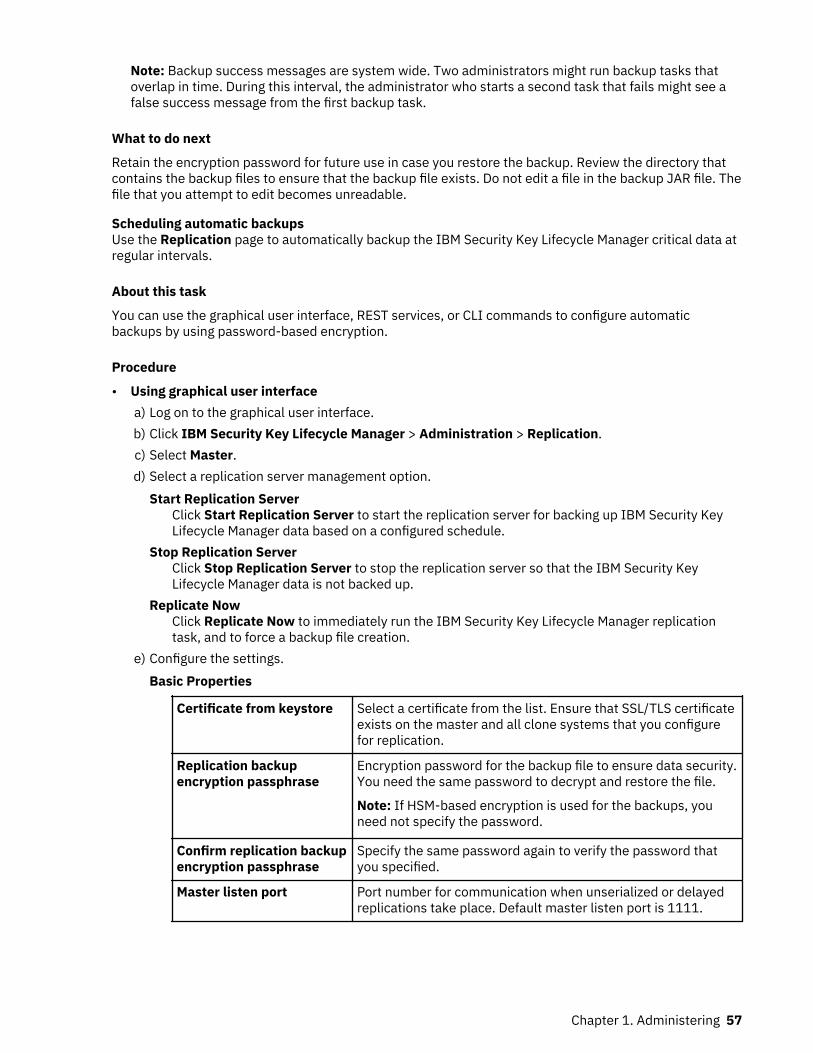
Note: Backup success messages are system wide. Two administrators might run backup tasks thatoverlap in time. During this interval, the administrator who starts a second task that fails might see afalse success message from the first backup task.
What to do next
Retain the encryption password for future use in case you restore the backup. Review the directory thatcontains the backup files to ensure that the backup file exists. Do not edit a file in the backup JAR file. Thefile that you attempt to edit becomes unreadable.
Scheduling automatic backupsUse the Replication page to automatically backup the IBM Security Key Lifecycle Manager critical data atregular intervals.
About this task
You can use the graphical user interface, REST services, or CLI commands to configure automaticbackups by using password-based encryption.
Procedure
• Using graphical user interfacea) Log on to the graphical user interface.b) Click IBM Security Key Lifecycle Manager > Administration > Replication.c) Select Master.d) Select a replication server management option.
Start Replication ServerClick Start Replication Server to start the replication server for backing up IBM Security KeyLifecycle Manager data based on a configured schedule.
Stop Replication ServerClick Stop Replication Server to stop the replication server so that the IBM Security KeyLifecycle Manager data is not backed up.
Replicate NowClick Replicate Now to immediately run the IBM Security Key Lifecycle Manager replicationtask, and to force a backup file creation.
e) Configure the settings.Basic Properties
Certificate from keystore Select a certificate from the list. Ensure that SSL/TLS certificateexists on the master and all clone systems that you configurefor replication.
Replication backupencryption passphrase
Encryption password for the backup file to ensure data security.You need the same password to decrypt and restore the file.
Note: If HSM-based encryption is used for the backups, youneed not specify the password.
Confirm replication backupencryption passphrase
Specify the same password again to verify the password thatyou specified.
Master listen port Port number for communication when unserialized or delayedreplications take place. Default master listen port is 1111.
Chapter 1. Administering 57

Advanced Properties
Replication backupdestination directory
Location to store the backup files. The Replication backupdestination directory field displays the default <SKLM_DATA>directory path, where the backup file is saved, for example,C:\Program Files\IBM\WebSphere\AppServer\products\sklm\data. For the definition of <SKLM_DATA>,see “Definitions for HOME and other directory variables” onpage 35. Click Browse to specify a backup repository locationunder <SKLM_DATA> directory.
Maximum number ofreplication files to keepbefore rollover
Maximum number of replication files that you want to keep. Thevalue must be a positive integer between 2 - 10. When thenumber of files exceed the specified limit, the oldest file isdeleted.
Replication frequency (inhours)
Frequency to check whether the backup operation is necessary.Default value is set to 1 hour. This parameter is ignored if thevalue for Daily Start Replication Time is set.
Daily replication time (inHH:MM format)
Time in HH:MM format to run the replication task every day.
Replication log file name Name and location for the replication log file. Default value forthis parameter is <WAS_HOME>\products\sklm\logs\replication.
Maximum log file size (inKB)
Maximum size of a log file before rollover occurs. Default valueis 1000 KB (kilobytes). When the file reaches the maximumsize, a new log file is created.
Maximum number of logfiles to keep
Maximum number of log files that you want to keep. By default,IBM Security Key Lifecycle Manager keeps the last 3 log files.When the number of files exceed the specified limit, the oldestfile is deleted.
f) Click OK.• Using REST services
a) Open a REST client.b) Obtain a unique user authentication identifier to access IBM Security Key Lifecycle Manager REST
services. For more information about the authentication process, see “Authentication process forREST services” on page 239.
c) To run Get Single Config Property REST Service, send the HTTP GET request. Pass theuser authentication identifier that you obtained in Step a along with the request message asshown in the following example.Service request
GET https://localhost:<port>/SKLM/rest/v1/configProperties/replication.roleContent-Type: application/jsonAccept: application/jsonAuthorization: SKLMAuth userAuthId=139aeh34567mAccept-Language: en
Success response
Status Code : 200 OKContent-Language: en{"replication.role" : "none"}
58 IBM Security Key Lifecycle Manager : Administering

d) Specify the changes. For example, you can use Update Replication Config Property RESTService to send the following service request to change the value of the replication.roleproperty.
PUT https://localhost:<port>/SKLM/rest/v1/configPropertiesContent-Type: application/jsonAccept: application/jsonAuthorization: SKLMAuth authId=139aeh34567mAccept-Language: en{ "replication.role": "master"}
• Using CLI commandsa) Go to the WAS_HOME/bin directory.
For example,Windows
cd drive:\Program Files\IBM\WebSphere\AppServer\binLinux
cd /opt/IBM/WebSphere/AppServer/binb) Start the wsadmin interface by using an authorized user ID, such as SKLMAdmin.
For example:Windows
wsadmin.bat -username SKLMAdmin -password mypwd -lang jython
Linux
./wsadmin.sh -username SKLMAdmin -password mypwd -lang jython
c) Type the tklmReplicationConfigGetEntry command on one line to get the current value ofthe target property in the ReplicationSKLMConfig.properties file.For example, type:
wsadmin>print AdminTask.tklmReplicationConfigGetEntry ('[-name replication.role]')
An example response might be:
none
d) Specify the changes. For example, to change the value of the replication.role property tomaster, type on one line.
print AdminTask.tklmReplicationConfigUpdateEntry ('[-name replication.role -value master]')
Restoring a backup fileA restore returns the IBM Security Key Lifecycle Manager server to a known state, by using backed-upproduction data, such as the IBM Security Key Lifecycle Manager key materials and other criticalinformation.
Before you begin
• Consider the following guidelines before you restore HSM-based encryption backups:
– Ensure that the same HSM partition is present with all its key entries intact on the system where thebackup file is restored.
– Master key that was used for the backup key encryption must be intact to restore the backup file. Ifthe master key is refreshed, all the older backups are inaccessible or unusable.
– You must connect to the same HSM and the master key for backup and restore operationsirrespective of whether you use HSM-based encryption or password-based encryption.
Chapter 1. Administering 59

• When you run the backup operation, the manifest file is created along with the backup archive. Beforeyou restore the backup files, ensure that the backup manifest file lists all the IBM Security Key LifecycleManager data files in the archive.
• To restore a backup file from a standalone IBM Security Key Lifecycle Manager server to the primarymaster server of a Multi-Master cluster, or vice versa, ensure that the enableHighScaleBackupproperty in the SKLMConfig.properties configuration file does not exist or is set to false.
About this task
You can use the Backup and Restore page to restore a backup file. Alternatively, you can use thetklmBackupRunRestore command or Backup Run Restore REST Service to restore the file. Yourrole must have the permission to restore files.. IBM Security Key Lifecycle Manager creates backup files ina manner that is independent of operating systems and directory structure of the application. You canrestore the backup files to an operating system that is different from the one it was backed up from.
Before you start a restore task, isolate the system for maintenance. Take a backup of the existing system.You can later use this backup to bring the system back to original state if any issues occur during therestore process.
Procedure
1. Go to the appropriate page or directory:Graphical user interface
a. Log on to the graphical user interface.b. On the Welcome page, click Administration > Backup and Restore.
Command-line interface
a. Go to the WAS_HOME/bin directory. For example,Windows
cd drive:\Program Files\IBM\WebSphere\AppServer\binLinux
cd /opt/IBM/WebSphere/AppServer/binb. Start the wsadmin interface by using an authorized user ID, such as SKLMAdmin. For example,
Windows
wsadmin.bat -username SKLMAdmin -password mypwd -lang jython
Linux
./wsadmin.sh -username SKLMAdmin -password mypwd -lang jython
REST interface
• Open a REST client.2. Restore a selected backup file. Only one backup or restore task can run at a time. If you restore a file
to a replica computer, copy the file to that computer by using media such as a disk, or electronictransmission.Graphical user interface
a. On the Backup and Restore table, select a backup file that is listed in the table.b. Click Restore from Backup.
Note:
• If you applied a fix pack on distributed systems, do not attempt to restore the backup filesthat were created before the fix pack application.
60 IBM Security Key Lifecycle Manager : Administering

c. On the Restore Backup page, specify the encryption password that was used to create thebackup file.
Note: If HSM-based encryption is used for the backups, you need not specify the password.d. Click Restore Backup.
Command-line interface
Type tklmBackupRunRestore and specify the necessary information such as the path andbackup file name. Specify the encryption password that was used to create the backup file. Forexample, type:
print AdminTask.tklmBackupRunRestore ('[-backupFilePath /opt/mysklmbackups/sklm_v3.0.1.0_20170705235417-1200_backup -password myBackupPwd]')
Note: If HSM-based encryption is used for the backups, you need not specify the password.
REST interface
a. Obtain a unique user authentication identifier to access IBM Security Key Lifecycle ManagerREST services. For more information about the authentication process, see “Authenticationprocess for REST services” on page 239.
b. To run Backup Run Restore REST Service, send the HTTP POST request. Pass the userauthentication identifier that you obtained in Step a along with the request message as shownin the following example.
POST https://localhost:<port>/SKLM/rest/v1/ckms/restoreContent-Type: application/jsonAccept : application/jsonAuthorization: SKLMAuth authId=139aeh34567mAccept-Language : en{"backupFilePath":"/opt/mysklmbackups/sklm_v2.7.0.0_20160705235417-1200_backup.jar","password":"myBackupPwd"}
Note: If HSM-based encryption is used for the backups, you need not specify the password.3. A message indicates that the restore operation succeeded.
ResultsThe IBM Security Key Lifecycle Manager server automatically restarts after a backup file is restored whenthe autoRestartAfterRestore property value is true (default value) in theSKLMConfig.properties file.
Note: After automatic restart of the IBM Security Key Lifecycle Manager server, the windows WebSphereApplication Server service status is not refreshed and is shown as stopped.
What to do next
Note: After data restoration, ensure that the path for the properties in the SKLMConfig.properties,datastore.properties, and ReplicationSKLMConfig.properties files are correct before youproceed with your next task.
Determine whether the server is at the expected state. For example, you might examine the keystore tosee whether a certificate that had problems before the backup file restore is now available for use.
Chapter 1. Administering 61
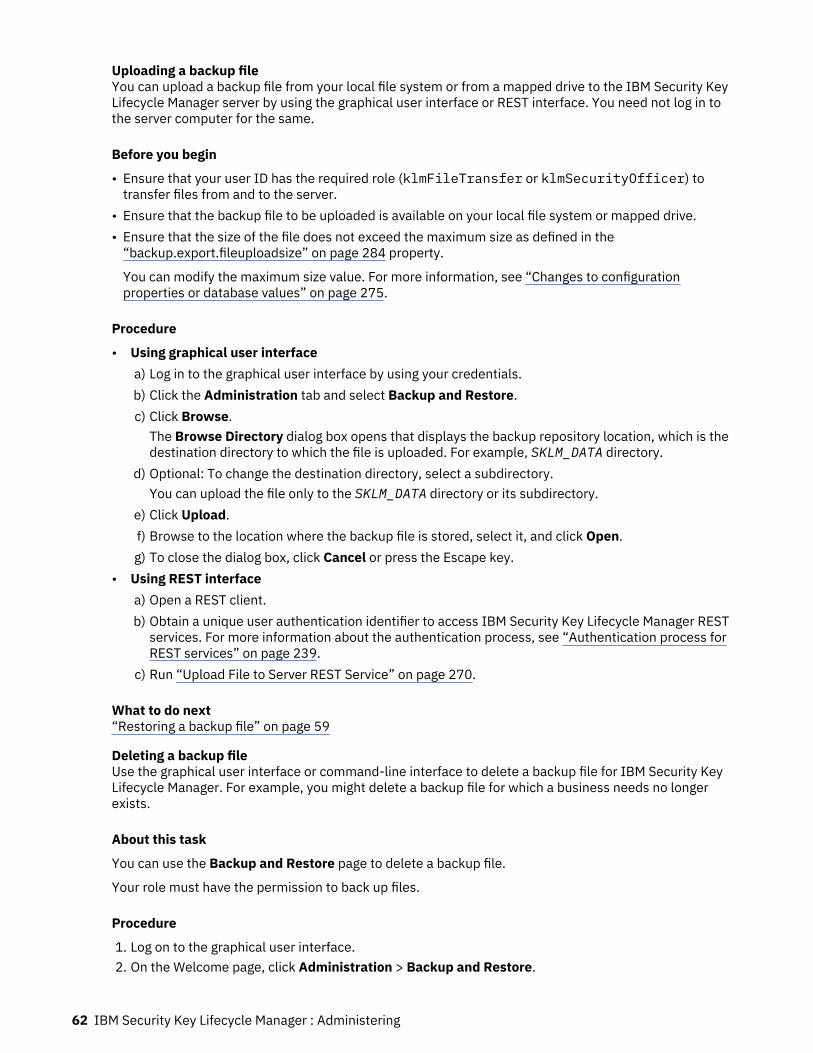
Uploading a backup fileYou can upload a backup file from your local file system or from a mapped drive to the IBM Security KeyLifecycle Manager server by using the graphical user interface or REST interface. You need not log in tothe server computer for the same.
Before you begin
• Ensure that your user ID has the required role (klmFileTransfer or klmSecurityOfficer) totransfer files from and to the server.
• Ensure that the backup file to be uploaded is available on your local file system or mapped drive.• Ensure that the size of the file does not exceed the maximum size as defined in the“backup.export.fileuploadsize” on page 284 property.
You can modify the maximum size value. For more information, see “Changes to configurationproperties or database values” on page 275.
Procedure
• Using graphical user interfacea) Log in to the graphical user interface by using your credentials.b) Click the Administration tab and select Backup and Restore.c) Click Browse.
The Browse Directory dialog box opens that displays the backup repository location, which is thedestination directory to which the file is uploaded. For example, SKLM_DATA directory.
d) Optional: To change the destination directory, select a subdirectory.You can upload the file only to the SKLM_DATA directory or its subdirectory.
e) Click Upload.f) Browse to the location where the backup file is stored, select it, and click Open.g) To close the dialog box, click Cancel or press the Escape key.
• Using REST interfacea) Open a REST client.b) Obtain a unique user authentication identifier to access IBM Security Key Lifecycle Manager REST
services. For more information about the authentication process, see “Authentication process forREST services” on page 239.
c) Run “Upload File to Server REST Service” on page 270.
What to do next“Restoring a backup file” on page 59
Deleting a backup fileUse the graphical user interface or command-line interface to delete a backup file for IBM Security KeyLifecycle Manager. For example, you might delete a backup file for which a business needs no longerexists.
About this task
You can use the Backup and Restore page to delete a backup file.
Your role must have the permission to back up files.
Procedure
1. Log on to the graphical user interface.2. On the Welcome page, click Administration > Backup and Restore.
62 IBM Security Key Lifecycle Manager : Administering
3. On the Backup and Restore table, select a backup file that is listed in the table.
4. Click Delete Backup and confirm that you want to delete the file.
What to do next
Examine the directory in which the backup files are stored to determine whether the specified file wasdeleted.
Downloading a backup fileYou can download a backup file from the IBM Security Key Lifecycle Manager server to your local filesystem by using the graphical user interface or REST interface. You need not log in to the server computerfor the same.
Before you beginEnsure that your user ID has the required role (klmFileTransfer or klmSecurityOfficer) totransfer files from and to the server.
Procedure
• Using graphical user interfacea) Log in to the graphical user interface by using your credentials.b) Click the Administration tab and select Backup and Restore.c) If the table does not display any backup files, click Display Backups.d) In the row that contains the backup file that you want to download, click Download.
• Using REST interfacea) Open a REST client.b) Obtain a unique user authentication identifier to access IBM Security Key Lifecycle Manager REST
APIs. For more information about the authentication process, see “Authentication process for RESTservices” on page 239.
c) Run “Download File from Server REST Service” on page 281.
ResultsThe file is downloaded in the folder that is configured as the default download folder of your browser.
Running backup and restore tasks on the command-line or REST interfaceYou can use the command-line interface or REST interface for more backup and restore tasks that are notavailable on the graphical user interface.
About this task
Before you begin, obtain the password. Your role must have permissions to back up or to restore files.
Procedure
1. Go to the appropriate page or directory.
• Command-line interface
a. Go to the <WAS_HOME>/bin directory. For example,Windows
cd drive:\Program Files\IBM\WebSphere\AppServer\binLinux
cd /opt/IBM/WebSphere/AppServer/binb. Start the wsadmin interface by using an authorized user ID, such as SKLMAdmin. For example,
Chapter 1. Administering 63
Windows
wsadmin.bat -username SKLMAdmin -password mypwd -lang jython
Linux
./wsadmin.sh -username SKLMAdmin -password mypwd -lang jython
• REST interface:
– Open a REST client.2. Complete the task.
• Command-line interface:tklmBackupGetProgress
Type tklmBackupGetProgress to determine the current phase of a backup task that isrunning. For example, type:
print AdminTask.tklmBackupGetProgress()
tklmBackupGetRestoreProgress
Type tklmBackupGetRestoreProgress to determine the current phase of a restore task thatis running. For example, type:
print AdminTask.tklmBackupGetRestoreProgress()
tklmBackupGetRestoreResult
Type tklmBackupGetRestoreResult to determine the success or failure of a completedrestore task. For example, type:
print AdminTask.tklmBackupGetRestoreResult()
tklmBackupGetResult
Type tklmBackupGetResult to determine the success or failure of a completed backup task.For example, type:
print AdminTask.tklmBackupGetResult()
tklmBackupIsRestoreRunning
Type tklmBackupIsRestoreRunning to determine whether the restore task is running. Forexample, type:
print AdminTask.tklmBackupIsRestoreRunning()
tklmBackupIsRunning
Type tklmBackupIsRunning to determine whether the backup task is running. For example,type:
print AdminTask.sklmBackupIsRunning()
tklmBackupList
Type tklmBackupList to list the backup files in a directory. For example, type:
print AdminTask.tklmBackupList ('[-backupDirectory C:\\sklmbackup1 -v y]')
• REST interface:
64 IBM Security Key Lifecycle Manager : Administering
a. Obtain a unique user authentication identifier to access IBM Security Key Lifecycle Manager RESTservices. For more information about the authentication process, see “Authentication process forREST services” on page 239.
b. To invoke the REST service, send the HTTP request. Pass the user authentication identifier thatyou obtained in Step a along with the request message as shown in the following example.Backup Get Progress REST Service
Use Backup Get Progress REST Service to determine the current phase of a backuptask that is running. For example, you can send the following HTTP request:
GET https://localhost:<port>/SKLM/rest/v1/ckms/backups/progressContent-Type: application/jsonAccept : application/jsonAuthorization: SKLMAuth authId=139aeh34567mAccept-Language : en
Backup Get Restore Progress REST ServiceUse Backup Get Restore Progress REST Service to determine the current phase ofa restore task that is running. For example, you can send the following HTTP request:
GET https://localhost:<port>/SKLM/rest/v1/ckms/restore/progressContent-Type: application/jsonAccept: application/jsonAuthorization: SKLMAuth authId=139aeh34567mAccept-Language: en
Backup Get Restore Result REST ServiceType Backup Get Restore Result REST Service to determine the success or failureof a completed restore task. For example, you can send the following HTTP request:
GET https://localhost:<port>/SKLM/rest/v1/ckms/restore/resultContent-Type: application/jsonAccept : application/jsonAuthorization: SKLMAuth authId=139aeh34567mAccept-Language : en
Backup Get Result REST ServiceType Backup Get Result REST Service to determine the success or failure of acompleted backup task. For example, you can send the following HTTP request:
GET https://localhost:<port>/SKLM/rest/v1/ckms/backups/resultContent-Type: application/jsonAccept : application/jsonAuthorization: SKLMAuth authId=139aeh34567mAccept-Language : en
Backup List REST ServiceUse Backup List REST Service to list the backup files in a directory. For example, youcan send the following HTTP request:
GET https://localhost:<port>/SKLM/rest/v1/ckms/backups?backupDirectory=/sklmbackupContent-Type: application/jsonAccept : application/jsonAuthorization: SKLMAuth authId=139aeh34567mAccept-Language : en
Key loss preventionTo prevent loss of encryption data for mission-critical devices and keys, always maintain a minimum oftwo instances of IBM Security Key Lifecycle Manager. Ensure that one of the instances is a replica of thesame devices and keys. You might provide more than two redundant instances.
IBM Security Key Lifecycle Manager provides support for DS5000 storage servers that automaticallygenerates keys when a new DS5000 device is registered in IBM Security Key Lifecycle Manager.
Chapter 1. Administering 65
Do not use a setting of 1 (auto accept) for the DS5000 device family. This setting allows generation andserving of keys to DS5000 storage servers before you backup data. For all other device families, back upany new keys that are served.
Remove the backup files from the server and store in a secure location. For example, copy the backupfiles to a CD/DVD and lock in a safe place.
Note: Do not copy the files to an encrypted storage that is dependent on this product. Doing so mightresult in the backup not being available because the product is not available.
IBM Security Key Lifecycle Manager also provides these key loss options:backup.keycert.before.serving
Set this property in the SKLMConfig.properties file to prevent serving new keys until the keys arebacked up.
Automated backup scriptUse the autobackup.bat script to automatically back up files. IBM Security Key Lifecycle Managerdoes not serve keys or certificates that are not backed up if the value of thebackup.keycert.before.serving property is set to true, or, is not present, in theSKLMConfig.properties file.
Configuring replicationIBM Security Key Lifecycle Manager replication ensures availability of the key materials, configurationfiles, and other data on a server by having at least one copy or replica of the data on another server. Eachserver is available for data recovery when the other one fails. In replication, IBM Security Key LifecycleManager creates a backup of the data and copies it to the other server as per the configured schedule.
Master server is the primary system that is being backed up and replicated to one or more secondaryservers, called clone servers. You must configure IBM Security Key Lifecycle Manager on the master andclone servers to schedule replication. New keys are created only on the master server. Clone servers canserve keys.
The following data in the master server is replicated to the clone server:
• IBM Security Key Lifecycle Manager database tables• Truststore and keystore with the master key• IBM Security Key Lifecycle Manager configuration files
Replication configurationTo schedule replication, you need to configure IBM Security Key Lifecycle Manager on the master andclone servers. You can configure one master and up to 20 clone servers. Cloning of the IBM Security KeyLifecycle Manager environment on the master server to the clone servers is independent of theiroperating systems and directory structure.
Types of replication
You can configure automatic replication in two ways:Full replication
Creates full backup of the data on the master server and then replicates the data to the clone servers.By default, full replication runs every 24 hours (daily). It is triggered only when new cryptographicobjects are added to or modified on the master server.
For detailed instructions, see “Enabling and configuring full replication” on page 67.
Incremental replicationReplicates data from the master to the clone server incrementally with the delta changes. If you havefrequent updates to the cryptographic objects in a master server, use incremental replication so thatthe clone servers always have almost up-to-date data. By default, incremental replication runs every60 seconds (1 minute). You can configure this frequency based on your requirement. You must
66 IBM Security Key Lifecycle Manager : Administering
configure full replication before you can configure incremental replication. You can configureincremental replication when you configure full replication as well.
For detailed instructions, see “Enabling and configuring incremental replication” on page 73.
You can use the graphical user interface, command-line interface, or REST interface to configure full andincremental replication.
Automated backup configuration
To schedule automatic backups, you need to configure IBM Security Key Lifecycle Manager on the masterserver only. For instructions, see “Scheduling automatic backups” on page 57.
Replicating large amount of data
You can configure IBM Security Key Lifecycle Manager to replicate large amount of data. Before youbegin, ensure that the master and clone servers are identical. The operating system, directory structures,and Db2 admin user must be the same on the master and clone servers. For more information, see“Backing up large amount of data” on page 55.
Backup protection
IBM Security Key Lifecycle Manager creates a cryptographic key to encrypt the backup files. Dependingon the encryption method that is selected in configuration, when the automatic backup or replicationoperation runs, the cryptographic key is encrypted by a password or by the master key in HSM.
For more information about the encryption methods for backup and replication, see “Backup encryptionmethods for replication activities” on page 257.
Enabling and configuring full replicationYou must configure the master and clone servers to replicate IBM Security Key Lifecycle Manager datafrom the master server to the clone servers.
About this taskYou can use the graphical user interface, REST APIs, or command-line interface to configure fullreplication. You need to configure settings on both, the master and clone servers.
Procedure
• Using graphical user interface
See “Enabling and configuring full replication by using the graphical user interface” on page 67.• Using REST interface
See “Enabling and configuring full replication by using REST APIs” on page 69.• Using CLI commands
See “Enabling and configuring full replication by using command-line interface” on page 70.
ResultsReplication is now set up and it checks for new cryptographic objects after every 24 hours. You canchange this interval and set up a specific time. You can also use the “Replication Now REST Service” onpage 245 to run replication immediately.
Enabling and configuring full replication by using the graphical user interfaceTo enable replication, you need to configure settings on both master and clone servers.
Before you beginEnsure that the master and clone servers have a secure communication:
Chapter 1. Administering 67
1. Create SSL certificate on the master server. If an SSL server certificate already exists, you can skip thisstep.
2. Export the private key of the SSL certificate. Run “Key Export REST Service” on page 325. For example:
PUT https://master_server_host:port/SKLM/rest/v1/keys/export{"alias":"SKLMSSLCertificate","fileName":"c:/SKLMSSLCertificate","type":"privatekey", "password":"password"}
3. Copy the exported private key file of the master server to the SKLM_DATA folder of the clone server.4. Import the private key file of the master server. Run “Key Import REST Service” on page 328. For
example,
POST https://clone_server_host:port/SKLM/rest/v1/keys/import{"alias":"SKLMSSLCertificate","fileName":"c:/Program Files/Websphere/AppServer/products/sklm/data/SKLMSSLCertificate","type":"privatekey","usage":"SSLSERVER", "password":"password"}
Procedure
On the master server1. Log in to the graphical user interface on the master server.2. Configure replication.
a) Click Administration > Replication.b) Select the Master role.c) In the Basic Properties tab, select the SSL server certificate.d) If you are configuring replication by using password-based encryption, enter the passphrase for the
backups that will be created during replication.e) Change the master listener port value.
By default, 1111 is provided.f) To configure a clone server, click Add Clone, enter the IP address or host name, and port number
of the clone server.g) Optional: Repeat the earlier step for every clone server that you want to configure.h) Click OK.
The configuration is saved.i) Click Start Replication Server.
Replication is now configured on the master server.On the clone server3. Log in to the graphical user interface on the clone server.4. Configure replication.
a) Click Administration > Replication.b) Select the Clone role.c) Optional: Modify the default configuration parameters.
For more information, see “Modifying replication configuration for a clone server” on page 79.d) Click Start Replication Server.e) Click OK.
Replication is now configured on the clone server.
Repeat these steps for every clone server that you want to configure.
ResultsReplication is now configured on the master and clone servers. Data is replicated based on the configuredschedule.
68 IBM Security Key Lifecycle Manager : Administering
Enabling and configuring full replication by using REST APIsTo enable replication, you need to configure settings on both master and clone servers.
Before you beginEnsure that the master and clone servers have a secure communication:
1. Create SSL certificate on the master server. If an SSL server certificate already exists, you can skip thisstep.
2. Export the private key of the SSL certificate. Run “Key Export REST Service” on page 325. For example:
PUT https://master_server_host:port/SKLM/rest/v1/keys/export{"alias":"SKLMSSLCertificate","fileName":"c:/SKLMSSLCertificate","type":"privatekey", "password":"password"}
3. Copy the exported private key file of the master server to the SKLM_DATA folder of the clone server.4. Import the private key file of the master server. Run “Key Import REST Service” on page 328. For
example,
POST https://clone_server_host:port/SKLM/rest/v1/keys/import{"alias":"SKLMSSLCertificate","fileName":"c:/Program Files/Websphere/AppServer/products/sklm/data/SKLMSSLCertificate","type":"privatekey","usage":"SSLSERVER", "password":"password"}
Procedure
1. Open a REST client.(Configure replication on the master server)2. Obtain a unique user authentication identifier to access IBM Security Key Lifecycle Manager REST APIs
on the master server. For more information about the authentication process, see “Authenticationprocess for REST services” on page 239.
3. Run “Update Replication Config Property REST Service” on page 333 on the master server and specifyvalues for the following mandatory properties:
• Set role to master.• Specify the server certificate that you created• Provide at least one clone server and port number.• Define a master listen port and specify a password.
Note: You need not specify the password when IBM Security Key Lifecycle Manager is configured touse Hardware Security Module (HSM) for storing the master encryption key. For information aboutencryption methods to back up data for replication activities, see Backup encryption methods forreplication activities.
For details about all the available replication configuration parameters, see Replication configurationparameters.
A sample request:
PUT https://master_server_host:port/SKLM/rest/v1/configProperties{ "replication.role": "master", "backup.EncryptionPassword": "mypassword","backup.TLSCertAlias":"sklmSSLCertificate", "backup.ClientIP1": "myhostname","backup.ClientPort1": "2222", "replication.MasterListenPort": "1111" , "backup.CheckFrequency":"60","backup.DailyStartReplicationBackupTime"="23:00"}
Note: You can configure incremental replication, if required. The sample request must include theadditional parameter to enable incremental replication. For example:
PUT https://master_server_host:port/SKLM/rest/v1/configProperties{ "replication.role": "master", "backup.EncryptionPassword": "mypassword","backup.TLSCertAlias":"sklmSSLCertificate", "backup.ClientIP1": "myhostname","backup.ClientPort1": "2222", "replication.MasterListenPort": "1111","backup.CheckFrequency":"60","backup.DailyStartReplicationBackupTime"="23:00","replication.Incremental.Enable"="true"
Chapter 1. Administering 69
The replication configuration file ReplicationSKLMConfig.properties is created on the masterserver in the same directory as the IBM Security Key Lifecycle Manager properties file. For example,C:\Program Files\IBM\WebSphere\AppServer\products\sklm\config\ReplicationSKLMConfig.properties.
4. Start Replication server.Run “Replication Start REST Service” on page 243.
5. Optional: To run replication immediately, run “Replication Now REST Service” on page 245.
Replication is now configured on the master server.(Configure replication on the clone server)6. Obtain a unique user authentication identifier to access IBM Security Key Lifecycle Manager REST
services on the clone server.For more information about the authentication process, see “Authentication process for RESTservices” on page 239.
7. Run “Update Replication Config Property REST Service” on page 333 on the clone server and specifyvalues for the following mandatory properties:
• Set role to clone.• Specify the server certificate that you created• Define a master listen port.• Define a restore listen port. The port must be the same port number that is coded in the
corresponding backup.ClientPort parameter on the master server
For details of all the available replication configuration parameters, see Replication configurationparameters.
A sample request:
PUT https://localhost:port/SKLM/rest/v1/configProperties{ "replication.role": "clone", "backup.TLSCertAlias":"sklmSSLCertificate", "restore.ListenPort": "2222", "replication.MasterListenPort": "1111" }
The replication configuration file ReplicationSKLMConfig.properties is created on the cloneserver in the same directory as the IBM Security Key Lifecycle Manager properties file. For example,C:\Program Files\IBM\WebSphere\AppServer\products\sklm\config\ReplicationSKLMConfig.properties.
8. Start Replication server on the clone server.Run “Replication Start REST Service” on page 243.
Replication is now configured on the clone server.
Repeat these steps for every clone server that you want to configure.
ResultsReplication is now configured on the master and clone servers. Data is replicated based on the configuredschedule.
Enabling and configuring full replication by using command-line interfaceTo enable replication, you need to configure settings on both master and clone servers.
Before you beginEnsure that the master and clone servers have a secure communication:
1. Create SSL certificate on the master server. If an SSL server certificate already exists, you can skip thisstep.
70 IBM Security Key Lifecycle Manager : Administering
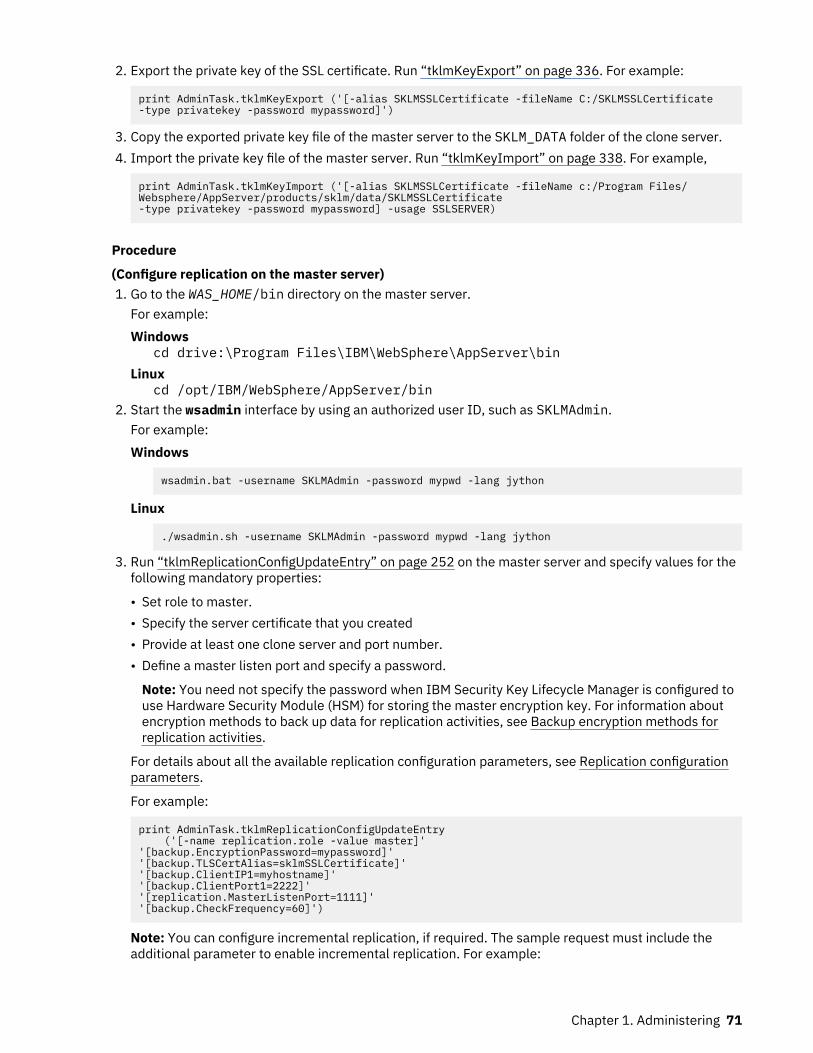
2. Export the private key of the SSL certificate. Run “tklmKeyExport” on page 336. For example:
print AdminTask.tklmKeyExport ('[-alias SKLMSSLCertificate -fileName C:/SKLMSSLCertificate-type privatekey -password mypassword]')
3. Copy the exported private key file of the master server to the SKLM_DATA folder of the clone server.4. Import the private key file of the master server. Run “tklmKeyImport” on page 338. For example,
print AdminTask.tklmKeyImport ('[-alias SKLMSSLCertificate -fileName c:/Program Files/Websphere/AppServer/products/sklm/data/SKLMSSLCertificate -type privatekey -password mypassword] -usage SSLSERVER)
Procedure
(Configure replication on the master server)1. Go to the WAS_HOME/bin directory on the master server.
For example:Windows
cd drive:\Program Files\IBM\WebSphere\AppServer\binLinux
cd /opt/IBM/WebSphere/AppServer/bin2. Start the wsadmin interface by using an authorized user ID, such as SKLMAdmin.
For example:Windows
wsadmin.bat -username SKLMAdmin -password mypwd -lang jython
Linux
./wsadmin.sh -username SKLMAdmin -password mypwd -lang jython
3. Run “tklmReplicationConfigUpdateEntry” on page 252 on the master server and specify values for thefollowing mandatory properties:
• Set role to master.• Specify the server certificate that you created• Provide at least one clone server and port number.• Define a master listen port and specify a password.
Note: You need not specify the password when IBM Security Key Lifecycle Manager is configured touse Hardware Security Module (HSM) for storing the master encryption key. For information aboutencryption methods to back up data for replication activities, see Backup encryption methods forreplication activities.
For details about all the available replication configuration parameters, see Replication configurationparameters.
For example:
print AdminTask.tklmReplicationConfigUpdateEntry ('[-name replication.role -value master]''[backup.EncryptionPassword=mypassword]''[backup.TLSCertAlias=sklmSSLCertificate]''[backup.ClientIP1=myhostname]''[backup.ClientPort1=2222]''[replication.MasterListenPort=1111]''[backup.CheckFrequency=60]')
Note: You can configure incremental replication, if required. The sample request must include theadditional parameter to enable incremental replication. For example:
Chapter 1. Administering 71
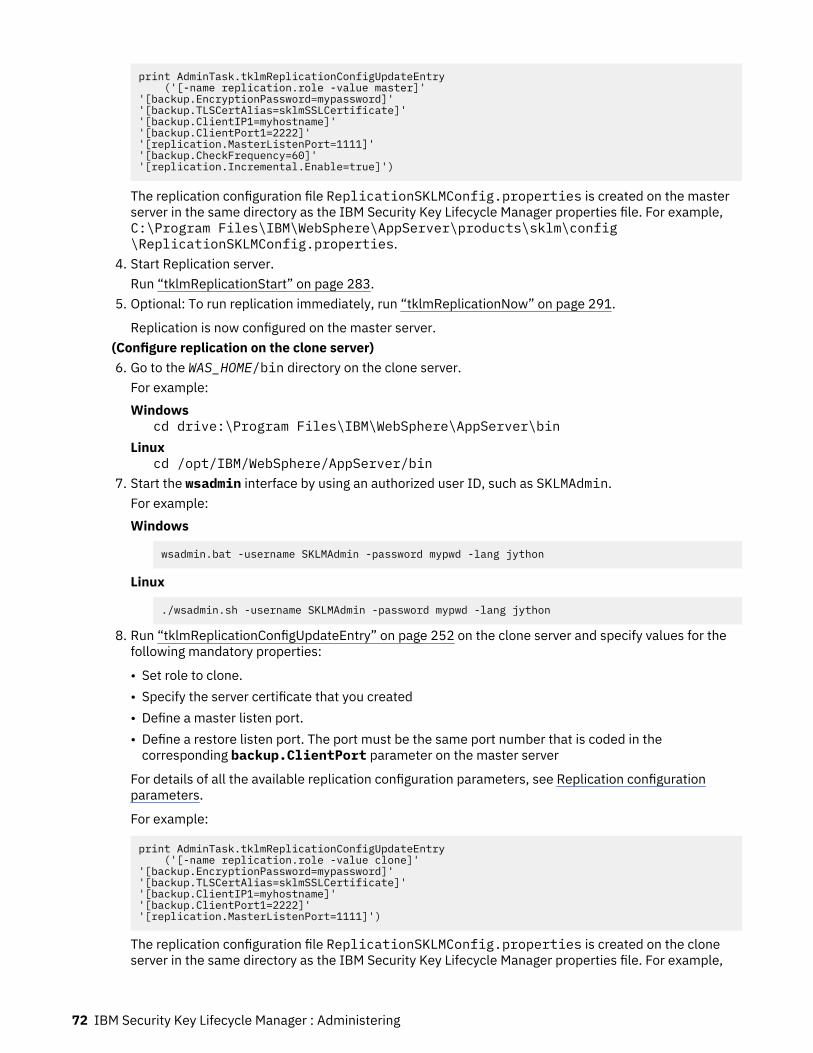
print AdminTask.tklmReplicationConfigUpdateEntry ('[-name replication.role -value master]''[backup.EncryptionPassword=mypassword]''[backup.TLSCertAlias=sklmSSLCertificate]''[backup.ClientIP1=myhostname]''[backup.ClientPort1=2222]''[replication.MasterListenPort=1111]''[backup.CheckFrequency=60]''[replication.Incremental.Enable=true]')
The replication configuration file ReplicationSKLMConfig.properties is created on the masterserver in the same directory as the IBM Security Key Lifecycle Manager properties file. For example,C:\Program Files\IBM\WebSphere\AppServer\products\sklm\config\ReplicationSKLMConfig.properties.
4. Start Replication server.Run “tklmReplicationStart” on page 283.
5. Optional: To run replication immediately, run “tklmReplicationNow” on page 291.
Replication is now configured on the master server.(Configure replication on the clone server)6. Go to the WAS_HOME/bin directory on the clone server.
For example:Windows
cd drive:\Program Files\IBM\WebSphere\AppServer\binLinux
cd /opt/IBM/WebSphere/AppServer/bin7. Start the wsadmin interface by using an authorized user ID, such as SKLMAdmin.
For example:Windows
wsadmin.bat -username SKLMAdmin -password mypwd -lang jython
Linux
./wsadmin.sh -username SKLMAdmin -password mypwd -lang jython
8. Run “tklmReplicationConfigUpdateEntry” on page 252 on the clone server and specify values for thefollowing mandatory properties:
• Set role to clone.• Specify the server certificate that you created• Define a master listen port.• Define a restore listen port. The port must be the same port number that is coded in the
corresponding backup.ClientPort parameter on the master server
For details of all the available replication configuration parameters, see Replication configurationparameters.
For example:
print AdminTask.tklmReplicationConfigUpdateEntry ('[-name replication.role -value clone]''[backup.EncryptionPassword=mypassword]''[backup.TLSCertAlias=sklmSSLCertificate]''[backup.ClientIP1=myhostname]''[backup.ClientPort1=2222]''[replication.MasterListenPort=1111]')
The replication configuration file ReplicationSKLMConfig.properties is created on the cloneserver in the same directory as the IBM Security Key Lifecycle Manager properties file. For example,
72 IBM Security Key Lifecycle Manager : Administering
C:\Program Files\IBM\WebSphere\AppServer\products\sklm\config\ReplicationSKLMConfig.properties.
9. Start Replication server on the clone server.Run “tklmReplicationStart” on page 283.
Replication is now configured on the clone server.
Repeat these steps for every clone server that you want to configure.
ResultsReplication is now configured on the master and clone servers. Data is replicated based on the configuredschedule.
Enabling and configuring incremental replicationYou can incrementally replicate the IBM Security Key Lifecycle Manager critical data from the masterserver to the clone servers. With incremental replication, the master server updates the clone serverswith the delta changes frequently. You can use the graphical user interface, REST APIs, or command-lineinterface to enable and schedule incremental replication.
Before you beginEnsure that full replication is already configured on the master server. For more information, see“Enabling and configuring full replication” on page 67.
About this task
Incremental replication needs to be configured on the master server. No configuration is required on theclone server.
Procedure
• Using graphical user interfacea) Log in to the graphical user interface.b) Click Administration > Replication.c) Ensure that Master role is selected.d) Click the Advanced Properties tab.e) In the Replication Scheduler Section, select the Incremental replication frequency check box.f) Optional: Specify the frequency (in seconds) at which you want the incremental replication
operation to run.By default, the incremental replication operation runs every 60 seconds, which is one minute.
g) Click Start Replication Server.h) Click OK.
• Using REST APIsa) Open a REST client.b) Obtain a unique user authentication identifier to access IBM Security Key Lifecycle Manager REST
services. For more information about the authentication process, see “Authentication process forREST services” on page 239.
c) Run “Update Replication Config Property REST Service” on page 333 to enable incrementalreplication.For example:
PUT https://localhost:<port>/SKLM/rest/v1/replicationConfigProperties{"replication.Incremental.Enable": "true"}
Chapter 1. Administering 73

d) Optional: To modify the default frequency (60 seconds) of the incremental replication, run “UpdateReplication Config Property REST Service” on page 333 and provide the frequency (in seconds) atwhich you want the incremental replication operation to run.For example:
PUT https://localhost:<port>/SKLM/rest/v1/replicationConfigProperties{"replication.Incremental.CheckFrequency": "120"}
e) Start Replication server.Run “Replication Start REST Service” on page 243.
• Using command-line interfacea) Go to the WAS_HOME/bin directory.
For example:Windows
cd drive:\Program Files\IBM\WebSphere\AppServer\binLinux
cd /opt/IBM/WebSphere/AppServer/binb) Start the wsadmin interface by using SKLMAdmin user credentials.
For example:Windows
wsadmin.bat -username SKLMAdmin -password mypwd -lang jython
Linux
./wsadmin.sh -username SKLMAdmin -password mypwd -lang jython
c) Run the “tklmReplicationConfigUpdateEntry” on page 252 command to enable incrementalreplication.For example:
print AdminTask.tklmReplicationConfigUpdateEntry ('[-name replication.Incremental.Enable -value true]')
d) Optional: To modify the default frequency (60 seconds) of incremental replication, run the“tklmReplicationConfigUpdateEntry” on page 252 command and provide the frequency (inseconds) at which you want the incremental replication operation to run.For example:
print AdminTask.tklmReplicationConfigUpdateEntry ('[-name replication.Incremental.CheckFrequency -value 120]')
e) Start Replication server.Run “tklmReplicationStart” on page 283.
ResultsIncremental replication is enabled and configured. You can immediately run the operation by clickingReplicate Now. Otherwise, the operation runs based on the value given in the Incremental replicationfrequency field. The operation runs until you disable it.
74 IBM Security Key Lifecycle Manager : Administering

Disabling replicationTo discontinue replicating data to the clone servers or to stop the replication operation, you must disablereplication on the master and clone servers. If you have configured incremental replication, it will also getdisabled.
About this task
You can use the graphical user interface, REST services, or CLI commands to disable replication. Youmust disable replication on the master and clone servers. If you want to disable only incrementalreplication, see “Disabling incremental replication” on page 76.
Procedure
• Using graphical user interface
Perform the following steps on the master and clone servers.
a) Log in to the graphical user interface.b) Click Administration > Replication, and select None as the role.c) Click OK.
• Using REST services
Perform the following steps on the master and clone servers.
a) Open a REST client.b) Obtain a unique user authentication identifier to access IBM Security Key Lifecycle Manager REST
services. For more information about the authentication process, see “Authentication process forREST services” on page 239.
c) Run “Delete Replication Config Property REST Service” on page 343.For example:
DELETE https://localhost:port/SKLM/rest/v1/configProperties{"propertyName" : "replication.role"}
• Using CLI commandsa) Go to the WAS_HOME/bin directory.
Perform the following steps on the master and clone servers.
For example:Windows
cd drive:\Program Files\IBM\WebSphere\AppServer\binLinux
cd /opt/IBM/WebSphere/AppServer/binb) Start the wsadmin interface by using an authorized user ID, such as SKLMAdmin.
For example:Windows
wsadmin -username SKLMAdmin -password mypwd -lang jython
Linux
./wsadmin.sh -username SKLMAdmin -password mypwd -lang jython
c) Run the “tklmReplicationConfigDeleteEntry” on page 284 command.For example:
print AdminTask.tklmReplicationConfigDeleteEntry('[-name replication.role]')
Chapter 1. Administering 75

ResultsReplication is disabled.
Disabling incremental replicationIf you have configured incremental replication but cryptographic data is not generated frequently, you candisable incremental replication. Even if you disable incremental replication, full replication continues torun as scheduled.
About this task
You can use the graphical user interface, REST services, or CLI commands to disable replication. Youneed to disable incremental replication on the master server only. If you disable full replication,incremental replication is automatically disabled. For instructions, see “Disabling replication” on page 75.
Procedure
• Using graphical user interfacea) Log in to the graphical user interface on the master server.b) Click Administration > Replication.c) Ensure that Master role is selected.d) Click the Advanced Properties tab.e) In the Replication Scheduler Section, clear the Incremental replication frequency check box.f) Click OK.
• Using REST servicesa) Open a REST client.b) Obtain a unique user authentication identifier to access IBM Security Key Lifecycle Manager REST
services. For more information about the authentication process, see “Authentication process forREST services” on page 239.
c) Run “Update Replication Config Property REST Service” on page 333.• Using CLI commands
a) Go to the WAS_HOME/bin directory.For example:Windows
cd drive:\Program Files\IBM\WebSphere\AppServer\binLinux
cd /opt/IBM/WebSphere/AppServer/binb) Start the wsadmin interface by using an authorized user ID, such as SKLMAdmin.
For example:Windows
wsadmin -username SKLMAdmin -password mypwd -lang jython
Linux
./wsadmin.sh -username SKLMAdmin -password mypwd -lang jython
c) Run the “tklmReplicationConfigUpdateEntry” on page 252 command.
ResultsIncremental replication is disabled. The full replication continues to run as per schedule.
76 IBM Security Key Lifecycle Manager : Administering
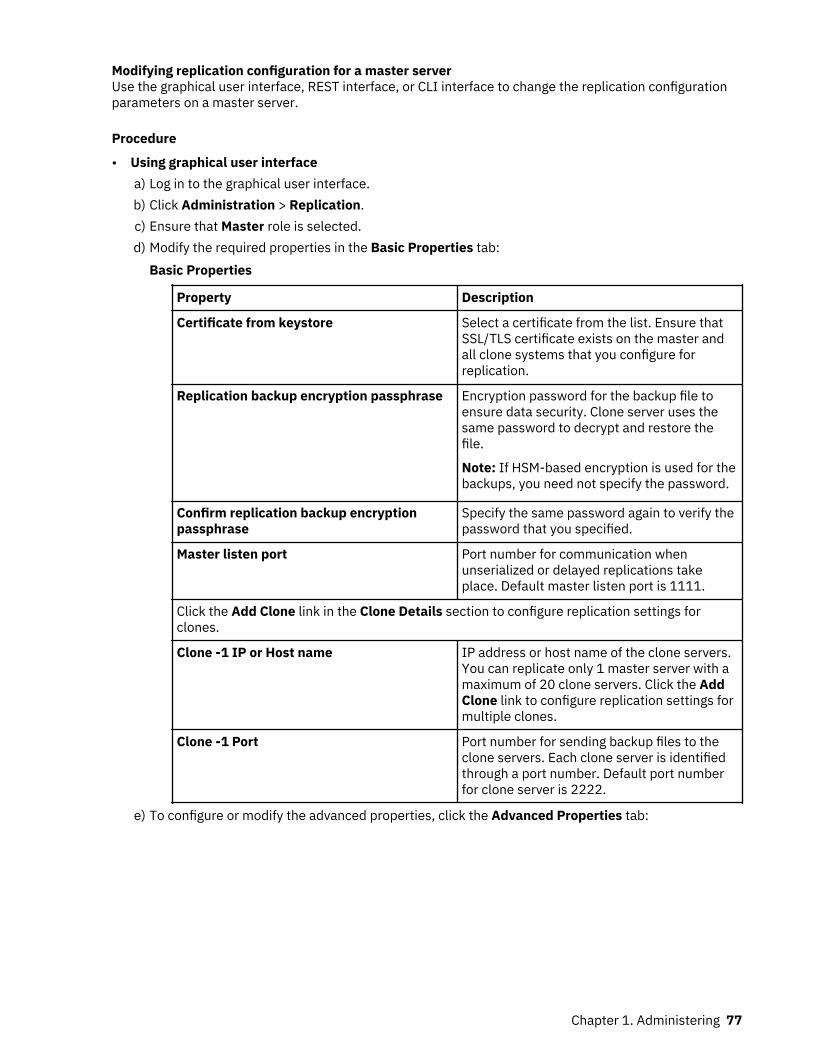
Modifying replication configuration for a master serverUse the graphical user interface, REST interface, or CLI interface to change the replication configurationparameters on a master server.
Procedure
• Using graphical user interfacea) Log in to the graphical user interface.b) Click Administration > Replication.c) Ensure that Master role is selected.d) Modify the required properties in the Basic Properties tab:
Basic Properties
Property Description
Certificate from keystore Select a certificate from the list. Ensure thatSSL/TLS certificate exists on the master andall clone systems that you configure forreplication.
Replication backup encryption passphrase Encryption password for the backup file toensure data security. Clone server uses thesame password to decrypt and restore thefile.
Note: If HSM-based encryption is used for thebackups, you need not specify the password.
Confirm replication backup encryptionpassphrase
Specify the same password again to verify thepassword that you specified.
Master listen port Port number for communication whenunserialized or delayed replications takeplace. Default master listen port is 1111.
Click the Add Clone link in the Clone Details section to configure replication settings forclones.
Clone -1 IP or Host name IP address or host name of the clone servers.You can replicate only 1 master server with amaximum of 20 clone servers. Click the AddClone link to configure replication settings formultiple clones.
Clone -1 Port Port number for sending backup files to theclone servers. Each clone server is identifiedthrough a port number. Default port numberfor clone server is 2222.
e) To configure or modify the advanced properties, click the Advanced Properties tab:
Chapter 1. Administering 77
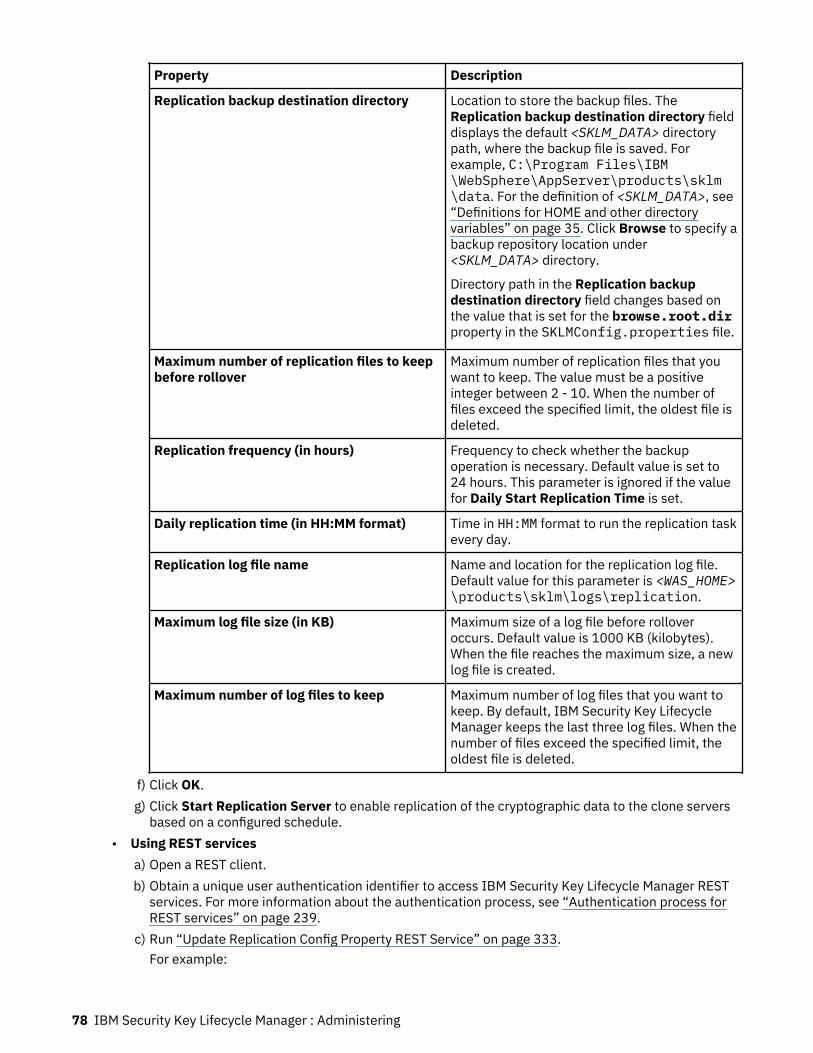
Property Description
Replication backup destination directory Location to store the backup files. TheReplication backup destination directory fielddisplays the default <SKLM_DATA> directorypath, where the backup file is saved. Forexample, C:\Program Files\IBM\WebSphere\AppServer\products\sklm\data. For the definition of <SKLM_DATA>, see“Definitions for HOME and other directoryvariables” on page 35. Click Browse to specify abackup repository location under<SKLM_DATA> directory.
Directory path in the Replication backupdestination directory field changes based onthe value that is set for the browse.root.dirproperty in the SKLMConfig.properties file.
Maximum number of replication files to keepbefore rollover
Maximum number of replication files that youwant to keep. The value must be a positiveinteger between 2 - 10. When the number offiles exceed the specified limit, the oldest file isdeleted.
Replication frequency (in hours) Frequency to check whether the backupoperation is necessary. Default value is set to24 hours. This parameter is ignored if the valuefor Daily Start Replication Time is set.
Daily replication time (in HH:MM format) Time in HH:MM format to run the replication taskevery day.
Replication log file name Name and location for the replication log file.Default value for this parameter is <WAS_HOME>\products\sklm\logs\replication.
Maximum log file size (in KB) Maximum size of a log file before rolloveroccurs. Default value is 1000 KB (kilobytes).When the file reaches the maximum size, a newlog file is created.
Maximum number of log files to keep Maximum number of log files that you want tokeep. By default, IBM Security Key LifecycleManager keeps the last three log files. When thenumber of files exceed the specified limit, theoldest file is deleted.
f) Click OK.g) Click Start Replication Server to enable replication of the cryptographic data to the clone servers
based on a configured schedule.• Using REST services
a) Open a REST client.b) Obtain a unique user authentication identifier to access IBM Security Key Lifecycle Manager REST
services. For more information about the authentication process, see “Authentication process forREST services” on page 239.
c) Run “Update Replication Config Property REST Service” on page 333.For example:
78 IBM Security Key Lifecycle Manager : Administering
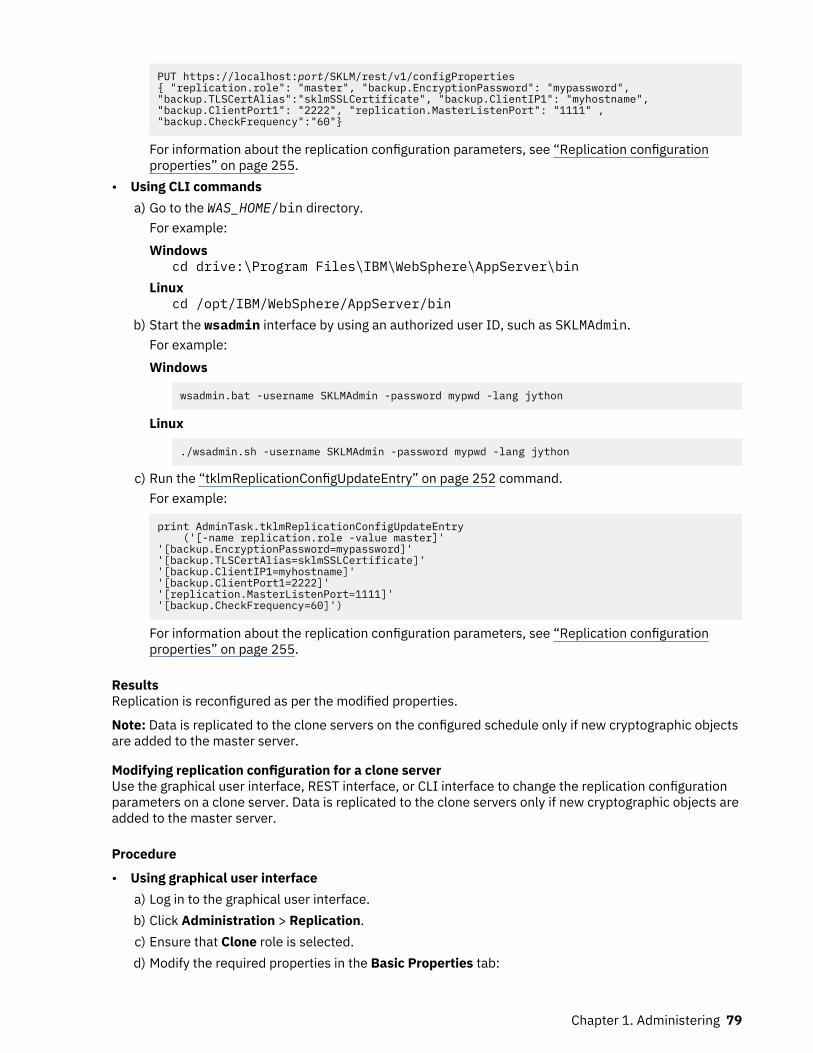
PUT https://localhost:port/SKLM/rest/v1/configProperties{ "replication.role": "master", "backup.EncryptionPassword": "mypassword","backup.TLSCertAlias":"sklmSSLCertificate", "backup.ClientIP1": "myhostname","backup.ClientPort1": "2222", "replication.MasterListenPort": "1111" , "backup.CheckFrequency":"60"}
For information about the replication configuration parameters, see “Replication configurationproperties” on page 255.
• Using CLI commandsa) Go to the WAS_HOME/bin directory.
For example:Windows
cd drive:\Program Files\IBM\WebSphere\AppServer\binLinux
cd /opt/IBM/WebSphere/AppServer/binb) Start the wsadmin interface by using an authorized user ID, such as SKLMAdmin.
For example:Windows
wsadmin.bat -username SKLMAdmin -password mypwd -lang jython
Linux
./wsadmin.sh -username SKLMAdmin -password mypwd -lang jython
c) Run the “tklmReplicationConfigUpdateEntry” on page 252 command.For example:
print AdminTask.tklmReplicationConfigUpdateEntry ('[-name replication.role -value master]''[backup.EncryptionPassword=mypassword]''[backup.TLSCertAlias=sklmSSLCertificate]''[backup.ClientIP1=myhostname]''[backup.ClientPort1=2222]''[replication.MasterListenPort=1111]''[backup.CheckFrequency=60]')
For information about the replication configuration parameters, see “Replication configurationproperties” on page 255.
ResultsReplication is reconfigured as per the modified properties.
Note: Data is replicated to the clone servers on the configured schedule only if new cryptographic objectsare added to the master server.
Modifying replication configuration for a clone serverUse the graphical user interface, REST interface, or CLI interface to change the replication configurationparameters on a clone server. Data is replicated to the clone servers only if new cryptographic objects areadded to the master server.
Procedure
• Using graphical user interfacea) Log in to the graphical user interface.b) Click Administration > Replication.c) Ensure that Clone role is selected.d) Modify the required properties in the Basic Properties tab:
Chapter 1. Administering 79

Basic Properties
Clone listen port Port number that the clone server must listen on to receivebackup files. Default port number is 2222.
Master listen port Port number for communication when unserialized or delayedreplications take place. Default master listen port is 1111.
e) To configure or modify the advanced properties, click the Advanced Properties tab:Advanced Properties
Number of retries incase ofrestore failure
Maximum number of retries that are allowed after the firstrestore operation is failed. The value must be a positive integerbetween 0 - 2.
Replication log file name Name and location for the replication log file. Default value forthis parameter is <WAS_HOME>\products\sklm\logs\replication.
Maximum log file size (inKB)
Maximum size of a log file before rollover occurs. Default valueis 1000 KB (kilobytes). When the file reaches the maximumsize, a new log file is created.
Maximum number of logfiles to keep
Maximum number of log files that you want to keep. By default,IBM Security Key Lifecycle Manager keeps the last 3 log files.When the number of files exceed the specified limit, the oldestfile is deleted.
f) Click OK.g) Click Start Replication Server to enable replication of the cryptographic data to the clone servers
based on a configured schedule.• Using REST interface
a) Open a REST client.b) Obtain a unique user authentication identifier to access IBM Security Key Lifecycle Manager REST
services. For more information about the authentication process, see “Authentication process forREST services” on page 239.
c) Run “Update Replication Config Property REST Service” on page 333.For example:
PUT https://localhost:port/SKLM/rest/v1/replicationConfigProperties{ "replication.role": "clone", "backup.TLSCertAlias":"sklmSSLCertificate", "restore.ListenPort": "2222", "replication.MasterListenPort": "1111" }
For information about the replication configuration parameters, see “Replication configurationproperties” on page 255.
• Using CLI commandsa) Go to the WAS_HOME/bin directory.
For example:Windows
cd drive:\Program Files\IBM\WebSphere\AppServer\binLinux
cd /opt/IBM/WebSphere/AppServer/binb) Start the wsadmin interface by using an authorized user ID, such as SKLMAdmin.
For example:
80 IBM Security Key Lifecycle Manager : Administering

Windows
wsadmin.bat -username SKLMAdmin -password mypwd -lang jython
Linux
./wsadmin.sh -username SKLMAdmin -password mypwd -lang jython
c) Run the “tklmReplicationConfigUpdateEntry” on page 252 command.For example:
print AdminTask.tklmReplicationConfigUpdateEntry ('[-name replication.role -value clone]''[backup.EncryptionPassword=mypassword]''[backup.TLSCertAlias=sklmSSLCertificate]''[backup.ClientIP1=myhostname]''[backup.ClientPort1=2222]''[replication.MasterListenPort=1111]')
For information about the replication configuration parameters, see “Replication configurationproperties” on page 255.
What to do next
You might want to change the settings for other clone servers. Complete this procedure on each cloneserver.
Replicating large amount of dataYou can configure IBM Security Key Lifecycle Manager to replicate large amount of data.
Before you beginEnsure that the master and clone servers are identical. The operating system, directory structures, andDb2 admin user must be the same on the master and clone servers.
Procedure
1. Using REST servicesa) Open a REST client.b) Obtain a unique user authentication identifier to access IBM Security Key Lifecycle Manager REST
services. For more information about the authentication process, see “Authentication process forREST services” on page 239.
c) Run “Update Config Property REST Service” on page 288 to update the enableHighScaleBackupproperty.
PUT https://localhost:port/SKLM/rest/v1/configProperties{ "enableHighScaleBackup": "true"}
2. Using CLI commandsa) Go to the WAS_HOME/bin directory.
For example:Windows
cd drive:\Program Files\IBM\WebSphere\AppServer\binLinux
cd /opt/IBM/WebSphere/AppServer/binb) Start the wsadmin interface by using an authorized user ID, such as SKLMAdmin.
For example:
Chapter 1. Administering 81

Windows
wsadmin.bat -username SKLMAdmin -password mypwd -lang jython
Linux
./wsadmin.sh -username SKLMAdmin -password mypwd -lang jython
c) Run the “tklmConfigUpdateEntry” on page 291 command to update theenableHighScaleBackup property.
print AdminTask.tklmConfigGetEntry ('[-name enableHighScaleBackup -value true]')
Viewing status of full replicationThe Replication section on the Welcome page of the IBM Security Key Lifecycle Manager graphical userinterface on the master server provides a quick status update on the full replication process. In case of afailure, you can review the error message and take a corrective action.
Procedure
1. Log in to the graphical user interface on the master server.2. Review the details that are provided in the Replication section on the Welcome page.
User interface field Description
Status Displays Up or Down to indicate whether theconfigured replication process is running or not.
Role Displays the role of the server: Master or Clone
Last run Displays the date and time of the last run of thereplication process.
Next scheduled run Displays the date and time of the next plannedreplication run.
Replication status table Displays the following details per clone server:
• Host name or IP address of the clone server.• Time of the last successful replication on the
clone.• Status of the last run of the replication process.• Error details of the replication process that was
last run. If the last run of the replicationprocess was successful, then this field is blank.
Replication configuration filesYou can run IBM Security Key Lifecycle Manager replication as a standalone task. A valid replicationconfiguration file must be available to start the automated replication process when the new keys areadded.
IBM Security Key Lifecycle Manager uses properties in the <SKLM_HOME>\config\ReplicationSKLMConfig.properties configuration file to control the replication process. Forexample,Windows
C:\Program Files\IBM\WebSphere\AppServer\products\sklm\config\ReplicationSKLMConfig.properties
82 IBM Security Key Lifecycle Manager : Administering
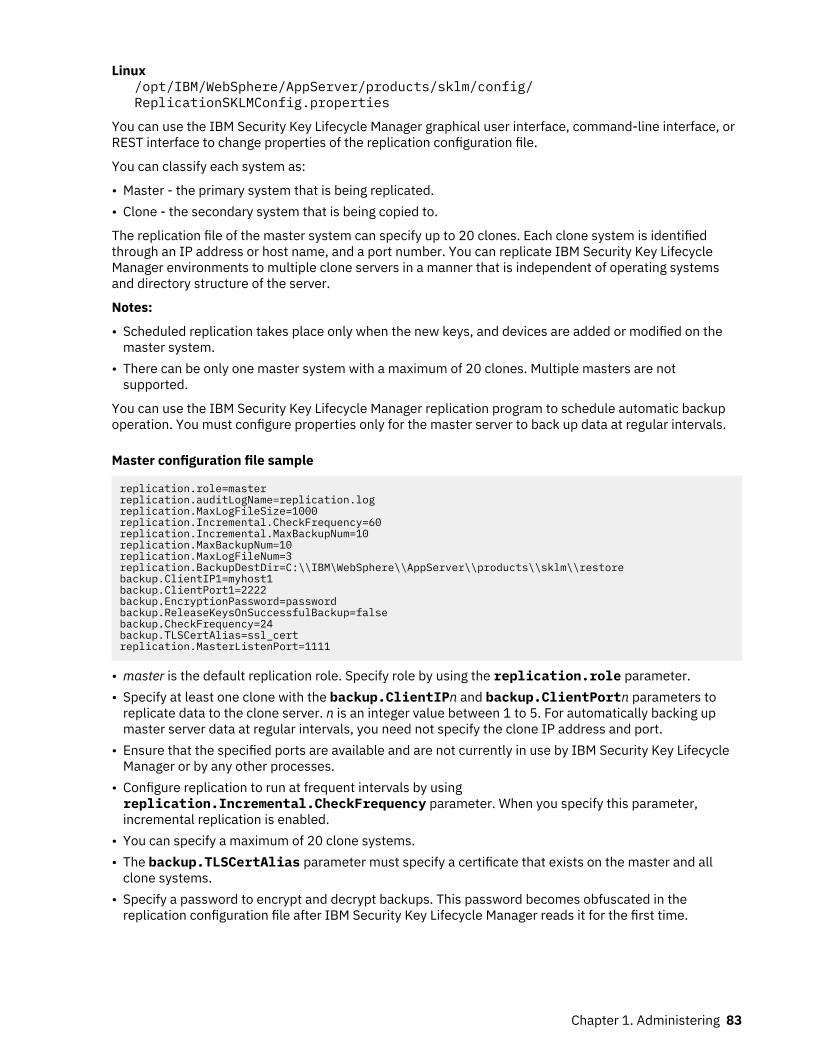
Linux/opt/IBM/WebSphere/AppServer/products/sklm/config/ReplicationSKLMConfig.properties
You can use the IBM Security Key Lifecycle Manager graphical user interface, command-line interface, orREST interface to change properties of the replication configuration file.
You can classify each system as:
• Master - the primary system that is being replicated.• Clone - the secondary system that is being copied to.
The replication file of the master system can specify up to 20 clones. Each clone system is identifiedthrough an IP address or host name, and a port number. You can replicate IBM Security Key LifecycleManager environments to multiple clone servers in a manner that is independent of operating systemsand directory structure of the server.
Notes:
• Scheduled replication takes place only when the new keys, and devices are added or modified on themaster system.
• There can be only one master system with a maximum of 20 clones. Multiple masters are notsupported.
You can use the IBM Security Key Lifecycle Manager replication program to schedule automatic backupoperation. You must configure properties only for the master server to back up data at regular intervals.
Master configuration file sample
replication.role=masterreplication.auditLogName=replication.logreplication.MaxLogFileSize=1000replication.Incremental.CheckFrequency=60replication.Incremental.MaxBackupNum=10replication.MaxBackupNum=10replication.MaxLogFileNum=3replication.BackupDestDir=C:\\IBM\WebSphere\\AppServer\\products\\sklm\\restorebackup.ClientIP1=myhost1backup.ClientPort1=2222backup.EncryptionPassword=passwordbackup.ReleaseKeysOnSuccessfulBackup=falsebackup.CheckFrequency=24backup.TLSCertAlias=ssl_certreplication.MasterListenPort=1111
• master is the default replication role. Specify role by using the replication.role parameter.• Specify at least one clone with the backup.ClientIPn and backup.ClientPortn parameters to
replicate data to the clone server. n is an integer value between 1 to 5. For automatically backing upmaster server data at regular intervals, you need not specify the clone IP address and port.
• Ensure that the specified ports are available and are not currently in use by IBM Security Key LifecycleManager or by any other processes.
• Configure replication to run at frequent intervals by usingreplication.Incremental.CheckFrequency parameter. When you specify this parameter,incremental replication is enabled.
• You can specify a maximum of 20 clone systems.• The backup.TLSCertAlias parameter must specify a certificate that exists on the master and all
clone systems.• Specify a password to encrypt and decrypt backups. This password becomes obfuscated in the
replication configuration file after IBM Security Key Lifecycle Manager reads it for the first time.
Chapter 1. Administering 83
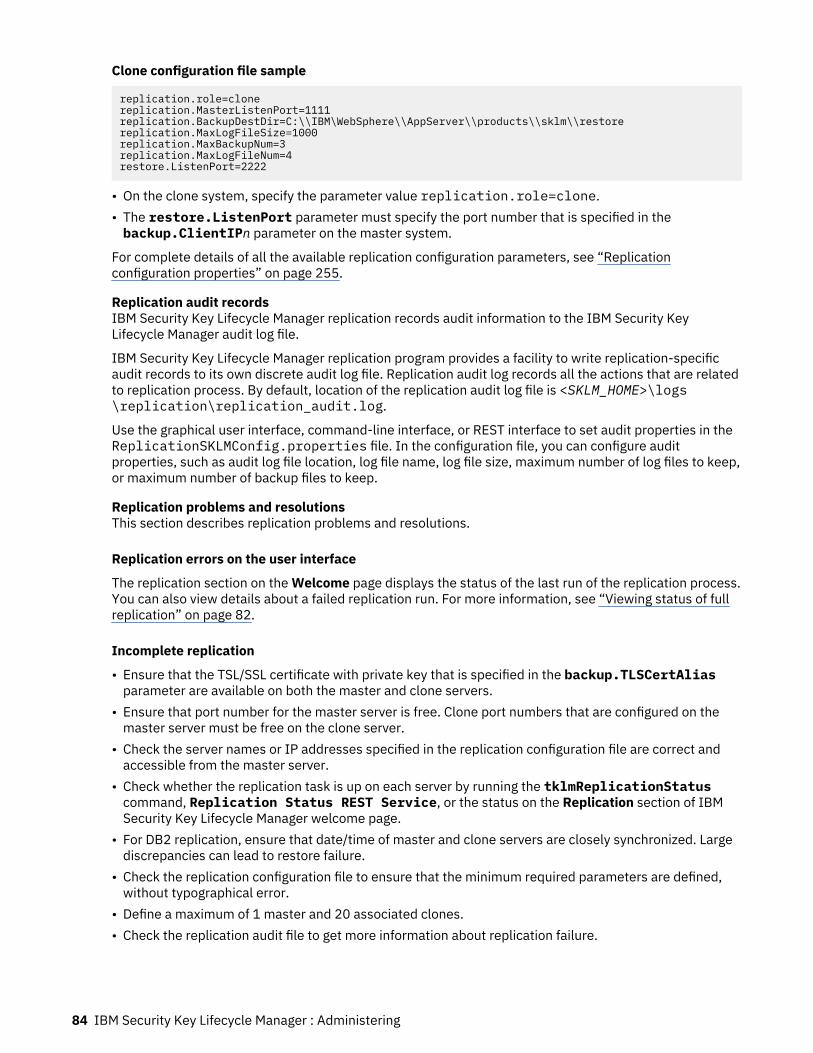
Clone configuration file sample
replication.role=clonereplication.MasterListenPort=1111replication.BackupDestDir=C:\\IBM\WebSphere\\AppServer\\products\\sklm\\restorereplication.MaxLogFileSize=1000replication.MaxBackupNum=3replication.MaxLogFileNum=4restore.ListenPort=2222
• On the clone system, specify the parameter value replication.role=clone.• The restore.ListenPort parameter must specify the port number that is specified in thebackup.ClientIPn parameter on the master system.
For complete details of all the available replication configuration parameters, see “Replicationconfiguration properties” on page 255.
Replication audit recordsIBM Security Key Lifecycle Manager replication records audit information to the IBM Security KeyLifecycle Manager audit log file.
IBM Security Key Lifecycle Manager replication program provides a facility to write replication-specificaudit records to its own discrete audit log file. Replication audit log records all the actions that are relatedto replication process. By default, location of the replication audit log file is <SKLM_HOME>\logs\replication\replication_audit.log.
Use the graphical user interface, command-line interface, or REST interface to set audit properties in theReplicationSKLMConfig.properties file. In the configuration file, you can configure auditproperties, such as audit log file location, log file name, log file size, maximum number of log files to keep,or maximum number of backup files to keep.
Replication problems and resolutionsThis section describes replication problems and resolutions.
Replication errors on the user interface
The replication section on the Welcome page displays the status of the last run of the replication process.You can also view details about a failed replication run. For more information, see “Viewing status of fullreplication” on page 82.
Incomplete replication
• Ensure that the TSL/SSL certificate with private key that is specified in the backup.TLSCertAliasparameter are available on both the master and clone servers.
• Ensure that port number for the master server is free. Clone port numbers that are configured on themaster server must be free on the clone server.
• Check the server names or IP addresses specified in the replication configuration file are correct andaccessible from the master server.
• Check whether the replication task is up on each server by running the tklmReplicationStatuscommand, Replication Status REST Service, or the status on the Replication section of IBMSecurity Key Lifecycle Manager welcome page.
• For DB2 replication, ensure that date/time of master and clone servers are closely synchronized. Largediscrepancies can lead to restore failure.
• Check the replication configuration file to ensure that the minimum required parameters are defined,without typographical error.
• Define a maximum of 1 master and 20 associated clones.• Check the replication audit file to get more information about replication failure.
84 IBM Security Key Lifecycle Manager : Administering
Replication is not taking place at scheduled time
• Scheduled replications take place only when new keys, and devices are added or modified on themaster server.
• When both specific replication time and a check interval are set in the master replication configurationfile, the time overrides the check interval.
Clone system replication
• The clone IBM Security Key Lifecycle Manager server restarts after replication.• Maintain the availability of your clone servers. You can specify a specific time-of-day to complete the
replication with the restore.DailyStartReplicationRestoreTime parameter. For example, torun restores only at 11 PM, regardless of when the backup file is received, code the following propertyin the configuration file:
restore.DailyStartReplicationRestoreTime=23:00
Configuring a Multi-Master clusterYou can implement high availability of real-time data by configuring IBM Security Key Lifecycle Managerservers in a Multi-Master cluster.
Overview
All IBM Security Key Lifecycle Manager servers in the Multi-Master cluster are called master servers. Eachserver points to a single data source (primary database). The server that hosts the primary database iscalled the primary master server. The other master servers are called as standby master servers, and thedatabases on these servers are the standby databases.
You can configure a Multi-Master cluster by using the graphical user interface (GUI) or REST APIs. Formore information, see “Setting up a Multi-Master cluster” on page 88.
Db2 high availability disaster recovery (HADR) is used as the underlying feature that ensures dataredundancy. HADR configuration is managed internally by IBM Security Key Lifecycle Manager. Db2 HADRsupports multiple standby databases in a Multi-Master setup.
Key features of a Multi-Master configuration
• Keys that are created on a master server are accessible to other master servers in the cluster.• IPP devices and KMIP clients that are registered on a master server can access keys on another master
server in the cluster.
Related information
Multi-Master deployment architectureIBM Security Key Lifecycle Manager Multi-Master architecture is based on the High Availability DisasterRecovery (HADR) feature of Db2 to implement high-availability solution.
Each master server of a Multi-Master cluster is installed with its Db2 instance that contains all themetadata, key data of managed cryptographic objects, and audit data. A cluster includes multiple masterservers, and all master servers have the same privileges.
Each master server connects to a database known as the primary database. The server that hosts theprimary database is called the primary master server. The primary database connects to the database ofanother master server, and is known as standby database. With Db2 HADR configuration, data istransmitted continuously between the two databases and synchronized. When the primary database fails,a standby database automatically takes over as the new primary and ensures availability of latest data toall masters in the cluster.
For a Multi-Master cluster configuration, you need minimum two servers:
Chapter 1. Administering 85
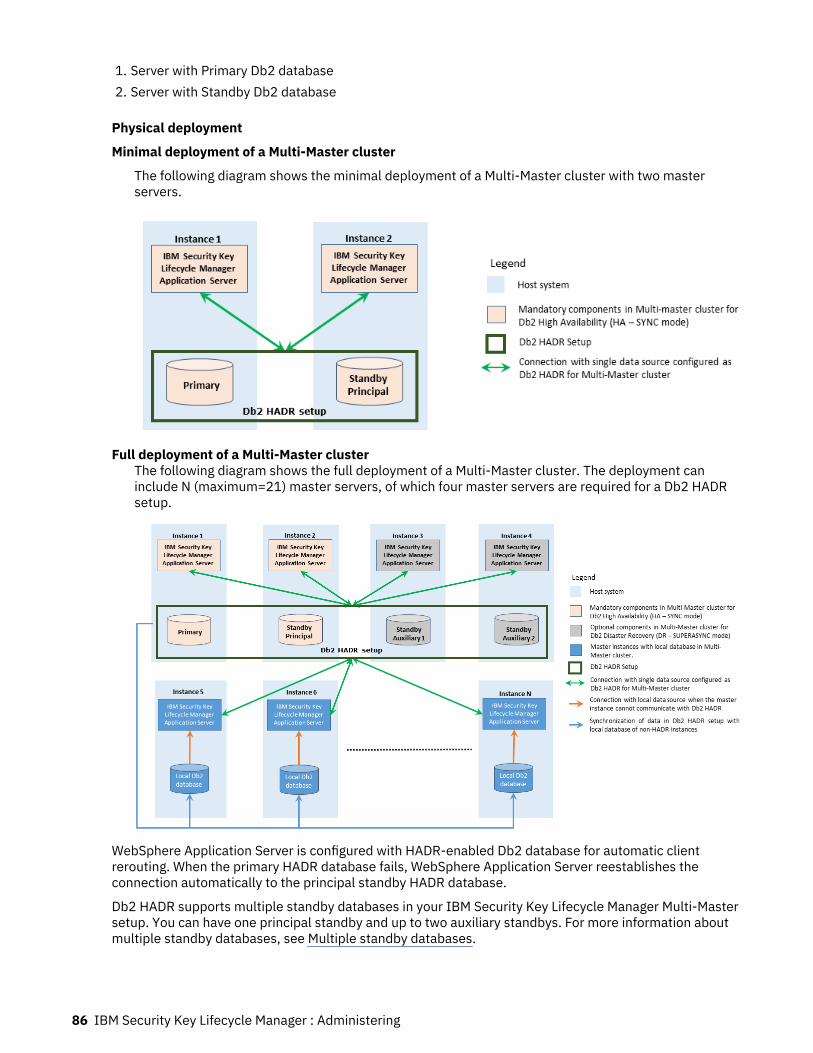
1. Server with Primary Db2 database2. Server with Standby Db2 database
Physical deployment
Minimal deployment of a Multi-Master cluster
The following diagram shows the minimal deployment of a Multi-Master cluster with two masterservers.
Full deployment of a Multi-Master clusterThe following diagram shows the full deployment of a Multi-Master cluster. The deployment caninclude N (maximum=21) master servers, of which four master servers are required for a Db2 HADRsetup.
WebSphere Application Server is configured with HADR-enabled Db2 database for automatic clientrerouting. When the primary HADR database fails, WebSphere Application Server reestablishes theconnection automatically to the principal standby HADR database.
Db2 HADR supports multiple standby databases in your IBM Security Key Lifecycle Manager Multi-Mastersetup. You can have one principal standby and up to two auxiliary standbys. For more information aboutmultiple standby databases, see Multiple standby databases.
86 IBM Security Key Lifecycle Manager : Administering

Deployment prerequisites
• Both primary and standby Db2 database servers must be installed on the same version of operatingsystem.
• The Db2 version that is installed on the IBM Security Key Lifecycle Manager primary and standbymaster servers must match.
• Must use a dedicated network for the Db2 HADR primary and standby connections.
Multiple standby databasesDB2 high availability disaster recovery (HADR) configuration is used to provide continuous dataavailability to all the IBM Security Key Lifecycle Manager instances in a Multi-Master cluster. HADRprotects against data loss by transmitting data changes from a source database, called primary, to atarget database, called the standby.
DB2 HADR supports three standby databases in your Multi-Master setup, one standby for high-availabilityand other two standbys for disaster recovery. When the primary database is down, the HADR takeoverservice instructs the standby database to take over as a new HADR primary database. For moreinformation about HADR takeover service, see HADR takeover service.
Priorities are assigned to each of the standby database in the cluster. Standby with the higher priority isthe one that assumes the primary database role. For example, if a primary database in the IBM SecurityKey Lifecycle Manager Multi-Master cluster fails, the standby database with a priority index 1 takes overthe role of the primary database.
For more information, see “Auto takeover scenarios” on page 87.
Related tasks“Adding a master server to a cluster” on page 91In IBM Security Key Lifecycle Manager, high-availability solution is implemented by using Multi-Mastercluster configuration. Adding a master server to a cluster is part of setting up a Multi-Master environment.“Adding a standby master server to a cluster” on page 92In IBM Security Key Lifecycle Manager, high-availability solution is implemented by using Multi-Mastercluster configuration. IBM Security Key Lifecycle Manager Multi-Master cluster must contain a primarymaster server and a standby master server. Add a standby master server to the cluster for setting up aMulti-Master environment.
Auto takeover scenariosUse this topic to understand the auto takeover scenarios.
The following table provides information about scenarios that are based on the status of the Agent andDb2 database of the primary and standby master servers, and whether auto takeover occurs or not.
PrimaryAgent
Primarydatabase
StandbyAgent
Standbydatabase
Autotakeover
Manualtakeover
Notes
Up Down Up Up Yes. Principalstandbymasterserver takesover and actsas primary.
Notapplicable
Restartprimarydatabase.
Down orUnreachable
Down orUnreachable
Up Up Yes Notapplicable
See Splitclusterscenario
Chapter 1. Administering 87
PrimaryAgent
Primarydatabase
StandbyAgent
Standbydatabase
Autotakeover
Manualtakeover
Notes
Down Down Up or Down Down No Yes.Takeovermanually onthe auxiliarystandbymasterserver, if itexists.
Requiresmanualinterventionbecause bothdatabasesare down.
Split cluster scenarioIssue
Primary master server is unreachable from the principal standby master server.Possible causes
• Operating system of the primary master server is down.• Issue with network connectivity between the principal standby and primary master servers.
Auto takeover operationThe principal standby master server tries to connect with the primary master server based on theMulti-Master configuration properties.When the connection attempts fail, the cluster splits into two clusters. The principal standby masterserver takes over as the primary master server of the second cluster. The original primary masterserver continues the role in the first cluster. For more information, see the Split cluster scenariosections in the technote: https://www.ibm.com/support/pages/node/1072470All master servers continue to operate in dual-cluster mode with the following restrictions:
• Db2 HADR is disabled on all the master servers.• You cannot add, modify, or delete a master server that is part of the Db2 HADR configuration (HADR
master server).• You cannot add or modify a non-HADR master server. However, you can delete it.• You can create and delete cryptographic objects. However, you cannot modify them.• You cannot modify an IBM Security Key Lifecycle Manager server certificate.• You cannot refresh IBM Security Key Lifecycle Manager master keys, and you cannot move a master
key from the Java keystore to Hardware Security Module (HSM) and vice versa.
User notificationNotification events are generated before and after the cluster is split.A Merge clusters link is displayed on the Welcome page of the user interface on the principal standbymaster server, which has the role of Primary of the second cluster.
Recovery stepsResolve the “Issue” on page 88. Then, click the Merge clusters link to merge the clusters, sync thedata, and restore the original cluster configuration.
Setting up a Multi-Master clusterYou can use the IBM Security Key Lifecycle Manager graphical user interface or REST services to set up aMulti-Master cluster.
Before you beginReview values of the following Multi-Master cluster configuration properties, and if required, modifythem:
• takeoverRetryTimeInterval
88 IBM Security Key Lifecycle Manager : Administering
• takeoverRetryFrequency
Procedure
1. Review the Multi-Master deployment architecture and requirements for configuring a cluster. and“Requirements and considerations for Multi-Master configuration” on page 89.
2. Configure the cluster with the first master server with Primary Db2 database (Primary master server).See “Adding a master server to a cluster” on page 91.
3. Add a master server with standby Db2 database (Principal standby master server) to the cluster. See“Adding a standby master server to a cluster” on page 92.
4. (Optional) Add one or two master servers with standby Db2 database (Auxiliary standby masterservers) to the cluster. See “Adding a master server to a cluster” on page 91.
5. (Optional) Add non-HADR master servers to the cluster. See “Adding a master server to a cluster” onpage 91.
6. Review the Multi-Master cluster configuration and ensure that the cluster is working correctly. See“Viewing the configuration status of all master servers” on page 95.
What to do nextCreate or use an application or utility to trigger email notifications for issues in the Multi-Master cluster.
Requirements and considerations for Multi-Master configurationBefore you set up IBM Security Key Lifecycle Manager Multi-Master environment, review therequirements and considerations to ensure a successful configuration.
Operating system and database requirements
• Ensure that the master servers with primary and standby Db2 HADR database host systems have thesame operating system version and fix pack levels. The non-HADR master servers can have a differentoperating system.
• IBM Security Key Lifecycle Manager Multi-Master architecture is based on Db2 High Availability DisasterRecovery (HADR) technology to implement high-availability solution. Therefore, all the Db2 HADRconfiguration rules and guidelines are applicable for IBM Security Key Lifecycle Manager Multi-Masterconfiguration.
• Db2 user name and password must be same on all the master servers of the IBM Security Key LifecycleManager Multi-Master cluster.
Port requirements
• Ensure that the agent port (60015) and HADR port (60027) that are used for Multi-Master configurationare not blocked by the firewall.
Default agent port is 60015, which you can update through UI. Default HADR port is 60027, which isassigned during the Multi-Master setup. It is configurable.
• Ensure that the KMIP, SSL, TCP, and agent ports are not blocked for communication before you set upIBM Security Key Lifecycle Manager masters for Multi-Master configuration.
• A TCP/IP interface must be available between primary and standby Db2 HADR database host systemswith a dedicated, high speed, and high capacity network bandwidth.
Other requirements and considerations
• If you want to add an existing IBM Security Key Lifecycle Manager server to the cluster, use the devicegroup export and import feature. For more information, see “Adding an existing IBM Security KeyLifecycle Manager instance with data to the Multi-Master cluster” on page 112.
• The IBM Security Key Lifecycle Manager server that you want to add to a Multi-Master cluster must notcontain any data. Adding of server with data results in loss of data that was previously created.
Chapter 1. Administering 89

• For IBM Security Key Lifecycle Manager Multi-Master deployment, the cluster must contain a minimumof one primary master server and one standby master server. When you set up a Multi-Master cluster,the server from which you add a master server or standby master server to the cluster becomes theprimary master server. You must add at least one standby master server to the cluster before you addother master servers.
• Server certificate must be created in the IBM Security Key Lifecycle Manager server before you add it tothe cluster as the primary master.
• IBM Security Key Lifecycle Manager Multi-Master cluster supports up to three standby master servers.When you add a standby master server to the cluster, the priority index value must be in the range of1-3.
• After the Multi-Master cluster is configured, you must avoid running manual backup and restoreoperations on any of the master servers in the cluster.
• Run the IBM Security Key Lifecycle Manager Multi-Master configuration operations only from theprimary master server of the cluster to avoid any problems.
• Before you add a server that runs the Linux operating system, to a cluster, the permissions for the /tmpdirectory must be set to 777 that is full execute, read, and write permissions.
• If you want to configure the Multi-Master cluster to use HSM to store the master key, you mustconfigure all the master servers in the cluster to use the same HSM.
• Before you add a master server to the cluster through the migrated system, modify the IBM SecurityKey Lifecycle Manager administrator user name and the password in the following situations:
1. When users and groups are migrated from previous version to version 4.0 through cross-migrationprocess.
2. IBM Security Key Lifecycle Manager administrator user name and the password are different thanthat of the credentials specified during version 4.0 installation.
• You cannot remove a standby master server from the Multi-Master cluster if a standby server is down.• Ensure that the master servers are not configured to back up large amount of data. So in theSKLMConfig.properties configuration file on every master server, ensure that theenableHighScaleBackup property does not exist or is set to false.
• If you plan to integrate LDAP with the Multi-Master setup for user authentication, you must configureLDAP on all master servers before configuring the Multi-Master cluster. Ensure that all the masterservers use the same LDAP, and have the same users as IBM Security Key Lifecycle ManagerAdministrator.
Best practice: If you plan to use IBM Security Key Lifecycle Manager REST services to connect to theIBM Security Key Lifecycle Manager server for key management operations, integrate with LDAP foruser authentication and management.
• The MMConfig.properties file contains the Multi-Master configuration properties.
Note: Do not update the configuration file manually.
IP address to host name mappingYou must ensure that your computer host name is configured correctly before you set up IBM SecurityKey Lifecycle Manager masters for Multi-Master configuration. You can resolve an IP address to a hostname by editing the etc/hosts file.
For DB2 HADR configuration, you must update the etc/hosts file in the primary and standby masterservers of the cluster to enable host name to IP address mapping.
Location of the host file
WindowsC:\Windows\System32\Drivers\etc\
Linux/etc/hosts
90 IBM Security Key Lifecycle Manager : Administering
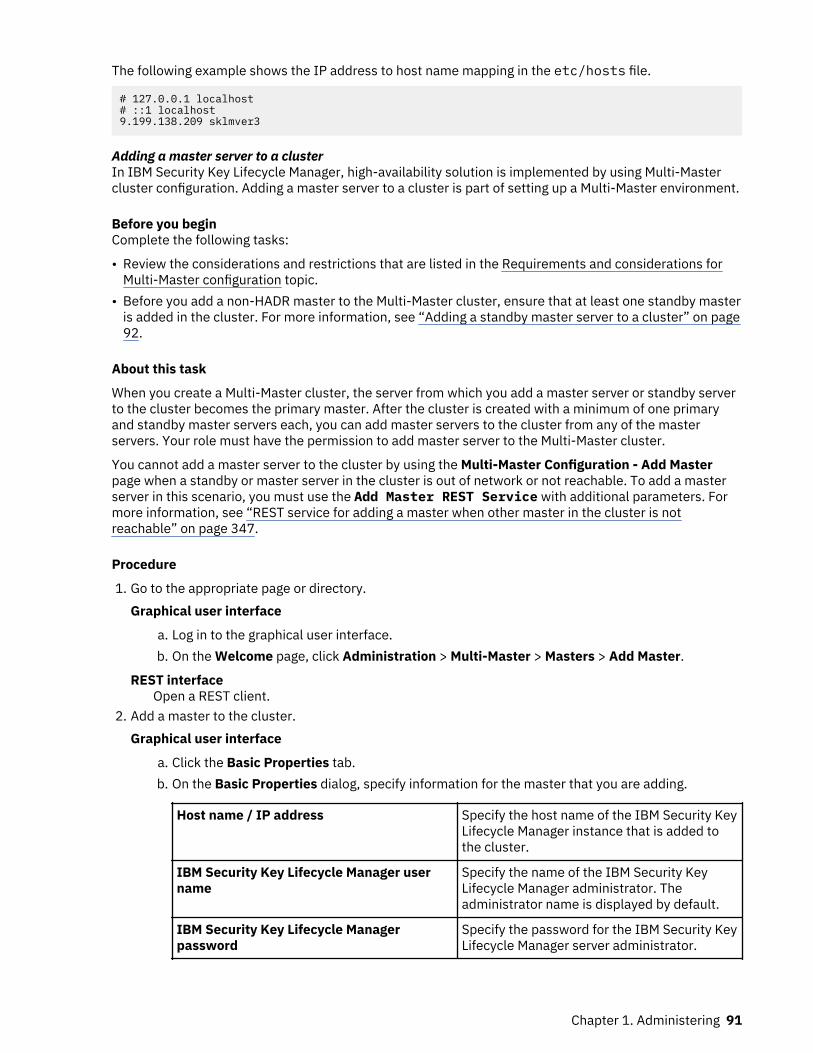
The following example shows the IP address to host name mapping in the etc/hosts file.
# 127.0.0.1 localhost# ::1 localhost9.199.138.209 sklmver3
Adding a master server to a clusterIn IBM Security Key Lifecycle Manager, high-availability solution is implemented by using Multi-Mastercluster configuration. Adding a master server to a cluster is part of setting up a Multi-Master environment.
Before you beginComplete the following tasks:
• Review the considerations and restrictions that are listed in the Requirements and considerations forMulti-Master configuration topic.
• Before you add a non-HADR master to the Multi-Master cluster, ensure that at least one standby masteris added in the cluster. For more information, see “Adding a standby master server to a cluster” on page92.
About this task
When you create a Multi-Master cluster, the server from which you add a master server or standby serverto the cluster becomes the primary master. After the cluster is created with a minimum of one primaryand standby master servers each, you can add master servers to the cluster from any of the masterservers. Your role must have the permission to add master server to the Multi-Master cluster.
You cannot add a master server to the cluster by using the Multi-Master Configuration - Add Masterpage when a standby or master server in the cluster is out of network or not reachable. To add a masterserver in this scenario, you must use the Add Master REST Service with additional parameters. Formore information, see “REST service for adding a master when other master in the cluster is notreachable” on page 347.
Procedure
1. Go to the appropriate page or directory.Graphical user interface
a. Log in to the graphical user interface.b. On the Welcome page, click Administration > Multi-Master > Masters > Add Master.
REST interfaceOpen a REST client.
2. Add a master to the cluster.Graphical user interface
a. Click the Basic Properties tab.b. On the Basic Properties dialog, specify information for the master that you are adding.
Host name / IP address Specify the host name of the IBM Security KeyLifecycle Manager instance that is added tothe cluster.
IBM Security Key Lifecycle Manager username
Specify the name of the IBM Security KeyLifecycle Manager administrator. Theadministrator name is displayed by default.
IBM Security Key Lifecycle Managerpassword
Specify the password for the IBM Security KeyLifecycle Manager server administrator.
Chapter 1. Administering 91
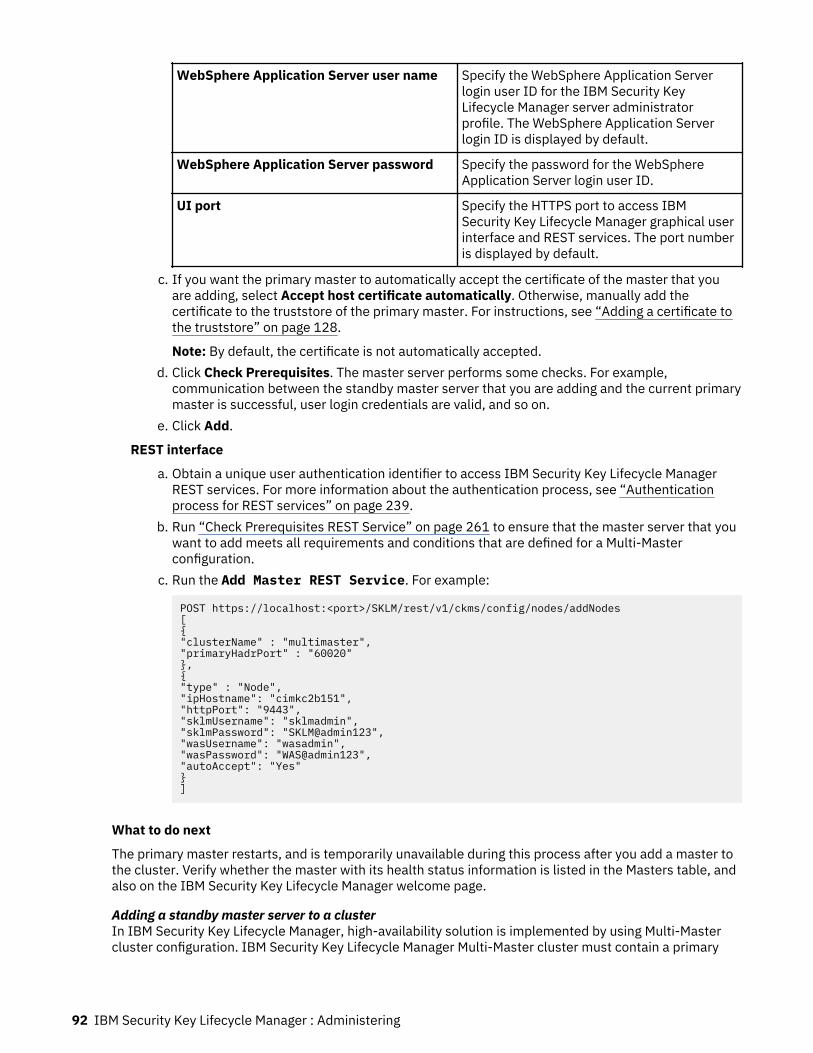
WebSphere Application Server user name Specify the WebSphere Application Serverlogin user ID for the IBM Security KeyLifecycle Manager server administratorprofile. The WebSphere Application Serverlogin ID is displayed by default.
WebSphere Application Server password Specify the password for the WebSphereApplication Server login user ID.
UI port Specify the HTTPS port to access IBMSecurity Key Lifecycle Manager graphical userinterface and REST services. The port numberis displayed by default.
c. If you want the primary master to automatically accept the certificate of the master that youare adding, select Accept host certificate automatically. Otherwise, manually add thecertificate to the truststore of the primary master. For instructions, see “Adding a certificate tothe truststore” on page 128.
Note: By default, the certificate is not automatically accepted.d. Click Check Prerequisites. The master server performs some checks. For example,
communication between the standby master server that you are adding and the current primarymaster is successful, user login credentials are valid, and so on.
e. Click Add.
REST interface
a. Obtain a unique user authentication identifier to access IBM Security Key Lifecycle ManagerREST services. For more information about the authentication process, see “Authenticationprocess for REST services” on page 239.
b. Run “Check Prerequisites REST Service” on page 261 to ensure that the master server that youwant to add meets all requirements and conditions that are defined for a Multi-Masterconfiguration.
c. Run the Add Master REST Service. For example:
POST https://localhost:<port>/SKLM/rest/v1/ckms/config/nodes/addNodes[{"clusterName" : "multimaster","primaryHadrPort" : "60020"},{"type" : "Node","ipHostname": "cimkc2b151","httpPort": "9443","sklmUsername": "sklmadmin","sklmPassword": "SKLM@admin123","wasUsername": "wasadmin","wasPassword": "WAS@admin123","autoAccept": "Yes"}]
What to do next
The primary master restarts, and is temporarily unavailable during this process after you add a master tothe cluster. Verify whether the master with its health status information is listed in the Masters table, andalso on the IBM Security Key Lifecycle Manager welcome page.
Adding a standby master server to a clusterIn IBM Security Key Lifecycle Manager, high-availability solution is implemented by using Multi-Mastercluster configuration. IBM Security Key Lifecycle Manager Multi-Master cluster must contain a primary
92 IBM Security Key Lifecycle Manager : Administering
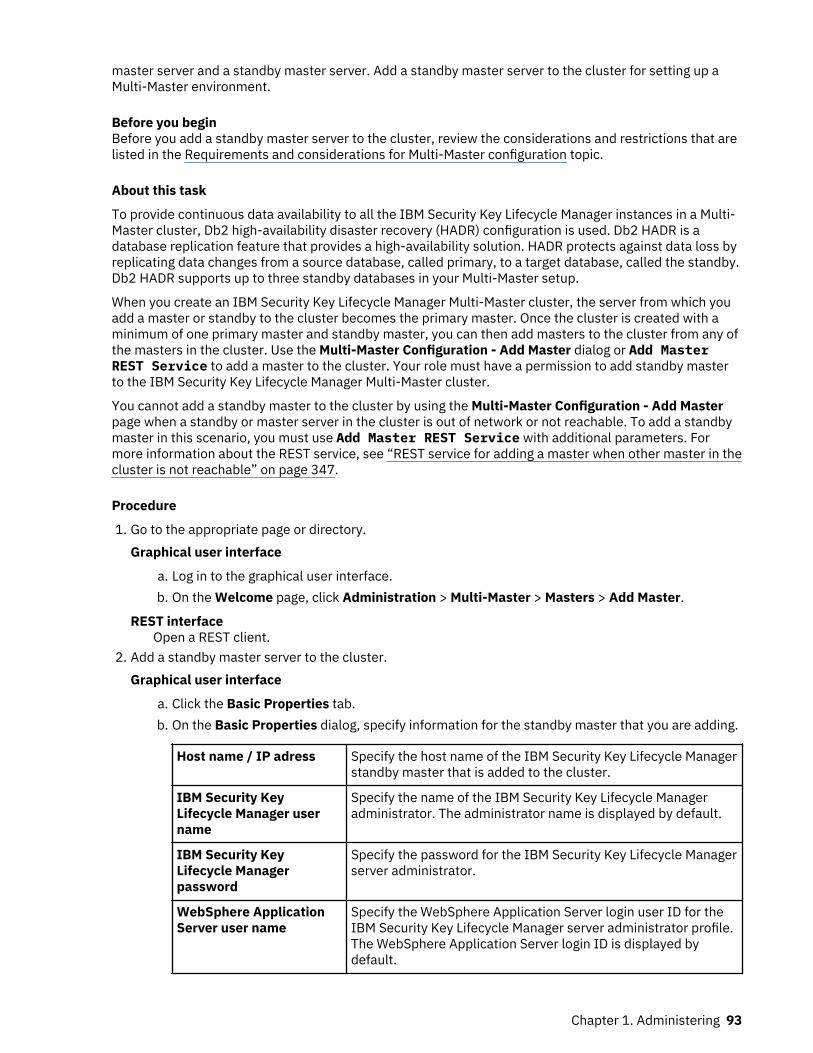
master server and a standby master server. Add a standby master server to the cluster for setting up aMulti-Master environment.
Before you beginBefore you add a standby master server to the cluster, review the considerations and restrictions that arelisted in the Requirements and considerations for Multi-Master configuration topic.
About this task
To provide continuous data availability to all the IBM Security Key Lifecycle Manager instances in a Multi-Master cluster, Db2 high-availability disaster recovery (HADR) configuration is used. Db2 HADR is adatabase replication feature that provides a high-availability solution. HADR protects against data loss byreplicating data changes from a source database, called primary, to a target database, called the standby.Db2 HADR supports up to three standby databases in your Multi-Master setup.
When you create an IBM Security Key Lifecycle Manager Multi-Master cluster, the server from which youadd a master or standby to the cluster becomes the primary master. Once the cluster is created with aminimum of one primary master and standby master, you can then add masters to the cluster from any ofthe masters in the cluster. Use the Multi-Master Configuration - Add Master dialog or Add MasterREST Service to add a master to the cluster. Your role must have a permission to add standby masterto the IBM Security Key Lifecycle Manager Multi-Master cluster.
You cannot add a standby master to the cluster by using the Multi-Master Configuration - Add Masterpage when a standby or master server in the cluster is out of network or not reachable. To add a standbymaster in this scenario, you must use Add Master REST Service with additional parameters. Formore information about the REST service, see “REST service for adding a master when other master in thecluster is not reachable” on page 347.
Procedure
1. Go to the appropriate page or directory.Graphical user interface
a. Log in to the graphical user interface.b. On the Welcome page, click Administration > Multi-Master > Masters > Add Master.
REST interfaceOpen a REST client.
2. Add a standby master server to the cluster.Graphical user interface
a. Click the Basic Properties tab.b. On the Basic Properties dialog, specify information for the standby master that you are adding.
Host name / IP adress Specify the host name of the IBM Security Key Lifecycle Managerstandby master that is added to the cluster.
IBM Security KeyLifecycle Manager username
Specify the name of the IBM Security Key Lifecycle Manageradministrator. The administrator name is displayed by default.
IBM Security KeyLifecycle Managerpassword
Specify the password for the IBM Security Key Lifecycle Managerserver administrator.
WebSphere ApplicationServer user name
Specify the WebSphere Application Server login user ID for theIBM Security Key Lifecycle Manager server administrator profile.The WebSphere Application Server login ID is displayed bydefault.
Chapter 1. Administering 93

WebSphere ApplicationServer password
Specify the password for the WebSphere Application Serverlogin user ID.
UI port Specify the HTTPS port to access IBM Security Key LifecycleManager graphical user interface and REST services. The portnumber is displayed by default.
c. Click the Advanced Properties tab.d. On the Advanced Properties dialog, specify information for the standby master that you are
adding.
Do you want to set thismaster as standbydatabase?
Select Yes to add the current instance of IBM Security KeyLifecycle Manager as a standby master to the cluster.
HADR port Specify the port number for the standby HADR database tocommunicate with the primary HADR database.
Standby priority index Specify the priority index value for the standby database totakeover when the primary database is down. You can set thepriority index to any value in the range 1-3. The standby serverwith a higher priority index level (lower number) takesprecedence over the lower-priority databases.
e. If you want the primary master to automatically accept the certificate of the master that youare adding, select Accept host certificate automatically. Otherwise, manually add thecertificate to the truststore of the primary master. For instructions, see “Adding a certificate tothe truststore” on page 128.
Note: By default, the certificate is not automatically accepted.f. Click Check Prerequisites. The master server performs some checks. For example,
communication between the standby master server that you are adding and the current primarymaster is successful, user login credentials are valid, and so on.
g. Click Add.
REST interface
a. Obtain a unique user authentication identifier to access IBM Security Key Lifecycle ManagerREST services. For more information about the authentication process, see “Authenticationprocess for REST services” on page 239.
b. Run “Check Prerequisites REST Service” on page 261 to ensure that the master server that youwant to add meets all requirements and conditions that are defined for IBM Security KeyLifecycle Manager Multi-Master configuration.
c. Run Add Master REST Service. For example:
POST https://localhost:<port>/SKLM/rest/v1/ckms/config/nodes/addNodes[{"clusterName" : "multimaster","hadrPort" : "60020"},{"type" : "Standby","ipHostname" : "cimkc2b151","httpPort" : "9443","sklmUsername" : "sklmadmin","sklmPassword" : "SKLM@admin123","wasUsername" : "wasadmin","wasPassword" : "WAS@admin123","standbyPriorityIndex" : "1","autoAccept" : "Yes"}]
94 IBM Security Key Lifecycle Manager : Administering
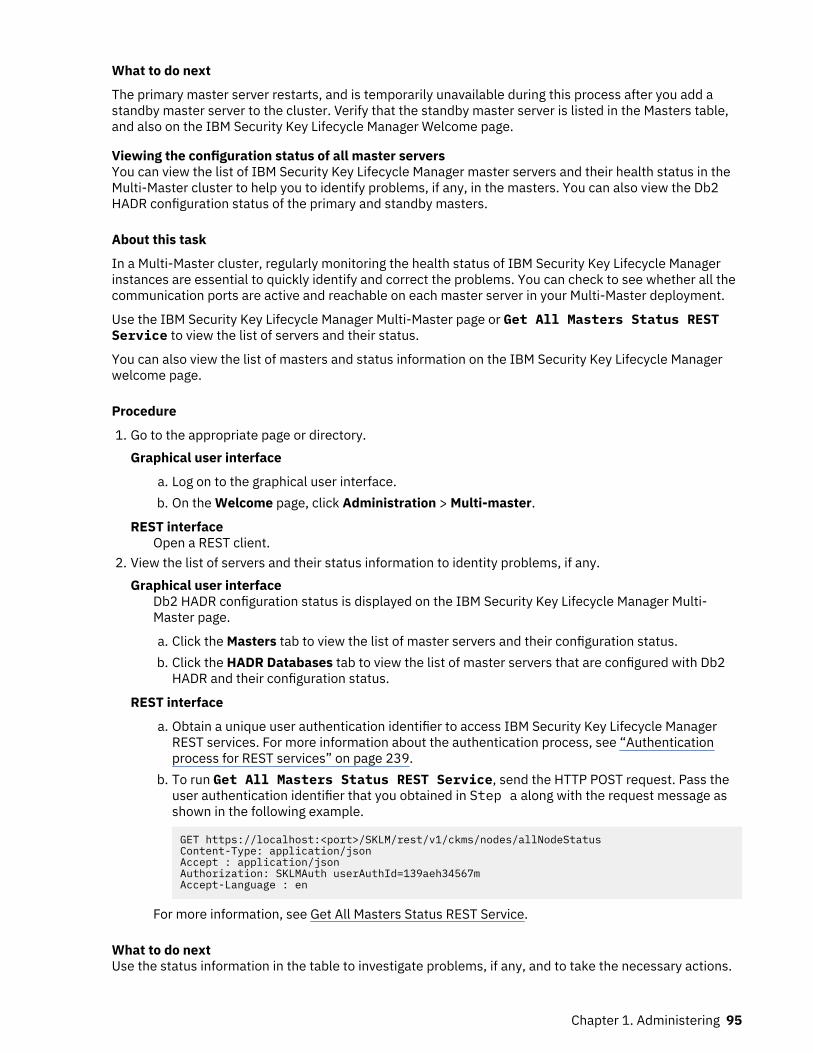
What to do next
The primary master server restarts, and is temporarily unavailable during this process after you add astandby master server to the cluster. Verify that the standby master server is listed in the Masters table,and also on the IBM Security Key Lifecycle Manager Welcome page.
Viewing the configuration status of all master serversYou can view the list of IBM Security Key Lifecycle Manager master servers and their health status in theMulti-Master cluster to help you to identify problems, if any, in the masters. You can also view the Db2HADR configuration status of the primary and standby masters.
About this task
In a Multi-Master cluster, regularly monitoring the health status of IBM Security Key Lifecycle Managerinstances are essential to quickly identify and correct the problems. You can check to see whether all thecommunication ports are active and reachable on each master server in your Multi-Master deployment.
Use the IBM Security Key Lifecycle Manager Multi-Master page or Get All Masters Status RESTService to view the list of servers and their status.
You can also view the list of masters and status information on the IBM Security Key Lifecycle Managerwelcome page.
Procedure
1. Go to the appropriate page or directory.Graphical user interface
a. Log on to the graphical user interface.b. On the Welcome page, click Administration > Multi-master.
REST interfaceOpen a REST client.
2. View the list of servers and their status information to identity problems, if any.Graphical user interface
Db2 HADR configuration status is displayed on the IBM Security Key Lifecycle Manager Multi-Master page.
a. Click the Masters tab to view the list of master servers and their configuration status.b. Click the HADR Databases tab to view the list of master servers that are configured with Db2
HADR and their configuration status.
REST interface
a. Obtain a unique user authentication identifier to access IBM Security Key Lifecycle ManagerREST services. For more information about the authentication process, see “Authenticationprocess for REST services” on page 239.
b. To run Get All Masters Status REST Service, send the HTTP POST request. Pass theuser authentication identifier that you obtained in Step a along with the request message asshown in the following example.
GET https://localhost:<port>/SKLM/rest/v1/ckms/nodes/allNodeStatusContent-Type: application/jsonAccept : application/jsonAuthorization: SKLMAuth userAuthId=139aeh34567mAccept-Language : en
For more information, see Get All Masters Status REST Service.
What to do nextUse the status information in the table to investigate problems, if any, and to take the necessary actions.
Chapter 1. Administering 95
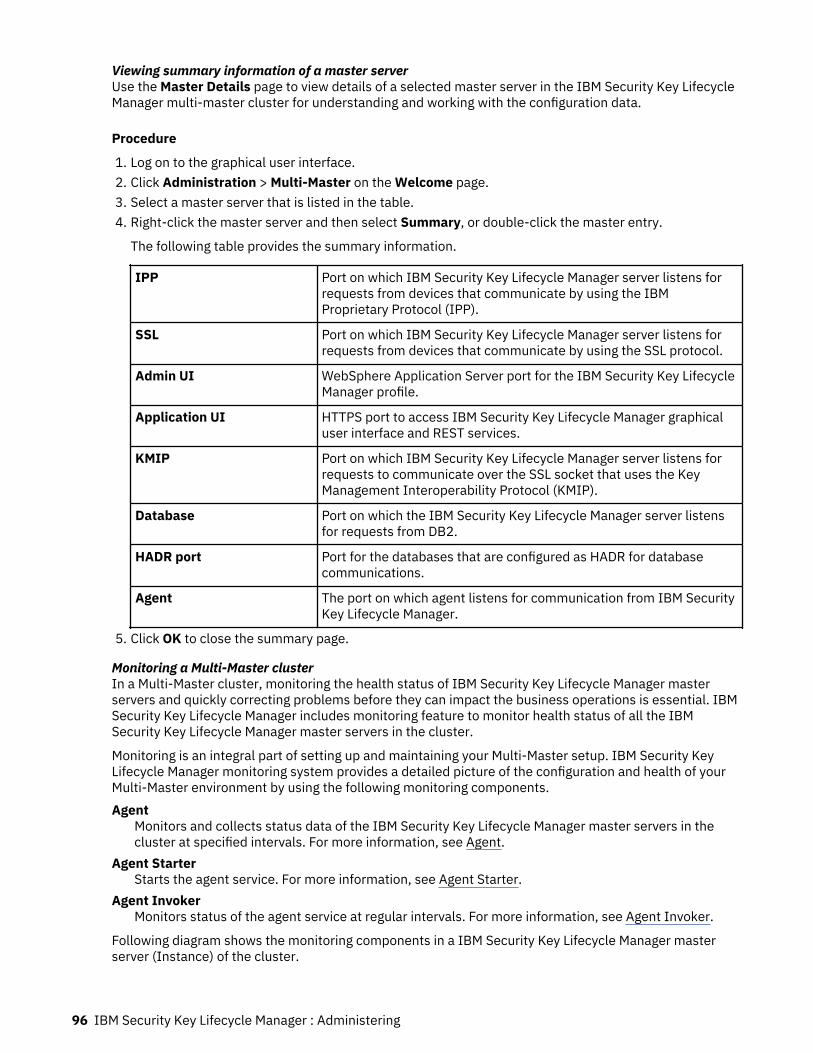
Viewing summary information of a master serverUse the Master Details page to view details of a selected master server in the IBM Security Key LifecycleManager multi-master cluster for understanding and working with the configuration data.
Procedure
1. Log on to the graphical user interface.2. Click Administration > Multi-Master on the Welcome page.3. Select a master server that is listed in the table.4. Right-click the master server and then select Summary, or double-click the master entry.
The following table provides the summary information.
IPP Port on which IBM Security Key Lifecycle Manager server listens forrequests from devices that communicate by using the IBMProprietary Protocol (IPP).
SSL Port on which IBM Security Key Lifecycle Manager server listens forrequests from devices that communicate by using the SSL protocol.
Admin UI WebSphere Application Server port for the IBM Security Key LifecycleManager profile.
Application UI HTTPS port to access IBM Security Key Lifecycle Manager graphicaluser interface and REST services.
KMIP Port on which IBM Security Key Lifecycle Manager server listens forrequests to communicate over the SSL socket that uses the KeyManagement Interoperability Protocol (KMIP).
Database Port on which the IBM Security Key Lifecycle Manager server listensfor requests from DB2.
HADR port Port for the databases that are configured as HADR for databasecommunications.
Agent The port on which agent listens for communication from IBM SecurityKey Lifecycle Manager.
5. Click OK to close the summary page.
Monitoring a Multi-Master clusterIn a Multi-Master cluster, monitoring the health status of IBM Security Key Lifecycle Manager masterservers and quickly correcting problems before they can impact the business operations is essential. IBMSecurity Key Lifecycle Manager includes monitoring feature to monitor health status of all the IBMSecurity Key Lifecycle Manager master servers in the cluster.
Monitoring is an integral part of setting up and maintaining your Multi-Master setup. IBM Security KeyLifecycle Manager monitoring system provides a detailed picture of the configuration and health of yourMulti-Master environment by using the following monitoring components.Agent
Monitors and collects status data of the IBM Security Key Lifecycle Manager master servers in thecluster at specified intervals. For more information, see Agent.
Agent StarterStarts the agent service. For more information, see Agent Starter.
Agent InvokerMonitors status of the agent service at regular intervals. For more information, see Agent Invoker.
Following diagram shows the monitoring components in a IBM Security Key Lifecycle Manager masterserver (Instance) of the cluster.
96 IBM Security Key Lifecycle Manager : Administering
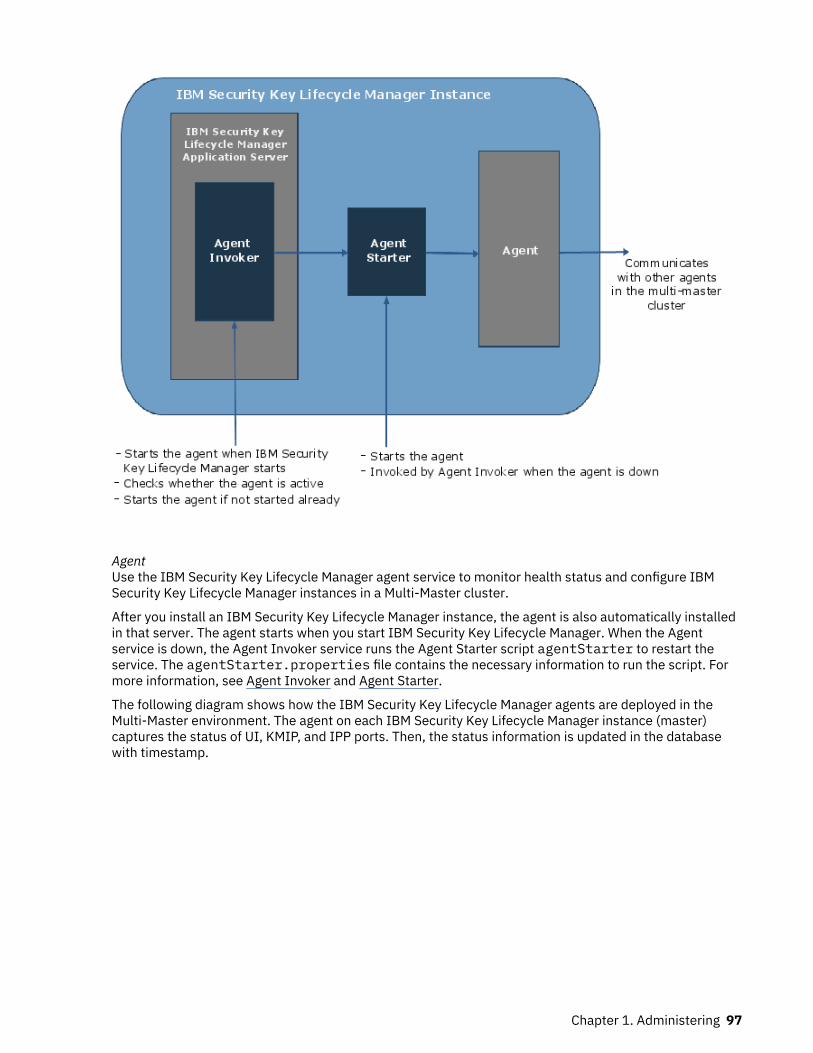
AgentUse the IBM Security Key Lifecycle Manager agent service to monitor health status and configure IBMSecurity Key Lifecycle Manager instances in a Multi-Master cluster.
After you install an IBM Security Key Lifecycle Manager instance, the agent is also automatically installedin that server. The agent starts when you start IBM Security Key Lifecycle Manager. When the Agentservice is down, the Agent Invoker service runs the Agent Starter script agentStarter to restart theservice. The agentStarter.properties file contains the necessary information to run the script. Formore information, see Agent Invoker and Agent Starter.
The following diagram shows how the IBM Security Key Lifecycle Manager agents are deployed in theMulti-Master environment. The agent on each IBM Security Key Lifecycle Manager instance (master)captures the status of UI, KMIP, and IPP ports. Then, the status information is updated in the databasewith timestamp.
Chapter 1. Administering 97

IBM Security Key Lifecycle Manager agent provides the following services to collect monitoring data andconfigure IBM Security Key Lifecycle Manager instances in the cluster.Scheduled services
Gathers status data by starting and maintaining the following set of services at regular intervals.
• Agent monitoring service• HADR takeover service• “Notification service” on page 101• Port monitoring service
Configuration servicesThe agent provides several services to set up IBM Security Key Lifecycle Manager masters for Multi-Master configuration. The configuration services are automatically started when the agent is started.
• Configuration services
98 IBM Security Key Lifecycle Manager : Administering

Agent monitoring serviceThe agent monitoring service periodically checks whether agents in the other IBM Security Key LifecycleManager master servers of the Multi-Master cluster are up and running.
When the agent in an IBM Security Key Lifecycle Manager master server is started, agent monitoringservice automatically starts monitoring the status of agents at regular intervals if IBM Security KeyLifecycle Manager instance is not of type Local. You can view the availability status by using IBMSecurity Key Lifecycle Manager graphical user interface or REST interface. For more information about theagent service, see Agents.
You can use the agent.monitoring.svc.interval property in the <SKLM_HOME>\config\SKLMConfig.properties file, for example, C:\Program Files\IBM\WebSphere\AppServer\products\sklm\config\SKLMConfig.properties to configure the agent monitoring serviceinterval. For more information about the configuration property, see agent.monitoring.svc.interval.
For the definition of <SKLM_HOME>, see “Definitions for HOME and other directory variables” on page 35.
HADR takeover serviceThe HADR takeover service is responsible to take over from a primary database when a connectionproblem occurs between IBM Security Key Lifecycle Manager master server and the primary database inthe Multi-Master cluster. When the primary database is down, the takeover operation is initiated on astandby database so that the user operations are not hindered during the outage.
You can configure agent.takeover.svc.interval property in the <SKLM_HOME>/config/SKLMConfig.properties file, for example, C:\Program Files\IBM\WebSphere\AppServer\products\sklm\config\SKLMConfig.properties to set the time interval for running HADRtakeover service. For more information about the configuration property, see agent.takeover.svc.interval.
DB2 High Availability Disaster Recovery (HADR) is used in IBM Security Key Lifecycle Manager Multi-Master cluster. Configuring DB2 HADR protects you against data loss by transmitting data changes from aprimary database to standby databases. Under normal conditions, DB2 HADR keeps the DB2 HADRprimary and standby databases in sync.
Agents are installed on all the master servers in the cluster. Agent services track the availability of IBMSecurity Key Lifecycle Manager related ports. If the primary database is down, takeover service instructsthe HADR standby database to take over as the new HADR primary database.
For the takeover operation, the primary and standby databases are continuously synchronized by using asecure communication channel. A set of DB2 HADR and WebSphere Application Server configurationparameters are automatically updated for the takeover operation by using the configuration services thatthe agent runs. For more information about the various configuration services, see Configuration services.
DB2 HADR supports up to three standby databases in your Multi-Master setup. You can have oneprincipal standby and up to two auxiliary standbys. Priorities are assigned to each of the standbydatabase in the cluster. Standby with the higher priority is the one that assumes the primary databaserole. For example, if a primary database in the IBM Security Key Lifecycle Manager Multi-Master clusterfails, the standby database with a priority index 1 takes over the role as acting primary database. If thetakeover operation on standby database with priority index 1 fails, the standby with next priority order(priority index 2) takes over as acting primary database.
Note: You must manually restart WebSphere Application Server in all the standby servers if an axillarystandby takes over the primary role. WebSphere Application Server restart is not required when principalstandby takes over the primary role.
IBM Security Key Lifecycle Manager supports the failback option. You can configure the primary databaseto take over the primary role when it comes up.
Chapter 1. Administering 99

• Takeover service of Instance 1 (primary master server) checks the database status (PrimaryDatabase) by using DB2 commands.
• If the Primary Database is down, Instance 2 (standby master server) receives takeover requestfrom the primary server. The Standby Database takes over as the Primary Database.
• The primary master server receives a message from standby to indicate whether the takeover operationis successful. When the takeover operation fails, takeover service on the primary server sends takeoverrequests to the next standby if the cluster is configured with multiple standby servers.
• When the old primary database server is up, takeover service starts HADR on it as standby.
For more information about prerequisites for DB2 HADR configuration, see Database configuration forhigh availability disaster recovery (HADR).
Manually initiating takeover operation
When the IBM Security Key Lifecycle Manager primary master server that contains the primary databaseis down, the takeover operation is not initiated automatically. In such cases, you can manually start thetakeover operation by running the sklmTakeoverHADR script.
Note: If the operating system of the IBM Security Key Lifecycle Manager primary master server fails, usethe instructions for manually initiating the takeover operation given here: Operating system of the IBMSecurity Key Lifecycle Manager primary master server fails.
1. Locate the sklmTakeoverHADR script.Windows
<SKLM_INSTALL_HOME>\agent
Default location is C:\Program Files\IBM\SKLMV40\agent.
100 IBM Security Key Lifecycle Manager : Administering

Linux<SKLM_INSTALL_HOME>/agent
Default location is /opt/IBM/SKLMV40\agent.2. Open a command prompt and run the script.
WindowsGo to the <SKLM_INSTALL_HOME>\agent directory and run the following command:
sklmTakeoverHADR.bat <WAS_HOME> [IP_HOSTNAME] [AGENT_PORT]
For example,
sklmTakeoverHADR.bat "C:\Program Files\IBM\WebSphere\AppServer" 9.113.37.10 60015
LinuxGo to the <SKLM_INSTALL_HOME>/agent directory and run the following command:
sklmTakeoverHADR.sh <WAS_HOME> [IP_HOSTNAME] [AGENT_PORT]
For example,
./sklmTakeoverHADR.sh /opt/IBM/WebSphere/AppServer 9.113.37.10 60015
Notification serviceThe Notification events generation service of the IBM Security Key Lifecycle Manager agent periodicallychecks the status of the Db2 HADR setup and the connectivity between the master servers. If the servicedetects a failure or an issue, it generates a notification event. You can create or use an existingnotification consumer, such as a REST service or a utility, that takes the notification events as input andtriggers email notifications.
Overview
As an administrator, you can use the notification event information to determine issues in the Multi-Master setup and resolve them.
Notification events are generated based on certain scenarios that occur in a Multi-Master such as theprimary master server is unreachable from the principal standby master server or another master serverin the cluster, a standby master server is unreachable from the primary master server, and so on.
Accessing notifications
Every notification is recorded in an XML file (notification_<date-time-stamp>.xml). A notification file iscreated for each run of the Notification events generation service.
To access the notification XML files, go to the following location on the primary master server:
SKLM_INSTALL_HOME\agent\notifications
For example:
(Windows) C:\Program Files\IBM\SKLMV40\agent\notifications(Linux) /opt/IBM/SKLMV40/agent/notifications
If the primary master server is offline, the notifications are stored on the other master servers of thecluster.
The default period between two subsequent runs is 5 minutes. You can configure this period in thenotification.svc.interval property of the SKLMConfig.properties file. The file is located inthe WAS_HOME\products\sklm\config.
Specify the value of this property in seconds. For example, notification.svc.interval=120
Where 120 means 120 seconds.
Chapter 1. Administering 101
You can use them as input to a notification consumer, such as a REST service or a utility, that will triggeremail notifications.
Using notifications
You can use the notification details to determine issues in the Multi-Master setup and resolve them.
The following table provides details about the notification events. Here are the column descriptions:
• Notification event: specifies the message ID and message text that you see in the notification event.• Scenario: specifies the issue and scenario in which the event is generated.• Severity: indicates the urgency of resolving the issue that is mentioned in the scenario.• Event source: specifies the master server in which the event occurs.• Suggested actions: provides the actions that you must take to resolve the issue that is mentioned in the
scenario.
Notification event(Message ID andmessage)
Scenario Severity Event source Suggested actions
CTGKM3385I
Primary masterserver hostname isunreachable frommaster serverhostname.
Check the networkconnectivitybetween thesemaster servers.
For moreinformation, seethe Notificationservice topic in theproductdocumentation inthe IBMKnowledge Center.
The primarymaster server isunreachable fromanother masterserver (notprincipal standby)of the cluster.
Low Master server Check the networkconnectivitybetween theprimary masterserver and theother masterserver of thecluster.
102 IBM Security Key Lifecycle Manager : Administering
Notification event(Message ID andmessage)
Scenario Severity Event source Suggested actions
CTGKM3386I
Standby masterserver hostname isunreachable fromthe primary masterserver hostname.
Check the networkconnectivitybetween thesemaster servers.
For moreinformation, seethe Notificationservice topic in theproductdocumentation inthe IBMKnowledge Center.
The standbymaster server isunreachable fromthe primary masterserver.
Medium Primary masterserver
Check the networkconnectivitybetween thestandby masterserver and theprimary masterserver.
CTGKM3387I
Db2 HADR setup isdown on themaster serverhostname.
Check whetherDb2 and Db2 HADRoperations arerunning on themaster server. Ifnot, start them.
For moreinformation, seethe Notificationevents generationservice topic in theproductdocumentation inthe IBMKnowledge Center.
Db2 HADR setup isdown on theprimary or standbymaster server.
Medium Primary or standbymaster server
Check whetherDb2 and Db2 HADRoperations arerunning on themaster server. Ifnot, start them.Check whethersynchronization isrunning betweenthe primary andstandby masterservers. For moreinformation, seethe Multi-Mastercluster section inthe technote:https://www.ibm.com/support/pages/node/881734
Chapter 1. Administering 103
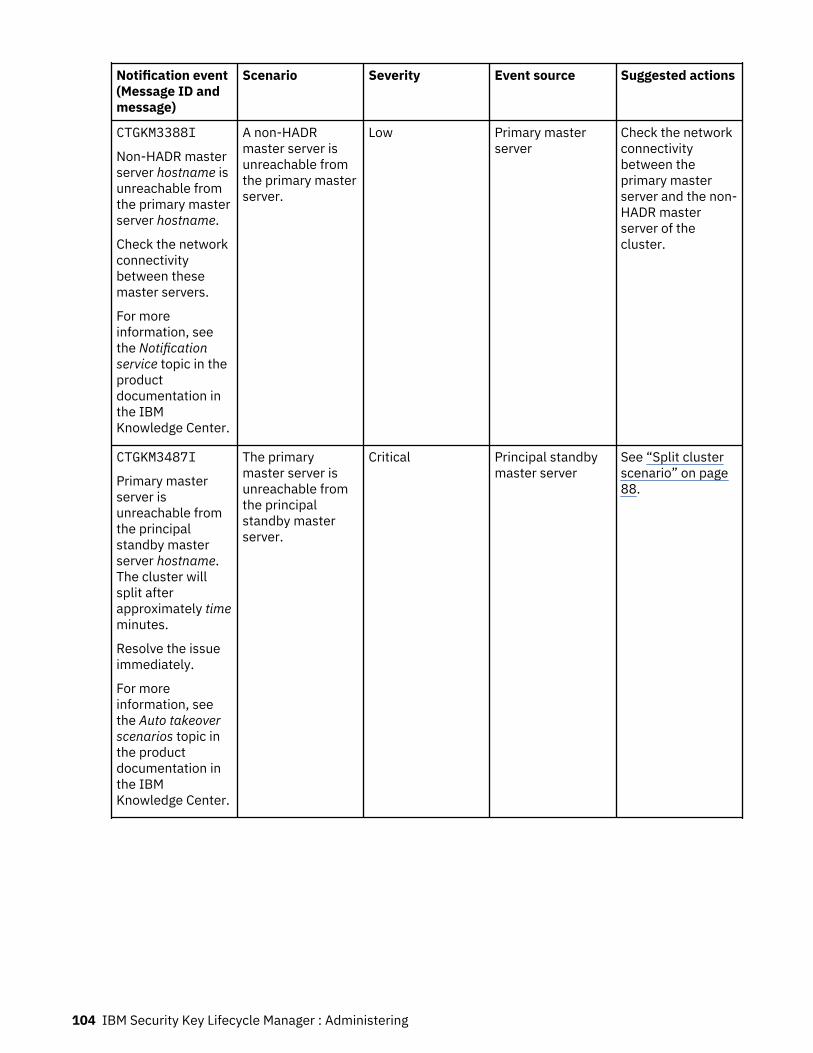
Notification event(Message ID andmessage)
Scenario Severity Event source Suggested actions
CTGKM3388I
Non-HADR masterserver hostname isunreachable fromthe primary masterserver hostname.
Check the networkconnectivitybetween thesemaster servers.
For moreinformation, seethe Notificationservice topic in theproductdocumentation inthe IBMKnowledge Center.
A non-HADRmaster server isunreachable fromthe primary masterserver.
Low Primary masterserver
Check the networkconnectivitybetween theprimary masterserver and the non-HADR masterserver of thecluster.
CTGKM3487I
Primary masterserver isunreachable fromthe principalstandby masterserver hostname.The cluster willsplit afterapproximately timeminutes.
Resolve the issueimmediately.
For moreinformation, seethe Auto takeoverscenarios topic inthe productdocumentation inthe IBMKnowledge Center.
The primarymaster server isunreachable fromthe principalstandby masterserver.
Critical Principal standbymaster server
See “Split clusterscenario” on page88.
104 IBM Security Key Lifecycle Manager : Administering

Notification event(Message ID andmessage)
Scenario Severity Event source Suggested actions
CTGKM3488I
Primary masterserver isunreachable fromthe principalstandby masterserver hostname.The Multi-Mastercluster is now splitinto two clusters.
Resolve the issueimmediately.
For moreinformation, seethe Auto takeoverscenarios topic inthe productdocumentation inthe IBMKnowledge Center.
The primarymaster server isunreachable fromthe principalstandby masterserver.
Critical Principal standbymaster server
See “Split clusterscenario” on page88.
You can create or use an existing notification consumer, such as a REST service or a utility, that takes thenotification events from the XML files as input and triggers email notifications.
Sample notification consumer
A sample utility that automatically triggers emails on occurrence of a notification event is available foryour use. You can customize this utility further according to your requirement.
Click here to download the utility (SKLM_SampleNotificationConsumer.zip file).
Instructions to use the utility are provided in a readme file that is included in the compressed file.
Important: This utility is provided ‘as is’ and no enhancements or fixes to it are supported.
Port monitoring serviceThe port monitoring service periodically checks availability of ports that are needed by an IBM SecurityKey Lifecycle Manager master server for communication in the Multi-Master cluster.
When the agent service in an IBM Security Key Lifecycle Manager master is started, the port monitoringservice automatically starts monitoring availability of the ports at regular intervals if IBM Security KeyLifecycle Manager instance is not of type Local. You can view the availability status by using IBMSecurity Key Lifecycle Manager graphical user interface or REST interface. For more information about theagent service, see Agents.
You can use the port.monitoring.svc.interval property in the <SKLM_HOME>\config\SKLMConfig.properties file, for example, C:\Program Files\IBM\WebSphere\AppServer\products\sklm\config\SKLMConfig.properties to configure the port monitoring interval. Formore information about the configuration property, see port.monitoring.svc.interval.
For the definition of <SKLM_HOME>, see “Definitions for HOME and other directory variables” on page 35.
The port monitoring service checks whether the following ports are running and reachable.TCP port
Port on which IBM Security Key Lifecycle Manager server listens for requests from devices.
Chapter 1. Administering 105
SSL portPort on which IBM Security Key Lifecycle Manager server listens for requests from devices thatcommunicate by using the SSL protocol.
KMIP portPort on which IBM Security Key Lifecycle Manager server listens for requests to communicate over theSSL socket that uses the Key Management Interoperability Protocol (KMIP).
DB2 portPort on which the IBM Security Key Lifecycle Manager server listens for requests from DB2.
HTTP portPort on which IBM Security Key Lifecycle Manager listens for HTTPS requests.
Admin portPort on which the IBM Security Key Lifecycle Manager server listens for requests.
HADR portPort for the databases that are configured as HADR for database communications.
Agent portThe port on which agent listens for communication from IBM Security Key Lifecycle Manager.
For more information about port default values, see Services, ports, and processes.
Configuration servicesThe agent provides several services to set up IBM Security Key Lifecycle Manager masters for Multi-Master configuration.
Update DB Configuration (Primary)Updates the primary database in an IBM Security Key Lifecycle Manager master server in the clusterwith necessary configurations for Multi-Master setup.
Update HADR DB Configuration (Primary/Standby)Updates the configuration parameters in both primary and standby database servers for setting upDB2 High Availability Disaster Recovery (HADR).
Take and Restore BackupBacks up the database from the primary server and restores it on the standby server. In a Multi-Master cluster with DB2 HADR configuration, the primary database server and the standby databaseserver must be synchronized with the same data.
Send and Receive BackupSends the backup file from the primary database server to the standby server by using a securecommunication channel. On the standby server, the backup file is stored in the <SKLM_DATA> folder,for example, C:\Program Files\IBM\WebSphere\AppServer\products\sklm\data. For thedefinition of <SKLM_DATA>, see “Definitions for HOME and other directory variables” on page 35.
Start HADR (Primary/Standby)Starts DB2 HADR operations on the primary and standby database servers. Starts DB2 HADR on thestandby server, and then on the primary server.
Update WebSphere Application Server ConfigurationUpdates WebSphere Application Server configuration to specify the DB2 data source properties suchas the names and ports of the standby database servers to support automatic client reroute. If theconnection to the primary DB2 server fails, WebSphere Application Server reestablishes theconnection automatically to the standby DB2 server.
Restart WebSphere Application ServerRestarts WebSphere Application Server on the primary server, standby server, and other IBM SecurityKey Lifecycle Manager instances in the cluster to apply the DB2 data source configuration changesthat are done to support automatic client reroute.
Get DB2 HADR and WebSphere Application Server Setup StatusGets the DB2 HADR and WebSphere Application Server connection status. For an operating HADRenvironment, you must ensure that the primary DB2 HADR and the standby DB2 HADR are connected.
106 IBM Security Key Lifecycle Manager : Administering
Data synchronization serviceIn IBM Security Key Lifecycle Manager Multi-Master cluster, the primary and standby databases areconfigured with DB2 HADR to ensure high-availability. Under normal conditions, DB2 HADR keeps theprimary and standby databases in sync. The IBM Security Key Lifecycle Manager data synchronizationservice copies the DB2 backup files from the primary master to the other master nodes in the cluster at aspecified interval. Data synchronization keeps data in the master nodes current with data in the primaryserver in the cluster.
When a master server is disconnected from the cluster because of connectivity issues, you can set thismaster server in read-write mode. You can then restore the backup files on the read-write master serverto serve keys to the devices. For more information about how to set the isolated master as read-writemaster, see “Configuring an isolated master as read-write master” on page 112. When connectivity issuesare resolved, you can rejoin master to the cluster. For more information about how to rejoin the cluster,see “Rejoining isolated read-write master back to cluster” on page 116.
Backup file location
The backup file from the primary server is copied to the <WAS_HOME>/products/sklm/data/synchronization folder on the master node. You can save a maximum of two backup files.
Setting interval for data synchronization
You can configure data.synchronizing.svc.interval property in the <SKLM_HOME>/config/SKLMConfig.properties file to set the time interval for data synchronization. For more informationabout the configuration property, see data.synchronizing.svc.interval.
Setting password for backup files
You can configure data.synchronizing.backup.password property in the <SKLM_HOME>/config/SKLMConfig.properties file to set password for the backup files that are generated by datasynchronization service on the primary or standby master. These backup files are copied to the othermaster nodes in the IBM Security Key Lifecycle Manager Multi-Master cluster at an interval that youspecified for the data.synchronizing.svc.interval property.
You can then restore the backup files on the read-write master server by using the password that you set.You can use graphical user interface, command line interface, or REST interface to restore data if you setthe password in the configuration file. If the value for the configuration property is not set, a randompassword is generated and the data is automatically restored on the read-write master. You must restartWebSphere Application Server and the agent service after you set the password. For more informationabout the configuration property, see data.synchronizing.backup.password.
Setting maximum number of DB2 backup files
You can configure the data.synchronizing.svc.MaxBackupNum property in the <SKLM_HOME>/config/SKLMConfig.properties file to specify maximum number of DB2 backup files to keep on thenon-HADR masters of the Multi-Master cluster. You must restart WebSphere Application Server and theagent service after you set the password. For more information about the configuration property, seedata.synchronizing.svc.MaxBackupNum.
Restarting the IBM Security Key Lifecycle Manager agent serviceRestart of the IBM Security Key Lifecycle Manager agent service causes the server to read itsconfiguration and accept the configuration changes, if any.
Procedure
1. Open a command prompt.2. Go the SKLM_INSTALL_HOME\agent directory.
WindowsC:\Program Files\IBM\SKLMV40\agent
Chapter 1. Administering 107
Linux/opt/IBM/SKLMV40/agent
3. Stop the agent service by running the following command.Windows
stopAgent.bat WAS_HOME
stopAgent.bat "C:\Program Files\IBM\WebSphere\AppServer"
Linux
./stopAgent.sh <WAS_HOME>
./stopAgent.sh /opt/IBM/WebSphere/AppServer
4. Start the agent service by running the following command.Windows
startAgent.bat WAS_HOME
startAgent.bat "C:\Program Files\IBM\WebSphere\AppServer"
Linux
./startAgent.sh WAS_HOME
./startAgent.sh /opt/IBM/WebSphere/AppServer
Agent StarterThe Agent Starter service in the IBM Security Key Lifecycle Manager Multi-Master cluster is used to startthe monitoring agent.
When the agent in a IBM Security Key Lifecycle Manager master is down, the Agent Invoker service runsthe Agent Starter script startAgent to restart the service. The agentStarter.properties filecontains the necessary information to run the script.
Location of the script and the properties file
The startAgent script and the agentStarter.properties file are in the SKLM_INSTALL_HOME\agent directory. For example,Windows
C:\Program Files\IBM\SKLMV40\agent\startAgent.batC:\Program Files\IBM\SKLMV40\agent\agentStarter.properties
Linux/opt/IBM/SKLMV40/agent/startAgent.sh/opt/IBM/SKLMV40/agent/agentStarter.properties
Starting the agent service
Run the following command:Windows
startAgent.bat WAS_HOME
startAgent.bat "C:\Program Files\IBM\WebSphere\AppServer"
108 IBM Security Key Lifecycle Manager : Administering
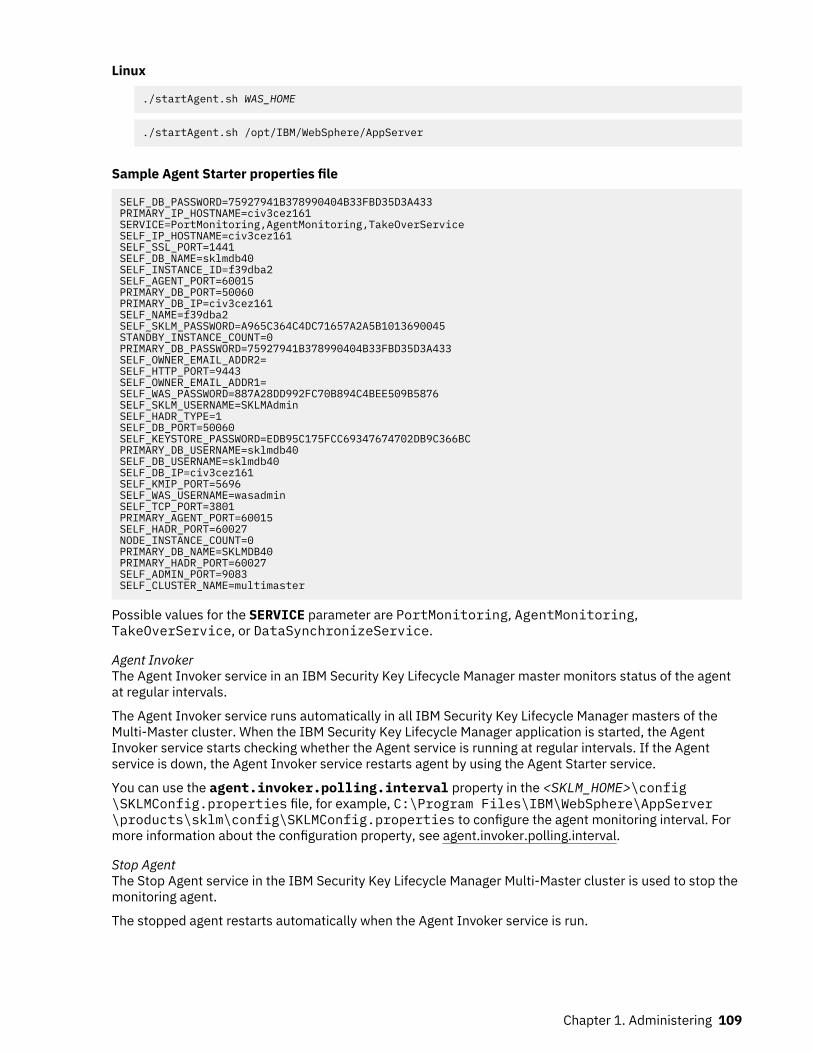
Linux
./startAgent.sh WAS_HOME
./startAgent.sh /opt/IBM/WebSphere/AppServer
Sample Agent Starter properties file
SELF_DB_PASSWORD=75927941B378990404B33FBD35D3A433PRIMARY_IP_HOSTNAME=civ3cez161SERVICE=PortMonitoring,AgentMonitoring,TakeOverServiceSELF_IP_HOSTNAME=civ3cez161SELF_SSL_PORT=1441SELF_DB_NAME=sklmdb40SELF_INSTANCE_ID=f39dba2SELF_AGENT_PORT=60015PRIMARY_DB_PORT=50060PRIMARY_DB_IP=civ3cez161SELF_NAME=f39dba2SELF_SKLM_PASSWORD=A965C364C4DC71657A2A5B1013690045STANDBY_INSTANCE_COUNT=0PRIMARY_DB_PASSWORD=75927941B378990404B33FBD35D3A433SELF_OWNER_EMAIL_ADDR2=SELF_HTTP_PORT=9443SELF_OWNER_EMAIL_ADDR1=SELF_WAS_PASSWORD=887A28DD992FC70B894C4BEE509B5876SELF_SKLM_USERNAME=SKLMAdminSELF_HADR_TYPE=1SELF_DB_PORT=50060SELF_KEYSTORE_PASSWORD=EDB95C175FCC69347674702DB9C366BCPRIMARY_DB_USERNAME=sklmdb40SELF_DB_USERNAME=sklmdb40SELF_DB_IP=civ3cez161SELF_KMIP_PORT=5696SELF_WAS_USERNAME=wasadminSELF_TCP_PORT=3801PRIMARY_AGENT_PORT=60015SELF_HADR_PORT=60027NODE_INSTANCE_COUNT=0PRIMARY_DB_NAME=SKLMDB40PRIMARY_HADR_PORT=60027SELF_ADMIN_PORT=9083SELF_CLUSTER_NAME=multimaster
Possible values for the SERVICE parameter are PortMonitoring, AgentMonitoring,TakeOverService, or DataSynchronizeService.
Agent InvokerThe Agent Invoker service in an IBM Security Key Lifecycle Manager master monitors status of the agentat regular intervals.
The Agent Invoker service runs automatically in all IBM Security Key Lifecycle Manager masters of theMulti-Master cluster. When the IBM Security Key Lifecycle Manager application is started, the AgentInvoker service starts checking whether the Agent service is running at regular intervals. If the Agentservice is down, the Agent Invoker service restarts agent by using the Agent Starter service.
You can use the agent.invoker.polling.interval property in the <SKLM_HOME>\config\SKLMConfig.properties file, for example, C:\Program Files\IBM\WebSphere\AppServer\products\sklm\config\SKLMConfig.properties to configure the agent monitoring interval. Formore information about the configuration property, see agent.invoker.polling.interval.
Stop AgentThe Stop Agent service in the IBM Security Key Lifecycle Manager Multi-Master cluster is used to stop themonitoring agent.
The stopped agent restarts automatically when the Agent Invoker service is run.
Chapter 1. Administering 109

Location of the stopAgent script file
The stopAgent script file is in the SKLM_INSTALL_HOME\agent directory. For example,Windows
C:\Program Files\IBM\SKLMV40\agent\stopAgent.batLinux
/opt/IBM/SKLMV40/agent/stopAgent.sh
Stopping the agent service
Run the following command:Windows
stopAgent.bat WAS_HOME
stopAgent.bat "C:\Program Files\IBM\WebSphere\AppServer"
Linux
./stopAgent.sh WAS_HOME
./stopAgent.sh /opt/IBM/WebSphere/AppServer
Stopping the agent permanently
You can stop an agent permanently. When stopped permanently, the agent does not restart automaticallywhen the Agent Invoker service runs.
To stop the agent permanently:
1. In the SKLMConfig.properties file, update the stopAgentInvocation property value to true.
stopAgentInvocation=true
2. Stop the agent. See the “Stopping the agent permanently” on page 110 section.
Note: Do not stop the agent permanently on a Multi-Master setup. You can do so on a standalone IBMSecurity Key Lifecycle Manager server or a replication setup.
To start an agent that was permanently stopped:
1. In the SKLMConfig.properties file, update the value of the stopAgentInvocation property tofalse.
stopAgentInvocation=false
You can use the “tklmConfigUpdateEntry” on page 291 CLI command or the “Update Config PropertyREST Service” on page 288 to update the SKLMConfig.properties file.
2. Restart the WebSphere Application Server.
Multi-Master cluster configuration statusThe Multi-Master section on the Welcome page of the IBM Security Key Lifecycle Manager graphical userinterface displays the configuration status of the Multi-Master cluster. You can determine whether thecluster configuration in any of the master servers of the cluster is out of sync.
If the cluster configuration is out of sync, you can sync it from the graphical user interface.
Supported master server operations
Adding or removing a standby or non-HADR master server depends on the configuration status of theMulti-Master cluster. The following tables provide details of the operations. Each row provides
110 IBM Security Key Lifecycle Manager : Administering

information about whether you can add or remove a standby and non-HADR master server given aspecific cluster status. For example, the first row in the Operation - Add master server table indicatesthat if the primary master server of the cluster is offline, you cannot add any type of master server to thecluster.
Table 6. Operation - Add master server
Cluster status Add master server of type
Standby Non-HADR
Primary master server is offline. No No
One or more standby master servers are offline. No Yes
Non-HADR master server is offline. Yes Yes
Cluster configuration on the standby master server isout of sync.
No
To add a standby masterserver, sync the masterserver that is out of syncand retry the operation.
Yes
Table 7. Operation - Remove master server
Cluster status Remove master server of type
Standby Non-HADR
Primary master server is offline. No No
One or more standby master servers areoffline.
• An online standby master server: Youcannot remove this standby masterserver.
• A offline standby master server:
– If more than one standby masterservers are offline, you can removeall except one offline master server.A cluster must have at least onestandby master server.
– If the standby master server is theonly master server other than theprimary master server in the cluster,you can remove it. This scenario is a"Cluster-break" scenario. Theprimary and standby master serverswill now act as standalone servers.
– If the cluster has an offline standbymaster server and a non-HADRmaster server, you cannot removethe offline standby master server.
To remove the offline Standbymaster server (cluster-breakscenario), first remove all the non-HADR master servers, and thenremove the offline standby masterserver.
Yes
Chapter 1. Administering 111
Table 7. Operation - Remove master server (continued)
Cluster status Remove master server of type
Standby Non-HADR
Non-HADR master server is offline. Yes Yes
Cluster configuration on the standbymaster server is out of sync.
No
To remove a standby master server,sync the master server that is out ofsync and retry the operation.
Yes
Managing a Multi-Master clusterAfter a Multi-Master cluster is set up, you need to perform operations to manage it.
You can perform the following operations to manage a Multi-Master cluster.
Adding an existing IBM Security Key Lifecycle Manager instance with data to the Multi-Master clusterYou can use the export and import feature of IBM Security Key Lifecycle Manager to add data from anexisting IBM Security Key Lifecycle Manager instance to the Multi-Master cluster. You must import thedata that was exported from the existing stand-alone instance to the Primary master server that isconfigured with DB2 HADR.
About this task
You cannot directly add an existing stand-alone instance with data into the cluster. You must first importdata from the existing IBM Security Key Lifecycle Manager instance to the primary master. Then, add amaster server into the cluster separately.
After data is imported, the data is available on all instances in the cluster. It is up to you to decidewhether to add a master separately.
Procedure
1. Export device group data from the existing IBM Security Key Lifecycle Manager instance. For moreinformation about how to export device group data, see “Exporting a device group” on page 150.
2. Import the data that was exported from the existing stand-alone instance to the primary master serverthat is configured with DB2 HADR. For more information about how to import device group data, see“Importing a device group” on page 152.
3. After you successfully import data to the primary server, you can access data from all the masters inthe cluster. If you need a dedicated IBM Security Key Lifecycle Manager master to access theimported data, add a master to the cluster. For more information about adding a master, see “Adding amaster server to a cluster” on page 91.
What to do nextYou might want to decommission the existing stand-alone IBM Security Key Lifecycle Manager instanceafter you successfully exported the data.
Configuring an isolated master as read-write masterDue to connectivity/network issues, a master server fails to communicate with other masters in thecluster, and gets isolated from the cluster. You can then configure this isolated master with its localdatabase in read-write mode. After the configuration in read-write mode, all devices and KMIP clientsthat are registered to the isolated master can communicate seamlessly with the server, without anyconfiguration changes in devices/clients.
Before you beginBefore you set an isolated master as read-write master, review the considerations and restrictions thatare listed in the Requirements and considerations for multi-master configuration topic.
112 IBM Security Key Lifecycle Manager : Administering

About this task
After the configuration in read-write mode, you can add new devices and KMIP clients to the server, andthe read-write master can serve them. However, a set of restrictions is imposed on the isolated read-write master on its functions and interfaces. All the delete and modify operations on device groups, keygroups, KMIP clients, and cryptographic objects are disabled for data consistency in case the isolatedmaster joins backs the Multi-Master cluster. Administrative functions such as replication, Multi-Masterconfiguration and restore of backup files are also restricted.
Procedure
1. Go to the appropriate page.Graphical user interface
a. Log on to the graphical user interface of isolated master.
REST interface
a. Open a REST client.2. Configure the isolated master as read-write master.
Graphical user interface
a. Click the Set this master as read-write master link in the notification area on IBM Security KeyLifecycle Manager Welcome page.
b. On the Confirm dialog, read the confirmation message before you configure the isolated masterin read-write mode.
c. Click OK.
REST interface
a. Obtain a unique user authentication identifier to access IBM Security Key Lifecycle ManagerREST services. For more information about the authentication process, see “Authenticationprocess for REST services” on page 239.
b. To run Set Up Read-Write Master REST Service, send the HTTP GET request. Pass theuser authentication identifier that you obtained in Step a along with the request message asshown in the following example.
GET https://localhost:<port>/SKLM/rest/v1/ckms/config/nodes/setupAsReadWriteMasterContent-Type: application/jsonAccept : application/jsonAuthorization: SKLMAuth userAuthId=139aeh34567mAccept-Language : en
Modifying master details of a clusterYou can change the IBM Security Key Lifecycle Manager multi-master configuration, such as modifyingmaster server details to meet your requirements. For example, you can update the IBM Security KeyLifecycle Manager administrator password.
Before you beginBefore you modify master details of the cluster, review the considerations and restrictions that are listedin the Requirements and considerations for multi-master configuration topic.
About this task
Use the Multi-Master Configuration - Modify Master dialog or Modify Master REST Service tomodify master details.
Your role must have a permission to modify details of a master server in the IBM Security Key LifecycleManager multi-master cluster.
Chapter 1. Administering 113
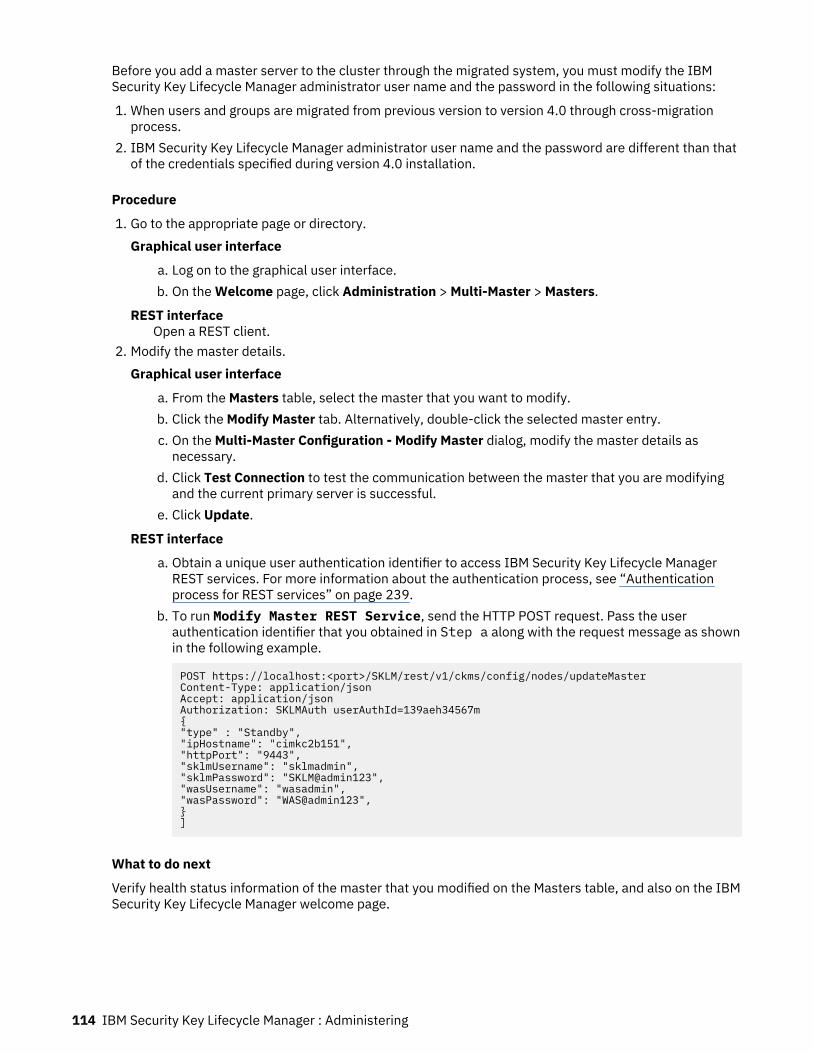
Before you add a master server to the cluster through the migrated system, you must modify the IBMSecurity Key Lifecycle Manager administrator user name and the password in the following situations:
1. When users and groups are migrated from previous version to version 4.0 through cross-migrationprocess.
2. IBM Security Key Lifecycle Manager administrator user name and the password are different than thatof the credentials specified during version 4.0 installation.
Procedure
1. Go to the appropriate page or directory.Graphical user interface
a. Log on to the graphical user interface.b. On the Welcome page, click Administration > Multi-Master > Masters.
REST interfaceOpen a REST client.
2. Modify the master details.Graphical user interface
a. From the Masters table, select the master that you want to modify.b. Click the Modify Master tab. Alternatively, double-click the selected master entry.c. On the Multi-Master Configuration - Modify Master dialog, modify the master details as
necessary.d. Click Test Connection to test the communication between the master that you are modifying
and the current primary server is successful.e. Click Update.
REST interface
a. Obtain a unique user authentication identifier to access IBM Security Key Lifecycle ManagerREST services. For more information about the authentication process, see “Authenticationprocess for REST services” on page 239.
b. To run Modify Master REST Service, send the HTTP POST request. Pass the userauthentication identifier that you obtained in Step a along with the request message as shownin the following example.
POST https://localhost:<port>/SKLM/rest/v1/ckms/config/nodes/updateMasterContent-Type: application/jsonAccept: application/jsonAuthorization: SKLMAuth userAuthId=139aeh34567m{"type" : "Standby","ipHostname": "cimkc2b151","httpPort": "9443","sklmUsername": "sklmadmin","sklmPassword": "SKLM@admin123","wasUsername": "wasadmin","wasPassword": "WAS@admin123",}]
What to do next
Verify health status information of the master that you modified on the Masters table, and also on the IBMSecurity Key Lifecycle Manager welcome page.
114 IBM Security Key Lifecycle Manager : Administering

Promoting standby server to primary serverIf a primary master in the IBM Security Key Lifecycle Manager multi-master cluster fails, you might wantto promote a standby master while you resolve the failure.
Before you beginBefore you promote a standby master in the cluster, review the considerations and restrictions that arelisted in the Requirements and considerations for multi-master configuration topic.
About this task
If the primary master becomes unavailable, use the IBM Security Key Lifecycle Manager Multi-Master >HADR Databases page or Promote Standby REST Service to change a standby master to theprimary master in the cluster.
Your role must have a permission to change a standby master to the primary master in the IBM SecurityKey Lifecycle Manager multi-master cluster.
You must manually restart WebSphere Application Server in all the standby servers if an auxiliary standbyis promoted as primary. WebSphere Application Server restart is not required when principal standby ispromoted as primary.
Procedure
1. Go to the appropriate page or directory.Graphical user interface
a. Log on to the graphical user interface.b. On the Welcome page, click Administration > Multi-Master > HADR Databases.
REST interfaceOpen a REST client.
2. Promote the standby master to primary master server.Graphical user interface
a. From the HADR Databases table, select the standby master that you want to promote.b. Click Promote As Primary.c. On the Confirm dialog, read the confirmation message before you promote the standby master.d. Click OK.
REST interface
a. Obtain a unique user authentication identifier to access IBM Security Key Lifecycle ManagerREST services. For more information about the authentication process, see “Authenticationprocess for REST services” on page 239.
b. To run Promote Standby REST Service, send the HTTP POST request. Pass the userauthentication identifier that you obtained in Step a along with the request message as shownin the following example.
POST https://localhost:<port>/SKLM/rest/v1/ckms/config/nodes/takeoverAsPrimaryContent-Type: application/jsonAccept: application/jsonAuthorization: SKLMAuth userAuthId=139aeh34567m[{clusterName:"multimaster"},{"ipHostname": "civ3cez160"}]
What to do next
Verify role and health status information of the standby master that you promoted on the HADRDatabases table, and also on the IBM Security Key Lifecycle Manager welcome page.
Chapter 1. Administering 115

Rejoining isolated read-write master back to clusterThe master server, which was isolated from Multi-Master cluster, and configured as read-write master,can rejoin the cluster when connectivity/network issues are resolved. The data from isolated read-writemaster is merged to the primary database of the cluster during rejoin process.
Before you beginBefore you rejoin isolated read-write master to the cluster, review the considerations and restrictions thatare listed in the Requirements and considerations for multi-master configuration topic.
About this task
The rejoining operation checks for possible conflicts between the data of isolated read-write master andprimary master of the cluster. A conflict report is generated to show the conflicts, if any. The isolatedread-write master can rejoin the cluster only after all conflicts are resolved. For more information abouthow to view and resolve the conflicts, see “Viewing conflicts report” on page 119.
Procedure
1. Go to the appropriate page.Graphical user interface
a. Log on to the graphical user interface of isolated master.b. Click the Join back this master to Multi-Master cluster link in the notification area on the IBM
Security Key Lifecycle Manager welcome page.c. On the Confirm dialog, read the confirmation message before you rejoin master to the cluster.d. Click OK to start the rejoin process.
REST interface
a. Open a REST client.b. Obtain a unique user authentication identifier to access IBM Security Key Lifecycle Manager
REST services. For more information about the authentication process, see “Authenticationprocess for REST services” on page 239.
c. To run Join Back Cluster REST Service, send the HTTP GET request. Pass the userauthentication identifier that you obtained in Step b along with the request message as shownin the following example.
GET https://localhost:<port>/SKLM/rest/v1/ckms/config/nodes/joinBackTheClusterContent-Type: application/jsonAccept : application/jsonAuthorization: SKLMAuth userAuthId=139aeh34567mAccept-Language : en
2. If any conflicts arise during the rejoin process, the "Conflicts with MM Cluster" window is displayed.See the “Viewing conflicts report” on page 119 topic for more information.
3. If no data conflicts, the progress dialog box appears. When the process is complete, a message box isdisplayed to indicate that the rejoin operation is complete.
4. Click Close.5. Restart the server. For instructions about how to stop and start the server, see “Restarting the IBM
Security Key Lifecycle Manager server” on page 38.
Removing a master server from Multi-Master clusterYou can remove a master server, which is no longer required in the IBM Security Key Lifecycle ManagerMulti-Master cluster.
Before you beginBefore you delete master server details of the cluster, review the considerations and restrictions that arelisted in the Requirements and considerations for multi-master configuration topic.
116 IBM Security Key Lifecycle Manager : Administering

About this task
You cannot delete the primary master server of a cluster. You can delete a standby master server only ifthe cluster contains at least one more standby master server. IBM Security Key Lifecycle Manager Multi-Master cluster supports up to three standby master servers.
You can remove a master server (standby, non-HADR) from the cluster when it is offline. When the masterserver is online again, its state is the same as it was before it became a part of the cluster. The server nolonger contains data from the cluster.
Use the IBM Security Key Lifecycle Manager Multi-Master page or Remove Master REST Service todelete a master.
Your role must have the permission to delete a master of the cluster.
Procedure
1. Go to the appropriate page or directory.Graphical user interface
a. Log on to the graphical user interface.b. On the Welcome page, click Administration > Multi-Master.
REST interfaceOpen a REST client.
2. Delete the master details.Graphical user interface
a. From the Masters table, select the master that you want to delete.b. Click Delete Master.c. On the Confirm dialog, read the confirmation message before you delete the master.d. Click OK.
REST interface
a. Obtain a unique user authentication identifier to access IBM Security Key Lifecycle ManagerREST services. For more information about the authentication process, see “Authenticationprocess for REST services” on page 239.
b. To run Remove Master REST Service, send the HTTP POST request. Pass the userauthentication identifier that you obtained in Step a along with the request message as shownin the following example.
POST https://localhost:<port>/SKLM/rest/v1/ckms/config/nodes/removeNodeContent-Type: application/jsonAccept: application/jsonAuthorization: SKLMAuth userAuthId=139aeh34567m[{"clusterName": "multimaster"},{"type": "Node","ipHostname" : "cimkc2b151","httpPort" : "9443","sklmUsername" : "sklmadmin","sklmPassword" : "SKLM@admin123","wasUsername" : "wasadmin","wasPassword" : "WAS@admin123"}]
3. Restart WebSphere Application Server to refresh the configuration.
What to do next
Verify whether the master that you deleted is removed from the Masters table.
Chapter 1. Administering 117
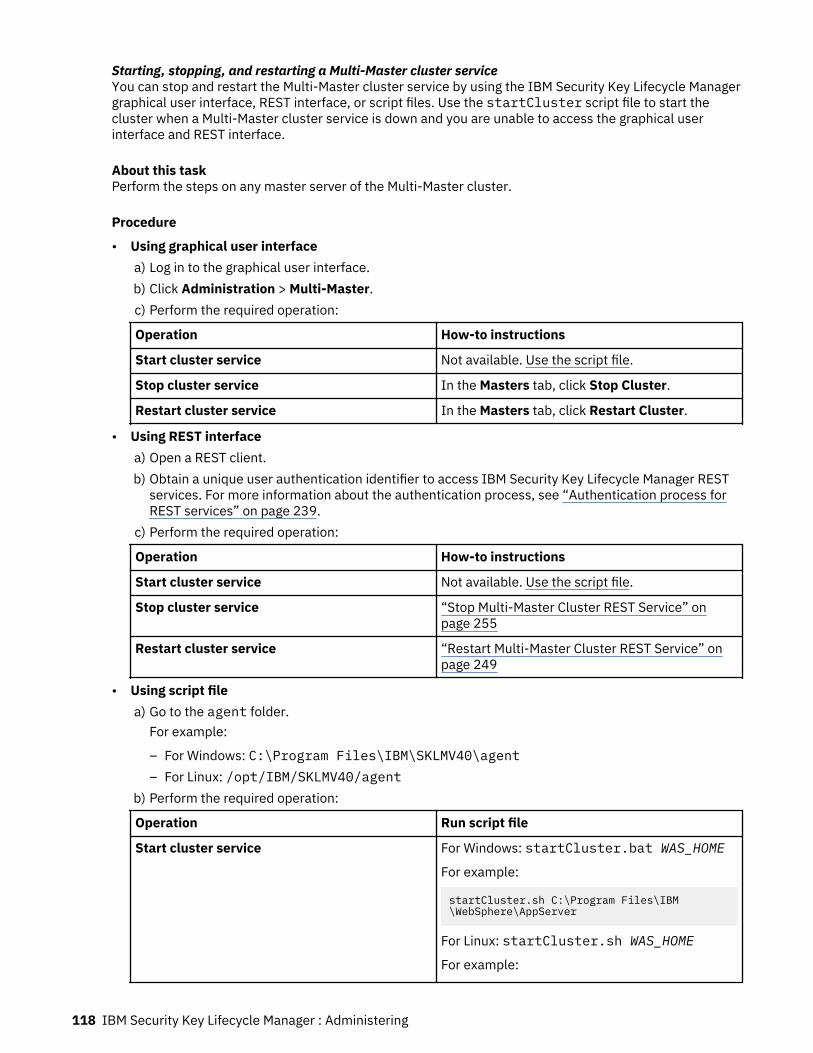
Starting, stopping, and restarting a Multi-Master cluster serviceYou can stop and restart the Multi-Master cluster service by using the IBM Security Key Lifecycle Managergraphical user interface, REST interface, or script files. Use the startCluster script file to start thecluster when a Multi-Master cluster service is down and you are unable to access the graphical userinterface and REST interface.
About this taskPerform the steps on any master server of the Multi-Master cluster.
Procedure
• Using graphical user interfacea) Log in to the graphical user interface.b) Click Administration > Multi-Master.c) Perform the required operation:
Operation How-to instructions
Start cluster service Not available. Use the script file.
Stop cluster service In the Masters tab, click Stop Cluster.
Restart cluster service In the Masters tab, click Restart Cluster.
• Using REST interfacea) Open a REST client.b) Obtain a unique user authentication identifier to access IBM Security Key Lifecycle Manager REST
services. For more information about the authentication process, see “Authentication process forREST services” on page 239.
c) Perform the required operation:
Operation How-to instructions
Start cluster service Not available. Use the script file.
Stop cluster service “Stop Multi-Master Cluster REST Service” onpage 255
Restart cluster service “Restart Multi-Master Cluster REST Service” onpage 249
• Using script filea) Go to the agent folder.
For example:
– For Windows: C:\Program Files\IBM\SKLMV40\agent– For Linux: /opt/IBM/SKLMV40/agent
b) Perform the required operation:
Operation Run script file
Start cluster service For Windows: startCluster.bat WAS_HOME
For example:
startCluster.sh C:\Program Files\IBM\WebSphere\AppServer
For Linux: startCluster.sh WAS_HOME
For example:
118 IBM Security Key Lifecycle Manager : Administering
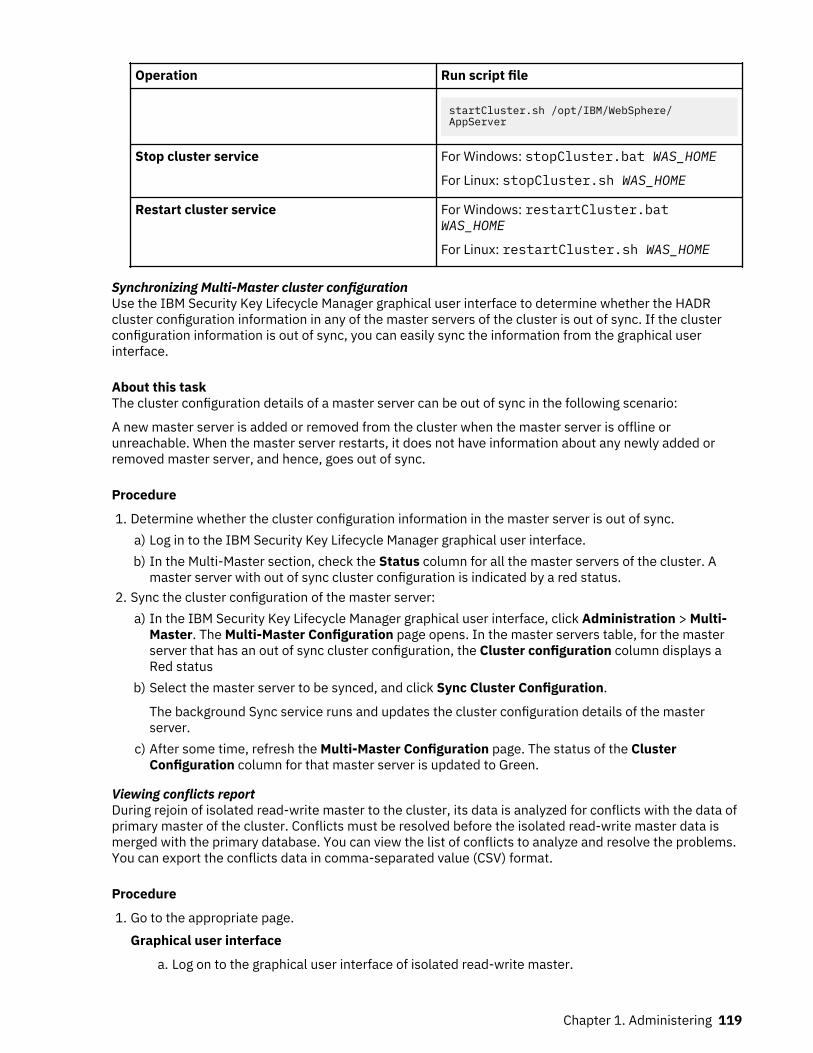
Operation Run script file
startCluster.sh /opt/IBM/WebSphere/AppServer
Stop cluster service For Windows: stopCluster.bat WAS_HOME
For Linux: stopCluster.sh WAS_HOME
Restart cluster service For Windows: restartCluster.batWAS_HOME
For Linux: restartCluster.sh WAS_HOME
Synchronizing Multi-Master cluster configurationUse the IBM Security Key Lifecycle Manager graphical user interface to determine whether the HADRcluster configuration information in any of the master servers of the cluster is out of sync. If the clusterconfiguration information is out of sync, you can easily sync the information from the graphical userinterface.
About this taskThe cluster configuration details of a master server can be out of sync in the following scenario:
A new master server is added or removed from the cluster when the master server is offline orunreachable. When the master server restarts, it does not have information about any newly added orremoved master server, and hence, goes out of sync.
Procedure
1. Determine whether the cluster configuration information in the master server is out of sync.a) Log in to the IBM Security Key Lifecycle Manager graphical user interface.b) In the Multi-Master section, check the Status column for all the master servers of the cluster. A
master server with out of sync cluster configuration is indicated by a red status.2. Sync the cluster configuration of the master server:
a) In the IBM Security Key Lifecycle Manager graphical user interface, click Administration > Multi-Master. The Multi-Master Configuration page opens. In the master servers table, for the masterserver that has an out of sync cluster configuration, the Cluster configuration column displays aRed status
b) Select the master server to be synced, and click Sync Cluster Configuration.
The background Sync service runs and updates the cluster configuration details of the masterserver.
c) After some time, refresh the Multi-Master Configuration page. The status of the ClusterConfiguration column for that master server is updated to Green.
Viewing conflicts reportDuring rejoin of isolated read-write master to the cluster, its data is analyzed for conflicts with the data ofprimary master of the cluster. Conflicts must be resolved before the isolated read-write master data ismerged with the primary database. You can view the list of conflicts to analyze and resolve the problems.You can export the conflicts data in comma-separated value (CSV) format.
Procedure
1. Go to the appropriate page.Graphical user interface
a. Log on to the graphical user interface of isolated read-write master.
Chapter 1. Administering 119
b. Click the Join back this master to Multi-Master cluster link in the notification area on the IBMSecurity Key Lifecycle Manager welcome page.
c. On the Confirm dialog, read the confirmation message before you rejoin master to the cluster.d. Click OK to run the rejoin process.
REST interface
a. Open a REST client.b. Obtain a unique user authentication identifier to access IBM Security Key Lifecycle Manager
REST services. For more information about the authentication process, see “Authenticationprocess for REST services” on page 239.
c. To run Join Back Cluster REST Service, send the HTTP POST request. Pass the userauthentication identifier that you obtained in Step b along with the request message as shownin the following example.
GET https://localhost:<port>/SKLM/rest/v1/ckms/config/nodes/joinBackTheClusterContent-Type: application/jsonAccept : application/jsonAuthorization: SKLMAuth userAuthId=139aeh34567mAccept-Language : en
2. If any conflicts arise during the rejoin process, a list of conflicts is displayed in the "Conflicts with MMCluster" window.
3. To export the conflicts data to a file in comma-separated values (CSV) format, click Export ConflictReport.
What to do next
You must resolve the conflicts before the isolated read-write master data is merged with the primarydatabase. You can use the following REST services to resolve conflicts.
• Change Name REST Service• Change Certificate Alias REST Service• Change History REST Service• Renew Key Alias REST Service
Configuring IBM Security Key Lifecycle ManagerDepending on your need, you can modify the default settings in IBM Security Key Lifecycle Manager.
Creating a server certificateYou can specify the self-signed certificate to be used as server communication certificate. Alternatively,you can create requests for certificates and manually send the request to a certificate authority (CA) forsigning.
About this task
For example, you can use certificates to secure the communication between IBM Security Key LifecycleManager and a tape library. The generated certificate request files reside in the <SKLM_HOME> directory.A sample certificate request file: C:\Program Files\IBM\WebSphere\AppServer\products\sklm\171029122037–sslcert001.csr.
Your role must have the permission to the configure action to create an SSL or KMIP certificate.
Before you begin, consider the following points:
• Whether you can use self-signed certificates during a phase in your project such as a test phase.• The time interval that is needed to receive a CA-issued certificate after a request is sent. You must
manually send a certificate request to the issuing authority.
120 IBM Security Key Lifecycle Manager : Administering

• Whether your site requires partner certificates for use with business partners, vendors, or for disasterrecovery purposes.
• The customary setting in days for a certificate validity interval.
Procedure
• Using graphical user interfacea) Log in to the graphical user interface. Click IBM Security Key Lifecycle Manager > Configuration >
SSL/KMIP.b) Select whether to generate a self-signed certificate, request a certificate from a third-party
provider, or use an existing certificate from the keystore.c) Specify values for the required and optional fields, and click OK.
Review and complete the steps under the Next steps section.• Using REST interface
a) Open a REST client.b) Obtain a unique user authentication identifier to access IBM Security Key Lifecycle Manager REST
services. For more information about the authentication process, see “Authentication process forREST services” on page 239.
c) Run Certificate Generate Request REST Service.Example 1: Create a self-signed certificate:
POST https://localhost:<port>/SKLM/rest/v1/certificates{"type":"selfsigned","alias":"sklmCertificate","cn":"sklm","ou":"sales","o":"myCompanyName","usage":"3592","country":"US","validity":"999", " algorithm ": " RSA " }
Example 2: Obtain a certificate from a certificate authority:
POST https://localhost:<port>/SKLM/rest/v1/certificates{"type":"certreq","alias":"sklmCert","cn":"sklm","ou":"sales","o":"myCompanyName","usage":"3592","country":"US","validity":"999","fileName":"myCertRequest1.crt","algorithm":"ECDSA"}
• Using command-line interfacea) Go to the <WAS_HOME>/bin directory.
For example:Windows
cd drive:\Program Files\IBM\WebSphere\AppServer\binLinux
cd /opt/IBM/WebSphere/AppServer/binb) Start the wsadmin interface by using an authorized user ID, such as SKLMAdmin.
For example,Windows
wsadmin.bat -username SKLMAdmin -password mypwd -lang jython
Linux
./wsadmin.sh -username SKLMAdmin -password mypwd -lang jython
c) Run the tklmCertCreate command.
Example 1: Create a self-signed certificate:
print AdminTask.tklmCertCreate ('[-type selfsigned -alias sklmSSLCertificate -cn sklmssl -ou accounting -o myCompanyName
Chapter 1. Administering 121
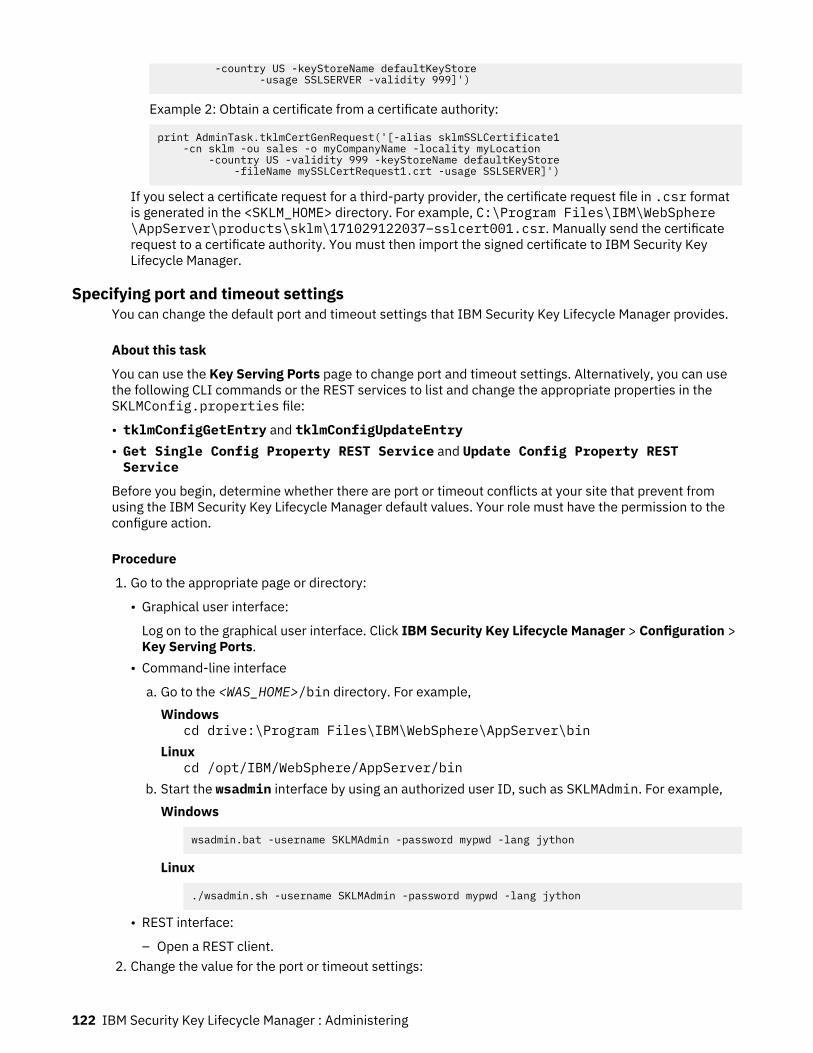
-country US -keyStoreName defaultKeyStore -usage SSLSERVER -validity 999]')
Example 2: Obtain a certificate from a certificate authority:
print AdminTask.tklmCertGenRequest('[-alias sklmSSLCertificate1 -cn sklm -ou sales -o myCompanyName -locality myLocation -country US -validity 999 -keyStoreName defaultKeyStore -fileName mySSLCertRequest1.crt -usage SSLSERVER]')
If you select a certificate request for a third-party provider, the certificate request file in .csr formatis generated in the <SKLM_HOME> directory. For example, C:\Program Files\IBM\WebSphere\AppServer\products\sklm\171029122037–sslcert001.csr. Manually send the certificaterequest to a certificate authority. You must then import the signed certificate to IBM Security KeyLifecycle Manager.
Specifying port and timeout settingsYou can change the default port and timeout settings that IBM Security Key Lifecycle Manager provides.
About this task
You can use the Key Serving Ports page to change port and timeout settings. Alternatively, you can usethe following CLI commands or the REST services to list and change the appropriate properties in theSKLMConfig.properties file:
• tklmConfigGetEntry and tklmConfigUpdateEntry• Get Single Config Property REST Service and Update Config Property RESTService
Before you begin, determine whether there are port or timeout conflicts at your site that prevent fromusing the IBM Security Key Lifecycle Manager default values. Your role must have the permission to theconfigure action.
Procedure
1. Go to the appropriate page or directory:
• Graphical user interface:
Log on to the graphical user interface. Click IBM Security Key Lifecycle Manager > Configuration >Key Serving Ports.
• Command-line interface
a. Go to the <WAS_HOME>/bin directory. For example,Windows
cd drive:\Program Files\IBM\WebSphere\AppServer\binLinux
cd /opt/IBM/WebSphere/AppServer/binb. Start the wsadmin interface by using an authorized user ID, such as SKLMAdmin. For example,
Windows
wsadmin.bat -username SKLMAdmin -password mypwd -lang jython
Linux
./wsadmin.sh -username SKLMAdmin -password mypwd -lang jython
• REST interface:
– Open a REST client.2. Change the value for the port or timeout settings:
122 IBM Security Key Lifecycle Manager : Administering
• In the graphical user interface, change one or more of these settings, and then click OK:TCP port
IBM Security Key Lifecycle Manager uses default port 3801. Values can range from 1 to 65535.The value that you set also changes the value of the TransportListener.tcp.port propertyin the SKLMConfig.properties file. You must ensure that the port is not already in use byanother application.
TCP timeout (in minutes)IBM Security Key Lifecycle Manager uses a default timeout value of 10 minutes. Values canrange from 1 to 120. The value that you set also changes the value of theTransportListener.tcp.timeout property in the SKLMConfig.properties file.
SSL portIBM Security Key Lifecycle Manager uses default port 1441. Values can range from 1 to 65535.The value that you set also changes the value of the TransportListener.ssl.port propertyin the SKLMConfig.properties file.
SSL timeout (in minutes)IBM Security Key Lifecycle Manager uses a default timeout value of 10 minutes. Values canrange from 1 to 120. This configuration parameter is associated with the value of theTransportListener.ssl.timeout property in the SKLMConfig.properties file.
KMIP SSL portKMIP uses default port 5696.Values can range from 1 to 65535. This configuration parameter isassociated with the value of the KMIPListener.ssl.port property in theSKLMConfig.properties file.
IBM Security Key Lifecycle Manager agent portAgent uses default port 60015 to communicate with IBM Security Key Lifecycle Manager server.You can update the default agent port number only when the IBM Security Key LifecycleManager instance is not configured for multi-master setup.
• Command-line interface:
a. Type the tklmConfigGetEntry command on one line to get the current value of the targetproperty in the SKLMConfig.properties file. For example, type on one line:
wsadmin>print AdminTask.tklmConfigGetEntry ('[-name TransportListener.tcp.port]')
An example response might be:
3801
b. Specify the required change. For example, to specify a different TCP port number, type on oneline:
print AdminTask.tklmConfigUpdateEntry ('[-name TransportListener.tcp.port -value 3802]')
• REST interface:
a. Obtain a unique user authentication identifier to access IBM Security Key Lifecycle Manager RESTservices. For more information about the authentication process, see “Authentication process forREST services” on page 239.
b. To run Get Single Config Property REST Service, send the HTTP GET request. Pass theuser authentication identifier that you obtained in Step a along with the request message asshown in the following example.Service request
GET https://localhost:<port>/SKLM/rest/v1/configProperties/TransportListener.tcp.portContent-Type: application/jsonAccept: application/json
Chapter 1. Administering 123
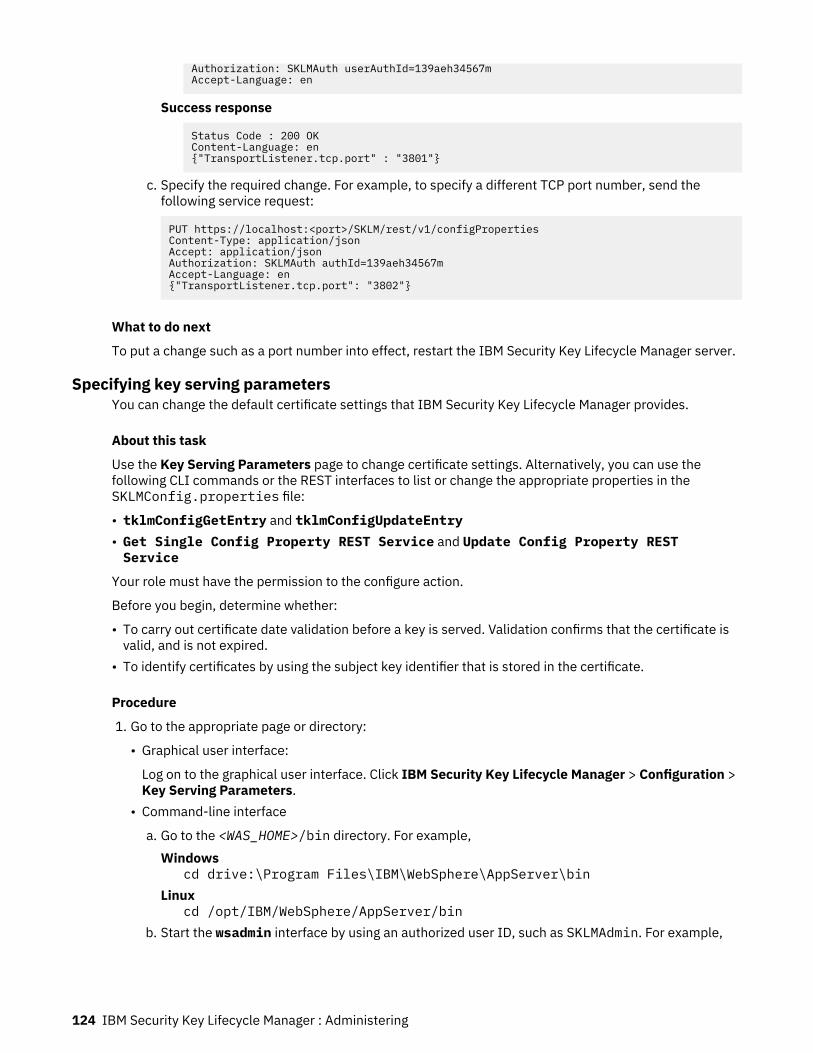
Authorization: SKLMAuth userAuthId=139aeh34567mAccept-Language: en
Success response
Status Code : 200 OKContent-Language: en{"TransportListener.tcp.port" : "3801"}
c. Specify the required change. For example, to specify a different TCP port number, send thefollowing service request:
PUT https://localhost:<port>/SKLM/rest/v1/configPropertiesContent-Type: application/jsonAccept: application/jsonAuthorization: SKLMAuth authId=139aeh34567mAccept-Language: en{"TransportListener.tcp.port": "3802"}
What to do next
To put a change such as a port number into effect, restart the IBM Security Key Lifecycle Manager server.
Specifying key serving parametersYou can change the default certificate settings that IBM Security Key Lifecycle Manager provides.
About this task
Use the Key Serving Parameters page to change certificate settings. Alternatively, you can use thefollowing CLI commands or the REST interfaces to list or change the appropriate properties in theSKLMConfig.properties file:
• tklmConfigGetEntry and tklmConfigUpdateEntry• Get Single Config Property REST Service and Update Config Property RESTService
Your role must have the permission to the configure action.
Before you begin, determine whether:
• To carry out certificate date validation before a key is served. Validation confirms that the certificate isvalid, and is not expired.
• To identify certificates by using the subject key identifier that is stored in the certificate.
Procedure
1. Go to the appropriate page or directory:
• Graphical user interface:
Log on to the graphical user interface. Click IBM Security Key Lifecycle Manager > Configuration >Key Serving Parameters.
• Command-line interface
a. Go to the <WAS_HOME>/bin directory. For example,Windows
cd drive:\Program Files\IBM\WebSphere\AppServer\binLinux
cd /opt/IBM/WebSphere/AppServer/binb. Start the wsadmin interface by using an authorized user ID, such as SKLMAdmin. For example,
124 IBM Security Key Lifecycle Manager : Administering
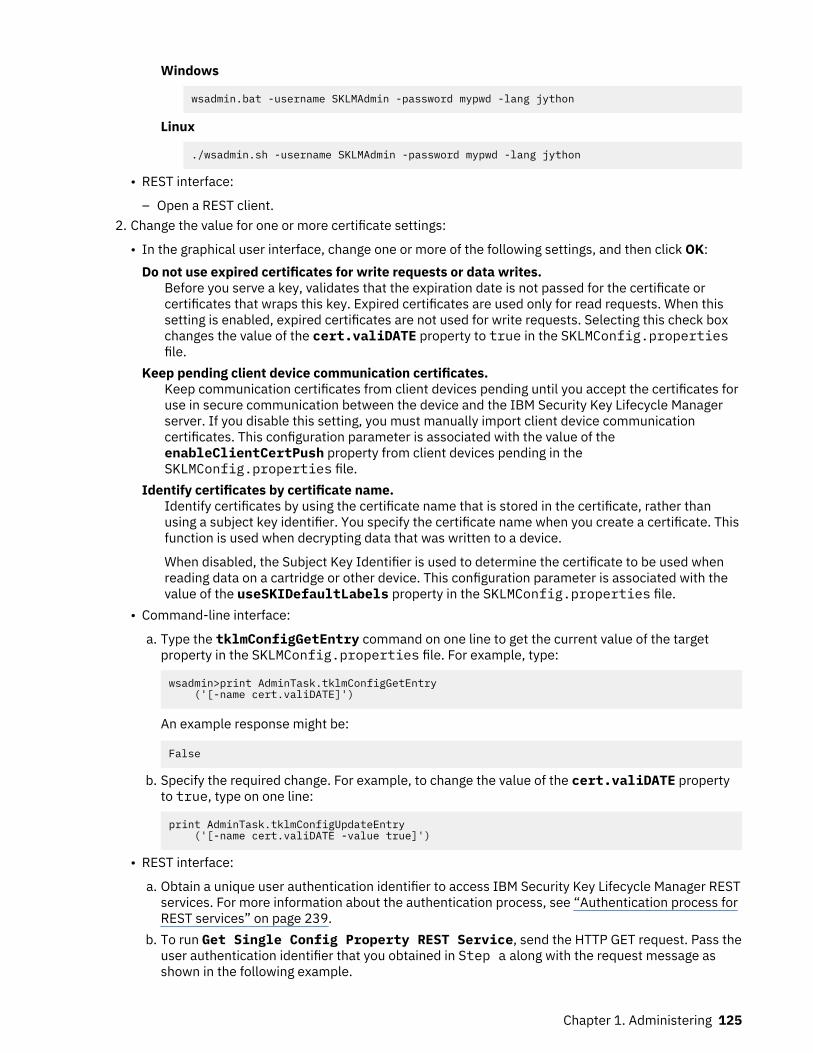
Windows
wsadmin.bat -username SKLMAdmin -password mypwd -lang jython
Linux
./wsadmin.sh -username SKLMAdmin -password mypwd -lang jython
• REST interface:
– Open a REST client.2. Change the value for one or more certificate settings:
• In the graphical user interface, change one or more of the following settings, and then click OK:Do not use expired certificates for write requests or data writes.
Before you serve a key, validates that the expiration date is not passed for the certificate orcertificates that wraps this key. Expired certificates are used only for read requests. When thissetting is enabled, expired certificates are not used for write requests. Selecting this check boxchanges the value of the cert.valiDATE property to true in the SKLMConfig.propertiesfile.
Keep pending client device communication certificates.Keep communication certificates from client devices pending until you accept the certificates foruse in secure communication between the device and the IBM Security Key Lifecycle Managerserver. If you disable this setting, you must manually import client device communicationcertificates. This configuration parameter is associated with the value of theenableClientCertPush property from client devices pending in theSKLMConfig.properties file.
Identify certificates by certificate name.Identify certificates by using the certificate name that is stored in the certificate, rather thanusing a subject key identifier. You specify the certificate name when you create a certificate. Thisfunction is used when decrypting data that was written to a device.
When disabled, the Subject Key Identifier is used to determine the certificate to be used whenreading data on a cartridge or other device. This configuration parameter is associated with thevalue of the useSKIDefaultLabels property in the SKLMConfig.properties file.
• Command-line interface:
a. Type the tklmConfigGetEntry command on one line to get the current value of the targetproperty in the SKLMConfig.properties file. For example, type:
wsadmin>print AdminTask.tklmConfigGetEntry ('[-name cert.valiDATE]')
An example response might be:
False
b. Specify the required change. For example, to change the value of the cert.valiDATE propertyto true, type on one line:
print AdminTask.tklmConfigUpdateEntry ('[-name cert.valiDATE -value true]')
• REST interface:
a. Obtain a unique user authentication identifier to access IBM Security Key Lifecycle Manager RESTservices. For more information about the authentication process, see “Authentication process forREST services” on page 239.
b. To run Get Single Config Property REST Service, send the HTTP GET request. Pass theuser authentication identifier that you obtained in Step a along with the request message asshown in the following example.
Chapter 1. Administering 125
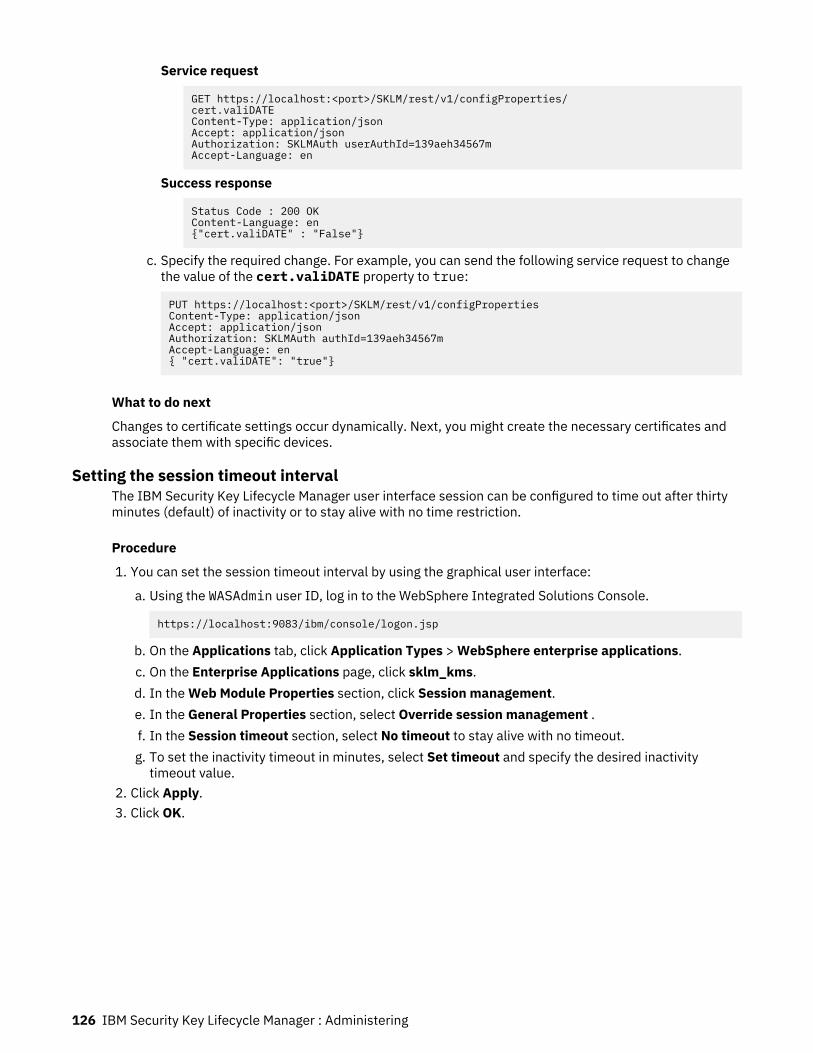
Service request
GET https://localhost:<port>/SKLM/rest/v1/configProperties/cert.valiDATEContent-Type: application/jsonAccept: application/jsonAuthorization: SKLMAuth userAuthId=139aeh34567mAccept-Language: en
Success response
Status Code : 200 OKContent-Language: en{"cert.valiDATE" : "False"}
c. Specify the required change. For example, you can send the following service request to changethe value of the cert.valiDATE property to true:
PUT https://localhost:<port>/SKLM/rest/v1/configPropertiesContent-Type: application/jsonAccept: application/jsonAuthorization: SKLMAuth authId=139aeh34567mAccept-Language: en{ "cert.valiDATE": "true"}
What to do next
Changes to certificate settings occur dynamically. Next, you might create the necessary certificates andassociate them with specific devices.
Setting the session timeout intervalThe IBM Security Key Lifecycle Manager user interface session can be configured to time out after thirtyminutes (default) of inactivity or to stay alive with no time restriction.
Procedure
1. You can set the session timeout interval by using the graphical user interface:
a. Using the WASAdmin user ID, log in to the WebSphere Integrated Solutions Console.
https://localhost:9083/ibm/console/logon.jsp
b. On the Applications tab, click Application Types > WebSphere enterprise applications.c. On the Enterprise Applications page, click sklm_kms.d. In the Web Module Properties section, click Session management.e. In the General Properties section, select Override session management .f. In the Session timeout section, select No timeout to stay alive with no timeout.g. To set the inactivity timeout in minutes, select Set timeout and specify the desired inactivity
timeout value.2. Click Apply.3. Click OK.
126 IBM Security Key Lifecycle Manager : Administering
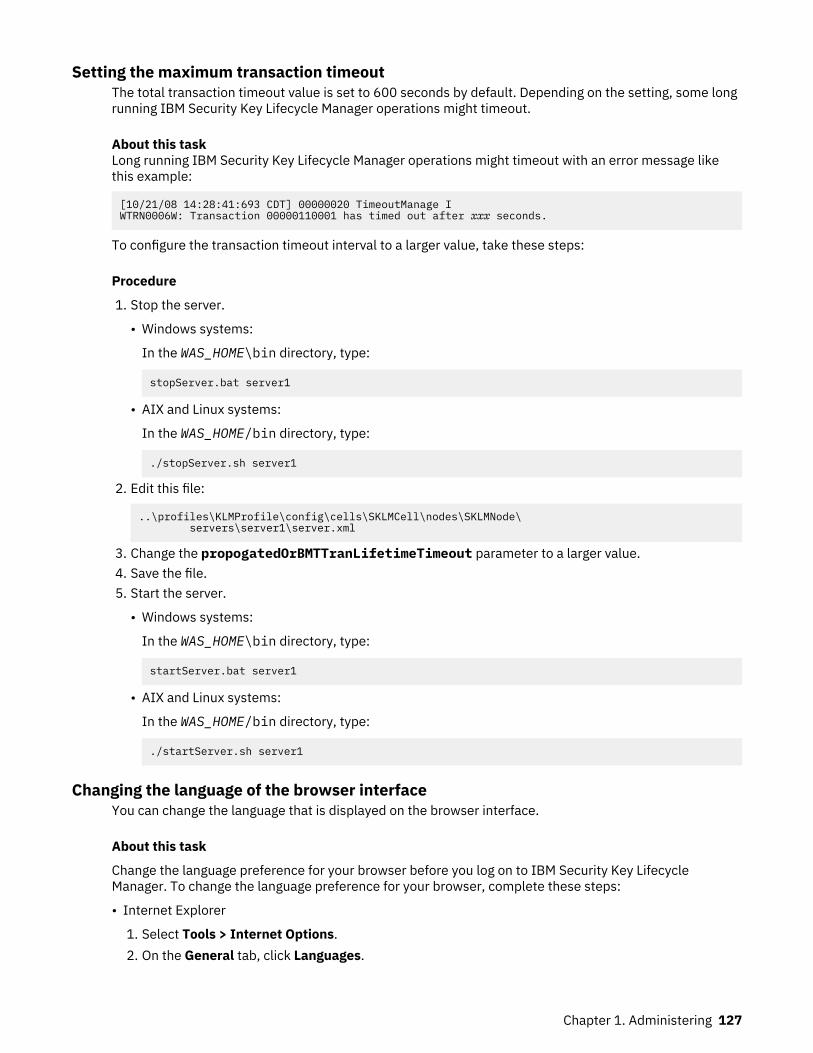
Setting the maximum transaction timeoutThe total transaction timeout value is set to 600 seconds by default. Depending on the setting, some longrunning IBM Security Key Lifecycle Manager operations might timeout.
About this taskLong running IBM Security Key Lifecycle Manager operations might timeout with an error message likethis example:
[10/21/08 14:28:41:693 CDT] 00000020 TimeoutManage I WTRN0006W: Transaction 00000110001 has timed out after xxx seconds.
To configure the transaction timeout interval to a larger value, take these steps:
Procedure
1. Stop the server.
• Windows systems:
In the WAS_HOME\bin directory, type:
stopServer.bat server1
• AIX and Linux systems:
In the WAS_HOME/bin directory, type:
./stopServer.sh server1
2. Edit this file:
..\profiles\KLMProfile\config\cells\SKLMCell\nodes\SKLMNode\ servers\server1\server.xml
3. Change the propogatedOrBMTTranLifetimeTimeout parameter to a larger value.4. Save the file.5. Start the server.
• Windows systems:
In the WAS_HOME\bin directory, type:
startServer.bat server1
• AIX and Linux systems:
In the WAS_HOME/bin directory, type:
./startServer.sh server1
Changing the language of the browser interfaceYou can change the language that is displayed on the browser interface.
About this task
Change the language preference for your browser before you log on to IBM Security Key LifecycleManager. To change the language preference for your browser, complete these steps:
• Internet Explorer
1. Select Tools > Internet Options.2. On the General tab, click Languages.
Chapter 1. Administering 127
3. Select a language and click OK. You might need to first add a language and move it up to the top ofthe list of languages.
4. Restart the browser.• Firefox
1. Select Tools > Options. Then, click the Content icon.2. On the Content tab, in the Languages section, click Choose.3. Select a language and click OK. You might need to first add a language and move it up to the top of
the list of languages.4. On the Options dialog, click OK again.5. Restart the browser.
Configuring securityConfigure IBM Security Key Lifecycle Manager to work with various security standards to meet thespecified security requirements for encryption.
Truststore configurationThe IBM Security Key Lifecycle Manager truststore stores the trusted certificates and the device rootcertificates that are used for secure communication between IBM Security Key Lifecycle Manager and thedevices.
The installation of IBM Security Key Lifecycle Manager creates the truststore filetklmTruststore.jceks at <WAS_HOME>\products\sklm\keystore.Windows
C:\Program Files\IBM\WebSphere\AppServer\products\sklm\keystoreLinux
/opt/IBM/WebSphere/AppServer/products/sklm/keystore
You can add the device root certificate to the trust list by adding it to the truststore. When the device rootcertificate is added to the truststore, all devices with certificates that are signed by this root certificate areautomatically becomes trusted. Adding device root certificate eliminates the need to import devicecertificate to the client device communication certificate list to establish SSL/TLS communication withIBM Security Key Lifecycle Manager server.
You can use IBM Security Key Lifecycle Manager graphical user interface, command line interface, andREST interface to manage certificates in the truststore.
You can run the following actions on the certificates:
• Add a certificate to the truststore.• View the certificates in the truststore.• Delete certificates from the truststore.
Adding a certificate to the truststoreYou might add a certificate from a certificate file that is in DER or base64 format to the IBM Security KeyLifecycle Manager internal truststore. The certificate is used for communication between IBM SecurityKey Lifecycle Manager and the device that identifies itself by using this certificate or the root certificatefor this certificate.
About this task
You can use the Add Certificate dialog, tklmTrustStoreCertAdd command, or TruststoreCertificate Add REST Service to add a certificate to the IBM Security Key Lifecycle Managertruststore. Your user ID must have the klmSecurityOfficer role.
128 IBM Security Key Lifecycle Manager : Administering

Procedure
1. Go to the appropriate page or directory.
• Graphical user interface
a. Log on to the graphical user interface.b. Click IBM Security Key Lifecycle Manager > Configuration > Truststore.c. On the Truststore page, click Add.
• Command-line interface
a. Go to the <WAS_HOME>/bin directory. For example,Windows
cd drive:\Program Files\IBM\WebSphere\AppServer\binLinux
cd /opt/IBM/WebSphere/AppServer/binb. Start the wsadmin interface by using an authorized user ID, such as SKLMAdmin. For example,
Windows
wsadmin.bat -username SKLMAdmin -password mypwd -lang jython
Linux
./wsadmin.sh -username SKLMAdmin -password mypwd -lang jython
• REST interface
– Open a REST client.2. Add a certificate from a certificate file that is in DER or base64 format to the truststore.
• Graphical user interface
a. In the Certificate alias field, specify alias name for the certificate.b. Click Browse to specify the certificate file location under <SKLM_DATA> directory, for example,C:\Program Files\IBM\WebSphere\AppServer\products\sklm\data. For the definitionof <SKLM_DATA>, see “Definitions for HOME and other directory variables” on page 35.
c. Select the certificate file format such as DER or base64.d. Click Add Certificatre.
• Command-line interface
Type tklmTrustStoreCertAdd to add a certificate file to the truststore. For example, to add acertificate file in DER format, run the following command.
print AdminTask.tklmTrustStoreCertAdd ('[-fileName d:\\mypath\\mycertfilename.der -format DER -alias myCertAlias]')
• REST interface
Use Truststore Certificate Add REST Service to add a certificate. For example, you cansend the following HTTP request.
PUT https://localhost:<port>/SKLM/rest/v2/trustStoreCertificates/addCertToTrustStoreContent-Type: application/jsonAccept: application/jsonAuthorization: SKLMAuth userAuthId=139aeh34567m{"certFile":"C:\\Program Files\\IBM\\WebSphere\\AppServer\\products\\sklm\\data\\clientsslcert.cer","certFormat":"DER","certAlias":"myCert"}
Chapter 1. Administering 129

Deleting a certificate from the truststoreYou might delete a certificate that is in the IBM Security Key Lifecycle Manager internal truststore. Forexample, you might delete a certificate for which a business needs no longer exists.
About this task
You can use the Delete dialog, tklmTrustStoreCertDelete command, or TruststoreCertificate Delete REST Service to delete a certificate from the truststore. Your user ID musthave the klmSecurityOfficer role.
Procedure
1. Go to the appropriate page or directory.
• Graphical user interface
a. Log on to the graphical user interface.b. Click IBM Security Key Lifecycle Manager > Configuration > Truststore.c. On the Truststore page, select a certificate.d. Click Delete.e. Alternatively, right-click a certificate on the table and then select Delete.
• Command-line interface
a. Go to the <WAS_HOME>/bin directory. For example,Windows
cd drive:\Program Files\IBM\WebSphere\AppServer\binLinux
cd /opt/IBM/WebSphere/AppServer/binb. Start the wsadmin interface by using an authorized user ID, such as SKLMAdmin. For example,
Windows
wsadmin.bat -username SKLMAdmin -password mypwd -lang jython
Linux
./wsadmin.sh -username SKLMAdmin -password mypwd -lang jython
• REST interface
– Open a REST client.2. Delete the certificate from the truststore.
• Graphical user interface
On the Confirm dialog, read the confirmation message before you delete the certificate. Click OK.• Command-line interface
Use the tklmTrustStoreCertList command to find a certificate, andtklmTrustStoreCertDelete command to delete a certificate from the truststore. To find thecertificate, run the following command.
print AdminTask.tklmTrustStoreCertList ('[-alias myCertAlias]')
To delete a certificate from the truststore, run the following command.
print AdminTask.tklmTrustStoreCertDelete ('[-alias myCertAlias]')
• REST interface
130 IBM Security Key Lifecycle Manager : Administering
Use Truststore Certificate List REST Service to find a certificate and TruststoreCertificate Delete REST Service to delete a certificate from the truststore. For example,you can send the following HTTP requests by using a REST client.
GET https://localhost:<port>/SKLM/rest/v1/trustStoreCertificates?alias=myCertAliasContent-Type: application/jsonAccept : application/jsonAuthorization: SKLMAuth userAuthId=139aeh34567m
DELETE https://localhost:<port>/SKLM/rest/v2/trustStoreCertificates?alias=myCertAliasContent-Type: application/jsonAccept: application/jsonAuthorization: SKLMAuth userAuthId=139aeh34567m
Hardware Security Module usage in IBM Security Key Lifecycle ManagerYou can use Hardware Security Module (HSM) for storing the master key to protect all passwords that arestored in the database.
IBM Security Key Lifecycle Manager uses the IBM PKCS11 Cryptographic Provider, and supports thecryptographic cards that the provider supports.
The commonly supported cryptographic cards are as follows:
• Gemalto/SafeNet Luna SA• Thales nShield Connect• IBM 4765 PCIe Cryptographic Coprocessor
For a complete list of supported cryptographic cards, see IBM Security Key Lifecycle Manager SupportMatrix.
Note:
• You can use Gemalto/SafeNet Luna SA and IBM 4765 PCIe Cryptographic Coprocessoronly when the keystore is not defined in IBM Security Key Lifecycle Manager. These cards do not allowimport of keys from outside.
• IBM 4765 PCIe Cryptographic Coprocessor is supported only for the following PKCS#11 cryptooperations:
– Convert an AES 128-bit or 256-bit software key to an AES hardware (PKCS#11) key– Generate an AES 128-bit or 256-bit key– Encrypt and decrypt data by using an AES key and an AES/ECB/NoPadding cipher– Store and retrieve an AES key to and from a PKCS11IMPLKS (PKCS#11) keystore
Configuring HSM
You can configure HSM for the new and existing installations of the product. To do so:
1. On the IBM Security Key Lifecycle Manager server, create an HSM configuration file. You can use thesample HSM configuration file for reference.
2. Define the following parameters in the configuration file:pkcs11.pin, pkcs11.config,useMasterKeyInHSM.
For more information, see “Configuring HSM parameters” on page 132.3. If you are configuring HSM on an existing installation, run the “Master Key REST Service” on page 240
to move the master key from the Java keystore to HSM.
Validating the HSM installationAfter you install HSM as per the instructions from manufacturers, validate the installation with the toolsthat the HSM client provides. IBM Security Key Lifecycle Manager supports 64-bit HSM client.
• Complete the following steps to validate the HSM installation:
Chapter 1. Administering 131

– Create a symmetric key with ckdemo or kSafe.
kSafe is a tool that comes with the nCipher nShield Connect 1500 card. ckdemo comes withthe SafeNet Luna SA 4.5 card, SafeNet Luna SA 5.0 card, and SafeNet Luna SA 6.1card.
– List the key.– Delete the key.
• Ensure that the nCipher nShield Connect 1500 card requires that the cknfastrc file contain thefollowing configuration:
CKNFAST_OVERRIDE_SECURITY_ASSURANCES=import;
Note: If the cknfastrc file does not exist on your system, create the file and configure it. Save this filein the location that is mentioned in the HSM documentation.
• IBM Security Key Lifecycle Manager backup or replication does not back up the master key when it isplaced in the HSM. To back up the HSM, follow the instructions in HSM documentation. You must backup the HSM because any master key loss might results in loss of all keys in IBM Security Key LifecycleManager.
• Use the SafeNet Luna SA 4.5 card, SafeNet Luna SA 5.0 card, and SafeNet Luna SA 6.1card only when the keystore is not defined in IBM Security Key Lifecycle Manager. These cards do notallow import of keys from outside.
• To clone IBM Security Key Lifecycle Manager, the HSM on the different systems must use the samemaster key. If you are using a network attached HSM, ensure that all your clients for HSM are pointingto the same area on the HSM network.
Configuring HSM parametersYou must define the pkcs11.pin, pkcs11.config, and useMasterKeyInHSM configurationparameters to configure Hardware Security Module.
Procedure
1. Set up the HSM as per the instructions from HSM manufacturers.2. Add the pkcs11.pin, pkcs11.config, and useMasterKeyInHSM parameters to the IBM Security
Key Lifecycle Manager configuration file. You can use the following CLI command or REST interface toadd the parameter:REST interface
PUT https://localhost:<port>/SKLM/rest/v1/configProperties{ "pkcs11.pin" : "<hsm pin>"}
PUT https://localhost:<port>/SKLM/rest/v1/configProperties{ "pkcs11.config" : "<hsm config file>"}
PUT https://localhost:<port>/SKLM/rest/v1/configProperties{ "useMasterKeyInHSM" : "<true | false>"}
Note: <hsm pin> is the PIN for HSM. <hsm config file> is the full path and file name to the HSMconfiguration file. For example: C:\Program Files\IBM\WebSphere\AppServer\sklm\config\LunaSA.cfg.
Command-line interface
print AdminTask.tklmConfigUpdateEntry('[-name pkcs11.pin -value <hsm pin>]')
print AdminTask.tklmConfigUpdateEntry('[-name pkcs11.config -value <hsm config file>]')
132 IBM Security Key Lifecycle Manager : Administering

print AdminTask.tklmConfigUpdateEntry('[-name useMasterKeyInHSM -value <true | false>]')
3. Restart IBM Security Key Lifecycle Manager.
Sample HSM configuration filesYou can use one of the sample HSM configuration files to create one on the IBM Security Key LifecycleManager server.
Sample HSM configuration file for Gemalto/SafeNet Luna SA
#Gemalto/SafeNet Lunaname = TKLMlibrary=C:/Program Files/LunaSA/cryptoki.dlldescription=Luna sample config
slotListIndex = 0
attributes (*, CKO_PRIVATE_KEY, *) = { CKA_SENSITIVE = true} attributes (GENERATE, CKO_SECRET_KEY, *) = { CKA_SENSITIVE = true CKA_ENCRYPT = true CKA_DECRYPT = true} attributes (IMPORT, CKO_PUBLIC_KEY, *) = { CKA_VERIFY = true}
Note: For the name parameter, you must always specify the value TKLM.
Sample HSM configuration file for nCipher nShield Connect 1500
# nCipher nShield, nForce 4000 - Generation 2 cardsname = TKLMlibrary=C:/nCipher/nfast/cknfast.dlldescription= nCipher sample config for TKLM
slotListIndex=1
attributes(*, CKO_SECRET_KEY, *) = { CKA_ENCRYPT=true CKA_DECRYPT=true CKA_SENSITIVE=true CKA_TOKEN=true}
attributes(*, CKO_PRIVATE_KEY, *) = { CKA_SIGN=true CKA_SENSITIVE=false# CKA_DERIVE=true# when using KeyAgreement CKA_DERIVE should# set to true and CKA_SIGN should set to false}
attributes(GENERATE, CKO_PUBLIC_KEY, *) = { CKA_VERIFY=true}
attributes(GENERATE, CKO_PRIVATE_KEY, CKK_RSA) = { CKA_DECRYPT=true CKA_UNWRAP=true CKA_EXTRACTABLE=true}
attributes(*, CKO_PUBLIC_KEY, CKK_RSA) = { CKA_ENCRYPT=true CKA_WRAP=true CKA_VERIFY=true} attributes(IMPORT, CKO_PRIVATE_KEY, CKK_RSA) = { CKA_EXTRACTABLE=true CKA_DECRYPT=true CKA_UNWRAP=true
Chapter 1. Administering 133
CKA_DERIVE=true}
Note: For the name parameter, you must always specify the value TKLM.
Master key managementAfter you install IBM Security Key Lifecycle Manager, an AES 256-bit master key is generated by default inthe server. This system-level master key protects key materials that are stored in the database. You canfurther enhance security by creating a master key for each device group.
Master key
You can create a new master key and refresh the system-generated one. You can also move a master keyfrom the Java keystore to Hardware Security Module (HSM) and vice versa.
Use the “Master Key REST Service” on page 240 to manage master key operations.
Device group master key
To enhance data security, IBM Security Key Lifecycle Manager supports master keys for device groups.The device group master key encrypts the cryptographic objects, such as keys and certificates, of a devicegroup. The master key encrypts this device group master key. Thus, providing a two-layered keywrapping.
You can enable master key for a device group by using the REST interface. For more information, seeEnable or Disable Master Key for Device Group REST Service.
You can refresh the device group master key. For more information, see Refresh Master Key for DeviceGroup REST Service.
Managing the IBM Security Key Lifecycle Manager master key in a Multi-Master setupThis topic explains the steps to perform the IBM Security Key Lifecycle Manager master key managementoperations in a Multi-Master cluster. All the master key management operations must be performed onthe primary master server only.
Procedure
1. Back up the primary master server.For instructions, see “Configuring backup and restore” on page 47.
2. Ensure that all the master servers in the Multi-master cluster are connected.3. Perform the master key management operations on the primary master server.
For instructions, see “Master Key REST Service” on page 240.4. On all the master servers, ensure that the value of the useMasterKeyInHSM property in theSKLMConfig.properties file is configured correctly.If the Multi-Master cluster is configured to use HSM, the value of the useMasterKeyInHSM propertymust be true.
Managing the IBM Security Key Lifecycle Manager master key in a replication setupThis topic explains the steps to perform the master key management operations in a replication setup.After you complete these steps, you can perform the replication of the master server to the clone servers.
Before you beginBack up the replication master server. For more information, see “Configuring backup and restore” onpage 47.
Procedure
1. Perform the master key management operations on the replication master server.For instructions, see “Master Key REST Service” on page 240.
134 IBM Security Key Lifecycle Manager : Administering

2. Back up the replication master server.For instructions, see “Configuring backup and restore” on page 47.
3. Copy the backup JAR file from the master server to all the clone servers.4. If the replication master server is configured to use HSM for storing the master key, ensure that all the
clone servers are also configured to use the same HSM.For instructions, see “Configuring HSM parameters” on page 132.
5. Restore the backup files on all the clone servers.For instructions, see “Restoring a backup file” on page 59.
6. On all the clone servers, log on to the IBM Security Key Lifecycle Manager graphical user interface asthe IBM Security Key Lifecycle Manager administrator.a) Click Administration > Replication.b) Select the replication role as Clone.
The replication role was changed to Master after you restored the backup files on the clone serverfrom the master server.
7. Restart the clone servers for which you changed the roles.For instructions, see “Restarting the IBM Security Key Lifecycle Manager server” on page 38.
Configuring compliance for FIPS in IBM Security Key Lifecycle ManagerYou can turn on FIPS for IBM Security Key Lifecycle Manager so that all crypto operations use theIBMJCEFIPS provider, which is FIPS 140-2 certified.
Procedure
1. Set the following property in the SKLM_HOME/config/SKLMConfig.properties file.
fips=on
Command-line interface
a. Go to the <WAS_HOME>/bin directory. For example,Windows
cd drive:\Program Files (x86)\IBM\WebSphere\AppServer\binLinux
cd /opt/IBM/WebSphere/AppServer/binb. Start the wsadmin interface by using an authorized user ID, such as SKLMAdmin. For example,
Windows
wsadmin.bat -username SKLMAdmin -password mypwd -lang jython
Linux
./wsadmin.sh -username SKLMAdmin -password mypwd -lang jython
c. Run the tklmConfigUpdateEntry command to set fips property in theSKLMConfig.properties configuration file.
print AdminTask.tklmConfigUpdateEntry ('[-name fips -value on]')
REST interface
a. Open a REST client.b. Obtain a unique user authentication identifier to access IBM Security Key Lifecycle Manager
REST services. For more information about the authentication process, see “Authenticationprocess for REST services” on page 239.
Chapter 1. Administering 135
c. Run Update Config Property REST Service to set fips property in theSKLMConfig.properties configuration file. Pass the user authentication identifier that youobtained in Step b along with the request message as shown in the following example.
PUT https://localhost:<port>/SKLM/rest/v1/configPropertiesContent-Type: application/jsonAccept : application/jsonAuthorization: SKLMAuth userAuthId=139aeh34567mAccept-Language : en{ "fips" : "on"}
2. Edit the <WAS_HOME>/java_1.7.1_32/jre/lib/security/java.security file and add theIBMJCEFIPS provider to the security providers list as shown in the following example.
Note: You must update the java.security file for the Java that is used by IBM Security KeyLifecycle Manager server.
security.provider.1=com.ibm.crypto.fips.provider.IBMJCEFIPSsecurity.provider.2=com.ibm.crypto.provider.IBMJCEsecurity.provider.3=com.ibm.jsse.IBMJSSEProvidersecurity.provider.4=com.ibm.jsse2.IBMJSSEProvider2security.provider.5=com.ibm.security.jgss.IBMJGSSProvidersecurity.provider.6=com.ibm.security.cert.IBMCertPathsecurity.provider.7=com.ibm.crypto.pkcs11.provider.IBMPKCS11security.provider.8=com.ibm.security.cmskeystore.CMSProvidersecurity.provider.9=com.ibm.security.jgss.mech.spnego.IBMSPNEGO
Note: Providers are renumbered to add the IBMJCEFIPS provider to the top of the list.3. Save the file.4. Restart the IBM Security Key Lifecycle Manager server.
Configuring IBM Security Key Lifecycle Manager for Suite B complianceYou can configure IBM Security Key Lifecycle Manager to comply with standards that are specified by theUS National Security Agency (NSA) to define security requirements for encryption.
About this task
To enable Suite B compliance in IBM Security Key Lifecycle Manager, you must configure theSKLMConfig.properties properties file with the following option.
suiteB=128|192
When you configure suiteB with the value 128 or 192, the following properties are added to theproperties file, or updated, if they already exist.
TransportListener.ssl.protocols=TLSv1.2requireSHA2Signatures=trueautoScaleSignatureHash=trueuseThisECKeySize=256(if suiteB is 128)|384(if suiteB is 192)
Procedure
1. Set the following property in the SKLM_HOME/config/SKLMConfig.properties file.
suiteB=128|192
• The value 128 specifies the 128-bit minimum level of security.• The value 192 specifies the 192-bit minimum level of security.
Command-line interface
a. Go to the WAS_HOME/bin directory. For example,Windows
cd drive:\Program Files\IBM\WebSphere\AppServer\bin
136 IBM Security Key Lifecycle Manager : Administering

Linuxcd /opt/IBM/WebSphere/AppServer/bin
b. Start the wsadmin interface by using an authorized user ID, such as SKLMAdmin. For example,Windows
wsadmin.bat -username SKLMAdmin -password mypwd -lang jython
Linux
./wsadmin.sh -username SKLMAdmin -password mypwd -lang jython
c. Run the tklmConfigUpdateEntry command to set suiteB property in theSKLMConfig.properties configuration file.
print AdminTask.tklmConfigUpdateEntry ('[-name suiteB -value 128|192]')
REST interface
a. Open a REST client.b. Obtain a unique user authentication identifier to access IBM Security Key Lifecycle Manager
REST services. For more information about the authentication process, see “Authenticationprocess for REST services” on page 239.
c. Run Update Config Property REST Service to set suiteB property in theSKLMConfig.properties configuration file. Pass the user authentication identifier that youobtained in Step b along with the request message as shown in the following example.
PUT https://localhost:port/SKLM/rest/v1/configPropertiesContent-Type: application/jsonAccept : application/jsonAuthorization: SKLMAuth userAuthId=139aeh34567mAccept-Language : en{ "suiteB" : "128|192"}
2. Restart the server.
What to do nextSelect a certificate that uses the ECDSA algorithm because Suite B compliance requires ECDSA certificatefor the SSL communication to work.
If a certificate with the ECDSA algorithm is not available, create a new certificate. For more information,see “Creating a server certificate” on page 120.
Configuring compliance for NIST SP 800-131A in IBM Security Key Lifecycle ManagerConfigure IBM Security Key Lifecycle Manager to communicate over secure sockets in compliance withthe National Institute of Standards and Technology (NIST) Special Publication (SP) 800-131A standard instrict mode.
About this task
The NIST SP 800-131A standard specifies algorithms to use to strengthen security and encryptionstrengths. In strict mode, all communication must conform to SP 800-131A.
This task uses the WASAdmin user ID on the WebSphere Integrated Solutions Console to configurecompliance for NIST SP 800-131A in IBM Security Key Lifecycle Manager.
For more information about configuring WebSphere Application Server for SP800-131 standard strictmode, see the IBM WebSphere Application Server documentation (http://www.ibm.com/support/knowledgecenter/en/SSAW57_9.0.0/com.ibm.websphere.nd.multiplatform.doc/ae/tsec_config_strictsp300.html).
Chapter 1. Administering 137
Procedure
1. Log on to WebSphere Integrated Solutions Console (https://localhost:9083/ibm/console/logon.jsp).
2. On the browser Welcome page, type the user ID WASAdmin and the password for this administrator.3. From the left navigation pane, click Security > SSL certificate and key management.4. On the SSL certificate and key management page, under Related Items, click SSL configurations.5. Click the NodeDefaultSSLSettings.6. Under the Additional Properties section, click Quality of protection (QoP) settings.7. From the Protocol list, select TLSv1.2, and under the Cipher suite settings section, in the cipher
suite groups section, select Strong, and click Update selected ciphers.8. Click OK.9. Click Save to save the configuration.
10. From the left navigation pane, click Security > SSL certificate and key management > ManageFIPS.
To run in a strict SP800-131 mode, all of the certificates that are used for SSL on the server must beconverted to certificates that comply with the SP800-131 requirements.
11. To convert certificates, under Related Items, click Convert Certificates.12. Select Strict, and choose algorithm SHA256withRSA to use for the new certificates from the list.13. Select the size 2048 bits for certificate from the New certificate key size list.
Note: If you choose an Elliptical Curve signature algorithm, they require specific sizes; you are notable to fill in a size. The correct size is used instead.
14. If no certificates are displayed in the Certificates that can not be converted frame, click Apply andOK.
If certificates are displayed in the Certificates that can not be converted frame, server is unable toconvert the certificates. Replace these certificates with ones that meet SP800-131 requirements.The server might not convert a certificate for the following reasons:
• The certificate was created by a Certificate Authority (CA)• The certificate is in a read only keystore
15. Click SSL certificate and key management > Manage FIPS.16. Select Enable SP800-131.17. Select Strict.18. Click Apply and OK.19. Click Save to save the configuration.20. Stop WebSphere Application Server.
For the steps on how to stop the server, see “Restarting the IBM Security Key Lifecycle Managerserver” on page 38.
21. In the <SKLM_HOME>/config/SKLMConfig.properties file, set theTransportListener.ssl.protocols and fips properties with these values.
TransportListener.ssl.protocols=TLSv1.2fips=on
Command-line interface
a. Go to the WAS_HOME/bin directory. For example,Windows
cd drive:\Program Files\IBM\WebSphere\AppServer\binLinux
cd /opt/IBM/WebSphere/AppServer/bin
138 IBM Security Key Lifecycle Manager : Administering

b. Start the wsadmin interface by using an authorized user ID, such as SKLMAdmin. For example,Windows
wsadmin.bat -username SKLMAdmin -password mypwd -lang jython
Linux
./wsadmin.sh -username SKLMAdmin -password mypwd -lang jython
c. Run the tklmConfigUpdateEntry command.
print AdminTask.tklmConfigUpdateEntry ('[-name TransportListener.ssl.protocols -value TLSv1.2]')
print AdminTask.tklmConfigUpdateEntry ('[-name fips -value on]')
REST interface
a. Open a REST client.b. Obtain a unique user authentication identifier to access IBM Security Key Lifecycle Manager
REST services. For more information about the authentication process, see “Authenticationprocess for REST services” on page 239.
c. Run Update Config Property REST Service. Pass the user authentication identifierthat you obtained in Step b along with the request message as shown in the followingexample.
PUT https://localhost:<port>/SKLM/rest/v1/configPropertiesContent-Type: application/jsonAccept : application/jsonAuthorization: SKLMAuth userAuthId=139aeh34567mAccept-Language : en{ "TransportListener.ssl.protocols" : "TLSv1.2"}
PUT https://localhost:<port>/SKLM/rest/v1/configPropertiesContent-Type: application/jsonAccept : application/jsonAuthorization: SKLMAuth userAuthId=139aeh34567mAccept-Language : en{ "fips" : "on"}
22. In the <WAS_HOME>/profiles/KLMProfile/properties/ssl.client.props file, update theproperties as shown here.
com.ibm.ssl.protocol=TLSv1.2com.ibm.security.useFIPS=truecom.ibm.websphere.security.FIPSLevel=SP800-131
23. Start WebSphere Application Server.
For the steps on how to start the server, see “Restarting the IBM Security Key Lifecycle Managerserver” on page 38.
Exporting and importing keysYou can enable data transfer between two IBM Security Key Lifecycle Manager servers by exporting thekeys (symmetric or private) from one server (source) and importing them into the other server (target).
Depending on the IBM Security Key Lifecycle Manager version on your server, you can use one of thefollowing methods to export and import keys:
Chapter 1. Administering 139

Table 8. Methods to export and import keys
Method How-to links
Graphical user interface • “Exporting a key by using the graphical userinterface” on page 140
• “Importing a key by using the graphical userinterface” on page 142
REST API • “Key Export REST Service” on page 325• “Key Import REST Service” on page 328
CLI command • “tklmKeyExport” on page 336• “tklmKeyImport” on page 338
Exporting a key by using the graphical user interfaceYou can export symmetric and private keys to an encrypted keystore file on an IBM Security Key LifecycleManager server. You can then import the keys from this file into another IBM Security Key LifecycleManager server to enable data transfer between these servers.
Procedure
1. Go to the appropriate page or directory.a) Log on to the graphical user interface.b) From the main menu, click Search.c) In the left Search pane, in Objects Type, select Symmetric Key or Private Key, depending on
which keys you want to search. Alternatively, you can also search for device groups whose keys youwant to export.
d) Click Search.The keys of selected key type are listed in the right pane.
2. Export the keys to a keystore file.a) From the list of keys in the right pane, select the keys that you want to export (Use CTRL to select
multiple keys), and click Export.b) In the Export Symmetric Keys or Export Private Keys window, specify a name for the keystore file
that is used to store the exported keys.c) Optional: Specify a different file location to save the keystore file. By default, the File location field
displays the default SKLM_DATA directory path, where the keystore file is saved.For example, C:\Program Files\IBM\WebSphere\AppServer\products\sklm\data.For the definition of SKLM_DATA, see “Definitions for HOME and other directory variables” on page35.
d) For symmetric key type: Specify a certificate as the key alias. The Certificate is the public key entryin the keystore that is used to encrypt the symmetric keys. Only the holder of the correspondingprivate key can access the keys.
e) For private key type: Create an encryption password.This password will be used to decrypt the keystore file while importing the keys into an IBMSecurity Key Lifecycle Manager server.
f) Click Export.
What to do next
Import the keys into the IBM Security Key Lifecycle Manager server with which you want to enable datatransfer.
140 IBM Security Key Lifecycle Manager : Administering

Related tasks“Importing a key by using the graphical user interface” on page 142You can import symmetric and private keys into an IBM Security Key Lifecycle Manager server to enabledata transfer between this server and the server from where the keys were exported. The keys to beimported must be stored in an encrypted keystore file.Related reference“Key Export REST Service” on page 325Use Key Export REST Service to export secret keys or public/private key pairs. A secret key is asymmetric key. A public/private key pair is an asymmetric key pair with a public key and a private key.
Uploading a keystore fileYou can upload a keystore file from your local file system or from a mapped drive to the IBM Security KeyLifecycle Manager server by using the graphical user interface or REST interface. You need not log in tothe server computer for the same.
Before you begin
• Ensure that your user ID has the required role (klmFileTransfer or klmSecurityOfficer) totransfer files from and to the server.
• Ensure that the keystore file to be uploaded is available on your local file system or mapped drive.• Ensure that the size of the file does not exceed the maximum size as defined in the“key.cert.fileuploadsize” on page 279 property.
You can modify the maximum size value. For more information, see “Changes to configurationproperties or database values” on page 275.
Procedure
• Using graphical user interfacea) Log in to the graphical user interface by using your credentials.b) Click the Administration tab and select Export and Import.c) Click the Import Keys tab.d) Select the type of key that you want to upload.e) Click Browse.
The Browse File dialog box opens that displays the keystore repository location, which is thedestination directory to which the file is uploaded. For example, SKLM_DATA directory.
f) Optional: To change the destination directory, select a subdirectory.You can upload the file only to the SKLM_DATA directory or its subdirectory.
g) Click Upload.h) Browse to the location where the keystore file is stored, select it, and click Open.
The file is uploaded to the SKLM_DATA folder in the server.i) To close the dialog box, click Cancel or press the Escape key.
• Using REST interfacea) Open a REST client.b) Obtain a unique user authentication identifier to access IBM Security Key Lifecycle Manager REST
services. For more information about the authentication process, see “Authentication process forREST services” on page 239.
c) Run “Upload File to Server REST Service” on page 270.
What to do next“Importing a key by using the graphical user interface” on page 142
Chapter 1. Administering 141

Importing a key by using the graphical user interfaceYou can import symmetric and private keys into an IBM Security Key Lifecycle Manager server to enabledata transfer between this server and the server from where the keys were exported. The keys to beimported must be stored in an encrypted keystore file.
Before you beginCopy the keystore file into the default SKLM_DATA directory path on the IBM Security Key LifecycleManager server where you want to import it. For example, C:\Program Files\IBM\WebSphere\AppServer\products\sklm\data. For the definition of SKLM_DATA, see “Definitions for HOME andother directory variables” on page 35.
Procedure
1. Go to the appropriate page or directory.a) Log on to the graphical user interface.b) On the Welcome page, click Administration > Export and Import > Import Keys.
2. Import a key from a keystore file.You can import one key at a time.a) Select the key type.b) Click Browse to select the keystore file to be imported.c) For symmetric key type: Select the certificate to be used to decrypt the keys in the keystore file.
Ensure that it is the same certificate that was used when you exported the key.d) For private keys: Specify the password to be used to decrypt the keys in the keystore file.
Ensure that it is the same password that was used when you exported the keys.e) Specify the key alias for the key to be imported.f) Optional: To rename the alias of the key that is imported, specify a new alias name.
You can rename the alias if the current key alias is already in use or if you want to change it.g) Select the device group in which the imported key is to be used.h) Click Import.
3. To import multiple keys, repeat Step 2 for each key.
Related tasks“Importing a key by using the graphical user interface” on page 142You can import symmetric and private keys into an IBM Security Key Lifecycle Manager server to enabledata transfer between this server and the server from where the keys were exported. The keys to beimported must be stored in an encrypted keystore file.Related reference“Key Import REST Service” on page 328Use Key Import REST Service to import secret keys or public/private key pairs. A secret key is asymmetric key. A public/private key pair is an asymmetric key pair that contains a public key and a privatekey. The private key file is in PKCS#12 format.
Managing client device certificatesIBM Security Key Lifecycle Manager provides a set of operations to manage certificates of client devicesthat communicate with IBM Security Key Lifecycle Manager. You need to import the certificate of theclient that needs to communicate with the IBM Security Key Lifecycle Manager.
For secure communication between a client device and the IBM Security Key Lifecycle Manager server,their certificates must be exchanged and saved in their respective keystore.
142 IBM Security Key Lifecycle Manager : Administering

You can define a set of certificates for client devices that IBM Security Key Lifecycle Manager server cantrust to allow secure communication between the device and the server. Certificates are used for SSL andKMIP communication.
For SSL clients, trusted client certificates may be required when SSL Authentication is set to Server/Client. For KMIP, trusted client certificates may be required for the KMIP client's authentication. SSL andKMIP certificates are shared. When you change any certificate, both the protocols are impacted.
Use the Client Device Certificates page to view all the added or imported certificates. To access thispage, after you log in to the graphical user interface, click the Advanced Configuration tab and selectClient Device Certificates. The page displays all the imported certificates in a table.
You can upload a certificate from your local file system or mapped drive to the IBM Security Key LifecycleManager server. You can import a certificate, change its trust setting, and also remove a certificate fromthe list of trusted certificates.
Client device certificate management
Table 9. Client device certificate management operations
Operation Graphical user interface REST service
Uploading a client devicecertificate to IBM Security KeyLifecycle Manager server.
“Uploading a client devicecertificate to IBM Security KeyLifecycle Manager server” onpage 145
-
Importing a client devicecertificate into the IBM SecurityKey Lifecycle Manager server.
“Importing a client devicecertificate by using the graphicaluser interface” on page 146
“Certificate Import REST Service”on page 315
Modifying a client devicecertificate.
“Modifying a client devicecertificate by using the graphicaluser interface” on page 147
“Certificate Update RESTService” on page 318
Deleting a client devicecertificate.
“Deleting a client devicecertificate by using the graphicaluser interface” on page 147
“Delete Certificate REST Service”on page 272
Accepting pending devicesUse the device pending function to accept or reject a device that contacts IBM Security Key LifecycleManager.
About this task
You can use the Pending Device Requests page or you can use several commands to accept or reject adevice that contacts IBM Security Key Lifecycle Manager. If the device belongs to the DS5000 devicefamily, and machine affinity is enabled, you might also accept or reject a relationship between a deviceand a machine. Using machine affinity, you can restrict key serving to specific device and machinecombinations.
Procedure
1. Keys are auto-generated for a device in a DS5000 device group when a pending request arrives. Carryout a backup before you accept the device to ensure that keys are backed up before served to adevice. For more information, see the administering backup and restore files.
2. Go to the appropriate page or directory.
• Graphical user interface:
Log on to the graphical user interface. From the navigation tree, click IBM Security Key LifecycleManager.
Chapter 1. Administering 143
• Command-line interface
a. Go to the <WAS_HOME>/bin directory. For example,Windows
cd drive:\Program Files\IBM\WebSphere\AppServer\binLinux
cd /opt/IBM/WebSphere/AppServer/binb. Start the wsadmin interface by using an authorized user ID, such as SKLMAdmin. For example,
Windows
wsadmin.bat -username SKLMAdmin -password mypwd -lang jython
Linux
./wsadmin.sh -username SKLMAdmin -password mypwd -lang jython
3. If you are not previously determined how to accept pending devices, set thedevice.AutoPendingAutoDiscovery attribute to a value that adds incoming devices to thepending devices list.
Specify a setting such as 2 (auto pending). All incoming devices are added to a pending list, but are notautomatically served keys upon request. You must accept or reject a device in the pending devices listbefore the device is served keys upon request. Do not use a setting of 1 (auto accept) for the DS5000device family. This setting allows generation and serving of keys to DS5000 storage servers before youbackup data.
• Graphical user interface:
a. Navigate to the Key and Device Management page for the device group of the pending devices.b. In the drop-down list at the bottom of the page, select Hold new device requests pending my
approval.• Command-line interface:
For example, for a DS5000 device, type:
print AdminTask.tklmDeviceGroupAttributeUpdate ('[-name DS5000 -attributes "{device.AutoPendingAutoDiscovery 2}"]')
4. List the pending devices.
• Graphical user interface:
Go to the Welcome page. In the Action Items area, click the pending devices link.• Command-line interface:
Type:
print AdminTask.tklmPendingDeviceList ('[-usage DS5000]')
5. Approve or reject a pending device request.
• Graphical user interface:
In the Pending Device Requests table, select a pending device and click Accept or Reject.
A pending request is listed only once for a DS5000 device that also has a machine-devicerelationship. The request appears with the table with a value for the machine ID. Accepting thepending device request also accepts the machine-device relationship.
On the Accept Device Request dialog, click Accept or Modify and Accept. If you choose to modifythe pending device information, make the necessary changes and click Accept.
• Command-line interface:
144 IBM Security Key Lifecycle Manager : Administering
– You might use one command to accept a pending DS5000 device and also the pending machine-device relationship. For example, type:
print AdminTask.tklmPendingMachineDeviceAccept ('[-deviceUUID DEVICE-7d588437-e725-48bf-a836-00a47df64e78 -machineID 3042383030303437000000000000]')
– Otherwise, you might first accept a pending device, assigning the device to the appropriate devicegroup. To accept a pending DS5000 device and later accept a machine-device relationship, forexample
a. First, type:
print AdminTask.tklmPendingDeviceAccept ('[-deviceUUID DEVICE-7d588437-e725-48bf-a836-00a47df64e78 -usage DS5000]')
b. Later, accept or reject pending relationships between a device and a machine.
1) List all of the pending devices that have a relationship with a machine ID, or all devices, if nomachine ID is specified. For example, type:
print AdminTask.tklmPendingMachineDeviceList ('[-machineID 3042383030303437000000000000]')
2) Accept or reject a pending device and machine relationship. Acceptance writes therelationship data to the IBM Security Key Lifecycle Manager data store.
print AdminTask.tklmPendingMachineDeviceAccept ('[-deviceUUID DEVICE-7d588437-e725-48bf-a836-00a47df64e78 -machineID 3042383030303437000000000000]')
What to do next
Examine the list of accepted devices. Use these commands:
• tklmDeviceList to list information about all devices of the specified device type.• tklmMachineDeviceList to list all the devices that are associated with a specific machine ID, or all
devices, if no machine ID is specified.
Uploading a client device certificate to IBM Security Key Lifecycle Manager serverYou can upload a client device certificate from your local file system or mapped drive to the IBM SecurityKey Lifecycle Manager server by using the graphical user interface or REST interface. You need not log into the server computer for the same.
Before you begin
• Ensure that your user ID has the required role (klmFileTransfer or klmSecurityOfficer) totransfer files from and to the server.
• Ensure that the certificate file to be uploaded is available on your local file system or mapped drive.• Ensure that the size of the file does not exceed the maximum size as defined in the“key.cert.fileuploadsize” on page 279 property.
You can modify the maximum size value. For more information, see “Changes to configurationproperties or database values” on page 275.
Procedure
• Using graphical user interfacea) Log in to the graphical user interface by using your credentials.b) Click the Advanced Configuration tab and select Client Device Certificates.
The Client Device Certificates page is displayed.
Chapter 1. Administering 145
c) Click Import.The Import SSL/KMIP Certificate for Clients dialog box is displayed.
d) Click Browse.The Browse File dialog box opens that displays the certificate import location, which is thedestination directory to which the file is uploaded. For example, SKLM_DATA directory.
e) Optional: To change the destination directory, select a subdirectory.You can upload the file only to the SKLM_DATA directory or its subdirectory.
f) Click Upload.g) Browse to the location where the certificate file is stored, select it, and click Open.
The file is uploaded.h) Optional: To import the certificate, select the certificate file, click Select, and click Import.
For more information, see “Importing a client device certificate by using the graphical userinterface” on page 146
i) To close the dialog box, click Cancel or press the Escape key.• Using REST interface
a) Open a REST client.b) Obtain a unique user authentication identifier to access IBM Security Key Lifecycle Manager REST
services. For more information about the authentication process, see “Authentication process forREST services” on page 239.
c) Run “Upload File to Server REST Service” on page 270.
What to do next“Importing a client device certificate by using the graphical user interface” on page 146
Importing a client device certificate by using the graphical user interfaceUse the Client Device Certificates page to import a client device certificate into the keystore of the IBMSecurity Key Lifecycle Manager server.
Before you beginEnsure that the certificate file to be imported is already uploaded to the IBM Security Key LifecycleManager server. For more information, see “Uploading a client device certificate to IBM Security KeyLifecycle Manager server” on page 145.
Procedure
1. Log in to the graphical user interface by using your credentials.2. Click the Advanced Configuration tab and select Client Device Certificates.
The Client Device Certificates page is displayed.3. Click Import.4. In the Import SSL/KMIP Certificate for Clients dialog box, specify the values:
a) Enter the name of the certificate to be imported.b) Browse to the directory path where the certificate file is stored.c) To allow the server to always trust this client certificate, select the Allow the server to trust this
certificate and communicate with the associated client device check box.By default, the client certificate is not trusted.
5. Click Import.
ResultsThe client certificate is imported for use in SSL and KMIP communication.
146 IBM Security Key Lifecycle Manager : Administering
Modifying a client device certificate by using the graphical user interfaceUse the Client Device Certificates page to modify the trust settings of a client device certificate that isalready imported into the keystore of the IBM Security Key Lifecycle Manager server.
Procedure
1. Log in to the graphical user interface by using your credentials.2. Click the Advanced Configuration tab and select Client Device Certificates.
The Client Device Certificates page is displayed that shows all the client certificates that areimported.
3. In the table, select the certificate for which you want to modify the trust settings.4. Click Modify.5. In the Modify SSL/KMIP Certificate for Clients dialog box, select or clear the Allow the server to
trust this certificate and communicate with the associated client device check box.6. Click Modify.
ResultsThe client certificate is modified.
Deleting a client device certificate by using the graphical user interfaceUse the Client Device Certificates page to delete a client device certificate that is not required.
Procedure
1. Log in to the graphical user interface by using your credentials.2. Click the Advanced Configuration tab and select Client Device Certificates.
The Client Device Certificates page is displayed that shows all the client certificates that areimported.
3. In the table, select the certificate that you want to delete.4. Click Delete.5. Review the text in the Confirm dialog box and click OK.
ResultsThe client certificate is deleted.
Managing device groupsUse the following information to manage device groups that are defined in the IBM Security Key LifecycleManager server.
Creating a device groupDepending on your organization requirements, you can create a device group to manage a subset ofdevices that have a restricted business use, such as LTO tape drives used by a single division. You mustalso create a role with a name that matches the name of the device group, including case. Name matchingis case-sensitive.
About this task
This task uses the SKLMAdmin user ID and the IBM Security Key Lifecycle Manager interface to create anextra device group.
Your user ID must have either:
• The securityOfficer role
Chapter 1. Administering 147
• Permission to the administrative actions (klmAdminDeviceGroup)
If you have the klmAdminDeviceGroup permission, you can create, view, and delete a device group. Itis not required that you first define a role for the device group. However, your other actions are limitedby the permissions that you have. For example, if you have only klmAdminDeviceGroup permission,you cannot update the attributes after you create the device group.
Procedure
1. Log on to IBM Security Key Lifecycle Manager.
• Graphical user interface:
On the browser Welcome page, type a user ID of SKLMAdmin and a password value, such asmypassword.
• Command-line interface
a. Go to the <WAS_HOME>/bin directory. For example,Windows
cd drive:\Program Files\IBM\WebSphere\AppServer\binLinux
cd /opt/IBM/WebSphere/AppServer/binb. Start the wsadmin interface by using an authorized user ID, such as SKLMAdmin. For example,
Windows
wsadmin.bat -username SKLMAdmin -password mypwd -lang jython
Linux
./wsadmin.sh -username SKLMAdmin -password mypwd -lang jython
• REST interface:
– Open a REST client.2. Navigate to the appropriate page or directory:
• Graphical user interface:
Click Advanced Configuration > Device Group.
a. In the Device Group table, click Create.b. In the Create Device Group dialog, complete the required fields and click Create.
• Command-line interface, type:
AdminTask.tklmDeviceGroupCreate('[-name myLTO -deviceFamily LTO]')
• REST interface:
a. Obtain a unique user authentication identifier to access IBM Security Key Lifecycle Manager RESTservices. For more information about the authentication process, see “Authentication process forREST services” on page 239.
b. To invoke Device Group Create REST Service, send the HTTP POST request. Pass theuser authentication identifier that you obtained in Step a along with the request message asshown in the following example.
POST https://localhost:<port>/SKLM/rest/v1/deviceGroups/newGroupContent-Type: application/jsonAccept : application/jsonAuthorization: SKLMAuth authId=139aeh34567m{"deviceFamily":"LTO","shortName":"myLTO","longName":"my companyname LTO devices"}
3. Verify that the device group exists.
148 IBM Security Key Lifecycle Manager : Administering
• Graphical user interface:
On the device group management page, scan the Device Group table to locate the device group.• Command-line interface, type:
print AdminTask.tklmDeviceGroupList ('[-name myLTO -v y]')
• REST interface:
Send the following HTTP GET request by using a REST client:
GET https://localhost:<port>/SKLM/rest/v1/deviceGroupsContent-Type: application/jsonAccept : application/jsonAuthorization: SKLMAuth authId=139aeh34567mAccept-Language : en
What to do next
Create a role with a name that matches the device group.
Creating a role for a new device groupWhen you create a new IBM Security Key Lifecycle Manager device group, also create a role for the devicegroup. Specify the same name for both the device group and the role, including case. Name matching iscase-sensitive.
About this task
You can add the role for a device group to the WebSphere Application Server by editing the admin-authz.xml configuration file.
Procedure
1. On Windows operating system, edit the <WAS_HOME>/profiles/KLMProfile/cofig/cells/SKLMCell/admin-authz.xml file by adding the following lines:
<roles xmi:id=<roleId> roleName=<deviceGroupName>/><authorizations xmi:id=<roleAssignmentId> role=<roleId/>
The values for roleId and roleAssignmentId must be unique across the roles and authorizationsthat are exists in the admin-authz.xml file.
For example, you must add the following lines if a new device group, such as MyDS5K is added:
<roles xmi:id="MyDS5K_Role" roleName="MyDS5K"/><authorizations xmi:id="MyDS5K_Role_Auth" role="MyDS5K_Role"/>
2. Restart WebSphere Application Server. You must stop the server and then restart. For instructionsabout how to stop and start the server, see “Restarting the IBM Security Key Lifecycle Manager server”on page 38.
What to do next
Next, you can specify that a user group has permissions to the new device group and the necessaryadministrative tasks, such as view or configure.
Chapter 1. Administering 149
Exporting a device groupYou can export device group data for the selected device group to an encrypted archive. Then, you canimport this device group data into another instance of IBM Security Key Lifecycle Manager acrossoperating systems.
About this task
You can use the Export Device Group dialog box to export a device group. Alternatively, you can useDevice Group Export REST Service.
Your role must have a permission to export device groups.
Note: During data migration from previous versions of IBM Security Key Lifecycle Manager, some of thecertificates might not be associated with the correct device group. As a result, it is possible that a fewcertificates are falsely shown (in UI, REST, or CLI) for a device group, such as 3592 or DS8000, eventhough the certificates do not belong to the device group. When you export such device groups, only thecertificates of the device group are exported. The falsely shown certificates are not exported.
Procedure
1. Go to the appropriate page or directory.Graphical user interface
a. Log in to the graphical user interface.b. On the Welcome page, click Administration > Export and Import. The Export/Import Device
Groups page is displayed.
Alternatively, in the Key and Device Management section, right-click a device group, andselect Export.
REST interfaceOpen a REST client.
2. Export the device group data for the selected device group to the directory you specified.Graphical user interface
a. On the Export/Import Device Groups page, click Export.b. On the Export Device Group dialog box, the Device Group field specifies the selected device
group.c. To change the device group, click Select.d. The Export repository location field displays the default <SKLM_DATA> directory path, where
the export file is saved, for example, C:\Program Files\IBM\WebSphere\AppServer\products\sklm\data. For the definition of <SKLM_DATA>, see “Definitions for HOME andother directory variables” on page 35. Click Browse to specify a export repository locationunder <SKLM_DATA> directory.
Directory path in the Export repository location field changes based on the value that is set forthe browse.root.dir property in the SKLMConfig.properties file.
e. In the Password field, specify a value for the encryption password. Ensure that you retain theencryption password for future use.
f. In the Retype password field, retype the password that you entered in the Password field.g. In the Description field, specify additional information that indicates the purpose of the device
group export file.h. Click Export.
150 IBM Security Key Lifecycle Manager : Administering
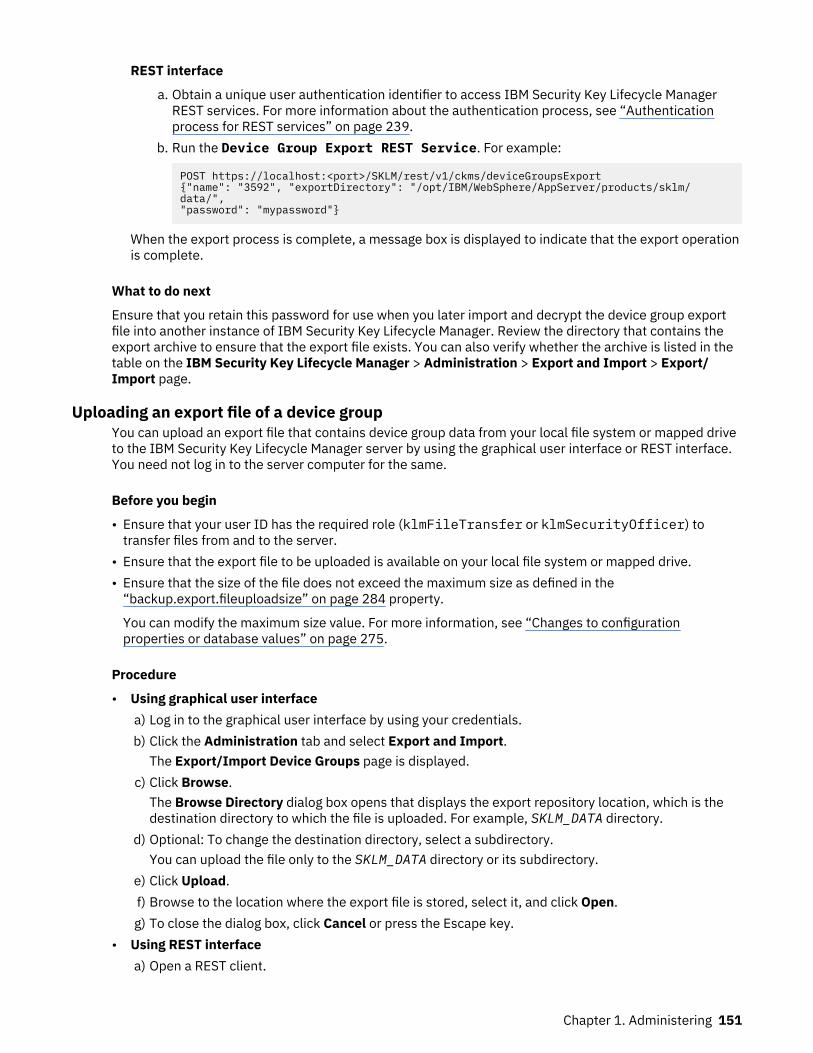
REST interface
a. Obtain a unique user authentication identifier to access IBM Security Key Lifecycle ManagerREST services. For more information about the authentication process, see “Authenticationprocess for REST services” on page 239.
b. Run the Device Group Export REST Service. For example:
POST https://localhost:<port>/SKLM/rest/v1/ckms/deviceGroupsExport{"name": "3592", "exportDirectory": "/opt/IBM/WebSphere/AppServer/products/sklm/data/", "password": "mypassword"}
When the export process is complete, a message box is displayed to indicate that the export operationis complete.
What to do next
Ensure that you retain this password for use when you later import and decrypt the device group exportfile into another instance of IBM Security Key Lifecycle Manager. Review the directory that contains theexport archive to ensure that the export file exists. You can also verify whether the archive is listed in thetable on the IBM Security Key Lifecycle Manager > Administration > Export and Import > Export/Import page.
Uploading an export file of a device groupYou can upload an export file that contains device group data from your local file system or mapped driveto the IBM Security Key Lifecycle Manager server by using the graphical user interface or REST interface.You need not log in to the server computer for the same.
Before you begin
• Ensure that your user ID has the required role (klmFileTransfer or klmSecurityOfficer) totransfer files from and to the server.
• Ensure that the export file to be uploaded is available on your local file system or mapped drive.• Ensure that the size of the file does not exceed the maximum size as defined in the“backup.export.fileuploadsize” on page 284 property.
You can modify the maximum size value. For more information, see “Changes to configurationproperties or database values” on page 275.
Procedure
• Using graphical user interfacea) Log in to the graphical user interface by using your credentials.b) Click the Administration tab and select Export and Import.
The Export/Import Device Groups page is displayed.c) Click Browse.
The Browse Directory dialog box opens that displays the export repository location, which is thedestination directory to which the file is uploaded. For example, SKLM_DATA directory.
d) Optional: To change the destination directory, select a subdirectory.You can upload the file only to the SKLM_DATA directory or its subdirectory.
e) Click Upload.f) Browse to the location where the export file is stored, select it, and click Open.g) To close the dialog box, click Cancel or press the Escape key.
• Using REST interfacea) Open a REST client.
Chapter 1. Administering 151
b) Obtain a unique user authentication identifier to access IBM Security Key Lifecycle Manager RESTservices. For more information about the authentication process, see “Authentication process forREST services” on page 239.
c) Run “Upload File to Server REST Service” on page 270.
What to do next“Importing a device group” on page 152
Importing a device groupYou can import device group data that were exported from another IBM Security Key Lifecycle Managerserver if you want to move data across IBM Security Key Lifecycle Manager servers.
Before you beginYou must have the export file and ensure that you have the password that you used when the export filewas created. Save the export files in the default <SKLM_DATA> directory, for example, C:\ProgramFiles\IBM\WebSphere\AppServer\products\sklm\data. For the definition of <SKLM_DATA>, see“Definitions for HOME and other directory variables” on page 35.
The <SKLM_DATA> directory path changes based on the value that is set for the browse.root.dirproperty in the SKLMConfig.properties file.
Version of the IBM Security Key Lifecycle Manager instance where the device group export data is beingimported must be same as the IBM Security Key Lifecycle Manager instance from which the device groupdata were exported.
About this task
At times, the device group data that is imported might conflict with an existing data in the database. Forexample, a key in the imported device group might be a key with same alias name of a device group in thecurrent instance of IBM Security Key Lifecycle Manager where the data is being imported. When conflictsoccur, they must be resolved before the import process can continue.
You can use the Export and Import page. Alternatively, you can use Device Group Import RESTService to import device groups.
Your role must have a permission to import device groups. For more information about device groupexport and import operations, see “Overview of device group export and import” on page 274.
Procedure
1. Go to the appropriate page or directory.Graphical user interface
a. Log in to the graphical user interface.b. On the Welcome page, click Administration > Export and Import.
REST interfaceOpen a REST client.
2. Import a selected export file. Only one export or import task can run at a time. If you want import a fileto an IBM Security Key Lifecycle Manager instance on a different system, copy the export file to thatsystem by using media such as a disk, or electronic transmission.Graphical user interface
a. Click Browse to specify the export file location under <SKLM_DATA> directory, for example,C:\Program Files\IBM\WebSphere\AppServer\products\sklm\data.
b. Click Display Exports to display the export files.c. In the table, select an export file.d. Click Import.
152 IBM Security Key Lifecycle Manager : Administering
e. Alternatively, double-click or right-click the export file and select Import.f. On the Import from Export Archive dialog, specify the encryption password that you used to
create the export file.g. Click Import to start the import operation.h. If any conflicts arise during the import process, the Conflicts while Importing dialog appears.
For more information, see “Resolving the import conflicts” on page 155.
Else, the progress dialog box appears. When the import process is complete, a message box isdisplayed to indicate that the import operation is complete.
i. Click Close.
REST interface
a. Obtain a unique user authentication identifier to access IBM Security Key Lifecycle ManagerREST services. For more information about the authentication process, see “Authenticationprocess for REST services” on page 239.
b. To run Device Group Import REST Service, send the HTTP POST request. Pass the userauthentication identifier that you obtained in Step a along with the request message as shownin the following example.
POST https://localhost:<port>/SKLM/rest/v1/ckms/deviceGroupsImportContent-Type: application/jsonAccept: application/jsonAuthorization: SKLMAuth userAuthId=139aeh34567m{"importFilePath": "C:\\Program Files\\IBM\\WebSphere\\AppServer\\products\\sklm\\data\\sklm_v4.0.0.0_20160728040703-1200_export.exp", "password": "passw0rd123"}
c. If any conflicts arise during the import process, obtain the list of conflicts.
For more information, see “Resolving the import conflicts” on page 155.3. Restart the server. For instructions about how to stop and start the server, see “Restarting the IBM
Security Key Lifecycle Manager server” on page 38.
Downloading an export file of a device groupYou can download an export file (.EXP) that contains device group data from the IBM Security KeyLifecycle Manager server to your local file system or mapped drive by using the graphical user interface orREST interface. You need not log in to the server computer for the same.
Before you begin
• Ensure that your user ID has the required role (klmFileTransfer or klmSecurityOfficer) totransfer files from and to the server.
• Only for Internet Explorer browser: Ensure that the value of the File download property is set toEnable.
To access this property, go to Internet options > Security > Local intranet zone or Trusted sites >Downloads.
Procedure
• Using graphical user interfacea) Log in to the graphical user interface by using your credentials.b) Click the Administration tab and select Export and Import.
The Export/Import Device Groups page is displayed.c) If the table does not display any exported files, click Display Exports.d) In the row that contains the export file that you want to download, click Download.
• Using REST interface
Chapter 1. Administering 153

a) Open a REST client.b) Obtain a unique user authentication identifier to access IBM Security Key Lifecycle Manager REST
APIs. For more information about the authentication process, see “Authentication process for RESTservices” on page 239.
c) Run “Download File from Server REST Service” on page 281.
ResultsThe file is downloaded in the folder that is configured as the default download folder of your browser.
Deleting a device group export fileYou might delete an export file for which a business needs no longer exists. Use the graphical userinterface or REST interface to delete a device group export file.
About this task
You can use the Export/Import page or Device Group Delete REST Service to delete an exportfile.
Procedure
1. Go to the appropriate page or directory.Graphical user interface
a. Log on to the graphical user interface.b. On the Welcome page, click Administration > Export and Import.
REST interfaceOpen a REST client.
2. Delete a selected export file.Graphical user interface
a. Click Browse to specify the export file location under <SKLM_DATA> directory. For thedefinition of <SKLM_DATA>, see “Definitions for HOME and other directory variables” on page35.
b. Click Display Exports to display the export files.c. In the table, select an export file.d. Click Delete and confirm that you want to delete the file.e. Alternatively, right-click the export file and select Delete and confirm that you want to delete
the file.
REST interface
a. Obtain a unique user authentication identifier to access IBM Security Key Lifecycle ManagerREST services. For more information about the authentication process, see “Authenticationprocess for REST services” on page 239.
b. To run Device Group Delete REST Service, send the HTTP DELETE request. Pass theuser authentication identifier that you obtained in Step a along with the request message asshown in the following example.
DELETE https://localhost:<port>/SKLM/rest/v1/deviceGroups/newDevGrpContent-Type: application/jsonAccept: application/jsonAuthorization: SKLMAuth userAuthId=139aeh34567m
154 IBM Security Key Lifecycle Manager : Administering
What to do next
Examine the directory in which the export files are stored to determine whether the specified file wasdeleted.
Resolving the import conflictsWhen the device group data is imported from an export file, its content is analyzed for conflicts with thedata that is stored in the database. The conflicts must be resolved before the data can be imported. Youcan view the list of conflicts to analyze and resolve the problems.
About this task
When you import device group data from an export file into an IBM Security Key Lifecycle Manager server,you might detect conflicts. You can also use Device Group Import Conflicts REST Service toobtain the list of the data conflicts, if any.
You must resolve the conflicts before the data can be imported.
Procedure
1. Open a REST client.2. Use the following REST APIs to resolve the import conflicts:
• Change Name REST Service• Change Certificate Alias REST Service• Change History REST Service• Renew Key Alias REST Service
Related tasks“Importing a device group” on page 152You can import device group data that were exported from another IBM Security Key Lifecycle Managerserver if you want to move data across IBM Security Key Lifecycle Manager servers.
Viewing device group export and import historyUse the History page to view details of all the device group export and import operations that are run onthe current instance of IBM Security Key Lifecycle Manager.
Procedure
1. Log on to the graphical user interface.2. On the Welcome page, click Administration > Export and Import.3. In the Export and Import page, click History.
A list of device group export and import operations that run on the current instance of IBM SecurityKey Lifecycle Manager is displayed.
4. Select a row and double-click. Summary details of the export or import operation is displayed.
Viewing device group export and import summary informationUse the Export/Import Summary page to view the details of a selected export file for understanding andworking with the device group data. You can view the details of an export file that is created in the currentinstance of IBM Security Key Lifecycle Manager. You can also view details of an export file that you wantto import into the current instance of IBM Security Key Lifecycle Manager.
Procedure
1. Log on to the graphical user interface.2. On the Welcome page, click Administration > Export and Import.
Chapter 1. Administering 155

3. Select a device group export file that is listed in the table.4. Click Summary.5. Alternatively, right-click the export file and select Summary.
The following table provides the summary information.
ID ID of the selected device group export file.
Archive Name Name of the device group export file.
Start Time Time at which the export or import operation was started.
End Time Time at which the export or import operation was ended.
Device Group Name of the device group from which the data is exported to the file.
<device group data> Displays the number of certificates, key groups, and other details inthe device group export file.
6. Click Cancel to close the summary page.
Moving devices between device groupsUse the device update function to move device from one existing device group to another existing devicegroup. For example, you might want to move a device to the MYDS5000 device group.
About this task
You can use the Modify Device page, tklmDeviceUpdate command, or Device Update RESTService to move a device that contacts IBM Security Key Lifecycle Manager from one device group toanother within the same device family. For example, you might want to move a device to the MYDS5000device group within the DS5000 device family.
For more information about creating a device group, see “Creating a device group” on page 147.
Procedure
1. Navigate to the appropriate page or directory:
• Graphical user interface:
a. Log on to the graphical user interface.b. In the Key and Device Management section on Welcome page, select DS5000.c. Right-click DS5000.d. Click Manage keys and devices.
• Command-line interface
a. Go to the <WAS_HOME>/bin directory. For example,Windows
cd drive:\Program Files\IBM\WebSphere\AppServer\binLinux
cd /opt/IBM/WebSphere/AppServer/binb. Start the wsadmin interface by using an authorized user ID, such as SKLMAdmin. For example,
Windows
wsadmin.bat -username SKLMAdmin -password mypwd -lang jython
Linux
./wsadmin.sh -username SKLMAdmin -password mypwd -lang jython
156 IBM Security Key Lifecycle Manager : Administering

• REST interface:
– Open a REST client.2. Locate the device that you want to move to another device group within a parent device family.
• Graphical user interface:
On the Key and Device Management DS5000 page, locate the device in the device table. Forexample, the device might have a serial number such as aaa123.
• Command-line interface:
Type the following command:
print AdminTask.tklmDeviceList ('[-type DS5000]')
In the command output, locate the value of the device uuid. For example:
Description = My long descriptionSerial Number = aaa123Device uuid = DEVICE-b7678b4d-3898-4f8c-9557-dbb2f381fc8aDevice group = DS5000Device Text =World wide name =Sym alias = DS5K-aaa123
• REST interface:
a. Obtain a unique user authentication identifier to access IBM Security Key Lifecycle Manager RESTservices. For more information about the authentication process, see “Authentication process forREST services” on page 239.
b. To invoke Device List Type REST Service, send the HTTP GET request. Pass the userauthentication identifier that you obtained in Step a along with the request message as shownin the following example.
GET https://localhost:<port>/SKLM/rest/v1/devices?type=DS5000Content-Type: application/jsonAccept : application/jsonAuthorization : SKLMAuth userAuthId=37ea1939-1374-4db7-84cd-14e399be2d20Accept-Language : en
In the success response locate the value of the device uuid. For example:
Status Code : 200 OKContent-Language: en[{"Description": "My long description","Serial Number": "aaa123","Device uuid": "DEVICE-b7678b4d-3898-4f8c-9557-dbb2f381fc8a","Device group": "DS5000","World wide name": "","Sym alias": "DS5K-aaa123"},]
3. Ensure that the target device group exists.
• Graphical user interface:
On the Key and Device Management DS5000 page, in the device table, select the device and clickModify > Device.
On the Modify Device page, in the Currently assigned device group field, expand the list todetermine whether the MYDS5000 device group is available.
• Command-line interface:
Type the following command:
print AdminTask.tklmDeviceGroupList ('[-deviceFamily DS5000 -v y]')
Chapter 1. Administering 157
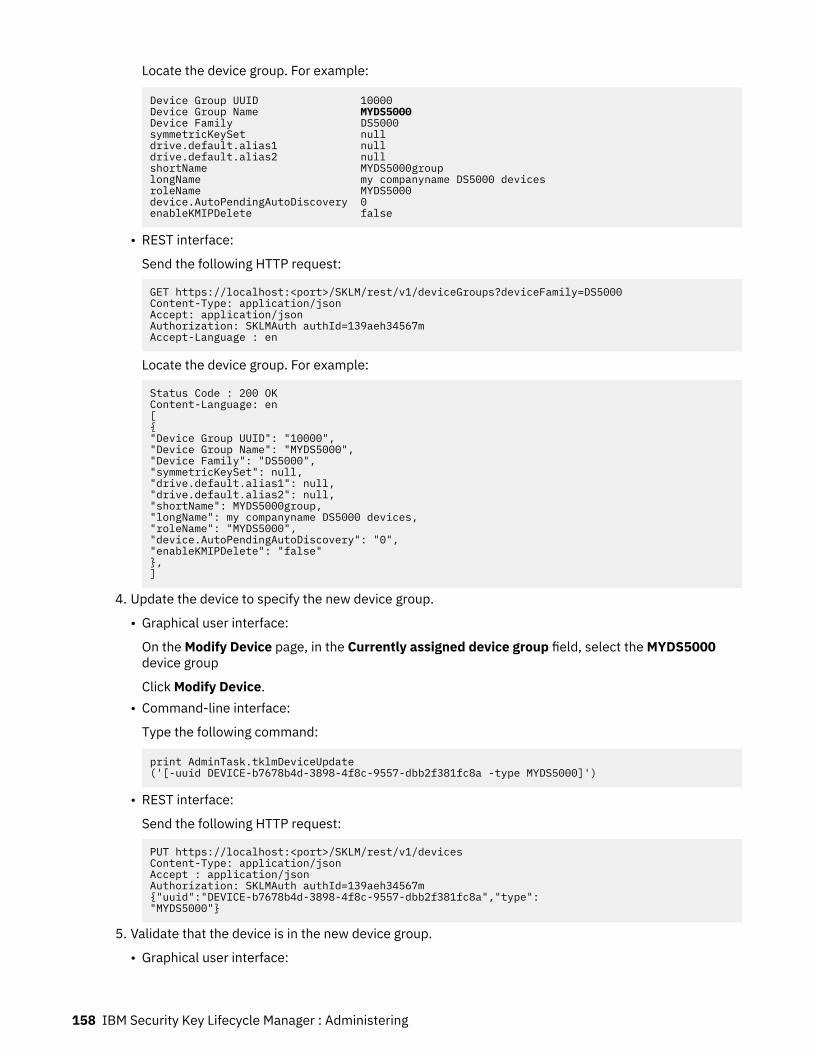
Locate the device group. For example:
Device Group UUID 10000Device Group Name MYDS5000Device Family DS5000symmetricKeySet nulldrive.default.alias1 nulldrive.default.alias2 nullshortName MYDS5000grouplongName my companyname DS5000 devicesroleName MYDS5000device.AutoPendingAutoDiscovery 0enableKMIPDelete false
• REST interface:
Send the following HTTP request:
GET https://localhost:<port>/SKLM/rest/v1/deviceGroups?deviceFamily=DS5000Content-Type: application/jsonAccept: application/jsonAuthorization: SKLMAuth authId=139aeh34567mAccept-Language : en
Locate the device group. For example:
Status Code : 200 OKContent-Language: en[{"Device Group UUID": "10000","Device Group Name": "MYDS5000","Device Family": "DS5000","symmetricKeySet": null,"drive.default.alias1": null,"drive.default.alias2": null,"shortName": MYDS5000group,"longName": my companyname DS5000 devices,"roleName": "MYDS5000","device.AutoPendingAutoDiscovery": "0","enableKMIPDelete": "false"},]
4. Update the device to specify the new device group.
• Graphical user interface:
On the Modify Device page, in the Currently assigned device group field, select the MYDS5000device group
Click Modify Device.• Command-line interface:
Type the following command:
print AdminTask.tklmDeviceUpdate ('[-uuid DEVICE-b7678b4d-3898-4f8c-9557-dbb2f381fc8a -type MYDS5000]')
• REST interface:
Send the following HTTP request:
PUT https://localhost:<port>/SKLM/rest/v1/devicesContent-Type: application/jsonAccept : application/jsonAuthorization: SKLMAuth authId=139aeh34567m{"uuid":"DEVICE-b7678b4d-3898-4f8c-9557-dbb2f381fc8a","type":"MYDS5000"}
5. Validate that the device is in the new device group.
• Graphical user interface:
158 IBM Security Key Lifecycle Manager : Administering
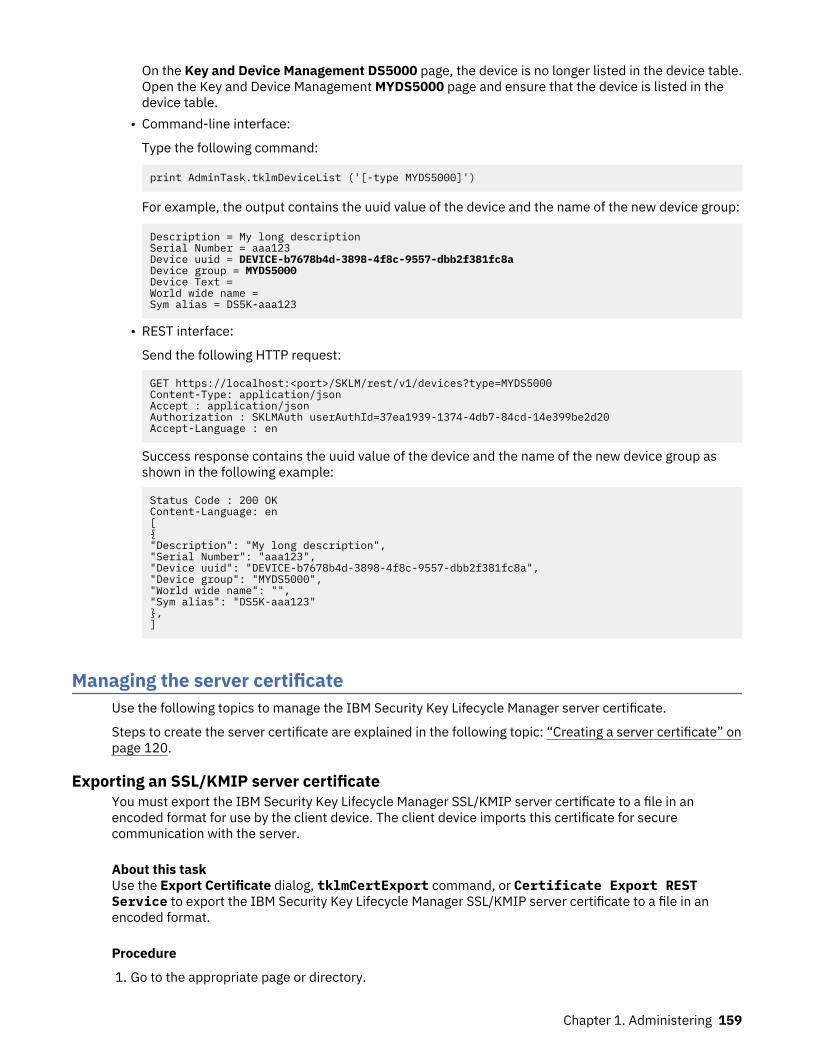
On the Key and Device Management DS5000 page, the device is no longer listed in the device table.Open the Key and Device Management MYDS5000 page and ensure that the device is listed in thedevice table.
• Command-line interface:
Type the following command:
print AdminTask.tklmDeviceList ('[-type MYDS5000]')
For example, the output contains the uuid value of the device and the name of the new device group:
Description = My long descriptionSerial Number = aaa123Device uuid = DEVICE-b7678b4d-3898-4f8c-9557-dbb2f381fc8aDevice group = MYDS5000Device Text =World wide name =Sym alias = DS5K-aaa123
• REST interface:
Send the following HTTP request:
GET https://localhost:<port>/SKLM/rest/v1/devices?type=MYDS5000Content-Type: application/jsonAccept : application/jsonAuthorization : SKLMAuth userAuthId=37ea1939-1374-4db7-84cd-14e399be2d20Accept-Language : en
Success response contains the uuid value of the device and the name of the new device group asshown in the following example:
Status Code : 200 OKContent-Language: en[{"Description": "My long description","Serial Number": "aaa123","Device uuid": "DEVICE-b7678b4d-3898-4f8c-9557-dbb2f381fc8a","Device group": "MYDS5000","World wide name": "","Sym alias": "DS5K-aaa123"},]
Managing the server certificateUse the following topics to manage the IBM Security Key Lifecycle Manager server certificate.
Steps to create the server certificate are explained in the following topic: “Creating a server certificate” onpage 120.
Exporting an SSL/KMIP server certificateYou must export the IBM Security Key Lifecycle Manager SSL/KMIP server certificate to a file in anencoded format for use by the client device. The client device imports this certificate for securecommunication with the server.
About this taskUse the Export Certificate dialog, tklmCertExport command, or Certificate Export RESTService to export the IBM Security Key Lifecycle Manager SSL/KMIP server certificate to a file in anencoded format.
Procedure
1. Go to the appropriate page or directory.
Chapter 1. Administering 159
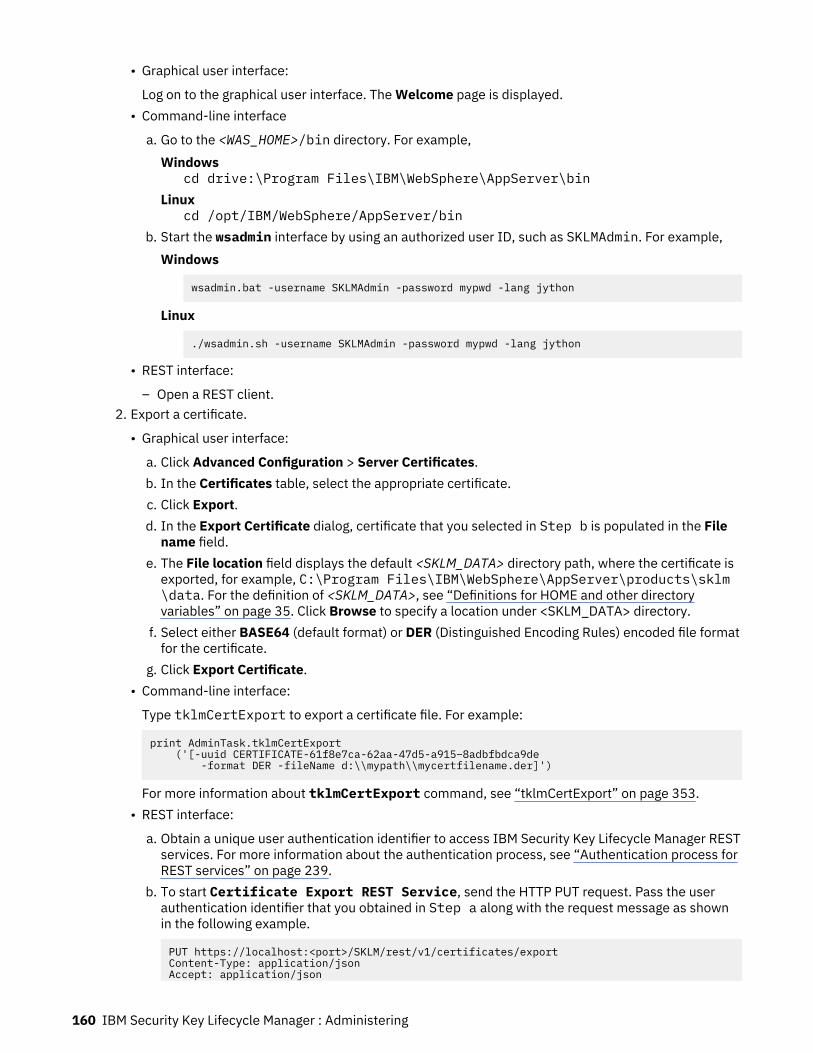
• Graphical user interface:
Log on to the graphical user interface. The Welcome page is displayed.• Command-line interface
a. Go to the <WAS_HOME>/bin directory. For example,Windows
cd drive:\Program Files\IBM\WebSphere\AppServer\binLinux
cd /opt/IBM/WebSphere/AppServer/binb. Start the wsadmin interface by using an authorized user ID, such as SKLMAdmin. For example,
Windows
wsadmin.bat -username SKLMAdmin -password mypwd -lang jython
Linux
./wsadmin.sh -username SKLMAdmin -password mypwd -lang jython
• REST interface:
– Open a REST client.2. Export a certificate.
• Graphical user interface:
a. Click Advanced Configuration > Server Certificates.b. In the Certificates table, select the appropriate certificate.c. Click Export.d. In the Export Certificate dialog, certificate that you selected in Step b is populated in the File
name field.e. The File location field displays the default <SKLM_DATA> directory path, where the certificate is
exported, for example, C:\Program Files\IBM\WebSphere\AppServer\products\sklm\data. For the definition of <SKLM_DATA>, see “Definitions for HOME and other directoryvariables” on page 35. Click Browse to specify a location under <SKLM_DATA> directory.
f. Select either BASE64 (default format) or DER (Distinguished Encoding Rules) encoded file formatfor the certificate.
g. Click Export Certificate.• Command-line interface:
Type tklmCertExport to export a certificate file. For example:
print AdminTask.tklmCertExport ('[-uuid CERTIFICATE-61f8e7ca-62aa-47d5-a915–8adbfbdca9de -format DER -fileName d:\\mypath\\mycertfilename.der]')
For more information about tklmCertExport command, see “tklmCertExport” on page 353.• REST interface:
a. Obtain a unique user authentication identifier to access IBM Security Key Lifecycle Manager RESTservices. For more information about the authentication process, see “Authentication process forREST services” on page 239.
b. To start Certificate Export REST Service, send the HTTP PUT request. Pass the userauthentication identifier that you obtained in Step a along with the request message as shownin the following example.
PUT https://localhost:<port>/SKLM/rest/v1/certificates/exportContent-Type: application/jsonAccept: application/json
160 IBM Security Key Lifecycle Manager : Administering
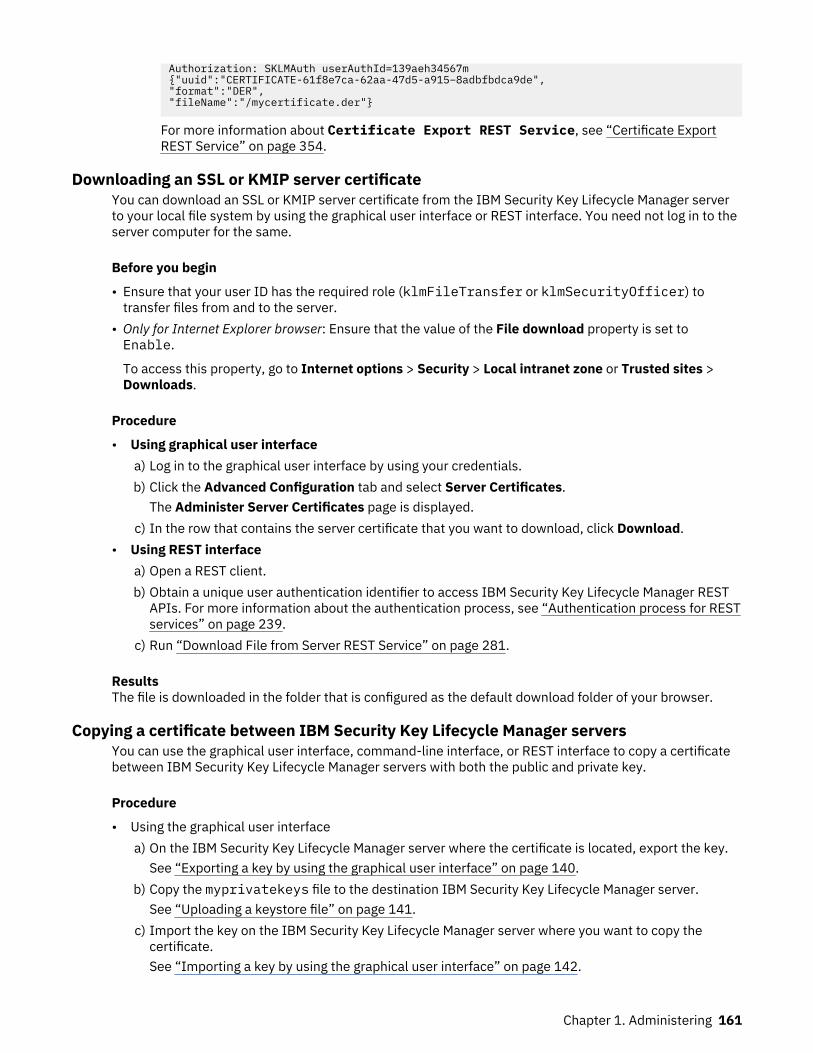
Authorization: SKLMAuth userAuthId=139aeh34567m{"uuid":"CERTIFICATE-61f8e7ca-62aa-47d5-a915–8adbfbdca9de","format":"DER","fileName":"/mycertificate.der"}
For more information about Certificate Export REST Service, see “Certificate ExportREST Service” on page 354.
Downloading an SSL or KMIP server certificateYou can download an SSL or KMIP server certificate from the IBM Security Key Lifecycle Manager serverto your local file system by using the graphical user interface or REST interface. You need not log in to theserver computer for the same.
Before you begin
• Ensure that your user ID has the required role (klmFileTransfer or klmSecurityOfficer) totransfer files from and to the server.
• Only for Internet Explorer browser: Ensure that the value of the File download property is set toEnable.
To access this property, go to Internet options > Security > Local intranet zone or Trusted sites >Downloads.
Procedure
• Using graphical user interfacea) Log in to the graphical user interface by using your credentials.b) Click the Advanced Configuration tab and select Server Certificates.
The Administer Server Certificates page is displayed.c) In the row that contains the server certificate that you want to download, click Download.
• Using REST interfacea) Open a REST client.b) Obtain a unique user authentication identifier to access IBM Security Key Lifecycle Manager REST
APIs. For more information about the authentication process, see “Authentication process for RESTservices” on page 239.
c) Run “Download File from Server REST Service” on page 281.
ResultsThe file is downloaded in the folder that is configured as the default download folder of your browser.
Copying a certificate between IBM Security Key Lifecycle Manager serversYou can use the graphical user interface, command-line interface, or REST interface to copy a certificatebetween IBM Security Key Lifecycle Manager servers with both the public and private key.
Procedure
• Using the graphical user interfacea) On the IBM Security Key Lifecycle Manager server where the certificate is located, export the key.
See “Exporting a key by using the graphical user interface” on page 140.b) Copy the myprivatekeys file to the destination IBM Security Key Lifecycle Manager server.
See “Uploading a keystore file” on page 141.c) Import the key on the IBM Security Key Lifecycle Manager server where you want to copy the
certificate.See “Importing a key by using the graphical user interface” on page 142.
Chapter 1. Administering 161
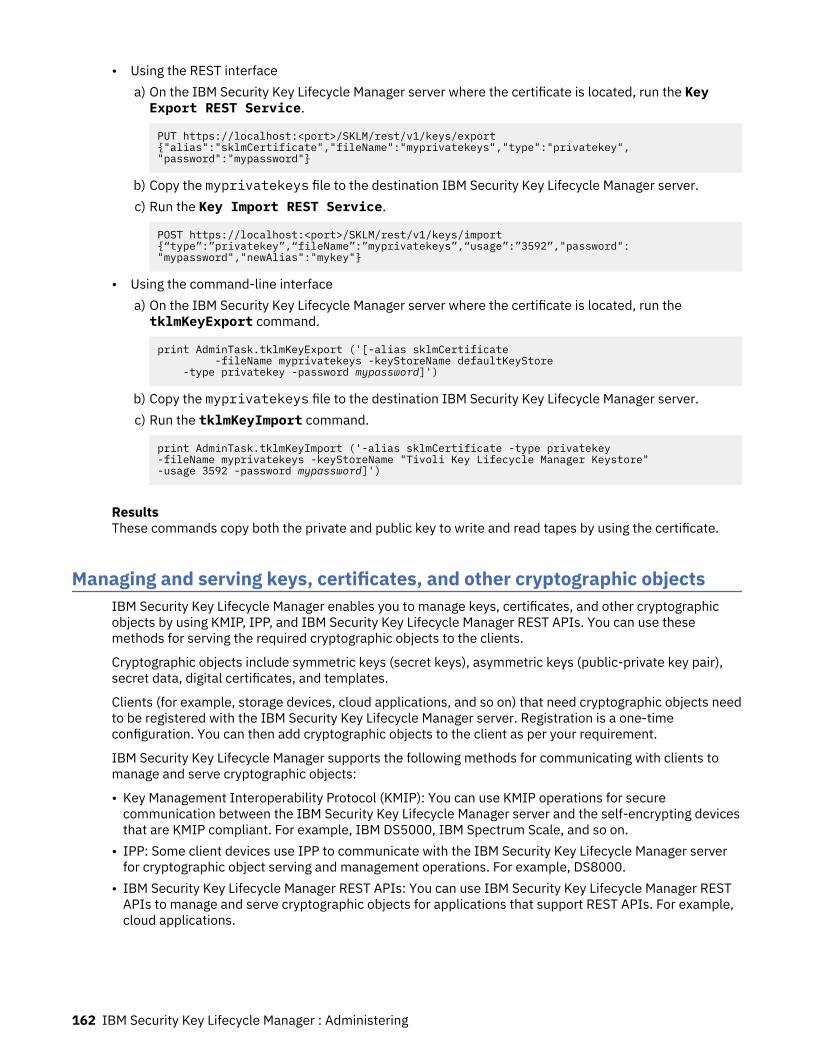
• Using the REST interfacea) On the IBM Security Key Lifecycle Manager server where the certificate is located, run the KeyExport REST Service.
PUT https://localhost:<port>/SKLM/rest/v1/keys/export{"alias":"sklmCertificate","fileName":"myprivatekeys","type":"privatekey","password":"mypassword"}
b) Copy the myprivatekeys file to the destination IBM Security Key Lifecycle Manager server.c) Run the Key Import REST Service.
POST https://localhost:<port>/SKLM/rest/v1/keys/import{“type”:”privatekey”,“fileName”:”myprivatekeys”,“usage”:”3592”,"password":"mypassword","newAlias":"mykey"}
• Using the command-line interfacea) On the IBM Security Key Lifecycle Manager server where the certificate is located, run thetklmKeyExport command.
print AdminTask.tklmKeyExport ('[-alias sklmCertificate -fileName myprivatekeys -keyStoreName defaultKeyStore -type privatekey -password mypassword]')
b) Copy the myprivatekeys file to the destination IBM Security Key Lifecycle Manager server.c) Run the tklmKeyImport command.
print AdminTask.tklmKeyImport ('-alias sklmCertificate -type privatekey -fileName myprivatekeys -keyStoreName "Tivoli Key Lifecycle Manager Keystore" -usage 3592 -password mypassword]')
ResultsThese commands copy both the private and public key to write and read tapes by using the certificate.
Managing and serving keys, certificates, and other cryptographic objectsIBM Security Key Lifecycle Manager enables you to manage keys, certificates, and other cryptographicobjects by using KMIP, IPP, and IBM Security Key Lifecycle Manager REST APIs. You can use thesemethods for serving the required cryptographic objects to the clients.
Cryptographic objects include symmetric keys (secret keys), asymmetric keys (public-private key pair),secret data, digital certificates, and templates.
Clients (for example, storage devices, cloud applications, and so on) that need cryptographic objects needto be registered with the IBM Security Key Lifecycle Manager server. Registration is a one-timeconfiguration. You can then add cryptographic objects to the client as per your requirement.
IBM Security Key Lifecycle Manager supports the following methods for communicating with clients tomanage and serve cryptographic objects:
• Key Management Interoperability Protocol (KMIP): You can use KMIP operations for securecommunication between the IBM Security Key Lifecycle Manager server and the self-encrypting devicesthat are KMIP compliant. For example, IBM DS5000, IBM Spectrum Scale, and so on.
• IPP: Some client devices use IPP to communicate with the IBM Security Key Lifecycle Manager serverfor cryptographic object serving and management operations. For example, DS8000.
• IBM Security Key Lifecycle Manager REST APIs: You can use IBM Security Key Lifecycle Manager RESTAPIs to manage and serve cryptographic objects for applications that support REST APIs. For example,cloud applications.
162 IBM Security Key Lifecycle Manager : Administering
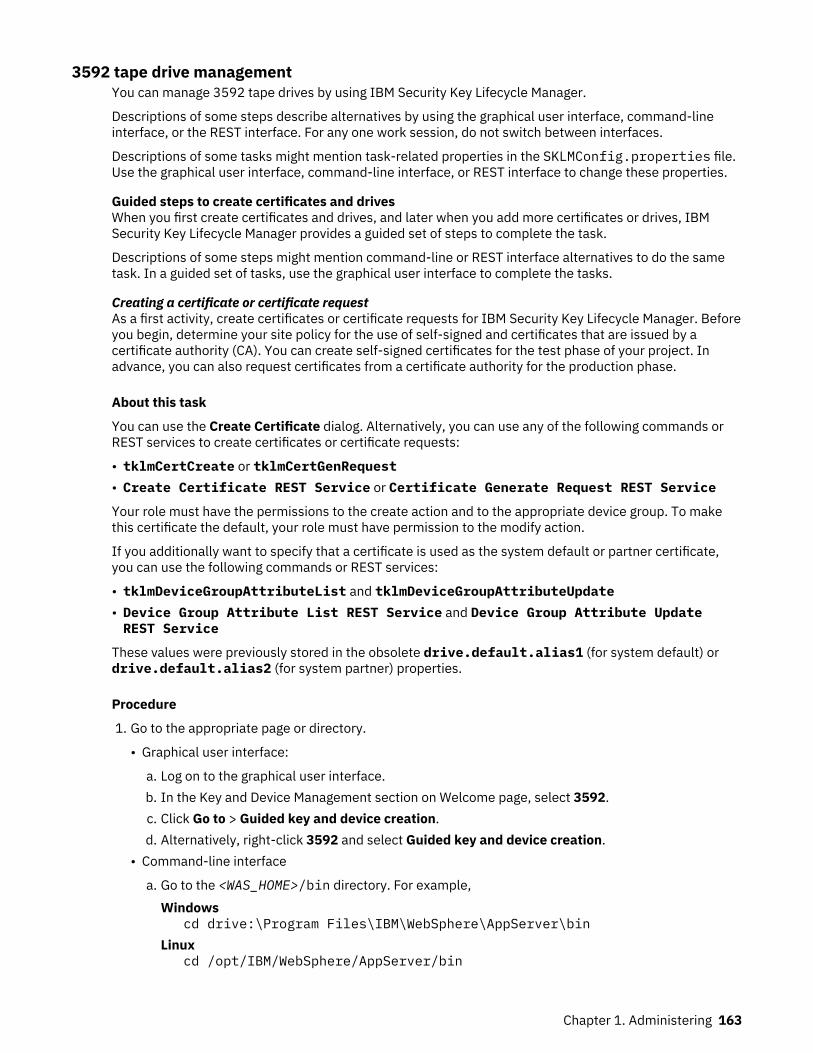
3592 tape drive managementYou can manage 3592 tape drives by using IBM Security Key Lifecycle Manager.
Descriptions of some steps describe alternatives by using the graphical user interface, command-lineinterface, or the REST interface. For any one work session, do not switch between interfaces.
Descriptions of some tasks might mention task-related properties in the SKLMConfig.properties file.Use the graphical user interface, command-line interface, or REST interface to change these properties.
Guided steps to create certificates and drivesWhen you first create certificates and drives, and later when you add more certificates or drives, IBMSecurity Key Lifecycle Manager provides a guided set of steps to complete the task.
Descriptions of some steps might mention command-line or REST interface alternatives to do the sametask. In a guided set of tasks, use the graphical user interface to complete the tasks.
Creating a certificate or certificate requestAs a first activity, create certificates or certificate requests for IBM Security Key Lifecycle Manager. Beforeyou begin, determine your site policy for the use of self-signed and certificates that are issued by acertificate authority (CA). You can create self-signed certificates for the test phase of your project. Inadvance, you can also request certificates from a certificate authority for the production phase.
About this task
You can use the Create Certificate dialog. Alternatively, you can use any of the following commands orREST services to create certificates or certificate requests:
• tklmCertCreate or tklmCertGenRequest• Create Certificate REST Service or Certificate Generate Request REST Service
Your role must have the permissions to the create action and to the appropriate device group. To makethis certificate the default, your role must have permission to the modify action.
If you additionally want to specify that a certificate is used as the system default or partner certificate,you can use the following commands or REST services:
• tklmDeviceGroupAttributeList and tklmDeviceGroupAttributeUpdate• Device Group Attribute List REST Service and Device Group Attribute UpdateREST Service
These values were previously stored in the obsolete drive.default.alias1 (for system default) ordrive.default.alias2 (for system partner) properties.
Procedure
1. Go to the appropriate page or directory.
• Graphical user interface:
a. Log on to the graphical user interface.b. In the Key and Device Management section on Welcome page, select 3592.c. Click Go to > Guided key and device creation.d. Alternatively, right-click 3592 and select Guided key and device creation.
• Command-line interface
a. Go to the <WAS_HOME>/bin directory. For example,Windows
cd drive:\Program Files\IBM\WebSphere\AppServer\binLinux
cd /opt/IBM/WebSphere/AppServer/bin
Chapter 1. Administering 163
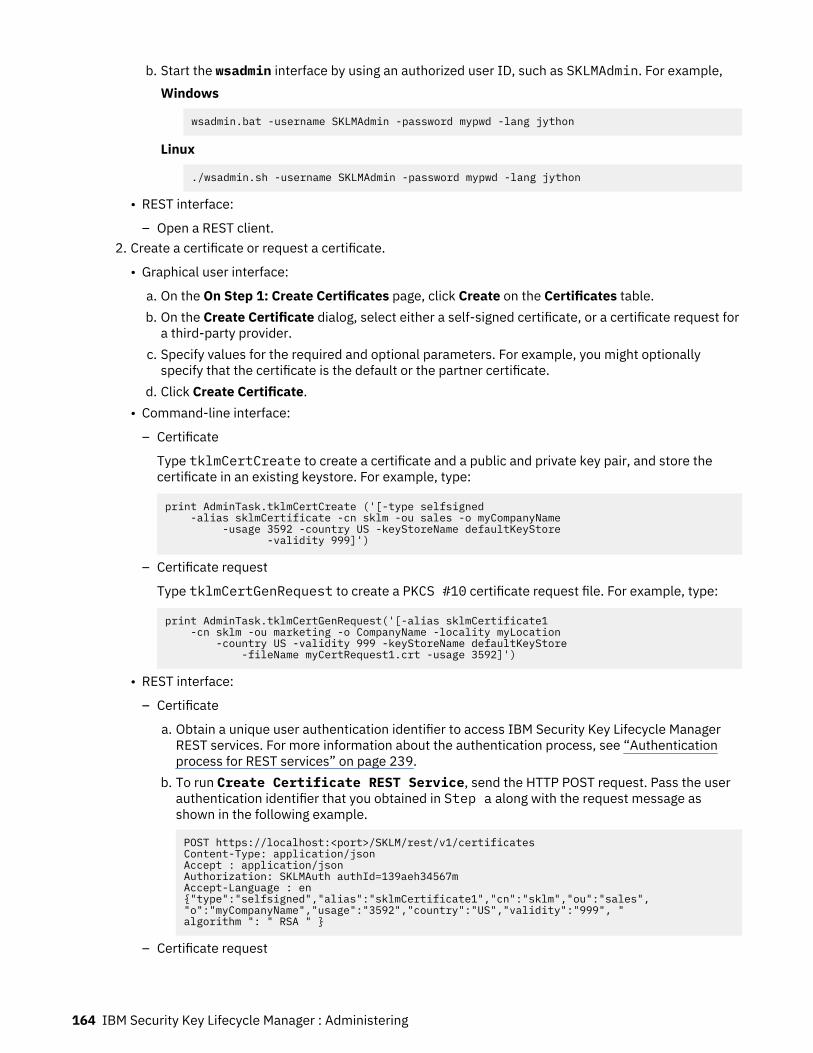
b. Start the wsadmin interface by using an authorized user ID, such as SKLMAdmin. For example,Windows
wsadmin.bat -username SKLMAdmin -password mypwd -lang jython
Linux
./wsadmin.sh -username SKLMAdmin -password mypwd -lang jython
• REST interface:
– Open a REST client.2. Create a certificate or request a certificate.
• Graphical user interface:
a. On the On Step 1: Create Certificates page, click Create on the Certificates table.b. On the Create Certificate dialog, select either a self-signed certificate, or a certificate request for
a third-party provider.c. Specify values for the required and optional parameters. For example, you might optionally
specify that the certificate is the default or the partner certificate.d. Click Create Certificate.
• Command-line interface:
– Certificate
Type tklmCertCreate to create a certificate and a public and private key pair, and store thecertificate in an existing keystore. For example, type:
print AdminTask.tklmCertCreate ('[-type selfsigned -alias sklmCertificate -cn sklm -ou sales -o myCompanyName -usage 3592 -country US -keyStoreName defaultKeyStore -validity 999]')
– Certificate request
Type tklmCertGenRequest to create a PKCS #10 certificate request file. For example, type:
print AdminTask.tklmCertGenRequest('[-alias sklmCertificate1 -cn sklm -ou marketing -o CompanyName -locality myLocation -country US -validity 999 -keyStoreName defaultKeyStore -fileName myCertRequest1.crt -usage 3592]')
• REST interface:
– Certificate
a. Obtain a unique user authentication identifier to access IBM Security Key Lifecycle ManagerREST services. For more information about the authentication process, see “Authenticationprocess for REST services” on page 239.
b. To run Create Certificate REST Service, send the HTTP POST request. Pass the userauthentication identifier that you obtained in Step a along with the request message asshown in the following example.
POST https://localhost:<port>/SKLM/rest/v1/certificatesContent-Type: application/jsonAccept : application/jsonAuthorization: SKLMAuth authId=139aeh34567mAccept-Language : en{"type":"selfsigned","alias":"sklmCertificate1","cn":"sklm","ou":"sales","o":"myCompanyName","usage":"3592","country":"US","validity":"999", "algorithm ": " RSA " }
– Certificate request
164 IBM Security Key Lifecycle Manager : Administering
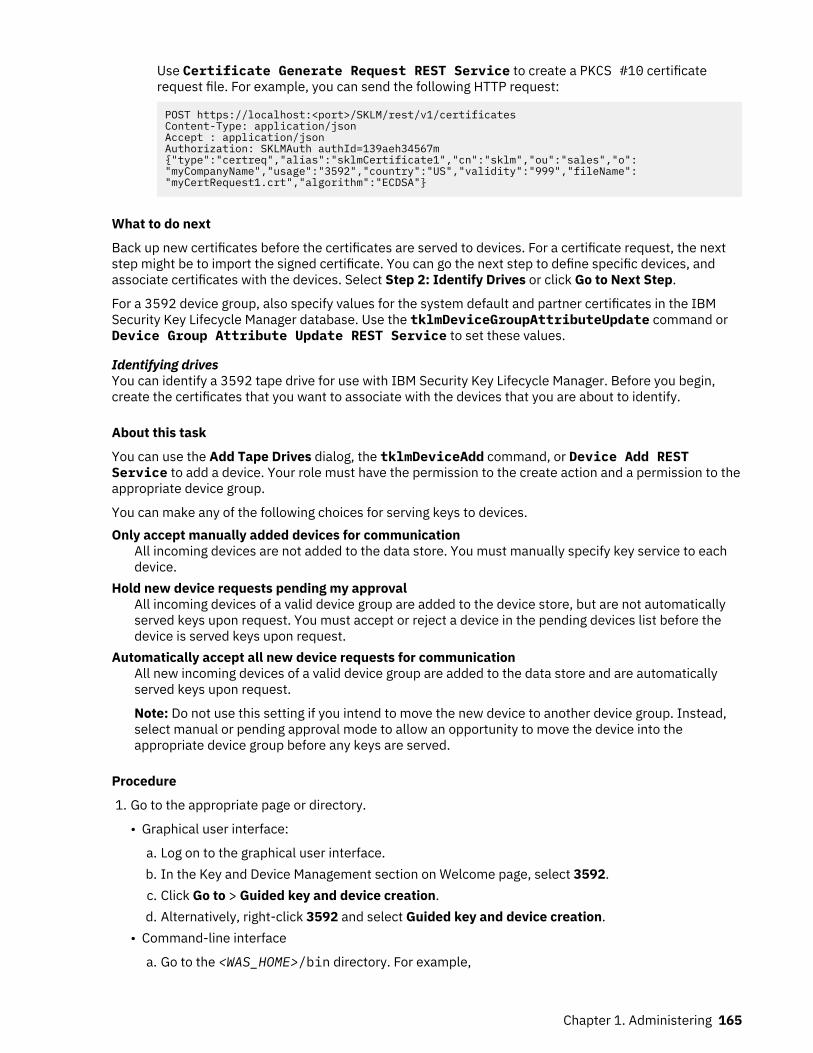
Use Certificate Generate Request REST Service to create a PKCS #10 certificaterequest file. For example, you can send the following HTTP request:
POST https://localhost:<port>/SKLM/rest/v1/certificatesContent-Type: application/jsonAccept : application/jsonAuthorization: SKLMAuth authId=139aeh34567m{"type":"certreq","alias":"sklmCertificate1","cn":"sklm","ou":"sales","o":"myCompanyName","usage":"3592","country":"US","validity":"999","fileName":"myCertRequest1.crt","algorithm":"ECDSA"}
What to do next
Back up new certificates before the certificates are served to devices. For a certificate request, the nextstep might be to import the signed certificate. You can go the next step to define specific devices, andassociate certificates with the devices. Select Step 2: Identify Drives or click Go to Next Step.
For a 3592 device group, also specify values for the system default and partner certificates in the IBMSecurity Key Lifecycle Manager database. Use the tklmDeviceGroupAttributeUpdate command orDevice Group Attribute Update REST Service to set these values.
Identifying drivesYou can identify a 3592 tape drive for use with IBM Security Key Lifecycle Manager. Before you begin,create the certificates that you want to associate with the devices that you are about to identify.
About this task
You can use the Add Tape Drives dialog, the tklmDeviceAdd command, or Device Add RESTService to add a device. Your role must have the permission to the create action and a permission to theappropriate device group.
You can make any of the following choices for serving keys to devices.Only accept manually added devices for communication
All incoming devices are not added to the data store. You must manually specify key service to eachdevice.
Hold new device requests pending my approvalAll incoming devices of a valid device group are added to the device store, but are not automaticallyserved keys upon request. You must accept or reject a device in the pending devices list before thedevice is served keys upon request.
Automatically accept all new device requests for communicationAll new incoming devices of a valid device group are added to the data store and are automaticallyserved keys upon request.
Note: Do not use this setting if you intend to move the new device to another device group. Instead,select manual or pending approval mode to allow an opportunity to move the device into theappropriate device group before any keys are served.
Procedure
1. Go to the appropriate page or directory.
• Graphical user interface:
a. Log on to the graphical user interface.b. In the Key and Device Management section on Welcome page, select 3592.c. Click Go to > Guided key and device creation.d. Alternatively, right-click 3592 and select Guided key and device creation.
• Command-line interface
a. Go to the <WAS_HOME>/bin directory. For example,
Chapter 1. Administering 165
Windowscd drive:\Program Files\IBM\WebSphere\AppServer\bin
Linuxcd /opt/IBM/WebSphere/AppServer/bin
b. Start the wsadmin interface by using an authorized user ID, such as SKLMAdmin. For example,Windows
wsadmin.bat -username SKLMAdmin -password mypwd -lang jython
Linux
./wsadmin.sh -username SKLMAdmin -password mypwd -lang jython
• REST interface:
– Open a REST client.2. Skip Step 1: Create Certificates. Click the Go to Next Step link or click Step 2: Identify Drives.3. You might specify that IBM Security Key Lifecycle Manager holds new device requests for your
approval. Your role must have permissions to the modify action and to the appropriate device group.
• Graphical user interface:
Select Hold new device requests pending my approval.• Command-line interface:
Use the tklmDeviceGroupAttributeUpdate command or Device Group AttributeUpdate REST Service to set the value of the device.AutoPendingAutoDiscovery attribute.For example, type:
print AdminTask.tklmDeviceGroupAttributeUpdate ('[-name 3592 -attributes "{device.AutoPendingAutoDiscovery 2}"]')
• REST interface:
a. Obtain a unique user authentication identifier to access IBM Security Key Lifecycle Manager RESTservices. For more information about the authentication process, see “Authentication process forREST services” on page 239.
b. To run Device Group Attribute Update REST Service and to set the value of thedevice.AutoPendingAutoDiscovery attribute, send the HTTP PUT request. Pass the userauthentication identifier that you obtained in Step a along with the request message as shownin the following example.
PUT https://localhost:<port>/SKLM/rest/v1/deviceGroupAttributesContent-Type: application/jsonAccept : application/jsonAuthorization: SKLMAuth authId=139aeh34567m{"name":"3592","attributes":"device.AutoPendingAutoDiscovery 2"}
4. Add a device.
• Graphical user interface:
a. On the Step 2: Identify Drives page, in the Devices table, click Add.b. On the Add Tape Drive dialog, type the required and optional information.c. Click Add Tape Drive.
• Command-line interface:
Type tklmDeviceAdd to add a device. You must specify the device group and serial number. Forexample, type:
print AdminTask.tklmDeviceAdd ('[-type 3592 -serialNumber CDA39403AQJF -attributes "{worldwideName ABCdeF1234567890}
166 IBM Security Key Lifecycle Manager : Administering

{description marketingDivisionDrive} {aliasOne encryption_cert}"]')
• REST interface:
You can use Device Add REST Service to add a device. For example, you can send the followingHTTP request:
POST https://localhost:<port>/SKLM/rest/v1/devicesContent-Type: application/jsonAccept : application/jsonAuthorization : SKLMAuth userAuthId=37ea1939-1374-4db7-84cd-14e399be2d20Accept-Language : en{"type":"3592","serialNumber":"CDA39403AQJF","attributes":"worldwideNameABCdeF1234567890,description marketingDivisionDrive"}
What to do next
Next, use the 3592 Key and Device Management page to view all certificates and devices.
Administering certificates and devicesTo administer certificates and devices, you might want to determine their status. You can map theirassociation, or add, modify, or delete specific certificates or devices.
About this task
Before you begin, examine the columns on the page, which provides buttons to add, modify, or delete atable item. To sort information, click a column header.
Use the 3592 Key and Device Management page to map certificates to devices to determine status ofitems in the table. You might add, modify, or delete certificates or devices. Your role must havepermissions to the view action and to the appropriate device group.
The table is organized in these areas:
• In left columns, information about certificates indicates the certificate name, whether the certificate isused as a system default or system partner, the expiration date, and status of the certificate.
• In right columns, information about drives indicates the drive name and whether the drive uses asystem default as its default or partner certificate.
• Status icons indicate the status of a certificate.
Table 10. Status icons and their meanings
Icon Description
Certificate is in an active state.
Certificate is in a compromised state.
Certificate expires soon.
Certificate is in an expired state.
Certificate valid from future date, for migrated certificates with afuture use time stamp.
IBM Security Key Lifecycle Manager has third-party certificaterequests that are waiting to be signed and imported.
Procedure
1. Log on to the graphical user interface:
Chapter 1. Administering 167

a. In the Key and Device Management section on Welcome page, select 3592.b. Click Go to > Manage keys and devices.c. Alternatively, right-click 3592 and select Manage keys and devices.
Descriptions of some steps describe alternatives by using the graphical user interface, command-lineinterface, or the REST interface. For any one work session, do not switch between interfaces.
Descriptions of some tasks might mention task-related properties in the SKLMConfig.propertiesfile. Use the graphical user interface, command-line interface, or REST interface to change theseproperties.
2. On the 3592 Key and Device Management page, you can add, modify, or delete a certificate or drive.Additionally, you can monitor the status of certificates.
You might do these administrative tasks:
• Add
Click Add. Alternatively, you can select a step-by-step process to create certificates and drives.
– Certificate
On the Create Certificate dialog, select the certificate type as either self-signed or from a third-party provider, and complete the required information. Then, click Create Certificate. Your rolemust have the permissions to the create action and to the appropriate device group. To make thiscertificate the default, your role must have permission to the modify action.
– Tape drive
On the Add Tape Drive dialog, type the drive information. Then, click Add Tape Drive. Your rolemust have the permission to the create action and a permission to the appropriate device group.
– Use step by step process for certificate and drive creation
On the Step1: Create Certificates and Step2: Identify Drives pages, enter the necessaryinformation.
A success indicator varies, showing a change in a column for the certificate or device.• Modify
To change or delete a certificate or drive, select a certificate or drive, and then click Modify.Alternatively, right-click the selected certificate or drive. Then, click Modify, or double-click acertificate or device entry in the list.
– Certificate
Specify changes in the Modify Certificate dialog. Then, click Modify Certificate. Your role musthave the permissions to the modify action and to the appropriate device group.
– Tape drive
Specify changes in the Modify Tape Drive dialog. Then, click Modify Tape Drive. Your role musthave permissions to the modify action and to the appropriate device group.
A success indicator varies, showing a change in a column for the certificate or device. Changes tosome information, such as optional fields, might not be provided in the table.
• Delete
To delete a certificate or drive, highlight the entry in the table and click Delete. Alternatively, right-click the selected certificate or drive. Then, click Delete.
– Certificate
Ensure that you have a current backup of the keystore before you delete a certificate. Any tapesthat are written by using this certificate become non-readable after the certificate is deleted. Thecertificate to be deleted can be in any state, such as active. Regardless of its state, you cannotdelete a certificate that is associated with a device. You also cannot delete a certificate that is
168 IBM Security Key Lifecycle Manager : Administering
marked as either default or partner. Your role must have the permissions to the delete action andto the appropriate device group.
Deleting a certificate deletes the material from the database.
To confirm deletion, click OK.– Tape drive
Metadata for the drive that you delete, such as the drive serial number, is removed from the IBMSecurity Key Lifecycle Manager database. To confirm deletion, click OK. Your role must havepermissions to the delete action and to the appropriate device group.
A success indicator is that the certificate or device is removed from the administration table.
Adding a certificate or certificate requestYou can add more certificates or certificate requests for use with IBM Security Key Lifecycle Manager.Before you begin, determine your site policy on the use of self-signed and CA certificates. You can createself-signed certificates for the test phase of your project. In advance, you can also request certificatesfrom a certificate authority for the production phase.
About this task
You can use the Create Certificate dialog. Alternatively, you can use any of the following commands orREST services to create certificates or certificate requests:
• tklmCertCreate or tklmCertGenRequest• Create Certificate REST Service or Certificate Generate Request REST Service
Your role must have the permissions to the create action and to the appropriate device group. To makethis certificate the default, your role must have permission to the modify action.
Before you begin, determine your site policy on the use of self-signed and CA certificates. You might needto create self-signed certificates for the test phase of your project. In advance, you might also requestcertificates from a certificate authority for the production phase.
Procedure
1. Go to the appropriate page or directory.
• Graphical user interface:
a. Log on to the graphical user interface.b. In the Key and Device Management section on Welcome page, select 3592.c. Click Go to > Manage keys and devices.d. Alternatively, right-click 3592 and select Manage keys and devices.e. On the management page for 3592, click Add.f. Click Certificate.
• Command-line interface
a. Go to the <WAS_HOME>/bin directory. For example,Windows
cd drive:\Program Files\IBM\WebSphere\AppServer\binLinux
cd /opt/IBM/WebSphere/AppServer/binb. Start the wsadmin interface by using an authorized user ID, such as SKLMAdmin. For example,
Windows
wsadmin.bat -username SKLMAdmin -password mypwd -lang jython
Chapter 1. Administering 169
Linux
./wsadmin.sh -username SKLMAdmin -password mypwd -lang jython
2. Create a certificate or request a certificate.
• Graphical user interface:
a. On the Create Certificate dialog, select either a self-signed certificate, or a certificate request fora third-party provider.
b. Specify values for the required and optional parameters. For example, you might optionallyspecify that this certificate is the default or the partner certificate. Then, click Create Certificate.
• Command-line interface:
– Certificate:
Type tklmCertCreate to create a certificate and a public and private key pair, and store thecertificate in an existing keystore. For example, type:
print AdminTask.tklmCertCreate ('[-type selfsigned -alias sklmCertificate -cn sklm -ou sales -o myCompanyName -usage 3592 -country US -keyStoreName defaultKeyStore -validity 999]')
– Certificate request:
Type tklmCertGenRequest to create a PKCS #10 certificate request file. For example, type:
print AdminTask.tklmCertGenRequest('[-alias sklmCertificate1 -cn sklm -ou marketing -o CompanyName -locality myLocation -country US -validity 999 -keyStoreName defaultKeyStore -fileName myCertRequest1.crt -usage 3592]')
• REST interface:
– Certificate
Use Create Certificate REST Service to create a certificate and a public and private keypair, and store the certificate in an existing keystore. For example, you can send the followingHTTP request by using a REST client:
POST https://localhost:<port>/SKLM/rest/v1/certificatesContent-Type: application/jsonAccept : application/jsonAuthorization: SKLMAuth authId=139aeh34567mAccept-Language : en{"type":"selfsigned","alias":"sklmCertificate1","cn":"sklm","ou":"sales","o":"myCompanyName","usage":"3592","country":"US","validity":"999", "algorithm ": " RSA " }
– Certificate request
Use Certificate Generate Request REST Service to create a PKCS #10 certificaterequest file. For example, you can send the following HTTP request by using a REST client:
POST https://localhost:<port>/SKLM/rest/v1/certificatesContent-Type: application/jsonAccept : application/jsonAuthorization: SKLMAuth authId=139aeh34567m{"type":"certreq","alias":"sklmCertificate1","cn":"sklm","ou":"sales","o":"myCompanyName","usage":"3592","country":"US","validity":"999","fileName":"myCertRequest1.crt","algorithm":"ECDSA"}
What to do next
Your next action depends on whether you created a certificate or a certificate request.
• Certificate:
170 IBM Security Key Lifecycle Manager : Administering
Back up new certificates before the certificates are served to devices. You can associate a certificatewith a specific device.
• Certificate request:
Manually send the certificate request to a certificate authority. When the signed certificate returns,import the certificate by using a pending action item on the Welcome panel, or by using thetklmCertImport command or Certificate Import REST Service. When the import completes,back up the certificate to enable serving the certificate to a device.
Specifying a rollover certificateYou can specify a certificate for future use as the system default or system partner certificate.
About this task
You can use the graphical user interface, tklmCertDefaultRolloverAdd command, or CertDefault Rollover Add REST Service to add a default certificate rollover for a specific date anddevice group. Your role must have the permission to the create action and a permission to the appropriatedevice group.
Procedure
1. Go to the appropriate page or directory.
• Graphical user interface:
a. Log on to the graphical user interface.b. In the Key and Device Management section on Welcome page, select 3592.c. Click Go to > Manage default rollover.d. Alternatively, right-click 3592 and select Manage default rollover.
• Command-line interface
a. Go to the <WAS_HOME>/bin directory. For example,Windows
cd drive:\Program Files\IBM\WebSphere\AppServer\binLinux
cd /opt/IBM/WebSphere/AppServer/binb. Start the wsadmin interface by using an authorized user ID, such as SKLMAdmin. For example,
Windows
wsadmin.bat -username SKLMAdmin -password mypwd -lang jython
Linux
./wsadmin.sh -username SKLMAdmin -password mypwd -lang jython
2. Specify an existing certificate for future use as a system default or system partner certificate.
• Graphical user interface:
a. On the management page for 3592, click Add.b. On the Add Future Write Default dialog, specify the required information.c. Click Add Future Write Default.
Note:
– Do not specify two defaults for the same rollover date.– No validation occurs on whether the selected certificate is expired or expires at the time of the
rollover.
Chapter 1. Administering 171
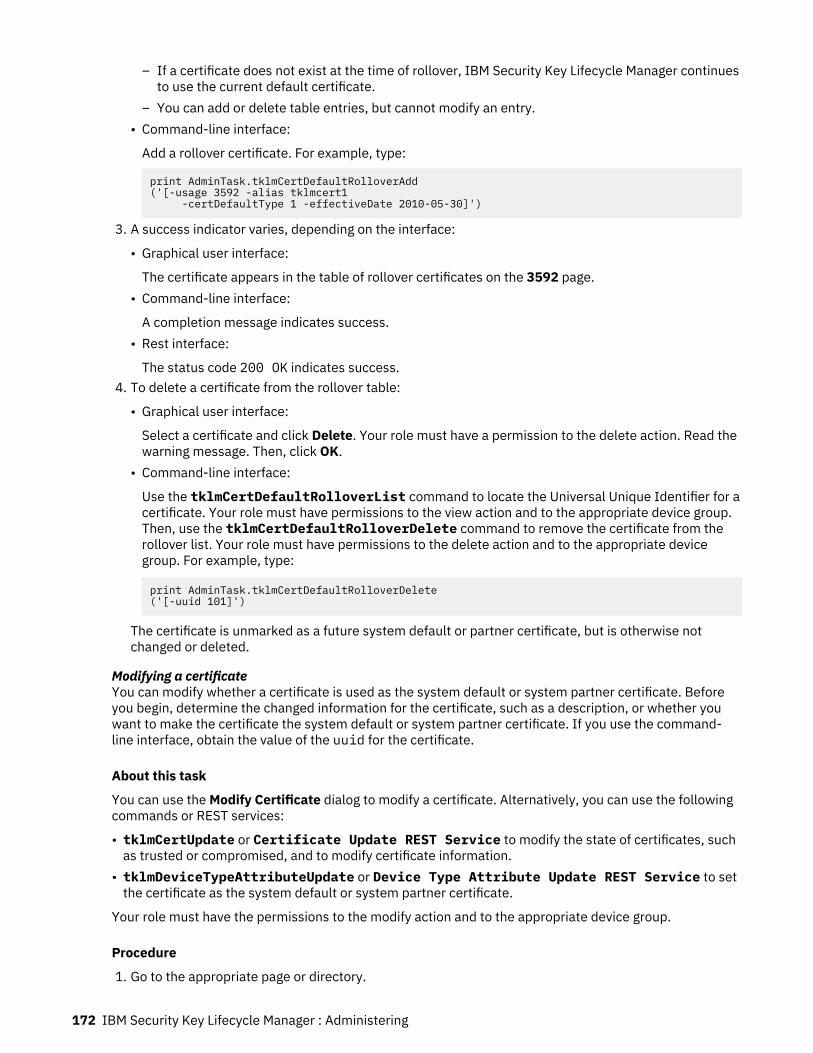
– If a certificate does not exist at the time of rollover, IBM Security Key Lifecycle Manager continuesto use the current default certificate.
– You can add or delete table entries, but cannot modify an entry.• Command-line interface:
Add a rollover certificate. For example, type:
print AdminTask.tklmCertDefaultRolloverAdd ('[-usage 3592 -alias tklmcert1 -certDefaultType 1 -effectiveDate 2010-05-30]')
3. A success indicator varies, depending on the interface:
• Graphical user interface:
The certificate appears in the table of rollover certificates on the 3592 page.• Command-line interface:
A completion message indicates success.• Rest interface:
The status code 200 OK indicates success.4. To delete a certificate from the rollover table:
• Graphical user interface:
Select a certificate and click Delete. Your role must have a permission to the delete action. Read thewarning message. Then, click OK.
• Command-line interface:
Use the tklmCertDefaultRolloverList command to locate the Universal Unique Identifier for acertificate. Your role must have permissions to the view action and to the appropriate device group.Then, use the tklmCertDefaultRolloverDelete command to remove the certificate from therollover list. Your role must have permissions to the delete action and to the appropriate devicegroup. For example, type:
print AdminTask.tklmCertDefaultRolloverDelete('[-uuid 101]')
The certificate is unmarked as a future system default or partner certificate, but is otherwise notchanged or deleted.
Modifying a certificateYou can modify whether a certificate is used as the system default or system partner certificate. Beforeyou begin, determine the changed information for the certificate, such as a description, or whether youwant to make the certificate the system default or system partner certificate. If you use the command-line interface, obtain the value of the uuid for the certificate.
About this task
You can use the Modify Certificate dialog to modify a certificate. Alternatively, you can use the followingcommands or REST services:
• tklmCertUpdate or Certificate Update REST Service to modify the state of certificates, suchas trusted or compromised, and to modify certificate information.
• tklmDeviceTypeAttributeUpdate or Device Type Attribute Update REST Service to setthe certificate as the system default or system partner certificate.
Your role must have the permissions to the modify action and to the appropriate device group.
Procedure
1. Go to the appropriate page or directory.
172 IBM Security Key Lifecycle Manager : Administering

• Graphical user interface:
a. Log on to the graphical user interface.b. In the Key and Device Management section on Welcome page, select 3592.c. Click Go to > Manage keys and devices.d. Alternatively, right-click 3592 and select Manage keys and devices.e. On the management page for 3592, select a certificate in the Certificates column.f. Click Modify.g. Alternatively, right-click a certificate and then select Modify, or double-click a certificate entry.
• Command-line interface
a. Go to the <WAS_HOME>/bin directory. For example,Windows
cd drive:\Program Files\IBM\WebSphere\AppServer\binLinux
cd /opt/IBM/WebSphere/AppServer/binb. Start the wsadmin interface by using an authorized user ID, such as SKLMAdmin. For example,
Windows
wsadmin.bat -username SKLMAdmin -password mypwd -lang jython
Linux
./wsadmin.sh -username SKLMAdmin -password mypwd -lang jython
2. Modify the certificate information:
• Graphical user interface:
On the Modify Certificate dialog, change the appropriate fields. Then, click Modify Certificate.• Command-line interface:
Type tklmCertList to find a certificate and tklmCertUpdate to update a certificate. You mustspecify the uuid of the certificate and the changed attribute. For example, to change the description,type:
print AdminTask.tklmCertList('[-usage 3592 -attributes "{state active}" -v y]')
print AdminTask.tklmCertUpdate ('[-uuid CERTIFICATE-99fc36a-4ab6a0e12343 -usage 3592 -attributes "{information {new information}}"]')
• REST interface:
Use Certificate List REST Service to find a certificate. For example, you can send thefollowing HTTP request:
GET https://localhost:<port>/SKLM/rest/v1/certificates?attributes=state active Content-Type: application/json Accept: application/json Authorization : SKLMAuth userAuthId=37ea1939-1374-4db7-84cd-14e399be2d20 Accept-Language : en
Use Certificate Update REST Service to update a certificate. For example, you can send thefollowing HTTP request:
PUT https://localhost:<port>/SKLM/rest/v1/certificatesContent-Type: application/jsonAccept: application/jsonAuthorization: SKLMAuth authId=139aeh34567m
Chapter 1. Administering 173

{"uuid":"CERTIFICATE-99fc36a-4ab6a0e12343","usage":"3592","attributes":"information newinformation" }
What to do next
Next, you might use the 3592 Key and Device Management page to associate certificates with specificdevices.
Deleting a certificateYou can delete a selected certificate, which can be in any state, such as active. You cannot delete acertificate that is associated with a device, or a certificate that is marked as either a default or partnercertificate. For example, you might delete an expired certificate.
About this task
Before you begin, ensure that a backup exists of the keystore with the certificate that you intend todelete. Verify that the certificate is not currently associated with a device, and that the certificate is notmarked as either a default or partner certificate. Determine the current state of the certificate, and ensurethat deleting a certificate in this state conforms with your site policies.
Delete certificates only when the data protected by those certificates is no longer needed. Deletingcertificates is like erasing the data. After certificates are deleted, data that is protected by thosecertificates is not retrievable.
You can use the Delete menu item or the tklmCertDelete command or Delete Certificate RESTService to delete a certificate. Your role must have permissions to the delete action and to theappropriate device group.
Deleting a certificate deletes the material from the database.
Procedure
1. Go to the appropriate page or directory.
• Graphical user interface:
a. Log on to the graphical user interface.b. In the Key and Device Management section on Welcome page, select 3592.c. Click Go to > Manage keys and devices.d. Alternatively, right-click 3592 and select Manage keys and devices.e. On the management page for 3592, select a certificate in the Certificates column.f. Click Delete.g. Alternatively, right-click a certificate and then select Delete.
• Command-line interface
a. Go to the <WAS_HOME>/bin directory. For example,Windows
cd drive:\Program Files\IBM\WebSphere\AppServer\binLinux
cd /opt/IBM/WebSphere/AppServer/binb. Start the wsadmin interface by using an authorized user ID, such as SKLMAdmin. For example,
Windows
wsadmin.bat -username SKLMAdmin -password mypwd -lang jython
Linux
./wsadmin.sh -username SKLMAdmin -password mypwd -lang jython
174 IBM Security Key Lifecycle Manager : Administering
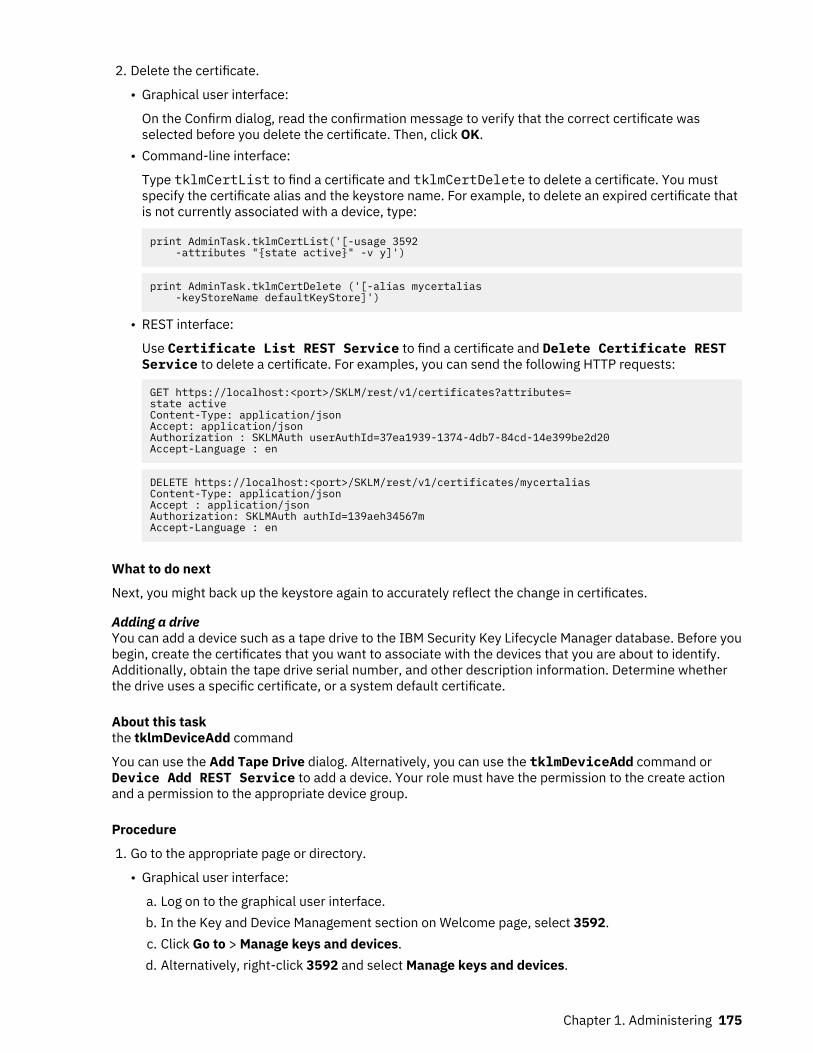
2. Delete the certificate.
• Graphical user interface:
On the Confirm dialog, read the confirmation message to verify that the correct certificate wasselected before you delete the certificate. Then, click OK.
• Command-line interface:
Type tklmCertList to find a certificate and tklmCertDelete to delete a certificate. You mustspecify the certificate alias and the keystore name. For example, to delete an expired certificate thatis not currently associated with a device, type:
print AdminTask.tklmCertList('[-usage 3592 -attributes "{state active}" -v y]')
print AdminTask.tklmCertDelete ('[-alias mycertalias -keyStoreName defaultKeyStore]')
• REST interface:
Use Certificate List REST Service to find a certificate and Delete Certificate RESTService to delete a certificate. For examples, you can send the following HTTP requests:
GET https://localhost:<port>/SKLM/rest/v1/certificates?attributes=state active Content-Type: application/json Accept: application/json Authorization : SKLMAuth userAuthId=37ea1939-1374-4db7-84cd-14e399be2d20 Accept-Language : en
DELETE https://localhost:<port>/SKLM/rest/v1/certificates/mycertaliasContent-Type: application/jsonAccept : application/jsonAuthorization: SKLMAuth authId=139aeh34567mAccept-Language : en
What to do next
Next, you might back up the keystore again to accurately reflect the change in certificates.
Adding a driveYou can add a device such as a tape drive to the IBM Security Key Lifecycle Manager database. Before youbegin, create the certificates that you want to associate with the devices that you are about to identify.Additionally, obtain the tape drive serial number, and other description information. Determine whetherthe drive uses a specific certificate, or a system default certificate.
About this taskthe tklmDeviceAdd command
You can use the Add Tape Drive dialog. Alternatively, you can use the tklmDeviceAdd command orDevice Add REST Service to add a device. Your role must have the permission to the create actionand a permission to the appropriate device group.
Procedure
1. Go to the appropriate page or directory.
• Graphical user interface:
a. Log on to the graphical user interface.b. In the Key and Device Management section on Welcome page, select 3592.c. Click Go to > Manage keys and devices.d. Alternatively, right-click 3592 and select Manage keys and devices.
Chapter 1. Administering 175
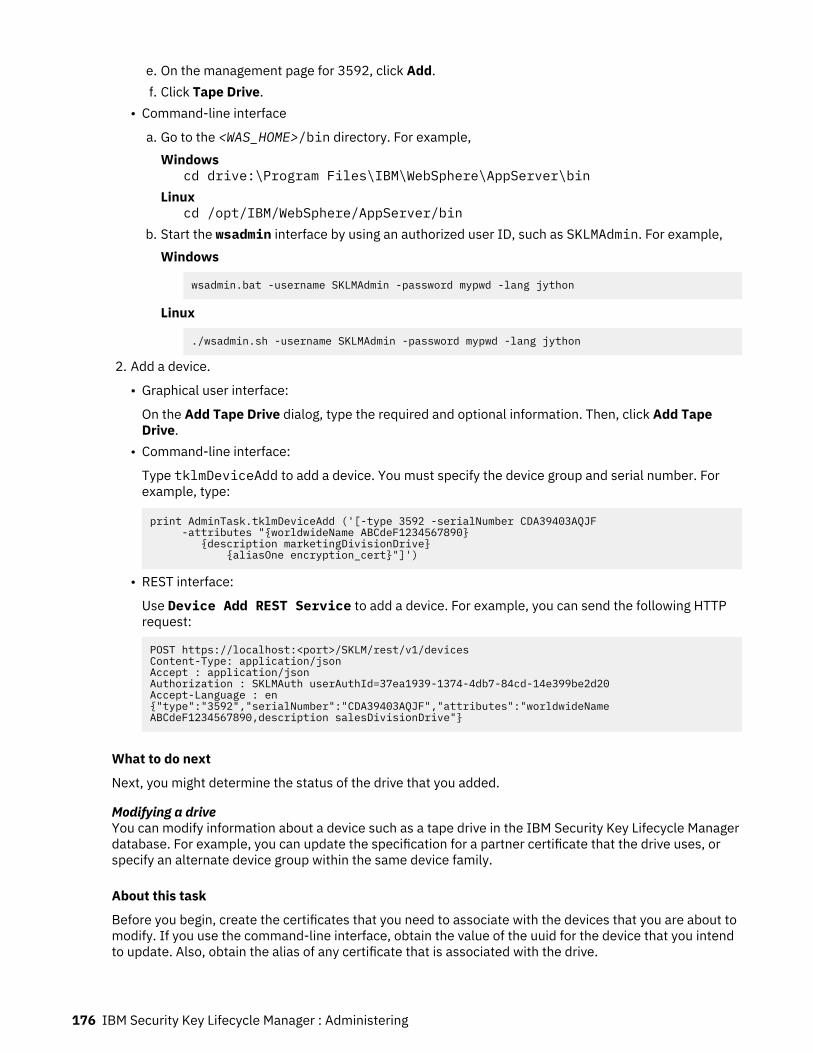
e. On the management page for 3592, click Add.f. Click Tape Drive.
• Command-line interface
a. Go to the <WAS_HOME>/bin directory. For example,Windows
cd drive:\Program Files\IBM\WebSphere\AppServer\binLinux
cd /opt/IBM/WebSphere/AppServer/binb. Start the wsadmin interface by using an authorized user ID, such as SKLMAdmin. For example,
Windows
wsadmin.bat -username SKLMAdmin -password mypwd -lang jython
Linux
./wsadmin.sh -username SKLMAdmin -password mypwd -lang jython
2. Add a device.
• Graphical user interface:
On the Add Tape Drive dialog, type the required and optional information. Then, click Add TapeDrive.
• Command-line interface:
Type tklmDeviceAdd to add a device. You must specify the device group and serial number. Forexample, type:
print AdminTask.tklmDeviceAdd ('[-type 3592 -serialNumber CDA39403AQJF -attributes "{worldwideName ABCdeF1234567890} {description marketingDivisionDrive} {aliasOne encryption_cert}"]')
• REST interface:
Use Device Add REST Service to add a device. For example, you can send the following HTTPrequest:
POST https://localhost:<port>/SKLM/rest/v1/devicesContent-Type: application/jsonAccept : application/jsonAuthorization : SKLMAuth userAuthId=37ea1939-1374-4db7-84cd-14e399be2d20Accept-Language : en{"type":"3592","serialNumber":"CDA39403AQJF","attributes":"worldwideNameABCdeF1234567890,description salesDivisionDrive"}
What to do next
Next, you might determine the status of the drive that you added.
Modifying a driveYou can modify information about a device such as a tape drive in the IBM Security Key Lifecycle Managerdatabase. For example, you can update the specification for a partner certificate that the drive uses, orspecify an alternate device group within the same device family.
About this task
Before you begin, create the certificates that you need to associate with the devices that you are about tomodify. If you use the command-line interface, obtain the value of the uuid for the device that you intendto update. Also, obtain the alias of any certificate that is associated with the drive.
176 IBM Security Key Lifecycle Manager : Administering
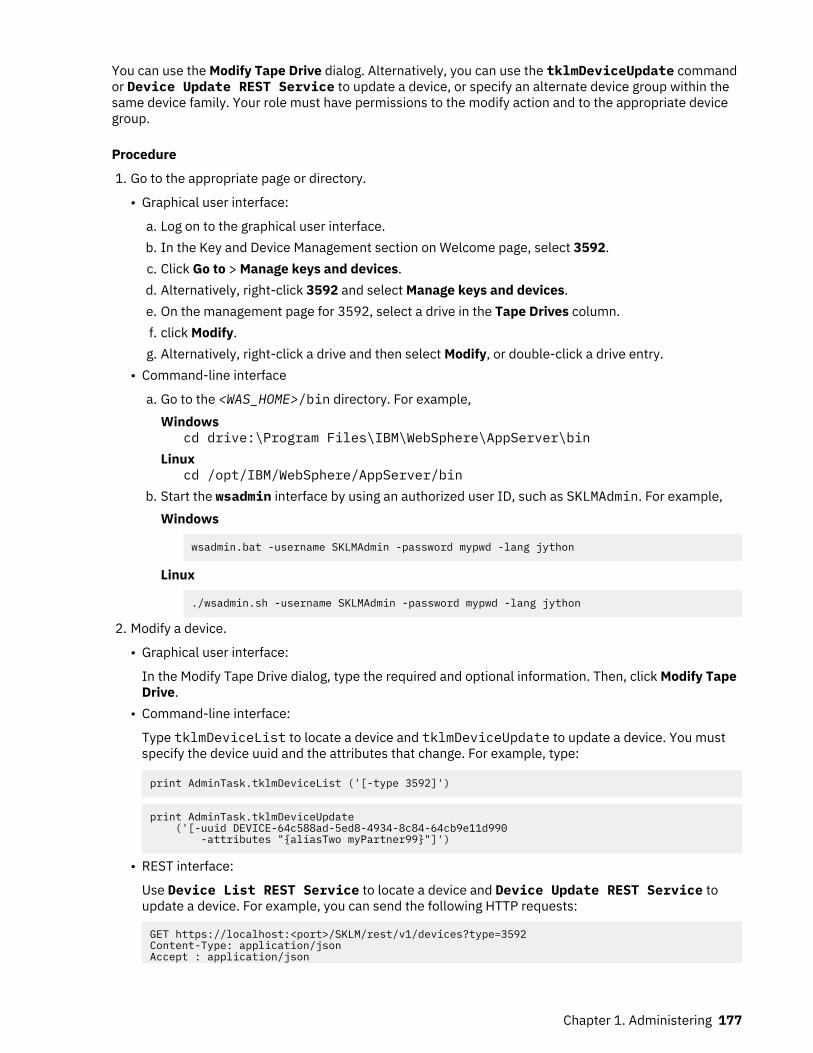
You can use the Modify Tape Drive dialog. Alternatively, you can use the tklmDeviceUpdate commandor Device Update REST Service to update a device, or specify an alternate device group within thesame device family. Your role must have permissions to the modify action and to the appropriate devicegroup.
Procedure
1. Go to the appropriate page or directory.
• Graphical user interface:
a. Log on to the graphical user interface.b. In the Key and Device Management section on Welcome page, select 3592.c. Click Go to > Manage keys and devices.d. Alternatively, right-click 3592 and select Manage keys and devices.e. On the management page for 3592, select a drive in the Tape Drives column.f. click Modify.g. Alternatively, right-click a drive and then select Modify, or double-click a drive entry.
• Command-line interface
a. Go to the <WAS_HOME>/bin directory. For example,Windows
cd drive:\Program Files\IBM\WebSphere\AppServer\binLinux
cd /opt/IBM/WebSphere/AppServer/binb. Start the wsadmin interface by using an authorized user ID, such as SKLMAdmin. For example,
Windows
wsadmin.bat -username SKLMAdmin -password mypwd -lang jython
Linux
./wsadmin.sh -username SKLMAdmin -password mypwd -lang jython
2. Modify a device.
• Graphical user interface:
In the Modify Tape Drive dialog, type the required and optional information. Then, click Modify TapeDrive.
• Command-line interface:
Type tklmDeviceList to locate a device and tklmDeviceUpdate to update a device. You mustspecify the device uuid and the attributes that change. For example, type:
print AdminTask.tklmDeviceList ('[-type 3592]')
print AdminTask.tklmDeviceUpdate ('[-uuid DEVICE-64c588ad-5ed8-4934-8c84-64cb9e11d990 -attributes "{aliasTwo myPartner99}"]')
• REST interface:
Use Device List REST Service to locate a device and Device Update REST Service toupdate a device. For example, you can send the following HTTP requests:
GET https://localhost:<port>/SKLM/rest/v1/devices?type=3592Content-Type: application/jsonAccept : application/json
Chapter 1. Administering 177

Authorization : SKLMAuth userAuthId=37ea1939-1374-4db7-84cd-14e399be2d20Accept-Language : en
PUT https://localhost:<port>/SKLM/rest/v1/devicesContent-Type: application/jsonAccept : application/jsonAuthorization: SKLMAuth authId=139aeh34567m{"uuid":"DEVICE-64c588ad-5ed8-4934-8c84-64cb9e11d990","attributes":"aliasTwo myPartner99"}
What to do next
Next, verify that the changes are made. For optional fields, such as the description, you might want to runthe tklmDeviceList command or Device List REST Service to determine whether the value ischanged. Alternatively, reopen the Modify Tape Drive dialog.
Deleting a driveYou can delete a device such as a tape drive. Metadata for the drive that you delete, such as the driveserial number, is removed from the IBM Security Key Lifecycle Manager database.
About this task
Before you begin, ensure that a current backup exists for the certificates and devices at your site. Obtainthe uuid of the device you intend to delete.
You can use the Delete menu item, the tklmDeviceDelete command, or Device Delete RESTService to delete a device. Your role must have permissions to the delete action and to the appropriatedevice group.
Procedure
1. Go to the appropriate page or directory.
• Graphical user interface:
a. Log on to the graphical user interface.b. In the Key and Device Management section on Welcome page, select 3592.c. Click Go to > Manage keys and devices.d. Alternatively, right-click 3592 and select Manage keys and devices.e. On the management page for 3592, select a device.f. click Delete.g. Alternatively, right-click a drive and then select Delete.
• Command-line interface
a. Go to the <WAS_HOME>/bin directory. For example,Windows
cd drive:\Program Files\IBM\WebSphere\AppServer\binLinux
cd /opt/IBM/WebSphere/AppServer/binb. Start the wsadmin interface by using an authorized user ID, such as SKLMAdmin. For example,
Windows
wsadmin.bat -username SKLMAdmin -password mypwd -lang jython
Linux
./wsadmin.sh -username SKLMAdmin -password mypwd -lang jython
2. Delete the device:
178 IBM Security Key Lifecycle Manager : Administering

• Graphical user interface:
On the Confirm dialog, read the confirmation message to verify that the correct device was selectedbefore you delete the device. Metadata for the drive that you delete, such as the drive serial number,is removed from the IBM Security Key Lifecycle Manager database.
Then, click OK.• Command-line interface:
Type tklmDeviceList to locate a device and tklmDeviceDelete to delete a device. You mustspecify the uuid. For example, type:
print AdminTask.tklmDeviceList ('[-type 3592]')
print AdminTask.tklmDeviceDelete ('[-uuid DEVICE-74386920-148c-47b2-a1e2-d19194b315cf]')
• REST interface:
Use Device List REST Service to locate a device and Device Delete REST Service todelete a device. For example, you can send the following HTTP requests:
GET https://localhost:<port>/SKLM/rest/v1/devices?type=3592Content-Type: application/jsonAccept : application/jsonAuthorization : SKLMAuth userAuthId=37ea1939-1374-4db7-84cd-14e399be2d20Accept-Language : en
DELETE https://localhost:<port>/SKLM/rest/v1/devices/DEVICE-74386920-148c-47b2-a1e2-d19194b315cfContent-Type: application/jsonAuthorization: SKLMAuth authId=139aeh34567mAccept : application/json
DS5000 managementYou can manage DS5000 storage servers by using IBM Security Key Lifecycle Manager.
Administering devices, keys, and device associationsTo administer DS5000 storage servers, you map a device to keys or machines.
About this task
Your role must have permissions to the view action and to the appropriate device group. Use the DS5000Key and Device Management page to add, modify, or delete a device, key, or association. These actionsrequire more permissions.
Before you begin, examine the columns on the page, which provides buttons to add, modify, or delete atable item. To sort information, click a column header.
The table is organized in the following information areas:
• Devices and any associated machines.• Current key that the device uses and a description of the device.
Procedure
1. Log on to the graphical user interface.
a. In the Key and Device Management section on Welcome page, select DS5000.b. Click Go to > Manage keys and devices.c. Alternatively, right-click DS5000 and select Manage keys and devices.
Descriptions of some steps describe alternatives by using the graphical user interface, command-lineinterface, or the REST interface. For any one work session, do not switch between interfaces.
Chapter 1. Administering 179
Descriptions of some tasks might mention task-related properties in the SKLMConfig.propertiesfile. Use the graphical user interface, command-line interface, or REST interface to change theseproperties.
2. You can add, modify, or delete a key, device, or machine association.
You can do the following administrative tasks:
• Refresh the list.
Click the refresh icon to refresh items in the table.• Add
Click Add.
– Device
On the Add Device dialog, type the device serial number and other information. Then, click AddDevice. Your role must have the permission to the create action and a permission to theappropriate device group.
– More Keys
Select a device and then select Add > More Keys. On the Add Key dialog, specify the necessaryinformation such as the number of keys to create, up to a maximum of 12 keys. Then, click Add >More Keys. Your role must have the permission to the create action and a permission to theappropriate device group.
– Association
When you select the Machine affinity check box on the Key and Device Management page, valueof the device.enableMachineAffinity property is set to true. Using machine affinity, you canset key serving for specific device and machine combinations.
When machine affinity is enabled, use the Add Association dialog to specify the necessaryinformation such as the machine ID. Then, click Add Association. Your role must have thepermission to the create action and a permission to the appropriate device group.
A success indicator varies, showing the addition of a device, keys, or association.• Modify
To change a device or keys, select the device and then click Modify. Alternatively, right-click theselected device. Then, click one of the choices, such as Modify Device.
– Device
Specify changes on the Modify Device dialog. Then, click Modify Device. Your role must havepermissions to the modify action and to the appropriate device group.
– Keys
Select a key on the Modify Keys dialog. Then, click Delete. Your role must have permissions to thedelete action and to the appropriate device group.
A success indicator varies, showing a change in a column for the device or key.• Delete
To delete a device, select the device, and then click Delete. Alternatively, right-click the selecteddevice. Then, click Delete. Before you delete the device, use the tklmMachineDeviceDeletecommand to remove the association of a device from an existing machine identifier in the IBMSecurity Key Lifecycle Manager database.
Metadata for the device that you delete, such as the device serial number, is removed from the IBMSecurity Key Lifecycle Manager database. Key data is also removed. To confirm deletion, click OK.Your role must have permissions to the delete action and to the appropriate device group.
A success indicator is deletion of the device from the table.
180 IBM Security Key Lifecycle Manager : Administering
Adding a deviceYou can add a device to the IBM Security Key Lifecycle Manager database.
About this task
If machine affinity is enabled, adding a device requires that you also add a relationship between a deviceand a machine. Otherwise, keys are not served to the added device. Using machine affinity, you can setkey serving for specific device and machine combinations.
You can use the Add Device dialog, the tklmDeviceAdd command, or Device Add REST Service toadd a device. Your role must have the permission to the create action and a permission to the appropriatedevice group.
Procedure
1. Go to the appropriate page or directory.
• Graphical user interface:
a. Log on to the graphical user interface.b. In the Key and Device Management section on Welcome page, select DS5000.c. Click Go to > Manage keys and devices.d. Alternatively, right-click DS5000 and select Manage keys and devices.e. On the management page for DS5000, click Add.f. Click Device.
• Command-line interface
a. Go to the <WAS_HOME>/bin directory. For example,Windows
cd drive:\Program Files\IBM\WebSphere\AppServer\binLinux
cd /opt/IBM/WebSphere/AppServer/binb. Start the wsadmin interface by using an authorized user ID, such as SKLMAdmin. For example,
Windows
wsadmin.bat -username SKLMAdmin -password mypwd -lang jython
Linux
./wsadmin.sh -username SKLMAdmin -password mypwd -lang jython
• REST interface:
– Open a REST client.2. Add a device.
• Graphical user interface:
On the Add Device dialog, type the required and optional information. Then, click Add Device.• Command-line interface:
Type tklmDeviceAdd to add a device. You must specify the device serial number and device group.For example, type:
print AdminTask.tklmDeviceAdd ('[-type DS5000 -serialNumber CDA39403AQJF -attributes "{worldwideName ABCdeF1234567890} {description marketingDivisionDrive} {keyPrefix AEF} {numberOfKeys 10} {deviceText abcdefghijklmnopqrst} {machineID 3042383030303437000000000000}"]')
Chapter 1. Administering 181

• REST interface:
a. Obtain a unique user authentication identifier to access IBM Security Key Lifecycle Manager RESTservices. For more information about the authentication process, see “Authentication process forREST services” on page 239.
b. To invoke Device Add REST Service, send the HTTP POST request. Pass the userauthentication identifier that you obtained in Step a along with the request message as shownin the following example.
POST https://localhost:<port>/SKLM/rest/v1/devicesContent-Type: application/jsonAccept : application/jsonAuthorization : SKLMAuth userAuthId=37ea1939-1374-4db7-84cd-14e399be2d20Accept-Language : en{"type":"DS5000","serialNumber":"CDA39403AQJF","attributes":"worldwideNameABCdeF1234567890,description marketingDivisionDrive"}
What to do next
Next, you can associate the device with a machine.
Modifying a deviceYou can modify information about a device in the IBM Security Key Lifecycle Manager database. Forexample, you might update the description of the drive.
About this task
You can use the Modify Device dialog. Alternatively, you can use the tklmDeviceUpdate command orDevice Update REST Service to update a device. Your role must have permissions to the modifyaction and to the appropriate device group.
Before you begin, if you use the command-line or REST interface, obtain the value of the uuid for thedevice that you intend to update.
Procedure
1. Go to the appropriate page or directory.
• Graphical user interface:
a. Log on to the graphical user interface.b. In the Key and Device Management section on Welcome page, select DS5000.c. Click Go to > Manage keys and devices.d. Alternatively, right-click DS5000 and select Manage keys and devices.e. On the management page for DS5000, select a device in the Device Serial Number column.f. click Modify Device.g. Alternatively, right-click a drive and then select Modify Device, or double-click a device entry.
• Command-line interface
a. Go to the <WAS_HOME>/bin directory. For example,Windows
cd drive:\Program Files\IBM\WebSphere\AppServer\binLinux
cd /opt/IBM/WebSphere/AppServer/binb. Start the wsadmin interface by using an authorized user ID, such as SKLMAdmin. For example,
Windows
wsadmin.bat -username SKLMAdmin -password mypwd -lang jython
182 IBM Security Key Lifecycle Manager : Administering
Linux
./wsadmin.sh -username SKLMAdmin -password mypwd -lang jython
2. Modify a device.
• Graphical user interface:
On the Modify Device dialog, type the changed information. Then, click Modify Device.• Command-line interface:
Type tklmDeviceUpdate to update a device. You must specify the device uuid and the attributesthat change. For example, type:
print AdminTask.tklmDeviceUpdate ('[-uuid DEVICE-15d499ad-3ad8-3333-8c84-64cb9e11d990 -attributes "{description myDevice}"]')
• REST interface:
Use Device Update REST Service to update a device. For example, send the following HTTPrequest:
PUT https://localhost:<port>/SKLM/rest/v1/devicesContent-Type: application/jsonAccept : application/jsonAuthorization: SKLMAuth authId=139aeh34567m{"uuid":"DEVICE-64c588ad-5ed8-4934-8c84-64cb9e11d990","attributes":"description myDevice"}
What to do next
Next, you might verify that the changes are made.
Deleting a deviceYou can delete a device such as a DS5000 storage server. Deleting the device removes the device serialnumber and its key data from the IBM Security Key Lifecycle Manager database.
About this task
If the device in the DS5000 device family and machine affinity is enabled, deleting the device also deletesany relationship between a device and a machine.
You can use the Delete menu item, the tklmDeviceDelete command, or Device Delete RESTService to delete a device. Your role must have permissions to the delete action and to the appropriatedevice group.
Procedure
1. Go to the appropriate page or directory.
• Graphical user interface:
a. Log on to the graphical user interface.b. In the Key and Device Management section on Welcome page, select DS5000.c. Click Go to > Manage keys and devices.d. Alternatively, right-click DS5000 and select Manage keys and devices.e. On the management page for DS5000, select a device.f. click Delete.g. Alternatively, right-click a drive and then select Delete.
• Command-line interface
a. Go to the <WAS_HOME>/bin directory. For example,
Chapter 1. Administering 183

Windowscd drive:\Program Files\IBM\WebSphere\AppServer\bin
Linuxcd /opt/IBM/WebSphere/AppServer/bin
b. Start the wsadmin interface by using an authorized user ID, such as SKLMAdmin. For example,Windows
wsadmin.bat -username SKLMAdmin -password mypwd -lang jython
Linux
./wsadmin.sh -username SKLMAdmin -password mypwd -lang jython
2. Using the command-line interface, run the tklmMachineDeviceList command or use MachineDevice List REST Service to obtain the uuid of the device that you intend to delete. Use thetklmMachineDeviceDelete command or Machine Device Delete REST Service to deleteany associations that the device has with machines.
For example, type:
print AdminTask.tklmMachineDeviceList ('[-machineID 3042383030303437000000000000]')
print AdminTask.tklmMachineDeviceDelete('[-deviceUUID DEVICE-663b6d37-e6d5-4c9f-af90-e40e48d27f3c -machineID 3042383030303437000000000000]')
You can send the following HTTP requests:
GET https://localhost:<port>/SKLM/rest/v1/machines/device?machineID=3042383030303437000000000000Content-Type: application/jsonAccept : application/jsonAuthorization: SKLMAuth authId=139aeh34567m
DELETE https://localhost:<port>/SKLM/rest/v1/machines/deviceContent-Type: application/jsonAccept : application/jsonAuthorization: SKLMAuth authId=139aeh34567m{"deviceUUID”:”DEVICE-663b6d37-e6d5-4c9f-af90-e40e48d27f3c","machineID":"3042383030303437000000000000”}
3. Delete the device.
• Graphical user interface:
On the Confirm dialog, read the confirmation message before you delete the device. Deleting thedevice removes the device serial number and its key data from the IBM Security Key LifecycleManager database.
Then, click OK.• Command-line interface:
Type tklmDeviceDelete to delete a device. You must specify the uuid. For example, type:
print AdminTask.tklmDeviceDelete ('[-uuid DEVICE-74386920-148c-47b2-a1e2-d19194b315cf]')
• REST interface:
Use Device Delete REST Service to delete a device. For example, you can send the followingHTTP request:
DELETE https://localhost:<port>/SKLM/rest/v1/devices/DEVICE-74386920-148c-47b2-a1e2-d19194b315cfContent-Type: application/json
184 IBM Security Key Lifecycle Manager : Administering
Accept : application/jsonAuthorization: SKLMAuth authId=139aeh34567m
Adding keysYou can add more keys for use with DS5000 storage servers. Before you begin, determine your site policyfor naming key prefixes.
About this task
You can use the Add Key dialog, the tklmSecretKeyCreate command, or Secret Key CreateREST Service to create one or more symmetric keys in the existing group. Your role must have thepermission to the create action and a permission to the appropriate device group.
Procedure
1. Go to the appropriate page or directory.
• Graphical user interface:
a. Log on to the graphical user interface.b. In the Key and Device Management section on Welcome page, select DS5000.c. Click Go to > Manage keys and devices.d. Alternatively, right-click DS5000 and select Manage keys and devices.e. On the management page for DS5000, click Add.f. Click More Keys.
• Command-line interface
a. Go to the <WAS_HOME>/bin directory. For example,Windows
cd drive:\Program Files\IBM\WebSphere\AppServer\binLinux
cd /opt/IBM/WebSphere/AppServer/binb. Start the wsadmin interface by using an authorized user ID, such as SKLMAdmin. For example,
Windows
wsadmin.bat -username SKLMAdmin -password mypwd -lang jython
Linux
./wsadmin.sh -username SKLMAdmin -password mypwd -lang jython
• REST interface:
– Open a REST client.2. Create keys.
• Graphical user interface
On the Add Key dialog, specify values for the required parameters. Then, click Add More Keys.• Command-line interface:
a. Use the tklmGroupList command obtain the value of the uuid for the key group. For example,type:
print AdminTask.tklmGroupList ('[-type keygroup -v y]')
The output might look like this example:
group name = DS5K-ds5kdevicegroup type = KEY
Chapter 1. Administering 185

group uuid = KEYGROUP-9c97d9aa-b5f0-41a1-b65f-119756168211initialization date = 6/4/10 12:00:00 AM GMT-12:00activation date = 6/4/10 12:00:00 AM GMT-12:00key[0]: uuid: KEY-66b0a3a2-3c52-4088-8772-0a1ddebf5803 aliases: dsk000000000000000000 keystore names: defaultKeyStorekey[1]: uuid: KEY-3f1230fd-59ef-4c15-82e6-40d68ac5f2ab aliases: dsk000000000000000001 keystore names: defaultKeyStore.. (Remaining elements not shown in this example.).
b. Create more keys and store them in the group. For example, type:
print AdminTask.tklmSecretKeyCreate ('[-alias abc -keyStoreName defaultKeyStore -numOfKeys 10 -usage DS5000 -keyGroupUuid KEYGROUP-9c97d9aa-b5f0-41a1-b65f-119756168211]')
• REST interface:
a. Obtain a unique user authentication identifier to access IBM Security Key Lifecycle Manager RESTservices. For more information about the authentication process, see “Authentication process forREST services” on page 239.
b. To invoke Group List REST Service, send the HTTP GET request. Pass the userauthentication identifier that you obtained in Step a along with the request message as shownin the following example.
GET https://localhost:<port>/SKLM/rest/v1/keygroupsContent-Type: application/jsonAccept : application/jsonAuthorization: SKLMAuth authId=139aeh34567mAccept-Language : en
The output might look like this example:
Status Code : 200 OKContent-Language: en[ { "group name": "DS5K-ds5kdevice", "group type": "KEY", "group uuid": "KEYGROUP-9c97d9aa-b5f0-41a1-b65f-119756168211", "initialization date": "6/4/10 12:00:00 AM Central Standard Time", "activation date": "6/4/10 12:00:00 AM Central Standard Time", "keys":[ { "uuid": "KEY-66b0a3a2-3c52-4088-8772-0a1ddebf5803", "alias(es)": "dsk000000000000000000", "key store name(s)": "defaultKeyStore " }, { "uuid": "KEY-3f1230fd-59ef-4c15-82e6-40d68ac5f2ab", "alias(es)": "dsk000000000000000001", "key store name(s)": "defaultKeyStore "...
c. Use Secret Key Create REST Service to create more keys and store them in the group. Forexample, you can send the following HTTP request:
POST https://localhost:<port>/SKLM/rest/v1/keysContent-Type: application/jsonAccept : application/jsonAuthorization: SKLMAuth authId=139aeh34567m{"alias":"abc","numOfKeys":"10","keyGroupUuid":"KEYGROUP-9c97d9aa-b5f0-41a1-b65f-119756168211",","usage":"DS5000"}
3. A success indicator varies, depending on the interface:
186 IBM Security Key Lifecycle Manager : Administering
• Graphical user interface:
The additional keys are visible in the table of keys on the Modify Keys page. Back up new keys beforethe keys are served to devices.
• Command-line interface:
Completion messages indicate success. Additionally, run the tklmGroupList command again toverify that the keys that you added now exist in the key group. For example, type:
print AdminTask.tklmGroupList ('[-type keygroup -v y]')
• Rest interface:
The status code 200 OK indicates success.
What to do next
Next, you can associate the device with a machine.
Modifying (deleting) keysYou can modify the number of keys that a DS5000 storage server uses by deleting one or more keys.Before you begin, determine the changed information, such as the number of keys that you want todelete.
About this task
Delete keys only when the data protected by those keys is no longer needed. Deleting keys is like erasingthe data. After keys are deleted, data that is protected by those keys is not retrievable.
You can use the Modify Keys dialog, the tklmKeyDelete command, or Delete Key REST Service.Your role must have permissions to the modify action and to the appropriate device group.
Procedure
1. Go to the appropriate page or directory.
• Graphical user interface:
a. Log on to the graphical user interface.b. In the Key and Device Management section on Welcome page, select DS5000.c. Click Go to > Manage keys and devices.d. Alternatively, right-click DS5000 and select Manage keys and devices.
• Command-line interface
a. Go to the <WAS_HOME>/bin directory. For example,Windows
cd drive:\Program Files\IBM\WebSphere\AppServer\binLinux
cd /opt/IBM/WebSphere/AppServer/binb. Start the wsadmin interface by using an authorized user ID, such as SKLMAdmin. For example,
Windows
wsadmin.bat -username SKLMAdmin -password mypwd -lang jython
Linux
./wsadmin.sh -username SKLMAdmin -password mypwd -lang jython
2. Modify the key information.
• Graphical user interface:
Chapter 1. Administering 187
On the management page for DS5000, select a device in the Device Serial Number column. Then,click Modify > Keys. Alternatively, right-click a device and then select Modify Keys.
Then, on the Modify Keys dialog, select a key and click Delete. Read the confirmation message.Then, click OK.
• Command-line interface:
You might delete a key. Your role must have permissions to the delete action and to the appropriatedevice group. For example, type:
print AdminTask.tklmKeyDelete ('[-alias aaa000000000000000000 -keyStoreName defaultKeyStore]')
• REST interface:
Use Delete Key REST Service to delete a key. For example, you can send the following HTTPrequest:
DELETE https://localhost:<port>/SKLM/rest/v1/keys/aaa000000000000000000Content-Type: application/jsonAccept : application/jsonAuthorization: SKLMAuth authId=139aeh34567m
What to do next
Next, you might associate the device with a machine.
DS8000 storage image managementYou can manage DS8000 storage images by using IBM Security Key Lifecycle Manager.
Descriptions of some steps describe alternatives by using the graphical user interface, command-lineinterface, or the REST interface. For any one work session, do not switch between interfaces.
Descriptions of some tasks might mention task-related properties in the SKLMConfig.properties file.Use the graphical user interface, command-line interface, or REST interface to change these properties.
Guided steps to create storage images and image certificatesWhen you create or add storage images and image certificates, IBM Security Key Lifecycle Managerprovides a guided set of steps to complete the task.
Descriptions of some steps might mention command-line alternatives to do the same task. In a guided setof tasks, use the graphical user interface to complete the tasks.
Creating an image certificate or certificate requestAs a first activity, create image certificates or certificate requests for IBM Security Key Lifecycle Manager.
About this task
You can use the Create Certificate dialog. Alternatively, you can use any of the following commands orREST services to create certificates or certificate requests:
• tklmCertCreate or tklmCertGenRequest• Create Certificate REST Service or Certificate Generate Request REST Service
Your role must have the permissions to the create action and to the appropriate device group. To makethis certificate the default, your role must have permission to the modify action.
Procedure
1. Go to the appropriate page or directory.
• Graphical user interface:
a. Log on to the graphical user interface.
188 IBM Security Key Lifecycle Manager : Administering

b. In the Key and Device Management section on Welcome page, select DS8000.c. Click Go to > Guided key and device creation.d. Alternatively, right-click DS8000 and select Guided key and device creation.
• Command-line interface
a. Go to the <WAS_HOME>/bin directory. For example,Windows
cd drive:\Program Files\IBM\WebSphere\AppServer\binLinux
cd /opt/IBM/WebSphere/AppServer/binb. Start the wsadmin interface by using an authorized user ID, such as SKLMAdmin. For example,
Windows
wsadmin.bat -username SKLMAdmin -password mypwd -lang jython
Linux
./wsadmin.sh -username SKLMAdmin -password mypwd -lang jython
• REST interface:
– Open a REST client.2. Create an image certificate or request a certificate.
• Graphical user interface:
a. On the On Step 1: Create Certificates page, click Create on the Certificates table.b. On the Create Certificate dialog, select either a self-signed certificate, or a certificate request for
a third-party provider.c. Specify values for the required and optional parameters.d. Click Create Certificate.
• Command-line interface:
– Certificate
Type tklmCertCreate to create a certificate and a public and private key pair, and store thecertificate in an existing keystore. For example, type:
print AdminTask.tklmCertCreate ('[-type selfsigned -alias sklmCertificate -cn sklm -ou sales -o myCompanyName -usage DS8000 -country US -keyStoreName defaultKeyStore -validity 999]')
– Certificate request
Type tklmCertGenRequest to create a PKCS #10 certificate request file. For example, type:
print AdminTask.tklmCertGenRequest('[-alias sklmCertificate3 -cn sklm -ou sales -o myCompanyName -locality myLocation -country US -validity 999 -keyStoreName defaultKeyStore -fileName myCertRequest3.crt -usage DS8000]')
• REST interface:
– Certificate
a. Obtain a unique user authentication identifier to access IBM Security Key Lifecycle ManagerREST services. For more information about the authentication process, see “Authenticationprocess for REST services” on page 239.
Chapter 1. Administering 189

b. To invoke Create Certificate REST Service, send the HTTP POST request. Pass theuser authentication identifier that you obtained in Step a along with the request message asshown in the following example.
POST https://localhost:<port>/SKLM/rest/v1/certificatesContent-Type: application/jsonAccept : application/jsonAuthorization: SKLMAuth authId=139aeh34567mAccept-Language : en{"type":"selfsigned","alias":"sklmCertificate","cn":"sklm","ou":"sales","o":"myCompanyName","usage":"DS8000","country":"US","validity":"999", "algorithm ": " RSA " }
– Certificate request
Use Certificate Generate Request REST Service to create a PKCS #10 certificaterequest file. For example, you can send the following HTTP request by using a REST client:
POST https://localhost:<port>/SKLM/rest/v1/certificatesContent-Type: application/jsonAccept : application/jsonAuthorization: SKLMAuth authId=139aeh34567m{"type":"certreq","alias":"sklmCertificate3","cn":"sklm","ou":"sales","o":"myCompanyName","usage":"DS8000","country":"US","validity":"999","fileName":"myCertRequest1.crt","algorithm":"ECDSA"}
What to do next
Next, go the next step to define specific storage images, and specify certificates for the storage images.Select Step 2: Identify Images or click Go to Next Step.
Identifying storage imagesIdentify a storage image (device) for use with IBM Security Key Lifecycle Manager. Before you begin,create the image certificates that you want to associate with the storage images that you are about toidentify.
About this task
You can use the Add Storage Image dialog. Alternatively, you can use the tklmDeviceAdd command orDevice Add REST Service to add a storage image.
You can make any of the following choices for serving keys to devices.Only accept manually added devices for communication
All incoming devices are not added to the data store. You must manually specify key service to eachdevice.
Hold new device requests pending my approvalAll incoming devices of a valid device group are added to the device store, but are not automaticallyserved keys upon request. You must accept or reject a device in the pending devices list before thedevice is served keys upon request.
Automatically accept all new device requests for communicationAll new incoming devices of a valid device group are added to the data store and are automaticallyserved keys upon request.
Note: Do not use this setting if you intend to move the new device to another device group. Instead,select manual or pending approval mode to allow an opportunity to move the device into theappropriate device group before any keys are served.
Procedure
1. Go to the appropriate page or directory.
• Graphical user interface:
190 IBM Security Key Lifecycle Manager : Administering
Log on to the graphical user interface. From the navigation tree, click IBM Security Key LifecycleManager > Welcome. Scroll down the page to the key and device management section. In Guidedkey and device creation, select DS8000. Then, click Go.
a. Log on to the graphical user interface.b. In the Key and Device Management section on Welcome page, select DS8000.c. Click Go to > Guided key and device creation.d. Alternatively, right-click DS8000 and select Guided key and device creation.
• Command-line interface
a. Go to the <WAS_HOME>/bin directory. For example,Windows
cd drive:\Program Files\IBM\WebSphere\AppServer\binLinux
cd /opt/IBM/WebSphere/AppServer/binb. Start the wsadmin interface by using an authorized user ID, such as SKLMAdmin. For example,
Windows
wsadmin.bat -username SKLMAdmin -password mypwd -lang jython
Linux
./wsadmin.sh -username SKLMAdmin -password mypwd -lang jython
• REST interface:
– Open a REST client.2. Skip Step 1: Create Certificates. Click the Go to Next Step link or click Step 2: Identify Drives.3. You might specify that all incoming devices are added to a pending list, but are not automatically
served keys upon request. You must accept or reject a device in the pending devices list before IBMSecurity Key Lifecycle Manager serves keys to the device upon request. Your role must havepermissions to the modify action and to the appropriate device group.
• Graphical user interface:
Select Hold new device requests pending my approval.• Command-line interface:
Use the tklmDeviceGroupAttributeUpdate command or Device Group AttributeUpdate REST Service to set the value of the device.AutoPendingAutoDiscovery attribute.For example, type:
print AdminTask.tklmDeviceGroupAttributeUpdate ('[-name DS8000 -attributes "{device.AutoPendingAutoDiscovery 2}"]')
• REST interface:
a. Obtain a unique user authentication identifier to access IBM Security Key Lifecycle Manager RESTservices. For more information about the authentication process, see “Authentication process forREST services” on page 239.
b. To run Device Group Attribute Update REST Service and to set the value of thedevice.AutoPendingAutoDiscovery attribute, send the HTTP PUT request. Pass the userauthentication identifier that you obtained in Step a along with the request message as shownin the following example.
PUT https://localhost:<port>/SKLM/rest/v1/deviceGroupAttributesContent-Type: application/jsonAccept : application/jsonAuthorization: SKLMAuth authId=139aeh34567m{"name":"DS8000","attributes":"device.AutoPendingAutoDiscovery 2"}
Chapter 1. Administering 191

4. Add a storage image.
• Graphical user interface:
a. On the Step 2: Identify Images page, in the table, click Add.b. On the Add Storage Image dialog, type the required and optional information.c. Click Add Storage Image.
• Command-line interface:
Type tklmDeviceAdd to add a storage image. You must specify the storage image type, the serialnumber, and an image certificate. For example, type:
print AdminTask.tklmDeviceAdd ('[-type DS8000 -serialNumber CCCB31403AFF -attributes "{worldwideName ABCdeF1234567890} {description salesDivisionDrive} {aliasOne myimagecertificate}"]')
• REST interface:
You can use Device Add REST Service to add a storage image. For example, you can send thefollowing HTTP request by using a REST client:
POST https://localhost:<port>/SKLM/rest/v1/devicesContent-Type: application/jsonAccept : application/jsonAuthorization : SKLMAuth userAuthId=37ea1939-1374-4db7-84cd-14e399be2d20Accept-Language : en{"type":"DS8000","serialNumber":"CCCB31403AFF","attributes":"worldwideNameABCdeF1234567890,description marketingDivisionDrive"}
What to do next
Next, you can import the signed certificate. Alternatively, use the Key and Device Management page toview all storage images and image certificates.
Administering storage images and image certificatesTo administer storage images and image certificates, you might want to determine their status. You canmap their association, or add, modify, or delete specific certificates or storage images.
About this task
Before you begin, examine the columns on the page, which provides buttons to add, modify, or delete atable item. To sort information, click a column header.
Use the DS8000 Key and Device Management page to map image certificates to storage images and todetermine status of items in the table. You might add, modify, or delete image certificates or storageimages. Your role must have permissions to the view action and to the appropriate device group.
The table is organized in these areas:
• In left columns, information about certificates indicates the certificate name, the expiration date, andstatus of the certificate.
• In right columns, information about storage images indicates the storage image name and associatedimage certificate.
• Status icons indicate the status of a certificate.
Table 11. Status icons and their meanings
Icon Description
Certificate is in an active state.
Certificate is in a compromised state.
192 IBM Security Key Lifecycle Manager : Administering

Table 11. Status icons and their meanings (continued)
Icon Description
Certificate expires soon.
Certificate is in an expired state.
Certificate valid from future date, for migrated certificates with afuture use time stamp.
IBM Security Key Lifecycle Manager has third-party certificaterequests that are waiting to be signed and imported.
Procedure
1. Log on to the graphical user interface.
a. In the Key and Device Management section on Welcome page, select DS8000.b. Click Go to > Manage keys and devices.c. Alternatively, right-click DS8000 and select Manage keys and devices.
Descriptions of some steps describe alternatives by using the graphical user interface, command-lineinterface, or the REST interface. For any one work session, do not switch between interfaces.
Descriptions of some tasks might mention task-related properties in the SKLMConfig.propertiesfile. Use the graphical user interface, command-line interface, or REST interface to change theseproperties.
2. On the DS8000 Key and Device Management page, you can add, modify, or delete a storage image orimage certificate.
You can do the following administrative tasks:
• Add
Click Add. Alternatively, you can select a step-by-step process to create certificates and storageimages.
– Certificate
On the Create Certificate page, select the certificate type as either the self-signed or a requestfrom a third-party provider, and complete the required information. Then, click Create Certificate.Your role must have the permissions to the create action and to the appropriate device group. Tomake this certificate the default, your role must have permission to the modify action.
– Storage image
On the Add Storage Image page, type the storage image information. Then, click Add StorageImage. Your role must have the permission to the create action and a permission to theappropriate device group.
– Use step by step process for certificate and storage image creation
On the Step1: Create Certificates and Step2: Identify Images pages, enter the necessaryinformation.
A success indicator varies, showing a change in a column for the certificate or storage image.• Modify
To change information about a storage image or view information about a certificate, select acertificate or storage image, and then click Modify. Alternatively, right-click the selected certificateor storage image. Then, click Modify, or double-click the certificate or storage image entry.
– Certificate
Chapter 1. Administering 193
View read-only information in the Modify Certificate page. Your role must have the permissions tothe modify action and to the appropriate device group.
– Storage image
Specify changes in the Modify Storage Image page. Then, click Modify Storage Image. Your rolemust have permissions to the modify action and to the appropriate device group.
A success indicator varies, showing a change in a column for the certificate or storage image.Changes to some information, such as optional fields, might not be provided in the table.
• Delete
To delete a certificate or storage image, verify that the correct certificate or storage image wasselected. Then, click Delete. Alternatively, right-click the selected certificate or storage image. Then,click Delete.
– Certificate
Ensure that you have a current backup of the keystore before you delete a certificate. Any storageimage that is written by using this certificate becomes non-readable after the certificate isdeleted. The certificate to be deleted can be in any state, such as active. Regardless of its state,you cannot delete a certificate that is:
- Associated with a storage image.- Marked by a DS8000 Turbo drive as a primary certificate for image or secondary certificate for
image.
Deleting a certificate deletes the material from the database.
To confirm deletion, click OK. Your role must have the permissions to the delete action and to theappropriate device group.
– Storage image
Metadata for the storage image that you delete, such as the serial number, is removed from theIBM Security Key Lifecycle Manager database. To confirm deletion, click OK. Your role must havepermissions to the delete action and to the appropriate device group.
A success indicator is deletion of the certificate or storage image from the administration table.
Adding an image certificate or certificate requestYou can add more image certificates or certificate requests for use with IBM Security Key LifecycleManager. Before you begin, determine your site policy on the use of certificates.
About this task
You can use the Create Certificate dialog. Alternatively, you can use any of the following commands orREST services to create certificates or certificate requests:
• tklmCertCreate or tklmCertGenRequest• Create Certificate REST Service or Certificate Generate Request REST Service
Your role must have the permissions to the create action and to the appropriate device group. To makethis certificate the default, your role must have permission to the modify action.
Procedure
1. Go to the appropriate page or directory.
• Graphical user interface:
a. Log on to the graphical user interface.b. In the Key and Device Management section on Welcome page, select DS8000.c. Click Go to > Manage keys and devices.d. Alternatively, right-click DS8000 and select Manage keys and devices.
194 IBM Security Key Lifecycle Manager : Administering

e. On the management page for DS8000, click Add.f. Click Certificate.
• Command-line interface
a. Go to the <WAS_HOME>/bin directory. For example,Windows
cd drive:\Program Files\IBM\WebSphere\AppServer\binLinux
cd /opt/IBM/WebSphere/AppServer/binb. Start the wsadmin interface by using an authorized user ID, such as SKLMAdmin. For example,
Windows
wsadmin.bat -username SKLMAdmin -password mypwd -lang jython
Linux
./wsadmin.sh -username SKLMAdmin -password mypwd -lang jython
2. Create a certificate or request a certificate.
• Graphical user interface:
a. On the Create Certificate page, select either a self-signed certificate, or a certificate request fora third-party provider.
b. Specify values for the required and optional parameters. Then, click Create Certificate.• Command-line interface:
– Certificate:
Type tklmCertCreate to create a certificate and a public and private key pair, and store thecertificate in an existing keystore. For example, type:
print AdminTask.tklmCertCreate ('[-type selfsigned -alias sklmCertificate -cn sklm -ou sales -o myCompanyName -usage DS8000 -country US -keyStoreName defaultKeyStore -validity 999]')
– Certificate request:
Type tklmCertGenRequest to create a PKCS #10 certificate request file. For example, type:
print AdminTask.tklmCertGenRequest('[-alias sklmCertificate3 -cn sklm -ou sales -o myCompanyName -locality myLocation -country US -validity 999 -keyStoreName defaultKeyStore -fileName myCertRequest3.crt -usage DS8000]')
• REST interface:
– Certificate
Use Create Certificate REST Service to create a certificate and a public and private keypair, and store the certificate in an existing keystore. For example, you can send the followingHTTP request by using a REST client:
POST https://localhost:<port>/SKLM/rest/v1/certificatesContent-Type: application/jsonAccept : application/jsonAuthorization: SKLMAuth authId=139aeh34567mAccept-Language : en{"type":"selfsigned","alias":"sklmCertificate","cn":"sklm","ou":"sales","o":"myCompanyName","usage":"DS8000","country":"US","validity":"999", "algorithm ": " RSA " }
– Certificate request
Chapter 1. Administering 195
Use Certificate Generate Request REST Service to create a PKCS #10 certificaterequest file. For example, you can send the following HTTP request by using a REST client:
POST https://localhost:<port>/SKLM/rest/v1/certificatesContent-Type: application/jsonAccept : application/jsonAuthorization: SKLMAuth authId=139aeh34567m{"type":"certreq","alias":"sklmCertificate3","cn":"sklm","ou":"sales","o":"myCompanyName","usage":"DS8000","country":"US","validity":"999","fileName":"myCertRequest3.crt","algorithm":"ECDSA"}
What to do next
Your next action depends on whether you created a certificate or a certificate request.
• Certificate:
You can associate a certificate with a specific storage image.• Certificate request:
Manually send the certificate request to a certificate authority. When the signed certificate returns,import the certificate by using a pending action item on the Welcome panel, or by using thetklmCertImport command or Certificate Import REST Service.
Modifying an image certificateYou can use the graphical user interface to view read-only information about an image certificate in theIBM Security Key Lifecycle Manager database. Using the command-line interface or REST interface, youcan change a limited number of attributes.
About this task
You can use the Modify Certificate dialog to modify a certificate. Alternatively, you can use the followingcommands or REST services:
• tklmCertUpdate or Certificate Update REST Service to modify the state of certificates, suchas trusted or compromised, and to modify certificate information.
• tklmDeviceTypeAttributeUpdate or Device Type Attribute Update REST Service to setthe certificate as the primary or secondary certificate.
Your role must have the permissions to the modify action and to the appropriate device group.
Note: IBM Security Key Lifecycle Manager database changes that you make are configured on theDS8000 Turbo drive when the drive contacts IBM Security Key Lifecycle Manager.
Procedure
1. Go to the appropriate page or directory.
• Graphical user interface:
a. Log on to the graphical user interface.b. In the Key and Device Management section on Welcome page, select DS8000.c. Click Go to > Manage keys and devices.d. Alternatively, right-click DS8000 and select Manage keys and devices.e. On the management page for DS8000, select a certificate in the Certificates column.f. Click Modify.g. Alternatively, right-click a certificate and then select Modify, or double-click a certificate entry.
• Command-line interface
a. Go to the <WAS_HOME>/bin directory. For example,
196 IBM Security Key Lifecycle Manager : Administering

Windowscd drive:\Program Files\IBM\WebSphere\AppServer\bin
Linuxcd /opt/IBM/WebSphere/AppServer/bin
b. Start the wsadmin interface by using an authorized user ID, such as SKLMAdmin. For example,Windows
wsadmin.bat -username SKLMAdmin -password mypwd -lang jython
Linux
./wsadmin.sh -username SKLMAdmin -password mypwd -lang jython
2. View (graphical user interface) or modify (command-line interface) the certificate information.
• Graphical user interface:
On the Modify Certificate dialog, view the read-only fields.• Command-line interface:
Type tklmCertList to find a certificate and tklmCertUpdate to update a certificate. You mustspecify the uuid of the certificate and the changed attribute. For example, to change the information,type:
print AdminTask.tklmCertList('[-usage DS8000 -attributes "{state active}" -v y]')
print AdminTask.tklmCertUpdate ('[-uuid CERTIFICATE-33fc26e-5fb5a0e66143 -usage DS8000 -attributes "{information {new information}}"]')
• REST interface:
Use Certificate List REST Service to find a certificate. For example, you can send thefollowing HTTP request:
GET https://localhost:<port>/SKLM/rest/v1/certificates?attributes=state active Content-Type: application/json Accept: application/json Authorization: SKLMAuth userAuthId=37ea1939-1374-4db7-84cd-14e399be2d20 Accept-Language: en
Use Certificate Update REST Service to update a certificate. For example, you can send thefollowing HTTP request:
PUT https://localhost:<port>/SKLM/rest/v1/certificatesContent-Type: application/jsonAccept: application/jsonAuthorization: SKLMAuth authId=139aeh34567m{"uuid":"CERTIFICATE-33fc26e-5fb5a0e66143","usage":"DS8000","attributes":"information {newinformation}" }
What to do next
Next, you can use the DS8000 Key and Device Management page to associate image certificates withspecific storage images.
Deleting an image certificateYou can delete a selected image certificate, which can be in any state, such as active. You cannot delete acertificate that is associated with a storage image. You also cannot delete a certificate that is identified as
Chapter 1. Administering 197
the primary certificate for image or secondary certificate for image. For example, you might delete anexpired certificate.
About this task
Before you begin, ensure that a backup exists of the keystore with the image certificate that you intend todelete. Verify that the certificate is not currently associated with a storage image. Determine the currentstate of the certificate, and ensure that deleting a certificate in this state conforms with your site policies.
Delete certificates only when the data protected by those certificates is no longer needed. Deletingcertificates is like erasing the data. After certificates are deleted, data that is protected by thosecertificates is not retrievable.
You can use the Delete menu item or you can use the tklmCertDelete command or DeleteCertificate REST Service to delete a selected image certificate. Your role must have permissionsto the delete action and to the appropriate device group.
Deleting a certificate deletes the material from the database.
Procedure
1. Go to the appropriate page or directory.
• Graphical user interface:
a. Log on to the graphical user interface.b. In the Key and Device Management section on Welcome page, select DS8000.c. Click Go to > Manage keys and devices.d. Alternatively, right-click DS8000 and select Manage keys and devices.e. On the management page for DS8000, select a certificate in the Certificates column.f. Click Delete.g. Alternatively, right-click a certificate and then select Delete.
• Command-line interface
a. Go to the <WAS_HOME>/bin directory. For example,Windows
cd drive:\Program Files\IBM\WebSphere\AppServer\binLinux
cd /opt/IBM/WebSphere/AppServer/binb. Start the wsadmin interface by using an authorized user ID, such as SKLMAdmin. For example,
Windows
wsadmin.bat -username SKLMAdmin -password mypwd -lang jython
Linux
./wsadmin.sh -username SKLMAdmin -password mypwd -lang jython
2. Delete the certificate.
• Graphical user interface:
On the Confirm dialog, read the confirmation message to verify that the correct certificate wasselected before you delete the certificate. Then, click OK.
• Command-line interface:
198 IBM Security Key Lifecycle Manager : Administering

Type tklmCertList to find a certificate and tklmCertDelete to delete a certificate. You mustspecify the certificate alias and the keystore name. For example, to delete an expired certificate thatis not currently associated with a storage image, type:
print AdminTask.tklmCertList('[-usage DS8000 -v y]')
print AdminTask.tklmCertDelete ('[-alias mycertalias -keyStoreName defaultKeyStore]')
• REST interface:
Use Certificate List REST Service to find a certificate and Delete Certificate RESTService to delete a certificate. For examples, you can send the following HTTP requests:
GET https://localhost:<port>/SKLM/rest/v1/certificates?usage=DS8000Content-Type: application/json Accept: application/json Authorization : SKLMAuth userAuthId=37ea1939-1374-4db7-84cd-14e399be2d20 Accept-Language : en
DELETE https://localhost:<port>/SKLM/rest/v1/certificates/mycertaliasContent-Type: application/jsonAccept: application/jsonAuthorization: SKLMAuth authId=139aeh34567mAccept-Language: en
What to do next
Next, you can back up the keystore again to accurately reflect the change in certificates.
Adding a storage imageYou can add a storage image to the IBM Security Key Lifecycle Manager database. Before you begin,create the certificates that you want to associate with the storage images that you are about to identify.Additionally, obtain the storage image serial number, and other description information.
About this task
You can use the Add Storage Image dialog or you can use the tklmDeviceAdd command or DeviceAdd REST Service to add a storage image. Your role must have the permission to the create action anda permission to the appropriate device group.
Procedure
1. Go to the appropriate page or directory.
• Graphical user interface:
a. Log on to the graphical user interface.b. In the Key and Device Management section on Welcome page, select DS8000.c. Click Go to > Manage keys and devices.d. Alternatively, right-click DS8000 and select Manage keys and devices.e. On the management page for DS8000, click Add.f. Click Storage Image.
• Command-line interface
a. Go to the <WAS_HOME>/bin directory. For example,Windows
cd drive:\Program Files\IBM\WebSphere\AppServer\binLinux
cd /opt/IBM/WebSphere/AppServer/bin
Chapter 1. Administering 199

b. Start the wsadmin interface by using an authorized user ID, such as SKLMAdmin. For example,Windows
wsadmin.bat -username SKLMAdmin -password mypwd -lang jython
Linux
./wsadmin.sh -username SKLMAdmin -password mypwd -lang jython
2. Add a storage image.
• Graphical user interface:
On the Add Storage Image dialog, type the required and optional information. Then, click AddStorage Image.
• Command-line interface:
Type tklmDeviceAdd to add a storage image. You must specify the storage image type, the serialnumber, and an image certificate. For example, type:
print AdminTask.tklmDeviceAdd ('[-type DS8000 -serialNumber CCCB31403AFF -attributes "{worldwideName ABCdeF1234567890} {description salesDivisionDrive} {aliasOne myimagecertificate}"]')
• REST interface:
Use Device Add REST Service to add a storage image. For example, you can send the followingHTTP request:
POST https://localhost:<port>/SKLM/rest/v1/devicesContent-Type: application/jsonAccept : application/jsonAuthorization : SKLMAuth userAuthId=37ea1939-1374-4db7-84cd-14e399be2d20Accept-Language : en{"type":"DS8000","serialNumber":"CCCB31403AFF","attributes":"worldwideNameABCdeF1234567890,description salesDivisionDrive"}
What to do next
Next, you can determine the status of the storage image that you added.
Modifying a storage imageYou can modify information about a storage image in the IBM Security Key Lifecycle Manager database.For example, you might update the storage image description.
About this task
Before you begin, create the certificates that you want to associate with the storage images that you areabout to modify. If you use the command-line interface, obtain the value of the uuid for the storage imagethat you intend to update and the alias of any certificate that is associated with the storage image.
You can use the Modify Storage Image dialog or you can use the tklmDeviceUpdate command orDevice Update REST Service to update a storage image. Your role must have permissions to themodify action and to the appropriate device group.
Procedure
1. Go to the appropriate page or directory.
• Graphical user interface:
a. Log on to the graphical user interface.b. In the Key and Device Management section on Welcome page, select DS8000.c. Click Go to > Manage keys and devices.
200 IBM Security Key Lifecycle Manager : Administering

d. Alternatively, right-click DS8000 and select Manage keys and devices.e. On the management page for DS8000, select a drive.f. click Modify.g. Alternatively, right-click a drive and then select Modify, or double-click a drive entry.
• Command-line interface
a. Go to the <WAS_HOME>/bin directory. For example,Windows
cd drive:\Program Files\IBM\WebSphere\AppServer\binLinux
cd /opt/IBM/WebSphere/AppServer/binb. Start the wsadmin interface by using an authorized user ID, such as SKLMAdmin. For example,
Windows
wsadmin.bat -username SKLMAdmin -password mypwd -lang jython
Linux
./wsadmin.sh -username SKLMAdmin -password mypwd -lang jython
2. Modify a storage image.
• Graphical user interface:
In the Modify Storage Image dialog, type the changed information. Then, click Modify StorageImage.
• Command-line interface:
Type tklmDeviceUpdate to update a storage image. You must specify the storage image uuid andthe attributes that change. For example, type:
print AdminTask.tklmDeviceUpdate ('[-uuid DEVICE-15d499ad-3ad8-3333-8c84-64cb9e11d990 -attributes "{description myDevice}"]')
• REST interface:
Use Device Update REST Service to update a storage image. For example, you can send thefollowing HTTP request:
PUT https://localhost:<port>/SKLM/rest/v1/devicesContent-Type: application/jsonAccept : application/jsonAuthorization: SKLMAuth authId=139aeh34567m{"uuid":"DEVICE-15d499ad-3ad8-3333-8c84-64cb9e11d990","attributes":"description myDevice"}
Deleting a storage imageYou can delete a storage image. Metadata for the storage image that you delete, such as the serialnumber, is removed from the IBM Security Key Lifecycle Manager database.
About this task
Before you begin, ensure that a current backup exists for the certificates and storage images at your site.If you use the command-line interface, obtain the uuid of the storage image that you intend to delete.
You can use the Delete menu item or you can use the tklmDeviceDelete command, or DeviceDelete REST Service to delete a storage image. Your role must have permissions to the delete actionand to the appropriate device group.
Chapter 1. Administering 201

Procedure
1. Go to the appropriate page or directory.
• Graphical user interface:
a. Log on to the graphical user interface.b. In the Key and Device Management section on Welcome page, select DS8000.c. Click Go to > Manage keys and devices.d. Alternatively, right-click DS8000 and select Manage keys and devices.e. On the management page for DS8000, select a device.f. click Delete.g. Alternatively, right-click a drive and then select Delete.
• Command-line interface
a. Go to the <WAS_HOME>/bin directory. For example,Windows
cd drive:\Program Files\IBM\WebSphere\AppServer\binLinux
cd /opt/IBM/WebSphere/AppServer/binb. Start the wsadmin interface by using an authorized user ID, such as SKLMAdmin. For example,
Windows
wsadmin.bat -username SKLMAdmin -password mypwd -lang jython
Linux
./wsadmin.sh -username SKLMAdmin -password mypwd -lang jython
2. Delete the storage image.
• Graphical user interface:
On the Confirm page, read the confirmation message to verify that the correct storage image wasselected before you delete the storage image. Metadata for the storage image that you delete, suchas the serial number, is removed from the IBM Security Key Lifecycle Manager database.
Then, click OK.• Command-line interface:
Type tklmDeviceList to locate a device and tklmDeviceDelete to delete a storage image. Youmust specify the uuid. For example, type:
print AdminTask.tklmDeviceList ('[-type DS8000]')
print AdminTask.tklmDeviceDelete ('[-uuid DEVICE-74386920-148c-47b2-a1e2-d19194b315cf]')
• REST interface:
Use Device List REST Service to locate a device and Device Delete REST Service todelete a storage image. For example, you can send the following HTTP requests:
GET https://localhost:<port>/SKLM/rest/v1/devices?type=DS8000Content-Type: application/jsonAccept : application/jsonAuthorization : SKLMAuth userAuthId=37ea1939-1374-4db7-84cd-14e399be2d20Accept-Language : en
DELETE https://localhost:<port>/SKLM/rest/v1/devices/DEVICE-74386920-148c-47b2-a1e2-d19194b315cfContent-Type: application/json
202 IBM Security Key Lifecycle Manager : Administering

Accept : application/jsonAuthorization: SKLMAuth authId=139aeh34567m
GPFS (IBM Spectrum Scale) file managementYou can use GPFS file system to manage keys in IBM Security Key Lifecycle Manager.
GPFS (IBM Spectrum Scale) is a high performance shared-disk file management solution that providesfast, reliable access to data from multiple nodes in a cluster environment. Applications can readily accessfiles using standard file system interfaces, and the same file can be accessed concurrently from multiplenodes.
GPFS provides support for file encryption that ensures both secure storage and secure deletion of data.GPFS manages encryption through the use of encryption keys and encryption policies.
See GPFS documentation for more information http://www.ibm.com/support/knowledgecenter/SSFKCN/gpfs_welcome.html.
Administering certificates and keysTo administer certificates and keys, you might want to add, modify, or delete their associated nodenames. You can also add keys and a name that is associated with the keys.
About this task
Your role must have permissions to the view action and to the appropriate device group. Use themanagement page for GPFS to add, modify, or delete a certificate or key.
Before you begin, examine the columns on the page, which provides buttons to add, modify, or delete atable item.
The table is organized in these information areas:
• In left columns, information about certificates indicates the certificate UUID, certificate name, and theendpoint count. The endpoint count is the number of endpoints that are using this certificate.
• In right columns, information about keys indicates the key UUID and the key name that the certificateson the left have access to.
Procedure
1. Log on to the graphical user interface.
a. In the Key and Device Management section on Welcome page, select GPFS.b. Click Go to > Manage keys and devices.c. Alternatively, right-click GPFS and select Manage keys and devices.
2. You can add, modify, or delete a key or certificate.
You might do these administrative tasks:
• Refresh the list.
Click the refresh icon to refresh items in the table.• Add
Click Add.
– Certificate
On the Add Certificate dialog, type a name and the file name and location of a certificate. Then,click Add.
– Key
On the Add Key dialog, specify the information according to your requirements, such as thenumber of keys to create, up to a maximum of 100 keys. Then, click Add.
Chapter 1. Administering 203

A success indicator varies, showing the addition of a certificate or keys.• Modify
To modify the device group that a certificate or key belongs to, select the certificate or key and thenclick Modify. Alternatively, right-click the selected certificate or key. Then, click Modify.
– Certificate
View read-only information in the Modify Certificate page. Your role must have permissions to themodify action and to the appropriate device group.
– Key
View read-only information in the Modify Key page. Your role must have permissions to the deleteaction and to the appropriate device group.
A success indicator varies, showing a change in a column for the certificate or key.• Delete
To delete a certificate or key, select the certificate or key, and then click Delete. Alternatively, right-click the selected certificate or key, and then click Delete.
Metadata for the certificate that you delete is removed from the IBM Security Key Lifecycle Managerdatabase. Key data is also removed. To confirm deletion, click OK. Your role must have permissionsto the delete action and to the appropriate device group.
A success indicator is deletion of the certificate from the able.
Adding a certificateYou might add more certificates for use with IBM Security Key Lifecycle Manager.
About this task
You can use the Add Certificate dialog to add a certificate. Your role must have the permission to thecreate action and a permission to the appropriate device group.
Procedure
1. Log on to the graphical user interface.2. In the Key and Device Management section on Welcome page, select GPFS.3. Click Go to > Manage keys and devices.4. Alternatively, right-click GPFS and select Manage keys and devices.5. On the management page for GPFS, click Add.6. Click Certificate.7. On the Add Certificate dialog, specify the information according to the requirements.8. Click Add.
The certificate is added to the table.
Modifying a certificateYou might modify information about a certificate in the IBM Security Key Lifecycle Manager database.
About this task
You can use the Modify Certificate dialog to update a certificate. Your role must have permissions to themodify action and to the appropriate device group.
Procedure
1. Log on to the graphical user interface.2. In the Key and Device Management section on Welcome page, select GPFS.
204 IBM Security Key Lifecycle Manager : Administering
3. Click Go to > Manage keys and devices.4. Alternatively, right-click GPFS and select Manage keys and devices.5. On the management page for GPFS, select a certificate.6. Click Modify.7. Alternatively, right-click a certificate and then select Modify, or double-click a certificate entry.8. On the Modify Certificate dialog, type the changed information.9. Click Modify.
The certificate information is changed in the table.
What to do next
Next, you might verify that the changes are made.
Deleting a certificateYou might delete a selected certificate, which can be in any state, such as active.
About this task
You can use the Delete menu item to delete a certificate. Your role must have permissions to the deleteaction and to the appropriate device group.
Procedure
1. Log on to the graphical user interface.2. In the Key and Device Management section on Welcome page, select GPFS.3. Click Go to > Manage keys and devices.4. Alternatively, right-click GPFS and select Manage keys and devices.5. On the management page for GPFS, select a certificate.6. Click Delete.7. Alternatively, right-click a certificate and then select Delete.8. On the Confirm dialog, read the confirmation message to verify that the correct certificate was
selected before you delete the certificate. Then, click OK.
The certificate is removed from the table.
Adding keysYou might add keys for use with GPFS.
About this task
You can use the Add Key dialog to create one or more keys in the existing group. Your role must have thepermission to the create action and a permission to the appropriate device group.
Before you begin, determine your site policy for naming key prefixes.
Procedure
1. Log on to the graphical user interface.2. In the Key and Device Management section on Welcome page, select GPFS.3. Click Go to > Manage keys and devices.4. Alternatively, right-click GPFS and select Manage keys and devices.5. On the management page for GPFS, click Add.6. Click Key.7. On the Add Key dialog, specify values for the parameters.8. Click Add.
Chapter 1. Administering 205
The keys that you added are visible in the table of keys. Back up the keys before the keys are served todevices.
Modifying a keyYou might modify information about a key in the IBM Security Key Lifecycle Manager database.
About this task
You can use the Modify Key dialog to modify information about a key. Your role must have permissions tothe modify action and to the appropriate device group.
Procedure
1. Log on to the graphical user interface.2. In the Key and Device Management section on Welcome page, select GPFS.3. Click Go to > Manage keys and devices.4. Alternatively, right-click GPFS and select Manage keys and devices.5. On the management page for GPFS, select a key.6. Click Modify.7. Alternatively, right-click a key and then select Modify, or double-click a key entry.8. On the Modify Key dialog, type the changed information. Then, click Modify.
The key information is changed in the table.
Deleting a keyYou might delete a key entry from the IBM Security Key Lifecycle Manager database.
About this task
You can use the Delete menu item to delete a key. Your role must have permissions to the delete actionand to the appropriate device group.
Procedure
1. Log on to the graphical user interface.2. In the Key and Device Management section on Welcome page, select GPFS.3. Click Go to > Manage keys and devices.4. Alternatively, right-click GPFS and select Manage keys and devices.5. On the management page for GPFS, select a key.6. Click Delete.7. Alternatively, right-click a key and then select Delete.8. On the Confirm dialog, read the confirmation message to verify that the correct key was selected
before you delete the key. Then, click OK.The key information is removed from the table.
LTO tape drive managementYou can manage LTO tape drives by using IBM Security Key Lifecycle Manager.
Guided steps to create key groups and drivesWhen you first create key groups and drives, and later when you add more key groups or drives, IBMSecurity Key Lifecycle Manager provides a guided set of steps to complete the task.
Descriptions of some steps might mention command-line and REST interface alternatives to do the sametask. In a guided set of tasks, use the graphical user interface to complete the tasks.
206 IBM Security Key Lifecycle Manager : Administering

Creating a key groupAs a first activity, create keys and key groups for IBM Security Key Lifecycle Manager. Before you begin,determine the quantity of keys and the purpose of individual key groups that your organization requires.
About this task
You can use the Create Key Group dialog. Alternatively, you can use the tklmGroupCreate commandor Group Create REST Service to create a group to which you want to add keys. Then, use thetklmSecretKeyCreate command or Secret Key Create REST Service to create one or moresymmetric keys in the existing group. Your role must have the permission to the create action and apermission to the appropriate device group.
Procedure
1. Go to the appropriate page or directory:
• Graphical user interface:
a. Log on to the graphical user interface.b. In the Key and Device Management section on Welcome page, select LTO.c. Click Go to > Guided key and device creation.d. Alternatively, right-click LTO and select Guided key and device creation.
• Command-line interface
a. Go to the <WAS_HOME>/bin directory. For example,Windows
cd drive:\Program Files\IBM\WebSphere\AppServer\binLinux
cd /opt/IBM/WebSphere/AppServer/binb. Start the wsadmin interface by using an authorized user ID, such as SKLMAdmin. For example,
Windows
wsadmin.bat -username SKLMAdmin -password mypwd -lang jython
Linux
./wsadmin.sh -username SKLMAdmin -password mypwd -lang jython
• REST interface:
– Open a REST client.2. Create a key group:
• Graphical user interface:
a. On the Step 1: Create Key Groups page, click Create on the Key Group table.b. On the Create Key Group dialog, specify values for the required and optional parameters. For
example, you might create a key group with 100 keys.c. Click Create Key Group.
• Command-line interface:
a. First, create a group to which you might add keys.
Type tklmGroupCreate to create a group. For example, type:
print AdminTask.tklmGroupCreate ('[-name GROUP-myKeyGroup -type keygroup -usage LTO]')
Chapter 1. Administering 207
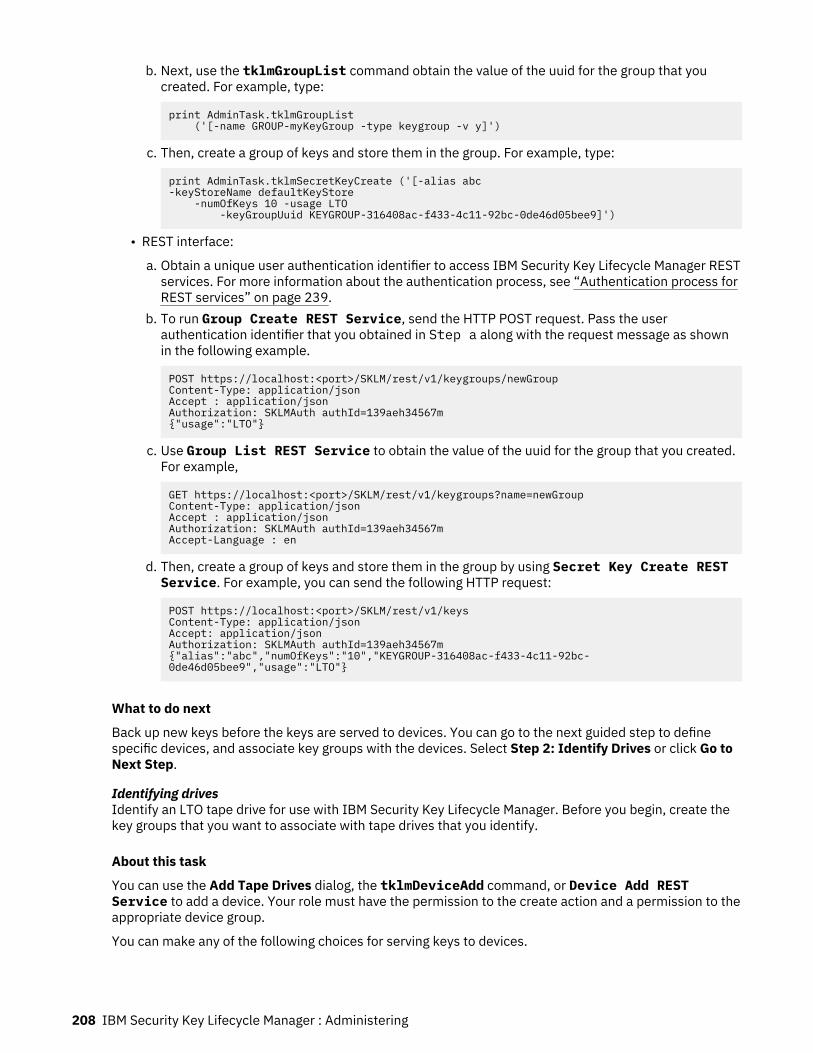
b. Next, use the tklmGroupList command obtain the value of the uuid for the group that youcreated. For example, type:
print AdminTask.tklmGroupList ('[-name GROUP-myKeyGroup -type keygroup -v y]')
c. Then, create a group of keys and store them in the group. For example, type:
print AdminTask.tklmSecretKeyCreate ('[-alias abc -keyStoreName defaultKeyStore -numOfKeys 10 -usage LTO -keyGroupUuid KEYGROUP-316408ac-f433-4c11-92bc-0de46d05bee9]')
• REST interface:
a. Obtain a unique user authentication identifier to access IBM Security Key Lifecycle Manager RESTservices. For more information about the authentication process, see “Authentication process forREST services” on page 239.
b. To run Group Create REST Service, send the HTTP POST request. Pass the userauthentication identifier that you obtained in Step a along with the request message as shownin the following example.
POST https://localhost:<port>/SKLM/rest/v1/keygroups/newGroupContent-Type: application/jsonAccept : application/jsonAuthorization: SKLMAuth authId=139aeh34567m{"usage":"LTO"}
c. Use Group List REST Service to obtain the value of the uuid for the group that you created.For example,
GET https://localhost:<port>/SKLM/rest/v1/keygroups?name=newGroupContent-Type: application/jsonAccept : application/jsonAuthorization: SKLMAuth authId=139aeh34567mAccept-Language : en
d. Then, create a group of keys and store them in the group by using Secret Key Create RESTService. For example, you can send the following HTTP request:
POST https://localhost:<port>/SKLM/rest/v1/keysContent-Type: application/jsonAccept: application/jsonAuthorization: SKLMAuth authId=139aeh34567m{"alias":"abc","numOfKeys":"10","KEYGROUP-316408ac-f433-4c11-92bc-0de46d05bee9","usage":"LTO"}
What to do next
Back up new keys before the keys are served to devices. You can go to the next guided step to definespecific devices, and associate key groups with the devices. Select Step 2: Identify Drives or click Go toNext Step.
Identifying drivesIdentify an LTO tape drive for use with IBM Security Key Lifecycle Manager. Before you begin, create thekey groups that you want to associate with tape drives that you identify.
About this task
You can use the Add Tape Drives dialog, the tklmDeviceAdd command, or Device Add RESTService to add a device. Your role must have the permission to the create action and a permission to theappropriate device group.
You can make any of the following choices for serving keys to devices.
208 IBM Security Key Lifecycle Manager : Administering
Only accept manually added devices for communicationAll incoming devices are not added to the data store. You must manually specify key service to eachdevice.
Hold new device requests pending my approvalAll incoming devices of a valid device group are added to the device store, but are not automaticallyserved keys upon request. You must accept or reject a device in the pending devices list before thedevice is served keys upon request.
Automatically accept all new device requests for communicationAll new incoming devices of a valid device group are added to the data store and are automaticallyserved keys upon request.
Note: Do not use this setting if you intend to move the new device to another device group. Instead,select manual or pending approval mode to allow an opportunity to move the device into theappropriate device group before any keys are served.
Any setting is acceptable if there are no device groups. However, if device groups are specified:
Determine whether you want IBM Security Key Lifecycle Manager to automatically accept requests fromall drives. For greater security, after all drives are discovered, you might turn off this option for aproduction environment.
Procedure
1. Go to the appropriate page or directory:
• Graphical user interface:
a. Log on to the graphical user interface.b. In the Key and Device Management section on Welcome page, select LTO.c. Click Go to > Guided key and device creation.d. Alternatively, right-click LTO and select Guided key and device creation.
• Command-line interface
a. Go to the <WAS_HOME>/bin directory. For example,Windows
cd drive:\Program Files\IBM\WebSphere\AppServer\binLinux
cd /opt/IBM/WebSphere/AppServer/binb. Start the wsadmin interface by using an authorized user ID, such as SKLMAdmin. For example,
Windows
wsadmin.bat -username SKLMAdmin -password mypwd -lang jython
Linux
./wsadmin.sh -username SKLMAdmin -password mypwd -lang jython
• REST interface:
– Open a REST client.2. Skip the Create Key Groups page. Click the Go to Next Step link or click Step 2: Identify Drives.3. You might specify that IBM Security Key Lifecycle Manager holds new device requests for your
approval.
• Graphical user interface:
Select Hold new device requests pending my approval.• Command-line interface:
Chapter 1. Administering 209

Use the tklmDeviceGroupAttributeUpdate command or Device Group AttributeUpdate REST Service to set the value of the device.AutoPendingAutoDiscovery attribute.For example, type:
print AdminTask.tklmDeviceGroupAttributeUpdate ('[-name LTO -attributes "{device.AutoPendingAutoDiscovery 2}"]')
For an LTO device group, use the tklmDeviceGroupAttributeUpdate command to specify a keygroup by using the symmetricKeySet attribute in the IBM Security Key Lifecycle Managerdatabase.
• REST interface:
a. Obtain a unique user authentication identifier to access IBM Security Key Lifecycle Manager RESTservices. For more information about the authentication process, see “Authentication process forREST services” on page 239.
b. To run Device Group Attribute Update REST Service and to set the value of thedevice.AutoPendingAutoDiscovery attribute, send the HTTP PUT request. Pass the userauthentication identifier that you obtained in Step a along with the request message as shownin the following example.
PUT https://localhost:<port>/SKLM/rest/v1/deviceGroupAttributesContent-Type: application/jsonAccept : application/jsonAuthorization: SKLMAuth authId=139aeh34567m{"name":"LTO","attributes":"device.AutoPendingAutoDiscovery 2"}
4. Add a device:
• Graphical user interface:
a. On the Step 2: Identify Drives page, in the Devices table, click Add.b. On the Add Tape Drive dialog, type the required and optional information.c. Click Add Tape Drive.
• Command-line interface:
Type tklmDeviceAdd to add a device. You must specify the device group and serial number. Forexample, type:
print AdminTask.tklmDeviceAdd ('[-type LTO -serialNumber FAA49403AQJF -attributes "{worldwideName ABCdeF1234567890} {description salesDivisionDrive} {symAlias LTOKeyGroup1}"]')
• REST interface:
You can use Device Add REST Service to add a device. For example, you can send the followingHTTP request:
POST https://localhost:<port>/SKLM/rest/v1/devicesContent-Type: application/jsonAccept : application/jsonAuthorization : SKLMAuth userAuthId=37ea1939-1374-4db7-84cd-14e399be2d20Accept-Language : en{"type":"LTO","serialNumber":"FAA49403AQJF","attributes":"worldwideNameABCdeF1234567890,description marketingDivisionDrive"}
What to do next
Next, you can use the LTO Key and Device Management page to view all key groups and devices.
210 IBM Security Key Lifecycle Manager : Administering

Managing keys, key groups, and drivesTo administer keys, key groups, and devices, you map key groups to drives. You can add, modify, ordelete specific keys, key groups, or devices.
About this task
Use the LTO Key and Device Management to map key groups to drives. You can add, modify, or deletespecific keys, key groups, or devices. Your role must have permissions to the view action and to theappropriate device group.
To change the view of information, select:
View Key Groups and DrivesView the key group names and drive serial numbers. Additionally, this view lists the key group, key, orsystem default that a drive uses.
View Keys, Key Group Membership and DrivesView the keys and key membership in key groups. Additionally, this view lists drive serial numbersand the key group, key, or system default that a drive uses.
Before you begin, examine the columns on the page, which provides buttons to add, modify, or delete atable item. To sort information, click a column header.
The table is organized in these areas:
• In left columns, information about keys or key groups.
For a key, the information indicates in which key group the key is a member. For a key group, theinformation indicates whether the key group is used as the default, and the number of keys in the group.
• In right columns, information about drives.
The information indicates the drive serial number and the key group or specific key that the drive uses.For example, a drive might use the System Default key group.
• Icons indicate the type of keys.
Table 12. Icons and their meanings
Icon Description
A symmetric key or private key. A private key is an asymmetric key in akey pair with a public key and a private key.
A key group
Procedure
1. Log on to the graphical user interface:
a. In the Key and Device Management section on Welcome page, select LTO.b. Click Go to > Manage keys and devices.c. Alternatively, right-click LTO and select Manage keys and devices.
Descriptions of some steps describe alternatives by using the graphical user interface, command-lineinterface, or the REST interface. For any one work session, do not switch between interfaces.
Descriptions of some tasks might mention task-related properties in the SKLMConfig.propertiesfile. Use the graphical user interface, command-line interface, or REST interface to change theseproperties.
2. On the LTO Key and Device Management, you can add, modify, or delete a key, a key group, or drive.
You can do the following administrative tasks:
• Refresh the list.
Chapter 1. Administering 211

Click the refresh icon to refresh items in the table.• Add
Click Add. Alternatively, you can select a step-by-step process to create key groups, and drives.
– Key group
On the Create Key Group dialog, specify the required information such as the key group name.You can also specify that this group serves keys as the default key group. There can be only onedefault key group. Then, click Create Key Group. Your role must have the permission to the createaction and a permission to the appropriate device group.
– Tape drive
On the Add Tape Drive dialog, type the drive serial number and other information. Then, click AddTape Drive. Your role must have the permission to the create action and a permission to theappropriate device group.
– Use step by step process for key groups, keys, and drive creation
On the Step1: Create Key Groups and Step2: Identify Drives pages, enter the necessaryinformation, and click the appropriate button to complete the task.
A success indicator varies, showing a key group or device.• Modify
To change a key group, key, or drive, select a key group, key, or drive, and then click Modify.Alternatively, right-click the selected key group, key, or drive. Then, click Modify.
– Key Group
Specify changes on the Modify Key Group dialog. Then, click Modify Key Group. Your role musthave permissions to the modify action and to the appropriate device group.
– Key
Specify changes on the Modify Key Membership dialog. Then, click Modify Key Membership. Yourrole must have permissions to the modify action and to the appropriate device group.
– Tape drive
Specify changes on the Modify Tape Drive dialog. Then, click Modify Tape Drive. Your role musthave permissions to the modify action and to the appropriate device group.
A success indicator varies, showing a change in a column for the key group, key, or device. Changesto optional information such as the value of a drive description might not be provided in the table.
• Delete
To delete a key group, key, or drive, select a key, a key group, or drive, and then click Delete.Alternatively, right-click the selected key group, key, or drive. Then, click Delete.
– Key group
You cannot delete a key group that is associated with a device, or a key group that is marked asdefault. Deleting a populated key group also deletes all the keys in the key group.
To confirm deletion, click OK. Your role must have permissions to the delete action and to theappropriate device group.
– Key
Deleting a key removes the key from any key group with which the key is associated. To confirmdeletion, click OK. You cannot delete a key that is associated with a drive. Your role must havepermissions to the delete action and to the appropriate device group.
– Tape drive
212 IBM Security Key Lifecycle Manager : Administering

Metadata for the drive that you delete, such as the drive serial number, is removed from the IBMSecurity Key Lifecycle Manager database. To confirm deletion, click OK. Your role must havepermissions to the delete action and to the appropriate device group.
A success indicator is the deletion of the key group, key, or device from the management table.
Adding a key or key groupYou can add more keys or key groups for use with IBM Security Key Lifecycle Manager. Before you begin,determine your site policy on the default key groups and naming for key prefixes.
About this task
You can use the Create Key Group dialog. Alternatively, you might first use the tklmGroupCreatecommand, or Group Create REST Service to create a group to which you want to add keys, and thenuse the tklmSecretKeyCreate command or Secret Key Create REST Service to create one ormore symmetric keys in the existing group. Your role must have the permission to the create action and apermission to the appropriate device group.
Procedure
1. Go to the appropriate page or directory:
• Graphical user interface:
a. Log on to the graphical user interface.b. In the Key and Device Management section on Welcome page, select LTO.c. Click Go to > Manage keys and devices.d. Alternatively, right-click LTO and select Manage keys and devices.e. On the management page for LTO, click Add.f. Click Key Group.
• Command-line interface
a. Go to the <WAS_HOME>/bin directory. For example,Windows
cd drive:\Program Files\IBM\WebSphere\AppServer\binLinux
cd /opt/IBM/WebSphere/AppServer/binb. Start the wsadmin interface by using an authorized user ID, such as SKLMAdmin. For example,
Windows
wsadmin.bat -username SKLMAdmin -password mypwd -lang jython
Linux
./wsadmin.sh -username SKLMAdmin -password mypwd -lang jython
2. Create a key or key group:
• Graphical user interface
a. On the Create Key Group dialog, specify values for the required and optional parameters. Forexample, you might optionally specify that this key group is the default.
b. Click Create Key Group.• Command-line interface:
a. First, create a group to which you might add keys.
Chapter 1. Administering 213

Type tklmGroupCreate to create a group of that has a type of key group. For example, type:
print AdminTask.tklmGroupCreate ('[-name GROUP-myKeyGroup -type keygroup -usage LTO]')
b. Next, use the tklmGroupList command obtain the value of the uuid for the group that youcreated. For example, type:
print AdminTask.tklmGroupList ('[-name GROUP-myKeyGroup -type keygroup -v y]')
c. Then, create a group of keys and store them in the group. For example, type:
print AdminTask.tklmSecretKeyCreate ('[-alias abc -keyStoreName defaultKeyStore -numOfKeys 10 -usage LTO -keyGroupUuid KEYGROUP-316408ac-f433-4c11-92bc-0de46d05bee9]')
• REST interface:
a. Create a group to which you might add keys by using Group Create REST Service.
For example, you can send the following HTTP request by using a REST client:
POST https://localhost:<port>/SKLM/rest/v1/keygroups/newGroupContent-Type: application/jsonAccept: application/jsonAuthorization: SKLMAuth authId=139aeh34567m{"usage":"LTO"}
b. Use Group List REST Service to obtain the value of the uuid for the group that you created.For example, you can send the following HTTP request:
GET https://localhost:<port>/SKLM/rest/v1/keygroups?name=newGroupContent-Type: application/jsonAccept: application/jsonAuthorization: SKLMAuth authId=139aeh34567mAccept-Language : en
c. Create a group of keys and store them in the group by using Secret Key Create RESTService. For example, you can send the following HTTP request:
POST https://localhost:<port>/SKLM/rest/v1/keysContent-Type: application/jsonAccept: application/jsonAuthorization: SKLMAuth authId=139aeh34567m{"alias":"abc","numOfKeys":"10","KEYGROUP-316408ac-f433-4c11-92bc-0de46d05bee9","usage":"LTO"}
What to do next
Back up new keys before the keys are served to devices. You might also associate key groups withspecific devices.
Specifying a rollover key groupYou can specify a key group for future use as the system default.
About this task
You can use the graphical user interface, tklmKeyGroupDefaultRolloverAdd command or KeyGroup Default Rollover Add REST Service to add a default key group rollover on a specific dateto serve keys to a device group. Your role must have the permission to the create action and a permissionto the appropriate device group.
Procedure
1. Go to the appropriate page or directory:
214 IBM Security Key Lifecycle Manager : Administering
• Graphical user interface:
a. Log on to the graphical user interface.b. In the Key and Device Management section on Welcome page, select LTO.c. Click Go to > Manage default rollover.d. Alternatively, right-click LTO and select Manage default rollover.
• Command-line interface
a. Go to the <WAS_HOME>/bin directory. For example,Windows
cd drive:\Program Files\IBM\WebSphere\AppServer\binLinux
cd /opt/IBM/WebSphere/AppServer/binb. Start the wsadmin interface by using an authorized user ID, such as SKLMAdmin. For example,
Windows
wsadmin.bat -username SKLMAdmin -password mypwd -lang jython
Linux
./wsadmin.sh -username SKLMAdmin -password mypwd -lang jython
2. Specify an existing key group to be a future system default.
• Graphical user interface:
a. On the management page for LTO, click Add.b. On the Add Future Write Default dialog, specify the required information.c. Click Add Future Write Default.
Note:
– Do not specify two defaults for the same rollover date.– If a key group does not exist at the time of rollover, IBM Security Key Lifecycle Manager continues
to use the current default key group.– You can add or delete table entries, but cannot modify an entry.
• Command-line interface:
Add a rollover key group. For example, type:
print AdminTask.tklmKeyGroupDefaultRolloverAdd ('[-usage LTO -keyGroupName myLTOkeygroup -effectiveDate 2010-04-30]')
3. A success indicator varies, depending on the interface:
• Graphical user interface:
The rollover key group is listed in the table of rollover key groups on the LTO management page.• Command-line interface:
A completion message indicates success.4. To delete a key group from the rollover table, your role must have permission to the delete action.
• Graphical user interface:
Select a key group and click Delete.• Command-line interface:
Use the tklmKeyGroupDefaultRolloverList command to locate the Universal Unique Identifierfor a key group. Your role must have permissions to the view action and to the appropriate device
Chapter 1. Administering 215
group. Then, use tklmKeyGroupDefaultRolloverDelete command to remove the key groupfrom the rollover list. Your role must have permissions to the delete action and to the appropriatedevice group.
For example, type:
print AdminTask.tklmKeyGroupDefaultRolloverList('[-usage LTO]')
print AdminTask.tklmKeyGroupDefaultRolloverDelete('[-uuid 201]')
Specifying that keys are used only onceYou can specify that the keys in a key group are used only once. For security reasons, for example, youmight prevent additional use of previously used keys that are defined for a key group.
About this task
You can use the command-line interface or REST interface to set the stopRoundRobinKeyGrpsproperty in the SKLMConfig.properties file. Your role must have the permission to the configureaction. This property is not initially present in the property file unless you set its value to true.
Important:
• Turning on this flag can cause key serving to stop if a key group is in use and the last key from the keygroup is served. Additional requests for a key from this group on a key serving write request cause anerror and send an error code of 0xEE34 (NO_KEY_TO_SERVE) to the device. To enable successfulprocessing of new key serving write requests, add new keys to the key group. Alternatively, you mightspecify use of a different key group that has available keys. Key serving read requests always succeedwhen the requested key exists.
• Use this property in an environment of strict government compliance and with FIPS 140. With theproperty on, you must actively monitor your key groups. Ensure that a key group does not run out ofkeys, causing the server to stop serving keys and the tape write request to fail.
• If you turn on this flag, do not turn off the flag. For example, if you turn on the flag, a key group does notserve previously used keys. If you turn off the flag, the next key in the group is served. After the last keyin the group is served, the next key to be served is the first key in the group.
• When this option is set, do not separately assign individual key aliases that belong to a key group todevices.
Procedure
1. Go to the appropriate directory:
a. Go to the <WAS_HOME>/bin directory. For example,Windows
cd drive:\Program Files\IBM\WebSphere\AppServer\binLinux
cd /opt/IBM/WebSphere/AppServer/binb. Start the wsadmin interface by using an authorized user ID, such as SKLMAdmin. For example,
Windows
wsadmin.bat -username SKLMAdmin -password mypwd -lang jython
Linux
./wsadmin.sh -username SKLMAdmin -password mypwd -lang jython
2. First, determine the current state of the property in the SKLMConfig.properties file. This propertyis not initially present in the property file unless you set its value to true.
216 IBM Security Key Lifecycle Manager : Administering

• Command-line interface:
At a wsadmin prompt, type this Jython-formatted command:
print AdminTask.tklmConfigGetEntry ('[-name stopRoundRobinKeyGrps]')
• REST interface:
Use Get Single Config Property REST Service to get the current value of the property.Send the following HTTP request:
GET https://localhost:<port>/SKLM/rest/v1/configProperties/stopRoundRobinKeyGrpsContent-Type: application/jsonAccept : application/jsonAuthorization: SKLMAuth userAuthId=139aeh34567mAccept-Language : en
3. Change the state of the stopRoundRobinKeyGrps property to a value of true in theSKLMConfig.properties file.
• Command-line interface:
Type this Jython-formatted command:
print AdminTask.tklmConfigUpdateEntry ('[-name stopRoundRobinKeyGrps -value true]')
• REST interface:
Send the following HTTP request:
PUT https://localhost:<port>/SKLM/rest/v1/configPropertiesContent-Type: application/jsonAccept: application/jsonAuthorization: SKLMAuth authId=139aeh34567mAccept-Language: en{ "stopRoundRobinKeyGrps": "true"}
4. To determine success, retype the tklmConfigGetEntry command or use Get Single ConfigProperty REST Service.
Additionally, on the Welcome page in the graphical user interface, you might observe a warning in theAction Items section. The section lists key groups with 10 percent or fewer available keys. Double-click an entry in this table to access the Modify Key Groups dialog, where you can add more keys foruse by the group.
There is no other warning. The low key count warning applies to all key groups, including the key groupthat is specified as the default.
Modifying a key groupYou can modify information about objects in a key group in the IBM Security Key Lifecycle Managerdatabase. Before you begin, determine the changed information for the group, such as the number ofmore keys that you want to add to the group.
About this task
You can use the Modify Key Group dialog. Alternatively, you can use the following commands or RESTinterfaces to modify objects in a key group in the IBM Security Key Lifecycle Manager database.
• tklmGroupEntryAdd and tklmGroupEntryDelete• Group Entry Add REST Service and Group Entry Delete REST Service
Your role must have permissions to the modify action and to the appropriate device group.
Chapter 1. Administering 217
Procedure
1. Go to the appropriate page or directory:
• Graphical user interface:
a. Log on to the graphical user interface.b. In the Key and Device Management section on Welcome page, select LTO.c. Click Go to > Manage keys and devices.d. Alternatively, right-click LTO and select Manage keys and devices.e. On the management page for LTO, select a key group in the Key Group column.f. Click Modify.g. Alternatively, right-click a key group and then select Modify, or double-click a key group entry.
• Command-line interface
a. Go to the <WAS_HOME>/bin directory. For example,Windows
cd drive:\Program Files\IBM\WebSphere\AppServer\binLinux
cd /opt/IBM/WebSphere/AppServer/binb. Start the wsadmin interface by using an authorized user ID, such as SKLMAdmin. For example,
Windows
wsadmin.bat -username SKLMAdmin -password mypwd -lang jython
Linux
./wsadmin.sh -username SKLMAdmin -password mypwd -lang jython
2. Modify the key group information:
• Graphical user interface:
a. On the Modify Key Group dialog, change the appropriate fields. Your role must have specificpermissions for each action. For example, to delete a key from the group, your role must have apermission to the delete action and a permission to the appropriate device group.
b. Click Modify Key Group.• Command-line interface:
You might delete an object in a group, or add an object to a group.
– Delete a key from the group. Your role must have permissions to the delete action and to theappropriate device group. For example, type:
print AdminTask.tklmGroupEntryDelete ('[-entry "{type key} {uuid KEY-a3ce9230-bef9-42bd-86b7-6d208ec119cf}" -name GROUP-myKeyGroup -type keygroup]')
– Add the same key back into the group again. Your role must have permissions to the modify actionand to the appropriate device group. For example, type:
print AdminTask.tklmGroupEntryAdd('[-name GROUP-myKeyGroup -type keygroup -entry "{type key} {alias aaa000000000000000000} {keyStoreName defaultKeyStore}"]')
• REST interface:
To delete a key from the group, you can send the following HTTP request:
DELETE https://localhost:<port>/SKLM/rest/v1/keygroups/KEY-a3ce9230-bef9-42bd-86b7-6d208ec119cf
218 IBM Security Key Lifecycle Manager : Administering
Content-Type: application/jsonAccept: application/jsonAuthorization: SKLMAuth userAuthId=139aeh34567m
To add the same key back into the group again, you can send the following HTTP request:
POST https://localhost:<port>/SKLM/rest/v1/keygroupentryContent-Type: application/jsonAccept : application/jsonAuthorization: SKLMAuth userAuthId=139aeh34567m{"name":"GROUP-myKeyGroup", "entry": "KEY-a3ce9230-bef9-42bd-86b7-6d208ec119cf"}
3. A success indicator varies, depending on the interface:
• Graphical user interface:
For required fields, a column displays changed data. For optional fields, you might need to reopenthe Modify Key Group dialog to see the changed values, and then click Cancel.
• Command-line interface:
A completion message indicates success.• Rest interface:
The status code 200 OK indicates success.
What to do next
Next, you can use the LTO Key and Device Management page to associate the key group with specificdevices.
Deleting a key or key groupYou can delete a selected key or key group. You cannot delete a key or a key group that is associated witha device, or a key group that is marked as the default key group.
About this task
Delete keys only when the data protected by those keys is no longer needed. Deleting keys is like erasingthe data. After keys are deleted, data that is protected by those keys is not retrievable.
You can use the Delete menu item. Alternatively, you can use the following commands or REST servicesto delete a key, or to delete the key group.
• tklmKeyDelete or Delete Key REST Service• tklmGroupDelete or Group Delete REST Service
Your role must have permissions to the delete action and to the appropriate device group.
Before you delete, carry out the following verifications:
• Key
Ensure that a backup exists of the keystore with the key that you intend to delete.• Key group
If you use the command-line interface, obtain the uuid of the key group that you intend to delete. Verifythat the key group is not currently associated with a device, and is not marked as a default key group.
Procedure
1. Go to the appropriate page or directory:
• Graphical user interface:
a. Log on to the graphical user interface.b. In the Key and Device Management section on Welcome page, select LTO.
Chapter 1. Administering 219

c. Click Go to > Manage keys and devices.d. Alternatively, right-click LTO and select Manage keys and devices.e. On the management for LTO, select a key or key group in the appropriate column.f. Click Delete.g. Alternatively, right-click a key or key group and then select Delete.
• Command-line interface
a. Go to the <WAS_HOME>/bin directory. For example,Windows
cd drive:\Program Files\IBM\WebSphere\AppServer\binLinux
cd /opt/IBM/WebSphere/AppServer/binb. Start the wsadmin interface by using an authorized user ID, such as SKLMAdmin. For example,
Windows
wsadmin.bat -username SKLMAdmin -password mypwd -lang jython
Linux
./wsadmin.sh -username SKLMAdmin -password mypwd -lang jython
2. Delete the key or key group:
• Graphical user interface:
On the Confirm dialog, read the confirmation message before you delete the key or key group. Verifythat the correct key or key group was selected. For example, you might delete an empty key group.Deleting a populated key group also deletes all the keys in the key group. Deleting a key that belongsto a key group also removes the key from the group. Then, click OK.
• Command-line interface:
– Key
Type tklmKeyDelete to delete a key. For example, to delete a key that is not currentlyassociated with a device, first locate the key. You might use the tklmKeyList command to findthe key that you want to delete. For example, type:
print AdminTask.tklmKeyList ('[-usage LTO -attributes "{state active}" -v y]')
Then, delete the key. For example, type:
print AdminTask.tklmKeyDelete ('[-alias aaa000000000000000000 -keyStoreName defaultKeyStore]')
Deleting a key deletes the key material from the database.– Key group
Type tklmGroupDelete to delete a key group. For example, you might delete an empty keygroup. Deleting a populated key group also deletes all the keys in the key group. For example, todelete a key group that is not currently associated with a device, type:
print AdminTask.tklmGroupDelete ('[-uuid GROUP-7d588437-e725-48bf-a836-00a47df64e78]')
• REST interface:
– Key
220 IBM Security Key Lifecycle Manager : Administering

Use Delete Key REST Service to delete a key. Use List Key REST Service to find thekey that you want to delete. For example, you can send the following HTTP request:
GET https://localhost:<port>/SKLM/rest/v1/keysContent-Type: application/json Accept : application/jsonAuthorization: SKLMAuth userAuthId=139aeh34567m
Send the following HTTP request to delete the key:
DELETE https://localhost:<port>/SKLM/rest/v1/keys/aaa000000000000000000Content-Type: application/jsonAccept : application/jsonAuthorization: SKLMAuth userAuthId=139aeh34567m
– Key Group
Use Group Delete REST Service to delete a key group. For example, you can send thefollowing HTTP request:
https://localhost:<port>/SKLM/rest/v1/keygroups/GROUP-7d588437-e725-48bf-a836-00a47df64e78Content-Type: application/jsonAccept: application/jsonAuthorization: SKLMAuth userAuthId=139aeh34567m
What to do next
Refresh the table to ensure that the key or key group is deleted. Back up the keystore to accurately reflectthe change in keys. Back up the database to reflect the change in key groups.
Adding a driveYou can add a device such as a tape drive to the IBM Security Key Lifecycle Manager database. Before youbegin, create the keys and key groups that you want to associate with the devices that you are about toidentify. Additionally, obtain the tape drive serial number, and other description information. Determinewhether the drive uses a specific key group, or a system default key group.
About this task
You can use the Add Tape Drive dialog. Alternatively, you can use the tklmDeviceAdd command orDevice Add REST Service to add a device. Your role must have the permission to the create actionand a permission to the appropriate device group.
Procedure
1. Go to the appropriate page or directory:
• Graphical user interface:
a. Log on to the graphical user interface.b. In the Key and Device Management section on Welcome page, select LTO.c. Click Go to > Manage keys and devices.d. Alternatively, right-click LTO and select Manage keys and devices.e. On the management page for LTO, click Add.f. Click Tape Drive.
• Command-line interface
a. Go to the <WAS_HOME>/bin directory. For example,Windows
cd drive:\Program Files\IBM\WebSphere\AppServer\binLinux
cd /opt/IBM/WebSphere/AppServer/bin
Chapter 1. Administering 221

b. Start the wsadmin interface by using an authorized user ID, such as SKLMAdmin. For example,Windows
wsadmin.bat -username SKLMAdmin -password mypwd -lang jython
Linux
./wsadmin.sh -username SKLMAdmin -password mypwd -lang jython
2. Add a device:
• Graphical user interface:
On the Add Tape Drive dialog, type the required and optional information. Then, click Add TapeDrive.
• Command-line interface:
Type tklmDeviceAdd to add a device. You must specify the device group and serial number. Forexample, type:
print AdminTask.tklmDeviceAdd ('[-type LTO -serialNumber FAA49403AQJF -attributes "{worldwideName ABCdeF1234567890} {description salesDivisionDrive} {symAlias LTOKeyGroup1}"]')
• REST interface:
Use Device Add REST Service to add a device. For example, you can send the following HTTPrequest:
POST https://localhost:<port>/SKLM/rest/v1/devicesContent-Type: application/jsonAccept : application/jsonAuthorization : SKLMAuth userAuthId=37ea1939-1374-4db7-84cd-14e399be2d20Accept-Language : en{"type":"LTO","serialNumber":"FAA49403AQJF","attributes":"worldwideNameABCdeF1234567890,description salesDivisionDrive"}
What to do next
Next, verify whether the drive that you added is listed in the Devices table.
Modifying a driveYou can modify information about a device such as a tape drive in the IBM Security Key Lifecycle Managerdatabase. For example, you can update the description of the drive.
About this task
You can use the Modify Tape Drive dialog, the tklmDeviceUpdate command, or Device UpdateREST Service to update a device. Your role must have permissions to the modify action and to theappropriate device group.
Before you begin, create the keys and key groups that you want to associate with the devices that you areabout to modify. If you use the command-line or REST interface, obtain the value of the uuid for thedevice that you intend to update.
Procedure
1. Go to the appropriate page or directory.
• Graphical user interface:
a. Log on to the graphical user interface.b. In the Key and Device Management section on Welcome page, select LTO.c. Click Go to > Manage keys and devices.
222 IBM Security Key Lifecycle Manager : Administering

d. Alternatively, right-click LTO and select Manage keys and devices.e. On the management page for LTO, select a drive in the Tape Drives column.f. click Modify.g. Alternatively, right-click a drive and then select Modify, or double-click a drive entry.
• Command-line interface
a. Go to the <WAS_HOME>/bin directory. For example,Windows
cd drive:\Program Files\IBM\WebSphere\AppServer\binLinux
cd /opt/IBM/WebSphere/AppServer/binb. Start the wsadmin interface by using an authorized user ID, such as SKLMAdmin. For example,
Windows
wsadmin.bat -username SKLMAdmin -password mypwd -lang jython
Linux
./wsadmin.sh -username SKLMAdmin -password mypwd -lang jython
2. Modify a device:
• Graphical user interface:
a. On the Modify Tape Drive dialog, type the required and optional information.b. Click Modify Tape Drive.
• Command-line interface:
Type tklmDeviceUpdate to update a device. You must specify the device uuid and the attributesthat change. For example, type:
print AdminTask.tklmDeviceList ('[-type lto]')
print AdminTask.tklmDeviceUpdate ('[-uuid DEVICE-44b123ad-5ed8-4934-8c84-64cb9e11d990 -attributes "{symAlias LTOKey000001} {description myLTOdrive}"]')
• REST interface:
Use Device Update REST Service to update a device. You must specify the device uuid and theattributes that change. For example, you can send the following HTTP request:
GET https://localhost:<port>/SKLM/rest/v1/devices?type=LTOContent-Type: application/jsonAccept : application/jsonAuthorization: SKLMAuth userAuthId=139aeh34567mAccept-Language : en
PUT https://localhost:<port>/SKLM/rest/v1/devicesContent-Type: application/jsonAccept : application/jsonAuthorization: SKLMAuth userAuthId=139aeh34567m{"uuid":"DEVICE-44b123ad-5ed8-4934-8c84-64cb9e11d990","attributes":"symAlias LTOKey000001,description myLTOdrive"}
What to do next
Next, verify that the changes are made. For optional fields, such as the description, you might want to runthe tklmDeviceList command or Device List REST Service to determine whether the value ischanged. Alternatively, reopen the Modify Tape Drive dialog.
Chapter 1. Administering 223
Deleting a driveYou can delete a device such as a tape drive. Metadata for the device that you delete, such as the driveserial number, is removed from the IBM Security Key Lifecycle Manager database.
About this task
Before you begin, ensure that a current backup exists for the IBM Security Key Lifecycle Managerdatabase. If you use the command-line interface or REST interface, obtain the uuid of the device that youintend to delete.
You can use the Delete menu item, the tklmDeviceDelete command, or Device Delete RESTService to delete a device. Your role must have permissions to the delete action and to the appropriatedevice group.
Procedure
1. Go to the appropriate page or directory.
• Graphical user interface:
a. Log on to the graphical user interface.b. In the Key and Device Management section on Welcome page, select LTO.c. Click Go to > Manage keys and devices.d. Alternatively, right-click LTO and select Manage keys and devices.e. On the management page for LTO, select a device.f. click Delete.g. Alternatively, right-click a drive and then select Delete.
• Command-line interface
a. Go to the <WAS_HOME>/bin directory. For example,Windows
cd drive:\Program Files\IBM\WebSphere\AppServer\binLinux
cd /opt/IBM/WebSphere/AppServer/binb. Start the wsadmin interface by using an authorized user ID, such as SKLMAdmin. For example,
Windows
wsadmin.bat -username SKLMAdmin -password mypwd -lang jython
Linux
./wsadmin.sh -username SKLMAdmin -password mypwd -lang jython
2. Delete the device.
• Graphical user interface:
On the Confirm dialog, read the confirmation message before you delete the device. Metadata for thedevice that you delete, such as the drive serial number, is removed from the IBM Security KeyLifecycle Manager database. Click OK.
• Command-line interface:
Type tklmDeviceDelete to delete a device. You must specify the uuid. For example, type:
print AdminTask.tklmDeviceList ('[-type lto]')
print AdminTask.tklmDeviceDelete ('[-uuid DEVICE-74386920-148c-47b2-a1e2-d19194b315cf]')
224 IBM Security Key Lifecycle Manager : Administering

• REST interface:
Use Device Delete REST Service to delete a device. You must specify the device uuid. Forexample, you can send the following HTTP request by using a REST client:
GET https://localhost:<port>/SKLM/rest/v1/devices?type=LTOContent-Type: application/jsonAccept : application/jsonAuthorization : SKLMAuth userAuthId=37ea1939-1374-4db7-84cd-14e399be2d20Accept-Language : en
DELETE https://localhost:<port>/SKLM/rest/v1/devices/DEVICE-74386920-148c-47b2-a1e2-d19194b315cfContent-Type: application/jsonAccept : application/jsonAuthorization : SKLMAuth userAuthId=37ea1939-1374-4db7-84cd-14e399be2d20
PEER_TO_PEER managementThe PEER_TO_PEER device group serves the devices that operate on Key Management InteroperabilityProtocol (KMIP). This device group allows a maximum of two devices to share one or more symmetrickeys.
You can use the PEER_TO_PEER device group to manage keys and device certificates in IBM Security KeyLifecycle Manager.
Administering certificates and keysTo administer certificates and keys, you might want to add, modify, or delete their associated nodenames. You can also add keys and a name that is associated with the keys.
About this task
Your role must have permissions to the view action and to the appropriate device group. Use themanagement page for PEER_TO_PEER to add, modify, or delete a certificate or key.
Before you begin, examine the columns on the page, which provides buttons to add, modify, or delete atable item.
The table is organized in these information areas:
• In left columns, information about the device WWNN (in ASCII format), device certificate name, anddevice type are displayed.
• In right columns, information about keys indicates the key UUID and the key name that the certificateson the left have access to, are displayed.
Procedure
1. Log in to the graphical user interface.
a. In the Key and Device Management section on Welcome page, select PEER_TO_PEER.b. Click Go to > Manage keys and devices.
Alternatively, right-click PEER_TO_PEER and select Manage keys and devices.2. You can add, modify, or delete a key or device certificate.
Adding a deviceYou can add a device to the PEER_TO_PEER device group for use with IBM Security Key LifecycleManager.
About this task
You can use the Add Device dialog box to add a device. Your role must have the permission to the createaction and a permission to the appropriate device group.
Chapter 1. Administering 225
Procedure
1. Log on to the graphical user interface.2. In the Key and Device Management section on Welcome page, select PEER_TO_PEER.3. Click Go to > Manage keys and devices.4. Alternatively, right-click PEER_TO_PEER and select Manage keys and devices.5. On the management page for PEER_TO_PEER, click Add.6. Click Device.7. On the Add Device dialog, specify the device certificate name and location, and the device type.
You can add only one device of each type, and a maximum of two devices.8. Click Add.
The device is added to the PEER_TO_PEER table.
Modifying a deviceYou can modify a device certificate in the IBM Security Key Lifecycle Manager database.
About this task
Use the Modify Device Certificate dialog box to update a device. Your role must have permissions to themodify action and to the appropriate device group.
Procedure
1. Log on to the graphical user interface.2. In the Key and Device Management section on Welcome page, select PEER_TO_PEER.3. Click Go to > Manage keys and devices.4. Alternatively, right-click PEER_TO_PEER and select Manage keys and devices.5. On the management page for PEER_TO_PEER, select a device.6. Click Modify.7. Alternatively, right-click a device and then select Modify, or double-click a device entry.8. On the Modify Device Certificate dialog box, select a certificate that has the same WWNN as the
earlier device certificate.9. Click Modify.
The device information is changed in the table.
What to do next
Next, you might verify that the changes are made.
Deleting a deviceYou might delete a selected device and its corresponding communication certificate, which can be in anystate, such as active. After deletion, this device cannot communicate with the objects of thePEER_TO_PEER group.
About this task
You can use the Delete menu item to delete a device. Your role must have permissions to the deleteaction and to the appropriate device group.
Procedure
1. Log on to the graphical user interface.2. In the Key and Device Management section on Welcome page, select PEER_TO_PEER.3. Click Go to > Manage keys and devices.
226 IBM Security Key Lifecycle Manager : Administering
4. Alternatively, right-click PEER_TO_PEER and select Manage keys and devices.5. On the management page for PEER_TO_PEER, select a device.6. Click Delete.7. Alternatively, right-click a device and then select Delete.8. On the Confirm dialog, read the confirmation message. Then, click OK.
The device is removed from the table.
Adding keysYou might add keys for use with PEER_TO_PEER.
About this task
You can use the Add Key dialog box to create one or more keys in the existing group. Your role must havethe permission to the create action and a permission to the appropriate device group.
Before you begin, determine your site policy for naming key prefixes.
Procedure
1. Log on to the graphical user interface.2. In the Key and Device Management section on Welcome page, select PEER_TO_PEER.3. Click Go to > Manage keys and devices.4. Alternatively, right-click PEER_TO_PEER and select Manage keys and devices.5. On the management page for PEER_TO_PEER, click Add.6. Click Key.7. On the Add Key dialog, specify values for the parameters.8. Click Add.
The keys that you added are visible in the table of keys. Back up the keys before the keys are served todevices.
Modifying a keyYou might modify information about a key in the IBM Security Key Lifecycle Manager database.
About this task
You can use the Modify Key dialog box to modify information about a key. Your role must havepermissions to the modify action and to the appropriate device group.
Procedure
1. Log on to the graphical user interface.2. In the Key and Device Management section on Welcome page, select PEER_TO_PEER.3. Click Go to > Manage keys and devices.4. Alternatively, right-click PEER_TO_PEER and select Manage keys and devices.5. On the management page for PEER_TO_PEER, select a key.6. Click Modify.7. Alternatively, right-click a key and then select Modify, or double-click a key entry.8. On the Modify Key dialog box, type the changed information. Then, click Modify.
The key information is changed in the table.
Chapter 1. Administering 227

Deleting a keyYou might delete a key entry from the IBM Security Key Lifecycle Manager database.
About this task
You can use the Delete menu item to delete a key. Your role must have permissions to the delete actionand to the appropriate device group.
Procedure
1. Log on to the graphical user interface.2. In the Key and Device Management section on Welcome page, select PEER_TO_PEER.3. Click Go to > Manage keys and devices.4. Alternatively, right-click PEER_TO_PEER and select Manage keys and devices.5. On the management page for PEER_TO_PEER, select a key.6. Click Delete.7. Alternatively, right-click a key and then select Delete.8. On the Confirm dialog, read the confirmation message to verify that the correct key was selected
before you delete the key. Then, click OK.The key information is removed from the table.
Using KMIP to manage and serve keys, certificates, and other cryptographic objectsThe IBM Security Key Lifecycle Manager server supports Key Management Interoperability Protocol(KMIP) communication with clients for key management operations on cryptographic and cryptographicobjects.
Before you beginEnsure that the client is KMIP compliant.
About this task
Key Management Interoperability Protocol (KMIP) is a client/server communication protocol for thestorage and maintenance of key, certificate, and secret objects. The standard is governed by theOrganization for the Advancement of Structured Information Standards (OASIS).
IBM Security Key Lifecycle Manager supports some KMIP operations on the cryptographic objects. Forexample, generating cryptographic keys, registering cryptographic objects with the server, retrievingobjects from the server, or destroying objects from the server. Cryptographic objects also have associatedattributes, which are named values stored by the key management system and are obtained from thesystem via operations. You can use operations to add, modify, or delete certain attributes. For thecomplete list of supported operations, see “KMIP objects and profiles” on page 229.
Before you can use the KMIP operations, you need to register the client in the IBM Security Key LifecycleManager server, and associate a certificate with the client for secure communication with the server. Ifyou accept a pending client certificate, it is imported into the database and marked as trusted. Thecertificate can then be used for secure communication between the client device and IBM Security KeyLifecycle Manager.
Procedure
1. Secure communication between the KMIP client and the IBM Security Key Lifecycle Manager servera) Create or use an existing SSL or KMIP certificate.
For detailed instructions, see “Creating a server certificate” on page 120.b) Export the SSL or KMIP certificate to the client.
For detailed instructions, see “Exporting a server certificate” on page 296.
228 IBM Security Key Lifecycle Manager : Administering

c) Import the KMIP client certificate in the IBM Security Key Lifecycle Manager server or accept apending client certificate.A client is created and registered in the IBM Security Key Lifecycle Manager server. The alias that isprovided while importing or accepting the pending client certificate is associated with the name ofthe client. For detailed instructions, see “Importing a client communication certificate” on page251. You can also use the “Certificate Import REST Service” on page 315.
d) Verify the connection between the KMIP client and the IBM Security Key Lifecycle Manager server.For detailed instructions, see “Querying IBM Security Key Lifecycle Manager server for KMIP” onpage 231.
2. Add cryptographic objects.For detailed instructions, see “Creating cryptographic objects by using the graphical user interface” onpage 238.
ResultsYou can now perform the required KMIP operations on the cryptographic objects. For a list of KMIPoperations, see http://www.oasis-open.org/committees/tc_home.php?wg_abbrev=kmip.
Overview - Key Management Interoperability ProtocolThe IBM Security Key Lifecycle Manager server supports Key Management Interoperability Protocol(KMIP) communication with clients for key management operations on cryptographic material. Thematerial includes symmetric and asymmetric keys, certificates, and templates that are used to create andcontrol their use.
The Key Management Interoperability Protocol is part of an Organization for the Advancement ofStructured Information Standards (OASIS) standardization project for encryption of stored data andcryptographic key management. For more information about the supported KMIP objects, operations,attributes, and profiles, see “KMIP objects and profiles” on page 229.
For more information, see Key Management Interoperability Protocol documentation (http://www.oasis-open.org/committees/tc_home.php?wg_abbrev=kmip).
KMIP objects and profilesKMIP elements include cryptographic objects, operations for the objects, and attributes that areassociated with these objects. With the implementation of KMIP, you can manage cryptographic objectsand control their use. Also, IBM Security Key Lifecycle Manager supports various KMIP profiles to interactwith KMIP clients.
KMIP objects
IBM Security Key Lifecycle Manager supports the following set of KMIP objects. These objects arerequired by the client and the server for the key management operations.
Object Description
Certificate A digital certificate, such as an X.509 certificate.
Opaque Object An object that is stored by a key management server, but not necessarilyinterpreted by it.
Private Key The private key of an asymmetric key pair.
Public Key The public key of an asymmetric key pair.
Secret Data A shared secret value that is not a key or certificate.
Symmetric Key A symmetric encryption key or message authentication code key.
Template A stored, named list of KMIP attributes.
Chapter 1. Administering 229

KMIP profiles
For information about the supported KMIP profiles, see https://www.ibm.com/support/pages/key-management-interoperability-protocol-kmip-profiles-supported-ibm-security-key-lifecycle-manager.
Administrative operations for KMIPYou can use the IBM Security Key Lifecycle Manager server graphical user interface, REST APIs, or CLIcommands for some KMIP-specific administrative tasks. For example, updating the KMIP listener port,modifying the attributes of the KMIP objects.
IBM Security Key Lifecycle Manager supports the following KMIP-specific administrative tasks:
• Managing following KMIP information through the IBM Security Key Lifecycle Manager graphical userinterface:
– Configuration of the KMIP ports and timeout settings.– Current KMIP certificate, indicating which certificate is in use for secure server or server/client
communication.– Secure communication configuration, indicating whether SSL/KMIP or SSL is specified.
• Updating KMIP attributes for keys and certificates.
For example, you can use the tklmKeyAttributeUpdate command to update specific parameters.• Listing and deleting client-registered KMIP templates.
Clients use a template to specify the cryptographic attributes of new objects in a standardized orconvenient way. The template is a managed object that contains attributes in operations that the clientcan set for a cryptographic object. For example, the client can set application-specific information.tklmKMIPTemplateList
List KMIP templates that IBM Security Key Lifecycle Manager provides. For example, you might listall templates.
tklmKMIPTemplateDeleteDelete KMIP templates that clients registered with IBM Security Key Lifecycle Manager.
• Listing and deleting secret data such as passwords or a seed that is used to generate keys.tklmSecretDataDelete
Delete secret data that KMIP clients sent to IBM Security Key Lifecycle Manager.tklmSecretDataList
List secret data that KMIP clients sent to IBM Security Key Lifecycle Manager.• Setting default port and timeout properties.
KMIPListener.ssl.portSpecifies the port on which the IBM Security Key Lifecycle Manager server listens for requests fromlibraries. The server communicates over the SSL socket by using Key Management InteroperabilityProtocol.
TransportListener.ssl.portSpecifies the port on which IBM Security Key Lifecycle Manager server listens for requests fromtape libraries that communicate by using the SSL protocol.
TransportListener.ssl.timeoutSpecifies how long the socket waits on a read() before closing. This property is used for the SSLsocket.
• Enabling or disabling delete requests from KMIP clients.
An authenticated client can request delete operations that might have a significant impact on theavailability of a key, on server performance, and on key security. Specify the enableKMIPDeleteattribute with either the tklmDeviceGroupAttributeUpdate or the tklmDeviceGroupCreate commandto determine whether IBM Security Key Lifecycle Manager acts on these requests.
230 IBM Security Key Lifecycle Manager : Administering
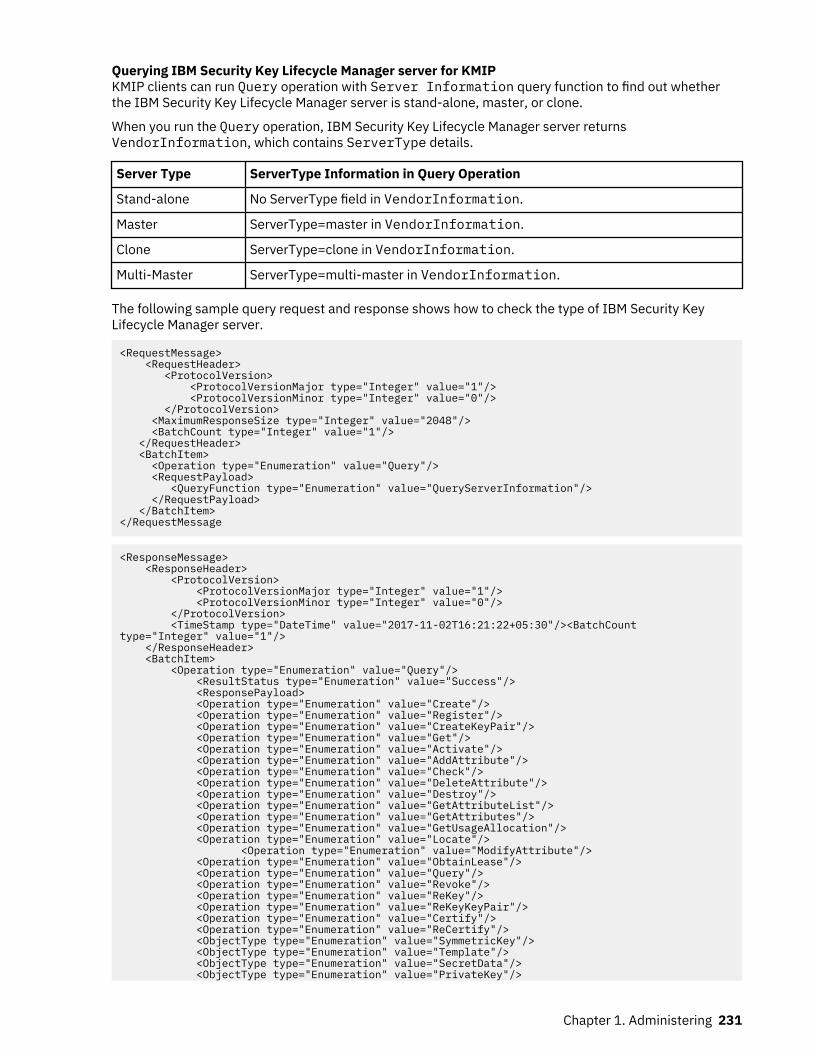
Querying IBM Security Key Lifecycle Manager server for KMIPKMIP clients can run Query operation with Server Information query function to find out whetherthe IBM Security Key Lifecycle Manager server is stand-alone, master, or clone.
When you run the Query operation, IBM Security Key Lifecycle Manager server returnsVendorInformation, which contains ServerType details.
Server Type ServerType Information in Query Operation
Stand-alone No ServerType field in VendorInformation.
Master ServerType=master in VendorInformation.
Clone ServerType=clone in VendorInformation.
Multi-Master ServerType=multi-master in VendorInformation.
The following sample query request and response shows how to check the type of IBM Security KeyLifecycle Manager server.
<RequestMessage> <RequestHeader> <ProtocolVersion> <ProtocolVersionMajor type="Integer" value="1"/> <ProtocolVersionMinor type="Integer" value="0"/> </ProtocolVersion> <MaximumResponseSize type="Integer" value="2048"/> <BatchCount type="Integer" value="1"/> </RequestHeader> <BatchItem> <Operation type="Enumeration" value="Query"/> <RequestPayload> <QueryFunction type="Enumeration" value="QueryServerInformation"/> </RequestPayload> </BatchItem></RequestMessage
<ResponseMessage> <ResponseHeader> <ProtocolVersion> <ProtocolVersionMajor type="Integer" value="1"/> <ProtocolVersionMinor type="Integer" value="0"/> </ProtocolVersion> <TimeStamp type="DateTime" value="2017-11-02T16:21:22+05:30"/><BatchCount type="Integer" value="1"/> </ResponseHeader> <BatchItem> <Operation type="Enumeration" value="Query"/> <ResultStatus type="Enumeration" value="Success"/> <ResponsePayload> <Operation type="Enumeration" value="Create"/> <Operation type="Enumeration" value="Register"/> <Operation type="Enumeration" value="CreateKeyPair"/> <Operation type="Enumeration" value="Get"/> <Operation type="Enumeration" value="Activate"/> <Operation type="Enumeration" value="AddAttribute"/> <Operation type="Enumeration" value="Check"/> <Operation type="Enumeration" value="DeleteAttribute"/> <Operation type="Enumeration" value="Destroy"/> <Operation type="Enumeration" value="GetAttributeList"/> <Operation type="Enumeration" value="GetAttributes"/> <Operation type="Enumeration" value="GetUsageAllocation"/> <Operation type="Enumeration" value="Locate"/> <Operation type="Enumeration" value="ModifyAttribute"/> <Operation type="Enumeration" value="ObtainLease"/> <Operation type="Enumeration" value="Query"/> <Operation type="Enumeration" value="Revoke"/> <Operation type="Enumeration" value="ReKey"/> <Operation type="Enumeration" value="ReKeyKeyPair"/> <Operation type="Enumeration" value="Certify"/> <Operation type="Enumeration" value="ReCertify"/> <ObjectType type="Enumeration" value="SymmetricKey"/> <ObjectType type="Enumeration" value="Template"/> <ObjectType type="Enumeration" value="SecretData"/> <ObjectType type="Enumeration" value="PrivateKey"/>
Chapter 1. Administering 231
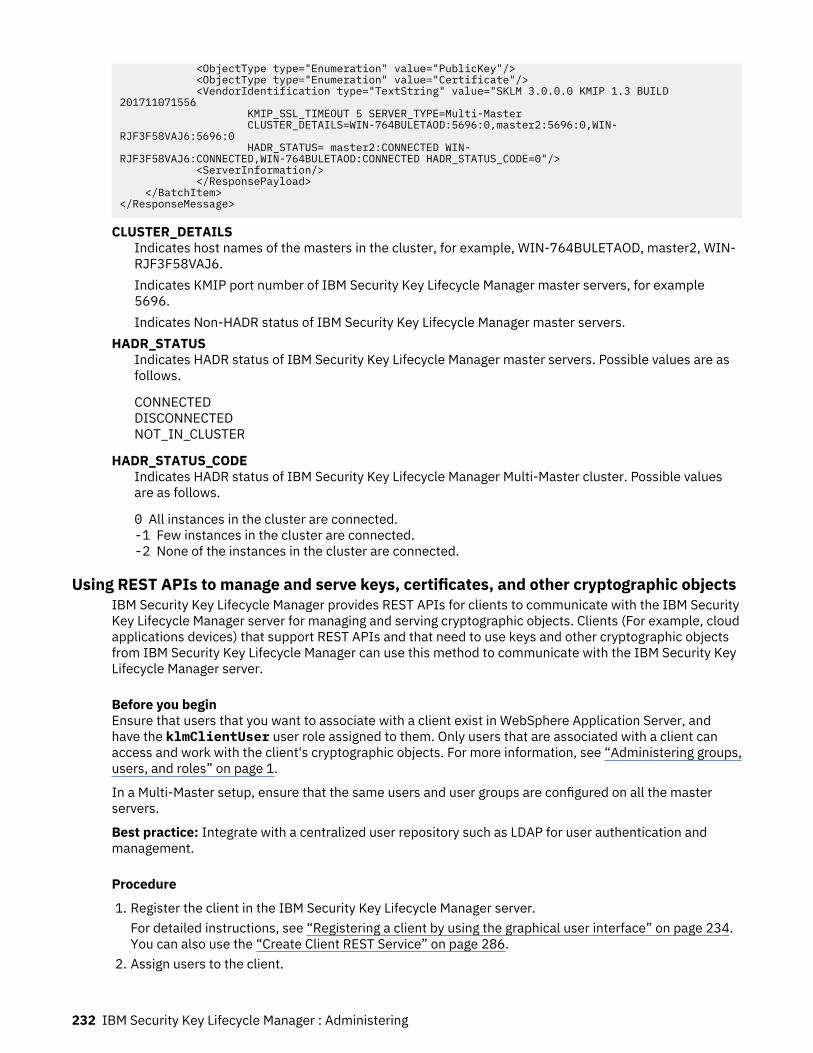
<ObjectType type="Enumeration" value="PublicKey"/> <ObjectType type="Enumeration" value="Certificate"/> <VendorIdentification type="TextString" value="SKLM 3.0.0.0 KMIP 1.3 BUILD 201711071556 KMIP_SSL_TIMEOUT 5 SERVER_TYPE=Multi-Master CLUSTER_DETAILS=WIN-764BULETAOD:5696:0,master2:5696:0,WIN-RJF3F58VAJ6:5696:0 HADR_STATUS= master2:CONNECTED WIN-RJF3F58VAJ6:CONNECTED,WIN-764BULETAOD:CONNECTED HADR_STATUS_CODE=0"/> <ServerInformation/> </ResponsePayload> </BatchItem></ResponseMessage>
CLUSTER_DETAILSIndicates host names of the masters in the cluster, for example, WIN-764BULETAOD, master2, WIN-RJF3F58VAJ6.Indicates KMIP port number of IBM Security Key Lifecycle Manager master servers, for example5696.Indicates Non-HADR status of IBM Security Key Lifecycle Manager master servers.
HADR_STATUSIndicates HADR status of IBM Security Key Lifecycle Manager master servers. Possible values are asfollows.
CONNECTEDDISCONNECTED NOT_IN_CLUSTER
HADR_STATUS_CODEIndicates HADR status of IBM Security Key Lifecycle Manager Multi-Master cluster. Possible valuesare as follows.
0 All instances in the cluster are connected.-1 Few instances in the cluster are connected.-2 None of the instances in the cluster are connected.
Using REST APIs to manage and serve keys, certificates, and other cryptographic objectsIBM Security Key Lifecycle Manager provides REST APIs for clients to communicate with the IBM SecurityKey Lifecycle Manager server for managing and serving cryptographic objects. Clients (For example, cloudapplications devices) that support REST APIs and that need to use keys and other cryptographic objectsfrom IBM Security Key Lifecycle Manager can use this method to communicate with the IBM Security KeyLifecycle Manager server.
Before you beginEnsure that users that you want to associate with a client exist in WebSphere Application Server, andhave the klmClientUser user role assigned to them. Only users that are associated with a client canaccess and work with the client's cryptographic objects. For more information, see “Administering groups,users, and roles” on page 1.
In a Multi-Master setup, ensure that the same users and user groups are configured on all the masterservers.
Best practice: Integrate with a centralized user repository such as LDAP for user authentication andmanagement.
Procedure
1. Register the client in the IBM Security Key Lifecycle Manager server.For detailed instructions, see “Registering a client by using the graphical user interface” on page 234.You can also use the “Create Client REST Service” on page 286.
2. Assign users to the client.
232 IBM Security Key Lifecycle Manager : Administering
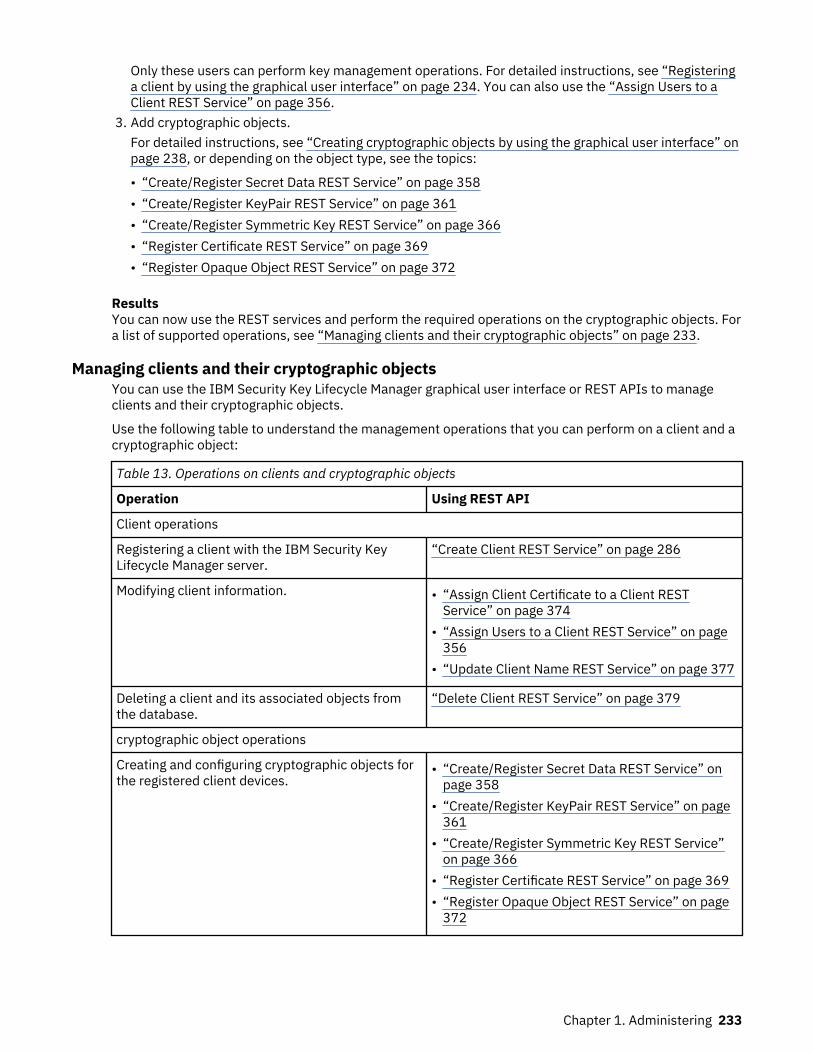
Only these users can perform key management operations. For detailed instructions, see “Registeringa client by using the graphical user interface” on page 234. You can also use the “Assign Users to aClient REST Service” on page 356.
3. Add cryptographic objects.For detailed instructions, see “Creating cryptographic objects by using the graphical user interface” onpage 238, or depending on the object type, see the topics:
• “Create/Register Secret Data REST Service” on page 358• “Create/Register KeyPair REST Service” on page 361• “Create/Register Symmetric Key REST Service” on page 366• “Register Certificate REST Service” on page 369• “Register Opaque Object REST Service” on page 372
ResultsYou can now use the REST services and perform the required operations on the cryptographic objects. Fora list of supported operations, see “Managing clients and their cryptographic objects” on page 233.
Managing clients and their cryptographic objectsYou can use the IBM Security Key Lifecycle Manager graphical user interface or REST APIs to manageclients and their cryptographic objects.
Use the following table to understand the management operations that you can perform on a client and acryptographic object:
Table 13. Operations on clients and cryptographic objects
Operation Using REST API
Client operations
Registering a client with the IBM Security KeyLifecycle Manager server.
“Create Client REST Service” on page 286
Modifying client information. • “Assign Client Certificate to a Client RESTService” on page 374
• “Assign Users to a Client REST Service” on page356
• “Update Client Name REST Service” on page 377
Deleting a client and its associated objects fromthe database.
“Delete Client REST Service” on page 379
cryptographic object operations
Creating and configuring cryptographic objects forthe registered client devices.
• “Create/Register Secret Data REST Service” onpage 358
• “Create/Register KeyPair REST Service” on page361
• “Create/Register Symmetric Key REST Service”on page 366
• “Register Certificate REST Service” on page 369• “Register Opaque Object REST Service” on page
372
Chapter 1. Administering 233
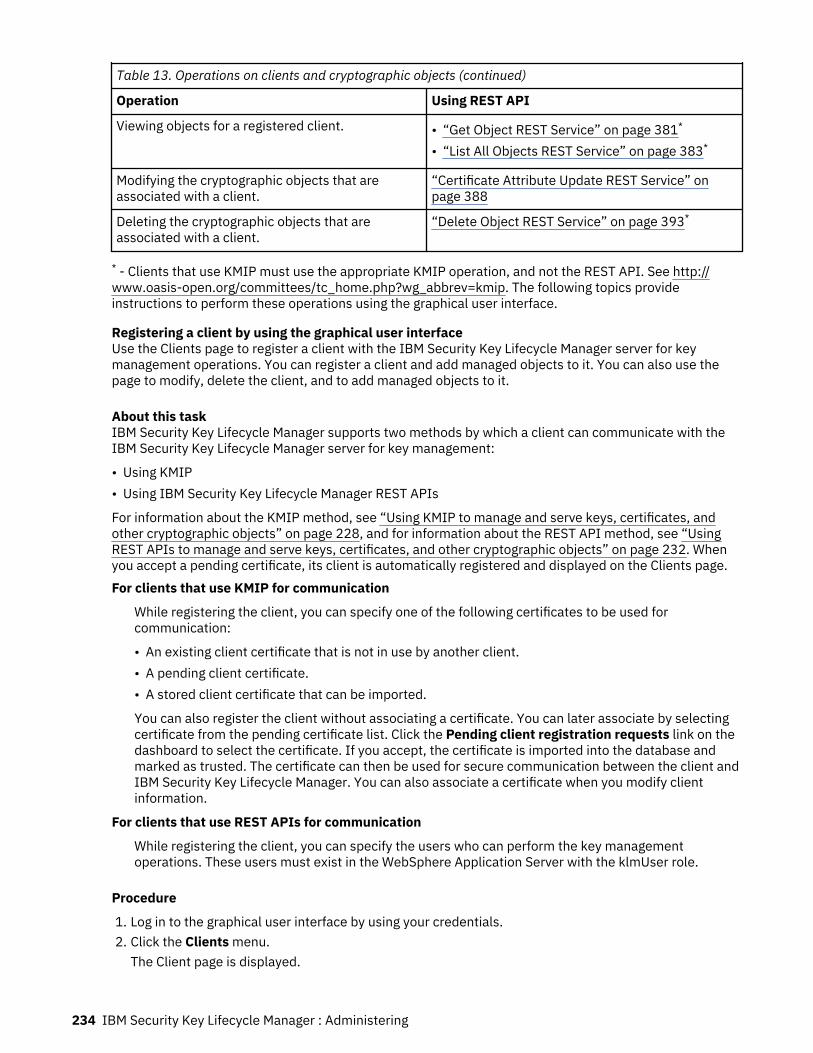
Table 13. Operations on clients and cryptographic objects (continued)
Operation Using REST API
Viewing objects for a registered client. • “Get Object REST Service” on page 381*
• “List All Objects REST Service” on page 383*
Modifying the cryptographic objects that areassociated with a client.
“Certificate Attribute Update REST Service” onpage 388
Deleting the cryptographic objects that areassociated with a client.
“Delete Object REST Service” on page 393*
* - Clients that use KMIP must use the appropriate KMIP operation, and not the REST API. See http://www.oasis-open.org/committees/tc_home.php?wg_abbrev=kmip. The following topics provideinstructions to perform these operations using the graphical user interface.
Registering a client by using the graphical user interfaceUse the Clients page to register a client with the IBM Security Key Lifecycle Manager server for keymanagement operations. You can register a client and add managed objects to it. You can also use thepage to modify, delete the client, and to add managed objects to it.
About this taskIBM Security Key Lifecycle Manager supports two methods by which a client can communicate with theIBM Security Key Lifecycle Manager server for key management:
• Using KMIP• Using IBM Security Key Lifecycle Manager REST APIs
For information about the KMIP method, see “Using KMIP to manage and serve keys, certificates, andother cryptographic objects” on page 228, and for information about the REST API method, see “UsingREST APIs to manage and serve keys, certificates, and other cryptographic objects” on page 232. Whenyou accept a pending certificate, its client is automatically registered and displayed on the Clients page.For clients that use KMIP for communication
While registering the client, you can specify one of the following certificates to be used forcommunication:
• An existing client certificate that is not in use by another client.• A pending client certificate.• A stored client certificate that can be imported.
You can also register the client without associating a certificate. You can later associate by selectingcertificate from the pending certificate list. Click the Pending client registration requests link on thedashboard to select the certificate. If you accept, the certificate is imported into the database andmarked as trusted. The certificate can then be used for secure communication between the client andIBM Security Key Lifecycle Manager. You can also associate a certificate when you modify clientinformation.
For clients that use REST APIs for communication
While registering the client, you can specify the users who can perform the key managementoperations. These users must exist in the WebSphere Application Server with the klmUser role.
Procedure
1. Log in to the graphical user interface by using your credentials.2. Click the Clients menu.
The Client page is displayed.
234 IBM Security Key Lifecycle Manager : Administering
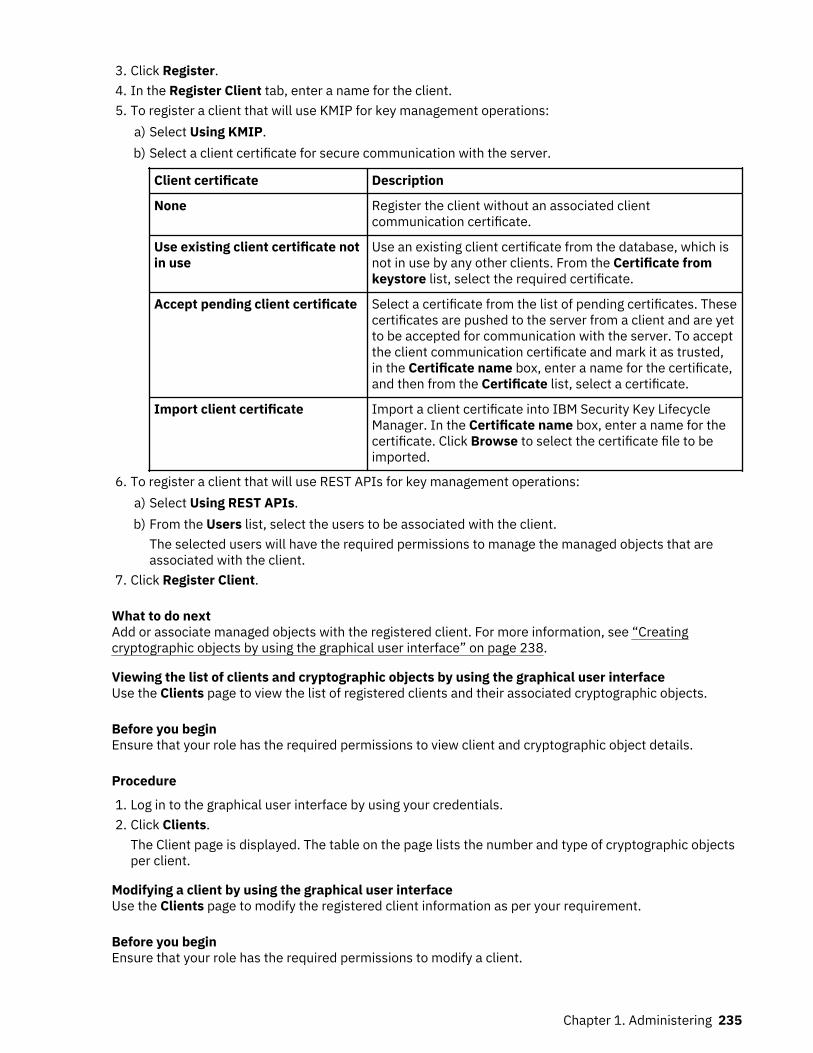
3. Click Register.4. In the Register Client tab, enter a name for the client.5. To register a client that will use KMIP for key management operations:
a) Select Using KMIP.b) Select a client certificate for secure communication with the server.
Client certificate Description
None Register the client without an associated clientcommunication certificate.
Use existing client certificate notin use
Use an existing client certificate from the database, which isnot in use by any other clients. From the Certificate fromkeystore list, select the required certificate.
Accept pending client certificate Select a certificate from the list of pending certificates. Thesecertificates are pushed to the server from a client and are yetto be accepted for communication with the server. To acceptthe client communication certificate and mark it as trusted,in the Certificate name box, enter a name for the certificate,and then from the Certificate list, select a certificate.
Import client certificate Import a client certificate into IBM Security Key LifecycleManager. In the Certificate name box, enter a name for thecertificate. Click Browse to select the certificate file to beimported.
6. To register a client that will use REST APIs for key management operations:a) Select Using REST APIs.b) From the Users list, select the users to be associated with the client.
The selected users will have the required permissions to manage the managed objects that areassociated with the client.
7. Click Register Client.
What to do nextAdd or associate managed objects with the registered client. For more information, see “Creatingcryptographic objects by using the graphical user interface” on page 238.
Viewing the list of clients and cryptographic objects by using the graphical user interfaceUse the Clients page to view the list of registered clients and their associated cryptographic objects.
Before you beginEnsure that your role has the required permissions to view client and cryptographic object details.
Procedure
1. Log in to the graphical user interface by using your credentials.2. Click Clients.
The Client page is displayed. The table on the page lists the number and type of cryptographic objectsper client.
Modifying a client by using the graphical user interfaceUse the Clients page to modify the registered client information as per your requirement.
Before you beginEnsure that your role has the required permissions to modify a client.
Chapter 1. Administering 235
About this taskYou can associate additional symmetric and key pair objects with a client. Based on the method that theclient uses for communicating with the IBM Security Key Lifecycle Manager server, the clientconfiguration options change. For a client that uses KMIP for communication, you can remove or modifythe associated client certificate. For a client that uses REST APIs for communication, you can add orremove users that are associated with the client.
Procedure
1. Log in to the graphical user interface by using your credentials.2. Click Clients.
The Client page is displayed.3. Select the client that you want to modify, and click Modify.4. In the Modify Client page, edit the name of the client.5. For a client that uses KMIP for key management operations, select a different client certificate
option:
Client certificate Description
None Register the client without an associated clientcommunication certificate.
Use existing client certificate notin use
Use an existing client certificate from the database, which isnot in use by any other clients. From the Certificate fromkeystore list, select the required certificate.
Accept pending client certificate Select a certificate from the list of pending certificates. Thesecertificates are pushed to the server from a client and are yetto be accepted for communication with the server. To acceptthe client communication certificate and mark it as trusted, inthe Certificate name box, enter a name for the certificate, andthen from the Certificate list, select a certificate.
Import client certificate Import a client certificate into IBM Security Key LifecycleManager. In the Certificate name box, enter a name for thecertificate. Click Browse to select the certificate file to beimported.
6. For a client that uses REST APIs for key management operations, from the Users list, select orremove the users to be associated with the client.These users will have the required permissions to manage the cryptographic objects that areassociated with the client.
7. Click Update.8. In the Add Objects section, select one of the following types of objects and specify their property
values:
Object type Description
None Do not add an object.
236 IBM Security Key Lifecycle Manager : Administering
Symmetric key Specify the following configuration settings:
• Number of symmetric keys for the client.• Cryptographic algorithm that is used to create the object,
such as AES or 3DES.• Bit length of the symmetric key object.• Prefix for the key. You must specify a three character value
for the key by using the alphabetic characters.• Cryptographic usage mask that defines the cryptographic
functions to be performed by using the object, such asEncrypt, Decrypt, Encrypt Decrypt, Sign, SignVerify, Verify, Wrap, Unwrap, or Wrap Unwrap.
Key Pair Create the asymmetric key pair object with the followingconfiguration settings:
• Number of key pair objects that you want to create.• Cryptographic algorithm that is used to create the object.
Possible values are RSA and DSA.• Three-alphabetic character prefix for the key.• Cryptographic usage mask that defines the cryptographic
functions to be performed by using the object, such asEncrypt, Decrypt, Encrypt Decrypt, Sign, SignVerify, Verify, Wrap, Unwrap, or Wrap Unwrap.
9. To save and add more objects, click Save and Add More Objects, and repeat the earlier step.10. Click Save and Exit.
Deleting a client or a cryptographic objectYou can delete a client and its cryptographic objects from the IBM Security Key Lifecycle Managerdatabase when they are no longer needed. You can delete a client from the graphical user interface or byusing REST APIs. Cryptographic objects that are associated with a client that uses KMIP forcommunication can be deleted via the applicable KMIP operation. Cryptographic objects that areassociated with a client that uses REST APIs for communication can be deleted by using IBM Security KeyLifecycle Manager REST APIs.
Before you begin
• Ensure that your role has the required permissions to delete a client and cryptographic object.• Ensure that the current backup for the IBM Security Key Lifecycle Manager database exists.• If you want to delete a client, ensure that it does not have any associated cryptographic objects.
Procedure
1. To delete a cryptographic object that is associated with:Option Description
Client that uses REST APIs for communicatingwith the IBM Security Key Lifecycle Managerserver
“Delete Object REST Service” on page 393.
Client that uses KMIP for communicating withthe IBM Security Key Lifecycle Manager server
Appropriate KMIP operation. See http://www.oasis-open.org/committees/tc_home.php?wg_abbrev=kmip.
2. To delete a client from the graphical user interface, complete the following steps:a) Log in to the graphical user interface.
Chapter 1. Administering 237
b) Click Clients.The Client page is displayed.
c) Ensure that there are no cryptographic objects associated with the client that you want to delete. Ifnot, delete them first.
d) Select the client that you want to delete, and click Delete.A confirmation dialog box is displayed.
e) Click OK. The client is removed from the IBM Security Key Lifecycle Manager database.Alternatively, you can use the “Delete Client REST Service” on page 379.
Creating cryptographic objects by using the graphical user interfaceUse the Clients page to create and associate cryptographic objects with a client that is registered with theIBM Security Key Lifecycle Manager server.
About this task
From the graphical user interface, you can create the following types of cryptographic objects andassociate them with a registered client:
• Symmetric keys• Key pairs
Note: For a client that uses REST APIs for communicating with the IBM Security Key Lifecycle Managerserver, use the appropriate REST APIs to create and associate the following cryptographic objects withthe client:
• Secret data• Opaque objects• Certificates
Procedure
1. Log in to the graphical user interface by using your credentials.2. Click the Clients menu.
The Client page is displayed.3. Ensure that the client to which you want to add the cryptographic objects is registered. If not, register
the client.For detailed steps, see “Registering a client by using the graphical user interface” on page 234.
4. Double-click the client to which you want to add a new cryptographic object.The Modify Client page is displayed.
5. In the Add Objects section, select one of the following types of objects and specify their propertyvalues:
Object type Description
None Do not add an object.
238 IBM Security Key Lifecycle Manager : Administering
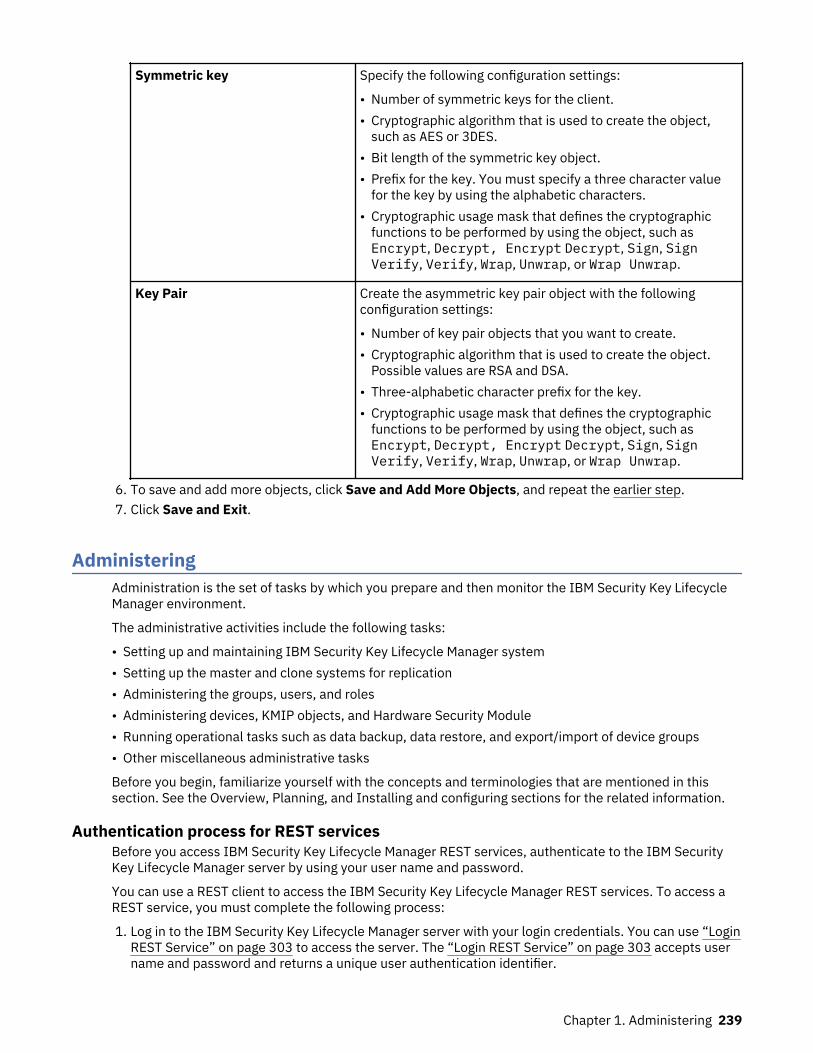
Symmetric key Specify the following configuration settings:
• Number of symmetric keys for the client.• Cryptographic algorithm that is used to create the object,
such as AES or 3DES.• Bit length of the symmetric key object.• Prefix for the key. You must specify a three character value
for the key by using the alphabetic characters.• Cryptographic usage mask that defines the cryptographic
functions to be performed by using the object, such asEncrypt, Decrypt, Encrypt Decrypt, Sign, SignVerify, Verify, Wrap, Unwrap, or Wrap Unwrap.
Key Pair Create the asymmetric key pair object with the followingconfiguration settings:
• Number of key pair objects that you want to create.• Cryptographic algorithm that is used to create the object.
Possible values are RSA and DSA.• Three-alphabetic character prefix for the key.• Cryptographic usage mask that defines the cryptographic
functions to be performed by using the object, such asEncrypt, Decrypt, Encrypt Decrypt, Sign, SignVerify, Verify, Wrap, Unwrap, or Wrap Unwrap.
6. To save and add more objects, click Save and Add More Objects, and repeat the earlier step.7. Click Save and Exit.
AdministeringAdministration is the set of tasks by which you prepare and then monitor the IBM Security Key LifecycleManager environment.
The administrative activities include the following tasks:
• Setting up and maintaining IBM Security Key Lifecycle Manager system• Setting up the master and clone systems for replication• Administering the groups, users, and roles• Administering devices, KMIP objects, and Hardware Security Module• Running operational tasks such as data backup, data restore, and export/import of device groups• Other miscellaneous administrative tasks
Before you begin, familiarize yourself with the concepts and terminologies that are mentioned in thissection. See the Overview, Planning, and Installing and configuring sections for the related information.
Authentication process for REST servicesBefore you access IBM Security Key Lifecycle Manager REST services, authenticate to the IBM SecurityKey Lifecycle Manager server by using your user name and password.
You can use a REST client to access the IBM Security Key Lifecycle Manager REST services. To access aREST service, you must complete the following process:
1. Log in to the IBM Security Key Lifecycle Manager server with your login credentials. You can use “LoginREST Service” on page 303 to access the server. The “Login REST Service” on page 303 accepts username and password and returns a unique user authentication identifier.
Chapter 1. Administering 239
2. Access the IBM Security Key Lifecycle Manager REST services that provide the required serverfunctions. To access an IBM Security Key Lifecycle Manager REST service, pass the userauthentication identifier that you obtained in Step 1 along with the request message.
3. Log out of the IBM Security Key Lifecycle Manager server by using “Logout REST Service” on page 312.To log out, you must pass the user authentication identifier that you obtained in Step 1.
Scenario: To request for a third-party certificateIBM Security Key Lifecycle Manager can generate a certificate request in PKCS #10 format that you cansend to a certificate authority. Use the returned CA certificate to protect data on an encryption-enableddevice, or for SSL communication.
1. Before you begin, determine whether the usage of the certificate is for SSL authentication, or forsecure communication with 3592 tape drives or DS8000 Turbo drives.
2. For each of the certificates that you anticipate in your next business cycle, create a certificate request.
The generated certificate request files reside in the SKLM_HOME directory. For example, a generatedcertificate request might be a file such as SKLM_HOME\080419154137–sslcert001.csr.
The certificate request file is an encoded, base64 format, which is not readable with an editor.
The certificate request file contains the base64 format information, including:
• The version number.• The subject name, which is the X.500 name of the requestor. For example, an X.500 name contains
values for a common name (cn), organization, and other values that identify the subject.• The public key data and the algorithm unique identifier. You can use the algorithm, such as RSA orECDSA.
• A generated signature for the data that is signed by the private key of the user.
The keystore database contains the private key that was used to generate the signature for thecertificate request.
Additionally, information related to the certificate request is stored in the database. The informationincludes the X.500 subject name, the start, expiration, and retirement date, and other values for otherattributes that are normally specified for a certificate, including a pending state for the certificaterequest. The values are updated when the returned certificate is imported.
3. Protect certificate requests until the certificate returns. It is important to run a backup task for thekeystore database after you create and send a certificate request, just as when you change actual keysor certificates in a keystore database.
4. After ensuring that a backup file is in place, manually send a certificate request to your selectedcertificate authority, by using the secure communication process that your site or the certificateauthority requires for e-mail or https transmission.
5. Import a returned certificate that matches an earlier certificate request.
Upon receipt of a valid request, the certificate authority returns a DER, base64, or PEM encodedcertificate to you. The certificate contains the public key that was provided in the certificate request,and a signature from the certificate authority, which specify that the public key is valid, and that yourenterprise is the authentic owner. The certificate subject name is the X.500 subject name that youprovided in the certificate request.
6. Again back up the keystore database, which contains the new certificate.
Master Key REST ServiceUse Master Key REST Service to create an IBM Security Key Lifecycle Manager master key of thelength that you specify for encryption of keys. If a key exists in the keystore, then the new master key thatis created by using this REST service replaces it. You can also use this REST service to move the masterkey from a Java keystore to HSM (Hardware Security Module) and vice versa.
240 IBM Security Key Lifecycle Manager : Administering
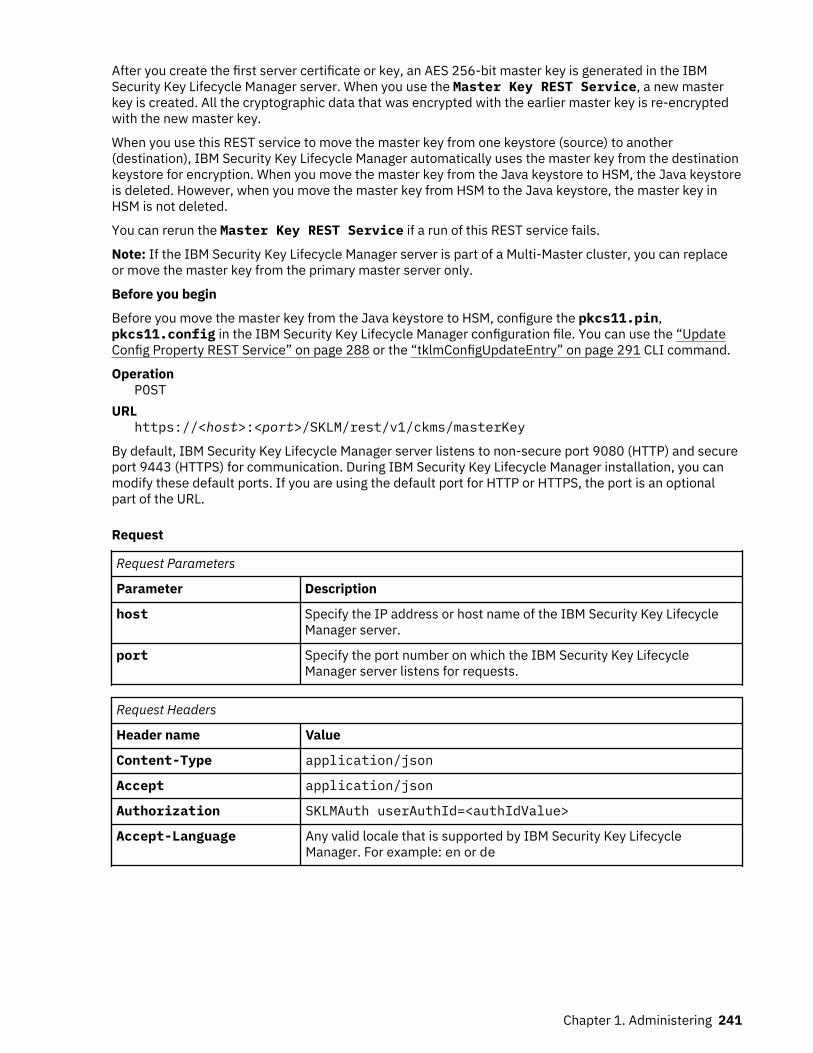
After you create the first server certificate or key, an AES 256-bit master key is generated in the IBMSecurity Key Lifecycle Manager server. When you use the Master Key REST Service, a new masterkey is created. All the cryptographic data that was encrypted with the earlier master key is re-encryptedwith the new master key.
When you use this REST service to move the master key from one keystore (source) to another(destination), IBM Security Key Lifecycle Manager automatically uses the master key from the destinationkeystore for encryption. When you move the master key from the Java keystore to HSM, the Java keystoreis deleted. However, when you move the master key from HSM to the Java keystore, the master key inHSM is not deleted.
You can rerun the Master Key REST Service if a run of this REST service fails.
Note: If the IBM Security Key Lifecycle Manager server is part of a Multi-Master cluster, you can replaceor move the master key from the primary master server only.
Before you begin
Before you move the master key from the Java keystore to HSM, configure the pkcs11.pin,pkcs11.config in the IBM Security Key Lifecycle Manager configuration file. You can use the “UpdateConfig Property REST Service” on page 288 or the “tklmConfigUpdateEntry” on page 291 CLI command.
OperationPOST
URLhttps://<host>:<port>/SKLM/rest/v1/ckms/masterKey
By default, IBM Security Key Lifecycle Manager server listens to non-secure port 9080 (HTTP) and secureport 9443 (HTTPS) for communication. During IBM Security Key Lifecycle Manager installation, you canmodify these default ports. If you are using the default port for HTTP or HTTPS, the port is an optionalpart of the URL.
Request
Request Parameters
Parameter Description
host Specify the IP address or host name of the IBM Security Key LifecycleManager server.
port Specify the port number on which the IBM Security Key LifecycleManager server listens for requests.
Request Headers
Header name Value
Content-Type application/json
Accept application/json
Authorization SKLMAuth userAuthId=<authIdValue>
Accept-Language Any valid locale that is supported by IBM Security Key LifecycleManager. For example: en or de
Chapter 1. Administering 241

Request Body
JSON object with the following specification:
JSON property name Description
masterKeySize Specify length of the IBM Security Key Lifecycle Manager master key inbits. You can specify 128 or 256.
source Optional. Specify the source keystore from where you want to move themaster key. The valid values are: Keystore or HSM.
The values are case-insensitive.
destination Optional. Specify the destination keystore to which you want to move themaster key. The valid values are: Keystore or HSM.
The values are case-insensitive.
Response
Response Headers
Header name Value and description
Status Code 200 OKThe request was successful. The response body contains therequested representation.
400 Bad RequestThe authentication information was not provided in the correctformat.
401 UnauthorizedThe authentication credentials were missing or incorrect.
404 Not Found ErrorThe processing of the request fails.
500 Internal Server ErrorThe processing of the request fails because of an unexpectedcondition on the server.
Content-Type application/json
Content-Language Locale for the response message.
Response Body
JSON object with the following specification:
JSON property name Description
code Returns the success or error message code.
message Returns the message that describes the success or error code.
ExamplesService request to create a new master key with 256-bits length
POST https://localhost:<port>/SKLM/rest/v1/ckms/masterKeyContent-Type: application/jsonAccept: application/jsonAuthorization: SKLMAuth userAuthId=139aeh34567m
242 IBM Security Key Lifecycle Manager : Administering

Accept-Language: en{"masterKeySize":"256"}
Success response
Status Code: 200 OK{"code":"CTGKM3350I", “message”:”Successfully refreshed Master Key.”}
Error response
Status Code: 400 Bad RequestContent-Language: en{"code": "CTGKM6002E", "message" : "CTGKM6002E Bad Request: Invalid userauthentication ID or invalid request format."}
Service request to move the master key from the Java keystore to HSM
POST https://localhost:<port>/SKLM/rest/v1/ckms/masterKeyContent-Type: application/jsonAccept: application/jsonAuthorization: SKLMAuth userAuthId=139aeh34567mAccept-Language: en{"masterKeySize":"256",”source”:”keystore”,”destination”:”HSM”}
Success response
Status Code: 200 OK{"code":"CTGKM3349I", “message”:”Successfully completed movement of Master Key from keystore to HSM.”}
Error response
Status Code: 400 Bad RequestContent-Language: en{"code": "CTGKM6002E", "message" : "CTGKM6002E Bad Request: Invalid userauthentication ID or invalid request format."}
Replication Start REST ServiceUse Replication Start REST Service to start the replication server for replicating the current IBMSecurity Key Lifecycle Manager active files on clone servers based on a configured schedule.
Note: IBM Security Key Lifecycle Manager data is replicated based on a configured schedule only whennew cryptographic objects are added to the master server.
OperationPOST
URLhttps://<host>:<port>/SKLM/rest/v1/replicate/start
By default, IBM Security Key Lifecycle Manager server listens to non-secure port 9080 (HTTP) and secureport 9443 (HTTPS) for communication. During IBM Security Key Lifecycle Manager installation, you canmodify these default ports. If you are using the default port for HTTP or HTTPS, the port is an optionalpart of the URL.
Request
Request Parameters
Parameter Description
host Specify the IP address or host name of the IBM Security Key LifecycleManager server.
port Specify the port number on which the IBM Security Key LifecycleManager server listens for requests.
Chapter 1. Administering 243
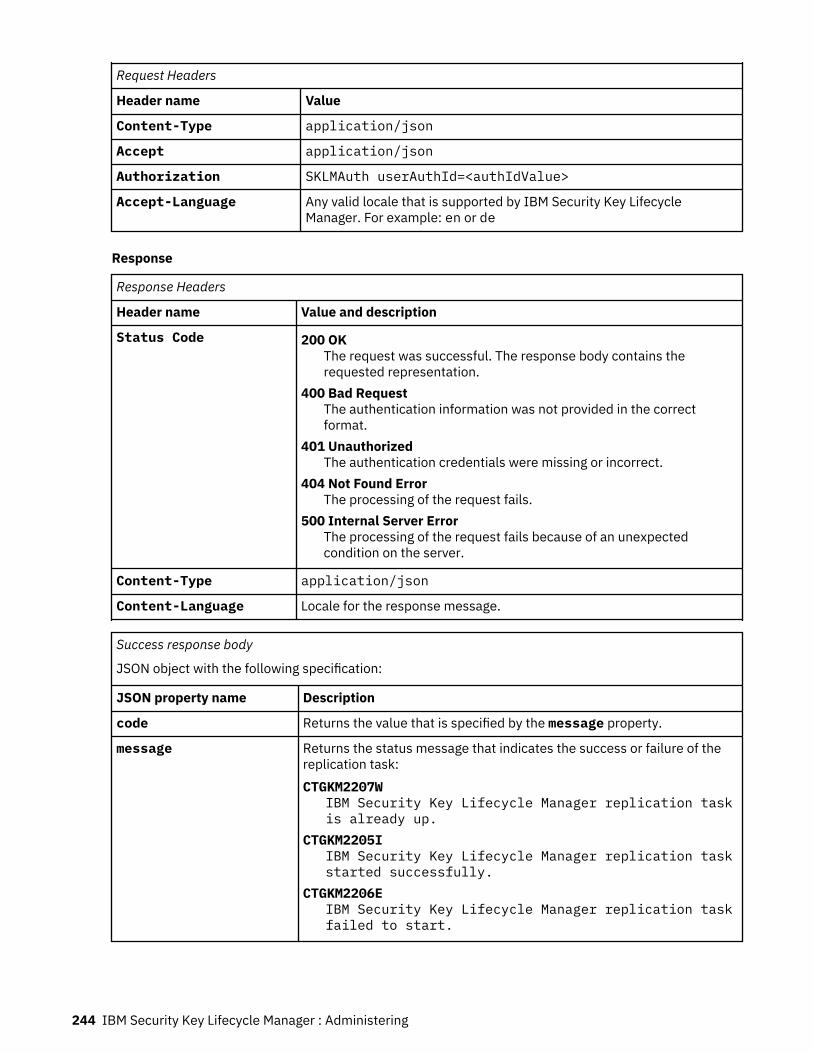
Request Headers
Header name Value
Content-Type application/json
Accept application/json
Authorization SKLMAuth userAuthId=<authIdValue>
Accept-Language Any valid locale that is supported by IBM Security Key LifecycleManager. For example: en or de
Response
Response Headers
Header name Value and description
Status Code 200 OKThe request was successful. The response body contains therequested representation.
400 Bad RequestThe authentication information was not provided in the correctformat.
401 UnauthorizedThe authentication credentials were missing or incorrect.
404 Not Found ErrorThe processing of the request fails.
500 Internal Server ErrorThe processing of the request fails because of an unexpectedcondition on the server.
Content-Type application/json
Content-Language Locale for the response message.
Success response body
JSON object with the following specification:
JSON property name Description
code Returns the value that is specified by the message property.
message Returns the status message that indicates the success or failure of thereplication task:CTGKM2207W
IBM Security Key Lifecycle Manager replication taskis already up.
CTGKM2205IIBM Security Key Lifecycle Manager replication taskstarted successfully.
CTGKM2206EIBM Security Key Lifecycle Manager replication taskfailed to start.
244 IBM Security Key Lifecycle Manager : Administering

Error Response Body
JSON object with the following specification.
JSON property name Description
code Returns the application error code.
message Returns a message that describes the error.
ExamplesService request to start the replication task
POST https://localhost:<port>/SKLM/rest/v1/replicate/startContent-Type: application/jsonAccept: application/jsonAuthorization: SKLMAuth userAuthId=139aeh34567m
Success response
Status Code : 200 OK{"code": "CTGKM2205I","message": "CTGKM2205I IBM Security Key Lifecycle Manager replication task started successfully."}}
Service request to start the replication task without specifying the configuration file
POST https://localhost:<port>/SKLM/rest/v1/replicate/startContent-Type: application/jsonAccept : application/jsonAuthorization: SKLMAuth userAuthId=139aeh34567m
Error response
Status Code : 200 OK{"code": "CTGKM2222E","message": "CTGKM2222E No valid replication config file exists."}
Replication Now REST ServiceUse Replication Now REST Service to immediately run the IBM Security Key Lifecycle Managerreplication task, and to force a backup to be sent to the configured clones.
OperationPOST
URLhttps://<host>:<port>/SKLM/rest/v1/replicate/now
By default, IBM Security Key Lifecycle Manager server listens to non-secure port 9080 (HTTP) and secureport 9443 (HTTPS) for communication. During IBM Security Key Lifecycle Manager installation, you canmodify these default ports. If you are using the default port for HTTP or HTTPS, the port is an optionalpart of the URL.
Request
Request Parameters
Parameter Description
host Specify the IP address or host name of the IBM Security Key LifecycleManager server.
port Specify the port number on which the IBM Security Key LifecycleManager server listens for requests.
Chapter 1. Administering 245
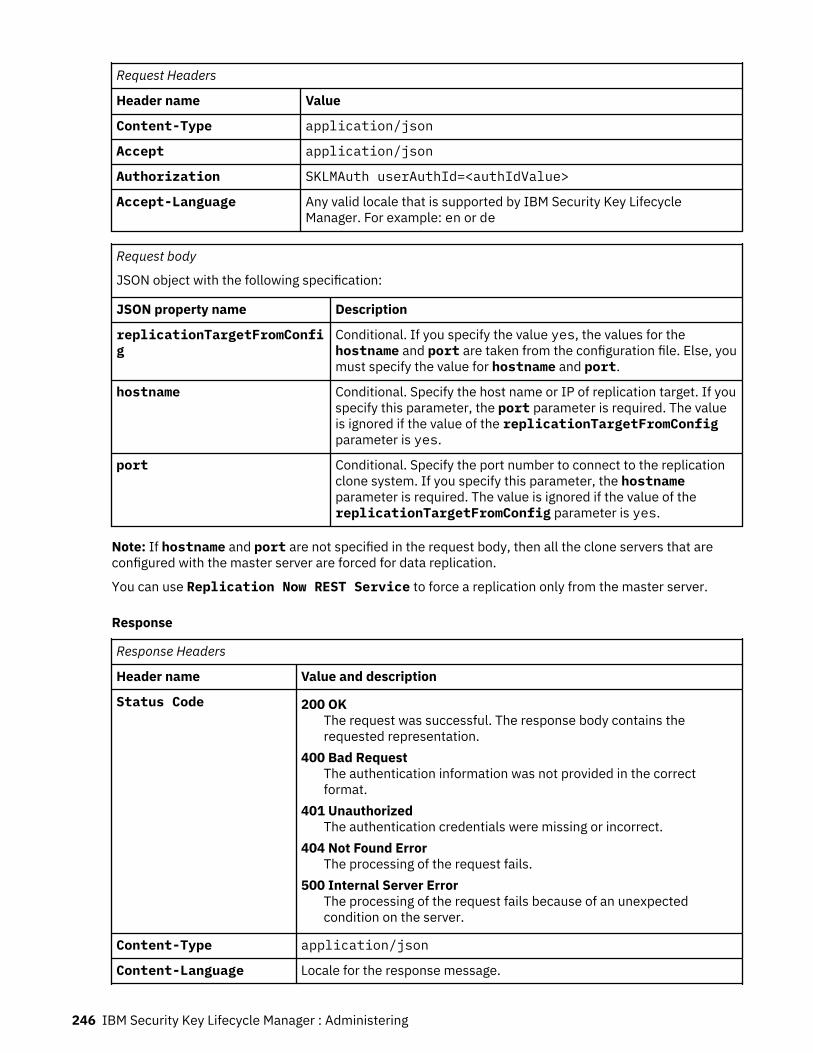
Request Headers
Header name Value
Content-Type application/json
Accept application/json
Authorization SKLMAuth userAuthId=<authIdValue>
Accept-Language Any valid locale that is supported by IBM Security Key LifecycleManager. For example: en or de
Request body
JSON object with the following specification:
JSON property name Description
replicationTargetFromConfig
Conditional. If you specify the value yes, the values for thehostname and port are taken from the configuration file. Else, youmust specify the value for hostname and port.
hostname Conditional. Specify the host name or IP of replication target. If youspecify this parameter, the port parameter is required. The valueis ignored if the value of the replicationTargetFromConfigparameter is yes.
port Conditional. Specify the port number to connect to the replicationclone system. If you specify this parameter, the hostnameparameter is required. The value is ignored if the value of thereplicationTargetFromConfig parameter is yes.
Note: If hostname and port are not specified in the request body, then all the clone servers that areconfigured with the master server are forced for data replication.
You can use Replication Now REST Service to force a replication only from the master server.
Response
Response Headers
Header name Value and description
Status Code 200 OKThe request was successful. The response body contains therequested representation.
400 Bad RequestThe authentication information was not provided in the correctformat.
401 UnauthorizedThe authentication credentials were missing or incorrect.
404 Not Found ErrorThe processing of the request fails.
500 Internal Server ErrorThe processing of the request fails because of an unexpectedcondition on the server.
Content-Type application/json
Content-Language Locale for the response message.
246 IBM Security Key Lifecycle Manager : Administering

Success response body
JSON array that contains JSON objects with the following specification:
JSON property name Description
code Returns the value that is specified by the message property.
message Returns the status message that indicates whether the replication task isrun:CTGKM2200I
Replication has been successful for the hostlisted.
CTGKM2201W.Replication already in progress.
CTGKM2202EReplication has failed for the host listed.
CTGKM2203EReplication has failed for the host listed with aconnection error.
CTGKM2204EReplication has failed for the host listed with avalidation error.
CTGKM2212EReplication for the specified host timed out.
CTGKM2243EReplication can only be invoked on the mastermachine.
CTGKM2222ENo valid replication config file exists.
Error Response Body
JSON object with the following specification.
JSON property name Description
code Returns the application error code.
message Returns a message that describes the error.
ExamplesService request to run the replication task
POST https://localhost:<port>/SKLM/rest/v1/replicate/nowContent-Type: application/jsonAccept: application/jsonAuthorization: SKLMAuth userAuthId=139aeh34567m{"hostname":"remotehost","port":"2222"}
Success response
Status Code : 200 OK[ { "code":"CTGKM2200I","message":" CTGKM2200I Replication successful for remotehost:2222” }]
Chapter 1. Administering 247

Service request to run the replication task without specifying the port number
POST https://localhost:<port>/SKLM/rest/v1/replicate/nowContent-Type: application/jsonAccept: application/jsonAuthorization: SKLMAuth userAuthId=139aeh34567m{"hostname":"remotehost"}
Error response
Status Code : 200 OK{"code":"CTGKM0631E","message":"CTGKM0631E Missing required parameter \" port \" ."}
HSM-based encryption for backupsYou can configure IBM Security Key Lifecycle Manager to use Hardware Security Module (HSM) for storingthe master encryption key, which protects the key materials that are stored in the database.
When you run the IBM Security Key Lifecycle Manager backup operation, a backup archive is created. Thebackup key in the archive encrypts backup contents. The master key in HSM encrypts the backup key.During the restore process, master key, which is stored in HSM, decrypts the backup key. Then, thebackup key is used to restore backup contents.
If you use HSM to store the master key, the backup archive contains the following files:
• Manifest file, which lists all the IBM Security Key Lifecycle Manager data files in the archive.• IBM Security Key Lifecycle Manager configuration files• IBM Security Key Lifecycle Manager data dumps
HSM-based encryption is the default method for the backups when HSM is configured to store the masterkey. You can also use the password-based encryption for the backups when HSM is configured by settingthe following property in the SKLMConfig.properties file.
enablePBEInHSM=true
Note:
• If HSM is not configured, you can only use password-based encryption for the backups.• If the value for enablePBEInHSM is not set or set to any other value than true, the value is assumed
as false.• You can restore the backup file that is created by using either password-based or HSM-based
encryption irrespective of the value set for enablePBEInHSM.
Operating system of the IBM Security Key Lifecycle Manager primary master server failsto start
When the operating system of the IBM Security Key Lifecycle Manager primary master server fails to start,the Agent and primary database are unreachable, and the IBM Security Key Lifecycle Manager service isdown. You must manually initiate the database takeover operation on the standby master server so thatthe standby database takes over as the primary database.
Note: If the IBM Security Key Lifecycle Manager primary master server is down but its operating system isrunning, manually initiate the takeover operation. For detailed instructions, see HADR takeover service.
Solution
Start the takeover operation by running the DB2TakeOver.sh or DB2TakeOver.bat script on thestandby master server. This script includes Db2 commands only and does not modify IBM Security KeyLifecycle Manager.
To start the takeover operation
1. Locate the DB2TakeOver.sh/.bat script.
248 IBM Security Key Lifecycle Manager : Administering

Windows<SKLM_INSTALL_HOME>\agent
Default location is C:\Program Files\IBM\SKLMV40\agent.
Linux<SKLM_INSTALL_HOME>/agent
Default location is /opt/IBM/SKLMV40/agent.2. Open a command line and run the DB2TakeOver.sh/.bat script.
WindowsGo to the <SKLM_INSTALL_HOME>\agent directory and run the following command:
DB2TakeOver.bat <LOG> <DB_NAME> <INST_HOME>
where, <LOG> is the log file path, <DB_NAME> is the Db2 database name, and <INST_HOME> isthe Db2 instance home.For example,
DB2TakeOver.bat takeover.log SKLMDB31 C:\SKLMDB31
LinuxGo to the <SKLM_INSTALL_HOME>\agent directory and run the following command:
DB2TakeOver.sh <LOG> <DB_NAME> <INST_HOME>
where, <LOG> is the log file path, <DB_NAME> is the Db2 database name, and <INST_HOME> isthe Db2 instance home.For example,
DB2TakeOver.sh takeover.log SKLMDB31 /home/sklmdb31/SKLMDB31
The Db2 database on the standby master server takes over as the primary database.
When the operating system of the earlier primary database server recovers, initiate the takeover serviceon it as standby. For detailed instructions, see HADR takeover service.
Restart Multi-Master Cluster REST ServiceUse Restart Multi-Master Cluster REST Service to restart the IBM Security Key LifecycleManager Multi-Master cluster service. You can run this REST service on any master server.
OperationPOST
URLhttps://host:port/SKLM/rest/v1/ckms/config/nodes/restartCluster
By default, IBM Security Key Lifecycle Manager server listens to non-secure port 9080 (HTTP) and secureport 9443 (HTTPS) for communication. During IBM Security Key Lifecycle Manager installation, you canmodify these default ports. If you are using the default port for HTTP or HTTPS, the port is an optionalpart of the URL.
Request
Request Parameters
Parameter Description
host Specify the IP address or host name of the IBM Security Key LifecycleManager server.
Chapter 1. Administering 249
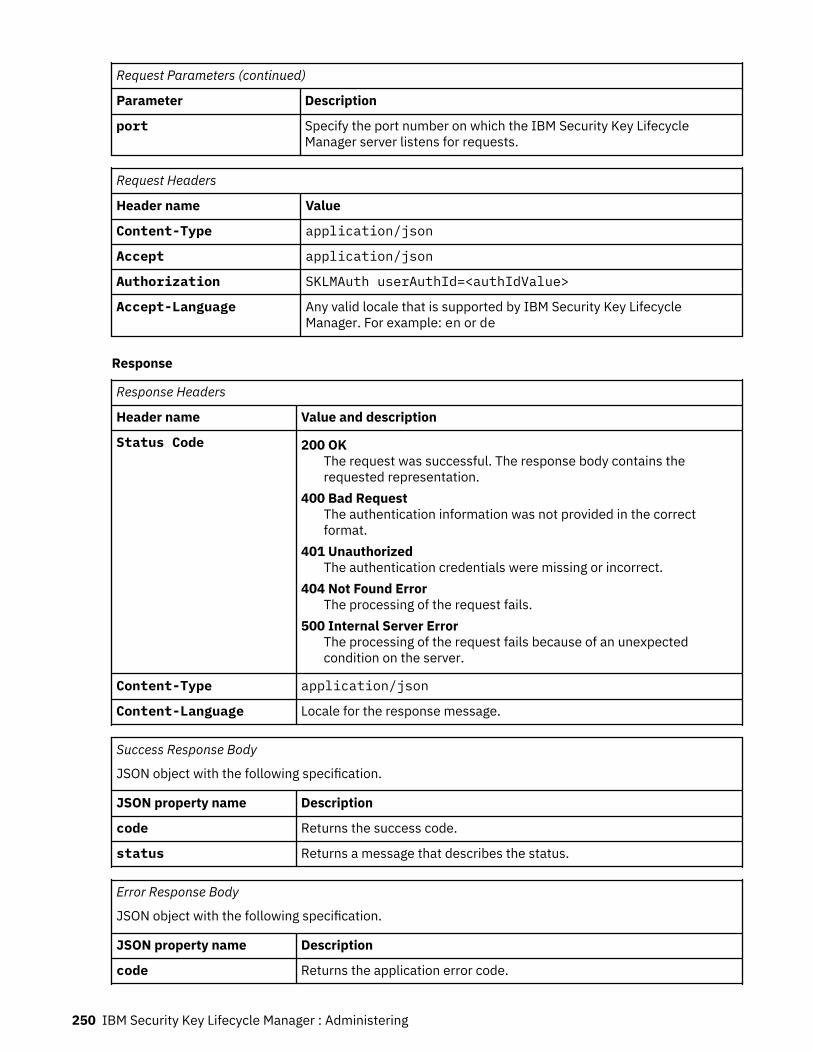
Request Parameters (continued)
Parameter Description
port Specify the port number on which the IBM Security Key LifecycleManager server listens for requests.
Request Headers
Header name Value
Content-Type application/json
Accept application/json
Authorization SKLMAuth userAuthId=<authIdValue>
Accept-Language Any valid locale that is supported by IBM Security Key LifecycleManager. For example: en or de
Response
Response Headers
Header name Value and description
Status Code 200 OKThe request was successful. The response body contains therequested representation.
400 Bad RequestThe authentication information was not provided in the correctformat.
401 UnauthorizedThe authentication credentials were missing or incorrect.
404 Not Found ErrorThe processing of the request fails.
500 Internal Server ErrorThe processing of the request fails because of an unexpectedcondition on the server.
Content-Type application/json
Content-Language Locale for the response message.
Success Response Body
JSON object with the following specification.
JSON property name Description
code Returns the success code.
status Returns a message that describes the status.
Error Response Body
JSON object with the following specification.
JSON property name Description
code Returns the application error code.
250 IBM Security Key Lifecycle Manager : Administering
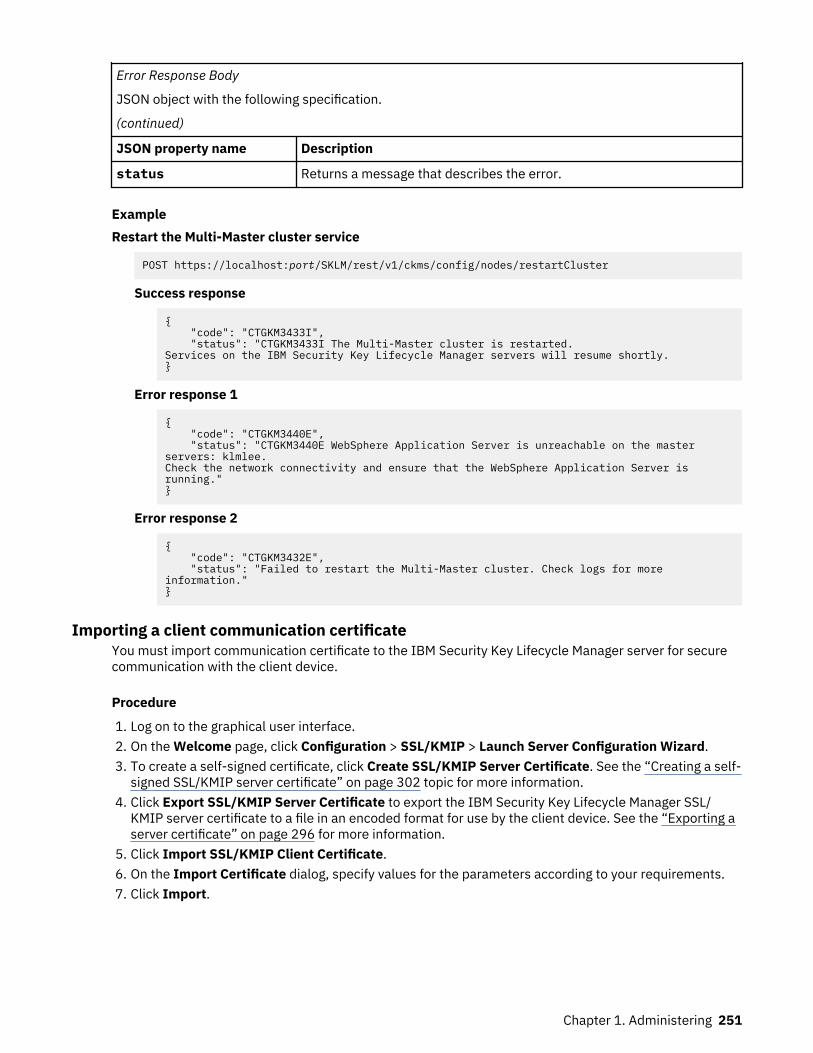
Error Response Body
JSON object with the following specification.
(continued)
JSON property name Description
status Returns a message that describes the error.
ExampleRestart the Multi-Master cluster service
POST https://localhost:port/SKLM/rest/v1/ckms/config/nodes/restartCluster
Success response
{ "code": "CTGKM3433I", "status": "CTGKM3433I The Multi-Master cluster is restarted. Services on the IBM Security Key Lifecycle Manager servers will resume shortly.}
Error response 1
{ "code": "CTGKM3440E", "status": "CTGKM3440E WebSphere Application Server is unreachable on the master servers: klmlee.Check the network connectivity and ensure that the WebSphere Application Server is running."}
Error response 2
{ "code": "CTGKM3432E", "status": "Failed to restart the Multi-Master cluster. Check logs for more information."}
Importing a client communication certificateYou must import communication certificate to the IBM Security Key Lifecycle Manager server for securecommunication with the client device.
Procedure
1. Log on to the graphical user interface.2. On the Welcome page, click Configuration > SSL/KMIP > Launch Server Configuration Wizard.3. To create a self-signed certificate, click Create SSL/KMIP Server Certificate. See the “Creating a self-
signed SSL/KMIP server certificate” on page 302 topic for more information.4. Click Export SSL/KMIP Server Certificate to export the IBM Security Key Lifecycle Manager SSL/
KMIP server certificate to a file in an encoded format for use by the client device. See the “Exporting aserver certificate” on page 296 for more information.
5. Click Import SSL/KMIP Client Certificate.6. On the Import Certificate dialog, specify values for the parameters according to your requirements.7. Click Import.
Chapter 1. Administering 251
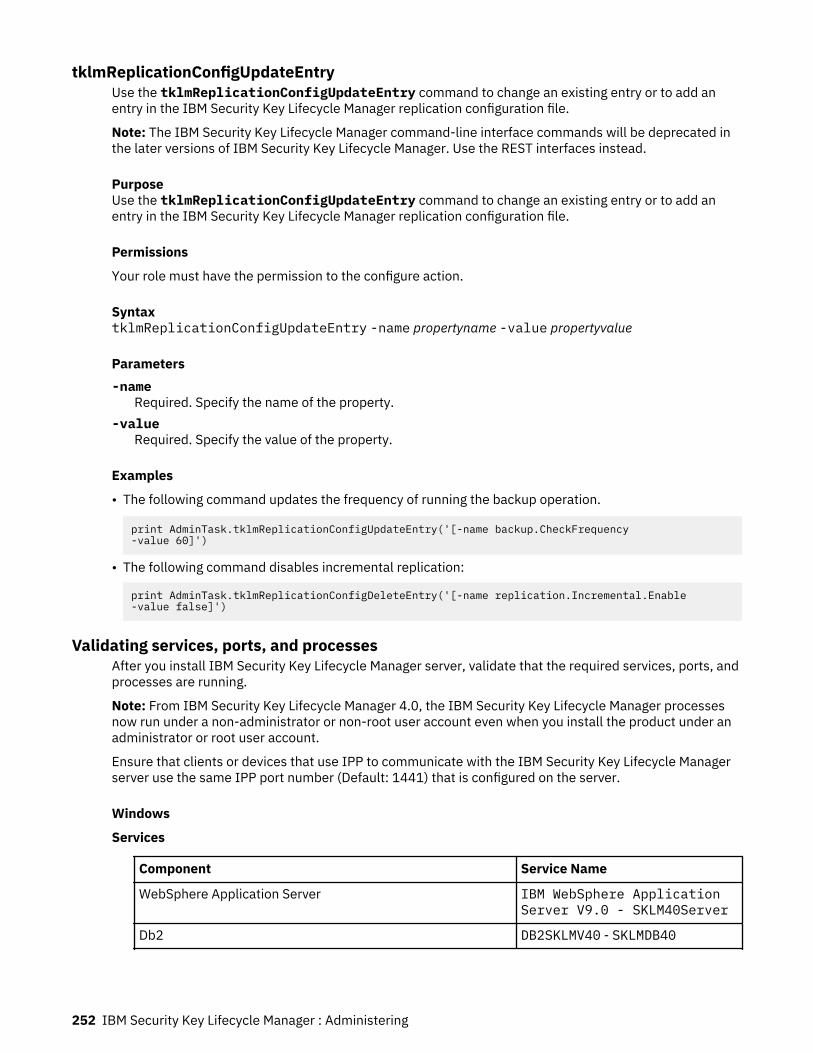
tklmReplicationConfigUpdateEntryUse the tklmReplicationConfigUpdateEntry command to change an existing entry or to add anentry in the IBM Security Key Lifecycle Manager replication configuration file.
Note: The IBM Security Key Lifecycle Manager command-line interface commands will be deprecated inthe later versions of IBM Security Key Lifecycle Manager. Use the REST interfaces instead.
PurposeUse the tklmReplicationConfigUpdateEntry command to change an existing entry or to add anentry in the IBM Security Key Lifecycle Manager replication configuration file.
Permissions
Your role must have the permission to the configure action.
SyntaxtklmReplicationConfigUpdateEntry -name propertyname -value propertyvalue
Parameters-name
Required. Specify the name of the property.-value
Required. Specify the value of the property.
Examples
• The following command updates the frequency of running the backup operation.
print AdminTask.tklmReplicationConfigUpdateEntry('[-name backup.CheckFrequency -value 60]')
• The following command disables incremental replication:
print AdminTask.tklmReplicationConfigDeleteEntry('[-name replication.Incremental.Enable -value false]')
Validating services, ports, and processesAfter you install IBM Security Key Lifecycle Manager server, validate that the required services, ports, andprocesses are running.
Note: From IBM Security Key Lifecycle Manager 4.0, the IBM Security Key Lifecycle Manager processesnow run under a non-administrator or non-root user account even when you install the product under anadministrator or root user account.
Ensure that clients or devices that use IPP to communicate with the IBM Security Key Lifecycle Managerserver use the same IPP port number (Default: 1441) that is configured on the server.
Windows
Services
Component Service Name
WebSphere Application Server IBM WebSphere ApplicationServer V9.0 - SKLM40Server
Db2 DB2SKLMV40 - SKLMDB40
252 IBM Security Key Lifecycle Manager : Administering
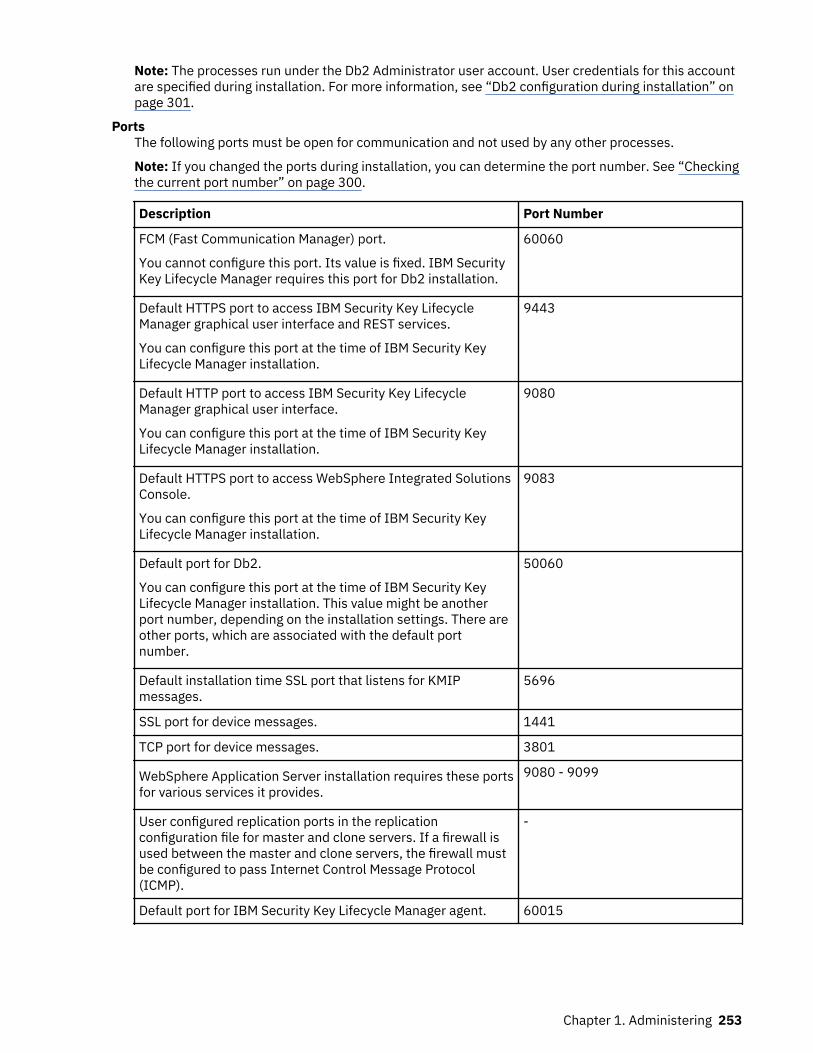
Note: The processes run under the Db2 Administrator user account. User credentials for this accountare specified during installation. For more information, see “Db2 configuration during installation” onpage 301.
PortsThe following ports must be open for communication and not used by any other processes.
Note: If you changed the ports during installation, you can determine the port number. See “Checkingthe current port number” on page 300.
Description Port Number
FCM (Fast Communication Manager) port.
You cannot configure this port. Its value is fixed. IBM SecurityKey Lifecycle Manager requires this port for Db2 installation.
60060
Default HTTPS port to access IBM Security Key LifecycleManager graphical user interface and REST services.
You can configure this port at the time of IBM Security KeyLifecycle Manager installation.
9443
Default HTTP port to access IBM Security Key LifecycleManager graphical user interface.
You can configure this port at the time of IBM Security KeyLifecycle Manager installation.
9080
Default HTTPS port to access WebSphere Integrated SolutionsConsole.
You can configure this port at the time of IBM Security KeyLifecycle Manager installation.
9083
Default port for Db2.
You can configure this port at the time of IBM Security KeyLifecycle Manager installation. This value might be anotherport number, depending on the installation settings. There areother ports, which are associated with the default portnumber.
50060
Default installation time SSL port that listens for KMIPmessages.
5696
SSL port for device messages. 1441
TCP port for device messages. 3801
WebSphere Application Server installation requires these portsfor various services it provides.
9080 - 9099
User configured replication ports in the replicationconfiguration file for master and clone servers. If a firewall isused between the master and clone servers, the firewall mustbe configured to pass Internet Control Message Protocol(ICMP).
-
Default port for IBM Security Key Lifecycle Manager agent. 60015
Chapter 1. Administering 253

Processes
Name Process
IBM Security Key Lifecycle Manager WASService.exe and java.exe
Db2 db2fmp64.exe anddb2syscs.exe
Linux
PortsThe following ports must be open for communication and not used by any other processes.
Note: If you changed the ports during installation, you can determine the port number. See “Checkingthe current port number” on page 300.
Description Port Number
FCM (Fast Communication Manager) port.
You cannot configure this port. Its value is fixed. IBM Security KeyLifecycle Manager requires this port for Db2 installation.
60060
Default HTTPS port to access IBM Security Key Lifecycle Managergraphical user interface and REST services.
You can configure this port at the time of IBM Security KeyLifecycle Manager installation.
9443
Default HTTP port to access IBM Security Key Lifecycle Managergraphical user interface.
You can configure this port at the time of IBM Security KeyLifecycle Manager installation.
9080
Default HTTPS port to access WebSphere Integrated SolutionsConsole.
You can configure this port at the time of IBM Security KeyLifecycle Manager installation.
9083
Default port for Db2.
You can configure this port at the time of IBM Security KeyLifecycle Manager installation. This value might be another portnumber, depending on the installation settings. There are otherports, which are associated with the default port number.
50060
Default installation time SSL port that listens for KMIP messages. 5696
SSL port for device messages. 1441
TCP port for device messages. 3801
WebSphere Application Server installation requires these portsfor various services it provides.
9080 - 9099
User configured replication ports in the replication configurationfile for master and clone servers. If a firewall is used between themaster and clone servers, the firewall must be configured to passInternet Control Message Protocol (ICMP).
-
Default port for IBM Security Key Lifecycle Manager agent. 60015
254 IBM Security Key Lifecycle Manager : Administering
Processes
Component Process
IBM Security Key Lifecycle Manager WebSphere Application Serverand Java
Db2 db2fmp64 and db2syscs
Replication configuration propertiesReplication configuration properties are stored in the ReplicationSKLMConfig.properties file.
The file is created when you configure replication. The properties in the file are updated automaticallydepending on the modifications to the replication configuration. The file is located in the WAS_HOME/products/sklm/config directory on the IBM Security Key Lifecycle Manager server.
Note: For replication:
• The backup properties are required only on a master system.• The restore properties are required only on a clone system.• You must specify the replication.role property on a clone system.
Stop Multi-Master Cluster REST ServiceUse Stop Multi-Master Cluster REST Service to stop the IBM Security Key Lifecycle Managerserver. You can run this REST service on any master server.
OperationPOST
URLhttps://host:port/SKLM/rest/v1/ckms/config/nodes/stopCluster
By default, IBM Security Key Lifecycle Manager server listens to non-secure port 9080 (HTTP) and secureport 9443 (HTTPS) for communication. During IBM Security Key Lifecycle Manager installation, you canmodify these default ports. If you are using the default port for HTTP or HTTPS, the port is an optionalpart of the URL.
Request
Request Parameters
Parameter Description
host Specify the IP address or host name of the IBM Security Key LifecycleManager server.
port Specify the port number on which the IBM Security Key LifecycleManager server listens for requests.
Request Headers
Header name Value
Content-Type application/json
Accept application/json
Authorization SKLMAuth userAuthId=<authIdValue>
Accept-Language Any valid locale that is supported by IBM Security Key LifecycleManager. For example: en or de
Chapter 1. Administering 255

Response
Response Headers
Header name Value and description
Status Code 200 OKThe request was successful. The response body contains therequested representation.
400 Bad RequestThe authentication information was not provided in the correctformat.
401 UnauthorizedThe authentication credentials were missing or incorrect.
404 Not Found ErrorThe processing of the request fails.
500 Internal Server ErrorThe processing of the request fails because of an unexpectedcondition on the server.
Content-Type application/json
Content-Language Locale for the response message.
Success response body
JSON object with the following specification:
JSON property name Description
code Returns the value that is specified by the message property.
message Returns the status message that indicates success or failure of theoperation.
Error Response Body
JSON object with the following specification.
JSON property name Description
code Returns the application error code.
message Returns a message that describes the error.
ExampleStop the Multi-Master cluster service
POST https://localhost:port/SKLM/rest/v1/ckms/config/nodes/stopCluster
Success response
{ "code": "CTGKM3435I", "status": "CTGKM3435I The Multi-Master cluster is stopped."}
Error response 1
{ "code": "CTGKM3440E", "status": "CTGKM3440E WebSphere Application Server is unreachable on the master
256 IBM Security Key Lifecycle Manager : Administering
servers: klmlee.Check the network connectivity and ensure that the WebSphere Application Server is running."}
Error response 2
{ "code": "CTGKM3434E", "status": "Failed to stop the Multi-Master cluster. Check logs for more information."}
Backup encryption methods for replication activitiesIBM Security Key Lifecycle Manager supports password-based encryption and HSM-based encryption forbackups and replication activities.
Password-based encryption
When you run the IBM Security Key Lifecycle Manager automated replication program on the masterserver, you must specify a password to encrypt the backup key. This backup key is used to encryptbackup contents. The encrypted backup data, the backup key, and the password are replicated on theclone server that you configured for replication. The clone server uses the replicated password to decryptand restore the backup files.
HSM-based encryption
When you run the automated replication on the master server, data is backed up and encrypted by abackup key. If Hardware Security Module (HSM) is configured with IBM Security Key Lifecycle Manager,master key in HSM encrypts the backup key. When data is replicated on the clone server with HSMconfigured, the master key, which is stored in HSM, decrypts the backup key. Then, the backup key isused to restore backup contents.
Consider the following guidelines for using HSM-based encryption.
• Same HSM partition must be present with all its key entries intact on all the clone servers.• Master key that you used for the backup key encryption must be intact to replicate the backup file on
the clone server. If the master key is refreshed, all the older backups are inaccessible or unusable.• You must connect to the same HSM and the master key for automated replication irrespective of
whether you use HSM-based encryption or password-based encryption.
HSM-based encryption is the default method for the backups and replication when HSM is configured tostore the master key. You can also use the password-based encryption when HSM is configured by settingthe following property in the SKLMConfig.properties file.
enablePBEInHSM=true
Note:
• If HSM is not configured, you can only use password-based encryption for the backups and replication.• If the value for enablePBEInHSM is not set or set to any other value than true, the value is assumed
as false.• You can replicate and restore a backup file that is created by using either password-based or HSM-
based encryption irrespective of the value set for enablePBEInHSM.
Replication configuration
Chapter 1. Administering 257
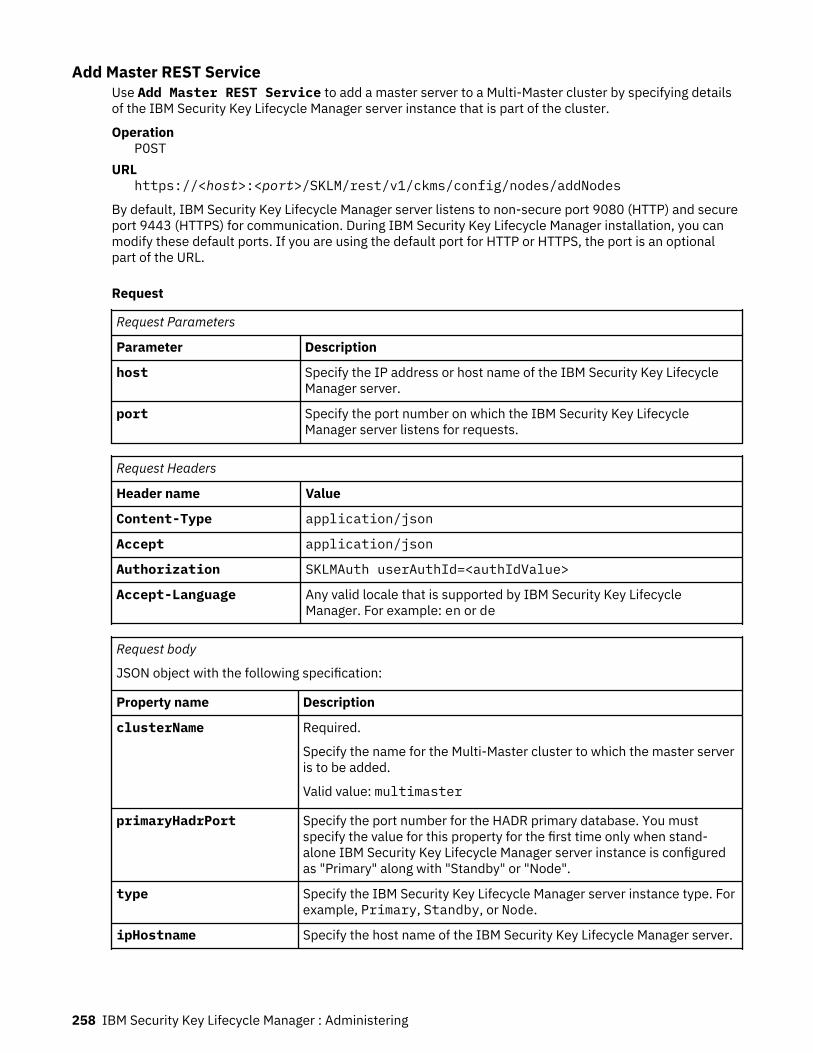
Add Master REST ServiceUse Add Master REST Service to add a master server to a Multi-Master cluster by specifying detailsof the IBM Security Key Lifecycle Manager server instance that is part of the cluster.
OperationPOST
URLhttps://<host>:<port>/SKLM/rest/v1/ckms/config/nodes/addNodes
By default, IBM Security Key Lifecycle Manager server listens to non-secure port 9080 (HTTP) and secureport 9443 (HTTPS) for communication. During IBM Security Key Lifecycle Manager installation, you canmodify these default ports. If you are using the default port for HTTP or HTTPS, the port is an optionalpart of the URL.
Request
Request Parameters
Parameter Description
host Specify the IP address or host name of the IBM Security Key LifecycleManager server.
port Specify the port number on which the IBM Security Key LifecycleManager server listens for requests.
Request Headers
Header name Value
Content-Type application/json
Accept application/json
Authorization SKLMAuth userAuthId=<authIdValue>
Accept-Language Any valid locale that is supported by IBM Security Key LifecycleManager. For example: en or de
Request body
JSON object with the following specification:
Property name Description
clusterName Required.
Specify the name for the Multi-Master cluster to which the master serveris to be added.
Valid value: multimaster
primaryHadrPort Specify the port number for the HADR primary database. You mustspecify the value for this property for the first time only when stand-alone IBM Security Key Lifecycle Manager server instance is configuredas "Primary" along with "Standby" or "Node".
type Specify the IBM Security Key Lifecycle Manager server instance type. Forexample, Primary, Standby, or Node.
ipHostname Specify the host name of the IBM Security Key Lifecycle Manager server.
258 IBM Security Key Lifecycle Manager : Administering
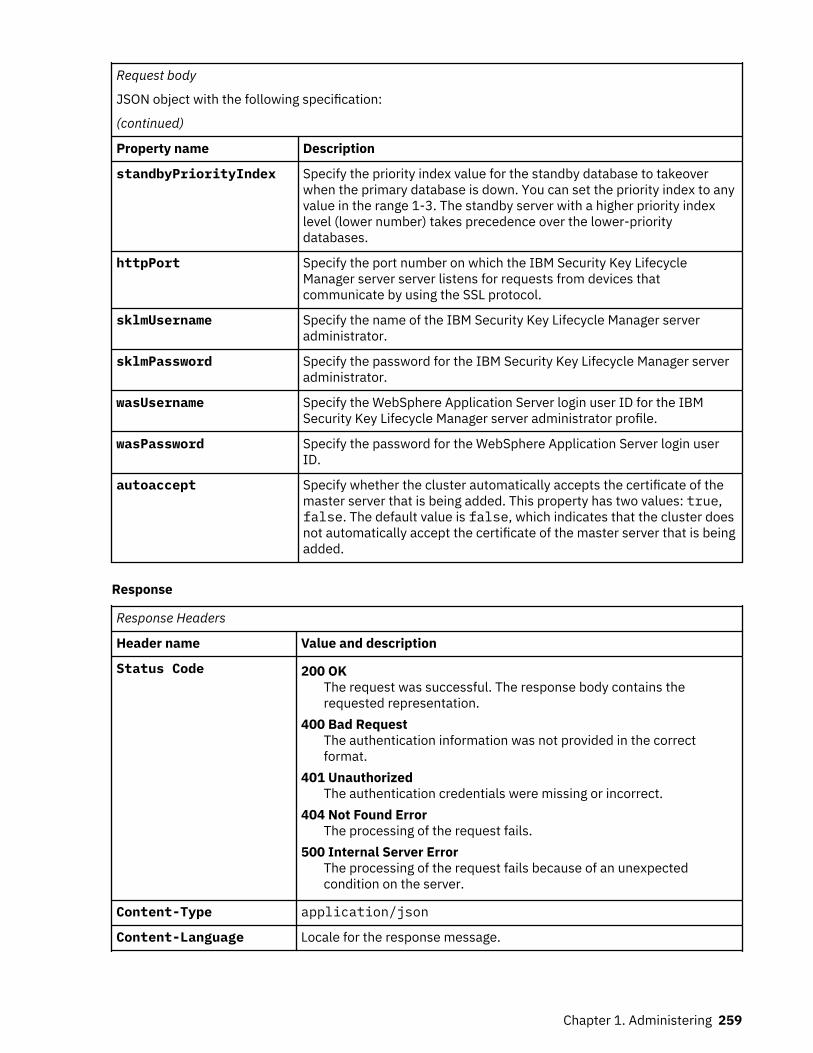
Request body
JSON object with the following specification:
(continued)
Property name Description
standbyPriorityIndex Specify the priority index value for the standby database to takeoverwhen the primary database is down. You can set the priority index to anyvalue in the range 1-3. The standby server with a higher priority indexlevel (lower number) takes precedence over the lower-prioritydatabases.
httpPort Specify the port number on which the IBM Security Key LifecycleManager server server listens for requests from devices thatcommunicate by using the SSL protocol.
sklmUsername Specify the name of the IBM Security Key Lifecycle Manager serveradministrator.
sklmPassword Specify the password for the IBM Security Key Lifecycle Manager serveradministrator.
wasUsername Specify the WebSphere Application Server login user ID for the IBMSecurity Key Lifecycle Manager server administrator profile.
wasPassword Specify the password for the WebSphere Application Server login userID.
autoaccept Specify whether the cluster automatically accepts the certificate of themaster server that is being added. This property has two values: true,false. The default value is false, which indicates that the cluster doesnot automatically accept the certificate of the master server that is beingadded.
Response
Response Headers
Header name Value and description
Status Code 200 OKThe request was successful. The response body contains therequested representation.
400 Bad RequestThe authentication information was not provided in the correctformat.
401 UnauthorizedThe authentication credentials were missing or incorrect.
404 Not Found ErrorThe processing of the request fails.
500 Internal Server ErrorThe processing of the request fails because of an unexpectedcondition on the server.
Content-Type application/json
Content-Language Locale for the response message.
Chapter 1. Administering 259

Success response body
JSON object with the following specification:
JSON property name Description
code Returns the code that is specified by the status property.
status Returns the status to indicate whether the master is added to the Multi-Master cluster.
Error Response Body
JSON object with the following specification.
JSON property name Description
code Returns the application error code.
message Returns a message that describes the error.
ExamplesService request to add master to a Multi-Master cluster
Example for adding a standby.
POST https://localhost:<port>/SKLM/rest/v1/ckms/config/nodes/addNodesContent-Type: application/jsonAccept : application/jsonAuthorization: SKLMAuth userAuthId=139aeh34567mAccept-Language : en[{"clusterName" : "multimaster","primaryHadrPort" : "60027"},{"type" : "Standby","ipHostname" : "cimkc2b151","httpPort" : "9443","sklmUsername" : "sklmadmin","sklmPassword" : "SKLM@admin123","wasUsername" : "wasadmin","wasPassword" : "WAS@admin123","standbyPriorityIndex" : "1","autoaccept" : "true"}]
Example for adding a master.
POST https://localhost:<port>/SKLM/rest/v1/ckms/config/nodes/addNodesContent-Type: application/jsonAccept : application/jsonAuthorization: SKLMAuth userAuthId=139aeh34567mAccept-Language : en[{"clusterName" : "multimaster"},{"type" : "Node","ipHostname" : "cimkc2b151","httpPort" : "9443","sklmUsername" : "sklmadmin","sklmPassword" : "SKLM@admin123","wasUsername" : "wasadmin","wasPassword" : "WAS@admin123","autoaccept" : "true"}]
260 IBM Security Key Lifecycle Manager : Administering
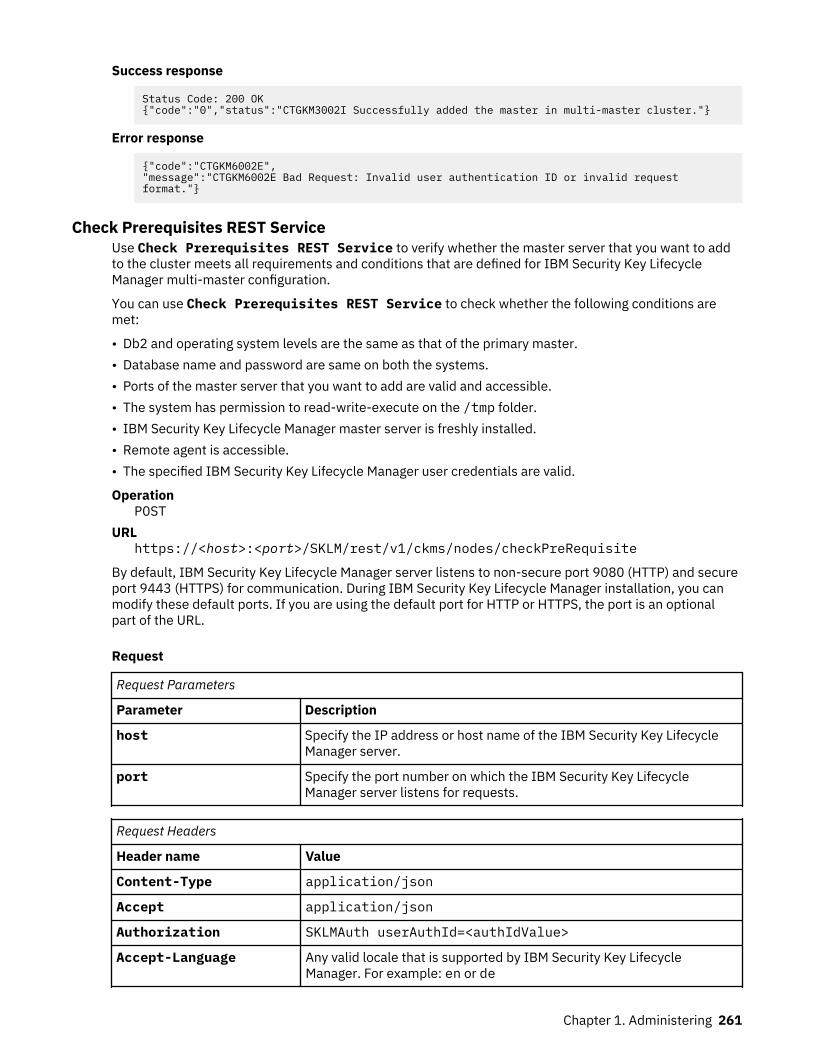
Success response
Status Code: 200 OK{"code":"0","status":"CTGKM3002I Successfully added the master in multi-master cluster."}
Error response
{"code":"CTGKM6002E","message":"CTGKM6002E Bad Request: Invalid user authentication ID or invalid request format."}
Check Prerequisites REST ServiceUse Check Prerequisites REST Service to verify whether the master server that you want to addto the cluster meets all requirements and conditions that are defined for IBM Security Key LifecycleManager multi-master configuration.
You can use Check Prerequisites REST Service to check whether the following conditions aremet:
• Db2 and operating system levels are the same as that of the primary master.• Database name and password are same on both the systems.• Ports of the master server that you want to add are valid and accessible.• The system has permission to read-write-execute on the /tmp folder.• IBM Security Key Lifecycle Manager master server is freshly installed.• Remote agent is accessible.• The specified IBM Security Key Lifecycle Manager user credentials are valid.
OperationPOST
URLhttps://<host>:<port>/SKLM/rest/v1/ckms/nodes/checkPreRequisite
By default, IBM Security Key Lifecycle Manager server listens to non-secure port 9080 (HTTP) and secureport 9443 (HTTPS) for communication. During IBM Security Key Lifecycle Manager installation, you canmodify these default ports. If you are using the default port for HTTP or HTTPS, the port is an optionalpart of the URL.
Request
Request Parameters
Parameter Description
host Specify the IP address or host name of the IBM Security Key LifecycleManager server.
port Specify the port number on which the IBM Security Key LifecycleManager server listens for requests.
Request Headers
Header name Value
Content-Type application/json
Accept application/json
Authorization SKLMAuth userAuthId=<authIdValue>
Accept-Language Any valid locale that is supported by IBM Security Key LifecycleManager. For example: en or de
Chapter 1. Administering 261
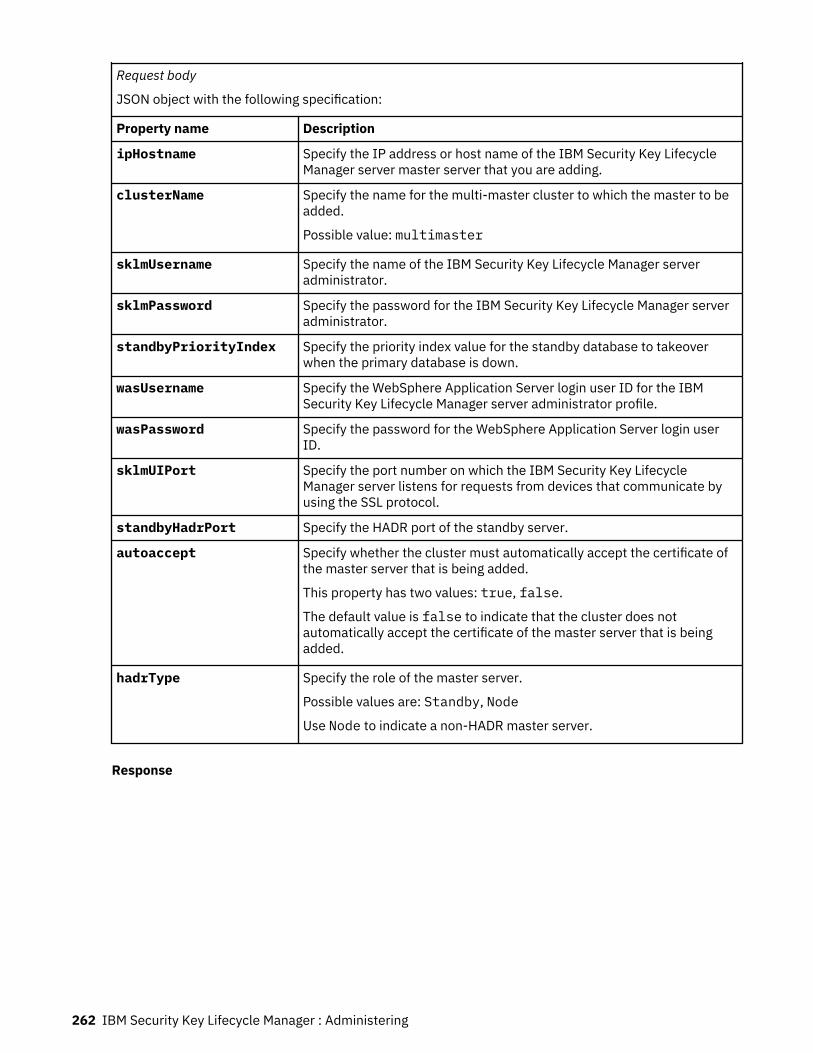
Request body
JSON object with the following specification:
Property name Description
ipHostname Specify the IP address or host name of the IBM Security Key LifecycleManager server master server that you are adding.
clusterName Specify the name for the multi-master cluster to which the master to beadded.
Possible value: multimaster
sklmUsername Specify the name of the IBM Security Key Lifecycle Manager serveradministrator.
sklmPassword Specify the password for the IBM Security Key Lifecycle Manager serveradministrator.
standbyPriorityIndex Specify the priority index value for the standby database to takeoverwhen the primary database is down.
wasUsername Specify the WebSphere Application Server login user ID for the IBMSecurity Key Lifecycle Manager server administrator profile.
wasPassword Specify the password for the WebSphere Application Server login userID.
sklmUIPort Specify the port number on which the IBM Security Key LifecycleManager server listens for requests from devices that communicate byusing the SSL protocol.
standbyHadrPort Specify the HADR port of the standby server.
autoaccept Specify whether the cluster must automatically accept the certificate ofthe master server that is being added.
This property has two values: true, false.
The default value is false to indicate that the cluster does notautomatically accept the certificate of the master server that is beingadded.
hadrType Specify the role of the master server.
Possible values are: Standby, Node
Use Node to indicate a non-HADR master server.
Response
262 IBM Security Key Lifecycle Manager : Administering

Response Headers
Header name Value and description
Status Code 200 OKThe request was successful. The response body contains therequested representation.
400 Bad RequestThe authentication information was not provided in the correctformat.
401 UnauthorizedThe authentication credentials were missing or incorrect.
404 Not Found ErrorThe processing of the request fails.
500 Internal Server ErrorThe processing of the request fails because of an unexpectedcondition on the server.
Content-Type application/json
Content-Language Locale for the response message.
Success response body
JSON object with the following specification:
JSON property name Description
code Returns the code that is specified by the status property.
status Returns the status to indicate whether the configuration of masters in thecluster you specify was successful.
Error Response Body
JSON object with the following specification.
JSON property name Description
code Returns the application error code.
message Returns a message that describes the error.
ExamplesService request to check whether the master server meets all the configuration conditions
POST https://localhost:<port>/SKLM/rest/v1/ckms/nodes/checkPreRequisiteContent-Type: application/jsonAccept : application/jsonAuthorization: SKLMAuth userAuthId=139aeh34567mAccept-Language : en{ "ipHostname" : "civ4cez199", "clusterName" : "multimaster", "sklmUsername" : "sklmadmin", "sklmPassword" : "SKLM@admin123", "wasUsername" : "wasadmin", "wasPassword" : "WAS@admin123", "sklmUIPort" : "9443", "standbyHadrPort" : "60020"}
Chapter 1. Administering 263

Success response
Status Code: 200 OK{"code":"0","status":"CTGKM3002I civ4cez199 met all the pre requisites and can be added into the cluster."}
Error response
{"code":"CTGKM6002E","message":"CTGKM6002E Bad Request: Invalid user authentication ID or invalid request format."}
Renew Key Alias REST ServiceUse Renew Key Alias REST Service to change the alias of a key present in the IBM Security KeyLifecycle Manager instance.
Note: The import conflict REST services make significant changes to the IBM Security Key LifecycleManager instance that might impact its operation and the communication with the storage device. Youmust carefully plan and evaluate the changes that are required on both IBM Security Key LifecycleManager and the storage device. The changes must be atomic; that is the changes must be done both onthe IBM Security Key Lifecycle Manager system and the devices. The import conflict resolution RESTservices handle the changes for IBM Security Key Lifecycle Manager. For the complete process handling,you must take the guidance of your IBM support representative.
OperationPOST
URLhttps://<host>:<port>/SKLM/rest/v1/ckms/conflictResolution/renewKeyAlias
By default, IBM Security Key Lifecycle Manager server listens to non-secure port 9080 (HTTP) and secureport 9443 (HTTPS) for communication. During IBM Security Key Lifecycle Manager installation, you canmodify these default ports. If you are using the default port for HTTP or HTTPS, the port is an optionalpart of the URL.
Request
Request Parameters
Parameter Description
host Specify the IP address or host name of the IBM Security Key LifecycleManager server.
port Specify the port number on which the IBM Security Key LifecycleManager server listens for requests.
Request Headers
Header name Value
Content-Type application/json
Accept application/json
Authorization SKLMAuth userAuthId=<authIdValue>
Accept-Language Any valid locale that is supported by IBM Security Key LifecycleManager. For example: en or de
264 IBM Security Key Lifecycle Manager : Administering
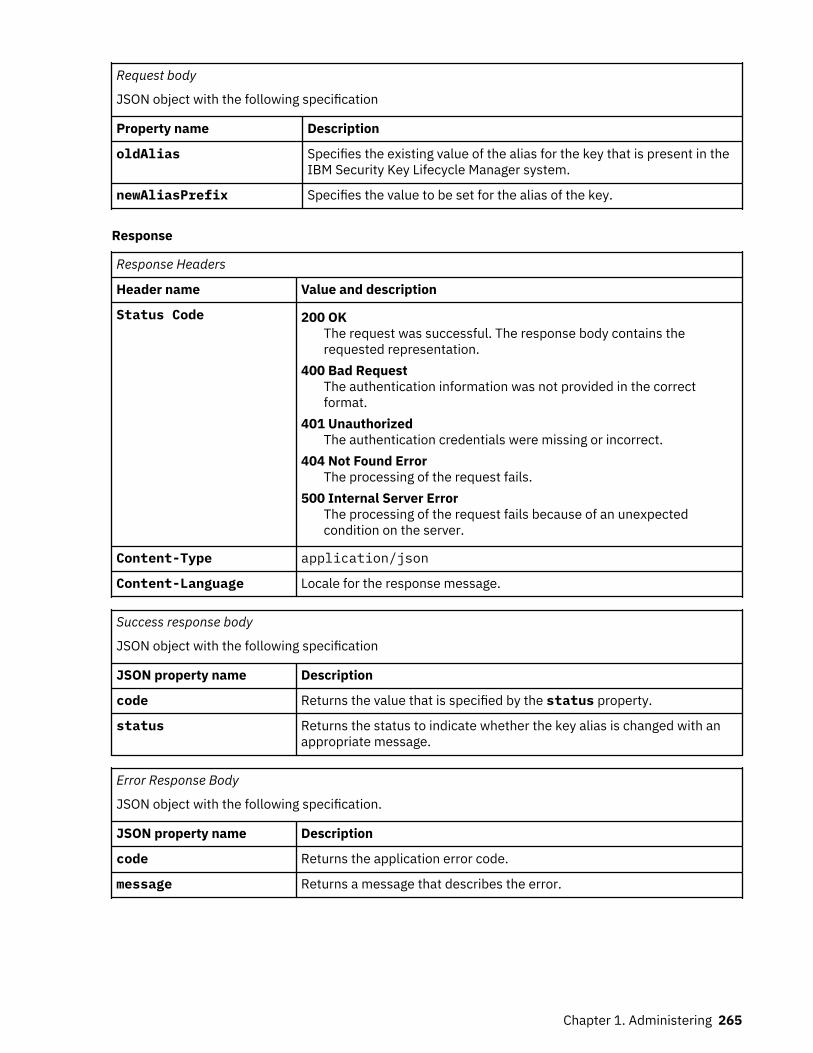
Request body
JSON object with the following specification
Property name Description
oldAlias Specifies the existing value of the alias for the key that is present in theIBM Security Key Lifecycle Manager system.
newAliasPrefix Specifies the value to be set for the alias of the key.
Response
Response Headers
Header name Value and description
Status Code 200 OKThe request was successful. The response body contains therequested representation.
400 Bad RequestThe authentication information was not provided in the correctformat.
401 UnauthorizedThe authentication credentials were missing or incorrect.
404 Not Found ErrorThe processing of the request fails.
500 Internal Server ErrorThe processing of the request fails because of an unexpectedcondition on the server.
Content-Type application/json
Content-Language Locale for the response message.
Success response body
JSON object with the following specification
JSON property name Description
code Returns the value that is specified by the status property.
status Returns the status to indicate whether the key alias is changed with anappropriate message.
Error Response Body
JSON object with the following specification.
JSON property name Description
code Returns the application error code.
message Returns a message that describes the error.
Chapter 1. Administering 265
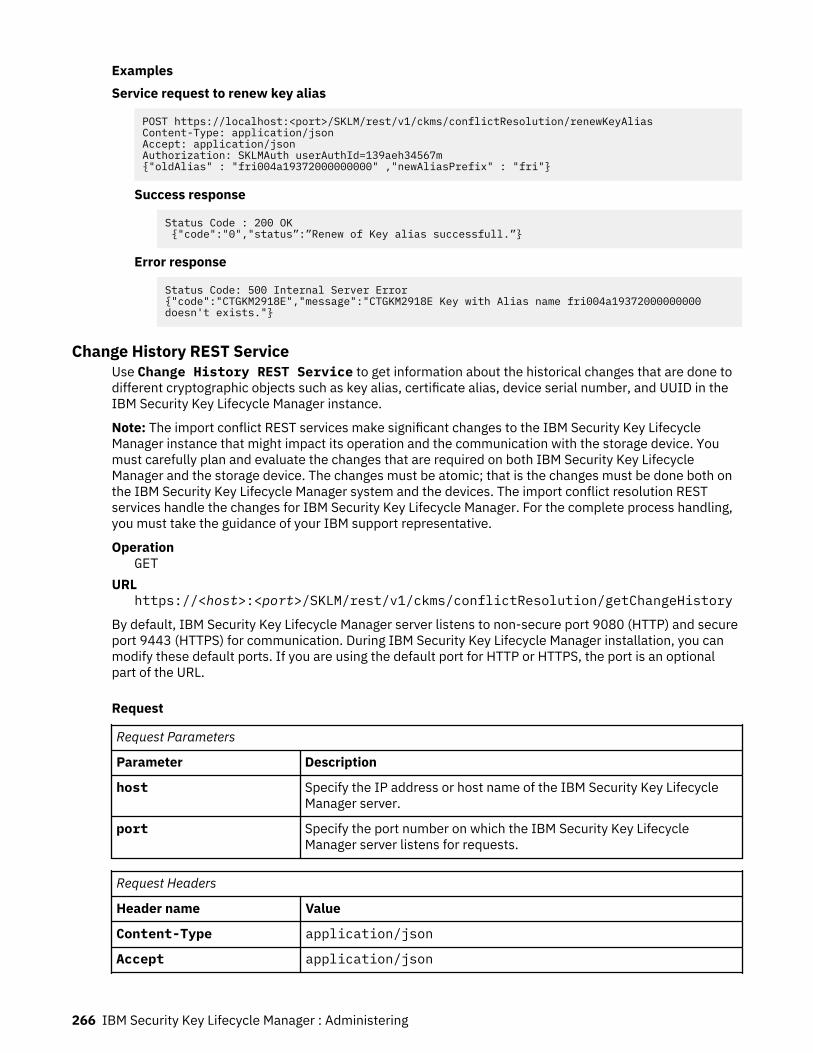
ExamplesService request to renew key alias
POST https://localhost:<port>/SKLM/rest/v1/ckms/conflictResolution/renewKeyAliasContent-Type: application/jsonAccept: application/jsonAuthorization: SKLMAuth userAuthId=139aeh34567m{"oldAlias" : "fri004a19372000000000" ,"newAliasPrefix" : "fri"}
Success response
Status Code : 200 OK {"code":"0","status”:”Renew of Key alias successfull.”}
Error response
Status Code: 500 Internal Server Error{"code":"CTGKM2918E","message":"CTGKM2918E Key with Alias name fri004a19372000000000 doesn't exists."}
Change History REST ServiceUse Change History REST Service to get information about the historical changes that are done todifferent cryptographic objects such as key alias, certificate alias, device serial number, and UUID in theIBM Security Key Lifecycle Manager instance.
Note: The import conflict REST services make significant changes to the IBM Security Key LifecycleManager instance that might impact its operation and the communication with the storage device. Youmust carefully plan and evaluate the changes that are required on both IBM Security Key LifecycleManager and the storage device. The changes must be atomic; that is the changes must be done both onthe IBM Security Key Lifecycle Manager system and the devices. The import conflict resolution RESTservices handle the changes for IBM Security Key Lifecycle Manager. For the complete process handling,you must take the guidance of your IBM support representative.
OperationGET
URLhttps://<host>:<port>/SKLM/rest/v1/ckms/conflictResolution/getChangeHistory
By default, IBM Security Key Lifecycle Manager server listens to non-secure port 9080 (HTTP) and secureport 9443 (HTTPS) for communication. During IBM Security Key Lifecycle Manager installation, you canmodify these default ports. If you are using the default port for HTTP or HTTPS, the port is an optionalpart of the URL.
Request
Request Parameters
Parameter Description
host Specify the IP address or host name of the IBM Security Key LifecycleManager server.
port Specify the port number on which the IBM Security Key LifecycleManager server listens for requests.
Request Headers
Header name Value
Content-Type application/json
Accept application/json
266 IBM Security Key Lifecycle Manager : Administering
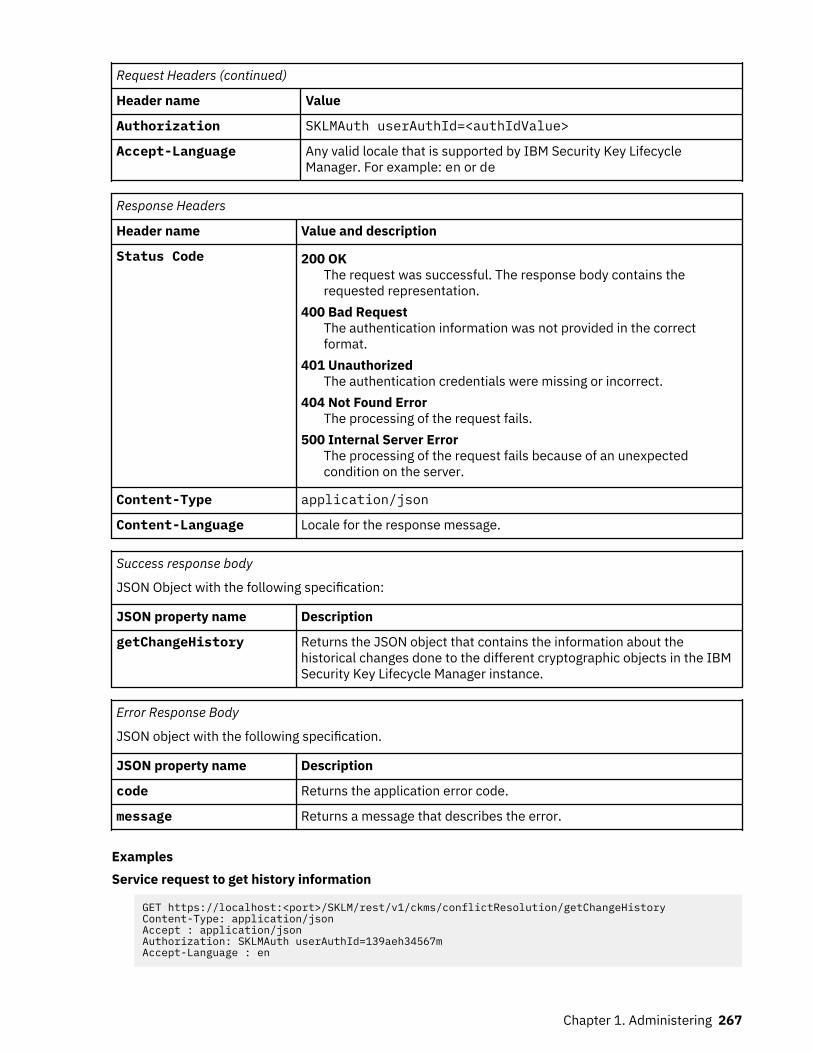
Request Headers (continued)
Header name Value
Authorization SKLMAuth userAuthId=<authIdValue>
Accept-Language Any valid locale that is supported by IBM Security Key LifecycleManager. For example: en or de
Response Headers
Header name Value and description
Status Code 200 OKThe request was successful. The response body contains therequested representation.
400 Bad RequestThe authentication information was not provided in the correctformat.
401 UnauthorizedThe authentication credentials were missing or incorrect.
404 Not Found ErrorThe processing of the request fails.
500 Internal Server ErrorThe processing of the request fails because of an unexpectedcondition on the server.
Content-Type application/json
Content-Language Locale for the response message.
Success response body
JSON Object with the following specification:
JSON property name Description
getChangeHistory Returns the JSON object that contains the information about thehistorical changes done to the different cryptographic objects in the IBMSecurity Key Lifecycle Manager instance.
Error Response Body
JSON object with the following specification.
JSON property name Description
code Returns the application error code.
message Returns a message that describes the error.
ExamplesService request to get history information
GET https://localhost:<port>/SKLM/rest/v1/ckms/conflictResolution/getChangeHistoryContent-Type: application/jsonAccept : application/jsonAuthorization: SKLMAuth userAuthId=139aeh34567mAccept-Language : en
Chapter 1. Administering 267

Success response
Status Code : 200 OKContent-Language: en [{"objectType":"CERTIFICATE","changeType":"ALIAS","oldValue":"cert1","newValue":"cert1_updated","changeTime":"10\/16\/16, 5:26:32 PM GMT-12:00"},…..{"objectType":"KEY","changeType":"ALIAS","oldValue":"abc0074a5aa0000000001","newValue":"fri0074a5aa0000000000","changeTime":"10\/17\/16, 12:48:06 AM GMT-12:00"},……{"objectType":"DEVICE","changeType":"SERIALNUMBER","oldValue":"DEV1LTO12345”,”newValue":"DEV1LTO1234U","changeTime":"10\/17\/16, 6:13:07 AM GMT-12:00"},…]
Error response
Status Code : 400 Bad Request{"code":"CTGKM6002E","message":"CTGKM6002E Bad Request: Invalid user authentication ID or invalid request format."}
Change Certificate Alias REST ServiceUse Change Certificate Alias REST Service to change the alias of a certificate present in theIBM Security Key Lifecycle Manager instance.
Note: The import conflict REST services make significant changes to the IBM Security Key LifecycleManager instance that might impact its operation and the communication with the storage device. Youmust carefully plan and evaluate the changes that are required on both IBM Security Key LifecycleManager and the storage device. The changes must be atomic; that is the changes must be done both onthe IBM Security Key Lifecycle Manager system and the devices. The import conflict resolution RESTservices handle the changes for IBM Security Key Lifecycle Manager. For the complete process handling,you must take the guidance of your IBM support representative.
OperationPOST
URLhttps://<host>:<port>/SKLM/rest/v1/ckms/conflictResolution/changeCertificateAlias
By default, IBM Security Key Lifecycle Manager server listens to non-secure port 9080 (HTTP) and secureport 9443 (HTTPS) for communication. During IBM Security Key Lifecycle Manager installation, you canmodify these default ports. If you are using the default port for HTTP or HTTPS, the port is an optionalpart of the URL.
Request
Request Parameters
Parameter Description
host Specify the IP address or host name of the IBM Security Key LifecycleManager server.
port Specify the port number on which the IBM Security Key LifecycleManager server listens for requests.
Request Headers
Header name Value
Content-Type application/json
Accept application/json
268 IBM Security Key Lifecycle Manager : Administering
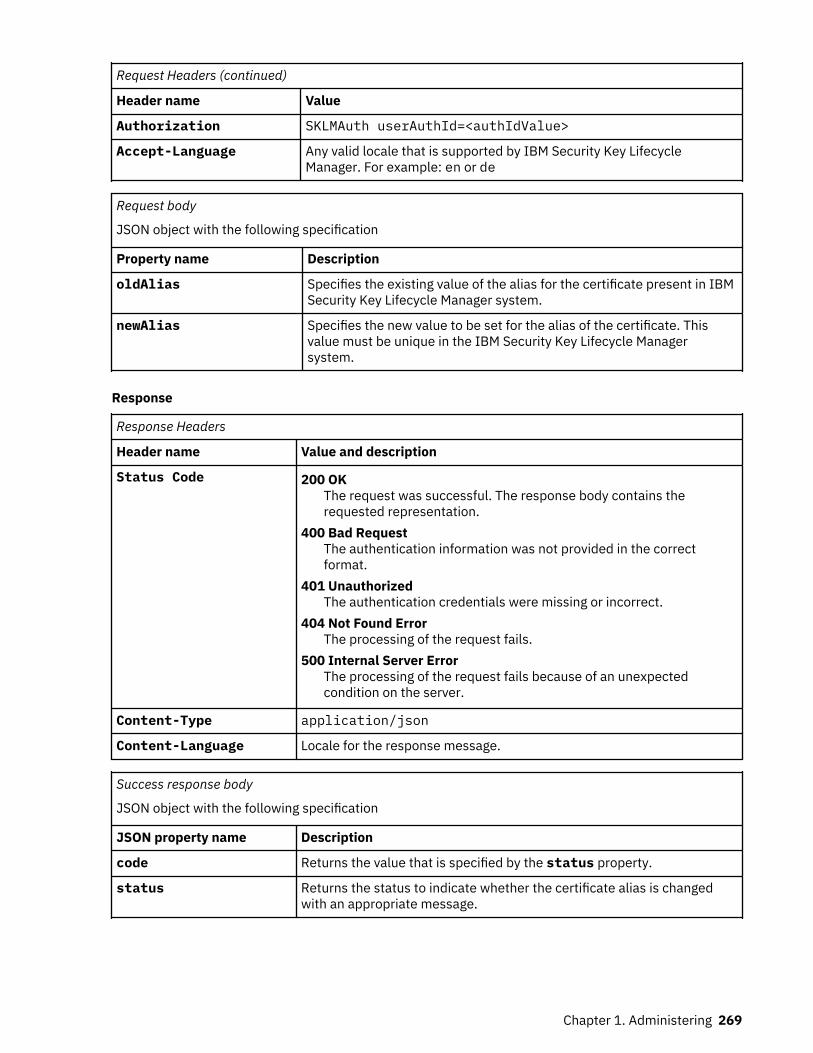
Request Headers (continued)
Header name Value
Authorization SKLMAuth userAuthId=<authIdValue>
Accept-Language Any valid locale that is supported by IBM Security Key LifecycleManager. For example: en or de
Request body
JSON object with the following specification
Property name Description
oldAlias Specifies the existing value of the alias for the certificate present in IBMSecurity Key Lifecycle Manager system.
newAlias Specifies the new value to be set for the alias of the certificate. Thisvalue must be unique in the IBM Security Key Lifecycle Managersystem.
Response
Response Headers
Header name Value and description
Status Code 200 OKThe request was successful. The response body contains therequested representation.
400 Bad RequestThe authentication information was not provided in the correctformat.
401 UnauthorizedThe authentication credentials were missing or incorrect.
404 Not Found ErrorThe processing of the request fails.
500 Internal Server ErrorThe processing of the request fails because of an unexpectedcondition on the server.
Content-Type application/json
Content-Language Locale for the response message.
Success response body
JSON object with the following specification
JSON property name Description
code Returns the value that is specified by the status property.
status Returns the status to indicate whether the certificate alias is changedwith an appropriate message.
Chapter 1. Administering 269
Error Response Body
JSON object with the following specification.
JSON property name Description
code Returns the application error code.
message Returns a message that describes the error.
ExamplesService request to change certificate alias
POST https://localhost:<port>/SKLM/rest/v1/ckms/conflictResolution/changeCertificateAliasContent-Type: application/jsonAccept: application/jsonAuthorization: SKLMAuth userAuthId=139aeh34567m{"oldAlias" : "3592cert2" ,"newAlias" : "3592cert3"}
Success response
Status Code : 200 OK {"code":"0","status”:”Certificate alias successfully changed”}
Error response
Status Code: 500 Internal Server Error{“code":"CTGKM2919E","message":"CTGKM2919E Certificate with Alias name 3592cert3 already exists."}
Upload File to Server REST ServiceUse Upload File to Server REST Service to upload a specific file such as a client certificate,backup file, or archive file, to the IBM Security Key Lifecycle Manager server. Only files with the followingfile extensions can be uploaded: cer, der, p12, exp, csr, jar.
OperationPOST
URLhttps://host:port/SKLM/rest/v1/filetransfer/upload/objectfiles
By default, IBM Security Key Lifecycle Manager server listens to non-secure port 9080 (HTTP) and secureport 9443 (HTTPS) for communication. During IBM Security Key Lifecycle Manager installation, you canmodify these default ports. If you are using the default port for HTTP or HTTPS, the port is an optionalpart of the URL.
Request
Request Parameters
Parameter Description
host Specify the IP address or host name of the IBM Security Key LifecycleManager server.
port Specify the port number on which the IBM Security Key LifecycleManager server listens for requests.
270 IBM Security Key Lifecycle Manager : Administering

Form parameters
Property name Description
fileToUpload Required. Specify the name of the file that you want to upload to the IBMSecurity Key Lifecycle Manager server. If a file of the same name alreadyexists in the destination directory, then the file will not be uploaded.
destination Optional. Specify the complete or absolute path of the directory on theIBM Security Key Lifecycle Manager server to which you want to uploadthe file. By default, the file is uploaded to the SKLM_DATA directory.
Request Headers
Header name Value
Content-Type application/octet-stream
Accept application/json
Authorization SKLMAuth userAuthId=<authIdValue>
Accept-Language Any valid locale that is supported by IBM Security Key LifecycleManager. For example: en or de
Response
Response Headers
Header name Value and description
Status Code 200 OKThe request was successful. The response body contains therequested representation.
400 Bad RequestThe authentication information was not provided in the correctformat.
401 UnauthorizedThe authentication credentials were missing or incorrect.
404 Not Found ErrorThe processing of the request fails.
500 Internal Server ErrorThe processing of the request fails because of an unexpectedcondition on the server.
Content-Type application/json
Content-Language Locale for the response message.
Success Response Body
JSON object with the following specification.
JSON property name Description
code Returns the application success code.
messageId Returns the status message identifier.
status Returns a success message.
Chapter 1. Administering 271
Error Response Body
JSON object with the following specification.
JSON property name Description
code Returns the application error code.
messageId Returns the status message identifier.
status Returns a message that describes the error.
ExampleUpload a server certificate
POST https://localhost:port/SKLM/rest/v1/filetransfer/upload/objectfilesContent-Type: multipart/form-data; boundary=---------------------------293582696224464Authorization: SKLMAuth userAuthId=139aeh34567m-----------------------------293582696224464Content-Disposition: form-data; name="fileToUpload"; filename="server.cer"<File Content>-----------------------------293582696224464
Success response
{ "code": "0", "status": "CTGKM3465I File /opt/IBM/WebSphere/AppServer/products/sklm/data/server.cer uploaded successfully.", "messageId": "CTGKM3465I"
Error response
{ "code": "1", "messageId": "CTGKM3466E", "status": "CTGKM3466E File upload not allowed. File /opt/IBM/WebSphere/AppServer/products/sklm/data/server.cer already exists."}
Delete Certificate REST ServiceUse Delete Certificate REST Service to delete a certificate from the IBM Security Key LifecycleManager server. The certificate can be in any state, such as active.
You cannot delete a certificate that is:
• Associated with a device or a certificate that is marked as either default or partner.• Scheduled for a future rollover.• Active SSLSERVER or IKEV2SERVER certificate.
OperationDELETE
URLhttps://<host>:<port>/SKLM/rest/v1/certificates/{alias}
By default, IBM Security Key Lifecycle Manager server listens to non-secure port 9080 (HTTP) and secureport 9443 (HTTPS) for communication. During IBM Security Key Lifecycle Manager installation, you canmodify these default ports. If you are using the default port for HTTP or HTTPS, the port is an optionalpart of the URL.
Request
272 IBM Security Key Lifecycle Manager : Administering
Request Parameters
Parameter Description
host Specify the IP address or host name of the IBM Security Key LifecycleManager server.
port Specify the port number on which the IBM Security Key LifecycleManager server listens for requests.
Request Headers
Header name Value
Content-Type application/json
Accept application/json
Authorization SKLMAuth userAuthId=<authIdValue>
Accept-Language Any valid locale that is supported by IBM Security Key LifecycleManager. For example: en or de
Path parameter
Parameter Description
alias Specify a unique name of the certificate to be deleted.
Response
Response Headers
Header name Value and description
Status Code 200 OKThe request was successful. The response body contains therequested representation.
400 Bad RequestThe authentication information was not provided in the correctformat.
401 UnauthorizedThe authentication credentials were missing or incorrect.
404 Not Found ErrorThe processing of the request fails.
500 Internal Server ErrorThe processing of the request fails because of an unexpectedcondition on the server.
Content-Type application/json
Content-Language Locale for the response message.
Success response body
JSON object with the following specification:
JSON property name Description
status Returns the status to indicate the certificate deletion.
Chapter 1. Administering 273
Error Response Body
JSON object with the following specification.
JSON property name Description
code Returns the application error code.
message Returns a message that describes the error.
ExamplesService request to delete a certificate
DELETE https://localhost:<port>/SKLM/rest/v1/certificates/sklmCertificateContent-Type: application/jsonAccept : application/jsonAuthorization: SKLMAuth userAuthId=139aeh34567mAccept-Language : en
Success response
Status Code : 200 OKContent-Language: en{"code":"0","status":"Succeeded"}
Error response
Status Code : 400 Bad RequestContent-Language: en{"code":"CTGKM6002E","message":"CTGKM6002E Bad Request: Invalid user authentication ID or invalid request format."}
Status Code : 500 Bad RequestContent-Language: en{"code":"CTGKM0567E","message":"CTGKM0567E Cannot find the certificate: sklmcertificate "}
Overview of device group export and importWhen multiple IBM Security Key Lifecycle Manager instances are maintained across operating systems,you might need to move device group data from one instance to another according to your businessrequirements. You can use the device group export and import operations to export and import dataacross IBM Security Key Lifecycle Manager instances with the same version as of the source IBM SecurityKey Lifecycle Manager instance, on the same or different operating systems, while maintaining dataintegrity. The exported device group data is encrypted and protected through a password.
Device groups for all the default device types are created during installation of IBM Security Key LifecycleManager. When you add a device type by using the graphical user interface, command-line interface, orREST interface, the corresponding device group is created in the database. Name of the device group issame as the device type that you created.
Device group export
You can export device group by using the IBM Security Key Lifecycle Manager graphical user interface orREST interface. The export device group operation creates a compressed archive with the extension .expin a location that you specify. Except for the manifest and summary.json files, all the following files ofthe archive are encrypted by the password that was specified during device group export operation.
• Manifest file, which lists all the device group data files in the archive• summary.json, which contains summary information for the device group• Files specific to devices• Files specific to keys• Files specific to certificates
274 IBM Security Key Lifecycle Manager : Administering

Device group import
You can import device group data to an IBM Security Key Lifecycle Manager instance from an encryptedarchive that was exported from another IBM Security Key Lifecycle Manager instance. During devicegroup import operation, you must specify the password that was used for device group export operationto import and decrypt data. Use the IBM Security Key Lifecycle Manager graphical user interface or RESTinterface to import device group.
Note: You must restart the server after you run the device group import operation.
Device group import conflicts
At times, the device group data that is imported might conflict with an existing data in the database. Forexample, a key in the imported device group might be a duplicate key of a device group in the currentinstance of IBM Security Key Lifecycle Manager where the data is being imported. When conflicts occur,they must be resolved before the import process can continue.
The device group import operation includes the following tasks:
• Saving export file in the target IBM Security Key Lifecycle Manager server where the device group isbeing imported. You must have the same encryption password that was used for creating the export fileto extract and decrypt data
• Evaluating duplicates between the data that is imported and the data in the target server• Resolving the conflicts• Importing device group data to the target server
You can view the list of conflicting items, if any, during device group import operation. Then, you canexport the conflict information to a file in comma-separated values (CSV) format for further analysis.
Changes to configuration properties or database valuesChanges to most of the configuration properties in the SKLMConfig.properties file or in the IBMSecurity Key Lifecycle Manager database occur dynamically. However, some changes take effect onlyafter you restart the IBM Security Key Lifecycle Manager server.
Depending on the configuration property to be changed, you can use the graphical user interface,command-line interface, or the REST interface. Not all properties in the configuration files, such asSKLMConfig.properties, or in the IBM Security Key Lifecycle Manager database can be changed byusing all the interfaces.
Use the “Update Config Property REST Service” on page 288 or “tklmConfigUpdateEntry” on page 291CLI command to update a property value.
Best practice: Do not update a configuration file manually.
If you manually update a configuration file, restart the IBM Security Key Lifecycle Manager server for thechanges to take effect.
Table 14. Changes to configuration properties or database entries
Property
Installationsets defaultvalue
Changerequiresserver restart
Changepossible fromREST and CLIinterfaces only
Audit.event.outcome
Audit.eventQueue.max
Audit.event.types
Audit.handler.file.multithreads
Chapter 1. Administering 275
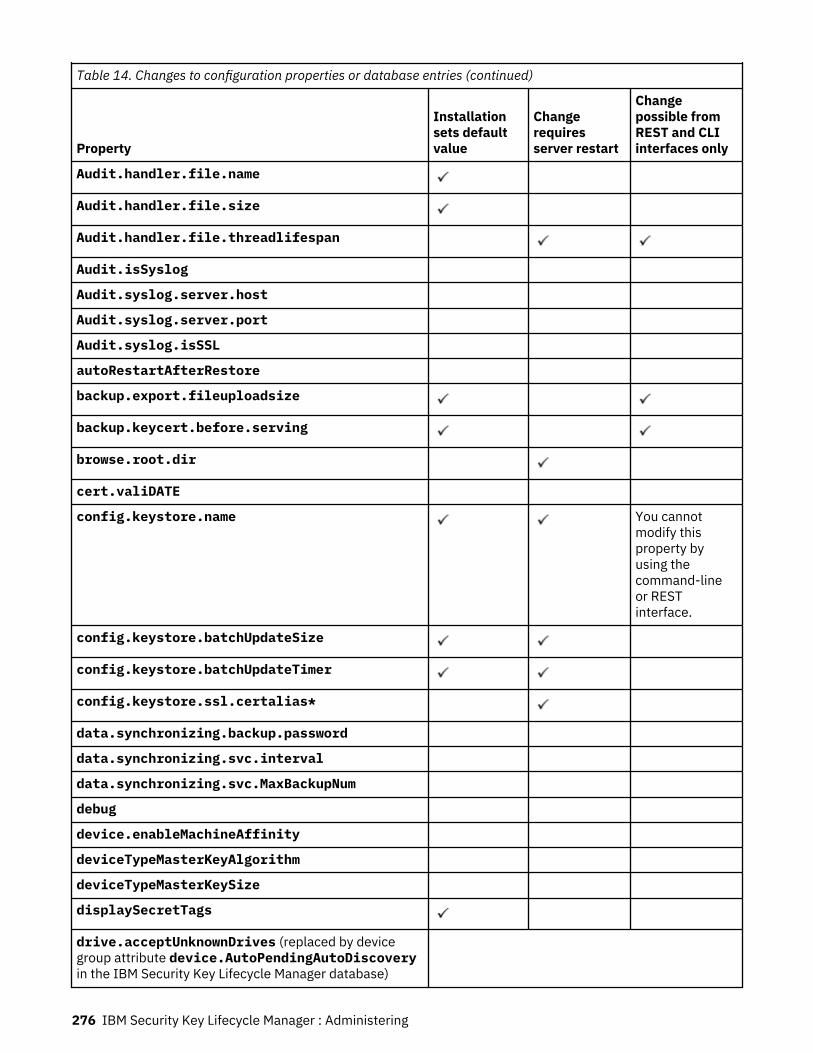
Table 14. Changes to configuration properties or database entries (continued)
Property
Installationsets defaultvalue
Changerequiresserver restart
Changepossible fromREST and CLIinterfaces only
Audit.handler.file.name
Audit.handler.file.size
Audit.handler.file.threadlifespan
Audit.isSyslog
Audit.syslog.server.host
Audit.syslog.server.port
Audit.syslog.isSSL
autoRestartAfterRestore
backup.export.fileuploadsize
backup.keycert.before.serving
browse.root.dir
cert.valiDATE
config.keystore.name You cannotmodify thisproperty byusing thecommand-lineor RESTinterface.
config.keystore.batchUpdateSize
config.keystore.batchUpdateTimer
config.keystore.ssl.certalias*
data.synchronizing.backup.password
data.synchronizing.svc.interval
data.synchronizing.svc.MaxBackupNum
debug
device.enableMachineAffinity
deviceTypeMasterKeyAlgorithm
deviceTypeMasterKeySize
displaySecretTags
drive.acceptUnknownDrives (replaced by devicegroup attribute device.AutoPendingAutoDiscoveryin the IBM Security Key Lifecycle Manager database)
276 IBM Security Key Lifecycle Manager : Administering

Table 14. Changes to configuration properties or database entries (continued)
Property
Installationsets defaultvalue
Changerequiresserver restart
Changepossible fromREST and CLIinterfaces only
drive.default.alias1 (replaced by a device groupattribute in the IBM Security Key Lifecycle Managerdatabase)
drive.default.alias2 (replaced by a device groupattribute in the IBM Security Key Lifecycle Managerdatabase)
ds8k.acceptUnknownDrives (replaced by devicegroup attribute device.AutoPendingAutoDiscovery in theIBM Security Key Lifecycle Manager database)
enableHighScaleBackup
enableClientCertPush
enablePBEInHSM
fips
isDeleteModifyRestricted
key.cert.fileuploadsize
kmip.request.processing.hostNameLookup
KMIPListener.ssl.port*
lock.timeout
maximum.keycert.expiration.period.in.years
maxPendingClientCerts
pcache.refresh.interval This propertyis optional intheconfigurationfile. By default,its value is notset and IBMSecurity KeyLifecycleManager usesthe defaulttime interval of15 minutes.
pkcs11.config
pkcs11.pin
pkcs11.pin.obfuscated
Chapter 1. Administering 277

Table 14. Changes to configuration properties or database entries (continued)
Property
Installationsets defaultvalue
Changerequiresserver restart
Changepossible fromREST and CLIinterfaces only
port.monitoring.svc.interval
requireSHA2Signatures
rest.user.inactive_time
stopRoundRobinKeyGrps
suiteB
symmetricKeySet (an attribute in the IBM Security KeyLifecycle Manager database)
tklm.backup.db2.dir You cannotmodify thisproperty byusing thecommand-lineor RESTinterface.
tklm.backup.dir Running abackup addsthis propertyto theconfigurationfile.
You cannotmodify thisproperty byusing thecommand-lineinterface orREST interface.
tklm.encryption.keysize
tklm.encryption.password This is an internally used property. Do not changeits value. You cannot modify this property by usingthe command-line or REST interface.
tklm.encryption.pbe.algorithm
tklm.lockout.attempts
tklm.lockout.enable
TransportListener.ssl.ciphersuites
TransportListener.ssl.clientauthentication
TransportListener.ssl.port*
TransportListener.ssl.protocols
TransportListener.ssl.timeout
TransportListener.tcp.port
278 IBM Security Key Lifecycle Manager : Administering

Table 14. Changes to configuration properties or database entries (continued)
Property
Installationsets defaultvalue
Changerequiresserver restart
Changepossible fromREST and CLIinterfaces only
TransportListener.tcp.timeout
Transport.ssl.vulnerableciphers.patterns
Transport.ssl.vulnerableciphers
useMasterKeyInHSM
useSKIDefaultLabels
* If you set this value for the first time, restart is not required. If you later modify the value, restart is required.
key.cert.fileuploadsizeThis property specifies the maximum size of a keystore file or client device certificate file that you canupload to the IBM Security Key Lifecycle Manager server.
key.cert.fileuploadsize= sizeInIntegerSpecifies the maximum size of a keystore file or client device certificate file that can be uploaded tothe IBM Security Key Lifecycle Manager server.Required
Optional. Required if you want to change the maximum file size.Value
Integer value in KB.Default
20KBExample
key.cert.fileuploadsize=20KB
Update Db2 Password on Standalone Server REST ServiceAfter the Db2 password is updated at the operating system level, use Update Db2 Password onStandalone Server REST Service to update the password on the standalone IBM Security KeyLifecycle Manager server so that Db2 continues to be connected to the IBM Security Key LifecycleManager server agent.
Before you begin
Before you use this REST service, ensure that you update the Db2 database password at the operatingsystem level. For more information about the instructions, see “Updating Db2 password on a Windowssystem” on page 34, “Updating Db2 password on a Linux or AIX system” on page 34.
OperationPUT
URLhttps://localhost:port/SKLM/rest/v1/ckms/changePassword/db2/standalone
By default, IBM Security Key Lifecycle Manager server listens to non-secure port 9080 (HTTP) and secureport 9443 (HTTPS) for communication. During IBM Security Key Lifecycle Manager installation, you canmodify these default ports. If you are using the default port for HTTP or HTTPS, the port is an optionalpart of the URL.
Chapter 1. Administering 279

Request
Request Parameters
Parameter Description
host Specify the IP address or host name of the IBM Security Key LifecycleManager server.
port Specify the port number on which the IBM Security Key LifecycleManager server listens for requests.
Request Headers
Header name Value
Content-Type application/json
Accept application/json
Authorization SKLMAuth userAuthId=<authIdValue>
Accept-Language Any valid locale that is supported by IBM Security Key LifecycleManager. For example: en or de
Request body
JSON object with the following specification:
Property name Description
newDb2Password Specify the new Db2 password.
Response
Response Headers
Header name Value and description
Status Code 200 OKThe request was successful. The response body contains therequested representation.
400 Bad RequestThe authentication information was not provided in the correctformat.
401 UnauthorizedThe authentication credentials were missing or incorrect.
404 Not Found ErrorThe processing of the request fails.
500 Internal Server ErrorThe processing of the request fails because of an unexpectedcondition on the server.
Content-Type application/json
Content-Language Locale for the response message.
280 IBM Security Key Lifecycle Manager : Administering
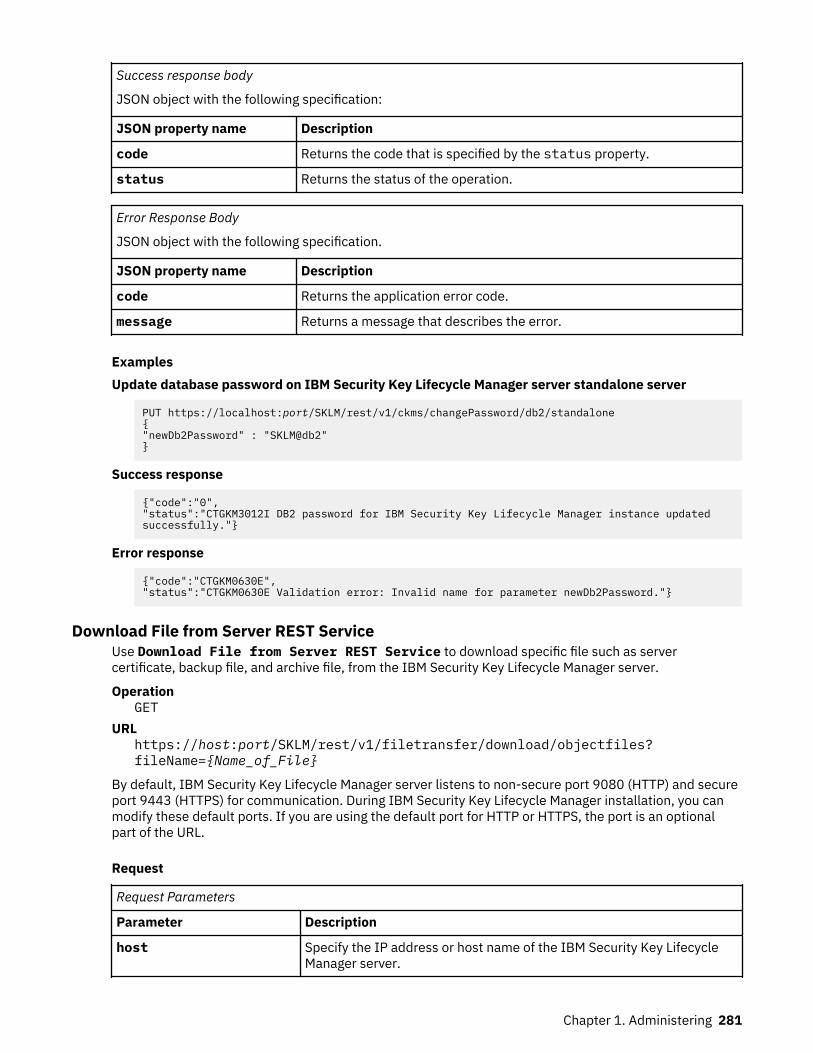
Success response body
JSON object with the following specification:
JSON property name Description
code Returns the code that is specified by the status property.
status Returns the status of the operation.
Error Response Body
JSON object with the following specification.
JSON property name Description
code Returns the application error code.
message Returns a message that describes the error.
ExamplesUpdate database password on IBM Security Key Lifecycle Manager server standalone server
PUT https://localhost:port/SKLM/rest/v1/ckms/changePassword/db2/standalone{"newDb2Password" : "SKLM@db2"}
Success response
{"code":"0","status":"CTGKM3012I DB2 password for IBM Security Key Lifecycle Manager instance updated successfully."}
Error response
{"code":"CTGKM0630E","status":"CTGKM0630E Validation error: Invalid name for parameter newDb2Password."}
Download File from Server REST ServiceUse Download File from Server REST Service to download specific file such as servercertificate, backup file, and archive file, from the IBM Security Key Lifecycle Manager server.
OperationGET
URLhttps://host:port/SKLM/rest/v1/filetransfer/download/objectfiles?fileName={Name_of_File}
By default, IBM Security Key Lifecycle Manager server listens to non-secure port 9080 (HTTP) and secureport 9443 (HTTPS) for communication. During IBM Security Key Lifecycle Manager installation, you canmodify these default ports. If you are using the default port for HTTP or HTTPS, the port is an optionalpart of the URL.
Request
Request Parameters
Parameter Description
host Specify the IP address or host name of the IBM Security Key LifecycleManager server.
Chapter 1. Administering 281
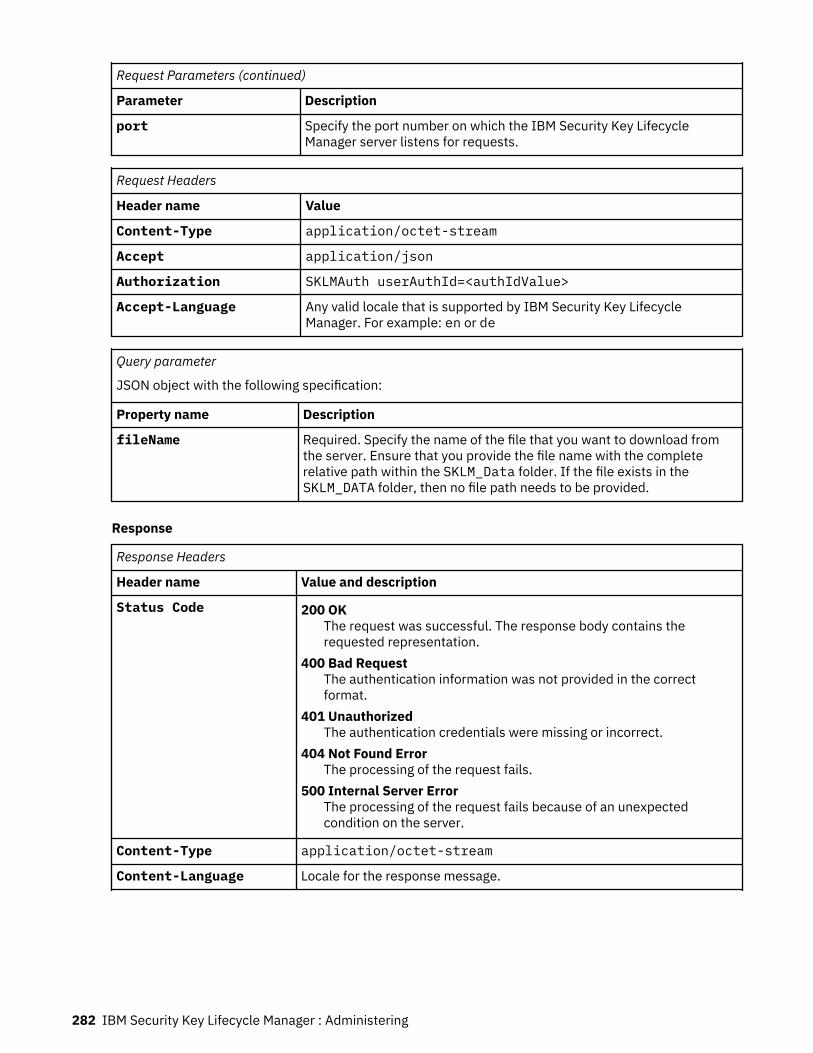
Request Parameters (continued)
Parameter Description
port Specify the port number on which the IBM Security Key LifecycleManager server listens for requests.
Request Headers
Header name Value
Content-Type application/octet-stream
Accept application/json
Authorization SKLMAuth userAuthId=<authIdValue>
Accept-Language Any valid locale that is supported by IBM Security Key LifecycleManager. For example: en or de
Query parameter
JSON object with the following specification:
Property name Description
fileName Required. Specify the name of the file that you want to download fromthe server. Ensure that you provide the file name with the completerelative path within the SKLM_Data folder. If the file exists in theSKLM_DATA folder, then no file path needs to be provided.
Response
Response Headers
Header name Value and description
Status Code 200 OKThe request was successful. The response body contains therequested representation.
400 Bad RequestThe authentication information was not provided in the correctformat.
401 UnauthorizedThe authentication credentials were missing or incorrect.
404 Not Found ErrorThe processing of the request fails.
500 Internal Server ErrorThe processing of the request fails because of an unexpectedcondition on the server.
Content-Type application/octet-stream
Content-Language Locale for the response message.
282 IBM Security Key Lifecycle Manager : Administering

Error Response Body
JSON object with the following specification.
JSON property name Description
code Returns the application error code.
messageId Returns the status message identifier.
status Returns a message that describes the error.
ExampleDownload a server certificate
GET https://localhost:port/SKLM/rest/v1/filetransfer/download/objectfiles?fileName=ssl.cer
Success response
Status: 200 OKFile content of the downloaded file
Error response
{ "code": "1", "messageId": "CTGKM3462E", "status": "CTGKM3462E File /opt/IBM/WebSphere/AppServer/products/sklm/data/ssl.cer path is invalid."}
port.monitoring.svc.intervalThis property specifies time interval to check the availability of ports that are needed by an IBM SecurityKey Lifecycle Manager instance for communication in a multi-master cluster.
port.monitoring.svc.interval=timeInSecondsWhen the agent service in an IBM Security Key Lifecycle Manager instance is started, the portmonitoring service automatically starts monitoring availability of the ports at a specified interval if theinstance is not of type Local.Required
Optional. Required if you want to change the port monitoring interval.Value
Integer value in seconds. Do not use zero (no timeout) as a value.Default
600Example
port.monitoring.svc.interval=600
tklmReplicationStartUse the tklmReplicationStart command to start the IBM Security Key Lifecycle Manager replicationtask.
Note: The IBM Security Key Lifecycle Manager command-line interface commands will be deprecated inthe later versions of IBM Security Key Lifecycle Manager. Use the REST interfaces instead.
PurposeUse this command to start the IBM Security Key Lifecycle Manager replication task.
Chapter 1. Administering 283
SyntaxtklmReplicationStart
Parameters
There are no parameters.
Example
This Jython-formatted command starts the IBM Security Key Lifecycle Manager replication task.
print AdminTask.tklmReplicationStart()
Multi-Master configuration REST servicesYou can use multi-master REST services to configure IBM Security Key Lifecycle Manager master serversfor multi-master replication.
For more information about IBM Security Key Lifecycle Manager multi-master configuration, see“Configuring a Multi-Master cluster” on page 85.
tklmReplicationConfigDeleteEntryUse the tklmReplicationConfigDeleteEntry command to delete a property in the IBM Security KeyLifecycle Manager replication configuration file.
Note: The IBM Security Key Lifecycle Manager command-line interface commands will be deprecated inthe later versions of IBM Security Key Lifecycle Manager. Use the REST interfaces instead.
PurposeUse this parameter to delete a property in the IBM Security Key Lifecycle Manager replicationconfiguration file.
Permissions
Your role must have the permission to the configure action.
SyntaxtklmReplicationConfigDeleteEntry -name propertyname
Parameters-name
Required. Specify property name in the IBM Security Key Lifecycle Manager replication configurationfile.
Example
The following command deletes the backup.ClientPort4 parameter from the replication configurationfile:
print AdminTask.tklmReplicationConfigDeleteEntry('[-name backup.ClientPort4]')
backup.export.fileuploadsizeThis property specifies the maximum size of a backup file or export file with device group data that youcan upload to the IBM Security Key Lifecycle Manager server.
backup.export.fileuploadsize= sizeInIntegerSpecifies the maximum size of a backup file or export file with device group data that can be uploadedto the IBM Security Key Lifecycle Manager server.
284 IBM Security Key Lifecycle Manager : Administering

RequiredOptional. Required if you want to change the maximum file size.
ValueInteger value in MB.
Default20MB
Examplebackup.export.fileuploadsize=30MB
data.synchronizing.svc.intervalThis property specifies the time interval to run the data synchronization service. Data synchronizationservice keeps data in the IBM Security Key Lifecycle Manager nodes current with data in the primaryserver of the multi-master cluster.
data.synchronizing.svc.interval=timeInSecondsSpecifies the time interval for synchronizing IBM Security Key Lifecycle Manager data betweenprimary server and the nodes.Required
Optional. Required if you want to change the data synchronization interval.Value
Integer value in seconds. Do not use zero (no timeout) as a value.Default
300Example
data.synchronizing.svc.interval=300
data.synchronizing.backup.passwordThis property is used to set password for the backup files that are generated by data synchronizationservice on the primary or standby master. These backup files are copied to the other master nodes in theIBM Security Key Lifecycle Manager multi-master cluster at a specified interval.
data.synchronizing.backup.password=passwordWhen a master server is disconnected from the multi-master cluster because of connectivity issues,you can set this master server in read-write mode. You can then restore the backup files on the read-write master server by using the password that you set. You can use graphical user interface,command line interface, or REST interface to restore data if you set the password in the configurationfile. If you do not set value for the configuration property, a system-generated password is used.Then, you cannot manually restore the backup files. For more information about data synchronizationservice, see “Data synchronization service” on page 107.
You must restart WebSphere Application Server and agent after you set the password.
RequiredOptional. Required if you want to use IBM Security Key Lifecycle Manager graphical user interface,command line interface, or REST interface to restore data on the read-only master.
ValueA password string that the user specifies before the backup task starts.
DefaultNone
Exampledata.synchronizing.backup.password=passW0rd
Chapter 1. Administering 285

data.synchronizing.svc.MaxBackupNumThis parameter specifies the maximum number of DB2 backup archive files to keep on master servers inthe IBM Security Key Lifecycle Manager multi-master cluster.
data.synchronizing.svc.MaxBackupNum=backupFileNumbersThe IBM Security Key Lifecycle Manager data synchronization service copies the DB2 backup filesfrom the primary master to the other master nodes in the cluster at a specified interval. For moreinformation about data synchronization service, see “Data synchronization service” on page 107.Required
Optional. Required if you want to change the default number of backup files to keep on the masterserver.
ValueMust be a positive integer between 2 and 100.
Default2
Exampledata.synchronizing.svc.MaxBackupNum=3
Create Client REST ServiceUse Create Client REST Service to create a client that is registered with IBM Security Key LifecycleManager server.
OperationPOST
URLhttps://host:port/SKLM/rest/v1/clients
By default, IBM Security Key Lifecycle Manager server listens to non-secure port 9080 (HTTP) and secureport 9443 (HTTPS) for communication. During IBM Security Key Lifecycle Manager installation, you canmodify these default ports. If you are using the default port for HTTP or HTTPS, the port is an optionalpart of the URL.
Request
Request Parameters
Parameter Description
host Specify the IP address or host name of the IBM Security Key LifecycleManager server.
port Specify the port number on which the IBM Security Key LifecycleManager server listens for requests.
Request Headers
Header name Value
Content-Type application/json
Accept application/json
Authorization SKLMAuth userAuthId=<authIdValue>
Accept-Language Any valid locale that is supported by IBM Security Key LifecycleManager. For example: en or de
286 IBM Security Key Lifecycle Manager : Administering

Request body
JSON object with the following specification:
Property name Description
clientName Required. Specify the name of the client that you want to create.
clientType Optional. Specify the way of client communication. Possible values:
• KMIP: This is the default value.• REST
Response
Response Headers
Header name Value and description
Status Code 201 CreatedThe request was successful. The response body contains therequested representation.
400 Bad RequestThe authentication information was not provided in the correctformat.
401 UnauthorizedThe authentication credentials were missing or incorrect.
404 Not Found ErrorThe processing of the request fails.
500 Internal Server ErrorThe processing of the request fails because of an unexpectedcondition on the server.
Content-Type application/json
Content-Language Locale for the response message.
Success response body
JSON object with the following specification:
JSON property name Description
messageId Returns the message identifier.
message Returns the message to indicate the operation is successful.
Error response body
JSON object with the following specification.
JSON property name Description
messageId Returns the message identifier.
error Returns a message that describes the error.
Chapter 1. Administering 287

ExampleCreate a client
POST https://localhost:port/SKLM/rest/v1/clients{ "clientName":"client_rest1", "clientType":"REST" }
Success response
{ "message": "CTGKM3411I Successfully created client CLIENT_REST1 .", "messageId": "CTGKM3411I"}
Error response
{ "error": "CTGKM3430E Failed to create client. Client with name CLIENT_REST1 already exists.", "messageId": "CTGKM3430E"}
Update Config Property REST ServiceUse Update Config Property REST Service to update one or more properties in one of thefollowing IBM Security Key Lifecycle Manager configuration files: SKLMConfig.properties (controlsthe IBM Security Key Lifecycle Manager server operations), MMConfig.properties (controls the Multi-Master cluster operations).
OperationPUT
URLhttps://host:port/SKLM/rest/v1/configProperties
By default, IBM Security Key Lifecycle Manager server listens to non-secure port 9080 (HTTP) and secureport 9443 (HTTPS) for communication. During IBM Security Key Lifecycle Manager installation, you canmodify these default ports. If you are using the default port for HTTP or HTTPS, the port is an optionalpart of the URL.
Request
Request Parameters
Parameter Description
host Specify the IP address or host name of the IBM Security Key LifecycleManager server.
port Specify the port number on which the IBM Security Key LifecycleManager server listens for requests.
Request Headers
Header name Value
Content-Type application/json
Accept application/json
Authorization SKLMAuth userAuthId=<authIdValue>
288 IBM Security Key Lifecycle Manager : Administering
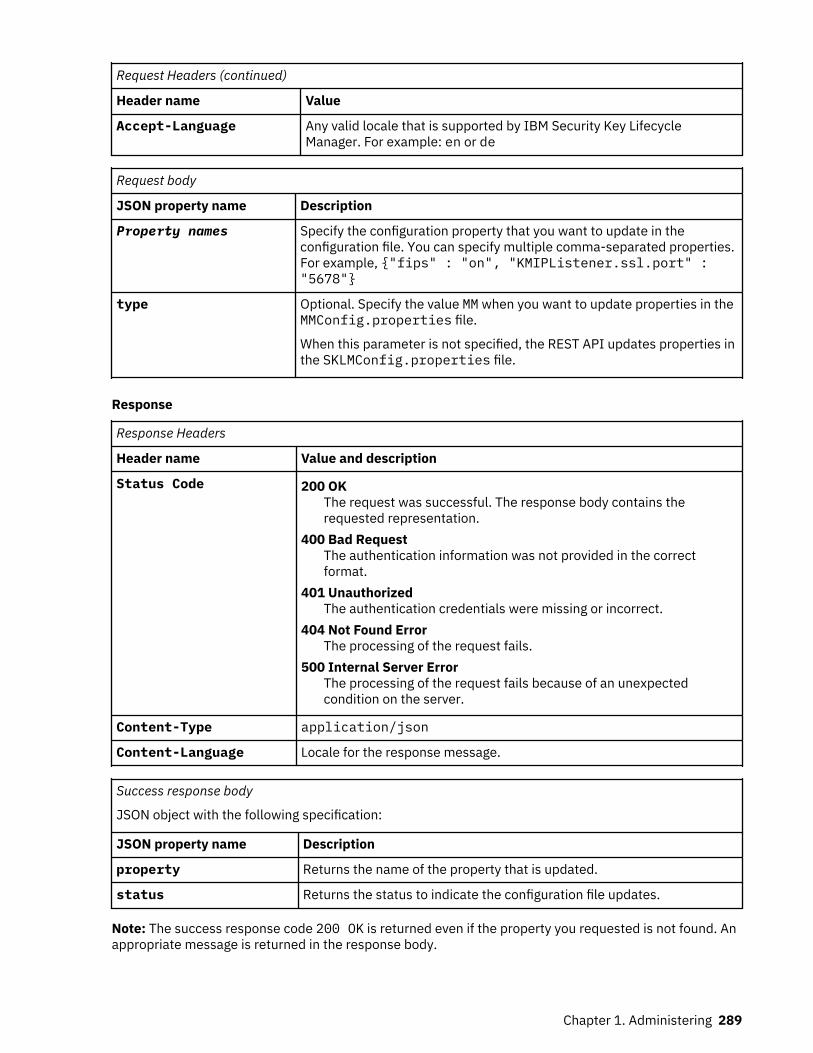
Request Headers (continued)
Header name Value
Accept-Language Any valid locale that is supported by IBM Security Key LifecycleManager. For example: en or de
Request body
JSON property name Description
Property names Specify the configuration property that you want to update in theconfiguration file. You can specify multiple comma-separated properties.For example, {"fips" : "on", "KMIPListener.ssl.port" :"5678"}
type Optional. Specify the value MM when you want to update properties in theMMConfig.properties file.
When this parameter is not specified, the REST API updates properties inthe SKLMConfig.properties file.
Response
Response Headers
Header name Value and description
Status Code 200 OKThe request was successful. The response body contains therequested representation.
400 Bad RequestThe authentication information was not provided in the correctformat.
401 UnauthorizedThe authentication credentials were missing or incorrect.
404 Not Found ErrorThe processing of the request fails.
500 Internal Server ErrorThe processing of the request fails because of an unexpectedcondition on the server.
Content-Type application/json
Content-Language Locale for the response message.
Success response body
JSON object with the following specification:
JSON property name Description
property Returns the name of the property that is updated.
status Returns the status to indicate the configuration file updates.
Note: The success response code 200 OK is returned even if the property you requested is not found. Anappropriate message is returned in the response body.
Chapter 1. Administering 289

Error Response Body
JSON object with the following specification.
JSON property name Description
code Returns the application error code.
message Returns a message that describes the error.
ExamplesService request to update a single server configuration property
PUT https://localhost:<port>/SKLM/rest/v1/configProperties{ "KMIPListener.ssl.port" : "10000"}
Success response
Status Code : 200 OK[{"property":"KMIPListener.ssl.port","status":"CTGKM0607I Update successful, server restart required for change to take effect"}]
Error response
Status Code : 400 Bad Request{"code" : "CTGKM6002E", "message" : "CTGKM6002E Bad Request: Invalid user authentication ID or invalid request format"}
Service request to update multiple server configuration properties
PUT https://localhost:<port>/SKLM/rest/v1/configProperties {"fips" : "on", "KMIPListener.ssl.port" : "5678"}
Success response
Status Code : 200 OK[{"property":"KMIPListener.ssl.port","status":"CTGKM0607I Update successful, server restart required for change to take effect"},{"property":"fips","status":"CTGKM0606I Update successful, change will take effect immediately"}]
Error response
Status Code : 400 Bad RequestContent-Language: en{"code" : "CTGKM6002E", "message" : "CTGKM6002E Bad Request: Invalid user authentication ID or invalid request format"}
Service request to update the Db2 password change in Multi-Master configuration(MMConfig.properties) file
PUT https://localhost:port/SKLM/rest/v1/configProperties{ "Db2PasswordChangeActivity" : "true", "type" : "MM"}
Success response
Status Code : 200 OK[{"property":"Db2PasswordChangeActivity","status":"CTGKM0607I Update successful, change will take effect immediately"}]
Error response
Status Code : 400 Bad Request{"code" : "CTGKM6002E", "message" : "CTGKM6002E Bad Request: Invalid user authentication ID or invalid request format"}
290 IBM Security Key Lifecycle Manager : Administering

tklmConfigUpdateEntryUse the tklmConfigUpdateEntry command to change an existing entry or to add an entry in theSKLMConfig.properties file.
Note: The IBM Security Key Lifecycle Manager command-line interface commands will be deprecated in alater version of IBM Security Key Lifecycle Manager. Use the REST interfaces instead.
PurposeChanges an existing entry or adds an entry in the SKLMConfig.properties file.
To change an attribute of a device group in the IBM Security Key Lifecycle Manager database, use the“tklmDeviceGroupAttributeUpdate” on page 299 CLI command.
Note: If you use the graphical user interface, or command-line interface, you can change the IBM SecurityKey Lifecycle Manager configuration file while the server is running. Depending on the change, you mightsee a message that indicates you to restart the IBM Security Key Lifecycle Manager server for the changeto take effect.
Permissions
Your role must have the permission to the configure action.
SyntaxtklmConfigUpdateEntry -name attributename -value attributevalue
Parameters-name
Required. Specify the name of the attribute.-value
Required. Specify the value of an attribute. Depending on the attribute, you can specify multiplevalues, by using commas to separate the values. For more information, see theSKLMConfig.properties file.
Examples
This Jython-formatted command example changes the types of events that are audited, specifying anAudit.event.types property to have two values (runtime and audit_management) in theSKLMConfig.properties file.
print AdminTask.tklmConfigUpdateEntry ('[-name Audit.event.types -value runtime,audit_management]')
This example specifies a different TCP port number.
print AdminTask.tklmConfigUpdateEntry ('[-name TransportListener.tcp.port -value 3802]')
tklmReplicationNowUse the tklmReplicationNow command to immediately run IBM Security Key Lifecycle Managerreplication and forces a backup to be sent to the configured clones.
Note: The IBM Security Key Lifecycle Manager command-line interface commands will be deprecated inthe later versions of IBM Security Key Lifecycle Manager. Use the REST interfaces instead.
PurposeUse this command to immediately run IBM Security Key Lifecycle Manager replication and to force abackup to be sent to the configured clones.
Chapter 1. Administering 291

SyntaxtklmReplicationNow -hostname hostname | -port portnum
Parameters
Note: If either host name or port parameter is coded, the other must be too.
-hostnameOptional. Specify the host to replicate to.
-portOptional. Specify the port to connect to the replication clone through.
Example
This Jython-formatted command replicates IBM Security Key Lifecycle Manager to all clones defined inthe ReplicationSKLMgrConfig.properties replication configuration file.
print AdminTask.tklmReplicationNow()
The following command replicates IBM Security Key Lifecycle Manager to a specific server.
print AdminTask.tklmReplicationNow('[-hostname myserver -port 1111]')
agent.invoker.polling.intervalThis property specifies the time interval to monitor status of the agent in an IBM Security Key LifecycleManager multi-master environment.
agent.invoker.polling.interval=timeInSecondsSpecifies the time interval for monitoring the agent status.Required
Optional. Required if you want to change the polling interval.Value
Integer value in seconds. Do not use zero (no timeout) as a value.Default
600Example
agent.invoker.polling.interval=600
Restart Server REST ServiceUse Restart Server REST Service to restart the IBM Security Key Lifecycle Manager server. Restartof the server causes the server to read its configuration and accept the configuration changes, if any.
OperationPOST
URLhttps://<host>:<port>/SKLM/rest/v1/ckms/servermanagement/restartServer
By default, IBM Security Key Lifecycle Manager server listens to non-secure port 9080 (HTTP) and secureport 9443 (HTTPS) for communication. During IBM Security Key Lifecycle Manager installation, you canmodify these default ports. If you are using the default port for HTTP or HTTPS, the port is an optionalpart of the URL.
Request
292 IBM Security Key Lifecycle Manager : Administering
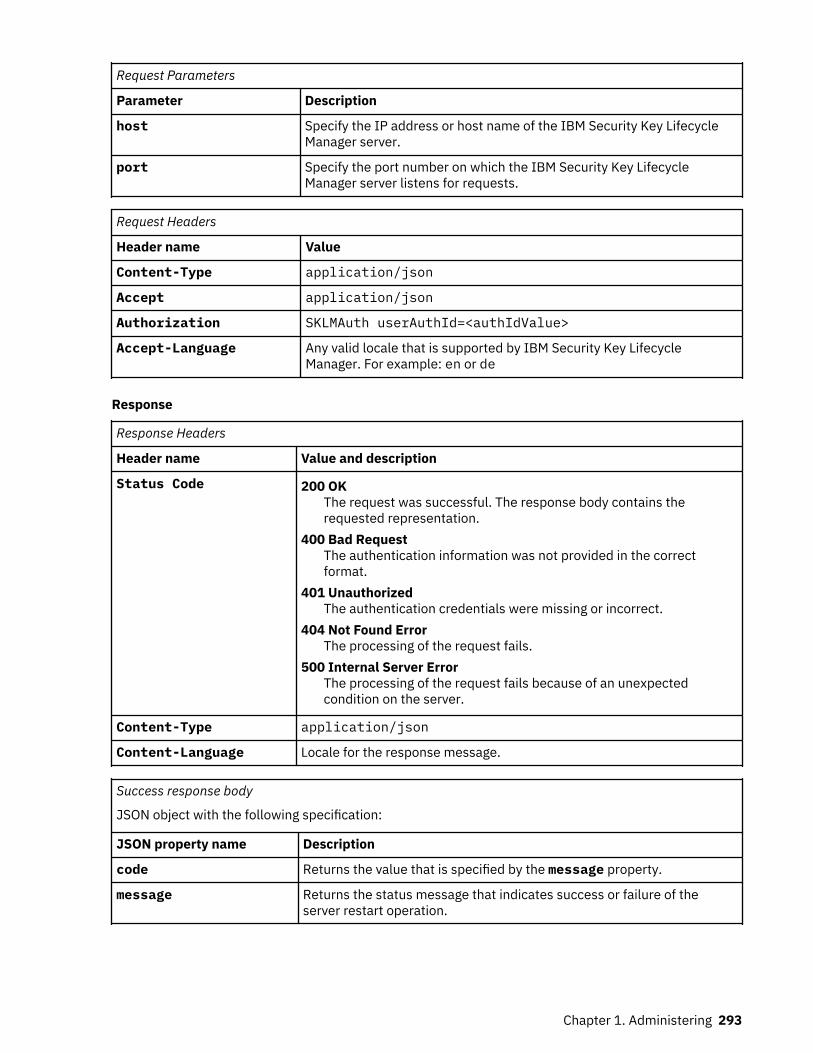
Request Parameters
Parameter Description
host Specify the IP address or host name of the IBM Security Key LifecycleManager server.
port Specify the port number on which the IBM Security Key LifecycleManager server listens for requests.
Request Headers
Header name Value
Content-Type application/json
Accept application/json
Authorization SKLMAuth userAuthId=<authIdValue>
Accept-Language Any valid locale that is supported by IBM Security Key LifecycleManager. For example: en or de
Response
Response Headers
Header name Value and description
Status Code 200 OKThe request was successful. The response body contains therequested representation.
400 Bad RequestThe authentication information was not provided in the correctformat.
401 UnauthorizedThe authentication credentials were missing or incorrect.
404 Not Found ErrorThe processing of the request fails.
500 Internal Server ErrorThe processing of the request fails because of an unexpectedcondition on the server.
Content-Type application/json
Content-Language Locale for the response message.
Success response body
JSON object with the following specification:
JSON property name Description
code Returns the value that is specified by the message property.
message Returns the status message that indicates success or failure of theserver restart operation.
Chapter 1. Administering 293
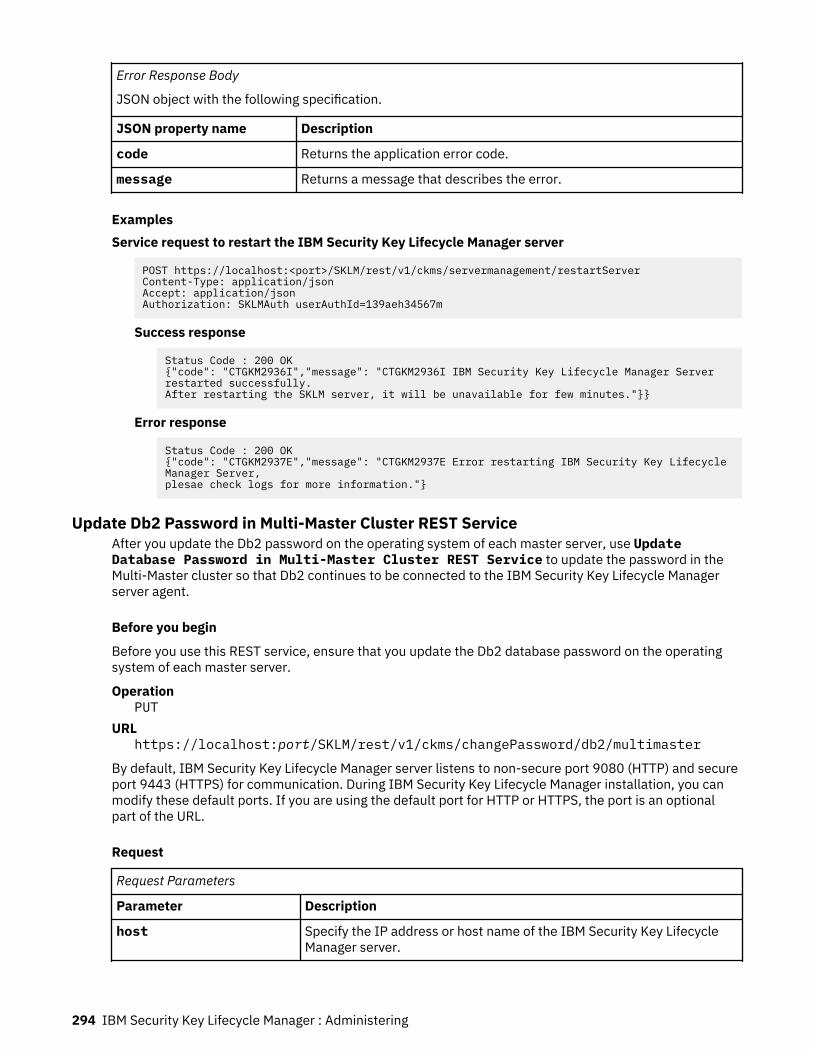
Error Response Body
JSON object with the following specification.
JSON property name Description
code Returns the application error code.
message Returns a message that describes the error.
ExamplesService request to restart the IBM Security Key Lifecycle Manager server
POST https://localhost:<port>/SKLM/rest/v1/ckms/servermanagement/restartServerContent-Type: application/jsonAccept: application/jsonAuthorization: SKLMAuth userAuthId=139aeh34567m
Success response
Status Code : 200 OK{"code": "CTGKM2936I","message": "CTGKM2936I IBM Security Key Lifecycle Manager Server restarted successfully. After restarting the SKLM server, it will be unavailable for few minutes."}}
Error response
Status Code : 200 OK{"code": "CTGKM2937E","message": "CTGKM2937E Error restarting IBM Security Key Lifecycle Manager Server, plesae check logs for more information."}
Update Db2 Password in Multi-Master Cluster REST ServiceAfter you update the Db2 password on the operating system of each master server, use UpdateDatabase Password in Multi-Master Cluster REST Service to update the password in theMulti-Master cluster so that Db2 continues to be connected to the IBM Security Key Lifecycle Managerserver agent.
Before you begin
Before you use this REST service, ensure that you update the Db2 database password on the operatingsystem of each master server.
OperationPUT
URLhttps://localhost:port/SKLM/rest/v1/ckms/changePassword/db2/multimaster
By default, IBM Security Key Lifecycle Manager server listens to non-secure port 9080 (HTTP) and secureport 9443 (HTTPS) for communication. During IBM Security Key Lifecycle Manager installation, you canmodify these default ports. If you are using the default port for HTTP or HTTPS, the port is an optionalpart of the URL.
Request
Request Parameters
Parameter Description
host Specify the IP address or host name of the IBM Security Key LifecycleManager server.
294 IBM Security Key Lifecycle Manager : Administering

Request Parameters (continued)
Parameter Description
port Specify the port number on which the IBM Security Key LifecycleManager server listens for requests.
Request Headers
Header name Value
Content-Type application/json
Accept application/json
Authorization SKLMAuth userAuthId=<authIdValue>
Accept-Language Any valid locale that is supported by IBM Security Key LifecycleManager. For example: en or de
Request body
JSON object with the following specification:
Property name Description
newDb2Password Specify the new Db2 password.
Response
Response Headers
Header name Value and description
Status Code 200 OKThe request was successful. The response body contains therequested representation.
400 Bad RequestThe authentication information was not provided in the correctformat.
401 UnauthorizedThe authentication credentials were missing or incorrect.
404 Not Found ErrorThe processing of the request fails.
500 Internal Server ErrorThe processing of the request fails because of an unexpectedcondition on the server.
Content-Type application/json
Content-Language Locale for the response message.
Success response body
JSON object with the following specification:
JSON property name Description
code Returns the code that is specified by the status property.
status Returns the status of the operation.
Chapter 1. Administering 295

Error Response Body
JSON object with the following specification.
JSON property name Description
code Returns the application error code.
message Returns a message that describes the error.
ExamplesUpdate database password on Multi-Master cluster
PUT https://localhost:port/SKLM/rest/v1/ckms/changePassword/db2/multimaster{"newDb2Password" : "SKLM@db2"}
Success response
{ "code": "CTGKM3448I", "status": "CTGKM3448I Db2 password changed successfully. Services on the IBM Security Key Lifecycle Manager servers will resume shortly."}
Error response
{"code":"CTGKM0630E","status":"CTGKM0630E Validation error: Invalid name for parameter newDb2Password."}
agent.monitoring.svc.intervalThis property specifies the time interval to run the agent monitoring service. The agent monitoring serviceperiodically checks whether the agent service in a IBM Security Key Lifecycle Manager instance of themulti-master cluster is up and running.
agent.monitoring.svc.interval=timeInSeconds
The agent service is used to monitor health status and configure IBM Security Key Lifecycle Managerinstances in a Multi-Master cluster.
RequiredOptional. Required if you want to change the agent monitoring interval.
ValueInteger value in seconds. Do not use zero (no timeout) as a value.
Default300
Exampleagent.monitoring.svc.interval=300
Exporting a server certificateYou must export the IBM Security Key Lifecycle Manager SSL/KMIP server certificate to a file in anencoded format for use by the client device. The client device imports this certificate for securecommunication with the server.
Procedure
1. Log on to the graphical user interface.2. On the Welcome page, click Configuration > SSL/KMIP > Launch Server Configuration Wizard.
296 IBM Security Key Lifecycle Manager : Administering

3. To create a self-signed certificate, click Create SSL/KMIP Server Certificate. See the “Creating a self-signed SSL/KMIP server certificate” on page 302 topic for more information.
4. Click Export SSL/KMIP Server Certificate.5. On the Export Certificate dialog, select the server certificate from the Certificate name list.6. Specify certificate name in the File name field.7. The File location field displays the default <SKLM_DATA> directory path, where the certificate is
exported, for example, C:\Program Files\IBM\WebSphere\AppServer\products\sklm\data. For the definition of <SKLM_DATA>, see “Definitions for HOME and other directory variables”on page 35. Click Browse to specify a location under <SKLM_DATA> directory.
8. Specify the certificate type, such as BASE64 or DER.9. Click Export Certificate.
What to do next
You might go the next step to import the client device communication certificate for securecommunication between IBM Security Key Lifecycle Manager server and the client device. Click the Go toNext Step link or select Import SSL/KMIP Server Certificate. See “Importing a client communicationcertificate” on page 251.
Archive Served Data List REST ServiceUse Archive Served Data List REST Service to move or archive the records in the databasetable that contains transaction details of the cryptographic objects that IBM Security Key LifecycleManager serves the clients. The records are deleted from the database table and moved to a file that isstored in the SKLM_DATA/data/ServedDataListArchives/ServedData_date_time_stamp.jarfile, where date_time_stamp is the date and time stamp when the REST service is run.
OperationPOST
URLhttps://host:port/SKLM/rest/v1/archive/servedData
By default, IBM Security Key Lifecycle Manager server listens to non-secure port 9080 (HTTP) and secureport 9443 (HTTPS) for communication. During IBM Security Key Lifecycle Manager installation, you canmodify these default ports. If you are using the default port for HTTP or HTTPS, the port is an optionalpart of the URL.
Request
Request Parameters
Parameter Description
host Specify the IP address or host name of the IBM Security Key LifecycleManager server.
port Specify the port number on which the IBM Security Key LifecycleManager server listens for requests.
Request Headers
Header name Value
Content-Type application/json
Accept application/json
Authorization SKLMAuth userAuthId=<authIdValue>
Chapter 1. Administering 297

Request Headers (continued)
Header name Value
Accept-Language Any valid locale that is supported by IBM Security Key LifecycleManager. For example: en or de
Response
Response Headers
Header name Value and description
Status Code 201 CreatedThe request was successful. The response body contains therequested representation.
400 Bad RequestThe authentication information was not provided in the correctformat.
401 UnauthorizedThe authentication credentials were missing or incorrect.
404 Not Found ErrorThe processing of the request fails.
500 Internal Server ErrorThe processing of the request fails because of an unexpectedcondition on the server.
Content-Type application/json
Content-Language Locale for the response message.
Success response body
JSON object with the following specification:
JSON property name Description
message Returns a message to indicate the success of the operation.
Error Response Body
JSON object with the following specification.
JSON property name Description
code Returns the application error code.
message Returns a message that describes the error.
ExampleArchive the database table that includes key serving transactional data
POST https://localhost:port/SKLM/rest/v1/archive/servedData
Success response
{"message":"CTGKM3437I Served data has been archived successfully."}
298 IBM Security Key Lifecycle Manager : Administering

Error response
{"code":"CTGKM6002E","message":"CTGKM6002E Bad Request: Invalid user authentication ID or invalid request format."}
tklmDeviceGroupAttributeUpdateUse the tklmDeviceGroupAttributeUpdate command to update the attributes of a device groupsuch as myLTO.
Note: The IBM Security Key Lifecycle Manager command-line interface commands will be deprecated inthe later versions of IBM Security Key Lifecycle Manager. Use the REST interfaces instead.
PurposeUse this command to update the attributes of a device group such as myLTO.
To change an existing entry or to add an entry in the SKLMConfig.properties file, use the“tklmConfigUpdateEntry” on page 291 command.
Permissions
Your role must have permissions to the modify action and to the appropriate device group.
Syntax
tklmDeviceGroupAttributeUpdate [-name {LTO | 3592 | DS5000 | DS8000 | GPFS | PEER_TO_PEER |BRCD_ENCRYPTOR | ONESECURE | GENERIC | userdevicegroup} -attributes {attributevaluepair}{attributevaluepair}]
Parameters-attributes
Specify one or more user-defined attribute-value pairs. Use the tklmDeviceGroupAttributeListcommand to view the current value.drive.default.alias1
Specifies the system default certificate that a 3592 device uses if the device is not associated withanother certificate.
drive.default.alias2Specifies the system partner certificate that a 3592 device uses if the device is not associatedwith another certificate.
enableKMIPDeleteEnables or disables KMIP delete requests. The klmAdminDeviceGroup permission permitsadministration (create, view, delete) of a device group. Disabling this attribute when you create adevice group prevents KMIP clients from deleting keys in the device group. The default isdisabled (false). Use the tklmDeviceGroupAttributeUpdate command to modify thisattribute.
symmetricKeySetSpecifies a key group to be used for a device group.
shortNameThis property specifies a short label that is usually a drive type such as LTO. This is used for anyadditional attributes that are required by an original equipment manufacturer.
longNameThis property specifies an extended descriptive name of a drive type, such as my division LTO.For example, this information might include business information.
AddNewCertsToPendingSpecifies whether to add a certificate to the list of pending certificates that you can accept orreject before key serving occurs, or to add a certificate automatically to the certificate table for
Chapter 1. Administering 299
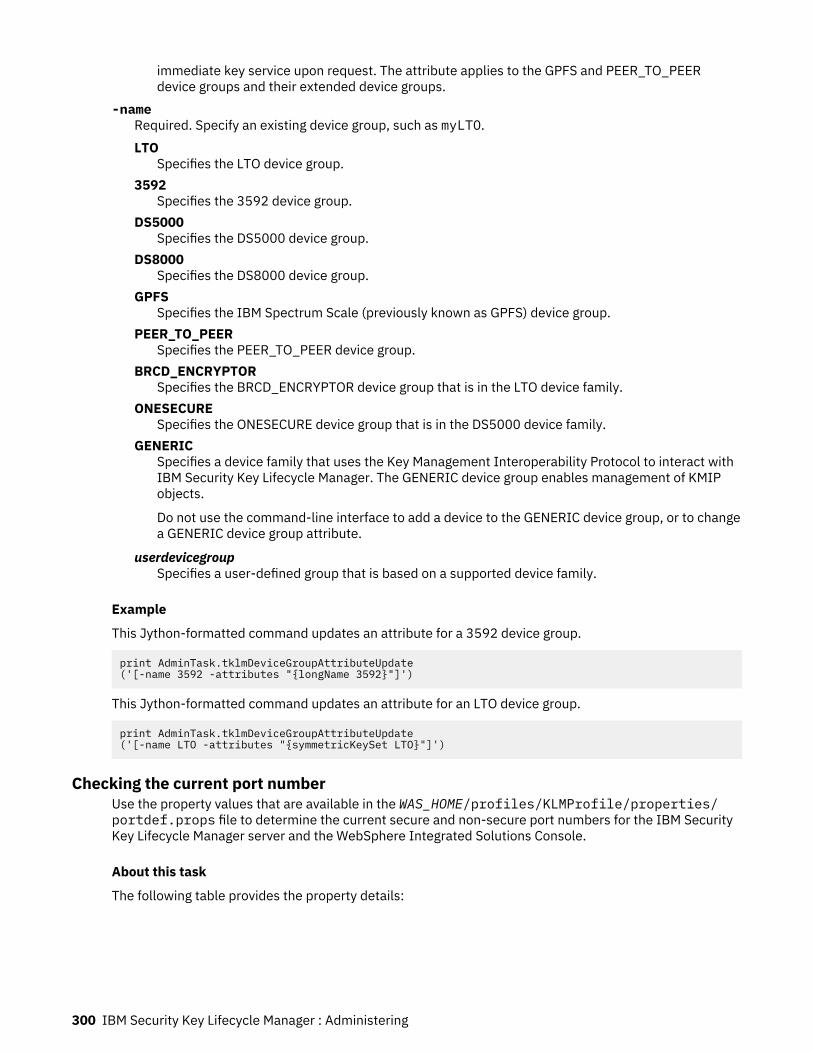
immediate key service upon request. The attribute applies to the GPFS and PEER_TO_PEERdevice groups and their extended device groups.
-nameRequired. Specify an existing device group, such as myLTO.LTO
Specifies the LTO device group.3592
Specifies the 3592 device group.DS5000
Specifies the DS5000 device group.DS8000
Specifies the DS8000 device group.GPFS
Specifies the IBM Spectrum Scale (previously known as GPFS) device group.PEER_TO_PEER
Specifies the PEER_TO_PEER device group.BRCD_ENCRYPTOR
Specifies the BRCD_ENCRYPTOR device group that is in the LTO device family.ONESECURE
Specifies the ONESECURE device group that is in the DS5000 device family.GENERIC
Specifies a device family that uses the Key Management Interoperability Protocol to interact withIBM Security Key Lifecycle Manager. The GENERIC device group enables management of KMIPobjects.
Do not use the command-line interface to add a device to the GENERIC device group, or to changea GENERIC device group attribute.
userdevicegroupSpecifies a user-defined group that is based on a supported device family.
Example
This Jython-formatted command updates an attribute for a 3592 device group.
print AdminTask.tklmDeviceGroupAttributeUpdate('[-name 3592 -attributes "{longName 3592}"]')
This Jython-formatted command updates an attribute for an LTO device group.
print AdminTask.tklmDeviceGroupAttributeUpdate ('[-name LTO -attributes "{symmetricKeySet LTO}"]')
Checking the current port numberUse the property values that are available in the WAS_HOME/profiles/KLMProfile/properties/portdef.props file to determine the current secure and non-secure port numbers for the IBM SecurityKey Lifecycle Manager server and the WebSphere Integrated Solutions Console.
About this task
The following table provides the property details:
300 IBM Security Key Lifecycle Manager : Administering

Table 15. Properties in WAS_HOME/profiles/KLMProfile/properties/portdef.props file forsecure and non-secure port numbers
Property Description Default value
WC_adminhost_secure WebSphere Integrated SolutionsConsole secure port
9083
WC_adminhost WebSphere Integrated SolutionsConsole non-secure port
9443
WC_defaulthost_secure IBM Security Key LifecycleManager server secure port
9061
WC_defaulthost IBM Security Key LifecycleManager server non-secure port
9080
Db2 configuration during installationThe IBM Security Key Lifecycle Manager installation process installs and configures Db2 AdvancedWorkgroup Server Edition.
Review the following scenarios and suggested actions before you configure Db2 during installation:
• If an existing copy of Db2 Advanced Workgroup Server Edition is installed as the root user at the correctversion for the operating system, you can use the existing Db2 Advanced Workgroup Server Edition. IBMSecurity Key Lifecycle Manager installer does not detect the presence of Db2. You must specify the Db2installation path.
You can also install a new copy of Db2 Advanced Workgroup Server Edition. An existing Db2 must belocally installed on the system and not on a network or shared drive.
On a Windows system, if a new copy of Db2 is installed, the DB2_COPY_NAME is set to DBSKLMV40.• If an earlier version of IBM Security Key Lifecycle Manager and an earlier version of Db2 exist on the
system, the installation process does not auto-detect the existing version, and installs Db2 AdvancedWorkgroup Server Edition at a version that depends on the operating system.
The process also migrates data from the previous version of IBM Security Key Lifecycle Manager to thenew version. For example:
– The new copy of Db2 Advanced Workgroup Server Edition uses the previous db2admin user ID andpassword.
– On a Windows system, if a new copy of Db2 is installed, the DB2_COPY_NAME is set to DBSKLMV40.• If no IBM Security Key Lifecycle Manager, no copy or earlier version of Db2 exist on the system, the
installation process installs Db2.
No Db2 upgrade occurs.
During Db2 configuration, you are prompted for the following information, which might differ from this list,depending on the operating system and on whether IBM Security Key Lifecycle Manager is installing Db2or by using an existing copy:Db2 Selection
The directory for the Db2 installation.
On Linux or AIX systems, the entry must start from the root directory. The first character in the entrymust be a forward slash ('/').
The installation process provides a default value. See “Definitions for HOME and other directoryvariables” on page 35.
Db2 Administrator IDThe local Db2 administrator user ID. The installation process provides a default Administrator user IDwith the necessary permissions. Do not use a domain user ID as the Db2 administrator. Do not specifya user ID greater than eight characters in length.
Chapter 1. Administering 301
Note: Do not use a hyphen (-) or underscore character (_) when you specify a user ID for an existingcopy of Db2.
On a Windows system, the Db2 Administrator user ID must be a member of the Administrator group.The user ID is subject to the security policy active on the Windows system.
On a Linux or AIX system, the user ID of the IBM Security Key Lifecycle Manager Db2 instance ownermust be a member of a group in which the root user ID is also a member. If it is available, use bin asthe group. If bin is not available, ask the system administrator for the name of a general-purposegroup to use.
Db2 Administrator PasswordThe password for the administrator.
The password for the Db2 Administrator user ID is subject to the security policy active on the system.In addition, the login password for the Db2 Administrator user ID and the Db2 password for the userID must be the same. When you change a password, ensure that the other one is changed too.
Note: If you are using an existing user as Db2 Administrator, ensure that the password is correctlyspecified during installation.
Database NameName of the IBM Security Key Lifecycle Manager database, SKLMDB40.
Db2 PortThe port that Db2 uses.
Administrator's GroupAccess group in which the Administrator user ID exists.
Administrator / Database HomeThe directory (AIX or Linux systems) or drive (Windows systems) in which the database instance andthe formatted tables that are used by IBM Security Key Lifecycle Manager are created.
Notes:
• Entries for all fields are restricted to alphabetical characters (A-Z and a-z), numeric characters (0-9),and , and the underscore character (_). Additionally, the password fields allow selected specialcharacters. For more information, see Supported special characters in passwords.
The restriction also applies to the values in the response file that is used for silent installation.• Do not specify spaces in any of the directory paths or file names.• The name of the computer on which you install Db2 cannot start with "ibm," "sql," or "sys," in lowercase
or uppercase. The name of the computer also cannot contain the underscore character (_).• If you are using an existing user as Db2 Administrator, ensure that the password is correctly specified
during installation.• The Db2 admin group name cannot be longer than 8 characters.
Creating a self-signed SSL/KMIP server certificateAs a first activity, you might create an SSL/KMIP server certificate for use with IBM Security Key LifecycleManager.
Procedure
1. Log on to the graphical user interface.2. Click the Review the configuration parameters and/or create an SSL server certificate link.
Immediately after you install IBM Security Key Lifecycle Manager, the Review the configurationparameters and/or create an SSL server certificate link is the only available option to configure IBMSecurity Key Lifecycle Manager for SSL/TLS handshake with the client devices. This link is not visible ifyou previously created an SSL server certificate.
3. Alternatively, on the Welcome page, click Configuration > SSL/KMIP > Launch Server ConfigurationWizard.
302 IBM Security Key Lifecycle Manager : Administering
4. Click Create SSL/KMIP Server Certificate.5. On the Add SSL/KMIP Certificate dialog, select Create self-signed certificate.6. Specify values for the parameters according to your requirements.7. Click Create Certificate.
What to do next
You might need to export the IBM Security Key Lifecycle Manager SSL/KMIP server certificate that youcreated to a file in an encoded format for use by the client device. Click the Export Certificate link or clickthe Export SSL/KMIP Server Certificate tab. You can also export an existing SSL/KMIP server certificateby selecting Use an existing certificate. See “Exporting a server certificate” on page 296.
Login REST ServiceUse Login REST Service to log in to the IBM Security Key Lifecycle Manager server with valid usercredentials. The REST service validates the credentials and returns a unique user authentication identifierfor all subsequent service requests.
OperationPOST
URLhttps://<host>:<port>/SKLM/rest/v1/ckms/login
By default, IBM Security Key Lifecycle Manager server listens to non-secure port 9080 (HTTP) and secureport 9443 (HTTPS) for communication. During IBM Security Key Lifecycle Manager installation, you canmodify these default ports. If you are using the default port for HTTP or HTTPS, the port is an optionalpart of the URL.
Request
Request Parameters
Parameter Description
host Specify the IP address or host name of the IBM Security Key LifecycleManager server.
port Specify the port number on which the IBM Security Key LifecycleManager server listens for requests.
Request headers
Header name Value
Content-Type application/json
Accept application/json
Request body
JSON Object with the following specification:
Parameter Description
userid Specify the user ID to access the IBM Security Key Lifecycle Managerserver.
password Specify the password that is associated with the user ID.
Chapter 1. Administering 303

Response
Response headers
Header name Value and description
Status Code 200 OKThe request was successful. The response body contains therequested representation.
400 Bad RequestThe authentication information was not provided in the correctformat.
401 UnauthorizedThe authentication credentials were missing or incorrect.
500 Internal Server ErrorThe processing of the request fails because of an unexpectedcondition on the server.
Content-Type application/json
Success response body
JSON object with the following specification:
JSON property name Description
userAuthId Returns a unique identifier for the authenticated user.
Error Response Body
JSON object with the following specification.
JSON property name Description
code Returns the application error code.
message Returns a message that describes the error.
ExamplesService request for user authentication
POST https://localhost:<port>/SKLM/rest/v1/ckms/loginContent-Type: application/jsonAccept : application/json{"userid" : "admin1", "password" : "pswd"}
Success response
Status Code : 200 OK{"userAuthId" : "37ea1939-1374-4db7-84cd-14e399be2d20"}
Error response
Status Code : 401 Unauthorised{"code" : "CTGKM6001E", "message" : "Authentication Failure : Incorrect user ID/password combination"}
304 IBM Security Key Lifecycle Manager : Administering

Served Data List REST ServiceUse Served Data List REST Service to query the database and list the served key data. Forexample, you might list which devices were served a specific key, or list the keys that were served to aspecific device.
Served Data List REST Service supports pagination. The request parameters, such as offsetand count, are used for pagination. For example, to retrieve the first 10 records for the list, set offset= 1 and count = 10. To retrieve the next 10 records, set offset = 2 and count = 10. If you do notspecify values for pagination parameters, the first 2000 records are returned.Operation
GETURL
Retrieve all the served key data:https://<host>:<port>/SKLM/rest/v1/servedData
Note: Returns 2000 records.
Retrieve all the served key data when you specify a few parameters:
https://<host>:<port>/SKLM/rest/v1/servedData?kmipClientCertUUID=<clientCertUUID>&dateBefore=<date>&dateAfter=<date>
Note: Returns 2000 records.
Retrieve all the served key data when you specify all the parameters:
https://<host>:<port>/SKLM/rest/v1/servedData?volser=<VolumeSerialNumber>&attributeName=<attrName>&attributeValue=<attrvalue>&dateBefore=<date>&dateAfter=<date>&usage=<devicetype>&serialNumber=<deviceSerialNumber>&kmipClientCertUUID=<clientCertUUID>
Note: Returns 2000 records.
To retrieve a specific list with pagination:
https://<host>:<port>/SKLM/rest/v1/servedData?volser=<VolumeSerialNumber>&attributeName=<attrName>&attributeValue=<attrvalue>&dateBefore=<date>&dateAfter=<date>&usage=<devicetype>&serialNumber=<deviceSerialNumber>&kmipClientCertUUID=<clientCertUUID>&offset=<offset>&count=<count>
By default, IBM Security Key Lifecycle Manager server listens to non-secure port 9080 (HTTP) and secureport 9443 (HTTPS) for communication. During IBM Security Key Lifecycle Manager installation, you canmodify these default ports. If you are using the default port for HTTP or HTTPS, the port is an optionalpart of the URL.
Request
Request Parameters
Parameter Description
host Specify the IP address or host name of the IBM Security Key LifecycleManager server.
port Specify the port number on which the IBM Security Key LifecycleManager server listens for requests.
Chapter 1. Administering 305

Request Headers
Header name Value
Content-Type application/json
Accept application/json
Authorization SKLMAuth userAuthId=<authIdValue>
Accept-Language Any valid locale that is supported by IBM Security Key LifecycleManager. For example: en or de
306 IBM Security Key Lifecycle Manager : Administering
Query parameters
Parameter name Description
attributeName Optional.alias1
Specify a default alias for a certificate that is used by a 3592 tapedrive or a DS8000 Turbo drive. Not used for an LTO tape drive orDS5000 storage server.3592 tape drive
The value is optional for a 3592 tape drive and specifies theprimary certificate that the device in the 3592 device familyuses. If this attribute is not specified, the partner defaultcertificate is used, as specified by a table entry for the devicegroup in the IBM Security Key Lifecycle Manager database.
DS8000 Turbo driveThe value is optional for a DS8000 Turbo drive and matches thelabel "Primary certificate for image" in the graphical userinterface panels for a DS8000 Turbo drive.
Use Device Group Attribute List REST Service andDevice Group Attribute Update REST Service to view andchange the value. This value was previously stored in the obsoleteconfiguration parameter drive.default.alias1.
alias2Used for a 3592 tape drive or a DS8000 Turbo drive. Not used for anLTO tape drive or DS5000 storage server.3592 tape drive
This attribute specifies a default alternative alias for a 3592 tapedrive. This value can be the same, or different from the value thatis specified for the primary certificate.
The value specifies the secondary certificate that the device in the3592 device family uses if the primary certificate is not available. Ifthis attribute is not specified, the partner default certificate is used,as specified by a table entry for the device group in the IBM SecurityKey Lifecycle Manager database.DS8000 Turbo drive
For a device in the DS8000 device family, the value specifies asecondary certificate that is available for use. For example, youmight use this certificate to unlock a DS8000 Turbo drive in thecase of a dead-lock condition.
Use Device Group Attribute List REST Service andDevice Group Attribute Update REST Service to view andchange the value. This value was previously stored in the obsoleteconfiguration parameter drive.default.alias2.
dkiData key identifier, used only for an LTO tape drive.
attributeValue Optional. Identifies the served data. For example, if attributeName isalias1, then attributeValue might be cert1.
Chapter 1. Administering 307
Query parameters (continued)
Parameter name Description
dateBefore Optional. If you specify only this date, list the audits that are madebefore this date. Hyphens are required in the date value.
To list audits that are made between the before and after dates, specifyboth values.
Format for the date is YYYY-MM-DD.
dateAfter Optional. If you specify only this date, list the audits that are made afterthis date. Hyphens are required in the date value.
To list audits that are made between the before and after dates, specifyboth values.
Format for the date is YYYY-MM-DD.
usage Optional. Specify one of the following values:LTO
Specifies the LTO device family.3592
Specifies the 3592 device group.DS5000
Specifies the DS5000 device group.DS8000
Specifies the DS8000 device group.GPFS
Specifies the IBM Spectrum Scale (previously known as GPFS)device group.
PEER_TO_PEERSpecifies the PEER_TO_PEER device group.
DS8000_TCTSpecifies the DS8000_TCT device group that is in the GPFS devicefamily.
BRCD_ENCRYPTORSpecifies the BRCD_ENCRYPTOR device group that is in the LTOdevice family.
ONESECURESpecifies the ONESECURE device group that is in the DS5000 devicefamily.
XIV®Specifies the IBM Spectrum Accelerate (previously known as XIV)device group.
userdevicegroupSpecifies a user-defined group that is based on a supported devicefamily.
volser Optional. Specify the volume and serial number of a tape cartridge.
kmipClientCertUUID Optional. Specify UUID of the KMIP client certificate.
serialNumber Optional. Specify the device serial number.
offset Optional. Specify the page number from which the records are displayedbased on the value that you specify for count.
308 IBM Security Key Lifecycle Manager : Administering

Query parameters (continued)
Parameter name Description
count Optional. Specify the number of records to display on the page that youspecified with offset. The count must not exceed 2000 records.
Response
Response Headers
Header name Value and description
Status Code 200 OKThe request was successful. The response body contains therequested representation.
400 Bad RequestThe authentication information was not provided in the correctformat.
401 UnauthorizedThe authentication credentials were missing or incorrect.
404 Not Found ErrorThe processing of the request fails.
500 Internal Server ErrorThe processing of the request fails because of an unexpectedcondition on the server.
Content-Type application/json
Content-Language Locale for the response message.
Success response body
JSON array that contains JSON objects with the following specification
JSON property name Description
Device uuid Returns the universal unique identifier of the device.
Serial Number Returns the serial number of the device as an ASCII string.
Volume Serial Number Returns the volume and serial number of the tape cartridge.
World wide name Returns the name of a device.
Key alias 1 Returns the default key alias.
Key alias 2 Returns the alias of the key served.
TimeStamp Returns the time stamp when the key was last served.
Data Key Identifier(dki)
Returns the data key identifier.
Attributes Returns one or more device attributes.
Device Group Name Returns the device type.
Kmip ClientCertificate UUID
Returns the universal unique identifier of KMIP client certificate.
Chapter 1. Administering 309
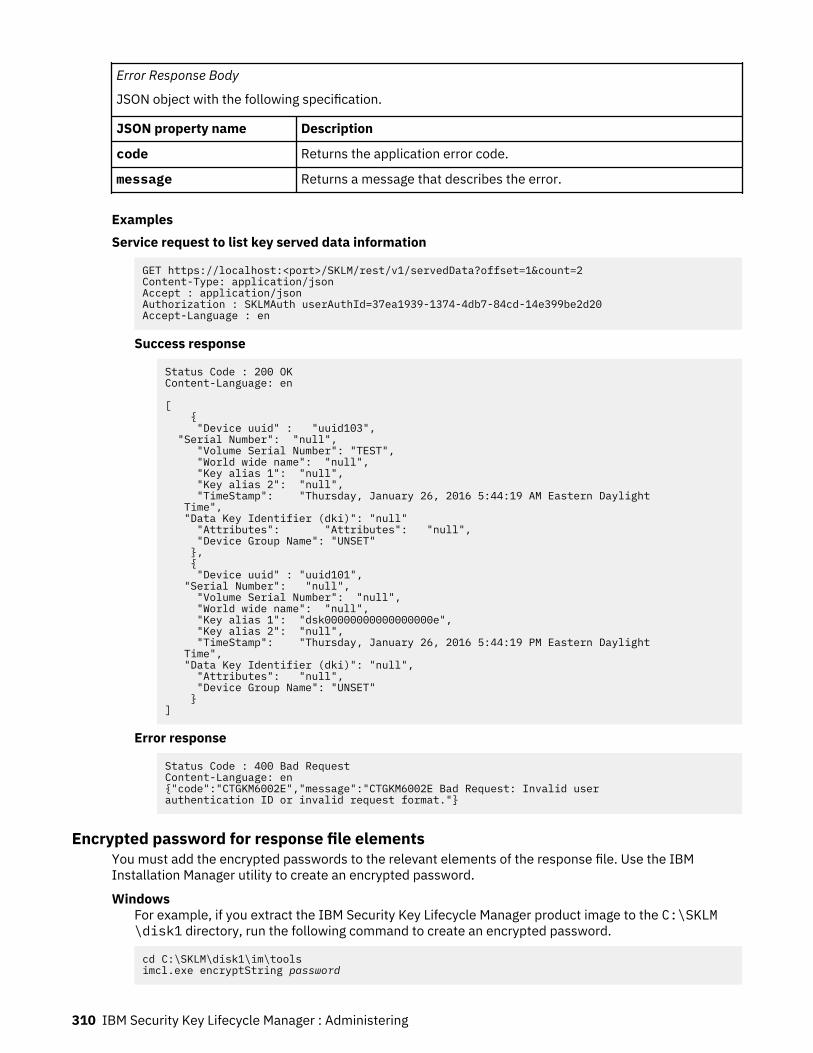
Error Response Body
JSON object with the following specification.
JSON property name Description
code Returns the application error code.
message Returns a message that describes the error.
ExamplesService request to list key served data information
GET https://localhost:<port>/SKLM/rest/v1/servedData?offset=1&count=2Content-Type: application/jsonAccept : application/jsonAuthorization : SKLMAuth userAuthId=37ea1939-1374-4db7-84cd-14e399be2d20Accept-Language : en
Success response
Status Code : 200 OKContent-Language: en
[ { "Device uuid" : "uuid103", "Serial Number": "null", "Volume Serial Number": "TEST", "World wide name": "null", "Key alias 1": "null", "Key alias 2": "null", "TimeStamp": "Thursday, January 26, 2016 5:44:19 AM Eastern Daylight Time", "Data Key Identifier (dki)": "null" "Attributes": "Attributes": "null", "Device Group Name": "UNSET" }, { "Device uuid" : "uuid101", "Serial Number": "null", "Volume Serial Number": "null", "World wide name": "null", "Key alias 1": "dsk00000000000000000e", "Key alias 2": "null", "TimeStamp": "Thursday, January 26, 2016 5:44:19 PM Eastern Daylight Time", "Data Key Identifier (dki)": "null", "Attributes": "null", "Device Group Name": "UNSET" }]
Error response
Status Code : 400 Bad RequestContent-Language: en{"code":"CTGKM6002E","message":"CTGKM6002E Bad Request: Invalid user authentication ID or invalid request format."}
Encrypted password for response file elementsYou must add the encrypted passwords to the relevant elements of the response file. Use the IBMInstallation Manager utility to create an encrypted password.
WindowsFor example, if you extract the IBM Security Key Lifecycle Manager product image to the C:\SKLM\disk1 directory, run the following command to create an encrypted password.
cd C:\SKLM\disk1\im\toolsimcl.exe encryptString password
310 IBM Security Key Lifecycle Manager : Administering
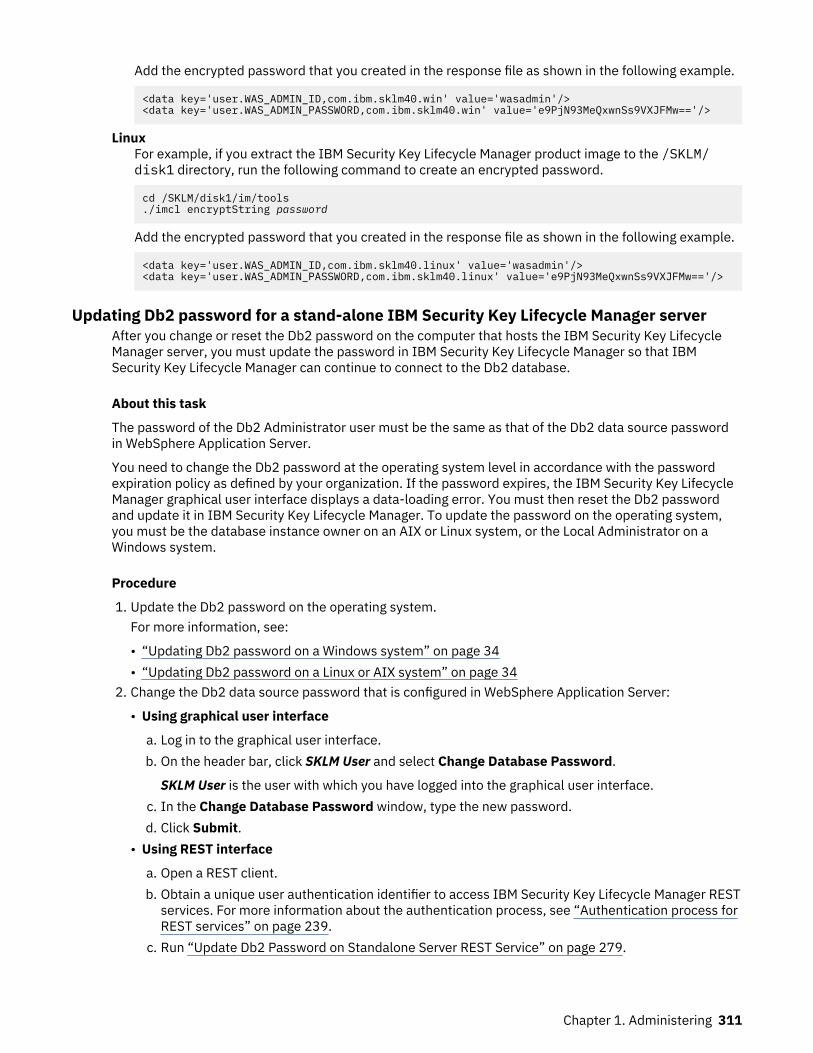
Add the encrypted password that you created in the response file as shown in the following example.
<data key='user.WAS_ADMIN_ID,com.ibm.sklm40.win' value='wasadmin'/><data key='user.WAS_ADMIN_PASSWORD,com.ibm.sklm40.win' value='e9PjN93MeQxwnSs9VXJFMw=='/>
LinuxFor example, if you extract the IBM Security Key Lifecycle Manager product image to the /SKLM/disk1 directory, run the following command to create an encrypted password.
cd /SKLM/disk1/im/tools./imcl encryptString password
Add the encrypted password that you created in the response file as shown in the following example.
<data key='user.WAS_ADMIN_ID,com.ibm.sklm40.linux' value='wasadmin'/><data key='user.WAS_ADMIN_PASSWORD,com.ibm.sklm40.linux' value='e9PjN93MeQxwnSs9VXJFMw=='/>
Updating Db2 password for a stand-alone IBM Security Key Lifecycle Manager serverAfter you change or reset the Db2 password on the computer that hosts the IBM Security Key LifecycleManager server, you must update the password in IBM Security Key Lifecycle Manager so that IBMSecurity Key Lifecycle Manager can continue to connect to the Db2 database.
About this task
The password of the Db2 Administrator user must be the same as that of the Db2 data source passwordin WebSphere Application Server.
You need to change the Db2 password at the operating system level in accordance with the passwordexpiration policy as defined by your organization. If the password expires, the IBM Security Key LifecycleManager graphical user interface displays a data-loading error. You must then reset the Db2 passwordand update it in IBM Security Key Lifecycle Manager. To update the password on the operating system,you must be the database instance owner on an AIX or Linux system, or the Local Administrator on aWindows system.
Procedure
1. Update the Db2 password on the operating system.For more information, see:
• “Updating Db2 password on a Windows system” on page 34• “Updating Db2 password on a Linux or AIX system” on page 34
2. Change the Db2 data source password that is configured in WebSphere Application Server:
• Using graphical user interface
a. Log in to the graphical user interface.b. On the header bar, click SKLM User and select Change Database Password.
SKLM User is the user with which you have logged into the graphical user interface.c. In the Change Database Password window, type the new password.d. Click Submit.
• Using REST interface
a. Open a REST client.b. Obtain a unique user authentication identifier to access IBM Security Key Lifecycle Manager REST
services. For more information about the authentication process, see “Authentication process forREST services” on page 239.
c. Run “Update Db2 Password on Standalone Server REST Service” on page 279.
Chapter 1. Administering 311

ResultsDb2 password is updated and IBM Security Key Lifecycle Manager server agent can connect to the Db2database.
Logout REST ServiceUse Logout REST Service to stop the user session and log out of the IBM Security Key LifecycleManager server. The server automatically logs out the user after 15 minutes of inactivity.
OperationDELETE
URLhttps://<host>:<port>/SKLM/rest/v1/ckms/logout
By default, IBM Security Key Lifecycle Manager server listens to non-secure port 9080 (HTTP) and secureport 9443 (HTTPS) for communication. During IBM Security Key Lifecycle Manager installation, you canmodify these default ports. If you are using the default port for HTTP or HTTPS, the port is an optionalpart of the URL.
Request
Request Parameters
Parameter Description
host Specify the IP address or host name of the IBM Security Key LifecycleManager server.
port Specify the port number on which the IBM Security Key LifecycleManager server listens for requests.
Request headers
Header name Value
Content-Type application/json
Accept application/json
Request body
JSON Object with the following specification:
JSON property name Description
userAuthId Specify the user authentication identifier that you must use to log outfrom the IBM Security Key Lifecycle Manager server.
Response
312 IBM Security Key Lifecycle Manager : Administering
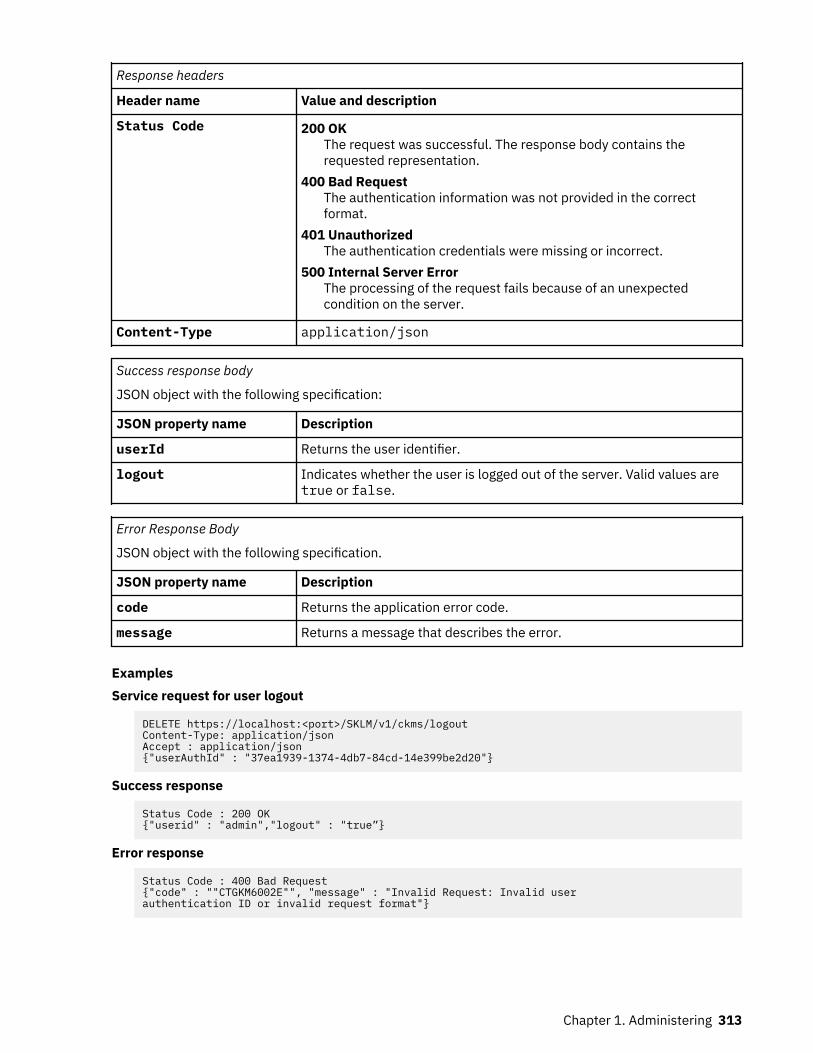
Response headers
Header name Value and description
Status Code 200 OKThe request was successful. The response body contains therequested representation.
400 Bad RequestThe authentication information was not provided in the correctformat.
401 UnauthorizedThe authentication credentials were missing or incorrect.
500 Internal Server ErrorThe processing of the request fails because of an unexpectedcondition on the server.
Content-Type application/json
Success response body
JSON object with the following specification:
JSON property name Description
userId Returns the user identifier.
logout Indicates whether the user is logged out of the server. Valid values aretrue or false.
Error Response Body
JSON object with the following specification.
JSON property name Description
code Returns the application error code.
message Returns a message that describes the error.
ExamplesService request for user logout
DELETE https://localhost:<port>/SKLM/v1/ckms/logoutContent-Type: application/jsonAccept : application/json{"userAuthId" : "37ea1939-1374-4db7-84cd-14e399be2d20"}
Success response
Status Code : 200 OK{"userid" : "admin","logout" : "true”}
Error response
Status Code : 400 Bad Request{"code" : ""CTGKM6002E"", "message" : "Invalid Request: Invalid user authentication ID or invalid request format"}
Chapter 1. Administering 313
Authentication process for REST servicesBefore you access IBM Security Key Lifecycle Manager REST services, authenticate to the IBM SecurityKey Lifecycle Manager server by using your user name and password.
You can use a REST client to access the IBM Security Key Lifecycle Manager REST services. To access aREST service, you must complete the following process:
1. Log in to the IBM Security Key Lifecycle Manager server with your login credentials. You can use “LoginREST Service” on page 303 to access the server. The “Login REST Service” on page 303 accepts username and password and returns a unique user authentication identifier.
2. Access the IBM Security Key Lifecycle Manager REST services that provide the required serverfunctions. To access an IBM Security Key Lifecycle Manager REST service, pass the userauthentication identifier that you obtained in Step 1 along with the request message.
3. Log out of the IBM Security Key Lifecycle Manager server by using “Logout REST Service” on page 312.To log out, you must pass the user authentication identifier that you obtained in Step 1.
Updating Db2 password for a stand-alone IBM Security Key Lifecycle Manager serverAfter you change or reset the Db2 password on the computer that hosts the IBM Security Key LifecycleManager server, you must update the password in IBM Security Key Lifecycle Manager so that IBMSecurity Key Lifecycle Manager can continue to connect to the Db2 database.
About this task
The password of the Db2 Administrator user must be the same as that of the Db2 data source passwordin WebSphere Application Server.
You need to change the Db2 password at the operating system level in accordance with the passwordexpiration policy as defined by your organization. If the password expires, the IBM Security Key LifecycleManager graphical user interface displays a data-loading error. You must then reset the Db2 passwordand update it in IBM Security Key Lifecycle Manager. To update the password on the operating system,you must be the database instance owner on an AIX or Linux system, or the Local Administrator on aWindows system.
Procedure
1. Update the Db2 password on the operating system.For more information, see:
• “Updating Db2 password on a Windows system” on page 34• “Updating Db2 password on a Linux or AIX system” on page 34
2. Change the Db2 data source password that is configured in WebSphere Application Server:
• Using graphical user interface
a. Log in to the graphical user interface.b. On the header bar, click SKLM User and select Change Database Password.
SKLM User is the user with which you have logged into the graphical user interface.c. In the Change Database Password window, type the new password.d. Click Submit.
• Using REST interface
a. Open a REST client.b. Obtain a unique user authentication identifier to access IBM Security Key Lifecycle Manager REST
services. For more information about the authentication process, see “Authentication process forREST services” on page 239.
c. Run “Update Db2 Password on Standalone Server REST Service” on page 279.
314 IBM Security Key Lifecycle Manager : Administering
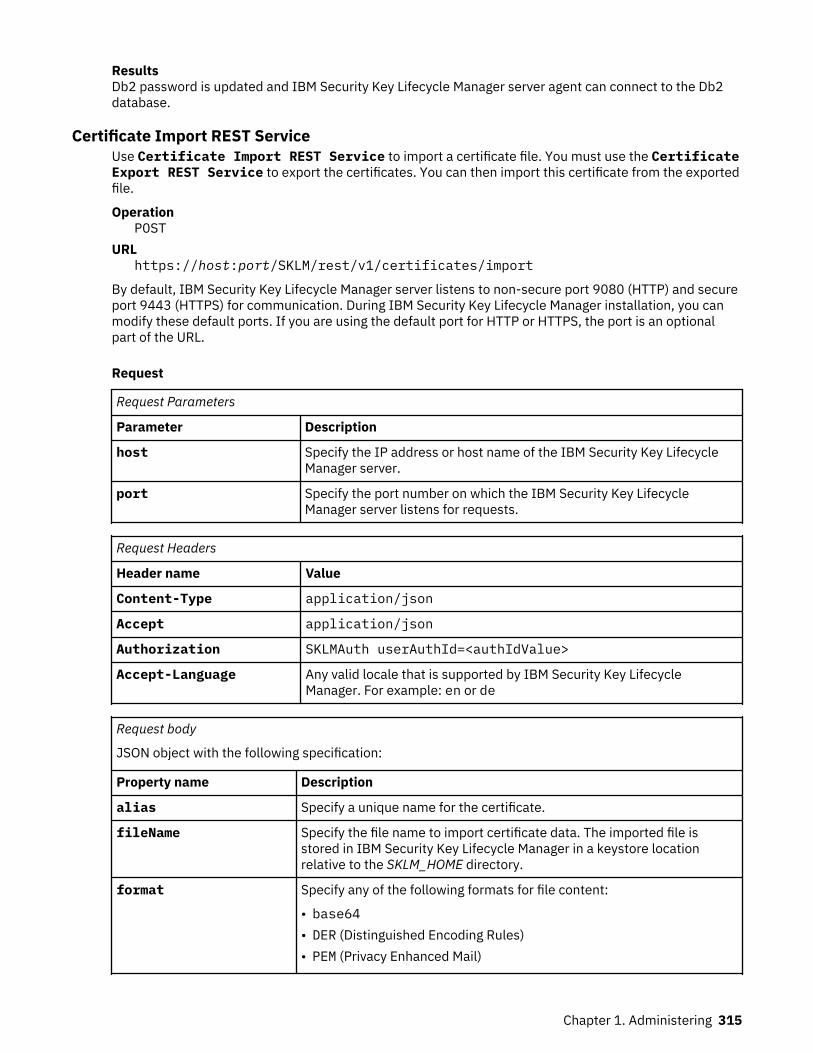
ResultsDb2 password is updated and IBM Security Key Lifecycle Manager server agent can connect to the Db2database.
Certificate Import REST ServiceUse Certificate Import REST Service to import a certificate file. You must use the CertificateExport REST Service to export the certificates. You can then import this certificate from the exportedfile.
OperationPOST
URLhttps://host:port/SKLM/rest/v1/certificates/import
By default, IBM Security Key Lifecycle Manager server listens to non-secure port 9080 (HTTP) and secureport 9443 (HTTPS) for communication. During IBM Security Key Lifecycle Manager installation, you canmodify these default ports. If you are using the default port for HTTP or HTTPS, the port is an optionalpart of the URL.
Request
Request Parameters
Parameter Description
host Specify the IP address or host name of the IBM Security Key LifecycleManager server.
port Specify the port number on which the IBM Security Key LifecycleManager server listens for requests.
Request Headers
Header name Value
Content-Type application/json
Accept application/json
Authorization SKLMAuth userAuthId=<authIdValue>
Accept-Language Any valid locale that is supported by IBM Security Key LifecycleManager. For example: en or de
Request body
JSON object with the following specification:
Property name Description
alias Specify a unique name for the certificate.
fileName Specify the file name to import certificate data. The imported file isstored in IBM Security Key Lifecycle Manager in a keystore locationrelative to the SKLM_HOME directory.
format Specify any of the following formats for file content:
• base64• DER (Distinguished Encoding Rules)• PEM (Privacy Enhanced Mail)
Chapter 1. Administering 315
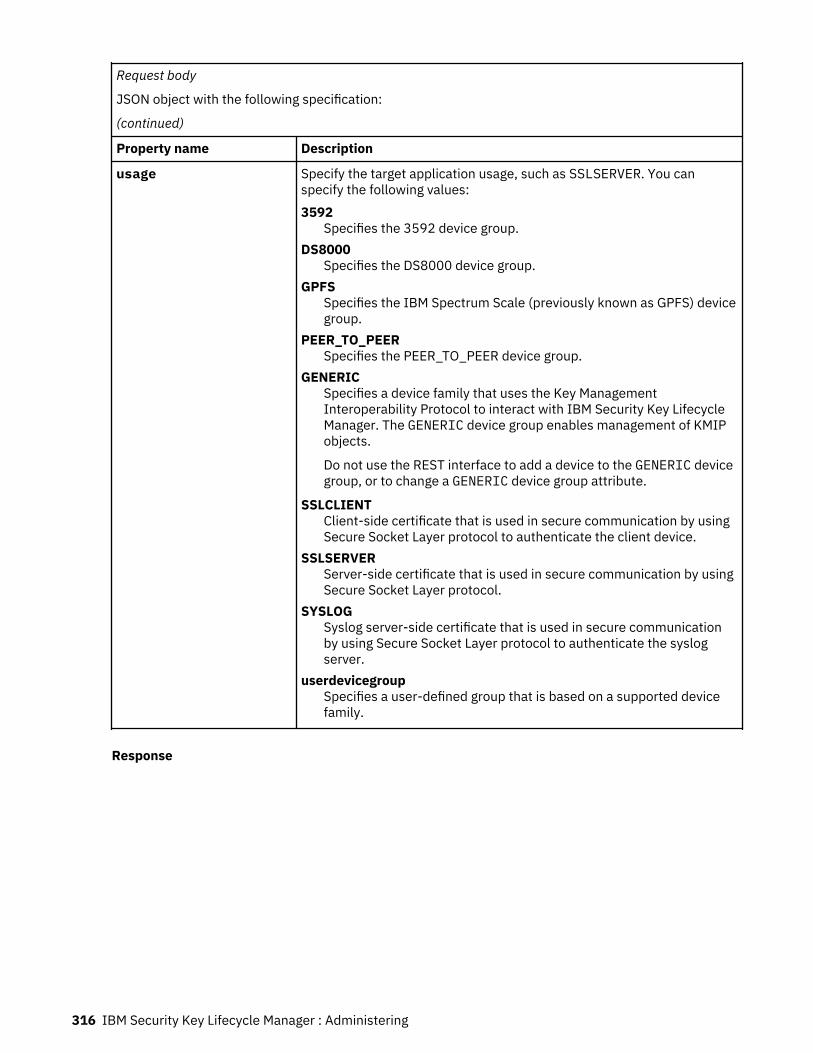
Request body
JSON object with the following specification:
(continued)
Property name Description
usage Specify the target application usage, such as SSLSERVER. You canspecify the following values:3592
Specifies the 3592 device group.DS8000
Specifies the DS8000 device group.GPFS
Specifies the IBM Spectrum Scale (previously known as GPFS) devicegroup.
PEER_TO_PEERSpecifies the PEER_TO_PEER device group.
GENERICSpecifies a device family that uses the Key ManagementInteroperability Protocol to interact with IBM Security Key LifecycleManager. The GENERIC device group enables management of KMIPobjects.
Do not use the REST interface to add a device to the GENERIC devicegroup, or to change a GENERIC device group attribute.
SSLCLIENTClient-side certificate that is used in secure communication by usingSecure Socket Layer protocol to authenticate the client device.
SSLSERVERServer-side certificate that is used in secure communication by usingSecure Socket Layer protocol.
SYSLOGSyslog server-side certificate that is used in secure communicationby using Secure Socket Layer protocol to authenticate the syslogserver.
userdevicegroupSpecifies a user-defined group that is based on a supported devicefamily.
Response
316 IBM Security Key Lifecycle Manager : Administering

Response Headers
Header name Value and description
Status Code 200 OKThe request was successful. The response body contains therequested representation.
400 Bad RequestThe authentication information was not provided in the correctformat.
401 UnauthorizedThe authentication credentials were missing or incorrect.
404 Not Found ErrorThe processing of the request fails.
500 Internal Server ErrorThe processing of the request fails because of an unexpectedcondition on the server.
Content-Type application/json
Content-Language Locale for the response message.
Success response body
JSON object with the following specification:
JSON property name Description
code Returns a 0 (zero) to indicate the completion of the certificate importtask
status Returns the status with an appropriate message to indicate whether thecertificate is imported.
Error Response Body
JSON object with the following specification.
JSON property name Description
code Returns the application error code.
message Returns a message that describes the error.
ExamplesService request to import a certificate
POST https://localhost:<port>/SKLM/rest/v1/certificates/importContent-Type: application/jsonAccept: application/jsonAuthorization: SKLMAuth userAuthId=139aeh34567m{"fileName":"/mycertfilenam.base64","alias":"newsklmCert","format":"base64","usage":"3592"}
Success response
Status Code: 200 OK{"code":"0","status":"Succeeded"}
Chapter 1. Administering 317

Error response for an invalid request
POST https://localhost:<port>/SKLM/rest/v1/certificates/importContent-Type: application/jsonAccept: application/jsonAuthorization: SKLMAuth userAuthId=139aeh34567m{"fileName":"/mycertfilenam.base64","alias":"newsklmCert","format":"ABC","usage":"3592"}
Error response
Status Code: 400 Bad Request{"code":"CTGKM0521E","message":"CTGKM0521E Unsupported certificate format: ABC"}
Certificate Update REST ServiceUse Certificate Update REST Service to update attributes or usage for a certificate. For example,you might update the state of the certificate to indicate that its use is compromised.
OperationPUT
URLhttps://<host>:<port>/SKLM/rest/v1/certificates
By default, IBM Security Key Lifecycle Manager server listens to non-secure port 9080 (HTTP) and secureport 9443 (HTTPS) for communication. During IBM Security Key Lifecycle Manager installation, you canmodify these default ports. If you are using the default port for HTTP or HTTPS, the port is an optionalpart of the URL.
Request
Request Parameters
Parameter Description
host Specify the IP address or host name of the IBM Security Key LifecycleManager server.
port Specify the port number on which the IBM Security Key LifecycleManager server listens for requests.
Request Headers
Header name Value
Content-Type application/json
Accept application/json
Authorization SKLMAuth userAuthId=<authIdValue>
Accept-Language Any valid locale that is supported by IBM Security Key LifecycleManager. For example: en or de
Request body
JSON object with the following specification:
Property name Description
uuid Specify the universal unique identifier of the certificate.
318 IBM Security Key Lifecycle Manager : Administering

Request body
JSON object with the following specification:
(continued)
Property name Description
attributes Optional. Specify one or more of the following attribute-value pairs:compromised
Specifies whether the use is compromised. The only value is y(compromised). You cannot change a compromised key orcertificate to an uncompromised state.
information informationstringSpecifies more information about the use of an object.
trusted [y|n]Specifies whether the use is trusted. Set this value to y to mark thekey or certificate as trusted. Or, set a value of n to mark the key orcertificate as not trusted. You cannot set compromised or expiredkeys or certificates to be trusted.
usage Optional. Specify the target application usage such as SSLSERVER. Youcan specify the following values:3592
Specifies the 3592 device group.DS8000
Specifies the DS8000 device group.GPFS
Specifies the IBM Spectrum Scale (previously known as GPFS)device group.
PEER_TO_PEERSpecifies the PEER_TO_PEER device group.
usage GENERICSpecifies a device family that uses the Key ManagementInteroperability Protocol to interact with IBM Security Key LifecycleManager. The GENERIC device group enables management of KMIPobjects.
Do not use the REST interface to add a device to the GENERICdevice group, or to change a GENERIC device group attribute.
SSLCLIENTClient-side certificate that is used in secure communication by usingSecure Socket Layer protocol to authenticate the client device.
SSLSERVERServer-side certificate that is used in secure communication byusing Secure Socket Layer protocol.
userdevicegroupSpecifies a user-defined group that is based on a supported devicefamily.
Response
Chapter 1. Administering 319

Response Headers
Header name Value and description
Status Code 200 OKThe request was successful. The response body contains therequested representation.
400 Bad RequestThe authentication information was not provided in the correctformat.
401 UnauthorizedThe authentication credentials were missing or incorrect.
404 Not Found ErrorThe processing of the request fails.
500 Internal Server ErrorThe processing of the request fails because of an unexpectedcondition on the server.
Content-Type application/json
Content-Language Locale for the response message.
Success response body
JSON object with the following specification:
JSON property name Description
code Returns the code that is specified by the status property.
status Returns the status message to indicate whether the certificate isupdated or not.0
The status indicates that the certificate update task succeeded.1
The status indicates that the certificates are not updated.
Error Response Body
JSON object with the following specification.
JSON property name Description
code Returns the application error code.
message Returns a message that describes the error.
ExamplesService request to update a certificate
PUT https://localhost:<port>/SKLM/rest/v1/certificatesContent-Type: application/jsonAccept: application/jsonAuthorization: SKLMAuth userAuthId=139aeh34567m{"uuid":"CERTIFICATE-78d68704-fdde-42df-95da-debef9de9309","attributes":"trusted y"}
320 IBM Security Key Lifecycle Manager : Administering
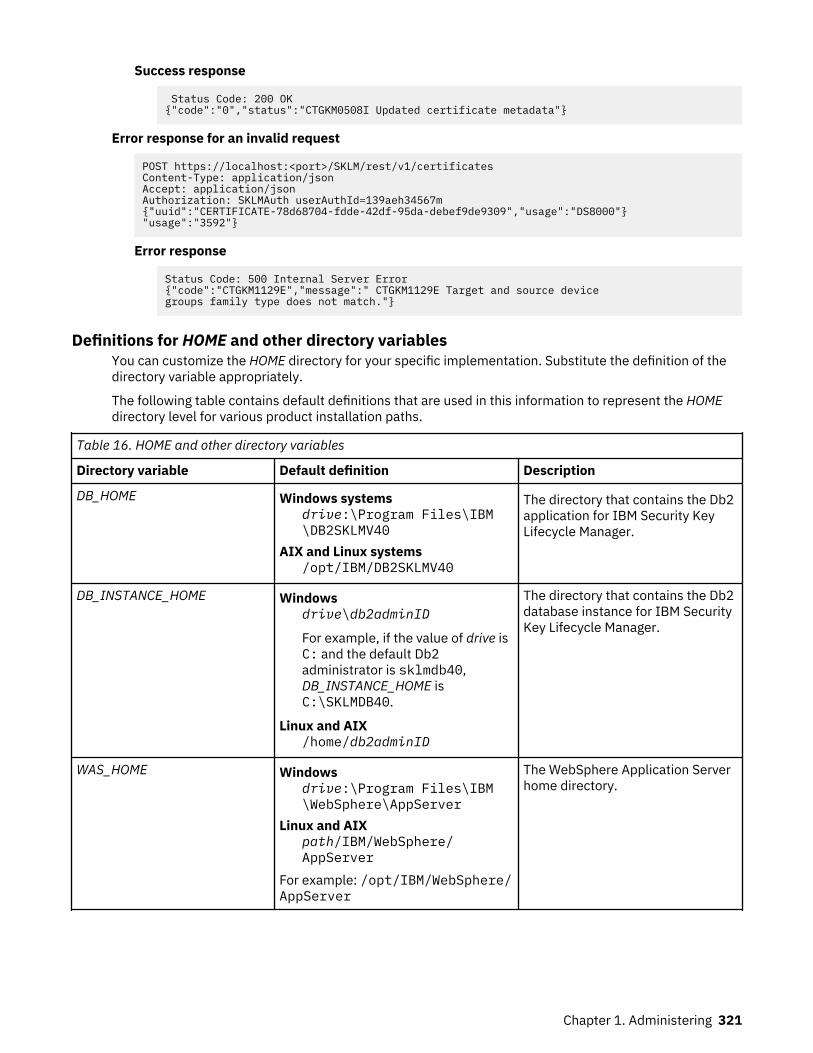
Success response
Status Code: 200 OK{"code":"0","status":"CTGKM0508I Updated certificate metadata"}
Error response for an invalid request
POST https://localhost:<port>/SKLM/rest/v1/certificatesContent-Type: application/jsonAccept: application/jsonAuthorization: SKLMAuth userAuthId=139aeh34567m{"uuid":"CERTIFICATE-78d68704-fdde-42df-95da-debef9de9309","usage":"DS8000"}"usage":"3592"}
Error response
Status Code: 500 Internal Server Error{"code":"CTGKM1129E","message":" CTGKM1129E Target and source device groups family type does not match."}
Definitions for HOME and other directory variablesYou can customize the HOME directory for your specific implementation. Substitute the definition of thedirectory variable appropriately.
The following table contains default definitions that are used in this information to represent the HOMEdirectory level for various product installation paths.
Table 16. HOME and other directory variables
Directory variable Default definition Description
DB_HOME Windows systemsdrive:\Program Files\IBM\DB2SKLMV40
AIX and Linux systems/opt/IBM/DB2SKLMV40
The directory that contains the Db2application for IBM Security KeyLifecycle Manager.
DB_INSTANCE_HOME Windowsdrive\db2adminID
For example, if the value of drive isC: and the default Db2administrator is sklmdb40,DB_INSTANCE_HOME isC:\SKLMDB40.
Linux and AIX/home/db2adminID
The directory that contains the Db2database instance for IBM SecurityKey Lifecycle Manager.
WAS_HOME Windowsdrive:\Program Files\IBM\WebSphere\AppServer
Linux and AIXpath/IBM/WebSphere/AppServer
For example: /opt/IBM/WebSphere/AppServer
The WebSphere Application Serverhome directory.
Chapter 1. Administering 321

Table 16. HOME and other directory variables (continued)
Directory variable Default definition Description
SKLM_HOME WindowsWAS_HOME\products\sklm
Linux and AIXWAS_HOME/products/sklm
The IBM Security Key LifecycleManager home directory.
SKLM_INSTALL_HOME Windowsdrive:\Program Files\IBM\SKLMV40
Linux and AIXpath/IBM/SKLMV40
The directory that contains the IBMSecurity Key Lifecycle Managerlicense and migration files.
SKLM_DATA WindowsWAS_HOME\products\sklm\dataC:\Program Files\IBM\WebSphere\AppServer\products\sklm\data
Linux and AIXWAS_HOME\products\sklm/data/opt/IBM/WebSphere/AppServer/products/sklm/data
The directory that contains the filesthat are exported from IBMSecurity Key Lifecycle Managersuch as backup files, exportedcertificates, and device groupexport files. Also, you must savethe files that you want to importinto IBM Security Key LifecycleManager in this directory.
IM_INSTALL_DIR Windowsdrive:\Program Files\IBM\Installation Manager
Linux and UNIX/opt/ibm/InstallationManager
The directory where IBMInstallation Manager is installed.
IM_DATA_DIR Windowsdrive:\ProgramData\IBM\Installation Manager
Linux and UNIX/var/ibm/InstallationManager
The data directory, which is used tostore information about productsthat are installed with InstallationManager.
Note: ProgramData\ is a hiddenfolder, and to see it you mustmodify your view preferences inExplorer to show hidden files andfolders.
Change Name REST ServiceUse Change Name REST Service to change the serial number of a storage device.
Note: The import conflict REST services make significant changes to the IBM Security Key LifecycleManager instance that might impact its operation and the communication with the storage device. Youmust carefully plan and evaluate the changes that are required on both IBM Security Key LifecycleManager and the storage device. The changes must be atomic; that is the changes must be done both onthe IBM Security Key Lifecycle Manager system and the devices. The import conflict resolution RESTservices handle the changes for IBM Security Key Lifecycle Manager. For the complete process handling,you must take the guidance of your IBM support representative.
322 IBM Security Key Lifecycle Manager : Administering

OperationPOST
URLhttps://<host>:<port>/SKLM/rest/v1/ckms/conflictResolution/changeName
By default, IBM Security Key Lifecycle Manager server listens to non-secure port 9080 (HTTP) and secureport 9443 (HTTPS) for communication. During IBM Security Key Lifecycle Manager installation, you canmodify these default ports. If you are using the default port for HTTP or HTTPS, the port is an optionalpart of the URL.
Request
Request Parameters
Parameter Description
host Specify the IP address or host name of the IBM Security Key LifecycleManager server.
port Specify the port number on which the IBM Security Key LifecycleManager server listens for requests.
Request Headers
Header name Value
Content-Type application/json
Accept application/json
Authorization SKLMAuth userAuthId=<authIdValue>
Accept-Language Any valid locale that is supported by IBM Security Key LifecycleManager. For example: en or de
Request body
JSON object with the following specification
Property name Description
type Specifies that the user can change the name of a device serial number.You can provide the value Device, Client, or LTOKeyGroup.
oldName Specifies the existing value of the storage device serial number.
newName Specifies the new value to be set for the storage device serial number.
Response
Chapter 1. Administering 323
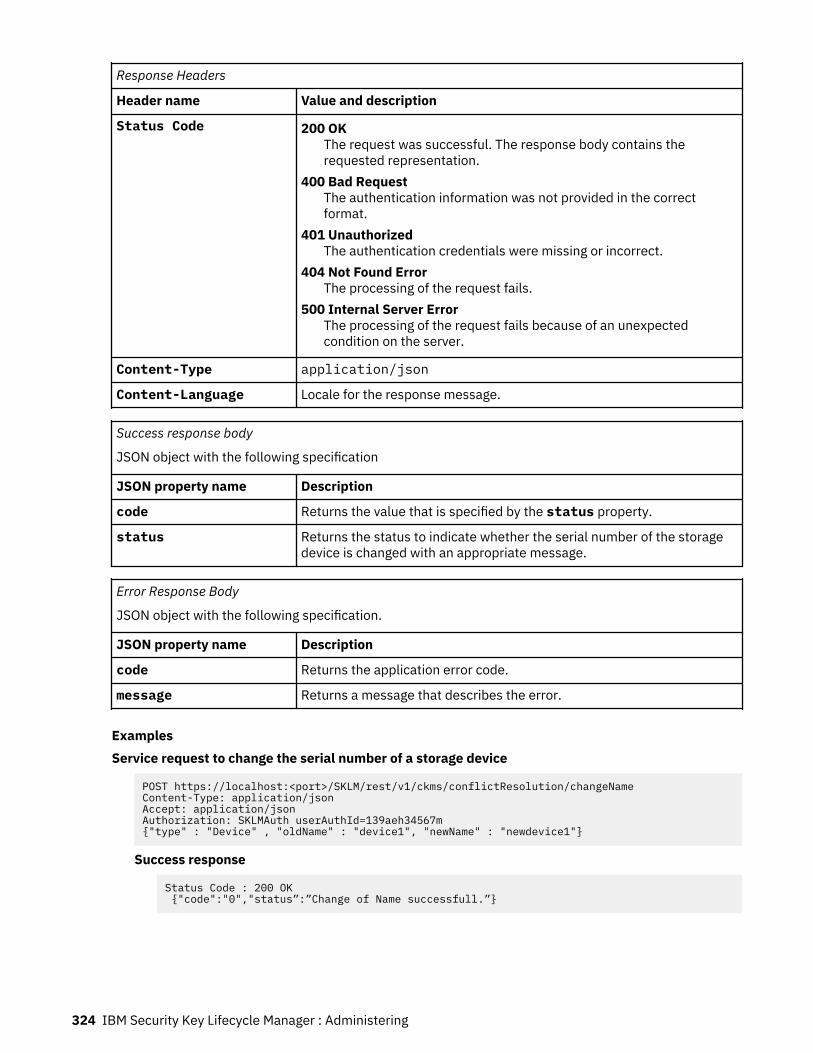
Response Headers
Header name Value and description
Status Code 200 OKThe request was successful. The response body contains therequested representation.
400 Bad RequestThe authentication information was not provided in the correctformat.
401 UnauthorizedThe authentication credentials were missing or incorrect.
404 Not Found ErrorThe processing of the request fails.
500 Internal Server ErrorThe processing of the request fails because of an unexpectedcondition on the server.
Content-Type application/json
Content-Language Locale for the response message.
Success response body
JSON object with the following specification
JSON property name Description
code Returns the value that is specified by the status property.
status Returns the status to indicate whether the serial number of the storagedevice is changed with an appropriate message.
Error Response Body
JSON object with the following specification.
JSON property name Description
code Returns the application error code.
message Returns a message that describes the error.
ExamplesService request to change the serial number of a storage device
POST https://localhost:<port>/SKLM/rest/v1/ckms/conflictResolution/changeNameContent-Type: application/jsonAccept: application/jsonAuthorization: SKLMAuth userAuthId=139aeh34567m{"type" : "Device" , "oldName" : "device1", "newName" : "newdevice1"}
Success response
Status Code : 200 OK {"code":"0","status”:”Change of Name successfull.”}
324 IBM Security Key Lifecycle Manager : Administering

Error response
Status Code: 500 Internal Server Error{"code":"CTGKM2923E","message":"CTGKM2923E Device with Serial number newdevice1 already exists."}
Key Export REST ServiceUse Key Export REST Service to export secret keys or public/private key pairs. A secret key is asymmetric key. A public/private key pair is an asymmetric key pair with a public key and a private key.
OperationPUT
URLhttps://<host>:<port>/SKLM/rest/v1/keys/export
By default, IBM Security Key Lifecycle Manager server listens to non-secure port 9080 (HTTP) and secureport 9443 (HTTPS) for communication. During IBM Security Key Lifecycle Manager installation, you canmodify these default ports. If you are using the default port for HTTP or HTTPS, the port is an optionalpart of the URL.
Request
Request Parameters
Parameter Description
host Specify the IP address or host name of the IBM Security Key LifecycleManager server.
port Specify the port number on which the IBM Security Key LifecycleManager server listens for requests.
Request Headers
Header name Value
Content-Type application/json
Accept application/json
Authorization SKLMAuth userAuthId=<authIdValue>
Accept-Language Any valid locale that is supported by IBM Security Key LifecycleManager. For example: en or de
Request body
JSON object with the following specification:
Property name Description
alias Specifies an alias of the key that you export. This parameter is requiredif a value is not specified for the aliasRange parameter. For aprivatekey type, a value for alias is required. For a secretkeytype, you must specify a value for either alias or aliasRange.
aliases This parameter is required if values are not specified for the alias andaliasRange parameters.
Specify comma-separated alias values for the keys that you want toexport.
Chapter 1. Administering 325

Request body
JSON object with the following specification:
(continued)
Property name Description
aliasRange This parameter is required if a value is not specified for the aliasparameter. When the value of alias is specified, the value ofaliasRange is ignored. To export a secret key, specify a threecharacter prefix followed by a range of numbers in hexadecimal format.You can use the characters 0 through 9 and a through f. You canspecify the range only for secret keys.
fileName Specifies the relative or full path and the name of a file that IBMSecurity Key Lifecycle Manager creates to store the exported keys. Ifyou do not specify a path name, the value of SKLM_HOME directory isused.
keyAlias This parameter is required if the exported key is a secret key. Specifythe alias of the public key entry in the keystore that is used to encryptthe secret key or keys to the file. Only the holder of the correspondingprivate key can access the keys.
password This parameter is required if the value of the type parameter isprivatekey. Specify a password to protect the PKCS#12 file to whichthe private key and certificate are exported. You might need to retainthe value of the password to import the key.
type Specifies whether the keys are secret or private.secretkey
Specifies a symmetric key.privatekey
Specifies an asymmetric key in a key pair with a public key and aprivate key. If you select this value, a password is required. If youexport private keys to a PKCS#12 file, ensure that the file with thekey is wrapped; use a FIPS-approved method before the file leavesthe computer.
Response
326 IBM Security Key Lifecycle Manager : Administering
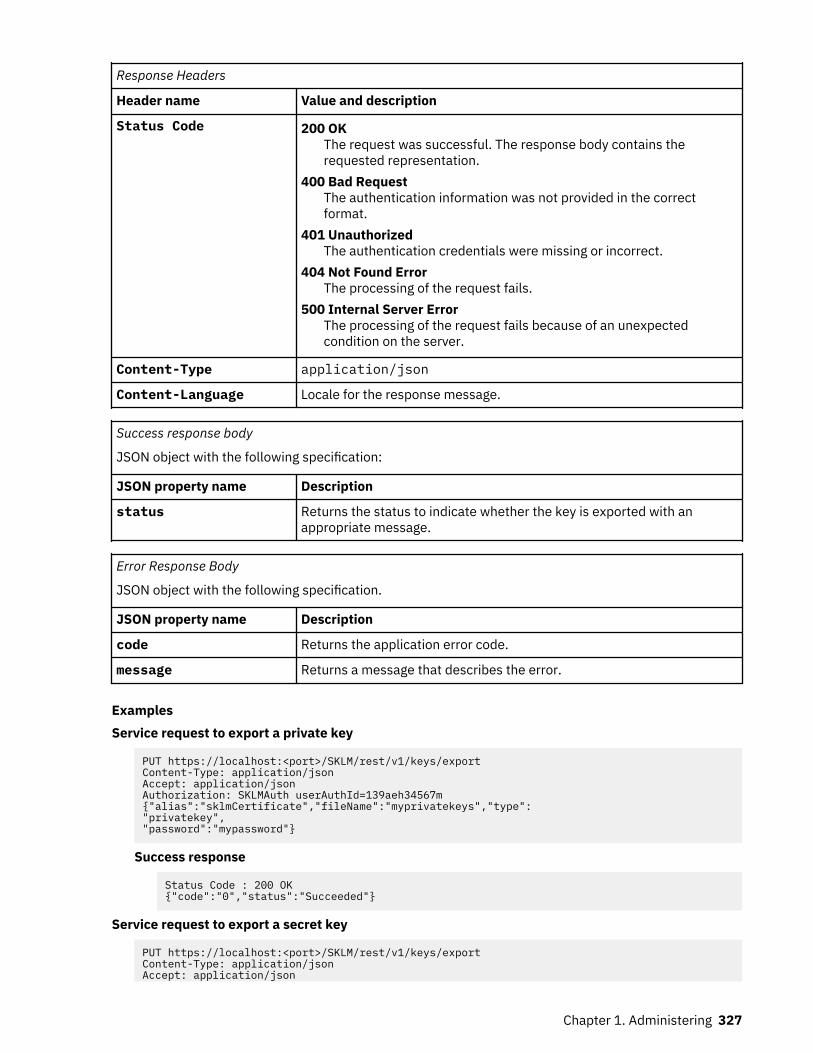
Response Headers
Header name Value and description
Status Code 200 OKThe request was successful. The response body contains therequested representation.
400 Bad RequestThe authentication information was not provided in the correctformat.
401 UnauthorizedThe authentication credentials were missing or incorrect.
404 Not Found ErrorThe processing of the request fails.
500 Internal Server ErrorThe processing of the request fails because of an unexpectedcondition on the server.
Content-Type application/json
Content-Language Locale for the response message.
Success response body
JSON object with the following specification:
JSON property name Description
status Returns the status to indicate whether the key is exported with anappropriate message.
Error Response Body
JSON object with the following specification.
JSON property name Description
code Returns the application error code.
message Returns a message that describes the error.
ExamplesService request to export a private key
PUT https://localhost:<port>/SKLM/rest/v1/keys/exportContent-Type: application/jsonAccept: application/jsonAuthorization: SKLMAuth userAuthId=139aeh34567m{"alias":"sklmCertificate","fileName":"myprivatekeys","type":"privatekey","password":"mypassword"}
Success response
Status Code : 200 OK{"code":"0","status":"Succeeded"}
Service request to export a secret key
PUT https://localhost:<port>/SKLM/rest/v1/keys/exportContent-Type: application/jsonAccept: application/json
Chapter 1. Administering 327
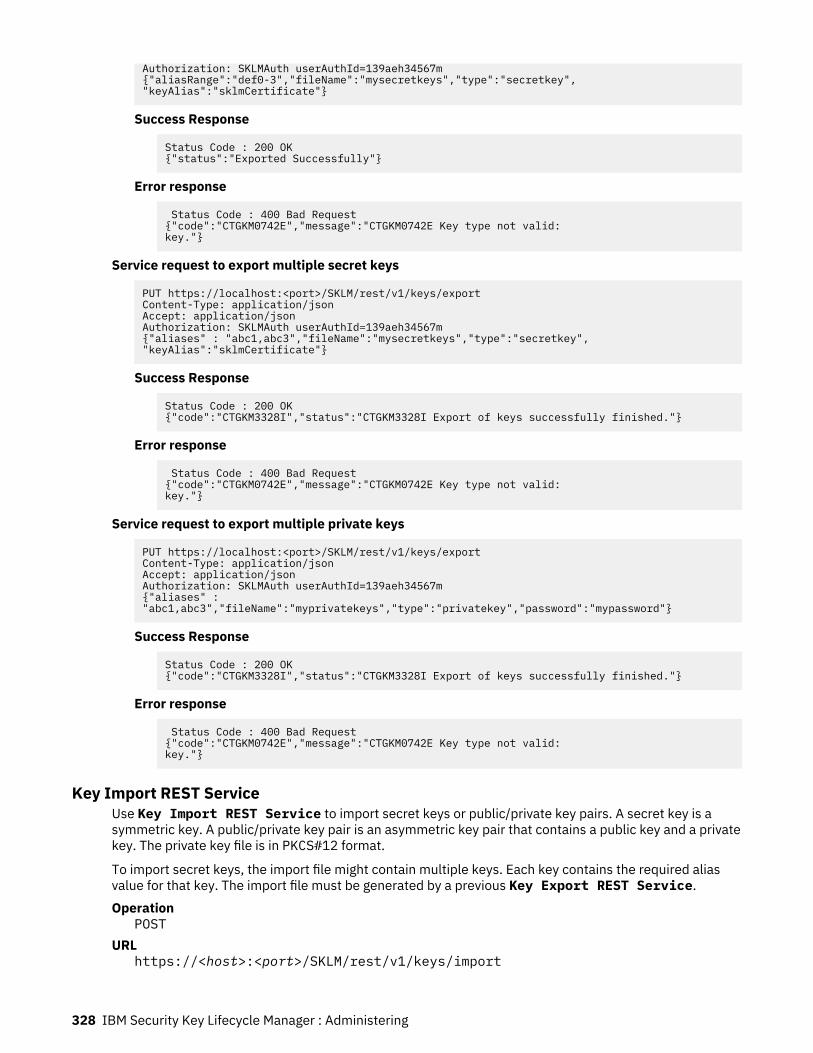
Authorization: SKLMAuth userAuthId=139aeh34567m{"aliasRange":"def0-3","fileName":"mysecretkeys","type":"secretkey","keyAlias":"sklmCertificate"}
Success Response
Status Code : 200 OK{"status":"Exported Successfully"}
Error response
Status Code : 400 Bad Request{"code":"CTGKM0742E","message":"CTGKM0742E Key type not valid: key."}
Service request to export multiple secret keys
PUT https://localhost:<port>/SKLM/rest/v1/keys/exportContent-Type: application/jsonAccept: application/jsonAuthorization: SKLMAuth userAuthId=139aeh34567m{"aliases" : "abc1,abc3","fileName":"mysecretkeys","type":"secretkey","keyAlias":"sklmCertificate"}
Success Response
Status Code : 200 OK{"code":"CTGKM3328I","status":"CTGKM3328I Export of keys successfully finished."}
Error response
Status Code : 400 Bad Request{"code":"CTGKM0742E","message":"CTGKM0742E Key type not valid: key."}
Service request to export multiple private keys
PUT https://localhost:<port>/SKLM/rest/v1/keys/exportContent-Type: application/jsonAccept: application/jsonAuthorization: SKLMAuth userAuthId=139aeh34567m{"aliases" : "abc1,abc3","fileName":"myprivatekeys","type":"privatekey","password":"mypassword"}
Success Response
Status Code : 200 OK{"code":"CTGKM3328I","status":"CTGKM3328I Export of keys successfully finished."}
Error response
Status Code : 400 Bad Request{"code":"CTGKM0742E","message":"CTGKM0742E Key type not valid: key."}
Key Import REST ServiceUse Key Import REST Service to import secret keys or public/private key pairs. A secret key is asymmetric key. A public/private key pair is an asymmetric key pair that contains a public key and a privatekey. The private key file is in PKCS#12 format.
To import secret keys, the import file might contain multiple keys. Each key contains the required aliasvalue for that key. The import file must be generated by a previous Key Export REST Service.Operation
POSTURL
https://<host>:<port>/SKLM/rest/v1/keys/import
328 IBM Security Key Lifecycle Manager : Administering

By default, IBM Security Key Lifecycle Manager server listens to non-secure port 9080 (HTTP) and secureport 9443 (HTTPS) for communication. During IBM Security Key Lifecycle Manager installation, you canmodify these default ports. If you are using the default port for HTTP or HTTPS, the port is an optionalpart of the URL.
Request
Request Parameters
Parameter Description
host Specify the IP address or host name of the IBM Security Key LifecycleManager server.
port Specify the port number on which the IBM Security Key LifecycleManager server listens for requests.
Request Headers
Header name Value
Content-Type application/json
Accept application/json
Authorization SKLMAuth userAuthId=<authIdValue>
Accept-Language Any valid locale that is supported by IBM Security Key LifecycleManager. For example: en or de
Request body
JSON object with the following specification:
Property name Description
alias Required parameter in the following scenarios:
• If the value of the type attribute is secretkey and you want torename the key with the newAlias parameter during the importprocess.
Specify a value for this parameter if you want to import a specificsecret key from a keystore file that has multiple secret keys.
• If the value of the type attribute is privatekey and if the keystorefile contains multiple private keys.
This parameter is not required when the keystore file contains only oneprivate key. If you specify a value, it is ignored.
fileName Required. Specify the path and file name of the file from which the keysare imported.
keyAlias This parameter is required if the value of the type attribute issecretkey. Specify the alias of the private key entry in the keystore thatdecrypts the secret key or keys, from the file. Use the same alias value toimport and export a secret key or keys.
newAlias Specify a new value for the key alias.
Chapter 1. Administering 329

Request body
JSON object with the following specification:
(continued)
Property name Description
password This parameter is required if the type parameter is privatekey. Thispassword was previously specified with the Key Export RESTService. If you export private keys to a PKCS#12 file, ensure that thefile with the key is wrapped with a FIPS-approved method before the fileleaves the computer.
type Specify whether the keys are secret or private.secretkey
Specifies a symmetric key.
If you select this value, specify a value for the usage attribute for adevice group family that administers keys.
privatekeySpecifies an asymmetric key in a key pair with a public key and aprivate key.
If you select this value, specify a value for the usage attribute for adevice group that administers keys. You can specify any of thefollowing values:
• SSLCLIENT• SSLSERVER
usage Specify the target application usage such as LTO device group. You canspecify the following values:LTO
Specifies the LTO device group.3592
Specifies the 3592 device group.DS5000
Specifies the DS5000 device group.DS8000
Specifies the DS8000 device group.BRCD_ENCRYPTOR
Specifies the BRCD_ENCRYPTOR device group that is in the LTOdevice family.
ONESECURESpecifies the ONESECURE device group that is in the DS5000 devicefamily.
330 IBM Security Key Lifecycle Manager : Administering

Request body
JSON object with the following specification:
(continued)
Property name Description
usage ETERNUS_DXSpecifies the ETERNUS_DX device group that is in the DS5000 devicefamily.
XIVSpecifies the IBM Spectrum Accelerate (previously known as XIV)device group.
GPFSSpecifies the IBM Spectrum Scale (previously known as GPFS) devicegroup.
PEER_TO_PEERSpecifies the PEER_TO_PEER device group.
DS8000_TCTSpecifies the DS8000_TCT device group that is in the GPFS devicefamily.
usage GENERICSpecifies a device family that uses the Key ManagementInteroperability Protocol to interact with IBM Security Key LifecycleManager. The GENERIC device group enables management of KMIPobjects
Do not use the REST interface to add a device to the GENERIC devicegroup, or to change a GENERIC device group attribute.
SSLCLIENTClient-side certificate that is used in secure communication by usingSecure Socket Layer protocol to authenticate the client device.
SSLSERVERServer-side certificate that is used in secure communication by usingSecure Socket Layer protocol.
ETERNUS_DXSpecifies the ETERNUS_DX device group that is in the DS5000 devicefamily.
XIVSpecifies the XIV device group that is in the DS5000 device family.
userdevicegroupSpecifies a user-defined group that is based on a supported devicefamily.
Response
Chapter 1. Administering 331
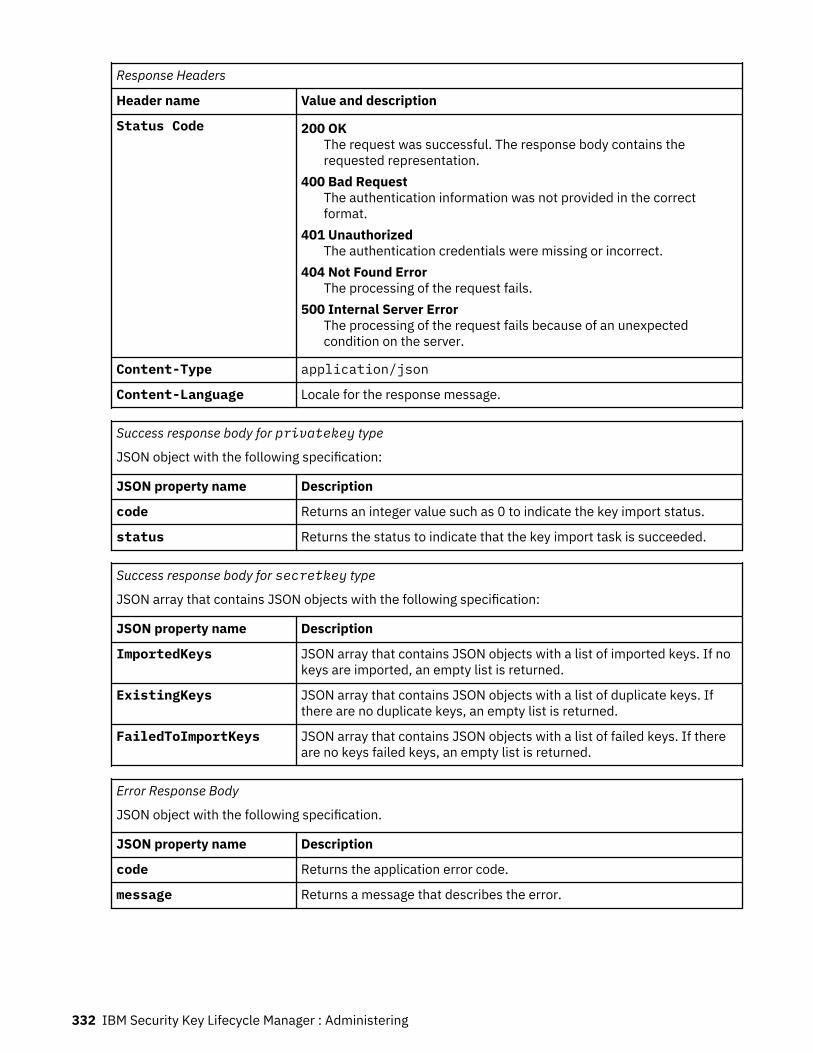
Response Headers
Header name Value and description
Status Code 200 OKThe request was successful. The response body contains therequested representation.
400 Bad RequestThe authentication information was not provided in the correctformat.
401 UnauthorizedThe authentication credentials were missing or incorrect.
404 Not Found ErrorThe processing of the request fails.
500 Internal Server ErrorThe processing of the request fails because of an unexpectedcondition on the server.
Content-Type application/json
Content-Language Locale for the response message.
Success response body for privatekey type
JSON object with the following specification:
JSON property name Description
code Returns an integer value such as 0 to indicate the key import status.
status Returns the status to indicate that the key import task is succeeded.
Success response body for secretkey type
JSON array that contains JSON objects with the following specification:
JSON property name Description
ImportedKeys JSON array that contains JSON objects with a list of imported keys. If nokeys are imported, an empty list is returned.
ExistingKeys JSON array that contains JSON objects with a list of duplicate keys. Ifthere are no duplicate keys, an empty list is returned.
FailedToImportKeys JSON array that contains JSON objects with a list of failed keys. If thereare no keys failed keys, an empty list is returned.
Error Response Body
JSON object with the following specification.
JSON property name Description
code Returns the application error code.
message Returns a message that describes the error.
332 IBM Security Key Lifecycle Manager : Administering
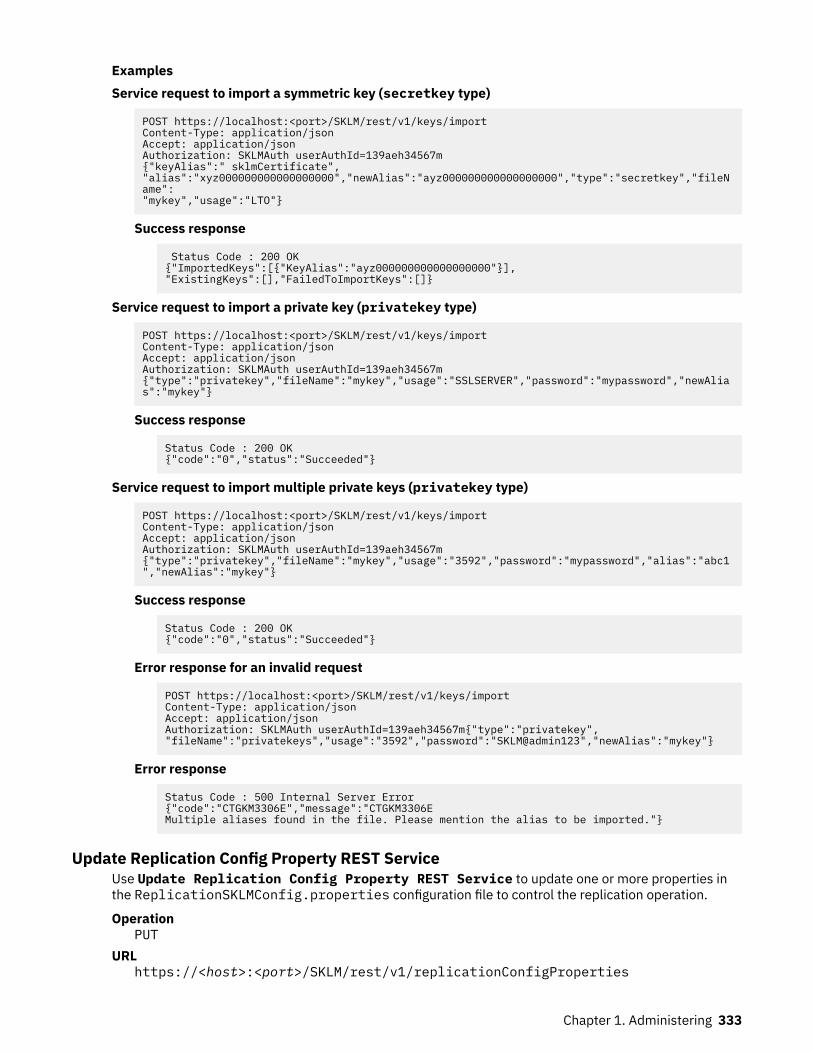
ExamplesService request to import a symmetric key (secretkey type)
POST https://localhost:<port>/SKLM/rest/v1/keys/importContent-Type: application/jsonAccept: application/jsonAuthorization: SKLMAuth userAuthId=139aeh34567m{"keyAlias":" sklmCertificate", "alias":"xyz000000000000000000","newAlias":"ayz000000000000000000","type":"secretkey","fileName":"mykey","usage":"LTO"}
Success response
Status Code : 200 OK{"ImportedKeys":[{"KeyAlias":"ayz000000000000000000"}],"ExistingKeys":[],"FailedToImportKeys":[]}
Service request to import a private key (privatekey type)
POST https://localhost:<port>/SKLM/rest/v1/keys/importContent-Type: application/jsonAccept: application/jsonAuthorization: SKLMAuth userAuthId=139aeh34567m{"type":"privatekey","fileName":"mykey","usage":"SSLSERVER","password":"mypassword","newAlias":"mykey"}
Success response
Status Code : 200 OK{"code":"0","status":"Succeeded"}
Service request to import multiple private keys (privatekey type)
POST https://localhost:<port>/SKLM/rest/v1/keys/import Content-Type: application/jsonAccept: application/jsonAuthorization: SKLMAuth userAuthId=139aeh34567m{"type":"privatekey","fileName":"mykey","usage":"3592","password":"mypassword","alias":"abc1","newAlias":"mykey"}
Success response
Status Code : 200 OK{"code":"0","status":"Succeeded"}
Error response for an invalid request
POST https://localhost:<port>/SKLM/rest/v1/keys/importContent-Type: application/jsonAccept: application/jsonAuthorization: SKLMAuth userAuthId=139aeh34567m{"type":"privatekey","fileName":"privatekeys","usage":"3592","password":"SKLM@admin123","newAlias":"mykey"}
Error response
Status Code : 500 Internal Server Error{"code":"CTGKM3306E","message":"CTGKM3306E Multiple aliases found in the file. Please mention the alias to be imported."}
Update Replication Config Property REST ServiceUse Update Replication Config Property REST Service to update one or more properties inthe ReplicationSKLMConfig.properties configuration file to control the replication operation.
OperationPUT
URLhttps://<host>:<port>/SKLM/rest/v1/replicationConfigProperties
Chapter 1. Administering 333

By default, IBM Security Key Lifecycle Manager server listens to non-secure port 9080 (HTTP) and secureport 9443 (HTTPS) for communication. During IBM Security Key Lifecycle Manager installation, you canmodify these default ports. If you are using the default port for HTTP or HTTPS, the port is an optionalpart of the URL.
Request
Request Parameters
Parameter Description
host Specify the IP address or host name of the IBM Security Key LifecycleManager server.
port Specify the port number on which the IBM Security Key LifecycleManager server listens for requests.
Request Headers
Header name Value
Content-Type application/json
Accept application/json
Authorization SKLMAuth userAuthId=<authIdValue>
Accept-Language Any valid locale that is supported by IBM Security Key LifecycleManager. For example: en or de
Request body
JSON property name Description
<propertyNames> Specify the replication configuration property names and values thatyou want to update. You can specify multiple comma-separatedproperties.
Response
Response Headers
Header name Value and description
Status Code 200 OKThe request was successful. The response body contains therequested representation.
400 Bad RequestThe authentication information was not provided in the correctformat.
401 UnauthorizedThe authentication credentials were missing or incorrect.
404 Not Found ErrorThe processing of the request fails.
500 Internal Server ErrorThe processing of the request fails because of an unexpectedcondition on the server.
Content-Type application/json
334 IBM Security Key Lifecycle Manager : Administering

Response Headers (continued)
Header name Value and description
Content-Language Locale for the response message.
Success response body
JSON object with the following specification:
JSON property name Description
property Returns the name of the property that is updated.
status Returns the update status to indicate whether the configuration propertyis updated with an appropriate message.
Note: The success response code 200 OK is returned even if the property you requested is not found. Anappropriate message is returned in the response body.
Error Response Body
JSON object with the following specification.
JSON property name Description
code Returns the application error code.
message Returns a message that describes the error.
ExamplesService request to disable incremental replication
PUT https://localhost:<port>/SKLM/rest/v1/replicationConfigProperties{ "replication.Incremental.Enable":"false"}
Success response
Status Code : 200 OK[{"property":"replication.Incremental.Enable","status":"CTGKM0607I Update successful, change will take effect immediately"}]
Error response
Status Code : 400 Bad Request{"code" : "CTGKM6002E", "message" : "CTGKM6002E Bad Request: Invalid user authentication ID or invalid request format"}
Service request to update the IP address
PUT https://localhost:<port>/SKLM/rest/v1/replicationConfigProperties{ "backup.ClientIP1":"9.118.40.184"}
Success response
Status Code : 200 OK[{"property":"backup.Client","status":"CTGKM0607I Update successful, server restart required for change to take effect"}]
Error response
Status Code : 400 Bad Request{"code" : "CTGKM6002E", "message" : "CTGKM6002E Bad Request: Invalid user authentication ID or invalid request format"}
Chapter 1. Administering 335
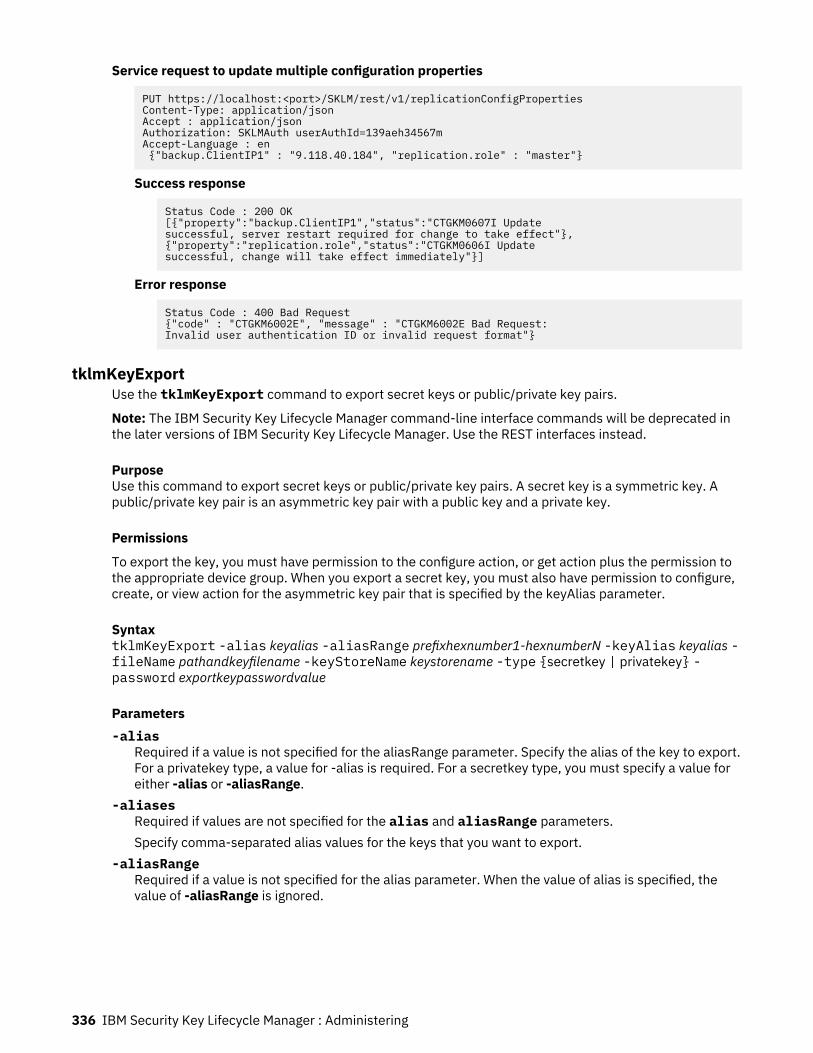
Service request to update multiple configuration properties
PUT https://localhost:<port>/SKLM/rest/v1/replicationConfigPropertiesContent-Type: application/jsonAccept : application/jsonAuthorization: SKLMAuth userAuthId=139aeh34567mAccept-Language : en {"backup.ClientIP1" : "9.118.40.184", "replication.role" : "master"}
Success response
Status Code : 200 OK[{"property":"backup.ClientIP1","status":"CTGKM0607I Update successful, server restart required for change to take effect"},{"property":"replication.role","status":"CTGKM0606I Update successful, change will take effect immediately"}]
Error response
Status Code : 400 Bad Request{"code" : "CTGKM6002E", "message" : "CTGKM6002E Bad Request: Invalid user authentication ID or invalid request format"}
tklmKeyExportUse the tklmKeyExport command to export secret keys or public/private key pairs.
Note: The IBM Security Key Lifecycle Manager command-line interface commands will be deprecated inthe later versions of IBM Security Key Lifecycle Manager. Use the REST interfaces instead.
PurposeUse this command to export secret keys or public/private key pairs. A secret key is a symmetric key. Apublic/private key pair is an asymmetric key pair with a public key and a private key.
Permissions
To export the key, you must have permission to the configure action, or get action plus the permission tothe appropriate device group. When you export a secret key, you must also have permission to configure,create, or view action for the asymmetric key pair that is specified by the keyAlias parameter.
SyntaxtklmKeyExport -alias keyalias -aliasRange prefixhexnumber1-hexnumberN -keyAlias keyalias -fileName pathandkeyfilename -keyStoreName keystorename -type {secretkey | privatekey} -password exportkeypasswordvalue
Parameters-alias
Required if a value is not specified for the aliasRange parameter. Specify the alias of the key to export.For a privatekey type, a value for -alias is required. For a secretkey type, you must specify a value foreither -alias or -aliasRange.
-aliasesRequired if values are not specified for the alias and aliasRange parameters.Specify comma-separated alias values for the keys that you want to export.
-aliasRangeRequired if a value is not specified for the alias parameter. When the value of alias is specified, thevalue of -aliasRange is ignored.
336 IBM Security Key Lifecycle Manager : Administering
Specify a three character prefix followed by a range of numbers in hexadecimal format (consisting ofthe sixteen characters 0-9, a-f) of secret keys to export. Allowed only for secret keys, not private keys.For example:
-aliasRange ibm1-a
Alternatively, you might specify:
-aliasRange xyz01-fff
-fileNameRequired. Specify the relative or full path, and the name of a file that IBM Security Key LifecycleManager creates to store the exported keys. If you do not specify a path name, the value ofSKLM_DATA directory is used.
-keyAliasRequired if the exported key is a secret key. Specify the alias of the public key entry in the keystorethat is used to encrypt the secret key, or keys, to the file. Only the holder of the corresponding privatekey can access the keys.
-keyStoreNameRequired. Specify the name of the keystore from which the exported keys are exported.
-passwordRequired if the value of the -type attribute is privatekey. Specify a password to protect thePKCS#12 file to which the private key and certificate are exported.
You might want to retain the value of the password for later use with the tklmKeyImport command.
Note: If you migrate data from IBM Security Key Lifecycle Manager Version 1, any scripts orapplications that you previously used to automate key export require modification to specify apassword.
-typeRequired. Specify whether the keys are secret or private. You can include the following values:secretkey
Specifies a symmetric key.privatekey
Specifies an asymmetric key in a key pair with a public key and a private key. If you select thisvalue, a password is required. If you export private keys to a PKCS#12 file, ensure that the filewith the key is wrapped by using a FIPS-approved method before the file leaves the computer.
Example
For tape usage, this Jython-formatted command exports a range of secret keys into a file namedmysecretkeys, in a path that is relative to the SKLM_DATA directory.
print AdminTask.tklmKeyExport ('[ -aliasRange abc1-ff -fileName mysecretkeys -keyStoreName defaultKeyStore -type secretkey -keyAlias mySecretKeyAlias]')
This Jython-formatted command specifies a password and exports a public/private key pair into a filenamed myprivatekeys, in a path that is relative to the SKLM_DATA directory.
print AdminTask.tklmKeyExport ('[ -alias myPrivateKeyAlias -fileName myprivatekeys -keyStoreName defaultKeyStore -type privatekey -password mypassword]')
Chapter 1. Administering 337
This Jython-formatted command specifies a password and exports multiple public/private key pairs into afile named myprivatekeys, in a path that is relative to the SKLM_DATA directory.
print AdminTask.tklmKeyExport ('[ -aliases abc1,abc3 -fileName myprivatekeys -keyStoreName defaultKeyStore -type privatekey -password mypassword]')
This Jython-formatted command specifies a password and exports multiple secret keys into a file namedmysecretkeys, in a path that is relative to the SKLM_DATA directory.
print AdminTask.tklmKeyExport ('[ -aliases abc1,abc3 -fileName mysecretkeys -keyStoreName defaultKeyStore -type secretkey -keyAlias sklmCertificate]')
tklmKeyImportUse the tklmKeyImport command to import secret keys or public/private key pairs. A secret key is asymmetric key. A public/private key pair is an asymmetric key pair with a public key and a private key. Theprivate key file is in PKCS#12 format.
Note: The IBM Security Key Lifecycle Manager command-line interface commands will be deprecated inthe later versions of IBM Security Key Lifecycle Manager. Use the REST interfaces instead.
PurposeUse this command to import secret keys or public/private key pairs. A secret key is a symmetric key. Apublic/private key pair is an asymmetric key pair with a public key and a private key. The private key file isin PKCS#12 format.
To import secret keys, the import file can contain multiple keys. Each key contains the required aliasvalue for that key. The import file must be generated by a previous tklmKeyExport command.
Permissions
To import the key, you must have permission to the configure action, or, create action and the permissionto the appropriate device group. When you import a secret key, you must also have permission toconfigure, create, or view action for the asymmetric key pair that is specified by the keyAlias parameter.
Syntax
An asterisk (*) indicates a deprecated value. If you enter the deprecated value, do not include theasterisk.
tklmKeyImport -alias keyalias -newAlias newkeyalias -keyAlias keyalias -fileNamepathandkeyfilename -keyStoreName keystorename -usage {LTO | 3592 | DS5000 | DS8000 |BRCD_ENCRYPTOR | ONESECURE | ETERNUS_DX | XIV | GPFS | PEER_TO_PEER | DS8000_TCT |GENERIC | userdevicegroup | SSLSERVER | SSL Server* | SSLCLIENT } -type {secretkey | privatekey} -password passwordvalue
Parameters-alias
Required parameter in the following scenarios:
• If the value of the type attribute is secretkey and you want to rename the key with the newAliasparameter during the import process.
Specify a value for this parameter if you want to import a specific secret key from a keystore file thathas multiple secret keys.
• If the value of the type attribute is privatekey and if the keystore file contains multiple privatekeys.
This parameter is not required when the keystore file contains only one private key. If you specify avalue, it is ignored.
338 IBM Security Key Lifecycle Manager : Administering
-fileNameRequired. Specify the path and file name of the file from which keys are imported.
-keyAliasRequired if the value of the -type attribute is secretkey. Specify the alias of the private key entry inthe keystore that is used to decrypt the secret key, or keys, from the file. Use the same alias value toimport and export a secret key, or keys.
-keyStoreNameRequired. Specify the name of the keystore into which the imported key is imported.
-newAliasSpecify a new value for the key alias.
-passwordRequired if the value of the -type attribute is privatekey. This password was previously specified byusing the tklmKeyExport command. If you export private keys to a PKCS#12 file, ensure that thefile with the key is wrapped by using a FIPS-approved method before the file leaves the computer.
-typeRequired. Specify whether the keys are secret or private. You can include the following values:secretkey
Specifies a symmetric key.
If you select this value, specify for the -usage attribute a value for a device group family thatadministers keys.
privatekeySpecifies an asymmetric key in a key pair with a public key and a private key.
If you select this value, specify for the -usage attribute a value for a device group that administerscertificates, or specify one of these values:
• SSLCLIENT• SSLSERVER
-usageRequired. Specify the target application usage, such as LTO device group. You can include thefollowing values:LTO
Specifies the LTO device group.3592
Specifies the 3592 device group.DS5000
Specifies the DS5000 device group.DS8000
Specifies the DS8000 device group.BRCD_ENCRYPTOR
Specifies the BRCD_ENCRYPTOR device group that is in the LTO device family.ONESECURE
Specifies the ONESECURE device group that is in the DS5000 device family.ETERNUS_DX
Specifies the ETERNUS_DX device group that is in the DS5000 device family.XIV
Specifies the IBM Spectrum Accelerate (previously known as XIV) device group.GPFS
Specifies the IBM Spectrum Scale (previously known as GPFS) device group.PEER_TO_PEER
Specifies the PEER_TO_PEER device group.
Chapter 1. Administering 339
DS8000_TCTSpecifies the DS8000_TCT device group that is in the GPFS device family.
GENERICSpecifies a device family that uses the Key Management Interoperability Protocol to interact withIBM Security Key Lifecycle Manager. The GENERIC device group enables management of KMIPobjects.
Do not use the command-line interface to add a device to the GENERIC device group, or to changea GENERIC device group attribute.
SSLCLIENTClient-side certificate that is used in secure communication by using Secure Socket Layer protocolto authenticate the client device.
SSLSERVERServer-side certificate that is used in secure communication by using Secure Socket Layerprotocol.
userdevicegroupSpecifies a user-defined group that is based on a supported device family.
Example
For tape usage, this Jython-formatted command imports a symmetric key named mysecretkey from a filenamed mykey.p12 into a keystore named myKeystore for use with LTO tape drives.
print AdminTask.tklmKeyImport ('[ -alias mysecretkey -type secretkey -keyAlias mySecretKey -newAlias myNewSecretKey -fileName c:\\myimportpath\\mykey.p12 -keyStoreName defaultKeyStore -usage LTO]')
This Jython-formatted command imports an asymmetric key in a key pair with a public key and a privatekey. A password is required.
print AdminTask.tklmKeyImport ('[-alias myprivatekey -type privatekey -fileName c:\\myimportpath\\myprivatekey.p12 -keyStoreName defaultKeyStore -usage SSLSERVER -password mypassword]')
Update Replication Config Property REST ServiceUse Update Replication Config Property REST Service to update one or more properties inthe ReplicationSKLMConfig.properties configuration file to control the replication operation.
OperationPUT
URLhttps://<host>:<port>/SKLM/rest/v1/replicationConfigProperties
By default, IBM Security Key Lifecycle Manager server listens to non-secure port 9080 (HTTP) and secureport 9443 (HTTPS) for communication. During IBM Security Key Lifecycle Manager installation, you canmodify these default ports. If you are using the default port for HTTP or HTTPS, the port is an optionalpart of the URL.
Request
Request Parameters
Parameter Description
host Specify the IP address or host name of the IBM Security Key LifecycleManager server.
port Specify the port number on which the IBM Security Key LifecycleManager server listens for requests.
340 IBM Security Key Lifecycle Manager : Administering
Request Headers
Header name Value
Content-Type application/json
Accept application/json
Authorization SKLMAuth userAuthId=<authIdValue>
Accept-Language Any valid locale that is supported by IBM Security Key LifecycleManager. For example: en or de
Request body
JSON property name Description
<propertyNames> Specify the replication configuration property names and values thatyou want to update. You can specify multiple comma-separatedproperties.
Response
Response Headers
Header name Value and description
Status Code 200 OKThe request was successful. The response body contains therequested representation.
400 Bad RequestThe authentication information was not provided in the correctformat.
401 UnauthorizedThe authentication credentials were missing or incorrect.
404 Not Found ErrorThe processing of the request fails.
500 Internal Server ErrorThe processing of the request fails because of an unexpectedcondition on the server.
Content-Type application/json
Content-Language Locale for the response message.
Success response body
JSON object with the following specification:
JSON property name Description
property Returns the name of the property that is updated.
status Returns the update status to indicate whether the configuration propertyis updated with an appropriate message.
Note: The success response code 200 OK is returned even if the property you requested is not found. Anappropriate message is returned in the response body.
Chapter 1. Administering 341
Error Response Body
JSON object with the following specification.
JSON property name Description
code Returns the application error code.
message Returns a message that describes the error.
ExamplesService request to disable incremental replication
PUT https://localhost:<port>/SKLM/rest/v1/replicationConfigProperties{ "replication.Incremental.Enable":"false"}
Success response
Status Code : 200 OK[{"property":"replication.Incremental.Enable","status":"CTGKM0607I Update successful, change will take effect immediately"}]
Error response
Status Code : 400 Bad Request{"code" : "CTGKM6002E", "message" : "CTGKM6002E Bad Request: Invalid user authentication ID or invalid request format"}
Service request to update the IP address
PUT https://localhost:<port>/SKLM/rest/v1/replicationConfigProperties{ "backup.ClientIP1":"9.118.40.184"}
Success response
Status Code : 200 OK[{"property":"backup.Client","status":"CTGKM0607I Update successful, server restart required for change to take effect"}]
Error response
Status Code : 400 Bad Request{"code" : "CTGKM6002E", "message" : "CTGKM6002E Bad Request: Invalid user authentication ID or invalid request format"}
Service request to update multiple configuration properties
PUT https://localhost:<port>/SKLM/rest/v1/replicationConfigPropertiesContent-Type: application/jsonAccept : application/jsonAuthorization: SKLMAuth userAuthId=139aeh34567mAccept-Language : en {"backup.ClientIP1" : "9.118.40.184", "replication.role" : "master"}
Success response
Status Code : 200 OK[{"property":"backup.ClientIP1","status":"CTGKM0607I Update successful, server restart required for change to take effect"},{"property":"replication.role","status":"CTGKM0606I Update successful, change will take effect immediately"}]
Error response
Status Code : 400 Bad Request{"code" : "CTGKM6002E", "message" : "CTGKM6002E Bad Request: Invalid user authentication ID or invalid request format"}
342 IBM Security Key Lifecycle Manager : Administering
Delete Replication Config Property REST ServiceUse Delete Replication Config Property REST Service to delete one or more properties fromthe ReplicationSKLMConfig.properties configuration file to control the replication operation.
OperationDELETE
URLhttps://<host>:<port>/SKLM/rest/v1/replicationConfigProperties
By default, IBM Security Key Lifecycle Manager server listens to non-secure port 9080 (HTTP) and secureport 9443 (HTTPS) for communication. During IBM Security Key Lifecycle Manager installation, you canmodify these default ports. If you are using the default port for HTTP or HTTPS, the port is an optionalpart of the URL.
Request
Request Parameters
Parameter Description
host Specify the IP address or host name of the IBM Security Key LifecycleManager server.
port Specify the port number on which the IBM Security Key LifecycleManager server listens for requests.
Request Headers
Header name Value
Content-Type application/json
Accept application/json
Authorization SKLMAuth userAuthId=<authIdValue>
Accept-Language Any valid locale that is supported by IBM Security Key LifecycleManager. For example: en or de
Request body
JSON property name Description
propertyName Specify the replication configuration property names that you want todelete. You can specify multiple comma-separated properties.
Response
Chapter 1. Administering 343

Response Headers
Header name Value and description
Status Code 200 OKThe request was successful. The response body contains therequested representation.
400 Bad RequestThe authentication information was not provided in the correctformat.
401 UnauthorizedThe authentication credentials were missing or incorrect.
404 Not Found ErrorThe processing of the request fails.
500 Internal Server ErrorThe processing of the request fails because of an unexpectedcondition on the server.
Content-Type application/json
Content-Language Locale for the response message.
Success response body
JSON object with the following specification:
JSON property name Description
property Returns the property name that is deleted from the replicationconfiguration file.
status Returns the delete status to indicate whether the configuration propertywas deleted. The status includes an appropriate message.
Note: The success response code 200 OK is returned even if the property you requested is not found. Anappropriate message is returned in the response body.
Error Response Body
JSON object with the following specification.
JSON property name Description
code Returns the application error code.
message Returns a message that describes the error.
ExamplesService request to delete a configuration property
DELETE https://localhost:<port>/SKLM/rest/v1/replicationConfigProperties{"propertyName" : "backup.ClientIP5"}
Success response
Status Code : 200 OK[{"propertyName":"backup.ClientIP5","status":"CTGKM0606I Update successful, change will take effect immediately"}]
344 IBM Security Key Lifecycle Manager : Administering
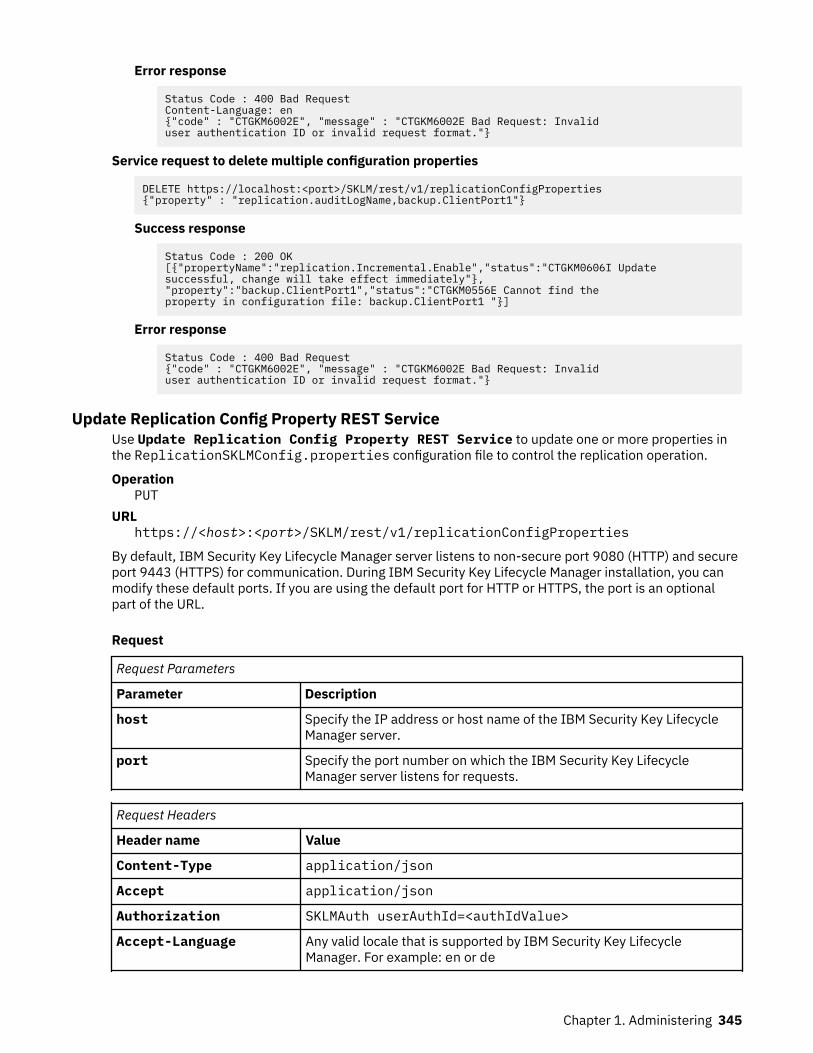
Error response
Status Code : 400 Bad RequestContent-Language: en{"code" : "CTGKM6002E", "message" : "CTGKM6002E Bad Request: Invalid user authentication ID or invalid request format."}
Service request to delete multiple configuration properties
DELETE https://localhost:<port>/SKLM/rest/v1/replicationConfigProperties{"property" : "replication.auditLogName,backup.ClientPort1"}
Success response
Status Code : 200 OK[{"propertyName":"replication.Incremental.Enable","status":"CTGKM0606I Update successful, change will take effect immediately"},"property":"backup.ClientPort1","status":"CTGKM0556E Cannot find the property in configuration file: backup.ClientPort1 "}]
Error response
Status Code : 400 Bad Request{"code" : "CTGKM6002E", "message" : "CTGKM6002E Bad Request: Invalid user authentication ID or invalid request format."}
Update Replication Config Property REST ServiceUse Update Replication Config Property REST Service to update one or more properties inthe ReplicationSKLMConfig.properties configuration file to control the replication operation.
OperationPUT
URLhttps://<host>:<port>/SKLM/rest/v1/replicationConfigProperties
By default, IBM Security Key Lifecycle Manager server listens to non-secure port 9080 (HTTP) and secureport 9443 (HTTPS) for communication. During IBM Security Key Lifecycle Manager installation, you canmodify these default ports. If you are using the default port for HTTP or HTTPS, the port is an optionalpart of the URL.
Request
Request Parameters
Parameter Description
host Specify the IP address or host name of the IBM Security Key LifecycleManager server.
port Specify the port number on which the IBM Security Key LifecycleManager server listens for requests.
Request Headers
Header name Value
Content-Type application/json
Accept application/json
Authorization SKLMAuth userAuthId=<authIdValue>
Accept-Language Any valid locale that is supported by IBM Security Key LifecycleManager. For example: en or de
Chapter 1. Administering 345
Request body
JSON property name Description
<propertyNames> Specify the replication configuration property names and values thatyou want to update. You can specify multiple comma-separatedproperties.
Response
Response Headers
Header name Value and description
Status Code 200 OKThe request was successful. The response body contains therequested representation.
400 Bad RequestThe authentication information was not provided in the correctformat.
401 UnauthorizedThe authentication credentials were missing or incorrect.
404 Not Found ErrorThe processing of the request fails.
500 Internal Server ErrorThe processing of the request fails because of an unexpectedcondition on the server.
Content-Type application/json
Content-Language Locale for the response message.
Success response body
JSON object with the following specification:
JSON property name Description
property Returns the name of the property that is updated.
status Returns the update status to indicate whether the configuration propertyis updated with an appropriate message.
Note: The success response code 200 OK is returned even if the property you requested is not found. Anappropriate message is returned in the response body.
Error Response Body
JSON object with the following specification.
JSON property name Description
code Returns the application error code.
message Returns a message that describes the error.
346 IBM Security Key Lifecycle Manager : Administering
ExamplesService request to disable incremental replication
PUT https://localhost:<port>/SKLM/rest/v1/replicationConfigProperties{ "replication.Incremental.Enable":"false"}
Success response
Status Code : 200 OK[{"property":"replication.Incremental.Enable","status":"CTGKM0607I Update successful, change will take effect immediately"}]
Error response
Status Code : 400 Bad Request{"code" : "CTGKM6002E", "message" : "CTGKM6002E Bad Request: Invalid user authentication ID or invalid request format"}
Service request to update the IP address
PUT https://localhost:<port>/SKLM/rest/v1/replicationConfigProperties{ "backup.ClientIP1":"9.118.40.184"}
Success response
Status Code : 200 OK[{"property":"backup.Client","status":"CTGKM0607I Update successful, server restart required for change to take effect"}]
Error response
Status Code : 400 Bad Request{"code" : "CTGKM6002E", "message" : "CTGKM6002E Bad Request: Invalid user authentication ID or invalid request format"}
Service request to update multiple configuration properties
PUT https://localhost:<port>/SKLM/rest/v1/replicationConfigPropertiesContent-Type: application/jsonAccept : application/jsonAuthorization: SKLMAuth userAuthId=139aeh34567mAccept-Language : en {"backup.ClientIP1" : "9.118.40.184", "replication.role" : "master"}
Success response
Status Code : 200 OK[{"property":"backup.ClientIP1","status":"CTGKM0607I Update successful, server restart required for change to take effect"},{"property":"replication.role","status":"CTGKM0606I Update successful, change will take effect immediately"}]
Error response
Status Code : 400 Bad Request{"code" : "CTGKM6002E", "message" : "CTGKM6002E Bad Request: Invalid user authentication ID or invalid request format"}
REST service for adding a master when other master in the cluster is not reachableTo add a standby or master server to the cluster when a standby or master server in the cluster is out ofnetwork or not reachable, use the Add Master REST Service with additional parameters,ignoreStandbys and ignoreNodes.
OperationPOST
URLhttps://<host>:<port>/SKLM/rest/v1/ckms/config/nodes/addNodes
Chapter 1. Administering 347
By default, IBM Security Key Lifecycle Manager server listens to non-secure port 9080 (HTTP) and secureport 9443 (HTTPS) for communication. During IBM Security Key Lifecycle Manager installation, you canmodify these default ports. If you are using the default port for HTTP or HTTPS, the port is an optionalpart of the URL.
Request
Request Parameters
Parameter Description
host Specify the IP address or host name of the IBM Security Key LifecycleManager server.
port Specify the port number on which the IBM Security Key LifecycleManager server listens for requests.
Request Headers
Header name Value
Content-Type application/json
Accept application/json
Authorization SKLMAuth userAuthId=<authIdValue>
Accept-Language Any valid locale that is supported by IBM Security Key LifecycleManager. For example: en or de
Request body
JSON object with the following specification:
Property name Description
clusterName Specify a name for the multi-master cluster to which the masters to beadded.
primaryHadrPort Specify the port number for the HADR primary database. You mustspecify the value for this property for the first time only when stand-alone IBM Security Key Lifecycle Manager server instance is configuredas "Primary" along with "Standby" or "Node".
type Specify the IBM Security Key Lifecycle Manager server instance type. Forexample, Primary, Standby, or Node.
ipHostname Specify the host name of the IBM Security Key Lifecycle Manager serverserver.
standbyPriorityIndex Specify the priority index value for the standby database to takeoverwhen the primary database is down. You can set the priority index to anyvalue in the range 1-3. The standby server with a higher priority indexlevel (lower number) takes precedence over the lower-prioritydatabases.
httpPort Specify the port number on which the IBM Security Key LifecycleManager server server listens for requests from devices thatcommunicate by using the SSL protocol.
sklmUsername Specify the name of the IBM Security Key Lifecycle Manager serveradministrator.
348 IBM Security Key Lifecycle Manager : Administering
Request body
JSON object with the following specification:
(continued)
Property name Description
sklmPassword Specify the password for the IBM Security Key Lifecycle Manager serveradministrator.
wasUsername Specify the WebSphere Application Server login user ID for the IBMSecurity Key Lifecycle Manager server administrator profile.
wasPassword Specify the password for the WebSphere Application Server login userID.
ignoreStandbys Specify the host name of standby server that is not reachable.
ignoreNodes Specify the host name of master server that is not reachable.
autoAccept Specify whether the cluster automatically accepts the certificate of themaster server that is being added. This property has two values: Yes, No.The default value is No, which indicates that the cluster does notautomatically accept the certificate of the master server that is beingadded.
Response
Response Headers
Header name Value and description
Status Code 200 OKThe request was successful. The response body contains therequested representation.
400 Bad RequestThe authentication information was not provided in the correctformat.
401 UnauthorizedThe authentication credentials were missing or incorrect.
404 Not Found ErrorThe processing of the request fails.
500 Internal Server ErrorThe processing of the request fails because of an unexpectedcondition on the server.
Content-Type application/json
Content-Language Locale for the response message.
Success response body
JSON object with the following specification:
JSON property name Description
code Returns the code that is specified by the status property.
status Returns the status to indicate whether the master is added to the multi-master cluster.
Chapter 1. Administering 349
Error Response Body
JSON object with the following specification.
JSON property name Description
code Returns the application error code.
message Returns a message that describes the error.
ExamplesService request to add master to the cluster when a master or standby server is not reachable
Example for adding a standby.
POST https://localhost:<port>/SKLM/rest/v1/ckms/config/nodes/addNodesContent-Type: application/jsonAccept : application/jsonAuthorization: SKLMAuth userAuthId=139aeh34567mAccept-Language : en[{"clusterName" : "multimaster","primaryHadrPort" : "60027""ignoreStandbys" : "cimkc2b151","ignoreNodes" : "cimkc2b152"},{"type" : "Standby","ipHostname" : "cimkc2b150","httpPort" : "9443","sklmUsername" : "sklmadmin","sklmPassword" : "SKLM@admin123","wasUsername" : "wasadmin","wasPassword" : "WAS@admin123","standbyPriorityIndex" : "2","autoAccept" : "Yes"}]
Example for adding a master.
POST https://localhost:<port>/SKLM/rest/v1/ckms/config/nodes/addNodesContent-Type: application/jsonAccept : application/jsonAuthorization: SKLMAuth userAuthId=139aeh34567mAccept-Language : en[{"clusterName" : "multimaster""ignoreStandbys" : "cimkc2b151","ignoreNodes" : "cimkc2b152"},{"type" : "Node","ipHostname" : "cimkc2b153","httpPort" : "9443","sklmUsername" : "sklmadmin","sklmPassword" : "SKLM@admin123","wasUsername" : "wasadmin","wasPassword" : "WAS@admin123","autoAccept" : "Yes"}]
Success response
Status Code: 200 OK{"code":"0","status":"CTGKM3002I Successfully added the master in Multi-Master cluster."}
350 IBM Security Key Lifecycle Manager : Administering

Error response
{"code":"CTGKM6002E","message":"CTGKM6002E Bad Request: Invalid user authentication ID or invalid request format."}
Get All Masters Status REST ServiceUse Get All Masters Status REST Service to obtain status information that indicates whether allthe communication ports in the master servers are reachable.
OperationGET
URLhttps://<host>:<port>/SKLM/rest/v1/ckms/nodes/allNodeStatus
By default, IBM Security Key Lifecycle Manager server listens to non-secure port 9080 (HTTP) and secureport 9443 (HTTPS) for communication. During IBM Security Key Lifecycle Manager installation, you canmodify these default ports. If you are using the default port for HTTP or HTTPS, the port is an optionalpart of the URL.
Request
Request Parameters
Parameter Description
host Specify the IP address or host name of the IBM Security Key LifecycleManager server.
port Specify the port number on which the IBM Security Key LifecycleManager server listens for requests.
Request Headers
Header name Value
Content-Type application/json
Accept application/json
Authorization SKLMAuth userAuthId=<authIdValue>
Accept-Language Any valid locale that is supported by IBM Security Key LifecycleManager. For example: en or de
Response
Chapter 1. Administering 351

Response Headers
Header name Value and description
Status Code 200 OKThe request was successful. The response body contains therequested representation.
400 Bad RequestThe authentication information was not provided in the correctformat.
401 UnauthorizedThe authentication credentials were missing or incorrect.
404 Not Found ErrorThe processing of the request fails.
500 Internal Server ErrorThe processing of the request fails because of an unexpectedcondition on the server.
Content-Type application/json
Content-Language Locale for the response message.
Success response body
JSON array that contains JSON objects with the following specification:
JSON property name Description
nodeType Returns the master type, such as PRIMARY, STANDBY, or LOCAL.
nodeIP Returns the IP address of the master.
ippPortStatus Returns the status code that indicates whether the IBM ProprietaryProtocol (IPP) port is reachable.
kmipPortStatus Returns the status code that indicates whether the Key ManagementInteroperability Protocol (KMIP) port is reachable.
agentPortStatus Returns the status code that indicates whether the agent port in themaster is reachable.
sslPortStatus Returns the status code that indicates whether the SSL port is reachable.
adminPortStatus Returns the status code that indicates whether the WebSphereApplication Server port for the IBM Security Key Lifecycle Managerprofile is reachable.
dbPortStatus Returns the status code that indicates whether the DB2 service listeningport is reachable.
httpPortStatus Returns the status code that indicates whether the HTTPS port isreachable.
actingPrimary Returns whether the master is promoted as a primary master.
lastUpdateTimeStamp Returns the time stamp that the master status was last updated.
352 IBM Security Key Lifecycle Manager : Administering

Error Response Body
JSON object with the following specification.
JSON property name Description
code Returns the application error code.
message Returns a message that describes the error.
ExamplesService request to get status of all the masters in the cluster
GET https://localhost:<port>/SKLM/rest/v1/ckms/nodes/allNodeStatusContent-Type: application/jsonAccept : application/jsonAuthorization: SKLMAuth userAuthId=139aeh34567mAccept-Language : en
Success response
Status Code : 200 OKContent-Language: en[ { "nodeType":"STANDBY", "nodeIP":"cimkc2a177", "ippPortStatus":0, "kmipPortStatus":0, "agentPortStatus":0, "sslPortStatus":0, "adminPortStatus":0, "dbPortStatus":0, "httpPortStatus":0, "actingPrimary":false, "lastUpdateTimeStamp":"2017-07-21 13:32:40.536" }, { "nodeType":"PRIMARY", "nodeIP":"cimkc2a176", "ippPortStatus":0, "kmipPortStatus":0, "agentPortStatus":0, "sslPortStatus":0, "adminPortStatus":0, "dbPortStatus":0, "httpPortStatus":0, "actingPrimary":true, "lastUpdateTimeStamp":"2017-07-21 13:06:36.752" }]
Error response
Status Code : 400 Bad RequestContent-Language: en{"code" : "CTGKM6002E", "message" : "CTGKM6002E Bad Request: Invalid user authentication ID or invalid request format."}
tklmCertExportUse the tklmCertExport command to export a certificate file.
Note: The IBM Security Key Lifecycle Manager command-line interface commands will be deprecated inthe later versions of IBM Security Key Lifecycle Manager. Use the REST interfaces instead.
PurposeUse this command to export a certificate file.
Chapter 1. Administering 353
Permissions
Your role must have the permissions to the get action and to the appropriate device group. Or, your rolemust have the permission to the configure action to export an SSL or KMIP certificate.
SyntaxtklmCertExport -uuid universalCertID -fileName pathandfilename -format {base64 | DER}
Parameters-fileName
Required. Specify the path and file name to which the certificate is exported.
If you specify no path, or a relative path, the command appends the file and the path, if specified, tothe SKLM_DATA directory. If you specify an absolute path, the file is stored in that path, which is notrelative to the SKLM_DATA directory.
-formatSpecify either base64 (default, if this parameter is not specified) or DER (Distinguished EncodingRules) format.
-uuidRequired. Specify the Universal Unique Identifier of the certificate.
Example
This Jython-formatted command exports a certificate.
print AdminTask.tklmCertExport ('[-uuid CERTIFICATE-61f8e7ca-62aa-47d5-a915–8adbfbdca9de -format DER -fileName d:\\mypath\\mycertfilename.der]')
Certificate Export REST ServiceUse Certificate Export REST Service to export a certificate file.
OperationPUT
URLhttps://<host>:<port>/SKLM/rest/v1/certificates/export
By default, IBM Security Key Lifecycle Manager server listens to non-secure port 9080 (HTTP) and secureport 9443 (HTTPS) for communication. During IBM Security Key Lifecycle Manager installation, you canmodify these default ports. If you are using the default port for HTTP or HTTPS, the port is an optionalpart of the URL.
Request
Request Parameters
Parameter Description
host Specify the IP address or host name of the IBM Security Key LifecycleManager server.
port Specify the port number on which the IBM Security Key LifecycleManager server listens for requests.
Request Headers
Header name Value
Content-Type application/json
354 IBM Security Key Lifecycle Manager : Administering

Request Headers (continued)
Header name Value
Accept application/json
Authorization SKLMAuth userAuthId=<authIdValue>
Accept-Language Any valid locale that is supported by IBM Security Key LifecycleManager. For example: en or de
Request body
JSON object with the following specification:
Property name Description
uuid Specify the Universal Unique Identifier of the certificate.
fileName Specify the path and file name to which the certificate is exported.
If you specify no path or a relative path, the command appends the fileand the path to the SKLM_HOME directory if you specify it.
If you specify an absolute path, the file is stored in that path; it is notrelative to the SKLM_HOME directory.
format Optional. Specify any of the following formats for file content:
• base64• DER (Distinguished Encoding Rules)
Response
Response Headers
Header name Value and description
Status Code 200 OKThe request was successful. The response body contains therequested representation.
400 Bad RequestThe authentication information was not provided in the correctformat.
401 UnauthorizedThe authentication credentials were missing or incorrect.
404 Not Found ErrorThe processing of the request fails.
500 Internal Server ErrorThe processing of the request fails because of an unexpectedcondition on the server.
Content-Type application/json
Content-Language Locale for the response message.
Chapter 1. Administering 355
Success response body
JSON object with the following specification:
JSON property name Description
code Returns a 0 (zero) to indicate the completion of the certificate exporttask.
status Returns the status with an appropriate message to indicate whether thecertificate is exported.
Error Response Body
JSON object with the following specification.
JSON property name Description
code Returns the application error code.
message Returns a message that describes the error.
ExamplesService request to export a certificate
PUT https://localhost:<port>/SKLM/rest/v1/certificates/exportContent-Type: application/jsonAccept: application/jsonAuthorization: SKLMAuth userAuthId=139aeh34567m{"uuid":"CERTIFICATE-78d68704-fdde-42df-95da-debef9de930","format":"DER","fileName":"/mycertificate.der"}
Success response
Status Code: 200 OK{"code":"0","status":"Succeeded"}
Error response for an invalid request
PUT https://localhost:<port>/SKLM/rest/v1/certificates/exportContent-Type: application/jsonAccept: application/jsonAuthorization: SKLMAuth userAuthId=139aeh34567m{"uuid":"CERTIFICATE-78d68704-fdde-42df-95da-debef9de930","format":"ABC","fileName":"/newcertificate.der"}
Error response
Status Code: 400 Bad Request{"code":"CTGKM0521E","message":"CTGKM0521E Unsupported certificate format: ABC"}}
Assign Users to a Client REST ServiceUse Assign Users to a Client REST Service to assign users to a client who can access thecryptographic objects of the client.
OperationPUT
URLhttps://host:port/SKLM/rest/v1/clients/{clientName}/assignUsers
By default, IBM Security Key Lifecycle Manager server listens to non-secure port 9080 (HTTP) and secureport 9443 (HTTPS) for communication. During IBM Security Key Lifecycle Manager installation, you can
356 IBM Security Key Lifecycle Manager : Administering
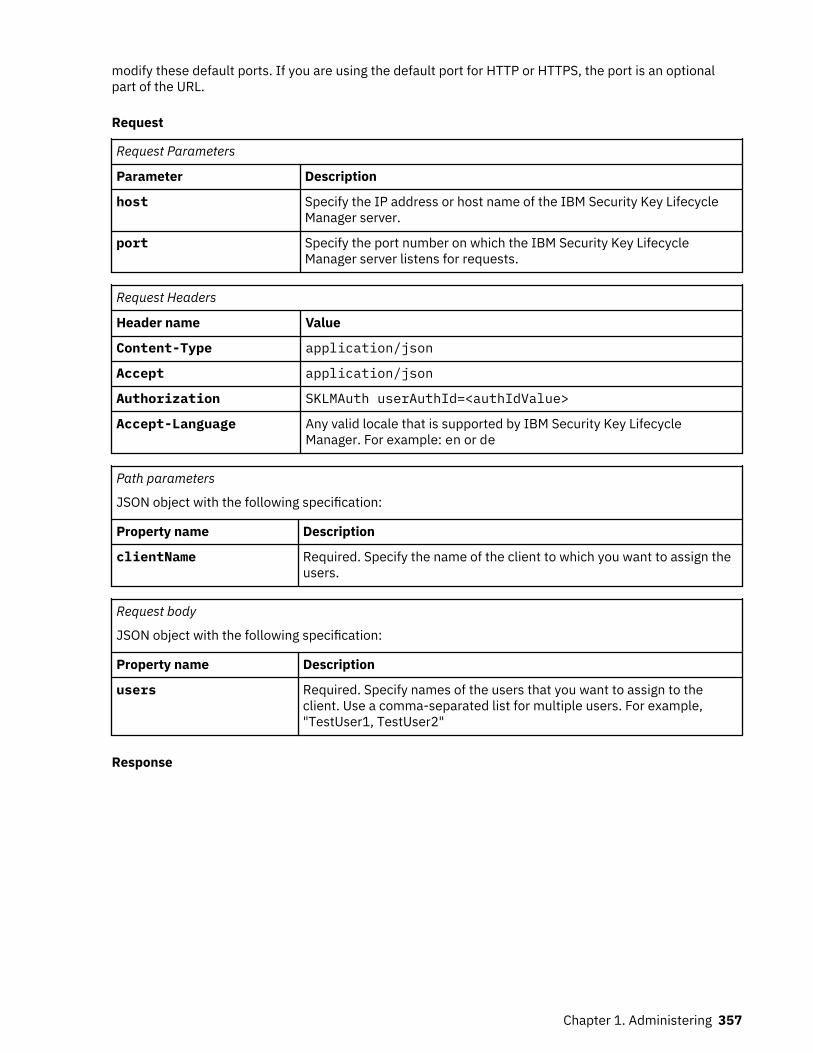
modify these default ports. If you are using the default port for HTTP or HTTPS, the port is an optionalpart of the URL.
Request
Request Parameters
Parameter Description
host Specify the IP address or host name of the IBM Security Key LifecycleManager server.
port Specify the port number on which the IBM Security Key LifecycleManager server listens for requests.
Request Headers
Header name Value
Content-Type application/json
Accept application/json
Authorization SKLMAuth userAuthId=<authIdValue>
Accept-Language Any valid locale that is supported by IBM Security Key LifecycleManager. For example: en or de
Path parameters
JSON object with the following specification:
Property name Description
clientName Required. Specify the name of the client to which you want to assign theusers.
Request body
JSON object with the following specification:
Property name Description
users Required. Specify names of the users that you want to assign to theclient. Use a comma-separated list for multiple users. For example,"TestUser1, TestUser2"
Response
Chapter 1. Administering 357
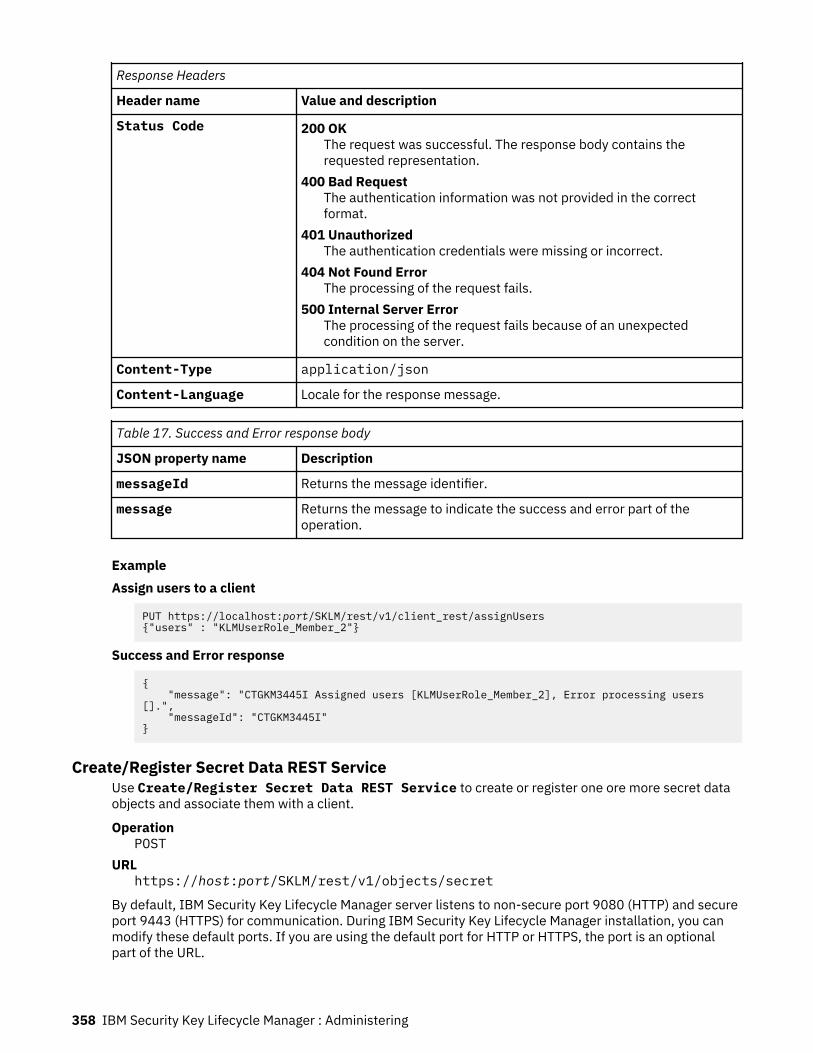
Response Headers
Header name Value and description
Status Code 200 OKThe request was successful. The response body contains therequested representation.
400 Bad RequestThe authentication information was not provided in the correctformat.
401 UnauthorizedThe authentication credentials were missing or incorrect.
404 Not Found ErrorThe processing of the request fails.
500 Internal Server ErrorThe processing of the request fails because of an unexpectedcondition on the server.
Content-Type application/json
Content-Language Locale for the response message.
Table 17. Success and Error response body
JSON property name Description
messageId Returns the message identifier.
message Returns the message to indicate the success and error part of theoperation.
ExampleAssign users to a client
PUT https://localhost:port/SKLM/rest/v1/client_rest/assignUsers{"users" : "KLMUserRole_Member_2"}
Success and Error response
{ "message": "CTGKM3445I Assigned users [KLMUserRole_Member_2], Error processing users [].", "messageId": "CTGKM3445I"}
Create/Register Secret Data REST ServiceUse Create/Register Secret Data REST Service to create or register one ore more secret dataobjects and associate them with a client.
OperationPOST
URLhttps://host:port/SKLM/rest/v1/objects/secret
By default, IBM Security Key Lifecycle Manager server listens to non-secure port 9080 (HTTP) and secureport 9443 (HTTPS) for communication. During IBM Security Key Lifecycle Manager installation, you canmodify these default ports. If you are using the default port for HTTP or HTTPS, the port is an optionalpart of the URL.
358 IBM Security Key Lifecycle Manager : Administering

Request
Request Parameters
Parameter Description
host Specify the IP address or host name of the IBM Security Key LifecycleManager server.
port Specify the port number on which the IBM Security Key LifecycleManager server listens for requests.
Request Headers
Header name Value
Content-Type application/json
Accept application/json
Authorization SKLMAuth userAuthId=<authIdValue>
Accept-Language Any valid locale that is supported by IBM Security Key LifecycleManager. For example: en or de
Request body
JSON object with the following specification:
Property name Description
clientName Required. Specify the name of the client.
prefixName Required. Specify the prefix that is used to create the alias.
numberOfObjects Optional. Specify the number of secret data objects.
Default value: 1
keyBlock Specify the following parameters if you want to register a secret dataobject:keyMaterial
Specify the key material value in Hex string format. For example,3082010a0282010100ab7f161c0042496ccd6c6d4dadb919.
keyFormatSpecify the format value of the secret data.
Default value: OPAQUE
cryptoUsageMask Optional. Specify the cryptographic usage for which the secret data is tobe used.
Default value: Verify
Other possible values: Decrypt, Encrypt_Decrypt, Sign, Sign_Verify,Verify, Wrap, Unwrap, Wrap_Unwrap
bitlength Optional. Specify the size of the secret data object.
Default value: 60
Response
Chapter 1. Administering 359
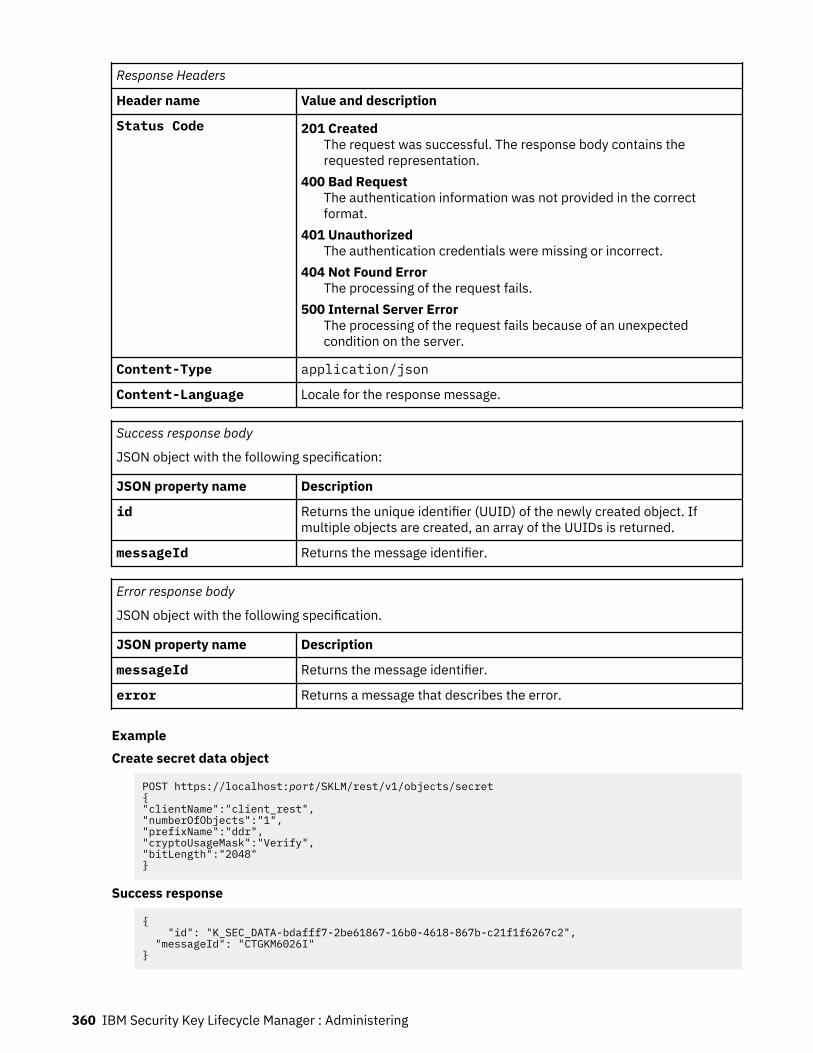
Response Headers
Header name Value and description
Status Code 201 CreatedThe request was successful. The response body contains therequested representation.
400 Bad RequestThe authentication information was not provided in the correctformat.
401 UnauthorizedThe authentication credentials were missing or incorrect.
404 Not Found ErrorThe processing of the request fails.
500 Internal Server ErrorThe processing of the request fails because of an unexpectedcondition on the server.
Content-Type application/json
Content-Language Locale for the response message.
Success response body
JSON object with the following specification:
JSON property name Description
id Returns the unique identifier (UUID) of the newly created object. Ifmultiple objects are created, an array of the UUIDs is returned.
messageId Returns the message identifier.
Error response body
JSON object with the following specification.
JSON property name Description
messageId Returns the message identifier.
error Returns a message that describes the error.
ExampleCreate secret data object
POST https://localhost:port/SKLM/rest/v1/objects/secret{"clientName":"client_rest", "numberOfObjects":"1","prefixName":"ddr","cryptoUsageMask":"Verify","bitLength":"2048"}
Success response
{ "id": "K_SEC_DATA-bdafff7-2be61867-16b0-4618-867b-c21f1f6267c2", "messageId": "CTGKM6026I"}
360 IBM Security Key Lifecycle Manager : Administering

Error response
{ "messageId": "CTGKM0631E", "error": "CTGKM0631E Missing required parameter \" prefixName \" ."}
Register a secret data object
POST https://localhost:port/SKLM/rest/v1/objects/secret{"clientName":"client_rest","keyBlock":{"keyFormat":"OPAQUE","keyMaterial":"4428472B4B6250655368566D597133743677397A244226452948404D635166546A576E5A7234753778214125442A462D4A614E645267556B58703273357638792F423F4528482B4B6250655368566D597133743677397A24432646294A404E635166546A576E5A7234753778214125442A472D4B6150645367556B58703273357638792F423F4528482B4D6251655468576D597133743677397A24432646294A404E635266556A586E327234753778214125442A472D4B6150645367566B59703373367638792F423F4528482B4D6251655468576D5A7134743777217A24432646294A404E635266556A586E3272357538782F413F442A472D4B615064536756"},"prefixName":"ddr","cryptoUsageMask":"Verify","bitLength":"2048"}
Success response
{ "id": "K_SEC_DATA-bdafff7-f2634ef7-cff0-46d8-abd5-e065c8b6476c", "messageId": "CTGKM6026I"}
Error response
{ "messageId": "CTGKM0631E", "error": "CTGKM0631E Missing required parameter \" prefixName \" ."}
Create/Register KeyPair REST ServiceUse Create/Register KeyPair REST Service to create or register a public-private key pair andassociate it with a client.
OperationPOST
URLhttps://host:port/SKLM/rest/v1/objects/keypair
By default, IBM Security Key Lifecycle Manager server listens to non-secure port 9080 (HTTP) and secureport 9443 (HTTPS) for communication. During IBM Security Key Lifecycle Manager installation, you canmodify these default ports. If you are using the default port for HTTP or HTTPS, the port is an optionalpart of the URL.
Request
Request Parameters
Parameter Description
host Specify the IP address or host name of the IBM Security Key LifecycleManager server.
port Specify the port number on which the IBM Security Key LifecycleManager server listens for requests.
Chapter 1. Administering 361

Request Headers
Header name Value
Content-Type application/json
Accept application/json
Authorization SKLMAuth userAuthId=<authIdValue>
Accept-Language Any valid locale that is supported by IBM Security Key LifecycleManager. For example: en or de
Request body
JSON object with the following specification:
Property name Description
clientName Required. Specify the name of the client.
prefixName Required. Specify the prefix that is used to create the alias.
publicKeyBlock Specify the following parameters if you want to register the key pair:publicKeyMaterial
Specify the key material value of the public key in Hex string format.For example,3082010a0282010100ab7f161c0042496ccd6c6d4dadb919.
publicKeyFormatSpecify the format value of the public key.
Default value: X509
Other possible value: PKCS1
privateKeyBlock Required. Specify the following parameters if you want to register thekey pair:privateKeyMaterial
Required. Specify the key material value of the private key in Hexstring format. For example,3082010a0282010100ab7f161c0042496ccd6c6d4dadb919.
privateKeyFormatOptional. Specify the format value of the private key.
Default value: PKCS8
Other possible value: PKCS1
numberOfObjects Optional. Specify the number of public-private key pair objects that youwant to create and assign to the client.
Default value: 1
privateKeyCryptoUsageMask
Optional. Specify the cryptographic usage for which the private key is tobe used.
Default value: Sign
Other possible values: Encrypt, Decrypt, Encrypt_Decrypt, Sign,Sign_Verify, Verify, Wrap, Unwrap, Wrap_Unwrap
362 IBM Security Key Lifecycle Manager : Administering
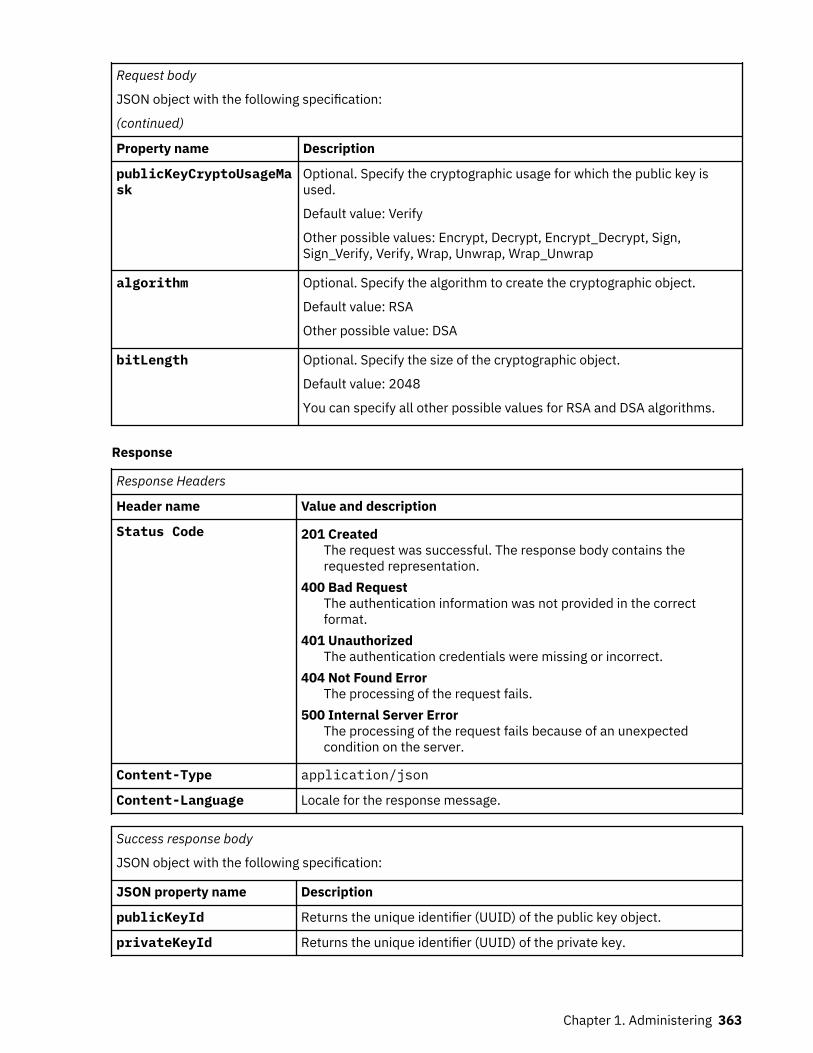
Request body
JSON object with the following specification:
(continued)
Property name Description
publicKeyCryptoUsageMask
Optional. Specify the cryptographic usage for which the public key isused.
Default value: Verify
Other possible values: Encrypt, Decrypt, Encrypt_Decrypt, Sign,Sign_Verify, Verify, Wrap, Unwrap, Wrap_Unwrap
algorithm Optional. Specify the algorithm to create the cryptographic object.
Default value: RSA
Other possible value: DSA
bitLength Optional. Specify the size of the cryptographic object.
Default value: 2048
You can specify all other possible values for RSA and DSA algorithms.
Response
Response Headers
Header name Value and description
Status Code 201 CreatedThe request was successful. The response body contains therequested representation.
400 Bad RequestThe authentication information was not provided in the correctformat.
401 UnauthorizedThe authentication credentials were missing or incorrect.
404 Not Found ErrorThe processing of the request fails.
500 Internal Server ErrorThe processing of the request fails because of an unexpectedcondition on the server.
Content-Type application/json
Content-Language Locale for the response message.
Success response body
JSON object with the following specification:
JSON property name Description
publicKeyId Returns the unique identifier (UUID) of the public key object.
privateKeyId Returns the unique identifier (UUID) of the private key.
Chapter 1. Administering 363

Success response body
JSON object with the following specification:
(continued)
JSON property name Description
id Returns an array of the UUIDs. This property value is returned only if thenumber of objects being created is more than one.
messageId Returns the message identifier.
Error response body
JSON object with the following specification.
JSON property name Description
messageId Returns the message identifier.
error Returns a message that describes the error.
ExampleCreate public-private key pair
POST https://localhost:port/SKLM/rest/v1/objects/keypair{"clientName":"client_rest","numberOfObjects":"2","prefixName":"fds","privateKeyCryptoUsageMask":"Encrypt","publicKeyCryptoUsageMask":"Decrypt","algorithm":"RSA","bitLength":"2048""publicKeyBlock":{ "publicKeyFormat":"X509", "publicKeyMaterial":"30819f300d06092a864886f70d010101050003818d0030818902818100930451c9ecd94f5bb9da17dd09381bd23be43eca8c7539f301fc8a8cd5d5274c3e7699dbdc711c97a7aa91e2c50a82bd0b1034f0df493dec16362427e58acce7f6ce0f9bcc617bbd8c90d0094a2703ba0d09eb19d1005f2fb265526aac75af32f8bc782cded2a57f811e03eaf67a944de5e78413dca8f232d074e6dcea4cec9f0203010001"},"privateKeyBlock":{ "privateKeyFormat":"PKCS8", "privateKeyMaterial":"30820276020100300d06092a864886f70d0101010500048202603082025c02010002818100930451c9ecd94f5bb9da17dd09381bd23be43eca8c7539f301fc8a8cd5d5274c3e7699dbdc711c97a7aa91e2c50a82bd0b1034f0df493dec16362427e58acce7f6ce0f9bcc617bbd8c90d0094a2703ba0d09eb19d1005f2fb265526aac75af32f8bc782cded2a57f811e03eaf67a944de5e78413dca8f232d074e6dcea4cec9f02030100010281800b6a7d736199ea48a420e4537ca0c7c046784dcbeaa63baebc0bc132787449cde8d7cad0c0c863c0fefb06c3062befc50033ecf87b4e33a9be7bcbc8f1511ae215e80deb5d8af2bd31319d7821196640935a0cd67c94599579f2100d65e038831fdafb0dbe2bbdac00a696e67e756350e1c99ace11a36dabac3ed3e730960059024100ddf672fbcc5bda3d73affc4e791e0c03390224405d69ccaabc749faa0dcd4c2583c71dde8941a7b9aa030f52ef1451466c074d4d338fe677892acd9e10fd35bd024100a98fbc3ed6b4c6f860f97165ac2f7bb6f2e2cb192a9abd49795be5bcf37d8ee69a6e169c24e5c32e4e7fa33265461407f952ba49e204818a2f785f113f922b8b0240253f9470390d39049303777ddbc9750e9d64849ce0903eae704dc9f589b7680deb9d609fd5bcd4decd6f120542e5cff5d76f2a43c8615fb5b3a9213463797aa9024100a1ddf023c0cd94c019bb26d09b9e3ca8fa971cb16aa58b9baf79d6081a1dbba452ba53653e2804ba98ff69e8bb1b3a161ea225ea501463216a8dab9b88a75e5f02406178646e112cf79d921a8a843f17f6e7ff974f688122365bf6690cdfc996e1890952eb3820dd1890ec1c8619e87a2bd38f9d03b37fac742efb748c7885942c39"}}
}
Success response
{ "id": [ { "publicKeyId": "KEY-d374678-2b27b43b-55d9-45b7-91d9-a2f0790dec52", "privateKeyId": "KEY-d374678-3b1ec88b-bf0f-4a50-9f75-51db32895c2f" },
364 IBM Security Key Lifecycle Manager : Administering
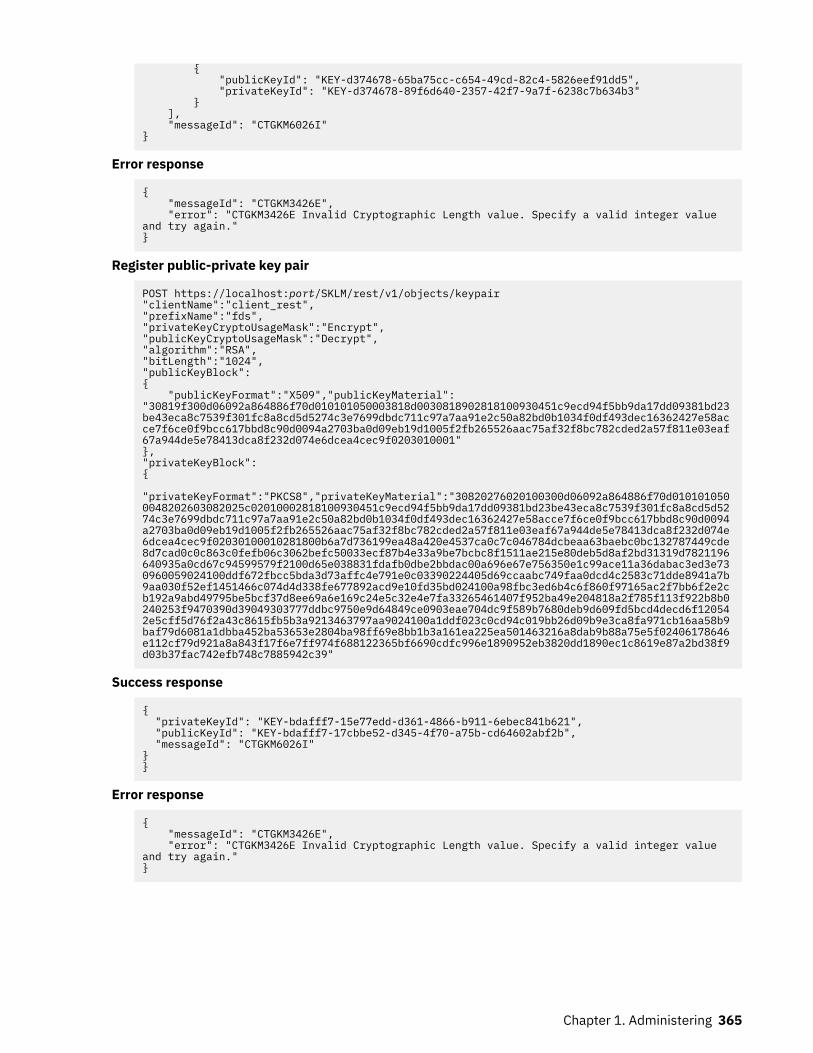
{ "publicKeyId": "KEY-d374678-65ba75cc-c654-49cd-82c4-5826eef91dd5", "privateKeyId": "KEY-d374678-89f6d640-2357-42f7-9a7f-6238c7b634b3" } ], "messageId": "CTGKM6026I"}
Error response
{ "messageId": "CTGKM3426E", "error": "CTGKM3426E Invalid Cryptographic Length value. Specify a valid integer value and try again."}
Register public-private key pair
POST https://localhost:port/SKLM/rest/v1/objects/keypair"clientName":"client_rest","prefixName":"fds","privateKeyCryptoUsageMask":"Encrypt","publicKeyCryptoUsageMask":"Decrypt","algorithm":"RSA","bitLength":"1024","publicKeyBlock":{ "publicKeyFormat":"X509","publicKeyMaterial":"30819f300d06092a864886f70d010101050003818d0030818902818100930451c9ecd94f5bb9da17dd09381bd23be43eca8c7539f301fc8a8cd5d5274c3e7699dbdc711c97a7aa91e2c50a82bd0b1034f0df493dec16362427e58acce7f6ce0f9bcc617bbd8c90d0094a2703ba0d09eb19d1005f2fb265526aac75af32f8bc782cded2a57f811e03eaf67a944de5e78413dca8f232d074e6dcea4cec9f0203010001"},"privateKeyBlock":{ "privateKeyFormat":"PKCS8","privateKeyMaterial":"30820276020100300d06092a864886f70d0101010500048202603082025c02010002818100930451c9ecd94f5bb9da17dd09381bd23be43eca8c7539f301fc8a8cd5d5274c3e7699dbdc711c97a7aa91e2c50a82bd0b1034f0df493dec16362427e58acce7f6ce0f9bcc617bbd8c90d0094a2703ba0d09eb19d1005f2fb265526aac75af32f8bc782cded2a57f811e03eaf67a944de5e78413dca8f232d074e6dcea4cec9f02030100010281800b6a7d736199ea48a420e4537ca0c7c046784dcbeaa63baebc0bc132787449cde8d7cad0c0c863c0fefb06c3062befc50033ecf87b4e33a9be7bcbc8f1511ae215e80deb5d8af2bd31319d7821196640935a0cd67c94599579f2100d65e038831fdafb0dbe2bbdac00a696e67e756350e1c99ace11a36dabac3ed3e730960059024100ddf672fbcc5bda3d73affc4e791e0c03390224405d69ccaabc749faa0dcd4c2583c71dde8941a7b9aa030f52ef1451466c074d4d338fe677892acd9e10fd35bd024100a98fbc3ed6b4c6f860f97165ac2f7bb6f2e2cb192a9abd49795be5bcf37d8ee69a6e169c24e5c32e4e7fa33265461407f952ba49e204818a2f785f113f922b8b0240253f9470390d39049303777ddbc9750e9d64849ce0903eae704dc9f589b7680deb9d609fd5bcd4decd6f120542e5cff5d76f2a43c8615fb5b3a9213463797aa9024100a1ddf023c0cd94c019bb26d09b9e3ca8fa971cb16aa58b9baf79d6081a1dbba452ba53653e2804ba98ff69e8bb1b3a161ea225ea501463216a8dab9b88a75e5f02406178646e112cf79d921a8a843f17f6e7ff974f688122365bf6690cdfc996e1890952eb3820dd1890ec1c8619e87a2bd38f9d03b37fac742efb748c7885942c39"
Success response
{ "privateKeyId": "KEY-bdafff7-15e77edd-d361-4866-b911-6ebec841b621", "publicKeyId": "KEY-bdafff7-17cbbe52-d345-4f70-a75b-cd64602abf2b", "messageId": "CTGKM6026I"}}
Error response
{ "messageId": "CTGKM3426E", "error": "CTGKM3426E Invalid Cryptographic Length value. Specify a valid integer value and try again."}
Chapter 1. Administering 365

Create/Register Symmetric Key REST ServiceUse Create/Register Symmetric Key REST Service to create or register one or more symmetrickeys and associate them with a client.
OperationPOST
URLhttps://host:port/SKLM/rest/v1/objects/symmetrickey
By default, IBM Security Key Lifecycle Manager server listens to non-secure port 9080 (HTTP) and secureport 9443 (HTTPS) for communication. During IBM Security Key Lifecycle Manager installation, you canmodify these default ports. If you are using the default port for HTTP or HTTPS, the port is an optionalpart of the URL.
Request
Request Parameters
Parameter Description
host Specify the IP address or host name of the IBM Security Key LifecycleManager server.
port Specify the port number on which the IBM Security Key LifecycleManager server listens for requests.
Request Headers
Header name Value
Content-Type application/json
Accept application/json
Authorization SKLMAuth userAuthId=<authIdValue>
Accept-Language Any valid locale that is supported by IBM Security Key LifecycleManager. For example: en or de
Request body
JSON object with the following specification:
Property name Description
clientName Required. Specify the name of the client.
prefixName Required. Specify the prefix that is used to create the alias.
keyBlock Optional. Specify the following parameters if you want to register asymmetric key:keyMaterial
Specify the key material value of the symmetric key in Hex stringformat. For example,3082010a0282010100ab7f161c0042496ccd6c6d4dadb919.
keyFormatSpecify the format value of the symmetric key.
Default value: RAW
Other possible value: TRANSPARENT_SYMMETRIC_KEY
366 IBM Security Key Lifecycle Manager : Administering

Request body
JSON object with the following specification:
(continued)
Property name Description
numberOfObjects Optional. Specify the number of symmetric keys that you want to createor register.
Default value: 1
algorithm Optional. Specify the algorithm to create symmetric key.
Default value: AES
Other possible value: 3DES
bitlength Optional. Specify the size of the key.For AES algorithm
Default value: 256
Other possible values: 128,192
For 3DES algorithmPossible values: 112, 168
cryptoUsageMask Optional. Specify the cryptographic usage for which the symmetric key isto be used.
Default value: Encrypt
Other possible values: Decrypt, Encrypt_Decrypt, Sign, Sign_Verify,Verify
Response
Response Headers
Header name Value and description
Status Code 201 CreatedThe request was successful. The response body contains therequested representation.
400 Bad RequestThe authentication information was not provided in the correctformat.
401 UnauthorizedThe authentication credentials were missing or incorrect.
404 Not Found ErrorThe processing of the request fails.
500 Internal Server ErrorThe processing of the request fails because of an unexpectedcondition on the server.
Content-Type application/json
Content-Language Locale for the response message.
Chapter 1. Administering 367
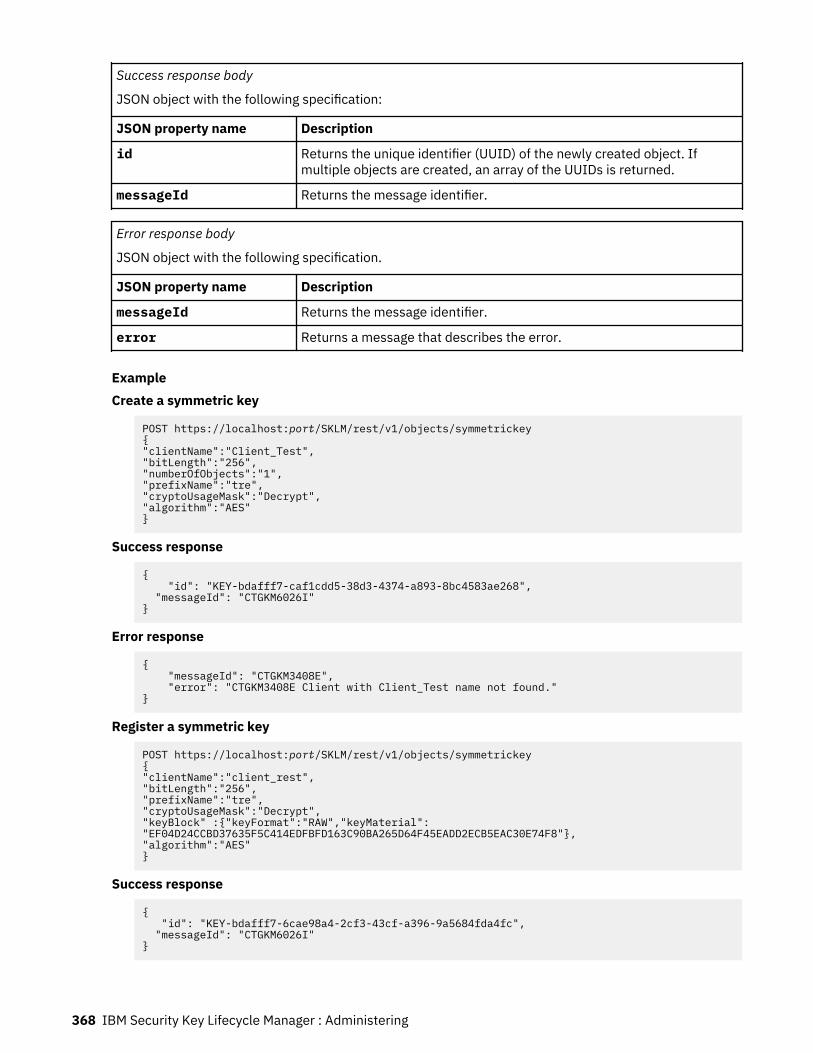
Success response body
JSON object with the following specification:
JSON property name Description
id Returns the unique identifier (UUID) of the newly created object. Ifmultiple objects are created, an array of the UUIDs is returned.
messageId Returns the message identifier.
Error response body
JSON object with the following specification.
JSON property name Description
messageId Returns the message identifier.
error Returns a message that describes the error.
ExampleCreate a symmetric key
POST https://localhost:port/SKLM/rest/v1/objects/symmetrickey{"clientName":"Client_Test","bitLength":"256","numberOfObjects":"1","prefixName":"tre","cryptoUsageMask":"Decrypt","algorithm":"AES" }
Success response
{ "id": "KEY-bdafff7-caf1cdd5-38d3-4374-a893-8bc4583ae268", "messageId": "CTGKM6026I"}
Error response
{ "messageId": "CTGKM3408E", "error": "CTGKM3408E Client with Client_Test name not found."}
Register a symmetric key
POST https://localhost:port/SKLM/rest/v1/objects/symmetrickey{"clientName":"client_rest","bitLength":"256","prefixName":"tre","cryptoUsageMask":"Decrypt","keyBlock" :{"keyFormat":"RAW","keyMaterial":"EF04D24CCBD37635F5C414EDFBFD163C90BA265D64F45EADD2ECB5EAC30E74F8"},"algorithm":"AES" }
Success response
{ "id": "KEY-bdafff7-6cae98a4-2cf3-43cf-a396-9a5684fda4fc", "messageId": "CTGKM6026I"}
368 IBM Security Key Lifecycle Manager : Administering
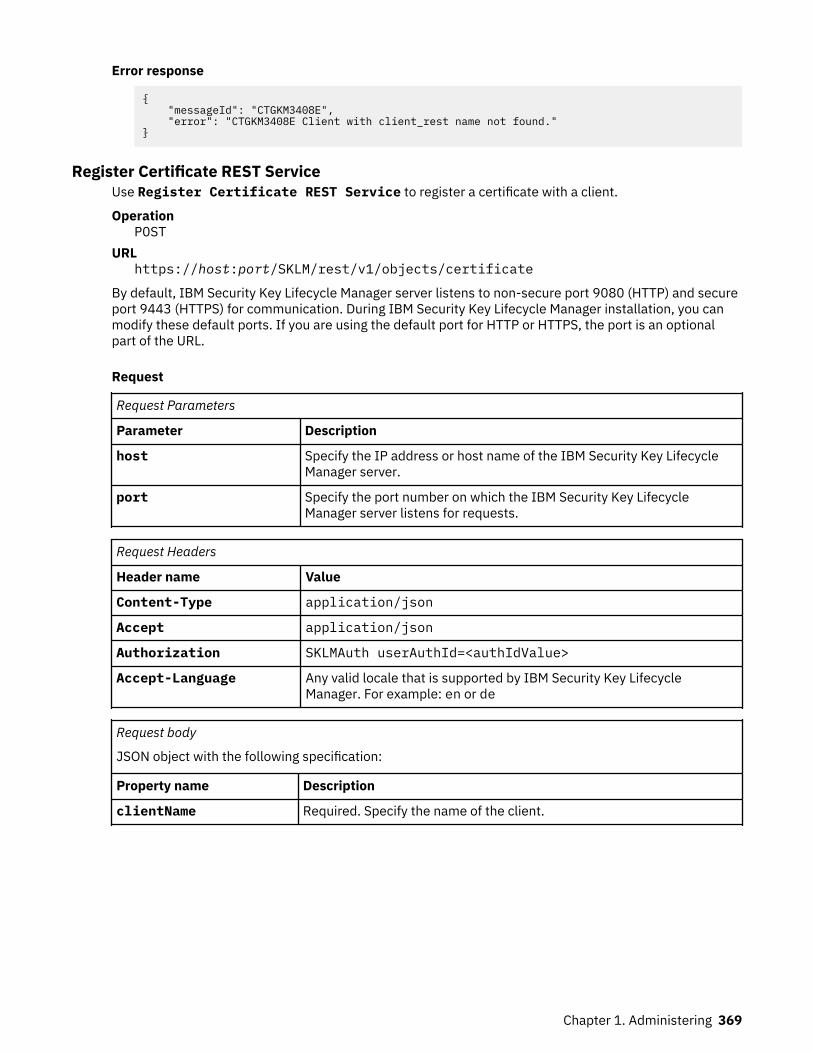
Error response
{ "messageId": "CTGKM3408E", "error": "CTGKM3408E Client with client_rest name not found."}
Register Certificate REST ServiceUse Register Certificate REST Service to register a certificate with a client.
OperationPOST
URLhttps://host:port/SKLM/rest/v1/objects/certificate
By default, IBM Security Key Lifecycle Manager server listens to non-secure port 9080 (HTTP) and secureport 9443 (HTTPS) for communication. During IBM Security Key Lifecycle Manager installation, you canmodify these default ports. If you are using the default port for HTTP or HTTPS, the port is an optionalpart of the URL.
Request
Request Parameters
Parameter Description
host Specify the IP address or host name of the IBM Security Key LifecycleManager server.
port Specify the port number on which the IBM Security Key LifecycleManager server listens for requests.
Request Headers
Header name Value
Content-Type application/json
Accept application/json
Authorization SKLMAuth userAuthId=<authIdValue>
Accept-Language Any valid locale that is supported by IBM Security Key LifecycleManager. For example: en or de
Request body
JSON object with the following specification:
Property name Description
clientName Required. Specify the name of the client.
Chapter 1. Administering 369
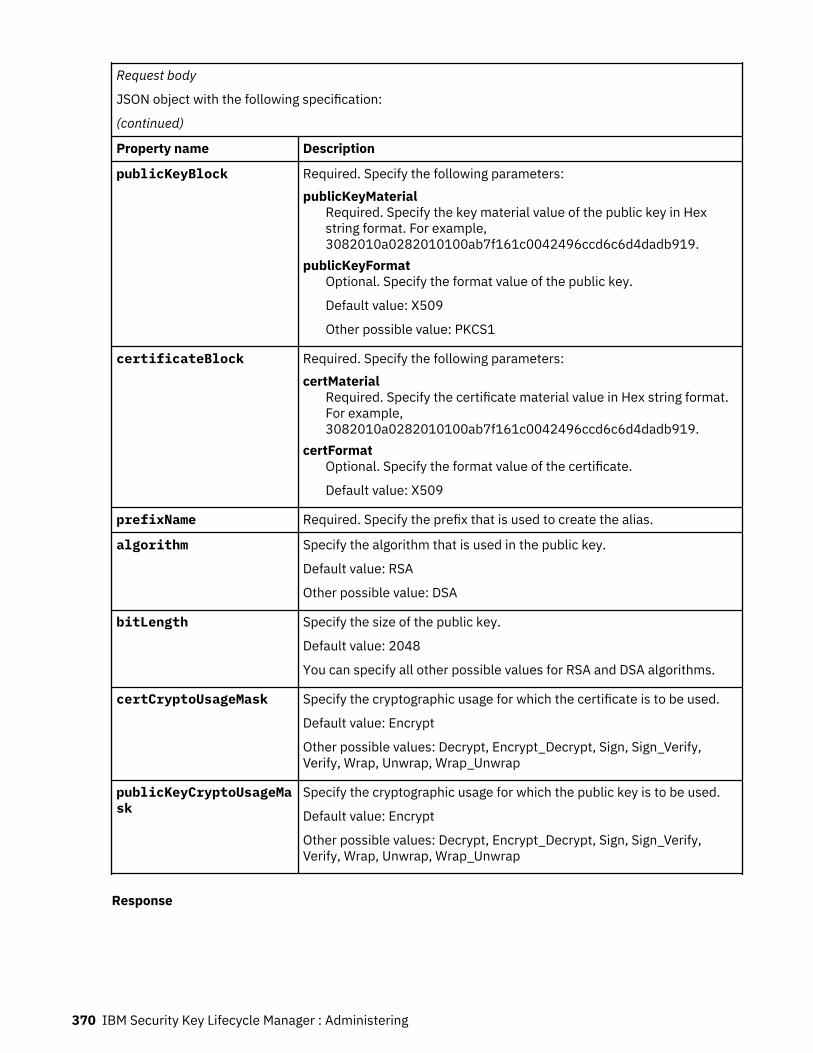
Request body
JSON object with the following specification:
(continued)
Property name Description
publicKeyBlock Required. Specify the following parameters:publicKeyMaterial
Required. Specify the key material value of the public key in Hexstring format. For example,3082010a0282010100ab7f161c0042496ccd6c6d4dadb919.
publicKeyFormatOptional. Specify the format value of the public key.
Default value: X509
Other possible value: PKCS1
certificateBlock Required. Specify the following parameters:certMaterial
Required. Specify the certificate material value in Hex string format.For example,3082010a0282010100ab7f161c0042496ccd6c6d4dadb919.
certFormatOptional. Specify the format value of the certificate.
Default value: X509
prefixName Required. Specify the prefix that is used to create the alias.
algorithm Specify the algorithm that is used in the public key.
Default value: RSA
Other possible value: DSA
bitLength Specify the size of the public key.
Default value: 2048
You can specify all other possible values for RSA and DSA algorithms.
certCryptoUsageMask Specify the cryptographic usage for which the certificate is to be used.
Default value: Encrypt
Other possible values: Decrypt, Encrypt_Decrypt, Sign, Sign_Verify,Verify, Wrap, Unwrap, Wrap_Unwrap
publicKeyCryptoUsageMask
Specify the cryptographic usage for which the public key is to be used.
Default value: Encrypt
Other possible values: Decrypt, Encrypt_Decrypt, Sign, Sign_Verify,Verify, Wrap, Unwrap, Wrap_Unwrap
Response
370 IBM Security Key Lifecycle Manager : Administering

Response Headers
Header name Value and description
Status Code 201 CreatedThe request was successful. The response body contains therequested representation.
400 Bad RequestThe authentication information was not provided in the correctformat.
401 UnauthorizedThe authentication credentials were missing or incorrect.
404 Not Found ErrorThe processing of the request fails.
500 Internal Server ErrorThe processing of the request fails because of an unexpectedcondition on the server.
Content-Type application/json
Content-Language Locale for the response message.
Success response body
JSON object with the following specification:
JSON property name Description
publicKeyId Returns the unique identifier (UUID) of the newly created public key.
certificateId Returns the unique identifier (UUID) of the newly created certificate.
messageId Returns the message identifier.
Error response body
JSON object with the following specification.
JSON property name Description
messageId Returns the message identifier.
error Returns a message that describes the error.
ExampleRegister a certificate
POST https://localhost:port/SKLM/rest/v1/objects/certificate{"clientName":"client_rest","publicKeyBlock":{"publickKeyFormat":"X509","publicKeyMaterial":"3082010a0282010100ab7f161c0042496ccd6c6d4dadb919973435357776003acf54b7af1e440afb80b64a8755f8002cfeba6b184540a2d66086d74648346d75b8d71812b205387c0f6583bc4d7dc7ec114f3b176b7957c422e7d03fc6267fa2a6f89b9bee9e60a1d7c2d833e5a5f4bb0b1434f4e795a41100f8aa214900df8b65089f98135b1c67b701675abdbc7d5721aac9d14a7f081fcec80b64e8a0ecc8295353c795328abf70e1b42e7bb8b7f4e8ac8c810cdb66e3d21126eba8da7d0ca34142cb76f91f013da809e9c1b7ae64c54130fbc21d80e9c2cb06c5c8d7cce8946a9ac99b1c2815c3612a29a82d73a1f99374fe30e54951662a6eda29c6fc411335d5dc7426b0f6050203010001"},"certificateBlock":{"certFormat":"X509","certMaterial":"30820312308201faa003020102020101300d06092a864886f70d0101050500303b310b3009060355040613025553310d300b060355040a130454455354310e300c060355040b13054f41534953310d300b060355040313044b4d4950301e170d3130313130313233353935395a170d3230313130313233353935395a303b310b3009060355040613025553310d300b060355040a130454455354310e300c060355040b13054f41534953310d300b060355040313044b4d495030820122300d06092a864886f70d01010105000382010f003082010a0282010100ab7f161c0042496ccd6c6d4dadb919973435357776003acf54b7af1e440afb80b64a8755f8002cfeba6b184540a2d66086d74648346d75b8d71812b205387c0f6583bc4d7dc7ec114f3b176b7957c422e7d03fc6267fa2a6f89b9bee9e60a1d7c2d833e5a5f4bb0
Chapter 1. Administering 371
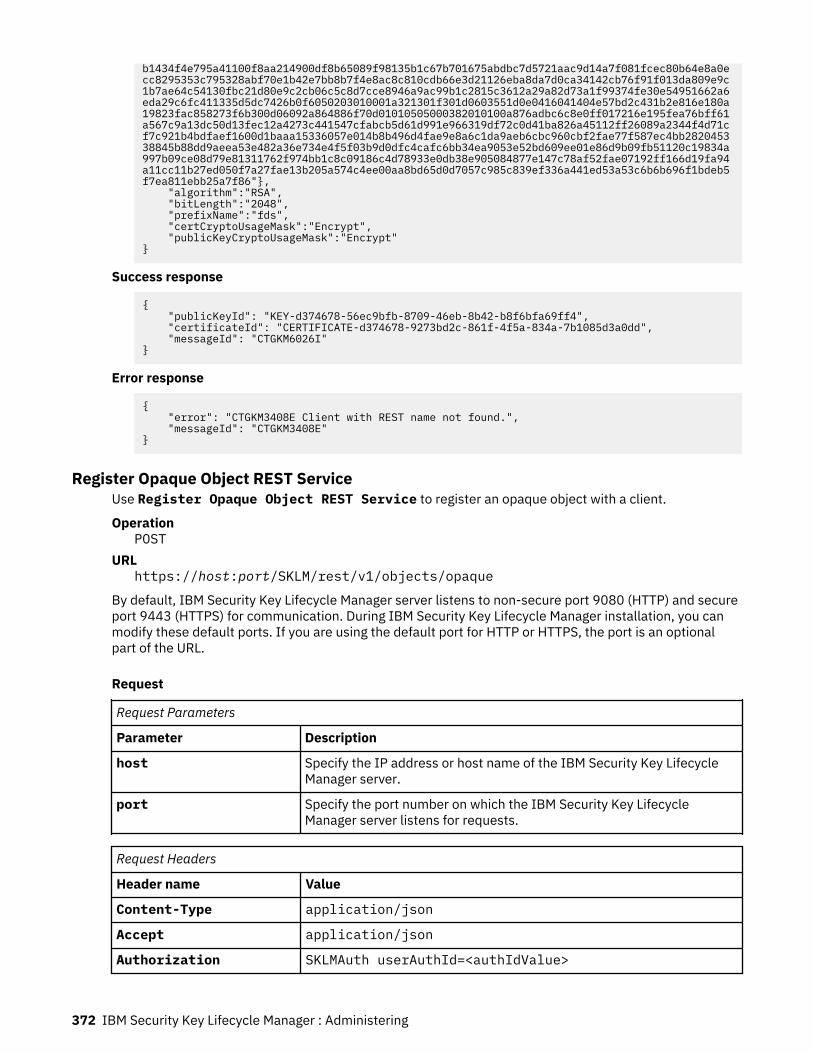
b1434f4e795a41100f8aa214900df8b65089f98135b1c67b701675abdbc7d5721aac9d14a7f081fcec80b64e8a0ecc8295353c795328abf70e1b42e7bb8b7f4e8ac8c810cdb66e3d21126eba8da7d0ca34142cb76f91f013da809e9c1b7ae64c54130fbc21d80e9c2cb06c5c8d7cce8946a9ac99b1c2815c3612a29a82d73a1f99374fe30e54951662a6eda29c6fc411335d5dc7426b0f6050203010001a321301f301d0603551d0e0416041404e57bd2c431b2e816e180a19823fac858273f6b300d06092a864886f70d01010505000382010100a876adbc6c8e0ff017216e195fea76bff61a567c9a13dc50d13fec12a4273c441547cfabcb5d61d991e966319df72c0d41ba826a45112ff26089a2344f4d71cf7c921b4bdfaef1600d1baaa15336057e014b8b496d4fae9e8a6c1da9aeb6cbc960cbf2fae77f587ec4bb282045338845b88dd9aeea53e482a36e734e4f5f03b9d0dfc4cafc6bb34ea9053e52bd609ee01e86d9b09fb51120c19834a997b09ce08d79e81311762f974bb1c8c09186c4d78933e0db38e905084877e147c78af52fae07192ff166d19fa94a11cc11b27ed050f7a27fae13b205a574c4ee00aa8bd65d0d7057c985c839ef336a441ed53a53c6b6b696f1bdeb5f7ea811ebb25a7f86"}, "algorithm":"RSA", "bitLength":"2048", "prefixName":"fds", "certCryptoUsageMask":"Encrypt", "publicKeyCryptoUsageMask":"Encrypt"}
Success response
{ "publicKeyId": "KEY-d374678-56ec9bfb-8709-46eb-8b42-b8f6bfa69ff4", "certificateId": "CERTIFICATE-d374678-9273bd2c-861f-4f5a-834a-7b1085d3a0dd", "messageId": "CTGKM6026I"}
Error response
{ "error": "CTGKM3408E Client with REST name not found.", "messageId": "CTGKM3408E"}
Register Opaque Object REST ServiceUse Register Opaque Object REST Service to register an opaque object with a client.
OperationPOST
URLhttps://host:port/SKLM/rest/v1/objects/opaque
By default, IBM Security Key Lifecycle Manager server listens to non-secure port 9080 (HTTP) and secureport 9443 (HTTPS) for communication. During IBM Security Key Lifecycle Manager installation, you canmodify these default ports. If you are using the default port for HTTP or HTTPS, the port is an optionalpart of the URL.
Request
Request Parameters
Parameter Description
host Specify the IP address or host name of the IBM Security Key LifecycleManager server.
port Specify the port number on which the IBM Security Key LifecycleManager server listens for requests.
Request Headers
Header name Value
Content-Type application/json
Accept application/json
Authorization SKLMAuth userAuthId=<authIdValue>
372 IBM Security Key Lifecycle Manager : Administering

Request Headers (continued)
Header name Value
Accept-Language Any valid locale that is supported by IBM Security Key LifecycleManager. For example: en or de
Request body
JSON object with the following specification:
Property name Description
clientName Required. Specify the name of the client.
keyBlock Required. Specify the key material value of the opaque object in Hexstring format. For example,3082010a0282010100ab7f161c0042496ccd6c6d4dadb919.
Response
Response Headers
Header name Value and description
Status Code 201 CreatedThe request was successful. The response body contains therequested representation.
400 Bad RequestThe authentication information was not provided in the correctformat.
401 UnauthorizedThe authentication credentials were missing or incorrect.
404 Not Found ErrorThe processing of the request fails.
500 Internal Server ErrorThe processing of the request fails because of an unexpectedcondition on the server.
Content-Type application/json
Content-Language Locale for the response message.
Success response body
JSON object with the following specification:
JSON property name Description
id Returns the unique identifier (UUID) of the newly created object. Ifmultiple objects are created, an array of the UUIDs is returned.
messageId Returns the message identifier.
Chapter 1. Administering 373

Error response body
JSON object with the following specification.
JSON property name Description
messageId Returns the message identifier.
error Returns a message that describes the error.
ExampleRegister an opaque object
POST https://localhost:port/SKLM/rest/v1/objects/opaque{"clientName":"client_rest", "keyBlock":{"keyMaterial":"2D4B6150645367566B59703373367639792442264529482B4D6251655468576D5A7134743777217A25432A462D4A614E635266556A586E3272357538782F413F4428472B4B6250655367566B5970337336763979244226452948404D635166546A576D5A7134743777217A25432A462D4A614E645267556B58703272357538782F413F4428472B4B6250655368566D5971337436763979244226452948404D635166546A576E5A7234753778217A25432A462D4A614E645267556B58703273357638792F423F4428472B4B6250655368566D597133743677397A244326462948404D635166546A576E5A7234753778214125442A472D4B614E645267556B5870","prefixName":"ddr"}
Success response
{ "id": "K_OPQ_OBJ-d374678-55891853-57d3-461b-b563-1b7c04546aa4", "messageId": "CTGKM6026I"}
Error response
{ "messageId": "CTGKM3408E", "error": "CTGKM3408E Client with client_rest name not found."}
Assign Client Certificate to a Client REST ServiceUse Assign Client Certificate to a Client REST Service to associate a certificate with aclient.
OperationPUT
URLhttps://host:port/SKLM/rest/v1/clients/{clientName}/assignCertificate
By default, IBM Security Key Lifecycle Manager server listens to non-secure port 9080 (HTTP) and secureport 9443 (HTTPS) for communication. During IBM Security Key Lifecycle Manager installation, you canmodify these default ports. If you are using the default port for HTTP or HTTPS, the port is an optionalpart of the URL.
Request
Request Parameters
Parameter Description
host Specify the IP address or host name of the IBM Security Key LifecycleManager server.
port Specify the port number on which the IBM Security Key LifecycleManager server listens for requests.
374 IBM Security Key Lifecycle Manager : Administering

Request Headers
Header name Value
Content-Type application/json
Accept application/json
Authorization SKLMAuth userAuthId=<authIdValue>
Accept-Language Any valid locale that is supported by IBM Security Key LifecycleManager. For example: en or de
Path parameters
JSON object with the following specification:
Property name Description
clientName Required. Specify the name of the client.
Request body
JSON object with the following specification:
Property name Description
certUseOption Required. Specify the option that you want to use to assign thecertificate to the client.
Specify one of the following values:
• ACCEPT_PENDING_CERT:
To accept the client communication certificate that was pushed to theIBM Security Key Lifecycle Manager server from a client device forsecure communication
• IMPORT_CERT:
To import a certificate and assign it to the client• USE_EXISTING:
To assign an existing certificate to the client
certAlias Required. Specify the alias of the certificate that you want to assign tothe client.
importPath Required only if you specify IMPORT_CERT as the option for thecertUseOption property.
Specify the complete path of the certificate file to be imported. Forexample, C:/Program Files/IBM/WebSphere/AppServer/products/sklm/data/clientCert.cer
certUUID Required only if you specify ACCEPT_PENDING_CERT as the option forthe certUseOption property.
Specify the universal unique identifier of the certificate that you want toaccept and import.
Response
Chapter 1. Administering 375
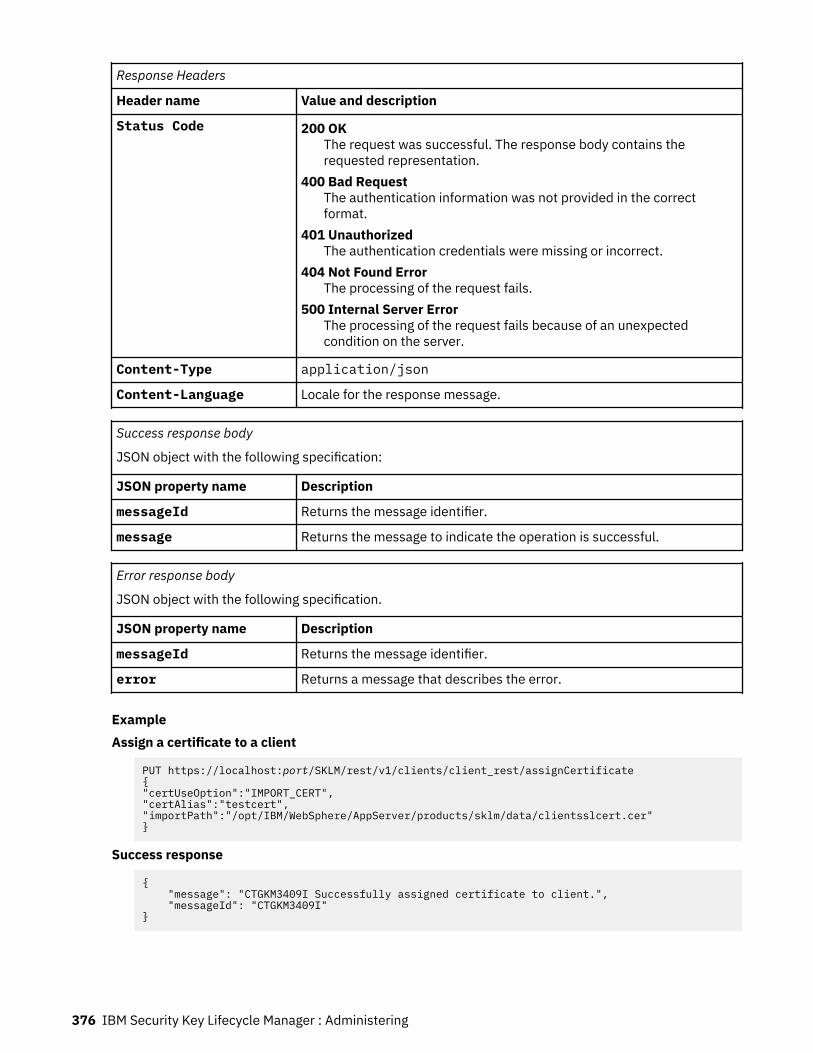
Response Headers
Header name Value and description
Status Code 200 OKThe request was successful. The response body contains therequested representation.
400 Bad RequestThe authentication information was not provided in the correctformat.
401 UnauthorizedThe authentication credentials were missing or incorrect.
404 Not Found ErrorThe processing of the request fails.
500 Internal Server ErrorThe processing of the request fails because of an unexpectedcondition on the server.
Content-Type application/json
Content-Language Locale for the response message.
Success response body
JSON object with the following specification:
JSON property name Description
messageId Returns the message identifier.
message Returns the message to indicate the operation is successful.
Error response body
JSON object with the following specification.
JSON property name Description
messageId Returns the message identifier.
error Returns a message that describes the error.
ExampleAssign a certificate to a client
PUT https://localhost:port/SKLM/rest/v1/clients/client_rest/assignCertificate{"certUseOption":"IMPORT_CERT","certAlias":"testcert","importPath":"/opt/IBM/WebSphere/AppServer/products/sklm/data/clientsslcert.cer"}
Success response
{ "message": "CTGKM3409I Successfully assigned certificate to client.", "messageId": "CTGKM3409I"}
376 IBM Security Key Lifecycle Manager : Administering
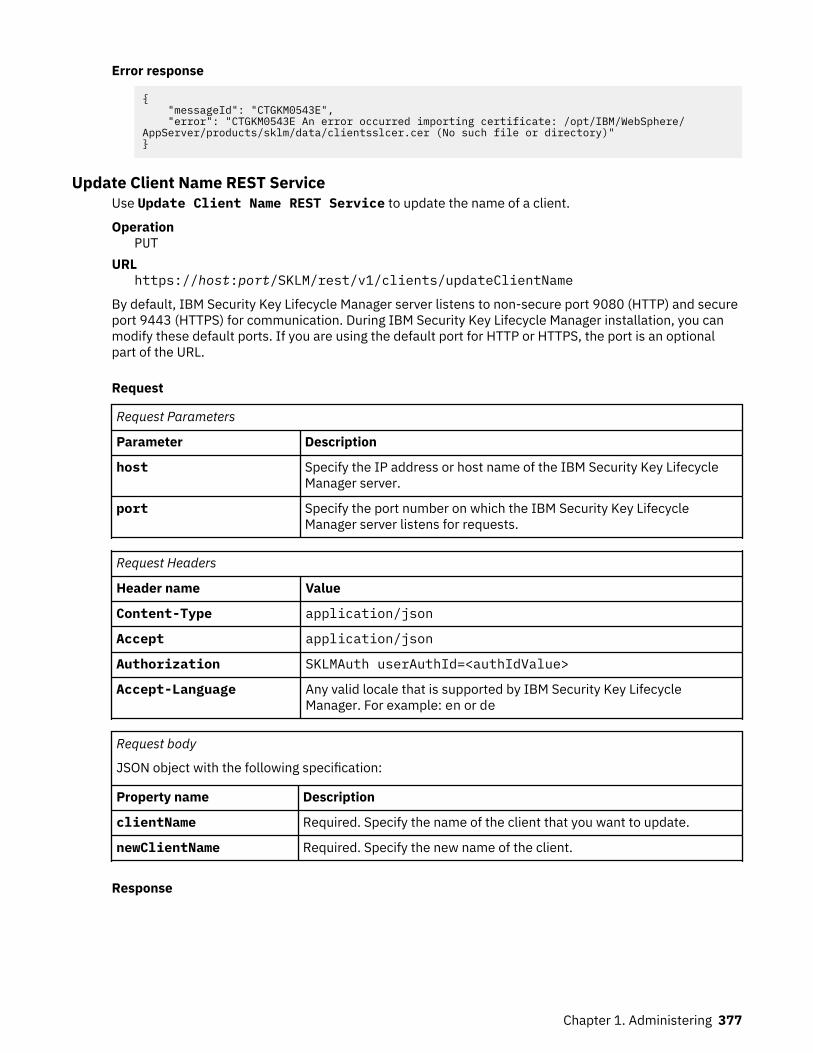
Error response
{ "messageId": "CTGKM0543E", "error": "CTGKM0543E An error occurred importing certificate: /opt/IBM/WebSphere/AppServer/products/sklm/data/clientsslcer.cer (No such file or directory)"}
Update Client Name REST ServiceUse Update Client Name REST Service to update the name of a client.
OperationPUT
URLhttps://host:port/SKLM/rest/v1/clients/updateClientName
By default, IBM Security Key Lifecycle Manager server listens to non-secure port 9080 (HTTP) and secureport 9443 (HTTPS) for communication. During IBM Security Key Lifecycle Manager installation, you canmodify these default ports. If you are using the default port for HTTP or HTTPS, the port is an optionalpart of the URL.
Request
Request Parameters
Parameter Description
host Specify the IP address or host name of the IBM Security Key LifecycleManager server.
port Specify the port number on which the IBM Security Key LifecycleManager server listens for requests.
Request Headers
Header name Value
Content-Type application/json
Accept application/json
Authorization SKLMAuth userAuthId=<authIdValue>
Accept-Language Any valid locale that is supported by IBM Security Key LifecycleManager. For example: en or de
Request body
JSON object with the following specification:
Property name Description
clientName Required. Specify the name of the client that you want to update.
newClientName Required. Specify the new name of the client.
Response
Chapter 1. Administering 377
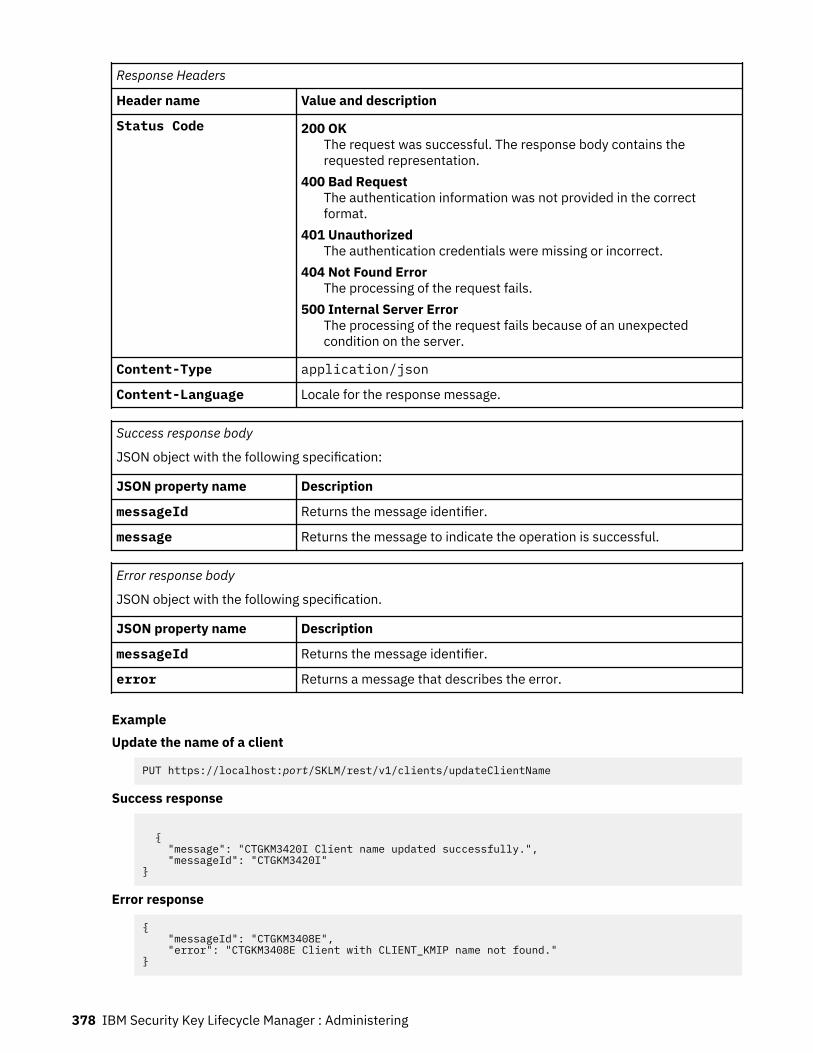
Response Headers
Header name Value and description
Status Code 200 OKThe request was successful. The response body contains therequested representation.
400 Bad RequestThe authentication information was not provided in the correctformat.
401 UnauthorizedThe authentication credentials were missing or incorrect.
404 Not Found ErrorThe processing of the request fails.
500 Internal Server ErrorThe processing of the request fails because of an unexpectedcondition on the server.
Content-Type application/json
Content-Language Locale for the response message.
Success response body
JSON object with the following specification:
JSON property name Description
messageId Returns the message identifier.
message Returns the message to indicate the operation is successful.
Error response body
JSON object with the following specification.
JSON property name Description
messageId Returns the message identifier.
error Returns a message that describes the error.
ExampleUpdate the name of a client
PUT https://localhost:port/SKLM/rest/v1/clients/updateClientName
Success response
{ "message": "CTGKM3420I Client name updated successfully.", "messageId": "CTGKM3420I"}
Error response
{ "messageId": "CTGKM3408E", "error": "CTGKM3408E Client with CLIENT_KMIP name not found."}
378 IBM Security Key Lifecycle Manager : Administering
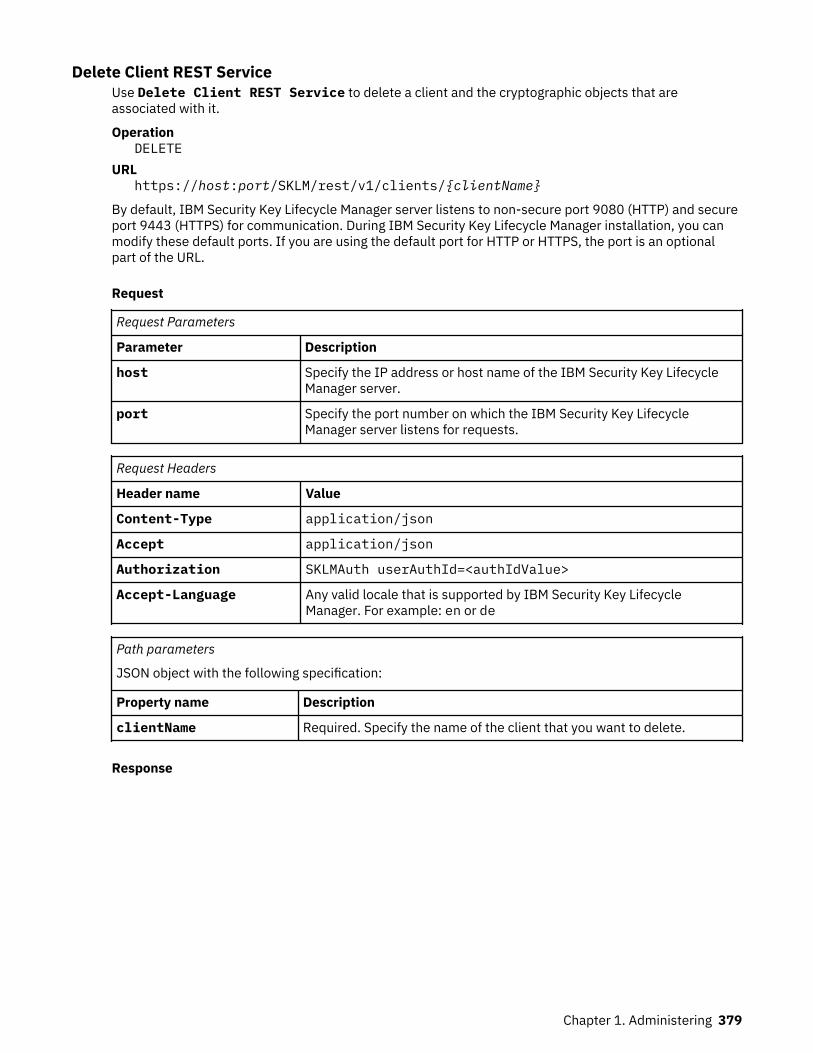
Delete Client REST ServiceUse Delete Client REST Service to delete a client and the cryptographic objects that areassociated with it.
OperationDELETE
URLhttps://host:port/SKLM/rest/v1/clients/{clientName}
By default, IBM Security Key Lifecycle Manager server listens to non-secure port 9080 (HTTP) and secureport 9443 (HTTPS) for communication. During IBM Security Key Lifecycle Manager installation, you canmodify these default ports. If you are using the default port for HTTP or HTTPS, the port is an optionalpart of the URL.
Request
Request Parameters
Parameter Description
host Specify the IP address or host name of the IBM Security Key LifecycleManager server.
port Specify the port number on which the IBM Security Key LifecycleManager server listens for requests.
Request Headers
Header name Value
Content-Type application/json
Accept application/json
Authorization SKLMAuth userAuthId=<authIdValue>
Accept-Language Any valid locale that is supported by IBM Security Key LifecycleManager. For example: en or de
Path parameters
JSON object with the following specification:
Property name Description
clientName Required. Specify the name of the client that you want to delete.
Response
Chapter 1. Administering 379
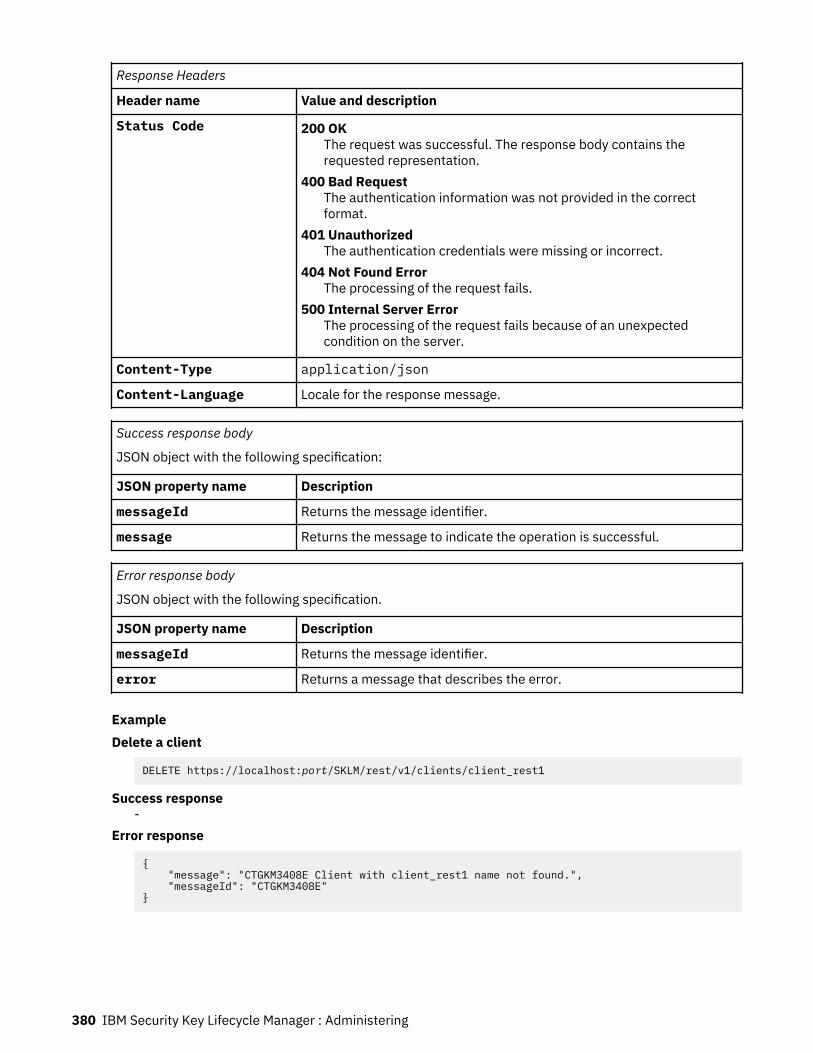
Response Headers
Header name Value and description
Status Code 200 OKThe request was successful. The response body contains therequested representation.
400 Bad RequestThe authentication information was not provided in the correctformat.
401 UnauthorizedThe authentication credentials were missing or incorrect.
404 Not Found ErrorThe processing of the request fails.
500 Internal Server ErrorThe processing of the request fails because of an unexpectedcondition on the server.
Content-Type application/json
Content-Language Locale for the response message.
Success response body
JSON object with the following specification:
JSON property name Description
messageId Returns the message identifier.
message Returns the message to indicate the operation is successful.
Error response body
JSON object with the following specification.
JSON property name Description
messageId Returns the message identifier.
error Returns a message that describes the error.
ExampleDelete a client
DELETE https://localhost:port/SKLM/rest/v1/clients/client_rest1
Success response-
Error response
{ "message": "CTGKM3408E Client with client_rest1 name not found.", "messageId": "CTGKM3408E"}
380 IBM Security Key Lifecycle Manager : Administering
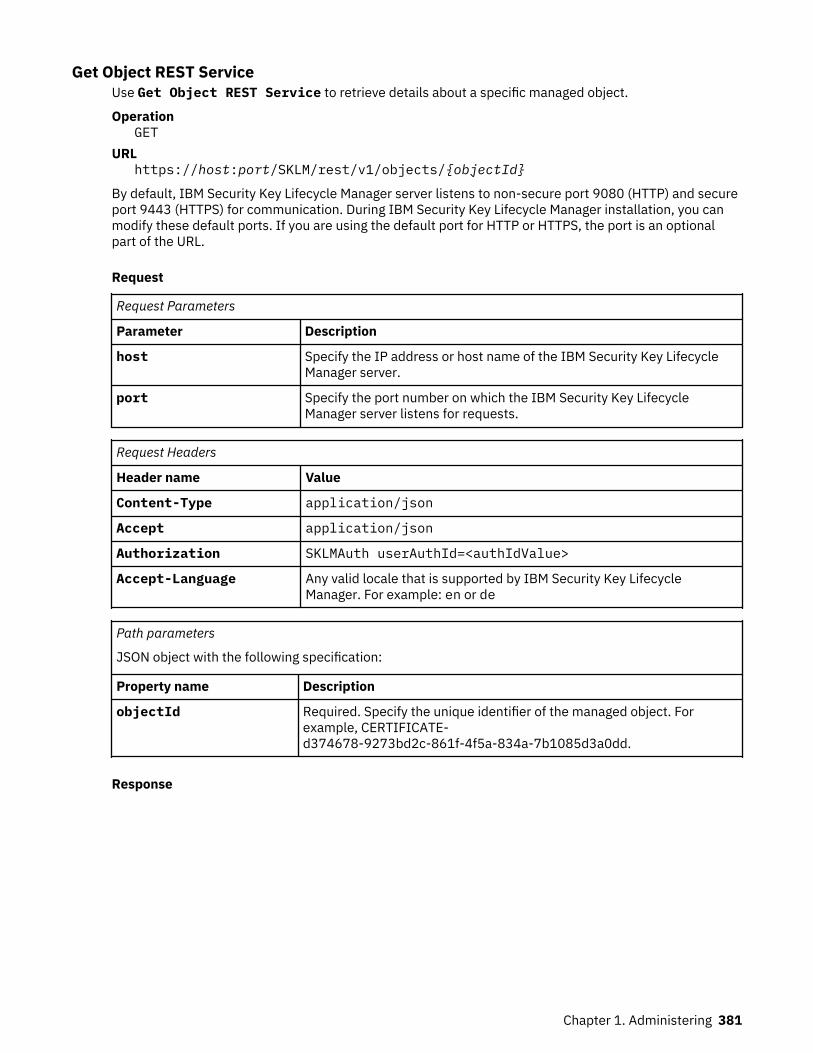
Get Object REST ServiceUse Get Object REST Service to retrieve details about a specific managed object.
OperationGET
URLhttps://host:port/SKLM/rest/v1/objects/{objectId}
By default, IBM Security Key Lifecycle Manager server listens to non-secure port 9080 (HTTP) and secureport 9443 (HTTPS) for communication. During IBM Security Key Lifecycle Manager installation, you canmodify these default ports. If you are using the default port for HTTP or HTTPS, the port is an optionalpart of the URL.
Request
Request Parameters
Parameter Description
host Specify the IP address or host name of the IBM Security Key LifecycleManager server.
port Specify the port number on which the IBM Security Key LifecycleManager server listens for requests.
Request Headers
Header name Value
Content-Type application/json
Accept application/json
Authorization SKLMAuth userAuthId=<authIdValue>
Accept-Language Any valid locale that is supported by IBM Security Key LifecycleManager. For example: en or de
Path parameters
JSON object with the following specification:
Property name Description
objectId Required. Specify the unique identifier of the managed object. Forexample, CERTIFICATE-d374678-9273bd2c-861f-4f5a-834a-7b1085d3a0dd.
Response
Chapter 1. Administering 381

Response Headers
Header name Value and description
Status Code 200 OKThe request was successful. The response body contains therequested representation.
400 Bad RequestThe authentication information was not provided in the correctformat.
401 UnauthorizedThe authentication credentials were missing or incorrect.
404 Not Found ErrorThe processing of the request fails.
500 Internal Server ErrorThe processing of the request fails because of an unexpectedcondition on the server.
Content-Type application/json
Content-Language Locale for the response message.
Success response body
JSON object with the following specification:
JSON property name Description
managedObject Returns details of the managed object.
Error response body
JSON object with the following specification.
JSON property name Description
messageId Returns the message identifier.
error Returns a message that describes the error.
ExampleRetrieve details of a specific managed object
GET https://localhost:port/SKLM/rest/v1/objects/CERTIFICATE-d374678-9273bd2c-861f-4f5a-834a-7b1085d3a0dd
Success response
{ "managedObject": { "uuid": "CERTIFICATE-d374678-9273bd2c-861f-4f5a-834a-7b1085d3a0dd", "Cryptographic Usage Mask": "ENCRYPT ", "Link": "[[TYPE PUBLIC_KEY] [LINKED_OBJECT_ID KEY-d374678-56ec9bfb-8709-46eb-8b42-b8f6bfa69ff4] ]", "Digest": "[[INDEX 0] [HASH SHA256] [VALUE x00,x7b,xd4,x7e,x4c,x86,xe9,x8b,x10,xe8,xd0,x79,x92,x2a,xa4,x3d,x3a,x0d,x24,x1b,x41,x88,x3c,xd4,x8e,x60,xf0,x77,x28,x9f,x96,xe0] [DIGESTED_KEY_FORMAT RAW]]", "Custom Attributes": "[[NAME y-Fresh] [[INDEX 0] [TYPE JAVA_STRING] [VALUE true]]]", "Last Changed Date": "6/12/19, 8:15:39 AM Eastern Daylight Time", "alias": "[fff00d374678000000001]", "key algorithm": "RSA", "key length (in bits)": "790", "key type": "X509", "key state": "PRE_ACTIVE",
382 IBM Security Key Lifecycle Manager : Administering
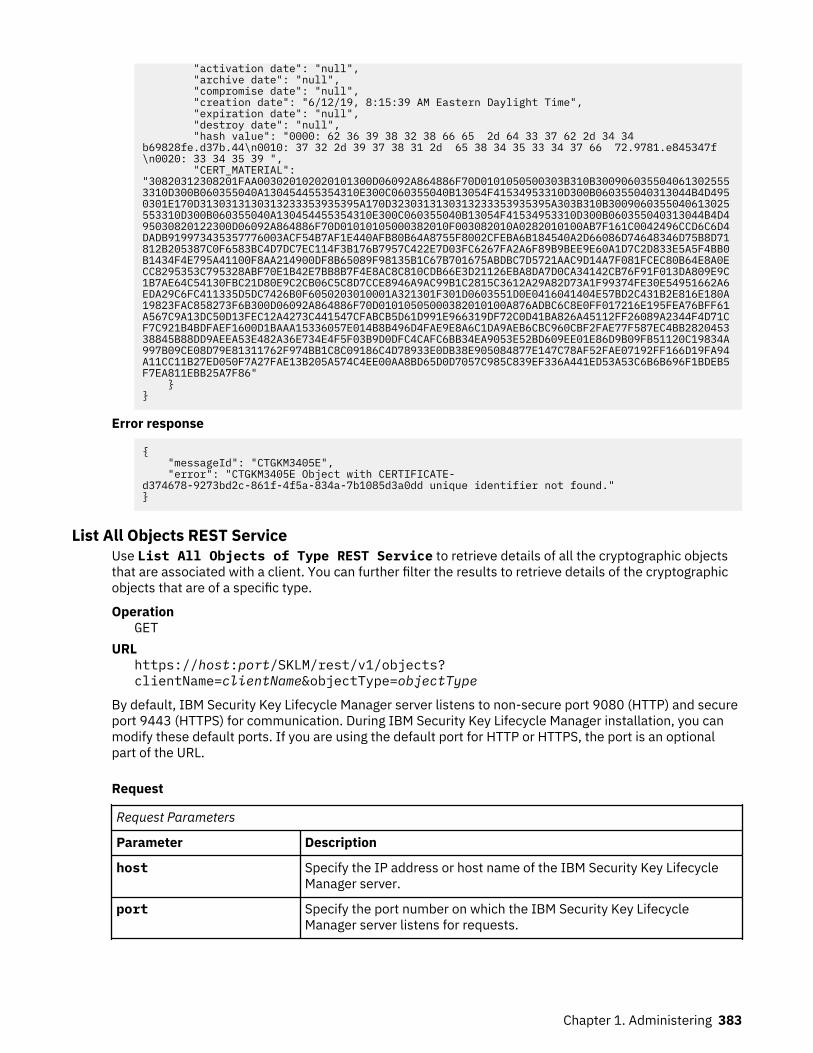
"activation date": "null", "archive date": "null", "compromise date": "null", "creation date": "6/12/19, 8:15:39 AM Eastern Daylight Time", "expiration date": "null", "destroy date": "null", "hash value": "0000: 62 36 39 38 32 38 66 65 2d 64 33 37 62 2d 34 34 b69828fe.d37b.44\n0010: 37 32 2d 39 37 38 31 2d 65 38 34 35 33 34 37 66 72.9781.e845347f\n0020: 33 34 35 39 ", "CERT_MATERIAL": "30820312308201FAA003020102020101300D06092A864886F70D0101050500303B310B3009060355040613025553310D300B060355040A130454455354310E300C060355040B13054F41534953310D300B060355040313044B4D4950301E170D3130313130313233353935395A170D3230313130313233353935395A303B310B3009060355040613025553310D300B060355040A130454455354310E300C060355040B13054F41534953310D300B060355040313044B4D495030820122300D06092A864886F70D01010105000382010F003082010A0282010100AB7F161C0042496CCD6C6D4DADB919973435357776003ACF54B7AF1E440AFB80B64A8755F8002CFEBA6B184540A2D66086D74648346D75B8D71812B205387C0F6583BC4D7DC7EC114F3B176B7957C422E7D03FC6267FA2A6F89B9BEE9E60A1D7C2D833E5A5F4BB0B1434F4E795A41100F8AA214900DF8B65089F98135B1C67B701675ABDBC7D5721AAC9D14A7F081FCEC80B64E8A0ECC8295353C795328ABF70E1B42E7BB8B7F4E8AC8C810CDB66E3D21126EBA8DA7D0CA34142CB76F91F013DA809E9C1B7AE64C54130FBC21D80E9C2CB06C5C8D7CCE8946A9AC99B1C2815C3612A29A82D73A1F99374FE30E54951662A6EDA29C6FC411335D5DC7426B0F6050203010001A321301F301D0603551D0E0416041404E57BD2C431B2E816E180A19823FAC858273F6B300D06092A864886F70D01010505000382010100A876ADBC6C8E0FF017216E195FEA76BFF61A567C9A13DC50D13FEC12A4273C441547CFABCB5D61D991E966319DF72C0D41BA826A45112FF26089A2344F4D71CF7C921B4BDFAEF1600D1BAAA15336057E014B8B496D4FAE9E8A6C1DA9AEB6CBC960CBF2FAE77F587EC4BB282045338845B88DD9AEEA53E482A36E734E4F5F03B9D0DFC4CAFC6BB34EA9053E52BD609EE01E86D9B09FB51120C19834A997B09CE08D79E81311762F974BB1C8C09186C4D78933E0DB38E905084877E147C78AF52FAE07192FF166D19FA94A11CC11B27ED050F7A27FAE13B205A574C4EE00AA8BD65D0D7057C985C839EF336A441ED53A53C6B6B696F1BDEB5F7EA811EBB25A7F86" }}
Error response
{ "messageId": "CTGKM3405E", "error": "CTGKM3405E Object with CERTIFICATE-d374678-9273bd2c-861f-4f5a-834a-7b1085d3a0dd unique identifier not found."}
List All Objects REST ServiceUse List All Objects of Type REST Service to retrieve details of all the cryptographic objectsthat are associated with a client. You can further filter the results to retrieve details of the cryptographicobjects that are of a specific type.
OperationGET
URLhttps://host:port/SKLM/rest/v1/objects?clientName=clientName&objectType=objectType
By default, IBM Security Key Lifecycle Manager server listens to non-secure port 9080 (HTTP) and secureport 9443 (HTTPS) for communication. During IBM Security Key Lifecycle Manager installation, you canmodify these default ports. If you are using the default port for HTTP or HTTPS, the port is an optionalpart of the URL.
Request
Request Parameters
Parameter Description
host Specify the IP address or host name of the IBM Security Key LifecycleManager server.
port Specify the port number on which the IBM Security Key LifecycleManager server listens for requests.
Chapter 1. Administering 383

Request Headers
Header name Value
Content-Type application/json
Accept application/json
Authorization SKLMAuth userAuthId=<authIdValue>
Accept-Language Any valid locale that is supported by IBM Security Key LifecycleManager. For example: en or de
Pagination headers
JSON object with the following specification:
Property name Description
Range Optional. Specify the number of items (in the range 0 to 9) to bedisplayed on a page. Provide the value in the following format:
items=0-9
where, 0 is the start and 9 is the end of the range. If this property is notspecified, all items are listed.
Query parameters
JSON object with the following specification:
Property name Description
clientName Specify the name of the client. Details of all the cryptographic objectsthat are associated with the client are retrieved.
objectType Specify the type of objects that you want to retrieve. You can provide oneof the following values:
• PUBLIC_KEY• PRIVATE_KEY• SYMMETRIC_KEY• CERTIFICATE• OPAQUE_OBJECT• SECRET_DATA
Response
384 IBM Security Key Lifecycle Manager : Administering
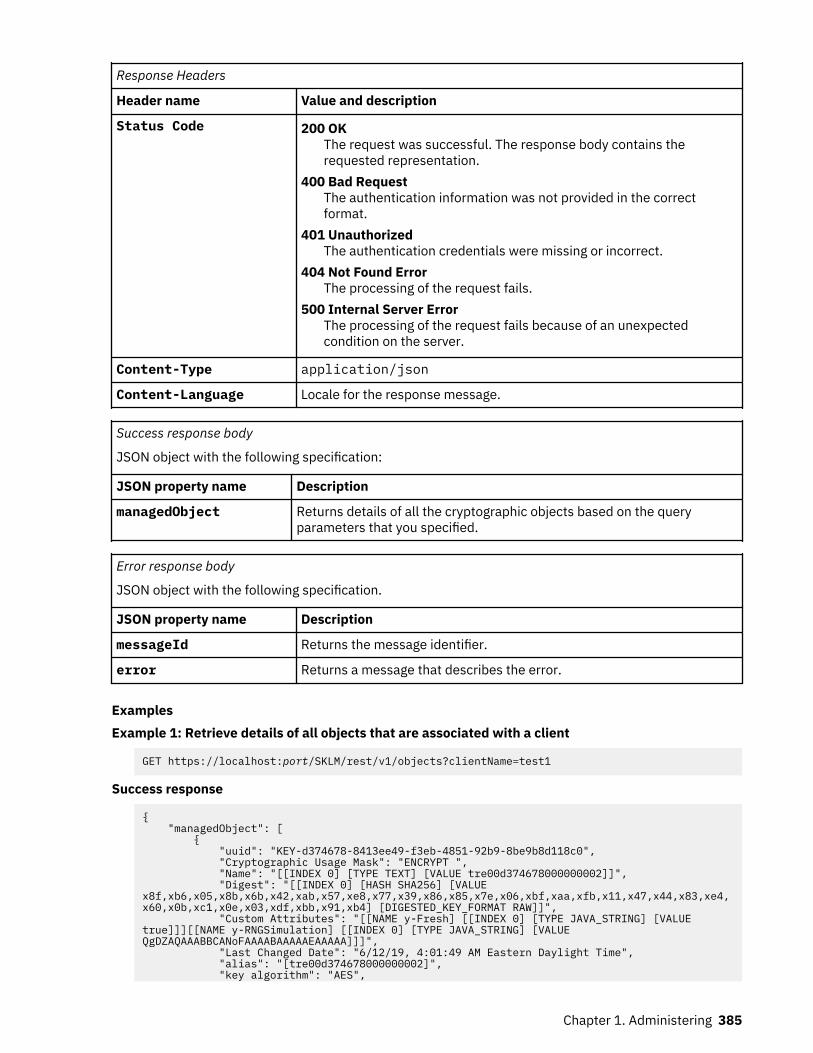
Response Headers
Header name Value and description
Status Code 200 OKThe request was successful. The response body contains therequested representation.
400 Bad RequestThe authentication information was not provided in the correctformat.
401 UnauthorizedThe authentication credentials were missing or incorrect.
404 Not Found ErrorThe processing of the request fails.
500 Internal Server ErrorThe processing of the request fails because of an unexpectedcondition on the server.
Content-Type application/json
Content-Language Locale for the response message.
Success response body
JSON object with the following specification:
JSON property name Description
managedObject Returns details of all the cryptographic objects based on the queryparameters that you specified.
Error response body
JSON object with the following specification.
JSON property name Description
messageId Returns the message identifier.
error Returns a message that describes the error.
ExamplesExample 1: Retrieve details of all objects that are associated with a client
GET https://localhost:port/SKLM/rest/v1/objects?clientName=test1
Success response
{ "managedObject": [ { "uuid": "KEY-d374678-8413ee49-f3eb-4851-92b9-8be9b8d118c0", "Cryptographic Usage Mask": "ENCRYPT ", "Name": "[[INDEX 0] [TYPE TEXT] [VALUE tre00d374678000000002]]", "Digest": "[[INDEX 0] [HASH SHA256] [VALUE x8f,xb6,x05,x8b,x6b,x42,xab,x57,xe8,x77,x39,x86,x85,x7e,x06,xbf,xaa,xfb,x11,x47,x44,x83,xe4,x60,x0b,xc1,x0e,x03,xdf,xbb,x91,xb4] [DIGESTED_KEY_FORMAT RAW]]", "Custom Attributes": "[[NAME y-Fresh] [[INDEX 0] [TYPE JAVA_STRING] [VALUE true]]][[NAME y-RNGSimulation] [[INDEX 0] [TYPE JAVA_STRING] [VALUE QgDZAQAAABBCANoFAAAABAAAAAEAAAAA]]]", "Last Changed Date": "6/12/19, 4:01:49 AM Eastern Daylight Time", "alias": "[tre00d374678000000002]", "key algorithm": "AES",
Chapter 1. Administering 385
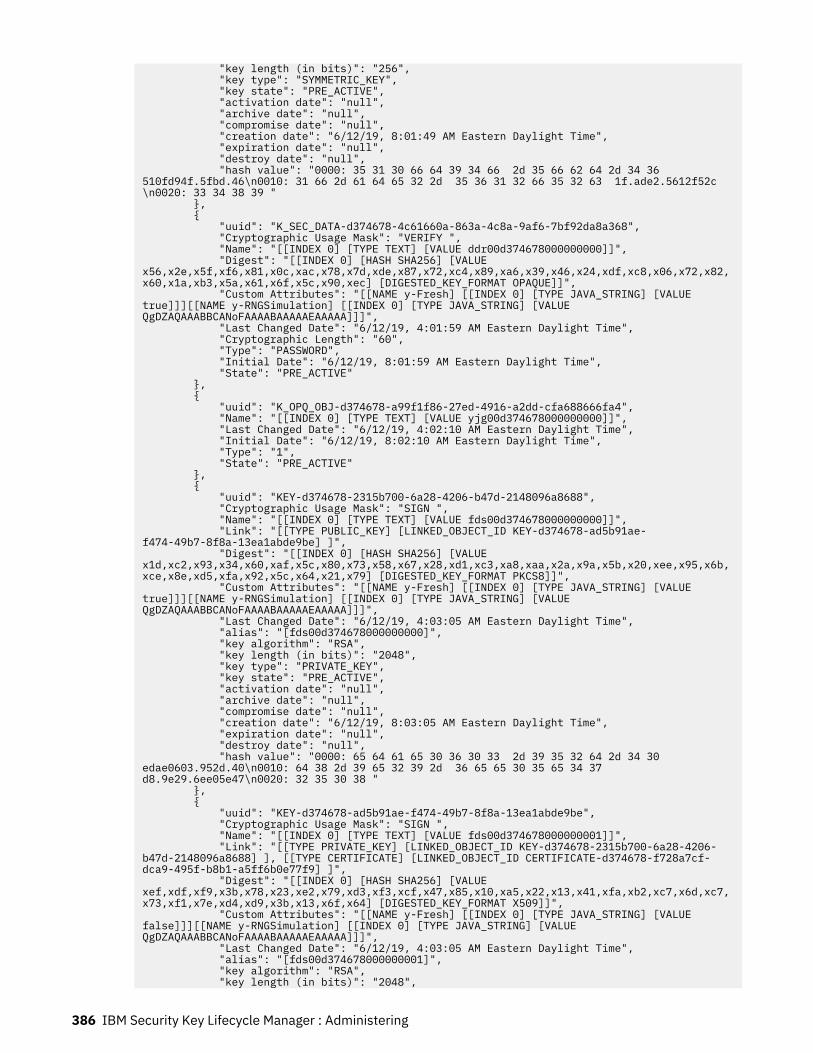
"key length (in bits)": "256", "key type": "SYMMETRIC_KEY", "key state": "PRE_ACTIVE", "activation date": "null", "archive date": "null", "compromise date": "null", "creation date": "6/12/19, 8:01:49 AM Eastern Daylight Time", "expiration date": "null", "destroy date": "null", "hash value": "0000: 35 31 30 66 64 39 34 66 2d 35 66 62 64 2d 34 36 510fd94f.5fbd.46\n0010: 31 66 2d 61 64 65 32 2d 35 36 31 32 66 35 32 63 1f.ade2.5612f52c\n0020: 33 34 38 39 " }, { "uuid": "K_SEC_DATA-d374678-4c61660a-863a-4c8a-9af6-7bf92da8a368", "Cryptographic Usage Mask": "VERIFY ", "Name": "[[INDEX 0] [TYPE TEXT] [VALUE ddr00d374678000000000]]", "Digest": "[[INDEX 0] [HASH SHA256] [VALUE x56,x2e,x5f,xf6,x81,x0c,xac,x78,x7d,xde,x87,x72,xc4,x89,xa6,x39,x46,x24,xdf,xc8,x06,x72,x82,x60,x1a,xb3,x5a,x61,x6f,x5c,x90,xec] [DIGESTED_KEY_FORMAT OPAQUE]]", "Custom Attributes": "[[NAME y-Fresh] [[INDEX 0] [TYPE JAVA_STRING] [VALUE true]]][[NAME y-RNGSimulation] [[INDEX 0] [TYPE JAVA_STRING] [VALUE QgDZAQAAABBCANoFAAAABAAAAAEAAAAA]]]", "Last Changed Date": "6/12/19, 4:01:59 AM Eastern Daylight Time", "Cryptographic Length": "60", "Type": "PASSWORD", "Initial Date": "6/12/19, 8:01:59 AM Eastern Daylight Time", "State": "PRE_ACTIVE" }, { "uuid": "K_OPQ_OBJ-d374678-a99f1f86-27ed-4916-a2dd-cfa688666fa4", "Name": "[[INDEX 0] [TYPE TEXT] [VALUE yjg00d374678000000000]]", "Last Changed Date": "6/12/19, 4:02:10 AM Eastern Daylight Time", "Initial Date": "6/12/19, 8:02:10 AM Eastern Daylight Time", "Type": "1", "State": "PRE_ACTIVE" }, { "uuid": "KEY-d374678-2315b700-6a28-4206-b47d-2148096a8688", "Cryptographic Usage Mask": "SIGN ", "Name": "[[INDEX 0] [TYPE TEXT] [VALUE fds00d374678000000000]]", "Link": "[[TYPE PUBLIC_KEY] [LINKED_OBJECT_ID KEY-d374678-ad5b91ae-f474-49b7-8f8a-13ea1abde9be] ]", "Digest": "[[INDEX 0] [HASH SHA256] [VALUE x1d,xc2,x93,x34,x60,xaf,x5c,x80,x73,x58,x67,x28,xd1,xc3,xa8,xaa,x2a,x9a,x5b,x20,xee,x95,x6b,xce,x8e,xd5,xfa,x92,x5c,x64,x21,x79] [DIGESTED_KEY_FORMAT PKCS8]]", "Custom Attributes": "[[NAME y-Fresh] [[INDEX 0] [TYPE JAVA_STRING] [VALUE true]]][[NAME y-RNGSimulation] [[INDEX 0] [TYPE JAVA_STRING] [VALUE QgDZAQAAABBCANoFAAAABAAAAAEAAAAA]]]", "Last Changed Date": "6/12/19, 4:03:05 AM Eastern Daylight Time", "alias": "[fds00d374678000000000]", "key algorithm": "RSA", "key length (in bits)": "2048", "key type": "PRIVATE_KEY", "key state": "PRE_ACTIVE", "activation date": "null", "archive date": "null", "compromise date": "null", "creation date": "6/12/19, 8:03:05 AM Eastern Daylight Time", "expiration date": "null", "destroy date": "null", "hash value": "0000: 65 64 61 65 30 36 30 33 2d 39 35 32 64 2d 34 30 edae0603.952d.40\n0010: 64 38 2d 39 65 32 39 2d 36 65 65 30 35 65 34 37 d8.9e29.6ee05e47\n0020: 32 35 30 38 " }, { "uuid": "KEY-d374678-ad5b91ae-f474-49b7-8f8a-13ea1abde9be", "Cryptographic Usage Mask": "SIGN ", "Name": "[[INDEX 0] [TYPE TEXT] [VALUE fds00d374678000000001]]", "Link": "[[TYPE PRIVATE_KEY] [LINKED_OBJECT_ID KEY-d374678-2315b700-6a28-4206-b47d-2148096a8688] ], [[TYPE CERTIFICATE] [LINKED_OBJECT_ID CERTIFICATE-d374678-f728a7cf-dca9-495f-b8b1-a5ff6b0e77f9] ]", "Digest": "[[INDEX 0] [HASH SHA256] [VALUE xef,xdf,xf9,x3b,x78,x23,xe2,x79,xd3,xf3,xcf,x47,x85,x10,xa5,x22,x13,x41,xfa,xb2,xc7,x6d,xc7,x73,xf1,x7e,xd4,xd9,x3b,x13,x6f,x64] [DIGESTED_KEY_FORMAT X509]]", "Custom Attributes": "[[NAME y-Fresh] [[INDEX 0] [TYPE JAVA_STRING] [VALUE false]]][[NAME y-RNGSimulation] [[INDEX 0] [TYPE JAVA_STRING] [VALUE QgDZAQAAABBCANoFAAAABAAAAAEAAAAA]]]", "Last Changed Date": "6/12/19, 4:03:05 AM Eastern Daylight Time", "alias": "[fds00d374678000000001]", "key algorithm": "RSA", "key length (in bits)": "2048",
386 IBM Security Key Lifecycle Manager : Administering
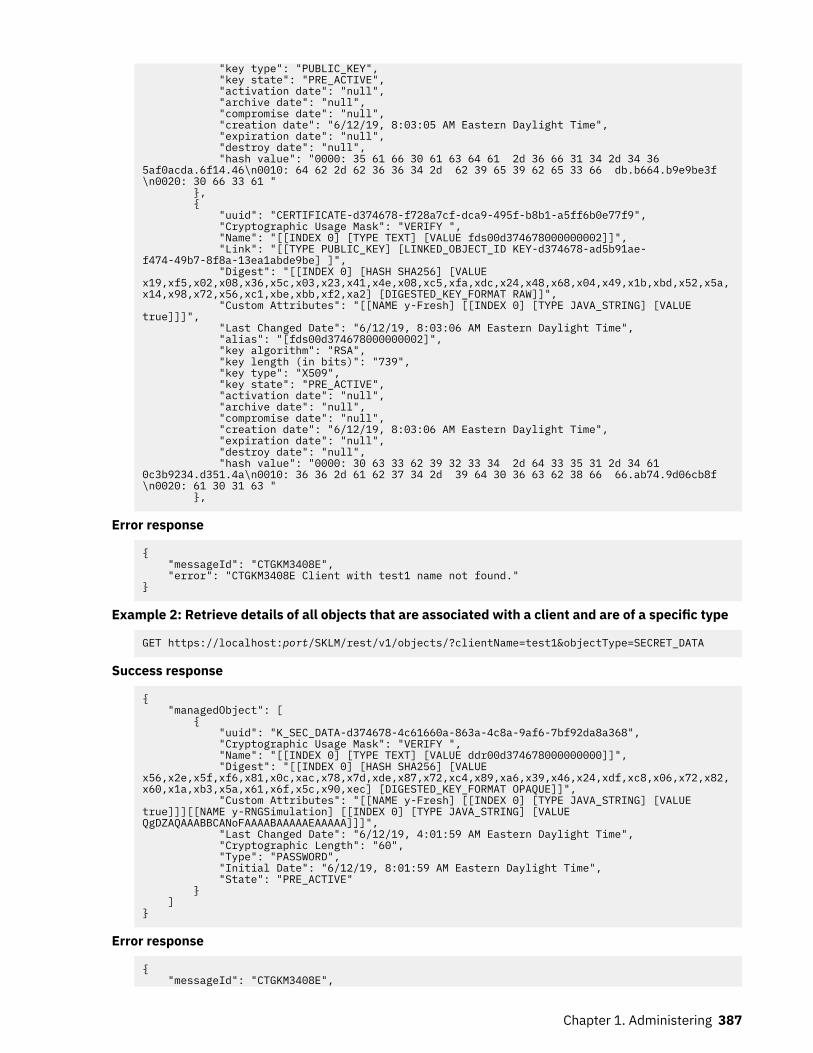
"key type": "PUBLIC_KEY", "key state": "PRE_ACTIVE", "activation date": "null", "archive date": "null", "compromise date": "null", "creation date": "6/12/19, 8:03:05 AM Eastern Daylight Time", "expiration date": "null", "destroy date": "null", "hash value": "0000: 35 61 66 30 61 63 64 61 2d 36 66 31 34 2d 34 36 5af0acda.6f14.46\n0010: 64 62 2d 62 36 36 34 2d 62 39 65 39 62 65 33 66 db.b664.b9e9be3f\n0020: 30 66 33 61 " }, { "uuid": "CERTIFICATE-d374678-f728a7cf-dca9-495f-b8b1-a5ff6b0e77f9", "Cryptographic Usage Mask": "VERIFY ", "Name": "[[INDEX 0] [TYPE TEXT] [VALUE fds00d374678000000002]]", "Link": "[[TYPE PUBLIC_KEY] [LINKED_OBJECT_ID KEY-d374678-ad5b91ae-f474-49b7-8f8a-13ea1abde9be] ]", "Digest": "[[INDEX 0] [HASH SHA256] [VALUE x19,xf5,x02,x08,x36,x5c,x03,x23,x41,x4e,x08,xc5,xfa,xdc,x24,x48,x68,x04,x49,x1b,xbd,x52,x5a,x14,x98,x72,x56,xc1,xbe,xbb,xf2,xa2] [DIGESTED_KEY_FORMAT RAW]]", "Custom Attributes": "[[NAME y-Fresh] [[INDEX 0] [TYPE JAVA_STRING] [VALUE true]]]", "Last Changed Date": "6/12/19, 8:03:06 AM Eastern Daylight Time", "alias": "[fds00d374678000000002]", "key algorithm": "RSA", "key length (in bits)": "739", "key type": "X509", "key state": "PRE_ACTIVE", "activation date": "null", "archive date": "null", "compromise date": "null", "creation date": "6/12/19, 8:03:06 AM Eastern Daylight Time", "expiration date": "null", "destroy date": "null", "hash value": "0000: 30 63 33 62 39 32 33 34 2d 64 33 35 31 2d 34 61 0c3b9234.d351.4a\n0010: 36 36 2d 61 62 37 34 2d 39 64 30 36 63 62 38 66 66.ab74.9d06cb8f\n0020: 61 30 31 63 " },
Error response
{ "messageId": "CTGKM3408E", "error": "CTGKM3408E Client with test1 name not found."}
Example 2: Retrieve details of all objects that are associated with a client and are of a specific type
GET https://localhost:port/SKLM/rest/v1/objects/?clientName=test1&objectType=SECRET_DATA
Success response
{ "managedObject": [ { "uuid": "K_SEC_DATA-d374678-4c61660a-863a-4c8a-9af6-7bf92da8a368", "Cryptographic Usage Mask": "VERIFY ", "Name": "[[INDEX 0] [TYPE TEXT] [VALUE ddr00d374678000000000]]", "Digest": "[[INDEX 0] [HASH SHA256] [VALUE x56,x2e,x5f,xf6,x81,x0c,xac,x78,x7d,xde,x87,x72,xc4,x89,xa6,x39,x46,x24,xdf,xc8,x06,x72,x82,x60,x1a,xb3,x5a,x61,x6f,x5c,x90,xec] [DIGESTED_KEY_FORMAT OPAQUE]]", "Custom Attributes": "[[NAME y-Fresh] [[INDEX 0] [TYPE JAVA_STRING] [VALUE true]]][[NAME y-RNGSimulation] [[INDEX 0] [TYPE JAVA_STRING] [VALUE QgDZAQAAABBCANoFAAAABAAAAAEAAAAA]]]", "Last Changed Date": "6/12/19, 4:01:59 AM Eastern Daylight Time", "Cryptographic Length": "60", "Type": "PASSWORD", "Initial Date": "6/12/19, 8:01:59 AM Eastern Daylight Time", "State": "PRE_ACTIVE" } ]}
Error response
{ "messageId": "CTGKM3408E",
Chapter 1. Administering 387
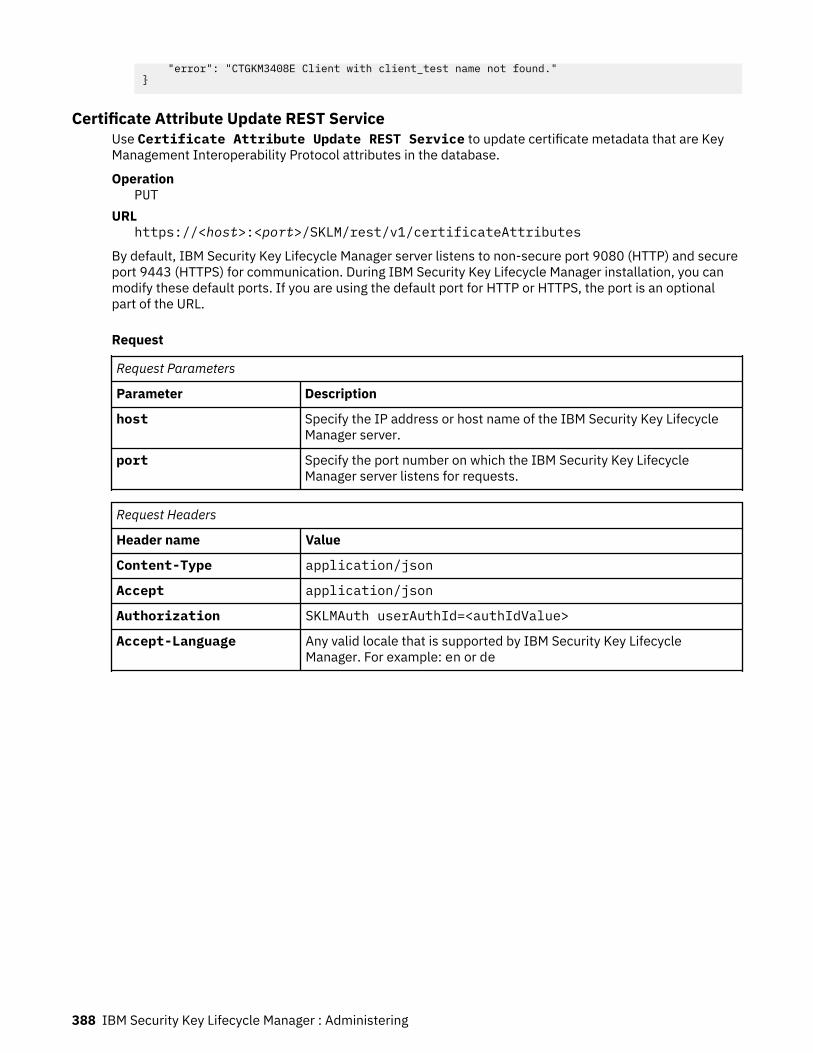
"error": "CTGKM3408E Client with client_test name not found."}
Certificate Attribute Update REST ServiceUse Certificate Attribute Update REST Service to update certificate metadata that are KeyManagement Interoperability Protocol attributes in the database.
OperationPUT
URLhttps://<host>:<port>/SKLM/rest/v1/certificateAttributes
By default, IBM Security Key Lifecycle Manager server listens to non-secure port 9080 (HTTP) and secureport 9443 (HTTPS) for communication. During IBM Security Key Lifecycle Manager installation, you canmodify these default ports. If you are using the default port for HTTP or HTTPS, the port is an optionalpart of the URL.
Request
Request Parameters
Parameter Description
host Specify the IP address or host name of the IBM Security Key LifecycleManager server.
port Specify the port number on which the IBM Security Key LifecycleManager server listens for requests.
Request Headers
Header name Value
Content-Type application/json
Accept application/json
Authorization SKLMAuth userAuthId=<authIdValue>
Accept-Language Any valid locale that is supported by IBM Security Key LifecycleManager. For example: en or de
388 IBM Security Key Lifecycle Manager : Administering
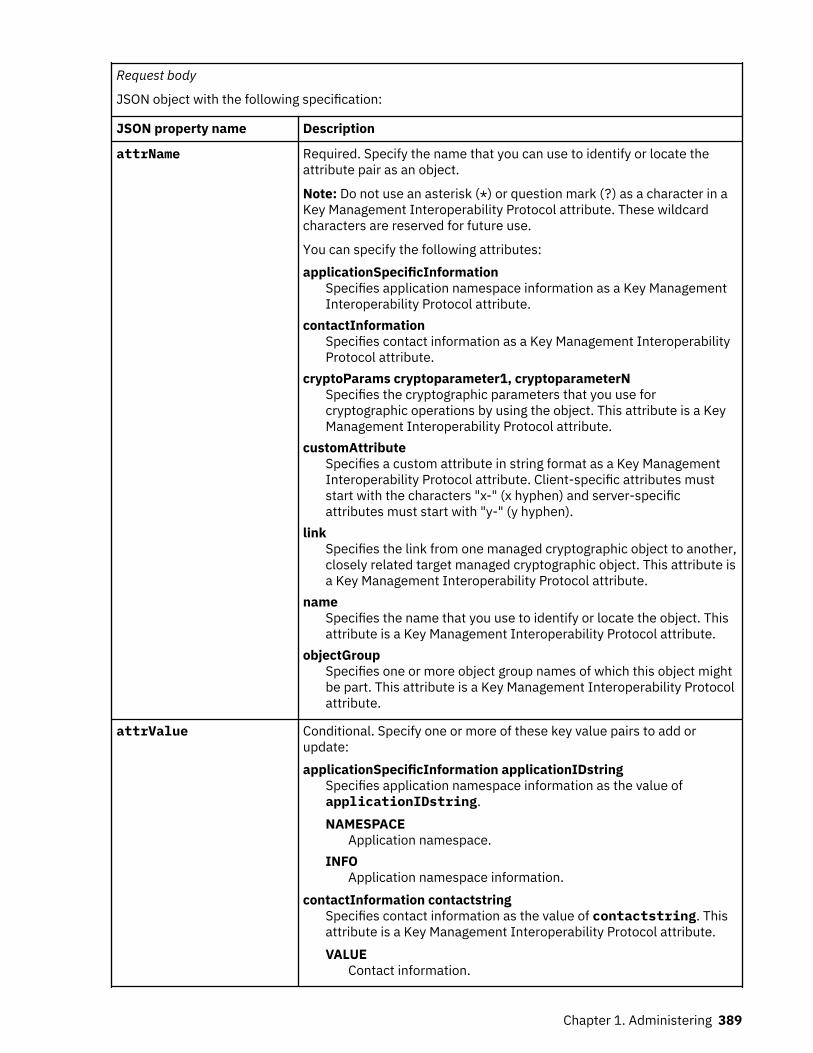
Request body
JSON object with the following specification:
JSON property name Description
attrName Required. Specify the name that you can use to identify or locate theattribute pair as an object.
Note: Do not use an asterisk (*) or question mark (?) as a character in aKey Management Interoperability Protocol attribute. These wildcardcharacters are reserved for future use.
You can specify the following attributes:applicationSpecificInformation
Specifies application namespace information as a Key ManagementInteroperability Protocol attribute.
contactInformationSpecifies contact information as a Key Management InteroperabilityProtocol attribute.
cryptoParams cryptoparameter1, cryptoparameterNSpecifies the cryptographic parameters that you use forcryptographic operations by using the object. This attribute is a KeyManagement Interoperability Protocol attribute.
customAttributeSpecifies a custom attribute in string format as a Key ManagementInteroperability Protocol attribute. Client-specific attributes muststart with the characters "x-" (x hyphen) and server-specificattributes must start with "y-" (y hyphen).
linkSpecifies the link from one managed cryptographic object to another,closely related target managed cryptographic object. This attribute isa Key Management Interoperability Protocol attribute.
nameSpecifies the name that you use to identify or locate the object. Thisattribute is a Key Management Interoperability Protocol attribute.
objectGroupSpecifies one or more object group names of which this object mightbe part. This attribute is a Key Management Interoperability Protocolattribute.
attrValue Conditional. Specify one or more of these key value pairs to add orupdate:applicationSpecificInformation applicationIDstring
Specifies application namespace information as the value ofapplicationIDstring.NAMESPACE
Application namespace.INFO
Application namespace information.contactInformation contactstring
Specifies contact information as the value of contactstring. Thisattribute is a Key Management Interoperability Protocol attribute.VALUE
Contact information.
Chapter 1. Administering 389
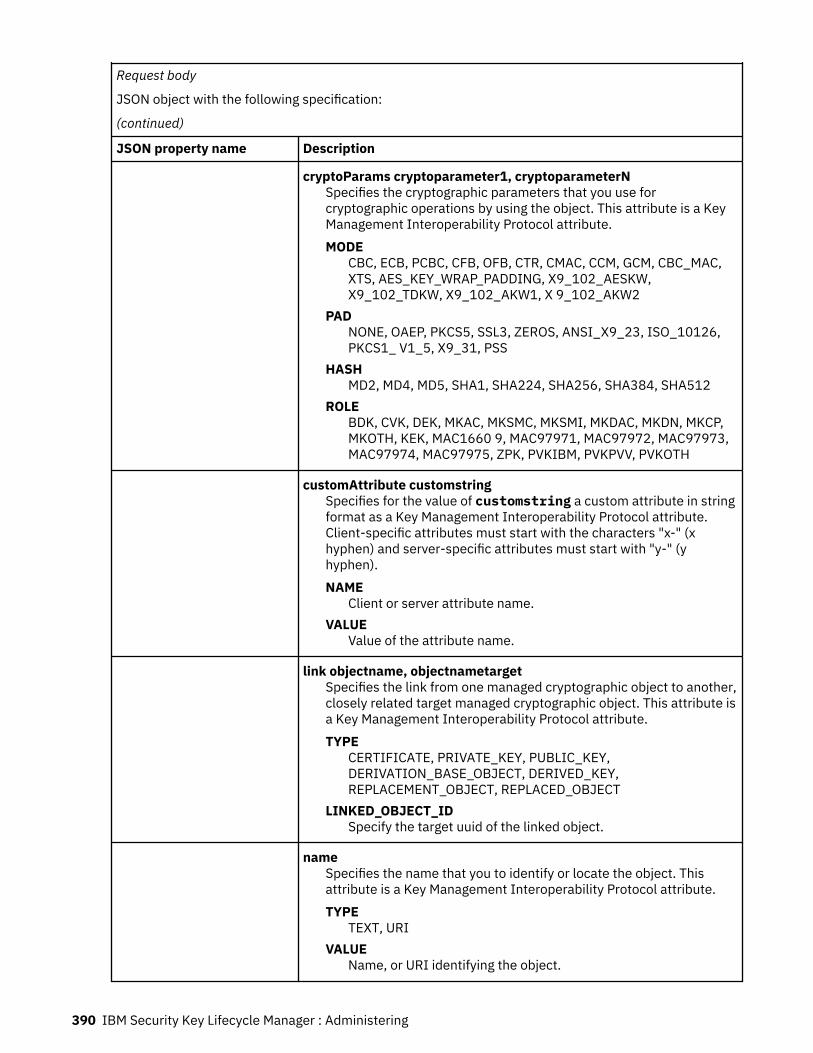
Request body
JSON object with the following specification:
(continued)
JSON property name Description
cryptoParams cryptoparameter1, cryptoparameterNSpecifies the cryptographic parameters that you use forcryptographic operations by using the object. This attribute is a KeyManagement Interoperability Protocol attribute.MODE
CBC, ECB, PCBC, CFB, OFB, CTR, CMAC, CCM, GCM, CBC_MAC,XTS, AES_KEY_WRAP_PADDING, X9_102_AESKW,X9_102_TDKW, X9_102_AKW1, X 9_102_AKW2
PADNONE, OAEP, PKCS5, SSL3, ZEROS, ANSI_X9_23, ISO_10126,PKCS1_ V1_5, X9_31, PSS
HASHMD2, MD4, MD5, SHA1, SHA224, SHA256, SHA384, SHA512
ROLEBDK, CVK, DEK, MKAC, MKSMC, MKSMI, MKDAC, MKDN, MKCP,MKOTH, KEK, MAC1660 9, MAC97971, MAC97972, MAC97973,MAC97974, MAC97975, ZPK, PVKIBM, PVKPVV, PVKOTH
customAttribute customstringSpecifies for the value of customstring a custom attribute in stringformat as a Key Management Interoperability Protocol attribute.Client-specific attributes must start with the characters "x-" (xhyphen) and server-specific attributes must start with "y-" (yhyphen).NAME
Client or server attribute name.VALUE
Value of the attribute name.
link objectname, objectnametargetSpecifies the link from one managed cryptographic object to another,closely related target managed cryptographic object. This attribute isa Key Management Interoperability Protocol attribute.TYPE
CERTIFICATE, PRIVATE_KEY, PUBLIC_KEY,DERIVATION_BASE_OBJECT, DERIVED_KEY,REPLACEMENT_OBJECT, REPLACED_OBJECT
LINKED_OBJECT_IDSpecify the target uuid of the linked object.
nameSpecifies the name that you to identify or locate the object. Thisattribute is a Key Management Interoperability Protocol attribute.TYPE
TEXT, URIVALUE
Name, or URI identifying the object.
390 IBM Security Key Lifecycle Manager : Administering
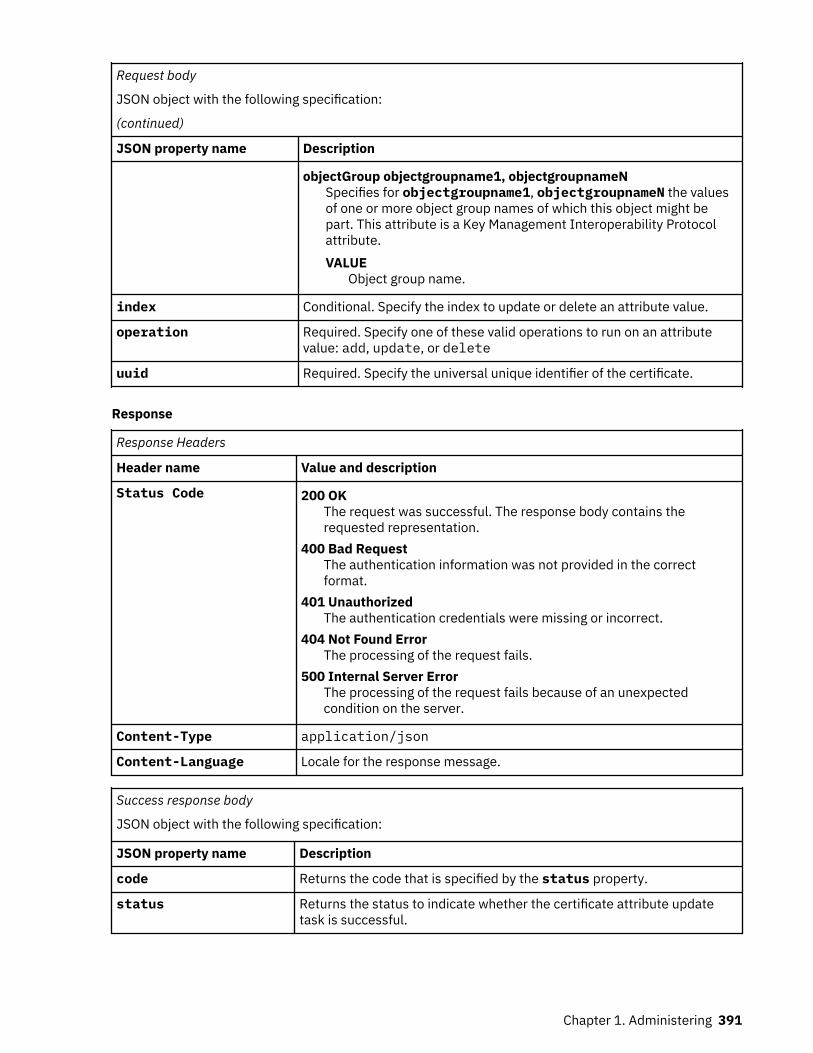
Request body
JSON object with the following specification:
(continued)
JSON property name Description
objectGroup objectgroupname1, objectgroupnameNSpecifies for objectgroupname1, objectgroupnameN the valuesof one or more object group names of which this object might bepart. This attribute is a Key Management Interoperability Protocolattribute.VALUE
Object group name.
index Conditional. Specify the index to update or delete an attribute value.
operation Required. Specify one of these valid operations to run on an attributevalue: add, update, or delete
uuid Required. Specify the universal unique identifier of the certificate.
Response
Response Headers
Header name Value and description
Status Code 200 OKThe request was successful. The response body contains therequested representation.
400 Bad RequestThe authentication information was not provided in the correctformat.
401 UnauthorizedThe authentication credentials were missing or incorrect.
404 Not Found ErrorThe processing of the request fails.
500 Internal Server ErrorThe processing of the request fails because of an unexpectedcondition on the server.
Content-Type application/json
Content-Language Locale for the response message.
Success response body
JSON object with the following specification:
JSON property name Description
code Returns the code that is specified by the status property.
status Returns the status to indicate whether the certificate attribute updatetask is successful.
Chapter 1. Administering 391

Error Response Body
JSON object with the following specification.
JSON property name Description
code Returns the application error code.
message Returns a message that describes the error.
ExamplesService request to add an attribute to a certificate
PUT https://localhost:<port>/SKLM/rest/v1/certificateAttributesContent-Type: application/jsonAccept : application/jsonAuthorization: SKLMAuth userAuthId=139aeh34567m{"uuid":"CERTIFICATE-d3ee4491-f96e-495d-bb37-fc03748924ba","operation":"add","attrName":"cryptoParams","attrValue":"MODE CBC, PAD NONE,HASH SHA256,ROLE BDK"}
Success response
Status Code : 200 OK{"code": "0","status": "Succeeded"}
Service request to add an attribute for a certificate name
PUT https://localhost:<port>/SKLM/rest/v1/certificateAttributesContent-Type: application/jsonAccept : application/jsonAuthorization: SKLMAuth userAuthId=139aeh34567m{"uuid":"CERTIFICATE-d3ee4491-f96e-495d-bb37-fc03748924ba","operation":"add","attrName":"name","attrValue":"TYPE TEXT,VALUE cert name for xyz"
Success response
Status Code : 200 OK{"code": "0","status": "Succeeded"}
Service request to update an attribute
PUT https://localhost:<port>/SKLM/rest/v1/certificateAttributesContent-Type: application/jsonAccept : application/jsonAuthorization: SKLMAuth userAuthId=139aeh34567m{"uuid":"KEY-d3ee4491-f96e-495d-bb37-fc03748924ba","operation":"update","index":"0","attrName":"name","attrValue":"TYPE TEXT,VALUE updated cert name for xyz"}
Success response
Status Code : 200 OK{"code": "0","status": "Succeeded"}
Service request to delete an attribute
PUT https://localhost:<port>/SKLM/rest/v1/certificateAttributesContent-Type: application/jsonAccept : application/jsonAuthorization: SKLMAuth userAuthId=139aeh34567m{"uuid":"KEY-d3ee4491-f96e-495d-bb37-fc03748924ba","operation":"delete","index":"0","attrName":"name"}
Success response
Status Code : 200 OK{"code": "0","status": "Succeeded"}
392 IBM Security Key Lifecycle Manager : Administering

Service request to update an attribute when an invalid parameter is specified
PUT https://localhost:<port>/SKLM/rest/v1/certificateAttributesContent-Type: application/jsonAccept : application/jsonAuthorization: SKLMAuth userAuthId=139aeh34567m{"UUID":"CERTIFICATE-d3ee4491-f96e-495d-bb37-fc03748924ba","operation":"add","attrName":"cryptoParams","attrValue":"MODE CBC, PAD NONE,HASH SHA256,ROLE BDK"}
Error response
Status Code : 400 Bad Request{"code":"CTGKM0630E","message":"CTGKM0630E Validation error: \"Invalid name \" for parameter \"UUID\"."}
Delete Object REST ServiceUse Delete Object REST Service to delete a specific managed object.
OperationDELETE
URLhttps://host:port/SKLM/rest/v1/objects/{objectId}
By default, IBM Security Key Lifecycle Manager server listens to non-secure port 9080 (HTTP) and secureport 9443 (HTTPS) for communication. During IBM Security Key Lifecycle Manager installation, you canmodify these default ports. If you are using the default port for HTTP or HTTPS, the port is an optionalpart of the URL.
Request
Request Parameters
Parameter Description
host Specify the IP address or host name of the IBM Security Key LifecycleManager server.
port Specify the port number on which the IBM Security Key LifecycleManager server listens for requests.
Request Headers
Header name Value
Content-Type application/json
Accept application/json
Authorization SKLMAuth userAuthId=<authIdValue>
Accept-Language Any valid locale that is supported by IBM Security Key LifecycleManager. For example: en or de
Path parameters
JSON object with the following specification:
Property name Description
objectId Required. Specify the unique identifier (UUID) of the managed objectthat you want to delete.
Response
Chapter 1. Administering 393

Response Headers
Header name Value and description
Status Code 200 OKThe request was successful. The response body contains therequested representation.
400 Bad RequestThe authentication information was not provided in the correctformat.
401 UnauthorizedThe authentication credentials were missing or incorrect.
404 Not Found ErrorThe processing of the request fails.
500 Internal Server ErrorThe processing of the request fails because of an unexpectedcondition on the server.
Content-Type application/json
Content-Language Locale for the response message.
Error response body
JSON object with the following specification.
JSON property name Description
messageId Returns the message identifier.
error Returns a message that describes the error.
ExampleDelete a managed object
DELETE https://localhost:port/SKLM/rest/v1/objects/CERTIFICATE-d374678-9273bd2c-861f-4f5a-834a-7b1085d3a0dd
Success response-
Error response
{ "messageId": "CTGKM3405E", "error": "CTGKM3405E Object with CERTIFICATE-d374678-9273bd2c-861f-4f5a-834a-7b1085d3a0dd unique identifier not found."}
Updating Db2 password for a stand-alone IBM Security Key Lifecycle Manager serverAfter you change or reset the Db2 password on the computer that hosts the IBM Security Key LifecycleManager server, you must update the password in IBM Security Key Lifecycle Manager so that IBMSecurity Key Lifecycle Manager can continue to connect to the Db2 database.
About this task
The password of the Db2 Administrator user must be the same as that of the Db2 data source passwordin WebSphere Application Server.
394 IBM Security Key Lifecycle Manager : Administering
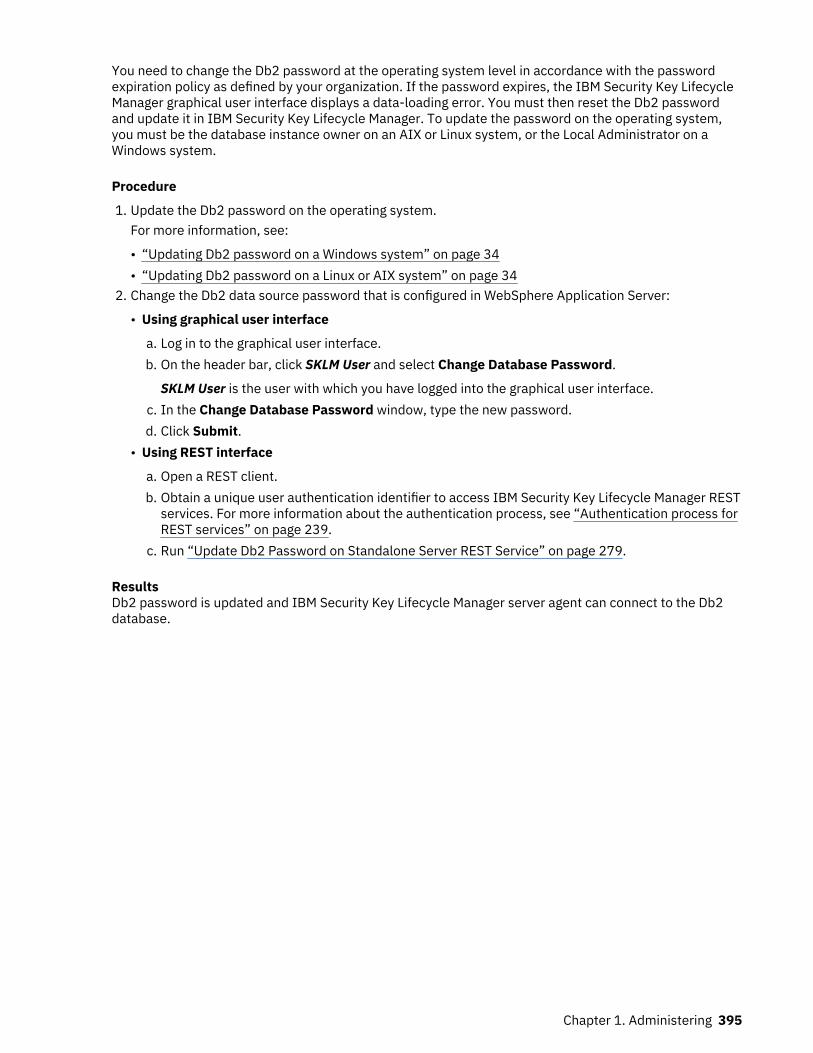
You need to change the Db2 password at the operating system level in accordance with the passwordexpiration policy as defined by your organization. If the password expires, the IBM Security Key LifecycleManager graphical user interface displays a data-loading error. You must then reset the Db2 passwordand update it in IBM Security Key Lifecycle Manager. To update the password on the operating system,you must be the database instance owner on an AIX or Linux system, or the Local Administrator on aWindows system.
Procedure
1. Update the Db2 password on the operating system.For more information, see:
• “Updating Db2 password on a Windows system” on page 34• “Updating Db2 password on a Linux or AIX system” on page 34
2. Change the Db2 data source password that is configured in WebSphere Application Server:
• Using graphical user interface
a. Log in to the graphical user interface.b. On the header bar, click SKLM User and select Change Database Password.
SKLM User is the user with which you have logged into the graphical user interface.c. In the Change Database Password window, type the new password.d. Click Submit.
• Using REST interface
a. Open a REST client.b. Obtain a unique user authentication identifier to access IBM Security Key Lifecycle Manager REST
services. For more information about the authentication process, see “Authentication process forREST services” on page 239.
c. Run “Update Db2 Password on Standalone Server REST Service” on page 279.
ResultsDb2 password is updated and IBM Security Key Lifecycle Manager server agent can connect to the Db2database.
Chapter 1. Administering 395

396 IBM Security Key Lifecycle Manager : Administering

Notices
This information was developed for products and services offered in the U.S.A. IBM may not offer theproducts, services, or features discussed in this document in other countries. Consult your local IBMrepresentative for information on the products and services currently available in your area. Anyreference to an IBM product, program, or service is not intended to state or imply that only that IBMproduct, program, or service may be used. Any functionally equivalent product, program, or service thatdoes not infringe any IBM intellectual property right may be used instead. However, it is the user'sresponsibility to evaluate and verify the operation of any non-IBM product, program, or service.
IBM may have patents or pending patent applications covering subject matter described in thisdocument. The furnishing of this document does not give you any license to these patents. You can sendlicense inquiries, in writing, to:
IBM Director of LicensingIBM CorporationNorth Castle Drive, MD-NC119Armonk, NY 10504-1785 US
For license inquiries regarding double-byte character set (DBCS) information, contact the IBM IntellectualProperty Department in your country or send inquiries, in writing, to:
Intellectual Property LicensingLegal and Intellectual Property LawIBM Japan, Ltd.19-21, Nihonbashi-Hakozakicho, Chuo-kuTokyo 103-8510, Japan
The following paragraph does not apply to the United Kingdom or any other country where suchprovisions are inconsistent with local law :
INTERNATIONAL BUSINESS MACHINES CORPORATION PROVIDES THIS PUBLICATION "AS IS"WITHOUT WARRANTY OF ANY KIND, EITHER EXPRESS OR IMPLIED, INCLUDING, BUT NOT LIMITED TO,THE IMPLIED WARRANTIES OF NON-INFRINGEMENT, MERCHANTABILITY OR FITNESS FOR APARTICULAR PURPOSE.
Some jurisdictions do not allow disclaimer of express or implied warranties in certain transactions,therefore, this statement may not apply to you.
This information could include technical inaccuracies or typographical errors. Changes are periodicallymade to the information herein; these changes will be incorporated in new editions of the publication.IBM may make improvements and/or changes in the product(s) and/or the program(s) described in thispublication at any time without notice.
Any references in this information to non-IBM Web sites are provided for convenience only and do not inany manner serve as an endorsement of those Web sites. The materials at those Web sites are not part ofthe materials for this IBM product and use of those Web sites is at your own risk.
IBM may use or distribute any of the information you supply in any way it believes appropriate withoutincurring any obligation to you.
Licensees of this program who wish to have information about it for the purpose of enabling: (i) theexchange of information between independently created programs and other programs (including thisone) and (ii) the mutual use of the information which has been exchanged, should contact:
IBM Director of LicensingIBM CorporationNorth Castle Drive, MD-NC119
© Copyright IBM Corp. 2008, 2019 397
Armonk, NY 10504-1785US
Such information may be available, subject to appropriate terms and conditions, including in some casespayment of a fee.
The licensed program described in this document and all licensed material available for it are provided byIBM under terms of the IBM Customer Agreement, IBM International Program License Agreement or anyequivalent agreement between us.
Any performance data contained herein was determined in a controlled environment. Therefore, theresults obtained in other operating environments may vary significantly. Some measurements may havebeen made on development-level systems and there is no guarantee that these measurements will be thesame on generally available systems. Furthermore, some measurement may have been estimatedthrough extrapolation. Actual results may vary. Users of this document should verify the applicable datafor their specific environment.
Information concerning non-IBM products was obtained from the suppliers of those products, theirpublished announcements or other publicly available sources. IBM has not tested those products andcannot confirm the accuracy of performance, compatibility or any other claims related to non-IBMproducts. Questions on the capabilities of non-IBM products should be addressed to the suppliers ofthose products.
All statements regarding IBM's future direction or intent are subject to change or withdrawal withoutnotice, and represent goals and objectives only.
All IBM prices shown are IBM's suggested retail prices, are current and are subject to change withoutnotice. Dealer prices may vary.
This information is for planning purposes only. The information herein is subject to change before theproducts described become available.
This information contains examples of data and reports used in daily business operations. To illustratethem as completely as possible, the examples include the names of individuals, companies, brands, andproducts. All of these names are fictitious and any similarity to the names and addresses used by anactual business enterprise is entirely coincidental.
COPYRIGHT LICENSE:
This information contains sample application programs in source language, which illustrate programmingtechniques on various operating platforms. You may copy, modify, and distribute these sample programsin any form without payment to IBM, for the purposes of developing, using, marketing or distributingapplication programs conforming to the application programming interface for the operating platform forwhich the sample programs are written. These examples have not been thoroughly tested under allconditions. IBM, therefore, cannot guarantee or imply reliability, serviceability, or function of theseprograms. The sample programs are provided "AS IS", without warranty of any kind. IBM shall not beliable for any damages arising out of your use of the sample programs.
Each copy or any portion of these sample programs or any derivative work, must include a copyrightnotice as follows:© (your company name) (year). Portions of this code are derived from IBM Corp. Sample Programs. ©Copyright IBM Corp. _enter the year or years_.
If you are viewing this information in softcopy form, the photographs and color illustrations might not bedisplayed.
Terms and conditions for product documentationPermissions for the use of these publications are granted subject to the following terms and conditions.Applicability
These terms and conditions are in addition to any terms of use for the IBM website.
398 IBM Security Key Lifecycle Manager : Administering

Personal useYou may reproduce these publications for your personal, noncommercial use provided that allproprietary notices are preserved. You may not distribute, display or make derivative work of thesepublications, or any portion thereof, without the express consent of IBM.
Commercial useYou may reproduce, distribute and display these publications solely within your enterprise providedthat all proprietary notices are preserved. You may not make derivative works of these publications,or reproduce, distribute or display these publications or any portion thereof outside your enterprise,without the express consent of IBM.
RightsExcept as expressly granted in this permission, no other permissions, licenses or rights are granted,either express or implied, to the publications or any information, data, software or other intellectualproperty contained therein.IBM reserves the right to withdraw the permissions granted herein whenever, in its discretion, the useof the publications is detrimental to its interest or, as determined by IBM, the above instructions arenot being properly followed.You may not download, export or re-export this information except in full compliance with allapplicable laws and regulations, including all United States export laws and regulationsIBM MAKES NO GUARANTEE ABOUT THE CONTENT OF THESE PUBLICATIONS. THE PUBLICATIONSARE PROVIDED "AS-IS" AND WITHOUT WARRANTY OF ANY KIND, EITHER EXPRESSED OR IMPLIED,INCLUDING BUT NOT LIMITED TO IMPLIED WARRANTIES OF MERCHANTABILITY, NON-INFRINGEMENT, AND FITNESS FOR A PARTICULAR PURPOSE.
TrademarksIBM, the IBM logo, and ibm.com are trademarks or registered trademarks of International BusinessMachines Corp., registered in many jurisdictions worldwide. Other product and service names might betrademarks of IBM or other companies. A current list of IBM trademarks is available on the web at http://www.ibm.com/legal/copytrade.shtml.
Adobe, Acrobat, PostScript and all Adobe-based trademarks are either registered trademarks ortrademarks of Adobe Systems Incorporated in the United States, other countries, or both.
IT Infrastructure Library is a registered trademark of the Central Computer and TelecommunicationsAgency which is now part of the Office of Government Commerce.
Intel, Intel logo, Intel Inside, Intel Inside logo, Intel Centrino, Intel Centrino logo, Celeron, Intel Xeon,Intel SpeedStep, Itanium, and Pentium are trademarks or registered trademarks of Intel Corporation orits subsidiaries in the United States and other countries.
Linux is a trademark of Linus Torvalds in the United States, other countries, or both.
Microsoft, Windows, Windows NT, and the Windows logo are trademarks of Microsoft Corporation in theUnited States, other countries, or both.
ITIL is a registered trademark, and a registered community trademark of the Office of GovernmentCommerce, and is registered in the U.S. Patent and Trademark Office.
UNIX is a registered trademark of The Open Group in the United States and other countries.
Java and all Java-based trademarks and logos are trademarks or registered trademarks of Oracle and/orits affiliates.
Cell Broadband Engine is a trademark of Sony Computer Entertainment, Inc. in the United States, othercountries, or both and is used under license therefrom.
Linear Tape-Open, LTO, the LTO Logo, Ultrium, and the Ultrium logo are trademarks of HP, IBM Corp. andQuantum in the U.S. and other countries.
Notices 399

400 IBM Security Key Lifecycle Manager : Administering


IBM®
Product Number: