
WSO2 API Manager
318
WSO2 API Manager, version 1.7.0, WSO2 Inc. WSO2 API Manager Documentation Version 1.7.0
-
Upload
khangminh22 -
Category
Documents
-
view
4 -
download
0
Transcript of WSO2 API Manager

WSO2 API Manager, version 1.7.0, WSO2 Inc.
1
WSO2 API ManagerDocumentation
Version 1.7.0

WSO2 API Manager, version 1.7.0, WSO2 Inc.
Copyright © WSO2 Inc. 2005-2014 2
Table of Contents1. WSO2 API Manager Documentation . . . . . . . . . . . . . . . . . . . . . . . . . . . . . . . . . . . . . . . . . . . . . . . . . . . . . . 5
1.1 About API Manager . . . . . . . . . . . . . . . . . . . . . . . . . . . . . . . . . . . . . . . . . . . . . . . . . . . . . . . . . . . . . . . 51.1.1 Introducing API Manager . . . . . . . . . . . . . . . . . . . . . . . . . . . . . . . . . . . . . . . . . . . . . . . . . . . . . . 61.1.2 Features . . . . . . . . . . . . . . . . . . . . . . . . . . . . . . . . . . . . . . . . . . . . . . . . . . . . . . . . . . . . . . . . . . . 61.1.3 Architecture . . . . . . . . . . . . . . . . . . . . . . . . . . . . . . . . . . . . . . . . . . . . . . . . . . . . . . . . . . . . . . . . . 81.1.4 About this Release . . . . . . . . . . . . . . . . . . . . . . . . . . . . . . . . . . . . . . . . . . . . . . . . . . . . . . . . . . . 101.1.5 FAQ . . . . . . . . . . . . . . . . . . . . . . . . . . . . . . . . . . . . . . . . . . . . . . . . . . . . . . . . . . . . . . . . . . . . . . 11
1.2 Getting Started . . . . . . . . . . . . . . . . . . . . . . . . . . . . . . . . . . . . . . . . . . . . . . . . . . . . . . . . . . . . . . . . . . . 151.2.1 Downloading the Product . . . . . . . . . . . . . . . . . . . . . . . . . . . . . . . . . . . . . . . . . . . . . . . . . . . . . . 161.2.2 Installation Prerequisites . . . . . . . . . . . . . . . . . . . . . . . . . . . . . . . . . . . . . . . . . . . . . . . . . . . . . . . 161.2.3 Installing the Product . . . . . . . . . . . . . . . . . . . . . . . . . . . . . . . . . . . . . . . . . . . . . . . . . . . . . . . . . 19
1.2.3.1 Installing on Linux or OS X . . . . . . . . . . . . . . . . . . . . . . . . . . . . . . . . . . . . . . . . . . . . . . . . 191.2.3.2 Installing on Solaris . . . . . . . . . . . . . . . . . . . . . . . . . . . . . . . . . . . . . . . . . . . . . . . . . . . . . . 211.2.3.3 Installing on Windows . . . . . . . . . . . . . . . . . . . . . . . . . . . . . . . . . . . . . . . . . . . . . . . . . . . . 221.2.3.4 Installing as a Linux Service . . . . . . . . . . . . . . . . . . . . . . . . . . . . . . . . . . . . . . . . . . . . . . . 251.2.3.5 Installing as a Windows Service . . . . . . . . . . . . . . . . . . . . . . . . . . . . . . . . . . . . . . . . . . . . 27
1.2.4 Building from Source . . . . . . . . . . . . . . . . . . . . . . . . . . . . . . . . . . . . . . . . . . . . . . . . . . . . . . . . . 321.2.5 Running the Product . . . . . . . . . . . . . . . . . . . . . . . . . . . . . . . . . . . . . . . . . . . . . . . . . . . . . . . . . . 351.2.6 Quick Start Guide . . . . . . . . . . . . . . . . . . . . . . . . . . . . . . . . . . . . . . . . . . . . . . . . . . . . . . . . . . . . 361.2.7 Upgrading from the Previous Release . . . . . . . . . . . . . . . . . . . . . . . . . . . . . . . . . . . . . . . . . . . . 54
1.3 User Guide . . . . . . . . . . . . . . . . . . . . . . . . . . . . . . . . . . . . . . . . . . . . . . . . . . . . . . . . . . . . . . . . . . . . . . 571.3.1 API Developer Guide . . . . . . . . . . . . . . . . . . . . . . . . . . . . . . . . . . . . . . . . . . . . . . . . . . . . . . . . . 58
1.3.1.1 Creating and Managing APIs . . . . . . . . . . . . . . . . . . . . . . . . . . . . . . . . . . . . . . . . . . . . . . . 591.3.1.1.1 Designing APIs . . . . . . . . . . . . . . . . . . . . . . . . . . . . . . . . . . . . . . . . . . . . . . . . . . . . . 591.3.1.1.2 Implementing APIs . . . . . . . . . . . . . . . . . . . . . . . . . . . . . . . . . . . . . . . . . . . . . . . . . . 621.3.1.1.3 Managing APIs . . . . . . . . . . . . . . . . . . . . . . . . . . . . . . . . . . . . . . . . . . . . . . . . . . . . . 66
1.3.1.2 Editing and Deleting APIs . . . . . . . . . . . . . . . . . . . . . . . . . . . . . . . . . . . . . . . . . . . . . . . . . 701.3.1.3 Managing Throttling Tiers . . . . . . . . . . . . . . . . . . . . . . . . . . . . . . . . . . . . . . . . . . . . . . . . . 721.3.1.4 Documenting APIs . . . . . . . . . . . . . . . . . . . . . . . . . . . . . . . . . . . . . . . . . . . . . . . . . . . . . . . 78
1.3.1.4.1 Adding Documentation Using API Publisher . . . . . . . . . . . . . . . . . . . . . . . . . . . . . . 781.3.1.4.2 Adding Documentation Using Swagger . . . . . . . . . . . . . . . . . . . . . . . . . . . . . . . . . . 801.3.1.4.3 Adding Apache Solr-Based Indexing . . . . . . . . . . . . . . . . . . . . . . . . . . . . . . . . . . . . 86
1.3.1.5 Versioning APIs . . . . . . . . . . . . . . . . . . . . . . . . . . . . . . . . . . . . . . . . . . . . . . . . . . . . . . . . . 891.3.1.6 Publishing to API Stores . . . . . . . . . . . . . . . . . . . . . . . . . . . . . . . . . . . . . . . . . . . . . . . . . . 901.3.1.7 Managing API Usage . . . . . . . . . . . . . . . . . . . . . . . . . . . . . . . . . . . . . . . . . . . . . . . . . . . . . 94
1.3.2 Application Developer Guide . . . . . . . . . . . . . . . . . . . . . . . . . . . . . . . . . . . . . . . . . . . . . . . . . . . 951.3.2.1 Signing up to API Store . . . . . . . . . . . . . . . . . . . . . . . . . . . . . . . . . . . . . . . . . . . . . . . . . . . 961.3.2.2 Subscribing to APIs . . . . . . . . . . . . . . . . . . . . . . . . . . . . . . . . . . . . . . . . . . . . . . . . . . . . . . 971.3.2.3 Working with Access Tokens . . . . . . . . . . . . . . . . . . . . . . . . . . . . . . . . . . . . . . . . . . . . . . . 1001.3.2.4 Invoking APIs . . . . . . . . . . . . . . . . . . . . . . . . . . . . . . . . . . . . . . . . . . . . . . . . . . . . . . . . . . . 1031.3.2.5 Engaging with Community . . . . . . . . . . . . . . . . . . . . . . . . . . . . . . . . . . . . . . . . . . . . . . . . . 104
1.3.3 Customizing the API Store . . . . . . . . . . . . . . . . . . . . . . . . . . . . . . . . . . . . . . . . . . . . . . . . . . . . . 1061.3.4 Monitoring, Statistics and Billing . . . . . . . . . . . . . . . . . . . . . . . . . . . . . . . . . . . . . . . . . . . . . . . . . 108
1.3.4.1 Publishing API Runtime Statistics . . . . . . . . . . . . . . . . . . . . . . . . . . . . . . . . . . . . . . . . . . . 1081.3.4.2 Integrating with Google Analytics . . . . . . . . . . . . . . . . . . . . . . . . . . . . . . . . . . . . . . . . . . . 112

WSO2 API Manager, version 1.7.0, WSO2 Inc.
Copyright © WSO2 Inc. 2005-2014 3
1.3.4.3 Monetization of API Usage . . . . . . . . . . . . . . . . . . . . . . . . . . . . . . . . . . . . . . . . . . . . . . . . 1141.3.4.4 Viewing API Statistics . . . . . . . . . . . . . . . . . . . . . . . . . . . . . . . . . . . . . . . . . . . . . . . . . . . . 114
1.3.5 Extending API Manager . . . . . . . . . . . . . . . . . . . . . . . . . . . . . . . . . . . . . . . . . . . . . . . . . . . . . . . 1191.3.5.1 Editing API Templates . . . . . . . . . . . . . . . . . . . . . . . . . . . . . . . . . . . . . . . . . . . . . . . . . . . . 1191.3.5.2 Implementing an API facade with WSO2 API Manager . . . . . . . . . . . . . . . . . . . . . . . . . . . 1191.3.5.3 Writing Custom Handlers . . . . . . . . . . . . . . . . . . . . . . . . . . . . . . . . . . . . . . . . . . . . . . . . . . 1191.3.5.4 Integrating with WSO2 Governance Registry Services . . . . . . . . . . . . . . . . . . . . . . . . . . . 1231.3.5.5 Adding Mediation Extensions . . . . . . . . . . . . . . . . . . . . . . . . . . . . . . . . . . . . . . . . . . . . . . 1251.3.5.6 Adding Workflow Extensions . . . . . . . . . . . . . . . . . . . . . . . . . . . . . . . . . . . . . . . . . . . . . . . 127
1.3.5.6.1 Adding an Application Creation Workflow . . . . . . . . . . . . . . . . . . . . . . . . . . . . . . . . . 1281.3.5.6.2 Adding an Application Registration Workflow . . . . . . . . . . . . . . . . . . . . . . . . . . . . . . 1311.3.5.6.3 Adding an API Subscription Workflow . . . . . . . . . . . . . . . . . . . . . . . . . . . . . . . . . . . 1351.3.5.6.4 Adding a User Signup Workflow . . . . . . . . . . . . . . . . . . . . . . . . . . . . . . . . . . . . . . . . 1371.3.5.6.5 Invoking API Manager from the BPEL Engine . . . . . . . . . . . . . . . . . . . . . . . . . . . . . 1401.3.5.6.6 Customizing a Workflow Extension . . . . . . . . . . . . . . . . . . . . . . . . . . . . . . . . . . . . . . 1411.3.5.6.7 Configuring Workflows for Tenants . . . . . . . . . . . . . . . . . . . . . . . . . . . . . . . . . . . . . . 145
1.3.5.7 Transforming API Message Payload . . . . . . . . . . . . . . . . . . . . . . . . . . . . . . . . . . . . . . . . . 1521.3.5.8 Customizing the Management Console . . . . . . . . . . . . . . . . . . . . . . . . . . . . . . . . . . . . . . . 1601.3.5.9 Writing Test Cases . . . . . . . . . . . . . . . . . . . . . . . . . . . . . . . . . . . . . . . . . . . . . . . . . . . . . . 163
1.3.6 Working with Security . . . . . . . . . . . . . . . . . . . . . . . . . . . . . . . . . . . . . . . . . . . . . . . . . . . . . . . . . 1631.3.6.1 Passing Enduser Attributes to the Backend Using JWT . . . . . . . . . . . . . . . . . . . . . . . . . . 1631.3.6.2 Saving Access Tokens in Separate Tables . . . . . . . . . . . . . . . . . . . . . . . . . . . . . . . . . . . . 1651.3.6.3 Fixing Security Vulnerabilities . . . . . . . . . . . . . . . . . . . . . . . . . . . . . . . . . . . . . . . . . . . . . . 1661.3.6.4 Encrypting Passwords . . . . . . . . . . . . . . . . . . . . . . . . . . . . . . . . . . . . . . . . . . . . . . . . . . . . 167
1.4 Admin Guide . . . . . . . . . . . . . . . . . . . . . . . . . . . . . . . . . . . . . . . . . . . . . . . . . . . . . . . . . . . . . . . . . . . . 1691.4.1 Managing Users and Roles . . . . . . . . . . . . . . . . . . . . . . . . . . . . . . . . . . . . . . . . . . . . . . . . . . . . 170
1.4.1.1 User Roles in the API Manager . . . . . . . . . . . . . . . . . . . . . . . . . . . . . . . . . . . . . . . . . . . . . 1701.4.1.2 Adding Users . . . . . . . . . . . . . . . . . . . . . . . . . . . . . . . . . . . . . . . . . . . . . . . . . . . . . . . . . . . 1741.4.1.3 Configuring User Stores . . . . . . . . . . . . . . . . . . . . . . . . . . . . . . . . . . . . . . . . . . . . . . . . . . 176
1.4.1.3.1 Realm Configuration . . . . . . . . . . . . . . . . . . . . . . . . . . . . . . . . . . . . . . . . . . . . . . . . . 1771.4.1.3.2 Changing the RDBMS . . . . . . . . . . . . . . . . . . . . . . . . . . . . . . . . . . . . . . . . . . . . . . . 1791.4.1.3.3 Configuring Primary User Stores . . . . . . . . . . . . . . . . . . . . . . . . . . . . . . . . . . . . . . . 1791.4.1.3.4 Configuring Secondary User Stores . . . . . . . . . . . . . . . . . . . . . . . . . . . . . . . . . . . . . 195
1.4.2 Deploying and Clustering the API Manager . . . . . . . . . . . . . . . . . . . . . . . . . . . . . . . . . . . . . . . . 1971.4.3 Working with Databases . . . . . . . . . . . . . . . . . . . . . . . . . . . . . . . . . . . . . . . . . . . . . . . . . . . . . . . 197
1.4.3.1 Setting up the Physical Database . . . . . . . . . . . . . . . . . . . . . . . . . . . . . . . . . . . . . . . . . . . 1981.4.3.1.1 Setting up with Derby . . . . . . . . . . . . . . . . . . . . . . . . . . . . . . . . . . . . . . . . . . . . . . . . 1981.4.3.1.2 Setting up with H2 Database . . . . . . . . . . . . . . . . . . . . . . . . . . . . . . . . . . . . . . . . . . 2051.4.3.1.3 Setting up with MS SQL . . . . . . . . . . . . . . . . . . . . . . . . . . . . . . . . . . . . . . . . . . . . . . 2121.4.3.1.4 Setting up with MySQL . . . . . . . . . . . . . . . . . . . . . . . . . . . . . . . . . . . . . . . . . . . . . . . 2151.4.3.1.5 Setting up with MySQL Cluster . . . . . . . . . . . . . . . . . . . . . . . . . . . . . . . . . . . . . . . . . 2191.4.3.1.6 Setting up with OpenEdge . . . . . . . . . . . . . . . . . . . . . . . . . . . . . . . . . . . . . . . . . . . . 2191.4.3.1.7 Setting up with Oracle . . . . . . . . . . . . . . . . . . . . . . . . . . . . . . . . . . . . . . . . . . . . . . . . 2221.4.3.1.8 Setting up with PostgreSQL . . . . . . . . . . . . . . . . . . . . . . . . . . . . . . . . . . . . . . . . . . . 232
1.4.3.2 Managing Datasources . . . . . . . . . . . . . . . . . . . . . . . . . . . . . . . . . . . . . . . . . . . . . . . . . . . 2391.4.3.2.1 Adding Datasources . . . . . . . . . . . . . . . . . . . . . . . . . . . . . . . . . . . . . . . . . . . . . . . . . 2391.4.3.2.2 Configuring an RDBMS Datasource . . . . . . . . . . . . . . . . . . . . . . . . . . . . . . . . . . . . . 2401.4.3.2.3 Configuring a Custom Datasource . . . . . . . . . . . . . . . . . . . . . . . . . . . . . . . . . . . . . . 247

WSO2 API Manager, version 1.7.0, WSO2 Inc.
Copyright © WSO2 Inc. 2005-2014 4
1.4.4 Configuring Caching . . . . . . . . . . . . . . . . . . . . . . . . . . . . . . . . . . . . . . . . . . . . . . . . . . . . . . . . . . 2491.4.5 Configuring Single Sign-on with SAML 2.0 . . . . . . . . . . . . . . . . . . . . . . . . . . . . . . . . . . . . . . . . . 2511.4.6 Maintaining Primary and Secondary Logins . . . . . . . . . . . . . . . . . . . . . . . . . . . . . . . . . . . . . . . . 2571.4.7 Adding Internationalization and Localization . . . . . . . . . . . . . . . . . . . . . . . . . . . . . . . . . . . . . . . 2581.4.8 Adding New Throttling Tiers . . . . . . . . . . . . . . . . . . . . . . . . . . . . . . . . . . . . . . . . . . . . . . . . . . . . 2591.4.9 Maintaining Separate Production and Sandbox Gateways . . . . . . . . . . . . . . . . . . . . . . . . . . . . 2611.4.10 Changing the Default Transport . . . . . . . . . . . . . . . . . . . . . . . . . . . . . . . . . . . . . . . . . . . . . . . . 2631.4.11 Running the Product on a Preferred Profile . . . . . . . . . . . . . . . . . . . . . . . . . . . . . . . . . . . . . . . 2651.4.12 Tuning Performance . . . . . . . . . . . . . . . . . . . . . . . . . . . . . . . . . . . . . . . . . . . . . . . . . . . . . . . . . 2661.4.13 Directing the Root Context to API Store . . . . . . . . . . . . . . . . . . . . . . . . . . . . . . . . . . . . . . . . . . 2691.4.14 Changing the Default Ports with Offset . . . . . . . . . . . . . . . . . . . . . . . . . . . . . . . . . . . . . . . . . . 2701.4.15 Adding Links to Navigate Between the Store and Publisher . . . . . . . . . . . . . . . . . . . . . . . . . . 2711.4.16 Migrating the API Manager . . . . . . . . . . . . . . . . . . . . . . . . . . . . . . . . . . . . . . . . . . . . . . . . . . . . 2731.4.17 Configuring WSO2 Identity Server as the Key Manager . . . . . . . . . . . . . . . . . . . . . . . . . . . . . 2741.4.18 Configuring Multiple Tenants . . . . . . . . . . . . . . . . . . . . . . . . . . . . . . . . . . . . . . . . . . . . . . . . . . 274
1.4.18.1 Multi Tenant Architecture . . . . . . . . . . . . . . . . . . . . . . . . . . . . . . . . . . . . . . . . . . . . . . . . 2741.4.18.2 Managing Tenants . . . . . . . . . . . . . . . . . . . . . . . . . . . . . . . . . . . . . . . . . . . . . . . . . . . . . . 2771.4.18.3 Tenant-Aware Load Balancing using WSO2 ELB . . . . . . . . . . . . . . . . . . . . . . . . . . . . . . 278
1.5 Samples . . . . . . . . . . . . . . . . . . . . . . . . . . . . . . . . . . . . . . . . . . . . . . . . . . . . . . . . . . . . . . . . . . . . . . . . 2801.5.1 Setting up the Samples . . . . . . . . . . . . . . . . . . . . . . . . . . . . . . . . . . . . . . . . . . . . . . . . . . . . . . . . 2811.5.2 Deploying and Testing YouTube API . . . . . . . . . . . . . . . . . . . . . . . . . . . . . . . . . . . . . . . . . . . . . 2821.5.3 Generating Billing Data . . . . . . . . . . . . . . . . . . . . . . . . . . . . . . . . . . . . . . . . . . . . . . . . . . . . . . . . 2841.5.4 Invoking APIs using a Web App Deployed in WSO2 AS . . . . . . . . . . . . . . . . . . . . . . . . . . . . . . 2871.5.5 Deploying and Testing Wikipedia API . . . . . . . . . . . . . . . . . . . . . . . . . . . . . . . . . . . . . . . . . . . . . 289
1.6 Published APIs . . . . . . . . . . . . . . . . . . . . . . . . . . . . . . . . . . . . . . . . . . . . . . . . . . . . . . . . . . . . . . . . . . 2891.6.1 Publisher APIs . . . . . . . . . . . . . . . . . . . . . . . . . . . . . . . . . . . . . . . . . . . . . . . . . . . . . . . . . . . . . . 2901.6.2 Store APIs . . . . . . . . . . . . . . . . . . . . . . . . . . . . . . . . . . . . . . . . . . . . . . . . . . . . . . . . . . . . . . . . . . 2931.6.3 Token API . . . . . . . . . . . . . . . . . . . . . . . . . . . . . . . . . . . . . . . . . . . . . . . . . . . . . . . . . . . . . . . . . . 2971.6.4 WSO2 Admin Services . . . . . . . . . . . . . . . . . . . . . . . . . . . . . . . . . . . . . . . . . . . . . . . . . . . . . . . . 304
1.7 Reference Guide . . . . . . . . . . . . . . . . . . . . . . . . . . . . . . . . . . . . . . . . . . . . . . . . . . . . . . . . . . . . . . . . . 3081.7.1 Default Ports of WSO2 Products . . . . . . . . . . . . . . . . . . . . . . . . . . . . . . . . . . . . . . . . . . . . . . . . 3091.7.2 WSO2 Patch Application Process . . . . . . . . . . . . . . . . . . . . . . . . . . . . . . . . . . . . . . . . . . . . . . . 3111.7.3 Error Handling . . . . . . . . . . . . . . . . . . . . . . . . . . . . . . . . . . . . . . . . . . . . . . . . . . . . . . . . . . . . . . . 313
1.8 Getting Support . . . . . . . . . . . . . . . . . . . . . . . . . . . . . . . . . . . . . . . . . . . . . . . . . . . . . . . . . . . . . . . . . . 3151.9 Glossary . . . . . . . . . . . . . . . . . . . . . . . . . . . . . . . . . . . . . . . . . . . . . . . . . . . . . . . . . . . . . . . . . . . . . . . . 3161.10 Site Map . . . . . . . . . . . . . . . . . . . . . . . . . . . . . . . . . . . . . . . . . . . . . . . . . . . . . . . . . . . . . . . . . . . . . . 317

WSO2 API Manager, version 1.7.0, WSO2 Inc.
Copyright © WSO2 Inc. 2005-2014 5
WSO2 API Manager DocumentationWelcome to WSO2 API Manager Documentation! (APIM) is a fully open source, completeWSO2 API Managersolution for creating, publishing and managing all aspects of an API and its life cycle, and is ready for massivelyscalable deployments.
Use the descriptions below to find the section you need, and then browse the topics in the left navigation panel. Youcan also use the box on the left to find a term in this documentation, or use the search box in the topSearchright-hand corner to search in all WSO2 product documentation.
To download a PDF of this document or a selected part of it, click (generate only one PDF at a time). To exporthereto a different format, click the menu at the top of this screen, click , and then select an Browse Space Operations E
option.xport
About API Manager
Introduces WSO2 APIManager, including thebusiness cases it solves, itsfeatures, architecture and howto get help.
Getting Started
Instructions to download,install, run and get startedquickly with WSO2 APIManager.
User Guide
Introduces the features andfunctionality of the APIManager, solutiondevelopment, testing,debugging and deployment.
Admin Guide
Introduces product deploymentand other systemadministration tasks.
Samples
Real-life business use casesof the product.
Published APIs
APIs to be used in yourapplications.

WSO2 API Manager, version 1.7.0, WSO2 Inc.
Copyright © WSO2 Inc. 2005-2014 6
About API ManagerThe topics in this section introduce WSO2 API Manager, including the business cases it solves, its features, andarchitecture.
Introducing API ManagerFeaturesArchitectureAbout this ReleaseFAQ
Introducing API Manager
As an organization implements SOA, it can benefit by exposing core processes, data and services as APIs to thepublic. External parties can mash up these APIs in innovative ways to build new solutions. A business can increaseits growth potential and partnership advancements by facilitating developments that are powered by its APIs in asimple, decentralized manner.
However, leveraging APIs in a collaborative way introduces new challenges in exercising control, establishing trust,security and regulation. As a result, proper API management is crucial.
WSO2 API Manager overcomes these challenges with a set of features for API creation, publication, lifecyclemanagement, versioning, monetization, governance, security etc. using proven WSO2 products such as WSO2
, , and . In addition, as it is also poweredEnterprise Service Bus WSO2 Identity Server WSO2 Governance Registryby the and is immediately ready for massively scalable deployments.WSO2 Business Activity Monitor
WSO2 API Manager is fully open source and provides Web interfaces for development teams to deploy and monitorAPIs. and for consumers to subscribe to, discover and consume APIs through a user-friendly storefront. The APIManager also provides complete API governance and shares the same metadata repository as WSO2 GovernanceRegistry. If your setup requires to govern more than APIs, we recommend you to use WSO2 API manager for APIgovernance and WSO2 Governance Registry for the other artifacts.
The WSO2 API Manager is an on-going project with continuous improvements and enhancements introduced witheach new release to address new business challenges and customer expectations. WSO2 invites users, developersand enthusiasts to or get the assistance of our development teams at many different levels through get involvedonline forums, mailing lists and support options.
Features
Feature Description
Creating a Store foryour APIs
Graphical experience similar to Android Marketplace or Apple App Store.Browse APIs by provider, tags or name.Self-registration to developer community to subscribe to APIs.Subscribe to APIs and manage subscriptions on per-application basis.Subscriptions can be at different service tiers based on expected usage levels.Role based access to API Store; manage public and private APIs.Manage subscriptions at a per-developer level.Browse API documentation, download helpers for easy consumption.Comment on and rate APIs.Forum for discussing API usage issues.Try APIs directly on the store front.Internationalization (i18n) support.

WSO2 API Manager, version 1.7.0, WSO2 Inc.
Copyright © WSO2 Inc. 2005-2014 7
Publishing andGoverning API Usage
Publish APIs to external consumers and partners, as well as internal users.Supports publishing multiple protocols including SOAP, REST, JSON and XML styleservices as APIs.Manage API versions and deployment status by version.Govern the API lifecycle (publish, deprecate, retire).Attach documentation (files, external URLs) to APIs.Apply Security policies to APIs (authentication, authorization).Associate API available to system defined service tiers.Provision and Manage API keys.Track consumers per API.One-click deployment to API Gateway for immediate publishing.
Routing API Traffic Supports API authentication with OAuth2.Extremely high performance pass-through message routing with sub-millisecondlatency.Enforce rate limiting and throttling policies for APIs by consumer.Horizontally scalable with easy deployment into cluster using proven routinginfrastructure.Scales to millions of developers/users.Capture all statistics and push to pluggable analytics system.Configure API routing policies with capabilities of WSO2 Enterprise Service Bus.Powered by WSO2 Enterprise Service Bus.
Managing theCommunity
Self-sign up for API consumption.Manage user account including password reset.Developer interaction with APIs via comments and ratings.Support for developer communication via forums.Powered by WSO2 Identity Server.
Governing CompleteAPI Lifecycle
Manage API lifecycle from cradle to grave: create, publish, block, deprecate andretire.Publish both production and sandbox keys for APIs to enable easy developer testing.Publish APIs to partner networks such as Programmable Web (Available soon infuture version).Powered by WSO2 Governance Registry.
Monitoring API Usageand Performance
All API usage published to pluggable analytics framework.Out of the box support for WSO2 Business Activity Monitor and Google Analytics.View metrics by user, API and more.Customized reporting via plugging reporting engines.Monitor SLA compliance.Powered by WSO2 Business Activity Monitor.
Deploying with Easein Enterprise Settings
Role based access control for managing users and their authorization levels.Store front can be deployed in DMZ for external access with Publisher inside thefirewall for private control.Different user stores for developer focused store-front and internal operations inpublisher.Integrates with enterprise identity systems including LDAP and Microsoft ActiveDirectory.Gateway can be deployed in DMZ with controlled access to WSO2 Identity Server(for authentication/authorization) and governance database behind firewall.

WSO2 API Manager, version 1.7.0, WSO2 Inc.
Copyright © WSO2 Inc. 2005-2014 8
When an API is published, a file with its synapse configuration is created on the API Gateway. The synapseconfiguration of each API has a set of handlers. Each of these handlers is executed on the APIs in the order they
.
.Application Developer Guide
.API Developer Guide
Customizing andExtending
All components are highly customizable. You can change the styles and themes ofthe Web interfaces.Storefront implemented with Jaggery ( ) for easy customization.jaggeryjs.orgPluggable to third-party analytics systems and billing systems (Available soon infuture version).Pluggable to existing user stores including via JDBC and LDAP.Components usable separately – storefront can be used to front APIs gatewayed viathird party gateways such as Intel Expressway Service Gateway.
Architecture
The WSO2 API Manager comprises the following main components:API PublisherAPI StoreAPI GatewayAPI HandlersAPI Key Manager
API Publisher
Provides an end-user, collaborative Web interface for API providers to publish APIs, share documentation, provisionAPI keys, and gather feedback on API features, quality and usage. The API Publisher is powered by ,Jaggery
products.WSO2 Governance Registry and WSO2 Identity Server
For more information on API Publisher and its functionality, refer to sections
API Store
Provides an end-user, collaborative Web interface for consumers to self-register, discover API functionality,subscribe to APIs, evaluate them and interact with API publishers. The API Store is powered by Jaggery, WSO2
products.Governance Registry and WSO2 Identity Server
For more information on the API Store and its functionality, refer to section
API Gateway
A runtime, back-end component developed using the WSO2 ESB, which is proven for its performance capability.API Gateway secures, protects, manages, and scales API calls. The API gateway is a simple API proxy thatintercepts API requests and applies policies such as throttling and security checks. It is also instrumental ingathering API usage statistics. We use a set of handlers for security validation and throttling purposes in the APIGateway. Upon validation, it passes Web service calls to the actual back-end. If the service call is a token requestcall, API Gateway passes it directly to the to handle it.API Key Manager Server
The API Gateway is accessible through the URL: once the API Manager server is up https://localhost:9443/carbonand running.
You can integrate a monitoring and statistics component to the API Manager without any additional configurationeffort. This monitoring component integrates with the WSO2 Business Activity Monitor, which can be deployedseparately to analyze events generated by the API manager. For more information, see Publishing API RuntimeStatistics
API Handlers
Although the API Gateway contains ESB features, it is recommended not to use it for ESB-specific tasks.Use it only for Gateway functionality related to API invocations. For example, if you want to call externalservices like SAP, use a separate ESB cluster.

WSO2 API Manager, version 1.7.0, WSO2 Inc.
Copyright © WSO2 Inc. 2005-2014 9
When the API Gateway receives API invocation calls, it similarlycontacts the API Key Manager service for verification. This verification call happens every time the Gatewayreceives an API invocation call if is not enabled at the Gateway level.caching
The API Key Manager component handles all security and key-related operations. When API Gateway receives APIcalls, it contacts the API Key Manager service to verify the validity of tokens and do security checks. When APIGateway receives calls to log in, it directly forwards the calls to Key Manager server. You must pass username,password, consumer key and consumer secret key with it to register. All tokens used for validation are based onOAuth 2.0.0 protocol. Secure authorization of APIs is provided by the OAuth 2.0 standard for key management. TheAPI Gateway supports API authentication with OAuth 2.0, and enables IT organizations to enforce rate limits andthrottling policies.
appear in the configuration.u can find a set of default handlers in any API Synapse definition as shown below.
<handlers> <handlerclass="org.wso2.carbon.apimgt.gateway.handlers.security.APIAuthenticationHandler"/> <handlerclass="org.wso2.carbon.apimgt.gateway.handlers.throttling.APIThrottleHandler"> <property name="id" value="A"/> <property name="policyKey" value="gov:/apimgt/applicationdata/tiers.xml"/> </handler> <handler class="org.wso2.carbon.apimgt.usage.publisher.APIMgtUsageHandler"/> <handlerclass="org.wso2.carbon.apimgt.usage.publisher.APIMgtGoogleAnalyticsTrackingHandler"/> <handlerclass="org.wso2.carbon.apimgt.gateway.handlers.ext.APIManagerExtensionHandler"/></handlers>
Let's see what each handler does:
APIAuthenticationHandler : Validates the OAuth2 bearer token used to invoke the API. It alsodetermines whether the token is of type or and sets variables asProduction Sandbox MessageContextappropriate. To extend the default authentication handler, see .Writing Custom Handlers
APIThrottleHandler : Throttles requests based on the throttling policy specified by the proppolicyKeyerty. Throttling is applied both at the application level as well as subscription level.
APIMgtUsageHandler : Publishes events to BAM for collection and analysis of statistics. This handler onlycomes to effect if . See for more information.API usage tracking is enabled Publishing API Runtime Statistics
APIMgtGoogleAnalyticsTrackingHandler : Publishes events to Google Analytics. This handler onlycomes into effect if Google analytics tracking is enabled. See for more Integrating with Google Analyticsinformation.
APIManagerExtensionHandler : Extends the mediation flow of messages passing through the APIGateway. See s for more information.Adding Mediation Extension
API Key Manager
ation between API Gateway and Key Manager happens in either of the following ways:
Through a Web service callThrough a Thrift call
The default communication protocol of Key Manager is Thrift, which is an RPC framework used to develop scalable,cross-language services. Thrift is much faster than SOAP over HTTP communication.
If your setup has a cluster of multiple Key Manager nodes that are fronted by a instance for loadWSO2 ELB
For detailed information on Thrift, see .http://thrift.apache.org/static/files/thrift-20070401.pdf

WSO2 API Manager, version 1.7.0, WSO2 Inc.
Copyright © WSO2 Inc. 2005-2014 10
balancing, change the key management protocol from Thrift to WSClient using the <KeyValidatorClientType>Thrift uses TCP load balancing and theelement in . file<APIM_HOME>/repository/conf/api-manager.xml
ELB does not support it.
The following diagram depicts the collaboration of these main components with an easily-integrable monitoring and component.statistics
About this Release
What is new in this release
The is the successor of version . WSO2 API Manager version 1.7.0 1.6.0 It contains the following new features andenhancements:
Capability to engage workflows when registering applications. See .Workflow: Application Registration Capability to provide custom error handling logic via custom fault sequence selected from the API PublisherWeb interface.Links added from the API Publisher UI to API Store and also from the API Store UI to the API Publisher, toquickly navigate between the two applications. These links are configurable. See Adding Links to Navigate
.Between the Store and PublisherCapability to parametrize the URL when defining API resources, so that the API Manager can map theincoming requests to the defined resource templates based on the message content and request URI. SeeURL Pattern section in . API ResourcesCapability to add a customized theme to your API Store in a multi-tenanted APIM setup. See Customizing the
.API StoreImproved search capability, including full-text search, by embedding with API Store.Apache SolrCapability for users to view their API usage statistics, billing rates etc. from the API Store. See Viewing API
.Statistics Capability to generate a destination-based usage tracking graph that shows the number of times an API
See .accesses its destination addresses. API Manager Statistics dashboardCapability to specify a default version form all API versions. See .Default API Versions
WSO2 API Manager, version 1.7.0, WSO2 Inc.
Copyright © WSO2 Inc. 2005-2014 11
New API visibility level where only users of the same tenant domain can view and use APIs you publish. See .API Visibility
Compatible WSO2 product versions
The following products were tested for compatibility with WSO2 APIM 1.7.0:
WSO2 APIM 1.7.0 is based on WSO2 Carbon 4.2.0 and is expected to be compatible with any other WSO2 productthat is based on the same Carbon version. If you get any compatibility issues, please . Forcontact team WSO2information on the third-party software required with APIM 1.7.0, see .Installation Prerequisites
Fixed issues
For a list of fixed issues in this release, see WSO2 API Manager 1.7.0 - Fixed Issues.
Known issues
For a list of known issues in this release, see WSO2 API Manager 1.7.0 - Known Issues.
FAQ
General API Manager questionsWhat is WSO2 API Manager?What is the open source license of the API Manager?How do I download and get started quickly?Is their commercial support available for WSO2 API Manager?What are the default ports opened in the API Manager?What are the technologies used underneath WSO2 API Manager?Can I get involved in APIM development activities?
Installation questionsWhat are the minimum requirements to run WSO2 API Manager?What Java versions are supported by the API Manager?How do I deploy a third-party library into the API Manager?Do you provide automated installation scripts based on Puppet or similar solutions?Is it possible to connect the API Manager directly to an LDAP or Active Directory where the corporateidentities are stored?Can I extend the management console UI to add custom UIs?I don't want some of the features that come with WSO2 API Manager. Can I remove them?How can I change the memory allocation for the API Manager?
Clustering and deployment questionsWhere can I look up details of different deployment patterns and clustering configurations of the APIManager?What is the recommended way to manage multiple artifacts in a product cluster?Is it recommended to run multiple WSO2 products on a single server?Can I install features of other WSO2 products to the API Manager?
Authentication and security questionsHow can I manage authentication centrally in a clustered environment?How can I manage the API permissions/visibility?How can I add security policies (UT, XACML etc.) for the services?How can I disable self signup capability to the API Store? I want to engage my own approvalmechanism.Is there a way to lock a user's account after a certain number of failed login attempts to the API Store?
Functionality questionsHow do I change the default admin password and what files should I edit after changing it?How can I recover the admin password used to log in to the management console?
Troubleshooting questionsWhy do I get the following warning:org.wso2.carbon.server.admin.module.handler.AuthenticationHandler - Illegal access attempt whiletrying to authenticate APIKeyValidationService?I hit the DentityExpansionLimit and it gives an error as

WSO2 API Manager, version 1.7.0, WSO2 Inc.
Copyright © WSO2 Inc. 2005-2014 12
{org.wso2.carbon.apimgt.hostobjects.APIStoreHostObject} - Error while getting Recently Added APIsInformation. What is the cause of this?When I call a REST API, I find that a lot of temporary files are created in my server and they are notcleared. This takes up a lot of space. What should I do?
General technology questionsDoes the API Manager use Thrift and where can I find information about it?
General API Manager questions
What is WSO2 API Manager?
WSO2 API Manager is a complete solution for creating, publishing and managing all aspects of an API and its lifecycle. See .About API Manager
What is the open source license of the API Manager?
Apache Software License Version 2.0
How do I download and get started quickly?
Go to to download the binary or source distributions. See .http://wso2.com/products/api-manager Getting Started
Is their commercial support available for WSO2 API Manager?
It is completely supported from evaluation to production. See .WSO2 Support
What are the default ports opened in the API Manager?
See .Default Ports of WSO2 Products
What are the technologies used underneath WSO2 API Manager?
The API Manager is built on top of , an OSGi based components framework for SOA. See WSO2 Carbon Architectur.e
Can I get involved in APIM development activities?
Not only are you allowed, but also encouraged. You can start by subscribing to and [email protected] architecture@ws mailing lists. Feel free to provide ideas, feedback and help make our code better. For more information ono2.org
contacts, mailing lists and forums, see .Getting Support
Installation questions
What are the minimum requirements to run WSO2 API Manager?
Minimum requirement is Oracle Java SE Development Kit (JDK). See .Installation Prerequisites
What Java versions are supported by the API Manager?
See .Installation Prerequisites
How do I deploy a third-party library into the API Manager?
Copy any third-party JARs to directory and restart the server.<APIM_HOME>/repository/components/lib
Do you provide automated installation scripts based on Puppet or similar solutions?
Yes. For information, .contact us
Is it possible to connect the API Manager directly to an LDAP or Active Directory where the corporate

WSO2 API Manager, version 1.7.0, WSO2 Inc.
Copyright © WSO2 Inc. 2005-2014 13
identities are stored?
Yes. You can configure the API Manager with multiple user stores. See . Configuring User Stores
Can I extend the management console UI to add custom UIs?
Yes, you can extend the management console easily by(default URL is ) https://localhost:9443/carbonwriting a custom UI component and simply deploying the OSGi bundle.
I don't want some of the features that come with WSO2 API Manager. Can I remove them?
Yes, you can do this using the menu under the Features Configure menu of the management console (default URLis ).https://localhost:9443/carbon
How can I change the memory allocation for the API Manager?
The memory allocation settings are in file <APIM_HOME>/bin/wso2server.sh .
Clustering and deployment questions
Where can I look up details of different deployment patterns and clustering configurations of the APIManager?
See .WSO2 clustering and deployment guide
What is the recommended way to manage multiple artifacts in a product cluster?
For artifact governance and lifecycle management, we recommend you to use a shared WSO2 Governance instance.Registry
Is it recommended to run multiple WSO2 products on a single server?
This is not recommend in a production environment involving multiple transactions. If you want to start severalWSO2 products on a single server, you must change their default ports to avoid port conflicts. See Changing the
.Default Ports with Offset
Can I install features of other WSO2 products to the API Manager?
Yes, you can do this using the management console. The API Manager already has features of WSO2 IdentityServer, WSO2 Governance Registry, WSO2 ESB etc. embedded in it. However, if you require more features of acertain product, it is recommended to use a separate instance of it rather than instal its features to the API Manager.
Authentication and security questions
How can I manage authentication centrally in a clustered environment?
You can enable centralized authentication using a WSO2 Identity Server based security and identity gateway, which (Single Sign On) across all the servers.solution enables SSO
How can I manage the API permissions/visibility?
To set visibility of the API only to selected user roles in the server, see .API Visibility
How can I add security policies (UT, XACML etc.) for the services?
This should be done in the backend services in the Application Server or WSO2 ESB.
How can I disable self signup capability to the API Store? I want to engage my own approval mechanism.

WSO2 API Manager, version 1.7.0, WSO2 Inc.
Copyright © WSO2 Inc. 2005-2014 14
To disable the self signup capability, set in the element to false<SelfSignUp><Enabled> <APIM_HOME>/repo file.sitory/conf/api-manager.xml
Is there a way to lock a user's account after a certain number of failed login attempts to the API Store?
If your identity provider is WSO2 Identity Server, this facility comes out of the box. If not, install the identity-mgtfeature to the API Manager and configure it. For information, see page in the Identity ServerAccount Lock/Unlockdocumentation.
Functionality questions
How do I change the default admin password and what files should I edit after changing it?
To change the default admin password, log in to the management console with admin/admin credentials and use the"Change my password" option. After changing the password, change the following elements in <APIM_HOME>repo
file:sitory/conf/api-manager.xml
<AuthManager> <Username>admin</Username> <Password>newpassword</Password></AuthManager>
<APIGateway> <Username>admin</Username> <Password>newpassword</Password></APIGateway>
<APIKeyManager> <Username>admin</Username> <Password>newpassword</Password></APIKeyManager>
How can I recover the admin password used to log in to the management console?
Use script.<APIM_HOME>/bin/chpasswd.sh
Troubleshooting questions
Why do I get the following warning: org.wso2.carbon.server.admin.module.handler.AuthenticationHandler -Illegal access attempt while trying to authenticate APIKeyValidationService?
Did you change the default admin password? If so, you need to change the credentials stored in the <APIKe element of the file of the APIyManager> <APIM_HOME>/repository/conf/api-manager.xml
Gateway node/s.Have you set the priority of the handler higher than that of the SAML2SSOAuthenticator BasicAuthenti
handler in the authenticators.xml file? If so, the handler tries to managecator SAML2SSOAuthenticatorthe basic authentication requests as well. Set a lower priority to the than the SAML2SSOAuthenticator Bas
handler as follows:icAuthenticator

WSO2 API Manager, version 1.7.0, WSO2 Inc.
Copyright © WSO2 Inc. 2005-2014 15
<Authenticator name="SAML2SSOAuthenticator" disabled="false"> <Priority>0</Priority> <Config> <Parameter name="LoginPage">/carbon/admin/login.jsp</Parameter> <Parameter name="ServiceProviderID">carbonServer</Parameter> <Parametername="IdentityProviderSSOServiceURL">https://localhost:9444/samlsso</Parameter> <Parametername="NameIDPolicyFormat">urn:oasis:names:tc:SAML:1.1:nameid-format:unspecified</Parameter> <Parameter name="ISAuthnReqSigned">false</Parameter> <!-<Parametername="AssetionConsumerServiceURL">https://localhost:9443/acs</Parameter>-> </Config></Authenticator>
I hit the and it gives an error asDentityExpansionLimit{org.wso2.carbon.apimgt.hostobjects.APIStoreHostObject} - Error while getting Recently Added APIsInformation. What is the cause of this?
This error occurs in JDK 1.7.0_45 and is fixed in JDK 1.7.0_51 onwards. See for details of the bug.here
In JDK 1.7.0_45, all XML readers share the same and . When theXMLSecurityManager XMLLimitAnalyzertotal count of all readers hits the entity expansion limit, which is 64000 by default, the XMLLimitanalyzer's totalcounter is accumulated and the cannot create more readers. If you still want to use update 45XMLInputFactoryof the JDK, try restarting the server with a higher value assigned to the DentityExpansionLimit.
When I call a REST API, I find that a lot of temporary files are created in my server and they are not cleared.This takes up a lot of space. What should I do?
There might be multiple configuration context objects created per each API invocation. Please check whether yourclient is creating a configuration context object per each API invocation. Also, configure a HouseKeeping task in the
file to clear the temporary folders. For example.<APIM_HOME>/repository/conf/carbon.xml
<HouseKeeping> <AutoStart>true</AutoStart> <!-- The interval in *minutes*, between house-keeping runs --> <Interval>10</Interval>
<!-- The maximum time in *minutes*, temp files are allowed to live in thesystem. Files/directories which were modified more than "MaxTempFileLifetime" minutes ago will be removed by the house-keeping task--> <MaxTempFileLifetime>30</MaxTempFileLifetime></HouseKeeping>
General technology questions
Does the API Manager use Thrift and where can I find information about it?
That the default communication protocol of Key Manager is Thrift. See http://thrift.apache.org/static/files/thrift-20070 for information on Thrift.401.pdf

WSO2 API Manager, version 1.7.0, WSO2 Inc.
Copyright © WSO2 Inc. 2005-2014 16
1. 2. 3.
Getting StartedThe following topics show how to download, install, run and get started quickly with WSO2 API Manager.
Downloading the ProductInstallation PrerequisitesInstalling the ProductBuilding from SourceRunning the ProductQuick Start GuideUpgrading from the Previous Release
Downloading the Product
Follow the instructions below to download the product. You can also download and .build the source code
In your Web browser, go to .http://wso2.com/products/api-managerIf you are a new user downloading WSO2 products for the first time, register and log in.Once you are logged in, click the button in the upper right corner of the page.Binary
The binary distribution contains the binary files for both MS Windows and Linux-based operating systems,compressed into a single ZIP file. This distribution is recommended for many users.
After downloading the binary distribution, go to for instructions on installing the necessaryInstallation Prerequisitessupporting applications.
Installation Prerequisites
Prior to installing any WSO2 Carbon based product, it is necessary to have the appropriate prerequisite softwareinstalled on your system. Verify that the computer has the supported operating system and development platformsbefore starting the installation.
System requirements
Memory ~ 2 GB minimum~ 512 MB heap size. This is generally sufficient to process typical SOAP messages but the requirements vary with larger message sizes and the number of messages processed concurrently.
Disk ~ 180 MB, excluding space allocated for log files and databases.
Environment compatibility
All WSO2 Carbon-based products are Java applications that can be run on any platform that is Oracle JDK. 1.6.*/1.7.* compliant. JDK 1.8 is not supported yet Also, we .do not recommend or support OpenJDK
All WSO2 Carbon-based products are generally compatible with most common DBMSs. The embedded H2database is suitable for development, testing, and some production environments. For most enterpriseproduction environments, however, we recommend you use an industry-standard RDBMS such as Oracle,PostgreSQL, MySQL, MS SQL, etc. For more information, see . Additionally, we doWorking with Databasesnot recommend the H2 database as a user store.It is in a production environment due to scalability issues. Instead,not recommended to use Apache DSuse an LDAP like OpenLDAP for user management.For environments that WSO2 products are tested with, see .Environments Tested with WSO2 Products If you have difficulty in setting up any WSO2 product in a specific platform or database, .please contact us
Required applications
The following applications are required for running the API Manager and its samples or for building from the sourcecode. Mandatory installs are marked with *.

WSO2 API Manager, version 1.7.0, WSO2 Inc.
Copyright © WSO2 Inc. 2005-2014 17
1.
2.
Application Purpose Version Download Links
Oracle JavaS EDevelopmentKit (JDK)*
Required to,
To launchthe productas eachproduct is aJavaapplication.To build theproduct fromthe source
(distributionboth JDKand ApacheMaven arerequired).To runApache Ant.
1.6.27 or later / 1.7.*
If you are using , you might need to replace the JavaJDK 1.6Cryptography Extension (JCE) policy files in your JDK withthe Java Cryptography Extension (JCE) Unlimited Strength
files. This will avoid "illegal key size" errorsJurisdiction Policywhen you try to invoke a secured Web service.To build the product from the source distribution, you mustuse JDK 1.6 instead of JDK 1.7.Oracle and IBM JRE 1.7 are also supported when running(not building) WSO2 products.If you are using , install theJDK 1.7 on a Mac OS or Solarissnappy-java library using the following steps:
Download the and extract it to asnappy-java JARpreferred location. This folder will be referred to as <SNAP
.PY_HOME>Copy the appropriate snappy-java library file i386.jnil
(32bit) or (64bit), which is in the ib x86_64.jnilib <SNdireAPPY_HOME>/org/xerial/snappy/native/Mac/
ctory, to the directory.<APIM_HOME>For more information on installing snappy-java library, see Sn
.appy-java fails on Mac OS JDK 1.7We .do not recommend OpenJDK
http://java.sun.com/javase/downloads/index.jsp
ApacheActiveMQ JMS Provider
To enablethe product'sJMS
antransportd try outJMSsamples.TheActiveMQclientlibrariesmust beinstalled inthe product'sclasspathbefore youcan enablethe JMStransport.
5 . 5 . 0 o r l a t e r
If you use any other JMS provider (e.g., Apache Qpid), install anynecessary libraries and/or components.
http://activemq.apache.org
Apache Ant To compileand run the product
.samples
1.7.0 or later http://ant.apache.org

WSO2 API Manager, version 1.7.0, WSO2 Inc.
Copyright © WSO2 Inc. 2005-2014 18
SVN Client To check outthe code to build theproduct fromthe source
.distributionIf you areinstalling bydownloadingandextractingthe binarydistributioninstead ofbuilding fromthe sourcecode, you do
need tonotinstall SVN.
Linux - http://subversion.apache.org/packages.htmlWindows - http://tortoisesvn.net/downloads.html
ApacheMaven
To build theproduct fromthe source
(distributionboth JDKand ApacheMaven arerequired). Ifyou areinstalling bydownloadingandextractingthe binarydistributioninstead ofbuilding fromthe sourcecode, you do
need tonotinstallMaven.
3.0.* http://maven.apache.org

WSO2 API Manager, version 1.7.0, WSO2 Inc.
Copyright © WSO2 Inc. 2005-2014 19
1.
2.
W e bBrowser
Required byall WSO2products toaccess eachproduct's Management
. Console The WebBrowsermust beJavaScriptenabled totake fulladvantage oftheManagementconsole.
NOTE: OnWindows Server2003, you mustnot go below themedium securitylevel in InternetExplorer 6.x.
You are now ready to install. Click one of the following links for instructions:
Installing on Linux or OS XInstalling on SolarisInstalling on WindowsInstalling as a Linux Service
Installing the Product
Installing WSO2 API Manager is very fast and easy. Before you begin, be sure you have met the installationprerequisites, and then follow the installation instructions for your platform. WSO2 API Manager also providespre-configured packages for automated installation based on Puppet or similar solutions. For information, contact
.team WSO2Installing on Linux or OS XInstalling on SolarisInstalling on WindowsInstalling as a Linux ServiceInstalling as a Windows Service
Installing on Linux or OS X
Follow the instructions below to install API Manager on Linux or Mac OS X.
Installing the required applications
Log in to the command line ( either as root or obtain root permissions after logging in via Terminal on Mac) suor command.sudoEnsure that your system meets the .Installation Prerequisites Java Development Kit (JDK) is essential to run
the product.
Before you begin, please see our compatibility matrix to find out if this version of the product is fully testedon Linux or OS X.

WSO2 API Manager, version 1.7.0, WSO2 Inc.
Copyright © WSO2 Inc. 2005-2014 20
the ProductDownloading 1. 2.
1.
2.
3.
4.
5.
Installing the API Manager
Download the latest version of the API Manager as described in . Extract the archive file to a dedicated directory for the , which will hereafter be referred to as API Manager <AP
.IM_HOME>
Setting up JAVA_HOME
You must set your environment variable to point to the directory where the Java Development Kit (JDK)JAVA_HOMEis installed on the computer.
In your home directory, open the BASHRC file (.bash_profile ) using editors such as vi, emacs, file on Macpico, or mcedit.Assuming you have JDK 1.6.0_25 in your system, add the following two lines at the bottom of the file,replacing with the actual directory where the JDK is installed./usr/java/jdk1.6.0_25
On Linux:export JAVA_HOME=/usr/java/jdk1.6.0_25export PATH=${JAVA_HOME}/bin:${PATH} On OS X:export JAVA_HOME=/System/Library/Java/JavaVirtualMachines/1.6.0.jdk/Contents/Home
Save the file.
To verify that the variable is set correctly, execute the following command:JAVA_HOME
On Linux:echo $JAVA_HOME On OS X:which java
If the above command gives you a path like /usr/bin/java, then it is a symboliclink to the real location. To get the real location, run the following:ls -l `which java`
The system returns the JDK installation path.
Setting system properties
If you need to set additional system properties when the server starts, you can take the following approaches:
Set the properties from a script: Setting your system properties in the startup script is ideal, because itensures that you set the properties every time you start the server. To avoid having to modify the script eachtime you upgrade, the best approach is to create your own startup script that wraps the WSO2 startup scriptand adds the properties you want to set, rather than editing the WSO2 startup script directly.Set the properties from an external registry: If you want to access properties from an external registry, youcould create Java code that reads the properties at runtime from that registry. Be sure to store sensitive data
Environment variables are global system variables accessible by all the processes running under the operatingsystem.
If you do not know how to work with text editors in a Linux SSH session, run the following command: Paste the string from the clipboard and press "Ctrl+D."cat >> .bashrc.

WSO2 API Manager, version 1.7.0, WSO2 Inc.
Copyright © WSO2 Inc. 2005-2014 21
the ProductDownloading
Installation Prerequisites
1.
2.
1. 2.
1. 2.
such as username and password to connect to the registry in a properties file instead of in the Java code andsecure the properties file with the .secure vault
You are now ready to .run the product
Installing on Solaris
Follow the instructions below to install API Manager on Solaris.
Installing the required applications
Establish a SSH connection to the Solaris machine or log in on the text console. You should either log in asroot or obtain root permissions after login via or command.su sudo
Be sure your system meets the . Java Development Kit (JDK) is essential to run theproduct.
Installing the API Manager
Download the latest version of the API Manager as described in.Extract the archive file to a dedicated directory for the , which will hereafter be referred to as API Manager <AP
.IM_HOME>
Setting up JAVA_HOME
You must set your environment variable to point to the directory where the Java Development Kit (JDK)JAVA_HOMEis installed on the computer.
In your home directory, open the BASHRC file in your favorite text editor, such as vi, emacs, pico, or mcedit.Assuming you have JDK 1.6.0_25 in your system, add the following two lines at the bottom of the file,replacing with the actual directory where the JDK is installed./usr/java/jdk1.6.0_25
export JAVA_HOME=/usr/java/jdk1.6.0_25export PATH=${JAVA_HOME}/bin:${PATH}
The file should now look like this:
When using SUSE Linux, it ignores and only looks at the file. This/etc/resolv.conf /etc/hostsmeans that the server will throw an exception on startup if you have not specified anything besideslocalhost. To avoid this error, add the following line above in the file127.0.0.1 localhost /etc/hosts: <ip_address> <machine_name> localhost
Before you begin, please see our compatibility matrix to find out if this version of the product is fully testedon Solaris.
Environment variables are global system variables accessible by all the processes running under the operatingsystem.

WSO2 API Manager, version 1.7.0, WSO2 Inc.
Copyright © WSO2 Inc. 2005-2014 22
the ProductDownloading
Installation Prerequisites
2.
3.
4.
5.
1.
2.
1. 2.
Save the file.
To verify that the variable is set correctly, execute the following command: JAVA_HOME
echo $JAVA_HOME
The system returns the JDK installation path.
Setting system properties
If you need to set additional system properties when the server starts, you can take the following approaches:
Set the properties from a script: Setting your system properties in the startup script is ideal, because itensures that you set the properties every time you start the server. To avoid having to modify the script eachtime you upgrade, the best approach is to create your own startup script that wraps the WSO2 startup scriptand adds the properties you want to set, rather than editing the WSO2 startup script directly.Set the properties from an external registry: If you want to access properties from an external registry, youcould create Java code that reads the properties at runtime from that registry. Be sure to store sensitive datasuch as username and password to connect to the registry in a properties file instead of in the Java code andsecure the properties file with the .secure vault
You are now ready to . run the product
Installing on Windows
Follow the instructions below to install API Manager on Windows.
Installing the required applications
Be sure your system meets the. Java Development Kit (JDK) is essential to run the product.
Be sure that the environment variable is set to "C:\Windows\System32", because the windowPATH findstrs exe is stored in this path.
Installing the API Manager
Download the latest version of the API Manager as described in.Extract the archive file to a dedicated directory for the API Manager, which will hereafter be referred to as <AP
If you do not know how to work with text editors in an SSH session, run the following command: cat >>.bashrc
Paste the string from the clipboard and press "Ctrl+D."
Before you begin, to find out if this version of the product is fully testedplease see our compatibility matrixon Windows.
WSO2 API Manager, version 1.7.0, WSO2 Inc.
Copyright © WSO2 Inc. 2005-2014 23
2.
1.
2.
.IM_HOME>
Setting up JAVA_HOME
You must set your environment variable to point to the directory where the Java Development Kit (JDK)JAVA_HOMEis installed on the computer. Typically, the JDK is installed in a directory under , such asC:/Program Files/Java
If you have multiple versions installed, choose the latest one, which./jdk1.6.0_27C:/Program Files/Javayou can find by sorting by date.
You set up JAVA_HOME using the System Properties, as described below. Alternatively, if you just want to setJAVA_HOME temporarily for the current command prompt window, set it at the command prompt.
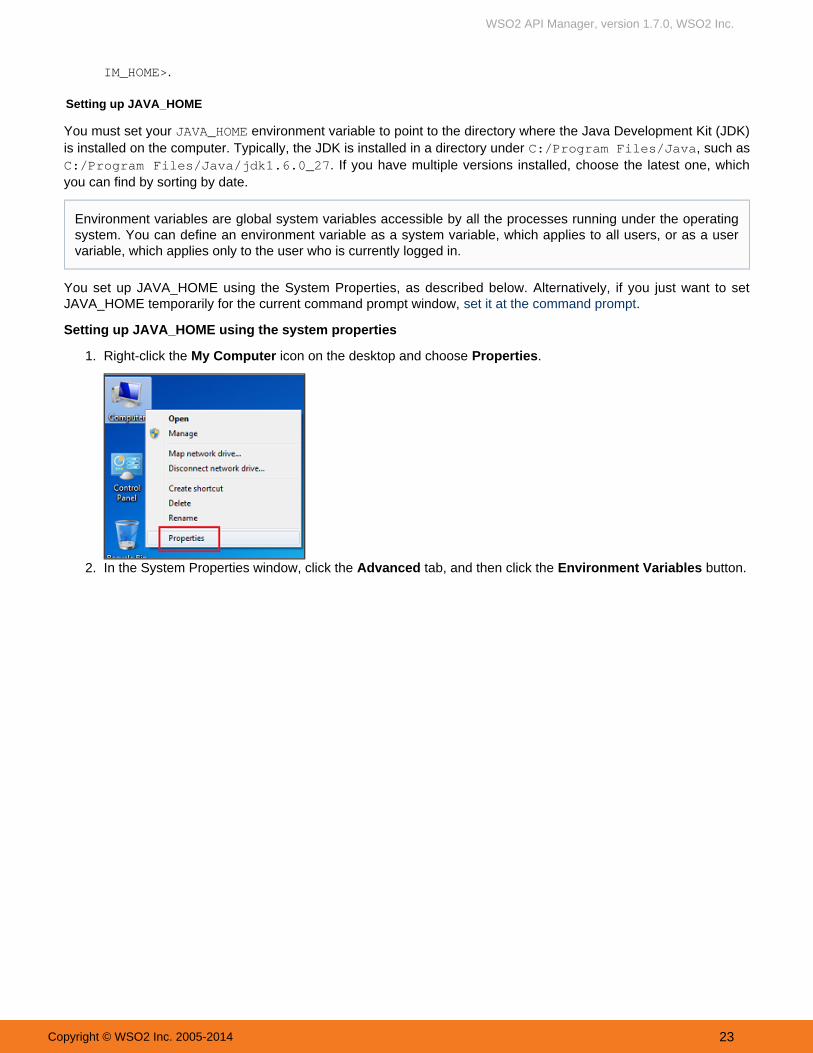
Setting up JAVA_HOME using the system properties
Right-click the icon on the desktop and choose .My Computer Properties
In the System Properties window, click the tab, and then click the button.Advanced Environment Variables
Environment variables are global system variables accessible by all the processes running under the operatingsystem. You can define an environment variable as a system variable, which applies to all users, or as a uservariable, which applies only to the user who is currently logged in.

WSO2 API Manager, version 1.7.0, WSO2 Inc.
Copyright © WSO2 Inc. 2005-2014 24
2.
3.
4.
1.
Click the New button under (for all users) or under (just for the user who isSystem variables User variablescurrently logged in).
Enter the following information:In the field, enter: Variable name JAVA_HOMEIn the field, enter the installation path of the Java Development Kit, such as: Variable value c:/Prog
ram Files/Java jdk1.6.0_27
The JAVA_HOME variable is now set and will apply to any subsequent command prompt windows you open. If youhave existing command prompt windows running, you must close and reopen them for the JAVA_HOME variable totake effect, or manually set the JAVA_HOME variable in those command prompt windows as described in the nextsection. To verify that the variable is set correctly, open a command window (from the menu, clickJAVA_HOME Start
, and then type and click ) and execute the following command:Run CMD Enter
set JAVA_HOME
The system returns the JDK installation path. You are now ready to .run the product
Setting JAVA_HOME temporarily using the Windows command prompt (CMD)
You can temporarily set the environment variable within a Windows command prompt window (CMD).JAVA_HOMEThis is useful when you have an existing command prompt window running and you do not want to restart it.

WSO2 API Manager, version 1.7.0, WSO2 Inc.
Copyright © WSO2 Inc. 2005-2014 25
1.
2.
3.
1.
In the command prompt window, enter the following command where <JDK_INSTALLATION_PATH> is theJDK installation directory and press Enter.
set JAVA_HOME=<JDK_INSTALLATION_PATH>
For example: set JAVA_HOME=c:/Program Files/java/jdk1.6.0_27
The JAVA_HOME variable is now set for the current CMD session only.To verify that the variable is set correctly, execute the following command:JAVA_HOME
set JAVA_HOME
The system returns the JDK installation path.
Setting system properties
If you need to set additional system properties when the server starts, you can take the following approaches:
Set the properties from a script: Setting your system properties in the startup script is ideal, because itensures that you set the properties every time you start the server. To avoid having to modify the script eachtime you upgrade, the best approach is to create your own startup script that wraps the WSO2 startup scriptand adds the properties you want to set, rather than editing the WSO2 startup script directly.Set the properties from an external registry: If you want to access properties from an external registry, youcould create Java code that reads the properties at runtime from that registry. Be sure to store sensitive datasuch as username and password to connect to the registry in a properties file instead of in the Java code andsecure the properties file with the .secure vault
You are now ready to .run the product
Installing as a Linux Service
Follow the sections below to run a WSO2 product as a Linux service:PrerequisitesSetting up CARBON_HOMERunning the product as a Linux service
Prerequisites
Install JDK 1.6.24 or later or 1.7.* and set up the environment variable. JAVA_HOME
Setting up CARBON_HOME
Extract the WSO2 product to a preferred directory in your machine and set the environment variable CARBON_HOMEto the extracted directory location.
Running the product as a Linux service
To run the product as a service, create a startup script and add it to the boot sequence. The basic structure ofthe startup script has three parts (i.e., start, stop and restart) as follows:
WSO2 API Manager, version 1.7.0, WSO2 Inc.
Copyright © WSO2 Inc. 2005-2014 26
1.
2.
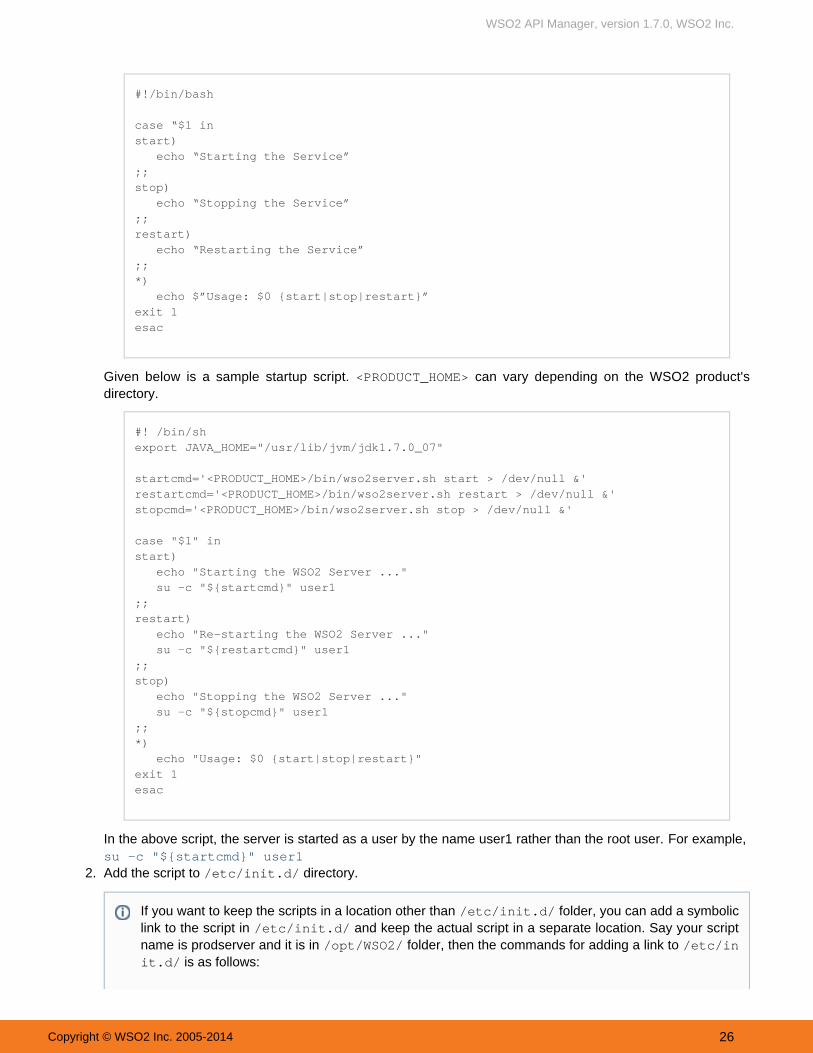
#!/bin/bash case “$1 instart) echo “Starting the Service”;;stop) echo “Stopping the Service”;;restart) echo “Restarting the Service”;;*) echo $”Usage: $0 {start|stop|restart}”exit 1esac
Given below is a sample startup script. can vary depending on the WSO2 product's<PRODUCT_HOME>directory.
#! /bin/shexport JAVA_HOME="/usr/lib/jvm/jdk1.7.0_07"
startcmd='<PRODUCT_HOME>/bin/wso2server.sh start > /dev/null &'restartcmd='<PRODUCT_HOME>/bin/wso2server.sh restart > /dev/null &'stopcmd='<PRODUCT_HOME>/bin/wso2server.sh stop > /dev/null &'
case "$1" instart) echo "Starting the WSO2 Server ..." su -c "${startcmd}" user1;;restart) echo "Re-starting the WSO2 Server ..." su -c "${restartcmd}" user1;;stop) echo "Stopping the WSO2 Server ..." su -c "${stopcmd}" user1;;*) echo "Usage: $0 {start|stop|restart}"exit 1esac
For example, In the above script, the server is started as a user by the name user1 rather than the root user. su -c "${startcmd}" user1
Add the script to directory./etc/init.d/
If you want to keep the scripts in a location other than , you can add a symbolic folder/etc/init.d/link to the script in and keep the actual script in a separate location. Say your script/etc/init.d/name is prodserver and it is in folder, then the commands for adding a link to /opt/WSO2/ /etc/in
is as follows:it.d/

WSO2 API Manager, version 1.7.0, WSO2 Inc.
Copyright © WSO2 Inc. 2005-2014 27
2.
3.
4.
Install the startup script to respective runlevels using the command . update-rc.d For example, give thefollowing command for the sample script shown in step1:
sudo update-rc.d prodserver defaults
The option in the above command makes the service to start in runlevels 2,3,4 and 5 and to stopdefaultsin runlevels 0,1 and 6.
A is a mode of operation in Linux (or any Unix-style operating system). There are several runlevelsrunlevelin a Linux server and each of these runlevels is represented by a single digit integer. Each runleveldesignates a different system configuration and allows access to a different combination of processes. You can now start, stop and restart the server using service <service name> {start|stop|restart
} command. You will be prompted for the password of the user (or root) who was used to start the service.
Installing as a Windows Service
WSO2 Carbon and any Carbon-based product can be run as a Windows service as described in the followingsections:
PrerequisitesSetting up the YAJSW wrapper configuration fileSetting up CARBON_HOMERunning the product in console modeWorking with the WSO2CARBON service
Prerequisites
Install JDK 1.6.24 or later or 1.7.* and set up the environment variable.JAVA_HOME
Download and install a service wrapper library to use for running your WSO2 product as a Windows service.WSO2 recommends Yet Another Java Service Wrapper (YAJSW) version 11.03, and several WSO2 productsprovide a default wrapper.conf file in their <PRODUCT_HOME>/bin/yajsw/ directory. The instructions
below describe how to set up this file.
Setting up the YAJSW wrapper configuration file
The configuration file used for wrapping Java Applications by YAJSW is , which is located in the wrapper.conf <Y directory and in the directory of many WSO2 products.AJSW_HOME>/conf/ <PRODUCT_HOME>/bin/yajsw/
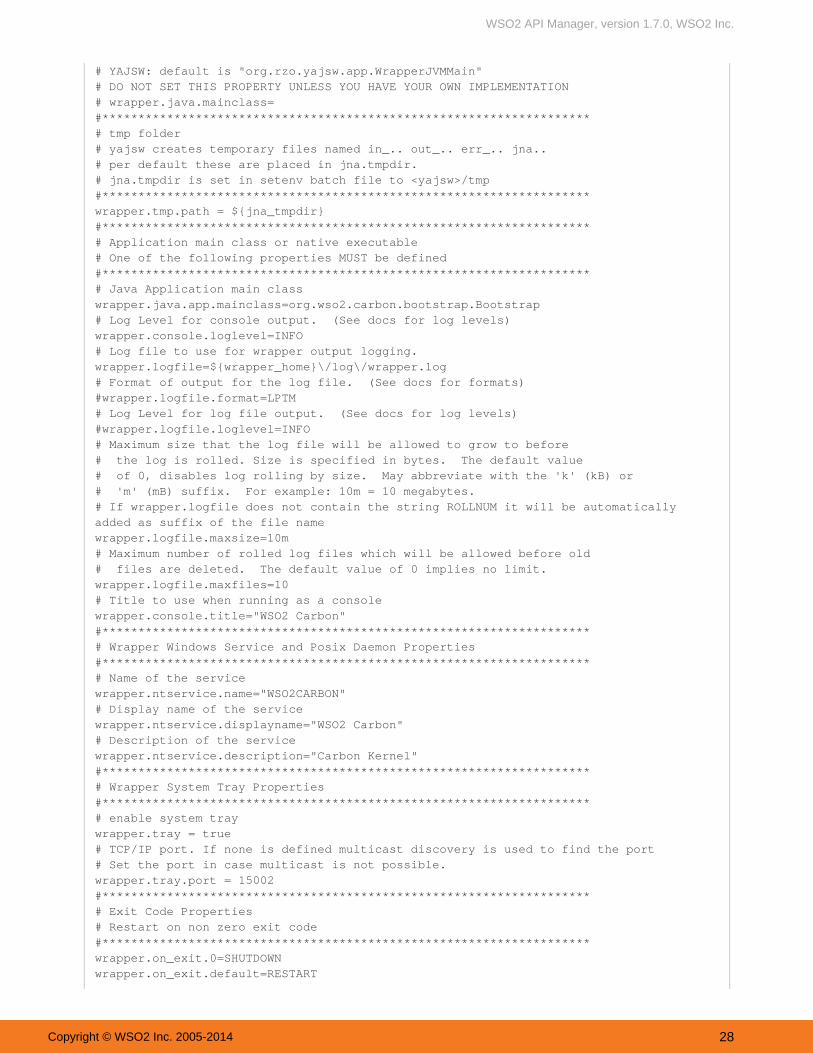
Following is the minimal configuration for running a WSO2 product as a Windows service. Openwrapper.confyour file, set its properties as follows, and save it in directory.wrapper.conf <YAJSW_HOME>/conf/
Minimal wrapper.conf configuration
#********************************************************************# working directory#********************************************************************wrapper.working.dir=${carbon_home}\\# Java Main class.
Make executable: sudo chmod a+x /opt/WSO2/prodserver Add a link to :/etc/init.d/ sudo ln -snf /opt/WSO2/prodserver
/etc/init.d/prodserver
If you want to set additional properties from an external registry at runtime, store sensitive information likeusernames and passwords for connecting to the registry in a properties file and secure it with .secure vault
WSO2 API Manager, version 1.7.0, WSO2 Inc.
Copyright © WSO2 Inc. 2005-2014 28
# YAJSW: default is "org.rzo.yajsw.app.WrapperJVMMain" # DO NOT SET THIS PROPERTY UNLESS YOU HAVE YOUR OWN IMPLEMENTATION# wrapper.java.mainclass=#********************************************************************# tmp folder# yajsw creates temporary files named in_.. out_.. err_.. jna..# per default these are placed in jna.tmpdir.# jna.tmpdir is set in setenv batch file to <yajsw>/tmp#********************************************************************wrapper.tmp.path = ${jna_tmpdir}#********************************************************************# Application main class or native executable# One of the following properties MUST be defined#********************************************************************# Java Application main classwrapper.java.app.mainclass=org.wso2.carbon.bootstrap.Bootstrap# Log Level for console output. (See docs for log levels)wrapper.console.loglevel=INFO# Log file to use for wrapper output logging.wrapper.logfile=${wrapper_home}\/log\/wrapper.log# Format of output for the log file. (See docs for formats)#wrapper.logfile.format=LPTM# Log Level for log file output. (See docs for log levels)#wrapper.logfile.loglevel=INFO# Maximum size that the log file will be allowed to grow to before# the log is rolled. Size is specified in bytes. The default value# of 0, disables log rolling by size. May abbreviate with the 'k' (kB) or# 'm' (mB) suffix. For example: 10m = 10 megabytes.# If wrapper.logfile does not contain the string ROLLNUM it will be automaticallyadded as suffix of the file namewrapper.logfile.maxsize=10m# Maximum number of rolled log files which will be allowed before old# files are deleted. The default value of 0 implies no limit.wrapper.logfile.maxfiles=10# Title to use when running as a consolewrapper.console.title="WSO2 Carbon"#********************************************************************# Wrapper Windows Service and Posix Daemon Properties#********************************************************************# Name of the servicewrapper.ntservice.name="WSO2CARBON"# Display name of the servicewrapper.ntservice.displayname="WSO2 Carbon"# Description of the servicewrapper.ntservice.description="Carbon Kernel"#********************************************************************# Wrapper System Tray Properties#********************************************************************# enable system traywrapper.tray = true# TCP/IP port. If none is defined multicast discovery is used to find the port# Set the port in case multicast is not possible.wrapper.tray.port = 15002#********************************************************************# Exit Code Properties# Restart on non zero exit code#********************************************************************wrapper.on_exit.0=SHUTDOWNwrapper.on_exit.default=RESTART

WSO2 API Manager, version 1.7.0, WSO2 Inc.
Copyright © WSO2 Inc. 2005-2014 29
#********************************************************************# Trigger actions on console output#********************************************************************# On Exception show message in system traywrapper.filter.trigger.0=Exceptionwrapper.filter.script.0=scripts\/trayMessage.gvwrapper.filter.script.0.args=Exception#********************************************************************# genConfig: further Properties generated by genConfig#********************************************************************placeHolderSoGenPropsComeHere=wrapper.java.command = ${java_home}\\bin\\javawrapper.java.classpath.1 = ${java_home}\\lib\\tools.jarwrapper.java.classpath.2 = ${carbon_home}\\bin\\*.jarwrapper.app.parameter.1 = org.wso2.carbon.bootstrap.Bootstrapwrapper.app.parameter.2 = RUNwrapper.java.additional.1 = -Xbootclasspath\/a:${carbon_home}\\lib\\xboot\\*.jarwrapper.java.additional.2 = -Xms256mwrapper.java.additional.3 = -Xmx1024mwrapper.java.additional.4 = -XX:MaxPermSize=256mwrapper.java.additional.5 = -XX:+HeapDumpOnOutOfMemoryErrorwrapper.java.additional.6 =-XX:HeapDumpPath=${carbon_home}\\repository\\logs\\heap-dump.hprofwrapper.java.additional.7 = -Dcom.sun.management.jmxremotewrapper.java.additional.8 =-Djava.endorsed.dirs=${carbon_home}\\lib\\endorsed;${java_home}\\jre\\lib\\endorsedwrapper.java.additional.9 = -Dcarbon.registry.root=\/wrapper.java.additional.10 = -Dcarbon.home=${carbon_home}wrapper.java.additional.11 = -Dwso2.server.standalone=truewrapper.java.additional.12 = -Djava.command=${java_home}\\bin\\javawrapper.java.additional.13 = -Djava.io.tmpdir=${carbon_home}\\tmpwrapper.java.additional.14 = -Dcatalina.base=${carbon_home}\\lib\\tomcat wrapper.java.additional.15 =-Djava.util.logging.config.file=${carbon_home}\\repository\\conf\\log4j.propertieswrapper.java.additional.16 = -Dcarbon.config.dir.path=${carbon_home}\\repository\\conf
wrapper.java.additional.17 = -Dcarbon.logs.path=${carbon_home}\\repository\\logs wrapper.java.additional.18 =-Dcomponents.repo=${carbon_home}\\repository\\components\\pluginswrapper.java.additional.19 = -Dconf.location=${carbon_home}\\repository\\conf wrapper.java.additional.20 =-Dcom.atomikos.icatch.file=${carbon_home}\\lib\\transactions.propertieswrapper.java.additional.21 = -Dcom.atomikos.icatch.hide_init_file_path=true wrapper.java.additional.22 =-Dorg.apache.jasper.runtime.BodyContentImpl.LIMIT_BUFFER=true
WSO2 API Manager, version 1.7.0, WSO2 Inc.
Copyright © WSO2 Inc. 2005-2014 30
1.
2.
wrapper.java.additional.23 = -Dcom.sun.jndi.ldap.connect.pool.authentication=simplewrapper.java.additional.24 = -Dcom.sun.jndi.ldap.connect.pool.timeout=3000 wrapper.java.additional.25 = -Dorg.terracotta.quartz.skipUpdateCheck=true
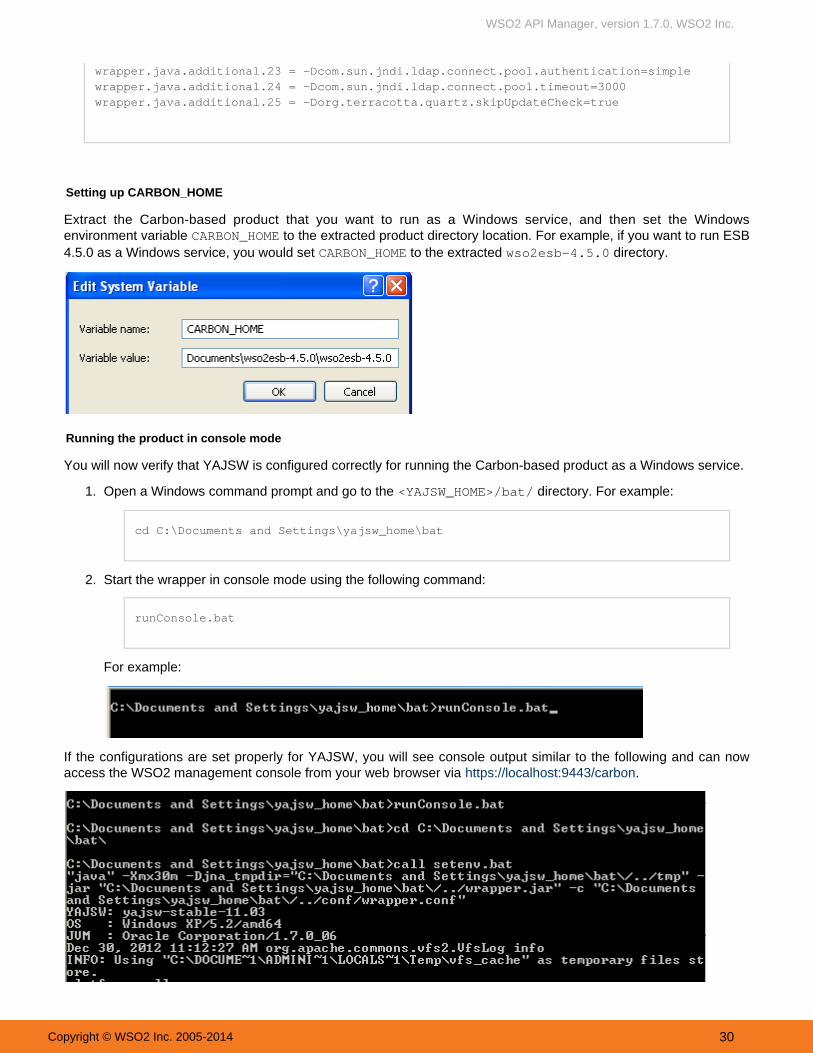
Setting up CARBON_HOME
Extract the Carbon-based product that you want to run as a Windows service, and then set the Windowsenvironment variable to the extracted product directory location. For example, if you want to run ESBCARBON_HOME4.5.0 as a Windows service, you would set to the extracted directory.CARBON_HOME wso2esb-4.5.0
Running the product in console mode
You will now verify that YAJSW is configured correctly for running the Carbon-based product as a Windows service.
Open a Windows command prompt and go to the directory. For example:<YAJSW_HOME>/bat/
cd C:\Documents and Settings\yajsw_home\bat
Start the wrapper in console mode using the following command:
runConsole.bat
For example:
If the configurations are set properly for YAJSW, you will see console output similar to the following and can nowaccess the WSO2 management console from your web browser via .https://localhost:9443/carbon
WSO2 API Manager, version 1.7.0, WSO2 Inc.
Copyright © WSO2 Inc. 2005-2014 31
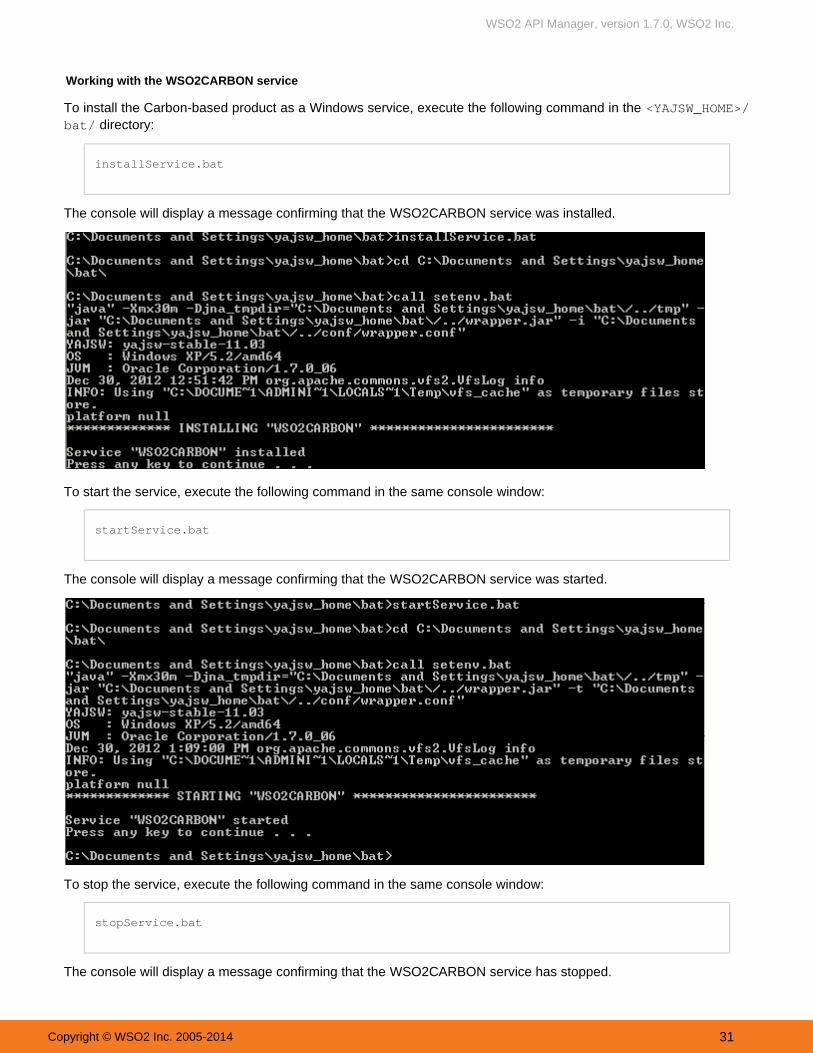
Working with the serviceWSO2CARBON
To install the Carbon-based product as a Windows service, execute the following command in the <YAJSW_HOME>/ directory:bat/
installService.bat
The console will display a message confirming that the service was installed.WSO2CARBON
To start the service, execute the following command in the same console window:
startService.bat
The console will display a message confirming that the service was started.WSO2CARBON
To stop the service, execute the following command in the same console window:
stopService.bat
The console will display a message confirming that the service has stopped.WSO2CARBON

WSO2 API Manager, version 1.7.0, WSO2 Inc.
Copyright © WSO2 Inc. 2005-2014 32
To uninstall the service, execute the following command in the same console window:
uninstallService.bat
The console will display a message confirming that the service was removed.WSO2CARBON
Building from Source
WSO2 invites you to contribute by from the Subversion (SVN) source control system, checking out the source buildi and making changes, and then back to the source repository. (For moreng the product committing your changes
information on Subversion, see .) The following sections describe this process:http://svnbook.red-bean.com
Checking out the sourceSetting up your development environmentBuilding the product Committing your changes
Building from source is optional. Users who do not want to make changes to the source code can simply do of the product and install it.wnload the binary distribution

WSO2 API Manager, version 1.7.0, WSO2 Inc.
Copyright © WSO2 Inc. 2005-2014 33
1. 2.
Checking out the source
WSO2 products are built on top of WSO2 Carbon Kernel, which contains the Kernel libraries used by all products.When there are changes in the Carbon Kernel, they are bundled and released in a new version (forWSO2 Carbonexample, WSO2 Carbon 4.2.0).
A WSO2 platform release is a set of WSO2 products based on the same Carbon release. For example, isTuringthe platform release name for WSO2 Carbon 4.2.0 and the WSO2 products that are based on it. Usually, not allproducts in a platform get released at the same time, so they are released in , each of which contains thechunksCarbon release and a subset of products. For example, chunk 8 of the platform release contains CarbonTuring4.2.0 plus Task Server 1.1.0, Data Services Server 3.2.0 and Complex Event Processor 3.1.0 .
Checking out the patches
Before checking out the product source, you need to checkout the patches related to the Carbon chunk using thefollowing command.
$ svn checkout https://svn.wso2.org/repos/wso2/carbon/kernel/branches/4.2.0 <local-platform-directory-1>
Downloading the product source
For products based on WSO2 Carbon 4.2.0, use the below command to download the product source:
$ svn checkouthttps://svn.wso2.org/repos/wso2/carbon/platform/tags/turing-<release-chunk>/<local-platform-directory-2>
Replace with the release chunk, on which the specific product version is based on. To find out<release-chunk>the respective release chunk, see the . For example, for products based on Chunk 08 of WSO2Release MatrixCarbon 4.2.0, the command is as follows:
$ svn checkout https://svn.wso2.org/repos/wso2/carbon/platform/tags/turing-chunk08/<local-platform-directory-2>
Setting up your development environment
Before you edit the source code in your IDE, set up your development environment by running one of the followingcommands:
If you are using this IDE... Run this command... Additional information
Eclipse mvn eclipse:eclipse http://maven.apache.org/plugins/maven-eclipse-plugin
IntelliJ IDEA mvn idea:idea http://maven.apache.org/plugins/maven-idea-plugin
If you are using a later Eclipse version and if you get errors (library path etc.) when trying to import the source codeusing the , follow the steps below to solve them by importing the source code asExisting Projects into Workspacea Maven project.
Build the source using the command: mvn clean installOpen Eclipse and click in the menu and then click as shown below Import File Existing Maven Projects :
Replace with a meaningful name, such as <local-platform-directory-1> wso2carbon-platform.
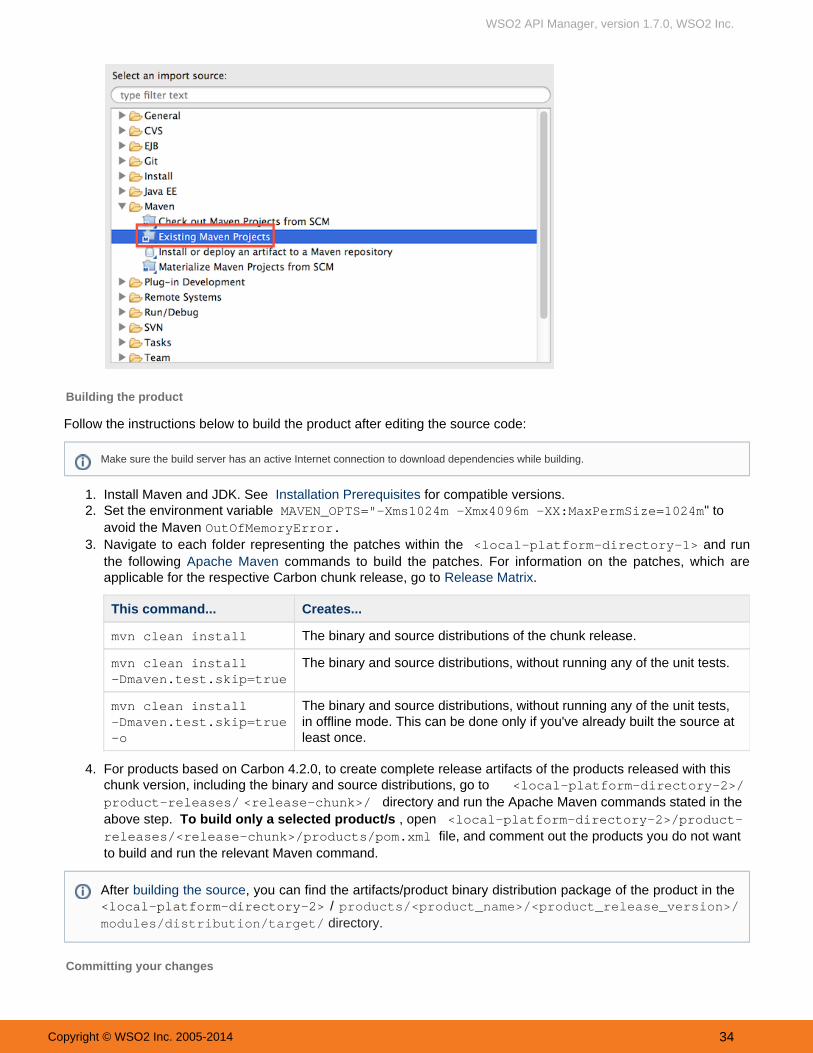
WSO2 API Manager, version 1.7.0, WSO2 Inc.
Copyright © WSO2 Inc. 2005-2014 34
2.
1. 2.
3.
4.
Building the product
Follow the instructions below to build the product after editing the source code:
Install Maven and JDK. See for compatible versions. Installation PrerequisitesSet the environment variable " toMAVEN_OPTS="-Xms1024m -Xmx4096m -XX:MaxPermSize=1024mavoid the Maven OutOfMemoryError.Navigate to each folder representing the patches within the and run<local-platform-directory-1>the following commands to build the patches. For information on the patches, which areApache Mavenapplicable for the respective Carbon chunk release, go to . Release Matrix
This command... Creates...
mvn clean install The binary and source distributions of the chunk release.
mvn clean install-Dmaven.test.skip=true
The binary and source distributions, without running any of the unit tests.
mvn clean install-Dmaven.test.skip=true-o
The binary and source distributions, without running any of the unit tests,in offline mode. This can be done only if you've already built the source atleast once.
For products based on Carbon 4.2.0, to create complete release artifacts of the products released with thischunk version, including the binary and source distributions, go to <local-platform-directory-2>/
and run the Apache Maven commands stated in theproduct-releases/ <release-chunk>/ directoryabove step. , open To build only a selected product/s <local-platform-directory-2>/product-
file, and comment out the products you do not want releases/<release-chunk>/products/pom.xmlto build and run the relevant Maven command.
Committing your changes
Make sure the build server has an active Internet connection to download dependencies while building.
After , you can find the artifacts/product binary distribution package of the product in the building the source / <local-platform-directory-2> products/<product_name>/<product_release_version>/ directory.modules/distribution/target/

WSO2 API Manager, version 1.7.0, WSO2 Inc.
Copyright © WSO2 Inc. 2005-2014 35
1.
2.
If you are a committer, you can commit your changes using the following command (SVN will prompt you for yourpassword):
$ svn commit --username your-username -m "A message"
Running the Product
To run WSO2 products, you start the product server at the command line. You can then run the ManagementConsole application to configure and manage the product. This page describes how to run the product in thefollowing sections:
Starting the serverRunning the management consoleStopping the server
Starting the server
To start the server, you run the script (on Windows) or (on Linux/Solaris) fromwso2server.bat wso2server.shthe folder. Alternatively, you can install and run the server bin as a Windows service .
Open a command prompt:
On Windows, choose , type at the prompt, and press Enter.Start -> Run cmdOn Linux/Solaris, establish a SSH connection to the server or log in to the text Linux console.
Execute one of the following commands, where is the directory where you installed the<APIM_HOME>product distribution:
On Windows: <APIM_HOME>/bin/wso2server.bat --runOn Linux/Solaris: sh <APIM_HOME>/bin/wso2server.sh
The operation log appears. When the product server is running, the log displays the message "WSO2 Carbonstarted in 'n' seconds."
Running the management console
Once the server has started, you can run the Management Console by opening a Web browser and typing in themanagement console's URL. The URL is displayed as the last line in the start script's console and log. For example:
The Management Console uses the default , which is configured in the HTTP-NIO transport catalina-se file in the directory. This transport must berver.xml <APIM_HOME>/repository/conf/tomcat
properly configured in this file for the Management Console to be accessible.
To start and stop the server in the background mode of Linux, run and wso2server.sh start wso2servcommands. er.sh stop
If you want to provide access to the production environment without allowing any user group(including admin) to log into the management console, execute one of the followingcommands.
On Windows: <PRODUCT_HOME>\bin\wso2server.bat --run -DworkerNodeOn Linux/Solaris: sh <PRODUCT_HOME>/bin/wso2server.sh -DworkerNode
If you want to check any additional options available to be used with the startup commands, type -help after the command, such as: sh <PRODUCT_HOME>/bin/wso2server.sh-help.

WSO2 API Manager, version 1.7.0, WSO2 Inc.
Copyright © WSO2 Inc. 2005-2014 36
The URL should be in the following format: https://<Server Host>:9443/carbon
You can use this URL to access the Management Console on this computer from any other computer connected tothe Internet or LAN. When accessing the Management Console from the same server where it's installed, you cantype "localhost" instead of the IP address: .https://localhost:9443/carbon
At the sign-in screen, sign in to the Management Console using as both the username and password. Youadmincan then use the Management Console to manage the product. The tabs and menu items in the navigation pane onthe left may vary depending on the features installed.
To view information about a particular page, click the , or click the link in the top right corner of that pageHelp Docslink to open this documentation for full information on managing the product.
If you leave the Management Console unattended, the session will time out. The default timeout value is 15 minutes,but you can change this in file asthe <APIM_HOME>/repository/conf/tomcat/carbon/WEB-INF/web.xmlfollows:
<session-config> <session-timeout>15</session-timeout></session-config>
Stopping the server
To stop the server, press in the command window, or click the link in the navigation paneCtrl+C Shutdown/Restartin the Management Console.
Quick Start Guide
WSO2 API Manager is a complete solution for publishing APIs, creating and managing a developer community andfor routing API traffic in a scalable manner. It leverages the integration, security and governance components fromthe WSO2 Enterprise Service Bus, WSO2 Identity Server, and WSO2 Governance Registry. In addition, as it ispowered by the WSO2 Business Activity Monitor (BAM), the WSO2 API Manager is ready for massively scalabledeployment immediately.
This guide walks you thorough the main usecases of the API Manager:Introduction to basic concepts
To change or recover the admin password, see following FAQs:How do I change the default admin password and what files should I edit after changing it?How can I recover the admin password used to log in to the management console?
When the Management Console Sign-in page appears, the web browser will typically display an "insecureconnection" message, which requires your confirmation before you can continue.
The Management Console is based on HTTPS protocol, which is a combination of HTTP and SSL protocols.This protocol is generally used to encrypt the traffic from the client to server for security reasons. Thecertificate it works with is used for encryption only, and does not prove the server identity, so when you try toaccess the Management Console, a warning of untrusted connection is usually displayed. To continueworking with this certificate, some steps should be taken to "accept" the certificate before access to the siteis permitted. If you are using the Mozilla Firefox browser, this usually occurs only on the first access to theserver, after which the certificate is stored in the browser database and marked as trusted. With otherbrowsers, the insecure connection warning might be displayed every time you access the server.
This scenario is suitable for testing purposes, or for running the program on the company's internalnetworks. If you want to make the Management Console available to external users, your organizationshould obtain a certificate signed by a well-known certificate authority, which verifies that the server actuallyhas the name it is accessed by and that this server belongs to the given organization.
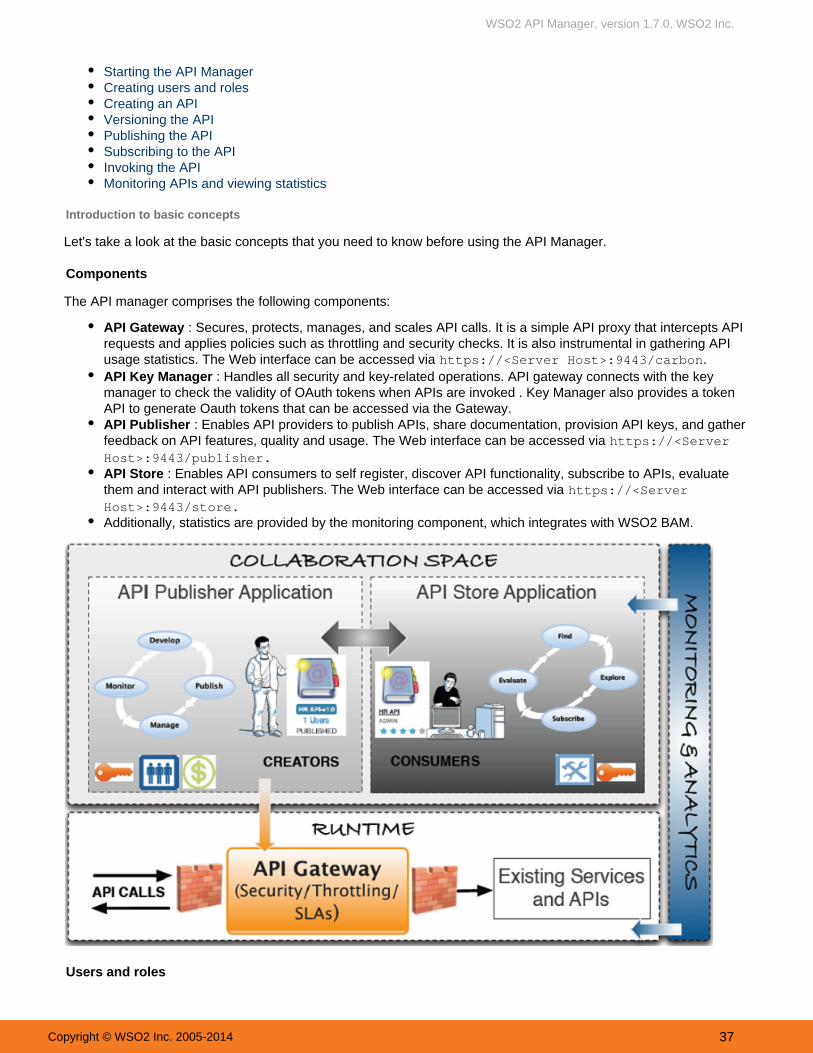
WSO2 API Manager, version 1.7.0, WSO2 Inc.
Copyright © WSO2 Inc. 2005-2014 37
Starting the API ManagerCreating users and rolesCreating an APIVersioning the APIPublishing the APISubscribing to the APIInvoking the APIMonitoring APIs and viewing statistics
Introduction to basic concepts
Let's take a look at the basic concepts that you need to know before using the API Manager.
Components
The API manager comprises the following components:
API Gateway : Secures, protects, manages, and scales API calls. It is a simple API proxy that intercepts APIrequests and applies policies such as throttling and security checks. It is also instrumental in gathering APIusage statistics. The Web interface can be accessed via .https://<Server Host>:9443/carbonAPI Key Manager : Handles all security and key-related operations. API gateway connects with the keymanager to check the validity of OAuth tokens when APIs are invoked . Key Manager also provides a tokenAPI to generate Oauth tokens that can be accessed via the Gateway.API Publisher : Enables API providers to publish APIs, share documentation, provision API keys, and gatherfeedback on API features, quality and usage. The Web interface can be accessed via https://<ServerHost>:9443/publisher.API Store : Enables API consumers to self register, discover API functionality, subscribe to APIs, evaluatethem and interact with API publishers. The Web interface can be accessed via https://<ServerHost>:9443/store.Additionally, statistics are provided by the monitoring component, which integrates with WSO2 BAM.
Users and roles

WSO2 API Manager, version 1.7.0, WSO2 Inc.
Copyright © WSO2 Inc. 2005-2014 38
The API manager offers three distinct community roles that are applicable to most enterprises:
Creator : a creator is a person in a technical role who understands the technical aspects of the API(interfaces, documentation, versions, how it is exposed by API Gateway) and uses the API publisher toprovision APIs into the API store. The creator uses the API Store to consult ratings and feedback provided byAPI users. Creator can add APIs to the store but cannot manage their lifecycle (i.e., make them visible to theoutside world).Publisher : a publisher manages a set of APIs across the enterprise or business unit and controls the APIlifecycle and monetization aspects. The publisher is also interested in usage patterns for APIs and as suchhas access to all API statistics.Consumer : a consumer uses the API store to discover APIs, see the documentation and forums andrate/comment on the APIs. S/he subscribes to APIs to obtain API keys.
API lifecycle
An API is the published interface, while the service is the implementation running in the backend. APIs have theirown lifecycles that are independent to the backend services they rely on. This lifecycle is exposed in the APIpublisher Web interface and is managed by the API publisher role.
The following stages are available in the default API life cycle:
CREATED : API metadata is added to the API Store, but it is not visible to subscribers yet, nor deployed tothe API gatewayPROTOTYPED : API is deployed and published in the API Store as a prototype. A prototyped API is usually amock implementation made public in order to get feedback about its usability. Users cannot subscribe to aprototyped API. They can only try out its functionality.PUBLISHED : API is visible in the API Store and available for subscription.DEPRECATED : API is still deployed into the API Gateway (i.e., available at runtime to existing users) but notvisible to subscribers. An API can automatically be deprecated when a new version is published.RETIRED : API is unpublished from the API gateway and deleted from the storeBLOCKED : Access is temporarily blocked. Runtime calls are blocked and the API is not shown in the APIStore anymore.
You can manage the API and service lifecycles in the same governance registry/repository and automatically linkthem. This feature is available in WSO2 Governance Registry (version 4.5 onwards).
Applications
An application is primarily used to decouple the consumer from the APIs. It allows you to :
WSO2 API Manager, version 1.7.0, WSO2 Inc.
Copyright © WSO2 Inc. 2005-2014 39
1. 2.
Generate and use a single key for multiple APIsSubscribe multiple times to a single API with different SLA levels
You create an application to subscribe to an API. The API Manager comes with a default application and you canalso create as many applications as you like.
Throttling tiers
Throttling tiers are associated to an API at subscription time. They define the throttling limits enforced by the APIgateway. E.g., 10 TPS (transactions per second). You define the list of tiers that are available for a given API at thepublisher level. The API Manager comes with three predefined tiers ( ) and a special tierGold/Silver/Bronzecalled , which can be disabled by editing the <TierManagement>element ofUnlimited<PRODUCT_HOME>/repository/conf/api-manager.xml file. To edit existing tiers or create your own tiers, see Addin
.g New Throttling Tiers
API keys
The API Manager supports two scenarios for authentication:
An access token is used to identify and authenticate a whole applicationAn access token is used to identify the final user of an application (for example, the final user of a mobileapplication deployed on many different devices)
Application access token
Application access tokens are generated by the API consumer and must be passed in the incoming API requests.The API Manager uses OAuth2 standard to provide key management. The API key is a simple string that you passto an HTTP header (e.g., " ") and it works equallyAuthorization: Bearer NtBQkXoKElu0H1a1fQ0DWfo6IX4awell for SOAP and REST calls.
Application access tokens are generated at the application level and valid for all APIs that are associated to theapplication. These tokens have a fixed expiration time, which is set to 60 minutes by default. You can change this toa longer time, even for several weeks. Consumers can re-generate the access token directly from the API StoreWeb interface. To change the default expiration time, you open <APIM_HOME>/repository/conf/identity.x
file and change the value for element . You set aml <ApplicationAccessTokenDefaultValidityPeriod>negative value to element to never expire the<ApplicationAccessTokenDefaultValidityPeriod>application access token.
Application user access token
You can generate access tokens on demand using the token API. In case a token expires, you use the token API torefresh it.
Application user access tokens have a fixed expiration time, which is 60 minutes by default. You can update it to alonger time, such as several weeks, by editing the ele<ApplicationAccessTokenDefaultValidityPeriod>ment in file.<APIM_HOME>/repository/conf/identity.xml
The token API takes the following parameters to generate the access token:
Grant TypeUsernamePasswordScope
To generate a new access token, you issue a token API call with the above parameters wheregrant_type=password. The Token API then returns two tokens: an access token and a refresh token. The accesstoken can then be stored in a session on the client side (the application itself does not need to manage users andpasswords). On the API Gateway side, the access token is validated for each API call. When the token expires, yourefresh the token by issuing a token API call with the above parameters where grant_type=refresh_token andpassing the refresh token as a parameter.

WSO2 API Manager, version 1.7.0, WSO2 Inc.
Copyright © WSO2 Inc. 2005-2014 40
1. 2. 3. 4.
5.
1.
2. 3. 4. 5.
6.
7.
8. 9.
10.
Starting the API Manager
Download WSO2 API Manager from .http://wso2.com/products/api-manager/Install version 1.6.24 or later or 1.7.*.Oracle Java SE Development Kit (JDK)Set the JAVA_HOME environment variable.Using the command line, go to <Installation directory>/bin and execute wso2server.bat (for Windows) orwso2server.sh (for Linux).Wait until you see the message "WSO2 Carbon started in 'n' seconds."
It indicates that the server started successfully. To stop the API Manager, simply hit Ctrl-C in the commandwindow.
Creating users and roles
In section , we introduced you to a set of users that are commonly found in many enterprises. To Users and rolescreate these users in the API Manager, you log in to the management console as an administration user(credentials: admin/admin). The admin use can play the creator, publisher and subscriber roles described earlier. Inthis section, we explain how to set up these users or custom users and roles.
Log in to the management console user interface ( ) of the API https://<hostname>:9443/carbonManager using admin/admin credentials.Select the menu under the menu.Users and Roles ConfigureClick and provide as the role name.Add New Role creatorClick .NextSelect the following permissions from the list that opens and click .Finish
LoginManage > API > CreateManage > Resources > Govern and all underlying permissions
Similarly, create the role with the following permissions.publisherLoginManage > API > Publish
You can now create users for each of those roles. To do so, click the menu under the Users and Roles Conf menu.igure
Click .UsersClick , provide the username/password and click .Add New User NextSelect the role you want to assign to the user (e.g., , or ) and click .creator publisher subscriber FinishGiven below is a list of usernames and the roles we assign to them in this guide.
Username Role
apicreator creator
apipublisher publisher
Repeat the steps to create at least one user for all roles.
Creating an API
An API creator uses the API provider Web application to create and publish APIs into the API Store. In this section,we explain how to create an API and attach documentation to it.
In this guide, we work with a service exposed by the Cdyne services provider ( ). We use their phonewww.cdyne.com
Tip: As the role is available in the API Manager by default, you do not have to create it.subscriber
If you want to create a new role with subscriber permissions, you can do so with the followingpermissions.
LoginManage > API > Subscribe
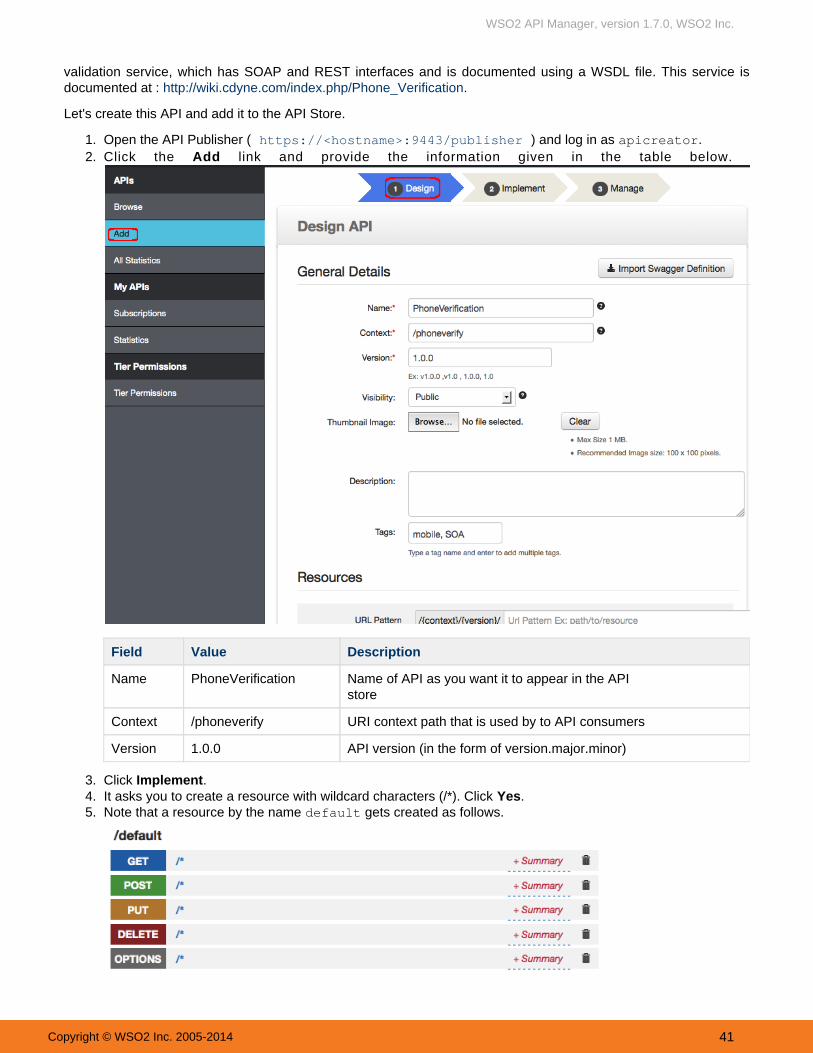
WSO2 API Manager, version 1.7.0, WSO2 Inc.
Copyright © WSO2 Inc. 2005-2014 41
1. 2.
3. 4. 5.
6.
validation service, which has SOAP and REST interfaces and is documented using a WSDL file. This service isdocumented at : . http://wiki.cdyne.com/index.php/Phone_Verification
Let's create this API and add it to the API Store.
Open the API Publisher ( ) and log in as . https://<hostname>:9443/publisher apicreatorClick the link and provide the information given in the table below. Add
Field Value Description
Name PhoneVerification Name of API as you want it to appear in the APIstore
Context /phoneverify URI context path that is used by to API consumers
Version 1.0.0 API version (in the form of version.major.minor)
Click .ImplementIt asks you to create a resource with wildcard characters (/*). Click .YesNote that a resource by the name gets created as follows. default

WSO2 API Manager, version 1.7.0, WSO2 Inc.
Copyright © WSO2 Inc. 2005-2014 42
6.
7.
Click again to go to the tab and provide the following information.Implement Implement
Field Value Description
Implementationmethod
Backend endpoint If you have a real backend implementationto your API, select that option. Else, youcan specify implementation in-line. Thelatter approach is usually used in mock-upimplementation for prototyped APIs.
Endpoint type HTTP endpoint
Productionendpoint
http://ws.cdyne.com/phoneverify/phoneverify.asmx
Endpointsecurityscheme
Non Secured If the endpoint is secured, user is asked forcredentials of the backend service.
WSDL URL:http://ws.cdyne.com/phoneverify/phoneverify.asmx?wsdl
URL of WSDL file (describing API interface)
Click to go to the tab and provide the following information.Manage Manage

WSO2 API Manager, version 1.7.0, WSO2 Inc.
Copyright © WSO2 Inc. 2005-2014 43
7.
Field Value Description
TierAvailability
Bronze/Gold/Silver/Unlimited The API can be available at different level of service; you canselect multiple entries from the list. At subscription time, theconsumer chooses which tier they are interested in.
Transports HTTP/HTTPS
API Resources
An API is made up of one or more resources. Each resource handles a particular type of request and isanalogous to a method (function) in a larger API. API resources accept following optional attributes:
verbs : Specifies the HTTP verbs a particular resource accepts. Allowed values are GET, POST, PUT, DELETE. Multiple values can be specified.
uri-template : A URI template as defined in http://tools.ietf.org/html/rfc6570 ( e.g., /phoneverify/<phoneNumber> )
url-mapping : A URL mapping defined as per the servlet specification (extension mappings, path mappings and exact mappings)
Throttling tiers : Limits the number of hits to a resource during a given period of time. For moreinformation, see .Managing Throttling TiersAuth-Type: Specifies the Resource level authentication along HTTP verbs. Auth-type can be None,Application or Application User.
None : Can access the particular API resource without any access tokens

WSO2 API Manager, version 1.7.0, WSO2 Inc.
Copyright © WSO2 Inc. 2005-2014 44
7.
1. 2.
3.
4. 5.
Application: Application access token required to access the API resourceApplication User: User access token required to access the API resource
Adding API documentation
After creating the API, click on its icon to open its details. Select the Docs tab.C l i c k l i n k . A d d N e w D o c u m e n t
Documentation can be provided inline, via a URL or as a file. For inline documentation, you can edit thecontent directly from the API publisher interface. You get several documents types:
Swagger documentsHow ToSamples and SDKPublic forum / Support forum (external link only)API message formatsOther
Select the type, a name for the document and a short description, which will appear in the API Store.How ToSelect inline or provide a URL.Click .Add DocumentOnce the document is added, click link, which opens an embedded editor to edit the documentEdit Contentcontents.
Adding interactive documentation using Swagger
The API Manager provides facility to add interactive documentation support through the integration of Swagger.Swagger is a specification and a complete framework implementation for describing, producing, consuming, andvisualizing RESTful Web services. In Swagger, when APIs are described in simple static JSON representation, theycan be loaded through the Swagger UI, which in turn provides the interactive documentation.
When an API is created, the JSON representation of that API is automatically generated and saved into the registryas API definition. This definition describes the API with the information provided at the API creation level. You cancustomize the automatically generated API definition by going to the Doc tab of the API inPhoneVerificationthe API Publisher.

WSO2 API Manager, version 1.7.0, WSO2 Inc.
Copyright © WSO2 Inc. 2005-2014 45
1. 2.
You can modify the paths, parameters, descriptions etc. by editing the JSON representation of API definition. Forexample, in the API, we have changed the path for all the HTTP methods of API definitionPhoneVerificationfrom /phoneverify/1.0.0/ to as follows:/phoneverify/1.0.0/CheckPhoneNumber
Versioning the API
Next, we will create a new version of this API.
Log in to the API Publisher as if you are not logged in already.apicreatorClick on the API and then the button that appears in its Overview tab. PhoneVerification Copy

WSO2 API Manager, version 1.7.0, WSO2 Inc.
Copyright © WSO2 Inc. 2005-2014 46
2.
3.
1. 2.
3.
Specify a new version number in version.major.minor format (e.g., 1.1.0) and click .Done
A new version of the API is created. It is a duplication of all the contents of the original API, including thedocumentation. The API is now ready to be published. This is done by a user in the publisher role.
Publishing the API
Log in to the API Publisher Web application as .apipublisherClick on the API version 1.1.0 that you created before. Note that you can now see aPhoneVerificationtab as in the API Publisher UI.API LifecycleGo to the tab and select the state as from the drop-down list. Lifecycle PUBLISHED
Propagate Changes to API Gateway: Used to define an API proxy in the API Gateway runtimecomponent, allowing the API to be exposed to the consumers via the API Gateway. If this option is leftunselected, the API metadata will not change and you will have to manually configure the APIGateway according to the information published in the API Store.Deprecate Old Versions: If selected, any prior versions of the API will be set to the DEPRECATEDstate automatically.Require Re-Subscription: Invalidates current user subscriptions, forcing users to subscribe again.
The API is now published and visible to consumers in the API store.

WSO2 API Manager, version 1.7.0, WSO2 Inc.
Copyright © WSO2 Inc. 2005-2014 47
1.
2.
3. 4.
5. 6.
Subscribing to the API
You subscribe to APIs using the API Store Web application.
Open the API Store ( ) using your browser. Using the API Store, you https://<hostname>:9443/storecan,
Search and browse APIsRead documentationSubscribe to APIsComment on, rate and share/advertize APIsTake part in forums and request features etc.
The API you published earlier is available in the API Store. Self sign up to the API Store using the linSign-upk .
After subscription, log in to the API Store and click the API you published earlier (PhoneVerification 1.1.0).Note that you can see the subscription option in the right hand side of the UI after logging in. Select thedefault application, tier and click .Bronze Subscribe
Applications
An application is a logical collection of one or more APIs, and is required when subscribing to an API. Youcan subscribe to multiple APIs using the same application. Instead of using the default application, you canalso create your own by selecting the option in the above drop-down list or by going toNew Application...the menu in the top menu bar.My ApplicationsOnce the subscription is successful, go to page.My SubscriptionsIn the My Subscriptions page, click the buttons to generate production and sandbox access tokensGenerateand consumer key/secret pairs for the API. For more information on access tokens, see Working with Access
.TokensYou are now successfully subscribed to the API and are ready to start using it.
Invoking the API
To invoke an API, you can use the integrated Swagger interactive documentation support (or any other simple

WSO2 API Manager, version 1.7.0, WSO2 Inc.
Copyright © WSO2 Inc. 2005-2014 48
1. 2. 3.
4.
REST client application or curl).
Log in to the API Store ( ).https://<YourHostName>:9443/storeClick the API that you published earlier.PhoneVerification 1.1.0Click the tab associated with the API.API Console
P or example,rovide the necessary parameters and click to call the API. FTry it out the PhoneVerificatio API takes two parameters: the phone number and a license key, which is set to 0 for testing purposes. n

WSO2 API Manager, version 1.7.0, WSO2 Inc.
Copyright © WSO2 Inc. 2005-2014 49
4.
5.
Note the following in the above UI:
Base URL Appears at the bottom of the console. Using the base URL and the parameters, thesystem creates the API URL in the form context>/<version><http://host:8280/
For example,/<back end service requirements included as parameters>..http://host:8280/phoneverify/1.1.0/CheckPhoneNumber
QueryParameters
Give the API payload as PhoneNumber=18006785432&LicenseKey=0 where/phoneverify is the context and 1.1.0 is the version. The rest of the URL is driven by thebackend service requirements.
Authorization In the , pass the application key that was generated at the time aauthorization headeruser subscribes to an API. This is prefixed by the string "Bearer". For example, Bearer q6-JeSXxZDDzBnccK3ZZGf5_AZTk.
WSO2 API Manager enforces OAuth security on all the published APIs. Consumers whotalk to the API Manager should send their credentials (application key) as per the OAuthbearer token profile. If you don't send an application key or send a wrong key, you willreceive a 401 Unauthorized response in return.
The response for the API invocation appears as follows:

WSO2 API Manager, version 1.7.0, WSO2 Inc.
Copyright © WSO2 Inc. 2005-2014 50
5.
6.
Within a minute after the first API invocation, make another attempt to invoke the API and note that thesecond invocation results in a throttling error.
This is because you applied a Bronze tier at the time you subscribed to the API and the Bronze tier onlyallows one API call per minute.
Monitoring APIs and viewing statistics
Both the API publisher and store provide several statistical dashboards. Some of them are as follows:
Number of subscriptions per API (across all versions of an API)

WSO2 API Manager, version 1.7.0, WSO2 Inc.
Copyright © WSO2 Inc. 2005-2014 51
1.
2.
Number of API calls being made per API (across all versions of an API)The subscribers who did the last 10 API invocations and the APIs/versions they invokedUsage of an API and from which resource path (per API version)Number of times a user has accessed an APIThe number of API invocations that failed to reach the endpoint per API per userAPI usage per applicationUsers who make the most API invocations, per applicationAPI usage from resource path, per application
Configuring statistics
Steps below explain how to configure with the API Manager.WSO2 BAM 2.4.1
Do the following changes in file:<APIM_HOME>/repository/conf/api-manager.xmlEnable API usage tracking by setting the element to true<APIUsageTracking>Set the Thrift port to 7614Set <BAMServerURL> to tcp://<BAM host IP>:7614/ where <BAM host IP> is the machine IP address.Do not use localhost unless you're in a disconnected mode.
<APIUsageTracking> <!-- Enable/Disable the API usage tracker. --> <Enabled>true</Enabled> <PublisherClass>org.wso2.carbon.apimgt.usage.publisher.APIMgtUsageDataBridgeDataPublisher</PublisherClass> <ThriftPort>7614</ThriftPort> <BAMServerURL>tcp://<BAM host IP>:7614/</BAMServerURL> <BAMUsername>admin</BAMUsername> <BAMPassword>admin</BAMPassword> <!-- JNDI name of the data source to be used for getting BAM statistics. Thisdata source should be defined in the master-datasources.xml file in conf/datasourcesdirectory. --> <DataSourceName>jdbc/WSO2AM_STATS_DB</DataSourceName></APIUsageTracking>
Specify the datasource definition in <APIM_HOME>/repository/conf/datasources/master-datasou file as follows.rces.xml

WSO2 API Manager, version 1.7.0, WSO2 Inc.
Copyright © WSO2 Inc. 2005-2014 52
2.
3. 4.
5.
6.
7.
<datasource> <name>WSO2AM_STATS_DB</name> <description>The datasource used for getting statistics to APIManager</description> <jndiConfig> <name>jdbc/WSO2AM_STATS_DB</name> </jndiConfig> <definition type="RDBMS"> <configuration> <!-- JDBC URL to query the database --> <url>jdbc:h2:<BAM_HOME>/repository/database/APIMGTSTATS_DB;AUTO_SERVER=TRUE</url> <username>wso2carbon</username> <password>wso2carbon</password> <driverClassName>org.h2.Driver</driverClassName> <maxActive>50</maxActive> <maxWait>60000</maxWait> <testOnBorrow>true</testOnBorrow> <validationQuery>SELECT 1</validationQuery> <validationInterval>30000</validationInterval> </configuration> </definition></datasource>
Next, prepare BAM to collect and analyze statistics from API manager.Download WSO2 BAM 2.4.1 or later from location: .http://wso2.com/products/business-activity-monitorChange port offset of BAM to by editing the file file3 <BAM_HOME>/repository/conf/carbon.xml(search for the offset node).
<Offset>3</Offset>
This increments all ports used by the server by 3, which means the BAM server will run on port 9446. Portoffset is used to increment the default port by a given value. It avoids possible port conflicts when multipleWSO2 products run in same host.Do the following changes in fil<BAM_HOME>/repository/conf/datasources/bam_datasources.xmle:
Copy/paste definition from API Manager's file. YouWSO2_AMSTATS_DB master-datasources.xmledited it in step 2.Replace the port of in URL (WSO2BAM_CASSANDRA_DATASOURCE jdbc:cassandra://localhost
). Note that localhost is used here; not the machine IP.: /EVENT_KS9163
Copy the file to directory <APIM_HOME>/statistics/API_Manager_Analytics.tbox <BAM_HOME>/r. epository/deployment/server/bam-toolbox
If this folder is not in the BAM installation directory by default, create it. The toolbox describes the informationcollected, how to analyze the data, as well as the location of the database where the analyzed data is stored.Open conf/etc/hector-config.xml file and change the port to . You<BAM_HOME>/repository/ localhost:9163must add the other nodes too when configuring a clustered setup.
Do not edit the , which is using the offsetWSO2BAM_UTIL_DATASOURCECassandra is bound by default on localhost, unless you change thedata-bridge/data-bridge-config.xml file

WSO2 API Manager, version 1.7.0, WSO2 Inc.
Copyright © WSO2 Inc. 2005-2014 53
7.
8.
1.
2.
3.
<Nodes>localhost:9163</Nodes>
Restart the BAM server by running .<BAM_HOME>/bin/wso2server.[sh/bat]
Viewing statistics
To see statistics, you first generate some traffic via the API Gateway ( we use in this guide)invoke the Cdyne APIand wait a few seconds. Then, follow these steps:
Connect to the API Publisher as a creator or publisher. In publisher role, you are able to see all stats and as creator, you see stats specific to the APIs you create.Click the menu. We show the sample statistics here, but you will see graphs specific to yourStatisticsinstance.
Similarly, API subscribers can also see statistics though the API Store. Click the menu as follows:Statistics

WSO2 API Manager, version 1.7.0, WSO2 Inc.
Copyright © WSO2 Inc. 2005-2014 54
3.
1. 2. 3.
1. 2.
For more information, see .Viewing API Statistics
This concludes the API Manager quick start. You have set up the API Manager and taken a look at its commonusecases. For more advanced usecases, please see the and the of the API ManagerUser Guide Admin Guidedocumentation.
Upgrading from the Previous Release
The following information describes how to upgrade your API Manager server from the release, which is APIM 1.6.0.To upgrade from a version older than 1.6.0, start from the doc that was released immediately after your currentrelease and upgrade incrementally.
Upgrading the product databasesMigrating the configurationsUpgrading APIM 1.6.0 to 1.7.0
Before you begin,
Stop all running API Manager server instances.Download API Manager 1.7.0 from .http://wso2.com/products/api-manager Replace all the files in folder with the<APIM_1.7.0_HOME>/dbscripts/migration-1.6.0_to_1.7.0files in . This is because some of the scripts in the 1.7.0 distribution give migration issues.this SVN locationWe have fixed this in APIM 1.8.0.
Upgrading the product databases
Back up the databases of your API Manager 1.6.0 server instance. Go to and run the database upgrade<APIM_1.7.0_HOME>/dbscripts/migration-1.6.0_to_1.7.0scripts on your old database. You must select the script corresponding to your database type. For example, ifyour database is MySQL, execute <APIM_1.7.0_HOME>/dbscripts/migration-1.6.0_to_1.7.0/mysql.sql on it. The script adds all the schema changes done to API Manager tables in the 1.7.0 release.
WSO2 API Manager, version 1.7.0, WSO2 Inc.
Copyright © WSO2 Inc. 2005-2014 55
2.
3.
1.
2.
3.
4.
5.
1. 2.
Point the WSO2 Carbon Database(User Store and Registry) and API Manager Databases of your AM 1.6.0instance to AM 1.7.0. (Configure AM_1.6.0/repository/datasource/master-datasources.xml to point samedatabases configured in AM 1.6.0)
Migrating the configurations
In this section, you move all existing API Manager configurations from the current environment to the new one.
Open file and<APIM_1.7.0_HOME>/repository/conf/datasources/master-datasources.xmlcopy the datasource configurations for the following databases from the same file in the APIM 1.6.0 instanceover to the 1.7.0 instance.
User store/sRegistry databaseAPIM databases
Move all your synapse configurations by copying and replacing <APIM_1.6.0_HOME>/repository/depl directory to oyment/server/synapse-config/default <APIM_1.7.0_HOME>/repository/deploy
directory.ment/server/synapse-config/default
Copy the directory<APIM_1.7.0_HOME>/dbscripts/migration-1.6.0_to_1.7.0/api-migrationto . Once done, you have the directory<APIM_1.7.0_HOME> <APIM_1.7.0_HOME>/api_migrationpath.Add the following property to .<APIM_1.7.0_HOME>/api-migration/build.xml
apim.home= Path to your APIM 1.7.0 distribution location (If you have adistributed setup, give the path to the Gateway node)
Go inside the directory and execute . You should get a mesapi-migration ant run BUILD SUCCESSFULsage.
Upgrading APIM 1.6.0 to 1.7.0
Start the API Manager 1.7.0 and log in to its management console.Select menu and click the link associated with the api artifact type.Extensions -> Artifact Types View/Edit
Tip: Do not use the migration scripts that are bundled in your product distribution as they causemigration issues. These issues are fixed in APIM 1.8.0 release.
Tip: If you changed the default URLs in and files, do notAuthorizeAPI.xml TokenAPI.xmlreplace them when copying. They are application-specific APIs.
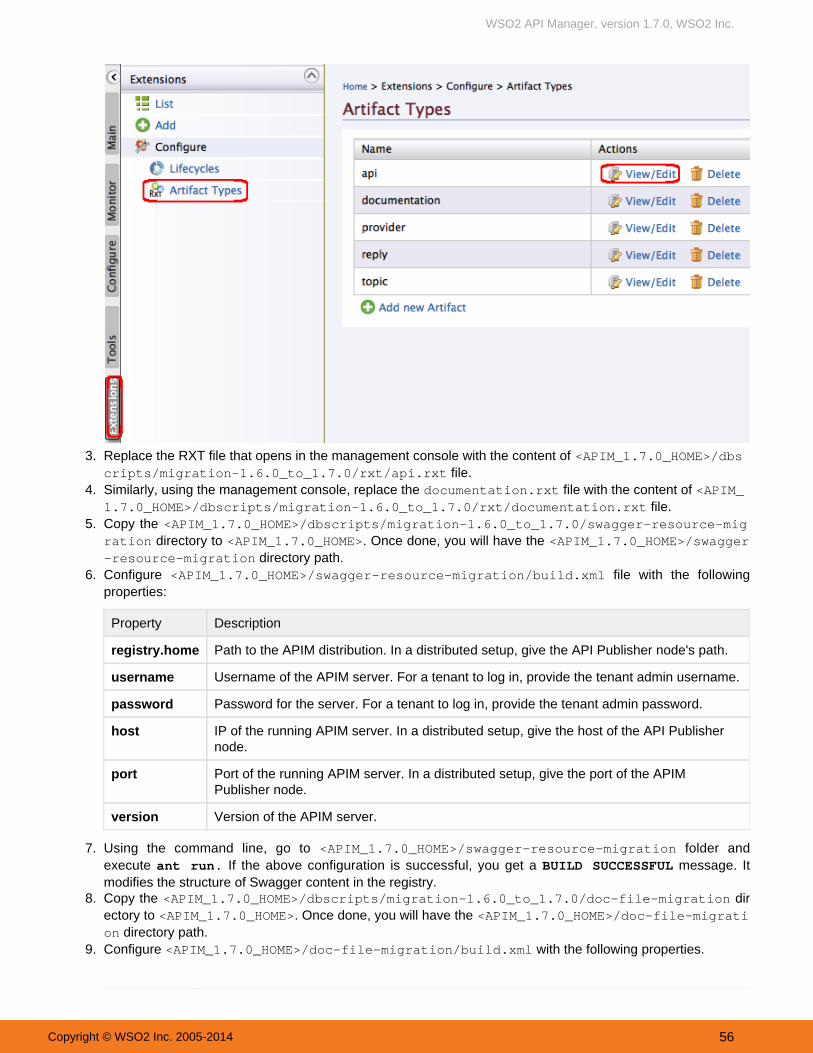
WSO2 API Manager, version 1.7.0, WSO2 Inc.
Copyright © WSO2 Inc. 2005-2014 56
2.
3.
4.
5.
6.
7.
8.
9.
Replace the RXT file that opens in the management console with the content of <APIM_1.7.0_HOME>/dbs file.cripts/migration-1.6.0_to_1.7.0/rxt/api.rxt
Similarly, using the management console, replace the file with the content of documentation.rxt <APIM_ file.1.7.0_HOME>/dbscripts/migration-1.6.0_to_1.7.0/rxt/documentation.rxt
Copy the <APIM_1.7.0_HOME>/dbscripts/migration-1.6.0_to_1.7.0/swagger-resource-mig directory to . Once done, you will have the ration <APIM_1.7.0_HOME> <APIM_1.7.0_HOME>/swagger
directory path.-resource-migrationConfigure file with the following/build.xml<APIM_1.7.0_HOME>/swagger-resource-migrationproperties:
Property Description
registry.home Path to the APIM distribution. In a distributed setup, give the API Publisher node's path.
username Username of the APIM server. For a tenant to log in, provide the tenant admin username.
password Password for the server. For a tenant to log in, provide the tenant admin password.
host IP of the running APIM server. In a distributed setup, give the host of the API Publishernode.
port Port of the running APIM server. In a distributed setup, give the port of the APIMPublisher node.
version Version of the APIM server.
Using the command line, go to folder and<APIM_1.7.0_HOME>/swagger-resource-migrationexecute If the above configuration is successful, you get a message. It.ant run BUILD SUCCESSFULmodifies the structure of Swagger content in the registry.Copy the dir<APIM_1.7.0_HOME>/dbscripts/migration-1.6.0_to_1.7.0/doc-file-migrationectory to . Once done, you will have the <APIM_1.7.0_HOME> <APIM_1.7.0_HOME>/doc-file-migrati
directory path.onConfigure with the following properties.<APIM_1.7.0_HOME>/doc-file-migration/build.xml

WSO2 API Manager, version 1.7.0, WSO2 Inc.
Copyright © WSO2 Inc. 2005-2014 57
9.
10.
11.
a.
b. c.
12.
a. b.
13.
a. b.
14.
a. b.
Property Description
registry.home Path to the APIM distribution. In a distributed setup, give the API Publisher node's path.
username Username of the APIM server
password Password of the APIM server
host IP of the running APIM server. In a distributed setup, give the host of the API Publishernode.
port Port of the running APIM server. In a distributed setup, give the port of the APIM Publishernode.
version Version of the APIM server
Using the command line, go to folder and execute <APIM_1.7.0_HOME>/doc-file-migration ant run If the above configuration is successful, you get a message.. BUILD SUCCESSFUL
Upgrading tenants
If you have added to your API Manager instance, follow the steps below to migrate tenantmultiple tenantsconfigurations:
Copy the contents from your previous directory to the same<APIM_HOME>/repository/tenantsdirectory in the API Manager 1.7.0. Execute steps 5 and 6 for all tenants in your system.Execute steps 8 to 10 for all tenants in your system.
Upgrading external stores
If you have configured under the element in external stores <ExternalAPIStores> <APIM_1.6.0_HOMe file, follow the steps below:>/repository/conf/api-manager.xml
Log in to APIM 1.7.0 management console and click the menu.Resources -> BrowseLoad resourc/_system/governance/apimgt/externalstores/external-api-stores.xmle in the registry browser UI, configure your external stores there and save.
Upgrading Google analytics
If you have configured under element in Google Analytics <GoogleAnalyticsTracking> <APIM_1.6.0 file, follow the steps below:_HOME>/repository/conf/api-manager.xml
Log in to APIM 1.7.0 management console and go to menu.Resources -> Browse Load resource in the registry/_system/governance/apimgt/statistics/ga-config.xmlbrowser UI, configure the Google analytics and save.
Upgrading workflows
If you have configured under element in Workflows <WorkFlowExtensions> <APIM_1.6.0_HOME>/rep file, follow the steps below:ository/conf/api-manager.xml
Log in to APIM 1.7.0 management console and go to menu.Resources -> BrowseLoad resour/_system/governance/apimgt/applicationdata/workflow-extensions.xmlce in the registry browser UI, configure your workflows and save.

WSO2 API Manager, version 1.7.0, WSO2 Inc.
Copyright © WSO2 Inc. 2005-2014 58
.User Roles in API Manager
User GuideThe user guide provides information about the features, functionality, solution development, testing and debuggingoptions of WSO2 API Manager.
API Developer GuideApplication Developer GuideCustomizing the API StoreMonitoring, Statistics and BillingExtending API ManagerWorking with Security
API Developer Guide
API development is usually done by someone who understands the technical aspects of the API, interfaces,documentation, versions etc., while API management is typically carried out by someone who understands thebusiness aspects of the APIs. In most business environments, API development is a responsibility that is distinctfrom API publication and management.
WSO2 API Manager provides a simplified Web interface called for API development,WSO2 API Publisherpublication and management. It is a structured GUI designed for API creators to develop, document, scale andversion APIs, while also facilitating more API management-related tasks such as publishing API, monetization,analyzing statistics, quality and usage and promoting and encouraging potential consumers and partners to adoptthe API in their solutions.
Shown in the diagram below are common life cycle activities of an API developer/manager, supported by the WSO2API Publisher:
To access the API development-related functionality provided by the WSO2 API Publisher, you need to create userroles with specific levels of permission. In this documentation, we use a role by the name creator to carry out moredevelopment-related tasks, and a role by the name publisher to carry out more management-related tasks. Forinstructions on adding the creator/publisher roles and assign them to users, refer to section
Before accessing the Web interface of the API Publisher, make sure you run the APIManager using instructions given in section . Once the server is up, type the following URL inRunning the Productyour browser to access the API Published Web interface.
https://<YourHostName>:9443/publisher
You cannot access the API Publisher Web interface using HTTP. It is exposed as HTTPSonly.
The API Publisher log-in page opens as follows:

WSO2 API Manager, version 1.7.0, WSO2 Inc.
Copyright © WSO2 Inc. 2005-2014 59
1. 2.
Once you are successfullylogged in to the APIPublisher, refer to thefollowing information tostart developing andmanaging APIs.
Creating and ManagingAPIsEditing and Deleting APIsManaging Throttling TiersDocumenting APIsVersioning APIsPublishing to API StoresManaging API Usage
Creating andManaging APIs
The following sectionswalk you through creating,
menting and managing an API:Designing APIsImplementing APIsManaging APIs
Designing APIs
Follow the steps below to start designing an API:
Log in to the API Publisher ( ) as a user who is assigned the . http://localhost:9763/publisher creator role to open Click Add Design window as follows:API

WSO2 API Manager, version 1.7.0, WSO2 Inc.
Copyright © WSO2 Inc. 2005-2014 60
2.
The sections below explain the fields of the above window.
General details
Field Description
Name* Name of API as you want it to appear in the API store (E.g., PhoneVerification)
Context* URI context path that is used by API consumers. (E.g., /phoneverify)
Version* API version in the form of version.major.minor. (E.g., 1.0.0)
Visibility See API visibility
Tags Any number of tags separated by comma. Tags allow you to group/categorize APIs that havesimilar attributes and behaviors. When tagging, always use relevant keywords and commonsearch terms. Once a tagged API gets , its tags appear on thepublished to the API Storedashboard as links to the API consumers, who can click on them to quickly jump to acategory they are interested in.
Resources See . (E.g., phoneID) API Resources
API visibility
Visibility settings prevent certain user roles from viewing and modifying APIs created by another user role.The visibility values mean the following:
Public : The API is visible to all users (subscribers and anonymous users) of its tenant store. Also, theAPI can be advertised in multiple stores - a central store and/or non-WSO2 stores.Visible to my domain : The API is visible to all users who are registered in the API's tenant domain.

WSO2 API Manager, version 1.7.0, WSO2 Inc.
Copyright © WSO2 Inc. 2005-2014 61
2.
Restricted by Roles : The API is visible only to specific user roles in the tenant store. When Restric is selected, specify theted by Roles a new field called appears where you can Visible to Roles
user roles that have access to the API in a comma-separated list (no spaces).
Given below is how visibility levels work for users in different tenant modes:
Visibility in super tenant mode
Subscribers in super tenant mode can see an API depending on its visibility level as follows: Anonymous users : can see APIs with visibilityPublic
Signed-up users : can see a as well as APIs that are ll APIs with visibilityPublic Restricted by, give that the user is assigned to the role the API is restricted by.Roles
Visibility in multi-tenant mode
In multi tenant environment, a subscriber can see API Store URLs of existing tenants. Click a URL to browsethe tenant's API Store.
A tenant's API Store is the API Store specific to the tenant domain the user belongs to. You can also access itwith the URL . http://<hostname>/Store?tenant=<tenantdomain.com> Therefore, the APIs asubscriber sees in multi tenant mode depend on their visibility levels as well as which API Store s/he islooking at. Any subscriber viewing his/her tenant's API Store can see an API depending on its visibility levelas follows:
Anonymous users: can see APIs that have visibility and created within the current user'sPublic tenant domain
Logged in users: can see,APIs that have visibility and created within the current users tenant domainPublic
APIs created within the current user's tenant domain and are allowedRestricted by Rolesto be accessed by the role of the current user
API resources
An API is made up of one or more resources. Each resource handles a particular type of request and isana logous to a me thod ( func t i on ) i n a l a rge r AP I .
API resources can accept the following attributes:
Roles that have API creation and publication permission can see all APIs in their tenantstore even if you restrict access to them. This is because any role that has API creationand publication permission can view and edit all APIs in the API Publisher. Therefore,there is no reason to hide the APIs from them in the Store. If you restrict the default role under the category,subscriber Visible to Rolesany user who self subscribes to the API Store will be able to access the API. This isbecause the API Manager assigns the subscriber role to all users who sign up to theAPI Store.
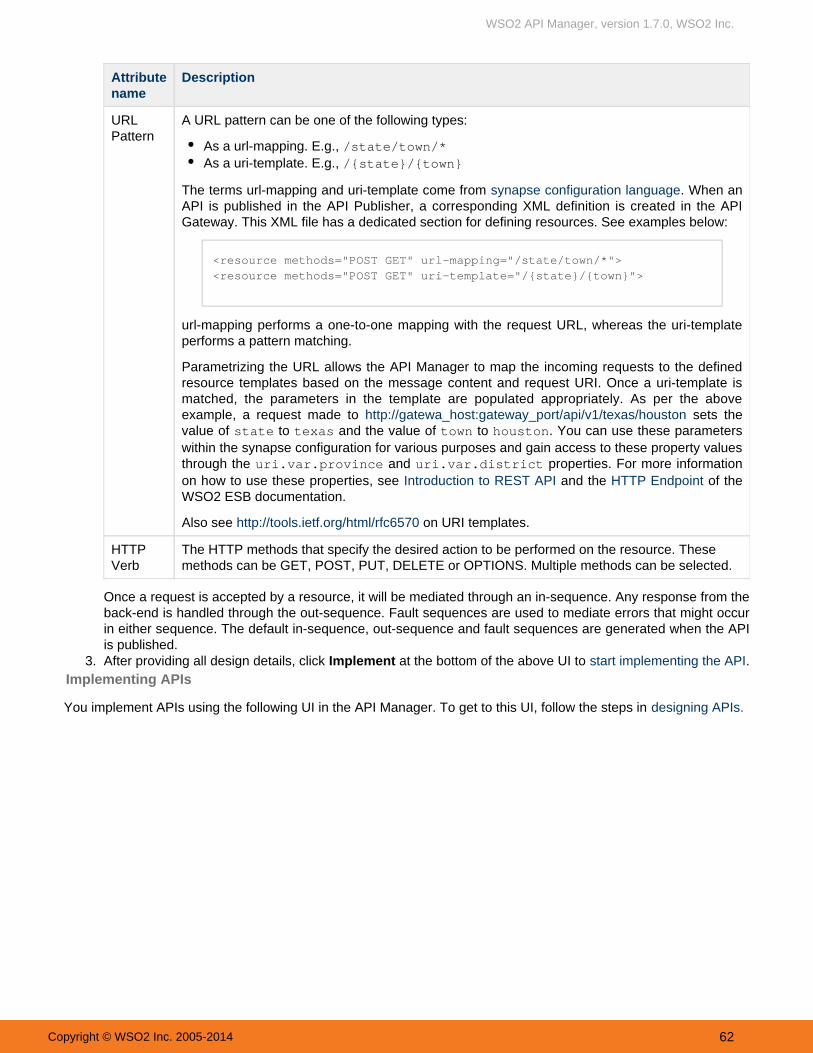
WSO2 API Manager, version 1.7.0, WSO2 Inc.
Copyright © WSO2 Inc. 2005-2014 62
2.
3.
Attributename
Description
URLPattern
A URL pattern can be one of the following types:
As a url-mapping. E.g., /state/town/*As a uri-template. E.g., /{state}/{town}
The terms url-mapping and uri-template come from . When ansynapse configuration languageAPI is published in the API Publisher, a corresponding XML definition is created in the APIGateway. This XML file has a dedicated section for defining resources. See examples below:
<resource methods="POST GET" url-mapping="/state/town/*"><resource methods="POST GET" uri-template="/{state}/{town}">
url-mapping performs a one-to-one mapping with the request URL, whereas the uri-templateperforms a pattern matching.
Parametrizing the URL allows the API Manager to map the incoming requests to the definedresource templates based on the message content and request URI. Once a uri-template ismatched, the parameters in the template are populated appropriately. As per the aboveexample, a request made to sets thehttp://gatewa_host:gateway_port/api/v1/texas/houstonvalue of to and the value of to . You can use these parametersstate texas town houstonwithin the synapse configuration for various purposes and gain access to these property valuesthrough the and properties. For more informationuri.var.province uri.var.districton how to use these properties, see and the of theIntroduction to REST API HTTP EndpointWSO2 ESB documentation.
Also see on URI templates.http://tools.ietf.org/html/rfc6570
HTTPVerb
The HTTP methods that specify the desired action to be performed on the resource. Thesemethods can be GET, POST, PUT, DELETE or OPTIONS. Multiple methods can be selected.
Once a request is accepted by a resource, it will be mediated through an in-sequence. Any response from theback-end is handled through the out-sequence. Fault sequences are used to mediate errors that might occurin either sequence. The default in-sequence, out-sequence and fault sequences are generated when the APIis published.After providing all design details, click at the bottom of the above UI to .Implement start implementing the API
Implementing APIs
You implement APIs using the following UI in the API Manager. To get to this UI, follow the steps in designing APIs.

WSO2 API Manager, version 1.7.0, WSO2 Inc.
Copyright © WSO2 Inc. 2005-2014 63
You can configure an actual backend or specify the implementation inline. You can also deploy this API as aprototype.
Backend endpointsSpecify InlineDeploy as a prototype
Backend endpoints
An endpoint defines the external destination for an outgoing message.
Field Description
Endpoint Type WSO2 API Manager has support for a range of different endpoint types allowing the API Gateway to connect with advancedtypes of backends. The API Manager supports , (also termed as address endpoint), HTTP endpoints URL endpoints WSDL
, , .endpoints Failover endpoints Load-balanced endpoints
Also see section in the ESB docs for details of the advanced configuration options.Adding an Endpoint

WSO2 API Manager, version 1.7.0, WSO2 Inc.
Copyright © WSO2 Inc. 2005-2014 64
Production/SandboxURLs
Endpoint of the back-end service URL and endpoint of sandbox (testing) back-end service. A sandbox URL is used foronline testing of an API with easy access to an API key.
Also see .Maintaining Separate Production and Sandbox Gateways
Endpoint SecurityScheme
Secured endpoint or Non secured endpoint. Default is non secured endpoint.
If secured endpoint is selected, user is asked for credentials of the backend service.
WSDL URL of WSDL file describing API interface. (E.g., )http://ws.cdyne.com/phoneverify/phoneverify.asmx?wsdl
WADL URL to WADL file (describing API interface).
Destination-basedUsage Tracking
Enable this feature to generate a graph This graph showing the number of times an API accesses its destination addresses.is generated in It gives API Publishers an insight about the requests that leave thethe .API Manager Statistics dashboardGateway to destination endpoints, especially useful in cases where the same API can reach different endpoints (e.g.,Load-balanced endpoints).
Specify Inline
You can specify the API implementation inline, without connecting to a backend where the API is implemented. Clickthe check box and you will find the resource created in the design section. For each HTTP method,Specify Inlineyou can write your own implementation in the section. For example,Script
The system reads gateway endpoints from file. When there are multiple gateway environmentsapi-manager.xmldefined, it picks the gateway endpoint of the production environment. You can define both HTTP and HTTPSgateway endpoints as follows:
<GatewayEndpoint>http://${carbon.local.ip}:${http.nio.port},https://${carbon.local.ip}</GatewayEndpoint>}:${https.nio.port
If both types of endpoints are defined, the HTTPS endpoint will be picked as the server endpoint.
You cannot call back-end services secured with OAuth through APIs created in the API Manager. At the moment,you can call only services secured with username/password.
The API Manager allows you to expose both REST and SOAP services to consumers through APIs.
If you get a when trying to send requests to a secured endpoint, exceptionHostname verfiication failedset to in <parameter name="HostnameVerifier"> AllowAll <APIM_HOME>/repository/conf/axis2/a
file's HTTPS transport sender configuration. For example,xis2.xml <parameter.name="HostnameVerifier">AllowAll</parameter>
This parameter verifies the hostname of the certificate of a server when API Manager acts as a client and does.outbound service calls
When you provide the WSDL URL, the WSDL content will be saved as a resource file under /system/governanc e/apimgt/applicationdata/ wsdls folder in the registry. API artifacts have a dependency to this WSDL
resource. Its original service address location is reset to the API Gateway's address URL to prevent accessing theservice endpoint directly. At the store, we will show the registry permlink of the wsdl resource. User can downloadthe WSDL and create a service project out of that.

WSO2 API Manager, version 1.7.0, WSO2 Inc.
Copyright © WSO2 Inc. 2005-2014 65
Deploy as a prototype
If you click the button, the API will be deployed as a sample or a model API. The purpose of aDeploy Prototypeprototyped API is to give the API users an early implementation of the API so that they can use it withoutsubscribing, comment on its effectiveness and request improvements. You then change the API's implementationaccording to user comments and publish it. A published API is available for subscription and monetization.
Go to the API Store ( ) and click the menu to see your API deployedhttps://localhost:9443/store/ Prototyped APIsthere. Then, open the API. For example:

WSO2 API Manager, version 1.7.0, WSO2 Inc.
Copyright © WSO2 Inc. 2005-2014 66
Note that the subscription options are not available for the API. But, users can test the API using the API Consoletab, read documentation, engage in forums and other community features and share comments about the API.
Next, .start managing the APIManaging APIs
You manage APIs using the following UI in the API Manager. To get to this UI, follow the instructions in implementin.g APIs

WSO2 API Manager, version 1.7.0, WSO2 Inc.
Copyright © WSO2 Inc. 2005-2014 67
The tables below explain the fields of the above UI.
Field Description
Make this thedefaul tversion
All API contexts are suffixed with an API version. The default version option allows you to markone API, from a group of API versions, as the default one, so that it can be invoked withoutspecifying the version number in the URL. For example, say that the following API versions exist:
http://host:port/youtube/1.0http://host:port/youtube/2.0http://host:port/youtube/3.0
If you mark the third API as the default API, requests made to gethttp://host:port/youtube/automatically routed to .http://host:port/youtube/3.0
You can make any of the API versions as the default version at any time. However, if you mark anunpublished API as the default while the previously default API was a published one, then theusers who invoke the default API will still be routed to the previous default version rather than thenew one. This is because the new default API version is not published yet.
TierAvailability
See . API-level throttling

WSO2 API Manager, version 1.7.0, WSO2 Inc.
Copyright © WSO2 Inc. 2005-2014 68
Transports The transport protocol on which the API is exposed. Both HTTP and HTTPS transports areselected by default. If you want to limit API availability to only one transport (e.g., HTTPS),un-check the other transport.
Sequences Custom sequences that you want to invoke in the message flow. For details, see per-API.sequences
ResponseCaching
Used to enable caching of response messages per each API. Caching protects the backendsystems from being exhausted due to serving the same response (for same request) multiple
If you select the option, specify the cache timeout value (in seconds) within whichtimes. enablethe system tries to retrieve responses from the cache without going to the backend.
To configure response caching, edit <APIM_HOME>/repository/resources/api_templatefile. The cache mediator properties in the XML file are as follows: s/velocity_template.xml
collectortrue: Specifies that the mediator instance is a response collection instancefalse: Specifies that it's a cache serving instance. max MessageSize: Specifies the maximum size of a message to be cached in bytes. An
optional attribute, with the default value as .unlimited maxSize: Defines the maximum number of elements to be cached.
Subscriptions Used to specify the tenants who can subscribe to an API, in a multi-tenanted API Managerdeployment. The following types of subscription categories are available between tenants:
Available to current Tenant Only: Only users who are in the current tenant domain, i.e., thetenant domain of the API creator, can subscribe to this API. Available to All the Tenants: Users of all tenant domains in the API Manager deployment cansubscribe to this API. Available to Specific Tenants: Users of specified tenant domains as well as the current tenantdomain (i.e., the tenant domain of the API creator) can subscribe to this API.
Resourcesettings
Scope: See OAuth scopes
Auth type: You can give the following levels of authentication to each HTTP method of theresource:
: The API Gateway skips the authentication processNone: Authentication is done by the applicationApplication
: Authentication is done by the application userApplication User: both Application and Application User application and application user level
authentication is applied. Note that if you select this option in the UI, it appears as in theAnyAPI Manager's internal data storage and data representation and will appear in theAnyresponse messages as well.
The auth type is cached in the API Manager for better performance. If you change the auth typethrough the UI, it takes about 15 minutes to refresh the cache. During that time, the server returnsthe old auth type from the cache. If you want the changes to be reflected immediately, pleaserestart the server after changing the auth type.
Tier: See Resource-level throttling
OAuth scopes
Scopes enable fine-grained access control to API resources based on user roles. You define scopes to an API'sresources. When a user invokes the API, his/her OAuth 2 bearer token cannot grant access to any API resourcebeyond its associated scopes.

WSO2 API Manager, version 1.7.0, WSO2 Inc.
Copyright © WSO2 Inc. 2005-2014 69
You can apply scopes to an API resource at the time the API is created or modified. In the API Publisher, click the A menu (to add a new API) or the link next to an existing API. Then, navigate to the tab andPI -> Add Edit Manage
scroll down to see the button. A screen such as the following appears:Add Scopes
ScopeKey
A unique key for identifying the scope. Typically, it is prefixed by part of the API's name foruniqueness, but is not necessarily reader-friendly.
ScopeName
A human-readable name for the scope. It typically says what the scope does.
Roles The user role(s) that are allowed to obtain a token against this scope. E.g., manager, employee.
To illustrate the functionality of scopes, assume you have the following scopes attached to resources of an API:
Assume that users named and are assigned the employee role and both the employee and managerTom Johnroles respectively.
Tom requests a token through the Token API as grant_type=password&username=nuwan&password=xxxx&. However, as Tom is not in the manager role, he will only be granted a tokenscope= news_read news_write
bearing the scope. The response from the Token API will be similar to the following:news_read

WSO2 API Manager, version 1.7.0, WSO2 Inc.
Copyright © WSO2 Inc. 2005-2014 70
1.
"scope":"news_read","token_type":"bearer","expires_in":3299,"refresh_token":"8579facb65d1d3eba74a395a2e78dd6","access_token":"eb51eff0b4d85cda1eb1d312c5b6a3b8"
Next, John requests a token as grant_type=password&username=john&password=john123&scope=news_. As has both roles assigned, the token will bear both the requested scopes and theread news_write john
response will be similar to the following:
"scope":"news_read news_write", "token_type":"bearer", "expires_in":3299,"refresh_token":"4ca244fb321bd555bd3d555df39315","access_token":"42a377a0101877d1d9e29c5f30857e"
This means that Tom can only access the GET operation of the API while John can access both as he is assignedto both the employee and manager roles. If Tom tries to access the POST operation, there will be an HTTP 403Forbidden error as follows:
<ams:fault xmlns:ams="http://wso2.org/apimanager/security"> <ams:code>900910</ams:code> <ams:message>The access token does not allow you to access the requestedresource</ams:message> <ams:description>Access failure for API: /orgnews, version: 1.0.0 with key:eb51eff0b4d85cda1eb1d312c5b6a3b8 </ams:description></ams:fault>
Click or click to publish the API later. For information on publishing APIs, see Save & Publish Save Publishing to.API Stores
Editing and Deleting APIs
The steps below explain how to modify an API's source code and delete an API.
Editing an API
You create an API using the API Publisher Web interface. To edit an API, you select the API in the API Publisherand then click the link next to its name. Similarly, most common configurations of the APIs are facilitatedEditthrough the Web UI.
However, if you want to do more advanced configurations to this API, you have to go into its code-levelconfigurations. You can do this using the steps given below.
Log in to the Management Console UI ( ) using credenthttps://localhost:9443/carbon admin/adminials. Then, select sub menu under the menu.Source View Service Bus
Tip: To invoke an API protected by scopes, you need to get an access token via the Token API. Tokensgenerated from the My Subscriptions page in the API Store will not work.
The link is only visible to users with creator privileges. See .Edit Managing Users and Roles
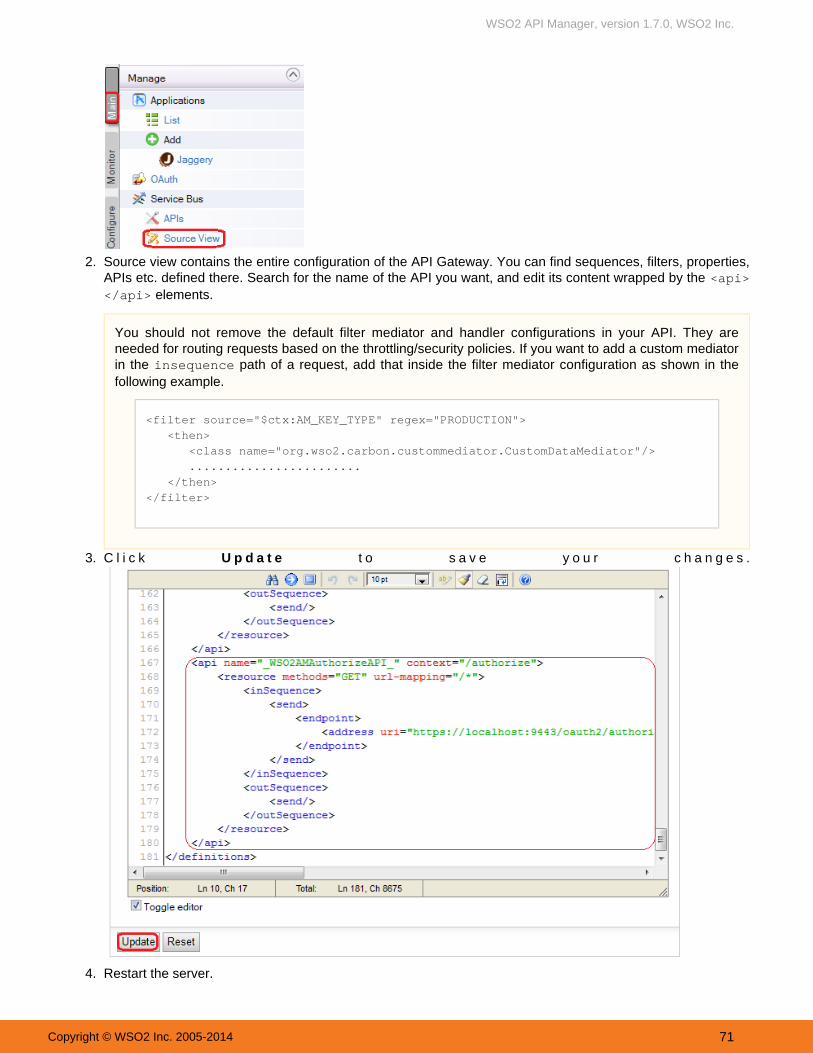
WSO2 API Manager, version 1.7.0, WSO2 Inc.
Copyright © WSO2 Inc. 2005-2014 71
1.
2.
3.
4.
Source view contains the entire configuration of the API Gateway. You can find sequences, filters, properties,APIs etc. defined there. Search for the name of the API you want, and edit its content wrapped by the <api>
elements.</api>
C l i c k t o s a v e y o u r c h a n g e s .U p d a t e
Restart the server.
You should not remove the default filter mediator and handler configurations in your API. They areneeded for routing requests based on the throttling/security policies. If you want to add a custom mediatorin the path of a request, add that inside the filter mediator configuration as shown in theinsequencefollowing example.
<filter source="$ctx:AM_KEY_TYPE" regex="PRODUCTION"> <then> <class name="org.wso2.carbon.custommediator.CustomDataMediator"/> ........................ </then></filter>
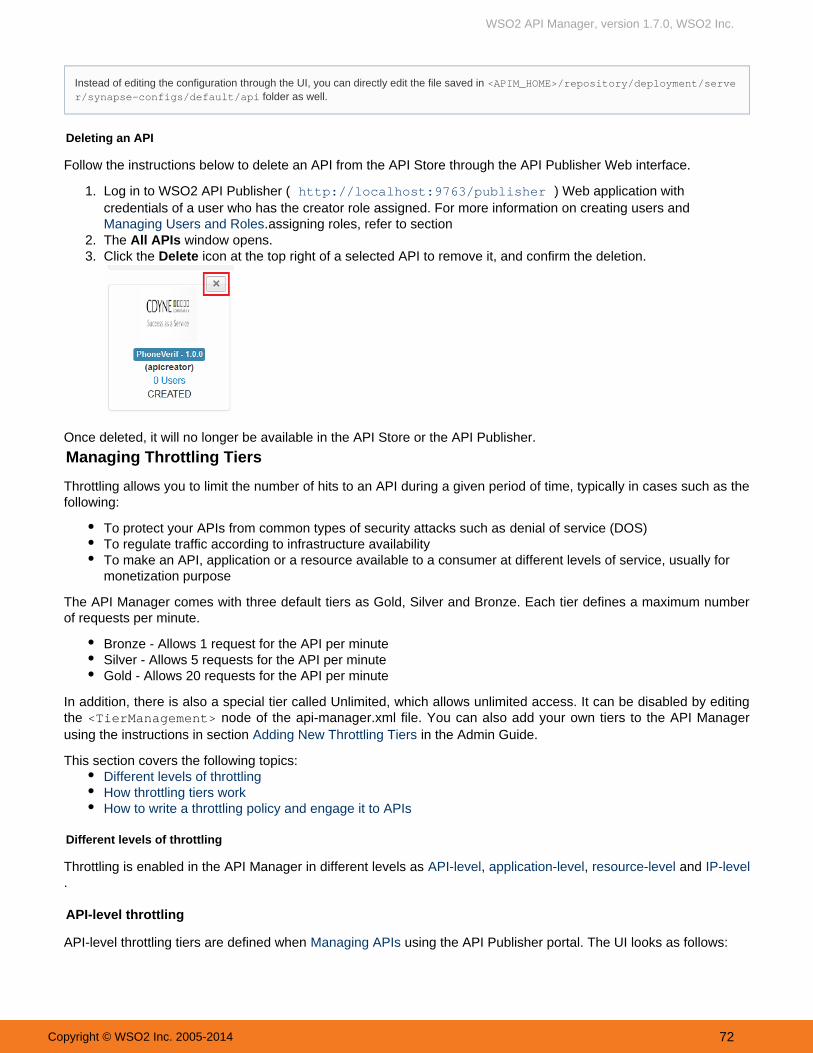
WSO2 API Manager, version 1.7.0, WSO2 Inc.
Copyright © WSO2 Inc. 2005-2014 72
.Managing Users and Roles
1.
2. 3.
Deleting an API
Follow the instructions below to delete an API from the API Store through the API Publisher Web interface.
Log in to WSO2 API Publisher ( ) Web application with http://localhost:9763/publishercredentials of a user who has the creator role assigned. For more information on creating users and
assigning roles, refer to sectionThe window opens.All APIsClick the icon at the top right of a selected API to remove it, and confirm the deletion. Delete
Once deleted, it will no longer be available in the API Store or the API Publisher.
Managing Throttling Tiers
Throttling allows you to limit the number of hits to an API during a given period of time, typically in cases such as thefollowing:
To protect your APIs from common types of security attacks such as denial of service (DOS)To regulate traffic according to infrastructure availabilityTo make an API, application or a resource available to a consumer at different levels of service, usually formonetization purpose
The API Manager comes with three default tiers as Gold, Silver and Bronze. Each tier defines a maximum numberof requests per minute.
Bronze - Allows 1 request for the API per minuteSilver - Allows 5 requests for the API per minuteGold - Allows 20 requests for the API per minute
In addition, there is also a special tier called Unlimited, which allows unlimited access. It can be disabled by editingthe node of the api-manager.xml file. You can also add your own tiers to the API Manager<TierManagement>using the instructions in section in the Admin Guide.Adding New Throttling Tiers
This section covers the following topics:Different levels of throttlingHow throttling tiers workHow to write a throttling policy and engage it to APIs
Different levels of throttling
Throttling is enabled in the API Manager in different levels as , , and API-level application-level resource-level IP-level.
API-level throttling
API-level throttling tiers are defined when using the API Publisher portal. The UI looks as follows:Managing APIs
Instead of editing the configuration through the UI, you can directly edit the file saved in <APIM_HOME>/repository/deployment/serve folder as well.r/synapse-configs/default/api
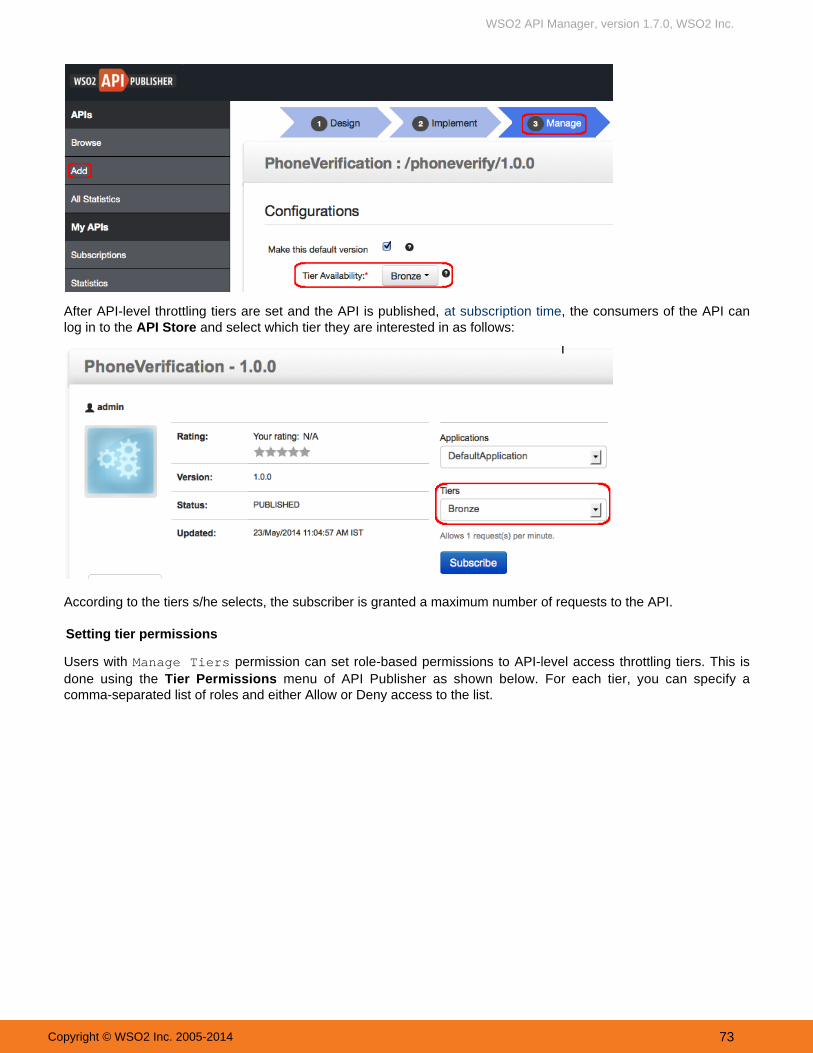
WSO2 API Manager, version 1.7.0, WSO2 Inc.
Copyright © WSO2 Inc. 2005-2014 73
After API-level throttling tiers are set and the API is published, , the consumers of the API canat subscription timelog in to the and select which tier they are interested in as follows:API Store
According to the tiers s/he selects, the subscriber is granted a maximum number of requests to the API.
Setting tier permissions
Users with permission can set role-based permissions to API-level access throttling tiers. This isManage Tiersdone using the menu of API Publisher as shown below. Tier Permissions For each tier, you can specify acomma-separated list of roles and either Allow or Deny access to the list.

WSO2 API Manager, version 1.7.0, WSO2 Inc.
Copyright © WSO2 Inc. 2005-2014 74
A subscriber logged into the API Store can consume APIs using a specific tier, only if s/he is assigned to a role thatis allowed access. In the API Store, the subscriber sees a list of tiers that is filtered based on the subscriber's role.Only the ALLOWED roles appear here. By default, all tiers are allowed to everyone.
Application-level throttling
Application-level throttling tiers are defined at the time an application is created using the API Store. For information,see . Applications and application-level throttling
Resource-level throttling
Resource-level throttling tiers are set to HTTP verbs of an API's when using the API Publisher portal. The UIresources Managing APIslooks as follows:

WSO2 API Manager, version 1.7.0, WSO2 Inc.
Copyright © WSO2 Inc. 2005-2014 75
When a subscriber views an API using the , s/he can see the resource-level tiers using the tab as follows:API Store throttling Throttle Info
Subscribers are not allowed to change these throttling tiers. They are simply notified of the limitations.

WSO2 API Manager, version 1.7.0, WSO2 Inc.
Copyright © WSO2 Inc. 2005-2014 76
1. 2.
3.
IP-level throttling
In IP-level throttling, you can limit the number of requests sent by a client IP (e.g., 10 calls from single client).
Log in to the management console and click the -> menu.Resources BrowseNavigate to the file in the registry location tiers.xml /_system/governance/apimgt/applicationda
.taAdd your policy. For example, the throttling policy shown below allows only 1 API call per minute for a clientfrom 10.1.1.1 and 2 calls per minute for a client from any other IP address.
<wsp:Policy xmlns:wsp="http://schemas.xmlsoap.org/ws/2004/09/policy"
xmlns:throttle="http://www.wso2.org/products/wso2commons/throttle"> <throttle:MediatorThrottleAssertion> <wsp:Policy> <throttle:ID throttle:type="IP">10.1.1.1</throttle:ID> <wsp:Policy> <throttle:Control> <wsp:Policy> <throttle:MaximumCount>1</throttle:MaximumCount> <throttle:UnitTime>60000</throttle:UnitTime> </wsp:Policy> </throttle:Control> </wsp:Policy> </wsp:Policy> <wsp:Policy> <throttle:ID throttle:type="IP">other</throttle:ID> <wsp:Policy> <throttle:Control> <wsp:Policy> <throttle:MaximumCount>2</throttle:MaximumCount> <throttle:UnitTime>60000</throttle:UnitTime> </wsp:Policy> </throttle:Control> </wsp:Policy> </wsp:Policy> </throttle:MediatorThrottleAssertion></wsp:Policy>
How throttling tiers work
When an API is invoked, it first checks whether the request is allowed by API-level throttling limit. If theconsumer has exceeded his/her maximum number of allowed API requests, the new request will beterminated.If API-level limit is not exceeded, it then checks whether the request is allowed by application-level throttlinglimit. If it has exceeded, the request will be terminated.If application-level limit is not exceeded, it finally checks whether the request is allowed by resource-levelthrottling limit. If the limit is not exceeded, then the request will be granted.
With capability to define throttling at three levels, the final request limit granted to a given user on a given API isultimately defined by the consolidated output of all throttling tiers together. For example, lets say two userssubscribed to an API using the Gold subscription, which allows 20 requests per minute. They both use theapplication App1 for this subscription, which again has a throttling tier set to 20 requests per minute. All resourcelevel throttling tiers are unlimited. In this scenario, although both users are eligible for 20 requests per minute accessto the API, each ideally has a limit of only 10 requests per minute. This is due to the application-level limitation of 20requests per minute.
How to write a throttling policy and engage it to APIs
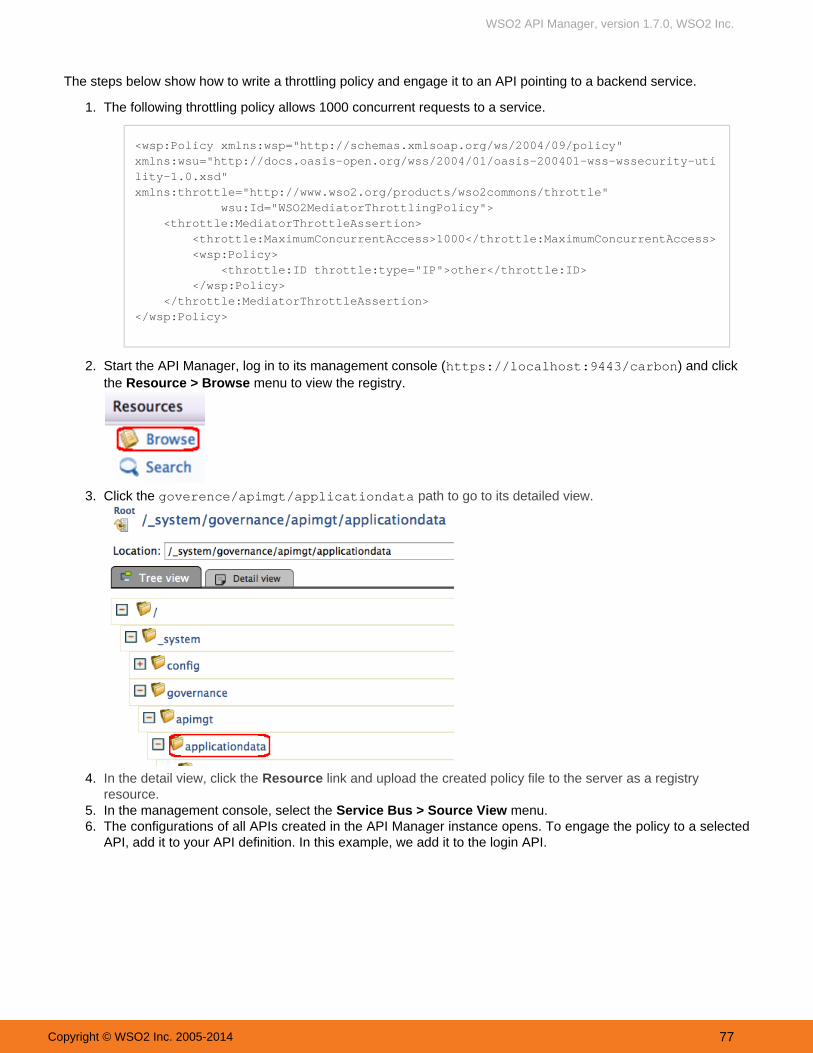
WSO2 API Manager, version 1.7.0, WSO2 Inc.
Copyright © WSO2 Inc. 2005-2014 77
1.
2.
3.
4.
5. 6.
The steps below show how to write a throttling policy and engage it to an API pointing to a backend service.
The following throttling policy allows 1000 concurrent requests to a service.
<wsp:Policy xmlns:wsp="http://schemas.xmlsoap.org/ws/2004/09/policy"xmlns:wsu="http://docs.oasis-open.org/wss/2004/01/oasis-200401-wss-wssecurity-utility-1.0.xsd"xmlns:throttle="http://www.wso2.org/products/wso2commons/throttle" wsu:Id="WSO2MediatorThrottlingPolicy"> <throttle:MediatorThrottleAssertion> <throttle:MaximumConcurrentAccess>1000</throttle:MaximumConcurrentAccess> <wsp:Policy> <throttle:ID throttle:type="IP">other</throttle:ID> </wsp:Policy> </throttle:MediatorThrottleAssertion></wsp:Policy>
Start the API Manager, log in to its management console ( ) and clickhttps://localhost:9443/carbonthe menu to view the registry.Resource > Browse
Click the goverence/apimgt/applicationdata path to go to its detailed view.
In the detail view, click the link and upload the created policy file to the server as a registryResourceresource. In the management console, select the menu.Service Bus > Source ViewThe configurations of all APIs created in the API Manager instance opens. To engage the policy to a selectedAPI, add it to your API definition. In this example, we add it to the login API.
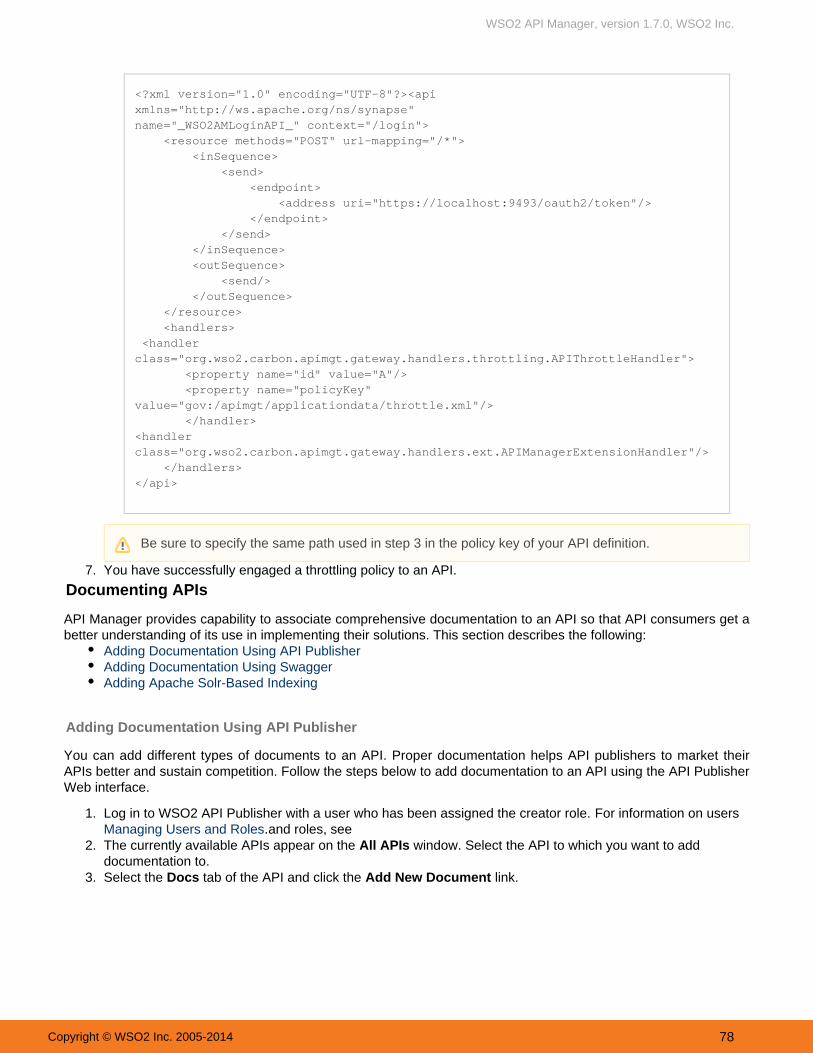
WSO2 API Manager, version 1.7.0, WSO2 Inc.
Copyright © WSO2 Inc. 2005-2014 78
.Managing Users and Roles
6.
7.
1.
2.
3.
<?xml version="1.0" encoding="UTF-8"?><apixmlns="http://ws.apache.org/ns/synapse" name="_WSO2AMLoginAPI_" context="/login"> <resource methods="POST" url-mapping="/*"> <inSequence> <send> <endpoint> <address uri="https://localhost:9493/oauth2/token"/> </endpoint> </send> </inSequence> <outSequence> <send/> </outSequence> </resource> <handlers> <handlerclass="org.wso2.carbon.apimgt.gateway.handlers.throttling.APIThrottleHandler"> <property name="id" value="A"/> <property name="policyKey"value="gov:/apimgt/applicationdata/throttle.xml"/> </handler> <handlerclass="org.wso2.carbon.apimgt.gateway.handlers.ext.APIManagerExtensionHandler"/> </handlers></api>
You have successfully engaged a throttling policy to an API.
Documenting APIs
API Manager provides capability to associate comprehensive documentation to an API so that API consumers get abetter understanding of its use in implementing their solutions. This section describes the following:
Adding Documentation Using API PublisherAdding Documentation Using SwaggerAdding Apache Solr-Based Indexing
Adding Documentation Using API Publisher
You can add different types of documents to an API. Proper documentation helps API publishers to market theirAPIs better and sustain competition. Follow the steps below to add documentation to an API using the API PublisherWeb interface.
For information on usersLog in to WSO2 API Publisher with a user who has been assigned the creator role. and roles, see
The currently available APIs appear on the window. Select All APIs the API to which you want to add. documentation to
Select the tab of the API and click the link.Docs Add New Document
Be sure to specify the same path used in step 3 in the policy key of your API definition.

WSO2 API Manager, version 1.7.0, WSO2 Inc.
Copyright © WSO2 Inc. 2005-2014 79
.
3.
4. 5. 6.
Documentation can be provided inline, via a URL or as a file. In-line: Documentation hosted in the API Manager itself. For inline documentation, you can edit thecontents directly from the API publisher interface. You get several documents types:
Swagger documentsHow ToSamples and SDKPublic forum / Support forum (external link only)API message formatsOther
URL: If you already have comprehensive documentation managed by an external configurationmanagement system, you can simply link to those file references (URLs) through the API Managerrather than importing them to the server.
Click the button to complete.Add DocumentThe added document shows on the same window. Click the link associated with it.Edit ContentThe embedded editor opens allowing you to edit the document content.
All documents have unique URLs to help improve SEO support. After editing the API, publish it for it to be availableto external parties through the API Store
By default, any document associated with an API has the same visibility level of the API. That is, if the API is public, its documentationis also visible to . To enable other visibility levels to the documentation, go to all users (registered and anonymous) <AM_HOME>/repos
file, uncomment and set the following element to true:itory/conf/api-manager.xml

WSO2 API Manager, version 1.7.0, WSO2 Inc.
Copyright © WSO2 Inc. 2005-2014 80
Next, see . Adding Documentation Using SwaggerAdding Documentation Using Swagger
Interactive documentation support helps users to understand and experience the APIs better. WSO2 API Managerprovides this functionality through the integration of Swagger ( ).https://developers.helloreverb.com/swaggerSwagger is a specification and a complete framework implementation for describing, producing, consuming, andvisualizing RESTful Web services. You can load APIs that are described in simple, static JSON representationthrough the Swagger UI and and make them available as interactive documentation.
The idea of this interactive console is allowing users to test the APIs and get to know how they respond withoutsubscribing to the APIs. When an API is created in API Publisher, the JSON representation of that API isautomatically generated and saved into the registry as an API definition. This API definition describes the API usingthe information provided at the time it is created. You can modify the API definition using the tab in theDocmanagement console. In API Store, the Swagger UI discovers the API definition for each API and displays theinteractive documentation in the API's tab.Documentation
The sections below explain how to create an interactive documentation for an API:Enabling cross-origin resource sharingCreating an APIUpdating the API definitionInvoking the interactive documentation
Enabling cross-origin resource sharing
Swagger-based interactive documentation allows you to try out APIs from the documentation itself. It is a Java Scriptclient that runs in the API Store and makes Java Script calls from the Store to the API Gateway. Since the API Storeand Gateway run on two different ports, you must enable (CORS) between the twocross-origin resource sharingusing CORS configuration in file. Given below is a<APIM_HOME>/repository/conf/api-manager.xmlsample configuration of CORS and a description of its XML elements:
Then, log in to the API Publisher, go to the tab and click to see a new drop-downDoc Add new Documentlist added to select visibility from. The settings are as follows:
: Visible to the same user roles who can see the API. For example, if the API'sSame as API visibilityvisibility is public, its documentation is visible to all users.Visible : Visible to all registered users in the API's tenant d to my domain omain.
: Private Visible only to the users who have permission to log in to the API Publisher Web interfaceand create and/or publish APIs to the API Store.
<APIPublisher> .... <EnableAPIDocVisibilityLevels>true</EnableAPIDocVisibilityLevels></APIPublisher>

WSO2 API Manager, version 1.7.0, WSO2 Inc.
Copyright © WSO2 Inc. 2005-2014 81
1.
CORS Configuration in api-manager.xml
<CORSConfiguration> <Enabled>true</Enabled> <Access-Control-Allow-Origin>https://localhost:9443,http://localhost:9763</Access-Control-Allow-Origin> <Access-Control-Allow-Headers>authorization,Access-Control-Allow-Origin,Content-Type</Access-Control-Allow-Headers>
<!--Configure Access-Control-Allow-Methods--> <Access-Control-Allow-Methods>GET,POST,PUT,DELETE,OPTIONS</Access-Control-Allow-Methods>
</CORSConfiguration>
XML Elements Values Description
<Enabled> True/False Used to enable/disable sendingCORS headers from the Gateway. Bydefault, CORS is enabled (True). Thisis needed for Swagger to functionproperly.
<Access-Control-Allow-Origin> HTTP and HTTPS Store Address. Change the Host andPort for correct values of your store. For example, https://localhost:9443,http://localhost:9763
The value of the <Access-Control. Default-Allow-Origin header>
values are API Store addresses thatare required for swagger to functionproperly.
<Access-Control-Allow-Headers> Header values you need to pass when invoking the API.For example, authorization,Access-Control-Allow-Origin, Content-Type
Default values are sufficient forSwagger to function.
<Access-Control-Allow-Methods> GET, POST, PUT, DELETE, OPTIONS Methods required to be supportedfrom the Swagger client.
Creating an API
Log in to API Publisher Web interface ( ), and go to page. Create ahttps://localhost:9443/publisher Add APInew API with following information by navigating to each tab.
Name: PhoneVerificationContext: /phoneverifyVersion: 1.0.0Choose to create a wildcard resource (/*)Endpoint type: HTTPProduction Endpoint: http://ws.cdyne.com/phoneverify/phoneverify.asmxTier availability: Bronze/Gold/Silver/UnlimitedTransports: HTTP/HTTPS

WSO2 API Manager, version 1.7.0, WSO2 Inc.
Copyright © WSO2 Inc. 2005-2014 82
1.
2. Publish the API to the API Store.
Updating the API definition
In the screen, you can specify an authentication type for the methods of the resource thatManageyou created earlier.
For each of the resource that has HTTP verbs requiring Authentication (i.e., Auth Type is not NONE),OPTIONS Noneenable with Auth type. For example, as the following screen shot shows, resources
with /* URL Pattern has HTTP verbs with Auth Type as Application & Application User.
None OPTIONSTherefore, we must give as the Auth Type of . This is to support CORS (Cross OriginResource Sharing) between the API Store and Gateway. But, if no authentication is needed for any of
None OPTIONSthe HTTP verbs, you don't have to specify Auth type to .

WSO2 API Manager, version 1.7.0, WSO2 Inc.
Copyright © WSO2 Inc. 2005-2014 83
1.
2.
3.
4.
The API creator can update/customize the automatically generated API definition for each API.
Log in to the API Publisher, go to the tab of API and click under SwaggerDoc PhoneVerify Edit ContentD o c u m e n t a t i o n .
The API definition opens. Note that the API definition contains its JSON representation.By default, all the POST and PUT operations have a parameter, which you can use to sendPayloadany payload when invoking the API.You can use the in GET, DELETE operations to send URL-appended valuesQuery parameters(e.g.,: v=2&length=200).
Modify existing content, add/remove elements, change paths and parameters of the API definition usingeither of the following editors or the .: Text Editor Graphical Tree Editor
The example below shows how we have changed the path for all the HTTP methods of the API definitionfrom /phoneverify/1.0.0/ to using both the text editor/phoneverify/1.0.0/CheckPhoneNumbera n d g r a p h i c a l t r e e e d i t o r :
After the modifications are done, click .save
API Manager 1.5.0 onwards has integrated JSONMate as the editor for modifying the APIDefinition.For the Swagger specification of API declaration, see https://github.com/wordnik/sw
.agger-core/wiki/API-Declaration

WSO2 API Manager, version 1.7.0, WSO2 Inc.
Copyright © WSO2 Inc. 2005-2014 84
1. 2.
3. 4. 5.
Invoking the interactive documentation
Log in to the API Store Web interface ( ) and click the API published before.https://localhost:9443/storeSubscribe to the API using the Bronze tier.
Generate access tokens. You need them to invoke the API in the next steps.Select the API again and go to the tab, which shows the interactive documentation of the API.API ConsoleP or example,rovide the necessary parameters and click to call the API. FTry it out the PhoneVerificatio
API takes two parameters: the phone number and a license key, which is set to 0 for testing purposes. n
The Swagger JSON files are saved in the following location in the registry: /_system/governance/apim. To browse the registry, log in to thegt/applicationdata/api-docs/<API name>/api-doc.json
management console ( ) as admin/admin and select mehttps://localhost:9443/carbon Resources -> Browsenu.

WSO2 API Manager, version 1.7.0, WSO2 Inc.
Copyright © WSO2 Inc. 2005-2014 85
5.
6.
Note the following in the above UI:
Base URL Appears at the bottom of the console. Using the base URL and the parameters, thesystem creates the API URL in the form context>/<version><http://host:8280/
For example,/<back end service requirements included as parameters>..http://host:8280/phoneverify/1.1.0/CheckPhoneNumber
QueryParameters
Give the API payload as wherePhoneNumber=18006785432&LicenseKey=0/phoneverify is the context and 1.1.0 is the version. The rest of the URL is driven by thebackend service requirements.
Authorization In the , pass the application key that was generated at the time aauthorization headeruser subscribes to an API. This is prefixed by the string "Bearer". For example, Bearer q6-JeSXxZDDzBnccK3ZZGf5_AZTk.
WSO2 API Manager enforces OAuth security on all the published APIs. Consumers whotalk to the API Manager should send their credentials (application key) as per the OAuthbearer token profile. If you don't send an application key or send a wrong key, you willreceive a 401 Unauthorized response in return.
Note the response for the API invocation that appears as follows:

WSO2 API Manager, version 1.7.0, WSO2 Inc.
Copyright © WSO2 Inc. 2005-2014 86
6.
7.
Within a minute after the first API invocation, make another attempt to invoke the API and note that thesecond invocation results in a throttling error.
This is because you applied a Bronze tier at the time you subscribed to the API and the Bronze tier onlyallows one API call per minute.
Adding Apache Solr-Based Indexing
The API Manager has based indexing for API documentation content. It provides both the APIApache SolrPublisher and Store full-text search facility to search through API documentation, find documents and related APIs.The search syntax is Search criteria looks for the keyword in any word/phrase in the documentationdoc:keyword.content and returns both the matching documents and associated APIs.
WSO2 API Manager, version 1.7.0, WSO2 Inc.
Copyright © WSO2 Inc. 2005-2014 87
1.
The following media types have Apache Solr based indexers by default, configured using the element<Indexers>in .<APIM_HOME>/repository/conf/registry.xml
Text : text/plainPDF : application/pdfMS word : application/mswordMS Powerpoint : application/vnd.ms-powerpointMS Excel : application/vnd.ms-excelXML : application/xml
Writing a custom index
In addition to the default ones, you can write your own indexer implementation and register it as follows:
Write a custom indexer. Given below is a sample indexer code.

WSO2 API Manager, version 1.7.0, WSO2 Inc.
Copyright © WSO2 Inc. 2005-2014 88
1.
2. 3.
package org.wso2.indexing.sample;
import java.util.HashMap;import java.util.List;import java.util.Map;import java.util.Arrays;import org.apache.solr.common.SolrException;import org.wso2.carbon.registry.core.exceptions.RegistryException;import org.wso2.carbon.registry.core.utils.RegistryUtils;import org.wso2.carbon.registry.indexing.IndexingConstants;import org.wso2.carbon.registry.indexing.AsyncIndexer.File2Index;import org.wso2.carbon.registry.indexing.indexer.Indexer;import org.wso2.carbon.registry.indexing.solr.IndexDocument;
public class PlainTextIndexer implements Indexer { public IndexDocument getIndexedDocument(File2Index fileData) throwsSolrException, RegistryException { /* Create index document with resource path and raw content*/ IndexDocument indexDoc = new IndexDocument(fileData.path,RegistryUtils.decodeBytes(fileData.data), null); /* You can specify required field/value pairs for this indexingdocument. * When searching we can query on these fields */ Map<String, List<String>> fields = new HashMap<String,List<String>>(); fields.put("path", Arrays.asList(fileData.path)); if (fileData.mediaType != null) { fields.put(IndexingConstants.FIELD_MEDIA_TYPE,Arrays.asList(fileData.mediaType)); } else { fields.put(IndexingConstants.FIELD_MEDIA_TYPE,Arrays.asList("text/plain")); } /* set fields for index document*/ indexDoc.setFields(fields); return indexDoc; } }
Add the custom indexer JAR file to directory.<APIM_HOME>/repository/components/libUpdate the element in file with the new<Indexers> <APIM_HOME>/repository/conf/registry.xmlindexer. The content is indexed using this media type. For example,
<indexers> <indexer class="org.wso2.indexing.sample.PlainTextIndexer"mediaTypeRegEx="text/plain" profiles="default,api-store,api-publisher"/></indexers>
The attributes of the above configuration are described below:
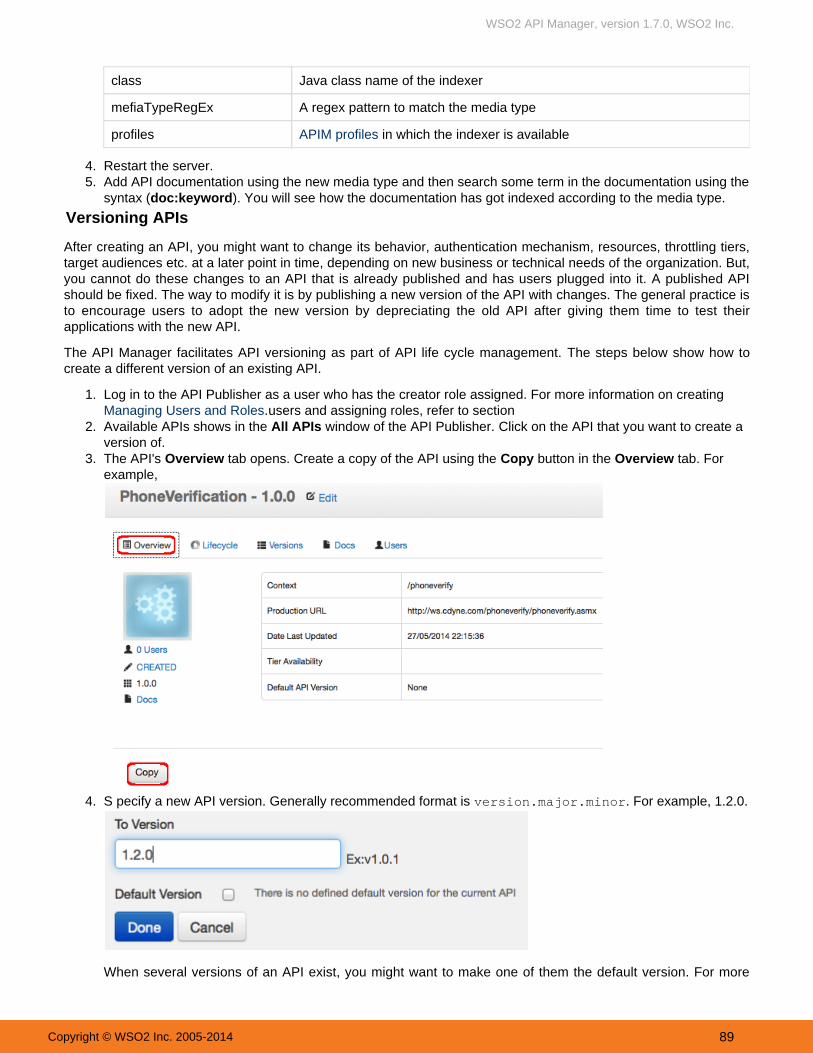
WSO2 API Manager, version 1.7.0, WSO2 Inc.
Copyright © WSO2 Inc. 2005-2014 89
.Managing Users and Roles
3.
4. 5.
1.
2.
3.
4.
class Java class name of the indexer
mefiaTypeRegEx A regex pattern to match the media type
profiles APIM profiles in which the indexer is available
Restart the server.Add API documentation using the new media type and then search some term in the documentation using thesyntax ( ). You will see how the documentation has got indexed according to the media type.doc:keyword
Versioning APIs
After creating an API, you might want to change its behavior, authentication mechanism, resources, throttling tiers,target audiences etc. at a later point in time, depending on new business or technical needs of the organization. But,you cannot do these changes to an API that is already published and has users plugged into it. A published APIshould be fixed. The way to modify it is by publishing a new version of the API with changes. The general practice isto depreciating the old API after giving them time to test theirencourage users to adopt the new version by applications with the new API.
The steps below show how toThe API Manager facilitates API versioning as part of API life cycle management.create a different version of an existing API.
Log in to the API Publisher as a user who has the creator role assigned. For more information on creatingusers and assigning roles, refer to section
Available APIs shows in the window of the API Publisher. All APIs Click on the API that you want to create a .version of
The API's tab opens. Create a copy of the API using the button in . ForOverview Copy the tabOverviewexample,
S pecify a new API version. Generally recommended format is . For example, 1.2.0.version.major.minor
When several versions of an API exist, you might want to make one of them the default version. For more

WSO2 API Manager, version 1.7.0, WSO2 Inc.
Copyright © WSO2 Inc. 2005-2014 90
.Publishing to API Stores
4.
5. information, see .Default API versionThe newly-added version appears in the window of API Publisher.All APIs
After creating the new version, a user who has the publisher role assigned can publis h the API. At the time youpublish it, you can select the option to automatically deprecate all previous versions of theDeprecate Old VersionsAPI.
Next, see
Publishing to API Stores
While an API is the published interface, a corresponding service running in the back-end handles its actualimplementation. APIs have their own lifecycle, independent from the back-end service they rely on. This sectioncovers the following:
The default API lifecyclePublishing an API
Publishing to multiple external API stores
The default API lifecycle
The default API lifecycle has the following stages:
CREATED: API metadata is saved, but it is not visible to subscribers yet, nor deployed to the API Gateway.PROTOTYPED : API is deployed and published in the API Store as a prototype. A prototyped API is usually amock implementation made public in order to get feedback from users about its usability. Users cannotsubscribe to a prototyped API. They can only try out its functionality.PUBLISHED: API is visible in API Store, and eventually published if the Propagate Changes to API
option is selected at publishing time.GatewayDEPRECATED: API is still deployed into API Gateway (available at runtime to existing users), but not visibleto subscribers. An API is automatically deprecated when a new version is published.RETIRED: API is unpublished from the API gateway and deleted from the store.BLOCKED: Access is temporarily blocked. Runtime calls are blocked and the API is not shown in the APIstore anymore.
The diagram below shows the general API and backend service life cycle elements.
Figure: API and backend service life cycle elements
API Publisher has a separate tab called using which you can publish APIs to the API Store, depreciate,Lifecycleretire and perform other operations to an API. The Life Cycle tab is only visible to and manageable by a user who isassigned the publisher role. For instructions on creating a user with the publisher role, see

WSO2 API Manager, version 1.7.0, WSO2 Inc.
Copyright © WSO2 Inc. 2005-2014 91
.Managing Users and Roles
1.
2. 3.
4.
5.
1.
Let's take a look at how to perform some common life cycle operations on an API.
Publishing an API
Log in to the API Publisher ( ) as a user who has the rolehttps://<HostName>:9443/store publisherassigned. See .Managing Users and RolesClick on an API that you want to publish.The API's overview window opens. Click the tab, which displays the API's available states.Life Cycle
To publish the API, select the PUBLISHED state from the drop-down list. You get three check boxes to selectas follows:
Propagate Changes to API Gateway
Used to define an API proxy in the API Gateway runtime component, allowing the API to be exposed to theconsumers via the API Gateway. If this option is left unselected, the API metadata will not change and youwill have to manually configure the API Gateway according to the information published in the .API Store
Deprecate Old Versions
If selected, any prior versions of the API will be set to the DEPRECATED state automatically.
Require Re-Subscription
Invalidates current user subscriptions, forcing users to subscribe again.Select the necessary options and click the button to publish the API to the API Store. Update
Similarly, you can deprecate, retire and block APIs.
Publishing to multiple external API stores
API publishers can share an API to application developers who are subscribed to multiple APItenant-specificStores. This allows them to expose APIs to a wider community.
Follow the steps below to configure:
Log in to APIM admin console ( ) https://<Server Host>:9443/carbon as admin and select Browse m
The Life Cycle tab is only visible to users with publisher privileges.
After publishing an API to external stores, it will be visible to the users of those stores. However, tosubscribe to the API, the users must visit the original publisher's store.

WSO2 API Manager, version 1.7.0, WSO2 Inc.
Copyright © WSO2 Inc. 2005-2014 92
1.
2.
3.
enu under Resources .
The Registry opens. G o to /_system/governance/apimgt/externalstores/external-api-store
s . x m l r e s o u r c e .
Click the link and change theEdit as Text element of each external API store that<ExternalAPIStores>you need to publish APIs to. For example,

WSO2 API Manager, version 1.7.0, WSO2 Inc.
Copyright © WSO2 Inc. 2005-2014 93
3.
4. 5.
<ExternalAPIStores> <StoreURL>http://localhost:9763/store</StoreURL> <ExternalAPIStore id="Store1" type="wso2"> <DisplayName>Store1</DisplayName> <Endpoint>http://localhost:9763/store</Endpoint> <Username>xxxx</Username> <Password>xxxx</Password> </ExternalAPIStore> <ExternalAPIStore id="ProWeb" type="proWeb"> <Name>ProgrammableWeb</Name> <Endpoint>xxxxx</Endpoint> </ExternalAPIStore> <ExternalAPIStore id="Store2" type="wso2"> <DisplayName>Store2</DisplayName> <Endpoint>http://localhost:9764/store</Endpoint> <Username>xxxx</Username> <Password>xxxx</Password> </ExternalAPIStore></ExternalAPIStores>
Note the following in the configuration above:
Element Description
<ExternalAPIStoreid="" type="">
: The external store identifier, which is a unique value.id: type Type of the Store. This can be a WSO2-specific API Store or an external
one.
<StoreURL> URL of the API store of the current APIM deployment. This is the URL to the APIin the original publisher's store. APIs that are published to external stores will beredirected to this URL.
<DisplayName> The name of the Store that is displayed in the publisher UI.
<Endpoint> URL of the API Store.
& <Username> <Password>
Credentials of a user who has permissions to create and publish APIs.
Registry changes are applied dynamically. You do not need to restart the server.Using the management console, .create an APIClick on the newly created API to see a new tab c alled added to the API PublisherExternal API Storesconsole.

WSO2 API Manager, version 1.7.0, WSO2 Inc.
Copyright © WSO2 Inc. 2005-2014 94
.Managing Users and Roles
5.
6. 7.
1.
2.
Note the following:
You can select multiple external API stores and click to publish your API to them. Save I f the API creator updates the API after publication to external stores, either the creator or a publisher
can simply push those changes to the published stores by selecting the stores and clicking againSave . If the API creator deletes the API, each external store that it is published to will receive a request todelete the API.
Log in to an external API store where the API is published to and click it to open.A link appears as and it directs you to the original publisher’s store through which youView Publisher Storecan subscribe to the API.
Next, see how to manage subscriptions and access tokens in .Managing API Usage
Managing API Usage
API Publisher provides several mechanisms to control and monitor subscriber usage and monetize APIs. Thefollowing topics describe some of them:
Blocking subscriptionsMonitoring and billing
Blocking subscriptions
The API creator can block a particular subscription on an API to disable access to it until s/he decides to unblock itagain. Once an API creator blocks on a selected subscription, neither a consumer nor the application access
This feature allows APIowner can invoke the subscribed API from the application, until it is unblocked again. creators to control usage of APIs among API consumers. The blocking can be done in two levels.
: Block production and sandbox access API access is blocked with both production and sandbox keys.: This blocking allows sandbox access. This is useful when a user wants to fixBlock production access only
and test an issue in an API. Rather than blocking all access, the manager can block production access only,allowing the developer to fix and test.
API Publisher provides you the page to view and manage all subscriptions to the APIs you created.SubscriptionsThe steps below explain how to view subscriptions and revoke access rights.
Log in to the API Publisher as a user who has the creator(https://<HostName>:9443/publisher) For more information on creating users and assigning roles, refer to section role assigned.
Click the menu to open the window. Subscriptions Subscriptions

WSO2 API Manager, version 1.7.0, WSO2 Inc.
Copyright © WSO2 Inc. 2005-2014 95
.Monitoring, Statistics and Billing
: Usernames of users who have subscribed to the API through the API Store. For instructions onUserssubscribing, see .Subscribing to APIs
2.
3.
The window displays the following information:
: An application is a logical collection of one or more APIs, and is required when subscribingpplicationto an API. Subscribed APIs : List of all APIs a given user is subscribed to on a given application. Since API keysare generated at the application-level and valid for all APIs that are associated with an application, allAPIs subscribed through the same application can be accessed using a single API key.
: The supported actions on each subscription. Currently, the API Manager provides actiActions Blockon to each subscription. It allows the API creator to block a particular subscription on an API. Once asubscription is blocked, neither its users nor the application owners can invoke the subscribed APIfrom the application. To allow APIs invocations back, the API creator has to unblock the subscription.
To block a subscription, go to the column. Choose one of the available Blocking options (e.g.,ActionsProduction or Production & Sandbox) and click . The link immediately turns to . You can click Block Unblock
any time to unblock the subscription and Unblock allows API consumers to use the subscription again. Notethat when API Gateway caching or Key Manager caching is enabled (validation information cache), even after
can access APIs until the cache expires. By default, Gateway caching is blocking a subscription, userenabled in the API Manager.
Monitoring and billing
For information, see
Application Developer Guide
API Manager provides a structured Web interface called the to host published APIs. APIWSO2 API Storeconsumers and partners can self-register to it on-demand to find, explore and subscribe to APIs, evaluate availableresources and collaboration channels. The API store is where the interaction between potential API consumers andAPI providers happen. Its simplified UI reduces time and effort taken when evaluating enterprise-grade, secure,protected, authenticated API resources.
Shown in the diagram below are common API consumer life cycle activities supported by the API Store:
NoteIn an environment where Gateway caching is enabled (which it is by default), blocking a subscription will notaffect the tokens that are already cached on the Gateway. Meaning that tokens belonging to the particularsubscription will still be active on the Gateway until the cache is invalidated/expired.

WSO2 API Manager, version 1.7.0, WSO2 Inc.
Copyright © WSO2 Inc. 2005-2014 96
Before accessing the Web interface of the API Store, make sure you run the API Manager using instructions given insection . Once the server is up, type the following URL in your browser to access the API Running API ManagerStore Web interface.
In anonymous mode, the API Store displays all public APIs that are published. Any user can click on a selected APIto view its information, documentation and search APIs by name without logging in to the API Store. Search is notcase-sensitive.
Follow the sections below for API Store functionality:Signing up to API StoreSubscribing to APIsWorking with Access TokensInvoking APIsEngaging with Community
https://<HostName>:9443/store
You cannot access the API Store Web interface using HTTP. It is exposed as HTTPSonly.
The API Store opens in anonymous mode as follows:

WSO2 API Manager, version 1.7.0, WSO2 Inc.
Copyright © WSO2 Inc. 2005-2014 97
This role has permission to subscribe to and consume APIs..User Roles in API Manager
and click the button.Submit
1.
2.
1.
2.
3.
Signing up to API Store
Anonymous users can self-subscribe to the API Store using the instructions given below.
Open the API Store Web application in a browser by typing the URL: https: //<HostName>:9443/store.Click the link that appears in the top, right-hand corner of the window, fill the sign-up form thatSign-upappears
Tag
to look for APIs under a specific topic/label.sClick on a selected API to view its details. For example,
To disable the self signup capability, set in the element to false<SelfSignUp><Enabled> <APIM_HOME file.>/repository/conf/api-manager.xml
You can also plug an external BPEL workflow to the user sign-up process. See Adding Workflow Extensions.

WSO2 API Manager, version 1.7.0, WSO2 Inc.
Copyright © WSO2 Inc. 2005-2014 98
3.
4.
5.
Note that subscribed users can add ratings and comments to an API or share it in social media, e-mail ortheir Websites. Note that the example above has two URLs for each for production and sandbox. This isbecause the API is marked as a default API. For information, see .Default API versionTo subscribe to this API, select an application from the drop-down list. You can use the defaultApplicationsapplication named , or create a new one.DefaultApplication
Applications
An application is a logical collection of one or more APIs, and is required when subscribing to an API.Consumers can create a logical application in WSO2 API Manager or use an existing one to subscribe to allthe relevant APIs using that application. To invoke any API in an application, you need to obtain a key.Applications decouple the consumers from the APIs and allow a consumer to generate and use a single keyto a collection of APIs in an application. Applications also enable a consumer to subscribe to one API multipletimes with different SLA levels.Click the to open the page.New Applications Add New Application

WSO2 API Manager, version 1.7.0, WSO2 Inc.
Copyright © WSO2 Inc. 2005-2014 99
5.
Through this window, new applications can be created, and the existing applications can be edited or deleted.
Application-Level Throttling Tiers
An application can be available to a consumer at different levels of service. For example, if you haveinfrastructure limitations in facilitating more than a certain number of requests to an application at a time, thethrottling tiers can be set accordingly so that the application can have a maximum number of requests withina defined time. WSO2 API Manager comes with three default tiers, which are 'Gold', 'Silver' and 'Bronze' asdefined below:
Bronze - Allows 1 request per minute.Silver - Allows 5 requests per minute.Gold - Allows 20 requests per minute.
In addition, there is also a special tier called 'Unlimited' which gives unlimited access. The WSO2 APIManager provides an application out of the box by the name and it can have anyDefault Applicationnumber of requests per minute. That is, its throttling tier is unlimited. You can change this and set it to arestricted limit by editing the default application.In addition to application-level throttling, you can also define . The final request other levels of throttling tierslimit granted to a given user on a given API is ultimately defined by the summed output of all of these differentthrottling tiers together. For example, lets say two users subscribe to an API using the Gold subscription,which allows 20 requests per minute. They both use the application App1 for this subscription, which againhas a throttling tier set as 20 requests per minute. All resource level throttling tiers are unlimited. In thisscenario, although both users are eligible for 20 requests per minute access to the API, each ideally has alimit of only 10 requests per minute. This is due to the application-level limitation of 20 requests per minute.
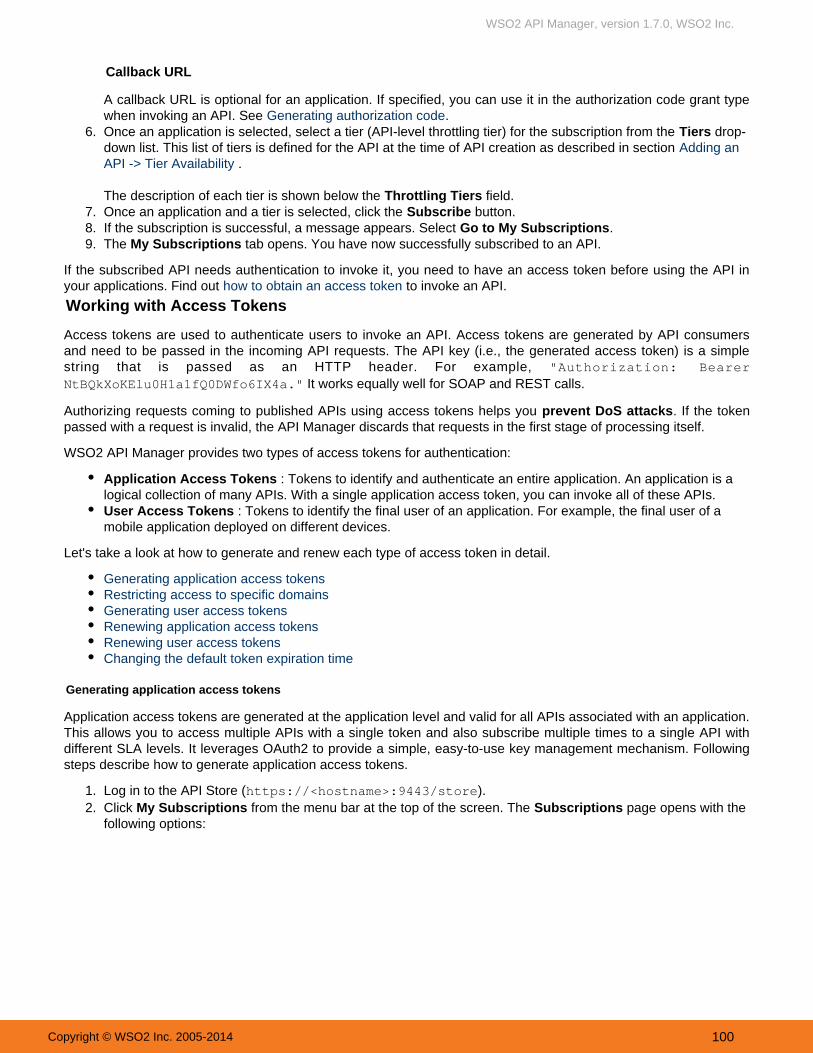
WSO2 API Manager, version 1.7.0, WSO2 Inc.
Copyright © WSO2 Inc. 2005-2014 100
5.
6.
7. 8. 9.
1. 2.
Callback URL
A callback URL is optional for an application. If specified, you can use it in the authorization code grant typewhen invoking an API. See .Generating authorization codeOnce an application is selected, select a tier (API-level throttling tier) for the subscription from the drop-Tiersdown list. This list of tiers is defined for the API at the time of API creation as described in section Adding an
.API -> Tier Availability
The description of each tier is shown below the field.Throttling TiersOnce an application and a tier is selected, click the button.SubscribeIf the subscription is successful, a message appears. Select .Go to My SubscriptionsThe tab opens. You have now successfully subscribed to an API.My Subscriptions
If the subscribed API needs authentication to invoke it, you need to have an access token before using the API inyour applications. Find out to invoke an API.how to obtain an access token
Working with Access Tokens
Access tokens are used to authenticate users to invoke an API. Access tokens are generated by API consumersand need to be passed in the incoming API requests. The API key (i.e., the generated access token) is a simplestring that is passed as an HTTP header. For example, "Authorization: Bearer
It works equally well for SOAP and REST calls.NtBQkXoKElu0H1a1fQ0DWfo6IX4a."
Authorizing requests coming to published APIs using access tokens helps you . If the tokenprevent DoS attackspassed with a request is invalid, the API Manager discards that requests in the first stage of processing itself.
WSO2 API Manager provides two types of access tokens for authentication:
Application Access Tokens : Tokens to identify and authenticate an entire application. An application is alogical collection of many APIs. With a single application access token, you can invoke all of these APIs.User Access Tokens : Tokens to identify the final user of an application. For example, the final user of amobile application deployed on different devices.
Let's take a look at how to generate and renew each type of access token in detail.
Generating application access tokensRestricting access to specific domainsGenerating user access tokensRenewing application access tokensRenewing user access tokensChanging the default token expiration time
Generating application access tokens
Application access tokens are generated at the application level and valid for all APIs associated with an application.This allows you to access multiple APIs with a single token and also subscribe multiple times to a single API withdifferent SLA levels. It leverages OAuth2 to provide a simple, easy-to-use key management mechanism. Followingsteps describe how to generate application access tokens.
Log in to the API Store ( ).https://<hostname>:9443/storeClick from the menu bar at the top of the screen. The page opens with theMy Subscriptions Subscriptionsfollowing options:

WSO2 API Manager, version 1.7.0, WSO2 Inc.
Copyright © WSO2 Inc. 2005-2014 101
2.
: Use the button associated with each type of key to generate an access token. ItGenerate button Generategenerates an application key and also a consumer key and a consumer secret. For testing purposes, youalso can create a sandbox key.
Allows you to associate a set of domains, as a comma separated list, to aAllowed Domains Text Area: token. API Gateway allows requests to the APIs from those domains only. Others will be restricted. Leave thisfield blank to allow all domains.
With this allowed domains feature, a client from a different domain cannot access an API even if anapplication key is stolen (when the key is placed in client side JS code). Whenever an API call happens, theGateway checks if the request originated from an allowed list of domains. This is the same solution done inG o o g l e M a p s .
When the client makes a request to an API that is only allowed to some domains, the request message musthave an HTTP header to specify its domain name. APIM admin can configure this header name using <Clie
in element under the elementntDomainHeader> <APIGateway> <APIM_HOME>/repository/conf/ap. For example, if the file contains i-manager.xml <ClientDomainHeader>domain</ClientDomainHea
, then the API invocation request must contain an HTTP header called with values as shown inder> domainthe example below:curl -v -H "Authorization: Bearer xxx" -H "domain: wso2.com" http://localhost:8280/twitter/1.0.0/search.atom?q=cat

WSO2 API Manager, version 1.7.0, WSO2 Inc.
Copyright © WSO2 Inc. 2005-2014 102
2.
Sending this header is mandatory only if the API is restricted to certain domains.
: Set a period in which the token will be expired after generation. Set to a negativeToken Validity Text Areavalue to ensure that the token never expires. Also see .Changing the default token expiration time
Generating user access tokens
User access tokens are generated at user-level and valid for all APIs subscribed to a user. User-level tokens allow u. You can generate a user-level token by sers to invoke an API even from a third-party application like a mobile app c
For more information on generating user-level tokens, referalling the API Manager Login API through a REST client.to . Token APIs
After an access token is generated, users sometimes want to renew the old token due to expiration or securityconcerns. API Consumers can re-generate/refresh access tokens in the following ways.
Renewing application access tokens
When an application access token expires, consumers can refresh the token by logging into API Store, selecting the link at the top of the screen, and clicking . You can also specify a token expirationMy Subscriptions Re-generate
time for the application access token or change its allowed domains. Set to a negative value to ensure that the tokennever expires.
Renewing user access token
To renew a user token, issue a REST call to WSO2 Login API through a REST client. For more information, see Re.new User Tokens
By default, access tokens, consumer keys and consumer secrets are not encrypted in the database. Anadmin can enable encryption as follows:
Set the value of the <EncryptPersistedTokens> to true inside the <APIKeyManager> section of the<APIM_HOME>/repository/conf/api-manager.xml file.Change the to <TokenPersistenceProcessor> org.wso2.carbon.identity.oauth.token
in the processor.EncryptionDecryptionPersistenceProcessor <APIM_HOME>/reposit file.ory/conf/identity.xml
If you want to keep authorization headers in massages that are going out of the API Gateway, an admin cango to file, uncomment the <API Gateway Node>/repository/conf/api-manager.xml <RemoveOAu
element, set its value to and then restart the server to apply thethHeadersFromOutMessage> falsechanges.
You can configure the API Manager instances to store access tokens in different tables according to their user store domain. This is referredto as and it ensures better security when there are multiple user stores in the system. For configuration details, see user token partitioning
.user token partitioning

WSO2 API Manager, version 1.7.0, WSO2 Inc.
Copyright © WSO2 Inc. 2005-2014 103
1. 2.
3.
Changing the default token expiration time
Access Tokens have a expiration time, which is set to 60 minutes by default.
To change the default expiration time of application access tokens,Change the value of element in <ApplicationAccessTokenDefaultValidityPeriod> <APIM_
file. Set to a negative value to ensure that the tokenHOME>/repository/conf/identity.xmlnever expires.Alternatively, you can set a default expiration time through the UI when generating/regenerating theapplication access token. This is explained in previous sections.
Similarly, to change the default expiration time of user access tokens, edit the value of <UserAccessToken element in file.DefaultValidityPeriod> identity.xml
Also see for several caching options available to optimize key validation.Configuring Caching
After subscribing to an API and generating a key to access it, the next step is to invoke the API through the Gatewayusing the steps given in section .Invoking APIs
Invoking APIs
There is a number of utilities available for invoking APIs. Some of them are covered in the following topics:Browser-based REST clients
Browser-based REST clients
WSO2 API Manager comes with a REST Client by default. It helps you to invoke and test an API through the APIStore. WSO2 REST Client has a simple Web interface and facilitates a range of HTTP verbs from simple GETmethod to POST, PUT, DELETE, OPTIONS. It also includes capability to move data around in header and payload
a useful alternative to similar tools like cURL.fields. The REST Client is
Follow the instructions below to invoke the REST Client.
Open the API Store ( ) in a Web browser.https://<YourHostName>:9443/storeThe menu appears under the menu at the top of the screen. Clicking it opens the RESTREST Client Toolsclient .on a global level
For example, shown below is how to invoke Google API using the REST Client.

WSO2 API Manager, version 1.7.0, WSO2 Inc.
Copyright © WSO2 Inc. 2005-2014 104
3.
API URL
The API URL takes the form <context>/<version>/<back end servicehttp://host:8280/. For example, .requirements included as parameters> http://localhost:8280/stock/1.0.0
Header
In the above request, the application key generated at the time a user subscribes to an API is passed with theauthorization header, which is prefixed by the string "Bearer". This is because, WSO2 API Manager enforces OAuthsecurity on all the published APIs. Any consumer that talks to the API Manager should send their credential(application key) as per the OAuth bearer token profile. If you don't send an application key or send a wrong key,you will receive a 401 Unauthorized response in return.
Engaging with Community
WSO2 API Manager provides capability to build and nurture an active community of API consumers with variouscommunity features such as commenting and rating.
Rating and commentingSharing on social media / E-mailEmbedding an API widgetParticipating in the forum
Rating and commenting
Consumers can rate APIs per version and comment on them. Potential API subscribers can use comments andrates as guidelines on the quality and usefulness of an API. Commenting and rating help create a community arounda particular API. Comments appear sorted by the time it was entered, alongside the author's name. Commenting is
The number of API calls you can make depends on the throttling tier applied to the API. For example, if aBronze tier is applied, the number of API calls is limited to 1 per minute. Another attempt to call the APIduring that time results in a throttling error.

WSO2 API Manager, version 1.7.0, WSO2 Inc.
Copyright © WSO2 Inc. 2005-2014 105
users can sign up to the API Store
similar to a forum for subscribers, who can discuss common issues/features pertaining to a given API version.
Shown below is how comments/rates of a published API is visible to subscribers through the API Store. To rate anAPI, and click on any available API.
Sharing on social media / E-mail
You can share APIs on Facebook, Twitter, Google+, digg etc. or e-mails. This allows developers to share their viewson selected APIs through supported social networking sites.
Embedding an API widget
You can generate an embeddable version of API details in HTML and share this HTML widget, which points to an

WSO2 API Manager, version 1.7.0, WSO2 Inc.
Copyright © WSO2 Inc. 2005-2014 106
API, in Web pages. This is similar to how Youtube videos can be embedded in a Web page.
Participating in the forum
Use the tab or menu to go to the forum, initiate conversations and communicate with other users subscribedForumto the API Store:
Customizing the API Store
There are several ways in which you can customize the look and feel, features and functionality of the API Store asdiscussed below:
Changing the themeChanging language settingsSingle login for all appsCategorizing APIs
Changing the theme

WSO2 API Manager, version 1.7.0, WSO2 Inc.
Copyright © WSO2 Inc. 2005-2014 107
1.
2.
3.
You can change the look and feel of your API Store by applying new themes or customizing the default theme'slogo, footer notes, page etc.About
The default API Store theme is inside <AM_HOME>/repository/deployment/server/jaggeryapps/store/ folder. You can override it by adding your customizations inside site/themes /repository/deployment/serv
folder. Follow this tutorial in WSO2 library forer/jaggeryapps/store/site/themes/fancy/subthemesinstructions to change the theme: .http://wso2.org/library/articles/2012/06/api-store-themes
If you are using a Cloud-based API Manager setup (e.g., ) and do not have access to theWSO2 API Clouddistribution directory, you can change the theme by logging into the Web application (WSO2 Workflow Admin http
) as a tenant admin. Bundle the new theme (CSS, images etc.)s://<Server Host>:9443/workflow-admininto a zip archive and upload it through the Workflow Admin Web app.
Changing language settings
You can change the language of the API Store Web interface to your local language. For configuration steps, see A.dding Internationalization and Localization
Single login for all apps
You can configure single sign-on (SSO) in API Manager so that users who are subscribed to one application can login to multiple other applications that they are authorized to access, using the same credentials. They do not have torepeatedly authenticate themselves. For configuration steps, see .Configuring Single Sign-on with SAML 2.0
Categorizing APIs
API providers add tags to APIs when designing them using the API Publisher. Tags allow API providers tocategorise APIs that have similar attributes. Once a tagged API gets published to the API Store, its tags appear asclickable links to the API consumers, who can use them to quickly jump to a category of interest.
If you want to see the APIs grouped according to different topics in the API Store, do the following:
Go to directory,<APIM_HOME>/repository/deployment/server/jaggeryapps/store/site/confopen the file and set the attribute as true. site.json tagWiseModeGo to the API Publisher and add tags with the suffix "-group" to APIs (e.g., Workflow APIs-group, IntegrationAPIs-group, Quote APIs-group.)Restart the server.
After you publish the APIs, you see the APIs listed under their groups. You can click on a group to check what theAPIs are inside it.

WSO2 API Manager, version 1.7.0, WSO2 Inc.
Copyright © WSO2 Inc. 2005-2014 108
Monitoring, Statistics and Billing
The following topics describe how to monitor API invocations and how to collect and summarize statistics in order tomonetize API usage.
Publishing API Runtime StatisticsIntegrating with Google AnalyticsMonetization of API UsageViewing API Statistics
Publishing API Runtime Statistics
You can set up ( used here) to collect and analyze runtimeWSO2 Business Activity Monitor version 2.4.1statistics from the API Manager. To publish data from the API Manager to BAM, the Thrift protocol is used.Information processed in BAM is stored in a database from which the API Publisher retrieves information beforedisplaying in the corresponding UI screens.
By default, is configured to org.wso2.carbon.apimgt.usage.publisher.APIMgtUsageDataPublishercollect data events from WSO2 BAM. If you use a system other than WSO2 BAM to collect and analyze runtimestatistics, you extending . Find the write a new data publishing agent by APIMgtUsageDataPublisher APItemplates inside . <APIM_HOME>/repository/resources/api_templates When writing a new data publishingagent, make sure the data publishing logic you implement has a minimal impact to API invocation.
PrerequisitesConfiguring WSO2 API ManagerConfiguring WSO2 BAMTroubleshooting common issuesChanging the statistics database
The data source and database names used in this guide are just examples. They may vary depending on yourconfigurations.

WSO2 API Manager, version 1.7.0, WSO2 Inc.
Copyright © WSO2 Inc. 2005-2014 109
1.
2.
Prerequisites
JDK 1.6.* or 1.7
BAM analyticsCygwin ( ) : Required . WSO2 http://www.cygwin.com only if you are using Windows
framework depends on Apache Hadoop, which requires Cygwin in order to run on Windows. Install at leastthe basic and security related Cygwin packages. After Cygwinnet (OpenSSH,tcp_wrapper packages)installation, update the PATH variable with and restart BAM.C:/cygwin/bin
Configuring WSO2 API Manager
Do the following changes in file:<APIM_HOME>/repository/conf/api-manager.xmlEnable API usage tracking by setting the element to true.<APIUsageTracking>Because you will apply an offset to the default BAM port later in this guide, you need to apply the sameoffset to the default Thrift port. To do that, change the port value to 7614 in the eleme<ThriftPort>nt of this file. The API Manager will then push the data to BAM through port 7614, using the Thriftprotocol.Uncomment the element. It sets the datasource used to get statistics from BAM<DataSourceName>Set to where is the machine<BAMServerURL> tcp://<BAM host IP>:7614/ <BAM host IP>IP address. Do not use localhost unless you're in a disconnected mode.
<APIUsageTracking> <!-- Enable/Disable the API usage tracker. --> <Enabled>true</Enabled> <PublisherClass>org.wso2.carbon.apimgt.usage.publisher.APIMgtUsageDataBridgeDataPublisher</PublisherClass> <ThriftPort>7614</ThriftPort> <BAMServerURL>tcp://<BAM host IP>:7614/</BAMServerURL> <BAMUsername>admin</BAMUsername> <BAMPassword>admin</BAMPassword> <!-- JNDI name of the data source to be used for getting BAM statistics. Thisdata source should be defined in the master-datasources.xml file in conf/datasourcesdirectory. --> <DataSourceName>jdbc/WSO2AM_STATS_DB</DataSourceName></APIUsageTracking>
Specify the datasource definition under the element in the <datasource> <APIM_HOME>/repository/co
If you install in JDK Program Files in the Windows environment, avoid the space by usinghen specifying environment variables for JAVA_HOME and PATH. Else, the serverPROGRA~1 w
throws an exception.
<BAMServerURL> refers to the endpoint to which events will be published from the APIGateway. This endpoint is also known as the event receiver. You can define multiple eventreceiver groups, each with one or more receivers. A receiver group is defined within curlybraces and receiver URLs are delimited by commas.
For example, <BAMServerURL>{ , }tcp://localhost:7612/ tcp://localhost:7613/. ,{ , }</BAMServerURL>tcp://localhost:7712/ tcp://localhost:7713/ This
example has two receiver groups defined with two receivers in each group. When a requestpasses through the API Gateway, an event will be published to one selected receiver in eachgroup.

WSO2 API Manager, version 1.7.0, WSO2 Inc.
Copyright © WSO2 Inc. 2005-2014 110
2.
3.
1. 2.
3.
file. The tables are created automatically when the Hivenf/datasources/master-datasources.xml
script runs. You just need to create the schema. The example below connects to a MySQL instance:
<datasource> <name>WSO2AM_STATS_DB</name> <description>The datasource used for getting statistics to APIManager</description> <jndiConfig> <name>jdbc/WSO2AM_STATS_DB</name> </jndiConfig> <definition type="RDBMS"> <configuration> <url>jdbc:mysql://localhost:3306/stats_db?autoReconnect=true&</url> <username>db_username</username> <password>db_password</password> <driverClassName>com.mysql.jdbc.Driver</driverClassName> <maxActive>50</maxActive> <maxWait>60000</maxWait> <testOnBorrow>true</testOnBorrow> <validationQuery>SELECT 1</validationQuery> <validationInterval>30000</validationInterval> </configuration> </definition> </datasource>
Save the database driver JAR inside both and <AM_HOME>/repository/components/lib <BAM_HOME> folders./repository/components/lib
Next, prepare BAM to collect and analyze statistics from the API Manager.
Configuring WSO2 BAM
Download WSO2 BAM 2.4.1 from location: .http://wso2.com/products/business-activity-monitorApply an offset of 3 to the default BAM port by editing the f<BAM_HOME>/repository/conf/carbon.xmlile. This step is done when you run both products on the same server.
<Offset>3</Offset>
This increments all ports used by the server by 3, which means the BAM server will run on port 9446. Portoffset is used to increment the default port by a given value. It avoids possible port conflicts when multipleWSO2 products run in same host.Do the following changes in fil<BAM_HOME>/repository/conf/datasources/bam_datasources.xmle:
Copy/paste definition from API Manager's file. YouWSO2AM_STATS_DB master-datasources.xmledited it in step 2. is used to fetch analytical data from the database.WSO2AM_STATS_DBReplace the port of in URL (WSO2BAM_CASSANDRA_DATASOURCE jdbc:cassandra://localhos
) . : / E V E N T _ K St 9 1 6 3Note that localhost is used here; not the machine IP. Cassandra is bound by default on localhost,unless you change the data-bridge/data-bridge-config.xml file. Also, if you are running BAM on adifferent server, the port will be different.
The WSO2AM_STATS_DB database is not available in <BAM_HOME>/repository/database directory at this point. It is created only after BAM starts up.

WSO2 API Manager, version 1.7.0, WSO2 Inc.
Copyright © WSO2 Inc. 2005-2014 111
3.
4.
5.
6. 7.
Copy the file to directory <APIM_HOME>/statistics/API_Manager_Analytics.tbox <BAM_HOME>/r. epository/deployment/server/bam-toolbox
If this folder is not in the BAM installation directory by default, create it. The toolbox describes the informationcollected, how to analyze the data, as well as the location of the database where the analyzed data is stored.Open file and change the port to <BAM_HOME>/repository/conf/etc/hector-config.xml localhost:9
. You must add the other nodes too when configuring a clustered setup.163
<Nodes>localhost:9163</Nodes>
Restart BAM server by running .<BAM_HOME>/bin/wso2server.[sh/bat]Optional: If you want to host the BAM server on a different machine or change the running port, you mustedit the node in file as<APIUsageTracking> <APIM_HOME>/repository/conf/api-manager.xmlfollows:
<!--API usage tracker configuration used by the BAM data publisher in APIgateway.--> <APIUsageTracking> <!-- Enable/Disable the API usage tracker.--> <Enabled>true</Enabled>
<!-- API Usage Data Publisher.--> <PublisherClass>org.wso2.carbon.apimgt.usage.publisher.APIMgtUsageDataBridgeDataPublisher</PublisherClass>
<!--Thrift port of the remote BAM server.--> <ThriftPort>7612</ThriftPort>
<!-- Server URL of the remote BAM server used to collect statistics. Mustbe specified in protocol://hostname:port/ format.--> <BAMServerURL>tcp://localhost:7614</BAMServerURL>
<!--Administrator username to login to the remote BAM server.--> <BAMUsername>admin</BAMUsername>
<!--Administrator password to login to the remote BAM server.--> <BAMPassword>admin</BAMPassword>
<!--JNDI name of the data source to be used for getting BAMstatistics.This data source should be defined in the master datasources.xml file in conf/datasources directory.--> <DataSourceName>jdbc/WSO2AM_STATS_DB</DataSourceName> </APIUsageTracking>
Troubleshooting common issues
Do not edit the with an offset value as it is using the offset.WSO2BAM_UTIL_DATASOURCE
Manually updating the port of is not needed if you areWSO2BAM_CASSANDRA_DATASOURCEusing .WSO2 BAM 2.5.0
Step 5 is not needed if you are using .WSO2 BAM 2.5.0

WSO2 API Manager, version 1.7.0, WSO2 Inc.
Copyright © WSO2 Inc. 2005-2014 112
After configuring WSO2 BAM to render and produce statistics of APIs hosted and managed in the API Manager, youcan view them through various statistical dashboards in the API Publisher, depending on your permission levels. Forinformation, refer to section .Viewing API Statistics
1.
2.
1. 2. 3.
1.
2.
3.
Given below is how to do troubleshoot some common issues users come across:
Do you get an exception as Cassandra?unable to connect to serverCheck if you changed the Cassandra port according to the port offset applied to the default BAM port. See St
under configuring BAM section.ep 3Do you get a on the BAM console? connection refused exceptionThis happens when you execute Hive scripts prior to changing the default port. Add the following line at thebeginning of the Hive scripts and rerun: You can find drop table <hive_cassandra_table_name>;the Hive scripts deployed with the toolbox file, which is inside <BAM_HOME>/repository/deployment/se
folder. For information, see in WSO2 BAM documentation.rver/bam-toolbox Editing an Analytic Script
Changing the statistics database
To use a different database than the default H2 for statistical publishing, you must change the properties of thedatasource element, and additionally delete some metadata tables created by previous executions of the Hive script,if there are any.
To delete the metadata tables,
Log in to BAM management console and select in menu.Add AnalyticsGo to the Script Editor in the window that opens.Execute the following script.
drop TABLE APIRequestData; drop TABLE APIRequestSummaryData; drop TABLE APIVersionUsageSummaryData; drop TABLE APIResourcePathUsageSummaryData; drop TABLE APIResponseData; drop TABLE APIResponseSummaryData; drop TABLE APIFaultData; drop TABLE APIFaultSummaryData; drop TABLE APIDestinationData; drop TABLE APIDestinationDataSummaryData;
u can configure the API Manager to track runtime statistics of API invocations through Google Analytics (http://www.). Google Analytics is a service that allows you to track visits to a website and generategoogle.com/analytics
detailed statistics on them.
This guide explains how to setup API Manager in order to feed runtime statistics to Google analytics forsummarization and display.
Setup a Google Analytics account if not subscribed already and receive a Tracking ID, which is of the format"UA-XXXXXXXX-X". A Tracking ID is issued at the time an account is created with Google Analytics.Log in to the API Manager management console ( ) using admin/adminhttps://localhost:9443/carboncredentials and go to menu.Main -> Resources -> Browse
Navigate to /_system/governance/apimgt/statistics/ga-config.xml file.

WSO2 API Manager, version 1.7.0, WSO2 Inc.
Copyright © WSO2 Inc. 2005-2014 113
3.
4.
5.
6.
7.
Change the <Enabled> element to , set your tracking ID in <TrackingID> element and .true Save
API Manager is now integrated with Google Analytics. A user who has subscribed to a published API throughthe API Store should see an icon as after logging into their Google Analytics account. Click on Real-Timethis icon and select .OverviewInvoke the above API using the embedded (or any third-part rest client such as cURL).WSO2 REST Client
Real-time statistics
This is one invocation of the API. Accordingly, Google Analytics graphs and statistics will be displayed atruntime. This example displays the per second graph and 1 user as active.PageViews

WSO2 API Manager, version 1.7.0, WSO2 Inc.
Copyright © WSO2 Inc. 2005-2014 114
7.
Reporting statistics
Google analytics reporting statistics take more than 24 hours from the time of invocation to populate. Shownbelow is a sample Dashboard with populated statistics.
There are widgets with statistics related to Audience, Traffic, Page Content, Visit Duration etc. You can addany widget of your preference to dashboard.
Monetization of API Usage
You can set up WSO2 Business Activity Monitor (BAM) to collect and summarize runtime statistics from the WSO2API Manager and generate bills for API consumers on usage. See a sample with full configuration steps in Generati
.ng Billing Data
Viewing API Statistics
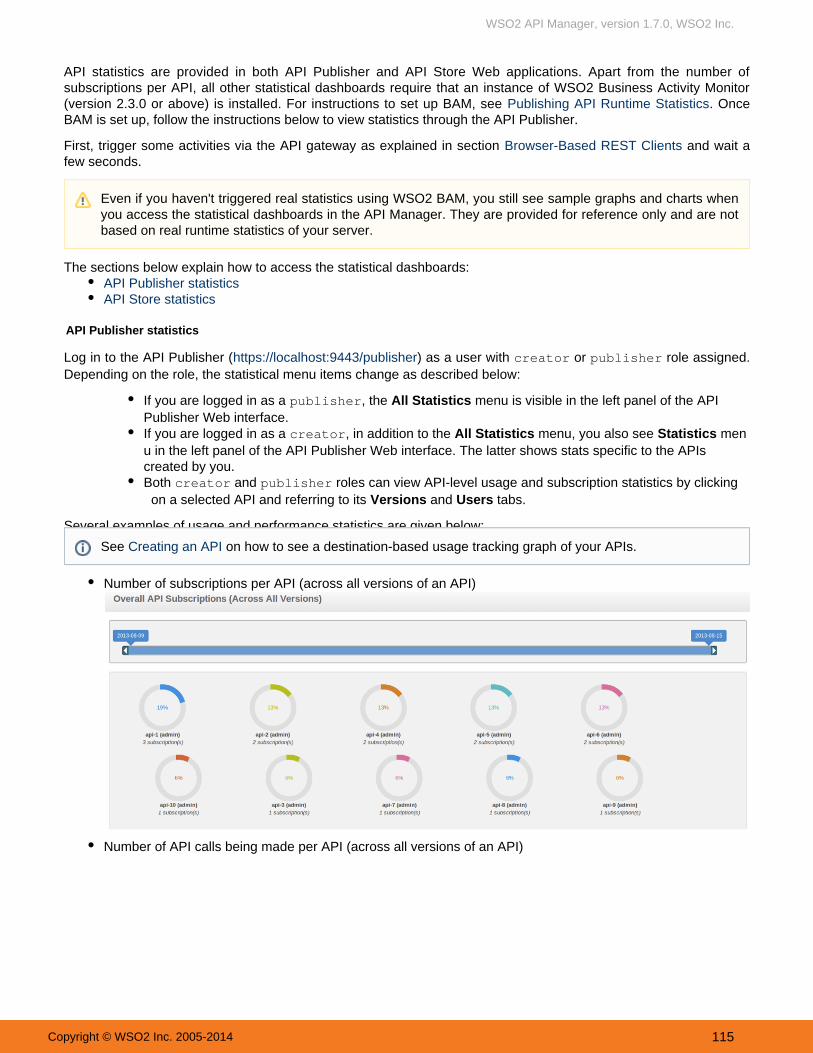
WSO2 API Manager, version 1.7.0, WSO2 Inc.
Copyright © WSO2 Inc. 2005-2014 115
Several examples of usage and performance statistics are given below:
API statistics are provided in both API Publisher and API Store Web applications. Apart from the number ofsubscriptions per API, all other statistical dashboards require that an instance of WSO2 Business Activity Monitor(version 2.3.0 or above) is installed. For instructions to set up BAM, see . OncePublishing API Runtime StatisticsBAM is set up, follow the instructions below to view statistics through the API Publisher.
First, trigger some activities via the API gateway as explained in section and wait aBrowser-Based REST Clientsfew seconds.
The sections below explain how to access the statistical dashboards:API Publisher statisticsAPI Store statistics
API Publisher statistics
Log in to the API Publisher ( ) as a user with or role assigned.https://localhost:9443/publisher creator publisherDepending on the role, the statistical menu items change as described below:
If you are logged in as a , the menu is visible in the left panel of the APIpublisher All StatisticsPublisher Web interface.If you are logged in as a , in addition to the menu, you also see mencreator All Statistics Statisticsu in the left panel of the API Publisher Web interface. The latter shows stats specific to the APIscreated by you.Both and roles can view API-level usage and subscription statistics by clickingcreator publisher
on a selected API and referring to its and tabs.Versions Users
Number of subscriptions per API (across all versions of an API)
Number of API calls being made per API (across all versions of an API)
Even if you haven't triggered real statistics using WSO2 BAM, you still see sample graphs and charts whenyou access the statistical dashboards in the API Manager. They are provided for reference only and are notbased on real runtime statistics of your server.
See on how to see a destination-based usage tracking graph of your APIs.Creating an API

WSO2 API Manager, version 1.7.0, WSO2 Inc.
Copyright © WSO2 Inc. 2005-2014 116
The subscribers who did the last 10 API invocations and the APIs/versions they invoked
Usage of an API and from which resource path (per API version)
Number of times a user has accessed an API
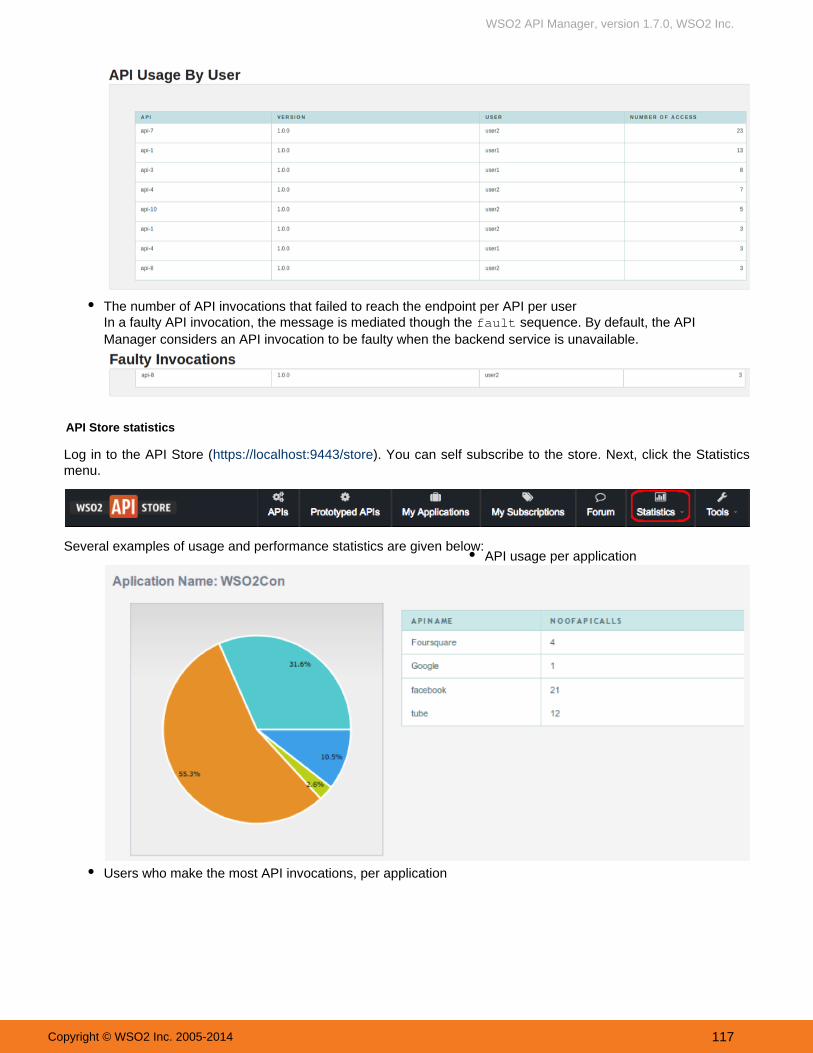
WSO2 API Manager, version 1.7.0, WSO2 Inc.
Copyright © WSO2 Inc. 2005-2014 117
Several examples of usage and performance statistics are given below:
The number of API invocations that failed to reach the endpoint per API per userIn a faulty API invocation, the message is mediated though the sequence. By default, the APIfaultManager considers an API invocation to be faulty when the backend service is unavailable.
API Store statistics
Log in to the API Store ( ). You can self subscribe to the store. Next, click the Statisticshttps://localhost:9443/storemenu.
API usage per application
Users who make the most API invocations, per application
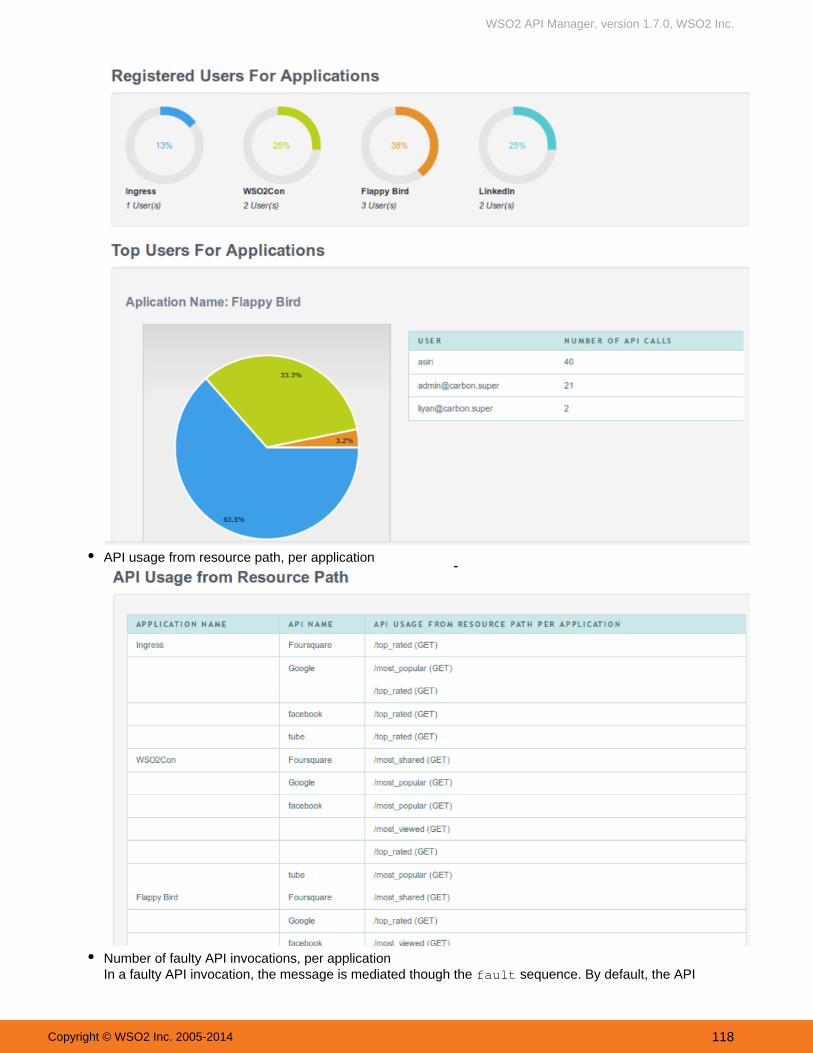
WSO2 API Manager, version 1.7.0, WSO2 Inc.
Copyright © WSO2 Inc. 2005-2014 118
API usage from resource path, per application
Number of faulty API invocations, per applicationIn a faulty API invocation, the message is mediated though the sequence. By default, the APIfault

WSO2 API Manager, version 1.7.0, WSO2 Inc.
Copyright © WSO2 Inc. 2005-2014 119
Manager considers an API invocation to be faulty when the backend service is unavailable.
Extending API Manager
The following topics cover different ways in which you can extend the API Manager:Editing API TemplatesImplementing an API facade with WSO2 API ManagerWriting Custom HandlersIntegrating with WSO2 Governance Registry ServicesAdding Mediation ExtensionsAdding Workflow ExtensionsTransforming API Message PayloadCustomizing the Management ConsoleWriting Test Cases
Editing API Templates
Each API in API manager is represented by an XML file. The elements of this XML file and their attributes aredefined in file, which is<APIM_HOME>/repository/resources/api_templates/velocity_template.xmlthe default API template that comes with the API Manager. By editing the default template definitions, you canchange the synapse configuration of all APIs that are created.
If you are using a distributed API Manager setup (i.e., Publisher, Store, Gateway and Key Manager components arerunning on separate JVMs), edit the template in the Publisher node.
Implementing an API facade with WSO2 API Manager
WSO2 API Manager shares most of the components of WSO2 ESB. Both products are built on top of the samecomponent-based WSO2 Carbon platform. Therefore, API Manager supports most of the ESB's functionality suchas exposing SOAP services as REST-JSON.
Using both the API Manager and WSO2 ESB, you can implement an . WSO2API facade architecture patternrecommends this architecture if you are performing heavy mediation in your setup. For implementation details of anAPI facade, see . Since the API Manager doesimplementing an API facade with WSO2 API management platformnot have the ESB's GUI to perform mediation functions, you need to use the XML-based source view forconfiguration. Alternatively, you can create the necessary mediation sequences using the GUI of the ESB, and copythem from the ESB to the API Manager.
Also see in WSO2 ESB documentation for more information on REST to SOAP conversion.the following usecases
Writing Custom Handlers

WSO2 API Manager, version 1.7.0, WSO2 Inc.
Copyright © WSO2 Inc. 2005-2014 120
hen an API is created, a file with its synapse configuration is added to the API Gateway. You can find it in the <APIM folder. It has a set of_HOME>/repository/deployment/server/synapse-configs/default/api
handlers, each of which is executed on the APIs in the same order they appear in the configuration.
This section introduces handlers and using an example, explains how to write a custom handler: Introducing HandlersWriting a custom handlerEngaging the custom handler
Introducing Handlers
W You find the default handlers in any API's Synapse definition as shown below.
<handlers> <handlerclass="org.wso2.carbon.apimgt.gateway.handlers.security.APIAuthenticationHandler"/> <handlerclass="org.wso2.carbon.apimgt.gateway.handlers.throttling.APIThrottleHandler"> <property name="id" value="A"/> <property name="policyKey" value="gov:/apimgt/applicationdata/tiers.xml"/> </handler> <handler class="org.wso2.carbon.apimgt.usage.publisher.APIMgtUsageHandler"/> <handlerclass="org.wso2.carbon.apimgt.usage.publisher.APIMgtGoogleAnalyticsTrackingHandler"/> <handlerclass="org.wso2.carbon.apimgt.gateway.handlers.ext.APIManagerExtensionHandler"/></handlers>
Let's see what each handler does:
APIAuthenticationHandler: Validates the OAuth2 bearer token used to invoke the API. It alsodetermines whether the token is of type or and sets variables asProduction Sandbox MessageContextappropriate.
APIThrottleHandler: Throttles requests based on the throttling policy specified by the proppolicyKeyerty. Throttling is applied both at the application level as well as subscription level.
APIMgtUsageHandler: Publishes events to BAM for collection and analysis of statistics. This handler onlycomes to effect if . See for more information.API usage tracking is enabled Publishing API Runtime Statistics
APIMgtGoogleAnalyticsTrackingHandler: Publishes events to Google Analytics. This handler onlycomes into effect if Google analytics tracking is enabled. See for more Integrating with Google Analyticsinformation.
APIManagerExtensionHandler: Triggers extension sequences. By default, the extension handler islisted at last in the handler chain, and therefore is executed last. To configure the API Gateway to executeextension handlers first, uncomment the section in the <ExtensionHandlerPosition> <APIM_HOME>/re
file and provide the value . This is useful when you want topository/conf/api-manager.xml topexecute your own extensions before our default handlers in situations like doing additional security checkssuch as signature verification on access tokens before executing the default security handler. See .Adding Mediation Extensions
Writing a custom handler
Let's see how you can write a custom handler and apply it to the API Manager. In this example, we extend theauthentication handler. Make sure your custom handler name is not the same as the name of an existing handler.
WSO2 API Manager provides the OAuth2 bearer token as its default authentication mechanism. The source code ofthe implementation is . Similarly, you can extend the API Manager to support any custom authenticationheremechanism by writing your own authentication handler class. This custom handler must extend org.apache.syna
class and implement the and methods.pse.rest.AbstractHandler handleRequest() handleResponse()
Given below is an example implementation:
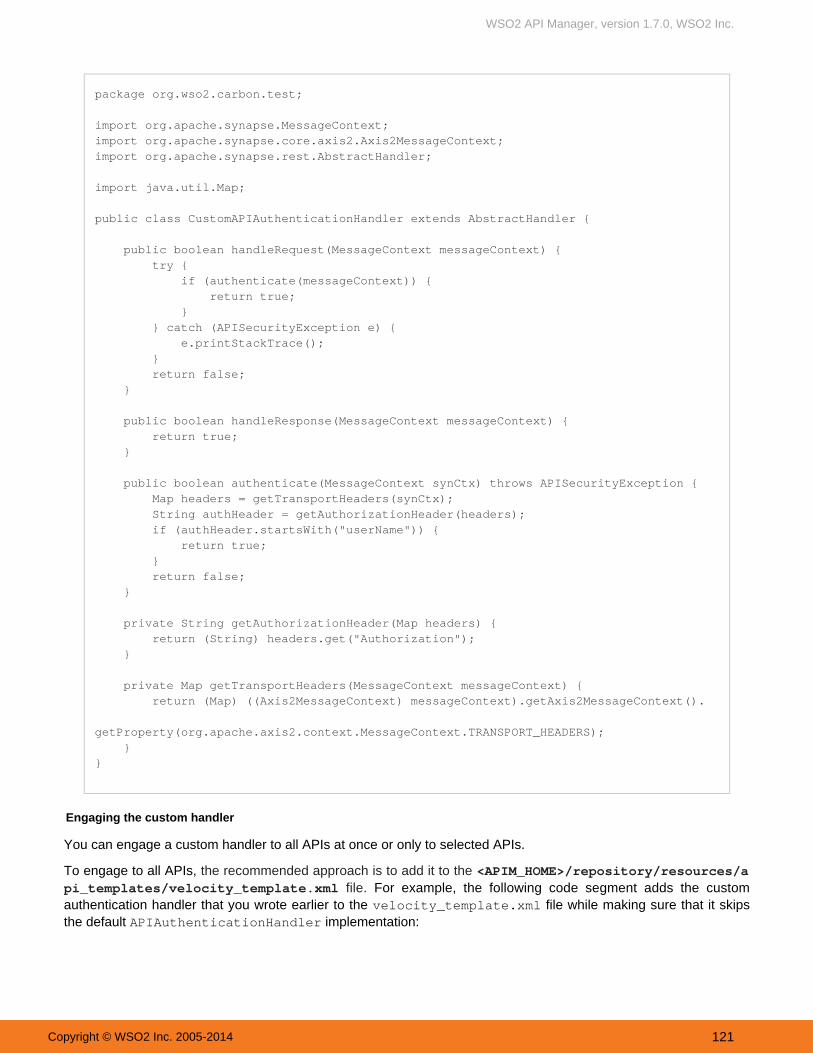
WSO2 API Manager, version 1.7.0, WSO2 Inc.
Copyright © WSO2 Inc. 2005-2014 121
package org.wso2.carbon.test;
import org.apache.synapse.MessageContext;import org.apache.synapse.core.axis2.Axis2MessageContext;import org.apache.synapse.rest.AbstractHandler;
import java.util.Map;
public class CustomAPIAuthenticationHandler extends AbstractHandler {
public boolean handleRequest(MessageContext messageContext) { try { if (authenticate(messageContext)) { return true; } } catch (APISecurityException e) { e.printStackTrace(); } return false; }
public boolean handleResponse(MessageContext messageContext) { return true; }
public boolean authenticate(MessageContext synCtx) throws APISecurityException { Map headers = getTransportHeaders(synCtx); String authHeader = getAuthorizationHeader(headers); if (authHeader.startsWith("userName")) { return true; } return false; }
private String getAuthorizationHeader(Map headers) { return (String) headers.get("Authorization"); }
private Map getTransportHeaders(MessageContext messageContext) { return (Map) ((Axis2MessageContext) messageContext).getAxis2MessageContext(). getProperty(org.apache.axis2.context.MessageContext.TRANSPORT_HEADERS); }}
Engaging the custom handler
You can engage a custom handler to all APIs at once or only to selected APIs.
To engage to all APIs, the recommended approach is to add it to the <APIM_HOME>/repository/resources/aFor example, the following code segment adds the custom file. pi_templates/velocity_template.xml
authentication handler that you wrote earlier to the file while making sure that it skipsvelocity_template.xmlthe default implementation:APIAuthenticationHandler

WSO2 API Manager, version 1.7.0, WSO2 Inc.
Copyright © WSO2 Inc. 2005-2014 122
1. 2.
3.
<handlerclass="org.wso2.carbon.apimgt.custom.authentication.handler.CustomAPIAuthenticationHandler" /> #foreach($handler in $handlers) #if(!($handler.className =="org.wso2.carbon.apimgt.gateway.handlers.security.APIAuthenticationHandler")) <handler xmlns="http://ws.apache.org/ns/synapse"class="$handler.className"> #if($handler.hasProperties()) #set ($map = $handler.getProperties() ) #foreach($property in $map.entrySet()) <property name="$!property.key" value="$!property.value"/> #end #end </handler> #end #end</handlers>
Given below is how to engage handlers to a single API, by editing its source view.
Build the class and copy the JAR file to folder.<APIM_HOME>/repository/components/libLog in to the management console and select in the menu.Service Bus > Source View Main
Note that when you engage a handler by editing the API's source view, your changes will be overwrittenevery time you save the API through the API Publisher.

WSO2 API Manager, version 1.7.0, WSO2 Inc.
Copyright © WSO2 Inc. 2005-2014 123
3.
4.
1. 2.
In the configuration that opens, select an API and navigate to the <Handlers> section. The following lineappears as the first handler. This is the current authentication handler used in the API Manager.
Replace the above line with the handler that you created. It will engage your custom handler to the APIManager instance. According to this example, it is as follows:
<handlerclass="org.wso2.carbon.apimgt.gateway.handlers.security.CustomAPIAuthenticationHandler"/>
Integrating with WSO2 Governance Registry Services
WSO2 Governance Registry is a registry-repository for storing and managing metadata related to services and otherartifacts. Services in the Governance Registry are implemented as (RXT files). configurable governance artifacts Usually, APIs are created using the API Publisher Web interface. Instead, you can integrate the API Manager with theGovernance Registry to directly create APIs in the API Publisher using the services deployed in the GovernanceRegistry.
The steps below explain how to configure the two products to expose services in the Governance Registry as APIs.
Follow the steps below to publish services on Governance Registry to the API Manager.
Download both WSO2 Governance Registry (G-Reg) and WSO2 API Manager.Provide the API Manager credentials in <GREG_HOME>/repository/resources/lifecycles/configu
file. For example, the following code block defines an element in strations.xml execution productionate. It provides the API Manager's endpoint, username and password as executor parameters.
The following steps apply to WSO2 Governance Registry version 4.6.0 or after.In WSO2 Governance Registry 4.6.0, we do a simple POST to create APIs in the API Publisher. It doesnot involve registry mounting.

WSO2 API Manager, version 1.7.0, WSO2 Inc.
Copyright © WSO2 Inc. 2005-2014 124
2.
3.
4.
5.
6. 7.
8.
1. 2. 3. 4.
<execution forEvent="Publish"class="org.wso2.carbon.governance.registry.extensions.executors.apistore.ApiStoreExecutor"> <parameter name="apim.endpoint" value="http://localhost:9763/"/> <parameter name="apim.username" value="admin"/> <parameter name="apim.password" value="admin"/> <parameter name="default.tier" value="Unlimited"/> <parameter name="throttlingTier"value="Unlimited,Unlimited,Unlimited,Unlimited,Unlimited"/></execution>
R u n t h e G - R e g a n d t h e A P I M a n a g e r .
When running more than one WSO2 products on the same server, change the default port of one product toavoid port conflicts. You can do this by changing the value of one product in <offset> <PRODUCT_HOME>/r
file. In this example, we set the port offset value of Governance Registry toepository/conf/carbon.xml1 as follows: > < Offset >1</ Offset
Access the API Manager server using the following URL: . As you changedhttps://<HostName>:9443/carbonthe default port of G-Reg, you can access the server using the following URL: https://<HostName>:<9443+off
.set>/carbonLog in to the G-Reg management console and create a new service in it and attach the default servicelifecycle to it. For instructions on how to add a new service and associate a new lifecycle, see http://docs.wso
in the Governance Registry documentation.2.org/governance-registry/Managing+Services Promote the service until it gets to the production state. When it is in the production state, publish it using the button. You should get a confirmation messagePublishonce the API is successfully published.You have now created an API using a service in the Governance Registry. Open the API Publisher to seethat this service is successfully created as an API.
Adding API Manager username and password to secure vault
Run ciphertool.sh/.bat with -Dconfigure parameter.Add and as aliases to ciper-text.properties.apim.username apim.passwordRun cipertool.sh (on Linux) or cipertool.bat (on Windows) and encrypt username and password values.Add the encrypted text to file after the other ailas and encrypted pairs and restartciper-text.propertiesthe server. For example,
a.
b. c.
Note: If you started the G-Reg server at least once before executing step 2, editing the configurat file and restarting the server does not apply the configurations. You need to add theions.xml
configurations using the G-Reg management console as follows:
Log in to the G-Reg Management console and select Extensions -> Configure -> Lifecyclesmenu.Click the Edit link associated with . ServiceLifeCycleAdd the configuration given in step 2 above and .Save
Note: If you offset the default API Manager port, you must also change the default API endpoints andthe Thrift port accordingly. See .Changing the Default Ports with Offset
Use Secure Vault to secure the API Manager username and Password in a production deployment.See .Adding API Manager username and password to secure vault

WSO2 API Manager, version 1.7.0, WSO2 Inc.
Copyright © WSO2 Inc. 2005-2014 125
4.
apim.username=klVWQ32mbNKBxiRp78kK1Et7ZDnLPEsFQTwYjNEzTdpYAISFWJht4cqMjtQ6sXRc7eubuFxBaGVYP6LBA33XjIc855a+kDiJKXjtGhcCejyHrZoKrHb2PCJ2y0TDWtczEfHHFMhn/0u+AJafU47HyOgBXZDLcbfGiC5mdJqEoj4=apim.password=klVWQ32mbNKBxiRp78kK1Et7ZDnLPEsFQTwYjNEzTdpYAISFWJht4cqMjtQ6sXRc7eubuFxBaGVYP6LBA33XjIc855a+kDiJKXjtGhcCejyHrZoKrHb2PCJ2y0TDWtczEfHHFMhn/0u+AJafU47HyOgBXZDLcbfGiC5mdJqEoj4=
Adding Mediation Extensions
The API Gateway has a default mediation flow that is executed in each API invocation. You can do additionalcustom mediation for the messages in the API Gateway by extending its mediation flow. An extension is provided asa synapse mediation sequence.
You can design all sequences using a tool like WSO2 Developer Studio, and store the sequence.xml file in thegovernance registry. For information, see in the Developer Studio documentation. TheCreating ESB Artifactsregistry collection where sequences are stored is govcustomsequences , which is available by default in apimgternance registry location. Given below are the registry paths:
Sequence Registry path
in /_system/governance/apimgt/customsequences/in
out /_system/governance/apimgt/customsequences/out
fault /_system/governance/apimgt/customsequences/fault
For example, if you have an in sequence file as , you must save it in testInSequence /_system/governance/apimgt/customsequences/in/testInSequence.xml.
There are two ways to apply mediation extensions to messages:
Global Extensions : Apply to all APIs Per-API Extensions : Apply only to an intended API
The difference between a global extension and a per-API extension is simply in the name given to the sequence thatyou use to create it.
Creating global extensions
Given below is the naming pattern of a global extension sequence.
WSO2AM--Ext--<DIRECTION>
The can be or . To change the default fault sequence, you can either modify the default<DIRECTION> In Outsequence or write a When the direction ofcustom fault sequence and engage it to APIs through the API Publisher. the sequence is , the extension is triggered on the in-flow (request path). Similarly, when the direction of theIn
sequence is , the extension is triggered on the out-flow (response path). Shown below is an example synapseOut
configuration of a global extension sequence.

WSO2 API Manager, version 1.7.0, WSO2 Inc.
Copyright © WSO2 Inc. 2005-2014 126
1.
2. 3.
Global Extension Sequence Example
<sequence xmlns="http://ws.apache.org/ns/synapse" name="WSO2AM--Ext--In"> <log level="custom"> <property name="TRACE" value="Global Mediation Extension"/> </log></sequence>
To test the code, copy it to an XML file (e.g., global_ext.xml) and save the file in the <APIM_HOME>/repository/ directory. The above sequence prints a logdeployment/server/synapse-configs/default/sequences
message on the console on every API invocation.
Creating per-API extensions
Given below is the naming pattern of a per-API extension sequence.
<API_NAME>:v<VERSION>--<DIRECTION>
Shown below is an example synapse configuration of a per-API extension sequence. It is created for an API namedadmin--TwitterSearch with version 1.0.0.
API Extension Sequence Example
<sequence xmlns="http://ws.apache.org/ns/synapse"name="admin--TwitterSearch:v1.0.0--In"> <log level="custom"> <property name="TRACE" value="API Mediation Extension"/> </log></sequence>
To test the code in super-tenant mode, copy it to an XML file (e.g., ) and save the file intwittersearch_ext.xmlthe directory, if<APIM_HOME>/repository/deployment/server/synapse-configs/default/sequencesyou are in single-tenant mode. In multi-tenant mode, copy the file to the tenant's synapse sequence folder. Forexample, if tenant id is 1, then copy it to <API_Gateway>/repository/tenants/1/synapse-configs/defa
folder. ult/sequences
The above sequence prints a log message on the console whenever the API is invoked.TwitterSearch
Alternatively, you can create the XML file and upload it to the registry using the management console UI.
Open the APIM management console ( with admin/admin as the defaulthttps://localhost:9443/carboncredentials) and select .Resources -> BrowseNavigate to registry location./_system/governance/apimgt/customsequencesClick link to upload the XML file.Add Resource
Selecting predefined APIs from the UI
You can attach pre-defined extension sequences to an API using the API Publisher Web interface, at the time theAPI is created. Log in to the API Publisher ( ) and click from the left panel. In the https://localhost:9443/publisher Add
NOTE: The tenant username must be given as in the configuration. For <username>-AT-<domain>example, if the tenant username is and the domain is , then the name attribute in thetestuser wso2.comabove configuration must be . The @ signtestuser-AT-wso2.com--TwitterSearch:v1.0.0–Inmust be given as AT.

WSO2 API Manager, version 1.7.0, WSO2 Inc.
Copyright © WSO2 Inc. 2005-2014 127
page that opens, navigate to the section where you find . There, you can select Add New API Manager Sequences sequences for the API from the drop-down lists. For example,In/Out/Fault
To populate these drop-down lists, you must add mediation sequences as explained at the beginning.
Invoking the extension sequences
When an API is published, a file with its synapse configuration is created on the API Gateway. This synapseconfiguration has a set of handlers as shown in the following example:
API Configuration
<handlers> <handlerclass="org.wso2.carbon.apimgt.gateway.handlers.security.APIAuthenticationHandler"/> <handler class="org.wso2.carbon.apimgt.usage.publisher.APIMgtUsageHandler"/> <handlerclass="org.wso2.carbon.apimgt.usage.publisher.APIMgtGoogleAnalyticsTrackingHandler"/> <handlerclass="org.wso2.carbon.apimgt.gateway.handlers.throttling.APIThrottleHandler"> <property name="id" value="A"/> <property name="policyKey" value="gov:/apimgt/applicationdata/tiers.xml"/> </handler> <handlerclass="org.wso2.carbon.apimgt.gateway.handlers.ext.APIManagerExtensionHandler"/></handlers>
The handler by the name triggers both global as well as per-API extensionAPIManagerExtensionHandlersequences. It reads the sequence names and determines what APIs must be invoked. By default, the extensionhandler is listed at last in the handler chain, and therefore is executed last. You can configure the API Gateway toexecute extension handlers first. To do that, open file,<APIM_HOME>/repository/conf/api-manager.xmluncomment the section and provide the value as follows:<ExtensionHandlerPosition> top
<ExtensionHandlerPosition>top</ExtensionHandlerPosition>
This is useful when you want to execute your own extensions before our default handlers. For example, if you wantto have additional security checks such as signature verification on access tokens before executing the defaultsecurity handler, you can define an extension and configure the Gateway to execute extension handlers first.
For more information on Handlers, see . Architecture
Adding Workflow Extensions
allow you to attach a custom workflow to various operations in the API Manager such as userWorkflow extensionssignup, application creation, registration, subscription etc. By default, the API Manager workflows have Simple
engaged in them. The carries out an operationWorkflow Executor Simple Workflow Executor without anyintervention by a workflow admin. For example, when the user creates an application, the Simple Workflow Executorallows the application to be created without the need for an admin to approve the creation process.
In order to enforce intervention by a workflow admin, you can engage the . It invokes anWS Workflow Executorexternal Web service when executing a workflow and the process completes based on the output of the Web

WSO2 API Manager, version 1.7.0, WSO2 Inc.
Copyright © WSO2 Inc. 2005-2014 128
1. 2.
3.
service. For example, when the user creates an application, the request goes into an intermediary state where itremains until authorized by a workflow admin.
By default, the comes with,WS Workflow Executor
A sample BPEL and Human Task for each standard workflow such as application creation, registration,subscription etc. You can also .customize the default implementationsA Jaggery-based Web application named (workflow-admin https://localhost:9443/workflow-ad
). It provides a GUI for the workflow admin to approve/reject pending Human Tasks. min
When executing a workflow, an entry is added to the table in the API Manager Database,AM_WORKFLOWSindicating the workflow status and workflow external reference along with other information. This entry is usedto track the progress of the workflow throughout its lifecycle. At a given time, the status of a workflow can be
, or . is the default status of a workflow. It gets promoted to CREATED APPROVED REJECTED CREATED APPROV or , based on the response from the workflow engine.ED REJECTED
The sections below explain different workflows provided by the API Manager to engage business processes withAPI management operations. They also explain how to customize the default workflows:
Adding an Application Creation WorkflowAdding an Application Registration WorkflowAdding an API Subscription WorkflowAdding a User Signup WorkflowInvoking API Manager from the BPEL EngineCustomizing a Workflow ExtensionConfiguring Workflows for Tenants
Adding an Application Creation Workflow
This section explains how to attach a custom workflow to the application creation operation in the API Manager.First, see for information on different types of workflow executors.Workflow Extensions
Configuring the Business Process Server
Download .WSO2 Business Process Server Set an offset of 2 to the default BPS port in file. This<BPS_HOME>/repository/conf/carbon.xml
prevents port conflicts that occur when you start more than one WSO2 product on the same server.
<Offset>2</Offset>
Copy the following from to <APIM_HOME>/business-processes/epr <BPS_HOME>/repository/conf folder./eprApplicationService.epr
You can maintain any number of states/steps for a workflow in between the and /CREATED APPROVED REJ states inside the workflow engine. The API Manager only acknowledges the / ECTED CREATED REJECTED
states.
If you change the port offset to a value other than 2 or run the API Manager and BPS on differentmachines (therefore, want to set the to a different value than ), you must dohostname localhostthe following:
Search and replace the value 9765 in all the files (.epr) inside <APIM_HOME>/business-profolder with the new port cesses
Search and replace port 9445 in <AM_HOME>/repository/deployment/server/jagger fileyapps/admin-dashboard/site/conf/site.json
Also change the hard-coded endpoints described in Changing the Default Ports with Offset

WSO2 API Manager, version 1.7.0, WSO2 Inc.
Copyright © WSO2 Inc. 2005-2014 129
3.
4.
5.
6.
1.
2.
3.
ApplicationCallbackService.eprStart the BPS server and log in to its management console (https://<Server Host>:9443+<port
).offset>/carbon Select the under menu and uploadAdd Processes <APIM_HOME>/business-processes/application-creation/BPEL/ApplicationApprovalWorkFlowProcess_1.0.0.zip file to BPS. This is thebusiness process archive file.
Select Add under the Human Tasks menu and upload <APIM_HOME>/business-processes/application-creation/HumanTask/ApplicationsApprovalTask-1.0.0.zip to BPS. This is the human taskarchived file.
Engaging the WS Workflow Executor in the API Manager
First, enable the application creation workflow.
Log in to APIM management console ( ) https://<Server Host>:9443/carbon and select Browse unde r Resources.
Go to resource, d/_system/governance/apimgt/applicationdata/workflow-extensions.xml is. able the Simple Workflow Executor and enable WS Workflow Executor Also specify the service endpoint
where the workflow engine is hosted and the credentials required to access the said service via basicauthentication (i.e., username/password based authentication).
<WorkFlowExtensions> <!--ApplicationCreationexecutor="org.wso2.carbon.apimgt.impl.workflow.ApplicationCreationSimpleWorkflowExecutor"/--> <ApplicationCreationexecutor="org.wso2.carbon.apimgt.impl.workflow.ApplicationCreationWSWorkflowExecutor"> <Propertyname="serviceEndpoint">http://localhost:9765/services/ApplicationApprovalWorkFlowProcess/</Property> <Property name="username">admin</Property> <Property name="password">admin</Property> <Propertyname="callbackURL">https://localhost:8243/services/WorkflowCallbackService</Property> </ApplicationCreation></WorkFlowExtensions>
The application creation WS Workflow Executor is now engaged.Go to the API Store Web interface, open page and create a new application. My ApplicationsIt invokes the application creation process and creates a Human Task instance that holds the execution of the

WSO2 API Manager, version 1.7.0, WSO2 Inc.
Copyright © WSO2 Inc. 2005-2014 130
3.
4.
5.
6.
BPEL process until some action is performed on it. Note the message that appears if the BPEL is invoked correctly, saying that the request is successfullysubmitted. Log in to the workflow-admin app ( ), list all the tasks forhttps://localhost:9443/workflow-adminapplication creation and approve the task. It resumes the BPEL process and completes the applicationcreation. Go back to the page on the API Store and see the created application. My Applications
Whenever a user tries to create an application in the API Store, a request is sent to the workflow endpoint. Given below is a sample:
<?xml version="1.0" encoding="UTF-8"?><soapenv:Envelope xmlns:soapenv="http://schemas.xmlsoap.org/soap/envelope/"xmlns:wor="http://workflow.subscription.apimgt.carbon.wso2.org"> <soapenv:Header /> <soapenv:Body> <wor:createApplicationxmlns:wor="http://workflow.application.apimgt.carbon.wso2.org"> <wor:applicationName>application1</wor:applicationName> <wor:applicationTier>Gold</wor:applicationTier> <wor:applicationCallbackUrl>http://webapp/url</wor:applicationCallbackUrl> <wor:applicationDescription>Application 1</wor:applicationDescription> <wor:tenantDomain>wso2.com</wor:tenantDomain> <wor:userName>user1</wor:userName> <wor:workflowExternalRef>c0aad878-278c-4439-8d7e-712ee71d3f1c</wor:workflowExternalRef> <wor:callBackURL>https://localhost:8243/services/WorkflowCallbackService</wor:callBackURL> </wor:createApplication> </soapenv:Body></soapenv:Envelope>
Elements of the above configuration are described below:
Element Description
applicationName Name of the application the user creates.
applicationTier Throttling tier of the application.
applicationCallbackUrl When the OAuth2 Authorization Code grant type is applied, this is theendpoint on which the callback needs to happen after the user isauthenticated. This is an attribute of the actual application registered onthe API Store.
applicationDescription Description of the application
tenantDomain Tenant domain associated with the application (domain of the usercreating the application).
userName username of the user creating the application.

WSO2 API Manager, version 1.7.0, WSO2 Inc.
Copyright © WSO2 Inc. 2005-2014 131
6.
1. 2. 3.
1. 2.
3.
4.
5.
workflowExternalRef The unique reference against which a workflow is tracked. This needs tobe sent back from the workflow engine to the API Manager at the time ofworkflow completion.
callBackURL At the time of workflow completion, the workflow-completion request issent to this URL by the workflow engine. This property is configured in the<callBackURL> element in the api-manager.xml.
Adding an Application Registration Workflow
This section explains how to attach a custom workflow to the application registration operation in the API Manager. First, see Workflow Extensions for information on different types of workflow executors.
Introduction to the application registration workflow
and registration are different workflows. After an application is created, you can subscribe toApplication creationavailable APIs, but you get the consumer key/secret and access tokens only after registering the application. Thereare two types of registrations that can be done to an application: production and sandbox. You change the defaultapplication registration workflow in situations such as the following:
To issue only sandbox keys when creating production keys is deferred until testing is complete.To restrict untrusted applications from creating production keys. You allow only the creation of sandbox keys. To make API subscribers go through an approval process before creating any type of access token.
Configuring the Business Process Server
Download .WSO2 Business Process Server Set an offset of 2 to the default BPS port in file. This<BPS_HOME>/repository/conf/carbon.xml
prevents port conflicts that occur when you start more than one WSO2 product on the same server. Also see .Changing the Default Ports with Offset
<Offset>2</Offset>
Copy the following from to <APIM_HOME>/business-processes/epr <BPS_HOME>/repository/conf folder./eprRegistrationService.eprRegistrationCallbackService.epr
Start the BPS server and log in to its management console (https://<Server Host>:9443+<port ).offset>/carbon
Select under menu and uploadAdd Processes t he <APIM_HOME>/business-processes/applicatio n-registration/BPEL/A file to BPS. ThispplicationRegistrationWorkflowProcess_1.0.0.zip
is the business process archive file.
If you change the port offset to a value other than 2 or run the API Manager and BPS on differentmachines (therefore, want to set the to a different value than ), you must dohostname localhostthe following:
Search and replace the value 9765 in all the files (.epr, .wsdl files inside the ZIP archives)inside folder with the new port <APIM_HOME>/business-processesZip the files you unzipped earlier and deploy the newly created zip file in BPS as explained inthe steps belowSearch and replace port 9445 in <AM_HOME>/repository/deployment/server/jagger
fileyapps/admin-dashboard/site/conf/site.json

WSO2 API Manager, version 1.7.0, WSO2 Inc.
Copyright © WSO2 Inc. 2005-2014 132
5.
6.
1.
2.
Select Add under the Human Tasks menu and upload <APIM_HOME>/business-processes/applicatto BPS. This ion-registration/HumanTaskBPEL/A pplicationRegistrationTask-1.0.0.zip
is the human task archived file.
Engaging the WS Workflow Executor in the API Manager
First, enable the application registration workflow .
Log in to APIM management console ( ) https://<Server Host>:9443/carbon and select Browse und er Resources .
Go to resource, d/_system/governance/apimgt/applicationdata/workflow-extensions.xml is
:able the Simple Workflow Executor and enable WS Workflow Executor

WSO2 API Manager, version 1.7.0, WSO2 Inc.
Copyright © WSO2 Inc. 2005-2014 133
2.
3.
4.
<WorkFlowExtensions> <!--ProductionApplicationRegistrationexecutor="org.wso2.carbon.apimgt.impl.workflow.ApplicationRegistrationSimpleWorkflowExecutor"/--> <ProductionApplicationRegistrationexecutor="org.wso2.carbon.apimgt.impl.workflow.ApplicationRegistrationWSWorkflowExecutor"> <Propertyname="serviceEndpoint">http://localhost:9765/services/ApplicationRegistrationWorkFlowProcess/</Property> <Property name="username">admin</Property> <Property name="password">admin</Property> <Propertyname="callbackURL">https://localhost:8248/services/WorkflowCallbackService</Property> </ProductionApplicationRegistration> <!--SandboxApplicationRegistrationexecutor="org.wso2.carbon.apimgt.impl.workflow.ApplicationRegistrationSimpleWorkflowExecutor"/--> <SandboxApplicationRegistrationexecutor="org.wso2.carbon.apimgt.impl.workflow.ApplicationRegistrationWSWorkflowExecutor"> <Propertyname="serviceEndpoint">http://localhost:9765/services/ApplicationRegistrationWorkFlowProcess/</Property> <Property name="username">admin</Property> <Property name="password">admin</Property> <Propertyname="callbackURL">https://localhost:8248/services/WorkflowCallbackService</Property> </SandboxApplicationRegistration></WorkFlowExtensions>
Go to the API Store Web interface, open page, select an application and click the My Subscriptions Genera b u t t o n a s s o c i a t e d w i t h t h e p r o d u c t i o n k e y . t e
It invokes the that is bundled with ApplicationRegistrationWorkFlowProcess.bpel ApplicationR and creates a HumanTask instance that holds the executionegistrationWorkflowProcess_1.0.0.zip
of the BPEL process until some action is performed on it. Note a message that appears saying that the request is successfully submitted if the BPEL was invokedc o r r e c t l y . F o r e x a m p l e ,
Note that all workflow process services of the BPS run on port 9765 as you changed its default portwith an offset of 2.

WSO2 API Manager, version 1.7.0, WSO2 Inc.
Copyright © WSO2 Inc. 2005-2014 134
4.
5.
6.
Log in to the workflow-admin app ( ) and list all the tasks forhttps://localhost:9443/workflow-adminapplication registrations. Click to start the Human Task and then change its state.Start
Once you approve the task, it resumes the BPEL process and completes the registration. Go back to the page on the API Store and view your application. My Subscriptions
It shows the application access token, consumer key and consumer secret. For example,
After the registration request is approved, keys are generated by invoking the serviAPIKeyMgtSubscriberce hosted in Key Manger nodes. Even when the request is approved, key generation can fail if this servicebecomes unavailable. To address such failures, you can configure to trigger key generation at a time KeyM a n a g e r n o d e s b e c o m e a v a i l a b l e a g a i n .
Given below is the message used to invoke the BPEL process:

WSO2 API Manager, version 1.7.0, WSO2 Inc.
Copyright © WSO2 Inc. 2005-2014 135
6.
1. 2.
3.
4.
5.
<applicationregistrationworkflowprocessrequestxmlns:wor="http://workflow.application.apimgt.carbon.wso2.org"xmlns="http://workflow.application.apimgt.carbon.wso2.org"> <applicationname>NewApp5</applicationname> <applicationtier>Unlimited</applicationtier> <applicationcallbackurl></applicationcallbackurl> <applicationdescription></applicationdescription> <tenantdomain>carbon.super</tenantdomain> <username>admin</username> <workflowexternalref>4a20749b-a10d-4fa5-819b-4fae5f57ffaf</workflowexternalref> <callbackurl>https://localhost:8243/services/WorkflowCallbackService</callbackurl> <keytype>PRODUCTION</keytype></applicationregistrationworkflowprocessrequest>
Adding an API Subscription Workflow
This section explains how to attach a custom workflow to the API subscription operation in the API Manager. First,see for information on different types of workflows executors.Workflow Extensions
Attaching a custom workflow to API subscription enables you to add throttling tiers to an API that consumers cannotchoose at the time of subscribing. Only admins can set these tiers to APIs. It also allows you to restrict APIconsumers to only subscribe to sandbox, and then go through an approval process to go to the next level ofsubscription.
Configuring the Business Process Server
Download .WSO2 Business Process Server Set an offset of 2 to the default BPS port in file. This<BPS_HOME>/repository/conf/carbon.xml
prevents port conflicts that occur when you start more than one WSO2 product on the same server. Also see .Changing the Default Ports with Offset
<Offset>2</Offset>
Copy the following from to <APIM_HOME>/business-processes/epr <BPS_HOME>/repository/conf folder./eprSubscriptionService.eprSubscriptionCallbackService.epr
Start the BPS server and log in to its management console (https://<Server Host>:9443+<port ).offset>/carbon
If you change the port offset to a value other than 2 or run the API Manager and BPS on differentmachines (therefore, want to set the to a different value than ), you must dohostname localhostthe following:
Search and replace the value 9765 in all the files (.epr, .wsdl files inside the ZIP archives)inside folder with the new port <APIM_HOME>/business-processesZip the files you unzipped earlier and deploy the newly created zip file in BPS as explained inthe steps belowSearch and replace port 9445 in <AM_HOME>/repository/deployment/server/jagger
fileyapps/admin-dashboard/site/conf/site.json
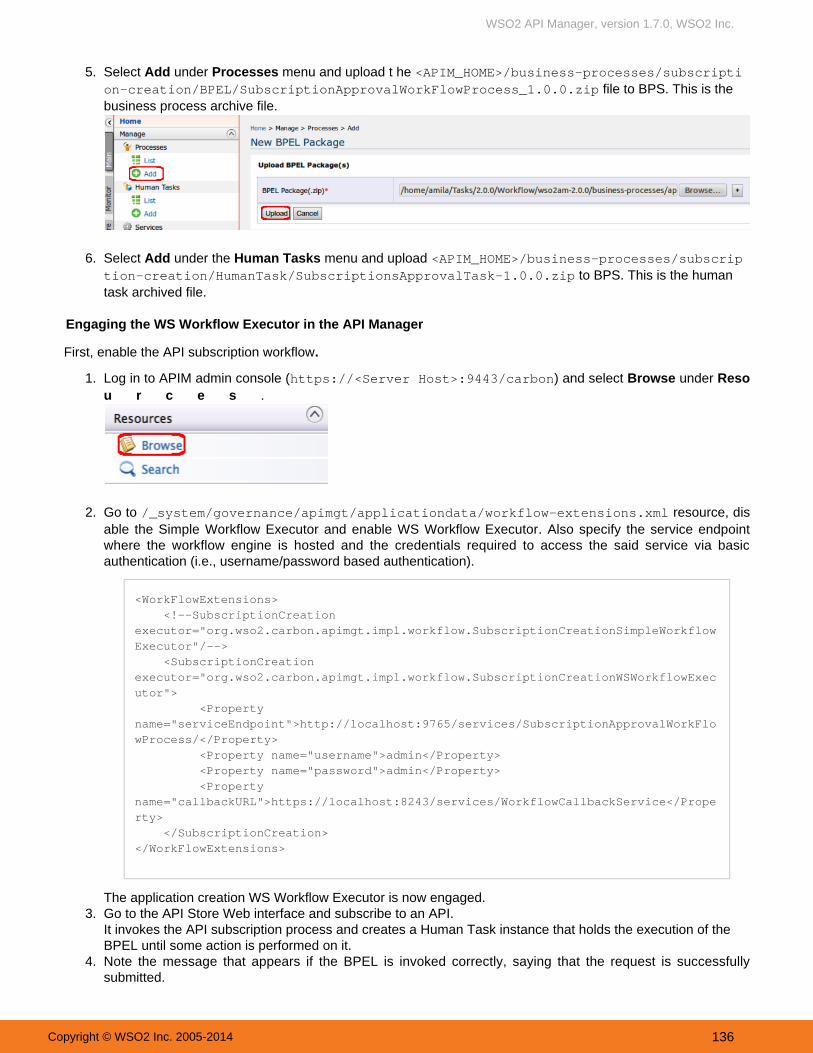
WSO2 API Manager, version 1.7.0, WSO2 Inc.
Copyright © WSO2 Inc. 2005-2014 136
5.
6.
1.
2.
3.
4.
5.
Select under menu and uploadAdd Processes t he <APIM_HOME>/business-processes/subscripti file to BPS. This is theon-creation/BPEL/SubscriptionApprovalWorkFlowProcess_1.0.0.zip
business process archive file.
Select Add under the Human Tasks menu and upload <APIM_HOME>/business-processes/subscrip to BPS. This is the humantion-creation/HumanTask/SubscriptionsApprovalTask-1.0.0.zip
task archived file.
Engaging the WS Workflow Executor in the API Manager
First, enable the API subscription workflow.
Log in to APIM admin console ( ) https://<Server Host>:9443/carbon and select Browse under Resou r c e s .
Go to resource, d/_system/governance/apimgt/applicationdata/workflow-extensions.xml is
. able the Simple Workflow Executor and enable WS Workflow Executor Also specify the service endpointwhere the workflow engine is hosted and the credentials required to access the said service via basicauthentication (i.e., username/password based authentication).
<WorkFlowExtensions> <!--SubscriptionCreationexecutor="org.wso2.carbon.apimgt.impl.workflow.SubscriptionCreationSimpleWorkflowExecutor"/--> <SubscriptionCreationexecutor="org.wso2.carbon.apimgt.impl.workflow.SubscriptionCreationWSWorkflowExecutor"> <Propertyname="serviceEndpoint">http://localhost:9765/services/SubscriptionApprovalWorkFlowProcess/</Property> <Property name="username">admin</Property> <Property name="password">admin</Property> <Propertyname="callbackURL">https://localhost:8243/services/WorkflowCallbackService</Property> </SubscriptionCreation></WorkFlowExtensions>
The application creation WS Workflow Executor is now engaged.Go to the API Store Web interface and subscribe to an API.It invokes the API subscription process and creates a Human Task instance that holds the execution of theBPEL until some action is performed on it.Note the message that appears if the BPEL is invoked correctly, saying that the request is successfullysubmitted.

WSO2 API Manager, version 1.7.0, WSO2 Inc.
Copyright © WSO2 Inc. 2005-2014 137
5.
6.
Log in to the workflow-admin app ( ), list all the tasks for APIhttps://localhost:9443/workflow-adminsubscription and approve the task. It resumes the BPEL process and completes the API subscription. Go back to the API Store and see that the user is now subscribed to the API.
Whenever a user tries to subscribe to an API, a request of the following format is sent to the workflowendpoint:
<soapenv:Envelope xmlns:soapenv="http://schemas.xmlsoap.org/soap/envelope/"xmlns:wor="http://workflow.subscription.apimgt.carbon.wso2.org"> <soapenv:Header/> <soapenv:Body> <wor:createSubscription> <wor:apiName>sampleAPI</wor:apiName> <wor:apiVersion>1.0.0</wor:apiVersion> <wor:apiContext>/sample</wor:apiContext> <wor:apiProvider>admin</wor:apiProvider> <wor:subscriber>subscriber1</wor:subscriber> <wor:applicationName>application1</wor:applicationName> <wor:tierName>gold</wor:tierName> <wor:workflowExternalRef></wor:workflowExternalRef> <wor:callBackURL>?</wor:callBackURL> </wor:createSubscription> </soapenv:Body></soapenv:Envelope>
Elements of the above configuration are described below:
Element Description
apiName Name of the API to which subscription is requested.
apiVersion Version of the API the user subscribes to.
apiContext Context in which the requested API is to be accessed.
apiProvider Provider of the API.
subscriber Name of the user requesting subscription.
applicationName Name of the application through which the user subscribes to the API.
tierName Throttling tiers specified for the application.
workflowExternalRef The unique reference against which a workflow is tracked. This needs to be sentback from the workflow engine to the API Manager at the time of workflowcompletion.
callBackURL The URL to which the Workflow completion request is sent to by the workflowengine, at the time of workflow completion. This property is configured under thecallBackURL property in the api-manager.xml.
Adding a User Signup Workflow
This section explains how to attach a custom workflow to the application creation operation in the API Manager.
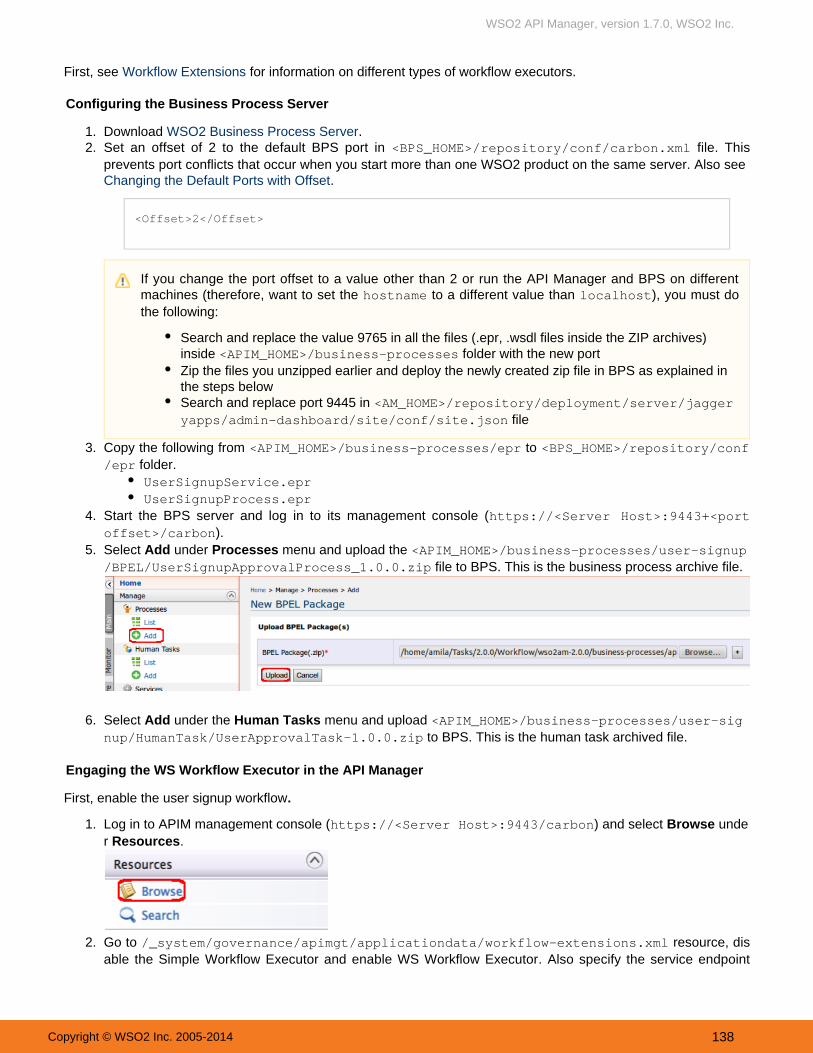
WSO2 API Manager, version 1.7.0, WSO2 Inc.
Copyright © WSO2 Inc. 2005-2014 138
1. 2.
3.
4.
5.
6.
1.
2.
First, see for information on different types of workflow executors.Workflow Extensions
Configuring the Business Process Server
Download .WSO2 Business Process Server Set an offset of 2 to the default BPS port in file. This<BPS_HOME>/repository/conf/carbon.xml
prevents port conflicts that occur when you start more than one WSO2 product on the same server. Also see .Changing the Default Ports with Offset
<Offset>2</Offset>
Copy the following from to <APIM_HOME>/business-processes/epr <BPS_HOME>/repository/conf folder./eprUserSignupService.eprUserSignupProcess.epr
Start the BPS server and log in to its management console (https://<Server Host>:9443+<port ).offset>/carbon
Select the under menu and uploadAdd Processes <APIM_HOME>/business-processes/user-signup/BPEL/UserSignupApprovalProcess_1.0.0.zip file to BPS. This is the business process archive file.
Select Add under the Human Tasks menu and upload <APIM_HOME>/business-processes/user-signup/HumanTask/UserApprovalTask-1.0.0.zip to BPS. This is the human task archived file.
Engaging the WS Workflow Executor in the API Manager
First, enable the user signup workflow.
Log in to APIM management console ( ) https://<Server Host>:9443/carbon and select Browse unde r Resources.
Go to resource, d/_system/governance/apimgt/applicationdata/workflow-extensions.xml is. able the Simple Workflow Executor and enable WS Workflow Executor Also specify the service endpoint
If you change the port offset to a value other than 2 or run the API Manager and BPS on differentmachines (therefore, want to set the to a different value than ), you must dohostname localhostthe following:
Search and replace the value 9765 in all the files (.epr, .wsdl files inside the ZIP archives)inside folder with the new port <APIM_HOME>/business-processesZip the files you unzipped earlier and deploy the newly created zip file in BPS as explained inthe steps belowSearch and replace port 9445 in <AM_HOME>/repository/deployment/server/jagger
fileyapps/admin-dashboard/site/conf/site.json
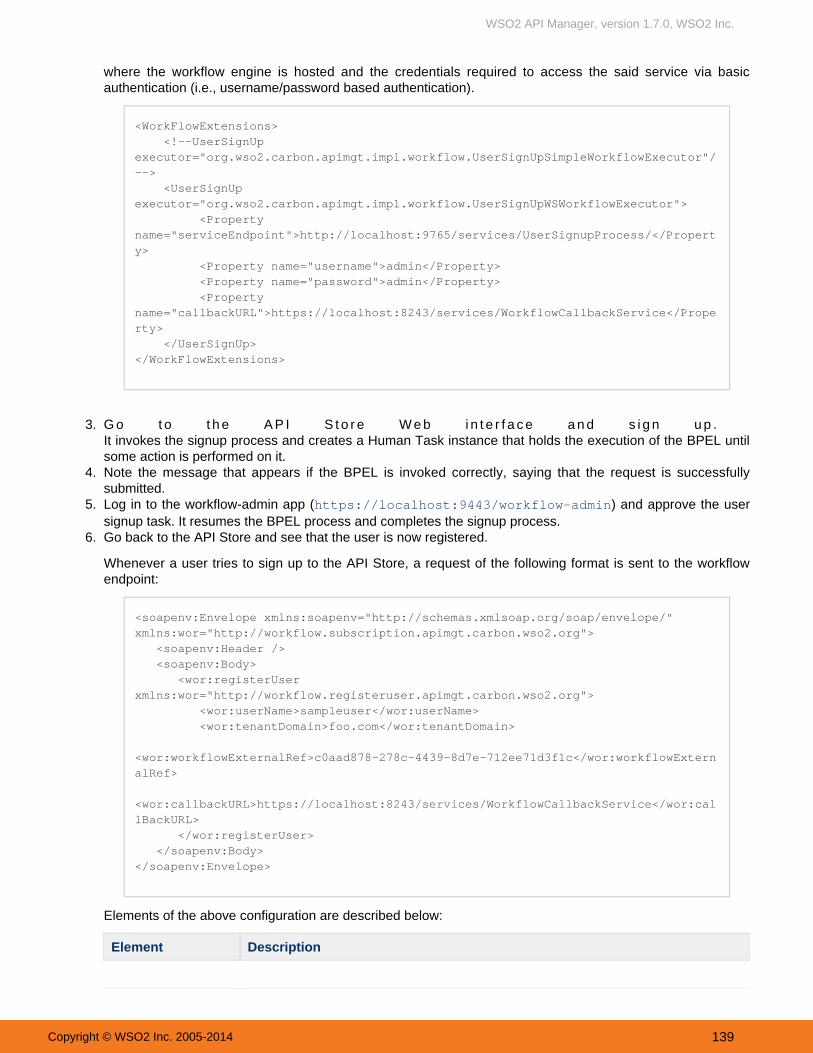
WSO2 API Manager, version 1.7.0, WSO2 Inc.
Copyright © WSO2 Inc. 2005-2014 139
2.
3.
4.
5.
6.
where the workflow engine is hosted and the credentials required to access the said service via basicauthentication (i.e., username/password based authentication).
<WorkFlowExtensions> <!--UserSignUpexecutor="org.wso2.carbon.apimgt.impl.workflow.UserSignUpSimpleWorkflowExecutor"/--> <UserSignUpexecutor="org.wso2.carbon.apimgt.impl.workflow.UserSignUpWSWorkflowExecutor"> <Propertyname="serviceEndpoint">http://localhost:9765/services/UserSignupProcess/</Property> <Property name="username">admin</Property> <Property name="password">admin</Property> <Propertyname="callbackURL">https://localhost:8243/services/WorkflowCallbackService</Property> </UserSignUp></WorkFlowExtensions>
G o t o t h e A P I S t o r e W e b i n t e r f a c e a n d s i g n u p . It invokes the signup process and creates a Human Task instance that holds the execution of the BPEL untilsome action is performed on it.Note the message that appears if the BPEL is invoked correctly, saying that the request is successfullysubmitted. Log in to the workflow-admin app ( ) and https://localhost:9443/workflow-admin approve the usersignup task. It resumes the BPEL process and completes the signup process. Go back to the API Store and see that the user is now registered.
Whenever a user tries to sign up to the API Store, a request of the following format is sent to the workflowendpoint:
<soapenv:Envelope xmlns:soapenv="http://schemas.xmlsoap.org/soap/envelope/"xmlns:wor="http://workflow.subscription.apimgt.carbon.wso2.org"> <soapenv:Header /> <soapenv:Body> <wor:registerUserxmlns:wor="http://workflow.registeruser.apimgt.carbon.wso2.org"> <wor:userName>sampleuser</wor:userName> <wor:tenantDomain>foo.com</wor:tenantDomain> <wor:workflowExternalRef>c0aad878-278c-4439-8d7e-712ee71d3f1c</wor:workflowExternalRef> <wor:callbackURL>https://localhost:8243/services/WorkflowCallbackService</wor:callBackURL> </wor:registerUser> </soapenv:Body></soapenv:Envelope>
Elements of the above configuration are described below:
Element Description

WSO2 API Manager, version 1.7.0, WSO2 Inc.
Copyright © WSO2 Inc. 2005-2014 140
6.
userName The user name requested by the user
tenantDomain Domain to which the user belongs to
workflowExternalRef The unique reference against which a workflow is tracked. This needs to be sentfrom the workflow engine to the API Manager at the time of workflow completion.
callBackURL The URL to which the workflow completion request is sent by the workflow engine,at the time of workflow completion. This property is configured under the"callBackURL" property in the api-manager.xml.
Invoking API Manager from the BPEL Engine
Once the workflow is finalized at BPEL end the call back url (originally configured in the api-manager.xml and sent toBPEL Engine in the outflow) of API Manager will be called to progress the workflow. In AM, endpoint has been madeavailable in both SOAP and REST variants. They are respectively;
Type URI
SOAP https://localhost:8243/services/WorkflowCallbackService
WSDLLocation : http://localhost:8280/services/WorkflowCallbackService?wsdl
REST https://localhost:9443/store/site/blocks/workflow/workflow-listener/ajax/workflow-listener.jag
Both the endpoints have been secured via Basic Authentication. Hence when invoking either, an Authorizationheader including a base64 encoded value of the User's username and password needs to be included, along withthe request. (E.g : Authorization: Basic <base64 encoded >username:password )
The endpoint expects the following list of parameters.
Parameter Description Mandatory
workflowReference The unique identifier sent to the BPEL against which the workflow istracked in API Manager
YES
status The next status to which the workflow needs to be promoted to. YES
description Notes, that may need to be persisted against a particular workflow. NO
A sample curl request for invoking the REST endpoint would be as follows.
curl -H "Authorization:Basic YWRtaW46YWRtaW4=" -X POSThttp://localhost:9763/store/site/blocks/workflow/workflow-listener/ajax/workflow-listener.jag -d'workflowReference=b530be39-9174-43b3-acb3-2603a223b094&status=APPROVED&description=DESCRIPTION'
A sample SOAP request would be as below.

WSO2 API Manager, version 1.7.0, WSO2 Inc.
Copyright © WSO2 Inc. 2005-2014 141
<soapenv:Envelope xmlns:soapenv="http://schemas.xmlsoap.org/soap/envelope/"xmlns:cal="http://callback.workflow.apimgt.carbon.wso2.org"> <soapenv:Header/> <soapenv:Body> <cal:resumeEvent> <cal:workflowReference>b530be39-9174-43b3-acb3-2603a223b094</cal:workflowReference> <cal:status>APPROVED</cal:status> <cal:description>DESCRIPTION</cal:description> </cal:resumeEvent> </soapenv:Body></soapenv:Envelope>
Customizing a Workflow Extension
Each workflow executor in the WSO2 API Manager is inherited from the org.wso2.carbon.apimgt.impl.work abstract class, which has two abstract methods:flow.WorkflowExecutor
execute: contains the implementation of the workflow executioncomplete: contains the implementation of the workflow completiongetWorkflowType: abstract method that returns the type of the workflow as a StringgetWorkflowDetails(String workflowStatus): abstract method that returns a list of WorkflowDTOobjects. This method is not used at the moment and it returns null for the time being.
To customize the default workflow extension, you override the and methods with yourexecute() complete()custom implementation. For example, the following class is a sample implementation of the Subscription Creationworkflow. It returns an email to an address provided through the configuration on each subscription creation:
package org.wso2.sample.workflow;
import java.util.List;import java.util.Properties;import javax.mail.Message;import javax.mail.MessagingException;import javax.mail.PasswordAuthentication;import javax.mail.Session;import javax.mail.Transport;import javax.mail.internet.InternetAddress;import javax.mail.internet.MimeMessage;import org.wso2.carbon.apimgt.api.APIManagementException;import org.wso2.carbon.apimgt.impl.APIConstants;import org.wso2.carbon.apimgt.impl.dao.ApiMgtDAO;import org.wso2.carbon.apimgt.impl.dto.SubscriptionWorkflowDTO;import org.wso2.carbon.apimgt.impl.dto.WorkflowDTO;import org.wso2.carbon.apimgt.impl.workflow.WorkflowConstants;import org.wso2.carbon.apimgt.impl.workflow.WorkflowException;import org.wso2.carbon.apimgt.impl.workflow.WorkflowExecutor;import org.wso2.carbon.apimgt.impl.workflow.WorkflowStatus;
public class SubsCreationEmailSender extends WorkflowExecutor { private String adminEmail; private String emailAddress; private String emailPassword;
@Override

WSO2 API Manager, version 1.7.0, WSO2 Inc.
Copyright © WSO2 Inc. 2005-2014 142
public List<WorkflowDTO> getWorkflowDetails(String arg0) throws WorkflowException { return null; }
@Override public String getWorkflowType() { return WorkflowConstants.WF_TYPE_AM_SUBSCRIPTION_CREATION; } @Override public void execute(WorkflowDTO workflowDTO) throws WorkflowException{ SubscriptionWorkflowDTO subsCreationWFDTO =(SubscriptionWorkflowDTO)workflowDTO; Properties props = new Properties(); props.put("mail.smtp.auth", "true"); props.put("mail.smtp.starttls.enable", "true"); props.put("mail.smtp.host", "smtp.gmail.com"); props.put("mail.smtp.port", "587"); Session session = Session.getInstance(props, new javax.mail.Authenticator() { protected PasswordAuthentication getPasswordAuthentication() { return new PasswordAuthentication(emailAddress, emailPassword); } }); try { Message message = new MimeMessage(session); message.setFrom(new InternetAddress(emailAddress)); message.setRecipients(Message.RecipientType.TO, InternetAddress.parse(adminEmail)); message.setSubject("Subscription Creation"); message.setText("Subscription created for API " +subsCreationWFDTO.getApiName() + " using Application " +subsCreationWFDTO.getApplicationName() + " by user " + subsCreationWFDTO.getSubscriber()); Transport.send(message); System.out.println("Sent email to notify subscription creation"); //Call the execute method of the parent class. This will create areference for the //workflow execution in the database. super.execute(workflowDTO); //Set the workflow Status to APPROVED and Immediately complete theworkflow since we //are not waiting for an external party to complete this. workflowDTO.setStatus(WorkflowStatus.APPROVED); complete(workflowDTO); } catch (MessagingException e) { e.printStackTrace(); throw new WorkflowException(e.getMessage()); } catch (Exception e){ e.printStackTrace();

WSO2 API Manager, version 1.7.0, WSO2 Inc.
Copyright © WSO2 Inc. 2005-2014 143
throw new WorkflowException(e.getMessage()); } } @Override public void complete(WorkflowDTO workflowDTO) throws WorkflowException{ workflowDTO.setUpdatedTime(System.currentTimeMillis()); super.complete(workflowDTO); ApiMgtDAO apiMgtDAO = new ApiMgtDAO(); try { apiMgtDAO.updateSubscriptionStatus( Integer.parseInt(workflowDTO.getWorkflowReference()), APIConstants.SubscriptionStatus.UNBLOCKED); } catch (APIManagementException e) { throw new WorkflowException( "Could not complete subscription creation workflow", e); } } public String getAdminEmail() { return adminEmail; } public void setAdminEmail(String adminEmail) { this.adminEmail = adminEmail; } public String getEmailAddress() { return emailAddress; } public void setEmailAddress(String emailAddress) { this.emailAddress = emailAddress; } public String getEmailPassword() { return emailPassword; } public void setEmailPassword(String emailPassword) {

WSO2 API Manager, version 1.7.0, WSO2 Inc.
Copyright © WSO2 Inc. 2005-2014 144
1.
2. 3.
4.
this.emailPassword = emailPassword; }}
Note the following regarding the above sample:
The method takes in a object ( class) that containsexecute() WorkflowDTO SubscriptionWorkflowDTOinformation about the subscription that is being created.The , and are private String variables with public anadminEmail emailAddress emailPassword getterd methods. The values for these variables are populated through the server configuration.setterAfter sending the email, a call is made to the super class's method in order to create a referenceexecute()entry in the database. This entry is generally used to look up the workflow when the workflow happensasynchronously (via a human approval).The complete() method contains the code to mark the subscription active. Until then, the subscription is inON_HOLD state.In this sample, the method is called immediately to make the subscription active instantly. If thecomplete()completion of your workflow happens asynchronously, you must not call the method from the complete() e
method.xecute()The is thrown to roll back the subscription in case of a failure.WorkflowException
After the implementation of the class is done, follow the steps below to implement the new workflow extension in theAPI Manager:
Compile the class and export it as a JAR file. Make sure you have the following JARs in the classpath beforecompilation.
<AM_HOME>/repository/components/plugins/org.wso2.carbon.apimgt.impl_1.2.1.jar<AM_HOME>/repository/components/plugins/org.wso2.carbon.apimgt.api_1.2.1.jarjavax.mail.jar: see to download the JARhttps://java.net/projects/javamail/pages/Home
After exporting the JAR, copy it to .<AM_HOME>/repository/components/libLog in to APIM management console ( ) https://<Server Host>:9443/carbon and select Browse unde
r R e s o u r c e s .
Go to resource, d/_system/governance/apimgt/applicationdata/workflow-extensions.xml is
. able the Simple Workflow Executor and enable WS Workflow Executor Also specify the service endpointwhere the workflow engine is hosted and the credentials required to access the said service via basicauthentication (i.e., username/password based authentication). For example:

WSO2 API Manager, version 1.7.0, WSO2 Inc.
Copyright © WSO2 Inc. 2005-2014 145
4.
<WorkFlowExtensions> <!--SubscriptionCreationexecutor="org.wso2.carbon.apimgt.impl.workflow.SubscriptionCreationSimpleWorkflowExecutor"/--> <SubscriptionCreationexecutor="org.wso2.sample.workflow.SubsCreationEmailSender"> <Property name="adminEmail">[email protected]</Property> <Property name="emailAddress">from [email protected]</Property> <Property name="emailPassword">from_user_password</Property> </SubscriptionCreation></WorkFlowExtensions>
Note that the , and properties will be assigned to theadminEmail emailAddress emailPasswordappropriate variables defined in the class through the public methods of those variables.setter
Configuring Workflows for Tenants
Using the API Manager, you can configure custom workflows that get invoked at the event of a user signup,application creation, registration, subscription etc. You do these configurations in the api-manager.xml as describedin the previous sections.
However, in a multi-tenant API Manager setup, not all tenants have access to the file system and not all tenantswant to use the same workflow that the super admin has configured in the api-manager.xml file. For example,different departments in an enterprise can act as different tenants using the same API Manager instance and theycan have different workflows. Also, an enterprise can combine WSO2 API Manager and WSO2 Business ProcessServer (BPS) to provide API Management As a Service to its clients. In this case, each client is a separateenterprise represented by a separate tenant. In both cases, the authority to approve business operations(workflows) resides within a tenant's space.
To allow different tenants to define their own custom workflows without editing configuration files, the API Managerprovides configuration in tenant-specific locations in the registry, which you can access through the UI.
The topics below explain how to deploy a BPEL/human task using WSO2 BPS and how to point them to servicesdeployed in the tenant spaces in the API Manager.
Deploying a BPEL and a HumanTask for a tenant
Only the users registered in the BPS can deploy BPELs and human tasks in it. Registration adds you to the userstore in the BPS. In this guide, the API Manager and BPS use the same user store and all the users present in theBPS are visible to the API Manager as well. This is depicted by the diagram below:
If you use the same or similar sample to return an email, you must remove the org.jaggeryjs.hostobj file from ects.email_0.9.0.ALPHA4_wso2v1.jar <AM_HOME>/repository/components/plugins
directory. Removing it results in a thrown at server startup, but it does notClassNotFoundExceptionaffect the server's functionality.

WSO2 API Manager, version 1.7.0, WSO2 Inc.
Copyright © WSO2 Inc. 2005-2014 146
1.
2.
: API Manager and BPS share the same user and permission storeFigure
Follow the steps below to deploy a BPEL and a human task for a tenant in the API Manager:
Sharing the user/permission stores with the BPS and API Manager
Create a database for the shared user store as follows:
mysql> create database workflow_ustore;Query OK, 1 row affected (0.00 sec)
Open the and create a<APIM_HOME>repository/conf/datasources/master-datasources.xmldatasource pointing to the newly created database. For example,
Tip: Copy the database driver (in this case, the MySql driver) to the /repository/components/l folder before starting each server.ib

WSO2 API Manager, version 1.7.0, WSO2 Inc.
Copyright © WSO2 Inc. 2005-2014 147
2.
3. 4.
5.
1.
<datasource> <name>USTORE</name> <description>The datasource used for API Manager database</description> <jndiConfig> <name>jdbc/ustore</name> </jndiConfig> <definition type="RDBMS"> <configuration> <url>jdbc:mysql://127.0.0.1:3306/workflow_ustore?autoReconnect=true&relaxAutoCommit=true</url> <username>root</username> <password>root</password> <driverClassName>com.mysql.jdbc.Driver</driverClassName> <maxActive>50</maxActive> <maxWait>60000</maxWait> <testOnBorrow>true</testOnBorrow> <validationQuery>SELECT 1</validationQuery> <validationInterval>30000</validationInterval> </configuration> </definition></datasource>
Repeat step 2 for the BPS as well.Point the datasource name in to the new datasource.<APIM_HOME>repository/conf/user-mgt.xml(note that the user store is configured using the element).<UserStoreManager>
In the following example, the same JDBC user store (that is shared by both the API Manager and the BPS) isused as the permission store as well:
<Configuration> <AddAdmin>true</AddAdmin> <AdminRole>admin</AdminRole> <AdminUser> <UserName>admin</UserName> <Password>admin</Password> </AdminUser> <EveryOneRoleName>everyone</EveryOneRoleName> <!-- By default users in thisrole sees the registry root --> <Property name="dataSource">jdbc/ustore</Property></Configuration>
Repeat step 4 for the BPS as well.
Sharing the data in the registry with the BPS and API Manager
To deploy BPELs in an API Manager tenant space, the tenant space should be accessible by both the BPS and APIManager and certain tenant specific data such as key stores needs to be shared with both products. Follow thesteps below to create a registry mount to share the data stored in the registry:
Create a separate database for the registry:

WSO2 API Manager, version 1.7.0, WSO2 Inc.
Copyright © WSO2 Inc. 2005-2014 148
1.
2.
3.
mysql> create database workflow_regdb;Query OK, 1 row affected (0.00 sec)
Create a new datasource in <APIM_HOME>repository/conf/datasources/master-datasources.x as done before:ml
<datasource> <name>REG_DB</name> <description>The datasource used for API Manager database</description> <jndiConfig> <name>jdbc/regdb</name> </jndiConfig> <definition type="RDBMS"> <configuration> <url>jdbc:mysql://127.0.0.1:3306/workflow_regdb?autoReconnect=true&relaxAutoCommit=true</url> <username>root</username> <password>root</password> <driverClassName>com.mysql.jdbc.Driver</driverClassName> <maxActive>50</maxActive> <maxWait>60000</maxWait> <testOnBorrow>true</testOnBorrow> <validationQuery>SELECT 1</validationQuery> <validationInterval>30000</validationInterval> </configuration> </definition></datasource>
Add the following entries to :<APIM_HOME>/repository/conf/registry.xml
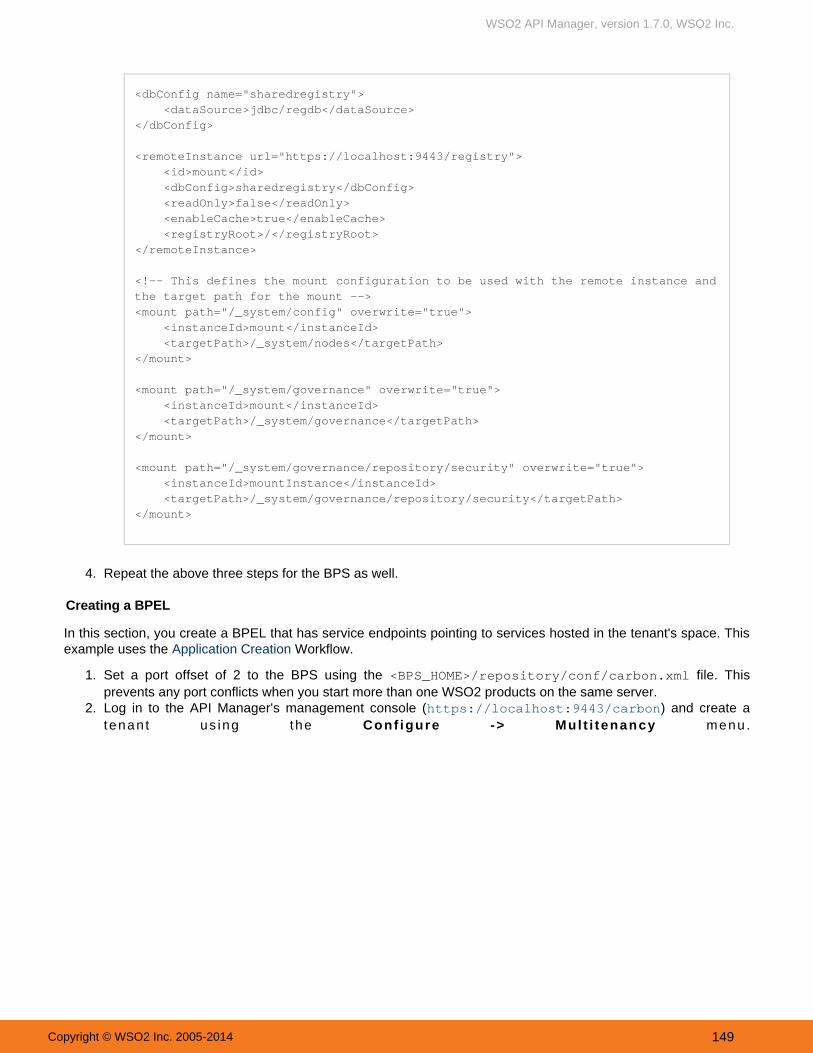
WSO2 API Manager, version 1.7.0, WSO2 Inc.
Copyright © WSO2 Inc. 2005-2014 149
3.
4.
1.
2.
<dbConfig name="sharedregistry"> <dataSource>jdbc/regdb</dataSource></dbConfig> <remoteInstance url="https://localhost:9443/registry"> <id>mount</id> <dbConfig>sharedregistry</dbConfig> <readOnly>false</readOnly> <enableCache>true</enableCache> <registryRoot>/</registryRoot></remoteInstance>
<!-- This defines the mount configuration to be used with the remote instance andthe target path for the mount --><mount path="/_system/config" overwrite="true"> <instanceId>mount</instanceId> <targetPath>/_system/nodes</targetPath></mount>
<mount path="/_system/governance" overwrite="true"> <instanceId>mount</instanceId> <targetPath>/_system/governance</targetPath></mount>
<mount path="/_system/governance/repository/security" overwrite="true"> <instanceId>mountInstance</instanceId> <targetPath>/_system/governance/repository/security</targetPath></mount>
Repeat the above three steps for the BPS as well.
Creating a BPEL
In this section, you create a BPEL that has service endpoints pointing to services hosted in the tenant's space. Thisexample uses the Workflow.Application Creation
Set a port offset of 2 to the BPS using the file. This<BPS_HOME>/repository/conf/carbon.xmlprevents any port conflicts when you start more than one WSO2 products on the same server.Log in to the API Manager's management console ( ) and create ahttps://localhost:9443/carbont enan t us ing the menu .Conf igure -> Mul t i tenancy

WSO2 API Manager, version 1.7.0, WSO2 Inc.
Copyright © WSO2 Inc. 2005-2014 150
2.
3.
4. 5.
6.
7.
8.
Create a copy of the BPEL located in <APIM_HOME>/business-processes/application-creation/.BPEL
Extract the contents of the new BPEL archive.Copy the and to the extracted folderApplicationService.epr ApplicationCallbackService.eprand rename them as and ApplicationService-Tenant.epr ApplicationCallbackService-Tenan
respectively.t.eprOpen and change the to ApplicationService-Tenant.epr wsa:Address http://localhost:9765
./services/t/<tenant domain>/ApplicationServicePoint the file to the new .epr files provided in the BPEL archive. For example,deploy.xml
<invoke partnerLink="AAPL"> <service name="applications:ApplicationService" port="ApplicationPort"> <endpoint xmlns="http://wso2.org/bps/bpel/endpoint/config"endpointReference="ApplicationService-Tenant.epr"></endpoint> </service></invoke>
<invoke partnerLink="CBPL"> <servicename="callback.workflow.apimgt.carbon.wso2.org:WorkflowCallbackService"port="WorkflowCallbackServiceHttpsSoap11Endpoint"> <endpoint xmlns="http://wso2.org/bps/bpel/endpoint/config"endpointReference="ApplicationCallbackService-Tenant.epr"></endpoint> </service></invoke>
Zip the content and create a BPEL archive in the following format:

WSO2 API Manager, version 1.7.0, WSO2 Inc.
Copyright © WSO2 Inc. 2005-2014 151
8.
9.
1.
2.
3. 4. 5.
6.
ApplicationApprovalWorkFlowProcess_1.0.0-Tenant.zip |_ApplicationApprovalWorkFlowProcess.bpel |_ApplicationApprovalWorkFlowProcessArtifacts.wsdl |_ApplicationCallbackService-Tenant.epr |_ApplicationService-Tenant.epr |_ApplicationsApprovalTaskService.wsdl |_SecuredService-service.xml |_WorkflowCallbackService.wsdl |_deploy.xml
Log into the BPS as the tenant admin and upload the BPEL.
Creating a human task
Similar to creating a BPEL, create a HumaTask that has service endpoints pointing to services hosted in the tenant'sspace.
Create a copy of the HumanTask archive in <APIM_HOME>/business-processes/application-creat and extract its contents.ion/HumanTask
Edit the following section in :ApplicationApprovalTaskService.wsdl
<invoke partnerLink="AAPL"> <service name="applications:ApplicationService" port="ApplicationPort"> <endpoint xmlns="http://wso2.org/bps/bpel/endpoint/config"endpointReference="ApplicationService-Tenant.epr"></endpoint> </service></invoke> <invoke partnerLink="CBPL"> <servicename="callback.workflow.apimgt.carbon.wso2.org:WorkflowCallbackService"port="WorkflowCallbackServiceHttpsSoap11Endpoint"> <endpoint xmlns="http://wso2.org/bps/bpel/endpoint/config"endpointReference="ApplicationCallbackService-Tenant.epr"></endpoint> </service></invoke>
Create the HumanTask archive by zipping all the extracted files.Log into the BPS as the tenant admin and upload the HumanTask.Log into the API Manager's management console as the tenant admin and select menResources > Browseu.Go to the in the/_system/governance/apimgt/applicationdata/workflow-extensions.xmlregistry and change the service URL and the credentials of the ApplicationCreationWSWorkflowExecu
. F o r e x a m p l e ,t o r

WSO2 API Manager, version 1.7.0, WSO2 Inc.
Copyright © WSO2 Inc. 2005-2014 152
6.
Testing the workflow
You have now completed configuring the Application Creation workflow for a tenant. Whenever a tenant user logs into the tenant store and create an application, the workflow will be invoked. You log in to the WebWorkflow Adminapplication ( ) as the tenant admin and browse https://<Server Host>:9443/workflow-admin Application
menu to see all approval tasks have been created for newly created applications. For example,Creation
Transforming API Message Payload
You can send API messages through the API Manager without any transformation configurations, if the back-endaccepts messages of the same format. For example, the API Manager handles JSON to JSON transformations outof the box. In cases where the back-end does not accept the same format, the transformations are done asdescribed below:
JSON message builders and formattersXML representation of JSON payloadsConverting a payload between XML and JSON
Be sure to disable the and enable the SimpleWorkflowExecutor ApplicationCreationWSWorkflowExecutor.
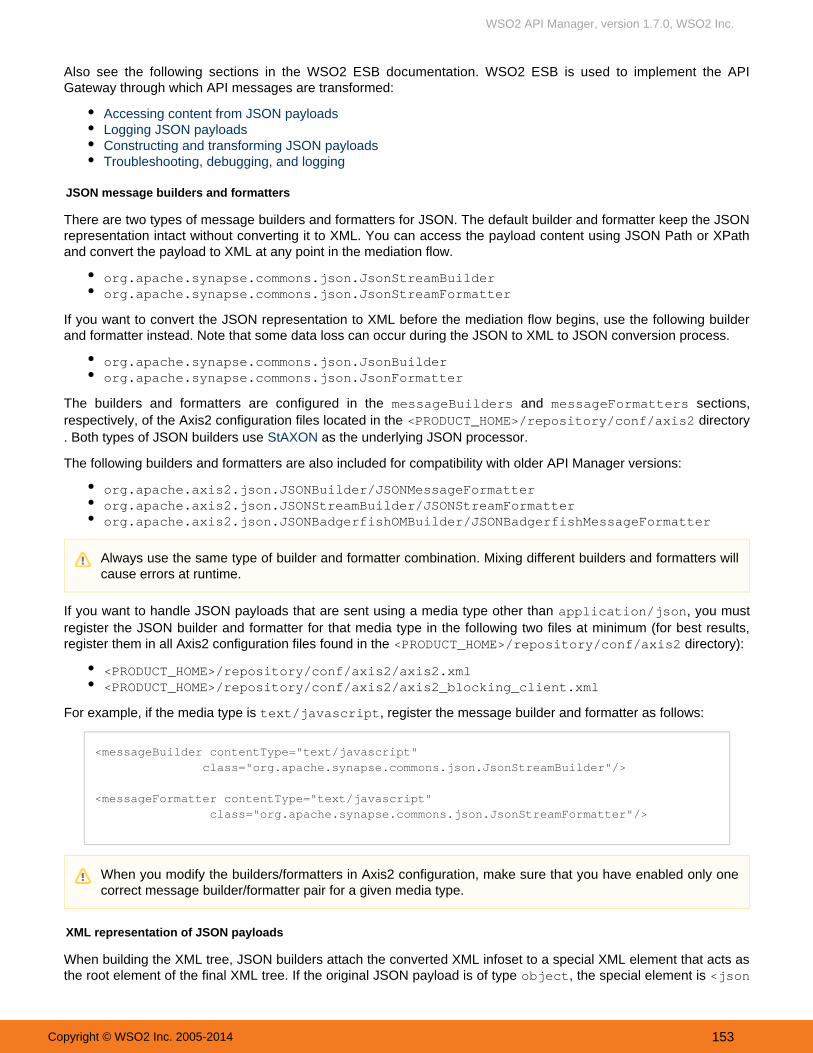
WSO2 API Manager, version 1.7.0, WSO2 Inc.
Copyright © WSO2 Inc. 2005-2014 153
Also see the following sections in the WSO2 ESB documentation. WSO2 ESB is used to implement the APIGateway through which API messages are transformed:
Accessing content from JSON payloadsLogging JSON payloadsConstructing and transforming JSON payloadsTroubleshooting, debugging, and logging
JSON message builders and formatters
There are two types of message builders and formatters for JSON. The default builder and formatter keep the JSONrepresentation intact without converting it to XML. You can access the payload content using JSON Path or XPathand convert the payload to XML at any point in the mediation flow.
org.apache.synapse.commons.json.JsonStreamBuilderorg.apache.synapse.commons.json.JsonStreamFormatter
If you want to convert the JSON representation to XML before the mediation flow begins, use the following builderand formatter instead. Note that some data loss can occur during the JSON to XML to JSON conversion process.
org.apache.synapse.commons.json.JsonBuilderorg.apache.synapse.commons.json.JsonFormatter
The builders and formatters are configured in the and sections,messageBuilders messageFormattersrespectively, of the Axis2 configuration files located in the directory<PRODUCT_HOME>/repository/conf/axis2. Both types of JSON builders use as the underlying JSON processor.StAXON
The following builders and formatters are also included for compatibility with older API Manager versions:
org.apache.axis2.json.JSONBuilder/JSONMessageFormatterorg.apache.axis2.json.JSONStreamBuilder/JSONStreamFormatterorg.apache.axis2.json.JSONBadgerfishOMBuilder/JSONBadgerfishMessageFormatter
If you want to handle JSON payloads that are sent using a media type other than , you mustapplication/jsonregister the JSON builder and formatter for that media type in the following two files at minimum (for best results,register them in all Axis2 configuration files found in the directory):<PRODUCT_HOME>/repository/conf/axis2
< _HOME>/repository/conf/axis2/axis2.xmlPRODUCT< _HOME>/repository/conf/axis2/axis2_blocking_client.xmlPRODUCT
For example, if the media type is , register the message builder and formatter as follows:text/javascript
<messageBuilder contentType="text/javascript" class="org.apache.synapse.commons.json.JsonStreamBuilder"/>
<messageFormatter contentType="text/javascript" class="org.apache.synapse.commons.json.JsonStreamFormatter"/>
XML representation of JSON payloads
When building the XML tree, JSON builders attach the converted XML infoset to a special XML element that acts asthe root element of the final XML tree. If the original JSON payload is of type , the special element is object <json
Always use the same type of builder and formatter combination. Mixing different builders and formatters willcause errors at runtime.
When you modify the builders/formatters in Axis2 configuration, make sure that you have enabled only onecorrect message builder/formatter pair for a given media type.

WSO2 API Manager, version 1.7.0, WSO2 Inc.
Copyright © WSO2 Inc. 2005-2014 154
. If it is an , the special element is . Following are examples of JSON and XMLObject/> array <jsonArray/>representations of various objects and arrays.
Null objects
JSON:
{"object":null}
XML:
<jsonObject> <object></object></jsonObject>
Empty objects
JSON:
{"object":{}}
XML:
<jsonObject> <object></object></jsonObject>
Empty strings
JSON:
{"object":""}
XML:
<jsonObject> <object></object></jsonObject>
Empty array
JSON:
[]
XML (JsonStreamBuilder):

WSO2 API Manager, version 1.7.0, WSO2 Inc.
Copyright © WSO2 Inc. 2005-2014 155
<jsonArray></jsonArray>
XML (JsonBuilder):
<jsonArray> <?xml-multiple jsonElement?></jsonArray>
Named arrays
JSON:
{"array":[1,2]}
XML (JsonStreamBuilder):
<jsonObject> <array>1</array> <array>2</array></jsonObject>
XML (JsonBuilder):
<jsonObject> <?xml-multiple array?> <array>1</array> <array>2</array></jsonObject>
JSON:
{"array":[]}
XML (JsonStreamBuilder):
<jsonObject></jsonObject>
XML (JsonBuilder):
<jsonObject> <?xml-multiple array?></jsonObject>
Anonymous arrays

WSO2 API Manager, version 1.7.0, WSO2 Inc.
Copyright © WSO2 Inc. 2005-2014 156
JSON:
[1,2]
XML (JsonStreamBuilder):
<jsonArray> <jsonElement>1</jsonElement> <jsonElement>2</jsonElement></jsonArray>
XML (JsonBuilder):
<jsonArray> <?xml-multiple jsonElement?> <jsonElement>1</jsonElement> <jsonElement>2</jsonElement></jsonArray>
JSON:
[1, []]
XML (JsonStreamBuilder):
<jsonArray> <jsonElement>1</jsonElement> <jsonElement> <jsonArray></jsonArray> </jsonElement></jsonArray>
XML (JsonBuilder):
<jsonArray> <?xml-multiple jsonElement?> <jsonElement>1</jsonElement> <jsonElement> <jsonArray> <?xml-multiple jsonElement?> </jsonArray> </jsonElement></jsonArray>
XML processing instructions (PIs)
Note that the addition of processing instructions to the XML payloads whose JSON representationsxml-multiplecontain arrays. (via StAXON) adds these instructions to the XML payload that it builds during theJsonBuilderJSON to XML conversion so that during the XML to JSON conversion, can reconstruct the arraysJsonFormatter

WSO2 API Manager, version 1.7.0, WSO2 Inc.
Copyright © WSO2 Inc. 2005-2014 157
that are present in the original JSON payload. interprets the elements immediately following aJsonFormatterprocessing instruction to construct an array.
Special characters
When building XML elements, the ‘$’ character and digits are handled in a special manner when they appear as thefirst character of a JSON key. Following are examples of two such occurrences. Note the addition of the _JsonRea
and prefixes in place of the ‘$’ and digit characters, respectively.der_PS_ _JsonReader_PD_
JSON:
{"$key":1234}
XML:
<jsonObject> <_JsonReader_PS_key>1234</_JsonReader_PS_key></jsonObject>
JSON:
{"32X32":"image_32x32.png"}
XML:
<jsonObject> <_JsonReader_PD_32X32>image_32x32.png</_JsonReader_PD_32X32></jsonObject>
Converting a payload between XML and JSON
To convert an XML payload to JSON, set the property to in the axis2 scopemessageType application/jsonbefore sending message to an endpoint. Similarly, to convert a JSON payload to XML, set the propermessageTypety to or . For example:application/xml text/xml
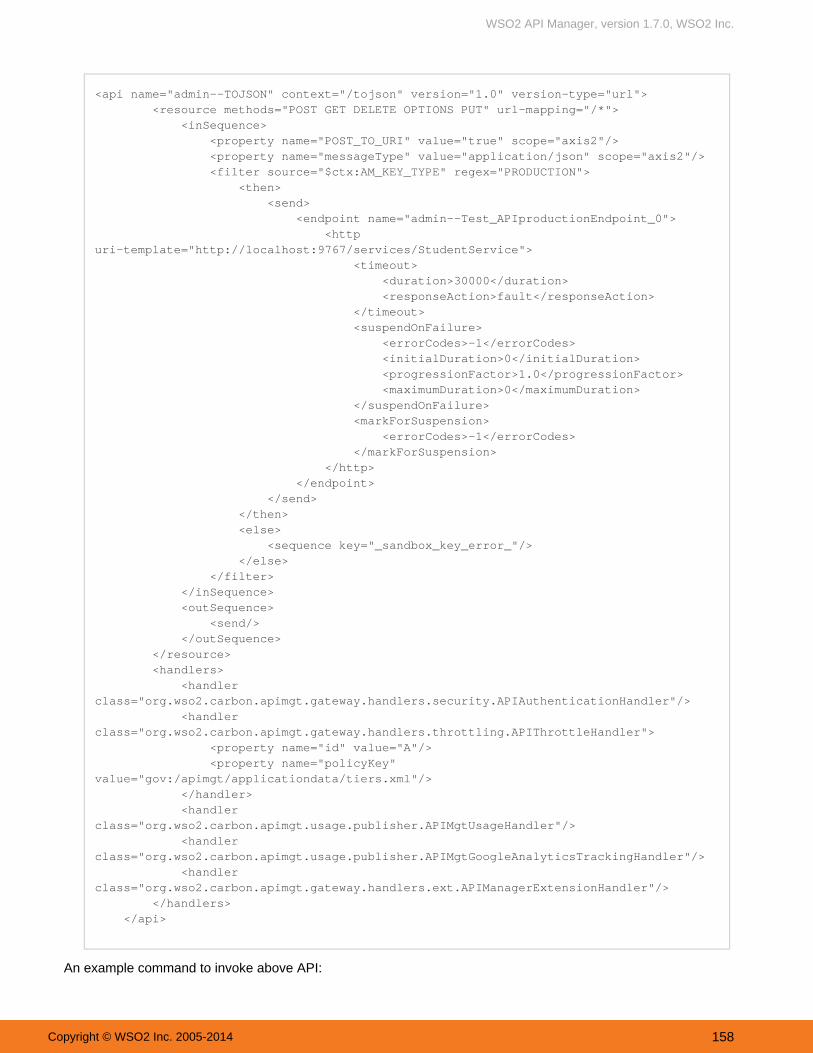
WSO2 API Manager, version 1.7.0, WSO2 Inc.
Copyright © WSO2 Inc. 2005-2014 158
<api name="admin--TOJSON" context="/tojson" version="1.0" version-type="url"> <resource methods="POST GET DELETE OPTIONS PUT" url-mapping="/*"> <inSequence> <property name="POST_TO_URI" value="true" scope="axis2"/> <property name="messageType" value="application/json" scope="axis2"/> <filter source="$ctx:AM_KEY_TYPE" regex="PRODUCTION"> <then> <send> <endpoint name="admin--Test_APIproductionEndpoint_0"> <httpuri-template="http://localhost:9767/services/StudentService"> <timeout> <duration>30000</duration> <responseAction>fault</responseAction> </timeout> <suspendOnFailure> <errorCodes>-1</errorCodes> <initialDuration>0</initialDuration> <progressionFactor>1.0</progressionFactor> <maximumDuration>0</maximumDuration> </suspendOnFailure> <markForSuspension> <errorCodes>-1</errorCodes> </markForSuspension> </http> </endpoint> </send> </then> <else> <sequence key="_sandbox_key_error_"/> </else> </filter> </inSequence> <outSequence> <send/> </outSequence> </resource> <handlers> <handlerclass="org.wso2.carbon.apimgt.gateway.handlers.security.APIAuthenticationHandler"/> <handlerclass="org.wso2.carbon.apimgt.gateway.handlers.throttling.APIThrottleHandler"> <property name="id" value="A"/> <property name="policyKey"value="gov:/apimgt/applicationdata/tiers.xml"/> </handler> <handlerclass="org.wso2.carbon.apimgt.usage.publisher.APIMgtUsageHandler"/> <handlerclass="org.wso2.carbon.apimgt.usage.publisher.APIMgtGoogleAnalyticsTrackingHandler"/> <handlerclass="org.wso2.carbon.apimgt.gateway.handlers.ext.APIManagerExtensionHandler"/> </handlers> </api>
An example command to invoke above API:

WSO2 API Manager, version 1.7.0, WSO2 Inc.
Copyright © WSO2 Inc. 2005-2014 159
curl -v -X POST -H "Content-Type:application/xml" -H "Authorization: Bearer xxx"[email protected] "http://10.100.1.110:8280/tojson/1.0"
If the request payload is as follows:
<coordinates> <location> <name>Bermuda Triangle</name> <n>25.0000</n> <w>71.0000</w> </location> <location> <name>Eiffel Tower</name> <n>48.8582</n> <e>2.2945</e> </location></coordinates>
The response payload will look like this:
{ "coordinates":{ "location":[ { "name":"Bermuda Triangle", "n":25.0000, "w":71.0000 }, { "name":"Eiffel Tower", "n":48.8582, "e":2.2945 } ] }}
Note that we have used the to mark the outgoing payload to be formatted as JSON. For moreProperty mediatorinformation about the Property Mediator, see the page on WSO2 ESB documentation.Property Mediator
<property name="messageType" value="application/json" scope="axis2"/>
Similarly if the response message needs to be transformed, set the messageType property in the outSequence.

WSO2 API Manager, version 1.7.0, WSO2 Inc.
Copyright © WSO2 Inc. 2005-2014 160
<api name="admin--TOJSON" context="/tojson" version="1.0" version-type="url"> <resource methods="POST GET DELETE OPTIONS PUT" url-mapping="/*"> <inSequence> <property name="POST_TO_URI" value="true" scope="axis2"/> <filter source="$ctx:AM_KEY_TYPE" regex="PRODUCTION"> <then> <send> <endpoint name="admin--Test_APIproductionEndpoint_0"> <httpuri-template="http://localhost:9767/services/StudentService"> <timeout> <duration>30000</duration> <responseAction>fault</responseAction> </timeout> <suspendOnFailure> <errorCodes>-1</errorCodes> <initialDuration>0</initialDuration> <progressionFactor>1.0</progressionFactor> <maximumDuration>0</maximumDuration> </suspendOnFailure> <markForSuspension> <errorCodes>-1</errorCodes> </markForSuspension> </http> </endpoint> </send> </then> <else> <sequence key="_sandbox_key_error_"/> </else> </filter> </inSequence> <outSequence> <property name="messageType" value="application/json" scope="axis2"/> <send/> </outSequence> </resource> <handlers> <handlerclass="org.wso2.carbon.apimgt.gateway.handlers.security.APIAuthenticationHandler"/> <handlerclass="org.wso2.carbon.apimgt.gateway.handlers.throttling.APIThrottleHandler"> <property name="id" value="A"/> <property name="policyKey"value="gov:/apimgt/applicationdata/tiers.xml"/> </handler> <handlerclass="org.wso2.carbon.apimgt.usage.publisher.APIMgtUsageHandler"/> <handlerclass="org.wso2.carbon.apimgt.usage.publisher.APIMgtGoogleAnalyticsTrackingHandler"/> <handlerclass="org.wso2.carbon.apimgt.gateway.handlers.ext.APIManagerExtensionHandler"/> </handlers> </api>
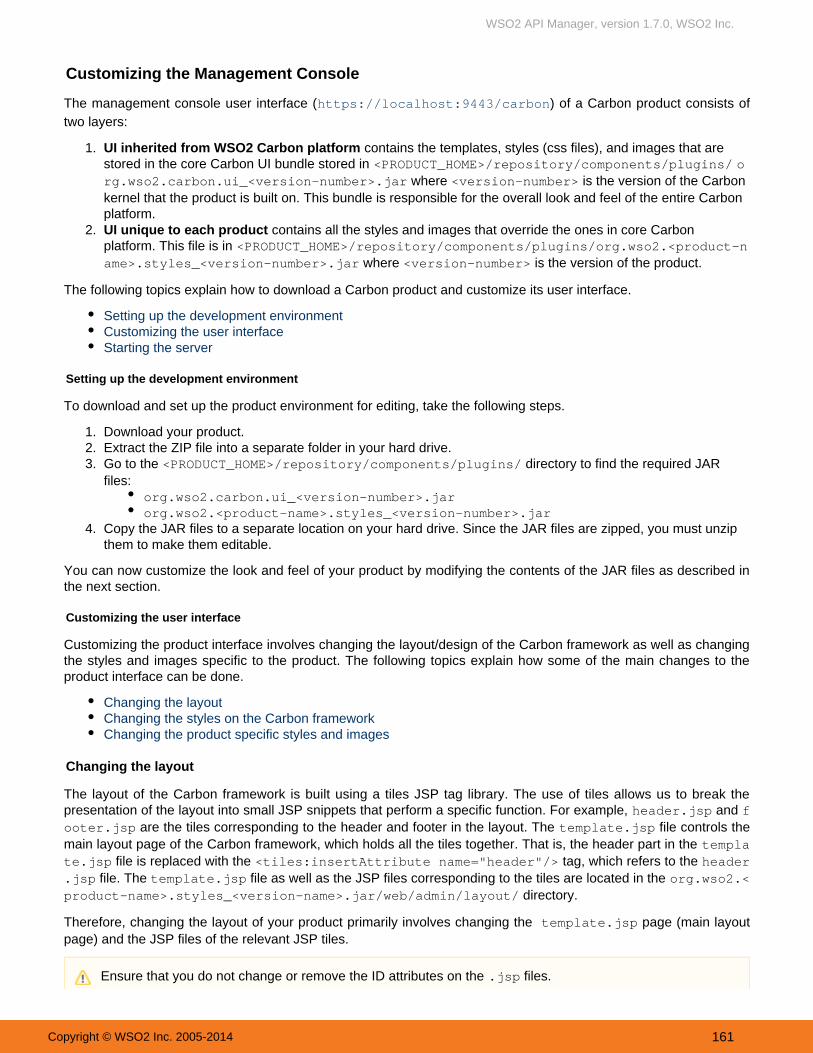
WSO2 API Manager, version 1.7.0, WSO2 Inc.
Copyright © WSO2 Inc. 2005-2014 161
1.
2.
1. 2. 3.
4.
Customizing the Management Console
The management console user interface ( ) of a Carbon product consists ofhttps://localhost:9443/carbon
two layers:
UI inherited from WSO2 Carbon platform contains the templates, styles (css files), and images that arestored in the core Carbon UI bundle stored in <PRODUCT_HOME>/repository/components/plugins/ o
where is the version of the Carbonrg.wso2.carbon.ui_<version-number>.jar <version-number>kernel that the product is built on. This bundle is responsible for the overall look and feel of the entire Carbonplatform.UI unique to each product contains all the styles and images that override the ones in core Carbonplatform. This file is in org.wso2.<product-n<PRODUCT_HOME>/repository/components/plugins/
where is the version of the product.ame>.styles_<version-number>.jar <version-number>
The following topics explain how to download a Carbon product and customize its user interface.
Setting up the development environmentCustomizing the user interfaceStarting the server
Setting up the development environment
To download and set up the product environment for editing, take the following steps.
Download your product.Extract the ZIP file into a separate folder in your hard drive. Go to the directory to find the required JAR<PRODUCT_HOME>/repository/components/plugins/files:
org.wso2.carbon.ui_<version-number>.jarorg.wso2.<product-name>.styles_<version-number>.jar
Copy the JAR files to a separate location on your hard drive. Since the JAR files are zipped, you must unzipthem to make them editable.
You can now customize the look and feel of your product by modifying the contents of the JAR files as described inthe next section.
Customizing the user interface
Customizing the product interface involves changing the layout/design of the Carbon framework as well as changingthe styles and images specific to the product. The following topics explain how some of the main changes to theproduct interface can be done.
Changing the layoutChanging the styles on the Carbon frameworkChanging the product specific styles and images
Changing the layout
The layout of the Carbon framework is built using a tiles JSP tag library. The use of tiles allows us to break thepresentation of the layout into small JSP snippets that perform a specific function. For example, and header.jsp f
are the tiles corresponding to the header and footer in the layout. The file controls theooter.jsp template.jspmain layout page of the Carbon framework, which holds all the tiles together. That is, the header part in the templa
file is replaced with the tag, which refers to the te.jsp <tiles:insertAttribute name="header"/> header file. The file as well as the JSP files corresponding to the tiles are located in the .jsp template.jsp org.wso2.<
directory.product-name>.styles_<version-name>.jar/web/admin/layout/
Therefore, changing the layout of your product primarily involves changing the page (main layout template.jsppage) and the JSP files of the relevant JSP tiles.
Ensure that you do not change or remove the ID attributes on the files..jsp

WSO2 API Manager, version 1.7.0, WSO2 Inc.
Copyright © WSO2 Inc. 2005-2014 162
1. 2.
3.
1.
2.
3.
1.
2.
Changing the styles on the Carbon framework
The file, which determines the styles of the Carbon framework, is located in the global.css org.wso2.carbon. directory. You can edit this file as per your requirement.ui_<version-name>.jar/web/admin/css/
Alternatively, you can apply a completely new stylesheet to your framework instead of the default stylglobal.css esheet.
To apply a new style sheet to the carbon framework:
Copy your new CSS file to this same location. Open the file located in the template.jsp org.wso2.carbon.ui_<version-name>.jar/web/admin
directory, which contains the main layout of the page and the default JavaScript libraries. /layout/Replace with the new style sheet by pointing the attribute to the newglobal.css String globalCSSstylesheet file.
//Customization of UI theming per tenant String tenantDomain = null; String globalCSS = "../admin/css/global.css"; String mainCSS = "";
Changing the product specific styles and images
The styles and images unique to your product is location in the org.wso2.<product-name>.styles_<version folder. To modify product specific styles and images, take the following steps.-number>.jar
Copy the necessary images to the org.wso2.<product-name>.styles_<version-number>.jar/we directory. For example, if you want to change the product banner, add the new imageb/styles/images/
file to this directory.Open the file located in the main.css org.wso2.<product-name>.styles_<version-name>.jar/w
directory.eb/styles/css/To specify a new product banner, change the attribute of background-image org.wso2.<product-name
file as follows:main.css>.styles_<version-name>.jar/web/styles/css/
/* ---------------- header styles ------------------ */div#header-div { background-image: url( ../images/newproduct-header-bg.png); height:70px;}
Starting the server
In the preceding steps, you have done the changes to the product interface after copying the JAR files to a separatelocation on your hard drive. Therefore, before you start your production server, these files must be correctly copiedback to your production environment as explained below.
Compress the contents of the and org.wso2.carbon.ui_<version-number>.jar org.wso2.<produ folders into separate ZIP files.ct-name>.styles_<product-version>.jar
Change the name of the ZIP file to and org.wso2.carbon.ui_<version-number>.jar org.wso2.<pr
Note that the size of the images you use will affect the overall UI of your product. For example, if the heightof the product logo image exceeds 28 pixels, you must adjust the file in the main.css org.wso2.<produ
directory to ensure that the other UIct-name>.styles_<version-name>.jar/web/styles/css/elements of your product aligns with the product logo.

WSO2 API Manager, version 1.7.0, WSO2 Inc.
Copyright © WSO2 Inc. 2005-2014 163
2.
3.
4.
respectively.oduct-name>.styles_<version-number>.jarCopy these two new JAR files to the / directory in<PRODUCT_HOME> repository/components/plugins/your product installation.Start the server.
Writing Test Cases
You can use WSO2 Test Automation Framework (TAF) to write automated test scripts for the API Manager. For anexample, see in TAF documentation.Writing a Test Case for API Manager
Working with Security
WSO2 API Manager provides many methods for implementing and managing security, as described in the followingtopics:
Passing Enduser Attributes to the Backend Using JWTSaving Access Tokens in Separate TablesFixing Security VulnerabilitiesEncrypting Passwords
Passing Enduser Attributes to the Backend Using JWT
To authenticate endusers, the API Manager passes attributes of the API invoker to the backend API implementation.is used to represent claims that are transferred between the enduser and the backend. AJSON Web Token (JWT)
claim is an attribute of the user that is mapped to the underlying user store. A set of claims is called a dialect (e.g., h). ttp://wso2.org/claims The general format of a JWT is {token infor}.{claims list}.{signature}.
The API implementation uses information such as logging, content filtering and authentication/authorization that is Fstored in this token. The token is Base64-encoded and sent to the API implementation in a HTTP header variable.
or more information on JWT, look here.
An example of a JWT passed in the API Manager is given below:
{ "typ":"JWT", "alg":"NONE" }{ "iss":"wso2.org/products/am", "exp":1345183492181, "http://wso2.org/claims/subscriber":"admin", "http://wso2.org/claims/applicationname":"app2", "http://wso2.org/claims/apicontext":"/placeFinder", "http://wso2.org/claims/version":"1.0.0", "http://wso2.org/claims/tier":"Silver", "http://wso2.org/claims/enduser":"sumedha" }
The above token contains,
Token expiration time ("exp")Subscriber to the API, usually the app developer (" ")http://wso2.org/claims/subscriberApplication through which API invocation is done (" ")http://wso2.org/claims/applicationnameContext of the API (" ")http://wso2.org/claims/apicontextAPI version (" ")http://wso2.org/claims/versionTier/price band for the subscription (" ")http://wso2.org/claims/tierEnduser of the app who's action invoked the API (" ")http://wso2.org/claims/enduser
Configuring JWT

WSO2 API Manager, version 1.7.0, WSO2 Inc.
Copyright © WSO2 Inc. 2005-2014 164
1.
2.
Given below is how to configure JWT generation in the API Manager.
Open file and enable JWT as follows.<APIM api-manager.xml_HOME>/repository/conf/
<EnableTokenGeneration>true</EnableTokenGeneration>
Configure the rest of the elements in the same XML file as described in the table below. If you do not specifyvalues to the elements, the default values will be applied.
Element Description
<SecurityContextHeader/> The name of the HTTP header to which the JWT is attached.
<ClaimsRetrieverImplClass/> By default, the following are encoded to the JWT:
subscriber nameapplication name API contextAPI versionauthorised resource owner name
In addition, you can also write your own class by extending the interface . Theorg.wso2.carbon.apimgt.impl.token.ClaimsRetrievermethods in this interface are described below:
Method Description
void init() throwsAPIManagementException;
Used to perform initialization tasks. Is executed once, right before the very first request.
SortedMap<String,String>getClaims(StringendUserName) throwsAPIManagementException;
Returns a sorted map of claims. The key of the map indicates the user attribute name and the value indicates thecorresponding user attribute value. The order in which these keys and values are encoded depends on theordering defined by the sorted map.
String getDialectURI(StringendUserName);
The dialect URI to which the attribute names returned by the method are appended to. ForgetClaims()example,if the method returns and the retgetClaims { , }email:[email protected] gender:male getDialectURI()urns , the JWT will contain http://wso2.org/claims “http://wso2.org/claims/gender”:“user1@wso
as part of the body.2.com”,“http://wso2.org/claims/email”:“male”
The default implementation ( ) returnsorg.wso2.carbon.apimgt.impl.token.DefaultClaimsRetrieverthe user's attributes defined under the dialect URI and the JWT will also be encodedhttp://wso2.org/claimswith the same dialect URI. The order of encoding the user's attributes is the natural order of the attributes. If novalue is specified, no additional claims will be encoded, except the 6 default attributes.
<ConsumerDialectURI/> The dialect URI under which the user's claims are be looked for. Only works with the default value of element<ClaimsRetrieverImplClass>defined above.
JWT token contains all claims define in the element. The default value of this element is .<ConsumerDialectURI> http://wso2.org/claimsTo get a list of users to be included in the JWT, simply uncomment this element after enabling JWT. It will include all claims in http://wso2.org
to the JWT token./claims
If you publish APIs before JWT is enabled, you have to republish them to include JWT.

WSO2 API Manager, version 1.7.0, WSO2 Inc.
Copyright © WSO2 Inc. 2005-2014 165
.Configuring Secondary User Stores
2.
<SignatureAlgorithm/> The signing algorithm used to sign the JWT. The general format of the JWT is . {token infor}.{claims list}.{signature} When NONEis specified as the algorithm, signing is turned off and the JWT looks as , with two strings delimited by a period{token infor}.{claims list}
and a period at the end.
This element can have only two values - the default value (SHA256WITHRSA) or NONE.
Saving Access Tokens in Separate Tables
You can configure the API Manager instances to store access tokens in different tables according to their user storedomain. This is referred to as and it ensures better security when there are multiple useruser token partitioningstores configured in the system. For information on configuring user stores other than the default one, see
To enable user token partitioning, you should change the <EnableAssertion and elements in <APIM_HOME>/repository/conf/identity.xml file.s> <AccessTokenPartitioning>
<EnableAssertions>
Assertions are used to embed parameters into tokens in order to generate a strong access token. You can also usethese parameters later for various other processing functionality. At the moment, API Manager only supportsUserName as an assertion.
By default, assertions are set to in <APIM_HOME>/repository/conf/identity.xml.false
<EnableAssertions> <UserName>false</UserName></EnableAssertions>
You can make it true by setting element to . You can add a user name to an access token when<UserName> truegenerating the key, and verify it by Base64-decoding the retrieved access token.
<AccessTokenPartitioning>
This parameter implies whether you need to store the keys in different tables or not. It can be used only if <UserNa assertion is enabled. If it is, set the element to true inme> <EnableAccessTokenPartitioning>
<APIM_HOME>/repository/conf/identity.xml to store the keys in different tables.
<EnableAccessTokenPartitioning>true</EnableAccessTokenPartitioning>
Also set the user store domain names and mappings to new table names. For example,
if userId = foo.com/admin where 'foo.com' is the user store domain name, then a 'mapping:domain' combocan be defined as 'A:foo.com'.'A' is the mapping for the table that stores tokens relevant to users coming from 'foo.com' user store.
In this case, the actual table name is 'IDN_OAUTH2_ACCESS_TOKEN_A'. We use a mapping simply to preventany issues caused by lengthy tables names when lengthy domain names are used. You need to manually create thetables you are going to use to store the access tokens in each user-store (i.e., tables'IDN_OAUTH2_ACCESS_TOKEN_A' and 'IDN_OAUTH2_ACCESS_TOKEN_B' should be manually createdaccording to the following defined domain mapping). This table structure is similar to the'IDN_OAUTH2_ACCESS_TOKEN' table defined in api-manager dbscript, which is inside<AMIM_HOME>/dbscripts/apimgt directory.
In a multi-tenanted setup with JWT token generation enabled, if a user who is in a secondary user store triesto invoke an API published within the same tenant store, you get an error. This issue is fixed from 1.8.0version onwards.

WSO2 API Manager, version 1.7.0, WSO2 Inc.
Copyright © WSO2 Inc. 2005-2014 166
1. 2. 3.
You can provide multiple mappings separated by commas as follows. Note that the domain names need to bespecified in upper case.
<AccessTokenPartitioningDomains>A:FOO.COM, B:BAR.COM</AccessTokenPartitioningDomains>
According to the information given above, change the element in the identity.xml file as shown<APIKeyManager>in the following example:
identity.xml
<!-- Assertions can be used to embedd parameters into access token.--><EnableAssertions> <UserName>false</UserName></EnableAssertions>
<!-- This should be set to true when using multiple user stores and keys should savedinto different tables according to the user store. By default all the application keysare saved in to the same table. UserName Assertion should be 'true' to use this.--><AccessTokenPartitioning> <EnableAccessTokenPartitioning>false</EnableAccessTokenPartitioning> <!-- user store domain names and mappings to new table names. eg: if you provide'A:foo.com', foo.com should be the user store domain name and 'A' represent the relavant mapping of token storing table, i.e. tokensrelevant to the users comming from foo.com user store will be added to a table called IDN_OAUTH2_ACCESS_TOKEN_A. --> <AccessTokenPartitioningDomains><!-- A:foo.com, B:bar.com--></AccessTokenPartitioningDomains></AccessTokenPartitioning>
Fixing Security Vulnerabilities
A cipher algorithm encryption decryption. You can disable the weak ciphers in the Tomcat is an for performing or server by modifying the attribute in the SSL Connector container, which is in the fcipher catalina-server.xmlile. Enter the ciphers that you want your server to support in a comma-separated list. By default, all ciphers, whetherthey are strong or weak, will be enabled. However, if you do not add the attribute or keep it blank, all SSLcipherciphers by JSSE will be supported by your server. This will enable the weak ciphers.
The steps below explain how to disable weak and enable strong ciphers in a product:
Take a backup of file.<PRODUCT_HOME>/repository/conf/tomcat/catalina-server.xmlStop the server.Add the attribute to the existing configuration in the file with the list ofcipher catalina-server.xmlciphers that you want your server to support as follows:
ciphers="<cipher-name>,<cipher-name>"
The code below shows how a connector looks after an example configuration is done:
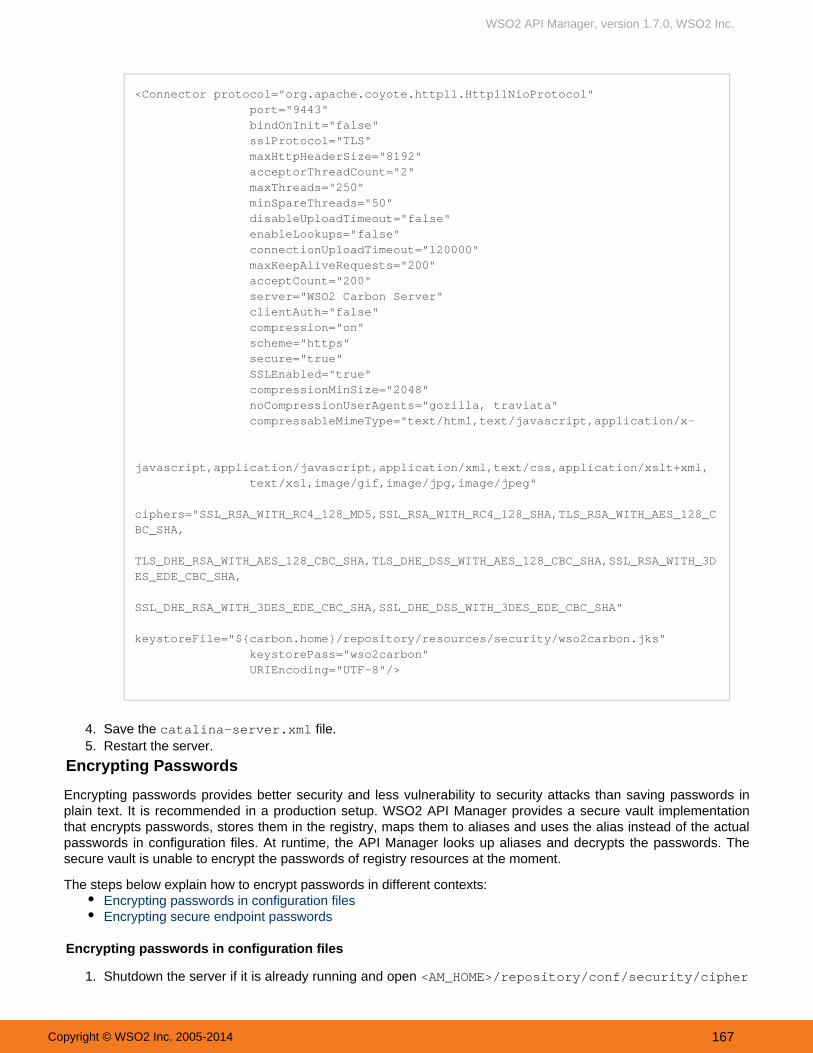
WSO2 API Manager, version 1.7.0, WSO2 Inc.
Copyright © WSO2 Inc. 2005-2014 167
3.
4. 5.
1.
<Connector protocol="org.apache.coyote.http11.Http11NioProtocol" port="9443" bindOnInit="false" sslProtocol="TLS" maxHttpHeaderSize="8192" acceptorThreadCount="2" maxThreads="250" minSpareThreads="50" disableUploadTimeout="false" enableLookups="false" connectionUploadTimeout="120000" maxKeepAliveRequests="200" acceptCount="200" server="WSO2 Carbon Server" clientAuth="false" compression="on" scheme="https" secure="true" SSLEnabled="true" compressionMinSize="2048" noCompressionUserAgents="gozilla, traviata" compressableMimeType="text/html,text/javascript,application/x- javascript,application/javascript,application/xml,text/css,application/xslt+xml, text/xsl,image/gif,image/jpg,image/jpeg" ciphers="SSL_RSA_WITH_RC4_128_MD5,SSL_RSA_WITH_RC4_128_SHA,TLS_RSA_WITH_AES_128_CBC_SHA, TLS_DHE_RSA_WITH_AES_128_CBC_SHA,TLS_DHE_DSS_WITH_AES_128_CBC_SHA,SSL_RSA_WITH_3DES_EDE_CBC_SHA, SSL_DHE_RSA_WITH_3DES_EDE_CBC_SHA,SSL_DHE_DSS_WITH_3DES_EDE_CBC_SHA" keystoreFile="${carbon.home}/repository/resources/security/wso2carbon.jks" keystorePass="wso2carbon" URIEncoding="UTF-8"/>
Save the file.catalina-server.xmlRestart the server.
Encrypting Passwords
Encrypting passwords provides better security and less vulnerability to security attacks than saving passwords inplain text. It is recommended in a production setup. WSO2 API Manager provides a secure vault implementationthat encrypts passwords, stores them in the registry, maps them to aliases and uses the alias instead of the actualpasswords in configuration files. At runtime, the API Manager looks up aliases and decrypts the passwords. Thesecure vault is unable to encrypt the passwords of registry resources at the moment.
The steps below explain how to encrypt passwords in different contexts: Encrypting passwords in configuration filesEncrypting secure endpoint passwords
Encrypting passwords in configuration files
Shutdown the server if it is already running and open <AM_HOME>/repository/conf/security/cipher
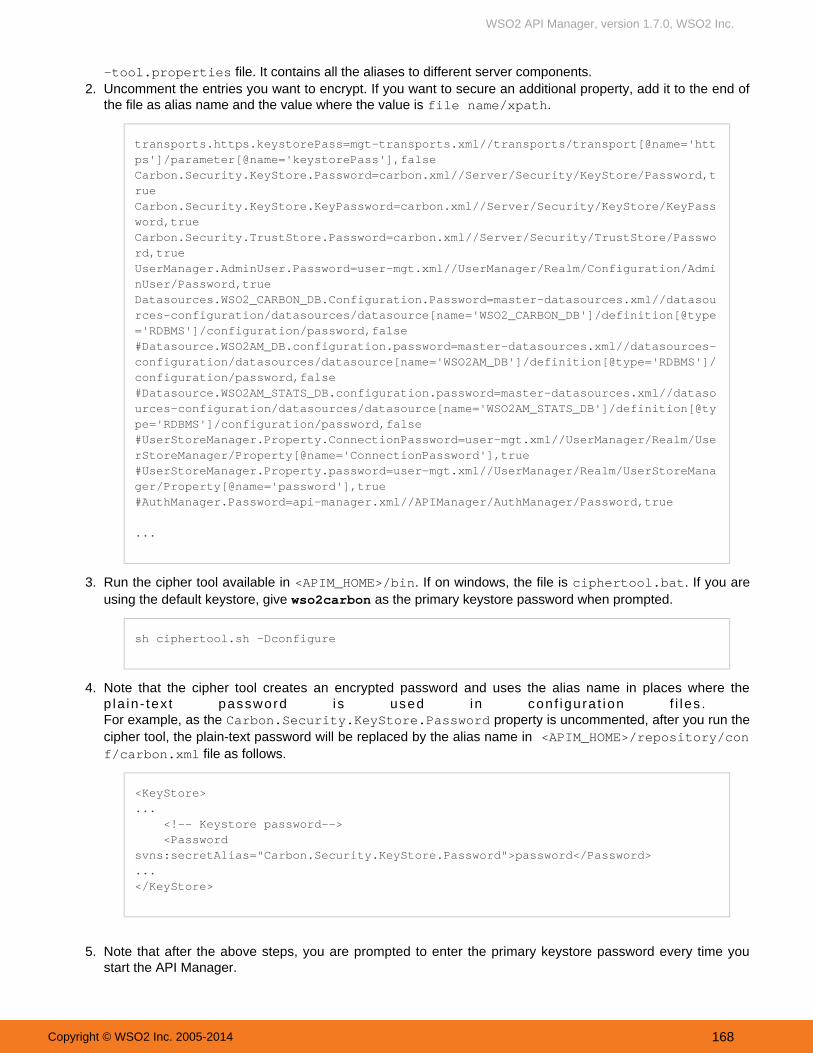
WSO2 API Manager, version 1.7.0, WSO2 Inc.
Copyright © WSO2 Inc. 2005-2014 168
1.
2.
3.
4.
5.
file. It contains all the aliases to different server components.-tool.propertiesUncomment the entries you want to encrypt. If you want to secure an additional property, add it to the end ofthe file as alias name and the value where the value is .file name/xpath
transports.https.keystorePass=mgt-transports.xml//transports/transport[@name='https']/parameter[@name='keystorePass'],falseCarbon.Security.KeyStore.Password=carbon.xml//Server/Security/KeyStore/Password,trueCarbon.Security.KeyStore.KeyPassword=carbon.xml//Server/Security/KeyStore/KeyPassword,trueCarbon.Security.TrustStore.Password=carbon.xml//Server/Security/TrustStore/Password,trueUserManager.AdminUser.Password=user-mgt.xml//UserManager/Realm/Configuration/AdminUser/Password,trueDatasources.WSO2_CARBON_DB.Configuration.Password=master-datasources.xml//datasources-configuration/datasources/datasource[name='WSO2_CARBON_DB']/definition[@type='RDBMS']/configuration/password,false#Datasource.WSO2AM_DB.configuration.password=master-datasources.xml//datasources-configuration/datasources/datasource[name='WSO2AM_DB']/definition[@type='RDBMS']/configuration/password,false#Datasource.WSO2AM_STATS_DB.configuration.password=master-datasources.xml//datasources-configuration/datasources/datasource[name='WSO2AM_STATS_DB']/definition[@type='RDBMS']/configuration/password,false#UserStoreManager.Property.ConnectionPassword=user-mgt.xml//UserManager/Realm/UserStoreManager/Property[@name='ConnectionPassword'],true#UserStoreManager.Property.password=user-mgt.xml//UserManager/Realm/UserStoreManager/Property[@name='password'],true#AuthManager.Password=api-manager.xml//APIManager/AuthManager/Password,true
...
Run the cipher tool available in . If you are<APIM_HOME>/bin If on windows, the file is .ciphertool.batusing the default keystore, give as the primary keystore password when prompted. wso2carbon
sh ciphertool.sh -Dconfigure
Note that the cipher tool creates an encrypted password and uses the alias name in places where thep la in - tex t password i s used in con f igura t ion f i l es . For example, as the property is uncommented, after you run theCarbon.Security.KeyStore.Passwordcipher tool, the plain-text password will be replaced by the alias name in <APIM_HOME>/repository/con
file as follows.f/carbon.xml
<KeyStore>... <!-- Keystore password--> <Passwordsvns:secretAlias="Carbon.Security.KeyStore.Password">password</Password>...</KeyStore>
Note that after the above steps, you are prompted to enter the primary keystore password every time youstart the API Manager.

WSO2 API Manager, version 1.7.0, WSO2 Inc.
Copyright © WSO2 Inc. 2005-2014 169
5.
1.
2.
3.
Encrypting secure endpoint passwords
When creating an API using the API Publisher, you specify the endpoint of its backend implementation in the Imple tab. If you select the endpoint as secured, you are prompted to give credentials in plain-text.ment
The steps below show how to secure the endpoint's password that is given in plain-text in the UI.
Shutdown the server if it is already running and set the element in <EnableSecureVault> <APIM_HOME> to . By default, the system stores passwords in configuration/repository/conf/api-manager.xml true
files in plain text because this values is set to .false Define synapse property in the synapse.properties file as follows: synapse.xpath.func.extensions=org.wso2.carbon.mediation.security.vault.xpath.SecureVaultLookupXPathFunctionProvider.Run the cipher tool available in . If you are<APIM_HOME>/bin If on windows, the file is .ciphertool.batusing the default keystore, give as the primary keystore password when prompted. wso2carbon
sh ciphertool.sh -Dconfigure
Tip: See for information on configuring cipher at the Tomcat level.Fixing Security Vulnerabilities

WSO2 API Manager, version 1.7.0, WSO2 Inc.
Copyright © WSO2 Inc. 2005-2014 170
Admin GuideThe following topics explore various product deployment scenarios and other topics useful for systemadministrators.
Managing Users and RolesDeploying and Clustering the API ManagerWorking with DatabasesConfiguring CachingConfiguring Single Sign-on with SAML 2.0Maintaining Primary and Secondary LoginsAdding Internationalization and LocalizationAdding New Throttling TiersMaintaining Separate Production and Sandbox GatewaysChanging the Default TransportRunning the Product on a Preferred ProfileTuning PerformanceDirecting the Root Context to API StoreChanging the Default Ports with OffsetAdding Links to Navigate Between the Store and PublisherMigrating the API ManagerConfiguring WSO2 Identity Server as the Key ManagerConfiguring Multiple Tenants
Managing Users and Roles
This chapter contains the following information:
User Roles in the API ManagerAdding UsersConfiguring User Stores
User Roles in the API Manager
Roles contain permissions for users to manage the server. You can create different roles with various combinationsof permissions and assign them to a user or a group of users. User roles can be reused throughout the system and
Through the Managementprevent the overhead of granting multiple permissions to each and every user individually.Console, you can also edit and delete an existing user role.
WSO2 API Manager allows you to log in to the Management Console as an admin user, and create custom roleswith different levels of permission. These roles can then be assigned to different users according to yourrequirement. are typically used in many organizational situations:We identify four distinct user roles that
Admin : Admin is the API management provider, who hosts and manages the . S/he isAPI Gatewayresponsible for creating user roles in the system, assign users to roles, managing databases, security etc.Also see the . The Admin role is available by default with credentials admin/admin.Admin Guidecreator: A creator is typically a person in a technical role who understands the technical aspects of the API(coding, interfaces, documentation, versions, how it is exposed by API gateway) and uses the API PublisherWeb application to develop and provision APIs into the . The creator uses the API store to consultAPI storeratings and feedback provided by API consumers. Creator can add APIs to the store but cannot manage theirlifecycles (that is, make them visible to the outside world).publisher: A publisher is typically a person in a managerial role and overlooks a set of APIs across theenterprise or a business unit, and controls the API lifecycle and monetization aspects. The publisher alsoanalyzes usage patterns for APIs and has access to all API statistics.
consumer : A consumer is typically an anonymous user or an application developer who searches the API to discover APIs and use them. He/she reads the documentation, forums, rates/comments on APIs.store
Administrators of the API Manager can use the Management Console UI to add user roles. Roles contain different
We have identified the three roles above as common in many organizational situations. They are used throughout this documentation.However, you can also define different user roles depending on your unique requirements.

WSO2 API Manager, version 1.7.0, WSO2 Inc.
Copyright © WSO2 Inc. 2005-2014 171
.Running the Product1.
2.
3.
4.
levels of permissions to manage the Server. You can create different roles with various combinations of permissions. Follow the instructions below to create the , and roles.creator publisher subscriber
Creating user roles
Log in to the Management Console ( ) andhttps://localhost:9443/carbon select Users and Roles under the Co nfigure menu. For instructions on accessing the Management Console, see
In the User Management page that opens, click andRoles Add New Role link.Adding the creator roleAdding the publisher roleThe default subscriber role
Adding the rolecreator
Add user role as and click .creator Next The drop-down list contains all user stores configured forDomainthis product instance. By default, you only have the PRIMARY user store. To configure secondary userstores, see .Configuring Secondary User Stores
Give the following privileges to the creator role. You can select them from the list of permissions that appears.Configure > Governance and all underlying permissions.LoginManage > API > Create Manage > Resources > Govern and all underlying permissions

WSO2 API Manager, version 1.7.0, WSO2 Inc.
Copyright © WSO2 Inc. 2005-2014 172
4.
5.
6.
Any user with the above permissions assigned is able to create, update and manage APIs using the A PI Publisher Web interface.
Click Finish once you are done adding permission. The role will be listed in the Roles window as follows:
From here, you can rename, edit, delete or assign users to the role.
Adding the rolepublisher
In the page, add user role as and click .Add Role publisher Next The drop-down list contains allDomain

WSO2 API Manager, version 1.7.0, WSO2 Inc.
Copyright © WSO2 Inc. 2005-2014 173
6.
7.
8.
9.
user stores configured for this product instance. By default, you only have the PRIMARY user store. Toconfigure secondary user stores, see .Configuring Secondary User Stores
Give the following privileges to the publisher role by selecting them from the list of permissions that appears. LoginManage > API > Publish
Any user with the above permissions assigned is able to manage the API's life cycle using the API Publisher
Web interface. Click Finish once you are done adding permission. The role will be listed in the Roles window as follows:
From here, you can rename, edit, delete or assign users to the role.
The default rolesubscriber
When you first log in to the Management Console, you can see the subscriber role already there, defined outof the box. The reason is because API Manager assigns this default subscriber role to all users who self-regis
.ter to the API Store
Follow the instructions below to create a different role with the same permission levels.In the window, add a suitable name for the role and click .Add Role Next For example,

WSO2 API Manager, version 1.7.0, WSO2 Inc.
Copyright © WSO2 Inc. 2005-2014 174
Users are consumers who interact with your organizational applications, databases or any other systems. Theseusers can be a person, a device or another application/program within or outside of the organization's network.
9.
10.
11. 12.
1.
Give the following privileges to the new role.LoginManage > API > Subscribe
Any user with the above permissions assigned is able to log in to the API Store and perform operations on the published APIs.
Click Finish once you are done adding permission. The role will be listed in the Roles window.Open and <APIM_HOME>/repository/conf/ file api-manager.xml edit the element to<SelfSignUp>
reflect the newly added role. For example,
<SelfSignUp> <Enabled>true</Enabled> <SubscriberRoleName>NewSubscriber</SubscriberRoleName> <CreateSubscriberRole>true</CreateSubscriberRole></SelfSignUp>
Editing this file ensures that all users who self-sign-up to API Store are automatically assigned the NewSubsc role.riber
Adding Users
Note: The parameter specifies whether the subscriber role should be<CreateSubscriberRole>created in the local user store or not. It is only used when the API subscribers are authenticatedagainst the local user store. That means the local Carbon server is acting as the AuthManager.
Set this parameter to false if a remote Carbon server acts as the AuthManager.

WSO2 API Manager, version 1.7.0, WSO2 Inc.
Copyright © WSO2 Inc. 2005-2014 175
Follow the steps below to create users and assign them to roles that you created in section . Also see how to add an of a user.User Roles in the API Manager e-mail address as the username
Since these users interact with internal systems and access data, the need to define which user is allowed to do To enable users to log into the product'swhat is critical. This is how the concept of user management developed.
management console, you create user accounts and assign them roles, which are sets of permissions. You can addindividual users or import users in bulk.
1.
2.
3.
4.
5.
from the Management Console and select Users and Roles the Configure menu.
Cl ick Users in the window that opens.User Management
C l i c k .A d d N e w U s e r
The Add User page opens. Provide the user name and password and click . The drop-downNext Domainlist contains all user stores configured for this product instance. By default, you only have the PRIMARY userstore. To configure other user stores, see .Configuring User Stores
Select the roles you want to assign to the user. In this example, we assign the user the role definedcreator
The Users link is only visible to users with administrator permission. It is used to add new user accountsand modify or delete existing accounts. The user has administrator privileges.admin

WSO2 API Manager, version 1.7.0, WSO2 Inc.
Copyright © WSO2 Inc. 2005-2014 176
5.
6. in section .User Roles in the API Manager
Click Finish to complete. The new use appears in the Users list.
From here, you can change the user's password, assign different roles or delete it. Since the apicreator user isassigned the creator role, it now has permission to create and manage APIs through the API Manager. Similarly,you can create users and assign them the publisher and subscriber roles.
Using the e-mail as the username
When adding a user, if you provide an e-mail address as the username, modify the following files accordingly:
In file, set <AM_HOME>/repository/conf/carbon.xml <EnableEmailUserName>true</EnableEmailUserName>In file, set<AM_HOME>/repository/conf/api-manager.xml
<LoginConfig> <UserIdLogin primary="true"> <ClaimUri></ClaimUri> </UserIdLogin> <EmailLogin primary="false"> <ClaimUri>http://wso2.org/claims/emailaddress</ClaimUri> </EmailLogin> </LoginConfig>
In file, set<AM_HOME>/repository/conf/user-mgt.xml
<UserStoreManager class="org.wso2.carbon.user.core.jdbc.JDBCUserStoreManager"> ... <Property name="IsEmailUserName">true</Property> <Propertyname="UsernameWithEmailJavaScriptRegEx">[a-zA-Z0-9@._-|//]{3,30}$</Property> ... </UserStoreManager>
Configuring User Stores
You cannot change the user name of an existing user.
If there are set up in your environment, e-mail login does not work for any tenant includingmultiple tenantsthe super tenant. This facility is currently only available in single tenant mode (i.e., users of the carbon.su
tenant only). However, this limitation per does not apply to user provisioning based on a social networklogin.
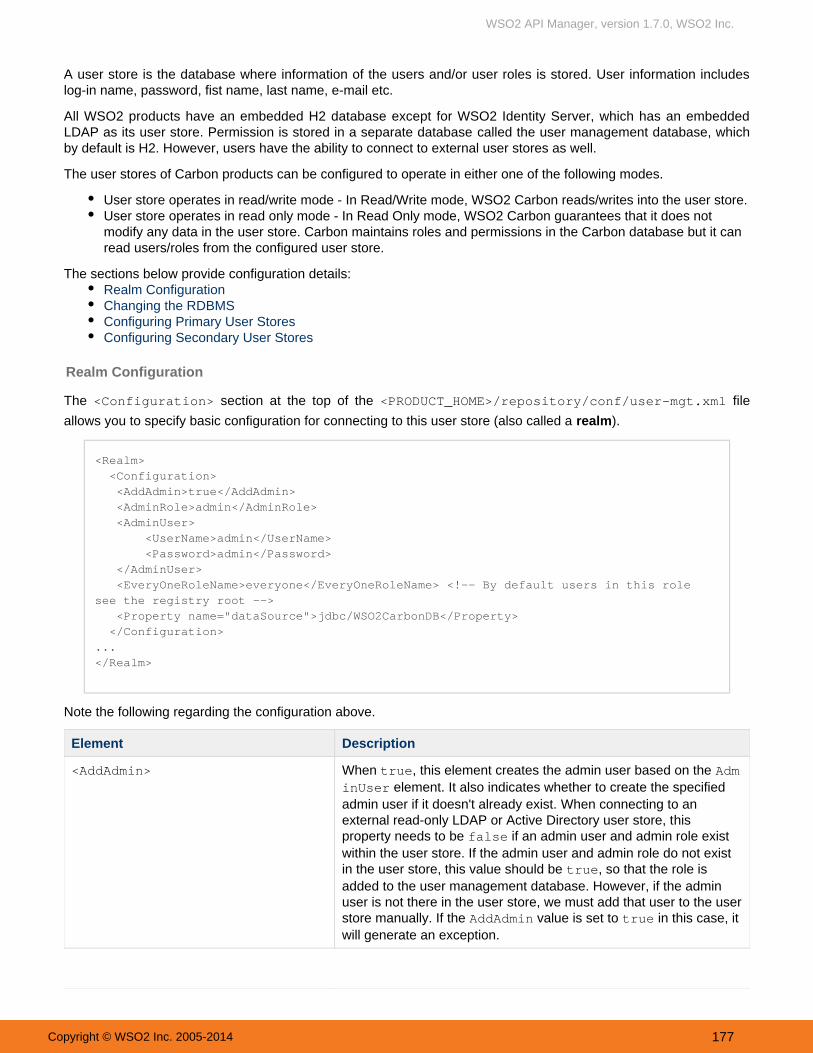
WSO2 API Manager, version 1.7.0, WSO2 Inc.
Copyright © WSO2 Inc. 2005-2014 177
A user store is the database where information of the users and/or user roles is stored. User information includeslog-in name, password, fist name, last name, e-mail etc.
All WSO2 products have an embedded H2 database except for WSO2 Identity Server, which has an embeddedLDAP as its user store. Permission is stored in a separate database called the user management database, whichby default is H2. However, users have the ability to connect to external user stores as well.
The user stores of Carbon products can be configured to operate in either one of the following modes.
User store operates in read/write mode - In Read/Write mode, WSO2 Carbon reads/writes into the user store.User store operates in read only mode - In Read Only mode, WSO2 Carbon guarantees that it does notmodify any data in the user store. Carbon maintains roles and permissions in the Carbon database but it canread users/roles from the configured user store.
The sections below provide configuration details:Realm ConfigurationChanging the RDBMSConfiguring Primary User StoresConfiguring Secondary User Stores
Realm Configuration
The at the top of the file section<Configuration> <PRODUCT_HOME>/repository/conf/user-mgt.xml
allows you to specify basic configuration for connecting to this user store (also called a ).realm
<Realm> <Configuration> <AddAdmin>true</AddAdmin> <AdminRole>admin</AdminRole> <AdminUser> <UserName>admin</UserName> <Password>admin</Password> </AdminUser> <EveryOneRoleName>everyone</EveryOneRoleName> <!-- By default users in this rolesee the registry root --> <Property name="dataSource">jdbc/WSO2CarbonDB</Property> </Configuration>...</Realm>
Note the following regarding the configuration above.
Element Description
<AddAdmin> When , this element creates the admin user based on the true Adm element. inUser It also indicates whether to create the specified
admin user if it doesn't already exist. When connecting to anexternal read-only LDAP or Active Directory user store, thisproperty needs to be if an admin user and admin role existfalsewithin the user store. If the admin user and admin role do not existin the user store, this value should be , so that the role istrueadded to the user management database. However, if the adminuser is not there in the user store, we must add that user to the userstore manually. If the value is set to in this case, itAddAdmin truewill generate an exception.

WSO2 API Manager, version 1.7.0, WSO2 Inc.
Copyright © WSO2 Inc. 2005-2014 178
<AdminRole>wso2admin</AdminRole> This is the role that has all administrative privileges of the WSO2product, so all users having this role are admins of the product. Youcan provide any meaningful name for this role. This role is createdin the internal H2 database when the product starts. This role haspermission to carry out any actions related to the ManagementConsole. If the user store is read-only, this role is added to thesystem as a special internal role where users are from an externaluser store.
<AdminUser> Configures the default administrator for the WSO2 product. If theuser store is read-only, the admin user must exist in the user store or the system will not start. If the external user store is read-only,you must select a user already existing in the external user storeand add it as the admin user that is defined in the el<AdminUser>ement. If the external user store is in read/write mode, and you set
to , the user you specify will be automatically<AddAdmin> truecreated.
<UserName> This is the username of the default administrator or super tenant ofthe user store. If the user store is read-only, the admin user MUSTexist in the user store for the process to work.
<Password> Do NOT put the password here but leave the default value as it is ifthe user store is read-only as this element and its value areignored. This password is used only if the user store is read-writeand the value is set to .AddAdmin true
<EveryOneRoleName> The name of the "everyone" role. All users in the system belong tothis role.
The main property given below contains details of the database connection.
PropertyName
Description Mandatory/Optional
dataSource Data sources are configured in the <PRODUCT_HOME>/repository/conf/datasou file. This property indicates the relevant datarces/master-datasources.xml
source configuration for the User Management database.
Mandatory
Given below are optional properties that can be used.
Property Name Description
Note that the password in the user-mgt.xml file is writtento the primary user store when the server starts for the firsttime. Thereafter, the password will be validated from theprimary user store and not from the user-mgt.xml file.Therefore, if you need to change the admin passwordstored in the user store, you cannot simply change thevalue in the user-mgt.xml file. To change the adminpassword, you must use the Change Password optionfrom the management console.

WSO2 API Manager, version 1.7.0, WSO2 Inc.
Copyright © WSO2 Inc. 2005-2014 179
1.
2. 3.
testOnBorrow It is recommended to set this property to 'true' so that object connections will bevalidated before being borrowed from the JDBC pool. For this property to be effective,the parameter in the validationQuery <PRODUCT_HOME>/repository/conf/da
should be a non-string value. This filetasources/master-datasources.xmlsetting will avoid connection failures. See the section on performance tuning of WSO2products for more information.
CaseSensitiveAuthorizationRules Permissions, and the rules (role name, action, resource) linked to each permission arestored in the RDBMS of the server. By default, these rules are not case sensitive. Thisproperty can be used if you want to make the rules case sensitive.
Changing the RDBMS
The default database of user manager is the H2 database that comes with WSO2 products. You can configure it topoint to databases by other vendors.
Add the JDBC driver to the by dropping the JAR into classpath <PRODUCT_HOME>/repository/compon.ents/lib
Change values of properties given in on the page appropriately. Realm ConfigurationCreate the database by running the relevant script in and restart the server: dbscript/<PRODUCT_HOME>
For Linux: or sh wso2server.sh sh wso2server.sh -DsetupFor Windows: or wso2server.bat wso2server.bat -Dsetup
Configuring Primary User Stores
Every WSO2 product comes with an embedded, internal user store, which is configured in <PRODUCT_HOME>/repo file. In WSO2 Identity Server, the embedded user store is LDAP, and in othersitory/conf/user-mgt.xml
products it is JDBC. Because the domain name (unique identifier) of this default user store is set to PRIMARY bydefault, it is called the primary user store.
Instead of using the embedded user store, you can set your own user store as the primary user store. Because theuser store you want to connect to might have different schemas from the ones available in the embedded user store,it needs to go through an adaptation process. WSO2 products provide the following adapters to enable you to
authenticate users from different types of user stores and plug into LDAP, Active Directory, and JDBC to performauthentication:
Use to do read-only operations for external LDAP user stores.ReadOnlyLDAPUserStoreManagerUse for external LDAP user stores to do both read and writeReadWriteLDAPUserStoreManageroperations.Use to configure an Active Directory Domain Service (AD DS) orActiveDirectoryUserStoreManagerActive Directory Lightweight Directory Service (AD LDS). This can be used for both read-only and read/writeoperations.Use for both internal and external JDBC user stores.JDBCUserStoreManager
The following topics provide details on the various primary user stores you can configure.
Configuring an external LDAP user store/active directoryConfiguring an internal/external JDBC user store
Configuring an external LDAP user store/active directory
All WSO2 products can read and write users and roles from external Active Directory/LDAP user stores. You canconfigure WSO2 products to access the Active Directory/LDAP user stores using one of the following modes.
Read-only modeRead/write mode
Read-only mode

WSO2 API Manager, version 1.7.0, WSO2 Inc.
Copyright © WSO2 Inc. 2005-2014 180
Active Directory User StoreLDAP User Store
1.
When you configure a product to read users/roles from your company LDAP in the 'Read Only' mode, it does notwrite any data into the LDAP.
Given below are samples for L DAP and Active Directory user stores in the <PRODUCT_HOME> /repository /conf/ user-mgt.xml file.
LDAP user store sample:
<UserManager> <Realm> <Configuration> <AdminRole>admin</AdminRole> <AdminUser> <UserName>admin</UserName> <Password>XXXXXX</Password> </AdminUser> <EveryOneRoleName>everyone</EveryOneRoleName> <!-- By default users in this role sees the registry root --> <Property name="dataSource">jdbc/WSO2CarbonDB</Property> <Propertyname="MultiTenantRealmConfigBuilder">org.wso2.carbon.user.core.config.multitenancy.SimpleRealmConfigBuilder</Property> </Configuration> <UserStoreManagerclass="org.wso2.carbon.user.core.ldap.ReadOnlyLDAPUserStoreManager"> <Propertyname="TenantManager">org.wso2.carbon.user.core.tenant.CommonHybridLDAPTenantManager</Property> <Property name="ConnectionURL">ldap://localhost:10389</Property> <Property name="ConnectionName">uid=admin,ou=system</Property> <Property name="ConnectionPassword">admin123</Property> <Property name="UserSearchBase">ou=system</Property> <Property name="UserNameListFilter">(objectClass=person)</Property> <Property name="UserNameAttribute">uid</Property> <Property name="ReadLDAPGroups">false</Property> <Property name="GroupSearchBase">ou=system</Property> <Propertyname="GroupNameSearchFilter">(objectClass=groupOfNames)</Property> <Property name="GroupNameAttribute">cn</Property> <Property name="MembershipAttribute">member</Property> </UserStoreManager> </Realm></UserManager>
Active directory user store sample:
<UserManager> <Realm> <Configuration> <AdminRole>admin</AdminRole> <AdminUser> <UserName>admin</UserName> <Password>XXXXXX</Password>

WSO2 API Manager, version 1.7.0, WSO2 Inc.
Copyright © WSO2 Inc. 2005-2014 181
1.
</AdminUser> <EveryOneRoleName>everyone</EveryOneRoleName> <!-- By default users in this role sees the registry root --> <Property name="dataSource">jdbc/WSO2CarbonDB</Property> <Propertyname="MultiTenantRealmConfigBuilder">org.wso2.carbon.user.core.config.multitenancy.SimpleRealmConfigBuilder</Property> </Configuration> <!-- Active directory configuration follows --> <UserStoreManagerclass="org.wso2.carbon.user.core.ldap.ActiveDirectoryUserStoreManager"> <Propertyname="TenantManager">org.wso2.carbon.user.core.tenant.CommonHybridLDAPTenantManager</Property> <Property name="defaultRealmName">WSO2.ORG</Property> <Property name="Disabled">false</Property>
<Property name="kdcEnabled">false</Property> <Property name="ConnectionURL">ldaps://10.100.1.100:636</Property> <Propertyname="ConnectionName">CN=admin,CN=Users,DC=WSO2,DC=Com</Property> <Property name="ConnectionPassword">A1b2c3d4</Property> <Property name="passwordHashMethod">PLAIN_TEXT</Property> <Property name="UserSearchBase">CN=Users,DC=WSO2,DC=Com</Property> <Property name="UserEntryObjectClass">user</Property> <Property name="UserNameAttribute">cn</Property> <Property name="isADLDSRole">false</Property> <Property name="userAccountControl">512</Property> <Property name="UserNameListFilter">(objectClass=user)</Property> <Propertyname="UserNameSearchFilter">(&(objectClass=user)(cn=?))</Property> <Propertyname="UsernameJavaRegEx">[a-zA-Z0-9._-|//]{3,30}$</Property> <Property name="UsernameJavaScriptRegEx">^[\S]{3,30}$</Property> <Property name="PasswordJavaScriptRegEx">^[\S]{5,30}$</Property> <Property name="RolenameJavaScriptRegEx">^[\S]{3,30}$</Property> <Propertyname="RolenameJavaRegEx">[a-zA-Z0-9._-|//]{3,30}$</Property> <Property name="ReadGroups">true</Property> <Property name="WriteGroups">false</Property> <Property name="EmptyRolesAllowed">true</Property> <Property name="GroupSearchBase">CN=Users,DC=WSO2,DC=Com</Property> <Property name="GroupEntryObjectClass">group</Property> <Property name="GroupNameAttribute">cn</Property> <Property name="SharedGroupNameAttribute">cn</Property> <Propertyname="SharedGroupSearchBase">ou=SharedGroups,dc=wso2,dc=org</Property> <Property name="SharedGroupEntryObjectClass">groups</Property> <Propertyname="SharedTenantNameListFilter">(object=organizationalUnit)</Property> <Property name="SharedTenantNameAttribute">ou</Property> <Propertyname="SharedTenantObjectClass">organizationalUnit</Property> <Property name="MembershipAttribute">member</Property> <Propertyname="GroupNameListFilter">(objectcategory=group)</Property> <Propertyname="GroupNameSearchFilter">(&(objectClass=group)(cn=?))</Property>

WSO2 API Manager, version 1.7.0, WSO2 Inc.
Copyright © WSO2 Inc. 2005-2014 182
1.
<Property name="UserRolesCacheEnabled">true</Property> <Property name="Referral">follow</Property> <Property name="BackLinksEnabled">true</Property> <Property name="MaxRoleNameListLength">100</Property> <Property name="MaxUserNameListLength">100</Property> <Property name="SCIMEnabled">false</Property> </UserStoreManager>

WSO2 API Manager, version 1.7.0, WSO2 Inc.
Copyright © WSO2 Inc. 2005-2014 183
1.
</Realm></UserManager>
The following tags in your file indicate whether it is an Active Directory or LDAP:
Active Directory: <UserStoreManagerclass="org.wso2.carbon.user.core.ldap.ActiveDirectoryUserStoreManager">LDAP: <UserStoreManagerclass="org.wso2.carbon.user.core.ldap.ReadOnlyLDAPUserStoreManager">
Find a valid user that resides in the directory server. For example, if the valid username is , updateAdminSOA
the Admin user section of your LDAP configuration as follows. You do not have to update the passwordelement; leave it as is.
<AdminRole>wso2admin</AdminRole><AdminUser> <UserName>AdminSOA</UserName> <Password>XXXXXX</Password></AdminUser>
Note the following regarding the configuration above:
Element Description
<AdminRole>wso2admin</AdminRole>
This is the role that has all administrative privileges of the WSO2 product, so all users having this role areadmins of the product. You can provide any meaningful name for this role. This role is created in theinternal H2 database when the product starts.
If you create the file yourself, be sure to save it in the user-mgt.xml <PRODUCT_HOME>/reposit directory.ory/conf

WSO2 API Manager, version 1.7.0, WSO2 Inc.
Copyright © WSO2 Inc. 2005-2014 184
1.
2.
3.
4.
5.
<AdminUser> Configure the default administrator for the WSO2 product. If the external user store is read-only, you mustselect a user already existing in the external user store and add it as the admin user within the <AdminUs
element. If the external user store is in read/write mode, even if the user you specify within the er> <Adm does not exist in the external user store, it will be automatically created. elementinUser>
<UserName> Username of the default administrator. This user MUST exist in the external LDAP. If the user store is read-only, the admin user must exist in the user store for the process to work.
<Password> Do NOT put the password here. Just leave it empty or place some stars (*) there. If the user store isread-only, this element and its value are ignored.
Update the connection details to suit your Directory Server. For example:
<Property name="ConnectionURL">ldap://localhost:10389</Property>
Obtain a user who has permission to read all users/attributes and perform searches on the Directory Serverfrom your LDAP administrator. For example, if the privileged user is "AdminLDAP" and the password is"2010#Avrudu", update the following sections of the realm configuration as follows:
<Property name="ConnectionName">uid=AdminLDAP,ou=system</Property><Property name="ConnectionPassword">2010#Avrudu</Property>
Update <Property name="UserSearchBase"> by providing the directory name where the users arestored. When LDAP searches for users, it will start from this location of the directory.
<Property name="UserSearchBase">ou=system</Property>
Set the attribute to use as the username. The most common case is to use either cn or uid as theusername. If you are not sure what attribute is available in your LDAP, check with your LDAP administrator.
If you are connecting WSO2 BAM with an external LDAP user store, be sure to change the <BAM_ file with the credentials you give inHOME>/repository/conf/etc/cassandra-auth.xml
the of the file. If not, you get an error when trying to element<AdminUser> user-mgt.xmlaccess Cassandra Keyspaces using the BAM management console. For example, if we use Admi
as the admin user, the file must be changed as follows:nSOA cassandra-auth.xml
<Cassandra> <!-- local transport --> <EPR>local://services/CassandraSharedKeyPublisher</EPR> <!-- HTTP transport --> <!-- <EPR>https://localhost:9443/services/CassandraSharedKeyPublisher</EPR>--> <User>AdminSOA</User> <Password>xxxxx</Password></Cassandra>

WSO2 API Manager, version 1.7.0, WSO2 Inc.
Copyright © WSO2 Inc. 2005-2014 185
5.
6.
7.
1.
2.
<Property name="UserNameAttribute">uid</Property>
For Active Directory this will differ as follows:
<Property name="UserNameAttribute">sAMAccountName</Property>
Optionally, configure the realm to read roles from the Directory Server by reading the user/role mappingbased on a membership (user list) or backlink attribute, as follows:
The following code snippet represents reading roles based on a membership attribute. This is used bythe server and .ApacheDirectory OpenLDAP
<Property name="ReadLDAPGroups">false</Property><Property name="GroupSearchBase">ou=system</Property><Property name="GroupSearchFilter">(objectClass=groupOfNames)</Property><Property name="GroupNameAttribute">cn</Property><Property name="MembershipAttribute">member</Property>
The following code snippet represents reading roles based on a backlink attribute. This is used by theActive Directory.
<Property name="ReadLDAPGroups">true</Property><Property name="GroupSearchBase">cn=users,dc=wso2,dc=lk</Property><Property name="GroupSearchFilter">(objectcategory=group)</Property><Property name="GroupNameAttribute">cn</Property><Property name="MemberOfAttribute">memberOf</Property>
Start your server and try to log in as "AdminSOA". The password is the AdminSOA's password in the LDAPserver.
Read/write mode
If you want to connect to an external LDAP user store, such that only the user entries are written to the externalLDAP and roles are not written to the external LDAP, the only difference from the steps in section iRead-only modes the following:
<UserStoreManagerclass="org.wso2.carbon.user.core.ldap.ReadWriteLDAPUserStoreManager">
The <PRODUCT_HOME>/repository/conf/user-mgt.xml file has commented-out configurations for externalLDAP user stores.
Enable the element in the file by uncommenting<ReadWriteLDAPUserStoreManager> user-mgt.xmlthe code. When it is enabled, the user manager reads/writes into the LDAP user store.The default configuration for the external read/write LDAP user store in the file is as follows.user-mgt.xmlChange the values according to your requirements.
Ideally, and <Property name="UserNameAttribute"> <Property should refer to the same attribute.name="UserNameSearchFilter">

WSO2 API Manager, version 1.7.0, WSO2 Inc.
Copyright © WSO2 Inc. 2005-2014 186
Active Directory User StoreLDAP User Store
2.
LDAP user store sample:
<UserStoreManagerclass="org.wso2.carbon.user.core.ldap.ReadWriteLDAPUserStoreManager"> <Propertyname="TenantManager">org.wso2.carbon.user.core.tenant.CommonHybridLDAPTenantManager</Property> <Propertyname="ConnectionURL">ldap://localhost:${Ports.EmbeddedLDAP.LDAPServerPort}</Property> <Property name="ConnectionName">uid=admin,ou=system</Property> <Property name="ConnectionPassword">admin</Property> <Property name="passwordHashMethod">SHA</Property> <Property name="UserNameListFilter">(objectClass=person)</Property> <Property name="UserEntryObjectClass">wso2Person</Property> <Property name="UserSearchBase">ou=Users,dc=wso2,dc=org</Property> <Propertyname="UserNameSearchFilter">(&(objectClass=person)(uid=?))</Property> <Property name="UserNameAttribute">uid</Property> <Property name="PasswordJavaScriptRegEx">[\\S]{5,30}</Property> <Property name="UsernameJavaScriptRegEx">[\\S]{3,30}</Property> <Propertyname="UsernameJavaRegEx">^[^~!@#$;%^*+={}\\|\\\\<>,\'\"]{3,30}$</Property> <Property name="RolenameJavaScriptRegEx">[\\S]{3,30}</Property> <Propertyname="RolenameJavaRegEx">^[^~!@#$;%^*+={}\\|\\\\<>,\'\"]{3,30}$</Property> <Property name="ReadLDAPGroups">true</Property> <Property name="WriteLDAPGroups">true</Property> <Property name="EmptyRolesAllowed">true</Property> <Property name="GroupSearchBase">ou=Groups,dc=wso2,dc=org</Property> <Property name="GroupNameListFilter">(objectClass=groupOfNames)</Property> <Property name="GroupEntryObjectClass">groupOfNames</Property> <Propertyname="GroupNameSearchFilter">(&(objectClass=groupOfNames)(cn=?))</Property> <Property name="GroupNameAttribute">cn</Property> <Property name="MembershipAttribute">member</Property> <Property name="UserRolesCacheEnabled">true</Property> <Property name="UserDNPattern">uid={0},ou=Users,dc=wso2,dc=org</Property></UserStoreManager>
Active directory user store sample:

WSO2 API Manager, version 1.7.0, WSO2 Inc.
Copyright © WSO2 Inc. 2005-2014 187
2.
<UserStoreManagerclass="org.wso2.carbon.user.core.ldap.ActiveDirectoryUserStoreManager"> <Propertyname="TenantManager">org.wso2.carbon.user.core.tenant.CommonHybridLDAPTenantManager</Property> <Property name="defaultRealmName">WSO2.ORG</Property> <Property name="Disabled">false</Property>
<Property name="kdcEnabled">false</Property> <Property name="ConnectionURL">ldaps://10.100.1.100:636</Property> <Propertyname="ConnectionName">CN=admin,CN=Users,DC=WSO2,DC=Com</Property> <Property name="ConnectionPassword">A1b2c3d4</Property> <Property name="passwordHashMethod">PLAIN_TEXT</Property> <Property name="UserSearchBase">CN=Users,DC=WSO2,DC=Com</Property> <Property name="UserEntryObjectClass">user</Property> <Property name="UserNameAttribute">cn</Property> <Property name="isADLDSRole">false</Property> <Property name="userAccountControl">512</Property> <Property name="UserNameListFilter">(objectClass=user)</Property> <Propertyname="UserNameSearchFilter">(&(objectClass=user)(cn=?))</Property> <Propertyname="UsernameJavaRegEx">[a-zA-Z0-9._-|//]{3,30}$</Property> <Property name="UsernameJavaScriptRegEx">^[\S]{3,30}$</Property> <Property name="PasswordJavaScriptRegEx">^[\S]{5,30}$</Property> <Property name="RolenameJavaScriptRegEx">^[\S]{3,30}$</Property> <Propertyname="RolenameJavaRegEx">[a-zA-Z0-9._-|//]{3,30}$</Property> <Property name="ReadGroups">true</Property> <Property name="WriteGroups">true</Property> <Property name="EmptyRolesAllowed">true</Property> <Property name="GroupSearchBase">CN=Users,DC=WSO2,DC=Com</Property> <Property name="GroupEntryObjectClass">group</Property> <Property name="GroupNameAttribute">cn</Property> <Property name="SharedGroupNameAttribute">cn</Property> <Propertyname="SharedGroupSearchBase">ou=SharedGroups,dc=wso2,dc=org</Property> <Property name="SharedGroupEntryObjectClass">groups</Property> <Propertyname="SharedTenantNameListFilter">(object=organizationalUnit)</Property> <Property name="SharedTenantNameAttribute">ou</Property> <Propertyname="SharedTenantObjectClass">organizationalUnit</Property> <Property name="MembershipAttribute">member</Property> <Propertyname="GroupNameListFilter">(objectcategory=group)</Property> <Propertyname="GroupNameSearchFilter">(&(objectClass=group)(cn=?))</Property> <Property name="UserRolesCacheEnabled">true</Property> <Property name="Referral">follow</Property> <Property name="BackLinksEnabled">true</Property> <Property name="MaxRoleNameListLength">100</Property> <Property name="MaxUserNameListLength">100</Property> <Property name="SCIMEnabled">false</Property></UserStoreManager>
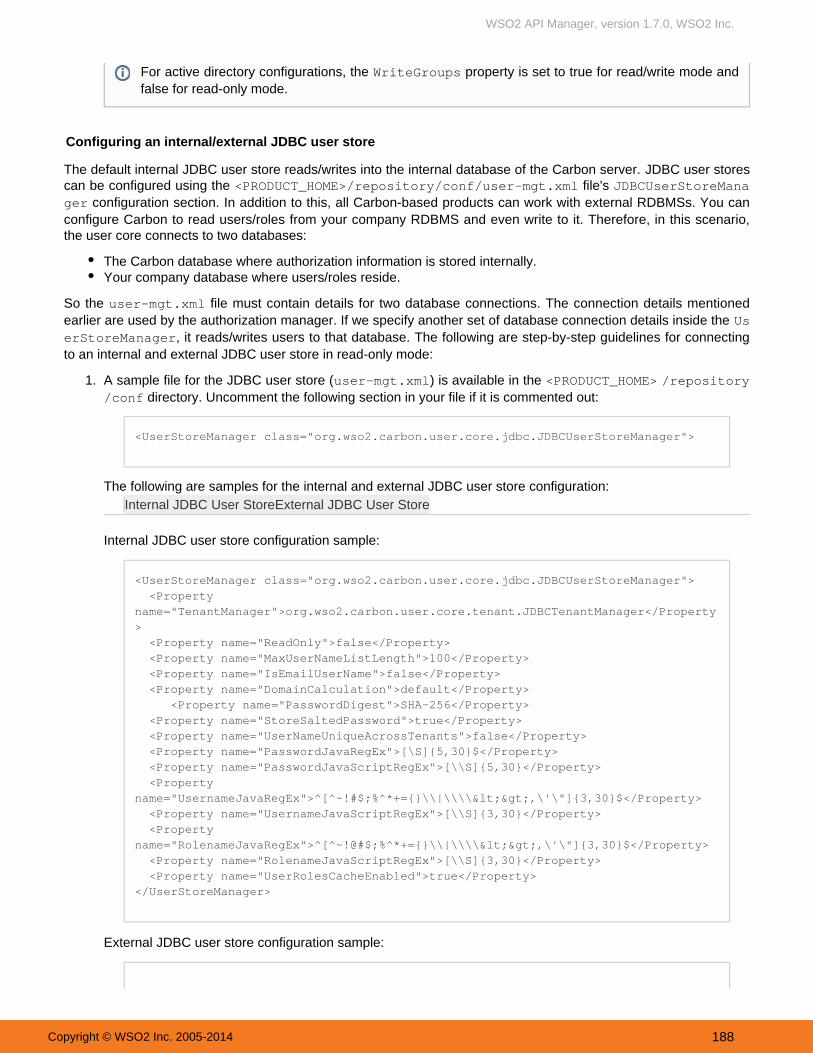
WSO2 API Manager, version 1.7.0, WSO2 Inc.
Copyright © WSO2 Inc. 2005-2014 188
External JDBC User StoreInternal JDBC User Store
2.
1.
Configuring an internal/external JDBC user store
The default internal JDBC user store reads/writes into the internal database of the Carbon server. JDBC user storescan be configured using the file's <PRODUCT_HOME>/repository/conf/user-mgt.xml JDBCUserStoreMana
In addition to this, all Carbon-based products can work with external RDBMSs. You can configuration section. gerconfigure Carbon to read users/roles from your company RDBMS and even write to it. Therefore, in this scenario,the user core connects to two databases:
The Carbon database where authorization information is stored internally.Your company database where users/roles reside.
So the file must contain details for two database connections. The connection details mentioneduser-mgt.xmlearlier are used by the authorization manager. If we specify another set of database connection details inside the Us
, it reads/writes users to that database. The following are step-by-step guidelines for connectingerStoreManagerto an internal and external JDBC user store in read-only mode:
A sample file for the JDBC user store ( ) is available in the user-mgt.xml <PRODUCT_HOME> /repository directory. Uncomment the following section in your file if it is commented out:/conf
<UserStoreManager class="org.wso2.carbon.user.core.jdbc.JDBCUserStoreManager">
The following are samples for the internal and external JDBC user store configuration:
Internal JDBC user store configuration sample:
<UserStoreManager class="org.wso2.carbon.user.core.jdbc.JDBCUserStoreManager"> <Propertyname="TenantManager">org.wso2.carbon.user.core.tenant.JDBCTenantManager</Property> <Property name="ReadOnly">false</Property> <Property name="MaxUserNameListLength">100</Property> <Property name="IsEmailUserName">false</Property> <Property name="DomainCalculation">default</Property> <Property name="PasswordDigest">SHA-256</Property> <Property name="StoreSaltedPassword">true</Property> <Property name="UserNameUniqueAcrossTenants">false</Property> <Property name="PasswordJavaRegEx">[\S]{5,30}$</Property> <Property name="PasswordJavaScriptRegEx">[\\S]{5,30}</Property> <Propertyname="UsernameJavaRegEx">^[^~!#$;%^*+={}\\|\\\\<>,\'\"]{3,30}$</Property> <Property name="UsernameJavaScriptRegEx">[\\S]{3,30}</Property> <Propertyname="RolenameJavaRegEx">^[^~!@#$;%^*+={}\\|\\\\<>,\'\"]{3,30}$</Property> <Property name="RolenameJavaScriptRegEx">[\\S]{3,30}</Property> <Property name="UserRolesCacheEnabled">true</Property></UserStoreManager>
External JDBC user store configuration sample:
For active directory configurations, the property is set to true for read/write mode andWriteGroupsfalse for read-only mode.

WSO2 API Manager, version 1.7.0, WSO2 Inc.
Copyright © WSO2 Inc. 2005-2014 189
1.
<UserStoreManager class="org.wso2.carbon.user.core.jdbc.JDBCUserStoreManager"> <Property name="driverName">com.mysql.jdbc.Driver</Property> <Property name="url">jdbc://localhost:3306/test</Property> <Property name="userName">admin</Property> <Property name="password">admin</Property> <Property name="Disabled">false</Property> <Property name="MaxUserNameListLength">100</Property> <Property name="MaxRoleNameListLength">100</Property> <Property name="UserRolesCacheEnabled">true</Property> <Property name="PasswordDigest">SHA-256</Property> <Property name="ReadGroups">true</Property> <Property name="ReadOnly">false</Property> <Property name="IsEmailUserName">false</Property> <Property name="DomainCalculation">default</Property> <Property name="StoreSaltedPassword">true</Property> <Property name="WriteGroups">false</Property> <Property name="UserNameUniqueAcrossTenants">false</Property> <Property name="PasswordJavaRegEx">^[\S]{5,30}$</Property> <Property name="PasswordJavaScriptRegEx">^[\S]{5,30}$</Property> <Property name="UsernameJavaRegEx">^[\S]{5,30}$</Property> <Property name="UsernameJavaScriptRegEx">^[\S]{5,30}$</Property> <Property name="RolenameJavaRegEx">^[\S]{5,30}$</Property> <Property name="RolenameJavaScriptRegEx">^[\S]{5,30}$</Property> <Property name="SCIMEnabled">false</Property> <Property name="SelectUserSQL">SELECT * FROM UM_USER WHERE UM_USER_NAME=?AND UM_TENANT_ID=?</Property> <Property name="GetRoleListSQL">SELECT UM_ROLE_NAME, UM_TENANT_ID,UM_SHARED_ROLE FROM UM_ROLE WHERE UM_ROLE_NAME LIKE ? AND UM_TENANT_ID=? ANDUM_SHARED_ROLE ='0' ORDER BY UM_ROLE_NAME</Property> <Property name="GetSharedRoleListSQL">SELECT UM_ROLE_NAME, UM_TENANT_ID,UM_SHARED_ROLE FROM UM_ROLE WHERE UM_ROLE_NAME LIKE ? AND UM_SHARED_ROLE ='1'ORDER BY UM_ROLE_NAME</Property> <Property name="UserFilterSQL">SELECT UM_USER_NAME FROM UM_USER WHEREUM_USER_NAME LIKE ? AND UM_TENANT_ID=? ORDER BY UM_USER_NAME</Property> <Property name="UserRoleSQL">SELECT UM_ROLE_NAME FROM UM_USER_ROLE,UM_ROLE, UM_USER WHERE UM_USER.UM_USER_NAME=? ANDUM_USER.UM_ID=UM_USER_ROLE.UM_USER_ID AND UM_ROLE.UM_ID=UM_USER_ROLE.UM_ROLE_IDAND UM_USER_ROLE.UM_TENANT_ID=? AND UM_ROLE.UM_TENANT_ID=? ANDUM_USER.UM_TENANT_ID=?</Property> <Property name="UserSharedRoleSQL">SELECT UM_ROLE_NAME,UM_ROLE.UM_TENANT_ID, UM_SHARED_ROLE FROM UM_SHARED_USER_ROLE INNER JOIN UM_USERON UM_SHARED_USER_ROLE.UM_USER_ID = UM_USER.UM_ID INNER JOIN UM_ROLE ONUM_SHARED_USER_ROLE.UM_ROLE_ID = UM_ROLE.UM_ID WHERE UM_USER.UM_USER_NAME = ? ANDUM_SHARED_USER_ROLE.UM_USER_TENANT_ID = UM_USER.UM_TENANT_ID ANDUM_SHARED_USER_ROLE.UM_ROLE_TENANT_ID = UM_ROLE.UM_TENANT_ID ANDUM_SHARED_USER_ROLE.UM_USER_TENANT_ID = ?</Property> <Property name="IsRoleExistingSQL">SELECT UM_ID FROM UM_ROLE WHEREUM_ROLE_NAME=? AND UM_TENANT_ID=?</Property> <Property name="GetUserListOfRoleSQL">SELECT UM_USER_NAME FROMUM_USER_ROLE, UM_ROLE, UM_USER WHERE UM_ROLE.UM_ROLE_NAME=? ANDUM_USER.UM_ID=UM_USER_ROLE.UM_USER_ID AND UM_ROLE.UM_ID=UM_USER_ROLE.UM_ROLE_IDAND UM_USER_ROLE.UM_TENANT_ID=? AND UM_ROLE.UM_TENANT_ID=? ANDUM_USER.UM_TENANT_ID=?</Property> <Property name="GetUserListOfSharedRoleSQL">SELECT UM_USER_NAME FROMUM_SHARED_USER_ROLE INNER JOIN UM_USER ON UM_SHARED_USER_ROLE.UM_USER_ID =UM_USER.UM_ID INNER JOIN UM_ROLE ON UM_SHARED_USER_ROLE.UM_ROLE_ID =UM_ROLE.UM_ID WHERE UM_ROLE.UM_ROLE_NAME= ? ANDUM_SHARED_USER_ROLE.UM_USER_TENANT_ID = UM_USER.UM_TENANT_ID ANDUM_SHARED_USER_ROLE.UM_ROLE_TENANT_ID = UM_ROLE.UM_TENANT_ID</Property>

WSO2 API Manager, version 1.7.0, WSO2 Inc.
Copyright © WSO2 Inc. 2005-2014 190
1.
<Property name="IsUserExistingSQL">SELECT UM_ID FROM UM_USER WHEREUM_USER_NAME=? AND UM_TENANT_ID=?</Property> <Property name="GetUserPropertiesForProfileSQL">SELECT UM_ATTR_NAME,UM_ATTR_VALUE FROM UM_USER_ATTRIBUTE, UM_USER WHERE UM_USER.UM_ID =UM_USER_ATTRIBUTE.UM_USER_ID AND UM_USER.UM_USER_NAME=? AND UM_PROFILE_ID=? ANDUM_USER_ATTRIBUTE.UM_TENANT_ID=? AND UM_USER.UM_TENANT_ID=?</Property> <Property name="GetUserPropertyForProfileSQL">SELECT UM_ATTR_VALUE FROMUM_USER_ATTRIBUTE, UM_USER WHERE UM_USER.UM_ID = UM_USER_ATTRIBUTE.UM_USER_ID ANDUM_USER.UM_USER_NAME=? AND UM_ATTR_NAME=? AND UM_PROFILE_ID=? ANDUM_USER_ATTRIBUTE.UM_TENANT_ID=? AND UM_USER.UM_TENANT_ID=?</Property> <Property name="GetUserLisForPropertySQL">SELECT UM_USER_NAME FROM UM_USER,UM_USER_ATTRIBUTE WHERE UM_USER_ATTRIBUTE.UM_USER_ID = UM_USER.UM_ID ANDUM_USER_ATTRIBUTE.UM_ATTR_NAME =? AND UM_USER_ATTRIBUTE.UM_ATTR_VALUE =? ANDUM_USER_ATTRIBUTE.UM_PROFILE_ID=? AND UM_USER_ATTRIBUTE.UM_TENANT_ID=? ANDUM_USER.UM_TENANT_ID=?</Property> <Property name="GetProfileNamesSQL">SELECT DISTINCT UM_PROFILE_ID FROMUM_USER_ATTRIBUTE WHERE UM_TENANT_ID=?</Property> <Property name="GetUserProfileNamesSQL">SELECT DISTINCT UM_PROFILE_ID FROMUM_USER_ATTRIBUTE WHERE UM_USER_ID=(SELECT UM_ID FROM UM_USER WHEREUM_USER_NAME=? AND UM_TENANT_ID=?) AND UM_TENANT_ID=?</Property> <Property name="GetUserIDFromUserNameSQL">SELECT UM_ID FROM UM_USER WHEREUM_USER_NAME=? AND UM_TENANT_ID=?</Property> <Property name="GetUserNameFromTenantIDSQL">SELECT UM_USER_NAME FROMUM_USER WHERE UM_TENANT_ID=?</Property> <Property name="GetTenantIDFromUserNameSQL">SELECT UM_TENANT_ID FROMUM_USER WHERE UM_USER_NAME=?</Property> <Property name="AddUserSQL">INSERT INTO UM_USER (UM_USER_NAME,UM_USER_PASSWORD, UM_SALT_VALUE, UM_REQUIRE_CHANGE, UM_CHANGED_TIME,UM_TENANT_ID) VALUES (?, ?, ?, ?, ?, ?)</Property> <Property name="AddUserToRoleSQL">INSERT INTO UM_USER_ROLE (UM_USER_ID,UM_ROLE_ID, UM_TENANT_ID) VALUES ((SELECT UM_ID FROM UM_USER WHERE UM_USER_NAME=?AND UM_TENANT_ID=?),(SELECT UM_ID FROM UM_ROLE WHERE UM_ROLE_NAME=? ANDUM_TENANT_ID=?), ?)</Property> <Property name="AddRoleSQL">INSERT INTO UM_ROLE (UM_ROLE_NAME,UM_TENANT_ID) VALUES (?, ?)</Property> <Property name="AddSharedRoleSQL">UPDATE UM_ROLE SET UM_SHARED_ROLE = ?WHERE UM_ROLE_NAME = ? AND UM_TENANT_ID = ?</Property> <Property name="AddRoleToUserSQL">INSERT INTO UM_USER_ROLE (UM_ROLE_ID,UM_USER_ID, UM_TENANT_ID) VALUES ((SELECT UM_ID FROM UM_ROLE WHERE UM_ROLE_NAME=?AND UM_TENANT_ID=?),(SELECT UM_ID FROM UM_USER WHERE UM_USER_NAME=? ANDUM_TENANT_ID=?), ?)</Property> <Property name="AddSharedRoleToUserSQL">INSERT INTO UM_SHARED_USER_ROLE(UM_ROLE_ID, UM_USER_ID, UM_USER_TENANT_ID, UM_ROLE_TENANT_ID) VALUES ((SELECTUM_ID FROM UM_ROLE WHERE UM_ROLE_NAME=? AND UM_TENANT_ID=?),(SELECT UM_ID FROMUM_USER WHERE UM_USER_NAME=? AND UM_TENANT_ID=?), ?, ?)</Property> <Property name="RemoveUserFromSharedRoleSQL">DELETE FROMUM_SHARED_USER_ROLE WHERE UM_ROLE_ID=(SELECT UM_ID FROM UM_ROLE WHEREUM_ROLE_NAME=? AND UM_TENANT_ID=?) AND UM_USER_ID=(SELECT UM_ID FROM UM_USERWHERE UM_USER_NAME=? AND UM_TENANT_ID=?) AND UM_USER_TENANT_ID=? ANDUM_ROLE_TENANT_ID = ?</Property> <Property name="RemoveUserFromRoleSQL">DELETE FROM UM_USER_ROLE WHEREUM_USER_ID=(SELECT UM_ID FROM UM_USER WHERE UM_USER_NAME=? AND UM_TENANT_ID=?)AND UM_ROLE_ID=(SELECT UM_ID FROM UM_ROLE WHERE UM_ROLE_NAME=? ANDUM_TENANT_ID=?) AND UM_TENANT_ID=?</Property> <Property name="RemoveRoleFromUserSQL">DELETE FROM UM_USER_ROLE WHEREUM_ROLE_ID=(SELECT UM_ID FROM UM_ROLE WHERE UM_ROLE_NAME=? AND UM_TENANT_ID=?)AND UM_USER_ID=(SELECT UM_ID FROM UM_USER WHERE UM_USER_NAME=? ANDUM_TENANT_ID=?) AND UM_TENANT_ID=?</Property> <Property name="DeleteRoleSQL">DELETE FROM UM_ROLE WHERE UM_ROLE_NAME = ?
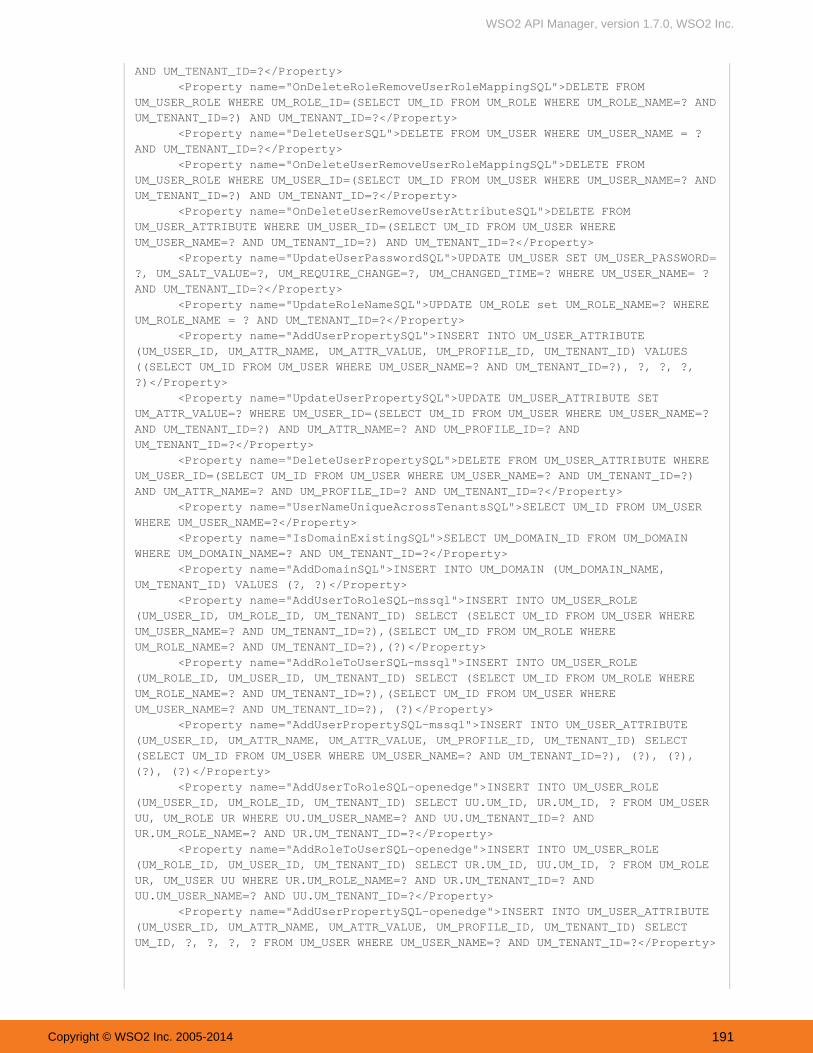
WSO2 API Manager, version 1.7.0, WSO2 Inc.
Copyright © WSO2 Inc. 2005-2014 191
1.
AND UM_TENANT_ID=?</Property> <Property name="OnDeleteRoleRemoveUserRoleMappingSQL">DELETE FROMUM_USER_ROLE WHERE UM_ROLE_ID=(SELECT UM_ID FROM UM_ROLE WHERE UM_ROLE_NAME=? ANDUM_TENANT_ID=?) AND UM_TENANT_ID=?</Property> <Property name="DeleteUserSQL">DELETE FROM UM_USER WHERE UM_USER_NAME = ?AND UM_TENANT_ID=?</Property> <Property name="OnDeleteUserRemoveUserRoleMappingSQL">DELETE FROMUM_USER_ROLE WHERE UM_USER_ID=(SELECT UM_ID FROM UM_USER WHERE UM_USER_NAME=? ANDUM_TENANT_ID=?) AND UM_TENANT_ID=?</Property> <Property name="OnDeleteUserRemoveUserAttributeSQL">DELETE FROMUM_USER_ATTRIBUTE WHERE UM_USER_ID=(SELECT UM_ID FROM UM_USER WHEREUM_USER_NAME=? AND UM_TENANT_ID=?) AND UM_TENANT_ID=?</Property> <Property name="UpdateUserPasswordSQL">UPDATE UM_USER SET UM_USER_PASSWORD=?, UM_SALT_VALUE=?, UM_REQUIRE_CHANGE=?, UM_CHANGED_TIME=? WHERE UM_USER_NAME= ?AND UM_TENANT_ID=?</Property> <Property name="UpdateRoleNameSQL">UPDATE UM_ROLE set UM_ROLE_NAME=? WHEREUM_ROLE_NAME = ? AND UM_TENANT_ID=?</Property> <Property name="AddUserPropertySQL">INSERT INTO UM_USER_ATTRIBUTE(UM_USER_ID, UM_ATTR_NAME, UM_ATTR_VALUE, UM_PROFILE_ID, UM_TENANT_ID) VALUES((SELECT UM_ID FROM UM_USER WHERE UM_USER_NAME=? AND UM_TENANT_ID=?), ?, ?, ?,?)</Property> <Property name="UpdateUserPropertySQL">UPDATE UM_USER_ATTRIBUTE SETUM_ATTR_VALUE=? WHERE UM_USER_ID=(SELECT UM_ID FROM UM_USER WHERE UM_USER_NAME=?AND UM_TENANT_ID=?) AND UM_ATTR_NAME=? AND UM_PROFILE_ID=? ANDUM_TENANT_ID=?</Property> <Property name="DeleteUserPropertySQL">DELETE FROM UM_USER_ATTRIBUTE WHEREUM_USER_ID=(SELECT UM_ID FROM UM_USER WHERE UM_USER_NAME=? AND UM_TENANT_ID=?)AND UM_ATTR_NAME=? AND UM_PROFILE_ID=? AND UM_TENANT_ID=?</Property> <Property name="UserNameUniqueAcrossTenantsSQL">SELECT UM_ID FROM UM_USERWHERE UM_USER_NAME=?</Property> <Property name="IsDomainExistingSQL">SELECT UM_DOMAIN_ID FROM UM_DOMAINWHERE UM_DOMAIN_NAME=? AND UM_TENANT_ID=?</Property> <Property name="AddDomainSQL">INSERT INTO UM_DOMAIN (UM_DOMAIN_NAME,UM_TENANT_ID) VALUES (?, ?)</Property> <Property name="AddUserToRoleSQL-mssql">INSERT INTO UM_USER_ROLE(UM_USER_ID, UM_ROLE_ID, UM_TENANT_ID) SELECT (SELECT UM_ID FROM UM_USER WHEREUM_USER_NAME=? AND UM_TENANT_ID=?),(SELECT UM_ID FROM UM_ROLE WHEREUM_ROLE_NAME=? AND UM_TENANT_ID=?),(?)</Property> <Property name="AddRoleToUserSQL-mssql">INSERT INTO UM_USER_ROLE(UM_ROLE_ID, UM_USER_ID, UM_TENANT_ID) SELECT (SELECT UM_ID FROM UM_ROLE WHEREUM_ROLE_NAME=? AND UM_TENANT_ID=?),(SELECT UM_ID FROM UM_USER WHEREUM_USER_NAME=? AND UM_TENANT_ID=?), (?)</Property> <Property name="AddUserPropertySQL-mssql">INSERT INTO UM_USER_ATTRIBUTE(UM_USER_ID, UM_ATTR_NAME, UM_ATTR_VALUE, UM_PROFILE_ID, UM_TENANT_ID) SELECT(SELECT UM_ID FROM UM_USER WHERE UM_USER_NAME=? AND UM_TENANT_ID=?), (?), (?),(?), (?)</Property> <Property name="AddUserToRoleSQL-openedge">INSERT INTO UM_USER_ROLE(UM_USER_ID, UM_ROLE_ID, UM_TENANT_ID) SELECT UU.UM_ID, UR.UM_ID, ? FROM UM_USERUU, UM_ROLE UR WHERE UU.UM_USER_NAME=? AND UU.UM_TENANT_ID=? ANDUR.UM_ROLE_NAME=? AND UR.UM_TENANT_ID=?</Property> <Property name="AddRoleToUserSQL-openedge">INSERT INTO UM_USER_ROLE(UM_ROLE_ID, UM_USER_ID, UM_TENANT_ID) SELECT UR.UM_ID, UU.UM_ID, ? FROM UM_ROLEUR, UM_USER UU WHERE UR.UM_ROLE_NAME=? AND UR.UM_TENANT_ID=? ANDUU.UM_USER_NAME=? AND UU.UM_TENANT_ID=?</Property> <Property name="AddUserPropertySQL-openedge">INSERT INTO UM_USER_ATTRIBUTE(UM_USER_ID, UM_ATTR_NAME, UM_ATTR_VALUE, UM_PROFILE_ID, UM_TENANT_ID) SELECTUM_ID, ?, ?, ?, ? FROM UM_USER WHERE UM_USER_NAME=? AND UM_TENANT_ID=?</Property>

WSO2 API Manager, version 1.7.0, WSO2 Inc.
Copyright © WSO2 Inc. 2005-2014 192
1.
2.
3.
4. 5.
<Property name="DomainName">wso2.org</Property> <Property name="Description"/></UserStoreManager>
Find a valid user that resides in the RDBMS. For example, say a valid username is . Update theAdminSOA
Admin user section of your LDAP configuration as follows. You do not have to update the password element;leave it as is.
<AdminUser> <UserName>AdminSOA</UserName> <Password>XXXXXX</Password></AdminUser>
In the file, add the property within the .user-mgt.xml passwordHashMethod JDBCUserStoreManagerFor example:
<UserStoreManager class="org.wso2.carbon.user.core.jdbc.JDBCUserStoreManager"> <Property name="passwordHashMethod">SHA</Property> ...</UserStoreManager>
The passwordHashMethod property specifies how the password should be stored. It usually has thefollowing values:
SHA - Uses SHA digest method.MD5 - Uses MD 5 digest method.PLAIN_TEXT - Plain text passwords.
In addition, it also supports all digest methods in http://docs.oracle.com/javase/6/docs/api/java/security/Mess.ageDigest.html
Update the connection details found within the class based on your preferences. <UserStoreManager>In the file, under the realm configuration, set the value of the user-mgt.xml MultiTenantRealmConfigB
property to uilder org.wso2.carbon.user.core.config.multitenancy.SimpleRealmConfigBu
. ilder For example:
<Propertyname="MultiTenantRealmConfigBuilder">org.wso2.carbon.user.core.config.multitenancy.SimpleRealmConfigBuilder</Property>
The sample for the external JDBC user store consists of properties pertaining to various SQLstatements. This is because the schema may be different for an external user store, and theseadjustments need to be made in order to streamline the configurations with WSO2 products.
You can define a ''data source" in repository/conf/datasources/master-datasources.xm and refer to it from the file. This takes the properties defined in the l user-mgt.xml master-data
file and reuses them in the file. To do this, you need to define thesources.xml user-mgt.xmlfollowing property: < Property name = "dataSource" >jdbc/WSO2CarbonDB</ Property >

WSO2 API Manager, version 1.7.0, WSO2 Inc.
Copyright © WSO2 Inc. 2005-2014 193
5.
6.
7.
Add the JDBC driver to the classpath by dropping the JAR into the <PRODUCT_HOME>/repository/compo
nents/lib directory.Edit the SQLs in the file according to your requirements, and start the server.user-mgt.xml
Properties of Primary User Stores
The following can give you a better understanding of the properties used to configure primary user stores:
Using properties
Property name Description
MaxUserNameListLength This property controls the number of users listed in the user storeof a WSO2 product. You might have hundreds or eventhousands of users hence you may not want to list them all.While you have the ability to control hundreds of users with thisproperty, you can use the number 0 as well.
ConnectionURL Connection URL to the LDAP server. In the case of default LDAPin Carbon, the port is mentioned in the file and acarbon.xmlreference to that port is mentioned in the above configuration.
ConnectionName This is the username used to connect to the database. This usermust have permissions to read the user list and user's attributes.This property is used to perform various operations on theexternal LDAP. In the case of ReadOnlyLDAPUserStoreMana
, use this for search operations such as user searches orgergroup searches on the external LDAP user store. This user doesnot have to be an administrator in the LDAP user store or havean administrator role in the WSO2 product that you are using, butthis user MUST be able to do search operations on the LDAPuser store. The value we put here is the DN (Distinguish
) attribute of the user. Note that this is a mandatoryNameconfiguration.
ConnectionPassword Password relevant to the of the user.ConnectionName
passwordHashMethod Password Hash method when storing user entries in the LDAP.
UserNameListFilter Filtering criteria for listing all the user entries in the LDAP. This LDAP query or filter is used when doing search operations onusers. In this case, the search operation only provides theobjects created from the specified class.
UserEntryObjectClass Object class used to construct user entries. In the case of defaultLDAP in Carbon, it is a custom object class defined with thename- wso2Person
UserSearchBase DN of the context or object under which the user entries arestored in the LDAP. In this case it is the "users" container.
UserNameSearchFilter Filtering criteria for searching a particular user entry.
Different databases have different search bases.

WSO2 API Manager, version 1.7.0, WSO2 Inc.
Copyright © WSO2 Inc. 2005-2014 194
UserNameAttribute This is the attribute used for uniquely identifying a user entry.Users can be authenticated using their email address, uid etc.
PasswordJavaScriptRegEx Policy that defines the password format.
UsernameJavaScriptRegEx The regular expression used by the front-end components forusername validation.
UsernameJavaRegEx A regular expression to validate usernames. By default, stringshaving a length between 5 to 30 with non-empty characters areallowed.
RolenameJavaScriptRegEx The regular expression used by the front-end components forrole name validation.
RolenameJavaRegEx A regular expression to validate role names. By default, stringshaving a length between 5 to 30 with non-empty characters areallowed.
ReadLDAPGroups Specifies whether groups should be read from LDAP. If this isdisabled by setting it to false, none of the groups in the LDAPuser store can be read. If you are setting the value of this to"false", the following group configurations are NOT mandatory: G
, and roupSearchBase GroupNameListFilter GroupNameA.ttribute
WriteLDAPGroups Specifies whether groups should be written to LDAP.
EmptyRolesAllowed Specifies whether the underlying LDAP user store allows emptygroups to be created. In the case of LDAP in Carbon, theschema is modified such that empty groups are allowed to becreated. Usually LDAP servers do not allow to create emptygroups.
GroupSearchBase DN of the context under which user entries are stored in theLDAP.
GroupSearchFilter The LDAP query used to search for groups.
GroupNameListFilter Filtering criteria for listing all the group entries in the LDAP.Groups are created using the " " class. The groupgroupOfNamesearch operation only returns objects created from the aboveclass.
GroupEntryObjectClass Object class used to construct user entries.
GroupNameSearchFilter Filtering criteria for searching a particular group entry.
GroupNameAttribute Attribute used for uniquely identifying a user entry. This attributeis to be treated as the group name.
MembershipAttribute Attribute used to define members of LDAP groups.
UserRolesCacheEnabled This is to indicate whether to cache the role list of a user. Bydefault this is set to . Set it to if the user roles aretrue falsechanged by external means and those changes should beinstantly reflected in the Carbon instance.
The name of the attribute is considered as theusername.
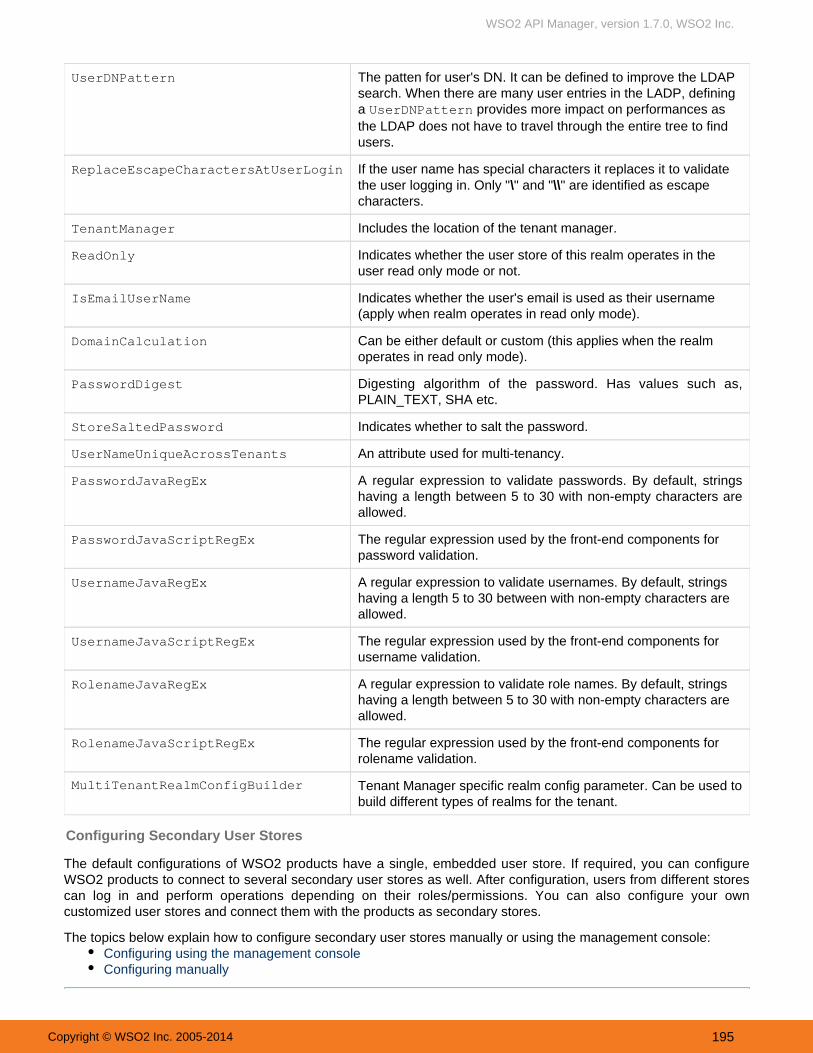
WSO2 API Manager, version 1.7.0, WSO2 Inc.
Copyright © WSO2 Inc. 2005-2014 195
UserDNPattern The patten for user's DN. It can be defined to improve the LDAPsearch. When there are many user entries in the LADP, defininga provides more impact on performances asUserDNPatternthe LDAP does not have to travel through the entire tree to findusers.
ReplaceEscapeCharactersAtUserLogin If the user name has special characters it replaces it to validatethe user logging in. Only " " and " " are identified as escape\ \\characters.
TenantManager Includes the location of the tenant manager.
ReadOnly Indicates whether the user store of this realm operates in theuser read only mode or not.
IsEmailUserName Indicates whether the user's email is used as their username(apply when realm operates in read only mode).
DomainCalculation Can be either default or custom (this applies when the realmoperates in read only mode).
PasswordDigest Digesting algorithm of the password. Has values such as,PLAIN_TEXT, SHA etc.
StoreSaltedPassword Indicates whether to salt the password.
UserNameUniqueAcrossTenants An attribute used for multi-tenancy.
PasswordJavaRegEx A regular expression to validate passwords. By default, stringshaving a length between 5 to 30 with non-empty characters areallowed.
PasswordJavaScriptRegEx The regular expression used by the front-end components forpassword validation.
UsernameJavaRegEx A regular expression to validate usernames. By default, stringshaving a length 5 to 30 non-empty characters arebetween with allowed.
UsernameJavaScriptRegEx The regular expression used by the front-end components forusername validation.
RolenameJavaRegEx A regular expression to validate role names. By default, stringshaving a length 5 to 30 with non-empty characters arebetween allowed.
RolenameJavaScriptRegEx The regular expression used by the front-end components forrolename validation.
MultiTenantRealmConfigBuilder Tenant Manager specific realm config parameter. Can be used tobuild different types of realms for the tenant.
Configuring Secondary User Stores
The default configurations of WSO2 products have a single, embedded user store. If required, you can configureWSO2 products to connect to several secondary user stores as well. After configuration, users from different storescan log in and perform operations depending on their roles/permissions. You can also configure your owncustomized user stores and connect them with the products as secondary stores.
The topics below explain how to configure secondary user stores manually or using the management console: Configuring using the management consoleConfiguring manually

WSO2 API Manager, version 1.7.0, WSO2 Inc.
Copyright © WSO2 Inc. 2005-2014 196
1. 2.
3. 4.
5. 6.
Configuring using the management console
Log in to the management console and click sub menu under menu.User Store Management ConfigureThe page opens. Initially, there are no secondary user stores.User Store Management
Click .Add Secondary User StoreThe page opens. Enter a unique domain name and fill in the rest of the data.User Store Manager
For details on each property, see the respective property description that is provided. Also, select therequired implementation of user store manager from the drop-down list. TheUser Store Manager Classdisplayed property list varies depending on the selected user store manager implementation. By default, allWSO2 products come with four user store manager implementations as follows:
ReadWriteLDAPUserStoreManagerReadOnlyLDAPUserStoreManagerActiveDirectoryUserStoreManagerJDBCUserStoreManager
You can also populate this drop-down list with custom user store manager implementations by adding them tothe server. A sample custom user store manager can be found in .the repository
Ensure that all the mandatory fields are filled and a valid domain name is given and click Add. A message appears saying that the user stores are being added.
Tip: If you set up a database other than the default H2 that comes with the product to store user information,select the script relevant to your database type from the folder and run it on<APIM_HOME>/dbscriptsyour database. It creates the necessary tables.
Note: You cannot update the at run time, so it is not visible on this page.PRIMARY user store
Domain names must be unique and must not include underscore character (_).
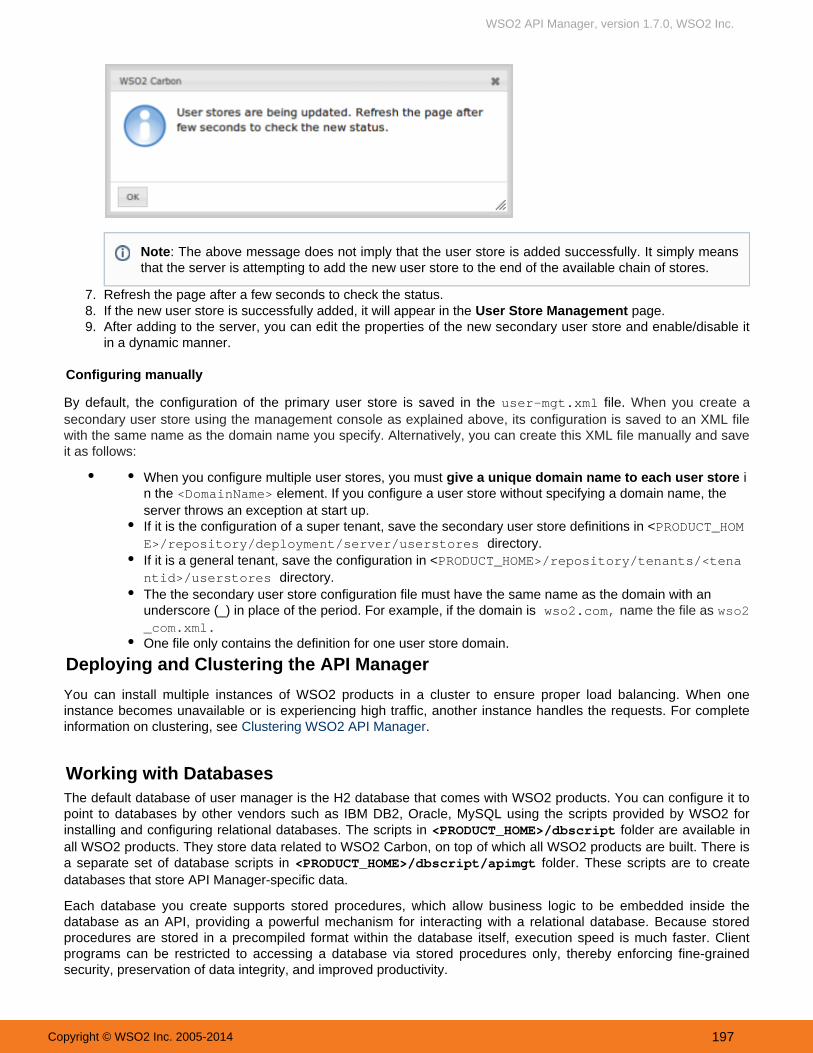
WSO2 API Manager, version 1.7.0, WSO2 Inc.
Copyright © WSO2 Inc. 2005-2014 197
6.
7. 8. 9.
Refresh the page after a few seconds to check the status. If the new user store is successfully added, it will appear in the page.User Store ManagementAfter adding to the server, you can edit the properties of the new secondary user store and enable/disable itin a dynamic manner.
Configuring manually
By default, the configuration of the primary user store is saved in the file. user-mgt.xml When you create asecondary user store using the management console as explained above, its configuration is saved to an XML filewith the same name as the domain name you specify. Alternatively, you can create this XML file manually and saveit as follows:
When you configure multiple user stores, you must igive a unique domain name to each user storen the element. If you configure a user store without specifying a domain name, the<DomainName>server throws an exception at start up.If it is the configuration of a super tenant, save the secondary user store definitions in <PRODUCT_HOM
directory.E>/repository/deployment/server/userstores If it is a general tenant, save the configuration in <PRODUCT_HOME>/repository/tenants/<tena
directory.ntid>/userstores The the secondary user store configuration file must have the same name as the domain with anunderscore (_) in place of the period. For example, if the domain is wso2.com, name the file as wso2_com.xml.One file only contains the definition for one user store domain.
Deploying and Clustering the API Manager
You can install multiple instances of WSO2 products in a cluster to ensure proper load balancing. When oneinstance becomes unavailable or is experiencing high traffic, another instance handles the requests. For completeinformation on clustering, see .Clustering WSO2 API Manager
Working with DatabasesThe default database of user manager is the H2 database that comes with WSO2 products. You can configure it topoint to databases by other vendors such as IBM DB2, Oracle, MySQL using the scripts provided by WSO2 forinstalling and configuring relational databases. The scripts in folder are available in<PRODUCT_HOME>/dbscriptall WSO2 products. They store data related to WSO2 Carbon, on top of which all WSO2 products are built. There isa separate set of database scripts in folder. These scripts are to create<PRODUCT_HOME>/dbscript/apimgtdatabases that store API Manager-specific data.
Each database you create supports stored procedures, which allow business logic to be embedded inside thedatabase as an API, providing a powerful mechanism for interacting with a relational database. Because storedprocedures are stored in a precompiled format within the database itself, execution speed is much faster. Clientprograms can be restricted to accessing a database via stored procedures only, thereby enforcing fine-grainedsecurity, preservation of data integrity, and improved productivity.
Note: The above message does not imply that the user store is added successfully. It simply meansthat the server is attempting to add the new user store to the end of the available chain of stores.

WSO2 API Manager, version 1.7.0, WSO2 Inc.
Copyright © WSO2 Inc. 2005-2014 198
After you , you in the Management Console to enable the server toset up the physical database add data sourcesconnect to that database.
Setting up the Physical Database
In the folder, the following scripts are available for installing and configuring a<PRODUCT_HOME>/dbscriptsdatabase.
The following topics describe how to use these scripts to set up each type of physical database. After you set up thedatabase, you can use the Management Console to that connect to that database.create the datasources
Setting up with DerbySetting up with H2 DatabaseSetting up with MS SQLSetting up with MySQLSetting up with MySQL ClusterSetting up with OpenEdgeSetting up with OracleSetting up with PostgreSQL
Setting up with Derby
You can set up either an embedded Derby database or a remote one according to the information given below:Setting up with Embedded DerbySetting up with Remote Derby
Setting up with Embedded Derby
Follow the instructions below to set up an embedded Derby database.
Preparing the Derby Database | | | Setup Configuration Files Setup Drivers Create Database
Preparing the Derby Database
1. Download Apache Derby from and save it to yourhttp://apache.mesi.com.ar/db/derby/db-derby-10.8.2.2/computer.
2. Install Apache Derby on your computer by following the instructions at: http://db.apache.org/derby/manuals
The embedded H2 database is suitable for development, testing, and some production environments. Formost enterprise production environments, however, we recommend you use an industry-standard RDBMSsuch as Oracle, PostgreSQL, MySQL, MS SQL, etc.

WSO2 API Manager, version 1.7.0, WSO2 Inc.
Copyright © WSO2 Inc. 2005-2014 199
Setup Configuration Files
1. Edit the default database configuration defined in the file located at master-datasources.xml <PRODUCT_HO directory as below. Both the database configurations in aME>/repository/conf/datasources registry.xml
nd refer this data source. user-mgt.xml
NoteThe configurations should be replaced with your own database name, username, and password.

WSO2 API Manager, version 1.7.0, WSO2 Inc.
Copyright © WSO2 Inc. 2005-2014 200
<datasource> <name>WSO2_CARBON_DB</name> <description>The datasource used for registry and user manager</description> <jndiConfig> <name>jdbc/WSO2CarbonDB</name> </jndiConfig> <definition type="RDBMS"> <configuration> <url>jdbc:derby://localhost:1527/db;create=true</url> <userName>regadmin</userName> <password>regadmin</password> <driverClassName>org.apache.derby.jdbc.EmbeddedDriver</driverClassName> <maxActive>80</maxActive> <maxWait>60000</maxWait> <minIdle>5</minIdle> <testOnBorrow>true</testOnBorrow> <validationQuery>SELECT 1</validationQuery> <validationInterval>30000</validationInterval> </configuration> </definition></datasource>
The database configuration options
url - The URL of the database.username - The name of the database user.password - The password of the database user.driverClassName - The class name of the database driver.maxActive - The maximum number of active connections that can be allocated from this pool at the sametime or negative for no limit.maxWait - The maximum number of milliseconds that the pool will wait (when there are no availableconnections) for a connection to be returned before throwing an exception or <= 0 to wait indefinitely.minIdle - The minimum number of active connections that can remain idle in the pool, without extra onesbeing created, or 0 to create none.
Setup Drivers
Copy , and from in to derby.jar derbyclient.jar derbynet.jar $DERBY_HOME/lib $CARBON_HOME/rep directory (to the class path of the WSO2 Carbon web application).ository/components/extensions
Create DatabaseAutomatic Database Creation
1. The first time you start the server, run with the option so it will create the Derby database.-Dsetup
For Linux:
NoteIn contrast to the , in embedded mode, you will set the database driver name ( the remote Derby driverNa
element) to the value and the database URL (the eme org.apache.derby.jdbc.EmbeddedDriver urllement) to the database directory location relative to the installation. In the above sample configuration, it isinside the directory.database/WSO2CARBON_DB
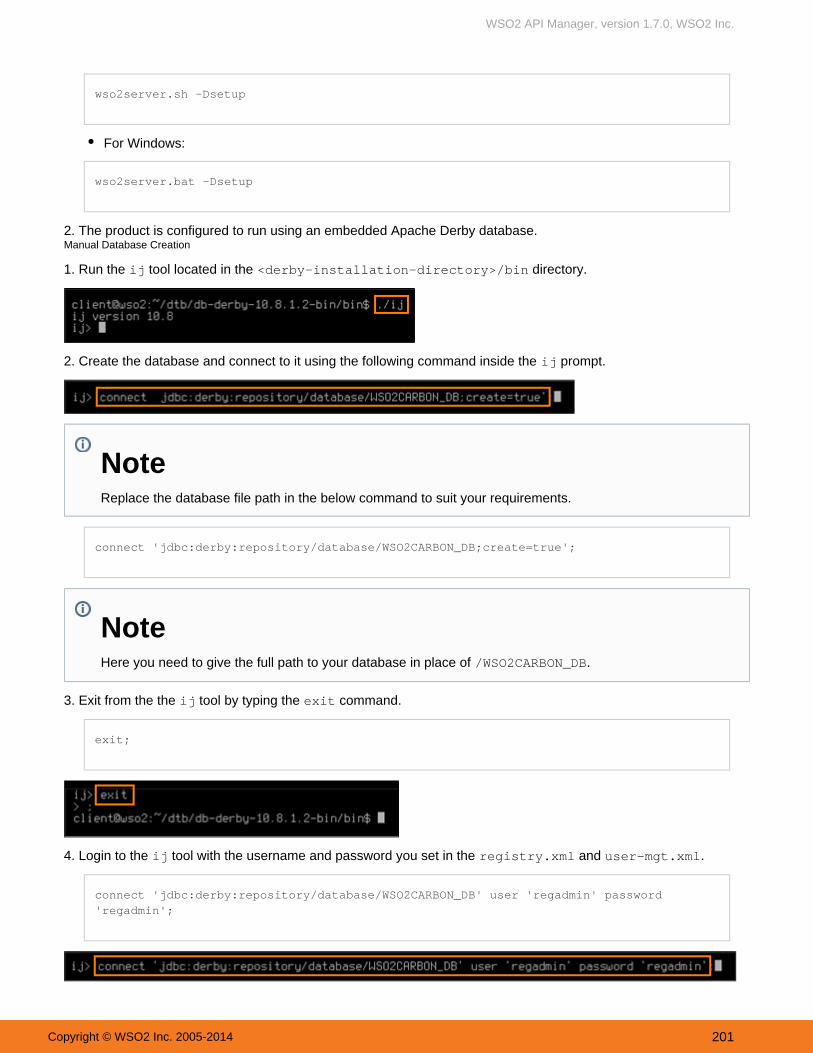
WSO2 API Manager, version 1.7.0, WSO2 Inc.
Copyright © WSO2 Inc. 2005-2014 201
wso2server.sh -Dsetup
For Windows:
wso2server.bat -Dsetup
2. The product is configured to run using an embedded Apache Derby database.Manual Database Creation
1. Run the tool located in the directory.ij <derby-installation-directory>/bin
2. Create the database and connect to it using the following command inside the prompt.ij
connect 'jdbc:derby:repository/database/WSO2CARBON_DB;create=true';
3. Exit from the the tool by typing the command.ij exit
exit;
4. Login to the tool with the username and password you set in the and .ij registry.xml user-mgt.xml
connect 'jdbc:derby:repository/database/WSO2CARBON_DB' user 'regadmin' password'regadmin';
NoteReplace the database file path in the below command to suit your requirements.
NoteHere you need to give the full path to your database in place of ./WSO2CARBON_DB

WSO2 API Manager, version 1.7.0, WSO2 Inc.
Copyright © WSO2 Inc. 2005-2014 202
5. Run the derby scripts for both the registry and user manager (embedded) databases, provided with the productusing the below command.
run 'CARBON_HOME/dbscripts/derby.sql';
6. Restart the server. Now the product is running using a remote Apache Derby database.Setting up with Remote Derby
Follow the below instructions to set up the remote Derby database.
Preparing the Derby Database | | | Setup Configuration Files Setup Drivers Create Database
Preparing the Derby Database
1. Download Apache Derby from and save it to yourhttp://apache.mesi.com.ar/db/derby/db-derby-10.8.2.2/computer.
2. Install Apache Derby on your computer using instructions given at http://db.apache.org/derby/manuals.
3. Go to the directory and run the Derby network server start script.<derby-installation directory>/binUsually, it is named .startNetworkServer
Setup Configuration Files
1. Edit the default database configuration defined in the file located at master-datasources.xml $CARBON_HOM directory as below. Both the database configurations in andE/repository/conf/datasources registry.xml
refer this data source. user-mgt.xml

WSO2 API Manager, version 1.7.0, WSO2 Inc.
Copyright © WSO2 Inc. 2005-2014 203
<datasource> <name>WSO2_CARBON_DB</name> <description>The datasource used for registry and user manager</description> <jndiConfig> <name>jdbc/WSO2CarbonDB</name> </jndiConfig> <definition type="RDBMS"> <configuration> <url>jdbc:derby://localhost:1527/db;create=true</url> <userName>regadmin</userName> <password>regadmin</password> <driverClassName>org.apache.derby.jdbc.ClientDriver</driverClassName> <maxActive>80</maxActive> <maxWait>60000</maxWait> <minIdle>5</minIdle> <testOnBorrow>true</testOnBorrow> <validationQuery>SELECT 1</validationQuery> <validationInterval>30000</validationInterval> </configuration> </definition></datasource>
The Database Configuration Options
url - The URL of the database.username - The name of the database user.password - The password of the database user.driverClassName - The class name of the database driver.maxActive - The maximum number of active connections that can be allocated from this pool at the sametime or negative for no limit.maxWait - The maximum number of milliseconds that the pool will wait (when there are no availableconnections) for a connection to be returned before throwing an exception, or <= 0 to wait indefinitely.minIdle - The minimum number of active connections that can remain idle in the pool without extra onesbeing created or 0 to create none.
Setup Drivers
Copy , and from in to derby.jar derbyclient.jar derbynet.jar $DERBY_HOME/lib $CARBON_HOME/rep directory (to the class path of the Web application).ository/components/extensions
Create DatabaseAutomatic Database Creation
NoteReplace the following settings with your own custom values:
NoteIn contrast to the , in the remote registry, you will set the database driver name (the embedded Derby drive
element) to the value and the database URL (the rName org.apache.derby.jdbc.ClientDriver urlelement) to the database remote location.

WSO2 API Manager, version 1.7.0, WSO2 Inc.
Copyright © WSO2 Inc. 2005-2014 204
1. The first time you start the server, run it with the -Dsetup option so that it will create the Derby database.
For Windows:
wso2server.bat -Dsetup
For Linux:
wso2server.sh -Dsetup
2. The product is configured to run using a remote Apache Derby database.Manual Database Creation
1. Run the tool located in the directory.ij <derby-installation directory>/bin
2. Create the database and connect to it using the following command inside the prompt:ij
connect 'jdbc:derby://localhost:1527/db;user=regadmin;password=regadmin;create=true';
3. Exit from the tool by typing the exit command.ij
exit;
4. Log in to the tool with the username and password you just used to create the database.ij
connect 'jdbc:derby://localhost:1527/db' user 'regadmin' password 'regadmin';
5. Run the Derby scripts for both the registry and user manager (embedded) databases, provided with the product
NoteReplace the database file path, user name, and password in the below command to suit your requirements.

WSO2 API Manager, version 1.7.0, WSO2 Inc.
Copyright © WSO2 Inc. 2005-2014 205
using the following command:
run 'CARBON_HOME/dbscripts/derby.sql';
6. Restart the server. Now the product is running using a remote Apache Derby database.Setting up with H2 Database
You can set up either an embedded H2 database or a remote one using the instructions given below:Setting up with Embedded H2Setting up with Remote H2
Setting up with Embedded H2
Follow the instructions below to set up an embedded H2 database.
Preparing the Embedded H2 Database | | | Setup configuration Files Setup Drivers Create Database
Preparing the Embedded H2 Database
Download and install the H2 database in your computer, if it is not already done, using the installation guide at http://.www.h2database.com/html/quickstart.html
Setup configuration Files
1. Edit the default database configuration defined in the master-datasources.xml file located at $CARBON_HO ME/repository/conf/datasources directory as below. Both the database configurations in registry.xml
and user-mgt.xml refer this data source.

WSO2 API Manager, version 1.7.0, WSO2 Inc.
Copyright © WSO2 Inc. 2005-2014 206
<datasource> <name>WSO2_CARBON_DB</name> <description>The datasource used for registry and user manager</description> <jndiConfig> <name>jdbc/WSO2CarbonDB</name> </jndiConfig> <definition type="RDBMS"> <configuration> <url>jdbc:h2:repository/database/WSO2CARBON_DB;DB_CLOSE_ON_EXIT=FALSE;LOCK_TIMEOUT=60000</url> <username>wso2carbon</username> <password>wso2carbon</password> <driverClassName>org.h2.Driver</driverClassName> <maxActive>50</maxActive> <maxWait>60000</maxWait> <testOnBorrow>true</testOnBorrow> <validationQuery>SELECT 1</validationQuery> <validationInterval>30000</validationInterval> </configuration> </definition></datasource>
The database configuration options.
url - The URL of the database.userName - The name of the database user.password - The password of the database user.driverClassName - The class name of the database driver.maxActive - The maximum number of active connections that can be allocated from this pool at the sametime or negative for no limit.maxWait - The maximum number of milliseconds that the pool will wait (when there are no availableconnections) for a connection to be returned before throwing an exception, or <= 0 to wait indefinitely.minIdle - The minimum number of active connections that can remain idle in the pool, without extra onesbeing created, or 0 to create none.
Setup Drivers
If you wish to use a new H2 database driver other than the version shipped with the product, follow the steps below.
1. Delete H2 database-related JARs shipped with the product. One could find them in the following locations.
<PRODUCT_HOME>/repository/components/plugins/h2-database-engine_1.2.140.wso2v3.jar
NoteThe configurations should be replaced with your own database name, username, and password.
TipCurrently, H2 database version h2-1.2.140.* and the related H2 database driver are shipped with theproduct.

WSO2 API Manager, version 1.7.0, WSO2 Inc.
Copyright © WSO2 Inc. 2005-2014 207
2. Copy the new H2 database driver ( ) to .org.h2.Driver <PRODUCT_HOME>/repository/components/libOne could find the required driver JAR in .$H2_HOME/bin/h2-*.jar
Create DatabaseAutomatic Database Creation
Next, at the first time you start the server, run with the option. It will create the H2 database with all the-Dsetupunderlying tables.
For Linux:
sh wso2server.sh -Dsetup
For Windows:
wso2server.bat -Dsetup
Manual Table Creation using scripts
Tables can be manually created by logging into the created database and running and following script in H2 shell orWeb Console.
<PRODUCT_HOME>/dbscripts/h2.
After setting up the DB tables, start the server with the below commands.
For Linux:
sh wso2server.sh
For Windows:
wso2server.bat
Setting up with Remote H2
Follow the instructions below to set up a remote H2 database.
Preparing the remote H2 DB | | | Setup Configuration Files Setup Drivers Create Database
Preparing the remote H2 DB
1. Download and install the H2 database on your computer. H2 installation guide can be found at: http://www.h2data.base.com/html/quickstart.html
Tip is the installation directory of H2.$H2_HOME
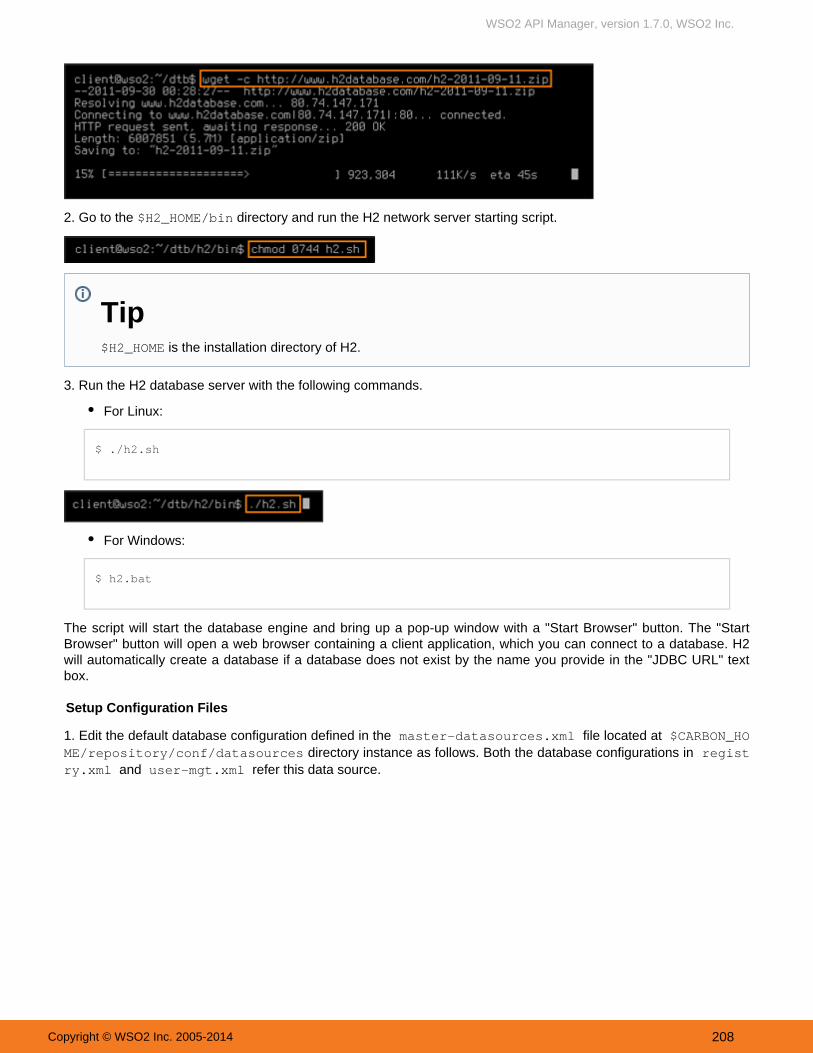
WSO2 API Manager, version 1.7.0, WSO2 Inc.
Copyright © WSO2 Inc. 2005-2014 208
2. Go to the directory and run the H2 network server starting script.$H2_HOME/bin
3. Run the H2 database server with the following commands.
For Linux:
$ ./h2.sh
For Windows:
$ h2.bat
The script will start the database engine and bring up a pop-up window with a "Start Browser" button. The "StartBrowser" button will open a web browser containing a client application, which you can connect to a database. H2will automatically create a database if a database does not exist by the name you provide in the "JDBC URL" textbox.
Setup Configuration Files
1. Edit the default database configuration defined in the master-datasources.xml file located at $CARBON_HO ME/repository/conf/datasources directory instance as follows. Both the database configurations in regist
ry.xml and user-mgt.xml refer this data source.
Tip$H2_HOME is the installation directory of H2.

WSO2 API Manager, version 1.7.0, WSO2 Inc.
Copyright © WSO2 Inc. 2005-2014 209
NoteThe configurations should be replaced with your own database name, username, and password.

WSO2 API Manager, version 1.7.0, WSO2 Inc.
Copyright © WSO2 Inc. 2005-2014 210
<datasource> <name>WSO2_CARBON_DB</name> <description>The datasource used for registry and user manager</description> <jndiConfig> <name>jdbc/WSO2CarbonDB</name> </jndiConfig> <definition type="RDBMS"> <configuration> <url>jdbc:h2:tcp://localhost/~/registryDB;create=true</url> <username>regadmin</username> <password>regadmin</password> <driverClassName>org.h2.Driver</driverClassName> <maxActive>80</maxActive> <maxWait>60000</maxWait> <minIdle>5</minIdle> <testOnBorrow>true</testOnBorrow> <validationQuery>SELECT 1</validationQuery> <validationInterval>30000</validationInterval> </configuration> </definition></datasource>
The database configuration options
url - The URL of the database.username - The name of the database user.password - The password of the database user.
driverClassName - The class name of the database driver.maxActive - The maximum number of active connections that can be allocated from this pool at the sametime or negative for no limit.maxWait - The maximum number of milliseconds that the pool will wait (when there are no availableconnections) for a connection to be returned before throwing an exception, or <= 0 to wait indefinitely.minIdle - The minimum number of active connections that can remain idle in the pool, without extra onesbeing created, or 0 to create none.
Setup Drivers
To use a new H2 database driver other than the version shipped with the product, do the following.
1. Delete the following H2 database related JARs. Some of them may already be excluded from the configuration.
<PRODUCT_HOME>/repository/components/plugins/h2-database-engine_1.2.140.wso2v3.jar
TipThe H2 database version h2-1.2.140 and the related H2 database driver are currently shipped with theproduct.

WSO2 API Manager, version 1.7.0, WSO2 Inc.
Copyright © WSO2 Inc. 2005-2014 211
2. Copy the new H2 database driver ( ) to .org.h2.Driver <PRODUCT_HOME>/repository/components/libYou can find the required driver JAR in .$H2_HOME/bin/h2-*.jar
Create DatabaseAutomatic Database Creation
1. The first time you start the server, run it with the option. It will create the H2 database with all the-Dsetupunderlying tables.
For Linux:
sh wso2server.sh -Dsetup
For Windows:
wso2server.bat -Dsetup
Manual Table Creation using scripts
1. Tables can be manually created by logging into the created database and running the following script in H2 shellor web console.
PRODUCT_HOME/dbscripts/h2.sql
NoteUse the command to start the web console. After that copy the script text from the SQL file, paste./h2.shit into the console and click "Run."

WSO2 API Manager, version 1.7.0, WSO2 Inc.
Copyright © WSO2 Inc. 2005-2014 212
2. After setting up the DB tables, start the server with the following commands.
For Linux:
sh wso2server.sh
For Windows:
wso2server.bat
Setting up with MS SQL
Follow the instructions below to set up the MS SQL database.
Setup Database and User | | | Setup Configuration File Copy JDBC Driver Create Database Tables
Setup Database and User
Enable TCP/IP
1. Open "SQL Server Configuration Manager" from Start Programs Microsoft SQL Server 2005 ConfigurationTools SQL Server Configuration Manager.
2. Enable "TCP/IP" and disable "Named Pipes" from protocols of your MSSQL server.

WSO2 API Manager, version 1.7.0, WSO2 Inc.
Copyright © WSO2 Inc. 2005-2014 213
3. Open TCP/IP Properties by double clicking "TCP/IP." Set "Listen All" to "Yes" in the "Protocol" tab.
4. From the "IP Address" tab, disable "TCP Dynamic Ports" by leaving it blank and give a valid "TCP Port" so thatMSSQL server will listen in that port.
5. Similarly, enable TCP/IP from "SQL Native Client Configuration" and disable "Named Pipes." Also, check whetherthe port is set correctly. Port should be 1433.
6. Restart MSSQL Server.
Create Database and User
1. Open "MSSQL Management Studio" to create a database and user.
2. Go to Database New Database and specify all the options to create a new database.
3. Go to Logins New Login and specify all the necessary options.
Grant Permission
Give required grants/permission to newly created user. Grant should allow newly created user to login, createtables, insert data to tables in newly created database.
Setup Configuration File
1. Edit the default database configuration defined in the master-datasources.xml file located at <PRODUCT_H OME>/repository/conf/datasources directory as below. Both the database configurations in registry.xm
l and user-mgt.xml refer this data source.
TipYou can use port 1433 in order processor services, so it is better to use that port.
Be sure to replace these settings with your custom values.

WSO2 API Manager, version 1.7.0, WSO2 Inc.
Copyright © WSO2 Inc. 2005-2014 214
<datasource> <name>WSO2_CARBON_DB</name> <description>The datasource used for registry and user manager</description> <jndiConfig> <name>jdbc/WSO2CarbonDB</name> </jndiConfig> <definition type="RDBMS"> <configuration> <defaultAutoCommit>false</defaultAutoCommit> <url>jdbc:jtds:sqlserver://10.100.3.251:1433/wso2greg</url> <username>regadmin</username> <password>regadmin</password> <driverClassName>net.sourceforge.jtds.jdbc.Driver</driverClassName> <maxActive>80</maxActive> <maxWait>60000</maxWait> <minIdle>5</minIdle> <testOnBorrow>true</testOnBorrow> <validationQuery>SELECT 1</validationQuery> <validationInterval>30000</validationInterval> </configuration> </definition></datasource>
The database configuration options
defaultAutoCommit - Set to false.url - The URL of the database.username - The name of the database user.password - The password of the database user.driverClassName - The class name of the database driver.maxActive - The maximum number of active connections that can be allocated from this pool at the sametime or negative for no limit.maxWait - The maximum number of milliseconds that the pool will wait (when there are no availableconnections) for a connection to be returned before throwing an exception, or <= 0 to wait indefinitely.minIdle - The minimum number of active connections that can remain idle in the pool without extra onesbeing created or 0 to create none.
Copy JDBC Driver
Download and copy the sqljdbc4 Microsoft SQL JDBC driver file to the WSO2 product's <PRODUCT_HOME>/reposi directory. Use as the tory/components/lib/ com.microsoft.sqlserver.jdbc.SQLServerDriver <driv
in your datasource configuration inerClassName> <PRODUCT_HOME>/repository/conf/datasources/mast file.er-datasources.xml
Create Database Tables
Database tables can be created either manually by running scripts or automatically by using start-up parameters.
Using Scripts
TipDefault port for MSSQL is 1433.

WSO2 API Manager, version 1.7.0, WSO2 Inc.
Copyright © WSO2 Inc. 2005-2014 215
Database tables can be created manually by logging in to created database and running <PRODUCT_HOME>/dbscr.ipts/mssql.sql
Using start-up Parameters
Windows users can run to create the database tables when<PRODUCT_HOME>/bin/wso2server.bat -Dsetupstarting the product for the first time.
Linux users should use .<PRODUCT_HOME>/bin/wso2server.sh -Dsetup
Setting up with MySQL
Follow the below instructions to set up a MySQL database.
Setup Database and the Database User | | | Setup Configuration Files Setup Drivers Create Database
Setup Database and the Database User
1. Download and install MySQL on your computer. Use the following command:
sudo apt-get install mysql-server mysql-client
2. Start the MySQL service using the following command:
sudo /etc/init.d/mysql start
3. Log in to the MySQL client as the root user (or any other user with database creation privileges).
mysql -u root -p
4. You will be prompted to enter the password.
TipIn most systems, the default root password is blank. Press "enter" without typing anything if you have notchanged the default root password.

WSO2 API Manager, version 1.7.0, WSO2 Inc.
Copyright © WSO2 Inc. 2005-2014 216
After that, you will see the MySQL command prompt.
5. In the MySQL prompt, create the database using the following command.
create database regdb;
6. Give authorization of the database to the user "regadmin."
GRANT ALL ON regdb.* TO regadmin@localhost IDENTIFIED BY "regadmin"
7. Log out from the MySQL prompt by typing the "quit" command.
quit;
Setup Configuration Files
1. Edit the default database configuration defined in the master-datasources.xml file located at $CARBON_HO ME/repository/conf/datasources directory as below. Both the database configurations in registry.xml
and user-mgt.xml refer this data source.

WSO2 API Manager, version 1.7.0, WSO2 Inc.
Copyright © WSO2 Inc. 2005-2014 217
<datasource> <name>WSO2_CARBON_DB</name> <description>The datasource used for registry and user manager</description> <jndiConfig> <name>jdbc/WSO2CarbonDB</name> </jndiConfig> <definition type="RDBMS"> <configuration> <url>jdbc:mysql://localhost:3306/regdb</url> <username>regadmin</username> <password>regadmin</password> <driverClassName>com.mysql.jdbc.Driver</driverClassName> <maxActive>80</maxActive> <maxWait>60000</maxWait> <minIdle>5</minIdle> <testOnBorrow>true</testOnBorrow> <validationQuery>SELECT 1</validationQuery> <validationInterval>30000</validationInterval> </configuration> </definition></datasource>
The database configuration options
NoteReplace these settings with your own custom values:

WSO2 API Manager, version 1.7.0, WSO2 Inc.
Copyright © WSO2 Inc. 2005-2014 218
url - The URL of the database.username - The name of the database user.password - The password of the database user.driverClassName - The class name of the database driver.maxActive - The maximum number of active connections that can be allocated from this pool at the sametime or negative for no limit.maxWait - The maximum number of milliseconds that the pool will wait (when there are no availableconnections) for a connection to be returned before throwing an exception or <= 0 to wait indefinitely.minIdle - The minimum number of active connections that can remain idle in the pool without extra onesbeing created or 0 to create none.
Setup Drivers
Download the MySQL Java connector JAR from and place it inhttp://dev.mysql.com/downloads/connector/j/5.1.htmlthe directory.$CARBON_HOME/repository/components/lib
Create DatabaseAutomatic Database Creation
1. When you start the server for the first time, use the option. It will create all the tables in the given-DsetupMySQL database.
For Linux:
wso2server.sh -Dsetup
For Windows:
wso2server.bat -Dsetup
2. The product is configured to run with MySQL database.Manual Database Creation
1. Run the MySQL scripts for both registry and user manager (embedded) databases, provided with the product,using the below commands (outside the MySQL prompt).
mysql -u regadmin -p -Dregdb < 'CARBON_HOME/dbscripts/mysql.sql';
2. Start the WSO2 Carbon instance.
For Linux:
TipHere, refers to the directory where you are running the product instance.$CARBON_HOME
NoteYou will be prompted to enter the password for each command.

WSO2 API Manager, version 1.7.0, WSO2 Inc.
Copyright © WSO2 Inc. 2005-2014 219
wso2server.sh
For Windows:
wso2server.bat
Setting up with MySQL Cluster
Find instruction on setting up any WSO2 product with MySQL cluster, refer to the following article published onWSO2 library:
http://wso2.org/library/articles/2012/06/deploying-wso2-platform-mysql-clusterSetting up with OpenEdge
Follow the instructions below to set up the OpenEdge.
Setup Database And The Database User | | | Setup Configuration Files Setup Drivers Create Database
Setup Database And The Database User
1. Download and install OpenEdge on you computer if it is not already done.
2. Go to the folder and use the script to setup the environment<OE-installation-directory>/bin proenvvariables. After doing that, add the to the envir<OE-insallation-directory>/java/prosp.jar CLASSPATHonment variable.
3. Create an empty database using the script. This script creates a database by copying an existingprodbdatabase provided with the installation.
prodb CARBON_DB <OE-installation-directory>/empty8
4. Start the database using the script. Provide the database name and a port as arguments to this scriptproserveusing the and parameters.-db -S
proserve -db CARBON_DB -S 6767
5. Use the script to start the default SQL explorer that comes with the OpenEdge installation. Connect tosqlexpthe database that was created previously by using the and parameters.-db -S
sqlexp -db CARBON_DB -S 6767
6. Now use the following commands to create a user and grant the permissions to the database.
CREATE USER 'wso2carbon','wso2carbon'; GRANT dba,resource TO 'wso2carbon'; COMMIT;
7. Now log out from the SQL explorer by typing "exit."

WSO2 API Manager, version 1.7.0, WSO2 Inc.
Copyright © WSO2 Inc. 2005-2014 220
Setup Configuration Files
1. Edit the default database configuration defined in the master-datasources.xml file located at PRODUCT_HO ME/repository/conf/datasources directory as below. Both the database configurations in registry.xml
and user-mgt.xml refer this data source.
NoteYou have to replace these settings with your custom values.

WSO2 API Manager, version 1.7.0, WSO2 Inc.
Copyright © WSO2 Inc. 2005-2014 221
<datasource> <name>WSO2_CARBON_DB</name> <description>The datasource used for registry and user manager</description> <jndiConfig> <name>jdbc/WSO2CarbonDB</name> </jndiConfig> <definition type="RDBMS"> <configuration> <url>jdbc:datadirect:openedge://localhost:6767;databaseName=CARBON_DB</url> <username>regadmin</username> <password>regadmin</password> <driverClassName>com.ddtek.jdbc.openedge.OpenEdgeDriver</driverClassName> <maxActive>80</maxActive> <maxWait>60000</maxWait> <minIdle>5</minIdle> <testOnBorrow>true</testOnBorrow> <validationQuery>SELECT 1</validationQuery> <validationInterval>30000</validationInterval> </configuration> </definition></datasource>
The database configuration options.
url - The URL of the database.username - The name of the database user.password - The password of the database user.driverName - The class name of the database driver.maxActive - The maximum number of active connections that can be allocated from this pool at the sametime or negative for no limit.maxWait - The maximum number of milliseconds that the pool will wait (when there are no availableconnections) for a connection to be returned before throwing an exception or <= 0 to wait indefinitely.minIdle - The minimum number of active connections that can remain idle in the pool, without extra onesbeing created, or 0 to create none.
Setup Drivers
Copy the to the <OE-insallation-directory>/java/openedge.jar $CARBON_HOME/repository/compo directory. nents/lib Here PRODUCT_HOME refers to the directory where you run the product instance.
Create Database
Automatic Database Creation
1. Next at the first time you start the server, run with the -Dsetup option. It will create all the tables in a givenOpenEdge database.
For Linux:
NotePlease note that we do not support running User Manager on OpenEdge in this release.

WSO2 API Manager, version 1.7.0, WSO2 Inc.
Copyright © WSO2 Inc. 2005-2014 222
wso2server.sh -Dsetup
For Windows:
wso2server.bat -Dsetup
2. The product is configured to run with the OpenEdge database.
Manual Database Creation
1. For creating the tables manually, the OpenEdge script provided with the product has to be modified.
Make a backup of the under the name of <PRODUCT_HOME>/dbscripts/openedge.sql openedge_manual.s.ql
2. Replace all the "/" symbols in the script with the ";" symbol.openedge_manual.sql
3. At the end of the script, add the following line and save the script.openedge_manual.sql
COMMIT;
4. Run the modified script using the SQL explorer.
sqlexp -db CARBON_DB -S 6767 -user wso2carbon -password wso2carbon <PRODUCT_HOME/dbscripts/openedge_manual.sql
5. Start the server.
For Linux:
wso2server.sh
For Windows:
wso2server.bat
Setting up with Oracle
Follow the instructions below to set up the Oracle database.
Setup Database and User | | | Setup Configuration File Copy JDBC Driver Create Database Tables
Setup Database and User
1. Create a new database. This can be done by either using the Oracle database configuration assistant (dbca) or
.Setting up with Oracle RAC For Oracle RAC, refer to

WSO2 API Manager, version 1.7.0, WSO2 Inc.
Copyright © WSO2 Inc. 2005-2014 223
manually. Do necessary changes in the Oracle and files in order to definetnsnames.ora listner.oradatabases addresses for establishing connections to the newly created database. After configuring them, startup theOracle instance.
$ sudo /etc/init.d/oracle-xe restart
2. Connect to Oracle using SQL*Plus as sysdba.
$ ./<ORACLE_HOME>/config/scripts/sqlplus.sh sysadm/password as sysdba
2.1. Connect to instance with username and password.
$ connect
3. As SYS DBA, create a database user and grant privileges to the user as shown below:
Create user USER_NAME identified by PASSWORD account unlock;grant connect to USER_NAME;grant create session, dba to USER_NAME;commit;

WSO2 API Manager, version 1.7.0, WSO2 Inc.
Copyright © WSO2 Inc. 2005-2014 224
For example,
4. Exit from the SQL*Plus session by typing the "quit" command.
SQL> quit
Setup Configuration File
1. Edit the default database configuration defined in the master-datasources.xml file located at <APIM_HOME >/repository/conf/datasources directory as follows. Both the database configurations in registry.xml
and user-mgt.xml refer this data source.

WSO2 API Manager, version 1.7.0, WSO2 Inc.
Copyright © WSO2 Inc. 2005-2014 225
<datasource> <name>WSO2_CARBON_DB</name> <description>The datasource used for registry and user manager</description> <jndiConfig> <name>jdbc/WSO2CarbonDB</name> </jndiConfig> <definition type="RDBMS"> <configuration> <url>jdbc:oracle:thin:@SERVER_NAME:PORT/DB_NAME</url> <username>regadmin</userName> <password>regadmin</password> <driverClassName>oracle.jdbc.driver.OracleDriver</driverClassName> <maxActive>80</maxActive> <maxWait>60000</maxWait> <minIdle>5</minIdle> <testOnBorrow>true</testOnBorrow> <validationQuery>SELECT 1 FROM DUAL</validationQuery> <validationInterval>30000</validationInterval> </configuration> </definition></datasource>
The database configuration options
url - The URL of the database.username - The name of the database user.
Replace these settings with your own custom values:

WSO2 API Manager, version 1.7.0, WSO2 Inc.
Copyright © WSO2 Inc. 2005-2014 226
password - The password of the database user.driverClassName - The class name of the database driver.maxActive - The maximum number of active connections that can be allocated from this pool at the sametime or negative for no limit.maxWait - The maximum number of milliseconds that the pool will wait (when there are no availableconnections) for a connection to be returned before throwing an exception or <= 0 to wait indefinitely.minIdle - The minimum number of active connections that can remain idle in the pool without extra onesbeing created or 0 to create none.
Copy JDBC Driver
Copy the Oracle JDBC libraries to . For example, <APIM_HOME>/repository/components/lib <ORACLE_HOME.>/jdbc/lib/ojdbc14.jar
Create Database Tables
Database tables can be created either manually by running scripts or automatically by using start-up parameters.
Using Scripts
Database tables can be created manually by logging in to the created database and running the following scripts inSQL*Plus:
SQL> @<APIM_HOME>/dbscripts/oracle.sql
Start the Carbon instance.
$ ./<APIM_HOME>/bin/wso2server.sh
Using start-up Parameters
For Windows users:
<APIM_HOME>/bin/wso2server.bat -Dsetup
TipDefault port for Oracle is 1521.
Remove old database driver from <APIM_HOME>/repository/components/dropins , when you upgrade thedatabase driver.
When using the with WSO2 servers there is a possibility of throwing an ojdbc6.jar timezone regionnot found error. To overcome this issue it is necessary to set the java property as export
.JAVA_OPTS="-Duser.timezone='+05:30'" The value of this property should be the GMT difference of the country.
if it is necessary to set this property permanently, then it should be defined inside the as awso2server.shnew JAVA_OPT property.

WSO2 API Manager, version 1.7.0, WSO2 Inc.
Copyright © WSO2 Inc. 2005-2014 227
Setting up with Oracle
To create the database tables when starting the product for the first time.
For Linux Users
$ ./<APIM_HOME>/bin/wso2server.sh -Dsetup
Setting up with Oracle RAC
Oracle Real Application Clusters (RAC) is an option for the Oracle Database for clustering and high availability inOracle database environments. In Oracle RAC environment, some of the commands used in isoracle.sql
considered inefficient (refer to ). Therefore, the product has a separate SQL script oracle_r for Oracle RAC. The Oracle RAC-friendly script is located in folder together with other scac.sql dbscripts .sql
ripts.
Setup User | | | Setup Configuration File Copy JDBC Driver Create Database Tables
Setup User
1. Set environment variables with the corresponding values ORACLE_HOME, PATH, ORACLE_SID /oracle/app/.oracle/product/11.2.0/dbhome_1, $PATH:$ORACLE_HOME/bin, orcl1
2. Connect to Oracle using SQL*Plus as sysdba.
TipTo test products on a Oracle RAC, please, rename to before running oracle_rac.sql oracle.sql -Ds
.etup
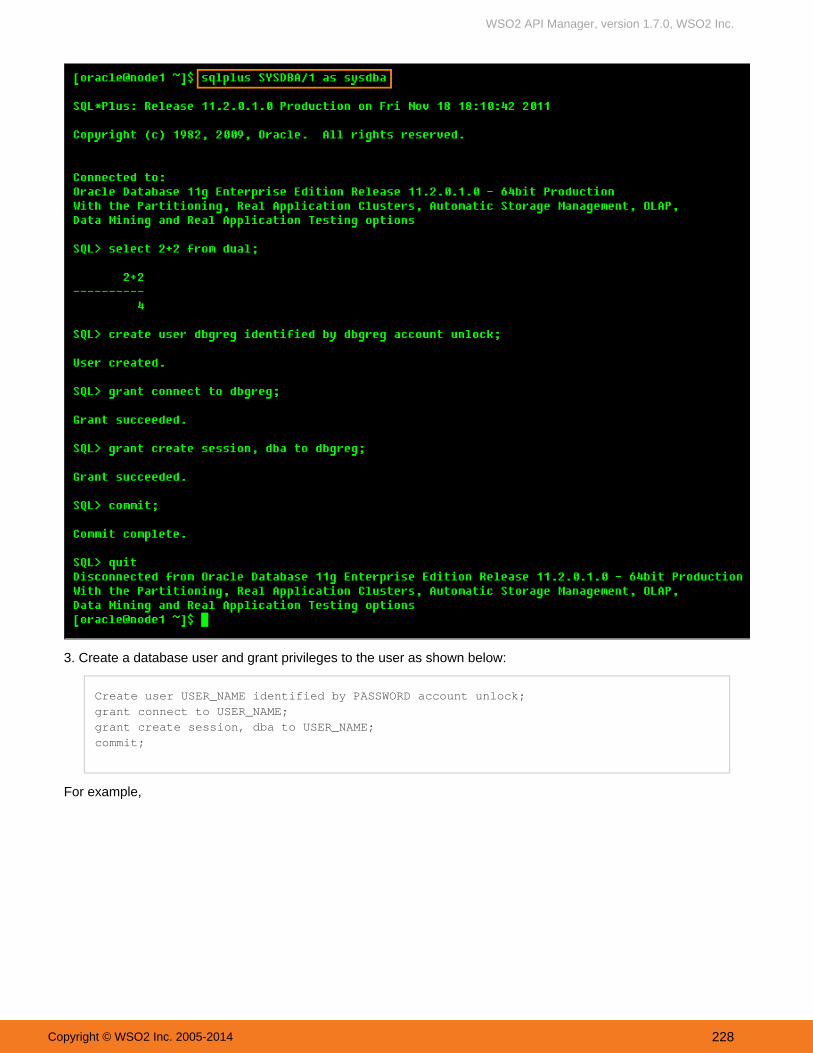
WSO2 API Manager, version 1.7.0, WSO2 Inc.
Copyright © WSO2 Inc. 2005-2014 228
3. Create a database user and grant privileges to the user as shown below:
Create user USER_NAME identified by PASSWORD account unlock;grant connect to USER_NAME;grant create session, dba to USER_NAME;commit;
For example,

WSO2 API Manager, version 1.7.0, WSO2 Inc.
Copyright © WSO2 Inc. 2005-2014 229
4. Exit from the SQL*Plus session by typing the "quit" command.
SQL> quit
Setup Configuration File
1. Edit the default database configuration defined in the master-datasources.xml file located at $CARBON_HO ME/repository/conf/datasources directory as follows. Both the database configurations in registry.xml
and user-mgt.xml refer this data source.

WSO2 API Manager, version 1.7.0, WSO2 Inc.
Copyright © WSO2 Inc. 2005-2014 230
<datasource> <name>WSO2_CARBON_DB</name> <description>The datasource used for registry and user manager</description> <jndiConfig> <name>jdbc/WSO2CarbonDB</name> </jndiConfig> <definition type="RDBMS"> <configuration> <url>jdbc:oracle:thin:@(DESCRIPTION=(LOAD_BALANCE=on) (ADDRESS=(PROTOCOL=TCP)(HOST=racnode1) (PORT=1521)) (ADDRESS=(PROTOCOL=TCP)(HOST=racnode2) (PORT=1521)) (CONNECT_DATA=(SERVICE_NAME=service_name)))</url> <username>regadmin</userName> <password>regadmin</password> <driverClassName>oracle.jdbc.driver.OracleDriver</driverClassName> <maxActive>80</maxActive> <maxWait>60000</maxWait> <minIdle>5</minIdle> <testOnBorrow>true</testOnBorrow> <validationQuery>SELECT 1 FROM DUAL</validationQuery> <validationInterval>30000</validationInterval> </configuration> </definition></datasource>
The database configuration options
url - The URL of the database.username - The name of the database user.password - The password of the database user.
Replace these settings with your own custom values.

WSO2 API Manager, version 1.7.0, WSO2 Inc.
Copyright © WSO2 Inc. 2005-2014 231
driverClassName - The class name of the database driver.maxActive - The maximum number of active connections that can be allocated from this pool at the sametime or negative for no limit.maxWait - The maximum number of milliseconds that the pool will wait (when there are no availableconnections) for a connection to be returned before throwing an exception or <= 0 to wait indefinitely.minIdle - The minimum number of active connections that can remain idle in the pool without extra onesbeing created or 0 to create none.
Copy JDBC Driver
Copy the Oracle JDBC libraries to <PRODUCT_HOME>/repository/components/lib . For example, - $ORACLE_HOME/jdbc/lib/ojdbc14.jar .
Create Database Tables
Database tables can be created either manually by running scripts or automatically by using start-up parameters.Using Scripts
Database tables can be created manually by logging in to the created database and running the following scripts inSQL*Plus:
SQL> @${PRODUCT_HOME}/dbscripts/oracle.sql
Note: Remove old database driver from ,when<PRODUCT_HOME>/repository/components/dropinsyou upgrade the database driver.

WSO2 API Manager, version 1.7.0, WSO2 Inc.
Copyright © WSO2 Inc. 2005-2014 232
Start the product.
$ ./${PRODUCT_HOME}/bin/wso2server.sh
Using Start-up Parameters
For Windows users:
$PRODUCT_HOME/bin/wso2server.bat -Dsetup
To create the database tables when starting the product for the first time.
For Linux Users
$ ./${PRODUCT_HOME}/bin/wso2server.sh -Dsetup
Setting up with PostgreSQL

WSO2 API Manager, version 1.7.0, WSO2 Inc.
Copyright © WSO2 Inc. 2005-2014 233
Follow the below instructions to set up PostgreSQL.
Setup Database And The Login Role | | | Setup Configuration Files Setup Drivers Create Database
Setup Database And The Login Role
1. Install PostgreSQL on your computer.
2. Start the PostgreSQL service.
3. You can create a database and the login role from a GUI using the PGAdminIII tool: http://www.pgadmin.org/dow.nload
4. To connect PGAdminIII to a PostgreSQL database server, locate the server from the object browser, right-clickthe client, and click "Connect." This will show you the databases, tablespaces, and login roles. For example,
5. To create a database, click the "Databases" entry in the tree (inside the object browser), and click "NewDatabase."

WSO2 API Manager, version 1.7.0, WSO2 Inc.
Copyright © WSO2 Inc. 2005-2014 234
6. From the "New Database" dialog box, give a name to the database (for example, "gregdb") and click the "OK"button.

WSO2 API Manager, version 1.7.0, WSO2 Inc.
Copyright © WSO2 Inc. 2005-2014 235
7. To create a login role, click the "Login Roles" entry in the tree (inside the object browser), and click "New LoginRole." Supply the role name and a password.

WSO2 API Manager, version 1.7.0, WSO2 Inc.
Copyright © WSO2 Inc. 2005-2014 236
These values will be used in the product configurations as described in the following sections.
You can provide other policies, such as the expiration time for the login and the connection limit, which are optional.
Click the "OK" button to finish creating the login role. For example,
TipIn the sample configuration, we are using "gregadmin" as the role name and "greadmin" as the password.

WSO2 API Manager, version 1.7.0, WSO2 Inc.
Copyright © WSO2 Inc. 2005-2014 237
Setup Configuration Files
1. Edit the default database configuration defined in the master-datasources.xml file located at $CARBON_HO ME/repository/conf/datasources directory as follows. Both the database configurations in registry.xml
and user-mgt.xml refer this data source.

WSO2 API Manager, version 1.7.0, WSO2 Inc.
Copyright © WSO2 Inc. 2005-2014 238
<datasource> <name>WSO2_CARBON_DB</name> <description>The datasource used for registry and user manager</description> <jndiConfig> <name>jdbc/WSO2CarbonDB</name> </jndiConfig> <definition type="RDBMS"> <configuration> <url>jdbc:postgresql://localhost:5432/gregdb</url> <username>regadmin</userName> <password>regadmin</password> <driverClassName>org.postgresql.Driver</driverClassName> <maxActive>80</maxActive> <maxWait>60000</maxWait> <minIdle>5</minIdle> <testOnBorrow>true</testOnBorrow> <validationQuery>SELECT 1</validationQuery> <validationInterval>30000</validationInterval> </configuration> </definition></datasource>
The database configuration options
url - The URL of the database.username - The name of the database user.
NoteReplace these settings with your own custom values:

WSO2 API Manager, version 1.7.0, WSO2 Inc.
Copyright © WSO2 Inc. 2005-2014 239
1.
password - The password of the database user.driverClassName - The class name of the database driver.maxActive - The maximum number of active connections that can be allocated from this pool at the sametime or negative for no limit.maxWait - The maximum number of milliseconds that the pool will wait (when there are no availableconnections) for a connection to be returned before throwing an exception or <= 0 to wait indefinitely.minIdle - The minimum number of active connections that can remain idle in the pool, without extra onesbeing created, or 0 to create none.
Setup Drivers
1. Download the PostgreSQL JDBC4 driver from .http://jdbc.postgresql.org/download.html
2. Place the driver in the directory. Here, refersPRODUCT_HOME/repository/components/lib $CARBON_HOMEto the directory where you are running the product instance.
Create Database
1. The first time you start the Carbon server, run it with the option. It will create all the tables in the given-DsetupPostgreSQL database.
For Linux:
wso2server.sh -Dsetup
For Windows:
wso2server.bat -Dsetup
2. The product is now configured to run with PostgreSQL database.
Managing Datasources
A provides information that a server can use to connect to a database.datasource isDatasource managementprovided by the following feature in the WSO2 feature repository:
Name : WSO2 Carbon - Datasource Management Feature Identifier : org.wso2.carbon.datasource.feature.group
If datasource management capability is not included in your product by default, you can add it by installing the abovefeature.
You can view, edit, and delete the datasources in your product instance by clicking on the ConfigureData Sourcestab of the product's management console. Note that you cannot edit or delete the default datasoWSO2_CARBON_DBurce.
The following topics describe how to manage datasources:Adding DatasourcesConfiguring an RDBMS DatasourceConfiguring a Custom Datasource
Adding Datasources
If the feature is installed in your WSO2 product instance, you can add datasources that allow the server toDatasource Managementconnect to databases and other external data stores.To add a datasource:

WSO2 API Manager, version 1.7.0, WSO2 Inc.
Copyright © WSO2 Inc. 2005-2014 240
1.
2. 3.
In the management console, click the tab, and then click . Configure Data Sources Click . Add Data SourceSpecify the required options for connecting to the database. The available options are based on the type ofdatasource you are creating:
Configuring an RDBMS DatasourceConfiguring a Custom Datasource
After adding datasources, they appear on the Data Sources page. You can as needed byedit and delete themclicking their or links.Edit DeleteConfiguring an RDBMS Datasource
When , if you select RDBMS as the datasource type, the following screen appears: adding a datasource
This is the default RDBMS datasource configuration provided by WSO2. You can also write your own RDBMSconfiguration by selecting the option. Enter values for the following fields when using the defaultcustom datasourceRDBMS datasource configuration:
Data Source Type: RDBMSName: Name of the datasource (must be a unique value)Data Source Provider: Specify the .datasource providerDriver: The class name of the JDBC driver to use. Be sure to copy the JDBC driver relevant to the databaseengine to the and <PRODUCT_HOME>/repository/components/dropins <PRODUCT_HOME>/reposit

WSO2 API Manager, version 1.7.0, WSO2 Inc.
Copyright © WSO2 Inc. 2005-2014 241
directories. For example, if you are using MySQL, you would specify ory/components/lib com.mysql.j as the driver and would copy to these directories.dbc.Driver mysql-connector-java-5.XX-bin.jar
If you do not copy the driver to these directories when you create the datasource, you will get an exceptionsimilar to "Cannot load JDBC driver class com.mysql.jdbc.Driver".URL: The connection URL to pass to the JDBC driver to establish the connectionUser Name: The connection user name to pass to the JDBC driver to establish the connectionPassword: The connection password to pass to the JDBC driver to establish the connectionExpose as a JNDI Data Souce: Allows you to specify the as described belowJNDI data sourceData Source Configuration Parameters: Allows you to specify the datasource connection pool parameterswhen creating an RDBMS datasource
After creating datasources, they appear on the Data Sources page. You can as needed byedit and delete themclicking their or links.Edit DeleteConfiguring the Datasource Provider
A datasource provider connects to a source of data such as a database, accesses its data, and returns the results ofthe access queries. When creating an RDBMS datasource, you can use the default provider or link to an externalprovider.
Default datasource provider
To use the default datasource provider, select , and then enter the connection properties Driver, URL, UserdefaultName, and Password as follows:
External datasource provider
If you need to add a datasource supported by an external provider class such as com.mysql.jdbc.jdbc2.optio, select , click , and then enter the name and valuenal.MysqlXADataSource External Data Source Add Property
of each connection property you need to configure. Following is an example datasource for an external datasourceprovider.

WSO2 API Manager, version 1.7.0, WSO2 Inc.
Copyright © WSO2 Inc. 2005-2014 242
Configuring a JNDI Datasource
Java Naming and Directory Interface (JNDI) is a Java application programming interface (API) that provides namingand directory functionality for Java software clients to discover and look up data and objects via a name. It helpsdecouple object creation from the object look-up. When you have registered a datasource with JNDI, others candiscover it through a JNDI look-up and use it.
When , to expose an as a JNDI datasource, click adding a datasource RDBMS datasource Expose as a JNDI Data to display the JNDI fields:Source
Following are descriptions of the JNDI fields:
Name: Name of the JNDI datasource that will be visible to others in object look-up

WSO2 API Manager, version 1.7.0, WSO2 Inc.
Copyright © WSO2 Inc. 2005-2014 243
Use Data Source Factory: To make the datasource accessible from an external environment, you must usea data source factory. When this option is selected, a reference object will be created with the defineddatasource properties. The data source factory will create the datasource instance based on the values of thereference object when accessing the datasource from an external environment. In the datasourceconfiguration, this is set as follows: <jndiConfig useDataSourceFactory="true">JNDI Properties: Properties related to the JNDI datasource (such as password). When you select this option,set the following properties:
java.naming.factory.initial: Selects the registry service provider as the initial contextjava.naming.provider.url: Specifies the location of the registry when the registry is being usedas the initial context
Configuring the Datasource Connection Pool Parameters
When the server processes a database operation, it spawns a database connection from an associated datasource.After using this connection, the server returns it to the pool of connections. This is called datasource connection
and is a recommended way to gain more performance/throughput in the system. In datasource connectionpoolingpooling, the physical connection is not dropped with the database server unless it becomes stale or the datasourceconnection is closed.
RDBMS datasources in WSO2 products use Tomcat JDBC connection pool ( ).org.apache.tomcat.jdbc.poolIt is common to all components that access databases for data persistence, such as the registry, user management(if configured against a JDBC userstore), etc.
You can configure the datasource connection pool parameters, such as how long a connection is persisted in thepool, using the datasource configuration parameters section that appears in the management console when creatinga datasource. Click and expand the option as shown below:

WSO2 API Manager, version 1.7.0, WSO2 Inc.
Copyright © WSO2 Inc. 2005-2014 244

WSO2 API Manager, version 1.7.0, WSO2 Inc.
Copyright © WSO2 Inc. 2005-2014 245
Following are descriptions of the parameters you can configure. For more details on datasource configurationparameters, refer to and the DBCP configuration guide at http://tomcat.apache.org/tomcat-7.0-doc/jdbc-pool.html htt
.p://commons.apache.org/proper/commons-dbcp/configuration.html
ParameterName
Description
TransactionIsolation
The default TransactionIsolation state of connections created by this pool.TRANSACTION_UNKNOWNTRANSACTION_NONETRANSACTION_READ_COMMITTEDTRANSACTION_READ_UNCOMMITTEDTRANSACTION_REPEATABLE_READTRANSACTION_SERIALIZABLE
Initial Size (int)
The initial number of connections created when the pool is started. Default value is 0.
Max. Active (int)
The maximum number of active connections that can be allocated from this pool at the same time.The default value is 100.
Max. Idle (int)
The maximum number of connections that should be kept in the pool at all times. Default value is 8.Idle connections are checked periodically (if enabled) and connections that have been idle forlonger than minEvictableIdleTimeMillis will be released. (also see )testWhileIdle
Min. Idle (int)
The minimum number of established connections that should be kept in the pool at all times. Theconnection pool can shrink below this number if validation queries fail. Default value is 0. (also see
)testWhileIdle
Max. Wait (int)
Maximum number of milliseconds that the pool waits (when there are no available connections) fora connection to be returned before throwing an exception. Default value is 30000 (30 seconds).
ValidationQuery
(String)
The SQL query used to validate connections from this pool before returning them to the caller. Ifspecified, this query does not have to return any data, it just can't throw a SQLException. Thedefault value is null. Example values are SELECT 1(mysql), select 1 from dual(oracle), SELECT1(MS Sql Server).
Test OnReturn
(boolean)
Used to indicate if objects will be validated before returned to the pool. NOTE - for a true value tohave any effect, the validationQuery parameter must be set to a non-null string. The default value isfalse.

WSO2 API Manager, version 1.7.0, WSO2 Inc.
Copyright © WSO2 Inc. 2005-2014 246
Test OnBorrow
(boolean)
Used to indicate if objects will be validated before borrowed from the pool. If the object fails tovalidate, it will be dropped from the pool, and we will attempt to borrow another. NOTE - for a truevalue to have any effect, the validationQuery parameter must be set to a non-null string. In order tohave a more efficient validation, see . Default value is false.validationInterval
Test WhileIdle
(boolean)
The indication of whether objects will be validated by the idle object evictor (if any). If an object failsto validate, it will be dropped from the pool. NOTE - for a true value to have any effect, the validatio
parameter must be set to a non-null string. The default value is false and this property hasnQueryto be set in order for the pool cleaner/test thread to run (also see ).timeBetweenEvictionRunsMillis
TimeBetweenEvictionRuns Mills
(int)
The number of milliseconds to sleep between runs of the idle connection validation/cleaner thread.This value should not be set under 1 second. It dictates how often we check for idle, abandonedconnections, and how often we validate idle connections. The default value is 5000 (5 seconds).
MinimumEvictableIdle Time
(int)
The minimum amount of time an object may sit idle in the pool before it is eligible for eviction. Thedefault value is 60000 (60 seconds).
RemoveAbandoned
(boolean)
Flag to remove abandoned connections if they exceed the . If set to trueremoveAbandonedTimouta connection is considered abandoned and eligible for removal if it has been in use longer than theremoveAbandonedTimeout Setting this to true can recover db connections from applications thatfail to close a connection. See also logAbandoned. The default value is false.
RemoveAbandonedTimeout
(int) Timeout in seconds before an abandoned(in use) connection can be removed. The defaultvalue is 60 (60 seconds). The value should be set to the longest running query your applicationsmight have.
LogAbandoned
(boolean) Flag to log stack traces for application code which abandoned a Connection. Logging ofabandoned Connections adds overhead for every Connection borrow because a stack trace has tobe generated. The default value is false.
AutoCommit
(boolean) The default auto-commit state of connections created by this pool. If not set, default isJDBC driver default (If not set then the setAutoCommit method will not be called.)
DefaultRead Only
(boolean) The default read-only state of connections created by this pool. If not set then thesetReadOnly method will not be called. (Some drivers don't support read only mode, ex: Informix)
DefaultCatalog
(String) The default catalog of connections created by this pool.
ValidatorClassName
(String) The name of a class which implements the org.apache.tomcat.jdbc.pool.Validator interfaceand provides a no-arg constructor (may be implicit). If specified, the class will be used to create aValidator instance which is then used instead of any validation query to validate connections. Thedefault value is null. An example value is com.mycompany.project.SimpleValidator.
ConnectionProperties
(String) The connection properties that will be sent to our JDBC driver when establishing newconnections. Format of the string must be [propertyName=property;]* NOTE - The "user" and"password" properties will be passed explicitly, so they do not need to be included here. Thedefault value is null.
Init SQL The ability to run a SQL statement exactly once, when the connection is created.
JDBCInterceptors
Flexible and pluggable interceptors to create any customizations around the pool, the queryexecution and the result set handling.
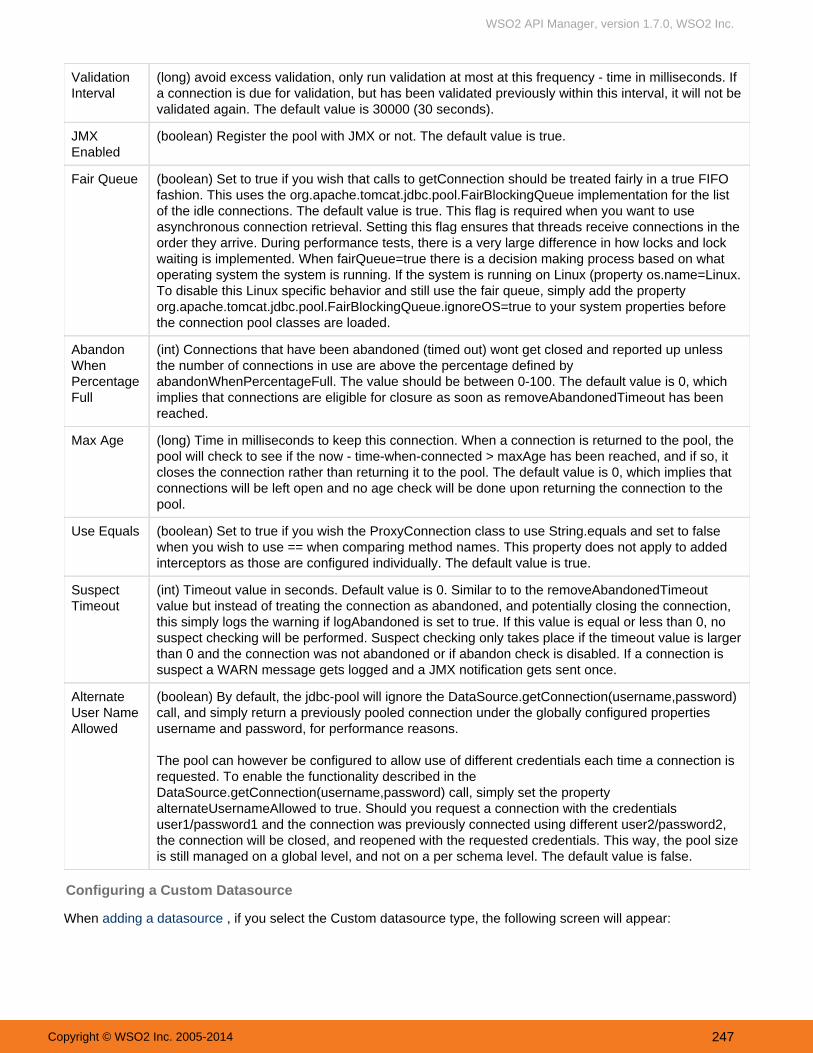
WSO2 API Manager, version 1.7.0, WSO2 Inc.
Copyright © WSO2 Inc. 2005-2014 247
ValidationInterval
(long) avoid excess validation, only run validation at most at this frequency - time in milliseconds. Ifa connection is due for validation, but has been validated previously within this interval, it will not bevalidated again. The default value is 30000 (30 seconds).
JMXEnabled
(boolean) Register the pool with JMX or not. The default value is true.
Fair Queue (boolean) Set to true if you wish that calls to getConnection should be treated fairly in a true FIFOfashion. This uses the org.apache.tomcat.jdbc.pool.FairBlockingQueue implementation for the listof the idle connections. The default value is true. This flag is required when you want to useasynchronous connection retrieval. Setting this flag ensures that threads receive connections in theorder they arrive. During performance tests, there is a very large difference in how locks and lockwaiting is implemented. When fairQueue=true there is a decision making process based on whatoperating system the system is running. If the system is running on Linux (property os.name=Linux.To disable this Linux specific behavior and still use the fair queue, simply add the propertyorg.apache.tomcat.jdbc.pool.FairBlockingQueue.ignoreOS=true to your system properties beforethe connection pool classes are loaded.
AbandonWhenPercentageFull
(int) Connections that have been abandoned (timed out) wont get closed and reported up unlessthe number of connections in use are above the percentage defined byabandonWhenPercentageFull. The value should be between 0-100. The default value is 0, whichimplies that connections are eligible for closure as soon as removeAbandonedTimeout has beenreached.
Max Age (long) Time in milliseconds to keep this connection. When a connection is returned to the pool, thepool will check to see if the now - time-when-connected > maxAge has been reached, and if so, itcloses the connection rather than returning it to the pool. The default value is 0, which implies thatconnections will be left open and no age check will be done upon returning the connection to thepool.
Use Equals (boolean) Set to true if you wish the ProxyConnection class to use String.equals and set to falsewhen you wish to use == when comparing method names. This property does not apply to addedinterceptors as those are configured individually. The default value is true.
SuspectTimeout
(int) Timeout value in seconds. Default value is 0. Similar to to the removeAbandonedTimeoutvalue but instead of treating the connection as abandoned, and potentially closing the connection,this simply logs the warning if logAbandoned is set to true. If this value is equal or less than 0, nosuspect checking will be performed. Suspect checking only takes place if the timeout value is largerthan 0 and the connection was not abandoned or if abandon check is disabled. If a connection issuspect a WARN message gets logged and a JMX notification gets sent once.
AlternateUser NameAllowed
(boolean) By default, the jdbc-pool will ignore the DataSource.getConnection(username,password)call, and simply return a previously pooled connection under the globally configured propertiesusername and password, for performance reasons.
The pool can however be configured to allow use of different credentials each time a connection isrequested. To enable the functionality described in theDataSource.getConnection(username,password) call, simply set the propertyalternateUsernameAllowed to true. Should you request a connection with the credentialsuser1/password1 and the connection was previously connected using different user2/password2,the connection will be closed, and reopened with the requested credentials. This way, the pool sizeis still managed on a global level, and not on a per schema level. The default value is false.
Configuring a Custom Datasource
When , if you select the Custom datasource type, the following screen will appear: adding a datasource

WSO2 API Manager, version 1.7.0, WSO2 Inc.
Copyright © WSO2 Inc. 2005-2014 248
Following are descriptions of the custom datasource fields:
Data Source Type: CustomCustom Data Source Type: Specify whether the data is in a table or accessed through a query as describedbelowName: Enter a unique name for this datasourceDescription: Description of the datasourceConfiguration: XML configuration of the datasource
Custom datasource type
When creating a custom datasource, you specify whether the datasource type is DS_CUSTOM_TABULAR (the datais stored in tables) or DS_CUSTOM_QUERY (non-tabular data accessed through a query). Following is moreinformation about each type.
Custom tabular datasources
Tabular datasources are used for accessing tabular data, that is, the data is stored in rows in named tables that canbe queried later. To implement tabular datasources, the interface org.wso2.carbon.dataservices.core.cus
is used. You can see a sample implementation of a tabular custom tom.datasource.TabularDataBasedDSdatasource at . InMemoryDataSource
A tabular datasource is typically associated with a SQL data services query. WSO2 products use an internal SQLparser to execute SQL against the custom datasource. You can see a sample data service descriptor at InMemoryD
. Carbon datasources also support tabular data with the datasource reader implementation SSample org.wso2.c. If you have Data arbon.dataservices.core.custom.datasource.CustomTabularDataSourceReader
Services Server installed, you can see a sample Carbon datasource configuration file at <DSS_HOME>\repositor.y\conf\datasources\custom-datasources.xml
Custom query datasources
Custom query-based datasources are used for accessing non-tabular data through a query expression. Toimplement query-based datasources, the interface org.wso2.carbon.dataservices.core.custom.datasou
is used. You can create any non-tabular datasource using the query-based rce.CustomQueryBasedDSapproach. Even if the target datasource does not have a query expression format, you can create and use your own.For example, you can support any NoSQL type datasource using this type of a datasource.
You can see a sample implementation of a custom query-based datasource at . You can see a EchoDataSource

WSO2 API Manager, version 1.7.0, WSO2 Inc.
Copyright © WSO2 Inc. 2005-2014 249
sample data service descriptor with custom query datasources in . Carbon datasources also InMemoryDSSamplesupport query-based data with the datasource reader implementation org.wso2.carbon.dataservices.core.
. If you have Data Services Server installed, you can custom.datasource.CustomQueryDataSourceReadersee a sample Carbon datasource configuration file at <DSS_HOME>\repository\conf\datasources\custom-
.datasources.xml
In the "init" methods of all custom datasources, user-supplied properties will be parsed to initialize the datasourceaccordingly. Also, a property named "__DATASOURCE_ID__", which contains a UUID to uniquely identify thecurrent datasource, will be passed. This can be used by custom datasource authors to identify the datasourcesaccordingly, such as datasource instances communicating within a server cluster for data synchronization.
Shown below is an example configuration of a custom datasource of type 'DS_CUSTOM_TABULAR'.
After creating datasources, they appear on the Data Sources page. You can as needed byedit and delete themclicking their or links.Edit Delete
Configuring Caching
When an API call hits the API Gateway, the Gateway carries out security checks to verify if the token is valid. Duringthese verifications, the API Gateway extracts parameters such as access token, API and API version that arepassed on to it. Since the entire load of traffic to APIs goes through the API Gateway, this verification process needsto be fast and efficient in order to prevent overhead and delays. The API Manager uses caching for this purpose,where the validation information is cached with the token, API name and version, and the cache is stored in eitherthe API Gateway or the key manager server.
Caching at API Gateway
W and a request hits the Gateway, it first populates the cached entry for ahen caching is enabled at the Gatewaygiven token. If a cache entry does not exist in cache, it calls the key manager server. This process is carried outusing Web service calls. Once the key manager server returns the validation information, it gets stored in theGateway. Because the API Gateway issues a Web service call to the key manager server only if it does not have acache entry, this method reduces the number of Web service calls to the key manager server. Therefore, it is fasterthan the alternative method.
By default, the API Gateway cache is enabled by setting the element to true in <EnableGatewayKeyCache> <API file:M_HOME>/repository/conf/api-manager.xml
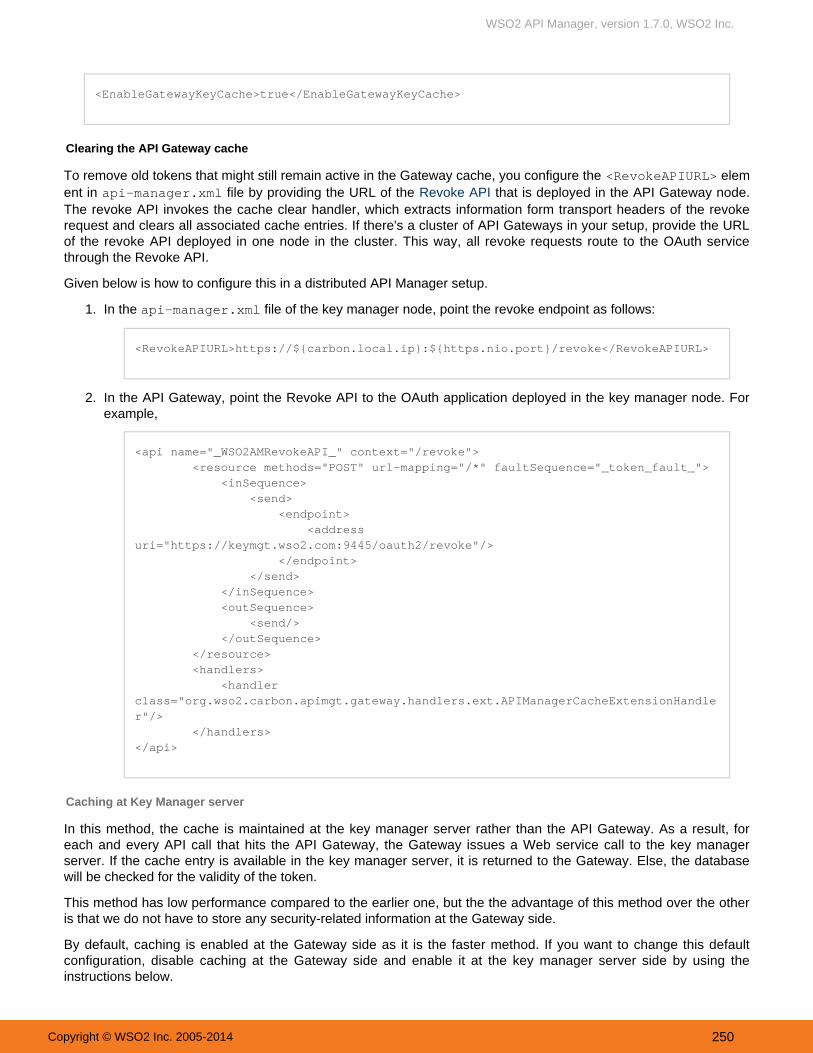
WSO2 API Manager, version 1.7.0, WSO2 Inc.
Copyright © WSO2 Inc. 2005-2014 250
1.
2.
<EnableGatewayKeyCache>true</EnableGatewayKeyCache>
Clearing the API Gateway cache
To remove old tokens that might still remain active in the Gateway cache, you configure the elem<RevokeAPIURL>ent in file by providing the URL of the that is deployed in the API Gateway node.api-manager.xml Revoke APIThe revoke API invokes the cache clear handler, which extracts information form transport headers of the revokerequest and clears all associated cache entries. If there's a cluster of API Gateways in your setup, provide the URLof the revoke API deployed in one node in the cluster. This way, all revoke requests route to the OAuth servicethrough the Revoke API.
Given below is how to configure this in a distributed API Manager setup.
In the file of the key manager node, point the revoke endpoint as follows:api-manager.xml
<RevokeAPIURL>https://${carbon.local.ip}:${https.nio.port}/revoke</RevokeAPIURL>
In the API Gateway, point the Revoke API to the OAuth application deployed in the key manager node. Forexample,
<api name="_WSO2AMRevokeAPI_" context="/revoke"> <resource methods="POST" url-mapping="/*" faultSequence="_token_fault_"> <inSequence> <send> <endpoint> <addressuri="https://keymgt.wso2.com:9445/oauth2/revoke"/> </endpoint> </send> </inSequence> <outSequence> <send/> </outSequence> </resource> <handlers> <handlerclass="org.wso2.carbon.apimgt.gateway.handlers.ext.APIManagerCacheExtensionHandler"/> </handlers></api>
Caching at Key Manager server
In this method, the cache is maintained at the key manager server rather than the API Gateway. As a result, foreach and every API call that hits the API Gateway, the Gateway issues a Web service call to the key managerserver. If the cache entry is available in the key manager server, it is returned to the Gateway. Else, the databasewill be checked for the validity of the token.
This method has low performance compared to the earlier one, but the the advantage of this method over the otheris that we do not have to store any security-related information at the Gateway side.
By default, caching is enabled at the Gateway side as it is the faster method. If you want to change this defaultconfiguration, disable caching at the Gateway side and enable it at the key manager server side by using theinstructions below.

WSO2 API Manager, version 1.7.0, WSO2 Inc.
Copyright © WSO2 Inc. 2005-2014 251
1.
2.
3.
Disable caching at API Gateway by adding the following entry to section of APIGateway <APIM_HOME>/rep file.ository/conf/api-manager.xml
<EnableGatewayKeyCache>false</EnableGatewayKeyCache>
Enable key manager server-side caching by adding the following entry to section of theAPIKeyManagerapi-manager.xml file.
<EnableKeyMgtValidationInfoCache>true</EnableKeyMgtValidationInfoCache>
The API Manager generates JWT tokens for each validation information object. Usually, JWT tokens also getcached with the validation information object, but you might want to generate JWT per each call. You can dothis by enabling JWT caching at key manager server. Add the following entry to section ofAPIKeyManagerthe api-manager.xml file.
<EnableJWTCache>true</EnableJWTCache>
Also enable token generation by setting the following entry to at the root level of the api-manager.xmltruefile.
<APIConsumerAuthentication> <EnableTokenGeneration>true</EnableTokenGeneration> ...</APIConsumerAuthentication>
Response caching
The API Manager uses toWSO2 ESB's cache mediator cache response messages per each API. You can configure For information, see .response caching at the time an API is created. Response Caching
Configuring Single Sign-on with SAML 2.0
Single sign-on (SSO) allows users, who are authenticated against one application, gain access to multiple otherrelated applications as well without having to repeatedly authenticate themselves. It also allows the Webapplications gain access to a set of back-end services with the logged-in user's access rights, and the back-endservices can authorize the user based on different claims like user role.
WSO2 API Manager includes feature, which is implemented Single Sign-On with SAML 2.0 according to the SAML2.0 Web browser-based SSO support that is facilitated by WSO2 Identity Server (IS). This feature is available in anyIS version from 4.1.0 onwards. We use in this guide. WSO2 Identity Server acts as an identity serviceIS 5.0.0provider of systems enabled with single sign-on, while the Web applications such as API Manager apps act as SSOservice providers. Using this feature, you can configure SSO across the two API Manager Web applications, whichare API Publisher and API Store as well as other Web applications in your organization. After configuring, you will beable to access API Store or API Publisher in a single authentication attempt.
Note that you must disable caching at the key manager server side in order to generate JWT pereach call.
To learn more about Single Sign-On with WSO2 Identity Server, see the following article in WSO2 library: ht.tp://wso2.org/library/articles/2010/07/saml2-web-browser-based-sso-wso2-identity-server
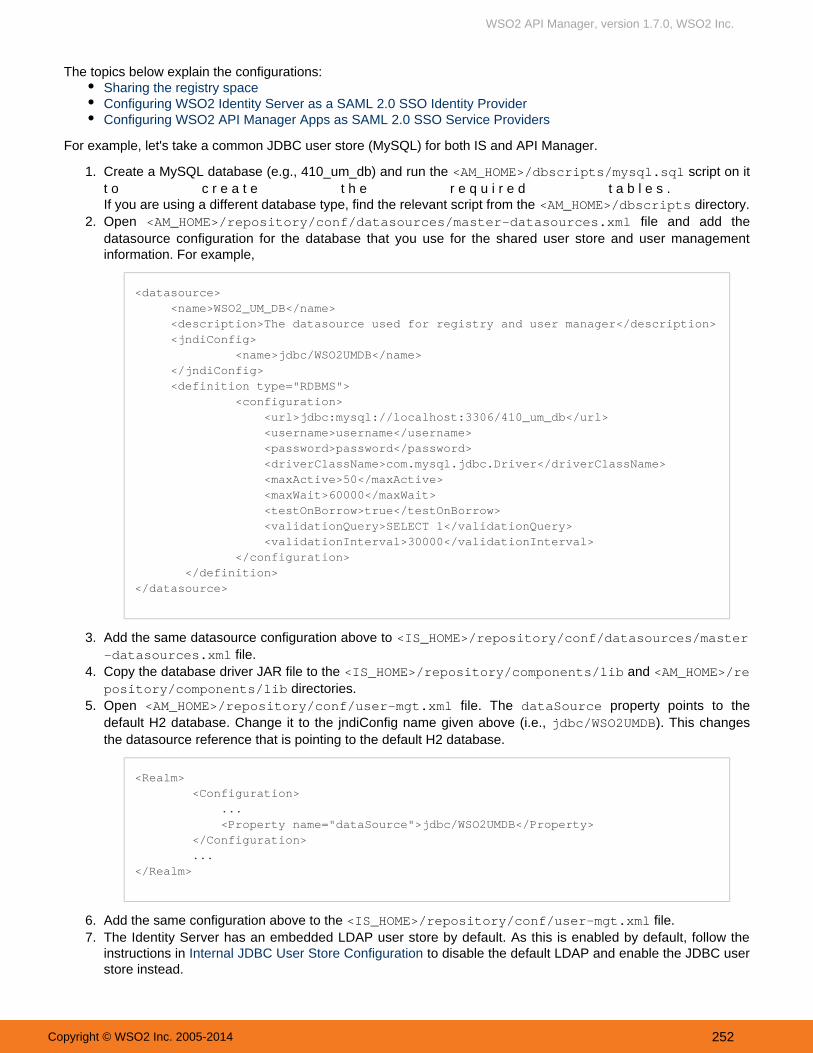
WSO2 API Manager, version 1.7.0, WSO2 Inc.
Copyright © WSO2 Inc. 2005-2014 252
1.
2.
3.
4.
5.
6. 7.
The topics below explain the configurations: Sharing the registry spaceConfiguring WSO2 Identity Server as a SAML 2.0 SSO Identity ProviderConfiguring WSO2 API Manager Apps as SAML 2.0 SSO Service Providers
For example, let's take a common JDBC user store (MySQL) for both IS and API Manager.
Create a MySQL database (e.g., 410_um_db) and run the script on it<AM_HOME>/dbscripts/mysql.sqlt o c r e a t e t h e r e q u i r e d t a b l e s . If you are using a different database type, find the relevant script from the directory.<AM_HOME>/dbscriptsOpen file and add the<AM_HOME>/repository/conf/datasources/master-datasources.xmldatasource configuration for the database that you use for the shared user store and user managementinformation. For example,
<datasource> <name>WSO2_UM_DB</name> <description>The datasource used for registry and user manager</description> <jndiConfig> <name>jdbc/WSO2UMDB</name> </jndiConfig> <definition type="RDBMS"> <configuration> <url>jdbc:mysql://localhost:3306/410_um_db</url> <username>username</username> <password>password</password> <driverClassName>com.mysql.jdbc.Driver</driverClassName> <maxActive>50</maxActive> <maxWait>60000</maxWait> <testOnBorrow>true</testOnBorrow> <validationQuery>SELECT 1</validationQuery> <validationInterval>30000</validationInterval> </configuration> </definition></datasource>
Add the same datasource configuration above to <IS_HOME>/repository/conf/datasources/master file.-datasources.xml
Copy the database driver JAR file to the and <IS_HOME>/repository/components/lib <AM_HOME>/re directories.pository/components/lib
Open file. The property points to the<AM_HOME>/repository/conf/user-mgt.xml dataSourcedefault H2 database. Change it to the jndiConfig name given above (i.e., ). This changesjdbc/WSO2UMDBthe datasource reference that is pointing to the default H2 database.
<Realm> <Configuration> ... <Property name="dataSource">jdbc/WSO2UMDB</Property> </Configuration> ...</Realm>
Add the same configuration above to the file.<IS_HOME>/repository/conf/user-mgt.xmlThe Identity Server has an embedded LDAP user store by default. As this is enabled by default, follow theinstructions in to disable the default LDAP and enable the JDBC userInternal JDBC User Store Configurationstore instead.

WSO2 API Manager, version 1.7.0, WSO2 Inc.
Copyright © WSO2 Inc. 2005-2014 253
1.
2.
3.
Sharing the registry space
Let's share a common registry space between the IS and APIM. This can be done by creating a registry databaseand mounting it on both the IS and APIM.
Create a MySQL database (e.g., registry) and run the script on it to<IS_HOME>/dbscripts/mysql.sqlc r e a t e t h e r e q u i r e d t a b l e s . If you are using a different database type, find the relevant script from the directory.<IS_HOME>/dbscriptsAdd the following datasource configuration to both the <IS_HOME>/repository/conf/datasources/ma
and ster-datasources.xml <AM_HOME>/repository/conf/datasources/master-datasources files..xml
<datasource> <name>WSO2REG_DB</name> <description>The datasource used for registry</description> <jndiConfig> <name>jdbc/WSO2REG_DB</name> </jndiConfig> <definition type="RDBMS"> <configuration> <url>jdbc:mysql://localhost:3306/registry?autoReconnect=true&relaxAutoCommit=true&</url> <username>apiuser</username> <password>apimanager</password> <driverClassName>com.mysql.jdbc.Driver</driverClassName> <maxActive>50</maxActive> <maxWait>60000</maxWait> <testOnBorrow>true</testOnBorrow> <validationQuery>SELECT 1</validationQuery> <validationInterval>30000</validationInterval> </configuration> </definition></datasource>
Create the registry mounts by inserting the following sections into the <IS_HOME>/repository/conf/re gistry.xml file.
When doing this change, do not replace the existing for " ". Simply add<dbConfig> wso2registrythe following configuration to the existing configurations.
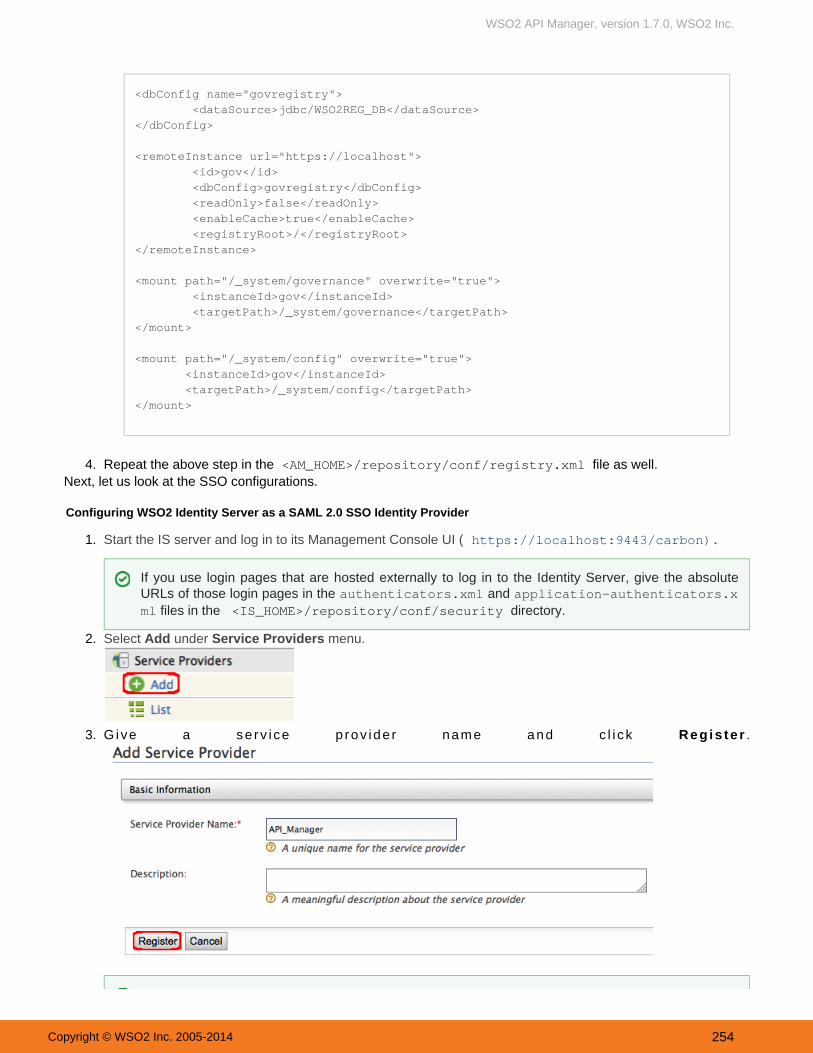
WSO2 API Manager, version 1.7.0, WSO2 Inc.
Copyright © WSO2 Inc. 2005-2014 254
3.
4.
1.
2.
3.
<dbConfig name="govregistry"> <dataSource>jdbc/WSO2REG_DB</dataSource></dbConfig> <remoteInstance url="https://localhost"> <id>gov</id> <dbConfig>govregistry</dbConfig> <readOnly>false</readOnly> <enableCache>true</enableCache> <registryRoot>/</registryRoot></remoteInstance> <mount path="/_system/governance" overwrite="true"> <instanceId>gov</instanceId> <targetPath>/_system/governance</targetPath></mount> <mount path="/_system/config" overwrite="true"> <instanceId>gov</instanceId> <targetPath>/_system/config</targetPath></mount>
Repeat the above step in the <AM_HOME>/repository/conf/registry.xml file as well.Next, let us look at the SSO configurations.
Configuring WSO2 Identity Server as a SAML 2.0 SSO Identity Provider
Start the IS server and log in to its Management Console UI ( ).https://localhost:9443/carbon
Select under menu.Add Service Providers
Give a se rv i ce p rov ide r name and c l i c k .Regis te r
If you use login pages that are hosted externally to log in to the Identity Server, give the absoluteURLs of those login pages in the and authenticators.xml application-authenticators.x
files in theml <IS_HOME>/repository/conf/security directory.

WSO2 API Manager, version 1.7.0, WSO2 Inc.
Copyright © WSO2 Inc. 2005-2014 255
3.
4.
5. 6.
You are navigated to the detailed configuration page. nside the Expand iSAML2 Web SSO Configuration Inbound Authentication Configuration section.Expand nside the iSAML2 Web SSO Configuration Inbound Authentication Configuration section.
Pro vide configurations to the following register the API Manager Web applications as SSO service providers.
To register API Publisher as an SSO service provider:Issuer : API_PUBLISHERAssertion Consumer URL: . Change the IPhttps://localhost:9443/publisher/jagg/jaggery_acs.jagand port accordingly. This is the URL for the acs page in your running publisher app.Select the following options:
Use fully qualified username in the NameID Enable Response SigningEnable Assertion SigningEnable Single Logout
Click once done.Register
To register API Store as an SSO service provider:Issuer : API_STOREAssertion Consumer URL: . Change the IP andhttps://localhost:9443/store/jagg/jaggery_acs.jagport accordingly. This is the URL for the acs page in your running store app.Select the following options:
Use fully qualified username in the NameID Enable Response Signing Enable Assertion Signing
Enable Single Logout Click once done.Register
F o r e x a m p l e :
: IfTip you are working in a multi tenanted environment and you want all tenants to be able to log in tothe APIM Web applications, you must click the option that appears afterSaaS Applicationr e g i s t e r i n g t h e s e r v i c e p r o v i d e r .
If not, only users in the current tenant domain (the one you are defining the service provider in) will beallowed to log in to the Web application and you have to register new service providers for all Webapplications (API Store and API Publisher in this case) from each tenant space separately. Forexample, let's say you have three tenants as TA, TB and TC and you register the service provider inTA only. If you tick the option, all users in TA, TB, TC tenant domains will be ableSaaS Applicationto log in. Else, only users in TA wi l l be able to log in.
In the following configurations, use the exact values that were used to configure the API ManagerWeb applications.

WSO2 API Manager, version 1.7.0, WSO2 Inc.
Copyright © WSO2 Inc. 2005-2014 256
1.
2.
3.
4.
5.
Configuring WSO2 API Manager Apps as SAML 2.0 SSO Service Providers
Open <AM_Home>/repository/deployment/server/jaggeryapps/publisher/site/conf/site and modify the following configurations found under ..json ssoConfigurationkeyStoreName: The keystore of the running IDP. As you use a remote instance of WSO2 IS here, youcan import the public certificate of the IS keystore to the APIM and then point to the APIM keystore.The default keystore of the APIM is <APIM_HOME>/repository/resources/security/wso2car
. bon.jks .Be sure to give the full path of the keystore herekeyStorePassword: Password for the above keystore.identityAlias: wso2carbon. enabled: Set this value to to enable SSO in the application.trueissuer: API_PUBLISHER. This value can change depending on the value defined in WSO2 ISIssuerSSO configuration above.identityProviderURL: . Change the IP and port accordingly. This is thehttps://localhost:9444/samlssoredirecting SSO URL in your running WSO2 IS server instance.
Similarly, configure the API Store with SSO. The only difference in API Store SSO configurations is setting A as the .PI_STORE issuer
Access the API Publisher : (e.g., ).https://localhost:<Port number>/publisher https://localhost:9443/publisherObserve the request redirect to the WSO2 IS SAML2.0 based SSO login page. For example,
Enter user credentials. If the user authentication is successful against WSO2 IS, it will redirect to the APIPublisher Web application with the user already authenticated.Access the API Store application, click its link (top, right-hand corner) and verify that the same user isLoginalready authenticated in API Store.

WSO2 API Manager, version 1.7.0, WSO2 Inc.
Copyright © WSO2 Inc. 2005-2014 257
1. a.
b. c.
Maintaining Primary and Secondary Logins
In a standalone deployment of the API Manager instance, users of the API Store can have a secondary login namein addition to the primary login name. This gives the user flexibility to provide either an email or a user name to login. You can configure the API Store to treat both login names as belonging to a single user. Users can invoke APIswith the same Accestoken without having to create a new one for the secondary login.
You can configure this capability using the steps below.
Configure user login under the element in <APIM_HOME>/repository/conf/identity.xml file.<OAuth>Mention your primary and secondary login names. Set the attribute of the primary login to primary tr
and the attribute of the secondary login to .ue primary falsePrimary login doesn't have a . Leave this field empty.ClaimUri
Provide the correct value for the secondary loginClaimUri
An example is given below:
Even with SSO enabled, if the user doesn't have sufficient privileges to access API Publisher/Store or anyother application, s/he will not be authorized to access them.
If there are many WSO2 products in your environment, you can configure SSO for the managementconsoles of all products by changing the configuration in SAML2SSOAuthenticator <PRODUCT_HOME>/r
file as follows:epository/conf/security/authenticators.xml
Set attributes in element to disabled <Authenticator> falseServiceProviderID : In this example, it is the issuer name of the service provider created in step1IdentityProviderSSOServiceURL : In this example, it is the Identity Server port
<Authenticator name="SAML2SSOAuthenticator" disabled="false"> <Priority>10</Priority> <Config> <Parametername="LoginPage">/carbon/admin/login.jsp</Parameter> <Parameter name="ServiceProviderID">carbonserver1</Parameter> <Parametername="IdentityProviderSSOServiceURL">https://localhost:9444/samlsso</Parameter> <Parametername="NameIDPolicyFormat">urn:oasis:names:tc:SAML:1.1:nameid-format:unspecified</Parameter></Config>
Make sure the of the is less than that of the <priority> SAML2SSOAuthenticator BasicAuthe handler. See for more information.nticator here

WSO2 API Manager, version 1.7.0, WSO2 Inc.
Copyright © WSO2 Inc. 2005-2014 258
1.
2.
3.
1.
2.
3.
4.
<OAuth> ..... . .... <LoginConfig> <UserIdLogin primary="true"> <ClaimUri></ClaimUri> </UserIdLogin> <EmailLogin primary="false"> <ClaimUri>http://wso2.org/claims/emailaddress</ClaimUri> </EmailLogin> </LoginConfig></OAuth>
In the API Store of a distributed setup, the element in the api-manager.xml file should point toserverURLthe key manager instance's service endpoint. This allows users to connect to the key manager's user store toperform any operations related to API Store such as login, access token generation etc. For example,
<AuthManager> <!--Server URL of the Authentication service --> <ServerURL>https://localhost:9444/services/</ServerURL>
<!-- Admin username for the Authentication manager. --> <Username>admin</Username>
<!-- Admin password for the Authentication manager.--> <Password>admin</Password></AuthManager>
In the distributed setup, API Store's user store needs to point to the key manager user store.
Adding Internationalization and Localization
The API Manager comes with two Web interfaces as API Publisher and API Store. The instructions given belowshow how to localize the Web interface of API Publisher in Spanish. Same instructions apply to localize API Store aswell in any other language.
Changing the browser settings
First, set the browser language to a preferred language. Instructions should be available in the web browser'suser guide. For example, language can be selected in Google Chrome through Settings -> Show advanced
menu.settings -> LanguagesSet the browser's encoding type to UTF-8.
Introduction to resource files
Go to directory where <AM_HOME>/repository/deployment/server/jaggeryapps/publisher <AM_ is the API Manager distribution home.HOME>
There are two types of resource files used to define localization strings in WSO2 API Manager.The resource file used to store the strings defined in .jag files according to browser locale (Forexample, ) is located in folder.locale_en.json .../publisher/site/conf/locales/jaggeryThe resource file i18nResources.json, which is used to store strings defined in client-side javascriptfiles such as pop-up messages when a UI event is triggered, is located in.../publisher/site/conf/locales/js folder.
Keeping the secondary login name unique for each user is the user's responsibility.

WSO2 API Manager, version 1.7.0, WSO2 Inc.
Copyright © WSO2 Inc. 2005-2014 259
4.
5.
6.
7.
8.
9.
1. 2.
For example,
To implement localization support for jaggery, we use its in-built script module 'i18n'. For more information,refer to .http://jaggeryjs.org/apidocs/i18n.jag
Localizing strings in Jaggery files
To localize the API publisher to Spanish, first localize the strings defined in jaggery files. Create a new file bythe name inside folder. For example, iflocale_{lolcaleCode}.json ...publisher/site/conf/locales/jaggerythe language set in the browser is Spanish, the locale code is and the file name should be .es locale_es.jsonAdd the key-value pairs to locale_es.json file. For an example on adding key value pairs, refer to locale_en.j
file in folder. It is the default resource file for jaggery.son ...publisher/site/conf/locales/jaggery
In addition, a section of a sample locale_es.json file is shown below for your reference.
Localizing strings in client-side Javascript files
To localize the javascript UI messages, navigate to publisher/site/conf/locales/js folder and update i18nReso file with relevant values for the key strings.urces.json
Once done, open the API Publisher web application in your browser ( https: //<YourHostName>:9443/publisher).Note that the UI is now changed to Spanish.
Adding New Throttling Tiers
API Manager admins can add new throttling tiers and define extra properties to throttling tiers using themanagement console as discussed below. For a description of throttling tiers, see .API-level throttling
Log in to the API Manager's Management Console and select under menu.Browse ResourcesSelect the file: ./_system/governance/apimgt/applicationdata/tiers.xml

WSO2 API Manager, version 1.7.0, WSO2 Inc.
Copyright © WSO2 Inc. 2005-2014 260
2.
3. 4.
In the panel, Contents click link Edit as text and the throttling policy opens.You can add a new policy configuration by editing the XML code. For example, we have added a new tiercalled by including the following XML code block soon after the Platinum <throttle:MediatorThrottl
e l e m e n t .e A s s e r t i o n >
Tier DisplayName : You can add this attribute to each throttle ID of tiers.xml file in order tooptionaldecouple the throttle policy name defined in tiers.xml from the tier name showing in APIPublisher/Store UIs.That is, a user can add a different throttle display name to appear in APIPublisher/Store UIs without changingthe throttle ID policy name. The configuration below has a displayName as for the throttle value platino pl
. This value is displayed in APIPublisher/Store apps.atinum
In the configuration below, there's a commented out XML section starting from the XML tag Tier Attributes :. You can use it to define additional attributes related to each throttling tier<throttle:Attributes>
definition. For example, if the throttling tier has attributes called and Platinum PaymentPlan Availabili, first uncomment the section and then define the new attributes as follows:ty <throttle:Attributes>

WSO2 API Manager, version 1.7.0, WSO2 Inc.
Copyright © WSO2 Inc. 2005-2014 261
4.
5.
<wsp:Policy> <throttle:ID throttle:type="ROLE"throttle:displayName="platino">Platinum</throttle:ID> <wsp:Policy> <throttle:Control> <wsp:Policy> <throttle:MaximumCount>50</throttle:MaximumCount> <throttle:UnitTime>60000</throttle:UnitTime> <!--It's possible to define tier level attributes as below foreach tier level.For eg:Payment Plan for a tier--> <wsp:Policy> <throttle:Attributes> <!--throttle:Attribute1>xxxx</throttle:Attribute1--> <!--throttle:Attribute2>xxxx</throttle:Attribute2--> <throttle:PaymentPlan>monthly</throttle:PaymentPlan> <throttle:Availability>FullTime</throttle:Availability> </throttle:Attributes> </wsp:Policy> </wsp:Policy> </throttle:Control> </wsp:Policy></wsp:Policy>
After the edits, click . Your new throttling policy (Platinum) is now successfully saved in theSave Content Repository used by WSO2 API Manager. You can view this new throttle tier available for selection when
creating a new API through the API Publisher.
Maintaining Separate Production and Sandbox Gateways
With WSO2 API Manager, you can maintain a production and a sandbox endpoint for a given API. The productionendpoint is the actual location of the API, whereas the sandbox endpoint points to its testing/pre-productionenvironment.
When you publish an API using the API Publisher, it gets deployed on the API Gateway. By default, there's a singleGateway instance (deployed either externally or embedded within the publisher), but you can also set up multipleGateways:
Single Gateway to handle both production and sandbox requestsMultiple Gateways to handle production and sandbox requests separately
Single Gateway to handle both production and sandbox requests
This is the default scenario. Because this Gateway instance handles both production and sandbox token traffic, it iscalled a hybrid API Gateway. When an API request comes to the API Gateway, it checks whether the requestingtoken is of type PRODUCTION or SANDBOX and forwards the request to the appropriate endpoint. The diagrambelow depicts this scenario.

WSO2 API Manager, version 1.7.0, WSO2 Inc.
Copyright © WSO2 Inc. 2005-2014 262
Multiple Gateways to handle production and sandbox requests separately
Having a single gateway instance to pass through both types of requests can negatively impact the performance ofthe production server. To avoid this, you can set up separate API Gateways. The production API Gateway handlesrequests that are made using PRODUCTION type tokens and the sandbox API Gateway handles requests that aremade using SANDBOX type tokens.
The diagram below depicts this using two Gateways:
In either of the two approaches, if an API Gateway receives an invalid token, it returns an error to the requestingclient saying that the token is invalid.
You configure production and sandbox gateways using the element in the <Environments> <AM_HOME>/reposi file as shown in the following example:tory/conf/api-manager.xml
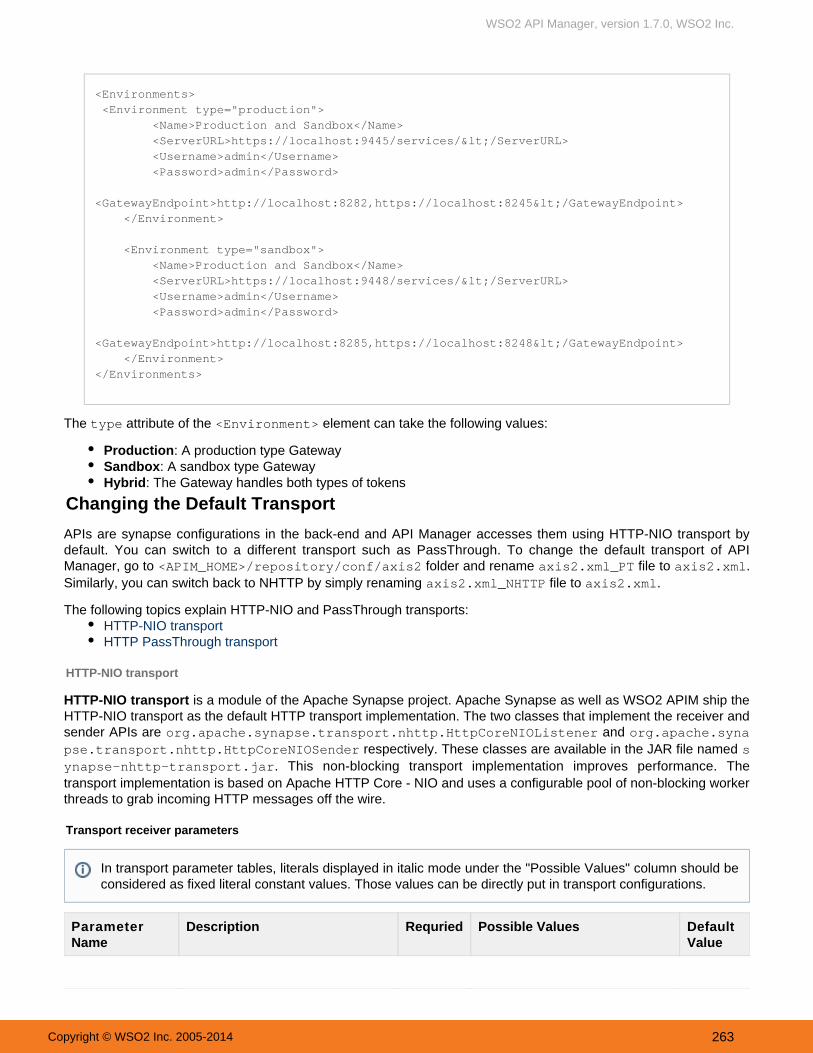
WSO2 API Manager, version 1.7.0, WSO2 Inc.
Copyright © WSO2 Inc. 2005-2014 263
<Environments> <Environment type="production"> <Name>Production and Sandbox</Name> <ServerURL>https://localhost:9445/services/</ServerURL> <Username>admin</Username> <Password>admin</Password> <GatewayEndpoint>http://localhost:8282,https://localhost:8245</GatewayEndpoint> </Environment> <Environment type="sandbox"> <Name>Production and Sandbox</Name> <ServerURL>https://localhost:9448/services/</ServerURL> <Username>admin</Username> <Password>admin</Password> <GatewayEndpoint>http://localhost:8285,https://localhost:8248</GatewayEndpoint> </Environment></Environments>
The attribute of the element can take the following values:type <Environment>
: A production type GatewayProduction: A sandbox type GatewaySandbox
: The Gateway handles both types of tokensHybrid
Changing the Default Transport
APIs are synapse configurations in the back-end and API Manager accesses them using HTTP-NIO transport bydefault. You can switch to a different transport such as PassThrough. To change the default transport of APIManager, go to folder and rename file to .<APIM_HOME>/repository/conf/axis2 axis2.xml_PT axis2.xmlSimilarly, you can switch back to NHTTP by simply renaming file to .axis2.xml_NHTTP axis2.xml
The following topics explain HTTP-NIO and PassThrough transports:HTTP-NIO transportHTTP PassThrough transport
HTTP-NIO transport
HTTP-NIO transport is a module of the Apache Synapse project. Apache Synapse as well as WSO2 APIM ship theHTTP-NIO transport as the default HTTP transport implementation. The two classes that implement the receiver andsender APIs are and org.apache.synapse.transport.nhttp.HttpCoreNIOListener org.apache.syna
respectively. These classes are available in the JAR file named pse.transport.nhttp.HttpCoreNIOSender s. This non-blocking transport implementation improves performance. Theynapse-nhttp-transport.jar
transport implementation is based on Apache HTTP Core - NIO and uses a configurable pool of non-blocking workerthreads to grab incoming HTTP messages off the wire.
Transport receiver parameters
ParameterName
Description Requried Possible Values DefaultValue
In transport parameter tables, literals displayed in italic mode under the "Possible Values" column should beconsidered as fixed literal constant values. Those values can be directly put in transport configurations.

WSO2 API Manager, version 1.7.0, WSO2 Inc.
Copyright © WSO2 Inc. 2005-2014 264
port The port on which this transportreceiver should listen for incomingmessages.
No A positive integer less than65535
8280
non-blocking Setting this parameter to true isvital for reliable messaging and anumber of other scenarios to workproperly.
Yes true
bind-address The address of the interface towhich the transport listener shouldbind.
No A host name or an IP address 127.0.0.1
hostname The host name of the server to bedisplayed in service EPRs,WSDLs etc. This parameter takeseffect only when theWSDLEPRPrefix parameter is notset.
No A host name or an IP address localhost
WSDLEPRPrefix A URL prefix which will be addedto all service EPRs and EPRs inWSDLs etc.
No A URL of the form<protocol>://<hostname>:<port>/
Transport sender parameters
Parameter Name Description Requried PossibleValues
DefaultValue
http.proxyHost If the outgoing messages should be sent throughan HTTP proxy server, use this parameter tospecify the target proxy.
No A host name oran IP address
http.proxyPort The port through which the target proxy acceptsHTTP traffic.
No A positiveinteger less than65535
http.nonProxyHosts The list of hosts to which the HTTP traffic shouldbe sent directly without going through the proxy.
No A list of hostnames or IPaddressesseparated by '|'
non-blocking Setting this parameter to true is vital for reliablemessaging and a number of other scenarios towork properly.
Yes true
HTTP PassThrough transport
HTTP PassThrough Transport is the default, non-blocking HTTP transport implementation based on HTTP CoreNIO and is specially designed for streaming messages. It is similar to the old message relay transport, but it doesnot care about the content type and simply streams all received messages through. It also has a simpler and cleanermodel for forw arding messages back and forth. It can be used as an alternative to the NHTTP transport.
The HTTP PassThrough Transport is enabled by default. If you want to use the NHTTP transport instead,uncomment the relevant NHTTP transport entries in and comment out the HTTP PassThroughaxis2.xmltransport entries. T he PassThrough Transport does not require the binary relay builder and expanding formatter.
Connection throttling
With the HTTP PassThrough and HTTP NIO transports, you can enable connection throttling to restrict the number

WSO2 API Manager, version 1.7.0, WSO2 Inc.
Copyright © WSO2 Inc. 2005-2014 265
of simultaneous open connections. To enable connection throttling, edit the <PRODUCT_HOME>/repository/con (for the HTTP NIO transport) or f/nhttp.properties <PRODUCT_HOME>/repository/conf/passthru.pro
(for the PassThrough transport) and add the following line:perties max_open_connections = 2
This will restrict simultaneous open incoming connections to 2. To disable throttling, delete the max_open_connect setting or set it to -1.ions
Running the Product on a Preferred Profile
When a WSO2 product server starts, it starts all features and related artifacts bundled in the product. Multi-profilesupport allows you to run the product on a selected profile so that only features specific to that profile along withcommon features start up with the server. This enables better resource utilization.
Execute one of the following commands to start a product on a preferred profile.
OS Command
Windows <PRODUCT_HOME>/bin/wso2server.bat -Dprofile=<preferred-profile> --run
Linux/Solaris sh < PRODUCT _HOME>/bin/wso2server.sh -Dprofile=<preferred-profile>
Given below are the profiles available in WSO2 API Manager. They are based on the main components of API.Manager
Profile Command Option with ProfileName
Description
Gatewaymanager
-Dprofile=gateway-manager Used when the API Gateway acts as a manager node in acluster. This profile starts front-end/UI features such as login aswell as back-end services that allow the product instance tocommunicate with other nodes in the cluster.
Gatewayworker
-Dprofile=gateway-worker Used when API Gateway acts as a worker node in a cluster. Thisprofile only starts the back-end features for data processing andcommunicating with the manager node.
KeyManager
-Dprofile=api-key-manager Starts only the features relevant to the Key Manager componentof API Manager.
APIPublisher
-Dprofile=api-publisher Starts only the front-end/back-end features relevant to the APIPublisher Web interface.
APIStore
-Dprofile=api-store Starts only the front-end/back-end features relevant to the APIStore Web interface.
Connection throttling is never exact. For example, setting this property to 2 will result in roughly twosimultaneous open connections at any given time.
WSO2 products do not use the HTTP/S servlet transport configurations that are in file. Instead,axis2.xmlthey use Tomcat-level servlet transports, which are used by the management console in <PRODUCT_HOME>
./repository/conf/tomcat/catalina-server.xml file
Note that the WSO2 products platform currently doesn't block/allow Web applications depending on profiles.Starting a product on a preferred profile only blocks/allows the relevant OSGI bundles. As a result, even ifyou start the server on a profile such as the api-store for example, you will still be able to access the APIPublisher Web application.

WSO2 API Manager, version 1.7.0, WSO2 Inc.
Copyright © WSO2 Inc. 2005-2014 266
How multi-profiling works
Starting a product on a preferred profile starts only a subset of features bundled in the product. In order to identifywhat feature bundles apply to which profile, each product maintains a set of files in bundles.info < _HOMPRODUCTE>/repository/components/ /configuration/org.eclipse.equinox.simpleconfi<profile-name>
. The files contain references to the actual bundles. Note that directoriesgurator bundles.info <profile-nam in the directory path refers to the name of the profile. For example, when there's a product profile namede>
webapp, references to all the feature bundles required for webapp profile to function are in a filebundles.infosaved in <PRODUCT_HOME>/repository/components/ /configuration/org.eclipse.equinox.swebapp
directory.impleconfigurator
Note that when you start the server without using a preferred profile, the server refers to < _HOME>/reposPRODUCTitory/components/ /configuration/org.eclipse.equinox.simpleconfigurator/default bundles
file by default. This file contains references to all bundles in .info < _HOME>/repository/componentsPRODUCTall components/bundles of a product are saved. directory, which is where /plugins
Tuning Performance
This section describes some recommended performance tuning configurations to optimize the API Manager. Itassumes that you have set up the API Manager on Unix/Linux, which is recommended for a production deployment.We also recommend for most production systems. Out of all components of an APIa distributed API Manager setupManager distributed setup, the API Gateway is the most critical, because it handles all inbound calls to APIs.Therefore, we recommend you to have at least a 2-node cluster of API Gateways in a distributed setup.
ImprovementArea
Performance Recommendations
API Gatewaynodes
Increase memory allocated by modifying /bin/wso2server. with the following setting:sh
-Xms2048m -Xmx2048m -XX:MaxPermSize=1024m
The values we discuss below are only general recommendations for the API Gateway. Generally, they workight not bebest when there are 350 to 30000 calls per second to the API Gateway, but these values m
optimal for the specific hardware configurations in your environment. We recommend you to carry out loadtests on your environment to tune the API Manager accordingly.

WSO2 API Manager, version 1.7.0, WSO2 Inc.
Copyright © WSO2 Inc. 2005-2014 267
NHTTPtransport ofAPI Gateway
Recommended values for file are given<AM_HOME>/repository/conf/nhttp.propertiesbelow. that the commented out values in this file are the default values that will be applied ifNoteyou do not change anything.
Property descriptions:
snd_t_core Transport sender worker pool's initial thread count
snd_t_max Transport sender worker pool's maximum thread count
snd_io_threads Sender-side IO workers, which is recommended to be equal to the numberof CPU cores. I/O reactors usually employ a small number of dispatchthreads (often as few as one) to dispatch I/O event notifications to a greaternumber (often as many as several thousands) of I/O sessions orconnections. Generally, one dispatch thread is maintained per CPU core.
snd_alive_sec Sender-side keep-alive seconds
snd_qlen Sender queue length, which is infinite by default
Recommended values:
# HTTP Sender thread pool parameters
snd_t_core=200snd_t_max=250snd_alive_sec=5snd_qlen=-1snd_io_threads=16
# HTTP Listener thread pool parameters
lst_t_core=200lst_t_max=250lst_alive_sec=5lst_qlen=-1lst_io_threads=16

WSO2 API Manager, version 1.7.0, WSO2 Inc.
Copyright © WSO2 Inc. 2005-2014 268
PassThroughtransport ofAPI Gateway
Recommended values for fil<AM_HOME>/repository/conf/passthru-http.propertiese are given below. that the commented out values in this file are the default values that willNotebe applied if you do not change anything.
Property descriptions
worker_thread_keepalive_sec Defines the keep-alive time for extra threads in the workerpool
worker_pool_queue_length Defines the length of the queue that is used to holdrunnable tasks to be executed by the worker pool
io_threads_per_reactor Defines the number of IO dispatcher threads used perreactor
http.max.connection.per.host.port Defines the maximum number of connections per hostport
worker_pool_queue_length Determines the length of the queue used by thePassThrough transport thread pool to store pending jobs.
Recommended values
worker_thread_keepalive_sec : Default value is 60s. This should be less than the sockettimeout.worker_pool_queue_length : Set to -1 to use an unbounded queue. If a bound queue is usedand the queue gets filled to its capacity, any further attempts to submit jobs will fail, causingsome messages to be dropped by Synapse. The thread pool starts queuing jobs when all theexisting threads are busy and the pool has reached the maximum number of threads. So, therecommended queue length is -1.io_threads_per_reactor : Value is based on the number of processor cores in the system.(Runtime.getRuntime().availableProcessors())http.max.connection.per.host.port : Default value is 32767, which works for most systems butyou can tune it based on your operating system (for example, Linux supports 65Kconnections).
http.socket.timeout=120000worker_pool_size_core=400worker_pool_size_max=500io_buffer_size=16384
. . =60000http socket timeoutsnd_t_core=200 snd_t_max=250 snd_io_threads=16 lst_t_core=200 lst_t_max=250 lst_io_threads=16
Make the number of threads equal to the number of processor cores.

WSO2 API Manager, version 1.7.0, WSO2 Inc.
Copyright © WSO2 Inc. 2005-2014 269
Keymanagementnodes
Set the following in <APIM_HOME>/repository/conf/axis2/axis2_client.xml file:
<parameter name="defaultMaxConnPerHost">1000</parameter> <parameter name="maxTotalConnections">30000</parameter>
Set the MySQL maximum connections:
mysql> show variables like "max_connections"; max_connections was 151 set to global max_connections = 250;
Set the open files limit to 200000 by editing the file:/etc/sysctl.conf
sudo sysctl -p
Set the following in batch file:CatlinaServer.sh
maxThreads="750" minSpareThreads="150" disableUploadTimeout="false" enableLookups="false" connectionUploadTimeout="120000" maxKeepAliveRequests="600" acceptCount="600"
Set the following connection pool elements in <APIM_HOME>/repository/conf/datasourc file:es/master-datasources.xml
<maxActive>50</maxActive><maxWait>60000</maxWait><testOnBorrow>true</testOnBorrow><validationQuery>SELECT 1</validationQuery><validationInterval>30000</validationInterval>
that you set theNote element to and provide a validation query (e.g., in<testOnBorrow> trueOracle, ), which is run to refresh any stale connections in the connectionSELECT 1 FROM DUALpool. Set a suitable value for the element, which defaults to 30000<validationInterval>milliseconds. It determines the time period after which the next iteration of the validation querywill be run on a particular connection. It avoids excess validations and ensures betterperformance.
Directing the Root Context to API Store
WSO2 API Manager maintains separate UIs for API publishers and subscribers as the API Publisher and API Store.The root context of the API Manager is set to direct to the API Publisher Web interface by default. For example,assume that the API Manager is hosted on a domain named with default ports. The URLs of the APIapis.comStore and API Publisher Web interfaces will be as follows:
API Store - https://apis.com:9443/storeAPI Publisher - https://apis.com:9443/publisher
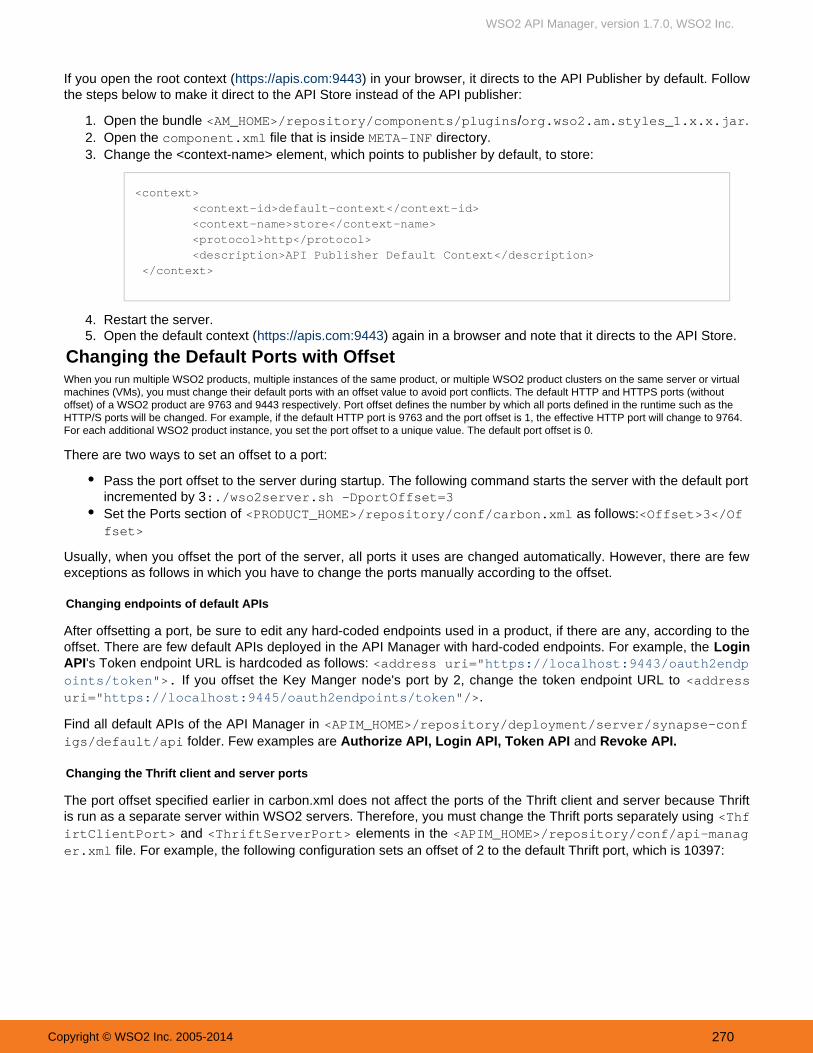
WSO2 API Manager, version 1.7.0, WSO2 Inc.
Copyright © WSO2 Inc. 2005-2014 270
1. 2. 3.
4. 5.
If you open the root context ( ) in your browser, it directs to the API Publisher by default. Followhttps://apis.com:9443the steps below to make it direct to the API Store instead of the API publisher:
Open the bundle / .<AM_HOME>/repository/components/plugins org.wso2.am.styles_1.x.x.jarOpen the file that is inside directory.component.xml META-INFChange the <context-name> element, which points to publisher by default, to store:
<context> <context-id>default-context</context-id> <context-name>store</context-name> <protocol>http</protocol> <description>API Publisher Default Context</description> </context>
Restart the server.Open the default context ( ) again in a browser and note that it directs to the API Store.https://apis.com:9443
Changing the Default Ports with OffsetWhen you run multiple WSO2 products, multiple instances of the same product, or multiple WSO2 product clusters on the same server or virtualmachines (VMs), you must change their default ports with an offset value to avoid port conflicts. The default HTTP and HTTPS ports (withoutoffset) of a WSO2 product are 9763 and 9443 respectively. Port offset defines the number by which all ports defined in the runtime such as theHTTP/S ports will be changed. For example, if the default HTTP port is 9763 and the port offset is 1, the effective HTTP port will change to 9764.For each additional WSO2 product instance, you set the port offset to a unique value. The default port offset is 0.
There are two ways to set an offset to a port:
Pass the port offset to the server during startup. The following command starts the server with the default portincremented by 3:./wso2server.sh -DportOffset=3Set the Ports section of as follows:<PRODUCT_HOME>/repository/conf/carbon.xml <Offset>3</Offset>
Usually, when you offset the port of the server, all ports it uses are changed automatically. However, there are fewexceptions as follows in which you have to change the ports manually according to the offset.
Changing endpoints of default APIs
After offsetting a port, be sure to edit any hard-coded endpoints used in a product, if there are any, according to theoffset. There are few default APIs deployed in the API Manager with hard-coded endpoints. For example, the Login
's Token endpoint URL is hardcoded as follows: API <address uri="https://localhost:9443/oauth2endp If you offset the Key Manger node's port by 2, change the token endpoint URL to ">.oints/token <address
.uri=" />"https://localhost:9445/oauth2endpoints/token
Find all default APIs of the API Manager in <APIM_HOME>/repository/deployment/server/synapse-conf folder. Few examples are and igs/default/api Authorize API, Login API, Token API Revoke API.
Changing the Thrift client and server ports
The port offset specified earlier in carbon.xml does not affect the ports of the Thrift client and server because Thriftis run as a separate server within WSO2 servers. Therefore, you must change the Thrift ports separately using <Thf
and elements in the irtClientPort> <ThriftServerPort> <APIM_HOME>/repository/conf/api-manag file. For example, the following configuration sets an offset of 2 to the default Thrift port, which is 10397:er.xml
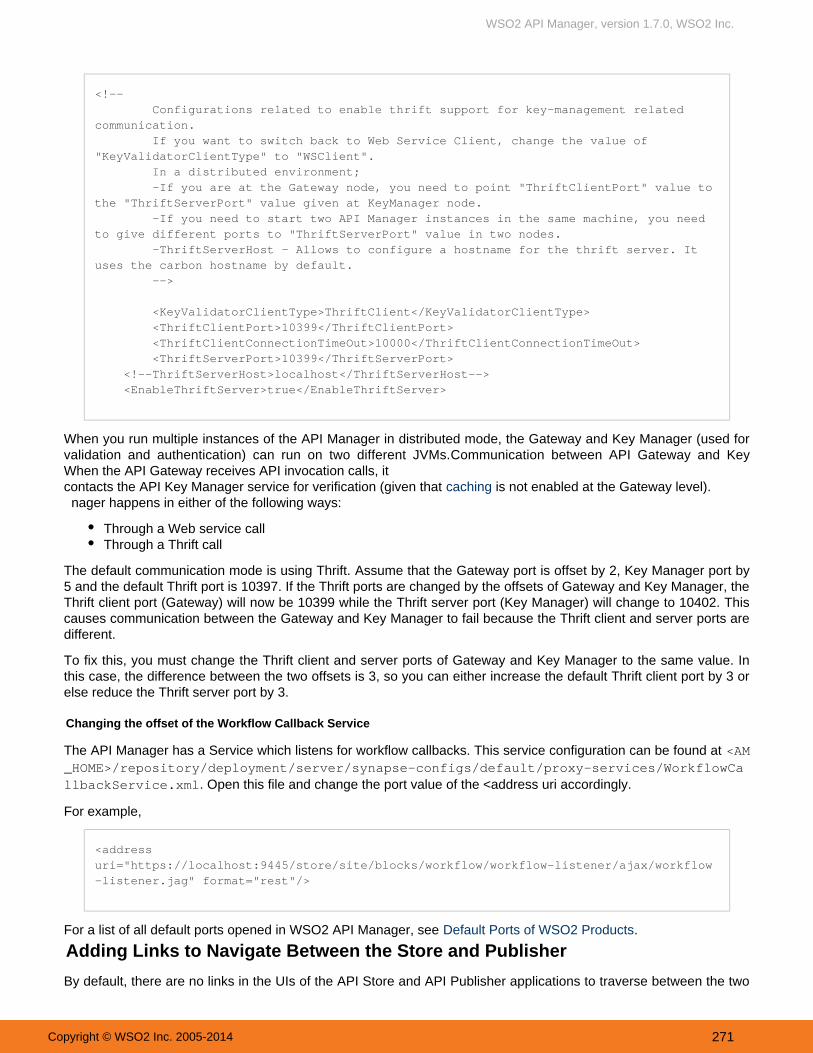
WSO2 API Manager, version 1.7.0, WSO2 Inc.
Copyright © WSO2 Inc. 2005-2014 271
When the API Gateway receives API invocation calls, itcontacts the API Key Manager service for verification (given that is not enabled at the Gateway level).caching
<!-- Configurations related to enable thrift support for key-management relatedcommunication. If you want to switch back to Web Service Client, change the value of"KeyValidatorClientType" to "WSClient". In a distributed environment; -If you are at the Gateway node, you need to point "ThriftClientPort" value tothe "ThriftServerPort" value given at KeyManager node. -If you need to start two API Manager instances in the same machine, you needto give different ports to "ThriftServerPort" value in two nodes. -ThriftServerHost - Allows to configure a hostname for the thrift server. Ituses the carbon hostname by default. -->
<KeyValidatorClientType>ThriftClient</KeyValidatorClientType> <ThriftClientPort>10399</ThriftClientPort> <ThriftClientConnectionTimeOut>10000</ThriftClientConnectionTimeOut> <ThriftServerPort>10399</ThriftServerPort> <!--ThriftServerHost>localhost</ThriftServerHost--> <EnableThriftServer>true</EnableThriftServer>
When you run multiple instances of the API Manager in distributed mode, the Gateway and Key Manager (used forvalidation and authentication) can run on two different JVMs.Communication between API Gateway and Key
nager happens in either of the following ways:
Through a Web service callThrough a Thrift call
The default communication mode is using Thrift. Assume that the Gateway port is offset by 2, Key Manager port by5 and the default Thrift port is 10397. If the Thrift ports are changed by the offsets of Gateway and Key Manager, theThrift client port (Gateway) will now be 10399 while the Thrift server port (Key Manager) will change to 10402. Thiscauses communication between the Gateway and Key Manager to fail because the Thrift client and server ports aredifferent.
To fix this, you must change the Thrift client and server ports of Gateway and Key Manager to the same value. Inthis case, the difference between the two offsets is 3, so you can either increase the default Thrift client port by 3 orelse reduce the Thrift server port by 3.
Changing the offset of the Workflow Callback Service
The API Manager has a Service which listens for workflow callbacks. This service configuration can be found at <AM_HOME>/repository/deployment/server/synapse-configs/default/proxy-services/WorkflowCa
. Open this file and change the port value of the <address uri accordingly. llbackService.xml
For example,
<addressuri="https://localhost:9445/store/site/blocks/workflow/workflow-listener/ajax/workflow-listener.jag" format="rest"/>
For a list of all default ports opened in WSO2 API Manager, see .Default Ports of WSO2 Products
Adding Links to Navigate Between the Store and Publisher
By default, there are no links in the UIs of the API Store and API Publisher applications to traverse between the two

WSO2 API Manager, version 1.7.0, WSO2 Inc.
Copyright © WSO2 Inc. 2005-2014 272
1.
2.
1.
2.
apps.
To add a link in API Publisher to API Store:
In file, set the to true and provide<AM_HOME>/repository/conf/api-manager.xml <DisplayURL>the URL of the Store.
<APIStore> <DisplayURL>true</DisplayURL> <URL>https://${carbon.local.ip}:${mgt.transport.https.port}/store</URL></APIStore>
Note a URL in the API Publisher that points to the API Store. For example,
To add a link in API Store to API Publisher:
In file, set the to true and provide<AM_HOME>/repository/conf/api-manager.xml <DisplayURL>the URL of the Publisher.
<APIPublisher> <DisplayURL>true</DisplayURL> <URL>https://${carbon.local.ip}:${mgt.transport.https.port}/publisher</URL> </APIPublisher>
Note a URL in the API Store that points to the API Publisher. For example,

WSO2 API Manager, version 1.7.0, WSO2 Inc.
Copyright © WSO2 Inc. 2005-2014 273
2.
1.
2.
3.
4.
a.
b.
5.
a. b.
6.
a. b.
Migrating the API Manager
If you have multiple instances of the WSO2 API Manager and want to move your data and deployment artifacts fromone instance to another (such as moving from development to test or production), follow the steps below.
Get a data dump from all the tables in the apimgt schema and dump them to the schema in the newenvironment.Open file and provide<APIM_HOME>/repository/conf/datasources/master-datasources.xmlthe datasource configurations for the following databases in the new environment.
User StoreRegistry databaseAPI Manager Databases
Move all your synapse configurations by copying and replacing <APIM_HOME>/repository/deployment directory to the same directory in the new environment./server/synapse-config/default
Migrate tenants
If you have added to your API Manager instance, follow the steps below to migrate tenantmultiple tenantsconfigurations:
Copy the contents from directory to the same directory in the<APIM_HOME>/repository/tenantsnew environment. Execute the following steps for all tenants in your system.
Migrate external stores
If you have configured under the element in external stores <ExternalAPIStores> <APIM_HOME>/repo file, follow the steps below:sitory/conf/api-manager.xml
Log in to APIM management console and click the menu.Resources -> BrowseLoad resourc/_system/governance/apimgt/externalstores/external-api-stores.xmle in the registry browser UI, configure your external stores there and save.
Migrate Google analytics
If you have configured under element in Google Analytics <GoogleAnalyticsTracking> <APIM_HOME> file, follow the steps below:/repository/conf/api-manager.xml
Log in to APIM management console and go to menu.Resources -> Browse Load resource in the registry/_system/governance/apimgt/statistics/ga-config.xmlbrowser UI, configure the Google analytics and save.
If you changed the default URLs in and files, do not replaceAuthorizeAPI.xml TokenAPI.xmlthem when copying. They are application-specific APIs.
WSO2 API Manager, version 1.7.0, WSO2 Inc.
Copyright © WSO2 Inc. 2005-2014 274
6.
7.
a. b.
Migrate workflows
If you have configured under element in Workflows <WorkFlowExtensions> <APIM_HOME>/repositor file, follow the steps below:y/conf/api-manager.xml
Log in to APIM management console and go to menu.Resources -> BrowseLoad resour/_system/governance/apimgt/applicationdata/workflow-extensions.xmlce in the registry browser UI, configure your workflows and save.
Configuring WSO2 Identity Server as the Key Manager
If your production environment already has an instance of WSO2 Identity Server, you can use it as the Key Managerrather than setting up an additional WSO2 API Manager instance to work as the Key Manager. If you set up theIdentity Server, you can get the added advantage of being able to use authentication/authorization features specificto the Identity Server.
For setup instructions, see the .Clustering Guide
Configuring Multiple Tenants
The goal of multitenancy is to maximize resource sharing by allowing multiple users (tenants) to log in and use asingle sever/cluster at the same time, in a tenant-isolated manner. That is, each user is given the experience ofusing his/her own server, rather than a shared environment. Multitenancy ensures optimal performance of thesystem's resources such as memory and hardware and also secures each tenant's personal data.
You can register tenant domains using the Management Console of WSO2 products.
This section covers the following topics: Multi Tenant ArchitectureManaging TenantsTenant-Aware Load Balancing using WSO2 ELB
Multi Tenant Architecture
The multi tenant architecture of WSO2 products allows you to deploy Web applications, Web services, ESBmediators, mashups etc. in an environment that supports the following:
Tenant isolation: Each tenant has its own domain, which the other tenants cannot access.Data isolation: Each tenant can manage its data securely, in an isolated manner. Execution isolation: Each tenant can carry out business processes and workflows independent of the othertenants. No action of a tenant is triggered or inhibited by another tenant.Performance Isolation: No tenant has an impact on the performance of another tenant.
Architecture
The super tenant is the complete server space of a WSO2 product instance. Separate spaces within this serverspace are allocated to individual tenants.
The super tenant as well as each individual tenant has its own configuration and context module.
Each tenant has its own security domain. A domain has a set of users, and permissions for those users to accessresources. Thus, a tenant is restricted by the users and permissions of the domain assigned to it. The artifactrepositories of the tenants are separated from each other.
Upgrading from a Previous ReleaseSee in the following situations:Upgrading from the Previous Release
The new environment you are migrating to has a different database version. In this case, you mustupgrade the older database.You want to upgrade from a previous API Manager release to a new one.

WSO2 API Manager, version 1.7.0, WSO2 Inc.
Copyright © WSO2 Inc. 2005-2014 275
An individual tenant can carry out the following activities within the boundaries of its own configuration and contextmodule:
Deploying artifactsApplying securityUser managementData managementRequest throttlingResponse caching
WSO2 Carbon provides a number of Admin services which have special privileges to manage the server. Theseadmin services are deployed in the super tenant. Other tenants can make use of these admin services to managetheir deployment. The admin services operate in a tenant aware fashion. Thus, privileges and restrictions that applyto any client using an admin service are taken into account.
Resource sharing
WSO2 Carbon supports the following methods for sharing resources among tenants:
Private Jet mode: This method allows the load of a tenant ID to be deployed in a single tenant mode. Asingle tenant is allocated an entire service cluster. The purpose of this approach is to allow special privileges(such as priority processing and improved performance) to a tenant.Separation at hardware level: This method allows different tenants to share a common set of resources, buteach tenant has to run its own operating system. This approach helps to achieve a high level of isolation, butit also incurs a high overhead cost.Separation at JVM level: This method allows tenants to share the same operating system. This is done byenabling each tenant to run a separate JVM instance in the operating system.Native : This method involves allowing all the tenants to share a single JVM instance. Thismultitenancymethod minimises the overhead cost.
Lazy loading
Lazy loading is a design pattern used specifically in cloud deployments to prolong the initialization of an object orartifact until it is requested by a tenant or an internal process.
Tenants
Lazy loading of tenants is a feature that is built into all WSO2 products. This feature ensures that all the tenants arenot loaded at the time the server starts in an environment with multiple tenants. Instead, they are loaded only whena request is made to a particular tenant. If a tenant is not utilized for a certain period of time (30 minutes by default),it will be unloaded from the memory.

WSO2 API Manager, version 1.7.0, WSO2 Inc.
Copyright © WSO2 Inc. 2005-2014 276
You can change the default time period allowed for tenant inactiveness by adding -Dtenant.idle.time=<time_ . in_minutes> java property to the startup scrip of the product ( /wso2server.sh file for Linux and wso2server.
bat for Windows) as shown below.
JAVA_OPTS \ -Dtenant.idle.time=30 \
Artifacts
Lazy loading of artifacts is a feature that is used by some WSO2 products, which can be enabled via the Carbonserver configuration file ( carbon.xml ). The deployer that handles lazy loading of artifacts is called the GhostDep
. A flag to enable or disable the is shown below. This is set to by default becauseloyer Ghost Deployer falsethe works only with the HTTP/S transports. Therefore, if other transports are used, the Ghost Deployer Ghost
does not have to be enabled.Deployer
<GhostDeployment> <Enabled>false</Enabled> <PartialUpdate>false</PartialUpdate></GhostDeployment>
When a stand-alone WSO2 product instance is started with lazy loading enabled, its services, applications and otherartifacts are not deployed immediately. They are first loaded in the Ghost form and the actual artifact is deployedonly when a request for the artifact is made. In addition, if an artifact has not been utilized for a certain period oftime, it will be unloaded from the memory.
When lazy loading of artifacts is enabled for PaaS deployments, lazy loading applies both for tenants as well as atenant artifacts. As a result, lazy loading is applicable on both levels for a tenant in a cloud environment. Therefore,the associated performance improvements and resource utilization efficiencies are optimal.
Restrictions
The following restrictions are imposed to ensure that each individual tenant has the required level of isolation andmaintains fine grained security control over its own services without affecting the other tenants.
Only the super tenant can modify its own configuration. In addition, it can add, view and delete tenants.When a tenant logs into the system, it can only access artifacts deployed under its own configuration. Onetenant cannot manipulate the code of another tenant.The super admin or tenant admin can add user stores to their own domain. Dynamic configurations arepossible only for secondary user stores and the primary user store is not configurable at run time. This isbecause primary user stores are available for all tenants and allowing changes to the configuration at runtime can lead to instability of the system. Therefore, the primary user store is treated as a static property inthe implementation and it should be configured prior to run time.A tenant's code cannot invoke sensitive server side functionality. This is achieved via Java security.Tenants share the transports provided by the system. They are not allowed to create their own transports.
Request dispatching
This section describes how the multi tenancy architecture described above works in a request dispatching scenario.
When a Carbon server receives a request, the message is first received by the handlers and dispatchers defined forthe server configuration (i.e. super tenant). The server configuration may include handlers that implement crosstenant policies and Service Level Agreement (SLA) management. For example, a priority based dispatcher can beapplied at this stage to offer differentiated qualities of service to different clients. Once the relevant handlers anddispatchers are applied, the request is sent to the tenant to which it is addressed. Then the message dispatchersand handlers specific to that tenant will be applied. See for further informationViewing Handlers in Message Flowson message handlers and dispatchers.

WSO2 API Manager, version 1.7.0, WSO2 Inc.
Copyright © WSO2 Inc. 2005-2014 277
1.
2.
The following example further illustrates how message dispatching is carried out in a multi tenant server.
For example, two tenants named foo.com and bar.com may deploy a service named MyService. When this serviceis hosted on the two tenants, they would have the following URLs.
http://example.com/t/foo.com/services/MyServicehttp://example.com/t/bar.com/services/MyService
The name of the tenant in the URL allows the tenant to be identified when the Carbon server receives a messagewhich is addressed to a specific client. Alternatively, you may configure a CNAME record in DNS (Domain NameSystem) as an alias for this information.
If a request is addressed to the service hosted by , the message handlers and dispatchers ofMyService foo.comthe super tenant will be applied and the tenant will be identified by the tenant name in the URL. Then thefoo.comrequest will be sent to where it will be processed.foo.com
Scaling
The multi tenancy architecture described above mainly refers to a scenario where a single instance of a Carbonserver acts as a single multi tenant node. In a situation where a very high load of requests are handles, you mayneed multiple multi tenant nodes. In order to operate with multiple multi tenant nodes, you need load balancing. Theload balancer you use also needs to be tenant-aware. See Tenant Aware Load Balancing Using the WSO2 Elastic
for further information.Load Balancer
Managing Tenants
You can add a new tenant in the management console and then view it by following the procedure below. In order toadd a new tenant, you should be logged in as a super user.
Click in the tab of your product's management console.Add New Tenant Configure
Enter the tenant information in screen as follows, and click .Register A New Organization Save
ParameterName
Description
Domain The domain name for the organization, which should be unique (e.g., abc.com). This is usedas a unique identifier for your domain. You can use it to log into the admin console to beredirected to your specific tenant. The domain is also used in URLs to distinguish one tenantfrom another.
SelectUsagePlan forTenant
The usage plan defines limitations (such as number of users, bandwidth etc.) for the tenant.
FirstName/Last Name
The name of the tenant admin.
AdminUsername
The login username of the tenant admin. The username always ends with the domain name(e.g., ) [email protected]
AdminPassword
The password used to log in using the admin username specified.

WSO2 API Manager, version 1.7.0, WSO2 Inc.
Copyright © WSO2 Inc. 2005-2014 278
2.
3.
1.
2. 3.
AdminPassword(Repeat)
Repeat the password to confirm.
Email The email address of the admin.
After saving, the newly added tenant appears in the page as shown below. ClickTenants List View Tenants in the tab of the management console to see information of all the tenants that currently exist inConfigurethe system. If you want to view only tenants of a specific domain, enter the domain name in the Enter the
p a r a m e t e r a n d c l i c k .T e n a n t D o m a i n F i n d
When you create multiple tenants in an API Manager deployment, the API Stores of each tenant are displayed in amuti-tenanted view for all users to browse and permitted users to subscribe to as shown below:
Access the API Store URL (by default, ) using a Web browser. You https://localhost:9443/storesee the storefronts of all the registered tenant domains listed there. For example,
This is called the public store. Each icon here is linked to the API Store of a registered tenant, including thesuper tenant, which is . That is, the super tenant is also considered a tenant.carbon.superClick the link associated with a given store to open it.Visit StoreAnonymous users can browse all stores and all public APIs that are published to them. However, in order tosubscribe to an API, the user must log in.
For example, if you are a user in the tenant domain,domain1.comYou can access the public store go to the ( ), https://localhost:9443/store domain1.comstore, log in to it and subscribe to its APIs.You can also browse the other tenant stores listed in the public store. But, within other tenant stores,you can only subscribe to the APIs to which your tenant domain is permitted to subscribe to. At thetime an API is created, t he API creator can specify which tenants are allowed to subscribe to the API .
For information, see .API Subscriptions
Tenant-Aware Load Balancing using WSO2 ELB
Tenant partitioning is required in a clustered deployment to be able to scale to large numbers of tenants. There canbe multiple clusters for a single service and each cluster would have a subset of tenants as illustrated in the diagrambelow. In such situations, the load balancers need to be tenant aware in order to route the requests to the requiredtenant clusters. They also need to be service aware since it is the service clusters which are partitioned according tothe clients.

WSO2 API Manager, version 1.7.0, WSO2 Inc.
Copyright © WSO2 Inc. 2005-2014 279
The following example further illustrates how this is achieved in WSO2 Elastic Load Balancer (ELB).
A request sent to a load balancer has the following host header to identify the cluster domain:
https://appserver.cloud-test. wso2.com/carbon.as1.domain/carbon/admin/login.jsp
In this URL:
appserver.cloud-test.wso2.com is the service domain which allows the load balancer to identify theservice.carbon.as1.domain.com is the tenant domain which allows the load balancer to identify the tenant.
Services are configured with their cluster domains and tenant ranges in the in ELB_HOME/repository/conf/loafile. These cluster domains and tenant ranges are picked by the load balancer when it loads. dbalancer.conf
The following is a sample configuration of the loadbalancer.conf file.
appserver {# multiple hosts should be separated by a comma.hosts appserver.cloud-test.wso2.com; domains {carbon.as1.domain {tenant_range 1-100;}carbon.as2.domain {tenant_range 101-200;}}}

WSO2 API Manager, version 1.7.0, WSO2 Inc.
Copyright © WSO2 Inc. 2005-2014 280
In the above configuration, there is a host address which maps to the application server service. If required, you canenter multiple host addresses separated by commas.
There are two cluster domains defined in the configuration. The cluster domain named iscarbon.as1.domainused to load the range of tenants with IDs 1-100. The other cluster domain named is used tocarbon.as2.domainload the tenants with IDs 101-200.
If the tenant ID of is 22, the request will be directed to the cluster.abc.com Carbon.AS1.domain
WSO2 API Manager, version 1.7.0, WSO2 Inc.
Copyright © WSO2 Inc. 2005-2014 281
1. 2.
SamplesThe WSO2 API Manager comes with a set of working samples that demonstrate some of its basic features andcapabilities. The following topics provide information on executing these samples and evaluating their results.
Setting up the SamplesDeploying and Testing YouTube APIGenerating Billing DataInvoking APIs using a Web App Deployed in WSO2 ASDeploying and Testing Wikipedia API
Setting up the Samples
The API Manager binary distribution comes with a number of samples to demonstrate API Manager's basicfunctionality. These samples are located in folder. Inside this directory, there are sub<APIM_HOME>/samplesdirectories for each sample. Each sub directory contains the relevant configurations, scripts and instructionsrequired to run the a sample. Each sample contains an script, which drives the API Manager via aAPIPopulatorREST API.
The sections below describe the generic setup instructions and prerequisites to run API Manager samples:PrerequisitesSetting up samples
Prerequisites
Java Development Kit/JRE version 1.6.* or 1.7.*Apache Ant 1.6.x or laterAn HTTP client tool such as cURL ( ) http://curl.haxx.seA JavaScript compatible web browserAn active Internet connection
Setting up samples
Download and install the API Manager according to the instructions given in .Getting StartedBefore installing samples, you must configure libraries. Go to directory using a command<APIM_HOME>/binprompt (on Windows) or text Linux console (on Linux) and type command. This step populates masterantdata required for the API Manager to start up. For example, on Windows:
Executing these steps only once is enough to try multiple samples in a single API Manager installation.
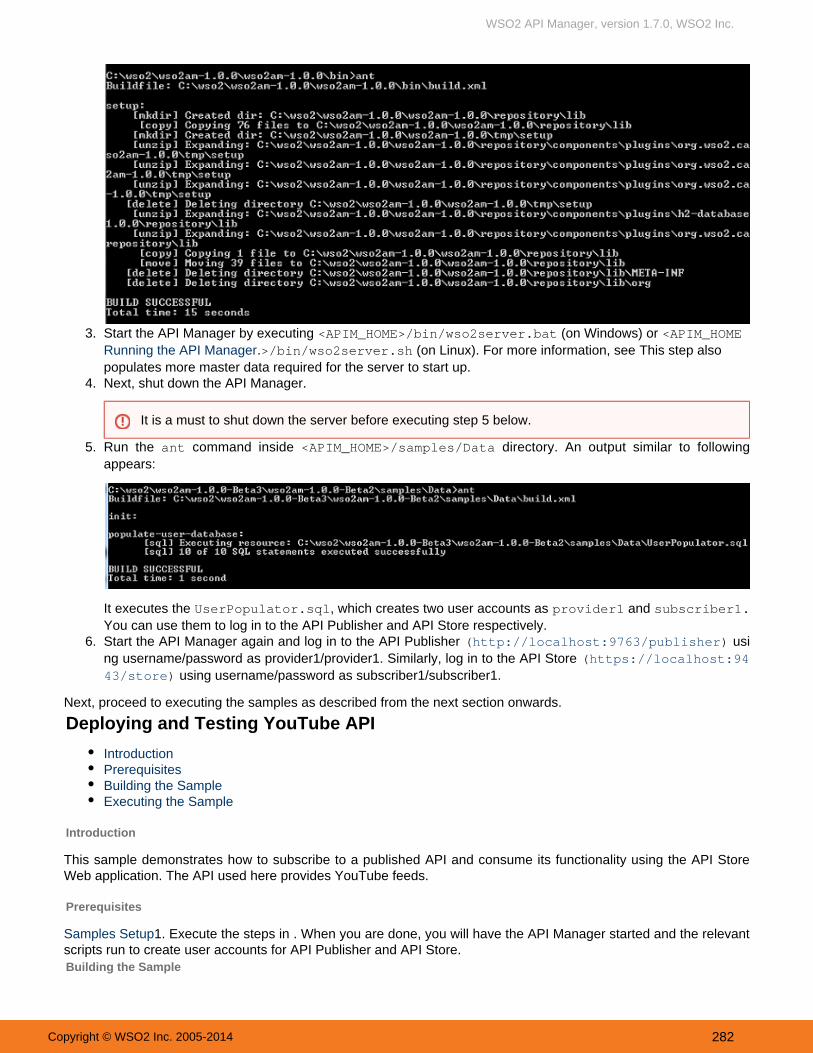
WSO2 API Manager, version 1.7.0, WSO2 Inc.
Copyright © WSO2 Inc. 2005-2014 282
Samples Setup
.Running the API Manager
2.
3.
4.
5.
6.
Start the API Manager by executing (on Windows) or <APIM_HOME>/bin/wso2server.bat <APIM_HOME (on Linux). For more information, see This step also>/bin/wso2server.sh
populates more master data required for the server to start up.Next, shut down the API Manager.
Run the command inside directory. An output similar to followingant <APIM_HOME>/samples/Dataappears:
It executes the , which creates two user accounts as and UserPopulator.sql provider1 subscriber1.You can use them to log in to the API Publisher and API Store respectively.Start the API Manager again and log in to the API Publisher usi( )http://localhost:9763/publisherng username/password as provider1/provider1. Similarly, log in to the API Store (https://localhost:94
using username/password as subscriber1/subscriber1.)43/store
Next, proceed to executing the samples as described from the next section onwards.
Deploying and Testing YouTube API
IntroductionPrerequisitesBuilding the SampleExecuting the Sample
Introduction
This sample demonstrates how to subscribe to a published API and consume its functionality using the API StoreWeb application. The API used here provides YouTube feeds.
Prerequisites
1. Execute the steps in . When you are done, you will have the API Manager started and the relevantscripts run to create user accounts for API Publisher and API Store.Building the Sample
It is a must to shut down the server before executing step 5 below.

WSO2 API Manager, version 1.7.0, WSO2 Inc.
Copyright © WSO2 Inc. 2005-2014 283
1. First, we need to add an API in the API Publisher and publish it to the API Store. To do that, simply run theAPIPopulator.sh (for Linux) or APIPopulator.bat (for Windows) files from folder,<AM_HOME>/samples/YoutubeFeeds.
2. The script will add an API to the API Publisher in Published state. This API can then be consumed by any usersigned in to the API Store.
Executing the Sample
Subscribing to the API
1. Log in to the ( ) with credentials subscriber1/subscriber1.API Store https://localhost:9443/store
2. Click the tab at the top of the page and select the YoutubeFeeds API.APIs
3. Next, subscribe to this API. Simply select the default application and throttling tier as .Gold
4. You will be asked to navigate to tab.My Subscriptions
5. Next, you can generate a key to the application. This key allows you to invoke APIs subscribed under a givenapplication. Click on the option to obtain an Application key. For example,Generate
Invoking the API
6. Once you have obtained a key, you can invoke the API using a REST client of your choice. In this example, weuse cURL ( ).http://curl.haxx.se
7. Copy and paste following into a new console window and execute it.
curl -H "Authorization :Bearer 9nEQnijLZ0Gi0gZ6a3pZICktVUca"http://localhost:8280/youtube/1.0.0/most_popular
where, access token = . Replace this value with the access token you9nEQnijLZ0Gi0gZ6a3pZICktVUcagenerated through the API Store in step 5 above.
The access token is passed in the Authorization header as a value of "Bearer". The Authorization header of themessage is prefixed by the string "Bearer". This is because, WSO2 API Manager enforces OAuth security on all thepublished APIs. Any consumer that talks to the API Manager should send their credential (application key) as perthe OAuth bearer token profile. If you don't send an application key or send a wrong key, you will receive a 401Unauthorized response in return.
8. You should be able to see results from YouTube on your console. For example,
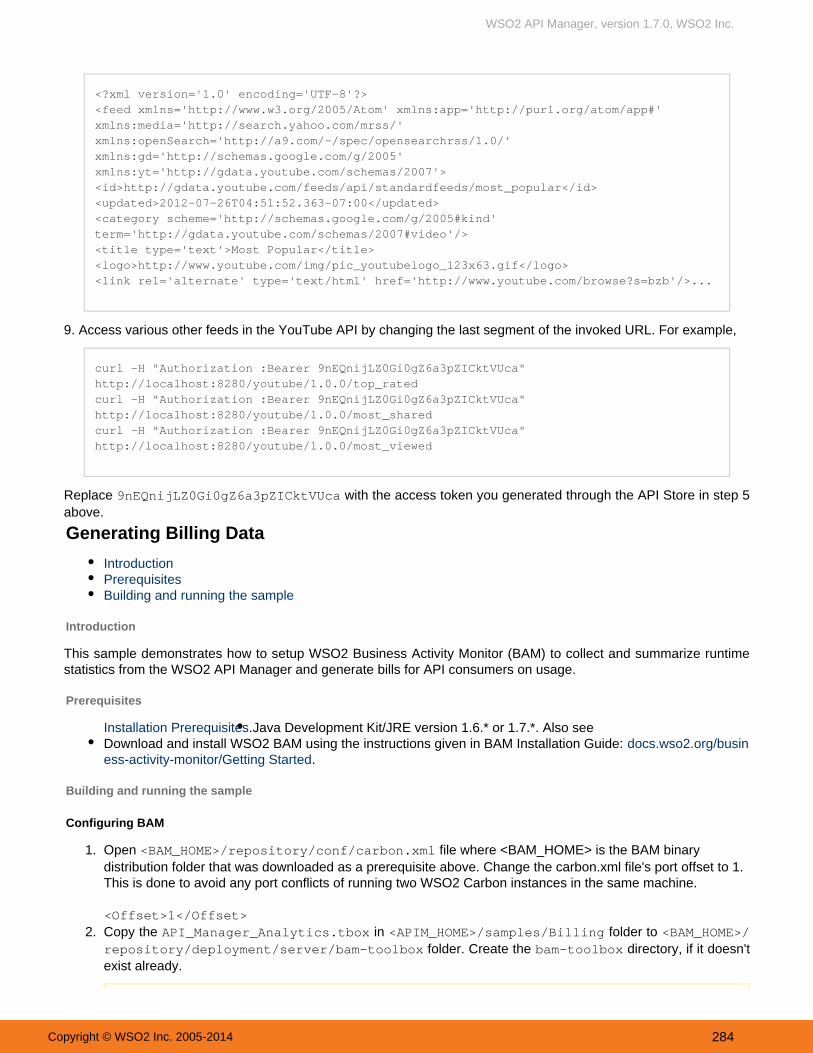
WSO2 API Manager, version 1.7.0, WSO2 Inc.
Copyright © WSO2 Inc. 2005-2014 284
Installation Prerequisites.
1.
2.
<?xml version='1.0' encoding='UTF-8'?><feed xmlns='http://www.w3.org/2005/Atom' xmlns:app='http://purl.org/atom/app#'xmlns:media='http://search.yahoo.com/mrss/'xmlns:openSearch='http://a9.com/-/spec/opensearchrss/1.0/'xmlns:gd='http://schemas.google.com/g/2005'xmlns:yt='http://gdata.youtube.com/schemas/2007'><id>http://gdata.youtube.com/feeds/api/standardfeeds/most_popular</id><updated>2012-07-26T04:51:52.363-07:00</updated><category scheme='http://schemas.google.com/g/2005#kind'term='http://gdata.youtube.com/schemas/2007#video'/><title type='text'>Most Popular</title><logo>http://www.youtube.com/img/pic_youtubelogo_123x63.gif</logo><link rel='alternate' type='text/html' href='http://www.youtube.com/browse?s=bzb'/>...
9. Access various other feeds in the YouTube API by changing the last segment of the invoked URL. For example,
curl -H "Authorization :Bearer 9nEQnijLZ0Gi0gZ6a3pZICktVUca"http://localhost:8280/youtube/1.0.0/top_ratedcurl -H "Authorization :Bearer 9nEQnijLZ0Gi0gZ6a3pZICktVUca"http://localhost:8280/youtube/1.0.0/most_sharedcurl -H "Authorization :Bearer 9nEQnijLZ0Gi0gZ6a3pZICktVUca"http://localhost:8280/youtube/1.0.0/most_viewed
Replace with the access token you generated through the API Store in step 59nEQnijLZ0Gi0gZ6a3pZICktVUcaabove.
Generating Billing Data
IntroductionPrerequisitesBuilding and running the sample
Introduction
This sample demonstrates how to setup WSO2 Business Activity Monitor (BAM) to collect and summarize runtimestatistics from the WSO2 API Manager and generate bills for API consumers on usage.
Prerequisites
Java Development Kit/JRE version 1.6.* or 1.7.*. Also seeDownload and install WSO2 BAM using the instructions given in BAM Installation Guide: docs.wso2.org/busin
.ess-activity-monitor/Getting Started
Building and running the sample
Configuring BAM
Open file where <BAM_HOME> is the BAM binary<BAM_HOME>/repository/conf/carbon.xmldistribution folder that was downloaded as a prerequisite above. Change the carbon.xml file's port offset to 1.This is done to avoid any port conflicts of running two WSO2 Carbon instances in the same machine.
<Offset>1</Offset>Copy the in folder to API_Manager_Analytics.tbox <APIM_HOME>/samples/Billing <BAM_HOME>/
folder. Create the directory, if it doesn'trepository/deployment/server/bam-toolbox bam-toolboxexist already.

WSO2 API Manager, version 1.7.0, WSO2 Inc.
Copyright © WSO2 Inc. 2005-2014 285
Default Ports of WSO2 Products
2.
3.
4.
The API Manager Analytic Toolbox : A toolbox is an installable archive, with a .tbox extension. It containsnecessary artifacts that models a complete usecase, from collecting data, analyzing through defined Hivescripts to summarizing data through gadgets, Jaggery scripts and other dashboard components.Connect the datasource to the database where the analytical data is stored using the <BAM_HOME>/reposi
file as follows. In the example, tory/conf/datasources/master-datasources.xml WSO2AM_STATS_ is the datasource used to fetch the analytical data stored in an H2 database. If you want to use a differentDB
database, see .Changing the statistics database
<datasource> <name>WSO2AM_STATS_DB</name> <description>The datasource used for getting statistics to APIManager</description> <jndiConfig> <name>jdbc/WSO2AM_STATS_DB</name> </jndiConfig> <definition type="RDBMS"> <configuration> <!-- JDBC URL to query the database --> <url>jdbc:h2:repository/database/APIMGTSTATS_DB;AUTO_SERVER=TRUE</url> <username>wso2carbon</username> <password>wso2carbon</password> <driverClassName>org.h2.Driver</driverClassName> <maxActive>50</maxActive> <maxWait>60000</maxWait> <testOnBorrow>true</testOnBorrow> <validationQuery>SELECT 1</validationQuery> <validationInterval>30000</validationInterval> </configuration> </definition></datasource>
Because you changed the default BAM port in step 2 above, you must change the Cassandra port given inJDBC connection url in the following datasource configuration found in master-datasources.xml file. Since thepo r t o f f se t i s 1 , t he Cassandra po r t mus t be 9161 .
For a list of default ports used by WSO2 products, see .
<datasource> <name>WSO2BAM_CASSANDRA_DATASOURCE</name> <description>The datasource used for Cassandra data</description> <definition type="RDBMS"> <configuration> <url>jdbc:cassandra://localhost:9161/EVENT_KS</url> <username>admin</username> <password>admin</password> </configuration> </definition></datasource>
If you have copied to the API_Manager_Analytics.tbox folder<BAM_HOME>/statisticsbefore, then you have to uninstall it first and install the new toolbox through the BAM Admin Console.Else, the Hive script used to summarize data on a monthly basis will not get executed.

WSO2 API Manager, version 1.7.0, WSO2 Inc.
Copyright © WSO2 Inc. 2005-2014 286
4.
5.
1.
2.
3.
Start WSO2 BAM server by running wso2server.bat (on Windows) and wso2server.sh (on Linux).
Configuring API Manager
To enable API statistics collection, configure the following properties in <APIM_HOME>/repository/conf/ file. Ensure that name is the same as JNDI config name inapi-manager.xml <DataSourceName>
master-datasources.xml file in BAM.
<!-- Enable/Disable the API usage tracker. --><Enabled>true</Enabled>
<!-- JNDI name of the data source to be used for getting BAM statistics.This datasource should be defined in the master-datasources.xml file in conf/datasources directory. --><DataSourceName>jdbc/WSO2AM_STATS_DB</DataSourceName>
<!-- Enable/Disable Usage metering and billing for api usage --><EnableBillingAndUsage>true</EnableBillingAndUsage>
Configure the data source definition in <APIM_HOME>/repository/conf/datasources/master-datas file.ources.xml
Note: Replace < in the configuration below with the path to the actual BAM distribution locationBAM_HOME>and the JNDI names must match the ones defined earlier in API Manager.
<datasource> <name>WSO2AM_STATS_DB</name> <description>The datasource used for getting statistics to APIManager</description> <jndiConfig> <!-- This jndi name should be same as the DataSourceName defined inapi-manager.xml --> <name>jdbc/WSO2AM_STATS_DB</name> </jndiConfig> <definition type="RDBMS"> <configuration> <!-- JDBC URL to query the database --> <url>jdbc:h2:<BAM_HOME>/repository/database/APIMGTSTATS_DB;AUTO_SERVER=TRUE</url> <username>wso2carbon</username> <password>wso2carbon</password> <driverClassName>org.h2.Driver</driverClassName> <maxActive>50</maxActive> <maxWait>60000</maxWait> <testOnBorrow>true</testOnBorrow> <validationQuery>SELECT 1</validationQuery> <validationInterval>30000</validationInterval> </configuration> </definition></datasource>
If you run the Hive scripts before changing the default Cassandra port according to the BAM portoffset, you keep getting an exception. To overcome this, add the following line at the beginning of theHive script and rerun.drop table <hive_cassandra_table_name>;

WSO2 API Manager, version 1.7.0, WSO2 Inc.
Copyright © WSO2 Inc. 2005-2014 287
Monetization in the menu bar at the top of the page
3.
1.
2.
1.
Copy file into <APIM_HOME>/samples/Billing/billing-conf.xml <APIM_HOME>/repository/con folder.f
Viewing billing information
Once the above configurations are done, log in to API Store Web application (https://<YourHostName>:9443/). You will see the menu items required for API .store
Invoking APIs using a Web App Deployed in WSO2 AS
IntroductionPrerequisitesBuilding the sampleExecuting the sample
Introduction
This sample demonstrates a pizza ordering scenario with backend services deployed in WSO2 Application Server(AS) to which we create APIs in WSO2 API Manager. Then, we invoke those APIs using a Web applicationdeployed in WSO2 AS.
Prerequisites
Download and install WSO2 Application Server. For instructions, see . Installation Because you installed WSO2 ASon the same server as APIM, increment its default port to avoid port conflicts. To do this, go to <AS_HOME>/reposi
and change tory/conf/carbon.xml <Offset>2</Offset>. Building the sample
Go to in command shell and run to build the<APIM_HOME>/samples/PizzaShack mvn clean installsample.Go to in command shell and run <APIM_HOME>/samples/PizzaShack/pizza-shack-web mvn clean
.install
Executing the sample
Log in to the API Publisher ( ) and create the following APIs.https://localhost:9443/publisher
If you are a new user, there will not be any billing information at the beginning.
1.
2. 3.
If you are rebuilding , execute the following stepsthis sample after building it at least once beforeinstead of the above:
Remove the following module from file: <APIM_HOME>/samples/PizzaShack/pom.xml <module>pre-processor</module>.Delete the file from PizzaShack.zip <APIM_HOME>/samples/PizzaShack.Go to in command shell and run <APIM_HOME>/samples/PizzaShack mvn clean install.

WSO2 API Manager, version 1.7.0, WSO2 Inc.
Copyright © WSO2 Inc. 2005-2014 288
1.
2.
3.
4. 5.
6.
7.
8.
Delivery API
API Name= pizzaShack Context = /pizzashack/delivery Version = 1.0.0 Production EndpointURL=http://localhost:9765/pizzashack-api-1.0.0/api/delivery API Resources =Keep the default values
Order API API Name= pizzashack-order Context = /pizzashack/order Version = 1.0.0 Production EndpointURL=http://localhost:9765/pizzashack-api-1.0.0/api/order API Resources =Keep the default values
Menu API
API Name= pizzashack-menu Context = /pizzashack/menu Version = 1.0.0 Production EndpointURL=http://localhost:9765/pizzashack-api-1.0.0/api/menu API Resources =Keep the default values
Navigate to the tab of each API and promote them to state. This will push the APIsLifecycles PUBLISHEDto the Gateway and they will be available for subscription in the API Store.Log in to the API Store ( ) and click on each API created earlier. Next, subscribe tohttps://localhost:9443/storeeach of them using the default application.After subscription, a message appears. Choose .Go to My SubscriptionsThe page opens. Create a production key by clicking the button associated with it.Subscriptions GenerateYou also have the option to increase the default token validity period, which is 1 hour.You get the access token, a consumer key and a consumer secret. Replace the consumer key and secretpair in <APIM_HOME>/samples/PizzaShack/pizza-shack-web/src/main/webapp/WEB-INF/web.
with the newly generated ones. For example,xml
<context-param> <param-name>consumerKey</param-name> <param-value>szsHscDYLeKUcwA1GhPARQlflusa</param-value></context-param><context-param> <param-name>consumerSecret</param-name> <param-value>wJEfRDE3JeFnGMuwVNseNzsXM1sa</param-value></context-param>
You now have three APIs subscribed under an application and an access token to the application. Next, wedeploy a Web application in the Application Server and use it to invoke the APIs.Start WSO2 AS ( ) and log into its management console. For instructions, see https://localhost:9445/console A
(If the AS documentation link doesn't load, please clear your browser cache and retry). S documentationDeploy the following into the Application Server.
<APIM_HOME>/samples/PizzaShack/pizza-shack-web/target/pizzashack.war<APIM_HOME>/samples/PizzaShack/pizza-shack-api/target/pizzashack-api-1.0.0.
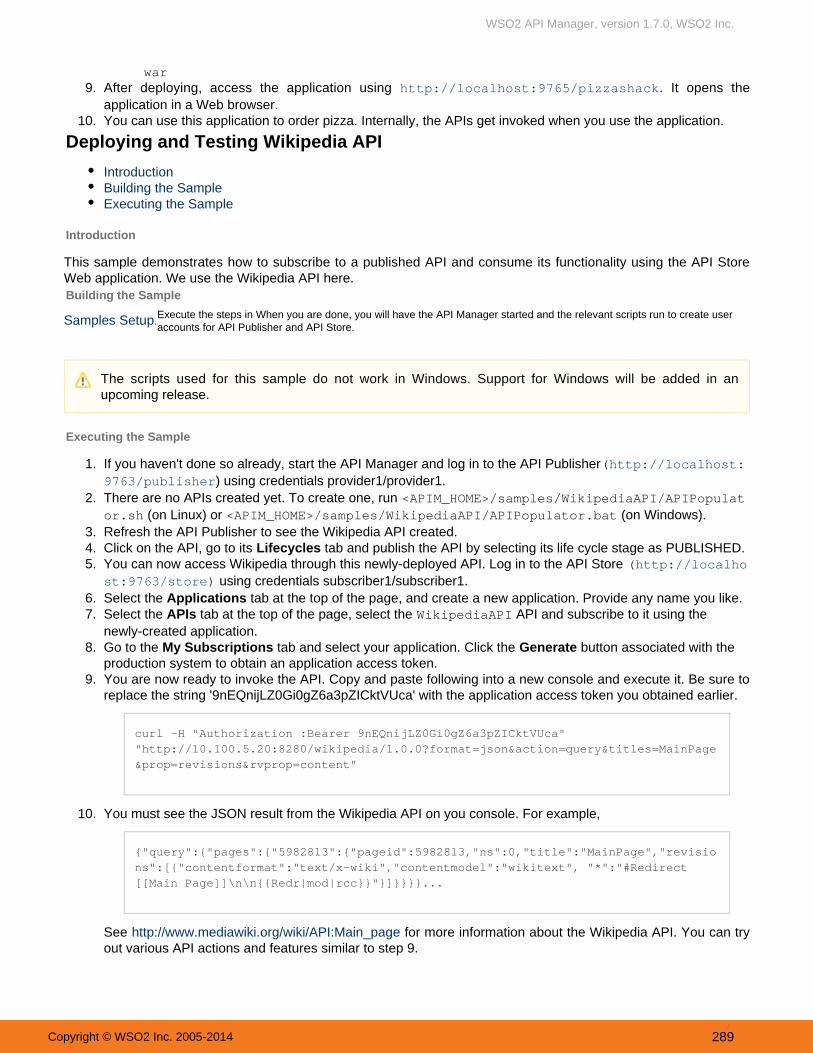
WSO2 API Manager, version 1.7.0, WSO2 Inc.
Copyright © WSO2 Inc. 2005-2014 289
.Samples Setup
8.
9.
10.
1.
2.
3. 4. 5.
6. 7.
8.
9.
10.
warAfter deploying, access the application using . It opens thehttp://localhost:9765/pizzashackapplication in a Web browser.You can use this application to order pizza. Internally, the APIs get invoked when you use the application.
Deploying and Testing Wikipedia API
IntroductionBuilding the SampleExecuting the Sample
Introduction
This sample demonstrates how to subscribe to a published API and consume its functionality using the API StoreWeb application. We use the Wikipedia API here.Building the Sample
Execute the steps in When you are done, you will have the API Manager started and the relevant scripts run to create useraccounts for API Publisher and API Store.
Executing the Sample
If you haven't done so already, start the API Manager and log in to the API Publisher(http://localhost:) using credentials provider1/provider1.9763/publisher
There are no APIs created yet. To create one, run <APIM_HOME>/samples/WikipediaAPI/APIPopulat (on Linux) or (on Windows).or.sh <APIM_HOME>/samples/WikipediaAPI/APIPopulator.bat
Refresh the API Publisher to see the Wikipedia API created.Click on the API, go to its tab and publish the API by selecting its life cycle stage as PUBLISHED.LifecyclesYou can now access Wikipedia through this newly-deployed API. Log in to the API Store (http://localho
using credentials subscriber1/subscriber1.)st:9763/storeSelect the tab at the top of the page, and create a new application. Provide any name you like.ApplicationsSelect the tab at the top of the page, select the API and subscribe to it using theAPIs WikipediaAPInewly-created application.Go to the tab and select your application. Click the button associated with theMy Subscriptions Generateproduction system to obtain an application access token.You are now ready to invoke the API. Copy and paste following into a new console and execute it. Be sure toreplace the string '9nEQnijLZ0Gi0gZ6a3pZICktVUca' with the application access token you obtained earlier.
curl -H "Authorization :Bearer 9nEQnijLZ0Gi0gZ6a3pZICktVUca""http://10.100.5.20:8280/wikipedia/1.0.0?format=json&action=query&titles=MainPage&prop=revisions&rvprop=content"
You must see the JSON result from the Wikipedia API on you console. For example,
{"query":{"pages":{"5982813":{"pageid":5982813,"ns":0,"title":"MainPage","revisions":[{"contentformat":"text/x-wiki","contentmodel":"wikitext", "*":"#Redirect[[Main Page]]\n\n{{Redr|mod|rcc}}"}]}}}}...
See for more information about the Wikipedia API. You can tryhttp://www.mediawiki.org/wiki/API:Main_pageout various API actions and features similar to step 9.
The scripts used for this sample do not work in Windows. Support for Windows will be added in anupcoming release.

WSO2 API Manager, version 1.7.0, WSO2 Inc.
Copyright © WSO2 Inc. 2005-2014 290
Published APIsThe following topics discuss the APIs exposed from the API Publisher and API Store Web applications using whichyou can create and manage APIs. You can consume APIs directly through their UIs or an external REST client likecURL or the . The Token APIs exposed in API Manager are also described here.WSO2 REST client
Publisher APIsStore APIsToken APIWSO2 Admin Services
Publisher APIs
Publisher APIs provide the following REST resources.[ ] [ ] [ ] [ ] [ ] [ ] [ ] [ Login Logout Add/Update API Get All APIs Get an API Remove an API Copy an API Check
] [ ] [ ] [ ]Older Version Change API Status Add/Update an API Document Remove an API Document
Login
Description Log in to API Publisher web application.
URI http://localhost:9763/publisher/site/blocks/user/login/ajax/login .jag
URIParameters
action=login&username=xxx&password=xxx
HTTPMethods
POST
Example curl -X POST -c cookies -dhttp://localhost:9763/publisher/site/blocks/user/login/ajax/login.jag'action=login&username=admin&password=admin'
Logout
Description Log out from API Publisher web application.
URI http://localhost:9763/publisher/site/blocks/user/login/ajax/login .jag
URIParameters
?action=logout
HTTP Methods GET
Example curl -b cookies http://localhost:9763/publisher/site/blocks/user/login/ajax/login.jag?action=logout
Add/Update API
Description Add a new API or update an existing API.
URI http://localhost:9763/publisher/site/blocks/item-add/ajax/add.jag
Note: When you access any API other than the login and logout APIs through an external REST client suchas cURL, first invoke the login API to ensure that user is authenticated. When the login API is invoked, thesystem stores the generated session cookie in a file, which we use in the next API invocations.
Alternatively, if you access these APIs from the API Publisher application itself, you do not have to invokethe login API first.

WSO2 API Manager, version 1.7.0, WSO2 Inc.
Copyright © WSO2 Inc. 2005-2014 291
URIParameters
:A d d A P I"action=addAPI&name=xxx&visibility=public&version=x.x.x&description=xxx&endpointType=nonsecured&http_checked=http&https_checked=https&&wsdl=&tags=x,y,z&tier=Silver&thumbUrl=<File>&context=/xxx&tiersCollection=Gold&resourceCount=0&resourceMethod-0=GET&resourceMethodAuthType-0=Application&resourceMethodThrottlingTier-0=Unlimited&uriTemplate-0=/*" - d ' e n d p o i n t _ c o n f i g = { " p r o d u c t i o n _ e n d p o i n t s " : { " u r l " : " < U R L > " , " c o n f i g " : n u l l } , " e n d p o i n t _ t y p e " : " h t t p " } ' ;
wsdl=&tier=Silver&thumbUrl=<URL>&tiersCollection=Gold&resourceCount=0&re sourceMethod-0=GET&resourceMethodAuthType-0=Application&resourceMethodThrottlingTier-0=Unlimited&u riTemplate-0=/*" : &description=xxx&tags=x,y,z& endpointType=nonsecured&http_checked=http&https_checked=https&Update API "action= &visibility=public& updateAPI thumbUrl=<File>-d'endpoint_config={"production_endpoints":{"url":"<URL>","config":null},"endpoint_ type":"http"}';
HTTPMethods
POST
Example A d d A P I : curl -X POST -b cookies -d "action=addAPI&name=YoutubeFeeds&visibility=public&version=1.0.0&description=Youtube Live Feeds&endpointType=nonsecured&http_checked=http&https_checked=https&&wsdl=&tags=youtube,gdata,multimedia&tier=Silver&thumbUrl=http://10.100.1.71:9763/publisher/site/blocks/item-add/ajax/add.jag http://www.10bigideas.com.au/www/573/files/pf
" -d'endpoint_config={"production_endpoints":{"url":" "}';-thumbnail-youtube_logo.jpg&context=/youtube&tiersCollection=Gold&resourceCount=0&resourceMethod-0=GET&resourceMethodAuthType-0=Application&resourceMethodThrottlingTier-0=Unlimited&uriTemplate-0=/* http://gdata.youtube.com/feeds/api/standardfeeds","config":null},"endpoint_type":"http
U p d a t e A P I : curl -X POST -b cookies -d "action= &visibility=public&description=Youtube Live Feeds&endpointType=nonsecured&http_checked=http&https_checked=https&&wsdl=&tags=youtube,gdata,multimedia&tier=Silver&thumbUrl=http://10.100.1.71:9763/publisher/site/blocks/item-add/ajax/add.jag updateAPI http://www.10bigideas.com.au/www/573/files/pf-thumbnail-youtube_logo.jpg&cont
" -d'endpoint_config={"production_endpoints":{"url":" "}';ext=/youtube&tiersCollection=Gold&resourceCount=0&resourceMethod-0=GET&resourceMethodAuthType-0=Application&resourceMethodThrottlingTier-0=Unlimited&uriTemplate-0=/* http://gdata.youtube.com/feeds/api/standardfeeds","config":null},"endpoint_type":"http
Get All APIs
Description Lists all the created APIs.
URI http://localhost:9763/publisher/site/blocks/listing/ajax/item-list.jag
URIParameters
?action=getAllAPIs
HTTP Methods GET
Example curl -b cookies http://localhost:9763/publisher/site/blocks/listing/ajax/item-list .jag ?action=getAllAPIs
Get an API
Description Get details of a specific API.
URI http://localhost:9763/publisher/site/blocks/listing/ajax/item-list.jag
URIParameters
action=getAPI&name=xxx&version=xxx&provider=xxx
HTTPMethods
POST
Tip: If you want to set only the HTTP transport, leave the parameter empty as .https_checked http_checked=http &https_checked=&
Tip: To add a thumbnail image, create a file object of that thumbnail and pass it with the parameter. See sample in this method.thumbUrl getMultipartEntity()
From APIM 1.6.0 onwards, this service accepts endpoint configuration data as a JSON value. In endpoint config JSON, you have to specify "endpoint_type" and "production_endpoints" and/or "sandbox_endpoints".
Add the argument to enable subscription to this API by all tenants. To enable subscription to selected tenants, use . For example,subscriptions=all_tenants subscriptions=specific_tennats&tenants=<tenant name>
curl -X POST -b cookies -d "action=addAPI&name=YoutubeFeeds&visibility=public&version=1.0.0&description=Youtube Live Feeds&endpointType=nonsecured&http_checked=http&https_checked=https&&wsdl=&tags=youtube,gdata,multimedia&tier=Silver&thumbUrl=http://localhost:9763/publisher/site/blocks/item-add/ajax/add.jag http://www.10bigideas.com.au/www/573/fil" -d'endpoint_config={"production_endpoints":{"url":"es/pf-thumbnail-youtube_logo.jpg&context=/youtube&tiersCollection=Gold&resourceCount=0&resourceMethod-0=GET&resourceMethodAuthType-0=Application&resourceMethodThrottlingTier-0=Unlimited&uriTemplate-0=/*&subscriptions=all_tenants http://gdata.youtube.com/feeds/api/standardfeeds","config":null},"end
"}';point_type":"http

WSO2 API Manager, version 1.7.0, WSO2 Inc.
Copyright © WSO2 Inc. 2005-2014 292
Example curl -X POST -b cookies -dhttp://localhost:9763/publisher/site/blocks/listing/ajax/item-list.jag"action=getAPI&name=API1&version=1.0.0&provider=user1"
Remove an API
Description Remove an API.
URI http://localhost:9763/publisher/site/blocks/item-add/ajax/remove.jag
URIParameters
action=removeAPI&name=xxx&version=xxx&provider=xxx
HTTPMethods
POST
Example curl -X POST -b cookies -dhttp://localhost:9763/publisher/site/blocks/item-add/ajax/remove.jag"action=removeAPI&name=API1&version=1.0.0&provider=user1"
Copy an API
Description Copy an API to a newer version.
URI ew.jag http://localhost:9763/publisher/site/blocks/overview/ajax/overvi
URIParameters
action=createNewAPI&provider=xxx&apiName=xxx&version=xxx&newVersion=xxx
HTTPMethods
POST
Example curl -X POST -b cookies -dhttp://localhost:9763/publisher/site/blocks/overview/ajax/overview.jag"action=createNewAPI&provider=user1&apiName=API1&version=1.0.0&newVersion=2.0.0&isDefaultVersion=default_version"
Check Older Version
Description Does older version of API exist.
URI .jag http://localhost:9763/publisher/site/blocks/life-cycles/ajax/life-cycles
URIParameters
?action=isAPIOlderVersionExist&provider=xxx&name=xxx&version=xxx
HTTPMethods
GET
Example curl -X POST -b cookies .jag http://localhost:9763/publisher/site/blocks/life-cycles/ajax/life-cyclesExist&provider=user1&name=API1&version=1.0.0 ?action=isAPIOlderVersion
Change API Status
Description Change the API's status.
URI .jag http://localhost:9763/publisher/site/blocks/life-cycles/ajax/life-cycles
URIParameters
action=updateStatus&name=xxx&version=1.0.0&provider=apiCreateName&status=PUBLISHED&publishToGateway=true&requireResubscription=true
HTTPMethods
POST
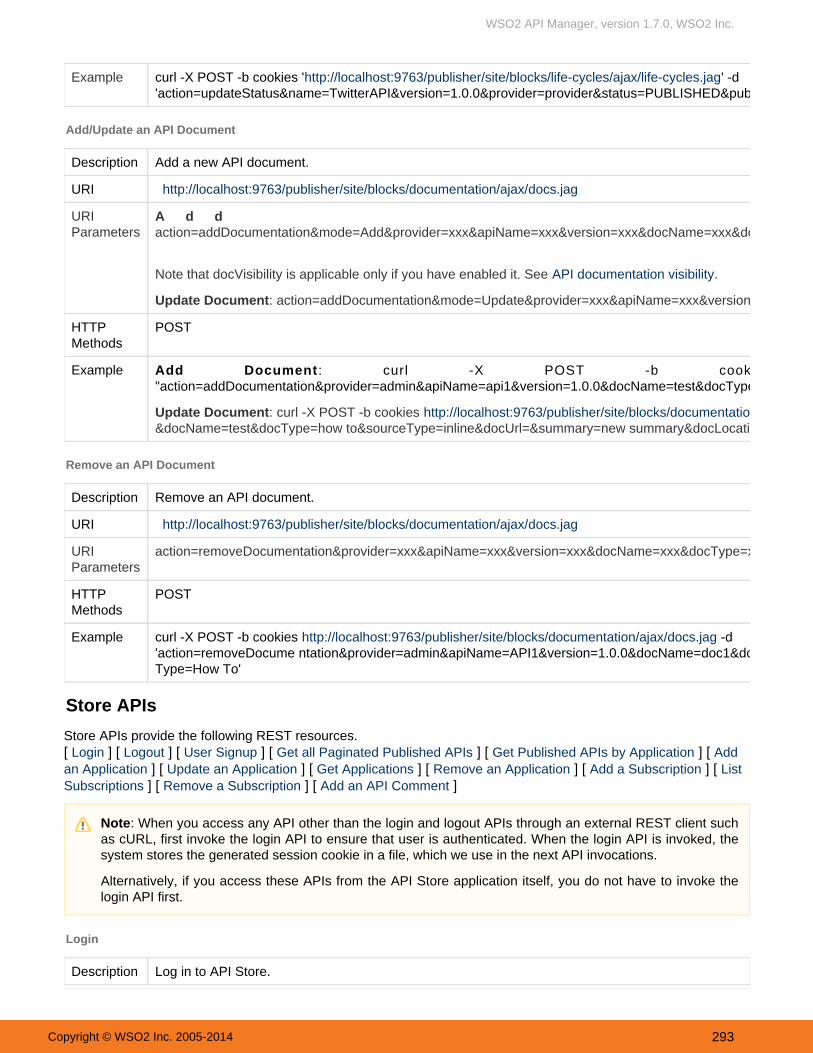
WSO2 API Manager, version 1.7.0, WSO2 Inc.
Copyright © WSO2 Inc. 2005-2014 293
Example curl -X POST -b cookies ' ' -dhttp://localhost:9763/publisher/site/blocks/life-cycles/ajax/life-cycles.jag'action=updateStatus&name=TwitterAPI&version=1.0.0&provider=provider&status=PUBLISHED&publishToGateway=true&requireResubscription=true'
Add/Update an API Document
Description Add a new API document.
URI docs.jaghttp://localhost:9763/publisher/site/blocks/documentation/ajax/
URIParameters
:A d d D o c u m e n taction=addDocumentation&mode=Add&provider=xxx&apiName=xxx&version=xxx&docName=xxx&docType=xxx&sourceType=xxx&docUrl=xxx&summary=xxx&docLocation=xxx&docVisibility=owner_only/private
Note that docVisibility is applicable only if you have enabled it. See .API documentation visibility
: action=addDocumentation&mode=Update&provider=xxx&apiName=xxx&version=xxx&docName=xxx&docType=xxx&sourceType=xxx&docUrl=xxx&summary=xxx&docLocation=xxxUpdate Document
HTTPMethods
POST
Example : curl -X POST -b cookies -dAdd Document http:// localhost:9763/publisher/site/blocks/documentation/ajax/docs.jag"action=addDocumentation&provider=admin&apiName=api1&version=1.0.0&docName=test&docType=how to&sourceType=inline&docUrl=&summary=testing&docLocation="
: action=addDocumentation&mode=Update&provider=admin&apiName=AP1&version=1.0.0Update Document curl -X POST -b cookies -d "http://localhost:9763/publisher/site/blocks/documentation/ajax/docs.jag&docName=test&docType= &sourceType= &docUrl=&summary=new summary&docLocation="how to inline
Remove an API Document
Description Remove an API document.
URI docs.jaghttp://localhost:9763/publisher/site/blocks/documentation/ajax/
URIParameters
action=removeDocumentation&provider=xxx&apiName=xxx&version=xxx&docName=xxx&docType=xxx
HTTPMethods
POST
Example curl -X POST -b cookies -dhttp://localhost:9763/publisher/site/blocks/documentation/ajax/docs.jagntation&provider=admin&apiName=API1&version=1.0.0&docName=doc1&doc 'action=removeDocume
Type=How To'
Store APIs
Store APIs provide the following REST resources.[ ] [ ] [ ] [ ] [ ] [ Login Logout User Signup Get all Paginated Published APIs Get Published APIs by Application Add
] [ ] [ ] [ ] [ ] [ an Application Update an Application Get Applications Remove an Application Add a Subscription List ] [ ] [ ]Subscriptions Remove a Subscription Add an API Comment
Login
Description Log in to API Store.
Note: When you access any API other than the login and logout APIs through an external REST client suchas cURL, first invoke the login API to ensure that user is authenticated. When the login API is invoked, thesystem stores the generated session cookie in a file, which we use in the next API invocations.
Alternatively, if you access these APIs from the API Store application itself, you do not have to invoke thelogin API first.
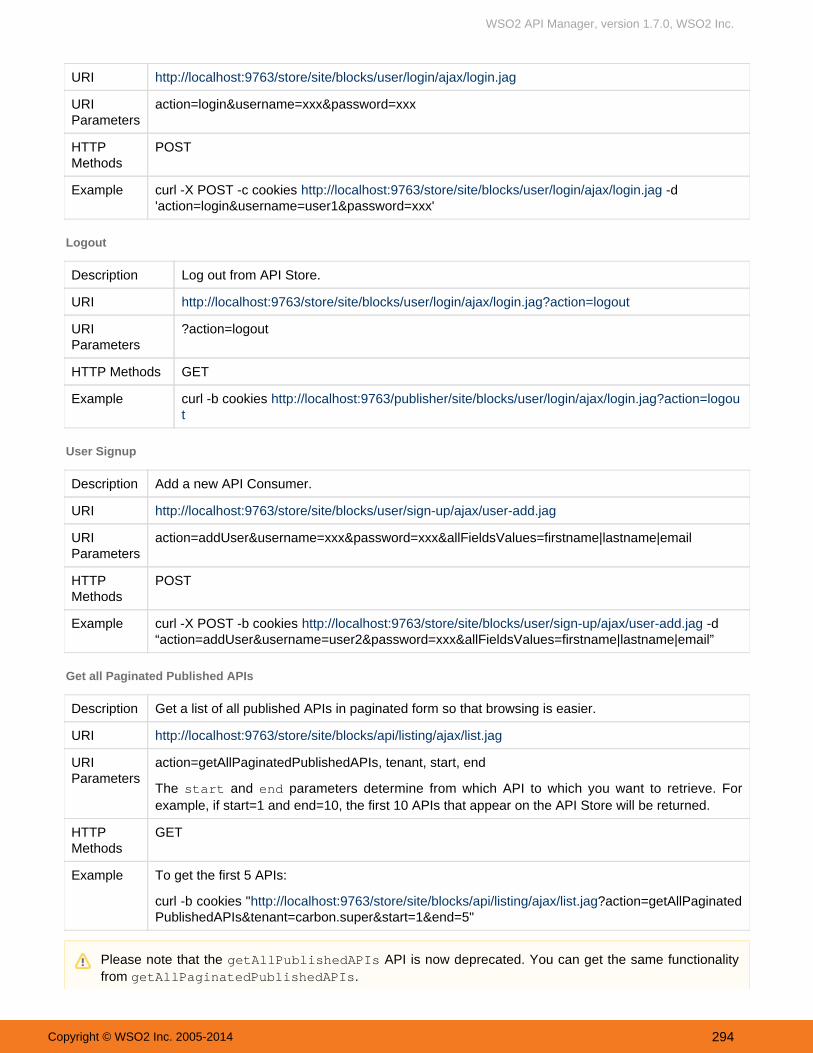
WSO2 API Manager, version 1.7.0, WSO2 Inc.
Copyright © WSO2 Inc. 2005-2014 294
URI http://localhost:9763/store/site/blocks/user/login/ajax/login.jag
URIParameters
action=login&username=xxx&password=xxx
HTTPMethods
POST
Example curl -X POST -c cookies -dhttp://localhost:9763/store/site/blocks/user/login/ajax/login.jag'action=login&username=user1&password=xxx'
Logout
Description Log out from API Store.
URI http://localhost:9763/store/site/blocks/user/login/ajax/login.jag?action=logout
URIParameters
?action=logout
HTTP Methods GET
Example curl -b cookies http://localhost:9763/publisher/site/blocks/user/login/ajax/login.jag?action=logout
User Signup
Description Add a new API Consumer.
URI http://localhost:9763/store/site/blocks/user/sign-up/ajax/user-add.jag
URIParameters
action=addUser&username=xxx&password=xxx&allFieldsValues=firstname|lastname|email
HTTPMethods
POST
Example curl -X POST -b cookies -d http://localhost:9763/store/site/blocks/user/sign-up/ajax/user-add.jag“action=addUser&username=user2&password=xxx&allFieldsValues=firstname|lastname|email”
Get all Paginated Published APIs
Description Get a list of all published APIs in paginated form so that browsing is easier.
URI http://localhost:9763/store/site/blocks/api/listing/ajax/list.jag
URIParameters
action= , tenant, start, endgetAllPaginatedPublishedAPIs
The start and end parameters determine from which API to which you want to retrieve. Forexample, if start=1 and end=10, the first 10 APIs that appear on the API Store will be returned.
HTTPMethods
GET
Example To get the first 5 APIs:
curl -b cookies " ?action=getAllPaginatedhttp://localhost:9763/store/site/blocks/api/listing/ajax/list.jagPublishedAPIs&tenant=carbon.super&start=1&end=5"
Please note that the API is now deprecated. You can get the same functionalitygetAllPublishedAPIsfrom .getAllPaginatedPublishedAPIs

WSO2 API Manager, version 1.7.0, WSO2 Inc.
Copyright © WSO2 Inc. 2005-2014 295
Get Published APIs by Application
Description Get a list of published APIs filtered by the subscribed Application. Login API needs be called priorto calling this API.
URI http://localhost:9763/store/site/blocks/subscription/subscription-list/ajax/subscription-list.jag
URIParameters
action=getSubscriptionByApplication&app=App1
HTTPMethods
GET
Example curl -b cookies 'http://localhost:9763/store/site/blocks/subscription/subscription-list/ajax/subscription '-list.jag ? action=getSubscriptionByApplication&app=App1
Add an Application
Description Add a new application.
URI http://localhost:9763/store/site/blocks/application/application-add/ajax/application-add.jag
URIParameters
action=addApplication&application=xxx&tier=xxx&description=xxx&callbackUrl
HTTPMethods
POST
Example curl -X POST -b cookies http://localhost:9763/store/site/blocks/application/application-add/ajax/appl -dication-add.jag
'action=addApplication&application=app1&tier=Unlimited&description=&callbackUrl='
Update an Application
Description Update an existing application.
URI http://localhost:9763/store/site/blocks/application/application-update/ajax/application-update.jag
URIParameters
action=updateApplication&applicationOld=xxx&applicationNew=xxx&callbackUrlNew=xxx&descriptionNew=xxx&tier=xxx
HTTPMethods
POST
Example curl -X POST -b cookies http://localhost:9763/store/site/blocks/application/application-update/ajax/application-update.j -dag
'action=updateApplication&applicationOld=app1&applicationNew=app2&tier=Unlimited&descriptionNew=&callbackUrlNew'
Get Applications
Description Get list of applications.
URI http://localhost:9763/store/site/blocks/application/application-list/ajax/application-list.jag
URIParameters
?action=getApplications
HTTPMethods
GET

WSO2 API Manager, version 1.7.0, WSO2 Inc.
Copyright © WSO2 Inc. 2005-2014 296
Example curl -b cookies http://localhost:9763/store/site/blocks/application/application-list/ajax/application-li?action=getApplications st.jag
Remove an Application
Description Remove an existing application.
URI http://localhost:9763/store/site/blocks/application/application-remove/ajax/application-remove.jag
URIParameters
action=removeApplication&application=xxx
HTTPMethods
POST
Example curl -X POST -b cookies http://localhost:9763/store/site/blocks/application/application-remove/aja -d "action=removeApplication&application=app2"x/application-remove.jag
Add a Subscription
Description Add a new API subscription.
URI -add/ajax/subscription-add.jaghttp://localhost:9763/store/site/blocks/subscription/subscription
URIParameters
To add a subscription by application ID: action= &name=xxx&version=xxx&provider=xxx&tiaddSubscriptioner=xxx& =xxxapplicationIdTo add a subscription by application name: action= &name=xxx&version=xxx&provideraddAPISubscription=xxx&tier=xxx& =xxxapplicationName
HTTPMethods
POST
Example curl -X POST -b cookies http://localhost:9763/store/site/blocks/subscription/subscription-add/ajax/subscripti -don-add.jag
'action=addSubscription&name=API1&version=1.0.0&provider=user1&tier=gold&applicationId=1' curl -X POST -b cookies http://localhost:9763/store/site/blocks/subscription/subscription-add/ajax/subscripti
-don-add.jag'action=addAPISubscription&name=API1&version=1.0.0&provider=user1&tier=gold&applicationName=app1'
List Subscriptions
Description List all API subscriptions.
URI -list/ajax/subscription-list.jaghttp://localhost:9763/store/site/blocks/subscription/subscription
URIParameters
action=getAllSubscriptions
HTTPMethods
GET
Example curl -b cookies http://localhost:9763/store/site/blocks/subscription/subscription-list/ajax/subscripti?action=getAllSubscriptionson-list.jag
Remove a Subscription
Description Remove an API subscription.

WSO2 API Manager, version 1.7.0, WSO2 Inc.
Copyright © WSO2 Inc. 2005-2014 297
.Signing up to API Store
URI -remove/ajax/subscription-remove.jahttp://localhost:9763/store/site/blocks/subscription/subscriptiong
URIParameters
action=removeSubscription&name=xxx&version=xxx&provider=xxx&applicationId=xxx
HTTPMethods
POST
Example curl -X POST -b cookies http://localhost:9763/store/site/blocks/subscription/subscription-remove/ -dajax/subscription-remove.jag
'action=removeSubscription&name=API1&version=1.0.0&provider=user1&applicationId=1'
Add an API Comment
Description Add a comment for an API.
URI http://localhost:9763/store/site/blocks/comment/comment-add/ajax/comment-add.jag
URIParameters
action=addComment&name=xxx&version=xxx&provider=xxx&comment=xxx
HTTPMethods
POST
Example curl -X POST -b cookies http://localhost:9763/store/site/blocks/comment/comment-add/ajax/com -dment-add.jag
'action=addComment&name=API1&version=1.0.0&provider=user1&comment=Hello'
Token API
Users need access tokens to invoke APIs subscribed under an application. Access tokens are passed in the HTTPheader when invoking APIs. The API Manager provides a T to generate and renew useroken API that you can useand application access tokens. The response of the Token API is a JSON message. You extract the token from theJSON and pass it with an HTTP Authorization header to access the API.
Let's take a look at how to generate/renew access tokens and authorize them. WSO2 API Manager supports thefour most common and you can also define additional types such as SAML. authorization grant types
Generating access tokens with user credentials (password grant type)Generating access tokens with authorization code (authorization code grant type)Exchanging SAML2 bearer tokens with OAuth2 (SAML extension grant type)Renewing access tokensRevoking access tokens
Generating access tokens with user credentials (password grant type)
You can obtain an access token by providing the resource owner's username and password as an authorizationgrant. combination.It requires the base64 encoded string of the consumer-key:consumer-secret You need tomeet the following prerequisites before using the Token API to generate a token.
Prerequisites
A valid user account in the API Store. See A valid consumer key and consumer secret pair. Initially, these keys must be generated through themanagement console You can find more details inby clicking the link on page.Generate My Subscriptions
.Working with Access TokensA running API Gateway instance (typically an API Manager instance should be running). For instructions onAPI Gateway, see . ArchitectureIf you have multiple Carbon servers (such as API Manager and WSO2 Application Server) running on thesame computer, you must to avoid port conflicts. Setting the port offset causes APIchange the port offset

WSO2 API Manager, version 1.7.0, WSO2 Inc.
Copyright © WSO2 Inc. 2005-2014 298
1.
2.
Manager to run on a different port from the default. Therefore, when you change the port offset, you mustalso update the port for the endpoint defined inside the Send mediator of the token API in <APIM_HOME>/re
. For example,pository/deployment/server/synapse-configs/default/api/_TokenAPI_.xmlif you set the port offset to 1, and the default port is 9443, you must change the port in the endpoint to 9444,as follows:
<send> <endpoint> <address uri="https://localhost:9444/oauth2/token"/> </endpoint></send>
If you have upgraded from a previous release of API Manager, you should also update the endpoint in thedeprecated API file _LoginAPI_.xmlIf the Key Manager is running on a different server from the API Gateway instance, change the host and portof the token API endpoint (see above) to the correct address of the Key Manager.
Invoking the Token API to generate tokens
Combine the consumer key and consumer secret keys in the format andconsumer-key:consumer-secretencode the combined string using base64. Encoding to base64 can be done using the URL: http://base64enc
.ode.orgHere's an example consumer key and secret combination : wU62DjlyDBnq87GlBwplfqvmAbAa:ksdSdoefDDP7wpaElfqvmjDue.Access the Token API by using a REST client such as the or Curl, with the following WSO2 REST Clientparameters.
Assuming that both the client and the API Gateway are run on the same server, the token API url is https://localhost:8243/tokenpayload - "grant_type=password&username=<username>&password=<password>&scope=<
. Replace the and values as appropriate. <scope> is optional,scope>" <username> <password>you can leave it off if necessaryheaders - Authorization: Basic <base64 encoded string>, Content-Type:
. Replace the asapplication/x-www-form-urlencoded <base64 encoded string>appropriate.
For example, use the following cURL command to access the Token API. It generates two tokens as anaccess token and a refresh token. You can use the refresh token at the time a . token is renewed
curl -k -d "grant_type=password&username=<username>&password=<password>" -H"Authorization: BasicSVpzSWk2SERiQjVlOFZLZFpBblVpX2ZaM2Y4YTpHbTBiSjZvV1Y4ZkM1T1FMTGxDNmpzbEFDVzhh,Content-Type: application/x-www-form-urlencoded" https://localhost:8243/token
CuRL command with Scopes
curl -k -d"grant_type=password&username=<username>&password=<password>&scope=<scope1><scope2>" -H "Authorization: BasicSVpzSWk2SERiQjVlOFZLZFpBblVpX2ZaM2Y4YTpHbTBiSjZvV1Y4ZkM1T1FMTGxDNmpzbEFDVzhh,Content-Type: application/x-www-form-urlencoded" https://localhost:8243/token

WSO2 API Manager, version 1.7.0, WSO2 Inc.
Copyright © WSO2 Inc. 2005-2014 299
2.
Instead of using the Token API, you can generate access tokens from the API Store UI. See Working with Access for information.Tokens
Generating access tokens with authorization code (authorization code grant type)
Instead of requesting authorization directly from the resource owner (resource owner's credentials), in this granttype, the client directs the resource owner to an authorization server. The authorization server works asan intermediary between the client and resource owner to issues an authorization code, authenticate the resourceowner and obtain authorization. As this is a redirection-based flow, the client must be capable of interacting with theresource owner's user-agent (typically a Web browser) and receiving incoming requests (via redirection) from theauthorization server.
The client initiates the flow by directing the resource owner's user-agent to the authorization endpoint (you can usethe endpoint for the authorization code grant type of OAuth2.0). It includes the client identifier,/authorizeresponse_type, requested scope, and a redirection URI to which the authorization server sends the user-agent backafter granting access. The authorization server authenticates the resource owner (via the user-agent) andestablishes whether the resource owner granted or denied the client's access request. Assuming the resourceowner grants access, the authorization server then redirects the user-agent back to the client using the redirectionURI provided earlier. The redirection URI includes an authorization code.
The client then requests an access token from the authorization server's endpoint by including the/tokenauthorization code received in the previous step. When making the request, the client authenticates with theauthorization server. It then includes the redirection URI used to obtain the authorization code for verification. Theauthorization server authenticates the client, validates the authorization code, and ensures that the redirection URImatches the URI used to redirect the client from the /authorize endpoint in the previous response. If valid, theauthorization server responds back with an access token and, optionally, a refresh token.
Invoking the Token API to generate tokens
Assuming that both the client and the API Gateway are run on the same server, the Authorization API url is https:.//localhost:8243/authorize
query component - response_type=code&client_id=<consumer_key>&scope=PRODUCTION&redirect_uri=<application_callback_url>
A note about scopesWhen defining an API, the API creator is able to specify a scope for an API Resource. This is so thatthe API Resource can only be accessed through a token that had been issued for at least the scopebelonging to the API Resource. For example if a Resource had been defined for a scope named'update' and if the token had been issued for the scopes 'read' and 'update', the token will be allowedto access the resource. If the token had been issued for a scope named 'read', the request bearingthe particular token will be blocked.
The Token API endpoint is specified in <APIM_HOME>/repository/deployment/server/syna file. When running the server on a different portpse-configs/default/api/_TokenAPI_.xml
from the default (i.e., 9443), or if your Key Manager is running on a different machine from your APIGateway, you must update the endpoint inside the file as described in the _TokenAPI_.xml prerequ
.isites
User access tokens have a fixed expiration time, which is set to 60 minutes by default. Before deployingthe API manager to users, extend the default expiration time by editing the <AccessTokenDefaultVal
tag in .idityPeriod> <PRODUCT_HOME>/repository/conf/identity.xml
When a user access token expires, the user can try regenerating the token as explained in the Renew section.user tokens
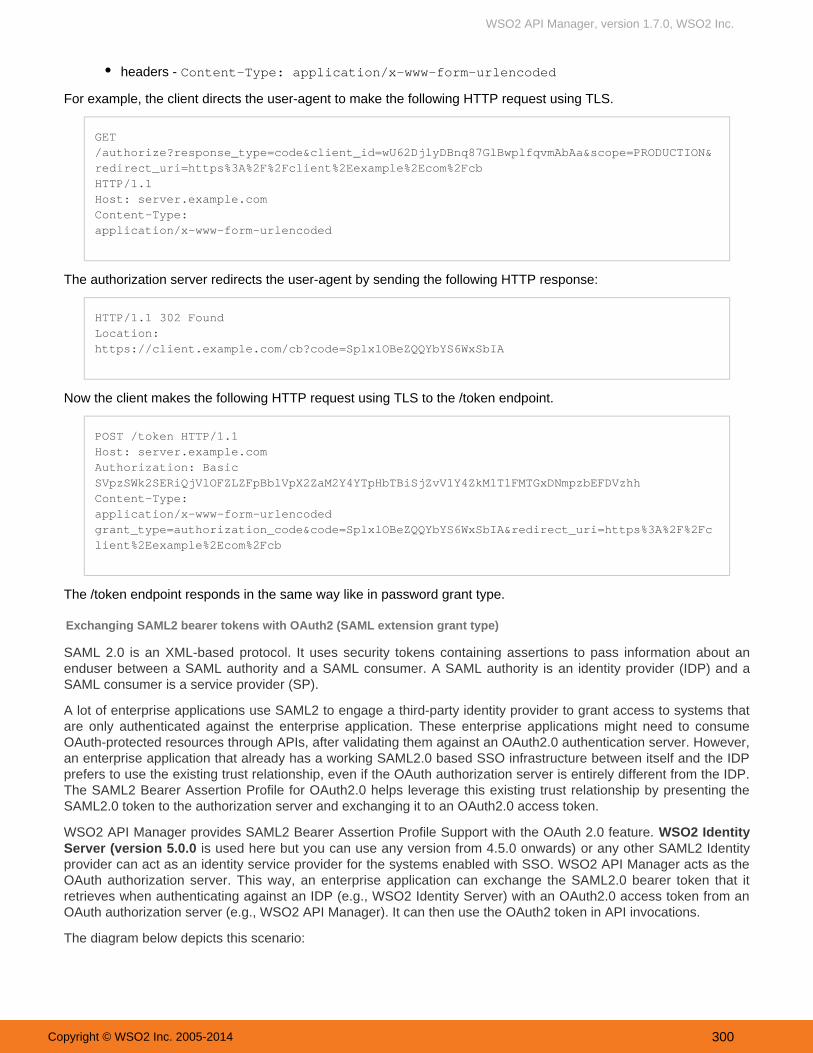
WSO2 API Manager, version 1.7.0, WSO2 Inc.
Copyright © WSO2 Inc. 2005-2014 300
headers - Content-Type: application/x-www-form-urlencoded
For example, the client directs the user-agent to make the following HTTP request using TLS.
GET/authorize?response_type=code&client_id=wU62DjlyDBnq87GlBwplfqvmAbAa&scope=PRODUCTION&redirect_uri=https%3A%2F%2Fclient%2Eexample%2Ecom%2FcbHTTP/1.1 Host: server.example.com Content-Type:application/x-www-form-urlencoded
The authorization server redirects the user-agent by sending the following HTTP response:
HTTP/1.1 302 Found Location:https://client.example.com/cb?code=SplxlOBeZQQYbYS6WxSbIA
Now the client makes the following HTTP request using TLS to the /token endpoint.
POST /token HTTP/1.1 Host: server.example.com Authorization: BasicSVpzSWk2SERiQjVlOFZLZFpBblVpX2ZaM2Y4YTpHbTBiSjZvV1Y4ZkM1T1FMTGxDNmpzbEFDVzhhContent-Type:application/x-www-form-urlencoded grant_type=authorization_code&code=SplxlOBeZQQYbYS6WxSbIA&redirect_uri=https%3A%2F%2Fclient%2Eexample%2Ecom%2Fcb
The /token endpoint responds in the same way like in password grant type.
Exchanging SAML2 bearer tokens with OAuth2 (SAML extension grant type)
SAML 2.0 is an -based It uses containing to pass information about anLXM .protocol security tokens assertionsenduser between a SAML authority and a SAML consumer. A SAML authority is an (IDP) and a identity provider
is a (SP).SAML consumer service provider
A lot of enterprise applications use SAML2 to engage a third-party identity provider to grant access to systems thatare only authenticated against the enterprise application. These enterprise applications might need to consumeOAuth-protected resources through APIs, after validating them against an OAuth2.0 authentication server. However,an enterprise application that already has a working SAML2.0 based SSO infrastructure between itself and the IDPprefers to use the existing trust relationship, even if the OAuth authorization server is entirely different from the IDP.The SAML2 Bearer Assertion Profile for OAuth2.0 helps leverage this existing trust relationship by presenting theSAML2.0 token to the authorization server and exchanging it to an OAuth2.0 access token.
WSO2 API Manager provides SAML2 Bearer Assertion Profile Support with the OAuth 2.0 feature. WSO2 Identity or any other SAML2 IdentityServer is used here but you can use any version from 4.5.0 onwards)(version 5.0.0
provider can act as an identity service provider for the systems enabled with SSO. WSO2 API Manager acts as theOAuth authorization server. This way, an enterprise application can exchange the SAML2.0 bearer token that itretrieves when authenticating against an IDP (e.g., WSO2 Identity Server) with an OAuth2.0 access token from anOAuth authorization server (e.g., WSO2 API Manager). It can then use the OAuth2 token in API invocations.
The diagram below depicts this scenario:
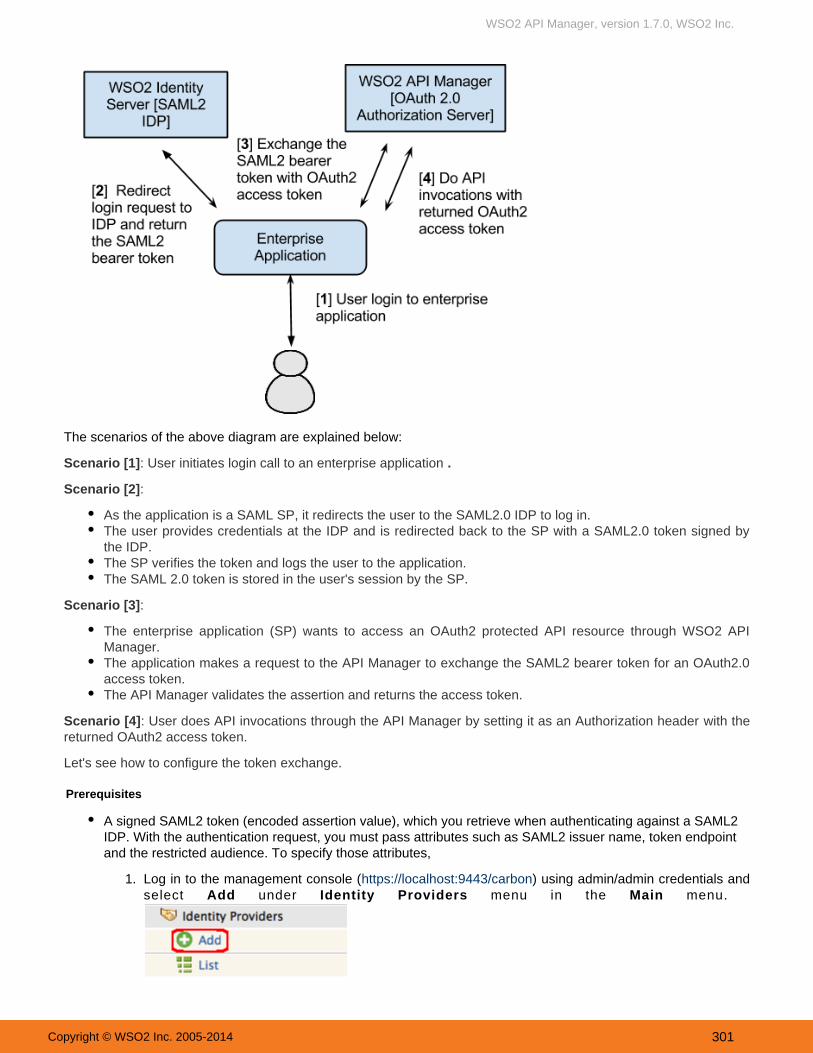
WSO2 API Manager, version 1.7.0, WSO2 Inc.
Copyright © WSO2 Inc. 2005-2014 301
1.
2.
The scenarios of the above diagram are explained below:
: User initiates login call to an enterprise applicationScenario [1] .
:Scenario [2]
As the application is a SAML SP, it redirects the user to the SAML2.0 IDP to log in. The user provides credentials at the IDP and is redirected back to the SP with a SAML2.0 token signed bythe IDP. The SP verifies the token and logs the user to the application. The SAML 2.0 token is stored in the user's session by the SP.
:Scenario [3]
The enterprise application (SP) wants to access an OAuth2 protected API resource through WSO2 APIManager.The application makes a request to the API Manager to exchange the SAML2 bearer token for an OAuth2.0access token.The API Manager validates the assertion and returns the access token.
: User does API invocations through the API Manager by setting it as an Authorization header Scenario [4] with thereturned OAuth2 access token.
Let's see how to configure the token exchange.
Prerequisites
A signed SAML2 token (encoded assertion value), which you retrieve when authenticating against a SAML2IDP. With the authentication request, you must pass attributes such as SAML2 issuer name, token endpointand the restricted audience. To specify those attributes,
Log in to the management console ( ) using admin/admin credentials andhttps://localhost:9443/carbonselect under Add menu in the menu. Identity Providers Main

WSO2 API Manager, version 1.7.0, WSO2 Inc.
Copyright © WSO2 Inc. 2005-2014 302
.Signing up to API Store
2. Provide the following values in the page that opens:Under Basic Information
Identity Provider Name: Enter a unique name for IDP: Identity Provider Public Certificate Upload Identity Provider public certificate
Alias: Give the name of the alias if the Identity Provider identifies this token endpoint byan alias
Under Federated Authenticators -> SAML2 Web SSO ConfigurationIdentity Provider Entity Id: The SAML2 issuer name specified when generatingassertion token, which contains the unique identifier of the IDP
: Service Provider Entity Id: Enter the IDP's SAML2 Web SSO URL value SSO URL
A valid user account in the API Store. SeeA valid consumer key and consumer secret. Initially, these keys must be generated through the managementconsole by clicking the link on page. For more information, seeGenerate My Subscriptions Working with
.Access TokensA running API Gateway instance. See information on API Gateway in .ArchitectureIf you have multiple Carbon servers (such as WSO2 API Manager and WSO2 Application Server) running onthe same machine, you must change the port offset and update the token API endpoint. Additionally, if thekey server is on a different server from the API Gateway, you must update the token API endpoint to use thecorrect host and port. For more information, see in the previous section.this prerequisite

WSO2 API Manager, version 1.7.0, WSO2 Inc.
Copyright © WSO2 Inc. 2005-2014 303
1.
2.
Invoking Token API to generate tokens
Follow the steps below to invoke Token API to generate access tokens from SAML2 assertions.
Combine the consumer key and consumer secret keys as and encode consumer-key:consumer-secretthe combined string using base64 using Here's an example consumer key and. http://base64encode.orgsecret combination: .wU62DjlyDBnq87GlBwplfqvmAbAa:ksdSdoefDDP7wpaElfqvmjDueAccess the Token API using a REST client such as the or Curl. The parameters are WSO2 REST Clientexplained below:
Assuming that both the client and the API Gateway run on the same server, the Token API URL is https://localhost:8243/token.payload - "grant_type=urn:ietf:params:oauth:grant-type:saml2-bearer&assertion=
. Replace the <SAML2_Encoded_Assertion_Token> &scope=PRODUCTION" <SAML2_Encoded_ value as appropriate.>Assertion_Token
headers - Authorization :Basic <base64 encoded string>, Content-Type:. Replace the asapplication/x-www-form-urlencoded <base64 encoded string>
appropriate.
For example, use the following cURL command used to access the Token API generates an access tokenand a refresh token. You can use the refresh token at the time a . token is renewed
curl -k -d"grant_type=urn:ietf:params:oauth:grant-type:saml2-bearer&assertion=<SAML2_Encoded Assertion>&scope=PRODUCTION" -H "Authorization: BasicSVpzSWk2SERiQjVlOFZLZFpBblVpX2ZaM2Y4YTpHbTBiSjZvV1Y4ZkM1T1FMTGxDNmpzbEFDVzhh,Content-Type: application/x-www-form-urlencoded" https://localhost:8243/token
Renewing access tokens
After an access token is generated, sometimes you might have to renew the old token due to expiration or securityconcerns. You can renew an access token using a refresh token, by issuing a REST call to the Token API with thefollowing parameters.
The Token API URL is , assuming that both the client and the Gateway are run onhttps://localhost:8243/tokenthe same server.payload: . Replace"grant_type=refresh_token&refresh_token=<retoken>&scope=PRODUCTION"the value with the refresh token generated in the <retoken> .previous sectionheaders: Authorization :Basic <base64 encoded string>, Content-Type:
. Replace as appropriate. application/x-www-form-urlencoded <base64 encoded string>
For example, the following cURL command can be used to access the Token API.
curl -k -d "grant_type=refresh_token&refresh_token=<retoken>&scope=PRODUCTION" -H"Authorization: BasicSVpzSWk2SERiQjVlOFZLZFpBblVpX2ZaM2Y4YTpHbTBiSjZvV1Y4ZkM1T1FMTGxDNmpzbEFDVzhh,Content-Type: application/x-www-form-urlencoded" https://localhost:8243/token
The above REST message grants you a renewed access token along with a refresh token, which you can use thenext time you renew the access token. A refresh token can be used only once. At the moment, a refresh token neverexpires, but we will provide a way to configure an expiration time in a future release.
The Token API endpoint is specified in <APIM_HOME>/repository/deployment/server/syna file. When running the server on a different portpse-configs/default/api/_TokenAPI_.xml
from the default (i.e., 9443), or if your Key Manager is running on a different server from your APIGateway, you must update the endpoint inside the file as described ._TokenAPI_.xml here

WSO2 API Manager, version 1.7.0, WSO2 Inc.
Copyright © WSO2 Inc. 2005-2014 304
1.
2. 3.
4. 5. 6.
7.
Revoking access tokens
After issuing an access token, a user or an admin can revoke it in case of theft or a security violation. You can dothis by calling Revoke API using a utility like cURL. The .Revoke API's endpoint URL is http://localhost:8280/revoke
Parameters required to invoke this API are as follows:
The token to be revokedConsumer key and consumer secret key. Must be encoded using Base64 algorithm
For example, curl -k -d "token=<ACCESS_TOKEN_TO_BE_REVOKED>" -H "Authorization: BasicBase64Encoded(Consumer secret)" key:consumer http://localhost:8280/revoke
WSO2 Admin Services
WSO2 products are managed internally using SOAP Web services known as . WSO2 productsadmin servicescome with a management console UI, which communicates with these admin services to facilitate administrationcapabilities through the UI.
A service in WSO2 products is defined by the following components:
Service component: provides the actual serviceUI component: provides the Web user interface to the serviceService stub: provides the interface to invoke the service generated from the service WSDL
There can be instances where you want to call back-end Web services directly. For example, in test automation, tominimize the overhead of having to change automation scripts whenever a UI change happens, developers prefer tocall the underlying services in scripts. The topics below explain how to discover and invoke these services from yourapplications.
Discovering the admin services
By default, the WSDLs of admin services are hidden from consumers. Given below is how to discover them.
Set the element to false in the <HideAdminServiceWSDLs> <PRODUCT_HOME>/repository/conf/car file.bon.xml
Restart the server.Start the WSO2 product with the option, such as -DosgiConsole sh
in Linux.<PRODUCT_HOME>/bin/wso2server.sh -DosgiConsoleWhen the server is started, hit the enter/return key several times to get the OSGI shell in the console.In the OSGI shell, type: osgi> listAdminServicesThe list of admin services of your product are listed. For example:
To see the service contract of an admin service, select the admin service's URL and then paste it in your
When is enabled (it is enabled by default), ethe API Gateway cache ven after revoking a token, it might stilluntil the cache expires in approximately 15 minutes. You can clearbe available in the cache to consumers
the cache manually by restarting the server.

WSO2 API Manager, version 1.7.0, WSO2 Inc.
Copyright © WSO2 Inc. 2005-2014 305
7.
8.
1. 2.
b r o w s e r w i t h a t t h e e n d . F o r e x a m p l e :? w s d lhttps://localhost:9443/services/UserAdmin?wsdl
Note that the admin service's URL appears as follows in the list you discovered in step 6:
AuthenticationAdmin, AuthenticationAdmin, https://<hostIP>:8243/services/AuthenticationAdmin
Invoking an admin service
Admin services are secured using common types of security protocols such as HTTP basic authentication,WS-Security username token, and session based authentication to prevent anonymous invocations. For example,the Web service is secured with the HTTP basic authentication. To invoke a service, you do theUserAdminfollowing:
Authenticate yourself and get the session cookie.Generate the client stubs to access the back-end Web services.
Authenticate the user
The example code below authenticates the user and gets the session cookie:
In products like WSO2 ESB and WSO2 API Manager, the port is 8243 (assuming 0 port offset).However, you should be accessing the Admin Services via the management console port, which is9443 when there is no port offset.
To generate the stubs, you can write your own client program using the Axis2 client API or use an existingtool like (4.5.1 or later) or wsdl2java.SoapUI
The wsdl2java tool, which comes with WSO2 products by default hides all the complexity and presents youwith a proxy to the back-end service. The stub generation happens during the project build process withinthe Maven POM files. It uses the Maven ant run plug-in to execute the wsdl2java tool.
You can also use the Java client program given to invoke admin services. All dependency JAR filesherethat you need to run this client are found in the directory./lib
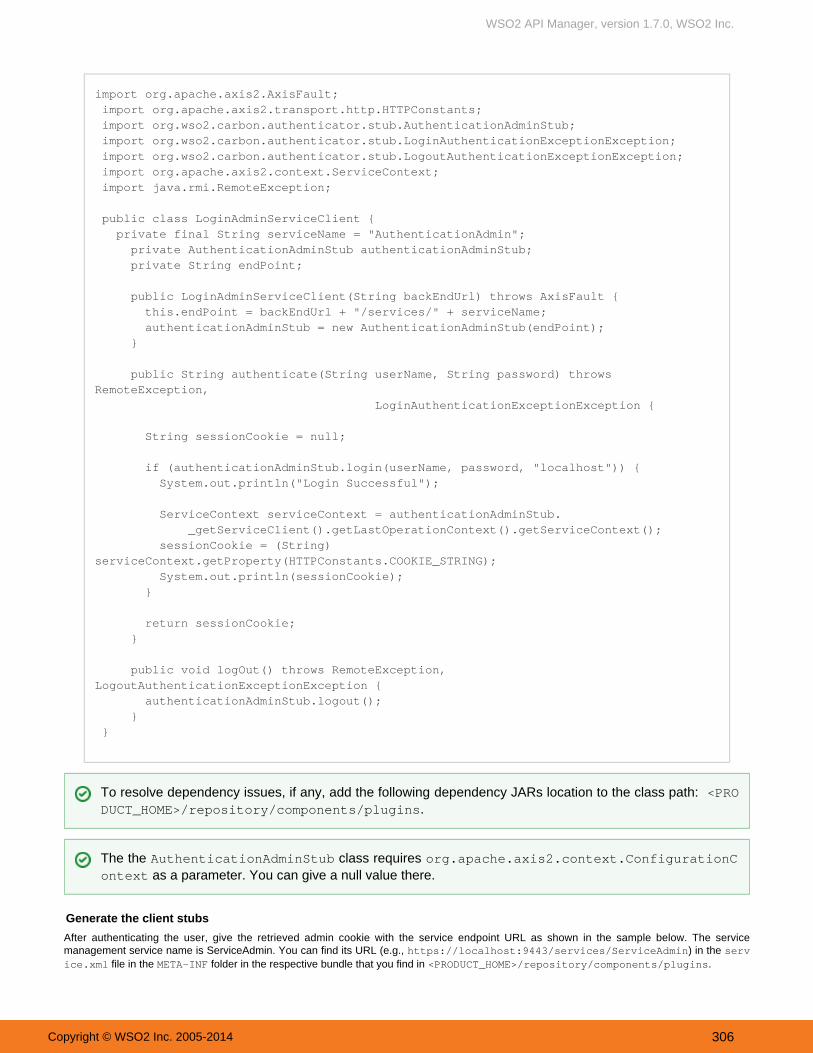
WSO2 API Manager, version 1.7.0, WSO2 Inc.
Copyright © WSO2 Inc. 2005-2014 306
import org.apache.axis2.AxisFault; import org.apache.axis2.transport.http.HTTPConstants; import org.wso2.carbon.authenticator.stub.AuthenticationAdminStub; import org.wso2.carbon.authenticator.stub.LoginAuthenticationExceptionException; import org.wso2.carbon.authenticator.stub.LogoutAuthenticationExceptionException; import org.apache.axis2.context.ServiceContext; import java.rmi.RemoteException; public class LoginAdminServiceClient { private final String serviceName = "AuthenticationAdmin"; private AuthenticationAdminStub authenticationAdminStub; private String endPoint; public LoginAdminServiceClient(String backEndUrl) throws AxisFault { this.endPoint = backEndUrl + "/services/" + serviceName; authenticationAdminStub = new AuthenticationAdminStub(endPoint); } public String authenticate(String userName, String password) throwsRemoteException, LoginAuthenticationExceptionException { String sessionCookie = null; if (authenticationAdminStub.login(userName, password, "localhost")) { System.out.println("Login Successful"); ServiceContext serviceContext = authenticationAdminStub. _getServiceClient().getLastOperationContext().getServiceContext(); sessionCookie = (String)serviceContext.getProperty(HTTPConstants.COOKIE_STRING); System.out.println(sessionCookie); } return sessionCookie; } public void logOut() throws RemoteException,LogoutAuthenticationExceptionException { authenticationAdminStub.logout(); } }
Generate the client stubs
After authenticating the user, give the retrieved admin cookie with the service endpoint URL as shown in the sample below. The servicemanagement service name is ServiceAdmin. You can find its URL (e.g., ) in the https://localhost:9443/services/ServiceAdmin serv
file in the folder in the respective bundle that you find in .ice.xml META-INF <PRODUCT_HOME>/repository/components/plugins
To resolve dependency issues, if any, add the following dependency JARs location to the class path: <PRO.DUCT_HOME>/repository/components/plugins
The the class requires AuthenticationAdminStub org.apache.axis2.context.ConfigurationC as a parameter. You can give a null value there.ontext

WSO2 API Manager, version 1.7.0, WSO2 Inc.
Copyright © WSO2 Inc. 2005-2014 307
import org.apache.axis2.AxisFault; import org.apache.axis2.client.Options; import org.apache.axis2.client.ServiceClient; import org.wso2.carbon.service.mgt.stub.ServiceAdminStub; import org.wso2.carbon.service.mgt.stub.types.carbon.ServiceMetaDataWrapper; import java.rmi.RemoteException; public class ServiceAdminClient { private final String serviceName = "ServiceAdmin"; private ServiceAdminStub serviceAdminStub; private String endPoint; public ServiceAdminClient(String backEndUrl, String sessionCookie) throws AxisFault{ this.endPoint = backEndUrl + "/services/" + serviceName; serviceAdminStub = new ServiceAdminStub(endPoint); //Authenticate Your stub from sessionCooke ServiceClient serviceClient; Options option; serviceClient = serviceAdminStub._getServiceClient(); option = serviceClient.getOptions(); option.setManageSession(true); option.setProperty(org.apache.axis2.transport.http.HTTPConstants.COOKIE_STRING,sessionCookie); } public void deleteService(String[] serviceGroup) throws RemoteException { serviceAdminStub.deleteServiceGroups(serviceGroup); } public ServiceMetaDataWrapper listServices() throws RemoteException { return serviceAdminStub.listServices("ALL", "*", 0); } }
The following sample code lists the back-end Web services:

WSO2 API Manager, version 1.7.0, WSO2 Inc.
Copyright © WSO2 Inc. 2005-2014 308
import org.wso2.carbon.authenticator.stub.LoginAuthenticationExceptionException; import org.wso2.carbon.authenticator.stub.LogoutAuthenticationExceptionException; import org.wso2.carbon.service.mgt.stub.types.carbon.ServiceMetaData; import org.wso2.carbon.service.mgt.stub.types.carbon.ServiceMetaDataWrapper; import java.rmi.RemoteException; public class ListServices { public static void main(String[] args) throws RemoteException, LoginAuthenticationExceptionException, LogoutAuthenticationExceptionException { System.setProperty("javax.net.ssl.trustStore","$ESB_HOME/repository/resources/security/wso2carbon.jks"); System.setProperty("javax.net.ssl.trustStorePassword", "wso2carbon"); System.setProperty("javax.net.ssl.trustStoreType", "JKS"); String backEndUrl = "https://localhost:9443"; LoginAdminServiceClient login = new LoginAdminServiceClient(backEndUrl); String session = login.authenticate("admin", "admin"); ServiceAdminClient serviceAdminClient = new ServiceAdminClient(backEndUrl,session); ServiceMetaDataWrapper serviceList = serviceAdminClient.listServices(); System.out.println("Service Names:"); for (ServiceMetaData serviceData : serviceList.getServices()) { System.out.println(serviceData.getName()); } login.logOut(); } }

WSO2 API Manager, version 1.7.0, WSO2 Inc.
Copyright © WSO2 Inc. 2005-2014 309
Reference GuideThe following topics provide reference information for working with WSO2 API Manager:
Default Ports of WSO2 ProductsWSO2 Patch Application ProcessError Handling
Default Ports of WSO2 Products
This page describes the default ports that are used for each WSO2 product when the is 0. port offset
Common portsProduct-specific ports
Common ports
The following ports are common to all WSO2 products that provide the given feature. Some features are bundled inthe WSO2 Carbon platform itself and therefore are available in all WSO2 products by default.
Management console ports
WSO2 products that provide a management console use the following servlet transport ports:
9443 - HTTPS servlet transport (the default URL of the management console is )https://localhost:9443/carbon9763 - HTTP servlet transport
LDAP server ports
Provided by default in the WSO2 Carbon platform.
10389 - Used in WSO2 products that provide an embedded LDAP server
KDC ports
8000 - Used to expose the Kerberos key distribution center server
JMX monitoring ports
WSO2 Carbon platform uses TCP ports to monitor a running Carbon instance using a JMX client such as JConsole.By default, JMX is enabled in all products. You can disable it using <PRODUCT_HOME>/repository/conf/etc/j
file.mx.xml
11111 - RMIRegistry port. Used to monitor Carbon remotely9999 - RMIServer port. Used along with the RMIRegistry port when Carbon is monitored from a JMX clientthat is behind a firewall
Clustering ports
To cluster any running Carbon instance, either one of the following ports must be opened.
45564 - Opened if the membership scheme is multicast4000 - Opened if the membership scheme is wka
Random ports
Certain ports are randomly opened during server startup. This is due to specific properties and configurations thatbecome effective when the product is started. Note that the IDs of these random ports will change every time theserver is started.
A random TCP port will open at server startup because of the prope-Dcom.sun.management.jmxremoterty set in the server startup script. This property is used for the JMX monitoring facility in JVM.A random UDP port is opened at server startup due to the log4j appender ( ), which isSyslogAppender
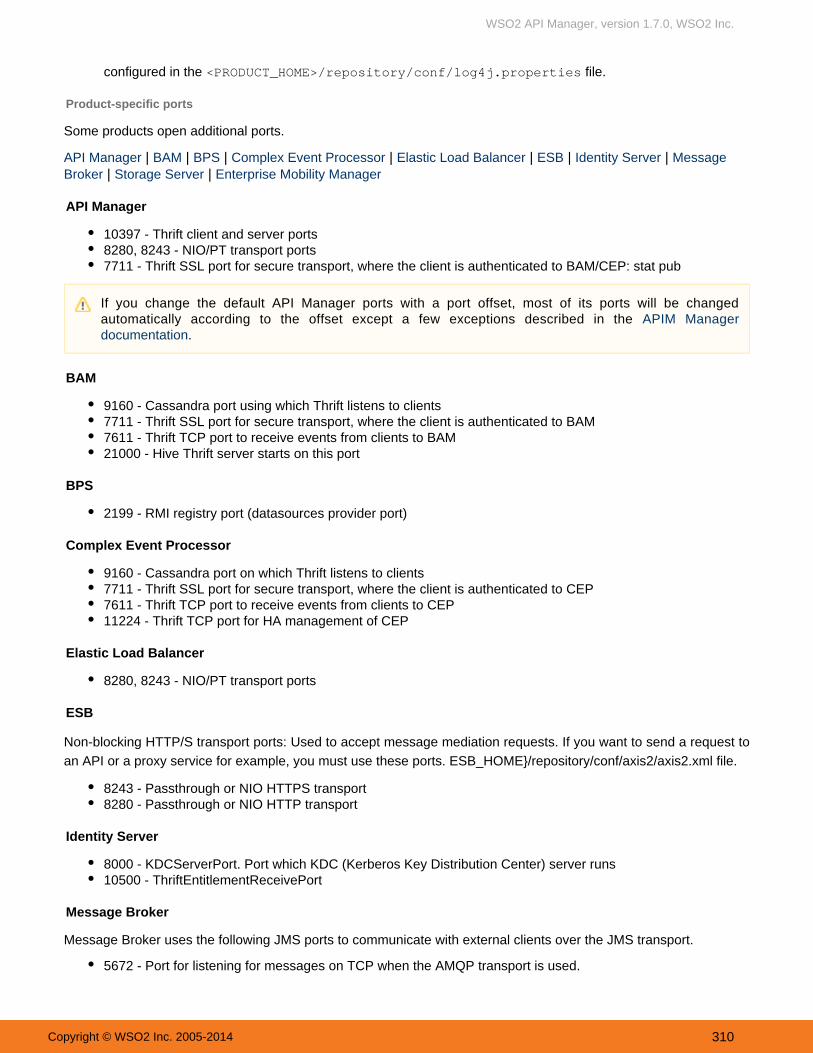
WSO2 API Manager, version 1.7.0, WSO2 Inc.
Copyright © WSO2 Inc. 2005-2014 310
configured in the file.<PRODUCT_HOME>/repository/conf/log4j.properties
Product-specific ports
Some products open additional ports.
API Manager | | | | | | | BAM BPS Complex Event Processor Elastic Load Balancer ESB Identity Server Message | | Broker Storage Server Enterprise Mobility Manager
API Manager
10397 - Thrift client and server ports8280, 8243 - NIO/PT transport ports7711 - Thrift SSL port for secure transport, where the client is authenticated to BAM/CEP: stat pub
BAM
9160 - Cassandra port using which Thrift listens to clients7711 - Thrift SSL port for secure transport, where the client is authenticated to BAM7611 - Thrift TCP port to receive events from clients to BAM21000 - Hive Thrift server starts on this port
BPS
2199 - RMI registry port (datasources provider port)
Complex Event Processor
9160 - Cassandra port on which Thrift listens to clients7711 - Thrift SSL port for secure transport, where the client is authenticated to CEP7611 - Thrift TCP port to receive events from clients to CEP11224 - Thrift TCP port for HA management of CEP
Elastic Load Balancer
8280, 8243 - NIO/PT transport ports
ESB
Non-blocking HTTP/S transport ports: Used to accept message mediation requests. If you want to send a request toan API or a proxy service for example, you must use these ports. ESB_HOME}/repository/conf/axis2/axis2.xml file.
8243 - Passthrough or NIO HTTPS transport8280 - Passthrough or NIO HTTP transport
Identity Server
8000 - KDCServerPort. Port which KDC (Kerberos Key Distribution Center) server runs10500 - ThriftEntitlementReceivePort
Message Broker
Message Broker uses the following JMS ports to communicate with external clients over the JMS transport.
5672 - Port for listening for messages on TCP when the AMQP transport is used.
If you change the default API Manager ports with a port offset, most of its ports will be changedautomatically according to the offset except a few exceptions described in the APIM Manager
.documentation
WSO2 API Manager, version 1.7.0, WSO2 Inc.
Copyright © WSO2 Inc. 2005-2014 311
8672 - Port for listening for messages on TCP/SSL when the AMQP Transport is used.1883 - Port for listening for messages on TCP when the MQTT transport is used.8833 - Port for listening for messages on TCP/SSL when the MQTT Transport is used.7611 - The port for Apache Thrift Server.
Storage Server
Cassandra:
7000 - For Inter node communication within cluster nodes7001 - For inter node communication within cluster nodes vis SSL9160 - For Thrift client connections7199 - For JMX
HDFS:
54310 - Port used to connect to the default file system.54311 - Port used by the MapRed job tracker50470 - Name node secure HTTP server port50475 - Data node secure HTTP server port50010 - Data node server port for data transferring50075 - Data node HTTP server port50020 - Data node IPC server port
Enterprise Mobility Manager
The following ports need to be opened for Android and iOS devices, so that it can connect GCM (Google CloudMessage) and APNS (Apple Push Notification Service) and enroll to WSO2 EMM.
A n d r o i d :The ports to open are 5228, 5229 and 5230. GCM typically only uses 5228, but it sometimes uses 5229 and 5230.GCM does not provide specific IPs, so it is recommended to allow the firewall to accept outgoing connections to all
IP addresses contained in the IP blocks listed in Google's ASN of 15169.
iOS:
5223 - TCP port used by devices to communicate to APNs servers2195 - TCP port used to send notifications to APNs2196 - TCP port used by the APNs feedback service443 - TCP port used as a fallback on Wifi only when devices are unable to communicate to APNs on port5223The APNs servers use load balancing. The devices will not always connect to the same public IP address for
17.0.0.0/8notifications. The entire address block is assigned to Apple, so it is best to allow this range in the firewall settings.
API Manager:
10397 - Thrift client and server ports8280, 8243 - NIO/PT transport ports
WSO2 Patch Application Process
You apply patches to WSO2 products either as individual patches or through a service pack. A service pack isrecommended when the number of patches increase. The following sections explain the WSO2 patch applicationprocess:
The following WSO2 API Manager ports are only applicable to WSO2 EMM 1.1.0 onwards.

WSO2 API Manager, version 1.7.0, WSO2 Inc.
Copyright © WSO2 Inc. 2005-2014 312
1.
2. a.
b.
c.
Applying service packs to the KernelApplying individual patches to the KernelVerifying the patch applicationOverview of the patch application process
Applying service packs to the product
Carbon 4.2.0 Kernel supports service packs. A service pack is a collection of patches in a single pack. It containstwo elements:
The directory: lib contains all the JARs relevant to the service pack.The text file: contains the list of JARs in the service pack.servicepack_patches.txt
Follow the steps below to apply service packs to your product.
Copy the service pack file to the director<PRODUCT_HOME>/repository/components/servicepacks/y. For example, the image below shows how a new service pack named is added to thisservicepack001directory.
Start your product. The following steps will be executed:Before applying any patches, the process first creates a backup folder named patch0000 inside the <PRODUCT_HOME>/repository/components/patches/ directory, which will contain the originalcontent of the <PRODUCT_HOME>/repository/components/plugins/ directory. This stepenables you to revert back to the previous state if something goes wrong during operations.The latest service pack in the dire<PRODUCT_HOME>/repository/components/servicepacks/
will be applied. That is, the patches in the service pack will be applied to the ctory <PRODUCT_HOME>/repository/components/plugins/ directory.In addition to the service pack, if there are added to the individual patches <PRODUCT_HOME>/repository/components/patches/ directory, those will also be incrementally applied to the plugins directory.
Applying individual patches to the product
Before you begin
You can download all WSO2 Carbon Kernel patches from .hereBefore you apply a patch, check its README.txt file for any configuration changes required.
The metadata file available in the service pack will maintain a list of the applied patches byservice pack. Therefore, the metadata file information will be compared against the <PRODUCT_HOME>/repository/components/patches/ directory, and only the patches that werenot applied by the service pack will be incrementally applied to the plugins directory.

WSO2 API Manager, version 1.7.0, WSO2 Inc.
Copyright © WSO2 Inc. 2005-2014 313
1. 2.
You can apply each patch individually to your system as explained below. Alternatively, you can apply patches as explained above.through service packs
Copy the patches to the <PRODUCT_HOME>/repository/components/patches/ directory.Start the Carbon server. The patches will then be incrementally applied to the plugins directory.
Verifying the patch application
After the patch application process is completed, the patch verification process ensures that the latest service packand other existing patches are correctly applied to the <PRODUCT_HOME>/repository/components/plugins/folder.
All patch related logs are recorded in the <PRODUCT_HOME>/repository/logs/patches.log file.The <PRODUCT_HOME>/repository/components/patches/.metadata/prePatchedJARs.txt metafile contains the list of patched JARs and the md5 values.A list of all the applied service packs and patches are in the <PRODUCT_HOME>/repository/components/default/configuration/prePatched.txt file.
Overview of the patch application process
The diagram below shows how the patch application process is implemented when you start the server.
Error Handling
When errors/exception occur in the system, the API Manager throws XML-based error responses by default. Tochange the format of the error response that is sent to the client, you change the auth failure handler in the <AM_HO
file. Given belowME>/repository/deployment/server/synapse-configs/auth_failure_handler.xmlis the default configuration:
<sequence name="auth_failure_handler"> <property name="error_message_type" value="application/xml"/> <sequence key="build"/> </sequence>
If you change to something like , the error response will be sent in JSONapplication/xml applicatoin/jsonformat.
Before applying any patches, the process first creates a backup folder named patch0000 inside the <PRODUCT_HOME>/repository/components/patches/ directory, which will contain the originalcontent of the <PRODUCT_HOME>/repository/components/plugins/ directory. This stepenables you to revert back to the previous state if something goes wrong during operations.
Prior to Carbon 4.2.0, users were expected to apply patches by starting the server with wso2server.shou do not have to issue a special command to trigger the patch application-DapplyPatches. Now, y
process. It starts automatically if there are changes in either the <PRODUCT_HOME>/repository/components/servicepacks/ directory or the <PRODUCT_HOME>/repository/components/patches/ directory. It verifies all the latest JARs in the and directories against the JARs in the servicepacks patches
directory by comparing MD5s of JARs.plugins
Do not change the data in the <PRODUCT_HOME>/repository/components/default/configu file. The patch application process gets the pre-patched list from this fileration/prePatched.txt
and compares the list with the patches available in the and directories. Ifservicepack patchesyou change the data in this file, you will get a startup error when applying patches.

WSO2 API Manager, version 1.7.0, WSO2 Inc.
Copyright © WSO2 Inc. 2005-2014 314
Given below are some error codes and theirmeanings.
API handlers error codes
Errorcode
Error Message Description
900900 Unclassified AuthenticationFailure.
An unspecified error has occurred
900901 Invalid Credentials Invalid Authentication information provided

WSO2 API Manager, version 1.7.0, WSO2 Inc.
Copyright © WSO2 Inc. 2005-2014 315
900902 Missing Credentials No authentication information provided
900903 Access Token Expired Access Token has expired. .Renew the access token
900904 Access Token Inactive Access token has become inactive. .Generate new access token
900905 Incorrect Access TokenType is provided
The access token type used is not supported when invoking the API. Thesupported access token types are Application Accesses Token and UserAccesses Token. .See Access Tokens
900906 No matching resourcefound in the API for thegiven request
A resource with the name in the request can not be found in the API.
900907 The requested API istemporarily blocked
The status of the API has been changed to an inaccessible/unavailablestate.
900908 Resource forbidden The user invoking the API has not been granted access to the requiredresource.
900909 The subscription to the APIis inactive
Happens when the API user is blocked.
900910 The access token does notallow you to access therequested resource
Can not access the required resource with the provided access token.Check the valid resources that can be accessed with this token.
900800 Message throttled out The maximum number of requests that can be made to the API within adesignated time period is reached and the API is throttled for the user.
Sequences error codes
Error code Description
900901 Production/sandbox key offered to the API with no production/sandbox endpoint
403 No matching resource found in the API for the given request
In addition to the above error codes, we have engaged Synapse-level error codes to the default fault sequence andcustom fault sequences (e.g.,_token_fault_.xml) of the API Manager. For information, see in WSO2Error HandlingESB documentation.
WSO2 API Manager, version 1.7.0, WSO2 Inc.
Copyright © WSO2 Inc. 2005-2014 316
Getting SupportIn addition to this documentation, there are several ways to get help as you work on WSO2 products.
Explore learning resources: For tutorials, articles, whitepapers, webinars, and other learningresources, look in the menu on the . In products that have a visual userResources WSO2 websiteinterface, click the Help link in the top right-hand corner to get help with your current task.
Try our support options: WSO2 offers a variety of development and production supportprograms, ranging from web-based support during normal business hours to premium 24x7 phonesupport. For support information, see .http://wso2.com/support/
Ask questions in the user forums at . Ensure that you tag your questionhttp://stackoverflow.comwith appropriate keywords such as and the product name so that our team can easily findWSO2your questions and provide answers. If you can't find an answer on the user forum, you can emailthe WSO2 development team directly using the relevant mailing lists described at http://wso2.org/
Report issues, submit enhancement requests, track and comment on issues using our public, and contribute samples, patches, and tips & tricks (see the bug-tracking system WSO2 Contributor
).License Agreement

WSO2 API Manager, version 1.7.0, WSO2 Inc.
Copyright © WSO2 Inc. 2005-2014 317
Glossary
Component | | | Endpoint SOAP Denial of Service
Component
Components in the Carbon platform add functionality to all WSO2 Carbon-based products. For example, thestatistics component enables users to monitor system and service level statistics. A component in the Carbonplatform is made up of one or more bundles, which is OSGi the modularization unit in OSGi similar to a JAR file in
component contains two bundles: one is the back-end bundle that collects, For example, the statisticsJava.summarizes, and stores statistics, and the other is the front-end bundle, which presents the data to the user througha user-friendly interface. This component-based architecture of the WSO2 Carbon platform gives developersflexibility to build efficient and lean products that best suit their unique business needs simply by adding andremoving components.
Endpoint
An endpoint is a specific destination for a message. It may be specified as an Address endpoint, WSDL endpoint, aFailover group, a Loadbalance group, and more. Endpoints can be added, edited, and deleted.
SOAP
An XML-based, extensible message envelope format, with "bindings" to underlying protocols. The primary protocolsare HTTP and HTTPS, although bindings for others, including SMTP and XMPP, have been written.
Denial of Service
In a Denial of Service (DOS) attack, the attacker tries to overload the backend services by sending invalid requestssuch as requests with false return addresses, so that the server cannot find the user when it tries to send theresponse back. The server gradually slows down when consuming CPU and memory in order to process multiplerequests. When the server closes the connection due to failure, the attacker sends a new batch of forged requests,and the process begins again, stalling the services indefinitely.
One of the most common methods of blocking a DOS attack is to filter requests by noticing patterns of incomingtraffic. If a pattern comes in frequently, the filter can block messages containing that pattern.

WSO2 API Manager, version 1.7.0, WSO2 Inc.
Copyright © WSO2 Inc. 2005-2014 318
Site MapUse this site map to quickly find the topic you're looking for by searching for a title on this page using your browser'ssearch feature. You an also use the search box in the upper right corner of this window to search for a word orphrase in all the pages in this documentation.