Cisco Meraki Deployment Guide - Securonix Documentation
14
Cisco Meraki Deployment Guide Date Published: 8/9/2021
-
Upload
khangminh22 -
Category
Documents
-
view
6 -
download
0
Transcript of Cisco Meraki Deployment Guide - Securonix Documentation

Cisco Meraki
Deployment GuideDate Published: 8/9/2021

Securonix Proprietary Statement
This material constitutes proprietary and trade secret information of Securonix, and shall not be disclosed to any
third party, nor used by the recipient except under the terms and conditions prescribed by Securonix.
The trademarks, service marks, and logos of Securonix and others used herein are the property of Securonix or their
respective owners.
Securonix Copyright Statement
This material is also protected by Federal Copyright Law and is not to be copied or reproduced in any form, using any
medium, without the prior written authorization of Securonix.
However, Securonix allows the printing of the Adobe Acrobat PDF files for the purposes of client training and
reference.
Information in this document is subject to change without notice. The software described in this document is
furnished under a license agreement or nondisclosure agreement. The software may be used or copied only in
accordance with the terms of those agreements. Nothing herein should be construed as constituting an additional
warranty. Securonix shall not be liable for technical or editorial errors or omissions contained herein. No part of this
publication may be reproduced, stored in a retrieval system, or transmitted in any form or any means electronic or
mechanical, including photocopying and recording for any purpose other than the purchaser's internal use without
the written permission of Securonix.
Copyright © 2021 Securonix. All rights reserved.
Contact Information
Securonix
5080 Spectrum Drive, Suite 950W
Addison, TX 75001
(855) 732-6649
SNYPR Deployment Guide 2

Table of Contents
Introduction 4
About Cisco Meraki 4
Supported Collection Method 4
Format 4
Functionality 4
Cisco Meraki Configuration 5
Configure the Dashboard 5Verify Logs on the RIN 6Additional Considerations 8
Configuration in SNYPR 8
Verify the Job 13
Resources 13
SNYPR Deployment Guide 3

Introduction
IntroductionThis Deployment Guide provides information on how to configure Cisco Meraki tosend security logs to SNYPR.
About Cisco MerakiCisco Meraki provides unified management of mobile devices, Macs, PCs, and theentire network from a centralized dashboard. It enforces device security policies,deploys software and apps, and performs remote, live troubleshooting on thousandsof managed devices.
Supported Collection MethodThe collection method is syslog.
FormatThe format is Regex.
FunctionalityIn SNYPR, resource groups (datasources) are categorized by functionality. Thefunctionality determines what content is available when you import the datasource.For more information about Device Categorization, see the Data Dictionary.
The functionality of Cisco Meraki is Network Access Control / NAC.
See Available Policies for a complete list of policies for this datasource.
SNYPR Deployment Guide 4

Cisco Meraki Configuration
Cisco Meraki ConfigurationComplete the steps in this section to configure Cisco Meraki to export events to
SNYPR:
l Configure the Dashboard
l Verify logs on the RIN
Note: Before configuring the log collection, you must have the IP address of the
Remote Ingester Node (RIN).
Configure the DashboardTo define the syslog server in the dashboard, complete the following steps:
1. Navigate to Network-wide > Configure > General.
2. Click Add a syslog server to define a new server.
a. Server IP: The RIN IP address.
b. Port: The UDP port number, 514.
c. Roles: The roles to send to the server.
Note: You can configure multiple syslog servers.
3. Choose the type of events to export:
SNYPR Deployment Guide 5

Cisco Meraki Configuration
a. Event Log: The messages from the dashboard underMonitor > Event Log.
b. Flows: Inbound and outbound traffic flow-generated syslog messages thatinclude the source, destination, and port numbers.
c. URL: HTTP GET requests generating syslog entries.
If the Flows role is enabled on an MX security appliance, the logging for individualfirewall rules can be enabled or disabled in the Logging column. Navigate toSecurity appliance > Configure > Firewall to enable or disable.
Verify Logs on the RINUse the following command to verify if the RIN is receiving logs:
tcpdump -i eth0 udp port 514 -v -A
Type of Events to Export
Event Log
Appliance/Switch/Wireless Event Log
May 10 18:46:04 192.168.10.1 1 948080570.911780502 MX60 events
dhcp lease of ip 192.168.10.252 from server mac 00:18:0A:XX.XX.XX
SNYPR Deployment Guide 6
Cisco Meraki Configuration
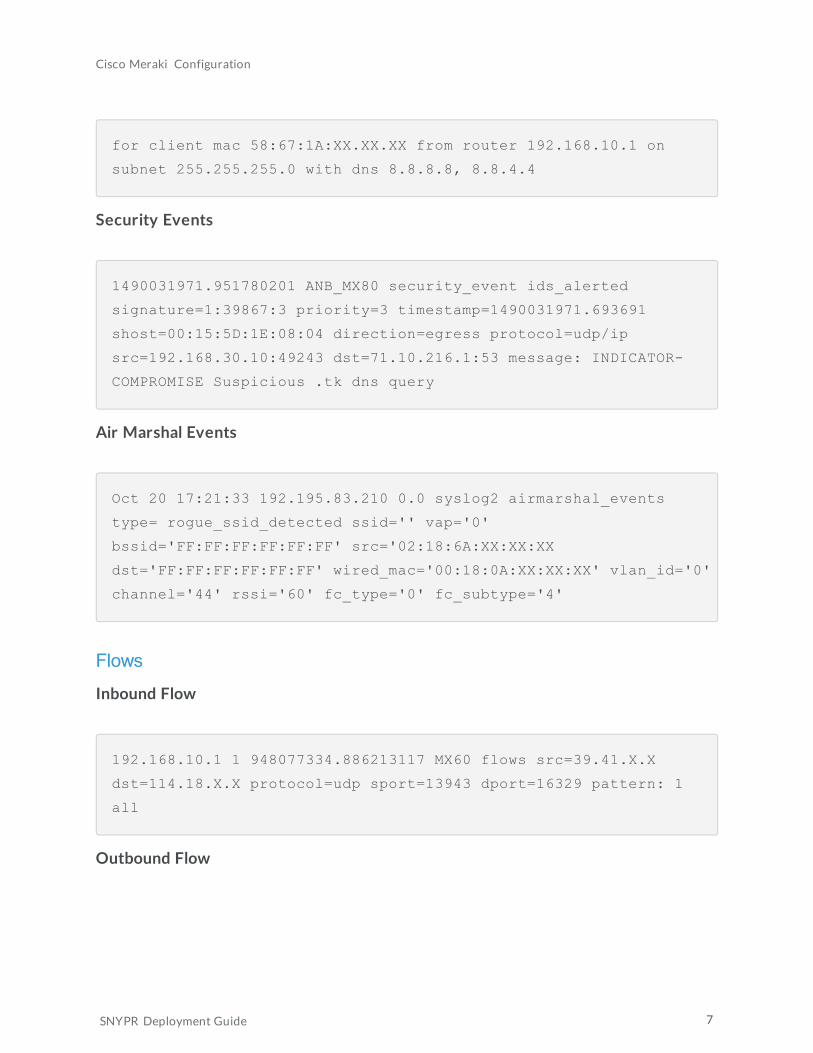
for client mac 58:67:1A:XX.XX.XX from router 192.168.10.1 on
subnet 255.255.255.0 with dns 8.8.8.8, 8.8.4.4
Security Events
1490031971.951780201 ANB_MX80 security_event ids_alerted
signature=1:39867:3 priority=3 timestamp=1490031971.693691
shost=00:15:5D:1E:08:04 direction=egress protocol=udp/ip
src=192.168.30.10:49243 dst=71.10.216.1:53 message: INDICATOR-
COMPROMISE Suspicious .tk dns query
Air Marshal Events
Oct 20 17:21:33 192.195.83.210 0.0 syslog2 airmarshal_events
type= rogue_ssid_detected ssid='' vap='0'
bssid='FF:FF:FF:FF:FF:FF' src='02:18:6A:XX:XX:XX
dst='FF:FF:FF:FF:FF:FF' wired_mac='00:18:0A:XX:XX:XX' vlan_id='0'
channel='44' rssi='60' fc_type='0' fc_subtype='4'
Flows
Inbound Flow
192.168.10.1 1 948077334.886213117 MX60 flows src=39.41.X.X
dst=114.18.X.X protocol=udp sport=13943 dport=16329 pattern: 1
all
Outbound Flow
SNYPR Deployment Guide 7

Configuration in SNYPR
192.168.10.1 1 948136486.721741837 MX60 flows src=192.168.10.254
dst=8.8.8.8 mac=00:18:0A:XX:XX:XX protocol=udp sport=9562
dport=53 pattern: allow all
URL
Apr 20 14:36:35 192.168.10.1 1 948077314.907556162 MX60 urls
src=192.168.10.3:62526 dst=54.241.7.X.X mac=00:1A:A0:XX:XX:XX
request: GET http://www.meraki.com
Additional ConsiderationsIf the environment has multiple MX devices using site-to-site VPN and logging is doneto a syslog server on the remote side of the VPN, that traffic is subject to the site-to-site firewall. It may be necessary to create a site-to-site firewall rule to allow thesyslog traffic through. This is done from Security appliance > Configure > Site-to-siteVPN > Organization-wide settings > Add a rule.
l Source: The IP address of the highest vlan on the MX sending the syslog messagesback to the syslog RIN server.
l Destination: The IP address of the syslog RIN server.
l Dst Port: Provide a destination port if the syslog RIN server does not use thestandard UDP port, 514, to listen to syslog messages.
Configuration in SNYPRTo configure Cisco Meraki in SNYPR, complete the following steps:
SNYPR Deployment Guide 8

Configuration in SNYPR
1. Login to SNYPR.
2. Navigate to Menu > Add Data > Activity.
3. Click + > Add Data for Existing Device Type.
4. Click the Vendor drop-down and select the following information:
l Vendors: Cisco Systems
l Device Type: Cisco Meraki
l Collection Method: Regex[SYSLOG]
5. Choose an ingester from the drop-down list.
6. Click + to add a filter.
SNYPR Deployment Guide 9

Configuration in SNYPR
7. Provide a name for the filter.
8. Add the following syslog filter in the Filter expression box:
{host("10.0.0.1");};
Note: IP address is the address of the source host initiating the traffic.
9. Click Add.
10. Complete the following information in the Device Information section:
a. Datasource Name: Cisco Meraki
b. Specify timezone for activity logs: Click the drop-down and select a timezonefor the logs.
11. Click Get Preview on the top right of the screen to view the data.
12. Click Save & Next until you reach step 4: Identity Attribution.
SNYPR Deployment Guide 10

Configuration in SNYPR
13. Click + > Add New Correlation Rule.
14. Enter a descriptive name for the correlation rule.
15. Provide the following parameters to create a correlation rule:
SNYPR Deployment Guide 11
Configuration in SNYPR
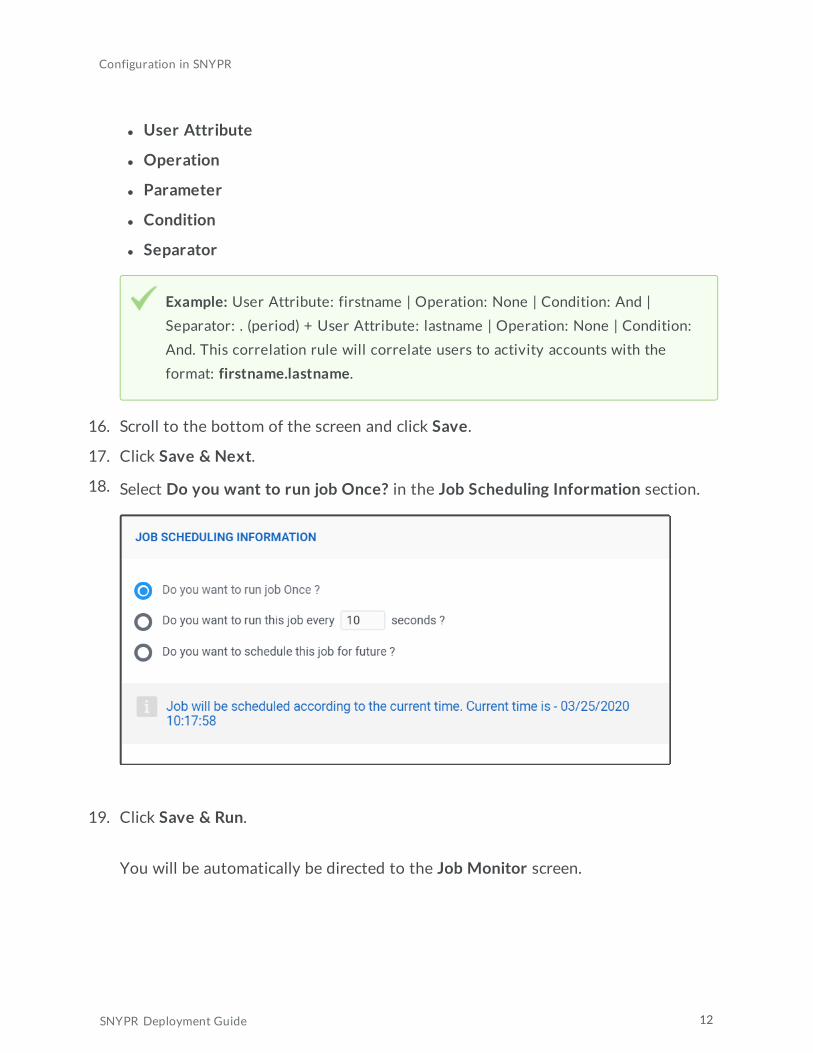
l User Attribute
l Operation
l Parameter
l Condition
l Separator
Example: User Attribute: firstname | Operation: None | Condition: And |
Separator: . (period) + User Attribute: lastname | Operation: None | Condition:
And. This correlation rule will correlate users to activity accounts with the
format: firstname.lastname.
16. Scroll to the bottom of the screen and click Save.
17. Click Save & Next.
18. Select Do you want to run job Once? in the Job Scheduling Information section.
19. Click Save & Run.
You will be automatically be directed to the Job Monitor screen.
SNYPR Deployment Guide 12
Resources
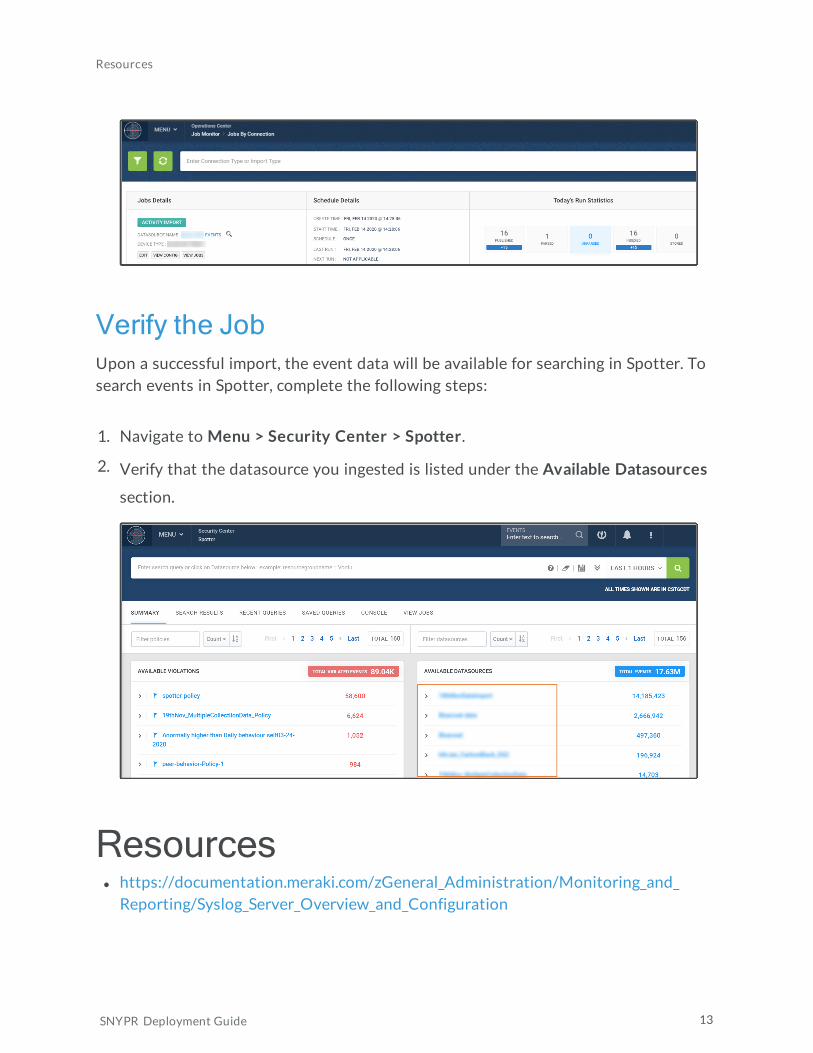
Verify the JobUpon a successful import, the event data will be available for searching in Spotter. Tosearch events in Spotter, complete the following steps:
1. Navigate to Menu > Security Center > Spotter.
2. Verify that the datasource you ingested is listed under the Available Datasources
section.
Resourcesl https://documentation.meraki.com/zGeneral_Administration/Monitoring_and_Reporting/Syslog_Server_Overview_and_Configuration
SNYPR Deployment Guide 13

Resources
l https://documentation.meraki.com/Special:Search?path=&q=Troubleshooting
SNYPR Deployment Guide 14