Documentation - HelpDocs
42
Documentation F24 Crisis Management Tool in FACT24 ultimate PLUS F24 TrustCase Business Messenger App
-
Upload
khangminh22 -
Category
Documents
-
view
2 -
download
0
Transcript of Documentation - HelpDocs
Documentation
F24 Crisis Management Tool
in FACT24 ultimate PLUS
F24 TrustCase Business Messenger App
Page 2 of 42
F24 CRISIS MANAGEMENT TOOL IN FACT24 ULTIMATE PLUS ....................... 4
F24 CRISIS MANAGEMENT TOOL: FUNCTIONS ................................................. 4 F24 CRISIS MANAGEMENT TOOL IN 11
LANGUAGES ................................................ 4 ACCESSING THE F24 CRISIS
MANAGEMENT TOOL .................................. 4 Web Login tab ...................................... 5 Login tab ................................................ 5 Profile settings ...................................... 6
CREATING A NEW DASHBOARD .................. 6 Displaying widgets on your dashboard ............................................. 7 Linking your dashboard to your FACT24 account .................................. 7
WIDGETS: INDIVIDUAL WIDGETS IN DETAIL 7 FACT24 Alarms .................................... 7 FACT24 Online Monitor ...................... 7 Contacts ................................................ 8 Rooms ................................................... 9
Creating a new room and adding contacts 9 Actions in a room ......................................... 10 Adding a room to a dashboard or saving separately ...................................................... 10
Tasks ................................................... 10 Creating a new task ..................................... 11
Task templates ................................... 11 Statistics: Tasks ................................. 12 Timeline ............................................... 12 Meteoalarm ......................................... 13 External websites ............................... 13 Twitter .................................................. 14 Global Monitoring ............................... 14
CHECKLISTS ............................................. 15 Opening the “Checklists” menu item .............................................................. 15 Categorising checklists ..................... 15 Creating a new checklist (template) 15
Creating a to-do in a checklist ................... 16 Assigning an existing checklist to a case and activating the checklist ..... 17 Displaying an active checklist .......... 18
Sort and search functions ........................... 18 Working through an active checklist 19 Archiving a checklist .......................... 19
A3M GLOBAL MONITORING ..................... 20 Opening the “A3M Global Monitoring” menu item ........................................... 20 Integrated online help for A3M Global Monitoring ........................................... 20 Basic knowledge to get you started in the world of A3M Global Monitoring 21
A3M Global Monitoring – Multifunctional tool .................................................................. 21
Open detailed information about a specific location .......................................................... 21 Search for a specific location on the world map ................................................................ 22 Select map type ........................................... 22 Filters and settings ...................................... 23 Configuring the map.................................... 23 “External information” filter ......................... 23 Events filter ................................................... 23 Filter area “Event / relevance level”.......... 24 “Time filter mode” filter area ...................... 25 “Time range” filter area ............................... 25 “Internal information” filter .......................... 25 Tickers ........................................................... 26 Event ticker ................................................... 26 “Travel Advice AA” ticker............................ 26
TRUSTCASE – F24’S BUSINESS MESSENGER APP................................. 27
INFORMING PERSONS SAVED IN FACT24
ABOUT THE TRUSTCASE APP ................... 27 FACT24 TRUSTBROKER FUNCTION ....... 28
TrustBroker in action ......................... 28 Creating persons in FACT24 ..................... 28
Create persons using Configuration upload ...................................................... 28 Creating persons using the menu item “Persons” ................................................. 28
Main settings for creating persons as TrustCase app users .................................. 29 Duplicating an existing device ................... 29 Roles in FACT24 ......................................... 30
Aspects of roles ...................................... 30 Overview of individual roles.................. 30
THE TRUSTCIRCLE FUNCTION ................. 31 ACCEPTANCE OF TRUSTBROKER BY A
PERSON (USING THE TRUSTCASE APP) AND SHARING CONTACTS TO PERSONS’ SMARTPHONES USING TRUSTBROKER.... 32 ACCEPTANCE OF TRUSTBROKER BY A
PERSON (WITHOUT TRUSTCASE APP) AND
SHARING CONTACTS TO THE “CONTACTS” WIDGET USING TRUSTBROKER ................ 34 BASIC INFORMATION FOR TRUSTCASE
USERS ....................................................... 35 Menu item “FACT24” in TrustCase . 35 Push notification in TrustCase for location-based FACT24 alarms ....... 36 Managing own contact data and scanning the TrustBroker’s QR code .............................................................. 37 Adding contacts to TrustCase (without a TrustBroker) ...................... 37
Generating a QR code................................ 38 Scanning a QR code ................................... 39
TrustLevels of contacts ..................... 39 Rooms and tasks in the TrustCase app ........................................................ 39
Creating a new room .................................. 40 Creating and sending a task in a room .... 41
Page 3 of 42
SYMBOLS AND ICONS ......................... 42 SYMBOLS AND ICONS IN THE F24 CRISIS
MANAGEMENT TOOL ................................ 42 SYMBOLS AND ICONS IN TRUSTCASE ..... 42
Page 4 of 42
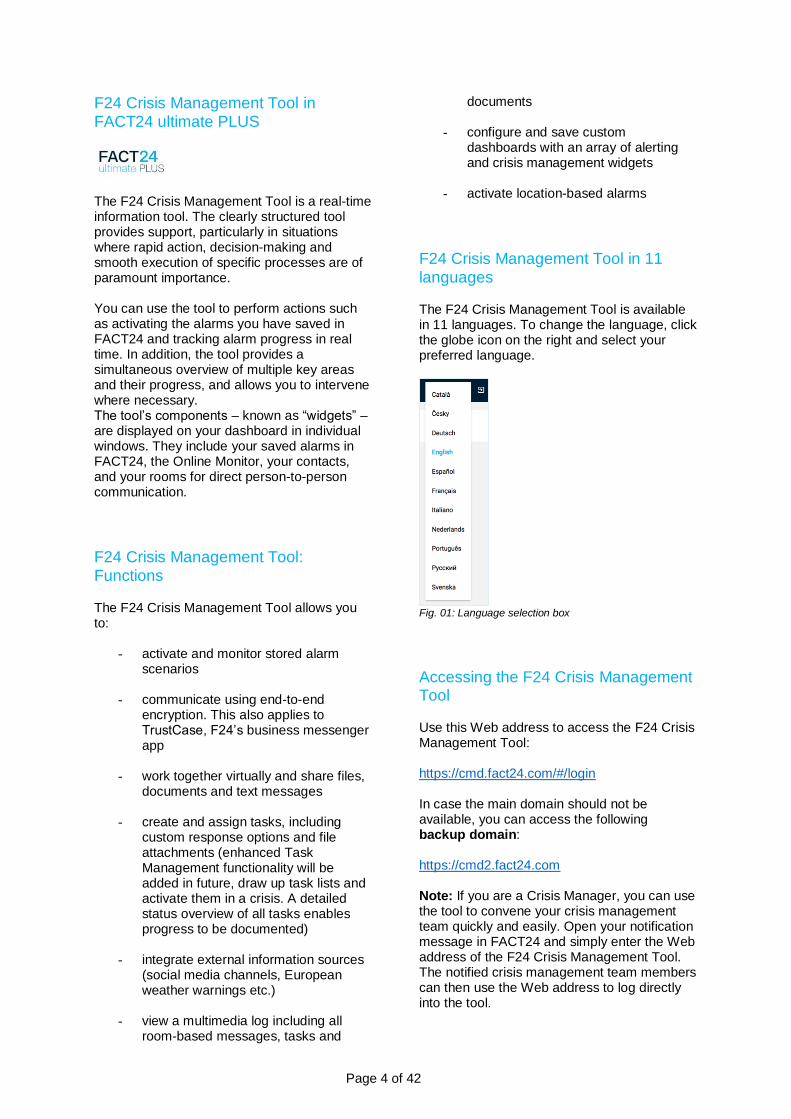
F24 Crisis Management Tool in FACT24 ultimate PLUS
The F24 Crisis Management Tool is a real-time information tool. The clearly structured tool provides support, particularly in situations where rapid action, decision-making and smooth execution of specific processes are of paramount importance. You can use the tool to perform actions such as activating the alarms you have saved in FACT24 and tracking alarm progress in real time. In addition, the tool provides a simultaneous overview of multiple key areas and their progress, and allows you to intervene where necessary. The tool’s components – known as “widgets” – are displayed on your dashboard in individual windows. They include your saved alarms in FACT24, the Online Monitor, your contacts, and your rooms for direct person-to-person communication.
F24 Crisis Management Tool: Functions The F24 Crisis Management Tool allows you to:
- activate and monitor stored alarm scenarios
- communicate using end-to-end encryption. This also applies to TrustCase, F24’s business messenger app
- work together virtually and share files, documents and text messages
- create and assign tasks, including custom response options and file attachments (enhanced Task Management functionality will be added in future, draw up task lists and activate them in a crisis. A detailed status overview of all tasks enables progress to be documented)
- integrate external information sources (social media channels, European weather warnings etc.)
- view a multimedia log including all room-based messages, tasks and
documents
- configure and save custom dashboards with an array of alerting and crisis management widgets
- activate location-based alarms
F24 Crisis Management Tool in 11 languages The F24 Crisis Management Tool is available in 11 languages. To change the language, click the globe icon on the right and select your preferred language.
Fig. 01: Language selection box
Accessing the F24 Crisis Management Tool Use this Web address to access the F24 Crisis Management Tool: https://cmd.fact24.com/#/login In case the main domain should not be available, you can access the following backup domain: https://cmd2.fact24.com Note: If you are a Crisis Manager, you can use the tool to convene your crisis management team quickly and easily. Open your notification message in FACT24 and simply enter the Web address of the F24 Crisis Management Tool. The notified crisis management team members can then use the Web address to log directly into the tool.
Page 5 of 42
To log in, use the Web login or enter your email address in the F24 Crisis Management Tool. The login option you choose depends on how you plan to use the F24 Crisis Management Tool. Web login is recommended if you plan to use the TrustCase secure messaging app. This method automatically displays your content from the TrustCase app in the F24 Crisis Management Tool. Email address login is recommended if you only plan to use the tool on your PC (and not in the TrustCase app).
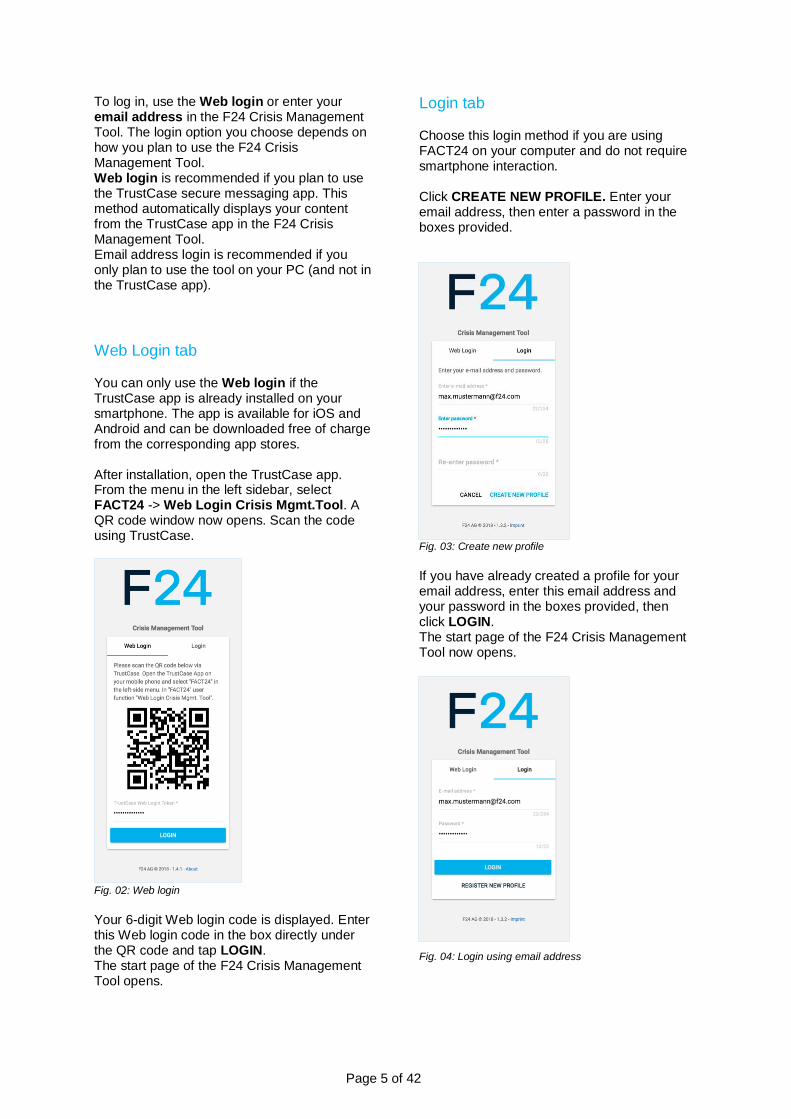
Web Login tab You can only use the Web login if the TrustCase app is already installed on your smartphone. The app is available for iOS and Android and can be downloaded free of charge from the corresponding app stores. After installation, open the TrustCase app. From the menu in the left sidebar, select FACT24 -> Web Login Crisis Mgmt.Tool. A QR code window now opens. Scan the code using TrustCase.
Fig. 02: Web login
Your 6-digit Web login code is displayed. Enter this Web login code in the box directly under the QR code and tap LOGIN. The start page of the F24 Crisis Management Tool opens.
Login tab Choose this login method if you are using FACT24 on your computer and do not require smartphone interaction. Click CREATE NEW PROFILE. Enter your email address, then enter a password in the boxes provided.
Fig. 03: Create new profile
If you have already created a profile for your email address, enter this email address and your password in the boxes provided, then click LOGIN. The start page of the F24 Crisis Management Tool now opens.
Fig. 04: Login using email address
Page 6 of 42
Profile settings
Fig. 05: Profile settings
Enter a name for your profile in the Profile name box. Your Profile ID is generated automatically and displayed. Now upload your profile and click SAVE to save your settings. Save your displayed TrustBrokers by clicking the SAVE button next to My TrustBrokers.
Creating a new dashboard The names of your existing dashboards are shown on the left of the Dashboards menu.
Fig. 06: Dashboards
To create a new dashboard, click New Dashboard. The following window opens:
Fig. 07: Create new dashboard
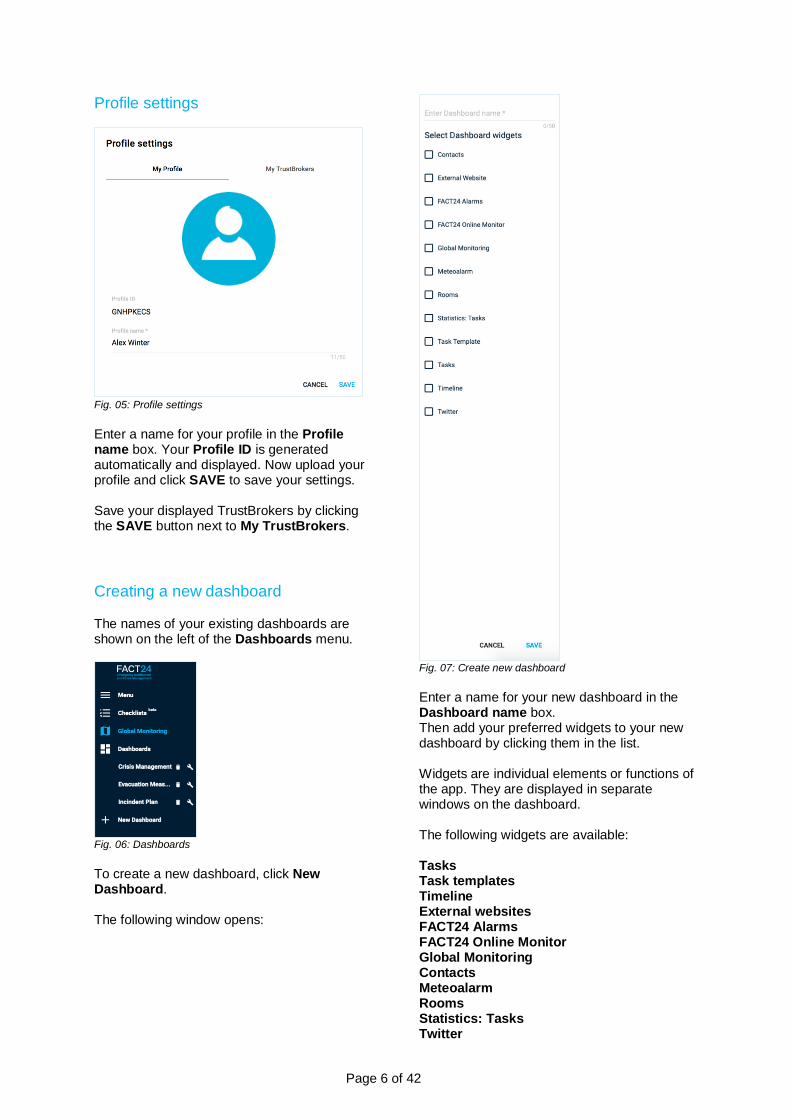
Enter a name for your new dashboard in the Dashboard name box. Then add your preferred widgets to your new dashboard by clicking them in the list. Widgets are individual elements or functions of the app. They are displayed in separate windows on the dashboard. The following widgets are available: Tasks Task templates Timeline External websites FACT24 Alarms FACT24 Online Monitor Global Monitoring Contacts Meteoalarm Rooms Statistics: Tasks Twitter

Page 7 of 42
Now click SAVE to save your settings.
Displaying widgets on your dashboard Your new dashboard displays all your chosen widgets at a glance in separate windows. Click and hold the mouse to drag any window from the upper window to the desired position. The positions of the other windows are automatically adjusted. Each window can be enlarged or reduced horizontally and vertically by clicking the small tick mark at bottom right.
Linking your dashboard to your FACT24 account When you first register for the F24 Crisis Management Tool, the following three widgets appear when you create your new dashboard: Tasks Contacts Rooms You need to link your dashboard with your F24 account to display more widgets. When you do this, data you have already saved on FACT24 are displayed in your dashboard. The visibility of the data depends on your roles as a FACT24 user. For example, if your role includes authorisation to activate alarms (Roles 7 to 10; see Roles in FACT24), the alarms you have saved in FACT24 are displayed on the dashboard and can be activated from there. To link the dashboard to your FACT24 account, click the cogwheel icon at top right, then FACT24 Account.
Fig. 08: Linking to FACT24
A new window opens. Enter your user name and password in the boxes provided, then click SAVE to create the link with FACT24.
Fig. 09: FACT24 user data
Widgets: Individual widgets in detail
FACT24 Alarms
Fig. 10: FACT24 alarms
This widget enables you to view and activate all the alarms you have saved in FACT24. Click Select organisational unit to open a pull-down menu of organisational units, and select the unit you require. All alarms assigned to your selected unit are shown. To activate an alarm, click the alarm bell icon on the right of the alarm. Use the Search function (magnifying glass icon at top left) to search for a specific alarm, entering the alarm number or name. You can use the arrow buttons < > to browse the list of alarms.
FACT24 Online Monitor
Fig. 11: FACT24 Online Monitor
When an alarm is activated in FACT24, use the FACT24 Online Monitor widget to track the alarm in real time and view all the relevant actions, status reports and results. To display the activated alarm, your dashboard must be linked with your FACT24 account (see Linking your dashboard to your FACT24 account).
Page 8 of 42
To display the desired alarm, open the Select organisational unit box and select the unit to which the alarm is assigned. The following information is displayed: alarm number, alarm name, time activated, and remaining time of activation. You can stop an activated alarm at
any time by clicking the stop icon . Click
the alarm bell icon to open a detailed overview of the activated alarm.
Fig. 12: Details of the activated alarm
When you use the FACT24 Alarms widget to activate an alarm, you can make changes to the following categories before activation: Message, Groups and Persons
Fig. 13: Alarm activation
To activate the alarm, click the Activate alarm button.
Contacts
Fig. 14: Saved contacts
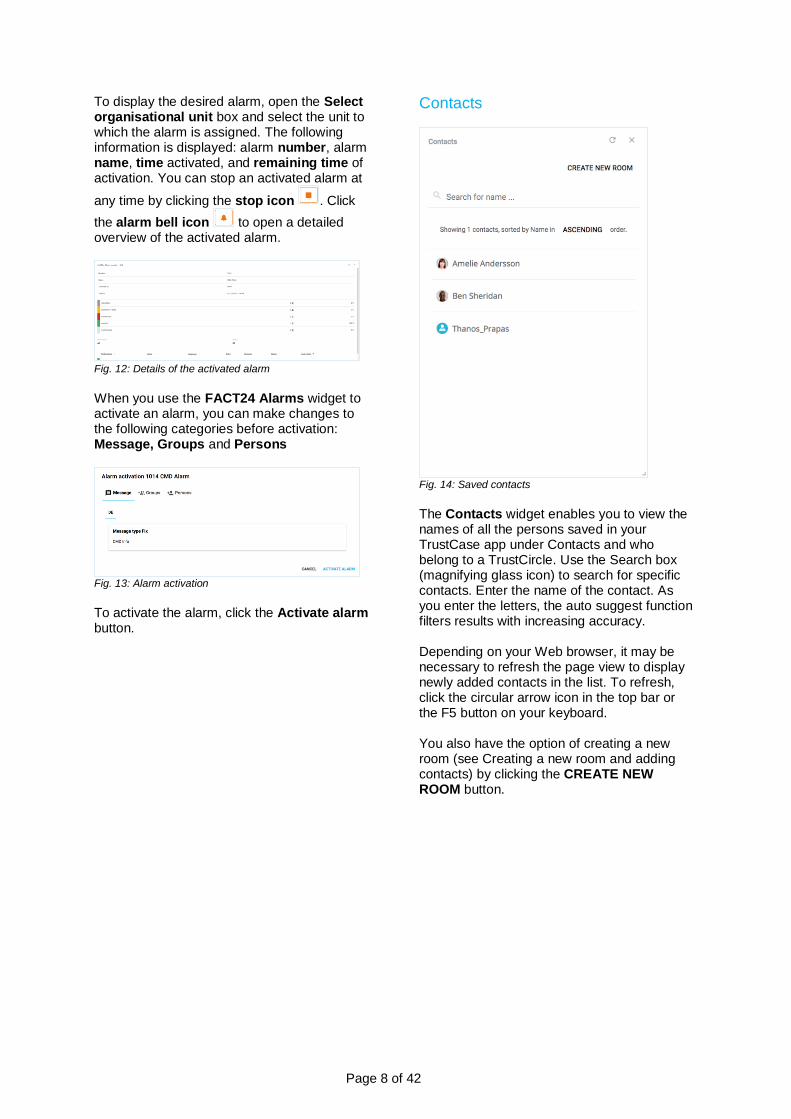
The Contacts widget enables you to view the names of all the persons saved in your TrustCase app under Contacts and who belong to a TrustCircle. Use the Search box (magnifying glass icon) to search for specific contacts. Enter the name of the contact. As you enter the letters, the auto suggest function filters results with increasing accuracy. Depending on your Web browser, it may be necessary to refresh the page view to display newly added contacts in the list. To refresh, click the circular arrow icon in the top bar or the F5 button on your keyboard. You also have the option of creating a new room (see Creating a new room and adding contacts) by clicking the CREATE NEW ROOM button.
Page 9 of 42
Rooms
Fig. 15: List of rooms already created
Communication with your contacts is end-to-end encrypted and takes place in protected rooms which you create and name yourself. This widget displays all the rooms you have already created, as well as rooms you have created in the TrustCase app. However, these rooms are only displayed after Web login to the F24 Crisis Management Tool is completed (see “Web login” tab). Use the Search box (magnifying glass icon) to search for specific rooms. Click a room name to open the room and continue communication there. Depending on your Web browser, it may sometimes be necessary to refresh the page view.
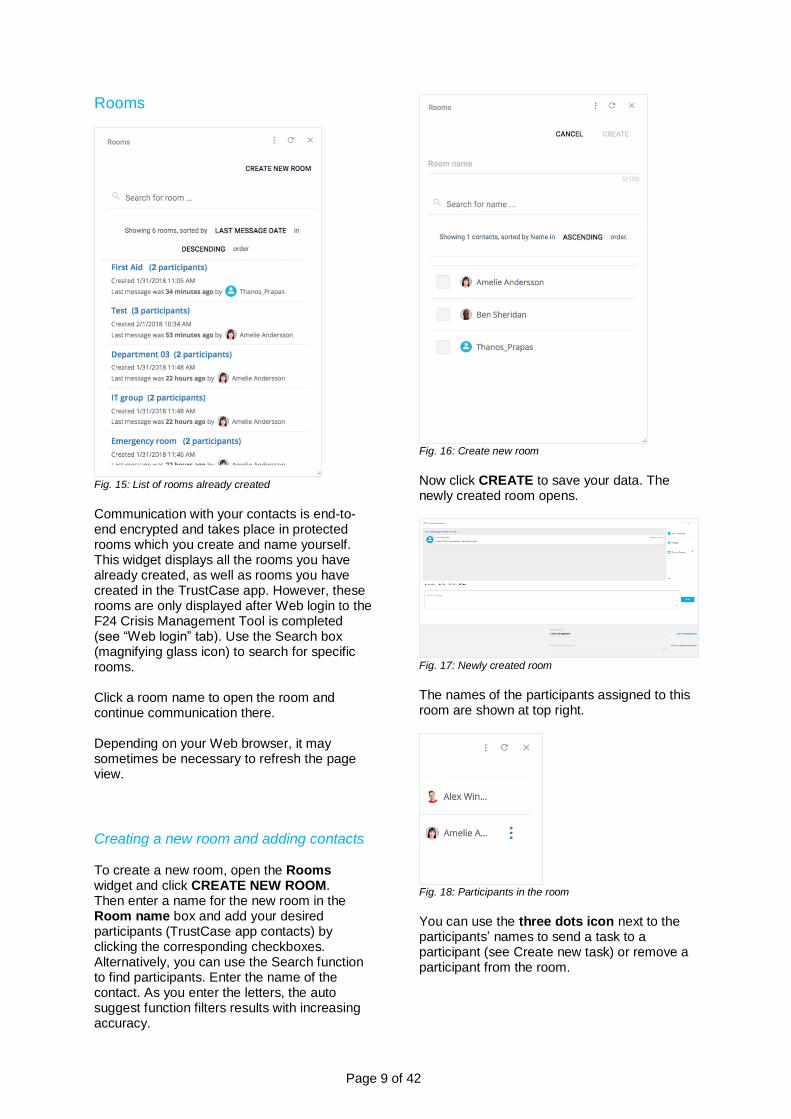
Creating a new room and adding contacts To create a new room, open the Rooms widget and click CREATE NEW ROOM. Then enter a name for the new room in the Room name box and add your desired participants (TrustCase app contacts) by clicking the corresponding checkboxes. Alternatively, you can use the Search function to find participants. Enter the name of the contact. As you enter the letters, the auto suggest function filters results with increasing accuracy.
Fig. 16: Create new room
Now click CREATE to save your data. The newly created room opens.
Fig. 17: Newly created room
The names of the participants assigned to this room are shown at top right.
Fig. 18: Participants in the room
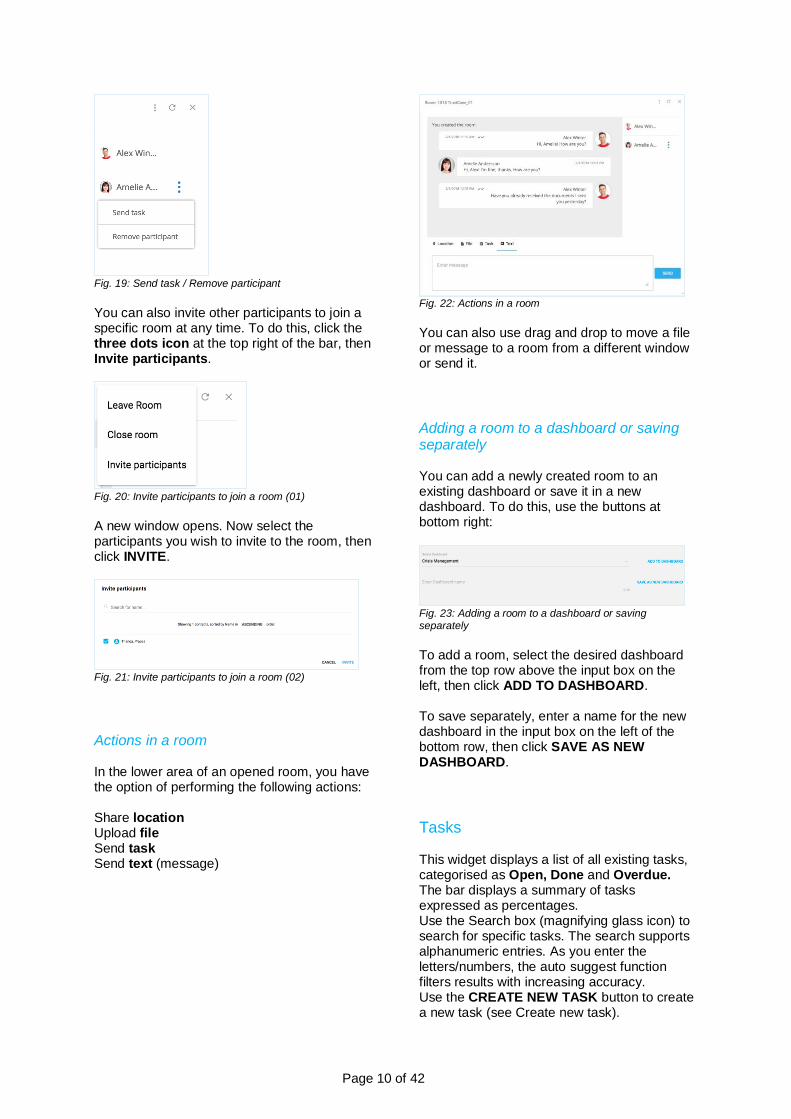
You can use the three dots icon next to the participants’ names to send a task to a participant (see Create new task) or remove a participant from the room.
Page 10 of 42
Fig. 19: Send task / Remove participant
You can also invite other participants to join a specific room at any time. To do this, click the three dots icon at the top right of the bar, then Invite participants.
Fig. 20: Invite participants to join a room (01)
A new window opens. Now select the participants you wish to invite to the room, then click INVITE.
Fig. 21: Invite participants to join a room (02)
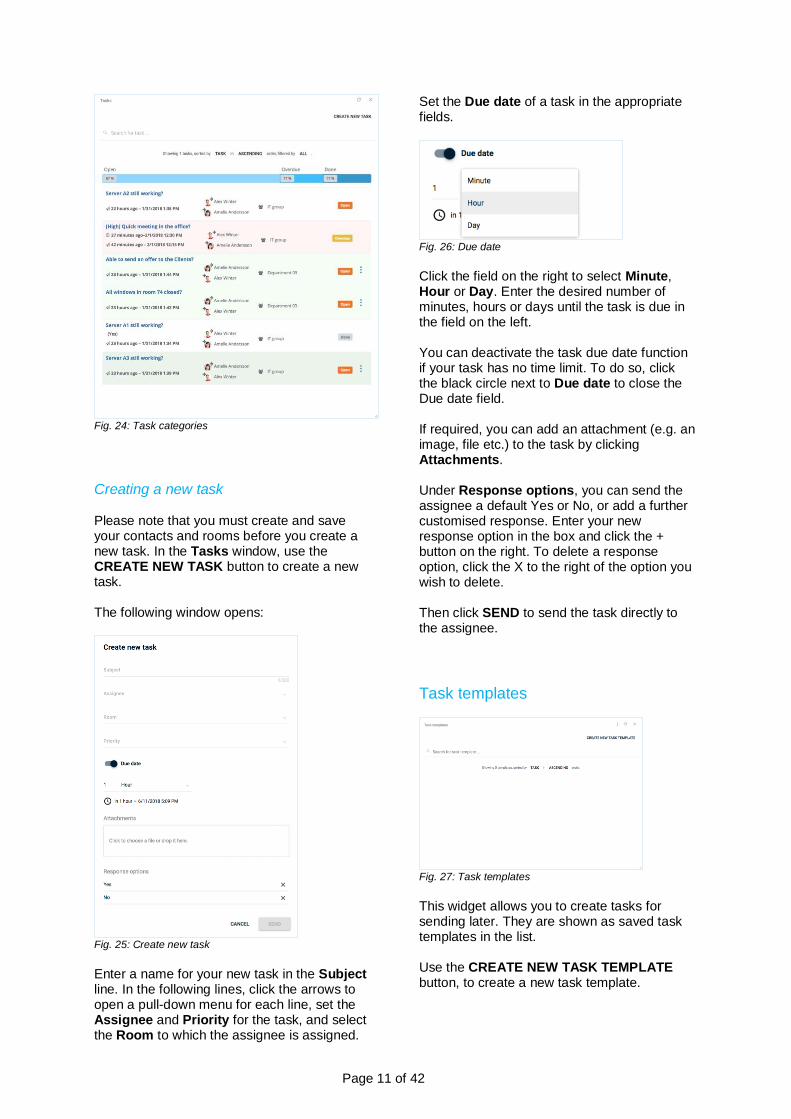
Actions in a room In the lower area of an opened room, you have the option of performing the following actions: Share location Upload file Send task Send text (message)
Fig. 22: Actions in a room
You can also use drag and drop to move a file or message to a room from a different window or send it.
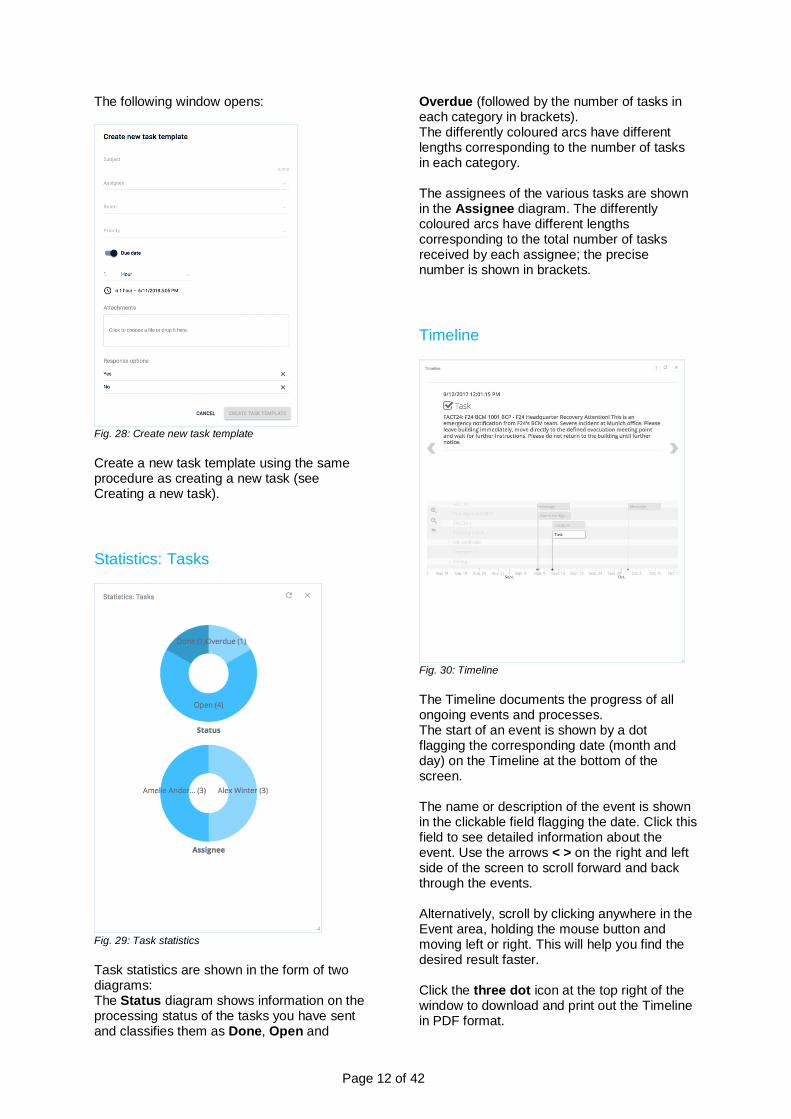
Adding a room to a dashboard or saving separately You can add a newly created room to an existing dashboard or save it in a new dashboard. To do this, use the buttons at bottom right:
Fig. 23: Adding a room to a dashboard or saving separately
To add a room, select the desired dashboard from the top row above the input box on the left, then click ADD TO DASHBOARD. To save separately, enter a name for the new dashboard in the input box on the left of the bottom row, then click SAVE AS NEW DASHBOARD.
Tasks This widget displays a list of all existing tasks, categorised as Open, Done and Overdue. The bar displays a summary of tasks expressed as percentages. Use the Search box (magnifying glass icon) to search for specific tasks. The search supports alphanumeric entries. As you enter the letters/numbers, the auto suggest function filters results with increasing accuracy. Use the CREATE NEW TASK button to create a new task (see Create new task).
Page 11 of 42
Fig. 24: Task categories
Creating a new task Please note that you must create and save your contacts and rooms before you create a new task. In the Tasks window, use the CREATE NEW TASK button to create a new task. The following window opens:
Fig. 25: Create new task
Enter a name for your new task in the Subject line. In the following lines, click the arrows to open a pull-down menu for each line, set the Assignee and Priority for the task, and select the Room to which the assignee is assigned.
Set the Due date of a task in the appropriate fields.
Fig. 26: Due date
Click the field on the right to select Minute, Hour or Day. Enter the desired number of minutes, hours or days until the task is due in the field on the left. You can deactivate the task due date function if your task has no time limit. To do so, click the black circle next to Due date to close the Due date field. If required, you can add an attachment (e.g. an image, file etc.) to the task by clicking Attachments. Under Response options, you can send the assignee a default Yes or No, or add a further customised response. Enter your new response option in the box and click the + button on the right. To delete a response option, click the X to the right of the option you wish to delete. Then click SEND to send the task directly to the assignee.
Task templates
Fig. 27: Task templates
This widget allows you to create tasks for sending later. They are shown as saved task templates in the list. Use the CREATE NEW TASK TEMPLATE button, to create a new task template.
Page 12 of 42
The following window opens:
Fig. 28: Create new task template
Create a new task template using the same procedure as creating a new task (see Creating a new task).
Statistics: Tasks
Fig. 29: Task statistics
Task statistics are shown in the form of two diagrams: The Status diagram shows information on the processing status of the tasks you have sent and classifies them as Done, Open and
Overdue (followed by the number of tasks in each category in brackets). The differently coloured arcs have different lengths corresponding to the number of tasks in each category. The assignees of the various tasks are shown in the Assignee diagram. The differently coloured arcs have different lengths corresponding to the total number of tasks received by each assignee; the precise number is shown in brackets.
Timeline
Fig. 30: Timeline
The Timeline documents the progress of all ongoing events and processes. The start of an event is shown by a dot flagging the corresponding date (month and day) on the Timeline at the bottom of the screen. The name or description of the event is shown in the clickable field flagging the date. Click this field to see detailed information about the event. Use the arrows < > on the right and left side of the screen to scroll forward and back through the events. Alternatively, scroll by clicking anywhere in the Event area, holding the mouse button and moving left or right. This will help you find the desired result faster. Click the three dot icon at the top right of the window to download and print out the Timeline in PDF format.
Page 13 of 42
Fig. 31: Download the Timeline
Meteoalarm
Fig. 32: Meteoalarm for Europe
Poor or hazardous weather conditions are classic reasons for activating an alarm. You can use the meteorological data in the map to keep current European weather conditions in view. You can activate an alarm to warn of impending bad weather or a natural disaster, or to give the all-clear if weather conditions improve. Use the Search box at top left to search for a specific location on the map. The search result is marked with a blue pin. Use the + and – buttons directly under the Search box to zoom in and out of the map. You can also add the following weather details to the map view: Wind speed, Temperature, Precipitation rate To add weather details, click the map symbol at top right and then click the checkboxes for the weather details you wish to view. The weather map display changes accordingly. Click the small tick symbol at bottom right to open a window showing weather information for your chosen location. Click the link shown to obtain detailed weather information.
Fig. 33: Meteoalarm for a specific location
You can display weather trends for wind speed, temperature and precipitation on the map at 3-hourly intervals. To change the weather trend intervals in the white bar at bottom left, click the + button (information for the following three hours) or – button (information for the previous three hours).
Fig. 34: Change map view
External websites
Fig. 35: External websites
This function adds any external websites which you regard as useful sources of information in connection with your alarms, and displays them. Display of external websites depends on your browser. If you have difficulties displaying a website, try using a different browser.
Page 14 of 42
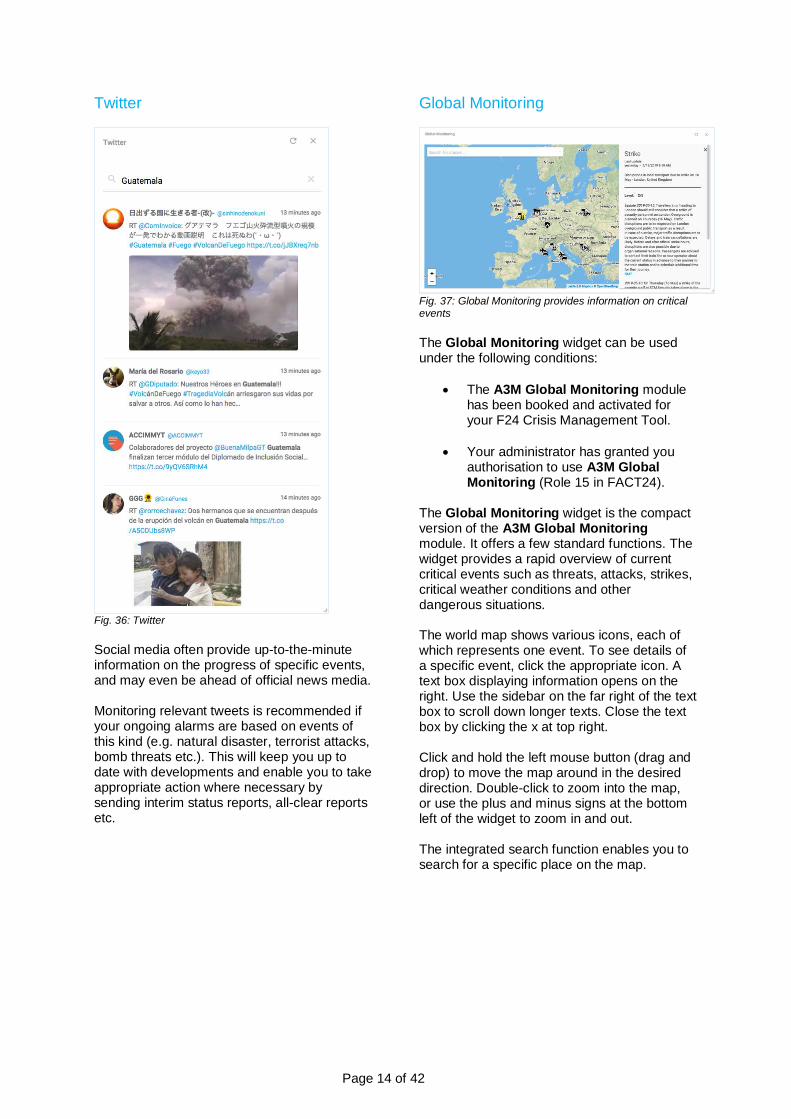
Fig. 36: Twitter
Social media often provide up-to-the-minute information on the progress of specific events, and may even be ahead of official news media. Monitoring relevant tweets is recommended if your ongoing alarms are based on events of this kind (e.g. natural disaster, terrorist attacks, bomb threats etc.). This will keep you up to date with developments and enable you to take appropriate action where necessary by sending interim status reports, all-clear reports etc.
Global Monitoring
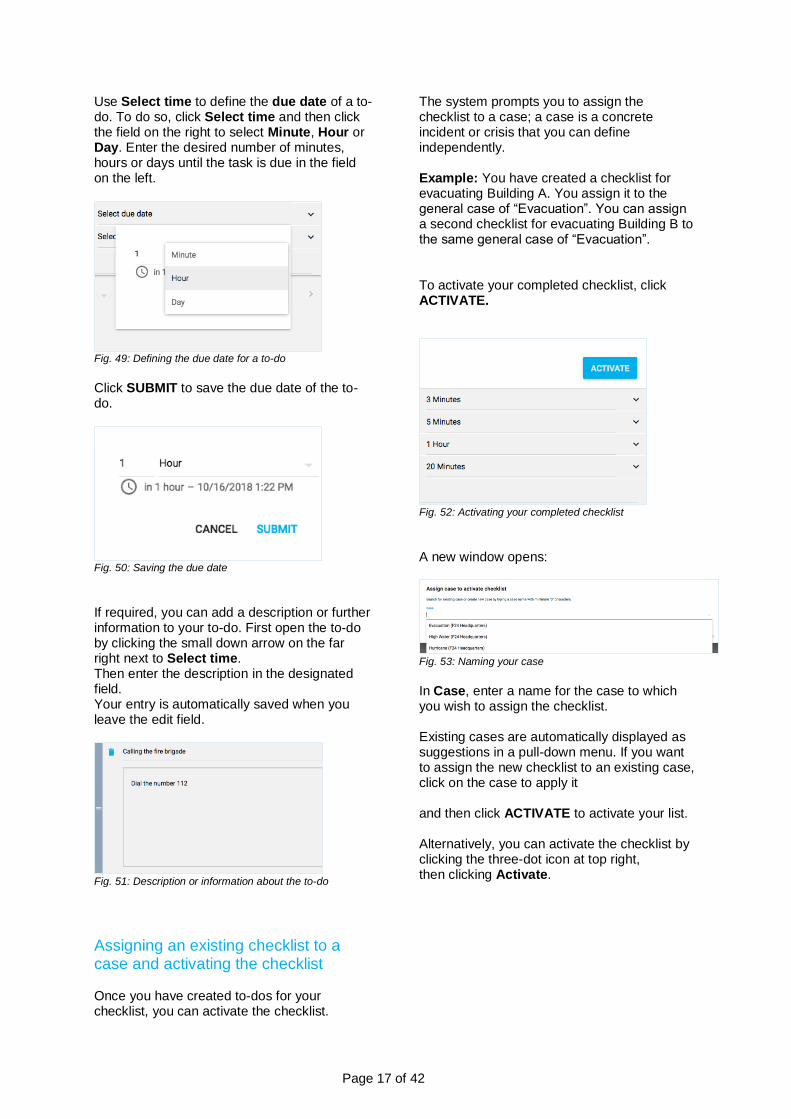
Fig. 37: Global Monitoring provides information on critical events
The Global Monitoring widget can be used under the following conditions:
• The A3M Global Monitoring module has been booked and activated for your F24 Crisis Management Tool.
• Your administrator has granted you authorisation to use A3M Global Monitoring (Role 15 in FACT24).
The Global Monitoring widget is the compact version of the A3M Global Monitoring module. It offers a few standard functions. The widget provides a rapid overview of current critical events such as threats, attacks, strikes, critical weather conditions and other dangerous situations. The world map shows various icons, each of which represents one event. To see details of a specific event, click the appropriate icon. A text box displaying information opens on the right. Use the sidebar on the far right of the text box to scroll down longer texts. Close the text box by clicking the x at top right. Click and hold the left mouse button (drag and drop) to move the map around in the desired direction. Double-click to zoom into the map, or use the plus and minus signs at the bottom left of the widget to zoom in and out. The integrated search function enables you to search for a specific place on the map.

Page 15 of 42
Fig. 38: Global Monitoring – search function
Enter the name of the desired place in the box at top left. The search results auto-complete to display options as you type. Click to select the correct place from the dropdown list of autocompleted suggestions and skip automatically to the desired location. The section on A3M Global Monitoring contains more details about the module.
Checklists The Checklists feature enables you to create lists of tasks for a specific case. You can compile a list of the required measures and actions as to-dos and work through them systematically. A specific timeframe can be assigned for the completion of each to-do task.
Opening the “Checklists” menu item The Checklists feature is currently available as a beta version. Further functions will be added to the program successively and can be used in later program versions. The Checklists user interface is currently only available in English. To open the menu item, click Checklists in the menu area on the left.
Fig. 39: Menu item “Checklists”
Categorising checklists Checklists can be classified into three categories, shown at the top left of the page.
Fig. 40: Categorising checklists
Templates: First create your new checklist as a template. Active: When you activate a template in a case (incident or crisis), it is automatically saved as an active checklist under Active. Archive: You can file completed checklists in the Archive. The number of checklists for each area is shown in brackets after each category name.
Creating a new checklist (template) Before you create a checklist, decide which Organisational Unit the checklist is for. To do this, click the first entry field at the top of the page (see blue arrow).
Fig. 41: Selecting the Organisational Unit
A pull-down menu opens, showing the Organisational Units already saved in FACT24 and for which you have authorisation to create checklists. Now select the desired organisational unit. To create a checklist, click the plus sign in the blue circle at the bottom right of the page.

Page 16 of 42
Fig. 42: Creating a checklist – the plus sign
The following window opens:
Fig. 43: Giving your checklist a title
Enter a title for your new checklist under Title, then click CREATE to save the list. The newly created checklist opens:
Fig. 44: Newly created checklist
You can enter a description of the new checklist or further information under Description. Your entry is automatically saved when you leave the edit field.
Fig. 45: Adding a description to your checklist
Use the search function at the top right of the page to search for the title of an existing checklist.
Fig. 46: Search function
Enter the title of the checklist in the entry field. If the title comprises several words, you can enter any part of the title; for example, when searching for a checklist entitled “Office Protection” you can search for “Office” or “Protection”. The search results auto-complete to display options as you type. For more information see section Sort and search functions.
Creating a to-do in a checklist You can create various to-dos in a checklist. A to-do is a task to be finished within a predefined timeframe. Up to 100 to-dos can be created per checklist. To create a to-do, proceed as follows: Click the field + Add new to-do.
Fig. 47: Creating a to-do
Enter a name for your new to-do, then save the to-do by clicking the plus sign or the Enter key on your keyboard. Click the small arrow directly underneath the list to open and close the to-do list at any time. To-dos are listed in their order of creation, with the most recent shown last.
Fig. 48: List of existing to-dos
You can change the order of existing to-dos at any time. To do so, click the two-bar icon next to the to-do that you wish to move, and drag and drop the to-do to its new position. To delete an existing to-do, click the dustbin icon on the left of the to-do title.
Page 17 of 42
Use Select time to define the due date of a to-do. To do so, click Select time and then click the field on the right to select Minute, Hour or Day. Enter the desired number of minutes, hours or days until the task is due in the field on the left.
Fig. 49: Defining the due date for a to-do
Click SUBMIT to save the due date of the to-do.
Fig. 50: Saving the due date
If required, you can add a description or further information to your to-do. First open the to-do by clicking the small down arrow on the far right next to Select time. Then enter the description in the designated field. Your entry is automatically saved when you leave the edit field.
Fig. 51: Description or information about the to-do
Assigning an existing checklist to a case and activating the checklist Once you have created to-dos for your checklist, you can activate the checklist.
The system prompts you to assign the checklist to a case; a case is a concrete incident or crisis that you can define independently. Example: You have created a checklist for evacuating Building A. You assign it to the general case of “Evacuation”. You can assign a second checklist for evacuating Building B to the same general case of “Evacuation”. To activate your completed checklist, click ACTIVATE.
Fig. 52: Activating your completed checklist
A new window opens:
Fig. 53: Naming your case
In Case, enter a name for the case to which you wish to assign the checklist. Existing cases are automatically displayed as suggestions in a pull-down menu. If you want to assign the new checklist to an existing case, click on the case to apply it and then click ACTIVATE to activate your list. Alternatively, you can activate the checklist by clicking the three-dot icon at top right, then clicking Activate.
Page 18 of 42
Fig. 54: Activating, copying or deleting your completed checklist
Click Copy to copy the checklist and its contents and use it as a template for creating a new checklist. To delete the checklist, click Delete.
Displaying an active checklist Once you have activated a checklist, you automatically skip to the Active area where the checklist is saved and displayed. Here you can view all active checklists within a specific case. To do this, go to Active and click the first entry field.
Fig. 55: Naming your case
A pull-down menu opens displaying a list of all existing cases.
Fig. 56: Selecting an existing case
Select the desired case to view all active checklists assigned to it. Alternatively, enter the name of the desired case in the entry field. The search results auto-complete to display options as you type. You can also view existing active checklists from all cases in a single page. To do this, click the cross on the right of the first entry field.
Fig. 57: Viewing checklists from all cases
Sort and search functions The system displays the checklists in descending order of their update, starting with the most recently updated. You can change the sort sequence in which the checklists are displayed at any time. To do this, click the entry field on the far right of the page.
Fig. 58: Search function
A pull-down menu opens:
Fig. 59: Sort criteria
Select from the following sort criteria: Updated DESC: Display checklists in descending order of their update, starting with the last updated. Updated ASC: Display checklists in ascending order of their update, starting with the first updated. Title DESC: Display checklists by title in alphabetical order (descending). Title ASC: Display checklists by title in alphabetical order (ascending). Use the search function (magnifying glass) to search for a specific checklist.
Fig. 60: Search function
Enter the name of the checklist in the entry field. If the title comprises several words you can enter any part of the title; for example, when

Page 19 of 42
searching for a checklist entitled “Office Protection” you can search for “Office” or “Protection”. The search results auto-complete to display options as you type. You can define the number of checklists displayed per page. To do this, click at the arrow at the bottom right of the page next to Checklists per page, then select the desired number of checklists to be displayed from the pull-up menu. You can display 10, 25, 50 or 100 checklists per page.
Fig. 61: Selecting the number of checklists to be displayed per page
Use the arrows on the far right of the page to scroll forward and back.
Working through an active checklist To work through an active checklist, click the Active area at top left of the page. Now select the checklist you want to work through (see Displaying active checklist).
Fig. 62: Active checklist
Open the to-do list by clicking the small down arrow under the checklist description in the middle of the page. Unfinished to-dos are flagged as Open on the right of the title. As soon as you have finished a to-do, you can flag it as Done. To do so, click the designated field and select Done from the pull-down menu. If the to-do has not yet been finished, you can set its status as In Progress. The Status column on the right of the to-do title displays the number of to-dos that have been finished (Done) and the number still open (Open) or still unfinished (In Progress).
Fig. 63: Status of a to-do
If required, you can change the due date of to-dos after creating them (see Creating a to-do within a checklist). You can edit an active checklist in exactly the same way as a template (see Creating a new checklist (template)).
Fig. 64: Subsequently editing the due date of a to-do
Archiving a checklist You can archive a checklist at any time. To do so, click the three-dot icon at top right of the checklist, then click Archive.
Page 20 of 42
Fig. 65: Archiving a checklist
The system will prompt you to confirm you want to archive the checklist. Click ARCHIVE to finally archive the checklist, which can then no longer be edited.
Fig. 66: Confirming archiving of a checklist
Archived checklists are saved for one year and then automatically deleted. To sort or search for archived checklists, use the functions described in the Sort and search function section.
A3M Global Monitoring A3M Global Monitoring is a web-based travel risk, information and management system that provides round-the-clock overviews of current threats around the world. The central feature of the function is the world map, which displays georeferenced information (warnings, threats, critical weather conditions etc.) in the form of icons at the corresponding locations. Use the filter function to the left of the map to customise the display of events and information to suit your personal needs and requirements. A window to the right of the map displays the latest news about events worldwide. All information in A3M Global Monitoring is automatically updated at regular intervals, keeping you permanently up to date with developments. Note: The new module can be added for an additional monthly surcharge.
For details of A3M Global Monitoring, go to https://www.fact24.com/en/areas-of-application/travel-safety/
Opening the “A3M Global Monitoring” menu item A3M Global Monitoring is optimised on an ongoing basis. Further functions will be added to the program successively and can be used in later program versions. The tool is currently available in two languages, German and English. You can pre-select the language in which you wish to activate the tool. To open the tool, click Global Monitoring in the menu on the left.
Fig. 67: “A3M Global Monitoring” menu item
Integrated online help for A3M Global Monitoring A3M Global Monitoring includes a detailed online help entry containing information on the functions and use of the tool. To open the online help, at the top right of the page click Help, then Global Monitoring Help.
Fig. 68: Integrated online help for A3M Global Monitoring
The online help entry opens in a separate tab.

Page 21 of 42
It is displayed in German or English, in line with the language version of A3M Global Monitoring activated for your use.
Basic knowledge to get you started in the world of A3M Global Monitoring All you need to start working with A3M Global Monitoring is some basic knowledge. The following sections describe this basic knowledge as an easy way to get you started in the world of A3M Global Monitoring. A3M Global Monitoring also contains more advanced functions to support you in your daily use of the tool. For more detailed information on all relevant topics related to the use and functions of A3M Global Monitoring, see the integrated online help entry (see Integrated online help for A3M Global Monitoring).
A3M Global Monitoring – Multifunctional tool The world map is the main element of A3M Global Monitoring. The multifunctional tool
is the most important tool for using this map. The multifunctional tool is located above the world map on the left of the toolbar, together with further tools (icons) which you can use to customise your map view.
Fig. 69: Toolbar
The multifunctional tool is activated as default (highlighted button). You can use the activated multifunctional tool to perform the following standard functions: Navigate around the world map Click and hold the left mouse button (drag and drop) to move the map in the desired direction. Double-click to zoom into the map.
Display information about events on the world map Each icon shown on the world map represents an event. To view more detailed information about an event, click the corresponding icon (see Open detailed information about a specific location).
Open detailed information about a specific location Each icon shown on the world map represents an event. The shape and colour of an icon corresponds to the type of event (see filter function “Event level / Relevance level”). Click an icon to display relevant information about the corresponding event. Information primarily involves warnings, threats, safety and weather reports, etc. Example: You are interested in the current travel safety situation in Tunisia and want relevant information. The world map currently shows two event icons for Tunisia.
Fig. 70: Zoomed world map view - Tunisia
Click the desired icon to display detailed information.

Page 22 of 42
Fig. 71: Opened pop-up window with event information
A pop-up window opens displaying the required information. The relevant country is highlighted on the map, with the highlight colours representing the various danger zones.
Fig. 72: Information in German and English
Use the EN and DE tabs at the top right of the pop-up window to choose English or German as the display language for the information. Click More to show further relevant information.
Search for a specific location on the world map You can use the search function on the right of the toolbar to search for a specific location.
Fig. 73: Input fields with search and map options
The tool offers the following search functions:
General search function This search field enables you to search by country or city name. Enter the name of the desired country or city in the field to the left of the Search icon (magnifying glass symbol).
Fig. 74: Search by country or city name
When you enter your search term, a dropdown list of search hits opens. Click to select the desired location and display it on the map. “Map section” search function This search field enables you to search by country or region name. Enter the name of the desired country or region in the search field.
Fig. 75: Search by country or region name
The search results auto-complete to display options as you type. Click to select the correct place from the dropdown list of options and display the selected location on the map. Alternatively, click the arrow on the right of the entry field to open a list of entries. Use the mouse to scroll down the list and click to select the desired entry.
Select map type You can change the map view at any time. To do so, click the arrow on the right of the field showing the last selected map type (on the far right above the map). A dropdown list of map types appears. Click to select the desired
Page 23 of 42
map type. The map view changes automatically.
Fig. 76: List of map types
The following map type options are available: Google Terrain (default) Google Roadmap Google Hybrid Google Satellite OpenStreetMap World Map
Filters and settings You can customise the event information display configuration using the filters and tickers on the left and right of the map. You can also activate or deactivate the display of additional event information. For details of how to configure the individual filters and tickers, see the online help entry for A3M Global Monitoring (section: Integrated online help for A3M Global Monitoring)
Configuring the map You can use the filters on the left of the world map to select the type of information you wish to display on the map. The following filter options are available: External information Events filter Internal information You can activate and deactivate various information categories, display events within a specific time range, display additional information, display internal data on the map (if saved as georeferenced data), etc. The following sections explain the available filters in more detail.
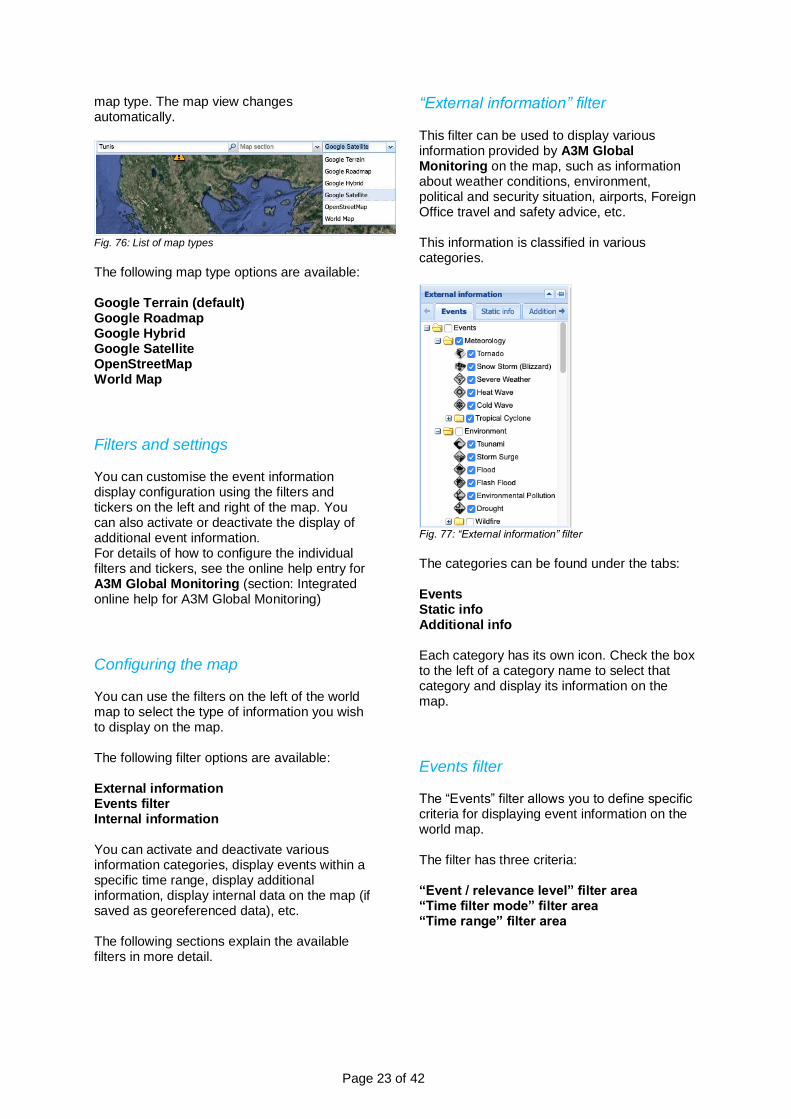
“External information” filter This filter can be used to display various information provided by A3M Global Monitoring on the map, such as information about weather conditions, environment, political and security situation, airports, Foreign Office travel and safety advice, etc. This information is classified in various categories.
Fig. 77: “External information” filter
The categories can be found under the tabs: Events Static info Additional info Each category has its own icon. Check the box to the left of a category name to select that category and display its information on the map.
Events filter The “Events” filter allows you to define specific criteria for displaying event information on the world map. The filter has three criteria: “Event / relevance level” filter area “Time filter mode” filter area “Time range” filter area

Page 24 of 42
Fig. 78: Events filter
Filter area “Event / relevance level” Events are displayed on the world map as icons in different colours. You can display events (icons) on the map by criticality or relevance level. These criteria are subdivided into various levels. In the “Event / relevance level” filter area, first select Event level or Relevance level. Now select the level of criticality or relevance. Depending on your selections, events (icons) are displayed in various colours on the map. Event level Click the round selection button next to the Event level heading to display events on the map by their level of criticality.
Fig. 79: “Event level” filter area
Then click the downward arrow at the right of the level bar. A pull-down menu opens showing the various levels. Each level is
shown as a colour scale in which each colour stands for a different level of criticality. Click to select the desired event level (criticality level). Key to colours:
• Green: Note / information or all-clear. Safety relevance of event: none
• Yellow: Safety relevance of event: low / Little or no effect on infrastructure
• Orange: Event is safety relevant / Infrastructure is affected
• Red: Safety relevance of event: high / Infrastructure is significantly affected
• Dark red: Highest level of safety relevance / Infrastructure largely at a standstill
Relevance level Click the round selection button next to the Relevance level heading to display events on the map by their level of relevance. Note: The relevance of an event is based on the event level and your internal data (guests, employees, infrastructure, target areas). Relevance can only be calculated if your target areas, hotels or bookings have been saved in the system.
Fig. 80: “Relevance” filter area
Then click the downward arrow at the right of the level bar. A pull-down menu opens showing the various levels. Each level is shown as a colour scale in which each colour stands for a different level of relevance. Click to select the desired relevance level. Key to colours:
• Green: Relevance: none / not affected
Page 25 of 42
• Yellow: Relevance: low / indirectly affected
• Orange: Relevance: medium / somewhat affected
• Red: Relevance: high / directly affected
“Time filter mode” filter area This filter enables you to display events on the map by the following criteria: Active Click the round selection button next to the Active heading to display events on the map which are active within the specified time range. Define the time range in the “Time range” filter (see “Time range” filter). New/updated Click the round selection button next to the New/updated heading to display only new events or events that have been updated in A3M within the time range you have defined in the “Time range” filter.
Fig. 81: “Time filter mode” filter area
Events displayed in line with the two criteria described above may be short-term or long-term events. Events such as an earthquake or accident are treated by the system as “short-term events” and usually appear on the map for a period of hours or days. However, German Foreign Office (AA) travel advice or industrial action are treated as “long-term events” that may be active for weeks or even months.
“Time range” filter area Use the “Time range” filter area to specify the time range for the events you wish to view. The events are then displayed on the map. To ensure the latest information is displayed, the map information automatically updates every minute.
Fig. 82: “Time range” filter area
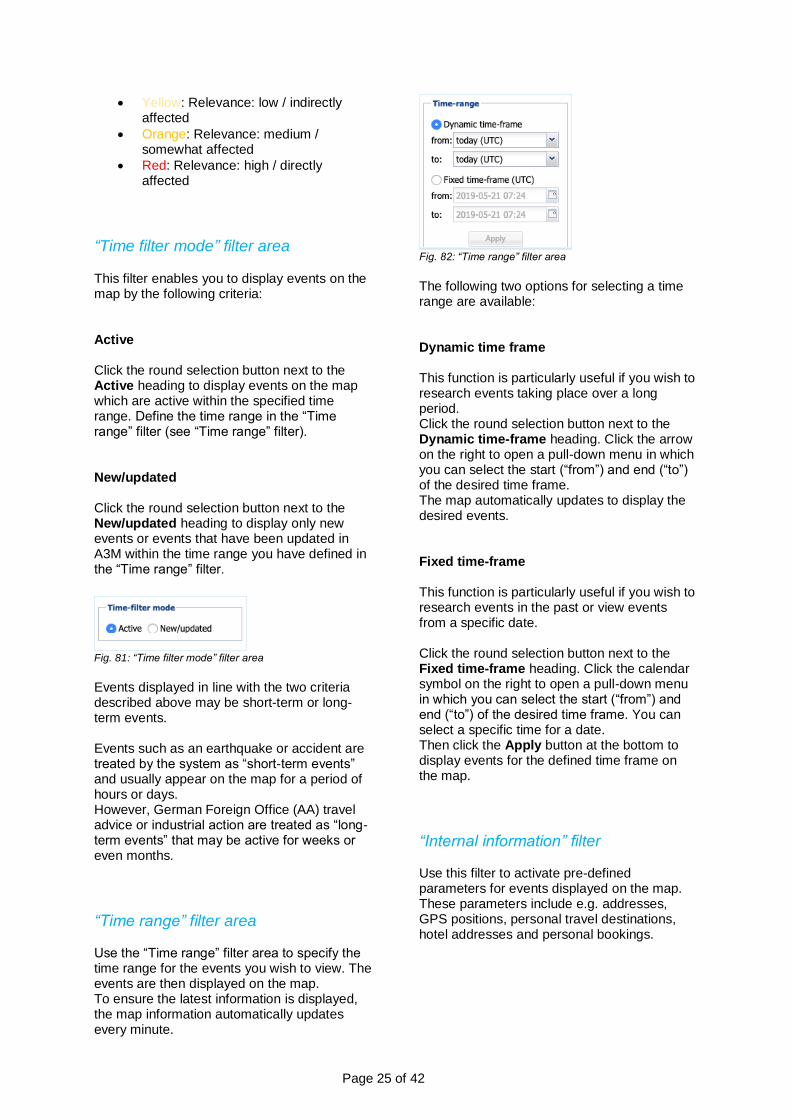
The following two options for selecting a time range are available: Dynamic time frame This function is particularly useful if you wish to research events taking place over a long period. Click the round selection button next to the Dynamic time-frame heading. Click the arrow on the right to open a pull-down menu in which you can select the start (“from”) and end (“to”) of the desired time frame. The map automatically updates to display the desired events. Fixed time-frame This function is particularly useful if you wish to research events in the past or view events from a specific date. Click the round selection button next to the Fixed time-frame heading. Click the calendar symbol on the right to open a pull-down menu in which you can select the start (“from”) and end (“to”) of the desired time frame. You can select a specific time for a date. Then click the Apply button at the bottom to display events for the defined time frame on the map.
“Internal information” filter Use this filter to activate pre-defined parameters for events displayed on the map. These parameters include e.g. addresses, GPS positions, personal travel destinations, hotel addresses and personal bookings.

Page 26 of 42
Fig. 83: “Internal information” filter
Tickers The tickers on the right of the map provide a brief overview of current global events. Entries are displayed in chronological order in the windows by default and updated every minute.
Event ticker This ticker displays the latest events in chart form. Events are listed in the order of updating, starting with the most recent update. The Update column shows the exact time of updating for an event. The chart also displays the following information for each event: Event level (EL) Relevance level (RL) Event category Country The Link column contains a link for each individual event. To find out more details about a specific event, click the “show” link for that event. An information window opens at the corresponding location on the map.
Fig. 84: Events ticker
“Travel Advice AA” ticker This ticker shows the latest travel advice from the German Foreign Office (AA), which may include travel and safety advice, partial travel alerts and travel alerts. Events are listed in the order of updating, starting with the most recent update. The Update column shows the exact time of updating for an event. The chart also displays the following information for each event: Status Country The Link column contains a link for each individual event. To find out more details about a specific event, click the “show” link for that event. The corresponding website opens in a separate tab.
Fig. 85: “Travel Advice AA” ticker
Page 27 of 42
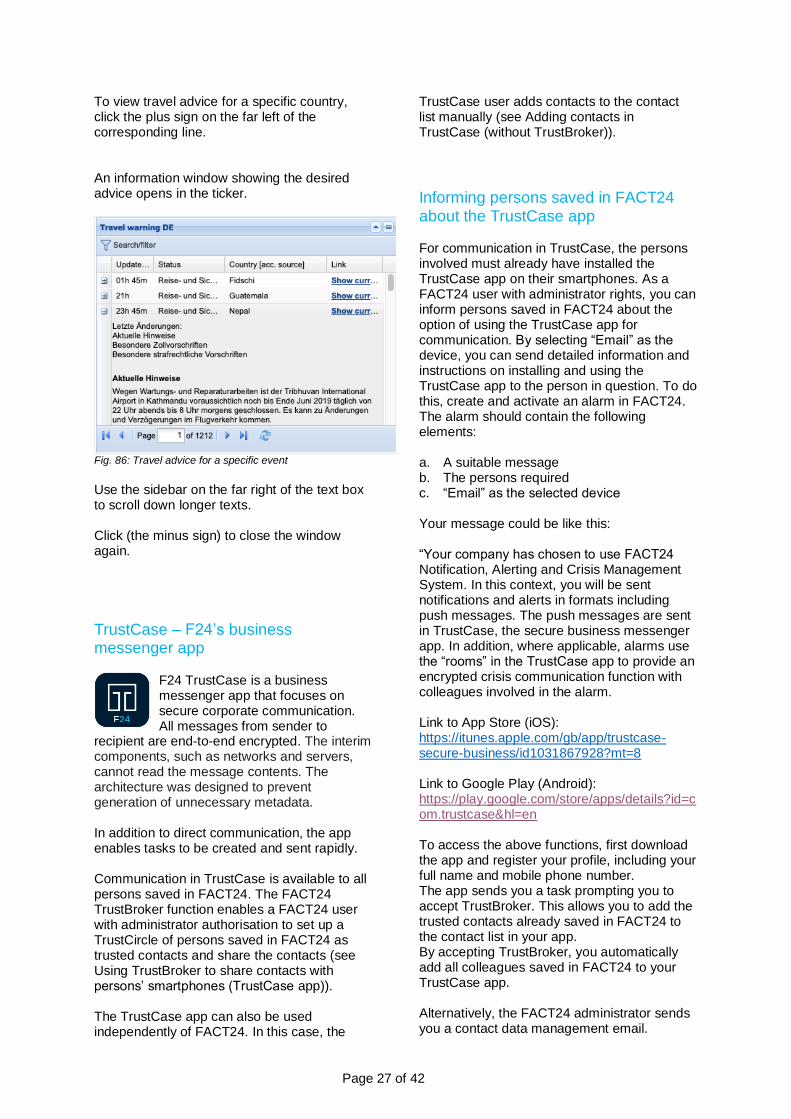
To view travel advice for a specific country, click the plus sign on the far left of the corresponding line. An information window showing the desired advice opens in the ticker.
Fig. 86: Travel advice for a specific event
Use the sidebar on the far right of the text box to scroll down longer texts. Click (the minus sign) to close the window again.
TrustCase – F24’s business messenger app
F24 TrustCase is a business messenger app that focuses on secure corporate communication. All messages from sender to
recipient are end-to-end encrypted. The interim components, such as networks and servers, cannot read the message contents. The architecture was designed to prevent generation of unnecessary metadata. In addition to direct communication, the app enables tasks to be created and sent rapidly. Communication in TrustCase is available to all persons saved in FACT24. The FACT24 TrustBroker function enables a FACT24 user with administrator authorisation to set up a TrustCircle of persons saved in FACT24 as trusted contacts and share the contacts (see Using TrustBroker to share contacts with persons’ smartphones (TrustCase app)). The TrustCase app can also be used independently of FACT24. In this case, the
TrustCase user adds contacts to the contact list manually (see Adding contacts in TrustCase (without TrustBroker)).
Informing persons saved in FACT24 about the TrustCase app For communication in TrustCase, the persons involved must already have installed the TrustCase app on their smartphones. As a FACT24 user with administrator rights, you can inform persons saved in FACT24 about the option of using the TrustCase app for communication. By selecting “Email” as the device, you can send detailed information and instructions on installing and using the TrustCase app to the person in question. To do this, create and activate an alarm in FACT24. The alarm should contain the following elements: a. A suitable message b. The persons required c. “Email” as the selected device Your message could be like this: “Your company has chosen to use FACT24 Notification, Alerting and Crisis Management System. In this context, you will be sent notifications and alerts in formats including push messages. The push messages are sent in TrustCase, the secure business messenger app. In addition, where applicable, alarms use the “rooms” in the TrustCase app to provide an encrypted crisis communication function with colleagues involved in the alarm. Link to App Store (iOS): https://itunes.apple.com/gb/app/trustcase-secure-business/id1031867928?mt=8 Link to Google Play (Android): https://play.google.com/store/apps/details?id=com.trustcase&hl=en To access the above functions, first download the app and register your profile, including your full name and mobile phone number. The app sends you a task prompting you to accept TrustBroker. This allows you to add the trusted contacts already saved in FACT24 to the contact list in your app. By accepting TrustBroker, you automatically add all colleagues saved in FACT24 to your TrustCase app. Alternatively, the FACT24 administrator sends you a contact data management email.

Page 28 of 42
Click the link in the email to open your contact data form. The contact data form contains a QR code. Scan the code using the TrustCase app to automatically copy all colleagues saved in FACT24 to the contact list in your TrustCase app. These contacts are then visible under their names in the corresponding crisis communication rooms.
*To scan the QR code, open the TrustCase App on your smartphone and tap “Contacts”, then the + key. Use the command “Scan QR code” to automatically open the camera and scan the code. This copies the names of your colleagues that may be participants in encrypted rooms.
FACT24 TrustBroker function The FACT24 TrustBroker function enables you to share persons saved in FACT24 with other colleagues as trusted contacts. This procedure enables you to add many trusted contacts to your own contact list (see Sharing contacts with persons’ smartphones using TrustBroker (TrustCase app)). To be a TrustBroker in FACT24, you need appropriate authorisation (Role 10, Principal Whole Enterprise, see Roles in FACT24). For assignment of these roles, follow the FACT24 path: SETUP -> User -> Assign roles. Only one FACT24 TrustBroker can be created for each FACT24 account.
TrustBroker in action
Creating persons in FACT24 To manage contacts in TrustBroker, first create the persons in FACT24. You have two options to do this:
Create persons using Configuration upload For large numbers of personal contacts, the recommended method is to import the data to FACT24 in the form of an Excel file which you have created in advance.
To do this, go to the ADMINISTRATION area and click Configuration download. Mark the Persons option and click Download configuration of the enterprise. FACT24 then creates an Excel file with predefined columns (e.g. Organisational Unit, Number, Name 1, Name 2, Language, Group, Device, etc.) After creating the Excel file you can save it on your computer and/or open it in a suitable program. Then enter the details in the corresponding columns. Please note that the following columns are mandatory and must be completed: Organisational unit Number Name 1 Language Active Access rights to rooms The columns Prioritize working hours and Prioritize non-working hours depend on the device used. As soon as you enter a device in the designated column, you must complete the associated columns for Prioritize working hours and Prioritize non-working hours. To transfer the data to FACT24, simply import the completed Excel file. To do this, go to the ADMINISTRATION area and click Configuration upload, then New upload. Under 1 Select action, select Add persons, and under Global import, confirm importing for the whole organisation by clicking YES. Define the language for the content of the Excel file in the corresponding field. Under 2 Upload file, upload the Excel file and then click 3 Start import to import the file. When data import is completed, all persons are displayed under ADMINISTRATION -> Persons.
Creating persons using the menu item “Persons” You can create persons individually by using the Persons menu item in the ADMINISTRATION area. If available and desired, a profile photo for the person created can be uploaded using the corresponding box in Basic Settings. The photo is displayed once the contact data has been confirmed by the person in question (TrustCase user) in the list of contacts in the TrustCase app.
Page 29 of 42
Otherwise the person receiving the contact data management has the option of uploading a photo to the contact data form. This photo is likewise displayed in the list of contacts in the TrustCase app.
Main settings for creating persons as TrustCase app users When creating persons, please note the following: a. For communication using TrustCase, the following two devices must be assigned to the participating persons:
- F24 push notification (with mobile phone number, see Duplicating an existing device)
- Email (with email address) b. To assign rights to rooms, go to ADMINISTRATION -> Persons -> Further settings. This enables person-to-person communication. c. Define the data manager in ADMINISTRATION -> Persons -> Further Settings -> Contact data management by. The data manager is responsible for managing personal data. Here the default setting can be retained, i.e. the data manager does not act for other persons but only manages his/her own data (see next line, Contact data management by, default setting “Person him/herself”). This is the only way for persons to receive the contact data form with their own data from the TrustBroker, including the TrustBroker’s QR code, by using contact data management. The QR code must be scanned to activate acceptance of the TrustBroker (see Managing own contact data and scanning the TrustBroker’s QR code)
Fig. 87: Default data manager settings
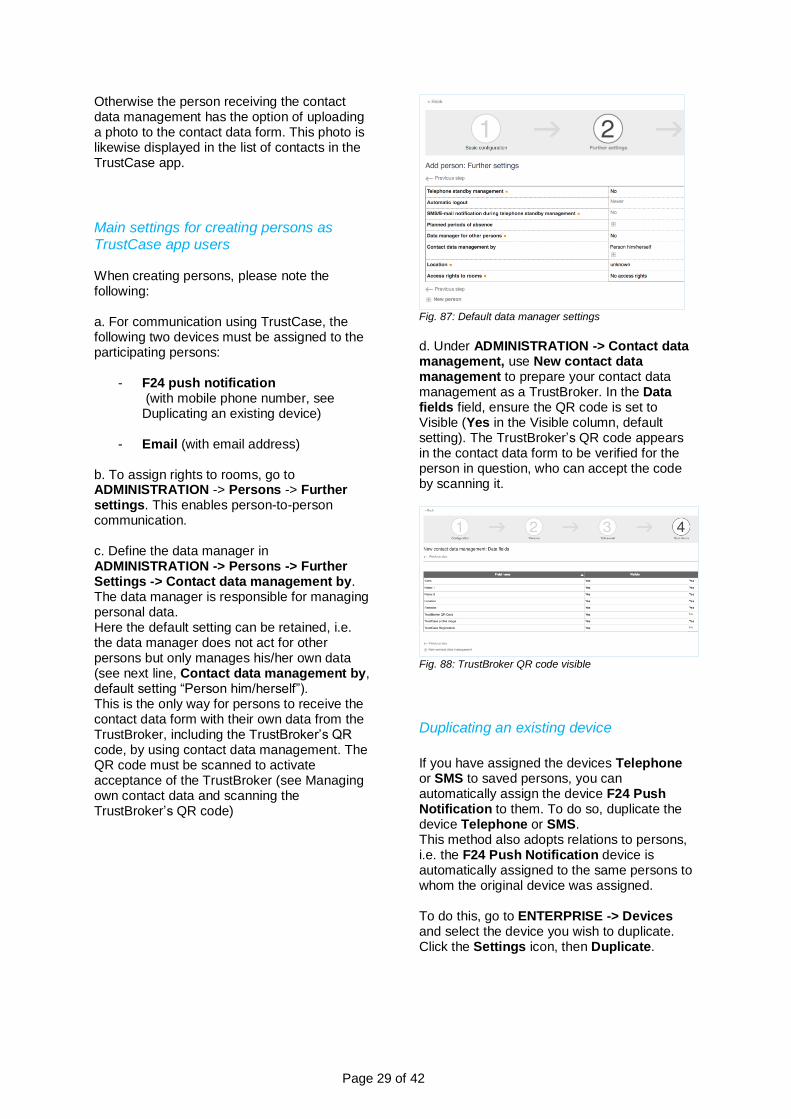
d. Under ADMINISTRATION -> Contact data management, use New contact data management to prepare your contact data management as a TrustBroker. In the Data fields field, ensure the QR code is set to Visible (Yes in the Visible column, default setting). The TrustBroker’s QR code appears in the contact data form to be verified for the person in question, who can accept the code by scanning it.
Fig. 88: TrustBroker QR code visible
Duplicating an existing device
If you have assigned the devices Telephone or SMS to saved persons, you can automatically assign the device F24 Push Notification to them. To do so, duplicate the device Telephone or SMS. This method also adopts relations to persons, i.e. the F24 Push Notification device is automatically assigned to the same persons to whom the original device was assigned. To do this, go to ENTERPRISE -> Devices and select the device you wish to duplicate. Click the Settings icon, then Duplicate.
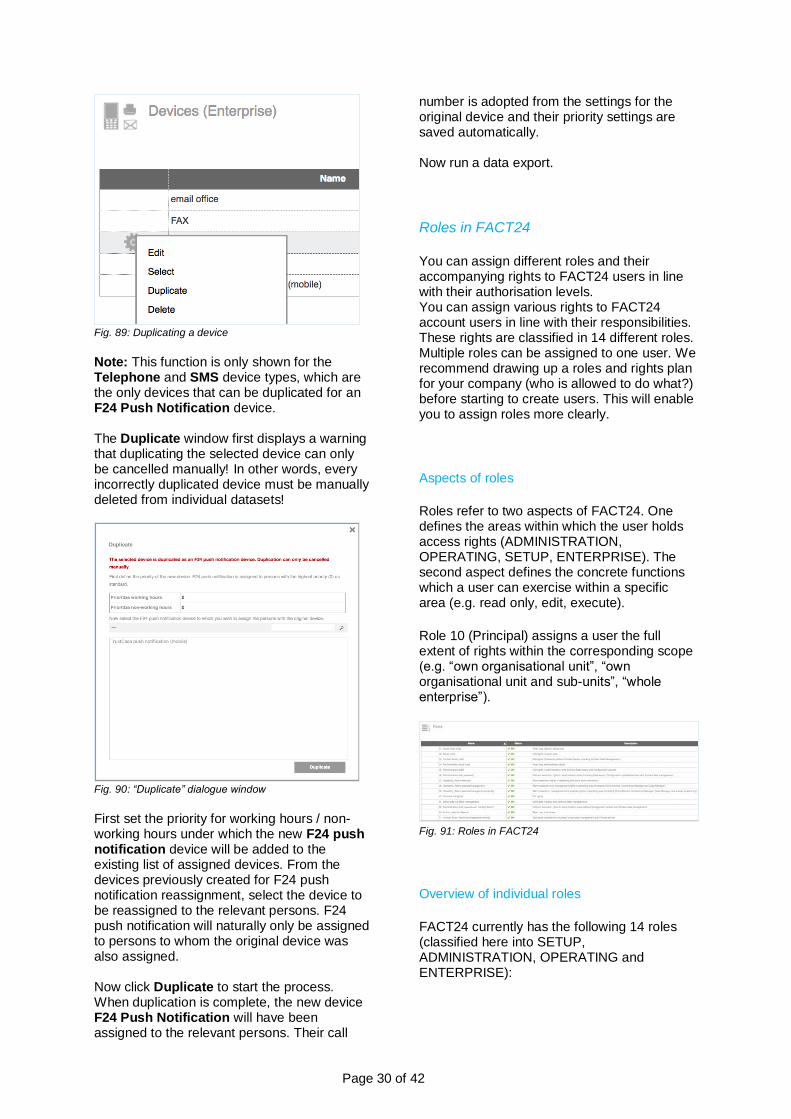
Page 30 of 42
Fig. 89: Duplicating a device
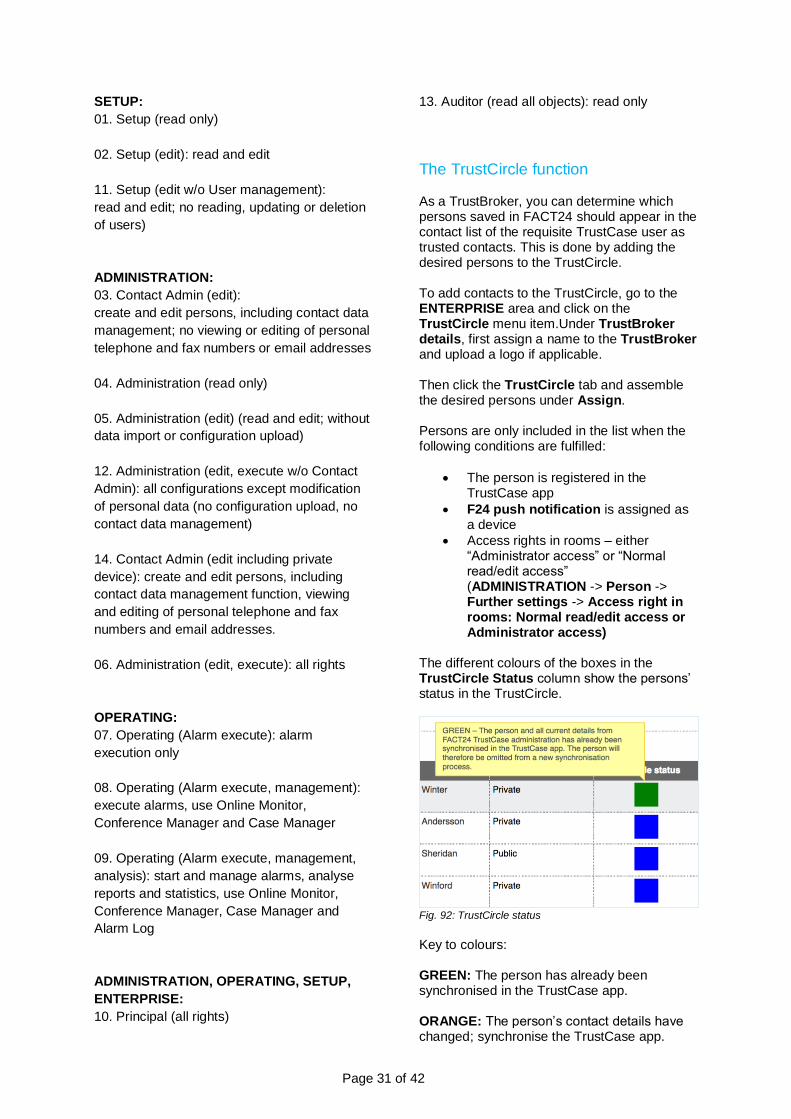
Note: This function is only shown for the Telephone and SMS device types, which are the only devices that can be duplicated for an F24 Push Notification device. The Duplicate window first displays a warning that duplicating the selected device can only be cancelled manually! In other words, every incorrectly duplicated device must be manually deleted from individual datasets!
Fig. 90: “Duplicate” dialogue window
First set the priority for working hours / non-working hours under which the new F24 push notification device will be added to the existing list of assigned devices. From the devices previously created for F24 push notification reassignment, select the device to be reassigned to the relevant persons. F24 push notification will naturally only be assigned to persons to whom the original device was also assigned. Now click Duplicate to start the process. When duplication is complete, the new device F24 Push Notification will have been assigned to the relevant persons. Their call
number is adopted from the settings for the original device and their priority settings are saved automatically. Now run a data export.
Roles in FACT24
You can assign different roles and their accompanying rights to FACT24 users in line with their authorisation levels. You can assign various rights to FACT24 account users in line with their responsibilities. These rights are classified in 14 different roles. Multiple roles can be assigned to one user. We recommend drawing up a roles and rights plan for your company (who is allowed to do what?) before starting to create users. This will enable you to assign roles more clearly.
Aspects of roles
Roles refer to two aspects of FACT24. One defines the areas within which the user holds access rights (ADMINISTRATION, OPERATING, SETUP, ENTERPRISE). The second aspect defines the concrete functions which a user can exercise within a specific area (e.g. read only, edit, execute).
Role 10 (Principal) assigns a user the full extent of rights within the corresponding scope (e.g. “own organisational unit”, “own organisational unit and sub-units”, “whole enterprise”).
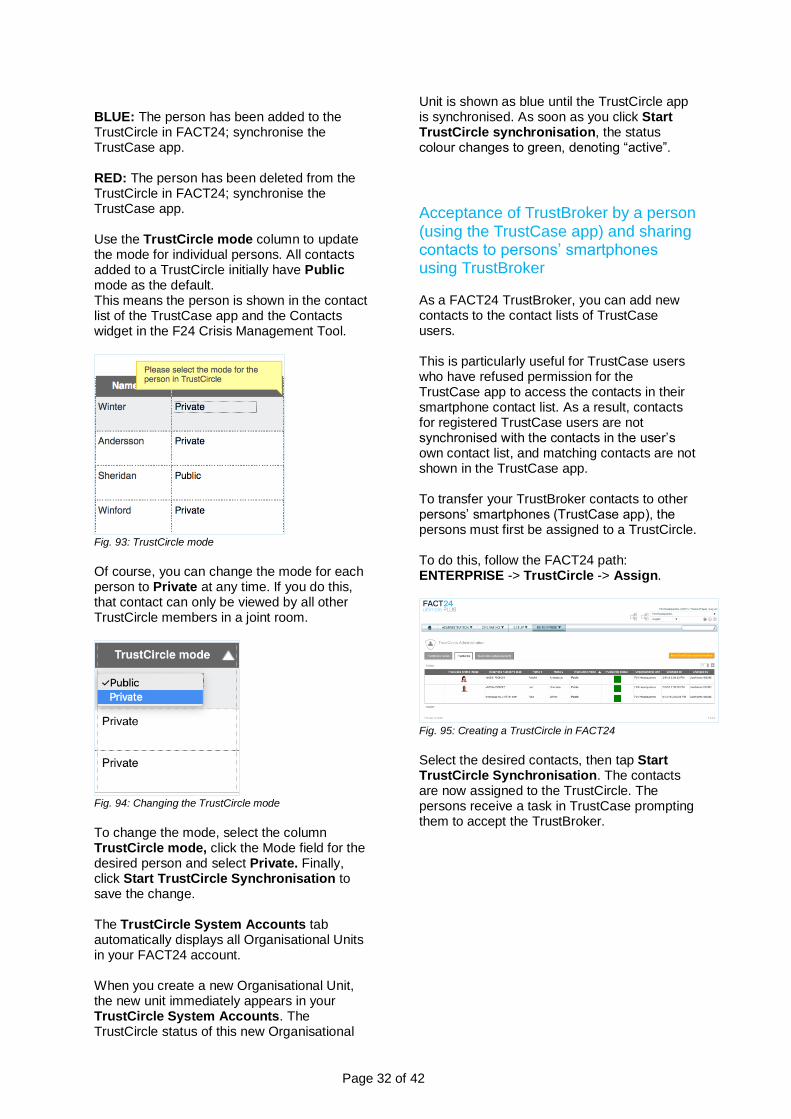
Fig. 91: Roles in FACT24
Overview of individual roles
FACT24 currently has the following 14 roles (classified here into SETUP, ADMINISTRATION, OPERATING and ENTERPRISE):
Page 31 of 42
SETUP:
01. Setup (read only)
02. Setup (edit): read and edit
11. Setup (edit w/o User management):
read and edit; no reading, updating or deletion
of users)
ADMINISTRATION:
03. Contact Admin (edit):
create and edit persons, including contact data
management; no viewing or editing of personal
telephone and fax numbers or email addresses
04. Administration (read only)
05. Administration (edit) (read and edit; without
data import or configuration upload)
12. Administration (edit, execute w/o Contact
Admin): all configurations except modification
of personal data (no configuration upload, no
contact data management)
14. Contact Admin (edit including private
device): create and edit persons, including
contact data management function, viewing
and editing of personal telephone and fax
numbers and email addresses.
06. Administration (edit, execute): all rights
OPERATING:
07. Operating (Alarm execute): alarm
execution only
08. Operating (Alarm execute, management):
execute alarms, use Online Monitor,
Conference Manager and Case Manager
09. Operating (Alarm execute, management,
analysis): start and manage alarms, analyse
reports and statistics, use Online Monitor,
Conference Manager, Case Manager and
Alarm Log
ADMINISTRATION, OPERATING, SETUP,
ENTERPRISE:
10. Principal (all rights)
13. Auditor (read all objects): read only
The TrustCircle function As a TrustBroker, you can determine which persons saved in FACT24 should appear in the contact list of the requisite TrustCase user as trusted contacts. This is done by adding the desired persons to the TrustCircle. To add contacts to the TrustCircle, go to the ENTERPRISE area and click on the TrustCircle menu item.Under TrustBroker details, first assign a name to the TrustBroker and upload a logo if applicable. Then click the TrustCircle tab and assemble the desired persons under Assign. Persons are only included in the list when the following conditions are fulfilled:
• The person is registered in the TrustCase app
• F24 push notification is assigned as a device
• Access rights in rooms – either “Administrator access” or “Normal read/edit access” (ADMINISTRATION -> Person -> Further settings -> Access right in rooms: Normal read/edit access or Administrator access)
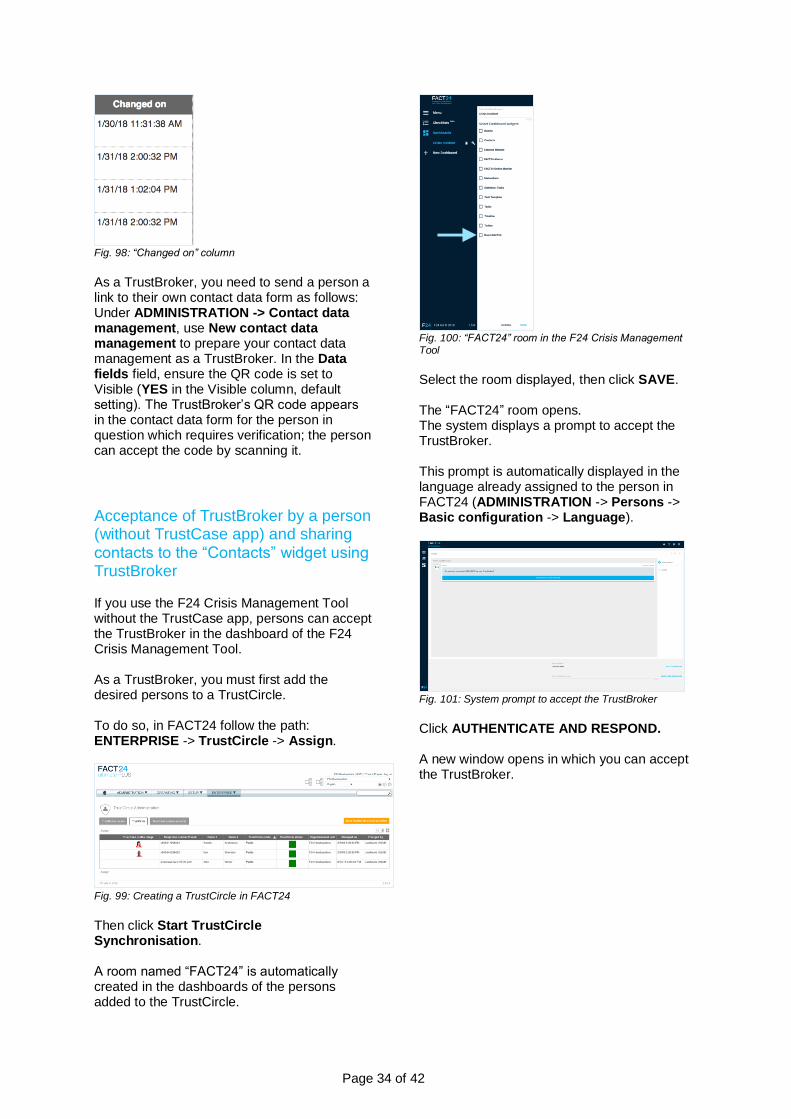
The different colours of the boxes in the TrustCircle Status column show the persons’ status in the TrustCircle.
Fig. 92: TrustCircle status
Key to colours: GREEN: The person has already been synchronised in the TrustCase app. ORANGE: The person’s contact details have changed; synchronise the TrustCase app.
Page 32 of 42
BLUE: The person has been added to the TrustCircle in FACT24; synchronise the TrustCase app. RED: The person has been deleted from the TrustCircle in FACT24; synchronise the TrustCase app. Use the TrustCircle mode column to update the mode for individual persons. All contacts added to a TrustCircle initially have Public mode as the default. This means the person is shown in the contact list of the TrustCase app and the Contacts widget in the F24 Crisis Management Tool.
Fig. 93: TrustCircle mode
Of course, you can change the mode for each person to Private at any time. If you do this, that contact can only be viewed by all other TrustCircle members in a joint room.
Fig. 94: Changing the TrustCircle mode
To change the mode, select the column TrustCircle mode, click the Mode field for the desired person and select Private. Finally, click Start TrustCircle Synchronisation to save the change. The TrustCircle System Accounts tab automatically displays all Organisational Units in your FACT24 account. When you create a new Organisational Unit, the new unit immediately appears in your TrustCircle System Accounts. The TrustCircle status of this new Organisational
Unit is shown as blue until the TrustCircle app is synchronised. As soon as you click Start TrustCircle synchronisation, the status colour changes to green, denoting “active”.
Acceptance of TrustBroker by a person (using the TrustCase app) and sharing contacts to persons’ smartphones using TrustBroker As a FACT24 TrustBroker, you can add new contacts to the contact lists of TrustCase users. This is particularly useful for TrustCase users who have refused permission for the TrustCase app to access the contacts in their smartphone contact list. As a result, contacts for registered TrustCase users are not synchronised with the contacts in the user’s own contact list, and matching contacts are not shown in the TrustCase app. To transfer your TrustBroker contacts to other persons’ smartphones (TrustCase app), the persons must first be assigned to a TrustCircle. To do this, follow the FACT24 path: ENTERPRISE -> TrustCircle -> Assign.
Fig. 95: Creating a TrustCircle in FACT24
Select the desired contacts, then tap Start TrustCircle Synchronisation. The contacts are now assigned to the TrustCircle. The persons receive a task in TrustCase prompting them to accept the TrustBroker.

Page 33 of 42
Fig. 96: Prompt to accept the TrustBroker
To accept the TrustBroker, tap Accept.
Fig. 97: Accepting the TrustBroker
When the person taps Accept, all contacts from the TrustCircle are automatically transferred to the person’s app. The TrustBroker is shown in FACT24 -> My TrustBrokers. All contacts received from the TrustBroker are shown with the TrustBroker icon. We recommend running the contact data management function for the TrustCircle members at regular intervals (ADMINISTRATION -> Contact data management). Members update their personal contacts individually by running the contact data management function. They can also upload a profile picture which is displayed in the TrustCase app. In ADMINISTRATION, tap the menu item Contact data management. In New contact data management at bottom left, follow steps 1-5 (Configuration -> Persons -> Edit email -> Data fields -> Send).
The selected persons receive an email containing a link to their own contact data for verification They receive the link because as data managers, they are responsible for managing their own data. This default setting can be found at ADMINISTRATION -> Persons -> Further Settings -> Contact data management by. Here the default setting can be retained, i.e. the data manager does not act for other persons but only manages his/her own data (see next line, Contact data management by, default setting “Person him/herself”). This is the only way for persons to receive the contact data form with their own data from the TrustBroker, including the TrustBroker’s QR code, by using the contact data management function. Individuals verify their own data and make any corrections or additions necessary. TrustBrokers can continue to use this method (ADMINISTRATION -> Contact data management) to transfer contacts to the smartphones (TrustCase app) of individual persons. A QR code is included in their individual contact data form. To accept the TrustBroker and receive all the TrustBroker’s contacts, you must scan the TrustBroker’s contacts (see Managing own contact data and scanning the TrustBroker’s QR code). This shares the contacts assembled by the TrustBroker in the TrustCircle to the person’s smartphone. As soon as the person has scanned the TrustBroker’s QR code, the person’s profile data (profile name and picture) are frozen and can no longer be changed in the TrustCase app. These personal details can only be changed if the TrustBroker is deleted on the person’s smartphone. The TrustBroker must run the contact data function management again to inform the administrator or FACT24 of the change and enable the TrustBroker to be reaccepted. As a TrustBroker, you can track the status of contact data management in ENTERPRISE -> TrustCircle by clicking the tab of the same name in the “Changed on” column. The date and time show when the person in question has verified and confirmed his/her contact data.
Page 34 of 42
Fig. 98: “Changed on” column
As a TrustBroker, you need to send a person a link to their own contact data form as follows: Under ADMINISTRATION -> Contact data management, use New contact data management to prepare your contact data management as a TrustBroker. In the Data fields field, ensure the QR code is set to Visible (YES in the Visible column, default setting). The TrustBroker’s QR code appears in the contact data form for the person in question which requires verification; the person can accept the code by scanning it.
Acceptance of TrustBroker by a person (without TrustCase app) and sharing contacts to the “Contacts” widget using TrustBroker If you use the F24 Crisis Management Tool without the TrustCase app, persons can accept the TrustBroker in the dashboard of the F24 Crisis Management Tool. As a TrustBroker, you must first add the desired persons to a TrustCircle. To do so, in FACT24 follow the path: ENTERPRISE -> TrustCircle -> Assign.
Fig. 99: Creating a TrustCircle in FACT24
Then click Start TrustCircle Synchronisation. A room named “FACT24” is automatically created in the dashboards of the persons added to the TrustCircle.
Fig. 100: “FACT24” room in the F24 Crisis Management Tool
Select the room displayed, then click SAVE. The “FACT24” room opens. The system displays a prompt to accept the TrustBroker. This prompt is automatically displayed in the language already assigned to the person in FACT24 (ADMINISTRATION -> Persons -> Basic configuration -> Language).
Fig. 101: System prompt to accept the TrustBroker
Click AUTHENTICATE AND RESPOND. A new window opens in which you can accept the TrustBroker.
Page 35 of 42
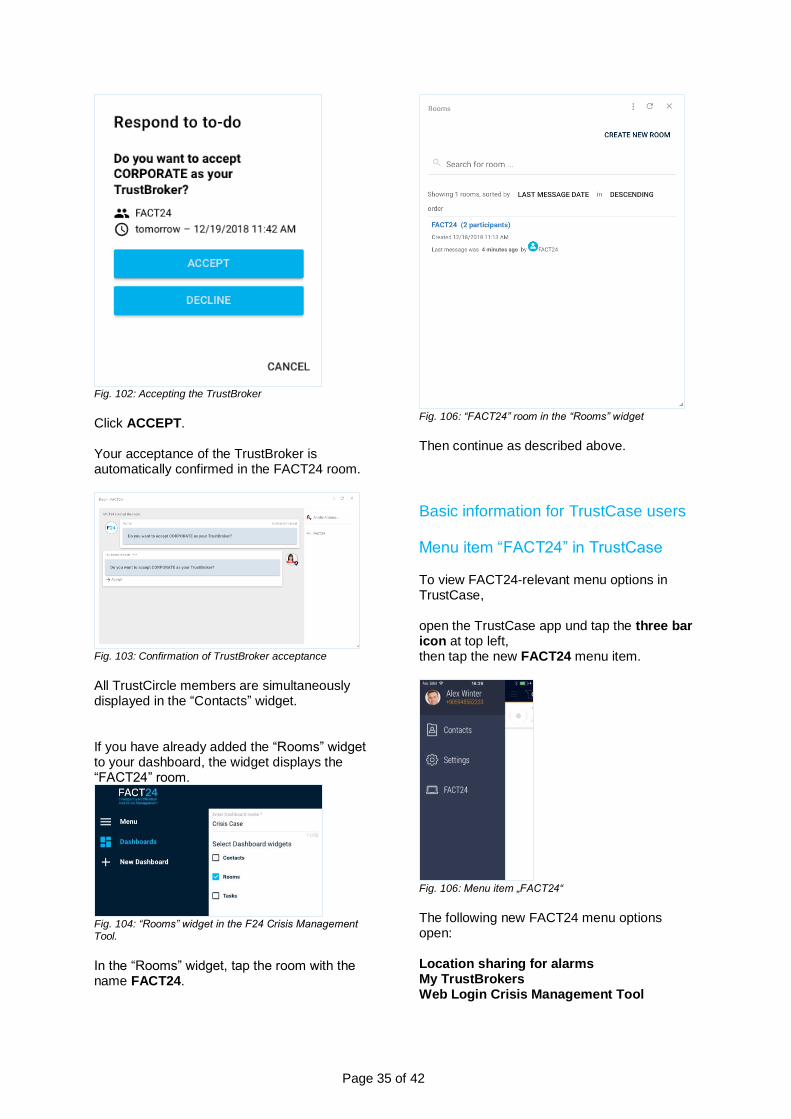
Fig. 102: Accepting the TrustBroker
Click ACCEPT. Your acceptance of the TrustBroker is automatically confirmed in the FACT24 room.
Fig. 103: Confirmation of TrustBroker acceptance
All TrustCircle members are simultaneously displayed in the “Contacts” widget. If you have already added the “Rooms” widget to your dashboard, the widget displays the “FACT24” room.
Fig. 104: “Rooms” widget in the F24 Crisis Management Tool.
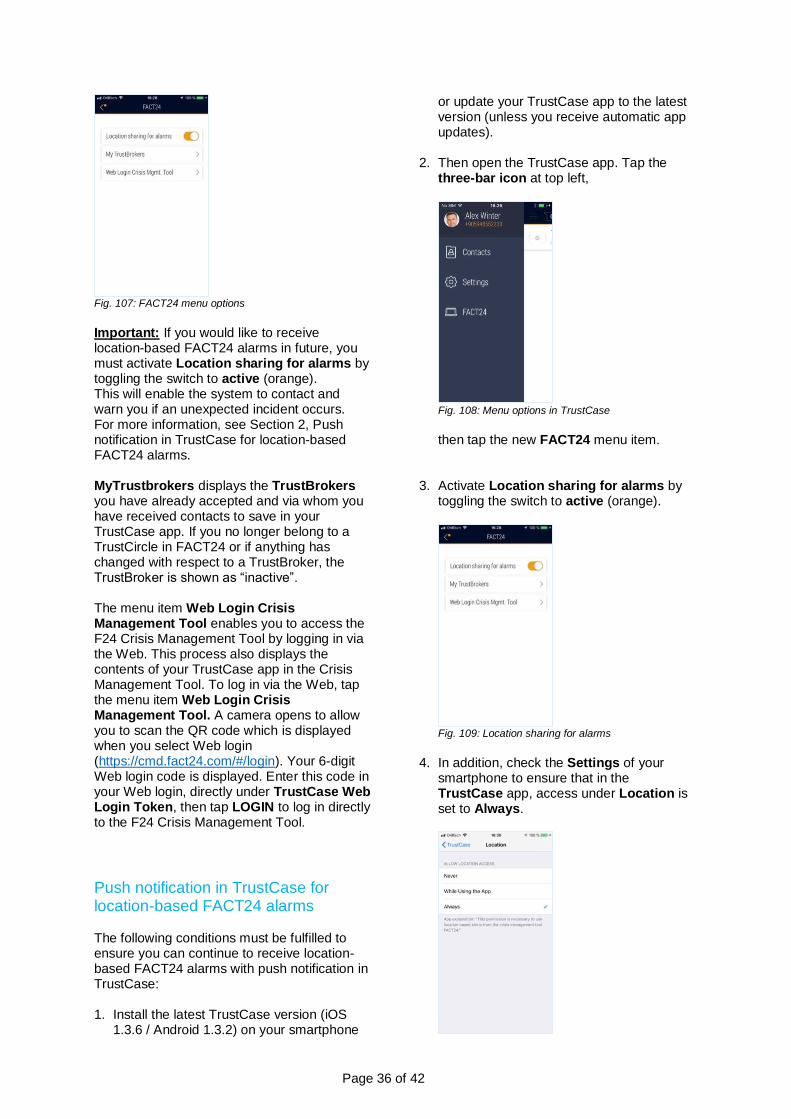
In the “Rooms” widget, tap the room with the name FACT24.
Fig. 106: “FACT24” room in the “Rooms” widget
Then continue as described above.
Basic information for TrustCase users
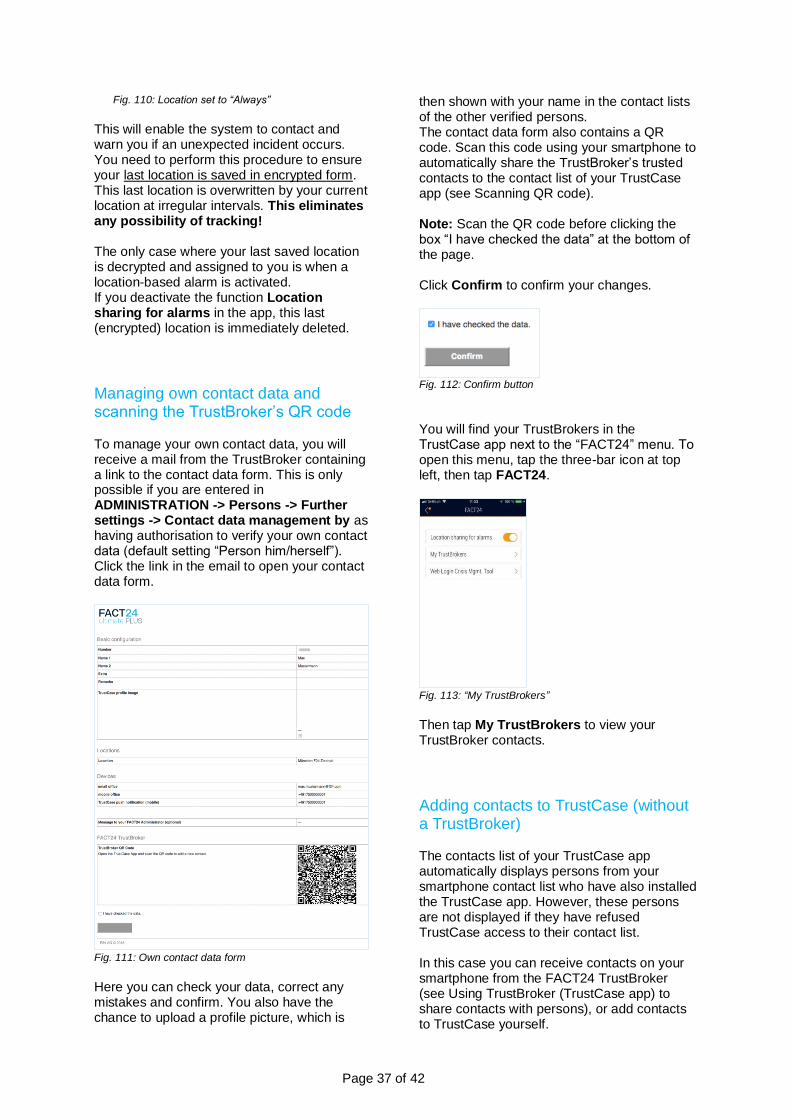
Menu item “FACT24” in TrustCase To view FACT24-relevant menu options in TrustCase, open the TrustCase app und tap the three bar icon at top left, then tap the new FACT24 menu item.
Fig. 106: Menu item „FACT24“
The following new FACT24 menu options open: Location sharing for alarms My TrustBrokers Web Login Crisis Management Tool
Page 36 of 42
Fig. 107: FACT24 menu options
Important: If you would like to receive location-based FACT24 alarms in future, you must activate Location sharing for alarms by toggling the switch to active (orange). This will enable the system to contact and warn you if an unexpected incident occurs. For more information, see Section 2, Push notification in TrustCase for location-based FACT24 alarms. MyTrustbrokers displays the TrustBrokers you have already accepted and via whom you have received contacts to save in your TrustCase app. If you no longer belong to a TrustCircle in FACT24 or if anything has changed with respect to a TrustBroker, the TrustBroker is shown as “inactive”. The menu item Web Login Crisis Management Tool enables you to access the F24 Crisis Management Tool by logging in via the Web. This process also displays the contents of your TrustCase app in the Crisis Management Tool. To log in via the Web, tap the menu item Web Login Crisis Management Tool. A camera opens to allow you to scan the QR code which is displayed when you select Web login (https://cmd.fact24.com/#/login). Your 6-digit Web login code is displayed. Enter this code in your Web login, directly under TrustCase Web Login Token, then tap LOGIN to log in directly to the F24 Crisis Management Tool.
Push notification in TrustCase for location-based FACT24 alarms The following conditions must be fulfilled to ensure you can continue to receive location-based FACT24 alarms with push notification in TrustCase: 1. Install the latest TrustCase version (iOS
1.3.6 / Android 1.3.2) on your smartphone
or update your TrustCase app to the latest version (unless you receive automatic app updates).
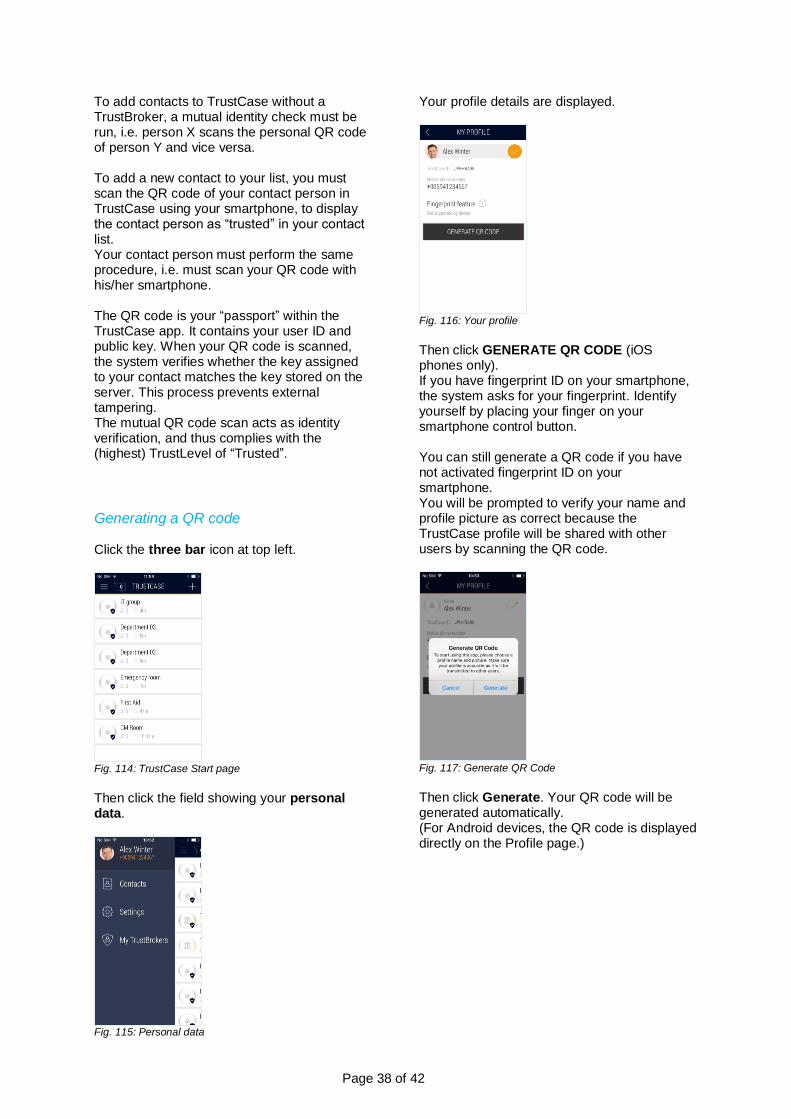
2. Then open the TrustCase app. Tap the
three-bar icon at top left,
Fig. 108: Menu options in TrustCase
then tap the new FACT24 menu item.
3. Activate Location sharing for alarms by toggling the switch to active (orange).
Fig. 109: Location sharing for alarms
4. In addition, check the Settings of your
smartphone to ensure that in the TrustCase app, access under Location is set to Always.
Page 37 of 42
Fig. 110: Location set to “Always”
This will enable the system to contact and warn you if an unexpected incident occurs. You need to perform this procedure to ensure your last location is saved in encrypted form. This last location is overwritten by your current location at irregular intervals. This eliminates any possibility of tracking! The only case where your last saved location is decrypted and assigned to you is when a location-based alarm is activated. If you deactivate the function Location sharing for alarms in the app, this last (encrypted) location is immediately deleted.
Managing own contact data and scanning the TrustBroker’s QR code To manage your own contact data, you will receive a mail from the TrustBroker containing a link to the contact data form. This is only possible if you are entered in ADMINISTRATION -> Persons -> Further settings -> Contact data management by as having authorisation to verify your own contact data (default setting “Person him/herself”). Click the link in the email to open your contact data form.
Fig. 111: Own contact data form
Here you can check your data, correct any mistakes and confirm. You also have the chance to upload a profile picture, which is
then shown with your name in the contact lists of the other verified persons. The contact data form also contains a QR code. Scan this code using your smartphone to automatically share the TrustBroker’s trusted contacts to the contact list of your TrustCase app (see Scanning QR code). Note: Scan the QR code before clicking the box “I have checked the data” at the bottom of the page. Click Confirm to confirm your changes.
Fig. 112: Confirm button
You will find your TrustBrokers in the TrustCase app next to the “FACT24” menu. To open this menu, tap the three-bar icon at top left, then tap FACT24.
Fig. 113: “My TrustBrokers”
Then tap My TrustBrokers to view your TrustBroker contacts.
Adding contacts to TrustCase (without a TrustBroker) The contacts list of your TrustCase app automatically displays persons from your smartphone contact list who have also installed the TrustCase app. However, these persons are not displayed if they have refused TrustCase access to their contact list. In this case you can receive contacts on your smartphone from the FACT24 TrustBroker (see Using TrustBroker (TrustCase app) to share contacts with persons), or add contacts to TrustCase yourself.
Page 38 of 42
To add contacts to TrustCase without a TrustBroker, a mutual identity check must be run, i.e. person X scans the personal QR code of person Y and vice versa. To add a new contact to your list, you must scan the QR code of your contact person in TrustCase using your smartphone, to display the contact person as “trusted” in your contact list. Your contact person must perform the same procedure, i.e. must scan your QR code with his/her smartphone. The QR code is your “passport” within the TrustCase app. It contains your user ID and public key. When your QR code is scanned, the system verifies whether the key assigned to your contact matches the key stored on the server. This process prevents external tampering. The mutual QR code scan acts as identity verification, and thus complies with the (highest) TrustLevel of “Trusted”.
Generating a QR code Click the three bar icon at top left.
Fig. 114: TrustCase Start page
Then click the field showing your personal data.
Fig. 115: Personal data
Your profile details are displayed.
Fig. 116: Your profile
Then click GENERATE QR CODE (iOS phones only). If you have fingerprint ID on your smartphone, the system asks for your fingerprint. Identify yourself by placing your finger on your smartphone control button. You can still generate a QR code if you have not activated fingerprint ID on your smartphone. You will be prompted to verify your name and profile picture as correct because the TrustCase profile will be shared with other users by scanning the QR code.
Fig. 117: Generate QR Code
Then click Generate. Your QR code will be generated automatically. (For Android devices, the QR code is displayed directly on the Profile page.)
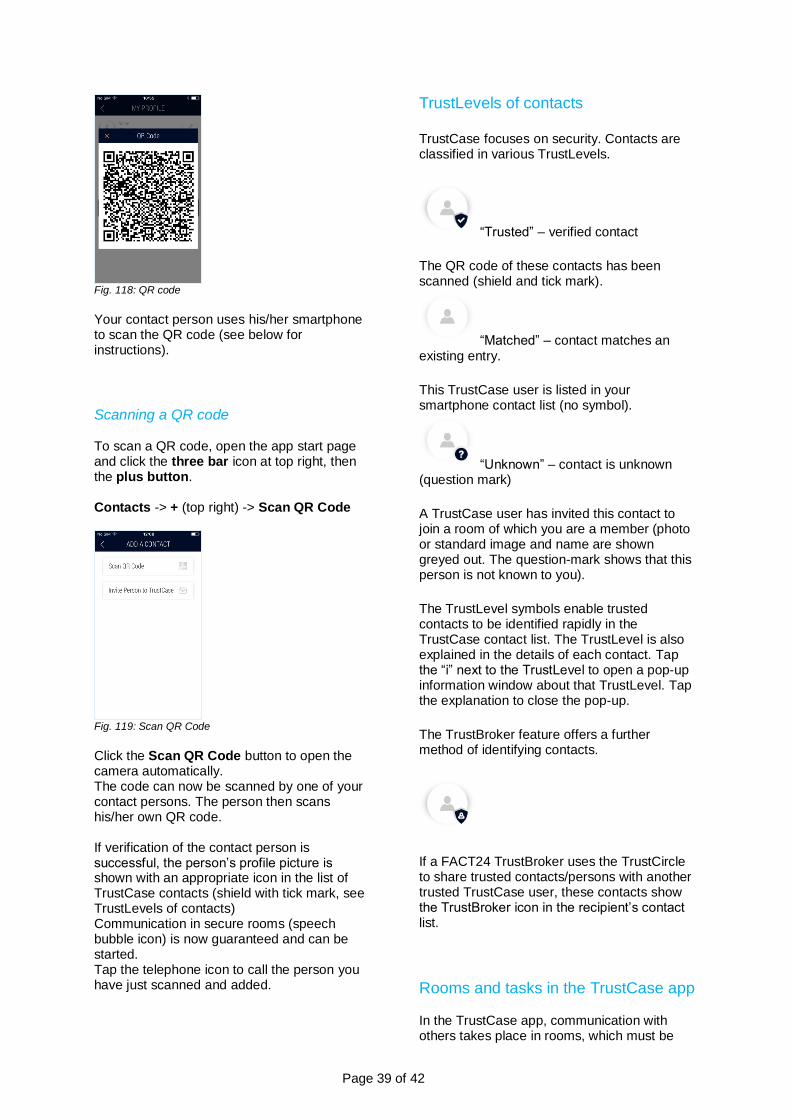
Page 39 of 42
Fig. 118: QR code
Your contact person uses his/her smartphone to scan the QR code (see below for instructions).
Scanning a QR code To scan a QR code, open the app start page and click the three bar icon at top right, then the plus button. Contacts -> + (top right) -> Scan QR Code
Fig. 119: Scan QR Code
Click the Scan QR Code button to open the camera automatically. The code can now be scanned by one of your contact persons. The person then scans his/her own QR code. If verification of the contact person is successful, the person’s profile picture is shown with an appropriate icon in the list of TrustCase contacts (shield with tick mark, see TrustLevels of contacts) Communication in secure rooms (speech bubble icon) is now guaranteed and can be started. Tap the telephone icon to call the person you have just scanned and added.
TrustLevels of contacts
TrustCase focuses on security. Contacts are classified in various TrustLevels.
“Trusted” – verified contact
The QR code of these contacts has been scanned (shield and tick mark).
“Matched” – contact matches an
existing entry.
This TrustCase user is listed in your smartphone contact list (no symbol).
“Unknown” – contact is unknown (question mark)
A TrustCase user has invited this contact to join a room of which you are a member (photo or standard image and name are shown greyed out. The question-mark shows that this person is not known to you).
The TrustLevel symbols enable trusted contacts to be identified rapidly in the TrustCase contact list. The TrustLevel is also explained in the details of each contact. Tap the “i” next to the TrustLevel to open a pop-up information window about that TrustLevel. Tap the explanation to close the pop-up.
The TrustBroker feature offers a further method of identifying contacts.
If a FACT24 TrustBroker uses the TrustCircle to share trusted contacts/persons with another trusted TrustCase user, these contacts show the TrustBroker icon in the recipient’s contact list.
Rooms and tasks in the TrustCase app In the TrustCase app, communication with others takes place in rooms, which must be
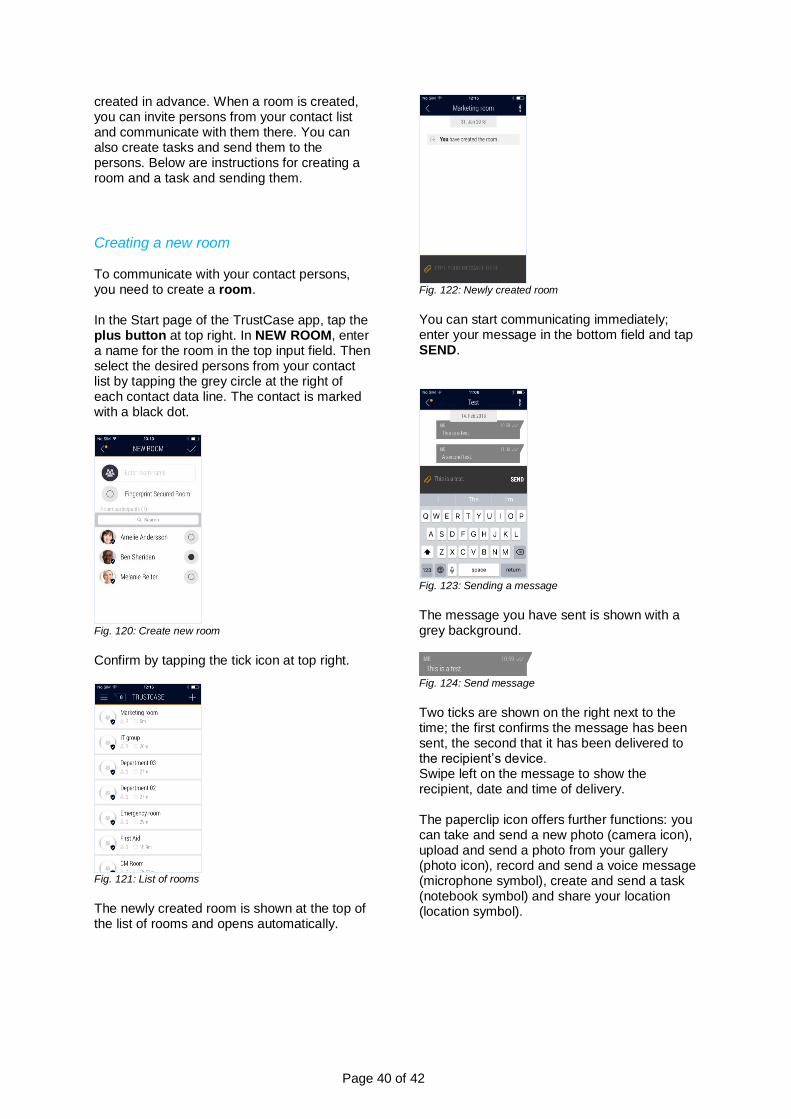
Page 40 of 42
created in advance. When a room is created, you can invite persons from your contact list and communicate with them there. You can also create tasks and send them to the persons. Below are instructions for creating a room and a task and sending them.
Creating a new room To communicate with your contact persons, you need to create a room. In the Start page of the TrustCase app, tap the plus button at top right. In NEW ROOM, enter a name for the room in the top input field. Then select the desired persons from your contact list by tapping the grey circle at the right of each contact data line. The contact is marked with a black dot.
Fig. 120: Create new room
Confirm by tapping the tick icon at top right.
Fig. 121: List of rooms
The newly created room is shown at the top of the list of rooms and opens automatically.
Fig. 122: Newly created room
You can start communicating immediately; enter your message in the bottom field and tap SEND.
Fig. 123: Sending a message
The message you have sent is shown with a grey background.
Fig. 124: Send message
Two ticks are shown on the right next to the time; the first confirms the message has been sent, the second that it has been delivered to the recipient’s device. Swipe left on the message to show the recipient, date and time of delivery. The paperclip icon offers further functions: you can take and send a new photo (camera icon), upload and send a photo from your gallery (photo icon), record and send a voice message (microphone symbol), create and send a task (notebook symbol) and share your location (location symbol).
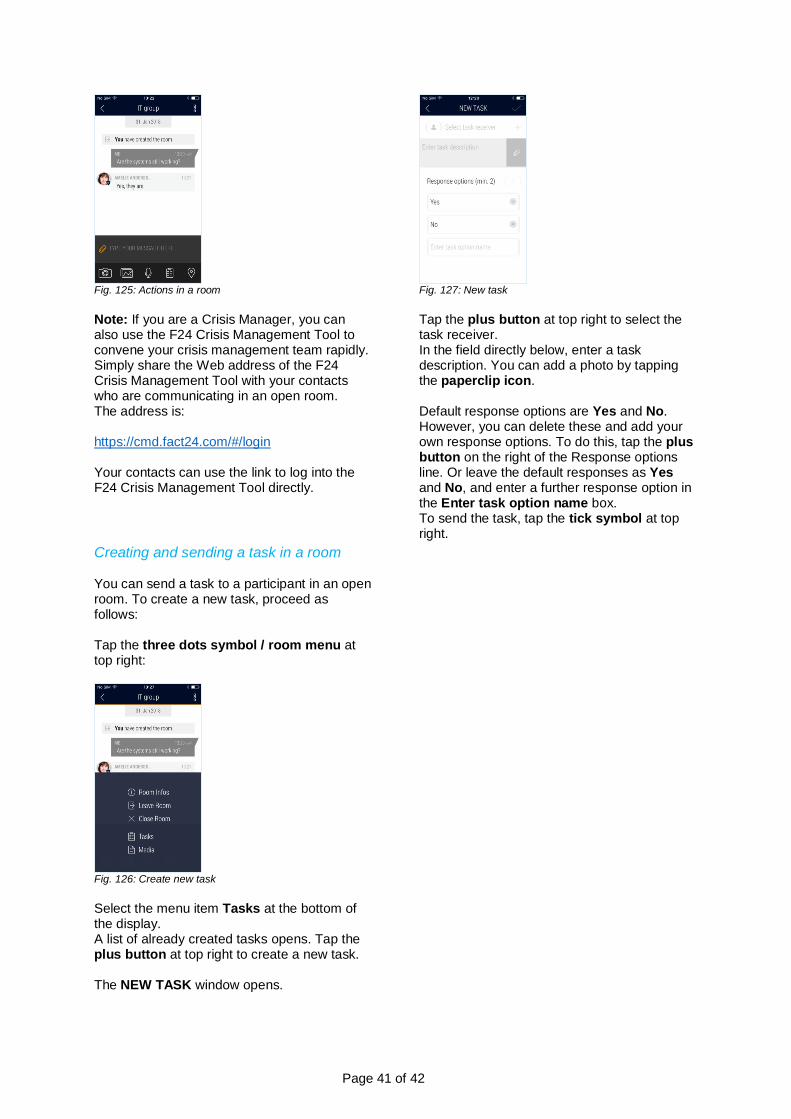
Page 41 of 42
Fig. 125: Actions in a room
Note: If you are a Crisis Manager, you can also use the F24 Crisis Management Tool to convene your crisis management team rapidly. Simply share the Web address of the F24 Crisis Management Tool with your contacts who are communicating in an open room. The address is: https://cmd.fact24.com/#/login Your contacts can use the link to log into the F24 Crisis Management Tool directly.
Creating and sending a task in a room You can send a task to a participant in an open room. To create a new task, proceed as follows: Tap the three dots symbol / room menu at top right:
Fig. 126: Create new task
Select the menu item Tasks at the bottom of the display. A list of already created tasks opens. Tap the plus button at top right to create a new task. The NEW TASK window opens.
Fig. 127: New task
Tap the plus button at top right to select the task receiver. In the field directly below, enter a task description. You can add a photo by tapping the paperclip icon. Default response options are Yes and No. However, you can delete these and add your own response options. To do this, tap the plus button on the right of the Response options line. Or leave the default responses as Yes and No, and enter a further response option in the Enter task option name box. To send the task, tap the tick symbol at top right.
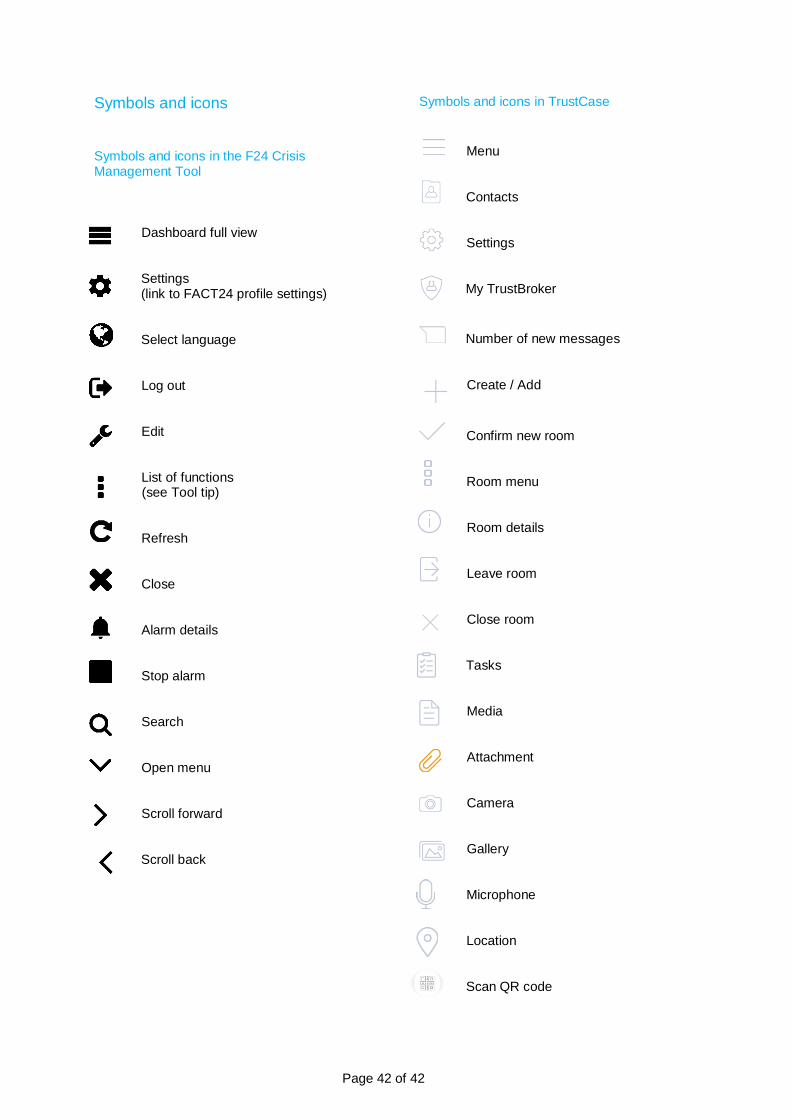
Page 42 of 42
Symbols and icons
Symbols and icons in the F24 Crisis Management Tool
Dashboard full view
Settings
(link to FACT24 profile settings)
Select language
Log out
Edit
List of functions (see Tool tip)
Refresh
Close
Alarm details Stop alarm
Search Open menu
Scroll forward
Scroll back
Symbols and icons in TrustCase
Menu
Contacts
Settings
My TrustBroker
Number of new messages
Create / Add
Confirm new room
Room menu
Room details
Leave room
Close room
Tasks
Media
Attachment
Camera
Gallery
Microphone Location
Scan QR code