Planning and Deployment Guide - Centrify Product ...
369
Centrify Server Suite Planning and Deployment Guide December 2021 (release 2021.1) Centrify Corporation
-
Upload
khangminh22 -
Category
Documents
-
view
0 -
download
0
Transcript of Planning and Deployment Guide - Centrify Product ...

Centrify Server Suite
Planning and Deployment GuideDecember 2021 (release 2021.1)
Centrify Corporation

Legal Notice
This document and the software described in this document are furnished under and are subject to theterms of a license agreement or a non-disclosure agreement. Except as expressly set forth in such licenseagreement or non-disclosure agreement, Centrify Corporation provides this document and the softwaredescribed in this document “as is” without warranty of any kind, either express or implied, including, but notlimited to, the implied warranties of merchantability or fitness for a particular purpose. Some states do notallow disclaimers of express or implied warranties in certain transactions; therefore, this statement may notapply to you.
This document and the software described in this document may not be lent, sold, or given away withoutthe prior written permission of Centrify Corporation, except as otherwise permitted by law. Except asexpressly set forth in such license agreement or non-disclosure agreement, no part of this document or thesoftware described in this document may be reproduced, stored in a retrieval system, or transmitted in anyform or by any means, electronic, mechanical, or otherwise, without the prior written consent of CentrifyCorporation. Some companies, names, and data in this document are used for illustration purposes andmay not represent real companies, individuals, or data.
This document could include technical inaccuracies or typographical errors. Changes are periodically madeto the information herein. These changes may be incorporated in new editions of this document. CentrifyCorporation may make improvements in or changes to the software described in this document at any time.
© 2004-2021 Centrify Corporation. All rights reserved. Portions of Centrify software are derived fromthird party or open source software. Copyright and legal notices for these sources are listed separately inthe Acknowledgements.txt file included with the software.
U.S. Government Restricted Rights: If the software and documentation are being acquired by or on behalf ofthe U.S. Government or by a U.S. Government prime contractor or subcontractor (at any tier), in accordancewith 48 C.F.R. 227.7202-4 (for Department of Defense (DOD) acquisitions) and 48 C.F.R. 2.101 and 12.212(for non-DOD acquisitions), the government’s rights in the software and documentation, including its rightsto use, modify, reproduce, release, perform, display or disclose the software or documentation, will besubject in all respects to the commercial license rights and restrictions provided in the license agreement.
Centrify, DirectControl, DirectAuthorize, DirectAudit, DirectSecure, DirectControl Express, Centrify forMobile, Centrify for SaaS, DirectManage, Centrify Express, DirectManage Express, Centrify Suite, CentrifyUser Suite, Centrify Identity Service, Centrify Privilege Service and Centrify Server Suite are registeredtrademarks of Centrify Corporation in the United States and other countries. Microsoft, Active Directory,Windows, andWindows Server are either registered trademarks or trademarks of Microsoft Corporation inthe United States and other countries.
Centrify software is protected by U.S. Patents 7,591,005; 8,024,360; 8,321,523; 9,015,103; 9,112,846;9,197,670; 9,442,962 and 9,378,391.
The names of any other companies and products mentioned in this document may be the trademarks orregistered trademarks of their respective owners. Unless otherwise noted, all of the names used asexamples of companies, organizations, domain names, people and events herein are fictitious. Noassociation with any real company, organization, domain name, person, or event is intended or should beinferred.
• • • • • •
Planning and Deployment Guide 2

ContentsAbout this guide 18Intended audience 18
Using this guide 19
Documentation conventions 21
Finding more information about Centrify products 21
Product names 22
Contacting Centrify 24
Getting additional support 24
Planning deployment for an enterprise 25What you should know before planning a deployment 25
Why planning a deployment is important 26
What to expect during deployment 27
Preparing a deployment team 28
Preparing deployment documentation 30
Defining goals for the deployment 31
Architecture and basic operations 33Centrify platform-specific components 33
Centrify components for Windows 34
Components installed on managed computers 34
Storing Centrify properties in Active Directory 35
Using Access Manager 37
Allowing and blocking domains for Access Manager 37
Core agent components and services 38
Key operations handled by the adclient process 40
How PAM applications work with Centrify 41
How NSS configuration works with Centrify 43
• • • • • •
Planning and Deployment Guide 3

How the Centrify Agent manages Kerberos files 44
What happens during the typical log-on process 44
How failover and disconnected access work 48
Establishing a connection to DNS 49
Connecting to the closest domain controller 49
Restricting the domain controllers contacted 50
Switching to disconnected mode 50
Responding to DNS configuration changes 51
Connecting to trusted forests and domains 51
Deployment process overview 53What’s involved in a typical deployment project 53
Plan 54
Prepare 57
Deploy 59
Validate 61
Manage 61
Deployment tasks and administrative activity 62
Steps you only take once 62
Steps you take more than once during deployment 64
Steps you take after deployment to begin managing zones effectively 64
What happens after deployment? 65
Sample work flow for deployment decisions 65
Planning organizational units and security groups 66Identifying stakeholders and business processes 66
Designing organizational units for Centrify 67
Selecting a location for the top-level OU 68
Single forest with a single domain 68
• • • • • •
Contents 4

Single forest with an empty root domain 68
Single forest with account and resource domains 69
Multiple forests with trust relationships 69
Forests separated by a firewall (DMZ) 71
Creating recommended organizational units 71
Creating organizational units in Access Manager 72
Centrify Administration organizational unit 73
Computer Roles organizational unit 73
Computers organizational unit 74
Provisioning Groups organizational unit 74
Service Accounts organizational unit 74
UNIX Groups organizational unit 75
User Roles organizational unit 75
Licenses and Zones parent containers 76
Security groups to manage Centrify information 76
Delegating control for Centrify administrators 77
Delegating control for authorization managers 77
Delegating control for computer managers 79
Delegating control for UNIX data managers 79
Planning for data storage in Active Directory 80
Changing the zone type 80
Modifying indexed attributes for zones 81
Viewing and manipulating data in Active Directory 82
Installing Authentication & Privilege Services 84Preparing for installation onWindows 85
Installing Centrify Privilege Elevation Service 85
Preparing Active Directory and DNS 85
Identifying theWindows computer and log on credentials 86
• • • • • •
Planning and Deployment Guide 5

Checking operating system and software requirements 87
Checking disk and memory requirements 87
Running the setup program on aWindows computer 87
Installing Zone Provisioning Agent 89
About Zone Provisioning Agent and its requirements 90
Installing the Zone Provisioning Agent on the Access Manager computer 92
Installing the Zone Provisioning Agent on its own 93
Configuring the Zone Provisioning Agent 94
Whitelisting domains for the Zone Provisioning Agent 96
Running Access Manager for the first time 96
Installing agents on computers to be managed 101About the deployment process 101
Select a target set of computers 101
Options for deploying Centrify Agent packages 102
Install interactively on a computer 103
Run the bundle installation from a mounted network volume 104
Install silently using a configuration file 105
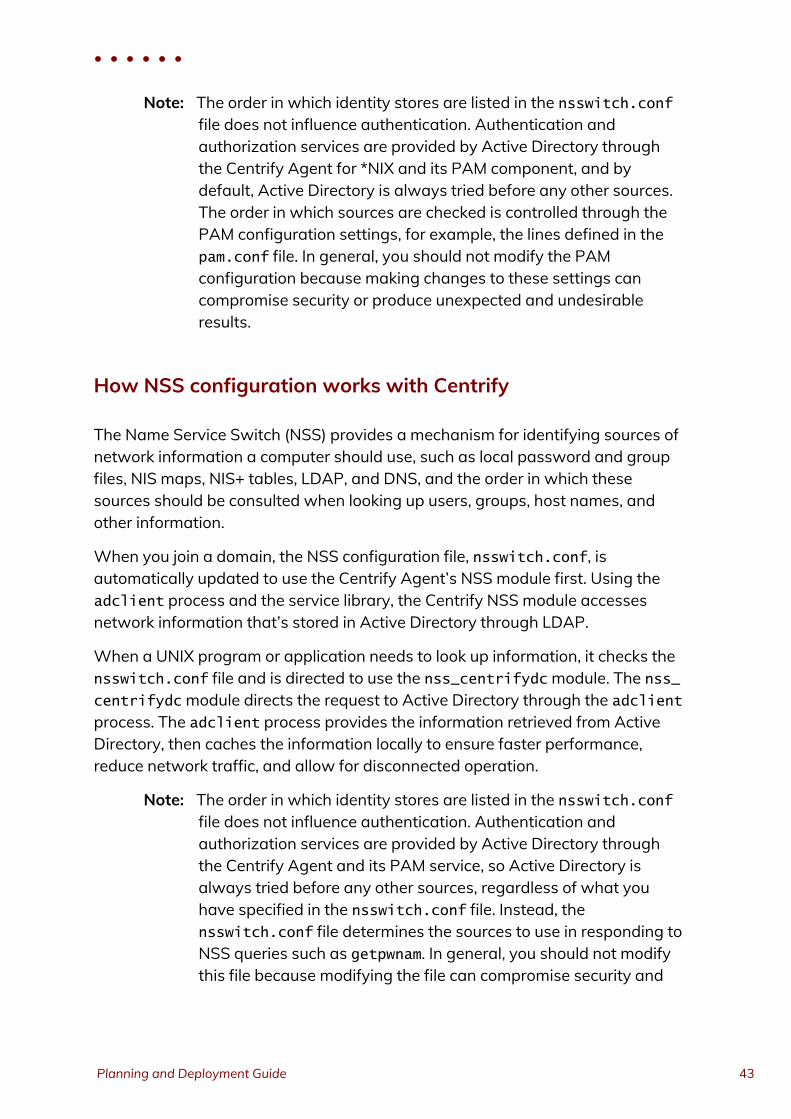
Using a native package installer 111
Use other automated software distribution utilities 121
About the files and directories installed on the agent 121
Joining an Active Directory domain at a later time 122
Installing the agent on Solaris systems 123
Installing the Solaris svr4 agent packages 124
Installing the Solaris IPS agent packages 124
Installing the Solaris IPS agent packages with child zones 125
Uninstalling the agent on Solaris systems 128
Sun Solaris installation notes 129
• • • • • •
Contents 6

Planning to use Centrify zones 131Why use zones? 131
Identity management using zones 132
Role-based access control and zones 133
Using zones to delegate administrative duties 133
Deploying to a single Auto Zone 134
Classic and hierarchical zones 135
Should you use classic zones? 135
When should you use hierarchical zones? 136
Howmany zones do you need? 137
A closer look at using zones in a hierarchical model 138
How inheritance provides additional benefits 138
Howmany levels should you use in the zone hierarchy? 138
Identity management and inherited profile information 139
Access controls and the assignment of rights and roles 141
Delegation in hierarchical zones 143
Designing a zone structure for your environment 143
Preparing to migrate existing users and groups 144Collecting and analyzing users and groups 144
Collecting information from other departments in your organization 144
Using a script to retrieve user and group profiles for each computer 145
Collecting data from NIS domains 146
Identifying accounts that should not be migrated 146
Eliminate default system accounts 146
Remove other invalid accounts 147
Create a list of the users and groups to ignore 147
Analyze user profiles for conflicting attributes 148
Analyze group profiles for conflicting attributes 149
• • • • • •
Planning and Deployment Guide 7

Create a working set of user and group profiles 149
Howmigration affects the zone design 150
Creating the first zone 151
Create a top-level parent zone 151
Add provisioning groups to the parent zone 152
Create groups for the default roles in the parent zone 153
Delegate administrative tasks on the parent zone 154
Link a role group to a role assignment in the parent zone 156
Create one or more child zones 156
Logical models for defining zones 156
Create a child zone under the parent zone 158
Create role groups for child zones 158
Delegate administrative tasks on the child zone 159
Link role groups to role assignments in the child zone 160
Creating computer objects for the target set of computers 160
Prepare a computer object before joining 161
Migrating existing users to hierarchical zones 163Importing group profiles 163
Import UNIX groups that apply to all computers into the parent zone 164
Import UNIX groups that apply only to a specific zone into a child zone 165
Import a group profile or override attributes on specific computers 166
Importing user profiles 167
How group membership works within zones 168
Assigning roles to existing users and groups 169
Using Active Directory groups for roles 170
Adding users to role groups 170
Migrating existing users into the UNIX Login role in the parent zone 170
Migrating existing users into the UNIX Login role in child zones 171
• • • • • •
Contents 8

Migrating existing users into the listed role in child zones 171
Using a computer-level override for the UNIX Login role 172
Managing role assignment without role groups 172
Verifying effective users on each zone 173
Adding existing users and groups to Provisioning Groups 174
Add existing users to the provisioning group for the parent zone 175
Add existing groups to the provisioning group for the parent zone 176
Joining computers to a domain and zone 177Using adjoin on new computers 177
Running adjoin requires UNIX and Active Directory privileges 177
Specifying the required options 178
Pre-Staging before using Adjoin on a newmachine 178
Verify authentication after joining the domain by logging on 180
Provisioning new user and group profiles aftermigration 182Integrating with existing provisioning processes 182
Defining the business rules for new groups in the parent zone 183
Configure the business rules for automated provisioning of group profiles 183
Add security groups to the parent zone 185
Defining the business rules for new users in the parent zone 186
How hierarchical zones affect provisioning 189
Adding new users to a provisioning group and a role group 190
Add the user to a provisioning group 191
Add the user to a role group 191
Adding a new UNIX group profile to all zones 192
Using the zoneupdate program for controlled automation 193
Using any Active Directory attribute in a profile 200
• • • • • •
Planning and Deployment Guide 9

Provisioning users when across trusted domains 201
Monitoring provisioning events 202
Adding new profiles manually 205
Validating operations after deploying 206Understanding testing as part of deployment 206
Validating basic authentication and password policy operations 207
Running commands on the UNIX computer to verify operations 208
Verify the computer is joined to Active Directory 208
Verify authentication for an authorized user 209
Test additional administrative tasks 210
Resolving issues in the pilot deployment 210
Preparing training and documentation for administrators and users 211
Deploying to the production environment 212
Training the support staff for a production deployment 213
Preparing the user community in a production deployment 214
Populating zones in a production environment 215
Joining a domain in a production environment 215
Defining role-based access for users and computers 217Addressing the business problem of role-based security 217
Creating a root-equivalent role definition 218
Define the right for running all commands 218
Create a role definition for running all commands 219
Assign an Active Directory group to the role 221
Creating a restricted role for a shared service account 222
Define the right for switching to a service account 222
Define a PAM access right to allow logging on 223
Create a restricted role definition for the service account 224
• • • • • •
Contents 10

Assign an Active Directory group to the role 225
Creating a role definition for temporary root access 227
Define a command that allows root access 227
Create a role definition for temporarily running as root 228
Assign the role as a computer-level override 229
Verify the role assignment on the computer 230
Creating a role definition with specific privileges 230
Define command rights to prevent the use of commands 230
Create a restricted shell role definition that uses the command rights 231
Create an unrestricted shell role definition that uses the command rights 233
Creating a role definition with rescue rights 234
Creating additional custom roles and role assignments 234
Working with computer roles 235
Planning to use computer roles 236
How computer roles simplify the management of access rights 237
Migrating and managing service accounts 238Why migrate service accounts? 238
Identifying service accounts to migrate to Active Directory 239
Service accounts without a password 239
Service accounts with a shared password 240
Service accounts that use SSH keys 240
Mapping a service account to an Active Directory user 240
Create a new Active Directory user account 240
Map the UNIX service account to the Active Directory user 241
How the mapped user changes your environment 242
Creating a service account role in a zone 243
Create an Active Directory user account for the service 244
Define a new role with system rights 244
• • • • • •
Planning and Deployment Guide 11

Create a UNIX profile for the service account and assign the role 245
Secure the Active Directory user account 247
Remove local service accounts from remote computers 250
Planning to deploy in a demilitarized zone (DMZ) 251Identifying the computers to protect 251
Creating a forest and trusts for a DMZ 251
Defining zones for computers in the DMZ 252
Creating a firewall and securing the network 253
How to join a domain with a read-only domain controller (RODC) 254
Enabling NTLM authentication through a firewall 255
Configuring the domain controllers that allow NTLM authentication 256
Configuring a map that converts NTLM domains to Active Directory 256
Managing and evolving operations after deployment 257Understanding how Centrify software affects operations 257
Understanding change management activities 258
Understanding system administration activities 258
Understanding security administration activities 259
Understanding service desk operations 259
Understanding capacity management activities 260
Troubleshooting logon failures 262
Evaluating additional services and integrations 264
Adding authentication service for applications 265
Adding custom reports for auditing UNIX properties 267
Adding group policies 268
Adding support for NIS clients 269
Using programs optimized for Kerberos authentication 270
Integrating with products from other vendors 270
• • • • • •
Contents 12

Getting assistance from Centrify Corporation Support 271
Templates and sample forms 274Simplified environment analysis and zone design template 274
Change control request form 276
Test case matrix sample 276
Preliminary software delivery notification email template 278
Department-specific announcement and instructions email template 279
General announcement and deployment schedule email template 280
Deployment team task checklist 281
Permissions required for administrative tasks 284How permissions are set 284
Permissions required to use the SetupWizard 287
Licenses container permission requirements 288
Licenses container permissions 289
Zones container permissions 290
Computers container permissions 291
Computers container within a zone permissions 291
Creating parent containers manually 291
Optional administrative tasks 292
Creating display specifiers for Centrify profiles 292
Registering the administrative notification handler 294
Granting permissions for administrative tasks 295
Setting permissions for zones 301
Creating a zone 302
Opening zones 302
Modifying zone properties 303
Renaming a zone 303
• • • • • •
Planning and Deployment Guide 13

Deleting a zone 304
Managing roles and rights in a zone 304
Managing role assignments in a zone 306
Changing computer role properties in a zone 308
Setting permissions to join or leave the domain 308
Setting permissions for zone computers 310
Joining a computer to a zone 310
Listing computer accounts 311
Modifying computer properties 311
Responding to NIS requests 312
Changing the computer zone 313
Preparing a computer object 314
Modifying computer roles 316
Deleting computer roles 317
Setting permissions for zone users 317
Adding users to standard zones 318
Modifying users in standard zones 318
Modifying users in RFC 2307-compliant zones 319
Listing users in standard zones 320
Listing users in RFC 2307-compliant zones 321
Removing users from zones 321
Setting permissions for zone groups 321
Adding security groups to zones 322
Modifying groups in standard zones 322
Modifying groups in RFC 2307-compliant zones 323
Listing groups in zones 324
Listing groups in RFC 2307-compliant zones 325
Removing groups from zones 325
Setting permissions for license keys 325
• • • • • •
Contents 14

Setting permissions for NIS maps 326
Adding NIS maps to a zone 327
Deleting NIS maps from a zone 328
Adding map entries to NIS maps 328
Modifying map entries in NIS maps 328
Changing the map type for NIS maps 329
Deleting map entries from NIS maps 329
Adding entries to a specific NIS map 329
Modifying entries in a specific NIS map 330
Changing the map type for a specific NIS map 330
Deleting map entries from a specific NIS map 330
Setting permissions for password synchronization 331
Centrify password synchronization service 331
Microsoft password synchronization service 331
Setting permissions for rights and roles 332
Creating the authorization store 332
Defining rights and roles in the authorization store 333
Adding roles 334
Modifying roles 334
Deleting roles 335
Adding rights 335
Modifying rights 335
Deleting rights 336
Adding or removing rights from roles 337
Adding role assignments 337
Modifying role assignments 337
Deleting role assignments 338
Setting permissions for zone provisioning 339
• • • • • •
Planning and Deployment Guide 15

Supplemental installation notes 340Verifying the DNS configuration on Linux 340
Joining the domain (Zoned mode only) 341
Joining the domain (Express mode) 341
HPUX installation notes 342
ia64 - Mapping local HP-UX user accounts to Active Directory accounts 342
Entering an incorrect password on HP-UX 342
AIX installation notes 343
Support for AIX Capabilities attribute 343
Users cannot log in via ftp if they have a restricted shell 344
Starting and stopping DirectControl on AIX 344
Using the Centrify Authentication Service LDAP Proxy on AIX 344
Setting the DNS configuration parameter to join the domain on SuSE Linux 345
Mounting CIFS shares 346Use cases 346
CentrifyDC-cifsidmap plug-in requirements 347
Prepare to install CentrifyDC-cifsidmap plug-in 348
Install the CentrifyDC-cifsidmap package 348
Configure cifs-utils for CentrifyDC-cifsidmap plug-in 349
Mount the CIFS share and confirm file ownership 351
Known Issues 353Installation and uninstallation issues 353
Configuration issues 354
Environment issues 355
RunAsRole issues 356
Desktop with Elevated Privileges issues 356
Roles and rights issues 357
• • • • • •
Contents 16

Compatibility with third party products issues 358
Application Manager issues 359
Best practices 360Best Practices for UNIX and Linux Systems with Centrify 360
Upgrade Centrify Agents and administrative tools 360
Enable NSCD 361
Set group policies to govern the agent behavior 361
Set agent parameters 362
Use the Centrify DB2 plugin 362
Best Practices for Active Directory Environment 363
Index the uid attribute 363
Windows Active Directory functional level andWindows Server version 363
Maintain sites and services domain controller topology 363
Centrify Access Model Best Practices 364
Proper definition of global/child zone structure. 364
Analyze the deployment periodically 365
Use the Centrify Zone Provisioning Agent 365
Deploy Reporting Services and Security Information and EventManagement (SIEM) 365
Best Practices for Centrify Audit and Monitoring Service 366
Manage the Audit Store Database Size 366
Maintain the audit store database index 367
Configure SQL Server 367
Audit and Monitoring Architecture 367
Grant audit installation rights to administrator groups 368
Centrify Relationship Best Practices 368
Monthly Cadence call with Centrify 368
Get your annual Centrify healthcheck 368
Attend annual Centrify update meetings 369
• • • • • •
Planning and Deployment Guide 17

About this guide
The Planning and Deployment Guide provides conceptual and technicalinformation to help you plan and manage the initial deployment of Centrifysoftware to provide secure authentication, authorization, and configurationservices through Microsoft Active Directory. It includes instructions and bestpractices for planning a deployment, installing the software, migrating existingaccounts, and developing a basic set of roles.
This guide addresses common factors that a cross-functional project team islikely to face when tasked with extending Microsoft Active Directory identity,access control, and policy management services to UNIX, Linux and Mac OS Xcomputers. It includes recommendations and examples to help you plan, install,verify, operate, and extend a deployment to suit the needs of your organization.
Intended audience
This guide is intended for security and IT architects, project managers, UNIX andWindows administrators, and other IT decision-makers who are responsible forplanning and deploying authentication and authorization services across theenterprise. It provides a basic framework for planning a successful deploymentand installing Centrify software in a phased rollout from a pilot program with asubset of target computers to a full production environment.
This guide assumes that you are familiar withWindows and the UNIX, Linux, orMac OS X operating environments you support and that you can perform basicadministrative tasks in these environments. This guide also assumes youunderstand the basic principles of information security, and the terminologies,technologies, and techniques that are used in the operating environments yousupport.
• • • • • •
Planning and Deployment Guide 18

Using this guide
Most large-scale deployments rely on a project team to design and articulate aproject plan, and teammembers take on specific roles and responsibilities.Depending on your role and responsibilities, you may want to read portions ofthis guide selectively.
Note: Most of the information in this guide applies to all platforms.However, there are some deployment scenarios and tasks that areunique to Mac OS X computers. If you manage Mac OS Xcomputers and users, refer to the Administrator’s Guide for Macfor additional information.
The guide provides the following information:
n Planning deployment for an enterprise provides an overview of keyconcepts and the deployment lifecycle, including suggestions for whoshould participate in the planning process and factors to consider that willaffect your deployment strategy.
n Architecture and basic operations describes the key components of theCentrify software architecture and how the components work together toprovide authentication and authorization services.
n Deployment process overview provides an overview of the steps involvedin a deployment project and a preview of the tasks you can expect tocomplete.
n Planning organizational units and security groups discusses the ActiveDirectory objects and organizational model that Centrify Corporationrecommends to ensure a separation of duties for UNIX administrators.
n Installing Authentication & Privilege Services provides step-by-stepinstructions for installing and configuring Centrify software components onWindows computers.
n Installing agents on computers to be managed describes the installationoptions available and provides instructions for installing Centrify softwarecomponents on UNIX and Linux computers.
n Planning to use Centrify zones describes the importance of zones and howyou can use classic and hierarchical zone for identity management, accesscontrol, and delegated administration.
• • • • • •
About this guide 19

n Preparing to migrate existing users and groups describes the steps to taketo prepare for migrating existing users and groups, including collecting andanalyzing existing profile information and creating the first zone.
n Migrating existing users to hierarchical zones describes how to import andmigrate an existing user population into hierarchical zones and enableauthentication using Active Directory and Centrify software.
n Joining computers to a domain and zone describes how to complete theinitial migration by joining the Active Directory domain and a Centrify zone.
n Provisioning new user and group profiles after migration describes how touse the Zone Provisioning Agent and Active Directory groups to automateprovisioning of new users and groups.
n Validating operations after deploying provides suggestions for formaltesting and validation activities you can perform to move from a pilotdeployment to a production environment.
n Defining role-based access for users and computers describes the mostcommon roles that organizations create to complete the initial deploymentand how to configure the appropriate rights and assign the roles toappropriate groups.
n Migrating and managing service accounts describes the strategies you canuse if you want to migrate local service accounts to Active Directory toimprove security for those accounts.
n Planning to deploy in a demilitarized zone (DMZ) describes how to deployCentrify components to allow communication between a perimeter (DMZ)zone and an internal zone.
n Managing and evolving operations after deployment describesmanagement activity for operations staff and additional services you maywant to implement after deployment as you evolve the Centrify softwaresolution.
n Templates and sample forms provides examples of common documentsand notification messages that you can customize and use throughout thedeployment process.
n Permissions required for administrative tasks provides information aboutthe specific Active Directory permissions required to perform administrativetasks on Centrify-specific objects.
• • • • • •
Planning and Deployment Guide 20

Documentation conventions
The following conventions are used in Centrify documentation:
n Fixed-width font is used for sample code, program names, programoutput, file names, and commands that you type at the command line.When italicized, this font indicates variables. Square brackets ([ ])indicate optional command-line arguments.
n Bold text is used to emphasize commands or key command results;buttons or user interface text; and new terms.
n Italics are used for book titles and to emphasize specific words or terms. Infixed-width font, italics indicate variable values.
n Standalone software packages include version and architectureinformation in the file name. Full file names are not documented in thisguide. For complete file names for the software packages you want toinstall, see the distribution media.
n For simplicity, UNIX is used to refer to all supported versions of the UNIXand Linux operating systems. Some parameters can also be used on MacOS X computers.
Finding more information about Centrify products
Centrify provides extensive documentation targeted for specific audiences,functional roles, or topics of interest. If you want to learn more about Centrifyand Centrify products and features, start by visiting the Centrify website. Fromthe Centrify website, you can download data sheets and evaluation software,view video demonstrations and technical presentations about Centrify products,and get the latest news about upcoming events and webinars.
For access to documentation for all Centrify products and services, visit theCentrify documentation portal at docs.centrify.com. From the Centrifydocumentation portal, you can always view or download the most up-to-dateversion of this guide and all other product documentation.
For details about supported platforms, please consult the release notes.
For the most up to date list of known issues, please login to the CustomerSupport Portal at http://www.centrify.com/support and refer to Knowledge Basearticles for any known issues with the release.
• • • • • •
About this guide 21

Product names
Over the years we've made some changes to some of our product offerings andfeatures and some of these previous product names still exist in some areas. Ourcurrent product offerings include the following services:
Current Overall Product Name Current Services Available
Centrify Identity-Centric PAM
Privileged Access Service
Gateway Session Audit and Monitoring
Authentication Service
Privilege Elevation Service
Audit and Monitoring Service
Privilege Threat Analytics Service
Whether you're a long-time or new customer, here are some quick summaries ofwhich features belong to which current product offerings:
PreviousProduct Offering
PreviousProductOffering
Description Current Product Offering
CentrifyPrivilegedService (CPS)
Privileged Access Service
DirectControl(DC) Authentication Service
DirectAuthorize(DZ or DZwin) Privilege Elevation Service
DirectAudit (DA) Audit and Monitoring Service
InfrastructureServices
Privileged Access Service,Authentication Service, PrivilegeElevation Service, Audit andMonitoring Service, and PrivilegeThreat Analytics Service
DirectManage(DM)
ManagementServices
Consoles that areused by all 3services:AuthenticationService, PrivilegeElevation Service,and Audit andMonitoring Service
User AnalyticsService Privilege Threat Analytics Service
• • • • • •
Planning and Deployment Guide 22

Depending on when you purchased a Centrify product offering, you may havepurchased one of the following product bundles:
PreviousProductBundle
PreviousProductBundle
CurrentProductBundle
Services Included Description
CentrifyIdentity-CentricPAM CoreEdition
Privileged Access Serviceand Gateway SessionAudit and Monitoring
CentrifyServer SuiteStandardEdition
Authentication Serviceand Privilege ElevationService
CentrifyInfrastructureServicesStandardEdition
CentrifyIdentity-CentricPAMStandardEdition
Privileged Access Service,Authentication Service,and Privilege ElevationService
CentrifyServer SuiteEnterpriseEdition
Authentication Service,Privilege Elevation Service,and Audit and MonitoringService
CentrifyInfrastructureServicesEnterpriseEdition
CentrifyIdentity-CentricPAMEnterpriseEdition
Privileged Access Service,Authentication Service,Privilege Elevation Service,Audit and MonitoringService (includes GatewaySession Audit andMonitoring)
CentrifyServer SuitePlatinumEdition
Discontinuedbundle thatincludedDirectControl,DirectAuthorize,DirectManage,DirectAudit, andDirectSecure
• • • • • •
About this guide 23

Contacting Centrify
You can contact Centrify by visiting our website, www.centrify.com. On thewebsite, you can find information about Centrify office locations worldwide,email and phone numbers for contacting Centrify sales, and links for followingCentrify on social media. If you have questions or comments, we look forward tohearing from you.
Getting additional support
If you have a Centrify account, click Support on the Centrify website to log onand access the Centrify Technical Support Portal. From the support portal, youcan search knowledge base articles, open and view support cases, downloadsoftware, and access other resources.
To connect with other Centrify users, ask questions, or share information, visitthe Centrify Community website to check in on customer forums, read the latestblog posts, view how-to videos, or exchange ideas with members of thecommunity.
• • • • • •
Planning and Deployment Guide 24

Planning deployment foran enterprise
This section provides a brief review of the information you should have to beginplanning a successful enterprise deployment of Server Suite. It includes anoverview of the deployment life cycle, roles and responsibilities to consider inassembling a deployment team, and the factors you should consider during theplanning phase that will affect how you deploy Centrify software.
For an overview of Centrify software and an introduction to basic tasks, see theEvaluation Guide for Linux and UNIX. For a general introduction to identity,access, and configuration management or more detailed information aboutperforming administrative tasks, see the Administrator’s Guide for Linux andUNIX.
What you should know before planning adeployment
Before you begin planning a full scale deployment of Centrify software, youshould be familiar with key concepts, terminology, and components for ServerSuite and Active Directory. You should also have information about your existingenvironment.
Before you continue planning the deployment, verify you have information about:
n How Active Directory is used to store user, group, and computerinformation in your organization and the Active Directory schema youcurrently have deployed.
n How you currently manage services and provision users for bothWindowsand non-Windows computers.
• • • • • •
Planning and Deployment Guide 25

n How the Centrify Agent installed on a UNIX, Linux, or Mac OS X computermakes that computer part of an Active Directory domain.
n How zones enable you to manage user profiles, control access to computerand application resources, and delegate administrative tasks.
If you are not familiar with Centrify architecture and the components that makeup the Server Suite, see Architecture and basic operations to be sure youunderstand the concepts, core components, and operations that enable ActiveDirectory users to log on to UNIX, Linux, and Mac OS X computers. This guideassumes you also have access to the Administrator’s Guide for Linux and UNIXand can refer to it, as needed, for additional details.
Why planning a deployment is important
Because Centrify software becomes a critical part of your IT infrastructure oncedeployed, it is important that you plan and test your deployment strategy andvalidate the results you expect before placing Centrify components into aproduction environment.
After you deploy Centrify software in a production environment, the rights androles you define will control whether users can log on and what they can do onspecific computers if they are allowed to log on. Because preventing users fromaccessing critical resources or services can affect business operations, youshould analyze the requirements of your environment as thoroughly as possiblebefore moving from a pilot deployment into production.
The deployment process described in this guide is intended to help you tomigrate existing users and groups to Active Directory with minimal disruption toend-user activity and ongoing business services. The recommendationspresented are designed to give you flexibility and provide you with a frameworkfor deploying that minimizes the effect of the deployment on the existing userpopulation.
Note: Planning is important regardless of whether you are deploying onWindows, UNIX, Linux, or Mac computers. However, somedeployment steps can be skipped if you are only deploying onWindows computers or if you aren’t migrating any local users orgroups. For more information about deploying only onWindowscomputers, see the Administrator’s Guide for Windows. Forinformation that is specifically about deploying on Mac computers,see the Administrator’s Guide for Mac.
• • • • • •
Planning deployment for an enterprise 26

What to expect during deployment
In most organizations, a deployment takes place in the following stages:
Evaluation
A primary senior analyst or small group installs the software in an isolated testenvironment. The main goal of this stage is to learn basic concepts, terminology,and operations and validate any specific functionality that is critical to theorganization adopting the software. The lab environment also allows you to testthe planned changes to system and user management processes withoutaffecting user access. This proof-of-concept stage often takes place before thedecision to purchase the software or with the decision to purchase a smallnumber of licenses for extended testing.
Analysis and design
During this stage, a planning team does deeper analysis into the goals andrequirements of the organization, the current state of the environment, and thedeployment and management options that best suit the organization. The maingoal of this stage is to design how you will use zones, import user accountinformation, and assign rights and roles through a combination of ActiveDirectory groups and zone definitions. Most of the information in this guide isintended to help you make those decisions and validate them in a pilotdeployment.
Pilot deployment
The pilot deployment is intended to be more robust than the evaluation stage.The pilot deployment is typically 10 to 20 computers, often with a commonadministrative owner or administrative group. The main goal of this stage is toverify your analysis accurately described your environment and to uncover anygaps that might have been missed or special circumstances that requireadjustment to the design planned for zones, user account information, or rightsand roles. You can include more than 20 computers in the pilot deployment, butlimiting the number makes the initial migration of the user population moremanageable while you become familiar with the process.
Testing and validation
After deploying the software, most organizations perform at least some formaltesting of specific scenarios to ensure the authentication and authorization rulesthey have defined operate as expected and users are not locked out ofcomputers they need access to but are prevented from logging on where they
• • • • • •
Planning and Deployment Guide 27

don’t have access rights. The main goal of this stage is to execute a test planthat exercises software operations in a number of different use cases.
Roll-out deployment
After sufficient testing and verification of the pilot deployment, the deploymentteam can use a software delivery method to install Centrify Agent packages onremote computers and join an Active Directory domain. Typically, the roll-out isdone in phases, so that Centrify software is deployed on a set of computers inone subnet, IP range, or administrative domain, then later deployed on anotherset of computers on a different subnet, with a different IP range, or in a differentadministrative domain. The goal of this stage is to deploy in a controlled manner,so that any issues can be resolved before they affect additional users orcomputers.
On-going management and evolution
As your environment changes and evolves, it is likely that you will want to refine,customize, and extend your deployment and your authentication, authorization,computer, and user management policies. You may also develop or enhancescripts that automate provisioning and decommissioning of accounts, or updatebusiness processes to take advantage of additional functionality, such asintegration with other tools to capture Centrify data or configuring databaseapplications to use PAM-based authentication. The goal of this stage iscontinuous improvement to streamline business processes and operationalefficiency.
Preparing a deployment team
In large organizations, the network architecture and Active Directoryinfrastructure is often highly complex and sophisticated. Adding UNIX, Linux,and Mac OS X computers and users to this infrastructure requires carefulplanning and is handled best with a clearly documented deployment plan. Thisguide is intended to help you develop such a plan and to suggest the issues youshould consider in designing a deployment that suits your organization. For anexample of what a deployment plan might look like, see Simplified environmentanalysis and zone design template.
Depending on the size of your organization, you might want to assemble across-functional deployment team to plan and implement a deploymentstrategy, set up and test a pilot deployment program, and refine, document, androll-out operations across the organization. In addition, a deployment team
• • • • • •
Planning deployment for an enterprise 28

might include project leads and IT staff members who will be responsible formaintaining and managing Server Suite and Active Directory on an ongoingbasis after deployment or developers who will extend or integrate applicationsto work with Server Suite and Active Directory.
A typical deployment teammight consist of members in the following roles:
Active Directory enterprise or domain administrators
Know the structure and trust relationships of one or more Active Directoryforests, including the topology of the Active Directory site and the roles of thedomain controllers. These administrators may also be responsible forprovisioning and decommissioning accounts or maintaining the tools for thesebusiness processes.
UNIX administrators or administrators with specific expertise
Manage access for all or specific groups of UNIX, Linux, or Mac OS X computers.These administrators may be responsible for specific resources, such as theservers that host mission-critical applications or a web farm, or have specificknowledge, such Oracle database administration or AIX administrative tools.
Security administrators
Establish security policies and audit trails and define the procedures for securingcomputer resources and user account information. These administrators mayalso define the provisioning rules for the organization or have detailedknowledge of the existing provisioning process.
IT or network architects
Understand the overall layout of the organization’s network, including internalconnectivity and access to the Internet, firewalls, port usage, bandwidth andlatency issues.
Application developers
Write programs that require authentication and authorization services.Application developers might also include UNIX programmers who will beresponsible for writing scripts to automate administrative tasks, such as creatingzones or adding new users to a zone.
Functional testers
Develop test cases for the user scenarios the deployment team wants tovalidate.
• • • • • •
Planning and Deployment Guide 29

Centrify administrative operators
Use Access Manager and other consoles onWindows, UNIX command lineprograms, ADEdit library, or PowerShell scripts to manage users, groups,computers, or zones. These operators might be delegated administrators forspecific zones after deployment or existing Active Directory administrators whoadd and remove users from groups or manage Active Directory containers.
Database administrators
Install and manage database instances and control access to database records.If you are planning a deployment that includes auditing user activity, thedeployment team should include at least one database administrator to plan forand create the databases that will store captured sessions and audit meta-data.A database administrator can also provide procedures and guidance for backingup, archiving, and removing historical data as appropriate for yourorganization’s record retention policies.
Internal or external auditors
Understand regulatory compliance requirements for the organization andindustry. Auditors typically know the type of information they need and candefine the reports that will satisfy their needs.
Assembling a cross-functional team with members who have expertise inworking with Active Directory andWindows architecture and members whohave expertise in managing UNIX, Linux, or Mac OS X servers and workstationsis often a key component of a successful deployment.
Preparing deployment documentation
In addition to deploying the software, the deployment team should preparematerials that document the solutions they are deploying and the processes andprocedures to assist others in migrating. The deployment documentation mightinclude training materials for new users and test plans to verify a successfuldeployment that can be reused when updating the software after the initialdeployment.
In general, members of the deployment team should focus on the followingactivities to prepare for a roll-out of Server Suite to a production environment:
n Document the configuration settings you plan to use and update thedocumentation as needed based on the pilot experience. For example,
• • • • • •
Planning deployment for an enterprise 30

during the planning phase you might have drafted a plan for user andgroup filtering or access controls that in practice you find must be adjusted.The pilot deployment gives you the opportunity to implement your plannedsolution but change it, if needed.
n Document and prototype any deployment scripts that you intend to useand any processes or policy decisions that impact using those scripts. Forexample, you might want to automate the join process or how new usersare added to a zone or modify existing scripts that provision users.
n Document issues that require troubleshooting during the pilot deploymentand the resolution for each issue. You can collect this information as anorganization-specific operations manual for IT staff.
n Prepare training materials for testers, operations personnel, and end-usersbased on the experience gained in the pilot deployment and tailored toyour organization’s specific needs and internal policies.
n Prepare test plans that sufficiently cover the types of scenarios that arespecific to your organization’s needs and internal policies. For example, ifyou plan to use group policies, your test plans should include scenarios fortesting the group policies you plan to implement.
n Update planning documents, such as the zone structure or role definitionsthat you developed during the planning phase in response to the practicalexperience gained in the pilot deployment.
n Create checklists or instructions that are specific to your organization’sdeployment. For example, you may want to create a “site preparationchecklist” that covers specific steps administrators should take beforedeploying, a “deployment checklist” that includes site-specific namingconventions and migration instructions, and a “handoff to operationschecklist” to ensure a smooth hand-over to data center staff afterdeployment is complete.
Defining goals for the deployment
One of the first tasks of the deployment team should be to define the goals youwant to achieve and the criteria you will use to measure whether you have metthose goals. As part of this process, you should define:
n The primary reason for deploying Centrify in your organization. Forexample, if providing centralized directory service or a single point of
• • • • • •
Planning and Deployment Guide 31

account administration is your most important goal, you may makedifferent deployment decisions than if auditing and restricting user accessto specific computers is your primary goal. That is, you want to be sure thedeployment addresses your most pressing concerns first.
n Priorities for any additional goals you want to set for the deployment.For example, you may want to transition to a rationalized namespace overtime, but this may be a lower priority for your organization than movingfrom decentralized computer administration to delegated administration ofthe tasks users can perform on specific computers.
n Any specific auditing requirements or security requirements that areunique to your organization or industry. For example, the way youorganize computers into groups may be determined by specific reports youneed to produce.
n Internal policies for how you update and distribute software. Forexample, you should define how frequently you apply operating systempatches and whether you automate software distribution.
n Internal policies for how you assign UNIX attributes and Active Directoryaccount information. For example, you should identify how you haveassigned UIDs, GIDs, and other UNIX-specific attributes and whether thereare existing naming conventions for Active Directory users and groups.
n Plans for who will manage UNIX profiles after deployment. For example,you should identify the group or groups that will manage which UNIX usersand computers and whether there will be separate UNIX and ActiveDirectory administrators with shared responsibilities or a clearly defineddivision of responsibilities. In most cases, Centrify recommends aseparation of duties model that enables UNIX administrators to managezones and Active Directory administrators to manage user objects andgroup membership.
• • • • • •
Planning deployment for an enterprise 32

Architecture andbasic operations
This chapter provides an overview of the Centrify architecture and thecomponents for Windows and non-Windows computers. It also describes thebasic flow of operation when users log in or access applications, and whathappens when an Active Directory domain controller goes down.
The following topics are covered:
n Centrify platform-specific components
n Storing Centrify properties in Active Directory
n Using Access Manager
n Core agent components and services
n What happens during the typical log-on process
n How failover and disconnected access work
The information in this section is not required for planning a deployment. It isintended as background information that can help you understand theauthentication and authorization process in some detail. If you want to proceeddirectly to planning the deployment, you can skip this section.
Centrify platform-specific components
Server Suite provide an integration layer between Active Directory in aWindowsenvironment and computers running other operating systems or applicationenvironments. Because of this, Centrify includes components for managingActive Directory-based objects in theWindows environment and agents that runon each server or workstation to be integrated into Active Directory.
• • • • • •
Planning and Deployment Guide 33

Centrify components for Windows
OnWindows, Centrify includes management consoles and services to simplifythe management and integration of Linux and UNIX computers and users intoActive Directory.
The key components for Windows that you use in deployment are:
n Centrify Access Manager console
n Centrify Zone Provisioning Agent configuration panel andWindows service
There are several additional Windows components available for you to use,depending on the version of Centrify software you install and the requirementsof your environment. For example, Centrify offers extensions for working withNIS maps and Active Directory group policies, as well as components to supporta multi-tier architecture for auditing activity in user sessions and the CentrifyNetwork Information Service to support agentless authentication service.
Components installed on managed computers
On non-Windows computers, Centrify software consists of the core CentrifyAgent (adclient), related libraries, and optional tools. The Centrify Agentenables the local host computer—most commonly a Linux or UNIX computer—tojoin an Active Directory domain.
After the agent is deployed on a server or workstation, that computer isconsidered amanaged computer and it can join any Active Directory domainyou choose.
When a Centrify-managed computer joins an Active Directory domain, itessentially becomes an Active Directory client and relies on Active Directory toprovide authentication, authorization, policy management, and directoryservices. The interaction between the agent on the local computer and ActiveDirectory is similar to the interaction between aWindows workstation and itsActive Directory domain controller, including failover to a backup domaincontroller if the managed computer is unable to connect to its primary domaincontroller.
The following figure provides a simplified view of the integration betweenWindows and non-Windows computers through Centrify software.
• • • • • •
Architecture and basic operations 34

To use Microsoft Active Directory to centrally manage access across differentplatforms, you need to do the following:
n Prepare the Active Directory environment by installing the Centrify AccessManager console on at least oneWindows computer and using the SetupWizard to update the Active Directory forest.
n Ensure each UNIX, Linux, or Mac OS X computer can communicate with anappropriate Active Directory domain controller through DNS.
n Install the agent (adclient) on the UNIX, Linux, or Mac OS X computersthat will be joining an Active Directory domain.
n Run the join command and specify the Active Directory domain on eachUNIX, Linux, or Mac OS X computers that needs to join an Active Directorydomain.
n Use Active Directory Users and Computers or Access Manager to authorizeaccess to the UNIX, Linux, and Mac OS X computers for specific users andgroups.
The next sections provide a more detailed discussion of the Centrify architectureand a summary of what happens when a user logs on to a UNIX computer thathas joined the Active Directory domain.
Storing Centrify properties in Active Directory
The Active Directory schema defines the object classes that can be stored inActive Directory, and the attributes that each object class must have, plus anyadditional attributes the object can have, and the object class that can be itsparent. Schema definitions are also stored as objects in Active Directory. To
• • • • • •
Planning and Deployment Guide 35

store UNIX-specific attributes within the Active Directory schema, the schemamust be able to include the properties that are associated with a UNIX user orgroup. For example, for a UNIX user, the schema needs to accommodate thefollowing information fields:
n UNIX user name
n Password hash (optional)
n Numeric user identifier (UID)
n Primary group identifier (GID)
n General information (GECOS)
n Home directory
n Default shell
Some of these information fields are similar to standard user class attributes inActive Directory. For example, the Active Directory Display Name (displayName)attribute typically stores a user’s full name—the same information typicallystored in the GECOS field in an /etc/passwd file on a UNIX computer, so thedisplayName is used to define the contents of the GECOS field in a user’s UNIXprofile. Depending on the Active Directory schema you have installed, some ofthe information fields required for logging on to UNIX computers might not havean equivalent Active Directory attribute.
If you are using the default Active Directory schema, Centrify stores UNIX-specific attributes in an Active Directory class under its own parent container forzones. Centrify then organizes the information about individual UNIX computers,users, and groups by zone.
If your organization has already deployed a Microsoft-supported set of UNIXschema extensions, such as those defined in theWindows Services for UNIX(SFU) schema extension, you can store UNIX attributes in the fields defined bythat schema as an alternative to using the zones container.
If you have deployed the RFC 2307-compliant Active Directory schema, you canstore UNIX attributes in the fields defined by that schema and organized intoRFC 2307-compliant zones.
After you have installed Centrify components on aWindows computer, the firsttime you open the Access Manager administrative console, a SetupWizardupdates the Active Directory forest to include the Centrify properties for UNIXattributes. You can then use Access Manager, the Active Directory Users andComputers MMC snap-in, ADEdit commands, or PowerShell scripts to view andmodify the UNIX properties for any user, group, or computer.
• • • • • •
Architecture and basic operations 36

Note: For RFC 2307-compliant zones, the group name and UNIX nameare stored in the same CN attribute. Therefore, if you change agroup’s name with its Active Directory Users and Computers’property page, the UNIX name is changed in Access Manager aswell.
Using Access Manager
Access Manager is the primary user interface for managing all of the Centrify-specific information stored in Active Directory. With Access Manager, you can:
n Manage access to all of your UNIX, Linux, and Mac OS X computers.
n Set and modify user and group properties for all of your UNIX, Linux, andMac OS X users and groups.
n Create and manage zones and zone properties to simplify the process ofgiving users access to specific computers and migrating UNIX useraccounts to Active Directory.
n Add Active Directory users and groups to zones.
n Import user and group information from local password and groups files orfrom NIS and NIS+ servers and domains.
n Import and maintain network information from NIS maps such asnetgroup, auto.master, and automount or create custom NIS maps.
n Define and assign rights and roles that authorize or restrict access tospecific computers and operations on managed computers.
You can also add other snap-ins to Access Manager or add Access Manager toanother Microsoft management console snap-in. For example, you can add theActive Directory Sites and Services and Active Directory Domains and Trustssnap-ins to Access Manager to consolidate management activity.
Allowing and blocking domains for Access Manager
You can configure Access Manager so that it can connect to trusted domains bysetting the following registry key with a list of trusted domains and/or forests.The type of key is REG_MULTI_SZ:
HKLM\SOFTWARE\Centrify\CIMS\AllowedTrusts
• • • • • •
Planning and Deployment Guide 37

Configuring a list of domains this way can be particularly useful and faster whenyou have a large amount of domains. Enter each domain as a separate line in theRegistry Editor window.
For example, to specify a single domain:
acme.com
For example, to specify multiple domains:
acme.comfoo.com
To block access to domains, you use the IgnoreTrusts key: HKLM\SOFTWARE\Centrify\CIMS\AllowedTrusts.
Core agent components and services
The Centrify Agent makes a UNIX, Linux, or Mac OS X computer look and behavelike aWindows computer to Active Directory. Once installed, the agent performsthe following key tasks:
n Joins UNIX, Linux, or Mac OS X computers to an Active Directory domain.
n Communicates with Active Directory to authenticate users logging on tothe UNIX, Linux, or Mac OS X computer, and caches credentials for offlineaccess.
n Enforces Active Directory authentication and password policies.
n Extends Active Directory group policies to manage the configuration ofUNIX users and computers.
n Provides a Kerberos environment so that existing Kerberos applicationswork transparently with Active Directory.
Individual agents are platform-specific, but provide an integrated a set ofservices to extend Active Directory authentication, authorization, and directoryservice to Centrify-managed computers. The following figure provides a closerlook at the services provided through the Centrify Agent:
• • • • • •
Architecture and basic operations 38

As this figure suggests, the agent typically includes the following corecomponents:
n The core component of the agent is the adclient process that handles allof the direct communication with Active Directory. The agent contactsActive Directory when there are requests for authentication, authorization,directory assistance, or policy updates, and then passes valid credentials orother requested information along to the programs or applications thatneed this information.
n The core component of the agent is the adclient process that handles allof the direct communication with Active Directory. The agent contactsActive Directory when there are requests for authentication, authorization,directory assistance, or policy updates, and then passes valid credentials orother requested information along to the programs or applications thatneed this information.
n The Centrify Pluggable Authentication Module, pam_centrifydc, enablesany PAM-enabled program, such as ftpd, telnetd, login, and sshd, toauthenticate using Active Directory.
Note: For AIX and Mac OS X, the implementation is slightlydifferent. For example, the agent for AIX can use PAMinterfaces if you have configured the computer to use PAMmodules or the interfaces in the Loadable AuthenticationModule (LAM) to handle behavior that on other platforms isdone through PAM or NSS. Similarly, the agent for Mac OS Xuses native interfaces where appropriate to provide servicesfrom Active Directory to the local computer.
• • • • • •
Planning and Deployment Guide 39

n The Centrify NSSmodule is added to nsswitch.conf so that system look-up requests use the agent to look up and validate information using ActiveDirectory through LDAP.
n The ADEdit Tcl application and procedure library and individual UNIXcommand line programs enable you to perform common administrativetasks, such as join and leave the Active Directory domain or change userpasswords for Active Directory accounts interactively or within scripts toautomate tasks.
n The Centrify-managed Kerberos environment generates a Kerberosconfiguration file (etc/krb5.conf) and a default key table (krb5.keytab)file to enable your Kerberos-enabled applications to authenticate throughActive Directory. These files are maintained by the agent and are updatedto reflect any changes in the Active Directory forest configuration.
n The Centrify local cache stores user credentials and other information foroffline access and network efficiency.
In addition to these core components, the agent can also be extended with theadditional software packages, including modified versions of programs such asKerberos command line tools, OpenSSH, OpenLDAP, and PuTTY utilities.Centrify-enabled versions of these programs allow you to use Active Directoryaccounts and Kerberos credentials for authentication, authorization, and policyenforcement services. Centrify also provides authentication modules that enableyou to configure single sign-on for web and database applications, andspecialized extensions such as the adnisd Network Information Service, whichenables you to publish information stored in Active Directory to NIS clients.
Key operations handled by the adclient process
The most important element in the agent is the adclient process. The adclientprocess runs as a single trusted service. This process is automatically added as aboot service and is started whenever you reboot a managed computer. Theadclient process handles all of the direct communication with Active Directoryand manages all of the operations provided through the other services.
The adclient process performs the following key tasks on managed computers:
n Locates the appropriate domain controllers for the local computer based onthe Active Directory forest and site topology published by theWindowsDNS server. If a domain controller becomes unavailable, the adclientprocess automatically locates the next available domain controller to
• • • • • •
Architecture and basic operations 40

ensure uninterrupted service.
n Provides Active Directory with credentials for the local computer account toverify the computer is a valid member of the domain.
n Delivers and stores user credentials so that users can be authenticated byActive Directory and, once authenticated successfully, can sign on even ifthe computer is disconnected from the network for mobile access or ifActive Directory is unavailable.
n Caches query responses and other information, including positive andnegative search results, to reduce network traffic and the number ofconnections to Active Directory and to ensure users can workuninterrupted and start new application sessions using their existing logincredentials. All communication with Active Directory is encrypted to ensuresecurity, and you can manage the cache through configuration parametersor group policy.
n Creates and maintains the Kerberos configuration and service ticket files toallow existing Kerberos-enabled applications to work with Active Directorywithout any manual configuration.
n Synchronizes the local computer’s time with the clock maintained by ActiveDirectory to ensure the timestamp on Kerberos tickets issued by the KDCare within a valid range.
n Resets the password for the local computer account in Active Directory at aregular interval to maintain security for the account’s credentials.
n Provides all the authentication, authorization, and directory look-upservices retrieved from Active Directory to the other Centrify Agentservices, such as the PAM service or the Apache authentication module.
How PAM applications work with Centrify
Pluggable Authentication Modules (PAM) are a common mechanism forconfiguring authentication and authorization used by many UNIX programs andapplications. If a program or application uses PAM for authentication andauthorization, the rules for authenticating the user are configured in either thePAM configuration file, /etc/pam.conf or in application-specific files in the/etc/pam.d directory.
The Centrify Agent for *NIX includes its own Pluggable Authentication Module(pam_centrifydc) that enables any application that uses PAM, such as ftpd,telnetd, login, and Apache, to authenticate users through Active Directory.
• • • • • •
Planning and Deployment Guide 41

When you join a domain, the pam_centrifydcmodule is automatically placedfirst in the PAM stack in system-auth, so that it takes precedence over otherauthentication modules.
The pam_centrifydcmodule is configured to work with adclient to provide anumber of services, such as checking for password expiration, filtering for usersand groups, and creating the local home directory and default user profile filesfor new users. The services provided through the pam_centrifydcmodule canbe customized locally on a computer, modified through Active Directory grouppolicy, or configured through a combination of local and Active Directorysettings.
Working in conjunction with the adclient process, the pam_centrifydcmoduleprovides the following services for PAM-enabled programs and applications:
n Requests the PAM-enabled application to prompt for a password whenappropriate and verifies whether the application-provided user name andpassword are valid in Active Directory.
n Checks whether the user’s password has expired in Active Directory. If thepassword has expired, the pam_centrifydcmodule prompts the user tochange the password, and forwards the new password to the adclientprocess, which communicates the change to Active Directory.
n Queries the adclient process to determine whether any access controlpolicies are applied. For example, the pam_centrifydcmodule uses theinformation in the centrifydc.conf file to determine whether a local userattempting to log on is mapped to an Active Directory account, whetherspecific users or groups have been granted or denied permission to log onto the local computer, or whether Active Directory authentication should beignored for a specific user or group.
n Creates the local home directory and default user profile files for new users.The pam_centrifydcmodule uses skeleton files to set up the userenvironment when new Active Directory users log on to a managedcomputer for the first time.
Most of these tasks are performed during a user login session as a series ofrequests and replies from the pam_centrifydcmodule to Active Directorythrough the adclient process for those programs and applications that areconfigured to use PAM. Because PAM is the most common authenticationservice used by UNIX programs and applications, the pam_centrifydcmodule isthe most commonly used for a typical log-on session. For a more detaileddescription of a typical log-on process, seeWhat happens during the typical log-on process.
• • • • • •
Architecture and basic operations 42
Note: The order in which identity stores are listed in the nsswitch.conffile does not influence authentication. Authentication andauthorization services are provided by Active Directory throughthe Centrify Agent for *NIX and its PAM component, and bydefault, Active Directory is always tried before any other sources.The order in which sources are checked is controlled through thePAM configuration settings, for example, the lines defined in thepam.conf file. In general, you should not modify the PAMconfiguration because making changes to these settings cancompromise security or produce unexpected and undesirableresults.
How NSS configuration works with Centrify
The Name Service Switch (NSS) provides a mechanism for identifying sources ofnetwork information a computer should use, such as local password and groupfiles, NIS maps, NIS+ tables, LDAP, and DNS, and the order in which thesesources should be consulted when looking up users, groups, host names, andother information.
When you join a domain, the NSS configuration file, nsswitch.conf, isautomatically updated to use the Centrify Agent’s NSS module first. Using theadclient process and the service library, the Centrify NSS module accessesnetwork information that’s stored in Active Directory through LDAP.
When a UNIX program or application needs to look up information, it checks thensswitch.conf file and is directed to use the nss_centrifydcmodule. The nss_centrifydcmodule directs the request to Active Directory through the adclientprocess. The adclient process provides the information retrieved from ActiveDirectory, then caches the information locally to ensure faster performance,reduce network traffic, and allow for disconnected operation.
Note: The order in which identity stores are listed in the nsswitch.conffile does not influence authentication. Authentication andauthorization services are provided by Active Directory throughthe Centrify Agent and its PAM service, so Active Directory isalways tried before any other sources, regardless of what youhave specified in the nsswitch.conf file. Instead, thensswitch.conf file determines the sources to use in responding toNSS queries such as getpwnam. In general, you should not modifythis file because modifying the file can compromise security and
• • • • • •
Planning and Deployment Guide 43

complicate auditing activity. In addition, you should not specifyldap as a source in any nsswitch.conf file where you haveinstalled the Centrify Agent. Specifying ldap in thensswitch.conf file can cause the system to crash.
How the Centrify Agent manages Kerberos files
Kerberos is a network authentication protocol for client/server applications thatuses encrypted tickets passed through a central Key Distribution Center to verifythe identity of a user or service requesting access. Because Kerberos is anindustry standard and a secure network authentication mechanism, you mayalready have UNIX programs and services that are configured to use it. To allowthose existing Kerberized applications to work with Active Directory withoutmanual configuration, the adclient process automatically creates andmaintains the Kerberos configuration file, krb5.conf, and the krb5.keytabservice ticket file to point Kerberos-enabled services and applications to the KeyDistribution Center (KDC) in Active Directory when you join a domain.
The configuration file is initially created using information collected by probingDNS and Active Directory with the default domain set to the domain that thecomputer has joined. Whenever a logon or ticket validation is performed with adomain that is not in the configuration file, the configuration file is updated sothat it includes the new domain. Although the adclient process canautomatically update the file as needed, it does not destroy existingconfiguration entries that you may have added by hand. Because of this,Centrify Agents work seamlessly with existing Kerberos-enabled applications.
Note: Centrify Authentication Servicesupports users defined in aKerberos realm as long as the Kerberos domains or realms areresolvable by DNS. Kerberos realm names are case sensitive, sobe careful to check that the realm spelling and capitalization iscorrect. (Ref: CS-21846a )
What happens during the typical log-on process
The core Centrify Agent for *NIX components work together to identify andauthenticate the user any time a user logs on to a computer using any UNIXcommand that requires the user to enter credentials. The following stepssummarize the interaction to help you understand the process for a typical log
• • • • • •
Architecture and basic operations 44

on request. The process is similar, though not identical, for UNIX commands thatneed to get information about the current user or group.
Note: The following steps focus on the operation of the agent ratherthan the interaction between the agent and Active Directory. Inaddition, these steps are intended to provide a generalunderstanding of the operations performed through the agent anddo not provide a detailed analysis of a typical log on session.
When a user starts the UNIX computer, the following takes place:
1. A login process starts and prompts the user to supply a user name.
2. The user responds by entering a valid local or Active Directory user name.
3. The login process, which is a PAM-enabled program, then reads the PAMconfiguration file, /etc/pam.conf, and determines that it should use theCentrify PAM service, pam_centrifydc, for identification.
4. The login process passes the login request and the user name to theCentrify PAM service for processing.
5. The pam_centrifydc service checks the pam.allow.override parameterin the agent configuration file to see if the user name entered is an accountthat should be authenticated locally.
n If the user should be authenticated locally, the pam_centrifydcservice passes the login request to the next PAMmodule specified inthe PAM configuration file, for example, to the local configuration file/etc/passwd.
n If the user is not listed as an override account, the pam_centrifydcservice continues with the login request and checks to see if theadclient process is running, then passes the login request and username to adclient.
6. The adclient process connects to Active Directory and queries the ActiveDirectory domain controller to determine whether the user name includedin the request is a user who has access to computers in the currentcomputer’s zone.
n If the adclient process is unable to connect to Active Directory, itqueries the local cache to determine whether the user name has beensuccessfully authenticated before.
n If the user account does not have access to computers in the currentzone or can’t be found in Active Directory or the local cache, the
• • • • • •
Planning and Deployment Guide 45

adclient process checks the Centrify Agent configuration file to seeif the user name is mapped to a different Active Directory useraccount with the adclient.mapuser.username parameter.
n If the user name is mapped to another Active Directory account in theconfiguration file, the adclient process queries the Active Directorydomain controller or local cache to determine whether the mappeduser name has access to computers in the current computer’s zone.
7. If the user has a UNIX profile for the current zone, the adclient processreceives the zone-specific information for the user, such as the user’s UID,the user’s local UNIX name, the user’s global Active Directory user name,the groups of which the user is a member, the user’s home directory, andthe user’s default shell.
8. The adclient process checks for NSS override settings(nss.group.override and nss.user.override) to determine whetherthere are any changes to the user profile or additional restrictions thatshould override the profile retrieved or prevent the user from logging on.
9. The adclient process queries through the nss_centrifydc service todetermine whether there’s another user currently logged in with same UID.
n If there is a potential conflict between local user account and theUNIX profile for an Active Directory account, the adclient processnotifies the pam_centrifydc service of the potential conflict.
n The pam_centrifydc service checks the Centrify Agent configurationfile to determine to issue a warning, ignore the conflict, or prevent theuser from logging on.
n If the login continues, the pam_centrifydc service asks the loginprocess for a password.
10. The login process prompts the user to provide a password and returns thepassword entered to the pam_centrifydc service.
11. The pam_centrifydc service checks the pam.allow.users andpam.deny.users parameters in the agent configuration file to see if anyuser filtering has been specified to allow or deny access to specific useraccounts. If any user filtering has been specified, the current user is eitherallowed to continue with the login process or denied access.
12. The pam_centrifydc service checks the pam.allow.groups andpam.deny.groups parameters in the agent configuration file to see if anygroup filtering has been specified to allow or deny access to members ofspecific groups. If any group filtering has been specified, the current user is
• • • • • •
Architecture and basic operations 46

either allowed to continue with the login process or denied access basedon group membership.
13. If the current user account is not prevented from logging on by user orgroup filtering, the pam_centrifydc service queries the adclient processto see if the user is authorized to log on.
14. The adclient process queries the Active Directory domain controllerthrough Kerberos to determine whether the user is authorized to log on tothe current computer at the current time.
15. The adclient process receives the results of its authorization request fromActive Directory and passes the reply to the pam_centrifydc service.
16. The pam_centrifydc service does one of the following depending on thecontent of the authorization reply:
n If the user is not authorized to use the current computer or to log in atthe current time, the pam_centrifydc service denies the user’srequest to log on through the UNIX login process.
n If the user’s password has expired, the pam_centrifydc servicesends a request through the UNIX login process asking the user tochange the password. After the user supplies the password, thelogin process completes successfully.
n If the user’s password is about to expire, the pam_centrifydc servicenotifies the user of impending expiration through the login process.
n If the user is authorized to log on and has a current password, thelogin process completes successfully. If this is the first time the userhas logged on to the computer through the agent, the pam_centrifydc service creates a new home directory on the computer inthe location specified in the agent configuration file by the parameterpam.homeskel.dir.
The following figure provides a simplified view of a typical log-on process whenusing the Centrify Agent for *NIX.
• • • • • •
Planning and Deployment Guide 47

How failover and disconnected access work
The Centrify Agent caches data from Active Directory so that users can log onand perform tasks even if the network or Active Directory server is unavailable,whether because of unexpected connectivity problems, scheduled maintenance,or offline operation of a portable computer. There are several configurationparameters that manage how the agent determines its connectivity to ActiveDirectory, the domain controllers it should attempt to connect to, and theoperation of the agent if it is unable to connect to any domain controller.
In most cases, you can set the values for the configuration parameters thatcontrol failover and disconnected operation by enabling Centrify group policiesfor a site, domain, or organizational unit. Alternatively, you can set theseparameters by editing the /etc/centrifydc/centrifydc.conf configurationfile on individual computers.
For an overview of how the agent determines the connection status and locatesa domain controller to use, see the following topics:
n Establishing a connection to DNS
n Connecting to the closest domain controller
n Restricting the domain controllers contacted
n Switching to disconnected mode
n Responding to DNS configuration changes
n Connecting to trusted forests and domains
• • • • • •
Architecture and basic operations 48

Establishing a connection to DNS
With each request to Active Directory, the Centrify Agent first determines itsconnection status based on upon the availability of a Domain Name Servicedomain controller. If a DNS request for a host name takes longer than thenumber of seconds specified by the adclient.dns.response.maxtimeparameter, the agent assumes DNS is down and switches to disconnectedmode.
While running in the disconnected mode, the agent does not attempt any moresynchronous network communications. Instead, it runs a background threadevery 30 seconds to determine when DNS becomes available. The default valuefor the adclient.dns.response.maxtime is 10 seconds, but this value can bechanged by group policy or by editing the /etc/centrifydc/centrifydc.conffile.
Note: If the network is disconnected for a short period of time, but duringthat time no data is needed from Active Directory, the agent doesnot switch into disconnected mode. The status only changes if aconnection attempt to DNS or to Active Directory through LDAPfails.
Connecting to the closest domain controller
If the initial DNS request for a host name is successful, the Centrify Agentattempts to connect to the appropriate domain controller and global catalog forits joined domain using the site information found in DNS.
Site information is configured using Active Directory Sites and Services and isdefined by subnet. Using the site information, the agent queries DNS for a list ofthe domain controllers in its site and attempts to connect to the nearest domaincontroller. It will continue trying to connect to each of the domain controllers in itssite based on proximity until it finds a server available. If the agent is unable toconnect to any of the domain controllers in its site or if no site information isavailable, the agent tries to connect to any remaining domain controllers listed inDNS.
Because connection status is determined by an attempt to bind to the ActiveDirectory domain controller using an LDAP call, theadclient.ldap.socket.timeout parameter determines the maximum numberof seconds the Centrify Agent will wait for a socket connection timeout whilebinding to the LDAP server. The default value is 5 seconds.
• • • • • •
Planning and Deployment Guide 49

Restricting the domain controllers contacted
If you have a large Active Directory infrastructure or some unreliable subnets,you might want to restrict the domain controllers the agent should attempt toconnect to if its primary domain controller becomes unavailable. You can limitthe list of domain controllers the agent should attempt to connect to by settingthe following property in the centrifydc.conf file:
dns.dc.domain_name: hostname [hostname] ...
where the domain_name is the Active Directory domain name and the hostnameis a fully-qualified host name that can be resolved using DNS or the /etc/hostsfile.
You can also limit the list of global catalog domain controllers the agent shouldattempt to connect to by setting the following property in the centrifydc.conffile:
dns.dc.forest_name: hostname [hostname] ...
where the forest_name is the forest root domain and the hostname is a fully-qualified host name that can be resolved using DNS or the /etc/hosts file.
Alternatively, you can use the adclient.server.try.max parameter orMaximum Server Connection Attempts group policy to limit the number ofdomain controllers the agent will attempt to connect to before switching todisconnected mode, eliminating the need to explicitly list the domain controllersusing the dns.dc.domain_name and dns.gc.forest_name parameters. Forexample, to have the agent try a maximum of three domain controllers, you canset the following property in the centrifydc.conf file:
adclient.server.try.max: 3
Because global catalog and domain controller connections are handledindependently, Centrify Agent for *NIX can still provide authentication services ifthe global catalog domain controller is disconnected, as long as another domaincontroller is available.
Switching to disconnected mode
After a connection to a domain controller is established, each subsequentrequest for information from Active Directory checks the connection status. If arequest is made to Active Directory and a response is not received within thenumber of seconds specified by the adclient.ldap.timeout parameter, that
• • • • • •
Architecture and basic operations 50

request is retried once. For the second request, the agent will wait up to twice aslong for a response. If the second request is not answered within that amount oftime, the connection to that specific domain controller is considereddisconnected. Once a connection to a specific domain controller is indisconnected mode, a background thread will attempt to reconnect to thatdomain approximately every 30 seconds. By default, the agent waits 7 secondsfor a response to the first request. If the request isn’t answered, it retries therequest and waits up to another 14 seconds for a response before switching todisconnected mode.
The adclient.ldap.timeout parameter specifies the maximum number ofseconds to wait for Active Directory fetch, update, and delete requests toimprove the response time when an initial connection attempt fails. A separateparameter, adclient.ldap.timeout.search, specifies the maximum time towait for search requests. If the search timeout value is not specified, the defaultis double the adclient.ldap.timeout value. By default, therefore, the agentwaits a maximum of 14 seconds for search requests.
The values for these parameters can be adjusted for high load or latencynetworks by configuring group policies or by editing the/etc/centrifydc/centrifydc.conf file.
Responding to DNS configuration changes
The DNS information collected when the agent starts and connects to a domaincontroller is not cached, and idle connections to Active Directory are droppedafter 5 minutes by default. If you make changes in the DNS configuration, thosechanges are detected the next time the agent needs to reconnect, either becausean idle connection has been dropped, or the currently connected domaincontroller suddenly becoming unavailable.
Connecting to trusted forests and domains
If the Centrify Agent establishes a successful connection to the joined domain, italso generates or updates the /etc/krb5.conf file using the domain trustinformation from the global catalog, and attempts to connect to the trusteddomains or to external forests to find all of the domains that are trusted.
Depending on the trust relationships you have defined, network topology, orfirewall requirements, querying external trusted forests can have a significant,negative impact on network performance. You can control whether trusted
• • • • • •
Planning and Deployment Guide 51

domains and external forests are queried to establish transitive trusts and cross-forest authentication with the adclient.ldap.trust.enabled parameter.Setting the adclient.ldap.trust.enabled parameter to true indicates thatyou want the Centrify Agent to query trusted domains and forests. Setting thisparameter to false disables this feature so that the agent does not connect toany external forests or trusted domains.
If you set the adclient.ldap.trust.enabled parameter to true, you cancontrol the maximum number of seconds to wait when searching for trustinformation in external forests and other trusted domains with theadclient.ldap.trust.timeout parameter. By default, the agent waits 10seconds. The search operation is not retried if the request times out, but therequest is regenerated approximately once an hour.
If your trusted domains and forests are widely distributed, have slow orunreliable network connections, or are protected by firewalls, you might want toincrease the value for this parameter to allow time for the Centrify Agent tocollect information from external domains and forests.
• • • • • •
Architecture and basic operations 52

Deployment processoverview
This chapter summarizes what’s involved in deploying Centrify software. Itincludes simplified diagrams that highlight the steps involved and describes thetasks that are done only once, the tasks that are repeated to complete adeployment, and the tasks that may be part of the deployment project orongoing administration after deployment.
The individual diagrams provide additional details about what’s involved in eachphase or the decisions you will need to make, such as who should be part of thedeployment team, where to install the software, and who has permission to dowhat.
What’s involved in a typical deployment project
The following illustration provides a visual summary of the overall deploymentprocess and highlights a few keys to a successful deployment.
• • • • • •
Planning and Deployment Guide 53

The next sections provide additional details about each of these phases.
Plan
During the first phase of the deployment, you should collect and analyze detailsabout your organization’s requirements and goals. You can then makepreliminary decisions about sizing, network communication, and what your zonestructure should look like.
• • • • • •
Deployment process overview 54

Here are the key steps involved:
n Assemble a deployment team with Active Directory and UNIX expertise.
The teammight also include specialists, such as database administrators,network architects, or application owners. For more information aboutassembling a deployment team, see Preparing a deployment team.
n Provide basic training so that members of the deployment team arefamiliar with Centrify concepts and terminology and knowwhere to go formore information.
n Analyze the existing environment to determine your goals andrequirements and identify target computers on which you plan to installCentrify components.
This step is essential for designing the zone structure if you are migratingany local accounts or legacy profiles. It is also critical if you are deployingthe auditing infrastructure. For more information about the questions toanswer and factors that affect deployment, see Defining goals for thedeployment.
n Design a basic zone structure that suits your organization.
The zone structure depends primarily on how you want to use zones. Formore information about deciding how to use zones, seeWhy use zones?.
n Identify a target set of computers for deployment and check that requiredports are open.
• • • • • •
Planning and Deployment Guide 55

Default ports for network traffic and communication
To help you plan for network traffic, the following ports are used in the initial setof network transactions when a user logs on and the agent connects to ActiveDirectory:
n Directory Service - Global Catalog lookup request on port 3268.
n Authentication Services - LDAP sealed request on port 389.
n Kerberos – Ticket Granting Ticket (TGT) request on port 88.
n Network Time Protocol (NTP) Server – Time synchronized for Kerberos onport 123.
n Domain Name Service (DNS) – Host (A), Pointer (PTR), Service Location(SRV) records on port 53.
Depending on the specific components you deploy and operations performed,you might need to open additional ports. The following table summarizes theports used for different editions of Centrify software.
Thisport
Is used for Where it is required
389 Encrypted TCP/UDPcommunication
Centrify authentication service and privilege elevationservice for Active Directory authentication and client LDAPservice.
3268 Encrypted TCPcommunication
Centrify authentication service and privilege elevationservice for Active Directory authentication and LDAPglobal catalog updates.
88 Encrypted UDPcommunication
Centrify authentication service and privilege elevationservice for Kerberos ticket validation and authenticationfor agents and Centrify PuTTY.
464
Encrypted TCP/UDPcommunication forKerberos passwordchanges
Centrify authentication service and privilege elevationservice for Kerberos ticket validation and authenticationfor agents, Centrify PuTTY, adpasswd, and passwd.
53 TCP/UDPcommunication
Centrify authentication service and privilege elevationservice for clients using the Active Directory DNS serverrole for DNS lookup requests.
445Encrypted TCP/UDPcommunication fordelivery of group policies
Centrify authentication service and privilege elevationservice for adclient and adgpupdate using Samba (SMB)andWindows file sharing to download and update grouppolicies, if applicable.
123UDP communication forsimple network timeprotocol (NTP)
Centrify authentication service and privilege elevationservice to keep time synchronized between clients andActive Directory for Kerberos ticketing.
• • • • • •
Deployment process overview 56

Thisport
Is used for Where it is required
22Encrypted TCPcommunication forOpenSSH connections
Centrify authentication service and privilege elevationservice to support secure shell connections on remoteclients.
23 TCP communication forTelnet connections
Centrify authentication service and privilege elevationservice to support telnet connections on remote clientsif you cannot use secure shell (ssh).
By default, telnet connections are not allowed becausepasswords are transferred over the network as plain text.
none ICMP (ping) connectionsCentrify authentication service and privilege elevationservice to determine whether if a remote computer isreachable.
1433
Encrypted TCPcommunication for thecollector connection toMicrosoft SQL Server
Centrify authentication service, privilege elevation service,and audit and monitoring service to enable the collectorservice to send audited activity to the database.
5063
Encrypted TCP/RPCcommunication for theagent connection tocollectors
Centrify authentication service, privilege elevation service,and audit and monitoring service to enable the auditingservice to record user activity on an audited computer.
443 Cloud proxy server toCentrify cloud service Centrify for mobile device management.
Network connections and database management for auditing
If you are planning a deployment with audit and monitoring service installedtogether with identity and privilege management, you must plan for reliable,high-speed network connections between components that collect and transferaudit data and how network traffic will be affected. You must also plan how youwill create and manage the databases that store and retrieve audit data, yourdata archiving and retention policies, auditor permissions, and other details. Formore information about planning and sizing for audit and monitoring service, seethe Auditing Administrator’s Guide.
Prepare
After you have analyzed the environment, you should prepare the ActiveDirectory organizational units and groups to use. You can then installadministrative consoles and prepare initial zones.
• • • • • •
Planning and Deployment Guide 57

Here are the key steps involved:
n Create organizational units or containers to define a scope of authority.
For example, if you want to organize all of the UNIX-related informationtogether for your organization, you can create one top-level container forthe enterprise, such as Centrify UNIX. If you want to define the scope ofauthority at a regional or business unit level, you might have separate top-level containers for the different regions or business units, for example,UNIX NA-SA, UNIX EMEA, UNIX PACIFIC or UNIX-Federal, UNIX-Consumer,UNIX-Industrial.
The deployment project team should consult with the Active Directoryenterprise administrator to determine the appropriate top-level containersor organizational units and who should be responsible for managing anddelegating administrative tasks for the objects in those top-levelcontainers. For more information about creating organizational units orcontainers in Active Directory, see Designing organizational units forCentrify.
n Create the appropriate Active Directory security groups for yourorganization.
• • • • • •
Deployment process overview 58

Groups can simplify permission management and the separation of dutiessecurity model. For more information about using groups, see Securitygroups to manage Centrify information.
n Select at least one administrativeWindows computer and install Centrifycomponents Access Manager.
This step is not strictly required if you only use existing processes or scriptsto perform administrative tasks, but Centrify recommends you have atleast one computer where you can use the graphical user interface toperform common tasks. If you are deploying the audit and monitoringservice infrastructure, you should also install Audit Manager and AuditAnalyzer. For more information about installing Centrify software onWindows, see Installing Authentication & Privilege Services.
n Start the Centrify Access Manager console to run the SetupWizard for theActive Directory domain.
n Create a parent zone and the appropriate child zones as identified in yourbasic zone design.
The hierarchical zone structure you use depends primarily on how youwant to use inheritance and overrides. For more information about creatingparent and child zones, see Creating the first zone.
n Determine the target set of computers and make sure that they have theappropriate connectivity.
Deploy
After you have prepared Active Directory, installed administrative consoles on atleast one computer, and created at least one zone, you are ready to deploy onthe computers to be managed.
• • • • • •
Planning and Deployment Guide 59

Here are the key steps involved:
n Download agent software from the Centrify Download Center or a networklocation.
n Deploy the agent software on discovered computers that are ready forinstallation.
n Determine whether there are any local accounts to migrate.
Right-click discovered computers, then click Export Users and Groups togenerate a text file containing information about local accounts. Reviewthe text file to determine whether there are any local accounts to migrate toActive Directory.
If there are local accounts that must be able to log on to the discoveredcomputer, import the groups, then users and assign them the default UNIXLogin role. For more information about migrating local accounts, seeMigrating existing users to hierarchical zones.
n Join the domain using the adjoin command.
n Prepare basic group policies.
The most commonWindows computer configuration policies to deploy are:
n Interactive Logon: Message text for users attempting to log on:—Enable and type a message that instructs the user to log on with anActive Directory user name and password.
n Global Configuration Settings - MaxPollInterval:—Enable and set aninterval if you are using Active Directory and the Centrify networktime provider. Disable if you are using a native UNIX NTP daemon.
n EnableWindows NTP Client—Enable if you are using Active Directoryand the Centrify network time provider. Disable if you are using anative UNIX NTP daemon.
The most common Centrify computer configuration policies to deploy are:
n Set login password prompt—Enable and type a message thatinstructs the user to log on with an Active Directory user name andpassword.
n Copy files—Enable to copy configuration files such as those requiredby autofs or sshd from the SYSVOL folder to managed computers.
n Generate forwardable tickets—Disable to prevent logon tickets frombeing sent from one computer to another.
• • • • • •
Deployment process overview 60

Validate
After you have deployed agents on target computers, you should test and verifyoperations before deploying on the additional computers.
Here are the key steps involved:
n Log on to a target computer using an Active Directory user account andpassword to verify Active Directory authentication.
n Test password policy enforcement by attempting to change to a passwordthat violates password complexity rules.
n Test account lockout and reset.
Manage
After you have verified the successful deployment on target computers, there aremany ways you can refine, manage, and enhance on-going operations.
• • • • • •
Planning and Deployment Guide 61

Here are a few of the key ways you can add value after deployment:
n Add custom roles and role assignments for users, groups, and computers.
n Import custom permissions from sudoers configuration files.
n Deploy group policies on the appropriate organizational units.
n Add the auditing infrastructure and add auditing to custom roles.
n Integrate Centrify software and Active Directory authentication andauthorization services with database or web applications.
Deployment tasks and administrative activity
For most deployments, there are tasks that you only perform once for an entireorganization, tasks that are repeated until the deployment in complete, andtasks that are essential to deployment, but are also administrative tasks that youperform infrequently or periodically after deployment.
Steps you only take once
In most organizations, you only perform the following tasks once in preparationfor the deployment:
n Assemble a deployment team with Active Directory, UNIX, and otherexpertise.
• • • • • •
Deployment process overview 62

n Provide basic training covering Centrify architecture, concepts, andterminology.
n Analyze the existing environment:
n Find a target set of computers that share a common attribute, such asthe same operating system or a similar user population.
n Plan for permissions and the appropriate separation of duties for yourorganization.
n Review network connections, ports, firewall configuration.
n Identify computers for administration.
Basic deployment—Access Manager
Auditing—Audit Manager and Audit Analyzer consoles, collectors, auditdatabases and servers, and the installation management server
Provisioning service—Zone Provisioning Agent and configuration tool
n Design a basic zone structure that suits your organization.
n Single or multiple top-level parents.
n Initial child zones, for example separate zones for Red Hat Linux andMac OS X or different functional departments.
n Create organizational units or containers to define a scope of authoritywithin Active Directory.
n Create Active Directory security groups for the UNIX Login role and thelisted role.
n Create an Active Directory distribution group for provisioning groups andan Active Directory distribution group for provisioning users if using theprovisioning service.
n Install Access Manager on at least one administrativeWindows computer.
n Open Access Manager for the first time to run the SetupWizard for theActive Directory domain.
n Create a parent zone and the appropriate child zones as identified in yourbasic zone design.
Creating additional zones is an infrequent administrative task that isperformed when the need arises. The basic zone design should besufficient for the scope of your initial deployment.
n Prepare group policies to be applied.
• • • • • •
Planning and Deployment Guide 63

Steps you take more than once during deployment
During deployment, you perform the following tasks multiple times until youhave rolled out the agent to all of the target computers that are in scope for thedeployment:
n Download agent software from the Centrify Download Center or a networklocation.
n Deploy the agent software on computers that are ready for installation.
n If there are local accounts to migrate that must be able to log on to thediscovered computer:
n Import the groups, then users.
n Map groups, then users to the appropriate Active Directory groupsand users.
n Assign migrated accounts the default UNIX Login role.
n Join the domain using the adjoin command.
n Verify Active Directory authentication and validate other operations.
After deployment, deploying new or updated agents is an ongoingadministrative task that should be performed on a regular basis unless you havechange control issues that either prevent software updates, do not allowInternet connections from the computer where Access Manager is installed, ordo not want to deploy the agent on computers added to your network.
Steps you take after deployment to begin managing zoneseffectively
After you have migrated existing user populations, deployed the agent, andjoined a domain, there are additional tasks you perform to complete thedeployment and transition into effective zone administration.
The following tasks are optional but illustrate common administrative tasks thatare often part of the deployment process to prepare for ongoing administrationand improvements to operational security and efficiency:
n Create custom roles for accounts that have permission to run privilegedcommands.
• • • • • •
Deployment process overview 64

n Create computer roles to link groups of computers with specific user roleassignments.
n Map service accounts to Active Directory accounts.
n Deploy the basic set of group policies for computers and users.
What happens after deployment?
After deployment, ongoing management of UNIX computers, users, and groupsis often handed off to Active Directory or Windows administrators or an internalservice desk provisioning team to align with previously established processesand procedures for Windows servers and workstations. This is entirely a matterof organizational policy. However, in many cases UNIX administrators mustcontinue to work with their Windows counterparts to ensure the appropriaterights and roles are assigned and the appropriate group policies are deployed.
Sample work flow for deployment decisions
Centrify software solutions are extremely flexible so that they can be adapted toa wide variety of organizational requirements. All of this flexibility, however, canmake deployment decisions difficult, especially in large scale or complexenvironments. To help you sort out the questions to ask, use the following workflow and responsibilities diagram as a guide.
This sample workflow diagram is only intended as a visual guide to the keydesign decisions you need to make. Many of these topics are covered in moredetail in other chapters in this guide. For many organizations, however, the bestguidance comes from an on-site Centrify Professional Services consultant or aCentrify partner with experience designing deployment solutions tailored to yourorganization’s business requirements. For customized help and advice, contactyour Centrify sales representative.
• • • • • •
Planning and Deployment Guide 65

Planning organizationalunits and security groups
One of the important steps in planning a successful deployment of Server Suiteis to consider how the software fits into your Active Directory infrastructure. Thissection describes the issues you should consider in the planning phase thataffect how Active Directory and Centrify-specific objects are organized andsuggests an organizational model you can use to successfully deploy Centrifywithin an existing Active Directory infrastructure.
If you are planning a deployment for managing and monitoring access toWindows computers, only Licenses and Zones parent containers is applicableand you can skip the other topics in this section. If you are planning adeployment that includes a mix of different platforms, however, you shouldreview the recommendations for using organizational units (OUs) and groups.
If you plan to audit activity on any platform, Centrify recommends creatingseparate Active Directory security groups for auditors, administrators, and thecomputers that make up the audit and monitoring service infrastructure.Planning a deployment that includes the audit and monitoring serviceinfrastructure requires additional resources and expertise. For more informationabout deploying auditing components, see the Auditing Administrator’s Guide.
Identifying stakeholders and business processes
Deploying Server Suite requires you to add objects to the Active Directory forestand, in most cases, update business processes for provisioning and removingusers. It is important to identify who will be affected, which processes will beupdated, how planned changes affect different parts of the business, and whenyou plan to deploy as early as possible in the planning stage.
It is also important to contact one or more Active Directory administrators toestablish who will be creating the necessary objects in Active Directory and
• • • • • •
Planning and Deployment Guide 66

communicate the permissions required to create and manage those objects. Ifinternal policies only allow Active Directory administrators to createorganizational units (OUs) or security groups, you may need to negotiate whenthose activities take place and who will own the objects after they are created.
Identifying the appropriate people and processes early in the project helpseliminate unnecessary delays to the deployment and adoption of Centrifysoftware. Communicating how the deployment affects the user andadministrative communities helps ensure you can deploy rapidly and completethe project on-time.
Note: The single biggest obstacle to storing UNIX data in ActiveDirectory is overcoming internal process issues, such as changecontrol restrictions, naming convention requirements, or properauthorization to perform administrative tasks. If you identify andresolve these challenges at the start of the project, deployingCentrify software across the enterprise becomes a fairlystraightforward and painless task.
If you are a UNIX administrator, keep in mind that changes to Active Directoryoften require a formal change request and approval process, which can taketime and delay the project. The earlier you begin planning the changes to ActiveDirectory and the appropriate separation of duties for managing UNIX objectsbefore, during, and after migration, the more successful the deployment will be.
Designing organizational units for Centrify
You can store Centrify-specific objects anywhere in the Active Directorystructure if you choose. However, Centrify recommends that you create a single,high-level organizational unit (OU) specifically for Centrify objects at or near thetop-level of an Active Directory forest root domain. Using one high-levelorganizational unit simplifies the management of Centrify containers and UNIXdata.
Consolidating all UNIX data under a single organizational unit also enables youto establish an appropriate separation of duties without affecting any otherpreviously-established OUs or permissions in Active Directory and reduces theneed for additional process documentation or training. The disadvantage is thatthere may be strict authorization policies against setting up new organizationalunits.
• • • • • •
Planning organizational units and security groups 67

Selecting a location for the top-level OU
If you plan to follow the Centrify recommendation to create a top-levelorganizational unit for Centrify-related objects, such as Linux and UNIXcomputers, this high-level OU should be named so that it is easy to identify. Forexample, name the OU Centrify or Centrify UNIX. In deciding where this top-level OU should be placed, you should review your current Active Directoryinfrastructure.
There are several common scenarios:
n Single forest with a single domain
n Single forest with an empty root domain
n Single forest with account and resource domains
n Multiple forests with trust relationships
n Forests separated by a firewall (DMZ)
Single forest with a single domain
If you have a single forest with a single Default-First-Site domain, you can createthe top-level OU fat the same level as the default containers for Computers,Users, and other top-level objects. This is the simplest implementation of anActive Directory infrastructure. In this scenario, the top-level Centrify OU mightlook similar to this:
Single forest with an empty root domain
In this scenario, the forest root domain is used for the DNS namespace with oneor more child domains that store information about computers, users, andgroups. This is the most common Active Directory implementation. There are twoimportant considerations if this is your Active Directory infrastructure:
• • • • • •
Planning and Deployment Guide 68

n It is likely you will have a disjointed DNS namespace that you will need toresolve when you join computers to the domain.
n You might want to use multiple top-level Centrify OUs for the site. Forexample, assume the empty forest root domain, sidebet.org, containsthree child domains:
us.sidebet.org
europe.sidebet.org
asia.sidebet.org
In this scenario, you might have a top-level Centrify OU in each childdomain that includes UNIX computers to allow for more efficient datamanagement and delegation of administrative tasks. However, if the childdomains are centrally managed, you might want to create a single OU forCentrify in the forest root or one of the child domains. In general, you shouldbase your decision on who will be responsible for managing the Centrifyobjects. If there are separate administrative groups for each child domain,create a top-level Centrify OU in each child domain.
Single forest with account and resource domains
In this scenario, the forest root domain has at least two child domains. One childdomain stores computer principals and related information. This domain is theresource domain. Another child domain stores the user and group principals.This domain is the account domain. This scenario requires a trust relationshipthat allows the computers in the resource domain to trust the users and groupsin the account domain. If this is your Active Directory infrastructure, you shouldstore the Centrify data in the resource domain. For example, if the root domain,sidebet.org, contains the child domains accounts.sidebet.org andresources.sidebet.org, you would define the top-level Centrify OU in theresources.sidebet.org (OU=Acme,DC=resources,DC=sidebet,DC=org).
Multiple forests with trust relationships
In this scenario, you have more than one forest needing access to Centrify data.If you have multiple forests in your organizations, you should create the top-levelOU for Centrify in the forests that have UNIX computers. The forests must alsobe configured with either a one-way or two-way trust relationship. Cross-forestauthentication requires a forest functional level of Windows Server 2003 or later.
• • • • • •
Planning organizational units and security groups 69

Kerberos V5 realms are not supported.
Cross-forest authentication for two-way trust relationships
For forests that have a two-way trust relationship, users from either forest canbe authenticated to log on to the other forest. For example, if you haveconfigured a two-way trust relationship between the forest root domainsidebet.org and youbet.org, and there are both UNIX computers and UNIXusers in both forests, you would create one top-level Centrify OU in each forestand users from either forest can be authenticated to the computers in eitherforest.
Cross-forest authentication for one-way trust relationships
To allow for cross-forest authentication with a one-way trust, Centrifyauthenticates users in the trusted “accounts” forest to allow those users to logon to computers in the “resources” forest. Users in the trusting “resources” forestcannot log on to computers in the “accounts” forest.
For cross-forest authentication with a one-way trust, when you add the userfrom the “account” forest to the Centrify zone, the user’s samAccountNameattribute is stored in the zone object. Therefore, once the user is added to thezone, their samAccountName cannot change without causing authentication tofail.
Analyzing trust relationship to prevent authentication failures
If your Active Directory environment does not permit one- or two-way trustsbetween forests, however, or uses a complex combination of one-way and two-way trust relationships between forests, users who attempt to log on from aremote forest may be denied access if the forest they are logging on to or theforest they are logging in from do not share a trust relationship.
As part of your deployment planning you should review your entire ActiveDirectory infrastructure and determine whether you will be authenticating usersfrom multiple forests and how trust relationships are defined for the forestsusers need access to. You may want to change the trust relationships you havedefined.
For information about configuring trust relationships, see your Active Directorydocumentation.
• • • • • •
Planning and Deployment Guide 70

Forests separated by a firewall (DMZ)
If you have a firewall between a forest outside of the firewall (the perimeter orDMZ forest) and a protected forest inside the firewall (the internal or corporateforest), the best security practice is to make the DMZ a separate forest with notrust relationship.
In this scenario, the top-level Centrify OU is created in the corporate forestprotected by the firewall. This configuration ensures that the domain controllersin the perimeter forest cannot compromise the corporate domain controllers orget access to the corporate global catalog (GC), which stores information aboutall domains in the forest. Although defining no trust relationship between theperimeter forest and the corporate forest is considered the best practice forsecurity reasons, this configuration prevents authentication through the firewall.
If you want to enable authentication for users in the corporate forest and allowthem to access resources in the perimeter forest, Centrify recommends that youcreate a separate Active Directory forest for the computers to be placed in thenetwork segment you are going to use as the demilitarized zone. You shouldthen establish a one-way outgoing trust from the internal forest to the DMZforest. For more information about deploying Centrify in a DMZ, see Planning todeploy in a demilitarized zone (DMZ).
Creating recommended organizational units
In addition to the top-level Centrify OU, Centrify recommends you create severaladditional organizational units for managing UNIX groups, users, and computeraccounts and rights and roles. These additional organizational units areintended to help you establish an appropriate separation of duties before,during, and after migration.
Centrify recommends the following organizational units as a starting point:
n Centrify Administration
n Computer Roles
n Computers
n Provisioning Groups
n Service Accounts
• • • • • •
Planning organizational units and security groups 71

n UNIX Groups
n User Roles
Creating organizational units in Access Manager
If you want to create the recommended organizational unit structure for Centrifyobjects during your initial deployment, you can do so automatically using theAccess Manager SetupWizard. The first time you start Access Manager, itopens the SetupWizard by default. From the SetupWizard, you can create all ofthe containers for the recommended deployment structure automatically withoutany manual configuration. Alternatively, you can create a completely customdeployment structure by first creating a PowerShell script that creates thecontainers you want to use then running the custom script from within the SetupWizard.
If you use the default script, the wizard adds the recommended organizationalunits and groups under the top-level Centrify OU and ensures all of thepermissions are properly set on the objects within it. You can then select anexisting organizational unit or create a new organizational unit for thecomponents of the deployment structure. If you use the default deploymentscript without modification, it creates a structure like this:
If you want to customize the script, you can use the wizard to export it. Afterexporting the script, you can modify it in a text editor, then restart the wizard touse the modified script. The SetupWizard will also create the parent containerfor Licenses and the parent container for Zones in the Active Directory locationyou select.
As you roll-out the deployment, you might find additional OUs are useful. Forexample, you might create additional OUs because specific permissions must begranted to create, modify, delete, and manage the objects within them. Bycreating this organizational structure, you can control who has permission tomanage the Centrify objects contained in each OU.
• • • • • •
Planning and Deployment Guide 72

By using the recommended deployment structure and associated permissions,you will have a solid foundation for deploying Centrify software across theenterprise without affecting any of your existing Active Directory structure. Therecommended deployment structure will also enable you to easily apply grouppolicies and manage user, group, and computer accounts.
For more information about the purpose of the additional organizational units,see the appropriate section.
Centrify Administration organizational unit
The Centrify Administration OU is intended to store Active Directory securitygroups that ensure the separation of duties and the segregation of Centrify-related administrative operations in Active Directory.
In most cases, you will want to allow your existing Active Directory accountfulfillment or provisioning team to edit UNIX groups and, potentially, the user rolegroups that allow for elevated permissions in UNIX. If users you have identifiedas Centrify Administrators are stored in the same organizational unit as the restof the UNIX groups, then members of the fulfillment or provisioning team couldgrant themselves permissions to create, modify, and delete zones. With thesepermissions, a disgruntled provisioning staff member could delete one or morezones and prevent access to production computers. To prevent this security risk,Centrify recommends you create a separate Centrify Administrationorganizational unit and protect access to it.
Computer Roles organizational unit
The Computer Roles OU is intended to store the computer group accounts thatare associated with a specific computer role. For example, if you plan to have acomputer role for computers that host Oracle databases and the set of usersassigned the database administrator role, you might create an Active Directorysecurity group called Oracle_Production_Computers in this OU for the computersthat host Oracle databases. If you were to add a new Oracle database instance,you would add the computer account for that database server to the Oracle_Production_Computers in this OU.
In most cases, the computer groups in this organizational unit are associatedwith the user role groups you add to the User Roles OU. For example, if you havea computer role for computers that host Oracle databases, you might have userrole groups for database administrators and another user role group for
• • • • • •
Planning organizational units and security groups 73

database users. If you were to change who should be allowed to use thedatabase or perform database administration activities, you would modify themembership of these two user role groups.
Computers organizational unit
The Servers OU is intended to store new computer principals in Active Directory.This organizational unit enables you to efficiently deliver computer-based grouppolicies from Active Directory. For example, you can use a group policy to turn offSNTP updates from Active Directory for Centrify-managed computers to preventthose computers from having two registered time sources. Having a separateOU also enables you control who has the permissions and authority to create,update, and delete computer objects in the domain.
Provisioning Groups organizational unit
The Provisioning Groups OU is intended to store Active Directory distributiongroups that are used by the Zone Provisioning Agent. The Zone ProvisioningAgent is aWindows service that processes the business rules for creating ordeleting UNIX profiles in zones. For example, if a new Active Directory userprincipal is in one of these group principals, and the group is associated with azone, the user is automatically provisioned with a UID and a GID in that zone.
Note: The profile does not allow the user to log on to computers in thezone. Identity management is separate from access management.The user’s role assignments control access.
During the migration process, users you have identified as CentrifyAdministrators should have the appropriate permissions and authority to create,delete, and manage the membership of these Active Directory distributiongroups. After migration, the team that owns the process for the provisioningUNIX accounts will need the same permissions and authority. For details aboutthe permissions required to perform these tasks, see Setting permissions forzone groups.
Service Accounts organizational unit
The Service Accounts OU is intended to store theWindows service account forthe Zone Provisioning Agent and any UNIX-specific service accounts that do not
• • • • • •
Planning and Deployment Guide 74

correlate to existing Active Directory user accounts. For example, you can usethis OU for application service accounts, such as Oracle or MySQL, to enablecentralized password management and auditing. By migrating service accountsfrom UNIX, you can centrally manage the account information, passwords, andprivileges for those service accounts and their associated UNIX groups.
UNIX Groups organizational unit
In this deployment model, the UNIX Groups OU is intended to store ActiveDirectory security groups that are migrated from /etc/group files or NIS group
maps that you want to preserve.
As part of the initial migration, you should identify one or more users as CentrifyAdministratorswho should be granted the appropriate permissions and theauthority to create new Active Directory group principals, and to add ActiveDirectory user principals to the new groups.
After the migration is complete, another team might be responsible formanaging the UNIX groups migrated into Active Directory. The team that ownsthe process for adding UNIX users to a UNIX group, removing UNIX users from aUNIX group, or creating new UNIX groups will need the permissions and theauthority in Active Directory to create and delete group principals and managethe membership of those group principals in this OU (for example, ou=unixgroups,ou=Centrify). For details about the permissions required to performthese tasks, see Setting permissions for zone groups.
User Roles organizational unit
The User Roles OU is intended to store Active Directory security groups that areassociated with user role definitions that grant privileges or restrict access. Forexample, a user role definition might grant permission to execute commands asroot or using a service account such as oracle. By associating an ActiveDirectory group with a role definition, you can grant or deny privileges bymanaging Active Directory group membership.
During the migration process, users you have identified as CentrifyAdministrators should have the permissions and the authority to add users tothe appropriate user role groups and to create new Active Directory groupobjects in the OU (for example, ou=user roles,ou=Centrify). After migration,your organization should decide who should be responsible for creating new
• • • • • •
Planning organizational units and security groups 75

user role groups and associating them with zones and who should be able toadd and remove users from the User Roles organizational unit.
Licenses and Zones parent containers
Regardless of whether you choose to create the organizational units for therecommended deployment structure or a custom deployment structure, Centrifyrequires the following parent containers:
n Licenses parent container object for license keys. You must have at leastone parent container for license keys in the forest. You can create morethan one of these container objects to give you more granular control overwho has access to which licenses.
n Zones parent container object for individual zone (ZoneName) objects. Youmust have at least one parent container for zones. You can create morethan one parent Zones container to give you more granularity fordelegating administrative tasks.
You can select the parent containers for Licenses and Zones when you run theSetupWizard, when creating a new zone, or when managing licenses in AccessManager.
Some organizations prefer to create and manage Active Directory objectsmanually to ensure tight control over the objects and their attributes. Forexample, you might want to manually create separate parent containers fordifferent business departments or locations if you want to manually setpermissions and refine who has access to them. However, managingpermissions manually can be complex and error-prone. In most cases, Centrifyrecommends that you establish appropriate permissions on the deploymentstructure and use the Zone DelegationWizard to manage administrativepermissions on individual zones and the objects contained in zones.
Security groups to manage Centrify information
If you use the default recommended deployment script, the script automaticallycreates the following Active Directory security groups for managing Centrify-related objects:
n CentrifyAdministrators
n AuthorizationManagers
• • • • • •
Planning and Deployment Guide 76

n ComputerManagers
n UnixDataManagers
Each security groups is granted the appropriate permissions to perform specificadministrative tasks. For example, users who are members of the CentrifyAdministrators group should be able to create, modify, and delete zones.
If you are not using the recommended deployment script, you should createsimilar security groups for managing Centrify-related objects.
Delegating control for Centrify administrators
The CentrifyAdministrators security group is intended for members of theadministrative or security team who are responsible for managing all Centrify-related information stored in Active Directory. You should add members to thegroup to grant specific users the rights required to manage Centrify licenses,zones, user roles, computer roles, provisioning groups, and the user, group, andcomputer profiles in each zone.
Members of the Centrify Administrators security group are responsible foridentifying an organization’s zone requirements and creating the zone hierarchy.Centrify Administrators also decide when to create new zones, delete obsoletezones, or consolidate existing zones. In most cases, Centrify Administratorsdefine the basic access rights for zones and delegate administrative tasks toother users and groups on a zone-by-zone basis.
Permissions for the Centrify Administrators group are applied at the top-level ofthe deployment structure—for example, ou=Centrify—and grant privileges onthe organizational units, containers, and object within the deployment structure.If you don’t create this group or a similar security group, only members of theDomain Admins group can create new zones.
If you are managing security and individual permissions manually for ActiveDirectory objects, see Permissions required for administrative tasks forinformation about the permissions required for individual tasks.
Delegating control for authorization managers
The AuthorizationManagers security group is intended for members of thesecurity team who are responsible for managing role-based access rights. You
• • • • • •
Planning organizational units and security groups 77

should add members to the group to grant specific users the rights required tomanage user roles, computer roles, access privileges, and role assignments.
You can delegate tasks to the AuthorizationManagers group on the User Rolesand Computer Roles organizational units using Active Directory Users andComputers. You can delegate zone administration tasks to the group in AccessManager.
Delegating tasks for user role groups
In Active Directory Users and Computers, select the User Roles organizationalunit, right-click, then select Delegate Control to start the Delegation of ControlWizard. Select the security group you are using for authorization managers anddelegate the following tasks:
n Create, delete and manage groups
n Modify the membership of a group
Delegating tasks for computer role groups
In Active Directory Users and Computers, select the User Roles organizationalunit, right-click, then select Delegate Control to start the Delegation of ControlWizard. Select the security group you are using for authorization managers anddelegate the following tasks:
n Create, delete and manage groups
n Modify the membership of a group
Delegating zone-specific tasks
As a member of the CentrifyAdministrators security group, you can grant zone-specific permissions to the members of the AuthorizationManagers group. Afteryou have created the appropriate zones, you can delegate the following zoneadministration tasks to authorization managers:
n Manage roles and rights
n Manage role assignments
n Modify computer roles
n Add computer roles
• • • • • •
Planning and Deployment Guide 78

Delegating control for computer managers
The ComputerManagers security group is intended for members of the UNIXadministration team who are responsible for managing computer accounts. Youshould add members to this security group to grant specific users the rightsrequired to manage computer objects in the Servers organizational unit in ActiveDirectory.
As a member of the CentrifyAdministrators security group, you can also grantzone-specific permissions to the members of the ComputerManagers group.After you have created the appropriate zones, you can delegate the followingzone administration tasks to computer managers:
n Join computers to the zone
n Remove computers from the zone
If you are managing security and individual permissions manually for ActiveDirectory objects, see Permissions required for administrative tasks forinformation about the permissions required for individual tasks.
Delegating control for UNIX data managers
The UnixDataManagers security group is intended for members of the UNIXadministration team who are responsible for managing computer accounts. Youshould add members to this security group to grant specific users the rightsrequired to manage UNIX users and groups objects in the UNIX groups andService Accounts organizational units in Active Directory.
You can delegate tasks to the UnixDataManagers group on the UNIX Groupsand Service Accounts organizational units using Active Directory Users andComputers. You can delegate zone administration tasks to the group in AccessManager.
Delegating tasks for UNIX groups
In Active Directory Users and Computers, select the UNIX Groups organizationalunit, right-click, then select Delegate Control to start the Delegation of ControlWizard. Select the security group you are using for UNIX data managers anddelegate the following tasks:
n Create, delete, and manage groups
n Modify the membership of a group
• • • • • •
Planning organizational units and security groups 79

Delegating tasks for service accounts
In Active Directory Users and Computers, select the Service Accountsorganizational unit, right-click, then select Delegate Control to start theDelegation of Control Wizard. Select the security group you are using for UNIXdata managers and delegate the following tasks:
n Create, delete, and manage user accounts
n Reset user passwords and force password change at next logon
Delegating zone-specific tasks
As a member of the CentrifyAdministrators security group, you can also grantzone-specific permissions to the members of the UnixDataManagers group.After you have created the appropriate zones, you can delegate the followingzone administration tasks to UNIX data managers:
n Add users
n Add groups
n Remove users
n Remove groups
n Modify user profiles
n Modify group profiles
Planning for data storage in Active Directory
Centrify stores all of the UNIX attributes required for users, groups, andcomputers in Active Directory, so that this information can be centrallymanaged. It stores these attributes without requiring you to make anymodifications to the Active Directory schema you choose to use.
Changing the zone type
If you create a new zone using the default zone options, the new zone is createdas a hierarchical zone that uses the Active Directory RFC2307-compatibleschema attributes for user and group profiles. If you deselect the Use the defaultzone type option, you can choose to create either a hierarchical zone or a classiczone and how you want zone information stored in the Active Directory schema.
• • • • • •
Planning and Deployment Guide 80

If you are not using the default zone type and storage model, you have thefollowing options:
n A Standard zone stores user and group attributes in the keywordsattribute of the serviceConnectionPoint object for the user or group ratherthan in the user or group object.
n An RFC2307-compatible zone stores user and group attributes in theattributes that are defined in the RFC2307-compatble schema for user andgroup objects.
n An SFU zone stores user and group attributes in the Services for UNIX(SFU) schema attributes for the user or group object.
It is worth noting that in the default zone storage model—which uses the defaultActive Directory RFC2307-compatible schema—some schema attributes are notindexed. For example, in the default Active Directory RFC2307-compatibleschema, the uid attribute is not an indexed attribute. Because of this limitation,queries that use this attribute might take longer than expected.
Modifying indexed attributes for zones
Depending on the requirements of your organization, you might see improvedperformance either by creating standard Centrify zones rather than RFC2307-compatible zones or by indexing the uid attribute in default zones. Beforeselecting a strategy for all or selected zones, however, you should consider thatindexing the uid attribute requires you to modify the Active Directory schema.
Modifying the Active Directory schema is an advanced operation that shouldonly be performed by experienced administrators. In addition, you must be amember of the Domain Admins group or the Enterprise Admins group in ActiveDirectory or been delegated similar authority to perform this operation. If youchoose to modify the schema to improve performance, you can use “Run as ...” toselect an account with appropriate permissions before performing the followingsteps.
To index an attribute:
1. Open a Command Prompt window, then type the following command toregister the schema management assembly on your computer:
regsvr32 schmmgmt.dll
2. Click Start, click Run, type mmc /a, then click OK.
• • • • • •
Planning organizational units and security groups 81

3. In the console root, select the File menu, then click Add/Remove Snap-in.
4. Under Available Standalone Snap-ins, double-click Active DirectorySchema, click Add, then click OK.
5. On the File menu, click Save, navigate to the %systemroot%/Sytem32directory, type a file name for the console, then click Save.
6. Click Start > All Programs to select the Administrative Tools folder, right-click, then select Open.
n If necessary, select Organize > Layout > Menu bar to display menus.
n On the File menu, select New, then click Shortcut.
n In the Create Shortcut Wizard, click in Type the location of the item,type the name you used for the file in Step 5, then click Next.
n Select the file name in Type a name for this shortcut field, type ActiveDirectory Schema, then click Finish.
7. Click Start > All Programs > Administrative Tools to select ActiveDirectory Schema, right-click, then select Open.
8. Expand Attributes to select a specific attribute, such as uid, right-click,then select Properties.
9. Select Index this attribute, then click OK.
Viewing and manipulating data in Active Directory
You can view, access, and manage any information stored in Active Directory—including Centrify profiles, rights, roles, and role assignments—using ADSI Editor using any tools that can perform standard LDAP operations such as ldifdeand OpenLDAP commands such ldapsearch, ldapadd, ldapdelete andldapmodify. For example, depending on the type of operating system and toolsyou prefer to use, you might view and manage Centrify profiles and zones usingany combination of the following tools:
n Access Manager
n Access Module for Windows PowerShell
n Audit Module for Windows PowerShell
n Active Directory Users and Computers
n The Centrify Windows API
• • • • • •
Planning and Deployment Guide 82

n The ADEdit Tcl application and procedure library
n Centrify command-line programs
By using these tools, you can manipulate Centrify information manually or createscripts to automate key tasks such as the provisioning of new accounts. Forexample, you can write scripts that access the Centrify Windows API or ADEditprocedures to automatically create computer, user, or group accounts, createnew zones, or assign users to roles. As part of your planning process, you shoulddetermine whether there are tasks you want to automate through the use ofscripts, so that members of the development team can create or modify theappropriate tools and test them thoroughly before deploying across theorganization.
• • • • • •
Planning organizational units and security groups 83

Installing Authentication &Privilege Services
This section provides instructions for installing all identity and privilegemanagement components onWindows computers in your network. There areseveral Windows-based components that enable you to manage thedeployment and ongoing operations of Centrify software. You should install allof the identity and privilege management components on at least oneWindowscomputer. Depending on the division of responsibilities in your organization, youmay want to install different components on more than oneWindows computer.
When you install identity and privilege management components, the followingfeatures are installed:
n The Privileged Access Service, which enables MFA login, MDM, and otherplatform services.
n The Centrify Privilege Elevation Service and Centrify AuthenticationService, which together enable computers where Centrify software isinstalled to use the Active Directory infrastructure located on the domaincontroller, and enable users and zone-joined computers to have elevatedprivileges. The services include ADUC extensions, GPOE extensions,PowerShell extensions, Centrify utilities, and Access Manager.
Access Manager is the administrative console that enables you to create zonesand configure rights and roles for Active Directory users running applications onWindows computers.
You should always install theWindows components first before you install theCentrify Agent on the non-Windows computers you intend to manage.
• • • • • •
Planning and Deployment Guide 84

Preparing for installation onWindows
Before installing Centrify identity and privilege management components onWindows, you should verify that the computers where you are planning to installmeet all of the system requirements and prerequisites and that you have all ofthe information you need to install and configure Centrify software packages.
At a minimum, you should install the following Centrify components on one ormoreWindows computers during the first stage of deployment:
n Centrify Access Manager console
n Zone Provisioning Agent
You can install these components together or independently using the setupprogram. Alternatively, you can install these components independently withoutrunning the setup program by using individual setup programs for eachcomponent.
Installing Centrify Privilege Elevation Service
Access Manager, which is installed when you install Centrify Privilege ElevationService, is the primary management console for performing access control andprivilege management operations. You typically install Access Manager directlyon the computers used by one or more administrators. Alternatively, you caninstall it on a physical or virtual server accessed remotely by one or moreadministrators. The most important requirement is that the computer where youinstall Access Manager must be able to connect to the Active Directory domainand forest.
The Centrify Access Manager console can be installed from the setup program orfrom a standalone executable separate from the setup program. Before youinstall, you should verify your environment meets the system requirements toensure a successful deployment.
Preparing Active Directory and DNS
All of the Centrify software components rely on critical pieces of Active Directoryinfrastructure. Before you install:
• • • • • •
Installing Authentication & Privilege Services 85

n Verify Active Directory is installed and you have access to at least oneWindows computer acting as a domain controller for the Active Directoryforest to which you want to add UNIX computers.
n Check the configuration of DNS and whether you are using aWindowscomputer as the primary DNS server.
n Verify the DNS server allows secure dynamic updates and your domaincontrollers are configured to publish updated service locator (SRV) records.
n Verify DNS resolution and network communication between the UNIXcomputers and the Active Directory domain controller. You can use theping command to test communication between the domain controller andthe UNIX computer.
Identifying the Windows computer and log on credentials
Depending on how you plan to manage Centrify properties, you should identifyan appropriateWindows computer and the user account credentials you shoulduse. For example:
n Check whether theWindows computer has Active Directory Users andComputers installed.
If you want to manage Centrify properties using Active Directory Users andComputers, the Active Directory Users and Computers MMC snap-in mustbe available on the local computer.
n Check whether theWindows computer is a domain computer, such as aWindows XP workstation, or a domain controller.
If you install on a domain controller, you must use your own logoncredential to connect to Active Directory. In most cases, you can install onany computer that has access to a domain controller.
n Verify that theWindows computer can connect to Active Directory.
n Verify that you have aWindows user account and password withsufficient rights to install software on the local computer and permission toupdate the Active Directory forest.
After installation, you must be able to create new container objects in theActive Directory forest. Alternatively, an Active Directory administrator canmanually configure the environment or temporarily modify your accountpermissions to enable you to perform setup tasks. For information about
• • • • • •
Planning and Deployment Guide 86

the specific rights required to perform tasks in the SetupWizard, seePermissions required to use the SetupWizard.
Checking operating system and software requirements
Before installing onWindows, check that you have a supported version of one oftheWindows operating system product families. For example, you can useWindows 7 for any console components. Alternatively, you can installcomponents on computers in theWindows Server product family—such asWindows Server 2008 orWindows Server 2012—so that your administrativecomputer can be configured with additional server roles.
For more detailed information about supported platforms for specificcomponents, see the release notes.
You should also verify that you have the .NET Framework, version 4.5 or later,installed. If the .NET Framework is not installed, the setup program can install itfor you. Alternatively, you can download the .NET Framework from the MicrosoftDownload Center, if needed.
Checking disk and memory requirements
You should also check that the computer where you are installing the CentrifyAccess Manager console meets the following requirements:
For this You need this
CPU speed Minimum 550 MHZ
RAM 25MB
Disk space 100MB
Running the setup program on aWindows computer
You can install Centrify software using the setup program on the CD or includedin the download package. The setup program copies the necessary files to thelocal Windows computer. There are no special permissions required to run thesetup program other than permission to install files on the local computer. Fromthe setup program, you can choose which components of you want to install.
• • • • • •
Installing Authentication & Privilege Services 87

Note: If you intend to install the Zone Provisioning Agent using the setupprogram, you should review the requirements and otherinformation in Installing Zone Provisioning Agent before youproceed, but you can skip the standalone installation instructionsin those sections. Use the individual setup programs forcomponents if you want to install a specific component on aspecific computer. For example, use the Centrify_Zpa-version-win64.exe program to selectively install ZoneProvisioning Agent components on a computer where AccessManager is not installed.
To install Authentication & Privilege onWindows:
1. Log on to theWindows computer and insert the CD or navigate to thedirectory where you downloaded Centrify files.
If the Getting Started page is not automatically displayed, double-click theautorun.exe program to start the installation of the Centrify software.
2. On the Getting Started page, click Authentication & Privilege to start thesetup program for identity and privilege management components.
If any programs must be updated before installing, the setup programdisplays the updates required and allows you to install them. For example,you might be prompted to install or update the Microsoft .NET Frameworkor Microsoft SQL Server Compact edition.
3. At theWelcome page, click Next.
4. Review the terms of the license agreement, click I agree to these terms,then click Next.
5. Type your name and organization, then click Next.
6. Expand and select the Centrify Administration and Centrify Utilitiescomponents you want to install, then click Next.
If you are managing access to Linux, UNIX, and Mac OS X computers, youshould select the following Centrify Administration components fordeployment:
n ADUC property page extensions if you want to include Centrifyprofiles when displaying properties in Active Directory Users andComputers.
• • • • • •
Planning and Deployment Guide 88

n Access Manager if you want to use an administrative console tomanage Centrify zones and roles.
n Group Policy Management Editor extension if you want to deployCentrify group policies.
You should also select the following Centrify Utilities components fordeployment:
n Zone Provisioning Agent if you want to automatically provision userand group profiles into zones.
If you want to skip the installation of any component on the local computer,click to deselect the item that you want to skip, then click Next. Forexample, if you want to skip installation of the Centrify Reporting Serviceand its Microsoft SQL Server database, deselect the Centrify ReportingService option, then click Next.
7. Accept the default location for installing components, or click Browse toselect a different location, then click Next.
8. Review the components you have selected, then click Next.
The setup program begins installing the selected components.
9. When setup is complete for the selected packages, click Finish to close thesetup program.
Depending on the components you selected, you might see options toconfigure reporting service, the Zone Provisioning Agent, or both. You candeselect these options if you want to skip configuration or plan to installthe components in a different computer. For details about configuring theCentrify reporting service, see the Report Administrator’s Guide. For detailsabout configuring the Zone Provisioning Agent after installing it with theCentrify setup program, see Configuring the Zone Provisioning Agent.
Installing Zone Provisioning Agent
The Zone Provisioning Agent enables automated provisioning of user and groupaccounts into Centrify zones. You configure the Zone Provisioning Agent tomonitor specific Active Directory groups that are linked to a zone. When you addor remove users or groups from the monitored groups, the Zone ProvisioningAgent adds or removes corresponding users or groups in the zone.
You can install the Zone Provisioning Agent with the Server Suite setup programor as a standalone service separate from the installation of other Server Suite
• • • • • •
Installing Authentication & Privilege Services 89

components. In most cases, it is installed on its own apart from the installation ofother Centrify components. After the Zone Provisioning Agent is installed, youcan configure the business rules for adding and removing groups and how theattributes associated with user or group profiles are automatically generated.
About Zone Provisioning Agent and its requirements
The Zone Provisioning Agent is intended to run on an ongoing basis on acomputer that is always available. It requires aWindows user account with theright to Log on as a service. If you have a single forest, you can install the ZoneProvisioning Agent on one or two computers. If you install the Zone ProvisioningAgent on two computers, you should only run one instance at a time. The ZoneProvisioning Agent on the second computer is intended for standby operation.You should only start the Zone Provisioning Agent on the second computer if thefirst instance fails.
Note: The business rules that control provisioning are stored in ActiveDirectory. If only one computer has the Zone Provisioning Agentand that computer stops running, the automated provisioning ofUNIX users and group is interrupted until the computer and theZone Provisioning Agent are restarted. Users with existing accessto UNIX computers are not affected.
The Zone Provisioning Agent has the following components:
n Zone Property Page Extensionmust be installed on the same computer asthe Centrify Access Manager console. This extension adds a tab to theZone Properties for configuring provisioning rules.
n Provisioning Agent can be installed separately from the property page asa standalone service or on the same computer as Access Manager. Thecomputer where you install the service should be available at all times. Inmost cases, this Windows service is not installed on the same computer asAccess Manager.
n Command Line Utility can be installed separately or on the same computeras Access Manager. The command line utility allows you to write scripts forprovisioning tasks or update zones on demand.
If you have more than one forest, you should install a Zone Provisioning Agent ineach forest. If you have geographical domains within a single forest, you maywant to install a Zone Provisioning Agent in each geographical domain. If you
• • • • • •
Planning and Deployment Guide 90

install a second instance of the Provisioning Agent for failover, be sure that onlyone instance of the Provisioning Agent runs in each forest.
Accountname(suggested)
Type ofaccount
Requiredpermissions
Notes
Cfy_SVC_ZPA
ActiveDirectoryaccount
Log on as aservice
The Zone Provisioning Agent requires permissionto create UNIX profiles-- that is, the serviceconnection points in each zone where it needs toperform provisioning operations. The serviceaccount that runs the Zone Provisioning Agentrequires the Log on as a service right set as alocal computer security policy, or in the defaultdomain policy.
Zone Provisioning Agent account permissions
Create a service account for the Zone Provisioning Agent
The Zone Provisioning Agent must run using a valid Windows user account withthe right to Log on as a service. In most cases, you should create a dedicateduser account, called the service account, for the service to run as rather than usean existing user account.
To create a new service account for the Zone ProvisioningAgent:1. Open Active Directory Users and Computers.
2. Select the UNIX Service Account organizational unit.
3. Right-click, then select New > User.
4. Type a display name and logon name for the service account, then clickNext.
5. Type and retype a password for the service account and modify theaccount options as follows, then click Next:
n Uncheck User must change password at next logon
n Check User cannot change password
n Check Password never expires
6. Click Finish to add the service account.
• • • • • •
Installing Authentication & Privilege Services 91

Configure the local or domain group policy to allow the account tolog on as a service
After you have created the service account, you must edit either a local securitypolicy or the default domain group policy to grant the service account the Log onas a service right.
If you edit the default domain policy, the Zone Provisioning Agent can run on anyWindows computer. If you need to move the service from one computer toanother, no additional configuration is required.
Alternatively, you can edit the local security policy specifically on the computersthat run the Zone Provisioning Agent. If you use the local policy, however, youmay need to investigate whether other group policies are applied to thecomputer running the Zone Provisioning Agent to see if inheritance disables yourlocal policy setting.
To edit the default domain group policy:1. Open the Group Policy Object Editor and navigate to Computer
Configuration > Windows Settings > Security Settings > Local Policies >User Rights Assignment > Log on as a service.
2. Right-click Log on as a service, then select Properties.
3. Select Define these policy settings, then click Add User or Group.
4. Click Browse to search for the service account you created.
5. Select the service account, then click OK to add the account and OK againto apply the policy.
Installing the Zone Provisioning Agent on the Access Managercomputer
You can install both the Zone Provisioning Agent service and the Zone PropertyPage Extension on the computer where Access Manager is installed. At aminimum, you should install the Zone Property Page Extension on the samecomputer as the Centrify Access Manager console. The Zone Property PageExtension enables you to configure the Active Directory groups to monitor andthe business rules for how to derive each user and group attribute.
Note: If you select the Zone Provisioning Agent when you installcomponents using the Server Suite setup program, all ZoneProvisioning Agent components are installed. If you want to
• • • • • •
Planning and Deployment Guide 92

selectively install Zone Provisioning Agent components on acomputer, you can install by running the Centrify_Zpa-version-win64.exe program.
To install the Zone Provisioning Agent on the Access Manager computer:
1. Log on to theWindows computer where Access Manager is installed.
2. Double-click the Centrify_Zpa-version-win64.exe file to start the ZoneProvisioning Agent setup program.
3. If a User Account Control message is displayed, click Yes.
If necessary, the setup program prompts you to install the CentrifyCommon Components.
4. On theWelcome screen, click Next.
5. Accept the licensing agreement, then click Next.
6. Select the features to install, then click Next.
The Zone Property Page Extension is only applicable on the computerwhere the Centrify Access Manager console is installed. Selecting thisoption adds the Provisioning tab to the Zone Properties for individualzones. You can install or uncheck the other features on the computer wherethe Centrify Access Manager console is installed.
7. Click Next to accept the default location for the Zone Provisioning Agentfiles, or click Browse to select a different location, then click Next.
8. Click Install to begin installation.
9. Click Finish to complete the installation.
Installing the Zone Provisioning Agent on its own
You can install the Provisioning Agent as a standalone service on a computerwith a relatively light load. The computer where you install the ProvisioningAgent should be one that is online at all times. If the computer is shut down orsuspended, the Provisioning Agent service will be suspended and noprovisioning can occur. You can install a second instance of the ZoneProvisioning Agent on another computer, and use your existing method ofdetermining if a service has failed to monitor the availability of the first instance.For example, configure monitoring of theWindows Event log to notify you if theZone Provisioning Agent service stops.
• • • • • •
Installing Authentication & Privilege Services 93

If you install the Provisioning Agent service as a standalone service, you shouldalso install the Command Line Utility on the same computer.
To install the Zone Provisioning Agent as a standalone service:
1. Log on to theWindows computer that has a light load and is rarely shutdown or offline.
2. Double-click the Centrify_Zpa-version-win64.exe file to start the ZoneProvisioning Agent setup program.
3. If a User Account Control message is displayed, click Yes.
If necessary, the setup program prompts you to install the CentrifyCommon Components.
4. On theWelcome screen, click Next.
5. Accept the licensing agreement, then click Next.
6. Select the Provisioning Agent and Command Line Utility features, then clickNext.
7. Click Next to accept the default location for the Zone Provisioning Agentfiles, or click Browse to select a different location, then click Next.
8. Click Install to begin installation.
9. (Optional) Uncheck the Configure and start Zone Provisioning Agentoption, then click Finish.
If you leave Configure and start Zone Provisioning Agent selected, youare prompted to provide the service account name and password, thenclick Start to start the agent service. Centrify recommends that youconfigure the monitored containers, polling interval, and logging options, inaddition to the service account name and password before starting theservice. Therefore, you should open Access Manager to set up the Centrifyorganization structure in Active Directory. For more information about theinitial configuration, see Running Access Manager for the first time.
Configuring the Zone Provisioning Agent
By default, the Zone Provisioning Agent monitors all domains in the entire forest.If you use the recommended Centrify organizational structure described inCreating recommended organizational units, Centrify recommends setting theZone Provisioning Agent to only monitor the top-level Centrify organizational
• • • • • •
Planning and Deployment Guide 94

unit or the Zones container. These objects are created in the SetupWizard thefirst time you open Access Manager. After the initial configuration, you canperform the steps in this section to configure the Zone Provisioning Agent. Formore information about the initial configuration, see Running Access Managerfor the first time.
The most common reason for monitoring more than one organizational unit is ifyou have a regional or team-based OU structure in Active Directory, where eachregion or team is responsible for managing its own UNIX data. In this scenario, aprovisioning staff member in Sidney, Australia, wouldn’t be responsible foraccount fulfillment of a UNIX user in Chicago. To ensure the appropriateseparation of duties between the different regions or teams, you would havemore than one Centrify organizational unit, and you would configure the ZoneProvisioning Agent to search each of the regional organizational units.
To configure the Zone Provisioning Agent:
1. Open the Zone Provisioning Agent Configuration Panel by clicking Start >All Programs > Server Suite 2021.1 > Zone Provisioning AgentConfiguration Panel.
2. In the Monitored containers section, click Add.
3. Navigate to select the Centrify organizational unit or the Zones container,then click OK.
4. Select Entire Forest forest_name from the list of Monitored containers, thenclick Remove.
5. Set the provisioning polling interval in minutes.
The polling interval controls how often the Zone Provisioning Agent checksmonitored containers for changes and processes the business rules forprovisioning users and groups into zones. The appropriate interval oftendepends on the expectations of the user population or on service levelagreements that define the provisioning team’s commitments. In general,you should avoid polling more frequently than necessary to reduce theaffect the Zone Provisioning Agent has on the performance of your domaincontrollers.
6. If desired, you can specify which domain controller that the ZoneProvisioning Agent uses.
a. To specify the domain controllers, click Advanced.
The Advanced Domain Controller Settings dialog box displays.
• • • • • •
Installing Authentication & Privilege Services 95

b. Click Add to open a separate dialog box in which you can add adomain and pick from a list of domain controllers. Click OK to saveyour chances.
c. Click Change if you want to change the specified domain controller,or click Remove if you need to remove the specified domain controller.
7. Type the service account name or click Browse to locate the serviceaccount name, then type the password for the account.
8. Click Apply.
9. Click Start to start the Zone Provisioning Agent.
Whitelisting domains for the Zone Provisioning Agent
You can configure the Zone Provisioning Agent so that it can connect to trusteddomains (whitelisting) by setting the following registry key with a list of trusteddomains and/or forests:
HKLM\SOFTWARE\Centrify ZPA\AllowedDomains
Configuring a list of domains this way can be particularly useful and faster whenyou have a large amount of domains.
For example, to specify a single domain:
HKLM\SOFTWARE\Centrify ZPA\AllowedDomains: "acme.com"
For example, to specify multiple domains:
HKLM\SOFTWARE\Centrify ZPA\AllowedDomains: "acme.com", "foo.com"
Running Access Manager for the first time
The first time you start the Centrify Access Manager console, a SetupWizardguides you through the initial configuration of the Active Directory forest. Thisinitial setup creates the recommended or a custom deployment structureincluding the parent containers for Licenses and Zones and sets the permissionsfor modifying the objects within the containers. These steps are only performedonce and can be done manually, if you choose.
• • • • • •
Planning and Deployment Guide 96

Because the SetupWizard creates container objects, you might need to use adomain administrator account. This requirement depends on the specificpermissions your organization has configured for different classes of users. Forexample, if your organization only permits Domain Admins to create parent andchild objects in Active Directory, you need to use an account with thosepermissions to run the SetupWizard. For more information about thepermissions required to perform specific configuration steps, see Permissionsrequired to use the SetupWizard.
Accountname(suggested)
Type ofaccount
Requiredpermissions
Notes
n/a
Domainadministrator
(when runningAccessManager forthe first time)
domainadmin
(in mostcases)
Because the SetupWizard creates containerobjects, you might need to use a domainadministrator account. This requirementdepends on the specific permissions yourorganization has configured for differentclasses of users. For example, if yourorganization only permits Domain Admins tocreate parent and child objects in ActiveDirectory, you need to use an account withthose permissions to run the SetupWizard.
Access Manager account permissions
To start the SetupWizard and update the Active Directory forest:
1. Open Access Manager from the desktop shortcut or Start menu.
2. Verify the name of the domain controller displayed is a member of theActive Directory forest you want to update or type the name of a differentdomain controller if you want to connect to a different forest, then click OK.
n If you want to connect to a different forest, type the name of a domaincontroller in that forest.
n If you want to connect to the forest with different credentials, selectConnect as another user, then type a user name and password toconnect as.
3. At theWelcome page, click Next.
4. Select Use currently connected user credentials to use your current log onaccount or select Specify alternate user credentials and type a user nameand password, then click Next.
• • • • • •
Installing Authentication & Privilege Services 97

5. Select Generate the Centrify recommended deployment structure if youwant to create all of the containers for the recommended deploymentstructure automatically.
If you select this option, select whether you want to generate the defaultdeployment structure or generate a custom structure, then click Next.
n If you are generating the default structure, clicking Next enables youto select or create the location for the deployment structure in ActiveDirectory. For example, if you want to create the top of the defaultdeployment structure at the domain level, click Next, then clickBrowse to select the domain name. After you have selected alocation, click OK. then click Next to create the deployment structure.
n If you are generating a custom structure, clicking Next enables you toexport the script that creates the default structure or run a script youhave previously written.
If you are generating a default or custom deployment structure, verify thesuccessful execution of the script that creates the structure, then click Nextto continue.
6. Verify the parent container for licenses is in the top-level Centrify containerif you are using the default deployment structure or the container of yourchoice, then click Next.
You can add other Licenses containers in other locations later using theManage Licenses dialog box.
If you are not using the recommended deployment structure, the defaultcontainer for license keys is domain_name/ProgramData/Centrify/Licenses. To create the parent container in a differentlocation, you can click Browse.
7. Review the permission requirements for the container, then click Yes tocontinue.
If you don’t want to allow the permissions for the selected container, clickNo and select a different container to continue.
8. Type or copy and paste the license key you received, then click Add.
If you received multiple license keys, add each key to the list of installedlicenses, then click Next. If you received license keys in a text file, clickImport to import the keys directly from the file instead of adding the keysindividually, then click Next.
• • • • • •
Planning and Deployment Guide 98

You can also add and remove license containers and keys after the initialconfiguration.
For details about licensing, including how to request new license keys afterdeployment, check license usage and compliance, and how license countsare determined, see the License Management Administrator’s Guide.
9. Verify that the Create default zone container option is selected and theparent container for zones is in the top-level Centrify container or thecontainer of your choice, then click Next.
If you are not using the recommended deployment structure, the defaultcontainer for zones is domain_name/Program Data/Centrify/Zones. Tocreate the parent container in a different location, you can click Browse.
You can skip creating the parent container in the forest or have more thanone Zones parent container. For example, if you have a regional OUstructure in Active Directory—where each region is responsible for its ownset of zones—each region should have its own top-level organizationalunit. For example, if you have separate OU structures for Tucson, AZ, andNewark, NJ, you would have separate deployment structures—SS-AZ andSS-NJ, for example—with separate parent containers for zones under eachdeployment structures. Users in each region can select the appropriateparent container when they create new zones.
Note: Users must have permission to read and create containerobjects on the parent Zones container and all child objects.You should verify the appropriate users have the permissionsrequired to create new zones.
10. If you are using the recommended deployment structure, click Next tocontinue.
This option allows “self-service” join operations for computers in theComputers container. It is only applicable if you are not using therecommended deployment structure. If you want to support “self-service”join operations and are not using the recommended deployment structure,select Grant computer accounts in the Computers container permissionto update their own account information, then click Next.
11. If you plan to use Access Manager to manage information stored in ActiveDirectory and maintain data integrity, click Next to continue.
• • • • • •
Installing Authentication & Privilege Services 99

You should select Register administrative notification handler forMicrosoft Active Directory Users and Computers snap-in if you want toautomatically maintain the integrity of the information in Centrify profiles.
This option prevents Centrify profile information from being left “orphaned”when changes are made to Active Directory objects such as users andgroups. This option is not selected by default because it requires you tohave Enterprise Admin or Domain Admin rights for the forest root domain.
12. Select Activate Centrify profile property pages if you want to be able todisplay Centrify profiles in any Active Directory context, then click Next.
Setting this option ensures that displaying the properties for a user, group,or computer always displays the Centrify Profile tab regardless of how younavigate to the Properties dialog box.
13. Review and confirm your configuration settings, click Next, then clickFinish.
• • • • • •
Planning and Deployment Guide 100

Installing agents oncomputers to be managed
This chapter describes the recommended steps for deploying Centrify softwareon the non-Windows computers that you want to add to Active Directory. Thechapter also describes the alternatives you can use to install agent packages onnon-Windows computers, including using native Linux installers to installCentrify packages manually and automatically.
About the deployment process
The steps in this section, and in Preparing to migrate existing users and groupsand Migrating existing users to hierarchical zones, are iterative in nature. In mostcases, you will select a subset of computers for deployment, and repeat thesteps for each target group until you have migrated all of the computers andusers in the enterprise into Active Directory.
There is no technical requirement that you only work with a subset of computersat a time, but in practice the process of checking computers for potentialproblems and resolving open issues is more manageable when applied to asubset of computers. It is also more practical to migrate user populations instages rather than all at once. After you step through the process a few times,you’ll be able to anticipate and resolve potential issues more quickly and moveinto a more rapid deployment model.
Select a target set of computers
As a first step in preparing to install Centrify software, you should select a targetset of computers on which to deploy. The target set can be based on any criteriayou choose. In many organizations, new software must always be installed inthe development environment first, then in the pre-production environment,
• • • • • •
Planning and Deployment Guide 101

before it can be deployed in the production environment. If your organization hasthis type of requirement, the first target set of computers would be thecomputers in the development environment.
Other possible candidates for the target set might be computers that:
n Have been identified for changes by an audit finding
n Are in the same physical location, such as a particular data center
n Share common attributes, such as all Red Hat Linux computers or all of theservers in aWeb farm
n Are used by a particular department, project, or line of business
n Have a common set of users who need access to the computer resources
After you have identified a target set of computers, you are ready to begin thedeployment. You should notify the user community that you are planning toinstall software on the target set of computers. For example, you may want tonotify users by sending out an email message similar to the sample provided inPreliminary software delivery notification email template.
After you have identified a target set of computers to work with, you can useadcheck to check whether those computers have any issues that need to beresolved before you install new software on them. Checking the environmentbefore you install helps to reduce change control issues.
Options for deploying Centrify Agent packages
You can:
n Run the agent installation script locally on any computer and respond tothe prompts displayed.
n Create a configuration file and run the installation script remotely on anycomputer in silent mode.
n Use the install or update operations in the native package installer for youroperating environment.
n Use a commercial or custom software distribution tool.
If you want to use one of these installation options and need more information,see the appropriate section.
• • • • • •
Installing agents on computers to be managed 102

Install interactively on a computer
The Centrify Agent installation script, install.sh, automatically checks theoperating system, disk space, DNS resolution, network connectivity, and otherrequirements on a target computer before installing. You can run this scriptinteractively on any supported UNIX, Linux, or Mac OS X computer and respondto the prompts displayed.
To install Centrify software packages on a computer interactively:
1. Log on or switch to the root user if you are installing on a Linux or UNIX.
If you are installing on Mac OS X, you can log on with any valid useraccount.
Note: On Mac OS X computers, you can install interactively usingthe graphical package installer or the install.sh script. Forinformation about installing and joining an Active Directorydomain using the Mac OS X package installer, see the Mac-specific instructions in theAdministrator’s Guide for Mac.
2. Mount the cdrom device using the appropriate command for the localcomputer’s operating environment, if necessary. On most platforms, the CDdrive is automatically mounted.
Note: If you have downloaded the package from an FTP server orwebsite, verify the location and go on to the next step.
The instructions for mounting the CD drive are platform-specific. Forexample on Linux, you can use a command similar to the following:
mount /mnt/cdrom
To manually mount the CD drive on AIX, run a command similar to thefollowing:
mount -v cdrfs -o ro /dev/cd0 /cdrom
To mount the CD drive on HP-UX, run a command similar to the followingto display the long file names:
mount -F cdfs -o rr /dev/dsk/c0t0d0 /mnt/cdrom
3. Change to the appropriate directory that contains the Centrify Agentpackage you want to install.
• • • • • •
Planning and Deployment Guide 103

For example, to install an agent on a Linux computer from a downloadedCentrify ISO or ZIP file, change to the Agent_Linux directory:
cd Agent_Linux
Similarly, if you are installing on a Solaris, HP-UX, AIX or other UNIXcomputer, change to the Agent_Unix directory. If installing on a Mac OS Xcomputer, change to the Agent_Mac directory.
If you downloaded individual agent packages from the Centrify DownloadCenter, unzip and extract the contents. For example:
gunzip -d centrify-infrastructure-services-<release>-platform-arch.tgz
tar -xf centrify-infrastructure-services-<release>-platform-arch.tar
4. Run the install.sh script to start the installation of the agent on the localcomputer’s operating environment. For example:
./install.sh
5. Follow the prompts displayed to select the services you want to install andthe tasks you want to perform. For example, you can choose whether youwant to:
n Perform a default installation.
n Perform a custom installation by selecting the specific packages toinstall.
n Join a domain automatically at the conclusion of the installation.
Depending on your selections, you may need to provide additionalinformation, such as the user name and password for joining the domain.
Run the bundle installation from a mounted network volume
You can install agents from a mounted network volume using the install-bundle.sh script. This script is available on the agent CD or ISO file that containsall of the supported agent platforms in compressed format. The bundleinstallation script automatically determines the platform required and extractsthe contents of the appropriate TGZ file, then starts the normal installationprocess.
• • • • • •
Installing agents on computers to be managed 104

To use the install-bundle.sh script:
1. Copy the install-bundle.sh script onto a network file system share andmount the shared directory.
2. Verify that the file is executable and that you have appropriate privileges torun it. For example:
chmod +x install-bundle.sh
chmod 755 install-bundle.sh
3. Run the script without command line options to start the installation or addcommand line options to install the agent silently.
For example, to start an interactive installation, type a command similar tothis:
sudo ./install-bundle.sh
To install the agent silently, type a command similar to this:
./install-bundle.sh --std-suite --adjoin_opt="sidebet.org --password pa$swd sudo ./install-bundle.sh
--zone global --container sidebet.org/UNIX/Servers --serverdemo.sidebet.org"
To see complete usage information for the install-bundle.sh script, type:
./install-bundle.sh --help
Install silently using a configuration file
Installing without user interaction enables you to automate software deliveryand the management of remote computers. If you want to install files withoutany user interaction, you can run the install.sh script silently invoking thescript with the appropriate command-line arguments. You can also customizethe packages installed and other options by creating a custom configuration filefor the installer to use.
n To see the install.sh silent mode and other command line options, enterinstall.sh -h
n To install Authentication & Privilege default packages and configurationoptions silently, run:
install.sh --std-suite
n To install Authentication & Privilege and Audit & Monitoringdefaultpackages and configuration options, run:
• • • • • •
Planning and Deployment Guide 105

install.sh --ent-suite
n To install a customized set of packages that all have the same versionnumber, run:
install.sh -n
About the sample configuration files available
You can customize the install.sh execution script. There are two sampleconfiguration files for installing software packages silently. These sampleconfiguration files are located in the same directory as the install.sh script:
n centrifydc-suite.cfg
n centrify-install.cfg
If you want to customize the packages installed or other configuration options,you can modify the sample centrifydc-suite.cfg or centrifydc-install.cfg file.
The centrifydc-suite.cfg file is used when you run install.shwith the--std-suite or --ent-suite options. If you run install.sh --std-suite orinstall.sh --ent-suitewith a customized version of the centrifydc-suite.cfg file, you can selectively install compatible add-on packages that donot have the same version number as the core Centrify Agent.
Alternatively, you can run install.sh -nwith a customized version of thecentrifydc-install.cfg file to install the agent and add-on packages if theyall have the same version number.
If you run the install.sh script silently and it cannot locate the centrifydc-suite.cfg or centrifydc-install.cfg file to use, default values defineddirectly in the script itself are used.
Setting the parameters in a custom configuration file for theinstallation script
If you want to specify values for the install.sh script to use, you should edit thesample centrifydc-suite.cfg or centrifydc-install.cfg file in its defaultlocation before invoking the install.sh script in silent mode.
Note: The parameters in the centrifydc-install.cfg or centrifydc-suite.cfg file are the same, except that the centrifydc-suite.cfg file is used when installing a set of services to allowpackages with different version numbers to be installed together.
• • • • • •
Installing agents on computers to be managed 106

Because you should not modify the compatibility defined in thecentrifydc-suite.cfg file, those parameters are not included inthe table.
To customize the installation using the centrifydc-install.cfg orcentrifydc-suite.cfg file, you can set the following parameters:
Set thisparameter
To do this
ADCHECK
Indicate whether you want to run the adcheck program to check theconfiguration of a local computer and its connectivity to Active Directory.
Note that the install.sh script calls adcheck twice. After the first call,adcheck performs several required pre-installation steps to make sure youcan install the Centrify Agent on the host computer. These steps aremandatory and cannot be skipped. However, the second call to adcheck isused to perform post-installation steps to make sure the agent has beeninstalled successfully. The second set of checks is optional and can skipped.
Set this parameter to Y if you want to run adcheck after installing. For non-interactive installations, the default is N.
ADLICENSE
Indicate whether you want to install licensed features.
Set this parameter to Y if you have purchased and installed license keys. Ifyou downloaded and want to install unlicensed Centrify Express agents, setthis parameter to N.
GLOBAL_ZONE_ONLY
Specify whether you want to install the agent in a Solaris 10 global zone andno other zones.
Set this parameter to Y only if you are running the install.sh script on aSolaris 10 computer and want to install the agent in the Solaris 10 globalzone and none of your non-global zones. In most cases, you only set thisparameter to Y if you use sparse root zones. The default setting for thisparameter is N so that the agent is installed in all Solaris zones. If the script isnot running on a Solaris 10 computer, this parameter is ignored.
ADJOIN
Indicate whether you want to attempt to join an Active Directory domain innon-interactive mode.
Set this parameter to Y to attempt to join the domain automatically. Set thisparameter to N to manually join the domain after installation.
ADJ_FORCE
Overwrite the information stored in Active Directory for an existing computeraccount.
Set this parameter to Y to replace the information for a computer previouslyjoined to the domain. If there is already a computer account with the samename stored in Active Directory, you must use this option if you want toreplace the stored information. You should only use this option when youknow it is safe to force information from the local computer to overwriteexisting information.
ADJ_TRUST Set the Trust for delegation option in Active Directory for the computer
• • • • • •
Planning and Deployment Guide 107

Set thisparameter
To do this
account.
Trusting an account for delegation allows the account to perform operationson behalf of other accounts on the network.
DOMAINSpecify the domain to join, if you set the ADJOIN parameter to Y.
Set this parameter to the name of a valid Active Directory domain.
USERID
Specify the Active Directory user name to use when connecting to ActiveDirectory to join the domain.
Set this parameter to a valid Active Directory user name.
PASSWD
Specify the password for the Active Directory user name you are using toconnect to Active Directory.
Set this parameter to the password for the Active Directory user namespecified for the USERID parameter.
COMPUTER
Specify the computer name to use for the local host in Active Directory.
Set this parameter to the computer name you want to use in Active Directoryif you don’t want to use the default host name for the computer.
CONTAINER
Specify the distinguished name (DN) of the container or Organizational Unit inwhich you want to place this computer account.
The DN you specify does not need to include the domain suffix. The domainsuffix is appended programmatically to provide the complete distinguishedname for the object. If you do not specify a container, the computer account iscreated in the domain’s default Computers container. Note that the containeryou specify must already exist in Active Directory, and you must havepermission to add entries to the specified container.
ZONE Specify the zone to which you want to add this computer.
SERVERSpecify the name of the domain controller to which you prefer to connect. Youcan use this option to override the automatic selection of a domain controllerbased on the Active Directory site information.
DA_ENABLE
Indicate whether you want to automatically enable the auditing service on thelocal computer. The valid settings are:
n Y if you want to enable auditing with the default auditing configuration.
n N if you don’t want to enable auditing.
n K if you are upgrading and want to keep your current auditingconfiguration unchanged.
DA_X_ENABLE
Indicate whether you want to automatically enable the Linux desktopauditing service on the local computer. The valid settings are:
n Y if you want to desktop enable auditing with the default auditingconfiguration.
n N if you don’t want to enable desktop auditing.
• • • • • •
Installing agents on computers to be managed 108

Set thisparameter
To do this
n K if you are upgrading and want to keep your current auditingconfiguration unchanged
DA_INST_NAME
Specify the name of an auditing installation if you set the DA_ENABLEparameter to Y.
REBOOT
Indicate whether you want to automatically restart the local computer after asuccessful installation.
Set this parameter to Y if you want to automatically restart the local computeror to N if you don’t want the computer restarted automatically.
INSTALL
Specify the operation to perform. The valid settings are:
n Y to install the Centrify Agent for *NIX and any other Centrify softwarepackages if they are not already installed on the local computer.
n U to update older versions of the Centrify Agent for *NIX and any otherCentrify packages you have installed. The update option only updatessoftware from one major release version to another. It does not updatethe software if the major release version is same between packages.
n R to reinstall or repair the Centrify Agent for *NIX and any otherCentrify packages you have installed. You can reinstall packages thathave the same major release version but different build number orrepair packages by installing an older version of the package.
n E to remove the software currently installed.
n K to keep current software unchanged.
Set this parameter to Y to install or to U to update the Centrify Agent for *NIXand other packages.
If you want to install or update other packages, select the operation toperform for each package. For example to update the Centrify Kerberospackage and keep the current Centrify LDAP proxy service, you might specifythe following:
CentrifyDC_krb5=”U”
CentrifyDC_ldapproxy="K"
Note that these additional packages may have dependencies or require aspecific version of the Centrify Agent for *NIX to be installed. Before installingor updating additional packages silently, you should review the information inthe Upgrade and Compatibility Guide.
UNINSTALL Specify whether you want to forcibly uninstall all installed packages.
For example, you can edit the centrifydc-install.cfg or centrifydc-suite.cfg file to silently install the Centrify Agent for *NIX, join the domain, andautomatically reboot the computer at the completion of the installation processwith a file similar to this:
• • • • • •
Planning and Deployment Guide 109

ADCHECK="N"ADLICENSE="Y"# Solaris 10 -G option, installation in global zone onlyGLOBAL_ZONE_ONLY="N"ADJOIN="Y"ADJ_FORCE="N"ADJ_TRUST="N"DOMAIN="sample.company.com"USERID=administratorPASSWD="securepassword123"#COMPUTER=my_host_name#CONTAINER="my_computers"ZONE="global_zone"#SERVER=server_nameDA_ENABLE="N"DA_INST_NAME=""REBOOT="Y"# Install the core agent packageINSTALL="Y"
# Skip installation for other packagesCentrifyDC_nis=CentrifyDC_krb5=CentrifyDC_ldapproxy=CentrifyDC_openssh=CentrifyDC_web=CentrifyDC_apache=CentrifyDC_idmap=CentrifyDA=
This sample configuration file does not install any of the Centrify add-onpackages. You can also use the configuration file to silently install or updateselected packages. For example, to update the LDAP proxy service andOpenSSH on a computer, you would modify the configuration file to indicate thatyou want to update those packages:
CentrifyDC_ldapproxy=”U”CentrifyDC_openssh=”U”
Customizing the return codes for the installation script
Normally, when you run the install.sh script silently, the script returns an exitcode of 0 if the operation is successful. If you want the script to return exit codesthat indicate whether the operation performed was a successful newinstallation, a successful upgrade, a successful uninstall, or there were errorspreventing installation, you can also use the --custom_rc option. For example:
install.sh -n --custom_rc
When you specify this option, the following return codes that are defined in theinstall.sh script are used to provide more detailed information about theresult:
• • • • • •
Installing agents on computers to be managed 110
Thisreturncode
Indicates
CODE_SIN=0 Successful installation
CODE_SUP=0 Successful upgrade
CODE_SUN=0 Successful uninstallation
CODE_NIN=24 Did nothing during installation
CODE_NUN=25 Did nothing during uninstallation
CODE_EIN=26 Error during installation
CODE_EUP=27 Error during upgrade
CODE_EUN=28 Error during uninstallation
CODE_ESU=29
Error encountered during setup, for example, the UID is not the root user UID, theoperating environment is not supported or not recognized, or the script is executedwith invalid arguments
Using a native package installer
If you want to manually install a software package using a native installationprogram instead of the Centrify installation script, you can follow the instructionsin the Upgrade and Compatibility Guide for the most common native packageinstallers, such as the Red Hat or Debian package manager. You should notethat these native packages are signed with a GNU Privacy Guard (GPG) key. Youneed to import the key to verify the package authenticity before installing thepackage. You can download the RPM-GPG-KEY-centrify file from the CentrifyDownload Center.
Alternatively, you can use any other installation program you have available forthe local operating environment. For example, if you use another program suchas SMIT, YAST, APT, SUSE, or YUM to install and manage software packages,you can use that program to install Server Suite software packages.
Perform the following steps to install the Centrify Agent using a nativeinstallation program that does not require a connection to a package repository.To use a native installation program that requires a repository connection (suchas yum, SUSE or APT), see Enabling package repositories.
• • • • • •
Planning and Deployment Guide 111

To install the agent using a native installation program:1. Log on as or switch to the root user.
2. If you are installing from a CD and the CD drive is not mountedautomatically, use the appropriate command for the local computer’soperating environment to mount the cdrom device.
3. Copy the appropriate package for the local computer’s operatingenvironment to a local directory.
For example, if installing from the CD and the operating environment isSolaris 10 SPARC:
cp /cdrom/cdrom0/Unix/centrifydc-release-sol10-sparc-local.tgz.
4. If the software package is a compressed file, unzip and extract thecontents. For example, on Solaris:
gunzip -d centrifydc-release-sol10-local.tgztar -xf centrifydc-release-sol10-sparc-local.tar
5. Run the appropriate command for installing the package based on thelocal computer’s operating environment. For example, on Solaris:
pkgadd –d CentrifyDC-a admin
If you are not sure which command to use for the local operatingenvironment, see the documentation associated with the package installeryou are using.
Enabling package repositories
You can also download and install agents using Linux package managementsoftware for your operating system. To do this, you set up a repository for youroperating system and then use the software's command line tools to manageautomatic agent updates.
n RedHat, CentOS, or Amazon systems: Use the "Yellowdog Updater,Modified (yum)" tool to update the rpm-redhat repository. For details, seeTo set up and configure a RedHat, CentOS, or Amazon repository.
n SuSE systems: Use the Zypper tool to update the rpm-suse repository. Fordetails, see To set up and configure a SUSE repository.
n Debian or Ubuntu systems: Use the Advanced Package Tool (APT), apt-get, or Aptitude tools to update the deb repository. For details, see To setup and configure a Debian or Ubuntu repository.
• • • • • •
Installing agents on computers to be managed 112

n Atomic systems: Use curl or wget to update the wget repository. Fordetails, see To access a raw package (WGET) repository .
n Alpine Linux systems: For details, see To set up and configure an AlpineLinux repository.
You must perform one of the following procedures to enable the repository.
Note: The procedures in this section require that you log in to theCentrify Support Portal and go to the Centrify Repo site. On thatpage, click the link to generate the repo key. You will then specifythe repo key in a yum (RHEL, SUSE, and so forth) or APT (Debian,Ubuntu, and so forth) configuration file. There are some exampleson the Centrify repo site about how to add the key to yourconfiguration file.
Note: For additional details about configuring and using SUSE or yumrepositories, see the documentation for the distribution of Linuxyou are using. For additional details about configuring and usingAPT repositories, see the documentation for the distribution ofDebian Linux or Ubuntu you are using.
WARNING: If you specify your repository on the command line, be sure to cleanout your command history afterwards. Because the URL for your repositoryincludes the credentials to access it, leaving this information around in commandhistory is not a secure practice.
To set up and configure a RedHat, CentOS, or Amazonrepository1. Create a /etc/yum.repos.d/centrify-rpm-redhat.repo configuration
file to use the official Centrify package repository, and download a RPM-GPG-KEY-centrify key from the Centrify Support Portal.
You can manually create the configuration file or you can use a setup scriptto generate the file automatically.
Note: For the baseurl parameter, enter your Centrify repo URLtoken in place of <URLtoken>.
n To create the repository configuration file manually
Create a file with the following:
• • • • • •
Planning and Deployment Guide 113

1 # Source: CENTRIFY2 # Repository: CENTRIFY / rpm-redhat3 # Description: YUM repository for RedHat packages (RPMs)45 [centrify-rpm-redhat]6 name=centrify-rpm-redhat7 baseurl=https://cloudrepo.centrify.com/<URLtoken>/rpm-
redhat/rpm/any-distro/any-version/$basearch8 repo_gpgcheck=19 enabled=1
10 gpgkey=https://downloads.centrify.com/products/RPM-GPG-KEY-centrify
11 gpgcheck=112 sslverify=113 sslcacert=/etc/pki/tls/certs/ca-bundle.crt14 metadata_expire=30015 pkg_gpgcheck=116 autorefresh=117 type=rpm-md
n To create the repository configuration file automatically from ascript
1 curl -1sLf 'https://cloudrepo.centrify.com/<URLtoken>/rpm-redhat/cfg/setup/bash.rpm.sh' | sudo -E bash
You should see output that lists out your repository details, such asthe following example:
# Source: CENTRIFY# Repository: CENTRIFY / rpm-redhat# Description: YUM repository for RedHat packages (RPMs)
[centrify-rpm-redhat]name=centrify-rpm-redhatbaseurl=https://cloudrepo.centrify.com/<URLtoken>/rpm-redhat/rpm/el/6/$basearchrepo_gpgcheck=1enabled=1gpgkey=https://cloudrepo.centrify.com/<URLtoken>/rpm-redhat/cfg/gpg/gpg.BDD3FD95B65ECA48.keygpgcheck=1sslverify=1sslcacert=/etc/pki/tls/certs/ca-bundle.crtmetadata_expire=300pkg_gpgcheck=1autorefresh=1type=rpm-md
Note: The gpgkey listed in the output is a public key.
• • • • • •
Installing agents on computers to be managed 114

2. Execute the yum info command to verify the repository connection. Youshould see output similar to the following.
1 #yum info CentrifyDC2 Loaded plugins: langpacks, product-id, search-disabled-repos,
subscription-manager3 2020-11-24 10:20:22,669 [INFO] yum:17896:MainThread
@connection.py:905 - Connection built:host=subscription.rhsm.redhat.com port=443 handler=/subscriptionauth=identity_cert ca_dir=/etc/rhsm/ca/ insecure=False
4 2020-11-24 10:20:22,671 [INFO] yum:17896:MainThread @repolib.py:464- repos updated: Repo updates
56 Total repo updates: 07 Updated8 <NONE>9 Added (new)
10 <NONE>11 Deleted12 <NONE>13 This system is not registered with an entitlement server. You can
use subscription-manager to register.14 Available Packages15 Name : CentrifyDC16 Arch : x86_6417 Version : 5.7.018 Release : 20719 Size : 23 M20 Repo : centrify-rpm-redhat/x86_6421 Summary : Centrify DirectControl Agent22 URL : http://www.centrify.com/23 License : BSD with portions copyright (c) Centrify Corporation
2006-2020 and licensed under Centrify End User License Agreement24 Description : RPM to install Centrify DirectControl on Linux
platforms.
3. Install the Centrify Agent for *NIX rpm package.
# yum install CentrifyDC
Note: To uninstall the Centrify Agent rpm file, you can use theerase command. For example:
# yum erase CentrifyDC
To set up and configure a SUSE repository1. If you have used a Centrify repository before, it's recommended that you
first delete the old repositories in the /etc/zypp/repos.d/*centrify*directory.
2. Create a new SUSE repository.
• • • • • •
Planning and Deployment Guide 115

You can manually create the repository or you can use a setup script tocreate the repository automatically.
Note: For the baseurl parameter, enter your Centrify repositoryURL token in place of <URLtoken>.
n To create the SUSE repository configuration file manually
Create a file with the following:
/etc/zypp/repos.d # cat /etc/zypp/repos.d/centrify-rpm-suse.repo[centrify-rpm-suse]name=centrify-rpm-suseenabled=1autorefresh=1baseurl=https://cloudrepo.centrify.com/<URLtoken>/rpm-suse/rpm/any-distro/any-version/$basearchtype=rpm-mdrepo_gpcheck=1gpgcheck=1gpgkey=https://downloads.centrify.com/products/RPM-GPG-KEY-centrify
n To create the SUSE repository configuration file automatically froma script
1 curl -1sLf 'https://cloudrepo.centrify.com/<URLtoken>/rpm-suse/cfg/setup/bash.rpm.sh' | sudo -E bash
3. Refresh the cache.
/etc/zypp/repos.d # zypper refresh
4. Verify the connection to the repository.
/etc/zypp/repos.d # zypper packages |grep centrify
You should see output similar to the following:
mysusemachine:/etc/zypp/repos.d # zypper refreshRetrieving repository 'centrify-rpm-suse' metadata ---------------[\]
Retrieving repository 'centrify-rpm-suse' metadata ...............[done]Building repository 'centrify-rpm-suse' cache ....................[done]All repositories have been refreshed.utsles15ppcle:/etc/zypp/repos.d # zypper packages | grep Centrify| centrify-rpm-suse | CentrifyDA | 3.7.0-172 |ppc64le
• • • • • •
Installing agents on computers to be managed 116

| centrify-rpm-suse | CentrifyDA | 3.6.1-324 |ppc64le| centrify-rpm-suse | CentrifyDC | 5.7.0-207 |ppc64le| centrify-rpm-suse | CentrifyDC | 5.6.1-330 |ppc64le| centrify-rpm-suse | CentrifyDC-cifsidmap | 5.7.0-207 |ppc64le| centrify-rpm-suse | CentrifyDC-cifsidmap | 5.6.1-330 |ppc64le| centrify-rpm-suse | CentrifyDC-curl | 5.7.0-207 |ppc64le| centrify-rpm-suse | CentrifyDC-curl | 5.6.1-330 |ppc64le| centrify-rpm-suse | CentrifyDC-ldapproxy | 5.7.0-207 |ppc64le| centrify-rpm-suse | CentrifyDC-ldapproxy | 5.6.1-330 |ppc64le| centrify-rpm-suse | CentrifyDC-nis | 5.7.0-207 |ppc64le| centrify-rpm-suse | CentrifyDC-nis | 5.6.1-330 |ppc64le| centrify-rpm-suse | CentrifyDC-openldap | 5.7.0-207 |ppc64le| centrify-rpm-suse | CentrifyDC-openldap | 5.6.1-330 |ppc64le| centrify-rpm-suse | CentrifyDC-openssh | 8.2p1-5.7.0.207 |ppc64le| centrify-rpm-suse | CentrifyDC-openssh | 7.9p1-5.6.1.329 |ppc64le| centrify-rpm-suse | CentrifyDC-openssl | 5.7.0-207 |ppc64le| centrify-rpm-suse | CentrifyDC-openssl | 5.6.1-330 |ppc64le
5. Install the Centrify Agent rpm package.
# zypper install CentrifyDC
Note: To uninstall the Centrify Agent rpm file, you can use theremove command. For example:
# zypper remove CentrifyDC
To set up and configure a Debian or Ubuntu repository1. Create the repository:
You can manually create the repository or you can use a setup script tocreate the repository automatically.
• • • • • •
Planning and Deployment Guide 117

n To create the Debian or Ubuntu repository configuration filemanually
a. Update the /etc/apt/sources.list file to include the official Centrifypackage repository.
deb https://cloudrepo.centrify.com/<URLtoken>/deb/deb/debianany-version main /etc/apt/sources.list.d/centrify-deb.list
b. Import your GPG key and update the repository.
# bash -c 'wget -O -https://downloads.centrify.com/products/RPM-GPG-KEY-centrify| apt-key add -'
c. Comment out the no-debsig line in /etc/dpkg/dpkg.cfg toenable GPG signature validation.
# grep no-debsig /etc/dpkg/dpkg.cfg# no-debsig
d. Clean and update the local archives.
# apt-get clean# apt-get update
n To create the Debian or Ubuntu repository configuration fileautomatically from a script
1 curl -1sLf'https://cloudrepo.centrify.com/<URLtoken>/deb/cfg/setup/bash.deb.sh' | sudo -E bash
Note: Enter your Centrify repository URL token in place of<URLtoken>.
If you manually created your APT repository, the configuration detailsare in the /etc/apt/sources.list file. If you used the setup script tocreate the APT repository, the configuration details are in a separate
• • • • • •
Installing agents on computers to be managed 118

file such as centrify-deb.list in the /etc/apt/sources.list.ddirectory.
2. Execute the apt list command to verify the repository connection. Youshould see output similar to the following.
# apt list --all-versions | grep centrifycentrifyda/buster 3.7.0-172 amd64centrifyda/buster 3.6.1-324 amd64centrifydc-adbindproxy/buster 5.7.0-217 amd64centrifydc-adbindproxy/buster 5.6.1-334 amd64centrifydc-cifsidmap/buster 5.7.0-207 amd64centrifydc-cifsidmap/buster 5.6.1-330 amd64centrifydc-curl/buster 5.7.0-207 amd64centrifydc-curl/buster 5.6.1-330 amd64centrifydc-ldapproxy/buster 5.7.0-207 amd64centrifydc-ldapproxy/buster 5.6.1-330 amd64centrifydc-nis/buster 5.7.0-207 amd64centrifydc-nis/buster 5.6.1-330 amd64centrifydc-openldap/buster 5.7.0-207 amd64centrifydc-openldap/buster 5.6.1-330 amd64centrifydc-openssh/buster 8.2p1-5.7.0.207 amd64centrifydc-openssh/buster 7.9p1-5.6.1.329 amd64centrifydc-openssl/buster 5.7.0-207 amd64centrifydc-openssl/buster 5.6.1-330 amd64centrifydc/buster 5.7.0-207 amd64centrifydc/buster 5.6.1-330 amd64
3. Execute the apt install or apt-get install commands to installCentrify packages. For example:
1 # apt install centrifydc centrifydc-nis2 # apt-get install centrifydc-5.7.0-207
Note: To uninstall the Centrify Agent for *NIX rpm, you can use theremove command to delete the Centrify Agent for *NIXpackage or the purge command to also delete anyconfiguration files. For example:
# apt remove centrifydc=5.7.0-207
To access a raw package (WGET) repositoryUse theWGET repository for Atomic packages or any raw or plain files such as*.zip, *.tar, *.tgz, and so forth .
1. Browse the package index to determine which file you want to download.You can view the package index in HTML or JSON:
• • • • • •
Planning and Deployment Guide 119

n HTML version is athttps://cloudrepo.centrify.com/<URLtoken>/wget/raw/
n JSON version is athttps://cloudrepo.centrify.com/<URLtoken>/wget/raw/index.json
Note: Enter your Centrify repository URL token in place of<URLtoken>.
2. Download the desired file using either curl or wget. For example:curl -1 -O'https://cloudrepo.centrify.com/<URLtoken>/wget/raw/versions/Latest/CentrifyDC-atomic.x86_64.tgz'
orwget'https://cloudrepo.centrify.com/<URLtoken>/wget/raw/versions/Latest/CentrifyDC-atomic.x86_64.tgz'
To set up and configure an Alpine Linux repository1. To configure the repository automatically, run the following commands:
1 sudo apk add --no-cache bash2 curl -1sLf \
'https://cloudrepo.centrify.com/<URLtoken>/apk/setup.alpine.sh' \ |sudo -E bash
Note: Enter your Centrify repository URL token in place of<URLtoken>.
2. Or, if you want to manually configure the repository, run the followingcommands:
1 curl -1sLf'https://cloudrepo.centrify.com/<URLtoken>/apk/rsa.5DD8742729E6E4B2.key' > /etc/apk/keys/[email protected]
2 curl -1sLf'https://cloudrepo.centrify.com/<URLtoken>/apk/config.alpine.txt?distro=alpine&codename=v3.13' >> /etc/apk/repositories
3 apk update
When configuring the repository manually, you reference the Centrifypublic RSA key: [email protected].
• • • • • •
Installing agents on computers to be managed 120

3. Execute the apk add command to install the Centrify packages. Forexample:
1 # apk add centrifydc centrifydc-nis
To uninstall the Centrify Agent for *NIX rpm, you can use the del commandto delete the Centrify Agent for *NIX package. For example:
# apk del centrifydc=5.8.0-xxx
Use other automated software distribution utilities
You can also install Centrify software using virtually any automated softwaredistribution framework. For example, you can use software delivery offeringsfrom HP OpsWare or IBM Tivoli, or features such as Apple Remote Desktop, orsoftware distribution in the Casper Suite to deliver Centrify software to remotecomputers. You can also use any custom software delivery tools you havedeveloped specifically for your organization. If you use a commercial or customsoftware distribution mechanism, review the release notes text file included withagent package for platform-specific installation details.
About the files and directories installed on theagent
When you complete the installation, the local computer will be updated with thefollowing directories and files for the core Centrify Agent for *NIX:
This directory Contains/etc/centrifydc The agent configuration file and the Kerberos configuration file.
/usr/share/centrifydc
Kerberos-related files and service library files used by the Centrify Agent toenable group policy and authentication and authorization services.
/usr/sbin
/usr/bin
Command line programs to perform Active Directory tasks, such as join thedomain and change a user password.
• • • • • •
Planning and Deployment Guide 121

This directory Contains/var/centrify Directories for temporary and common files that can be used by the agent.
/var/centrifydc
Before joining the domain, the directory contains basic information aboutthe environment, such as the IP address of the DNS server and whetheryou installed licensed or express agent features.
After you join the domain, several files are added to this directory to recordinformation about the Active Directory domain the computer is joined to,the Active Directory site the computer is part of, and other details.
Depending on the components you select during installation, additional files anddirectories might be installed or updated. For example, if you install EnterpriseEdition, the computer is updated with additional files and directories for auditing.
Joining an Active Directory domain at a later time
At this point, you have delivered the software to target computers, but notchanged their configuration. Users still have exactly the same access as they didbefore installing Centrify software. The computer’s configuration changes onlyhappen when the computer joins an Active Directory domain, that is, joining thedomain is what “activates” Centrify software.
You have the option to automatically join an Active Directory domain when youinstall Centrify Agents the install.sh script. In most cases, however, youshould not do so unless you have already planned your user migration andcreated your initial zones. Typically, it is best to analyze the user population andprepare for migration before joining the domain to ensure minimal disruption ofuser activity and ease the transition to new software. Over time, as you becomemore familiar with the migration process and refine your zone design, you canadapt the steps to suit your organization.
If you want to join the domain at the same time you deploy the Centrify software,you should do the following before you install files on the UNIX computers:
1. Download the Server Suite software for all platforms or the subset ofplatforms you intend to support.
2. Analyze existing user and group accounts.
3. Identify your zone requirements and create the initial zone design.
4. Migrate users and groups into the appropriate zones and role assignments.
• • • • • •
Installing agents on computers to be managed 122

5. Use the install.sh script or a custom script to install Centrify Agents andjoin the domain.
The additional steps are described in the next sections. You can also manuallyjoin a domain at any time after installation by using the adjoin command.
Installing the agent on Solaris systems
This section covers information about installing the Centrify Agent for *NIX onSolaris systems. The procedures differ depending on whether you're installingsvr4 or IPS packages. If you're installing IPS packages onto a system with Solaris11 child zones, there's a separate procedure for that deployment.
For which packaged file to use for installation, refer to the table below.
Solaris version Package type x86 or Sparc Agent package filename
Solaris 10 svr4 x86 centrify-server-suite-2021.1-sol10-x86.tgz
Solaris 10 svr4 Sparc centrify-server-suite-2021.1-sol10-sparc.tgz
Solaris 11 svr4 x86 centrify-server-suite-2021.1-sol10-x86.tgz
Solaris 11 svr4 Sparc centrify-server-suite-2021.1-sol10-sparc.tgz
Solaris 11 IPS x86 centrify-server-suite-2021.1-sol11-i386.tgz
Solaris 11 IPS Sparc centrify-server-suite-2021.1-sol11-sparc.tgz
Solaris agent installation packages
This section includes the following topics:
Installing the Solaris svr4 agent packages 124
Installing the Solaris IPS agent packages 124
Installing the Solaris IPS agent packages with child zones 125
Uninstalling the agent on Solaris systems 128
Sun Solaris installation notes 129
Changing the local user password on Solaris 129
Installing authentication service packages into Solaris 10 zones 130
Installing authentication service packages into Solaris 11 child zones 130
Creating a home directory for new users on Solaris 130
• • • • • •
Planning and Deployment Guide 123

Installing the Solaris svr4 agent packages
Download the solaris package appropriate for your Solaris system and run theinstall.sh script as mentioned in Install interactively on a computer. You canfollow the same procedure if you're installing on a system with or without childzones.
You can run the following command to verify the Solaris agent package svr4installation status:
pkginfo | grep -i centrify
Note that there is no space between "pkg" and "info"; if you search for "pkg info"you'll be searching for IPS packages.
Installing the Solaris IPS agent packages
This procedure is for systems where you are doing a fresh install of Centrifysoftware onto a Solaris 11 system with IPS support.
This procedure is the same as for the regular install script, except that you runthe install-ips.sh script, not the install.sh script: Install interactively on acomputer.
You'll need the centrify-infrastructure-services-2021.1-sol11-i386.tgz file or thecentrify-infrastructure-services-2021.1-sol11-sparc.tgz file for this procedure,depending on the type of system you have.
To install the Solaris IPS packages:
1. Download the Centrify Server Suite package for your version of Solaris.
2. Extract the Centrify packages onto the system.
3. Run the install-ips.sh script. For example:./install-ips.sh
4. Follow the prompts displayed to select the services you want to install andthe tasks you want to perform. For example, you can choose whether youwant to:
• • • • • •
Installing agents on computers to be managed 124

n Perform a default installation.
n Perform a custom installation by selecting the specific packages toinstall.
n Join a domain automatically at the conclusion of the installation.
Depending on your selections, you may need to provide additionalinformation, such as the user name and password for joining the domain.
5. You can run the following command to verify the Solaris agent package IPSinstallation status:pkg info | grep -i centrify
Note the space between "pkg" and "info"; if you search for "pkginfo" you'llbe searching for svr4 packages.
Installing the Solaris IPS agent packages with child zones
When you install the agent onto a Solaris 11 computer enabled with IPS thatalso has one or more child zones configured, you need to import the agentpackages into a new repository and then install directly from the repository.
You do this install in the global zone and the repository will automatically installthe files into the child zones.
You'll need the centrify-infrastructure-services-2021.1-sol11-i386.tgz file or thecentrify-infrastructure-services-2021.1-sol11-sparc.tgz file for this procedure,depending on the type of system you have.
To install the Solaris IPS agent packages onto a system with one or more childzones:
1. Create a directory and extract the IPS tgz file into that directory.
For example, create directory called "install-ips" and extract the contents ofthe tgz file into that directory.
a. Create a repository:
For example, run the following command to create a repository called"my-repo":
Tip: You can run the zfs list command to list all of thezone filesystems.
• • • • • •
Planning and Deployment Guide 125

zfs create rpool/export/my-repo
zfs set atime=off rpool/export/my-repo
pkgrepo create /export/my-repo
pkgrepo set -s /export/my-repo publisher/prefix=centrify
pkgrepo -s /export/my-repo refresh
pkgrepo -s /export/my-repo info
pkg set-publisher -G '*' -M '*' -g /export/my-repo centrify
pkg publisher
You should see the repository listed.PUBLISHER TYPE STATUS P LOCATIONcentrify origin onlineF file:///export/my-repo
2. Import the packages into the repository. You need to import the packagesthat end with .p5p and you need to import them one at a time.
a. In the directory where you extracted the Centrify Agent packages, listout the files in that directory (use the ls command).
The full package list of files that you need to import into the repositorylooks something like this:centrifyda-3.7.0-sol11-i386.p5p
centrifydc-5.7.0-sol11-i386.p55
centrifydc-curl-5.7.0-sol11-i386.p5p
centrifydc-ldapproxy-5.7.0-sol11-i386.p5p
centrifydc-nis-5.7.0-sol11-i386.p5p
centrifydc-openldap-5.7.0-sol11-i386.p5p
centrifydc-openssh-5.7.0-sol11-i386.p5p
centrifydc-openssl-5.7.0-sol11-i386.p5p
b. Import each package into the repository.
For example, if you're installing all 8 packages, you'll run the following8 commands:pkgrecv -s centrifyda-3.7.0-sol11-i386.p5p -d /export/my-repo'*'
pkgrecv -s centrifydc-5.7.0-sol11-i386.p55 -d /export/my-repo'*'
pkgrecv -s centrifydc-curl-5.7.0-sol11-i386.p5p -d /export/my-repo '*'
pkgrecv -s centrifydc-ldapproxy-5.7.0-sol11-i386.p5p -d/export/my-repo '*'
pkgrecv -s centrifydc-nis-5.7.0-sol11-i386.p5p -d /export/my-repo '*'
• • • • • •
Installing agents on computers to be managed 126

pkgrecv -s centrifydc-openldap-5.7.0-sol11-i386.p5p -d/export/my-repo '*'
pkgrecv -s centrifydc-openssh-5.7.0-sol11-i386.p5p -d/export/my-repo '*'
pkgrecv -s centrifydc-openssl-5.7.0-sol11-i386.p5p -d/export/my-repo '*'
c. You can verify that the packages imported correctly by listing out therepository packages.
For example, run the following command:pkgrepo list -s /export/my-repo
You'll see a list of packages where each package has a long version.For example:centrify security/centrifydc 5.7.0.207:20200726T052946Z
1. Install the packages from the repository into the parent and child zones.
Be sure to reference the package's entire version. When you install thecentrifydc package, the other packages for cURL, OpenLDAP, andOpenSSL are also installed.
For example, to install centrifydc, you'd run the following command, :pkg install -r security/[email protected]:20200726T052946Z
For example, to install all the packages with one command, you'd runsomething like this:pkg install -r security/[email protected]:20200726T052946Zsecurity/[email protected]:20200726T053320Zsecurity/[email protected]:20200726T053352Zsecurity/[email protected]:20200727T065442Zsecurity/[email protected]:20200725T014652Z
2. You can run the following command to verify the Solaris agent package IPSinstallation status:pkg info | grep -i centrify
Note the space between "pkg" and "info"; if you search for "pkginfo" you'llbe searching for svr4 packages.
• • • • • •
Planning and Deployment Guide 127

Uninstalling the agent on Solaris systems
To uninstall the Solaris svr4 packages:
1. In the directory where you have downloaded and extracted the CentrifyAgent packages, run the following command:
./install.sh -e -n
2. You can run the following command to verify the Solaris agent packagesvr4 installation status:pkginfo | grep -i centrify
Note that there is no space between "pkg" and "info"; if you search for "pkginfo" you'll be searching for IPS packages.
To uninstall the Solaris IPS packages:
1. In the directory where you have downloaded and extracted the CentrifyAgent packages, run the following command:
./install-ips.sh -e -n
2. You can run the following command to verify the Solaris agent package IPSinstallation status:pkg info | grep -i centrify
Note the space between "pkg" and "info"; if you search for "pkginfo" you'llbe searching for svr4 packages.
To uninstall the Solaris IPS packages on systems with one or more child zones:
1. To uninstall a single package from both parent and child zones, run thefollowing command:pkg uninstall -r packagename
For example, to uninstall only the CentrifyDA package, run the followingcommand:pkg uninstall -r security/centrifyda
To uninstall more than one package or all installed packages, enter thepackage names separated by a space. For example:pkg uninstall -r security/centrifyda security/centrifydc-curlsecurity/centrifydc-ldapproxy
• • • • • •
Installing agents on computers to be managed 128

2. You can run the following command to verify the Solaris agent package IPSinstallation status:pkg info | grep -i centrify
Note the space between "pkg" and "info"; if you search for "pkginfo" you'llbe searching for svr4 packages.
Sun Solaris installation notes
This section describes the unique characteristics or known limitations that arespecific to using authentication service on a computer with the Solaris operatingenvironment.
Changing the local user password on Solaris
On Solaris, the passwd command is designed to update the databases listed inthe nsswitch.conf file or the specific repositories you indicate with the -r option.Therefore, by default, you can use passwd command without any command lineoptions to update your password wherever necessary.
Once you install authentication service and join the domain, however, ActiveDirectory becomes the primary repository for user account information andchanging the password for any local user account you need to maintain outsideof Active Directory requires you to explicitly specify the repository to update withthe -r option.
For example, if you want to change the password for a local user account in/etc/passwd, you must specify the files repository when you run the passwdcommand:
passwd -r files user
If you want to update the password for an Active Directory user account, youcan use the passwd command without the repository option on Solaris 10. Forexample:
passwd adusername
If you are using an earlier version of the Solaris operating environment, however,you must use the adpasswd command that is installed with authenticationservice to update the password for Active Directory user accounts. Forinformation about using adpasswd, see the adpasswd man page or theAdministrator’s Guide for Linux and UNIX.
• • • • • •
Planning and Deployment Guide 129

Installing authentication service packages into Solaris 10 zones
All zones should be up and running during an upgrade from a previous release ofCentrify Authentication Service and its add-on packages (for example Centrifysudo or Centrify for Web Applications) should not be installed directly into asparse zone, they should be installed from the global zone only.
Installing authentication service packages into Solaris 11 child zones
You need to install SVR4 packaging tools in the child zone before authenticationservice can be installed.
To check if the SVR4 package has been installed, run
$ pkg info svr4
If it is not installed yet, run the following to install it:
$ pkg install pkg:/package/svr4
Note that the command above may need internet connection (depends on howthe IPS repository is configured in the zone).
Creating a home directory for new users on Solaris
In most operating environments, when new users log on successfully,authentication service will automatically create the user's home directory. OnSolaris, however, the home directory is typically automounted over NFS, so theoption to automatically create a new home directory for new users is off bydefault. You can turn on this feature, if suitable to your environment, by addingthe following to /etc/centrifydc/centrifydc.conf:
pam.create.homedir: true
With this flag, the first time a user logs in the home directory will be created. Theuser will see the message "Failed to create home directory", but this can beignored.
In Express mode use auto.schema.homedir to specify the home directory forusers. Use %{user} as a placeholder for a user's name.
For example:
auto.schema.homedir: /export/home/${user}
• • • • • •
Installing agents on computers to be managed 130

Planning to use Centrifyzones
One of the most important aspects of managing computers with Centrifysoftware is the ability to organize computers, users, and groups into zones. Thissection discusses the primary reasons for using zones and provides an overviewof how to analyze and migrate an existing user population into zones, includingan introduction to assigning roles that enable users to access computerresources. These topics will then be described in greater detail in the nextsections to help you create an initial zone structure and migrate users andgroups for a target set of computers.
Why use zones?
A zone is similar to an Active Directory organizational unit (OU) or NIS domain.Zones allow you to organize the computers in your organization in meaningfulways to simplify the transition to Active Directory and the migration of user andgroup information from existing identity stores. The primary benefits to usingzones are:
n Identity management through user and group profile definitions
n Access and authorization control through rights and role definitions
n Delegated computer management for zone-based administrative tasks
Zones also enable you to centrally manage configuration policies for computersand users through group policies, but for most organizations the keyconsiderations for designing a zone structure involve:
n Identity management because zones enable you to migrate from acomplex UID space, where a user can have multiple UIDs or different profileattributes on different computers or a single UID might identify differentpeople depending on the computer being used. With zones, you can
• • • • • •
Planning and Deployment Guide 131

associate multiple UNIX profiles with a user and identify the correct profileattributes for any user on any given computer.
n Access and authorization management because zones enable you to grantspecific rights to users in specific roles on specific computers. By assigningroles, you can control who has access to which computers.
n Delegated computer management because zones enable you to assignspecific administrative tasks to specific users or groups on a zone-by-zonebasis, allowing you to establish an appropriate separation of duties. Withzones, administrators can be given the authority to manage a given set ofcomputers and users without granting them permission to perform actionson computers in other zones or access to other Active Directory objects.
In most organizations, the first goal in designing the zone structure is to migrateusers and computers from an existing identity store, such as NIS, NIS+, local files,or LDAP, to Active Directory and to do so with the least possible disruption touser activity, business services, and the existing infrastructure. Over time, youcan also use zones to organize computers along departmental, geographical, orfunctional lines using whatever strategy works best for your organization.
Although Centrify supports aworkstation mode that does not require you tocreate and manage zones—a single Auto Zone is defined instead—mostorganizations find using zones to be an essential part of their migration to ActiveDirectory. The next sections provide more information about why zones are animportant part of the planning process. For more information about using AutoZone, see Deploying to a single Auto Zone.
Identity management using zones
For most organizations, it is impractical to attempt to rationalize user accountsacross the enterprise to achieve a single global UID for each user. For example,most organizations have multiple identity stores already in use on their currentUNIX platforms. These identity stores may include LDAP directories, NIS or NIS+domains, and local /etc/passwd and /etc/group configuration files. With thesemultiple identity stores, it is common for a single user to have a different username, UID, group memberships, or other attributes defined for differentcomputers.
Zones allow you to import the information from these legacy identity storeswithout consolidating the multiple profiles that each user may have. Forexample, a single user might have an account in a UNIX LDAP directory, anotherdefined in a NIS domain, and one or more local /etc/passwd files. Zones enable
• • • • • •
Planning to use Centrify zones 132

the profiles from these different identity stores to map to a single ActiveDirectory user account without changing the user profile defined in each of thelegacy directories. By keeping the profiles intact, the user’s file ownership andlog in permissions are not affected by the migration to Active Directory, makingthe transition from a legacy system to Active Directory more transparent toend-users and less of a management burden for the deployment team.
Role-based access control and zones
As a practical matter, you may choose to use Centrify zones to ease migration toActive Directory by creating a separate zone for each legacy identity store.However, you can also use zones to group computers by department, byfunction, or by any other criteria you choose. Using zones in this way gives you agreat deal of flexibility in controlling who has access to the UNIX, Linux, and MacOS X computers in your environment and makes it easier to set up accountinformation for new users based on job function or other criteria.
Through role assignments, zones provide a scope of resources particular userscan access, allowing you to define who can do what on which computers. Forexample, all of the computers in the finance department could be grouped into asingle zone called “finance” and the members of that zone could be restricted tofinance employees and senior managers, each with specific rights, such as logon to a database, update certain files, or generate reports. This gives you bettercontrol over access to systems based on well-defined roles. You can also limitaccess to certain types of applications, such as database management utilitiesor web services. For example, you can define specific actions specific users areallowed to perform by assigning them different roles in different zones.
Using zones to delegate administrative duties
Zones can also be useful for grouping computers that form a naturaladministrative set or that should be managed by different administrative teams.For example, you may want to group computers that are managed by a localsupport organization in one zone and computers that are managed by acorporate IT group in another zone.
Using zones, you can then control what different groups of users can do withinthe zones they have permission to access. For example, you can set up regionalzones to provide a separation of duties, authorizing users in San Francisco tomanage computers and user profiles in their local office while a team in
• • • • • •
Planning and Deployment Guide 133

Barcelona has authority to join computers and manage group profiles for officeslocated in Spain.
Zones provide a convenient way for you to assign individual administrativeresponsibilities to specific users or groups based on a set criteria, such asdepartment, geographic location, or functional role.
Deploying to a single Auto Zone
In most cases, if you are deploying on Linux or UNIX computers and have anexisting user population to migrate to Active Directory, you would create ahierarchical zone structure of multiple zones. However, multiple zones are notrequired for all situations. You can greatly reduce the time required andcomplexity of your deployment if a single zone suits your organization’s needs.For example, if you are deploying on Mac OS X orWindows computers or if youhave a mix of computer platforms but do not have an existing user population tomigrate, you might benefit from deploying agents using the Auto Zone option.
With Auto Zone, you have a single zone for an entire forest. All of the users andgroups you have defined in Active Directory for the forest automatically becomevalid users and groups on the computers that join the Auto Zone. If the forest hasa two-way trust relationship with another forest, all Active Directory usersdefined in that trusted forest are also automatically valid on computers that jointhe Auto Zone.
If you simply want to use the Active Directory users and groups you havealready defined on the non-Windows computers you manage, you can skip theplanning and creation of zones and simply add computers to the Auto Zonewhen you join the domain. The UNIX profile attributes that are required to accesscomputers in the Auto Zone are then automatically derived from user attributesin Active Directory or from settings defined in group policies or configurationparameters.
Note: You cannot use Auto Zone to give automatic access to users andgroups in a forest or domain with a one-way trust relationshipwith another forest or domain.
You can use Auto Zone without enabling any group policies or changing any ofthe default configuration settings. You can also join a domain through the AutoZone without installing Access Manager. However, you can use group policies orconfiguration parameters to specify a subset of Active Directory users or groups
• • • • • •
Planning to use Centrify zones 134

as valid Auto Zone users. The settings are then enforced on computers in theAuto Zone.
Using Auto Zone can make sense in small or larger organizations if you are notmigrating existing users and groups or maintaining legacy UNIX profileattributes. However, if you use Auto Zone, you cannot use zone-specificfeatures. For computers in the Auto Zone, you cannot configure rights and roles,assign roles to users and groups, or provide different profile attributes ondifferent computers.
For information about joining a domain using Auto Zone, see the man page foradjoin or the Administrator’s Guide for Linux and UNIX. For information aboutusing group policies or configuration parameters, see the Group Policy Guide orConfiguration and Tuning Reference Guide.
Classic and hierarchical zones
If you plan to deploy using zones—which is the most common deploymentmodel—you have to option to create classic or hierarchical zones. Classic zonesprovide a simple model for organizing computers and backwards compatibilityfor organizations with older versions of the Centrify Agent. Hierarchical zonesenable you to establish parent-child zone relationships, allowing profileattributes, rights, and roles to be inherited down the zone hierarchy. Classiczones are peers to each other and do not inherit profile attributes, rights, or rolesfrom each other.
One of the first decisions you need to make in planning your zone structure iswhether you will use classic zones, hierarchical zones, or some combination ofboth.
Should you use classic zones?
Classic zones provide a simple structure for delineating users and groups basedon a criteria you choose, such as by region or department. They are mostappropriate if you have a well-defined and well-managed UNIX namespacewith very few users who require special handling because of multiple profiles orconflicting profile attributes.
Classic zones are simple to manage as long as you only need a few. Forexample, imagine you have three regional zones with no users in common thatare managed independently by their own zone administrators with only one
• • • • • •
Planning and Deployment Guide 135

enterprise system administrator who must have a profile in each zone. In thatscenario, classic zones provide a simple solution because only one user account,the enterprise system administrator, must have a profile in each zone.
However, classic zones are very limited in complex environments where usersneed profiles in multiple zones or where there are multiple independently-managed UNIX namespaces to migrate to Active Directory. That is becauseclassic zones do not share data across zone boundaries. The data must becreated and managed in each zone independently. By contrast, hierarchicalzones support inheritance, enabling you to create parent and child zones thatshare information as needed. Because classic zones do not support inheritance,you cannot use variables to define profile attributes or any other hierarchicalzone features.
For most organizations, classic zones are primarily used to enable a new zonethat works with pre-5.0 versions of the Centrify Agent. If you have an olderversion of Centrify software installed and already have some zones deployed inyour environment, you can continue to use those zones as-is. After upgrading,you then have the option to create any new zones as classic zones to operatewithin the legacy zone environment or as hierarchical zones.
Note: If you already have zones deployed, you can convert them tohierarchical zones after you deploy the new version of Centrifysoftware, if you choose to do so. However, there’s no requirementfor you to convert existing zones to hierarchical zones.
When should you use hierarchical zones?
For most organizations, Centrify recommends that you use hierarchical zones forall new zones that you create. Hierarchical zones provide greater flexibility toinherit profile information, rights and role definitions, and user and group roleassignments.
Because hierarchical zones allow you to share or override information at anypoint in the hierarchy, they also allow you to design a simpler zone structurethan classic zones and support an easier deployment model. Typically, a simplerzone structure is easier to manage, but hierarchical zones also allow you toimplement a very sophisticated zone structure to address complex accesscontrol rules, if you so choose.
• • • • • •
Planning to use Centrify zones 136

Howmany zones do you need?
The goal in planning to use zones is to have a fairly small number of zones thatorganize the computers and users in your organization most effectively. As anexample, consider an organization where some UNIX computers are used tohost financial applications. Those computers are centrally managed by the ITorganization, which follows well-established conventions for issuing user loginnames, user IDs, and home directories. The same organization has a softwaredevelopment group that includes numerous UNIX workstations that are notcentrally managed by the IT organization and computers and accounts areadded when needed and managed independently.
Because enterprise-wide conventions are not enforced for the UNIX computersin the software development group, it’s possible that the local login names anduser IDs may conflict with the names and IDs used on the computers running thefinancial applications. In addition, users in the software development group mayuse a different convention for their home directories or prefer different loginshells.
Without zones, the IT organization would need to eliminate any duplicate userIDs and verify each login name was unique across all of the computers. Byplacing the computers running the financial applications in one zone and thecomputers in the development lab in another zone, the IT organization can avoidthe overhead of checking and changing existing account information and can setdefault zone settings, such as different default home directories or login shells,that are most appropriate to the users in each zone.
There are many different approaches you can take to defining the scope of azone, including organizing by platform, department, manager, application,geographical location, or how a computer is used. The factors that are mostlikely to affect your initial zone design, however, will involve migrating user andgroup profiles, identifying the appropriate access control policies and roleassignments, and delegating administrative tasks to the appropriate users andgroups. For many organizations, the most important issue during the initialdeployment is a successful migration of existing users. Using hierarchical zoneswith the ability to override attributes simplifies this task, helping to reduce thetotal number of zones you need to deploy.
• • • • • •
Planning and Deployment Guide 137

A closer look at using zones in a hierarchical model
In older versions of Centrify software, zones were always parallel with eachother and did not share or inherit data except through manual processes.Starting with Centrify Infrastructure Services 2012, however, you have theoption to use hierarchical zones that support the inheritance of user and groupdata and provide a great deal of flexibility for defining the rights and roles forwho can access which computers and what those users can do on thecomputers to which they have access.
How inheritance provides additional benefits
As discussed inWhy use zones?, the primary benefits to using zones are:
n Identity management through user and group profile definitions
n Access and authorization control through rights and role definitions
n Delegated computer management for zone-based administrative tasks
Hierarchical zones provide additional flexibility for each of these benefits. Forexample, because hierarchical zones allow inheritance, hierarchical zonesenable you define partial profiles and use variables that can be substituted atrun-time when a user accesses a specific computer in a particular zone.Hierarchical zones also enable you to define access control rules and delegateadministrative tasks at any point in the zone hierarchy.
This flexibility makes planning for hierarchical zones a key component of asuccessful deployment.
How many levels should you use in the zone hierarchy?
There are no predefined limits to the number of zones that can be used in a zonehierarchy or the number of levels deep zones can be nested in the hierarchy youdefine. For practical purposes, however, Centrify recommends using a hierarchysimilar to the following:
n One or more top-level parent zones that include basic profile informationfor all users and groups that access the UNIX, Linux, and Mac OS Xcomputers.
• • • • • •
Planning to use Centrify zones 138

n One to three levels of intermediate child zones based on natural accesscontrol or administrative boundaries.
At each level in the hierarchy, profile information and access controls areinherited from the zone above and either applied or overridden by the child zonesettings. At the lowest level of the hierarchy, you can override profile attributesor role assignments on any individual computers usingmachine overridesettings, if needed.
In addition, hierarchical zones support computer-based access rules, calledcomputer roles, that enable you to selectively map a set of users with aparticular role assignment access to a particular set of computers.
Identity management and inherited profile information
User and group profiles specify attributes such as the UID, primary group, homedirectory, and shell that are required for logging on to UNIX computers. You canspecify all or part of the profile anywhere in the zone hierarchy, but users musthave a complete profile to access computers they have permission to access. Ifthe user or group profile is incomplete, it is invalid and ignored.
Working with partial profiles in the zone hierarchy
The profile information in the zone hierarchy is resolved from top to bottom foreach user. For example, assume the user Pat Jackson has the login name patjand UID 12000 defined in the parent zone arcade_global and those profilesettings are inherited without change, along with a default shell, home directoryand other properties that are defined in the child zone arcade_web_dev. In asecond child zone, arcade_aix, the UID for patj is set to 7088 to override theinherited UID. Changes to the profile properties can be made in any zone andinherited down the tree down to overrides set for specific individual computers, ifneeded.
• • • • • •
Planning and Deployment Guide 139

Working with variables in the zone hierarchy
Partial profiles enable you define a subset of profile attributes for users andgroups that can be completed by lower level zones in the zone hierarchy. Youcan also define variables for resolving profile attributes. The variables are thensubstituted at run-time by adclient. For example, adclient can resolve thevariable %{home}/%{user} to a platform-specific home directory for each userwithout having the attribute manually defined. You can set the variables at anylevel in the zone hierarchy, and they are inherited and resolved, or can beoverridden, at a lower level in the tree.
You should note that variables can only be used to define profile attributes inhierarchical zones. You cannot import them or use them in classic zones.
Complete profiles do not grant access
Creating user profiles in a zone does not give users access to any computers inthe zone. The zone hierarchy simply creates a set of profiles with the potential tobe granted access to computers. In previous versions of Centrify software,enabling a UNIX profile for a user in a zone granted that user access to thecomputers in that zone by default. With hierarchical zones, the profile
• • • • • •
Planning to use Centrify zones 140

information only establishes the required properties for the user’s identity, butdoes not grant access to any computers in any zones.
Access to computers is controlled through the definition of rights and roles.
Access controls and the assignment of rights and roles
A user must have a complete UNIX profile to log on to any computer in a zone.However, a complete profile alone does not allow a user to access anycomputers. The user must also have at least one role assignment that grantsaccess somewhere in the zone hierarchy before any type of access is granted.Role assignments can be made anywhere in the zone hierarchy and inherited ata lower level in the tree.
Understanding roles and rights
Rights represent specific operations users are allowed to perform. A role is acollection of rights that can be defined in a parent or child zone and inherited. Forexample, a role defined in a parent zone can be used in a child zone, in acomputer role, or at the computer level.
There are only a few predefined rights, called system rights. The system rightsfor Linux, UNIX, and Mac OS X are:
n Password login and non password (SSO) login are allowed: Specifiesthat a user is allowed to log on interactively using a password or without apassword using a single sign-on token.
n Non password (SSO) login is allowed: Specifies that a user is allowed tolog on using a single sign-on token.
n Account disabled in AD can be used by sudo, cron, etc.: Specifies that anaccount that is disabled is allowed to access the computer. This rightenables service accounts that run without a password to performoperations.
n Login with non-Restricted Shell: Controls whether a user gets a full shellor is forced into a restricted shell. Users must be assigned at least one rolewith this right to have access to a standard shell environment. A restrictedshell only allows a user to execute explicitly defined commands.
The system rights for Windows computers are:
• • • • • •
Planning and Deployment Guide 141

n Console login is allowed: Specifies that users are allowed to log on locallyusing their Active Directory account credentials.
n Remote login is allowed: Specifies that users are allowed to log onremotely using their Active Directory account credentials.
In addition to the platform-specific system rights, there is a common systemright that allows users to bypass auditing or role restrictions to log on whenthere are problems on a computer. The Rescue rights option allows you tospecify the users who can log on if problems with the authorization cache or theauditing service on a computer are preventing all other users from logging on.
You grant users permission to access computers by assigning them to a role thatincludes one or more access rights. By default, zones only contain the followingpredefined roles to grant basic access rights:
n UNIX Login role allows users assigned this role to log on and access UNIXcomputers in the zone.
n Windows Login role allows users assigned this role to log on and accessWindows computers in the zone.
There are additional predefined roles that grant specific rights, such as the rightto log on if auditing is required but not available. The predefined roles exist ineach zone, but their role names are qualified by the zone name so that the samerole name in a parent zone and a child zone are considered different roles. Fordeployment, the predefined roles enable you to migrate existing users withoutdeveloping custom role definitions. After deployment, you can define additionalrights, roles, and role assignments to refine how users and groups accesscomputers in different zones.
Working with a candidate set of profiles
Ultimately, the purpose of the zone structure is to determine who has access,and what kind of access, to a computer. The candidate set of profiles that havethe potential to access a computer is resolved by traversing the zone hierarchyfrom top to bottom. Because profile data is defined separately from the roleassignments that control access, you can define an inclusive set of user profilesin a parent zone to create a candidate set that can then be applied to multiplechild zones. In each child zone or at the individual computer level, you can userole assignment to control access for specific users from the inclusive candidateset.
• • • • • •
Planning to use Centrify zones 142

Delegation in hierarchical zones
Hierarchical zones enable you to create a separation of duties for zoneadministration without recreating user and group profiles in multiple child zones.You can create full or partial profiles in the parent zone and inherit them into thechild zone. Within each child zone, zone administrators can modify the profiles,as needed, and assign roles to control access to the computers they manage.
Designing a zone structure for your environment
Because the flexibility of hierarchical zones is a key element in designing thezone structure for your deployment, the next sections describe how to set up anduse parent and child zones through sample deployment scenarios. The scenariosillustrate a basic deployment model, which will then be used to discuss how tomigrate existing users and groups to Active Directory.
Your own zone structure and deployment model can be more complex than theone described in this guide. However, the deployment model described in thenext sections is intended to ensure that you have a successful initial deployment.Over time, it is likely that you will change and adapt the zone structure torequirements that are specific to your organization. There are also multiple waysto accomplish the tasks described in the next sections of this guide. You can useother strategies and techniques for deployment if appropriate for yourorganization.
• • • • • •
Planning and Deployment Guide 143

Preparing to migrateexisting users and groups
This section describes how to prepare your environment for migration andcomputer access, including how to create and configure the initial zones. Thischapter also describes how to import existing account information into ActiveDirectory, set up provisioning for new users and groups, and configure role-based access controls.
Collecting and analyzing users and groups
Before you create any zones, you should collect and analyze information aboutexisting users and groups in the target set of computers. After you haveinvestigated user and group attributes and identified invalid accounts andconflicting attributes, you can draft a basic zone design that addresses theneeds of that user population. The goal of the initial zone design is to provideaccess to those users who currently have access, so they can transition to ActiveDirectory with no disruption to their work. Later, you can refine access tocomputers through role assignments, filtering, and other options, if needed.
Collecting information from other departments inyour organization
Before you look at the content of identity stores you want to migrate, you shouldconsider other sources of information that will help you identify a definitive set oflegitimate users. For example, it can be useful to contact people in otherdepartments who have reliable knowledge about the current organization orhistorical knowledge about how the organization has evolved. Individuals withinformation about a segment of the user population can help you identify
• • • • • •
Planning and Deployment Guide 144

accounts that are obsolete or were created for testing, or belong to users whohave left the company or moved to another department.
As a starting point for collecting information about existing users and groups,consider doing the following:
n Contact HR to get an up-to-date list of current active-duty employees,contractors, and consultants. You can use this information to comparepersonnel records to the UNIX accounts to be migrated. After you identifywhich accounts correspond to people in the organization, you can create aspreadsheet to record the UNIX user names, UIDs, and other useful fieldsfor those accounts.
n Contact enterprise security administrators or department-level UNIXadministrators to determine whether all of the accounts defined for acomputer still need access to that computer. For example, you shoulddetermine if any users validated as current employees have changeddepartments or job functions. If a user no longer needs access to somecomputers, you may not need to add a profile for that user.
n Identify any conventions used in defining the namespace. For example, isthere a standard format for the contents of the GECOS field? How do theconventions used for UNIX, Linux, or Mac OS X accounts compare to theconventions used in Active Directory? For example, is the convention usedfor the UNIX login name the same as the convention used for the user’ssAMAcountName in Active Directory? Does the GECOS field follow the sameconventions as the user’s displayName in Active Directory?
n Identify which user attribute fields that can be used as primary keys foridentifying a unique user. Depending on the conventions you use forcreating new accounts, the user name, user identifier (UID), or the GECOSfield may be a reliable field for identifying real users and mapping them toActive Directory accounts. If you use a standard provisioning conventionacross platforms for an attribute such as the GECOS field or user name, theconvention makes it much easier to identify unique users and map userprofiles to Active Directory accounts.
Using a script to retrieve user and group profiles foreach computer
Alternatively, you can write a script to retrieve all of the /etc/passwd and/etc/group files in the target set of computers. For example, to create a
• • • • • •
Preparing to migrate existing users and groups 145

hostname.passwd and hostname.group file for each computer in a target set ofcomputers, you might use code similar to the following:
for name in `cat hostname.txt`; \do scp $name:/etc/passwd $name.passwd; \scp $name:/etc/group $name.group; \done
This sample script includes the computer host name in the file name, so that youcan determine which user and group definitions came from which computer. Ifyou use a script to collect user and group information, copy all of the filesgenerated by the script to a common location for analysis.
Collecting data from NIS domains
If you’re migrating users and groups from a NIS domain, you can use ypcat orniscat to generate a copy of the NIS passwd and groupmaps once for each NISdomain. For example, run commands similar to the following:
ypcat passwd > `domainname`.passwdypcat group > `domainname`.group
If you are collecting user and group information from NIS maps, copy all of thefiles generated by these commands to a common location for analysis.
Identifying accounts that should not be migrated
After you have collected information about the existing users and groups in thetarget set of computers, examine each of the passwd and group files and NISdomain maps to create a list of users and groups that you do not plan to migrateinto Active Directory. For example, in most cases, there’s no compelling businessreason to migrate default system accounts, such as nfsnobdy or games, that willnot map to Active Directory users. You should also eliminate accounts for peoplewho have left your organization, and accounts that are locked or obviouslyinvalid.
Eliminate default system accounts
In most cases, you can ignore all UNIX users with a UID less than 99 becausethose are the default operating system accounts. You may also want to skipmigration for some or all UNIX service accounts unless you explicitly want to
• • • • • •
Planning and Deployment Guide 146

manage those service accounts, and any privileged commands they run, throughActive Directory and zones.
You can manage the passwords for UNIX service accounts using AccessManager without having those accounts defined in zones or in Active Directory.Therefore, you may want to leave most or all of the service accounts as locallydefined accounts.
In general, the only reasons to migrate default system or service accounts toActive Directory are:
n If you want to use Active Directory password policies for the account.
n If the service account itself owns one or more privileged commands thatyou want to manage through Centrify role definitions rather than locally inthe sudoers file.
Typically, only service accounts that own special permissions, such the oracleuser account, are migrated to Active Directory.
Remove other invalid accounts
You should also skip migration for users who have left the organization andprofiles that contain invalid data. Scan the data set for user accounts and groupsthat are locked or indicate they were created for testing. You should also checkfor profiles that contain obvious errors or legacy information no longer used.
In some cases, you may need to contact workstation or application ownersdirectly to determine whether a profile should be skipped for migration. Forexample, assume the /etc/group file contains an entry for clownswith krusty,bozo, and tadams as members and there are valid user profiles for those threeusers. You may suspect the clowns group was created for some local testing,and therefore, not a candidate for migration. However, there’s no definitiveindication that the clowns group should be skipped without more information.
Create a list of the users and groups to ignore
Add all of the accounts that should not be migrated to a text file. For example,create a text file named user.ignore and include all of the user accounts youdon’t want to migrate into Active Directory. For default system and serviceaccounts that have known UIDs, you can create the text file programmaticallyusing code similar to the following:
• • • • • •
Preparing to migrate existing users and groups 147

cat *.passwd | \egrep "x?:[0-9]:[0-9].|x?:[0-9][0-9]:[0-9].|x?:60[0-9][0-9][0-9]:[0-9]|x?:65[0-9][0-9][0-9]:[0-9]" | \cut -d ":" -f 1 | \sort | \uniq | \sed 's/^/\^/' > user.ignore
Other accounts you have identified as invalid can be added manually or usingcode if they share some common attribute, such as LOCKED in the password field.
Analyze user profiles for conflicting attributes
After the initial analysis to remove profiles that should not be migrated, you havea candidate data set of users and groups to import. The next step is to analyzethe attributes in user profiles to identify any potential problems that you willneed to address when you move the profiles into zones. Centrify ProfessionalServices offers scripts that assist in this process. If you are analyzing the filesmanually or writing your own scripts, here are the common issues you need tocheck for:
n Determine whether any user name has more than one UID in the target setof computers. The UID is the primary way of determining file ownershipand file permissions. On a single UNIX system, a user can only have oneUID. However, across all of the computers in the target set, the same username might have more than one UID.
n Determine whether any UIDs are associated with more than one username.
n Determine whether any users have other profile conflicts, such as morethan one primary GID, home directory, or shell on the computers in thetarget set.
In doing your preliminary analysis, keep in mind that you need to know whichuser profiles are associated with which people in your organization. Forexample, do the user names ldavis and davle refer to the same person (LenDavis) or to different people (Len Davis and Leslie Davidson).
This analysis of existing user profiles will help you identify the requirements ofyour initial zone design. The zone design allows you to use conflicting attributesas-is, without modifying any of the legacy data. You need to be aware of wherethere are conflicts so you can address them, but you do not need to changevalues for any attributes.
• • • • • •
Planning and Deployment Guide 148

Analyze group profiles for conflicting attributes
You need to perform a similar analysis across the groups in the target set ofcomputers. Centrify Professional Services offers scripts that assist in thisprocess. If you are analyzing the files manually or writing your own scripts, hereare the common issues you need to check for:
n Determine whether any group name has more than one GID in the targetset of computers. Like the UID, the GID affects file ownership and filepermissions. On a single UNIX computer, a group name can only have oneGID. However, across all of the computers in the target set, the same groupname might have more than one GID.
n Determine whether any GIDs are associated with more than one groupname.
n Determine whether any group has a different set of members on anycomputers in the target set. Group membership is particularly important forzone design. The members of a group must be consistent across all of thecomputers in a zone.
As with the user analysis, this analysis of existing group profiles will help youidentify the requirements of your initial zone design. The zone design allows youto use conflicting attributes as-is, without modifying any of the legacy data. Youneed to be aware of where there are conflicts so you can address them, but youdo not need to change values for any attributes.
Create a working set of user and group profiles
After you have identified profiles that should not be migrated and noted anyconflicting attributes you need to address, you have a known set of user andgroup profiles that you plan to migrate into Active Directory. The next step is toremove the users who should be ignored from list of users to import, and toremove the groups that should be ignored from the list of groups to import. Youcan do this manually or write a script that removes the profiles defined in theuser.ignore and group.ignore files and outputs the results to a new file. Forexample, you might use code similar to the following to remove ignored usersand generate a working set of user profiles:
mkdir output; \for name in `cat hostname.txt`; \do egrep -v -f user.ignore $name.passwd > \output/$name.passwd; \done
• • • • • •
Preparing to migrate existing users and groups 149

Howmigration affects the zone design
As discussed inWhy use zones?, identity management is one of the primarybenefits of using zones. Identity management is important because mostorganizations have an existing user population where users can have multipleUIDs or other attributes, such as different default shells, on different computersand groups with the same name can have different members. Each user has oneActive Directory user object but may have multiple UNIX profiles, some withattributes in common and some with different settings. Zones allow you tomigrate the profile information as it is defined, setting overrides wherenecessary, so that you can manage and report on the accounts withoutrationalizing the user namespace.
For all of the computers in a zone, a user or group has one profile definition, butthe user or group could have different profile attributes on the computers in adifferent zone. Hierarchical zones make the zone design even more flexible.Hierarchical zones allow you to define one or more profile attributes in a parentzone and use those profile attributes in all child zones. In practice, this enablesyou to define a dominant set of attributes in a parent zone, and inherit thecommon attributes in one or more child zones. You can also override anyattribute at any point in the zone hierarchy down to an individual computer.
For example, if a UNIX administrator has a consistent profile across all of theUNIX computers, but a customized home directory on two Mac OS X computers,you could define the default profile for the user in a parent zone, then create achild zone for the Mac OS X computers and inherit all of the profile attributesexcept the home directory setting.
In planning the migration, you identify the attributes that are the same acrossthe target set of computers and where there are differences. If you usehierarchical zones, the primary task is identify one or more potential parentzones. For example, if you are migrating two NIS domains, you might create twoparent zones because the UID space is unique in each domain but there wouldbe conflicting attributes if the domains were combined into a single parent zone.The computers in each of the parent zones would inherit the UID and otherprofile attributes from each distinct NIS domain.
After you have identified one or more parent zones, you can plan how you willuse child zones and overrides to manage profile attributes, implement accesscontrols, and delegate administrative duties.
• • • • • •
Planning and Deployment Guide 150

Creating the first zone
Centrify recommends that you plan to use hierarchical zones and create at leastone top-level parent zone. A single top-level zone for your organization is alsouseful for long-term management of UNIX profiles. You can have more than onetop-level parent zone. For example, if your organization has subsidiaries that arerun independently or distinct geographical locations managed by differentteams, you may want to create separate parent zones for those lines of businessor locations.
Having a single top-level parent zone enables you to create an administrativegroup of super-users who can log on to every UNIX computer in yourorganization. It also allows to define some common rights and roles that can beinherited by child zones and the computers in those zones. Having a global ormaster zone for the entire organization also simplifies setting up provisioning fornew accounts. However, there’s no restriction on the number of parent or childzones you create. If you have a distributed environment and delegateadministrative authority to separate teams, you can create as many parentzones as you find useful.
This guide describes how to set up the migration environment using one top-level parent zone. If you create more than one parent zone, you may need torepeat steps or extrapolate additional steps from the information presentedhere.
Create a top-level parent zone
Before you migrate users and groups or add computers to the domain, you musthave at least one zone. Centrify recommends that you create one top-levelparent for your organization, which is similar to having a single forest rootdomain.
To create the top-level parent zone:
1. Log on to theWindows computer where Authentication & Privilege isinstalled and open Access Manager.
If you are not currently connected to the appropriate forest, specify thedomain controller to which you want to connect.
• • • • • •
Preparing to migrate existing users and groups 151

2. In the console tree, select Zones and right-click, then click Create NewZone.
3. Type the zone name and, optionally, a longer description of the zone.
In most cases, you should use the default parent container and containertype that you created when you configured the Active Directory forest, andthe default zone type, which creates the new zone as a hierarchical zone,then click Next.
The only reasons for changing the default settings would be if you want to:
n Create a zone in a new location to separate administrative activity fordifferent groups of administrators.
n Create zones as organizational units because you want to assigngroup policy objects to zones.
n Create a classic zone for backwards compatibility or are using theMicrosoft Services for UNIX (SFU) schema.
For additional details about any of the zone fields, press F1 to viewcontext-sensitive help.
4. Review the information about the zone you are creating, then click Finish.
Add provisioning groups to the parent zone
The next step in configuring the top-level parent zone is to create two ActiveDirectory groups that will enable automated provisioning and de-provisioning ofusers and groups in the top-level parent zone. By creating these provisioninggroups in the parent zone, you can integrate the provisioning of UNIX users andgroups with your existing processes for provisioning Active Directory users.
The provisioning groups are not required for migration, but a recommendedconfiguration for the top-level parent zone you are creating as the first zone inthe environment.
Centrify recommends you follow the naming conventions suggested for thesegroups. If you use a different naming convention, you should be sure it is welldocumented in your internal process documentation.
• • • • • •
Planning and Deployment Guide 152

To add the provisioning groups for user and group profiles to the parent zone:
1. Start Active Directory Users and Computers.
2. Expand the forest domain and the top-level UNIX organizational unit youcreated in Selecting a location for the top-level OU.
3. Select Provisioning Groups, right-click, then select New > Group.
4. Type the group name using the format ZoneName_Zone_Groups. Forexample, if the zone name is arcadeGlobal, type arcadeGlobal_Zone_Groups, then click OK.
The Zone Provisioning Agent will use this group when processing thebusiness rules for adding or removing group profiles in the parent zone.
5. Select Provisioning Groups, right-click, then select New > Group.
6. Type the group name using the format ZoneName_Zone_Users. Forexample, if the zone name is arcadeGlobal, type arcadeGlobal_Zone_Users, then click OK.
The Zone Provisioning Agent will use this group when processing thebusiness rules for adding or removing user profiles in the parent zone.
To prevent problems in UIDs and GIDs for existing users and groups, you shouldimport existing user and group profiles before defining the business rules forautomated provisioning of new accounts. After you complete the migration ofthe existing user population, you will define the business rules for theZoneName_Zone_Groups and ZoneName_Zone_Users groups you just created.
Create groups for the default roles in the parent zone
The next step in configuring the top-level parent zone is to create two ActiveDirectory groups for the default listed and UNIX Login roles that arepredefined in hierarchical zones.
n If you have a single top-level parent zone, users with a listed role can berecognized as having a valid profile on every UNIX computer in theorganization. However, users in the listed role are not allowed to log on toany of those computers.
n If you have a single top-level parent zone, users with a UNIX Login rolecan log on to every UNIX computer in the organization.
For the top-level parent zone, the UNIX Login role is intended for enterprise-level systems administrators who need to be able to log on to any UNIX
• • • • • •
Preparing to migrate existing users and groups 153

computer in the organization. Because these are powerful roles in the parentzone, only a limited number of users would ever be assigned to these roles.However, the listed and UNIX Login roles are key components of migrationwhen you create one or more child zones. If no users in the organization will beassigned these roles in the parent zone, you can skip the creation of the ActiveDirectory groups for roles in the parent zone.
To create the groups for listed and UNIX Login roles in the parent zone:
1. Start Active Directory Users and Computers.
2. Expand the forest domain and the top-level UNIX organizational unit youcreated in Selecting a location for the top-level OU.
3. Select the User Roles organizational unit, right-click, then select New >Group.
4. Type the group name using the format ZoneName_Role_RoleName. Forexample, if the zone name is arcadeGlobal, type arcadeGlobal_Role_Listed, then click OK.
5. Select the User Roles organizational unit, right-click, then select New >Group.
6. Type the group name using the format ZoneName_Role_RoleName. Forexample, if the zone name is arcadeGlobal, type arcadeGlobal_Role_Login, then click OK.
Delegate administrative tasks on the parent zone
The next step in configuring the top-level parent zone is to delegateadministrative authority to the Zone Administrators group and to delegatespecific permissions to the service account for the Zone Provisioning Agent toenable automated provisioning of user and group profiles in the parent zone.
To delegate administrative tasks on the top-level parent zone:
1. Start Access Manager.
2. In the console tree, expand the Zones node.
3. Select the top-level parent zone, right-click, then click Delegate ZoneControl.
• • • • • •
Planning and Deployment Guide 154

4. Click Add.
5. Change the Find list from User to Group, type z, then click Find Now.
6. Select Zone Administrators in the results, then click OK.
7. Click Next.
8. Select All to enable members of the Zone Administrators group to performall administrative tasks on the top-level parent zone, then click Next.
9. If you are delegating the task of joining computers to a zone, you canspecify the scope of computers you can join to the zone; you pick acontainer in Active Directory to grant access to.
If you leave the scope blank, the scope is the domain root. Be aware thatthe postalAddress field is used for information about joining computers to azone; if you lookup the permissions for people you've delegated the task ofjoining computers to a zone, they'll have permissions to the postalAddressfield for the affected computers.
10. Review your selections, then click Finish.
11. Right-click, then click Delegate Zone Control.
12. Click Add.
13. Type all or part of the service account name for the Zone ProvisioningAgent that you created in About Zone Provisioning Agent and itsrequirements, click Find Now, then select the service account in the resultsand click OK.
14. Click Next.
15. Select the following delegation rights for the Zone Provisioning Agentservice account, then click Next:
n Change zone properties
n Add users
n Add groups
n Remove users
n Remove groups
16. Review your selections, then click Finish to save the changes and close thedialog.
• • • • • •
Preparing to migrate existing users and groups 155

Link a role group to a role assignment in the parent zone
The next step in configuring the top-level parent zone is to link the ActiveDirectory role groups created in Create groups for the default roles in the parentzone with the listed and UNIX Login role definitions that are predefined in theparent zone. You create this link between an Active Directory group name andthe combination of rights associated with a role name by assigning the ActiveDirectory group to the role.
1. Start Access Manager.
2. In the console tree, expand Zones, the top-level parent zone, andAuthorization nodes.
3. Select Role Assignments, right-click, then click Assign Role.
4. Find the ZoneName_Role_Listed Active Directory group, then click OK.
5. Click Browse.
6. Select the listed role from the list of available roles, then click OK.
7. Check that the Start immediately and Never expire options are selectedand appropriate or deselect those options and set start and end times, thenclick OK.
8. Repeat Step 3 through Step 7for the ZoneName_Role_Login ActiveDirectory group and the UNIX Login role.
Create one or more child zones
After you have created a parent zone and prepared it with provisioning and rolegroups, you can create one or more child zones. You can create the child zonesbased on any logical model you choose. This is where the analysis of commonand conflicting attributes and some creativity come into play.
Logical models for defining zones
Because the zone design uses hierarchical zones, you can override attributes atany zone or computer level to deal with conflicts in legacy profile data. With thisflexibility, you can experiment with different possible designs, for example,based on delegated administrative authority or physical location. Some common
• • • • • •
Planning and Deployment Guide 156

models for grouping a set of computers, users, groups, roles, and rights in thesame zone include:
n By shared identity store. For example, existing identity stores, such as NISdomains or a centralized user and group database, often provide a naturalboundary for zones. This strategy is especially effective if each identitystore has a consistent namespace, without profile conflicts. It is lesseffective if the computers that share a common administrative group uselocal /etc/passwd and /etc/group file to store account information.
n By application or function. For example, you might want to groups all ofyour database servers or web farm servers into their own zones. As part ofthis design, you might need to evaluate whether you are combiningdevelopment computers with production servers and what roleassignments you’ll need to control what users can do on each type ofcomputer.
n By geographical region or line of business. For example, all of the UNIXcomputers that support a business unit could be logically grouped together.As part of this design, you might evaluate whether different business unitsshould be responsible for provisioning users or assigning roles within theirown business unit.
n By host name. If you already have a meaningful host name conventionthat identifies machine owners or primary function, you may want to createzones based on that naming convention.
n By platform and operating system. You can use this strategy, for example,to create separate zones for Red Hat Linux workstations and Sun SolarisUNIX workstations.
n By department or user community. You can use this strategy, for example,to create separate zones for the computers that host financial applicationsand computers used by software developers.
You are not required to create child zones. You could control access to the parentzone through role assignments. For most organizations, however, one or morechild zones makes it easier to assign roles and manage group membership.
Depending on your target set of computers, you may decide to start with one ortwo child zones or skip the creation of a child zone.
• • • • • •
Preparing to migrate existing users and groups 157

Create a child zone under the parent zone
Creating a child zone is similar to creating a parent zone. You select the parent inthe left pane, then create and configure the child zone to prepare anenvironment into which you will migrate existing users and groups.
To create a child zone under the parent zone:
1. Start Access Manager.
2. In the console tree, expand the Zones node.
3. Select the top-level parent zone, right-click, then click Create Child Zone.
4. Type a name and description for the child zone, then click Next.
For example, if you are organizing by functional group, this zone might befinance or engineering. If you are organizing by data center location, thechild zone might be sanfrancisco or seattle.
5. Click Finish to complete the zone creation.
The new zone is listed under the Child Zones node in the left pane.
Create role groups for child zones
The next step in configuring the child zone is to create two Active Directorygroups for the default listed and UNIX Login roles that apply to this zone.
n In the child zone, users with a listed role can be recognized as having avalid profile but only on computers that are joined to the child zone. Usersin the listed role for the child zone cannot log on to any of the computersjoined to the child zone.
n In the child zone, users with a UNIX Login role are allowed to log on toevery UNIX computer joined to the child zone if they have a UNIX profile forthe zone.
For the child zone, the UNIX Login role is intended zone-level administrators andusers who were previously able to log on to the UNIX computers joined to thechild zone. The listed and UNIX Login roles are key components of migrationwhen you create one or more child zones.
• • • • • •
Planning and Deployment Guide 158

To create the role groups for listed and UNIX Login roles in the parent zone:
1. Start Active Directory Users and Computers.
2. Expand the forest domain and the top-level UNIX organizational unit youcreated in Selecting a location for the top-level OU.
3. Select User Roles, right-click, then select New > Group.
4. Type the group name using the format ChildZoneName_Role_RoleName.For example, if the child zone name is sanfrancisco, type sanfrancisco_Role_Listed, then click OK.
5. Select User Roles, right-click, then select New > Group.
6. Type the group name using the format ChildZoneName_Role_RoleName.For example, if the zone name is sanfrancisco, type sanfrancisco_Role_Login, then click OK.
Delegate administrative tasks on the child zone
The next step in configuring the child zone is to delegate administrative authorityto the Zone Administrators group. The steps are the same for the child zone asthe parent zone, except that you expand the Child Zones node and select thename of the child zone before selecting the Delegate Zone Control command.You should still assign the Zone Administrators group All permissions.
You also have the option of assigning the permissions to join or leave to the JoinOperators Active Directory group. If you pre-create computer accounts andallow the computer to join itself to the Active Directory domain, you can skip thisstep.
If you don’t want to pre-create the computer account and allow the self-servicejoin, you must give members of the Join Operators group the followingadministrative tasks:
n Join Computers to the Zone
n Remove Computers from the Zone
n Modify Computer Profiles
• • • • • •
Preparing to migrate existing users and groups 159

Link role groups to role assignments in the child zone
The next step in configuring the child zone is to link the Active Directory rolegroups created in Create role groups for child zones with the listed and UNIXLogin role definitions that are predefined in the child zone. You create this linkbetween an Active Directory group name and the combination of rightsassociated with a role name by assigning the Active Directory group to the role.The steps are the same for the child zone as the parent zone, except that youexpand the Child Zones node and select the name of the child zone beforeselecting the Authorization node.
When you search for the Active Directory group to assign, you will select theChildZoneName_Role_Listed, for example sanfrancisco_Role_Listed, for thelisted role, and ChildZoneName_Role_Login, for example sanfrancisco_Role_Login, for the UNIX Login role.
Users who are added to the ChildZoneName_Role_Login group will be able tolog on to computers that are joined to the child zone or any of its own children,but will not be able to log on to computers in other child zones.
Creating computer objects for the target set ofcomputers
When you manage UNIX computers with Centrify software, you add computerobjects to Active Directory for those computers. These computer objects can becreated automatically when a computer joins the domain, or created in ActiveDirectory before the computer joins the domain. In most cases, Centrifyrecommends that you create the computer account objects before joining, ifpossible.
For deployment and migration, creating the computer objects before joiningprovides the following key advantages:
n You can define computer-level overrides before computers are added tothe zone. This allows you to resolve issues with divergent UNIX profileswithout having to change file permissions at the file system level.
n You can check who will have access to which UNIX computers before thosecomputers join the Active Directory domain.
Pre-creating the computer objects enables you to check that you have userprofiles and role assignments correctly defined before you join the UNIX
• • • • • •
Planning and Deployment Guide 160

computers to zones. Verifying this information before the join operation helps toensure a smooth migration without disrupting users’ access to files orapplications.
Prepare a computer object before joining
In most cases, you should pre-create the computer object for every UNIXcomputer in every zone. For individual computers, you can use the PrepareComputer wizard to guide you through the process. However, you will probablywant to create aWindows or UNIX script for performing the operationrepeatedly. For example, you can use adedit or theWindows API to create ascript.
To prepare a computer account in Active Directory using Prepare Computer:
1. Start Access Manager.
2. In the console tree, expand the Child Zones node, then expand the childzone for this computer to join.
3. Select the Computers node, right-click, then click Prepare Computer.
4. Accept the default preparation options, then click Next.
5. Accept the default to Create a new computer object, then click Next.
6. Type the name of the computer object to create and modify the DNS hostname of the computer object, if necessary.
The computer name is the name of the computer principal in ActiveDirectory. The DNS name is how the UNIX computer is currently registeredin DNS. If you have a disjointed DNS namespace, you should be sure theDNS name is the name used in the computer’s DNS entry.
7. Click Change and navigate to the organizational unit for storing computerprincipals. For example, if you created the organizational unit structuredescribed in Creating recommended organizational units, select UNIXServers andWorkstations and click OK, then click Next.
8. Select an option for joining the computer to the domain, then click Next.
n If you want to require users to interactively join the computer toActive Directory, click Browse to select the Join Operators group.
• • • • • •
Preparing to migrate existing users and groups 161

n If you want to allow the computer to join itself to the zone, selectAllow the computer to join itself to the zone. This optionautomatically associates the computer with the correct zone, sothere’s less chance of a human error.
9. Click Browse to select the Zone Administrators group, then click Next.
With this setting, users in the Zone Administrators can override anyinherited attributes of a UNIX user or a UNIX group profile on the computer.
10. Review your selections, then click Next to create the computer account.
11. Click Finish to complete the process.
You have now finished preparing the environment for migration and are ready tobegin importing groups and users and assigning them appropriate roles.
• • • • • •
Planning and Deployment Guide 162

Migrating existing users tohierarchical zones
Now that you understand how zones are used and have prepared anenvironment for an initial migration, you are ready to import the existing usersand groups that you have identified as candidates for being migrated to ActiveDirectory.
This section uses a sample data set to illustrate how to migrate an existing userpopulation into hierarchical zones and how to assign the appropriate roles toconvert from a legacy authentication model to Active Directory and Server Suite.
Importing group profiles
After you have created one or more zones and separated the users and groupsto ignore from the users and groups that you think should be migrated to ActiveDirectory, you must decide which groups apply to which zones. For example, ifyou have some groups with the same group profile and group membership in allzones, you would import those groups into the top-level parent zone so that theyalso exist, with the same definition, in all child zones. If a group is only applicablefor computers in a child zone, you can import the group profiles directly into thatzone. You can also override group profile attributes on specific computers, ifneeded.
After you have made these decisions, importing the groups is a simple processusing either the Import from UNIXwizard or ADedit scripts with two importantconsiderations:
n Group names must be unique in Active Directory. If you create a group witha common name, such as admins, you cannot create another group withthe same name.
• • • • • •
Planning and Deployment Guide 163

n Having the same UNIX group name on computers in different zones cancreate group collisions and inadvertent privilege escalation or fileownership conflicts.
To prevent group name collisions, Centrify recommends that you include thezone name in the Active Directory group name. You may also want to add asuffix that identifies the group as an UNIX security group. In most cases, youcreate the Active Directory group object for the UNIX group in the UNIX Groupsorganizational unit if you created the organizational unit structure described inCreating recommended organizational units.
You should import group profiles and create the corresponding Active Directorygroups for those groups before you import users. If you import group profilesfirst, you can resolve secondary group membership for users immediately afteryou import user profiles.
Import UNIX groups that apply to all computers into theparent zone
If your organization has a default UNIX administrators group or security groupthat you want to be available on all UNIX computers, that group is a goodcandidate for importing into the parent zone. Other groups that might becandidates for the parent zone are special purpose UNIX groups that ownsudoers permissions that apply to all UNIX computers or an auditing group thatrequires access to all computers.
If you have identified any common groups, use the Import from UNIX wizard or ascript to import the UNIX groups that should be available for all computers intothe top-level parent zone.
To import UNIX groups using the Import from UNIX wizard:
1. Start Access Manager.
2. In the console tree, expand Zones and the top-level parent zone.
3. Select UNIX Data, right-click, then click Import from UNIX.
4. Click UNIX configuration files, then click Browse to locate and select thegroup file to import, then click Next.
5. Select the option to automatically shorten the UNIX name, if desired, thenclick Next.
• • • • • •
Migrating existing users to hierarchical zones 164

6. Leave Store in Active Directory selected and click Next.
7. Select Check data conflicts while importing, then click Finish.
This step places the profiles under Groups as Pending Import.
8. Select one or more group names that are Pending Import, right-click, thenselect Create new AD groups.
9. Click Browse, navigate to the UNIX Groups organizational unit and clickOK, then click Next.
10. Click Add a prefix to group name, type the parent zone name and anunderscore (_), select the group scope as Global, then click Next. Forexample, if the parent zone name is arcadeGlobal, use the prefixarcadeGlobal_.
Optionally, click Add a suffix to group name and type a suffix thatidentifies the group as a UNIX security group, for example, _unix.
11. Review the information displayed, then click Finish.
For more information about importing groups, see the Administrator’s Guide forLinux and UNIX.
Import UNIX groups that apply only to a specific zone into achild zone
From your initial analysis and zone design, you should also have a reasonableplan for groups that apply to specific child zones. Groups imported into a childzone are visible to all the UNIX computers in that zone, but not in other zones.For example, assume you have identified an application-specific group, ora_app01, that allows users to use a database, and the database application existsthree computers. In your zone design, you decide those three computers shouldbe a single child zone. In that case, you import the ora_app01 group profile intothe child zone group because the database application group is only relevant tothe UNIX computers in the child zone.
The steps for importing into a child zone are the same as for the parent zone,except that you select the UNIX Data under the child zone name in the consoletree and specify the child zone name as the prefix for the Active Directory groupname.
• • • • • •
Planning and Deployment Guide 165

Import a group profile or override attributes on specificcomputers
In some cases, you may have a UNIX group that only exists on one computer in azone or exists on more than one computer but has different attributes ondifferent computers. You can use computer-level overrides to handle thesecases. Computer-level overrides enable Zone Administrators to create andmanage group profile attributes manually for individual computers.
To create a group profile for a specific computer:
1. Use Active Directory Users and Computers to create an Active Directorygroup in the UNIX Groups organizational unit. If the group only applies to aspecific computer, you may want to use the computer name as the prefix.
2. Start Access Manager.
3. Expand the console tree to display the individual computer object under thezone the computer will join.
4. Expand UNIX Data, select Groups and right-click, then click Create UNIXGroup.
5. Click the attributes to define, type the appropriate values, then click OK.
n Click GID to manually specify a GID for the group profile on theselected computer.
n Click UNIX group name to manually specify a group name for theprofile on the selected computer.
Avoiding group collisions when using computer-level overrides
If you create group profile overrides on individual computers, you should makesure that the UNIX group name and GID are not being used by any other groupsin the parent or child zone. If the group profile defined for the computer is thesame as a group profile defined for a group in the parent or child zone, userswho should only be able to access files on the local computer may be able toaccess files owned by the group defined for the parent or child zone. This can bea difficult problem to identify. For example, assume you have an Active Directorygroup named contract_admins, but you have used the UNIX group nameadmins and the same GID as a group in the parent zone. Any user who is amember of the contract_admins group in Active Directory is going to have thesame GID as the parent zone’s admins group. If that happens, members of the
• • • • • •
Migrating existing users to hierarchical zones 166

contract_admins group will have access to the same files as the admins groupin the parent zone.
The only way to identify when this problem occurs is by running the followingcommand for a user in the contract_admins group:
id -a
Importing user profiles
You can import user profiles into the parent zone or into child zones. If you importuser profiles into the parent zone, all existing users will be included in thecandidate set of users who have the potential to log on to all of the UNIXcomputers in the organization. However, they are not granted any access bydefault. Instead, the management of identity information, such as the user name,UID, and primary group, is separate from privilege management. Users cannotaccess any UNIX computers until they are assigned a valid role with the specificpermissions they need to be recognized, allowed to log on, or run specificcommands.
Although you can import users into the parent zone without granting themaccess rights, you may prefer to import them into one or more child zones. Byimporting users into specific child zones, you can limit the scope of their potentialaccess. In general, this option is applicable for the majority of your end-users andcan apply to other users, such as database administrators, project managers,and contractors who won’t ever need access to all the UNIX computers in theorganization.
At this stage you should decide whether to give users the potential to access allcomputers in the organization, or only the computers in one or more specific childzones. After you import the user profiles, you will use the default listed andUNIX Login roles or custom roles to control access to the UNIX computers.
The steps for importing user profiles into a parent or child zone are essentiallythe same as importing groups. You can use the Import from UNIXwizard orADedit scripts to import the profiles into one or more zones. The profileinformation for any user can be different in each zone. If the profile information isdivergent on any computer within a zone, you can set computer-specificoverrides for any or all attributes.
Tip: If you are importing users from a file, you can write a script thatmodifies the GECOS field to use the same format used in theActive Directory displayName attribute before importing so that
• • • • • •
Planning and Deployment Guide 167

users are automatically mapped to their corresponding ActiveDirectory accounts. For example, if your convention for the GECOSfield is first_name last_name (JaeWilson) but the convention usedin Active Directory is last_name, first_name (Wilson, Jae), youmust manually map the UNIX user account to the Active Directoryaccount. If you modify the format of the GECOS field beforeimporting, the Import from UNIX wizard can automatically suggesta candidate for mapping the UNIX user to an Active Directoryuser, if an account exists.
After you import users, their profiles are placed under Users as Pending Import. Ifthe user has an existing Active Directory account, you can select the user name,right-click, then select Extend existing AD user. If an Active Directory accountdoes not exist, you can select the user name, right-click, then select Create newAD users. You can then use Check Status to resolve group membership forPending Groups. This command adds the imported users to the appropriateActive Directory groups that have UNIX profiles in the zone to complete the firstphase of the migration to Active Directory.
For more information about importing users and resolving group membership,see the Administrator’s Guide for Linux and UNIX.
How group membership works within zones
When a UNIX group profile is imported into a zone, its group name and GID arerecognized by all computers joined to that zone. However, the groupmembership might vary by computer. For a user to be a member of the UNIXgroup, the user must:
n Be a member of the Active Directory group.
n Have a complete UNIX user profile defined somewhere in the zonehierarchy (in the parent zone, a child zone, or with computer-leveloverrides).
n Be assigned the listed role or the UNIX Login role somewhere in the zonehierarchy (in the parent zone, a child zone, or with computer-leveloverrides).
For example, assume the users Alison and Clyde are assigned the UNIX Login
role for the Engineering zone. As discussed in Create role groups for childzones, that means they are also listed as members of the Engineering_Role_Login role group in Active Directory. Clyde is also a member of the denali
• • • • • •
Migrating existing users to hierarchical zones 168

project group in the Engineering zone and has a profile defined in the parentzone. Alison’s profile is defined in the Engineering zone. If the denali projectgroup (Engineering_Denali in Active Directory) is added to the Engineeringzone, both Alison and Clyde can log on to computers in the Engineering zone,but only Clyde will be a member of the denali UNIX group in the Engineeringzone.
Assigning roles to existing users and groups
You have now imported the existing user and group profiles for a target set ofcomputers into Active Directory. This is one critical component of migrationbecause users must have a valid UNIX profile, that is, a unique user name, UID,primary GID, home directory and shell, in a zone for them to be recognized asvalid users. However, Centrify separates UNIX profile management from UNIXprivilege management. Users cannot log on to UNIX computers until they areassigned a role that allows them to log on to those computers.
As discussed in Access controls and the assignment of rights and roles, a role isa collection of rights and there are two default roles: the listed role and theUNIX Login role. As part of deploying Centrify software with the least disruptionto your environment, your existing users must be able to log on to the UNIXcomputers they currently use. That is the primary purpose of the UNIX Login
role: to allow you to quickly give log on access to a set of users in one or morezones. The UNIX Login role in the parent zone is intended for enterpriseadministrators who need log on access to all computers. The UNIX Login role inthe finance zone would be for those users who currently have interactiveaccess to the limited number of computers in that zone and would expect tohave that access after migration.
The listed role is intended for users who need a valid profile defined but do notneed interactive log on access to the computers in a zone. For example, youassign the listed role to remote NFS users so that they have access to their fileswithout the ability to log on and open a shell. You can also use the listed role togive users access to applications, such as ClearCase or Samba, that require aUNIX profile without the ability to log on locally or remotely. The listed role inthe software-dev zone would be for those ClearCase users who need to berecognized on all computers in the zone so they can check files in and out.
The next step in the migration is to identify which users should be assigned toeach role in each zone you have created.
• • • • • •
Planning and Deployment Guide 169

Using Active Directory groups for roles
For most organizations, the most efficient way to manage role assignment is byadding users to Active Directory groups, then managing those groups. Therefore,for management purposes, a Centrify access role should always be linked to anActive Directory security group. The Active Directory groups that identify theusers in specific Centrify user roles are stored in the User Roles organizationalunit. All of the users in a specific role group will share a common set of rightsunder UNIX. You can then use machine-level overrides for handling edge casesfor individual computers.
Adding users to role groups
There are many different ways you can add UNIX user profiles to an ActiveDirectory group. For example, you can manually select a UNIX profile in a zone,right-click, then select Add to a group or select groups under the RoleAssignments node for the zone, and modify the group membership. In mostorganizations, however, you can leverage your existing provisioning process. Ifyour current provisioning process involves managing a group in Active Directory,whether it is through automated scripts or human processes, you can use thesame process for provisioning UNIX users.
Migrating existing users into the UNIX Login role in the parentzone
In Create groups for the default roles in the parent zone, you created ActiveDirectory security groups for UNIX Login and listed roles in the parent zone. Ifyou want to give all users the potential to log in to all UNIX systems, you canmake them members of the parentZone_Role_Login group.
Users who are members of this group and have a complete UNIX profile in theparent zone can log on to all UNIX computers that are joined to the parent zoneand all UNIX computers joined to the child zones of the parent zone. However, ifyou add users to the parentZone_Role_Login group in Active Directory, but donot define a UNIX user profile in the parent zone, those users will only be able tolog on to the UNIX computers in the child zones where they have a UNIX userprofile defined or the individual computers where you define machine-leveloverrides to give them a UNIX profile.
• • • • • •
Migrating existing users to hierarchical zones 170

The default UNIX Login role associated with the parentZone_Role_Login groupdoes not grant any additional privileges. It simply allows users to log on to UNIXcomputers. Therefore, one strategy for migrating users is to add them all toparent zone’s Login role group. You can then control access based on where theuser’s UNIX profile is defined and control what the user can do using additionalrole assignments. For example, you may create custom roles to grant expandedUNIX privileges.
Migrating existing users into the UNIX Login role in childzones
If you define user profiles for most of your users in the parent zone, you shouldnot make themmembers the parentZone_Role_Login group. Instead, you canadd users to the appropriate childZone_Role_Login groups. All of your existingUNIX users who can currently log on interactively to existing UNIX systemsshould be added to one or more childZone_Role_Login groups. For example,users who currently have access to all of the computers in the Engineering zoneshould be added to the Engineering_Role_Login Active Directory group. Ifthose users also have a UNIX profile in the parent zone or the Engineering zone,they will be able to log on to all of the computers in the Engineering zone. If auser only needs access to a specific computer in the zone, you can use amachine-level override to give the user access to that specific computer.
You can use the Access Manager console, Active Directory Users andComputers, ADEdit or custom scripts to add UNIX user profiles to theappropriate childZone_Role_Login groups. If possible, you should integrate thispart of the migration with your existing provisioning process to ensure thatfuture requests for UNIX role assignments use the processes that line of businesspersonnel already understand.
Migrating existing users into the listed role in child zones
After you have assigned users who must be able to log on to the UNIX Login
role, you should identify users who should be assigned the listed role to limitthe number of users allowed to log on. The listed role is intended for existingUNIX users who have a UNIX user profile in one or more zones that you want toallow to be listed in getent output without the ability to log on to UNIXcomputers in those zones.
• • • • • •
Planning and Deployment Guide 171

The listed role is most commonly used for users who access UNIX applications,such as ClearCase, or Samba, or an NFS-mounted file system, that require aUNIX profile. In practical terms, however, this role also allows you to migrateusers you aren’t sure have been authorized for access. With this role, the userprofile is recognized but the user cannot log on locally or remotely.
You can use the Access Manager console, Active Directory Users andComputers, ADEdit or custom scripts to add the UNIX user profiles to theappropriate childZone_Role_Listed groups. If possible, you should integratethis part of the migration with your existing provisioning process to ensure thatfuture requests for UNIX role assignments use the processes that line of businesspersonnel already understand.
Keep in mind that the childZone_Role_Listed group affects all the UNIXcomputers joined to the specified child zone. Before you move a user to thechildZone_Role_Listed group, you should check whether there are anycomputers in the zone that the user must be able to access to preventaccidentally locking the user out. You can use a machine-level override to grantthe UNIX Login role on a specific computer, if needed.
Using a computer-level override for the UNIX Login role
You can also create computer-level overrides for the UNIX Login or listed role,if needed. This is not typically part of the migration process. However, if yourinitial analysis identified a zone where overrides would be useful, you caninclude overrides in your migration plan. For example, assume you have a zonewhere most of the user profiles are common across a set of computers. If youimport the UNIX profiles for that user population, you see that two users wouldhave access to a UNIX computer where they previously did not have access. Topreserve the existing access while migrating from the legacy environment, youcan define the UNIX profile in the zone but control access for those two userswith a computer-level override.
Managing role assignment without role groups
You are not required to use Active Directory security groups to manage roleassignments. You can manually add users and groups to roles within any zone.Manually adding a user or group to a role without using Active Directory groupsmakes integration with provisioning systems more difficult, however. Mostidentity management and provisioning systems are designed to work with
• • • • • •
Migrating existing users to hierarchical zones 172

Active Directory groups inherently. Therefore, associating Active Directorygroups with Centrify roles typically provides easier integration with existingprovisioning processes.
If you decide to manually manage role assignments, you can use the CentrifyAccess Module for Windows PowerShell, Centrify Access SDK, or ADedit tocreate scripts that manipulate the objects in Active Directory. Role assignmentsare stored in Active Directory using Microsoft Authorization Manager containers.If you want to add and remove user and group assignments, you will need todevelop custom code to accomplish those tasks.
Verifying effective users on each zone
Now that you have imported profiles and assigned existing users to theappropriate roles, you can verify who has access to the computers in each zonebefore you proceed with joining a domain. Checking the Effective Users in eachzone enables you to verify the users who have been assigned the UNIX Login
and listed roles before any users are affected by the changes.
You should have a checklist of the users who require interactive access on thecomputers in the target set and which user profiles you suspect only need to berecognized without the ability to log on. You can then using the Effective Usersoption to see the role assignments for the pre-created computer objects in thetarget set of computers. By comparing the list of users to the role assignments,you should be confident that you are ready to complete the migration by joiningUNIX computers to the Active Directory domain.
Performing this step before joining the domain helps to ensure the transition toActive Directory does not interfere with end-users daily work or the delivery ofbusiness services. Therefore, verifying UNIX Login and listed access beforejoining computers to the domain is a key part of a successful migration.
To access the Effective Users for a zone:
1. Start Access Manager.
2. In the console tree, expand Zones and the top-level parent zone.
3. Select a zone, right-click, then click Show Effective UNIX User Rights.
4. Review the list of UNIX user profiles for the zone in the UNIX users section.
5. Select a user name to display additional information about each user:
• • • • • •
Planning and Deployment Guide 173

n Zone Profile displays details about inherited profile attributes. Forexisting users being migrated, the profile attributes are typicallyexplicitly defined. If a profile is defined higher up in the zone hierarchy,the Inheritance tab indicates where the profile attributes are defined.
n Role Assignments lists the role assignments for the selected user inthe zone. For the initial migration, users must be assigned the UNIXLogin or listed role.
n PAM Access lists the specific PAM application access rightsassociated with the roles a user is assigned. For example, the defaultUNIX Login role has the login-all PAM access right, which enablesPAM authentication for all computers in the zone.
n Commands lists the specific UNIX command rights associated withthe roles a user is assigned. For example, you can define a role thatallows users to run specific privileged commands as root. You canclick the Commands tab to see the specific privileged commandsdefined for the role.
n SSH Rights lists the specific secure shell (ssh) command rightsassociated with the roles a user is assigned.
6. Click Closewhen you have finished checking role assignments for the usersin target computer of computers.
You can also select Show Effective UNIX User Rights for individual UNIXcomputers and generate Hierarchical Zone reports that describe the effectiverights for computers and users.
Adding existing users and groups to ProvisioningGroups
After you have added the existing users and groups to the appropriate Loginand Listed role groups, the next step for completing the migration to ActiveDirectory is to add the existing user and group profiles to the ProvisioningGroups you created for the parent zone. This step is not directly related to datamigration, but enables you to prepare the environment for automated user andgroup fulfillment using on the Zone Provisioning Agent.
• • • • • •
Migrating existing users to hierarchical zones 174

Add existing users to the provisioning group for the parentzone
At this point, you have imported legacy data into one or more child zones andaccepted divergent profile attributes using computer-level overrides. You shouldnow add all of your imported UNIX users to the provisioning group in the top-level parent zone. Adding users as members of the provisioning group willenable the Zone Provisioning Agent to define a new “universal” UNIX profile forlegacy users based on business rules you establish for the parent zone. The newprofile will not affect the existing file ownership, but will make it easier toprovision and deprovision users moving forward.
As discussed in Installing Zone Provisioning Agent, the Zone Provisioning Agentenables you to define business rules for creating new UNIX profiles for new UNIXusers. After you complete the migration and enable the Zone Provisioning Agent,it runs at a regularly scheduled interval to determine whether there are newusers or users who should be removed. At each interval, the Zone ProvisioningAgent compares the members of the parent zone’s Users provisioning groupwith the user profiles currently defined for the zone.
If there are UNIX profiles for users who aren’t members of the provisioninggroup, the Zone Provisioning Agent removes those user profiles. To prevent theZone Provisioning Agent from removing the imported data, you must add theActive Directory users associated with the imported user profiles to the parentzone’s Users provisioning group.
To add existing UNIX users to the provisioning group for the parent zone:
1. Start Active Directory Users and Computers.
2. Expand the forest domain and the top-level UNIX organizational unit youcreated in Selecting a location for the top-level OU.
3. Expand the Provisioning Groups organizational unit, then select theparentZoneName_Zone_Users group. For example, if the parent zone isarcadeGlobal, select arcadeGlobal_Zone_Users, right-click, then selectProperties.
4. Click theMembers tab, then click Add.
5. Search for and select the imported user accounts that you have mapped toActive Directory users, then click OK.
6. Click OK to save the provisioning group and close the Properties.
• • • • • •
Planning and Deployment Guide 175

Add existing groups to the provisioning group for the parentzone
As with imported users, you should also add all of your imported UNIX groups tothe provisioning group in the top-level parent zone. Adding the group profiles asmembers of the top-level provisioning group will enable the Zone ProvisioningAgent to define a new “universal” UNIX profile for each group based on businessrules you establish for the parent zone. The new profile will not affect theexisting file ownership, but will make it easier to provision and deprovision usersmoving forward. Adding the UNIX group profiles to the top-level parent zoneensures that the Zone Provisioning Agent does not remove the imported groupsfrom the zone.
To add existing UNIX groups to the provisioning group for the parent zone:
1. Start Active Directory Users and Computers.
2. Expand the forest domain and the top-level UNIX organizational unit youcreated in Selecting a location for the top-level OU.
3. Expand the Provisioning Groups organizational unit, then select theparentZoneName_Zone_Groups group. For example, if the parent zone isarcadeGlobal, select arcadeGlobal_Zone_Groups, right-click, then selectProperties.
4. Click theMembers tab, then click Add.
5. Search for and select the imported user accounts that you have mapped toActive Directory users, then click OK.
6. Click OK to save the provisioning group and close the Properties.
• • • • • •
Migrating existing users to hierarchical zones 176

Joining computers to adomain and zone
You have completed the preparation of the environment and added existingusers and groups to Active Directory. The steps up to this point have not affectedthe day-to-day activities of any UNIX users or groups, and have not changed theconfiguration of any UNIX computers. The final step in the migration requires youto join UNIX computers to the Active Directory domain. This step does have thepotential to affect end-users.
This section describes how to complete the migration by joining the target set ofcomputers to an Active Directory domain and a Centrify zone.
Using adjoin on new computers
You can run the adjoin command interactively or in a script to join UNIXcomputers to Active Directory. One advantage to using the adjoin command isthat it enables you to add the join operation to the steps for building a new UNIXcomputer. For example, if you have a process for provisioning a new UNIXcomputer, you can add an adjoin step that allows the new UNIX computer tojoin itself to Active Directory. Provisioning new computers to join the domainwhen they are built ensures that there are no new local users being defined onthose UNIX computers.
Running adjoin requires UNIX and Active Directory privileges
On UNIX, running adjoin requires you to log on as root, be a member of thewheel group, or have root equivalent privileges in the sudoers file. On Mac OS Xcomputers, adjoin requires the administrator account and password.
• • • • • •
Planning and Deployment Guide 177

Specifying the required options
The basic syntax for the adjoin command is:
adjoin [options] domain_name [--zone zone_name | --workstation]
The domain_name should be a fully-qualified domain name; for example,sales.acme.com. If you are using adjoin to provision new computers, there areseveral options you should specify on the command line or in the script.
n Use the --container or -c option to specify the location for the computeraccount. Typically, you should use the organizational unit that you createdfor UNIX Servers andWorkstation under the top-level UNIX organizationalunit. It must be the location you used when you pre-created the computerobject. For example:
-c “ou=UNIX Server and Workstations,ou=UNIX”
n Use the --selfserve or -S option to specify that you want the computer tojoin itself to the Active Directory domain.
n Use the --zone or -z option to specify the name of the zone to join. Youmust specify a zone name unless you are joining Auto Zone using the --workstation option.
n If you have a disjointed DNS environment where the Active Directorydomain for the computer account does not match the name of the DNSdomain, you must also specify the --name and--alias options. The --name option specifies the name of the ActiveDirectory computer object and the --aliaswill be the fully-qualified DNSname of the computer.
For example, update your provisioning process for a new computer to include acommand similar to the following:
adjoin -c “ou=UNIX Server and Workstations,ou=UNIX” -S -zproduction arcade.net
For complete information about adjoin options, see the adjoinman page.
Pre-Staging before using Adjoin on a new machine
When joining a large AD environment, the join procedure can take a very longtime - up to dozens of minutes. This becomes a concern in some use cases, suchas starting an Amazon EC2 instance that needs to join the domain to provideservice.
• • • • • •
Joining computers to a domain and zone 178

To speed up the adjoin process, the adjoin --prestage option uses existingcache files instead of populating cache from scratch.
Some preparation is required to take advantage of the --prestage option:
n Prepare a pre-staged cache directory on a joined machine
n Copy the cache directory to the new machine
Security requirements
To use the --prestage option, ensure the following:
n Joined and newmachine requirements:
n The --prestage option can only be used between machines that havethe same platform, architecture, and Authentication Service (CentrifyDirectControl) release version installed.
n Adclient cache data encryption feature cannot be enabled on thejoined machine. See the adclient.cache.encrypt parameter.
n Pre-staged cache directory on joined machine requirements:
n On a joined machine, create or designate a directory for the pre-staging cache files.
n The directory must be in a safe path. That means all levels of parentdirectories are owned by system accounts.
n The directory cannot be either group or world writable.
n Content for the pre-staged cache directory on the joined machine:
n Place the cache files (dz.cache, dc.cache, gc.cache,.idx and kset.files) in the specified directory.
n Ensure the cache files are owned by system accounts.
n Files cannot be either group or world writable.
n Symlink is not allowed for the cache files.
n Zone hierarchy changes are not allowed between the staging directory andthe newmachine. This includes:
n zone name change
n zone GUID change
n zone schema change
• • • • • •
Planning and Deployment Guide 179

Preparing to use --prestage option
1. Create a directory on a joined machine. For example, /pre.
2. Stop adclient on that machine.
3. Copy the /var/centrifydc/ directory to the pre-staged directory on thejoined machine.
For example:
Copying the /var/centrifydc/ directory to the pre-staged directory, /pre,places a copy of the required files in /pre/centrifydc/.
4. Verify the pre-staged directory on the joined machine contains all the .idx,.cache, and kset. files.
5. Copy the pre-staged directory to the newmachine.
Use a method of your choice, such as scp or sftp.
This is done so the pre-staged files are available locally on the newmachine.
6. Add the option to the adjoin command when adding the newmachine. Thesyntax is:
-E | --prestage <directory>
where directory is the path to the pre-staged directory on the newmachine.
For example, if the pre-staged files are in directory, /pre/centrifydc/, usethe following adjoin command.
adjoin -z <zone> -E /pre/centrifydc<domain>
Verify authentication after joining the domain bylogging on
As the final step in the initial migration, you should verify that authentication foran Active Directory user is successful. You can do this by logging on to the UNIXconsole using either the UNIX user name or the Active Directory User PrincipalName for a user assigned to the UNIX Login role. When prompted, type theActive Directory password for the account. If you are able to log on using theActive Directory password, you know that authentication is being handled byActive Directory and the user account has been successfully migrated.
• • • • • •
Joining computers to a domain and zone 180

You should also verify that you can log on remotely using a secure shell (ssh)connection and that you can use other services such as ftp.
If users have trouble logging on after a UNIX computer has joined the domain, itis typically because they’re not assigned the UNIX Login role or don’t have avalid UNIX profile in the zone. You can use the Show Effective UNIX User Rightscommand to check which users have profiles and what roles have beenassigned to users who have access to the selected computer.
• • • • • •
Planning and Deployment Guide 181

Provisioning new user andgroup profiles aftermigration
After you have completed the basic migration for a set of existing users andgroups, you can continue with the Centrify deployment by configuring theenvironment for automated provisioning of new users and groups. At this stage,you have already built the foundation for the automated addition and removal ofusers and groups. The next steps involve defining the business rules for creatingnew user and group profiles. The goal of this section is to help you identify andintegrate a provisioning process for new UNIX users and groups.
Integrating with existing provisioning processes
The Zone Provisioning Agent and the provisioning groups you created in Addprovisioning groups to the parent zone are intended to integrate the provisioningof UNIX users and groups with your existing account fulfillment process. Thosegroups enable you to leverage existing processes because most organizationshave well-defined and standardized procedures for provisioning new ActiveDirectory users based on Active Directory group membership.
If possible, you would like to use the same or a similar process for provisioningUNIX users and groups. If you can integrate the provisioning of UNIX users andgroups with your existing process, the people in your organization can use toolsthey are familiar with and won't have to learn an entirely new process.
However, defining the business rules for adding new user and group profiles tozones requires some planning. In particular, you need to make decisions aboutActive Directory group membership, primary group definitions for users in zones,and how profile attributes are defined.
• • • • • •
Planning and Deployment Guide 182

Defining the business rules for new groups in theparent zone
You have already started the process of integrating the provisioning for UNIXusers and groups when you added imported accounts to the Active Directoryprovisioning groups in Adding existing users and groups to Provisioning Groups.The next step is to define the business rules for creating new UNIX group profilesin the top-level parent zone.
Note: The business rules you define only affect new UNIX user andgroup profiles. The imported legacy data remains unchanged, andthe Zone Provisioning Agent will not modify any attributes on theexisting user and group profiles.
Configure the business rules for automated provisioning ofgroup profiles
You configure the business rules for automated provisioning of group profiles ona zone-by-zone basis. When you use hierarchical zones, you typically want toconfigure the business rules for the parent zone so that the profile can beinherited in all child zones. Remember that the profile, by itself, does not provideany access to the computers in the child zones, and that you can override anyinherited attributes in any zone or on individual computers.
To configure the business rules for groups in the parent zone:
1. Start Access Manager.
2. In the console tree, expand the Zones node.
3. Select the top-level parent zone, right-click, then click Properties.
4. Click the Provisioning tab.
If you are defining business rules for a parent hierarchical zone and want toestablish a “source zone” for profile attributes, click Advanced. You canthen select the Source zone for any or all user and group profile attributes.If you select Source zone for any attribute on the Advanced Provisioningpage, you can click Browse to search for and select the zone to use as thesource zone. In most cases, selecting a source zone is not necessary if you
• • • • • •
Provisioning new user and group profiles aftermigration 183

using hierarchical zones, but this option can be useful if you are migratingfrom classic to hierarchical zones.
5. Click Enable auto-provisioning for group profiles.
6. Click the Find icon to search for and select the “groups” zone provisioninggroup as the Source Group.
If you followed the recommended naming convention, search for and selectparentZoneName_Zone_Groups. For example, if the zone name isarcadeGlobal, select arcadeGlobal_Zone_Groups.
7. Select a method for assigning a new GID to new UNIX group profiles:
n Generate from group SID generates new GIDs that are guaranteedto be unique in the forest based on the Active Directory securityidentifier (SID) of the group. Selecting this option ensures groupsdefined in the parent zone have a unique GID across all zones in theActive Directory forest.
n RFC 2307 attribute uses the gidNumber attribute from the RFC 2307schema to define GID values for the Active Directory groups that youadd to the parent zone. This option requires you to add the RFC 2307attribute to Active Directory group principals.
n Use auto-incremented GID selects the next available GID in theparent zone. In most cases, you should avoid using this optionbecause it does not guarantee unique GIDs.
n Generate using Apple scheme generates group GIDs based on theApple algorithm for generating numeric identifiers from the ActiveDirectory group’s objectGuid. This option is only supported forhierarchical zones.
8. Select a method for assigning a new group name to new UNIX groupprofiles:
n SamAccountName attribute generates the group name for UNIXgroup profile based on the sAMAccountName value.
n CN attribute uses the common name attribute to define group namesfor the Active Directory groups you add to the zone. You should onlyselect this option if you verify the common name does not containspaces or special characters. Otherwise, you should not use thisoption.
• • • • • •
Planning and Deployment Guide 184

n RFC 2307 attribute uses the cn attribute from the RFC 2307 schemato define group names for the Active Directory groups you add to thezone.
n Zone default value uses the Group name setting from the GroupDefaults tab to define group names for the Active Directory groupsyou add to the zone. In most cases, the default is a variable that usesthe sAMAccountName attribute.
By default, all UNIX group names are lowercase and invalid characters arereplaced with underscores.
9. Click OK to save your changes.
Add security groups to the parent zone
The most common way to provision UNIX users is to use a private groupidentifier as the primary group. With this approach, every user has a uniqueprimary GID that is the same as the UID.
Although not required, another common approach to provisioning UNIX usersinvolves adding a small number of key security groups to the parent zone. Forexample, if you have a commonly-used group such as All US Employees towhich you normally add valid Active Directory users as members, you could addthat security group to the parent zone to assign all UNIX users the same primaryGID in the parent zone. This approach makes provisioning UNIX users easierbecause you have already defined Active Directory users as members of thatgroup. If you want to use an Active Directory group to set the primary GID forprovisioned users, keep in mind that the size of the group membership can affectthe performance of the Zone Provisioning Agent and how long it take tocomplete provisioning.
If you choose to have the user’s primary group defined by Active Directory groupmembership, the Active Directory group must be in the same Active Directoryforest as the users being provisioned. If the Active Directory group is located inanother forest, provisioning fails.
If you want to use this approach:
1. Add the security group to the provisioning group for the parent zone (forexample, parentZoneName_Zone_Groups).
• • • • • •
Provisioning new user and group profiles aftermigration 185

2. Open the Properties for the parent zone, click the Provisioning tab, anddefine the business rules for the UNIX group profile provisioning associatedwith the security group.
At the next update interval, the Zone Provisioning Agent adds a profile forthe group to the zone. You can also run the zoneupdate command to addthe profile without waiting until the next update interval. For example:
zoneupdate zoneName
3. Click the User Defaults tab for the parent zone, select the ellipsis <...>option for the Primary Group and select the GID for the group profile thatthe Zone Provisioning Agent added to the zone.
Defining the business rules for new users in theparent zone
In addition to the business rules for group profiles, you configure similar rules fornew UNIX user profiles. When you use hierarchical zones, you typically want toconfigure these business rules for the parent zone so that the profile can beinherited in all child zones. Remember that the profile, by itself, does not provideany access to the computers in the child zones, and that you can override anyinherited attributes in any zone or on individual computers.
Note: The business rules you define only affect new UNIX user andgroup profiles. The imported legacy data remains unchanged, andthe Zone Provisioning Agent will not modify any attributes on theexisting user and group profiles.
To configure the business rules for user profiles in the parent zone:
1. Start Access Manager.
2. In the console tree, expand the Zones node.
3. Select the top-level parent zone, right-click, then click Properties.
4. Click the Provisioning tab.
If you are defining business rules for a parent hierarchical zone and want toestablish a “source zone” for profile attributes, click Advanced. You canthen select the Source zone for any or all user and group profile attributes.If you select Source zone for any attribute on the Advanced Provisioningpage, you can click Browse to search for and select the zone to use as the
• • • • • •
Planning and Deployment Guide 186

source zone. In most cases, selecting a source zone is not necessary if youusing hierarchical zones, but this option can be useful if you are migratingfrom classic to hierarchical zones.
5. Click Enable auto-provisioning for user profiles.
6. Click the Find icon to search for and select the “users” zone provisioninggroup as the Source Group.
If you followed the recommended naming convention, search for and selectparentZoneName_Zone_Users. For example, if the parent zone name isarcadeGlobal, select arcadeGlobal_Zone_Users.
This is the same group to which you added the Active Directory usersassociated with imported user profiles as described in Add existing usersto the provisioning group for the parent zone.
7. Select a method for assigning a new UID to new UNIX user profiles:
n Generate from user SID generates new UIDs that are guaranteed tobe unique in the forest based on the Active Directory securityidentifier (SID) of the user. Selecting this option ensures users definedin the parent zone have a unique UID across all zones in the ActiveDirectory forest.
n RFC 2307 attribute uses the uidNumber attribute from the RFC 2307schema to define UID values for the Active Directory users that youadd to the zone. This option requires you to add the RFC 2307attribute to Active Directory user principals. Otherwise, you shouldnot use this option.
n Use auto-incremented UID uses the next available UID in the parentzone. In most cases, you should avoid using this option because it cancreate UID conflicts with users in other zones.
n Use custom ID enables you to use the employeeId, employeeNumber,or uidNumber attribute as the UID for new users. You should onlyselect the employeeId or employeeNumber attribute if yourorganization already populates the employeeId or employeeNumberattribute with a unique value for each user account.
n Generate using Apple scheme generates user UIDs based on theApple algorithm for generating numeric identifiers from the ActiveDirectory user’s objectGuid. This option is only supported forhierarchical zones.
• • • • • •
Provisioning new user and group profiles aftermigration 187

8. Select a method for assigning a new UNIX user login name to new UNIXuser profiles:
n SamAccountName attribute generates the user login name for newUNIX users based on the sAMAccountName attribute.
n CN attribute uses common name attribute for user names. Youshould only select this option if you verify the common name does notcontain spaces or special characters. Otherwise, you should not usethis option.
n RFC 2307 attribute uses the uid attribute from the RFC 2307schema to define user names for the Active Directory users that youadd to the zone. This option requires you to add the RFC 2307attribute to Active Directory user principals. Otherwise, you shouldnot use this option.
n Zone default value uses the setting from the User Defaults tab for thezone. In most cases, the default is a variable that uses thesAMAccountName attribute.
9. Select a method for assigning a new shell and home directory to new UNIXuser profiles.
n RFC 2307 attribute uses the loginShell attribute for the shell andthe unixHomeDirectory attribute for home directory from RFC 2307schema for the default shell and home directory
n Zone default value uses the values you define on the User Defaultstab, which can include runtime variables for the shell and homedirectory.
Runtime variables are populated with platform-specific values when a usertries to log on to a UNIX computer. For example, if a user logs on to a Linuxcomputer with a profile that uses the runtime variable for the homedirectory, the home directory is/home/username. If the user logs on to a Solaris computer, the runtimevariable becomes /export/home/username.
10. Select a method for assigning a primary group to new UNIX user profiles.
n RFC 2307 attribute uses the gidNumber attribute from the RFC 2307schema for primary group values. This option requires you to add theRFC 2307 attribute to Active Directory user principals. Otherwise, youshould not use this option.
• • • • • •
Planning and Deployment Guide 188

n Zone default value uses the values you define on the User Defaultstab. This setting enables you to use a specific group profile as theprimary group for all UNIX users. If you don’t change the default valuefor the primary group on the User Defaults tab, the default primarygroup is a private group.
n Private group uses the user’s UID as the primary GID.
n Active Directory group membership uses the Active Directory groupwith the highest priority as the primary UNIX group. With this option,the Zone Provisioning Agent checks which groups a user belongs toand a prioritized list of groups you have defined. If you select thisoption, click the Configure icon to search for and select the ActiveDirectory groups to include in the prioritized list. This option allowsdifferent users to have different primary GIDs in the same zone.
n Generate using Apple scheme generates the user’s primary groupidentifier (GID) based on the Apple algorithm for generating numericidentifiers from the Active Directory objectGuid for the user’s primarygroup. Note that the user's primary group must configured for thezone. If the primary group is not configured for the zone, an error willbe logged in theWindows Event Log when the user is provisioned.This option is only supported for hierarchical zones.
n Generate from group SID generates new primary GIDs based on theuser’s Active Directory primary group using the Centrify algorithm forgenerating GIDs.
If you select the Active Directory group membership option and a user isn’ta member of any of the groups in the list of prioritized groups, the ZoneProvisioning Agent will not create a UNIX user profile for the user, becauseit won’t be able to determine the primary group. As noted in Add securitygroups to the parent zone, the most common approach is to have all usersassigned the same primary GID in a zone.
11. Click OK to save your changes.
By default, the GECOS field in new UNIX user profiles is populated usingthe displayName attribute for the user.
How hierarchical zones affect provisioning
Because hierarchical zones enable profile attributes to be inherited, defining thebusiness rules for new users and groups in the parent zone enables the Zone
• • • • • •
Provisioning new user and group profiles aftermigration 189

Provisioning Agent to generate consistent profiles for all child zones.
When you define a UNIX profile for a group or a user in a parent zone, theattributes are automatically inherited by all child zones. For groups, inheritancemakes the group GID and group name available in all child zones. For users,inheritance gives every user defined in the parent zone the potential to log on toevery UNIX computer. You then use role assignments to control which computersusers can actually access, and, once you begin defining custom roles, what theycan do on those computers.
By default, all of the attributes in each new profile are inherited from the parentzone. You can then override any of the attributes as needed in each of the childzones or on individual computers on a case-by-case basis. This flexibilityenables you to establish a consistent UID and GID namespace across all zonesbased on unique SID and sAMAccountName values, while granting exceptions tothe specific cases where you need them.
For individual computers, UNIX user and group profiles are inherited from thezone the computer has joined. Typically, this is a child zone or the child of a childzone. You can manually override any attribute or set of attributes for individualcomputers. Any attributes you do not override are inherited from the zone andthe business rules you defined for the Zone Provisioning Agent.
Adding new users to a provisioning group and arole group
For new Active Directory users to be effective users of a zone, they must beadded to the parent zone’s “users” provisioning group and to a role group. Youcan add users to these groups manually using Active Directory Users andComputers or you can update your existing provisioning process for modifyingthe membership of Active Directory groups to add users to the appropriategroups. The key points to understand are:
n Users are added to a provisioning group so that the Zone ProvisioningAgent creates a UNIX profile for them. A user must have a complete UNIXprofile to be a valid user on UNIX computers. Centrify recommends creatingthe profile in the parent zone, but you can create the profile in any zone oron individual computers.
n Users are added to a role group so that they have a valid role assignmentthat allows them to log on or perform specific tasks. Initially, you only have
• • • • • •
Planning and Deployment Guide 190

two possible role assignments, listed or UNIX Login, but you are likely tocreate more.
Add the user to a provisioning group
Using Active Directory Users and Computers, scripts, or internal procedures, thebasic workflow for a new user would be similar to this:
1. A new Active Directory user requests access to UNIX computers.
2. You add the user principal name to an Active Directory group principal. Ifyou are adding the user to the parent zone, you add the user to the “users”provisioning group parentZoneName_Zone_Users.
If you wanted to create the profile in a child zone instead of the parentzone, you would add the Active Directory user to the childZoneName_Zone_Users. If you use some other naming convention for the provisioninggroup, you would search for and select that group.
3. The Zone Provisioning Agent monitors this group and at the next interval(or on-demand) creates a UNIX profile for the user in the zone, based onthe business rules you defined.
Note: If you remove a user from the Active Directory provisioninggroup, the Zone Provisioning Agent removes the UNIX userprofile from the zone.
4. You notify the user that a new UNIX profile has been created withinformation about the login name and initial Active Directory password touse.
Add the user to a role group
Users must also have a role assignment for the zone where you want to grantaccess. A role assignment is required before the UNIX user profile is usable.
Using Active Directory Users and Computers, scripts, or internal procedures, thebasic work flow for a new user would be similar to this:
1. A new Active Directory user requests access to UNIX computers.
2. You add the user principal name to the appropriate Active Directory groupprincipal. If you want to allow the user to log on to computers in a child
• • • • • •
Provisioning new user and group profiles aftermigration 191

zone, you add the user to the Login role group childZoneName_Role_Login.
If the user should be recognized but not allowed to log on, you would addthe Active Directory user to the childZoneName_Role_Listed. After youhave created custom roles, you would search for and select groups basedon the specific rights a user needs.
3. Run the Zone Provisioning Agent update command in preview mode toverify your changes. For example:
zoneupdate /p zoneName
4. Check the results of the zoneupdate preview, then run the commandwithout the preview option to execute the business rules for provisioning.For example:
zoneupdate zoneName
Adding a new UNIX group profile to all zones
If you want to make a new UNIX group available to all zones, you should firstcreate a new Active Directory group. In most cases, groups are not sharedacross multiple zones because of the potential for privilege escalation based ongroup membership. However, the steps for creating a UNIX profile that spans allzones or only the computers in a specific zone are similar.
Using Active Directory Users and Computers, scripts, or your existingprovisioning process, the basic workflow for a new group would be similar tothis:
1. Create a new Active Directory group for access to UNIX computers in theUNIX Groups organizational unit (ou=UNIX Groups, ou=UNIX).
For example, if you are creating a new Active Directory group for thedenali project team in the parent zone arcadeGlobal, use Active DirectoryUsers and Computers to create a new group named arcadeGlobal_denali.
2. (Optional) Add users to the group if you knowwho to add.
For example, if you are creating the group for a new project and you have alist of authorized users for that project, you can click the Members tab toadd those Active Directory users to the new group. If those Active Directoryusers have a valid UNIX profile and role assignment in the zone, theirsecondary group membership is updated with the new group.
• • • • • •
Planning and Deployment Guide 192

3. Add the new Active Directory group to the appropriate zone provisioninggroup. If you are adding the group to the parent zone, you add the user tothe “groups” provisioning group parentZoneName_Zone_Groups.
If you wanted to create the profile in a child zone instead of the parentzone, you would add the Active Directory group to the childZoneName_Zone_Groups. If you use some other naming convention for the provisioninggroup, you would search for and select that group.
4. Run the Zone Provisioning Agent update command in preview mode toverify your changes. For example:
zoneupdate /p zoneName
5. Check the results of the zoneupdate preview, then run the commandwithout the preview option to execute the business rules for provisioning.For example:
zoneupdate zoneName
6. The Zone Provisioning Agent creates a UNIX profile for the group in thezone based on the business rules you defined.
Note: If you remove an Active Directory group from the ActiveDirectory provisioning group, the Zone Provisioning Agentremoves the UNIX group profile from the zone.
Using the zoneupdate program for controlledautomation
You can use the zoneupdate.exe program with command line options toprovision profiles in controlled way, allowing you to verify that profiles andaccess rights are defined correctly for subsets of users or groups withoutaffecting the production environment.
At a minimum, you must specify the zone name or canonical name for the zoneto use the zoneupdate.exe program. The command line options are similar tothe options available on the Provisioning tab when you display a zone’sproperties.
For example, to use the provisioning properties defined for a zone, you only needto specify the zone name at the command line:
zoneupdate default
If you use the canonical name for the zone, you specify the full path to the zone:
• • • • • •
Provisioning new user and group profiles aftermigration 193

zoneupdate "centrify.com/program data/Centrify/zones/default"
You can override the default provisioning properties for a zone by specifying oneor more of the following command line options.
Options are not case-sensitive. If you specify an option more than once, only thelast value is used.
Use this option To specify
/z:ZoneName
or
/SourceZone:ZoneName
The name of a source zone. If you do not specify a zone nameand there’s not a source zone defined in the zone’s provisioningproperties, you cannot use the zoneupdate command tocopy user or group attributes from one zone to another.
A source zone is required for classic zones. It is optional forparent hierarchical zones, but can be useful if you are migratingfrom classic to hierarchical zones.
/d:DomainName
or
/Domain:DomainName
The name of the domain to process. If you do not specify adomain name, the zoneupdate program processes the ActiveDirectory domain to which the computer is joined.
/dc:DCName
or
/DomainController:DCName
The name of the target domain controller to connect. No option- This will use the default domain controller of target domain.
/uu:Option
or
/UserUid:Option
The method to use to set the user’s numeric identifier (UID)value. You can specify any one of the following values:
n Auto to generate UIDs based on the Active Directorydomain name and the RID of a user object. This setting isequivalent to selecting Generate from user SID in theProvisioning tab.
n AppleScheme to generate UIDs based on the Applealgorithm for generating numeric identifiers from theActive Directory user object's objectGuid. This setting isequivalent to selecting Generate using Apple scheme inthe Provisioning tab.
n RFC2307 to use the uidNumber attribute in the ActiveDirectory RFC2307 schema for the user’s UID value.
n ZoneDefault to use the UID defined on the UserDefaults tab for the zone. If there’s no default value, theNext UID value for the zone is used.
n SourceZone to copy the UID from the same user in aspecified source zone.
n EmployeeId to copy the UID from the employeeIdattribute of the user object.
• • • • • •
Planning and Deployment Guide 194

Use this option To specifyn EmployeeNumber to copy the UID from theemployeeNumber attribute of the user object.
n uidNumber to copy the UID from the uidNumberattribute of the user object.
If you don’t use one of these values, you can set the UID to nothave any value. For example:
/uu:empty
If you use this setting, users will have an incomplete profile inthe zone.
/un:Option
or
/UserName:Option
The method to use to set the user’s name. You can specify anyone of the following values:
n sAMAccountName to use the Active Directory user’ssAMAccountName attribute as the UNIX user name.
n CN to use the user's common name (CN) attribute as theUNIX user name.
n RFC2307 to use the uid attribute in the ActiveDirectory RFC2307 schema as the UNIX user name.
n ZoneDefault to use the user name defined on theUser Defaults tab for the zone. If there’s no default valuezone, the sAMAccountName is used.
n SourceZone to copy the user name from the sameuser in a specified source zone.
If you don’t use one of these values, you can set the user nameto an explicit value. For example:
/un:hunter
/us:Option
or
/UserShell:Option
The method to use to specify the user’s default login shell. Youcan specify any one of the following values:
n RFC2307 to use the loginShell attribute in theActive Directory RFC2307 schema as the default shell.
n ZoneDefault to use the shell specified on the UserDefaults tab for the zone.
n SourceZone to copy the shell defined for the user in aspecified source zone.
If you don’t use one of these values, you can set the login shellusing an explicit value. For example:
/us:/bin/bash
/uh:Option
orThe method to use to specify the user’s default home directory.You can specify any one of the following values:
• • • • • •
Provisioning new user and group profiles aftermigration 195

Use this option To specify
/UserHomeDirectory:Option
n RFC2307 to use the unixHomeDirectory attributein the Active Directory RFC2307 schema for a user asthe default home directory.
n ZoneDefault to use the home directory specified onthe User Defaults tab for the zone.
n SourceZone to copy the home directory defined for theuser in a specified source zone.
If you don’t use one of these values, you can set the homedirectory to an explicit value. For example:
/uh:/home/hunter
/ug:Option
or
/UserPrimaryGroup:Option
The method to use to specify the user’s primary groupidentifier. You can specify any one of the following values:
n AppleScheme to generate the user’s primary groupidentifier (GID) based on the Apple algorithm forgenerating numeric identifiers from the Active DirectoryobjectGuid for the user’s primary group. Note that theuser's primary group must configured for the zone. If theprimary group is not configured for the zone, an error willbe logged in theWindows Event Log when the user isprovisioned. This setting is equivalent to selectingGenerate using Apple scheme in the Provisioning tab.
n PrimaryGroupSID to generate the user’s primarygroup identifier (GID) based on the Centrify algorithm forgenerating numeric identifiers from the Active Directorysecurity identifier of the user’s primary group.
n PrivateGroup to set the user's primary GID value tobe the same as the user‘s UID value.
n RFC2307 to use the gidNumber attribute f in theActive Directory RFC2307 schema as the primary groupidentifier or a user.
n ZoneDefault to use the primary group specified onthe User Defaults tab in the zone. If there’s no defaultvalue, zoneupdate.exewill stop provisioning theuser.
n SourceZone to copy the primary group defined for theuser in a specified source zone.
example:
/ug:empty
If you use this setting, users will have an incomplete profile inthe zone.
• • • • • •
Planning and Deployment Guide 196

Use this option To specifyn GroupMembership to set the user's primary GIDbased on the user’s Active Directory group membership.If a user is a member of the Active Directory groupsops-mgrs and ops-labs and one of those groupshas a UNIX profile in the zone but not the other, thegroup with the UNIX profile in the zone will be used asthe primary GID for the user. If both group have a UNIXprofile in the zone, the one with higher priority will beused. You can set the priority for selecting the primarygroup to use in the Access Manager console. If thepriority is the same, zoneupdate.exewill stopprovisioning the user.
If you don’t use one of these values, you can set the primaryGID to not have any value.
/uc:Option
or
/UserGecos:Option
The method to use to specify the user’s GECOS field. You canspecify any one of the following values:
n RFC2307 to use the gecos attribute in the ActiveDirectory RFC2307 schema for a user.
n ZoneDefault to use the value defined for the GECOSfield on the User Defaults tab for the zone.
If you don’t use one of these values, you can set the primaryGID value to an explicit value. For example:
/uc:Thompson, Hunter S.
/gg:Option
or
/GroupGid:Option
The method to use to set the group numeric identifier (GID)value. You can specify any one of the following values:
n Auto to generate the GID based on the Active Directorydomain name and the RID of a group object. This settingis equivalent to selecting Generate from group SID in theProvisioning tab.
n AppleScheme to generate GIDs based on the Applealgorithm for generating numeric identifiers from theActive Directory group object's objectGuid. This setting isequivalent to selecting Generate using Apple scheme inthe Provisioning tab.
n RFC2307 to use the gidNumber attribute in the ActiveDirectory RFC2307 schema for the group GID value.
n ZoneDefault to use the GID defined on the GroupDefaults tab for the zone. If there’s no default value, theNext GID value for the zone is used.
n SourceZone to use the GID defined for the group in a
• • • • • •
Provisioning new user and group profiles aftermigration 197

Use this option To specify
specified source zone.
If you don’t use one of these values, you can set the GID to nothave any value. For example:
/gg:empty
If you use this setting, groups will have an incomplete profile inthe zone.
/gn:Option
or
/GroupName:Option
The method to use to set the group name. You can specify anyone of the following values:
n samAccountName to use the Active Directory groupsamAccountName attribute as the UNIX group name.
n CN to use the group's common name (CN) attribute asthe UNIX group name.
n RFC2307 to use the cn attribute in the Active DirectoryRFC2307 schema as the UNIX group name.
n ZoneDefault to use the group name defined on theGroup Defaults tab for the zone. If there’s no defaultvalue, the sAMAccountName is used.
n SourceZone to copy the group name from the group ina specified source zone.
If you don’t use one of these values, you can set the groupname to an explicit value. For example:
/gn:apps-lab
/u:ADGroupName
or
/UserSource:ADGroupName
An Active Directory group to use to populate a Centrify zonewith users. Use the sAMAccountName and, optionally, thedomain name to identify the group. For example, to use theActive Directory engineers group in the currently connecteddomain to populate users in the default zone:
zoneupdate /u:engineers default
To use the Active Directory engineers group in a specificdomain, you can use the /d:DomainName option or group_name@domain_name. For example to use the Active Directoryengineers group in the testdomain.org domain topopulate users in the default zone:
zoneupdate /u:[email protected]
/g:ADGroupName
or
/GroupSource:ADGroupName
An Active Directory group to use to populate a Centrify zonewith groups. Use the sAMAccountName and, optionally, thedomain name to identify the group. For example, to use theActive Directory employees group in the currently connecteddomain to populate groups in the default zone:
• • • • • •
Planning and Deployment Guide 198

Use this option To specifyzoneupdate /g:employees default
/v
or
/Verbose
Display detailed information about the provisioning of usersand groups. When you use this option, the output format is:
Group: groupname:gid
User: uid:username:shell:home:primarygid
/p
or
/Preview
Preview the users or groups to be provisioned or removed. Inpreview mode, the zoneupdate.exe program does notcreate or remove any UNIX profiles.
/el
or
/EventLog: Level
Enable logging to the Event log. You can use the Event Viewerto check the log results. For the log level, you can specify anyone of the following values:
n None - don't write any provisioning activities to theEvent log. This is the default setting.
n Normal - Write only the name of the provisioned usersand groups to the Event log.
n Verbose - Write the UNIX profiles for the provisionedusers and groups to the Vent log.
/l
or
/Log:Level
Enable logging and set the level of detail recorded in the log file.For the log level, you can specify any one of the followingvalues:
n Error to log only error messages.
n Warning to log warnings and error messages.
n Information to log informational messages,warnings, and errors.
n Verbose to log all messages, including details aboutthe user and group profiles created or removed.
Logging is off by default. If you enable logging, the default filelocation for the log file is:
C:\Users\user_name\AppData\Roaming\Centrify\ZoneProvisioning Agent\Log
You can change the default log file path by modifying thefollowing registry key:
HKEY_LOCAL_MACHINE\Software\CentrifyZPA\LogLevel
• • • • • •
Provisioning new user and group profiles aftermigration 199

Using any Active Directory attribute in a profile
In addition to the provisioning properties you can set for a zone using AccessManager, you can manually configure the Zone Provisioning Agent to use anyattribute in Active Directory to define a value for any field in automatically-provisioned UNIX user or group profiles. For example, if your organization uses acustom attribute, such as org_global_id, for all users, you can manuallyconfigure the Zone Provisioning Agent to use that attribute for the numeric useridentifier (UID) in automatically-generated user profiles.
To manually specify an Active Directory attribute to use in a UNIX profile:
1. Open Microsoft ADSI Edit.
2. Select a target zone, right-click, then click Properties.
3. Select the description attribute, then click Edit.
4. Type a profile provisioning attribute and specify the Active Directoryattribute to use for the profile.
The valid provisioning attributes are:
provisioning_custom_uid_attributeprovisioning_custom_gid_attributeprovisioning_custom_primary_group_attributeprovisioning_custom_user_unixname_attributeprovisioning_custom_group_unixname_attributeprovisioning_custom_home_directory_attributeprovisioning_custom_shell_attribute
The format for the entry is:
provisioning_custom_uid_attribute:attribute_name
Replace attribute_namewith the Active Directory attribute you want touse. For example:
• • • • • •
Planning and Deployment Guide 200

5. Click Add, then click OK.
6. Run the Zone Provisioning Agent update command in preview mode toverify your settings. For example:
zoneupdate /p zoneName
7. Check the results of the zoneupdate preview, then run the commandwithout the preview option to execute the business rules for provisioning.For example:
zoneupdate zoneName
If the Active Directory attribute type is different from the target profile value, theZone Provisioning Agent attempts to convert the data type. If the dataconversion fails, the Zone Provisioning Agent reports an error and stops theprovisioning process.
Provisioning users when across trusted domains
The Zone Provisioning Agent includes two utilities in its Tools folder to assist youin provisioning users when there are trust relationships between domains. Thesetwo utilities are CopyGroup and CopyGroupNested. These utilities enable you tomirror group membership or a group hierarchy from a trusted domain and forestin a target domain and forest.
To use these command line utilities, you must have an account that can log on tothe trusted source domain and the target domain. The account should also have
• • • • • •
Provisioning new user and group profiles aftermigration 201

read permission on the source domain and permission to update the targetdomain.
For example, assume you have configured the AJAX domain to have a one-waytrust with the ACME domain and you have your Active Directory users andgroups defined in the ACME domain. If you want to allow the users and groupsin the ACME domain to log on to computers that are joined to the AJAX domain,you can log on to the AJAX domain controller with an account that hasadministrative privileges in both the AJAX and ACME domains, then run theCopyGroup utility to mirror the group membership from a group in the ACMEsource domain as zone users in the AJAX target domain.
For more information about the command line arguments and options for theseutilities, see the usage message displayed for each utility.
Monitoring provisioning events
The Zone Provisioning Agent writes events to theWindows event log. You canuse tools that monitor the event log to notify you of specific provisioning events.The following table lists the event identifiers and messages the ZoneProvisioning Agent records.
Event Severity Event description and sample message
1 Information
Summarizes the result after a provisioning run.
Centrify zones updated. Domain controller: domain_controller_name Container: container_name Start time:start_time End time: end_time Successful: successful_message Failure: failure_message
2 ErrorIndicates that provisioning failed for a specific domain because thedomain was not found.
Domain domain_name not found.
3 ErrorIndicates that provisioning failed because the domain controller wasnot accessible.
Domain server domain_controller_name is down.
4 ErrorIndicates that provisioning failed because the domain was notoperational.
Domain domain_name is not operational.
5 ErrorIndicates that provisioning failed without a specific cause.
Failed to update zones in domain domain_name ondomain controller domain_controller_name.
6 Error Indicates that provisioning failed because there was a problem with
• • • • • •
Planning and Deployment Guide 202

Event Severity Event description and sample message
the agent connecting to the Active Directory.
Failed to update zones in domain domain_name ondomain controller domain_controller_name. Error onActive Directory service.
7 Error
Indicates that provisioning failed because there was an unexpectederror when updating the zones in a specific domain.
Unexpected error when updating the zones in domaindomain_name on domain controller domain_controller.Details: detail_message.
8 Information
Provides verbose user provisioning information, including detailsabout the provisioned user profile.
User provisioned to a Centrify zone. User: user Zone:zone UID: uid Name: name Shell: shell Home directory:home_directory Primary group: primary_group Gecos:gecos
9 InformationProvides basic user provisioning information.
User provisioned to a Centrify zone. User: user Zone:zone
10 Information
Provides verbose user de-provisioning information, including detailsabout the user profile removed.
User removed from a Centrify zone. User: user Zone:zone UID: uid Name: name Shell: shell Home directory:home_directory Primary group: primary_group Gecos:gecos
11 InformationProvides basic user de-provisioning information.
User removed from a Centrify zone. User: user Zone:zone
12 Information
Provides verbose group provisioning information, including detailsabout the provisioned group profile.
Group provisioned to a Centrify zone. Group: groupZone: zone GID: gid Name: name
13 InformationProvides basic group provisioning information.
Group provisioned to a Centrify zone. Group: groupZone: zone
14 Information
Provides verbose group de-provisioning information, including detailsabout the group profile removed.
Group removed from a Centrify zone. Group: groupZone: zone GID: gid Name: name
15 InformationProvides basic group de-provisioning information.
Group removed from a Centrify zone. Group: groupZone: zone
16 Warning Indicates that the Zone Provisioning Agent received a warningmessage during the provisioning process.
• • • • • •
Provisioning new user and group profiles aftermigration 203

Event Severity Event description and sample messageWarning occurred when provisioning a Centrify zone.Zone: zone Details: detail_message
17 Error
Indicates that provisioning failed because there was a problem withthe permissions on the account used to run the Zone ProvisioningAgent.
Insufficient permission to setup the log file. Pleasecontact your local administrator. Details: detail_message
18 Error
Indicates that provisioning failed because there was a problem withcreating the log file in the log file location.
Failed to create the log file. Please contact yourlocal administrator. Details: detail_message
19 Information
Indicates that provisioning is paused to allow another provisioningcycle to complete.
Zone Provisioning Agent failed to start anotherprovisioning cycle at current_time because theprevious provisioning cycle is not yet complete. Theprovisioning request is pending until ZoneProvisioning Agent finishes the previous provisioningcycle.
20 Error
Indicates that provisioning failed because the computer was notfound in the domain being provisioned.
This computer is not joined to a domain or the domainis not available.
21 Error
Indicates that provisioning failed because there was a problemloading domain information.
Failed to load domain information. No zone will beprovisioned. Error: error_message
22 ErrorIndicates that provisioning failed because there was a problem withthe functional operation of the domain.
Functional error occurred with domain domain_name.
23 ErrorIndicates that provisioning failed because authentication failed for theaccount used to run the Zone Provisioning Agent.
Domain domain_name authentication failed.
24 ErrorIndicates that provisioning failed because the authentication systemfailed.
Domain domain_name authentication (system) failed.
25 Error
Indicates that provisioning failed because there was an unexpectederror when loading a specific domain.
Unexpected error occurred when loading domain domain_name.
26 Error Indicates that provisioning failed because the Active Directory forestwas not found.
• • • • • •
Planning and Deployment Guide 204

Event Severity Event description and sample messageForest forest_name not found.
27 ErrorIndicates that provisioning failed because the root domain controllerwas not accessible.
Forest server server_name is down.
28 ErrorIndicates that provisioning failed because the forest was notoperational.
Forest forest_name is not operational.
29 ErrorIndicates that provisioning failed because there was a problem withthe functional operation of the forest.
Functional error occurred with forest forest_name.
30 ErrorIndicates that provisioning failed because authentication failed at theforest level for the account used to run the Zone Provisioning Agent.
Forest forest_name authentication failed.
31 ErrorIndicates that provisioning failed because the authentication systemfailed at the forest level.
Forest forest_name authentication (system) failed.
32 Error
Indicates that provisioning failed because there was an unexpectederror at the forest level.
Unexpected error occurred when loading forest forest_name.
33 Error
Indicates that provisioning failed because there was an error duringthe provisioning process.
Error occurred when provisioning a Centrify zone.Zone: zone Details: detail_message
34 Warning
Indicates that provisioning might be incomplete because the accountused to run the Zone Provisioning Agent does not have permissionupdate zone in a specified domain.
Insufficient permission to update the zones in domaindomain.
Adding new profiles manually
Provisioning groups enable automated provisioning of UNIX profiles for usersand groups with the Zone Provisioning Agent. Server Suite does not require youto use provisioning groups and business rules to create new users and groups.You can also manually create UNIX users and groups in any zone using theAccess Manager console, ADedit, or custom scripts. Adding profiles manually toa zone provides you with control over the definition of individual UNIX profiles ona zone-by-zone basis.
• • • • • •
Provisioning new user and group profiles aftermigration 205

Validating operationsafter deploying
This section provides sample activities for creating test cases and performing aformal validation of the Centrify deployment. Although not required, executing aset of test cases that exercise Centrify functionality will help you validateoperations before extending the deployment to additional computers in theenterprise.
The specific use case scenarios and test cases you execute will depend on yourorganization’s goals and requirements.
Understanding testing as part of deployment
Most organizations initially deploy in a lab environment that simulates theproduction environment. The lab environment allows you to test the plannedchanges to system and user management processes. For example, if you plan toautomate migration using scripts, you should build and test the operation of yourtools to verify they work as you intend. After testing in a lab, most organizationsmove to a pilot deployment with a limited number of computers and users tocontinue verifying that authentication, authorization, and directory services areall handled properly in a real-world environment before moving to a full-scalemigration across the enterprise.
In many cases, the pilot deployment also requires more formal testing of specificuse cases to validate the deployment before rolling out software to additionalcomputers. This phase of the deployment may also include activities designed tohelp users transition to Active Directory.
To validate the deployment:
• • • • • •
Planning and Deployment Guide 206
n Execute test cases that verify authentication.
n Execute test cases the verify authorization rules for login access andrestricted access.
n Execute test cases that verify the provisioning process.
n Execute test cases that address issues unique to your organization or youruser community.
Other activities you may want to perform as part of the validation processinclude:
n Test configuration changes and customize configuration parameters.
n Document test results.
n Troubleshoot any authentication or authorization issues, if any are found.
n Train staff on new procedures.
n Communicate process changes to the users who are migrating to ActiveDirectory.
For example, if you plan to eliminate local account access, implementstricter password policies, or apply new access controls, you shouldprepare the user community for these changes.
Validating basic authentication and passwordpolicy operations
Before you begin testing organization-specific scenarios, such as the integrationof migration scripts or customized access control policies, you should verify basicoperations are handled as expected. At a minimum, you should perform some ofthe following tests to verify basic operations:
n Verify a UNIX profile exists for the Active Directory users and groups to beused in testing.
n Verify the UNIX computer has successfully joined an Active Directorydomain and the computer account has been created correctly.
n Verify an Active Directory user assigned the UNIX Login role isauthenticated and can access computers in the zone used for testing.
n Verify migrated users assigned the UNIX Login role can log on using theirUNIX or Active Directory user name and Active Directory password.
• • • • • •
Validating operations after deploying 207

n Verify an Active Directory user assigned the Listed role has a valid UNIXprofile, but cannot log on to computers in the zone used for testing.
n Verify that workstation authorization or account lockout policies defined inActive Directory are enforced.
n Verify that password management policies defined in Active Directory areproperly enforced.
n Verify that a previously authenticated user is authenticated successfullywhen the UNIX lab computer is offline.
n Verify that common lookup commands and commands that require userand group information work as expected.
You can verify authentication, authorization, and password policy operations bysetting options in Active Directory and attempting to log on and log off thecomputers in the pilot deployment.
Running commands on the UNIX computer to verifyoperations
To confirm that a UNIX computer is a member of the Active Directory domain,you can run commands that retrieve information from Active Directory on theUNIX lab computer itself or by viewing the UNIX computer’s account informationin Active Directory Users and Computers or the Access Manager console.
Verify the computer is joined to Active Directory
To verify a computer is joined to the Active Directory domain and is retrievinginformation from Active Directory by running commands on the UNIX computer:
1. Log on to the UNIX computer.
2. Type the following command to retrieve information about the computer’sconnection to Active Directory:
adinfo
This command returns basic information such as the host name for thecomputer, whether the computer is joined to the domain, and whether thecomputer is currently connected to Active Directory. For example:
Local host name: magnoliaJoined to domain: ajax.org
• • • • • •
Planning and Deployment Guide 208

Joined as: magnolia.ajax.orgCurrent DC: ginger.ajax.orgPreferred site: Default-First-Site-NameZone: ajax.org/Centrify/Zones/defaultLast password set: 2017-12-21 11:37:22 PSTCentrifyDC mode: connected
For more detailed information about the environment, you can use --diagor other options with the command. For information about the optionsavailable and the information displayed for each option, see the adinfoman page.
3. Type the following command to verify that the adclient process isrunning:
ps -aef|grep adclient
The command should return output similar to the following:
root 1585 1 0 14:50 ? 00:00:29 adclient
4. Type the following command to confirm that lookup requests use theinformation in Active Directory:
getent passwd
The command should list all of the Active Directory user accounts that aremembers of the zone and all local user accounts in the/etc/passwd file format. For example:
ben:x:601:100:Ben Waters:/home/ben:/bin/bashashish:x:501:100:Ashish Menendez:/home/ashish:/bin/bashsunni:x:900:100:Sunni Ashton:/home/sunni:/bin/bashjolie:x:502:100:Jolie Ames:/home/jolie:/bin/bashpierre:x:1001:100:Pierre Leroy:/home/pierre:/bin/bash
5. Review the contents of the /var/log/messages file and look for messagesthat indicate authentication problems or failures.
Verify authentication for an authorized user
To verify that an authorized Active Directory user can log on to a UNIX computer:
1. Restart the computer to display a logon screen or prompt.
2. Log on with the Active Directory user account you created for testing andprovide the Active Directory password for that account.
n The user account must have a complete UNIX profile.
n The user account must be assigned the UNIX Login role.
• • • • • •
Validating operations after deploying 209

n If the user account has been configured to set a new password at thenext logon, you should be prompted to change the password. In thiscase, you must type and confirm the new password beforecontinuing.
3. Log on using the UNIX login name for the user account and the ActiveDirectory password.
4. Type commands to check the UID and GID assignments, home directoryownership, and other information for the logged on user.
Test additional administrative tasks
You may want to try other typical administrative tasks that you expect toperform in the production environment. For example, you may want to test andverify the following tasks:
n Changing the password for an Active Directory user using the passwd oradpasswd command on a UNIX computer changes the user’s ActiveDirectory password for Windows computers.
n Logging on as a user from another trusted Active Directory domain oranother trusted forest is successful when you specify the user’s fully-qualified domain name (for example, [email protected]).
n Setting a user’s effective group membership using the adsetgroupscommand.
n Logging on using previously cached credentials. Offline authenticationenables users to log on when computers are disconnected from thenetwork or have only periodic access to the Active Directory domain. Forexample, users who have laptop computers must be able to log on and besuccessfully authenticated when they are not connected to the network.
Resolving issues in the pilot deployment
Executing a formal test plan is intended to help you uncover issues that need tobe resolved, troubleshoot any unexpected behavior, and correct any potentialproblems before end-users are affected. The pilot deployment enables you todeploy Centrify software packages on a subset of typical users in the productionenvironment in a controlled way. You can then use the pilot deployment toevaluate server and network load and how adding new computers and users to
• • • • • •
Planning and Deployment Guide 210

the Active Directory affects your environment. The initial deployment also allowsyou to closely monitor the experience of the user community participating in thepilot program.
With the pilot deployment, you can also develop and refine your processes andoperational expertise before you roll out Centrify authentication andauthorization services to the entire organization.
You can install Centrify Agents at any time without affecting any user orcomputer operations. Installing the Centrify Agent on UNIX computers has noeffect until you join the computer to the domain. Setting up the initial zone or setof zones does not affect the operation of any existing Active Directoryinfrastructure or Windows environment. Therefore, you can install the softwarefor the pilot whenever it is convenient to do so.
Before you join computers to the domain, you must define and assignappropriate roles to the user community. Users who don’t have role assignmentswill not be allowed to log on to any computers. It is essential for you to test andvalidate role definitions and assignments to ensure users won’t be locked out ofthe computers they need access to when computers join the domain.
Preparing training and documentation foradministrators and users
The deployment team should develop and deliver training for end-users,technical support personnel, help desk operators, and account fulfillmentpersonnel. This role-based internal training will help new teammembers comeup to speed and also help with the resolution of technical issues.
You should also train staff members to understand that there will be twofulfillment processes in place during migration: the legacy account fulfillmentprocess for computers that have not joined the domain and a new accountfulfillment process for computers that have joined an Active Directory domain.Both fulfillment processes should be clearly documented and staff should betrained on how to determine which process to use. For example, trainingmaterial should indicate how the UNIX provisioning team can determine whethera computer is in a zone, so that members know whether to use the legacyprocess or the new process.
After a computer is migrated to Active Directory, you should not allow any localaccount provisioning on that computer. You should also be sure that this isclearly documented in training materials, especially if you don’t have centralized
• • • • • •
Validating operations after deploying 211

management of account creation policies. If you don’t prevent local accountprovisioning, orphaned and noncompliant UNIX accounts can continue to exist,may create conflicts in the UID and GID namespace, and create auditcompliance issues because they are not included in required reports.
As you migrate each set of computers to an appropriate zone, you should alsonotify all affected users before you complete the migration. This notification cantake the form of an email, voicemail, meeting with project personnel ormanagement, or any other logical combination. Notifying users in advance helpsto reduce the number of account lockouts caused by UNIX users attempting tolog on using their old UNIX password on migrated computers.
Deploying to the production environment
After the initial deployment is stable and you have migrated existing users andgroups successfully, you can begin moving the rest of your UNIX computers,users, and groups to Active Directory. In most cases, this migration is done instages by repeating the tasks described in this guide for additional target sets ofcomputers, users, and groups. After each stage, you should allow a period oftime for monitoring and resolving issues for the migrated user population. Yourdeployment plan should include a schedule for when different sets of users areto be migrated and an analysis of how those users should be placed into zonesaccording to your migration plan.
In general, you should migrate an increasing number of computers into zones ineach stage of the production deployment. For example, in the first round ofmigration, you might migrate 15% of the computers into the first set of zones.You should then allow time in the schedule to troubleshoot and resolve issues toensure that the migration was successful. In the next phase, you then mightmigrate another 25% of the computers. After you determine the second phase ofthe migration is successful, you might migrate the remaining computers into theremaining zones.
Note: Whenever possible, you should also plan to migrate all of thecomputers that have been identified for a particular zone at thesame time. Migrating all of the computers in a zone at the sametime helps to reduce user confusion over which password to usewhen authenticating.
• • • • • •
Planning and Deployment Guide 212

Training the support staff for a production deployment
You should provide the following information or training to the IT support staffwho are responsible for a set of users to be migrated to Active Directory:
n Review of the deployment project plan. Have the support staff read thedeployment plan and review any changes to policies or procedures thatdeployment will entail.
n Schedule for deployment. Make sure members of the support staff areaware of when the deployment is scheduled to take place and that theywill be available at that time and for a reasonable period thereafter.
n Location of documentation. Make sure all internal, operating system, andCentrify-specific documentation is available so that support staff can usethose documents to help them resolve any end-user issues that ariseduring the production deployment.
n Pilot deployment experience and feedback. Explain the result of the pilotdeployment, including any issues encountered during the pilot and theresolution for each issue.
n CommonWindows and Active Directory administrative tasks. Forsupport staff members who are familiar only with supporting UNIX-basedcomputers, provide training about Windows and Active Directory conceptsand administration, as appropriate. If administrators will be usingWindows-based programs or scripts to manage UNIX users andcomputers, they may need training specific to those tools. For example,administrators may need training to use Active Directory Users andComputers, Visual Basic scripts, or Access Manager console to manageActive Directory data.
n Common UNIX administrative tasks. For support staff members who arefamiliar only with supportingWindows-based computers, provide trainingabout UNIX concepts and administration, as appropriate. If administratorswill be using UNIX-based programs or scripts to manage UNIX users andcomputers, they may need training specific to those tools. For example,administrators may need training to create and use ADedit or LDAP scriptsto manage Active Directory data.
n Common access control and privilege management tasks. Make suremembers of the support staff are familiar with the tasks described in theAdministrator’s Guide for Linux and UNIX, and provide hands-on training inperforming the most common of those tasks.
• • • • • •
Validating operations after deploying 213

n Internal policies and procedures specific to your network and businessenvironment. Create an operations handbook with details about commonscenarios the support staff may be required to address, such as addingnew UNIX computers or users to Active Directory.
n Reporting and tracking issues related to Centrify software. Make suresupport staff members know how to report issues or problems withauthentication, authorization, or directory services. If your organizationuses a bug or problem-ticket system for tracking issues, set up a newsubject area for Centrify-related issues.
Preparing the user community in a production deployment
As you prepare to migrate a set of users to Active Directory, you should providetraining or informational materials to inform that user community about what toexpect. For example, if your organization has decided to implement policies thatprevent locally-defined user accounts from accessing some computers, be surethat the user community affected by this policy understands the change.Similarly, if your organization has decided to eliminate service accounts orrestrict access to computers previously available, you should communicate thesechanges and notify users about any migration issues that may affect file accesspermissions and file ownership.
When you are ready to migrate a specific set of users, you should inform the userpopulation about the upcoming deployment by providing the followinginformation:
n Schedule for deployment. Make sure that department managers and end-users know when the switch to Active Directory is scheduled to occur.
n Computers and applications affected. Make sure that departmentmanagers and end-users know if their workstations or the servers theyaccess for business applications are included in the deployment. If usersneed access to a computer that is being added to an Active Directorydomain, they need to know whether their user account is in the samedomain as the computer or a different domain. If there are applicationshosted on a computer that is being added to an Active Directory domain,users need to know how this will affect access to the hosted application.For example, users may need to select a domain when logging on, or log onusing the user_name@domain_name format.
n Active Directory account information. Make sure that end-users knowtheir Active Directory account information and understand that they must
• • • • • •
Planning and Deployment Guide 214

use their Active Directory password to access their UNIX workstationsafter the deployment is complete. You should inform users about the validlogon names and formats they can use, the Active Directory passwordassigned to their account if it is a new account, whether they are requiredto change their password when they next log on, and any passwordcomplexity rules you have implemented. Active Directory may lockaccounts if users attempt to log on using their UNIX password, which couldresult in a large number of Help Desk requests for password resets.
n Changes to access policies. Make sure that department managers andend-users are aware of any changes to access control policies. Forexample, if you are using group policies to deny access to some users orgroups who could previously log on to a computer, you should inform thoseusers or groups of the change and that it will take effect after the migrationto Active Directory.
Populating zones in a production environment
In planning your deployment, you should have determined your basic zonerequirements and how you will migrate existing user communities to ActiveDirectory. Based on your analysis, you should have a zone design with one ormore parent zones and the child zones for each parent to define a candidate setof users and groups with the potential to access a given set of computers.
Typically, you should focus on one zone at a time, importing and mapping theexisting users to Active Directory accounts. You should also determine whetheryou need to create new Active Directory accounts for any of the existing users orgroups you are importing. If possible, you should use Active Directory groupmembership and role assignments to manage access for UNIX users and groups,you import.
Joining a domain in a production environment
In smaller organizations or organizations where individual users havepermission to join their own workstation to the Active Directory domain, you canrun the adjoin command interactively on individual computers. This optionworks well when computers are distributed across many different domains orwhen individual users are joining their own workstation to the domain.
In larger organizations, however, you may want to use a custom script toremotely join a group of UNIX computers to an Active Directory domain. If you
• • • • • •
Validating operations after deploying 215

develop a custom script for joining a domain, the script should restart services orreboot the computers where it runs.
After joining a domain, you should monitor computers closely for a few daysbefore extending the deployment to additional computers.
If the join operation fails or users cannot log on, you can run the adleavecommand to restore the computer to its previous state.
• • • • • •
Planning and Deployment Guide 216

Defining role-basedaccess for users andcomputers
By default, Server Suite includes two roles—the listed role and the UNIX Login
role—that are required for migration. This section discusses additional role-based controls you can define for better management of privileged access andauthorized activity.
Note: If you have well-defined access rules and command privileges insudoers configuration files, you can import those definitions anduse them as the basis for creating custom roles in AccessManager. For information about importing sudoers files andconverting the imported definitions into roles, see theAdministrator’s Guide for Linux and UNIX.
Addressing the business problem of role-basedsecurity
Privilege management and role-based access controls are approaches to thebasic business problem of securing an enterprise’s key computer systems andsensitive data. Restricting access based on a user’s role or specific jobrequirements can require you to make some difficult decisions about who hasaccess to what and why access is granted or denied. These decisions also havethe potential to disrupt user activity or existing business processes. Therefore,you should do thorough planning to identify the roles to implement, who shouldhave permission to execute privileged commands, and who should haverestricted access.
• • • • • •
Planning and Deployment Guide 217

Defining the appropriate rights for users in different roles often requiresnegotiation with different groups in the organization to achieve the right balanceof security and functional capability. Before implementing a solution, you shouldhave these conversations and set expectations about what will change in theuser’s environment.
Creating a root-equivalent role definition
One of the first roles you should plan to create is an administrative role that isequivalent to specifying ALL:ALL in a sudoers file or giving users access to theroot password on their computers. The purpose of this role definition is to allowselected users to execute privileged commands on a regular basis. The roledefinition allows them to execute commands without being given the rootpassword or having privileges hard-coded in individual sudoers files on multiplecomputers.
Because this role definition enables system administrators to execute privilegedcommands without the root password, you can improve security for theorganization and reduce the chance of an audit finding for access to the rootpassword.
You can create this role definition in a parent zone or a child zone to control itsscope. In most cases, you should only assign the role in a child zone or on anindividual computers.
Define the right for running all commands
Rights and roles are defined at the zone level and inherited down the zonehierarchy. If you define a right in the top-level zone, it is available in all childzones. If you define a right in a child zone, it can be used in that zone and any ofits child zones. Similarly, you can define roles in the top-level parent or any childzone, depending on where you want to make the role available. In this example,the right to run all commands as the root user is defined in a top-level parentzone.
The following instructions illustrate how to define a right for running allcommands using Access Manager. Examples of scripts that use the AccessModule for Windows PowerShell, ADEdit, or the Centrify Windows API areavailable in other guides, the Centrify Software Developer’s Kit, or in communityforums on the Centrify website.
• • • • • •
Defining role-based access for users and computers 218

To define a right for running all commands as root:
1. Open Access Manager.
2. Expand Zones and select the top-level parent zone.
3. Expand Authorization > UNIX Right Definitions.
4. Select Commands, right-click, then click New Command.
5. On the General tab, type a name for this command right and, optionally, adescription for this right, then define the right to run all commands like this:
n Type an asterisk (*) in the Command field to indicate all commandsare allowed.
n Select Specific path and type an asterisk (*) in the field to indicatethat any path is allowed.
6. Click the Restricted Shell tab and deselect the Can be used in a restrictedrole option if you want to prevent this command from being used in a rolethat uses a restricted shell environment.
7. Click the Run As tab to verify the command can be used by dzdo and is setto run as root by default.
8. Click OK to use the default environment variable settings and commandattributes.
Alternatively, you can click the Environment and Attributes tabs if you wantto view or set additional properties for this right definition.
Create a role definition for running all commands
After you have defined the right to allow a user to run any command with rootprivileges, you can create a role definition for that right. You must create a roledefinition somewhere in the zone hierarchy before you can assign users to therole.
To create a role definition with the right to run all commands as root:
1. Open Access Manager.
2. Expand Zones and the individual parent or child zones required to selectthe zone name where you want to create the role definition.
3. Expand Authorization.
• • • • • •
Planning and Deployment Guide 219

4. Select Role Definitions, right-click, then click Add Role.
5. Type a name and description for the new role, then click OK.
For example, type a name such as root_equivalent and descriptive textsuch as Users with this role can run any command with root
privileges.
Optionally, you can select Allow local accounts to be assigned to this roleif you want to assign both Active Directory users and local users to the role.This option is only available when you first create a role definition. You canalso click Available Times if you want to limit when the role is available foruse. By default, roles are available at all times.
If you are using the UNIX Login role to grant access to computers in thezone and want to use the default auditing level of Audit if possible, youcan click OK then skip to Step 8.
6. If you are not assigning the UNIX Login role to grant access to computers,click the System Rights tab and select the following options:
n Password login and non-password (SSO) login are allowed
n Non-password (SSO) login is allowed
n Login with non-Restricted Shell
Note that you cannot set these system rights if you selected the option toallow local users to be assigned to this role.
7. If you don’t want to use the default auditing level, click the Audit tab.
n Select Audit not requested/required if you have the auditing serviceenabled but don’t want to audit user activity when this role is used.
n Select Audit if possible to audit user activity where you have theauditing service enabled.
n Select Audit required to always audit user activity. If the auditingservice is not installed or not available, users in this role are notallowed to log on.
8. Select the new role definition, right-click, then click Add Right.
9. Select the right you defined for running all commands as root, then clickOK.
• • • • • •
Defining role-based access for users and computers 220

Assign an Active Directory group to the role
As discussed in previous chapters, you should associate Centrify role definitionswith Active Directory security groups so that you can manage them using theprocesses and procedures you have for managing Active Directory groupmembership. If you are using the recommended deployment structure andnaming conventions, you would create a new Active Directory group in theou=User Roles, ou=Centrify organizational unit using the format ZoneName_Role_RoleName. For example, you would create an Active Directory groupnamed sanfrancisco_role_rootequivalent. You can then assign the new roledefinition to that group.
To assign the role definition to an Active Directory group:
1. Open Access Manager.
2. Expand Zones and the individual parent or child zones required to selectthe zone name where you want to assign the role definition.
3. Expand Authorization.
4. Select Role Assignments, right-click, then click Assign Role.
5. Select the role definition you created for root-level access, such as root_equivalent, then click OK.
6. Click Add AD Account to search for and select the Active Directory securitygroup you created for the role.
n Select Group as the object to find.
n Optionally, type all or part of the group name.
n Click Find Now.
Select the group you created for the role in the results, then click OK.
7. Click OK to complete the assignment.
8. Add members to the Active Directory security group for the role definitionusing Active Directory Users and Computers, an internal script, or anothertool.
9. Test the role assignment by checking whether the user you added to theActive Directory group can execute privileged commands using dzdo inplace of sudo.
dzdo /usr/share/centrifydc/din/adflush
• • • • • •
Planning and Deployment Guide 221

Details about commands that are executed with dzdo are logged to thesecure syslog facility on the computer where they were executed.
Creating a restricted role for a shared serviceaccount
The root-equivalent role definition provides centralized management for alimited number of administrators who have permission to execute all commandson selected computers. Another common reason for defining a role is to executeprivileged commands associated with a service account. In many organizations,service account passwords are known by multiple users, making them a securityrisk. For example, all of the database administrators in the organization mightknow the password for an oracle service account, an account with permissionto perform privileged database operations. Because the password is sharedinformation, it presents a security risk and a potential audit finding that mighthave costly consequences.
Setting up a role definition for a service account involves creating a commandright for switching to the service account user and defining a PAM access rightfor role.
Define the right for switching to a service account
The steps for defining a right for switching to the service account user are similarto defining the rights for the root-equivalent user, but the definition is morerestrictive.
To define a right for switching to a service account:
1. Open Access Manager.
2. Expand Zones and the individual parent or child zones required to selectthe zone name where you want to create the new command right.
3. Expand Authorization > UNIX Right Definitions.
4. Select Commands, right-click, then click New Command.
5. On the General tab, type a name for this command right and, optionally, adescription for this right, then define the right to switch to the service
• • • • • •
Defining role-based access for users and computers 222

account. For example, if the service account is oracle:
n Type su - oracle in the Command field.
n Verify the Standard user path is selected.
6. Click the Restricted Shell tab, under Can be used in a restricted role, selectSpecific user or uid, then type root.
7. Click the Run As tab, deselect Can be used by dzdo.
These settings specify that this right can only be used in a restricted shellenvironment and users can only run the commands that are explicitlyallowed in the restricted role they are assigned. If this is the only rightdefined for a role, the only command users assigned to the role can run issu - oracle. For a role definition with this right to be effective, you wouldadd command rights for the specific database operations users should beallowed to perform after switching to the oracle service account. Forexample, if the oracle service account is used to run a backup-all-dbsscript, you would add a right to allow the execution of that script.
8. Click OK to use the default environment variable settings and commandattributes.
Alternatively, you can click the Environment and Attributes tabs if you wantto view or set additional properties for this right definition.
Define a PAM access right to allow logging on
The default UNIX Login role allows users to log on using a password or withouta password in an unrestricted environment. If you are creating a role definitionfor a service account, you can use PAM access rights to control the specific PAM-enabled applications users can use to log on. To illustrate controlling how userslog on, this example of a restricted role for the oracle service account onlyallows users to log on with ssh.
To define a PAM access right for a specific application:
1. Open Access Manager.
2. Expand Zones and the individual parent or child zones required to selectthe zone name where you want to create the new PAM right.
3. Expand Authorization > UNIX Right Definitions.
4. Select PAM Access, right-click, then click Add PAM Access Right.
• • • • • •
Planning and Deployment Guide 223

5. Type a name and, optionally, a description of the PAM application forwhich you are adding an access right.
For the Application field, type the platform-specific name for the PAMapplication as defined in the PAM configuration file or PAM directory. Forexample, type ssh or sshd. You can also use wildcards in this field toperform pattern matching for the application name.
6. Click OK to save the access right for this PAM-enabled application.
Create a restricted role definition for the service account
After you have defined the rights that allow a user to log on using a PAM-enabled application and run the su - command for a service account, you cancreate a role definition for these rights. You must create a role definitionsomewhere in the zone hierarchy before you can assign users to the role.
To create a restricted role definition for switching to a shared service account:
1. Open Access Manager.
2. Expand Zones and the individual parent or child zones required to selectthe zone name where you want to create the new role definition.
3. Expand Authorization.
4. Select Role Definitions, right-click, then click Add Role.
5. Type a name and description for the new role, then click OK.
For example, type a name such as oracle_service and descriptive textsuch as Users with this role can start a secure shell session
and switch to oracle.
By default, this role is available at all times. You can click Available Times ifyou want to specify days of the week or select times of the day for makingthe role available.
6. Click the System Rights tab and select at least one option that allow usersassigned to this role definition to log on, then click OK.
In this example, users open a secure shell to switch to the service accountso you might select Non-password (SSO) login is allowed.
If a service account instead of a user account is used to log on, it might bemapped to a disabled Active Directory account. In this case, you might
• • • • • •
Defining role-based access for users and computers 224

select the Account disabled in AD can be used by sudo, cron etc systemright to ignore the disabled state and allow the service account to log on.
7. Select the new role definition, right-click, then click Add Right.
8. Select the rights you defined for running the switch user (su -) commandand logging on with the PAM application ssh, then click OK.
Assign an Active Directory group to the role
As discussed in previous chapters, you should associate Centrify role definitionswith Active Directory security groups so that you can manage them using theprocesses and procedures you have for managing Active Directory groupmembership.
If you are using the recommended deployment structure and namingconventions, you would create the Active Directory group in the ou=ServiceAccounts, ou=Centrify organizational unit using the format ZoneName_Service_RoleName. For example, create an Active Directory group namedsanfrancisco_service_oracle. You can then assign the new role definition tothat group.
To assign the role definition to an Active Directory group:
1. Open Access Manager.
2. Expand Zones and the individual parent or child zones required to selectthe zone name where you want to assign the role definition.
3. Expand Authorization.
4. Select Role Assignments, right-click, then click Assign Role.
5. Select the role definition you created for using secure shell and switching tothe service account access, such as oracle_service, then click OK.
6. Click Add AD Account to search for and select the Active Directory securitygroup you created for the role definition.
n Select Group as the object to find.
n Optionally, type all or part of the group name.
n Click Find Now.
Select the group you created for the role in the results, then click OK.
7. Click OK to complete the assignment.
• • • • • •
Planning and Deployment Guide 225

Working in a restricted shell environment
When users who are assigned to this role want to open a secure shell sessionand switch to the oracle service account, they will be placed in a restricted shellenvironment. Within the restricted shell, they can only execute the commandsyou have added to the role definition until they exit the restricted shell session. Inthis example, the role definition only allows users to log on using ssh andexecute one command, su - oracle. If those users are also assigned theUNIX Login role, they will have access to an unrestricted shell when they closethe restricted shell session.
If you want users who access a shared service account to work exclusivelywithin the restricted shell environment, you must remove the UNIX Login roleassignment in the zone or on the computer where they should only haverestricted shell access. Before removing the UNIX Login role assignment,however, you should consider the trade-off between improved operationalsecurity and audit compliance and reduced operational access. Depending onthe rights you add to a role that runs in a restricted shell environment, therestricted shell can dramatically limit what users can do.
Testing access in a restricted shell
If you create a role definition for a shared service account that runs in a restrictedshell environment, you should test it before migrating any users to it. You can usethe dzinfo command with the --test option from a UNIX command prompt. Forexample, type dzinfo, the user name to test, the --test option, then the fullpath to the command to test:
dzinfo raejames --test “/usr/bin/su - oracle
You can also run the dzinfo command with the --roles option to seeinformation about the rights defined for the current user or a specified user. Forexample, run the following command to check the roles and rights defined forthe user raejames:
dzinfo raejames --roles
For more information about using this command, see the dzinfoman page.
What users see in a restricted shell environment
For users assigned to a role that runs in a restricted shell, logging on opens adzsh shell. Within that shell users can only execute the commands you haveexplicitly defined for them. In this example scenario for a shared service account,
• • • • • •
Defining role-based access for users and computers 226

typing su - oracle is the only allowed command. If the user types any othercommand, the shell reports that the command is not allowed.
Creating a role definition for temporary root access
Another common use case for role definitions occurs when you want to providetemporary access to privileged commands. For example, you might want toprovide temporary root-level access to an application developer troubleshootinga problem on a production server or to a consultant you’ve hired for a specificperiod of time. These types of role definitions are often used as overrides onindividual computers.
The steps for creating a role definition with temporary root access are similar tothe steps for creating the other roles, except that you specify time constraints forthe role. The time constraints might include specific hours of the day, days of theweek, or a start and end time for a role assignment. The next sectionssummarize the steps for creating a role with temporary root-level access.
Define a command that allows root access
The steps for defining a right for switching to the root user are similar todefining the right to run commands for the root-equivalent user, but Centrifyrecommends you create a separate right definition for this case.
To create the right to switch to the root user:
1. Open Access Manager.
2. Expand Zones and the individual parent or child zones required to selectthe zone name where you want to create the new command right.
3. Expand Authorization > UNIX Right Definitions.
4. Select Commands, right-click, then click New Command.
5. On the General tab, type a name, such as emergency_access, for thiscommand right and, optionally, a description for this right, then define theright to switch to the root user:
n Type the command for switching to the root user. For example, typesu - root in the Command field.
• • • • • •
Planning and Deployment Guide 227

n Verify Standard user path is selected.
6. Click the Restricted Shell tab and verify Can be used in a restricted roleand User running the command are selected.
These options enable you to use this command right in combination withother rights in a role definition that requires a restricted shell environment.
7. Click the Run As tab and verify Can be used by dzdo and Any user areselected, then click OK.
In most cases, you can leave the default settings for the other properties. Ifyou want to make changes, click the Environment and Attributes tabsbefore saving the new command.
Create a role definition for temporarily running as root
After you have defined the right to switch to the root user, you can create a roledefinition for that right.
To create a role definition with the right to run the emergency_access command:
1. Open Access Manager.
2. Expand Zones and the individual parent or child zones required to selectthe zone name where you want to create the new role definition.
3. Expand Authorization.
4. Select Role Definitions, right-click, then click Add Role.
5. Type a name and description for the new role.
For example, type a name such as emergency_access and descriptive textsuch as Users with this role can temporarily run commands with
root privileges.
6. Click Available Times to specify days of the week or select times of the dayfor making the role definition available.
For example, you might want to allow access only on Friday, Saturday, andSunday and deny access the rest of the week. After you have set the daysand times for the role definition to be available, click OK.
7. Click OK to save the role definition.
8. Select the new role definition, right-click, then click Add Right.
• • • • • •
Defining role-based access for users and computers 228

9. Select the emergency_access command you defined for switching to theroot user, then click OK.
To use this role, a user must be assigned to the UNIX Login role for thezone or a role definition that has, at a minimum, the following SystemRights:
n Password login and non-password (SSO) login are allowed
n Login with non-Restricted Shell
Assign the role as a computer-level override
In most cases, a role definition of this type is assigned to a specific computerrather than applied to all computers in a zone.
To make a role assignment on an individual computer:
1. Open Access Manager.
2. Expand Zones and the individual parent or child zones required to selectthe zone name that contains the computer for which you want to define acomputer-level role assignment.
3. Expand Computers, then select the specific computer on which you want tomake a role assignment.
4. Select Role Assignments, right-click, then click Assign Role.
5. Select the role definition you created for temporary root access, such asemergency_access, then click OK.
6. Click Add AD Account to search for and select the Active Directory userwho should have temporary root access:
n Leave User as the object to find.
n Optionally, type all or part of the use name.
n Click Find Now.
Select the user in the results, then click OK.
7. Deselect Start immediately and set a specific Start time for the roleassignment.
8. Deselect Never expire and set a specific End time for the role assignment.
9. Click OK.
• • • • • •
Planning and Deployment Guide 229

Verify the role assignment on the computer
You can run dzinfo --roles or dzinfo username --roles to see if theemergency_access role is available based on the start time for the role definitionand the local time of the Linux or UNIX computer.
At the specified start time for the role assignment on the local computer, the useryou assigned to the emergency_access role can type the following command:
dzdo su - root
The user is not prompted to provide the password and becomes the root useron the local computer until the specified role assignment end time. The onecaveat to be aware of is that the user would continue to have root access afterthe specified end time if the shell session remains open continuously. If a user isstill logged on after the time period has expired, you should check whether theuser still requires root-level access. If the session has remained open but theuser should no longer have root access, kill the session and log the user off.
Creating a role definition with specific privileges
The previous examples of role definitions granted broad privileges. You can alsouse role definitions to grant or deny very specific rights. For example, you mightwant to deny access to a specific set of commands for a specific group ofadministrators who otherwise have broad access rights or to strictly limit exactlywhat commands users can execute. Depending on the requirements of yourorganization, you might configure these types of role definitions to be used in arestricted or unrestricted shell.
The steps for creating a role definition with specific privileges are similar to thesteps for creating the other roles. In this example, rights are defined to preventthe execution of specific commands and combined with a right to grant accessto all commands not explicitly listed.
Define command rights to prevent the use of commands
The steps for defining rights that deny access to specific commands are similarto the steps defining other rights, but require different syntax. In this example,you create a “blacklist” of commands users cannot execute.
• • • • • •
Defining role-based access for users and computers 230

To create the right to switch to the root user:
1. Open Access Manager.
2. Expand Zones and the individual parent or child zones required to selectthe zone name where you want to create the new command right.
3. Expand Authorization > UNIX Right Definitions.
4. Select Commands, right-click, then click New Command.
5. On the General tab, type a name, such as No password resets, for thiscommand right and, optionally, a description for this right, then define theright:
n Type !passwd * in the Command field.
n Verify Standard user path is selected.
An exclamation point (!) at the start of a command disallows matchingcommands. Command rights that start with the exclamation point takeprecedence over others that don’t.
6. Click the Restricted Shell tab and verify Can be used in a restricted roleand User running the command are selected.
These options enable you to use this command right in combination withother rights in a role definition that requires a restricted shell environment.
7. Click the Run As tab and verify Can be used by dzdo and Any user areselected, then click OK.
In most cases, you can leave the default settings for the other properties. Ifyou want to make changes, click the Environment and Attributes tabsbefore saving the new command.
8. Repeat Step 4 to Step 7to create rights for the following specificcommands:
!groupadd *!useradd *!groupdel *!userdel *
Create a restricted shell role definition that uses the commandrights
After you have defined all of the command rights that disallow specificcommands, you can create one or more role definitions to use those rights. For
• • • • • •
Planning and Deployment Guide 231

example, you might create one role definition to run in an unrestricted shell thatrequires users to invoke dzdo to execute privileged commands and another roledefinition that runs in a restricted shell but does not require users to executeprivileged commands using dzdo. The second role might be useful if you haveexisting scripts that would have to be modified if invoking dzdo is required.
To create a role definition for specific command rights:
1. Open Access Manager.
2. Expand Zones and the individual parent or child zones required to selectthe zone name where you want to create the new role definition.
3. Expand Authorization.
4. Select Role Definitions, right-click, then click Add Role.
5. Type a name and description for the new role.
For example, type a name such as operators and descriptive text such asUsers with this role can run privileged commands but not reset
passwords, add or delete users and groups.
6. Click System Rights if you want this role definition to be used in arestricted shell environment as a replacement for the predefined UNIXLogin role.
To use this role, a user must be assigned to a role definition that has atleast one UNIX system right, such as Password login and non-password(SSO) login are allowed or Non-password (SSO) login is allowed.
7. Click OK to save the role definition.
8. Select the new role definition, right-click, then click Add Right.
9. Select all of the command right that disallow specific operations, thecommand right that grants access to all remaining commands, and a PAMaccess right, then click OK.
For example, you might add the following previously-defined commandrights to this role definition:
No password resetsNo user addsNo group addsNo user deletesNo group deletesRoot like access (* for all commands not explicitlydisallowed)PAM ssh/login allowed
• • • • • •
Defining role-based access for users and computers 232

This role definition allows members of the operators role to execute anycommand within a restricted shell environment except those explicitlydisallowed, including privileged commands, without invoking dzdo first.You can assign the role definition to the appropriate Active Directory usersor groups like the previous role definitions.
Create an unrestricted shell role definition that uses thecommand rights
The command rights were configured to allow execution in either a restrictedshell environment or an unrestricted shell environment. In an unrestricted shellenvironment—for example, the default shell environment when users areassigned the UNIX Login role—commands that require administrative privilegesmust be executed by first invoking the dzdo command, which is similar toinvoking commands with sudo.
You can control whether users are required to enter a password when theyexecute privileged commands using dzdo by setting the Authentication requiredon the Attributes tab when you create a command right. By default, nopassword is required. If you were adding a new command right that requiresauthentication, you would click the Attributes tab, select Authenticationrequired then select one of these options:
n User’s password if users are required to enter their own password beforeexecuting the command.
n Run as target’s password if users are required to enter the password forthe target account that is executing the command.
In most cases, the default of no password is appropriate because the user hasbeen previous authenticated before invoking dzdo to execute a privilegedcommand and the Run as target’s password option requires the user to knowthe privileged account password. For example, if the run-as user is root, the Runas target’s password authentication option requires the user to know thepassword for the root account.
The steps for creating the role definition that includes the previously-definedcommand right are the same for the unrestricted shell as for the restricted shellexcept that at Step 6 of Create a restricted role definition for the service accountin the System Rights tab, you would also select the Login with non-RestrictedShell option if you are not using the UNIX Login role. You could add all of the
• • • • • •
Planning and Deployment Guide 233

same command rights to the role definition and grant the same privileges andexceptions.
The primary difference between the two role definitions would be how usersexecute their privileged commands.
In the restricted shell environment, users running the adflush commandrequiring administrative privileges:
dzsh $ adflush
In the unrestricted shell environment, users running the adflush commandrequiring administrative privileges:
[tulo@ajax]$ dzdo adflush
Creating a role definition with rescue rights
The Rescue rights option allows you to control which users should be able to logon if problems with the authorization cache or auditing service are preventing allother users from logging on. For example, if you have a computer with sensitiveinformation, such as credit card numbers or intellectual property, you mightrequire auditing for all users in the role with access that computer. If the auditingservice is stopped or removed on that computer, no one would be able to log onand use the computer until auditing is restored. If you create a role with theRescue rights option selected, only the users assigned to that role are able to logon and continue working until the problem that caused the lockout is found andfixed.
Users who are in a role granted access because they have rescue rights can stillbe audited through the system logging facility. However, their activity is notrecorded in the audit store database if the auditing service is not available.
Creating additional custom roles and roleassignments
The previous sections described common roles that organizations implement tobegin the process of migrating and removing locally defined privileged accounts.For most organizations, locally-defined accounts with privileged access presenta security risk and are often identified as a compliance issue by auditors.
• • • • • •
Defining role-based access for users and computers 234

By creating role definitions similar to those described in this chapter, you caneliminate the need to share root and service account passwords while stillproviding privileged access to computers where it’s needed. These additionalroles are not required, however. You can choose to create them or create acompletely different set of role definitions to suit your organization. For example,you might decide to create custom roles specifically tailored to the needs ofdatabase administrators, backup operators, and web application developers.Similarly, you might decide to create separate role definitions that arecustomized with AIX command rights for AIX administrators that are differentfrom the command rights defined for Solaris administrators.
As with the common role definitions, additional custom role definitions can becreated in the top-level parent zone and available throughout the zone hierarchyor in any child zone. They can also span all the computers in a zone or beassigned specifically to individual computers.
If you plan to create your own custom role definitions and role assignments, keepthe following key points in mind:
n Rights associated with roles are cumulative. Users receive all of the rightsin all of the roles they are assigned.
n Users must be assigned at least one role that allows an interactive login orKerberos authentication to have any access to any computers. For existingusers, this is accomplished by assigning the default UNIX Login role duringthe migration to Active Directory.
n Users must be given the Login with non-Restricted Shell system right tohave access to a full shell. If they assigned in a role without this right, theycan only execute the commands explicitly defined for their role.
For users who have previously had full shell access, this limitation can befrustrating, unexpected, and unworkable. Before placing or moving users into arestricted role, be sure those users and managers throughout the organizationare well-informed and well-prepared for the change and understand thebusiness reasons for the change.
Working with computer roles
In addition to the role definitions that confer specific rights when assigned tousers and groups, Server Suite provides a mechanism for linking a specific groupof computers to a group of users with a specific role assignment. Thesecomputer-based access rules, called computer roles, identify computers that
• • • • • •
Planning and Deployment Guide 235

share a specific attribute that you define and a set of users with common accessrights.
For example, you can define a computer role that identifies a set of computers asOracle database servers linked to a set of users who have been assigned theoracle_dba role. You can then add and remove users from the Active Directoryrole group linked to the oracle_dba role to grant or remove the rights associatedwith the oracle_dba role. In this example, the computer role identifies computersthat host Oracle databases and the set of users assigned the databaseadministrator role.
The same set of computers might include computers with AIX and Solarisoperating systems. You could then create separate computer roles that link theAIX computers to a group of AIX administrators and the Solaris computers to agroup of Solaris administrators.
Planning to use computer roles
Because computer roles provide you with a great deal of flexibility for definingaccess rights, you might want to do some planning before you create newcomputer roles. For example, before you create a computer role you must knowthe criteria you want to use to group computers into one or more Active Directorysecurity groups. You must also identify the users who will have a common set ofaccess rights based on the computer grouping.
At a high-level, defining a computer role requires the following:
n Identify computer roles you want to define.
Decide on the attribute the computers in a particular group share. Forexample, you can use a computer role to identify computers in the webfarm, that host specific applications, or serve a specific department.
n Identify the users for the computer role and create Active Directory groupsfor them.
You might need multiple groups because different sets of users havedifferent access requirements. For example, if you are creating a computerrole for a set of Oracle servers, you might need separate Active Directorygroups for database users, database administrators, and backupoperators.
n Identify the role definitions each set of users should be assigned.
• • • • • •
Defining role-based access for users and computers 236

You might need to create specific access rights and role definitions fordifferent sets of users. For example, if you are creating access rights fordatabase users, database administrators, and backup operators, thedatabase users may be able to use the predefined UNIX Login role, whileadministrators need permission to run privileged commands, and backupoperators might be assigned a limited set of commands in a restricted shell.
How computer roles simplify the management of accessrights
Deciding how best to use computer roles requires some upfront planning andconfiguration that might not be part of your initial deployment plan. To makeeffective use of computer roles, you also need to plan for and prepareappropriate role definitions for different sets of users. However, computer rolesprovide a powerful and flexible option for managing access to Centrify-managed computers using your existing processes and procedures formanaging Active Directory group membership.
For example, if you create a computer role group for Oracle servers and youdeploy a new Oracle server, you simply add the computer account for the newserver to the computer role group in Active Directory. If new databaseadministrators join your organization, you simply add them to the ActiveDirectory security group for Oracle database administrators. The computer rolelinks the computer role group to the user role assignment and no additionalupdates are needed to accommodate organizational changes. If you need tomodify the access rights, you can change the role definition and have thechanges apply to all members of the group.
Because creating and managing computer roles is typically an ongoingadministrative task after initial deployment, it is covered in the Administrator’sGuide for Linux and UNIX.
• • • • • •
Planning and Deployment Guide 237

Migrating and managingservice accounts
After you have migrated accounts for the users who log on to the UNIXcomputers in your organization, the next step in the deployment is to decide howyou want to manage the service accounts for applications in your environment.This section describes the options available and why you should considermigrating local service accounts to Active Directory.
Why migrate service accounts?
A service account is typically a local user and group account dedicated to aspecific application or to performing specific operations. In many cases, theservice account has escalated permissions that allow it to run privilegedoperations on behalf of the application it supports. In addition, service accountsoften have no password or a password that is well-known to multiple users.Service accounts without a password typically require a local sudoers policy tocontrol access. Service accounts with a shared passwords present a security riskbecause users can avoid an audit trail and, if passwords are managed locally,they may not conform to the password policies that are enforced for normal useraccounts.
Therefore, the primary reason for migrating service accounts to Active Directoryis to provide better security for accounts that can execute privileged commands,start and stop processes, or run specialized jobs on computers in your network.
Note that not all organizations choose to migrate and manage service accountsin Active Directory. There is no technical requirement that you do so. However,Server Suite provides you with several options for improving the security forservice accounts. You should consider the options available, then decide which, ifany, are most applicable for your environment.
• • • • • •
Planning and Deployment Guide 238

Identifying service accounts to migrate to ActiveDirectory
Every UNIX platform has its own set of standard service accounts that areinstalled by default. For example, most UNIX platforms include services accountsfor common applications, such as gopher, mail, ftp, and uucp. For most of thesestandard service accounts, there’s no business reason to map them to accountsin Active Directory, unless you are trying to eliminate all local accounts on yourUNIX computers.
In most cases, you can skip migration for the standard service accounts includedby default when you installed the operating system as described in Eliminatedefault system accounts.
However, service accounts that run or manage applications or own anapplication’s files are typically good candidates for mapping to Active Directoryusers. For example, an Oracle database instance has an oracle service accountthat owns the database server and the related processes that run in thebackground. Although usually linked to an application, a service account canalso be account created to run scheduled jobs and own the files related to thosejobs.
Service accounts that are good candidates for mapping to Active Directory usersare ones that perform business operations without a password, rely on a sharedpassword known to multiple users, or use shared SSH keys.
Service accounts without a password
Most UNIX service accounts do not use passwords because UNIX services don’trequire an interactive log on to own files or run jobs. The most common way forusers to access the service account is through the configuration of the sudoersfile. The sudoers file provides rules that allow a subset of users to run the sucommand and change to the service account user. Mapping this type of serviceaccount to an Active Directory user eliminates the need for managing accessthrough local sudoers policies and enables you to enforce the same passwordcomplexity rules for service accounts as normal user accounts.
• • • • • •
Migrating and managing service accounts 239

Service accounts with a shared password
The second most common way for users to access service accounts is with ashared account password. In this scenario, multiple users know the password forthe service account and may be able to log on directly as that account. Withshared accounts, there is no authoritative way to identify who is logging in touse the account. If you have any service accounts that rely on a sharedpassword, you should consider migrating those accounts to Active Directory toeliminate the shared password.
Service accounts that use SSH keys
Another common attribute of service accounts is that they often have a set ofSSH keys that are available on multiple computers. The SSH keys allow theservice account to transfer information from one UNIX computer to anotherwithout a password. In this scenario, a specific or the default SSH key for theservice account exists in the authorized keys file on each of the computers towhich the service account must connect.
Mapping a service account to an Active Directoryuser
After you identify one or more service accounts as candidates for mapping to anActive Directory user principal, you should identify an appropriate ActiveDirectory user principal for the service account to map to. In most cases, therewon’t be an appropriate user already defined in Active Directory, so you willneed to create one or more new users.
Create a new Active Directory user account
You can use Active Directory Users and Computers or another tool to create anew user principal for each service account you are migrating to ActiveDirectory.
Note: In most cases, you submit a request for a new account to becreated using the procedure defined for your organization. Forexample, you might submit a request by filling out a service desk
• • • • • •
Planning and Deployment Guide 240

ticket and have the request serviced by a member of the accountfulfillment team. The steps in this section only apply if you havepermission to create new Active Directory user accounts. If youare not responsible for creating new Active Directory userprincipals, you can skip the following procedure.
To create a new Active Directory user for a service account:
1. Start Active Directory Users and Computers.
2. Expand the forest domain and the top-level UNIX organizational unit youcreated in Selecting a location for the top-level OU.
3. Select Service Accounts, right-click, then select New > User.
4. Type a name and account login information for the service account, thenclick Next.
5. Type and confirm the password to use for the service account in ActiveDirectory, select the User cannot change password and Password neverexpires options, then click Next.
The password must conform to your existing password policies for ActiveDirectory users.
If you are creating a new user to replace a shared account, type thepassword currently in use if it is acceptable within your site’s ActiveDirectory rules for password complexity. If you use the shared password,you should change the password after migration. If the current password isnot complex enough, you should type a new password that complies orcontact the Active Directory Enterprise Administrator for alternatives.
6. Click Finish to complete the creation of the new user principal.
Map the UNIX service account to the Active Directory user
After you create a new Active Directory user principal for the service account, thenext step is to map the UNIX account to the Active Directory user.
In preparation for this step, you should notify the user community that theservice account will be unavailable for a brief period of time, so that you canmake the change and verify that everything works as expected. You should thenstop the service and any jobs associated with the service account.
• • • • • •
Migrating and managing service accounts 241

By notifying users and making the service account unavailable for a period oftime, you can prevent the change from affecting people who depend on theservice to do their jobs. You can then use Access Manager to select the serviceaccount and map it to an Active Directory user.
To map the service account to an Active Directory user with Access Manager:
1. Start Access Manager.
2. Navigate to the UNIX user account
3. Navigate to the service account under a specific computer’s Users node orunder the Local Account Users node.
4. Select the service account, right-click, then clickMap to AD User.
5. Type all or part of the Active Directory user name, click Find Now, thenselect the account in the results and click OK.
Clicking OK updates the configuration on the remote host. You couldaccomplish the same thing by manually editing the configuration file(centrifydc.conf) or with a group policy.
6. Verify the service starts and executes operations as expected by switchingto the root user or the service account and attempting to start the service.
7. Check for messages in the log files that the service account writes to. Theentries should be regular service startup messages. You should verify thatthere are no errors or authentication failure messages.
After you verify that the service starts as expected and that any jobs itowns start successfully, you can notify users that the service is available ordo additional testing. Depending on your organization and the serviceaccount you have mapped to Active Directory, developers, databaseowners, application owners, and others may want to do full regressiontesting or execute specific test cases.
How the mapped user changes your environment
The Active Directory user you create for a service account must be enabled forauthentication to work. However, enabling this new user account does presentsome potential risks to your environment. For example, on UNIX computers,creating the new user may have added a password for a service account thatdid not previously have one. If the new password is known to more than one
• • • • • •
Planning and Deployment Guide 242

person, the account may be considered a shared account and result in an auditfinding.
Also, because the new account is a valid Active Directory user principal, anyonewith the password can potentially log on to anyWindows computer in theforest. By giving the service account a valid password and enabling the account,you have granted access to theWindows network for an account that previouslyhad no access toWindows computers.
If you disable the account, you prevent that account from accessing all Windowsand UNIX computers, running jobs, or executing required tasks. If you leave theaccount enabled and the password is compromised, bothWindows and UNIXcomputers are vulnerable to attack. Even if the password is not compromised,failed password attempts could trigger an account lockout policy, rendering theservice unusable.
Mapping service accounts to Active Directory users is a simple technique formanaging access and password complexity for service accounts. If you havestrong passwords and carefully control access to the account and its password,you can mitigate the risks. This strategy is also best suited to service accountsthat already use a password. However, if granting the service account access totheWindows network presents too great of a risk, you should consideralternatives.
Creating a service account role in a zone
As discussed in How the mapped user changes your environment, mapping aservice account to aWindows user makes the account vulnerable to attack. Ifthe attack results in a guessed password, the attacker would be able to log onas the service account, and, potentially, impersonate the service account onmultiple computers on the network using SSH keys. Because the mapped user isalso a valid Windows account, a successful dictionary attack might also grantaccess toWindows computers on the network. If the attack did not result in aguessed password, the failed password attempts could lock out the serviceaccount, making it unusable.
For service accounts that do not have a password, this vulnerability to apassword-guessing attack would be a new security risk that did not previouslyexist. Therefore, simple account mapping is typically not the best solution forservice accounts that are secured using sudoers policies or SSH keys instead ofan account password.
• • • • • •
Migrating and managing service accounts 243

If simple account mapping is not the appropriate solution for the serviceaccounts in your organization, you may want to consider creating one or moreservice account roles. Roles enable you to securely manage the privileges ofUNIX service accounts through Active Directory.
Create an Active Directory user account for the service
Because roles are tightly integrated with Active Directory user and groupdefinitions, linking a service account to a role requires that you have an ActiveDirectory user object to work with. In most cases, you should use your existingprocedures to request a new user account. If you are responsible for creatingnew Active Directory user principals, see Create a new Active Directory useraccount.
Define a new role with system rights
Centrify recommends that you create the role definition for a service account inthe appropriate child zone. If you want to make the role definition available in allchild zones, however, you can create it in the parent zone. The specific selectionsyou make for the role depend on the requirements of the service account forwhich you are creating the role definition. The steps described here providegeneral guidelines. Other settings may apply for the role definition in yourorganization.
To create a new role for a service account:
1. Start Access Manager.
2. In the console tree, expand Zones and the top-level parent zone.
3. Select the specific zone for which you want to define a role, and expandAuthorization.
4. Select Role Definitions, right-click, then click Add Role.
5. On the General tab, type a name and description for the new role, then clickOK.
6. Click the System Rights tab and select the following options that allow theservice account to access UNIX computers using SSH keys or Kerberos,then click OK:
• • • • • •
Planning and Deployment Guide 244

n Non-password (SSO) login is allowed
n Account disabled in AD can be used
n Login with non-restricted shell
In most cases, you should select the Login with non-restricted shell option.This option enables the service account to execute all of its commands in astandard shell. To have the service account run in a restricted shell, youmust be able to identify and define rights for all of the commands that theservice runs. The service account must also be able to execute all of itscommands within the restricted shell (dzsh) environment. For mostorganizations, this additional security requires significant research andtesting before it can be implemented. However, forcing a service account torun in a restricted shell reduces the likelihood that a compromised serviceaccount could be used to attack computers on the network.
7. Select the new role, right-click, then click Add Right.
8. Select the login-all right for the zone, then click OK.
This predefined right grants access rights for all PAM applications. If youdetermine that a specific service account should only use a specific PAMapplication, such as SSH or FTP, you can define a right that only allowsthat application to be used, then select that right in the role definition tospecify that the service account must use the selected PAM application foraccess.
Create a UNIX profile for the service account and assign therole
After you define the role for the service account, you can create a UNIX profile forthe service account. In most cases, you should define the UNIX profile for serviceaccounts using machine-level overrides, rather than defining them for zones.Defining profiles for service accounts using machine-level overrides has thefollowing advantages:
n Profile attributes are not affected the Zone Provisioning Agent. Mostservice accounts require specific UID and GID values. By specifying thesevalues using a machine-level override, you don’t have to worry about themchanging when the Zone Provisioning Agent runs.
n You can explicitly identify which computers the service account can run on.If you define the UNIX profile for a service account in a zone, all of the
• • • • • •
Migrating and managing service accounts 245

computers in the zone are available to the same service account. If youdefine the UNIX profile using machine-level overrides, the service accountonly runs on computers where it has a profile and the profile attributes forthe service account can be different on different computers in the samezone.
n You can restrict the scope of the role assignments on a computer-by-computer basis. By defining the UNIX profile using machine-level overrides,you can configure different service account owners for development,testing, and production computers in the same zone.
If the profile attributes are consistent across most of the computers in a zoneand the service account should run able to run on all of those computers, you candefine all or part of the UNIX profile for the parent or child zone to reduce themanagement of profile attributes on individual computers. However, if thelegacy accounts had different attributes on different computers, it is typicallybest to use machine-level overrides.
To create the UNIX profile and assign the service account role using machine-level overrides:
1. Start Access Manager.
2. In the console tree, expand Zones and the top-level parent zone.
3. Expand the Child Zones node, select a specific child zone and expand it todisplay the Computers node.
4. Select computer for which you want to define machine-level overrides,right-click, then click Add User.
5. Click Browse to search for and select the Active Directory user account forthe service, then click Next.
6. Select Define user UNIX profile and Assign roles, then click Next.
7. Select and define the attributes in the UNIX profile for the service account,then click Next.
You can use inherited default values for any of the attributes from thedefault values specified for the zone or selectively override the defaultvalues for any of the attributes. For example if you define user defaultsusing runtime variables in the zone, you can use the inherited values for theLogin name, GECOS field, Home directory, and Shell and explicitly definethe UID and primary GID for the service account profile.
• • • • • •
Planning and Deployment Guide 246

8. Select the default UNIX Login role, click Remove, then click Add.
9. Click Browse, select the role you created for the service account, then clickOK.
10. Click OK to accept the default start and end times for the role assignment,then click Next.
11. Review your selections, click Next, then click Finish.
Secure the Active Directory user account
At this point, you have an enabled Active Directory user mapped to a UNIXprofile for the service account. Having an enabled Active Directory user mappedto a service account, however, still presents a potential security risk as discussedin How the mapped user changes your environment. The next step is to decidehow to secure the account to reduce the risk that it will be compromised andallow an attacker to gain access to the computers on your network. Dependingon your organization’s infrastructure and requirements, there are essentially twooptions available:
n Use SSH public key authentication
n Use Kerberos authentication
Each of these options has advantages and disadvantages and require differentsteps to configure.
Using SSH keys for authentication
If you already use distributed SSH keys on hosts that run services, you can takeadvantage of that infrastructure and secure the service account by disabling theActive Directory user object in Active Directory. This is a common configurationthat enables computer-to-computer communication without a pass-phrase.
To use SSH public key authentication:
• • • • • •
Migrating and managing service accounts 247

n Define the role for the service account with the Account disabled in ADcan be used by sudo, cron, etc system right enabled. The role should notallow an interactive login.
n Ensure that the computers that communicate with each other have theSSH public key in the authorized_keys file.
n Select the Active Directory user principal you created for the serviceaccount and set the Disable Account option.
After you disable the account, it cannot be used for authentication onWindowsor UNIX computers and it is not susceptible to a password-guessing attack. Theaccount can continue to run UNIX services and use PAM-aware applications tocommunicate to other computers on the network using the SSH public key.
The primary advantage of using SSH authentication is that if you already haveSSH public keys distributed to allow computer-to-computer communications,services should continue to work after the Active Directory user principal isdisabled. There is very little configuration required to implement this solution.
There are, however, disadvantages to using SSH public keys. For example, youmust manage key distribution. To allow a UNIX service account to communicatewith other UNIX computers, you must generate the SSH key, and distribute thatkey to all of the hosts that the service account needs to communicate with. Inaddition, the most common configuration of SSH authentication allows keys tobe used without a pass phrase. If the private key is compromised, an attackercould effectively impersonate the service account across multiple computers onthe network and reacting to a compromised key can be time-consuming becauseit requires you to remove the public key from every $HOME/.ssh/authorized_keys file distributed across the enterprise.
Using Kerberos tickets for authentication
If you are not already using distributed public-private SSH keys forauthentication, you may want to consider using Kerberos authentication.Kerberos authentication is more secure than SSH keys and using Kerberosenables you to centrally manage access for service accounts, but it requiresadditional configuration.
To use Kerberos to secure UNIX service accounts:
n Install Kerberos-enabled software. You can use the Centrify-providedversion of OpenSSH or OpenSSH, version 3.9 or later, if it has beencompiled with Kerberos support.
• • • • • •
Planning and Deployment Guide 248

n Ensure the Active Directory user principal for the service account isenabled. Unlike SSH authentication, Kerberos requires the user account tobe enabled to request ticket granting tickets or service tickets for othercomputers.
n Use the setspn.exe program to create at least one new Service PrincipalName (SPN) for the UNIX service account.
n Run the adkeytab command on every UNIX computer where you want tore-use the Active Directory user principal that you created the new SPN for.This command creates a Kerberos keytab file that is only readable to theservice account user. The keytab file allows the service account to requesta ticket granting ticket so that it can communicate with other UNIXcomputers.
n Use the kinit command to request a ticket granting ticket from ActiveDirectory for the UNIX service account. The ticket granting ticket (TGT)allows the service account to request additional host tickets for SSHcommunications to other UNIX computers.
n Use the klist command to list the tickets for the UNIX service account.
Testing and migration
If you decide to use Kerberos for service accounts, you should test thecomputer-to-computer communication. If you are migrating from authenticationusing SSH public-private keys, you can move ore rename the authorized_keysfile for the service account on remote hosts to test authentication. After you testthe Kerberos authentication of SSH communications and are certain that itworks, you can delete the id_rsa, id_rsa.pub, and authorized_keys files forthe service account that you have migrated.
Renewing ticket granting tickets
Using Kerberos gives you consolidated control over UNIX service accounts. If anaccount is disabled in Active Directory, it cannot be used after any existingtickets expire.
If the service account runs scheduled jobs, you may want to create a crontabentry for the UNIX service account to run the kinit command at a regularinterval so that the TGT doesn’t expire. If the ticket expires and the kinitcommand isn’t embedded in the job the service run, computer-to-computercommunication will fail until the next time kinit is executed. For example, youmay want to add logic to run klist to check whether there is a valid TGT, thenrun kinit is no valid TGT is found.
• • • • • •
Migrating and managing service accounts 249

More information
For information about using the setspn.exe program, see the Microsoftdocumentation for that program. For information about using Centrify commandline programs, see the corresponding man page.
Remove local service accounts from remote computers
After you have migrated service accounts to roles in Active Directory, testedoperations, and verified that commands and jobs run as expected, you canremove the local service accounts from remote computers to prevent them frombeing used.
For most organizations, removing local service accounts is a recommendedsecurity practice. However, you should leave the default operating systemaccounts as local accounts. In most cases, those accounts are not migrated toActive Directory. The default accounts for each platform are listed in theuser.ignore file that is installed with the platform-specific Centrify Agent.
• • • • • •
Planning and Deployment Guide 250

Planning to deploy in ademilitarized zone (DMZ)
Many organizations require both an internal network for corporate assets and aphysical or logical subnet that exposes resources or services to a larger, externalnetwork, such as the Internet. For security, computers and resources in theexternal-facing perimeter network or demilitarized zone (DMZ) have limitedaccess to the computers in the internal network. Because communicationbetween the computers in the DMZ and the corporate network is restricted andprotected through the use of a firewall, there are specific constraints onconfiguring authentication and authorization services.
This section describes how to deploy Centrify components in specific DMZscenarios.
Identifying the computers to protect
The computers that are most vulnerable to attack are computers that provideservices such as e-mail, host external-facing web applications, and managenetwork routing through Domain Name Servers (DNS). Computers that providethese services are typically isolated from the internal network on their ownsubnet and allowed to communicate with the internal network throughspecifically designated channels. This configuration allows computers in theDMZ to provide services to both the internal and external network, but controlsthe traffic allowed to be routed between the computers in the DMZ and theinternal network clients.
Creating a forest and trusts for a DMZ
Centrify recommends that you create a separate Active Directory forest for thecomputers to be placed in the network segment you are going to use as the
• • • • • •
Planning and Deployment Guide 251

demilitarized zone. You should then establish a one-way outgoing trust fromthe internal forest to the DMZ forest.
Defining a one-way trust allows existing internal forest users to accessresources in the DMZ without separate credentials or being prompted forauthentication. The one-way trust also prevents any accounts defined in theDMZ forest from having access to the internal network. Accounts defined in theDMZ forest can only access computers inside the DMZ domain. If a privilegedaccount in the DMZ forest is compromised, that compromise is limited to thescope of the DMZ forest.
For Centrify, the one-way trust enables you to:
n Use the internal forest for authentication and authorization services foruser accounts.
n Define computer accounts in the DMZ domain without permission to readdata from the trusted domain of the internal forest.
In most cases, you should not use an existing Active Directory domain whendeploying Centrify Agents in a DMZ. Using an existing domain requires openingadditional ports through the internal firewall to allow computers to connectdirectly to the domain controllers in the internal forest. Allowing computers in theDMZ to connect directly to the internal forest implicitly grants access toresources behind the internal firewall.
Defining zones for computers in the DMZ
You should create one or more zones in the DMZ forest and specify those DMZzones when computers join the DMZ domain. You should also create andmanage UNIX group profiles in the DMZ domain. However, you should defineuser accounts and UNIX profiles for in the internal forest and not the DMZ forest.Defining user accounts in the internal forest ensures that users can use a singlepassword to authenticate across all network resources, including those in theDMZ.
The following figure provides an overview of the basic architecture for deployingCentrify Agents when you have computers in a DMZ.
• • • • • •
Planning to deploy in a demilitarized zone (DMZ) 252

To enable authentication for resources in the DMZ, users must have:
n A valid Active Directory user principal.
n A complete UNIX profile in one or more zones in the DMZ.
n A UNIX Login, listed, or custom role assignment that allows accesscomputers in the DMZ.
Creating a firewall and securing the network
You should establish firewall rules that allow communication from the DMZdomain controllers to the internal domain controllers. Other computers in theDMZ, for example, the UNIX servers you want to isolate from the internalnetwork, should have limited access to the corporate network. The mostcommon exception is to allow communication from the corporate network to theDMZ network using port 22.
The client and server port requirements to enable communication through thefirewall depend on theWindows operating system you have installed on thedomain controllers and the functional level of the forest. For information aboutthe specific ports to open and the services that use the ports, see MicrosoftActive Directory documentation, such as How to configure a firewall for domainsand trusts.
• • • • • •
Planning and Deployment Guide 253

In addition to configuring a firewall that minimizes exposure to the corporatenetwork, you should remove insecure network protocols, if possible, or replacinginsecure authentication programs, such as POP3 and FTP, with Kerberos-enabled programs. These security steps reduce the potential for passwordexposure and the risk of an account in the corporate domain beingcompromised.
How to join a domain with a read-only domaincontroller (RODC)
WithWindows Server 2008, you have the option of installing read-only domaincontrollers (RODC). Read-only domain controllers enable you to deploy a domaincontroller that hosts read-only partitions of the Active Directory database.Deploying a read-only domain controller enables you to make Active Directorydata and reliable authentication services available in locations that cannotensure physical security required for a writable domain controller.
You can also deploy read-only domain controllers to handle specialadministrative or application management requirements. For example, you mayhave line-of-business applications that are required to run on a domaincontroller, or application owners who must have access to the domain controllerto configure and manage operations but not allowed to modify Active Directoryobjects as they could with a writable domain controller. You can grant a non-administrative domain user the right to log on to the read-only domain controllerwhile minimizing the security risk to the Active Directory forest.
For more information about read-only domain controllers, see the Read-OnlyDomain Controller (RODC) Planning and Deployment Guide.
To join a domain that has a read-only domain controller:
1. Create a computer account for the computer in the DMZ that will connect tothe read-only domain controller using a writable domain controller asdescribed in Creating computer objects for the target set of computers.
Note: You can create the computer account using the AccessManager console, an adedit script, or using the adjoincommand with the --precreate command line option.However, be sure to create the computer account in a DMZzone.
• • • • • •
Planning to deploy in a demilitarized zone (DMZ) 254

2. Use Active Directory Sites and Services or the repadmin program toreplicate the computer account in the read-only domain controller. Forexample,
n In the console tree, expand Sites, and then expand the site of thedomain controller that you want to receive configuration updates.
n Expand the Servers container to display the list of servers that arecurrently configured for that site.
n Double-click the server object that requires the configuration updatesthat you want to replicate.
n Right-click NTDS Settings below the server object, and then clickReplicate configuration to the selected DC.
n In the Replicate Nowmessage box, click OK.
3. (Optional) Open a Command Prompt and use the repadmin/showrepl command to verify successful replication on the read-onlydomain controller.
4. Block the route from the UNIX computer to the writable domain controller, ifnecessary.
5. Run the adjoin command with the self-service option. For example:
adjoin mydomain.local --password c%ntrify --name quad90 --selfserve
Because you have already created the computer account in ActiveDirectory, you don’t need to specify the zone to join the domain.
Enabling NTLM authentication through a firewall
Having a domain controller in the perimeter forest trust the internal domainrequires you to open up ports through the firewall. The specific port requirementsdepend on theWindows operating system version and functional level of theforest. As an alternative, you can use NT LAN Manager (NTLM) authentication toallow Active Directory users in the internal forest to log on to computers in theperimeter forest.
Using NT LAN Manager (NTLM) authentication enables you to have a morerestrictive firewall with a one-way forest trust between the perimeter forest andthe internal forest. For example, if the firewall prevents you from using the portsrequired for Kerberos authentication or if you have limited communicationsbetween the forests to a specific port, you can use NTLM authentication to pass
• • • • • •
Planning and Deployment Guide 255

authentication requests from the domain controllers in the perimeter domain tothe internal domain controllers through the transitive trust chain.
Note: This configuration still requires a one-way trust relationshipbetween the internal forest and domain controllers outside of thefirewall.
Configuring the domain controllers that allow NTLMauthentication
You can use the pam.ntlm.auth.domains configuration parameter to specify thedomain controllers in the DMZ forest that should use NTLM authentication. Thisparameter requires that you specify the domain controllers using their ActiveDirectory domain names. In addition to setting this parameter, you must be ableto map NTLM domain names to their corresponding Active Directory domainnames to support looking up user and group information in the cache.
Configuring a map that converts NTLM domains to ActiveDirectory
For Centrify to automatically construct this map, it must be a able to send LDAPsearch requests to the domain controllers in the corporate forest. If the firewallrestrictions will block these search requests, you must manually define atopology map that converts NTLM domain names into Active Directory domainnames. To manually configure how Active Directory domain names map toNTLM domain names, define entries in the /etc/centrifydc/domains.conf fileusing the following format:
ActiveDirectory_Domain_Name: NTLM_Domain_Name
For example:
arcade.com: ARCADEajax.org: AJAX
You can refresh the list of domain controllers in DMZ forest at any time bymodifying the configuration parameters, then running the adreload command.
• • • • • •
Planning to deploy in a demilitarized zone (DMZ) 256

Managing and evolvingoperations afterdeployment
In previous sections, you prepared for deployment, migrated existing users,configured automated provisioning for new users and groups, and added one ormore custom roles for privilege management. Most of these activities are relatedto the initial deployment and extending deployment to additional sets of targetcomputers and interactive users.
This section discusses management activity, evolving operational security, andadding services to extend authentication and authorization after deployment.Often, at this stage, the deployment project team begins to transition activity toan operations team or support staff.
Understanding how Centrify software affectsoperations
Through Active Directory, Centrify software provides a consolidated solution toauthentication, authorization, and policy management for Linux, UNIX, and MacOS X computers. Because of this consolidation, however, you may need to makechanges or additions to the IT tasks or operational procedures you currentlyhave in place. Therefore, when you deploy Centrify software in a productionenvironment, you should consider how it impacts the management taskstypically performed by operations staff members.
The routine tasks that may be affected by adding Centrify software to theenvironment fall into the following categories:
n Change management
n System administration
• • • • • •
Planning and Deployment Guide 257

n Security administration
n Service desk operations
n Capacity management
Understanding change management activities
Change management typically involves testing and installing updates to theoperating system or installed applications. For example, most organizationsfollow a controlled process for reviewing and implementing changes to theoperating system because of patches or new releases.
If you are preparing to update the operating system, the support staff shouldalso plan to test that user log-ons and role assignments continue to functioncorrectly after update. If a system patch or update affects the operation ofCentrify software, you should contact Centrify Customer Support to determinewhether the patch is supported.
Staff members should also periodically review new and maintenance releases ofCentrify software to get the latest features, fixes to known issues, andenhancements requested by Centrify customers. After downloading thesoftware, you can review the release notes included in each package todetermine what’s changed and the suitability of the update for yourorganization.
Understanding system administration activities
Most system administration tasks involve managing users and groups. Afterdeploying Centrify software, this information is centralized in Active Directory forbothWindows and non-Windows computers. Therefore, any administrativeaction for a user account affects that user on bothWindows and UNIXcomputers. For example, if you disable a user account in Active Directory, theuser will be unable to log on to anyWindows or UNIX-based computer in theforest.
Typically, there is a period of time where staff members must use one set ofsteps for provisioning users and groups on the computers not yet joined to thedomain and another set of steps for provisioning users and groups on computersthat have successfully joined the domain. After you complete the migration toActive Directory, you can leverage the processes and tools you use forprovisioningWindows users and groups for ongoing administration of UNIX
• • • • • •
Managing and evolving operations after deployment 258

users. For example, you can use Active Directory Users and Computers, in-housecustom scripts, Access Manager, ADEdit, or another management tool toperform administrative tasks.
After deployment, you should prepare any site-specific or platform-specificinstructions the operations staff should follow if you are making changes to theprocesses or tools they are familiar with.
Understanding security administration activities
Security administration involves ensuring that operators are granted theappropriate rights for administering the computers and attributes that arerequired as part of their job but are prevented from accessing or changingcomputer settings outside their areas of responsibility.
Delegated administration
Centrify enables administrators to explicitly delegate management tasks to theappropriate users and groups on a zone-by-zone basis.
Password policy enforcement
Centrify enables you to use existing Active Directory password policy rules, suchas the minimum password length, complexity requirements, expiration, andallowed number of logon failures to allow before locking an account for bothWindows and UNIX users.
Privileged account management
Centrify enables you define rights, roles, and role assignments to control whatusers can do and who can execute privileged commands. You can also mapprivileged local accounts to Active Directory accounts to ensure better passwordsecurity for those accounts. For example, the local root user account has fullaccess to all data and can manipulate all settings on a UNIX computer. Mappingthe local root user to an Active Directory user account enforces the ActiveDirectory password policies on the account and makes it more difficult for anunauthorized user to obtain escalated privileges on the UNIX computer.
Understanding service desk operations
Active Directory and Centrify simplify help desk and service desk operations by:
• • • • • •
Planning and Deployment Guide 259

n Enabling centralized administration for tasks such as adding new users orgranting access to new computers.
n Consolidating user passwords and reducing the need for password resets.
n Simplifying troubleshooting for log on failures for UNIX users.
You should provide help desk staff with troubleshooting instructions to helpthem diagnose and resolve failed authentication or authorization tickets.
Understanding capacity management activities
During the deployment of Centrify Agents, you should monitor and analyzenetwork traffic and domain controller replication to determine how well yourenvironment handles the extra load of UNIX users and computers in ActiveDirectory. In general, Centrify software is configured to use minimal systemresources and network bandwidth. In practice, however, you should monitor andevaluate the volume of traffic to determine its impact on performance across thenetwork and the performance experienced by users logging on to UNIXworkstations and servers.
If the network traffic or resource usage exceeds your expectations, you maywant to modify the default configuration to better suit your network topology.For example, Centrify provides numerous group policies and configurationparameters that you can modify to optimize network activity or control howmuch data is stored locally on individual computers.
Determining whether you need more resources
In most cases, deploying Centrify software does not noticeably affect theperformance of the network or domain controllers. However, if you have a widelydistributed network or replication delays, you should analyze your network’scapacity to handle the additional load of UNIX users and computers to determinewhether you need to make changes to ensure optimal performance andavailability. For example, the following factors may require you to allocateadditional resources:
n If the UNIX computers are in a different physical location than the domaincontrollers that they access, you may want to install a domain controller ona computer that is physically closer to the UNIX computers to reduce long-distance network traffic and the chance of replication delays.
• • • • • •
Managing and evolving operations after deployment 260

n If you need to ensure availability in the event of a network or server failure,you should ensure that you have an adequate number of domaincontrollers to support the UNIX computers when they need to fail-over to abackup domain controller.
n If you add a large number of UNIX users to the Active Directory domain,apply your standard method for balancing domain controllers per numberof users.
n If you add a large number of UNIX computers to the Active Directorydomain, apply your standard method for balancing domain controllers pernumbers of computers.
n If you move a large number of UNIX users and groups from a local directory(/etc/passwd and /etc/group) to Active Directory, you may needadditional network bandwidth because authentication and authorizationrequests are now done over the network.
For more information about modifying configuration parameters, see theConfiguration and Tuning Reference Guide.
Understanding how caching facilitates lookups
Centrify Agents store credentials in a local cache to reduce the network trafficrequired to look up information in the directory. For example, if a user executesthe directory listing command in a UNIX command shell (such as with the ls -l
command), the command looks up and displays a listing of files along with theirattributes, such as the owner of each file.
However, a file’s owner is stored as a number—the user’s UID—on UNIX-basedcomputers, but because the ls command displays the owner as a name and nota number, the ls command must look up the actual user name associated withthe file owner’s UID. Because UNIX UIDs and user names are stored in ActiveDirectory, this lookup request must be serviced by Active Directory. If a largenumber of files are displayed when the ls command is run, this creates asubstantial amount of lookup traffic between the UNIX computer and the ActiveDirectory domain controller.
Centrify reduces this traffic by caching the lookups so that the information doesnot have to be retrieved from the Active Directory each time a lookup is required.Commands such as ls check the local cache first for the relevant informationinstead of retrieving the information from Active Directory every time.
• • • • • •
Planning and Deployment Guide 261

Troubleshooting logon failures
If a user attempts to log on to a computer that is in a Centrify zone and the logonfails, the problem is typically caused by one of the following:
n Users attempting to log on to a computer they are not authorized to use.
n Users have an incomplete profile in the zone where the computer they areattempting to use is located.
n Users have not been assigned an appropriate role that allows logonaccess.
n Users have typed their non-Active Directory password or typed the wrongpassword more times than allowed.
n Local or group policy settings are applied to the computer to preventaccess.
To investigate these potential problem areas:
1. Check whether the local UNIX computer can connect to the Active Directorydomain controller.
n Log on to the computer using a locally authenticated user, such as thelocal root user.
n Run the ping command with the name of an appropriate domaincontroller in the forest.
For example, if the local computer is joined to the snowline.org forest, thecommand might look similar to this:
su -Password:ping shasta.snowline.org
If the command receives a reply from the domain controller, the DNSservice is functioning and the local computer is able to locate the domaincontroller on the network. If the ping command does not generate a reply,you should check your DNS configuration and check whether the localcomputer or the domain controller is disconnected from the network.
2. Check Active Directory information by running the adinfo command. Theoutput from this command should appear similar to the following:
Local host name: magnoliaJoined to domain: snowline.orgJoined as: magnolia.snowline.orgCurrent DC: shasta.snowline.orgPreferred site: Default-First-Site-Name
• • • • • •
Managing and evolving operations after deployment 262

Zone: snowline.org/Acme/Zones/cascadeLast password set: 2017-12-21 11:37:22 PSTCentrifyDC mode: connected
If the mode is disconnected, check whether adclient is running andnetwork connectivity. On a slow network adclientmay drop theconnection to Active Directory if there is a long delay in response time.
If the output displays an <unavailable> error, you should try running theadleave command to leave Active Directory, re-run the adjoin command,then re-run the adinfo command. For example:
adleave --forceadjoin --user skip --zone cascade snowline.orgPassword:adinfo
If a problem still exists, check the DNS host name of the local computer andthe domain controller, the user name joining the domain, and the domainname you are using.
3. Check the clock synchronization between the local UNIX computer and theActive Directory domain controller.
If the clocks are not synchronized, reset the system clock on the UNIXcomputer using the date command.
4. Check for denied users and groups in the/etc/centrifydc/centrifydc.conf file or the Login Controls grouppolicy. For example, open the centrifydc.conf file in a text editor, such asvi:
vi /etc/centrifydc/centrifydc.conf
n Search for the pam.deny.users line and make sure that the user whois trying to log on is not listed.
n Search for the pam.deny.groups line and make sure that the userwho is trying to log on is not a member of any group that is listed onthis line.
5. Check the contents of the system log files or the centrifydc.log file afterthe user attempts to log on. You can use information in this file to helpdetermine whether the issue is with the configuration of the software orwith the user’s account.
6. Check for conflicts between local user accounts and the user profiles inActive Directory by running the getent command. For example:
getent passwd
• • • • • •
Planning and Deployment Guide 263

This command displays a list of local and Active Directory users withaccess to the computer. If the user’s name is not listed but other ActiveDirectory users are listed, the problem may be in the user’s Active Directoryaccount settings or UNIX profile.
If no Active Directory users are listed in the output of the command, checkwhether adclient is running and whether the Active Directory domaincontroller is available.
7. Check the user’s Active Directory account settings using Access Manageror Active Directory Users and Computers. For example:
n Check whether the user has a UNIX profile for the local computer’szone.
n If the user has a UNIX profile in the zone, check whether the profile iscurrently enabled.
n If the user has an enabled UNIX profile, check the user’s groupmembership to determine whether it is a local group defined in adifferent domain than the computer account.
n Check whether the user’s account has been disabled or locked.
n Check whether any user-based group policies have been applied tothe user account that may prevent access to the UNIX computer.
8. Enable logging of adclient activity using the addebug command. Forexample:
/usr/share/centrifydc/bin/addebug on
This command enables extensive logging of each operation performed bythe adclient process in the /var/log/centrifydc.log file. You can usethe information in this file to further diagnose the cause of any problems orto enable Centrify’s support staff to assist with resolving any issues.
Evaluating additional services and integrations
After you have deployed Centrify Agents to implement an Active Directory-based security and directory services, you may want to explore other ways totake advantage of Active Directory’s infrastructure. In evaluating ways to extendyour security and directory services, you must first understand:
n How the UNIX servers and workstation that are joining the domain areused
• • • • • •
Managing and evolving operations after deployment 264

n Which applications are accessed locally and which applications areaccessed by remote users
n How the servers and workstations are managed, and whetheradministrators are local users or remote users
n Whether there are specific additional IT services you want to enable
n Whether there are specific controls you want to apply
As a starting point, you should consider whether computers joining the domainare workstations that primarily support local logon sessions or servers thatrequire few, if any, local logon sessions. In many cases, UNIX computers havefew interactive users but are frequently used as application servers that hostdatabase or web applications. For those computers, you should determinewhether Active Directory authentication and authorization is primarily foradministrators who manage the server or for users who log in to access theapplication.
Some of the ways you can extend and evolve the deployment of Centrifysoftware include:
n Adding authentication service for applications
n Adding custom reports for auditing UNIX properties
n Adding group policies
n Adding support for NIS clients
n Using programs optimized for Kerberos authentication
n Integrating with products from other vendors
Adding authentication service for applications
Because Active Directory and Centrify use Kerberos and LDAP standards, manyKerberos-enabled or PAM-enabled applications can use Active Directory forauthentication and authorization service with little or no configuration. One wayyou can evolve your deployment is to add support for single sign-on to additionalapplications.
Supporting single sign-on for Kerberos-enabled applications
The primary way that Centrify supports single sign-on is through Kerberos.Kerberos provides a ticket-based authentication mechanism that is the defaultmethod for authentication in Active Directory. When a user logs on to a
• • • • • •
Planning and Deployment Guide 265

computer that uses Active Directory authentication, a Kerberos ticket is issued tothe user and that ticket allows the user to access data, applications, othercomputers, and other sessions without having to present credentials again. Thissilent authentication that takes place in the background as users browsenetwork shares or run applications is the key to enabling a single sign-onexperience.
Many applications are Kerberos-enabled by default or can be configured tosupport the use of Kerberos tickets. By default, when a computer joins an ActiveDirectory domain, Kerberos requests are forwarded and serviced by theKerberos Key Distribution Server on the Active Directory domain controller.Therefore, in most cases, existing Kerberos-enabled applications canauthenticate and authorize access without any modification.
If you use an application that is not configured to use Kerberos authentication bydefault, however, you may need to modify configuration options or use specificcommand line options to support single sign-on.
In addition, users must be assigned to a role with the Non-password (SSO)login is allowed system right. This right is enabled in the predefined UNIX Login
role. If you create custom roles and want to allow single sign-on, you shouldselect this system right when defining the role.
Supporting single sign-on for PAM-aware applications
Pluggable Authentication Modules (PAM) provide a flexible mechanism forauthenticating users regardless of the underlying authentication system. Mostprograms and applications that rely on user authentication use PAM.
The agent uses its own PAMmodule, pam_centrifydc.so, to direct PAMrequests to Active Directory. Therefore, in most cases, existing PAM-enabledapplications can authenticate and authorize access without any modificationand support single sign-on without any special configuration.
One known exception, however, is that most database applications supportPAM authentication, but do not enable it by default. To support single sign-on fordatabase applications, you should modify the database configuration to enablePAM authentication.
In addition, users must be assigned to a role with the Non-password (SSO)login is allowed system right. This right is enabled in the predefined UNIX Login
role. If you create custom roles and want to allow single sign-on, you shouldselect this system right when defining the role.
• • • • • •
Managing and evolving operations after deployment 266

Supporting Active Directory authentication for Apache and Javaapplications
MostWeb and J2EE platforms provide their own native authentication andauthorization services for Web developers to use. With Server Suite, you canchoose to extend the native interfaces to enable web applications to providesingle sign-on capability or redirect authentication requests to Active Directoryinstead of a native authenticator.
Supporting database server applications
Most database servers provide their own native authentication andauthorization services. With Server Suite, you can choose to extend the nativeinterfaces to enable supported database servers to provide single sign-oncapability or redirect authentication requests to Active Directory instead of anative authentication service.
Adding custom reports for auditing UNIX properties
Server Suite includes several default reports that you can use to monitor andaudit access to the computers in your environment. The default reports providedetailed information about your UNIX users, groups, computers, zones, andlicenses, and enable you to verify which users have access to specific computers,zones, or applications. Default reports also provide easy access to theinformation that you require for auditing, business planning, and regulatorycompliance. After you generate a report, you can save the report in the followingformats:
n Microsoft Excel (.xls)
n Microsoft Word (.doc)
n Adobe Acrobat (.pdf)
n XML document (.xml)
For example, after generating a report with information about the users in eachzone, you can save it as a Microsoft Excel spreadsheet (.xls), and import theinformation into an Excel Workbook to create a Charge Back report on accountusage for each department.
One of the most common ways to evolve the Server Suite deployment is tocreate custom reports that are specifically tailored to your organization andauditing requirements. The Access Manager console includes a Report Wizard
• • • • • •
Planning and Deployment Guide 267

that allows you select the specific Active Directory objects and properties andthe relationships on which you want to base the report.
For information about creating and generating custom reports, see theAdministrator’s Guide for Linux and UNIX.
Adding group policies
For many companies, centralized policy management and configuration controlis just as important as centralized identity management. With Server Suite, youcan apply group policy settings from Active Directory to the non-Windowscomputers and UNIX users.
Evaluating existing policy settings
If you have applied any domain-wide policies in the Active Directory forest, youshould review what the policy settings are and where they are enforced forWindows-based computers. You should then evaluate which policy settings, ifany, are applicable for computers running UNIX, Linux, or Mac OS X operatingsystems. For example, most organizations establish a policy for passwordcomplexity. You can view your current password policy settings by clickingDomain Security Policy under Administrative Tools to open the DefaultDomain Security Settings, then select Password Policy.
If you enable any password policy settings for the domain, they automaticallyapply to UNIX users and managed computers because Active Directory usesthese settings when authenticating users. If you enable or change any of thedefault domain policy settings, you should consider how they affect UNIX usersand computers. For information about the standardWindows group policies thatapply for UNIX, see the Group Policy Guide.
Adding Centrify-specific group policies to a GPO
You can add Centrify-specific configuration settings to any Group Policy Objectapplied to any site, domain, or organizational unit in the Active Directory forest.You can then manage the specific policies enabled and settings applied centrallythrough the Group Policy Object Editor onWindows.
Each GPO can consist of configuration information that applies to computers,configuration information that applies to users, or sections of policy that applyspecifically either to users or to computers. You link a GPO to an Active Directory
• • • • • •
Managing and evolving operations after deployment 268

organizational unit, domain, or site. Windows then applies the policy settingsbased on an established hierarchical order.
The Centrify-specific group policy settings available for users and groups aredefined separate administrative templates (.adm or .xml files) that can be addedto any GPO. If you enable any of the policy settings, they are written to a virtualregistry on the UNIX computer. The Centrify Agent then runs a set of localmapping programs that read the virtual registry and modify local configurationfiles to implement the setting defined by the group policy. You can also createyour own custom administrative template and mapper programs to implementcustom group policies.
For more detailed information about creating and managing Centrify-specificgroup policies, see the Group Policy Guide and Active Directory documentation.
Adding support for NIS clients
You can extend Centrify software to provide NIS service from a Centrify-managed computer, acting as a NIS server, to NIS client requests using ActiveDirectory as the central data store for NIS maps.
There are many scenarios in which adding the Centrify Network InformationService (adnisd) to your infrastructure can enable you to integrate Centrify andActive Directory with other enterprise solutions. For example, the adnisdNetwork Information Service and Centrify zones can be used to centrallymanage and map multiple UNIX identities to aWindows user account for accessresources stored on EMC Celerra Network Servers or Network Appliance Filers.Active Directory remains the central identity store and zones remain the primaryway of mapping UNIX profiles to a user account, but the Centrify NetworkInformation Service enables you to deliver the appropriate information to serversand devices across the network.
Using the Centrify Network Information Service in conjunction with the CentrifyAgent is a scenario like this provides the following advantages:
n Redundancy. As an NIS client, the Celerra Network Server can find NISservers by broadcasting on the local subnet. If a subnet hosts more thanone Centrify-managed computer acting as a NIS server, the Celerra orNetApp server can fail over from one NIS server to another NIS server onthat subnet, thus enabling multiple NIS paths to the same data held withinActive Directory.
• • • • • •
Planning and Deployment Guide 269

n Multi-domain support. The Centrify NIS service can provide user mappingdata to NIS clients who may have an account anywhere within an ActiveDirectory forest, including remote or child domains. Through the ActiveDirectory Global Catalog, Centrify Agents can find user mappinginformation for users anywhere across the forest.
Extending your deployment with the Centrify Network Information Service alsoenables you to centrally manage network information and publish custominformation to NIS clients throughout the network without modifying theunderlying Active Directory schema.
Using programs optimized for Kerberos authentication
As a management platform, Centrify provides its own versions of commonly-used open source programs. For example, the following packages have beenoptimized to work with Centrify software and Active Directory:
n Standard MIT Kerberos utilities, such as kinit and kdestroy, are installedwith the agent to support Kerberos keytabmanagement for accounts inActive Directory.
n Kerberos-enabled client programs such as OpenSSH, support Kerberosauthentication and single sign-on for secure connections betweenCentrify-managed computers.
n An enhanced version of PuTTY supports Kerberos authentication forsecure, remote access fromWindows computers to Centrify-managedcomputers.
Integrating with products from other vendors
Centrify software also integrates with products from many other vendors, suchas Splunk, IBM DB2, SAP Netweaver and Secure Network Communication(SNC), and Quest ActiveRoles Server. In addition to Active Directory, you can useCentrify software to extend other Microsoft services such as Services forNetwork File System (NFS), Microsoft Identity Integration Server (MIIS), andMicrosoft Active Directory Federation Services (ADFS).
For more information about add-on packages, integration with other systems, orconfiguring Centrify software to work with other products, see the ResourceCenter on the Centrify Corporation website.
• • • • • •
Managing and evolving operations after deployment 270

Getting assistance from Centrify CorporationSupport
Centrify recommends you take the following steps if you need assistance withan issue or have questions about the operation of Centrify components:
1. Check the Centrify Support Portal on the Centrify Corporation website tosearch the Knowledge Base to see if your problem is a known issue orsomething for which there is a recommended solution.
n Open http://www.centrify.com/support/login.asp in aWebbrowser.
n Log in using your customer account information and password.
n Click Find Answer and type one or more key words to describe theissue, then click Find to view potential answers to your question. Forexample, to search for known issues, type known issues and clickFind to see articles related to the known issues in different releases.
If your issue is not covered in an existing Knowledge Base article or theCentrify documentation set, you should open a case with Centrify Support.
2. Click Log a Case to open a new case using the Centrify Support Portal.
Alternatively, you can contact Centrify Support by email or telephone, if youprefer. Worldwide contact information is available in the “How to open acase and collect information for Centrify Support” Knowledge Base article(KB-0301).
3. Provide as much information as possible about your case, including theoperating environment where you encountered the issue, and the versionof the Centrify Corporation product you are working with, then click Submitto open the case.
Before or after opening a support case, you may need to collect additionalinformation about your environment. To help ensure your issue gets resolvedquickly and efficiently, you should take the following steps to gather as muchinformation as possible:
1. Verify the Centrify Agent is running on the computer where you haveencountered a problem. For example, run the following command:
ps –ef | grep adclient
• • • • • •
Planning and Deployment Guide 271

If the adclient process is not running, check whether the watchdogprocess, cdcwatch, is running:
ps –ef | grep cdcwatch
The cdcwatch process is used to restart adclient if it stops unexpectedly.
2. Enable logging for the Centrify Agent. For example:
/usr/share/centrifydc/bin/addebug on
3. Create a log file for the Mac OS X Directory Service. For example:
killall –USR1 DirectoryService
4. Run the adinfo command to generate a report that describes the domainand current environment. For example:
adinfo --diag --output filename
5. Duplicate the steps that led to the problem you want to report. Forexample, if an Active Directory user can’t log in to a Centrify managedcomputer, attempt to log the user in and confirm that the attempt fails. Besure to make note of key information such as the user name or group namebeing, so that Centrify Support can identify problem accounts more quickly.
6. Verify that log file /var/log/centrifydc.log or/var/adm/syslog/centrifydc.log exists and contains data.
7. Generate information about Active Directory domain connectivity andconfiguration files by running the following command:
adinfo --support
This command writes output to the file /var/centrify/tmp/adinfo_support.txt.
8. If there is a core dump during or related to the problem, save the core fileand inform Centrify Support that it exists. Centrify Support may ask for thefile to be uploaded for their review.
If the core dump is caused by an agent process or command, such asadclient or adinfo, open the /etc/centrifydc/centrifydc.conf fileand change the adclient.dumpcore parameter from never to always andrestart the agent:
/etc/init.d/centrifydc restart
9. If there is a cache-related issue, Centrify Support may want the contents ofthe /var/centrifydc directory. You should be able to create an archive ofthe directory, if needed.
• • • • • •
Managing and evolving operations after deployment 272

10. If there is a DNS, LDAP, or other network issue, Centrify Support mayrequire a network trace. You can use Ethereal to create the network tracefromWindows or UNIX. You can also use Netmon onWindows computers.
11. Create an archive (for example, a .tar or .zip file) that contains all of thelog files and diagnostic reports you have generated, and add the archive toyour case or send it directly to Centrify Support.
12. Consult with Centrify Support to determine whether to turn off debuglogging. If no more information is needed, run the following command:
/usr/share/centrifydc/bin/addebug off
• • • • • •
Planning and Deployment Guide 273

Templates and sampleforms
This section provides templates and samples that you can customize and use inthe deployment process. These templates represent documents that arecommonly used, such as change control requests and email notifications ofsoftware changes. Your organization may require you to use organization-specific versions of these documents.
Simplified environment analysis and zone designtemplate
This template provides a framework for the information that the deploymentteam should collect, analyze, and document in evaluating the existing networkinfrastructure and how it will change after deployment. Depending on yourenvironment and requirements, you might need to collect additional information,but this template describes the most common elements with examples that youcan adapt to your organization.
1. Introduction
Use this section to provide a brief overview of the deployment plan. Forexample, document the features you plan to deploy, any primary goals thatmight affect design decisions, and any dependencies or specialconsiderations, such as activities that require change control approval orenhanced permissions.
2. Network architecture
Use this section to capture details about your existing networkconfiguration and Active Directory architecture. For example, you mightwant to record information about the Active Directory site, forest, and
• • • • • •
Planning and Deployment Guide 274

domain controllers, including trust relationships and domain and forestfunctional levels, if applicable.
You might also include details about your DNS configuration, includingwhether you have more than one DNS namespace and any portrequirements, firewall restrictions, and any network connectivity issues. Fordetails about the default ports used, see Default ports for network trafficand communication.
3. Centrify-managed computers
Use this section to provide details about the existing UNIX, Linux, and MacOS X computers on which you plan to deploy the Centrify Agent.
4. Provisioning process
Use this section to describe the process for provisioning computers, groups,and users.
5. Rights, roles, and role assignments
Use this section to describe the rights, roles, role assignments, andconfiguration policies you require. For example, if you use the sudoprogram and the sudoers file, use this section to document how rights androles defined in the sudoers file and whether the sudoers file is managedlocally on each computer or in a central location.
6. Zone architecture
Use this section to identify the Active Directory schema you are using andwhere Centrify-related objects are located in the Active Directory forest.
7. Deployment preparation in Active Directory
Use this section to summarize the deployment of Centrify components intothe existing Active Directory forest and domain.
8. Windows installation
Use this section to describe how zones will be created and configured.
9. UNIX deployment
Use this section to describes the deployment of Centrify Agents on UNIXcomputers.
10. Group Policies
Use this section describes the group policies that will be deployed for UNIXcomputers.
• • • • • •
Templates and sample forms 275

Change control request form
Most larger organizations require a formal change request to be submitted forany changes to Active Directory. The purpose of this template is to illustrate arequest for creating new Active Directory organizational units, groups, andusers. If the deployment team is not allowed to add UNIX groups and groupmembers to Active Directory after the organizational structure if created, it islikely the project will experience delays.
Computer:
Change Requested:
Approved By:
Test case matrix sample
To validate the pilot deployment, most organizations execute at least someformal testing of features and functionality. The purpose of this template is tosuggest a basic set of test cases to execute that apply to most environments.These test activities apply to setting up your environment, installing thesoftware, and performing common administrative tasks. You can skip anyactivities that don’t apply to your organization.
Activity Remarks Date
Create the OU Structure with a script ormanually Active Directory setup activities
Create the OU Permissions with a script ormanually
Create Security Groups with a script ormanually
Create Distribution Groups with a script ormanually
Create the Zones Container with the SetupWizard, a script, or manually
Create the Licenses Container with theSetupWizard, a script, or manually
Create the service account for the ZoneProvisioning Agent
Update the local or domain policy to allow
Testing Matrix
• • • • • •
Planning and Deployment Guide 276

Activity Remarks Date
the Zone Provisioning Agent service to Logon as a service right
Deploy the agent on computers
Create a zone with a script or AccessManager console Access Manager console activity
Delegate zone control with a script or usingthe Delegate Zone Control Wizard
Pre-Create Computer account
Import UNIX groups from group files orgroup NIS maps
Resolve mapping issues
Import UNIX users from passwd files orpasswd NIS maps
Assign interactive users to the UNIX Loginrole Authorization activities
Assign users who need profile but notaccess to the listed role
Join computers to the domain using adjoinYou should prepare for migration andcreate one or more initial zones beforeyou join the domain.
Configure root-equivalent rights
Configure root-equivalent replacement role
Add an Active Directory group for the role
Test role access
Test role privileges control
Identify current management process(manual or automated) UID consolidation activities
Document the new management process
Define the business rule for assigning UIDs(for example, SID)
Identify active users to preserve, migrate,and keep
Run adfixid to change file ownership
Identify current management process(manual or automated) GID consolidation activities
Document the new management process
Define the business rule for assigning theprimary GID values (for example, GID)
Identify the Active Directory groups forprimary GID assignments Domain Users
• • • • • •
Templates and sample forms 277

Activity Remarks Date
Validate Active Directory log on credentials User login activities
Validate successful access to UNIX, Linux,Mac OS X
Validate successful application usage
Validate password complexity policy
Validate account lockout policy
Validate role enforcement
Validate single sign on
Validate password reset
Test period users validated Clean up activities
Test period groups validated
Test period roles validated
Run adrmlocal to remove local accounts
Preliminary software delivery notification emailtemplate
The purpose of this template is to notify users that they are scheduled to receivenew software that will be delivered to their computers. This email notice shouldinclude a specific delivery date or a time frame estimate, if possible. Althoughyou can delete this information from the email message you send out in yourorganization, this notice is most effective if users know specifically when thechange is scheduled to occur. You can also customize the specific requirementsor objectives that Server Suite is helping your organization achieve.
Colleagues:
The [Department Testing Centrify] has successfully completed testing of theCentrify software and is ready to begin the deployment portion of the project.The target date for deployment is [Scheduled time].
Deployment of this software will greatly enhance our ability to comply withmultiple industry requirements to include [List objectives, such as: PCI,Sarbanes-Oxley compliance, Internal/External Security Audit, specificorganization initiatives]. These requirements are in alignment with prioritizedcorporate business objectives.
The Centrify software enables the streamlining of authentication, accesscontrols and privileges, and auditing for all corporate IT systems. For the most
• • • • • •
Planning and Deployment Guide 278

part, deployment and streamlined authentication and authorizations servicesoccurs “behind the scenes” with minimal, if any, user disruption. You should notnotice any operational changes when the software is deployed to yourcomputer.
Thank you for your cooperation,
[IT Department Signature]
Department-specific announcement andinstructions email template
The purpose of this template is to notify users in a specific department that theyare scheduled to transition to using Server Suite for authentication andauthorization. This email notification indicates that you plan to join thecomputers in the department to an Active Directory domain during down time.Depending on your organization’s policies, this email may suggest users log onwith their Active Directory credentials or explicitly state that they can continue tolog on with their existing credentials.
Colleagues:
The [Specific department you are deploying to, such as: Accounting Department]is scheduled to begin the transition to Server Suite next week. In order to ensurea smooth transaction we simply ask that you log off of all systems before leavingfor the weekend. When you return to work the following week, you should [beable to log on with your current user name and password].
If you experience any difficulties logging on, or with application connectivity,please submit a ticket or contact the support desk immediately. Severalmembers of each department helped the IT team perform successful testing andvalidation of this new solution, and we anticipate a smooth transition.
Thank you for your cooperation,
[IT Department Signature]
• • • • • •
Templates and sample forms 279

General announcement and deployment scheduleemail template
The purpose of this template is to notify a broader user community of thedeployment schedule for multiple departments across the company. This samplealso illustrates the type of notes you can incorporate into the email message tokeep other groups informed of their status. The general announcement may alsoinclude portions of the other two email templates. For example, you may want toinclude the objectives the transition to Server Suite helps the company achieve orthe instructions to use current or Active Directory credentials after migration.
Colleagues:
At the completion of the week, the [Centrify Deployment Project Team]willallocate first response resources to the next department scheduled fordeployment.
This is the schedule coordinated with the Department Heads throughout thecompany:
Date DEPARTMENT REMARKS
9 May 2017 Information Technology
16 May 2017 Accounting
23 May 2017 Marketing Pending EOQ Reports
30 May 2017 Security
6 Jun 2017 Sales
13 Jun 2017 Executive
20 Jun 2017 PMO
27 Jun 2017 DataWarehouse Pending EOQ Reports
3 Jul 2017 Training
10 Jul 2017 Business Development
17 Jul 2017 Audit
The IT Department would like to thank everyone to date for their work on thisproject, and look forward to a successful deployment. If you have any questions,please submit them to the [Centrify_project] distribution list and include yourcontact information. We will respond with answers or contact you directly formore information.
Sincerely,
[IT Department | Centrify Deployment Project Team]
• • • • • •
Planning and Deployment Guide 280

Deployment team task checklist
Before you install the pilot deployment, you should prepare a deploymentchecklist to ensure you have the information you need to successfully completethe deployment. For example, you should review port requirements, verify DNSresolution, and create one or more spreadsheets that describe the user andgroup accounts to be imported and any special relationships, such asmembership in specific groups that need to be preserved or any specialconfiguration you want to implement.
Creating a deployment checklist is optional, but can help you to collect detailedinformation about each of the computers targeted for deployment.
The following example illustrates information you can collect and record in adeployment team task checklist.
Preparing computers for deployment
Operating system, version, and patch level for target computers
Host name and IP address for target computers
Current disk space for target computers
Review the details of the current DNS configuration
For example:
Is the address resolved through a UNIX DNS server, Windows DNS server, or settingsin the /etc/hosts and /etc/resolv.conf files?
Is the computer using a DNS server that has SRV records for Active Directory domaincontrollers?
Are UNIX subnets registered and associated with Sites in Active Directory?
Are you using a disjointed DNS namespace, where a UNIX computer name may beserver.company.com but the Active Directory domain name isserver.windows.company.com?
Are you using DNS aliases and do they resolve correctly?
Are there multiple network interfaces (NIC) in use?
Current network time provider (NTP)
For example, does the computer use a different server to determine the time than theActive Directory domain controller?
Current firewall configuration
For example, are there any firewalls blocking required ports between the UNIXcomputer and the Active Directory domain controllers for the registered sites?
Current applications and services
• • • • • •
Templates and sample forms 281

Preparing computers for deployment
For example, do you have Perl, Samba, or OpenSSH deployed? Are the versions youhave compatible with the Centrify Agent or—if a Centrify version is available—to bereplaced by versions provided by Centrify?
Do you have existing authentication providers deployed?
Are existing applications and services Kerberos-enabled or PAM-enabled?
Are there other applications that require local users or groups?
Current source of user and group information
For example, are the /etc/passwd and /etc/group files the only source of userinformation for the users who access this computer or other identity stores, such asexisting LDAP servers or NIS domains, used?
Are there any specific users or groups that should remain locally defined?
Current NSS configuration
For example, have you reviewed the contents of the nsswitch.conf file to checkfor other sources of user and group information?
Connectivity between this computer and the domain controller
For example, is there a reply from the domain controller when you run the pingcommand?
User names and UIDs checked for conflicts across the target group
Zone requirements analyzed for the target group
Zone identified for this computer
Centrify Agent installed and the computer joined to the domain
Groups allowed or denied access identified for this computer
Existing users and groups for this computer imported into Active Directory
Imported user and group profiles mapped to Active Directory accounts
Allowed or denied groups configured using parameter values or group policy
If you use a deployment checklist, you can also include additional notes anddetails about the activities performed. For example, a partially completedchecklist might look something like this:
Preparing computers for deployment
Operating system: Sun Solaris 10 with all patches applied (17-April-2017)
Host name and IP address: aspen, 177.29.10.10
Current DNS configuration: Resolved through the enterprise DNS server,spider.ajax.org
Current time source is NTP server: ntpd on solstice.ajax.org
Change for deployment: Use SNTP on the Active Directory domain controller
• • • • • •
Planning and Deployment Guide 282

Preparing computers for deployment
Current firewall configuration: No port issues
Existing OpenSSH version to be replaced, no other issues found.
Current source of user and group information: /etc/passwd, /etc/group, andNIS domain nwest03 have users who access aspen
Connectivity with the domain controller: Verified by JR (2-May-2011).
User names and UIDs checked for conflicts across the target group: Analyzed by JRand DC (4-May-2017).
Zone requirements analyzed for the target group: Zones required for the target groupare nwest01, swest02, corp-main, and nwest03 (9 May 2017).
SF to recommend new extended zone descriptions for approval.
Zone identified for this computer: nwest03
Centrify Agent installed and the computer joined to the Active Directory domain:dc3colorado.ajax.org, OU: US-UNIX-Computers
Groups allowed r denied access identified for this computer:
Allowed access group—all_employees, oracle_sys
Denied access—consultants, temps
Existing users and groups for this computer imported into Active Directory: Completedby DC (20-May-2017).
Imported user and group profiles mapped to Active Directory accounts: Workcomplete for users and groups that already had matching Active Directory candidates.Work in progress for the remaining profiles without any matching Active Directorycandidate.
Target date for completion: 31-May-2017
Allowed or denied groups configured using parameter values or group policy: TBD
• • • • • •
Templates and sample forms 283

Permissions required foradministrative tasks
This chapter describes the permissions required to perform administrative tasksthat affect Centrify-specific objects in Active Directory. You can set thesepermissions manually for individual users and groups who manage Centrifyzones in Active Directory. However, setting permissions manually can be time-consuming and error-prone. In most cases, you should use the Zone DelegationWizard to authorize users to perform specific tasks.
At a minimum, all Access Manager actions require users to have generic Readpermission. This permission is typically granted to all Authenticated Users bydefault.
Because Authenticated Users have read access, they can run reports in theReport Center. No additional rights need to be granted to enable users to runreports.
How permissions are set
Access Manager requires specific rights for administrators to work with objectssuch as UNIX users, groups, and computers within Active Directory. As part ofyour deployment planning process, you should review the rights required to setup and manage Centrify-specific objects and be familiar with how to manuallyassign rights for managing Centrify objects, if needed.
Built-in Windows groups, such as Domain Admins and Domain Users, havedefault permissions, which might be customized for your organization. Ingeneral, the administrators for the forest root domain have broad authority toset permissions for all other users and groups, including the administrators ofother domains. Therefore, whether you can modify the permissions for specificusers and groups within your Active Directory environment will depend on thepolicies of your organization.
• • • • • •
Planning and Deployment Guide 284

If you have the appropriate authority, there are several ways you can access,verify, and modify the permissions assigned to specific users and groups.
For example, you can view and modify permissions in the following ways:
n Use ADSI Edit to directly modify any Active Directory attributes.
n Use Active Directory Users and Computers to set basic or advancedpermissions on any Active Directory object through the Security tab.
To display the Security tab, select View > Advanced Features. To accesssome permissions, however, your user account must have Create all childobjects orWrite all properties permissions.
n Run the Zone Delegation Wizard to set the appropriate permissions forspecific users or groups to perform specific tasks within a zone.
n Click Permissionswhen viewing Zone Properties in Access Manager to setbasic or advanced permissions on any zone object.
n Click Permissionswhen viewing the Centrify Profile for a user in AccessManager to set basic or advanced permissions on any user object.
The following steps illustrate how you can set permissions from Active DirectoryUsers and Computers:
1. Open the console and connect to the Active Directory domain.
2. Select an Active Directory object, such as a user or computer, right-click,then click Properties.
3. Click the Security tab, then click Advanced.
• • • • • •
Permissions required for administrative tasks 285

4. Select the user or group to which you want to assign rights, then click Edit.
If the user or group to which you want to assign permissions isn’t listed,click Add to find the account.
5. In the Permission Entry dialog box, click the Object or Properties tab, asneeded.
• • • • • •
Planning and Deployment Guide 286

Selecting Object or Properties and where the permission should be appliedvaries depending on the task you are allowing a user or group to perform.
6. Select the specific rights you want to assign by scrolling to find thepermission, then clicking the Allow check box.
7. When you are finished setting the appropriate permissions, click OK.
For more specific information about how to set permissions on ActiveDirectory objects and properties and how to view, modify, and removepermissions, see your Active Directory documentation.
Permissions required to use the SetupWizard
In most cases, you run the SetupWizard to guide you through the configurationof Active Directory for Centrify. The SetupWizard updates Active Directory withCentrify-specific objects and properties, including zone and license containersthat are required for proper operation.
To successfully perform initialization tasks, the user account that runs the SetupWizard must have specific rights. Because some of these rights might bereserved for administrative accounts, some users might be prevented fromperforming certain steps in the SetupWizard.
• • • • • •
Permissions required for administrative tasks 287

To allow other user accounts to run the SetupWizard, you can manually createthe appropriate container objects, then assign to those objects only the specificpermissions needed to correctly complete the configuration of Centrify-specificobjects. Users can then use the SetupWizard to select the appropriate containerobjects and perform all of the necessary steps without being members of anadministrative group.
Licenses container permission requirements
The following table describes the minimum rights that must be applied to theCentrify-specific container objects or other users to successfully complete theconfiguration of Centrify software.
This target object Requires these permissions Applied to
Licenses container
n Read all properties
n Create classStore Objects
n Modify permissions
This object only
n Write Description property
n Write displayName propertyThis object and all childobjects
The SetupWizard requires you to create or select at least one parentcontainer for license keys. By default, this container object is:
domain/Program Data/Centrify/Licenses
You can create additional License containers, if needed, through theManage Licenses dialog box.
By default, all Authenticated Users have read and list contentspermission for the Licenses container and all of its child objects. Youcan change these permissions if you want to restrict access to AccessManager.
Zones container orany container used asa destination for anew zone
n Read all properties
n Create classStore Objects
n Create container objects
This object only
n Write displayName property This object and all childobjects
The SetupWizard requires you to create or select a parent containerobject for creating new zones. By default, this container object is:
domain/Program Data/Centrify/Zones
You can use other containers for zones, if needed. For example, if youhave created a separate high-level organizational unit called UNIX asthe parent container:
• • • • • •
Planning and Deployment Guide 288

This target object Requires these permissions Applied todomain/UNIX/Zones
ZoneName/Computerscontainer
n Create group objects
n Write Description propertyThis object only
These permissions are only needed if you are supporting “agentless”authentication in a zone.
Computerscontainer
For example, thegeneric Computerscontainer:domain.com/Computers
n Write operatingSystemproperty
n Write operatingSystemVersionproperty
n Write operatingSystemHotfixproperty
n WriteoperatingSystemServicePackproperty
SELF on Computer objects
These permission are granted to each computer’s SELF account whenyou select the Grant computer accounts in the Computers containerpermission to update their own account information option in theSetupWizard.
Licenses container permissions
The following table describes the minimum rights that must be applied to theCentrify Licenses container that stores the license keys for your installation.
This target object Requires these permissions Applied to
Licenses container
n Read all properties
n Create classStoreObjects
n Modify permissions
This object only
n Write Descriptionproperty
n Write displayNameproperty
This object and all child objects
The SetupWizard requires you to create or select a parent container for licensekeys. The default location for the parent container for license keys depends onthe organizational structure you deploy. For example, if you use therecommended organizational structure, the default location for licenses wouldbe domain/Centrify/Licenses.
• • • • • •
Permissions required for administrative tasks 289

You must have at least one parent container for license keys in the forest. Youmight want to create more than one license container objects to give you moregranular control over who has access to which licenses.
By default, all Authenticated Users have Read and List Contents permission forthe Licenses container and all of its child objects. These permissions are requiredto use Access Manager. You can change who has these permissions if you wantto prevent users from using Access Manager.
Zones container permissions
The following table describes the minimum rights that must be applied to theCentrify Zones container.
This target object Requires thesepermissions
Applied to
Zones container or any container used as adestination for a new zone
n Read allproperties
n CreateclassStoreObjects
n Createcontainerobjects
This object only
n WritedisplayNameproperty
This object and allchild objects
Change the default zone container n Delete Previous zonecontainer
The SetupWizard requires you to create or select a parent Zones containerobject for new zones. The default location for the parent container for new zonesdepends on the organizational structure you deploy. For example, if you use therecommended organizational structure, the default location for new zones wouldbe domain/Centrify/Zones. You can use other containers for zones or createmultiple parent containers for zones to separate administrative duties fordifferent groups.
• • • • • •
Planning and Deployment Guide 290

Computers container permissions
The following table describes the minimum rights that must be applied to thegeneric Computers container (domain/Computers).
This target object Requires these permissions Applied to
Computerscontainer
n Write operatingSystem property
n Write operatingSystemVersionproperty
n Write operatingSystemHotfixproperty
n Write operatingSystemServicePackproperty
SELF on Computerobjects
These permission are granted to each computer’s SELF account when you selectthe Grant computer accounts in the Computers container permission toupdate their own account information option in the SetupWizard.
Computers container within a zone permissions
The following table describes the minimum rights that must be applied to theComputers container in a named zone if you are supporting “agentless”authentication in that zone.
This target object Requires these permissions Applied to
ZoneName/Computers container
n Create group objects
n Write Descriptionproperty
This object only
Creating parent containers manually
Some organizations prefer to create and manage Active Directory objectsmanually to ensure tight control over the objects and their related attributes. Forexample, you might want to manually create separate Zones or Licenses parentcontainers for different business units or geographic locations so that you canmanually set different sets of permissions and related properties on thosecontainers. Creating objects manually also enables you to have precise controlover who has access to the objects.
• • • • • •
Permissions required for administrative tasks 291

You can create the container objects anywhere in the forest’s directory structure,but you must have at least one parent Zones container object and at least oneparent Licenses container object.
Optional administrative tasks
By default, Centrify does not require you to be an enterprise administrator ordomain administrator of the forest root domain to install or configure Centrify-specific properties. However, some optional configuration tasks do require you tobe an enterprise administrator or a domain administrator of the forest rootdomain.
These optional tasks involve:
n Creating display specifiers for Centrify profiles to enable access to theCentrify Profile properties page in Active Directory Users and Computers.
n Registering the administrative notification handler to ensure dataconsistency if users delete Centrify objects using Active Directory Usersand Computers.
n Setting permissions for zones objects to enable maximum control over theplacement of and rights associated with Centrify-related objects withinActive Directory.
In most cases, if you want to perform any of these tasks, you must use anaccount that is an enterprise administrator or a domain administrator of theforest root domain.
Creating display specifiers for Centrify profiles
To display the Centrify Profile properties in Active Directory Users andComputers, you must be an enterprise administrator or a domain administratorfor the forest root domain because adding the Centrify Profile to Active DirectoryUsers and Computers requires you to add display specifiers to Active Directory.
Note: A display specifier is an Active Directory object that allows you toadd components to the Active Directory Users and Computers(ADUC) Microsoft management console (MMC) snap-in.
If you want to make the Centrify Profile available in Active Directory Users andComputers, an enterprise administrator can manually define the display
• • • • • •
Planning and Deployment Guide 292

specifiers (under domain/Configuration/DisplaySpecifiers/LanguageID/)for computer, group, and user properties by modifying the adminPropertyPagesattribute with the appropriate GUID. For example, if the Active Directory domainis ajax.org and the language you support is US-English (CN=409), you woulddefine the display specifiers in:
ajax.org/Configuration/DisplaySpecifiers/409
Note: Adding the display specifiers for Centrify properties is an optionalstep you can perform manually using ADSI Edit or by running thedisplayspecifier.vbs script. If you manage all Centrify objectsthrough Access Manager, you do not need to perform this task.
To use the displayspecifier.vbs script to set up the display specifiers:
1. Log on using an enterprise administrator account or a domainadministrator for the forest root domain.
2. Open a Command Prompt window and change to the Centrify installationdirectory. For example:
cd C:\Program Files\Centrify\Access Manager
3. Run the displayspecifier.vbs script.
If you want to manually add the display specifiers to display propertypages in Active Directory Users and Computers, you must create thefollowing entries using ADSI Edit, where n is the next number in the indexof values for the attribute:
For this target object Set this attribute Tocomputer-DisplaydisplaySpecifier
adminPropertyPagesn,{DB5E4BE1-A0F0-4e6c-AD8A-B46475D727CB}
group-DisplaydisplaySpecifier
adminPropertyPagesn,{0CDC9AD0-E870-483f-8D16-17EAB3B7F881}
user-DisplaydisplaySpecifier
adminPropertyPagesn,{543DBFE3-317D-4493-8D00-84591E4EDCDE}
inetOrgPerson-Display adminPropertyPagesn,{543DBFE3-317D-4493-8D00-84591E4EDCDE}
For example, if the Active Directory domain is ajax.org and the language yousupport is US-English (CN=409), you would add these entries to the objects in:
ajax.org/Configuration/DisplaySpecifiers/409
In most cases, you only need to set up the display specifiers once for the ActiveDirectory forest. If you support multiple languages, you can manually add thedisplay specifiers to each language you support. For example, if your
• • • • • •
Permissions required for administrative tasks 293

organization supports US-English (CN=409), Standard French (CN=40C), andJapanese (CN=411), you would add the display specifiers to these threecontainers. Once you have updated Active Directory by running thedisplayspecifier.vbs script or by manually adding the display specifiers, youcan access the Centrify Profile properties using Active Directory Users andComputers.
Registering the administrative notification handler
The administrative notification handler provides services to ensure data integrityin the Active Directory forest. You can register the notification handlerautomatically through the SetupWizard the first time you start Access Manager,but this requires an account that is an enterprise administrator or a domainadministrator in the forest root domain.
Registering the administrative notification handler is optional, but doing so helpsto ensure that no orphan UNIX data is left in the directory if a user, group, orcomputer is deleted using Active Directory Users and Computers. Whenregistered, the notification handler automatically deletes any service connectionpoint (SCP) dependencies on a directory object if the directory object is deleted.Without this service, deleting a directory object such as a computer or useraccount in Active Directory might leave an orphan service connection point forthe object in the directory.
If you don’t want to perform this step in the SetupWizard, you can manuallyconfigure the administrative notification handler using ADSI Edit or you canchoose not to register the administrative notification handler for Centrify. If youchoose not to register the administrative notification handler, however, youshould periodically run the Analyze command to check for orphan data in theActive Directory forest.
To manually set up the administrative notification handler for Centrify, add thefollowing entry using ADSI Edit underdomain/Configuration/DisplaySpecifiers/LanguageID/where n is the nextnumber in the index of values for the attribute:
For this target object Set this attribute ToDS-UI-Default-Settings
dSUIAdminNotificationn,{D0D2C2AE-C143-4C81-A61C-BE95C3C5EEDF}
For example, if the Active Directory domain is ajax.org and the language yousupport is US-English (CN=409), you would add this entry to the object in:
• • • • • •
Planning and Deployment Guide 294

ajax.org/Configuration/DisplaySpecifiers/409
Granting permissions for administrative tasks
The easiest way to grant permissions to perform administrative tasks is to usethe Zone DelegationWizard. The Zone DelegationWizard enables you todelegate specific administrative tasks to specific users and groups. For each taskyou delegate to a specific user or group, you are providing that user or groupwith a specific set of permissions for working with objects in Active Directory.
The user who creates a zone has full control on the zone’sserviceConnectionPoint. That user has exclusive permission to delegateadministrative tasks to other users. The user who creates a zone is also the onlyuser who can add NIS maps to the zone because creating NIS maps requirespermission to create containers in Active Directory. The zone creator can,however, grant other users permission to add, remove, or modify NIS mapentries.
The following table summarizes the permissions that can be assigned throughyour selections in the Zone DelegationWizard. In addition to the permissionslisted, however, the basic Read permission is required to perform any action. TheRead permission is granted to Authenticated Users by default.
Selecting thistask
Grants these rights
All
Permissions to perform all of the actions listed in the Zone DelegationWizardand described below.
This option allows a designated user or group to perform all of the otheractions. Only the user who creates a zone can grant this permission to otherusers and groups for the zone.
Change zoneproperties
n List contents on the ZoneName object container.
n Read all properties on the ZoneName object container.
n Write name on the ZoneName object container.
n Write Name on the ZoneName object container.
n Write Description property on the ZoneName object container.
Add users
n List contents on the ZoneName/Users object container.
n Read all properties on the ZoneName/Users object container.
n Create serviceConnectionPoint objects on the ZoneName/Usersobject container.
Add groups n List contents on the ZoneName/Groups object container.
• • • • • •
Permissions required for administrative tasks 295

Selecting thistask
Grants these rights
n Read all properties on the ZoneName/Groups object container.
n Create serviceConnectionPoint objects on the ZoneName/Groupsobject container.
Add localusers
n List contents on the ZoneName/Local Users object container.
n Read all properties on the ZoneName/Local Users objectcontainer.
n Add local users to the zone.
Add localgroups
n List contents on the ZoneName/Local Groups object container.
n Read all properties on the ZoneName/Local Groups objectcontainer.
n Add local groups to the zone.
Joincomputers tothe zone
n List contents on the ZoneName/Computers object container.
n Read all properties on the ZoneName/Computers object container.
n Create serviceConnectionPoint objects on the ZoneName/Computersobject container.
Note Joining the domain requires additional permissions on the ActiveDirectory computer object, but the join command performs the necessaryoperations without requiring the additional permissions to be granted to theuser or group you are designating as a trustee.
Remove zones
n List contents on the ZoneName object container.
n Read all properties on the ZoneName object container.
n Allow Delete on the ZoneName object container.
n Allow Delete Subtree on the ZoneName object container.
Remove users
n List contents on the ZoneName/Users object container.
n Read all properties on the ZoneName/Users object container.
n Delete serviceConnectionPoint objects on the ZoneName/Usersobject container.
Removegroups
n List contents on the ZoneName/Groups object container.
n Read all properties on the ZoneName/Groups object container.
n Delete serviceConnectionPoint objects on the ZoneName/Groupsobject container.
Remove localusers
n List contents on the ZoneName/Local Users object container.
n Read all properties on the ZoneName/Local Users objectcontainer.
n Remove local users from the zone.
• • • • • •
Planning and Deployment Guide 296

Selecting thistask
Grants these rights
Remove localgroups
n List contents on the ZoneName/Local Groups object container.
n Read all properties on the ZoneName/Local Groups objectcontainer.
n Remove local groups from the zone.
Removecomputersfrom the zone
n List contents on the ZoneName/Computers object container.
n Read all properties on the ZoneName/Computers object container.
n Delete serviceConnectionPoint objects on the ZoneName/Computersobject container.
Modify userprofiles
n List contents on the ZoneName/Users object container.
n Read all properties on the ZoneName/Users object container.
n Write cn on the serviceConnectionPoint object.
n Write name on the serviceConnectionPoint object.
n Write Name on the serviceConnectionPoint object.
n Write keywords on the serviceConnectionPoint object.
For RFC 2307-compliant zones, modifying the user’s UNIX profile alsorequires the following rights on the serviceConnectionPoint object of the UNIXuser object:
n Write uid.
n Write uidNumber.
n Write loginShell.
n Write gidNumber.
n Write gecos.
n Write unixHomeDirectory.
The additional rights for RFC 2307-compliant zones are applied to theposixAccount object associated with the serviceConnectionPoint for theUNIX user object.
Modify groupprofiles
n List contents on the ZoneName/Groups object container.
n Read all properties on the object containers.
n Write name on the serviceConnectionPoint object.
n Write Name on the serviceConnectionPoint object.
n Write keywords on the serviceConnectionPoint object.
For RFC 2307-compliant zones, modifying the group’s UNIX profile alsorequires the following rights applied to the posixGroup object associatedwith the serviceConnectionPoint object of the UNIX group object:
• • • • • •
Permissions required for administrative tasks 297

Selecting thistask
Grants these rights
n Write gidNumber.
Modify localuser profiles
n List contents on the ZoneName/Local Users object container.
n Read all properties on the ZoneName/Local Users objectcontainer.
n Modify local users in the zone.
n Parameters that can be modified are:
n User name (the UNIX login name).
n The user identifier (UID).
n The user’s primary group profile numeric identifier (GID).
n The default home directory for the user.
n The default login shell for the user.
n General information about the user account (GECOS).
n State.
Modify localgroup profiles
n List contents on the ZoneName/Local Groups object container.
n Read all properties on the object containers.
n Modify local groups in the zone.
n Parameters that can be modified are:
n Group name.
n Group members.
n Group identifier (GID).
n State.
Modifycomputerprofiles
n List contents on the ZoneName/Computers container object.
n Read all properties on the ZoneName/Computers container object.
n Write description on the ZoneName/Computers container object ifthe zone is a hierarchical zone.
n Write keywords on the serviceConnectionPoint object.
n Write displayName on the serviceConnectionPoint object.
n Write cn on the serviceConnectionPoint object.
n Write name on the serviceConnectionPoint object.
Allowcomputers torespond to NISclient requests
n List contents on the ZoneName/Computers/zone_nis_serversgroup object.
n Read all properties on the ZoneName/Computers/zone_nis_servers group object.
• • • • • •
Planning and Deployment Guide 298

Selecting thistask
Grants these rights
n Write member property of group object on theZoneName/Computers/zone_nis_servers group object.
Import usersand groups tozone
n List contents on the ZoneName/Users and ZoneName/Groupscontainer object.
n Read all properties on the ZoneName/Groups container object.
n Create serviceConnectionPoint on the ZoneName/Users andZoneName/Groups container objects.
n Write cn on the serviceConnectionPoint object.
n Write name on the serviceConnectionPoint object.
n Write managedby on the serviceConnectionPoint object.
n Write displayName on the serviceConnectionPoint object.
n Write keywords on the serviceConnectionPoint object.
For RFC 2307-compliant zones, importing users also requires the followingrights on the serviceConnectionPoint object of the UNIX user objectZoneName/Users:
n - Write uid.
n - Write uidNumber.
n - Write loginShell.
n - Write gidNumber.
n - Write unixHomeDirectory.
n - Write gecos.
For RFC 2307-compliant zones, importing groups also requires the followingright on the serviceConnectionPoint object of the UNIX group object underZoneName/Groups:
n - Write gidNumber.
Manage rolesand rights
List contents on the AzTask container and all child objects.
n Read all properties on the AzTask container and all child objects.
n Create msDS-AzTask objects
n Delete msDS-AzTask objects
n Write msDS-AzApplicationData on the msDs-AzTask object.
n Write cn on the msDs-AzTask object.
n Write name on the msDs-AzTask object.
n Write description on the msDs-AzTask object.
n Write msDs-OperationsForAzTask on the msDs-AzTask object.
• • • • • •
Permissions required for administrative tasks 299

Selecting thistask
Grants these rights
n List contents on the AzOperation container and all child objects.
n Read all properties on the AzOperation container and all child objects.
n Create msDS-AzOperation objects
n Delete msDS-AzOperation objects
n Write msDs-AzApplicationData on the msDs-AzOperation object.
n Write cn on the msDs-AzOperation object.
n Write name on the msDs-AzOperation object.
n Write description on the msDs-AzOperation object.
n List contents on the msDS-AzAdminManager object.
n Read all properties on msDS-AzAdminManager object.
n Write msDs-AzApplicationData on msDS-AzAdminManager object.
Manage roleassignments
n List contents on the msDS-AzAdminManager object and all childobjects.
n Read all properties on the msDS-AzAdminManager object and all childobjects.
n Create msDS-AzRole objects.
n Delete msDS-AzRole objects.
n Write msDS-AzApplicationData on the msDS-AzRole object.
n Write msDS-TasksForAzRole on the msDS-AzRole object.
n Write msDS-MembersForAzRole on the msDS-AzRole object.
n Write displayName on the msDS-AzRole object.
n Write msDS-AzApplicationData on the msDS-AzAdminManagerobject.
Modifycomputerroles
n List contents on the ZoneName object and all child objects.
n Read all properties on the ZoneName object and all child objects.
n Write msDS-AzApplicationData
n Write msDS-AzScopeName
n Write description
Add or removeNIS mapentries
n List contents on the ZoneName/NISMaps object container.
n Read all properties on the ZoneName/NISMaps object container.
n Create classStore Objects on the ZoneName/NISMaps objectcontainer.
n Write name on the ZoneName/NISMaps object container.
• • • • • •
Planning and Deployment Guide 300

Selecting thistask
Grants these rights
n Write Name on the ZoneName/NISMaps object container.
Modify NISmap entries
n List contents on the ZoneName/NISMaps object container.
n Read all properties on the ZoneName/NISMaps object container.
n Write adminDescription on the classStore object.
n Write Description on the classStore object.
n Write wWWHomePage on the classStore object.
Remove NISmaps
n List contents on the ZoneName/NISMaps object container.
n Read all properties on the ZoneName/NISMaps object container.
n Allow Delete on the MapName object.
n Allow Delete Subtree on the MapName object.
Note: In some cases, the permissions granted through the ZoneDelegationWizard are a subset of the complete permissionsrequired to perform some tasks. For information about thecomplete permissions required to perform a specific task, see thesection that describes the permissions for performing that task.For example, for information about setting permissions for NISmaps, see Setting permissions for NIS maps.
Setting permissions for zones
The user who creates a zone has full control over zone properties andadministrative tasks. Only the zone owner can delegate administrative tasks toother users and groups through the Zone DelegationWizard. In most cases, theusers who are allowed to create zones have domain administrator privileges andsufficient permissions to perform all administrative tasks and to delegateadministrative tasks to other users.
If you manually set permissions to allow domain users to create zones, however,you should also manually set the permissions to allow those users to managerights and roles or notify zone administrators that they should run the ZoneDelegationWizard and assign those tasks to their own account or toappropriate users and groups. At least one administrator must have permissionto add an authorization store, define rights and roles, and manage roleassignments in each zone. All users must have at least one valid role assignmentto access a zone.
• • • • • •
Permissions required for administrative tasks 301

Creating a zone
To create new zones, your user account must be set with the followingpermissions:
Select this target object To apply these permissions
Parent container for new zonesyou created or selected in theSetupWizard.
For example:
domain/UNIX/Zones
On the Object tab, select Allow to apply the followingpermission to this object and all child objects:
n Create Container Objects
n Create Organizational Unit Objects
Note Both permissions are required if you want to allowzones to be created as either container objects ororganizational unit objects.
Parent container for Computersin the zone
On the Object tab, select Allow to apply the followingpermission to this object only:
n Create group objects
Click the Properties tab and select Allow to apply thefollowing properties to this object only:
n Write Description property
These permissions are only needed if you are supporting“agentless” authentication in the new zone.
Opening zones
To open an existing zone, your user account must be set with the followingpermissions:
Select this target object To apply these permissions
Parent container for new zones
For example:
domain/UNIX/Zones
On the Object tab, select Allow to apply the followingpermission to this object:
n List contents
Container for the individual zone
For example, a ZoneNamecontainer object, such as:
domain/UNIX/Zones/arcade
Click the Properties tab and select Allow to apply thefollowing properties to this object only:
n Read allowedAttributes
n Read allowedAttributesEffective
n Read canonicalName
n Read Description
• • • • • •
Planning and Deployment Guide 302

Select this target object To apply these permissionsn Read displayName
n Read name
n Read objectClass
Parent container for Users in thezone
Click the Properties tab and select Allow to apply thefollowing properties to this object only:
n Read objectClass
Parent container for Groups inthe zone
Click the Properties tab and select Allow to apply thefollowing properties to this object only:
n Read objectClass
Modifying zone properties
To modify zone properties for a zone, your user account must be set with thefollowing permissions:
Select this target object To apply these permissions
Container for an individualzone
For example, a ZoneNamecontainer object:
domain/UNIX/Zones/arcade
Click the Properties tab and select Allow to apply the followingproperties to this object only:
n Read Name
n Read name
n Read Description
n Read displayName
n Write Description
Note You can grant these permission to specific users or groupsby selecting the Change zone properties task in the ZoneDelegationWizard.
These permissions also enable you to change the parent zone fora selected zone object.
Renaming a zone
To rename a zone, your user account must be set with the following permissions:
• • • • • •
Permissions required for administrative tasks 303

Select this target object To apply these permissions
Container for an individualzone
For example, a ZoneNamecontainer object, such as:
domain/UNIX/Zones/arcade
Click the Properties tab and select Allow to apply the followingproperties to this object only:
n Write name property
n Write Name property
Note You can grant this permission to specific users or groups byselecting the Change zone properties task in the ZoneDelegationWizard.
Deleting a zone
To delete a zone from Active Directory, your user account must be set with thefollowing permissions:
Select this target object To apply these permissions
Container for an individualzone
For example, a ZoneNamecontainer object, such as:
domain/UNIX/Zones/arcade
On the Object tab, select Allow to apply the following propertiesto this object only:
n Delete
n Delete Subtree
Click the Properties tab and select Allow to apply the followingproperties to this object only:
n Read Name
n Read name
n Read displayName
Note You can grant this permission to specific users or groups byselecting the Delete zone task in the Zone DelegationWizard.
Managing roles and rights in a zone
To manage rights and roles in a zone, including creating and deleting roledefinitions and updating time constraints, your user account must be set withthe following permissions:
• • • • • •
Planning and Deployment Guide 304

Select this target object To apply these permissions
Container for the authorization store
For example:
domain/UNIX/Zones/arcade/Authorization
On the Object tab, select Allow to apply thefollowing properties to this object and allchild objects:
n List contents
n Read all properties
Click the Properties tab and select Allow toapply the following properties to the msDS-AzAdminManager object:
n Write msDS-AzApplicationData
AzTaskObjectContainer
On the Object tab, select Allow to apply thefollowing properties to this object and allchild objects:
n List contents
n Read all properties
n Create msDS-AzTask objects
n Delete msDS-AzTask objects
Click the Properties tab and select Allow toapply the following properties to msDS-AzTask objects:
n Write msDS-AzApplicationData
n Write cn
n Write name
n Write description
n Write msDs-OperationsForAzTask
AzOpObjectContainer
On the Object tab, select Allow to apply thefollowing properties to this object and allchild objects:
n List contents
n Read all properties
n Create msDS-AzOperation objects
n Delete msDS-AzOperation objects
Click the Properties tab and select Allow toapply the following properties to msDS-AzOperation objects:
n Write msDS-AzApplicationData
n Write cn
• • • • • •
Permissions required for administrative tasks 305

Select this target object To apply these permissionsn Write name
n Write description
Managing role assignments in a zone
To manage role assignments in a zone, your user account must be set with thefollowing permissions:
Select this target object To apply these permissions
Container for the authorization store
For example:
domain/UNIX/Zones/arcade/Authorization
On the Object tab, select Allow to apply thefollowing properties to this object only:
n List contents
n Read all properties
n Create all child objects
n Delete all child objects
Click the Properties tab and select Allow toapply the following properties to this objectonly:
n Write msDS-AzApplicationData
Click the Properties tab and select Allow toapply the following properties to msDS-AzRole objects:
n Write displayName
n Write msDS-AzApplicationData
n Write msDS-TasksForAzRole
n Write msDS-MembersForAzRole
Computers container in the zone
On the Object tab, select Allow to apply thefollowing properties to this object only:
n Create Container Right
This permission is required to allow adelegated user to make the first roleassignment after a computer is joined toActive Directory.
AzRoleObjectContainerOn the Object tab, select Allow to apply thefollowing properties to the msDS-AzApplication object and all child objects:
• • • • • •
Planning and Deployment Guide 306

Select this target object To apply these permissionsn List contents
n Read all properties
n Create msDS-AzRole objects
n Delete msDS-AzRole objects
Click the Properties tab and select Allow toapply the following properties to msDS-AzRole objects:
n Write displayName
n Write msDS-AzApplicationData
n Write msDS-TasksForAzRole
n Write msDS-MembersForAzRole
Click the Properties tab and select Allow toapply the following properties to msDS-AzAdminManager objects:
n Write msDS-AzApplicationData
AzOpObjectContainer
On the Object tab, select Allow to apply thefollowing properties to this object only:
n Read all properties
n Create msDS-AzOperation objects
n Delete msDS-AzOperation objects
n Create msDS-AzRole objects
n Delete msDS-AzRole objects
Click the Properties tab and select Allow toapply the following properties to msDS-AzRole objects:
n Write displayName
n Write msDS-AzApplicationData
n Write msDS-TasksForAzRole
n Write msDS-MembersForAzRole
Click the Properties tab and select Allow toapply the following properties to msDS-AzOperation objects:
n Read name
n Read Name
n Write msDS-AzApplicationData
• • • • • •
Permissions required for administrative tasks 307

Select this target object To apply these permissionsn Write name
n Write description
Changing computer role properties in a zone
To manage computer role properties in a zone, your user account must be setwith the following permissions:
Select this target object To apply these permissions
Container for the authorization store
For example:
domain/UNIX/Zones/arcade/Authorization/guid
The guid object is a globally unique identifier(GUID) for the Authorization object. For example:
CN=cab186af-61a0-4d54-a0dd...
On the Object tab, select Allow to applythe following properties to this object only:
n Read all properties
Click the Properties tab and select Allowto apply the following properties to msDS-AzScope objects:
n Read name
n Read Name
n Write msDS-AzApplicationData
n Write msDS-AzScopeName
n Write description
Setting permissions to join or leave the domain
To join a UNIX computer to an Active Directory domain without predefining acomputer account, your Active Directory user account must be set with thefollowing permissions:
Select this targetobject
To apply these permissions
Parent container objectfor computer accounts
For example:
domain/UNIX/Servers
On the Object tab, select Allow to apply the following permission tothis object only:
n Create serviceConnectionPoint Objects
Note You can grant this permission to specific users or groups byselecting the Join computers task in the Zone DelegationWizard.
• • • • • •
Planning and Deployment Guide 308

To join a UNIX computer to an Active Directory domain and place the computeraccount in a specific organizational unit (OU), the Active Directory account usedto join the domain must be set with the following permissions:
Select this target object To apply these permissions
Parent container object for thecomputer accounts
On the Object tab, select Allow to apply the followingpermission to this object only:
n Create serviceConnectionPoint Objects
n Create Computer Objects
To join a UNIX computer to an Active Directory domain when you are using apredefined computer account, your Active Directory user account must be setwith the following permissions:
Select this target object To apply these permissions
Parent container object for the computer account
On the Object tab, select Allow to applythe following permission to this objectonly:
n Create serviceConnectionPointObjects
Computer account object in Active Directory
For example, if the computer account is AJAX inthe default Active Directory Computerscontainer:
domain/Computers/AJAX
On the Object tab, select Allow to applythe following permission to this objectonly:
n Full Control
This permission is required for enabling ordisabling a computer account.
To remove a UNIX computer from an Active Directory domain, your ActiveDirectory user account must be set with the following permissions:
Select this target object To apply these permissions
Parent container object for thecomputer account
On the Object tab, select Allow to apply the followingpermission to this object only:
n Delete serviceConnectionPoint Objects
If you are deleting a computer account, you also need theDelete Computer Objects permission.
Note: This setting only gives the user or group permission to leave anActive Directory domain. If you want to grant permission for a useror group to delete a computer account, you also need the DeleteComputer Objects permission.
• • • • • •
Permissions required for administrative tasks 309

Setting permissions for zone computers
Although joining or leaving a domain is the primary task for working withcomputer accounts in Active Directory, there are also specific permissionsrequired to list computers or modify computer properties. The objects andpermissions can also vary depending on the type of zone the computer accountis associated with and the task to be performed. In most cases, you can grantthe required permissions to specific users or groups by selecting the appropriatetask in the Zone DelegationWizard.
In most cases, you can grant the required permissions to specific users or groupsby selecting the appropriate task in the Zone DelegationWizard instead ofassigning the permissions manually.
Joining a computer to a zone
To join a computer to a zone, your user account must have the followingpermission:
Select this target object To apply these permissions
Parent container object for thecomputer account in the zone
For example, in a classic zone, theZoneName/Computers containerobject:
domain/UNIX/Zones/acme/Computers
Click the Object tab and select Allow to apply thefollowing permission to this object only:
n Create serviceConnectionPoint Objects
Computer account object in ActiveDirectory
For example, if the computer accountname is AJAX:
domain/UNIX/Servers/AJAX
Click the Object tab and select Allow for the FullControl permission for the user with permission tojoin the domain.
The adjoin command grants the computer’s SELFaccount the following permissions:
n Write operatingSystem
n Write operatingSystemVersion
n Write operatingSystemHotfix
n Write operatingSystemServicePack
n Write servicePrincipalName
n Write userAccountControl
n Write dnsHostName
• • • • • •
Planning and Deployment Guide 310

Listing computer accounts
To list computers, your user account must have the following permission:
Select this target object To apply these permissions
Parent container object for thecomputer account in Active Directory
For example:
domain/UNIX/Servers
On the Object tab, select Allow to apply thefollowing permission to this object for each of thecomputers to be included in the list:
n List contents
Parent container object for thecomputer account in the zone
For example, in a classic zone, theZoneName/Computers containerobject:
domain/UNIX/Zones/acme/Computers
Click the Properties tab and select Allow to apply thefollowing properties to this object only:
n Read objectClass
The serviceConnectionPoint object forthe computer account
For example, if the computer accountname is AJAX, select:
domain/UNIX/Servers/AJAX
then select:
serviceConnectionPointobjects
Click the Properties tab and select Allow to apply thefollowing properties to this object for each of thecomputers to be included in the list:
n Read displayName
n Read keywords
n Read managedBy
n Read Name
n Read objectClass
Computer account object in ActiveDirectory
For example, if the computer accountname is AJAX:
domain/UNIX/Servers/AJAX
Click the Properties tab and select Allow to apply thefollowing properties to this object for each of thecomputers to be included in the list:
n Read objectClass
n Read Operating System
n Read Operating System Version
n Read userAccountControl
Modifying computer properties
To modify any computer account properties for a UNIX computer, your useraccount must have the following permission:
• • • • • •
Permissions required for administrative tasks 311

Select this target object To apply these permissions
Parent container object for the computeraccount in Active Directory
For example:
domain/UNIX/Servers
On the Object tab, select Allow to apply thefollowing permission to this object only:
n List contents
The serviceConnectionPoint object for thecomputer account
For example, if the computer account name isAJAX, select:
domain/UNIX/Servers/AJAX
then select:
serviceConnectionPoint objects
Click the Properties tab and select Allow toapply the following properties to this objectonly:
n Read allowedAttributes
n Read allowedAttributesEffective
n Read displayName
n Read keywords
n Read managedBy
n Read Name
n Read objectClass
n Write keywords
Computer account object in Active Directory
For example, if the computer account is AJAX inthe default Active Directory Computerscontainer:
domain/UNIX/Servers/AJAX
Click the Properties tab and select Allow toapply the following properties to this objectonly:
n Read objectGUID
n Read objectSid
n Read objectClass
n Read Operating System
n Read Operating System Version
n Read userAccountControl
Responding to NIS requests
If you are supporting “agentless” authentication or want to allow a computer toservice NIS client requests in a zone, the computer must be a member of thezone_nis_servers group in the zone. Setting or unsetting the Allow thiscomputer to respond to NIS client requests property requires the followingpermissions:
• • • • • •
Planning and Deployment Guide 312

Select this target object To apply these permissions
The zone_nis_servers group object
For example, select:
domain/UNIX/Zones/acme/Computers/zone_nis_servers
Click the Properties tab and select Allow toapply the following properties to this objectonly:
n List contents
n Read all properties
n Write member property
If the zone_nis_servers group does notalready exist in the current zone, setting theAllow this computer to respond to NISclient requests property also requires thefollowing permission on theZoneName/Computers object:
n Create group objects
Changing the computer zone
If you need to change the zone for a computer account, your user account musthave the following additional permissions:
Select this target object To apply these permissions
All parent container objects for the original and new zones
Click the Properties tab andselect Allow to apply thefollowing properties to thisobject only:
n Read name
n Read Name
The serviceConnectionPoint object for the computer account
Click the Properties tab andselect Allow to apply thefollowing properties to thisobject only:
n Write name
n Write Name
Note The Name property is thecommon name (cn) of theserviceConnectionPoint object.
Original parent container for the computer account in thecurrent zone
For example, if you are moving a computer from the
On the Object tab, select Allowto apply the followingpermission to this object only:
• • • • • •
Permissions required for administrative tasks 313

Select this target object To apply these permissions
Finance zone to the Corporate zone, the target objectwould be:
domain/UNIX/Zones/Finance/Computers
n DeleteserviceConnectionPointObjects
Click the Properties tab andselect Allow to apply thefollowing properties to thisobject only:
n Read objectGUID
New parent container for the computer account in the newzone
For example, if you are moving a computer from theFinance zone to the Corporate zone, and you use thedefault Computers container, the target object would be:
domain/UNIX/Zones/Corporate/Computers
On the Object tab, select Allowto apply the followingpermission to this object only:
n CreateserviceConnectionPointObjects
Click the Properties tab andselect Allow to apply thefollowing properties to thisobject only:
n Read objectGUID
Note: You can set the permissions for modifying computer accounts byclicking the Security tab when you are viewing a computer’sproperties.
Preparing a computer object
To prepare a computer account in a zone before joining, the followingpermissions apply to the user or group you want to designate as the trustee forjoining the domain.
Select this target object To apply these permissions
The serviceConnectionPoint objectfor the computer account
Click the Object tab and select Allow to apply thefollowing permission to this object only:
n Read all properties
n Write keywords property
n Write displayName property
Computer account object in ActiveDirectory
For example, if the computer account
Click the Object tab and select Allow to apply thefollowing permission to this object only:
n Read Permission
• • • • • •
Planning and Deployment Guide 314

Select this target object To apply these permissions
name is AJAX:
domain/Computers/AJAX
n Reset Password
n Write userAccountControl
n Validated write to DNS host name
n Validated write to service principal name
n Write to service principal name
n Write msDS-SupportedEncryptionTypes
n Write Account Restrictions
n Write Description
n Write displayName
n Write computer name (Pre-Windows 2000)
n Delete
n Delete Subtree
n All Extended Rights
The adjoin command resets the computer account and grants the computer’sSELF account the following permissions:
n Write operatingSystem
n Write operatingSystemVersion
n Write operatingSystemHotfix
n Write operatingSystemServicePack
n Write altSecurityIdentities
Creating the computer object manually
If you use Active Directory Users and Computers to prepare the computer objectinstead of the Prepare Computer wizard, the following permissions must begranted on the computer for the trustee:
• • • • • •
Permissions required for administrative tasks 315

Select this target object To apply these permissions
The serviceConnectionPoint objectfor the computer account
Click the Object tab and select Allow to apply thefollowing permission to this object only:
n Read all properties
n Write keywords property
n Write displayName property
Computer account object in ActiveDirectory
For example, if the computer accountname is AJAX:
domain/Computers/AJAX
Click the Object tab and select Allow to apply thefollowing permission to this object only:
n Read Permission
n Reset Password
n Write userAccountControl
n Validated write to DNS Host Name
n Validated write to service principal name
n Write Account Restrictions
n Write Description
n Write displayName
n Write computer name (Pre-Windows 2000)
n Write operatingSystem
n Write operatingSystemVersion
n Write operatingSystemHotfix
n Write operatingSystemServicePack
n Write altSecurityIdentities
n Write msDS-SupportedEncryptionTypes
n Delete
n Delete Subtree
n All Extended Rights
Modifying computer roles
If you use computer role assignments to control access to a computer, thefollowing permissions are required to modify computer roles:
• • • • • •
Planning and Deployment Guide 316

Select this target object To apply these permissions
msDS-AzScope
This object is listed under a globally uniqueidentifier (GUID) for the Authorization object. Forexample:
CN=cab186af-61a0-4d54-a0dd...
Click the Properties tab and select Allow toapply the following properties to this objectonly:
n Read description
n Read msDS-AzScopeName
n Read msDS-AzApplicationData
n Write description
n Write msDS-AzScopeName
n Write msDS-AzApplicationData
Deleting computer roles
If you use computer role assignments to control access to a computer, thefollowing permissions are required to delete computer roles:
Select this target object To apply these permissions
msDS-AzScope
This object is listed under a globally uniqueidentifier (GUID) for the Authorization object.
Click the Properties tab and select Allow toapply the following properties to this objectonly:
n Read Name
n Read name
n Read displayName
n Allow Delete
n Allow Delete Tree
Setting permissions for zone users
The specific objects and permissions required to work with user accountsdepend on the type of zone the user account is associated with and the task tobe performed.
In most cases, you can grant the required permissions to specific users or groupsby selecting the appropriate task in the Zone DelegationWizard instead ofassigning the permissions manually.
• • • • • •
Permissions required for administrative tasks 317

Adding users to standard zones
In a standard Centrify zone when the functional level of the forest is WindowsServer 2003 or later, adding a user account with an Active Directory securitygroup as the primary group to a zone requires the following permissions:
Select this target object To apply these permissions
Parent container object for the userprofile
For example, if you use classic zones,the default Users container in theFinance zone:
domain/UNIX/Zones/Finance/Users
On the Object tab, select Allow to apply the followingpermission to this object only:
n Create serviceConnectionPoint Objects
This permission is required for both standard zonesand RFC 2307-compliant zones.
For standard zones, you need to apply additionalpermissions. Click the Properties tab and selectserviceConnectionPoint objects from the object list,then select Allow to apply the following properties tothis object:
n Read Name
n Read name
n Read displayName
User account object in ActiveDirectory
For example:
domain/Users/user_name
Click the Properties tab and select Allow to apply thefollowing properties to this object only:
n Read objectCategory
n Read objectClass
n Read objectGUID
n Read objectSid
n Read userAccountControl
Parent container object for theindividual zone
For example, if you are adding a userto the Finance zone:
domain/UNIX/Zones/Finance
Click the Properties tab and select Allow to apply thefollowing properties to this object only:
n Read objectGUID
n Write Description
Modifying users in standard zones
In a standard zone, modifying user account properties for a user with a standardActive Directory security group as the primary group requires the followingpermissions:
• • • • • •
Planning and Deployment Guide 318

Select this target object To apply these permissions
The serviceConnectionPoint object for the useraccount
For example, if you are using classic zones andthe UNIX user name is chris:
domain/UNIX/Zones/Finance/Users/chris
then select
serviceConnectionPoint objects
Click the Properties tab and select Allow toapply the following properties to this objectonly:
n Read allowedAttributesEffective
n Read objectGUID
n Write keywords
If you are changing the UNIX user name forthe user, you need the following additionalpermissions applied to this object:
n Read name
n Write name
n Write Name property
Note The Name property is the commonname (cn) of the serviceConnectionPointobject.
Note: You can set the permissions for modifying user accounts byclicking Permissionswhen you are viewing the Centrify Profile fora user.
Modifying users in RFC 2307-compliant zones
In a standard RFC 2307-compliant zone, modifying user account properties for auser with an Active Directory security group as the primary group requires thefollowing permissions:
• • • • • •
Permissions required for administrative tasks 319

Select this target object To apply these permissions
The serviceConnectionPoint object for the useraccount
For example, if you are using classic zones andthe UNIX user name is chris:
domain/UNIX/Zones/Finance/Users/chris
then select
serviceConnectionPoint objects
Click the Properties tab and select Allow toapply the following properties to this objectonly:
n Read allowedAttributesEffective
n Write keywords
n Write uid
n Write uidNumber
n Write gidNumber
n Write loginShell
n Write unixHomeDirectory
If you don’t see some of these attributes listedfor serviceConnectionPoint objects, changethe object selected to posixAccount objects,then click Allow for the additional properties.
The GECOS field in a user’s UNIX profile isderived from the displayName attribute orthe Name property (cn).
Note: You can grant the required permissions to specific users or groupsfor any zone by selecting theModify users task in the ZoneDelegationWizard.
Listing users in standard zones
In a standard zone, listing user account information requires the followingpermissions:
Select this target object To apply these permissions
The serviceConnectionPointobject for the user account
Click the Properties tab and select Allow to apply the followingproperties to this object for each user included in the list:
n Read displayName
n Read managedBy
n Read objectClass
n Read Name to display the UNIX name
n Read keywords to display the other UNIX attributes
• • • • • •
Planning and Deployment Guide 320

Listing users in RFC 2307-compliant zones
In a standard RFC 2307-compliant zone, listing user account informationrequires the following permissions:
Select this target object To apply these permissions
The serviceConnectionPointobject for the user account
Click the Properties tab and select Allow to apply the followingproperties to this object for each user included in the list:
n Read displayName
n Read keywords
n Read managedBy
n Read objectClass
n Read uid to display the UNIX name
n Read uidNumber to display the UNIX UID
n Read gidNumber to display the GID of the user’s primarygroup
n Read logonShell to display the default shell for the user
n Read unixHomeDirectory to display the user’s homedirectory
n Read Public Information to display theuserPrincipalName for the user
Removing users from zones
Removing a user account from a standard zone or RFC 2307-compliant zonerequires the following permission:
Select this target object To apply these permissions
The serviceConnectionPoint objectfor the user account
On the Object tab, select Allow to apply the followingpermission to this object only:
n Delete
Setting permissions for zone groups
The specific objects and permissions required to work with group accounts canvary depending on the type of zone the group is associated with and the task to
• • • • • •
Permissions required for administrative tasks 321

be performed.
In most cases, you can grant the required permissions to specific users or groupsby selecting the appropriate task in the Zone DelegationWizard instead ofassigning the permissions manually.
Adding security groups to zones
Adding an Active Directory group to a zone requires the following permissions:
Select this target object To apply these permissions
Parent container object for thegroup
For example, if you are usingclassic zones, theZoneName/Groups container:
domain/UNIX/Zones/acme/Groups
On the Object tab, select Allow to apply the followingpermission to this object only:
n Create serviceConnectionPoint objects
Click the Properties tab and select Allow to apply thefollowing properties to this object only:
n Read objectClass
Note You can grant the required permissions to specificusers or groups by selecting the Add or remove groupstask in the Zone DelegationWizard.
Group account object in ActiveDirectory
For example:
domain/UNIX/UNIXgroups/group_name
Click the Properties tab and select Allow to apply thefollowing properties to this object only:
n Read groupType
n Read objectCategory
n Read objectClass
n Read objectGUID
n Read objectSid
Parent container object for theindividual zone
For example, if you are adding agroup to the Finance zone:
domain/UNIX/Zones/Finance
Click the Properties tab and select Allow to apply thefollowing properties to this object only:
n Read objectGUID
n Write Description
Modifying groups in standard zones
In a standard zone, modifying a group profile in a zone requires the followingpermissions:
• • • • • •
Planning and Deployment Guide 322
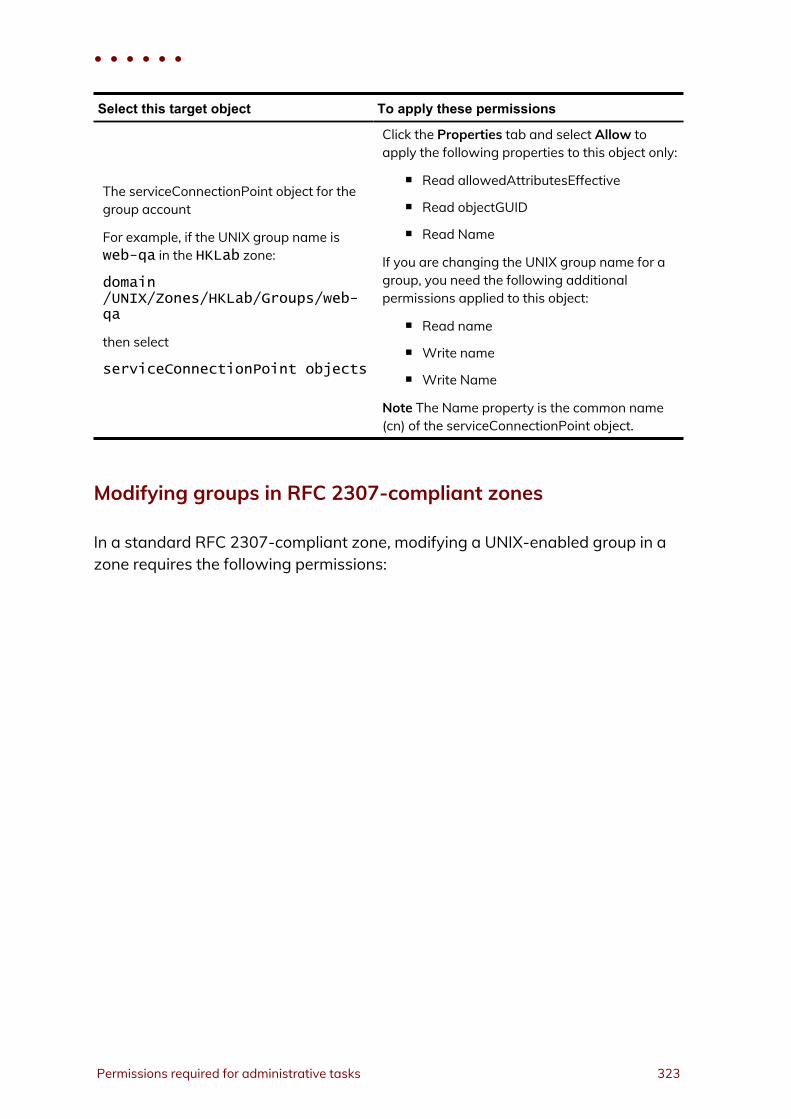
Select this target object To apply these permissions
The serviceConnectionPoint object for thegroup account
For example, if the UNIX group name isweb-qa in the HKLab zone:
domain/UNIX/Zones/HKLab/Groups/web-qa
then select
serviceConnectionPoint objects
Click the Properties tab and select Allow toapply the following properties to this object only:
n Read allowedAttributesEffective
n Read objectGUID
n Read Name
If you are changing the UNIX group name for agroup, you need the following additionalpermissions applied to this object:
n Read name
n Write name
n Write Name
Note The Name property is the common name(cn) of the serviceConnectionPoint object.
Modifying groups in RFC 2307-compliant zones
In a standard RFC 2307-compliant zone, modifying a UNIX-enabled group in azone requires the following permissions:
• • • • • •
Permissions required for administrative tasks 323

Select this target object To apply these permissions
The serviceConnectionPointobject for the groupaccount
Click the Properties tab and select Allow to apply the followingproperties to this object only:
n Read allowedAttributesEffective
n Read objectGUID
n Read Name
If you are changing the UNIX group identifier for a group, youneed the following additional permissions applied to this object:
n Read gidNumber
n Write gidNumber
Note If you don’t see this attribute listed for theserviceConnectionPoint object, change the object selected toposixGroup objects.
If you are changing the UNIX name for a group, you need thefollowing additional permissions applied to this object:
n Read name
n Write name
n Write Name
Note The Name property is the common name (cn) of theserviceConnectionPoint object.
Listing groups in zones
In a standard zone, listing group account information requires the followingpermissions:
Select this target object To apply these permissions
The serviceConnectionPointobject for the group account
Click the Properties tab and select Allow to apply the followingproperties to this object for each group included in the list:
n Read displayName
n Read managedBy
n Read objectClass
n Read Name to display the UNIX group name
n Read keywords to display the UNIX GID
• • • • • •
Planning and Deployment Guide 324

Listing groups in RFC 2307-compliant zones
In a standard RFC 2307-compliant zone, listing group account informationrequires the following permissions:
Select this target object To apply these permissions
The serviceConnectionPointobject for the user account
Click the Properties tab and select Allow to apply the followingproperties to this object for each user included in the list:
n Read displayName
n Read keywords
n Read managedBy
n Read objectClass
n Read objectGUID
n Read Name to display the group name
n Read gidNumber to display the group GID
Removing groups from zones
Removing an Active Directory group from a standard zone or RFC 2307-compliant zone requires the following permission:
Select this target object To apply these permissions
The serviceConnectionPoint objectfor the group account
On the Object tab, select Allow to apply the followingpermission to this object only:
n Delete
Setting permissions for license keys
Starting Access Manager requires the following permissions on the containerobject for licenses:
• • • • • •
Permissions required for administrative tasks 325

Select this target object To apply these permissions
The domain root object
For example, if the root domain of the forest isarcade.com:
DC=arcade,DC=com
Click the Properties tab and select Allow toapply the following properties to this objectonly:
n Read objectClass
Parent container for the Licenses containerobject
For example:
domain/Centrify UNIX
On the Object tab, select Allow to apply thefollowing permission to this object only:
n List contents
Parent container for license keys
For example, the Licenses container objectyou created or selected in the SetupWizard:
domain/Centrify UNIX/Licenses
On the Object tab, select Allow to apply thefollowing permission to this object only:
n List contents
To add and remove license keys, your user account must have the followingpermissions:
For this target object You need these permissions
Parent container for license keys
For example, the Licenses containerobject you created or selected in theSetupWizard:
domain/Centrify UNIX/Licenses
Click the Properties tab and select Allow to applythe following properties to this object and all childobjects:
n Write Description
Setting permissions for NIS maps
You can delegate administrative permissions for all NIS maps in a zone or forany specific NIS map within a zone by selecting either the NIS Maps parentcontainer object or the specific NIS map object you want to work with. If youselect the NIS Maps parent container object, the permissions you set apply to allNIS maps you add to the zone. If you select the individual NIS map object, thepermissions you set only apply to that individual NIS map.
To set permissions on NIS maps or NIS map entries
1. Open the ADSI Edit MMC snap-in and connect to the Active Directorydomain.
• • • • • •
Planning and Deployment Guide 326

Note: For NIS maps, you must use the Zone DelegationWizard orADSI Edit to set Active Directory permissions.
2. In the console tree, navigate to the zone folder.
For example, if you deployed using the recommended organizationalstructure, expand the domain, Centrify, Zones, and select a specific zonename.
3. Select CN=NisMaps to set permissions for all NIS maps in a zone, right-click, then select Properties.
If setting permissions for an individual map, expand CN=NisMaps, thenselect the map object—such as CN=auto_master—right-click and selectProperties.
4. Click the Security tab, then click Advanced.
5. Click Add to search for the user or group to which you want to giveadministrative privileges, select the user or group in the results, then clickOK.
6. Scroll to locate the appropriate permissions for the object and its propertiesto allow the selected user or group to perform the administrative task, clickAllow, then click OK.
In most cases, you can grant the required permissions to specific users or groupsby selecting the appropriate task in the Zone DelegationWizard instead ofassigning the permissions manually.
Adding NIS maps to a zone
To add NIS maps to the NIS Maps parent container in a zone, the user accountmust have the following permissions:
Select this target object To apply these permissions
Parent container for NIS Maps
For example, if you are usingclassic zones:
domain/UNIX/Zones/ZoneName/NISMaps
On the Object tab, select Allow to apply the followingpermissions to this object and all child objects:
n Create Container Objects
• • • • • •
Permissions required for administrative tasks 327

Deleting NIS maps from a zone
To delete NIS maps in a zone, the user account must have the followingpermissions:
Select this targetobject
To apply these permissions
Parent containerfor NIS Maps
On the Object tab, select Allow to apply the following permissions:
n Delete Container Objects applied to this object and all childobjects.
On the Object tab, set Apply onto to Container objects, then select Allowto apply the following permissions:
n Delete Subtree
Note This permission is required if the map contains any entries.
Adding map entries to NIS maps
To add entries to any NIS map in a zone, the user account must have thefollowing permissions:
Select this targetobject
To apply these permissions
Parent containerfor NIS Maps
On the Object tab, set Apply onto to Container objects, then select Allowto apply the following permissions:
n Create classStore Objects
Modifying map entries in NIS maps
To modify entries in any NIS map in a zone, the user account must have thefollowing permissions:
Select this targetobject
To apply these permissions
Parent container forNIS Maps
Click the Properties tab, set Apply onto to classStore objects, then selectAllow for the following properties:
n Write adminDescription
n Write Description
n Write wWWHomePage
• • • • • •
Planning and Deployment Guide 328

Changing the map type for NIS maps
To change the map type for any NIS map in a zone, the user account must havethe following permissions:
Select this targetobject
To apply these permissions
Parent containerfor NIS Maps
Click the Properties tab, set Apply onto to This object and all childobjects, then select Allow for the following properties:
n Write Description
Deleting map entries from NIS maps
To delete entries from any NIS map in a zone, the user account must have thefollowing permissions:
Select this targetobject
To apply these permissions
Parent container forNIS Maps
Click the Properties tab, set Apply onto to classStore objects, then selectAllow for the following properties:
n Write name
n Write Name
Adding entries to a specific NIS map
To add entries to a specific NIS map in a zone, the user account must have thefollowing permissions:
Select this targetobject
To apply these permissions
Individual NISmap
On the Object tab, select Allow to apply the following permissions to thisobject and all child objects:
n Create classStore Objects
• • • • • •
Permissions required for administrative tasks 329

Modifying entries in a specific NIS map
To modify the entries in a specific NIS map in a zone, the user account must havethe following permissions:
Select thistarget object
To apply these permissions
Individual NISmap
Click the Properties tab, set Apply onto to classStore objects, then selectAllow for the following properties:
n Write adminDescription
n Write Description
n Write wWWHomePage
Changing the map type for a specific NIS map
To change the map type for a specific NIS map in a zone, the user account musthave the following permissions:
Select thistarget object
To apply these permissions
Individual NISmap
Click the Properties tab, set the Apply onto to This object and all childobjects, then select Allow for the following properties:
n Write Description
Deleting map entries from a specific NIS map
To delete entries from a specific NIS map in a zone, the user account must havethe following permissions:
Select thistarget object
To apply these permissions
Individual NISmap
Click the Properties tab, set Apply onto to classStore objects, then selectAllow for the following properties:
n Write name
n Write Name
• • • • • •
Planning and Deployment Guide 330

Setting permissions for password synchronization
If you want to use the Network Information Service, adnisd, and the CentrifyPassword Filter to support “agentless” authentication of NIS client requests, thecomputer that will service the requests must be a member of the zone_nis_servers group in the zone and must be able to access the Active Directoryattribute that stores the password hash. The specific permissions requireddepend on the attribute being used to store the password hash.
Centrify password synchronization service
If you are using the Centrify Password Filter synchronization service, the zone_nis_servers group requires the following permissions:
If this attribute is used These permissions are required
altSecurityIndentitiesn ReadaltSecurityIndentities
msSFU30Password n Read msSFU30Password
unixUserPasswordn Read unixUserPassword
n All Extended Rights
Microsoft password synchronization service
If you are using the Microsoft password synchronization service and the CentrifyNetwork Information Service, adnisd, to authenticate NIS client requests, youmust set the following permissions at the domain level, on the Users containerobject, or on another container that applies to all users.
Select this targetobject
To apply these permissions
Users container or acontainer that appliesto all users
Click the Object tab, set the Apply onto to User objects and selectAllow to apply the following permission:
n All Extended Rights
You can apply this permission to Domain Computers or to a specificgroup of computers that contains the computer where the adnisdservice is running.
• • • • • •
Permissions required for administrative tasks 331

For information about installing and configuring a Microsoft passwordsynchronization service, see the Microsoft documentation for that service or referto documentation on the Microsoft Web site.
Setting permissions for rights and roles
If you define specific rights and establish role-based access controls on a zone-by-zone or computer-by-computer basis, you might want to manually assignpermissions for users who can configure rights and roles.
In most cases, you can grant the required permissions to specific users or groupsby selecting the appropriate task in the Zone DelegationWizard instead ofassigning the permissions manually.
Creating the authorization store
All of the information about rights, roles, and role assignments is held in anauthorization store for each zone in Active Directory. The name of authorizationstore object is CN=Authorization under the zone object’s DN. For example, theauthorization store for the zone named EMEA_Territories in the Arcade.Netforest is:
cn=Authorization, cn=EMEA_Territories, cn=Zones, cn=UNIX,dc=Arcade, dc=Net
To create the authorization store for a zone, users must have the followingpermissions:
Select this target object To apply these permissions
Parent container for anindividual zone
For example, a ZoneNamecontainer object, such as:
domain/Centrify/Zones/arcade
On the Object tab, select Allow to apply the followingpermissions to this object and all child objects:
n List contents
n Read all properties
n Read Permissions
Select Allow to apply the following permissions to this objectonly:
n Create msDS-AzAdminManager objects
• • • • • •
Planning and Deployment Guide 332

Defining rights and roles in the authorization store
To configure rights, roles, and role assignments, users must have the followingpermissions for the authorization store:
Select this target object To apply these permissions
Authorization
On the Object tab, select Allow to apply the followingpermissions to this object and all child objects:
n List contents
n Read all properties
n Write all properties
msDS-AzApplication
This object is listed under aglobally unique identifier(GUID) for theAuthorization object. Forexample:
CN=cab186af-61a0-4d54-a0dd...
On the Object tab, select Allow to apply the followingpermissions to this object (listed as CN=GUID under theAuthorization object) and all child objects:
n Create and delete msDS-AzOperation objects
n Create and delete msDS-AzTask objects
n Create and delete msDS-AzRole objects
n Create msDS-AzScope objects
Note You must grant these permissions on the CN=GUID object ifyou are granting permissions manually with ADSI Edit. Theproper permissions are set automatically for the users when youdelegate administrative tasks for a zone.
Configuring authorization in classic zones
Unlike hierarchical zones, authorization is an optional feature in classic zones.You must be an administrator or the user who created a classic zone to initializethe authorization store in Active Directory, identify the users who should beallowed to configure rights, roles, and role assignments, and enable or disablethe enforcement of the rights and role assignments you have configured.
To update the list of users and groups who are allowed to configureDirectAuthorize rights and roles, you must have the Modify permissions right onthe Authorization container under the classic zone container applied to thisobject and all child objects. If you have this permission, you can click Add to addWindows users and groups to the list of users and groups who can configurerights and roles. If you have the Modify permissions right, you can also select auser or group in the list and click Remove a user or group from the list.
• • • • • •
Permissions required for administrative tasks 333

Adding roles
To add roles for users or groups, users must have the following permissions:
Select this target object To apply these permissions
Authorization
Click the Properties tab, then select Allowfor the following properties:
n Write msDS-AzApplicationData
msDS-AzTaskObjectContainer
This object is listed under a globally uniqueidentifier (GUID) for the Authorization object.
On the Object tab, select Allow to apply thefollowing permissions to this object:
n Create msDS-AzTask objects
Click the Properties tab, then select Allowfor the following properties:
n Read objectClass
Modifying roles
To modify roles for users or groups, users must have the following permissions:
Select this target object To apply these permissions
Authorization
Click the Properties tab, thenselect Allow for the followingproperties:
n Write msDS-AzApplicationData
msDS-AzTaskObjectContainer/CN=roleName
This object is listed under a globally unique identifier(GUID) for the Authorization object and a specific rolename.
Click the Properties tab, thenselect Allow for the followingproperties:
n Read Name
n Read name
n Read description
n Read msDS-AzApplicationData
n Write Name
n Write name
n Write description
n Write msDS-AzApplicationData
• • • • • •
Planning and Deployment Guide 334

Deleting roles
To delete roles for users or groups, users must have the following permissions:
Select this target object To apply these permissions
Authorization
Click the Properties tab, thenselect Allow for the followingproperties:
n Write msDS-AzApplicationData
msDS-AzTaskObjectContainer/CN=roleName
This object is listed under a globally unique identifier(GUID) for the Authorization object and a specific rolename.
Click the Properties tab, thenselect Allow for the followingproperties:
n Read Name
n Read name
n Allow Delete
Adding rights
To add the definition for a right in a zone, users must have the followingpermissions:
Select this target object To apply these permissions
Authorization
Click the Properties tab, then select Allowfor the following properties:
n Write msDS-AzApplicationData
msDS-OpObjectContainer
This object is listed under a globally uniqueidentifier (GUID) for the Authorization object.
On the Object tab, select Allow to apply thefollowing permissions to this object:
n Create msDS-AzOperation objects
Click the Properties tab, then select Allowfor the following properties:
n Read objectClass
Modifying rights
To modify right definitions in a zone, users must have the following permissions:
• • • • • •
Permissions required for administrative tasks 335

Select this target object To apply these permissions
Authorization
Click the Properties tab, thenselect Allow for the followingproperties:
n Write msDS-AzApplicationData
msDS-AzTaskObjectContainer/CN=roleName
This object is listed under a globally unique identifier(GUID) for the Authorization object and a specific rolename.
Click the Properties tab, thenselect Allow for the followingproperties:
n Read Name
n Read name
n Read description
n Read msDS-AzApplicationData
n Write Name
n Write name
n Write description
n Write msDS-AzApplicationData
Deleting rights
To delete right definitions in a zone, users must have the following permissions:
Select this target object To apply thesepermissions
Authorization
Click the Properties tab,then select Allow for thefollowing properties:
n Write msDS-AzApplicationData
msDS-AzOpObjectContainer/CN=pam-rightName
or
msDS-AzOpObjectContainer/CN=pc-rightName
This object is listed under a globally unique identifier (GUID) forthe Authorization object and a specific PAM access right nameor privileged command name.
Click the Properties tab,then select Allow for thefollowing properties:
n Read Name
n Read name
n Allow Delete
• • • • • •
Planning and Deployment Guide 336

Adding or removing rights from roles
To add or remove rights from a role in a zone, users must have the followingpermissions:
Select this target object To apply these permissions
Authorization
Click the Properties tab, thenselect Allow for the followingproperties:
n Write msDS-AzApplicationData
msDS-AzTaskObjectContainer/CN=roleName
This object is listed under a globally unique identifier(GUID) for the Authorization object and a specific rolename.
Click the Properties tab, thenselect Allow for the followingproperties:
n Read Name
n Read name
n Read msDS-OperationsForAzTask
n Write msDS-OperationsForAzTask
Adding role assignments
To add a role assignment, users must have the following permissions:
Select this target object To apply these permissions
Authorization
Click the Properties tab, then select Allowfor the following properties:
n Write msDS-AzApplicationData
msDS-AzRoleObjectContainer
This object is listed under a globally uniqueidentifier (GUID) for the Authorization object.
On the Object tab, select Allow to apply thefollowing permissions to this object:
n Create msDS-AzRole objects
Modifying role assignments
To modify role assignments, users must have the following permissions:
• • • • • •
Permissions required for administrative tasks 337

Select this target object To apply these permissions
Authorization
Click the Properties tab, then select Allow forthe following properties:
n Write msDS-AzApplicationData
msDS-AzRoleObjectContainer
This object is listed under a globally uniqueidentifier (GUID) for the Authorization object.
On the Object tab, select Allow to apply thefollowing permissions to this object:
n Create msDS-AzRole objects
msDS-AzRoleObjectContainer/CN=CRA_guid
This object is listed under a globally uniqueidentifier (GUID) for the Authorization objectand a unique identifier for the role assignment.
Click the Properties tab, then select Allow forthe following properties to allow changes tothe assigned user or groups:
n Read Name
n Read name
n Allow Delete
Click the Properties tab, then select Allow forthe following properties to allow changes tothe available time for a role assignment:
n Read Name
n Read name
n Read msDS-AzApplicationData
n Write msDS-AzApplicationData
Deleting role assignments
To modify role assignments, users must have the following permissions:
Select this target object To apply these permissions
Authorization
Click the Properties tab, thenselect Allow for the followingproperties:
n Write msDS-AzApplicationData
msDS-AzRoleObjectContainer/CN=CRA_guid
This object is listed under a globally unique identifier (GUID)for the Authorization object and a unique identifier for therole assignment.
Click the Properties tab, thenselect Allow for the followingproperties:
n Read Name
n Read name
n Allow Delete
• • • • • •
Planning and Deployment Guide 338

Setting permissions for zone provisioning
The Zone Provisioning Agent requires permission to create UNIX profiles, that is,the service connection points in each zone where it needs to performprovisioning operations. The service account that runs the Zone ProvisioningAgent requires the Log on as a service right set as a local computer securitypolicy, or in the default domain policy.
• • • • • •
Permissions required for administrative tasks 339

Supplemental installationnotes
This document includes various notes about installing Server Suite on differentoperating system platforms.
This section includes the following topics:
Verifying the DNS configuration on Linux 340
Joining the domain (Zoned mode only) 341
Joining the domain (Express mode) 341
HPUX installation notes 342
AIX installation notes 343
Setting the DNS configuration parameter to join the domain on SuSELinux 345
Verifying the DNS configuration on Linux
Centrify Authentication Service uses DNS to locate domain controllers for theActive Directory forest. To verify the Active Directory domain controller can belocated through DNS, try sending a ping request to the computer.
You can also run the adinfo --diag command to attempt to read the DNS recordsfor the domain you want to join. For example:
adinfo --diag domain_name
If DNS is properly configured, the command should display the LDAP URLs forthe domain controllers in the domain you want to join.
For more detailed information about configuring DNS or troubleshooting yourDNS configuration, see the Administrator’s Guide for Linux and UNIX.
• • • • • •
Planning and Deployment Guide 340

Joining the domain (Zoned mode only)
To join an Active Directory domain manually:
1. On the Linux computer, log in as or switch to the root user.
2. Run adjoin to join an existing Active Directory domain using a fully-qualified domain name.
adjoin --zone <zone_name> --user <user_name><domain_name>
The user account you specify must have permission to add computers tothe specified domain and zone. If you don't specify a user name, theAdministrator account is used by default.
3. Type the password for the specified user account.
If the authentication service can connect to Active Directory and join thedomain, a confirmation message is displayed. You can now enable existingActive Directory groups and users to work with this Unix computer.
For more information about the options you can specify when joining a domain,see the man page for the adjoin command or the Administrator’s Guide forLinux and UNIX.
To step through common tasks and test scenarios, see the Evaluation Guide forLinux and UNIX.
Joining the domain (Express mode)
To join an Active Directory domain manually:
1. On the UNIX computer, log in as or switch to the root user.
2. Run adjoin to join an existing Active Directory domain using a fully-qualified domain name.
adjoin --workstation --user <user_name> <domain_name>
The user account you specify must have permission to add computers tothe specified domain. If you don't specify a user name, the Administratoraccount is used by default.
3. Type the password for the specified user account.
• • • • • •
Supplemental installation notes 341

If the authentication service can connect to Active Directory and join thedomain, a confirmation message is displayed.
For more information about the options you can specify when joining adomain, see the man page for the adjoin command or the Administrator’sGuide for Linux and UNIX.
HPUX installation notes
This section describes the unique characteristics or known limitations that arespecific to using authentication service on a computer with the HP-UX operatingenvironment.
ia64 - Mapping local HP-UX user accounts to Active Directoryaccounts
In most environments, you can map local user accounts to Active Directoryaccounts to manage the passwords for local users using your Active Directorypassword policies. On HP-UX, however, if an account is a valid Active Directoryaccount but the authentication through Active Directory fails, the PAMmodulewill attempt to authenticate the account locally and will allow the account to logon if the local authentication succeeds. Because users can still log on to HP-UXsystems using their local account password, you cannot effectively use ActiveDirectory or the User Map group policy to enforce your password policies forlocal HP-UX user accounts.
To enforce Active Directory password policies for local HP-UX users, you need todisable the local user accounts to prevent those local account names andpasswords from being used to log on.
Entering an incorrect password on HP-UX
On HP-UX, if Centrify-enabled users enter an incorrect password, they arenormally prompted with a second "System password" prompt. This prompt isasking for a password for a local user, regardless of whether that user actuallyexists locally on the system. If the user exists locally, this prompt allows the userto log in using the local password. If the user does not exist locally, this prompt isunnecessary and will not allow the authentication service-enabled user to log in,regardless of the password entered.
• • • • • •
Planning and Deployment Guide 342

This second prompt can be avoided by changing the options in /etc/pam.conf tothe authentication modules. Two changes are necessary:
1. Add an option to the authentication service PAMmodule to prompt allusers for a password (not just Active Directory users)
2. Add an option to the HP-UX UNIX login module to use the passwordobtained by the authentication service module.
The lines which need to be modified appear like this in the file:
service_name auth sufficient/usr/lib/security/libpam_centrifydc.1 debug
service_name auth required/usr/lib/security/libpam_unix.1
Where service_name is something like login, dtlogin, ftp, or similar. Thepam_centrifydc.1 line needs the ask flag to prompt all users for passwords.The libpam_unix.1 line needs the use_first_pass option. For example:
login auth sufficient /usr/lib/security/libpam_centrifydc.1debug ask
login auth required /usr/lib/security/libpam_unix.1use_first_pass
Note: It is extremely important that the pam_centrifydc line appearbefore the pam_unix line in the file, or users will never beprompted for a password. Administrators should be extremelycareful when editing this file. Any typographically errors in this filecould prevent all users from logging on to the system and renderthe system unusable.
AIX installation notes
Support for AIX Capabilities attribute
Support has been added for the AIX Capabilities user attribute, a feature that isonly available on AIX 5.3 and later. To enable the feature, edit/etc/centrifydc/centrifydc.conf to add the following line:
lam.method.version: 520
This allows using methods that are only available with AIX 5.3 and later, andthese methods are required to support the Capabilities attribute.
Use adquery to view capabilities for an Active Directory user:
• • • • • •
Supplemental installation notes 343

adquery user -X aix.capabilities <ADuser>
Use adupdate to set capabilities for an Active Directory user:
adupdate modify user -X +aix.capabilities=CAPABILITIES <ADuser>
Where CAPABILITIES is a comma-separated list of capabilities to add for theuser. For example:
CAP_NUMA_ATTACH, CAP_BYPASS_RAC_VMM, CAP_PROPOGATE
Currently there is no group policy support for capabilities, this may beimplemented in a future release of authentication service.
Users cannot log in via ftp if they have a restricted shell
On AIX 6.1, a user's login shell must appear in the shells attribute of the/etc/security/login.cfg file. Centrify Privilege Elevation Service does not add dzshto this attribute so by default an ftp user who is using dzsh as their login shellcannot log in. To workaround this issue, add /usr/bin/dzsh to the shells attributeof /etc/security/login.cfg.
Starting and stopping DirectControl on AIX
Because the authentication service daemon, adclient, is defined as an AIXsystem resource, you use the following commands to start, stop, and check thestatus of the daemon:
startsrc -s centrifydc
stopsrc -s centrifydc
lssrc -s centrifydc
Using the Centrify Authentication Service LDAP Proxy on AIX
When using the LDAP Proxy on AIX you need the following line in the slapdconfiguration file at
/usr/share/centrifydc/etc/openldap/ldapproxy.slapd.confmoduleload /usr/share/centrifydc/libexec/openldap/libback_centrifydc.a(libback_centrifydc.so.0)
Note: Note this should be entered as a single line into the configurationfile. This line may already be in the configuration file, but
• • • • • •
Planning and Deployment Guide 344

commented out, in which case you can just remove the leading "#"to uncomment it.
Setting the DNS configuration parameter to join thedomain on SuSE Linux
To successfully join a Active Directory domain on computers running SuSE Linux,you must set the mdns option to off in the /etc/host.conf file. If your/etc/host.conf file does not include the following line, you should add it to the file:
mdns off
This setting is required to enable proper DNS resolution, and therefore, must beset to successfully join the domain, and to allow users to log on properly.
• • • • • •
Supplemental installation notes 345

Mounting CIFS shares
Common Internet File Systems (CIFS) provides an open and cross-platformprotocol for requesting remote network server files and services. When a CIFSshare is mounted on a Centrify Linux system, file ownership is listed incorrectly.
To correct this, apply the CentrifyDC-cifsidmap plug-in. The CentrifyDC-cifsidmap plug-in enables mapping AD User/Group Security IDs (SIDs) toUser/Group IDs (UIDs/GIDs) configured in a zone and from UIDs/GIDs to ADUser/Group SIDs correctly. This, in turn, allows the CIFS Client integration withCentrify DirectControl.
Use cases
Mapping UIDs to SIDs is not always required when mounting CIFS shares. But itis needed when working with the files on the shares. For example, whenmodifying Access Control Links (ACLs). In version 5.8 and older, the cifs-utilspackage uses the winbind daemon for this mapping. Through winbind, the/usr/sbin/cifs.idmap binary was linked against libraries.
The /usr/sbin/cifs.idmap binary works in conjunction with the Sambawinbind facility to map owner and group SIDs to UIDs and GIDs respectively.
With version 5.9 the winbind facility does not perform this mapping. Use theCentrifyDC-cifsidmap plug-in to ensure that:
n cifs-idmap translates the ownership on the SMB share correctly.
n the kernel determines who has rights to the CIFS share mount directoriesand files correctly.
n AD User/Group SIDs are mapped correctly and all the IDs are consistentand correct.
For example:
• • • • • •
Planning and Deployment Guide 346

To see the incorrect file ownership: mount your CIFS share and display theownership of the files in the mounted share.
1. Mount the share. This command requires root privileges.
Syntax:
sudo mount -t cifs domain_ip/path /local/path/ -ousername=your_user_name, file_privilege,password=your_password, domain=domain_name, cifsacl
Example:
sudo mount -t cifs //192.168.0.100/cifsshare /tmp/mntshare1/ -o username=cifsdemouser1,rw,password=My1Pass,domain=example.com,cifsacl
The cifs type (-t cifs) requires the cifsacl option. See man mount.cifs
for command usage.
2. List all the files on the mounted file system.
If the CIFS share is owned by root, then you need to use sudo to view thefiles on the mounted directory, because the files you are verifying can onlybe seen with root privileges.
sudo ls -al /mntshare1
...
... root root ... cifsdemouser1.txt
... root root ... cifsdemouser2.txt
... root root ... cifsdemouser3.txt
If the AD user names are not listed, and only root is listed at the ownerof the files, then you need to install the CentrifyDC-cifsidmap plug-in.Complete the steps in the following sections.
CentrifyDC-cifsidmap plug-in requirements
The Centrify CIFS idmap plug-in is available only for supported systems. Thecifs.idmap-plugin requires:
Operating system versions:
n RedHat 7 or above
n Debian 8 or above
n SUSE 12 or above
cifs-utils version:
• • • • • •
Mounting CIFS shares 347

n cifs-util 5.9 or above
Prepare to install CentrifyDC-cifsidmap plug-in
Prior to installing the CentrifyDC-cifsidmap plug-in, install and configure thefollowing:
n Install the cifs-utils
The cifs-utils are a package of tools used on CIFS filesystems. See yourCIFS documentation.
n Install CentrifyDC
See the Planning and Deployment Guide.
n Join the machine to AD
See the Planning and Deployment Guide.
Install the CentrifyDC-cifsidmap package
1. Verify cifs-utils package is installed. Install it, if it is not alreadyinstalled. For example:
It is possible to manually configure your system without cifs-utils, butthe program /usr/sbin/cifs.idmap, is still required for the Centrify CIFSidmap plug-in to work.
n SUSE or RedHat
yum install cifs-utils
n Debian
apt-get install cifs-utils
2. Download the CentrifyDC-cifsidmap package and change to the downloaddirectory.
The package contains the cifs-idmap-plugin.
Example download package names
n SUSE or RedHat
CentrifyDC-cifsidmap-5.5.1-rhel5.x86_64.rpm
• • • • • •
Planning and Deployment Guide 348

n Debian
CentrifyDC-cifsidmap-5.5.1-deb8-x86_64.deb
Example download directory
# cd /home/user1/Download/
3. Run the appropriate package install command from the downloaddirectory.
n SUSE or RedHat
# sudo rpm -i CentrifyDC-cifsidmap-5.5.1-rhel5.x86_64.rpm
n Debian
# sudo dpkg -i CentrifyDC-cifsidmap-5.5.1-deb8-x86_64.deb
4. Verify the CentrifyDC-cifsidmap package is installed correctly. Check thelibcifsidmap.so location.
n SUSE or RedHat
# ls/usr/share/centrifydc/lib64/plugins/cifs/libcifsidmap.so-al
.../usr/share/centrifydc/lib64/plugins/cifs/libcifsidmap.so
n Debian
# ls/usr/share/centrifydc/lib/plugins/cifs/libcifsidmap.so -al
.../usr/share/centrifydc/lib/plugins/cifs/libcifsidmap.so
Configure cifs-utils for CentrifyDC-cifsidmap plug-in
On Linux, the command, alternatives, is a tool for managing different softwarepackages that provide the same functionality. The alternatives command, ondifferent systems has different names and locations. For additional informationon alternatives use, see your Linux documentation.
n RedHat
/usr/sbin/alternatives
• • • • • •
Mounting CIFS shares 349

n SUSE and Debian
/usr/sbin/update-alternatives
To configure the cifs-utils
1. Check the status of /etc/cifs-utils/idmap-plugin and note the prioritylevel.
For example on RedHat:
# pwd
/etc/cifs-utils
# ls -al
... idmap-plugin -- /etc/alternatives/cifs-idmap-plugin
# alternatives --display cifs-idmap-plugin
.../usr/lib64/cifs-utils/cifs_idmap_sss.so - priority 20...Current 'best' version is /usr/lib64/cifs-utils/cifs_idmap_sss.so.
In this example the cifs_idmap_sss.so plugin object has the highestpriority and that priority is set to 20.
2. Configure cifs-utils to use the CentrifyDC-cifsidmap plug-in, cifs-idmap-plugin.
Run the commands appropriate for your OS.
Include a priority that is higher than the priority listed in Step 1. Forexample, the priority in Step 1 is 20, set this cifs-idmap-plugin priority to21 or higher.
n RedHat
alternatives --install /etc/cifs-utils/idmap-plugin cifs-idmap-plugin/usr/share/centrifydc/lib64/plugins/cifs/libcifsidmap.so<priority>
alternatives --set cifs-idmap-plugin/usr/share/centrifydc/lib64/plugins/cifs/libcifsidmap.so
n SUSE or Debian
update-alternatives --install /etc/cifs-utils/idmap-plugin cifs-idmap-plugin/usr/share/centrifydc/lib64/plugins/cifs/libcifsidmap.so<priority>
• • • • • •
Planning and Deployment Guide 350

update-alternatives --set cifs-idmap-plugin/usr/share/centrifydc/lib64/plugins/cifs/libcifsidmap.so
3. Verify the CentrifyDC-cifsidmap plug-in is configured correctly. Run theappropriate alternatives display option.
n RedHat
alternatives --display cifs-idmap-plugin
n SUSE or Debian
update-alternatives --display cifs-idmap-plugin
4. Verify the cifs-idmap-plugin location and priority. Review thealternative command response.
The cifs-idmap-plugin priority needs to be higher than other listedidmaps. The Current 'best' version needs to point to the cifs-idmap-plugin location.
For example on RedHat:
# alternatives --display cifs-idmap-plugin
.../usr/share/centrifydc/lib64/plugins/cifs/libcifsidmap.so -priority 21Current 'best' version is/usr/share/centrifydc/lib64/plugins/cifs/libcifsidmap.so.
Mount the CIFS share and confirm file ownership
Only mount CIFS shares as root user or use sudo.
1. Verify the receiving mount directory. Create a directory to receive themount files, if you do not have one. For example:
cd /tmpmkdir mntshare1ls -al /mntshare1
2. Optionally, verify that the user(s), you are expecting to be owners of CIFSshared files, are valid AD users. For example:adquery user cifsdemouser1
cifsdemouser1:x:1019226236:1019226232:cifsdemouser1:home/cifsdemouser1:/bin/bash
• • • • • •
Mounting CIFS shares 351

3. If you previously mounted the CIFS share, and found that file ownershipwas incorrect, unmount it now. For example:
sudo unmount /tmp/mntshare1/
4. Mount the share. This command requires root privileges.
Syntax:
sudo mount -t cifs domain_ip/path /local/path/ -ousername=your_user_name, file_privilege,password=your_password, domain=domain_name, cifsacl
Example:
sudo mount -t cifs //192.168.0.100/cifsshare /tmp/mntshare1/ -o username=cifsdemouser1,rw,password=My1Pass,domain=example.com,cifsacl
The cifs type (-t cifs) requires the cifsacl option. See man mount.cifs
for command usage.
5. List all the files on the mounted file system.
If the CIFS share is owned by root, then you need to use sudo to view thefiles on the mounted directory, because the files you are verifying can onlybe seen with root privileges.
sudo ls -al /tmp/mntshare1
...
... cifsdemouser1 root ... cifsdemouser1.txt
... cifsdemouser2 root ... cifsdemouser2.txt
... cifsdemouser3 root ... cifsdemouser3.txt
Notice the AD users are listed as owners of the CIFS share files. Thiscompletes the task.
• • • • • •
Planning and Deployment Guide 352

Known Issues
Here are some known issues, organized by category.
Installation and uninstallation issues
n Upgrading from the beta build to this version may result in offline MFAmode if there are multiple authentication servers registered in your ADforest. To resolve this, uninstall the beta build first and then install this newversion. (Ref: CS-41915)
n The Centrify Common Component should be the last Server Suitecomponent uninstalled. If the component is uninstalled before othercomponent, it must be reinstalled by the uninstall process to complete itstask. (Ref: 36226a)
n If you intend to install the software on the desktop with elevated privilege,you should not check the “Run with UAC restrictions” option when creatingthe desktop. (Ref: 39725b)
n When you double-click on the Centrify Agent for Windows msi and selectthe “repair” option, the existing files are replaced irrespective of theirversion number, even when they are identical. As a result, a prompt torestart the system is displayed as files that were in use were replaced.However, if you use the Easy Installer to do the repair and a file on the diskhas the same version as the file that is part of the installer package, theinstalled file will not be replaced. Therefore, there will not be any prompt torestart the system. (Ref: 26561a)
n If you uninstall the Centrify Agent for Windows while the DirectAudit AgentControl Panel is open, files needed by the uninstall process may be blocked.You should close the DirectAudit Agent Control Panel for a successfulconclusion to the uninstall process. (Ref: 25753a)
n Centrify Agent for Windows and its installer are built on .NET. Therefore,.NET is always installed as a pre-requisite before the agent is installed. If.NET is removed from the system later, Centrify Agent for Windows will not
• • • • • •
Planning and Deployment Guide 353

run properly. User will also experience problem when trying to removeCentrify Agent for Windows from the system. To properly uninstall CentrifyAgent for Windows, please make sure Centrify Agent for Windows isuninstalled before .NET. (Ref: 39051a)
Configuration issues
n In a cross-forest environment, forest A user cannot enroll a device joined toforest B when forest A does not have a connector. (Ref: CS-44805)
n In Windows 2016 andWindows 10, during the login process, selectingSMS or using other mechanisms like Security Question/Phonecall/Password/Email/Mobile for MFA and clicking the “Commit” button willbe intermittently unresponsive. (Ref: CS-41699)
n In some large environment with multiple domain controllers, it may take upto one minute for the new zone setting in Centrify Agent Configuration totake effect. (Ref: 58128b)
n If one of the Global Catalog servers is unavailable, user may not be able toconfigure the zone for Centrify Agent for Windows. (Ref: 58621b)
n Microsoft normally automatically distributes and installs root certificates totheWindows system from trusted Certificate Authorities (CA) and usersare seamlessly able to use a secure connection by trusting a certificatechain issued from the trusted CA. However, this mechanism may fail if thesystem is in a disconnected environment where access toWindowsUpdate is blocked or this feature of automatic root certificate installation isdisabled. Without updates on the certificate trust list (CTL), the defaultCTLs on the system may not be adequate for secure connections of multi-factor authentication especially for older versions of Windows such asWindows 7 andWindows Server 2008 R2. To ensure the success of multi-factor authentication, user may need manually distribute and install thelatest CTLs and the required root certificate to systems in a disconnectedenvironment. See Centrify KB-6724 for further information. (Ref: CS-39703)
• • • • • •
Known Issues 354

Environment issues
n OnWindows 10 andWindows 2016 machines with Centrify PrivilegeElevation Service, the following will occur (Ref: CS-43883):
n Pop up an error dialog several seconds after clicking "Open filelocation" in the context menu of a shortcut on the start menu. Explorerwindows will display correctly.
n No responses to the following actions
n Clicking "Open file location" in the context menu of a shortcut ondesktop
n Clicking "Open file location" in the context menu of a shortcut onthe Centrify Start menu in the Privileged Desktop
n Slow response to "OK", "Cancel" in the shortcut property pageafter "Open file location" in the general tab is clicked. The dialogwill close after several seconds.
n On someWindows 10 computers, the smart card login option may not bedisplayed if another credential method has been recently used. To displaythe smart card login option, remove and insert a smart card into the reader.This will cause the login screen to reload and will display the smart cardlogin option. (Ref: CS-41282)
n An environment with no Global Catalog is not supported. (Ref: 46577a)
n Centrify Privilege Elevation Service requires machine time to besynchronized with domain controller. VMware virtual machine has a knownissue that its time may not be synchronized with domain controller. Thisproblem occurs more often on an overloaded virtual machine host. If thesystem clocks on the local Windows computer and the domain controllerare not synchronized, Centrify Privilege Elevation Service does not allowany domain users to login. You can try the following KB from VMware to fixthe time synchronization issue.http://kb.vmware.com/selfservice/microsites/search.do?language=en_US&cmd=displayKC&externalId=1189 (Ref: 47795b)
• • • • • •
Planning and Deployment Guide 355

RunAsRole issues
n If you use the “RunAsRole.exe /wait” command to run a Python script, theinput/output cannot be redirected for versions of Python below 3.0.0. (Ref:45061a)
n The Run As Role menu is not available on the start screen inWindows 8 orWindows 2012 or later because Microsoft doesn’t support any customcontext menu on the start screen. User has to go to theWindows desktopin order to launch an application using Run As Role context menu. (Ref:35487a)
n When running “RunAsRole.exe /wait sc.exe” with no argument provided tosc.exe, sc.exe will prompt
n Would you like to see help for the QUERY and QUERYEX commands?[ y | n ]:
n Typing ‘y’ or ‘n’ doesn’t do anything because the input cannot besuccessfully redirected to sc.exe. (Ref: 47016b)
n It is not recommended to change zone via Run As Role since the role that isin use may no longer be available once after leaving from the previous zoneduring the change zone process. (Ref: 58043a)
n OnWindows Server 2008 R2 andWindows 7, if the Agent machine has nointernet connection and the .NET CLR settings(checkCertificateRevocationList) is set to True, the MFA authentication willbe failed because the CLR is unable to verify the certificate throughinternet. The workaround is to enable the internet connection or turn off theCLR settings (set checkCertificateRevocationList to False which is also thedefault value). (Ref: CS-40147)
Desktop with Elevated Privileges issues
n On a desktop with elevated privileges, if you use “Control Panel >Programs > Programs and Features” to uninstall a program, you may seethe following warning message and cannot uninstall the software.
“The system administrator has set policies to prevent this installation.”
This issue happens when User Account Control (UAC) is enabled and when“Run with UAC restrictions” is selected when creating the new desktop.(Ref: 33384a)
• • • • • •
Known Issues 356

n You cannot use the Start menu option “Switch User” while you are using arole-based, privileged desktop. To use the “Switch User” shortcut, changefrom the privileged desktop to your default Windows desktop. From thedefault desktop, you can then select Start > Switch User to log on as adifferent user. (Ref: 39011b)
Roles and rights issues
n There is no 'Require multi-factor authentication' system right for thepredefined 'Windows Login' role. To define this system right for MFA, usethe pre-defined Require MFA for logon role, or create a new custom role.(Ref: CS-40888)
n Windows Network Access rights do not take effect on a Linux or UNIXmachines. If you select a role to start a program or create a desktop thatcontains a Network Access right, you can only use that role to accessWindows computers. TheWindows computers you access over thenetwork must be joined to a zone that honors the selected role. Theselected role cannot be used to access any Linux or UNIX server computerson the network. (Ref: 32980a)
n Network Access rights are not supported on theWindows 2008 R2Terminal Server if “RDC Client Single Sign-On for Remote DesktopServices” is enabled on the client side. (Ref: 34368b)
n To elevate privileges to the “Run as” account specified in aWindows right,the “run as” account must have local logon rights. If you have explicitlydisallowed this right, you may receive an error such as “the user has notbeen granted the requested logon type at this computer” when attemptingto use the right. (Ref: 34266a)
n If your computer network is spread out geographically, there may befailures in NETBIOS name translation. If a NETBIOS name is used, ActiveDirectory attempts to resolve the NETBIOS name based on the domaincontroller that the user belongs to, which in a multi-segment network mightfail. Therefore, Network Access rights might not work as expected if theremote server is located using NETBIOS name. You may need to consultyour network administrator to work around this issue. (Ref: 39087a)
n File hash matching criteria in the Application right is not supported for a filelarger than 500MB. This is to make sure DirectAuthorize does not spendtoo much CPU and memory resources to calculate the file hash. User trying
• • • • • •
Planning and Deployment Guide 357

to import a file with the size larger than 500MB will see an empty value forthe file hash field. (Ref: 56778a)
n For a small set of application, enabled matching criterion - “Product Name”,“Product version”, “Company”, “File Version” or “File Description” of aWindows Application Right may fail to match after upgrading agent underthe following conditions: - Any value for the enabled matching criteria isdefined by either import from a process or file - The matching criteria isdefined by 5.1.3 or 5.2.0 DirectManage Access Manager since the numberof affected application is expected to be relatively low, proactivelyupdating the defined matching criteria of Windows Application Right is notnecessary. (Ref: 60053a)
Compatibility with third party products issues
n VirtualDesktop is not compatible with Centrify Agent for Windows. Usersshould use the Centrify system tray applet to create virtual desktopinstead. (Ref: 44641b)
n The startup path for “SharePoint 2010 Management Shell” and “ExchangeManagement Shell” may set to C:\Windows instead of user home directoryif it is launched via RunAsRole.exe or from a desktop with elevatedprivilege. (Ref: 38814b, 46943b)
n Attempting to enable Kerberos authentication for Oracle databases willfail. This issue is being brought to the attention of Oracle Support for aresolution in upcoming releases. (Ref: 33835b)
n Some applications do not use the process token to check the groupmembership. They check the user’s group membership on its own.Therefore, anyWindows rights configured to use a privileged group willnot take effect in these applications. The workaround is to use a privilegeduser account instead of a privileged group. Here is the list of knownapplication with this issue:
n vCenter Server 5.1
n SQL Server
n Exchange 2010 or above
n SCOM 2007
(Ref: 45318a, 45218a, 43779a, 38016a)
• • • • • •
Known Issues 358

n Users may notice an error and cannot install ActivClient after installingCentrify Agent for Windows. During the installation of ActivClient, itattempts to change the local security setting. However, there is a knownissue for Centrify Agent for Windows of blocking the local security setting(Ref: 63609b). Therefore, users may not be able to install ActivClientsuccessfully after installing Centrify Agent for Windows. We suggestinstalling ActivClient before installing Centrify Agent for Windows. IfCentrify Agent for Windows has been installed, please uninstall it andfollow the installation sequence suggested. This issue happens onWindows 8.1 andWindows 2012 R2 only. (Ref: 76016b)
Application Manager issues
Application Manager does not support the Server Core edition of Windows. (Ref:CS-40656)
• • • • • •
Planning and Deployment Guide 359

Best practices
This section, created by Centrify Systems Engineering in collaboration withCentrify Engineering and Centrify Professional Services, describes thedeployment best practices for Server Suite. The goal of this document is tooutline and document the actions customers can take to prevent unexpectedservice degradation with the Centrify product.
Using our best practices that have evolved over many years, we have developedthe Centrify software to be extremely resilient to many types of Active Directorytopologies, networks and environments. In addition, we have gathered datafrom our major deployments to provide the top items that a customer should doto ensure the Centrify deployment is healthy. The best practices are organizedby functional area.
Best Practices for UNIX and Linux Systems withCentrify
This section includes the following topics:
Upgrade Centrify Agents and administrative tools
Many technologies are prone to introducing problems when upgrading to thelatest and greatest version. Centrify technology has been around for 15 yearsand unlike common practice with other technologies of waiting to upgrade,Centrify recommends having the latest and greatest versions installed becausethese will provide greater stability and security. Centrify provides major releasesand minor releases every year. The agent is continually receiving security,performance, and feature updates. The administrator tools (consoles, SDKs,APIs) are continually adding functionality that can be pushed to the agent andmore support for automation.
Customers should review security updates from Centrify on a periodic basis.
• • • • • •
Known Issues 360

One of the most important things a customer can do is to upgrade the CentrifyAgent once per year to take advantage of the additional functionality/stabilityoffered with latest versions. Centrify Agents and administrative tools are easy toupgrade, can be done in a modular fashion and are backwards and forwardscompatible. The most recent releases can be found at the Centrify Downloadssection of the Centrify Support Portal.
Customers should leverage Enterprise grade deployment framework (supportedby technologies like Chef, Puppet, Bladelogic, etc) to automatically deploy theCentrify Agent and updates. Leverage Chef/Puppet/BladeLogic to automaticallydeploy and maintain agent configuration parameters and to leverage theCentrify Repo to automatically upgrade target systems in a streamlined fashion. Another option is the Centrify Software Repo for streamlined installation andupdates.
Enable NSCD
Nscd is a daemon that provides a cache for the most common name servicerequests. The default configuration file, /etc/nscd.conf, determines the behaviorof the cache daemon. More information on NSCD can be found here.
Centrify recommends enabling nscd on each Centrify enabled server tomaximize the caching performance. The default configuration of nscd willsuffice.
Set group policies to govern the agent behavior
One of the most powerful features in the Centrify platform is the ability tocentrally push out Group Policy to Linux systems. Centrify recommendsdeploying at least 1 GPO to your systems so you have the means to centrallyconfigure the agent behavior in your environment. Group policy settings aredocumented in the Group Policy Guide. In the event a change to the Centrifyparameters is needed for the environment, a GPO change can quickly deploy thechange to the systems.
Customers should use the “Set crontab entries” GPO to deploy a crontab entrythat runs the program /usr/share/centrifydc/adedit/adsyncignore every week. This will assure Centrify is not looking up in AD local users, not defined in AD. This is a very strong recommendation. Customers can choose anothermechanism to deploy the crontab entry to systems if that makes more sense fortheir environment.
• • • • • •
Planning and Deployment Guide 361

Set agent parameters
Exclusions of Domains:
Centrify provides robust support for complex active directory environments withvarying trust relationships. Many agent parameters can be configured throughGroup Policy. We often see customers don’t cleanup decommissioned domainsor have domains in the environment not in scope for Centrify. We recommendblacklisting the domains that are not in scope or whitelisting only the domains inscope for Centrify.
An example of excluding, black listing, a domain in /etc/centrifydc/centrifydc.confis:
adclient.excluded.domains: anvil.acme.com
An example of including, white listing, a domain in /etc/centrifydc.conf is:
adclient.included.domains: anvil.acme.com
Paged Control:
To operate the best with the Microsoft Active Directory search optimizer, Centrifyhas provides a parameter called“adclient.schema.extensions.search.add.paged.control”. Centrify recommendssetting this parameter to true to optimize AD lookups.
Suite 2016.1:
If the version of the Centrify Agent for *NIX running is version 5.3.1, part Suite2016.1, Centrify highly recommends configuring the parameter“adclient.altupn.update.interval: 90000000” in /etc/centrifydc/centrifydc.conf.
These parameters can be deployed via the GPO“Add centrifydc.conf properties”under Computer Configuration > Centrify Settings > DirectControl Settings. Seethe Group Policy Guide for additional information.
Use the Centrify DB2 plugin
DB2 systems normally authenticate users against the local Operating System.Therefore, most customers don’t think about performance of authentication andlookups when they centralize authentication to Active Directory. However, as
• • • • • •
Known Issues 362

customers centralize authentication to Active Directory, performanceconsiderations become more important since DB2 is very user lookup intensive.Customers that leverage DB2 in their environment should consider usingCentrify’s DB2 user and group plugin since it delivers enhanced caching toimproves the performance of lookups in a DB2 environment that leveragesActive Directory for authentication/authorization.
Best Practices for Active Directory Environment
Index the uid attribute
Many UNIX applications make requests for the uid attribute as part of theirinnerworkings. If the uid attribute is not indexed and applications make frequentrequests for uid data, this can have a negative effect on the performance ofDomain Controllers. Centrify highly recommends customers index the uidattribute in Active Directory.
Windows Active Directory functional level and WindowsServer version
Customers should maintain an upgrade strategy to use a stable and supportedActive Directory functional level and the version of Windows server. As of thiswriting customers should be moving toWindows 2016 functional modes.
Maintain sites and services domain controller topology
A common issue customers come across is Centrify binding to the wrongDomain Controllers. For example, all the users in the US may be authenticatingto a domain controller that is not geographically desirable. In most instances,this occurs because the AD Sites and Services definition does not include thesubnets of the UNIX/Linux systems or is not updated on a consistent basis.
A process should be defined where the UNIX/Linux networking teams regularlyinteract with the AD team to assure subnets are added and removed from ADSites and Services accordingly.
• • • • • •
Planning and Deployment Guide 363

Centrify Access Model Best Practices
Proper definition of global/child zone structure.
A proper Centrify deployment should have a Global Zone with an appropriatenumber of Child Zones and Computer Roles to drive access across groups ofsystems. The general recommendation for defining profiles, roles and rights is:
n UNIX enable all users at the Global Zone level
n In addition, UNIX enable users at the child zone level, if attributes need tobe different for users on the systems in the child zones (ie.different primarygroup)
n UNIX enable groups at the Child Zone vs. the Global Zone unless thegroups need to be visible across all servers
n Always enable ZPA to automate UNIX profile provisioning across all Zonesthat will have user/group UNIX profiles
n Define Roles and Rights in the Global zone and assign roles at computerroles or zones if appropriate
A common mistake made is the use of too many Child Zones or use Child Zonesincorrectly. Limit child zone sprawl. Child zones should be used for specificpurposes like:
Segregating systems in different business units
Segregate the management of groups of systems to differentadministrative groups
Override the UNIX profiles of users and groups across groups of systems.
Another common mistake is managing roles and rights definition throughout thezone hierarchy which makes it difficult to find roles and rights when updates areneeded.
Another mistake is using Zones to define access. Instead, use Computer roles toprevent lateral movement, drive an automated access model and to takeadvantage of performance benefits. Leverage Computer Roles and AD groups
• • • • • •
Known Issues 364

to manage system types by likeness of access and create AD user groups in asimilar manner. This promotes automation because user access can be grantedaccess/privileges by simply adding users to the right AD groups. Similarly,systems can be provisioned to the right AD group of computers. Computer rolescan be defined by application types. For example, “App 1 DEV” App1 PROD”,etc. The goal is to not have to use the access manager UI for provisioning access.
Analyze the deployment periodically
As a Centrify deployment matures, customers should perform a periodic analysisusing the Centrify Access Manager “Analyze” feature. The analysis highlightsproblem areas in the Centrify deployment. For example, the analysis will identifyorphaned objects.
Additionally, Centrify recommends periodically reviewing security updates:https://www.centrify.com/support/customer-support-portal/policies/product-security/
Use the Centrify Zone Provisioning Agent
Centrify highly recommends leveraging the Zone Provisioning Agent toautomatically provision UNIX profiles for users. Centrify additionallyrecommends two instances of ZPA in large environments. This providesredundancy in the provisioning process. The ZPA service should also bemonitored to ensure it is operational.
Deploy Reporting Services and Security Information andEvent Management (SIEM)
To maximize the investment, Centrify highly recommends deploying CentrifyReporting Services and SIEM integration. These capabilities provide customerswhich insight into which users can access which system and security relatedevents the Centrify Agent reports on. See the following items for moreinformation:
• • • • • •
Planning and Deployment Guide 365

n Report Administrator’s Guide
n SIEM documentation on the documentation portal
n A Centrify community article
Best Practices for Centrify Audit and MonitoringService
This section includes the following topics:
Manage the Audit Store Database Size
The Audit Store database needs to be managed according to the company’sretention policy which often dictated by the security/compliance team. To assurethe audit service performs and scales as required, Centrify recommends keepingthe active Audit Store database at most, between 250GB and 500GB in size. Perform a database rotation if your active Audit Store database is larger than500GB. A database rotation takes the current active database and marks itinactive and makes a new database the active database. See the Centrifydocumentation for how to automate database rotation.
Another approach is to delete audit records and shrink the size of the activedatabase. This approach works well as long as the indexes are also rebuilt. Otherwise, shrinking the database without indexing will lead to fragmentedindexes and poor query performance. KB-8472 details how to shrink and re-build the database indexes.
Centrify recommends keeping only databases that are required for auditingpurposes attached to the audit infrastructure. The databases that are notneeded should be detached. Customers often forget to detach the databasesthat are outside the company’s normal live data/retention policies. Too manyattached Audit Store databases result into poor query performance andincreased load on the Management database. Periodically review the list ofattached Audit Store databases and detach the ones that are no longer neededto be online as per the retention policy.
• • • • • •
Known Issues 366

Maintain the audit store database index
It is recommended to maintain the audit store database’s indexes regularly. Thiscan be done by setting up a simple SQL job to reorganize the indexes if they are5%-30% fragmented and rebuild the indexes if they’re more than 30%fragmented. KB-8472 details how shrink and re-build the database indexes.
Configure SQL Server
There are several SQL specific configurations and server settings that can affectperformance and operation.
Avoid deploying the Audit Store databases in a SQL availability group unless it’srequired by the company’s compliance policies.
Configure SQL Server power settings to be set to Balanced instead of HighPerformance.
SQL Server has a setting called Max Server Memory that controls the maximumamount of physical memory that can be consumed by the SQL Server’s bufferpool. An incorrectly configured Max Server Memory may either result into theSQL engine causing high IO or OS/other programs starving for more memory.Refer to the “configuring the maximummemory for audit store databases”section of the Auditing Administrator’s Guide and always configure this value asrecommended before the deployment begins.
If you’re expecting a database server to get migrated/retired in the near future,it’s better to create a CNAME alias in DNS for the current database server andspecify the alias everywhere (e.g. when creating a new Management database)rather than specifying the actual host name. This will prevent scenarios wherethe database server is not found after a migration.
Audit and Monitoring Architecture
The audit architecture includes several components to ensure a smoothoperating and secure audit environment. A Collector is the service that collectsaudit records from servers being audited and stores them in the audit storedatabase. Avoid deploying the collector on the same machine as the active AuditStore database’s SQL Server.
• • • • • •
Planning and Deployment Guide 367

When using the Centrify Agent for Windows to audit sessions, configure datacapture at native color depth when auditing systems with many concurrentusers (such as Citrix XenApp server). When not capturing at native color depth,the DirectAudit daemon has to transform the captured data to its target formatwhich ends up consuming CPU cycles. To automatically set native color depth atinstallation time, see the Centrify documentation.
Grant audit installation rights to administrator groups
Centrify Audit Administrators have specific privileges to manage and configurethe Centrify audit configuration. A common mistake is rights are assigned tospecific AD accounts vs. AD groups or rights are not delegated at all. Whenemployees leave the company and those AD accounts are disabled, the Auditservices becomes inaccessible. To avoid this, Centrify recommends rights overthe Audit installation are delegated to AD groups and administrators/auditorsare placed into the proper AD groups. This will ensure that all administratorswithin that security group will have access to configure/modify the audit settingsin the event that a specific employee leaves the organization.
Centrify Relationship Best Practices
Monthly Cadence call with Centrify
Customers can schedule a monthly cadence call with Centrify Account Team,Support, and Engineering to ensure that best practices and customerrequirements are consistently being communicated.
Customers should have the contact information of their account team (Accountexecutive, customer success manager, and systems engineer). This accountteam can help escalate requests internally within Centrify, handle licensingquestions and feature requests.
Get your annual Centrify healthcheck
Customers are entitled to annual healthchecks provided by the Centrify accountteam. Centrify conducts healthchecks in varying scope. A basic healthcheck canbe conducted by a Centrify Systems Engineer in a few hours and can provide
• • • • • •
Known Issues 368

insight into the usage of Centrify, risks and areas for improvement. Additionally,more advanced healthchecks can be provided in a 3 to 5 day paid engagementwith Centrify professional services to delve deep into the environment to providerecommendations for security and operational improvement as well as addressidentified issues.
Attend annual Centrify update meetings
Customers are entitled to annual update meetings with the Centrify Account andProduct Management to understand new feature availability and to submit/trackenhancements. Customers often find that Centrify has provided additionalcapability in a new release that addresses new requirements they are entitled to.Additionally, this helps customers to understand the product roadmap anddirection for Centrify and promotes a partnership between Centrify and thecustomer.
• • • • • •
Planning and Deployment Guide 369