Deployment Guide for Cisco Virtualization Experience Media ...
30
Deployment Guide for Cisco Virtualization Experience Media Engine for Windows Release 9.7 First Published: 2014-06-24 Last Modified: 2014-12-17 Americas Headquarters Cisco Systems, Inc. 170 West Tasman Drive San Jose, CA 95134-1706 USA http://www.cisco.com Tel: 408 526-4000 800 553-NETS (6387) Fax: 408 527-0883
-
Upload
khangminh22 -
Category
Documents
-
view
5 -
download
0
Transcript of Deployment Guide for Cisco Virtualization Experience Media ...
Deployment Guide for Cisco Virtualization Experience Media Enginefor Windows Release 9.7First Published: 2014-06-24
Last Modified: 2014-12-17
Americas HeadquartersCisco Systems, Inc.170 West Tasman DriveSan Jose, CA 95134-1706USAhttp://www.cisco.comTel: 408 526-4000 800 553-NETS (6387)Fax: 408 527-0883

THE SPECIFICATIONS AND INFORMATION REGARDING THE PRODUCTS IN THIS MANUAL ARE SUBJECT TO CHANGE WITHOUT NOTICE. ALL STATEMENTS,INFORMATION, AND RECOMMENDATIONS IN THIS MANUAL ARE BELIEVED TO BE ACCURATE BUT ARE PRESENTED WITHOUT WARRANTY OF ANY KIND,EXPRESS OR IMPLIED. USERS MUST TAKE FULL RESPONSIBILITY FOR THEIR APPLICATION OF ANY PRODUCTS.
THE SOFTWARE LICENSE AND LIMITEDWARRANTY FOR THE ACCOMPANYING PRODUCT ARE SET FORTH IN THE INFORMATION PACKET THAT SHIPPED WITHTHE PRODUCT AND ARE INCORPORATED HEREIN BY THIS REFERENCE. IF YOU ARE UNABLE TO LOCATE THE SOFTWARE LICENSE OR LIMITED WARRANTY,CONTACT YOUR CISCO REPRESENTATIVE FOR A COPY.
The Cisco implementation of TCP header compression is an adaptation of a program developed by the University of California, Berkeley (UCB) as part of UCB's public domain versionof the UNIX operating system. All rights reserved. Copyright © 1981, Regents of the University of California.
NOTWITHSTANDINGANYOTHERWARRANTYHEREIN, ALL DOCUMENT FILES AND SOFTWARE OF THESE SUPPLIERS ARE PROVIDED “AS IS"WITH ALL FAULTS.CISCO AND THE ABOVE-NAMED SUPPLIERS DISCLAIM ALL WARRANTIES, EXPRESSED OR IMPLIED, INCLUDING, WITHOUT LIMITATION, THOSE OFMERCHANTABILITY, FITNESS FORA PARTICULAR PURPOSEANDNONINFRINGEMENTORARISING FROMACOURSEOFDEALING, USAGE, OR TRADE PRACTICE.
IN NO EVENT SHALL CISCO OR ITS SUPPLIERS BE LIABLE FOR ANY INDIRECT, SPECIAL, CONSEQUENTIAL, OR INCIDENTAL DAMAGES, INCLUDING, WITHOUTLIMITATION, LOST PROFITS OR LOSS OR DAMAGE TO DATA ARISING OUT OF THE USE OR INABILITY TO USE THIS MANUAL, EVEN IF CISCO OR ITS SUPPLIERSHAVE BEEN ADVISED OF THE POSSIBILITY OF SUCH DAMAGES.
Any Internet Protocol (IP) addresses and phone numbers used in this document are not intended to be actual addresses and phone numbers. Any examples, command display output, networktopology diagrams, and other figures included in the document are shown for illustrative purposes only. Any use of actual IP addresses or phone numbers in illustrative content is unintentionaland coincidental.
Cisco and the Cisco logo are trademarks or registered trademarks of Cisco and/or its affiliates in the U.S. and other countries. To view a list of Cisco trademarks, go to this URL: http://www.cisco.com/go/trademarks. Third-party trademarks mentioned are the property of their respective owners. The use of the word partner does not imply a partnershiprelationship between Cisco and any other company. (1110R)
© 2017 Cisco Systems, Inc. All rights reserved.

C O N T E N T S
C H A P T E R 1 Cisco Virtualization Experience Media Engine 1
Virtual Deployments 1
Differences in the Virtual Environment 3
Considerations for Virtual Environments 4
Cisco Media Services Interface 5
Traffic Marking 5
Prepare Your Network 5
Install Cisco Media Services Interface 6
C H A P T E R 2 Installation and Deployment 7
Deployment Tasks 7
Download Cisco Virtualization Experience Media Engine 9
Download Cisco VXME Utilities 9
Cisco Virtualization Experience Media Engine Installation 10
Run the Microsoft Installer 10
Use the Command Line 11
Use the Group Policy Editor 12
Set the Language Code 13
Install Cisco VXME Utilities 14
Create a CSF Device and a Directory Number for Each User 15
Associate New Devices with a User 17
Enable the CTI Protocol for Users 18
Change a User Password 18
Links to Documentation 19
Create a Desktop Shortcut 19
Add a Link to the Citrix Landing Page 19
Add a Link to the VMware Prelogin Banner 20
Configuration Files 21
Deployment Guide for Cisco Virtualization Experience Media Engine for Windows Release 9.7 iii

Port Usage 21
Upgrade Cisco Jabber for Windows 22
Upgrade Cisco UC Integration for Microsoft Lync 22
Upgrade the Citrix Receiver or the VMware Client 23
Change the Hosted Virtual Desktop Connection Type 23
Uninstall Cisco Virtualization Experience Media Engine 24
C H A P T E R 3 Troubleshooting 25
Basic Troubleshooting 25
Verify That Cisco VXME Is Running 25
Problem Reporting Tool 25
Virtual Channel Problem 26
Deployment Guide for Cisco Virtualization Experience Media Engine for Windows Release 9.7iv
Contents

C H A P T E R 1Cisco Virtualization Experience Media Engine
• Virtual Deployments, page 1
• Differences in the Virtual Environment, page 3
• Considerations for Virtual Environments, page 4
• Cisco Media Services Interface, page 5
Virtual Deployments
In this deployment guide, the term thin client refers to repurposed PCs, or other supported client devicesset up to provide access to hosted virtual desktops (HVD).
Note
With the Cisco Virtualization Experience Media Engine (VXME) for Windows software, users can place andreceive calls with their Cisco Unified Communications clients in a virtual environment. The Cisco VirtualizationExperience Media Engine software runs on the thin client, and the Cisco Unified Communications client andCisco VXME Utilities runs on the Microsoft Windows hosted virtual desktop (HVD), in the data center. Toreduce latency and to enhance media quality, Cisco Virtualization Experience Media Engine streams mediabetween the thin clients without going through the hosted virtual desktops.
Deployment Guide for Cisco Virtualization Experience Media Engine for Windows Release 9.7 1

Use the following flowchart to determine whether you require VXME for your virtual environment.
Figure 1: Determine Whether You Need Cisco Virtualization Experience Media Engine for Windows
A Cisco Virtualization Experience Media Engine for Windows virtual deployment comprises the followingcomponents:
• Supported desktop virtualization platforms (thin clients).For more information about the minimum requirements for supported thin clients, see the Release Notesfor Cisco Virtualization Experience Media Engine for Windows for your release.
• Cisco Virtualization Experience Media Engine software, which is required to support audio and videocalls in the virtual environment.
Cisco Virtualization Experience Media Engine also provides support for some accessories. For moreinformation about supported accessories, see the Release Notes for Cisco Virtualization ExperienceMedia Engine for Windows for your release.
• Microsoft Windows hosted virtual desktops (HVD), in a data center.
For more information about supported Windows operating systems, see Release Notes for CiscoVirtualization Experience Media Engine for Windows for your release.
• Supported Cisco Unified Communications clients with Cisco VXMEUtilities, such as Cisco Jabber andCisco UC Integration™ for Microsoft Lync.
For Cisco Jabber, you must install Cisco VXMEUtilities, on the HVD, separately. CiscoUC Integration™ for Microsoft Lync includes Cisco VXMEUtilities, which is installedautomatically if the installer detects a virtual environment.
Note
Deployment Guide for Cisco Virtualization Experience Media Engine for Windows Release 9.72
Cisco Virtualization Experience Media EngineVirtual Deployments
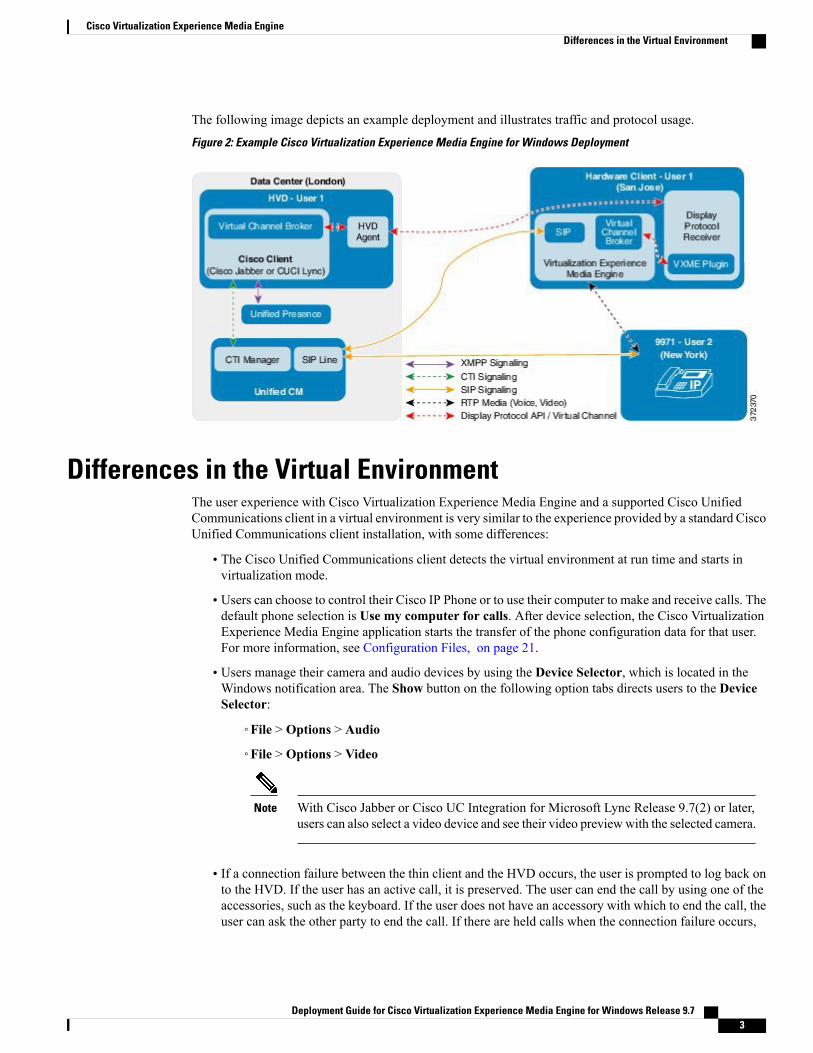
The following image depicts an example deployment and illustrates traffic and protocol usage.
Figure 2: Example Cisco Virtualization Experience Media Engine for Windows Deployment
Differences in the Virtual EnvironmentThe user experience with Cisco Virtualization Experience Media Engine and a supported Cisco UnifiedCommunications client in a virtual environment is very similar to the experience provided by a standard CiscoUnified Communications client installation, with some differences:
• The Cisco Unified Communications client detects the virtual environment at run time and starts invirtualization mode.
• Users can choose to control their Cisco IP Phone or to use their computer to make and receive calls. Thedefault phone selection is Use my computer for calls. After device selection, the Cisco VirtualizationExperience Media Engine application starts the transfer of the phone configuration data for that user.For more information, see Configuration Files, on page 21.
• Users manage their camera and audio devices by using the Device Selector, which is located in theWindows notification area. The Show button on the following option tabs directs users to the DeviceSelector:
◦File > Options > Audio
◦File > Options > Video
With Cisco Jabber or Cisco UC Integration for Microsoft Lync Release 9.7(2) or later,users can also select a video device and see their video previewwith the selected camera.
Note
• If a connection failure between the thin client and the HVD occurs, the user is prompted to log back onto the HVD. If the user has an active call, it is preserved. The user can end the call by using one of theaccessories, such as the keyboard. If the user does not have an accessory with which to end the call, theuser can ask the other party to end the call. If there are held calls when the connection failure occurs,
Deployment Guide for Cisco Virtualization Experience Media Engine for Windows Release 9.7 3
Cisco Virtualization Experience Media EngineDifferences in the Virtual Environment

any parties on hold will not be aware of the connection failure. After logging back on to the HVD, theuser can send an instant message (IM) to the parties that were left on hold.
• If the thin client loses the connection to the network, the user is prompted to log back on to the HVD.If the connection failure occurs during a call, the call is lost. After reconnecting, the user can try to callthe other party or send an IM. For the other party to the call, silence is the only indication that the callhas dropped.
• By default, all calls send and receive video if both parties have video capability. Users can select theirpreference from the following options:
◦Always start calls with video: Starts all calls as video calls, which send local video
◦Never start calls with video: Starts all calls as audio-only calls
This setting applies to all calls that the user places and receives. The default setting isAlways start callswith video. Users can change this setting in File > Options > Calls.
You can disable video globally or on a per-device basis on the Cisco UnifiedCommunications Manager. Navigate to System > Enterprise Phone Configurationand set Video Calling to Disabled.
Note
• Some menus and options for the supported Cisco Unified Communications clients are different. Forexample, users can receive Desktop Share invitations but cannot initiate them.
If Cisco Jabber or Cisco UC Integration for Microsoft Lync is also installed on the thin client, ensure thatusers exit the software client before they sign in to their HVDs. If Cisco Jabber or Cisco UC Integrationfor Microsoft Lync is running on the thin client, and the user subsequently tries to sign in to anotherinstance of the software client on their HVD, Cisco VXME cannot register and problems with accessoriescan occur.
Important
Considerations for Virtual EnvironmentsIn a virtual environment, you install Cisco Virtualization ExperienceMedia Engine forWindows on a supporteddesktop virtualization platform. You install a supported Cisco Unified Communications client on the hostedvirtual desktops (HVD), rather than on client computers (PCs). If your Cisco Unified Communications clientdoes not include Cisco VXME Utilities, you must install that first. Otherwise, the installation is the same asthe installation of the Cisco Unified Communications client in a nonvirtual environment.
When you add devices for virtual users to the Cisco Unified Communications Manager, the device type isCisco Unified Client Services Framework (CSF). Each user should have only one CSF device. If multipleCSF devices exist for a user, Cisco Virtualization Experience Media Engine selects the first device in thealphabetical list. To prevent issues caused by multiple registrations for the same user on the Cisco UnifiedCommunications Manager, advise users to sign in to only one HVD or client at a time. A CSF device usercan register with the Unified Communications Manager from only one client at a time. Multiple registrationsfrom multiple clients with the same CSF device are not supported.
You must also enable the computer-telephony integration (CTI) protocol for all virtual Cisco UnifiedCommunications client users.
Deployment Guide for Cisco Virtualization Experience Media Engine for Windows Release 9.74
Cisco Virtualization Experience Media EngineConsiderations for Virtual Environments

Before you begin to install the Cisco Unified Communications client on the HVD, see the Release Notesfor Cisco Virtualization Experience Media Engine for Windows for your release and for the Cisco UnifiedCommunications client.
Tip
Cisco Media Services InterfaceCisco Virtualization ExperienceMedia Engine (VXME) forWindows supports CiscoMedia Services Interface(MSI) for Microsoft Windows 7 and Windows 8. Install Cisco MSI on each thin client on which you installCiscoVXME forWindows. For version requirements, see theRelease Notes for Cisco Virtualization ExperienceMedia Engine for Windows for your release.
Cisco Audio Session Tunnel (CAST) connection to the HVD is not supported.Note
You can download MSI for Microsoft Windows 7 or Windows 8 from http://software.cisco.com/download/navigator.html. Choose Products > Collaboration Endpoints > Virtual Endpoints > VirtualizationExperience Media Engine and then select the software type.
Traffic MarkingCisco Media Services Interface provides a Microsoft Windows service that works with Cisco PrimeCollaboration Manager and Cisco Medianet-enabled routers to ensure that Cisco VXME for Windows cansend audio media and video media on your network with minimum latency or packet loss.
Before Cisco VXME for Windows sends audio media or video media, it checks for Cisco Media ServicesInterface.
• If the service exists on the computer, Cisco VXME for Windows provides flow information to CiscoMedia Services Interface.
The service then signals the network so that routers classify the flow and provide priority to the CiscoVXME for Windows traffic.
• If the service does not exist, Cisco VXME forWindows does not use it and sends audio media and videomedia as normal.
Cisco VXME for Windows checks for Cisco Media Services Interface for each audio call or video call.Note
Prepare Your NetworkTo install Cisco Media Service Interface for traffic marking, you must prepare your network.
Deployment Guide for Cisco Virtualization Experience Media Engine for Windows Release 9.7 5
Cisco Virtualization Experience Media EngineCisco Media Services Interface

Procedure
Step 1 Install Cisco Prime Collaboration manager.Step 2 Install routers or switches enabled for Cisco Medianet where appropriate.Step 3 Configure your network to handle the metadata attributes that Cisco Media Service Interface applies to
applications.Not all devices on your network must support Cisco Medianet.
The first hop should prioritize traffic based on the metadata attributes from Cisco Media Service Interface.As the traffic traverses the network, all other devices should also prioritize that traffic unless you configurepolicies on those devices to handle the traffic differently.
Install Cisco Media Services Interface
Procedure
Step 1 Download the Cisco Media Services Interface installation program from the download site on Cisco.com.Step 2 Install Cisco Media Services Interface on each computer on which you install Cisco VXME for Windows.
See the appropriate Cisco Medianet documentation for installing Cisco Media Services Interface.
Deployment Guide for Cisco Virtualization Experience Media Engine for Windows Release 9.76
Cisco Virtualization Experience Media EngineInstall Cisco Media Services Interface

C H A P T E R 2Installation and Deployment
• Deployment Tasks, page 7
• Download Cisco Virtualization Experience Media Engine, page 9
• Download Cisco VXME Utilities, page 9
• Cisco Virtualization Experience Media Engine Installation, page 10
• Install Cisco VXME Utilities, page 14
• Create a CSF Device and a Directory Number for Each User, page 15
• Associate New Devices with a User, page 17
• Enable the CTI Protocol for Users, page 18
• Change a User Password, page 18
• Links to Documentation, page 19
• Configuration Files, page 21
• Port Usage, page 21
• Upgrade Cisco Jabber for Windows, page 22
• Upgrade Cisco UC Integration for Microsoft Lync, page 22
• Upgrade the Citrix Receiver or the VMware Client, page 23
• Change the Hosted Virtual Desktop Connection Type, page 23
• Uninstall Cisco Virtualization Experience Media Engine, page 24
Deployment TasksYou can use the following overview to plan your deployment, or use it as an installation checklist.
Deployment Guide for Cisco Virtualization Experience Media Engine for Windows Release 9.7 7

Table 1: Overview of Installation and Deployment Tasks
DetailsStep
See the documentation for the endpoints.Set up the endpoints and configurethem.
1
See the documentation for your Citrix or VMware product.
• Citrix: http://www.citrix.com
• VMware: https://www.vmware.com
Ensure that you install a supported version of Citrixor VMware. For more information, see the releasenotes document for your release of VirtualizationExperience Media Engine.
Important
Install the Citrix Receiver orVMware Horizon View Client onthe endpoints.
2
For more information, see Cisco Media Services Interface, onpage 5.
(Optional) Install Cisco MediaServices Interface (MSI).
3
Cisco Virtualization Experience Media Engine Installation, onpage 10
Install the Cisco VirtualizationExperience Media Engine softwareon the endpoints.
4
Install Cisco VXME Utilities, on page 14
See the Cisco Jabber for Windows Installation and ConfigurationGuide for your release:
http://www.cisco.com/c/en/us/support/unified-communications/jabber-windows/products-installation-guides-list.html
See the Administration Guide for Cisco UC Integration forMicrosoft Lync for your release:
http://www.cisco.com/c/en/us/support/unified-communications/uc-integration-tm-microsoft-lync/products-installation-guides-list.html
Multiple registrations to the Cisco UnifiedCommunicationsManager are not supported. To helpprevent multiple registrations, Cisco recommendsthat you create only one HVD for each user.
Important
Install Cisco VXME Utilities andCisco Jabber for Windows or CiscoUC Integration for Microsoft Lyncon the hosted virtual desktop(HVD).
5
• Create a CSFDevice and a Directory Number for Each User,on page 15
• Associate New Devices with a User, on page 17
Add users and devices on the CiscoUnified CommunicationsManager.
6
Deployment Guide for Cisco Virtualization Experience Media Engine for Windows Release 9.78
Installation and DeploymentDeployment Tasks

DetailsStep
See the server setup guide for your release of Cisco Jabber forWindows:
http://www.cisco.com/en/US/products/ps12511/prod_installation_guides_list.html
See the Administration Guide for Cisco UC Integration forMicrosoft Lync for your release:
http://www.cisco.com/c/en/us/support/unified-communications/uc-integration-tm-microsoft-lync/products-installation-guides-list.html
Set up users on the Cisco UnifiedCommunicationsManager for CiscoJabber Unified Communicationsfeatures, such as Cisco UnifiedCommunications Manager IM andPresence Service and CiscoWebExintegration.
7
Links to Documentation, on page 19Ensure that users know how toaccess the user guides.
8
Port Usage, on page 21Open the required ports in allfirewalls.
9
Download Cisco Virtualization Experience Media EngineProcedure
Step 1 Go to the following URL:http://www.cisco.com/cisco/software/navigator.html
Step 2 Select Products > Unified Communications > Unified Communications Applications >Messaging >Cisco Virtualization Experience Media Engine > Cisco Virtualization Experience Media Engine forWindows.
Step 3 In the navigation tree, select your release.Step 4 From the list, select the file for your release.Step 5 Select Download or Add to cart and follow the prompts.
Related Topics
File Names
Download Cisco VXME Utilities
Cisco UC Integration for Microsoft Lync installer includes Cisco VXME Utilities. If you are installingCisco UC Integration for Microsoft Lync, you need not perform this procedure.
Note
Deployment Guide for Cisco Virtualization Experience Media Engine for Windows Release 9.7 9
Installation and DeploymentDownload Cisco Virtualization Experience Media Engine

Procedure
Step 1 Go to the following URL:http://www.cisco.com/cisco/software/navigator.html
Step 2 Select Products > Unified Communications > Unified Communications Applications >Messaging >Cisco Virtualization Experience Media Engine > Cisco Virtualization Experience Media Engine forWindows
Step 3 In the navigation tree, select your release.Step 4 From the list, select the file for your release.Step 5 Select Download or Add to cart and follow the prompts.
Related Topics
File Names
Cisco Virtualization Experience Media Engine InstallationBefore you install Cisco Virtualization Experience Media Engine (VXME) for Windows, you must completethe following tasks:
• Install and set up the Citrix Receiver or VMware Horizon View Client.
Ensure that you are using a supported version of your Citrix or VMware product. For more information,see the release notes document for your release of Cisco Virtualization Experience Media Engine.
• Obtain the Cisco Virtualization Experience Media Engine for Windows installation zip file, and extractthe contents.
You can use one of the following methods to install Cisco Virtualization Experience Media Engine:
• Run the Microsoft Installer, on page 10
• Use the Command Line, on page 11
• Use the Group Policy Editor, on page 12
Related Topics
File NamesUninstall Cisco Virtualization Experience Media Engine, on page 24
Run the Microsoft InstallerRun the Microsoft Installer (MSI) to install Cisco VXME for Windows.
Before You Begin
• Install and set up the Citrix Receiver or VMware Horizon View Client.
Deployment Guide for Cisco Virtualization Experience Media Engine for Windows Release 9.710
Installation and DeploymentCisco Virtualization Experience Media Engine Installation

Ensure that you are using a supported version of your Citrix or VMware product. For more information,see the release notes document for your release of Cisco Virtualization Experience Media Engine.
• Obtain the Cisco Virtualization Experience Media Engine (VXME) for Windows zip file, and extractthe contents.
Procedure
Step 1 Double-click the CiscoVXMESetup.msi file.Step 2 To open the executable file, click OK.Step 3 If the Open File - Security Warning appears, click Run.Step 4 Read the EULA and if you agree, click Accept and Install.
http://www.cisco.com/go/eula.
Step 5 To complete the installation, click Finish.The VXME process starts automatically after the installation is complete.
Use the Command LineUse the command line to run the Microsoft Installer (MSI). You can use the command line to install VXMEin HP Thin Shell Kiosk mode version 1.0.
Values are case sensitive. For example: desktop, kiosk, or DESKTOP is considered an invalid value. Thedefault value is Desktop.
The name of the parameter is case sensitive. For example: mode, mODE, or mode is considered an invalidvalue.
Use of an invalid value results in a desktop installation.
Note
Before You Begin
• Install and set up the Citrix Receiver or VMware Horizon View Client.
Ensure that you are using a supported version of your Citrix or VMware product. For more information,see the release notes document for your release of Cisco Virtualization Experience Media Engine.
• Obtain the Cisco Virtualization Experience Media Engine (VXME) for Windows zip file, and extractthe contents.
Procedure
Step 1 Open a command window.Step 2 Enter the following command: start /wait msiexec.exe /i <path to MSI>\CiscoVXMESetup.msi /quiet.
The /quiet switch specifies a silent installation.
To install VXME in kiosk mode, entermsiexec.exe /i CiscoVXMESetup.msi MODE=Kiosk.
Deployment Guide for Cisco Virtualization Experience Media Engine for Windows Release 9.7 11
Installation and DeploymentUse the Command Line

To install VXME in desktop mode, entermsiexec.exe /i CiscoVXMESetup.msi MODE=Desktop.
Step 3 Enter one of the following commands (including quotation marks) depending on the operating system:
• For 32 bit Windows, enter "%PROGRAMFILES%\Cisco Systems\Cisco VXME\uc-start.bat".
• For 64 bit Windows, enter "%PROGRAMFILES(X86)%\Cisco Systems\Cisco VXME\uc-start.bat".
Use the Group Policy EditorUse the Group Policy Management console to deploy Cisco VXME for Windows to supported thin clientsthat are running a supported Microsoft Windows operating system.
To install Cisco VXME for Windows with Group Policy, all computers or users to which you plan todeploy Cisco VXME for Windows must be in the same domain.
Important
Before You Begin
• Install and set up the Citrix Receiver or VMware Horizon View Client.
Ensure that you are using a supported version of your Citrix or VMware product. For more information,see the release notes document for your release of Cisco Virtualization Experience Media Engine.
• Obtain the Cisco Virtualization Experience Media Engine (VXME) for Windows zip file, and extractthe contents.
• Use Microsoft Orca to set the language code to 1033.
• Copy the modified Microsoft Installer (MSI) to a software distribution point for deployment. Allcomputers to which you plan to deploy Cisco VXME for Windows must be able to access the MSI onthe distribution point.
Procedure
Step 1 Select Start > Run.Step 2 At the prompt, enter the following command: GPMC.msc.Step 3 Right-click on the appropriate domain in the left pane.Step 4 Select Create a GPO in this Domain, and Link it here.Step 5 In the New GPO window, Name field, enter a name for the group policy object.Step 6 Leave the default value or select an option from the Source Starter GPO list, and then select OK.
Deployment Guide for Cisco Virtualization Experience Media Engine for Windows Release 9.712
Installation and DeploymentUse the Group Policy Editor

The new group policy appears in the list of group policies for the domain.
Step 7 Select the group policy object under the domain in the left pane.Step 8 From the Security Filtering section of the Scope tab, select Add.Step 9 Specify the computers and users to which you want to deploy Cisco VXME for Windows.Step 10 Specify the MSI file.Step 11 Right-click the group policy object in the left pane and then select Edit.
The Group Policy Management Editor opens.
Step 12 Select Computer Configuration and then select Policies > Software Settings.Step 13 Right-click Software Installation and then select New > Package.Step 14 Next to File Name, enter the location of the MSI file.
Example:\\server\software_distribution
You must enter the Uniform Naming Convention (UNC) path for the location of the MSI file.If you do not enter the UNC path, Group Policy cannot deploy Cisco VXME for Windows.
Important
Step 15 Select the MSI file, and then select Open.Step 16 In the Deploy Software dialog box, select Assigned, and then select OK.
Set the Language CodeUse Microsoft Orca to set the language code if you plan to use Group Policy to deploy Cisco VXME forWindows. Microsoft Orca is available as part of the Microsoft Windows SDK for Windows 7 and .NETFramework 4 that you can download from the Microsoft website.
Before You Begin
You have Microsoft Orca installed.
Deployment Guide for Cisco Virtualization Experience Media Engine for Windows Release 9.7 13
Installation and DeploymentUse the Group Policy Editor

Procedure
Step 1 Start Microsoft Orca.Step 2 Select File > Open.Step 3 Browse to the location of CiscoVXMESetup.msi.Step 4 Select CiscoVXMESetup.msi, and then select Open.Step 5 Select View > Summary Information.Step 6 Set the Languages field to 1033.Step 7 Select OK.Step 8 Select Tools > Options.Step 9 Select the Database tab.Step 10 Select Copy embedded streams during 'Save As'.Step 11 Select Apply, and then select OK.Step 12 Select File > Save As.Step 13 Select a location to which to save the modified CiscoVXMESetup.msi file.Step 14 Specify a name for the modified file, and then select Save.
What to Do Next
Use the Group Policy Editor, on page 12
Install Cisco VXME UtilitiesInstall Cisco Virtualization ExperienceMedia Engine (VXME) Utilities on the hosted virtual desktops (HVD),before you install Cisco Jabber for windows. If you plan to install Cisco UC Integration for Microsoft Lync,you must not perform this procedure because Cisco UC Integration for Microsoft Lync includes Cisco VXMEUtilities.
Run the Microsoft Installer (MSI) on the hosted virtual desktop (HVD).
Before You Begin
Obtain the Cisco VXME Utilities zip file, and extract the contents.
Procedure
Step 1 Double-click the CiscoVXMEUtilitiesSetup.msi file.Step 2 To open the executable file, click OK.Step 3 If the Open File - Security Warning appears, click Run.Step 4 Read the EULA and if you agree, click Accept and Install.
http://www.cisco.com/go/eula.
Step 5 To complete the installation, click Finish.
Deployment Guide for Cisco Virtualization Experience Media Engine for Windows Release 9.714
Installation and DeploymentInstall Cisco VXME Utilities
Create a CSF Device and a Directory Number for Each User
Use the same Cisco Unified Client Services Framework (CSF) devices type for the virtual environmentas you do for a nonvirtual environment. We recommend that you create only one CSF device for eachvirtual user. If multiple devices exist for a virtual user, Cisco Virtualization Experience Media Engineautomatically selects the first device in the list.
Note
Procedure
Step 1 From Cisco Unified Communications Manager Administration, choose Device > Phone.Step 2 Select Add New.Step 3 From the Phone Type drop-down list, choose Cisco Unified Client Services Framework, and then select
Next.Step 4 In the Phone Configuration window, enter the applicable information for the phone as follows:
DescriptionOption
Enter a name to identify the Cisco Unified Client Services Framework device.The name can contain 1 to 15 characters, including alphanumeric characters.Periods, hyphens, and underscores are not supported. Typically the device nameformat is CSF<username>; however, including the user ID is optional. Example:CSFjohndoe.
Device Name
Enter a descriptive name for the phone. For example, enterRichard-phone-on-computer.
Description
ChooseDefault or another profile that was previously created. The device pooldefines sets of common characteristics for devices, such as region, date andtime group, softkey template, andMultilevel Precedence and Preemption (MLPP)information.
Device Pool
Choose Standard Client Services Framework. The phone button templatedetermines the configuration of buttons on a phone and identifies which feature(such as line or speed dial) is used for each button. This option is required.
Phone Button Template
To use an adjunct license with this device, choose the user ID from the list.Owner User ID
To use an adjunct license with this device, choose the device name of the CiscoUnified IP Phone to associate with the client application.
Primary Phone
Always check this option in a virtual environment.Allow Control of Devicefrom CTI
Choose Standard Presence Group.Presence Group
Deployment Guide for Cisco Virtualization Experience Media Engine for Windows Release 9.7 15
Installation and DeploymentCreate a CSF Device and a Directory Number for Each User

DescriptionOption
Choose Cisco Unified Client Services Framework - Standard SIPNon-Secure Profile.
Device Security Profile
Choose Standard SIP Profile or another profile that was previously created.SIP profiles provide specific SIP information for the phone, such as registrationand keepalive timers, media ports, and Do Not Disturb control.
SIP Profile
Step 5 Scroll down to the Product Specific Configuration Layout section, and set Video Calling to Enabled.Step 6 Select Save.Step 7 Select Apply Config if this button is available, and then confirm when prompted.Step 8 Select Add a new DN in the Association Information section that appears on the left side of the window.Step 9 Enter information for the directory number on the Directory Number Configuration window.
DescriptionOption
Enter the directory number (line) to assign to the device.Directory Number
Enter the route partition. Partitions divide the route plan into logical subsets.These subsets include organization, location, and type of call.
Route Partition
Enter the Caller ID. This entry is optional. The actual display depends on thisentry and the configuration for the other party. For example, Cisco IP Phonesdisplay the Caller ID, but Cisco Jabber does not.
Display (Internal Caller ID)
Specify themaximum number of calls that can be presented to the application.This number includes all calls placed on hold plus the active call, regardlessof which party initiated the calls.
MaximumNumber of Calls
Specify the number of calls (active and on hold). Incoming calls above thislimit receive a busy signal or are redirected to the Forward BusyInternal/External target (if the target is configured).
Busy Trigger
Step 10 Select Save.Step 11 Select Apply Config if this button is available, and then confirm when prompted.Step 12 Scroll to the bottom of theDirectory Number Configurationwindow, and then selectAssociate End Users.Step 13 In the Find and List Users window, use the search criteria to find the user who you want to associate with
the directory number.Step 14 Check the box next to that username, and then select Add Selected.
Deployment Guide for Cisco Virtualization Experience Media Engine for Windows Release 9.716
Installation and DeploymentCreate a CSF Device and a Directory Number for Each User

The user is now associated with the DN.
Step 15 In the User Associated with Line section of the window, select the username.Step 16 In the End User Configuration window, scroll down to the Direct Number Associations section.Step 17 From the Primary Extension drop-down list, choose the DN for the user.Step 18 In the End User Configuration window, under Permissions Information, select Add to User Group or
Add to Access Control Group, depending on your version of Cisco Unified Communications Manager.Step 19 In the Find and List User Groups window, use the search criteria to find Standard CCM End Users.Step 20 Check the box next to Standard CCM End Users, and then select Add Selected.Step 21 In the Find and List User Groups window, use the search criteria to find Standard CTI Enabled.Step 22 Check the box next to Standard CTI Enabled, and then select Add Selected.Step 23 Select Save.
Cisco Unified CommunicationsManager reminds you that changes to line or directory number settings requirea restart. However, you need only restart after you edit lines on Cisco Unified IP Phones that are running atthe time of the modifications.
Associate New Devices with a User
Perform this task in Cisco Unified Communications Manager.Note
Procedure
Step 1 From Cisco Unified Communications Manager Administration, choose > User Management > End User.Step 2 Search for the user in the Find and List Users window.Step 3 Select the user.Step 4 Select Device Association in the Device Information section.Step 5 Search for the devices that you require in the User Device Association window.Step 6 Select the devices that you require.
For example, you can select a device whose type is Cisco Unified Client Services Framework, and a desk-phonedevice.
Step 7 Select Save Selected/Changes.Step 8 Select Back to User from the menu in the Related Links navigation box at the top right of the window.Step 9 Select Go.Step 10 Verify that the devices are listed in the Device Information section in the End User Configurationwindow.
Deployment Guide for Cisco Virtualization Experience Media Engine for Windows Release 9.7 17
Installation and DeploymentAssociate New Devices with a User
Enable the CTI Protocol for UsersEnable the computer-telephony integration (CTI) protocol for each Cisco Virtualization Experience MediaEngine (VXME) user.
Procedure
Step 1 From Cisco Unified Communications Manager Administration, choose User Management > End Users.Step 2 Search for the user in the Find and List Users window.Step 3 Select the user.Step 4 In the End User Configuration window, scroll down to Permissions Information.Step 5 Select Add to User Group.Step 6 Select the following groups:
• Standard CCM End Users
• Standard CTI Allow Control of All Devices
• Standard CTI Enabled
Step 7 Select Save.
What to Do Next
Enable the Unified Communications Manager IM and Presence Service. See the documentation for yourversion of Cisco Unified Communications Manager.
Change a User PasswordUse this procedure to change the password for a user only if LDAP Authentication is not enabled. If LDAPAuthentication is enabled, the passwords are stored on the LDAP Server. For Cisco Unified CommunicationsManager 9.0 or later, this procedure applies only to passwords for users created locally.
Procedure
Step 1 From Cisco Unified Communications Manager Administration, choose Cisco Unified CommunicationsManager Administration > User Management > End User.
Step 2 Search for the user in the Find and List Users window.Step 3 Select the user.Step 4 In the End User Configuration window, in the Password field, enter a new password for the user.Step 5 In the Confirm Password field, enter the new password for the user again.Step 6 Select Save.
Deployment Guide for Cisco Virtualization Experience Media Engine for Windows Release 9.718
Installation and DeploymentEnable the CTI Protocol for Users

Links to DocumentationUsers may require assistance to familiarize themselves with their Cisco Unified Communications client andthe accessories in the virtual environment. You can add links to the virtualization platform desktop, or to theCitrix or VMware login screens, so that users can easily locate the documentation.
Create a Desktop ShortcutAdd a desktop shortcut to the user documentation for users who do not connect to their hosted virtual desktopsin kiosk mode. Users can click the shortcut to access the documentation and to get help.
Procedure
Step 1 On the Microsoft Windows desktop, right-click and point to New.Step 2 Select Shortcut.Step 3 Copy and paste the URL for the end-user documentation into the text box.
User Guides: http://www.cisco.com/en/US/products/ps12862/products_user_guide_list.html
Step 4 Select Next.Step 5 Type a name for the shortcut.
Example:Documentation/Help for Cisco VXME
Step 6 Select Finish.
Add a Link to the Citrix Landing PageYou can add a link to the Citrix landing page. This link is important for Citrix connections that operate inkiosk mode. In kiosk mode, the users have no access to the thin client desktop.
You must be a Desktop Delivery Controller (DDC) administrator.Note
Deployment Guide for Cisco Virtualization Experience Media Engine for Windows Release 9.7 19
Installation and DeploymentLinks to Documentation

Procedure
Step 1 Establish a Remote Desktop connection to the server running the Desktop Delivery Controller (DDC).Step 2 In the navigation tree, under Access, select Citrix Web Interface > XenApp Web Sites > Internal Site.Step 3 Under Internal Site - Edit Settings, select Web Site Appearance.Step 4 In the Customize Web Site Appearance - Internal Site window, under Options, select Content.Step 5 Select the language code (for example, English [en]), and then select Edit.Step 6 In the Edit Custom Text window, check Footer text (all screens).Step 7 In the Edit Custom Text window, under Customize Footer Text, enter text to point the user to the online
documentation.
Example:Sample textUser Guides: http://www.cisco.com/en/US/products/ps12862/products_user_guide_list.html
Step 8 Select Finish, and then select OK.
Add a Link to the VMware Prelogin BannerYou can add a link to the VMware prelogin banner. This link is important for VMware connections thatoperate in kiosk mode. In kiosk mode, the users have no access to the thin client desktop.
You must be a VMware Connection Server administrator.Note
Procedure
Step 1 Log in to the VMware Connection Server.Step 2 Select View Configuration - Global Settings.Step 3 Under the General section, select Edit.Step 4 Check Display a prelogin message.Step 5 Enter text to point the user to the online documentation URL.
Example:Sample textUser Guides: http://www.cisco.com/en/US/products/ps12862/products_user_guide_list.html
Step 6 Select OK.
Deployment Guide for Cisco Virtualization Experience Media Engine for Windows Release 9.720
Installation and DeploymentAdd a Link to the VMware Prelogin Banner

Configuration FilesFor each Cisco Unified Client Services Framework (CSF) device that you add to the system, Cisco UnifiedCommunications Manager creates a configuration (CNF.xml) file. The CNF file contains the devicespecifications for the associated user.
When users sign in to their supported Cisco Unified Communications application, Cisco VirtualizationExperience Media Engine starts the download of the associated CNF file to the thin client. To ensure thesuccessful transfer of the file, open the relevant ports in all firewall applications to allow the thin client toaccess the ports. For more information about how to open ports, see the documentation for the firewall software.
Download of the CNF.xml file follows the system setting for HTTP proxy. Ensure that the proxy doesnot route the HTTP request from the thin client outside of the corporate network.
Important
Port UsageThe following table lists the ports used by Cisco Virtualization Experience Media Engine for Windows andexplains the use for each port or range of ports.
Table 2: Port Usage for Cisco Virtualization Experience Media Engine for Windows
DescriptionPort
UDP Outbound traffic for TFTP
An ephemeral port is a short-lived transport protocol port forIP communications. IP software can allocate ephemeral portsautomatically from a predefined range. Transmission ControlProtocol (TCP), User Datagram Protocol (UDP), and StreamControl Transmission Protocol (SCTP) can use an ephemeralport as the port assignment for the client end of a client–servercommunication, to a well known port on a server. Awell knownport is a port reserved by the Internet Corporation for AssignedNames and Numbers (ICANN) for assignment for specificapplications.
Note
69 and Ephemeral
TCP (default) or UDP Outbound traffic for Session Initiation Protocol(SIP) call signaling
5060
TCP Outbound traffic for Secure SIP call signaling5061
TCP Outbound traffic for HTTP6970
UDP Inbound and outbound traffic for RTP (audio and video streams)
You can reduce this port range by changing the Start/StopMedia Portsetting in the SIP Profile, which is associated with the CSF device, onthe Cisco Unified Communications Manager.
16384–32767
Deployment Guide for Cisco Virtualization Experience Media Engine for Windows Release 9.7 21
Installation and DeploymentConfiguration Files

For Cisco Jabber for Windows port usage on the hosted virtual desktop (HVD), see the Installation andConfiguration Guide for your release.
Cisco VXME uses the computer-telephony integration (CTI) protocol. Cisco Jabber for Windows on anHVD uses outbound TCP port 2748 to connect to the CTI gateway, which is the CTI Manager componentof Cisco Unified Communications Manager.
Note
Cisco VXME uses ICA/PCoIP connections to establish virtual channel communications between the clientand the HVD.
Note
• For more information about Citrix port usage, seeCommunication ports used by Citrix Technologies.http://www.citrix.com
• For more information about VMware port usage, see the VMware documentation for your productrelease.
https://www.vmware.com
Upgrade Cisco Jabber for WindowsUse this procedure to upgrade to a newer release, or to repair either the Cisco Jabber or the Cisco VXMEUtilities installation.
Procedure
Step 1 Close Cisco Jabber and ensure that it is not running on the HVD.If Cisco Jabber is running during the installation, you must completely exit and restart CiscoJabber to enable virtualization.
Important
Step 2 Install Cisco VXME Utilities.Step 3 Install Cisco Jabber.
Upgrade Cisco UC Integration for Microsoft LyncUse this procedure to upgrade to a newer release, or to repair the Cisco UC Integration for Microsoft Lyncand VXME Utilities installation. The Cisco UC Integration for Microsoft Lync Microsoft Installer (MSI)includes Cisco VXME Utilities.
Procedure
Step 1 Close Cisco UC Integration for Microsoft Lync and ensure that it is not running on the HVD.If Cisco UC Integration forMicrosoft Lync is running during the installation, youmust completelyexit and restart Cisco UC Integration for Microsoft Lync to enable virtualization.
Important
Deployment Guide for Cisco Virtualization Experience Media Engine for Windows Release 9.722
Installation and DeploymentUpgrade Cisco Jabber for Windows

Step 2 Install Cisco UC Integration for Microsoft Lync.
Upgrade the Citrix Receiver or the VMware ClientIf you upgrade the Citrix Receiver or the VMware Horizon Client, and Cisco Virtualization ExperienceMediaEngine (VXME) is already installed, perform this procedure to repair Cisco VXME.
Before You Begin
Upgrade the Citrix Receiver or the VMware Horizon Client. See the documentation for your Citrix or VMwareproduct.
Procedure
Step 1 Double click the CiscoVXMESetup.msiCiscoVXMEClientSetup.msi file.Step 2 To open the executable file, select OK.Step 3 If the Open File - Security Warning appears, select Run.Step 4 In theWelcome window, select Next.Step 5 In the Program Maintenance window, select Repair and then Next.Step 6 To proceed with repairing the installation, select Install.Step 7 To complete the installation, select Finish.
Change the Hosted Virtual Desktop Connection TypeUse this procedure if Cisco Virtualization Experience Media Engine (VXME) is already installed and youchange the connection type as follows:
• Citrix Receiver to VMware Horizon Client
• VMware Horizon Client to Citrix Receiver
Before You Begin
Install the software for the new connection type, either Citrix Receiver or VMware Horizon Client.
Deployment Guide for Cisco Virtualization Experience Media Engine for Windows Release 9.7 23
Installation and DeploymentUpgrade the Citrix Receiver or the VMware Client

Procedure
Step 1 Double click the CiscoVXMESetup.msi file.Step 2 To open the executable file, select OK.Step 3 If the Open File–Security Warning appears, select Run.Step 4 In theWelcome window, select Next.Step 5 In the Program Maintenance window, selectModify and then Next.Step 6 In theCustom setupwindow, selectCitrix Client Support orVMware Client Support depending on which
you installed and select Next.Step 7Step 8 To proceed with modifying the installation, select Install.
During the modification of Cisco Virtualization ExperienceMedia Engine (VXME), only componentsthat were installed with the previous version are reinstalled.
Note
Step 9 To complete the installation, select Finish.
Uninstall Cisco Virtualization Experience Media EngineYou can use the command line to uninstall Cisco VXME for Windows.
Alternately, you can use the Windows Control Panel to remove Cisco VXME for Windows.Tip
Before You Begin
The Cisco Virtualization ExperienceMedia Engine (VXME) forWindowsMicrosoft Installer (MSI) file mustbe present in the file system.
Procedure
Step 1 Open a command window.Step 2 Enter the following command:msiexec.exe /x <path to MSI>\CiscoVXMESetup.msi /quiet.
The /quiet switch specifies a silent installation.
Deployment Guide for Cisco Virtualization Experience Media Engine for Windows Release 9.724
Installation and DeploymentUninstall Cisco Virtualization Experience Media Engine

C H A P T E R 3Troubleshooting
• Basic Troubleshooting, page 25
• Problem Reporting Tool, page 25
Basic Troubleshooting
Verify That Cisco VXME Is RunningUse Windows Task Manager to verify that Cisco VXME is running.
Procedure
Step 1 On the thin client desktop, right-click the taskbar and then select Task Manager.Step 2 On the Processes tab, scroll down and look for the vxc.exe process.
Problem Reporting ToolThe Problem Reporting Tool (PRT) is a small program, which automatically runs if Cisco Jabber or CiscoUC Integration™ for Microsoft Lync encounters an unrecoverable error, or unhandled exception. The toolcollects logs from the thin client and hosted virtual desktop and then creates a problem report. The report isa zip file that you can send to the Cisco Technical Assistance Center (TAC), to provide the necessaryinformation to solve the problem.
If a user experiences an error that does not crash the software, the user can run the PRT from the client Helpmenu: Help > Report a problem.
Users can generate a problem report from the Windows Start menu if Cisco Jabber is not running. To accessthe tool from outside the application, choose Start >All Programs >Cisco Jabber >Cisco Jabber ProblemReport.
Deployment Guide for Cisco Virtualization Experience Media Engine for Windows Release 9.7 25

Users can generate a problem report from the Windows Start menu if Cisco UC Integration™ for MicrosoftLync is not running. To access the tool from outside the application, choose Start > All Programs > CiscoSystems, Inc > Report a problem.
Advise users to include a memory dump with the problem report if their Cisco Unified Communicationsapplication crashes.
Users must accept the privacy agreement to run the PRT.Note
We recommend that users provide a description of the circumstances that lead up to the error. For more detailedinformation about how to run the PRT, see the Troubleshooting section in the applicable user guide.
Virtual Channel ProblemIf a problem exists with the virtual channel, the problem-reporting tool cannot collect the logs from the thinclient. A problem with the virtual channel can cause the Device Selector to not start or to not populate withdevices. To work around an issue with the virtual channel, you can collect the logs from%LOCALAPPDATA%\Cisco\VXME on the thin client. Users can still use the PRT to gather the logs fromthe hosted virtual desktop. You can submit the logs to the Cisco Technical Assistance Center, along with thelogs that you collected manually from the thin client.
Deployment Guide for Cisco Virtualization Experience Media Engine for Windows Release 9.726
TroubleshootingVirtual Channel Problem