Experimental Investigation of Container-based Virtualization ...
Upload
khangminh22Category
view
3download
0
Red Hat Virtualization 4.4
Administration Guide
Administration tasks in Red Hat Virtualization
Last Updated: 2022-06-19


Red Hat Virtualization 4.4 Administration Guide
Administration tasks in Red Hat Virtualization
Red Hat Virtualization Documentation TeamRed Hat Customer Content [email protected]

Legal Notice
Copyright © 2022 Red Hat, Inc.
The text of and illustrations in this document are licensed by Red Hat under a Creative CommonsAttribution–Share Alike 3.0 Unported license ("CC-BY-SA"). An explanation of CC-BY-SA isavailable athttp://creativecommons.org/licenses/by-sa/3.0/. In accordance with CC-BY-SA, if you distribute this document or an adaptation of it, you mustprovide the URL for the original version.
Red Hat, as the licensor of this document, waives the right to enforce, and agrees not to assert,Section 4d of CC-BY-SA to the fullest extent permitted by applicable law.
Red Hat, Red Hat Enterprise Linux, the Shadowman logo, the Red Hat logo, JBoss, OpenShift,Fedora, the Infinity logo, and RHCE are trademarks of Red Hat, Inc., registered in the United Statesand other countries.
Linux ® is the registered trademark of Linus Torvalds in the United States and other countries.
Java ® is a registered trademark of Oracle and/or its affiliates.
XFS ® is a trademark of Silicon Graphics International Corp. or its subsidiaries in the United Statesand/or other countries.
MySQL ® is a registered trademark of MySQL AB in the United States, the European Union andother countries.
Node.js ® is an official trademark of Joyent. Red Hat is not formally related to or endorsed by theofficial Joyent Node.js open source or commercial project.
The OpenStack ® Word Mark and OpenStack logo are either registered trademarks/service marksor trademarks/service marks of the OpenStack Foundation, in the United States and othercountries and are used with the OpenStack Foundation's permission. We are not affiliated with,endorsed or sponsored by the OpenStack Foundation, or the OpenStack community.
All other trademarks are the property of their respective owners.
Abstract
This document provides information and procedures relevant to Red Hat Virtualizationadministrators.

. . . . . . . . . . . . . . . . . . . . . . . . . . . . . . . . . . . . . . . . . . . . . . . . . . . . . . . . . . . . . . . . . . . . . . . . . . . . . . . . . . . . . . . . . . . . . . . . . . . . . . . . . . . . . . . . . . . . . . . . . . . . . . . . . . . . . . . . . . . . . . . . . . . . . . . . . . . . . . . . . . . . . . . . . . . . . . . . . . . . . . . . . . . . . . . . . . . . . . . . . . . . . . . . . . . . . . . . . . . . . . . . . . . . . . . . . . . . . . . . . . . . . . . . . . . . . . . . . . . . . . . . . . . . . . . . . . . . . . . .
. . . . . . . . . . . . . . . . . . . . . . . . . . . . . . . . . . . . . . . . . . . . . . . . . . . . . . . . . . . . . . . . . . . . . . . . . . . . . . . . . . . . . . . . . . . . . . . . . . . . . . . . . . . . . . . . . . . . . . . . . . . . . . . . . . . . . . . . . . . . . . . . . . . . . . . . . . . . . . . . . . . . . . . . . . . . . . . . . . . . . . . . . . . . . . . . . . . . . . . . . . . . . . . . . . . . . . . . . . . . . . . . . . . . . . . . . . . . . . . . . . . . . . . . . . . . . . . . . . . . . . . . . . . . . . . . . . . . . . . .
. . . . . . . . . . . . . . . . . . . . . . . . . . . . . . . . . . . . . . . . . . . . . . . . . . . . . . . . . . . . . . . . . . . . . . . . . . . . . . . . . . . . . . . . . . . . . . . . . . . . . . . . . . . . . . . . . . . . . . . . . . . . . . . . . . . . . . . . . . . . . . . . . . . . . . . . . . . . . . . . . . . . . . . . . . . . . . . . . . . . . . . . . . . . . . . . . . . . . . . . . . . . . . . . . . . . . . . . . . . . . . . . . . . . . . . . . . . . . . . . . . . . . . . . . . . . . . . . . . . . . . . . . . . . . . . . . . . . . . . .
. . . . . . . . . . . . . . . . . . . . . . . . . . . . . . . . . . . . . . . . . . . . . . . . . . . . . . . . . . . . . . . . . . . . . . . . . . . . . . . . . . . . . . . . . . . . . . . . . . . . . . . . . . . . . . . . . . . . . . . . . . . . . . . . . . . . . . . . . . . . . . . . . . . . . . . . . . . . . . . . . . . . . . . . . . . . . . . . . . . . . . . . . . . . . . . . . . . . . . . . . . . . . . . . . . . . . . . . . . . . . . . . . . . . . . . . . . . . . . . . . . . . . . . . . . . . . . . . . . . . . . . . . . . . . . . . . . . . . . . .
. . . . . . . . . . . . . . . . . . . . . . . . . . . . . . . . . . . . . . . . . . . . . . . . . . . . . . . . . . . . . . . . . . . . . . . . . . . . . . . . . . . . . . . . . . . . . . . . . . . . . . . . . . . . . . . . . . . . . . . . . . . . . . . . . . . . . . . . . . . . . . . . . . . . . . . . . . . . . . . . . . . . . . . . . . . . . . . . . . . . . . . . . . . . . . . . . . . . . . . . . . . . . . . . . . . . . . . . . . . . . . . . . . . . . . . . . . . . . . . . . . . . . . . . . . . . . . . . . . . . . . . . . . . . . . . . . . . . . . . .
. . . . . . . . . . . . . . . . . . . . . . . . . . . . . . . . . . . . . . . . . . . . . . . . . . . . . . . . . . . . . . . . . . . . . . . . . . . . . . . . . . . . . . . . . . . . . . . . . . . . . . . . . . . . . . . . . . . . . . . . . . . . . . . . . . . . . . . . . . . . . . . . . . . . . . . . . . . . . . . . . . . . . . . . . . . . . . . . . . . . . . . . . . . . . . . . . . . . . . . . . . . . . . . . . . . . . . . . . . . . . . . . . . . . . . . . . . . . . . . . . . . . . . . . . . . . . . . . . . . . . . . . . . . . . . . . . . . . . . . .
. . . . . . . . . . . . . . . . . . . . . . . . . . . . . . . . . . . . . . . . . . . . . . . . . . . . . . . . . . . . . . . . . . . . . . . . . . . . . . . . . . . . . . . . . . . . . . . . . . . . . . . . . . . . . . . . . . . . . . . . . . . . . . . . . . . . . . . . . . . . . . . . . . . . . . . . . . . . . . . . . . . . . . . . . . . . . . . . . . . . . . . . . . . . . . . . . . . . . . . . . . . . . . . . . . . . . . . . . . . . . . . . . . . . . . . . . . . . . . . . . . . . . . . . . . . . . . . . . . . . . . . . . . . . . . . . . . . . . . . .
Table of Contents
CHAPTER 1. ADMINISTERING AND MAINTAINING THE RED HAT VIRTUALIZATION ENVIRONMENT1.1. GLOBAL CONFIGURATION1.2. DASHBOARD1.3. SEARCHES1.4. BOOKMARKS1.5. TAGS
CHAPTER 2. ADMINISTERING THE RESOURCES2.1. QUALITY OF SERVICE2.2. DATA CENTERS2.3. CLUSTERS2.4. LOGICAL NETWORKS2.5. HOSTS2.6. STORAGE2.7. POOLS2.8. VIRTUAL DISKS2.9. EXTERNAL PROVIDERS
CHAPTER 3. ADMINISTERING THE ENVIRONMENT3.1. ADMINISTERING THE SELF-HOSTED ENGINE3.2. BACKUPS AND MIGRATION3.3. SETTING UP ERRATA VIEWING WITH RED HAT SATELLITE3.4. RENEWING CERTIFICATES BEFORE THEY EXPIRE3.5. AUTOMATING CONFIGURATION TASKS USING ANSIBLE3.6. USERS AND ROLES3.7. QUOTAS AND SERVICE LEVEL AGREEMENT POLICY3.8. EVENT NOTIFICATIONS3.9. UTILITIES
CHAPTER 4. GATHERING INFORMATION ABOUT THE ENVIRONMENT4.1. MONITORING AND OBSERVABILITY4.2. LOG FILES
APPENDIX A. VDSM SERVICE AND HOOKSA.1. INSTALLING A VDSM HOOKA.2. SUPPORTED VDSM EVENTSA.3. THE VDSM HOOK ENVIRONMENTA.4. THE VDSM HOOK DOMAIN XML OBJECTA.5. DEFINING CUSTOM PROPERTIESA.6. SETTING VIRTUAL MACHINE CUSTOM PROPERTIESA.7. EVALUATING VIRTUAL MACHINE CUSTOM PROPERTIES IN A VDSM HOOKA.8. USING THE VDSM HOOKING MODULEA.9. VDSM HOOK EXECUTIONA.10. VDSM HOOK RETURN CODESA.11. VDSM HOOK EXAMPLES
APPENDIX B. CUSTOM NETWORK PROPERTIESB.1. EXPLANATION OF BRIDGE_OPTS PARAMETERSB.2. HOW TO SET UP RED HAT VIRTUALIZATION MANAGER TO USE ETHTOOLB.3. HOW TO SET UP RED HAT VIRTUALIZATION MANAGER TO USE FCOE
APPENDIX C. RED HAT VIRTUALIZATION USER INTERFACE PLUGINSC.1. ABOUT RED HAT VIRTUALIZATION USER INTERFACE PLUG-INS
44
31365657
60606572
102141
183218
234249
266266275326327328331
362368380
395395403
411411
412414414415417417417418419419
422422424424
426426
Table of Contents
1

. . . . . . . . . . . . . . . . . . . . . . . . . . . . . . . . . . . . . . . . . . . . . . . . . . . . . . . . . . . . . . . . . . . . . . . . . . . . . . . . . . . . . . . . . . . . . . . . . . . . . . . . . . . . . . . . . . . . . . . . . . . . . . . . . . . . . . . . . . . . . . . . . . . . . . . . . . . . . . . . . . . . . . . . . . . . . . . . . . . . . . . . . . . . . . . . . . . . . . . . . . . . . . . . . . . . . . . . . . . . . . . . . . . . . . . . . . . . . . . . . . . . . . . . . . . . . . . . . . . . . . . . . . . . . . . . . . . . . . . .
. . . . . . . . . . . . . . . . . . . . . . . . . . . . . . . . . . . . . . . . . . . . . . . . . . . . . . . . . . . . . . . . . . . . . . . . . . . . . . . . . . . . . . . . . . . . . . . . . . . . . . . . . . . . . . . . . . . . . . . . . . . . . . . . . . . . . . . . . . . . . . . . . . . . . . . . . . . . . . . . . . . . . . . . . . . . . . . . . . . . . . . . . . . . . . . . . . . . . . . . . . . . . . . . . . . . . . . . . . . . . . . . . . . . . . . . . . . . . . . . . . . . . . . . . . . . . . . . . . . . . . . . . . . . . . . . . . . . . . . .
. . . . . . . . . . . . . . . . . . . . . . . . . . . . . . . . . . . . . . . . . . . . . . . . . . . . . . . . . . . . . . . . . . . . . . . . . . . . . . . . . . . . . . . . . . . . . . . . . . . . . . . . . . . . . . . . . . . . . . . . . . . . . . . . . . . . . . . . . . . . . . . . . . . . . . . . . . . . . . . . . . . . . . . . . . . . . . . . . . . . . . . . . . . . . . . . . . . . . . . . . . . . . . . . . . . . . . . . . . . . . . . . . . . . . . . . . . . . . . . . . . . . . . . . . . . . . . . . . . . . . . . . . . . . . . . . . . . . . . . .
. . . . . . . . . . . . . . . . . . . . . . . . . . . . . . . . . . . . . . . . . . . . . . . . . . . . . . . . . . . . . . . . . . . . . . . . . . . . . . . . . . . . . . . . . . . . . . . . . . . . . . . . . . . . . . . . . . . . . . . . . . . . . . . . . . . . . . . . . . . . . . . . . . . . . . . . . . . . . . . . . . . . . . . . . . . . . . . . . . . . . . . . . . . . . . . . . . . . . . . . . . . . . . . . . . . . . . . . . . . . . . . . . . . . . . . . . . . . . . . . . . . . . . . . . . . . . . . . . . . . . . . . . . . . . . . . . . . . . . . .
. . . . . . . . . . . . . . . . . . . . . . . . . . . . . . . . . . . . . . . . . . . . . . . . . . . . . . . . . . . . . . . . . . . . . . . . . . . . . . . . . . . . . . . . . . . . . . . . . . . . . . . . . . . . . . . . . . . . . . . . . . . . . . . . . . . . . . . . . . . . . . . . . . . . . . . . . . . . . . . . . . . . . . . . . . . . . . . . . . . . . . . . . . . . . . . . . . . . . . . . . . . . . . . . . . . . . . . . . . . . . . . . . . . . . . . . . . . . . . . . . . . . . . . . . . . . . . . . . . . . . . . . . . . . . . . . . . . . . . . .
. . . . . . . . . . . . . . . . . . . . . . . . . . . . . . . . . . . . . . . . . . . . . . . . . . . . . . . . . . . . . . . . . . . . . . . . . . . . . . . . . . . . . . . . . . . . . . . . . . . . . . . . . . . . . . . . . . . . . . . . . . . . . . . . . . . . . . . . . . . . . . . . . . . . . . . . . . . . . . . . . . . . . . . . . . . . . . . . . . . . . . . . . . . . . . . . . . . . . . . . . . . . . . . . . . . . . . . . . . . . . . . . . . . . . . . . . . . . . . . . . . . . . . . . . . . . . . . . . . . . . . . . . . . . . . . . . . . . . . . .
C.2. RED HAT VIRTUALIZATION USER INTERFACE PLUGIN LIFECYCLEC.3. USER INTERFACE PLUGIN-RELATED FILES AND THEIR LOCATIONSC.4. EXAMPLE USER INTERFACE PLUG-IN DEPLOYMENT
APPENDIX D. ENABLING FIPS IN RED HAT VIRTUALIZATIOND.1. ENABLING FIPS IN A SELF-HOSTED ENGINED.2. ENABLING FIPS IN RHV HOSTS AND THE STANDALONE MANAGERD.3. ADDITIONAL RESOURCES
APPENDIX E. RED HAT VIRTUALIZATION AND ENCRYPTED COMMUNICATIONE.1. REPLACING THE RED HAT VIRTUALIZATION MANAGER CA CERTIFICATEE.2. SETTING UP ENCRYPTED COMMUNICATION BETWEEN THE MANAGER AND AN LDAP SERVERE.3. ENABLING ENCRYPTED VNC CONSOLES FOR FIPSE.4. TROUBLESHOOTING
APPENDIX F. PROXIESF.1. SPICE PROXYF.2. SQUID PROXYF.3. WEBSOCKET PROXY
APPENDIX G. BRANDINGG.1. BRANDING
APPENDIX H. SYSTEM ACCOUNTSH.1. RED HAT VIRTUALIZATION MANAGER USER ACCOUNTSH.2. RED HAT VIRTUALIZATION MANAGER GROUPSH.3. VIRTUALIZATION HOST USER ACCOUNTSH.4. VIRTUALIZATION HOST GROUPS
APPENDIX I. LEGAL NOTICE
426428428
430430430431
432432435436437
440440442444
445445
448448448448449
450
Red Hat Virtualization 4.4 Administration Guide
2

Table of Contents
3

CHAPTER 1. ADMINISTERING AND MAINTAINING THE REDHAT VIRTUALIZATION ENVIRONMENT
The Red Hat Virtualization environment requires an administrator to keep it running. As an administrator,your tasks include:
Managing physical and virtual resources such as hosts and virtual machines. This includesupgrading and adding hosts, importing domains, converting virtual machines created on foreignhypervisors, and managing virtual machine pools.
Monitoring the overall system resources for potential problems such as extreme load on one ofthe hosts, insufficient memory or disk space, and taking any necessary actions (such asmigrating virtual machines to other hosts to lessen the load or freeing resources by shuttingdown machines).
Responding to the new requirements of virtual machines (for example, upgrading the operatingsystem or allocating more memory).
Managing customized object properties using tags.
Managing searches saved as public bookmarks.
Managing user setup and setting permission levels.
Troubleshooting for specific users or virtual machines for overall system functionality.
Generating general and specific reports.
1.1. GLOBAL CONFIGURATION
Accessed by clicking Administration → Configure, the Configure window allows you to configure anumber of global resources for your Red Hat Virtualization environment, such as users, roles, systempermissions, scheduling policies, instance types, and MAC address pools. This window allows you tocustomize the way in which users interact with resources in the environment, and provides a centrallocation for configuring options that can be applied to multiple clusters.
1.1.1. Roles
Roles are predefined sets of privileges that can be configured from Red Hat Virtualization Manager.Roles provide access and management permissions to different levels of resources in the data center,and to specific physical and virtual resources.
With multilevel administration, any permissions which apply to a container object also apply to allindividual objects within that container. For example, when a host administrator role is assigned to a useron a specific host, the user gains permissions to perform any of the available host operations, but onlyon the assigned host. However, if the host administrator role is assigned to a user on a data center, theuser gains permissions to perform host operations on all hosts within the cluster of the data center.
1.1.1.1. Creating a New Role
If the role you require is not on Red Hat Virtualization’s default list of roles, you can create a new role andcustomize it to suit your purposes.
Procedure
1. Click Administration → Configure. This opens the Configure window. The Roles tab is
Red Hat Virtualization 4.4 Administration Guide
4

1. Click Administration → Configure. This opens the Configure window. The Roles tab isselected by default, showing a list of default User and Administrator roles, and any custom roles.
2. Click New.
3. Enter the Name and Description of the new role.
4. Select either Admin or User as the Account Type.
5. Use the Expand All or Collapse All buttons to view more or fewer of the permissions for thelisted objects in the Check Boxes to Allow Action list. You can also expand or collapse theoptions for each object.
6. For each of the objects, select or clear the actions you want to permit or deny for the role youare setting up.
7. Click OK to apply the changes. The new role displays on the list of roles.
1.1.1.2. Editing or Copying a Role
You can change the settings for roles you have created, but you cannot change default roles. To changedefault roles, clone and modify them to suit your requirements.
Procedure
1. Click Administration → Configure. This opens the Configure window, which shows a list ofdefault User and Administrator roles, as well as any custom roles.
2. Select the role you wish to change.
3. Click Edit or Copy. This opens the Edit Role or Copy Role window.
4. If necessary, edit the Name and Description of the role.
5. Use the Expand All or Collapse All buttons to view more or fewer of the permissions for thelisted objects. You can also expand or collapse the options for each object.
6. For each of the objects, select or clear the actions you wish to permit or deny for the role youare editing.
7. Click OK to apply the changes you have made.
1.1.1.3. User Role and Authorization Examples
The following examples illustrate how to apply authorization controls for various scenarios, using thedifferent features of the authorization system described in this chapter.
Example 1.1. Cluster Permissions
Sarah is the system administrator for the accounts department of a company. All the virtualresources for her department are organized under a Red Hat Virtualization cluster called Accounts.She is assigned the ClusterAdmin role on the accounts cluster. This enables her to manage all virtualmachines in the cluster, since the virtual machines are child objects of the cluster. Managing thevirtual machines includes editing, adding, or removing virtual resources such as disks, and taking
CHAPTER 1. ADMINISTERING AND MAINTAINING THE RED HAT VIRTUALIZATION ENVIRONMENT
5

snapshots. It does not allow her to manage any resources outside this cluster. BecauseClusterAdmin is an administrator role, it allows her to use the Administration Portal or the VM Portalto manage these resources.
Example 1.2. VM PowerUser Permissions
John is a software developer in the accounts department. He uses virtual machines to build and testhis software. Sarah has created a virtual desktop called johndesktop for him. John is assigned theUserVmManager role on the johndesktop virtual machine. This allows him to access this singlevirtual machine using the VM Portal. Because he has UserVmManager permissions, he can modifythe virtual machine. Because UserVmManager is a user role, it does not allow him to use theAdministration Portal.
Example 1.3. Data Center Power User Role Permissions
Penelope is an office manager. In addition to her own responsibilities, she occasionally helps the HRmanager with recruitment tasks, such as scheduling interviews and following up on reference checks.As per corporate policy, Penelope needs to use a particular application for recruitment tasks.
While Penelope has her own machine for office management tasks, she wants to create a separatevirtual machine to run the recruitment application. She is assigned PowerUserRole permissions forthe data center in which her new virtual machine will reside. This is because to create a new virtualmachine, she needs to make changes to several components within the data center, includingcreating the virtual disk in the storage domain.
Note that this is not the same as assigning DataCenterAdmin privileges to Penelope. As aPowerUser for a data center, Penelope can log in to the VM Portal and perform virtual machine-specific actions on virtual machines within the data center. She cannot perform data center-leveloperations such as attaching hosts or storage to a data center.
Example 1.4. Network Administrator Permissions
Chris works as the network administrator in the IT department. Her day-to-day responsibilitiesinclude creating, manipulating, and removing networks in the department’s Red Hat Virtualizationenvironment. For her role, she requires administrative privileges on the resources and on thenetworks of each resource. For example, if Chris has NetworkAdmin privileges on the ITdepartment’s data center, she can add and remove networks in the data center, and attach anddetach networks for all virtual machines belonging to the data center.
Example 1.5. Custom Role Permissions
Rachel works in the IT department, and is responsible for managing user accounts in Red HatVirtualization. She needs permission to add user accounts and assign them the appropriate roles andpermissions. She does not use any virtual machines herself, and should not have access toadministration of hosts, virtual machines, clusters or data centers. There is no built-in role whichprovides her with this specific set of permissions. A custom role must be created to define the set ofpermissions appropriate to Rachel’s position.
Figure 1.1. UserManager Custom Role
Red Hat Virtualization 4.4 Administration Guide
6
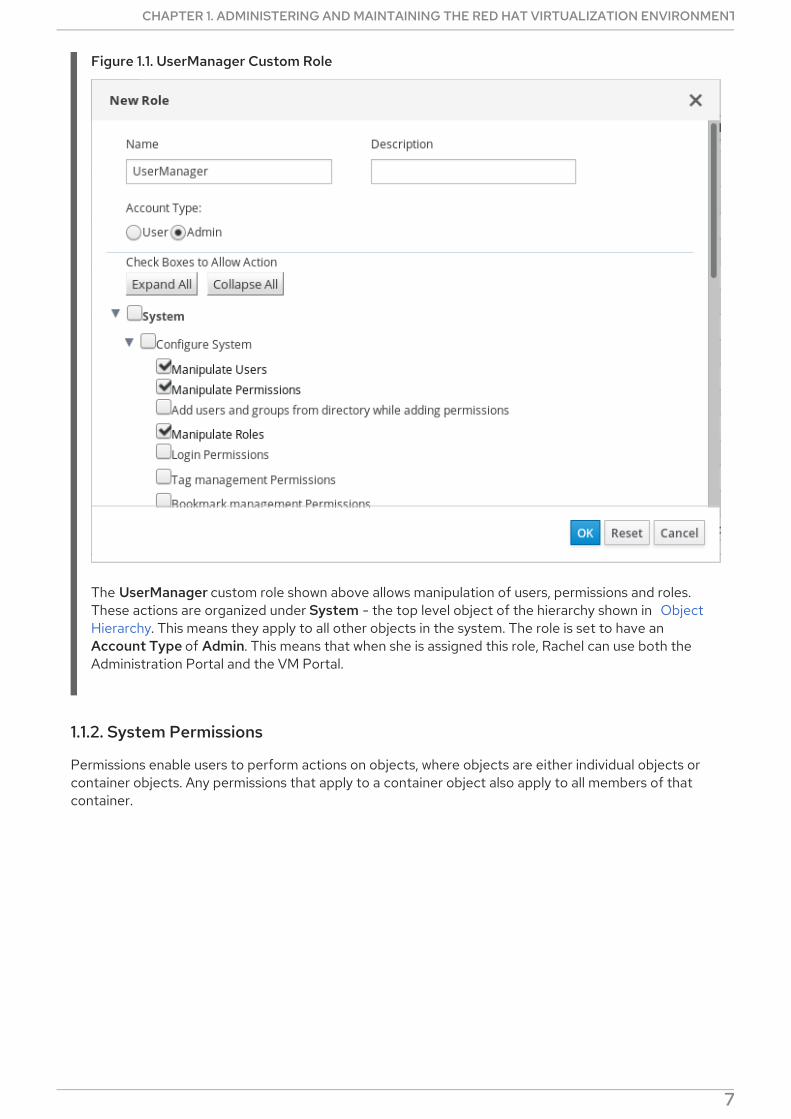
Figure 1.1. UserManager Custom Role
The UserManager custom role shown above allows manipulation of users, permissions and roles.These actions are organized under System - the top level object of the hierarchy shown in ObjectHierarchy. This means they apply to all other objects in the system. The role is set to have anAccount Type of Admin. This means that when she is assigned this role, Rachel can use both theAdministration Portal and the VM Portal.
1.1.2. System Permissions
Permissions enable users to perform actions on objects, where objects are either individual objects orcontainer objects. Any permissions that apply to a container object also apply to all members of thatcontainer.
Figure 1.2. Permissions & Roles
CHAPTER 1. ADMINISTERING AND MAINTAINING THE RED HAT VIRTUALIZATION ENVIRONMENT
7

Figure 1.2. Permissions & Roles
Figure 1.3. Red Hat Virtualization Object Hierarchy
1.1.2.1. User Properties
Roles and permissions are the properties of the user. Roles are predefined sets of privileges that permitaccess to different levels of physical and virtual resources. Multilevel administration provides a finelygrained hierarchy of permissions. For example, a data center administrator has permissions to manage allobjects in the data center, while a host administrator has system administrator permissions to a singlephysical host. A user can have permissions to use a single virtual machine but not make any changes tothe virtual machine configurations, while another user can be assigned system permissions to a virtualmachine.
1.1.2.2. User and Administrator Roles
Red Hat Virtualization provides a range of pre-configured roles, from an administrator with system-widepermissions to an end user with access to a single virtual machine. While you cannot change or removethe default roles, you can clone and customize them, or create new roles according to yourrequirements. There are two types of roles:
Red Hat Virtualization 4.4 Administration Guide
8

Administrator Role: Allows access to the Administration Portal for managing physical andvirtual resources. An administrator role confers permissions for actions to be performed in theVM Portal; however, it has no bearing on what a user can see in the VM Portal.
User Role: Allows access to the VM Portal for managing and accessing virtual machines andtemplates. A user role determines what a user can see in the VM Portal. Permissions granted toa user with an administrator role are reflected in the actions available to that user in the VMPortal.
1.1.2.3. User Roles Explained
The table below describes basic user roles which confer permissions to access and configure virtualmachines in the VM Portal.
Table 1.1. Red Hat Virtualization User Roles - Basic
Role Privileges Notes
UserRole Can access and use virtualmachines and pools.
Can log in to the VM Portal, useassigned virtual machines andpools, view virtual machine stateand details.
PowerUserRole Can create and manage virtualmachines and templates.
Apply this role to a user for thewhole environment with theConfigure window, or for specificdata centers or clusters. Forexample, if a PowerUserRole isapplied on a data center level, thePowerUser can create virtualmachines and templates in thedata center.
UserVmManager System administrator of a virtualmachine.
Can manage virtual machines andcreate and use snapshots. A userwho creates a virtual machine inthe VM Portal is automaticallyassigned the UserVmManagerrole on the machine.
The table below describes advanced user roles which allow you to do more fine tuning of permissions forresources in the VM Portal.
Table 1.2. Red Hat Virtualization User Roles - Advanced
Role Privileges Notes
UserTemplateBasedVm Limited privileges to only useTemplates.
Can use templates to createvirtual machines.
CHAPTER 1. ADMINISTERING AND MAINTAINING THE RED HAT VIRTUALIZATION ENVIRONMENT
9

DiskOperator Virtual disk user. Can use, view and edit virtualdisks. Inherits permissions to usethe virtual machine to which thevirtual disk is attached.
VmCreator Can create virtual machines in theVM Portal.
This role is not applied to aspecific virtual machine; apply thisrole to a user for the wholeenvironment with the Configurewindow. Alternatively apply thisrole for specific data centers orclusters. When applying this roleto a cluster, you must also applythe DiskCreator role on an entiredata center, or on specificstorage domains.
TemplateCreator Can create, edit, manage andremove virtual machine templateswithin assigned resources.
This role is not applied to aspecific template; apply this roleto a user for the wholeenvironment with the Configurewindow. Alternatively apply thisrole for specific data centers,clusters, or storage domains.
DiskCreator Can create, edit, manage andremove virtual disks withinassigned clusters or data centers.
This role is not applied to aspecific virtual disk; apply this roleto a user for the wholeenvironment with the Configurewindow. Alternatively apply thisrole for specific data centers orstorage domains.
TemplateOwner Can edit and delete the template,assign and manage userpermissions for the template.
This role is automatically assignedto the user who creates atemplate. Other users who do nothave TemplateOwnerpermissions on a template cannotview or use the template.
VnicProfileUser Logical network and networkinterface user for virtual machineand template.
Can attach or detach networkinterfaces from specific logicalnetworks.
Role Privileges Notes
1.1.2.4. Administrator Roles Explained
The table below describes basic administrator roles which confer permissions to access and configureresources in the Administration Portal.
Red Hat Virtualization 4.4 Administration Guide
10

Table 1.3. Red Hat Virtualization System Administrator Roles - Basic
Role Privileges Notes
SuperUser System Administrator of the RedHat Virtualization environment.
Has full permissions across allobjects and levels, can manage allobjects across all data centers.
ClusterAdmin Cluster Administrator. Possesses administrativepermissions for all objectsunderneath a specific cluster.
DataCenterAdmin Data Center Administrator. Possesses administrativepermissions for all objectsunderneath a specific data centerexcept for storage.
IMPORTANT
Do not use the administrative user for the directory server as the Red Hat Virtualizationadministrative user. Create a user in the directory server specifically for use as the RedHat Virtualization administrative user.
The table below describes advanced administrator roles which allow you to do more fine tuning ofpermissions for resources in the Administration Portal.
Table 1.4. Red Hat Virtualization System Administrator Roles - Advanced
Role Privileges Notes
TemplateAdmin Administrator of a virtual machinetemplate.
Can create, delete, and configurethe storage domains and networkdetails of templates, and movetemplates between domains.
StorageAdmin Storage Administrator. Can create, delete, configure, andmanage an assigned storagedomain.
HostAdmin Host Administrator. Can attach, remove, configure,and manage a specific host.
NetworkAdmin Network Administrator. Can configure and manage thenetwork of a particular datacenter or cluster. A networkadministrator of a data center orcluster inherits networkpermissions for virtual poolswithin the cluster.
CHAPTER 1. ADMINISTERING AND MAINTAINING THE RED HAT VIRTUALIZATION ENVIRONMENT
11

VmPoolAdmin System Administrator of a virtualpool.
Can create, delete, and configurea virtual pool; assign and removevirtual pool users; and performbasic operations on a virtualmachine in the pool.
GlusterAdmin Gluster Storage Administrator. Can create, delete, configure, andmanage Gluster storage volumes.
VmImporterExporter Import and export Administratorof a virtual machine.
Can import and export virtualmachines. Able to view all virtualmachines and templates exportedby other users.
Role Privileges Notes
1.1.2.5. Assigning an Administrator or User Role to a Resource
Assign administrator or user roles to resources to allow users to access or manage that resource.
Procedure
1. Find and click the resource’s name. This opens the details view.
2. Click the Permissions tab to list the assigned users, each user’s role, and the inheritedpermissions for the selected resource.
3. Click Add.
4. Enter the name or user name of an existing user into the Search text box and click Go. Select auser from the resulting list of possible matches.
5. Select a role from the Role to Assign drop-down list.
6. Click OK.
The user now has the inherited permissions of that role enabled for that resource.
IMPORTANT
Red Hat Virtualization 4.4 Administration Guide
12

IMPORTANT
Avoid assigning global permissions to regular users on resources such as clusters becausepermissions are automatically inherited by resources that are lower in a system’shierarchy. Set UserRole and all other user role permissions on specific resources such asvirtual machines, pools or virtual machine pools, especially the latter.
Assigning global permissions can cause two problems due to the inheritance ofpermissions:
A regular user can automatically be granted permission to control virtual machinepools, even if the administrator assigning permissions did not intend for this tohappen.
The virtual machine portal might behave unexpectedly with pools.
Therefore, it is strongly recommended to set UserRole and all other user role permissionson specific resources only, especially virtual machine pool resources, and not onresources from which other resources inherit permissions.
1.1.2.6. Removing an Administrator or User Role from a Resource
Remove an administrator or user role from a resource; the user loses the inherited permissionsassociated with the role for that resource.
Procedure
1. Find and click the resource’s name. This opens the details view.
2. Click the Permissions tab to list the assigned users, the user’s role, and the inheritedpermissions for the selected resource.
3. Select the user to remove from the resource.
4. Click Remove.
5. Click OK.
1.1.2.7. Managing System Permissions for a Data Center
As the SuperUser, the system administrator manages all aspects of the Administration Portal. Morespecific administrative roles can be assigned to other users. These restricted administrator roles areuseful for granting a user administrative privileges that limit them to a specific resource. For example, aDataCenterAdmin role has administrator privileges only for the assigned data center with the exceptionof the storage for that data center, and a ClusterAdmin has administrator privileges only for theassigned cluster.
A data center administrator is a system administration role for a specific data center only. This is useful invirtualization environments with multiple data centers where each data center requires an administrator.The DataCenterAdmin role is a hierarchical model; a user assigned the data center administrator rolefor a data center can manage all objects in the data center with the exception of storage for that datacenter. Use the Configure button in the header bar to assign a data center administrator for all datacenters in the environment.
The data center administrator role permits the following actions:
CHAPTER 1. ADMINISTERING AND MAINTAINING THE RED HAT VIRTUALIZATION ENVIRONMENT
13

Create and remove clusters associated with the data center.
Add and remove hosts, virtual machines, and pools associated with the data center.
Edit user permissions for virtual machines associated with the data center.
NOTE
You can only assign roles and permissions to existing users.
You can change the system administrator of a data center by removing the existing systemadministrator and adding the new system administrator.
1.1.2.8. Data Center Administrator Roles Explained
Data Center Permission Roles
The table below describes the administrator roles and privileges applicable to data center administration.
Table 1.5. Red Hat Virtualization System Administrator Roles
Role Privileges Notes
DataCenterAdmin Data Center Administrator Can use, create, delete, manageall physical and virtual resourceswithin a specific data centerexcept for storage, includingclusters, hosts, templates andvirtual machines.
NetworkAdmin Network Administrator Can configure and manage thenetwork of a particular datacenter. A network administrator ofa data center inherits networkpermissions for virtual machineswithin the data center as well.
1.1.2.9. Managing System Permissions for a Cluster
As the SuperUser, the system administrator manages all aspects of the Administration Portal. Morespecific administrative roles can be assigned to other users. These restricted administrator roles areuseful for granting a user administrative privileges that limit them to a specific resource. For example, aDataCenterAdmin role has administrator privileges only for the assigned data center with the exceptionof the storage for that data center, and a ClusterAdmin has administrator privileges only for theassigned cluster.
A cluster administrator is a system administration role for a specific cluster only. This is useful in datacenters with multiple clusters, where each cluster requires a system administrator. The ClusterAdminrole is a hierarchical model: a user assigned the cluster administrator role for a cluster can manage allobjects in the cluster. Use the Configure button in the header bar to assign a cluster administrator for allclusters in the environment.
The cluster administrator role permits the following actions:
Red Hat Virtualization 4.4 Administration Guide
14

Create and remove associated clusters.
Add and remove hosts, virtual machines, and pools associated with the cluster.
Edit user permissions for virtual machines associated with the cluster.
NOTE
You can only assign roles and permissions to existing users.
You can also change the system administrator of a cluster by removing the existing systemadministrator and adding the new system administrator.
1.1.2.10. Cluster Administrator Roles Explained
Cluster Permission Roles
The table below describes the administrator roles and privileges applicable to cluster administration.
Table 1.6. Red Hat Virtualization System Administrator Roles
Role Privileges Notes
ClusterAdmin Cluster Administrator Can use, create, delete, manageall physical and virtual resourcesin a specific cluster, includinghosts, templates and virtualmachines. Can configure networkproperties within the cluster suchas designating display networks,or marking a network as requiredor non-required.
However, a ClusterAdmin doesnot have permissions to attach ordetach networks from a cluster,to do so NetworkAdminpermissions are required.
NetworkAdmin Network Administrator Can configure and manage thenetwork of a particular cluster. Anetwork administrator of a clusterinherits network permissions forvirtual machines within the clusteras well.
1.1.2.11. Managing System Permissions for a Network
As the SuperUser, the system administrator manages all aspects of the Administration Portal. Morespecific administrative roles can be assigned to other users. These restricted administrator roles areuseful for granting a user administrative privileges that limit them to a specific resource. For example, aDataCenterAdmin role has administrator privileges only for the assigned data center with the exceptionof the storage for that data center, and a ClusterAdmin has administrator privileges only for theassigned cluster.
CHAPTER 1. ADMINISTERING AND MAINTAINING THE RED HAT VIRTUALIZATION ENVIRONMENT
15

A network administrator is a system administration role that can be applied for a specific network, or forall networks on a data center, cluster, host, virtual machine, or template. A network user can performlimited administration roles, such as viewing and attaching networks on a specific virtual machine ortemplate. You can use the Configure button in the header bar to assign a network administrator for allnetworks in the environment.
The network administrator role permits the following actions:
Create, edit and remove networks.
Edit the configuration of the network, including configuring port mirroring.
Attach and detach networks from resources including clusters and virtual machines.
The user who creates a network is automatically assigned NetworkAdmin permissions on the creatednetwork. You can also change the administrator of a network by removing the existing administrator andadding the new administrator.
1.1.2.12. Network Administrator and User Roles Explained
Network Permission Roles
The table below describes the administrator and user roles and privileges applicable to networkadministration.
Table 1.7. Red Hat Virtualization Network Administrator and User Roles
Role Privileges Notes
NetworkAdmin Network Administrator for datacenter, cluster, host, virtualmachine, or template. The userwho creates a network isautomatically assignedNetworkAdmin permissions onthe created network.
Can configure and manage thenetwork of a particular datacenter, cluster, host, virtualmachine, or template. A networkadministrator of a data center orcluster inherits networkpermissions for virtual poolswithin the cluster. To configureport mirroring on a virtualmachine network, apply theNetworkAdmin role on thenetwork and theUserVmManager role on thevirtual machine.
VnicProfileUser Logical network and networkinterface user for virtual machineand template.
Can attach or detach networkinterfaces from specific logicalnetworks.
1.1.2.13. Managing System Permissions for a Host
As the SuperUser, the system administrator manages all aspects of the Administration Portal. Morespecific administrative roles can be assigned to other users. These restricted administrator roles areuseful for granting a user administrative privileges that limit them to a specific resource. For example, a
Red Hat Virtualization 4.4 Administration Guide
16

DataCenterAdmin role has administrator privileges only for the assigned data center with the exceptionof the storage for that data center, and a ClusterAdmin has administrator privileges only for theassigned cluster.
A host administrator is a system administration role for a specific host only. This is useful in clusters withmultiple hosts, where each host requires a system administrator. You can use the Configure button inthe header bar to assign a host administrator for all hosts in the environment.
The host administrator role permits the following actions:
Edit the configuration of the host.
Set up the logical networks.
Remove the host.
You can also change the system administrator of a host by removing the existing system administratorand adding the new system administrator.
1.1.2.14. Host Administrator Roles Explained
Host Permission Roles
The table below describes the administrator roles and privileges applicable to host administration.
Table 1.8. Red Hat Virtualization System Administrator Roles
Role Privileges Notes
HostAdmin Host Administrator Can configure, manage, andremove a specific host. Can alsoperform network-relatedoperations on a specific host.
1.1.2.15. Managing System Permissions for a Storage Domain
As the SuperUser, the system administrator manages all aspects of the Administration Portal. Morespecific administrative roles can be assigned to other users. These restricted administrator roles areuseful for granting a user administrative privileges that limit them to a specific resource. For example, aDataCenterAdmin role has administrator privileges only for the assigned data center with the exceptionof the storage for that data center, and a ClusterAdmin has administrator privileges only for theassigned cluster.
A storage administrator is a system administration role for a specific storage domain only. This is usefulin data centers with multiple storage domains, where each storage domain requires a systemadministrator. Use the Configure button in the header bar to assign a storage administrator for allstorage domains in the environment.
The storage domain administrator role permits the following actions:
Edit the configuration of the storage domain.
Move the storage domain into maintenance mode.
Remove the storage domain.
CHAPTER 1. ADMINISTERING AND MAINTAINING THE RED HAT VIRTUALIZATION ENVIRONMENT
17

NOTE
You can only assign roles and permissions to existing users.
You can also change the system administrator of a storage domain by removing the existing systemadministrator and adding the new system administrator.
1.1.2.16. Storage Administrator Roles Explained
Storage Domain Permission Roles
The table below describes the administrator roles and privileges applicable to storage domainadministration.
Table 1.9. Red Hat Virtualization System Administrator Roles
Role Privileges Notes
StorageAdmin Storage Administrator Can create, delete, configure andmanage a specific storagedomain.
GlusterAdmin Gluster Storage Administrator Can create, delete, configure andmanage Gluster storage volumes.
1.1.2.17. Managing System Permissions for a Virtual Machine Pool
As the SuperUser, the system administrator manages all aspects of the Administration Portal. Morespecific administrative roles can be assigned to other users. These restricted administrator roles areuseful for granting a user administrative privileges that limit them to a specific resource. For example, aDataCenterAdmin role has administrator privileges only for the assigned data center with the exceptionof the storage for that data center, and a ClusterAdmin has administrator privileges only for theassigned cluster.
A virtual machine pool administrator is a system administration role for virtual machine pools in a datacenter. This role can be applied to specific virtual machine pools, to a data center, or to the wholevirtualized environment; this is useful to allow different users to manage certain virtual machine poolresources.
The virtual machine pool administrator role permits the following actions:
Create, edit, and remove pools.
Add and detach virtual machines from the pool.
NOTE
You can only assign roles and permissions to existing users.
1.1.2.18. Virtual Machine Pool Administrator Roles Explained
Pool Permission Roles
Red Hat Virtualization 4.4 Administration Guide
18

The table below describes the administrator roles and privileges applicable to pool administration.
Table 1.10. Red Hat Virtualization System Administrator Roles
Role Privileges Notes
VmPoolAdmin System Administrator role of avirtual pool.
Can create, delete, and configurea virtual pool, assign and removevirtual pool users, and performbasic operations on a virtualmachine.
ClusterAdmin Cluster Administrator Can use, create, delete, manageall virtual machine pools in aspecific cluster.
1.1.2.19. Managing System Permissions for a Virtual Disk
As the SuperUser, the system administrator manages all aspects of the Administration Portal. Morespecific administrative roles can be assigned to other users. These restricted administrator roles areuseful for granting a user administrative privileges that limit them to a specific resource. For example, aDataCenterAdmin role has administrator privileges only for the assigned data center with the exceptionof the storage for that data center, and a ClusterAdmin has administrator privileges only for theassigned cluster.
Red Hat Virtualization Manager provides two default virtual disk user roles, but no default virtual diskadministrator roles. One of these user roles, the DiskCreator role, enables the administration of virtualdisks from the VM Portal. This role can be applied to specific virtual machines, to a data center, to aspecific storage domain, or to the whole virtualized environment; this is useful to allow different users tomanage different virtual resources.
The virtual disk creator role permits the following actions:
Create, edit, and remove virtual disks associated with a virtual machine or other resources.
Edit user permissions for virtual disks.
NOTE
You can only assign roles and permissions to existing users.
1.1.2.20. Virtual Disk User Roles Explained
Virtual Disk User Permission Roles
The table below describes the user roles and privileges applicable to using and administrating virtualdisks in the VM Portal.
Table 1.11. Red Hat Virtualization System Administrator Roles
Role Privileges Notes
CHAPTER 1. ADMINISTERING AND MAINTAINING THE RED HAT VIRTUALIZATION ENVIRONMENT
19

DiskOperator Virtual disk user. Can use, view and edit virtualdisks. Inherits permissions to usethe virtual machine to which thevirtual disk is attached.
DiskCreator Can create, edit, manage andremove virtual disks withinassigned clusters or data centers.
This role is not applied to aspecific virtual disk; apply this roleto a user for the wholeenvironment with the Configurewindow. Alternatively apply thisrole for specific data centers,clusters, or storage domains.
Role Privileges Notes
1.1.2.20.1. Setting a Legacy SPICE Cipher
SPICE consoles use FIPS-compliant encryption by default, with a cipher string. The default SPICEcipher string is: kECDHE+FIPS:kDHE+FIPS:kRSA+FIPS:!eNULL:!aNULL
This string is generally sufficient. However, if you have a virtual machine with an older operating systemor SPICE client, where either one or the other does not support FIPS-compliant encryption, you mustuse a weaker cipher string. Otherwise, a connection security error may occur if you install a new cluster ora new host in an existing cluster and try to connect to that virtual machine.
You can change the cipher string by using an Ansible playbook.
Changing the cipher string
1. On the Manager machine, create a file in the directory /usr/share/ovirt-engine/playbooks. Forexample:
2. Enter the following in the file and save it:
3. Run the file you just created:
Alternatively, you can reconfigure the host with the Ansible playbook ovirt-host-deploy using the --extra-vars option with the variable host_deploy_spice_cipher_string:
# vim /usr/share/ovirt-engine/playbooks/change-spice-cipher.yml
name: oVirt - setup weaker SPICE encryption for old clientshosts: hostnamevars: host_deploy_spice_cipher_string: 'DEFAULT:-RC4:-3DES:-DES'roles: - ovirt-host-deploy-spice-encryption
# ansible-playbook -l hostname /usr/share/ovirt-engine/playbooks/change-spice-cipher.yml
# ansible-playbook -l hostname \ --extra-vars host_deploy_spice_cipher_string=”DEFAULT:-RC4:-3DES:-DES” \ /usr/share/ovirt-engine/playbooks/ovirt-host-deploy.yml
Red Hat Virtualization 4.4 Administration Guide
20

1.1.3. Scheduling Policies
A scheduling policy is a set of rules that defines the logic by which virtual machines are distributedamongst hosts in the cluster that scheduling policy is applied to. Scheduling policies determine this logicvia a combination of filters, weightings, and a load balancing policy. The filter modules apply hardenforcement and filter out hosts that do not meet the conditions specified by that filter. The weightsmodules apply soft enforcement, and are used to control the relative priority of factors considered whendetermining the hosts in a cluster on which a virtual machine can run.
The Red Hat Virtualization Manager provides five default scheduling policies: Evenly_Distributed,Cluster_Maintenance, None, Power_Saving, and VM_Evenly_Distributed. You can also define newscheduling policies that provide fine-grained control over the distribution of virtual machines.Regardless of the scheduling policy, a virtual machine will not start on a host with an overloaded CPU. Bydefault, a host’s CPU is considered overloaded if it has a load of more than 80% for 5 minutes, but thesevalues can be changed using scheduling policies. See Scheduling Policies in the Administration Guide formore information about the properties of each scheduling policy.
For detailed information about how scheduling policies work, see How does cluster scheduling policywork?.
Figure 1.4. Evenly Distributed Scheduling Policy
The Evenly_Distributed scheduling policy distributes the memory and CPU processing load evenlyacross all hosts in the cluster. Additional virtual machines attached to a host will not start if that host hasreached the defined CpuOverCommitDurationMinutes, HighUtilization, orMaxFreeMemoryForOverUtilized.
The VM_Evenly_Distributed scheduling policy distributes virtual machines evenly between hosts basedon a count of the virtual machines. The cluster is considered unbalanced if any host is running morevirtual machines than the HighVmCount and there is at least one host with a virtual machine count thatfalls outside of the MigrationThreshold.
Figure 1.5. Power Saving Scheduling Policy
CHAPTER 1. ADMINISTERING AND MAINTAINING THE RED HAT VIRTUALIZATION ENVIRONMENT
21

Figure 1.5. Power Saving Scheduling Policy
The Power_Saving scheduling policy distributes the memory and CPU processing load across a subsetof available hosts to reduce power consumption on underutilized hosts. Hosts with a CPU load below thelow utilization value for longer than the defined time interval will migrate all virtual machines to otherhosts so that it can be powered down. Additional virtual machines attached to a host will not start if thathost has reached the defined high utilization value.
Set the None policy to have no load or power sharing between hosts for running virtual machines. This isthe default mode. When a virtual machine is started, the memory and CPU processing load is spreadevenly across all hosts in the cluster. Additional virtual machines attached to a host will not start if thathost has reached the defined CpuOverCommitDurationMinutes, HighUtilization, orMaxFreeMemoryForOverUtilized.
The Cluster_Maintenance scheduling policy limits activity in a cluster during maintenance tasks. Whenthe Cluster_Maintenance policy is set, no new virtual machines may be started, except highly availablevirtual machines. If host failure occurs, highly available virtual machines will restart properly and anyvirtual machine can migrate.
1.1.3.1. Creating a Scheduling Policy
You can create new scheduling policies to control the logic by which virtual machines are distributedamongst a given cluster in your Red Hat Virtualization environment.
Procedure
1. Click Administration → Configure.
2. Click the Scheduling Policies tab.
3. Click New.
4. Enter a Name and Description for the scheduling policy.
5. Configure filter modules:
a. In the Filter Modules section, drag and drop the preferred filter modules to apply to thescheduling policy from the Disabled Filters section into the Enabled Filters section.
b. Specific filter modules can also be set as the First, to be given highest priority, or Last, tobe given lowest priority, for basic optimization. To set the priority, right-click any filtermodule, hover the cursor over Position and select First or Last.
Red Hat Virtualization 4.4 Administration Guide
22

6. Configure weight modules:
a. In the Weights Modules section, drag and drop the preferred weights modules to apply tothe scheduling policy from the Disabled Weights section into the Enabled Weights &Factors section.
b. Use the + and - buttons to the left of the enabled weight modules to increase or decreasethe weight of those modules.
7. Specify a load balancing policy:
a. From the drop-down menu in the Load Balancer section, select the load balancing policyto apply to the scheduling policy.
b. From the drop-down menu in the Properties section, select a load balancing property toapply to the scheduling policy and use the text field to the right of that property to specify avalue.
c. Use the + and - buttons to add or remove additional properties.
8. Click OK.
1.1.3.2. Explanation of Settings in the New Scheduling Policy and Edit Scheduling PolicyWindow
The following table details the options available in the New Scheduling Policy and Edit SchedulingPolicy windows.
Table 1.12. New Scheduling Policy and Edit Scheduling Policy Settings
Field Name Description
Name The name of the scheduling policy. This is the nameused to refer to the scheduling policy in the Red HatVirtualization Manager.
Description A description of the scheduling policy. This field isrecommended but not mandatory.
Filter Modules A set of filters for controlling the hosts on which avirtual machine in a cluster can run. Enabling a filterwill filter out hosts that do not meet the conditionsspecified by that filter, as outlined below:
ClusterInMaintenance: Virtual machinesbeing started on the host that are notconfigured for high availability filter out thehost.
CpuPinning: Hosts which do not satisfythe CPU pinning definition.
Migration: Prevents migration to the samehost.
CPUOverloaded: Hosts with CPU usagethat is above the defined HighUtilization
CHAPTER 1. ADMINISTERING AND MAINTAINING THE RED HAT VIRTUALIZATION ENVIRONMENT
23

threshold for the interval defined by theCpuOverCommitDurationMinutes.
PinToHost: Hosts other than the host towhich the virtual machine is pinned.
CPU-Level: Hosts that do not meet theCPU topology of the virtual machine.
VmAffinityGroups: Hosts that do notmeet the affinity rules defined for the virtualmachine.
NUMA: Hosts that do not have NUMAnodes that can accommodate the virtualmachine vNUMA nodes in terms ofresources.
InClusterUpgrade: Hosts that are runningan earlier version of the operating systemthan the host that the virtual machinecurrently runs on.
MDevice: Hosts that do not provide therequired mediated device (mDev).
Memory: Hosts that do not have sufficientmemory to run the virtual machine.
CPU: Hosts with fewer CPUs than thenumber assigned to the virtual machine.
HostedEnginesSpares: Reserves spacefor the Manager virtual machine on aspecified number of self-hosted enginenodes.
Swap: Hosts that are not swapping withinthe threshold.
VM leases ready: Hosts that do notsupport virtual machines configured withstorage leases.
VmToHostsAffinityGroups: Group ofhosts that do not meet the conditionsspecified for a virtual machine that is amember of an affinity group. For example,that virtual machines in an affinity groupmust run on one of the hosts in a group oron a separate host that is excluded from thegroup.
HostDevice: Hosts that do not supporthost devices required by the virtualmachine.
HA: Forces the Manager virtual machine ina self-hosted engine environment to runonly on hosts with a positive high availabilityscore.
Emulated-Machine: Hosts which do nothave proper emulated machine support.
HugePages: Hosts that do not meet the
Field Name Description
Red Hat Virtualization 4.4 Administration Guide
24
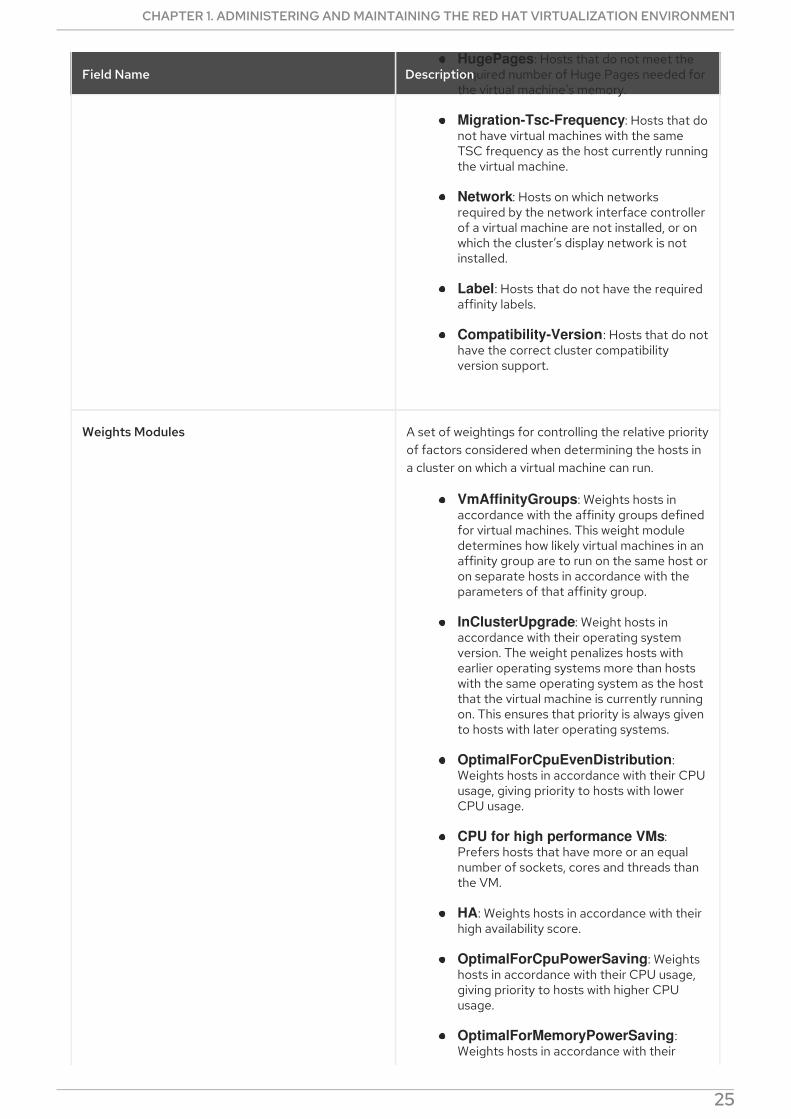
HugePages: Hosts that do not meet therequired number of Huge Pages needed forthe virtual machine’s memory.
Migration-Tsc-Frequency: Hosts that donot have virtual machines with the sameTSC frequency as the host currently runningthe virtual machine.
Network: Hosts on which networksrequired by the network interface controllerof a virtual machine are not installed, or onwhich the cluster’s display network is notinstalled.
Label: Hosts that do not have the requiredaffinity labels.
Compatibility-Version: Hosts that do nothave the correct cluster compatibilityversion support.
Weights Modules A set of weightings for controlling the relative priorityof factors considered when determining the hosts ina cluster on which a virtual machine can run.
VmAffinityGroups: Weights hosts inaccordance with the affinity groups definedfor virtual machines. This weight moduledetermines how likely virtual machines in anaffinity group are to run on the same host oron separate hosts in accordance with theparameters of that affinity group.
InClusterUpgrade: Weight hosts inaccordance with their operating systemversion. The weight penalizes hosts withearlier operating systems more than hostswith the same operating system as the hostthat the virtual machine is currently runningon. This ensures that priority is always givento hosts with later operating systems.
OptimalForCpuEvenDistribution:Weights hosts in accordance with their CPUusage, giving priority to hosts with lowerCPU usage.
CPU for high performance VMs:Prefers hosts that have more or an equalnumber of sockets, cores and threads thanthe VM.
HA: Weights hosts in accordance with theirhigh availability score.
OptimalForCpuPowerSaving: Weightshosts in accordance with their CPU usage,giving priority to hosts with higher CPUusage.
OptimalForMemoryPowerSaving:Weights hosts in accordance with their
Field Name Description
CHAPTER 1. ADMINISTERING AND MAINTAINING THE RED HAT VIRTUALIZATION ENVIRONMENT
25

memory usage, giving priority to hosts withlower available memory.
CPU and NUMA pinning compatibility: Weights hosts inaccordance to pinning compatibility. When avirtual machine has both vNUMA andpinning defined, this weight module givespreference to hosts whose CPU pinningdoes not clash with the vNUMA pinning.
VmToHostsAffinityGroups: Weightshosts in accordance with the affinity groupsdefined for virtual machines. This weightmodule determines how likely virtualmachines in an affinity group are to run onone of the hosts in a group or on a separatehost that is excluded from the group.
OptimalForEvenGuestDistribution:Weights hosts in accordance with thenumber of virtual machines running on thosehosts.
OptimalForHaReservation: Weightshosts in accordance with their highavailability score.
OptimalForMemoryEvenDistribution:Weights hosts in accordance with theirmemory usage, giving priority to hosts withhigher available memory.
Fit VM to single host NUMA node:Weights hosts in accordance to whether avirtual machine fits into a single NUMAnode. When a virtual machine does not havevNUMA defined, this weight module givespreference to hosts that can fit the virtualmachine into a single physical NUMA.
PreferredHosts: Preferred hosts havepriority during virtual machine setup.
Load Balancer This drop-down menu allows you to select a loadbalancing module to apply. Load balancing modulesdetermine the logic used to migrate virtual machinesfrom hosts experiencing high usage to hostsexperiencing lower usage.
Properties This drop-down menu allows you to add or removeproperties for load balancing modules, and is onlyavailable when you have selected a load balancingmodule for the scheduling policy. No properties aredefined by default, and the properties that areavailable are specific to the load balancing modulethat is selected. Use the + and - buttons to add orremove additional properties to or from the loadbalancing module.
Field Name Description
Red Hat Virtualization 4.4 Administration Guide
26

1.1.4. Instance Types
Instance types can be used to define the hardware configuration of a virtual machine. Selecting aninstance type when creating or editing a virtual machine will automatically fill in the hardwareconfiguration fields. This allows users to create multiple virtual machines with the same hardwareconfiguration without having to manually fill in every field.
NOTE
Support for instance types is now deprecated, and will be removed in a future release.
A set of predefined instance types are available by default, as outlined in the following table:
Table 1.13. Predefined Instance Types
Name Memory vCPUs
Tiny 512 MB 1
Small 2 GB 1
Medium 4 GB 2
Large 8 GB 2
XLarge 16 GB 4
Administrators can also create, edit, and remove instance types from the Instance Types tab of theConfigure window.
Fields in the New Virtual Machine and Edit Virtual Machine windows that are bound to an instancetype have a chain link image next to them ( ). If the value of one of these fields is changed, thevirtual machine will be detached from the instance type, changing to Custom, and the chain will appearbroken ( ). However, if the value is changed back, the chain will relink and the instance type willmove back to the selected one.
1.1.4.1. Creating Instance Types
Administrators can create new instance types, which can then be selected by users when creating orediting virtual machines.
Procedure
1. Click Administration → Configure.
2. Click the Instance Types tab.
3. Click New.
4. Enter a Name and Description for the instance type.
5. Click Show Advanced Options and configure the instance type’s settings as required. The
CHAPTER 1. ADMINISTERING AND MAINTAINING THE RED HAT VIRTUALIZATION ENVIRONMENT
27

settings that appear in the New Instance Type window are identical to those in the New VirtualMachine window, but with the relevant fields only. See Explanation of Settings in the NewVirtual Machine and Edit Virtual Machine Windows in the Virtual Machine Management Guide .
6. Click OK.
The new instance type will appear in the Instance Types tab in the Configure window, and can beselected from the Instance Type drop-down list when creating or editing a virtual machine.
1.1.4.2. Editing Instance Types
Administrators can edit existing instance types from the Configure window.
Procedure
1. Click Administration → Configure.
2. Click the Instance Types tab.
3. Select the instance type to be edited.
4. Click Edit.
5. Change the settings as required.
6. Click OK.
The configuration of the instance type is updated. When a new virtual machine based on this instancetype is created, or when an existing virtual machine based on this instance type is updated, the newconfiguration is applied.
Existing virtual machines based on this instance type will display fields, marked with a chain icon, that willbe updated. If the existing virtual machines were running when the instance type was changed, theorange Pending Changes icon will appear beside them and the fields with the chain icon will be updatedat the next restart.
1.1.4.3. Removing Instance Types
Procedure
1. Click Administration → Configure.
2. Click the Instance Types tab.
3. Select the instance type to be removed.
4. Click Remove.
5. If any virtual machines are based on the instance type to be removed, a warning window listingthe attached virtual machines will appear. To continue removing the instance type, select theApprove Operation check box. Otherwise click Cancel.
6. Click OK.
The instance type is removed from the Instance Types list and can no longer be used when creating a
Red Hat Virtualization 4.4 Administration Guide
28

The instance type is removed from the Instance Types list and can no longer be used when creating anew virtual machine. Any virtual machines that were attached to the removed instance type will now beattached to Custom (no instance type).
1.1.5. MAC Address Pools
MAC address pools define the range(s) of MAC addresses allocated for each cluster. A MAC addresspool is specified for each cluster. By using MAC address pools, Red Hat Virtualization can automaticallygenerate and assign MAC addresses to new virtual network devices, which helps to prevent MACaddress duplication. MAC address pools are more memory efficient when all MAC addresses related to acluster are within the range for the assigned MAC address pool.
The same MAC address pool can be shared by multiple clusters, but each cluster has a single MACaddress pool assigned. A default MAC address pool is created by Red Hat Virtualization and is used ifanother MAC address pool is not assigned. For more information about assigning MAC address pools toclusters see Creating a New Cluster .
NOTE
If more than one Red Hat Virtualization cluster shares a network, do not rely solely on thedefault MAC address pool because the virtual machines of each cluster will try to use thesame range of MAC addresses, leading to conflicts. To avoid MAC address conflicts,check the MAC address pool ranges to ensure that each cluster is assigned a unique MACaddress range.
The MAC address pool assigns the next available MAC address following the last address that wasreturned to the pool. If there are no further addresses left in the range, the search starts again from thebeginning of the range. If there are multiple MAC address ranges with available MAC addresses definedin a single MAC address pool, the ranges take turns in serving incoming requests in the same wayavailable MAC addresses are selected.
1.1.5.1. Creating MAC Address Pools
You can create new MAC address pools.
Procedure
1. Click Administration → Configure.
2. Click the MAC Address Pools tab.
3. Click Add.
4. Enter the Name and Description of the new MAC address pool.
5. Select the Allow Duplicates check box to allow a MAC address to be used multiple times in apool. The MAC address pool will not automatically use a duplicate MAC address, but enablingthe duplicates option means a user can manually use a duplicate MAC address.
NOTE
If one MAC address pool has duplicates disabled, and another has duplicatesenabled, each MAC address can be used once in the pool with duplicatesdisabled but can be used multiple times in the pool with duplicates enabled.
6. Enter the required MAC Address Ranges. To enter multiple ranges click the plus button next to
CHAPTER 1. ADMINISTERING AND MAINTAINING THE RED HAT VIRTUALIZATION ENVIRONMENT
29

6. Enter the required MAC Address Ranges. To enter multiple ranges click the plus button next tothe From and To fields.
7. Click OK.
1.1.5.2. Editing MAC Address Pools
You can edit MAC address pools to change the details, including the range of MAC addresses availablein the pool and whether duplicates are allowed.
Procedure
1. Click Administration → Configure.
2. Click the MAC Address Pools tab.
3. Select the MAC address pool to be edited.
4. Click Edit.
5. Change the Name, Description, Allow Duplicates, and MAC Address Ranges fields asrequired.
NOTE
When a MAC address range is updated, the MAC addresses of existing NICs arenot reassigned. MAC addresses that were already assigned, but are outside of thenew MAC address range, are added as user-specified MAC addresses and are stilltracked by that MAC address pool.
6. Click OK.
1.1.5.3. Editing MAC Address Pool Permissions
After a MAC address pool has been created, you can edit its user permissions. The user permissionscontrol which data centers can use the MAC address pool. See Roles for more information on addingnew user permissions.
Procedure
1. Click Administration → Configure.
2. Click the MAC Address Pools tab.
3. Select the required MAC address pool.
4. Edit the user permissions for the MAC address pool:
To add user permissions to a MAC address pool:
a. Click Add in the user permissions pane at the bottom of the Configure window.
b. Search for and select the required users.
c. Select the required role from the Role to Assign drop-down list.
Red Hat Virtualization 4.4 Administration Guide
30

d. Click OK to add the user permissions.
To remove user permissions from a MAC address pool:
a. Select the user permission to be removed in the user permissions pane at the bottom ofthe Configure window.
b. Click Remove to remove the user permissions.
1.1.5.4. Removing MAC Address Pools
You can remove a created MAC address pool if the pool is not associated with a cluster, but the defaultMAC address pool cannot be removed.
Procedure
1. Click Administration → Configure.
2. Click the MAC Address Pools tab.
3. Select the MAC address pool to be removed.
4. Click the Remove.
5. Click OK.
1.2. DASHBOARD
The Dashboard provides an overview of the Red Hat Virtualization system status by displaying asummary of Red Hat Virtualization’s resources and utilization. This summary can alert you to a problemand allows you to analyze the problem area.
The information in the dashboard is updated every 15 minutes by default from Data Warehouse, andevery 15 seconds by default by the Manager API, or whenever the Dashboard is refreshed. TheDashboard is refreshed when the user changes back from another page or when manually refreshed.The Dashboard does not automatically refresh. The inventory card information is supplied by theManager API and the utilization information is supplied by Data Warehouse. The Dashboard isimplemented as a UI plugin component, which is automatically installed and upgraded alongside theManager.
Figure 1.6. The Dashboard
CHAPTER 1. ADMINISTERING AND MAINTAINING THE RED HAT VIRTUALIZATION ENVIRONMENT
31

Figure 1.6. The Dashboard
1.2.1. Prerequisites
The Dashboard requires that Data Warehouse is installed and configured. See Installing and ConfiguringData Warehouse in the Data Warehouse Guide.
1.2.2. Global Inventory
The top section of the Dashboard provides a global inventory of the Red Hat Virtualization resourcesand includes items for data centers, clusters, hosts, storage domains, virtual machines, and events. Iconsshow the status of each resource and numbers show the quantity of the each resource with that status.
Figure 1.7. Global Inventory
The title shows the number of a type of resource and their status is displayed below the title. Clicking onthe resource title navigates to the related page in the Red Hat Virtualization Manager. The status forClusters is always displayed as N/A.
Table 1.14. Resource Status
Icon Status
None of that resource added to Red HatVirtualization.
Red Hat Virtualization 4.4 Administration Guide
32

Shows the number of a resource with a warningstatus. Clicking on the icon navigates to theappropriate page with the search limited to thatresource with a warning status. The search is limiteddifferently for each resource:
Data Centers: The search is limited to datacenters that are not operational or non-responsive.
Gluster Volumes: The search is limited togluster volumes that are powering up,paused, migrating, waiting, suspended, orpowering down.
Hosts: The search is limited to hosts thatare unassigned, in maintenance mode,installing, rebooting, preparing formaintenance, pending approval, orconnecting.
Storage Domains: The search is limited tostorage domains that are uninitialized,unattached, inactive, in maintenance mode,preparing for maintenance, detaching, oractivating.
Virtual Machines: The search is limited tovirtual machines that are powering up,paused, migrating, waiting, suspended, orpowering down.
Events: The search is limited to events withthe severity of warning.
Shows the number of a resource with an up status.Clicking on the icon navigates to the appropriatepage with the search limited to resources that are up.
Icon Status
CHAPTER 1. ADMINISTERING AND MAINTAINING THE RED HAT VIRTUALIZATION ENVIRONMENT
33

Shows the number of a resource with a down status.Clicking on the icon navigates to the appropriatepage with the search limited to resources with adown status. The search is limited differently foreach resource:
Data Centers: The search is limited to datacenters that are uninitialized, inmaintenance mode, or with a down status.
Gluster Volumes: The search is limited togluster volumes that are detached orinactive.
Hosts: The search is limited to hosts thatare non-responsive, have an error, have aninstallation error, non-operational,initializing, or down.
Storage Domains: The search is limited tostorage domains that are detached orinactive.
Virtual Machines: The search is limited tovirtual machines that are down, notresponding, or rebooting.
images:images/Dashboard_Alert.png[title="Alerticon"]
Shows the number of events with an alert status.Clicking on the icon navigates to Events with thesearch limited to events with the severity of alert.
images:images/Dashboard_Error.png[title="Erroricon"]
Shows the number of events with an error status.Clicking on the icon navigates to Events with thesearch limited to events with the severity of error.
Icon Status
1.2.3. Global Utilization
The Global Utilization section shows the system utilization of the CPU, Memory and Storage.
Figure 1.8. Global Utilization
The top section shows the percentage of the available CPU, memory or storage and the over
Red Hat Virtualization 4.4 Administration Guide
34

commit ratio. For example, the over commit ratio for the CPU is calculated by dividing thenumber of virtual cores by the number of physical cores that are available for the running virtualmachines based on the latest data in Data Warehouse.
The donut displays the usage in percentage for the CPU, memory or storage and shows theaverage usage for all hosts based on the average usage in the last 5 minutes. Hovering over asection of the donut will display the value of the selected section.
The line graph at the bottom displays the trend in the last 24 hours. Each data point shows theaverage usage for a specific hour. Hovering over a point on the graph displays the time and thepercentage used for the CPU graph and the amount of usage for the memory and storagegraphs.
1.2.3.1. Top Utilized Resources
Figure 1.9. Top Utilized Resources (Memory)
Clicking the donut in the global utilization section of the Dashboard will display a list of the top utilizedresources for the CPU, memory or storage. For CPU and memory the pop-up shows a list of the tenhosts and virtual machines with the highest usage. For storage the pop-up shows a list of the top tenutilized storage domains and virtual machines. The arrow to the right of the usage bar shows the trendof usage for that resource in the last minute.
1.2.4. Cluster Utilization
The Cluster Utilization section shows the cluster utilization for the CPU and memory in a heatmap.
Figure 1.10. Cluster Utilization
1.2.4.1. CPU
CHAPTER 1. ADMINISTERING AND MAINTAINING THE RED HAT VIRTUALIZATION ENVIRONMENT
35

The heatmap of the CPU utilization for a specific cluster that shows the average utilization of the CPUfor the last 24 hours. Hovering over the heatmap displays the cluster name. Clicking on the heatmapnavigates to Compute → Hosts and displays the results of a search on a specific cluster sorted by CPUutilization. The formula used to calculate the usage of the CPU by the cluster is the average host CPUutilization in the cluster. This is calculated by using the average host CPU utilization for each host overthe last 24 hours to find the total average usage of the CPU by the cluster.
1.2.4.2. Memory
The heatmap of the memory utilization for a specific cluster that shows the average utilization of thememory for the last 24 hours. Hovering over the heatmap displays the cluster name. Clicking on theheatmap navigates to Compute → Hosts and displays the results of a search on a specific cluster sortedby memory usage. The formula used to calculate the memory usage by the cluster is the total utilizationof the memory in the cluster in GB. This is calculated by using the average host memory utilization foreach host over the last 24 hours to find the total average usage of memory by the cluster.
1.2.5. Storage Utilization
The Storage Utilization section shows the storage utilization in a heatmap.
Figure 1.11. Storage Utilization
The heatmap shows the average utilization of the storage for the last 24 hours. The formula used tocalculate the storage usage by the cluster is the total utilization of the storage in the cluster. This iscalculated by using the average storage utilization for each host over the last 24 hours to find the totalaverage usage of the storage by the cluster. Hovering over the heatmap displays the storage domainname. Clicking on the heatmap navigates to Storage → Domains with the storage domains sorted byutilization.
1.3. SEARCHES
1.3.1. Performing Searches in Red Hat Virtualization
The Administration Portal allows you to manage thousands of resources, such as virtual machines, hosts,users, and more. To perform a search, enter the search query (free-text or syntax-based) into the
Red Hat Virtualization 4.4 Administration Guide
36

search bar, available on the main page for each resource. Search queries can be saved as bookmarks forfuture reuse, so you do not have to reenter a search query each time the specific search results arerequired. Searches are not case sensitive.
1.3.2. Search Syntax and Examples
The syntax of the search queries for Red Hat Virtualization resources is as follows:
result type: {criteria} [sortby sort_spec]
Syntax Examples
The following examples describe how the search query is used and help you to understand how Red HatVirtualization assists with building search queries.
Table 1.15. Example Search Queries
Example Result
Hosts: Vms.status = up page 2 Displays page 2 of a list of all hosts running virtualmachines that are up.
Vms: domain = qa.company.com Displays a list of all virtual machines running on thespecified domain.
Vms: users.name = Mary Displays a list of all virtual machines belonging tousers with the user name Mary.
Events: severity > normal sortby time Displays the list of all Events whose severity is higherthan Normal, sorted by time.
1.3.3. Search Auto-Completion
The Administration Portal provides auto-completion to help you create valid and powerful searchqueries. As you type each part of a search query, a drop-down list of choices for the next part of thesearch opens below the Search Bar. You can either select from the list and then continuetyping/selecting the next part of the search, or ignore the options and continue entering your querymanually.
The following table specifies by example how the Administration Portal auto-completion assists inconstructing a query:
Hosts: Vms.status = down
Table 1.16. Example Search Queries Using Auto-Completion
Input List Items Displayed Action
h Hosts (1 option only) Select Hosts or type Hosts
Hosts: All host properties Type v
CHAPTER 1. ADMINISTERING AND MAINTAINING THE RED HAT VIRTUALIZATION ENVIRONMENT
37

Hosts: v host properties starting with a v Select Vms or type Vms
Hosts: Vms All virtual machine properties Type s
Hosts: Vms.s All virtual machine propertiesbeginning with s
Select status or type status
Hosts: Vms.status =
!=
Select or type =
Hosts: Vms.status = All status values Select or type down
Input List Items Displayed Action
1.3.4. Search Result Type Options
The result type allows you to search for resources of any of the following types:
Vms for a list of virtual machines
Host for a list of hosts
Pools for a list of pools
Template for a list of templates
Events for a list of events
Users for a list of users
Cluster for a list of clusters
DataCenter for a list of data centers
Storage for a list of storage domains
As each type of resource has a unique set of properties and a set of other resource types that it isassociated with, each search type has a set of valid syntax combinations. You can also use the auto-complete feature to create valid queries easily.
1.3.5. Search Criteria
You can specify the search criteria after the colon in the query. The syntax of {criteria} is as follows:
<prop><operator><value>
or
<obj-type><prop><operator><value>
Examples
Red Hat Virtualization 4.4 Administration Guide
38

The following table describes the parts of the syntax:
Table 1.17. Example Search Criteria
Part Description Values Example Note
prop The property ofthe searched-forresource. Can alsobe the property ofa resource type(see obj-type), ortag (custom tag).
Limit your searchto objects with acertain property.For example,search for objectswith a statusproperty.
Status N/A
obj-type A resource typethat can beassociated withthe searched-forresource.
These are systemobjects, like datacenters and virtualmachines.
Users N/A
operator Comparisonoperators.
=
!= (not equal)
>
<
>=
<=
N/A Value optionsdepend onproperty.
CHAPTER 1. ADMINISTERING AND MAINTAINING THE RED HAT VIRTUALIZATION ENVIRONMENT
39

Value What theexpression is beingcompared to.
String
Integer
Ranking
Date (formattedaccording toRegional Settings)
Jones
256
normal
Wildcardscan beusedwithinstrings.
"" (twosets ofquotationmarkswith nospacebetweenthem)can beused torepresentan un-initialized(empty)string.
Doublequotesshould beusedaround astring ordatecontaining spaces
Part Description Values Example Note
1.3.6. Search: Multiple Criteria and Wildcards
Wildcards can be used in the <value> part of the syntax for strings. For example, to find all usersbeginning with m, enter m*.
You can perform a search having two criteria by using the Boolean operators AND and OR. For example:
Vms: users.name = m* AND status = Up
This query returns all running virtual machines for users whose names begin with "m".
Vms: users.name = m* AND tag = "paris-loc"
This query returns all virtual machines tagged with "paris-loc" for users whose names begin with "m".
When two criteria are specified without AND or OR, AND is implied. AND precedes OR, and ORprecedes implied AND.
1.3.7. Search: Determining Search Order
You can determine the sort order of the returned information by using sortby. Sort direction (asc forascending, desc for descending) can be included.
Red Hat Virtualization 4.4 Administration Guide
40

For example:
events: severity > normal sortby time desc
This query returns all Events whose severity is higher than Normal, sorted by time (descending order).
1.3.8. Searching for Data Centers
The following table describes all search options for Data Centers.
Table 1.18. Searching for Data Centers
Property (of resource orresource-type)
Type Description (Reference)
Clusters.clusters-prop Depends on property type The property of the clustersassociated with the data center.
name String The name of the data center.
description String A description of the data center.
type String The type of data center.
status List The availability of the data center.
sortby List Sorts the returned results by oneof the resource properties.
page Integer The page number of results todisplay.
Example
Datacenter: type = nfs and status != up
This example returns a list of data centers with a storage type of NFS and status other than up.
1.3.9. Searching for Clusters
The following table describes all search options for clusters.
Table 1.19. Searching Clusters
Property (of resource orresource-type)
Type Description (Reference)
Datacenter.datacenter-prop Depends on property type The property of the data centerassociated with the cluster.
CHAPTER 1. ADMINISTERING AND MAINTAINING THE RED HAT VIRTUALIZATION ENVIRONMENT
41

Datacenter String The data center to which thecluster belongs.
name String The unique name that identifiesthe clusters on the network.
description String The description of the cluster.
initialized String True or False indicating the statusof the cluster.
sortby List Sorts the returned results by oneof the resource properties.
page Integer The page number of results todisplay.
Property (of resource orresource-type)
Type Description (Reference)
Example
Clusters: initialized = true or name = Default
This example returns a list of clusters which are initialized or named Default.
1.3.10. Searching for Hosts
The following table describes all search options for hosts.
Table 1.20. Searching for Hosts
Property (of resource orresource-type)
Type Description (Reference)
Vms.Vms-prop Depends on property type The property of the virtualmachines associated with thehost.
Templates.templates-prop Depends on property type The property of the templatesassociated with the host.
Events.events-prop Depends on property type The property of the eventsassociated with the host.
Users.users-prop Depends on property type The property of the usersassociated with the host.
name String The name of the host.
Red Hat Virtualization 4.4 Administration Guide
42

status List The availability of the host.
external_status String The health status of the host asreported by external systems andplug-ins.
cluster String The cluster to which the hostbelongs.
address String The unique name that identifiesthe host on the network.
cpu_usage Integer The percent of processing powerused.
mem_usage Integer The percentage of memory used.
network_usage Integer The percentage of network usage.
load Integer Jobs waiting to be executed inthe run-queue per processor, in agiven time slice.
version Integer The version number of theoperating system.
cpus Integer The number of CPUs on the host.
memory Integer The amount of memory available.
cpu_speed Integer The processing speed of the CPU.
cpu_model String The type of CPU.
active_vms Integer The number of virtual machinescurrently running.
migrating_vms Integer The number of virtual machinescurrently being migrated.
committed_mem Integer The percentage of committedmemory.
tag String The tag assigned to the host.
Property (of resource orresource-type)
Type Description (Reference)
CHAPTER 1. ADMINISTERING AND MAINTAINING THE RED HAT VIRTUALIZATION ENVIRONMENT
43
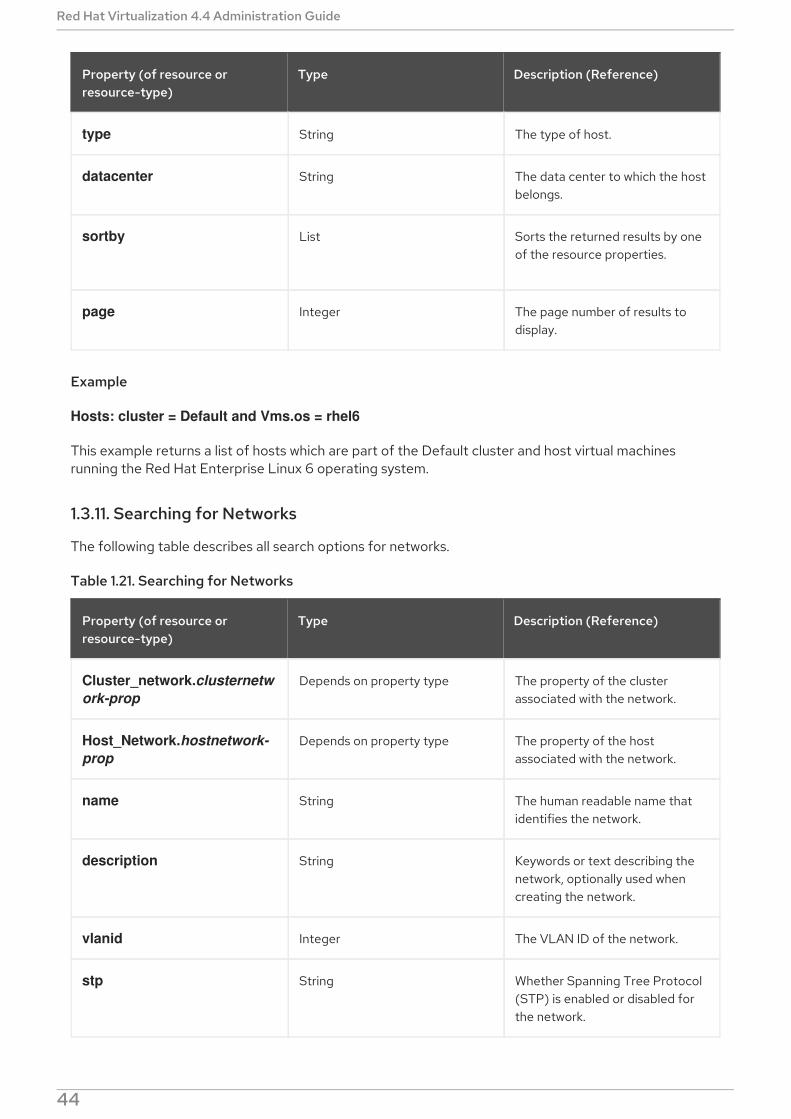
type String The type of host.
datacenter String The data center to which the hostbelongs.
sortby List Sorts the returned results by oneof the resource properties.
page Integer The page number of results todisplay.
Property (of resource orresource-type)
Type Description (Reference)
Example
Hosts: cluster = Default and Vms.os = rhel6
This example returns a list of hosts which are part of the Default cluster and host virtual machinesrunning the Red Hat Enterprise Linux 6 operating system.
1.3.11. Searching for Networks
The following table describes all search options for networks.
Table 1.21. Searching for Networks
Property (of resource orresource-type)
Type Description (Reference)
Cluster_network.clusternetwork-prop
Depends on property type The property of the clusterassociated with the network.
Host_Network.hostnetwork-prop
Depends on property type The property of the hostassociated with the network.
name String The human readable name thatidentifies the network.
description String Keywords or text describing thenetwork, optionally used whencreating the network.
vlanid Integer The VLAN ID of the network.
stp String Whether Spanning Tree Protocol(STP) is enabled or disabled forthe network.
Red Hat Virtualization 4.4 Administration Guide
44

mtu Integer The maximum transmission unitfor the logical network.
vmnetwork String Whether the network is only usedfor virtual machine traffic.
datacenter String The data center to which thenetwork is attached.
sortby List Sorts the returned results by oneof the resource properties.
page Integer The page number of results todisplay.
Property (of resource orresource-type)
Type Description (Reference)
Example
Network: mtu > 1500 and vmnetwork = true
This example returns a list of networks with a maximum transmission unit greater than 1500 bytes, andwhich are set up for use by only virtual machines.
1.3.12. Searching for Storage
The following table describes all search options for storage.
Table 1.22. Searching for Storage
Property (of resource orresource-type)
Type Description (Reference)
Hosts.hosts-prop Depends on property type The property of the hostsassociated with the storage.
Clusters.clusters-prop Depends on property type The property of the clustersassociated with the storage.
name String The unique name that identifiesthe storage on the network.
status String The status of the storage domain.
external_status String The health status of the storagedomain as reported by externalsystems and plug-ins.
CHAPTER 1. ADMINISTERING AND MAINTAINING THE RED HAT VIRTUALIZATION ENVIRONMENT
45

datacenter String The data center to which thestorage belongs.
type String The type of the storage.
free-size Integer The size (GB) of the free storage.
used-size Integer The amount (GB) of the storagethat is used.
total_size Integer The total amount (GB) of thestorage that is available.
committed Integer The amount (GB) of the storagethat is committed.
sortby List Sorts the returned results by oneof the resource properties.
page Integer The page number of results todisplay.
Property (of resource orresource-type)
Type Description (Reference)
Example
Storage: free_size > 6 GB and total_size < 20 GB
This example returns a list of storage with free storage space greater than 6 GB, or total storage spaceless than 20 GB.
1.3.13. Searching for Disks
The following table describes all search options for disks.
NOTE
You can use the Disk Type and Content Type filtering options to reduce the number ofdisplayed virtual disks.
Table 1.23. Searching for Disks
Property (of resource orresource-type)
Type Description (Reference)
Datacenters.datacenters-prop
Depends on property type The property of the data centersassociated with the disk.
Red Hat Virtualization 4.4 Administration Guide
46

Storages.storages-prop Depends on property type The property of the storageassociated with the disk.
alias String The human readable name thatidentifies the storage on thenetwork.
description String Keywords or text describing thedisk, optionally used whencreating the disk.
provisioned_size Integer The virtual size of the disk.
size Integer The size of the disk.
actual_size Integer The actual size allocated to thedisk.
creation_date Integer The date the disk was created.
bootable String Whether the disk can or cannot bebooted. Valid values are one of 0, 1, yes, or no
shareable String Whether the disk can or cannot beattached to more than one virtualmachine at a time. Valid valuesare one of 0, 1, yes, or no
format String The format of the disk. Can beone of unused, unassigned, cow, or raw.
status String The status of the disk. Can be oneof unassigned, ok, locked, invalid, or illegal.
disk_type String The type of the disk. Can be oneof image or lun.
number_of_vms Integer The number of virtual machine(s)to which the disk is attached.
vm_names String The name(s) of the virtualmachine(s) to which the disk isattached.
Property (of resource orresource-type)
Type Description (Reference)
CHAPTER 1. ADMINISTERING AND MAINTAINING THE RED HAT VIRTUALIZATION ENVIRONMENT
47

quota String The name of the quota enforcedon the virtual disk.
sortby List Sorts the returned results by oneof the resource properties.
page Integer The page number of results todisplay.
Property (of resource orresource-type)
Type Description (Reference)
Example
Disks: format = cow and provisioned_size > 8
This example returns a list of virtual disks with QCOW format and an allocated disk size greater than 8GB.
1.3.14. Searching for Volumes
The following table describes all search options for volumes.
Table 1.24. Searching for Volumes
Property (of resource orresource-type)
Type Description (Reference)
Cluster String The name of the clusterassociated with the volume.
Cluster.cluster-prop Depends on property type(examples: name, description,comment, architecture)
The property of the clustersassociated with the volume.
name String The human readable name thatidentifies the volume.
type String Can be one of distribute,replicate, distributed_replicate,stripe, or distributed_stripe.
transport_type Integer Can be one of TCP or RDMA.
replica_count Integer Number of replica.
stripe_count Integer Number of stripes.
status String The status of the volume. Can beone of Up or Down.
Red Hat Virtualization 4.4 Administration Guide
48

sortby List Sorts the returned results by oneof the resource properties.
page Integer The page number of results todisplay.
Property (of resource orresource-type)
Type Description (Reference)
Example
Volume: transport_type = rdma and stripe_count >= 2
This example returns a list of volumes with transport type set to RDMA, and with 2 or more stripes.
1.3.15. Searching for Virtual Machines
The following table describes all search options for virtual machines.
NOTE
Currently, the Network Label, Custom Emulated Machine, and Custom CPU Typeproperties are not supported search parameters.
Table 1.25. Searching for Virtual Machines
Property (of resource orresource-type)
Type Description (Reference)
Hosts.hosts-prop Depends on property type The property of the hostsassociated with the virtualmachine.
Templates.templates-prop Depends on property type The property of the templatesassociated with the virtualmachine.
Events.events-prop Depends on property type The property of the eventsassociated with the virtualmachine.
Users.users-prop Depends on property type The property of the usersassociated with the virtualmachine.
Storage.storage-prop Depends on the property type The property of storage devicesassociated with the virtualmachine.
CHAPTER 1. ADMINISTERING AND MAINTAINING THE RED HAT VIRTUALIZATION ENVIRONMENT
49

Vnic.vnic-prop Depends on the property type The property of the vNICassociated with the virtualmachine.
name String The name of the virtual machine.
status List The availability of the virtualmachine.
ip Integer The IP address of the virtualmachine.
uptime Integer The number of minutes that thevirtual machine has been running.
domain String The domain (usually ActiveDirectory domain) that groupsthese machines.
os String The operating system selectedwhen the virtual machine wascreated.
creationdate Date The date on which the virtualmachine was created.
address String The unique name that identifiesthe virtual machine on thenetwork.
cpu_usage Integer The percent of processing powerused.
mem_usage Integer The percentage of memory used.
network_usage Integer The percentage of network used.
memory Integer The maximum memory defined.
apps String The applications currentlyinstalled on the virtual machine.
cluster List The cluster to which the virtualmachine belongs.
Property (of resource orresource-type)
Type Description (Reference)
Red Hat Virtualization 4.4 Administration Guide
50

pool List The virtual machine pool to whichthe virtual machine belongs.
loggedinuser String The name of the user currentlylogged in to the virtual machine.
tag List The tags to which the virtualmachine belongs.
datacenter String The data center to which thevirtual machine belongs.
type List The virtual machine type (serveror desktop).
quota String The name of the quota associatedwith the virtual machine.
description String Keywords or text describing thevirtual machine, optionally usedwhen creating the virtual machine.
sortby List Sorts the returned results by oneof the resource properties.
page Integer The page number of results todisplay.
next_run_configuration_exists
Boolean The virtual machine has pendingconfiguration changes.
Property (of resource orresource-type)
Type Description (Reference)
Example
Vms: template.name = Win* and user.name = ""
This example returns a list of virtual machines whose base template name begins with Win and areassigned to any user.
Example
Vms: cluster = Default and os = windows7
This example returns a list of virtual machines that belong to the Default cluster and are runningWindows 7.
1.3.16. Searching for Pools
The following table describes all search options for Pools.
CHAPTER 1. ADMINISTERING AND MAINTAINING THE RED HAT VIRTUALIZATION ENVIRONMENT
51

Table 1.26. Searching for Pools
Property (of resource orresource-type)
Type Description (Reference)
name String The name of the pool.
description String The description of the pool.
type List The type of pool.
sortby List Sorts the returned results by oneof the resource properties.
page Integer The page number of results todisplay.
Example
Pools: type = automatic
This example returns a list of pools with a type of automatic.
1.3.17. Searching for Templates
The following table describes all search options for templates.
Table 1.27. Searching for Templates
Property (of resource orresource-type)
Type Description (Reference)
Vms.Vms-prop String The property of the virtualmachines associated with thetemplate.
Hosts.hosts-prop String The property of the hostsassociated with the template.
Events.events-prop String The property of the eventsassociated with the template.
Users.users-prop String The property of the usersassociated with the template.
name String The name of the template.
domain String The domain of the template.
os String The type of operating system.
Red Hat Virtualization 4.4 Administration Guide
52

creationdate Integer The date on which the templatewas created.
Date format is mm/dd/yy.
childcount Integer The number of virtual machinescreated from the template.
mem Integer Defined memory.
description String The description of the template.
status String The status of the template.
cluster String The cluster associated with thetemplate.
datacenter String The data center associated withthe template.
quota String The quota associated with thetemplate.
sortby List Sorts the returned results by oneof the resource properties.
page Integer The page number of results todisplay.
Property (of resource orresource-type)
Type Description (Reference)
Example
Template: Events.severity >= normal and Vms.uptime > 0
This example returns a list of templates where events of normal or greater severity have occurred onvirtual machines derived from the template, and the virtual machines are still running.
1.3.18. Searching for Users
The following table describes all search options for users.
Table 1.28. Searching for Users
Property (of resource orresource-type)
Type Description (Reference)
CHAPTER 1. ADMINISTERING AND MAINTAINING THE RED HAT VIRTUALIZATION ENVIRONMENT
53

Vms.Vms-prop Depends on property type The property of the virtualmachines associated with theuser.
Hosts.hosts-prop Depends on property type The property of the hostsassociated with the user.
Templates.templates-prop Depends on property type The property of the templatesassociated with the user.
Events.events-prop Depends on property type The property of the eventsassociated with the user.
name String The name of the user.
lastname String The last name of the user.
usrname String The unique name of the user.
department String The department to which the userbelongs.
group String The group to which the userbelongs.
title String The title of the user.
status String The status of the user.
role String The role of the user.
tag String The tag to which the user belongs.
pool String The pool to which the userbelongs.
sortby List Sorts the returned results by oneof the resource properties.
page Integer The page number of results todisplay.
Property (of resource orresource-type)
Type Description (Reference)
Example
Users: Events.severity > normal and Vms.status = up or Vms.status = pause
Red Hat Virtualization 4.4 Administration Guide
54

This example returns a list of users where events of greater than normal severity have occurred on theirvirtual machines AND the virtual machines are still running; or the users' virtual machines are paused.
1.3.19. Searching for Events
The following table describes all search options you can use to search for events. Auto-completion isoffered for many options as appropriate.
Table 1.29. Searching for Events
Property (of resource orresource-type)
Type Description (Reference)
Vms.Vms-prop Depends on property type The property of the virtualmachines associated with theevent.
Hosts.hosts-prop Depends on property type The property of the hostsassociated with the event.
Templates.templates-prop Depends on property type The property of the templatesassociated with the event.
Users.users-prop Depends on property type The property of the usersassociated with the event.
Clusters.clusters-prop Depends on property type The property of the clustersassociated with the event.
Volumes.Volumes-prop Depends on property type The property of the volumesassociated with the event.
type List Type of the event.
severity List The severity of the event:Warning/Error/Normal.
message String Description of the event type.
time List Day the event occurred.
usrname String The user name associated withthe event.
event_host String The host associated with theevent.
event_vm String The virtual machine associatedwith the event.
CHAPTER 1. ADMINISTERING AND MAINTAINING THE RED HAT VIRTUALIZATION ENVIRONMENT
55

event_template String The template associated with theevent.
event_storage String The storage associated with theevent.
event_datacenter String The data center associated withthe event.
event_volume String The volume associated with theevent.
correlation_id Integer The identification number of theevent.
sortby List Sorts the returned results by oneof the resource properties.
page Integer The page number of results todisplay.
Property (of resource orresource-type)
Type Description (Reference)
Example
Events: Vms.name = testdesktop and Hosts.name = gonzo.example.com
This example returns a list of events, where the event occurred on the virtual machine named testdesktop while it was running on the host gonzo.example.com.
1.4. BOOKMARKS
1.4.1. Saving a Query String as a Bookmark
A bookmark can be used to remember a search query, and shared with other users.
Procedure
1. Enter the desired search query in the search bar and perform the search.
2. Click the star-shaped Bookmark button to the right of the search bar. This opens the NewBookmark window.
3. Enter the Name of the bookmark.
4. Edit the Search string field, if required.
5. Click OK.
Red Hat Virtualization 4.4 Administration Guide
56

Click the Bookmarks icon ( ) in the header bar to find and select the bookmark.
1.4.2. Editing a Bookmark
You can modify the name and search string of a bookmark.
Procedure
1. Click the Bookmarks icon ( ) in the header bar.
2. Select a bookmark and click Edit.
3. Change the Name and Search string fields as necessary.
4. Click OK.
1.4.3. Deleting a Bookmark
When a bookmark is no longer needed, remove it.
Procedure
1. Click the Bookmarks icon ( ) in the header bar.
2. Select a bookmark and click Remove.
3. Click OK.
1.5. TAGS
1.5.1. Using Tags to Customize Interactions with Red Hat Virtualization
After your Red Hat Virtualization platform is set up and configured to your requirements, you cancustomize the way you work with it using tags. Tags allow system resources to be arranged into groupsor categories. This is useful when many objects exist in the virtualization environment and theadministrator wants to concentrate on a specific set of them.
This section describes how to create and edit tags, assign them to hosts or virtual machines and searchusing the tags as criteria. Tags can be arranged in a hierarchy that matches a structure, to fit the needsof the enterprise.
To create, modify, and remove Administration Portal tags, click the Tags icon ( ) in the header bar.
1.5.2. Creating a Tag
Create tags so you can filter search results using tags.
Procedure
1. Click the Tags icon ( ) in the header bar.
2. Click Add to create a new tag, or select a tag and click New to create a descendant tag.
CHAPTER 1. ADMINISTERING AND MAINTAINING THE RED HAT VIRTUALIZATION ENVIRONMENT
57

3. Enter the Name and Description of the new tag.
4. Click OK.
1.5.3. Modifying a Tag
You can edit the name and description of a tag.
Modifying a Tag
1. Click the Tags icon ( ) in the header bar.
2. Select the tag you want to modify and click Edit.
3. Change the Name and Description fields as necessary.
4. Click OK.
1.5.4. Deleting a Tag
When a tag is no longer needed, remove it.
Procedure
1. Click the Tags icon ( ) in the header bar.
2. Select the tag you want to delete and click Remove. A message warns you that removing thetag will also remove all descendants of the tag.
3. Click OK.
You have removed the tag and all its descendants. The tag is also removed from all the objects that itwas attached to.
1.5.5. Adding and Removing Tags to and from Objects
You can assign tags to and remove tags from hosts, virtual machines, and users.
Procedure
1. Select the object(s) you want to tag or untag.
2. Click More Actions ( ), then click Assign Tags.
3. Select the check box to assign a tag to the object, or clear the check box to detach the tag fromthe object.
4. Click OK.
The specified tag is now added or removed as a custom property of the selected object(s).
1.5.6. Searching for Objects Using Tags
Enter a search query using tag as the property and the desired value or set of values as criteria for the
Red Hat Virtualization 4.4 Administration Guide
58

Enter a search query using tag as the property and the desired value or set of values as criteria for thesearch.
The objects tagged with the specified criteria are listed in the results list.
NOTE
If you search for objects using tag as the property and the inequality operator ( !=), forexample, Host: Vms.tag!=server1, the results list does not include untagged objects.
1.5.7. Customizing Hosts with Tags
You can use tags to store information about your hosts. You can then search for hosts based on tags.For more information on searches, see Searches.
Procedure
1. Click Compute → Hosts and select a host.
2. Click More Actions ( ), then click Assign Tags.
3. Select the check boxes of applicable tags.
4. Click OK.
You have added extra, searchable information about your host as tags.
CHAPTER 1. ADMINISTERING AND MAINTAINING THE RED HAT VIRTUALIZATION ENVIRONMENT
59

CHAPTER 2. ADMINISTERING THE RESOURCES
2.1. QUALITY OF SERVICE
Red Hat Virtualization allows you to define quality of service entries that provide fine-grained controlover the level of input and output, processing, and networking capabilities that resources in yourenvironment can access. Quality of service entries are defined at the data center level and are assignedto profiles created under clusters and storage domains. These profiles are then assigned to individualresources in the clusters and storage domains where the profiles were created.
2.1.1. Storage Quality of Service
Storage quality of service defines the maximum level of throughput and the maximum level of input andoutput operations for a virtual disk in a storage domain. Assigning storage quality of service to a virtualdisk allows you to fine tune the performance of storage domains and prevent the storage operationsassociated with one virtual disk from affecting the storage capabilities available to other virtual diskshosted in the same storage domain.
2.1.1.1. Creating a Storage Quality of Service Entry
Procedure
1. Click Compute → Data Centers.
2. Click a data center’s name. This opens the details view.
3. Click the QoS tab.
4. Under Storage, click New.
5. Enter a QoS Name and a Description for the quality of service entry.
6. Specify the Throughput quality of service by clicking one of the radio buttons:
None
Total - Enter the maximum permitted total throughput in the MB/s field.
Read/Write - Enter the maximum permitted throughput for read operations in the leftMB/s field, and the maximum permitted throughput for write operations in the right MB/sfield.
7. Specify the input and output (IOps) quality of service by clicking one of the radio buttons:
None
Total - Enter the maximum permitted number of input and output operations per second inthe IOps field.
Read/Write - Enter the maximum permitted number of input operations per second in theleft IOps field, and the maximum permitted number of output operations per second in theright IOps field.
8. Click OK.
You have created a storage quality of service entry, and can create disk profiles based on that entry in
Red Hat Virtualization 4.4 Administration Guide
60

You have created a storage quality of service entry, and can create disk profiles based on that entry indata storage domains that belong to the data center.
2.1.1.2. Removing a Storage Quality of Service Entry
Remove an existing storage quality of service entry.
Procedure
1. Click Compute → Data Centers.
2. Click a data center’s name. This opens the details view.
3. Click the QoS tab.
4. Under Storage, select a storage quality of service entry and click Remove.
5. Click OK.
If any disk profiles were based on that entry, the storage quality of service entry for those profiles isautomatically set to [unlimited].
2.1.2. Virtual Machine Network Quality of Service
Virtual machine network quality of service is a feature that allows you to create profiles for limiting boththe inbound and outbound traffic of individual virtual network interface controllers. With this feature, youcan limit bandwidth in a number of layers, controlling the consumption of network resources.
2.1.2.1. Creating a Virtual Machine Network Quality of Service Entry
Create a virtual machine network quality of service entry to regulate network traffic when applied to avirtual network interface controller (vNIC) profile, also known as a virtual machine network interfaceprofile.
Creating a Virtual Machine Network Quality of Service Entry
1. Click Compute → Data Centers.
2. Click a data center’s name. This opens the details view.
3. Click the QoS tab.
4. Under VM Network, click New.
5. Enter a Name for the virtual machine network quality of service entry.
6. Enter the limits for the Inbound and Outbound network traffic.
7. Click OK.
You have created a virtual machine network quality of service entry that can be used in a virtual networkinterface controller.
2.1.2.2. Settings in the New Virtual Machine Network QoS and Edit Virtual Machine NetworkQoS Windows Explained
Virtual machine network quality of service settings allow you to configure bandwidth limits for both
CHAPTER 2. ADMINISTERING THE RESOURCES
61

Virtual machine network quality of service settings allow you to configure bandwidth limits for bothinbound and outbound traffic on three distinct levels.
Table 2.1. Virtual Machine Network QoS Settings
Field Name Description
Data Center The data center to which the virtual machine networkQoS policy is to be added. This field is configuredautomatically according to the selected data center.
Name A name to represent the virtual machine networkQoS policy within the Manager.
Inbound The settings to be applied to inbound traffic. Selector clear the Inbound check box to enable or disablethese settings.
Average: The average speed of inboundtraffic.
Peak: The speed of inbound traffic duringpeak times.
Burst: The speed of inbound traffic duringbursts.
Outbound The settings to be applied to outbound traffic. Selector clear the Outbound check box to enable or disablethese settings.
Average: The average speed of outboundtraffic.
Peak: The speed of outbound traffic duringpeak times.
Burst: The speed of outbound traffic duringbursts.
To change the maximum value allowed by the Average, Peak, or Burst fields, use the engine-configcommand to change the value of the MaxAverageNetworkQoSValue, MaxPeakNetworkQoSValue, or MaxBurstNetworkQoSValue configuration keys. You must restart the ovirt-engine service for anychanges to take effect. For example:
# engine-config -s MaxAverageNetworkQoSValue=2048# systemctl restart ovirt-engine
2.1.2.3. Removing a Virtual Machine Network Quality of Service Entry
Remove an existing virtual machine network quality of service entry.
Procedure
Red Hat Virtualization 4.4 Administration Guide
62
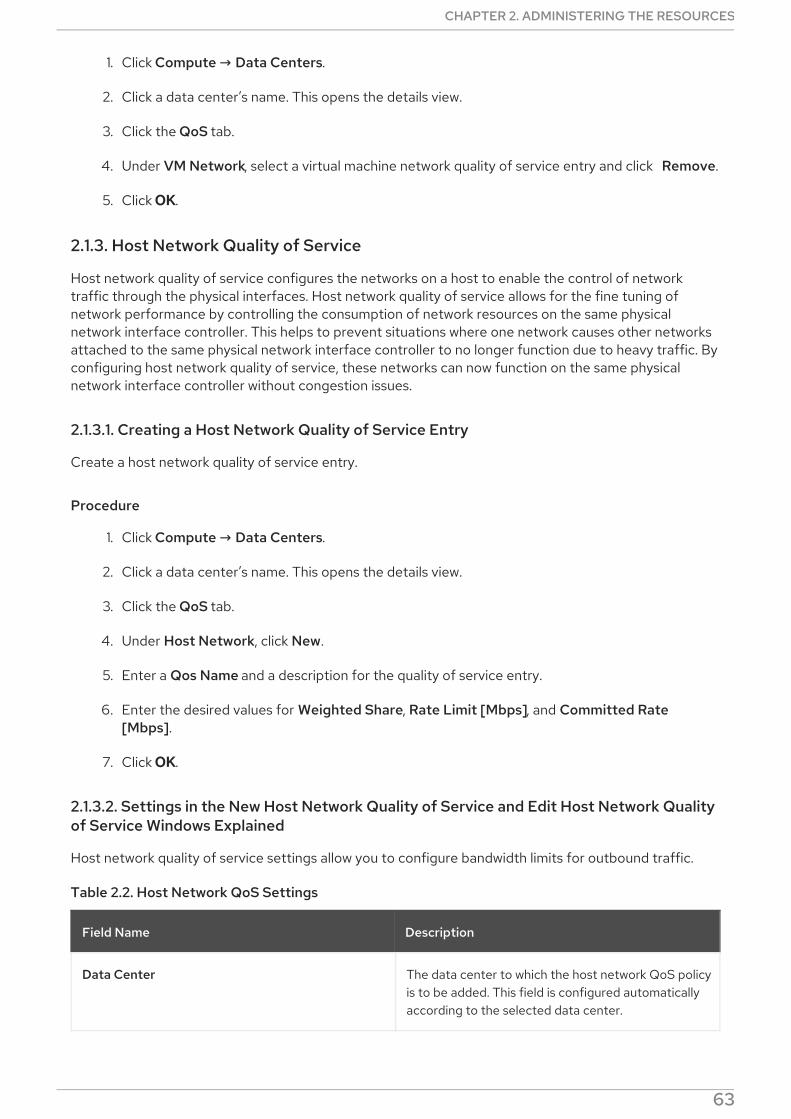
1. Click Compute → Data Centers.
2. Click a data center’s name. This opens the details view.
3. Click the QoS tab.
4. Under VM Network, select a virtual machine network quality of service entry and click Remove.
5. Click OK.
2.1.3. Host Network Quality of Service
Host network quality of service configures the networks on a host to enable the control of networktraffic through the physical interfaces. Host network quality of service allows for the fine tuning ofnetwork performance by controlling the consumption of network resources on the same physicalnetwork interface controller. This helps to prevent situations where one network causes other networksattached to the same physical network interface controller to no longer function due to heavy traffic. Byconfiguring host network quality of service, these networks can now function on the same physicalnetwork interface controller without congestion issues.
2.1.3.1. Creating a Host Network Quality of Service Entry
Create a host network quality of service entry.
Procedure
1. Click Compute → Data Centers.
2. Click a data center’s name. This opens the details view.
3. Click the QoS tab.
4. Under Host Network, click New.
5. Enter a Qos Name and a description for the quality of service entry.
6. Enter the desired values for Weighted Share, Rate Limit [Mbps], and Committed Rate[Mbps].
7. Click OK.
2.1.3.2. Settings in the New Host Network Quality of Service and Edit Host Network Qualityof Service Windows Explained
Host network quality of service settings allow you to configure bandwidth limits for outbound traffic.
Table 2.2. Host Network QoS Settings
Field Name Description
Data Center The data center to which the host network QoS policyis to be added. This field is configured automaticallyaccording to the selected data center.
CHAPTER 2. ADMINISTERING THE RESOURCES
63

QoS Name A name to represent the host network QoS policywithin the Manager.
Description A description of the host network QoS policy.
Outbound The settings to be applied to outbound traffic.
Weighted Share: Signifies how much of thelogical link’s capacity a specific networkshould be allocated, relative to the othernetworks attached to the same logical link.The exact share depends on the sum ofshares of all networks on that link. Bydefault this is a number in the range 1-100.
Rate Limit [Mbps]: The maximumbandwidth to be used by a network.
Committed Rate [Mbps]: The minimumbandwidth required by a network. TheCommitted Rate requested is notguaranteed and will vary depending on thenetwork infrastructure and the CommittedRate requested by other networks on thesame logical link.
Field Name Description
To change the maximum value allowed by the Rate Limit [Mbps] or Committed Rate [Mbps] fields, usethe engine-config command to change the value of the MaxAverageNetworkQoSValue configurationkey. You must restart the ovirt-engine service for the change to take effect. For example:
# engine-config -s MaxAverageNetworkQoSValue=2048# systemctl restart ovirt-engine
2.1.3.3. Removing a Host Network Quality of Service Entry
Remove an existing network quality of service entry.
Procedure
1. Click Compute → Data Centers.
2. Click a data center’s name. This opens the details view.
3. Click the QoS tab.
4. Under Host Network, select a host network quality of service entry and click Remove.
5. Click OK when prompted.
2.1.4. CPU Quality of Service
CPU quality of service defines the maximum amount of processing capability a virtual machine can
Red Hat Virtualization 4.4 Administration Guide
64
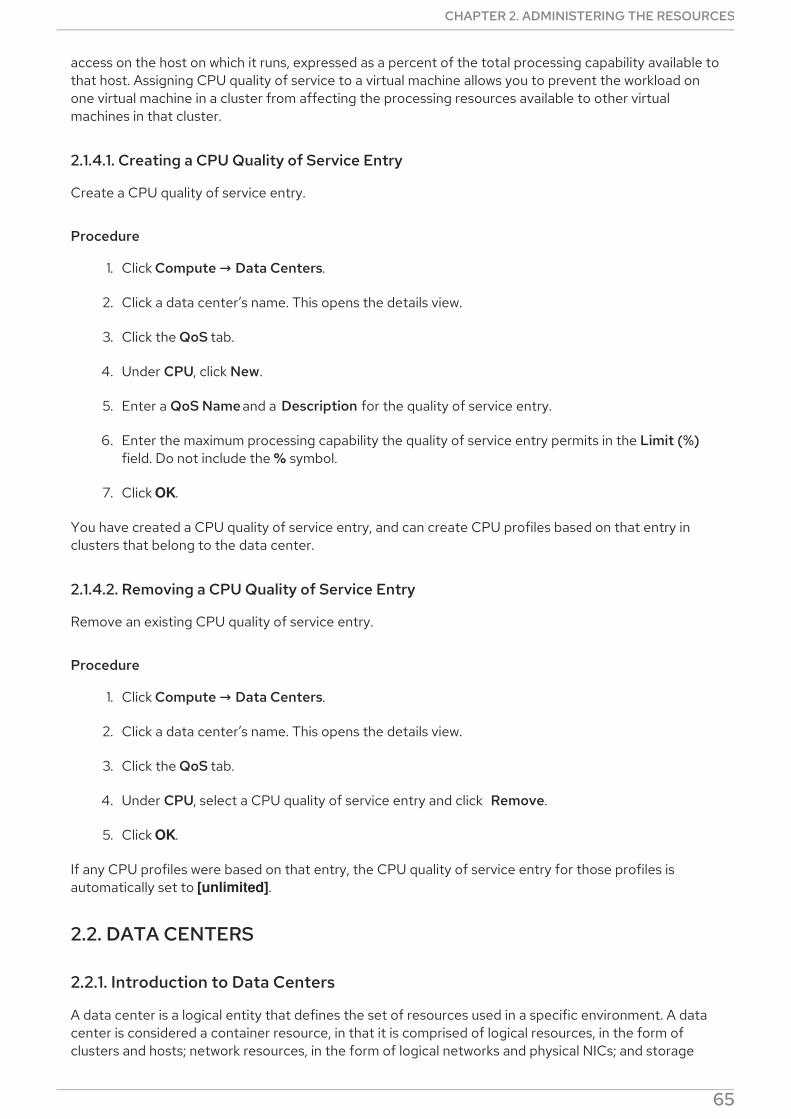
access on the host on which it runs, expressed as a percent of the total processing capability available tothat host. Assigning CPU quality of service to a virtual machine allows you to prevent the workload onone virtual machine in a cluster from affecting the processing resources available to other virtualmachines in that cluster.
2.1.4.1. Creating a CPU Quality of Service Entry
Create a CPU quality of service entry.
Procedure
1. Click Compute → Data Centers.
2. Click a data center’s name. This opens the details view.
3. Click the QoS tab.
4. Under CPU, click New.
5. Enter a QoS Name and a Description for the quality of service entry.
6. Enter the maximum processing capability the quality of service entry permits in the Limit (%)field. Do not include the % symbol.
7. Click OK.
You have created a CPU quality of service entry, and can create CPU profiles based on that entry inclusters that belong to the data center.
2.1.4.2. Removing a CPU Quality of Service Entry
Remove an existing CPU quality of service entry.
Procedure
1. Click Compute → Data Centers.
2. Click a data center’s name. This opens the details view.
3. Click the QoS tab.
4. Under CPU, select a CPU quality of service entry and click Remove.
5. Click OK.
If any CPU profiles were based on that entry, the CPU quality of service entry for those profiles isautomatically set to [unlimited].
2.2. DATA CENTERS
2.2.1. Introduction to Data Centers
A data center is a logical entity that defines the set of resources used in a specific environment. A datacenter is considered a container resource, in that it is comprised of logical resources, in the form ofclusters and hosts; network resources, in the form of logical networks and physical NICs; and storage
CHAPTER 2. ADMINISTERING THE RESOURCES
65

resources, in the form of storage domains.
A data center can contain multiple clusters, which can contain multiple hosts; it can have multiplestorage domains associated to it; and it can support multiple virtual machines on each of its hosts. A RedHat Virtualization environment can contain multiple data centers; the data center infrastructure allowsyou to keep these centers separate.
All data centers are managed from the single Administration Portal.
Figure 2.1. Data Centers
Red Hat Virtualization creates a default data center during installation. You can configure the defaultdata center, or set up new appropriately named data centers.
2.2.2. The Storage Pool Manager
The Storage Pool Manager (SPM) is a role given to one of the hosts in the data center enabling it tomanage the storage domains of the data center. The SPM entity can be run on any host in the datacenter; the Red Hat Virtualization Manager grants the role to one of the hosts. The SPM does notpreclude the host from its standard operation; a host running as SPM can still host virtual resources.
The SPM entity controls access to storage by coordinating the metadata across the storage domains.This includes creating, deleting, and manipulating virtual disks (images), snapshots, and templates, andallocating storage for sparse block devices (on SAN). This is an exclusive responsibility: only one hostcan be the SPM in the data center at one time to ensure metadata integrity.
The Red Hat Virtualization Manager ensures that the SPM is always available. The Manager moves theSPM role to a different host if the SPM host encounters problems accessing the storage. When the SPMstarts, it ensures that it is the only host granted the role; therefore it will acquire a storage-centric lease.This process can take some time.
Red Hat Virtualization 4.4 Administration Guide
66

2.2.3. SPM Priority
The SPM role uses some of a host’s available resources. The SPM priority setting of a host alters thelikelihood of the host being assigned the SPM role: a host with high SPM priority will be assigned theSPM role before a host with low SPM priority. Critical virtual machines on hosts with low SPM priority willnot have to contend with SPM operations for host resources.
You can change a host’s SPM priority in the SPM tab in the Edit Host window.
2.2.4. Data Center Tasks
2.2.4.1. Creating a New Data Center
This procedure creates a data center in your virtualization environment. The data center requires afunctioning cluster, host, and storage domain to operate.
NOTE
After you set the Compatibility Version, you cannot lower the version number. Versionregression is not supported.
You can specify a MAC pool range for a cluster. Setting a MAC pool range is no longersupported.
Procedure
1. Click Compute → Data Centers.
2. Click New.
3. Enter the Name and Description of the data center.
4. Select the Storage Type, Compatibility Version, and Quota Mode of the data center from thedrop-down menus.
5. Click OK to create the data center and open the Data Center - Guide Me window.
6. The Guide Me window lists the entities that need to be configured for the data center.Configure these entities or postpone configuration by clicking the Configure Later button.
Configuration can be resumed by selecting the data center and clicking More Actions ( ), thenclicking Guide Me.
The new data center will remain Uninitialized until a cluster, host, and storage domain are configured forit; use Guide Me to configure these entities.
2.2.4.2. Explanation of Settings in the New Data Center and Edit Data Center Windows
The table below describes the settings of a data center as displayed in the New Data Center and EditData Center windows. Invalid entries are outlined in orange when you click OK, prohibiting the changesbeing accepted. In addition, field prompts indicate the expected values or range of values.
Table 2.3. Data Center Properties
CHAPTER 2. ADMINISTERING THE RESOURCES
67

Field Description/Action
Name The name of the data center. This text field has a40-character limit and must be a unique name withany combination of uppercase and lowercase letters,numbers, hyphens, and underscores.
Description The description of the data center. This field isrecommended but not mandatory.
Storage Type Choose Shared or Local storage type.
Different types of storage domains (iSCSI, NFS, FC,POSIX, and Gluster) can be added to the same datacenter. Local and shared domains, however, cannotbe mixed.
You can change the storage type after the datacenter is initialized. See Changing the Data CenterStorage Type.
Compatibility Version The version of Red Hat Virtualization.
After upgrading the Red Hat Virtualization Manager,the hosts, clusters and data centers may still be in theearlier version. Ensure that you have upgraded all thehosts, then the clusters, before you upgrade theCompatibility Level of the data center.
Quota Mode Quota is a resource limitation tool provided with RedHat Virtualization. Choose one of:
Disabled: Select if you do not want toimplement Quota
Audit: Select if you want to edit the Quotasettings
Enforced: Select to implement Quota
Comment Optionally add a plain text comment about the datacenter.
2.2.4.3. Re-Initializing a Data Center: Recovery Procedure
This recovery procedure replaces the master data domain of your data center with a new master datadomain. You must re-initialize your master data domain if its data is corrupted. Re-initializing a datacenter allows you to restore all other resources associated with the data center, including clusters, hosts,and non-problematic storage domains.
You can import any backup or exported virtual machines or templates into your new master datadomain.
Red Hat Virtualization 4.4 Administration Guide
68

Procedure
1. Click Compute → Data Centers and select the data center.
2. Ensure that any storage domains attached to the data center are in maintenance mode.
3. Click More Actions ( ), then click Re-Initialize Data Center.
4. The Data Center Re-Initialize window lists all available (detached; in maintenance mode)storage domains. Click the radio button for the storage domain you are adding to the datacenter.
5. Select the Approve operation check box.
6. Click OK.
The storage domain is attached to the data center as the master data domain and activated. You cannow import any backup or exported virtual machines or templates into your new master data domain.
2.2.4.4. Removing a Data Center
An active host is required to remove a data center. Removing a data center will not remove theassociated resources.
Procedure
1. Ensure the storage domains attached to the data center are in maintenance mode.
2. Click Compute → Data Centers and select the data center to remove.
3. Click Remove.
4. Click OK.
2.2.4.5. Force Removing a Data Center
A data center becomes Non Responsive if the attached storage domain is corrupt or if the hostbecomes Non Responsive. You cannot Remove the data center under either circumstance.
Force Remove does not require an active host. It also permanently removes the attached storagedomain.
It may be necessary to Destroy a corrupted storage domain before you can Force Remove the datacenter.
Procedure
1. Click Compute → Data Centers and select the data center to remove.
2. Click More Actions ( ), then click Force Remove.
3. Select the Approve operation check box.
4. Click OK
The data center and attached storage domain are permanently removed from the Red Hat Virtualization
CHAPTER 2. ADMINISTERING THE RESOURCES
69

The data center and attached storage domain are permanently removed from the Red Hat Virtualizationenvironment.
2.2.4.6. Changing the Data Center Storage Type
You can change the storage type of the data center after it has been initialized. This is useful for datadomains that are used to move virtual machines or templates around.
Limitations
Shared to Local - For a data center that does not contain more than one host and more thanone cluster, since a local data center does not support it.
Local to Shared - For a data center that does not contain a local storage domain.
Procedure
1. Click Compute → Data Centers and select the data center to change.
2. Click Edit.
3. Change the Storage Type to the desired value.
4. Click OK.
2.2.4.7. Changing the Data Center Compatibility Version
Red Hat Virtualization data centers have a compatibility version. The compatibility version indicates theversion of Red Hat Virtualization with which the data center is intended to be compatible. All clusters inthe data center must support the desired compatibility level.
Prerequisites
To change the data center compatibility level, you must first update the compatibility version ofall clusters and virtual machines in the data center.
Procedure
1. In the Administration Portal, click Compute → Data Centers.
2. Select the data center to change and click Edit.
3. Change the Compatibility Version to the desired value.
4. Click OK. The Change Data Center Compatibility Version confirmation dialog opens.
5. Click OK to confirm.
2.2.5. Data Centers and Storage Domains
2.2.5.1. Attaching an Existing Data Domain to a Data Center
Data domains that are Unattached can be attached to a data center. Shared storage domains ofmultiple types (iSCSI, NFS, FC, POSIX, and Gluster) can be added to the same data center.
Red Hat Virtualization 4.4 Administration Guide
70

Procedure
1. Click Compute → Data Centers.
2. Click a data center’s name. This opens the details view.
3. Click the Storage tab to list the storage domains already attached to the data center.
4. Click Attach Data.
5. Select the check box for the data domain to attach to the data center. You can select multiplecheck boxes to attach multiple data domains.
6. Click OK.
The data domain is attached to the data center and is automatically activated.
2.2.5.2. Attaching an Existing ISO domain to a Data Center
An ISO domain that is Unattached can be attached to a data center. The ISO domain must be of thesame Storage Type as the data center.
Only one ISO domain can be attached to a data center.
Procedure
1. Click Compute → Data Centers.
2. Click a data center’s name. This opens the details view.
3. Click the Storage tab to list the storage domains already attached to the data center.
4. Click Attach ISO.
5. Click the radio button for the appropriate ISO domain.
6. Click OK.
The ISO domain is attached to the data center and is automatically activated.
2.2.5.3. Attaching an Existing Export Domain to a Data Center
NOTE
The export storage domain is deprecated. Storage data domains can be unattached froma data center and imported to another data center in the same environment, or in adifferent environment. Virtual machines, floating virtual disks, and templates can then beuploaded from the imported storage domain to the attached data center. See ImportingExisting Storage Domains for information on importing storage domains.
An export domain that is Unattached can be attached to a data center. Only one export domain can beattached to a data center.
Procedure
CHAPTER 2. ADMINISTERING THE RESOURCES
71

1. Click Compute → Data Centers.
2. Click a data center’s name. This opens the details view.
3. Click the Storage tab to list the storage domains already attached to the data center.
4. Click Attach Export.
5. Click the radio button for the appropriate export domain.
6. Click OK.
The export domain is attached to the data center and is automatically activated.
2.2.5.4. Detaching a Storage Domain from a Data Center
Detaching a storage domain from a data center stops the data center from associating with that storagedomain. The storage domain is not removed from the Red Hat Virtualization environment; it can beattached to another data center.
Data, such as virtual machines and templates, remains attached to the storage domain.
WARNING
Although it possible to detach the last master storage domain, this is notrecommended.
If the master storage domain is detached, it must be reinitialized.
If the storage domain is reinitialized, all your data will be lost, and the storagedomain might not find your disks again.
Procedure
1. Click Compute → Data Centers.
2. Click a data center’s name. This opens the details view.
3. Click the Storage tab to list the storage domains attached to the data center.
4. Select the storage domain to detach. If the storage domain is Active, click Maintenance.
5. Click OK to initiate maintenance mode.
6. Click Detach.
7. Click OK.
It can take up to several minutes for the storage domain to disappear from the details view.
2.3. CLUSTERS
Red Hat Virtualization 4.4 Administration Guide
72

2.3.1. Introduction to Clusters
A cluster is a logical grouping of hosts that share the same storage domains and have the same type ofCPU (either Intel or AMD). If the hosts have different generations of CPU models, they use only thefeatures present in all models.
Each cluster in the system must belong to a data center, and each host in the system must belong to acluster. Virtual machines are dynamically allocated to any host in a cluster and can be migrated betweenthem, according to policies defined on the cluster and settings on the virtual machines. The cluster is thehighest level at which power and load-sharing policies can be defined.
The number of hosts and number of virtual machines that belong to a cluster are displayed in the resultslist under Host Count and VM Count, respectively.
Clusters run virtual machines or Red Hat Gluster Storage Servers. These two purposes are mutuallyexclusive: A single cluster cannot support virtualization and storage hosts together.
Red Hat Virtualization creates a default cluster in the default data center during installation.
Figure 2.2. Cluster
2.3.2. Cluster Tasks
NOTE
Some cluster options do not apply to Gluster clusters. For more information about usingRed Hat Gluster Storage with Red Hat Virtualization, see Configuring Red HatVirtualization with Red Hat Gluster Storage.
2.3.2.1. Creating a New Cluster
CHAPTER 2. ADMINISTERING THE RESOURCES
73

A data center can contain multiple clusters, and a cluster can contain multiple hosts. All hosts in a clustermust have the same CPU architecture. To optimize your CPU types, create your hosts before you createyour cluster. After creating the cluster, you can configure the hosts using the Guide Me button.
Procedure
1. Click Compute → Clusters.
2. Click New.
3. Select the Data Center the cluster will belong to from the drop-down list.
4. Enter the Name and Description of the cluster.
5. Select a network from the Management Network drop-down list to assign the managementnetwork role.
6. Select the CPU Architecture.
7. For CPU Type, select the oldest CPU processor family among the hosts that will be part of thiscluster. The CPU types are listed in order from the oldest to newest.
IMPORTANT
A hosts whose CPU processor family is older than the one you specify with CPUType cannot be part of this cluster. For details, see Which CPU family should aRHEV3 or RHV4 cluster be set to?.
8. Select the FIPS Mode of the cluster from the drop-down list.
9. Select the Compatibility Version of the cluster from the drop-down list.
10. Select the Switch Type from the drop-down list.
11. Select the Firewall Type for hosts in the cluster, either Firewalld (default) or iptables.
NOTE
iptables is only supported on Red Hat Enterprise Linux 7 hosts, in clusters withcompatibility version 4.2 or 4.3. You can only add Red Hat Enterprise Linux 8hosts to clusters with firewall type firewalld
12. Select either the Enable Virt Service or Enable Gluster Service check box to define whetherthe cluster will be populated with virtual machine hosts or with Gluster-enabled nodes.
13. Optionally select the Enable to set VM maintenance reason check box to enable an optionalreason field when a virtual machine is shut down from the Manager, allowing the administrator toprovide an explanation for the maintenance.
14. Optionally select the Enable to set Host maintenance reason check box to enable an optionalreason field when a host is placed into maintenance mode from the Manager, allowing theadministrator to provide an explanation for the maintenance.
15. Optionally select the /dev/hwrng source (external hardware device) check box to specify the
Red Hat Virtualization 4.4 Administration Guide
74

15. Optionally select the /dev/hwrng source (external hardware device) check box to specify therandom number generator device that all hosts in the cluster will use. The /dev/urandomsource (Linux-provided device) is enabled by default.
16. Click the Optimization tab to select the memory page sharing threshold for the cluster, andoptionally enable CPU thread handling and memory ballooning on the hosts in the cluster.
17. Click the Migration Policy tab to define the virtual machine migration policy for the cluster.
18. Click the Scheduling Policy tab to optionally configure a scheduling policy, configure scheduleroptimization settings, enable trusted service for hosts in the cluster, enable HA Reservation, andselect a serial number policy.
19. Click the Console tab to optionally override the global SPICE proxy, if any, and specify theaddress of a SPICE proxy for hosts in the cluster.
20. Click the Fencing policy tab to enable or disable fencing in the cluster, and select fencingoptions.
21. Click the MAC Address Pool tab to specify a MAC address pool other than the default pool forthe cluster. For more options on creating, editing, or removing MAC address pools, see MACAddress Pools.
22. Click OK to create the cluster and open the Cluster - Guide Me window.
23. The Guide Me window lists the entities that need to be configured for the cluster. Configurethese entities or postpone configuration by clicking the Configure Later button. Configuration
can be resumed by selecting the cluster and clicking More Actions ( ), then clicking Guide Me.
2.3.2.2. General Cluster Settings Explained
The table below describes the settings for the General tab in the New Cluster and Edit Clusterwindows. Invalid entries are outlined in orange when you click OK, prohibiting the changes beingaccepted. In addition, field prompts indicate the expected values or range of values.
Table 2.4. General Cluster Settings
Field Description/Action
Data Center The data center that will contain the cluster. The datacenter must be created before adding a cluster.
Name The name of the cluster. This text field has a 40-character limit and must be a unique name with anycombination of uppercase and lowercase letters,numbers, hyphens, and underscores.
Description / Comment The description of the cluster or additional notes.These fields are recommended but not mandatory.
CHAPTER 2. ADMINISTERING THE RESOURCES
75
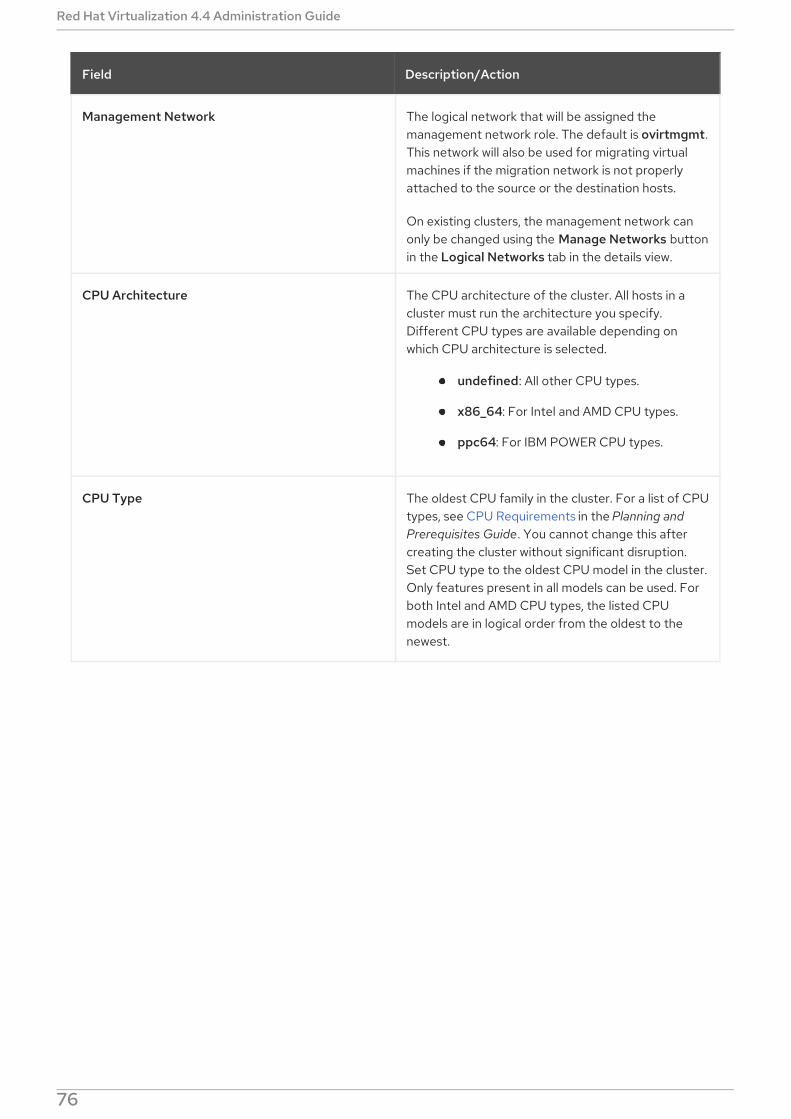
Management Network The logical network that will be assigned themanagement network role. The default is ovirtmgmt.This network will also be used for migrating virtualmachines if the migration network is not properlyattached to the source or the destination hosts.
On existing clusters, the management network canonly be changed using the Manage Networks buttonin the Logical Networks tab in the details view.
CPU Architecture The CPU architecture of the cluster. All hosts in acluster must run the architecture you specify.Different CPU types are available depending onwhich CPU architecture is selected.
undefined: All other CPU types.
x86_64: For Intel and AMD CPU types.
ppc64: For IBM POWER CPU types.
CPU Type The oldest CPU family in the cluster. For a list of CPUtypes, see CPU Requirements in the Planning andPrerequisites Guide. You cannot change this aftercreating the cluster without significant disruption.Set CPU type to the oldest CPU model in the cluster.Only features present in all models can be used. Forboth Intel and AMD CPU types, the listed CPUmodels are in logical order from the oldest to thenewest.
Field Description/Action
Red Hat Virtualization 4.4 Administration Guide
76
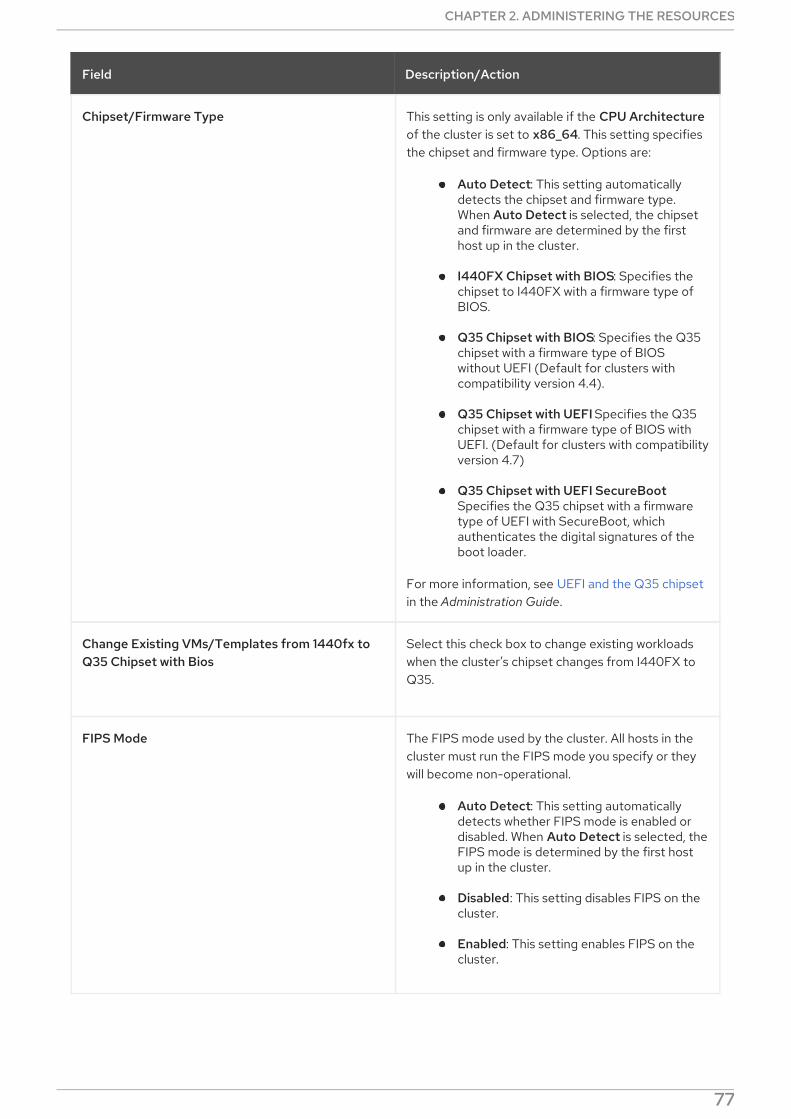
Chipset/Firmware Type This setting is only available if the CPU Architectureof the cluster is set to x86_64. This setting specifiesthe chipset and firmware type. Options are:
Auto Detect: This setting automaticallydetects the chipset and firmware type.When Auto Detect is selected, the chipsetand firmware are determined by the firsthost up in the cluster.
I440FX Chipset with BIOS: Specifies thechipset to I440FX with a firmware type ofBIOS.
Q35 Chipset with BIOS: Specifies the Q35chipset with a firmware type of BIOSwithout UEFI (Default for clusters withcompatibility version 4.4).
Q35 Chipset with UEFI Specifies the Q35chipset with a firmware type of BIOS withUEFI. (Default for clusters with compatibilityversion 4.7)
Q35 Chipset with UEFI SecureBootSpecifies the Q35 chipset with a firmwaretype of UEFI with SecureBoot, whichauthenticates the digital signatures of theboot loader.
For more information, see UEFI and the Q35 chipsetin the Administration Guide.
Change Existing VMs/Templates from 1440fx toQ35 Chipset with Bios
Select this check box to change existing workloadswhen the cluster’s chipset changes from I440FX toQ35.
FIPS Mode The FIPS mode used by the cluster. All hosts in thecluster must run the FIPS mode you specify or theywill become non-operational.
Auto Detect: This setting automaticallydetects whether FIPS mode is enabled ordisabled. When Auto Detect is selected, theFIPS mode is determined by the first hostup in the cluster.
Disabled: This setting disables FIPS on thecluster.
Enabled: This setting enables FIPS on thecluster.
Field Description/Action
CHAPTER 2. ADMINISTERING THE RESOURCES
77

Compatibility Version The version of Red Hat Virtualization. You will not beable to select a version earlier than the versionspecified for the data center.
Switch Type The type of switch used by the cluster. Linux Bridgeis the standard Red Hat Virtualization switch. OVSprovides support for Open vSwitch networkingfeatures.
Firewall Type Specifies the firewall type for hosts in the cluster,either firewalld (default) or iptables. iptables is onlysupported on Red Hat Enterprise Linux 7 hosts, inclusters with compatibility version 4.2 or 4.3. You canonly add Red Hat Enterprise Linux 8 hosts to clusterswith firewall type firewalld. If you change an existingcluster’s firewall type, you must reinstall all hosts inthe cluster to apply the change.
Default Network Provider Specifies the default external network provider thatthe cluster will use. If you select Open VirtualNetwork (OVN), the hosts added to the cluster areautomatically configured to communicate with theOVN provider.
If you change the default network provider, you mustreinstall all hosts in the cluster to apply the change.
Maximum Log Memory Threshold Specifies the logging threshold for maximummemory consumption as a percentage or as anabsolute value in MB. A message is logged if a host’smemory usage exceeds the percentage value or if ahost’s available memory falls below the absolutevalue in MB. The default is 95%.
Enable Virt Service If this check box is selected, hosts in this cluster willbe used to run virtual machines.
Enable Gluster Service If this check box is selected, hosts in this cluster willbe used as Red Hat Gluster Storage Server nodes,and not for running virtual machines.
Field Description/Action
Red Hat Virtualization 4.4 Administration Guide
78

Import existing gluster configuration This check box is only available if the Enable GlusterService radio button is selected. This option allowsyou to import an existing Gluster-enabled clusterand all its attached hosts to Red Hat VirtualizationManager.
The following options are required for each host inthe cluster that is being imported:
Hostname: Enter the IP or fully qualifieddomain name of the Gluster host server.
Host ssh public key (PEM): Red HatVirtualization Manager fetches the host’sSSH public key, to ensure you areconnecting with the correct host.
Password: Enter the root password requiredfor communicating with the host.
Additional Random Number Generator source If the check box is selected, all hosts in the clusterhave the additional random number generator deviceavailable. This enables passthrough of entropy fromthe random number generator device to virtualmachines.
Gluster Tuned Profile This check box is only available if the Enable GlusterService check box is selected. This option specifiesthe virtual-host tuning profile to enable moreaggressive writeback of dirty memory pages, whichbenefits the host performance.
Field Description/Action
2.3.2.3. Optimization Settings Explained
Memory Considerations
Memory page sharing allows virtual machines to use up to 200% of their allocated memory by utilizingunused memory in other virtual machines. This process is based on the assumption that the virtualmachines in your Red Hat Virtualization environment will not all be running at full capacity at the sametime, allowing unused memory to be temporarily allocated to a particular virtual machine.
CPU Considerations
For non-CPU-intensive workloads, you can run virtual machines with a total number ofprocessor cores greater than the number of cores in the host. Doing so enables the following:
You can run a greater number of virtual machines, which reduces hardware requirements.
You can configure virtual machines with CPU topologies that are otherwise not possible,such as when the number of virtual cores is between the number of host cores and thenumber of host threads.
For best performance, and especially for CPU-intensive workloads, you should use the same
CHAPTER 2. ADMINISTERING THE RESOURCES
79

topology in the virtual machine as in the host, so the host and the virtual machine expect thesame cache usage. When the host has hyperthreading enabled, QEMU treats the host’shyperthreads as cores, so the virtual machine is not aware that it is running on a single core withmultiple threads. This behavior might impact the performance of a virtual machine, because avirtual core that actually corresponds to a hyperthread in the host core might share a singlecache with another hyperthread in the same host core, while the virtual machine treats it as aseparate core.
The table below describes the settings for the Optimization tab in the New Cluster and Edit Clusterwindows.
Table 2.5. Optimization Settings
Field Description/Action
Memory OptimizationNone - Disable memory overcommit:Disables memory page sharing.
For Server Load - Allow scheduling of150% of physical memory: Sets the memorypage sharing threshold to 150% of thesystem memory on each host.
For Desktop Load - Allow scheduling of200% of physical memory: Sets thememory page sharing threshold to 200% ofthe system memory on each host.
CPU Threads Selecting the Count Threads As Cores check boxenables hosts to run virtual machines with a totalnumber of processor cores greater than the numberof cores in the host.
When this check box is selected, the exposed hostthreads are treated as cores that virtual machinescan use. For example, a 24-core system with 2threads per core (48 threads total) can run virtualmachines with up to 48 cores each, and thealgorithms to calculate host CPU load wouldcompare load against twice as many potential utilizedcores.
Red Hat Virtualization 4.4 Administration Guide
80

Memory Balloon Selecting the Enable Memory Balloon Optimizationcheck box enables memory overcommitment onvirtual machines running on the hosts in this cluster.When this check box is selected, the MemoryOvercommit Manager (MoM) starts ballooning whereand when possible, with a limitation of theguaranteed memory size of every virtual machine.
To have a balloon running, the virtual machine needsto have a balloon device with relevant drivers. Eachvirtual machine includes a balloon device unlessspecifically removed. Each host in this clusterreceives a balloon policy update when its statuschanges to Up. If necessary, you can manuallyupdate the balloon policy on a host without having tochange the status. See Updating the MoM Policy onHosts in a Cluster.
It is important to understand that in some scenariosballooning may collide with KSM. In such cases MoMwill try to adjust the balloon size to minimizecollisions. Additionally, in some scenarios ballooningmay cause sub-optimal performance for a virtualmachine. Administrators are advised to useballooning optimization with caution.
KSM control Selecting the Enable KSM check box enables MoMto run Kernel Same-page Merging (KSM) whennecessary and when it can yield a memory savingbenefit that outweighs its CPU cost.
Field Description/Action
2.3.2.4. Migration Policy Settings Explained
A migration policy defines the conditions for live migrating virtual machines in the event of host failure.These conditions include the downtime of the virtual machine during migration, network bandwidth, andhow the virtual machines are prioritized.
Table 2.6. Migration Policies Explained
Policy Description
Cluster default (Minimal downtime) Overrides in vdsm.conf are still applied. The guestagent hook mechanism is disabled.
Minimal downtime A policy that lets virtual machines migrate in typicalsituations. Virtual machines should not experienceany significant downtime. The migration will beaborted if the virtual machine migration does notconverge after a long time (dependent on QEMUiterations, with a maximum of 500 milliseconds). Theguest agent hook mechanism is enabled.
CHAPTER 2. ADMINISTERING THE RESOURCES
81

Post-copy migration When used, post-copy migration pauses themigrating virtual machine vCPUs on the source host,transfers only a minimum of memory pages, activatesthe virtual machine vCPUs on the destination host,and transfers the remaining memory pages while thevirtual machine is running on the destination.
The post-copy policy first tries pre-copy to verifywhether convergence can occur. The migrationswitches to post-copy if the virtual machinemigration does not converge after a long time.
This significantly reduces the downtime of themigrated virtual machine, and also guarantees thatthe migration finishes regardless of how rapidly thememory pages of the source virtual machine change.It is optimal for migrating virtual machines in heavycontinuous use, which would not be possible tomigrate with standard pre-copy migration.
The disadvantage of this policy is that in the post-copy phase, the virtual machine may slow downsignificantly as the missing parts of memory aretransferred between the hosts.
WARNING
If the network connectionbreaks prior to the completionof the post-copy process, theManager pauses and then killsthe running virtual machine. Donot use post-copy migration ifthe virtual machine availabilityis critical or if the migrationnetwork is unstable.
Policy Description
Red Hat Virtualization 4.4 Administration Guide
82

Suspend workload if needed A policy that lets virtual machines migrate in mostsituations, including virtual machines running heavyworkloads. Because of this, virtual machines mayexperience a more significant downtime than withsome of the other settings. The migration may still beaborted for extreme workloads. The guest agenthook mechanism is enabled.
Policy Description
The bandwidth settings define the maximum bandwidth of both outgoing and incoming migrations perhost.
Table 2.7. Bandwidth Explained
Policy Description
Auto Bandwidth is copied from the Rate Limit [Mbps]setting in the data center Host Network QoS. If therate limit has not been defined, it is computed as aminimum of link speeds of sending and receivingnetwork interfaces. If rate limit has not been set, andlink speeds are not available, it is determined by localVDSM setting on sending host.
Hypervisor default Bandwidth is controlled by local VDSM setting onsending Host.
Custom Defined by user (in Mbps). This value is divided bythe number of concurrent migrations (default is 2, toaccount for ingoing and outgoing migration).Therefore, the user-defined bandwidth must be largeenough to accommodate all concurrent migrations.
For example, if the Custom bandwidth is defined as600 Mbps, a virtual machine migration’s maximumbandwidth is actually 300 Mbps.
The resilience policy defines how the virtual machines are prioritized in the migration.
Table 2.8. Resilience Policy Settings
Field Description/Action
Migrate Virtual Machines Migrates all virtual machines in order of their definedpriority.
Migrate only Highly Available Virtual Machines Migrates only highly available virtual machines toprevent overloading other hosts.
CHAPTER 2. ADMINISTERING THE RESOURCES
83

Do Not Migrate Virtual Machines Prevents virtual machines from being migrated.
Field Description/Action
Table 2.9. Additional Properties Settings
Field Description/Action
Enable Migration Encryption Allows the virtual machine to be encrypted duringmigration.
Cluster default
Encrypt
Don’t encrypt
Parallel Migrations Allows you to specify whether and how many parallelmigration connections to use.
Disabled: The virtual machine is migratedusing a single, non-parallel connection.
Auto: The number of parallel connections isautomatically determined. This settingsmight automatically disable parallelconnections.
Auto Parallel: The number of parallelconnections is automatically determined.
Custom: Allows you to specify the preferrednumber of parallel Connections, the actualnumber may be lower.
Number of VM Migration Connections This setting is only available when Custom isselected. The preferred number of custom parallelmigrations, between 2 and 255.
2.3.2.5. Scheduling Policy Settings Explained
Scheduling policies allow you to specify the usage and distribution of virtual machines between availablehosts. Define the scheduling policy to enable automatic load balancing across the hosts in a cluster.Regardless of the scheduling policy, a virtual machine will not start on a host with an overloaded CPU. Bydefault, a host’s CPU is considered overloaded if it has a load of more than 80% for 5 minutes, but thesevalues can be changed using scheduling policies. See Scheduling Policies in the Administration Guide formore information.
Table 2.10. Scheduling Policy Tab Properties
Red Hat Virtualization 4.4 Administration Guide
84

Field Description/Action
Select Policy Select a policy from the drop-down list.
none: Disables load-balancing or power-sharing between hosts foralready-running virtual machines. This is the default mode. When avirtual machine is started, the memory and CPU processing load isspread evenly across all hosts in the cluster. Additional virtual machinesattached to a host will not start if that host has reached the definedCpuOverCommitDurationMinutes, HighUtilization, orMaxFreeMemoryForOverUtilized.
evenly_distributed: Distributes the memory and CPU processing loadevenly across all hosts in the cluster. Additional virtual machines attachedto a host will not start if that host has reached the definedCpuOverCommitDurationMinutes, HighUtilization, orMaxFreeMemoryForOverUtilized.
cluster_maintenance: Limits activity in a cluster during maintenancetasks. No new virtual machines may be started, except highly availablevirtual machines. If host failure occurs, highly available virtual machineswill restart properly and any virtual machine can migrate.
power_saving: Distributes the memory and CPU processing load acrossa subset of available hosts to reduce power consumption onunderutilized hosts. Hosts with a CPU load below the low utilization valuefor longer than the defined time interval will migrate all virtual machinesto other hosts so that it can be powered down. Additional virtualmachines attached to a host will not start if that host has reached thedefined high utilization value.
vm_evenly_distributed: Distributes virtual machines evenly betweenhosts based on a count of the virtual machines. The cluster is consideredunbalanced if any host is running more virtual machines than theHighVmCount and there is at least one host with a virtual machine countthat falls outside of the MigrationThreshold.
Properties The following properties appear depending on the selected policy. Edit them ifnecessary:
HighVmCount: Sets the minimum number of virtual machines that mustbe running per host to enable load balancing. The default value is 10running virtual machines on one host. Load balancing is only enabledwhen there is at least one host in the cluster that has at least HighVmCount running virtual machines.
MigrationThreshold: Defines a buffer before virtual machines aremigrated from the host. It is the maximum inclusive difference in virtualmachine count between the most highly-utilized host and the least-utilized host. The cluster is balanced when every host in the cluster has avirtual machine count that falls inside the migration threshold. Thedefault value is 5.
SpmVmGrace: Defines the number of slots for virtual machines to bereserved on SPM hosts. The SPM host will have a lower load than otherhosts, so this variable defines how many fewer virtual machines the SPMhost can run in comparison to other hosts. The default value is 5.
CpuOverCommitDurationMinutes: Sets the time (in minutes) that ahost can run a CPU load outside of the defined utilization values beforethe scheduling policy takes action. The defined time interval protects
CHAPTER 2. ADMINISTERING THE RESOURCES
85

against temporary spikes in CPU load activating scheduling policies andinstigating unnecessary virtual machine migration. Maximum twocharacters. The default value is 2.
HighUtilization: Expressed as a percentage. If the host runs with CPUusage at or above the high utilization value for the defined time interval,the Red Hat Virtualization Manager migrates virtual machines to otherhosts in the cluster until the host’s CPU load is below the maximumservice threshold. The default value is 80.
LowUtilization: Expressed as a percentage. If the host runs with CPUusage below the low utilization value for the defined time interval, theRed Hat Virtualization Manager will migrate virtual machines to otherhosts in the cluster. The Manager will power down the original hostmachine, and restart it again when load balancing requires or there arenot enough free hosts in the cluster. The default value is 20.
ScaleDown: Reduces the impact of the HA Reservation weight function,by dividing a host’s score by the specified amount. This is an optionalproperty that can be added to any policy, including none.
HostsInReserve: Specifies a number of hosts to keep running eventhough there are no running virtual machines on them. This is an optionalproperty that can be added to the power_saving policy.
EnableAutomaticHostPowerManagement: Enables automatic powermanagement for all hosts in the cluster. This is an optional property thatcan be added to the power_saving policy. The default value is true.
MaxFreeMemoryForOverUtilized: Specifies the minimum amount offree memory a host should have, in MB. If a host has less free memorythan this amount, the RHV Manager considers the host overutilized. Forexample, if you set this property to 1000, a host that has less than 1 GBof free memory is overutilized.For details on how this property interacts with the power_saving andevenly_distributed policies, see MaxFreeMemoryForOverUtilized andMinFreeMemoryForUnderUtilized cluster scheduling policy properties.
You can add this property to the power_saving and evenly_distributedpolicies. Although it appears among the list of properties for thevm_evenly_distributed policy, it does not apply to that policy.
MinFreeMemoryForUnderUtilized: Specifies the maximum amount offree memory a host should have, in MB. If a host has more free memorythan this amount, the RHV Manager scheduler considers the hostunderutilized. For example, if you set this parameter to 10000, a hostthat has more than 10 GB of free memory is underutilized.For details on how this property interacts with the power_saving andevenly_distributed policies, see MaxFreeMemoryForOverUtilized andMinFreeMemoryForUnderUtilized cluster scheduling policy properties.
You can add this property to the power_saving and evenly_distributedpolicies. Although it appears among the list of properties for thevm_evenly_distributed policy, it does not apply to that policy.
HeSparesCount: Sets the number of additional self-hosted enginenodes that must reserve enough free memory to start the Managervirtual machine if it migrates or shuts down. Other virtual machines areprevented from starting on a self-hosted engine node if doing so wouldnot leave enough free memory for the Manager virtual machine. This isan optional property that can be added to the power_saving,vm_evenly_distributed, and evenly_distributed policies. The defaultvalue is 0.
Field Description/Action
Red Hat Virtualization 4.4 Administration Guide
86

Scheduler Optimization Optimize scheduling for host weighing/ordering.
Optimize for Utilization: Includes weight modules in scheduling to allowbest selection.
Optimize for Speed: Skips host weighting in cases where there are morethan ten pending requests.
Enable Trusted Service Enable integration with an OpenAttestation server. Before this can be enabled,use the engine-config tool to enter the OpenAttestation server’s details.IMPORTANT: OpenAttestation and Intel Trusted Execution Technology (IntelTXT) are no longer available.
Enable HA Reservation Enable the Manager to monitor cluster capacity for highly available virtualmachines. The Manager ensures that appropriate capacity exists within a clusterfor virtual machines designated as highly available to migrate in the event thattheir existing host fails unexpectedly.
Field Description/Action
CHAPTER 2. ADMINISTERING THE RESOURCES
87

Serial Number Policy Configure the policy for assigning serial numbers to each new virtual machine inthe cluster:
System Default: Use the system-wide defaults in the Managerdatabase. To configure these defaults, use the engine configuration toolto set the values of the DefaultSerialNumberPolicy and DefaultCustomSerialNumber. These key-value pairs are saved in thevdc_options table of the Manager database.For DefaultSerialNumberPolicy:
Default value: HOST_ID
Possible values: HOST_ID, VM_ID, CUSTOM
Command line example: engine-config --set DefaultSerialNumberPolicy=VM_ID
Important: Restart the Manager to apply the configuration.
For DefaultCustomSerialNumber:
Default value: Dummy serial number
Possible values: Any string (max length 255 characters)
Command line example: engine-config --set DefaultCustomSerialNumber="My very special string value"
Important: Restart the Manager to apply the configuration.
Host ID: Set each new virtual machine’s serial number to the UUID of thehost.
Vm ID: Set each new virtual machine’s serial number to the UUID of thevirtual machine.
Custom serial number: Set each new virtual machine’s serial number tothe value you specify in the following Custom Serial Number parameter.
Custom Serial Number Specify the custom serial number to apply to new virtual machines in the cluster.
Field Description/Action
When a host’s free memory drops below 20%, ballooning commands like mom.Controllers.Balloon - INFO Ballooning guest:half1 from 1096400 to 1991580 are logged to /var/log/vdsm/mom.log./var/log/vdsm/mom.log is the Memory Overcommit Manager log file.
2.3.2.6. MaxFreeMemoryForOverUtilized and MinFreeMemoryForUnderUtilized clusterscheduling policy properties
The scheduler has a background process that migrates virtual machines according to the current clusterscheduling policy and its parameters. Based on the various criteria and their relative weights in a policy,the scheduler continuously categorizes hosts as source hosts or destination hosts and migratesindividual virtual machines from the former to the latter.
The following description explains how the evenly_distributed and power_saving cluster schedulingpolicies interact with the MaxFreeMemoryForOverUtilized and MinFreeMemoryForUnderUtilized
Red Hat Virtualization 4.4 Administration Guide
88

properties. Although both policies consider CPU and memory load, CPU load is not relevant for theMaxFreeMemoryForOverUtilized and MinFreeMemoryForUnderUtilized properties.
If you define the MaxFreeMemoryForOverUtilized and MinFreeMemoryForUnderUtilized propertiesas part of the evenly_distributed policy:
Hosts that have less free memory than MaxFreeMemoryForOverUtilized are overutilized andbecome source hosts.
Hosts that have more free memory than MinFreeMemoryForUnderUtilized are underutilizedand become destination hosts.
If MaxFreeMemoryForOverUtilized is not defined, the scheduler does not migrate virtualmachines based on the memory load. (It continues migrating virtual machines based on thepolicy’s other criteria, such as CPU load.)
If MinFreeMemoryForUnderUtilized is not defined, the scheduler considers all hosts eligible tobecome destination hosts.
If you define the MaxFreeMemoryForOverUtilized and MinFreeMemoryForUnderUtilized propertiesas part of the power_saving policy:
Hosts that have less free memory than MaxFreeMemoryForOverUtilized are overutilized andbecome source hosts.
Hosts that have more free memory than MinFreeMemoryForUnderUtilized are underutilizedand become source hosts.
Hosts that have more free memory than MaxFreeMemoryForOverUtilized are not overutilizedand become destination hosts.
Hosts that have less free memory than MinFreeMemoryForUnderUtilized are notunderutilized and become destination hosts.
The scheduler prefers migrating virtual machines to hosts that are neither overutilized norunderutilized. If there are not enough of these hosts, the scheduler can migrate virtual machinesto underutilized hosts. If the underutilized hosts are not needed for this purpose, the schedulercan power them down.
If MaxFreeMemoryForOverUtilized is not defined, no hosts are overutilized. Therefore, onlyunderutilized hosts are source hosts, and destination hosts include all hosts in the cluster.
If MinFreeMemoryForUnderUtilized is not defined, only overutilized hosts are source hosts,and hosts that are not overutilized are destination hosts.
Additional resources
Cluster Scheduling Policy Settings
2.3.2.7. Cluster Console Settings Explained
The table below describes the settings for the Console tab in the New Cluster and Edit Clusterwindows.
Table 2.11. Console Settings
CHAPTER 2. ADMINISTERING THE RESOURCES
89

Field Description/Action
Define SPICE Proxy for Cluster Select this check box to enable overriding the SPICEproxy defined in global configuration. This feature isuseful in a case where the user (who is, for example,connecting via the VM Portal) is outside of thenetwork where the hypervisors reside.
Overridden SPICE proxy address The proxy by which the SPICE client connects tovirtual machines. The address must be in thefollowing format:
protocol://[host]:[port]
2.3.2.8. Fencing Policy Settings Explained
The table below describes the settings for the Fencing Policy tab in the New Cluster and Edit Clusterwindows.
Table 2.12. Fencing Policy Settings
Field Description/Action
Enable fencing Enables fencing on the cluster. Fencing is enabled bydefault, but can be disabled if required; for example,if temporary network issues are occurring orexpected, administrators can disable fencing untildiagnostics or maintenance activities are completed.Note that if fencing is disabled, highly availablevirtual machines running on non-responsive hosts willnot be restarted elsewhere.
Skip fencing if host has live lease on storage If this check box is selected, any hosts in the clusterthat are Non Responsive and still connected tostorage will not be fenced.
Skip fencing on cluster connectivity issues If this check box is selected, fencing will betemporarily disabled if the percentage of hosts in thecluster that are experiencing connectivity issues isgreater than or equal to the defined Threshold. TheThreshold value is selected from the drop-down list;available values are 25, 50, 75, and 100.
Skip fencing if gluster bricks are up This option is only available when Red Hat GlusterStorage functionality is enabled. If this check box isselected, fencing is skipped if bricks are running andcan be reached from other peers. See Chapter 2.Configure High Availability using Fencing Policies andAppendix A. Fencing Policies for Red Hat GlusterStorage in Maintaining Red Hat HyperconvergedInfrastructure for more information.
Red Hat Virtualization 4.4 Administration Guide
90

Skip fencing if gluster quorum not met This option is only available when Red Hat GlusterStorage functionality is enabled. If this check box isselected, fencing is skipped if bricks are running andshutting down the host will cause loss of quorum. SeeChapter 2. Configure High Availability using FencingPolicies and Appendix A. Fencing Policies for Red HatGluster Storage in Maintaining Red HatHyperconverged Infrastructure for more information.
Field Description/Action
2.3.2.9. Setting Load and Power Management Policies for Hosts in a Cluster
The evenly_distributed and power_saving scheduling policies allow you to specify acceptable memoryand CPU usage values, and the point at which virtual machines must be migrated to or from a host. Thevm_evenly_distributed scheduling policy distributes virtual machines evenly between hosts based on acount of the virtual machines. Define the scheduling policy to enable automatic load balancing acrossthe hosts in a cluster. For a detailed explanation of each scheduling policy, see Cluster Scheduling PolicySettings.
Procedure
1. Click Compute → Clusters and select a cluster.
2. Click Edit.
3. Click the Scheduling Policy tab.
4. Select one of the following policies:
none
vm_evenly_distributed
a. Set the minimum number of virtual machines that must be running on at least one hostto enable load balancing in the HighVmCount field.
b. Define the maximum acceptable difference between the number of virtual machines onthe most highly-utilized host and the number of virtual machines on the least-utilizedhost in the MigrationThreshold field.
c. Define the number of slots for virtual machines to be reserved on SPM hosts in theSpmVmGrace field.
d. Optionally, in the HeSparesCount field, enter the number of additional self-hostedengine nodes on which to reserve enough free memory to start the Manager virtualmachine if it migrates or shuts down. See Configuring Memory Slots Reserved for theself-hosted engine for more information.
evenly_distributed
a. Set the time (in minutes) that a host can run a CPU load outside of the definedutilization values before the scheduling policy takes action in theCpuOverCommitDurationMinutes field.
b. Enter the CPU utilization percentage at which virtual machines start migrating to other
CHAPTER 2. ADMINISTERING THE RESOURCES
91

b. Enter the CPU utilization percentage at which virtual machines start migrating to otherhosts in the HighUtilization field.
c. Optionally, in the HeSparesCount field, enter the number of additional self-hostedengine nodes on which to reserve enough free memory to start the Manager virtualmachine if it migrates or shuts down. See Configuring Memory Slots Reserved for theself-hosted engine for more information.
power_saving
a. Set the time (in minutes) that a host can run a CPU load outside of the definedutilization values before the scheduling policy takes action in theCpuOverCommitDurationMinutes field.
b. Enter the CPU utilization percentage below which the host will be considered under-utilized in the LowUtilization field.
c. Enter the CPU utilization percentage at which virtual machines start migrating to otherhosts in the HighUtilization field.
d. Optionally, in the HeSparesCount field, enter the number of additional self-hostedengine nodes on which to reserve enough free memory to start the Manager virtualmachine if it migrates or shuts down. See Configuring Memory Slots Reserved for theself-hosted engine for more information.
5. Choose one of the following as the Scheduler Optimization for the cluster:
Select Optimize for Utilization to include weight modules in scheduling to allow bestselection.
Select Optimize for Speed to skip host weighting in cases where there are more than tenpending requests.
6. If you are using an OpenAttestation server to verify your hosts, and have set up the server’sdetails using the engine-config tool, select the Enable Trusted Service check box.
OpenAttestation and Intel Trusted Execution Technology (Intel TXT) are no longer available.
1. Optionally select the Enable HA Reservation check box to enable the Manager to monitorcluster capacity for highly available virtual machines.
2. Optionally select a Serial Number Policy for the virtual machines in the cluster:
System Default: Use the system-wide defaults, which are configured in the Managerdatabase using the engine configuration tool and the DefaultSerialNumberPolicy and DefaultCustomSerialNumber key names. The default value for DefaultSerialNumberPolicy is to use the Host ID. See Scheduling Policies in theAdministration Guide for more information.
Host ID: Set each virtual machine’s serial number to the UUID of the host.
Vm ID: Set each virtual machine’s serial number to the UUID of the virtual machine.
Custom serial number: Set each virtual machine’s serial number to the value you specify inthe following Custom Serial Number parameter.
3. Click OK.
Red Hat Virtualization 4.4 Administration Guide
92
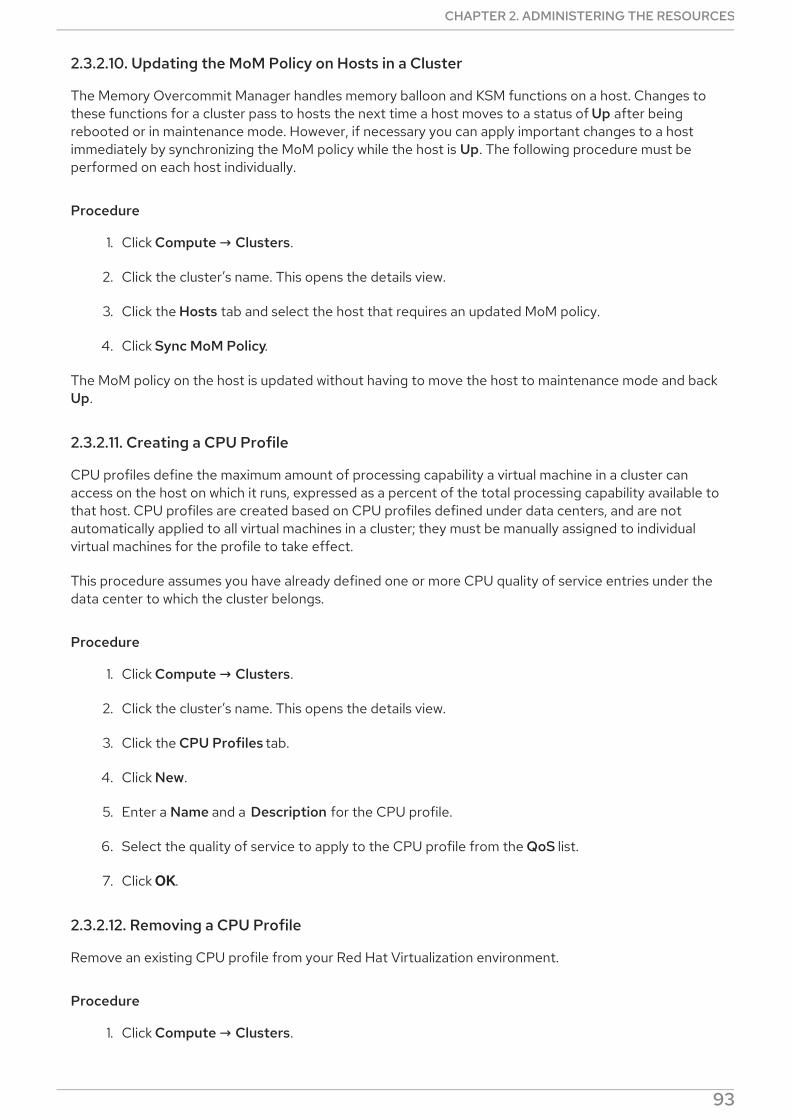
2.3.2.10. Updating the MoM Policy on Hosts in a Cluster
The Memory Overcommit Manager handles memory balloon and KSM functions on a host. Changes tothese functions for a cluster pass to hosts the next time a host moves to a status of Up after beingrebooted or in maintenance mode. However, if necessary you can apply important changes to a hostimmediately by synchronizing the MoM policy while the host is Up. The following procedure must beperformed on each host individually.
Procedure
1. Click Compute → Clusters.
2. Click the cluster’s name. This opens the details view.
3. Click the Hosts tab and select the host that requires an updated MoM policy.
4. Click Sync MoM Policy.
The MoM policy on the host is updated without having to move the host to maintenance mode and backUp.
2.3.2.11. Creating a CPU Profile
CPU profiles define the maximum amount of processing capability a virtual machine in a cluster canaccess on the host on which it runs, expressed as a percent of the total processing capability available tothat host. CPU profiles are created based on CPU profiles defined under data centers, and are notautomatically applied to all virtual machines in a cluster; they must be manually assigned to individualvirtual machines for the profile to take effect.
This procedure assumes you have already defined one or more CPU quality of service entries under thedata center to which the cluster belongs.
Procedure
1. Click Compute → Clusters.
2. Click the cluster’s name. This opens the details view.
3. Click the CPU Profiles tab.
4. Click New.
5. Enter a Name and a Description for the CPU profile.
6. Select the quality of service to apply to the CPU profile from the QoS list.
7. Click OK.
2.3.2.12. Removing a CPU Profile
Remove an existing CPU profile from your Red Hat Virtualization environment.
Procedure
1. Click Compute → Clusters.
CHAPTER 2. ADMINISTERING THE RESOURCES
93

2. Click the cluster’s name. This opens the details view.
3. Click the CPU Profiles tab and select the CPU profile to remove.
4. Click Remove.
5. Click OK.
If the CPU profile was assigned to any virtual machines, those virtual machines are automaticallyassigned the default CPU profile.
2.3.2.13. Importing an Existing Red Hat Gluster Storage Cluster
You can import a Red Hat Gluster Storage cluster and all hosts belonging to the cluster into Red HatVirtualization Manager.
When you provide details such as the IP address or host name and password of any host in the cluster,the gluster peer status command is executed on that host through SSH, then displays a list of hoststhat are a part of the cluster. You must manually verify the fingerprint of each host and providepasswords for them. You will not be able to import the cluster if one of the hosts in the cluster is down orunreachable. As the newly imported hosts do not have VDSM installed, the bootstrap script installs allthe necessary VDSM packages on the hosts after they have been imported, and reboots them.
Procedure
1. Click Compute → Clusters.
2. Click New.
3. Select the Data Center the cluster will belong to.
4. Enter the Name and Description of the cluster.
5. Select the Enable Gluster Service check box and the Import existing gluster configurationcheck box.The Import existing gluster configuration field is only displayed if the Enable Gluster Serviceis selected.
6. In the Hostname field, enter the host name or IP address of any server in the cluster.The host SSH Fingerprint displays to ensure you are connecting with the correct host. If a hostis unreachable or if there is a network error, an error Error in fetching fingerprint displays in theFingerprint field.
7. Enter the Password for the server, and click OK.
8. The Add Hosts window opens, and a list of hosts that are a part of the cluster displays.
9. For each host, enter the Name and the Root Password.
10. If you wish to use the same password for all hosts, select the Use a Common Password checkbox to enter the password in the provided text field.Click Apply to set the entered password all hosts.
Verify that the fingerprints are valid and submit your changes by clicking OK.
The bootstrap script installs all the necessary VDSM packages on the hosts after they have been
Red Hat Virtualization 4.4 Administration Guide
94

The bootstrap script installs all the necessary VDSM packages on the hosts after they have beenimported, and reboots them. You have now successfully imported an existing Red Hat Gluster Storagecluster into Red Hat Virtualization Manager.
2.3.2.14. Explanation of Settings in the Add Hosts Window
The Add Hosts window allows you to specify the details of the hosts imported as part of a Gluster-enabled cluster. This window appears after you have selected the Enable Gluster Service check box inthe New Cluster window and provided the necessary host details.
Table 2.13. Add Gluster Hosts Settings
Field Description
Use a common password Tick this check box to use the same password for allhosts belonging to the cluster. Enter the password inthe Password field, then click the Apply button toset the password on all hosts.
Name Enter the name of the host.
Hostname/IP This field is automatically populated with the fullyqualified domain name or IP of the host you providedin the New Cluster window.
Root Password Enter a password in this field to use a different rootpassword for each host. This field overrides thecommon password provided for all hosts in thecluster.
Fingerprint The host fingerprint is displayed to ensure you areconnecting with the correct host. This field isautomatically populated with the fingerprint of thehost you provided in the New Cluster window.
2.3.2.15. Removing a Cluster
Move all hosts out of a cluster before removing it.
NOTE
You cannot remove the Default cluster, as it holds the Blank template. You can,however, rename the Default cluster and add it to a new data center.
Procedure
1. Click Compute → Clusters and select a cluster.
2. Ensure there are no hosts in the cluster.
3. Click Remove.
4. Click OK
CHAPTER 2. ADMINISTERING THE RESOURCES
95

2.3.2.16. Memory Optimization
To increase the number of virtual machines on a host, you can use memory overcommitment , in whichthe memory you assign to virtual machines exceeds RAM and relies on swap space.
However, there are potential problems with memory overcommitment:
Swapping performance - Swap space is slower and consumes more CPU resources than RAM,impacting virtual machine performance. Excessive swapping can lead to CPU thrashing.
Out-of-memory (OOM) killer - If the host runs out of swap space, new processes cannot start,and the kernel’s OOM killer daemon begins shutting down active processes such as virtualmachine guests.
To help overcome these shortcomings, you can do the following:
Limit memory overcommitment using the Memory Optimization setting and the MemoryOvercommit Manager (MoM).
Make the swap space large enough to accommodate the maximum potential demand for virtualmemory and have a safety margin remaining.
Reduce virtual memory size by enabling memory ballooning and Kernel Same-page Merging(KSM).
2.3.2.17. Memory Optimization and Memory Overcommitment
You can limit the amount of memory overcommitment by selecting one of the Memory Optimizationsettings: None (0%), 150%, or 200%.
Each setting represents a percentage of RAM. For example, with a host that has 64 GB RAM, selecting150% means you can overcommit memory by an additional 32 GB, for a total of 96 GB in virtual memory.If the host uses 4 GB of that total, the remaining 92 GB are available. You can assign most of that to thevirtual machines (Memory Size on the System tab), but consider leaving some of it unassigned as asafety margin.
Sudden spikes in demand for virtual memory can impact performance before the MoM, memoryballooning, and KSM have time to re-optimize virtual memory. To reduce that impact, select a limit thatis appropriate for the kinds of applications and workloads you are running:
For workloads that produce more incremental growth in demand for memory, select a higherpercentage, such as 200% or 150%.
For more critical applications or workloads that produce more sudden increases in demand formemory, select a lower percentage, such as 150% or None (0%). Selecting None helps preventmemory overcommitment but allows the MoM, memory balloon devices, and KSM to continueoptimizing virtual memory.
IMPORTANT
Always test your Memory Optimization settings by stress testing under a wide range ofconditions before deploying the configuration to production.
To configure the Memory Optimization setting, click the Optimization tab in the New Cluster or EditCluster windows. See Cluster Optimization Settings Explained .
Red Hat Virtualization 4.4 Administration Guide
96

Additional comments:
The Host Statistics views display useful historical information for sizing the overcommitmentratio.
The actual memory available cannot be determined in real time because the amount of memoryoptimization achieved by KSM and memory ballooning changes continuously.
When virtual machines reach the virtual memory limit, new apps cannot start.
When you plan the number of virtual machines to run on a host, use the maximum virtualmemory (physical memory size and the Memory Optimization setting) as a starting point. Donot factor in the smaller virtual memory achieved by memory optimizations such as memoryballooning and KSM.
2.3.2.18. Swap Space and Memory Overcommitment
Red Hat provides these recommendations for configuring swap space .
When applying these recommendations, follow the guidance to size the swap space as "last effortmemory" for a worst-case scenario. Use the physical memory size and Memory Optimization setting asa basis for estimating the total virtual memory size. Exclude any reduction of the virtual memory sizefrom optimization by the MoM, memory ballooning, and KSM.
IMPORTANT
To help prevent an OOM condition, make the swap space large enough to handle a worst-case scenario and still have a safety margin available. Always stress-test yourconfiguration under a wide range of conditions before deploying it to production.
2.3.2.19. The Memory Overcommit Manager (MoM)
The Memory Overcommit Manager (MoM) does two things:
It limits memory overcommitment by applying the Memory Optimization setting to the hosts ina cluster, as described in the preceding section.
It optimizes memory by managing the memory ballooning and KSM, as described in the followingsections.
You do not need to enable or disable MoM.
When a host’s free memory drops below 20%, ballooning commands like mom.Controllers.Balloon - INFO Ballooning guest:half1 from 1096400 to 1991580 are logged to /var/log/vdsm/mom.log, theMemory Overcommit Manager log file.
2.3.2.20. Memory Ballooning
Virtual machines start with the full amount of virtual memory you have assigned to them. As virtualmemory usage exceeds RAM, the host relies more on swap space. If enabled, memory ballooning letsvirtual machines give up the unused portion of that memory. The freed memory can be reused by otherprocesses and virtual machines on the host. The reduced memory footprint makes swapping less likelyand improves performance.
The virtio-balloon package that provides the memory balloon device and drivers ships as a loadable
CHAPTER 2. ADMINISTERING THE RESOURCES
97

The virtio-balloon package that provides the memory balloon device and drivers ships as a loadablekernel module (LKM). By default, it is configured to load automatically. Adding the module to the denyistor unloading it disables ballooning.
The memory balloon devices do not coordinate directly with each other; they rely on the host’s MemoryOvercommit Manager (MoM) process to continuously monitor each virtual machine needs and instructthe balloon device to increase or decrease virtual memory.
Performance considerations:
Red Hat does not recommend memory ballooning and overcommitment for workloads thatrequire continuous high-performance and low latency. See Configuring High-PerformanceVirtual Machines, Templates, and Pools.
Use memory ballooning when increasing virtual machine density (economy) is more importantthan performance.
Memory ballooning does not have a significant impact on CPU utilization. (KSM consumes someCPU resources, but consumption remains consistent under pressure.)
To enable memory ballooning, click the Optimization tab in the New Cluster or Edit Cluster windows.Then select the Enable Memory Balloon Optimization checkbox. This setting enables memoryovercommitment on virtual machines running on the hosts in this cluster. When this check box isselected, the MoM starts ballooning where and when possible, with a limitation of the guaranteedmemory size of every virtual machine. See Cluster Optimization Settings Explained .
Each host in this cluster receives a balloon policy update when its status changes to Up. If necessary, youcan manually update the balloon policy on a host without having to change the status. See Updating theMoM Policy on Hosts in a Cluster.
2.3.2.21. Kernel Same-page Merging (KSM)
When a virtual machine runs, it often creates duplicate memory pages for items such as commonlibraries and high-use data. Furthermore, virtual machines that run similar guest operating systems andapplications produce duplicate memory pages in virtual memory.
When enabled, Kernel Same-page Merging (KSM) examines the virtual memory on a host, eliminatesduplicate memory pages, and shares the remaining memory pages across multiple applications andvirtual machines. These shared memory pages are marked copy-on-write; if a virtual machine needs towrite changes to the page, it makes a copy first before writing its modifications to that copy.
While KSM is enabled, the MoM manages KSM. You do not need to configure or control KSM manually.
KSM increases virtual memory performance in two ways. Because a shared memory page is used morefrequently, the host is more likely to the store it in cache or main memory, which improves the memoryaccess speed. Additionally, with memory overcommitment, KSM reduces the virtual memory footprint,reducing the likelihood of swapping and improving performance.
KSM consumes more CPU resources than memory ballooning. The amount of CPU KSM consumesremains consistent under pressure. Running identical virtual machines and applications on a hostprovides KSM with more opportunities to merge memory pages than running dissimilar ones. If you runmostly dissimilar virtual machines and applications, the CPU cost of using KSM may offset its benefits.
Performance considerations:
After the KSM daemon merges large amounts of memory, the kernel memory accounting
Red Hat Virtualization 4.4 Administration Guide
98

After the KSM daemon merges large amounts of memory, the kernel memory accountingstatistics may eventually contradict each other. If your system has a large amount of freememory, you might improve performance by disabling KSM.
Red Hat does not recommend KSM and overcommitment for workloads that require continuoushigh-performance and low latency. See Configuring High-Performance Virtual Machines,Templates, and Pools.
Use KSM when increasing virtual machine density (economy) is more important thanperformance.
To enable KSM, click the Optimization tab in the New Cluster or Edit Cluster windows. Then select theEnable KSM checkbox. This setting enables MoM to run KSM when necessary and when it can yield amemory saving benefit that outweighs its CPU cost. See Cluster Optimization Settings Explained .
2.3.2.22. UEFI and the Q35 chipset
The Intel Q35 chipset, the default chipset for new virtual machines, includes support for the UnifiedExtensible Firmware Interface (UEFI), which replaces legacy BIOS.
Alternatively you can configure a virtual machine or cluster to use the legacy Intel i440fx chipset, whichdoes not support UEFI.
UEFI provides several advantages over legacy BIOS, including the following:
A modern boot loader
SecureBoot, which authenticates the digital signatures of the boot loader
GUID Partition Table (GPT), which enables disks larger than 2 TB
To use UEFI on a virtual machine, you must configure the virtual machine’s cluster for 4.4 compatibilityor later. Then you can set UEFI for any existing virtual machine, or to be the default BIOS type for newvirtual machines in the cluster. The following options are available:
Table 2.14. Available BIOS Types
BIOS Type Description
Q35 Chipset with Legacy BIOS Legacy BIOS without UEFI (Default for clusters withcompatibility version 4.4)
Q35 Chipset with UEFI BIOS BIOS with UEFI
Q35 Chipset with SecureBoot UEFI with SecureBoot, which authenticates thedigital signatures of the boot loader
Legacy i440fx chipset with legacy BIOS
Setting the BIOS type before installing the operating system
You can configure a virtual machine to use the Q35 chipset and UEFI before installing an operatingsystem. Converting a virtual machine from legacy BIOS to UEFI is not supported after installing anoperating system.
CHAPTER 2. ADMINISTERING THE RESOURCES
99

2.3.2.23. Configuring a cluster to use the Q35 Chipset and UEFI
After upgrading a cluster to Red Hat Virtualization 4.4, all virtual machines in the cluster run the 4.4version of VDSM. You can configure a cluster’s default BIOS type, which determines the default BIOStype of any new virtual machines you create in that cluster. If necessary, you can override the cluster’sdefault BIOS type by specifying a different BIOS type when you create a virtual machine.
Procedure
1. In the VM Portal or the Administration Portal, click Compute → Clusters.
2. Select a cluster and click Edit.
3. Click General.
4. Define the default BIOS type for new virtual machines in the cluster by clicking the BIOS Typedropdown menu, and selecting one of the following:
Legacy
Q35 Chipset with Legacy BIOS
Q35 Chipset with UEFI BIOS
Q35 Chipset with SecureBoot
5. From the Compatibility Version dropdown menu select 4.4. The Manager checks that allrunning hosts are compatible with 4.4, and if they are, the Manager uses 4.4 features.
6. If any existing virtual machines in the cluster should use the new BIOS type, configure them todo so. Any new virtual machines in the cluster that are configured to use the BIOS type Clusterdefault now use the BIOS type you selected. For more information, see Configuring a virtualmachine to use the Q35 Chipset and UEFI.
NOTE
Because you can change the BIOS type only before installing an operating system, forany existing virtual machines that are configured to use the BIOS type Cluster default,change the BIOS type to the previous default cluster BIOS type. Otherwise the virtualmachine might not boot. Alternatively, you can reinstall the virtual machine’s operatingsystem.
2.3.2.24. Configuring a virtual machine to use the Q35 Chipset and UEFI
You can configure a virtual machine to use the Q35 chipset and UEFI before installing an operatingsystem. Converting a virtual machine from legacy BIOS to UEFI, or from UEFI to legacy BIOS, mightprevent the virtual machine from booting. If you change the BIOS type of an existing virtual machine,reinstall the operating system.
Red Hat Virtualization 4.4 Administration Guide
100
WARNING
If the virtual machine’s BIOS type is set to Cluster default, changing the BIOS typeof the cluster changes the BIOS type of the virtual machine. If the virtual machinehas an operating system installed, changing the cluster BIOS type can causebooting the virtual machine to fail.
Procedure
To configure a virtual machine to use the Q35 chipset and UEFI:
1. In the VM Portal or the Administration Portal click Compute → Virtual Machines.
2. Select a virtual machine and click Edit.
3. On the General tab, click Show Advanced Options.
4. Click System → Advanced Parameters.
5. Select one of the following from the BIOS Type dropdown menu:
Cluster default
Q35 Chipset with Legacy BIOS
Q35 Chipset with UEFI BIOS
Q35 Chipset with SecureBoot
6. Click OK.
7. From the Virtual Machine portal or the Administration Portal, power off the virtual machine. Thenext time you start the virtual machine, it will run with the new BIOS type you selected.
2.3.2.25. Changing the Cluster Compatibility Version
Red Hat Virtualization clusters have a compatibility version. The cluster compatibility version indicatesthe features of Red Hat Virtualization supported by all of the hosts in the cluster. The clustercompatibility is set according to the version of the least capable host operating system in the cluster.
Prerequisites
To change the cluster compatibility level, you must first update all the hosts in your cluster to alevel that supports your desired compatibility level. Check if there is an icon next to the hostindicating an update is available.
Limitations
Virtio NICs are enumerated as a different device after upgrading the cluster compatibility levelto 4.6. Therefore, the NICs might need to be reconfigured. Red Hat recommends that you testthe virtual machines before you upgrade the cluster by setting the cluster compatibility level to4.6 on the virtual machine and verifying the network connection.
If the network connection for the virtual machine fails, configure the virtual machine with a
CHAPTER 2. ADMINISTERING THE RESOURCES
101

If the network connection for the virtual machine fails, configure the virtual machine with acustom emulated machine that matches the current emulated machine, for example pc-q35-rhel8.3.0 for 4.5 compatibility version, before upgrading the cluster.
Procedure
1. In the Administration Portal, click Compute → Clusters.
2. Select the cluster to change and click Edit.
3. On the General tab, change the Compatibility Version to the desired value.
4. Click OK. The Change Cluster Compatibility Version confirmation dialog opens.
5. Click OK to confirm.
IMPORTANT
An error message might warn that some virtual machines and templates are incorrectlyconfigured. To fix this error, edit each virtual machine manually. The Edit Virtual Machinewindow provides additional validations and warnings that show what to correct.Sometimes the issue is automatically corrected and the virtual machine’s configurationjust needs to be saved again. After editing each virtual machine, you will be able tochange the cluster compatibility version.
After updating a cluster’s compatibility version, you must update the cluster compatibility version of allrunning or suspended virtual machines by rebooting them from the Administration Portal, or using theREST API, instead of from within the guest operating system. Virtual machines that require a reboot are
marked with the pending changes icon ( ). You cannot change the cluster compatibility version of avirtual machine snapshot that is in preview. You must first commit or undo the preview.
In a self-hosted engine environment, the Manager virtual machine does not need to be restarted.
Although you can wait to reboot the virtual machines at a convenient time, rebooting immediately ishighly recommended so that the virtual machines use the latest configuration. Virtual machines thathave not been updated run with the old configuration, and the new configuration could be overwritten ifother changes are made to the virtual machine before the reboot.
Once you have updated the compatibility version of all clusters and virtual machines in a data center,you can then change the compatibility version of the data center itself.
2.4. LOGICAL NETWORKS
2.4.1. Logical Network Tasks
2.4.1.1. Performing Networking Tasks
Network → Networks provides a central location for users to perform logical network-relatedoperations and search for logical networks based on each network’s property or association with otherresources. The New, Edit and Remove buttons allow you to create, change the properties of, and deletelogical networks within data centers.
Click each network name and use the tabs in the details view to perform functions including:
Red Hat Virtualization 4.4 Administration Guide
102
Attaching or detaching the networks to clusters and hosts
Removing network interfaces from virtual machines and templates
Adding and removing permissions for users to access and manage networks
These functions are also accessible through each individual resource.
WARNING
Do not change networking in a data center or a cluster if any hosts are running asthis risks making the host unreachable.
IMPORTANT
If you plan to use Red Hat Virtualization nodes to provide any services, remember thatthe services will stop if the Red Hat Virtualization environment stops operating.
This applies to all services, but you should be especially aware of the hazards of runningthe following on Red Hat Virtualization:
Directory Services
DNS
Storage
2.4.1.2. Creating a New Logical Network in a Data Center or Cluster
Create a logical network and define its use in a data center, or in clusters in a data center.
Procedure
1. Click Compute → Data Centers or Compute → Clusters.
2. Click the data center or cluster name. The Details view opens.
3. Click the Logical Networks tab.
4. Open the New Logical Network window:
From a data center details view, click New.
From a cluster details view, click Add Network.
5. Enter a Name, Description, and Comment for the logical network.
6. Optional: Enable Enable VLAN tagging.
7. Optional: Disable VM Network.
8. Optional: Select the Create on external provider checkbox. This disables the network label and
CHAPTER 2. ADMINISTERING THE RESOURCES
103

8. Optional: Select the Create on external provider checkbox. This disables the network label andthe VM network. See External Providers for details.
a. Select the External Provider. The External Provider list does not include externalproviders that are in read-only mode.
b. To create an internal, isolated network, select ovirt-provider-ovn on the External Providerlist and leave Connect to physical network cleared.
9. Enter a new label or select an existing label for the logical network in the Network Label textfield.
10. For MTU, either select Default (1500) or select Custom and specify a custom value.
IMPORTANT
After you create a network on an external provider, you cannot change thenetwork’s MTU settings.
IMPORTANT
If you change the network’s MTU settings, you must propagate this change tothe running virtual machines on the network: Hot unplug and replug every virtualmachine’s vNIC that should apply the MTU setting, or restart the virtualmachines. Otherwise, these interfaces fail when the virtual machine migrates toanother host. For more information, see After network MTU change, some VMsand bridges have the old MTU and seeing packet drops and BZ#1766414.
11. If you selected ovirt-provider-ovn from the External Provider drop-down list, define whetherthe network should implement Security Groups. See Logical Network General SettingsExplained for details.
12. From the Cluster tab, select the clusters to which the network will be assigned. You can alsospecify whether the logical network will be a required network.
13. If the Create on external provider checkbox is selected, the Subnet tab is visible. From theSubnet tab, select the Create subnet and enter a Name, CIDR, and Gateway address, andselect an IP Version for the subnet that the logical network will provide. You can also add DNSservers as required.
14. From the vNIC Profiles tab, add vNIC profiles to the logical network as required.
15. Click OK.
If you entered a label for the logical network, it is automatically added to all host network interfaces withthat label.
NOTE
When creating a new logical network or making changes to an existing logical networkthat is used as a display network, any running virtual machines that use that network mustbe rebooted before the network becomes available or the changes are applied.
2.4.1.3. Editing a Logical Network
IMPORTANT
Red Hat Virtualization 4.4 Administration Guide
104

IMPORTANT
A logical network cannot be edited or moved to another interface if it is not synchronizedwith the network configuration on the host. See Editing Host Network Interfaces andAssigning Logical Networks to Hosts on how to synchronize your networks.
Procedure
1. Click Compute → Data Centers.
2. Click the data center’s name. This opens the details view.
3. Click the Logical Networks tab and select a logical network.
4. Click Edit.
5. Edit the necessary settings.
NOTE
You can edit the name of a new or existing network, with the exception of thedefault network, without having to stop the virtual machines.
6. Click OK.
NOTE
Multi-host network configuration automatically applies updated network settings to all ofthe hosts within the data center to which the network is assigned. Changes can only beapplied when virtual machines using the network are down. You cannot rename a logicalnetwork that is already configured on a host. You cannot disable the VM Network optionwhile virtual machines or templates using that network are running.
2.4.1.4. Removing a Logical Network
You can remove a logical network from Network → Networks or Compute → Data Centers. Thefollowing procedure shows you how to remove logical networks associated to a data center. For aworking Red Hat Virtualization environment, you must have at least one logical network used as theovirtmgmt management network.
Procedure
1. Click Compute → Data Centers.
2. Click a data center’s name. This opens the details view.
3. Click the Logical Networks tab to list the logical networks in the data center.
4. Select a logical network and click Remove.
5. Optionally, select the Remove external network(s) from the provider(s) as well check box toremove the logical network both from the Manager and from the external provider if thenetwork is provided by an external provider. The check box is grayed out if the external provideris in read-only mode.
CHAPTER 2. ADMINISTERING THE RESOURCES
105

6. Click OK.
The logical network is removed from the Manager and is no longer available.
2.4.1.5. Configuring a Non-Management Logical Network as the Default Route
The default route used by hosts in a cluster is through the management network (ovirtmgmt). Thefollowing procedure provides instructions to configure a non-management logical network as thedefault route.
Prerequisite:
If you are using the default_route custom property, you need to clear the custom property fromall attached hosts and then follow this procedure.
Configuring the Default Route Role
1. Click Network → Networks.
2. Click the name of the non-management logical network to configure as the default route toaccess its details.
3. Click the Clusters tab.
4. Click Manage Network. This opens the Manage Network window.
5. Select the Default Route checkbox for the appropriate cluster(s).
6. Click OK.
When networks are attached to a host, the default route of the host will be set on the network of yourchoice. It is recommended to configure the default route role before any host is added to your cluster. Ifyour cluster already contains hosts, they may become out-of-sync until you sync your change to them.
Important Limitations with IPv6
For IPv6, Red Hat Virtualization supports only static addressing.
If both networks share a single gateway (are on the same subnet), you can move the defaultroute role from the management network (ovirtmgmt) to another logical network.
If the host and Manager are not on the same subnet, the Manager loses connectivity with thehost because the IPv6 gateway has been removed.
Moving the default route role to a non-management network removes the IPv6 gateway fromthe network interface and generates an alert: "On cluster clustername the 'Default Route Role'network is no longer network ovirtmgmt. The IPv6 gateway is being removed from this network."
2.4.1.6. Adding a static route on a host
You can use nmstate to add static routes to hosts. This method requires you to configure the hostsdirectly, without using Red Hat Virtualization Manager.
Static-routes you add are preserved as long as the related routed bridge, interface, or bond exists andhas an IP address. Otherwise, the system removes the static route.
IMPORTANT
Red Hat Virtualization 4.4 Administration Guide
106

IMPORTANT
Except for adding or removing a static route on a host, always use the RHV Manager toconfigure host network settings in your cluster. For details, see Network ManagerStateful Configuration (nmstate).
NOTE
The custom static-route is preserved so long as its interface/bond exists and has an IPaddress. Otherwise, it will be removed.
As a result, VM networks behave differently from non-VM networks:
VM networks are based on a bridge. Moving the network from oneinterfaces/bond to another does not affect the route on a VM Network.
Non-VM networks are based on an interface. Moving the network from oneinterfaces/bond to another deletes the route related to the Non-VM network.
Prerequisites
This procedure requires nmstate, which is only available if your environment uses:
Red Hat Virtualization Manager version 4.4
Red Hat Enterprise Linux hosts and Red Hat Virtualization Hosts that are based on Red HatEnterprise Linux 8
Procedure
1. Connect to the host you want to configure.
2. On the host, create a static_route.yml file, with the following example content:
3. Replace the example values shown with real values for your network.
4. To route your traffic to a secondary added network, use next-hop-interface to specify aninterface or network name.
To use a non-virtual machine network, specify an interface such as eth1.
To use a virtual machine network, specify a network name that is also the bridge name suchas net1.
5. Run this command:
$ nmstatectl set static_route.yml
Verification steps
routes: config: - destination: 192.168.123.0/24 next-hop-address: 192.168.178.1 next-hop-interface: eth1
CHAPTER 2. ADMINISTERING THE RESOURCES
107

Run the IP route command, ip route, with the destination parameter value you set in static_route.yml. This should show the desired route. For example, run the following command:
$ ip route | grep 192.168.123.0`
Additional resources
Network Manager Stateful Configuration (nmstate)
Removing a static route on a host
2.4.1.7. Removing a static route on a host
You can use nmstate to remove static routes from hosts. This method requires you to configure thehosts directly, without using Red Hat Virtualization Manager.
IMPORTANT
Except for adding or removing a static route on a host, always use the RHV Manager toconfigure host network settings in your cluster. For details, see Network ManagerStateful Configuration (nmstate).
NOTE
The custom static-route is preserved so long as its interface/bond exists and has an IPaddress. Otherwise, it will be removed.
As a result, VM networks behave differently from non-VM networks:
VM networks are based on a bridge. Moving the network from oneinterfaces/bond to another does not affect the route on a VM Network.
Non-VM networks are based on an interface. Moving the network from oneinterfaces/bond to another deletes the route related to the Non-VM network.
Prerequisites
This procedure requires nmstate, which is only available if your environment uses:
Red Hat Virtualization Manager version 4.4
Red Hat Enterprise Linux hosts and Red Hat Virtualization Hosts that are based on Red HatEnterprise Linux 8
Procedure
1. Connect to the host you want to reconfigure.
2. On the host, edit the static_route.yml file.
3. Insert a line state: absent as shown in the following example.
4. Add the value of next-hop-interface between the brackets of interfaces: []. The result shouldlook similar to the example shown here.
Red Hat Virtualization 4.4 Administration Guide
108

5. Run this command:
$ nmstatectl set static_route.yml
Verification steps
Run the IP route command, ip route, with the destination parameter value you set in static_route.yml. This should no longer show the desired route. For example, run the followingcommand:
$ ip route | grep 192.168.123.0`
Additional resources
Network Manager Stateful Configuration (nmstate)
Adding a static route on a host
2.4.1.8. Viewing or Editing the Gateway for a Logical Network
Users can define the gateway, along with the IP address and subnet mask, for a logical network. This isnecessary when multiple networks exist on a host and traffic should be routed through the specifiednetwork, rather than the default gateway.
If multiple networks exist on a host and the gateways are not defined, return traffic will be routedthrough the default gateway, which may not reach the intended destination. This would result in usersbeing unable to ping the host.
Red Hat Virtualization handles multiple gateways automatically whenever an interface goes up or down.
Procedure
1. Click Compute → Hosts.
2. Click the host’s name. This opens the details view.
3. Click the Network Interfaces tab to list the network interfaces attached to the host, and theirconfigurations.
4. Click Setup Host Networks.
5. Hover your cursor over an assigned logical network and click the pencil icon. This opens the EditManagement Network window.
The Edit Management Network window displays the network name, the boot protocol, and the IP,
routes: config: - destination: 192.168.123.0/24 next-hop-address: 192.168.178. next-hop-interface: eth1 state: absentinterfaces: [{“name”: eth1}]
CHAPTER 2. ADMINISTERING THE RESOURCES
109

The Edit Management Network window displays the network name, the boot protocol, and the IP,subnet mask, and gateway addresses. The address information can be manually edited by selecting aStatic boot protocol.
2.4.1.9. Logical Network General Settings Explained
The table below describes the settings for the General tab of the New Logical Network and EditLogical Network window.
Table 2.15. New Logical Network and Edit Logical Network Settings
Field Name Description
Name The name of the logical network. This text field mustbe a unique name with any combination of uppercaseand lowercase letters, numbers, hyphens, andunderscores.
Note that while the name of the logical network canbe longer than 15 characters and can contain non-ASCII characters, the on-host identifier (vdsm_name)will differ from the name you defined. See MappingVDSM Names to Logical Network Names forinstructions on displaying a mapping of these names.
Description The description of the logical network. This text fieldhas a 40-character limit.
Comment A field for adding plain text, human-readablecomments regarding the logical network.
Create on external provider Allows you to create the logical network to anOpenStack Networking instance that has beenadded to the Manager as an external provider.
External Provider - Allows you to select the externalprovider on which the logical network will be created.
Enable VLAN tagging VLAN tagging is a security feature that gives allnetwork traffic carried on the logical network aspecial characteristic. VLAN-tagged traffic cannotbe read by interfaces that do not also have thatcharacteristic. Use of VLANs on logical networks alsoallows a single network interface to be associatedwith multiple, differently VLAN-tagged logicalnetworks. Enter a numeric value in the text entry fieldif VLAN tagging is enabled.
VM Network Select this option if only virtual machines use thisnetwork. If the network is used for traffic that doesnot involve virtual machines, such as storagecommunications, do not select this check box.
Red Hat Virtualization 4.4 Administration Guide
110

Port Isolation If this is set, virtual machines on the same host areprevented from communicating and seeing eachother on this logical network. For this option to workon different hypervisors, the switches need to beconfigured with PVLAN/Port Isolation on therespective port/VLAN connected to the hypervisors,and not reflect back the frames with any hairpinsetting.
MTU Choose either Default, which sets the maximumtransmission unit (MTU) to the value given in theparenthesis (), or Custom to set a custom MTU forthe logical network. You can use this to match theMTU supported by your new logical network to theMTU supported by the hardware it interfaces with.Enter a numeric value in the text entry field ifCustom is selected. IMPORTANT: If you change thenetwork’s MTU settings, you must propagate thischange to the running virtual machines on thenetwork: Hot unplug and replug every virtualmachine’s vNIC that should apply the MTU setting, orrestart the virtual machines. Otherwise, theseinterfaces fail when the virtual machine migrates toanother host. For more information, see Afternetwork MTU change, some VMs and bridges havethe old MTU and seeing packet drops andBZ#1766414.
Network Label Allows you to specify a new label for the network orselect from existing labels already attached to hostnetwork interfaces. If you select an existing label, thelogical network will be automatically assigned to allhost network interfaces with that label.
Security Groups Allows you to assign security groups to the ports onthis logical network. Disabled disables the securitygroup feature. Enabled enables the feature. When aport is created and attached to this network, it will bedefined with port security enabled. This means thataccess to/from the virtual machines will be subject tothe security groups currently being provisioned. Inherit from Configuration enables the ports toinherit the behavior from the configuration file that isdefined for all networks. By default, the file disablessecurity groups. See Assigning Security Groups toLogical Networks for details.
Field Name Description
2.4.1.10. Logical Network Cluster Settings Explained
CHAPTER 2. ADMINISTERING THE RESOURCES
111

The table below describes the settings for the Cluster tab of the New Logical Network window.
Table 2.16. New Logical Network Settings
Field Name Description
Attach/Detach Network to/from Cluster(s) Allows you to attach or detach the logical networkfrom clusters in the data center and specify whetherthe logical network will be a required network forindividual clusters.
Name - the name of the cluster to which the settingswill apply. This value cannot be edited.
Attach All - Allows you to attach or detach thelogical network to or from all clusters in the datacenter. Alternatively, select or clear the Attach checkbox next to the name of each cluster to attach ordetach the logical network to or from a given cluster.
Required All - Allows you to specify whether thelogical network is a required network on all clusters.Alternatively, select or clear the Required check boxnext to the name of each cluster to specify whetherthe logical network is a required network for a givencluster.
2.4.1.11. Logical Network vNIC Profiles Settings Explained
The table below describes the settings for the vNIC Profiles tab of the New Logical Network window.
Table 2.17. New Logical Network Settings
Field Name Description
vNIC Profiles Allows you to specify one or more vNIC profiles forthe logical network. You can add or remove a vNICprofile to or from the logical network by clicking theplus or minus button next to the vNIC profile. Thefirst field is for entering a name for the vNIC profile.
Public - Allows you to specify whether the profile isavailable to all users.
QoS - Allows you to specify a network quality ofservice (QoS) profile to the vNIC profile.
2.4.1.12. Designate a Specific Traffic Type for a Logical Network with the Manage NetworksWindow
Specify the traffic type for the logical network to optimize the network traffic flow.
Procedure
Red Hat Virtualization 4.4 Administration Guide
112

1. Click Compute → Clusters.
2. Click the cluster’s name. This opens the details view.
3. Click the Logical Networks tab.
4. Click Manage Networks.
5. Select the appropriate check boxes and radio buttons.
6. Click OK.
NOTE
Logical networks offered by external providers must be used as virtual machine networks;they cannot be assigned special cluster roles such as display or migration.
2.4.1.13. Explanation of Settings in the Manage Networks Window
The table below describes the settings for the Manage Networks window.
Table 2.18. Manage Networks Settings
Field Description/Action
Assign Assigns the logical network to all hosts in the cluster.
Required A Network marked "required" must remainoperational in order for the hosts associated with it tofunction properly. If a required network ceases tofunction, any hosts associated with it become non-operational.
VM Network A logical network marked "VM Network" carriesnetwork traffic relevant to the virtual machinenetwork.
Display Network A logical network marked "Display Network" carriesnetwork traffic relevant to SPICE and to the virtualnetwork controller.
Migration Network A logical network marked "Migration Network" carriesvirtual machine and storage migration traffic. If anoutage occurs on this network, the managementnetwork (ovirtmgmt by default) will be used instead.
2.4.1.14. Configuring virtual functions on a NIC
NOTE
This is one in a series of topics that show how to set up and configure SR-IOV on Red HatVirtualization. For more information, see Setting Up and Configuring SR-IOV
CHAPTER 2. ADMINISTERING THE RESOURCES
113

Single Root I/O Virtualization (SR-IOV) enables you to use each PCIe endpoint as multiple separatedevices by using physical functions (PFs) and virtual functions (VFs). A PCIe card can have between oneand eight PFs. Each PF can have many VFs. The number of VFs it can have depends on the specific typeof PCIe device.
To configure SR-IOV-capable Network Interface Controllers (NICs), you use the Red Hat VirtualizationManager. There, you can configure the number of VFs on each NIC.
You can configure a VF like you would configure a standalone NIC, including:
Assigning one or more logical networks to the VF.
Creating bonded interfaces with VFs.
Assigning vNICs to VFs for direct device passthrough.
By default, all virtual networks have access to the virtual functions. You can disable this default andspecify which networks have access to a virtual function.
Prerequisite
For a vNIC to be attached to a VF must, its passthrough property must be enabled. For details,see Enabling_Passthrough_on_a_vNIC_Profile.
Procedure
1. Click Compute → Hosts.
2. Click the name of an SR-IOV-capable host. This opens the details view.
3. Click the Network Interfaces tab.
4. Click Setup Host Networks.
5. Select an SR-IOV-capable NIC, marked with a , and click the pencil icon.
6. Optional: To change the number of virtual functions, click the Number of VFs setting drop-down button and edit the Number of VFs text field.
IMPORTANT
Changing the number of VFs deletes all previous VFs on the network interfacebefore creating the new VFs. This includes any VFs that have virtual machinesdirectly attached.
7. Optional: To limit which virtual networks have access virtual functions, select Specific networks.
a. Select the networks that should have access to the VF, or use Labels to select networksbased on their network labels.
8. Click OK.
9. In the Setup Host Networks window, click OK.
Red Hat Virtualization 4.4 Administration Guide
114

2.4.2. Virtual Network Interface Cards (vNICs)
2.4.2.1. vNIC Profile Overview
A Virtual Network Interface Card (vNIC) profile is a collection of settings that can be applied toindividual virtual network interface cards in the Manager. A vNIC profile allows you to apply Network QoSprofiles to a vNIC, enable or disable port mirroring, and add or remove custom properties. A vNIC profilealso offers an added layer of administrative flexibility in that permission to use (consume) these profilescan be granted to specific users. In this way, you can control the quality of service that different usersreceive from a given network.
2.4.2.2. Creating or Editing a vNIC Profile
Create or edit a Virtual Network Interface Controller (vNIC) profile to regulate network bandwidth forusers and groups.
NOTE
If you are enabling or disabling port mirroring, all virtual machines using the associatedprofile must be in a down state before editing.
Procedure
1. Click Network → Networks.
2. Click the logical network’s name. This opens the details view.
3. Click the vNIC Profiles tab.
4. Click New or Edit.
5. Enter the Name and Description of the profile.
6. Select the relevant Quality of Service policy from the QoS list.
7. Select a Network Filter from the drop-down list to manage the traffic of network packets toand from virtual machines. For more information on network filters, see Applying networkfiltering in the Red Hat Enterprise Linux Virtualization Deployment and Administration Guide .
8. Select the Passthrough check box to enable passthrough of the vNIC and allow direct deviceassignment of a virtual function. Enabling the passthrough property will disable QoS, networkfiltering, and port mirroring as these are not compatible. For more information on passthrough,see Enabling Passthrough on a vNIC Profile .
9. If Passthrough is selected, optionally deselect the Migratable check box to disable migrationfor vNICs using this profile. If you keep this check box selected, see Additional Prerequisites forVirtual Machines with SR-IOV-Enabled vNICs in the Virtual Machine Management Guide .
10. Use the Port Mirroring and Allow all users to use this Profile check boxes to toggle theseoptions.
11. Select a custom property from the custom properties list, which displays Please select a key…by default. Use the + and - buttons to add or remove custom properties.
12. Click OK.
Apply this profile to users and groups to regulate their network bandwidth. If you edited a vNIC profile,
CHAPTER 2. ADMINISTERING THE RESOURCES
115

Apply this profile to users and groups to regulate their network bandwidth. If you edited a vNIC profile,you must either restart the virtual machine, or hot unplug and then hot plug the vNIC if the guestoperating system supports vNIC hot plug and hot unplug.
2.4.2.3. Explanation of Settings in the VM Interface Profile Window
Table 2.19. VM Interface Profile Window
Field Name Description
Network A drop-down list of the available networks to applythe vNIC profile to.
Name The name of the vNIC profile. This must be a uniquename with any combination of uppercase andlowercase letters, numbers, hyphens, andunderscores between 1 and 50 characters.
Description The description of the vNIC profile. This field isrecommended but not mandatory.
QoS A drop-down list of the available Network Quality ofService policies to apply to the vNIC profile. QoSpolicies regulate inbound and outbound networktraffic of the vNIC.
Network Filter A drop-down list of the available network filters toapply to the vNIC profile. Network filters improvenetwork security by filtering the type of packets thatcan be sent to and from virtual machines. Thedefault filter is vdsm-no-mac-spoofing, which is acombination of no-mac-spoofing and no-arp-mac-spoofing. For more information on thenetwork filters provided by libvirt, see the Pre-existing network filters section of the Red HatEnterprise Linux Virtualization Deployment andAdministration Guide.
Use <No Network Filter> for virtual machineVLANs and bonds. On trusted virtual machines,choosing not to use a network filter can improveperformance.
NOTE
Red Hat no longer supportsdisabling filters by setting the EnableMACAntiSpoofingFilterRules parameter to false using the engine-config tool. Use the <No Network Filter> option instead.
Red Hat Virtualization 4.4 Administration Guide
116

Passthrough A check box to toggle the passthrough property.Passthrough allows a vNIC to connect directly to avirtual function of a host NIC. The passthroughproperty cannot be edited if the vNIC profile isattached to a virtual machine.
QoS, network filters, and port mirroring are disabledin the vNIC profile if passthrough is enabled.
Migratable A check box to toggle whether or not vNICs usingthis profile can be migrated. Migration is enabled bydefault on regular vNIC profiles; the check box isselected and cannot be changed. When thePassthrough check box is selected, Migratablebecomes available and can be deselected, if required,to disable migration of passthrough vNICs.
Failover A drop-down menu to select available vNIC profilesthat act as a failover device. Available only when thePassthrough and Migratable check boxes arechecked.
Port Mirroring A check box to toggle port mirroring. Port mirroringcopies layer 3 network traffic on the logical networkto a virtual interface on a virtual machine. It it notselected by default. For further details, see PortMirroring in the Technical Reference.
Device Custom Properties A drop-down menu to select available customproperties to apply to the vNIC profile. Use the + and- buttons to add and remove properties respectively.
Allow all users to use this Profile A check box to toggle the availability of the profile toall users in the environment. It is selected by default.
Field Name Description
2.4.2.4. Enabling Passthrough on a vNIC Profile
NOTE
This is one in a series of topics that show how to set up and configure SR-IOV on Red HatVirtualization. For more information, see Setting Up and Configuring SR-IOV
The passthrough property of a vNIC profile enables a vNIC to be directly connected to a virtual function(VF) of an SR-IOV-enabled NIC. The vNIC will then bypass the software network virtualization andconnect directly to the VF for direct device assignment.
The passthrough property cannot be enabled if the vNIC profile is already attached to a vNIC; this
CHAPTER 2. ADMINISTERING THE RESOURCES
117

The passthrough property cannot be enabled if the vNIC profile is already attached to a vNIC; thisprocedure creates a new profile to avoid this. If a vNIC profile has passthrough enabled, QoS, networkfilters, and port mirroring cannot be enabled on the same profile.
For more information on SR-IOV, direct device assignment, and the hardware considerations forimplementing these in Red Hat Virtualization, see Hardware Considerations for Implementing SR-IOV .
Procedure
1. Click Network → Networks.
2. Click the logical network’s name. This opens the details view.
3. Click the vNIC Profiles tab to list all vNIC profiles for that logical network.
4. Click New.
5. Enter the Name and Description of the profile.
6. Select the Passthrough check box.
7. Optionally deselect the Migratable check box to disable migration for vNICs using this profile. Ifyou keep this check box selected, see Additional Prerequisites for Virtual Machines with SR-IOV-Enabled vNICs in the Virtual Machine Management Guide .
8. If necessary, select a custom property from the custom properties list, which displays Pleaseselect a key… by default. Use the + and - buttons to add or remove custom properties.
9. Click OK.
The vNIC profile is now passthrough-capable. To use this profile to directly attach a virtual machine to aNIC or PCI VF, attach the logical network to the NIC and create a new PCI Passthrough vNIC on thedesired virtual machine that uses the passthrough vNIC profile. For more information on theseprocedures respectively, see Editing Host Network Interfaces and Assigning Logical Networks to Hosts ,and Adding a New Network Interface in the Virtual Machine Management Guide .
2.4.2.5. Enabling a vNIC profile for SR-IOV migration with failover
Failover allows the selection of a profile that acts as a failover device during virtual machine migrationwhen the VF needs to be detached, preserving virtual machine communication with minimal interruption.
NOTE
Failover is a Technology Preview feature only. Technology Preview features are notsupported with Red Hat production service-level agreements (SLAs) and might not befunctionally complete, and Red Hat does not recommend using them for production.These features provide early access to upcoming product features, enabling customersto test functionality and provide feedback during the development process. For moreinformation see Red Hat Technology Preview Features Support Scope .
Prerequisites
The Passthrough and Migratable check boxes of the profile are selected.
The failover network is attached to the host.
In order to make a vNIC profile acting as failover editable, you must first remove any failover
Red Hat Virtualization 4.4 Administration Guide
118

In order to make a vNIC profile acting as failover editable, you must first remove any failoverreferences.
vNIC profiles that can act as failover are profiles that are not selected as Passthrough or are notconnected to an External Network.
Procedure
1. In the Administration Portal, go to Network → VNIC profiles, select the vNIC profile, click Editand select a Failover vNIC profile from the drop down list.
2. Click OK to save the profile settings.
NOTE
Attaching two vNIC profiles that reference the same failover vNIC profile to the samevirtual machine will fail in libvirt.
2.4.2.6. Removing a vNIC Profile
Remove a vNIC profile to delete it from your virtualized environment.
Procedure
1. Click Network → Networks.
2. Click the logical network’s name. This opens the details view.
3. Click the vNIC Profiles tab to display available vNIC profiles.
4. Select one or more profiles and click Remove.
5. Click OK.
2.4.2.7. Assigning Security Groups to vNIC Profiles
NOTE
This feature is only available when ovirt-provider-ovn is added as an external networkprovider. Security groups cannot be created through the Red Hat Virtualization Manager.You must create security groups through OpenStack Networking on the ovirt-provider-ovn. For more information, see Project Security Management in the Red Hat OpenStackPlatform Users and Identity Management Guide.
You can assign security groups to the vNIC profile of networks that have been imported from anOpenStack Networking instance and that use the Open vSwitch plug-in. A security group is a collectionof strictly enforced rules that allow you to filter inbound and outbound traffic over a network interface.The following procedure outlines how to attach a security group to a vNIC profile.
NOTE
CHAPTER 2. ADMINISTERING THE RESOURCES
119

NOTE
A security group is identified using the ID of that security group as registered in the OpenVirtual Network (OVN) External Network Provider. You can find the IDs of securitygroups for a given tenant using the OpenStack Networking API, see List Security Groupsin the OpenStack API Reference .
Procedure
1. Click Network → Networks.
2. Click the logical network’s name. This opens the details view.
3. Click the vNIC Profiles tab.
4. Click New, or select an existing vNIC profile and click Edit.
5. From the custom properties drop-down list, select SecurityGroups. Leaving the customproperty drop-down blank applies the default security settings, which permit all outboundtraffic and intercommunication but deny all inbound traffic from outside of the default securitygroup. Note that removing the SecurityGroups property later will not affect the appliedsecurity group.
6. In the text field, enter the ID of the security group to attach to the vNIC profile.
7. Click OK.
You have attached a security group to the vNIC profile. All traffic through the logical network to whichthat profile is attached will be filtered in accordance with the rules defined for that security group.
2.4.2.8. User Permissions for vNIC Profiles
Configure user permissions to assign users to certain vNIC profiles. Assign the VnicProfileUser role to auser to enable them to use the profile. Restrict users from certain profiles by removing their permissionfor that profile.
User Permissions for vNIC Profiles
1. Click Network → vNIC Profile.
2. Click the vNIC profile’s name. This opens the details view.
3. Click the Permissions tab to show the current user permissions for the profile.
4. Click Add or Remove to change user permissions for the vNIC profile.
5. In the Add Permissions to User window, click My Groups to display your user groups. You canuse this option to grant permissions to other users in your groups.
You have configured user permissions for a vNIC profile.
2.4.3. External Provider Networks
2.4.3.1. Importing Networks From External Providers
To use networks from an Open Virtual Network (OVN), register the provider with the Manager. See
Red Hat Virtualization 4.4 Administration Guide
120

Adding an External Network Provider for more information. Then, use the following procedure to importthe networks provided by that provider into the Manager so the networks can be used by virtualmachines.
Procedure
1. Click Network → Networks.
2. Click Import.
3. From the Network Provider drop-down list, select an external provider. The networks offeredby that provider are automatically discovered and listed in the Provider Networks list.
4. Using the check boxes, select the networks to import in the Provider Networks list and click thedown arrow to move those networks into the Networks to Import list.
5. You can customize the name of the network that you are importing. To customize the name,click the network’s name in the Name column, and change the text.
6. From the Data Center drop-down list, select the data center into which the networks will beimported.
7. Optional: Clear the Allow All check box to prevent that network from being available to all users.
8. Click Import.
The selected networks are imported into the target data center and can be attached to virtual machines.See Adding a New Network Interface in the Virtual Machine Management Guide for more information.
2.4.3.2. Limitations to Using External Provider Networks
The following limitations apply to using logical networks imported from an external provider in a Red HatVirtualization environment.
Logical networks offered by external providers must be used as virtual machine networks, andcannot be used as display networks.
The same logical network can be imported more than once, but only to different data centers.
You cannot edit logical networks offered by external providers in the Manager. To edit thedetails of a logical network offered by an external provider, you must edit the logical networkdirectly from the external provider that provides that logical network.
Port mirroring is not available for virtual network interface cards connected to logical networksoffered by external providers.
If a virtual machine uses a logical network offered by an external provider, that provider cannotbe deleted from the Manager while the logical network is still in use by the virtual machine.
Networks offered by external providers are non-required. As such, scheduling for clusters inwhich such logical networks have been imported will not take those logical networks intoaccount during host selection. Moreover, it is the responsibility of the user to ensure theavailability of the logical network on hosts in clusters in which such logical networks have beenimported.
2.4.3.3. Configuring Subnets on External Provider Logical Networks
CHAPTER 2. ADMINISTERING THE RESOURCES
121

A logical network provided by an external provider can only assign IP addresses to virtual machines if oneor more subnets have been defined on that logical network. If no subnets are defined, virtual machineswill not be assigned IP addresses. If there is one subnet, virtual machines will be assigned an IP addressfrom that subnet, and if there are multiple subnets, virtual machines will be assigned an IP address fromany of the available subnets. The DHCP service provided by the external network provider on which thelogical network is hosted is responsible for assigning these IP addresses.
While the Red Hat Virtualization Manager automatically discovers predefined subnets on importedlogical networks, you can also add or remove subnets to or from logical networks from within theManager.
If you add Open Virtual Network (OVN) (ovirt-provider-ovn) as an external network provider, multiplesubnets can be connected to each other by routers. To manage these routers, you can use theOpenStack Networking API v2.0. Please note, however, that ovirt-provider-ovn has a limitation: SourceNAT (enable_snat in the OpenStack API) is not implemented.
2.4.3.4. Adding Subnets to External Provider Logical Networks
Create a subnet on a logical network provided by an external provider.
Procedure
1. Click Network → Networks.
2. Click the logical network’s name. This opens the details view.
3. Click the Subnets tab.
4. Click New.
5. Enter a Name and CIDR for the new subnet.
6. From the IP Version drop-down list, select either IPv4 or IPv6.
7. Click OK.
NOTE
For IPv6, Red Hat Virtualization supports only static addressing.
2.4.3.5. Removing Subnets from External Provider Logical Networks
Remove a subnet from a logical network provided by an external provider.
Procedure
1. Click Network → Networks.
2. Click the logical network’s name. This opens the details view.
3. Click the Subnets tab.
4. Select a subnet and click Remove.
5. Click OK.
Red Hat Virtualization 4.4 Administration Guide
122

2.4.3.6. Assigning Security Groups to Logical Networks and Ports
NOTE
This feature is only available when Open Virtual Network (OVN) is added as an externalnetwork provider (as ovirt-provider-ovn). Security groups cannot be created through theRed Hat Virtualization Manager. You must create security groups through OpenStackNetworking API v2.0 or Ansible.
A security group is a collection of strictly enforced rules that allow you to filter inbound and outboundtraffic over a network. You can also use security groups to filter traffic at the port level.
In Red Hat Virtualization 4.2.7, security groups are disabled by default.
Procedure
1. Click Compute → Clusters.
2. Click the cluster name. This opens the details view.
3. Click the Logical Networks tab.
4. Click Add Network and define the properties, ensuring that you select ovirt-provider-ovn fromthe External Providers drop-down list. For more information, see Creating a new logicalnetwork in a data center or cluster.
5. Select Enabled from the Security Group drop-down list. For more details see Logical NetworkGeneral Settings Explained.
6. Click OK.
7. Create security groups using either OpenStack Networking API v2.0 or Ansible.
8. Create security group rules using either OpenStack Networking API v2.0 or Ansible.
9. Update the ports with the security groups that you defined using either OpenStack NetworkingAPI v2.0 or Ansible.
10. Optional. Define whether the security feature is enabled at the port level. Currently, this is onlypossible using the OpenStack Networking API. If the port_security_enabled attribute is not set,it will default to the value specified in the network to which it belongs.
2.4.4. Hosts and Networking
2.4.4.1. Network Manager Stateful Configuration (nmstate)
Version 4.4 of Red Hat Virtualization (RHV) uses Network Manager Stateful Configuration (nmstate) toconfigure networking for RHV hosts that are based on RHEL 8. RHV version 4.3 and earlier use interfaceconfiguration (ifcfg) network scripts to manage host networking.
To use nmstate, upgrade the Red Hat Virtualization Manager and hosts as described in the RHVUpgrade Guide.
As an administrator, you do not need to install or configure nmstate. It is enabled by default and runs inthe background.
IMPORTANT
CHAPTER 2. ADMINISTERING THE RESOURCES
123

IMPORTANT
Always use RHV Manager to modify the network configuration of hosts in your clusters.Otherwise, you might create an unsupported configuration.
The change to nmstate is nearly transparent. It only changes how you configure host networking in thefollowing ways:
After you add a host to a cluster, always use the RHV Manager to modify the host network.
Modifying the host network without using the Manager can create an unsupportedconfiguration.
To fix an unsupported configuration, you replace it with a supported one by using the Managerto synchronize the host network. For details, see Synchronizing Host Networks .
The only situation where you modify host networks outside the Manager is to configure a staticroute on a host. For more details, see Adding a static route on a host .
The change to nmstate improves how RHV Manager applies configuration changes you make in Cockpitand Anaconda before adding the host to the Manager. This fixes some issues, such as BZ#1680970Static IPv6 Address is lost on host deploy if NM manages the interface.
IMPORTANT
If you use dnf or yum to manually update the nmstate package, restart vdsmd and supervdsmd on the host. For example:
# dnf update nmstate# systemctl restart vdsmd supervdsmd
IMPORTANT
If you use dnf or yum to manually update the Network Manager package, restart NetworkManager on the host. For example:
# dnf update NetworkManager# systemctl restart NetworkManager
2.4.4.2. Refreshing Host Capabilities
When a network interface card is added to a host, the capabilities of the host must be refreshed todisplay that network interface card in the Manager.
Procedure
1. Click Compute → Hosts and select a host.
2. Click Management → Refresh Capabilities.
The list of network interface cards in the Network Interfaces tab for the selected host is updated. Anynew network interface cards can now be used in the Manager.
Red Hat Virtualization 4.4 Administration Guide
124

2.4.4.3. Editing Host Network Interfaces and Assigning Logical Networks to Hosts
You can change the settings of physical host network interfaces, move the management network fromone physical host network interface to another, and assign logical networks to physical host networkinterfaces. Bridge and ethtool custom properties are also supported.
WARNING
The only way to change the IP address of a host in Red Hat Virtualization is toremove the host and then to add it again.
To change the VLAN settings of a host, see Editing VLAN Settings.
IMPORTANT
You cannot assign logical networks offered by external providers to physical host networkinterfaces; such networks are dynamically assigned to hosts as they are required by virtualmachines.
NOTE
If the switch has been configured to provide Link Layer Discovery Protocol (LLDP)information, you can hover your cursor over a physical network interface to view theswitch port’s current configuration. This can help to prevent incorrect configuration.Check the following information prior to assigning logical networks:
Port Description (TLV type 4) and System Name (TLV type 5) help to detectto which ports and on which switch the host’s interfaces are patched.
Port VLAN ID shows the native VLAN ID configured on the switch port foruntagged ethernet frames. All VLANs configured on the switch port are shown asVLAN Name and VLAN ID combinations.
Procedure
1. Click Compute → Hosts.
2. Click the host’s name. This opens the details view.
3. Click the Network Interfaces tab.
4. Click Setup Host Networks.
5. Optionally, hover your cursor over host network interface to view configuration informationprovided by the switch.
6. Attach a logical network to a physical host network interface by selecting and dragging thelogical network into the Assigned Logical Networks area next to the physical host networkinterface.
NOTE
CHAPTER 2. ADMINISTERING THE RESOURCES
125
NOTE
If a NIC is connected to more than one logical network, only one of the networkscan be non-VLAN. All the other logical networks must be unique VLANs.
7. Configure the logical network:
a. Hover your cursor over an assigned logical network and click the pencil icon. This opens theEdit Management Network window.
b. From the IPv4 tab, select a Boot Protocol from None, DHCP, or Static. If you selectedStatic, enter the IP, Netmask / Routing Prefix, and the Gateway.
NOTE
For IPv6, only static IPv6 addressing is supported. To configure the logicalnetwork, select the IPv6 tab and make the following entries:
Set Boot Protocol to Static.
For Routing Prefix, enter the length of the prefix using a forward slashand decimals. For example: /48
IP: The complete IPv6 address of the host network interface. Forexample: 2001:db8::1:0:0:6
Gateway: The source router’s IPv6 address. For example: 2001:db8::1:0:0:1
NOTE
If you change the host’s management network IP address, you must reinstallthe host for the new IP address to be configured.
Each logical network can have a separate gateway defined from themanagement network gateway. This ensures traffic that arrives on the logicalnetwork will be forwarded using the logical network’s gateway instead of thedefault gateway used by the management network.
IMPORTANT
Set all hosts in a cluster to use the same IP stack for their managementnetwork; either IPv4 or IPv6 only. Dual stack is not supported.
c. Use the QoS tab to override the default host network quality of service. Select OverrideQoS and enter the desired values in the following fields:
Weighted Share: Signifies how much of the logical link’s capacity a specific networkshould be allocated, relative to the other networks attached to the same logical link. Theexact share depends on the sum of shares of all networks on that link. By default this is anumber in the range 1-100.
Rate Limit [Mbps]: The maximum bandwidth to be used by a network.
Committed Rate [Mbps]: The minimum bandwidth required by a network. The
Red Hat Virtualization 4.4 Administration Guide
126

Committed Rate requested is not guaranteed and will vary depending on the networkinfrastructure and the Committed Rate requested by other networks on the samelogical link.
d. To configure a network bridge, click the Custom Properties tab and select bridge_optsfrom the drop-down list. Enter a valid key and value with the following syntax: key=value.Separate multiple entries with a whitespace character. The following keys are valid, with thevalues provided as examples. For more information on these parameters, see Explanation ofbridge_opts Parameters.
e. To configure ethernet properties, click the Custom Properties tab and select ethtool_optsfrom the drop-down list. Enter a valid value using the format of the command-linearguments of ethtool. For example: :
This field can accept wild cards. For example, to apply the same option to all of thisnetwork’s interfaces, use:
The ethtool_opts option is not available by default; you need to add it using the engineconfiguration tool. See How to Set Up Manager to Use Ethtool for more information. Formore information on ethtool properties, see the manual page by typing man ethtool in thecommand line.
f. To configure Fibre Channel over Ethernet (FCoE), click the Custom Properties tab andselect fcoe from the drop-down list. Enter a valid key and value with the following syntax:key=value. At least enable=yes is required. You can also add dcb=[yes|no] and `auto_vlan=[yes|no]. Separate multiple entries with a whitespace character. The fcoe option is notavailable by default; you need to add it using the engine configuration tool. See How to SetUp Manager to Use FCoE for more information.
NOTE
forward_delay=1500group_addr=1:80:c2:0:0:0group_fwd_mask=0x0hash_max=512hello_time=200max_age=2000multicast_last_member_count=2multicast_last_member_interval=100multicast_membership_interval=26000multicast_querier=0multicast_querier_interval=25500multicast_query_interval=13000multicast_query_response_interval=1000multicast_query_use_ifaddr=0multicast_router=1multicast_snooping=1multicast_startup_query_count=2multicast_startup_query_interval=3125
--coalesce em1 rx-usecs 14 sample-interval 3 --offload em2 rx on lro on tso off --change em1 speed 1000 duplex half
--coalesce * rx-usecs 14 sample-interval 3
CHAPTER 2. ADMINISTERING THE RESOURCES
127

NOTE
A separate, dedicated logical network is recommended for use with FCoE.
g. To change the default network used by the host from the management network(ovirtmgmt) to a non-management network, configure the non-management network’sdefault route. See Configuring a Default Route for more information.
h. If your logical network definition is not synchronized with the network configuration on thehost, select the Sync network check box. For more information about unsynchronized hostsand how to synchronize them, see Synchronizing host networks .
8. Select the Verify connectivity between Host and Engine check box to check networkconnectivity. This action only works if the host is in maintenance mode.
9. Click OK.
NOTE
If not all network interface cards for the host are displayed, click Management → RefreshCapabilities to update the list of network interface cards available for that host.
Troubleshooting
In some cases, making multiple concurrent changes to a host network configuration using the SetupHost Networks window or setupNetwork command fails with an Operation failed: [Cannot setup Networks]. Another Setup Networks or Host Refresh process in progress on the host. Please try later.] error in the event log. This error indicates that some of the changes were not configured on thehost. This happens because, to preserve the integrity of the configuration state, only a single setupnetwork command can be processed at a time. Other concurrent configuration commands are queuedfor up to a default timeout of 20 seconds. To help prevent the above failure from happening, use the engine-config command to increase the timeout period of SetupNetworksWaitTimeoutSecondsbeyond 20 seconds. For example:
Additional resources
Syntax for the engine-config Command
setupnetworks POST
2.4.4.4. Synchronizing Host Networks
The Manager defines a network interface as out-of-sync when the definition of the interface on thehost differs from the definitions stored by the Manager.
Out-of-sync networks appear with an Out-of-sync icon in the host’s Network Interfaces tab and
with this icon in the Setup Host Networks window.
When a host’s network is out of sync, the only activities that you can perform on the unsynchronizednetwork in the Setup Host Networks window are detaching the logical network from the networkinterface or synchronizing the network.
# engine-config --set SetupNetworksWaitTimeoutSeconds=40
Red Hat Virtualization 4.4 Administration Guide
128

Understanding How a Host Becomes out-of-sync
A host will become out of sync if:
You make configuration changes on the host rather than using the the Edit Logical Networkswindow, for example:
Changing the VLAN identifier on the physical host.
Changing the Custom MTU on the physical host.
You move a host to a different data center with the same network name, but with differentvalues/parameters.
You change a network’s VM Network property by manually removing the bridge from the host.
IMPORTANT
If you change the network’s MTU settings, you must propagate this change to therunning virtual machines on the network: Hot unplug and replug every virtual machine’svNIC that should apply the MTU setting, or restart the virtual machines. Otherwise, theseinterfaces fail when the virtual machine migrates to another host. For more information,see After network MTU change, some VMs and bridges have the old MTU and seeingpacket drops and BZ#1766414.
Preventing Hosts from Becoming Unsynchronized
Following these best practices will prevent your host from becoming unsynchronized:
1. Use the Administration Portal to make changes rather than making changes locally on the host.
2. Edit VLAN settings according to the instructions in Editing VLAN Settings.
Synchronizing Hosts
Synchronizing a host’s network interface definitions involves using the definitions from the Manager andapplying them to the host. If these are not the definitions that you require, after synchronizing your hostsupdate their definitions from the Administration Portal. You can synchronize a host’s networks on threelevels:
Per logical network
Per host
Per cluster
Synchronizing Host Networks on the Logical Network Level
1. Click Compute → Hosts.
2. Click the host’s name. This opens the details view.
3. Click the Network Interfaces tab.
4. Click Setup Host Networks.
5. Hover your cursor over the unsynchronized network and click the pencil icon. This opens the
CHAPTER 2. ADMINISTERING THE RESOURCES
129

5. Hover your cursor over the unsynchronized network and click the pencil icon. This opens theEdit Network window.
6. Select the Sync network check box.
7. Click OK to save the network change.
8. Click OK to close the Setup Host Networks window.
Synchronizing a Host’s Networks on the Host level
Click the Sync All Networks button in the host’s Network Interfaces tab to synchronize all ofthe host’s unsynchronized network interfaces.
Synchronizing a Host’s Networks on the Cluster level
Click the Sync All Networks button in the cluster’s Logical Networks tab to synchronize allunsynchronized logical network definitions for the entire cluster.
NOTE
You can also synchronize a host’s networks via the REST API. See syncallnetworks in theREST API Guide .
2.4.4.5. Editing a Host’s VLAN Settings
To change the VLAN settings of a host, the host must be removed from the Manager, reconfigured, andre-added to the Manager.
To keep networking synchronized, do the following:
1. Put the host in maintenance mode.
2. Manually remove the management network from the host. This will make the host reachableover the new VLAN.
3. Add the host to the cluster. Virtual machines that are not connected directly to themanagement network can be migrated between hosts safely.
The following warning message appears when the VLAN ID of the management network is changed:
Changing certain properties (e.g. VLAN, MTU) of the management network could lead to loss of connectivity to hosts in the data center, if its underlying network infrastructure isn't configured to accommodate the changes. Are you sure you want to proceed?
Proceeding causes all of the hosts in the data center to lose connectivity to the Manager and causes themigration of hosts to the new management network to fail. The management network will be reportedas "out-of-sync".
IMPORTANT
If you change the management network’s VLAN ID, you must reinstall the host to applythe new VLAN ID.
2.4.4.6. Adding Multiple VLANs to a Single Network Interface Using Logical Networks
Red Hat Virtualization 4.4 Administration Guide
130

Multiple VLANs can be added to a single network interface to separate traffic on the one host.
IMPORTANT
You must have created more than one logical network, all with the Enable VLAN taggingcheck box selected in the New Logical Network or Edit Logical Network windows.
Procedure
1. Click Compute → Hosts.
2. Click the host’s name. This opens the details view.
3. Click the Network Interfaces tab.
4. Click Setup Host Networks.
5. Drag your VLAN-tagged logical networks into the Assigned Logical Networks area next to thephysical network interface. The physical network interface can have multiple logical networksassigned due to the VLAN tagging.
6. Edit the logical networks:
a. Hover your cursor over an assigned logical network and click the pencil icon.
b. If your logical network definition is not synchronized with the network configuration on thehost, select the Sync network check box.
c. Select a Boot Protocol:
None
DHCP
Static
d. Provide the IP and Subnet Mask.
e. Click OK.
7. Select the Verify connectivity between Host and Engine check box to run a network check;this will only work if the host is in maintenance mode.
8. Click OK.
Add the logical network to each host in the cluster by editing a NIC on each host in the cluster. After thisis done, the network will become operational.
This process can be repeated multiple times, selecting and editing the same network interface eachtime on each host to add logical networks with different VLAN tags to a single network interface.
2.4.4.6.1. Copying host networks
To save time, you can copy a source host’s network configuration to a target host in the same cluster.
Copying the network configuration includes:
CHAPTER 2. ADMINISTERING THE RESOURCES
131

Logical networks attached to the host, except the ovirtmgmt management network
Bonds attached to interfaces
Limitations
Do not copy network configurations that contain static IP addresses. Doing this sets the bootprotocol in the target host to none.
Copying a configuration to a target host with the same interface names as the source host butdifferent physical network connections produces a wrong configuration.
The target host must have an equal or greater number of interfaces than the source host.Otherwise, the operation fails.
Copying QoS, DNS, and custom_properties is not supported.
Network interface labels are not copied.
WARNING
Copying host networks replaces ALL network settings on the target host except itsattachment to the ovirtmgmt management network.
Prerequisites
The number of NICs on the target host must be equal or greater than those on the source host.Otherwise, the operation fails.
The hosts must be in the same cluster.
Procedure
1. In the Administration Portal, click Compute → Hosts.
2. Select the source host whose configuration you want to copy.
3. Click Copy Host Networks. This opens the Copy Host Networks window.
4. Use Target Host to select the host that should receive the configuration. The list only showshosts that are in the same cluster.
5. Click Copy Host Networks.
6. Verify the network settings of the target host
Tips
Selecting multiple hosts disables the Copy Host Networks button and context menu.
Instead of using the Copy Host Networks button, you can right-click a host and select Copy
Red Hat Virtualization 4.4 Administration Guide
132

Instead of using the Copy Host Networks button, you can right-click a host and select CopyHost Networks from the context menu.
The Copy Host Networks button is also available in any host’s details view.
2.4.4.7. Assigning Additional IPv4 Addresses to a Host Network
A host network, such as the ovirtmgmt management network, is created with only one IP address wheninitially set up. This means that if a NIC’s configuration file is configured with multiple IP addresses, onlythe first listed IP address will be assigned to the host network. Additional IP addresses may be required ifconnecting to storage, or to a server on a separate private subnet using the same NIC.
The vdsm-hook-extra-ipv4-addrs hook allows you to configure additional IPv4 addresses for hostnetworks. For more information about hooks, see VDSM and Hooks.
In the following procedure, the host-specific tasks must be performed on each host for which you wantto configure additional IP addresses.
Procedure
1. On the host that you want to configure additional IPv4 addresses for, install the VDSM hookpackage. The package is available by default on Red Hat Virtualization Hosts but needs to beinstalled on Red Hat Enterprise Linux hosts.
2. On the Manager, run the following command to add the key:
3. Restart the ovirt-engine service:
4. In the Administration Portal, click Compute → Hosts.
5. Click the host’s name. This opens the details view.
6. Click the Network Interfaces tab and click Setup Host Networks.
7. Edit the host network interface by hovering the cursor over the assigned logical network andclicking the pencil icon.
8. Select ipv4_addr from the Custom Properties drop-down list and add the additional IPaddress and prefix (for example 5.5.5.5/24). Multiple IP addresses must be comma-separated.
9. Click OK to close the Edit Network window.
10. Click OK to close the Setup Host Networks window.
The additional IP addresses will not be displayed in the Manager, but you can run the command ip addr show on the host to confirm that they have been added.
2.4.4.8. Adding Network Labels to Host Network Interfaces
# dnf install vdsm-hook-extra-ipv4-addrs
# engine-config -s 'UserDefinedNetworkCustomProperties=ipv4_addrs=.*'
# systemctl restart ovirt-engine.service
CHAPTER 2. ADMINISTERING THE RESOURCES
133

Using network labels allows you to greatly simplify the administrative workload associated with assigninglogical networks to host network interfaces. Setting a label on a role network (for instance, a migrationnetwork or a display network) causes a mass deployment of that network on all hosts. Such massadditions of networks are achieved through the use of DHCP. This method of mass deployment waschosen over a method of typing in static addresses, because of the unscalable nature of the task oftyping in many static IP addresses.
There are two methods of adding labels to a host network interface:
Manually, in the Administration Portal
Automatically, with the LLDP Labeler service
Procedure
1. Click Compute → Hosts.
2. Click the host’s name. This opens the details view.
3. Click the Network Interfaces tab.
4. Click Setup Host Networks.
5. Click Labels and right-click [New Label]. Select a physical network interface to label.
6. Enter a name for the network label in the Label text field.
7. Click OK.
Procedure
You can automate the process of assigning labels to host network interfaces in the configured list ofclusters with the LLDP Labeler service.
2.4.4.8.1. Configuring the LLDP Labeler
By default, LLDP Labeler runs as an hourly service. This option is useful if you make hardware changes(for example, NICs, switches, or cables) or change switch configurations.
Prerequisites
The interfaces must be connected to a Juniper switch.
The Juniper switch must be configured to provide the Port VLAN using LLDP.
Procedure
1. Configure the username and password in /etc/ovirt-lldp-labeler/conf.d/ovirt-lldp-credentials.conf:
username - the username of the Manager administrator. The default is admin@internal.
password - the password of the Manager administrator. The default is 123456.
2. Configure the LLDP Labeler service by updating the following values in etc/ovirt-lldp-labeler/conf.d/ovirt-lldp-credentials.conf:
Red Hat Virtualization 4.4 Administration Guide
134
clusters - a comma-separated list of clusters on which the service should run. Wildcards aresupported. For example, Cluster* defines LLDP Labeler to run on all clusters starting withword Cluster. To run the service on all clusters in the data center, type *. The default is Def*.
api_url - the full URL of the Manager’s API. The default is https://Manager_FQDN/ovirt-engine/api
ca_file - the path to the custom CA certificate file. Leave this value empty if you do not usecustom certificates. The default is empty.
auto_bonding - enables LLDP Labeler’s bonding capabilities. The default is true.
auto_labeling - enables LLDP Labeler’s labeling capabilities. The default is true.
3. Optionally, you can configure the service to run at a different time interval by changing thevalue of OnUnitActiveSec in etc/ovirt-lldp-labeler/conf.d/ovirt-lldp-labeler.timer. The defaultis 1h.
4. Configure the service to start now and at boot by entering the following command:
# systemctl enable --now ovirt-lldp-labeler
To invoke the service manually, enter the following command:
# /usr/bin/python /usr/share/ovirt-lldp-labeler/ovirt_lldp_labeler_cli.py
You have added a network label to a host network interface. Newly created logical networks with thesame label are automatically assigned to all host network interfaces with that label. Removing a labelfrom a logical network automatically removes that logical network from all host network interfaces withthat label.
2.4.4.9. Changing the FQDN of a Host
Use the following procedure to change the fully qualified domain name of hosts.
Procedure
1. Place the host into maintenance mode so the virtual machines are live migrated to another host.See Moving a host to maintenance mode for more information. Alternatively, manually shutdown or migrate all the virtual machines to another host. See Manually Migrating VirtualMachines in the Virtual Machine Management Guide for more information.
2. Click Remove, and click OK to remove the host from the Administration Portal.
3. Use the hostnamectl tool to update the host name. For more options, see Configure HostNames in the Red Hat Enterprise Linux 7 Networking Guide .
4. Reboot the host.
5. Re-register the host with the Manager. See Adding standard hosts to the Manager for moreinformation.
# hostnamectl set-hostname NEW_FQDN
CHAPTER 2. ADMINISTERING THE RESOURCES
135

2.4.4.9.1. IPv6 Networking Support
Red Hat Virtualization supports static IPv6 networking in most contexts.
NOTE
Red Hat Virtualization requires IPv6 to remain enabled on the computer or virtualmachine where you are running the Manager (also called "the Manager machine"). Do notdisable IPv6 on the Manager machine, even if your systems do not use it.
Limitations for IPv6
Only static IPv6 addressing is supported. Dynamic IPv6 addressing with DHCP or StatelessAddress Autoconfiguration are not supported.
Dual-stack addressing, IPv4 and IPv6, is not supported.
OVN networking can be used with only IPv4 or IPv6.
Switching clusters from IPv4 to IPv6 is not supported.
Only a single gateway per host can be set for IPv6.
If both networks share a single gateway (are on the same subnet), you can move the defaultroute role from the management network (ovirtmgmt) to another logical network. The host andManager should have the same IPv6 gateway. If the host and Manager are not on the samesubnet, the Manager might lose connectivity with the host because the IPv6 gateway wasremoved.
Using a glusterfs storage domain with an IPv6-addressed gluster server is not supported.
2.4.4.9.2. Setting Up and Configuring SR-IOV
This topic summarizes the steps for setting up and configuring SR-IOV, with links out to topics thatcover each step in detail.
Prerequisites
Set up your hardware in accordance with the Hardware Considerations for Implementing SR-IOV
Procedure
To set up and configure SR-IOV, complete the following tasks.
1. Configuring a Host for PCI Passthrough .
2. Editing the virtual function configuration on a NIC .
3. Enabling passthrough on a vNIC Profile .
4. Configuring Virtual Machines with SR-IOV-Enabled vNICs to Reduce Network Outage duringMigration.
Notes
The number of the 'passthrough' vNICs depends on the number of available virtual functions
Red Hat Virtualization 4.4 Administration Guide
136

The number of the 'passthrough' vNICs depends on the number of available virtual functions(VFs) on the host. For example, to run a virtual machine (VM) with three SR-IOV cards (vNICs),the host must have three or more VFs enabled.
Hotplug and unplug are supported.
Live migration is supported.
To migrate a VM, the destination host must also have enough available VFs to receive the VM.During the migration, the VM releases a number of VFs on the source host and occupies thesame number of VFs on the destination host.
On the host, you will see a device, link, or ifcae like any other interface. That device disappearswhen it is attached to a VM, and reappears when it is released.
Avoid attaching a host device directly to a VM for SR-IOV feature.
To use a VF as a trunk port with several VLANs and configure the VLANs within the Guest,please see Cannot configure VLAN on SR-IOV VF interfaces inside the Virtual Machine .
Here is an example of what the libvirt XML for the interface would look like:
Troubleshooting
The following example shows you how to get diagnostic information about the VFs attached to aninterface.
# ip -s link show dev enp5s0f0
1: enp5s0f0: <BROADCAST,MULTICAST,UP,LOWER_UP> mtu 9000 qdisc mq state UP mode DEFAULT qlen 1000 link/ether 86:e2:ba:c2:50:f0 brd ff:ff:ff:ff:ff:ff RX: bytes packets errors dropped overrun mcast 30931671 218401 0 0 0 19165434 TX: bytes packets errors dropped carrier collsns 997136 13661 0 0 0 0 vf 0 MAC 02:00:00:00:00:01, spoof checking on, link-state auto, trust off, query_rss off vf 1 MAC 00:1a:4b:16:01:5e, spoof checking on, link-state auto, trust off, query_rss off vf 2 MAC 02:00:00:00:00:01, spoof checking on, link-state auto, trust off, query_rss off
2.4.4.9.2.1. Additional Resources
How to configure SR-IOV passthrough for RHV VM?
---- <interface type='hostdev'> <mac address='00:1a:yy:xx:vv:xx'/> <driver name='vfio'/> <source> <address type='pci' domain='0x0000' bus='0x05' slot='0x10' function='0x0'/> </source> <alias name='ua-18400536-5688-4477-8471-be720e9efc68'/> <address type='pci' domain='0x0000' bus='0x00' slot='0x08' function='0x0'/> </interface> ----
CHAPTER 2. ADMINISTERING THE RESOURCES
137

How to configure bonding with SR-IOV VF(Virtual Function) in RHV
How to enable host device passthrough and SR-IOV to allow assigning dedicated virtual NICs tovirtual machines in RHV
2.4.5. Network Bonding
2.4.5.1. Bonding methods
Network bonding combines multiple NICs into a bond device, with the following advantages:
The transmission speed of bonded NICs is greater than that of a single NIC.
Network bonding provides fault tolerance, because the bond device will not fail unless all itsNICs fail.
Using NICs of the same make and model ensures that they support the same bonding options andmodes.
IMPORTANT
Red Hat Virtualization’s default bonding mode, (Mode 4) Dynamic Link Aggregation,requires a switch that supports 802.3ad.
The logical networks of a bond must be compatible. A bond can support only 1 non-VLANlogical network. The rest of the logical networks must have unique VLAN IDs.
Bonding must be enabled for the switch ports. Consult the manual provided by yourswitch vendor for specific instructions.
You can create a network bond device using one of the following methods:
Manually, in the Administration Portal , for a specific host
Automatically, using LLDP Labeler, for unbonded NICs of all hosts in a cluster or data center
If your environment uses iSCSI storage and you want to implement redundancy, follow the instructionsfor configuring iSCSI multipathing .
2.4.5.2. Creating a Bond Device in the Administration Portal
You can create a bond device on a specific host in the Administration Portal. The bond device can carryboth VLAN-tagged and untagged traffic.
Procedure
1. Click Compute → Hosts.
2. Click the host’s name. This opens the details view.
3. Click the Network Interfaces tab to list the physical network interfaces attached to the host.
4. Click Setup Host Networks.
5. Check the switch configuration. If the switch has been configured to provide Link Layer
Red Hat Virtualization 4.4 Administration Guide
138
5. Check the switch configuration. If the switch has been configured to provide Link LayerDiscovery Protocol (LLDP) information, hover your cursor over a physical NIC to view the switchport’s aggregation configuration.
6. Drag and drop a NIC onto another NIC or onto a bond.
NOTE
Two NICs form a new bond. A NIC and a bond adds the NIC to the existing bond.
If the logical networks are incompatible, the bonding operation is blocked.
7. Select the Bond Name and Bonding Mode from the drop-down menus. See Bonding Modesfor details.If you select the Custom bonding mode, you can enter bonding options in the text field, as in thefollowing examples:
If your environment does not report link states with ethtool, you can set ARP monitoring byentering mode=1 arp_interval=1 arp_ip_target=192.168.0.2.
You can designate a NIC with higher throughput as the primary interface by entering mode=1 primary=eth0.For a comprehensive list of bonding options and their descriptions, see the Linux EthernetBonding Driver HOWTO on Kernel.org.
8. Click OK.
9. Attach a logical network to the new bond and configure it. See Editing Host Network Interfacesand Assigning Logical Networks to Hosts for instructions.
NOTE
You cannot attach a logical network directly to an individual NIC in the bond.
10. Optionally, you can select Verify connectivity between Host and Engine if the host is inmaintenance mode.
11. Click OK.
2.4.5.3. Creating a Bond Device with the LLDP Labeler Service
The LLDP Labeler service enables you to create a bond device automatically with all unbonded NICs, forall the hosts in one or more clusters or in the entire data center. The bonding mode is (Mode 4) Dynamic Link Aggregation(802.3ad).
NICs with incompatible logical networks cannot be bonded.
2.4.5.3.1. Configuring the LLDP Labeler
By default, LLDP Labeler runs as an hourly service. This option is useful if you make hardware changes(for example, NICs, switches, or cables) or change switch configurations.
Prerequisites
The interfaces must be connected to a Juniper switch.
CHAPTER 2. ADMINISTERING THE RESOURCES
139

The Juniper switch must be configured for Link Aggregation Control Protocol (LACP) usingLLDP.
Procedure
1. Configure the username and password in /etc/ovirt-lldp-labeler/conf.d/ovirt-lldp-credentials.conf:
username - the username of the Manager administrator. The default is admin@internal.
password - the password of the Manager administrator. The default is 123456.
2. Configure the LLDP Labeler service by updating the following values in etc/ovirt-lldp-labeler/conf.d/ovirt-lldp-credentials.conf:
clusters - a comma-separated list of clusters on which the service should run. Wildcards aresupported. For example, Cluster* defines LLDP Labeler to run on all clusters starting withword Cluster. To run the service on all clusters in the data center, type *. The default is Def*.
api_url - the full URL of the Manager’s API. The default is https://Manager_FQDN/ovirt-engine/api
ca_file - the path to the custom CA certificate file. Leave this value empty if you do not usecustom certificates. The default is empty.
auto_bonding - enables LLDP Labeler’s bonding capabilities. The default is true.
auto_labeling - enables LLDP Labeler’s labeling capabilities. The default is true.
3. Optionally, you can configure the service to run at a different time interval by changing thevalue of OnUnitActiveSec in etc/ovirt-lldp-labeler/conf.d/ovirt-lldp-labeler.timer. The defaultis 1h.
4. Configure the service to start now and at boot by entering the following command:
# systemctl enable --now ovirt-lldp-labeler
To invoke the service manually, enter the following command:
# /usr/bin/python /usr/share/ovirt-lldp-labeler/ovirt_lldp_labeler_cli.py
1. Attach a logical network to the new bond and configure it. See Editing Host Network Interfacesand Assigning Logical Networks to Hosts for instructions.
NOTE
You cannot attach a logical network directly to an individual NIC in the bond.
2.4.5.4. Bonding Modes
The packet dispersal algorithm is determined by the bonding mode. (See the Linux Ethernet BondingDriver HOWTO for details). Red Hat Virtualization’s default bonding mode is (Mode 4) Dynamic Link Aggregation(802.3ad).
Red Hat Virtualization supports the following bonding modes, because they can be used in virtual
Red Hat Virtualization 4.4 Administration Guide
140

Red Hat Virtualization supports the following bonding modes, because they can be used in virtualmachine (bridged) networks:
(Mode 1) Active-Backup
One NIC is active. If the active NIC fails, one of the backup NICs replaces it as the only active NIC inthe bond. The MAC address of this bond is visible only on the network adapter port. This preventsMAC address confusion that might occur if the MAC address of the bond were to change, reflectingthe MAC address of the new active NIC.
(Mode 2) Load Balance (balance-xor)
The NIC that transmits packets is selected by performing an XOR operation on the source MACaddress and the destination MAC address, multiplied by the modulo of the total number of NICs.This algorithm ensures that the same NIC is selected for each destination MAC address.
(Mode 3) Broadcast
Packets are transmitted to all NICs.
(Mode 4) Dynamic Link Aggregation(802.3ad) (Default)
The NICs are aggregated into groups that share the same speed and duplex settings . All the NICs inthe active aggregation group are used.
NOTE
(Mode 4) Dynamic Link Aggregation(802.3ad) requires a switch that supports802.3ad.
The bonded NICs must have the same aggregator IDs. Otherwise, the Managerdisplays a warning exclamation mark icon on the bond in the Network Interfaces taband the ad_partner_mac value of the bond is reported as 00:00:00:00:00:00. You cancheck the aggregator IDs by entering the following command:
See Which bonding modes work when used with a bridge that virtual machine guestsor containers connect to?.
The following bonding modes are incompatible with virtual machine logical networks and therefore onlynon-VM logical networks can be attached to bonds using these modes:
(Mode 0) Round-Robin
The NICs transmit packets in sequential order. Packets are transmitted in a loop that begins with thefirst available NIC in the bond and ends with the last available NIC in the bond. Subsequent loopsstart with the first available NIC.
(Mode 5) Balance-TLB, also called Transmit Load-Balance
Outgoing traffic is distributed, based on the load, over all the NICs in the bond. Incoming traffic isreceived by the active NIC. If the NIC receiving incoming traffic fails, another NIC is assigned.
(Mode 6) Balance-ALB, also called Adaptive Load-Balance
(Mode 5) Balance-TLB is combined with receive load-balancing for IPv4 traffic. ARP negotiation isused for balancing the receive load.
2.5. HOSTS
# cat /proc/net/bonding/bond0
CHAPTER 2. ADMINISTERING THE RESOURCES
141

2.5.1. Introduction to Hosts
Hosts, also known as hypervisors, are the physical servers on which virtual machines run. Fullvirtualization is provided by using a loadable Linux kernel module called Kernel-based Virtual Machine(KVM).
KVM can concurrently host multiple virtual machines running either Windows or Linux operating systems.Virtual machines run as individual Linux processes and threads on the host machine and are managedremotely by the Red Hat Virtualization Manager. A Red Hat Virtualization environment has one or morehosts attached to it.
Red Hat Virtualization supports two methods of installing hosts. You can use the Red Hat VirtualizationHost (RHVH) installation media, or install hypervisor packages on a standard Red Hat Enterprise Linuxinstallation.
NOTE
You can identify the host type of an individual host in the Red Hat Virtualization Managerby selecting the host’s name. This opens the details view. Then look at the OSDescription under Software.
Hosts use tuned profiles, which provide virtualization optimizations. For more information on tuned, seethe Red Hat Enterprise Linux 7 Performance Tuning Guide .
The Red Hat Virtualization Host has security features enabled. Security Enhanced Linux (SELinux) andthe firewall are fully configured and on by default. The status of SELinux on a selected host is reportedunder SELinux mode in the General tab of the details view. The Manager can open required ports onRed Hat Enterprise Linux hosts when it adds them to the environment.
A host is a physical 64-bit server with the Intel VT or AMD-V extensions running Red Hat EnterpriseLinux 7 AMD64/Intel 64 version.
A physical host on the Red Hat Virtualization platform:
Must belong to only one cluster in the system.
Must have CPUs that support the AMD-V or Intel VT hardware virtualization extensions.
Must have CPUs that support all functionality exposed by the virtual CPU type selected uponcluster creation.
Has a minimum of 2 GB RAM.
Can have an assigned system administrator with system permissions.
Administrators can receive the latest security advisories from the Red Hat Virtualization watch list.Subscribe to the Red Hat Virtualization watch list to receive new security advisories for Red HatVirtualization products by email. Subscribe by completing this form:
https://www.redhat.com/mailman/listinfo/rhsa-announce
2.5.2. Red Hat Virtualization Host
Red Hat Virtualization Host (RHVH) is installed using a special build of Red Hat Enterprise Linux withonly the packages required to host virtual machines. It uses an Anaconda installation interface based onthe one used by Red Hat Enterprise Linux hosts, and can be updated through the Red Hat Virtualization
Red Hat Virtualization 4.4 Administration Guide
142

Manager or via yum. Using the yum command is the only way to install additional packages and havethem persist after an upgrade.
RHVH features a Cockpit web interface for monitoring the host’s resources and performingadministrative tasks. Direct access to RHVH via SSH or console is not supported, so the Cockpit webinterface provides a graphical user interface for tasks that are performed before the host is added tothe Red Hat Virtualization Manager, such as configuring networking or running terminal commands viathe Terminal sub-tab.
Access the Cockpit web interface at https://HostFQDNorIP:9090 in your web browser. Cockpit forRHVH includes a custom Virtualization dashboard that displays the host’s health status, SSH Host Key,self-hosted engine status, virtual machines, and virtual machine statistics.
Starting in Red Hat Virtualization version 4.4 SP1 the RHVH uses systemd-coredump to gather, saveand process core dumps. For more information, see the documentation for core dump storageconfiguration files and systemd-coredump service.
In Red Hat Virtualization 4.4 and earlier RHVH uses the Automatic Bug Reporting Tool (ABRT) tocollect meaningful debug information about application crashes. For more information, see the Red HatEnterprise Linux System Administrator’s Guide.
NOTE
Custom boot kernel arguments can be added to Red Hat Virtualization Host using the grubby tool. The grubby tool makes persistent changes to the grub.cfg file. Navigate tothe Terminal sub-tab in the host’s Cockpit web interface to use grubby commands. Seethe Red Hat Enterprise Linux System Administrator’s Guide for more information.
WARNING
Do not create untrusted users on RHVH, as this can lead to exploitation of localsecurity vulnerabilities.
2.5.3. Red Hat Enterprise Linux hosts
You can use a Red Hat Enterprise Linux 7 installation on capable hardware as a host. Red HatVirtualization supports hosts running Red Hat Enterprise Linux 7 Server AMD64/Intel 64 version withIntel VT or AMD-V extensions. To use your Red Hat Enterprise Linux machine as a host, you must alsoattach the Red Hat Enterprise Linux Server and Red Hat Virtualization subscriptions.
Adding a host can take some time, as the following steps are completed by the platform: virtualizationchecks, installation of packages, and the creation of a bridge. Use the details view to monitor theprocess as the host and management system establish a connection.
Optionally, you can install a Cockpit web interface for monitoring the host’s resources and performingadministrative tasks. The Cockpit web interface provides a graphical user interface for tasks that areperformed before the host is added to the Red Hat Virtualization Manager, such as configuringnetworking or running terminal commands via the Terminal sub-tab.
IMPORTANT
CHAPTER 2. ADMINISTERING THE RESOURCES
143

IMPORTANT
Third-party watchdogs should not be installed on Red Hat Enterprise Linux hosts, as theycan interfere with the watchdog daemon provided by VDSM.
2.5.4. Satellite Host Provider Hosts
Hosts provided by a Satellite host provider can also be used as virtualization hosts by the Red HatVirtualization Manager. After a Satellite host provider has been added to the Manager as an externalprovider, any hosts that it provides can be added to and used in Red Hat Virtualization in the same wayas Red Hat Virtualization Hosts (RHVH) and Red Hat Enterprise Linux hosts.
2.5.5. Host Tasks
2.5.5.1. Adding Standard Hosts to the Red Hat Virtualization Manager
IMPORTANT
Always use the RHV Manager to modify the network configuration of hosts in yourclusters. Otherwise, you might create an unsupported configuration. For details, seeNetwork Manager Stateful Configuration (nmstate) .
Adding a host to your Red Hat Virtualization environment can take some time, as the following steps arecompleted by the platform: virtualization checks, installation of packages, and creation of a bridge.
Procedure
1. From the Administration Portal, click Compute → Hosts.
2. Click New.
3. Use the drop-down list to select the Data Center and Host Cluster for the new host.
4. Enter the Name and the Address of the new host. The standard SSH port, port 22, is auto-filledin the SSH Port field.
5. Select an authentication method to use for the Manager to access the host.
Enter the root user’s password to use password authentication.
Alternatively, copy the key displayed in the SSH PublicKey field to/root/.ssh/authorized_keys on the host to use public key authentication.
6. Optionally, click the Advanced Parameters button to change the following advanced hostsettings:
Disable automatic firewall configuration.
Add a host SSH fingerprint to increase security. You can add it manually, or fetch itautomatically.
7. Optionally configure power management, where the host has a supported power managementcard. For information on power management configuration, see Host Power ManagementSettings Explained in the Administration Guide.
Red Hat Virtualization 4.4 Administration Guide
144

8. Click OK.
The new host displays in the list of hosts with a status of Installing, and you can view the progress of the
installation in the Events section of the Notification Drawer ( ). After a brief delay the host statuschanges to Up.
2.5.5.2. Adding a Satellite Host Provider Host
The process for adding a Satellite host provider host is almost identical to that of adding a Red HatEnterprise Linux host except for the method by which the host is identified in the Manager. Thefollowing procedure outlines how to add a host provided by a Satellite host provider.
Procedure
1. Click Compute → Hosts.
2. Click New.
3. Use the drop-down menu to select the Host Cluster for the new host.
4. Select the Foreman/Satellite check box to display the options for adding a Satellite hostprovider host and select the provider from which the host is to be added.
5. Select either Discovered Hosts or Provisioned Hosts.
Discovered Hosts (default option): Select the host, host group, and compute resourcesfrom the drop-down lists.
Provisioned Hosts: Select a host from the Providers Hosts drop-down list.Any details regarding the host that can be retrieved from the external provider areautomatically set, and can be edited as desired.
6. Enter the Name and SSH Port (Provisioned Hosts only) of the new host.
7. Select an authentication method to use with the host.
Enter the root user’s password to use password authentication.
Copy the key displayed in the SSH PublicKey field to /root/.ssh/authorized_hosts on thehost to use public key authentication (Provisioned Hosts only).
8. You have now completed the mandatory steps to add a Red Hat Enterprise Linux host. Click theAdvanced Parameters drop-down button to show the advanced host settings.
a. Optionally disable automatic firewall configuration.
b. Optionally add a host SSH fingerprint to increase security. You can add it manually, or fetchit automatically.
9. You can configure the Power Management, SPM, Console, and Network Provider using theapplicable tabs now; however, as these are not fundamental to adding a Red Hat EnterpriseLinux host, they are not covered in this procedure.
10. Click OK to add the host and close the window.
The new host displays in the list of hosts with a status of Installing, and you can view the progress of the
CHAPTER 2. ADMINISTERING THE RESOURCES
145

The new host displays in the list of hosts with a status of Installing, and you can view the progress of theinstallation in the details view. After installation is complete, the status will update to Reboot. The hostmust be activated for the status to change to Up.
2.5.5.3. Setting up Satellite errata viewing for a host
In the Administration Portal, you can configure a host to view errata from Red Hat Satellite. After youassociate a host with a Red Hat Satellite provider, you can receive updates in the host configurationdashboard about available errata and their importance, and decide when it is practical to apply theupdates.
Red Hat Virtualization 4.4 supports viewing errata with Red Hat Satellite 6.6.
Prerequisites
The Satellite server must be added as an external provider.
The Manager and any hosts on which you want to view errata must be registered in the Satelliteserver by their respective FQDNs. This ensures that external content host IDs do not need to bemaintained in Red Hat Virtualization.
IMPORTANT
Hosts added using an IP address cannot report errata.
The Satellite account that manages the host must have Administrator permissions and a defaultorganization set.
The host must be registered to the Satellite server.
Use Red Hat Satellite remote execution to manage packages on hosts.
NOTE
The Katello agent is deprecated and will be removed in a future Satellite version. Migrateyour processes to use the remote execution feature to update clients remotely.
Procedure
1. Click Compute → Hosts and select the host.
2. Click Edit.
3. Select the Use Foreman/Satellite check box.
4. Select the required Satellite server from the drop-down list.
5. Click OK.
The host is now configured to show the available errata, and their importance, in the same dashboardused to manage the host’s configuration.
Additional resources
Adding a Red Hat Satellite Instance for Host Provisioning
Red Hat Virtualization 4.4 Administration Guide
146

Host Management Without Goferd and Katello Agent in the Red Hat Satellite documentManaging Hosts
2.5.5.3.1. Configuring a Host for PCI Passthrough
NOTE
This is one in a series of topics that show how to set up and configure SR-IOV on Red HatVirtualization. For more information, see Setting Up and Configuring SR-IOV
Enabling PCI passthrough allows a virtual machine to use a host device as if the device were directlyattached to the virtual machine. To enable the PCI passthrough function, you must enable virtualizationextensions and the IOMMU function. The following procedure requires you to reboot the host. If thehost is attached to the Manager already, ensure you place the host into maintenance mode first.
Prerequisites
Ensure that the host hardware meets the requirements for PCI device passthrough andassignment. See PCI Device Requirements for more information.
Configuring a Host for PCI Passthrough
1. Enable the virtualization extension and IOMMU extension in the BIOS. See Enabling Intel VT-xand AMD-V virtualization hardware extensions in BIOS in the Red Hat Enterprise LinuxVirtualization Deployment and Administration Guide for more information.
2. Enable the IOMMU flag in the kernel by selecting the Hostdev Passthrough & SR-IOV checkbox when adding the host to the Manager or by editing the grub configuration file manually.
To enable the IOMMU flag from the Administration Portal, see Adding Standard Hosts tothe Red Hat Virtualization Manager and Kernel Settings Explained.
To edit the grub configuration file manually, see Enabling IOMMU Manually.
3. For GPU passthrough, you need to run additional configuration steps on both the host and theguest system. See GPU device passthrough: Assigning a host GPU to a single virtual machine inSetting up an NVIDIA GPU for a virtual machine in Red Hat Virtualization for more information.
Enabling IOMMU Manually
1. Enable IOMMU by editing the grub configuration file.
NOTE
If you are using IBM POWER8 hardware, skip this step as IOMMU is enabled bydefault.
For Intel, boot the machine, and append intel_iommu=on to the end of the GRUB_CMDLINE_LINUX line in the grub configuration file.
# vi /etc/default/grub...GRUB_CMDLINE_LINUX="nofb splash=quiet console=tty0 ... intel_iommu=on...
CHAPTER 2. ADMINISTERING THE RESOURCES
147

For AMD, boot the machine, and append amd_iommu=on to the end of the GRUB_CMDLINE_LINUX line in the grub configuration file.
NOTE
If intel_iommu=on or an AMD IOMMU is detected, you can try adding iommu=pt. The pt option only enables IOMMU for devices used inpassthrough and provides better host performance. However, the optionmight not be supported on all hardware. Revert to the previous option if the pt option doesn’t work for your host.
If the passthrough fails because the hardware does not support interruptremapping, you can consider enabling the allow_unsafe_interrupts option ifthe virtual machines are trusted. The allow_unsafe_interrupts is notenabled by default because enabling it potentially exposes the host to MSIattacks from virtual machines. To enable the option:
# vi /etc/modprobe.doptions vfio_iommu_type1 allow_unsafe_interrupts=1
2. Refresh the grub.cfg file and reboot the host for these changes to take effect:
2.5.5.3.2. Enabling nested virtualization for all virtual machines
IMPORTANT
Using hooks to enable nested virtualization is a Technology Preview feature. TechnologyPreview features are not supported with Red Hat production service-level agreements(SLAs) and might not be functionally complete, and Red Hat does not recommend usingthem for production. These features provide early access to upcoming product features,enabling customers to test functionality and provide feedback during the developmentprocess. For more information, see Red Hat Technology Preview Features SupportScope.
Nested virtualization enables virtual machines to host other virtual machines. For clarity, we will callthese the parent virtual machines and nested virtual machines .
Child virtual machines are only visible to and managed by users who have access to the parent virtualmachine. They are not visible to Red Hat Virtualization (RHV) administrators.
By default, nested virtualization is not enabled in RHV. To enable nested virtualization, you install a
# vi /etc/default/grub… GRUB_CMDLINE_LINUX="nofb splash=quiet console=tty0 … amd_iommu=on…
# grub2-mkconfig -o /boot/grub2/grub.cfg
# reboot
Red Hat Virtualization 4.4 Administration Guide
148
By default, nested virtualization is not enabled in RHV. To enable nested virtualization, you install aVDSM hook, vdsm-hook-nestedvt, on all of the hosts in the cluster. Then, all of the virtual machinesthat run on these hosts can function as parent virtual machines.
You should only run parent virtual machines on hosts that support nested virtualization. If a parentvirtual machine migrates to a host that does not support nested virtualization, its child virtual machinesfail. To prevent this from happening, configure all of the hosts in the cluster to support nestedvirtualization. Otherwise, restrict parent virtual machines from migrating to hosts that do not supportnested virtualization.
WARNING
Take precautions to prevent parent virtual machines from migrating to hosts that donot support nested virtualization.
Procedure
1. In the Administration Portal, click Compute → Hosts.
2. Select a host in the cluster where you want to enable nested virtualization and clickManagement → Maintenance and OK.
3. Select the host again, click Host Console, and log into the host console.
4. Install the VDSM hook:
# dnf install vdsm-hook-nestedvt
5. Reboot the host.
6. Log into the host console again and verify that nested virtualization is enabled:
$ cat /sys/module/kvm*/parameters/nested
If this command returns Y or 1, the feature is enabled.
7. Repeat this procedure for all of the hosts in the cluster.
Additional resources
VDSM hooks
2.5.5.3.3. Enabling nested virtualization for individual virtual machines
IMPORTANT
CHAPTER 2. ADMINISTERING THE RESOURCES
149

IMPORTANT
Nested virtualization is a Technology Preview feature. Technology Preview features arenot supported with Red Hat production service-level agreements (SLAs) and might notbe functionally complete, and Red Hat does not recommend using them for production.These features provide early access to upcoming product features, enabling customersto test functionality and provide feedback during the development process. For moreinformation see Red Hat Technology Preview Features Support Scope .
Nested virtualization enables virtual machines to host other virtual machines. For clarity, we will callthese the parent virtual machines and nested virtual machines .
Child virtual machines are only visible to and managed by users who have access to the parent virtualmachine. They are not visible to Red Hat Virtualization (RHV) administrators.
To enable nested virtualization on specific virtual machines , not all virtual machines, you configure a hostor hosts to support nested virtualization. Then you configure the virtual machine or virtual machines onrun on those specific hosts and enable Pass-Through Host CPU. This option lets the virtual machinesuse the nested virtualization settings you just configured on the host. This option also restricts whichhosts the virtual machines can run on and requires manual migration.
Otherwise, to enable nested virtualization for all of the virtual machines in a cluster, see Enabling nestedvirtualization for all virtual machines
Only run parent virtual machines on hosts that support nested virtualization. If you migrate a parentvirtual machine to a host that does not support nested virtualization, its child virtual machines will fail.
WARNING
Do not migrate parent virtual machines to hosts that do not support nestedvirtualization.
Avoid live migration of parent virtual machines that are running child virtual machines. Even if the sourceand destination hosts are identical and support nested virtualization, the live migration can cause thechild virtual machines to fail. Instead, shut down virtual machines before migration.
Procedure
Configure the hosts to support nested virtualization:
1. In the Administration Portal, click Compute → Hosts.
2. Select a host in the cluster where you want to enable nested virtualization and clickManagement → Maintenance and OK.
3. Select the host again, click Host Console, and log into the host console.
4. In the Edit Host window, select the Kernel tab.
5. Under Kernel boot parameters, if the checkboxes are greyed-out, click RESET.
6. Select Nested Virtualization and click OK.
Red Hat Virtualization 4.4 Administration Guide
150

This action displays a kvm-<architecture>.nested=1 parameter in Kernel command line. Thefollowing steps add this parameter to the Current kernel CMD line.
7. Click Installation → Reinstall.
8. When the host status returns to Up, click Management → Restart under Power Managementor SSH Management.
9. Verify that nested virtualization is enabled. Log into the host console and enter:
$ cat /sys/module/kvm*/parameters/nested
If this command returns Y or 1, the feature is enabled.
10. Repeat this procedure for all of the hosts you need to run parent virtual machines.
Enable nested virtualization in specific virtual machines:
1. In the Administration Portal, click Compute → Virtual Machines.
2. Select a virtual machine and click Edit
3. In the Edit Vitual Machine window, click Show Advanced Options and select the Host tab.
4. Under Start Running On, click Specific Host and select the host or hosts you configured tosupport nested virtualization.
5. Under CPU Options, select Pass-Through Host CPU. This action automatically sets theMigration mode to Allow manual migration only.
NOTE
In RHV version 4.2, you can only enable Pass-Through Host CPU when Do notallow migration is selected.
Additional resources
VDSM hooks
Creating nested virtual machines in the RHEL documentation.
2.5.5.4. Moving a Host to Maintenance Mode
Many common maintenance tasks, including network configuration and deployment of softwareupdates, require that hosts be placed into maintenance mode. Hosts should be placed into maintenancemode before any event that might cause VDSM to stop working properly, such as a reboot, or issueswith networking or storage.
When a host is placed into maintenance mode the Red Hat Virtualization Manager attempts to migrateall running virtual machines to alternative hosts. The standard prerequisites for live migration apply, inparticular there must be at least one active host in the cluster with capacity to run the migrated virtualmachines.
NOTE
CHAPTER 2. ADMINISTERING THE RESOURCES
151

NOTE
Virtual machines that are pinned to the host and cannot be migrated are shut down. Youcan check which virtual machines are pinned to the host by clicking Pinned to Host in theVirtual Machines tab of the host’s details view.
Placing a Host into Maintenance Mode
1. Click Compute → Hosts and select the desired host.
2. Click Management → Maintenance. This opens the Maintenance Host(s) confirmationwindow.
3. Optionally, enter a Reason for moving the host into maintenance mode, which will appear in thelogs and when the host is activated again. Then, click OK
NOTE
The host maintenance Reason field will only appear if it has been enabled in thecluster settings. See Cluster General Settings Explained for more information.
4. Optionally, select the required options for hosts that support Gluster.Select the Ignore Gluster Quorum and Self-Heal Validations option to avoid the defaultchecks. By default, the Manager checks that the Gluster quorum is not lost when the host ismoved to maintenance mode. The Manager also checks that there is no self-heal activity thatwill be affected by moving the host to maintenance mode. If the Gluster quorum will be lost or ifthere is self-heal activity that will be affected, the Manager prevents the host from being placedinto maintenance mode. Only use this option if there is no other way to place the host inmaintenance mode.
Select the Stop Gluster Service option to stop all Gluster services while moving the host tomaintenance mode.
NOTE
These fields will only appear in the host maintenance window when the selectedhost supports Gluster. See Replacing the Primary Gluster Storage Node inMaintaining Red Hat Hyperconverged Infrastructure for more information.
5. Click OK to initiate maintenance mode.
All running virtual machines are migrated to alternative hosts. If the host is the Storage Pool Manager(SPM), the SPM role is migrated to another host. The Status field of the host changes to Preparing for Maintenance, and finally Maintenance when the operation completes successfully. VDSM does not stopwhile the host is in maintenance mode.
NOTE
If migration fails on any virtual machine, click Management → Activate on the host tostop the operation placing it into maintenance mode, then click Cancel Migration on thevirtual machine to stop the migration.
2.5.5.5. Activating a Host from Maintenance Mode
Red Hat Virtualization 4.4 Administration Guide
152

A host that has been placed into maintenance mode, or recently added to the environment, must beactivated before it can be used. Activation may fail if the host is not ready; ensure that all tasks arecomplete before attempting to activate the host.
Procedure
1. Click Compute → Hosts and select the host.
2. Click Management → Activate.
The host status changes to Unassigned, and finally Up when the operation is complete. Virtualmachines can now run on the host. Virtual machines that were migrated off the host when it was placedinto maintenance mode are not automatically migrated back to the host when it is activated, but can bemigrated manually. If the host was the Storage Pool Manager (SPM) before being placed intomaintenance mode, the SPM role does not return automatically when the host is activated.
2.5.5.5.1. Configuring Host Firewall Rules
You can configure the host firewall rules so that they are persistent, using Ansible. The cluster must beconfigured to use firewalld.
NOTE
Changing the firewalld zone is not supported.
Configuring Firewall Rules for Hosts
1. On the Manager machine, edit ovirt-host-deploy-post-tasks.yml.example to add a customfirewall port:
2. Save the file to another location as ovirt-host-deploy-post-tasks.yml.
New or reinstalled hosts are configured with the updated firewall rules.
Existing hosts must be reinstalled by clicking Installation → Reinstall and selecting Automaticallyconfigure host firewall.
2.5.5.5.2. Removing a Host
Removing a host from your Red Hat Virtualization environment is sometimes necessary, such as whenyou need to reinstall a host.
# vi /etc/ovirt-engine/ansible/ovirt-host-deploy-post-tasks.yml.example---## Any additional tasks required to be executing during host deploy process can# be added below#- name: Enable additional port on firewalld firewalld: port: "12345/tcp" permanent: yes immediate: yes state: enabled
CHAPTER 2. ADMINISTERING THE RESOURCES
153

Procedure
1. Click Compute → Hosts and select the host.
2. Click Management → Maintenance.
3. Once the host is in maintenance mode, click Remove. The Remove Host(s) confirmationwindow opens.
4. Select the Force Remove check box if the host is part of a Red Hat Gluster Storage cluster andhas volume bricks on it, or if the host is non-responsive.
5. Click OK.
2.5.5.5.3. Updating Hosts Between Minor Releases
You can update all hosts in a cluster , or update individual hosts.
2.5.5.5.3.1. Updating All Hosts in a Cluster
You can update all hosts in a cluster instead of updating hosts individually. This is particularly usefulduring upgrades to new versions of Red Hat Virtualization. See oVirt Cluster Upgrade for moreinformation about the Ansible role used to automate the updates.
Update one cluster at a time.
Limitations
On RHVH, the update only preserves modified content in the /etc and /var directories. Modifieddata in other paths is overwritten during an update.
If the cluster has migration enabled, virtual machines are automatically migrated to another hostin the cluster.
In a self-hosted engine environment, the Manager virtual machine can only migrate betweenself-hosted engine nodes in the same cluster. It cannot migrate to standard hosts.
The cluster must have sufficient memory reserved for its hosts to perform maintenance.Otherwise, virtual machine migrations will hang and fail. You can reduce the memory usage ofhost updates by shutting down some or all virtual machines before updating hosts.
You cannot migrate a pinned virtual machine (such as a virtual machine using a vGPU) toanother host. Pinned virtual machines are shut down during the update, unless you choose toskip that host instead.
Procedure
1. In the Administration Portal, click Compute → Clusters and select the cluster. The Upgradestatus column shows if an upgrade is available for any hosts in the cluster.
2. Click Upgrade.
3. Select the hosts to update, then click Next.
4. Configure the options:
Stop Pinned VMs shuts down any virtual machines that are pinned to hosts in the cluster,
Red Hat Virtualization 4.4 Administration Guide
154

and is selected by default. You can clear this check box to skip updating those hosts so thatthe pinned virtual machines stay running, such as when a pinned virtual machine is runningimportant services or processes and you do not want it to shut down at an unknown timeduring the update.
Upgrade Timeout (Minutes) sets the time to wait for an individual host to be updatedbefore the cluster upgrade fails with a timeout. The default is 60. You can increase it forlarge clusters where 60 minutes might not be enough, or reduce it for small clusters wherethe hosts update quickly.
Check Upgrade checks each host for available updates before running the upgradeprocess. It is not selected by default, but you can select it if you need to ensure that recentupdates are included, such as when you have configured the Manager to check for hostupdates less frequently than the default.
Reboot After Upgrade reboots each host after it is updated, and is selected by default. Youcan clear this check box to speed up the process if you are sure that there are no pendingupdates that require a host reboot.
Use Maintenance Policy sets the cluster’s scheduling policy to cluster_maintenanceduring the update. It is selected by default, so activity is limited and virtual machines cannotstart unless they are highly available. You can clear this check box if you have a customscheduling policy that you want to keep using during the update, but this could haveunknown consequences. Ensure your custom policy is compatible with cluster upgradeactivity before disabling this option.
5. Click Next.
6. Review the summary of the hosts and virtual machines that will be affected.
7. Click Upgrade.
You can track the progress of host updates:
in the Compute → Clusters view, the Upgrade Status column shows Upgrade in progress.
in the Compute → Hosts view
in the Events section of the Notification Drawer ( ).
You can track the progress of individual virtual machine migrations in the Status column of theCompute → Virtual Machines view. In large environments, you may need to filter the results to show aparticular group of virtual machines.
2.5.5.5.3.2. Updating Individual Hosts
Use the host upgrade manager to update individual hosts directly from the Administration Portal.
NOTE
The upgrade manager only checks hosts with a status of Up or Non-operational, but notMaintenance.
Limitations
On RHVH, the update only preserves modified content in the /etc and /var directories. Modified
CHAPTER 2. ADMINISTERING THE RESOURCES
155

On RHVH, the update only preserves modified content in the /etc and /var directories. Modifieddata in other paths is overwritten during an update.
If the cluster has migration enabled, virtual machines are automatically migrated to another hostin the cluster. Update a host when its usage is relatively low.
In a self-hosted engine environment, the Manager virtual machine can only migrate betweenself-hosted engine nodes in the same cluster. It cannot migrate to standard hosts.
The cluster must have sufficient memory reserved for its hosts to perform maintenance.Otherwise, virtual machine migrations will hang and fail. You can reduce the memory usage ofhost updates by shutting down some or all virtual machines before updating hosts.
Do not update all hosts at the same time, as one host must remain available to perform StoragePool Manager (SPM) tasks.
You cannot migrate a pinned virtual machine (such as a virtual machine using a vGPU) toanother host. Pinned virtual machines must be shut down before updating the host.
Procedure
1. Ensure that the correct repositories are enabled. To view a list of currently enabled repositories,run dnf repolist.
For Red Hat Virtualization Hosts:
For Red Hat Enterprise Linux hosts:
2. In the Administration Portal, click Compute → Hosts and select the host to be updated.
3. Click Installation → Check for Upgrade and click OK.
Open the Notification Drawer ( ) and expand the Events section to see the result.
4. If an update is available, click Installation → Upgrade.
5. Click OK to update the host. Running virtual machines are migrated according to their migrationpolicy. If migration is disabled for any virtual machines, you are prompted to shut them down.The details of the host are updated in Compute → Hosts and the status transitions throughthese stages:
Maintenance > Installing > Reboot > Up
NOTE
If the update fails, the host’s status changes to Install Failed. From Install Failedyou can click Installation → Upgrade again.
# subscription-manager repos --enable=rhvh-4-for-rhel-8-x86_64-rpms
# subscription-manager repos \ --enable=rhel-8-for-x86_64-baseos-rpms \ --enable=rhel-8-for-x86_64-appstream-rpms \ --enable=rhv-4-mgmt-agent-for-rhel-8-x86_64-rpms \ --enable=advanced-virt-for-rhel-8-x86_64-rpms \ --enable=fast-datapath-for-rhel-8-x86_64-rpms
Red Hat Virtualization 4.4 Administration Guide
156

Repeat this procedure for each host in the Red Hat Virtualization environment.
NOTE
You should update the hosts from the Administration Portal. However, you can updatethe hosts using dnf upgrade instead.
2.5.5.5.3.3. Manually Updating Hosts
CAUTION
This information is provided for advanced system administrators who need to update hosts manually, butRed Hat does not support this method. The procedure described in this topic does not include importantsteps, including certificate renewal, assuming advanced knowledge of such information. Red Hatsupports updating hosts using the Administration Portal. For details, see Updating individual hosts orUpdating all hosts in a cluster in the Administration Guide.
You can use the dnf command to update your hosts. Update your systems regularly, to ensure timelyapplication of security and bug fixes.
Limitations
On RHVH, the update only preserves modified content in the /etc and /var directories. Modifieddata in other paths is overwritten during an update.
If the cluster has migration enabled, virtual machines are automatically migrated to another hostin the cluster. Update a host when its usage is relatively low.
In a self-hosted engine environment, the Manager virtual machine can only migrate betweenself-hosted engine nodes in the same cluster. It cannot migrate to standard hosts.
The cluster must have sufficient memory reserved for its hosts to perform maintenance.Otherwise, virtual machine migrations will hang and fail. You can reduce the memory usage ofhost updates by shutting down some or all virtual machines before updating hosts.
Do not update all hosts at the same time, as one host must remain available to perform StoragePool Manager (SPM) tasks.
You cannot migrate a pinned virtual machine (such as a virtual machine using a vGPU) toanother host. Pinned virtual machines must be shut down before updating the host.
Procedure
1. Ensure the correct repositories are enabled. You can check which repositories are currentlyenabled by running dnf repolist.
For Red Hat Virtualization Hosts:
For Red Hat Enterprise Linux hosts:
# subscription-manager repos --enable=rhvh-4-for-rhel-8-x86_64-rpms
# subscription-manager repos \ --enable=rhel-8-for-x86_64-baseos-rpms \
CHAPTER 2. ADMINISTERING THE RESOURCES
157
2. In the Administration Portal, click Compute → Hosts and select the host to be updated.
3. Click Management → Maintenance and OK.
4. For Red Hat Enterprise Linux hosts:
a. Identify the current version of Red Hat Enterprise Linux:
b. Check which version of the redhat-release package is available:
This command shows any available updates. For example, when upgrading from Red HatEnterprise Linux 8.2.z to 8.3, compare the version of the package with the currently installedversion:
CAUTION
The Red Hat Enterprise Linux Advanced Virtualization module is usually released later thanthe Red Hat Enterprise Linux y-stream. If no new Advanced Virtualization module isavailable yet, or if there is an error enabling it, stop here and cancel the upgrade. Otherwiseyou risk corrupting the host.
c. If the Advanced Virtualization stream is available for Red Hat Enterprise Linux 8.3 or later,reset the virt module:
NOTE
If this module is already enabled in the Advanced Virtualization stream, thisstep is not necessary, but it has no negative impact.
You can see the value of the stream by entering:
# dnf module list virt
d. Enable the virt module in the Advanced Virtualization stream with the following command:
--enable=rhel-8-for-x86_64-appstream-rpms \ --enable=rhv-4-mgmt-agent-for-rhel-8-x86_64-rpms \ --enable=advanced-virt-for-rhel-8-x86_64-rpms \ --enable=fast-datapath-for-rhel-8-x86_64-rpms
# cat /etc/redhat-release
# dnf --refresh info --available redhat-release
Available PackagesName : redhat-releaseVersion : 8.3Release : 1.0.el8…
# dnf module reset virt
Red Hat Virtualization 4.4 Administration Guide
158

For RHV 4.4.2:
For RHV 4.4.3 to 4.4.5:
For RHV 4.4.6 to 4.4.10:
For RHV 4.4 and later:
# dnf module enable virt:rhel
NOTE
Starting with RHEL 8.6 the Advanced virtualization packages will use thestandard virt:rhel module. For RHEL 8.4 and 8.5, only one AdvancedVirtualization stream is used, rhel:av.
1. Update the host:
2. Reboot the host to ensure all updates are correctly applied.
NOTE
Check the imgbased logs to see if any additional package updates havefailed for a Red Hat Virtualization Host. If some packages were notsuccessfully reinstalled after the update, check that the packages are listedin /var/imgbased/persisted-rpms. Add any missing packages then run rpm -Uvh /var/imgbased/persisted-rpms/*.
Repeat this process for each host in the Red Hat Virtualization environment.
2.5.5.5.4. Reinstalling Hosts
Reinstall Red Hat Virtualization Hosts (RHVH) and Red Hat Enterprise Linux hosts from theAdministration Portal. The procedure includes stopping and restarting the host.
# dnf module enable virt:8.2
# dnf module enable virt:8.3
# dnf module enable virt:av
# dnf upgrade --nobest
CHAPTER 2. ADMINISTERING THE RESOURCES
159

WARNING
When installing or reinstalling the host’s operating system, Red Hat stronglyrecommends that you first detach any existing non-OS storage that is attached tothe host to avoid accidental initialization of these disks, and with that, potential dataloss.
Prerequisites
If the cluster has migration enabled, virtual machines can automatically migrate to another hostin the cluster. Therefore, reinstall a host while its usage is relatively low.
Ensure that the cluster has sufficient memory for its hosts to perform maintenance. If a clusterlacks memory, migration of virtual machines will hang and then fail. To reduce memory usage,shut down some or all of the virtual machines before moving the host to maintenance.
Ensure that the cluster contains more than one host before performing a reinstall. Do notattempt to reinstall all the hosts at the same time. One host must remain available to performStorage Pool Manager (SPM) tasks.
Procedure
1. Click Compute → Hosts and select the host.
2. Click Management → Maintenance and OK.
3. Click Installation → Reinstall. This opens the Install Host window.
4. Click OK to reinstall the host.
After a host has been reinstalled and its status returns to Up, you can migrate virtual machines back tothe host.
IMPORTANT
After you register a Red Hat Virtualization Host to the Red Hat Virtualization Managerand reinstall it, the Administration Portal may erroneously display its status as InstallFailed. Click Management → Activate, and the host will change to an Up status and beready for use.
2.5.5.6. Viewing Host Errata
Errata for each host can be viewed after the host has been configured to receive errata information fromthe Red Hat Satellite server. For more information on configuring a host to receive errata informationsee Configuring Satellite Errata Management for a Host
Procedure
1. Click Compute → Hosts.
2. Click the host’s name. This opens the details view.
Red Hat Virtualization 4.4 Administration Guide
160
3. Click the Errata tab.
2.5.5.7. Viewing the Health Status of a Host
Hosts have an external health status in addition to their regular Status. The external health status isreported by plug-ins or external systems, or set by an administrator, and appears to the left of the host’sName as one of the following icons:
OK: No icon
Info:
Warning:
Error:
Failure:
To view further details about the host’s health status, click the host’s name. This opens the details view,and click the Events tab.
The host’s health status can also be viewed using the REST API. A GET request on a host will include theexternal_status element, which contains the health status.
You can set a host’s health status in the REST API via the events collection. For more information, seeAdding Events in the REST API Guide .
2.5.5.8. Viewing Host Devices
You can view the host devices for each host in the Host Devices tab in the details view. If the host hasbeen configured for direct device assignment, these devices can be directly attached to virtualmachines for improved performance.
For more information on the hardware requirements for direct device assignment, see AdditionalHardware Considerations for Using Device Assignment in Hardware Considerations for ImplementingSR-IOV.
For more information on configuring the host for direct device assignment, see Configuring a Host forPCI Passthrough host tasks.
For more information on attaching host devices to virtual machines, see Host Devices in the VirtualMachine Management Guide.
Procedure
1. Click Compute → Hosts.
2. Click the host’s name. This opens the details view.
3. Click Host Devices tab.
This tab lists the details of the host devices, including whether the device is attached to a virtualmachine, and currently in use by that virtual machine.
2.5.5.9. Accessing Cockpit from the Administration Portal
CHAPTER 2. ADMINISTERING THE RESOURCES
161

Cockpit is available by default on Red Hat Virtualization Hosts (RHVH) and Red Hat Enterprise Linuxhosts. You can access the Cockpit web interface by typing the address into a browser, or through theAdministration Portal.
Procedure
1. In the Administration Portal, click Compute → Hosts and select a host.
2. Click Host Console.
The Cockpit login page opens in a new browser window.
2.5.5.9.1. Setting a Legacy SPICE Cipher
SPICE consoles use FIPS-compliant encryption by default, with a cipher string. The default SPICEcipher string is: kECDHE+FIPS:kDHE+FIPS:kRSA+FIPS:!eNULL:!aNULL
This string is generally sufficient. However, if you have a virtual machine with an older operating systemor SPICE client, where either one or the other does not support FIPS-compliant encryption, you mustuse a weaker cipher string. Otherwise, a connection security error may occur if you install a new cluster ora new host in an existing cluster and try to connect to that virtual machine.
You can change the cipher string by using an Ansible playbook.
Changing the cipher string
1. On the Manager machine, create a file in the directory /usr/share/ovirt-engine/playbooks. Forexample:
2. Enter the following in the file and save it:
3. Run the file you just created:
Alternatively, you can reconfigure the host with the Ansible playbook ovirt-host-deploy using the --extra-vars option with the variable host_deploy_spice_cipher_string:
2.5.5.10. Configuring Host Power Management Settings
Configure your host power management device settings to perform host life-cycle operations (stop,
# vim /usr/share/ovirt-engine/playbooks/change-spice-cipher.yml
name: oVirt - setup weaker SPICE encryption for old clientshosts: hostnamevars: host_deploy_spice_cipher_string: 'DEFAULT:-RC4:-3DES:-DES'roles: - ovirt-host-deploy-spice-encryption
# ansible-playbook -l hostname /usr/share/ovirt-engine/playbooks/change-spice-cipher.yml
# ansible-playbook -l hostname \ --extra-vars host_deploy_spice_cipher_string=”DEFAULT:-RC4:-3DES:-DES” \ /usr/share/ovirt-engine/playbooks/ovirt-host-deploy.yml
Red Hat Virtualization 4.4 Administration Guide
162

Configure your host power management device settings to perform host life-cycle operations (stop,start, restart) from the Administration Portal.
You must configure host power management in order to utilize host high availability and virtual machinehigh availability. For more information about power management devices, see Power Management inthe Technical Reference.
Procedure
1. Click Compute → Hosts and select a host.
2. Click Management → Maintenance, and click OK to confirm.
3. When the host is in maintenance mode, click Edit.
4. Click the Power Management tab.
5. Select the Enable Power Management check box to enable the fields.
6. Select the Kdump integration check box to prevent the host from fencing while performing akernel crash dump.
IMPORTANT
If you enable or disable Kdump integration on an existing host, you must reinstallthe host for kdump to be configured.
7. Optionally, select the Disable policy control of power management check box if you do notwant your host’s power management to be controlled by the Scheduling Policy of the host’scluster.
8. Click the plus (+) button to add a new power management device. The Edit fence agent windowopens.
9. Enter the User Name and Password of the power management device into the appropriatefields.
10. Select the power management device Type in the drop-down list.
11. Enter the IP address in the Address field.
12. Enter the SSH Port number used by the power management device to communicate with thehost.
13. Enter the Slot number used to identify the blade of the power management device.
14. Enter the Options for the power management device. Use a comma-separated list of'key=value' entries.
If both IPv4 and IPv6 IP addresses can be used (default), leave the Options field blank.
If only IPv4 IP addresses can be used, enter inet4_only=1.
If only IPv6 IP addresses can be used, enter inet6_only=1.
15. Select the Secure check box to enable the power management device to connect securely tothe host.
16. Click Test to ensure the settings are correct. Test Succeeded, Host Status is: on will display
CHAPTER 2. ADMINISTERING THE RESOURCES
163

16. Click Test to ensure the settings are correct. Test Succeeded, Host Status is: on will displayupon successful verification.
17. Click OK to close the Edit fence agent window.
18. In the Power Management tab, optionally expand the Advanced Parameters and use the upand down buttons to specify the order in which the Manager will search the host’s cluster anddc (datacenter) for a fencing proxy.
19. Click OK.
NOTE
For IPv6, Red Hat Virtualization supports only static addressing.
Dual-stack IPv4 and IPv6 addressing is not supported.
The Management → Power Management drop-down menu is now enabled in the AdministrationPortal.
2.5.5.11. Configuring Host Storage Pool Manager Settings
The Storage Pool Manager (SPM) is a management role given to one of the hosts in a data center tomaintain access control over the storage domains. The SPM must always be available, and the SPM rolewill be assigned to another host if the SPM host becomes unavailable. As the SPM role uses some of thehost’s available resources, it is important to prioritize hosts that can afford the resources.
The Storage Pool Manager (SPM) priority setting of a host alters the likelihood of the host beingassigned the SPM role: a host with high SPM priority will be assigned the SPM role before a host withlow SPM priority.
Procedure
1. Click Compute → Hosts.
2. Click Edit.
3. Click the SPM tab.
4. Use the radio buttons to select the appropriate SPM priority for the host.
5. Click OK.
2.5.5.11.1. Migrating a self-hosted engine host to a different cluster
You cannot migrate a host that is configured as a self-hosted engine host to a data center or clusterother than the one in which the self-hosted engine virtual machine is running. All self-hosted enginehosts must be in the same data center and cluster.
You need to disable the host from being a self-hosted engine host by undeploying the self-hostedengine configuration from the host.
Procedure
1. Click Compute → Hosts and select the host.
Red Hat Virtualization 4.4 Administration Guide
164

2. Click Management → Maintenance. The host’s status changes to Maintenance.
3. Under Reinstall, select Hosted Engine UNDEPLOY.
4. Click Reinstall.
TIP
Alternatively, you can use the REST API undeploy_hosted_engine parameter.
5. Click Edit.
6. Select the target data center and cluster.
7. Click OK.
8. Click Management → Activate.
Additional resources
Moving a Host to Maintenance mode
Activating a Host from Maintenance Mode
2.5.6. Explanation of Settings and Controls in the New Host and Edit Host Windows
2.5.6.1. Host General Settings Explained
These settings apply when editing the details of a host or adding new Red Hat Enterprise Linux hostsand Satellite host provider hosts.
The General settings table contains the information required on the General tab of the New Host orEdit Host window.
Table 2.20. General settings
Field Name Description
Host Cluster The cluster and data center to which the hostbelongs.
CHAPTER 2. ADMINISTERING THE RESOURCES
165

Use Foreman/Satellite Select or clear this check box to view or hide optionsfor adding hosts provided by Satellite host providers.The following options are also available:
Discovered Hosts
Discovered Hosts - A drop-down list that ispopulated with the name of Satellite hostsdiscovered by the engine.
Host Groups -A drop-down list of hostgroups available.
Compute Resources - A drop-down list ofhypervisors to provide compute resources.
Provisioned Hosts
Providers Hosts - A drop-down list that ispopulated with the name of hosts providedby the selected external provider. Theentries in this list are filtered in accordancewith any search queries that have beeninput in the Provider search filter.
Provider search filter - A text field thatallows you to search for hosts provided bythe selected external provider. This option isprovider-specific; see providerdocumentation for details on formingsearch queries for specific providers. Leavethis field blank to view all available hosts.
Name The name of the host. This text field has a 40-character limit and must be a unique name with anycombination of uppercase and lowercase letters,numbers, hyphens, and underscores.
Comment A field for adding plain text, human-readablecomments regarding the host.
Hostname The IP address or resolvable host name of the host. Ifa resolvable hostname is used, you must ensure thatall addresses that the hostname is resolved to matchthe IP addresses, IPv4 and IPv6, used by themanagement network of the host.
Password The password of the host’s root user. Set thepassword when adding the host. The passwordcannot be edited afterwards.
Field Name Description
Red Hat Virtualization 4.4 Administration Guide
166

Activate host after install Select this checkbox to activate the host aftersuccessful installation. This is enabled by default andrequired for the hypervisors to be activatedsuccessfully.
After successful installation, you can clear thischeckbox to switch the host status to Maintenance.This allows the administrator to perform additionalconfiguration tasks on the hypervisors.
Reboot host after install Select this checkbox to reboot the host after it isinstalled. This is enabled by default.
NOTE
Changing the kernel command lineparameters of the host, or changingthe firewall type of the cluster alsorequire you to reboot the host.
SSH Public Key Copy the contents in the text box to the/root/.ssh/authorized_hosts file on the host to usethe Manager’s SSH key instead of a password toauthenticate with a host.
Automatically configure host firewall When adding a new host, the Manager can open therequired ports on the host’s firewall. This is enabledby default. This is an Advanced Parameter.
SSH Fingerprint You can fetch the host’s SSH fingerprint, andcompare it with the fingerprint you expect the host toreturn, ensuring that they match. This is anAdvanced Parameter.
Field Name Description
2.5.6.2. Host Power Management Settings Explained
The Power Management settings table contains the information required on the Power Managementtab of the New Host or Edit Host windows. You can configure power management if the host has asupported power management card.
Table 2.21. Power Management Settings
Field Name Description
Enable Power Management Enables power management on the host. Select thischeck box to enable the rest of the fields in thePower Management tab.
CHAPTER 2. ADMINISTERING THE RESOURCES
167

Kdump integration Prevents the host from fencing while performing akernel crash dump, so that the crash dump is notinterrupted. In Red Hat Enterprise Linux 7.1 and later,kdump is available by default. If kdump is available onthe host, but its configuration is not valid (the kdumpservice cannot be started), enabling Kdumpintegration will cause the host (re)installation to fail.If you enable or disable Kdump integration on anexisting host, you must reinstall the host.
Disable policy control of power management Power management is controlled by the SchedulingPolicy of the host’s cluster. If power management isenabled and the defined low utilization value isreached, the Manager will power down the hostmachine, and restart it again when load balancingrequires or there are not enough free hosts in thecluster. Select this check box to disable policycontrol.
Agents by Sequential Order Lists the host’s fence agents. Fence agents can besequential, concurrent, or a mix of both.
If fence agents are used sequentially, theprimary agent is used first to stop or start ahost, and if it fails, the secondary agent isused.
If fence agents are used concurrently, bothfence agents have to respond to the Stopcommand for the host to be stopped; if oneagent responds to the Start command, thehost will go up.
Fence agents are sequential by default. Use the upand down buttons to change the sequence in whichthe fence agents are used.
To make two fence agents concurrent, select onefence agent from the Concurrent with drop-downlist next to the other fence agent. Additional fenceagents can be added to the group of concurrentfence agents by selecting the group from theConcurrent with drop-down list next to theadditional fence agent.
Add Fence Agent Click the + button to add a new fence agent. The Editfence agent window opens. See the table below formore information on the fields in this window.
Field Name Description
Red Hat Virtualization 4.4 Administration Guide
168

Power Management Proxy Preference By default, specifies that the Manager will search fora fencing proxy within the same cluster as the host,and if no fencing proxy is found, the Manager willsearch in the same dc (data center). Use the up anddown buttons to change the sequence in which theseresources are used. This field is available underAdvanced Parameters.
Field Name Description
The following table contains the information required in the Edit fence agent window.
Table 2.22. Edit fence agent Settings
Field Name Description
Address The address to access your host’s powermanagement device. Either a resolvable hostname oran IP address.
User Name User account with which to access the powermanagement device. You can set up a user on thedevice, or use the default user.
Password Password for the user accessing the powermanagement device.
CHAPTER 2. ADMINISTERING THE RESOURCES
169

Type The type of power management device in your host.Choose one of the following:
apc - APC MasterSwitch network powerswitch. Not for use with APC 5.x powerswitch devices.
apc_snmp - Use with APC 5.x power switchdevices.
bladecenter - IBM Bladecenter RemoteSupervisor Adapter.
cisco_ucs - Cisco Unified ComputingSystem.
drac5 - Dell Remote Access Controller forDell computers.
drac7 - Dell Remote Access Controller forDell computers.
eps - ePowerSwitch 8M+ network powerswitch.
hpblade - HP BladeSystem.
ilo, ilo2, ilo3, ilo4 - HP Integrated Lights-Out.
ipmilan - Intelligent Platform ManagementInterface and Sun Integrated Lights OutManagement devices.
rsa - IBM Remote Supervisor Adapter.
rsb - Fujitsu-Siemens RSB managementinterface.
wti - WTI Network Power Switch.
For more information about power managementdevices, see Power Management in the TechnicalReference.
Port The port number used by the power managementdevice to communicate with the host.
Slot The number used to identify the blade of the powermanagement device.
Service Profile The service profile name used to identify the blade ofthe power management device. This field appearsinstead of Slot when the device type is cisco_ucs.
Field Name Description
Red Hat Virtualization 4.4 Administration Guide
170

Options Power management device specific options. Enterthese as 'key=value'. See the documentation of yourhost’s power management device for the optionsavailable.
For Red Hat Enterprise Linux 7 hosts, if you are usingcisco_ucs as the power management device, you alsoneed to append ssl_insecure=1 to the Optionsfield.
Secure Select this check box to allow the powermanagement device to connect securely to the host.This can be done via ssh, ssl, or other authenticationprotocols depending on the power managementagent.
Field Name Description
2.5.6.3. SPM Priority Settings Explained
The SPM settings table details the information required on the SPM tab of the New Host or Edit Hostwindow.
Table 2.23. SPM settings
Field Name Description
SPM Priority Defines the likelihood that the host will be given therole of Storage Pool Manager (SPM). The optionsare Low, Normal, and High priority. Low prioritymeans that there is a reduced likelihood of the hostbeing assigned the role of SPM, and High prioritymeans there is an increased likelihood. The defaultsetting is Normal.
2.5.6.4. Host Console Settings Explained
The Console settings table details the information required on the Console tab of the New Host orEdit Host window.
Table 2.24. Console settings
Field Name Description
CHAPTER 2. ADMINISTERING THE RESOURCES
171
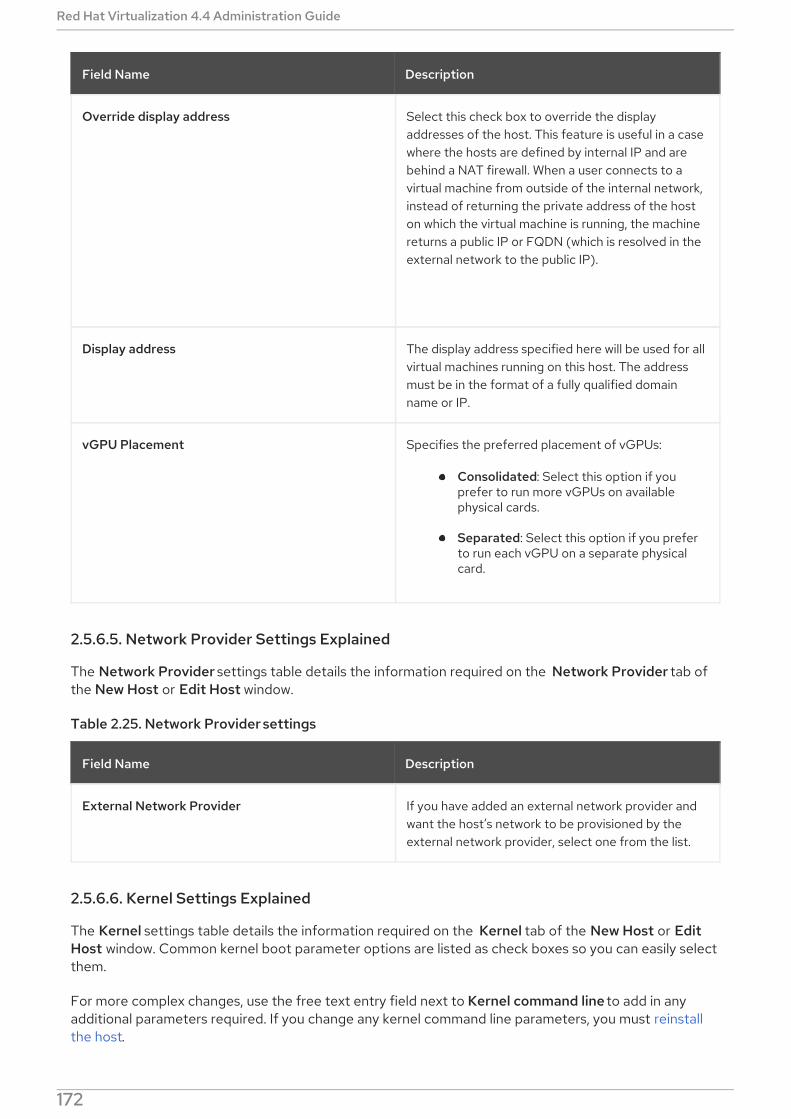
Override display address Select this check box to override the displayaddresses of the host. This feature is useful in a casewhere the hosts are defined by internal IP and arebehind a NAT firewall. When a user connects to avirtual machine from outside of the internal network,instead of returning the private address of the hoston which the virtual machine is running, the machinereturns a public IP or FQDN (which is resolved in theexternal network to the public IP).
Display address The display address specified here will be used for allvirtual machines running on this host. The addressmust be in the format of a fully qualified domainname or IP.
vGPU Placement Specifies the preferred placement of vGPUs:
Consolidated: Select this option if youprefer to run more vGPUs on availablephysical cards.
Separated: Select this option if you preferto run each vGPU on a separate physicalcard.
Field Name Description
2.5.6.5. Network Provider Settings Explained
The Network Provider settings table details the information required on the Network Provider tab ofthe New Host or Edit Host window.
Table 2.25. Network Provider settings
Field Name Description
External Network Provider If you have added an external network provider andwant the host’s network to be provisioned by theexternal network provider, select one from the list.
2.5.6.6. Kernel Settings Explained
The Kernel settings table details the information required on the Kernel tab of the New Host or EditHost window. Common kernel boot parameter options are listed as check boxes so you can easily selectthem.
For more complex changes, use the free text entry field next to Kernel command line to add in anyadditional parameters required. If you change any kernel command line parameters, you must reinstallthe host.
Red Hat Virtualization 4.4 Administration Guide
172

IMPORTANT
If the host is attached to the Manager, you must place the host into maintenance modebefore making changes. After making the changes, reinstall the host to apply thechanges.
Table 2.26. Kernel Settings
Field Name Description
Hostdev Passthrough & SR-IOV Enables the IOMMU flag in the kernel so a virtualmachine can use a host device as if it is attacheddirectly to the virtual machine. The host hardwareand firmware must also support IOMMU. Thevirtualization extension and IOMMU extension mustbe enabled on the hardware. See Configuring a Hostfor PCI Passthrough. IBM POWER8 has IOMMUenabled by default.
Nested Virtualization Enables the vmx or svm flag so virtual machines canrun within virtual machines. This option is aTechnology Preview feature: It is intended only forevaluation purposes. It is not supported forproduction purposes. To use this setting, you mustinstall the vdsm-hook-nestedvt hook on the host.For details, see Enabling nested virtualization for allvirtual machines and Enabling nested virtualizationfor individual virtual machines
Unsafe Interrupts If IOMMU is enabled but the passthrough failsbecause the hardware does not support interruptremapping, you can consider enabling this option.Note that you should only enable this option if thevirtual machines on the host are trusted; having theoption enabled potentially exposes the host to MSIattacks from the virtual machines. This option is onlyintended to be used as a workaround when usinguncertified hardware for evaluation purposes.
PCI Reallocation If your SR-IOV NIC is unable to allocate virtualfunctions because of memory issues, considerenabling this option. The host hardware and firmwaremust also support PCI reallocation. This option is onlyintended to be used as a workaround when usinguncertified hardware for evaluation purposes.
Blacklist Nouveau Blocks the nouveau driver. Nouveau is a communitydriver for NVIDIA GPUs that conflicts with vendor-supplied drivers. The nouveau driver should beblocked when vendor drivers take precedence.
CHAPTER 2. ADMINISTERING THE RESOURCES
173

SMT Disabled Disables Simultaneous Multi Threading (SMT).Disabling SMT can mitigate security vulnerabilities,such as L1TF or MDS.
FIPS mode Enables FIPS mode. For details, see Enabling FIPSusing the Manager.
Kernel command line This field allows you to append more kernelparameters to the default parameters.
Field Name Description
NOTE
If the kernel boot parameters are grayed out, click the reset button and the options willbe available.
2.5.6.7. Hosted Engine Settings Explained
The Hosted Engine settings table details the information required on the Hosted Engine tab of theNew Host or Edit Host window.
Table 2.27. Hosted Engine Settings
Field Name Description
Choose hosted engine deployment action Three options are available:
None - No actions required.
Deploy - Select this option to deploy thehost as a self-hosted engine node.
Undeploy - For a self-hosted engine node,you can select this option to undeploy thehost and remove self-hosted engine relatedconfigurations.
2.5.7. Host Resilience
2.5.7.1. Host High Availability
The Red Hat Virtualization Manager uses fencing to keep hosts in a cluster responsive. A NonResponsive host is different from a Non Operational host. Non Operational hosts can becommunicated with by the Manager, but have an incorrect configuration, for example a missing logicalnetwork. Non Responsive hosts cannot be communicated with by the Manager.
Fencing allows a cluster to react to unexpected host failures and enforce power saving, load balancing,and virtual machine availability policies. You should configure the fencing parameters for your host’s
Red Hat Virtualization 4.4 Administration Guide
174

power management device and test their correctness from time to time. In a fencing operation, a non-responsive host is rebooted, and if the host does not return to an active status within a prescribed time,it remains non-responsive pending manual intervention and troubleshooting.
NOTE
To automatically check the fencing parameters, you can configure the PMHealthCheckEnabled (false by default) and PMHealthCheckIntervalInSec (3600sec by default) engine-config options.
When set to true, PMHealthCheckEnabled will check all host agents at the intervalspecified by PMHealthCheckIntervalInSec, and raise warnings if it detects issues. SeeSyntax for the engine-config Command for more information about configuring engine-config options.
Power management operations can be performed by Red Hat Virtualization Manager after it reboots, bya proxy host, or manually in the Administration Portal. All the virtual machines running on the non-responsive host are stopped, and highly available virtual machines are started on a different host. Atleast two hosts are required for power management operations.
After the Manager starts up, it automatically attempts to fence non-responsive hosts that have powermanagement enabled after the quiet time (5 minutes by default) has elapsed. The quiet time can beconfigured by updating the DisableFenceAtStartupInSec engine-config option.
NOTE
The DisableFenceAtStartupInSec engine-config option helps prevent a scenario wherethe Manager attempts to fence hosts while they boot up. This can occur after a datacenter outage because a host’s boot process is normally longer than the Manager bootprocess.
Hosts can be fenced automatically by the proxy host using the power management parameters, ormanually by right-clicking on a host and using the options on the menu.
IMPORTANT
If a host runs virtual machines that are highly available, power management must beenabled and configured.
2.5.7.2. Power Management by Proxy in Red Hat Virtualization
The Red Hat Virtualization Manager does not communicate directly with fence agents. Instead, theManager uses a proxy to send power management commands to a host power management device. TheManager uses VDSM to execute power management device actions, so another host in the environmentis used as a fencing proxy.
You can select between:
Any host in the same cluster as the host requiring fencing.
Any host in the same data center as the host requiring fencing.
A viable fencing proxy host has a status of either UP or Maintenance.
CHAPTER 2. ADMINISTERING THE RESOURCES
175

2.5.7.3. Setting Fencing Parameters on a Host
The parameters for host fencing are set using the Power Management fields on the New Host or EditHost windows. Power management enables the system to fence a troublesome host using an additionalinterface such as a Remote Access Card (RAC).
All power management operations are done using a proxy host, as opposed to directly by the Red HatVirtualization Manager. At least two hosts are required for power management operations.
Procedure
1. Click Compute → Hosts and select the host.
2. Click Edit.
3. Click the Power Management tab.
4. Select the Enable Power Management check box to enable the fields.
5. Select the Kdump integration check box to prevent the host from fencing while performing akernel crash dump.
IMPORTANT
If you enable or disable Kdump integration on an existing host, you must reinstallthe host.
6. Optionally, select the Disable policy control of power management check box if you do notwant your host’s power management to be controlled by the Scheduling Policy of the host’scluster.
7. Click the + button to add a new power management device. The Edit fence agent windowopens.
8. Enter the Address, User Name, and Password of the power management device.
9. Select the power management device Type from the drop-down list.
10. Enter the SSH Port number used by the power management device to communicate with thehost.
11. Enter the Slot number used to identify the blade of the power management device.
12. Enter the Options for the power management device. Use a comma-separated list of'key=value' entries.
13. Select the Secure check box to enable the power management device to connect securely tothe host.
14. Click the Test button to ensure the settings are correct. Test Succeeded, Host Status is: onwill display upon successful verification.
Red Hat Virtualization 4.4 Administration Guide
176

WARNING
Power management parameters (userid, password, options, etc) are testedby Red Hat Virtualization Manager only during setup and manually afterthat. If you choose to ignore alerts about incorrect parameters, or if theparameters are changed on the power management hardware without thecorresponding change in Red Hat Virtualization Manager, fencing is likely tofail when most needed.
15. Click OK to close the Edit fence agent window.
16. In the Power Management tab, optionally expand the Advanced Parameters and use the upand down buttons to specify the order in which the Manager will search the host’s cluster anddc (datacenter) for a fencing proxy.
17. Click OK.
You are returned to the list of hosts. Note that the exclamation mark next to the host’s name has nowdisappeared, signifying that power management has been successfully configured.
2.5.7.4. fence_kdump Advanced Configuration
kdump
Click the name of a host to view the status of the kdump service in the General tab of the details view:
Enabled: kdump is configured properly and the kdump service is running.
Disabled: the kdump service is not running (in this case kdump integration will not workproperly).
Unknown: happens only for hosts with an earlier VDSM version that does not report kdumpstatus.
For more information on installing and using kdump, see the Red Hat Enterprise Linux 7 Kernel CrashDump Guide.
fence_kdump
Enabling Kdump integration in the Power Management tab of the New Host or Edit Host windowconfigures a standard fence_kdump setup. If the environment’s network configuration is simple and theManager’s FQDN is resolvable on all hosts, the default fence_kdump settings are sufficient for use.
However, there are some cases where advanced configuration of fence_kdump is necessary.Environments with more complex networking may require manual changes to the configuration of theManager, fence_kdump listener, or both. For example, if the Manager’s FQDN is not resolvable on allhosts with Kdump integration enabled, you can set a proper host name or IP address using engine-config:
engine-config -s FenceKdumpDestinationAddress=A.B.C.D
CHAPTER 2. ADMINISTERING THE RESOURCES
177

The following example cases may also require configuration changes:
The Manager has two NICs, where one of these is public-facing, and the second is the preferreddestination for fence_kdump messages.
You need to execute the fence_kdump listener on a different IP or port.
You need to set a custom interval for fence_kdump notification messages, to prevent possiblepacket loss.
Customized fence_kdump detection settings are recommended for advanced users only, as changes tothe default configuration are only necessary in more complex networking setups.
2.5.7.5. fence_kdump listener Configuration
Edit the configuration of the fence_kdump listener. This is only necessary in cases where the defaultconfiguration is not sufficient.
Procedure
1. Create a new file (for example, my-fence-kdump.conf) in /etc/ovirt-engine/ovirt-fence-kdump-listener.conf.d/.
2. Enter your customization with the syntax OPTION=value and save the file.
IMPORTANT
The edited values must also be changed in engine-config as outlined in thefence_kdump Listener Configuration Options table in Configuring fence-kdumpon the Manager.
3. Restart the fence_kdump listener:
The following options can be customized if required:
Table 2.28. fence_kdump Listener Configuration Options
Variable Description Default Note
LISTENER_ADDRESS Defines the IP addressto receive fence_kdumpmessages on.
0.0.0.0 If the value of thisparameter is changed, itmust match the value of FenceKdumpDestinationAddress in engine-config.
# systemctl restart ovirt-fence-kdump-listener.service
Red Hat Virtualization 4.4 Administration Guide
178

LISTENER_PORT Defines the port toreceive fence_kdumpmessages on.
7410 If the value of thisparameter is changed, itmust match the value of FenceKdumpDestinationPort in engine-config.
HEARTBEAT_INTERVAL
Defines the interval inseconds of the listener’sheartbeat updates.
30 If the value of thisparameter is changed, itmust be half the size orsmaller than the value ofFenceKdumpListenerTimeout in engine-config.
SESSION_SYNC_INTERVAL
Defines the interval inseconds to synchronizethe listener’s hostkdumping sessions inmemory to thedatabase.
5 If the value of thisparameter is changed, itmust be half the size orsmaller than the value ofKdumpStartedTimeout in engine-config.
REOPEN_DB_CONNECTION_INTERVAL
Defines the interval inseconds to reopen thedatabase connectionwhich was previouslyunavailable.
30 -
KDUMP_FINISHED_TIMEOUT
Defines the maximumtimeout in seconds afterthe last receivedmessage from kdumpinghosts after which thehost kdump flow ismarked as FINISHED.
60 If the value of thisparameter is changed, itmust be double the sizeor higher than the valueof FenceKdumpMessageInterval in engine-config.
Variable Description Default Note
2.5.7.6. Configuring fence_kdump on the Manager
Edit the Manager’s kdump configuration. This is only necessary in cases where the default configurationis not sufficient. The current configuration values can be found using:
Procedure
1. Edit kdump’s configuration using the engine-config command:
IMPORTANT
# engine-config -g OPTION
# engine-config -s OPTION=value
CHAPTER 2. ADMINISTERING THE RESOURCES
179

IMPORTANT
The edited values must also be changed in the fence_kdump listenerconfiguration file as outlined in the Kdump Configuration Options table. Seefence_kdump listener configuration .
2. Restart the ovirt-engine service:
3. Reinstall all hosts with Kdump integration enabled, if required (see the table below).
The following options can be configured using engine-config:
Table 2.29. Kdump Configuration Options
Variable Description Default Note
FenceKdumpDestinationAddress
Defines the hostname(s)or IP address(es) tosend fence_kdumpmessages to. If empty,the Manager’s FQDN isused.
Empty string (ManagerFQDN is used)
If the value of thisparameter is changed, itmust match the value of LISTENER_ADDRESS in the fence_kdumplistener configurationfile, and all hosts withKdump integrationenabled must bereinstalled.
FenceKdumpDestinationPort
Defines the port to sendfence_kdump messagesto.
7410 If the value of thisparameter is changed, itmust match the value of LISTENER_PORT inthe fence_kdumplistener configurationfile, and all hosts withKdump integrationenabled must bereinstalled.
FenceKdumpMessageInterval
Defines the interval inseconds betweenmessages sent byfence_kdump.
5 If the value of thisparameter is changed, itmust be half the size orsmaller than the value ofKDUMP_FINISHED_TIMEOUT in thefence_kdump listenerconfiguration file, and allhosts with Kdumpintegration enabledmust be reinstalled.
# systemctl restart ovirt-engine.service
Red Hat Virtualization 4.4 Administration Guide
180

FenceKdumpListenerTimeout
Defines the maximumtimeout in seconds sincethe last heartbeat toconsider thefence_kdump listeneralive.
90 If the value of thisparameter is changed, itmust be double the sizeor higher than the valueof HEARTBEAT_INTERVAL in thefence_kdump listenerconfiguration file.
KdumpStartedTimeout Defines the maximumtimeout in seconds towait until the firstmessage from thekdumping host isreceived (to detect thathost kdump flow hasstarted).
30 If the value of thisparameter is changed, itmust be double the sizeor higher than the valueof SESSION_SYNC_INTERVAL in thefence_kdump listenerconfiguration file, and FenceKdumpMessageInterval.
Variable Description Default Note
2.5.7.7. Soft-Fencing Hosts
Hosts can sometimes become non-responsive due to an unexpected problem, and though VDSM isunable to respond to requests, the virtual machines that depend upon VDSM remain alive andaccessible. In these situations, restarting VDSM returns VDSM to a responsive state and resolves thisissue.
"SSH Soft Fencing" is a process where the Manager attempts to restart VDSM via SSH on non-responsive hosts. If the Manager fails to restart VDSM via SSH, the responsibility for fencing falls to theexternal fencing agent if an external fencing agent has been configured.
Soft-fencing over SSH works as follows. Fencing must be configured and enabled on the host, and avalid proxy host (a second host, in an UP state, in the data center) must exist. When the connectionbetween the Manager and the host times out, the following happens:
1. On the first network failure, the status of the host changes to "connecting".
2. The Manager then makes three attempts to ask VDSM for its status, or it waits for an intervaldetermined by the load on the host. The formula for determining the length of the interval isconfigured by the configuration values TimeoutToResetVdsInSeconds (the default is 60seconds) + [DelayResetPerVmInSeconds (the default is 0.5 seconds)]*(the count of runningvirtual machines on host) + [DelayResetForSpmInSeconds (the default is 20 seconds)] * 1 (ifhost runs as SPM) or 0 (if the host does not run as SPM). To give VDSM the maximum amountof time to respond, the Manager chooses the longer of the two options mentioned above (threeattempts to retrieve the status of VDSM or the interval determined by the above formula).
3. If the host does not respond when that interval has elapsed, vdsm restart is executed via SSH.
CHAPTER 2. ADMINISTERING THE RESOURCES
181

4. If vdsm restart does not succeed in re-establishing the connection between the host and theManager, the status of the host changes to Non Responsive and, if power management isconfigured, fencing is handed off to the external fencing agent.
NOTE
Soft-fencing over SSH can be executed on hosts that have no power managementconfigured. This is distinct from "fencing": fencing can be executed only on hosts thathave power management configured.
2.5.7.8. Using Host Power Management Functions
When power management has been configured for a host, you can access a number of options from theAdministration Portal interface. While each power management device has its own customizable options,they all support the basic options to start, stop, and restart a host.
Procedure
1. Click Compute → Hosts and select the host.
2. Click the Management drop-down menu and select one of the following Power Managementoptions:
Restart: This option stops the host and waits until the host’s status changes to Down. Whenthe agent has verified that the host is down, the highly available virtual machines arerestarted on another host in the cluster. The agent then restarts this host. When the host isready for use its status displays as Up.
Start: This option starts the host and lets it join a cluster. When it is ready for use its statusdisplays as Up.
Stop: This option powers off the host. Before using this option, ensure that the virtualmachines running on the host have been migrated to other hosts in the cluster. Otherwisethe virtual machines will crash and only the highly available virtual machines will be restartedon another host. When the host has been stopped its status displays as Non-Operational.
NOTE
If Power Management is not enabled, you can restart or stop the host byselecting it, clicking the Management drop-down menu, and selecting anSSH Management option, Restart or Stop.
IMPORTANT
When two fencing agents are defined on a host, they can be usedconcurrently or sequentially. For concurrent agents, both agents have torespond to the Stop command for the host to be stopped; and when oneagent responds to the Start command, the host will go up. For sequentialagents, to start or stop a host, the primary agent is used first; if it fails, thesecondary agent is used.
3. Click OK.
2.5.7.9. Manually Fencing or Isolating a Non-Responsive Host
Red Hat Virtualization 4.4 Administration Guide
182

If a host unpredictably goes into a non-responsive state, for example, due to a hardware failure, it cansignificantly affect the performance of the environment. If you do not have a power management device,or if it is incorrectly configured, you can reboot the host manually.
WARNING
Do not select Confirm 'Host has been Rebooted' unless you have manuallyrebooted the host. Using this option while the host is still running can lead to avirtual machine image corruption.
Procedure
1. In the Administration Portal, click Compute → Hosts and confirm the host’s status is Non Responsive.
2. Manually reboot the host. This could mean physically entering the lab and rebooting the host.
3. In the Administration Portal, select the host and click More Actions ( ), then click Confirm'Host has been Rebooted'.
4. Select the Approve Operation check box and click OK.
5. If your hosts take an unusually long time to boot, you can set ServerRebootTimeout to specifyhow many seconds to wait before determining that the host is Non Responsive:
2.6. STORAGE
2.6.1. About Red Hat Virtualization storage
Red Hat Virtualization uses a centralized storage system for virtual disks, ISO files and snapshots.Storage networking can be implemented using:
Network File System (NFS)
Other POSIX compliant file systems
Internet Small Computer System Interface (iSCSI)
Local storage attached directly to the virtualization hosts
Fibre Channel Protocol (FCP)
Parallel NFS (pNFS)
Setting up storage is a prerequisite for a new data center because a data center cannot be initializedunless storage domains are attached and activated.
As a Red Hat Virtualization system administrator, you need to create, configure, attach and maintain
# engine-config --set ServerRebootTimeout=integer
CHAPTER 2. ADMINISTERING THE RESOURCES
183

storage for the virtualized enterprise. You should be familiar with the storage types and their use. Readyour storage array vendor’s guides, and see the Red Hat Enterprise Linux Storage Administration Guidefor more information on the concepts, protocols, requirements or general usage of storage.
To add storage domains you must be able to successfully access the Administration Portal, and theremust be at least one host connected with a status of Up.
Red Hat Virtualization has three types of storage domains:
Data Domain: A data domain holds the virtual hard disks and OVF files of all the virtualmachines and templates in a data center. In addition, snapshots of the virtual machines are alsostored in the data domain.The data domain cannot be shared across data centers. Data domains of multiple types (iSCSI,NFS, FC, POSIX, and Gluster) can be added to the same data center, provided they are allshared, rather than local, domains.
You must attach a data domain to a data center before you can attach domains of other typesto it.
ISO Domain: ISO domains store ISO files (or logical CDs) used to install and boot operatingsystems and applications for the virtual machines. An ISO domain removes the data center’sneed for physical media. An ISO domain can be shared across different data centers. ISOdomains can only be NFS-based. Only one ISO domain can be added to a data center.
Export Domain: Export domains are temporary storage repositories that are used to copy andmove images between data centers and Red Hat Virtualization environments. Export domainscan be used to backup virtual machines. An export domain can be moved between data centers,however, it can only be active in one data center at a time. Export domains can only be NFS-based. Only one export domain can be added to a data center.
NOTE
The export storage domain is deprecated. Storage data domains can beunattached from a data center and imported to another data center in the sameenvironment, or in a different environment. Virtual machines, floating virtual disks,and templates can then be uploaded from the imported storage domain to theattached data center. See Importing Existing Storage Domains for informationon importing storage domains.
IMPORTANT
Only commence configuring and attaching storage for your Red Hat Virtualizationenvironment once you have determined the storage needs of your data center(s).
2.6.2. Understanding Storage Domains
A storage domain is a collection of images that have a common storage interface. A storage domaincontains complete images of templates and virtual machines (including snapshots), or ISO files. Astorage domain can be made of block devices (SAN - iSCSI or FCP) or a file system (NAS - NFS,GlusterFS, or other POSIX compliant file systems).
By default, GlusterFS domains and local storage domains support 4K block size. 4K block size canprovide better performance, especially when using large files, and it is also necessary when you use toolsthat require 4K compatibility, such as VDO.
NOTE
Red Hat Virtualization 4.4 Administration Guide
184

NOTE
GlusterFS Storage is deprecated, and will no longer be supported in future releases.
On NFS, all virtual disks, templates, and snapshots are files.
On SAN (iSCSI/FCP), each virtual disk, template or snapshot is a logical volume. Block devices areaggregated into a logical entity called a volume group, and then divided by LVM (Logical VolumeManager) into logical volumes for use as virtual hard disks. See Red Hat Enterprise Linux Logical VolumeManager Administration Guide for more information on LVM.
Virtual disks can have one of two formats, either QCOW2 or raw. The type of storage can be sparse orpreallocated. Snapshots are always sparse but can be taken for disks of either format.
Virtual machines that share the same storage domain can be migrated between hosts that belong to thesame cluster.
2.6.3. Preparing and Adding NFS Storage
2.6.3.1. Preparing NFS Storage
Set up NFS shares on your file storage or remote server to serve as storage domains on Red HatEnterprise Virtualization Host systems. After exporting the shares on the remote storage andconfiguring them in the Red Hat Virtualization Manager, the shares will be automatically imported on theRed Hat Virtualization hosts.
For information on setting up, configuring, mounting and exporting NFS, see Managing file systems forRed Hat Enterprise Linux 8.
Specific system user accounts and system user groups are required by Red Hat Virtualization so theManager can store data in the storage domains represented by the exported directories. The followingprocedure sets the permissions for one directory. You must repeat the chown and chmod steps for allof the directories you intend to use as storage domains in Red Hat Virtualization.
Prerequisites
1. Install the NFS utils package.
2. To check the enabled versions:
3. Enable the following services:
Procedure
1. Create the group kvm:
# dnf install nfs-utils -y
# cat /proc/fs/nfsd/versions
# systemctl enable nfs-server# systemctl enable rpcbind
CHAPTER 2. ADMINISTERING THE RESOURCES
185

2. Create the user vdsm in the group kvm:
3. Create the storage directory and modify the access rights.
# mkdir /storage# chmod 0755 /storage# chown 36:36 /storage/
4. Add the storage directory to /etc/exports with the relevant permissions.
5. Restart the following services:
6. To see which export are available for a specific IP address:
NOTE
If changes in /etc/exports have been made after starting the services, the exportfs -racommand can be used to reload the changes. After performing all the above stages, theexports directory should be ready and can be tested on a different host to check that it isusable.
2.6.3.2. Adding NFS Storage
This procedure shows you how to attach existing NFS storage to your Red Hat Virtualizationenvironment as a data domain.
If you require an ISO or export domain, use this procedure, but select ISO or Export from the DomainFunction list.
Procedure
1. In the Administration Portal, click Storage → Domains.
2. Click New Domain.
3. Enter a Name for the storage domain.
# groupadd kvm -g 36
# useradd vdsm -u 36 -g kvm
# vi /etc/exports# cat /etc/exports /storage *(rw)
# systemctl restart rpcbind# systemctl restart nfs-server
# exportfs /nfs_server/srv 10.46.11.3/24 /nfs_server <world>
Red Hat Virtualization 4.4 Administration Guide
186

4. Accept the default values for the Data Center, Domain Function, Storage Type, Format, andHost lists.
5. Enter the Export Path to be used for the storage domain. The export path should be in theformat of 123.123.0.10:/data (for IPv4), [2001:0:0:0:0:0:0:5db1]:/data (for IPv6), ordomain.example.com:/data.
6. Optionally, you can configure the advanced parameters:
a. Click Advanced Parameters.
b. Enter a percentage value into the Warning Low Space Indicator field. If the free spaceavailable on the storage domain is below this percentage, warning messages are displayedto the user and logged.
c. Enter a GB value into the Critical Space Action Blocker field. If the free space available onthe storage domain is below this value, error messages are displayed to the user and logged,and any new action that consumes space, even temporarily, will be blocked.
d. Select the Wipe After Delete check box to enable the wipe after delete option. This optioncan be edited after the domain is created, but doing so will not change the wipe after deleteproperty of disks that already exist.
7. Click OK.
The new NFS data domain has a status of Locked until the disk is prepared. The data domain is thenautomatically attached to the data center.
2.6.3.3. Increasing NFS Storage
To increase the amount of NFS storage, you can either create a new storage domain and add it to anexisting data center, or increase the available free space on the NFS server. For the former option, seeAdding NFS Storage . The following procedure explains how to increase the available free space on theexisting NFS server.
Procedure
1. Click Storage → Domains.
2. Click the NFS storage domain’s name. This opens the details view.
3. Click the Data Center tab and click Maintenance to place the storage domain intomaintenance mode. This unmounts the existing share and makes it possible to resize the storagedomain.
4. On the NFS server, resize the storage. For Red Hat Enterprise Linux 6 systems, see Red HatEnterprise Linux 6 Storage Administration Guide. For Red Hat Enterprise Linux 7 systems, seeRed Hat Enterprise Linux 7 Storage Administration Guide .
5. In the details view, click the Data Center tab and click Activate to mount the storage domain.
2.6.4. Preparing and adding local storage
A virtual machine’s disk that uses a storage device that is physically installed on the virtual machine’shost is referred to as a local storage device.
A storage device must be part of a storage domain. The storage domain type for local storage is
CHAPTER 2. ADMINISTERING THE RESOURCES
187

A storage device must be part of a storage domain. The storage domain type for local storage isreferred to as a local storage domain.
Configuring a host to use local storage automatically creates, and adds the host to, a new local storagedomain, data center and cluster to which no other host can be added. Multiple-host clusters require thatall hosts have access to all storage domains, which is not possible with local storage. Virtual machinescreated in a single-host cluster cannot be migrated, fenced, or scheduled.
2.6.4.1. Preparing local storage
On Red Hat Virtualization Host (RHVH), local storage should always be defined on a file system that isseparate from / (root). Use a separate logical volume or disk, to prevent possible loss of data duringupgrades.
Procedure for Red Hat Enterprise Linux hosts
1. On the host, create the directory to be used for the local storage:
2. Ensure that the directory has permissions allowing read/write access to the vdsm user (UID 36)and kvm group (GID 36):
Procedure for Red Hat Virtualization Hosts
Create the local storage on a logical volume:
1. Create a local storage directory:
2. Mount the new local storage:
3. Ensure that the directory has permissions allowing read/write access to the vdsm user (UID 36)and kvm group (GID 36):
2.6.4.2. Adding a local storage domain
When adding a local storage domain to a host, setting the path to the local storage directoryautomatically creates and places the host in a local data center, local cluster, and local storage domain.
# mkdir -p /data/images
# chown 36:36 /data /data/images# chmod 0755 /data /data/images
# mkdir /data# lvcreate -L $SIZE rhvh -n data# mkfs.ext4 /dev/mapper/rhvh-data# echo "/dev/mapper/rhvh-data /data ext4 defaults,discard 1 2" >> /etc/fstab# mount /data
# mount -a
# chown 36:36 /data /rhvh-data# chmod 0755 /data /rhvh-data
Red Hat Virtualization 4.4 Administration Guide
188

Procedure
1. Click Compute → Hosts and select the host.
2. Click Management → Maintenance and OK. The host’s status changes to Maintenance.
3. Click Management → Configure Local Storage.
4. Click the Edit buttons next to the Data Center, Cluster, and Storage fields to configure andname the local storage domain.
5. Set the path to your local storage in the text entry field.
6. If applicable, click the Optimization tab to configure the memory optimization policy for thenew local storage cluster.
7. Click OK.
The Manager sets up the local data center with a local cluster, local storage domain. It also changes thehost’s status to Up.
Verification
1. Click Storage → Domains.
2. Locate the local storage domain you just added.
The domain’s status should be Active ( ), and the value in the Storage Type column should be Localon Host.
You can now upload a disk image in the new local storage domain.
2.6.5. Preparing and Adding POSIX-compliant File System Storage
2.6.5.1. Preparing POSIX-compliant File System Storage
POSIX file system support allows you to mount file systems using the same mount options that youwould normally use when mounting them manually from the command line. This functionality is intendedto allow access to storage not exposed using NFS, iSCSI, or FCP.
Any POSIX-compliant file system used as a storage domain in Red Hat Virtualization must be a clusteredfile system, such as Global File System 2 (GFS2), and must support sparse files and direct I/O. TheCommon Internet File System (CIFS), for example, does not support direct I/O, making it incompatiblewith Red Hat Virtualization.
For information on setting up and configuring POSIX-compliant file system storage, see Red HatEnterprise Linux Global File System 2.
IMPORTANT
Do not mount NFS storage by creating a POSIX-compliant file system storage domain.Always create an NFS storage domain instead.
2.6.5.2. Adding POSIX-compliant File System Storage
This procedure shows you how to attach existing POSIX-compliant file system storage to your Red Hat
CHAPTER 2. ADMINISTERING THE RESOURCES
189

This procedure shows you how to attach existing POSIX-compliant file system storage to your Red HatVirtualization environment as a data domain.
Procedure
1. Click Storage → Domains.
2. Click New Domain.
3. Enter the Name for the storage domain.
4. Select the Data Center to be associated with the storage domain. The data center selectedmust be of type POSIX (POSIX compliant FS). Alternatively, select (none).
5. Select Data from the Domain Function drop-down list, and POSIX compliant FS from theStorage Type drop-down list.If applicable, select the Format from the drop-down menu.
6. Select a host from the Host drop-down list.
7. Enter the Path to the POSIX file system, as you would normally provide it to the mountcommand.
8. Enter the VFS Type, as you would normally provide it to the mount command using the -targument. See man mount for a list of valid VFS types.
9. Enter additional Mount Options, as you would normally provide them to the mount commandusing the -o argument. The mount options should be provided in a comma-separated list. See man mount for a list of valid mount options.
10. Optionally, you can configure the advanced parameters.
a. Click Advanced Parameters.
b. Enter a percentage value in the Warning Low Space Indicator field. If the free spaceavailable on the storage domain is below this percentage, warning messages are displayedto the user and logged.
c. Enter a GB value in the Critical Space Action Blocker field. If the free space available onthe storage domain is below this value, error messages are displayed to the user and logged,and any new action that consumes space, even temporarily, will be blocked.
d. Select the Wipe After Delete check box to enable the wipe after delete option. This optioncan be edited after the domain is created, but doing so will not change the wipe after deleteproperty of disks that already exist.
11. Click OK.
2.6.6. Preparing and Adding Block Storage
2.6.6.1. Preparing iSCSI Storage
Red Hat Virtualization supports iSCSI storage, which is a storage domain created from a volume groupmade up of LUNs. Volume groups and LUNs cannot be attached to more than one storage domain at atime.
For information on setting up and configuring iSCSI storage, see Getting started with iSCSI in Managing
Red Hat Virtualization 4.4 Administration Guide
190
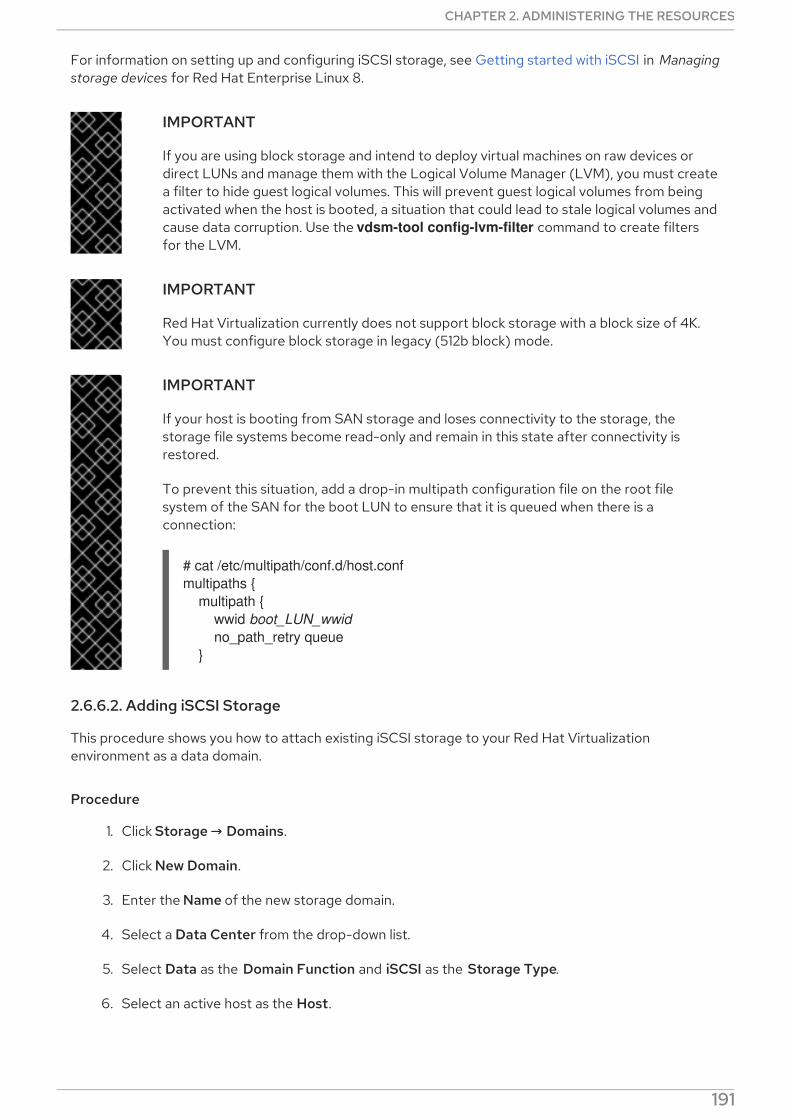
For information on setting up and configuring iSCSI storage, see Getting started with iSCSI in Managingstorage devices for Red Hat Enterprise Linux 8.
IMPORTANT
If you are using block storage and intend to deploy virtual machines on raw devices ordirect LUNs and manage them with the Logical Volume Manager (LVM), you must createa filter to hide guest logical volumes. This will prevent guest logical volumes from beingactivated when the host is booted, a situation that could lead to stale logical volumes andcause data corruption. Use the vdsm-tool config-lvm-filter command to create filtersfor the LVM.
IMPORTANT
Red Hat Virtualization currently does not support block storage with a block size of 4K.You must configure block storage in legacy (512b block) mode.
IMPORTANT
If your host is booting from SAN storage and loses connectivity to the storage, thestorage file systems become read-only and remain in this state after connectivity isrestored.
To prevent this situation, add a drop-in multipath configuration file on the root filesystem of the SAN for the boot LUN to ensure that it is queued when there is aconnection:
2.6.6.2. Adding iSCSI Storage
This procedure shows you how to attach existing iSCSI storage to your Red Hat Virtualizationenvironment as a data domain.
Procedure
1. Click Storage → Domains.
2. Click New Domain.
3. Enter the Name of the new storage domain.
4. Select a Data Center from the drop-down list.
5. Select Data as the Domain Function and iSCSI as the Storage Type.
6. Select an active host as the Host.
IMPORTANT
# cat /etc/multipath/conf.d/host.confmultipaths { multipath { wwid boot_LUN_wwid no_path_retry queue }
CHAPTER 2. ADMINISTERING THE RESOURCES
191

IMPORTANT
Communication to the storage domain is from the selected host and not directlyfrom the Manager. Therefore, all hosts must have access to the storage devicebefore the storage domain can be configured.
7. The Manager can map iSCSI targets to LUNs or LUNs to iSCSI targets. The New Domainwindow automatically displays known targets with unused LUNs when the iSCSI storage type isselected. If the target that you are using to add storage does not appear, you can use targetdiscovery to find it; otherwise proceed to the next step.
a. Click Discover Targets to enable target discovery options. When targets have beendiscovered and logged in to, the New Domain window automatically displays targets withLUNs unused by the environment.
NOTE
LUNs used externally for the environment are also displayed.
You can use the Discover Targets options to add LUNs on many targets or multiple pathsto the same LUNs.
IMPORTANT
If you use the REST API method discoveriscsi to discover the iscsi targets,you can use an FQDN or an IP address, but you must use the iscsi detailsfrom the discovered targets results to log in using the REST API method iscsilogin. See discoveriscsi in the REST API Guide for more information.
b. Enter the FQDN or IP address of the iSCSI host in the Address field.
c. Enter the port with which to connect to the host when browsing for targets in the Port field.The default is 3260.
d. If CHAP is used to secure the storage, select the User Authentication check box. Enter theCHAP user name and CHAP password.
NOTE
You can define credentials for an iSCSI target for a specific host with theREST API. See StorageServerConnectionExtensions: add in the REST APIGuide for more information.
e. Click Discover.
f. Select one or more targets from the discovery results and click Login for one target orLogin All for multiple targets.
IMPORTANT
If more than one path access is required, you must discover and log in to thetarget through all the required paths. Modifying a storage domain to addadditional paths is currently not supported.
IMPORTANT
Red Hat Virtualization 4.4 Administration Guide
192

IMPORTANT
When using the REST API iscsilogin method to log in, you must use the iscsidetails from the discovered targets results in the discoveriscsi method. Seeiscsilogin in the REST API Guide for more information.
8. Click the + button next to the desired target. This expands the entry and displays all unusedLUNs attached to the target.
9. Select the check box for each LUN that you are using to create the storage domain.
10. Optionally, you can configure the advanced parameters:
a. Click Advanced Parameters.
b. Enter a percentage value into the Warning Low Space Indicator field. If the free spaceavailable on the storage domain is below this percentage, warning messages are displayedto the user and logged.
c. Enter a GB value into the Critical Space Action Blocker field. If the free space available onthe storage domain is below this value, error messages are displayed to the user and logged,and any new action that consumes space, even temporarily, will be blocked.
d. Select the Wipe After Delete check box to enable the wipe after delete option. This optioncan be edited after the domain is created, but doing so will not change the wipe after deleteproperty of disks that already exist.
e. Select the Discard After Delete check box to enable the discard after delete option. Thisoption can be edited after the domain is created. This option is only available to blockstorage domains.
11. Click OK.
If you have configured multiple storage connection paths to the same target, follow the procedure inConfiguring iSCSI Multipathing to complete iSCSI bonding.
If you want to migrate your current storage network to an iSCSI bond, see Migrating a Logical Networkto an iSCSI Bond.
2.6.6.3. Configuring iSCSI Multipathing
iSCSI multipathing enables you to create and manage groups of logical networks and iSCSI storageconnections. Multiple network paths between the hosts and iSCSI storage prevent host downtimecaused by network path failure.
The Manager connects each host in the data center to each target, using the NICs or VLANs that areassigned to the logical networks in the iSCSI bond.
You can create an iSCSI bond with multiple targets and logical networks for redundancy.
Prerequisites
One or more iSCSI targets
One or more logical networks that meet the following requirements:
Not defined as Required or VM Network
CHAPTER 2. ADMINISTERING THE RESOURCES
193

Assigned to a host interface
Assigned a static IP address in the same VLAN and subnet as the other logical networks inthe iSCSI bond
Procedure
1. Click Compute → Data Centers.
2. Click the data center name. This opens the details view.
3. In the iSCSI Multipathing tab, click Add.
4. In the Add iSCSI Bond window, enter a Name and a Description.
5. Select a logical network from Logical Networks and a storage domain from Storage Targets.You must select all the paths to the same target.
6. Click OK.
The hosts in the data center are connected to the iSCSI targets through the logical networks in theiSCSI bond.
2.6.6.4. Migrating a Logical Network to an iSCSI Bond
If you have a logical network that you created for iSCSI traffic and configured on top of an existingnetwork bond, you can migrate it to an iSCSI bond on the same subnet without disruption or downtime.
Procedure
1. Modify the current logical network so that it is not Required:
a. Click Compute → Clusters.
b. Click the cluster name. This opens the details view.
c. In the Logical Networks tab, select the current logical network ( net-1) and click ManageNetworks.
d. Clear the Require check box and click OK.
2. Create a new logical network that is not Required and not VM network:
a. Click Add Network. This opens the New Logical Network window.
b. In the General tab, enter the Name (net-2) and clear the VM network check box.
c. In the Cluster tab, clear the Require check box and click OK.
3. Remove the current network bond and reassign the logical networks:
a. Click Compute → Hosts.
b. Click the host name. This opens the details view.
c. In the Network Interfaces tab, click Setup Host Networks.
Red Hat Virtualization 4.4 Administration Guide
194

d. Drag net-1 to the right to unassign it.
e. Drag the current bond to the right to remove it.
f. Drag net-1 and net-2 to the left to assign them to physical interfaces.
g. Click the pencil icon of net-2. This opens the Edit Network window.
h. In the IPV4 tab, select Static.
i. Enter the IP and Netmask/Routing Prefix of the subnet and click OK.
4. Create the iSCSI bond:
a. Click Compute → Data Centers.
b. Click the data center name. This opens the details view.
c. In the iSCSI Multipathing tab, click Add.
d. In the Add iSCSI Bond window, enter a Name, select the networks, net-1 and net-2, andclick OK.
Your data center has an iSCSI bond containing the old and new logical networks.
2.6.6.5. Preparing FCP Storage
Red Hat Virtualization supports SAN storage by creating a storage domain from a volume group madeof pre-existing LUNs. Neither volume groups nor LUNs can be attached to more than one storagedomain at a time.
Red Hat Virtualization system administrators need a working knowledge of Storage Area Networks(SAN) concepts. SAN usually uses Fibre Channel Protocol (FCP) for traffic between hosts and sharedexternal storage. For this reason, SAN may occasionally be referred to as FCP storage.
For information on setting up and configuring FCP or multipathing on Red Hat Enterprise Linux, see theStorage Administration Guide and DM Multipath Guide.
IMPORTANT
If you are using block storage and intend to deploy virtual machines on raw devices ordirect LUNs and manage them with the Logical Volume Manager (LVM), you must createa filter to hide guest logical volumes. This will prevent guest logical volumes from beingactivated when the host is booted, a situation that could lead to stale logical volumes andcause data corruption. Use the vdsm-tool config-lvm-filter command to create filtersfor the LVM.
IMPORTANT
Red Hat Virtualization currently does not support block storage with a block size of 4K.You must configure block storage in legacy (512b block) mode.
IMPORTANT
CHAPTER 2. ADMINISTERING THE RESOURCES
195

IMPORTANT
If your host is booting from SAN storage and loses connectivity to the storage, thestorage file systems become read-only and remain in this state after connectivity isrestored.
To prevent this situation, add a drop-in multipath configuration file on the root filesystem of the SAN for the boot LUN to ensure that it is queued when there is aconnection:
2.6.6.6. Adding FCP Storage
This procedure shows you how to attach existing FCP storage to your Red Hat Virtualizationenvironment as a data domain.
Procedure
1. Click Storage → Domains.
2. Click New Domain.
3. Enter the Name of the storage domain.
4. Select an FCP Data Center from the drop-down list.If you do not yet have an appropriate FCP data center, select (none).
5. Select the Domain Function and the Storage Type from the drop-down lists. The storagedomain types that are not compatible with the chosen data center are not available.
6. Select an active host in the Host field. If this is not the first data domain in a data center, youmust select the data center’s SPM host.
IMPORTANT
All communication to the storage domain is through the selected host and notdirectly from the Red Hat Virtualization Manager. At least one active host mustexist in the system and be attached to the chosen data center. All hosts musthave access to the storage device before the storage domain can be configured.
7. The New Domain window automatically displays known targets with unused LUNs when FibreChannel is selected as the storage type. Select the LUN ID check box to select all of theavailable LUNs.
8. Optionally, you can configure the advanced parameters.
a. Click Advanced Parameters.
b. Enter a percentage value into the Warning Low Space Indicator field. If the free space
# cat /etc/multipath/conf.d/host.confmultipaths { multipath { wwid boot_LUN_wwid no_path_retry queue }
Red Hat Virtualization 4.4 Administration Guide
196

b. Enter a percentage value into the Warning Low Space Indicator field. If the free spaceavailable on the storage domain is below this percentage, warning messages are displayedto the user and logged.
c. Enter a GB value into the Critical Space Action Blocker field. If the free space available onthe storage domain is below this value, error messages are displayed to the user and logged,and any new action that consumes space, even temporarily, will be blocked.
d. Select the Wipe After Delete check box to enable the wipe after delete option. This optioncan be edited after the domain is created, but doing so will not change the wipe after deleteproperty of disks that already exist.
e. Select the Discard After Delete check box to enable the discard after delete option. Thisoption can be edited after the domain is created. This option is only available to blockstorage domains.
9. Click OK.
The new FCP data domain remains in a Locked status while it is being prepared for use. When ready, it isautomatically attached to the data center.
2.6.6.7. Increasing iSCSI or FCP Storage
There are several ways to increase iSCSI or FCP storage size:
Add an existing LUN to the current storage domain.
Create a new storage domain with new LUNs and add it to an existing data center. See AddingiSCSI Storage.
Expand the storage domain by resizing the underlying LUNs.
For information about creating, configuring, or resizing iSCSI storage on Red Hat Enterprise Linux 7systems, see the Red Hat Enterprise Linux 7 Storage Administration Guide .
The following procedure explains how to expand storage area network (SAN) storage by adding a newLUN to an existing storage domain.
Prerequisites
The storage domain’s status must be UP.
The LUN must be accessible to all the hosts whose status is UP, or else the operation will failand the LUN will not be added to the domain. The hosts themselves, however, will not beaffected. If a newly added host, or a host that is coming out of maintenance or a Non Operational state, cannot access the LUN, the host’s state will be Non Operational.
Increasing an Existing iSCSI or FCP Storage Domain
1. Click Storage → Domains and select an iSCSI or FCP domain.
2. Click Manage Domain.
3. Click Targets → LUNs and click the Discover Targets expansion button.
4. Enter the connection information for the storage server and click Discover to initiate theconnection.
CHAPTER 2. ADMINISTERING THE RESOURCES
197

5. Click LUNs → Targets and select the check box of the newly available LUN.
6. Click OK to add the LUN to the selected storage domain.
This will increase the storage domain by the size of the added LUN.
When expanding the storage domain by resizing the underlying LUNs, the LUNs must also be refreshedin the Administration Portal.
Refreshing the LUN Size
1. Click Storage → Domains and select an iSCSI or FCP domain.
2. Click Manage Domain.
3. Click LUNs → Targets.
4. In the Additional Size column, click Add Additional_Storage_Size button of the LUN torefresh.
5. Click OK to refresh the LUN to indicate the new storage size.
2.6.6.8. Reusing LUNs
LUNs cannot be reused, as is, to create a storage domain or virtual disk. If you try to reuse the LUNs, theAdministration Portal displays the following error message:
A self-hosted engine shows the following error during installation:
Before the LUN can be reused, the old partitioning table must be cleared.
PROCEDURE
You must run this procedure on the correct LUN so that you do not inadvertently destroydata.
1. Delete the partition mappings in <LUN_ID>:
2. Erase the fileystem or raid signatures in <LUN_ID>:
3. Inform the operating system about the partition table changes on <LUN_ID>:
Physical device initialization failed. Please check that the device is empty and accessible by the host.
[ ERROR ] Error creating Volume Group: Failed to initialize physical device: ("[u'/dev/mapper/000000000000000000000000000000000']",)[ ERROR ] Failed to execute stage 'Misc configuration': Failed to initialize physical device: ("[u'/dev/mapper/000000000000000000000000000000000']",)
kpartx -dv /dev/mapper/<LUN_ID>
wipefs -a /dev/mapper/<LUN_ID>
partprobe
Red Hat Virtualization 4.4 Administration Guide
198

2.6.6.9. Removing stale LUNs
When a storage domain is removed, stale LUN links can remain on the storage server. This can lead toslow multipath scans, cluttered log files, and LUN ID conflicts.
Red Hat Virtualization does not manage the iSCSI servers and, therefore, cannot automatically removeLUNs when a storage domain is removed. The administrator can manually remove stale LUN links withthe remove_stale_lun.yml Ansible role. This role removes stale LUN links from all hosts that belong togiven data center. For more information about this role and its variables, see the Remove Stale LUN rolein the oVirt Ansible collection.
NOTE
It is assumed that you are running remove_stale_lun.yml from the engine machine asthe engine ssh key is already added on all the hosts. If the playbook is not running on theengine machine, a user’s SSH key must be added to all hosts that belong to the datacenter, or the user must provide an appropriate inventory file.
Procedure
1. Click Storage → Domains.
2. Click the storage domain’s name. This opens the details view.
3. Click the Data Center tab.
4. Click Maintenance, then click OK.
5. Click Detatch, then click OK.
6. Click Remove.
7. Click OK to remove the storage domain from the source environment.
8. Remove the LUN from the storage server.
9. Remove the stale LUNs from the host using Ansible:
where LUN is the LUN removed from the storage server in the steps above.
NOTE
If you remove the stale LUN from the host using Ansible without first removingthe LUN from the storage server, the stale LUN will reappear on the host the nexttime VDSM performs an iSCSI rescan.
2.6.6.10. Creating an LVM filter
An LVM filter is a capability that can be set in /etc/lvm/lvm.conf to accept devices into or reject devicesfrom the list of volumes based on a regex query. For example, to ignore /dev/cdrom you can use filter=["r|^/dev/cdrom$|"], or add the following parameter to the lvm command: lvs --config 'devices{filter=
# ansible-playbook --extra-vars "lun=<LUN>" /usr/share/ansible/collections/ansible_collections/ovirt/ovirt/roles/remove_stale_lun/examples/remove_stale_lun.yml
CHAPTER 2. ADMINISTERING THE RESOURCES
199

["r|cdrom|"]}'.
This provides a simple way to prevent a host from scanning and activating logical volumes that are notrequired directly by the host. In particular, the solution addresses logical volumes on shared storagemanaged by RHV, and logical volumes created by a guest in RHV raw volumes. This solution is neededbecause scanning and activating other logical volumes may cause data corruption, slow boot, or otherissues.
The solution is to configure an LVM filter on each host, which allows the LVM on a host to scan only thelogical volumes that are required by the host.
You can use the command vdsm-tool config-lvm-filter to analyze the current LVM configuration anddecide if a filter needs to be configured.
If the LVM filter has not yet been configured, the command generates an LVM filter option for the host,and adds the option to the LVM configuration.
Scenario 1: An Unconfigured Host
On a host yet to be configured, the command automatically configures the LVM once the user confirmsthe operation:
# vdsm-tool config-lvm-filter
Analyzing host...Found these mounted logical volumes on this host:
logical volume: /dev/mapper/vg0-lv_homemountpoint: /homedevices: /dev/vda2
logical volume: /dev/mapper/vg0-lv_rootmountpoint: /devices: /dev/vda2
logical volume: /dev/mapper/vg0-lv_swapmountpoint: [SWAP]devices: /dev/vda2
This is the recommended LVM filter for this host:
filter = [ "a|^/dev/vda2$|", "r|.*|" ]
This filter will allow LVM to access the local devices used by thehypervisor, but not shared storage owned by VDSM. If you add a newdevice to the volume group, you will need to edit the filter manually.
Configure LVM filter? [yes,NO] ? [NO/yes] yesConfiguration completed successfully!
Please reboot to verify the LVM configuration.
Red Hat Virtualization 4.4 Administration Guide
200

Scenario 2: A Configured Host
If the host is already configured, the command simply informs the user that the LVM filter is alreadyconfigured:
# vdsm-tool config-lvm-filter
Analyzing host...LVM filter is already configured for Vdsm
Scenario 3: Manual Configuration Required
If the host configuration does not match the configuration required by VDSM, the LVM filter will need tobe configured manually:
# vdsm-tool config-lvm-filter
Analyzing host...Found these mounted logical volumes on this host:
logical volume: /dev/mapper/vg0-lv_homemountpoint: /homedevices: /dev/vda2
logical volume: /dev/mapper/vg0-lv_rootmountpoint: /devices: /dev/vda2
logical volume: /dev/mapper/vg0-lv_swapmountpoint: [SWAP]devices: /dev/vda2
This is the recommended LVM filter for this host:
filter = [ "a|^/dev/vda2$|", "r|.*|" ]
This filter will allow LVM to access the local devices used by thehypervisor, but not shared storage owned by VDSM. If you add a newdevice to the volume group, you will need to edit the filter manually.
This is the current LVM filter:
filter = [ "a|^/dev/vda2$|", "a|^/dev/vdb1$|", "r|.*|" ]
WARNING: The current LVM filter does not match the recommended filter,Vdsm cannot configure the filter automatically.
Please edit /etc/lvm/lvm.conf and set the 'filter' option in the 'devices' section to the recommended value.
CHAPTER 2. ADMINISTERING THE RESOURCES
201

It is recommended to reboot after changing LVM filter.
2.6.7. Preparing and Adding Red Hat Gluster Storage
2.6.7.1. Preparing Red Hat Gluster Storage
For information on setting up and configuring Red Hat Gluster Storage, see the Red Hat Gluster StorageInstallation Guide.
For the Red Hat Gluster Storage versions that are supported with Red Hat Virtualization, see Red HatGluster Storage Version Compatibility and Support.
2.6.7.2. Adding Red Hat Gluster Storage
To use Red Hat Gluster Storage with Red Hat Virtualization, see Configuring Red Hat Virtualization withRed Hat Gluster Storage.
For the Red Hat Gluster Storage versions that are supported with Red Hat Virtualization, see Red HatGluster Storage Version Compatibility and Support.
2.6.8. Importing Existing Storage Domains
2.6.8.1. Overview of Importing Existing Storage Domains
Aside from adding new storage domains, which contain no data, you can import existing storage domainsand access the data they contain. By importing storage domains, you can recover data in the event of afailure in the Manager database, and migrate data from one data center or environment to another.
The following is an overview of importing each storage domain type:
Data
Importing an existing data storage domain allows you to access all of the virtual machines andtemplates that the data storage domain contains. After you import the storage domain, you mustmanually import virtual machines, floating disk images, and templates into the destination datacenter. The process for importing the virtual machines and templates that a data storage domaincontains is similar to that for an export storage domain. However, because data storage domainscontain all the virtual machines and templates in a given data center, importing data storage domainsis recommended for data recovery or large-scale migration of virtual machines between data centersor environments.
IMPORTANT
You can import existing data storage domains that were attached to data centers withthe correct supported compatibility level. See Supportability and constraintsregarding importing Storage Domains and Virtual Machines from older RHV versionsfor more information.
ISO
Importing an existing ISO storage domain allows you to access all of the ISO files and virtual diskettesthat the ISO storage domain contains. No additional action is required after importing the storagedomain to access these resources; you can attach them to virtual machines as required.
Export
Importing an existing export storage domain allows you to access all of the virtual machine images
Red Hat Virtualization 4.4 Administration Guide
202

Importing an existing export storage domain allows you to access all of the virtual machine imagesand templates that the export storage domain contains. Because export domains are designed forexporting and importing virtual machine images and templates, importing export storage domains isrecommended method of migrating small numbers of virtual machines and templates inside anenvironment or between environments. For information on exporting and importing virtual machinesand templates to and from export storage domains, see Exporting and Importing Virtual Machinesand Templates in the Virtual Machine Management Guide .
NOTE
The export storage domain is deprecated. Storage data domains can be unattachedfrom a data center and imported to another data center in the same environment, orin a different environment. Virtual machines, floating virtual disks, and templates canthen be uploaded from the imported storage domain to the attached data center.
WARNING
Upon attaching a Storage Domain to the destination Data-Center, it may beupgraded to a newer Storage Domain format and may not re-attach to thesource Data-Center. This breaks the use of a Data-Domain as a replacement forExport Domains.
2.6.8.2. Importing storage domains
Import a storage domain that was previously attached to a data center in the same environment or in adifferent environment. This procedure assumes the storage domain is no longer attached to any datacenter in any environment, to avoid data corruption. To import and attach an existing data storagedomain to a data center, the target data center must be initialized.
Procedure
1. Click Storage → Domains.
2. Click Import Domain.
3. Select the Data Center you want to import the storage domain to.
4. Enter a Name for the storage domain.
5. Select the Domain Function and Storage Type from the drop-down lists.
6. Select a host from the Host drop-down list.
IMPORTANT
All communication to the storage domain is through the selected host and notdirectly from the Red Hat Virtualization Manager. At least one active host mustexist in the system and be attached to the chosen data center. All hosts musthave access to the storage device before the storage domain can be configured.
CHAPTER 2. ADMINISTERING THE RESOURCES
203

7. Enter the details of the storage domain.
NOTE
The fields for specifying the details of the storage domain change depending onthe values you select in the Domain Function and Storage Type lists. Thesefields are the same as those available for adding a new storage domain.
8. Select the Activate Domain in Data Center check box to activate the storage domain afterattaching it to the selected data center.
9. Click OK.
You can now import virtual machines and templates from the storage domain to the data center.
WARNING
Upon attaching a Storage Domain to the destination Data-Center, it may beupgraded to a newer Storage Domain format and may not re-attach to the sourceData-Center. This breaks the use of a Data-Domain as a replacement for ExportDomains.
Related information
Importing Virtual Machines from a Data Domain
Importing Templates from Imported Data Storage Domains
2.6.8.3. Migrating Storage Domains between Data Centers in the Same Environment
Migrate a storage domain from one data center to another in the same Red Hat Virtualizationenvironment to allow the destination data center to access the data contained in the storage domain.This procedure involves detaching the storage domain from one data center, and attaching it to adifferent data center.
WARNING
Migrating a data storage domain to a data center that has a higher compatibilitylevel than the original data center upgrades the storage domain’s storage formatversion.
If you want to move the storage domain back to the original data center for any reason, such as tomigrate virtual machines to the new data center, be aware that the higher version prevents reattachingthe data storage domain to the original data center.
The Administration Portal prompts you to confirm that you want to update the storage domain format,
Red Hat Virtualization 4.4 Administration Guide
204

The Administration Portal prompts you to confirm that you want to update the storage domain format,for example, from V3 to V5. It also warns that you will not be able to attach it back to an older datacenter with a lower DC level.
To work around this issue, you can create a target data center that has the same compatibility version asthe source data center. When you no longer need to maintain the lower compatibility version, you canincrease the target data center’s compatibility version.
For details, see Supportability and constraints regarding importing Storage Domains and VirtualMachines from older RHV versions.
Procedure
1. Shut down all virtual machines running on the required storage domain.
2. Click Storage → Domains.
3. Click the storage domain’s name. This opens the details view.
4. Click the Data Center tab.
5. Click Maintenance, then click OK.
6. Click Detach, then click OK.
7. Click Attach.
8. Select the destination data center and click OK.
The storage domain is attached to the destination data center and is automatically activated. You cannow import virtual machines and templates from the storage domain to the destination data center.
2.6.8.4. Migrating Storage Domains between Data Centers in Different Environments
Migrate a storage domain from one Red Hat Virtualization environment to another to allow thedestination environment to access the data contained in the storage domain. This procedure involvesremoving the storage domain from one Red Hat Virtualization environment, and importing it into adifferent environment. To import and attach an existing data storage domain to a Red Hat Virtualizationdata center, the storage domain’s source data center must have the correct supported compatibilitylevel.
WARNING
Migrating a data storage domain to a data center that has a higher compatibilitylevel than the original data center upgrades the storage domain’s storage formatversion.
If you want to move the storage domain back to the original data center for any reason, such as tomigrate virtual machines to the new data center, be aware that the higher version prevents reattachingthe data storage domain to the original data center.
The Administration Portal prompts you to confirm that you want to update the storage domain format,
CHAPTER 2. ADMINISTERING THE RESOURCES
205

The Administration Portal prompts you to confirm that you want to update the storage domain format,for example, from V3 to V5. It also warns that you will not be able to attach it back to an older datacenter with a lower DC level.
To work around this issue, you can create a target data center that has the same compatibility version asthe source data center. When you no longer need to maintain the lower compatibility version, you canincrease the target data center’s compatibility version.
For details, see Supportability and constraints regarding importing Storage Domains and VirtualMachines from older RHV versions.
Procedure
1. Log in to the Administration Portal of the source environment.
2. Shut down all virtual machines running on the required storage domain.
3. Click Storage → Domains.
4. Click the storage domain’s name. This opens the details view.
5. Click the Data Center tab.
6. Click Maintenance, then click OK.
7. Click Detach, then click OK.
8. Click Remove.
9. In the Remove Storage(s) window, ensure the Format Domain, i.e. Storage Content will belost! check box is not selected. This step preserves the data in the storage domain for later use.
10. Click OK to remove the storage domain from the source environment.
11. Log in to the Administration Portal of the destination environment.
12. Click Storage → Domains.
13. Click Import Domain.
14. Select the destination data center from the Data Center drop-down list.
15. Enter a name for the storage domain.
16. Select the Domain Function and Storage Type from the appropriate drop-down lists.
17. Select a host from the Host drop-down list.
18. Enter the details of the storage domain.
NOTE
The fields for specifying the details of the storage domain change depending onthe value you select in the Storage Type drop-down list. These fields are thesame as those available for adding a new storage domain.
19. Select the Activate Domain in Data Center check box to automatically activate the storage
Red Hat Virtualization 4.4 Administration Guide
206
19. Select the Activate Domain in Data Center check box to automatically activate the storagedomain when it is attached.
20. Click OK.
The storage domain is attached to the destination data center in the new Red Hat Virtualizationenvironment and is automatically activated. You can now import virtual machines and templates fromthe imported storage domain to the destination data center.
WARNING
Upon attaching a Storage Domain to the destination Data-Center, it may beupgraded to a newer Storage Domain format and may not re-attach to the sourceData-Center. This breaks the use of a Data-Domain as a replacement for ExportDomains.
2.6.8.5. Importing Templates from Imported Data Storage Domains
Import a template from a data storage domain you have imported into your Red Hat Virtualizationenvironment. This procedure assumes that the imported data storage domain has been attached to adata center and has been activated.
Procedure
1. Click Storage → Domains.
2. Click the imported storage domain’s name. This opens the details view.
3. Click the Template Import tab.
4. Select one or more templates to import.
5. Click Import.
6. For each template in the Import Templates(s) window, ensure the correct target cluster isselected in the Cluster list.
7. Map external virtual machine vNIC profiles to profiles that are present on the target cluster(s):
a. Click vNic Profiles Mapping.
b. Select the vNIC profile to use from the Target vNic Profile drop-down list.
c. If multiple target clusters are selected in the Import Templates window, select each targetcluster in the Target Cluster drop-down list and ensure the mappings are correct.
d. Click OK.
8. Click OK.
The imported templates no longer appear in the list under the Template Import tab.
CHAPTER 2. ADMINISTERING THE RESOURCES
207

2.6.9. Storage Tasks
2.6.9.1. Uploading Images to a Data Storage Domain
You can upload virtual disk images and ISO images to your data storage domain in the AdministrationPortal or with the REST API.
NOTE
To upload images with the REST API, see IMAGETRANSFERS and IMAGETRANSFER inthe REST API Guide .
QEMU-compatible virtual disks can be attached to virtual machines. Virtual disk types must be eitherQCOW2 or raw. Disks created from a QCOW2 virtual disk cannot be shareable, and the QCOW2 virtualdisk file must not have a backing file.
ISO images can be attached to virtual machines as CDROMs or used to boot virtual machines.
Prerequisites
The upload function uses HTML 5 APIs, which requires your environment to have the following:
Certificate authority, imported into the web browser used to access the Administration Portal.To import the certificate authority, browse to https://engine_address/ovirt-engine/services/pki-resource?resource=ca-certificate&format=X509-PEM-CA and enableall the trust settings. Refer to the instructions to install the certificate authority in Firefox,Internet Explorer, or Google Chrome.
Browser that supports HTML 5, such as Firefox 35, Internet Explorer 10, Chrome 13, or later.
Procedure
1. Click Storage → Disks.
2. Select Start from the Upload menu.
3. Click Choose File and select the image to upload.
4. Fill in the Disk Options fields. See Explanation of Settings in the New Virtual Disk Window fordescriptions of the relevant fields.
5. Click OK.A progress bar indicates the status of the upload. You can pause, cancel, or resume uploadsfrom the Upload menu.
TIP
If the upload times out with the message, Reason: timeout due to transfer inactivity, increase thetimeout value and restart the ovirt-engine service:
2.6.9.2. Uploading the VirtIO image files to a storage domain
# engine-config -s TransferImageClientInactivityTimeoutInSeconds=6000# systemctl restart ovirt-engine
Red Hat Virtualization 4.4 Administration Guide
208
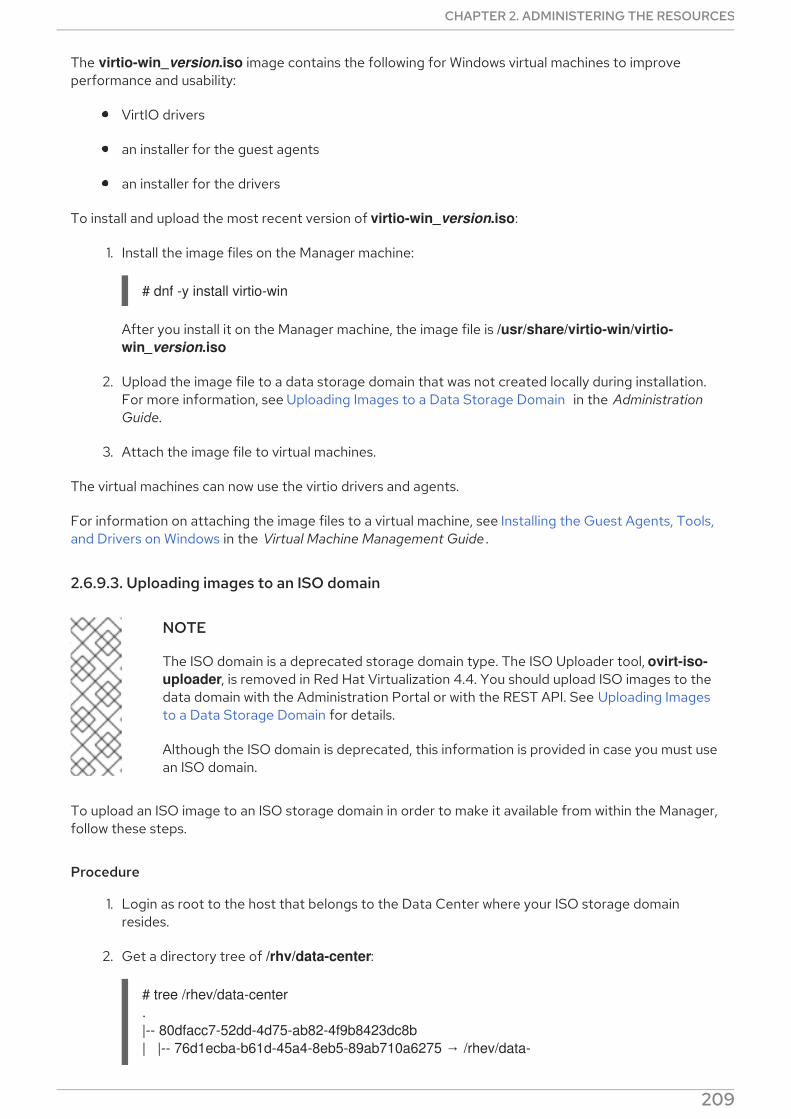
The virtio-win_version.iso image contains the following for Windows virtual machines to improveperformance and usability:
VirtIO drivers
an installer for the guest agents
an installer for the drivers
To install and upload the most recent version of virtio-win_version.iso:
1. Install the image files on the Manager machine:
After you install it on the Manager machine, the image file is /usr/share/virtio-win/virtio-win_version.iso
2. Upload the image file to a data storage domain that was not created locally during installation.For more information, see Uploading Images to a Data Storage Domain in the AdministrationGuide.
3. Attach the image file to virtual machines.
The virtual machines can now use the virtio drivers and agents.
For information on attaching the image files to a virtual machine, see Installing the Guest Agents, Tools,and Drivers on Windows in the Virtual Machine Management Guide .
2.6.9.3. Uploading images to an ISO domain
NOTE
The ISO domain is a deprecated storage domain type. The ISO Uploader tool, ovirt-iso-uploader, is removed in Red Hat Virtualization 4.4. You should upload ISO images to thedata domain with the Administration Portal or with the REST API. See Uploading Imagesto a Data Storage Domain for details.
Although the ISO domain is deprecated, this information is provided in case you must usean ISO domain.
To upload an ISO image to an ISO storage domain in order to make it available from within the Manager,follow these steps.
Procedure
1. Login as root to the host that belongs to the Data Center where your ISO storage domainresides.
2. Get a directory tree of /rhv/data-center:
# dnf -y install virtio-win
# tree /rhev/data-center.|-- 80dfacc7-52dd-4d75-ab82-4f9b8423dc8b| |-- 76d1ecba-b61d-45a4-8eb5-89ab710a6275 → /rhev/data-
CHAPTER 2. ADMINISTERING THE RESOURCES
209
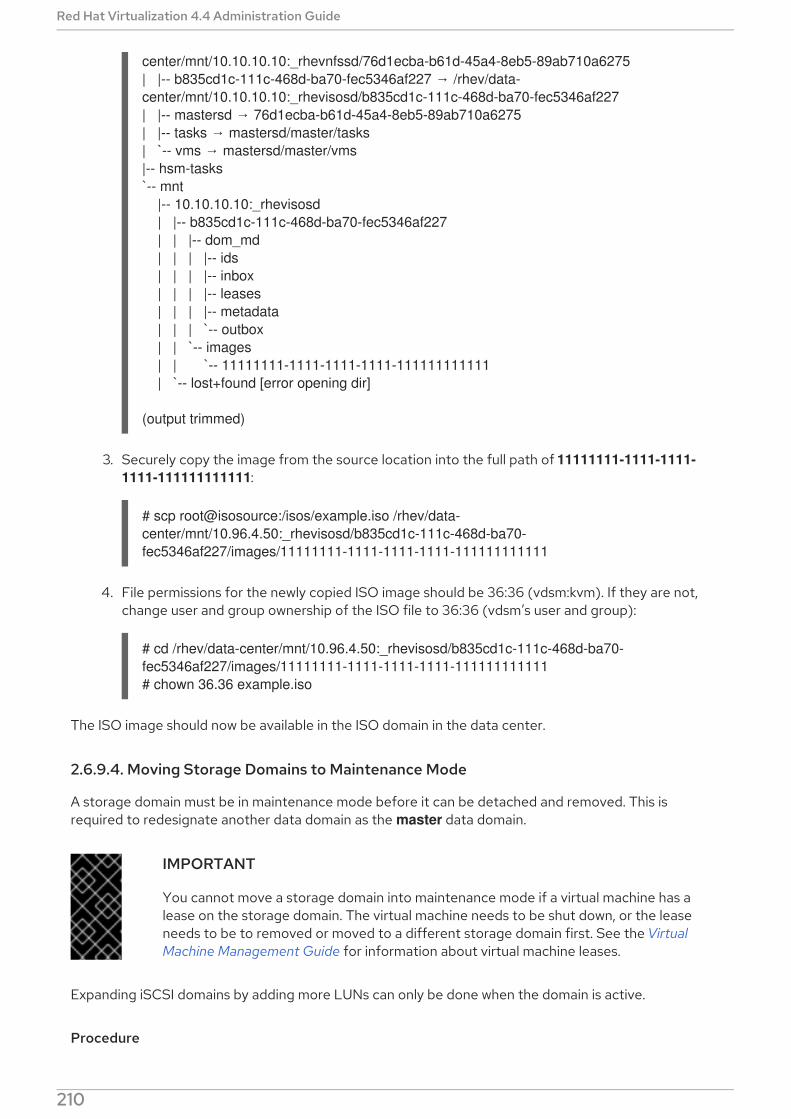
3. Securely copy the image from the source location into the full path of 11111111-1111-1111-1111-111111111111:
4. File permissions for the newly copied ISO image should be 36:36 (vdsm:kvm). If they are not,change user and group ownership of the ISO file to 36:36 (vdsm’s user and group):
The ISO image should now be available in the ISO domain in the data center.
2.6.9.4. Moving Storage Domains to Maintenance Mode
A storage domain must be in maintenance mode before it can be detached and removed. This isrequired to redesignate another data domain as the master data domain.
IMPORTANT
You cannot move a storage domain into maintenance mode if a virtual machine has alease on the storage domain. The virtual machine needs to be shut down, or the leaseneeds to be to removed or moved to a different storage domain first. See the VirtualMachine Management Guide for information about virtual machine leases.
Expanding iSCSI domains by adding more LUNs can only be done when the domain is active.
Procedure
center/mnt/10.10.10.10:_rhevnfssd/76d1ecba-b61d-45a4-8eb5-89ab710a6275| |-- b835cd1c-111c-468d-ba70-fec5346af227 → /rhev/data-center/mnt/10.10.10.10:_rhevisosd/b835cd1c-111c-468d-ba70-fec5346af227| |-- mastersd → 76d1ecba-b61d-45a4-8eb5-89ab710a6275| |-- tasks → mastersd/master/tasks| `-- vms → mastersd/master/vms|-- hsm-tasks`-- mnt |-- 10.10.10.10:_rhevisosd | |-- b835cd1c-111c-468d-ba70-fec5346af227 | | |-- dom_md | | | |-- ids | | | |-- inbox | | | |-- leases | | | |-- metadata | | | `-- outbox | | `-- images | | `-- 11111111-1111-1111-1111-111111111111 | `-- lost+found [error opening dir]
(output trimmed)
# scp root@isosource:/isos/example.iso /rhev/data-center/mnt/10.96.4.50:_rhevisosd/b835cd1c-111c-468d-ba70-fec5346af227/images/11111111-1111-1111-1111-111111111111
# cd /rhev/data-center/mnt/10.96.4.50:_rhevisosd/b835cd1c-111c-468d-ba70-fec5346af227/images/11111111-1111-1111-1111-111111111111# chown 36.36 example.iso
Red Hat Virtualization 4.4 Administration Guide
210

1. Shut down all the virtual machines running on the storage domain.
2. Click Storage → Domains.
3. Click the storage domain’s name. This opens the details view.
4. Click the Data Center tab.
5. Click Maintenance.
NOTE
The Ignore OVF update failure check box allows the storage domain to go intomaintenance mode even if the OVF update fails.
6. Click OK.
The storage domain is deactivated and has an Inactive status in the results list. You can now edit,detach, remove, or reactivate the inactive storage domains from the data center.
NOTE
You can also activate, detach, and place domains into maintenance mode using theStorage tab in the details view of the data center it is associated with.
2.6.9.5. Editing Storage Domains
You can edit storage domain parameters through the Administration Portal. Depending on the state ofthe storage domain, either active or inactive, different fields are available for editing. Fields such as DataCenter, Domain Function, Storage Type, and Format cannot be changed.
Active: When the storage domain is in an active state, the Name, Description, Comment,Warning Low Space Indicator (%), Critical Space Action Blocker (GB), Wipe After Delete,and Discard After Delete fields can be edited. The Name field can only be edited while thestorage domain is active. All other fields can also be edited while the storage domain is inactive.
Inactive: When the storage domain is in maintenance mode or unattached, thus in an inactivestate, you can edit all fields except Name, Data Center, Domain Function, Storage Type, andFormat. The storage domain must be inactive to edit storage connections, mount options, andother advanced parameters. This is only supported for NFS, POSIX, and Local storage types.
NOTE
iSCSI storage connections cannot be edited via the Administration Portal, but can beedited via the REST API. See Updating Storage Connections in the REST API Guide .
Editing an Active Storage Domain*
1. Click Storage → Domains and select a storage domain.
2. Click Manage Domain.
3. Edit the available fields as required.
4. Click OK.
CHAPTER 2. ADMINISTERING THE RESOURCES
211

Editing an Inactive Storage Domain
1. Click Storage → Domains.
2. If the storage domain is active, move it to maintenance mode:
a. Click the storage domain’s name. This opens the details view.
b. Click the Data Center tab.
c. Click Maintenance.
d. Click OK.
3. Click Manage Domain.
4. Edit the storage path and other details as required. The new connection details must be of thesame storage type as the original connection.
5. Click OK.
6. Activate the storage domain:
a. Click the storage domain’s name. This opens the details view.
b. Click the Data Center tab.
c. Click Activate.
2.6.9.6. Updating OVFs
By default, OVFs are updated every 60 minutes. However, if you have imported an important virtualmachine or made a critical update, you can update OVFs manually.
Procedure
1. Click Storage → Domains.
2. Select the storage domain and click More Actions ( ), then click Update OVFs.The OVFs are updated and a message appears in Events.
2.6.9.7. Activating Storage Domains from Maintenance Mode
If you have been making changes to a data center’s storage, you have to put storage domains intomaintenance mode. Activate a storage domain to resume using it.
1. Click Storage → Domains.
2. Click an inactive storage domain’s name. This opens the details view.
3. Click the Data Centers tab.
4. Click Activate.
IMPORTANT
Red Hat Virtualization 4.4 Administration Guide
212

IMPORTANT
If you attempt to activate the ISO domain before activating the data domain, an errormessage displays and the domain is not activated.
2.6.9.8. Detaching a Storage Domain from a Data Center
Detach a storage domain from one data center to migrate it to another data center.
Procedure
1. Click Storage → Domains.
2. Click the storage domain’s name. This opens the details view.
3. Click the Data Center tab.
4. Click Maintenance.
5. Click OK to initiate maintenance mode.
6. Click Detach.
7. Click OK to detach the storage domain.
The storage domain has been detached from the data center, ready to be attached to another datacenter.
2.6.9.9. Attaching a Storage Domain to a Data Center
Attach a storage domain to a data center.
Procedure
1. Click Storage → Domains.
2. Click the storage domain’s name. This opens the details view.
3. Click the Data Center tab.
4. Click Attach.
5. Select the appropriate data center.
6. Click OK.
The storage domain is attached to the data center and is automatically activated.
2.6.9.10. Removing a Storage Domain
You have a storage domain in your data center that you want to remove from the virtualizedenvironment.
Procedure
1. Click Storage → Domains.
CHAPTER 2. ADMINISTERING THE RESOURCES
213

2. Move the storage domain to maintenance mode and detach it:
a. Click the storage domain’s name. This opens the details view.
b. Click the Data Center tab.
c. Click Maintenance, then click OK.
d. Click Detach, then click OK.
3. Click Remove.
4. Optionally select the Format Domain, i.e. Storage Content will be lost! check box to erase thecontent of the domain.
5. Click OK.
The storage domain is permanently removed from the environment.
2.6.9.11. Destroying a Storage Domain
A storage domain encountering errors may not be able to be removed through the normal procedure.Destroying a storage domain forcibly removes the storage domain from the virtualized environment.
Procedure
1. Click Storage → Domains.
2. Select the storage domain and click More Actions ( ), then click Destroy.
3. Select the Approve operation check box.
4. Click OK.
2.6.9.12. Creating a Disk Profile
Disk profiles define the maximum level of throughput and the maximum level of input and outputoperations for a virtual disk in a storage domain. Disk profiles are created based on storage profilesdefined under data centers, and must be manually assigned to individual virtual disks for the profile totake effect.
This procedure assumes you have already defined one or more storage quality of service entries underthe data center to which the storage domain belongs.
Procedure
1. Click Storage → Domains.
2. Click the data storage domain’s name. This opens the details view.
3. Click the Disk Profiles tab.
4. Click New.
5. Enter a Name and a Description for the disk profile.
Red Hat Virtualization 4.4 Administration Guide
214

6. Select the quality of service to apply to the disk profile from the QoS list.
7. Click OK.
2.6.9.13. Removing a Disk Profile
Remove an existing disk profile from your Red Hat Virtualization environment.
Procedure
1. Click Storage → Domains.
2. Click the data storage domain’s name. This opens the details view.
3. Click the Disk Profiles tab.
4. Select the disk profile to remove.
5. Click Remove.
6. Click OK.
If the disk profile was assigned to any virtual disks, the disk profile is removed from those virtual disks.
2.6.9.14. Viewing the Health Status of a Storage Domain
Storage domains have an external health status in addition to their regular Status. The external healthstatus is reported by plug-ins or external systems, or set by an administrator, and appears to the left ofthe storage domain’s Name as one of the following icons:
OK: No icon
Info:
Warning:
Error:
Failure:
To view further details about the storage domain’s health status, click the storage domain’s name. Thisopens the details view, and click the Events tab.
The storage domain’s health status can also be viewed using the REST API. A GET request on a storagedomain will include the external_status element, which contains the health status.
You can set a storage domain’s health status in the REST API via the events collection. For moreinformation, see Adding Events in the REST API Guide .
2.6.9.15. Setting Discard After Delete for a Storage Domain
When the Discard After Delete check box is selected, a blkdiscard command is called on a logicalvolume when it is removed and the underlying storage is notified that the blocks are free. The storagearray can use the freed space and allocate it when requested. Discard After Delete only works on block
CHAPTER 2. ADMINISTERING THE RESOURCES
215

storage. The flag is not available on the Red Hat Virtualization Manager for file storage, for exampleNFS.
Restrictions:
Discard After Delete is only available on block storage domains, such as iSCSI or Fibre Channel.
The underlying storage must support Discard.
Discard After Delete can be enabled both when creating a block storage domain or when editing ablock storage domain. See Preparing and Adding Block Storage and Editing Storage Domains .
2.6.9.16. Enabling 4K support on environments with more than 250 hosts
By default, GlusterFS domains and local storage domains support 4K block size on Red HatVirtualization environments with up to 250 hosts. 4K block size can provide better performance,especially when using large files, and it is also necessary when you use tools that require 4K compatibility,such as VDO.
NOTE
GlusterFS Storage is deprecated, and will no longer be supported in future releases.
The lockspace area that Sanlock allocates is 1 MB when the maximum number of hosts is the default250. When you increase the maximum number of hosts when using 4K storage, the lockspace area islarger. For example, when using 2000 hosts, the lockspace area could be as large as 8 MB.
You can enable 4K block support on environments with more than 250 hosts by setting the engineconfiguration parameter MaxNumberOfHostsInStoragePool.
Procedure
1. On the Manager machine enable the required maximum number of hosts:
2. Restart the JBoss Application Server:
For example, if you have a cluster with 300 hosts, enter:
Verification
View the value of the MaxNumberOfHostsInStoragePool parameter on the Manager:
2.6.9.17. Disabling 4K support
# engine-config -s MaxNumberOfHostsInStoragePool=NUMBER_OF_HOSTS
# service jboss-as restart
# engine-config -s MaxNumberOfHostsInStoragePool=300# service jboss-as restart
# engine-config --get=MaxNumberOfHostsInStoragePool MaxNumberOfHostsInStoragePool: 250 version: general
Red Hat Virtualization 4.4 Administration Guide
216

By default, GlusterFS domains and local storage domains support 4K block size. 4K block size canprovide better performance, especially when using large files, and it is also necessary when you use toolsthat require 4K compatibility, such as VDO.
NOTE
GlusterFS Storage is deprecated, and will no longer be supported in future releases.
You can disable 4K block support.
Procedure
1. Ensure that 4K block support is enabled.
2. Edit /etc/vdsm/vdsm.conf.d/gluster.conf and set enable_4k_storage to false. For example:
2.6.9.18. Monitoring available space in a storage domain
You can monitor available space in a storage domain and create an alert to warn you when a storagedomain is nearing capacity. You can also define a critical threshold at which point the domain shutsdown.
With Virtual Data Optimizer (VDO) and thin pool support, you might see more available space than isphysically available. For VDO this behavior is expected, but the Manager cannot predict how much datayou can actually write. The Warning Low Confirmed Space Indicator parameter notifies you when thedomain is nearing physical space capacity and shows how much confirmed space remains. Confirmedspace refers to the actual space available to write data.
Procedure
1. In the Administration Portal, click Storage → Storage Domain and click the name of a storagedomain.
2. Click Manage Domain. The Manage Domains dialog box opens.
3. Expand Advanced Parameters.
4. For Warning Low Space Indicator (%) enter a percentage value. When the available space in
$ vdsm-client Host getCapabilities… { "GLUSTERFS" : [ 0, 512, 4096, ] …
$ vi /etc/vdsm/vdsm.conf.d/gluster.conf
[gluster]# Use to disable 4k support# if needed.enable_4k_storage = false
CHAPTER 2. ADMINISTERING THE RESOURCES
217

4. For Warning Low Space Indicator (%) enter a percentage value. When the available space inthe storage domain reaches this value, the Manager alerts you that the domain is nearingcapacity.
5. For Critical Space Action Blocker (GB), enter a value in gigabytes. When the available space inthe storage domain reaches this value, the Manager shuts down.
6. For Warning Low Confirmed Space Indicator (%) enter a percentage value. When theavailable space in the storage domain reaches this value, the Manager alerts you that the actualspace available to write data is nearing capacity.
2.7. POOLS
2.7.1. Introduction to Virtual Machine Pools
A virtual machine pool is a group of virtual machines that are all clones of the same template and thatcan be used on demand by any user in a given group. Virtual machine pools allow administrators torapidly configure a set of generalized virtual machines for users.
Users access a virtual machine pool by taking a virtual machine from the pool. When a user takes avirtual machine from a pool, they are provided with any one of the virtual machines in the pool if any areavailable. That virtual machine will have the same operating system and configuration as that of thetemplate on which the pool was based, but users may not receive the same member of the pool eachtime they take a virtual machine. Users can also take multiple virtual machines from the same virtualmachine pool depending on the configuration of that pool.
Virtual machine pools are stateless by default, meaning that virtual machine data and configurationchanges are not persistent across reboots. However, the pool can be configured to be stateful, allowingchanges made by a previous user to persist. However, if a user configures console options for a virtualmachine taken from a virtual machine pool, those options will be set as the default for that user for thatvirtual machine pool.
NOTE
Virtual machines taken from a pool are not stateless when accessed from theAdministration Portal. This is because administrators need to be able to write changes tothe disk if necessary.
In principle, virtual machines in a pool are started when taken by a user, and shut down when the user isfinished. However, virtual machine pools can also contain pre-started virtual machines. Pre-startedvirtual machines are kept in an up state, and remain idle until they are taken by a user. This allows usersto start using such virtual machines immediately, but these virtual machines will consume systemresources even while not in use due to being idle.
2.7.2. Creating a virtual machine pool
You can create a virtual machine pool containing multiple virtual machines based on a commontemplate. See Templates in the Virtual Machine Management Guide for information about sealing avirtual machine and creating a template.
Sysprep File Configuration Options for Windows Virtual Machines
Several sysprep file configuration options are available, depending on your requirements.
If your pool does not need to join a domain, you can use the default sysprep file, located in
Red Hat Virtualization 4.4 Administration Guide
218

If your pool does not need to join a domain, you can use the default sysprep file, located in /usr/share/ovirt-engine/conf/sysprep/.
If your pool needs to join a domain, you can create a custom sysprep for each Windows operatingsystem:
1. Copy the relevant sections for each operating system from /usr/share/ovirt-engine/conf/osinfo-defaults.properties to a new file and save as 99-defaults.properties.
2. In 99-defaults.properties, specify the Windows product activation key and the path of your newcustom sysprep file:os.operating_system.productKey.value=Windows_product_activation_key …os.operating_system.sysprepPath.value =${ENGINE_USR}/conf/sysprep/sysprep.operating_system
3. Create a new sysprep file, specifying the domain, domain password, and domain administrator:
<Credentials> <Domain>__AD_Domain__</Domain> <Password>__Domain_Password__</Password> <Username>__Domain_Administrator__</Username></Credentials>
If you need to configure different sysprep settings for different pools of Windows virtual machines, youcan create a custom sysprep file in the Administration Portal (see Creating a Virtual Machine Poolbelow). See Using Sysprep to Automate the Configuration of Virtual Machines in the Virtual MachineGuide for more information.
Procedure
1. Click Compute → Pools.
2. Click New.
3. Select a Cluster from the drop-down list.
4. Select a Template and version from the drop-down menu. A template provides standardsettings for all the virtual machines in the pool.
5. Select an Operating System from the drop-down list.
6. Use Optimized for to optimize virtual machines for Desktop or Server.
NOTE
High Performance optimization is not recommended for pools because a highperformance virtual machine is pinned to a single host and concrete resources. Apool containing multiple virtual machines with such a configuration would not runwell.
7. Enter a Name and, optionally, a Description and Comment.The Name of the pool is applied to each virtual machine in the pool, with a numeric suffix. Youcan customize the numbering of the virtual machines with ? as a placeholder.
Example 2.1. Pool Name and Virtual Machine Numbering Examples
CHAPTER 2. ADMINISTERING THE RESOURCES
219

Pool: MyPoolVirtual machines: MyPool-1, MyPool-2, … MyPool-10
Pool: MyPool-???Virtual machines: MyPool-001, MyPool-002, … MyPool-010
8. Enter the Number of VMs for the pool.
9. Enter the number of virtual machines to be prestarted in the Prestarted field.
10. Select the Maximum number of VMs per user that a single user is allowed to run in a session.The minimum is 1.
11. Select the Delete Protection check box to enable delete protection.
12. If you are creating a pool of non-Windows virtual machines or if you are using the default sysprep, skip this step. If you are creating a custom sysprep file for a pool of Windows virtualmachines:
a. Click the Show Advanced Options button.
b. Click the Initial Run tab and select the Use Cloud-Init/Sysprep check box.
c. Click the Authentication arrow and enter the User Name and Password or select Usealready configured password.
NOTE
This User Name is the name of the local administrator. You can change itsvalue from its default value (user) here in the Authentication section or in acustom sysprep file.
d. Click the Custom Script arrow and paste the contents of the default sysprep file, locatedin /usr/share/ovirt-engine/conf/sysprep/, into the text box.
e. You can modify the following values of the sysprep file:
Key. If you do not want to use the pre-defined Windows activation product key, replace <![CDATA[$ProductKey$]]> with a valid product key:
<ProductKey> <Key><![CDATA[$ProductKey$]]></Key></ProductKey>
Example 2.2. Windows Product Key Example
<ProductKey> <Key>0000-000-000-000</Key></ProductKey>
Domain that the Windows virtual machines will join, the domain’s Password, and thedomain administrator’s Username:
Red Hat Virtualization 4.4 Administration Guide
220

<Credentials> <Domain>__AD_Domain__</Domain> <Password>__Domain_Password__</Password> <Username>__Domain_Administrator__</Username></Credentials>
Example 2.3. Domain Credentials Example
<Credentials> <Domain>addomain.local</Domain> <Password>12345678</Password> <Username>Sarah_Smith</Username></Credentials>
NOTE
The Domain, Password, and Username are required to join the domain.The Key is for activation. You do not necessarily need both.
The domain and credentials cannot be modified in the Initial Run tab.
FullName of the local administrator:
<UserData>... <FullName>__Local_Administrator__</FullName>...</UserData>
DisplayName and Name of the local administrator:
<LocalAccounts> <LocalAccount wcm:action="add"> <Password> <Value><![CDATA[$AdminPassword$]]></Value> <PlainText>true</PlainText> </Password> <DisplayName>__Local_Administrator__</DisplayName> <Group>administrators</Group> <Name>__Local_Administrator__</Name> </LocalAccount></LocalAccounts>
The remaining variables in the sysprep file can be filled in on the Initial Run tab.
13. Optional. Set a Pool Type:
a. Click the Type tab and select a Pool Type:
Manual - The administrator is responsible for explicitly returning the virtual machine tothe pool.
Automatic - The virtual machine is automatically returned to the virtual machine pool.
CHAPTER 2. ADMINISTERING THE RESOURCES
221

b. Select the Stateful Pool check box to ensure that virtual machines are started in a statefulmode. This ensures that changes made by a previous user will persist on a virtual machine.
c. Click OK.
14. Optional. Override the SPICE proxy:
a. In the Console tab, select the Override SPICE Proxy check box.
b. In the Overridden SPICE proxy address text field, specify the address of a SPICE proxy tooverride the global SPICE proxy.
c. Click OK.
15. For a pool of Windows virtual machines, click Compute → Virtual Machines, select each virtualmachine from the pool, and click Run → Run Once.
NOTE
If the virtual machine does not start and Info [windeploy.exe] Found no unattend file appears in %WINDIR%\panther\UnattendGC\setupact.log, addthe UnattendFile key to the registry of the Windows virtual machine that wasused to create the template for the pool:
1. Check that the Windows virtual machine has an attached secondary CD-ROM device with the unattend file, for example, A:\Unattend.xml.
2. Select the virtual machine and click Run → Run once.
3. Under Boot Options, check Attach Windows guest tools CD.
4. Click Start, click Run, type regedit in the Open text box, and click OK.
5. In the left pane, go to HKEY_LOCAL_MACHINE → SYSTEM → Setup.
6. Right-click the right pane and select New → String Value.
7. Enter UnattendFile as the key name.
8. Double-click the new key and enter the unattend file name and path, forexample, A:\Unattend.xml, as the key’s value.
9. Save the registry, seal the Windows virtual machine, and create a newtemplate. See Templates in the Virtual Machine Management Guide fordetails.
You have created and configured a virtual machine pool with the specified number of identical virtualmachines. You can view these virtual machines in Compute → Virtual Machines, or by clicking the nameof a pool to open its details view; a virtual machine in a pool is distinguished from independent virtualmachines by its icon.
2.7.3. Explanation of Settings and Controls in the New Pool and Edit Pool Windows
2.7.3.1. New Pool and Edit Pool General Settings Explained
The following table details the information required on the General tab of the New Pool and Edit Pool
Red Hat Virtualization 4.4 Administration Guide
222

The following table details the information required on the General tab of the New Pool and Edit Poolwindows that are specific to virtual machine pools. All other settings are identical to those in the NewVirtual Machine window.
Table 2.30. General settings
Field Name Description
Template The template and template sub-version on which thevirtual machine pool is based. If you create a poolbased on the latest sub-version of a template, allvirtual machines in the pool, when rebooted, willautomatically receive the latest template version. Formore information on configuring templates for virtualmachines see Virtual Machine General SettingsExplained and Explanation of Settings in the NewTemplate and Edit Template Windows in the VirtualMachine Management Guide.
Description A meaningful description of the virtual machine pool.
Comment A field for adding plain text human-readablecomments regarding the virtual machine pool.
Prestarted VMs Allows you to specify the number of virtual machinesin the virtual machine pool that will be started beforethey are taken and kept in that state to be taken byusers. The value of this field must be between 0 andthe total number of virtual machines in the virtualmachine pool.
Number of VMs/Increase number of VMs in poolby
Allows you to specify the number of virtual machinesto be created and made available in the virtualmachine pool. In the edit window it allows you toincrease the number of virtual machines in the virtualmachine pool by the specified number. By default,the maximum number of virtual machines you cancreate in a pool is 1000. This value can be configuredusing the MaxVmsInPool key of the engine-config command.
Maximum number of VMs per user Allows you to specify the maximum number of virtualmachines a single user can take from the virtualmachine pool at any one time. The value of this fieldmust be between 1 and 32,767.
Delete Protection Allows you to prevent the virtual machines in the poolfrom being deleted.
CHAPTER 2. ADMINISTERING THE RESOURCES
223

Sealed Ensures that machine-specific settings from thetemplate are not reproduced in virtual machines thatare provisioned from the template. For moreinformation about the sealing process, see Sealing aWindows Virtual Machine for Deployment as aTemplate
Field Name Description
2.7.3.2. New Pool and Edit Pool Type Settings Explained
The following table details the information required on the Type tab of the New Pool and Edit Poolwindows.
Table 2.31. Type settings
Field Name Description
Pool Type This drop-down menu allows you to specify the typeof the virtual machine pool. The following options areavailable:
Automatic: After a user finishes using avirtual machine taken from a virtual machinepool, that virtual machine is automaticallyreturned to the virtual machine pool.
Manual: After a user finishes using a virtualmachine taken from a virtual machine pool,that virtual machine is only returned to thevirtual machine pool when an administratormanually returns the virtual machine.
Stateful Pool Specify whether the state of virtual machines in thepool is preserved when a virtual machine is passed toa different user. This means that changes made by aprevious user will persist on the virtual machine.
2.7.3.3. New Pool and Edit Pool Console Settings Explained
The following table details the information required on the Console tab of the New Pool or Edit Poolwindow that is specific to virtual machine pools. All other settings are identical to those in the NewVirtual Machine and Edit Virtual Machine windows.
Table 2.32. Console settings
Field Name Description
Red Hat Virtualization 4.4 Administration Guide
224

Override SPICE proxy Select this check box to enable overriding the SPICEproxy defined in global configuration. This feature isuseful in a case where the user (who is, for example,connecting via the VM Portal) is outside of thenetwork where the hosts reside.
Overridden SPICE proxy address The proxy by which the SPICE client connects tovirtual machines. This proxy overrides both the globalSPICE proxy defined for the Red Hat Virtualizationenvironment and the SPICE proxy defined for thecluster to which the virtual machine pool belongs, ifany. The address must be in the following format:
Field Name Description
2.7.3.4. Virtual Machine Pool Host Settings Explained
The following table details the options available on the Host tab of the New Pool and Edit Poolwindows.
Table 2.33. Virtual Machine Pool: Host Settings
Field Name Sub-element Description
Start Running On Defines the preferred host onwhich the virtual machine is to run.Select either:
Any Host in Cluster -The virtual machine canstart and run on anyavailable host in thecluster.
Specific Host(s) - Thevirtual machine will startrunning on a particularhost in the cluster.However, the Manageror an administrator canmigrate the virtualmachine to a differenthost in the clusterdepending on themigration and high-availability settings ofthe virtual machine.Select the specific hostor group of hosts fromthe list of available hosts.
protocol://host:port
CHAPTER 2. ADMINISTERING THE RESOURCES
225

CPU options Pass-Through Host CPU When selected, allows virtualmachines to use the host’s CPUflags. When selected, MigrationOptions is set to Allow manualmigration only.
Migrate only to hosts with thesame TSC frequency
When selected, this virtualmachine can only be migrated toa host with the same TSCfrequency. This option is only validfor High Performance virtualmachines.
Migration Options Migration mode Defines options to run andmigrate the virtual machine. If theoptions here are not used, thevirtual machine will run or migrateaccording to its cluster’s policy.
Allow manual andautomatic migration -The virtual machine canbe automaticallymigrated from one hostto another in accordancewith the status of theenvironment, ormanually by anadministrator.
Allow manual migrationonly - The virtualmachine can only bemigrated from one hostto another manually byan administrator.
Do not allow migration -The virtual machinecannot be migrated,either automatically ormanually.
Migration policy Defines the migrationconvergence policy. If the checkbox is left unselected, the hostdetermines the policy.
Cluster default(Minimal downtime) -Overrides in vdsm.confare still applied. Theguest agent hookmechanism is disabled.
Minimal downtime -
Field Name Sub-element Description
Red Hat Virtualization 4.4 Administration Guide
226

Allows the virtualmachine to migrate intypical situations. Virtualmachines should notexperience anysignificant downtime.The migration will beaborted if virtualmachine migration doesnot converge after along time (dependent onQEMU iterations, with amaximum of 500milliseconds). The guestagent hook mechanism isenabled.
Post-copy migration -When used, post-copymigration pauses themigrating virtualmachine vCPUs on thesource host, transfersonly a minimum ofmemory pages, activatesthe virtual machinevCPUs on thedestination host, andtransfers the remainingmemory pages while thevirtual machine is runningon the destination.The post-copy policyfirst tries pre-copy toverify whetherconvergence can occur.The migration switchesto post-copy if thevirtual machine migrationdoes not converge aftera long time.
This significantly reducesthe downtime of themigrated virtual machine,and also guarantees thatthe migration finishesregardless of how rapidlythe memory pages of thesource virtual machinechange. It is optimal formigrating virtualmachines in heavycontinuous use, whichwould not be possible tomigrate with standardpre-copy migration.
The disadvantage of thispolicy is that in the post-copy phase, the virtualmachine may slow downsignificantly as themissing parts of memoryare transferred betweenthe hosts.
Field Name Sub-element Description
CHAPTER 2. ADMINISTERING THE RESOURCES
227

WARNING
Ifthenetworkconnectionbreakspriortothecompletionofthepost-copyprocess,theManagerpausesandthenkillstherunni
Field Name Sub-element Description
Red Hat Virtualization 4.4 Administration Guide
228

ngvirtualmachine.Donotusepost-copymigrationifthevirtualmachineavailabilityiscriticalorifthemigrationnetworkisunstable.
Suspend workload ifneeded - Allows thevirtual machine tomigrate in mostsituations, includingwhen the virtual machineis running a heavy
Field Name Sub-element Description
CHAPTER 2. ADMINISTERING THE RESOURCES
229
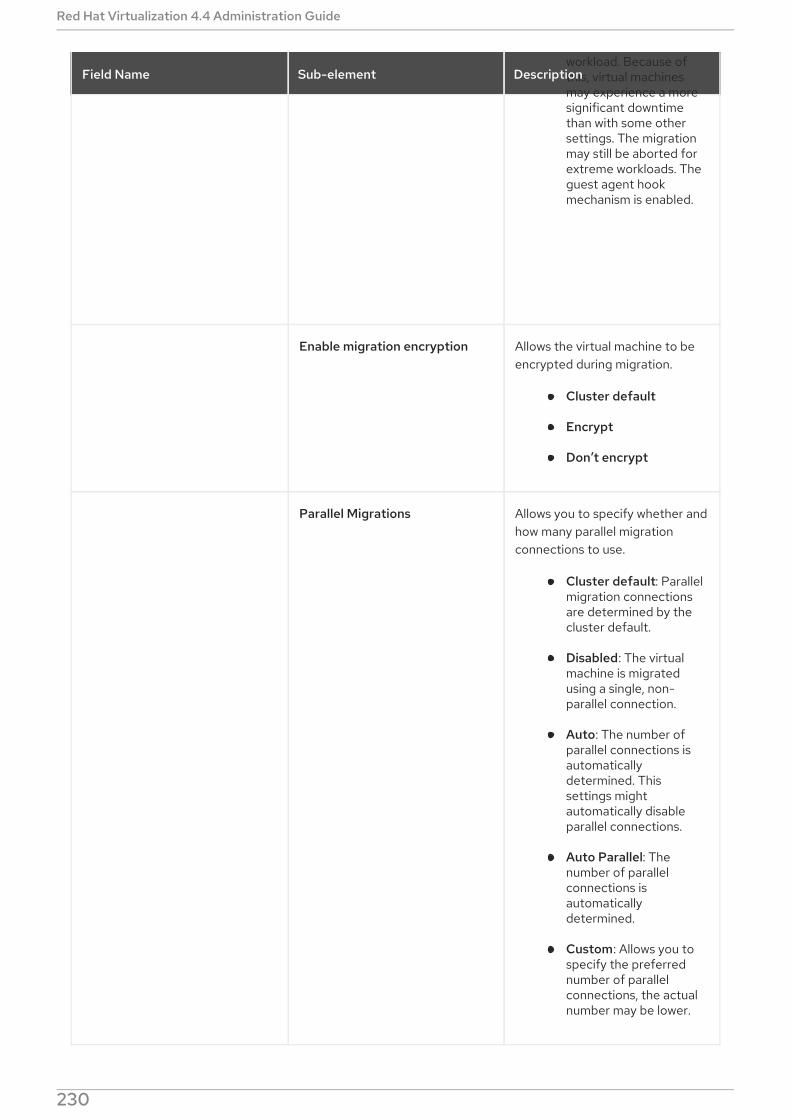
workload. Because ofthis, virtual machinesmay experience a moresignificant downtimethan with some othersettings. The migrationmay still be aborted forextreme workloads. Theguest agent hookmechanism is enabled.
Enable migration encryption Allows the virtual machine to beencrypted during migration.
Cluster default
Encrypt
Don’t encrypt
Parallel Migrations Allows you to specify whether andhow many parallel migrationconnections to use.
Cluster default: Parallelmigration connectionsare determined by thecluster default.
Disabled: The virtualmachine is migratedusing a single, non-parallel connection.
Auto: The number ofparallel connections isautomaticallydetermined. Thissettings mightautomatically disableparallel connections.
Auto Parallel: Thenumber of parallelconnections isautomaticallydetermined.
Custom: Allows you tospecify the preferrednumber of parallelconnections, the actualnumber may be lower.
Field Name Sub-element Description
Red Hat Virtualization 4.4 Administration Guide
230

Number of VM MigrationConnections
This setting is only available whenCustom is selected. Thepreferred number of customparallel migrations, between 2 and255.
Configure NUMA NUMA Node Count The number of virtual NUMAnodes available in a host that canbe assigned to the virtualmachine.
NUMA Pinning Opens the NUMA Topologywindow. This window shows thehost’s total CPUs, memory, andNUMA nodes, and the virtualmachine’s virtual NUMA nodes.You can manually pin virtualNUMA nodes to host NUMAnodes by clicking and draggingeach vNUMA from the box on theright to a NUMA node on the left.
You can also set Tune Mode formemory allocation:
Strict - Memory allocation will failif the memory cannot be allocatedon the target node.
Preferred - Memory is allocatedfrom a single preferred node. Ifsufficient memory is not available,memory can be allocated fromother nodes.
Interleave - Memory is allocatedacross nodes in a round-robinalgorithm.
If you define NUMA pinning,Migration Options is set to Allowmanual migration only.
Field Name Sub-element Description
2.7.3.5. New Pool and Edit Pool Resource Allocation Settings Explained
The following table details the information required on the Resource Allocation tab of the New Pooland Edit Pool windows that are specific to virtual machine pools. All other settings are identical to thosein the New Virtual Machine window. See Virtual Machine Resource Allocation Settings Explained in theVirtual Machine Management Guide for more information.
Table 2.34. Resource Allocation settings
CHAPTER 2. ADMINISTERING THE RESOURCES
231

Field Name Sub-element Description
Disk Allocation Auto select target Select this check box toautomatically select the storagedomain that has the most freespace. The Target and DiskProfile fields are disabled.
Format This field is read-only and alwaysdisplays QCOW2.
2.7.3.6. Editing a Virtual Machine Pool
After a virtual machine pool has been created, its properties can be edited. The properties availablewhen editing a virtual machine pool are identical to those available when creating a new virtual machinepool except that the Number of VMs property is replaced by Increase number of VMs in pool by.
NOTE
When editing a virtual machine pool, the changes introduced affect only new virtualmachines. Virtual machines that existed already at the time of the introduced changesremain unaffected.
Procedure
1. Click Compute → Pools and select a virtual machine pool.
2. Click Edit.
3. Edit the properties of the virtual machine pool.
4. Click Ok.
2.7.3.7. Prestarting Virtual Machines in a Pool
The virtual machines in a virtual machine pool are powered down by default. When a user requests avirtual machine from a pool, a machine is powered up and assigned to the user. In contrast, a prestartedvirtual machine is already running and waiting to be assigned to a user, decreasing the amount of time auser has to wait before being able to access a machine. When a prestarted virtual machine is shut downit is returned to the pool and restored to its original state. The maximum number of prestarted virtualmachines is the number of virtual machines in the pool.
Prestarted virtual machines are suitable for environments in which users require immediate access tovirtual machines which are not specifically assigned to them. Only automatic pools can have prestartedvirtual machines.
Procedure
1. Click Compute → Pools and select the virtual machine pool.
2. Click Edit.
3. Enter the number of virtual machines to be prestarted in the Prestarted VMs field.
Red Hat Virtualization 4.4 Administration Guide
232

4. Click the Type tab. Ensure Pool Type is set to Automatic.
5. Click OK.
2.7.3.8. Adding Virtual Machines to a Virtual Machine Pool
If you require more virtual machines than originally provisioned in a virtual machine pool, add moremachines to the pool.
Procedure
1. Click Compute → Pools and select the virtual machine pool.
2. Click Edit.
3. Enter the number of additional virtual machines in the Increase number of VMs in pool by field.
4. Click OK.
2.7.3.9. Detaching Virtual Machines from a Virtual Machine Pool
You can detach virtual machines from a virtual machine pool. Detaching a virtual machine removes itfrom the pool to become an independent virtual machine.
Procedure
1. Click Compute → Pools.
2. Click the pool’s name. This opens the details view.
3. Click the Virtual Machines tab to list the virtual machines in the pool.
4. Ensure the virtual machine has a status of Down; you cannot detach a running virtual machine.
5. Select one or more virtual machines and click Detach.
6. Click OK.
NOTE
The virtual machine still exists in the environment and can be viewed and accessed fromCompute → Virtual Machines. Note that the icon changes to denote that the detachedvirtual machine is an independent virtual machine.
2.7.3.10. Removing a Virtual Machine Pool
You can remove a virtual machine pool from a data center. You must first either delete or detach all ofthe virtual machines in the pool. Detaching virtual machines from the pool will preserve them asindependent virtual machines.
Procedure
1. Click Compute → Pools and select the virtual machine pool.
2. Click Remove.
CHAPTER 2. ADMINISTERING THE RESOURCES
233

3. Click OK.
2.8. VIRTUAL DISKS
2.8.1. Understanding Virtual Machine Storage
Red Hat Virtualization supports three storage types: NFS, iSCSI and FCP.
In each type, a host known as the Storage Pool Manager (SPM) manages access between hosts andstorage. The SPM host is the only node that has full access within the storage pool; the SPM can modifythe storage domain metadata, and the pool’s metadata. All other hosts can only access virtual machinehard disk image data.
By default in an NFS, local, or POSIX compliant data center, the SPM creates the virtual disk using a thinprovisioned format as a file in a file system.
In iSCSI and other block-based data centers, the SPM creates a volume group on top of the Logical UnitNumbers (LUNs) provided, and makes logical volumes to use as virtual disks. Virtual disks on block-based storage are preallocated by default.
If the virtual disk is preallocated, a logical volume of the specified size in GB is created. The virtualmachine can be mounted on a Red Hat Enterprise Linux server using kpartx, vgscan, vgchange or mount to investigate the virtual machine’s processes or problems.
If the virtual disk is thinly provisioned, a 1 GB logical volume is created. The logical volume is continuouslymonitored by the host on which the virtual machine is running. As soon as the usage nears a thresholdthe host notifies the SPM, and the SPM extends the logical volume by 1 GB. The host is responsible forresuming the virtual machine after the logical volume has been extended. If the virtual machine goesinto a paused state it means that the SPM could not extend the disk in time. This occurs if the SPM istoo busy or if there is not enough storage space.
A virtual disk with a preallocated (raw) format has significantly faster write speeds than a virtual diskwith a thin provisioning (QCOW2) format. Thin provisioning takes significantly less time to create avirtual disk. The thin provision format is suitable for non-I/O intensive virtual machines. The preallocatedformat is recommended for virtual machines with high I/O writes. If a virtual machine is able to writemore than 1 GB every four seconds, use preallocated disks where possible.
2.8.2. Understanding Virtual Disks
Red Hat Virtualization features Preallocated (thick provisioned) and Sparse (thin provisioned) storageoptions.
PreallocatedA preallocated virtual disk allocates all the storage required for a virtual machine up front. Forexample, a 20 GB preallocated logical volume created for the data partition of a virtual machinewill take up 20 GB of storage space immediately upon creation.
SparseA sparse allocation allows an administrator to define the total storage to be assigned to thevirtual machine, but the storage is only allocated when required.
For example, a 20 GB thin provisioned logical volume would take up 0 GB of storage spacewhen first created. When the operating system is installed it may take up the size of the installedfile, and would continue to grow as data is added up to a maximum of 20 GB size.
You can view a virtual disk’s ID in Storage → Disks. The ID is used to identify a virtual disk because its
Red Hat Virtualization 4.4 Administration Guide
234

You can view a virtual disk’s ID in Storage → Disks. The ID is used to identify a virtual disk because itsdevice name (for example, /dev/vda0) can change, causing disk corruption. You can also view a virtualdisk’s ID in /dev/disk/by-id.
You can view the Virtual Size of a disk in Storage → Disks and in the Disks tab of the details view forstorage domains, virtual machines, and templates. The Virtual Size is the total amount of disk space thatthe virtual machine can use. It is the number that you enter in the Size(GB) field when you create or edita virtual disk.
You can view the Actual Size of a disk in the Disks tab of the details view for storage domains andtemplates. This is the amount of disk space that has been allocated to the virtual machine so far.Preallocated disks show the same value for Virtual Size and Actual Size. Sparse disks may showdifferent values, depending on how much disk space has been allocated.
The possible combinations of storage types and formats are described in the following table.
Table 2.35. Permitted Storage Combinations
Storage Format Type Note
NFS Raw Preallocated A file with an initial sizethat equals the amountof storage defined forthe virtual disk, and hasno formatting.
NFS Raw Sparse A file with an initial sizethat is close to zero, andhas no formatting.
NFS QCOW2 Sparse A file with an initial sizethat is close to zero, andhas QCOW2 formatting.Subsequent layers willbe QCOW2 formatted.
SAN Raw Preallocated A block device with aninitial size that equalsthe amount of storagedefined for the virtualdisk, and has noformatting.
SAN QCOW2 Sparse A block device with aninitial size that is muchsmaller than the sizedefined for the virtualdisk (currently 1 GB), andhas QCOW2 formattingfor which space isallocated as needed(currently in 1 GBincrements).
CHAPTER 2. ADMINISTERING THE RESOURCES
235
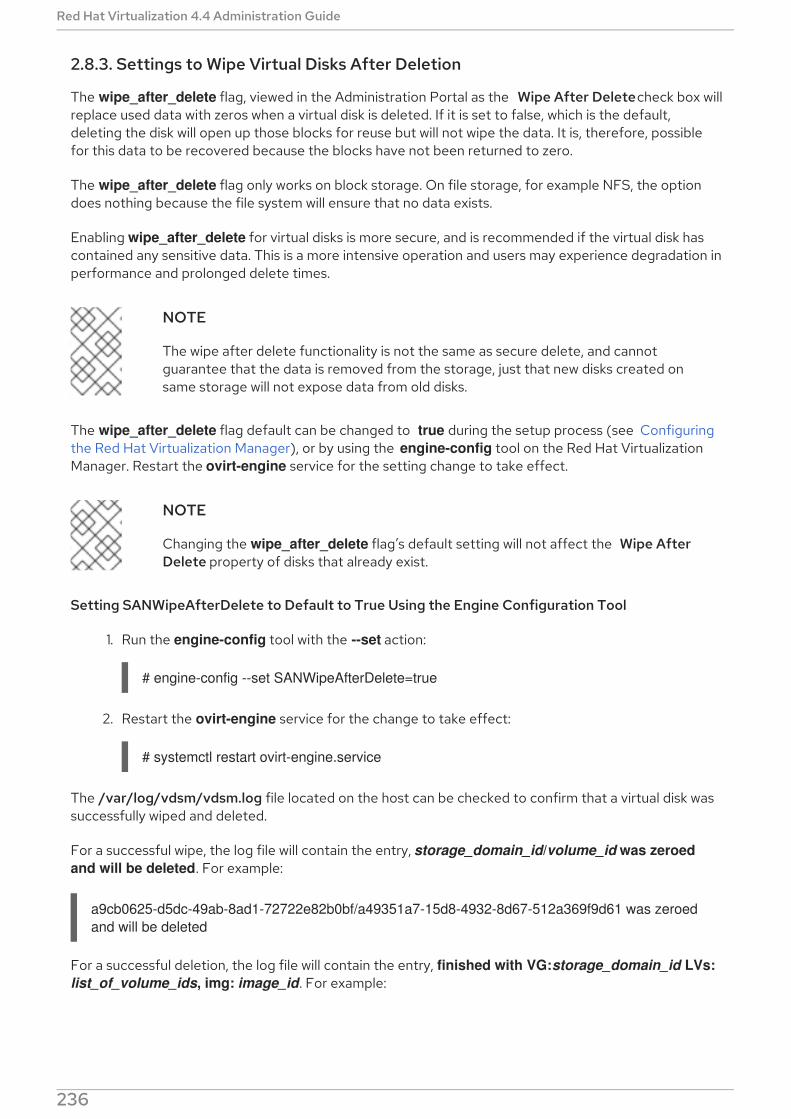
2.8.3. Settings to Wipe Virtual Disks After Deletion
The wipe_after_delete flag, viewed in the Administration Portal as the Wipe After Delete check box willreplace used data with zeros when a virtual disk is deleted. If it is set to false, which is the default,deleting the disk will open up those blocks for reuse but will not wipe the data. It is, therefore, possiblefor this data to be recovered because the blocks have not been returned to zero.
The wipe_after_delete flag only works on block storage. On file storage, for example NFS, the optiondoes nothing because the file system will ensure that no data exists.
Enabling wipe_after_delete for virtual disks is more secure, and is recommended if the virtual disk hascontained any sensitive data. This is a more intensive operation and users may experience degradation inperformance and prolonged delete times.
NOTE
The wipe after delete functionality is not the same as secure delete, and cannotguarantee that the data is removed from the storage, just that new disks created onsame storage will not expose data from old disks.
The wipe_after_delete flag default can be changed to true during the setup process (see Configuringthe Red Hat Virtualization Manager), or by using the engine-config tool on the Red Hat VirtualizationManager. Restart the ovirt-engine service for the setting change to take effect.
NOTE
Changing the wipe_after_delete flag’s default setting will not affect the Wipe AfterDelete property of disks that already exist.
Setting SANWipeAfterDelete to Default to True Using the Engine Configuration Tool
1. Run the engine-config tool with the --set action:
2. Restart the ovirt-engine service for the change to take effect:
The /var/log/vdsm/vdsm.log file located on the host can be checked to confirm that a virtual disk wassuccessfully wiped and deleted.
For a successful wipe, the log file will contain the entry, storage_domain_id/volume_id was zeroed and will be deleted. For example:
For a successful deletion, the log file will contain the entry, finished with VG:storage_domain_id LVs: list_of_volume_ids, img: image_id. For example:
# engine-config --set SANWipeAfterDelete=true
# systemctl restart ovirt-engine.service
a9cb0625-d5dc-49ab-8ad1-72722e82b0bf/a49351a7-15d8-4932-8d67-512a369f9d61 was zeroed and will be deleted
Red Hat Virtualization 4.4 Administration Guide
236

An unsuccessful wipe will display a log message zeroing storage_domain_id/volume_id failed. Zero and remove this volume manually, and an unsuccessful delete will display Remove failed for some of VG: storage_domain_id zeroed volumes: list_of_volume_ids.
2.8.4. Shareable Disks in Red Hat Virtualization
Some applications require storage to be shared between servers. Red Hat Virtualization allows you tomark virtual machine hard disks as Shareable and attach those disks to virtual machines. That way asingle virtual disk can be used by multiple cluster-aware guests.
Shared disks are not to be used in every situation. For applications like clustered database servers, andother highly available services, shared disks are appropriate. Attaching a shared disk to multiple gueststhat are not cluster-aware is likely to cause data corruption because their reads and writes to the diskare not coordinated.
You cannot take a snapshot of a shared disk. Virtual disks that have snapshots taken of them cannotlater be marked shareable.
You can mark a disk shareable either when you create it, or by editing the disk later.
2.8.5. Read Only Disks in Red Hat Virtualization
Some applications require administrators to share data with read-only rights. You can do this whencreating or editing a disk attached to a virtual machine via the Disks tab in the details view of the virtualmachine and selecting the Read Only check box. That way, a single disk can be read by multiple cluster-aware guests, while an administrator maintains writing privileges.
You cannot change the read-only status of a disk while the virtual machine is running.
IMPORTANT
Mounting a journaled file system requires read-write access. Using the Read Only optionis not appropriate for virtual disks that contain such file systems (e.g. EXT3, EXT4, orXFS).
2.8.6. Virtual Disk Tasks
2.8.6.1. Creating a Virtual Disk
Image disk creation is managed entirely by the Manager. Direct LUN disks require externally preparedtargets that already exist.
You can create a virtual disk that is attached to a specific virtual machine. Additional options areavailable when creating an attached virtual disk, as specified in Explanation of Settings in the NewVirtual Disk Window.
Creating a Virtual Disk Attached to a Virtual Machine
1. Click Compute → Virtual Machines.
finished with VG:a9cb0625-d5dc-49ab-8ad1-72722e82b0bf LVs: {'a49351a7-15d8-4932-8d67-512a369f9d61': ImgsPar(imgs=['11f8b3be-fa96-4f6a-bb83-14c9b12b6e0d'], parent='00000000-0000-0000-0000-000000000000')}, img: 11f8b3be-fa96-4f6a-bb83-14c9b12b6e0d
CHAPTER 2. ADMINISTERING THE RESOURCES
237

2. Click the virtual machine’s name. This opens the details view.
3. Click the Disks tab.
4. Click New.
5. Click the appropriate button to specify whether the virtual disk will be an Image or Direct LUNdisk.
6. Select the options required for your virtual disk. The options change based on the disk typeselected. See Explanation of Settings in the New Virtual Disk Window for more details on eachoption for each disk type.
7. Click OK.
You can also create a floating virtual disk that does not belong to any virtual machines. You can attachthis disk to a single virtual machine, or to multiple virtual machines if the disk is shareable. Some optionsare not available when creating a virtual disk, as specified in Explanation of Settings in the New VirtualDisk Window.
Creating a Floating Virtual Disk
1. Click Storage → Disks.
2. Click New.
3. Click the appropriate button to specify whether the virtual disk will be an Image or Direct LUNdisk.
4. Select the options required for your virtual disk. The options change based on the disk typeselected. See Explanation of Settings in the New Virtual Disk Window for more details on eachoption for each disk type.
5. Click OK.
2.8.6.2. Explanation of settings in the New Virtual Disk window
Because the New Virtual Disk windows for creating floating and attached virtual disks are very similar,their settings are described in a single section.
Table 2.36. New Virtual Disk and Edit Virtual Disk settings: Image
Field Name Description
Size(GB) The size of the new virtual disk in GB.
Alias The name of the virtual disk, limited to 40 characters.
Description A description of the virtual disk. This field isrecommended but not mandatory.
Red Hat Virtualization 4.4 Administration Guide
238

Interface This field only appears when creating an attacheddisk.
The virtual interface the disk presents to virtualmachines. VirtIO is faster, but requires drivers. RedHat Enterprise Linux 5 and later include thesedrivers. Windows does not include these drivers, butyou can install them from the virtio-win ISO image.IDE and SATA devices do not require special drivers.
The interface type can be updated after stopping allvirtual machines that the disk is attached to.
Data Center This field only appears when creating a floating disk.
The data center in which the virtual disk will beavailable.
Storage Domain The storage domain in which the virtual disk will bestored. The drop-down list shows all storage domainsavailable in the given data center, and also shows thetotal space and currently available space in thestorage domain.
Allocation Policy The provisioning policy for the new virtual disk.
Preallocated allocates the entire size of thedisk on the storage domain at the time thevirtual disk is created. The virtual size andthe actual size of a preallocated disk are thesame. Preallocated virtual disks take moretime to create than thin provisioned virtualdisks, but have better read and writeperformance. Preallocated virtual disks arerecommended for servers and other I/Ointensive virtual machines. If a virtualmachine is able to write more than 1 GBevery four seconds, use preallocated diskswhere possible.
Thin Provision allocates 1 GB at the timethe virtual disk is created and sets amaximum limit on the size to which the diskcan grow. The virtual size of the disk is themaximum limit; the actual size of the disk isthe space that has been allocated so far.Thin provisioned disks are faster to createthan preallocated disks and allow forstorage over-commitment. Thin provisionedvirtual disks are recommended for desktops.
Field Name Description
CHAPTER 2. ADMINISTERING THE RESOURCES
239

Disk Profile The disk profile assigned to the virtual disk. Diskprofiles define the maximum amount of throughputand the maximum level of input and outputoperations for a virtual disk in a storage domain. Diskprofiles are defined on the storage domain levelbased on storage quality of service entries createdfor data centers.
Activate Disk(s) This field only appears when creating an attacheddisk.
Activate the virtual disk immediately after creation.
Wipe After Delete Allows you to enable enhanced security for deletionof sensitive material when the virtual disk is deleted.
Bootable This field only appears when creating an attacheddisk.
Allows you to enable the bootable flag on the virtualdisk.
Shareable Allows you to attach the virtual disk to more than onevirtual machine at a time.
Read-Only This field only appears when creating an attacheddisk.
Allows you to set the disk as read-only. The samedisk can be attached as read-only to one virtualmachine, and as rewritable to another.
Enable Incremental Backup Enables incremental backup on the virtual disk.Incremental backup requires disks to be formatted inQCOW2 format instead of RAW format. SeeIncremental backup and restore.
Enable Discard This field only appears when creating an attacheddisk.
Allows you to shrink a thin provisioned disk while thevirtual machine is up. For block storage, theunderlying storage device must support discard calls,and the option cannot be used with Wipe AfterDelete unless the underlying storage supports thediscard_zeroes_data property. For file storage, theunderlying file system and the block device mustsupport discard calls. If all requirements are met,SCSI UNMAP commands issued from guest virtualmachines is passed on by QEMU to the underlyingstorage to free up the unused space.
Field Name Description
Red Hat Virtualization 4.4 Administration Guide
240

The Direct LUN settings can be displayed in either Targets > LUNs or LUNs > Targets. Targets >LUNs sorts available LUNs according to the host on which they are discovered, whereas LUNs >Targets displays a single list of LUNs.
Fill in the fields in the Discover Targets section and click Discover to discover the target server. Youcan then click the Login All button to list the available LUNs on the target server and, using the radiobuttons next to each LUN, select the LUN to add.
Using LUNs directly as virtual machine hard disk images removes a layer of abstraction between yourvirtual machines and their data.
The following considerations must be made when using a direct LUN as a virtual machine hard diskimage:
Live storage migration of direct LUN hard disk images is not supported.
Direct LUN disks are not included in virtual machine exports.
Direct LUN disks are not included in virtual machine snapshots.
Table 2.37. New Virtual Disk and Edit Virtual Disk settings: Direct LUN
Field Name Description
Alias The name of the virtual disk, limited to 40 characters.
Description A description of the virtual disk. This field isrecommended but not mandatory. By default the last4 characters of the LUN ID is inserted into the field.
The default behavior can be configured by settingthe PopulateDirectLUNDiskDescriptionWithLUNId configuration key to the appropriate value usingthe engine-config command. The configurationkey can be set to -1 for the full LUN ID to be used, or 0 for this feature to be ignored. A positive integerpopulates the description with the correspondingnumber of characters of the LUN ID.
Interface This field only appears when creating an attacheddisk.
The virtual interface the disk presents to virtualmachines. VirtIO is faster, but requires drivers. RedHat Enterprise Linux 5 and later include thesedrivers. Windows does not include these drivers, butthey can be installed from the virtio-win ISO . IDE andSATA devices do not require special drivers.
The interface type can be updated after stopping allvirtual machines that the disk is attached to.
CHAPTER 2. ADMINISTERING THE RESOURCES
241
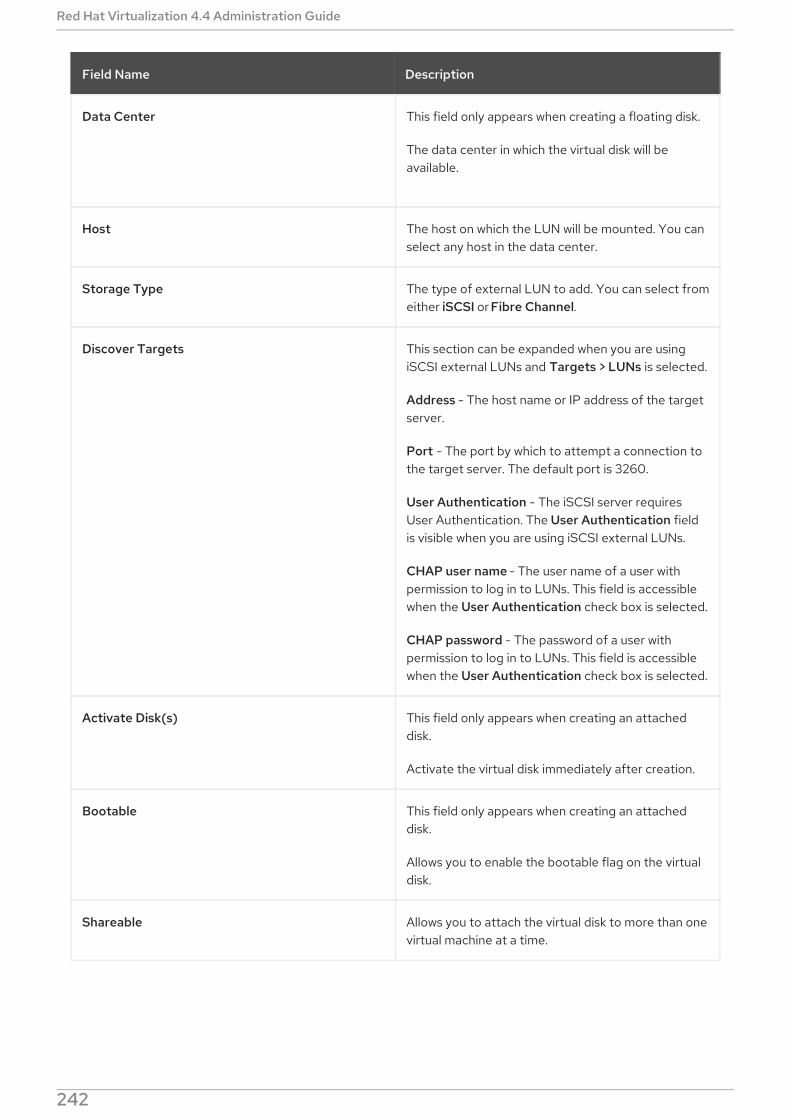
Data Center This field only appears when creating a floating disk.
The data center in which the virtual disk will beavailable.
Host The host on which the LUN will be mounted. You canselect any host in the data center.
Storage Type The type of external LUN to add. You can select fromeither iSCSI or Fibre Channel.
Discover Targets This section can be expanded when you are usingiSCSI external LUNs and Targets > LUNs is selected.
Address - The host name or IP address of the targetserver.
Port - The port by which to attempt a connection tothe target server. The default port is 3260.
User Authentication - The iSCSI server requiresUser Authentication. The User Authentication fieldis visible when you are using iSCSI external LUNs.
CHAP user name - The user name of a user withpermission to log in to LUNs. This field is accessiblewhen the User Authentication check box is selected.
CHAP password - The password of a user withpermission to log in to LUNs. This field is accessiblewhen the User Authentication check box is selected.
Activate Disk(s) This field only appears when creating an attacheddisk.
Activate the virtual disk immediately after creation.
Bootable This field only appears when creating an attacheddisk.
Allows you to enable the bootable flag on the virtualdisk.
Shareable Allows you to attach the virtual disk to more than onevirtual machine at a time.
Field Name Description
Red Hat Virtualization 4.4 Administration Guide
242

Read-Only This field only appears when creating an attacheddisk.
Allows you to set the disk as read-only. The samedisk can be attached as read-only to one virtualmachine, and as rewritable to another.
Enable Discard This field only appears when creating an attacheddisk.
Allows you to shrink a thin provisioned disk while thevirtual machine is up. With this option enabled, SCSIUNMAP commands issued from guest virtualmachines is passed on by QEMU to the underlyingstorage to free up the unused space.
Enable SCSI Pass-Through This field only appears when creating an attacheddisk.
Available when the Interface is set to VirtIO-SCSI.Selecting this check box enables passthrough of aphysical SCSI device to the virtual disk. A VirtIO-SCSI interface with SCSI passthrough enabledautomatically includes SCSI discard support. Read-Only is not supported when this check box isselected.
When this check box is not selected, the virtual diskuses an emulated SCSI device. Read-Only issupported on emulated VirtIO-SCSI disks.
Allow Privileged SCSI I/O This field only appears when creating an attacheddisk.
Available when the Enable SCSI Pass-Throughcheck box is selected. Selecting this check boxenables unfiltered SCSI Generic I/O (SG_IO) access,allowing privileged SG_IO commands on the disk.This is required for persistent reservations.
Using SCSI Reservation This field only appears when creating an attacheddisk.
Available when the Enable SCSI Pass-Through andAllow Privileged SCSI I/O check boxes are selected.Selecting this check box disables migration for anyvirtual machine using this disk, to prevent virtualmachines that are using SCSI reservation from losingaccess to the disk.
Field Name Description
CHAPTER 2. ADMINISTERING THE RESOURCES
243

IMPORTANT
Mounting a journaled file system requires read-write access. Using the Read-Only optionis not appropriate for virtual disks that contain such file systems (e.g. EXT3, EXT4, orXFS).
2.8.6.3. Overview of Live Storage Migration
Virtual disks can be migrated from one storage domain to another while the virtual machine to whichthey are attached is running. This is referred to as live storage migration. When a disk attached to arunning virtual machine is migrated, a snapshot of that disk’s image chain is created in the sourcestorage domain, and the entire image chain is replicated in the destination storage domain. As such,ensure that you have sufficient storage space in both the source storage domain and the destinationstorage domain to host both the disk image chain and the snapshot. A new snapshot is created on eachlive storage migration attempt, even when the migration fails.
Consider the following when using live storage migration:
You can live migrate multiple disks at one time.
Multiple disks for the same virtual machine can reside across more than one storage domain, butthe image chain for each disk must reside on a single storage domain.
You can live migrate disks between any two storage domains in the same data center.
You cannot live migrate direct LUN hard disk images or disks marked as shareable.
2.8.6.4. Moving a Virtual Disk
Move a virtual disk that is attached to a virtual machine or acts as a floating virtual disk from one storagedomain to another. You can move a virtual disk that is attached to a running virtual machine; this isreferred to as live storage migration. Alternatively, shut down the virtual machine before continuing.
Consider the following when moving a disk:
You can move multiple disks at the same time.
You can move disks between any two storage domains in the same data center.
If the virtual disk is attached to a virtual machine that was created based on a template andused the thin provisioning storage allocation option, you must copy the disks for the templateon which the virtual machine was based to the same storage domain as the virtual disk.
Procedure
1. Click Storage → Disks and select one or more virtual disks to move.
2. Click Move.
3. From the Target list, select the storage domain to which the virtual disk(s) will be moved.
4. From the Disk Profile list, select a profile for the disk(s), if applicable.
5. Click OK.
The virtual disks are moved to the target storage domain. During the move procedure, the Status
Red Hat Virtualization 4.4 Administration Guide
244

The virtual disks are moved to the target storage domain. During the move procedure, the Statuscolumn displays Locked and a progress bar indicating the progress of the move operation.
2.8.6.5. Changing the Disk Interface Type
Users can change a disk’s interface type after the disk has been created. This enables you to attach anexisting disk to a virtual machine that requires a different interface type. For example, a disk using the VirtIO interface can be attached to a virtual machine requiring the VirtIO-SCSI or IDE interface. Thisprovides flexibility to migrate disks for the purpose of backup and restore, or disaster recovery. The diskinterface for shareable disks can also be updated per virtual machine. This means that each virtualmachine that uses the shared disk can use a different interface type.
To update a disk interface type, all virtual machines using the disk must first be stopped.
Changing a Disk Interface Type*
1. Click Compute → Virtual Machines and stop the appropriate virtual machine(s).
2. Click the virtual machine’s name. This opens the details view.
3. Click the Disks tab and select the disk.
4. Click Edit.
5. From the Interface list, select the new interface type and click OK.
You can attach a disk to a different virtual machine that requires a different interface type.
Attaching a Disk to a Different Virtual Machine using a Different Interface Type
1. Click Compute → Virtual Machines and stop the appropriate virtual machine(s).
2. Click the virtual machine’s name. This opens the details view.
3. Click the Disks tab and select the disk.
4. Click Remove, then click OK.
5. Go back to Virtual Machines and click the name of the new virtual machine that the disk will beattached to.
6. Click the Disks tab, then click Attach.
7. Select the disk in the Attach Virtual Disks window and select the appropriate interface fromthe Interface drop-down.
8. Click OK.
2.8.6.6. Copying a Virtual Disk
You can copy a virtual disk from one storage domain to another. The copied disk can be attached tovirtual machines.
Procedure
1. Click Storage → Disks and select the virtual disk(s).
CHAPTER 2. ADMINISTERING THE RESOURCES
245

2. Click Copy .
3. Optionally, enter a new name in the Alias field.
4. From the Target list, select the storage domain to which the virtual disk(s) will be copied.
5. From the Disk Profile list, select a profile for the disk(s), if applicable.
6. Click OK.
The virtual disks have a status of Locked while being copied.
2.8.6.7. Improving disk performance
In the Administration Portal, on the virtual machine’s Resource Allocation tab, the default I/O ThreadsEnabled setting is checked (enabled), and the number of threads is 1.
Suppose a virtual machine has multiple disks that have VirtIO controllers, and its workloads makesignificant use of those controllers. In that case, you can improve performance by increasing the numberof I/O threads.
However, also consider that increasing the number of I/O threads decreases the virtual machine’s poolof threads. If your workloads do not use the VirtIO controllers and the threads you allocate to them,increasing the number of I/O threads might decrease overall performance.
To find the optimal number of threads, benchmark the performance of your virtual machine runningworkloads before and after you adjust the number of threads.
Procedure
1. On Compute → Virtual Machines, Power Off the virtual machine.
2. Click the name of the virtual machine.
3. In the details pane, click the Vm Devices tab.
4. Count the number of controllers whose Type is virtio or virtio-scsi.
5. Click Edit.
6. In the Edit Virtual Machine window, click the Resource Allocation tab.
7. Confirm that I/O Threads Enabled is checked (enabled).
8. To the right of I/O Threads Enabled, increase the number of threads, but do not exceednumber of controllers whose type is virtio or virtio-scsi.
9. Click OK.
10. In the details pane, click the Disks tab.
11. For each disk, use More Actions ( ) to Deactivate and Activate the disk. This action remapsthe disks to the controllers.
12. Click Run to start the virtual machine.
Red Hat Virtualization 4.4 Administration Guide
246

Verification steps
To see which controllers have an I/O thread, click Vm Devices in the details pane and look for ioThreadid= in the Spec Params column.
To see the mapping of disks to controllers, log into the host machine and enter the followingcommand:
Additional resources
Configuring High-Performance Virtual Machines, Templates, and Pools
Virtual Machine Resource Allocation Settings Explained
2.8.6.8. Uploading Images to a Data Storage Domain
You can upload virtual disk images and ISO images to your data storage domain in the AdministrationPortal or with the REST API. See Uploading Images to a Data Storage Domain for details.
2.8.6.9. Importing a Disk Image from an Imported Storage Domain
Import floating virtual disks from an imported storage domain.
NOTE
Only QEMU-compatible disks can be imported into the Manager.
Procedure
1. Click Storage → Domains.
2. Click the name of an imported storage domain. This opens the details view.
3. Click the Disk Import tab.
4. Select one or more disks and click Import.
5. Select the appropriate Disk Profile for each disk.
6. Click OK.
2.8.6.10. Importing an Unregistered Disk Image from an Imported Storage Domain
Import floating virtual disks from a storage domain. Floating disks created outside of a Red HatVirtualization environment are not registered with the Manager. Scan the storage domain to identifyunregistered floating disks to be imported.
NOTE
Only QEMU-compatible disks can be imported into the Manager.
Procedure
# virsh -r dumpxml virtual_machine_name
CHAPTER 2. ADMINISTERING THE RESOURCES
247

1. Click Storage → Domains.
2. Click the storage domain’s name. This opens the details view.
3. Click More Actions ( ), then click Scan Disks so that the Manager can identify unregistereddisks.
4. Click the Disk Import tab.
5. Select one or more disk images and click Import.
6. Select the appropriate Disk Profile for each disk.
7. Click OK.
2.8.6.11. Importing a Virtual Disk from an OpenStack Image Service
Virtual disks managed by an OpenStack Image Service can be imported into the Red Hat VirtualizationManager if that OpenStack Image Service has been added to the Manager as an external provider.
1. Click Storage → Domains.
2. Click the OpenStack Image Service domain’s name. This opens the details view.
3. Click the Images tab and select an image.
4. Click Import.
5. Select the Data Center into which the image will be imported.
6. From the Domain Name drop-down list, select the storage domain in which the image will bestored.
7. Optionally, select a quota to apply to the image from the Quota drop-down list.
8. Click OK.
The disk can now be attached to a virtual machine.
2.8.6.12. Exporting a Virtual Disk to an OpenStack Image Service
Virtual disks can be exported to an OpenStack Image Service that has been added to the Manager as anexternal provider.
IMPORTANT
Virtual disks can only be exported if they do not have multiple volumes, are not thinprovisioned, and do not have any snapshots.
1. Click Storage → Disks and select the disks to export.
2. Click More Actions ( ), then click Export.
3. From the Domain Name drop-down list, select the OpenStack Image Service to which the diskswill be exported.
Red Hat Virtualization 4.4 Administration Guide
248

4. From the Quota drop-down list, select a quota for the disks if a quota is to be applied.
5. Click OK.
2.8.6.13. Reclaiming Virtual Disk Space
Virtual disks that use thin provisioning do not automatically shrink after deleting files from them. Forexample, if the actual disk size is 100GB and you delete 50GB of files, the allocated disk size remains at100GB, and the remaining 50GB is not returned to the host, and therefore cannot be used by othervirtual machines. This unused disk space can be reclaimed by the host by performing a sparsify operationon the virtual machine’s disks. This transfers the free space from the disk image to the host. You cansparsify multiple virtual disks in parallel.
Perform this operation before cloning a virtual machine, creating a template based on a virtual machine,or cleaning up a storage domain’s disk space.
Limitations
NFS storage domains must use NFS version 4.2 or higher.
You cannot sparsify a disk that uses a direct LUN.
You cannot sparsify a disk that uses a preallocated allocation policy. If you are creating a virtualmachine from a template, you must select Thin from the Storage Allocation field, or if selectingClone, ensure that the template is based on a virtual machine that has thin provisioning.
You can only sparsify active snapshots.
Sparsifying a Disk
1. Click Compute → Virtual Machines and shut down the required virtual machine.
2. Click the virtual machine’s name. This opens the details view.
3. Click the Disks tab. Ensure that the disk’s status is OK.
4. Click More Actions ( ), then click Sparsify.
5. Click OK.
A Started to sparsify event appears in the Events tab during the sparsify operation and the disk’sstatus displays as Locked. When the operation is complete, a Sparsified successfully event appears inthe Events tab and the disk’s status displays as OK. The unused disk space has been returned to thehost and is available for use by other virtual machines.
2.9. EXTERNAL PROVIDERS
2.9.1. Introduction to External Providers in Red Hat Virtualization
In addition to resources managed by the Red Hat Virtualization Manager itself, Red Hat Virtualizationcan also take advantage of resources managed by external sources. The providers of these resources,known as external providers, can provide resources such as virtualization hosts, virtual machine images,and networks.
Red Hat Virtualization currently supports the following external providers:
CHAPTER 2. ADMINISTERING THE RESOURCES
249

Red Hat Satellite for Host Provisioning
Satellite is a tool for managing all aspects of the life cycle of both physical and virtual hosts. In RedHat Virtualization, hosts managed by Satellite can be added to and used by the Red Hat VirtualizationManager as virtualization hosts. After you add a Satellite instance to the Manager, the hosts managedby the Satellite instance can be added by searching for available hosts on that Satellite instancewhen adding a new host. For more information on installing Red Hat Satellite and managing hostsusing Red Hat Satellite, see the Red Hat Satellite Quick Start Guide and Red Hat Satellite ManagingHosts.
KubeVirt/Openshift Virtualization
Openshift Virtualization (formerly container-native virtualization or "CNV") enables you to bringvirtual machines (VMs) into containerized workflows so you can develop, manage, and deploy virtualmachines side-by-side with containers and serverless. In RHV Manager, adding this provider is one ofthe requirements for using Openshift Virtualization. For details, see Adding KubeVirt/OpenshiftVirtualization as an external provider.
OpenStack Image Service (Glance) for Image Management
OpenStack Image Service provides a catalog of virtual machine images. In Red Hat Virtualization,these images can be imported into the Red Hat Virtualization Manager and used as floating disks orattached to virtual machines and converted into templates. After you add an OpenStack ImageService to the Manager, it appears as a storage domain that is not attached to any data center.Virtual disks in a Red Hat Virtualization environment can also be exported to an OpenStack ImageService as virtual disks.
NOTE
Support for OpenStack Glance is now deprecated. This functionality will be removed in alater release.
VMware for Virtual Machine Provisioning
Virtual machines created in VMware can be converted using V2V (virt-v2v) and imported into a RedHat Virtualization environment. After you add a VMware provider to the Manager, you can import thevirtual machines it provides. V2V conversion is performed on a designated proxy host as part of theimport operation.
RHEL 5 Xen for Virtual Machine Provisioning
Virtual machines created in RHEL 5 Xen can be converted using V2V (virt-v2v) and imported into aRed Hat Virtualization environment. After you add a RHEL 5 Xen host to the Manager, you can importthe virtual machines it provides. V2V conversion is performed on a designated proxy host as part ofthe import operation.
KVM for Virtual Machine Provisioning
Virtual machines created in KVM can be imported into a Red Hat Virtualization environment. Afteryou add a KVM host to the Manager, you can import the virtual machines it provides.
Open Virtual Network (OVN) for Network Provisioning
Open Virtual Network (OVN) is an Open vSwitch (OVS) extension that provides software-definednetworks. After you add OVN to the Manager, you can import existing OVN networks, and create newOVN networks from the Manager. You can also automatically install OVN on the Manager using engine-setup.
2.9.2. Adding External Providers
2.9.2.1. Adding a Red Hat Satellite Instance for Host Provisioning
Add a Satellite instance for host provisioning to the Red Hat Virtualization Manager. Red Hat
Red Hat Virtualization 4.4 Administration Guide
250

Add a Satellite instance for host provisioning to the Red Hat Virtualization Manager. Red HatVirtualization 4.2 is supported with Red Hat Satellite 6.1.
Procedure
1. Click Administration → Providers.
2. Click Add.
3. Enter a Name and Description.
4. Select Foreman/Satellite from the Type drop-down list.
5. Enter the URL or fully qualified domain name of the machine on which the Satellite instance isinstalled in the Provider URL text field. You do not need to specify a port number.
IMPORTANT
IP addresses cannot be used to add a Satellite instance.
6. Select the Requires Authentication check box.
7. Enter the Username and Password for the Satellite instance. You must use the same username and password as you would use to log in to the Satellite provisioning portal.
8. Test the credentials:
a. Click Test to test whether you can authenticate successfully with the Satellite instanceusing the provided credentials.
b. If the Satellite instance uses SSL, the Import provider certificates window opens; click OKto import the certificate that the Satellite instance provides to ensure the Manager cancommunicate with the instance.
9. Click OK.
2.9.2.2. Adding an OpenStack Image (Glance) Instance for Image Management
NOTE
Support for OpenStack Glance is now deprecated. This functionality will be removed in alater release.
Add an OpenStack Image (Glance) instance for image management to the Red Hat VirtualizationManager.
Procedure
1. Click Administration → Providers.
2. Click Add and enter the details in the General Settings tab. For more information on thesefields, see Add Provider General Settings Explained .
3. Enter a Name and Description.
CHAPTER 2. ADMINISTERING THE RESOURCES
251

4. Select OpenStack Image from the Type drop-down list.
5. Enter the URL or fully qualified domain name of the machine on which the OpenStack Imageinstance is installed in the Provider URL text field.
6. Optionally, select the Requires Authentication check box and enter the Username andPassword for the OpenStack Image instance user registered in Keystone. You must also definethe authentication URL of the Keystone server by defining the Protocol (must be HTTP),Hostname, and API Port.Enter the Tenant for the OpenStack Image instance.
7. Test the credentials:
a. Click Test to test whether you can authenticate successfully with the OpenStack Imageinstance using the provided credentials.
b. If the OpenStack Image instance uses SSL, the Import provider certificates window opens.Click OK to import the certificate that the OpenStack Image instance provides to ensurethe Manager can communicate with the instance.
8. Click OK.
2.9.2.3. Adding KubeVirt/Openshift Virtualization as an external provider
To run virtual machines in a container on the OpenShift Container Platform, you add OpenShift as anexternal provider in Red Hat Virtualization.
NOTE
This capability is known as OpenShift Virtualization.
Prerequisites
In OpenShift Container Platform, your cluster is configured for OpenShift Virtualization .
Procedure
1. In the RHV Administration Portal, go to Administration → Providers and click New.
2. In Add Provider, set Type to KubeVirt/Openshift Virtualization.
3. Enter the Provider URL and Token, which are required.
4. Optional: Enter values for Advanced parameters such as Certificate Authority, PrometheusURL, and Prometheus Certificate Authority.
5. Click Test to verify the connection to the new provider.
6. Click OK to finish adding this new provider.
Verification steps
1. In the RHV Administration Portal, click Compute → Clusters.
2. Click the name of new cluster you just created. This cluster name, kubevirt for example, is basedon the name of the provider. This action opens the cluster details view.
Red Hat Virtualization 4.4 Administration Guide
252

3. Click the Hosts tab to verify that the status of the OpenShift Container Platform worker nodesis up.
NOTE
The status of the control plane nodes is down, even if they are running, becausethey cannot host virtual machines.
4. Use Compute → Virtual Machines to deploy a virtual machine to the new cluster.
5. In the OpenShift Container Platform web console, in the Administrator perspective, useWorkloads → Virtual Machines to view the virtual machine you deployed.
Additional resources
About OpenShift Virtualization
Add Provider General Settings Explained
2.9.2.4. Adding a VMware Instance as a Virtual Machine Provider
Add a VMware vCenter instance to import virtual machines from VMware to the Red Hat VirtualizationManager.
Red Hat Virtualization uses V2V to convert VMware virtual machines to the correct format before theyare imported. The virt-v2v package must be installed on at least one host. The virt-v2v package isavailable by default on Red Hat Virtualization Hosts (RHVH) and is installed on Red Hat Enterprise Linuxhosts as a dependency of VDSM when added to the Red Hat Virtualization environment. Red HatEnterprise Linux hosts must be Red Hat Enterprise Linux 7.2 or later.
NOTE
The virt-v2v package is not available on ppc64le architecture; these hosts cannot beused as proxy hosts.
Procedure
1. Click Administration → Providers.
2. Click Add.
3. Enter a Name and Description.
4. Select VMware from the Type drop-down list.
5. Select the Data Center into which VMware virtual machines will be imported, or select AnyData Center to instead specify the destination data center during individual import operations.
6. Enter the IP address or fully qualified domain name of the VMware vCenter instance in thevCenter field.
7. Enter the IP address or fully qualified domain name of the host from which the virtual machineswill be imported in the ESXi field.
8. Enter the name of the data center in which the specified ESXi host resides in the Data Center
CHAPTER 2. ADMINISTERING THE RESOURCES
253

8. Enter the name of the data center in which the specified ESXi host resides in the Data Centerfield.
9. If you have exchanged the SSL certificate between the ESXi host and the Manager, leave theVerify server’s SSL certificate check box selected to verify the ESXi host’s certificate. If not,clear the check box.
10. Select a host in the chosen data center with virt-v2v installed to serve as the Proxy Host duringvirtual machine import operations. This host must also be able to connect to the network of theVMware vCenter external provider. If you selected Any Data Center above, you cannot choosethe host here, but instead can specify a host during individual import operations.
11. Enter the Username and Password for the VMware vCenter instance. The user must haveaccess to the VMware data center and ESXi host on which the virtual machines reside.
12. Test the credentials:
a. Click Test to test whether you can authenticate successfully with the VMware vCenterinstance using the provided credentials.
b. If the VMware vCenter instance uses SSL, the Import provider certificates window opens;click OK to import the certificate that the VMware vCenter instance provides to ensure theManager can communicate with the instance.
13. Click OK.
To import virtual machines from the VMware external provider, see Importing a Virtual Machine from aVMware Provider in the Virtual Machine Management Guide .
2.9.2.5. Adding a RHEL 5 Xen Host as a Virtual Machine Provider
Add a RHEL 5 Xen host to import virtual machines from Xen to Red Hat Virtualization.
Red Hat Virtualization uses V2V to convert RHEL 5 Xen virtual machines to the correct format beforethey are imported. The virt-v2v package must be installed on at least one host. The virt-v2v package isavailable by default on Red Hat Virtualization Hosts (RHVH) and is installed on Red Hat Enterprise Linuxhosts as a dependency of VDSM when added to the Red Hat Virtualization environment. Red HatEnterprise Linux hosts must be Red Hat Enterprise Linux 7.2 or later.
NOTE
The virt-v2v package is not available on ppc64le architecture; these hosts cannot beused as proxy hosts.
Procedure
1. Enable public key authentication between the proxy host and the RHEL 5 Xen host:
a. Log in to the proxy host and generate SSH keys for the vdsm user.
b. Copy the vdsm user’s public key to the RHEL 5 Xen host. The proxy host’s known_hostsfile will also be updated to include the host key of the RHEL 5 Xen host.
# sudo -u vdsm ssh-keygen
# sudo -u vdsm ssh-copy-id [email protected]
Red Hat Virtualization 4.4 Administration Guide
254

c. Log in to the RHEL 5 Xen host to verify that the login works correctly.
2. Click Administration → Providers.
3. Click Add.
4. Enter a Name and Description.
5. Select XEN from the Type drop-down list.
6. Select the Data Center into which Xen virtual machines will be imported, or select Any DataCenter to specify the destination data center during individual import operations.
7. Enter the URI of the RHEL 5 Xen host in the URI field.
8. Select a host in the chosen data center with virt-v2v installed to serve as the Proxy Host duringvirtual machine import operations. This host must also be able to connect to the network of theRHEL 5 Xen external provider. If you selected Any Data Center above, you cannot choose thehost here, but instead can specify a host during individual import operations.
9. Click Test to test whether you can authenticate successfully with the RHEL 5 Xen host.
10. Click OK.
To import virtual machines from a RHEL 5 Xen external provider, see Importing a Virtual Machine from aRHEL 5 Xen Host in the Virtual Machine Management Guide .
2.9.2.6. Adding a KVM Host as a Virtual Machine Provider
Add a KVM host to import virtual machines from KVM to Red Hat Virtualization Manager.
Procedure
1. Enable public key authentication between the proxy host and the KVM host:
a. Log in to the proxy host and generate SSH keys for the vdsm user.
b. Copy the vdsm user’s public key to the KVM host. The proxy host’s known_hosts file willalso be updated to include the host key of the KVM host.
c. Log in to the KVM host to verify that the login works correctly.
2. Click Administration → Providers.
3. Click Add.
4. Enter a Name and Description.
# sudo -u vdsm ssh [email protected]
# sudo -u vdsm ssh-keygen
# sudo -u vdsm ssh-copy-id [email protected]
# sudo -u vdsm ssh [email protected]
CHAPTER 2. ADMINISTERING THE RESOURCES
255

5. Select KVM from the Type drop-down list.
6. Select the Data Center into which KVM virtual machines will be imported, or select Any DataCenter to specify the destination data center during individual import operations.
7. Enter the URI of the KVM host in the URI field.
8. Select a host in the chosen data center to serve as the Proxy Host during virtual machineimport operations. This host must also be able to connect to the network of the KVM externalprovider. If you selected Any Data Center in the Data Center field above, you cannot choosethe host here. The field is greyed out and shows Any Host in Data Center. Instead you canspecify a host during individual import operations.
9. Optionally, select the Requires Authentication check box and enter the Username andPassword for the KVM host. The user must have access to the KVM host on which the virtualmachines reside.
10. Click Test to test whether you can authenticate successfully with the KVM host using theprovided credentials.
11. Click OK.
To import virtual machines from a KVM external provider, see Importing a Virtual Machine from a KVMHost in the Virtual Machine Management Guide .
2.9.2.7. Adding Open Virtual Network (OVN) as an External Network Provider
You can use Open Virtual Network (OVN) to create overlay virtual networks that enable communicationamong the virtual machines without adding VLANs or changing the infrastructure. OVN is an extensionof Open vSwitch (OVS) that provides native support for virtual L2 and L3 overlays.
You can also connect an OVN network to a native Red Hat Virtualization network. See Connecting anOVN Network to a Physical Network for more information. This feature is available as a TechnologyPreview only.
The ovirt-provider-ovn exposes an OpenStack Networking REST API. You can use this API to createnetworks, subnets, ports, and routers. For details, see OpenStack Networking API v2.0 .
For more details, see the Open vSwitch Documentation and Open vSwitch Manpages.
2.9.2.7.1. Installing a New OVN Network Provider
Installing OVN using engine-setup performs the following steps:
Sets up an OVN central server on the Manager machine.
Adds OVN to Red Hat Virtualization as an external network provider.
On the Default cluster only, sets the Default Network Provider to ovirt-provider-ovn.
IMPORTANT
qemu+ssh://[email protected]/system
Red Hat Virtualization 4.4 Administration Guide
256

IMPORTANT
Installing OVN changes the Default Network Provider setting on the Defaultcluster only, not on other clusters.
Changing the Default Network Provider setting does not update hosts in thatcluster to use the Default Network Provider.
For hosts and virtual machines to use OVN, perform the addition tasks describedin the "Next steps" at the end of this topic.
Procedure
1. Optional: If you use a preconfigured answer file with engine-setup, add the following entry toinstall OVN:
OVESETUP_OVN/ovirtProviderOvn=bool:True
2. Run engine-setup on the Manager machine.
3. If you do not use a preconfigured answer file, answer Yes when the engine-setup asks:
Configuring ovirt-provider-ovn also sets the Default cluster's default network provider to ovirt-provider-ovn.Non-Default clusters may be configured with an OVN after installation.Configure ovirt-provider-ovn (Yes, No) [Yes]:
4. Answer the following question:
Use default credentials (admin@internal) for ovirt-provider-ovn (Yes, No) [Yes]?:
If Yes, engine-setup uses the default engine user and password specified earlier in the setupprocess. This option is only available during new installations.
oVirt OVN provider user[admin]:oVirt OVN provider password[empty]:
You can use the default values or specify the oVirt OVN provider user and password.
NOTE
To change the authentication method later, you can edit the /etc/ovirt-provider-ovn/conf.d/10_engine_setup.conf file, or create a new /etc/ovirt-provider-ovn/conf.d/20_engine_setup.conf file. Restart the ovirt-provider-ovn service for thechange to take effect. See oVirt external network provider for OVN for more informationabout OVN authentication.
Next steps
Before you can create virtual machines that use a newly-installed OVN network, complete theseadditional steps:
1. Add a network to the Default cluster.
a. While doing so, select the Create on external provider check box. This creates a network
CHAPTER 2. ADMINISTERING THE RESOURCES
257

a. While doing so, select the Create on external provider check box. This creates a networkbased on ovirt-provider-ovn.
b. Optional: To connect the OVN network to a physical network , select the Connect tophysical network check box and specify the Red Hat Virtualization network to use.
c. Optional: Determine whether the network should use a security group and select one fromthe Security Groups drop-down. For more information on the available options see LogicalNetwork General Settings Explained.
2. Add hosts to or reinstall the hosts on the Default cluster so they use the cluster’s new DefaultNetwork Provider, ovirt-provider-ovn.
3. Optional: Edit non-Default clusters and set Default Network Provider to ovirt-provider-ovn.
a. Optional: Reinstall the hosts on each non-Default cluster so they use the cluster’s newDefault Network Provider, ovirt-provider-ovn.
Additional resources
To configure your hosts to use an existing, non-default network, see Configuring Hosts for anOVN tunnel network.
2.9.2.7.2. Updating the OVN Tunnel Network on a Single Host
You can update the OVN tunnel network on a single host with vdsm-tool:
NOTE
The Host_FQDN must match the FQDN that is specified in the engine for this host.
Example 2.4. Updating a Host with vdsm-tool
2.9.2.7.3. Connecting an OVN Network to a Physical Network
IMPORTANT
This feature relies on Open vSwitch support, which is available only as a TechnologyPreview in Red Hat Virtualization. Technology Preview features are not supported withRed Hat production service level agreements (SLAs), might not be functionally complete,and Red Hat does not recommend using them for production. These features provideearly access to upcoming product features, enabling customers to test functionality andprovide feedback during the development process.
For more information on Red Hat Technology Preview features support scope, seeTechnology Preview Features Support Scope .
You can create an external provider network that overlays a native Red Hat Virtualization network so
# vdsm-tool ovn-config OVN_Central_IP Tunneling_IP_or_Network_Name Host_FQDN
# vdsm-tool ovn-config 192.168.0.1 MyNetwork MyFQDN
Red Hat Virtualization 4.4 Administration Guide
258

You can create an external provider network that overlays a native Red Hat Virtualization network sothat the virtual machines on each appear to be sharing the same subnet.
IMPORTANT
If you created a subnet for the OVN network, a virtual machine using that network willreceive an IP address from there. If you want the physical network to allocate the IPaddress, do not create a subnet for the OVN network.
Prerequisites
The cluster must have OVS selected as the Switch Type. Hosts added to this cluster must nothave any pre-existing Red Hat Virtualization networks configured, such as the ovirtmgmtbridge.
The physical network must be available on the hosts. You can enforce this by setting thephysical network as required for the cluster (in the Manage Networks window, or the Clustertab of the New Logical Network window).
Procedure
1. Click Compute → Clusters.
2. Click the cluster’s name. This opens the details view.
3. Click the Logical Networks tab and click Add Network.
4. Enter a Name for the network.
5. Select the Create on external provider check box. ovirt-provider-ovn is selected by default.
6. Select the Connect to physical network check box if it is not already selected by default.
7. Choose the physical network to connect the new network to:
Click the Data Center Network radio button and select the physical network from thedrop-down list. This is the recommended option.
Click the Custom radio button and enter the name of the physical network. If the physicalnetwork has VLAN tagging enabled, you must also select the Enable VLAN tagging checkbox and enter the physical network’s VLAN tag.
IMPORTANT
The physical network’s name must not be longer than 15 characters, orcontain special characters.
8. Click OK.
////Removing for BZ2006228include::topics/Adding_an_External_Network_Provider.adoc[leveloffset=+2]
2.9.2.8. Add Provider General Settings Explained
The General tab in the Add Provider window allows you to register the core details of the external
CHAPTER 2. ADMINISTERING THE RESOURCES
259

The General tab in the Add Provider window allows you to register the core details of the externalprovider.
Table 2.38. Add Provider: General Settings
Setting Explanation
Name A name to represent the provider in the Manager.
Description A plain text, human-readable description of theprovider.
Type The type of external provider. Changing this settingalters the available fields for configuring the provider.
External Network Provider
Networking Plugin : Determines whichimplementation of the driver will be used onthe host to handle NIC operations. If anexternal network provider with the oVirt Network Provider for OVN plugin isadded as the default network provider for acluster, this also determines which driver willbe installed on hosts added to the cluster.
Automatic Synchronization: Allows you tospecify whether the provider will beautomatically synchronized with existingnetworks.
Provider URL: The URL or fully qualifieddomain name of the machine on which theexternal network provider is hosted. Youmust add the port number for the externalnetwork provider to the end of the URL orfully qualified domain name. By default, thisport number is 9696.
Read Only: Allows you to specify whetherthe external network provider can bemodified from the Administration Portal.
Requires Authentication: Allows you tospecify whether authentication is requiredto access the external network provider.
Username: A user name for connecting tothe external network provider. If you areauthenticating with Active Directory, theuser name must be in the format ofusername@domain@auth_profile instead ofthe default username@domain.
Password: The password against which theabove user name is to be authenticated.
Protocol: The protocol used tocommunicate with the Keystone server. Thedefault is HTTPS.
Hostname: The IP address or hostname of
Red Hat Virtualization 4.4 Administration Guide
260

Hostname: The IP address or hostname ofthe Keystone server.
API port: The API port number of theKeystone server.
API Version: The version of the Keystoneserver. The value is v2.0 and the field isdisabled.
Tenant Name: Optional. The name of thetenant of which the external networkprovider is a member.
Foreman/Satellite
Provider URL: The URL or fully qualifieddomain name of the machine that hosts theSatellite instance. You do not need to addthe port number to the end of the URL orfully qualified domain name.
Requires Authentication: Allows you tospecify whether authentication is requiredfor the provider. Authentication ismandatory when Foreman/Satellite isselected.
Username: A user name for connecting tothe Satellite instance. This user name mustbe the user name used to log in to theprovisioning portal on the Satellite instance.
Password: The password against which theabove user name is to be authenticated.This password must be the password usedto log in to the provisioning portal on theSatellite instance.
KubeVirt/OpenShift Virtualization
Provider URL: The URL or fully qualifieddomain name and port number of theOpenShift Container Platform API. Bydefault, this port number is 6443.
Token The OAuth access token forauthenticating this connection to the API.
Certificate Authority The CA certificate tobe trusted when making https requests.
Prometheus URL The URL for theOpenShift cluster’s prometheus service. Ifyou do not provide this URL, the softwarewill try to automatically detect this URL.
Prometheus Certificate Authority TheX509 certificate for prometheus. If you donot specify this CA, the provider uses theKubeVirt CA instead.
OpenStack Image
Provider URL: The URL or fully qualified
Setting Explanation
CHAPTER 2. ADMINISTERING THE RESOURCES
261

domain name of the machine on which theOpenStack Image service is hosted. Youmust add the port number for theOpenStack Image service to the end of theURL or fully qualified domain name. Bydefault, this port number is 9292.
Requires Authentication: Allows you tospecify whether authentication is requiredto access the OpenStack Image service.
Username: A user name for connecting tothe Keystone server. This user name mustbe the user name for the OpenStack Imageservice registered in the Keystone instanceof which the OpenStack Image service is amember.
Password: The password against which theabove user name is to be authenticated.This password must be the password for theOpenStack Image service registered in theKeystone instance of which the OpenStackImage service is a member.
Protocol: The protocol used tocommunicate with the Keystone server. Thismust be set to HTTP.
Hostname: The IP address or hostname ofthe Keystone server.
API port: The API port number of theKeystone server.
API Version: The version of the Keystoneservice. The value is v2.0 and the field isdisabled.
Tenant Name: The name of the OpenStacktenant of which the OpenStack Imageservice is a member.
OpenStack Volume
Data Center : The data center to whichOpenStack Volume storage volumes will beattached.
Provider URL: The URL or fully qualifieddomain name of the machine on which theOpenStack Volume instance is hosted. Youmust add the port number for theOpenStack Volume instance to the end ofthe URL or fully qualified domain name. Bydefault, this port number is 8776.
Requires Authentication: Allows you tospecify whether authentication is requiredto access the OpenStack Volume service.
Username: A user name for connecting tothe Keystone server. This user name mustbe the user name for OpenStack Volume
Setting Explanation
Red Hat Virtualization 4.4 Administration Guide
262

registered in the Keystone instance of whichthe OpenStack Volume instance is amember.
Password: The password against which theabove user name is to be authenticated.This password must be the password forOpenStack Volume registered in theKeystone instance of which the OpenStackVolume instance is a member.
Protocol: The protocol used tocommunicate with the Keystone server. Thismust be set to HTTP.
Hostname: The IP address or hostname ofthe Keystone server.
API port: The API port number of theKeystone server.
API Version: The version of the Keystoneserver. The value is v2.0 and the field isdisabled.
Tenant Name: The name of the OpenStacktenant of which the OpenStack Volumeinstance is a member.
VMware
Data Center : Specify the data center intowhich VMware virtual machines will beimported, or select Any Data Center tospecify the destination data center duringindividual import operations (using theImport function in the Virtual Machinestab).
vCenter: The IP address or fully qualifieddomain name of the VMware vCenterinstance.
ESXi: The IP address or fully qualifieddomain name of the host from which thevirtual machines will be imported.
Data Center : The name of the data centerin which the specified ESXi host resides.
Cluster: The name of the cluster in whichthe specified ESXi host resides.
Verify server’s SSL certificate: Specifywhether the ESXi host’s certificate will beverified on connection.
Proxy Host: Select a host in the chosendata center with virt-v2v installed to serveas the host during virtual machine importoperations. This host must also be able toconnect to the network of the VMwarevCenter external provider. If you selectedAny Data Center, you cannot choose thehost here, but can specify a host during
Setting Explanation
CHAPTER 2. ADMINISTERING THE RESOURCES
263

individual import operations (using theImport function in the Virtual Machinestab).
Username: A user name for connecting tothe VMware vCenter instance. The usermust have access to the VMware datacenter and ESXi host on which the virtualmachines reside.
Password: The password against which theabove user name is to be authenticated.
RHEL 5 Xen
Data Center : Specify the data center intowhich Xen virtual machines will be imported,or select Any Data Center to insteadspecify the destination data center duringindividual import operations (using theImport function in the Virtual Machinestab).
URI: The URI of the RHEL 5 Xen host.
Proxy Host: Select a host in the chosendata center with virt-v2v installed to serveas the host during virtual machine importoperations. This host must also be able toconnect to the network of the RHEL 5 Xenexternal provider. If you selected Any DataCenter, you cannot choose the host here,but instead can specify a host duringindividual import operations (using theImport function in the Virtual Machinestab).
KVM
Data Center : Specify the data center intowhich KVM virtual machines will beimported, or select Any Data Center toinstead specify the destination data centerduring individual import operations (usingthe Import function in the Virtual Machinestab).
URI: The URI of the KVM host.
Proxy Host: Select a host in the chosendata center to serve as the host duringvirtual machine import operations. This hostmust also be able to connect to the networkof the KVM external provider. If youselected Any Data Center, you cannotchoose the host here, but instead canspecify a host during individual importoperations (using the Import function in theVirtual Machines tab).
Requires Authentication: Allows you tospecify whether authentication is requiredto access the KVM host.
Username: A user name for connecting to
Setting Explanation
Red Hat Virtualization 4.4 Administration Guide
264

Username: A user name for connecting tothe KVM host.
Password: The password against which theabove user name is to be authenticated.
Test Allows users to test the specified credentials. Thisbutton is available to all provider types.
Setting Explanation
2.9.3. Editing an External Provider
Procedure
1. Click Administration → Providers and select the external provider to edit.
2. Click Edit.
3. Change the current values for the provider to the preferred values.
4. Click OK.
2.9.4. Removing an External Provider
Procedure
1. Click Administration → Providers and select the external provider to remove.
2. Click Remove.
3. Click OK.
CHAPTER 2. ADMINISTERING THE RESOURCES
265

CHAPTER 3. ADMINISTERING THE ENVIRONMENT
3.1. ADMINISTERING THE SELF-HOSTED ENGINE
3.1.1. Maintaining the Self-hosted engine
3.1.1.1. Self-hosted engine maintenance modes explained
The maintenance modes enable you to start, stop, and modify the Manager virtual machine withoutinterference from the high-availability agents, and to restart and modify the self-hosted engine nodes inthe environment without interfering with the Manager.
There are three maintenance modes:
global - All high-availability agents in the cluster are disabled from monitoring the state of theManager virtual machine. The global maintenance mode must be applied for any setup orupgrade operations that require the ovirt-engine service to be stopped, such as upgrading to alater version of Red Hat Virtualization.
local - The high-availability agent on the node issuing the command is disabled frommonitoring the state of the Manager virtual machine. The node is exempt from hosting theManager virtual machine while in local maintenance mode; if hosting the Manager virtualmachine when placed into this mode, the Manager will migrate to another node, provided thereis one available. The local maintenance mode is recommended when applying system changesor updates to a self-hosted engine node.
none - Disables maintenance mode, ensuring that the high-availability agents are operating.
3.1.1.2. Setting local maintenance mode
Enabling local maintenance mode stops the high-availability agent on a single self-hosted engine node.
Setting the local maintenance mode from the Administration Portal
1. Put a self-hosted engine node into local maintenance mode:
a. In the Administration Portal, click Compute → Hosts and select a self-hosted engine node.
b. Click Management → Maintenance and OK. Local maintenance mode is automaticallytriggered for that node.
2. After you have completed any maintenance tasks, disable the maintenance mode:
a. In the Administration Portal, click Compute → Hosts and select the self-hosted enginenode.
b. Click Management → Activate.
Setting the local maintenance mode from the command line
1. Log in to a self-hosted engine node and put it into local maintenance mode:
# hosted-engine --set-maintenance --mode=local
Red Hat Virtualization 4.4 Administration Guide
266

2. After you have completed any maintenance tasks, disable the maintenance mode:
# hosted-engine --set-maintenance --mode=none
3.1.1.3. Setting global maintenance mode
Enabling global maintenance mode stops the high-availability agents on all self-hosted engine nodes inthe cluster.
Setting the global maintenance mode from the Administration Portal
1. Put all of the self-hosted engine nodes into global maintenance mode:
a. In the Administration Portal, click Compute → Hosts and select any self-hosted enginenode.
b. Click More Actions ( ), then click Enable Global HA Maintenance.
2. After you have completed any maintenance tasks, disable the maintenance mode:
a. In the Administration Portal, click Compute → Hosts and select any self-hosted enginenode.
b. Click More Actions ( ), then click Disable Global HA Maintenance.
Setting the global maintenance mode from the command line
1. Log in to any self-hosted engine node and put it into global maintenance mode:
# hosted-engine --set-maintenance --mode=global
2. After you have completed any maintenance tasks, disable the maintenance mode:
# hosted-engine --set-maintenance --mode=none
3.1.2. Administering the Manager Virtual Machine
The hosted-engine utility provides many commands to help administer the Manager virtual machine.You can run hosted-engine on any self-hosted engine node. To see all available commands, run hosted-engine --help. For additional information on a specific command, run hosted-engine --command --help.
3.1.2.1. Updating the Self-Hosted Engine Configuration
To update the self-hosted engine configuration, use the hosted-engine --set-shared-configcommand. This command updates the self-hosted engine configuration on the shared storage domainafter the initial deployment.
To see the current configuration values, use the hosted-engine --get-shared-config command.
To see a list of all available configuration keys and their corresponding types, enter the followingcommand:
CHAPTER 3. ADMINISTERING THE ENVIRONMENT
267

Where type is one of the following:
he_local Sets values in the local instance of etc/ovirt-hosted-engine/hosted-engine.conf on thelocal host, so only that host uses the new values. To enable the new value, restart the ovirt-ha-agent and ovirt-ha-broker services.
he_shared Sets values in etc/ovirt-hosted-engine/hosted-engine.conf on shared storage, so allhosts that are deployed after a configuration change use these values. To enable the newvalue on a host, redeploy that host.
ha Sets values in /var/lib/ovirt-hosted-engine-ha/ha.conf on local storage. New settingstake effect immediately.
broker Sets values in /var/lib/ovirt-hosted-engine-ha/broker.conf on local storage. Restart theovirt-ha-broker service to enable new settings.
3.1.2.2. Configuring Email Notifications
You can configure email notifications using SMTP for any HA state transitions on the self-hostedengine nodes. The keys that can be updated include: smtp-server, smtp-port, source-email, destination-emails, and state_transition.
To configure email notifications:
1. On a self-hosted engine node, set the smtp-server key to the desired SMTP server address:
NOTE
To verify that the self-hosted engine configuration file has been updated, run:
2. Check that the default SMTP port (port 25) has been configured:
# hosted-engine --get-shared-config smtp-port --type=brokerbroker : 25, type : broker
3. Specify an email address you want the SMTP server to use to send out email notifications. Onlyone address can be specified.
4. Specify the destination email address to receive email notifications. To specify multiple emailaddresses, separate each address by a comma.
# hosted-engine --set-shared-config key --type=type --help
# hosted-engine --set-shared-config smtp-server smtp.example.com --type=broker
# hosted-engine --get-shared-config smtp-server --type=brokerbroker : smtp.example.com, type : broker
# hosted-engine --set-shared-config source-email [email protected] --type=broker
Red Hat Virtualization 4.4 Administration Guide
268

To verify that SMTP has been properly configured for your self-hosted engine environment, change theHA state on a self-hosted engine node and check if email notifications were sent. For example, you canchange the HA state by placing HA agents into maintenance mode. See Maintaining the Self-HostedEngine for more information.
3.1.3. Configuring Memory Slots Reserved for the Self-Hosted Engine on AdditionalHosts
If the Manager virtual machine shuts down or needs to be migrated, there must be enough memory on aself-hosted engine node for the Manager virtual machine to restart on or migrate to it. This memory canbe reserved on multiple self-hosted engine nodes by using a scheduling policy. The scheduling policychecks if enough memory to start the Manager virtual machine will remain on the specified number ofadditional self-hosted engine nodes before starting or migrating any virtual machines. See Creating aScheduling Policy in the Administration Guide for more information about scheduling policies.
To add more self-hosted engine nodes to the Red Hat Virtualization Manager, see Adding self-hostedengine nodes to the Manager.
Configuring Memory Slots Reserved for the Self-Hosted Engine on Additional Hosts
1. Click Compute → Clusters and select the cluster containing the self-hosted engine nodes.
2. Click Edit.
3. Click the Scheduling Policy tab.
4. Click + and select HeSparesCount.
5. Enter the number of additional self-hosted engine nodes that will reserve enough free memoryto start the Manager virtual machine.
6. Click OK.
3.1.4. Adding Self-Hosted Engine Nodes to the Red Hat Virtualization Manager
Add self-hosted engine nodes in the same way as a standard host, with an additional step to deploy thehost as a self-hosted engine node. The shared storage domain is automatically detected and the nodecan be used as a failover host to host the Manager virtual machine when required. You can also attachstandard hosts to a self-hosted engine environment, but they cannot host the Manager virtual machine.Have at least two self-hosted engine nodes to ensure the Manager virtual machine is highly available.You can also add additional hosts using the REST API. See Hosts in the REST API Guide .
Prerequisites
All self-hosted engine nodes must be in the same cluster.
If you are reusing a self-hosted engine node, remove its existing self-hosted engineconfiguration. See Removing a Host from a Self-Hosted Engine Environment .
Procedure
1. In the Administration Portal, click Compute → Hosts.
# hosted-engine --set-shared-config destination-emails [email protected],[email protected] --type=broker
CHAPTER 3. ADMINISTERING THE ENVIRONMENT
269
2. Click New.For information on additional host settings, see Explanation of Settings and Controls in the NewHost and Edit Host Windows in the Administration Guide.
3. Use the drop-down list to select the Data Center and Host Cluster for the new host.
4. Enter the Name and the Address of the new host. The standard SSH port, port 22, is auto-filledin the SSH Port field.
5. Select an authentication method to use for the Manager to access the host.
Enter the root user’s password to use password authentication.
Alternatively, copy the key displayed in the SSH PublicKey field to/root/.ssh/authorized_keys on the host to use public key authentication.
6. Optionally, configure power management, where the host has a supported power managementcard. For information on power management configuration, see Host Power ManagementSettings Explained in the Administration Guide.
7. Click the Hosted Engine tab.
8. Select Deploy.
9. Click OK.
3.1.5. Reinstalling an Existing Host as a Self-Hosted Engine Node
You can convert an existing, standard host in a self-hosted engine environment to a self-hosted enginenode capable of hosting the Manager virtual machine.
WARNING
When installing or reinstalling the host’s operating system, Red Hat stronglyrecommends that you first detach any existing non-OS storage that is attached tothe host to avoid accidental initialization of these disks, and with that, potential dataloss.
Procedure
1. Click Compute → Hosts and select the host.
2. Click Management → Maintenance and OK.
3. Click Installation → Reinstall.
4. Click the Hosted Engine tab and select DEPLOY from the drop-down list.
5. Click OK.
The host is reinstalled with self-hosted engine configuration, and is flagged with a crown icon in theAdministration Portal.
Red Hat Virtualization 4.4 Administration Guide
270

3.1.6. Booting the Manager Virtual Machine in Rescue Mode
This topic describes how to boot the Manager virtual machine into rescue mode when it does not start.For more information, see Booting to Rescue Mode in the Red Hat Enterprise Linux SystemAdministrator’s Guide.
1. Connect to one of the hosted-engine nodes:
2. Put the self-hosted engine in global maintenance mode:
3. Check if there is already a running instance of the Manager virtual machine:
If a Manager virtual machine instance is running, connect to its host:
4. Shut down the virtual machine:
NOTE
If the virtual machine does not shut down, execute the following command:
# hosted-engine --vm-poweroff
5. Start the Manager virtual machine in pause mode:
6. Set a temporary VNC password:
The command outputs the necessary information you need to log in to the Manger virtualmachine with VNC.
7. Log in to the Manager virtual machine with VNC. The Manager virtual machine is still paused, soit appears to be frozen.
8. Resume the Manager virtual machine with the following command on its host:
$ ssh root@host_address
# hosted-engine --set-maintenance --mode=global
# hosted-engine --vm-status
# ssh root@host_address
# hosted-engine --vm-shutdown
hosted-engine --vm-start-paused
hosted-engine --add-console-password
CHAPTER 3. ADMINISTERING THE ENVIRONMENT
271

WARNING
After running the following command, the boot loader menu appears. Youneed to enter into rescue mode before the boot loader proceeds with thenormal boot process. Read the next step about entering into rescue modebefore proceeding with this command.
9. Boot the Manager virtual machine in rescue mode.
10. Disable global maintenance mode
You can now run rescue tasks on the Manager virtual machine.
3.1.7. Removing a Host from a Self-Hosted Engine Environment
To remove a self-hosted engine node from your environment, place the node into maintenance mode,undeploy the node, and optionally remove it. The node can be managed as a regular host after the HAservices have been stopped, and the self-hosted engine configuration files have been removed.
Procedure
1. In the Administration Portal, click Compute → Hosts and select the self-hosted engine node.
2. Click Management → Maintenance and OK.
3. Click Installation → Reinstall.
4. Click the Hosted Engine tab and select UNDEPLOY from the drop-down list. This action stopsthe ovirt-ha-agent and ovirt-ha-broker services and removes the self-hosted engineconfiguration file.
5. Click OK.
6. Optionally, click Remove. This opens the Remove Host(s) confirmation window.
7. Click OK.
3.1.8. Updating a Self-Hosted Engine
To update a self-hosted engine from your current version to the latest version, you must place theenvironment in global maintenance mode and then follow the standard procedure for updating betweenminor versions.
Enabling global maintenance mode
You must place the self-hosted engine environment in global maintenance mode before performing any
# /usr/bin/virsh -c qemu:///system?authfile=/etc/ovirt-hosted-engine/virsh_auth.conf resume HostedEngine
# hosted-engine --set-maintenance --mode=none
Red Hat Virtualization 4.4 Administration Guide
272

You must place the self-hosted engine environment in global maintenance mode before performing anysetup or upgrade tasks on the Manager virtual machine.
Procedure
1. Log in to one of the self-hosted engine nodes and enable global maintenance mode:
2. Confirm that the environment is in global maintenance mode before proceeding:
You should see a message indicating that the cluster is in global maintenance mode.
Updating the Red Hat Virtualization Manager
Procedure
1. On the Manager machine, check if updated packages are available:
# engine-upgrade-check
2. Update the setup packages:
3. Update the Red Hat Virtualization Manager with the engine-setup script. The engine-setupscript prompts you with some configuration questions, then stops the ovirt-engine service,downloads and installs the updated packages, backs up and updates the database, performspost-installation configuration, and starts the ovirt-engine service.
# engine-setup
When the script completes successfully, the following message appears:
Execution of setup completed successfully
NOTE
The engine-setup script is also used during the Red Hat Virtualization Managerinstallation process, and it stores the configuration values supplied. During anupdate, the stored values are displayed when previewing the configuration, andmight not be up to date if engine-config was used to update configuration afterinstallation. For example, if engine-config was used to update SANWipeAfterDelete to true after installation, engine-setup will output"Default SAN wipe after delete: False" in the configuration preview. However, theupdated values will not be overwritten by engine-setup.
IMPORTANT
The update process might take some time. Do not stop the process before itcompletes.
# hosted-engine --set-maintenance --mode=global
# hosted-engine --vm-status
# yum update ovirt\*setup\* rh\*vm-setup-plugins
CHAPTER 3. ADMINISTERING THE ENVIRONMENT
273
4. Update the base operating system and any optional packages installed on the Manager:
# yum update --nobest
IMPORTANT
If you encounter a required Ansible package conflict during the update, seeCannot perform yum update on my RHV manager (ansible conflict) .
IMPORTANT
If any kernel packages were updated:
1. Disable global maintenance mode
2. Reboot the machine to complete the update.
Related Information
Disabling global maintenance mode
Disabling global maintenance mode
Procedure
1. Log in to the Manager virtual machine and shut it down.
2. Log in to one of the self-hosted engine nodes and disable global maintenance mode:
When you exit global maintenance mode, ovirt-ha-agent starts the Manager virtual machine,and then the Manager automatically starts. It can take up to ten minutes for the Manager tostart.
3. Confirm that the environment is running:
The listed information includes Engine Status. The value for Engine status should be:
{"health": "good", "vm": "up", "detail": "Up"}
NOTE
When the virtual machine is still booting and the Manager hasn’t started yet, theEngine status is:
{"reason": "bad vm status", "health": "bad", "vm": "up", "detail": "Powering up"}
If this happens, wait a few minutes and try again.
# hosted-engine --set-maintenance --mode=none
# hosted-engine --vm-status
Red Hat Virtualization 4.4 Administration Guide
274

3.1.9. Changing the FQDN of the Manager in a Self-Hosted Engine
You can use the ovirt-engine-rename command to update records of the fully qualified domain name(FQDN) of the Manager.
For details see Renaming the Manager with the Ovirt Engine Rename Tool .
3.2. BACKUPS AND MIGRATION
3.2.1. Backing Up and Restoring the Red Hat Virtualization Manager
3.2.1.1. Backing up Red Hat Virtualization Manager - Overview
Use the engine-backup tool to take regular backups of the Red Hat Virtualization Manager. The toolbacks up the engine database and configuration files into a single file and can be run withoutinterrupting the ovirt-engine service.
3.2.1.2. Syntax for the engine-backup Command
The engine-backup command works in one of two basic modes:
These two modes are further extended by a set of parameters that allow you to specify the scope of thebackup and different credentials for the engine database. Run engine-backup --help for a full list ofparameters and their function.
Basic Options
--mode
Specifies whether the command will perform a backup operation or a restore operation. Two optionsare available - backup, and restore. This is a required parameter.
--file
Specifies the path and name of a file into which backups are to be taken in backup mode, and thepath and name of a file from which to read backup data in restore mode. This is a required parameterin both backup mode and restore mode.
--log
Specifies the path and name of a file into which logs of the backup or restore operation are to bewritten. This parameter is required in both backup mode and restore mode.
--scope
Specifies the scope of the backup or restore operation. There are four options: all, which backs up orrestores all databases and configuration data; files, which backs up or restores only files on thesystem; db, which backs up or restores only the Manager database; and dwhdb, which backs up orrestores only the Data Warehouse database. The default scope is all.The --scope parameter can be specified multiple times in the same engine-backup command.
Manager Database Options
The following options are only available when using the engine-backup command in restore mode. The
# engine-backup --mode=backup
# engine-backup --mode=restore
CHAPTER 3. ADMINISTERING THE ENVIRONMENT
275

The following options are only available when using the engine-backup command in restore mode. Theoption syntax below applies to restoring the Manager database. The same options exist for restoring theData Warehouse database. See engine-backup --help for the Data Warehouse option syntax.
--provision-db
Creates a PostgreSQL database for the Manager database backup to be restored to. This is arequired parameter when restoring a backup on a remote host or fresh installation that does not havea PostgreSQL database already configured.
--change-db-credentials
Allows you to specify alternate credentials for restoring the Manager database using credentialsother than those stored in the backup itself. See engine-backup --help for the additionalparameters required by this parameter.
--restore-permissions or --no-restore-permissions
Restores (or does not restore) the permissions of database users. One of these parameters isrequired when restoring a backup.
NOTE
If a backup contains grants for extra database users, restoring the backup with the --restore-permissions and --provision-db (or --provision-dwh-db) options will createthe extra users with random passwords. You must change these passwords manually ifthe extra users require access to the restored system. See How to grant access to anextra database user after restoring Red Hat Virtualization from a backup.
3.2.1.3. Creating a backup with the engine-backup command
You can back up the Red Hat Virtualization Manager with the engine-backup command while theManager is active. Append one of the following values to the --scope option to specify what you want toback up:
all
A full backup of all databases and configuration files on the Manager
files
A backup of only the files on the system
db
A backup of only the Manager database
dwhdb
A backup of only the Data Warehouse database
cinderlibdb
A backup of only the Cinderlib database
grafanadb
A backup of only the Grafana database
You can specify the --scope option more than once.
You can also configure the engine-backup command to back up additional files. It restores everythingthat it backs up.
IMPORTANT
Red Hat Virtualization 4.4 Administration Guide
276

IMPORTANT
To restore a database to a fresh installation of Red Hat Virtualization Manager, adatabase backup alone is not sufficient. The Manager also requires access to theconfiguration files. If you specify a scope other than all, you must also include --scope=files, or back up the file system.
For a complete explanation of the engine-backup command, enter engine-backup --help on theManager machine.
Procedure
1. Log on to the Manager machine.
2. Create a backup:
The command generates the backup in file_name.tar, and a log file in log_file_name.
Use file_name.tar to restore the environment.
The following examples demonstrate several different backup scenarios.
Example 3.1. Full backup
Example 3.2. Manager database backup
Example 3.3. Data Warehouse database backup
Example 3.4. Adding specific files to the backup
1. Make a directory to store configuration customizations for the engine-backup command:
2. Create a text file in the new directory named ntp-chrony.sh with the following contents:
# engine-backup --scope=all --mode=backup --file=file_name --log=log_file_name
# engine-backup --scope=all --mode=backup --file=file_name --log=log_file_name
# engine-backup --scope=files --scope=db --mode=backup --file=file_name --log=log_file_name
# engine-backup --scope=files --scope=dwhdb --mode=backup --file=file_name --log=log_file_name
# mkdir -p /etc/ovirt-engine-backup/engine-backup-config.d
BACKUP_PATHS="${BACKUP_PATHS}/etc/chrony.conf/etc/ntp.conf/etc/ovirt-engine-backup"
CHAPTER 3. ADMINISTERING THE ENVIRONMENT
277

3. When you run the engine-backup command, use --scope=files. The backup and restoreincludes /etc/chrony.conf, /etc/ntp.conf, and /etc/ovirt-engine-backup.
3.2.1.4. Restoring a Backup with the engine-backup Command
Restoring a backup using the engine-backup command involves more steps than creating a backupdoes, depending on the restoration destination. For example, the engine-backup command can be usedto restore backups to fresh installations of Red Hat Virtualization, on top of existing installations of RedHat Virtualization, and using local or remote databases.
IMPORTANT
The version of the Red Hat Virtualization Manager (such as 4.4.8) used to restore abackup must be later than or equal to the Red Hat Virtualization Manager version (suchas 4.4.7) used to create the backup. Starting with Red Hat Virtualization 4.4.7, this policyis strictly enforced by the engine-backup command. To view the version of Red HatVirtualization contained in a backup file, unpack the backup file and read the value in theversion file located in the root directory of the unpacked files.
3.2.1.5. Restoring a Backup to a Fresh Installation
The engine-backup command can be used to restore a backup to a fresh installation of the Red HatVirtualization Manager. The following procedure must be performed on a machine on which the baseoperating system has been installed and the required packages for the Red Hat Virtualization Managerhave been installed, but the engine-setup command has not yet been run. This procedure assumes thatthe backup file or files can be accessed from the machine on which the backup is to be restored.
Procedure
1. Log on to the Manager machine. If you are restoring the engine database to a remote host, youwill need to log on to and perform the relevant actions on that host. Likewise, if also restoringthe Data Warehouse to a remote host, you will need to log on to and perform the relevantactions on that host.
2. Restore a complete backup or a database-only backup.
Restore a complete backup:
If Data Warehouse is also being restored as part of the complete backup, provision theadditional database:
Restore a database-only backup by restoring the configuration files and database backup:
# engine-backup --mode=restore --file=file_name --log=log_file_name --provision-db --restore-permissions
engine-backup --mode=restore --file=file_name --log=log_file_name --provision-db --provision-dwh-db --restore-permissions
# engine-backup --mode=restore --scope=files --scope=db --file=file_name --log=log_file_name --provision-db --restore-permissions
Red Hat Virtualization 4.4 Administration Guide
278

The example above restores a backup of the Manager database.
The example above restores a backup of the Data Warehouse database.
If successful, the following output displays:
3. Run the following command and follow the prompts to configure the restored Manager:
The Red Hat Virtualization Manager has been restored to the version preserved in the backup. Tochange the fully qualified domain name of the new Red Hat Virtualization system, see The oVirt EngineRename Tool.
3.2.1.6. Restoring a Backup to Overwrite an Existing Installation
The engine-backup command can restore a backup to a machine on which the Red Hat VirtualizationManager has already been installed and set up. This is useful when you have taken a backup of anenvironment, performed changes on that environment, and then want to undo the changes by restoringthe environment from the backup.
Changes made to the environment since the backup was taken, such as adding or removing a host, willnot appear in the restored environment. You must redo these changes.
Procedure
1. Log in to the Manager machine.
2. Remove the configuration files and clean the database associated with the Manager:
The engine-cleanup command only cleans the Manager database; it does not drop thedatabase or delete the user that owns that database.
3. Restore a full backup or a database-only backup. You do not need to create a new database orspecify the database credentials because the user and database already exist.
Restore a full backup:
Restore a database-only backup by restoring the configuration files and the databasebackup:
NOTE
# engine-backup --mode=restore --scope=files --scope=dwhdb --file=file_name --log=log_file_name --provision-dwh-db --restore-permissions
You should now run engine-setup.Done.
# engine-setup
# engine-cleanup
# engine-backup --mode=restore --file=file_name --log=log_file_name --restore-permissions
# engine-backup --mode=restore --scope=files --scope=db --scope=dwhdb --file=file_name --log=log_file_name --restore-permissions
CHAPTER 3. ADMINISTERING THE ENVIRONMENT
279

NOTE
To restore only the Manager database (for example, if the Data Warehousedatabase is located on another machine), you can omit the --scope=dwhdbparameter.
If successful, the following output displays:
4. Reconfigure the Manager:
3.2.1.7. Restoring a Backup with Different Credentials
The engine-backup command can restore a backup to a machine on which the Red Hat VirtualizationManager has already been installed and set up, but the credentials of the database in the backup aredifferent to those of the database on the machine on which the backup is to be restored. This is usefulwhen you have taken a backup of an installation and want to restore the installation from the backup to adifferent system.
IMPORTANT
When restoring a backup to overwrite an existing installation, you must run the engine-cleanup command to clean up the existing installation before using the engine-backupcommand. The engine-cleanup command only cleans the engine database, and does notdrop the database or delete the user that owns that database. So you do not need tocreate a new database or specify the database credentials. However, if the credentialsfor the owner of the engine database are not known, you must change them before youcan restore the backup.
Procedure
1. Log in to the Red Hat Virtualization Manager machine.
2. Run the following command and follow the prompts to remove the Manager’s configuration filesand to clean the Manager’s database:
3. Change the password for the owner of the engine database if the credentials of that user arenot known:
a. Enter the postgresql command line:
# su - postgres -c 'psql'
b. Change the password of the user that owns the engine database:
You should now run engine-setup.Done.
# engine-setup
# engine-cleanup
postgres=# alter role user_name encrypted password 'new_password';
Red Hat Virtualization 4.4 Administration Guide
280

Repeat this for the user that owns the ovirt_engine_history database if necessary.
4. Restore a complete backup or a database-only backup with the --change-db-credentialsparameter to pass the credentials of the new database. The database_location for a databaselocal to the Manager is localhost.
NOTE
The following examples use a --*password option for each database withoutspecifying a password, which prompts for a password for each database.Alternatively, you can use --*passfile=password_file options for each databaseto securely pass the passwords to the engine-backup tool without the need forinteractive prompts.
Restore a complete backup:
If Data Warehouse is also being restored as part of the complete backup, include therevised credentials for the additional database:
Restore a database-only backup by restoring the configuration files and the databasebackup:
The example above restores a backup of the Manager database.
The example above restores a backup of the Data Warehouse database.
If successful, the following output displays:
5. Run the following command and follow the prompts to reconfigure the firewall and ensure the ovirt-engine service is correctly configured:
# engine-backup --mode=restore --file=file_name --log=log_file_name --change-db-credentials --db-host=database_location --db-name=database_name --db-user=engine --db-password --no-restore-permissions
engine-backup --mode=restore --file=file_name --log=log_file_name --change-db-credentials --db-host=database_location --db-name=database_name --db-user=engine --db-password --change-dwh-db-credentials --dwh-db-host=database_location --dwh-db-name=database_name --dwh-db-user=ovirt_engine_history --dwh-db-password --no-restore-permissions
# engine-backup --mode=restore --scope=files --scope=db --file=file_name --log=log_file_name --change-db-credentials --db-host=database_location --db-name=database_name --db-user=engine --db-password --no-restore-permissions
# engine-backup --mode=restore --scope=files --scope=dwhdb --file=file_name --log=log_file_name --change-dwh-db-credentials --dwh-db-host=database_location --dwh-db-name=database_name --dwh-db-user=ovirt_engine_history --dwh-db-password --no-restore-permissions
You should now run engine-setup.Done.
CHAPTER 3. ADMINISTERING THE ENVIRONMENT
281

3.2.1.8. Backing up and Restoring a Self-Hosted Engine
You can back up a self-hosted engine and restore it in a new self-hosted environment. Use thisprocedure for tasks such as migrating the environment to a new self-hosted engine storage domain witha different storage type.
When you specify a backup file during deployment, the backup is restored on a new Manager virtualmachine, with a new self-hosted engine storage domain. The old Manager is removed, and the old self-hosted engine storage domain is renamed and can be manually removed after you confirm that the newenvironment is working correctly. Deploying on a fresh host is highly recommended; if the host used fordeployment existed in the backed up environment, it will be removed from the restored database toavoid conflicts in the new environment. If you deploy on a new host, you must assign a unique name tothe host. Reusing the name of an existing host included in the backup can cause conflicts in the newenvironment.
The backup and restore operation involves the following key actions:
1. Back up the original Manager using the engine-backup tool.
2. Deploy a new self-hosted engine and restore the backup.
3. Enable the Manager repositories on the new Manager virtual machine.
4. Reinstall the self-hosted engine nodes to update their configuration.
5. Remove the old self-hosted engine storage domain.
This procedure assumes that you have access and can make changes to the original Manager.
Prerequisites
A fully qualified domain name prepared for your Manager and the host. Forward and reverselookup records must both be set in the DNS. The new Manager must have the same fullyqualified domain name as the original Manager.
The original Manager must be updated to the latest minor version. The version of the Red HatVirtualization Manager (such as 4.4.8) used to restore a backup must be later than or equal tothe Red Hat Virtualization Manager version (such as 4.4.7) used to create the backup. Startingwith Red Hat Virtualization 4.4.7, this policy is strictly enforced by the engine-backup command.See Updating the Red Hat Virtualization Manager in the Upgrade Guide.
NOTE
If you need to restore a backup, but do not have a new appliance, the restoreprocess will pause, and you can log into the temporary Manager machine via SSH,register, subscribe, or configure channels as needed, and upgrade the Managerpackages before resuming the restore process.
The data center compatibility level must be set to the latest version to ensure compatibility withthe updated storage version.
There must be at least one regular host in the environment. This host (and any other regularhosts) will remain active to host the SPM role and any running virtual machines. If a regular host
# engine-setup
Red Hat Virtualization 4.4 Administration Guide
282

is not already the SPM, move the SPM role before creating the backup by selecting a regularhost and clicking Management → Select as SPM.If no regular hosts are available, there are two ways to add one:
Remove the self-hosted engine configuration from a node (but do not remove the nodefrom the environment). See Removing a Host from a Self-Hosted Engine Environment .
Add a new regular host. See Adding standard hosts to the Manager host tasks .
3.2.1.8.1. Backing up the Original Manager
Back up the original Manager using the engine-backup command, and copy the backup file to aseparate location so that it can be accessed at any point during the process.
For more information about engine-backup --mode=backup options, see Backing Up and Restoringthe Red Hat Virtualization Manager in the Administration Guide.
Procedure
1. Log in to one of the self-hosted engine nodes and move the environment to globalmaintenance mode:
# hosted-engine --set-maintenance --mode=global
2. Log in to the original Manager and stop the ovirt-engine service:
# systemctl stop ovirt-engine# systemctl disable ovirt-engine
NOTE
Though stopping the original Manager from running is not obligatory, it isrecommended as it ensures no changes are made to the environment after thebackup is created. Additionally, it prevents the original Manager and the newManager from simultaneously managing existing resources.
3. Run the engine-backup command, specifying the name of the backup file to create, and thename of the log file to create to store the backup log:
4. Copy the files to an external server. In the following example, storage.example.com is the fullyqualified domain name of a network storage server that will store the backup until it is needed,and /backup/ is any designated folder or path.
5. If you do not require the Manager machine for other purposes, unregister it from Red HatSubscription Manager:
6. Log in to one of the self-hosted engine nodes and shut down the original Manager virtual
# engine-backup --mode=backup --file=file_name --log=log_file_name
# scp -p file_name log_file_name storage.example.com:/backup/
# subscription-manager unregister
CHAPTER 3. ADMINISTERING THE ENVIRONMENT
283

6. Log in to one of the self-hosted engine nodes and shut down the original Manager virtualmachine:
After backing up the Manager, deploy a new self-hosted engine and restore the backup on the newvirtual machine.
3.2.1.8.2. Restoring the Backup on a New Self-Hosted Engine
Run the hosted-engine script on a new host, and use the --restore-from-file=path/to/file_name optionto restore the Manager backup during the deployment.
IMPORTANT
If you are using iSCSI storage, and your iSCSI target filters connections according to theinitiator’s ACL, the deployment may fail with a STORAGE_DOMAIN_UNREACHABLEerror. To prevent this, you must update your iSCSI configuration before beginning theself-hosted engine deployment:
If you are redeploying on an existing host, you must update the host’s iSCSIinitiator settings in /etc/iscsi/initiatorname.iscsi. The initiator IQN must be thesame as was previously mapped on the iSCSI target, or updated to a new IQN, ifapplicable.
If you are deploying on a fresh host, you must update the iSCSI targetconfiguration to accept connections from that host.
Note that the IQN can be updated on the host side (iSCSI initiator), or on the storageside (iSCSI target).
Procedure
1. Copy the backup file to the new host. In the following example, host.example.com is the FQDNfor the host, and /backup/ is any designated folder or path.
2. Log in to the new host.
3. If you are deploying on Red Hat Virtualization Host, ovirt-hosted-engine-setup is alreadyinstalled, so skip this step. If you are deploying on Red Hat Enterprise Linux, install the ovirt-hosted-engine-setup package:
4. Use the tmux window manager to run the script to avoid losing the session in case of network orterminal disruption.Install and run tmux:
5. Run the hosted-engine script, specifying the path to the backup file:
# hosted-engine --vm-shutdown
# scp -p file_name host.example.com:/backup/
# dnf install ovirt-hosted-engine-setup
# dnf -y install tmux# tmux
Red Hat Virtualization 4.4 Administration Guide
284

To escape the script at any time, use CTRL+D to abort deployment.
6. Select Yes to begin the deployment.
7. Configure the network. The script detects possible NICs to use as a management bridge for theenvironment.
8. If you want to use a custom appliance for the virtual machine installation, enter the path to theOVA archive. Otherwise, leave this field empty to use the RHV-M Appliance.
9. Enter the root password for the Manager.
10. Enter an SSH public key that will allow you to log in to the Manager as the root user, and specifywhether to enable SSH access for the root user.
11. Enter the virtual machine’s CPU and memory configuration.
12. Enter a MAC address for the Manager virtual machine, or accept a randomly generated one. Ifyou want to provide the Manager virtual machine with an IP address via DHCP, ensure that youhave a valid DHCP reservation for this MAC address. The deployment script will not configurethe DHCP server for you.
13. Enter the virtual machine’s networking details. If you specify Static, enter the IP address of theManager.
IMPORTANT
The static IP address must belong to the same subnet as the host. For example, ifthe host is in 10.1.1.0/24, the Manager virtual machine’s IP must be in the samesubnet range (10.1.1.1-254/24).
14. Specify whether to add entries for the Manager virtual machine and the base host to the virtualmachine’s /etc/hosts file. You must ensure that the host names are resolvable.
15. Provide the name and TCP port number of the SMTP server, the email address used to sendemail notifications, and a comma-separated list of email addresses to receive thesenotifications:
16. Enter a password for the admin@internal user to access the Administration Portal.The script creates the virtual machine. This can take some time if the RHV-M Appliance needsto be installed.
NOTE
# hosted-engine --deploy --restore-from-file=backup/file_name
CHAPTER 3. ADMINISTERING THE ENVIRONMENT
285
NOTE
If the host becomes non operational, due to a missing required network or asimilar problem, the deployment pauses and a message such as the following isdisplayed:
[ INFO ] You can now connect to https://<host name>:6900/ovirt-engine/ and check the status of this host and eventually remediate it, please continue only when the host is listed as 'up'[ INFO ] TASK [ovirt.ovirt.hosted_engine_setup : include_tasks][ INFO ] ok: [localhost][ INFO ] TASK [ovirt.ovirt.hosted_engine_setup : Create temporary lock file][ INFO ] changed: [localhost][ INFO ] TASK [ovirt.ovirt.hosted_engine_setup : Pause execution until /tmp/ansible.<random>_he_setup_lock is removed, delete it once ready to proceed]
Pausing the process allows you to:
Connect to the Administration Portal using the provided URL.
Assess the situation, find out why the host is non operational, and fixwhatever is needed. For example, if this deployment was restored from abackup, and the backup included required networks for the host cluster,configure the networks, attaching the relevant host NICs to these networks.
Once everything looks OK, and the host status is Up, remove the lock filepresented in the message above. The deployment continues.
17. Select the type of storage to use:
For NFS, enter the version, full address and path to the storage, and any mount options.
WARNING
Do not use the old self-hosted engine storage domain’s mount pointfor the new storage domain, as you risk losing virtual machine data.
For iSCSI, enter the portal details and select a target and LUN from the auto-detected lists.You can only select one iSCSI target during the deployment, but multipathing is supportedto connect all portals of the same portal group.
NOTE
To specify more than one iSCSI target, you must enable multipathing beforedeploying the self-hosted engine. See Red Hat Enterprise Linux DMMultipath for details. There is also a Multipath Helper tool that generates ascript to install and configure multipath with different options.
For Gluster storage, enter the full address and path to the storage, and any mount options.
Red Hat Virtualization 4.4 Administration Guide
286

WARNING
Do not use the old self-hosted engine storage domain’s mount pointfor the new storage domain, as you risk losing virtual machine data.
IMPORTANT
Only replica 1 and replica 3 Gluster storage are supported. Ensure youconfigure the volume as follows:
For Fibre Channel, select a LUN from the auto-detected list. The host bus adapters must beconfigured and connected, and the LUN must not contain any existing data. To reuse anexisting LUN, see Reusing LUNs in the Administration Guide.
18. Enter the Manager disk size.The script continues until the deployment is complete.
19. The deployment process changes the Manager’s SSH keys. To allow client machines to accessthe new Manager without SSH errors, remove the original Manager’s entry from the .ssh/known_hosts file on any client machines that accessed the original Manager.
When the deployment is complete, log in to the new Manager virtual machine and enable the requiredrepositories.
3.2.1.8.3. Enabling the Red Hat Virtualization Manager Repositories
You need to log in and register the Manager machine with Red Hat Subscription Manager, attach the Red Hat Virtualization Manager subscription, and enable the Manager repositories.
Procedure
1. Register your system with the Content Delivery Network, entering your Customer Portal username and password when prompted:
NOTE
If you are using an IPv6 network, use an IPv6 transition mechanism to access theContent Delivery Network and subscription manager.
2. Find the Red Hat Virtualization Manager subscription pool and record the pool ID:
gluster volume set VOLUME_NAME group virtgluster volume set VOLUME_NAME performance.strict-o-direct ongluster volume set VOLUME_NAME network.remote-dio offgluster volume set VOLUME_NAME storage.owner-uid 36gluster volume set VOLUME_NAME storage.owner-gid 36gluster volume set VOLUME_NAME network.ping-timeout 30
# subscription-manager register
CHAPTER 3. ADMINISTERING THE ENVIRONMENT
287

3. Use the pool ID to attach the subscription to the system:
NOTE
To view currently attached subscriptions:
To list all enabled repositories:
4. Configure the repositories:
5. Enable the pki-deps module.
6. Enable version 12 of the postgresql module.
7. Enable version 14 of the nodejs module:
8. Synchronize installed packages to update them to the latest available versions.
Additional resources
For information on modules and module streams, see the following sections in Installing,managing, and removing user-space components
Module streams
Selecting a stream before installation of packages
# subscription-manager list --available
# subscription-manager attach --pool=pool_id
# subscription-manager list --consumed
# dnf repolist
# subscription-manager repos \ --disable='*' \ --enable=rhel-8-for-x86_64-baseos-rpms \ --enable=rhel-8-for-x86_64-appstream-rpms \ --enable=rhv-4.4-manager-for-rhel-8-x86_64-rpms \ --enable=fast-datapath-for-rhel-8-x86_64-rpms \ --enable=jb-eap-7.4-for-rhel-8-x86_64-rpms \ --enable=openstack-16.2-cinderlib-for-rhel-8-x86_64-rpms \ --enable=rhceph-4-tools-for-rhel-8-x86_64-rpms
# dnf module -y enable pki-deps
# dnf module -y enable postgresql:12
# dnf module -y enable nodejs:14
# dnf distro-sync --nobest
Red Hat Virtualization 4.4 Administration Guide
288

Resetting module streams
Switching to a later stream
The Manager and its resources are now running in the new self-hosted environment. The self-hostedengine nodes must be reinstalled in the Manager to update their self-hosted engine configuration.Standard hosts are not affected. Perform the following procedure for each self-hosted engine node.
3.2.1.8.4. Reinstalling Hosts
Reinstall Red Hat Virtualization Hosts (RHVH) and Red Hat Enterprise Linux hosts from theAdministration Portal. The procedure includes stopping and restarting the host.
WARNING
When installing or reinstalling the host’s operating system, Red Hat stronglyrecommends that you first detach any existing non-OS storage that is attached tothe host to avoid accidental initialization of these disks, and with that, potential dataloss.
Prerequisites
If the cluster has migration enabled, virtual machines can automatically migrate to another hostin the cluster. Therefore, reinstall a host while its usage is relatively low.
Ensure that the cluster has sufficient memory for its hosts to perform maintenance. If a clusterlacks memory, migration of virtual machines will hang and then fail. To reduce memory usage,shut down some or all of the virtual machines before moving the host to maintenance.
Ensure that the cluster contains more than one host before performing a reinstall. Do notattempt to reinstall all the hosts at the same time. One host must remain available to performStorage Pool Manager (SPM) tasks.
Procedure
1. Click Compute → Hosts and select the host.
2. Click Management → Maintenance and OK.
3. Click Installation → Reinstall. This opens the Install Host window.
4. Click the Hosted Engine tab and select DEPLOY from the drop-down list.
5. Click OK to reinstall the host.
After a host has been reinstalled and its status returns to Up, you can migrate virtual machines back tothe host.
IMPORTANT
CHAPTER 3. ADMINISTERING THE ENVIRONMENT
289

IMPORTANT
After you register a Red Hat Virtualization Host to the Red Hat Virtualization Managerand reinstall it, the Administration Portal may erroneously display its status as InstallFailed. Click Management → Activate, and the host will change to an Up status and beready for use.
After reinstalling the self-hosted engine nodes, you can check the status of the new environment byrunning the following command on one of the nodes:
# hosted-engine --vm-status
During the restoration, the old self-hosted engine storage domain was renamed, but was not removedfrom the new environment in case the restoration was faulty. After confirming that the environment isrunning normally, you can remove the old self-hosted engine storage domain.
3.2.1.8.5. Removing a Storage Domain
You have a storage domain in your data center that you want to remove from the virtualizedenvironment.
Procedure
1. Click Storage → Domains.
2. Move the storage domain to maintenance mode and detach it:
a. Click the storage domain’s name. This opens the details view.
b. Click the Data Center tab.
c. Click Maintenance, then click OK.
d. Click Detach, then click OK.
3. Click Remove.
4. Optionally select the Format Domain, i.e. Storage Content will be lost! check box to erase thecontent of the domain.
5. Click OK.
The storage domain is permanently removed from the environment.
3.2.1.9. Recovering a Self-Hosted Engine from an Existing Backup
If a self-hosted engine is unavailable due to problems that cannot be repaired, you can restore it in a newself-hosted environment using a backup taken before the problem began, if one is available.
When you specify a backup file during deployment, the backup is restored on a new Manager virtualmachine, with a new self-hosted engine storage domain. The old Manager is removed, and the old self-hosted engine storage domain is renamed and can be manually removed after you confirm that the newenvironment is working correctly. Deploying on a fresh host is highly recommended; if the host used fordeployment existed in the backed up environment, it will be removed from the restored database to
Red Hat Virtualization 4.4 Administration Guide
290

avoid conflicts in the new environment. If you deploy on a new host, you must assign a unique name tothe host. Reusing the name of an existing host included in the backup can cause conflicts in the newenvironment.
Restoring a self-hosted engine involves the following key actions:
1. Deploy a new self-hosted engine and restore the backup.
2. Enable the Manager repositories on the new Manager virtual machine.
3. Reinstall the self-hosted engine nodes to update their configuration.
4. Remove the old self-hosted engine storage domain.
This procedure assumes that you do not have access to the original Manager, and that the new host canaccess the backup file.
Prerequisites
A fully qualified domain name prepared for your Manager and the host. Forward and reverselookup records must both be set in the DNS. The new Manager must have the same fullyqualified domain name as the original Manager.
3.2.1.9.1. Restoring the Backup on a New Self-Hosted Engine
Run the hosted-engine script on a new host, and use the --restore-from-file=path/to/file_name optionto restore the Manager backup during the deployment.
IMPORTANT
If you are using iSCSI storage, and your iSCSI target filters connections according to theinitiator’s ACL, the deployment may fail with a STORAGE_DOMAIN_UNREACHABLEerror. To prevent this, you must update your iSCSI configuration before beginning theself-hosted engine deployment:
If you are redeploying on an existing host, you must update the host’s iSCSIinitiator settings in /etc/iscsi/initiatorname.iscsi. The initiator IQN must be thesame as was previously mapped on the iSCSI target, or updated to a new IQN, ifapplicable.
If you are deploying on a fresh host, you must update the iSCSI targetconfiguration to accept connections from that host.
Note that the IQN can be updated on the host side (iSCSI initiator), or on the storageside (iSCSI target).
Procedure
1. Copy the backup file to the new host. In the following example, host.example.com is the FQDNfor the host, and /backup/ is any designated folder or path.
2. Log in to the new host.
3. If you are deploying on Red Hat Virtualization Host, ovirt-hosted-engine-setup is already
# scp -p file_name host.example.com:/backup/
CHAPTER 3. ADMINISTERING THE ENVIRONMENT
291

3. If you are deploying on Red Hat Virtualization Host, ovirt-hosted-engine-setup is alreadyinstalled, so skip this step. If you are deploying on Red Hat Enterprise Linux, install the ovirt-hosted-engine-setup package:
4. Use the tmux window manager to run the script to avoid losing the session in case of network orterminal disruption.Install and run tmux:
5. Run the hosted-engine script, specifying the path to the backup file:
To escape the script at any time, use CTRL+D to abort deployment.
6. Select Yes to begin the deployment.
7. Configure the network. The script detects possible NICs to use as a management bridge for theenvironment.
8. If you want to use a custom appliance for the virtual machine installation, enter the path to theOVA archive. Otherwise, leave this field empty to use the RHV-M Appliance.
9. Enter the root password for the Manager.
10. Enter an SSH public key that will allow you to log in to the Manager as the root user, and specifywhether to enable SSH access for the root user.
11. Enter the virtual machine’s CPU and memory configuration.
12. Enter a MAC address for the Manager virtual machine, or accept a randomly generated one. Ifyou want to provide the Manager virtual machine with an IP address via DHCP, ensure that youhave a valid DHCP reservation for this MAC address. The deployment script will not configurethe DHCP server for you.
13. Enter the virtual machine’s networking details. If you specify Static, enter the IP address of theManager.
IMPORTANT
The static IP address must belong to the same subnet as the host. For example, ifthe host is in 10.1.1.0/24, the Manager virtual machine’s IP must be in the samesubnet range (10.1.1.1-254/24).
14. Specify whether to add entries for the Manager virtual machine and the base host to the virtualmachine’s /etc/hosts file. You must ensure that the host names are resolvable.
15. Provide the name and TCP port number of the SMTP server, the email address used to sendemail notifications, and a comma-separated list of email addresses to receive thesenotifications:
# dnf install ovirt-hosted-engine-setup
# dnf -y install tmux# tmux
# hosted-engine --deploy --restore-from-file=backup/file_name
Red Hat Virtualization 4.4 Administration Guide
292

16. Enter a password for the admin@internal user to access the Administration Portal.The script creates the virtual machine. This can take some time if the RHV-M Appliance needsto be installed.
NOTE
If the host becomes non operational, due to a missing required network or asimilar problem, the deployment pauses and a message such as the following isdisplayed:
[ INFO ] You can now connect to https://<host name>:6900/ovirt-engine/ and check the status of this host and eventually remediate it, please continue only when the host is listed as 'up'[ INFO ] TASK [ovirt.ovirt.hosted_engine_setup : include_tasks][ INFO ] ok: [localhost][ INFO ] TASK [ovirt.ovirt.hosted_engine_setup : Create temporary lock file][ INFO ] changed: [localhost][ INFO ] TASK [ovirt.ovirt.hosted_engine_setup : Pause execution until /tmp/ansible.<random>_he_setup_lock is removed, delete it once ready to proceed]
Pausing the process allows you to:
Connect to the Administration Portal using the provided URL.
Assess the situation, find out why the host is non operational, and fixwhatever is needed. For example, if this deployment was restored from abackup, and the backup included required networks for the host cluster,configure the networks, attaching the relevant host NICs to these networks.
Once everything looks OK, and the host status is Up, remove the lock filepresented in the message above. The deployment continues.
17. Select the type of storage to use:
For NFS, enter the version, full address and path to the storage, and any mount options.
WARNING
Do not use the old self-hosted engine storage domain’s mount pointfor the new storage domain, as you risk losing virtual machine data.
For iSCSI, enter the portal details and select a target and LUN from the auto-detected lists.You can only select one iSCSI target during the deployment, but multipathing is supportedto connect all portals of the same portal group.
NOTE
CHAPTER 3. ADMINISTERING THE ENVIRONMENT
293

NOTE
To specify more than one iSCSI target, you must enable multipathing beforedeploying the self-hosted engine. See Red Hat Enterprise Linux DMMultipath for details. There is also a Multipath Helper tool that generates ascript to install and configure multipath with different options.
For Gluster storage, enter the full address and path to the storage, and any mount options.
WARNING
Do not use the old self-hosted engine storage domain’s mount pointfor the new storage domain, as you risk losing virtual machine data.
IMPORTANT
Only replica 1 and replica 3 Gluster storage are supported. Ensure youconfigure the volume as follows:
For Fibre Channel, select a LUN from the auto-detected list. The host bus adapters must beconfigured and connected, and the LUN must not contain any existing data. To reuse anexisting LUN, see Reusing LUNs in the Administration Guide.
18. Enter the Manager disk size.The script continues until the deployment is complete.
19. The deployment process changes the Manager’s SSH keys. To allow client machines to accessthe new Manager without SSH errors, remove the original Manager’s entry from the .ssh/known_hosts file on any client machines that accessed the original Manager.
When the deployment is complete, log in to the new Manager virtual machine and enable the requiredrepositories.
3.2.1.9.2. Enabling the Red Hat Virtualization Manager Repositories
You need to log in and register the Manager machine with Red Hat Subscription Manager, attach the Red Hat Virtualization Manager subscription, and enable the Manager repositories.
Procedure
1. Register your system with the Content Delivery Network, entering your Customer Portal username and password when prompted:
gluster volume set VOLUME_NAME group virtgluster volume set VOLUME_NAME performance.strict-o-direct ongluster volume set VOLUME_NAME network.remote-dio offgluster volume set VOLUME_NAME storage.owner-uid 36gluster volume set VOLUME_NAME storage.owner-gid 36gluster volume set VOLUME_NAME network.ping-timeout 30
Red Hat Virtualization 4.4 Administration Guide
294

NOTE
If you are using an IPv6 network, use an IPv6 transition mechanism to access theContent Delivery Network and subscription manager.
2. Find the Red Hat Virtualization Manager subscription pool and record the pool ID:
3. Use the pool ID to attach the subscription to the system:
NOTE
To view currently attached subscriptions:
To list all enabled repositories:
4. Configure the repositories:
5. Enable the pki-deps module.
6. Enable version 12 of the postgresql module.
7. Enable version 14 of the nodejs module:
8. Synchronize installed packages to update them to the latest available versions.
# subscription-manager register
# subscription-manager list --available
# subscription-manager attach --pool=pool_id
# subscription-manager list --consumed
# dnf repolist
# subscription-manager repos \ --disable='*' \ --enable=rhel-8-for-x86_64-baseos-rpms \ --enable=rhel-8-for-x86_64-appstream-rpms \ --enable=rhv-4.4-manager-for-rhel-8-x86_64-rpms \ --enable=fast-datapath-for-rhel-8-x86_64-rpms \ --enable=jb-eap-7.4-for-rhel-8-x86_64-rpms \ --enable=openstack-16.2-cinderlib-for-rhel-8-x86_64-rpms \ --enable=rhceph-4-tools-for-rhel-8-x86_64-rpms
# dnf module -y enable pki-deps
# dnf module -y enable postgresql:12
# dnf module -y enable nodejs:14
CHAPTER 3. ADMINISTERING THE ENVIRONMENT
295

Additional resources
For information on modules and module streams, see the following sections in Installing,managing, and removing user-space components
Module streams
Selecting a stream before installation of packages
Resetting module streams
Switching to a later stream
The Manager and its resources are now running in the new self-hosted environment. The self-hostedengine nodes must be reinstalled in the Manager to update their self-hosted engine configuration.Standard hosts are not affected. Perform the following procedure for each self-hosted engine node.
3.2.1.9.3. Reinstalling Hosts
Reinstall Red Hat Virtualization Hosts (RHVH) and Red Hat Enterprise Linux hosts from theAdministration Portal. The procedure includes stopping and restarting the host.
WARNING
When installing or reinstalling the host’s operating system, Red Hat stronglyrecommends that you first detach any existing non-OS storage that is attached tothe host to avoid accidental initialization of these disks, and with that, potential dataloss.
Prerequisites
If the cluster has migration enabled, virtual machines can automatically migrate to another hostin the cluster. Therefore, reinstall a host while its usage is relatively low.
Ensure that the cluster has sufficient memory for its hosts to perform maintenance. If a clusterlacks memory, migration of virtual machines will hang and then fail. To reduce memory usage,shut down some or all of the virtual machines before moving the host to maintenance.
Ensure that the cluster contains more than one host before performing a reinstall. Do notattempt to reinstall all the hosts at the same time. One host must remain available to performStorage Pool Manager (SPM) tasks.
Procedure
1. Click Compute → Hosts and select the host.
2. Click Management → Maintenance and OK.
3. Click Installation → Reinstall. This opens the Install Host window.
# dnf distro-sync --nobest
Red Hat Virtualization 4.4 Administration Guide
296

4. Click the Hosted Engine tab and select DEPLOY from the drop-down list.
5. Click OK to reinstall the host.
After a host has been reinstalled and its status returns to Up, you can migrate virtual machines back tothe host.
IMPORTANT
After you register a Red Hat Virtualization Host to the Red Hat Virtualization Managerand reinstall it, the Administration Portal may erroneously display its status as InstallFailed. Click Management → Activate, and the host will change to an Up status and beready for use.
After reinstalling the self-hosted engine nodes, you can check the status of the new environment byrunning the following command on one of the nodes:
# hosted-engine --vm-status
During the restoration, the old self-hosted engine storage domain was renamed, but was not removedfrom the new environment in case the restoration was faulty. After confirming that the environment isrunning normally, you can remove the old self-hosted engine storage domain.
3.2.1.9.4. Removing a Storage Domain
You have a storage domain in your data center that you want to remove from the virtualizedenvironment.
Procedure
1. Click Storage → Domains.
2. Move the storage domain to maintenance mode and detach it:
a. Click the storage domain’s name. This opens the details view.
b. Click the Data Center tab.
c. Click Maintenance, then click OK.
d. Click Detach, then click OK.
3. Click Remove.
4. Optionally select the Format Domain, i.e. Storage Content will be lost! check box to erase thecontent of the domain.
5. Click OK.
The storage domain is permanently removed from the environment.
3.2.1.10. Overwriting a Self-Hosted Engine from an Existing Backup
If a self-hosted engine is accessible, but is experiencing an issue such as database corruption, or a
CHAPTER 3. ADMINISTERING THE ENVIRONMENT
297

If a self-hosted engine is accessible, but is experiencing an issue such as database corruption, or aconfiguration error that is difficult to roll back, you can restore the environment to a previous state usinga backup taken before the problem began, if one is available.
Restoring a self-hosted engine’s previous state involves the following steps:
1. Place the environment in global maintenance mode.
2. Restore the backup on the Manager virtual machine.
3. Disable global maintenance mode.
For more information about engine-backup --mode=restore options, see Backing Up and Restoringthe Manager.
3.2.1.10.1. Enabling global maintenance mode
You must place the self-hosted engine environment in global maintenance mode before performing anysetup or upgrade tasks on the Manager virtual machine.
Procedure
1. Log in to one of the self-hosted engine nodes and enable global maintenance mode:
2. Confirm that the environment is in global maintenance mode before proceeding:
You should see a message indicating that the cluster is in global maintenance mode.
3.2.1.10.2. Restoring a Backup to Overwrite an Existing Installation
The engine-backup command can restore a backup to a machine on which the Red Hat VirtualizationManager has already been installed and set up. This is useful when you have taken a backup of anenvironment, performed changes on that environment, and then want to undo the changes by restoringthe environment from the backup.
Changes made to the environment since the backup was taken, such as adding or removing a host, willnot appear in the restored environment. You must redo these changes.
Procedure
1. Log in to the Manager machine.
2. Remove the configuration files and clean the database associated with the Manager:
The engine-cleanup command only cleans the Manager database; it does not drop thedatabase or delete the user that owns that database.
3. Restore a full backup or a database-only backup. You do not need to create a new database orspecify the database credentials because the user and database already exist.
# hosted-engine --set-maintenance --mode=global
# hosted-engine --vm-status
# engine-cleanup
Red Hat Virtualization 4.4 Administration Guide
298

Restore a full backup:
Restore a database-only backup by restoring the configuration files and the databasebackup:
NOTE
To restore only the Manager database (for example, if the Data Warehousedatabase is located on another machine), you can omit the --scope=dwhdbparameter.
If successful, the following output displays:
4. Reconfigure the Manager:
3.2.1.10.3. Disabling global maintenance mode
Procedure
1. Log in to the Manager virtual machine and shut it down.
2. Log in to one of the self-hosted engine nodes and disable global maintenance mode:
When you exit global maintenance mode, ovirt-ha-agent starts the Manager virtual machine,and then the Manager automatically starts. It can take up to ten minutes for the Manager tostart.
3. Confirm that the environment is running:
The listed information includes Engine Status. The value for Engine status should be:
{"health": "good", "vm": "up", "detail": "Up"}
NOTE
# engine-backup --mode=restore --file=file_name --log=log_file_name --restore-permissions
# engine-backup --mode=restore --scope=files --scope=db --scope=dwhdb --file=file_name --log=log_file_name --restore-permissions
You should now run engine-setup.Done.
# engine-setup
# hosted-engine --set-maintenance --mode=none
# hosted-engine --vm-status
CHAPTER 3. ADMINISTERING THE ENVIRONMENT
299

NOTE
When the virtual machine is still booting and the Manager hasn’t started yet, theEngine status is:
{"reason": "bad vm status", "health": "bad", "vm": "up", "detail": "Powering up"}
If this happens, wait a few minutes and try again.
When the environment is running again, you can start any virtual machines that were stopped, and checkthat the resources in the environment are behaving as expected.
3.2.2. Migrating the Data Warehouse to a Separate Machine
This section describes how to migrate the Data Warehouse database and service from the Red HatVirtualization Manager machine to a separate machine. Hosting the Data Warehouse service on aseparate machine reduces the load on each individual machine, and avoids potential conflicts caused bysharing CPU and memory resources with other processes.
NOTE
Red Hat only supports installing the Data Warehouse database, the Data Warehouseservice and Grafana all on the same machine as each other, even though you can installeach of these components on separate machines from each other.
You have the following migration options:
You can migrate the Data Warehouse service away from the Manager machine and connect itwith the existing Data Warehouse database (ovirt_engine_history).
You can migrate the Data Warehouse database away from the Manager machine and thenmigrate the Data Warehouse service.
3.2.2.1. Migrating the Data Warehouse Database to a Separate Machine
Migrate the Data Warehouse database (ovirt_engine_history) before you migrate the Data Warehouseservice. Use engine-backup to create a database backup and restore it on the new database machine.For more information on engine-backup, run engine-backup --help.
NOTE
Red Hat only supports installing the Data Warehouse database, the Data Warehouseservice and Grafana all on the same machine as each other, even though you can installeach of these components on separate machines from each other.
The new database server must have Red Hat Enterprise Linux 8 installed.
Enable the required repositories on the new database server.
3.2.2.1.1. Enabling the Red Hat Virtualization Manager Repositories
You need to log in and register the Data Warehouse machine with Red Hat Subscription Manager, attachthe Red Hat Virtualization Manager subscription, and enable the Manager repositories.
Procedure
Red Hat Virtualization 4.4 Administration Guide
300

Procedure
1. Register your system with the Content Delivery Network, entering your Customer Portal username and password when prompted:
NOTE
If you are using an IPv6 network, use an IPv6 transition mechanism to access theContent Delivery Network and subscription manager.
2. Find the Red Hat Virtualization Manager subscription pool and record the pool ID:
3. Use the pool ID to attach the subscription to the system:
NOTE
To view currently attached subscriptions:
To list all enabled repositories:
4. Configure the repositories:
5. Enable version 12 of the postgresql module.
6. Enable version 14 of the nodejs module:
7. Synchronize installed packages to update them to the latest available versions.
Additional resources
# subscription-manager register
# subscription-manager list --available
# subscription-manager attach --pool=pool_id
# subscription-manager list --consumed
# dnf repolist
# subscription-manager repos \ --disable='*' \ --enable=rhel-8-for-x86_64-baseos-rpms \ --enable=rhel-8-for-x86_64-appstream-rpms \ --enable=rhv-4.4-manager-for-rhel-8-x86_64-rpms
# dnf module -y enable postgresql:12
# dnf module -y enable nodejs:14
# dnf distro-sync --nobest
CHAPTER 3. ADMINISTERING THE ENVIRONMENT
301

For information on modules and module streams, see the following sections in Installing,managing, and removing user-space components
Module streams
Selecting a stream before installation of packages
Resetting module streams
Switching to a later stream
3.2.2.1.2. Migrating the Data Warehouse Database to a Separate Machine
Procedure
1. Create a backup of the Data Warehouse database and configuration files on the Manager:
2. Copy the backup file from the Manager to the new machine:
3. Install engine-backup on the new machine:
4. Install the PostgreSQL server package:
5. Initialize the PostgreSQL database, start the postgresql service, and ensure that this servicestarts on boot:
# su - postgres -c 'initdb'# systemctl enable postgresql# systemctl start postgresql
6. Restore the Data Warehouse database on the new machine. file_name is the backup file copiedfrom the Manager.
The Data Warehouse database is now hosted on a separate machine from that on which the Manager ishosted. After successfully restoring the Data Warehouse database, a prompt instructs you to run the engine-setup command. Before running this command, migrate the Data Warehouse service.
3.2.2.2. Migrating the Data Warehouse Service to a Separate Machine
You can migrate the Data Warehouse service installed and configured on the Red Hat Virtualization
# engine-backup --mode=backup --scope=dwhdb --scope=files --file=file_name --log=log_file_name
# scp /tmp/file_name [email protected]:/tmp
# dnf install ovirt-engine-tools-backup
# dnf install postgresql-server postgresql-contrib
# engine-backup --mode=restore --scope=files --scope=dwhdb --file=file_name --log=log_file_name --provision-dwh-db --restore-permissions
Red Hat Virtualization 4.4 Administration Guide
302

You can migrate the Data Warehouse service installed and configured on the Red Hat VirtualizationManager to a separate machine. Hosting the Data Warehouse service on a separate machine helps toreduce the load on the Manager machine.
Notice that this procedure migrates the Data Warehouse service only.
To migrate the Data Warehouse database (ovirt_engine_history) prior to migrating the DataWarehouse service, see Migrating the Data Warehouse Database to a Separate Machine .
NOTE
Red Hat only supports installing the Data Warehouse database, the Data Warehouseservice and Grafana all on the same machine as each other, even though you can installeach of these components on separate machines from each other.
Prerequisites
You must have installed and configured the Manager and Data Warehouse on the samemachine.
To set up the new Data Warehouse machine, you must have the following:
The password from the Manager’s /etc/ovirt-engine/engine.conf.d/10-setup-database.conf file.
Allowed access from the Data Warehouse machine to the Manager database machine’sTCP port 5432.
The username and password for the Data Warehouse database from the Manager’s/etc/ovirt-engine-dwh/ovirt-engine-dwhd.conf.d/10-setup-database.conf file.If you migrated the ovirt_engine_history database using the procedures described inMigrating the Data Warehouse Database to a Separate Machine , the backup includes thesecredentials, which you defined during the database setup on that machine.
Installing this scenario requires four steps:
1. Setting up the New Data Warehouse Machine
2. Stopping the Data Warehouse service on the Manager machine
3. Configuring the new Data Warehouse machine
4. Disabling the Data Warehouse package on the Manager machine
3.2.2.2.1. Setting up the New Data Warehouse Machine
Enable the Red Hat Virtualization repositories and install the Data Warehouse setup package on a RedHat Enterprise Linux 8 machine:
1. Enable the required repositories:
a. Register your system with the Content Delivery Network, entering your Customer Portaluser name and password when prompted:
# subscription-manager register
CHAPTER 3. ADMINISTERING THE ENVIRONMENT
303

b. Find the Red Hat Virtualization Manager subscription pool and record the pool ID:
c. Use the pool ID to attach the subscription to the system:
d. Configure the repositories:
2. Enable the pki-deps module.
3. Ensure that all packages currently installed are up to date:
4. Install the ovirt-engine-dwh-setup package:
3.2.2.2.2. Stopping the Data Warehouse Service on the Manager Machine
Procedure
1. Stop the Data Warehouse service:
2. If the database is hosted on a remote machine, you must manually grant access by editing thepostgres.conf file. Edit the /var/lib/pgsql/data/postgresql.conf file and modify thelisten_addresses line so that it matches the following:
If the line does not exist or has been commented out, add it manually.
If the database is hosted on the Manager machine and was configured during a clean setup ofthe Red Hat Virtualization Manager, access is granted by default.
3. Restart the postgresql service:
# subscription-manager list --available
# subscription-manager attach --pool=pool_id
# subscription-manager repos \ --disable='*' \ --enable=rhel-8-for-x86_64-baseos-rpms \ --enable=rhel-8-for-x86_64-appstream-rpms \ --enable=rhv-4.4-manager-for-rhel-8-x86_64-rpms \ --enable=fast-datapath-for-rhel-8-x86_64-rpms \ --enable=jb-eap-7.4-for-rhel-8-x86_64-rpms
# dnf module -y enable pki-deps
# dnf upgrade --nobest
# dnf install ovirt-engine-dwh-setup
# systemctl stop ovirt-engine-dwhd.service
listen_addresses = '*'
# systemctl restart postgresql
Red Hat Virtualization 4.4 Administration Guide
304

3.2.2.2.3. Configuring the New Data Warehouse Machine
The order of the options or settings shown in this section may differ depending on your environment.
1. If you are migrating both the ovirt_engine_history database and the Data Warehouse serviceto the same machine, run the following, otherwise proceed to the next step.
2. Run the engine-setup command to begin configuration of Data Warehouse on the machine:
3. Press Enter to accept the automatically detected host name, or enter an alternative host nameand press Enter:
4. Press Enter to automatically configure the firewall, or type No and press Enter to maintainexisting settings:
If you choose to automatically configure the firewall, and no firewall managers are active, youare prompted to select your chosen firewall manager from a list of supported options. Type thename of the firewall manager and press Enter. This applies even in cases where only one optionis listed.
5. Enter the fully qualified domain name and password for the Manager. Press Enter to accept thedefault values in each other field:
6. Enter the FQDN and password for the Manager database machine. Press Enter to accept thedefault values in each other field:
# sed -i '/^ENGINE_DB_/d' \ /etc/ovirt-engine-dwh/ovirt-engine-dwhd.conf.d/10-setup-database.conf
# sed -i \ -e 's;^\(OVESETUP_ENGINE_CORE/enable=bool\):True;\1:False;' \ -e '/^OVESETUP_CONFIG\/fqdn/d' \ /etc/ovirt-engine-setup.conf.d/20-setup-ovirt-post.conf
# engine-setup
Host fully qualified DNS name of this server [autodetected host name]:
Setup can automatically configure the firewall on this system.Note: automatic configuration of the firewall may overwrite current settings.Do you want Setup to configure the firewall? (Yes, No) [Yes]:
Host fully qualified DNS name of the engine server []: engine-fqdnSetup needs to do some actions on the remote engine server. Either automatically, using ssh as root to access it, or you will be prompted to manually perform each such action.Please choose one of the following:1 - Access remote engine server using ssh as root2 - Perform each action manually, use files to copy content around(1, 2) [1]:ssh port on remote engine server [22]:root password on remote engine server engine-fqdn: password
Engine database host []: manager-db-fqdnEngine database port [5432]:
CHAPTER 3. ADMINISTERING THE ENVIRONMENT
305

7. Confirm your installation settings:
The Data Warehouse service is now configured on the remote machine. Proceed to disable the DataWarehouse service on the Manager machine.
3.2.2.2.4. Disabling the Data Warehouse Service on the Manager Machine
Procedure
1. On the Manager machine, restart the Manager:
2. Run the following command to modify the file /etc/ovirt-engine-setup.conf.d/20-setup-ovirt-post.conf and set the options to False:
3. Disable the Data Warehouse service:
4. Remove the Data Warehouse files:
The Data Warehouse service is now hosted on a separate machine from the Manager.
3.2.3. Backing Up and Restoring Virtual Machines Using a Backup Storage Domain
3.2.3.1. Backup storage domains explained
A backup storage domain is one that you can use specifically for storing and migrating virtual machinesand virtual machine templates for the purpose of backing up and restoring for disaster recovery,migration, or any other backup/restore usage model. A backup domain differs from a non-backupdomain in that all virtual machines on a backup domain are in a powered-down state. A virtual machinecannot run on a backup domain.
You can set any data storage domain to be a backup domain. You can enable or disable this setting by
Engine database secured connection (Yes, No) [No]:Engine database name [engine]:Engine database user [engine]:Engine database password: password
Please confirm installation settings (OK, Cancel) [OK]:
# service ovirt-engine restart
# sed -i \ -e 's;^\(OVESETUP_DWH_CORE/enable=bool\):True;\1:False;' \ -e 's;^\(OVESETUP_DWH_CONFIG/remoteEngineConfigured=bool\):True;\1:False;' \ /etc/ovirt-engine-setup.conf.d/20-setup-ovirt-post.conf
# sed -i \ -e 's;^\(OVESETUP_GRAFANA_CORE/enable=bool\):True;\1:False;' \ /etc/ovirt-engine-setup.conf.d/20-setup-ovirt-post.conf
# systemctl disable ovirt-engine-dwhd.service
# rm -f /etc/ovirt-engine-dwh/ovirt-engine-dwhd.conf.d/*.conf /var/lib/ovirt-engine-dwh/backups/*
Red Hat Virtualization 4.4 Administration Guide
306

You can set any data storage domain to be a backup domain. You can enable or disable this setting byselecting or deselecting a checkbox in the Manage Domain dialog box. You can enable this setting onlyafter all virtual machines on that storage domain are stopped.
You cannot start a virtual machine stored on a backup domain. The Manager blocks this and any otheroperation that might invalidate the backup. However, you can run a virtual machine based on a templatestored on a backup domain if the virtual machine’s disks are not part of a backup domain.
As with other types of storage domains, you can attach or detach backup domains to or from a datacenter. So, in addition to storing backups, you can use backup domains to migrate virtual machinesbetween data centers.
Advantages
Some reasons to use a backup domain, rather than an export domain, are listed here:
You can have multiple backup storage domains in a data center, as opposed to only one exportdomain.
You can dedicate a backup storage domain to use for backup and disaster recovery.
You can transfer a backup of a virtual machine, a template, or a snapshot to a backup storagedomain
Migrating a large number of virtual machines, templates, or OVF files is significantly faster withbackup domains than export domains.
A backup domain uses disk space more efficiently than an export domain.
Backup domains support both file storage (NFS, Gluster) and block storage (Fiber Channel andiSCSI). This contrasts with export domains, which only support file storage.
You can dynamically enable and disable the backup setting for a storage domain, taking intoaccount the restrictions.
Restrictions
Any virtual machine or template on a _backup domain must have all its disks on that samedomain.
All virtual machines on a storage domain must be powered down before you can set it to be abackup domain.
You cannot run a virtual machine that is stored on a backup domain, because doing so mightmanipulate the disk’s data.
A backup domain cannot be the target of memory volumes because memory volumes are onlysupported for active virtual machines.
You cannot preview a virtual machine on a backup domain.
Live migration of a virtual machine to a backup domain is not possible.
You cannot set a backup domain to be the master domain.
You cannot set a Self-hosted engine’s domain to be a backup domain.
Do not use the default storage domain as a backup domain.
CHAPTER 3. ADMINISTERING THE ENVIRONMENT
307

3.2.3.2. Setting a data storage domain to be a backup domain
Prerequisites
All disks belonging to a virtual machine or template on the storage domain must be on the samedomain.
All virtual machines on the domain must be powered down.
Procedure
1. In the Administration Portal, select Storage → Domains.
2. Create a new storage domain or select an existing storage domain and click Manage Domain.The Manage Domains dialog box opens.
3. Under Advanced Parameters, select the Backup checkbox.
The domain is now a backup domain.
3.2.3.3. Backing up or Restoring a Virtual Machine or Snapshot Using a Backup Domain
You can back up a powered down virtual machine or snapshot. You can then store the backup on thesame data center and restore it as needed, or migrate it to another data center.
Procedure: Backing Up a Virtual Machine
1. Create a backup domain. See Setting a storage domain to be a backup domain backup domain .
2. Create a new virtual machine based on the virtual machine you want to back up:
To back up a snapshot, first create a virtual machine from a snapshot. See Creating a VirtualMachine from a Snapshot in the Virtual Machine Management Guide .
To back up a virtual machine, first clone the virtual machine. See Cloning a Virtual Machinein the Virtual Machine Management Guide . Make sure the clone is powered down beforeproceeding.
3. Export the new virtual machine to a backup domain. See Exporting a Virtual Machine to a DataDomain in the Virtual Machine Management Guide .
Procedure: Restoring a Virtual Machine
1. Make sure that the backup storage domain that stores the virtual machine backup is attachedto a data center.
2. Import the virtual machine from the backup domain. See Importing Virtual Machines from aData Domain.
Related information
Importing storage domains
Migrating storage domains between data centers in same environment
Migrating storage domains between data centers in different environments
Red Hat Virtualization 4.4 Administration Guide
308

3.2.4. Backing Up and Restoring Virtual Machines Using the Backup and Restore API
3.2.4.1. The Backup and Restore API
The backup and restore API is a collection of functions that allows you to perform full or file-levelbackup and restoration of virtual machines. The API combines several components of Red HatVirtualization, such as live snapshots and the REST API, to create and work with temporary volumes thatcan be attached to a virtual machine containing backup software provided by an independent softwareprovider.
For supported third-party backup vendors, consult the Red Hat Virtualization Ecosystem .
3.2.4.2. Backing Up a Virtual Machine
Use the backup and restore API to back up a virtual machine. This procedure assumes you have twovirtual machines: the virtual machine to back up, and a virtual machine on which the software formanaging the backup is installed.
Procedure
1. Using the REST API, create a snapshot of the virtual machine to back up:
NOTE
Here, replace {vm:id} with the VM ID of the virtual machine whose snapshotyou are making. This ID is available from the General tab of the New VirtualMachine and Edit Virtual Machine windows in the Administration Portaland VM Portal.
Taking a snapshot of a virtual machine stores its current configuration data inthe data attribute of the configuration attribute in initialization under thesnapshot.
IMPORTANT
You cannot take snapshots of disks marked as shareable or based on direct LUNdisks.
2. Retrieve the configuration data of the virtual machine from the data attribute under thesnapshot:
NOTE
POST /api/vms/{vm:id}/snapshots/ HTTP/1.1Accept: application/xmlContent-type: application/xml
<snapshot> <description>BACKUP</description></snapshot>
GET /api/vms/{vm:id}/snapshots/{snapshot:id} HTTP/1.1All-Content: trueAccept: application/xmlContent-type: application/xml
CHAPTER 3. ADMINISTERING THE ENVIRONMENT
309

NOTE
Here, replace {vm:id} with the ID of the virtual machine whose snapshot youmade earlier. Replace {snapshot:id} with the snapshot ID.
Add the All-Content: true header to retrieve additional OVF data in theresponse. The OVF data in the XML response is located within the VMconfiguration element, <initialization><configuration>. Later, you will usethis data to restore the virtual machine.
3. Get the snapshot ID:
4. Identify the disk ID of the snapshot:
5. Attach the snapshot to a backup virtual machine as an active disk attachment, with the correctinterface type (for example, virtio_scsi):
NOTE
Here, replace {vm:id} with the ID of the backup virtual machine, not the virtualmachine whose snapshot you made earlier. Replace {disk:id} with the disk ID.Replace {snapshot:id} with the snapshot ID.
6. Use the backup software on the backup virtual machine to back up the data on the snapshotdisk.
7. Remove the snapshot disk attachment from the backup virtual machine:
NOTE
GET /api/vms/{vm:id}/snapshots/ HTTP/1.1Accept: application/xmlContent-type: application/xml
GET /api/vms/{vm:id}/snapshots/{snapshot:id}/disks HTTP/1.1Accept: application/xmlContent-type: application/xml
POST /api/vms/{vm:id}/diskattachments/ HTTP/1.1Accept: application/xmlContent-type: application/xml
<disk_attachment> <active>true</active> <interface>_virtio_scsi_</interface> <disk id="{disk:id}"> <snapshot id="{snapshot:id}"/> </disk></disk_attachment>
DELETE /api/vms/{vm:id}/diskattachments/{snapshot:id} HTTP/1.1Accept: application/xmlContent-type: application/xml
Red Hat Virtualization 4.4 Administration Guide
310

NOTE
Here, replace {vm:id} with the ID of the backup virtual machine, not the virtualmachine whose snapshot you made earlier. Replace {snapshot:id} with thesnapshot ID.
8. Optionally, delete the snapshot:
NOTE
Here, replace {vm:id} with the ID of the virtual machine whose snapshot youmade earlier. Replace {snapshot:id} with the snapshot ID.
You have backed up the state of a virtual machine at a fixed point in time using backup softwareinstalled on a separate virtual machine.
3.2.4.3. Restoring a Virtual Machine
Restore a virtual machine that has been backed up using the backup and restore API. This procedureassumes you have a backup virtual machine on which the software used to manage the previous backupis installed.
Procedure
1. In the Administration Portal, create a floating disk on which to restore the backup. See Creatinga Virtual Disk for details on how to create a floating disk.
2. Attach the disk to the backup virtual machine:
NOTE
Here, replace {vm:id} with the ID of this backup virtual machine, not the virtualmachine whose snapshot you made earlier. Replace {disk:id} with the disk ID yougot while backing up the virtual machine.
3. Use the backup software to restore the backup to the disk.
4. Detach the disk from the backup virtual machine:
DELETE /api/vms/{vm:id}/snapshots/{snapshot:id} HTTP/1.1Accept: application/xmlContent-type: application/xml
POST /api/vms/{vm:id}/disks/ HTTP/1.1Accept: application/xmlContent-type: application/xml
<disk id="{disk:id}"></disk>
DELETE /api/vms/{vm:id}/disks/{disk:id} HTTP/1.1Accept: application/xmlContent-type: application/xml
CHAPTER 3. ADMINISTERING THE ENVIRONMENT
311

NOTE
Here, replace {vm:id} with the ID of this backup virtual machine, not the virtualmachine whose snapshot you made earlier. Replace {disk:id} with the disk ID.
5. Create a new virtual machine using the configuration data of the virtual machine being restored:
POST /api/vms/ HTTP/1.1Accept: application/xmlContent-type: application/xml
<vm> <cluster> <name>cluster_name</name> </cluster> <name>_NAME_</name> <initialization> <configuration> <data> <!-- omitting long ovf data --> </data> <type>ovf</type> </configuration> </initialization> ...</vm>
NOTE
To override any of the values in the ovf while creating the virtual machine,redefine the element before or after the initialization element. Not within theinitialization element.
6. Attach the disk to the new virtual machine:
NOTE
Here, replace {vm:id} with the ID of the new virtual machine, not the virtualmachine whose snapshot you made earlier. Replace {disk:id} with the disk ID.
<action> <detach>true</detach></action>
POST /api/vms/{vm:id}/disks/ HTTP/1.1Accept: application/xmlContent-type: application/xml
<disk id="{disk:id}"></disk>
Red Hat Virtualization 4.4 Administration Guide
312

You have restored a virtual machine using a backup that was created using the backup and restore API.
3.2.5. Backing Up and Restoring Virtual Machines Using the Incremental Backup andRestore API
3.2.5.1. Incremental Backup and Restore API
Red Hat Virtualization provides an Incremental Backup API that you can use for full backups of QCOW2or RAW virtual disks, or incremental backups of QCOW 2 virtual disks, without any temporary snapshots.Data is backed-up in RAW format, whether the virtual disk being backed up is QCOW2 or RAW. You canrestore RAW guest data and either RAW or QCOW2 disks. The Incremental Backup API is part of theRHV REST API. You can backup virtual machines that are running or that are not.
As a developer, you can use the API to develop a backup application.
Features
Backups are simpler, faster and more robust than when using the Backup and Restore API. TheIncremental Backup API provides improved integration with backup applications, with new support forbacking up and restoring RAW guest data, regardless of the underlying disk format.
If an invalid bitmap causes a backup to fail, you can remove a specific checkpoint in the backup chain.You do not need to run a full backup.
Limitations:
Only disks in QCOW2 format can be backed up incrementally, not RAW format disks. Thebackup process saves the backed up data in RAW format.
Only backed up data in RAW format can be restored.
Incremental restore does not support restoring snapshots as they existed at the time of thebackup, rather incremental restore restores only the data and not the structure of volumes orimages in snapshots as they existed at the time of the backup. This limit is common in backupsolutions for other systems.
As is commonly the case with backup solutions, incremental restore restores only the data andnot the structure of volumes or images in snapshots as they existed at the time of the backup.
An unclean shutdown of a virtual machine, whatever the cause, might invalidate bitmaps on thedisk, which invalidates the entire backup chain. Restoring an incremental backup using an invalidbitmap leads to corrupt virtual machine data.There is no way to detect an invalid bitmap, other than starting a backup. If the disk includes anyinvalid bitmaps, the operation fails.
The following table describes the disk configurations that support incremental backup.
NOTE
When you create a disk using the Administration portal, you set the storage type,provisioning type, and whether incremental backup is enabled or disabled. Based on thesesettings, the Manager determines the virtual disk format.
Table 3.1. Supported disk configurations for incremental backup
CHAPTER 3. ADMINISTERING THE ENVIRONMENT
313

Storage type Provisioning type When incrementalbackup is…
Virtual disk format is…
block thin enabled qcow2
block preallocated enabled qcow2 (preallocated)
file thin enabled qcow2
file preallocated enabled qcow2 (preallocated)
block thin disabled qcow2
block preallocated disabled raw (preallocated)
file thin disabled raw (sparse)
file preallocated disabled raw (preallocated)
network Not applicable disabled raw
lun Not applicable disabled raw
3.2.5.1.1. Incremental Backup Flow
A backup application that uses the Incremental Backup API must follow this sequence to back up virtualmachine disks that have already been enabled for incremental backup:
1. The backup application uses the REST API to find virtual machine disks that should be includedin the backup. Only disks in QCOW2 format are included.
2. The backup application starts a full backup or an incremental backup. The API call specifies avirtual machine ID, an optional previous checkpoint ID, and a list of disks to back up. If the APIcall does not specify a previous checkpoint ID, a full backup begins, which includes all data in thespecified disks, based on the current state of each disk.
3. The engine prepares the virtual machine for backup. The virtual machine can continue runningduring the backup.
4. The backup application polls the engine for the backup status, until the engine reports that thebackup is ready to begin.
5. When the backup is ready to begin, the backup application creates an image transfer object forevery disk included in the backup.
6. The backup application gets a list of changed blocks from ovirt-imageio for every imagetransfer. If a change list is not available, the backup application gets an error.
7. The backup application downloads changed blocks in RAW format from ovirt-imageio andstores them in the backup media. If a list of changed blocks is not available, the backupapplication can fall back to copying the entire disk.
Red Hat Virtualization 4.4 Administration Guide
314

8. The backup application finalizes all image transfers.
9. The backup application finalizes the backup using the REST API .
3.2.5.1.2. Incremental Restore Flow
A backup application that uses the Incremental Backup API must follow this sequence to restore virtualmachine disks that have been backed up:
1. The user selects a restore point based on available backups using the backup application.
2. The backup application creates a new disk or a snapshot with an existing disk to hold therestored data.
3. The backup application starts an upload image transfer for every disk , specifying format is raw.This enables format conversion when uploading RAW data to a QCOW2 disk.
4. The backup application transfers the data included in this restore point to imageio using theAPI.
5. The backup application finalizes the image transfers.
3.2.5.1.3. Incremental Backup and Restore API Tasks
The Incremental Backup and Restore API is documented in the Red Hat Virtualization REST API Guide .The backup and restore flow requires the following actions.
Enabling incremental backup on either a new or existing virtual disk:
A new disk, using the Administration Portal
An existing disk, using the Administration Portal
A new or existing disk, using an API call
Finding disks that are enabled for incremental backup
Starting a full backup
Starting an incremental backup
Finalizing a backup
Getting information about a backup
Getting information about the disks in a backup
Listing all checkpoints for a virtual machine
Listing information for a specific virtual machine checkpoint
Removing a checkpoint of a specific virtual machine
Downloading an image transfer object to archive a backup
Uploading an image transfer object to restore a backup
CHAPTER 3. ADMINISTERING THE ENVIRONMENT
315

Listing changed blocks
Downloading and uploading changed blocks
3.2.5.1.4. Enabling Incremental Backup on a new virtual disk
Enable incremental backup for a virtual disk to mark it as included in an incremental backup. Whenadding a disk, you can enable incremental backup for every disk, either with the REST API or using theAdministration Portal. You can back up existing disks that are not enabled for incremental backup usingfull backup or in the same way you did previously.
NOTE
The Manager does not require the disk to be enabled for it to be included in anincremental backup, but you can enable it to keep track of which disks are enabled.
Because incremental backup requires disks to be formatted in QCOW2, use QCOW2 format instead ofRAW format.
Procedure
1. Add a new virtual disk. For more information see Creating a Virtual Disk .
2. When configuring the disk, select the Enable Incremental Backup checkbox.
Additional resources
Enabling incremental backup for a disk using the API .
3.2.5.1.5. Enabling Incremental Backup on an existing RAW virtual disk
Because incremental backup is not supported for disks in RAW format, a QCOW2 format layer mustexist on top of any RAW format disks in order to use incremental backup. Creating a snapshot generatesa QCOW2 layer, enabling incremental backup on all disks that are included in the snapshot, from thepoint at which the snapshot is created.
WARNING
If the base layer of a disk uses RAW format, deleting the last snapshot and mergingthe top QCOW2 layer into the base layer converts the disk to RAW format, therebydisabling incremental backup if it was set. To re-enable incremental backup, you cancreate a new snapshot, including this disk.
Procedure
1. In the Administration Portal, click Compute → Virtual Machines.
2. Select a virtual machine and click the Disks tab.
3. Click the Edit button. The Edit Disk dialog box opens.
Red Hat Virtualization 4.4 Administration Guide
316

4. Select the Enable Incremental Backup checkbox.
Additional resources
Enabling incremental backup for a disk using the API
3.2.5.1.6. Enabling incremental backup
You can use a REST API request to enable incremental backup for a virtual machine’s disk.
Procedure
Enable incremental backup for a new disk. For example, for a new disk on a virtual machine withID 123, send this request:
The request body should include backup set to incremental as part of a disk object, like this:
The response is:
Additional resources
DiskBackup enum in the REST API Guide for RHV
3.2.5.1.7. Finding disks that are enabled for incremental backup
For the specified virtual machine, you can list the disks that are enabled for incremental backup, filteredaccording to the backup property.
Procedure
1. List the disks that are attached to the virtual machine. For example, for a virtual machine withthe ID 123, send this request:
The response includes all disk_attachment objects, each of which includes one or more disk
POST /ovirt-engine/api/vms/123/diskattachments
<disk_attachment> … <disk> … <backup>incremental</backup> … </disk></disk_attachment>
<disk_attachment> … <disk href="/ovirt-engine/api/disks/456" id="456"/> … </disk_attachment>
GET /ovirt-engine/api/vms/123/diskattachments
CHAPTER 3. ADMINISTERING THE ENVIRONMENT
317

The response includes all disk_attachment objects, each of which includes one or more diskobjects. For example:
2. Use the disk service to see the properties of a disk from the previous step. For example, for thedisk with the ID 456, send this request:
The response includes all properties for the disk. backup is set to none or incremental. Forexample:
Additional resources
backup attribute of Disk struct
DiskBackup enum
3.2.5.1.8. Starting a full backup
After a full backup you can use the resulting checkpoint ID as the start point in the next incrementalbackup.
When taking a backup of a running virtual machine, the process creates a scratch disk on the samestorage domain as the disk being backed up. The backup process creates this disk to enable new data tobe written to the running virtual machine during the backup. You can see this scratch disk in theAdministration Portal during the backup. It is automatically deleted when the backup finishes.
Starting a full backup requires a request call with a body, and includes a response.
Procedure
1. Send a request specifying a virtual machine to back up. For example, specify a virtual machinewith ID 123 like this:
2. In the request body, specify a disk to back up. For example, to start a full backup of a disk with ID456, send the following request body:
<disk_attachments> <disk_attachment> … <disk href="/ovirt-engine/api/disks/456" id="456"/> … </disk_attachment> … </disk_attachments>
GET /ovirt-engine/api/disks/456
<disk href="/ovirt-engine/api/disks/456" id="456"> … <backup>incremental</backup> … </disk>
POST /ovirt-engine/api/vms/123/backups
Red Hat Virtualization 4.4 Administration Guide
318

The response body should look similar to this:
The response includes the following:
The backup id
The status of the backup, indicating that the backup is initializing.
3. Poll the backup until the status is ready. The response includes to_checkpoint_id. Note this IDand use it for from_checkpoint_id in the next incremental backup.
Additional resources
add method of the VmBackups service in the REST API Guide for RHV
3.2.5.1.9. Starting an incremental backup
Once a full backup is completed for a given virtual disk, subsequent incremental backups that diskcontain only the changes since the last backup. Use the value of to_checkpoint_id from the mostrecent backup as the value for from_checkpoint_id in the request body.
When taking a backup of a running virtual machine, the process creates a scratch disk on the samestorage domain as the disk being backed up. The backup process creates this disk to enable new data tobe written to the running virtual machine during the backup. You can see this scratch disk in theAdministration Portal during the backup. It is automatically deleted when the backup finishes.
Starting an incremental backup or mixed backup requires a request call with a body, and includes aresponse.
Procedure
1. Send a request specifying a virtual machine to back up. For example, specify a virtual machinewith ID 123 like this:
2. In the request body, specify a disk to back up. For example, to start an incremental backup of adisk with ID 456, send the following request body:
<backup> <disks> <disk id="456" /> … </disks></backup>
<backup id="789"> <disks> <disk id="456" /> … … </disks> <status>initializing</status> <creation_date></backup>
POST /ovirt-engine/api/vms/123/backups
CHAPTER 3. ADMINISTERING THE ENVIRONMENT
319

NOTE
In the request body, if you include a disk that is not included in the previouscheckpoint, the request also runs a full backup of this disk. For example, a diskwith ID 789 has not been backed up yet. To add a full backup of 789 to the aboverequest body, send a request body like this:
The response body should look similar to this:
The response includes the following:
The backup ID.
The ID of any disk that was included in the backup.
The status, indicating that the backup is initializing.
3. Poll the backup until the status is ready. The response includes to_checkpoint_id. Note this IDand use it for from_checkpoint_id in the next incremental backup.
Additional resources
add method of the VmBackups service in the REST API Guide for RHV.
<backup> <from_checkpoint_id>previous-checkpoint-uuid</from_checkpoint_id> <disks> <disk id="456" /> … </disks></backup>
<backup> <from_checkpoint_id>previous-checkpoint-uuid</from_checkpoint_id> <disks> <disk id="456" /> <disk id="789" /> … </disks></backup>
<backup id="101112"><from_checkpoint_id>previous-checkpoint-uuid</from_checkpoint_id><to_checkpoint_id>new-checkpoint-uuid</to_checkpoint_id> <disks> <disk id="456" /> <disk id="789" /> … … </disks> <status>initializing</status> <creation_date></backup>
Red Hat Virtualization 4.4 Administration Guide
320

3.2.5.1.10. Getting information about a backup
You can get information about a backup that you can use to start a new incremental backup.
The list method of the VmBackups service returns the following information about a backup:
The ID of each disk that was backed up.
The IDs of the start and end checkpoints of the backup.
The ID of the disk image of the backup, for each disk included in the backup.
The status of the backup.
The date the backup was created.
When the value of <status> is ready, the response includes <to_checkpoint_id> which should be used asthe <from_checkpoint_id> in the next incremental backup and you can start downloading the disks toback up the virtual machine storage.
Procedure
To get information about a backup with ID 456 of a virtual machine with ID 123, send a requestlike this:
The response includes the backup with ID 456, with <from_checkpoint_id> 999 and<to_checkpoint_id> 666. The disks included in the backup are referenced in the <link> element.
Additional resources
list method of the VmBackups service
3.2.5.1.11. Getting information about the disks in a backup
You can get information about the disks that are part of the backup, including the backup mode thatwas used for each disk in a backup, which helps determine the mode that you use to download thebackup.
The list method of the VmBackupDisks service returns the following information about a backup:
The ID and name of each disk that was backed up.
The ID of the disk image of the backup, for each disk included in the backup.
The disk format.
GET /ovirt-engine/api/vms/456/backups/123
<backup id="456"> <from_checkpoint_id>999</from_checkpoint_id> <to_checkpoint_id>666</to_checkpoint_id> <link href="/ovirt-engine/api/vms/456/backups/123/disks" rel="disks"/> <status>ready</status> <creation_date></backup>
CHAPTER 3. ADMINISTERING THE ENVIRONMENT
321

The backup behavior supported by the disk.
The backup type that was taken for the disk (full/incremental).
Procedure
To get information about a backup with ID 456 of a virtual machine with ID 123, send a requestlike this:
The response includes the disk with ID 789, and the ID of the disk image is 555.
Additional resources
list method of the VmBackupDisks service
3.2.5.1.12. Finalizing a backup
Finalizing a backup ends the backup, unlocks resources, and performs cleanups. Use the finalize backupservice method
Procedure
To finalize a backup of a disk with ID 456 on a virtual machine with ID 123, send a request likethis:
Additional resources
finalize POST in the REST API Guide .
3.2.5.1.13. Creating an image transfer object for incremental backup
When the backup is ready to download, the backup application should create an imagetransfer object,which initiates a transfer for an incremental backup.
Creating an image transfer object requires a request call with a body.
GET /ovirt-engine/api/vms/456/backups/123/disks
<disks> <disk id="789"> <name>vm1_Disk1</name> <actual_size>671744</actual_size> <backup>incremental</backup> <backup_mode>full</backup_mode> <format>cow</format> <image_id>555</image_id> <qcow_version>qcow2_v3</qcow_version> <status>locked</status> <storage_type>image</storage_type> <total_size>0</total_size> </disk></disks>
POST /vms/123/backups/456/finalize
Red Hat Virtualization 4.4 Administration Guide
322

Procedure
1. Send a request like this:
2. In the request body, specify the following parameters:
Disk ID.
Backup ID.
Direction of the disk set to download.
Format of the disk set to raw.
For example, to transfer a backup of a disk where the ID of the disk is 123 and the ID of thebackup is 456, send the following request body:
Additional resources
add method for creating an imagetransfer object in the REST API Guide for RHV.
3.2.5.1.14. Creating an image transfer object for incremental restore
To enable restoring raw data backed up using the incremental backup API to a QCOW2-formatted disk,the backup application should create an imagetransfer object.
When the transfer format is raw and the underlying disk format is QCOW2, uploaded data is convertedon the fly to QCOW2 format when writing to storage. Uploading data from a QCOW2 disk to a RAW diskis not supported.
Creating an image transfer object requires a request call with a body.
Procedure
1. Send a request like this:
2. In the request body, specify the following parameters:
Disk ID or snapshot ID.
Direction of the disk set to upload.
Format of the disk set to raw.
For example, to transfer a backup of a disk where the ID of the disk is 123, send the following
POST /ovirt-engine/api/imagetransfers
<image_transfer> <disk id="123"/> <backup id="456"/> <direction>download</direction> <format>raw</format></image_transfer>
POST /ovirt-engine/api/imagetransfers
CHAPTER 3. ADMINISTERING THE ENVIRONMENT
323

For example, to transfer a backup of a disk where the ID of the disk is 123, send the followingrequest body:
Additional resources
add method for creating an imagetransfer object in the REST API Guide for RHV.
3.2.5.1.15. Listing checkpoints for a virtual machine
You can list all checkpoints for a virtual machine, including information for each checkpoint, by sending arequest call.
Procedure
Send a request specifying a virtual machine. For example, specify a virtual machine with ID 123like this:
The response includes all the virtual machine checkpoints. Each checkpoint contains the followinginformation:
The checkpoint’s disks.
The ID of the parent checkpoint.
Creation date of the checkpoint.
The virtual machine to which it belongs.
For example:
Additional resources
list method to list virtual machine checkpoints in the REST API Guide for RHV.
3.2.5.1.16. Listing a specific checkpoint for a virtual machine
<image_transfer> <disk id="123"/> <direction>upload</direction> <format>raw</format></image_transfer>
GET /vms/123/checkpoints/
<parent_id>, <creation_date> and the virtual machine it belongs to <vm>:<checkpoints> <checkpoint id="456"> <link href="/ovirt-engine/api/vms/vm-uuid/checkpoints/456/disks" rel="disks"/> <parent_id>parent-checkpoint-uuid</parent_id> <creation_date>xxx</creation_date> <vm href="/ovirt-engine/api/vms/123" id="123"/> </checkpoint></checkpoints>
Red Hat Virtualization 4.4 Administration Guide
324

You can list information for a specific checkpoint for a virtual machine by sending a request call.
Procedure
Send a request specifying a virtual machine. For example, specify a virtual machine with ID 123and checkpoint ID 456 like this:
The response includes the following information for the checkpoint:
The checkpoint’s disks.
The ID of the parent checkpoint.
Creation date of the checkpoint.
The virtual machine to which it belongs.
For example:
Additional resources
list method to list virtual machine checkpoints in the REST API Guide for RHV.
3.2.5.1.17. Removing a checkpoint
You can remove a checkpoint of a virtual machine by sending a DELETE request. You can remove acheckpoint on a virtual machine whether it is running or not.
Procedure
Send a request specifying a virtual machine and a checkpoint. For example, specify a virtualmachine with ID 123 and a checkpoint with ID 456 like this:
Additional resources
remove method of VmCheckpoint
3.2.5.1.18. Using the imageio API to transfer backup data
Image transfer APIs start and stop an image transfer. The result is a transfer URL.
You use the imageio API to actually transfer the data from the transfer URL.
GET /vms/123/checkpoints/456
<checkpoint id="456"> <link href="/ovirt-engine/api/vms/vm-uuid/checkpoints/456/disks" rel="disks"/> <parent_id>parent-checkpoint-uuid</parent_id> <creation_date>xxx</creation_date> <vm href="/ovirt-engine/api/vms/123" id="123"/></checkpoint>
DELETE /vms/123/checkpoints/456/
CHAPTER 3. ADMINISTERING THE ENVIRONMENT
325

For complete information on using the imageio API, see the ovirt-imageio Images API reference.
Table 3.2. imageio Image API methods used in incremental backup and restore
API request Description imageio Image API referencesection
OPTIONS /images/{ticket-id} HTTP/1.1
Gets the server options, to findout what features the serversupports.
See OPTIONS
GET /images/{ticket-id}/extents
Gets information about diskimage content and allocation, orabout blocks that changed duringan incremental backup. Thisinformation is known as extentinformation.
See EXTENTS
GET /images/{ticket-id}/extent?context=dirty
The program doing image transferneeds to download changes fromthe backup. These changes areknow as dirty extents. Todownload changes, send arequest like this:
See EXTENTS→ Examples→Request dirty extents
PUT /images/{ticket-id} The backup application creates anew disk or a snapshot with anexisting disk to hold the restoreddata.
See PUT
Additional resources
The Red Hat Virtualization Python SDK includes several implementation examples you can use to getstarted with transferring backups:
ovirt-imageio Images API reference
Creating a disk
Calling imagetransfer.create_transfer()
a helper to simplify creating a transfer
Using the Red Hat Virtualization Python SDK
3.3. SETTING UP ERRATA VIEWING WITH RED HAT SATELLITE
In the Administration Portal, you can configure Red Hat Virtualization to view errata from Red HatSatellite in the Red Hat Virtualization Manager. After you associate your hosts, virtual machines, and theManager with a Red Hat Satellite provider, you can receive updates about available errata and theirimportance, and decide when to apply them. For more information about Red Hat Satellite see the RedHat Satellite Documentation.
Red Hat Virtualization 4.4 Administration Guide
326

Red Hat Virtualization 4.4 supports viewing errata with Red Hat Satellite 6.6.
Prerequisites
The Satellite server must be added as an external provider.
The Manager, hosts, and virtual machines must all be registered in the Satellite server by theirrespective FQDNs. This ensures that external content host IDs do not need to be maintained inRed Hat Virtualization.
The Satellite account that manages the Manager, hosts and virtual machines must haveAdministrator permissions and a default organization set.
NOTE
The Katello agent is deprecated and will be removed in a future Satellite version. Migrateyour processes to use the remote execution feature to update clients remotely.
Configuring Red Hat Virtualization errata
To associate the Manager, host, and virtual machine with a Red Hat Satellite provider, complete thefollowing tasks:
1. Add the required Satellite server to the Manager as an external provider .
2. Configure the required hosts to display available errata .
3. Configure the required virtual machines to display available errata .
Viewing Red Hat Virtualization Manager errata
1. Click Administration → Errata.
2. Select the Security, Bugs, or Enhancements check boxes to view only those errata types.
Additional resources
Configuring Satellite Errata Management for a Host
Installing the Guest Agents, Tools, and Drivers on Linux in the Virtual Machine ManagementGuide for Red Hat Enterprise Linux virtual machines.
Installing the Guest Agents, Tools, and Drivers on Windows in the Virtual Machine ManagementGuide for Windows virtual machines.
Viewing Host Errata
Configuring Satellite errata viewing for a virtual machine in the Virtual Machine ManagementGuide for more information.
Viewing Red Hat Satellite errata for a virtual machine in the Virtual Machine Management Guide .
3.4. RENEWING CERTIFICATES BEFORE THEY EXPIRE
Red Hat Virtualization certificates now follow a standard 398 day lifetime and must be renewed once
CHAPTER 3. ADMINISTERING THE ENVIRONMENT
327
Red Hat Virtualization certificates now follow a standard 398 day lifetime and must be renewed onceper year.
WARNING
Do not let certificates expire. If they expire, the host and Manager stop responding,and recovery is an error-prone and time-consuming process.
Procedure
1. Renew the host certificates:
a. In the Administration Portal, click Compute → Hosts.
b. Click Management → Maintenance and then click OK. The virtual machines shouldautomatically migrate away from the host. If they are pinned or otherwise cannot bemigrated, you must shut them down.
c. When the host is in maintenance mode and there are no more virtual machines remaining onthis host, click Installation → Enroll Certificate.
d. When enrollment is complete, click Management → Activate.
2. Renew the Manager certificates:
a. Self-hosted engine only: log in to the host and put it in global maintenance mode.
# hosted-engine --set-maintenance --mode=global
b. Self-hosted engine and standalone Manager: log in to the Manager and run engine-setup.
# engine-setup --offline
The engine-setup script prompts you with configuration questions. Respond to thequestions as appropriate or use an answers file.
c. Enter Yes after the following engine-setup prompt:
Renew certificates? (Yes, No) [Yes]:
d. Self-hosted engine only: log in to the host and disable global maintenance mode:
# hosted-engine --set-maintenance --mode=none
Additional resources
How to manually renew RHV host SSL certificate if expired?
3.5. AUTOMATING CONFIGURATION TASKS USING ANSIBLE
Red Hat Virtualization 4.4 Administration Guide
328

Ansible is an automation tool used to configure systems, deploy software, and perform rolling updates.Red Hat Virtualization includes a limited version of Ansible to automate RHV post-installation tasks suchas data center setup and configuration, managing users, and virtual machine operations.
Ansible provides an easier method of automating Red Hat Virtualization configuration compared toREST APIs and SDKs, and you can integrate with other Ansible modules. For more information about theAnsible modules available for Red Hat Virtualization, see the oVirt Ansible Collection in the Red HatAnsible Automation Hub documentation.
NOTE
Ansible Tower is a graphically enabled framework accessible through a web interface andREST APIs for Ansible. If you want support for Ansible Tower, then you must have anAnsible Tower license, which is not part of the Red Hat Virtualization subscription.
See the Ansible documentation for alternate installation instructions, and information about usingAnsible.
3.5.1. oVirt Ansible Collection
oVirt Ansible Collection provides modules, roles, and plugins for managing various parts of the Red HatVirtualization infrastructure. The modules are used for communication between Ansible and the Red HatVirtualization Manager. Ansible roles provide a method of modularizing Ansible code by breaking up largeplaybooks into smaller reusable files that can be shared with other users. For more information aboutoVirt Ansible Collection, see the Automation Hub documentation.
3.5.1.1. Installing oVirt Ansible Collection from an RPM package
You can install oVirt Ansible Collection for Red Hat Virtualization from the Red Hat VirtualizationManager repository.
Prerequisites
To install oVirt Ansible Collection, you must subscribe to one of the following subscription channels:
Using a Red Hat Virtualization subscription - rhv-4.4-manager-for-rhel-8-x86_64-rpms
Using any Red Hat Enterprise Linux subscription - rhv-4-tools-for-rhel-8-x86_64-rpms
Procedure
1. Run the following command to install the oVirt Ansible Collection on the Manager machine:
# dnf install ovirt-ansible-collection
2. By default, the collection is installed to:/usr/share/ansible/collections/ansible_collections/redhat/rhv.
The structure of the ovirt-ansible-collection package is as follows:
/usr/share/ansible/collections/ansible_collections/redhat/rhv/usr/share/doc/ovirt-ansible-collection/
3.5.1.2. Installing oVirt Ansible Collection from Automation Hub
Automation Hub is a new place that can be used to install oVirt Ansible Collection. To configure the
CHAPTER 3. ADMINISTERING THE ENVIRONMENT
329

Automation Hub is a new place that can be used to install oVirt Ansible Collection. To configure theenvironment, follow the instructions in oVirt Ansible Collection documentation .
Procedure
1. Install the collection
# ansible-galaxy collection install redhat.rhv
2. The Automation Hub currently does not install RPM dependencies. Make sure that you havethese packages on the host where you execute the playbook:
python3-ovirt-engine-sdk4
python3-netaddr
python3-jmespath
python3-passlib
3.5.1.3. Using oVirt Ansible Collection to Configure Red Hat Virtualization
The following procedure guides you through creating and running a playbook that uses oVirt AnsibleCollection to configure Red Hat Virtualization. This example uses Ansible to connect to the Manager onthe local machine and create a new data center.
Prerequisites
Ensure that you have the Python SDK installed on the machine running the playbook.
Procedure
1. Create your playbook.
- name: RHV infrastructure hosts: localhost connection: local gather_facts: false
vars_files: # Contains variables to connect to the Manager - engine_vars.yml # Contains encrypted engine_password variable using ansible-vault - passwords.yml
pre_tasks: # The use of redhat.rhv before ovirt_auth is to check if oVirt Ansible Collection is correctly loaded - name: Login to RHV redhat.rhv.ovirt_auth: hostname: "{{ engine_fqdn }}" username: "{{ engine_user }}" password: "{{ engine_password }}" ca_file: "{{ engine_cafile | default(omit) }}" insecure: "{{ engine_insecure | default(true) }}"
Red Hat Virtualization 4.4 Administration Guide
330

tags: - always
vars: data_center_name: mydatacenter data_center_description: mydatacenter data_center_local: false compatibility_version: 4.4
roles: - infra collections: - redhat.rhv post_tasks: - name: Logout from RHV ovirt_auth: state: absent ovirt_auth: "{{ ovirt_auth }}" tags: - always
You have successfully used the infra Ansible role from oVirt Ansible Collection to create a data centernamed mydatacenter.
3.6. USERS AND ROLES
3.6.1. Introduction to Users
In Red Hat Virtualization, there are two types of user domains: local domain and external domain. Adefault local domain called the internal domain and a default user admin is created during the theManager installation process.
You can create additional users on the internal domain using ovirt-aaa-jdbc-tool. User accountscreated on local domains are known as local users. You can also attach external directory servers such asRed Hat Directory Server, Active Directory, OpenLDAP, and many other supported options to your RedHat Virtualization environment and use them as external domains. User accounts created on externaldomains are known as directory users.
Both local users and directory users need to be assigned with appropriate roles and permissions throughthe Administration Portal before they can function in the environment. There are two main types of userroles: end user and administrator. An end user role uses and manages virtual resources from the VMPortal. An administrator role maintains the system infrastructure using the Administration Portal. Theroles can be assigned to the users for individual resources like virtual machines and hosts, or on ahierarchy of objects like clusters and data centers.
3.6.2. Introduction to Directory Servers
During installation, Red Hat Virtualization Manager creates an admin user on the internal domain. Theuser is also referred to as admin@internal. This account is intended for use when initially configuring theenvironment and for troubleshooting. After you have attached an external directory server, added thedirectory users, and assigned them with appropriate roles and permissions, the admin@internal usercan be disabled if it is not required.The directory servers supported are:
389ds
CHAPTER 3. ADMINISTERING THE ENVIRONMENT
331

389ds RFC-2307 Schema
Active Directory
IBM Security Directory Server
IBM Security Directory Server RFC-2307 Schema
FreeIPA
iDM
Novell eDirectory RFC-2307 Schema
OpenLDAP RFC-2307 Schema
OpenLDAP Standard Schema
Oracle Unified Directory RFC-2307 Schema
RFC-2307 Schema (Generic)
Red Hat Directory Server (RHDS)
Red Hat Directory Server (RHDS) RFC-2307 Schema
iPlanet
IMPORTANT
It is not possible to install Red Hat Virtualization Manager (rhevm) and IdM (ipa-server)on the same system. IdM is incompatible with the mod_ssl package, which is required byRed Hat Virtualization Manager.
IMPORTANT
If you are using Active Directory as your directory server, and you want to use sysprep inthe creation of templates and virtual machines, then the Red Hat Virtualizationadministrative user must be delegated control over the Domain to:
Join a computer to the domain
Modify the membership of a group
For information on creation of user accounts in Active Directory, see Create a New UserAccount.
For information on delegation of control in Active Directory, see Delegate Control of anOrganizational Unit.
3.6.3. Configuring an External LDAP Provider
3.6.3.1. Configuring an External LDAP Provider (Interactive Setup)
The ovirt-engine-extension-aaa-ldap extension allows users to customize their external directory
Red Hat Virtualization 4.4 Administration Guide
332

The ovirt-engine-extension-aaa-ldap extension allows users to customize their external directorysetup easily. The ovirt-engine-extension-aaa-ldap extension supports many different LDAP servertypes, and an interactive setup script is provided to assist you with the setup for most LDAP types.
If the LDAP server type is not listed in the interactive setup script, or you want to do morecustomization, you can manually edit the configuration files. See Configuring an External LDAP Providerfor more information.
For an Active Directory example, see Attaching an Active Directory .
Prerequisites
You must know the domain name of the DNS or the LDAP server.
To set up secure connection between the LDAP server and the Manager, ensure that a PEM-encoded CA certificate has been prepared.
Have at least one set of account name and password ready to perform search and login queriesto the LDAP server.
Procedure
1. On the Red Hat Virtualization Manager, install the LDAP extension package:
2. Run ovirt-engine-extension-aaa-ldap-setup to start the interactive setup:
3. Select an LDAP type by entering the corresponding number. If you are not sure which schemayour LDAP server is, select the standard schema of your LDAP server type. For ActiveDirectory, follow the procedure at Attaching_an_Active_Directory.
4. Press Enter to accept the default and configure domain name resolution for your LDAP servername:
# dnf install ovirt-engine-extension-aaa-ldap-setup
# ovirt-engine-extension-aaa-ldap-setup
Available LDAP implementations: 1 - 389ds 2 - 389ds RFC-2307 Schema 3 - Active Directory 4 - IBM Security Directory Server 5 - IBM Security Directory Server RFC-2307 Schema 6 - IPA 7 - Novell eDirectory RFC-2307 Schema 8 - OpenLDAP RFC-2307 Schema 9 - OpenLDAP Standard Schema10 - Oracle Unified Directory RFC-2307 Schema11 - RFC-2307 Schema (Generic)12 - RHDS13 - RHDS RFC-2307 Schema14 - iPlanetPlease select:
CHAPTER 3. ADMINISTERING THE ENVIRONMENT
333

5. Select a DNS policy method:
For option 1, the DNS servers listed in /etc/resolv.conf are used to resolve the IP address.Check that the /etc/resolv.conf file is updated with the correct DNS servers.
For option 2, enter the fully qualified domain name (FQDN) or the IP address of the LDAPserver. You can use the dig command with the SRV record to find out the domain name. AnSRV record takes the following format:
Example: dig _ldap._tcp.redhat.com SRV.
For option 3, enter a space-separated list of LDAP servers. Use either the FQDN or IPaddress of the servers. This policy provides load-balancing between the LDAP servers.Queries are distributed among all LDAP servers according to the round-robin algorithm.
For option 4, enter a space-separated list of LDAP servers. Use either the FQDN or IPaddress of the servers. This policy defines the first LDAP server to be the default LDAPserver to respond to queries. If the first server is not available, the query will go to the nextLDAP server on the list.
6. Select the secure connection method your LDAP server supports and specify the method toobtain a PEM-encoded CA certificate:
File allows you to provide the full path to the certificate.
URL allows you to specify a URL for the certificate.
Inline allows you to paste the content of the certificate in the terminal.
System allows you to specify the default location for all CA files.
Insecure skips certificate validation, but the connection is still encrypted using TLS.
NOTE
It is highly recommended to use DNS resolution for LDAP server.If for some reason you intend to use hosts or plain address disable DNS usage.Use DNS (Yes, No) [Yes]:
_service._protocol.domain_name
1 - Single server2 - DNS domain LDAP SRV record3 - Round-robin between multiple hosts4 - Failover between multiple hostsPlease select:
NOTE:It is highly recommended to use secure protocol to access the LDAP server.Protocol startTLS is the standard recommended method to do so.Only in cases in which the startTLS is not supported, fallback to non standard ldaps protocol.Use plain for test environments only.Please select protocol to use (startTLS, ldaps, plain) [startTLS]: startTLSPlease select method to obtain PEM encoded CA certificate (File, URL, Inline, System, Insecure):Please enter the password:
Red Hat Virtualization 4.4 Administration Guide
334

NOTE
LDAPS stands for Lightweight Directory Access Protocol Over SecureSocket Links. For SSL connections, select the ldaps option.
7. Enter the search user distinguished name (DN). The user must have permissions to browse allusers and groups on the directory server. The search user must be specified in LDAPannotation. If anonymous search is allowed, press Enter without any input.
8. Enter the base DN:
9. Select Yes if you intend to configure single sign-on for virtual machines. Note that the featurecannot be used with single sign-on to the Administration Portal feature. The script reminds youthat the profile name must match the domain name. You will still need to follow the instructionsin Configuring Single Sign-On for Virtual Machines in the Virtual Machine Management Guide .
10. Specify a profile name. The profile name is visible to users on the login page. This example uses redhat.com.
NOTE
To rename the profile after the domain has been configured, edit the ovirt.engine.aaa.authn.profile.name attribute in the /etc/ovirt-engine/extensions.d/redhat.com-authn.properties file. Restart the ovirt-engine service for the changes to take effect.
Figure 3.1. The Administration Portal Login Page
Enter search user DN (for example uid=username,dc=example,dc=com or leave empty for anonymous): uid=user1,ou=Users,ou=department-1,dc=example,dc=comEnter search user password:
Please enter base DN (dc=redhat,dc=com) [dc=redhat,dc=com]: ou=department-1,dc=redhat,dc=com
Are you going to use Single Sign-On for Virtual Machines (Yes, No) [Yes]:
Please specify profile name that will be visible to users: redhat.com
CHAPTER 3. ADMINISTERING THE ENVIRONMENT
335

Figure 3.1. The Administration Portal Login Page
NOTE
Users must select the profile from the drop-down list when logging in for the firsttime. The information is stored in browser cookies and preselected the next timethe user logs in.
11. Test the login function to ensure your LDAP server is connected to your Red Hat Virtualizationenvironment properly. For the login query, enter your user name and password:
12. Check that the user details are correct. If the user details are incorrect, select Abort:
13. Manually testing the Search function is recommended. For the search query, select Principalfor user accounts or Group for group accounts. Select Yes to Resolve Groups if you want thegroup account information for the user account to be returned. Three configuration files arecreated and displayed in the screen output.
NOTE:It is highly recommended to test drive the configuration before applying it into engine.Login sequence is executed automatically, but it is recommended to also execute Search sequence manually after successful Login sequence.
Please provide credentials to test login flow:Enter user name:Enter user password:[ INFO ] Executing login sequence… … [ INFO ] Login sequence executed successfully
Please make sure that user details are correct and group membership meets expectations (search for PrincipalRecord and GroupRecord titles).Abort if output is incorrect.Select test sequence to execute (Done, Abort, Login, Search) [Abort]:
Red Hat Virtualization 4.4 Administration Guide
336

14. Select Done to complete the setup:
15. Restart the ovirt-engine service. The profile you have created is now available on theAdministration Portal and the VM Portal login pages. To assign the user accounts on the LDAPserver appropriate roles and permissions, for example, to log in to the VM Portal, see ManagerUser Tasks.
NOTE
For more information, see the LDAP authentication and authorization extensionREADME file at /usr/share/doc/ovirt-engine-extension-aaa-ldap-version.
3.6.3.2. Attaching an Active Directory
Prerequisites
You need to know the Active Directory forest name. The forest name is also known as the rootdomain name.
NOTE
Examples of the most common Active Directory configurations, which cannot beconfigured using the ovirt-engine-extension-aaa-ldap-setup tool, are provided in/usr/share/ovirt-engine-extension-aaa-ldap/examples/README.md.
You need to either add the DNS server that can resolve the Active Directory forest name to the
Select test sequence to execute (Done, Abort, Login, Search) [Search]: SearchSelect entity to search (Principal, Group) [Principal]:Term to search, trailing '*' is allowed: testuser1Resolve Groups (Yes, No) [No]:
Select test sequence to execute (Done, Abort, Login, Search) [Abort]: Done[ INFO ] Stage: Transaction setup[ INFO ] Stage: Misc configuration[ INFO ] Stage: Package installation[ INFO ] Stage: Misc configuration[ INFO ] Stage: Transaction commit[ INFO ] Stage: Closing upCONFIGURATION SUMMARYProfile name is: redhat.comThe following files were created: /etc/ovirt-engine/aaa/redhat.com.properties /etc/ovirt-engine/extensions.d/redhat.com.properties /etc/ovirt-engine/extensions.d/redhat.com-authn.properties[ INFO ] Stage: Clean upLog file is available at /tmp/ovirt-engine-extension-aaa-ldap-setup-20171004101225-mmneib.log:[ INFO ] Stage: Pre-termination[ INFO ] Stage: Termination
# systemctl restart ovirt-engine.service
CHAPTER 3. ADMINISTERING THE ENVIRONMENT
337

You need to either add the DNS server that can resolve the Active Directory forest name to the/etc/resolv.conf file on the Manager, or note down the Active Directory DNS servers and enterthem when prompted by the interactive setup script.
To set up secure connection between the LDAP server and the Manager, ensure a PEM-encoded CA certificate has been prepared. See Setting Up SSL or TLS Connections betweenthe Manager and an LDAP Server for more information.
Unless anonymous search is supported, a user with permissions to browse all users and groupsmust be available on the Active Directory to be used as the search user. Note down the searchuser’s distinguished name (DN). Do not use the administrative user for the Active Directory.
You must have at least one account name and password ready to perform search and loginqueries to the Active Directory.
If your Active Directory deployment spans multiple domains, be aware of the limitationdescribed in the /usr/share/ovirt-engine-extension-aaa-ldap/profiles/ad.properties file.
Procedure
1. On the Red Hat Virtualization Manager, install the LDAP extension package:
2. Run ovirt-engine-extension-aaa-ldap-setup to start the interactive setup:
3. Select an LDAP type by entering the corresponding number. The LDAP-related questions afterthis step are different for different LDAP types.
4. Enter the Active Directory forest name. If the forest name is not resolvable by your Manager’sDNS, the script prompts you to enter a space-separated list of Active Directory DNS servernames.
# dnf install ovirt-engine-extension-aaa-ldap-setup
# ovirt-engine-extension-aaa-ldap-setup
Available LDAP implementations: 1 - 389ds 2 - 389ds RFC-2307 Schema 3 - Active Directory 4 - IBM Security Directory Server 5 - IBM Security Directory Server RFC-2307 Schema 6 - IPA 7 - Novell eDirectory RFC-2307 Schema 8 - OpenLDAP RFC-2307 Schema 9 - OpenLDAP Standard Schema10 - Oracle Unified Directory RFC-2307 Schema11 - RFC-2307 Schema (Generic)12 - RHDS13 - RHDS RFC-2307 Schema14 - iPlanetPlease select: 3
Please enter Active Directory Forest name: ad-example.redhat.com[ INFO ] Resolving Global Catalog SRV record for ad-example.redhat.com[ INFO ] Resolving LDAP SRV record for ad-example.redhat.com
Red Hat Virtualization 4.4 Administration Guide
338

5. Select the secure connection method your LDAP server supports and specify the method toobtain a PEM-encoded CA certificate. The file option allows you to provide the full path to thecertificate. The URL option allows you to specify a URL to the certificate. Use the inline optionto paste the content of the certificate in the terminal. The system option allows you to specifythe location for all CA files. The insecure option allows you to use startTLS in insecure mode.
NOTE
LDAPS stands for Lightweight Directory Access Protocol Over Secure SocketLinks. For SSL connections, select the ldaps option.
For more information on creating a PEM-encoded CA certificate, see Setting UpSSL or TLS Connections between the Manager and an LDAP Server.
6. Enter the search user distinguished name (DN). The user must have permissions to browse allusers and groups on the directory server. The search user must be of LDAP annotation. Ifanonymous search is allowed, press Enter without any input.
7. Specify whether to use single sign-on for virtual machines. This feature is enabled by default,but cannot be used if single sign-on to the Administration Portal is enabled. The script remindsyou that the profile name must match the domain name. You will still need to follow theinstructions in Configuring Single Sign-On for Virtual Machines in the Virtual MachineManagement Guide.
8. Specify a profile name. The profile name is visible to users on the login page. This example uses redhat.com.
Figure 3.2. The Administration Portal Login Page
NOTE:It is highly recommended to use secure protocol to access the LDAP server.Protocol startTLS is the standard recommended method to do so.Only in cases in which the startTLS is not supported, fallback to non standard ldaps protocol.Use plain for test environments only.Please select protocol to use (startTLS, ldaps, plain) [startTLS]: startTLSPlease select method to obtain PEM encoded CA certificate (File, URL, Inline, System, Insecure): FilePlease enter the password:
Enter search user DN (empty for anonymous): cn=user1,ou=Users,dc=test,dc=redhat,dc=comEnter search user password:
Are you going to use Single Sign-On for Virtual Machines (Yes, No) [Yes]:
Please specify profile name that will be visible to users:redhat.com
CHAPTER 3. ADMINISTERING THE ENVIRONMENT
339

Figure 3.2. The Administration Portal Login Page
NOTE
Users need to select the desired profile from the drop-down list when logging infor the first time. The information is then stored in browser cookies andpreselected the next time the user logs in.
9. Test the search and login function to ensure your LDAP server is connected to your Red HatVirtualization environment properly. For the login query, enter the account name and password.For the search query, select Principal for user accounts, and select Group for group accounts.Enter Yes to Resolve Groups if you want the group account information for the user accountto be returned. Select Done to complete the setup. Three configuration files are created anddisplayed in the screen output.
NOTE:It is highly recommended to test drive the configuration before applying it into engine.Login sequence is executed automatically, but it is recommended to also execute Search sequence manually after successful Login sequence.Select test sequence to execute (Done, Abort, Login, Search) [Abort]: LoginEnter search user name: testuser1Enter search user password:[ INFO ] Executing login sequence......Select test sequence to execute (Done, Abort, Login, Search) [Abort]: SearchSelect entity to search (Principal, Group) [Principal]:Term to search, trailing '*' is allowed: testuser1Resolve Groups (Yes, No) [No]:[ INFO ] Executing login sequence......Select test sequence to execute (Done, Abort, Login, Search) [Abort]: Done[ INFO ] Stage: Transaction setup[ INFO ] Stage: Misc configuration[ INFO ] Stage: Package installation[ INFO ] Stage: Misc configuration[ INFO ] Stage: Transaction commit
Red Hat Virtualization 4.4 Administration Guide
340

[ INFO ] Stage: Closing up CONFIGURATION SUMMARY Profile name is: redhat.com The following files were created: /etc/ovirt-engine/aaa/redhat.com.properties /etc/ovirt-engine/extensions.d/redhat.com-authz.properties /etc/ovirt-engine/extensions.d/redhat.com-authn.properties[ INFO ] Stage: Clean up Log file is available at /tmp/ovirt-engine-extension-aaa-ldap-setup-20160114064955-1yar9i.log:[ INFO ] Stage: Pre-termination[ INFO ] Stage: Termination
10. The profile you have created is now available on the Administration Portal and the VM Portallogin pages. To assign the user accounts on the LDAP server appropriate roles and permissions,for example, to log in to the VM Portal, see Manager User Tasks.
NOTE
For more information, see the LDAP authentication and authorization extensionREADME file at /usr/share/doc/ovirt-engine-extension-aaa-ldap-version.
3.6.3.3. Configuring an External LDAP Provider (Manual Method)
The ovirt-engine-extension-aaa-ldap extension uses the LDAP protocol to access directory serversand is fully customizable. Kerberos authentication is not required unless you want to enable the singlesign-on to the VM Portal or the Administration Portal feature.
If the interactive setup method in the previous section does not cover your use case, you can manuallymodify the configuration files to attach your LDAP server. The following procedure uses generic details.Specific values depend on your setup.
Procedure
1. On the Red Hat Virtualization Manager, install the LDAP extension package:
2. Copy the LDAP configuration template file into the /etc/ovirt-engine directory. Template filesare available for active directories (ad) and other directory types (simple). This example usesthe simple configuration template.
3. Rename the configuration files to match the profile name you want visible to users on theAdministration Portal and the VM Portal login pages:
4. Edit the LDAP property configuration file by uncommenting an LDAP server type and updating
# dnf install ovirt-engine-extension-aaa-ldap
# cp -r /usr/share/ovirt-engine-extension-aaa-ldap/examples/simple/. /etc/ovirt-engine
# mv /etc/ovirt-engine/aaa/profile1.properties /etc/ovirt-engine/aaa/example.properties# mv /etc/ovirt-engine/extensions.d/profile1-authn.properties /etc/ovirt-engine/extensions.d/example-authn.properties# mv /etc/ovirt-engine/extensions.d/profile1-authz.properties /etc/ovirt-engine/extensions.d/example-authz.properties
CHAPTER 3. ADMINISTERING THE ENVIRONMENT
341

4. Edit the LDAP property configuration file by uncommenting an LDAP server type and updatingthe domain and passwords fields:
Example 3.5. Example profile: LDAP server section
To use TLS or SSL protocol to interact with the LDAP server, obtain the root CA certificate forthe LDAP server and use it to create a public keystore file. Uncomment the following lines andspecify the full path to the public keystore file and the password to access the file.
NOTE
For more information on creating a public keystore file, see Setting Up SSL orTLS Connections between the Manager and an LDAP Server.
Example 3.6. Example profile: keystore section
5. Review the authentication configuration file. The profile name visible to users on the
# vi /etc/ovirt-engine/aaa/example.properties
# Select one#include = <openldap.properties>#include = <389ds.properties>#include = <rhds.properties>#include = <ipa.properties>#include = <iplanet.properties>#include = <rfc2307-389ds.properties>#include = <rfc2307-rhds.properties>#include = <rfc2307-openldap.properties>#include = <rfc2307-edir.properties>#include = <rfc2307-generic.properties>
# Server#vars.server = ldap1.company.com
# Search user and its password.#vars.user = uid=search,cn=users,cn=accounts,dc=company,dc=comvars.password = 123456
pool.default.serverset.single.server = ${global:vars.server}pool.default.auth.simple.bindDN = ${global:vars.user}pool.default.auth.simple.password = ${global:vars.password}
# Create keystore, import certificate chain and uncomment# if using tls.pool.default.ssl.startTLS = truepool.default.ssl.truststore.file = /full/path/to/myrootca.jkspool.default.ssl.truststore.password = password
Red Hat Virtualization 4.4 Administration Guide
342

Administration Portal and the VM Portal login pages is defined byovirt.engine.aaa.authn.profile.name. The configuration profile location must match the LDAPconfiguration file location. All fields can be left as default.
Example 3.7. Example authentication configuration file
6. Review the authorization configuration file. The configuration profile location must match theLDAP configuration file location. All fields can be left as default.
Example 3.8. Example authorization configuration file
7. Ensure that the ownership and permissions of the configuration profile are appropriate:
8. Restart the engine service:
9. The example profile you have created is now available on the Administration Portal and the VMPortal login pages. To give the user accounts on the LDAP server appropriate permissions, forexample, to log in to the VM Portal, see Manager User Tasks.
NOTE
For more information, see the LDAP authentication and authorization extensionREADME file at /usr/share/doc/ovirt-engine-extension-aaa-ldap-version.
# vi /etc/ovirt-engine/extensions.d/example-authn.properties
ovirt.engine.extension.name = example-authnovirt.engine.extension.bindings.method = jbossmoduleovirt.engine.extension.binding.jbossmodule.module = org.ovirt.engine.extension.aaa.ldapovirt.engine.extension.binding.jbossmodule.class = org.ovirt.engine.extension.aaa.ldap.AuthnExtensionovirt.engine.extension.provides = org.ovirt.engine.api.extensions.aaa.Authnovirt.engine.aaa.authn.profile.name = exampleovirt.engine.aaa.authn.authz.plugin = example-authzconfig.profile.file.1 = ../aaa/example.properties
# vi /etc/ovirt-engine/extensions.d/example-authz.properties
ovirt.engine.extension.name = example-authzovirt.engine.extension.bindings.method = jbossmoduleovirt.engine.extension.binding.jbossmodule.module = org.ovirt.engine.extension.aaa.ldapovirt.engine.extension.binding.jbossmodule.class = org.ovirt.engine.extension.aaa.ldap.AuthzExtensionovirt.engine.extension.provides = org.ovirt.engine.api.extensions.aaa.Authzconfig.profile.file.1 = ../aaa/example.properties
# chown ovirt:ovirt /etc/ovirt-engine/aaa/example.properties# chmod 600 /etc/ovirt-engine/aaa/example.properties
# systemctl restart ovirt-engine.service
CHAPTER 3. ADMINISTERING THE ENVIRONMENT
343

3.6.3.4. Removing an External LDAP Provider
This procedure shows you how to remove an external configured LDAP provider and its users.
Procedure
1. Remove the LDAP provider configuration files, replacing the default name profile1:
2. Restart the ovirt-engine service:
3. In the Administration Portal, in the Users resource tab, select the users of this provider (thosewhose Authorization provider is profile1-authz) and click Remove.
3.6.4. Configuring LDAP and Kerberos for Single Sign-on
Single sign-on allows users to log in to the VM Portal or the Administration Portal without re-typing theirpasswords. Authentication credentials are obtained from the Kerberos server. To configure single sign-on to the Administration Portal and the VM Portal, you need to configure two extensions: ovirt-engine-extension-aaa-misc and ovirt-engine-extension-aaa-ldap; and two Apache modules:mod_auth_gssapi and mod_session. You can configure single sign-on that does not involve Kerberos,however this is outside the scope of this documentation.
NOTE
If single sign-on to the VM Portal is enabled, single sign-on to virtual machines is notpossible. With single sign-on to the VM Portal enabled, the VM Portal does not need toaccept a password, so you cannot delegate the password to sign in to virtual machines.
This example assumes the following:
The existing Key Distribution Center (KDC) server uses the MIT version of Kerberos 5.
You have administrative rights to the KDC server.
The Kerberos client is installed on the Red Hat Virtualization Manager and user machines.
The kadmin utility is used to create Kerberos service principals and keytab files.
This procedure involves the following components:
On the KDC server
Create a service principal and a keytab file for the Apache service on the Red Hat VirtualizationManager.
On the Red Hat Virtualization Manager
Install the authentication and authorization extension packages and the Apache Kerberosauthentication module.
# rm /etc/ovirt-engine/extensions.d/profile1-authn.properties# rm /etc/ovirt-engine/extensions.d/profile1-authz.properties# rm /etc/ovirt-engine/aaa/profile1.properties
# systemctl restart ovirt-engine
Red Hat Virtualization 4.4 Administration Guide
344

Configure the extension files.
Configuring Kerberos for the Apache Service
1. On the KDC server, use the kadmin utility to create a service principal for the Apache service onthe Red Hat Virtualization Manager. The service principal is a reference ID to the KDC for theApache service.
2. Generate a keytab file for the Apache service. The keytab file stores the shared secret key.
NOTE
The engine-backup command includes the file /etc/httpd/http.keytab whenbacking up and restoring. If you use a different name for the keytab file, makesure you back up and restore it.
3. Copy the keytab file from the KDC server to the Red Hat Virtualization Manager:
Configuring Single Sign-on to the VM Portal or Administration Portal
1. On the Red Hat Virtualization Manager, ensure that the ownership and permissions for thekeytab are appropriate:
2. Install the authentication extension package, LDAP extension package, and the mod_auth_gssapi and mod_session Apache modules:
3. Copy the SSO configuration template file into the /etc/ovirt-engine directory. Template filesare available for Active Directory (ad-sso) and other directory types (simple-sso). Thisexample uses the simple SSO configuration template.
4. Move ovirt-sso.conf into the Apache configuration directory.
NOTE
# kadminkadmin> addprinc -randkey HTTP/[email protected]
kadmin> ktadd -k /tmp/http.keytab HTTP/[email protected]> quit
# scp /tmp/http.keytab [email protected]:/etc/httpd
# chown apache /etc/httpd/http.keytab# chmod 400 /etc/httpd/http.keytab
# dnf install ovirt-engine-extension-aaa-misc ovirt-engine-extension-aaa-ldap mod_auth_gssapi mod_session
# cp -r /usr/share/ovirt-engine-extension-aaa-ldap/examples/simple-sso/. /etc/ovirt-engine
CHAPTER 3. ADMINISTERING THE ENVIRONMENT
345

NOTE
The engine-backup command includes the file /etc/httpd/conf.d/ovirt-sso.confwhen backing up and restoring. If you use a different name for this file, make sureyou back up and restore it.
5. Review the authentication method file. You do not need to edit this file, as the realm isautomatically fetched from the keytab file.
Example 3.9. Example authentication method file
<LocationMatch ^/ovirt-engine/sso/(interactive-login-negotiate|oauth/token-http-auth)|^/ovirt-engine/api> <If "req('Authorization') !~ /^(Bearer|Basic)/i"> RewriteEngine on RewriteCond %{LA-U:REMOTE_USER} ^(.*)$ RewriteRule ^(.*)$ - [L,NS,P,E=REMOTE_USER:%1] RequestHeader set X-Remote-User %{REMOTE_USER}s
AuthType GSSAPI AuthName "Kerberos Login"
# Modify to match installation GssapiCredStore keytab:/etc/httpd/http.keytab GssapiUseSessions On Session On SessionCookieName ovirt_gssapi_session path=/private;httponly;secure;
Require valid-user ErrorDocument 401 "<html><meta http-equiv=\"refresh\" content=\"0; url=/ovirt-engine/sso/login-unauthorized\"/><body><a href=\"/ovirt-engine/sso/login-unauthorized\">Here</a></body></html>" </If></LocationMatch>
6. Rename the configuration files to match the profile name you want visible to users on theAdministration Portal and the VM Portal login pages:
# mv /etc/ovirt-engine/aaa/ovirt-sso.conf /etc/httpd/conf.d
# vi /etc/httpd/conf.d/ovirt-sso.conf
# mv /etc/ovirt-engine/aaa/profile1.properties /etc/ovirt-engine/aaa/example.properties
# mv /etc/ovirt-engine/extensions.d/profile1-http-authn.properties /etc/ovirt-engine/extensions.d/example-http-authn.properties
# mv /etc/ovirt-engine/extensions.d/profile1-http-mapping.properties /etc/ovirt-engine/extensions.d/example-http-mapping.properties
Red Hat Virtualization 4.4 Administration Guide
346

7. Edit the LDAP property configuration file by uncommenting an LDAP server type and updatingthe domain and passwords fields:
Example 3.10. Example profile: LDAP server section
To use TLS or SSL protocol to interact with the LDAP server, obtain the root CA certificate forthe LDAP server and use it to create a public keystore file. Uncomment the following lines andspecify the full path to the public keystore file and the password to access the file.
NOTE
For more information on creating a public keystore file, see Setting Up SSL orTLS Connections between the Manager and an LDAP Server.
Example 3.11. Example profile: keystore section
# mv /etc/ovirt-engine/extensions.d/profile1-authz.properties /etc/ovirt-engine/extensions.d/example-authz.properties
# vi /etc/ovirt-engine/aaa/example.properties
# Select oneinclude = <openldap.properties>#include = <389ds.properties>#include = <rhds.properties>#include = <ipa.properties>#include = <iplanet.properties>#include = <rfc2307-389ds.properties>#include = <rfc2307-rhds.properties>#include = <rfc2307-openldap.properties>#include = <rfc2307-edir.properties>#include = <rfc2307-generic.properties>
# Server#vars.server = ldap1.company.com
# Search user and its password.#vars.user = uid=search,cn=users,cn=accounts,dc=company,dc=comvars.password = 123456
pool.default.serverset.single.server = ${global:vars.server}pool.default.auth.simple.bindDN = ${global:vars.user}pool.default.auth.simple.password = ${global:vars.password}
# Create keystore, import certificate chain and uncomment# if using ssl/tls.pool.default.ssl.startTLS = truepool.default.ssl.truststore.file = /full/path/to/myrootca.jkspool.default.ssl.truststore.password = password
CHAPTER 3. ADMINISTERING THE ENVIRONMENT
347

8. Review the authentication configuration file. The profile name visible to users on theAdministration Portal and the VM Portal login pages is defined byovirt.engine.aaa.authn.profile.name. The configuration profile location must match the LDAPconfiguration file location. All fields can be left as default.
Example 3.12. Example authentication configuration file
9. Review the authorization configuration file. The configuration profile location must match theLDAP configuration file location. All fields can be left as default.
Example 3.13. Example authorization configuration file
10. Review the authentication mapping configuration file. The configuration profile location mustmatch the LDAP configuration file location. The configuration profile extension name mustmatch the ovirt.engine.aaa.authn.mapping.plugin value in the authentication configurationfile. All fields can be left as default.
Example 3.14. Example authentication mapping configuration file
ovirt.engine.extension.name = example-http-mappingovirt.engine.extension.bindings.method = jbossmoduleovirt.engine.extension.binding.jbossmodule.module = org.ovirt.engine.extension.aaa.miscovirt.engine.extension.binding.jbossmodule.class = org.ovirt.engine.extension.aaa.misc.mapping.MappingExtension
# vi /etc/ovirt-engine/extensions.d/example-http-authn.properties
ovirt.engine.extension.name = example-http-authnovirt.engine.extension.bindings.method = jbossmoduleovirt.engine.extension.binding.jbossmodule.module = org.ovirt.engine.extension.aaa.miscovirt.engine.extension.binding.jbossmodule.class = org.ovirt.engine.extension.aaa.misc.http.AuthnExtensionovirt.engine.extension.provides = org.ovirt.engine.api.extensions.aaa.Authnovirt.engine.aaa.authn.profile.name = example-httpovirt.engine.aaa.authn.authz.plugin = example-authzovirt.engine.aaa.authn.mapping.plugin = example-http-mappingconfig.artifact.name = HEADERconfig.artifact.arg = X-Remote-User
# vi /etc/ovirt-engine/extensions.d/example-authz.properties
ovirt.engine.extension.name = example-authzovirt.engine.extension.bindings.method = jbossmoduleovirt.engine.extension.binding.jbossmodule.module = org.ovirt.engine.extension.aaa.ldapovirt.engine.extension.binding.jbossmodule.class = org.ovirt.engine.extension.aaa.ldap.AuthzExtensionovirt.engine.extension.provides = org.ovirt.engine.api.extensions.aaa.Authzconfig.profile.file.1 = ../aaa/example.properties
# vi /etc/ovirt-engine/extensions.d/example-http-mapping.properties
Red Hat Virtualization 4.4 Administration Guide
348
ovirt.engine.extension.provides = org.ovirt.engine.api.extensions.aaa.Mappingconfig.mapAuthRecord.type = regexconfig.mapAuthRecord.regex.mustMatch = trueconfig.mapAuthRecord.regex.pattern = ^(?<user>.*?)((\\\\(?<at>@)(?<suffix>.*?)@.*)|(?<realm>@.*))$config.mapAuthRecord.regex.replacement = ${user}${at}${suffix}
11. Ensure that the ownership and permissions of the configuration files are appropriate:
12. Restart the Apache service and the ovirt-engine service:
3.6.5. Installing and Configuring Red Hat Single Sign-On
To use Red Had Single Sign-On as your authorization method, you need to:
Install Red Hat SSO.
Configure the LDAP group mapper.
Configure Apache on the Manager.
Configure OVN provider credentials.
Configure the Monitoring Portal (Grafana)
NOTE
If Red Hat SSO is configured, previous LDAP sign ons will not work, as only a singleauthorization protocol may be used at a time.
# chown ovirt:ovirt /etc/ovirt-engine/aaa/example.properties
# chown ovirt:ovirt /etc/ovirt-engine/extensions.d/example-http-authn.properties
# chown ovirt:ovirt /etc/ovirt-engine/extensions.d/example-http-mapping.properties
# chown ovirt:ovirt /etc/ovirt-engine/extensions.d/example-authz.properties
# chmod 600 /etc/ovirt-engine/aaa/example.properties
# chmod 640 /etc/ovirt-engine/extensions.d/example-http-authn.properties
# chmod 640 /etc/ovirt-engine/extensions.d/example-http-mapping.properties
# chmod 640 /etc/ovirt-engine/extensions.d/example-authz.properties
# systemctl restart httpd.service# systemctl restart ovirt-engine.service
CHAPTER 3. ADMINISTERING THE ENVIRONMENT
349

3.6.5.1. Installing Red Hat SSO
You can install Red Hat Single Sign-On by downloading a ZIP file and unpacking it, or by using an RPMfile.
Follow the installation instructions at Red Hat SSO Installation
Prepare the following information:
Path/location of the Open ID Connect server.
The subscription channel for the correct repositories.
Valid Red Hat subscription login credentials.
3.6.5.2. Configuring the LDAP group mapper
Procedure
1. Add the LDAP groups mapper with the following information:
Name: ldapgroups
Mapper Type: group-ldap-mapper
LDAP Groups DN: ou=groups,dc=example,dc=com
Group Object Classes: groupofuniquenames (adapt this class according to your LDAPserver setup)
Membership LDAP Attribute: uniquemember (adapt this class according to your LDAPserver setup)
2. Click Save.
3. Click Sync LDAP Groups to KeyCloak.
4. At the bottom of the User Federation Provider page, click Synchronize all users.
5. In the Clients tab, under Add Client, add ovirt-engine as the Client ID, and enter the engine urlas the Root URL.
6. Modify the Client Protocol to openid-connect and the Access Type to confidential.
7. In the Clients tab, under Ovirt-engine > Advanced Settings, increase the Access Token Lifespan.
8. Add https://rhvm.example.com:443/* as a valid redirect URI.
9. The client secret is generated, and can be viewed in the Credentials tab.
10. In the Clients tab under Create Mapper Protocol, create a mapper with the following settings:
Name: groups
Mapper Type: Group Membership
Red Hat Virtualization 4.4 Administration Guide
350

Token Claim Name: groups
Full group path: ON
Add to ID token: ON
Add to access token: ON
Add to userinfo: ON
11. Add the Builtin Protocol Mapper for username.
12. Create the scopes needed by ovirt-engine, ovirt-app-api, ovirt-app-admin, and ovirt-ext=auth:sequence-priority=~.
13. Use the scopes created in the previous step to set up optional client scopes for the ovirt-engineclient.
3.6.5.3. Configuring Apache in the Manager
1. Enable the mod_auth_openidc module.
# dnf module enable mod_auth_openidc:2.3 -y
2. Configure Apache in the Manager
# dnf install mod_auth_openidc
3. Create a new httpd config file ovirt-openidc.conf in /etc/httpd/conf.d/ with the followingcontent:
LoadModule auth_openidc_module modules/mod_auth_openidc.so
OIDCProviderMetadataURL https://SSO.example.com/auth/realms/master/.well-known/openid-configurationOIDCSSLValidateServer Off
OIDCClientID ovirt-engineOIDCClientSecret <client_SSO _generated_key>OIDCRedirectURI https://rhvm.example.com/ovirt-engine/callbackOIDCDefaultURL https://rhvm.example.com/ovirt-engine/login?scope=ovirt-app-admin+ovirt-app-portal+ovirt-ext%3Dauth%3Asequence-priority%3D%7E
# maps the prefered_username claim to the REMOTE_USER environment variable:
OIDCRemoteUserClaim <preferred_username>OIDCCryptoPassphrase <random1234>
<LocationMatch ^/ovirt-engine/sso/(interactive-login-negotiate|oauth/token-http-auth)|^/ovirt-engine/callback> <If "req('Authorization') !~ /^(Bearer|Basic)/i">
Require valid-user AuthType openid-connect
CHAPTER 3. ADMINISTERING THE ENVIRONMENT
351
ErrorDocument 401 "<html><meta http-equiv=\"refresh\" content=\"0; url=/ovirt-engine/sso/login-unauthorized\"/><body><a href=\"/ovirt-engine/sso/login-unauthorized\">Here</a></body></html>" </If></LocationMatch>
OIDCOAuthIntrospectionEndpoint https://SSO.example.com/auth/realms/master/protocol/openid-connect/token/introspectOIDCOAuthSSLValidateServer OffOIDCOAuthIntrospectionEndpointParams token_type_hint=access_tokenOIDCOAuthClientID ovirt-engineOIDCOAuthClientSecret <client_SSO _generated_key>OIDCOAuthRemoteUserClaim sub
<LocationMatch ^/ovirt-engine/(api$|api/)> AuthType oauth20 Require valid-user</LocationMatch>
4. To save the configuration changes, restart httpd and ovirt-engine:
# systemctl restart httpd# systemctl restart ovirt-engine
5. Create the file openidc-authn.properties in /etc/ovirt-engine/extensions.d/ with thefollowing content:
ovirt.engine.extension.name = openidc-authnovirt.engine.extension.bindings.method = jbossmoduleovirt.engine.extension.binding.jbossmodule.module = org.ovirt.engine.extension.aaa.miscovirt.engine.extension.binding.jbossmodule.class = org.ovirt.engine.extension.aaa.misc.http.AuthnExtensionovirt.engine.extension.provides = org.ovirt.engine.api.extensions.aaa.Authnovirt.engine.aaa.authn.profile.name = openidchttpovirt.engine.aaa.authn.authz.plugin = openidc-authzovirt.engine.aaa.authn.mapping.plugin = openidc-http-mappingconfig.artifact.name = HEADERconfig.artifact.arg = OIDC_CLAIM_preferred_username
6. Create the file openidc-http-mapping.properties in /etc/ovirt-engine/extensions.d/ withthe following content:
ovirt.engine.extension.name = openidc-http-mappingovirt.engine.extension.bindings.method = jbossmoduleovirt.engine.extension.binding.jbossmodule.module = org.ovirt.engine.extension.aaa.miscovirt.engine.extension.binding.jbossmodule.class = org.ovirt.engine.extension.aaa.misc.mapping.MappingExtensionovirt.engine.extension.provides = org.ovirt.engine.api.extensions.aaa.Mappingconfig.mapAuthRecord.type = regexconfig.mapAuthRecord.regex.mustMatch = falseconfig.mapAuthRecord.regex.pattern = ^(?<user>.*?)((\\\\(?<at>@)(?<suffix>.*?)@.*)|(?<realm>@.*))$config.mapAuthRecord.regex.replacement = ${user}${at}${suffix}
7. Create the file openidc-authz.properties in /etc/ovirt-engine/extensions.d/ with the
Red Hat Virtualization 4.4 Administration Guide
352

7. Create the file openidc-authz.properties in /etc/ovirt-engine/extensions.d/ with thefollowing content:
ovirt.engine.extension.name = openidc-authzovirt.engine.extension.bindings.method = jbossmoduleovirt.engine.extension.binding.jbossmodule.module = org.ovirt.engine.extension.aaa.miscovirt.engine.extension.binding.jbossmodule.class = org.ovirt.engine.extension.aaa.misc.http.AuthzExtensionovirt.engine.extension.provides = org.ovirt.engine.api.extensions.aaa.Authzconfig.artifact.name.arg = OIDC_CLAIM_preferred_usernameconfig.artifact.groups.arg = OIDC_CLAIM_groups
8. Create the file 99-enable-external-auth.conf in /etc/ovirt-engine/engine.conf.d/ with thefollowing content:
ENGINE_SSO_ENABLE_EXTERNAL_SSO=trueENGINE_SSO_EXTERNAL_SSO_LOGOUT_URI="${ENGINE_URI}/callback"EXTERNAL_OIDC_USER_INFO_END_POINT=https://SSO.example.com/auth/realms/master/protocol/openid-connect/userinfoEXTERNAL_OIDC_TOKEN_END_POINT=https://SSO.example.com/auth/realms/master/protocol/openid-connect/tokenEXTERNAL_OIDC_LOGOUT_END_POINT=https://SSO.example.com/auth/realms/master/protocol/openid-connect/logoutEXTERNAL_OIDC_CLIENT_ID=ovirt-engineEXTERNAL_OIDC_CLIENT_SECRET="<client_SSO _generated_key>"EXTERNAL_OIDC_HTTPS_PKI_TRUST_STORE="/etc/pki/java/cacerts"EXTERNAL_OIDC_HTTPS_PKI_TRUST_STORE_PASSWORD=""EXTERNAL_OIDC_SSL_VERIFY_CHAIN=falseEXTERNAL_OIDC_SSL_VERIFY_HOST=false
3.6.5.4. Configuring OVN
If you configured the ovirt-ovn-provider in the Manager, you need to configure the OVN providercredentials.
Procedure
1. Create the file 20-setup-ovirt-provider-ovn.conf in /etc/ovirt-provider-ovn/conf.d/ with thefollowing contents, where user1 belongs to the LDAP group ovirt-administrator, andopenidchttp is the profile configured for aaa-ldap-misc.
[OVIRT]# ovirt-admin-user-name=user1@openidchttp
2. Restart the ovirt-provider-ovn:
# systemctl restart ovirt-provider-ovn
3. Log in to the Administration Portal, navigate to Administration → Providers, select ovirt-provider-ovn, and click Edit to update the password for the ovn provider.
3.6.5.5. Configuring the Monitoring Portal (Grafana)
CHAPTER 3. ADMINISTERING THE ENVIRONMENT
353

Procedure
1. Configure a client’s valid redirect URL:
a. Select the client configured in earlier steps (ie. ovirt-engine)
b. Add an additional valid Redirect URI for the Monitoring Portal(Grafana). Valid Redirect URIs:https://rhvm.example.com:443/ovirt-engine-grafana/login/generic_oauth/
c. Select the Mappers tab.
d. Click Create to create a new Mapper, and fill in the following fields:
Name: realm role
Mapper Type: User Realm Role
Token Claim Name: realm_access.roles
Claim JSON Type: String
2. Configure Grafana specific roles:
a. Select Roles from the main menu.
b. Add the following roles: admin, editor, viewer.
3. Assign Grafana specific roles to the desired groups:
a. Select Groups from the main menu, and choose a desired group.
b. Select Role Mappings.
c. Move the desired roles from Available Roles to Assigned Roles.
4. Configure Grafana - modify the section auth.generic_oauth in /etc/grafana/grafana.ini asfollows. Replace the values in arrow brackets < > as needed.
(...)#################################### Generic OAuth #######################[auth.generic_oauth]name = oVirt Engine Authenabled = trueallow_sign_up = trueclient_id = ovirt-engineclient_secret = <client-secret-of-RH-SSO>scopes = openid,ovirt-app-admin,ovirt-app-portal,ovirt-ext=auth:sequence-priority=~email_attribute_name = email:primaryrole_attribute_path = "contains(realm_access.roles[*], 'admin') && 'Admin' || contains(realm_access.roles[*], 'editor') && 'Editor' || 'Viewer'"auth_url = https://<rh-sso-hostname>/auth/realms/<RH-SSO-REALM>/protocol/openid-connect/authtoken_url = https://<rh-sso-hostname>/auth/realms/<RH-SSO-REALM>/protocol/openid-connect/tokenapi_url = https://<rh-sso-hostname>/auth/realms/<RH-SSO-REALM>/protocol/openid-connect/userinfoteam_ids =allowed_organizations =
Red Hat Virtualization 4.4 Administration Guide
354

tls_skip_verify_insecure = falsetls_client_cert =tls_client_key =tls_client_ca = /etc/pki/ovirt-engine/apache-ca.pemsend_client_credentials_via_post = false(...)
3.6.6. User Authorization
3.6.6.1. User Authorization Model
Red Hat Virtualization applies authorization controls based on the combination of the threecomponents:
The user performing the action
The type of action being performed
The object on which the action is being performed
3.6.6.2. User Actions
For an action to be successfully performed, the user must have the appropriate permission for theobject being acted upon. Each type of action has a corresponding permission.
Some actions are performed on more than one object. For example, copying a template to anotherstorage domain will impact both the template and the destination storage domain. The user performingan action must have appropriate permissions for all objects the action impacts.
3.6.7. Administering User Tasks From the Administration Portal
3.6.7.1. Adding Users and Assigning VM Portal Permissions
Users must be created already before they can be added and assigned roles and permissions. The rolesand permissions assigned in this procedure give the user the permission to log in to the VM Portal and tostart creating virtual machines. The procedure also applies to group accounts.
Procedure
1. On the header bar, click Administration → Configure. This opens the Configure window.
2. Click System Permissions.
3. Click Add. This opens the Add System Permission to User window.
4. Select a profile under Search. The profile is the domain you want to search. Enter a name or partof a name in the search text field, and click GO. Alternatively, click GO to view a list of all usersand groups.
5. Select the check boxes for the appropriate users or groups.
6. Select an appropriate role to assign under Role to Assign. The UserRole role gives the useraccount the permission to log in to the VM Portal.
CHAPTER 3. ADMINISTERING THE ENVIRONMENT
355

7. Click OK.
Log in to the VM Portal to verify that the user account has the permissions to log in.
3.6.7.2. Viewing User Information
Procedure
1. Click Administration → Users to display the list of authorized users.
2. Click the user’s name. This opens the details view, usually with the General tab displayinggeneral information, such as the domain name, email and status of the user.
3. The other tabs allow you to view groups, permissions, quotas, and events for the user.
For example, to view the groups to which the user belongs, click the Directory Groups tab.
3.6.7.3. Viewing User Permissions on Resources
Users can be assigned permissions on specific resources or a hierarchy of resources. You can view theassigned users and their permissions on each resource.
Procedure
1. Find and click the resource’s name. This opens the details view.
2. Click the Permissions tab to list the assigned users, the user’s role, and the inheritedpermissions for the selected resource.
3.6.7.4. Removing Users
When a user account is no longer required, remove it from Red Hat Virtualization.
Procedure
1. Click Administration → Users to display the list of authorized users.
2. Select the user to be removed. Ensure the user is not running any virtual machines.
3. Click Remove, then click OK.
The user is removed from Red Hat Virtualization, but not from the external directory.
3.6.7.5. Viewing Logged-In Users
You can view the users who are currently logged in, along with session times and other details. ClickAdministration → Active User Sessions to view the Session DB ID, User Name, Authorizationprovider, User id, Source IP, Session Start Time, and Session Last Active Time for each logged-inuser.
3.6.7.6. Terminating a User Session
You can terminate the session of a user who is currently logged in.
Red Hat Virtualization 4.4 Administration Guide
356

Terminating a User Session
1. Click Administration → Active User Sessions.
2. Select the user session to be terminated.
3. Click Terminate Session.
4. Click OK.
3.6.8. Administering User Tasks From the Command Line
You can use the ovirt-aaa-jdbc-tool tool to manage user accounts on the internal domain. Changesmade using the tool take effect immediately and do not require you to restart the ovirt-engine service.For a full list of user options, run ovirt-aaa-jdbc-tool user --help. Common examples are provided inthis section.
IMPORTANT
You must be logged into the Manager machine.
3.6.8.1. Creating a New User
You can create a new user account. The optional --attribute command specifies account details. For afull list of options, run ovirt-aaa-jdbc-tool user add --help.
# ovirt-aaa-jdbc-tool user add test1 --attribute=firstName=John --attribute=lastName=Doeadding user test1...user added successfully
You can add the newly created user in the Administration Portal and assign the user appropriate rolesand permissions. See Adding users for more information.
3.6.8.2. Setting a User Password
You can create a password. You must set a value for --password-valid-to, otherwise the passwordexpiry time defaults to the current time. The date format is yyyy-MM-dd HH:mm:ssX. In this example, -0800 stands for GMT minus 8 hours. For more options, run ovirt-aaa-jdbc-tool user password-reset --help.
# ovirt-aaa-jdbc-tool user password-reset test1 --password-valid-to="2025-08-01 12:00:00-0800"Password:updating user test1...user updated successfully
NOTE
CHAPTER 3. ADMINISTERING THE ENVIRONMENT
357

NOTE
By default, the password policy for user accounts on the internal domain has the followingrestrictions:
A minimum of 6 characters.
Three previous passwords used cannot be set again during the password change.
For more information on the password policy and other default settings, run ovirt-aaa-jdbc-tool settings show.
Once the admin password is updated, the change must be manually propagated to ovirt-provider-ovn.Otherwise, the the admin user will become locked because the Red Hat Virtualization Manager willcontinue to use the old password to synchronize networks from ovirt-provider-ovn. To propogate thenew password to ovirt-provider-ovn, do the following:
1. In the Administration Portal, click Administration → Providers.
2. Select ovirt-provider-ovn.
3. Click Edit and enter the new password in the Password field.
4. Click Test to test if authentication succeeds with the credentials you provided.
5. When the authentication test succeeds, click OK.
3.6.8.3. Setting User Timeout
You can set the user timeout period:
3.6.8.4. Pre-encrypting a User Password
You can create a pre-encrypted user password using the ovirt-engine-crypto-tool script. This option isuseful if you are adding users and passwords to the database with a script.
NOTE
Passwords are stored in the Manager database in encrypted form. The ovirt-engine-crypto-tool script is used because all passwords must be encrypted with the samealgorithm.
If the password is pre-encrypted, password validity tests cannot be performed. Thepassword will be accepted even if it does not comply with the password validation policy.
1. Run the following command:
The script will prompt you to enter the password.
Alternatively, you can use the --password=file:file option to encrypt a single password that
# engine-config --set UserSessionTimeOutInterval=integer
# /usr/share/ovirt-engine/bin/ovirt-engine-crypto-tool.sh pbe-encode
Red Hat Virtualization 4.4 Administration Guide
358

Alternatively, you can use the --password=file:file option to encrypt a single password thatappears as the first line of a file. This option is useful for automation. In the following example, file is a text file containing a single password for encryption:
2. Set the new password with the ovirt-aaa-jdbc-tool script, using the --encrypted option:
3. Enter and confirm the encrypted password:
Password:Reenter password:updating user test1...user updated successfully
3.6.8.5. Viewing User Information
You can view detailed user account information:
This command displays more information than in the Administration Portal’s Administration → Usersscreen.
3.6.8.6. Editing User Information
You can update user information, such as the email address:
# ovirt-aaa-jdbc-tool user edit test1 [email protected]
3.6.8.7. Removing a User
You can remove a user account:
Remove the user from the Administration Portal. See Removing Users for more information.
3.6.8.8. Disabling the Internal Administrative User
You can disable users on the local domains including the admin@internal user created during engine-setup. Make sure you have at least one user in the envrionment with full administrative permissionsbefore disabling the default admin user.
Procedure
1. Log in to the machine on which the Red Hat Virtualization Manager is installed.
2. Make sure another user with the SuperUser role has been added to the environment. See
# /usr/share/ovirt-engine/bin/ovirt-engine-crypto-tool.sh pbe-encode --password=file:file
# ovirt-aaa-jdbc-tool user password-reset test1 --password-valid-to="2025-08-01 12:00:00-0800" --encrypted
# ovirt-aaa-jdbc-tool user show test1
# ovirt-aaa-jdbc-tool user delete test1
CHAPTER 3. ADMINISTERING THE ENVIRONMENT
359

2. Make sure another user with the SuperUser role has been added to the environment. SeeAdding users for more information.
3. Disable the default admin user:
NOTE
To enable a disabled user, run ovirt-aaa-jdbc-tool user edit username --flag=-disabled
3.6.8.9. Managing Groups
You can use the ovirt-aaa-jdbc-tool tool to manage group accounts on your internal domain. Managinggroup accounts is similar to managing user accounts. For a full list of group options, run ovirt-aaa-jdbc-tool group --help. Common examples are provided in this section.
Creating a Group
This procedure shows you how to create a group account, add users to the group, and view the details ofthe group.
1. Log in to the machine on which the Red Hat Virtualization Manager is installed.
2. Create a new group:
3. Add users to the group. The users must be created already.
NOTE
For a full list of the group-manage options, run ovirt-aaa-jdbc-tool group-manage --help.
4. View group account details:
5. Add the newly created group in the Administration Portal and assign the group appropriate rolesand permissions. The users in the group inherit the roles and permissions of the group. SeeAdding users for more information.
Creating Nested Groups
This procedure shows you how to create groups within groups.
1. Log in to the machine on which the Red Hat Virtualization Manager is installed.
2. Create the first group:
# ovirt-aaa-jdbc-tool user edit admin --flag=+disabled
# ovirt-aaa-jdbc-tool group add group1
# ovirt-aaa-jdbc-tool group-manage useradd group1 --user=test1
# ovirt-aaa-jdbc-tool group show group1
# ovirt-aaa-jdbc-tool group add group1
Red Hat Virtualization 4.4 Administration Guide
360

3. Create the second group:
4. Add the second group to the first group:
5. Add the first group in the Administration Portal and assign the group appropriate roles andpermissions. See Adding users for more information.
3.6.8.10. Querying Users and Groups
The query module allows you to query user and group information. For a full list of options, run ovirt-aaa-jdbc-tool query --help.
Listing All User or Group Account Details
This procedure shows you how to list all account information.
1. Log in to the machine on which the Red Hat Virtualization Manager is installed.
2. List the account details.
All user account details:
All group account details:
Listing Filtered Account Details
This procedure shows you how to apply filters when listing account information.
1. Log in to the machine on which the Red Hat Virtualization Manager is installed.
2. Filter account details using the --pattern parameter.
List user account details with names that start with the character j.
List groups that have the department attribute set to marketing:
3.6.8.11. Managing Account Settings
To change the default account settings, use the ovirt-aaa-jdbc-tool settings module.
Updating Account Settings
# ovirt-aaa-jdbc-tool group add group1-1
# ovirt-aaa-jdbc-tool group-manage groupadd group1 --group=group1-1
# ovirt-aaa-jdbc-tool query --what=user
# ovirt-aaa-jdbc-tool query --what=group
# ovirt-aaa-jdbc-tool query --what=user --pattern="name=j*"
# ovirt-aaa-jdbc-tool query --what=group --pattern="department=marketing"
CHAPTER 3. ADMINISTERING THE ENVIRONMENT
361

This procedure shows you how to update the default account settings.
1. Log in to the machine on which the Red Hat Virtualization Manager is installed.
2. Run the following command to show all the settings available:
3. Change the desired settings:
This example updates the default log in session time to 60 minutes for all user accounts.The default value is 10080 minutes.
This example updates the number of failed login attempts a user can perform before theuser account is locked. The default value is 5.
NOTE
To unlock a locked user account, run ovirt-aaa-jdbc-tool user unlock test1.
3.6.9. Configuring Additional Local Domains
Creating additional local domains other than the default internal domain is also supported. This can bedone using the ovirt-engine-extension-aaa-jdbc extension and allows you to create multiple domainswithout attaching external directory servers, though the use case may not be common for enterpriseenvironments.
Additionally created local domains will not get upgraded autonmatically during standard Red HatVirtualization upgrades and need to be upgraded manually for each future release. For more informationon creating additional local domains and how to upgrade the domains, see the README file at/usr/share/doc/ovirt-engine-extension-aaa-jdbc-version/README.admin.
3.7. QUOTAS AND SERVICE LEVEL AGREEMENT POLICY
3.7.1. Introduction to Quota
Quota is a resource limitation tool provided with Red Hat Virtualization. Quota may be thought of as alayer of limitations on top of the layer of limitations set by User Permissions.
Quota is a data center object.
Quota allows administrators of Red Hat Virtualization environments to limit user access to memory,CPU, and storage. Quota defines the memory resources and storage resources an administrator canassign users. As a result users may draw on only the resources assigned to them. When the quotaresources are exhausted, Red Hat Virtualization does not permit further user actions.
There are two different kinds of Quota:
Table 3.3. The Two Different Kinds of Quota
# ovirt-aaa-jdbc-tool settings show
# ovirt-aaa-jdbc-tool settings set --name=MAX_LOGIN_MINUTES --value=60
# ovirt-aaa-jdbc-tool settings set --name=MAX_FAILURES_SINCE_SUCCESS --value=3
Red Hat Virtualization 4.4 Administration Guide
362

Quota type Definition
Run-time Quota This quota limits the consumption of runtimeresources, like CPU and memory.
Storage Quota This quota limits the amount of storage available.
Quota, like SELinux, has three modes:
Table 3.4. Quota Modes
Quota Mode Function
Enforced This mode puts into effect the quota that you haveset in Audit mode, limiting resources to the group oruser affected by the quota.
Audit This mode logs quota violations without blockingusers and can be used to test quotas. In Audit mode,you can increase or decrease the amount of runtimequota and the amount of storage quota available tousers affected by it.
Disabled This mode turns off the runtime and storagelimitations defined by the quota.
When a user attempts to run a virtual machine, the specifications of the virtual machine are compared tothe storage allowance and the runtime allowance set in the applicable quota.
If starting a virtual machine causes the aggregated resources of all running virtual machines covered bya quota to exceed the allowance defined in the quota, then the Manager refuses to run the virtualmachine.
When a user creates a new disk, the requested disk size is added to the aggregated disk usage of all theother disks covered by the applicable quota. If the new disk takes the total aggregated disk usage abovethe amount allowed by the quota, disk creation fails.
Quota allows for resource sharing of the same hardware. It supports hard and soft thresholds.Administrators can use a quota to set thresholds on resources. These thresholds appear, from the user’spoint of view, as 100% usage of that resource. To prevent failures when the customer unexpectedlyexceeds this threshold, the interface supports a "grace" amount by which the threshold can be brieflyexceeded. Exceeding the threshold results in a warning sent to the customer.
IMPORTANT
CHAPTER 3. ADMINISTERING THE ENVIRONMENT
363

IMPORTANT
Quota imposes limitations upon the running of virtual machines. Ignoring these limitationsis likely to result in a situation in which you cannot use your virtual machines and virtualdisks.
When quota is running in enforced mode, virtual machines and disks that do not havequotas assigned cannot be used.
To power on a virtual machine, a quota must be assigned to that virtual machine.
To create a snapshot of a virtual machine, the disk associated with the virtual machinemust have a quota assigned.
When creating a template from a virtual machine, you are prompted to select the quotathat you want the template to consume. This allows you to set the template (and all futuremachines created from the template) to consume a different quota than the virtualmachine and disk from which the template is generated.
3.7.2. Shared Quota and Individually Defined Quota
Users with SuperUser permissions can create quotas for individual users or quotas for groups.
Group quotas can be set for Active Directory users. If a group of ten users are given a quota of 1 TB ofstorage and one of the ten users fills the entire terabyte, then the entire group will be in excess of thequota and none of the ten users will be able to use any of the storage associated with their group.
An individual user’s quota is set for only the individual. Once the individual user has used up all of his orher storage or runtime quota, the user will be in excess of the quota and the user will no longer be ableto use the storage associated with his or her quota.
3.7.3. Quota Accounting
When a quota is assigned to a consumer or a resource, each action by that consumer or on the resourceinvolving storage, vCPU, or memory results in quota consumption or quota release.
Since the quota acts as an upper bound that limits the user’s access to resources, the quota calculationsmay differ from the actual current use of the user. The quota is calculated for the max growth potentialand not the current usage.
Example 3.15. Accounting example
A user runs a virtual machine with 1 vCPU and 1024 MB memory. The action consumes 1 vCPU and1024 MB of the quota assigned to that user. When the virtual machine is stopped 1 vCPU and 1024MB of RAM are released back to the quota assigned to that user. Run-time quota consumption isaccounted for only during the actual run-time of the consumer.
A user creates a virtual thin provision disk of 10 GB. The actual disk usage may indicate only 3 GB ofthat disk are actually in use. The quota consumption, however, would be 10 GB, the max growthpotential of that disk.
3.7.4. Enabling and Changing a Quota Mode in a Data Center
This procedure enables or changes the quota mode in a data center. You must select a quota mode
Red Hat Virtualization 4.4 Administration Guide
364

This procedure enables or changes the quota mode in a data center. You must select a quota modebefore you can define quotas. You must be logged in to the Administration Portal to follow the steps ofthis procedure.
Use Audit mode to test your quota to verify that it works as you expect it to. You do not need to haveyour quota in Audit mode to create or change a quota.
Procedure
1. Click Compute → Data Centers and select a data center.
2. Click Edit.
3. In the Quota Mode drop-down list, change the quota mode to Enforced.
4. Click OK.
If you set the quota mode to Audit during testing, then you must change it to Enforced in order for thequota settings to take effect.
3.7.5. Creating a New Quota Policy
You have enabled quota mode, either in Audit or Enforcing mode. You want to define a quota policy tomanage resource usage in your data center.
Procedure
1. Click Administration → Quota.
2. Click Add.
3. Fill in the Name and Description fields.
4. Select a Data Center.
5. In the Memory & CPU section, use the green slider to set Cluster Threshold.
6. In the Memory & CPU section, use the blue slider to set Cluster Grace.
7. Click the All Clusters or the Specific Clusters radio button. If you select Specific Clusters,select the check box of the clusters that you want to add a quota policy to.
8. Click Edit. This opens the Edit Quota window.
a. Under the Memory field, select either the Unlimited radio button (to allow limitless use ofMemory resources in the cluster), or select the limit to radio button to set the amount ofmemory set by this quota. If you select the limit to radio button, input a memory quota inmegabytes (MB) in the MB field.
b. Under the CPU field, select either the Unlimited radio button or the limit to radio button toset the amount of CPU set by this quota. If you select the limit to radio button, input anumber of vCPUs in the vCpus field.
c. Click OK in the Edit Quota window.
9. In the Storage section, use the green slider to set Storage Threshold.
CHAPTER 3. ADMINISTERING THE ENVIRONMENT
365

10. In the Storage section, use the blue slider to set Storage Grace.
11. Click the All Storage Domains or the Specific Storage Domains radio button. If you selectSpecific Storage Domains, select the check box of the storage domains that you want to add aquota policy to.
12. Click Edit. This opens the Edit Quota window.
a. Under the Storage Quota field, select either the Unlimited radio button (to allow limitlessuse of Storage) or the limit to radio button to set the amount of storage to which quota willlimit users. If you select the limit to radio button, input a storage quota size in gigabytes(GB) in the GB field.
b. Click OK in the Edit Quota window.
13. Click OK in the New Quota window.
3.7.6. Explanation of Quota Threshold Settings
Table 3.5. Quota thresholds and grace
Setting Definition
Cluster Threshold The amount of cluster resources available per datacenter.
Cluster Grace The amount of the cluster available for the datacenter after exhausting the data center’s ClusterThreshold.
Storage Threshold The amount of storage resources available per datacenter.
Storage Grace The amount of storage available for the data centerafter exhausting the data center’s Storage Threshold.
If a quota is set to 100 GB with 20% Grace, then consumers are blocked from using storage after theyuse 120 GB of storage. If the same quota has a Threshold set at 70%, then consumers receive a warningwhen they exceed 70 GB of storage consumption (but they remain able to consume storage until theyreach 120 GB of storage consumption.) Both "Threshold" and "Grace" are set relative to the quota."Threshold" may be thought of as the "soft limit", and exceeding it generates a warning. "Grace" may bethought of as the "hard limit", and exceeding it makes it impossible to consume any more storageresources.
3.7.7. Assigning a Quota to an Object
Assigning a Quota to a Virtual Machine
1. Click Compute → Virtual Machines and select a virtual machine.
2. Click Edit.
3. Select the quota you want the virtual machine to consume from the Quota drop-down list.
Red Hat Virtualization 4.4 Administration Guide
366

4. Click OK.
Assigning a Quota to a Disk
1. Click Compute → Virtual Machines.
2. Click a virtual machine’s name. This opens the details view.
3. Click the Disks tab and select the disk you plan to associate with a quota.
4. Click Edit.
5. Select the quota you want the virtual disk to consume from the Quota drop-down list.
6. Click OK.
IMPORTANT
Quota must be selected for all objects associated with a virtual machine, in order for thatvirtual machine to work. If you fail to select a quota for the objects associated with avirtual machine, the virtual machine will not work. The error that the Manager throws inthis situation is generic, which makes it difficult to know if the error was thrown becauseyou did not associate a quota with all of the objects associated with the virtual machine. Itis not possible to take snapshots of virtual machines that do not have an assigned quota.It is not possible to create templates of virtual machines whose virtual disks do not haveassigned quotas.
3.7.8. Using Quota to Limit Resources by User
This procedure describes how to use quotas to limit the resources a user has access to.
Procedure
1. Click Administration → Quota.
2. Click the name of the target quota. This opens the details view.
3. Click the Consumers tab.
4. Click Add.
5. In the Search field, type the name of the user you want to associate with the quota.
6. Click GO.
7. Select the check box next to the user’s name.
8. Click OK.
After a short time, the user will appear in the Consumers tab in the details view.
3.7.9. Editing Quotas
This procedure describes how to change existing quotas.
CHAPTER 3. ADMINISTERING THE ENVIRONMENT
367

Procedure
1. Click Administration → Quota and select a quota.
2. Click Edit.
3. Edit the fields as required.
4. Click OK.
3.7.10. Removing Quotas
This procedure describes how to remove quotas.
Procedure
1. Click Administration → Quota and select a quota.
2. Click Remove.
3. Click OK.
3.7.11. Service Level Agreement Policy Enforcement
This procedure describes how to set service level agreement CPU features.
Procedure
1. Click Compute → Virtual Machines.
2. Click New, or select a virtual machine and click Edit.
3. Click the Resource Allocation tab.
4. Specify CPU Shares. Possible options are Low, Medium, High, Custom, and Disabled. Virtualmachines set to High receive twice as many shares as Medium, and virtual machines set toMedium receive twice as many shares as virtual machines set to Low. Disabled instructs VDSMto use an older algorithm for determining share dispensation; usually the number of sharesdispensed under these conditions is 1020.
The CPU consumption of users is now governed by the policy you have set.
3.8. EVENT NOTIFICATIONS
3.8.1. Configuring Event Notifications in the Administration Portal
The Red Hat Virtualization Manager can notify designated users via email when specific events occur inthe environment that the Red Hat Virtualization Manager manages. To use this functionality, you mustset up a mail transfer agent to deliver messages. Only email notifications can be configured through theAdministration Portal. SNMP traps must be configured on the Manager machine.
Procedure
1. Ensure that you have access to an email server that can accept automated messages from
Red Hat Virtualization 4.4 Administration Guide
368

1. Ensure that you have access to an email server that can accept automated messages fromManager and deliver them to a distribution list.
2. Click Administration → Users and select a user.
3. Click the user’s User Name to go to the details page.
4. In the Event Notifier tab, click Manage Events.
5. Use the Expand All button or the subject-specific expansion buttons to view the events.
6. Select the appropriate check boxes.
7. Enter an email address in the Mail Recipient field.
NOTE
The email address can be a text message email address (for example, [email protected]) or an email group address thatincludes email addresses and text message email addresses.
8. Click OK.
9. On the Manager machine, copy ovirt-engine-notifier.conf to a new file called 90-email-notify.conf:
10. Edit 90-email-notify.conf, deleting everything except the EMAIL Notifications section.
11. Enter the correct email variables, as in the example below. This file overrides the values in theoriginal ovirt-engine-notifier.conf file.
#---------------------## EMAIL Notifications ##---------------------#
# The SMTP mail server address. Required.MAIL_SERVER=myemailserver.example.com
# The SMTP port (usually 25 for plain SMTP, 465 for SMTP with SSL, 587 for SMTP with TLS)MAIL_PORT=25
# Required if SSL or TLS enabled to authenticate the user. Used also to specify 'from' user address if mail server# supports, when MAIL_FROM is not set. Address is in RFC822 formatMAIL_USER=
# Required to authenticate the user if mail server requires authentication or if SSL or TLS is enabledSENSITIVE_KEYS="${SENSITIVE_KEYS},MAIL_PASSWORD"MAIL_PASSWORD=
# cp /usr/share/ovirt-engine/services/ovirt-engine-notifier/ovirt-engine-notifier.conf /etc/ovirt-engine/notifier/notifier.conf.d/90-email-notify.conf
CHAPTER 3. ADMINISTERING THE ENVIRONMENT
369

# Indicates type of encryption (none, ssl or tls) should be used to communicate with mail server.MAIL_SMTP_ENCRYPTION=none
# If set to true, sends a message in HTML format.HTML_MESSAGE_FORMAT=false
# Specifies 'from' address on sent mail in RFC822 format, if supported by mail [email protected]
# Specifies 'reply-to' address on sent mail in RFC822 format.MAIL_REPLY_TO=
# Interval to send smtp messages per # of IDLE_INTERVALMAIL_SEND_INTERVAL=1
# Amount of times to attempt sending an email before failing.MAIL_RETRIES=4
NOTE
See /etc/ovirt-engine/notifier/notifier.conf.d/README for more options.
12. Enable and restart the ovirt-engine-notifier service to activate the changes you have made:
The specified user now receives emails based on events in the Red Hat Virtualization environment. Theselected events are displayed on the Event Notifier tab for that user.
3.8.2. Canceling Event Notifications in the Administration Portal
A user has configured some unnecessary email notifications and wants them canceled.
Procedure
1. Click Administration → Users.
2. Click the user’s User Name. This opens the details view.
3. Click the Event Notifier tab to list events for which the user receives email notifications.
4. Click Manage Events.
5. Use the Expand All button, or the subject-specific expansion buttons, to view the events.
6. Clear the appropriate check boxes to remove notification for that event.
7. Click OK.
3.8.3. Parameters for Event Notifications in ovirt-engine-notifier.conf
# systemctl daemon-reload# systemctl enable ovirt-engine-notifier.service# systemctl restart ovirt-engine-notifier.service
Red Hat Virtualization 4.4 Administration Guide
370

The event notifier configuration file can be found in /usr/share/ovirt-engine/services/ovirt-engine-notifier/ovirt-engine-notifier.conf.
Table 3.6. ovirt-engine-notifier.conf variables
Variable Name Default Remarks
SENSITIVE_KEYS none A comma-separated list of keysthat will not be logged.
JBOSS_HOME /opt/rh/eap7/root/usr/share/wildfly
The location of the JBossapplication server used by theManager.
ENGINE_ETC /etc/ovirt-engine The location of the etc directoryused by the Manager.
ENGINE_LOG /var/log/ovirt-engine The location of the logs directoryused by the Manager.
ENGINE_USR /usr/share/ovirt-engine The location of the usr directoryused by the Manager.
ENGINE_JAVA_MODULEPATH ${ENGINE_USR}/modules The file path to which the JBossmodules are appended.
NOTIFIER_DEBUG_ADDRESS none The address of a machine thatcan be used to perform remotedebugging of the Java virtualmachine that the notifier uses.
NOTIFIER_STOP_TIME 30 The time, in seconds, after whichthe service will time out.
NOTIFIER_STOP_INTERVAL 1 The time, in seconds, by which thetimeout counter will beincremented.
INTERVAL_IN_SECONDS 120 The interval in seconds betweeninstances of dispatchingmessages to subscribers.
IDLE_INTERVAL 30 The interval, in seconds, betweenwhich low-priority tasks will beperformed.
CHAPTER 3. ADMINISTERING THE ENVIRONMENT
371

DAYS_TO_KEEP_HISTORY 0 This variable sets the number ofdays dispatched events will bepreserved in the history table. Ifthis variable is not set, eventsremain on the history tableindefinitely.
FAILED_QUERIES_NOTIFICATION_THRESHOLD
30 The number of failed queries afterwhich a notification email is sent.A notification email is sent afterthe first failure to fetchnotifications, and then once everytime the number of failuresspecified by this variable isreached. If you specify a value of 0 or 1, an email will be sent witheach failure.
FAILED_QUERIES_NOTIFICATION_RECIPIENTS
none The email addresses of therecipients to which notificationemails will be sent. Emailaddresses must be separated by acomma. This entry has beendeprecated by the FILTERvariable.
DAYS_TO_SEND_ON_STARTUP 0 The number of days of old eventsthat will be processed and sentwhen the notifier starts.
FILTER exclude:* The algorithm used to determinethe triggers for and recipients ofemail notifications. The value forthis variable comprises acombination of include or exclude, the event, and therecipient. For example, include:VDC_START(smtp:[email protected]) ${FILTER}
MAIL_SERVER none The SMTP mail server address.Required.
MAIL_PORT 25 The port used for communication.Possible values include 25 forplain SMTP, 465 for SMTP withSSL, and 587 for SMTP with TLS.
Variable Name Default Remarks
Red Hat Virtualization 4.4 Administration Guide
372
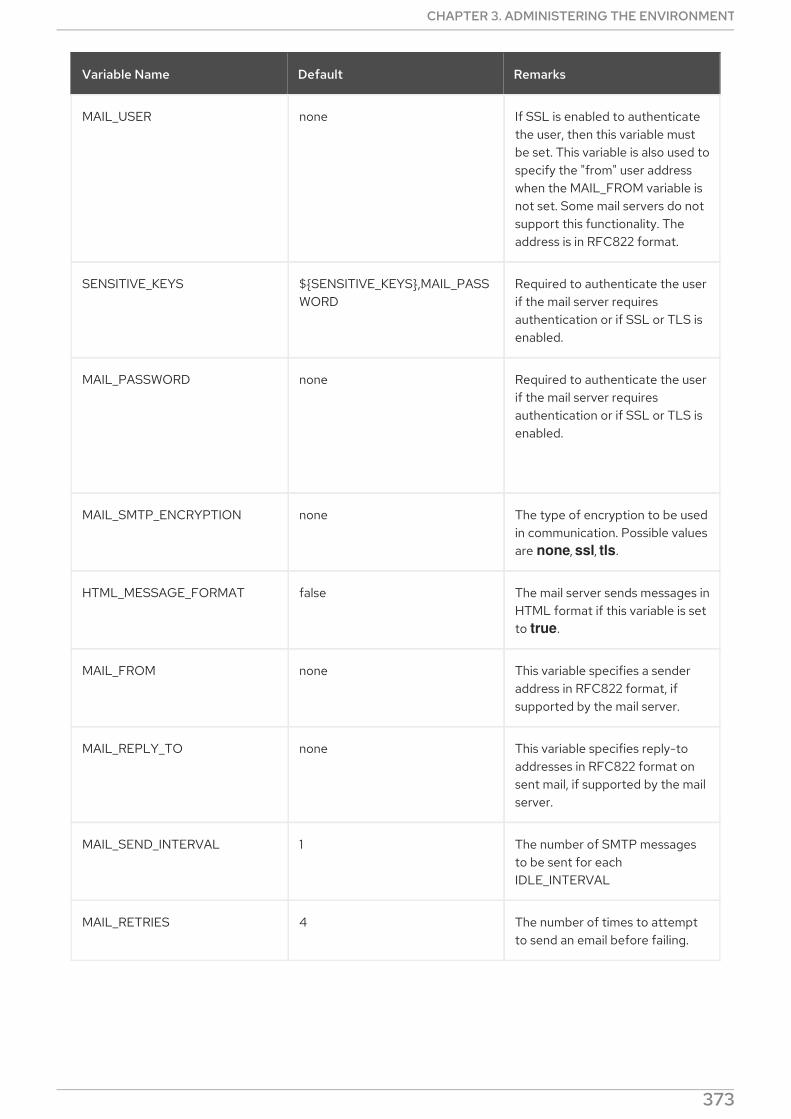
MAIL_USER none If SSL is enabled to authenticatethe user, then this variable mustbe set. This variable is also used tospecify the "from" user addresswhen the MAIL_FROM variable isnot set. Some mail servers do notsupport this functionality. Theaddress is in RFC822 format.
SENSITIVE_KEYS ${SENSITIVE_KEYS},MAIL_PASSWORD
Required to authenticate the userif the mail server requiresauthentication or if SSL or TLS isenabled.
MAIL_PASSWORD none Required to authenticate the userif the mail server requiresauthentication or if SSL or TLS isenabled.
MAIL_SMTP_ENCRYPTION none The type of encryption to be usedin communication. Possible valuesare none, ssl, tls.
HTML_MESSAGE_FORMAT false The mail server sends messages inHTML format if this variable is setto true.
MAIL_FROM none This variable specifies a senderaddress in RFC822 format, ifsupported by the mail server.
MAIL_REPLY_TO none This variable specifies reply-toaddresses in RFC822 format onsent mail, if supported by the mailserver.
MAIL_SEND_INTERVAL 1 The number of SMTP messagesto be sent for eachIDLE_INTERVAL
MAIL_RETRIES 4 The number of times to attemptto send an email before failing.
Variable Name Default Remarks
CHAPTER 3. ADMINISTERING THE ENVIRONMENT
373

SNMP_MANAGERS none The IP addresses or fully qualifieddomain names of machines thatwill act as the SNMP managers.Entries must be separated by aspace and can contain a portnumber. For example, manager1.example.com manager2.example.com:164
SNMP_COMMUNITY public (SNMP version 2 only) The SNMPcommunity.
SNMP_OID 1.3.6.1.4.1.2312.13.1.1 The default trap object identifiersfor alerts. All trap types are sent,appended with event information,to the SNMP manager when thisOID is defined. Note thatchanging the default trapprevents generated traps fromcomplying with the Manager’smanagement information base.
SNMP_VERSION 2 Defines which version of SNMP touse. SNMP version 2 and version 3traps are supported. Possiblevalues: 2 or 3.
SNMP_ENGINE_ID none (SNMPv3) The Manager ID usedfor SNMPv3 traps. This ID is aunique identifier for the devicethat is connected through SNMP.
SNMP_USERNAME none (SNMPv3) The user name usedfor SNMPv3 traps.
SNMP_AUTH_PROTOCOL none (SNMPv3) The SNMPv3authorization protocol. Possiblevalues: MD5, SHA
SNMP_AUTH_PASSPHRASE none (SNMPv3) The passphrase usedwhen SNMP_SECURITY_LEVELis set to AUTH_NOPRIV andAUTH_PRIV.
Variable Name Default Remarks
Red Hat Virtualization 4.4 Administration Guide
374

SNMP_PRIVACY_PROTOCOL none (SNMPv3) The SNMPv3 privacyprotocol. Possible values: AES128, AES192, AES256
IMPORTANT
AES192 andAES256 are notdefined inRFC3826, soverify that yourSNMP serversupports thoseprotocols beforeenabling them.
SNMP_PRIVACY_PASSPHRASE none The SNMPv3 privacy passphrase,used when SNMP_SECURITY_LEVEL isset to AUTH_PRIV.
SNMP_SECURITY_LEVEL 1 (SNMPv3) The SNMPv3 securitylevel. Possible values: * 1 -NOAUTH_NOPRIV * 2 -AUTH_NOPRIV * 3 - AUTH_PRIV
ENGINE_INTERVAL_IN_SECONDS
300 The interval, in seconds, betweenmonitoring the machine on whichthe Manager is installed. Theinterval is measured from the timethe monitoring is complete.
ENGINE_MONITOR_RETRIES 3 The number of times the notifierattempts to monitor the status ofthe machine on which theManager is installed in a giveninterval after a failure.
ENGINE_TIMEOUT_IN_SECONDS
30 The time, in seconds, to waitbefore the notifier attempts tomonitor the status of the machineon which the Manager is installedin a given interval after a failure.
IS_HTTPS_PROTOCOL false This entry must be set to true ifJBoss is being run in securedmode.
Variable Name Default Remarks
CHAPTER 3. ADMINISTERING THE ENVIRONMENT
375

SSL_PROTOCOL TLS The protocol used by JBossconfiguration connector whenSSL is enabled.
SSL_IGNORE_CERTIFICATE_ERRORS
false This value must be set to true ifJBoss is running in secure modeand SSL errors is to be ignored.
SSL_IGNORE_HOST_VERIFICATION
false This value must be set to true ifJBoss is running in secure modeand host name verification is tobe ignored.
REPEAT_NON_RESPONSIVE_NOTIFICATION
false This variable specifies whetherrepeated failure messages will besent to subscribers if the machineon which the Manager is installedis non-responsive.
ENGINE_PID /var/lib/ovirt-engine/ovirt-engine.pid
The path and file name of the PIDof the Manager.
Variable Name Default Remarks
3.8.4. Configuring the Red Hat Virtualization Manager to Send SNMP Traps
Configure your Red Hat Virtualization Manager to send Simple Network Management Protocol (SNMP)traps to one or more external SNMP managers. SNMP traps contain system event information; they areused to monitor your Red Hat Virtualization environment. The number and type of traps sent to theSNMP manager can be defined within the Red Hat Virtualization Manager.
Red Hat Virtualization supports SNMP version 2 and version 3. SNMP version 3 supports the followingsecurity levels:
NoAuthNoPriv
SNMP traps are sent without any authorization or privacy.
AuthNoPriv
SNMP traps are sent with password authorization but no privacy.
AuthPriv
SNMP traps are sent with password authorization and privacy.
Prerequisites
One or more external SNMP managers are configured to receive traps.
The IP addresses or fully qualified domain names of machines that will act as SNMP managers.Optionally, determine the port through which Manager receives trap notifications. The default isUDP port 162.
The SNMP community (SNMP version 2 only). Multiple SNMP managers can belong to a single
Red Hat Virtualization 4.4 Administration Guide
376

The SNMP community (SNMP version 2 only). Multiple SNMP managers can belong to a singlecommunity. Management systems and agents can communicate only if they are within the samecommunity. The default community is public.
The trap object identifier for alerts. The Red Hat Virtualization Manager provides a default OIDof 1.3.6.1.4.1.2312.13.1.1. All trap types are sent, appended with event information, to the SNMPmanager when this OID is defined. Note that changing the default trap prevents generatedtraps from complying with the Manager’s management information base.
An SNMP username, for SNMP version 3, security levels 1, 2, and 3.
An SNMP passphrase, for SNMP version 3, security levels 2 and 3.
An SNMP private passphrase, for SNMP version 3, security level 3.
NOTE
The Red Hat Virtualization Manager provides management information bases at /usr/share/doc/ovirt-engine/mibs/OVIRT-MIB.txt and /usr/share/doc/ovirt-engine/mibs/REDHAT-MIB.txt. Load the MIBs in your SNMP manager beforeproceeding.
Default SNMP configuration values exist on the Manager in the events notification daemonconfiguration file /usr/share/ovirt-engine/services/ovirt-engine-notifier/ovirt-engine-notifier.conf.The values outlined in the following procedure are based on the default or example values provided inthis file. Do not edit this file directly, because system changes, such as upgrades, might remove anychanges you make to this file. Instead, copy this file to /etc/ovirt-engine/notifier/notifier.conf.d/<integer>-snmp.conf, where <integer> is a number indicating thepriority with which the file should run.
Procedure
1. On the Manager, create the SNMP configuration file with the file name <integer>-snmp.conf,where <integer> is an integer that indicates the order in which files are processed. For example:
TIP
Copy the default SNMP settings from the events notification daemon configuration file /usr/share/ovirt-engine/services/ovirt-engine-notifier/ovirt-engine-notifier.conf. This fileincludes inline comments for all settings.
2. Specify the SNMP manager(s), the SNMP community (SNMP version 2 only), and the OID inthe format in this example:
3. Define whether to use SNMP version 2 (default) or 3:
# vi /etc/ovirt-engine/notifier/notifier.conf.d/20-snmp.conf
SNMP_MANAGERS="manager1.example.com manager2.example.com:162"SNMP_COMMUNITY=publicSNMP_OID=1.3.6.1.4.1.2312.13.1.1
SNMP_VERSION=3
CHAPTER 3. ADMINISTERING THE ENVIRONMENT
377

4. Specify a value for SNMP_ENGINE_ID. For example:
5. With SNMP version 3, specify the security level for SNMP traps:Security level 1, NoAuthNoPriv traps:
Security level 2, AuthNoPriv traps, as user ovirtengine, with SNMP Auth passphrase authpass.
Security level 3, AuthPriv traps, as user ovirtengine with SNMP Auth passphrase authpass andSNMP Priv passphrase privpass. For example:
6. Define which events to send to the SNMP manager:
Example 3.16. Event examples
Send all events to the default SNMP profile:
Send all events with the severity ERROR or ALERT to the default SNMP profile:
Send events for VDC_START to the specified email address:
Send events for everything but VDC_START to the default SNMP profile:
This the default filter defined in ovirt-engine-notifier.conf; if you do not disable this filter orapply overriding filters, no notifications will be sent:
SNMP_ENGINE_ID="80:00:00:00:01:02:05:05"
SNMP_USERNAME=NoAuthNoPrivSNMP_SECURITY_LEVEL=1
SNMP_USERNAME=ovirtengineSNMP_AUTH_PROTOCOL=MD5SNMP_AUTH_PASSPHRASE=authpassSNMP_SECURITY_LEVEL=2
SNMP_USERNAME=ovirtengineSNMP_AUTH_PROTOCOL=MD5SNMP_AUTH_PASSPHRASE=authpassSNMP_PRIVACY_PROTOCOL=AES128SNMP_PRIVACY_PASSPHRASE=privpassSNMP_SECURITY_LEVEL=3
FILTER="include:*(snmp:) ${FILTER}"
FILTER="include:*:ERROR(snmp:) ${FILTER}"
FILTER="include:*:ALERT(snmp:) ${FILTER}"
FILTER="include:VDC_START(snmp:[email protected]) ${FILTER}"
FILTER="exclude:VDC_START include:*(snmp:) ${FILTER}"
Red Hat Virtualization 4.4 Administration Guide
378

1
VDC_START is an example of the audit log messages available. A full list of audit log messagescan be found in /usr/share/doc/ovirt-engine/AuditLogMessages.properties. Alternatively,filter results within your SNMP manager.
7. Save the file.
8. Start the ovirt-engine-notifier service, and ensure that this service starts on boot:
Check your SNMP manager to ensure that traps are being received.
NOTE
SNMP_MANAGERS, MAIL_SERVER, or both must be properly defined in /usr/share/ovirt-engine/services/ovirt-engine-notifier/ovirt-engine-notifier.conf or inan override file in order for the notifier service to run.
Sample SNMP configuration fileThis sample configuration file is based on settings in ovirt-engine-notifier.conf. A dedicated SNMPconfiguration file, such as this one, overrides the settings in ovirt-engine-notifier.conf.
TIP
Copy the default SNMP settings from the events notification daemon configuration file /usr/share/ovirt-engine/services/ovirt-engine-notifier/ovirt-engine-notifier.conf to /etc/ovirt-engine/notifier/notifier.conf.d/<_integer_>-snmp.conf, where <_integer_> is a number indicating thepriority with which the file should run. This file includes inline comments for all settings.
/etc/ovirt-engine/notifier/notifier.conf.d/20-snmp.conf
The IP addresses or fully qualified domain names of machines that will act as the SNMP managers.Entries must be separated by a space and can contain a port number. For example, manager1.example.com manager2.example.com:164
FILTER="exclude:*"
# systemctl start ovirt-engine-notifier.service# systemctl enable ovirt-engine-notifier.service
SNMP_MANAGERS="manager1.example.com manager2.example.com:162" 1SNMP_COMMUNITY=public 2SNMP_OID=1.3.6.1.4.1.2312.13.1.1 3FILTER="include:*(snmp:)" 4SNMP_VERSION=3 5SNMP_ENGINE_ID="80:00:00:00:01:02:05:05" 6SNMP_USERNAME=<username> 7SNMP_AUTH_PROTOCOL=MD5 8SNMP_AUTH_PASSPHRASE=<authpass> 9SNMP_PRIVACY_PROTOCOL=AES128 10SNMP_PRIVACY_PASSPHRASE=<privpass> 11SNMP_SECURITY_LEVEL=3 12
CHAPTER 3. ADMINISTERING THE ENVIRONMENT
379

2
3
4
5
6
7
8
9
10
11
12
(SNMP version 2 only) Default SNMP Community String.
SNMP Trap Object Identifier for outgoing notifications. iso(1) org(3) dod(6) internet(1) private(4)enterprises(1) redhat(2312) ovirt(13) engine(1) notifier(1)
NOTE
Changing the default will prevent generated traps from complying with OVIRT-MIB.txt.
The algorithm used to determine the triggers for and recipients of SNMP notifications.
SNMP Version. SNMP version 2 and version 3 traps are supported. 2 = SNMPv2, 3 = SNMPv3.
(SNMP version 3 only) The engine ID used for SNMP traps.
(SNMP version 3 only) The user name used for SNMP traps.
(SNMP version 3 only) The SNMP auth protocol. Supported values are MD5 and SHA. Requiredwhen SNMP_SECURITY_LEVEL is set to 2 ( AUTH_NOPRIV) or 3 (AUTH_PRIV).
(SNMP version 3 only) The SNMP auth passphrase. Required when SNMP_SECURITY_LEVEL isset to 2 (AUTH_NOPRIV) or 3 (AUTH_PRIV).
(SNMP version 3 only) The SNMP privacy protocol. Supported values are AES128, AES192 andAES256. Be aware that AES192 and AES256 are not defined in RFC3826, so verify that your SNMPserver supports those protocols before enabling them. Required when SNMP_SECURITY_LEVELis set to 3 (AUTH_PRIV).
(SNMP version 3 only) The SNMP privacy passphrase. Required when SNMP_SECURITY_LEVELis set to 3 (AUTH_PRIV).
(SNMP version 3 only) The SNMP security level. 1 = NOAUTH_NOPRIV, 2 = AUTH_NOPRIV, 3 = AUTH_PRIV.
3.9. UTILITIES
3.9.1. The oVirt Engine Rename Tool
3.9.1.1. The oVirt Engine Rename Tool
When the engine-setup command is run in a clean environment, the command generates a number ofcertificates and keys that use the fully qualified domain name of the Manager supplied during the setupprocess. If the fully qualified domain name of the Manager must be changed later on (for example, dueto migration of the machine hosting the Manager to a different domain), the records of the fullyqualified domain name must be updated to reflect the new name. The ovirt-engine-rename commandautomates this task.
The ovirt-engine-rename command updates records of the fully qualified domain name of the Managerin the following locations:
/etc/ovirt-engine/engine.conf.d/10-setup-protocols.conf
/etc/ovirt-engine/isouploader.conf.d/10-engine-setup.conf
Red Hat Virtualization 4.4 Administration Guide
380
/etc/ovirt-engine/logcollector.conf.d/10-engine-setup.conf
/etc/pki/ovirt-engine/cert.conf
/etc/pki/ovirt-engine/cert.template
/etc/pki/ovirt-engine/certs/apache.cer
/etc/pki/ovirt-engine/keys/apache.key.nopass
/etc/pki/ovirt-engine/keys/apache.p12
WARNING
While the ovirt-engine-rename command creates a new certificate for the webserver on which the Manager runs, it does not affect the certificate for the Manageror the certificate authority. Due to this, there is some risk involved in using the ovirt-engine-rename command, particularly in environments that have been upgradedfrom Red Hat Enterprise Virtualization 3.2 and earlier. Therefore, changing the fullyqualified domain name of the Manager by running engine-cleanup and engine-setup is recommended where possible.
WARNING
During the upgrade process, the old hostname must be resolvable. If the oVirtEngine Rename Tool fails with the message [ ERROR ] Host name is not valid: <OLD FQDN> did not resolve into an IP address, add the old hostname to the /etc/hosts file, use the oVirt Engine Rename Tool, and then remove the oldhostname from the /etc/hosts file.
3.9.1.2. Syntax for the oVirt Engine Rename Command
The basic syntax for the ovirt-engine-rename command is:
The command also accepts the following options:
--newname=[new name]
Allows you to specify the new fully qualified domain name for the Manager without user interaction.
--log=[file]
Allows you to specify the path and name of a file into which logs of the rename operation are to bewritten.
--config=[file]
# /usr/share/ovirt-engine/setup/bin/ovirt-engine-rename
CHAPTER 3. ADMINISTERING THE ENVIRONMENT
381

Allows you to specify the path and file name of a configuration file to load into the rename operation.
--config-append=[file]
Allows you to specify the path and file name of a configuration file to append to the renameoperation. This option can be used to specify the path and file name of an existing answer file toautomate the rename operation.
--generate-answer=[file]
Allows you to specify the path and file name of the file in which your answers and the values changedby the ovirt-engine-rename command are recorded.
3.9.1.3. Renaming the Manager with the oVirt Engine Rename Tool
You can use the ovirt-engine-rename command to update records of the fully qualified domain name(FQDN) of the Manager.
The tool checks whether the Manager provides a local ISO or Data storage domain. If it does, the toolprompts the user to eject, shut down, or place into maintenance mode any virtual machine or storagedomain connected to the storage before continuing with the operation. This ensures that virtualmachines do not lose connectivity with their virtual disks, and prevents ISO storage domains from losingconnectivity during the renaming process.
Procedure
1. Prepare all DNS and other relevant records for the new FQDN.
2. Update the DHCP server configuration if DHCP is used.
3. Update the host name on the Manager.
4. Run the following command:
5. When prompted, press Enter to stop the engine service:
6. When prompted, enter the new FQDN for the Manager:
The ovirt-engine-rename command updates records of the FQDN of the Manager.
For a self-hosted engine, complete these additional steps:
1. Run the following command on every existing self-hosted engine node:
This command modifies the FQDN in each self-hosted engine node’s local copy of /etc/ovirt-hosted-engine-ha/hosted-engine.conf
2. Run the following command on one of the self-hosted engine nodes:
# /usr/share/ovirt-engine/setup/bin/ovirt-engine-rename
During execution engine service will be stopped (OK, Cancel) [OK]:
New fully qualified server name:new_engine_fqdn
# hosted-engine --set-shared-config fqdn new_engine_fqdn --type=he_local
Red Hat Virtualization 4.4 Administration Guide
382

This command modifies the FQDN in the main copy of /etc/ovirt-hosted-engine-ha/hosted-engine.conf on the shared storage domain.
Now, all new and existing self-hosted engine nodes use the new FQDN.
3.9.2. The Engine Configuration Tool
3.9.2.1. The Engine Configuration Tool
The engine configuration tool is a command-line utility for configuring global settings for your Red HatVirtualization environment. The tool interacts with a list of key-value mappings that are stored in theengine database, and allows you to retrieve and set the value of individual keys, and retrieve a list of allavailable configuration keys and values. Furthermore, different values can be stored for eachconfiguration level in your Red Hat Virtualization environment.
NOTE
Neither the Red Hat Virtualization Manager nor Red Hat JBoss Enterprise ApplicationPlatform need to be running to retrieve or set the value of a configuration key. Becausethe configuration key value-key mappings are stored in the engine database, they can beupdated while the postgresql service is running. Changes are then applied when the ovirt-engine service is restarted.
3.9.2.2. Syntax for the engine-config Command
You can run the engine configuration tool from the machine on which the Red Hat VirtualizationManager is installed. For detailed information on usage, print the help output for the command:
Common tasks:
List available configuration keys
List available configuration values
Retrieve value of configuration key
Replace KEY_NAME with the name of the preferred key to retrieve the value for the givenversion of the key. Use the --cver parameter to specify the configuration version of the value tobe retrieved. If no version is provided, values for all existing versions are returned.
Set value of configuration key
# hosted-engine --set-shared-config fqdn new_engine_fqdn --type=he_shared
# engine-config --help
# engine-config --list
# engine-config --all
# engine-config --get KEY_NAME
# engine-config --set KEY_NAME=KEY_VALUE --cver=VERSION
CHAPTER 3. ADMINISTERING THE ENVIRONMENT
383

Replace KEY_NAME with the name of the specific key to set, and replace KEY_VALUE with thevalue to be set. You must specify the VERSION in environments with more than oneconfiguration version.
Restart the ovirt-engine service to load changesThe ovirt-engine service needs to be restarted for your changes to take effect.
3.9.3. The USB Filter Editor
3.9.3.1. Installing the USB Filter Editor
The USB Filter Editor is a Windows tool used to configure the usbfilter.txt policy file. The policy rulesdefined in this file allow or deny automatic passthrough of specific USB devices from client machines tovirtual machines managed using the Red Hat Virtualization Manager. The policy file resides on the RedHat Virtualization Manager in the following location: /etc/ovirt-engine/usbfilter.txt Changes to USBfilter policies do not take effect unless the ovirt-engine service on the Red Hat Virtualization Manager isrestarted.
Download the USB Filter Editor installer from this "Installers and Images for Red Hat VirtualizationManager" topic.
Procedure
1. On a Windows machine, extract the .msi intaller from the .zip file and run the .msi installer.
2. Follow the steps of the installation wizard. Unless otherwise specified, the USB Filter Editor willbe installed by default in either C:\Program Files\RedHat\USB Filter Editor or C:\ProgramFiles(x86)\RedHat\USB Filter Editor depending on your version of Windows.
3. A USB Filter Editor shortcut icon is created on your desktop.
IMPORTANT
Use a Secure Copy (SCP) client such as WinSCP to import and export filter policies fromthe Red Hat Virtualization Manager.
The default USB device policy provides virtual machines with basic access to USB devices; update thepolicy to allow the use of additional USB devices.
3.9.3.2. The USB Filter Editor Interface
Double-click the USB Filter Editor shortcut icon on your desktop.
The Red Hat USB Filter Editor interface displays the Class, Vendor, Product, Revision, and Action foreach USB device. Permitted USB devices are set to Allow in the Action column; prohibited devices areset to Block.
Table 3.7. USB Editor Fields
# systemctl restart ovirt-engine.service
Red Hat Virtualization 4.4 Administration Guide
384

Name Description
Class Type of USB device; for example, printers, massstorage controllers.
Vendor The manufacturer of the selected type of device.
Product The specific USB device model.
Revision The revision of the product.
Action Allow or block the specified device.
The USB device policy rules are processed in their listed order. Use the Up and Down buttons to moverules higher or lower in the list. The universal Block rule needs to remain as the lowest entry to ensure allUSB devices are denied unless explicitly allowed in the USB Filter Editor.
3.9.3.3. Adding a USB Policy
Double-click the USB Filter Editor shortcut icon on your desktop. This opens the editor.
Procedure
1. Click Add.
2. Use the USB Class, Vendor ID, Product ID, and Revision check boxes and lists to specify thedevice.Click the Allow button to permit virtual machines use of the USB device; click the Block buttonto prohibit the USB device from virtual machines.
Click OK to add the selected filter rule to the list and close the window.
Example 3.17. Adding a Device
The following is an example of how to add USB Class Smartcard, device EP-1427X-2 Ethernet Adapter, from manufacturer Acer Communications & Multimedia to the list ofallowed devices.
CHAPTER 3. ADMINISTERING THE ENVIRONMENT
385

3. Click File → Save to save the changes.
You have added a USB policy to the USB Filter Editor. You need to export USB filter policies to the RedHat Virtualization Manager for them to take effect.
Additional resources
Exporting a USB Policy
3.9.3.4. Removing a USB Policy
Double-click the USB Filter Editor shortcut icon on your desktop. This opens the editor.
Procedure
1. Select the policy to be removed.
2. Click Remove. A message displays prompting you to confirm that you want to remove thepolicy.
3. Click Yes to confirm that you want to remove the policy.
4. Click File → Save to save the changes.
You have removed a USB policy from the USB Filter Editor. You need to export USB filter policies to theRed Hat Virtualization Manager for them to take effect.
Additional resources
Exporting a USB Policy
3.9.3.5. Searching for USB Device Policies
Red Hat Virtualization 4.4 Administration Guide
386

Search for attached USB devices to either allow or block them in the USB Filter Editor.
Double-click the USB Filter Editor shortcut icon on your desktop. This opens the editor.
Procedure
1. Click Search. The Attached USB Devices window displays a list of all the attached devices.
2. Select the device and click Allow or Block as appropriate. Double-click the selected device toclose the window. A policy rule for the device is added to the list.
3. Use the Up and Down buttons to change the position of the new policy rule in the list.
4. Click File → Save to save the changes.
You have searched the attached USB devices. USB filter policies need to be exported to the Red HatVirtualization Manager to take effect.
3.9.3.6. Exporting a USB Policy
USB device policy changes need to be exported and uploaded to the Red Hat Virtualization Manager forthe updated policy to take effect. Upload the policy and restart the ovirt-engine service.
Double-click the USB Filter Editor shortcut icon on your desktop. This opens the editor.
Procedure
1. Click Export; the Save As window opens.
2. Save the file with a file name of usbfilter.txt.
3. Using a Secure Copy client, such as WinSCP, upload the usbfilter.txt file to the server runningRed Hat Virtualization Manager. The file must be placed in the following directory on the server:/etc/ovirt-engine/
4. As the root user on the server running Red Hat Virtualization Manager, restart the ovirt-engineservice.
3.9.3.7. Importing a USB Policy
An existing USB device policy must be downloaded and imported into the USB Filter Editor before youcan edit it.
Procedure
1. Using a Secure Copy client, such as WinSCP, download the usbfilter.txt file from the serverrunning Red Hat Virtualization Manager. The file can be found in the following directory on theserver: /etc/ovirt-engine/
2. Double-click the USB Filter Editor shortcut icon on your desktop. This opens the editor.
3. Click Import. This opens the Open window.
# systemctl restart ovirt-engine.service
CHAPTER 3. ADMINISTERING THE ENVIRONMENT
387

4. Open the usbfilter.txt file that was downloaded from the server.
3.9.4. The Image discrepancies tool
3.9.4.1. Monitoring snapshot health with the image discrepancies tool
The RHV Image Discrepancies tool analyzes image data in the Storage Domain and RHV Database. Italerts you if it finds discrepancies in volumes and volume attributes, but does not fix those discrepancies.Use this tool in a variety of scenarios, such as:
Before upgrading versions, to avoid carrying over broken volumes or chains to the new version.
Following a failed storage operation, to detect volumes or attributes in a bad state.
After restoring the RHV database or storage from backup.
Periodically, to detect potential problems before they worsen.
To analyze a snapshot- or live storage migration-related issues, and to verify system healthafter fixing these types of problems.
Prerequisites
Required Versions: this tool was introduced in RHV version 4.3.8 with rhv-log-collector-analyzer-0.2.15-0.el7ev.
Because data collection runs simultaneously at different places and is not atomic, stop allactivity in the environment that can modify the storage domains. That is, do not create orremove snapshots, edit, move, create, or remove disks. Otherwise, false detection ofinconsistencies may occur. Virtual Machines can remain running normally during the process.
Procedure
1. To run the tool, enter the following command on the RHV Manager:
# rhv-image-discrepancies
2. If the tool finds discrepancies, rerun it to confirm the results, especially if there is a chance someoperations were performed while the tool was running.
NOTE
This tool includes any Export and ISO storage domains and may report discrepancies forthem. If so, these can be ignored, as these storage domains do not have entries forimages in the RHV database.
Understanding the results
The tool reports the following:
If there are volumes that appear on the storage but are not in the database, or appear in thedatabase but are not on the storage.
If some volume attributes differ between the storage and the database.
Red Hat Virtualization 4.4 Administration Guide
388

Sample output:
Checking storage domain c277ad93-0973-43d9-a0ca-22199bc8e801 Looking for missing images... No missing images found Checking discrepancies between SD/DB attributes... image ef325650-4b39-43cf-9e00-62b9f7659020 has a different attribute capacity on storage(2696984576) and on DB(2696986624) image 852613ce-79ee-4adc-a56a-ea650dcb4cfa has a different attribute capacity on storage(5424252928) and on DB(5424254976)
Checking storage domain c64637b4-f0e8-408c-b8af-6a52946113e2 Looking for missing images... No missing images found Checking discrepancies between SD/DB attributes... No discrepancies found
3.9.5. The Log Collector Tool
3.9.5.1. Log Collector
A log collection tool is included in the Red Hat Virtualization Manager. This allows you to easily collectrelevant logs from across the Red Hat Virtualization environment when requesting support.
The log collection command is ovirt-log-collector. You are required to log in as the root user andprovide the administration credentials for the Red Hat Virtualization environment. The ovirt-log-collector -h command displays usage information, including a list of all valid options for the ovirt-log-collector command.
3.9.5.2. Syntax for the ovirt-log-collector Command
The basic syntax for the log collector command is:
The two supported modes of operation are list and collect.
The list parameter lists either the hosts, clusters, or data centers attached to the Red HatVirtualization Manager. You are able to filter the log collection based on the listed objects.
The collect parameter performs log collection from the Red Hat Virtualization Manager. Thecollected logs are placed in an archive file under the /tmp/logcollector directory. The ovirt-log-collector command assigns each log a specific file name.
Unless another parameter is specified, the default action is to list the available hosts together with thedata center and cluster to which they belong. You will be prompted to enter user names and passwordsto retrieve certain logs.
There are numerous parameters to further refine the ovirt-log-collector command.
General options
--version
# ovirt-log-collector options list all|clusters|datacenters# ovirt-log-collector options collect
CHAPTER 3. ADMINISTERING THE ENVIRONMENT
389

Displays the version number of the command in use and returns to prompt.
-h, --help
Displays command usage information and returns to prompt.
--conf-file=PATH
Sets PATH as the configuration file the tool is to use.
--local-tmp=PATH
Sets PATH as the directory in which logs are saved. The default directory is /tmp/logcollector.
--ticket-number=TICKET
Sets TICKET as the ticket, or case number, to associate with the SOS report.
--upload=FTP_SERVER
Sets FTP_SERVER as the destination for retrieved logs to be sent using FTP.Do not use this option unless advised to by a Red Hat support representative.
--log-file=PATH
Sets PATH as the specific file name the command should use for the log output.
--quiet
Sets quiet mode, reducing console output to a minimum. Quiet mode is off by default.
-v, --verbose
Sets verbose mode, providing more console output. Verbose mode is off by default.
--time-only
Displays only information about time differences between hosts, without generating a full SOSreport.
Red Hat Virtualization Manager Options
These options filter the log collection and specify authentication details for the Red Hat VirtualizationManager.
These parameters can be combined for specific commands. For example, ovirt-log-collector --user=admin@internal --cluster ClusterA,ClusterB --hosts "SalesHost"* specifies the user as admin@internal and limits the log collection to only SalesHost hosts in clusters A and B.
--no-hypervisors
Omits virtualization hosts from the log collection.
--one-hypervisor-per-cluster
Collects the logs of one host (the SPM, if there is one) from each cluster.
-u USER, --user=USER
Sets the user name for login. The USER is specified in the format user@domain, where user is theuser name and domain is the directory services domain in use. The user must exist in directoryservices and be known to the Red Hat Virtualization Manager.
-r FQDN, --rhevm=FQDN
Sets the fully qualified domain name of the Red Hat Virtualization Manager from which to collectlogs, where FQDN is replaced by the fully qualified domain name of the Manager. It is assumed thatthe log collector is being run on the same local host as the Red Hat Virtualization Manager; thedefault value is localhost.
-c CLUSTER, --cluster=CLUSTER
Collects logs from the virtualization hosts in the nominated CLUSTER in addition to logs from the
Red Hat Virtualization 4.4 Administration Guide
390

Collects logs from the virtualization hosts in the nominated CLUSTER in addition to logs from theRed Hat Virtualization Manager. The cluster(s) for inclusion must be specified in a comma-separatedlist of cluster names or match patterns.
-d DATACENTER, --data-center=DATACENTER
Collects logs from the virtualization hosts in the nominated DATACENTER in addition to logs fromthe Red Hat Virtualization Manager. The data center(s) for inclusion must be specified in a comma-separated list of data center names or match patterns.
-H HOSTS_LIST, --hosts=HOSTS_LIST
Collects logs from the virtualization hosts in the nominated HOSTS_LIST in addition to logs from theRed Hat Virtualization Manager. The hosts for inclusion must be specified in a comma-separated listof host names, fully qualified domain names, or IP addresses. Match patterns are also valid.
SSH Configuration
--ssh-port=PORT
Sets PORT as the port to use for SSH connections with virtualization hosts.
-k KEYFILE, --key-file=KEYFILE
Sets KEYFILE as the public SSH key to be used for accessing the virtualization hosts.
--max-connections=MAX_CONNECTIONS
Sets MAX_CONNECTIONS as the maximum concurrent SSH connections for logs from virtualizationhosts. The default is 10.
PostgreSQL Database Options
The database user name and database name must be specified, using the pg-user and dbnameparameters, if they have been changed from the default values.
Use the pg-dbhost parameter if the database is not on the local host. Use the optional pg-host-keyparameter to collect remote logs. The PostgreSQL SOS plugin must be installed on the database serverfor remote log collection to be successful.
--no-postgresql
Disables collection of database. The log collector will connect to the Red Hat Virtualization ManagerPostgreSQL database and include the data in the log report unless the --no-postgresql parameter isspecified.
--pg-user=USER
Sets USER as the user name to use for connections with the database server. The default ispostgres.
--pg-dbname=DBNAME
Sets DBNAME as the database name to use for connections with the database server. The default isrhevm.
--pg-dbhost=DBHOST
Sets DBHOST as the host name for the database server. The default is localhost.
--pg-host-key=KEYFILE
Sets KEYFILE as the public identity file (private key) for the database server. This value is not set bydefault; it is required only where the database does not exist on the local host.
3.9.5.3. Basic Log Collector Usage
When the ovirt-log-collector command is run without specifying any additional parameters, its default
CHAPTER 3. ADMINISTERING THE ENVIRONMENT
391

behavior is to collect all logs from the Red Hat Virtualization Manager and its attached hosts. It will alsocollect database logs unless the --no-postgresql parameter is added. In the following example, logcollector is run to collect all logs from the Red Hat Virtualization Manager and three attached hosts.
Example 3.18. Log Collector Usage
# ovirt-log-collectorINFO: Gathering oVirt Engine information...INFO: Gathering PostgreSQL the oVirt Engine database and log files from localhost...Please provide REST API password for the admin@internal oVirt Engine user (CTRL+D to abort):About to collect information from 3 hypervisors. Continue? (Y/n):INFO: Gathering information from selected hypervisors...INFO: collecting information from 192.168.122.250INFO: collecting information from 192.168.122.251INFO: collecting information from 192.168.122.252INFO: finished collecting information from 192.168.122.250INFO: finished collecting information from 192.168.122.251INFO: finished collecting information from 192.168.122.252Creating compressed archive...INFO Log files have been collected and placed in /tmp/logcollector/sosreport-rhn-account-20110804121320-ce2a.tar.xz.The MD5 for this file is 6d741b78925998caff29020df2b2ce2a and its size is 26.7M
3.9.6. The Engine Vacuum Tool
3.9.6.1. The Engine Vacuum Tool
The Engine Vacuum tool maintains PostgreSQL databases by updating tables and removing dead rows,allowing disk space to be reused. See the PostgreSQL documentation for information about the VACUUM command and its parameters.
The Engine Vacuum command is engine-vacuum. You must log in as the root user and provide theadministration credentials for the Red Hat Virtualization environment.
Alternatively, the Engine Vacuum tool can be run while using the engine-setup command to customizean existing installation:
$ engine-setup...[ INFO ] Stage: Environment customization...Perform full vacuum on the engine database engine@localhost?This operation may take a while depending on this setup health and theconfiguration of the db vacuum process.See https://www.postgresql.org/docs/12/static/sql-vacuum.html(Yes, No) [No]:
The Yes option runs the Engine Vacuum tool in full vacuum verbose mode.
3.9.6.2. Engine Vacuum Modes
Engine Vacuum has two modes:
Red Hat Virtualization 4.4 Administration Guide
392

Standard Vacuum
Frequent standard vacuuming is recommended.Standard vacuum removes dead row versions in tables and indexes and marks the space as availablefor future reuse. Frequently updated tables should be vacuumed on a regular basis. However,standard vacuum does not return the space to the operating system.
Standard vacuum, with no parameters, processes every table in the current database.
Full Vacuum
Full vacuum is not recommended for routine use, but should only be run when a significant amount ofspace needs to be reclaimed from within the table.Full vacuum compacts the tables by writing a new copy of the table file with no dead space, therebyenabling the operating system to reclaim the space. Full vacuum can take a long time.
Full vacuum requires extra disk space for the new copy of the table, until the operation completesand the old copy is deleted. Because full vacuum requires an exclusive lock on the table, it cannot berun in parallel with other uses of the table.
3.9.6.3. Syntax for the engine-vacuum Command
The basic syntax for the engine-vacuum command is:
Running the engine-vacuum command with no options performs a standard vacuum.
There are several parameters to further refine the engine-vacuum command.
General Options
-h --help
Displays information on how to use the engine-vacuum command.
-a
Runs a standard vacuum, analyzes the database, and updates the optimizer statistics.
-A
Analyzes the database and updates the optimizer statistics, without vacuuming.
-f
Runs a full vacuum.
-v
Runs in verbose mode, providing more console output.
-t table_name
Vacuums a specific table or tables.
# engine-vacuum
# engine-vacuum option
# engine-vacuum -f -v -t vm_dynamic -t vds_dynamic
CHAPTER 3. ADMINISTERING THE ENVIRONMENT
393

3.9.7. The VDSM to Network Name Mapping Tool
3.9.7.1. Mapping VDSM Names to Logical Network Names
If the name of a logical network is longer than 15 characters or contains non-ASCII characters, thesystem automatically generates an on-host identifier (vdsm_name) name; it comprises the letters on andthe first 13 characters of the network’s unique identifier, for example, ona1b2c3d4e5f6g. It is this namethat appears in the host’s log files. To view a list of logical network names and their auto-generatednetwork name, use the VDSM-to-Network-Name Mapping tool located in /usr/share/ovirt-engine/bin/.
Procedure
1. The first time you run the tool, define a PASSWORD environment variable, which is thepassword of a database user with read access to the Manager database. For example, run:
2. Run the VDSM-to-Network-Name Mapping tool:
# vdsm_to_network_name_map --user USER
where USER is the database user with read access to the Manager database, whose password isassigned to the PASSWORD environment variable.
The tool displays a list of logical network names that are mapped to their equivalent on-host identifiers.
Additional Flags
You can run the tool with the following flags:
--host is the hostname/IP address of the database server. The default value is localhost.
--port is the port number of the database server. The default value is 5432. --database is the name ofthe database. The default value is engine, which is the Manager database.
--secure enables a secure connection with the database. By default the tool is run without a secureconnection.
# export PASSWORD=DatabaseUserPassword
Red Hat Virtualization 4.4 Administration Guide
394

CHAPTER 4. GATHERING INFORMATION ABOUT THEENVIRONMENT
4.1. MONITORING AND OBSERVABILITY
This chapter provides a number of ways to monitor and obtain metrics and logs from your Red HatVirtualization system. These methods include:
Using Data Warehouse and Grafana to monitor RHV
Sending metrics to a remote instance of Elasticsearch
Deploying Insights in Red Hat Virtualization Manager
4.1.1. Using Data Warehouse and Grafana to monitor RHV
4.1.1.1. Grafana overview
Grafana is a web-based UI tool used to display reports based on data collected from the oVirt DataWarehouse PostgreSQL database under the database name ovirt_engine_history. For details of theavailable report dashboards, see Grafana dashboards and Grafana website - dashboards .
Data from the Manager is collected every minute and aggregated in hourly and daily aggregations. Thedata is retained according to the scale setting defined in the Data Warehouse configuration duringengine-setup (Basic or Full scale):
Basic (default) - samples data saved for 24 hours, hourly data saved for 1 month, daily data - nodaily aggregations saved.
Full (recommended)- samples data saved for 24 hours, hourly data saved for 2 months, dailyaggregations saved for 5 years.
Full sample scaling may require migrating the Data Warehouse to a separate virtual machine.
For Data Warehouse scaling instructions, see Changing the Data Warehouse Sampling Scale .
For instructions on migrating the Data Warehouse to or installing on a separate machine, seeMigrating Data Warehouse to a Separate Machine and Installing and Configuring DataWarehouse on a Separate Machine.
NOTE
Red Hat only supports installing the Data Warehouse database, the Data Warehouseservice and Grafana all on the same machine as each other, even though you can installeach of these components on separate machines from each other.
4.1.1.2. Installation
Grafana integration is enabled and installed by default when you run Red Hat Virtualization Manager engine-setup in a Stand Alone Manager installation, and in the Self-Hosted engine installation.
NOTE
CHAPTER 4. GATHERING INFORMATION ABOUT THE ENVIRONMENT
395
NOTE
Grafana is not installed by default and you may need to install it manually under somescenarios such as performing an upgrade from an earlier version of RHV, restoring abackup, or when the Data Warehouse is migrated to a separate machine.
To enable Grafana integration manually:
1. Put the environment in global maintenance mode:
2. Log in to the machine where you want to install Grafana. This should be the same machinewhere the Data Warehouse is configured; usually the Manager machine.
3. Run the engine-setup command as follows:
# engine-setup --reconfigure-optional-components
4. Answer Yes to install Grafana on this machine:
Configure Grafana on this host (Yes, No) [Yes]:
5. Disable global maintenance mode:
To access the Grafana dashboards:
Go to https://<engine FQDN or IP address>/ovirt-engine-grafana
or
Click Monitoring Portal in the web administration welcome page for the Administration Portal.
4.1.1.2.1. Configuring Grafana for Single Sign-on
The Manager engine-setup automatically configures Grafana to allow existing users on the Manager tolog in with SSO from the Administration Portal, but does not automatically create users. You need tocreate new users (Invite in the Grafana UI), confirm the new user, and then they can log in.
1. Set an email address for the user in the Manager, if it is not already defined.
2. Log in to Grafana with an existing admin user (the initially configured admin).
3. Go to Configuration → Users and select Invite.
4. Input the email address and name, and select a Role.
5. Send the invitation using one of these options:
Select Send invite mail and click Submit. For this option, you need an operational local mailserver configured on the Grafana machine.or
# hosted-engine --set-maintenance --mode=global
# hosted-engine --set-maintenance --mode=none
Red Hat Virtualization 4.4 Administration Guide
396

Select Pending Invites
Locate the entry you want
Select Copy invite
Copy and use this link to create the account by pasting it directly into a browser addressbar, or by sending it to another user.
If you use the Pending Invites option, no email is sent, and the email address does not really need toexist - any valid looking address will work, as long as it’s configured as the email address of a Manageruser.
To log in with this account:
1. Log in to the Red Hat Virtualization web administration welcome page using the account thathas this email address.
2. Select Monitoring Portal to open the Grafana dashboard.
3. Select Sign in with oVirt Engine Auth.
4.1.1.3. Built-in Grafana dashboards
The following dashboards are available in the initial Grafana setup to report Data Center, Cluster, Host,and Virtual Machine data:
Table 4.1. Built-in Grafana dashboards
Dashboard type Content
CHAPTER 4. GATHERING INFORMATION ABOUT THE ENVIRONMENT
397

Executive dashboardsSystem dashboard - resource usage and up-time for hosts and storage domains in thesystem, according to the latestconfigurations.
Data Center dashboard - resource usage,peaks, and up-time for clusters, hosts, andstorage domains in a selected data center,according to the latest configurations.
Cluster dashboard - resource usage, peaks,over-commit, and up-time for hosts andvirtual machines in a selected cluster,according to the latest configurations.
Host dashboard - latest and historicalconfiguration details and resource usagemetrics of a selected host over a selectedperiod.
Virtual Machine dashboard - latest andhistorical configuration details and resourceusage metrics of a selected virtual machineover a selected period.
Executive dashboard - user resource usageand number of operating systems for hostsand virtual machines in selected clustersover a selected period.
Inventory dashboardsInventory dashboard - number of hosts,virtual machines, and running virtualmachines, resources usage and over-commit rates for selected data centers,according to the latest configurations.
Hosts Inventory dashboard - FQDN, VDSMversion, operating system, CPU model, CPUcores, memory size, create date, deletedate, and hardware details for selectedhosts, according to the latest configurations.
Storage Domains Inventory dashboard -domain type, storage type, available disksize, used disk size, total disk size, creationdate, and delete date for selected storagedomains over a selected period.
Virtual Machines Inventory dashboard -template name, operating system, CPUcores, memory size, create date, and deletedate for selected virtual machines,according to the latest configurations.
Dashboard type Content
Red Hat Virtualization 4.4 Administration Guide
398

Service Level dashboardsUptime dashboard - planned downtime,unplanned downtime, and total time for thehosts, high availability virtual machines, andall virtual machines in selected clusters in aselected period.
Hosts Uptime dashboard - the uptime,planned downtime, and unplanneddowntime for selected hosts in a selectedperiod.
Virtual Machines Uptime dashboard - theuptime, planned downtime, and unplanneddowntime for selected virtual machines in aselected period.
Cluster Quality of Service
Hosts dashboard - the time selectedhosts have performed above and belowthe CPU and memory threshold in aselected period.
Virtual Machines dashboard - the timeselected virtual machines haveperformed above and below the CPUand memory threshold in a selectedperiod.
Trend dashboardsTrend dashboard - usage rates for the 5most and least utilized virtual machines andhosts by memory and by CPU in selectedclusters over a selected period.
Hosts Trend dashboard - resource usage(number of virtual machines, CPU, memory,and network Tx/Rx) for selected hosts overa selected period.
Virtual Machines Trend dashboard -resource usage (CPU, memory, networkTx/Rx, disk I/O) for selected virtualmachines over a selected period.
Hosts Resource Usage dashboard - dailyand hourly resource usage (number ofvirtual machines, CPU, memory, networkTx/Rx) for selected hosts in a selectedperiod.
Virtual Machines Resource Usagedashboard - daily and hourly resource usage(CPU, memory, network Tx/Rx, disk I/O) forselected virtual machines in a selectedperiod.
Dashboard type Content
NOTE
CHAPTER 4. GATHERING INFORMATION ABOUT THE ENVIRONMENT
399
NOTE
The Grafana dashboards includes direct links to the Red Hat Virtualization AdministrationPortal, allowing you to quickly view additional details for your clusters, hosts, and virtualmachines.
4.1.1.4. Customized Grafana dashboards
You can create customized dashboards or copy and modify existing dashboards according to yourreporting needs.
NOTE
Built-in dashboards cannot be customized.
4.1.2. Sending metrics and logs to a remote instance of Elasticsearch
NOTE
Red Hat does not own or maintain Elasticsearch. You need to have a working familiaritywith Elasticsearch setup and maintenance to deploy this option.
You can configure the Red Hat Virtualization Manager and hosts to send metrics data and logs to yourexisting Elasticsearch instance.
To do this, run the Ansible role that configures collectd and rsyslog on the Manager and all hosts tocollect engine.log, vdsm.log, and collectd metrics, and send them to your Elasticsearch instance.
For more information, including a full list with explanations of available Metrics Schema, see SendingRHV monitoring data to a remote Elasticsearch instance.
4.1.2.1. Installing collectd and rsyslog
Deploy collectd and rsyslog on the hosts to collect logs and metrics.
NOTE
You do not need to repeat this procedure for new hosts. Every new host that is added isautomatically configured by the Manager to send the data to Elasticsearch during host-deploy.
Procedure
1. Log in to the Manager machine using SSH.
2. Copy /etc/ovirt-engine-metrics/config.yml.example to create /etc/ovirt-engine-metrics/config.yml.d/config.yml:
3. Edit the ovirt_env_name and elasticsearch_host parameters in config.yml and save the file.The following additional parameters can be added to the file:
# cp /etc/ovirt-engine-metrics/config.yml.example /etc/ovirt-engine-metrics/config.yml.d/config.yml
Red Hat Virtualization 4.4 Administration Guide
400
use_omelasticsearch_cert: falsersyslog_elasticsearch_usehttps_metrics: !!str offrsyslog_elasticsearch_usehttps_logs: !!str off
When using certificates, set use_omelasticsearch_cert to true.
To disable logs or metrics, use the rsyslog_elasticsearch_usehttps_metrics and/or rsyslog_elasticsearch_usehttps_logs parameters.
4. Deploy collectd and rsyslog on the hosts:
The configure_ovirt_machines_for_metrics.sh script runs an Ansible role that includes linux-system-roles (see Administration and configuration tasks using System Roles in RHEL ) anduses it to deploy and configure rsyslog on the host. rsyslog collects metrics from collectd andsends them to Elasticsearch.
4.1.2.2. Logging schema and analyzing logs
Use the Discover page to interactively explore data collected from RHV. Each set of results that iscollected is referred to as a document. Documents are collected from the following log files:
engine.log - contains all oVirt Engine UI crashes, Active Directory lookups, database issues, andother events.
vdsm.log - the log file for the VDSM, the Manager’s agent on the virtualization hosts, andcontains host-related events.
The following fields are available:
parameter description
_id The unique ID of the document
_index The ID of the index to which the document belongs.The index with the project.ovirt-logs prefix is theonly relevant index in the Discover page.
hostname For the engine.log this is the hostname of theManager. For the vdsm.log this is the hostname ofthe host.
level The log record severity: TRACE, DEBUG, INFO,WARN, ERROR, FATAL.
message The body of the document message.
ovirt.class The name of a Java class that produced this log.
# /usr/share/ovirt-engine-metrics/setup/ansible/configure_ovirt_machines_for_metrics.sh
CHAPTER 4. GATHERING INFORMATION ABOUT THE ENVIRONMENT
401

ovirt.correlationid For the engine.log only. This ID is used to correlatethe multiple parts of a single task performed by theManager.
ovirt.thread The name of a Java thread inside which the logrecord was produced.
tag Predefined sets of metadata that can be used tofilter the data.
@timestamp The [time](Troubleshooting#information-is-missing-from-kibana) that the record was issued.
_score N/A
_type N/A
ipaddr4 The machine’s IP address.
ovirt.cluster_name For the vdsm.log only. The name of the cluster towhich the host belongs.
ovirt.engine_fqdn The Manager’s FQDN.
ovirt.module_lineno The file and line number within the file that ran thecommand defined in ovirt.class.
parameter description
4.1.3. Deploying Insights
To deploy Red Hat Insights on an existing Red Hat Enterprise Linux (RHEL) system with Red HatVirtualization Manager installed, complete these tasks:
Register the system to the Red Hat Insights application.
Enable data collection from the Red Hat Virtualization environment.
4.1.3.1. Register the system to Red Hat Insights
Register the system to communicate with the Red Hat Insights service and to view results displayed inthe Red Hat Insights console.
[root@server ~]# insights-client --register
4.1.3.2. Enable data collection from the Red Hat Virtualization environment
Modify the /etc/ovirt-engine/rhv-log-collector-analyzer/rhv-log-collector-analyzer.conf file to includethe following line:
Red Hat Virtualization 4.4 Administration Guide
402

upload-json=True
4.1.3.3. View your Insights results in the Insights Console
System and infrastructure results can be viewed in the Insights console. The Overview tab provides adashboard view of current risks to your infrastructure. From this starting point, you can investigate how aspecific rule is affecting your system, or take a system-based approach to view all the rule matches thatpose a risk to the system.
Procedure
1. Select Rule hits by severity to view rules by the Total Risk they pose to your infrastructure(Critical, Important, Moderate, or Low).Or
2. Select Rule hits by category to see the type of risk they pose to your infrastructure(Availability, Stability, Performance, or Security).
3. Search for a specific rule by name, or scroll through the list of rules to see high-level informationabout risk, systems exposed, and availability of Ansible Playbook to automate remediation.
4. Click a rule to see a description of the rule, learn more from relevant knowledge base articles,and view a list of systems that are affected.
5. Click a system to see specific information about detected issues and steps to resolve the issue.
4.2. LOG FILES
4.2.1. Manager Installation Log Files
Table 4.2. Installation
Log File Description
/var/log/ovirt-engine/engine-cleanup_yyyy_mm_dd_hh_mm_ss.log
Log from the engine-cleanup command. This isthe command used to reset a Red Hat VirtualizationManager installation. A log is generated each timethe command is run. The date and time of the run isused in the filename to allow multiple logs to exist.
/var/log/ovirt-engine/engine-db-install-yyyy_mm_dd_hh_mm_ss.log
Log from the engine-setup command detailing thecreation and configuration of the engine database.
/var/log/ovirt-engine/ovirt-engine-dwh-setup-yyyy_mm_dd_hh_mm_ss.log
Log from the ovirt-engine-dwh-setup command.This is the command used to create theovirt_engine_history database for reporting. A log isgenerated each time the command is run. The dateand time of the run is used in the filename to allowmultiple logs to exist concurrently.
CHAPTER 4. GATHERING INFORMATION ABOUT THE ENVIRONMENT
403

/var/log/ovirt-engine/setup/ovirt-engine-setup-yyyymmddhhmmss.log
Log from the engine-setup command. A log isgenerated each time the command is run. The dateand time of the run is used in the filename to allowmultiple logs to exist concurrently.
Log File Description
4.2.2. Red Hat Virtualization Manager Log Files
Table 4.3. Service Activity
Log File Description
/var/log/ovirt-engine/engine.log Reflects all Red Hat Virtualization Manager GUIcrashes, Active Directory lookups, Database issues,and other events.
/var/log/ovirt-engine/host-deploy Log files from hosts deployed from the Red HatVirtualization Manager.
/var/lib/ovirt-engine/setup-history.txt Tracks the installation and upgrade of packagesassociated with the Red Hat Virtualization Manager.
/var/log/httpd/ovirt-requests-log Logs files from requests made to the Red HatVirtualization Manager via HTTPS, including how longeach request took.
A Correlation-Id header is included to allow you tocompare requests when comparing a log file with/var/log/ovirt-engine/engine.log.
/var/log/ovn-provider/ovirt-provider-ovn.log Logs the activities of the OVN provider. Forinformation about Open vSwitch logs, see the OpenvSwitch documentation.
4.2.3. SPICE Log Files
SPICE log files are useful when troubleshooting SPICE connection issues. To start SPICE debugging,change the log level to debugging. Then, identify the log location.
Both the clients used to access the guest machines and the guest machines themselves have SPICE logfiles. For client-side logs, if a SPICE client was launched using the native client, for which a console.vvfile is downloaded, use the remote-viewer command to enable debugging and generate log output.
4.2.3.1. SPICE Logs for Hypervisor SPICE Servers
Table 4.4. SPICE Logs for Hypervisor SPICE Servers
Red Hat Virtualization 4.4 Administration Guide
404

Log Type Log Location To Change Log Level:
Host/Hypervisor SPICE Server /var/log/libvirt/qemu/(guest_name).log
Run export SPICE_DEBUG_LEVEL=5 onthe host/hypervisor prior tolaunching the guest. This variableis parsed by QEMU, and if runsystem-wide will print thedebugging information of allvirtual machines on the system.This command must be run oneach host in the cluster. Thiscommand works only on a per-host/hypervisor basis, not a per-cluster basis.
4.2.3.2. SPICE Logs for Guest Machines
Table 4.5. spice-vdagent Logs for Guest Machines
Log Type Log Location To Change Log Level:
Windows Guest C:\Windows\Temp\vdagent.log
C:\Windows\Temp\vdservice.log
Not applicable
Red Hat Enterprise Linux Guest Use journalctl as the root user. To run the spice-vdagentdservice in debug mode, as the rootuser create a/etc/sysconfig/spice-vdagentdfile with this entry: SPICE_VDAGENTD_EXTRA_ARGS=”-d -d”
To run spice-vdagent in debugmode, from the command line:
$ killall - u $USER spice-vdagent$ spice-vdagent -x -d [-d] [ |& tee spice-vdagent.log ]
4.2.3.3. SPICE Logs for SPICE Clients Launched Using console.vv Files
For Linux client machines:
1. Enable SPICE debugging by running the remote-viewer command with the --spice-debugoption. When prompted, enter the connection URL, for example, spice://virtual_machine_IP:port.
# remote-viewer --spice-debug
CHAPTER 4. GATHERING INFORMATION ABOUT THE ENVIRONMENT
405

2. To run SPICE client with the debug parameter and to pass a .vv file to it, download theconsole.vv file and run the remote-viewer command with the --spice-debug option andspecify the full path to the console.vv file.
For Windows client machines:
1. In versions of virt-viewer 2.0-11.el7ev and later, virt-viewer.msi installs virt-viewer and debug-viewer.exe.
2. Run the remote-viewer command with the spice-debug argument and direct the command atthe path to the console:
3. To view logs, connect to the virtual machine, and you will see a command prompt running GDBthat prints standard output and standard error of remote-viewer.
4.2.4. Host Log Files
Log File Description
/var/log/messages The log file used by libvirt. Use journalctl to viewthe log. You must be a member of the adm, systemd-journal, or wheel groups to view the log.
/var/log/vdsm/spm-lock.log Log file detailing the host’s ability to obtain a leaseon the Storage Pool Manager role. The log detailswhen the host has acquired, released, renewed, orfailed to renew the lease.
/var/log/vdsm/vdsm.log Log file for VDSM, the Manager’s agent on thehost(s).
/tmp/ovirt-host-deploy-Date.log A host deployment log that is copied to the Manageras /var/log/ovirt-engine/host-deploy/ovirt-Date-Host-Correlation_ID.log afterthe host has been successfully deployed.
/var/log/vdsm/import/import-UUID-Date.log Log file detailing virtual machine imports from a KVMhost, a VMWare provider, or a RHEL 5 Xen host,including import failure information. UUID is the UUIDof the virtual machine that was imported and Date isthe date and time that the import began.
/var/log/vdsm/supervdsm.log Logs VDSM tasks that were executed with superuserpermissions.
/var/log/vdsm/upgrade.log VDSM uses this log file during host upgrades to logconfiguration changes.
# remote-viewer --spice-debug /path/to/console.vv
remote-viewer --spice-debug path\to\console.vv
Red Hat Virtualization 4.4 Administration Guide
406

/var/log/vdsm/mom.log Logs the activities of the VDSM’s memoryovercommitment manager.
Log File Description
4.2.5. Setting debug-level logging for Red Hat Virtualization services
You can set the logs of the following Red Hat Virtualization (RHV) services to debug-level by modifyingthe sysconfig file of each service.
Table 4.6. RHV services and sysconfig file paths
Service File path
ovirt-engine.service /etc/sysconfig/ovirt-engine
ovirt-engine-dwhd.service /etc/sysconfig/ovirt-engine-dwhd
ovirt-fence-kdump-listener.service /etc/sysconfig/ovirt-fence-kdump-listener
ovirt-websocket-proxy.service /etc/sysconfig/ovirt-websocket-proxy
This modification affects logging done by the Python wrapper, not the main service process.
Setting logging to debug-level is useful for debugging issues related to start up - for example, if themain process fails to start due to a missing or incorrect Java runtime or library.
Prerequisites
Verify that the sysconfig file you want to modify exists. If necessary, create it.
Procedure
1. Add the following to the sysconfig file of the service:
2. Restart the service:
The sysconfig log file of the service is now set to debug-level.
Logging caused by this setting goes to the system log, so the logs it generates can be found in /var/log/messages, not in the service-specific log file, or by using the journalctl command.
4.2.6. Main configuration files for Red Hat Virtualization services
In addition to a sysconfig file, each of these Red Hat Virtualization (RHV) services has anotherconfiguration file that is used more often.
OVIRT_SERVICE_DEBUG=1
# systemctl restart <service>
CHAPTER 4. GATHERING INFORMATION ABOUT THE ENVIRONMENT
407
Table 4.7. RHV services and configuration files
Service sysconfig file path Main configuration file
ovirt-engine.service /etc/sysconfig/ovirt-engine /etc/ovirt-engine/engine.conf.d/*.conf
ovirt-engine-dwhd.service /etc/sysconfig/ovirt-engine-dwhd
/etc/ovirt-engine-dwh/ovirt-engine-dwhd.conf.d/*.conf
ovirt-fence-kdump-listener.service
/etc/sysconfig/ovirt-fence-kdump-listener
/etc/ovirt-engine/ovirt-fence-kdump-listener.conf.d/*.conf
ovirt-websocket-proxy.service
/etc/sysconfig/ovirt-websocket-proxy
/etc/ovirt-engine/ovirt-websocket-proxy.conf.d/*.conf
4.2.7. Setting Up a Host Logging Server
Hosts generate and update log files, recording their actions and problems. Collecting these log filescentrally simplifies debugging.
This procedure should be used on your centralized log server. You could use a separate logging server,or use this procedure to enable host logging on the Red Hat Virtualization Manager.
Procedure
1. Check to see if the firewall allows traffic on the UDP 514 port, and is open to syslog servicetraffic:
If the output is no, allow traffic on the UDP 514 port with:
# firewall-cmd --add-service=syslog --permanent# firewall-cmd --reload
2. Create a new .conf file on the syslog server, for example, /etc/rsyslog.d/from_remote.conf, andadd the following lines:
3. Restart the rsyslog service:
4. Log in to the hypervisor, and in the /etc/rsyslog.conf add the following line:
# firewall-cmd --query-service=syslog
template(name="DynFile" type="string" string="/var/log/%HOSTNAME%/%PROGRAMNAME%.log")RuleSet(name="RemoteMachine"){ action(type="omfile" dynaFile="DynFile") }Module(load="imudp")Input(type="imudp" port="514" ruleset="RemoteMachine")
# systemctl restart rsyslog.service
Red Hat Virtualization 4.4 Administration Guide
408

5. Restart the rsyslog service on the hypervisor.
Your centralized log server is now configured to receive and store the messages and secure logs fromyour virtualization hosts.
4.2.8. Enabling SyslogHandler to pass RHV Manager logs to a remote syslog server
This implementation uses the JBoss EAP SyslogHandler log manager and enables passing log recordsfrom the engine.log and server.log to a syslog server.
NOTE
RHV versions earlier than RHV 4.4.10 featured similar functionality provided by ovirt-engine-extension-logger-log4j. That package was removed in RHV 4.4.10 and replacedby a new implementation using the JBoss EAP SyslogHandler log manager. If you havebeen using ovirt-engine-extension-logger-log4j in earlier RHV versions, following anupgrade to RHV 4.4.10, perform following steps:
Manually configure sending log records to a remote syslog server using theguidelines provided in this chapter.
Manually remove the ovirt-engine-extension-logger-log4j configuration files(remove the /etc/ovirt-engine/extensions.d/Log4jLogger.propertiesconfiguration file).
Use this procedure on the central syslog server. You can use a separate logging server, or use thisprocedure to pass the engine.log and server.log files from the Manager to the syslog server. See alsothe configuration procedure Setting up a Host Logging Server .
Configuring the SyslogHandler implementation
1. Create the configuration file 90-syslog.conf in the /etc/ovirt-engine/engine.conf.d directoryand add the following content:
SYSLOG_HANDLER_ENABLED=trueSYSLOG_HANDLER_SERVER_HOSTNAME=localhostSYSLOG_HANDLER_FACILITY=USER_LEVEL
2. Install and configure rsyslog.
# dnf install rsyslog
3. Configure SELinux to allow rsyslog traffic.
# semanage port -a -t syslogd_port_t -p udp 514
4. Create the configuration file /etc/rsyslog.d/rhvm.conf and add the following content:
*.info;mail.none;authpriv.none;cron.none @<syslog-FQDN>:514
# systemctl restart rsyslog.service
CHAPTER 4. GATHERING INFORMATION ABOUT THE ENVIRONMENT
409
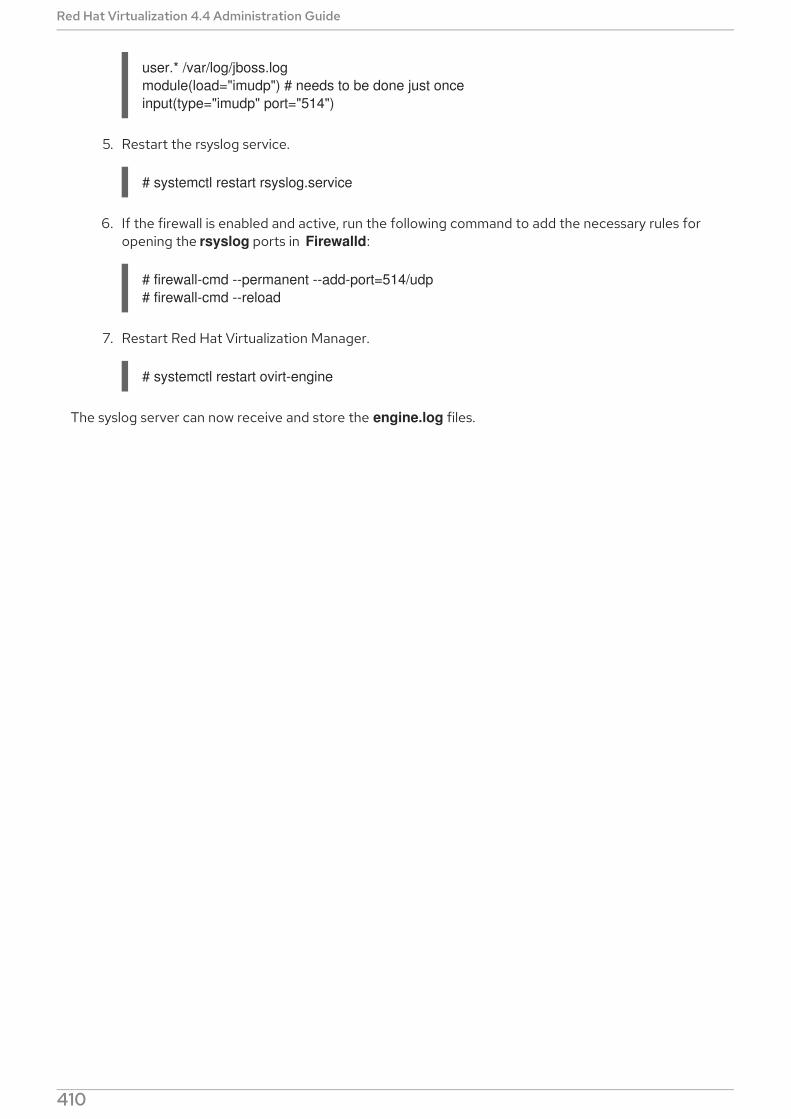
user.* /var/log/jboss.logmodule(load="imudp") # needs to be done just onceinput(type="imudp" port="514")
5. Restart the rsyslog service.
# systemctl restart rsyslog.service
6. If the firewall is enabled and active, run the following command to add the necessary rules foropening the rsyslog ports in Firewalld:
# firewall-cmd --permanent --add-port=514/udp# firewall-cmd --reload
7. Restart Red Hat Virtualization Manager.
# systemctl restart ovirt-engine
The syslog server can now receive and store the engine.log files.
Red Hat Virtualization 4.4 Administration Guide
410

APPENDIX A. VDSM SERVICE AND HOOKSThe VDSM service is used by the Red Hat Virtualization Manager to manage Red Hat VirtualizationHosts (RHVH) and Red Hat Enterprise Linux hosts. VDSM manages and monitors the host’s storage,memory, and network resources. It also coordinates virtual machine creation, statistics gathering, logcollection and other host administration tasks. VDSM is run as a daemon on each host managed by RedHat Virtualization Manager. It answers XML-RPC calls from clients. The Red Hat Virtualization Managerfunctions as a VDSM client.
VDSM is extensible via hooks. Hooks are scripts executed on the host when key events occur. When asupported event occurs VDSM runs any executable hook scripts in/usr/libexec/vdsm/hooks/nn_event-name/ on the host in alphanumeric order. By convention eachhook script is assigned a two digit number, included at the front of the file name, to ensure that theorder in which the scripts will be run in is clear. You are able to create hook scripts in any programminglanguage, Python will however be used for the examples contained in this chapter.
Note that all scripts defined on the host for the event are executed. If you require that a given hook isonly executed for a subset of the virtual machines which run on the host then you must ensure that thehook script itself handles this requirement by evaluating the Custom Properties associated with thevirtual machine.
WARNING
VDSM hooks can interfere with the operation of Red Hat Virtualization. A bug in aVDSM hook has the potential to cause virtual machine crashes and loss of data.VDSM hooks should be implemented with caution and tested rigorously. The HooksAPI is new and subject to significant change in the future.
You can extend VDSM with event-driven hooks. Extending VDSM with hooks is an experimentaltechnology, and this chapter is intended for experienced developers.
By setting custom properties on virtual machines it is possible to pass additional parameters, specific toa given virtual machine, to the hook scripts.
A.1. INSTALLING A VDSM HOOK
By default, VDSM hooks are not installed. If you need a specific hook, you must install it manually.
Prerequisites
The host repository must be enabled.
You are logged into the host with root permissions.
Procedure
1. Get a list of available hooks:
# dnf list vdsm\*hook\*
APPENDIX A. VDSM SERVICE AND HOOKS
411

2. Install the desired VDSM hook package on the host:
# dnf install <vdsm-hook-name>
For example, to install the vdsm-hook-vhostmd package on the host, enter the following:
# dnf install vdsm-hook-vhostmd
Additional resources
Enabling the Red Hat Virtualization Host Repository
Enabling the Red Hat Enterprise Linux host Repositories
A.2. SUPPORTED VDSM EVENTS
Table A.1. Supported VDSM Events
Name Description
before_vm_start Before virtual machine starts.
after_vm_start After virtual machine starts.
before_vm_cont Before virtual machine continues.
after_vm_cont After virtual machine continues.
before_vm_pause Before virtual machine pauses.
after_vm_pause After virtual machine pauses.
before_vm_hibernate Before virtual machine hibernates.
after_vm_hibernate After virtual machine hibernates.
before_vm_dehibernate Before virtual machine dehibernates.
after_vm_dehibernate After virtual machine dehibernates.
before_vm_migrate_source Before virtual machine migration, run on the sourcehost from which the migration is occurring.
after_vm_migrate_source After virtual machine migration, run on the sourcehost from which the migration is occurring.
before_vm_migrate_destination Before virtual machine migration, run on thedestination host to which the migration is occurring.
Red Hat Virtualization 4.4 Administration Guide
412

after_vm_migrate_destination After virtual machine migration, run on thedestination host to which the migration is occurring.
after_vm_destroy After virtual machine destruction.
before_vdsm_start Before VDSM is started on the host.before_vdsm_start hooks are executed as the userroot, and do not inherit the environment of theVDSM process.
after_vdsm_stop After VDSM is stopped on the host.after_vdsm_stop hooks are executed as the userroot, and do not inherit the environment of theVDSM process.
before_nic_hotplug Before the NIC is hot plugged into the virtualmachine.
after_nic_hotplug After the NIC is hot plugged into the virtual machine.
before_nic_hotunplug Before the NIC is hot unplugged from the virtualmachine
after_nic_hotunplug After the NIC is hot unplugged from the virtualmachine.
after_nic_hotplug_fail After hot plugging the NIC to the virtual machinefails.
after_nic_hotunplug_fail After hot unplugging the NIC from the virtualmachine fails.
before_disk_hotplug Before the disk is hot plugged into the virtualmachine.
after_disk_hotplug After the disk is hot plugged into the virtual machine.
before_disk_hotunplug Before the disk is hot unplugged from the virtualmachine
after_disk_hotunplug After the disk is hot unplugged from the virtualmachine.
after_disk_hotplug_fail After hot plugging the disk to the virtual machinefails.
Name Description
APPENDIX A. VDSM SERVICE AND HOOKS
413

after_disk_hotunplug_fail After hot unplugging the disk from the virtualmachine fails.
before_device_create Before creating a device that supports customproperties.
after_device_create After creating a device that supports customproperties.
before_update_device Before updating a device that supports customproperties.
after_update_device After updating a device that supports customproperties.
before_device_destroy Before destroying a device that supports customproperties.
after_device_destroy After destroying a device that supports customproperties.
before_device_migrate_destination Before device migration, run on the destination hostto which the migration is occurring.
after_device_migrate_destination After device migration, run on the destination host towhich the migration is occurring.
before_device_migrate_source Before device migration, run on the source host fromwhich the migration is occurring.
after_device_migrate_source After device migration, run on the source host fromwhich the migration is occurring.
after_network_setup After setting up the network when starting a hostmachine.
before_network_setup Before setting up the network when starting a hostmachine.
Name Description
A.3. THE VDSM HOOK ENVIRONMENT
Most hook scripts are run as the vdsm user and inherit the environment of the VDSM process. Theexceptions are hook scripts triggered by the before_vdsm_start and after_vdsm_stop events. Hookscripts triggered by these events run as the root user and do not inherit the environment of the VDSMprocess.
A.4. THE VDSM HOOK DOMAIN XML OBJECT
Red Hat Virtualization 4.4 Administration Guide
414
VDSM uses the libvirt domain XML format to define virtual machines. The UUID of the virtual machinemay be deduced from the domain XML, but it is also available as the environment variable vmId.
When hook scripts are started, the _hook_domxml variable is appended to the environment. Thisvariable contains the path of the libvirt domain XML representation of the relevant virtual machine.
Some hooks are an exception to this rule. The following hooks contain the XML representation of theNIC, not the virtual machine:
*_nic_hotplug_*
*_nic_hotunplug_*
*_update_device
*_device_create
*_device_migrate_*
IMPORTANT
The before_migration_destination and before_dehibernation hooks currently receivethe domain XML from the source host. The domain XML at the destination will bedifferent.
A.5. DEFINING CUSTOM PROPERTIES
The custom properties that are accepted by the Red Hat Virtualization Manager - and in turn passed tocustom hooks - are defined using the engine-config command. Run this command as the root user onthe host where Red Hat Virtualization Manager is installed.
The UserDefinedVMProperties and CustomDeviceProperties configuration keys are used to storethe names of the custom properties supported. Regular expressions defining the valid values for eachnamed custom property are also contained in these configuration keys.
Multiple custom properties are separated by a semi-colon. Note that when setting the configuration key,any existing value it contained is overwritten. When combining new and existing custom properties, all ofthe custom properties in the command used to set the key’s value must be included.
Once the configuration key has been updated, the ovirt-engine service must be restarted for the newvalues to take effect.
Example A.1. Virtual Machine Properties - Defining the smartcard Custom Property
1. Check the existing custom properties defined by the UserDefinedVMPropertiesconfiguration key using the following command:
As shown by the output below, the custom property memory is already defined. The regularexpression ^[0-9]+$ ensures that the custom property will only ever contain numericcharacters.
# engine-config -g UserDefinedVMPropertiesUserDefinedVMProperties: version: 4.3
# engine-config -g UserDefinedVMProperties
APPENDIX A. VDSM SERVICE AND HOOKS
415

UserDefinedVMProperties: version: 4.4UserDefinedVMProperties : memory=^[0-9]+$ version: 4.4
2. Because the memory custom property is already defined in the UserDefinedVMPropertiesconfiguration key, the new custom property must be appended to it. The additional customproperty, smartcard, is added to the configuration key’s value. The new custom property isable to hold a value of true or false.
# engine-config -s UserDefinedVMProperties='memory=^[0-9]+$;smartcard=^(true|false)$' --cver=4.4
3. Verify that the custom properties defined by the UserDefinedVMProperties configurationkey have been updated correctly.
# engine-config -g UserDefinedVMPropertiesUserDefinedVMProperties: version: 4.3UserDefinedVMProperties: version: 4.4UserDefinedVMProperties : memory=^[0-9]+$;smartcard=^(true|false)$ version: 4.4
4. Finally, the ovirt-engine service must be restarted for the configuration change to takeeffect.
# systemctl restart ovirt-engine.service
Example A.2. Device Properties - Defining the interface Custom Property
1. Check the existing custom properties defined by the CustomDevicePropertiesconfiguration key using the following command:
# engine-config -g CustomDeviceProperties
As shown by the output below, no custom properties have yet been defined.
# engine-config -g CustomDevicePropertiesCustomDeviceProperties: version: 4.3CustomDeviceProperties: version: 4.4
2. The interface custom property does not already exist, so it can be appended as is. In thisexample, the value of the speed sub-property is set to a range of 0 to 99999, and the valueof the duplex sub-property is set to a selection of either full or half.
# engine-config -s CustomDeviceProperties="{type=interface;prop={speed=^([0-9]{1,5})$;duplex=^(full|half)$}}" --cver=4.4
3. Verify that the custom properties defined by the CustomDeviceProperties configurationkey have been updated correctly.
# engine-config -g CustomDevicePropertiesUserDefinedVMProperties: version: 4.3UserDefinedVMProperties: version: 4.4UserDefinedVMProperties : {type=interface;prop={speed=^([0-9]{1,5})$;duplex=^(full|half)$}} version: 4.4
Red Hat Virtualization 4.4 Administration Guide
416

4. Finally, the ovirt-engine service must be restarted for the configuration change to takeeffect.
# systemctl restart ovirt-engine.service
A.6. SETTING VIRTUAL MACHINE CUSTOM PROPERTIES
Once custom properties are defined in the Red Hat Virtualization Manager, you can begin setting themon virtual machines. Custom properties are set on the Custom Properties tab of the New VirtualMachine and Edit Virtual Machine windows in the Administration Portal.
You can also set custom properties from the Run Virtual Machine(s) dialog box. Custom properties setfrom the Run Virtual Machine(s) dialog box will only apply to the virtual machine until it is nextshutdown.
The Custom Properties tab provides a facility for you to select from the list of defined customproperties. Once you select a custom property key an additional field will display allowing you to enter avalue for that key. Add additional key/value pairs by clicking the + button and remove them by clickingthe - button.
A.7. EVALUATING VIRTUAL MACHINE CUSTOM PROPERTIES IN AVDSM HOOK
Each key set in the Custom Properties field for a virtual machine is appended as an environmentvariable when calling hook scripts. Although the regular expressions used to validate the CustomProperties field provide some protection you should ensure that your scripts also validate that theinputs provided match their expectations.
Example A.3. Evaluating Custom Properties
This short Python example checks for the existence of the custom property key1. If the customproperty is set then the value is printed to standard error. If the custom property is not set then noaction is taken.
A.8. USING THE VDSM HOOKING MODULE
VDSM ships with a Python hooking module, providing helper functions for VDSM hook scripts. Thismodule is provided as an example, and is only relevant to VDSM hooks written in Python.
The hooking module supports reading of a virtual machine’s libvirt XML into a DOM object. Hook scripts
#!/usr/bin/python
import osimport sys
if os.environ.has_key('key1'): sys.stderr.write('key1 value was : %s\n' % os.environ['key1'])else: sys.exit(0)
APPENDIX A. VDSM SERVICE AND HOOKS
417

The hooking module supports reading of a virtual machine’s libvirt XML into a DOM object. Hook scriptscan then use Python’s built-in xml.dom library to manipulate the object.
The modified object can then be saved back to libvirt XML using the hooking module. The hookingmodule provides the following functions to support hook development:
Table A.2. Hooking module functions
Name Argument Description
tobool string Converts a string "true" or "false"to a Boolean value
read_domxml - Reads the virtual machine’s libvirtXML into a DOM object
write_domxml DOM object Writes the virtual machine’s libvirtXML from a DOM object
A.9. VDSM HOOK EXECUTION
before_vm_start scripts can edit the domain XML in order to change VDSM’s definition of a virtualmachine before it reaches libvirt. Caution must be exercised in doing so. Hook scripts have the potentialto disrupt the operation of VDSM, and buggy scripts can result in outages to the Red Hat Virtualizationenvironment. In particular, ensure you never change the UUID of the domain, and do not attempt toremove a device from the domain without sufficient background knowledge.
Both before_vdsm_start and after_vdsm_stop hook scripts are run as the root user. Other hookscripts that require root access to the system must be written to use the sudo command for privilegeescalation. To support this the /etc/sudoers must be updated to allow the vdsm user to use sudowithout reentering a password. This is required as hook scripts are executed non-interactively.
Example A.4. Configuring sudo for VDSM Hooks
In this example the sudo command will be configured to allow the vdsm user to run the /bin/chowncommand as root.
1. Log into the virtualization host as root.
2. Open the /etc/sudoers file in a text editor.
3. Add this line to the file:
This specifies that the vdsm user has the ability to run the /bin/chown command as the rootuser. The NOPASSWD parameter indicates that the user will not be prompted to enter theirpassword when calling sudo.
Once this configuration change has been made VDSM hooks are able to use the sudo command torun /bin/chown as root. This Python code uses sudo to execute /bin/chown as root on the file/my_file.
vdsm ALL=(ALL) NOPASSWD: /bin/chown
Red Hat Virtualization 4.4 Administration Guide
418

The standard error stream of hook scripts is collected in VDSM’s log. This information is used to debughook scripts.
A.10. VDSM HOOK RETURN CODES
Hook scripts must return one of the return codes shown in hook return codes. The return code willdetermine whether further hook scripts are processed by VDSM.
Table A.3. Hook Return Codes
Code Description
0 The hook script ended successfully
1 The hook script failed, other hooks should beprocessed
2 The hook script failed, no further hooks should beprocessed
>2 Reserved
A.11. VDSM HOOK EXAMPLES
The example hook scripts provided in this section are strictly not supported by Red Hat. You mustensure that any and all hook scripts that you install to your system, regardless of source, are thoroughlytested for your environment.
Example A.5. NUMA Node Tuning
Purpose:
This hook script allows for tuning the allocation of memory on a NUMA host based on the numasetcustom property. Where the custom property is not set no action is taken.
Configuration String:
numaset=^(interleave|strict|preferred):[\^]?\d+(-\d+)?(,[\^]?\d+(-\d+)?)*$
The regular expression used allows the numaset custom property for a given virtual machine tospecify both the allocation mode (interleave, strict, preferred) and the node to use. The two valuesare separated by a colon (:). The regular expression allows specification of the nodeset as:
that a specific node (numaset=strict:1, specifies that only node 1 be used), or
that a range of nodes be used (numaset=strict:1-4, specifies that nodes 1 through 4 beused), or
that a specific node not be used (numaset=strict:^3, specifies that node 3 not be used), or
retcode = subprocess.call( ["/usr/bin/sudo", "/bin/chown", "root", "/my_file"] )
APPENDIX A. VDSM SERVICE AND HOOKS
419

any comma-separated combination of the above (numaset=strict:1-4,6, specifies thatnodes 1 to 4, and 6 be used).
Script:
/usr/libexec/vdsm/hooks/before_vm_start/50_numa
#!/usr/bin/python
import osimport sysimport hookingimport traceback
'''numa hook=========add numa support for domain xml:
<numatune> <memory mode="strict" nodeset="1-4,^3" /></numatune>
memory=interleave|strict|preferred
numaset="1" (use one NUMA node)numaset="1-4" (use 1-4 NUMA nodes)numaset="^3" (don't use NUMA node 3)numaset="1-4,^3,6" (or combinations)
syntax: numa=strict:1-4'''
if os.environ.has_key('numa'): try: mode, nodeset = os.environ['numa'].split(':')
domxml = hooking.read_domxml()
domain = domxml.getElementsByTagName('domain')[0] numas = domxml.getElementsByTagName('numatune')
if not len(numas) > 0: numatune = domxml.createElement('numatune') domain.appendChild(numatune)
memory = domxml.createElement('memory') memory.setAttribute('mode', mode) memory.setAttribute('nodeset', nodeset) numatune.appendChild(memory)
hooking.write_domxml(domxml) else: sys.stderr.write('numa: numa already exists in domain xml') sys.exit(2)
Red Hat Virtualization 4.4 Administration Guide
420

except: sys.stderr.write('numa: [unexpected error]: %s\n' % traceback.format_exc()) sys.exit(2)
APPENDIX A. VDSM SERVICE AND HOOKS
421
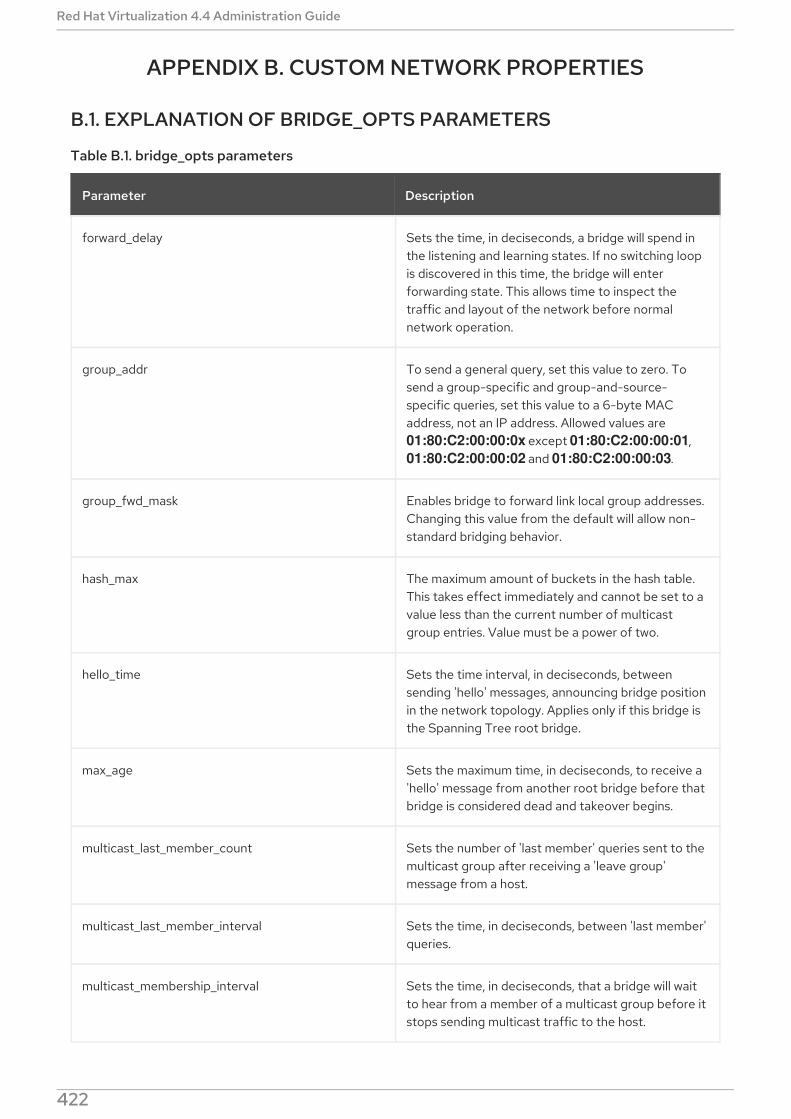
APPENDIX B. CUSTOM NETWORK PROPERTIES
B.1. EXPLANATION OF BRIDGE_OPTS PARAMETERS
Table B.1. bridge_opts parameters
Parameter Description
forward_delay Sets the time, in deciseconds, a bridge will spend inthe listening and learning states. If no switching loopis discovered in this time, the bridge will enterforwarding state. This allows time to inspect thetraffic and layout of the network before normalnetwork operation.
group_addr To send a general query, set this value to zero. Tosend a group-specific and group-and-source-specific queries, set this value to a 6-byte MACaddress, not an IP address. Allowed values are 01:80:C2:00:00:0x except 01:80:C2:00:00:01, 01:80:C2:00:00:02 and 01:80:C2:00:00:03.
group_fwd_mask Enables bridge to forward link local group addresses.Changing this value from the default will allow non-standard bridging behavior.
hash_max The maximum amount of buckets in the hash table.This takes effect immediately and cannot be set to avalue less than the current number of multicastgroup entries. Value must be a power of two.
hello_time Sets the time interval, in deciseconds, betweensending 'hello' messages, announcing bridge positionin the network topology. Applies only if this bridge isthe Spanning Tree root bridge.
max_age Sets the maximum time, in deciseconds, to receive a'hello' message from another root bridge before thatbridge is considered dead and takeover begins.
multicast_last_member_count Sets the number of 'last member' queries sent to themulticast group after receiving a 'leave group'message from a host.
multicast_last_member_interval Sets the time, in deciseconds, between 'last member'queries.
multicast_membership_interval Sets the time, in deciseconds, that a bridge will waitto hear from a member of a multicast group before itstops sending multicast traffic to the host.
Red Hat Virtualization 4.4 Administration Guide
422

multicast_querier Sets whether the bridge actively runs a multicastquerier or not. When a bridge receives a 'multicasthost membership' query from another network host,that host is tracked based on the time that the querywas received plus the multicast query interval time. Ifthe bridge later attempts to forward traffic for thatmulticast membership, or is communicating with aquerying multicast router, this timer confirms thevalidity of the querier. If valid, the multicast traffic isdelivered via the bridge’s existing multicastmembership table; if no longer valid, the traffic issent via all bridge ports.Broadcast domains with, orexpecting, multicast memberships should run at leastone multicast querier for improved performance.
multicast_querier_interval Sets the maximum time, in deciseconds, between last'multicast host membership' query received from ahost to ensure it is still valid.
multicast_query_use_ifaddr Boolean. Defaults to '0', in which case the querieruses 0.0.0.0 as source address for IPv4 messages.Changing this sets the bridge IP as the sourceaddress.
multicast_query_interval Sets the time, in deciseconds, between querymessages sent by the bridge to ensure validity ofmulticast memberships. At this time, or if the bridgeis asked to send a multicast query for thatmembership, the bridge checks its own multicastquerier state based on the time that a check wasrequested plus multicast_query_interval. If amulticast query for this membership has been sentwithin the last multicast_query_interval, it is not sentagain.
multicast_query_response_interval Length of time, in deciseconds, a host is allowed torespond to a query once it has been sent.Must beless than or equal to the value of themulticast_query_interval.
multicast_router Allows you to enable or disable ports as havingmulticast routers attached. A port with one or moremulticast routers will receive all multicast traffic. Avalue of 0 disables completely, a value of 1 enablesthe system to automatically detect the presence ofrouters based on queries, and a value of 2 enablesports to always receive all multicast traffic.
Parameter Description
APPENDIX B. CUSTOM NETWORK PROPERTIES
423

multicast_snooping Toggles whether snooping is enabled or disabled.Snooping allows the bridge to listen to the networktraffic between routers and hosts to maintain a mapto filter multicast traffic to the appropriate links.Thisoption allows the user to re-enable snooping if it wasautomatically disabled due to hash collisions,however snooping will not be re-enabled if the hashcollision has not been resolved.
multicast_startup_query_count Sets the number of queries sent out at startup todetermine membership information.
multicast_startup_query_interval Sets the time, in deciseconds, between queries sentout at startup to determine membership information.
Parameter Description
B.2. HOW TO SET UP RED HAT VIRTUALIZATION MANAGER TO USEETHTOOL
You can configure ethtool properties for host network interface cards from the Administration Portal.The ethtool_opts key is not available by default and needs to be added to the Manager using theengine configuration tool. You also need to install the required VDSM hook package on the hosts.
Adding the ethtool_opts Key to the Manager
1. On the Manager, run the following command to add the key:
2. Restart the ovirt-engine service:
3. On the hosts that you want to configure ethtool properties, install the VDSM hook package. Thepackage is available by default on Red Hat Virtualization Host but needs to be installed on RedHat Enterprise Linux hosts.
The ethtool_opts key is now available in the Administration Portal. See Editing Host Network Interfacesand Assigning Logical Networks to Hosts to apply ethtool properties to logical networks.
B.3. HOW TO SET UP RED HAT VIRTUALIZATION MANAGER TO USEFCOE
You can configure Fibre Channel over Ethernet (FCoE) properties for host network interface cards fromthe Administration Portal. The fcoe key is not available by default and needs to be added to the
# engine-config -s UserDefinedNetworkCustomProperties=ethtool_opts=.* --cver=4.4
# systemctl restart ovirt-engine.service
# dnf install vdsm-hook-ethtool-options
Red Hat Virtualization 4.4 Administration Guide
424
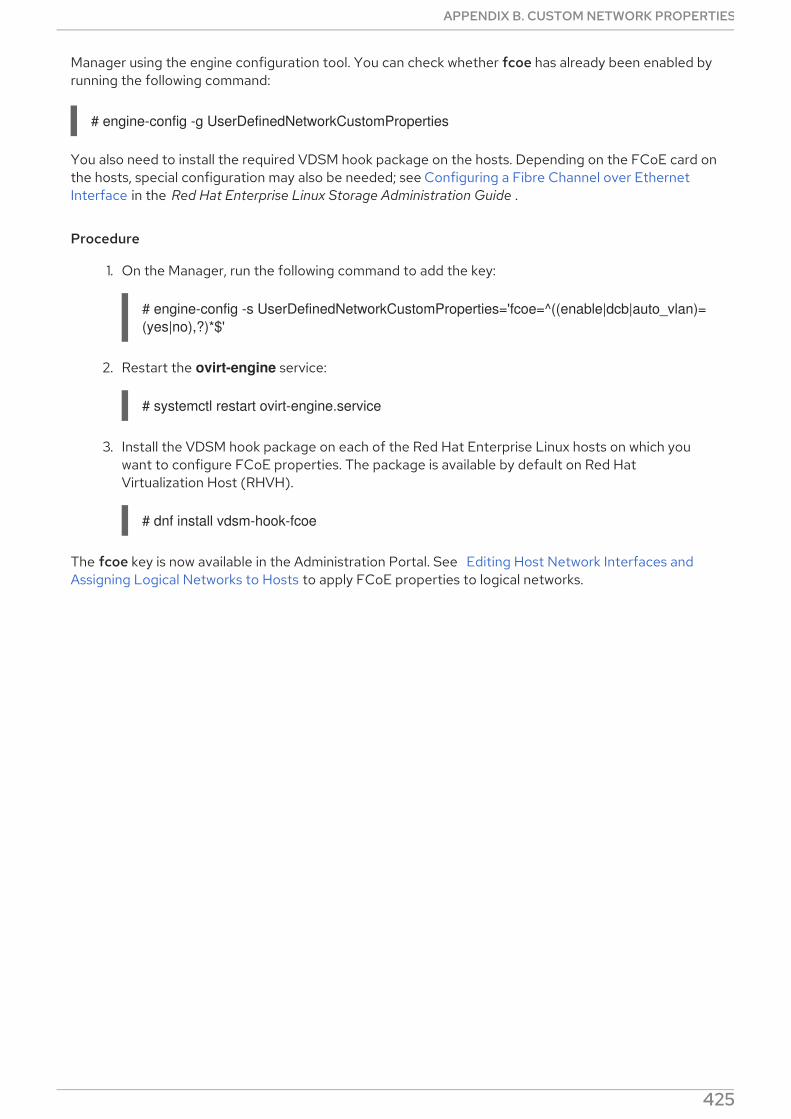
Manager using the engine configuration tool. You can check whether fcoe has already been enabled byrunning the following command:
You also need to install the required VDSM hook package on the hosts. Depending on the FCoE card onthe hosts, special configuration may also be needed; see Configuring a Fibre Channel over EthernetInterface in the Red Hat Enterprise Linux Storage Administration Guide .
Procedure
1. On the Manager, run the following command to add the key:
2. Restart the ovirt-engine service:
3. Install the VDSM hook package on each of the Red Hat Enterprise Linux hosts on which youwant to configure FCoE properties. The package is available by default on Red HatVirtualization Host (RHVH).
The fcoe key is now available in the Administration Portal. See Editing Host Network Interfaces andAssigning Logical Networks to Hosts to apply FCoE properties to logical networks.
# engine-config -g UserDefinedNetworkCustomProperties
# engine-config -s UserDefinedNetworkCustomProperties='fcoe=^((enable|dcb|auto_vlan)=(yes|no),?)*$'
# systemctl restart ovirt-engine.service
# dnf install vdsm-hook-fcoe
APPENDIX B. CUSTOM NETWORK PROPERTIES
425

APPENDIX C. RED HAT VIRTUALIZATION USER INTERFACEPLUGINS
C.1. ABOUT RED HAT VIRTUALIZATION USER INTERFACE PLUG-INS
Red Hat Virtualization supports plug-ins that expose non-standard features. This makes it easier to usethe Red Hat Virtualization Administration Portal to integrate with other systems. Each interface plug-inrepresents a set of user interface extensions that can be packaged and distributed for use with Red HatVirtualization.
Red Hat Virtualization’s User Interface plug-ins integrate with the Administration Portal directly on theclient using the JavaScript programming language. Plug-ins are invoked by the Administration Portaland executed in the web browser’s JavaScript runtime. User Interface plug-ins can use the JavaScriptlanguage and its libraries.
At key events during runtime, the Administration Portal invokes individual plug-ins via event handlerfunctions representing Administration-Portal-to-plug-in communication. Although the AdministrationPortal supports multiple event-handler functions, a plug-in declares functions which are of interest onlyto its implementation. Each plug-in must register relevant event handler functions as part of the plug-inbootstrap sequence before the plug-in is put to use by the administration portal.
To facilitate the plug-in-to-Administration-Portal communication that drives the User Interfaceextension, the Administration Portal exposes the plug-in API as a global (top-level) pluginApi JavaScriptobject that individual plug-ins can consume. Each plug-in obtains a separate pluginApi instance, allowingthe Administration Portal to control plug-in API-function invocation for each plug-in with respect to theplug-in’s life cycle.
C.2. RED HAT VIRTUALIZATION USER INTERFACE PLUGIN LIFECYCLE
The basic life cycle of a User Interface Plug-in divides into three stages:
Plug-in discovery.
Plug-in loading.
Plug-in bootstrapping.
C.2.1. Red Hat Virtualization User Interface Plug-in Discovery
Creating plug-in descriptors is the first step in the plug-in discovery process. Plug-in descriptorscontain important plug-in metadata and optional default plug-in-specific configurations.
As part of handling administration portal HTML page requests (HTTP GET), User Interface plug-ininfrastructure attempts to discover and load plug-in descriptors from your local file system. For eachplug-in descriptor, the infrastructure also attempts to load corresponding plug-in user configurationsused to override default plug-in-specific configurations (if any exist) and tweak plug-in runtimebehavior. Plug-in user configuration is optional. After loading descriptors and corresponding userconfiguration files, oVirt Engine aggregates User Interface plug-in data and embeds it into theadministration portal HTML page for runtime evaluation.
By default, plug-in descriptors reside in $ENGINE_USR/ui-plug-ins, with a default mapping ofENGINE_USR=/usr/share/ovirt-engine as defined by oVirt Engine local configuration. Plug-indescriptors are expected to comply with JSON format specifications, but plug-in descriptors allowJava/C++ style comments (of both /* and // varieties) in addition to the JSON format specifications.
Red Hat Virtualization 4.4 Administration Guide
426

By default, plug-in user configuration files reside in $ENGINE_ETC/ui-plug-ins, with a default mappingof ENGINE_ETC=/etc/ovirt-engine as defined by oVirt Engine local configuration. Plug-in userconfiguration files are expected to comply with same content format rules as plug-in descriptors.
NOTE
Plug-in user configuration files generally follow the <descriptorFileName>-config.jsonnaming convention.
C.2.2. Red Hat Virtualization User Interface Plug-in Loading
After a plug-in has been discovered and its data is embedded into the administration portal HTML page,administration portal tries to load the plug-in as part of application startup (unless you have configuredit not to load as part of application startup).
For each plug-in that has been discovered, the administration portal creates an HTML iframe elementthat is used to load its host page. The plug-in host page is necessary to begin the plug-in bootstrapprocess, which (the bootstrap process) is used to evaluate the plug-in code in the context of the plug-in’s iframe element. User interface plug-in infrastructure supports serving plug-in resource files (such asthe plug-in host page) from the local file system. The plug-in host page is loaded into the iframeelement and the plug-in code is evaluated. After the plug-in code is evaluated, the plug-incommunicates with the administration portal by means of the plug-in API.
C.2.3. Red Hat Virtualization User Interface Plug-in Bootstrapping
A typical plug-in bootstrap sequence consists of following steps:
Plug-in Bootstrap Sequence
1. Obtain pluginApi instance for the given plug-in
2. Obtain runtime plug-in configuration object (optional)
3. Register relevant event handler functions
4. Notify UI plug-in infrastructure to proceed with plug-in initialization
The following code snippet illustrates the above mentioned steps in practice:
// Access plug-in API using 'parent' due to this code being evaluated within the context of an iframe element.// As 'parent.pluginApi' is subject to Same-Origin Policy, this will only work when WebAdmin HTML page and plug-in// host page are served from same origin. WebAdmin HTML page and plug-in host page will always be on same origin// when using UI plug-in infrastructure support to serve plug-in resource files.var api = parent.pluginApi('MyPlugin');
// Runtime configuration object associated with the plug-in (or an empty object).var config = api.configObject();
// Register event handler function(s) for later invocation by UI plug-in infrastructure.api.register({ // UiInit event handler function. UiInit: function() {
APPENDIX C. RED HAT VIRTUALIZATION USER INTERFACE PLUGINS
427

C.3. USER INTERFACE PLUGIN-RELATED FILES AND THEIRLOCATIONS
Table C.1. UI Plugin-related Files and their Locations
File Location Remarks
Plug-in descriptor files (meta-data)
/usr/share/ovirt-engine/ui-plugins/my-plugin.json
Plug-in user configuration files /etc/ovirt-engine/ui-plugins/my-plugin-config.json
Plug-in resource files /usr/share/ovirt-engine/ui-plugins/<resourcePath>/PluginHostPage.html
<resourcePath> is defined by thecorresponding attribute in theplug-in descriptor.
C.4. EXAMPLE USER INTERFACE PLUG-IN DEPLOYMENT
Follow these instructions to create a user interface plug-in that runs a Hello World! program when yousign in to the Red Hat Virtualization Manager Administration Portal.
Deploying a Hello World! Plug-in
1. Create a plug-in descriptor by creating the following file in the Manager at /usr/share/ovirt-engine/ui-plugins/helloWorld.json:
2. Create the plug-in host page by creating the following file in the Manager at /usr/share/ovirt-engine/ui-plugins/hello-files/start.html:
// Handle UiInit event. window.alert('Favorite music band is ' + config.band); }});
// Notify UI plug-in infrastructure to proceed with plug-in initialization.api.ready();
{ "name": "HelloWorld", "url": "/ovirt-engine/webadmin/plugin/HelloWorld/start.html", "resourcePath": "hello-files"}
<!DOCTYPE html><html><head><script> var api = parent.pluginApi('HelloWorld'); api.register({ UiInit: function() { window.alert('Hello world'); } });
Red Hat Virtualization 4.4 Administration Guide
428

If you have successfully implemented the Hello World! plug-in, you will see this screen when you sign into the Administration Portal:
Figure C.1. A Successful Implementation of the Hello World! Plug-in
api.ready();</script></head><body></body></html>
APPENDIX C. RED HAT VIRTUALIZATION USER INTERFACE PLUGINS
429

APPENDIX D. ENABLING FIPS IN RED HAT VIRTUALIZATIONYou can set up Red Hat Virtualization to be compliant with the Federal Information Processing Standard(FIPS), specifically FIPS 140-2. You can enable FIPS mode selectively, on specific virtual machines, baremetal machines, or across your entire environment, based on your organization’s FIPS compliancerequirements.
You can create a FIPS-enabled bare metal machine in RHV 4.4 by either installing the operating systemin FIPS mode, or by switching the system into FIPS mode after installing the operating system.However, you must switch to FIPS mode before installing and configuring Red Hat Virtualization to avoidintroducing system conflicts.
IMPORTANT
Red Hat recommends installing RHEL 8 with FIPS mode enabled as opposed to enablingFIPS mode later. Enabling FIPS mode during the installation ensures that the systemgenerates all keys with FIPS-approved algorithms and continuous monitoring tests inplace.
You enable FIPS first on each bare metal machine, and then in the Manager.
Enabling FIPS in a self-hosted engine
Enabling FIPS in RHEL hosts and the standalone Manager
D.1. ENABLING FIPS IN A SELF-HOSTED ENGINE
You can enable FIPS in a self-hosted engine during deployment when using the command-line.
Procedure
1. Start the self-hosted engine deployment script. See Installing Red Hat Virtualization as a self-hosted engine using the command line.
2. When the deployment script prompts Do you want to enable FIPS?, enter Yes
Verification
Verify that FIPS is enabled by entering the command fips-mode-setup --check on the host. Thecommand should return FIPS mode is enabled:
D.2. ENABLING FIPS IN RHV HOSTS AND THE STANDALONEMANAGER
You can enable FIPS mode when installing a Red Hat Enterprise Linux (RHEL) host or Red HatVirtualization Host (RHVH). For details, see Installing a RHEL 8 system with FIPS mode enabled in theguide Security hardening for Red Hat Enterprise Linux 8. Red Hat does not support switching aprovisioned host or Manager machine to FIPS mode
Verification
# fips-mode-setup --checkFIPS mode is enabled.
Red Hat Virtualization 4.4 Administration Guide
430

Verify that FIPS is enabled by entering the command fips-mode-setup --check on the host. Thecommand should return FIPS mode is enabled:
D.3. ADDITIONAL RESOURCES
Installing Red Hat Virtualization Hosts
Configuring and Applying SCAP Policies During Installation
Installers and Images for Red Hat Virtualization Manager (v. 4.4 for x86_64)
Security policies available in the SCAP Security Guide
Security Hardening for Red Hat Enterprise Linux 8
# fips-mode-setup --checkFIPS mode is enabled.
APPENDIX D. ENABLING FIPS IN RED HAT VIRTUALIZATION
431

APPENDIX E. RED HAT VIRTUALIZATION AND ENCRYPTEDCOMMUNICATION
E.1. REPLACING THE RED HAT VIRTUALIZATION MANAGER CACERTIFICATE
WARNING
Do not change the permissions and ownerships for the /etc/pki directory or anysubdirectories. The permission for the /etc/pki and the /etc/pki/ovirt-enginedirectory must remain as the default, 755.
You can configure your organization’s third-party CA certificate to identify the Red Hat VirtualizationManager to users connecting over HTTPS.
NOTE
Using a third-party CA certificate for HTTPS connections does not affect the certificateused for authentication between the Manager and hosts. They will continue to use theself-signed certificate generated by the Manager.
Prerequisites
A third-party CA certificate. This is the certificate of the CA (Certificate Authority) that issuedthe certificate you want to use. It is provided as a PEM file. The certificate chain must becomplete up to the root certificate. The chain’s order is critical and must be from the lastintermediate certificate to the root certificate. This procedure assumes that the third-party CAcertificate is provided in /tmp/3rd-party-ca-cert.pem.
The private key that you want to use for Apache httpd. It must not have a password. Thisprocedure assumes that it is located in /tmp/apache.key.
The certificate issued by the CA. This procedure assumes that it is located in /tmp/apache.cer.
If you received the private key and certificate from your CA in a P12 file, use the following procedure toextract them. For other file formats, contact your CA. After extracting the private key and certificate,proceed to Replacing the Red Hat Virtualization Manager Apache CA Certificate .
Extracting the Certificate and Private Key from a P12 Bundle
The internal CA stores the internally generated key and certificate in a P12 file, in /etc/pki/ovirt-engine/keys/apache.p12. Store your new file in the same location. The following procedure assumesthat the new P12 file is in /tmp/apache.p12.
1. Back up the current apache.p12 file:
# cp -p /etc/pki/ovirt-engine/keys/apache.p12 /etc/pki/ovirt-engine/keys/apache.p12.bck
Red Hat Virtualization 4.4 Administration Guide
432

2. Replace the current file with the new file:
3. Extract the private key and certificate to the required locations. If the file is passwordprotected, you must add -passin pass:_password_, replacing password with the requiredpassword.
IMPORTANT
For new Red Hat Virtualization installations, you must complete all of the steps in thisprocedure.
Replacing the Red Hat Virtualization Manager Apache CA Certificate
1. If you are using a self-hosted engine, put the environment into global maintenance mode.
For more information, see Maintaining the Self-Hosted Engine.
2. Add your CA certificate to the host-wide trust store:
3. The Manager has been configured to use /etc/pki/ovirt-engine/apache-ca.pem, which issymbolically linked to /etc/pki/ovirt-engine/ca.pem. Remove the symbolic link:
4. Save your CA certificate as /etc/pki/ovirt-engine/apache-ca.pem:
5. Back up the existing private key and certificate:
6. Copy the private key to the required location:
7. Set the private key owner to root and set the permissions to 0640:
# cp /tmp/apache.p12 /etc/pki/ovirt-engine/keys/apache.p12
# openssl pkcs12 -in /etc/pki/ovirt-engine/keys/apache.p12 -nocerts -nodes > /tmp/apache.key# openssl pkcs12 -in /etc/pki/ovirt-engine/keys/apache.p12 -nokeys > /tmp/apache.cer
# hosted-engine --set-maintenance --mode=global
# cp /tmp/3rd-party-ca-cert.pem /etc/pki/ca-trust/source/anchors# update-ca-trust
# rm /etc/pki/ovirt-engine/apache-ca.pem
# cp /tmp/3rd-party-ca-cert.pem /etc/pki/ovirt-engine/apache-ca.pem
# cp /etc/pki/ovirt-engine/keys/apache.key.nopass /etc/pki/ovirt-engine/keys/apache.key.nopass.bck# cp /etc/pki/ovirt-engine/certs/apache.cer /etc/pki/ovirt-engine/certs/apache.cer.bck
# cp /tmp/apache.key /etc/pki/ovirt-engine/keys/apache.key.nopass
APPENDIX E. RED HAT VIRTUALIZATION AND ENCRYPTED COMMUNICATION
433

8. Copy the certificate to the required location:
9. Set the certificate owner to root and set the permissions to 0644:
10. Restart the Apache server:
11. Create a new trust store configuration file, /etc/ovirt-engine/engine.conf.d/99-custom-truststore.conf, with the following parameters:
12. Copy the /etc/ovirt-engine/ovirt-websocket-proxy.conf.d/10-setup.conf file, and rename itwith an index number that is greater than 10 (for example, 99-setup.conf). Add the followingparameters to the new file:
SSL_CERTIFICATE=/etc/pki/ovirt-engine/certs/apache.cerSSL_KEY=/etc/pki/ovirt-engine/keys/apache.key.nopass
13. Restart the websocket-proxy service:
14. If you manually changed the /etc/ovirt-provider-ovn/conf.d/10-setup-ovirt-provider-ovn.conffile, or are using a configuration file from an older installation, make sure that the Manager is stillconfigured to use /etc/pki/ovirt-engine/apache-ca.pem as the certificate source.
15. Enable engine-backup to update the system on restore by creating a new file, /etc/ovirt-engine-backup/engine-backup-config.d/update-system-wide-pki.sh, with the followingcontent:
16. Restart the ovirt-provider-ovn service:
17. Restart the ovirt-imageio service:
# chown root:ovirt /etc/pki/ovirt-engine/keys/apache.key.nopass# chmod 640 /etc/pki/ovirt-engine/keys/apache.key.nopass
# cp /tmp/apache.cer /etc/pki/ovirt-engine/certs/apache.cer
# chown root:ovirt /etc/pki/ovirt-engine/certs/apache.cer# chmod 644 /etc/pki/ovirt-engine/certs/apache.cer
# systemctl restart httpd.service
ENGINE_HTTPS_PKI_TRUST_STORE="/etc/pki/java/cacerts"ENGINE_HTTPS_PKI_TRUST_STORE_PASSWORD=""
# systemctl restart ovirt-websocket-proxy.service
BACKUP_PATHS="${BACKUP_PATHS}/etc/ovirt-engine-backup"cp -f /etc/pki/ovirt-engine/apache-ca.pem \/etc/pki/ca-trust/source/anchors/3rd-party-ca-cert.pemupdate-ca-trust
# systemctl restart ovirt-provider-ovn.service
Red Hat Virtualization 4.4 Administration Guide
434

18. Restart the ovirt-engine service:
19. If you are using a self-hosted engine, turn off global maintenance mode.
Your users can now connect to the Administration Portal and VM Portal, without seeing a warning aboutthe authenticity of the certificate used to encrypt HTTPS traffic.
E.2. SETTING UP ENCRYPTED COMMUNICATION BETWEEN THEMANAGER AND AN LDAP SERVER
To set up encrypted communication between the Red Hat Virtualization Manager and an LDAP server,obtain the root CA certificate of the LDAP server, copy the root CA certificate to the Manager, andcreate a PEM-encoded CA certificate. The keystore type can be any Java-supported type. Thefollowing procedure uses the Java KeyStore (JKS) format.
NOTE
For more information on creating a PEM-encoded CA certificate and importingcertificates, see the X.509 CERTIFICATE TRUST STORE section of the README file at/usr/share/doc/ovirt-engine-extension-aaa-ldap-version.
Procedure
1. On the Red Hat Virtualization Manager, copy the root CA certificate of the LDAP server to the/tmp directory and import the root CA certificate using keytool to create a PEM-encoded CAcertificate. The following command imports the root CA certificate at /tmp/myrootca.pem andcreates a PEM-encoded CA certificate myrootca.jks under /etc/ovirt-engine/aaa/. Note downthe certificate’s location and password. If you are using the interactive setup tool, this is all theinformation you need. If you are configuring the LDAP server manually, follow the rest of theprocedure to update the configuration files.
2. Update the /etc/ovirt-engine/aaa/profile1.properties file with the certificate information:
NOTE
${local:_basedir} is the directory where the LDAP property configuration fileresides and points to the /etc/ovirt-engine/aaa directory. If you created thePEM-encoded CA certificate in a different directory, replace ${local:_basedir}with the full path to the certificate.
To use startTLS (recommended):
# systemctl restart ovirt-imageio.service
# systemctl restart ovirt-engine.service
# hosted-engine --set-maintenance --mode=none
$ keytool -importcert -noprompt -trustcacerts -alias myrootca -file /tmp/myrootca.pem -keystore /etc/ovirt-engine/aaa/myrootca.jks -storepass password
# Create keystore, import certificate chain and uncomment
APPENDIX E. RED HAT VIRTUALIZATION AND ENCRYPTED COMMUNICATION
435

To use SSL:
To continue configuring an external LDAP provider, see Configuring an External LDAP Provider . Tocontinue configuring LDAP and Kerberos for Single Sign-on, see Configuring LDAP and Kerberos forSingle Sign-on.
E.3. ENABLING ENCRYPTED VNC CONSOLES FOR FIPS
You can set up encrypted VNC consoles to work with a Red Hat Virtualization (RHV) Manager and hoststhat have FIPS enabled.
To set up encrypted VNC consoles, you complete the following procedures:
Enable FIPS in RHV
Configure the host cluster’s console settings to enable VNC Encryption .
Run the VNC SASL ansible playbook on each host.
Configure the Remote Viewer to trust the Manager’s CA certificate.
E.3.1. Configuring the cluster to enable VNC Encryption
Procedure
1. In the Administration Portal, click Compute → Clusters.
2. Select the cluster where you plan to enable VNC encryption and click Edit. The Edit Clusterwindow opens.
3. Select the Console tab.
4. Select the Enable VNC Encryption checkbox and click OK.
E.3.2. Running the VNC SASL Ansible playbook for each host
Procedure
1. In the Administration Portal, put the hosts you created with FIPS enabled into maintenancemode:
a. In the Administration Portal, click Compute → Hosts.
b. In the Virtual Machines column, verify that each host has zero virtual machines. Perform a
pool.default.ssl.startTLS = truepool.default.ssl.truststore.file = ${local:_basedir}/myrootca.jkspool.default.ssl.truststore.password = password
# Create keystore, import certificate chain and uncommentpool.default.serverset.single.port = 636pool.default.ssl.enable = truepool.default.ssl.truststore.file = ${local:_basedir}/myrootca.jkspool.default.ssl.truststore.password = password
Red Hat Virtualization 4.4 Administration Guide
436
b. In the Virtual Machines column, verify that each host has zero virtual machines. Perform alive migration to remove all virtual machines from any hosts where necessary. For details,see Migrating Virtual Machines Between Hosts
c. Select each host and click Management → Maintenance and OK.
2. Connect to the command line of the machine where the Manager is running.
If the Manager is running on a stand-alone machine, connect to that machine’s commandline. For example, enter:
If the Manager is running as a self-hosted engine, use Compute → Virtual Machines toselect the self-hosted engine virtual machine, named HostedEngine by default, and click Console.
3. On the Manager machine, run the VNC SASL ansible playbook for each host.
For <hostname>, enter the complete Hostname shown on Compute → Hosts.
4. Select the host and click Installation → Reinstall.
5. After reinstallation, select the host and click Management → Restart.
6. After rebooting, select the host and click Management → Activate.
E.4. TROUBLESHOOTING
When running the VNC SASL Ansible playbook, the task might fail with the following error message:
To solve this problem, disable host key checking by doing one of the following:
Disable host key checking permanently by uncommenting the following line in /etc/ansible/ansible.cfg:
Disable host key checking temporarily by running the following command:
Additional resources
Configuring and Applying SCAP Policies During Installation
Installers and Images for Red Hat Virtualization Manager (v. 4.3 for x86_64)
# ssh root@rhvm
# cd /usr/share/ovirt-engine/ansible-runner-service-project/project/# ansible-playbook --ask-pass --inventory=<hostname>, ovirt-vnc-sasl.yml
Using a SSH password instead of a key is not possible because Host Key checking is enabled and sshpass does not support this. Please add this host’s fingerprint to your known_hosts file to manage this host.
#host_key_checking = False
export ANSIBLE_HOST_KEY_CHECKING=False.
APPENDIX E. RED HAT VIRTUALIZATION AND ENCRYPTED COMMUNICATION
437

Configuring the Remote Viewer to trust the Manager’s CA certificateConfigure the Remote Viewer console on your client machine, virt-viewer or remote-viewer, to trust theRHV Manager’s certificate authority (CA)
Procedure
1. Navigate to https://<engine_address>/ovirt-engine/services/pki-resource?resource=ca-certificate&format=X509-PEM-CA.
2. Enable all the trust settings.
3. On the client machine where you plan to run the VNC console, create a directory for thecertificate file:
WARNING
If this step generates an error such as mkdir: cannot create directory ‘/home/example_user/.pki/CA’: File exists, take precautions to avoidoverwriting ~/.pki/CA/cacert.pem in the next step. For example, include thecurrent date in the filename.
4. Download the certificate:
5. Install the certificate authority in your browser:
Firefox
Internet Explorer
Google Chrome.
Install the SASL SCRAM libraries on the client machine:
Verification steps
1. Run a virtual machine on one of the FIPS-enabled hosts you created.
2. Connect to the virtual machine using a VNC console.
Additional resources
Installing Console Components
$ mkdir ~/.pki/CA
$ curl -k -o ~/.pki/CA/cacert-<today’s date>.pem '\https://<engine_address>/ovirt-engine/services/pki-resource?resource=ca-certificate&format=X509-PEM-CA'
$ sudo dnf install cyrus-sasl-scram
Red Hat Virtualization 4.4 Administration Guide
438

Replacing the Manager CA Certificate
APPENDIX E. RED HAT VIRTUALIZATION AND ENCRYPTED COMMUNICATION
439

APPENDIX F. PROXIES
F.1. SPICE PROXY
F.1.1. SPICE Proxy Overview
The SPICE Proxy is a tool used to connect SPICE Clients to virtual machines when the SPICE Clients areoutside the network that connects the hypervisors. Setting up a SPICE Proxy consists of installing Squid on a machine and configuring the firewall to allow proxy traffic. Turning a SPICE Proxy on consistsof using engine-config on the Manager to set the key SpiceProxyDefault to a value consisting of thename and port of the proxy. Turning a SPICE Proxy off consists of using engine-config on the Managerto remove the value to which the key SpiceProxyDefault has been set.
IMPORTANT
The SPICE Proxy can only be used in conjunction with the standalone SPICE client, andcannot be used to connect to virtual machines using noVNC.
F.1.2. SPICE Proxy Machine Setup
This procedure explains how to set up a machine as a SPICE Proxy. A SPICE Proxy makes it possible toconnect to the Red Hat Virtualization network from outside the network. We use Squid in thisprocedure to provide proxy services.
Procedure
1. Install Squid on the Proxy machine:
2. Open /etc/squid/squid.conf. Change:
to:
3. Start the squid service and enable it to run automatically after reboot:
4. Enable incoming requests to the squid service in the default firewalld zone:
5. Make this firewall rule persistent in the runtime configuration:
6. Confirm that the squid service appears in the list of firewall services:
# dnf install squid
http_access deny CONNECT !SSL_ports
http_access deny CONNECT !Safe_ports
# systemctl enable squid.service --now
# firewall-cmd --permanent --add-service=squid
# firewall-cmd --reload
Red Hat Virtualization 4.4 Administration Guide
440

You have now set up a machine as a SPICE proxy. Before connecting to the Red Hat Virtualizationnetwork from outside the network, activate the SPICE proxy.
F.1.3. Turning On a SPICE Proxy
This procedure explains how to activate (or turn on) the SPICE proxy.
Procedure
1. On the Manager, use the engine-config tool to set a proxy:
2. Restart the ovirt-engine service:
The proxy must have this form:
NOTE
Only SPICE clients shipped with Red Hat Enterprise Linux 6.7, Red Hat EnterpriseLinux 7.2, or later, support HTTPS proxies. Earlier clients only support HTTP. IfHTTPS is specified for earlier clients, the client will ignore the proxy setting andattempt a direct connection to the host.
SPICE Proxy is now activated (turned on). It is now possible to connect to the Red Hat Virtualizationnetwork through the SPICE proxy.
F.1.4. Turning Off a SPICE Proxy
This procedure explains how to turn off (deactivate) a SPICE proxy.
Procedure
1. Log in to the Manager:
2. Run the following command to clear the SPICE proxy:
3. Restart the Manager:
# firewall-cmd --list-servicesssh dhcpv6-client squid
# engine-config -s SpiceProxyDefault=someProxy
# systemctl restart ovirt-engine.service
protocol://[host]:[port]
$ ssh root@[IP of Manager]
# engine-config -s SpiceProxyDefault=""
# systemctl restart ovirt-engine.service
APPENDIX F. PROXIES
441

SPICE proxy is now deactivated (turned off). It is no longer possible to connect to the Red HatVirtualization network through the SPICE proxy.
F.2. SQUID PROXY
F.2.1. Installing and Configuring a Squid Proxy
This section explains how to install and configure a Squid proxy to the VM Portal. A Squid proxy server isused as a content accelerator. It caches frequently-viewed content, reducing bandwidth and improvingresponse times.
Procedure
1. Obtain a keypair and certificate for the HTTPS port of the Squid proxy server. You can obtainthis keypair the same way that you would obtain a keypair for another SSL/TLS service. Thekeypair is in the form of two PEM files which contain the private key and the signed certificate.For this procedure, we assume that they are named proxy.key and proxy.cer.
NOTE
The keypair and certificate can also be generated using the certificate authorityof the engine. If you already have the private key and certificate for the proxy anddo not want to generate it with the engine certificate authority, skip to the nextstep.
2. Choose a host name for the proxy. Then, choose the other components of the distinguishedname of the certificate for the proxy.
NOTE
It is good practice to use the same country and same organization name used bythe engine itself. Find this information by logging in to the machine where theManager is installed and running the following command:
This command outputs something like this:
The relevant part here is /C=US/O=Example Inc.. Use this to build the completedistinguished name for the certificate for the proxy:
3. Log in to the proxy machine and generate a certificate signing request:
IMPORTANT
openssl x509 -in /etc/pki/ovirt-engine/ca.pem -noout -text | grep DirName
subject= /C=US/O=Example Inc./CN=engine.example.com.81108
/C=US/O=Example Inc./CN=proxy.example.com
# openssl req -newkey rsa:2048 -subj '/C=US/O=Example Inc./CN=proxy.example.com' -nodes -keyout proxy.key -out proxy.req
Red Hat Virtualization 4.4 Administration Guide
442

IMPORTANT
You must include the quotes around the distinguished name for the certificate.The -nodes option ensures that the private key is not encrypted; this means thatyou do not need to enter the password to start the proxy server.
The command generates two files: proxy.key and proxy.req. proxy.key is the private key. Keepthis file safe. proxy.req is the certificate signing request. proxy.req does not require any specialprotection.
4. To generate the signed certificate, copy the certificate signing request file from the proxymachine to the Manager machine:
5. Log in to the Manager machine and sign the certificate:
This signs the certificate and makes it valid for 10 years (3650 days). Set the certificate toexpire earlier, if you prefer.
6. The generated certificate file is available in the directory /etc/pki/ovirt-engine/certs andshould be named proxy.cer. On the proxy machine, copy this file from the Manager machine toyour current directory:
7. Ensure both proxy.key and proxy.cer are present on the proxy machine:
8. Install the Squid proxy server package on the proxy machine:
9. Move the private key and signed certificate to a place where the proxy can access them, forexample to the /etc/squid directory:
10. Set permissions so that the squid user can read these files:
11. The Squid proxy must verify the certificate used by the engine. Copy the Manager certificate tothe proxy machine. This example uses the file path /etc/squid:
NOTE
# scp proxy.req engine.example.com:/etc/pki/ovirt-engine/requests/.
# /usr/share/ovirt-engine/bin/pki-enroll-request.sh --name=proxy --days=3650 --subject='/C=US/O=Example Inc./CN=proxy.example.com'
# scp engine.example.com:/etc/pki/ovirt-engine/certs/proxy.cer .
# ls -l proxy.key proxy.cer
# dnf install squid
# cp proxy.key proxy.cer /etc/squid/.
# chgrp squid /etc/squid/proxy.*# chmod 640 /etc/squid/proxy.*
# scp engine.example.com:/etc/pki/ovirt-engine/ca.pem /etc/squid/.
APPENDIX F. PROXIES
443

NOTE
The default CA certificate is located in /etc/pki/ovirt-engine/ca.pem on theManager machine.
12. Set permissions so that the squid user can read the certificate file:
13. If SELinux is in enforcing mode, change the context of port 443 using the semanage tool topermit Squid to use port 443:
14. Replace the existing Squid configuration file with the following:
15. Restart the Squid proxy server:
NOTE
Squid Proxy in the default configuration will terminate its connection after 15 idleminutes. To increase the amount of time before Squid Proxy terminates its idleconnection, adjust the read_timeout option in squid.conf (for instance read_timeout 10hours).
F.3. WEBSOCKET PROXY
F.3.1. Websocket Proxy Overview
The websocket proxy allows users to connect to virtual machines via a noVNC console.
The websocket proxy can be installed and configured on the Red Hat Virtualization Manager machineduring the initial configuration (see Configuring the Red Hat Virtualization Manager ).
# chgrp squid /etc/squid/ca.pem# chmod 640 /etc/squid/ca.pem
# dnf install policycoreutils-python# semanage port -m -p tcp -t http_cache_port_t 443
https_port 443 key=/etc/squid/proxy.key cert=/etc/squid/proxy.cer ssl-bump defaultsite=engine.example.comcache_peer engine.example.com parent 443 0 no-query originserver ssl sslcafile=/etc/squid/ca.pem name=engine login=PASSTHRUcache_peer_access engine allow allssl_bump allow allhttp_access allow all
# systemctl restart squid.service
Red Hat Virtualization 4.4 Administration Guide
444
APPENDIX G. BRANDING
G.1. BRANDING
G.1.1. Re-Branding the Manager
Various aspects of the Red Hat Virtualization Manager can be customized, such as the icons used by andtext displayed in pop-up windows and the links shown on the Welcome Page. This allows you to re-brandthe Manager and gives you fine-grained control over the end look and feel presented to administratorsand users.
The files required to customize the Manager are located in the /etc/ovirt-engine/branding/ directoryon the system on which the Manager is installed. The files comprise a set of cascading style sheet filesthat are used to style various aspects of the graphical user interface and a set of properties files thatcontain messages and links that are incorporated into various components of the Manager.
To customize a component, edit the file for that component and save the changes. The next time youopen or refresh that component, the changes will be applied.
G.1.2. Login Screen
The login screen is the login screen used by both the Administration Portal and VM Portal. The elementsof the login screen that can be customized are as follows:
The border
The header image on the left
The header image on the right
The header text
The classes for the login screen are located in common.css.
G.1.3. Administration Portal Screen
The administration portal screen is the main screen that is shown when you log into the AdministrationPortal. The elements of the administration portal screen that can be customized are as follows:
The logo
The left background image
The center background image
The right background image
The text to the right of the logo
The classes for the administration portal screen are located in web_admin.css.
G.1.4. VM Portal Screen
The VM Portal screen is the screen that is shown when you log into the VM Portal. The elements of the
APPENDIX G. BRANDING
445

The VM Portal screen is the screen that is shown when you log into the VM Portal. The elements of theVM Portal screen that can be customized are as follows:
The logo
The center background image
The right background image
The border around the main grid
The text above the Logged in user label
The classes for the VM Portal screen are located in user_portal.css.
G.1.5. Pop-Up Windows
Pop-up windows are all windows in the Manager that allow you to create, edit or update an entity such asa host or virtual machine. The elements of pop-up windows that can be customized are as follows:
The border
The header image on the left
The header center image (repeated)
The classes for pop-up windows are located in common.css.
G.1.6. Tabs
Many pop-up windows in the Administration Portal include tabs. The elements of these tabs that can becustomized are as follows:
Active
Inactive
The classes for tabs are located in common.css and user_portal.css.
G.1.7. The Welcome Page
The Welcome Page is the page that is initially displayed when you visit the homepage of the Manager. Inaddition to customizing the overall look and feel, you can also make other changes such as adding linksto the page for additional documentation or internal websites by editing a template file. The elements ofthe Welcome Page that can be customized are as follows:
The page title
The header (left, center and right)
The error message
The link to forward and the associated message for that link
Add a message banner or preamble
The classes for the Welcome Page are located in welcome_style.css.
Red Hat Virtualization 4.4 Administration Guide
446

The Template File
The template file for the Welcome Page is a regular HTML file of the name welcome_page.templatethat does not contain HTML, HEAD or BODY tags. This file is inserted directly into the Welcome Pageitself, and acts as a container for the content that is displayed in the Welcome Page. As such, you mustedit this file to add new links or change the content itself. Another feature of the template file is that itcontains placeholder text such as {user_portal} that is replaced by corresponding text in the messages.properties file when the Welcome Page is processed.
The Preamble
You can add a custom message banner to the Welcome Page by adding a preamble.templatecontaining the banner text and a preamble.css file defining the banner size, and linking them in the branding.properties file. Sample files are available at sample preamble template.
NOTE
In an engine upgrade, the custom message banner remains in place and will work withoutissue. Following engine backup and restore, during engine restore, the custom messagebanner needs to be manually restored and verified.
G.1.8. The Page Not Found Page
The Page Not Found page is a page that is displayed when you open a link to a page that cannot befound in the Red Hat Virtualization Manager. The elements of the Page Not Found page that can becustomized are as follows:
The page title
The header (left, center and right)
The error message
The link to forward and the associated message for that link
The classes for the Page Not Found page are located in welcome_style.css.
APPENDIX G. BRANDING
447

APPENDIX H. SYSTEM ACCOUNTS
H.1. RED HAT VIRTUALIZATION MANAGER USER ACCOUNTS
A number of system user accounts are created to support Red Hat Virtualization when the rhevmpackage is installed. Each system user has a default user identifier (UID). The system user accountscreated are:
The vdsm user (UID 36). Required for support tools that mount and access NFS storagedomains.
The ovirt user (UID 108). Owner of the ovirt-engine Red Hat JBoss Enterprise ApplicationPlatform instance.
The ovirt-vmconsole user (UID 498). Required for the guest serial console.
H.2. RED HAT VIRTUALIZATION MANAGER GROUPS
A number of system user groups are created to support Red Hat Virtualization when the rhevm packageis installed. Each system user group has a default group identifier (GID). The system user groupscreated are:
The kvm group (GID 36). Group members include:
The vdsm user.
The ovirt group (GID 108). Group members include:
The ovirt user.
The ovirt-vmconsole group (GID 498). Group members include:
The ovirt-vmconsole user.
H.3. VIRTUALIZATION HOST USER ACCOUNTS
A number of system user accounts are created on the virtualization host when the vdsm and qemu-kvm-rhev packages are installed. Each system user has a default user identifier (UID). The system useraccounts created are:
The vdsm user (UID 36).
The qemu user (UID 107).
The sanlock user (UID 179).
The ovirt-vmconsole user (UID 498).
IMPORTANT
Red Hat Virtualization 4.4 Administration Guide
448

IMPORTANT
The user identifiers (UIDs) and group identifiers (GIDs) allocated may vary betweensystems. The vdsm user is fixed to a UID of 36 and the kvm group is fixed to a GID of 36.
If UID 36 or GID 36 is already used by another account on the system a conflict will ariseduring installation of the vdsm and qemu-kvm-rhev packages.
H.4. VIRTUALIZATION HOST GROUPS
A number of system user groups are created on the virtualization host when the vdsm and qemu-kvm-rhev packages are installed. Each system user group has a default group identifier (GID). The systemuser groups created are:
The kvm group (GID 36). Group members include:
The qemu user.
The sanlock user.
The qemu group (GID 107). Group members include:
The vdsm user.
The sanlock user.
The ovirt-vmconsole group (GID 498). Group members include:
The ovirt-vmconsole user.
IMPORTANT
The user identifiers (UIDs) and group identifiers (GIDs) allocated may vary betweensystems. The vdsm user is fixed to a UID of 36 and the kvm group is fixed to a GID of 36.
If UID 36 or GID 36 is already used by another account on the system a conflict will ariseduring installation of the vdsm and qemu-kvm-rhev packages.
APPENDIX H. SYSTEM ACCOUNTS
449

APPENDIX I. LEGAL NOTICECopyright © 2022 Red Hat, Inc.
Licensed under the (Creative Commons Attribution–ShareAlike 4.0 International License). Derived fromdocumentation for the (oVirt Project). If you distribute this document or an adaptation of it, you mustprovide the URL for the original version.
Modified versions must remove all Red Hat trademarks.
Red Hat, Red Hat Enterprise Linux, the Red Hat logo, the Shadowman logo, JBoss, OpenShift, Fedora,the Infinity logo, and RHCE are trademarks of Red Hat, Inc., registered in the United States and othercountries.
Linux® is the registered trademark of Linus Torvalds in the United States and other countries.
Java® is a registered trademark of Oracle and/or its affiliates.
XFS® is a trademark of Silicon Graphics International Corp. or its subsidiaries in the United States and/orother countries.
MySQL® is a registered trademark of MySQL AB in the United States, the European Union and othercountries.
Node.js® is an official trademark of Joyent. Red Hat Software Collections is not formally related to orendorsed by the official Joyent Node.js open source or commercial project.
The OpenStack® Word Mark and OpenStack logo are either registered trademarks/service marks ortrademarks/service marks of the OpenStack Foundation, in the United States and other countries andare used with the OpenStack Foundation’s permission. We are not affiliated with, endorsed or sponsoredby the OpenStack Foundation, or the OpenStack community.
All other trademarks are the property of their respective owners.
Red Hat Virtualization 4.4 Administration Guide
450
Copyright © 2022 FDOKUMEN