Kofax Enterprise Capture Solutions Enable Document-driven ...
Upload
independentCategory
view
1download
0
Image Services
Kofax Capture System Administration Guide
Copyright @ “Solutions”, Inc. 1986-2010
Page 1
Table of Contents
Steps for Creating a new Batch Class ................................................................................. 2 Field Types.......................................................................................................................... 3
Field Type Properties- General ....................................................................................... 4 Field Type Properties- Values ........................................................................................ 5
Batch Class.......................................................................................................................... 6 Batch Class Properties – General .................................................................................... 7 Batch Class Properties – Queues .................................................................................... 8
Batch Class Properties – Separation and Form Identification ........................................ 9 Batch Class Properties –Batch Naming ........................................................................ 10
Batch Class Properties – Advanced .............................................................................. 11 Document Class ................................................................................................................ 12
Document Class Properties – General .......................................................................... 13 Document Class Properties – OCR ............................................................................... 14
Document Class Properties – PDF ................................................................................ 15 Release Script – Content Manager 5.1/5.3.................................................................... 16
Release Setup - Login Information ........................................................................... 17 Release Setup - Document Settings .......................................................................... 18
Release Setup - Folder Settings ................................................................................ 19 Release Setup - Image Settings ................................................................................. 20
Release Setup - Document Routing .......................................................................... 21 Release Script – Text .................................................................................................... 22
Release Setup – Index Storage .................................................................................. 23
Release Setup – Document Storage .......................................................................... 24 Release Setup – Image Format ................................................................................. 25
Form Type ..................................................................................................................... 26 Form Type Properties – General ............................................................................... 26 Form Type Properties – Image ................................................................................. 27
Form Type Properties – Page Level Bar Code ......................................................... 28
Add Sample Page ...................................................................................................... 28 Publish............................................................................................................................... 29 How To ............................................................................................................................. 31
Delete scanner profiles. ................................................................................................. 31 Backup Kofax Capture Profiles .................................................................................... 31
Import Kofax Capture Profiles...................................................................................... 35 Switch Dongle with another PC .................................................................................... 37

Image Services
Kofax Capture System Administration Guide
Copyright @ “Solutions”, Inc. 1986-2010
Page 2
Steps for Creating a new Batch Class 1. Create any new Field Types
2. Create a Batch Class
3. Create a Document Class
a. Complete the Release Script
4. Create a New Form Type
a. Add a Sample Page
i. Add Index Zones
ii. Add Page Level Bar Codes
5. Publish the Batch Class

Image Services
Kofax Capture System Administration Guide
Copyright @ “Solutions”, Inc. 1986-2010
Page 3
Field Types Click on the Field Types tab to view all existing field types.
Field Types are definitions of the properties of a field rather than the definition of a
specific field. For example, you would have a field type of Character 40, meaning it
is a character field that is 40 characters in length, rather than a field type of Customer
Name.
The exceptions to this are fields that you want to have specific values attached to.
For Example, RV Code would be either A, B or S. So you could setup a field type of
RV Code with a value list, rather than a character field of 1 in length. This will
provide some error checking within the Kofax Capture Process.
To create a new field type, place your arrow over the white with field names, right
click and select New Field Type, or click on File, New, Field Type.
To change an existing field type, highlight that field type, right click and select
properties.
With version 8.0 or higher in Kofax Capture, you may create fields types from the
proprieties window for the Document Type.

Image Services
Kofax Capture System Administration Guide
Copyright @ “Solutions”, Inc. 1986-2010
Page 4
Field Type Properties- General
Enter the name for your field type. If should be meaningful enough so that you can
pick from a list. I would recommend „Char xx‟ or „Number xx‟. If defining a values
list, give a meaningful name.
If the name is not self explanatory, enter a more complete description.
Select the appropriate data type. I would recommend selecting CHAR, NUMERIC.
DATE or TIME data types have specific formats. These formats will not match to 8
or 10 numeric fields on the i5.

Image Services
Kofax Capture System Administration Guide
Copyright @ “Solutions”, Inc. 1986-2010
Page 5
Field Type Properties- Values
If a list of values is to be associated with this field enter on the Values Tab.
Enter the value in the top box, and click on Add.
Select Force Match if the field should only contain an entry from this list.

Image Services
Kofax Capture System Administration Guide
Copyright @ “Solutions”, Inc. 1986-2010
Page 6
Batch Class
Click on the Batch Tab to see a list of all existing Batch Classes.
To Create a new batch class, place your arrow in the white space, right click and
select New Batch Class.
To change and existing Batch Class, highlight that batch class, right click and select
Properties.
You should have a batch class for each Index class (file Cabinet) in the Content
Manager Profiles.

Image Services
Kofax Capture System Administration Guide
Copyright @ “Solutions”, Inc. 1986-2010
Page 7
Batch Class Properties – General
For a new Batch Class, enter a name and a meaningful description.
There are fields you can define at the batch level and have these used when releasing
to the iSeries, but I do not have a good example.
I would leave this screen as is.

Image Services
Kofax Capture System Administration Guide
Copyright @ “Solutions”, Inc. 1986-2010
Page 8
Batch Class Properties – Queues
Scan will be automatically selected for you.
If you are using bar codes or OCR, select Recognition Server
If want to create PDF Documents, select PDF Generator.
Select Validation
Select Release (with Version 9, they are called Export Connectors)

Image Services
Kofax Capture System Administration Guide
Copyright @ “Solutions”, Inc. 1986-2010
Page 9
Batch Class Properties – Separation and Form Identification
If each document will have a fixed number of pages, select Kofax fixed pages. You
will need to define the number of pages on the form type also.
If the first page of each document is always the same form or format is unique to the
document you may use Kofax page Recognition. You must enable the Recognition
Server as one of the queues and each page to be recognized, but have its own form
type for that document class.
For DOT and Indexing where there is a bar code on the first page of each document,
use Custom and the 1st Page bar code profile. (if needed this profile may be adapted
for other uses).
If none of the above is true, leave selected Kofax Manual.

Image Services
Kofax Capture System Administration Guide
Copyright @ “Solutions”, Inc. 1986-2010
Page 10
Batch Class Properties –Batch Naming
You can use this screen to change the format of the batch name.
The Default is Current Date and Time
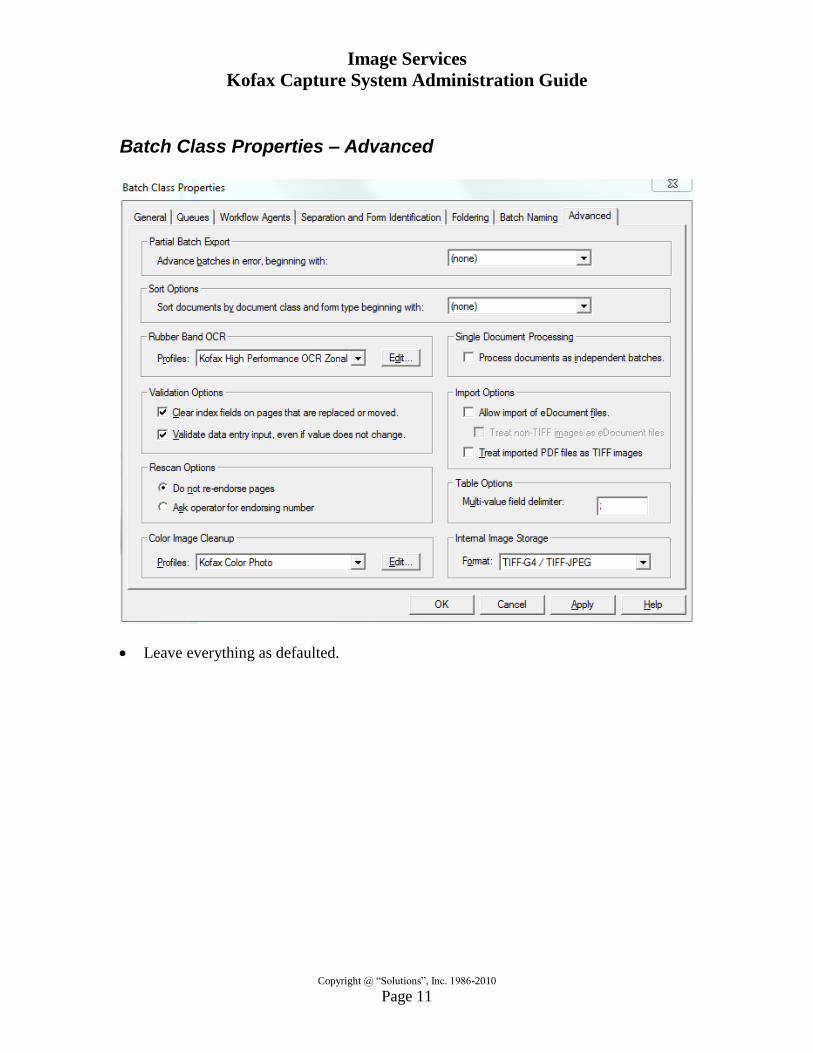
Image Services
Kofax Capture System Administration Guide
Copyright @ “Solutions”, Inc. 1986-2010
Page 11
Batch Class Properties – Advanced
Leave everything as defaulted.
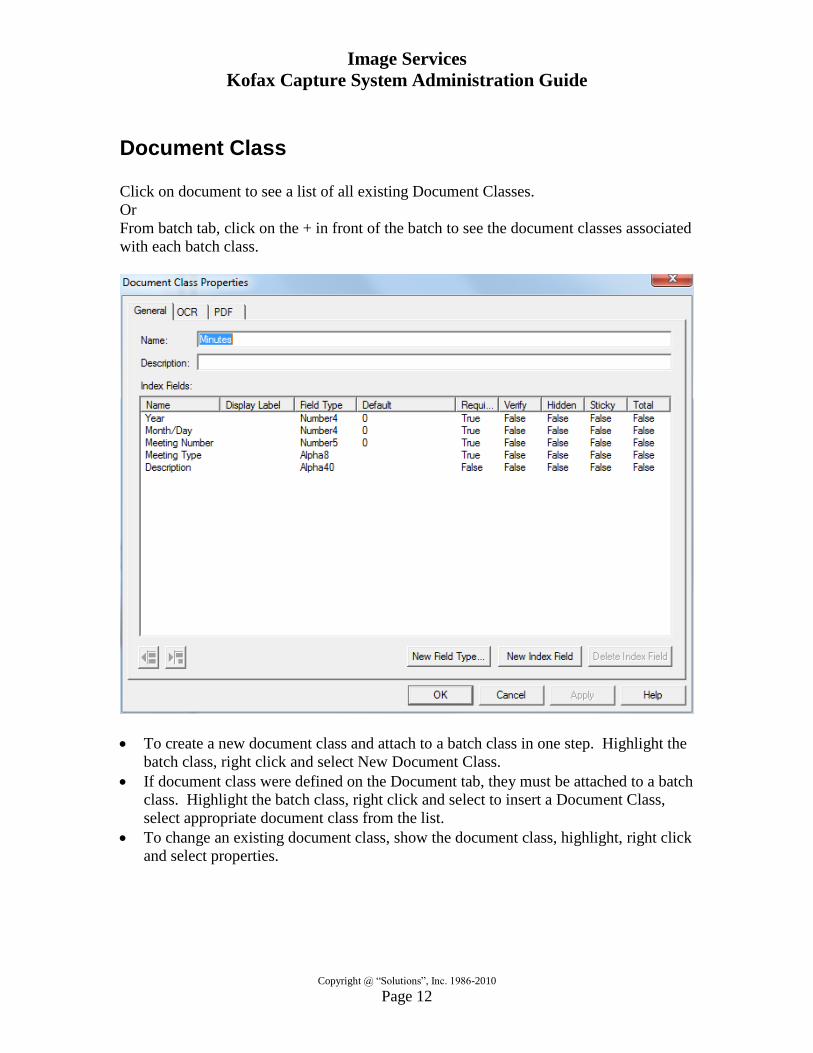
Image Services
Kofax Capture System Administration Guide
Copyright @ “Solutions”, Inc. 1986-2010
Page 12
Document Class
Click on document to see a list of all existing Document Classes.
Or
From batch tab, click on the + in front of the batch to see the document classes associated
with each batch class.
To create a new document class and attach to a batch class in one step. Highlight the
batch class, right click and select New Document Class.
If document class were defined on the Document tab, they must be attached to a batch
class. Highlight the batch class, right click and select to insert a Document Class,
select appropriate document class from the list.
To change an existing document class, show the document class, highlight, right click
and select properties.

Image Services
Kofax Capture System Administration Guide
Copyright @ “Solutions”, Inc. 1986-2010
Page 13
Document Class Properties – General
On this screen you will define the fields to be associated with this document class.
The fields should match to the fields defined on the File Cabinet in Content Manager.
To create a new field, click on New Index Field.
o Type a Name
o Select a Field Type from the Drop Down list
o Enter a default if applicable
o If required, enter TRUE
o If set Verify to True, you will also need to add the verification queue to
your list of queues for this batch class.
o If you want to hide the field from entry on validation and use the default
only, set this to True.
o Set Sticky to true if the value will stay in the field from one record to the
next in validation.
o Total is valid only on numeric fields and will give a total for the batch.
o If there is not a Field Type that fulfills your requirements, click on New
Fields Type to create from this screen.
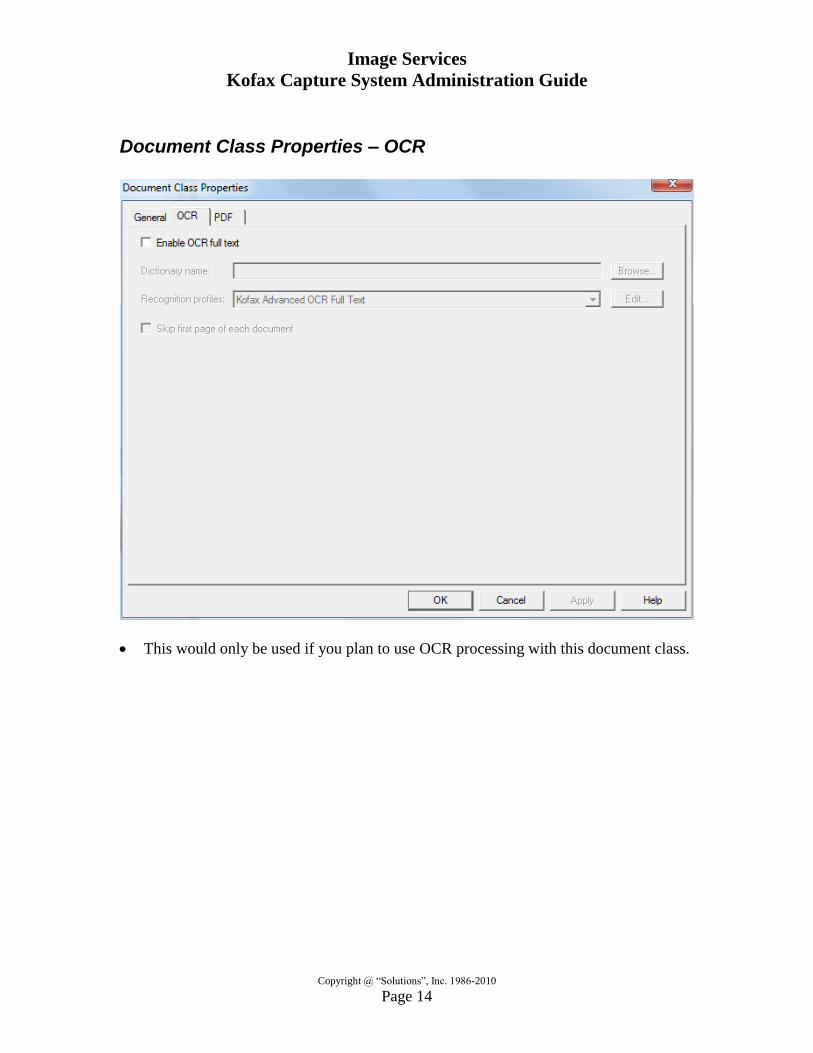
Image Services
Kofax Capture System Administration Guide
Copyright @ “Solutions”, Inc. 1986-2010
Page 14
Document Class Properties – OCR
This would only be used if you plan to use OCR processing with this document class.

Image Services
Kofax Capture System Administration Guide
Copyright @ “Solutions”, Inc. 1986-2010
Page 15
Document Class Properties – PDF
This would only be used if you plan to generate PDF files from this Document Class.

Image Services
Kofax Capture System Administration Guide
Copyright @ “Solutions”, Inc. 1986-2010
Page 16
Release Script – Content Manager 5.1/5.3
Use with Content Manager 5.3 or 5.4
Click on IBM Content Manger iSeries 5.1-5.3, then click on ADD.
Click on Setup

Image Services
Kofax Capture System Administration Guide
Copyright @ “Solutions”, Inc. 1986-2010
Page 17
Release Setup - Login Information
Use user id QVIADMIN and appropriate password
Select „If unable to log in during release, prompt for valid login information‟
Click on OK

Image Services
Kofax Capture System Administration Guide
Copyright @ “Solutions”, Inc. 1986-2010
Page 18
Release Setup - Document Settings
Select the appropriate Index Class by using the drop down box.
The Content Manager Fields will change to reflect the Index Class Selected
To set a value, click on the white part of the field, a drop down box will appear
allowing you to select Index Fields, Kofax Capture Values or Text.

Image Services
Kofax Capture System Administration Guide
Copyright @ “Solutions”, Inc. 1986-2010
Page 19
Release Setup - Folder Settings
Leave as is
Unless, you always want a document to be routed to a work basket or process.

Image Services
Kofax Capture System Administration Guide
Copyright @ “Solutions”, Inc. 1986-2010
Page 20
Release Setup - Image Settings
Recommend you use either
o MO:DCA or
o Multipage TIFF – CCITT Group 4

Image Services
Kofax Capture System Administration Guide
Copyright @ “Solutions”, Inc. 1986-2010
Page 21
Release Setup - Document Routing
Leave as is

Image Services
Kofax Capture System Administration Guide
Copyright @ “Solutions”, Inc. 1986-2010
Page 22
Release Script – Text
Use Kofax Capture Text Release Script if you want to save the scanned images to
your local system and not be stored as part of Content Manager
Will create a text file with the key information and document name
Documents can be stored as TIFF and/or PDF Images.

Image Services
Kofax Capture System Administration Guide
Copyright @ “Solutions”, Inc. 1986-2010
Page 23
Release Setup – Index Storage
Enter a file name to hold the index information
The above illustration would use the file called index.txt in the folder scans
Use Browse to find an existing file.
Will show all fields from Document Class Properties.
You can add field or remove fields.
Would only recommend adding fields if they are to have a system value or a text
value.
Starting with Version 9, you may customize the name of the file

Image Services
Kofax Capture System Administration Guide
Copyright @ “Solutions”, Inc. 1986-2010
Page 24
Release Setup – Document Storage
If not checked, marked Release Image Files
Enter the directory where you want the images to reside.
If you are creating PDF files, check Release Kodak PDF Files and enter the directory
where they should reside.
If the directories you have entered do not exist, you will be prompted to create them.
Not Required
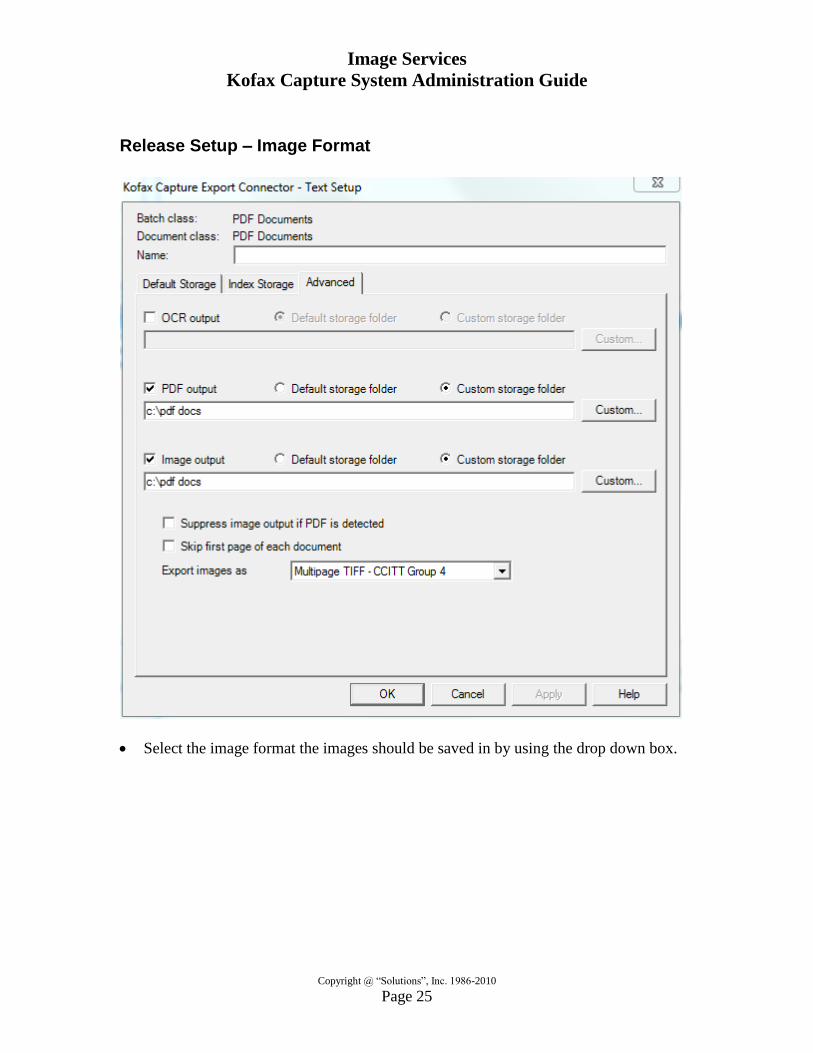
Image Services
Kofax Capture System Administration Guide
Copyright @ “Solutions”, Inc. 1986-2010
Page 25
Release Setup – Image Format
Select the image format the images should be saved in by using the drop down box.

Image Services
Kofax Capture System Administration Guide
Copyright @ “Solutions”, Inc. 1986-2010
Page 26
Form Type
Form types are created for a specific Document Class.
To see the Form Types for an Document Class, click on the + in front of the
Document Class on either the Batch or Document Tabs.
To create a new Form Type, highlight the appropriate Document Class, right click
and select New Form Type
To update an existing Form Type, highlight that form type, right click and select
Properties.
Form Type Properties – General
Enter the Name and a meaningful name of the Form Type.
If there are a fixed number of pages for each document, check Fixed number of pages
and enter the number of pages each document will have.
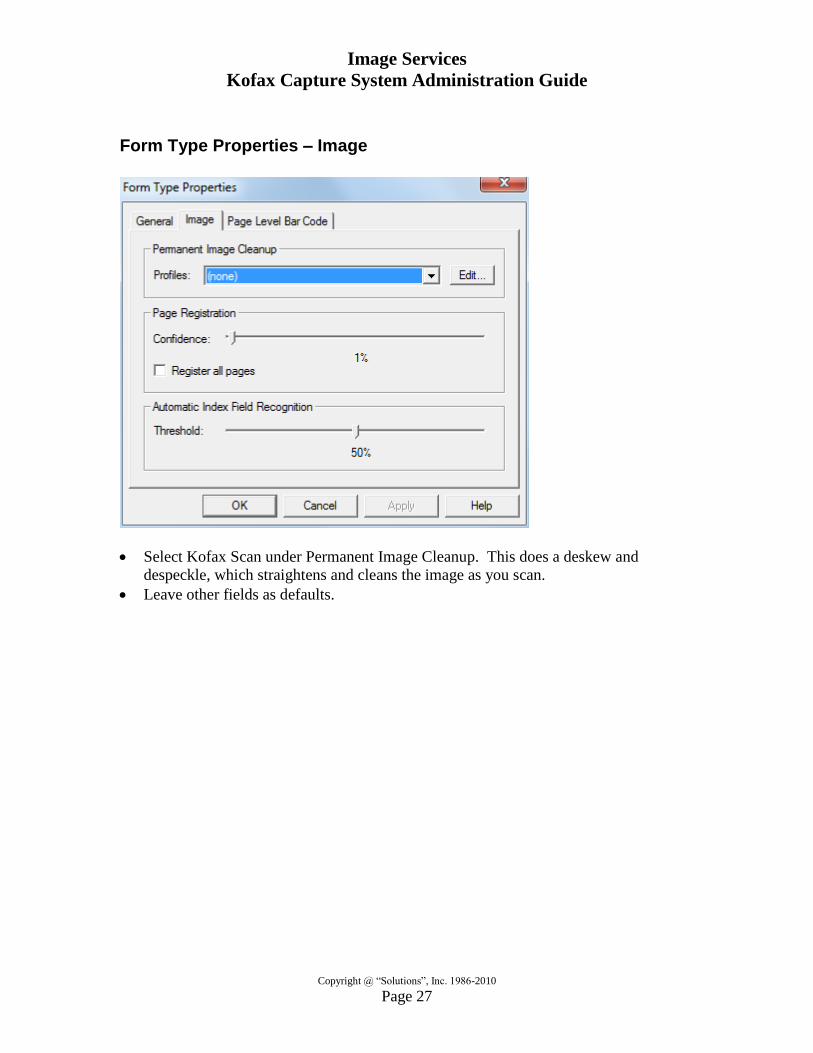
Image Services
Kofax Capture System Administration Guide
Copyright @ “Solutions”, Inc. 1986-2010
Page 27
Form Type Properties – Image
Select Kofax Scan under Permanent Image Cleanup. This does a deskew and
despeckle, which straightens and cleans the image as you scan.
Leave other fields as defaults.

Image Services
Kofax Capture System Administration Guide
Copyright @ “Solutions”, Inc. 1986-2010
Page 28
Form Type Properties – Page Level Bar Code
If doing page level bar code, select the type of bar code to search for under profiles.
Add Sample Page
This is only required if you will be using bar codes or OCR for this form type.
Click on the + in front of the Form Type to see existing sample pages.
Setup your scanner profile to match the DPI that you will be using to scan.
Recommend setting to 300/

Image Services
Kofax Capture System Administration Guide
Copyright @ “Solutions”, Inc. 1986-2010
Page 29
Publish
Whenever a Batch Class is created or changed it must be published for those changes
to be available to the Batch Manager.
From the Batch Tab, highlight the batch to be published, right click and select publish
or click on File and Publish
You may also disable a batch class through this process.
Highlight the Bath Class or Classes to be published and click on Publish
To Publish all click on Select All and Publish

Image Services
Kofax Capture System Administration Guide
Copyright @ “Solutions”, Inc. 1986-2010
Page 30
When all Classes are published, click on Close.
If there are any errors, you will need to correct those errors and republish.

Image Services
Kofax Capture System Administration Guide
Copyright @ “Solutions”, Inc. 1986-2010
Page 31
How To
Delete scanner profiles.
There are two ways to remove unused scanner profiles. The first is to open the file
„kscan.ini‟ and remove the sections that apply to the profiles you want to be rid of
(recommend you make a backup first). The second and safest way, is to remove the
kscan.ini file and recreate new scanner profiles just for the Batch Classes you want to
have profiles for.
Backup Kofax Capture Profiles
Open Kofax Capture Administration Module
Click On File
Click On Export
Click on Add All

Image Services
Kofax Capture System Administration Guide
Copyright @ “Solutions”, Inc. 1986-2010
Page 32
Click on Save As
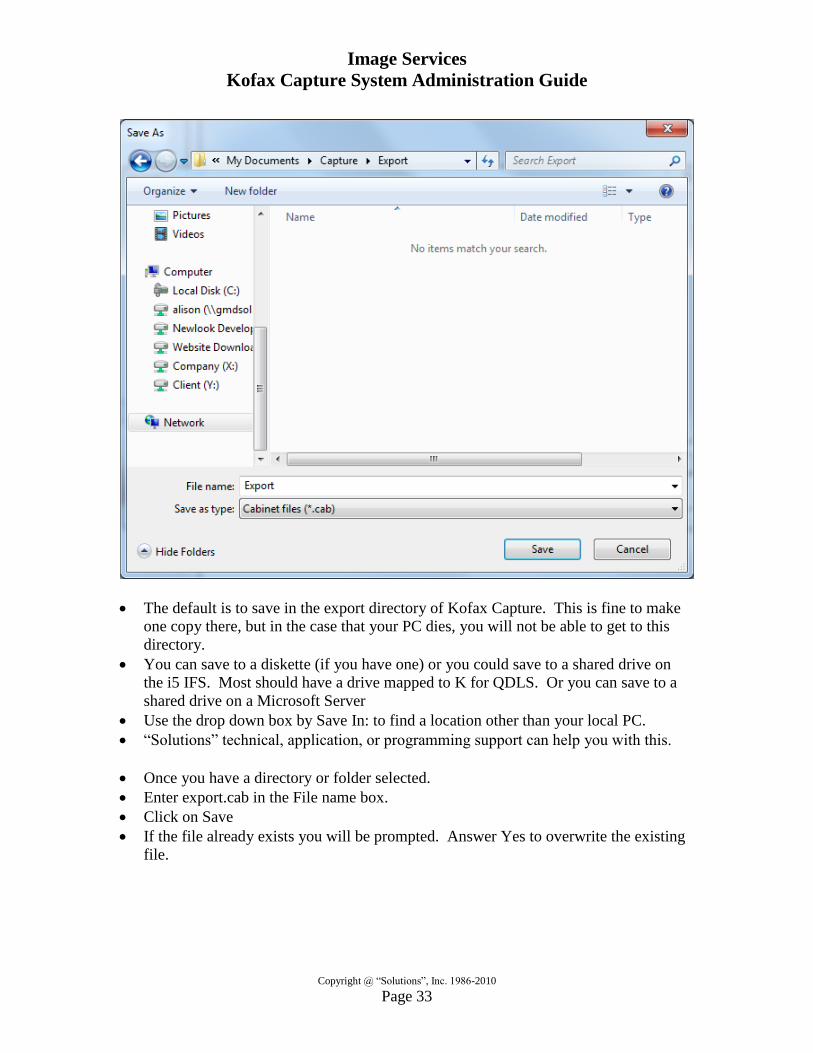
Image Services
Kofax Capture System Administration Guide
Copyright @ “Solutions”, Inc. 1986-2010
Page 33
The default is to save in the export directory of Kofax Capture. This is fine to make
one copy there, but in the case that your PC dies, you will not be able to get to this
directory.
You can save to a diskette (if you have one) or you could save to a shared drive on
the i5 IFS. Most should have a drive mapped to K for QDLS. Or you can save to a
shared drive on a Microsoft Server
Use the drop down box by Save In: to find a location other than your local PC.
“Solutions” technical, application, or programming support can help you with this.
Once you have a directory or folder selected.
Enter export.cab in the File name box.
Click on Save
If the file already exists you will be prompted. Answer Yes to overwrite the existing
file.

Image Services
Kofax Capture System Administration Guide
Copyright @ “Solutions”, Inc. 1986-2010
Page 34
Click on Export
When the export is done, Click on OK
Close Kofax Capture Administration window.

Image Services
Kofax Capture System Administration Guide
Copyright @ “Solutions”, Inc. 1986-2010
Page 35
Import Kofax Capture Profiles
Place the exported definition file x.cab on your desktop or in an accessible folder on
the network or your PC.
Open Kofax Capture Administration Module
Click On File
Click On Import
The default is to start in either the default import directory or the last directory you
imported from.
If this is not the directory where your export file is, navigate to that folder
Select the correct file and click on OPEN.

Image Services
Kofax Capture System Administration Guide
Copyright @ “Solutions”, Inc. 1986-2010
Page 36
Click on OK
Highlight Batch Class(es) to be imported and click on ADD
Click on Save Duplicates to new name at the bottom
When all are selected, click on Import.

Image Services
Kofax Capture System Administration Guide
Copyright @ “Solutions”, Inc. 1986-2010
Page 37
If there are any errors, you can either read the errors and try the import again, making
appropriate adjustments to your selections or call “Solutions” for assistance.
Click on OK
You should validate the Release Scripts are correct.
The imported batch classes will need to be published before they can be used.
Switch Dongle with another PC
PCs using the dongles must be at the same version of Kofax Capture
Switch Dongles on the PCs
The following steps must be done on each PC
Start the License Utilities
Start Programs Kofax Capture x.x License Utility
Click on File
Click On Active
Click on Automatic
When the licensing is done and was successful click on OK
Close the License Utility window
Copyright © 2022 FDOKUMEN