Capture & Replay - Spirent Support
11
Capture & Replay First Steps User’s Guide spirent.com General Information This user’s guide helps you to download and install TTworkbench, and guides you through the capture and replay process. For a successful proceeding please follow the instructions step by step! If you need any assistance, please contact Spirent’s customer care department: Mr. Dirk Borowski Manager Support Services Phone: +49 30 726 19 19 0 Email: [email protected]
-
Upload
khangminh22 -
Category
Documents
-
view
0 -
download
0
Transcript of Capture & Replay - Spirent Support

Capture & Replay First Steps User’s Guide
spirent.com
General Information This user’s guide helps you to download and install TTworkbench, and guides you through the capture and replay process. For a successful proceeding please follow the instructions step by step! If you need any assistance, please contact Spirent’s customer care department: Mr. Dirk Borowski Manager Support Services Phone: +49 30 726 19 19 0 Email: [email protected]

Spirent Capture & Replay First Steps User’s Guide
spirent.com | i
Table of Content 1. Requirements……………………………………………………………………………............. 3 2. Download…………………………………………………………………………………………..3 3. Installation………………………………………………………………………………………... 4
3.1. TTworkbench………………………………………………………………………………… 4 3.2. CaptureAddressBook Example……………………………………………………………. 4
4. Test Case Generation…………………………………………………………………………… 5 4.1. Capture & Replay Configuration…………………………………………………………… 5 4.2. Capture / Select Trace……………………………………………………………………… 5 4.3. Decode Events………………………………………………………………………………. 5 4.4. Group Events in Scenarios…………………………………………………………………. 6 4.5. Configure Test Cases………………………………………………………………………. 6 4.6. Generate TTCN-3…………………………………………………………………………… 7
5. Executing Generated Tests……………………………………………………………………... 7 6. Importing Trace Files…………………………………………………………………………….. 8 7. Captors……………………………………………………………………………………………. 8
7.1. Capture & Replay Preferences……………………………………………………............. 8 7.2. Capture Steps………………………………………………………………………............. 9 7.3. Terminal Capture……………………………………………………………………………10
8. Appendix…………………………………………………………………………………............11

Spirent Capture & Replay First Steps User’s Guide
spirent.com | 3/11
1. Requirements Operating Systems: Microsoft Windows 7/8/10 Linux (GTK2, x86-32, x86-64)
Java 2 Platform: Version 8 JDK or JRE Download at www.oracle.com/technetwork/java/javase/downloads/index.html. We strongly recommend using the above Java JDK. With the OpenJDK / IcedTea for Linux the TTworkbench license will not work correctly!
Memory: 2 GB (4 GB recommended) Reference ID and License File Before you download TTworkbench, make sure you received a valid license file. Otherwise please contact our sales team at [email protected].
2. Download Please use Spirent’s Customer Service Center at https://support.spirent.com. Step 1 In case you are not registered yet, go to https://support.spirent.com/CSC/register and fill in the registration form. The support team will check your data and notify you about your approval. Step 2 Login at Spirent’s CSC and click on the download app tab on the left side. Step 3 Select the product line TTworkbench and filter for categories and operating system. Download the purchased TTworkbench version.
Spirent Capture & Replay First Steps User’s Guide
spirent.com | 4/11
3. Installation
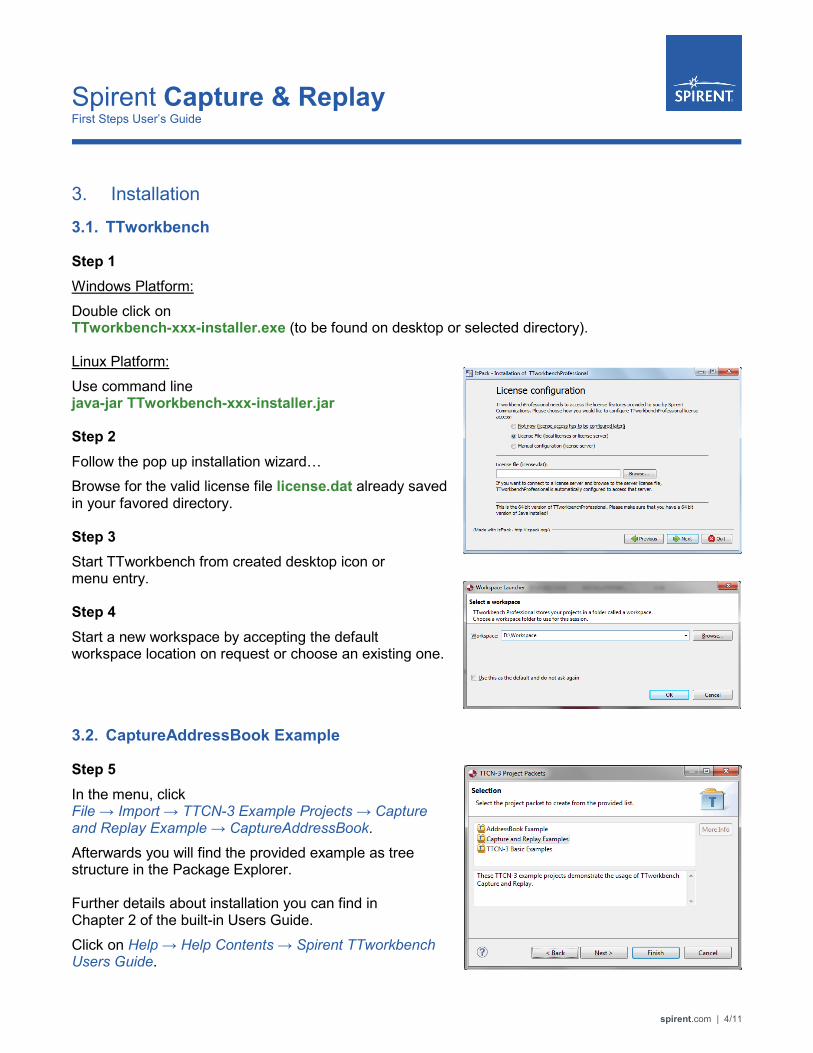
3.1. TTworkbench Step 1 Windows Platform: Double click on TTworkbench-xxx-installer.exe (to be found on desktop or selected directory). Linux Platform: Use command line java-jar TTworkbench-xxx-installer.jar Step 2 Follow the pop up installation wizard… Browse for the valid license file license.dat already saved in your favored directory. Step 3 Start TTworkbench from created desktop icon or menu entry. Step 4 Start a new workspace by accepting the default workspace location on request or choose an existing one.
3.2. CaptureAddressBook Example Step 5 In the menu, click File → Import → TTCN-3 Example Projects → Capture and Replay Example → CaptureAddressBook. Afterwards you will find the provided example as tree structure in the Package Explorer. Further details about installation you can find in Chapter 2 of the built-in Users Guide. Click on Help → Help Contents → Spirent TTworkbench Users Guide.

Spirent Capture & Replay First Steps User’s Guide
spirent.com | 5/11
4. Test Case Generation
4.1. Capture & Replay Configuration Step 1 Click on File → New → Capture Replay Session. Step 2 Select CaptureAddressBook as parent folder and click Finish.
4.2. Capture / Select Trace Step 3 A new Capture & Reply Editor will be opened. The “Capture Configuration” tab is shown. This tab can be used to capture new traces. For more details, please refer to Chapter 6. Step 4 If a trace is already available, switch to the “Trace Selection” tab to use it. Click on the button Browse under Select Trace details to select the trace folder. Step 5 In this example, a trace file can be found under CaptureAndReplayExample\Traces\Example_Capture. Go there and click OK. In the available traces field Local Jcap is shown.
4.3. Decode Events Step 6 In the “Protocols used for event decoding” section click the button Add… Step 7 Select AddressBookExample and click OK.

Spirent Capture & Replay First Steps User’s Guide
spirent.com | 6/11
Step 8 Switch to the “Select Events” tab. The events from the trace section will contain all those being decoded. Selecting an event will update the Dump View and Message View beneath. You can then check the message as a plain text or as a decoded data structure.
4.4. Group Events in Scenarios Step 9 In the “Events from the trace” section right click on any event and select Check conversation(s) containing selected events. Step 10 Click on Add in the “Events from the trace” section to add all selected events to a scenario (one will be created automatically). Step 11 Switch to the “Test Case Configuration” tab.
4.5. Configure Test Cases Step 12 Click on Add in the “Test Cases” section to create a new test case. Step 13 Select TestCase2, and in the “Component mapping” section checkbox 192.168.89.169:4545. Step 14 Type in ttcn3\generated in the “Output Folder” field as target folder for generated TTCN-3 code.

Spirent Capture & Replay First Steps User’s Guide
spirent.com | 7/11
4.6. Generate TTCN-3 Step 15 Click on the button Generate Test Suite, the TTCN-3 code will be generated. Two TTCN-3 files will be shown under ttcn3/generated:
• SC1.ttcn3 • testsuite_configuration.ttcn3
5. Executing Generated Tests Step 1 Compile testsuite_configuration.ttcn3. (Open the file and click the button Build or Rebuild from the toolbar). Step 2 Start the AddressBook server (SUT) by using LaunchServer.bat / LaunchServe.sh in command line. Step 3 In the TTCN-3 Projects view, right click on testsuite_configuration.ttcn3 and select Generate Default Test Campaign → Recursively. Step 4 Open testsuite_configuration.clf in the root directory of the project. It can be configured to any other destination in TTworkbench. Please refer to Help → Help Contents → Spirent TTworkbench Users Guide. Step 5 The Execution Perspective opens. In the Management View, select TestCase1 and click on Execute Tests to run the test. Step 6 Observe the test result using the TTCN-3 Graphical Logging view.

Spirent Capture & Replay First Steps User’s Guide
spirent.com | 8/11
6. Importing Trace Files
A trace folder shall contain one or more trace files (e.g. pcap files) and must be in the workspace. The folder can either be created manually and you copy the trace files into it, or can be generated automatically when using the import wizard. All trace files are stored by default in a trace folder. Step 1 Click on File → New → Capture & Replay Session. Step 2 Select a project to import to and click Next. Step 3 Click on Browse (from directory) and select the folder from where trace files will be imported. Step 4 Select the files to import and click Finish. The Capture & Replay Editor will open with the active “Trace Selection” tab.
7. Captors
In Chapter 6 it is described how to import some trace files created with other tools such as Wireshark. TTworkbench provides also capture function with its built-in captors.
7.1. Capture & Replay Preferences Captor Selection Open Window → Preferences → TTCN-3 → Capture & Replay to enable/disable captors. Enabled captors will appear in the Capture & Replay Editor as capture sources. The trace output folder determines the default location for saving new traces.

Spirent Capture & Replay First Steps User’s Guide
spirent.com | 9/11
Remote Jpcap The Remote Service is used to capture events on remote machines running the Capture Server. The Capture Server can be started by launching CaptureServer.bat / CaptureServer.sh in the TTworkbench install folder. In order to connect the remote service, the Service port and Service host need to be defined. Test Connection can be used to verify the connection. *Administrator rights are required for the Capture Server to function correctly. Terminal Connectors Terminal capture records terminal communication. Terminal Connectors store often used connection settings such as user, password, host, etc. Current connection types are: SSH, Telnet, Local (only on Linux and MacOSX) and Serial (RS232). Local Captor The local captor does not require any settings, if active it will list all available local interfaces. On Linux and MacOSX administrator rights are required to use the local captor, it is recommended to use the Remote Service for local capture.
7.2. Capture Steps Step 1 Open the Capture & Replay Wizard by clicking on File → New → Capture & Replay Session. Step 2 Enter a file name that does not exist in the selected project and click Finish. The Capture & Reply Editor will open with the “Capture Configuration” page selected. Step 3 Choose a capture name and select the desired captors. In case no captor is shown, click on the button Refresh, otherwise just click on the button Capture to begin capturing. The Terminal Capture view will be opened automatically if the Terminal Captor is selected (see 5.3 for details).

Spirent Capture & Replay First Steps User’s Guide
spirent.com | 10/11
Step 4 To end the capture, click Stop. The “Trace Selection” tab will be opened automatically. The captured traces are shown. The Terminal Capture view is still open. However, no more events will be recorded until capture is started again. Step 5 To see the captured events a protocol must be added. Click on Add… in the “Protocols used for event decoding” section. The “Add Protocol” dialog will open. Step 6 Select the appropriate protocol and click OK. Step 7 Switch to the “Select Events” tab. All the captured events will be listed.
7.3. Terminal Capture Terminal Capture View The Terminal Capture view is used to capture input / output from terminal connections such as SSH, Telnet and Local Terminal (only available on Linux and MacOSX). Initially no terminals are open, to open a terminal click on the drop down in the right corner and select one of the available Terminal Connectors (which were set in the preference page). More than one tab can be opened for a Terminal Connector, and several connectors can be used in parallel. The new terminal connection option allows temporary Terminal Connectors to be created.

Spirent Capture & Replay First Steps User’s Guide
spirent.com/ttworkbench
AMERICAS 1-800-SPIRENT +1-818-676-2683 | [email protected]
US Government & Defense [email protected] | spirentfederal.com
EUROPE AND THE MIDDLE EAST +44 (0) 1293 767979 | [email protected]
ASIA AND THE PACIFIC +86-10-8518-2539 | [email protected]
© Spirent Communications, Inc. All of the company names and/or brand names and/or product names and/or logos referred to in this document, in particular the name “Spirent” and its logo device, are either registered trademarks or trademarks pending registration in accordance with relevant national laws. All rights reserved. Specifications subject to change without notice.
Rev # 2017/04/06 11/11
8. Appendix Acronyms CL Editor Core Language Editor CLF Campaign Loader File IUT Implementation Under Test MBS Message Building System PCAP Packet Capture (e.g. used by Wireshark) MLF Module Loader File OS Operating System SUT System Under Test TLZ Test Logging Zip File Notes This document is subject to change without notice. Spirent Communications Michaelkirchstraße 17/18 10179 Berlin, Germany Phone +49 30 726 19 19 0 Fax: +49 30 726 19 19 20 Email: [email protected] Internet: www.spirent.com/ttworkbench