Administration Guide - One Identity Support
220
Safeguard Authentication Services 5.0.3 Administration Guide
-
Upload
khangminh22 -
Category
Documents
-
view
0 -
download
0
Transcript of Administration Guide - One Identity Support
Safeguard Authentication Services 5.0.3
Administration Guide

Copyright 2021 One Identity LLC.
ALL RIGHTS RESERVED.
This guide contains proprietary information protected by copyright. The software described in this guide is furnished under a software license or nondisclosure agreement. This software may be used or copied only in accordance with the terms of the applicable agreement. No part of this guide may be reproduced or transmitted in any form or by any means, electronic or mechanical, including photocopying and recording for any purpose other than the purchaser’s personal use without the written permission of One Identity LLC .The information in this document is provided in connection with One Identity products. No license, express or implied, by estoppel or otherwise, to any intellectual property right is granted by this document or in connection with the sale of One Identity LLC products. EXCEPT AS SET FORTH IN THE TERMS AND CONDITIONS AS SPECIFIED IN THE LICENSE AGREEMENT FOR THIS PRODUCT, ONE IDENTITY ASSUMES NO LIABILITY WHATSOEVER AND DISCLAIMS ANY EXPRESS, IMPLIED OR STATUTORY WARRANTY RELATING TO ITS PRODUCTS INCLUDING, BUT NOT LIMITED TO, THE IMPLIED WARRANTY OF MERCHANTABILITY, FITNESS FOR A PARTICULAR PURPOSE, OR NON-INFRINGEMENT. IN NO EVENT SHALL ONE IDENTITY BE LIABLE FOR ANY DIRECT, INDIRECT, CONSEQUENTIAL, PUNITIVE, SPECIAL OR INCIDENTAL DAMAGES (INCLUDING, WITHOUT LIMITATION, DAMAGES FOR LOSS OF PROFITS, BUSINESS INTERRUPTION OR LOSS OF INFORMATION) ARISING OUT OF THE USE OR INABILITY TO USE THIS DOCUMENT, EVEN IF ONE IDENTITY HAS BEEN ADVISED OF THE POSSIBILITY OF SUCH DAMAGES. One Identity makes no representations or warranties with respect to the accuracy or completeness of the contents of this document and reserves the right to make changes to specifications and product descriptions at any time without notice. One Identity does not make any commitment to update the information contained in this document.If you have any questions regarding your potential use of this material, contact:
One Identity LLC.Attn: LEGAL Dept4 Polaris WayAliso Viejo, CA 92656
Refer to our Web site (http://www.OneIdentity.com) for regional and international office information.
Patents
One Identity is proud of our advanced technology. Patents and pending patents may apply to this product. For the most current information about applicable patents for this product, please visit our website at http://www.OneIdentity.com/legal/patents.aspx.
Trademarks
One Identity and the One Identity logo are trademarks and registered trademarks of One Identity LLC. in the U.S.A. and other countries. For a complete list of One Identity trademarks, please visit our website at www.OneIdentity.com/legal. All other trademarks are the property of their respective owners.
Legend
WARNING: A WARNING icon highlights a potential risk of bodily injury or property damage, for which industry-standard safety precautions are advised. This icon is often associated with electrical hazards related to hardware.
CAUTION: A CAUTION icon indicates potential damage to hardware or loss of data if instructions are not followed.
Safeguard Authentication Services Administration GuideUpdated - 03 September 2021, 11:47Version - 5.0.3
Contents
Privileged Access Suite for Unix 10
About this guide 11
Introducing One Identity Safeguard Authentication Services 13
About licenses 13
System requirements 13
Windows and cloud requirements 14
Windows components 15
Windows permissions 15
Configure Active Directory 16
Unix agent requirements 21
Unix components 22
Permissions matrix 23
Encryption types 27
Management Console for Unix requirements 28
Network requirements 29
Unix administration and configuration 31
Joining the domain 31
Joining the domain using VASTOOL 32
Automatically generate user attributes 32
Unattended joining using Offline Domain Join (ODJ) credentials 33
Joining the domain using VASJOIN script 34
Using manual pages (man pages) 36
The configuration file 37
Unix login syntax 37
Keytab files 38
Handling platform limitations on user name length 38
Configuring Name Service Switch (NSS) 39
Using VASTOOL to configure NSS 39
Using NSCD 40
Forcing lowercase names 40
Configuring PAM 40
Safeguard Authentication Services 5.0.3 Administration Guide3
Using VASTOOL to configure PAM 41
Home directory creation 41
Kerberos ticket caches 42
Configuring AIX 42
Using VASTOOL to configure AIX 42
Configuring SELinux 43
Using VASTOOL to configure SELinux 43
Enabling diagnostic logging 44
Working with netgroups 46
Configuring netgroup support with name service 46
Unconfiguring netgroup support with name service 47
Cache administration 48
Blackout period 48
Disconnected authentication 49
Working with read-only domain controllers 50
Cross-forest authentication 50
One-way trust authentication 51
Supporting legacy LDAP applications 52
Installing the LDAP proxy 52
Configuring the LDAP proxy 53
IPv6 54
Identity management 55
Planning your user identity deployment strategy 55
User and group schema configuration 57
Configuring a custom schema mapping 57
Active Directory optimization (Best practice) 58
Managing Unix user accounts 59
Managing Unix users with MMC 59
Managing user accounts from the Unix command line 62
Managing users with Windows PowerShell 63
PowerShell cmdlets 64
Password management 66
Changing passwords 66
Mapping local users to Active Directory users 68
Using map files to map users 68
Safeguard Authentication Services 5.0.3 Administration Guide4

Mapping the root account 69
Enable self-enrollment 69
Automatically generating Posix user identities 70
Migrating auto-generated identities to enterprise identities 71
Migrating auto-generated group identities 71
Unix Personality Management 72
Unix Personality Management schema extension 72
Joining the domain in Unix Personality Management mode 73
Overriding Unix account information 73
Managing Unix group accounts 74
Nested group support 74
Managing Unix groups with MMC 74
Managing groups from the Unix command line 75
Managing groups with Windows PowerShell 76
Overriding Unix group information 77
Local account migration to Active Directory 78
AIX extended attribute support 78
Unix Account Import Wizard 80
Import Source Selection 80
Account matching rules 82
Search base selection 82
Account Association 82
Final Review 82
Results 83
Unix account management in large environments 83
User and group search paths 83
Minimizing the size of the user cache 83
Migrating from NIS 85
Using Safeguard Authentication Services to augment or replace NIS 85
RFC 2307 overview 86
RFC classes and attributes 86
Limitations of RFC 2307 as implemented by Microsoft 87
Installing and configuring the Safeguard Authentication Services NIS components 87
Installing and configuring the Linux NIS client components 88
Installing and configuring the Oracle Solaris NIS client components 89
Safeguard Authentication Services 5.0.3 Administration Guide5
Installing and configuring the HP-UX NIS client components 91
Installing and configuring the AIX NIS client components 92
NIS map search locations 93
Deploying in a NIS environment 93
Starting the NIS Map Import Wizard 93
Import RFC 2307 NIS map objects from a local file 94
Import RFC 2307 NIS map objects from an existing NIS server 95
Using NIS map command line administration utility 95
passwd, group, and netid maps 96
Specific vs generic maps 96
The VASYP daemon 96
Maintaining netgroup data 98
Managing access control 99
About host access control 99
Using "Logon To" for access control 100
Setting up access control 101
Configuring local file-based access control 101
Resolving conflicts between the allow and deny files 102
Per-service access control 104
Configuring access control on ESX 4 104
Configuring Sudo access control 105
Enabling sudo_vas 105
Certificate distribution policy 106
Managing local file permissions 107
The Ownership Alignment Tool 107
Using OAT 108
Installing OAT 109
Changing file ownership manually 110
Performing a cross-domain search 111
OAT matching scripts 111
Rollback changes 111
Changing file ownership using the script 112
OAT file formats 113
Active Directory User Information file 113
Safeguard Authentication Services 5.0.3 Administration Guide6
Active Directory Group Information file 114
User map file 115
Group map file 115
Local User Override file 116
Local Group Override file 116
Files to Process List file 117
Files to Exclude List file 117
Processed Files List file 118
Certificate Autoenrollment 119
Certificate Autoenrollment on UNIX and Linux 119
Certificate Autoenrollment requirements and setup 120
Java requirement: Unlimited Strength Jurisdiction Policy Files 122
Installing certificate enrollment web services 123
Configuring Certificate Services Client - Certificate Enrollment Policy Group Policy 123
Configuring Certificate Services Client - Auto-Enrollment Group Policy 124
Configuring Certificate Templates for autoenrollment 125
Using Certificate Autoenrollment 125
Configuring Certificate Autoenrollment manually 126
Configure a machine for Certificate Autoenrollment 126
Configure a user for Certificate Autoenrollment 127
Trigger machine-based Certificate Autoenrollment 127
Troubleshooting Certificate Autoenrollment 128
Certificate Autoenrollment process exited with an error 128
Enable full debug logging 129
Pulse Certificate Autoenrollment processing 130
Manually apply Group Policy 130
Command line tool 131
vascert command reference 131
vascert commands and arguments 132
Integrating with other applications 136
One Identity Starling integration 136
Starling Two-Factor Authentication requirements 137
Setting up Starling users 138
Joining Safeguard Authentication Services with Starling 139
Safeguard Authentication Services 5.0.3 Administration Guide7
Configuring Starling to use a proxy server 140
Starling Attributes: Configure LDAP attributes for use with push notifications 141
Logging in with Starling Two-Factor Authentication 142
Unjoining from Starling 143
Disabling Starling 2FA for a specific PAM service 143
Defender integration 143
Defender installation prerequisites 145
Installing Defender 145
Change Auditor for Authentication Services integration 146
Installing Change Auditor for Authentication Services 149
Application integration 150
Managing Unix hosts with Group Policy 152
Safeguard Authentication Services Group Policy 152
Group Policy 152
Administrative interface 153
Unix agent technology 153
Concepts 153
How Safeguard Authentication Services Group Policy works 154
Group Policy framework for Unix 154
Server-side extensions 154
vgptool 154
Client-side extensions 155
Administrative templates on Unix 156
Apply mode 156
Unix policies 157
Scripts 157
Refresh Scripts policy 157
Startup Scripts policy 158
Cron policy 159
Files policy 161
Dynamic File Copy policy 163
Login Prompt policy 164
Message of the Day policy 164
Samba Configuration policy 165
Symbolic Link policy 165
Safeguard Authentication Services 5.0.3 Administration Guide8
Syslog policy 167
Sudo policy 168
One Identity policies 169
Quest OpenSSH Configuration policy 169
Licensing policy 170
Defender Settings policy 170
Privilege Manager for Unix policy 171
Safeguard Authentication Services group policies 173
Safeguard Authentication Services policies 174
Display specifiers 180
Registering display specifiers 180
Unregistering display specifiers 181
Display specifier registration tables 182
Appendix: Troubleshooting 188
Getting help from technical support 188
Disaster recovery 189
Long startup delays on Windows 189
Pointer Record updates are rejected 189
Resolving preflight failures 190
Resolving DNS problems 193
Time synchronization problems 194
Unable to authenticate to Active Directory 194
Unable to install or upgrade 195
Unable to join the domain 195
Unable to log in 196
Unix Account tab is missing in ADUC 196
vasypd has unsatisfied dependencies 197
About us 198
Contacting us 198
Technical support resources 198
Glossary 199
Index 212
Safeguard Authentication Services 5.0.3 Administration Guide9
1
Privileged Access Suite for Unix
Unix security simplified
Privileged Access Suite for Unix solves the intrinsic security and administration issues of Unix-based systems (including Linux and macOS) while making satisfying compliance requirements easier. It unifies and consolidates identities, assigns individual accountability, and enables centralized reporting for user and administrator access to Unix. The Privileged Access Suite for Unix combines an Active Directory bridge and root delegation solutions under a unified console that grants organizations centralized visibility and streamlined administration of identities and access rights across their entire Unix environment.
Active Directory bridge
Achieve unified access control, authentication, authorization, and identity administration for Unix, Linux, and macOS systems by extending them into Active Directory (AD) and taking advantage of AD’s inherent benefits. Patented technology allows non-Windows resources to become part of the AD trusted realm, and extends AD’s security, compliance, and Kerberos-based authentication capabilities to Unix, Linux, and macOS. See www.oneidentity.com/products/safeguard-authentication-services/ for more information about the Active Directory Bridge product.
Root delegation
The Privileged Access Suite for Unix offers two different approaches to delegating the Unix root account. The suite either enhances or replaces sudo, depending on your needs.
l By choosing to enhance sudo, you will keep everything you know and love about sudo while enhancing it with features like a central sudo policy server, centralized keystroke logs, a sudo event log, and compliance reports for who can do what with sudo.
See www.oneidentity.com/products/privilege-manager-for-sudo/ for more information about enhancing sudo.
l By choosing to replace sudo, you will still be able to delegate the Unix root privilege based on centralized policy reporting on access rights, but with a more granular permission and the ability to log keystrokes on all activities from the time a user logs in, not just the commands that are prefixed with "sudo." In addition, this option
Safeguard Authentication Services 5.0.3 Administration Guide
Privileged Access Suite for Unix10
implements several additional security features like restricted shells, remote host command execution, and hardened binaries that remove the ability to escape out of commands and gain undetected elevated access.
See www.oneidentity.com/products/privilege-manager-for-unix/ for more information about replacing sudo.
Privileged Access Suite for Unix
Privileged Access Suite for Unix offers two editions: Standard edition and Advanced edition. Both editions include the Management Console for Unix, a common management console that provides a consolidated view and centralized point of management for local Unix users and groups; and Safeguard Authentication Services, patented technology that allows organizations to extend the security and compliance of Active Directory to Unix, Linux, and macOS platforms and enterprise applications. In addition:
l The Standard edition licenses you for Safeguard for Sudo.
l The Advanced edition licenses you for Privilege Manager for Unix.
One Identity recommends that you follow these steps:
1. Install Safeguard Authentication Services on one machine, so you can set up your Active Directory Forest.
2. Install Management Console for Unix, so you can perform all the other installation steps from the management console.
3. Add and profile hosts using the management console.
4. Configure the console to use Active Directory.
5. Deploy client software to remote hosts.
Depending on which Privileged Access Suite for Unix edition you have purchased, deploy one of the following:
l Privilege Manager for Unix software (that is, Privilege Manager Agent packages)
-OR-
l Safeguard for Sudo software (that is, Sudo Plugin packages)
About this guide
The Safeguard Authentication Services Administration Guide is intended for Windows, Unix*, Linux, and Macintosh system administrators, network administrators, consultants, analysts, and any other IT professionals responsible for deploying Safeguard Authentication Services. By following the instructions presented in this guide, a system administrator will be able to configure new or existing Unix, Linux, or macOS systems so they can authenticate user logins against user and group accounts stored in Windows Active Directory.
Safeguard Authentication Services 5.0.3 Administration Guide
Privileged Access Suite for Unix11

NOTE: The Safeguard Authentication Services Installation Guide, which can be found on the Safeguard Authentication Services - Technical Documentation page on the One Identity support site, walks you through one simple approach to installing Safeguard Authentication Services using the One Identity Management Console for Unix.
* The term "Unix" is used informally throughout the Safeguard Authentication Services documentation to denote any operating system that closely resembles the trademarked system, UNIX.
Safeguard Authentication Services 5.0.3 Administration Guide
Privileged Access Suite for Unix12
2
Introducing One Identity Safeguard Authentication Services
One Identity Safeguard Authentication Services is patented technology that enables organizations to extend the security and compliance of Active Directory to Unix, Linux, and macOS platforms and enterprise applications. It addresses the compliance need for cross-platform access control, the operational need for centralized authentication and single sign-on, and enables the unification of identities and directories for simplified identity and access management.
About licenses
Safeguard Authentication Services must be licensed in order for Active Directory users to authenticate on Unix and macOS hosts.
Considerations:
l New licenses have to be added prior to upgrade.
l You can install and configure Safeguard Authentication Services on Windows and use the included management tools to Unix-enable users and groups in Active Directory without installing a license. However, you must have a valid Safeguard Authentication Services license installed for full functionality.
l In order to use Starling Two-Factor Authentication, you must have a valid license for Safeguard Authentication Services.
To obtain a license, use the Licensing Assistance page on the One Identity support page or contact your account representative.
System requirements
Prior to installing Safeguard Authentication Services, ensure your system meets the minimum hardware and software requirements for your platform. Safeguard
Safeguard Authentication Services 5.0.3 Administration Guide
Introducing One Identity Safeguard Authentication Services13

Authentication Services consists of Windows management tools and Unix client agent components.
Windows and cloud requirements
The following are the minimum requirements for using Safeguard Authentication Services in your environment.
System requirements
Supported Windows Platforms
Prerequisite Windows software
If the following prerequisite is missing, the Safeguard Authentication Services installer suspends the installation process to allow you to download the required component. It then continues the install:
l Microsoft .NET Framework 4.5
You can install Safeguard Authentication Services on 64-bit editions of the following configurations:
l Windows Server 2008 R2
l Windows Server 2012
l Windows Server 2012 R2
l Windows Server 2016
l Windows Server 2019
NOTE: Due to tightened security, when running Safeguard Authentication Services Control Center on Windows 2008 R2 (or later) operating system, functioning as a domain controller, the process must be elevated or you must add authenticated users to the Distributed COM Users group on the computer. As a best practice, One Identity does not recommend that you install or run the Safeguard Authentication Services Windows components on Active Directory domain controllers. The recommended configuration is to install the Safeguard Authentication Services Windows components on an administrative workstation.
Supported cloud services
l AWS Directory Service for Microsoft Active Directory (also called AWS Managed Microsoft AD)
l Azure Active Directory Domain Services
l Google Cloud Platform Managed Service for Microsoft Active Directory
Table 1: Authentication Services requirements
Safeguard Authentication Services 5.0.3 Administration Guide
Introducing One Identity Safeguard Authentication Services14

Windows components
Safeguard Authentication Services includes the following Windows components.
Windows component Description
Safeguard Authentication Services Control Center
A single console for access to all of the tools and configuration settings for Safeguard Authentication Services.
Active Directory Users and Computers MMC Snapin Extensions
Unix management extensions for Active Directory users and groups.
Group Policy Management Editor MMC Snapin Extensions
Group Policy extensions for management of Unix, Linux, and macOS.
RFC2307 NIS Map Editor MMC Snapin
Provides the ability to manage NIS data in Active Directory.
NIS Map Import Wizard Imports NIS data into Active Directory.
Unix Account Import Wizard Imports Unix identity data into Active Directory.
Safeguard Authentication Services PowerShell cmdlets
Provides the ability to script Unix management tasks.
Documentation Full product documentation and online help.
Table 2: Windows components
Windows permissions
To install Safeguard Authentication Services on Windows, you must have:
l Local administrator rights
l Rights to create and delete all child objects in the container where you will install the configuration settings (first-time only)
Authenticated Users must have rights to read cn, displayName, description, and whenCreated attributes for container objects in the application configuration location. To change Active Directory configuration settings, Administrators must have rights to Create Child Object (container) and Write Attribute for cn, displayName, description, and showInAdvancedViewOnly in the application configuration location.
Safeguard Authentication Services 5.0.3 Administration Guide
Introducing One Identity Safeguard Authentication Services15

Rights required
For user Object class
Attributes
Create Child Object
Safeguard Authentication Services Administrators Only
Container
Delete Child Object
Safeguard Authentication Services Administrators Only
Container
Delete Child Object
Safeguard Authentication Services Administrators Only
Container
Write Attribute
Safeguard Authentication Services Administrators Only
Container cn, displayName, description, showInAdvancedViewOnly
Read Attribute
Authenticated Users Container cn, displayName, description, whenCreated
Table 3: Required Windows permissions
Configure Active Directory
To utilize full Active Directory functionality, when you install Safeguard Authentication Services in your environment, One Identity recommends that you prepare Active Directory to store the configuration settings that it uses. Safeguard Authentication Services adds the Unix properties of Active Directory users and groups to Active Directory and allows you to map a Unix user to an Active Directory user. This is a one-time process that creates the Safeguard Authentication Services application configuration in your forest.
NOTE: To use the Safeguard Authentication Services Active Directory Configuration Wizard, you must have rights to create and delete all child objects in the Active Directory container.
If you do not configure Active Directory for Safeguard Authentication Services, you can run your Safeguard Authentication Services client agent in Version 3 Compatibility Mode, which allows you to join a host to an Active Directory domain.
For more information, see Version 3 Compatibility Mode on page 20..
When running Safeguard Authentication Services client agent in Version 3 Compatibility Mode, you have the option in One Identity Management Console for Unix to set the schema configuration to use Windows 2003 R2. See Configure Windows 2003 R2 Schema in the management console online help for details. The Windows 2003 R2 schema option extends the schema to support the direct look up of Unix identities in Active Directory domain servers.
You can also create the Safeguard Authentication Services application configuration from the Unix command line, if you prefer. For more information, see Creating the Application
Safeguard Authentication Services 5.0.3 Administration Guide
Introducing One Identity Safeguard Authentication Services16

Configuration from the Unix Command Line in the Safeguard Authentication Services Installation Guide.
Configuring Active Directory
The first time you install Safeguard Authentication Services in your environment, One Identity recommends that you perform this one-time Active Directory configuration step to utilize full Safeguard Authentication Services functionality.
NOTE: If you do not configure Active Directory for Safeguard Authentication Services, you can run your Safeguard Authentication Services client agent in Version 3 Compatibility Mode, which allows you to join a host to an Active Directory domain.
For more information, see Version 3 Compatibility Mode on page 20..
To configure Active Directory for Safeguard Authentication Services
1. In the Safeguard Authentication Services Active Directory Configuration Wizard Welcome dialog, click Next.
2. In the Connect to Active Directory dialog:
a. Provide Active Directory login credentials for the wizard to use for this task:
l Select Use my current AD logon credentials if you are a user with permission to create a container in Active Directory.
l Select Use different AD logon credentials to specify the Active Directory credentials of another user, enter the User name and Password.
NOTE: The wizard does not save these credentials; it only uses them for this setup task.
b. Indicate how you want to connect to Active Directory:
Select whether to connect to an Active Directory Domain Controller or One Identity Active Roles Server.
NOTE: If you have not installed the One Identity Active Roles Server MMC Console on your computer, the ActiveRoles Server option is not available.
c. Optionally enter the domain or domain controller and click Next.
3. In the License Safeguard Authentication Services dialog, for Add a license, browse to select your license file and click Next.
Refer to About licenses on page 13 for more information about licensing requirements.
NOTE: You can add additional licenses later from Safeguard Authentication Services Control Center | Preferences | Licensing.
4. In the Configure Settings in Active Directory dialog, accept the default location in which to store the configuration or browse to select the Active Directory location where you want to create the container and click Setup.
Safeguard Authentication Services 5.0.3 Administration Guide
Introducing One Identity Safeguard Authentication Services17
NOTE: You must have rights to create and delete all child objects in the selected location. For more information on the structure and rights required see Windows permissions on page 15.
5. Once you have configured Active Directory for Safeguard Authentication Services a message like this displays: You've successfully completed the setup. Click Close.
The Control Center opens. You are now ready to configure your Unix Agent Components.
Refer to Configure Unix Agent Components in the Safeguard Authentication Services Installation Guide for more information.
About Active Directory configuration
The first time you install or upgrade the Safeguard Authentication ServicesWindows components in your environment, One Identity recommends that you configure Active Directory for Safeguard Authentication Services to utilize full functionality. This is a one-time Active Directory configuration step that creates the application configuration in your forest. Safeguard Authentication Services uses the information found in the application configuration to maintain consistency across the enterprise. Without the application configuration, store UNIX attributes in the RFC2307 standard attributes to achieve the most functionality.
NOTE: If you do not configure Active Directory for Safeguard Authentication Services, you can run your client agent in Version 3 Compatibility Mode, which allows you to join a host to an Active Directory domain.
For more information, see For more information, see Version 3 Compatibility Mode on page 20..
The Safeguard Authentication Services application configuration stores the following information in Active Directory:
l Application Licenses
l Settings controlling default values and behavior for Unix-enabled users and groups
l Schema configuration
The Unix agents use the Active Directory configuration to validate license information and determine schema mappings. Windows management tools read this information to determine the schema mappings and the default values it uses when Unix-enabling new users and groups.
The Safeguard Authentication Services application configuration information is stored inside a container object with the specific naming of: cn={786E0064-A470-46B9-83FB-C7539C9FA27C}. The default location for this container is cn=Program Data,cn=Quest Software,cn=Authentication Services,dc=<your domain>. This location is configurable.
There can only be one Active Directory configuration per forest. If Safeguard Authentication Services finds multiple configurations, it uses the one created first as determined by reading the whenCreated attribute. The only time this would be a problem is if different groups were using different schema mappings for Unix attributes in Active Directory. In that case, standardize on one schema and use local override files to resolve conflicts.
Safeguard Authentication Services 5.0.3 Administration Guide
Introducing One Identity Safeguard Authentication Services18

You can use the Set-QasUnixUser and Set-QasUnixGroup PowerShell commands to migrate Unix attributes from one schema configuration to another. Refer to the PowerShell help for more information.
The first time you run the Control Center, the Safeguard Authentication Services Active Directory Configuration Wizard walks you through the setup.
NOTE: You can also create the Safeguard Authentication Services application configuration from the Unix command line, if you prefer.
For more information, see Creating the Application Configuration from the Unix Command Line in the Safeguard Authentication Services Installation Guide.
You can modify the settings using Safeguard Authentication ServicesControl Center| Preferences. To change Active Directory configuration settings, you must have rights to Create Child Object (container) and Write Attribute for cn, displayName, description, showInAdvancedViewOnly for the Active Directory configuration root container and all child objects.
In order for Unix clients to read the configuration, authenticated users must have rights to read cn, displayName, description, and whenCreated attributes for container objects in the application configuration. For most Active Directory configurations, this does not require any change.
The following table summarizes the required rights.
Rights required
For user Object class
Attributes
Create Child Object
Safeguard Authentication Services Administrators Only
Container cn, displayName, description, showInAdvancedViewOnly
Write Attribute
Safeguard Authentication Services Administrators Only
Container
Read Attribute
Authenticated Users Container cn, displayName, description, whenCreated
Table 4: Safeguard Authentication Services Required rights
At any time you can completely remove the Safeguard Authentication Services application configuration using the Remove-QasConfiguration cmdlet. However, without the application configuration, Safeguard Authentication Services Active Directory-based management tools do not function.
Safeguard Authentication Services 5.0.3 Administration Guide
Introducing One Identity Safeguard Authentication Services19
Join the host to AD without the Safeguard Authentication Services application configuration
You can install the Safeguard Authentication Services Agent on a Unix system and join it to Active Directory without installing Safeguard Authentication Services on Windows and setting up the Safeguard Authentication Services Application Configuration.
The Safeguard Authentication Services 4.x client-side agent required detection of a directory-based Application Configuration data object within the Active Directory forest in order to join the host computer to the Active Directory Domain. Safeguard Authentication Services 4.0.2 removed this requirement for environments where directory-based User and/or Group identity information is not needed on the host Unix computer. These environments include full Mapped-User environments, GSSAPI based authentication-only environments, or configurations where the Safeguard Authentication Services agent will auto-generate posix attributes for Active Directory Users and Groups objects.
Version 3 Compatibility Mode
When upgrading to or installing Safeguard Authentication Services 4.x, you can choose not to configure Active Directory for Safeguard Authentication Services and run your Safeguard Authentication Services client agent in Version 3 Compatibility Mode. While this prevents you from running the Control Center and accessing its many features and tools, you can join a host to an Active Directory domain when operating in Version 3 Compatibility Mode.
NOTE: When you run the join command without first creating a One Identity Application Configuration, Safeguard Authentication Services displays a warning.
Without the Safeguard Authentication Services application configuration the following information is stored locally:
l Application Licenses
l Settings controlling default values and behavior for Unix-enabled users and groups
l Schema configuration
Best practice
Because Version 3 Compatibility Mode does not allow you run the Control Center and access its many features and tools, One Identity recommends that you create the application configuration so you can utilize full Safeguard Authentication Services functionality.
There are two ways to create the application configuration:
l When you start the Control Center from a Windows workstation, the Set up Safeguard Authentication Services Active Directory Configuration Wizard starts automatically to lead you through the process of configuring Active Directory for Safeguard Authentication Services.
Safeguard Authentication Services 5.0.3Administration Guide
20

l Alternatively, you can run vastool configure ad from the Unix command line to create the One Identity Application Configuration in Active Directory.
Unix agent requirements
NOTE: To install Safeguard Authentication Services on Unix, Linux, or macOS, you must have root access rights.
NOTE: With Safeguard Authentication Services 4.2 and later, Linux platforms require glibc 2.4 (or later).
The following table provides a list of supported Unix and Linux platforms for Safeguard Authentication Services.
Platform Version Architecture
Amazon Linux AMI x86_64
Apple MacOS 10.14 or later x86_64, ARM64
CentOS Linux 5, 6, 7, 8 Current Linux architectures: s390, s390x, PPC64, PPC64le, IA-64, x86, x86_64, AARCH64
Debian Current supported releases
x86_64, x86, AARCH64
Fedora Linux Current supported releases
x86_64, x86, AARCH64
FreeBSD 10.x, 11.x, 12.x
x32, x64
HP-UX 11.31 PA, IA-64
IBM AIX 6.1, 7.1, 7.2 Power 4+
OpenSuSE Current supported releases
x86_64, x86, AARCH64
Oracle Enterprise Linux (OEL)
5, 6, 7, 8 Current Linux architectures: s390, s390x, PPC64, PPC64le, IA-64, x86, x86_64, AARCH64
Oracle Solaris 10 8/11 (Update 10),
11.x
SPARC, x64
Table 5: Unix agent: Supported platforms
Safeguard Authentication Services 5.0.3Administration Guide
21
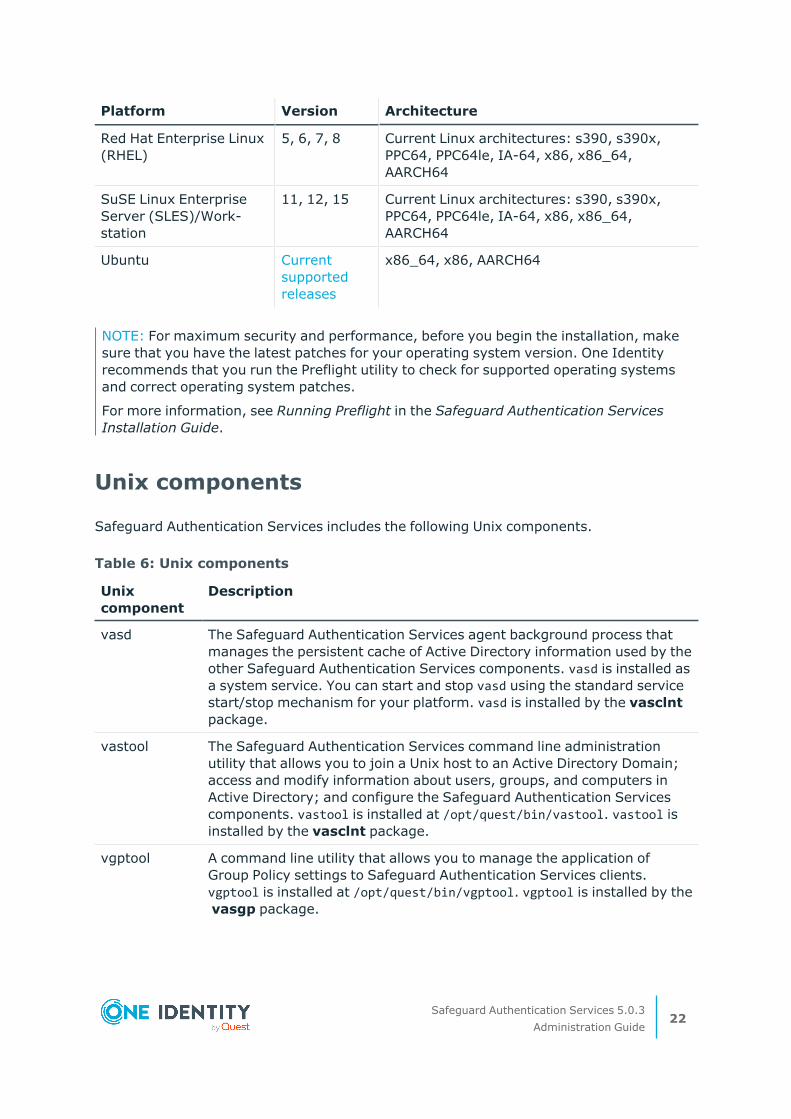
Platform Version Architecture
Red Hat Enterprise Linux (RHEL)
5, 6, 7, 8 Current Linux architectures: s390, s390x, PPC64, PPC64le, IA-64, x86, x86_64, AARCH64
SuSE Linux Enterprise Server (SLES)/Work-station
11, 12, 15 Current Linux architectures: s390, s390x, PPC64, PPC64le, IA-64, x86, x86_64, AARCH64
Ubuntu Current supported releases
x86_64, x86, AARCH64
NOTE: For maximum security and performance, before you begin the installation, make sure that you have the latest patches for your operating system version. One Identity recommends that you run the Preflight utility to check for supported operating systems and correct operating system patches.
For more information, see Running Preflight in the Safeguard Authentication Services Installation Guide.
Unix components
Safeguard Authentication Services includes the following Unix components.
Unix component
Description
vasd The Safeguard Authentication Services agent background process that manages the persistent cache of Active Directory information used by the other Safeguard Authentication Services components. vasd is installed as a system service. You can start and stop vasd using the standard service start/stop mechanism for your platform. vasd is installed by the vasclnt package.
vastool The Safeguard Authentication Services command line administration utility that allows you to join a Unix host to an Active Directory Domain; access and modify information about users, groups, and computers in Active Directory; and configure the Safeguard Authentication Services components. vastool is installed at /opt/quest/bin/vastool. vastool is installed by the vasclnt package.
vgptool A command line utility that allows you to manage the application of Group Policy settings to Safeguard Authentication Services clients. vgptool is installed at /opt/quest/bin/vgptool. vgptool is installed by the vasgp package.
Table 6: Unix components
Safeguard Authentication Services 5.0.3Administration Guide
22
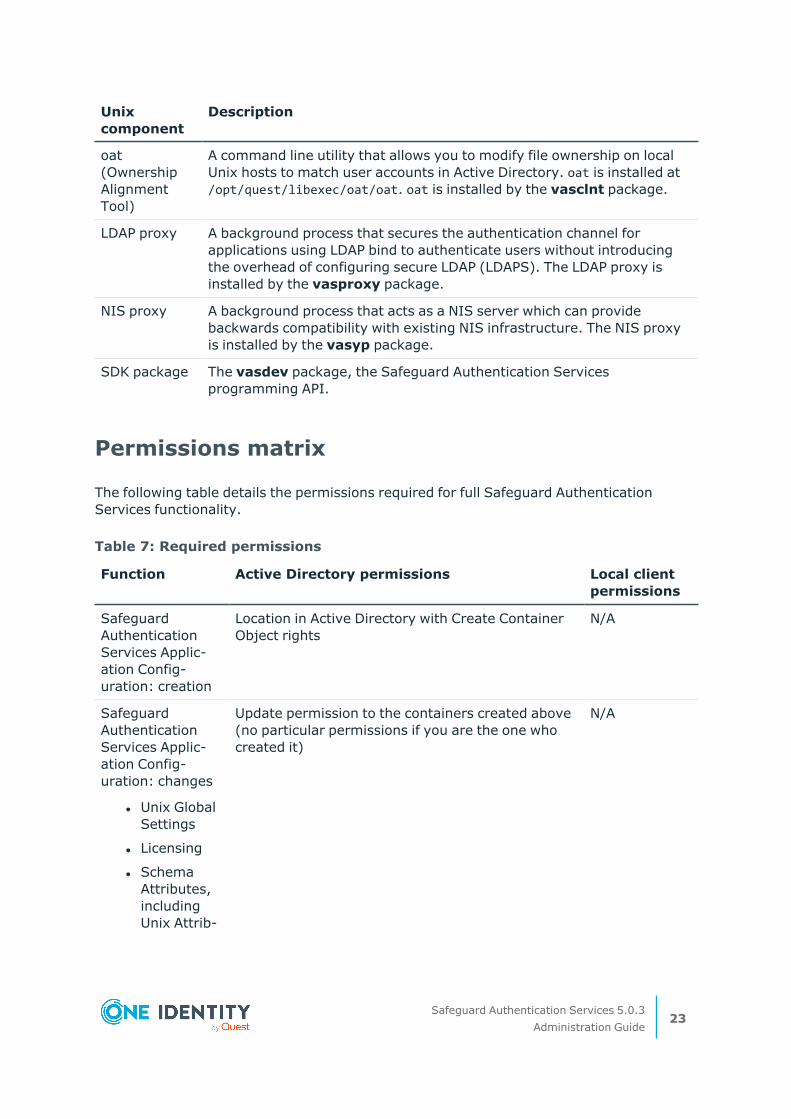
Unix component
Description
oat (Ownership Alignment Tool)
A command line utility that allows you to modify file ownership on local Unix hosts to match user accounts in Active Directory. oat is installed at /opt/quest/libexec/oat/oat. oat is installed by the vasclnt package.
LDAP proxy A background process that secures the authentication channel for applications using LDAP bind to authenticate users without introducing the overhead of configuring secure LDAP (LDAPS). The LDAP proxy is installed by the vasproxy package.
NIS proxy A background process that acts as a NIS server which can provide backwards compatibility with existing NIS infrastructure. The NIS proxy is installed by the vasyp package.
SDK package The vasdev package, the Safeguard Authentication Services programming API.
Permissions matrix
The following table details the permissions required for full Safeguard Authentication Services functionality.
Function Active Directory permissions Local client permissions
Safeguard Authentication Services Applic-ation Config-uration: creation
Location in Active Directory with Create Container Object rights
N/A
Safeguard Authentication Services Applic-ation Config-uration: changes
l Unix Global Settings
l Licensing
l Schema Attributes, including Unix Attrib-
Update permission to the containers created above (no particular permissions if you are the one who created it)
N/A
Table 7: Required permissions
Safeguard Authentication Services 5.0.3Administration Guide
23
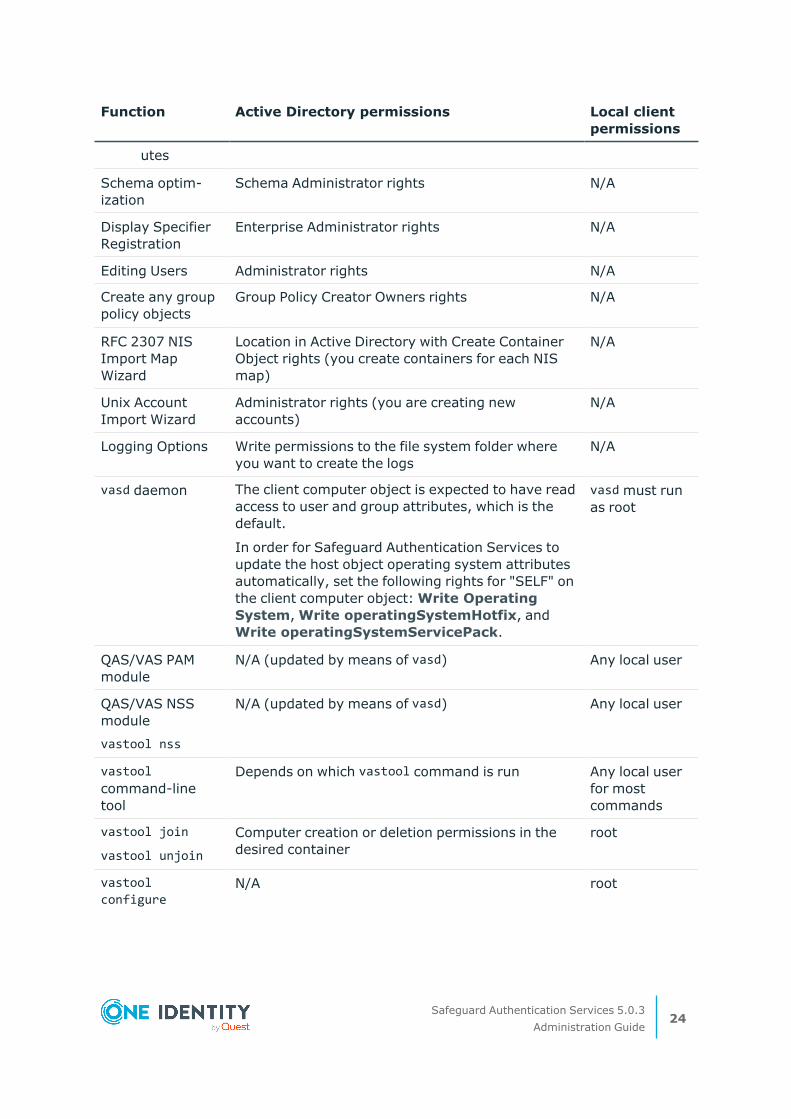
Function Active Directory permissions Local client permissions
utes
Schema optim-ization
Schema Administrator rights N/A
Display Specifier Registration
Enterprise Administrator rights N/A
Editing Users Administrator rights N/A
Create any group policy objects
Group Policy Creator Owners rights N/A
RFC 2307 NIS Import Map Wizard
Location in Active Directory with Create Container Object rights (you create containers for each NIS map)
N/A
Unix Account Import Wizard
Administrator rights (you are creating new accounts)
N/A
Logging Options Write permissions to the file system folder where you want to create the logs
N/A
vasd daemon The client computer object is expected to have read access to user and group attributes, which is the default.
In order for Safeguard Authentication Services to update the host object operating system attributes automatically, set the following rights for "SELF" on the client computer object: Write Operating System, Write operatingSystemHotfix, and Write operatingSystemServicePack.
vasd must run as root
QAS/VAS PAM module
N/A (updated by means of vasd) Any local user
QAS/VAS NSS module
vastool nss
N/A (updated by means of vasd) Any local user
vastool command-line tool
Depends on which vastool command is run Any local user for most commands
vastool join
vastool unjoin
Computer creation or deletion permissions in the desired container
root
vastool configure
N/A root
Safeguard Authentication Services 5.0.3Administration Guide
24
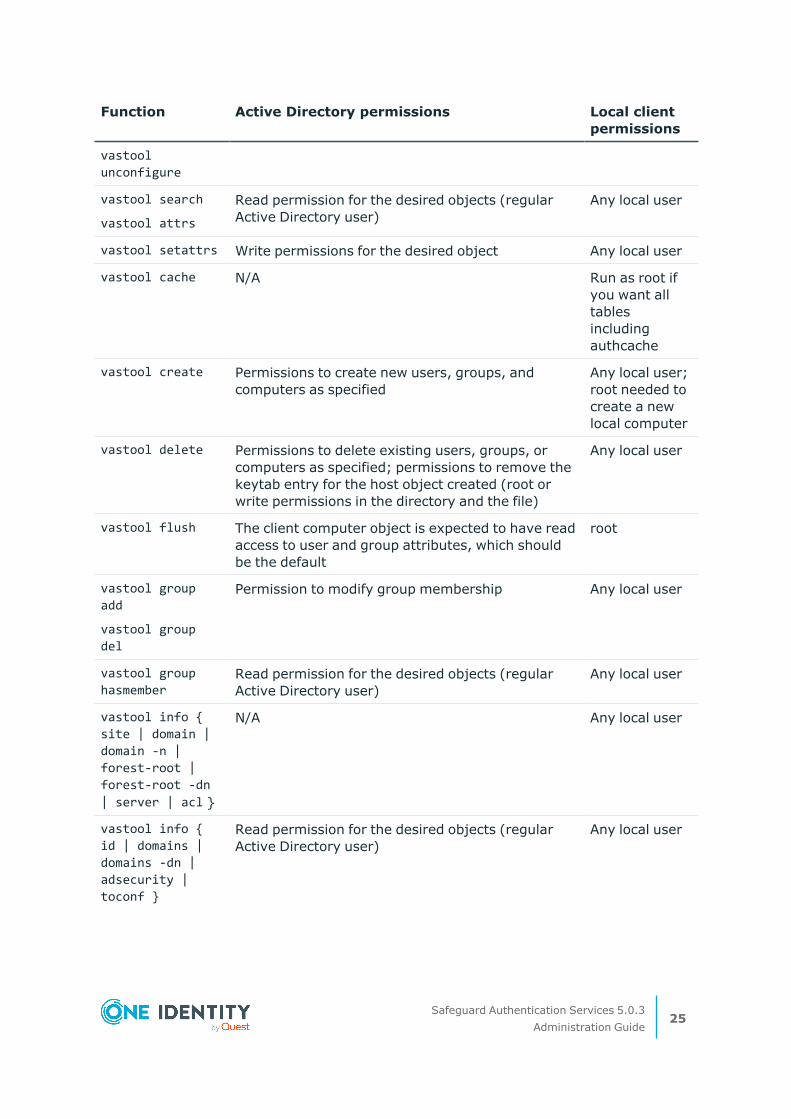
Function Active Directory permissions Local client permissions
vastool unconfigure
vastool search
vastool attrs
Read permission for the desired objects (regular Active Directory user)
Any local user
vastool setattrs Write permissions for the desired object Any local user
vastool cache N/A Run as root if you want all tables including authcache
vastool create Permissions to create new users, groups, and computers as specified
Any local user; root needed to create a new local computer
vastool delete Permissions to delete existing users, groups, or computers as specified; permissions to remove the keytab entry for the host object created (root or write permissions in the directory and the file)
Any local user
vastool flush The client computer object is expected to have read access to user and group attributes, which should be the default
root
vastool group add
vastool group del
Permission to modify group membership Any local user
vastool group hasmember
Read permission for the desired objects (regular Active Directory user)
Any local user
vastool info { site | domain | domain -n | forest-root | forest-root -dn | server | acl }
N/A Any local user
vastool info { id | domains | domains -dn | adsecurity | toconf }
Read permission for the desired objects (regular Active Directory user)
Any local user
Safeguard Authentication Services 5.0.3Administration Guide
25
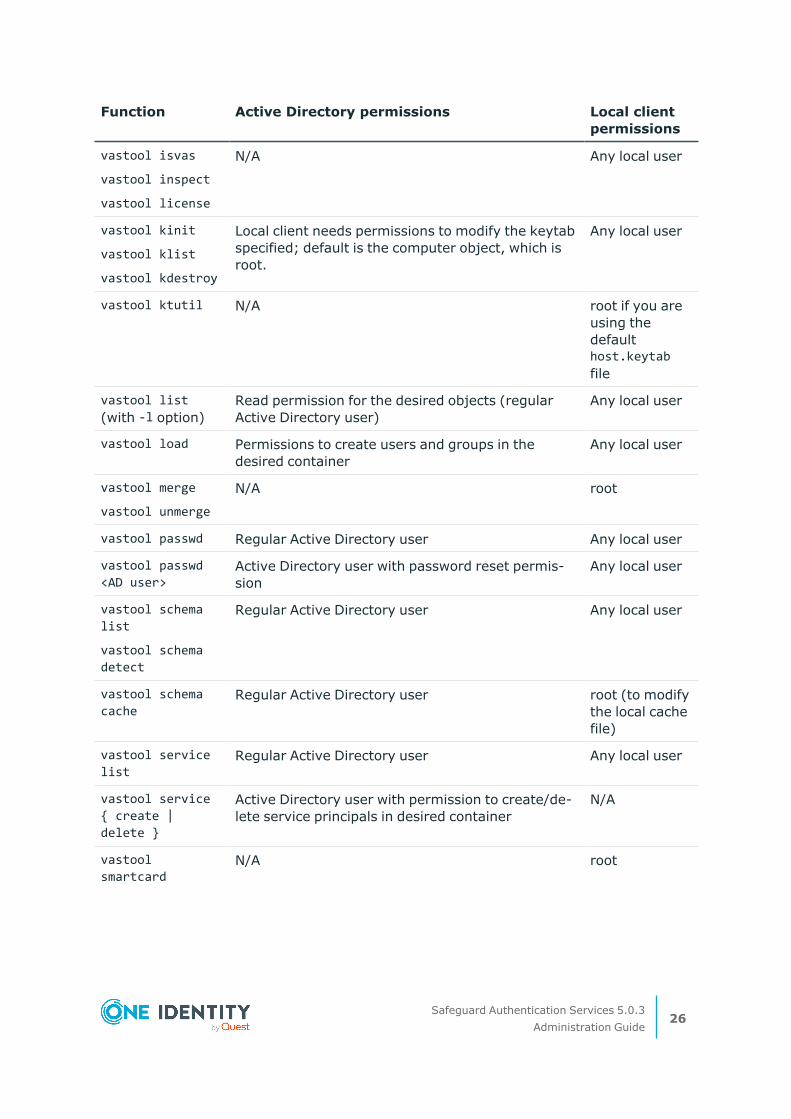
Function Active Directory permissions Local client permissions
vastool isvas
vastool inspect
vastool license
N/A Any local user
vastool kinit
vastool klist
vastool kdestroy
Local client needs permissions to modify the keytab specified; default is the computer object, which is root.
Any local user
vastool ktutil N/A root if you are using the default host.keytab file
vastool list (with -l option)
Read permission for the desired objects (regular Active Directory user)
Any local user
vastool load Permissions to create users and groups in the desired container
Any local user
vastool merge
vastool unmerge
N/A root
vastool passwd Regular Active Directory user Any local user
vastool passwd <AD user>
Active Directory user with password reset permis-sion
Any local user
vastool schema list
vastool schema detect
Regular Active Directory user Any local user
vastool schema cache
Regular Active Directory user root (to modify the local cache file)
vastool service list
Regular Active Directory user Any local user
vastool service { create | delete }
Active Directory user with permission to create/de-lete service principals in desired container
N/A
vastool smartcard
N/A root
Safeguard Authentication Services 5.0.3Administration Guide
26

Function Active Directory permissions Local client permissions
vastool starling {list | detect [-d domain] | cache | check}
Regular Active Directory user Any local user (for list, detect, check)
root (for cache)
vastool status N/A root
vastool timesync N/A root, if you only query the time from AD, you can run as any local user
vastool user { enable | disable }
Modify permissions on the AD Object Any local user
vastool user { checkaccess | checkconflict }
N/A Any local user
vastool user checklogin
Access to Active Directory users password Any local user
Encryption types
The following table details the encryption types used in Safeguard Authentication Services.
Encryption types
Specification Active Directory version
Safeguard Authentication Services version
KERB_ENCTYPE_DES_CBC_CRC
CRC32 RFC 3961 All All
KERB_ENCTYPE_DES_CBC_MD5
RSA-MD5 RFC 3961 All All
KERB_ENCTYPE_RC4_HMAC_MD5
RC4-HMAC-MD5 RFC 4757 All All
KERB_ENCTYPE_AES128_CTS_HMAC_SHA1_96
HMAC-SHA1-96- RFC 3961 Windows Server 3.3.2+
Table 8: Encryption types
Safeguard Authentication Services 5.0.3Administration Guide
27
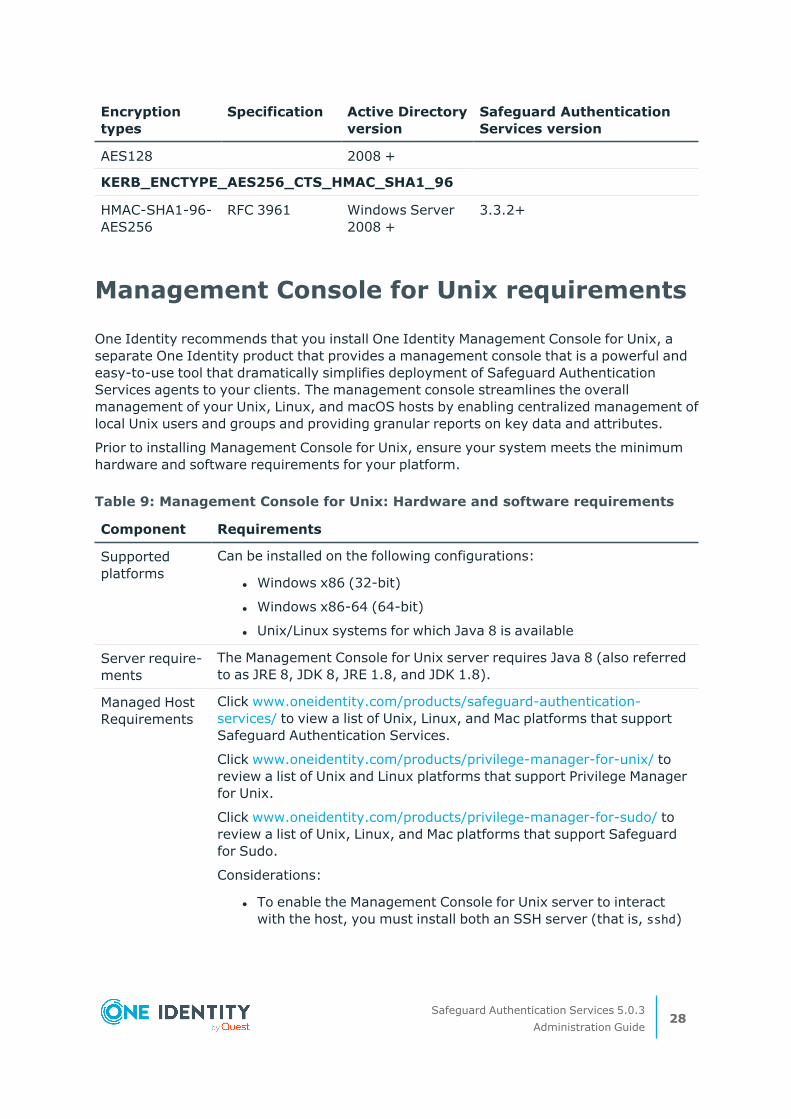
Encryption types
Specification Active Directory version
Safeguard Authentication Services version
AES128 2008 +
KERB_ENCTYPE_AES256_CTS_HMAC_SHA1_96
HMAC-SHA1-96-AES256
RFC 3961 Windows Server 2008 +
3.3.2+
Management Console for Unix requirements
One Identity recommends that you install One Identity Management Console for Unix, a separate One Identity product that provides a management console that is a powerful and easy-to-use tool that dramatically simplifies deployment of Safeguard Authentication Services agents to your clients. The management console streamlines the overall management of your Unix, Linux, and macOS hosts by enabling centralized management of local Unix users and groups and providing granular reports on key data and attributes.
Prior to installing Management Console for Unix, ensure your system meets the minimum hardware and software requirements for your platform.
Component Requirements
Supported platforms
Can be installed on the following configurations:
l Windows x86 (32-bit)
l Windows x86-64 (64-bit)
l Unix/Linux systems for which Java 8 is available
Server require-ments
The Management Console for Unix server requires Java 8 (also referred to as JRE 8, JDK 8, JRE 1.8, and JDK 1.8).
Managed Host Requirements
Click www.oneidentity.com/products/safeguard-authentication-services/ to view a list of Unix, Linux, and Mac platforms that support Safeguard Authentication Services.
Click www.oneidentity.com/products/privilege-manager-for-unix/ to review a list of Unix and Linux platforms that support Privilege Manager for Unix.
Click www.oneidentity.com/products/privilege-manager-for-sudo/ to review a list of Unix, Linux, and Mac platforms that support Safeguard for Sudo.
Considerations:
l To enable the Management Console for Unix server to interact with the host, you must install both an SSH server (that is, sshd)
Table 9: Management Console for Unix: Hardware and software requirements
Safeguard Authentication Services 5.0.3Administration Guide
28
Component Requirements
and an SSH client on each managed host. Both OpenSSH 2.5 (and higher) and Tectia SSH 5.0 (and higher) are supported.
l Management Console for Unix does not support Security-Enhanced Linux (SELinux)
l When you install Safeguard Authentication Services on Oracle Solaris 11, the Oracle Solaris 10 packages are installed.
Default memory requirement
1024 MB
NOTE: See JVM memory tuning suggestions in the One Identity Management Console for Unix Administration Guide for information about changing the default memory allocation setting in the config-uration file.
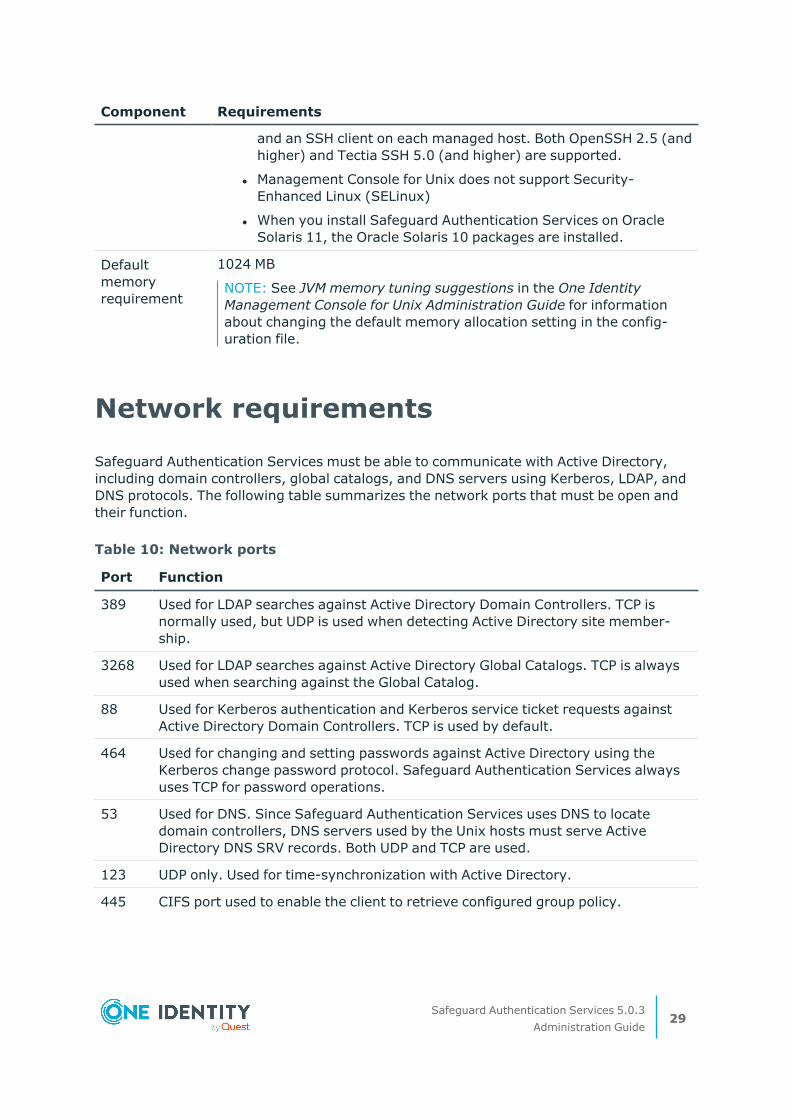
Network requirements
Safeguard Authentication Services must be able to communicate with Active Directory, including domain controllers, global catalogs, and DNS servers using Kerberos, LDAP, and DNS protocols. The following table summarizes the network ports that must be open and their function.
Port Function
389 Used for LDAP searches against Active Directory Domain Controllers. TCP is normally used, but UDP is used when detecting Active Directory site member-ship.
3268 Used for LDAP searches against Active Directory Global Catalogs. TCP is always used when searching against the Global Catalog.
88 Used for Kerberos authentication and Kerberos service ticket requests against Active Directory Domain Controllers. TCP is used by default.
464 Used for changing and setting passwords against Active Directory using the Kerberos change password protocol. Safeguard Authentication Services always uses TCP for password operations.
53 Used for DNS. Since Safeguard Authentication Services uses DNS to locate domain controllers, DNS servers used by the Unix hosts must serve Active Directory DNS SRV records. Both UDP and TCP are used.
123 UDP only. Used for time-synchronization with Active Directory.
445 CIFS port used to enable the client to retrieve configured group policy.
Table 10: Network ports
Safeguard Authentication Services 5.0.3Administration Guide
29
NOTE: Safeguard Authentication Services, by default, operates as a client, initiating connections. It does not require any firewall exceptions for incoming traffic.
Safeguard Authentication Services 5.0.3Administration Guide
30
3
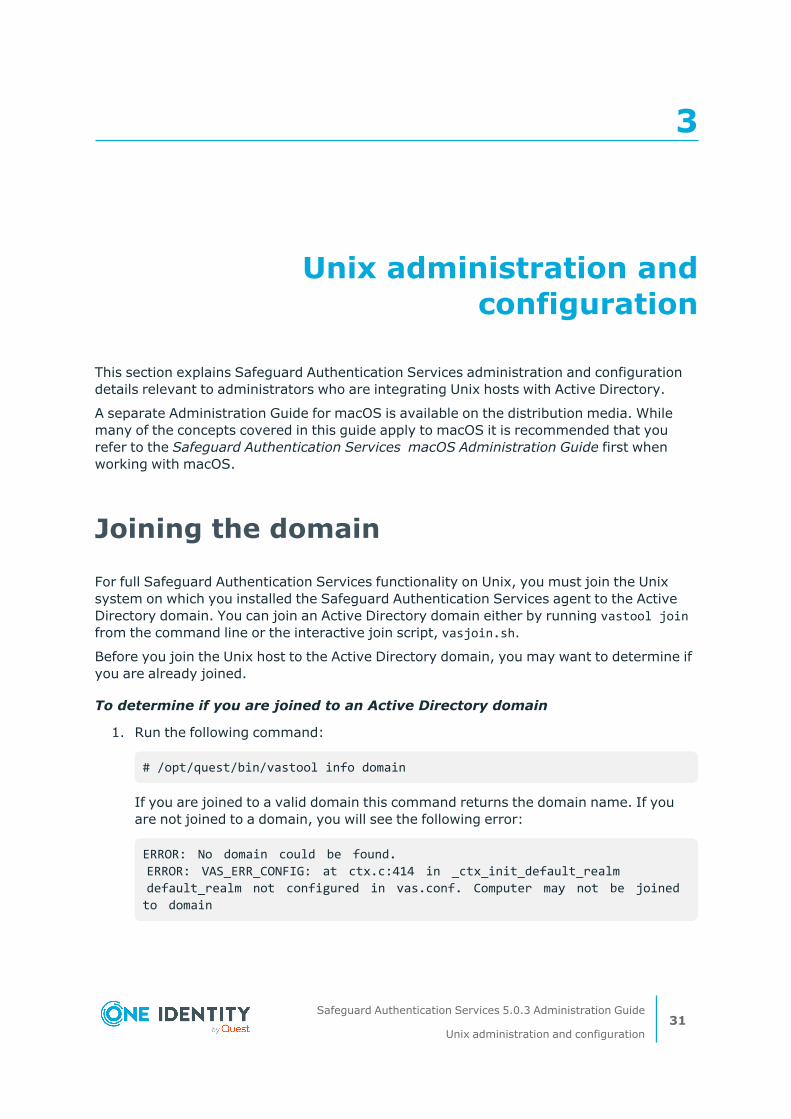
Unix administration and configuration
This section explains Safeguard Authentication Services administration and configuration details relevant to administrators who are integrating Unix hosts with Active Directory.
A separate Administration Guide for macOS is available on the distribution media. While many of the concepts covered in this guide apply to macOS it is recommended that you refer to the Safeguard Authentication Services macOS Administration Guide first when working with macOS.
Joining the domain
For full Safeguard Authentication Services functionality on Unix, you must join the Unix system on which you installed the Safeguard Authentication Services agent to the Active Directory domain. You can join an Active Directory domain either by running vastool join from the command line or the interactive join script, vasjoin.sh.
Before you join the Unix host to the Active Directory domain, you may want to determine if you are already joined.
To determine if you are joined to an Active Directory domain
1. Run the following command:
# /opt/quest/bin/vastool info domain
If you are joined to a valid domain this command returns the domain name. If you are not joined to a domain, you will see the following error:
ERROR: No domain could be found. ERROR: VAS_ERR_CONFIG: at ctx.c:414 in _ctx_init_default_realm default_realm not configured in vas.conf. Computer may not be joined to domain
Safeguard Authentication Services 5.0.3 Administration Guide
Unix administration and configuration31
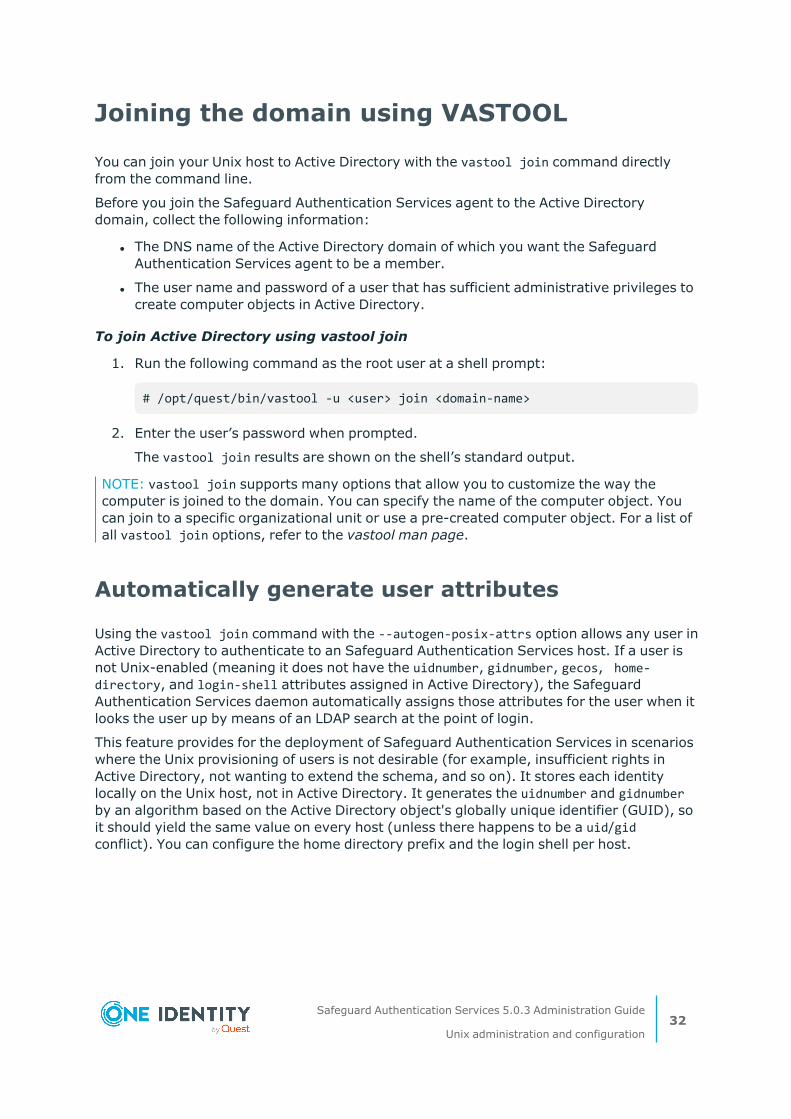
Joining the domain using VASTOOL
You can join your Unix host to Active Directory with the vastool join command directly from the command line.
Before you join the Safeguard Authentication Services agent to the Active Directory domain, collect the following information:
l The DNS name of the Active Directory domain of which you want the Safeguard Authentication Services agent to be a member.
l The user name and password of a user that has sufficient administrative privileges to create computer objects in Active Directory.
To join Active Directory using vastool join
1. Run the following command as the root user at a shell prompt:
# /opt/quest/bin/vastool -u <user> join <domain-name>
2. Enter the user’s password when prompted.
The vastool join results are shown on the shell’s standard output.
NOTE: vastool join supports many options that allow you to customize the way the computer is joined to the domain. You can specify the name of the computer object. You can join to a specific organizational unit or use a pre-created computer object. For a list of all vastool join options, refer to the vastool man page.
Automatically generate user attributes
Using the vastool join command with the --autogen-posix-attrs option allows any user in Active Directory to authenticate to an Safeguard Authentication Services host. If a user is not Unix-enabled (meaning it does not have the uidnumber, gidnumber, gecos, home-directory, and login-shell attributes assigned in Active Directory), the Safeguard Authentication Services daemon automatically assigns those attributes for the user when it looks the user up by means of an LDAP search at the point of login.
This feature provides for the deployment of Safeguard Authentication Services in scenarios where the Unix provisioning of users is not desirable (for example, insufficient rights in Active Directory, not wanting to extend the schema, and so on). It stores each identity locally on the Unix host, not in Active Directory. It generates the uidnumber and gidnumber by an algorithm based on the Active Directory object's globally unique identifier (GUID), so it should yield the same value on every host (unless there happens to be a uid/gid conflict). You can configure the home directory prefix and the login shell per host.
Safeguard Authentication Services 5.0.3 Administration Guide
Unix administration and configuration32
Unattended joining using Offline Domain Join (ODJ) credentials
An Administrator can use a Windows Offline Domain Join (ODJ) credential instead of a keytab for scripting an unattended installation of Safeguard Authentication Services to enhance security.
There must be connectivity from the Unix machine to domain controllers. When using this method of joining AD, the [domain] is not needed on the vastool join command, nor credentials. That information will come from the file. More information is in the vastool man page.
The join can work in the following ways:
l vastool join [some flag] <path to the offline join file>
l vastool join to use a newly defined environment variable that points to the location of the offline join file
l vastool join to use if the flag wasn't passed and the environment variable is not set, a predefined location is checked for the offline join file
To join with Windows Offline Domain Join (ODJ) credential
The option is -j <file>. The variable is AUTHENTICATION_SERVICES_DJOIN_FILE, so for example:
export AUTHENTICATION_SERVICES_DJOIN_FILE=/tmp/host.djoin.out
The file is /tmp/AUTHENTICATION_SERVICES_DJOIN.
During package installation, if AUTH_SERVICES_DJOIN_FILE is set to a valid file or /tmp/AUTHENTICATION_SERVICES_DJOIN is a valid file, the package install script will attempt to join Active Directory with the file’s information, and the output will be in ./tmp/AUTHENTICATION_SERVICES_DJOIN.join.out.
More information is in the vastool man page.
vastool join can use a djoin file generated from Window's djoin.exe. There are three ways to pass the file to vastool:
1. vastool join -j djoin_file, with the location of a valid djoin file.
2. The ENV option AUTHENTICATION_SERVICES_DJOIN_FILE set to the location of a valid djoin file.
3. The file /tmp/AUTHENTICATION_SERVICES_DJOIN exists, and is a valid djoin file.
These options are checked in order. When using -j, the domain_name and server should not be set. If either are set, options 2 and 3 above are not checked.
Also, the options -n and -c are not supported, that information is read from the join file. -f is automatically set to use the pre-existing object.
During the join the credentials in the join file are used, and -u -w and -k from vastool are ignored.
Safeguard Authentication Services 5.0.3 Administration Guide
Unix administration and configuration33
This method is similar to the above "join itself", without the security risk as long as the djoin.exe /DEFPW flag isn't used.
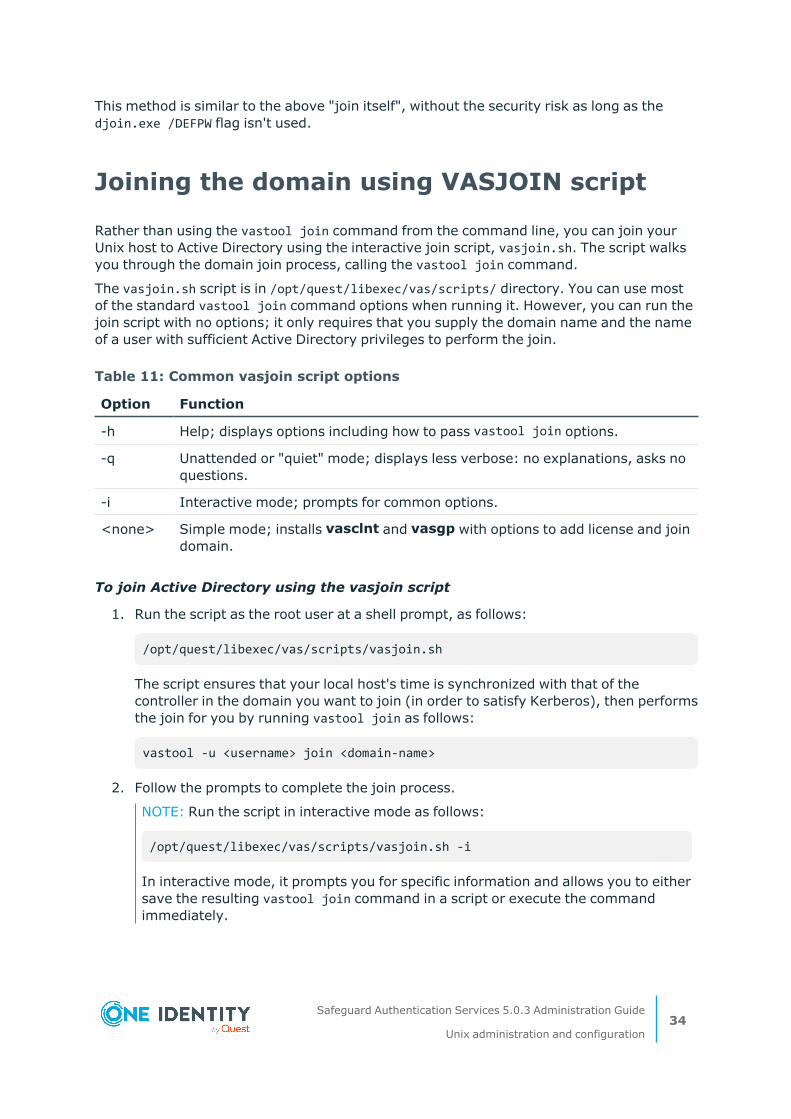
Joining the domain using VASJOIN script
Rather than using the vastool join command from the command line, you can join your Unix host to Active Directory using the interactive join script, vasjoin.sh. The script walks you through the domain join process, calling the vastool join command.
The vasjoin.sh script is in /opt/quest/libexec/vas/scripts/ directory. You can use most of the standard vastool join command options when running it. However, you can run the join script with no options; it only requires that you supply the domain name and the name of a user with sufficient Active Directory privileges to perform the join.
Option Function
-h Help; displays options including how to pass vastool join options.
-q Unattended or "quiet" mode; displays less verbose: no explanations, asks no questions.
-i Interactive mode; prompts for common options.
<none> Simple mode; installs vasclnt and vasgp with options to add license and join domain.
Table 11: Common vasjoin script options
To join Active Directory using the vasjoin script
1. Run the script as the root user at a shell prompt, as follows:
/opt/quest/libexec/vas/scripts/vasjoin.sh
The script ensures that your local host's time is synchronized with that of the controller in the domain you want to join (in order to satisfy Kerberos), then performs the join for you by running vastool join as follows:
vastool -u <username> join <domain-name>
2. Follow the prompts to complete the join process.
NOTE: Run the script in interactive mode as follows:
/opt/quest/libexec/vas/scripts/vasjoin.sh -i
In interactive mode, it prompts you for specific information and allows you to either save the resulting vastool join command in a script or execute the command immediately.
Safeguard Authentication Services 5.0.3 Administration Guide
Unix administration and configuration34
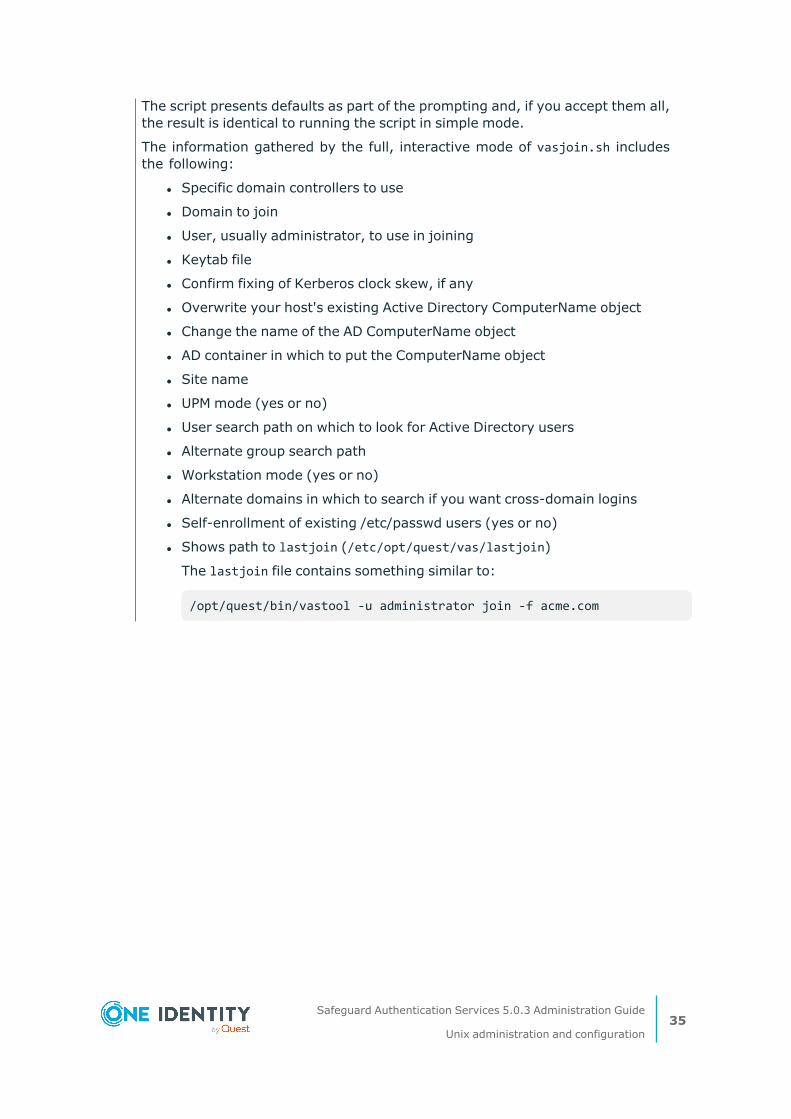
The script presents defaults as part of the prompting and, if you accept them all, the result is identical to running the script in simple mode.
The information gathered by the full, interactive mode of vasjoin.sh includes the following:
l Specific domain controllers to use
l Domain to join
l User, usually administrator, to use in joining
l Keytab file
l Confirm fixing of Kerberos clock skew, if any
l Overwrite your host's existing Active Directory ComputerName object
l Change the name of the AD ComputerName object
l AD container in which to put the ComputerName object
l Site name
l UPM mode (yes or no)
l User search path on which to look for Active Directory users
l Alternate group search path
l Workstation mode (yes or no)
l Alternate domains in which to search if you want cross-domain logins
l Self-enrollment of existing /etc/passwd users (yes or no)
l Shows path to lastjoin (/etc/opt/quest/vas/lastjoin)
The lastjoin file contains something similar to:
/opt/quest/bin/vastool -u administrator join -f acme.com
Safeguard Authentication Services 5.0.3 Administration Guide
Unix administration and configuration35
Using manual pages (man pages)
Unix manual pages (man pages) provide help for commands and configuration files. Safeguard Authentication Services installs man pages for the following components:
l ldapmodify
l ldapsearch
l nisedit
l nss_vas
l oat
l oat_adlookup
l oat_changeowner
l oat_match
l oat_overview
l pam_defender
l pam_vas
l pam_vas_smartcard
l preflight
l uptool
l vas.conf
l vasd
l vasproxyd
l vastool
l vasypd
l vgp.conf
l vgpmod
l vgptool
Man pages are installed and configured automatically by Safeguard Authentication Services. Use the man command to access Safeguard Authentication Services man pages. For example, to access the vastool man page, enter the following at the Unix prompt:
man vastool
Alternatively, you can access the Safeguard Authentication Services man pages in HTML format by navigating to the docs/vas-man-pages directory on the distribution media.
Safeguard Authentication Services 5.0.3Administration Guide
36
The configuration file
Safeguard Authentication Services uses /etc/opt/quest/vas/vas.conf as its main configuration file. You can modify, enable, or disable most Safeguard Authentication Services functionality in the vas.conf file.
The Safeguard Authentication Services configuration file follows the format of the typical krb5.conf. The file is divided into sections. Each section contains a name enclosed in square brackets followed by a list of settings. Settings are key value pairs. For example:
[vasd] workstation-mode = false
In this example, [vasd] is the section name and workstation-mode is the setting.
For a complete list of all settings, refer to the vas.conf man page.
You can centrally manage and enforce vas.conf settings using Group Policy. For more information, see Configuration policy on page 174..
Unix login syntax
Users logging in to Unix hosts using Active Directory credentials must identify themselves using a user name. You can specify either the configured Unix Name of the Active Directory user or a combination of the domain and sAMAccountName attribute.
You can configure the Active Directory attribute used for Unix Name. By default, with the Windows 2003 R2 schema, the Unix Name is mapped to sAMAccountName. If you map the Unix Name to the user principal name attribute, the user can log in with either the full UPN or just the user portion of the UPN (that is, the portion before the @ symbol) for backward compatibility.
Users can always log in using a combination of domain and sAMAccountName. Cross-forest login requires the user to specify domain and sAMAccountName unless you have configured the cross-forest-domain option in vas.conf. The following formats are accepted when authenticating:
l DOMAIN\sAMAccountName (you may need to escape the \ depending on the shell)
l sAMAccountName@DOMAIN
You can specify DOMAIN as either the full DNS domain name (example.com) or the NETBIOS domain name (EXAMPLE).
NOTE: A Unix Name that ends with a / is not valid. Names that end with a / are reserved for services on Unix hosts.
Safeguard Authentication Services 5.0.3Administration Guide
37

Keytab files
A keytab file stores Kerberos keys for computer and service accounts. Safeguard Authentication Services automatically generates and maintains keytab files when you join the Active Directory domain or when you create service accounts in Active Directory. By default, the keytab files are created in /etc/opt/quest/vas directory. Each keytab file is named according to the service that uses it.
For example, the host principal keys are stored in the /etc/opt/quest/vas/host.keytab file. Keytab files are stored using the standard MIT style and may be used by third-party applications.
The keytab is essentially the computer's Active Directory password. It is owned by root and must be secured accordingly. The default permissions for a computer object restrict the computer from accessing and modifying sensitive data in Active Directory. The schema extensions are carefully designed to allow computers with default permissions to access only the Unix account data that is absolutely necessary for the normal operation of Safeguard Authentication Services.
One Identity recommends that administrators not modify the default permissions for the computer object to make them either more or less restrictive. Changing the computer object permissions could disrupt normal operation or create a security liability in Active Directory if a Unix host is compromised.
If the host.keytab file is compromised by unauthorized root access on the Unix system, then you can assume the password for the associated computer object is compromised as well. You can reset the computer object's password and generate a new keytab file by running
vastool -u <admin> passwd –r –k /etc/opt/quest/vas/host.keytab host/
Another option is to delete the computer object and recreate it by running vastool create host/.
Handling platform limitations on user name length
Some platforms limit the length of a user name. By default Safeguard Authentication Services uses the attribute mapped to User Name in the Safeguard Authentication Services application configuration as the Unix user name. You can view this mapping in the Control Center, Preferences | Schema Attributes | Unix Attributes panel.
You may need to override this setting for certain hosts. You can use the username-attr-name option in vas.conf to override this setting. This allows you to work around name length limitations on a machine-by-machine basis by defining an attribute to be used for a short name.
Safeguard Authentication Services 5.0.3Administration Guide
38
To map the user name to the Active Directory gecos attribute, add the following lines to vas.conf:
[vasd] username-attr-name = gecos
Configuring Name Service Switch (NSS)
Unix-based operating systems can work with a number of databases for host, user, group, and other information. The name service provides access to these databases. You can configure each database for multiple data sources through plugin modules. For example, host name information can be returned from /etc/hosts, NIS, NIS+, LDAP, or DNS. You may use one or more modules for each database; the modules and their lookup order are specified in the /etc/nsswitch.conf file.
Safeguard Authentication Services provides a name service module (vas4) that resolves user and group information from Active Directory. When the Unix host is joined to the domain, the passwd and group lines of /etc/nsswitch.conf are automatically modified to include the Safeguard Authentication Services name service module (details vary by platform). The following is an example of what the passwd and group lines may look like after a Unix host has been joined to the domain:
passwd: files vas4 nis group: files vas4 nis
NOTE: The Safeguard Authentication Services name service module (vas4) does not apply to AIX or macOS; instead of NSS, AIX uses LAM and macOS uses Directory Services.
Using VASTOOL to configure NSS
Because the name service configuration may vary by platform, Safeguard Authentication Services provides the ability to automatically configure the name service system for Safeguard Authentication Services.
To configure the NSS
1. Execute the following command as root:
vastool configure nss
2. To undo the configuration, run the following command as root:
vastool unconfigure nss
Safeguard Authentication Services 5.0.3Administration Guide
39
3. After modifying the name service configuration, restart any affected services or reboot.
Using NSCD
nscd is a Unix caching daemon that can increase the efficiency of the Name Service. nscd caches results supplied by NSS modules. This cache is used instead of calling the NSS modules for a specified period of time. After a configurable timeout, the cached results are flushed and NSS again calls the NSS modules directly to load the cache.
NOTE: nscd is not available on all supported platforms.
Safeguard Authentication Services contains similar functionality for its own user and group caches. Therefore, the behavior for vastool join and vastool configure nss is to modify /etc/nscd.conf to disable nscd caching of passwd and group data. It is possible to use Safeguard Authentication Services and nscd together, but you must manually re-enable nscd caching for users and groups. Safeguard Authentication Services comments out the previous nscd configuration so you can locate and reverse this change in /etc/nscd.conf, if needed.
Forcing lowercase names
In some environments, the user and group names in Active Directory are upper case or mixed case. Normally user and group names on Unix systems are lowercase. It is possible to have the Safeguard Authentication Services name service module force user and group names to lowercase.
To enable this, add the following line to the nss_vas section in vas.conf
lowercase-names = true
To apply the change, you can either restart vasd or flush the cache.
Configuring PAM
Pluggable Authentication Module (PAM) is a common Unix authentication API. A PAM module provides a PAM implementation. You can stack PAM modules together to allow a single Unix host to authenticate using several back-end authentication providers. Safeguard Authentication Services provides a PAM module that provides advanced Active Directory authentication.
Depending on the platform, PAM is controlled by configuration settings in the /etc/pam.conf or by individual service-specific files in the /etc/pam.d directory. When you join the domain, Safeguard Authentication Services automatically configures PAM to work with the Safeguard Authentication Services PAM module.
Safeguard Authentication Services 5.0.3Administration Guide
40

Using VASTOOL to configure PAM
vastool can automatically update the PAM configuration files on your system.
To modify the PAM configuration
1. To configure PAM to use the Safeguard Authentication Services PAM module, execute the following command as root:
vastool configure pam
2. To remove the Safeguard Authentication Services PAM module configuration, run the following command as root:
vastool unconfigure pam
When you join the domain, PAM is configured for all existing services. If you install a new service that requires PAM configuration, you can configure individual services using vastool.
3. To configure sshd to use the Safeguard Authentication Services PAM module, execute the following command as root:
vastool configure pam sshd
4. To remove the PAM configuration from sshd, execute the following command as root:
vastool unconfigure pam sshd
5. After modifying the PAM configuration, you may have to restart the affected services.
Home directory creation
By default, Safeguard Authentication Services creates users' home directories if they do not exist, using native operating system methods. It creates the home directories with the permissions of 0700 (readable, writable, and executable only by the owner of the directory) and owned by the user. Safeguard Authentication Services can only create home directories on local file systems.
On systems where home directories are stored on network file servers, it may be useful to disable automatic home directory creation. To disable automatic home directory creation, edit the PAM configuration file, (/etc/pam.conf or /etc/pam.d/<service>). As root, modify the auth line to remove the create_homedir option. For example, if the auth line looks like:
auth sufficient pam_vas.so create_homedir
The modified entry will look like the following:
Safeguard Authentication Services 5.0.3Administration Guide
41
auth sufficient pam_vas.so
Kerberos ticket caches
The Safeguard Authentication Services PAM module uses the Kerberos protocol to authenticate users against Active Directory. The Kerberos protocol allows users to obtain a Ticket Granting Ticket (TGT) that can then be used to obtain other tickets to authenticate to services. Once the TGT has been obtained, it can be used as a single sign-on mechanism that does not require users to repeatedly enter their password.
By default, when a user establishes a login session by means of a service configured to use the Safeguard Authentication Services PAM module, the ticket is cached by default in the /tmp directory; the name of the cache file is krb5cc_<uid> where <uid> is the User ID (UID) of the account.
Configuring AIX
AIX does not support NSS in the same way that most other Unix versions do. On AIX there is no /etc/nsswitch.conf or support for NSS modules. AIX uses the Loadable Authentication Module (LAM) system to support name service lookups and authentication. As of AIX 5.3 all native binaries support PAM, but are configured for LAM by default.
Safeguard Authentication Services supports both a LAM module and a PAM module on AIX. Configuring the PAM module on AIX is the same as for any other platform. This section explains how to configure the LAM module.
When you join the domain, Safeguard Authentication Services automatically configures the AIX system to use the Safeguard Authentication Services LAM module for authentication as well as name service lookups. The modified files are /usr/lib/security/methods.cfg and /etc/security/user.
Using VASTOOL to configure AIX
vastool can automatically update the AIX configuration files on your system.
To modify the AIX configuration
1. To configure AIX to use Safeguard Authentication Services for authentication and name service resolution, run the following command as root:
vastool configure irs
Safeguard Authentication Services 5.0.3Administration Guide
42
2. To remove the Safeguard Authentication Services AIX module configuration, run the following command as root:
vastool unconfigure irs
3. After modifying the AIX configuration, restart any affected system services or reboot.
Configuring SELinux
Security Enhanced Linux (SELinux) allows users and administrators more control over access control.
To configure:
1. Join the domain.
2. After the join, run /opt/quest/bin/vastool configure selinux.
When complete, Safeguard Authentication Services works with the SELinux VAS module which contains a Red Hat Enterprise Linux SELinux policy for Authentication Services.
NOTE: The installation dependencies for the SELinux VAS module are:
l RHEL 6 & equivalent and higher
l policycoreutils-python (audit2allow)
l policycoreutils (semodule, restorecom)
l selinux-policy-devel (RHEL7) | selinux-policy (RHEL6)
NOTE: After installing the vasd-selinux policy, user home directories that were created prior to the policy being installed might have the incorrect SELinux security context label.
Workaround:
Run the following command to restore the home directories to their default file contexts:
$ /opt/quest/libexec/vas/selinux/configure_selinux.sh restore <*/home*>
where /home is the path to the users' home directories that need the correct SELinux context label. If no path is provided, /home is used by default.
Using VASTOOL to configure SELinux
vastool can automatically update the SELinux configuration files on your system.
Safeguard Authentication Services 5.0.3Administration Guide
43
To modify the SELinux configuration
1. To configure SELinux to use the SELunix module, run the following command as root:
vastool configure selinux
2. To remove the SELinux module configuration, run the following command as root:
vastool unconfigure selinux
Enabling diagnostic logging
Debug logging configuration depends on your platform and the subsystem you are troubleshooting. Some issues can span multiple subsystems.
Safeguard Authentication Services vasd daemon
To enable Safeguard Authentication Services daemon debug output, set the debug-level setting in the [vasd] section of vas.conf. Unless instructed otherwise by Technical Support, the recommended level is 5 for investigating issues. Refer to the vas.conf man page for details on debug log settings.
vasd logs events to syslog using the DAEMON facility. vasd dynamically picks up the change for both enabling and disabling without requiring a restart.
Authentication
NOTE: For both PAM and LAM, regardless of debug level, Safeguard Authentication Services outputs a success or failure message to AUTH (AUTHPRIV on Linux or macOS), for example:
<syslog prefix>: pam_vas: Authentication <succeeded> for <Active Directory> user: <user1> account: <[email protected]> service: <sshd> reason: <N/A> Access Control Identifier(NT Name):<EXAMPLE1\user1>
The message indicates if the authentication was successful or failed, was disconnected, what type of account, if failed a general message as to why, what service if PAM, and the NT style name of the account used to authenticate against.
PAM
To enable PAM debug output, you must set the debug option for the Safeguard Authentication Services PAM module in the pam.conf file. This consists of adding debug
Safeguard Authentication Services 5.0.3Administration Guide
44

trace to each pam_vas3 line in the appropriate files for the system. For more information, refer to the pam.conf man page for your platform.
When you enable debug output, Safeguard Authentication Services logs PAM output authentication events to syslog using the AUTH facility (AUTHPRIV on macOS and Linux). Normally this does not require a restart of an application to start debugging.
NOTE: On HP-UX, Oracle Solaris, and AIX, you can obtain additional PAM debug information by running touch /etc/pam_debug. This enables PAM library level debugging. To disable it, remove the "touched" file.
LAM
If you are using LAM for authentication on AIX, you can enable authentication debug output by running:
touch /var/opt/quest/vas/.qas_auth_dbg
When you enable this debug option, Safeguard Authentication Services logs LAM authentication events to /tmp/qas_module.log.
Identity
This includes debugging NSS on Linux, HP-UX, and Oracle Solaris and LAM identification on AIX. To enable full debugging of the Safeguard Authentication Services identity library for the operating system, run the following:
touch /var/opt/quest/vas/.qas_id_dbg
This enables debug globally for the system. Disable it by removing the "touched" file. Enabling and disabling applies within 30 seconds.
You can also enable debugging for a single application to send output to stderr by defining the environment variable QAS_ID_DBG_STDERR. For example, in a Bourne shell, enter:
QAS_ID_DBG_STDERR=1 getent passwd
The output includes a line that lists input, result, and time spent in the call. Enable only this line by running:
touch /var/opt/quest/vas/.qas_id_call
You can also use the environment variable, QAS_ID_CALL_STDERR to log the result line of the above debug.
This output is useful for profiling the volume/type of calls the Safeguard Authentication Services identity interface is receiving.
Output is written to the /tmp/qas_module.log file for both options.
NOTE: The /tmp/qas_module.log file is world writable making it possible for any user to write output to it. Thus, One Identity recommends that you change the permissions once
Safeguard Authentication Services 5.0.3Administration Guide
45
debug is disabled.
vastool
Safeguard Authentication Services command line tools accept a -d parameter to indicate the level of debug output (1-5) you want to print to the console. To see more output, specify a higher value to the -d parameter. For example, to see extra diagnostic information when you join the domain, enter:
/opt/quest/bin/vastool -u administrator -d5 join example.com
NOTE: When you have debug enabled, it can affect performance.
Working with netgroups
With the Windows 2003 R2 schema, you can access netgroup data based on RFC 2307 stored in Active Directory through the Safeguard Authentication Services name service module. Safeguard Authentication Services caches the netgroup information locally. This netgroup support is built in to the name service module and does not require the Safeguard Authentication Services LDAP proxy service to be running.
NOTE: Netgroup data through the Safeguard Authentication Services name service module is only supported on Linux, Oracle Solaris, HP-UX, and AIX.
Configuring netgroup support with name service
To configure Safeguard Authentication Services to resolve netgroup data from the name service module
1. Run the following command as root to configure Safeguard Authentication Services for netgroup support:
vastool configure vas vasd netgroup-mode NSS
2. Run the following command as root to configure the Safeguard Authentication Services name service module:
a. On Linux, Oracle Solaris, or HP-UX:
vastool configure nss netgroup
Safeguard Authentication Services 5.0.3Administration Guide
46

b. On AIX:
vastool configure irs netgroup
NOTE: To create a netgroup map, if needed, you can enter the following at the command line:
nisedit -u <admin> add -m netgroup -f an /etc/netgroup style file>
For more information about the nisedit tool, see Using NIS map command line administration utility on page 95.
3. Load the netgroup caches by running the following command as root:
vastool flush netgroup
4. To test the netgroup configuration run the following command:
vastool nss getnetgrent <netgroup name>
Unconfiguring netgroup support with name service
To prevent Safeguard Authentication Services from resolving netgroup data from the name service module
1. Run the following command as root to remove name service netgroup support:
vastool configure vas vasd netgroup-mode
2. Run the following command as root to configure the Safeguard Authentication Services name service module:
a. On Linux, Oracle Solaris, or HP-UX:
vastool unconfigure nss netgroup
b. On AIX:
vastool unconfigure irs netgroup
3. Run the following command as root to configure the Safeguard Authentication Services name service module:
a. On Linux, Oracle Solaris, or HP-UX:
vastool configure nss
Safeguard Authentication Services 5.0.3Administration Guide
47
4. Flush the netgroup caches by running the following command as root:
vastool flush netgroup
Cache administration
To minimize network traffic and load on Active Directory, Safeguard Authentication Services maintains a local cache of user and group data.
You can force Safeguard Authentication Services to immediately reload the cache by running the following command as root:
vastool flush
NOTE: When you run vastool flush the entire user and group cache database is reloaded from Active Directory. This can generate a significant amount of network traffic so use this command sparingly.
Blackout period
It is not uncommon for systems to generate hundreds of user and group lookup requests per second. Because of this, Safeguard Authentication Services enforces a "blackout period" during which all name service requests are resolved from the local cache. By default, the blackout period is set to 10 minutes. This means that changes to Unix account information in Active Directory may take up to 10 minutes to propagate to Safeguard Authentication Services clients.
There are two events that cause Safeguard Authentication Services to update the local cache:
l A user logs in
l The blackout period expires
You can adjust the blackout period by changing the update-interval setting in the [vasd] section of vas.conf. For an example, refer to the vas.conf man page. See Using manual pages (man pages) on page 36 for information about accessing the vas.conf man page. In small installations (less than 100 hosts or less than 100 users) you can safely reduce the blackout period. In larger installations it is recommended that the blackout period remain at the default value or set to 30 minutes or 1 hour.
Regardless of the blackout period, you can reset the blackout period timer by signaling vasd with SIGHUP, using the vasd init script to restart vasd, or by executing vastool flush.
To force Safeguard Authentication Services to update the cache immediately regardless of the blackout period, run this command:
vastool flush -f {users|groups}
Safeguard Authentication Services 5.0.3Administration Guide
48
Disconnected authentication
Safeguard Authentication Services provides the ability to authenticate an Active Directory user to a Unix system even when Active Directory is unavailable. For example, because Safeguard Authentication Services supports disconnected authentication, you can still log into your laptop when you are traveling and your laptop does not have connectivity to Active Directory.
Safeguard Authentication Services supports several options for disconnected authentication. Two types of disconnected authentication modes are the default disconnected authentication mode and permanent-disconnected authentication mode.
Default disconnected authentication mode
By default, Safeguard Authentication Services relies on a previous successful authentication attempt when the computer was not in disconnected mode. The successful authentication caches a sha256 hash of the user’s password. Safeguard Authentication Services uses this hash to validate the user’s password when it is in disconnected mode for one of the following reasons:
l The computer is physically disconnected from the network or the network is down.
l The computer object has been deleted.
NOTE: If the host's computer object has been deleted, then Safeguard Authentication Services can no longer authenticate with Active Directory. The solution to this problem is to recreate the computer object, then restart vasd.
l The host keytab file (/etc/opt/quest/vas/host.keytab) is missing or invalid.
NOTE: If the host keytab is deleted or becomes corrupt, then Safeguard Authentication Services can no longer authenticate with Active Directory. The solution to this problem is to delete then recreate the computer object and restart vasd.
l The Active Directory server is down or object unreachable.
You can disable the default disconnected authentication mode by setting allow-disconnected-auth to false in the vas.conf. See the vas.conf man page for more details.
Permanent-disconnected authentication mode
There are situations where a Unix system administrator may be responsible for a large number of Unix systems. In the default mode, you need to log in to every Unix system at least once to be able to log in to the systems in a disconnected state. In a large environment with hundreds or thousands of Unix systems, this requirement would be impractical. Safeguard Authentication Services has added a feature called Permanent-disconnected authentication mode. This mode does not require a previously successful authentication, that is, users or group of users can log into a Unix system in a disconnected state even if they had never logged into the Unix system in the past.
Before you configure permanent-disconnected authentication mode in the vas.conf file, you must first set the service principal name (SPN) for each user who will authenticate
Safeguard Authentication Services 5.0.3Administration Guide
49
using this mode. You can set the SPN by using a tool like the Microsoft Active Directory Service Interfaces Editor (ADSI Edit), or by issuing a vastool command such as the following:
vastool <username> setattrs - u <username> servicePrincipalName "user/<username>@<DomainName>"
NOTE: The content of the service principal name is unimportant; it just needs to conform to the format of servicePrincipalName.
Configure the permanent-disconnected authentication mode in addition to the default disconnected authentication mode on a per user or group basis by specifying perm-disconnected-users in the vas.conf. See the vas.conf man page for more details. These perm-disconnected-users have encrypted credentials pre-cached when the Safeguard Authentication Services caching daemon starts the first time (immediately upon join if the users are configured as perm-disconnected-users by means of group policy). Typically you configure permanent-disconnected authentication mode to ensure that a certain group of system administrators can access a system, even if the first time they attempt access it is disconnected from the network.
Safeguard Authentication Services continues to operate normally in disconnected mode; thus, it may be difficult to know whether Safeguard Authentication Services is in disconnected mode. Safeguard Authentication Services creates log entries in the system log each time the connection mode changes.
Working with read-only domain controllers
Read-only domain controllers (RODCs) are a new feature in Microsoft Server 2008. Safeguard Authentication Services supports read-only domain controllers as long as the Unix attributes for users and groups are not in the RODC filtered attribute set. You can set the RODC_FILTERED flag on any attribute in the Active Directory schema to add it to the RODC-filtered attribute set. If this flag is set on an attribute, it is not replicated to an RODC. If RODC_FILTERED is set on the attributes used for UID Number, GID Number, Comment (GECOS), Home Directory, or Login Shell, no groups or users are cached because Safeguard Authentication Services cannot identify any Unix-enabled users.
Cross-forest authentication
Safeguard Authentication Services supports cross-forest authentication as long as a trust exists between the two forests. You must configure both forests for Safeguard Authentication Services. For more information, refer to the Safeguard Authentication Services Installation Guide.
Safeguard Authentication Services 5.0.3Administration Guide
50
In addition, you must configure the cross-forest-domains setting in vas.conf. For details about that, see to the vas.conf man page.
NOTE: When using Unix Personality Management in a cross-forest environment, the user or group to which a personality links must be in the same forest as the personality.
One-way trust authentication
You can enable authentication between domains that do not have a two-way trust between them.
To configure a one-way trust
1. On the Unix host joined to domain A (TRUSTING.COM) that trusts domain B (TRUSTED.COM), create a service principal in domain B, as follows:
vastool -u <DomainAdminUserInDomainB> service create ServiceName/@TRUSTED.COM
where ServiceName is any unique identifier you choose.
This creates a keytab file containing the value of the krb5name for your service name.
2. To list the keytab file, enter the following:
vastool ktutil -k /etc/opt/quest/vas/ServiceName.keytab list
The results will look something like:
Vno Type Principal 1 arcfour-hmac-md5 [email protected] 1 arcfour-hmac-md5 ServiceName/[email protected]
3. Create a trust mapping by adding the service principal name to the vas_host_services section of the vas.conf file, as follows:
[vas_host_services] trusted.com = { krb5name = ServiceName/[email protected] }
NOTE: You can also use an interactive script to configure a one-way trust. Run the following:
/opt/quest/libexec/vas/scripts/vas_oneway_setup.sh
Safeguard Authentication Services 5.0.3Administration Guide
51
This script prompts you for all of the necessary information and creates the one-way trust configuration for you.
Supporting legacy LDAP applications
The Safeguard Authentication Services daemon, vasproxyd, provides a way for applications that use LDAP bind to authenticate users to Active Directory without using secure LDAP (LDAPS). Instead of sending LDAP traffic directly to Active Directory domain controllers, you can configure applications to send plain text LDAP traffic to vasproxyd by means of the loopback interface. vasproxyd proxies these requests to Active Directory using Kerberos as the security mechanism.
vasproxyd provides the following features:
l Secure LDAP authentication without SSL
LDAP is designed as a data access protocol. The use of LDAP as an authentication mechanism introduces important security considerations—especially since most applications are only able to produce simple bind credentials. vasproxyd allows applications to use LDAP simple bind securely by generating the appropriate Kerberos authentication traffic. The use of Kerberos eliminates the need for public key cryptography while providing a high level of security.
l Authenticated anonymous searches
Many applications require the use of anonymous LDAP searches. vasproxyd allows you to specify a service account that can authenticate and proxy anonymous queries so that applications that expect to be able to use anonymous LDAP can operate with Active Directory without requiring modification of Active Directory to allow anonymous queries.
l allow/deny authorization
vasproxyd allows you to add an additional layer of application authorization based on Active Directory user name, Active Directory group membership, or Active Directory Organizational Unit (OU) containership. In other words, vasproxyd returns an LDAP BindResponse error on an (otherwise valid) LDAP bind attempt if the authenticating user is not authorized by means of settings in the users.allow/ users.deny files.
Installing the LDAP proxy
You can install the LDAP proxy package using the install.sh script.
To install the LDAP proxy
1. Insert the Safeguard Authentication Services distribution media and navigate to the root directory of the installation media.
Safeguard Authentication Services 5.0.3Administration Guide
52
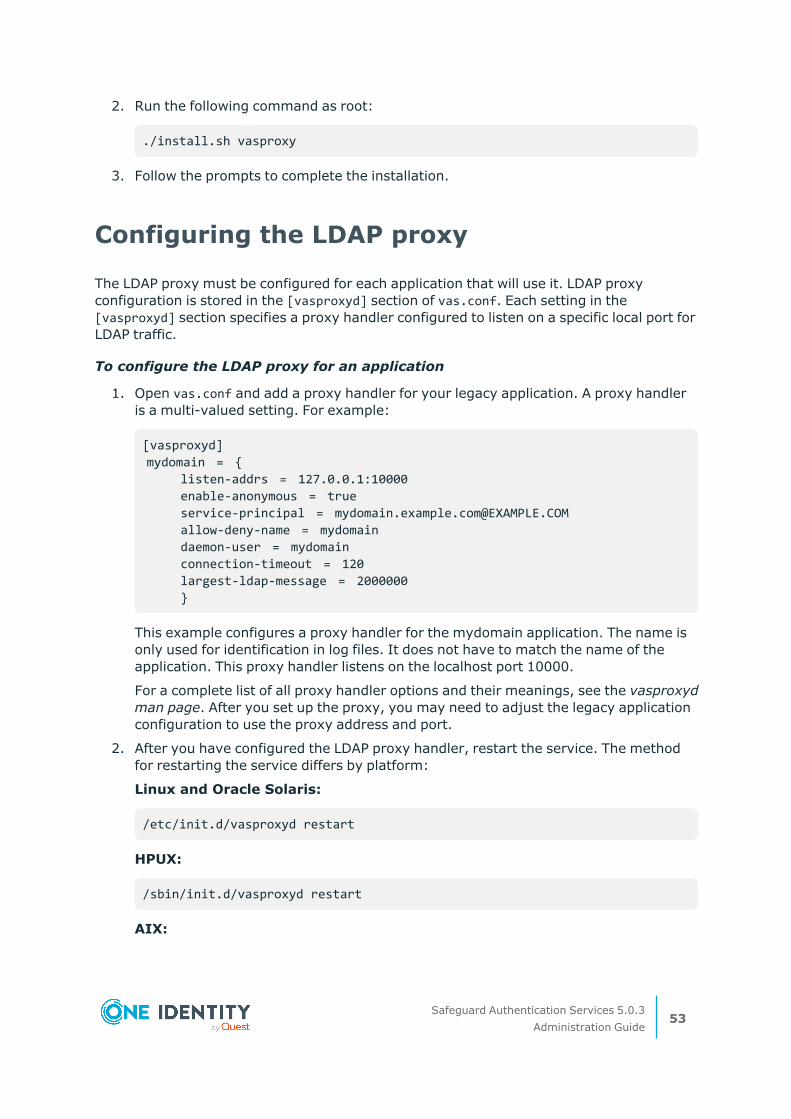
2. Run the following command as root:
./install.sh vasproxy
3. Follow the prompts to complete the installation.
Configuring the LDAP proxy
The LDAP proxy must be configured for each application that will use it. LDAP proxy configuration is stored in the [vasproxyd] section of vas.conf. Each setting in the [vasproxyd] section specifies a proxy handler configured to listen on a specific local port for LDAP traffic.
To configure the LDAP proxy for an application
1. Open vas.conf and add a proxy handler for your legacy application. A proxy handler is a multi-valued setting. For example:
[vasproxyd] mydomain = { listen-addrs = 127.0.0.1:10000 enable-anonymous = true service-principal = [email protected] allow-deny-name = mydomain daemon-user = mydomain connection-timeout = 120 largest-ldap-message = 2000000 }
This example configures a proxy handler for the mydomain application. The name is only used for identification in log files. It does not have to match the name of the application. This proxy handler listens on the localhost port 10000.
For a complete list of all proxy handler options and their meanings, see the vasproxyd man page. After you set up the proxy, you may need to adjust the legacy application configuration to use the proxy address and port.
2. After you have configured the LDAP proxy handler, restart the service. The method for restarting the service differs by platform:
Linux and Oracle Solaris:
/etc/init.d/vasproxyd restart
HPUX:
/sbin/init.d/vasproxyd restart
AIX:
Safeguard Authentication Services 5.0.3Administration Guide
53
stopsrc -s vasproxyd startsrc -s vasproxyd
IPv6
Safeguard Authentication Services supports IPv6 and is designed to run equally in IPv4-only, dual-stack (IPv4 and IPv6), and IPv6-only environments. The following describes the IPv6 features and considerations when running Safeguard Authentication Services in an IPv6-enabled environment.
NOTE: Safeguard Authentication Services uses IPv6 when the operating system's DNS resolver correctly supports mapping of IPv4 addresses to IPv6 addresses. If a problem with address mapping is detected, Safeguard Authentication Services operates in IPv4-only mode, even if an IPv6 address is assigned and other applications use IPv6.
Safeguard Authentication Services uses IPv6 automatically when DNS contains IPv6 address records (AAAA records). These are most commonly published for servers running Windows 2008 or later on an IPv6-enabled network. Similarly, hosts may use IPv4 whenever IPv4 address records (A records) appear in DNS.
To ensure reliability, when connecting to a TCP service that is available over both IPv4 and IPv6, Safeguard Authentication Services uses an adaptive algorithm used by popular web browsers and published in RFC 6555. If an initial connection attempt does not complete in a short amount of time, it makes a parallel connection attempt using a subsequent address, if available. This happens in a fraction of a second and is usually invisible to the user, even if one protocol is perennially unavailable.
For UDP connections, the service sends packets in parallel using both protocols (when available). This provides the best performance and reliability, with a negligible effect on network traffic.
IPv6 connectivity in Safeguard Authentication Services depends on the operating system. To determine IPv6 availability on a host-by-host basis, run vastool info ipv6 on each client.
NOTE: You may need to update or patch your operating system for Safeguard Authentication Services to use IPv6.
The system resolver's address selection policies directly influence the addresses chosen by Safeguard Authentication Services when more than one address is available. Depending on the operating system, you may be able to configure the polices. For example, configure /etc/gai.conf on GNU libc-based operating systems. The standard address selection policies (RFC 3484) and fallback connection algorithm should obviate the need to alter the default address selection policy.
NOTE: Active Directory servers must be running Windows 2008 or later for IPv6 communication.
Safeguard Authentication Services 5.0.3Administration Guide
54

4
Identity management
Safeguard Authentication Services provides many features designed to help you consolidate and organize your identity infrastructure by bringing Unix identity information into Active Directory. This section introduces you to some of the identity management tools available to you.
NOTE: You can access your Unix hosts from the Control Center to perform the command line tasks described in this section.
Planning your user identity deployment strategy
Before you deploy Safeguard Authentication Services in your enterprise, One Identity recommends that you have a strategy for resolving the user identities on each Unix host against Active Directory. Safeguard Authentication Services supports the following methods:
l Enterprise Identity. Unix User and Group identities have their Posix identity information centrally managed within Active Directory. All entities have the same credential information across the enterprise.
l Mapped User. User identity information is local to each Unix Host, however Active Directory users are mapped to a local Unix account. This enables the user to authenticate using an Active Directory password, while maintaining his existing local identity.
l Posix Identity Auto-generation. User identity information is not stored centrally within Active Directory, however Active Directory users have Posix identity attributes automatically generated for them when interacting with Unix Hosts. Users authenticate with an Active Directory password.
l Personalities. Personalities allow an Active Directory user to have multiple identity objects stored in Active Directory, allowing for multiple roles, multiple NIS domain consolidation, and so forth.
Safeguard Authentication Services 5.0.3 Administration Guide
Identity management55
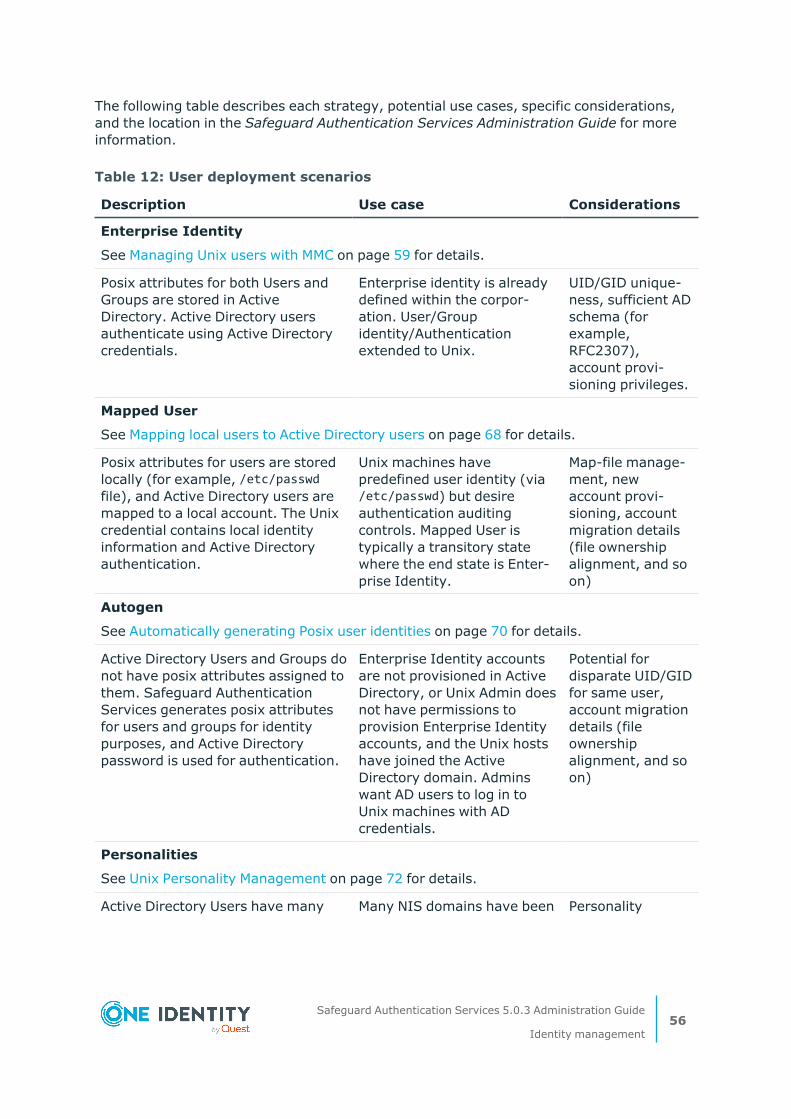
The following table describes each strategy, potential use cases, specific considerations, and the location in the Safeguard Authentication Services Administration Guide for more information.
Description Use case Considerations
Enterprise Identity
See Managing Unix users with MMC on page 59 for details.
Posix attributes for both Users and Groups are stored in Active Directory. Active Directory users authenticate using Active Directory credentials.
Enterprise identity is already defined within the corpor-ation. User/Group identity/Authentication extended to Unix.
UID/GID unique-ness, sufficient AD schema (for example, RFC2307), account provi-sioning privileges.
Mapped User
See Mapping local users to Active Directory users on page 68 for details.
Posix attributes for users are stored locally (for example, /etc/passwd file), and Active Directory users are mapped to a local account. The Unix credential contains local identity information and Active Directory authentication.
Unix machines have predefined user identity (via /etc/passwd) but desire authentication auditing controls. Mapped User is typically a transitory state where the end state is Enter-prise Identity.
Map-file manage-ment, new account provi-sioning, account migration details (file ownership alignment, and so on)
Autogen
See Automatically generating Posix user identities on page 70 for details.
Active Directory Users and Groups do not have posix attributes assigned to them. Safeguard Authentication Services generates posix attributes for users and groups for identity purposes, and Active Directory password is used for authentication.
Enterprise Identity accounts are not provisioned in Active Directory, or Unix Admin does not have permissions to provision Enterprise Identity accounts, and the Unix hosts have joined the Active Directory domain. Admins want AD users to log in to Unix machines with AD credentials.
Potential for disparate UID/GID for same user, account migration details (file ownership alignment, and so on)
Personalities
See Unix Personality Management on page 72 for details.
Active Directory Users have many Many NIS domains have been Personality
Table 12: User deployment scenarios
Safeguard Authentication Services 5.0.3 Administration Guide
Identity management56
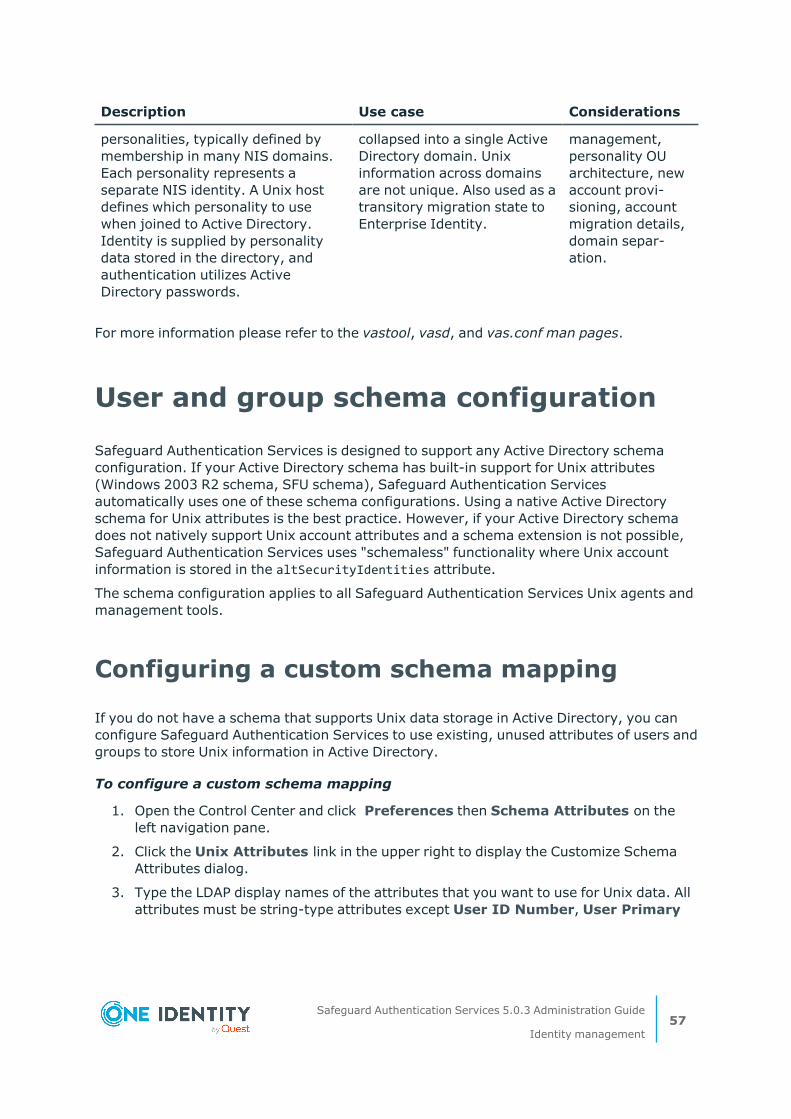
Description Use case Considerations
personalities, typically defined by membership in many NIS domains. Each personality represents a separate NIS identity. A Unix host defines which personality to use when joined to Active Directory. Identity is supplied by personality data stored in the directory, and authentication utilizes Active Directory passwords.
collapsed into a single Active Directory domain. Unix information across domains are not unique. Also used as a transitory migration state to Enterprise Identity.
management, personality OU architecture, new account provi-sioning, account migration details, domain separ-ation.
For more information please refer to the vastool, vasd, and vas.conf man pages.
User and group schema configuration
Safeguard Authentication Services is designed to support any Active Directory schema configuration. If your Active Directory schema has built-in support for Unix attributes (Windows 2003 R2 schema, SFU schema), Safeguard Authentication Services automatically uses one of these schema configurations. Using a native Active Directory schema for Unix attributes is the best practice. However, if your Active Directory schema does not natively support Unix account attributes and a schema extension is not possible, Safeguard Authentication Services uses "schemaless" functionality where Unix account information is stored in the altSecurityIdentities attribute.
The schema configuration applies to all Safeguard Authentication Services Unix agents and management tools.
Configuring a custom schema mapping
If you do not have a schema that supports Unix data storage in Active Directory, you can configure Safeguard Authentication Services to use existing, unused attributes of users and groups to store Unix information in Active Directory.
To configure a custom schema mapping
1. Open the Control Center and click Preferences then Schema Attributes on the left navigation pane.
2. Click the Unix Attributes link in the upper right to display the Customize Schema Attributes dialog.
3. Type the LDAP display names of the attributes that you want to use for Unix data. All attributes must be string-type attributes except User ID Number, User Primary
Safeguard Authentication Services 5.0.3 Administration Guide
Identity management57
Group ID, and Group ID Number, which may be integers. If an attribute does not exist or is of the wrong type, the border will turn red indicating that the LDAP attribute is invalid.
NOTE: When customizing the schema mapping, ensure that the attributes used for User ID Number and Group ID Number are indexed and replicated to the global catalog.
For more information, see Active Directory Optimization in the Control Center online help.
4. Click OK to validate and save the specified mappings in Active Directory.
Active Directory optimization (Best practice)
Indexing certain attributes used by the Safeguard Authentication Services Unix agent can have a dramatic effect on the performance and scalability of your Unix and Active Directory integration project. The Control Center, Preferences | Schema Attributes | Unix Attributes panel displays a warning if the Active Directory configuration is not optimized according to best practices.
NOTE: The Optimize Schema option is only available if you have not optimized the Active Directory schema.
One Identity recommends that you index the following attributes in Active Directory:
l User Login Name
l User ID Number
l Group Name
l Group ID Number
NOTE: LDAP display names vary depending on your Unix attribute mappings.
It is also a best practice to add all Unix identity attributes to the global catalog. This reduces the number of Active Directory lookups that need to be performed by Safeguard Authentication Services Unix agents. Click the Optimize Schema link to run a script that updates these attributes as necessary.
This operation requires administrative rights in Active Directory. If you do not have the necessary rights to optimize your schema, it generates a schema optimization script. You can send the script to an Active Directory administrator who has rights to make the necessary changes.
All schema optimizations are reversible and no schema extensions are applied in the process.
Safeguard Authentication Services 5.0.3 Administration Guide
Identity management58
Managing Unix user accounts
You can Unix-enable Active Directory user accounts. A Unix-enabled user has a Unix User Name, UID Number, Primary GID Number, Comment (GECOS), Home Directory, and Login Shell. These attributes enable an Active Directory user to appear as a standard Unix user. Safeguard Authentication Services provides several tools to help you manage Unix account information in Active Directory.
Managing Unix users with MMC
You can access Active Directory Users and Computers (ADUC) from the Control Center. Navigate to the Tools | Safeguard Authentication Services Extensions for Active Directory Users and Computers.
After installing Safeguard Authentication Services on Windows, a Unix Account tab appears in the Active Directory user's Properties dialog:
Safeguard Authentication Services 5.0.3 Administration Guide
Identity management59
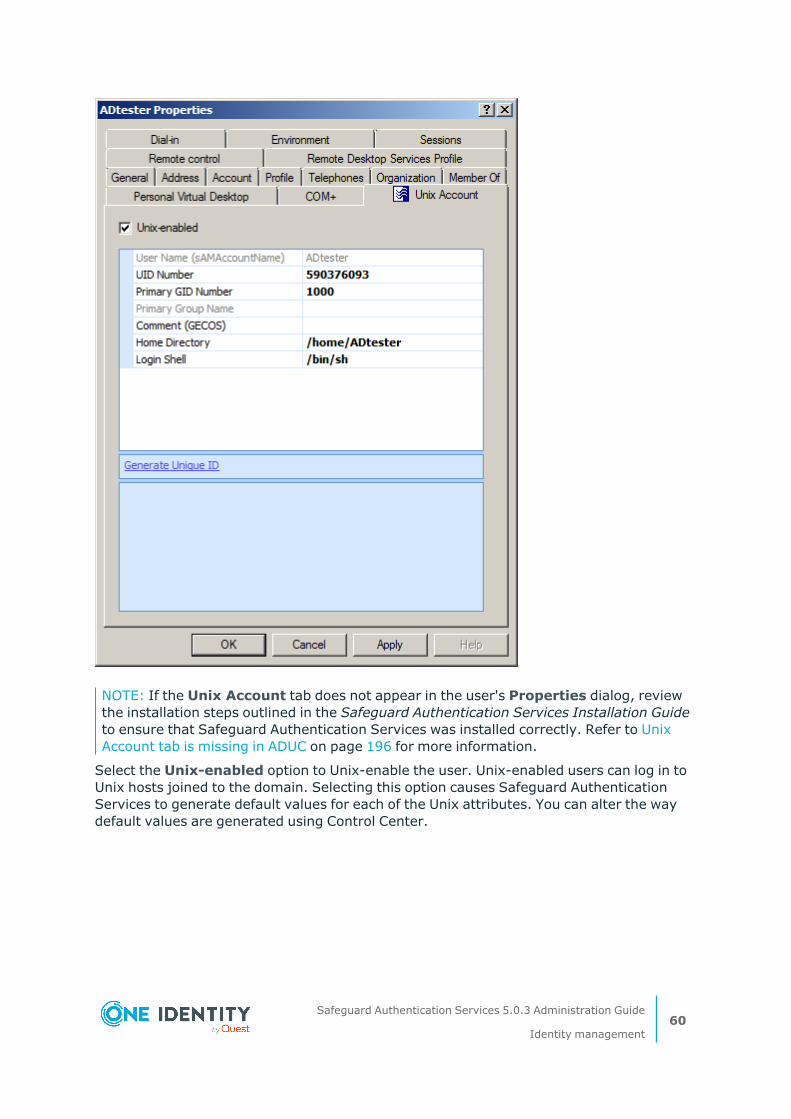
NOTE: If the Unix Account tab does not appear in the user's Properties dialog, review the installation steps outlined in the Safeguard Authentication Services Installation Guide to ensure that Safeguard Authentication Services was installed correctly. Refer to Unix Account tab is missing in ADUC on page 196 for more information.
Select the Unix-enabled option to Unix-enable the user. Unix-enabled users can log in to Unix hosts joined to the domain. Selecting this option causes Safeguard Authentication Services to generate default values for each of the Unix attributes. You can alter the way default values are generated using Control Center.
Safeguard Authentication Services 5.0.3 Administration Guide
Identity management60
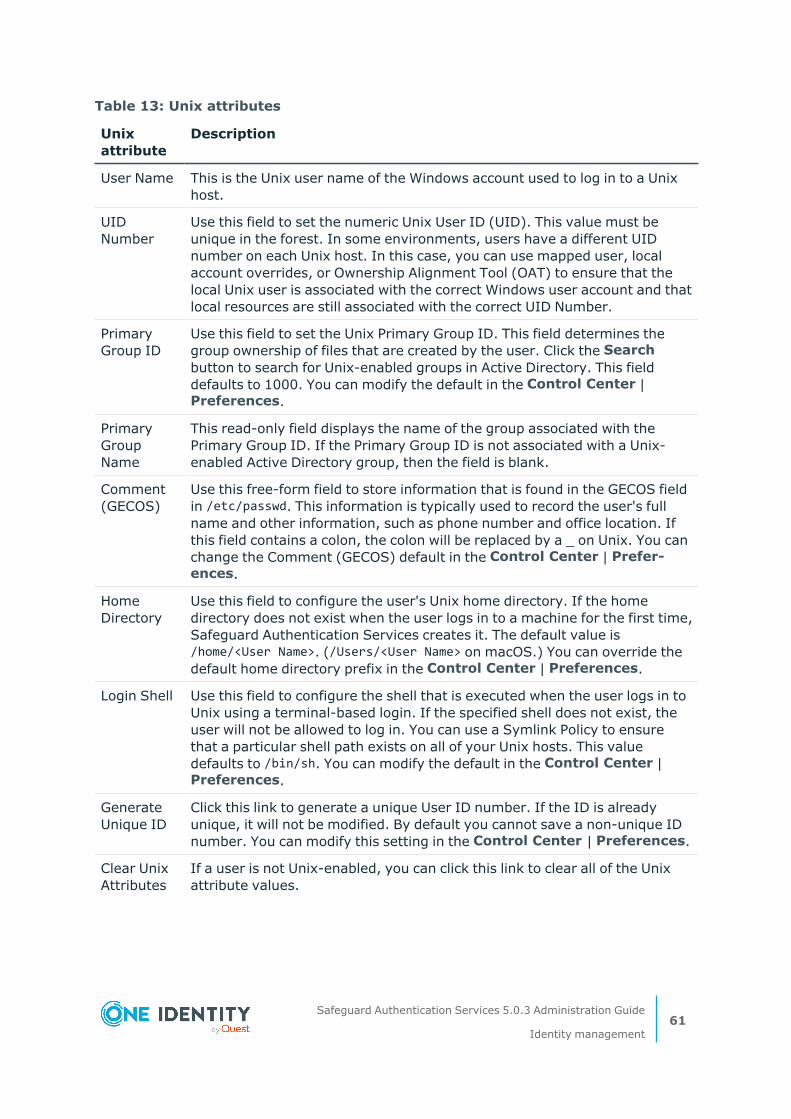
Unix attribute
Description
User Name This is the Unix user name of the Windows account used to log in to a Unix host.
UID Number
Use this field to set the numeric Unix User ID (UID). This value must be unique in the forest. In some environments, users have a different UID number on each Unix host. In this case, you can use mapped user, local account overrides, or Ownership Alignment Tool (OAT) to ensure that the local Unix user is associated with the correct Windows user account and that local resources are still associated with the correct UID Number.
Primary Group ID
Use this field to set the Unix Primary Group ID. This field determines the group ownership of files that are created by the user. Click the Search button to search for Unix-enabled groups in Active Directory. This field defaults to 1000. You can modify the default in the Control Center | Preferences.
Primary Group Name
This read-only field displays the name of the group associated with the Primary Group ID. If the Primary Group ID is not associated with a Unix-enabled Active Directory group, then the field is blank.
Comment (GECOS)
Use this free-form field to store information that is found in the GECOS field in /etc/passwd. This information is typically used to record the user's full name and other information, such as phone number and office location. If this field contains a colon, the colon will be replaced by a _ on Unix. You can change the Comment (GECOS) default in the Control Center | Prefer-ences.
Home Directory
Use this field to configure the user's Unix home directory. If the home directory does not exist when the user logs in to a machine for the first time, Safeguard Authentication Services creates it. The default value is /home/<User Name>. (/Users/<User Name> on macOS.) You can override the default home directory prefix in the Control Center | Preferences.
Login Shell Use this field to configure the shell that is executed when the user logs in to Unix using a terminal-based login. If the specified shell does not exist, the user will not be allowed to log in. You can use a Symlink Policy to ensure that a particular shell path exists on all of your Unix hosts. This value defaults to /bin/sh. You can modify the default in the Control Center | Preferences.
Generate Unique ID
Click this link to generate a unique User ID number. If the ID is already unique, it will not be modified. By default you cannot save a non-unique ID number. You can modify this setting in the Control Center | Preferences.
Clear Unix Attributes
If a user is not Unix-enabled, you can click this link to clear all of the Unix attribute values.
Table 13: Unix attributes
Safeguard Authentication Services 5.0.3 Administration Guide
Identity management61

Managing user accounts from the Unix command line
NOTE: In the following examples, it is assumed that you have already logged in with a user that has sufficient permissions in Active Directory to perform the intended command. See Permissions matrix on page 23. If your present account is lacking necessary permissions, you may use either of the following methods to perform the desired administrative command:
1. Use vastool kinit <elevated-permission-user> to obtain elevated permissions. For example, execute vastool kinit admin-user, and then perform the command as outlined in the examples.
-OR-
2. Use vastool -u <elevated-permission-user>. For example, vastool create user test-account becomes vastool -u admin-user create user test-account.
You can use the vastool command from the command line to create and delete users, as well as list user information.
To create a user, use the vastool create command. The following command creates a non-Unix-enabled user, bsmith, in Active Directory:
vastool create bsmith
To create a user that has its Unix account enabled, pass in an /etc/passwd formatted string using the -i option, as follows:
vastool create -i "bsmith:x:1003:1000:Bob:/home/bsmith:/bin/bash" bsmith
By default, all users created with vastool create are created in the Users container. To create a user in a different organizational unit, use the -c command line option.
The following command creates a Unix-enabled user, bsmith, in the OU=sales,DC=example,DC=com organizational unit:
vastool create -i \ "bsmith:x:1003:1000:Bob:/home/bsmith:/bin/bash" \ -c "OU=sales,DC=example,DC=com" bsmith
To delete a user, use vastool delete. The following command deletes the bsmith user:
vastool delete bsmith
To list users, use vastool list users. The vastool list users command returns information from the local account cache. The following command lists all the users with Unix accounts enabled:
vastool list users
Safeguard Authentication Services 5.0.3 Administration Guide
Identity management62

This command produces output similar to the following:
pspencer:VAS:1000:1000:Pat Spencer:/home/pspencer:/bin/bash djones:VAS:1001:1000:Dave Jones:/home/djones:/bin/bash molsen:VAS:1002:1000:Mary Olsen:/home/molsen/bin/bash bsmith:VAS:1003:1000:Bob Smith:/home/bsmith:/bin/bash
Managing users with Windows PowerShell
Safeguard Authentication Services includes PowerShell modules that provide a "scriptable" interface to many Safeguard Authentication Services management tasks.
Using Safeguard Authentication Services PowerShell commands you can Unix-enable, Unix-disable, modify, report on, and clear Unix attributes of Active Directory users.
NOTE: You can access a customized PowerShell console from Control Center | Tools. To add Safeguard Authentication Services cmdlets to an existing PowerShell session, run Import-Module Quest.AuthenticationServices. See PowerShell Cmdlets for a complete list of available commands.
To Unix-enable a user, use the Enable-QasUnixUser command. The following command Unix-enables the user, bsmith, in Active Directory:
Enable-QasUnixUser -Identity <domain>\bsmith
To disable a user for Unix access use the Disable-QasUnixUser command:
Disable-QasUnixUser -Identity <domain>\bsmith
To set a particular Unix attribute use the Set-QasUnixUser command. The following command sets the Comment (GECOS) field of the bsmith user to Bob Smith:
Set-QasUnixUser -Identity <domain>\bsmith -Gecos "Bob Smith"
To report on a user, use the Get-QASUnixUser command. The following command shows all users that start with "bsm".
Get-QasUnixUser -Identity bsm
The Safeguard Authentication Services PowerShell commands are designed to work with the Active Directory commands from Microsoft (Get-ADUser) and One Identity (Get-QADUser). You can pipe the output of these commands to any of the Safeguard Authentication Services PowerShell commands that operate on users. For example, the following command clears the Unix attributes from the bsmith user.
Get-QADUser -Identity <domain>\bsmith | Clear-QasUnixUser
Safeguard Authentication Services 5.0.3 Administration Guide
Identity management63
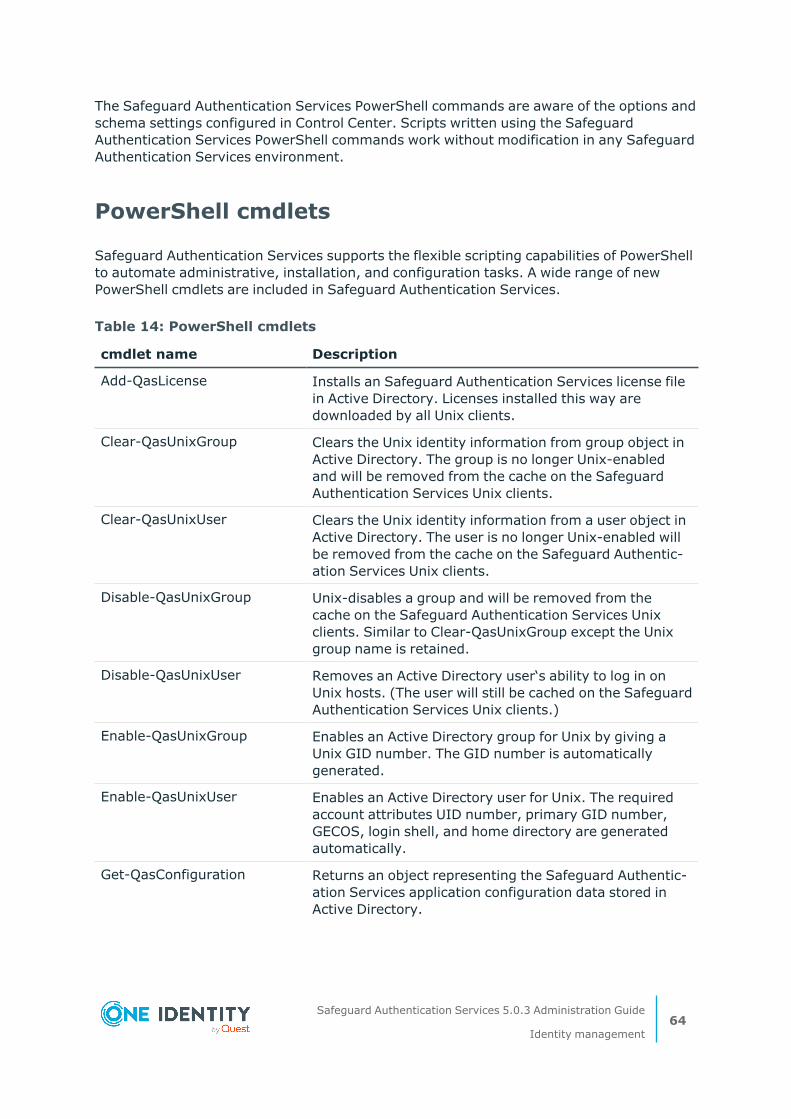
The Safeguard Authentication Services PowerShell commands are aware of the options and schema settings configured in Control Center. Scripts written using the Safeguard Authentication Services PowerShell commands work without modification in any Safeguard Authentication Services environment.
PowerShell cmdlets
Safeguard Authentication Services supports the flexible scripting capabilities of PowerShell to automate administrative, installation, and configuration tasks. A wide range of new PowerShell cmdlets are included in Safeguard Authentication Services.
cmdlet name Description
Add-QasLicense Installs an Safeguard Authentication Services license file in Active Directory. Licenses installed this way are downloaded by all Unix clients.
Clear-QasUnixGroup Clears the Unix identity information from group object in Active Directory. The group is no longer Unix-enabled and will be removed from the cache on the Safeguard Authentication Services Unix clients.
Clear-QasUnixUser Clears the Unix identity information from a user object in Active Directory. The user is no longer Unix-enabled will be removed from the cache on the Safeguard Authentic-ation Services Unix clients.
Disable-QasUnixGroup Unix-disables a group and will be removed from the cache on the Safeguard Authentication Services Unix clients. Similar to Clear-QasUnixGroup except the Unix group name is retained.
Disable-QasUnixUser Removes an Active Directory user‘s ability to log in on Unix hosts. (The user will still be cached on the Safeguard Authentication Services Unix clients.)
Enable-QasUnixGroup Enables an Active Directory group for Unix by giving a Unix GID number. The GID number is automatically generated.
Enable-QasUnixUser Enables an Active Directory user for Unix. The required account attributes UID number, primary GID number, GECOS, login shell, and home directory are generated automatically.
Get-QasConfiguration Returns an object representing the Safeguard Authentic-ation Services application configuration data stored in Active Directory.
Table 14: PowerShell cmdlets
Safeguard Authentication Services 5.0.3 Administration Guide
Identity management64
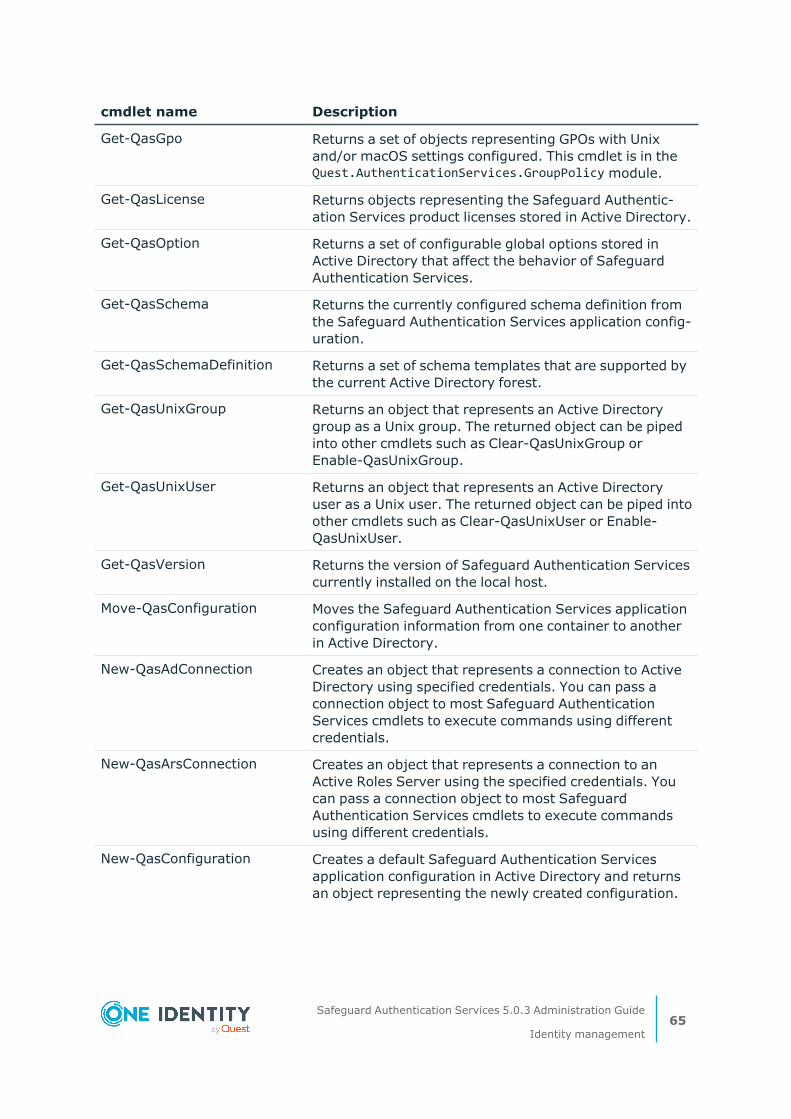
cmdlet name Description
Get-QasGpo Returns a set of objects representing GPOs with Unix and/or macOS settings configured. This cmdlet is in the Quest.AuthenticationServices.GroupPolicy module.
Get-QasLicense Returns objects representing the Safeguard Authentic-ation Services product licenses stored in Active Directory.
Get-QasOption Returns a set of configurable global options stored in Active Directory that affect the behavior of Safeguard Authentication Services.
Get-QasSchema Returns the currently configured schema definition from the Safeguard Authentication Services application config-uration.
Get-QasSchemaDefinition Returns a set of schema templates that are supported by the current Active Directory forest.
Get-QasUnixGroup Returns an object that represents an Active Directory group as a Unix group. The returned object can be piped into other cmdlets such as Clear-QasUnixGroup or Enable-QasUnixGroup.
Get-QasUnixUser Returns an object that represents an Active Directory user as a Unix user. The returned object can be piped into other cmdlets such as Clear-QasUnixUser or Enable-QasUnixUser.
Get-QasVersion Returns the version of Safeguard Authentication Services currently installed on the local host.
Move-QasConfiguration Moves the Safeguard Authentication Services application configuration information from one container to another in Active Directory.
New-QasAdConnection Creates an object that represents a connection to Active Directory using specified credentials. You can pass a connection object to most Safeguard Authentication Services cmdlets to execute commands using different credentials.
New-QasArsConnection Creates an object that represents a connection to an Active Roles Server using the specified credentials. You can pass a connection object to most Safeguard Authentication Services cmdlets to execute commands using different credentials.
New-QasConfiguration Creates a default Safeguard Authentication Services application configuration in Active Directory and returns an object representing the newly created configuration.
Safeguard Authentication Services 5.0.3 Administration Guide
Identity management65

cmdlet name Description
Remove-QasConfiguration Accepts a Safeguard Authentication Services application configuration object as input and removes it from Active Directory. This cmdlet produces no output.
Remove-QasLicense Accepts an Safeguard Authentication Services product license object as input and removes the license from Active Directory. This cmdlet produces no output.
Set-QasOption Accepts an Safeguard Authentication Services options set as input and saves it to Active Directory.
Set-QasSchema Accepts an Safeguard Authentication Services schema template as input and saves it to Active Directory as the schema template that will be used by all Safeguard Authentication Services Unix clients.
Set-QasUnixGroup Accepts a Unix group object as input and saves it to Active Directory. You can also set specific attributes using command line options.
Set-QasUnixUser Accepts a Unix user object as input and saves it to Active Directory. You can also set specific attributes using command line options.
Safeguard Authentication Services PowerShell cmdlets are contained in PowerShell modules named Quest.AuthenticationServices and Quest.AuthenticationServices.GroupPolicy. Use the Import-Module command to import the Safeguard Authentication Services commands into an existing PowerShell session.
Password management
Safeguard Authentication Services supports and enforces all the Active Directory password policy concepts including minimum password length, age, complexity, lockout requirements and history. It also supports the fine grained password policies introduced in Windows 2008.
Changing passwords
Unix users can change their Active Directory passwords using vastool or with PAM-enabled system password utilities such as passwd.
Changing passwords with VASTOOL
You can use vastool passwd to change your password or to reset another user's password.
Safeguard Authentication Services 5.0.3 Administration Guide
Identity management66
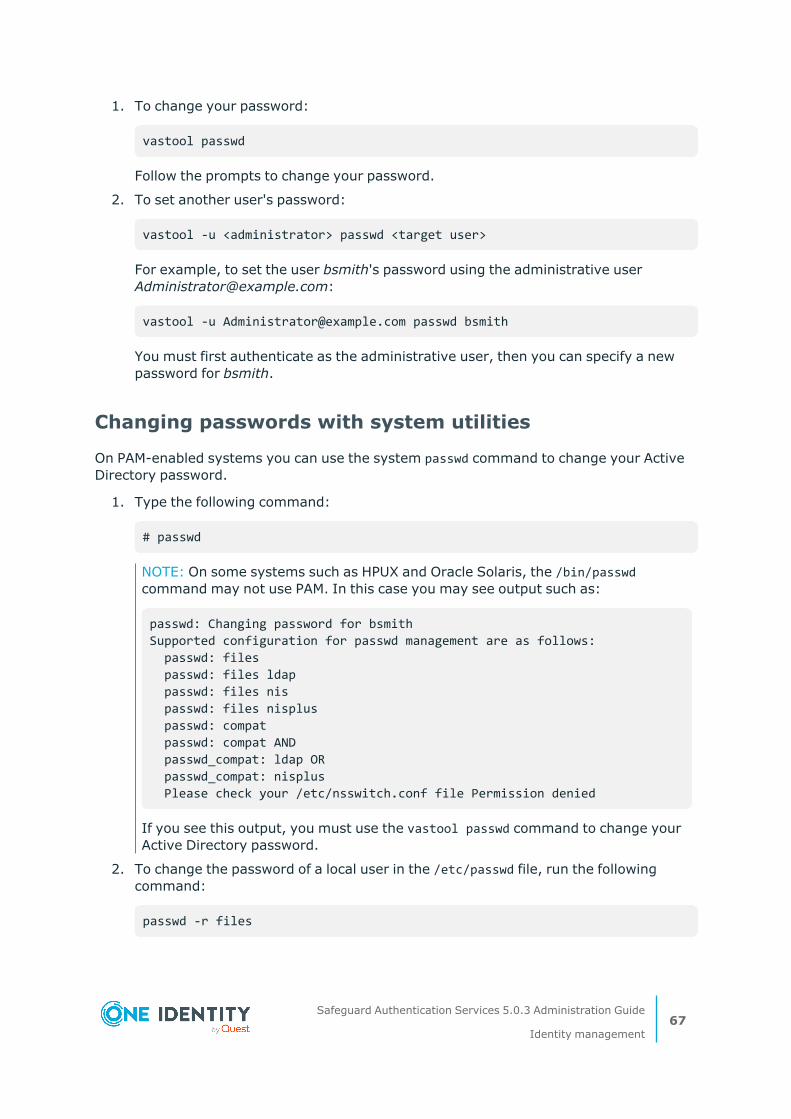
1. To change your password:
vastool passwd
Follow the prompts to change your password.
2. To set another user's password:
vastool -u <administrator> passwd <target user>
For example, to set the user bsmith's password using the administrative user [email protected]:
vastool -u [email protected] passwd bsmith
You must first authenticate as the administrative user, then you can specify a new password for bsmith.
Changing passwords with system utilities
On PAM-enabled systems you can use the system passwd command to change your Active Directory password.
1. Type the following command:
# passwd
NOTE: On some systems such as HPUX and Oracle Solaris, the /bin/passwd command may not use PAM. In this case you may see output such as:
passwd: Changing password for bsmith Supported configuration for passwd management are as follows: passwd: files passwd: files ldap passwd: files nis passwd: files nisplus passwd: compat passwd: compat AND passwd_compat: ldap OR passwd_compat: nisplus Please check your /etc/nsswitch.conf file Permission denied
If you see this output, you must use the vastool passwd command to change your Active Directory password.
2. To change the password of a local user in the /etc/passwd file, run the following command:
passwd -r files
Safeguard Authentication Services 5.0.3 Administration Guide
Identity management67
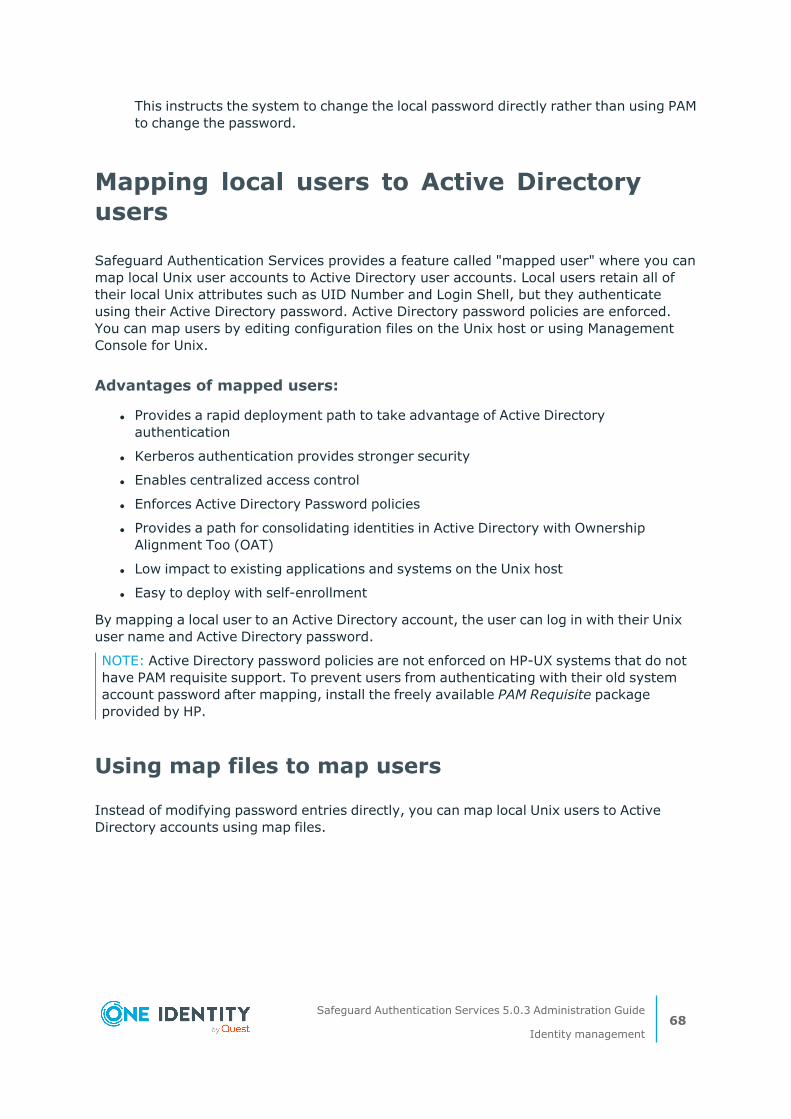
This instructs the system to change the local password directly rather than using PAM to change the password.
Mapping local users to Active Directory users
Safeguard Authentication Services provides a feature called "mapped user" where you can map local Unix user accounts to Active Directory user accounts. Local users retain all of their local Unix attributes such as UID Number and Login Shell, but they authenticate using their Active Directory password. Active Directory password policies are enforced. You can map users by editing configuration files on the Unix host or using Management Console for Unix.
Advantages of mapped users:
l Provides a rapid deployment path to take advantage of Active Directory authentication
l Kerberos authentication provides stronger security
l Enables centralized access control
l Enforces Active Directory Password policies
l Provides a path for consolidating identities in Active Directory with Ownership Alignment Too (OAT)
l Low impact to existing applications and systems on the Unix host
l Easy to deploy with self-enrollment
By mapping a local user to an Active Directory account, the user can log in with their Unix user name and Active Directory password.
NOTE: Active Directory password policies are not enforced on HP-UX systems that do not have PAM requisite support. To prevent users from authenticating with their old system account password after mapping, install the freely available PAM Requisite package provided by HP.
Using map files to map users
Instead of modifying password entries directly, you can map local Unix users to Active Directory accounts using map files.
Safeguard Authentication Services 5.0.3 Administration Guide
Identity management68
To configure a user mapping file
1. Run the following command as root to enable local map files:
vastool configure vas vas_auth user-map-files /etc/user-map
NOTE: This example configures Safeguard Authentication Services to use /etc/user-map for user mappings. You can specify any filename.
2. Add user mappings to the map file.
The format is <local user name>:<sAMAccountName@domain>.
If you want to map a local user named pspencer to the Active Directory account for [email protected], add the following line to the file:
pspencer:[email protected]
Mapping the root account
You can only map the root account to an Active Directory account using the mapped-root-user setting in vas.conf.
To map the root user to an Active Directory account
1. Run the following command as root:
vastool configure vas vas_auth mapped-root-user [email protected]
NOTE: If you specify mapped-root-user on AIX you must set VASMU on the system line of the root section in /etc/security/user. Refer to your AIX system documentation for more information.
Enable self-enrollment
Self-enrollment allows users to map their Unix account to an Active Directory account as they log in to Unix. This mapping occurs as part of the standard PAM login. Users are first prompted for their Unix password. Once authenticated to Unix, they are prompted to authenticate to Active Directory. This process happens on the first log in after you enable self-enrollment. Once the self-enrollment is complete, the user logs in with his Unix user name and Active Directory password.
To enable self-enrollment
1. Run the following command as root:
vastool configure vas vas_auth enable-self-enrollment true
Safeguard Authentication Services 5.0.3 Administration Guide
Identity management69

NOTE: All users mapped by the self-enrollment process are stored in the /etc/opt/quest/vas/automatic_mappings file.
2. Force Safeguard Authentication Services to reload configuration settings by restarting the Safeguard Authentication Services services.
Restarting services
1. The method for restarting services varies by platform:
a. To restart Safeguard Authentication Services on Linux or Oracle Solaris, enter:
/etc/init.d/vasd restart
b. To restart Safeguard Authentication Services on HP-UX, enter:
/sbin/init.d/vasd restart
c. To restart Safeguard Authentication Services on AIX, enter:
stopsrc -s vasd startsrc -s vasd
NOTE: Due to library changes between the Safeguard Authentication Services 4.1 and 4.2, the system may need to be rebooted before all processes load the new libraries.
Automatically generating Posix user identities
When user identity information is not stored centrally within Active Directory, it is possible for Active Directory users to have Posix identity attributes automatically generated for them when interacting with Unix hosts, allowing the user to authenticate with an Active Directory password.
This is convenient in situations where you can not utilize enterprise user and group identification from Active Directory. For example, when you do not have sufficient rights to modify User identity objects, or are unable to create the Safeguard Authentication Services Application Configuration object, you can configure Safeguard Authentication Services to auto-generate Posix identity attributes on the Unix host for Active Directory users.
The following attributes are auto-generated:
l UID Number: This attribute is derived from a hash of the Active Directory Users Globally Unique Identifier (GUID).
l GID Number: This attribute is derived from the hash of the Active Directory Group GUID that is assigned as the Windows Primary Group object.
Safeguard Authentication Services 5.0.3 Administration Guide
Identity management70
l Gecos: The gecos field is populated by the users CN, but is configurable by using the [vasd] realname-attr vas.conf setting.
l Unix Home Directory: This attribute is a concatenation of the per-machine configurable home directory base option, [vasd] autogen-posix-homedir-base, and the users sAMAccountName value.
l Login Shell: This attribute is set by the per-machine [vasd] autogen-posix-default-shell configuration option.
The generated attributes are stored locally on each Unix host and remain in effect until manually removed by the system administrator.
Migrating auto-generated identities to enterprise identities
Once a host has Posix identity attributes generated for an Active Directory user or group, they remain in effect until you manually remove them. This ensures that you take the proper steps when migrating user identities, specifically when you realign the file and directory ownerships to the new UID and GID values.
To migrate an auto-generated user to use an enterprise identity
1. Make sure that you have realigned the file and directory ownerships to the new UID and GID values, including the user's home directory.
For more information, see Managing local file permissions on page 107..
2. Locate the user record in the /etc/opt/quest/vas/autogen.passwd file, and remove it.
3. Force Safeguard Authentication Services to update the user by means of logging in or by running:
vastool list –f user <username>
Migrating auto-generated group identities
To migrate an auto-generated group to use an enterprise identity
1. Make sure that you have realigned the file and directory ownerships to the new UID and GID values, including the user's home directory.
For more information, see Managing local file permissions on page 107..
2. Locate the user record in the /etc/opt/quest/vas/autogen.group file, and remove it.
3. Force Safeguard Authentication Services to update the user by means of logging in or by running:
vastool list –f group <groupname>
Safeguard Authentication Services 5.0.3 Administration Guide
Identity management71
Unix Personality Management
Unix Personality Management (UPM) delivers a highly flexible model for managing multiple Unix identities for a user or group. This preserves the administrative boundaries typical to Unix systems while still allowing for consolidation into Active Directory.
In Unix Personality Management, Unix hosts are joined to a "personality container" when they join the domain. The personality container provides a constrained view of the users and groups available in Active Directory. Personality containers can contain Unix-enabled users. In addition, you can define Unix personality objects and link them to regular Windows users.
This allows an override mechanism for Unix identity data that is stored in Active Directory. In this way a single Active Directory user is associated with multiple Unix identity objects. Personality containers can also link to secondary containers, which allows for a shared repository of globally unique Unix identities.
NIS domains are particularly applicable to Unix Personality Management. If you have several NIS domains where users have different Unix identities in each NIS domain, you can create a personality container corresponding to each NIS domain. Unix hosts are then joined to the personality container corresponding to their NIS domain. To aid in this scenario, you can create a personality container directly from a NIS domain. See the Unix Account Import Wizard online help for more information.
NOTE: Unix Personality Management is not appropriate when Unix identity data is divergent across Unix hosts. For example, if users have a different UID number on every Unix host, UPM is not the best choice because you need to maintain a personality container per-host.
Unix Personality Management schema extension
Unix Personality Management requires an extension to the default Active Directory schema in order to store multiple Unix identities for each Active Directory user and group. The UPM schema extension derives from the RFC 2307 standard for storing Unix identity information in LDAP. It introduces new structural classes for user personalities and group personalities. You can link multiple user personalities to an Active Directory user, and multiple group personalities to an Active Directory group.
The UPM schema extension is provided in the standard LDAP Data Interchange Format (LDIF). You can use LDIF files to modify your schema using the ldifde.exe utility that is distributed by Microsoft with the Windows operating system. You must have administrative rights to extend the schema. You can find the LDIF file, qas_unix_personality_management.ldif, on the distribution media in the windows\ldif directory.
For help with running ldifde.exe, see Ldifde Command-line Reference.
Safeguard Authentication Services 5.0.3 Administration Guide
Identity management72
Joining the domain in Unix Personality Management mode
To join a Unix host to the domain in UPM mode,
1. Extend the schema with the Unix Personality Management schema extension.
2. Create a personality container.
In ADUC, right-click a container and select All Tasks | Unix Tasks | Promote to Personality Container.
3. Join Unix hosts to the domain in UPM mode using the new personality container.
For example, run the following vastool command to join to domain example.com using personality container ou=Unix Users,dc=example,dc=com:
vastool -u Administrator join -p "ou=Unix Users,dc=example,dc=com" example.com
When the Unix host is joined in UPM mode, only the Unix objects contained in the personality container are cached.
Overriding Unix account information
You can override user account attributes on the local Unix host. This allows you to use the identity information from Active Directory but modify individual attributes on certain hosts as needed. User overrides are specified in the /etc/opt/quest/vas/user-override configuration file. Overrides are specified as follows:
DOMAIN\sAMAccountName:<Login Name>:<UID Number>:<Primary GID Number>:<Comment (GECOS)>:<Home Directory>:<Login Shell>
DOMAIN\sAMAccountName must refer to a valid Active Directory user account. You can omit any of the Unix account fields. If a field is not specified it will get the default value for that user. You can override every member of a group using the following syntax:
DOMAIN\sAMAccountName:::::<Home Directory>:<Login Shell>
DOMAIN\sAMAccountName must refer to a valid Active Directory group account. You can only specify the Home Directory and Login Shell attributes because all of the other attributes are user-specific. You can insert a special %s macro anywhere in the override entry to specify the user name. For example, refer to the /etc/opt/quest/vas/user-override.sample file. See also the Overriding Unix Account Information section in the vasd man page. See to Using manual pages (man pages) on page 36 for information about accessing the vasd man page.
You can manage user overrides using Group Policy. For more information, see Account Override policies on page 176..
Safeguard Authentication Services 5.0.3 Administration Guide
Identity management73
Managing Unix group accounts
You can Unix-enable Active Directory groups. A Unix-enabled group has a Group Name and a GID Number. These attributes cause an Active Directory group to appear as a standard Unix group. The group membership on Unix is the same as the Windows group membership, but any users that are not Unix-enabled are excluded from the group membership on the Unix host.
Nested group support
Safeguard Authentication Services supports the Active Directory nested group concept, where groups can be added as members of other groups such that users in the child group are members of the parent group as well.
Nested group information is provided in the Kerberos ticket. This information is cached when the user logs in. Any time a user performs a non-Kerberos login (such as when using SSH keys), nested group information is not available. In these situations, you can ensure that group memberships include nested groups by enabling the groups-for-user-update option in vas.conf.
See vas.conf man page for more details. This will produce more LDAP traffic, but group memberships will remain up-to-date. Unless this option is enabled, nested group memberships are only updated when a user logs in.
Managing Unix groups with MMC
You can access Active Directory Users and Computers (ADUC) from the Control Center. Navigate to the Tools | Safeguard Authentication Services Extensions for Active Directory Users and Computers.
After installing Safeguard Authentication Services on Windows, a Unix Account tab appears in the Active Directory group's Properties dialog.
Safeguard Authentication Services 5.0.3 Administration Guide
Identity management74
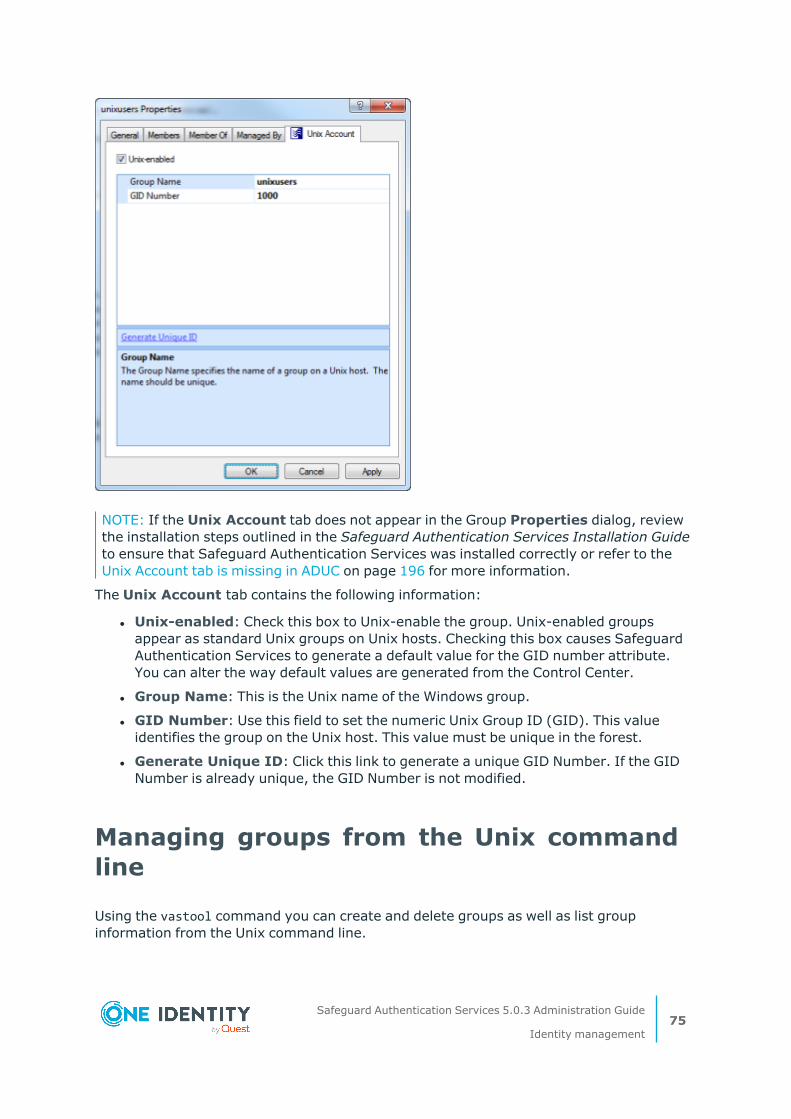
NOTE: If the Unix Account tab does not appear in the Group Properties dialog, review the installation steps outlined in the Safeguard Authentication Services Installation Guide to ensure that Safeguard Authentication Services was installed correctly or refer to the Unix Account tab is missing in ADUC on page 196 for more information.
The Unix Account tab contains the following information:
l Unix-enabled: Check this box to Unix-enable the group. Unix-enabled groups appear as standard Unix groups on Unix hosts. Checking this box causes Safeguard Authentication Services to generate a default value for the GID number attribute. You can alter the way default values are generated from the Control Center.
l Group Name: This is the Unix name of the Windows group.
l GID Number: Use this field to set the numeric Unix Group ID (GID). This value identifies the group on the Unix host. This value must be unique in the forest.
l Generate Unique ID: Click this link to generate a unique GID Number. If the GID Number is already unique, the GID Number is not modified.
Managing groups from the Unix command line
Using the vastool command you can create and delete groups as well as list group information from the Unix command line.
Safeguard Authentication Services 5.0.3 Administration Guide
Identity management75
To create a group, use the vastool create command. The following command creates the sales group in Active Directory that is not Unix-enabled:
vastool create -g sales
To create a group that is Unix-enabled, pass in a string formatted like a line from /etc/group as an argument to the -i option, as follows:
vastool create -i "sales:x:1003:" -g sales
By default, all groups created with vastool create are created in the Users container. To create a group in a different organizational unit, use the -c command line option. The following command creates a Unix-enabled group, sales, in the OU=sales,DC=example,DC=com organisational unit:
vastool create -i "sales:x:1003" -c "OU=sales,DC=example,DC=com" -g sales
To delete a group, use vastool delete with the -g option. The following command deletes the sales group:
vastool delete -g sales
To list groups, use vastool list groups. The following command lists all the groups with Unix accounts enabled:
vastool list groups
This command produces output similar to the following:
eng:VAS:1001:pspencer,[email protected] it:VAS:1002:molsen sales:VAS:1003:bsmith
Managing groups with Windows PowerShell
Using Windows PowerShell you can Unix-enable, Unix-disable, modify, report on, and clear Unix attributes of Active Directory groups using the Safeguard Authentication Services PowerShell commands.
NOTE: You can access the Safeguard Authentication Services PowerShell commands from Tools in the Control Center. To add Safeguard Authentication Services cmdlets to an existing PowerShell session run Import-Module Quest.AuthenticationServices. See PowerShell cmdlets on page 64 for a complete list of available commands.
To Unix-enable a group, use the Enable-QasUnixGroup command. The following command Unix-enables the Active Directory group named UNIXusers:
Enable-QasUnixGroup -Identity <domain>\UNIXusers
Safeguard Authentication Services 5.0.3 Administration Guide
Identity management76
To disable a group for Unix use the Disable-QasUnixGroup command:
Disable-QasUnixGroup -Identity <domain>\UNIXusers
To report on a group, use the Get-QASUnixGroup <groupname> command. The following commands shows all groups that start with "sa":
Get-QasUnixGroup -Identity sa
The Safeguard Authentication Services PowerShell commands are designed to work with the Active Directory commands from Microsoft (Get-ADGroup) and One Identity (Get-QADGroup). You can pipe the output of these commands to any of the Safeguard Authentication Services PowerShell commands that operate on groups. For example, the following command clears the Unix attributes from the group UNIXusers:
Get-QADGroup -Identity <domain>\UNIXusers | Clear-QasUnixGroup
The Safeguard Authentication Services PowerShell commands are aware of the options and schema settings configured in Control Center. Scripts written using the Safeguard Authentication Services PowerShell commands work without modification in any Safeguard Authentication Services environment.
Overriding Unix group information
You can override group account attributes on the local Unix host. This allows you to use the group information from Active Directory but modify individual attributes on certain hosts as needed. Group overrides are specified in the /etc/opt/quest/vas/group-override configuration file. Overrides are specified as follows:
DOMAIN\sAMAccountName:<Group Name>:<GID Number>:<Group Membership>
DOMAIN\sAMAccountName must refer to a valid Active Directory group account. You can omit any of the Unix account fields. If a field is not specified, it will get the default value for that group. The group membership field consists of a comma-separated list of Active Directory user accounts specified in DOMAIN\sAMAccountName format. For examples, refer to the /etc/opt/quest/vas/group-override.sample file.
You can manage group overrides using Group Policy. For more information, see Account Override policies on page 176..
Safeguard Authentication Services 5.0.3 Administration Guide
Identity management77
Local account migration to Active Directory
On Unix, a user or group is identified by a 32-bit ID number. This is usually sufficient for individual Unix hosts or NIS environments. As more and more Unix hosts are brought into the Active Directory domain, the possibility for conflicting user and group IDs increases. Ideally, each Unix-enabled Active Directory user or group is assigned a unique ID number and this ID is used across all Unix hosts. In practice, this is difficult to achieve because Unix hosts are often managed independently and user accounts are populated organically which leads to many conflicting or duplicated accounts. Safeguard Authentication Services provides several mechanisms to help alleviate this problem.
The Safeguard Authentication Services MMC snapin provides a Unix Account tab for users and groups. The Unix Account dialog checks UID and GID numbers against the Global Catalog to ensure the value is unique in the forest. In addition, Safeguard Authentication Services has updated the default method used to generate unique UID and GID numbers. The generated values are based on a hash of the object GUID of the account. This results in a unique number with the added benefit that the same object always generates the same number.
To avoid conflicting with existing local accounts, Safeguard Authentication Services provides UID and GID ranges that you can configure in Control Center. The Safeguard Authentication Services management tools do not allow you to set the UID or GID on an Active Directory object to a value that is outside of the configured range.
Using Management Console for Unix, you can gather all of the disparate local account information into one console to consolidate and map local users to the appropriate Active Directory account without disrupting normal operation of the Unix hosts.
Once you have mapped all of the local accounts to Unix-enabled Active Directory users, you can use the Ownership Alignment Tool (OAT) to take the final step of adjusting local file permissions and eliminating the local user (and group) accounts. See Managing local file permissions on page 107 for more information about using OAT.
AIX extended attribute support
The Safeguard Authentication Services LAM module has the ability to service a number of user attributes beyond the standard Unix identity attributes (UID, GID, Shell, and so on). For example, you can store user-specific ulimit attributes, such as fsize, core, or cpu. There are many other attributes you can service with the Safeguard Authentication Services LAM module.
To store all of these attributes in an LDAP directory, IBM provides a user object schema extension. Safeguard Authentication Services does not require this schema extension to service these extended attributes. Instead, the Safeguard Authentication Services LAM module stores this extended attribute data in a local database. In this way, the Safeguard Authentication Services module is a hybrid module; it serves core identity information
Safeguard Authentication Services 5.0.3 Administration Guide
Identity management78

(UID) from Active Directory, while storing and serving these extended user attributes locally. Since extended attributes are stored locally on each AIX server, you must make extended attribute changes for user accounts on every AIX server.
Use the chuser command to set an extended attribute on a Safeguard Authentication Services user, as follows:
bash$ chuser fsize=3000000 user1
You can set any number of attributes in this fashion.
After setting the value, you can view it using the lsuser command:
bash$ lsuser user1 user1 id=5000 pgrp=jdgroup home=/home/user1 shell=/bin/bash gecos= registry=VAS fsize=3000000
You can set a large number of attributes this way; however, you can not set attributes that have either a static value returned by the Safeguard Authentication Services LAM module or a read-only value served out of Active Directory.
These are the attributes you can not set through the Safeguard Authentication Services LAM module (chuser).
SYSTEM
account_locked
auth1
auth2
gecos
groups
groupsids
home
id
pgid
pgrp
pwdwarntime
registry
shell
unsuccessful_login_count
Table 15: AIX extended attributes
Safeguard Authentication Services 5.0.3 Administration Guide
Identity management79
logintimes
expires
maxage
minage
Use the rmuser command to remove all of the extended attributes from an Safeguard Authentication Services user. The rmuser command usually deletes a user, but when used on an Safeguard Authentication Services user, it only removes attributes stored locally on the AIX server. It never modifies anything in Active Directory.
Notice in the following example that you can still list the user. The only thing missing is the fsize attribute that was just set using chuser.
bash$ rmuser user1 bash$ lsuser user1 user1 id=5000 pgrp=jdgroup home=/home/user1 shell=/bin/bash gecos= registry=VAS
Unix Account Import Wizard
The Unix Account Import Wizard is a versatile tool that helps migrate Unix account information to Active Directory. It is especially well-suited to small, one-shot import tasks, such as importing all the local user accounts from a specific Unix host. The Unix Account Import Wizard can import Unix data as new user and group objects, or use the data to Unix-enable existing users and groups. In Unix Personality Mode, you can use account information to create and link personality objects.
The Unix Account Import Wizard provides several different ways to import Unix account data into Active Directory. You can import Unix account information from various sources, such as local files, remote Unix hosts, and NIS servers. Once the wizard has imported the source data, it uses customizable rules to match the source accounts with existing accounts in Active Directory or uses the information to create new accounts in Active Directory.
Import Source Selection
The Import Source Selection page allows you to select the source of your Unix account information by clicking on an item in the list. You can only import from a single source, but you can run the Account Importer several times to capture data from multiple sources. Options include:
Safeguard Authentication Services 5.0.3 Administration Guide
Identity management80
l Local Files
Import Unix account information from text files in /etc/passwd format stored on the local host.
You can easily migrate local users to Active Directory by exporting a file from the Master /etc/passwd List report accessible from management console's Reports page, then importing it into the Unix Account Import Wizard accessible from the Safeguard Authentication Services Control CenterTools navigation link.
NOTE: By default, Management Console for Unix creates the Master_etc_passwdList .csv file in the Application Data directory:
l On Windows:
%SystemDrive%:\ProgramData\Quest Software\Management Console for Unix\reports
l On Unix:
/var/opt/quest/mcu/reports
NOTE: You can also use vastool utilities from a Unix server command line, such as vastool load, to assist you in migrating local users to Active Directory. See the vastool man page located in the docs directory of the installation media.
l NIS Server
Import Unix account information directly from the passwd and group maps of an active NIS server.
l Remote Unix Host
Import Unix account information directly from /etc/passwd or /etc/group files stored on a remote Unix host. This option uses SSH to retrieve the remote data so you must have an SSH login on the remote Unix host.
l Existing Unlinked Unix Personalities
Use this option to link orphaned or newly created Unix personalities with Active Directory users and groups. This option does not create new objects in Active Directory. It provides a way to quickly find and link Unix personalities using matching rules. This option is only available when the Unix Account Import Wizard is launched from Active Directory Users and Computers in the context of a Primary UPM container. (Right click on a UPM container and select All Tasks | Unix Tasks | Unix Account Import Wizard.)
l Saved Import Session
Use this option to resume an import session that was saved previously.
l Existing Active Directory objects
Use this option to create Unix personality objects based on existing Active Directory users and groups. This is helpful when creating new personality containers that are pre-populated with a set of personality objects linked to existing users and groups.
Safeguard Authentication Services 5.0.3 Administration Guide
Identity management81
Account matching rules
When Unix-enabling existing users or importing personalities, you can specify rules that automatically associate Unix accounts to Active Directory accounts.
Search base selection
Select the Active Directory search base to use when matching Unix accounts to Active Directory accounts. All user and group objects found under the selected search base will be considered for matching. This can reduce the network load when importing user and group accounts. You can also use the search base to restrict the set of accounts to a particular container or organizational unit.
Account Association
The Account Association page allows you to customize account associations when linking Unix accounts to Active Directory accounts. The Unix Account Import Wizard attempts to automatically match the Unix account information to Active Directory accounts using the specified matching rules. If the Import Wizard finds multiple matches, it displays a message warning you of a conflict. You can select it from the matches or click the ... option to browse Active Directory for a different account. The tool bar filter buttons allow you to filter out matched items from the list. With the filter enabled, items disappear from the list as you match the Unix information to Active Directory accounts.
You can click the tool bar button to permanently remove the selected item from the list. Click the tool bar button to permanently remove all visible items from the list.
Final Review
The Final Review view allows you to review the proposed changes before any information is written to the directory. When you click Next from this view, the proposed changes are applied to the directory.
If you are unsure whether you want to apply the changes at this time, you can click the Save import session button to save the current session data to a text file. You can review the information and apply the changes at a later time by running the Unix Account Import Wizard again and selecting Resume saved import session.
Safeguard Authentication Services 5.0.3 Administration Guide
Identity management82
Results
The Results view confirms that the import is complete. If any problems were encountered, the import errors are reported on this view.
Click Save to save the import results to a text file.
Unix account management in large environments
In large Active Directory environments, it is always a challenge to provide optimal performance and functionality. Safeguard Authentication Services provides configuration settings that may help you improve performance in an enterprise deployment.
User and group search paths
Each Unix host running Safeguard Authentication Services builds a persistent cache of user and group information. By default, the cache is built from users and groups in the joined domain. It is possible to change the search base from which the users or groups are loaded by using the group-search-path and user-search-path options. These search paths can either restrict the location from which the users and groups are loaded, or you can specify a search base in an entirely different domain. This is useful in organizations that use resource domains, where computer objects are stored in a separate domain from the domains where users and groups are located.
You can specify a group or user search path using the -g or -u options to the vastool join command. The following command joins the Unix host to the computers.example.com domain, and loads users from the base of the sub.example.com domain:
vastool -u admin join -u DC=sub,DC=example,DC=com computers.example.com
You can change the default user or group search base at any time by adding the group-search-path and user-search-path options in the [vasd] section of vas.conf and running vastool flush. See the vas.conf man page for an example of user and group search paths.
Minimizing the size of the user cache
By default, Safeguard Authentication Services caches Unix user information for all users in a domain on every machine joined to that domain. An alternate caching method, known as "workstation mode", allows you to limit the size of the user cache by caching user
Safeguard Authentication Services 5.0.3 Administration Guide
Identity management83
information only for users who log in to a particular workstation. To enable workstation mode, enable the workstation-mode option in vas.conf.
For details, refer to the vas.conf man page. See Using manual pages (man pages) on page 36 for information about accessing the vas.conf man page.
Safeguard Authentication Services 5.0.3 Administration Guide
Identity management84
5
Migrating from NIS
Safeguard Authentication Services simultaneously supports ongoing production operations and provides a NIS migration path that does not impact existing systems and processes. The combination of flexible deployment options, data transparency, and One Identity-provided tools enable migrating and consolidating NIS data from various stores into a single, consistent, enterprise-wide identity stored in Active Directory.
Using Safeguard Authentication Services to augment or replace NIS
Safeguard Authentication Services addresses several issues that affect NIS viability in modern computing environments. The NIS protocol is not secure and is not well-adopted on non-Unix platforms. Traditionally, the underlying NIS data store is file-based, leading to issues with scalability, data extensibility, and accessibility. Safeguard Authentication Services supports re-hosting NIS data in Active Directory and provides tools to securely access the NIS maps stored in Active Directory.
Safeguard Authentication Services provides a NIS proxy agent (vasypd) that runs on each Unix host. This proxy acts as a local NIS server, providing NIS data to the local host using information retrieved securely from Active Directory using Kerberized LDAP. NIS data is cached locally to reduce load on Active Directory.
With Safeguard Authentication Services, the NIS wire protocols are eliminated. NIS traffic only occurs on the loopback device. This increases network security without the need for NIS+.
Safeguard Authentication Services allows you to transition to Kerberos-based authentication for Unix users, eliminating a variety of security risks and providing better manageability and interoperability. If there are no identity conflicts, both the user's identity and configuration can be transitioned. Otherwise, you can accomplish the migration in steps, starting with upgrading to Kerberos and then reconciling and consolidating the user's identities.
The use of standards, such as RFC-2307, as the native store for Unix identity information dovetails nicely with standard Unix practices. Safeguard Authentication Services is
Safeguard Authentication Services 5.0.3 Administration Guide
Migrating from NIS85

designed to naturally integrate with the majority of real world Windows, Unix, and Linux deployments.
RFC 2307 overview
The schema definitions of choice for most Safeguard Authentication Services users is a subset of the IETF RFC 2307 schema for Unix user attributes. RFC 2307 is a cross-platform standard designed to promote interoperability between Unix systems and LDAP-based directories. (Safeguard Authentication Services also recognizes the Microsoft SFU schema as well as allowing custom schema definitions.)
With Microsoft Windows Server 2003 R2, Microsoft has embraced the RFC 2307 standard, and is now including the RFC 2307 attribute definition as part of the default Active Directory schema. This means that when you install Windows 2003 R2 (or later), support for Unix attribute information is automatically included and forms part of the baseline Active Directory schema definition.
RFC classes and attributes
Safeguard Authentication Services supports all NIS map objects defined in RFC 2307 as well as the ability to store custom NIS data. RFC 2307 provides classes for six standard NIS maps:
l hosts
l networks
l protocols
l services
l rpc
l netgroup
Safeguard Authentication Services supports these RFC 2307 standard maps and their representative classes.
Map name RFC 2307 object class
netgroup nisNetgroup
hosts ipHost (device)
networks ipNetwork
services ipService
Table 16: RFS classes and attributes
Safeguard Authentication Services 5.0.3 Administration Guide
Migrating from NIS86
Map name RFC 2307 object class
protocols ipProtocol
rpc oncRpc
These objects are generally created inside a container or organizational unit.
All other NIS maps are represented using the generic map classes provided in RFC 2307. These classes are nisMap and nisObject. A nisMap is a container object that holds nisObject objects. Set the nisMapName attribute of the nisMap object and nisObject objects it contains to the name of the imported NIS map. A nisObject represents a key-value pair where cn is the key attribute and nisMapEntry is the value.
Limitations of RFC 2307 as implemented by Microsoft
The RFC 2307 specification assumes that the cn attribute is multivalued. In Active Directory, the cn attribute is single-valued. This means that you must create aliases as separate objects.
NIS is case-sensitive and Active Directory is case-insensitive. Some aliases for certain NIS map entries are the same keys except all capitalized. Active Directory cannot distinguish between names that differ only by case.
Installing and configuring the Safeguard Authentication Services NIS components
To ensure that the NIS proxy agent daemon, vasypd, does not cause any system hangs when you install, configure, or upgrade it, follow the steps for each supported Unix platform outlined in this section.
NOTE: Before installing and configuring the Safeguard Authentication Services NIS components, you should have previously installed the Safeguard Authentication Services agent software and joined the Unix machine to an Active Directory domain.
Safeguard Authentication Services 5.0.3 Administration Guide
Migrating from NIS87
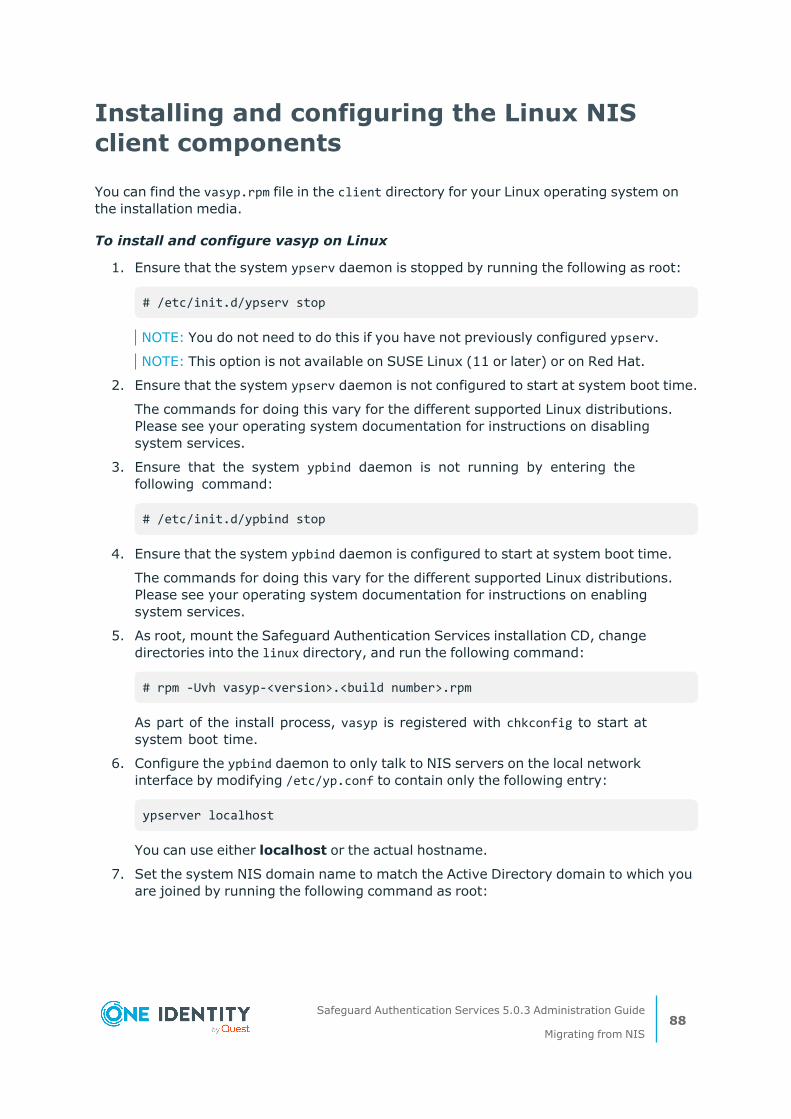
Installing and configuring the Linux NIS client components
You can find the vasyp.rpm file in the client directory for your Linux operating system on the installation media.
To install and configure vasyp on Linux
1. Ensure that the system ypserv daemon is stopped by running the following as root:
# /etc/init.d/ypserv stop
NOTE: You do not need to do this if you have not previously configured ypserv.
NOTE: This option is not available on SUSE Linux (11 or later) or on Red Hat.
2. Ensure that the system ypserv daemon is not configured to start at system boot time.
The commands for doing this vary for the different supported Linux distributions. Please see your operating system documentation for instructions on disabling system services.
3. Ensure that the system ypbind daemon is not running by entering the following command:
# /etc/init.d/ypbind stop
4. Ensure that the system ypbind daemon is configured to start at system boot time.
The commands for doing this vary for the different supported Linux distributions. Please see your operating system documentation for instructions on enabling system services.
5. As root, mount the Safeguard Authentication Services installation CD, change directories into the linux directory, and run the following command:
# rpm -Uvh vasyp-<version>.<build number>.rpm
As part of the install process, vasyp is registered with chkconfig to start at system boot time.
6. Configure the ypbind daemon to only talk to NIS servers on the local network interface by modifying /etc/yp.conf to contain only the following entry:
ypserver localhost
You can use either localhost or the actual hostname.
7. Set the system NIS domain name to match the Active Directory domain to which you are joined by running the following command as root:
Safeguard Authentication Services 5.0.3 Administration Guide
Migrating from NIS88
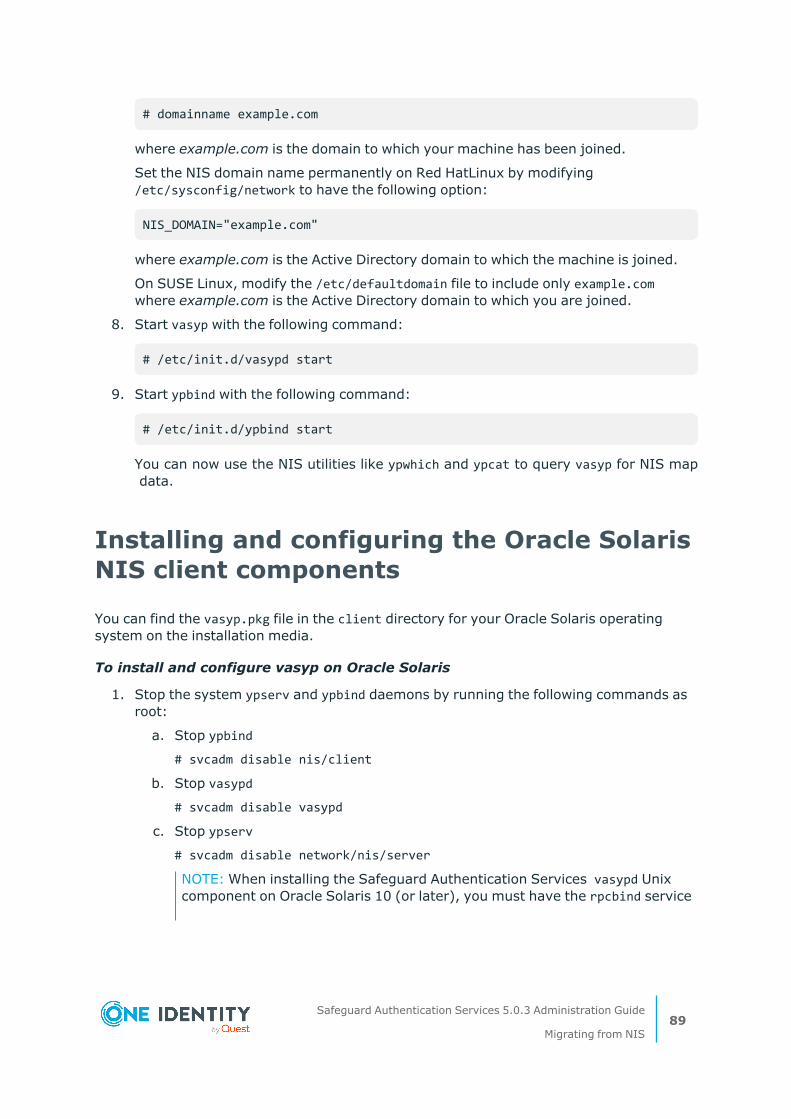
# domainname example.com
where example.com is the domain to which your machine has been joined.
Set the NIS domain name permanently on Red HatLinux by modifying /etc/sysconfig/network to have the following option:
NIS_DOMAIN="example.com"
where example.com is the Active Directory domain to which the machine is joined.
On SUSE Linux, modify the /etc/defaultdomain file to include only example.com where example.com is the Active Directory domain to which you are joined.
8. Start vasyp with the following command:
# /etc/init.d/vasypd start
9. Start ypbind with the following command:
# /etc/init.d/ypbind start
You can now use the NIS utilities like ypwhich and ypcat to query vasyp for NIS map data.
Installing and configuring the Oracle Solaris NIS client components
You can find the vasyp.pkg file in the client directory for your Oracle Solaris operating system on the installation media.
To install and configure vasyp on Oracle Solaris
1. Stop the system ypserv and ypbind daemons by running the following commands as root:
a. Stop ypbind
# svcadm disable nis/client
b. Stop vasypd
# svcadm disable vasypd
c. Stop ypserv
# svcadm disable network/nis/server
NOTE: When installing the Safeguard Authentication Services vasypd Unix component on Oracle Solaris 10 (or later), you must have the rpcbind service
Safeguard Authentication Services 5.0.3 Administration Guide
Migrating from NIS89
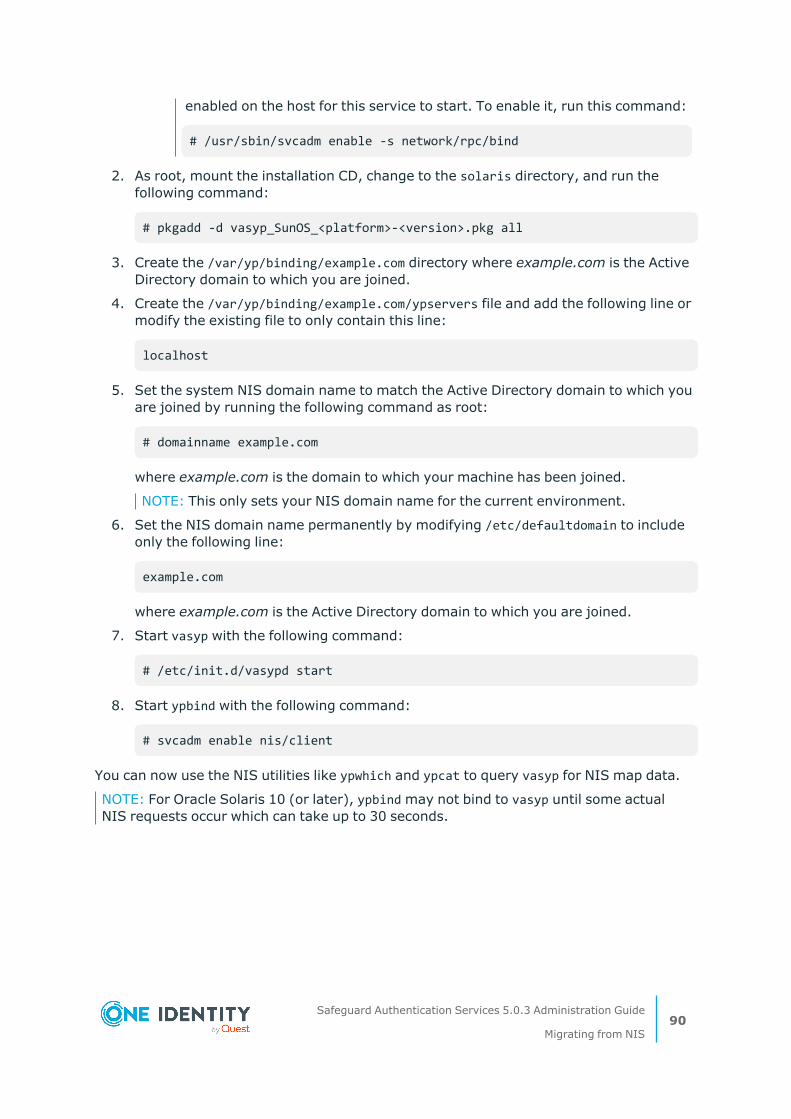
enabled on the host for this service to start. To enable it, run this command:
# /usr/sbin/svcadm enable -s network/rpc/bind
2. As root, mount the installation CD, change to the solaris directory, and run the following command:
# pkgadd -d vasyp_SunOS_<platform>-<version>.pkg all
3. Create the /var/yp/binding/example.com directory where example.com is the Active Directory domain to which you are joined.
4. Create the /var/yp/binding/example.com/ypservers file and add the following line or modify the existing file to only contain this line:
localhost
5. Set the system NIS domain name to match the Active Directory domain to which you are joined by running the following command as root:
# domainname example.com
where example.com is the domain to which your machine has been joined.
NOTE: This only sets your NIS domain name for the current environment.
6. Set the NIS domain name permanently by modifying /etc/defaultdomain to include only the following line:
example.com
where example.com is the Active Directory domain to which you are joined.
7. Start vasyp with the following command:
# /etc/init.d/vasypd start
8. Start ypbind with the following command:
# svcadm enable nis/client
You can now use the NIS utilities like ypwhich and ypcat to query vasyp for NIS map data.
NOTE: For Oracle Solaris 10 (or later), ypbind may not bind to vasyp until some actual NIS requests occur which can take up to 30 seconds.
Safeguard Authentication Services 5.0.3 Administration Guide
Migrating from NIS90
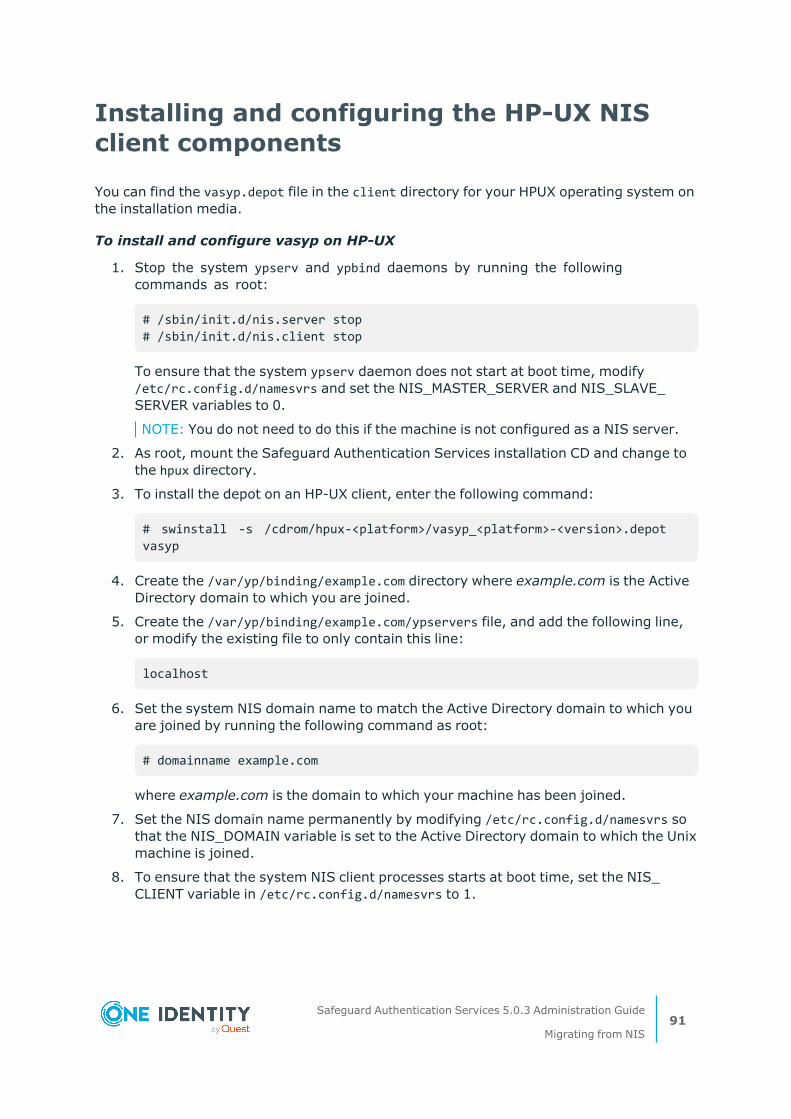
Installing and configuring the HP-UX NIS client components
You can find the vasyp.depot file in the client directory for your HPUX operating system on the installation media.
To install and configure vasyp on HP-UX
1. Stop the system ypserv and ypbind daemons by running the following commands as root:
# /sbin/init.d/nis.server stop # /sbin/init.d/nis.client stop
To ensure that the system ypserv daemon does not start at boot time, modify /etc/rc.config.d/namesvrs and set the NIS_MASTER_SERVER and NIS_SLAVE_SERVER variables to 0.
NOTE: You do not need to do this if the machine is not configured as a NIS server.
2. As root, mount the Safeguard Authentication Services installation CD and change to the hpux directory.
3. To install the depot on an HP-UX client, enter the following command:
# swinstall -s /cdrom/hpux-<platform>/vasyp_<platform>-<version>.depot vasyp
4. Create the /var/yp/binding/example.com directory where example.com is the Active Directory domain to which you are joined.
5. Create the /var/yp/binding/example.com/ypservers file, and add the following line, or modify the existing file to only contain this line:
localhost
6. Set the system NIS domain name to match the Active Directory domain to which you are joined by running the following command as root:
# domainname example.com
where example.com is the domain to which your machine has been joined.
7. Set the NIS domain name permanently by modifying /etc/rc.config.d/namesvrs so that the NIS_DOMAIN variable is set to the Active Directory domain to which the Unix machine is joined.
8. To ensure that the system NIS client processes starts at boot time, set the NIS_CLIENT variable in /etc/rc.config.d/namesvrs to 1.
Safeguard Authentication Services 5.0.3 Administration Guide
Migrating from NIS91
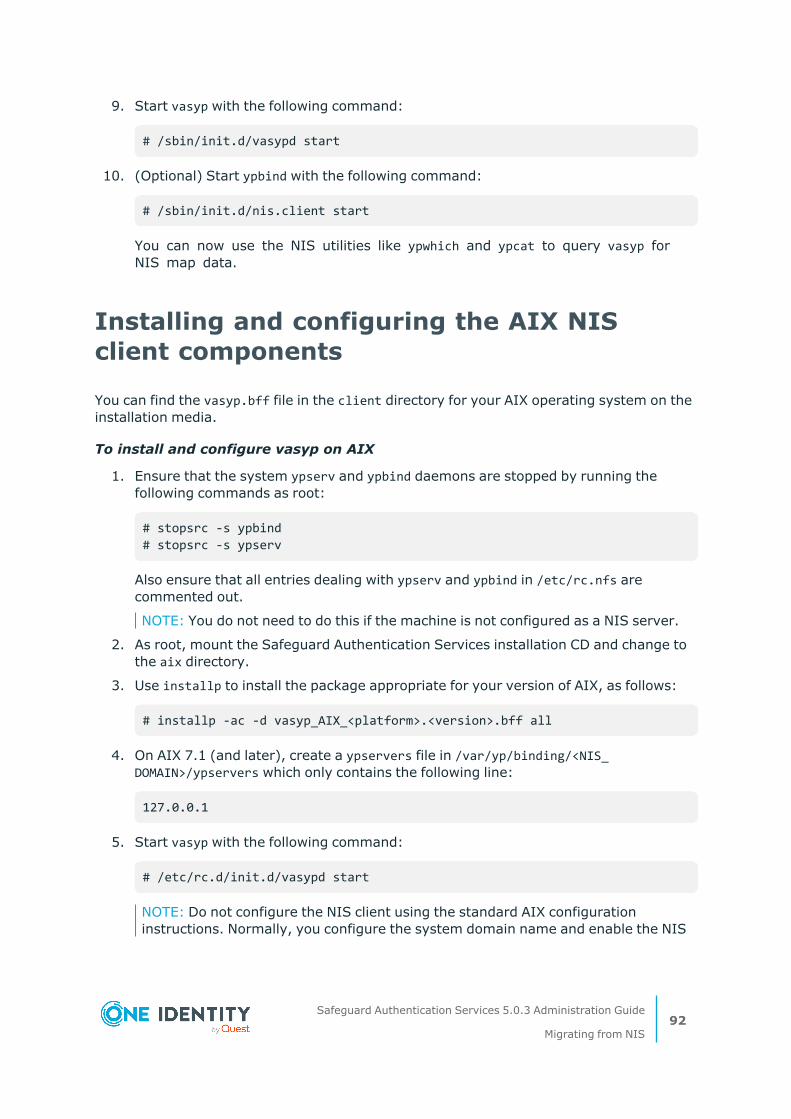
9. Start vasyp with the following command:
# /sbin/init.d/vasypd start
10. (Optional) Start ypbind with the following command:
# /sbin/init.d/nis.client start
You can now use the NIS utilities like ypwhich and ypcat to query vasyp for NIS map data.
Installing and configuring the AIX NIS client components
You can find the vasyp.bff file in the client directory for your AIX operating system on the installation media.
To install and configure vasyp on AIX
1. Ensure that the system ypserv and ypbind daemons are stopped by running the following commands as root:
# stopsrc -s ypbind # stopsrc -s ypserv
Also ensure that all entries dealing with ypserv and ypbind in /etc/rc.nfs are commented out.
NOTE: You do not need to do this if the machine is not configured as a NIS server.
2. As root, mount the Safeguard Authentication Services installation CD and change to the aix directory.
3. Use installp to install the package appropriate for your version of AIX, as follows:
# installp -ac -d vasyp_AIX_<platform>.<version>.bff all
4. On AIX 7.1 (and later), create a ypservers file in /var/yp/binding/<NIS_DOMAIN>/ypservers which only contains the following line:
127.0.0.1
5. Start vasyp with the following command:
# /etc/rc.d/init.d/vasypd start
NOTE: Do not configure the NIS client using the standard AIX configuration instructions. Normally, you configure the system domain name and enable the NIS
Safeguard Authentication Services 5.0.3 Administration Guide
Migrating from NIS92
client in /etc/rc.nfs. For vasyp to work correctly on AIX, you must disable any NIS configuration in the /etc/rc.nfs file.
You can now use the NIS utilities like ypwhich and ypcat to query vasyp for NIS map data.
NIS map search locations
By default, the vasyp daemon only searches the Active Directory container, or organizational unit (OU) in which the Unix computer object was created. You can override this search location by configuring the search-base option in vas.conf. This allows you to have different sets of NIS maps for different groups of Unix hosts.
For more information on the search-base option, refer to the vasypd section of the vas.conf man page.
Deploying in a NIS environment
These are the components associated with using Safeguard Authentication Services in a NIS environment:
l RFC 2307 NIS Map Import Wizard
The RFC 2307 Map Import Wizard imports NIS data into Active Directory as RFC 2307 objects either from a NIS server or from a local file. This wizard can also save an import session as an LDIF file that you can import using standard LDAP tools.
l RFC 2307 NIS Map Editor
The RFC 2307 NIS Map Editor is the standard Windows tool for modifying RFC 2307 NIS data that has been imported into Active Directory using the import wizard.
l nisedit
nisedit is the NIS Map Command Line Administration Utility you run from the host.
l vasyp
vasyp runs on a Safeguard Authentication Services Unix host machine joined to an Active Directory domain. It interprets RFC 2307 objects from Active Directory as standard NIS maps on Unix.
Starting the NIS Map Import Wizard
Using the RFC 2307 NIS Map Import Wizard, you can import directly from local files or from an existing NIS server.
Safeguard Authentication Services 5.0.3 Administration Guide
Migrating from NIS93
To start the NIS Map Import Wizard
1. From Windows, start Active Directory Users and Computers.
By default, NIS Map Objects are only available to Safeguard Authentication Services clients in the same organizational unit to which they are joined.
If the client is joined in Unix Personality Mode then only the NIS maps residing in the personality containers NIS OU are accessible.
2. Right-click on the Computers container in the ADUC or, if in UPM mode, the NIS OU inside the promoted personality OU in ADUC.
3. Select All Tasks | Unix Tasks | RFC 2307 NIS Map Import Wizard to launch the wizard.
4. Click Next in the Welcome dialog.
5. In the Source Selection dialog, select the option to Import NIS Data from Local file or Import NIS Data from the NIS Server.
Import RFC 2307 NIS map objects from a local file
To import RFC 2307 NIS map objects from a local file
1. In the Source Selection dialog of the NIS Map Import Wizard, select the Local File option and click Next.
2. From the File Selection dialog, select the NIS map type.
3. Browse for the nismap file.
NOTE: NIS Map file format that worked with the (legacy) VAS NIS maps does not work for the RFC 2307 nismaps.
4. In the Final Review screen, verify that you have the correct NIS map information selected and the correct number of entries.
You also have the option to export the maps to LDIF.
5. Click Next.
A verification prompt displays.
6. Click OK to confirm.
The Results screen lists the imported maps and notifies you if there were any errors. You have the option to save the results to a file.
7. On the Results screen, click Finish.
To view the NIS Map object you must enable View | Advanced Features in Active Directory Users and Computers.
Safeguard Authentication Services 5.0.3 Administration Guide
Migrating from NIS94
Import RFC 2307 NIS map objects from an existing NIS server
To import RFC 2307 NIS map objects from an existing NIS server
1. In the Source Selection dialog of the NIS Map Import Wizard, select the NIS Server option and click Next.
2. Enter the NIS Domain and click Connect.
The NIS server loads and lists the available NIS maps in the window.
3. Select All or specific NIS maps to import and click Next.
4. In the Final Review screen, verify that you have selected the correct NIS map information and the correct number of entries.
You also have the option to export the maps to LDIF.
5. Click Next.
A verification prompt displays.
6. Click OK to confirm.
The Results screen lists the imported maps and notifies you if there were any errors.
7. Click Finish.
To view the NIS map object, enable View | Advanced Features in Active Directory Users and Computers.
Using NIS map command line administration utility
The nisedit command line utility allows you to manage NIS maps stored in Active Directory as RFC 2307 objects. nisedit is located at /opt/quest/bin/nisedit and has been designed to be script- and automation-friendly.
To run the nisedit utility, specify one or more general options and then specify a specific sub-command which may have further options and arguments. The following table contains a complete list of supported nisedit commands and a brief description of each.
Command Description
add Add RFC 2307 NIS maps and/or entries to Active Directory.
delete Delete RFC 2307 NIS map or entries out of Active Directory.
dump Output RFC 2307 NIS maps and entries from Active Directory.
Table 17: nisedit commands
Safeguard Authentication Services 5.0.3 Administration Guide
Migrating from NIS95
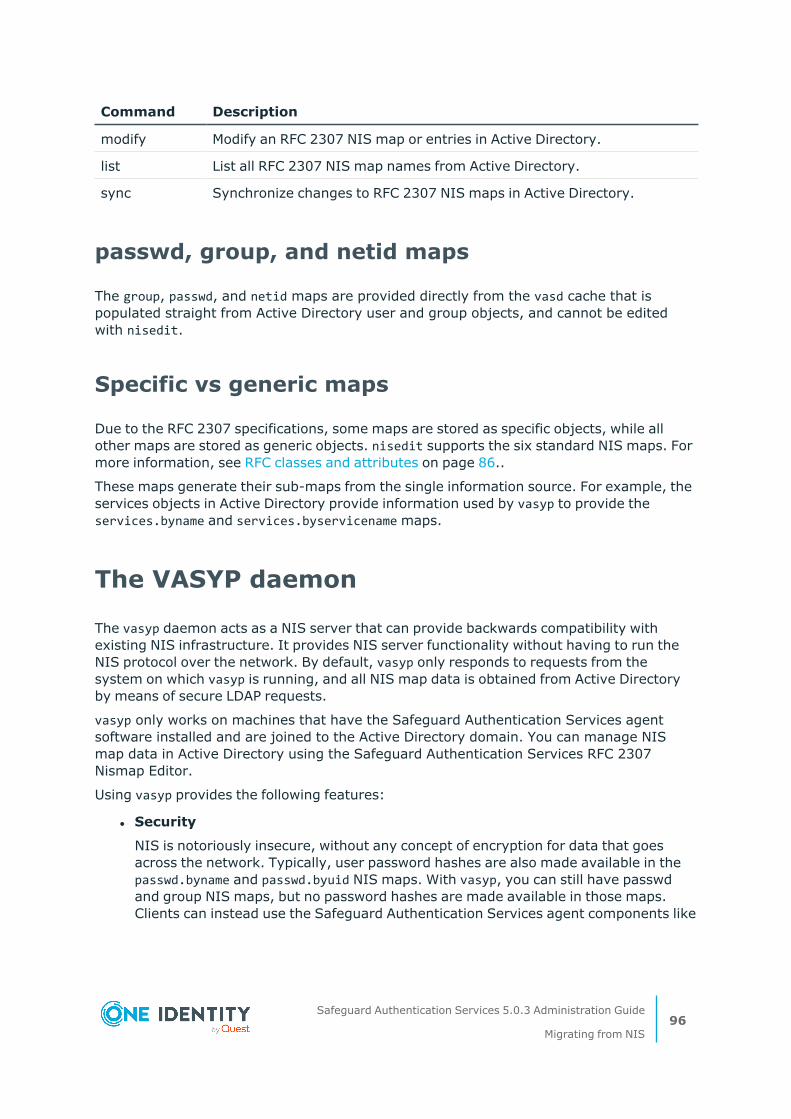
Command Description
modify Modify an RFC 2307 NIS map or entries in Active Directory.
list List all RFC 2307 NIS map names from Active Directory.
sync Synchronize changes to RFC 2307 NIS maps in Active Directory.
passwd, group, and netid maps
The group, passwd, and netid maps are provided directly from the vasd cache that is populated straight from Active Directory user and group objects, and cannot be edited with nisedit.
Specific vs generic maps
Due to the RFC 2307 specifications, some maps are stored as specific objects, while all other maps are stored as generic objects. nisedit supports the six standard NIS maps. For more information, see RFC classes and attributes on page 86..
These maps generate their sub-maps from the single information source. For example, the services objects in Active Directory provide information used by vasyp to provide the services.byname and services.byservicename maps.
The VASYP daemon
The vasyp daemon acts as a NIS server that can provide backwards compatibility with existing NIS infrastructure. It provides NIS server functionality without having to run the NIS protocol over the network. By default, vasyp only responds to requests from the system on which vasyp is running, and all NIS map data is obtained from Active Directory by means of secure LDAP requests.
vasyp only works on machines that have the Safeguard Authentication Services agent software installed and are joined to the Active Directory domain. You can manage NIS map data in Active Directory using the Safeguard Authentication Services RFC 2307 Nismap Editor.
Using vasyp provides the following features:
l Security
NIS is notoriously insecure, without any concept of encryption for data that goes across the network. Typically, user password hashes are also made available in the passwd.byname and passwd.byuid NIS maps. With vasyp, you can still have passwd and group NIS maps, but no password hashes are made available in those maps. Clients can instead use the Safeguard Authentication Services agent components like
Safeguard Authentication Services 5.0.3 Administration Guide
Migrating from NIS96

pam_vas for secure authentication with Active Directory, while still making the passwd NIS maps available to NAS devices and other systems that need the NIS information to function. vasyp uses the same computer identity that vasd does to authenticate to Active Directory and obtain the NIS map data through secure LDAP.
To successfully advertise a user's password hash by means of vasyp, a password hash must exist on the user object in Active Directory, and this hash must be cached locally.
To cache an existing hash locally, you must set the vasdcache-unix-password option in the vasd section of vas.conf
For further details, refer to the vas.conf man page.
Initially, creating these password hashes in Active Directory requires installation and configuration of a password filter DLL on the domain controller. One such DLL is included in SFU 3.5.
NOTE: The password filter .dll does not work on 64-bit versions of Windows Server. As this .dll is an integral part of legacy authentication support, running legacy authentication support using 64-bit versions of Windows is not supported.
NOTE: Safeguard Authentication Services does not require caching of password hashes to support authentication. Safeguard Authentication Services features a PAM module that provides Active Directory authentication support for most recent applications. It is only necessary to set up caching of Unix password hashes to support much older applications that are not PAM-enabled and can only do crypt and compare authentication.
l Disconnected Operation
vasyp manages a persistent cache of all available NIS maps. This allows applications like autofs, which uses NIS to get configuration information, to continue to function without interruption in situations where the Active Directory domain controller is unreachable.
l Scalability
vasyp is a miniature NIS server that runs on each NIS client. Instead of having to deploy a master NIS server along with a number of slave servers, each NIS client talks to the vasyp daemon running on the same machine. This allows each NIS server to only have to handle one client. vasyp has been designed to minimize its memory footprint and computing requirements so that it has a minimal impact on the system's resources.
l Flexibility
vasyp uses a two-process model, where the parent process ensures that the child process that handles all of the NIS RPC messages is always running. The NIS RPC process drops root privileges and runs as the daemon user. The parent process runs a separate process to update the NIS map cache periodically. This arrangement avoids potential blocking problems when using vasyp for hosts and services resolving.
See the vasypd man page for detailed information on usage and available options.
Safeguard Authentication Services 5.0.3 Administration Guide
Migrating from NIS97

Maintaining netgroup data
The vasd daemon maintains the netgroup cache data regardless of whether netgroup data is resolved through the name service module or through NIS (vasyp).
You can configure netgroup-mode in the vas.conf file. See the vas.conf man page for more information.
Safeguard Authentication Services 5.0.3 Administration Guide
Migrating from NIS98
6
Managing access control
Safeguard Authentication Services extends the native access control capabilities of Active Directory to non-Windows systems, providing centralized access control. Safeguard Authentication Services allows non-Windows systems to become full citizens in Active Directory. Once you have joined your Unix, Linux, and macOS systems to the Active Directory domain, you can easily control which Active Directory users are permitted to authenticate to your non-Windows systems.
Safeguard Authentication Services includes the industry’s largest collection of highly flexible access control options and integrates with your existing technology. This section discusses each of these options in detail:
l Host access control
l Access control using the "Logon To" functionality
l Configuring local file-based access control
l Access control based on service (PAM only)
About host access control
Administrators commonly want to restrict access to sensitive machines on the network to selected users and groups. This is especially true of Unix machines which are used to host business critical applications.
It is possible to have fine-grained control over which Active Directory users can log in using Safeguard Authentication Services.
NOTE: Computer access control functionality does not work with local user accounts; it only works with Active Directory user accounts.
By default, each time a user successfully authenticates, the Safeguard Authentication Services authentication module checks to see if it should allow access using one of two methods: file-based access control or policy-based access control.
File-based access control involves checking access control rules stored locally on each workstation in /etc/opt/quest/vas/users.allow and /etc/opt/quest/vas/users.deny. (You can change the default location for these files with the users-allow-file and the users-deny-file options in vas.conf.)
Safeguard Authentication Services 5.0.3 Administration Guide
Managing access control99
Policy-based access control involves using Safeguard Authentication Services Group Policy, which allows you to apply the following native Windows access policies under the User Rights Assignments settings in the Windows Security Policy:
l Access this computer from the network
l Deny access to this computer from the network
l Allow Log on Locally
l Deny Log on Locally
To enable application of Windows access control policies, add the option ApplyWindowsHostAccess = true under the [policy] section of the /etc/opt/quest/vgp/vgp.conf file.
NOTE: The four native Windows access policies listed above are the only native Windows group policy settings that Safeguard Authentication Services Group Policy applies and Safeguard Authentication Services enforces on the client. All other native Windows policy settings are applied by Windows to the server which then enforces the policy on itself.
Safeguard Authentication Services always performs access control by checking local files unless you explicitly enable application of Windows access control policies on Unix hosts. If the ApplyWindowsHostAccess option is set to true in the vgp.conf file, Safeguard Authentication Services ignores local file-based access control. This means listing a user in the /etc/opt/quest/vas/users.allow or /etc/opt/quest/vas/users.deny file has no effect.
You can centrally manage both methods of access control through Active Directory using Safeguard Authentication Services Group Policy. For more information, see Managing Unix hosts with Group Policy on page 152..
Regardless of the method you choose for managing access, locking down a machine does not require you to deny everyone access explicitly. If you define only an "allow access" policy (that is, use only a users.allow file), only users granted access through that file have access. This simplifies the process significantly.
Both access control methods allow you to specify users or groups that you want to allow or deny. If a user is specified in more than one way, the most specific reference to the user takes precedence.
For example, suppose Bob is a member of the Domain Admins group. If the Domain Admins group is allowed access to a machine, but Bob is explicitly denied, he will NOT be granted access. See the table in Resolving conflicts between the allow and deny files on page 102 for additional information about the System Access Rules.
Safeguard Authentication Services honors the Logon To workstation list (on the Account tab in the ADUC snap-in) as an additional security measure in both access control modes.
Using "Logon To" for access control
Each user has a Logon To attribute that is used to store a list of FQDNs that this user is allowed to access.
Safeguard Authentication Services 5.0.3 Administration Guide
Managing access control100
If your workstation is using file-based access control (versus policy-based), the Logon To attribute is absolutely authoritative. This means if you are allowed access by the Logon To attribute, you cannot be denied by any entry in the /etc/opt/quest/vas/users.deny file. Additionally, if you are denied access by the Logon To attribute (done by exclusion; that is, you specify a list of workstations, excluding the workstation you are currently logging in to) no entry in the /etc/opt/quest/vas/users.allow file has power to grant you access. In short, if the user has a value set in the Logon To attribute, the contents of /etc/opt/quest/vas/users.allow or /etc/opt/quest/vas/users.deny file are ignored.
When using policy-based access control, the interaction between Logon To and the access policies are the same as they are with Windows clients. You have to be allowed by both the access control policy and the Logon To attribute before you are admitted. Being denied by either is enough to reject access.
Setting up access control
To use Logon To to set up access control
1. Turn on log on support by setting the use-log-on-to option to true in the vas_auth section of the vas.conf file.
2. Open Active Directory Users and Computers.
3. Right-click the user, choose All Tasks | Logon To.
The Logon To dialog displays.
4. Click Add to open the Select Computers dialog.
5. Enter the name of a permitted computer and click OK.
6. Repeat this procedure to specify additional computers.
Configuring local file-based access control
Lines starting with "#" in the users.allow and users.deny files are comments. Valid entries may be Active Directory users or groups (both Unix-enabled and standard) in the Domain\sAMAccountName format (preferred), Active Directory organizational units, and Active Directory domain names, or you may define users with the user principal name format (for backward compatibility).
Using non-Unix-enabled groups is useful in environments where Unix-enabled users easily hit the group membership limits of Unix. For purposes of access control, Safeguard Authentication Services treats both Unix-enabled and non-Unix Active Directory groups the same. Remember that Safeguard Authentication Services only uses Unix-enabled Active Directory groups to control permissions on Unix files and directories. Non-Unix-enabled groups are only updated and added to the cache when the user logs in, as this group
Safeguard Authentication Services 5.0.3 Administration Guide
Managing access control101
information is obtained from the user's PAC encoded in the Kerberos tickets obtained during log in. These groups can be from anywhere in the Active Directory forest.
When determining if a given user is a member of a group, by default Safeguard Authentication Services only considers the explicit membership of the group. This is to avoid potential security holes when administrators have ACL's controlling group membership, but are unable to control who manages the GID number attribute for users. In versions of VAS previous to 2.6.22, this behavior was different in that the implicit membership of Unix-enabled groups was also used. You can enable this old behavior by setting the checkaccess-use-implicit option to true in the [vas_auth] section in vas.conf. When checkaccess-use-implicit is set to true, a user is considered a member of a group if that group is Unix-enabled, and the user's primary GID matches the group's GID.
Also note that in determining whether a given user belongs to an organizational unit (OU), Safeguard Authentication Services supports OU nesting with the OU closest to the user's actual distinguished name (DN) taking precedence.
Since it is possible to put groups into /etc/opt/quest/vas/users.allow and /etc/opt/quest/vas/users.deny, you can set each file's contents once and then manage who has access to that Unix host through Active Directory by managing the group membership lists of the groups used in the files.
The following is an example of a /etc/opt/quest/vas/users.allow file that grants access to the Fred and Sue users and to the unixAdmins group:
# users.allow - allow fred, sue, and the unixAdmins group example\fred example\sue example\unixAdmins
The following example shows a /etc/opt/quest/vas/users.deny file that is configured to deny access to the brad user. This user belongs to the unixAdmins group, but has had his access taken away.
# users.deny - don't let brad in regardless of group membership example\brad
NOTE: Note that in most cases Safeguard Authentication Services uses /etc/opt/quest/vas/users.allow more often than the /etc/opt/quest/vas/users.deny file.
Safeguard Authentication Services provides the /etc/opt/quest/vas/users.deny file to allow maximum flexibility to administrators.
Resolving conflicts between the allow and deny files
If a user is allowed by the users.allow file and denied by the users.deny file (either directly or indirectly), you must resolve the inconsistency. As a quick rule of thumb, precedence is
Safeguard Authentication Services 5.0.3 Administration Guide
Managing access control102

given to the more specific user reference. The precedence is as follows: user listed (sAMAccountName or UPN), group listed, OU listed, and domain listed.
If there is a tie between users.allow and users.deny, users are denied access. In the following table, the columns represent users.deny and the rows represent users.allow.
No file User Group OU Domain Not listed
No File A D D D D A
User A D A A A A
Group A D D A A A
OU A D D * A A
Domain A D D D D A
Not Listed D D D D D D
Table 18: Conflict resolution
NOTE: The labels in ALL CAPs indicates the users.deny files; the labels in Initial Caps indicates the users.allow files. The asterisk (*) in the table denotes that if a user is both denied and allowed by means of OU membership, the OU closest to the object takes precedence. If the same OU is specified in both files, the user is denied access.
Rules for System Access
l No File
There is no file, or else the file is empty with no entries.
l User
The user is explicitly listed.
l Group
A group to which user belongs is listed.
NOTE: Non-Unix-enabled/Active Directory-only groups used for host access do not count against group membership limits.
l OU
An OU to which the user belongs is listed. For example, if a user's distinguished name is CN=John,CN=Users, DC=example,DC=com, then the OU of CN=Users,DC=example,DC=com would match the user, John.
l Domain
The Active Directory domain to which the user belongs is listed. For example, if a user belongs to the example.com domain, then @example.com is listed.
l Not listed
The entries do not include the user in any way.
Safeguard Authentication Services 5.0.3 Administration Guide
Managing access control103
NOTE: The allowed scenarios (same descriptions as those listed above) make up each row of the matrix.
Per-service access control
If you are using local file-based access control, it is possible to configure different sets of Allow and Deny rules for each individual authentication service. Per-service access control is only supported on PAM-based systems. Service-specific Allow or Deny rules take precedence over other access control rules that may be in effect.
The default directory for service access configuration files is /etc/opt/quest/vas/access.d. You can override this by setting the service-access-dir option in vas.conf. Access control rules are specified in files named <service>.allow and <service>.deny in the /etc/opt/quest/vas/access.d directory where <service> is replaced with the name service according to PAM.
The following example sshd service access control configuration allows members of the ssh_users group access, but not [email protected]. This example assumes that you have created sshd.allow and sshd.deny in the /etc/opt/quest/vas/access.d directory:
# sshd.allow - Allow only users that are members of ssh_users group EXAMPLE\ssh_users
# sshd.deny - deny pspencer access regardless of group membership EXAMPLE\pspencer
NOTE: If either of the <service>.allow or <service>.deny files exist, then both the users.allow and users.deny files will be ignored.
NOTE: The vas.conf options hide-if-denied and check-host-access do not support service-specific access control settings because there is no way to associate a service with the access checks performed by these options.
A service-specific allow file cannot allow a user explicitly denied by the Windows Security Policy.
Configuring access control on ESX 4
If you are configuring Safeguard Authentication Services on VMware ESX Server vSphere (ESX 4.0) you must decide if you want to use the ESX interface for managing access control, or if you want to use standard Safeguard Authentication Services methods for managing who is allowed access to the machine by means of the users.allow and users.deny files.
By default, ESX has its own access control list stored in /etc/security/access.conf. After joining a domain, this file does not have any Safeguard Authentication Services users in it;
Safeguard Authentication Services 5.0.3 Administration Guide
Managing access control104
thus, no Safeguard Authentication Services users will have access to the machine. If you do not modify the ESX access control list to allow specific Safeguard Authentication Services users, you must allow all users in /etc/security/access.conf and begin managing access control through the Safeguard Authentication Services users.allow and users.deny files.
Configuring Sudo access control
Safeguard Authentication Services allows you to not only use Unix-enabled groups in sudo access control rules, One Identity provides the sudo_vas group provider module in Safeguard Authentication Services to allow you to use non-Unix-enabled Active Directory groups in sudo access control rules.
NOTE: This feature requires Sudo 1.8. If you are upgrading from One Identity Sudo 1.7, you must move the sudoers file from /etc/opt/quest/sudo/sudoers to /etc/sudoers.
sudo_vas uses Safeguard Authentication Services to determine group membership. Once you enable sudo_vas, sudo uses it to resolve groups that are not known to the local system by means of the Name Service Switch (NSS).
NOTE: Refer to the sudo_vas man page for more information on the sudo add-on features provided by Safeguard Authentication Services.
Enabling sudo_vas
You enable sudo_vas by running vastool configure sudo. This command configures sudo to allow access control based on Active Directory groups that are not Unix-enabled. The vastool configure sudo command inserts the group_plugin line into the sudoers file, which ensures it uses the correct path and remains valid.
NOTE: When using the sudo_vas group_plugin option with Safeguard for Sudo, the path to the sudo_vas group_plugin must be the same on all servers and any system with a joined Safeguard for Sudo plugin. This means you may need to create a symbolic link to the library on those systems for Safeguard for Sudo to resolve those Active Directory groups when handling off-line mode requests. The symbolic link must refer to the actual path for the sudo_vas group_plugin library on that system.
The group_plugin line looks similar to:
Defaults group_plugin="/opt/quest/lib/libsudo_vas.so"
The location of the configuration file (sudoers file) is determined automatically if visudo is in your PATH.
Generally, you can enable the sudo_vas module by running:
vastool configure sudo
Safeguard Authentication Services 5.0.3 Administration Guide
Managing access control105
Alternatively, you can provide the path to visudo with the -V option, or the path to a sudoers file with the -f option, as follows:
vastool configure sudo -V /usr/sbin/visudo
-OR-
vastool configure sudo -f /etc/sudoers
vastool configure sudo is not run automatically as part of vastool join. You must run vastool configure sudo explicitly if you intend to use non-Unix-enabled groups in your sudo configuration.
NOTE: Refer to the vastool man page for more information about enabling sudo_vas.
Certificate distribution policy
Group Policy supports the ability to distribute trusted certificates. Certificates in the "Trusted Root Certification Authorities" and "Intermediate Certification Authorities" group policies (located at <Policy_Object_Name>/Computer Configuration/Windows Settings/Security Settings/Public Key Policies/) are automatically copied to the Unix host. After group policy has applied them, the certificates are located at /var/opt/quest/vas/certs/CA/ and are automatically copied into Keychain on macOS.
Refer to the following link for the procedure to add a trusted root certification authority to a Group Policy object: http://technet.microsoft.com/en-us/library/cc738131%28v=ws.10%29.aspx
Safeguard Authentication Services 5.0.3 Administration Guide
Managing access control106

7
Managing local file permissions
Safeguard Authentication Services provides tools to help consolidate Unix identity into a single entity in Active Directory. As part of this process, you may need to change permissions on local Unix files and directories. The Ownership Alignment Tool (OAT) helps simplify this process by matching accounts and providing the ability to roll back changes.
The Ownership Alignment Tool
The Ownership Alignment Tool (OAT) provides a flexible solution for changing resource ownership to accommodate changes in users’ UID/GID, and changes to group membership before, during, or after migration to Active Directory.
OAT is a general-purpose tool that combines an automated solution with fine-grained control, reporting, error recovery, the ability to stop and restart bulk updates, and rollback capability. OAT provides the necessary flexibility to update file or directory ownerships in a production environment.
OAT features include:
l Breaking a migration down into multiple projects
l Rollback and restore to a previous state
l Automated matching of Unix and Windows identities
OAT allows you to:
1. Match local Unix/Linux users to their corresponding Active Directory user
2. Resolve conflicts with existing users and groups
OAT leverages the single, enterprise-wide identity based on the user's Active Directory identity. OAT maps multiple Unix accounts to a single, authoritative, Active Directory-based identity:
Safeguard Authentication Services 5.0.3 Administration Guide
Managing local file permissions107
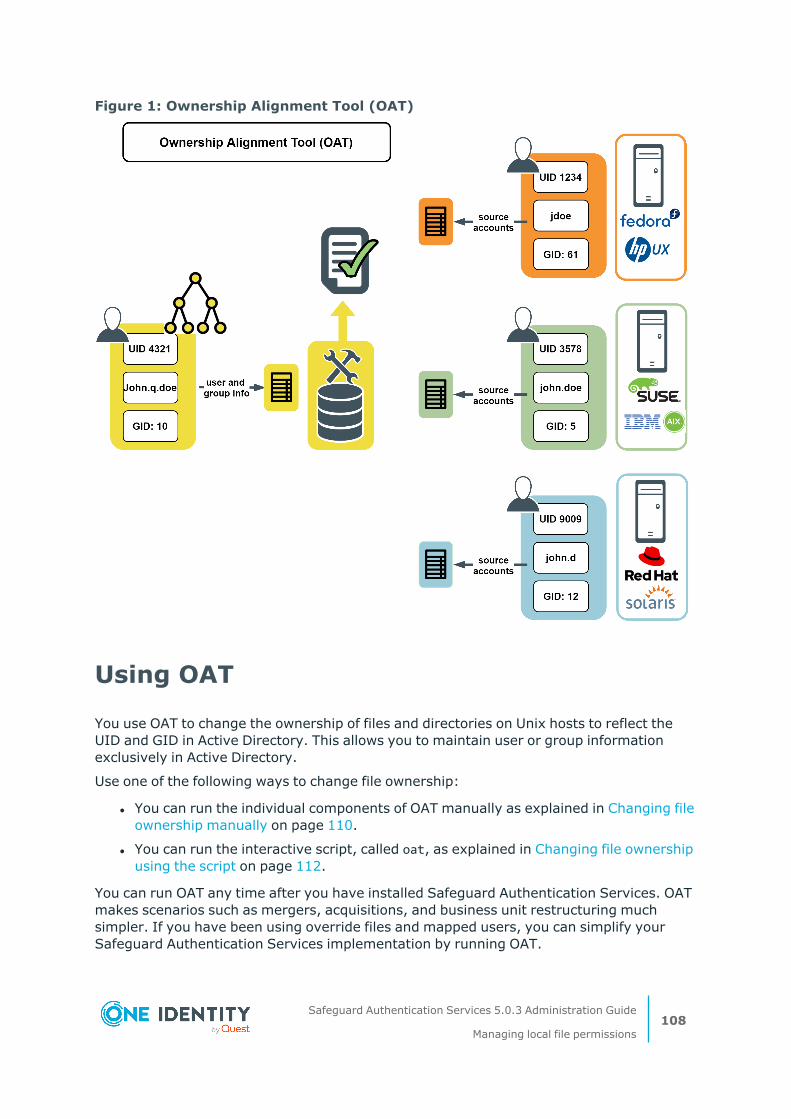
Figure 1: Ownership Alignment Tool (OAT)
Using OAT
You use OAT to change the ownership of files and directories on Unix hosts to reflect the UID and GID in Active Directory. This allows you to maintain user or group information exclusively in Active Directory.
Use one of the following ways to change file ownership:
l You can run the individual components of OAT manually as explained in Changing file ownership manually on page 110.
l You can run the interactive script, called oat, as explained in Changing file ownership using the script on page 112.
You can run OAT any time after you have installed Safeguard Authentication Services. OAT makes scenarios such as mergers, acquisitions, and business unit restructuring much simpler. If you have been using override files and mapped users, you can simplify your Safeguard Authentication Services implementation by running OAT.
Safeguard Authentication Services 5.0.3 Administration Guide
Managing local file permissions108

OAT allows you to maintain user information in Active Directory and simplify the footprint of information required on each Unix host. To do this, set the UID (User ID) and GID (Group ID) of each file or directory on each host to that of the User ID and Group ID maintained in Active Directory. For example, suppose you have the following user information:
Hostname Username UserID Explanation
hosta jdoe 100 files and/or directories on hosta have owner uid 100
hostb johnd 1000 files and/or directories on hosta have owner uid 1000
hostc john 10000 files and/or directories on hosta have owner uid 10000
And in Active Directory you have:
Hostname Username UserID Explanation
hostAD johndoe 55555
After running OAT, the UID associated with each file and/or directory on each host is 55555, as follows:
Hostname Old UserID
New UserID
Explanation
hosta 100 55555 files and/or directories on hosta have owner uid 55555
hostb 1000 55555 files and/or directories on hosta have owner uid 55555
hostc 10000 55555 files and/or directories on hosta have owner uid 55555
Once you have changed the UID and GID to reflect the information now maintained in Active Directory, you can remove the /etc/passwd, /etc/shadow, and /etc/group information from each host. Safeguard Authentication Services allows proper permission handling of each file and directory.
Installing OAT
OAT is implemented as a combination of binaries and is included in the vasclnt package.
The following OAT man pages explain all the command line parameters and options:
Safeguard Authentication Services 5.0.3 Administration Guide
Managing local file permissions109
l oat (1)
l oat_adlookup (1)
l oat_changeowner (1)
l oat_match (1)
NOTE: You start OAT from the Unix command line.
Changing file ownership manually
OAT consists of three utilities. You run each of these utilities in order. The first two steps of the process create a file that gets passed to the next step:
1. oat_adlookup
The first command creates the Active Directory User Information file on page 113 (or the Active Directory Group Information file on page 114 ) listing the Unix-enabled Active Directory users (or groups) that is passed to oat_match to create a map between Active Directory and local users or groups.
2. oat_match
The second command creates the User map file on page 115 (or the Group map file on page 115 ) containing mappings between Active Directory and local users (or groups) that is passed to oat_changeowners to align file ownership.
3. oat_changeowner
The third command changes UID and/or GID of files and directories on local Unix hosts to the UID/GID maintained in Active Directory. Before you do this step you can manually create special files to pass into oat_changeowner, the Files to Process List file on page 117 or the Files to Exclude List file on page 117 . Finally, oat_changeowner produces the Processed Files List file on page 118 .
NOTE: One Identity also provides an interactive script, named oat, that calls oat_adlookup, oat_match, and oat_changeowner utilities with appropriate arguments based on responses that you provide. For more information see Changing file ownership using the script on page 112.
The /opt/quest/libexec/oat/oat_example.sh script file shows you examples of running OAT without using the interactive script. Having the ability to run the oat utilities manually gives you flexibility when changing ownership. As noted in the example in Changing file ownership using the script on page 112, OAT is not limited when hosts do not use the same naming conventions.
NOTE: To see the arguments and options for each of these utilities, run them with a -h option. For example, to see the syntax for oat_adlookup, enter:
# /opt/quest/libexec/oat/oat_adlookup -h
Safeguard Authentication Services 5.0.3 Administration Guide
Managing local file permissions110
Performing a cross-domain search
To perform a cross-domain search
1. Enter the following command:
vastool -u admin -w password search -b "dc=example2,dc=com" "(objectCategory=person)" sAMAccountName > results_file
This command performs a cross-domain search of all person objects in the example2.com domain, and puts their sAMAccountName into a new file called results_file.
2. Use the results_file for the oat_match.
For more information about vastool search options, refer to the OAT man page.
OAT matching scripts
The OAT matching scripts allow for flexible resolution of user name rules. These scripts match local Unix accounts to Active Directory accounts. You can customize or replace these scripts to work as needed in your environment.
The basic match scripts match users and groups by comparing naming attributes:
l oat_match_group.awk
l oat_match_user.awk
The mapped user script matches users based on an existing mapped user file:
l oat_match_user_mappeduser.awk
The override scripts match users and groups using an existing Safeguard Authentication Services override file:
l oat_match_user_override.awk
l oat_match_group_override.awk
Rollback changes
In the event that you want to revert the files back to the original User ID and Group ID, you can use the rollback option.
To change the ownership of a directory and remove the users from the system with oat_changeowner, enter:
oat_changeowner process -b backup_dir -d /home/user -u user_match_file -m
Safeguard Authentication Services 5.0.3 Administration Guide
Managing local file permissions111
To undo the changes made by the oat_changeowner command, enter:
oat_changeowner rollback -b backup_dir
Changing file ownership using the script
One Identity provides an interactive script, called oat, that walks you through the process of changing file ownerships to match Active Directory. This script calls oat_adlookup, oat_match, and oat_changeowner with appropriate arguments based on responses that you provide.
NOTE: You must have Safeguard Authentication Services installed and your system joined to an Active Directory domain to run the interactive script.
To change file ownership
1. At the command prompt enter:
/opt/quest/libexec/oat/oat
The interactive script requests information about:
a. Active Directory users and passwords
b. Attributes
c. Local users and passwords
d. Group names and path
e. Path where you want OAT to perform the Ownership Alignment process.
NOTE: No changes are made to your system until you have reviewed and approved the list of files and directories.
2. Enter the requested information or press Enter to accept the default values enclosed in square brackets.
3. At the end of the interview, it asks you to specify the directory for which you want to change file ownership.
Typically you would specify "/" for the root directory.
NOTE: If you choose "/", it changes the file ownership for every file in your file system. One Identity recommends that you run OAT against a test directory first to confirm your understanding of what OAT does.
The oat_changeowner script creates a list of files that will be modified.
4. Review the list of files that will be changed.
5. If the files in the list are what you want changed, respond with a yes or no.
oat saves rollback information in a directory called oatwork<date> (where <date> is today's date). For example, in the /var/opt/quest/oat/oatwork20100513/ you would see a list of files similar to this:
Safeguard Authentication Services 5.0.3 Administration Guide
Managing local file permissions112
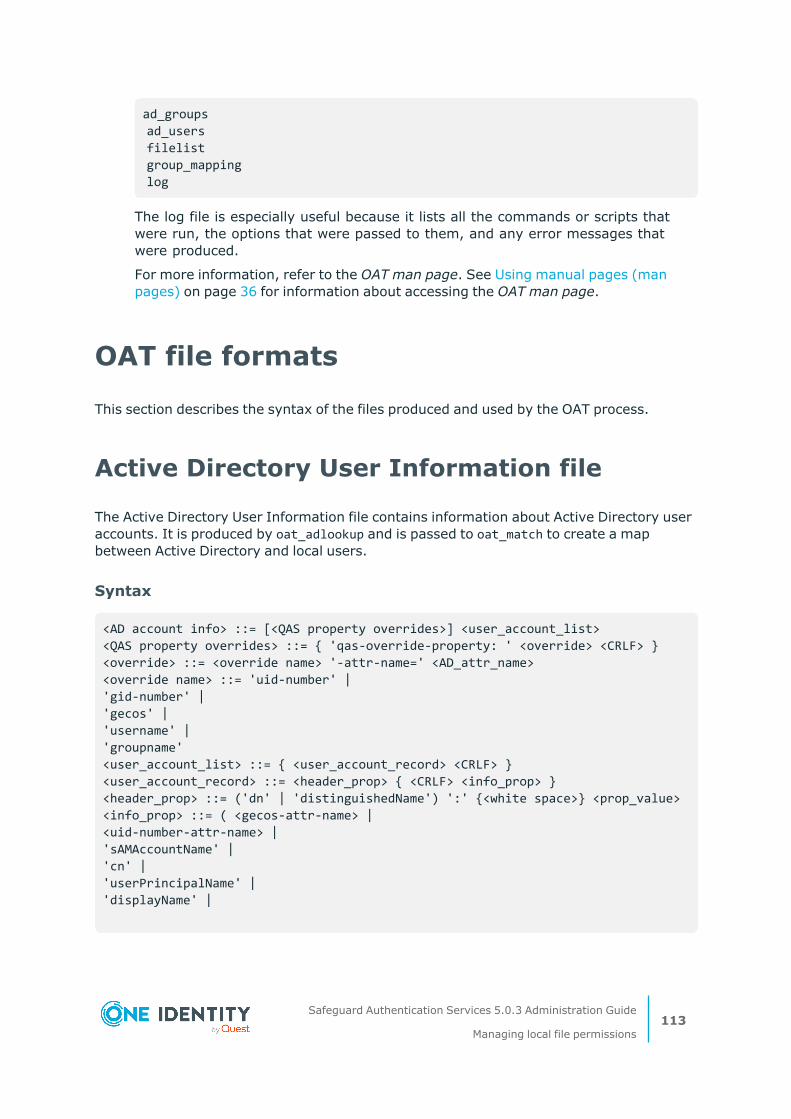
ad_groups ad_users filelist group_mapping log
The log file is especially useful because it lists all the commands or scripts that were run, the options that were passed to them, and any error messages that were produced.
For more information, refer to the OAT man page. See Using manual pages (man pages) on page 36 for information about accessing the OAT man page.
OAT file formats
This section describes the syntax of the files produced and used by the OAT process.
Active Directory User Information file
The Active Directory User Information file contains information about Active Directory user accounts. It is produced by oat_adlookup and is passed to oat_match to create a map between Active Directory and local users.
Syntax
<AD account info> ::= [<QAS property overrides>] <user_account_list> <QAS property overrides> ::= { 'qas-override-property: ' <override> <CRLF> } <override> ::= <override name> '-attr-name=' <AD_attr_name> <override name> ::= 'uid-number' | 'gid-number' | 'gecos' | 'username' | 'groupname' <user_account_list> ::= { <user_account_record> <CRLF> } <user_account_record> ::= <header_prop> { <CRLF> <info_prop> } <header_prop> ::= ('dn' | 'distinguishedName') ':' {<white space>} <prop_value> <info_prop> ::= ( <gecos-attr-name> | <uid-number-attr-name> | 'sAMAccountName' | 'cn' | 'userPrincipalName' | 'displayName' |
Safeguard Authentication Services 5.0.3 Administration Guide
Managing local file permissions113

'givenName' | 'sn' | <username-attr-name> ) ':' <white space>} <prop_value> <prop_value> ::= {<character>}
Sample
dn: CN=Ivan M. Petrovich,CN=Users,DC=a,DC=vmx gecos: Ivan M. Petrovich uidNumber: 1001 sAMAccountName: vanya cn: Ivan M. Petrovich userPrincipalName: [email protected] displayName: Ivan M. Petrovich givenName: Ivan sn: Petrovich
Active Directory Group Information file
The Active Directory Group Information file contains information about Active Directory group accounts. It is produced by oat_adlookup and is passed to oat_match to create a map between Active Directory and local groups.
Syntax
<AD account info> ::= [<VAS property overrides>] <group account list> <VAS property overrides> ::= { 'vas-override-property: ' <override> <CRLF> } <override> ::= <override name> '-attr-name=' <AD_attr_name> <override name> ::= 'uid-number' | 'gid-number' | 'gecos' | 'username' | 'groupname' <group account list> ::= { <group account record> <CRLF> } <group account record> ::= <header_prop> { <CRLF> <info_prop> } <header_prop> ::= ('dn' | 'distinguishedName') ':' {<white space>} <prop_value> <info_prop> ::= ( 'cn' | 'sAMAccountName' | <gid-number-attr-name> | <groupname-attr-name> ) ':' {<white space>} <prop_value> <prop_value> ::= {<character>}
Safeguard Authentication Services 5.0.3 Administration Guide
Managing local file permissions114
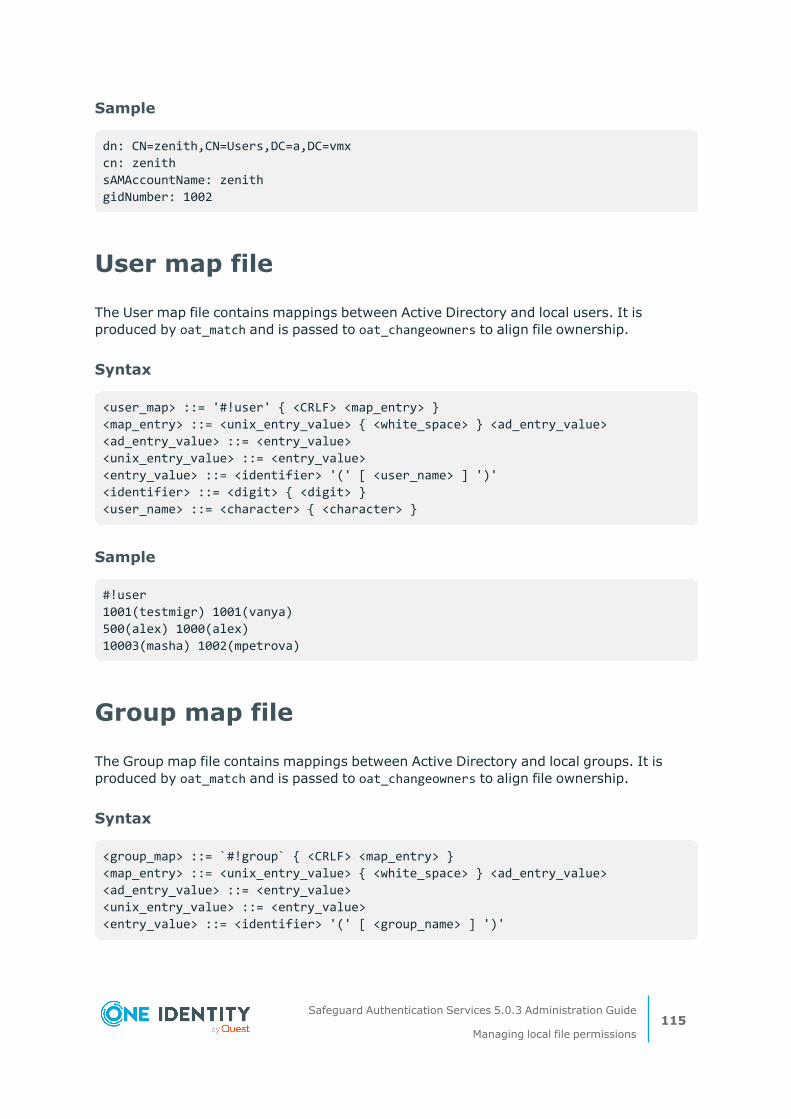
Sample
dn: CN=zenith,CN=Users,DC=a,DC=vmx cn: zenith sAMAccountName: zenith gidNumber: 1002
User map file
The User map file contains mappings between Active Directory and local users. It is produced by oat_match and is passed to oat_changeowners to align file ownership.
Syntax
<user_map> ::= '#!user' { <CRLF> <map_entry> } <map_entry> ::= <unix_entry_value> { <white_space> } <ad_entry_value> <ad_entry_value> ::= <entry_value> <unix_entry_value> ::= <entry_value> <entry_value> ::= <identifier> '(' [ <user_name> ] ')' <identifier> ::= <digit> { <digit> } <user_name> ::= <character> { <character> }
Sample
#!user 1001(testmigr) 1001(vanya) 500(alex) 1000(alex) 10003(masha) 1002(mpetrova)
Group map file
The Group map file contains mappings between Active Directory and local groups. It is produced by oat_match and is passed to oat_changeowners to align file ownership.
Syntax
<group_map> ::= `#!group` { <CRLF> <map_entry> } <map_entry> ::= <unix_entry_value> { <white_space> } <ad_entry_value> <ad_entry_value> ::= <entry_value> <unix_entry_value> ::= <entry_value> <entry_value> ::= <identifier> '(' [ <group_name> ] ')'
Safeguard Authentication Services 5.0.3 Administration Guide
Managing local file permissions115

<identifier> ::= <digit> { <digit> } <group_name> ::= <character> { <character> }
Sample
#!group 1002(grp1) 1001(grp1)
Local User Override file
The User Local Override file contains information about mappings between Active Directory and local users. It is produced by oat_match and is used by Safeguard Authentication Services to override properties of Active Directory users on the local host.
Syntax
<user_local_override_list> ::= { <user_local_override_record> <CRLF> } <user_local_override_record> ::= <AD_user> ':' <local_user> <AD_user> ::= <UPN> <local_user> ::= <Login Name> ':' [<UID>] ':' [<GID>] ':' [<GECOS>] ':' [<Home Directory>] ':' [<Shell>] <UPN> ::= <character> {<character>} '@' <character> {<character>} <Login Name> ::= <character> {<character>} <UID> ::= <digit> { <digit> } <GID> ::= <digit> { <digit> } <GECOS> ::= <character> {<character>} <Home Directory> ::= <character> {<character>} <Shell> ::= <character> {<character>}
Sample
[email protected]:testmigr:1001:1001::/home/testmigr: [email protected]:alex:500:500::/home/alex: [email protected]:masha:10003:0:Maria Petrova::
Local Group Override file
The Group Local Override file contains information about mappings between Active Directory and local groups. It is produced by oat_match and is used by Safeguard Authentication Services to override properties of Active Directory users on the local host.
Safeguard Authentication Services 5.0.3 Administration Guide
Managing local file permissions116

Syntax
<group_local_override_list> ::= { <group_local_override_record> <CRLF> } <group_local_override_record> ::= <AD_group> ':' <local_group> <AD_group> ::= <Group Name> <local_group> ::= <Override Group Name> ':' <GID> ':' [<Additional Members>] <Group Name> ::= <character> {<character>} <Override Group Name> ::= <character> {<character>} <GID> ::= <digit> { <digit> } <Additional Members> ::= <User name> { ',' <User name> } <User name> ::= <character> {<character>}
Sample
spartak:spartak:1002:
Files to Process List file
The Files to Process List file contains a list of files and directories for which you want to change the ownership. It is produced by X? and is passed to oat_changeowners.
Syntax
<file_list> ::= { < file_list_entry > <CRLF> } <file_list_entry> ::= <full_file_name> | <full_directory_name> <full_file_name> ::= '/' { <character> } <full_directory_name> ::= '/' { <character> }
Sample
/home/alex /home/mike /etc /opt/quest/bin/vastool
Files to Exclude List file
The Files to Exclude List file contains a list of files and directories for which you do not want to change the ownership. It is produced by X? and is passed to oat_changeowners.
Safeguard Authentication Services 5.0.3 Administration Guide
Managing local file permissions117
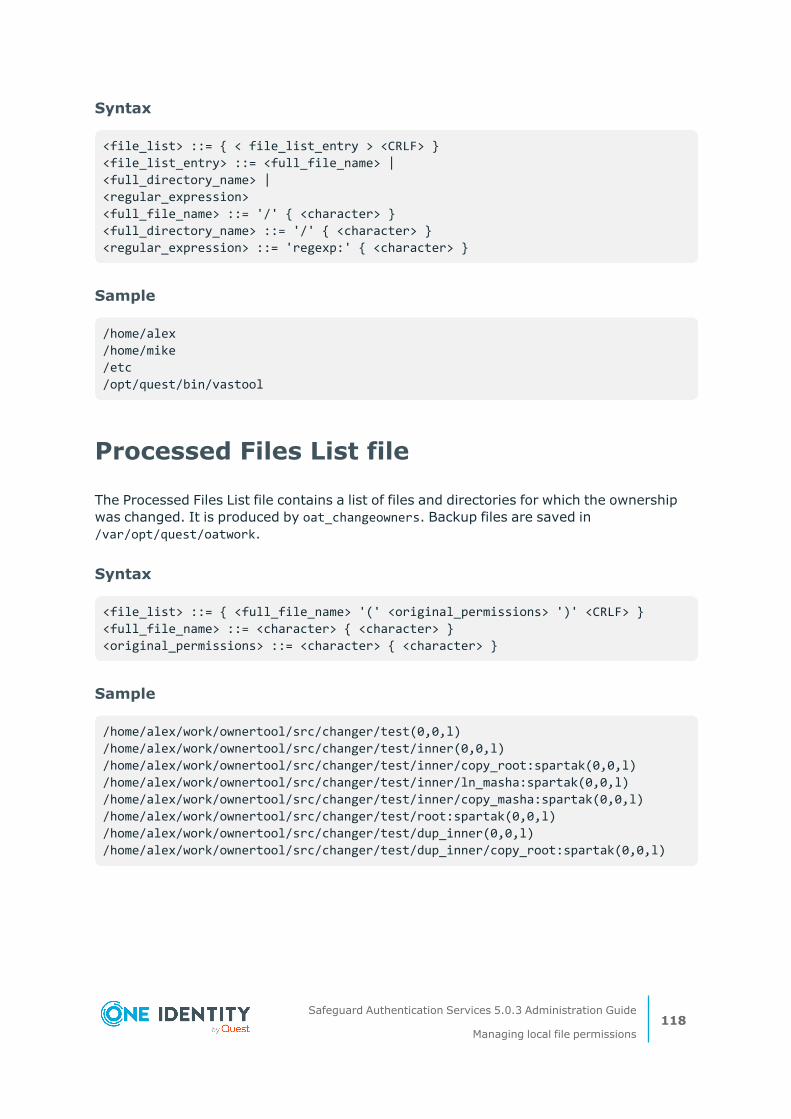
Syntax
<file_list> ::= { < file_list_entry > <CRLF> } <file_list_entry> ::= <full_file_name> | <full_directory_name> | <regular_expression> <full_file_name> ::= '/' { <character> } <full_directory_name> ::= '/' { <character> } <regular_expression> ::= 'regexp:' { <character> }
Sample
/home/alex /home/mike /etc /opt/quest/bin/vastool
Processed Files List file
The Processed Files List file contains a list of files and directories for which the ownership was changed. It is produced by oat_changeowners. Backup files are saved in /var/opt/quest/oatwork.
Syntax
<file_list> ::= { <full_file_name> '(' <original_permissions> ')' <CRLF> } <full_file_name> ::= <character> { <character> } <original_permissions> ::= <character> { <character> }
Sample
/home/alex/work/ownertool/src/changer/test(0,0,l) /home/alex/work/ownertool/src/changer/test/inner(0,0,l) /home/alex/work/ownertool/src/changer/test/inner/copy_root:spartak(0,0,l) /home/alex/work/ownertool/src/changer/test/inner/ln_masha:spartak(0,0,l) /home/alex/work/ownertool/src/changer/test/inner/copy_masha:spartak(0,0,l) /home/alex/work/ownertool/src/changer/test/root:spartak(0,0,l) /home/alex/work/ownertool/src/changer/test/dup_inner(0,0,l) /home/alex/work/ownertool/src/changer/test/dup_inner/copy_root:spartak(0,0,l)
Safeguard Authentication Services 5.0.3 Administration Guide
Managing local file permissions118
8
Certificate Autoenrollment
Certificate Autoenrollment is a feature of Safeguard Authentication Services based on Microsoft Open Specifications. Certificate Autoenrollment allows macOS/macOS®, UNIX, and Linux clients to take advantage of existing Microsoft infrastructure to automatically enroll for and install certificates. Certificate policy controls which certificates are enrolled and what properties those certificates will have.
With Certificate Autoenrollment, a public/private key pair is automatically generated according to certificate template parameters defined in Group Policy. The public key is sent to the Certification Authority (CA), and the CA responds with a new certificate corresponding to the public key, which is installed along with the private key into the appropriate system or user keychain on the Mac , UNIX, or Linux client.
You can use Group Policy to automatically configure which certificate enrollment policy servers to use for Certificate Autoenrollment and to periodically run Certificate Autoenrollment.
By following the instructions presented in this section, a system administrator will be able to configure new or existing systems to download certificate enrollment policy from a certificate enrollment policy server. Additionally, the systems will automatically enroll and renew certificates based on the certificate enrollment policy.
Certificate Autoenrollment is an optional package distributed with One Identity Safeguard Authentication Services. For instructions on installing this package, see the One Identity Safeguard Authentication Services Installation Guide.
Certificate Autoenrollment on UNIX and Linux
Most of the Certificate Autoenrollment code is implemented in Java. After this code has successfully requested a certificate from a CA, it invokes platform-specific code to store the private key and certificate in a suitable way for the operating system or for particular applications. This platform-specific code is implemented as a shell script, certstore.sh, in the /var/opt/quest/vascert/script directory.
The certstore.sh script is a platform-agnostic front end that chooses and loads a platform-specific back end script:
Safeguard Authentication Services 5.0.3 Administration Guide
Certificate Autoenrollment119

l For macOS, the back end script is certstore-mac.sh. This script provides a fully functional implementation that uses the /usr/bin/security tool to integrate with macOS keychains.
l For UNIX/Linux, the back end script is certstore-DEV.sh. This script provides a skeletal implementation that is convenient for initial experimentation and may be used as the basis for implementation; the script itself does not provide a fully functional implementation:
l Some of the shell functions in certstore-DEV.sh simply print "UNIMPLEMENTED" and return a non-zero exit status to indicate failure.
l The following shell functions in certstore-DEV.sh are mock implementations designed to facilitate simple experimentation with the "vascert pulse" command for a user:
l importIdentity()
l exportUserCerts()
l These mock implementations assume that the openssl command is installed and available on the default PATH.
l The mock implementations also make some platform-specific assumptions (for example, they invoke the mv command with the --backup option), but these are not critical and can be removed.
As a consequence, on UNIX/Linux some important Certificate Autoenrollment commands, such as "vascert pulse" for the superuser will NOT work until the necessary platform-specific functionality has been implemented in certstore-DEV.sh or a similar script.
See the Examples and further explanation for modifying certstore-DEV.sh on Linux and Unix (284711) KB article for more information on modifying certstore-DEV.sh and a simple example script.
Certificate Autoenrollment requirements and setup
Prior to installing One Identity Certificate Autoenrollment, ensure your system meets the following minimum hardware and software requirements.
Component Requirements
Operating system
macOS 10.13 (or later)
Red Hat® Enterprise Linux® 6 (or later)
Oracle Solaris® 11 (or later)
Table 19: Certificate Autoenrollment: Minimum requirements
Safeguard Authentication Services 5.0.3 Administration Guide
Certificate Autoenrollment120

Component Requirements
SUSE® Linux Enterprise Server 11 (or later)
Ubuntu® 14.04 LTS (or later)
Java unlimited strength policy files
For more information, see Java requirement: Unlimited Strength Juris-diction Policy Files on page 122..
Authentication Services
One Identity Authentication Services version 4.1.2 (or later).
Additional software
Certificate Autoenrollment depends on services provided by a Microsoft Enterprise Certificate Authority (CA) in your environment.
In addition to Active Directory and an Enterprise CA, you must install the following software in your environment:
l Microsoft Certificate Enrollment Web Services
In order for Certificate Autoenrollment to function on client computers, you must configure the following policies:
l Certificate Services Client - Auto-Enrollment Group Policy
l Certificate Services Client - Certificate Enrollment PolicyGroup Policy
l Certificate Templates
Additionally, you must configure Java 1.6 (or later) as the default JVM for your system.
NOTE: Install JRE (Java Runtime Environment) on all platforms other than macOS; macOS requires JDK (Java Development Kit). Typing java on the command line provides instructions.
l For Linux/UNIX operating systems, install JRE 1.6 (or later).
l For Mac OS X (that is, your operating system tells you to get it from Apple), install what Apple provides (JRE).
l For macOS (that is, your operating system tells you to get it from Oracle), install the JDK.
Rights Enterprise Administrator rights to install software and configure Group Policy and Certificate Template policy (only if Certificate Autoenrollment is not already configured for Windows hosts in your environment.)
Safeguard Authentication Services 5.0.3 Administration Guide
Certificate Autoenrollment121
Java requirement: Unlimited Strength Jurisdiction Policy Files
By default, most JRE and JDK implementations enforce limits on cryptographic key strengths that satisfy US export regulations. These limits are often insufficient for Certificate Autoenrollment and may lead to "java.security.InvalidKeyException: Illegal key size" failures. The "Java Cryptography Extension (JCE) Unlimited Strength Jurisdiction Policy Files" can be installed to remove these limits and enable Certificate Autoenrollment to function properly.
Do I need the Java Cryptography Extension (JCE) Unlimited Strength Jurisdiction Policy Files?
In general the answer is: Yes, these files are needed.
Java 9 and above do not require these files, but Java 6, 7, and 8 rely on these files.
Obtaining and installing the policy files
For Java implementations from IBM, the policy files are usually bundled with the JDK but not the JRE, so it may be more convenient to install the JDK rather than just the JRE. Once the JDK is installed its demo/jce/policy-files/unrestricted directory should contain two JAR files:
l local_policy.jar
l US_export_policy.jar
Use these files to replace the corresponding JAR files in the jre/lib/security directory of the JDK. Alternatively, the "Unrestricted SDK JCE policy files" can be downloaded from ibm.com.
For Java implementations from Sun, Oracle and Apple and for OpenJDK implementations, the policy files must be downloaded from Oracle. Each major Java version requires its own policy files:
l Java 6: http://www.oracle.com/technetwork/java/javase/downloads/jce-6-download-429243.html
l Java 7: http://www.oracle.com/technetwork/java/javase/downloads/jce-7-download-432124.html
l Java 8: http://www.oracle.com/technetwork/java/javase/downloads/jce8-download-2133166.html
Each of these downloads is a zip file that includes a README.txt and two JAR files, local_policy.jar and US_export_policy.jar. Use these JAR files to replace the corresponding files in the JRE or JDK:
l JRE: The lib/security directory usually holds these files.
l JDK: The jre/lib/security directory usually holds these files.
Safeguard Authentication Services 5.0.3 Administration Guide
Certificate Autoenrollment122
Installing certificate enrollment web services
The following procedures walk you through the installation and configuration of the required components. If Certificate Autoenrollment is already configured for Windows hosts in your environment, you can skip to Using Certificate Autoenrollment on page 125.
To perform these procedures, you need Enterprise Administrator rights to install software and configure Group Policy and Certificate Template policy.
NOTE: Microsoft has documented all of the steps to install and configure certificate enrollment Web services.
To set up certificate enrollment web services
1. Review the requirements as specified by Microsoft at: http://technet.microsoft.com/en-us/library/dd759243.aspx.
2. Follow the instructions at: http://technet.microsoft.com/en-us/library/dd759241.aspx to install the Certificate Enrollment Web Service.
3. Follow the instructions at: http://technet.microsoft.com/en-us/library/dd759214.aspx to install the Certificate Enrollment Policy Web Service.
4. Follow the instructions at: http://technet.microsoft.com/en-us/library/dd759140.aspx to configure server certificates for HTTPS.
Certificate enrollment Web services are now installed. Next, you will configure policy settings to enable Certificate Autoenrollment.
Configuring Certificate Services Client - Certificate Enrollment Policy Group Policy
If you are using Group Policy, you must configure the Certificate Enrollment Policy Web Service group policy setting to provide the location of the web service to domain members. Otherwise, you must manually configure the server URL on each system as explained in Using Certificate Autoenrollment.
To configure certificate enrollment policy
1. On the web server that hosts the Certificate Enrollment Policy Web Service, open Server Manager.
2. In the console tree, expand Roles, and then expand Web Server (IIS).
3. Click Internet Information Services (IIS) Manager.
4. In the console tree, expand Sites, and click the web service application that begins with ADPolicyProvider_CEP.
Safeguard Authentication Services 5.0.3 Administration Guide
Certificate Autoenrollment123
NOTE: The name of the application is ADPolicyProvider_CEP_AuthenticationType , where AuthenticationType is the web service authentication type.
5. Under ASP.NET, double-click Application Settings.
6. Double-click URI, and copy the URI value.
7. Click Start, type gpmc.msc in the Search programs and files box, and press ENTER.
8. In the console tree, expand the forest and domain that contain the policy that you want to edit, and click Group Policy Objects.
9. Right-click the policy that you want to edit, and then click Edit.
10. In the console tree, navigate to User Configuration | Policies | Windows Settings | Security Settings and click Public Key Policies.
11. Double-click Certificate Services Client – Certificate Enrollment Policy.
12. Click Add to open the Certificate Enrollment Policy Server dialog.
13. In the Enter enrollment policy server URI box, type or paste the certificate enrollment policy server URI obtained earlier.
14. In the Authentication type list, select the authentication type required by the enrollment policy server (Kerberos).
15. Click Validate, and review the messages in the Certificate enrollment policy server properties area.
16. Click Add.
The Add button is available only when the enrollment policy server URI and authentication type are valid.
17. In the Group Policy Object Editor, navigate to Computer Configuration | Policies | Windows Settings | Security Settings and click Public Key Policies.
18. Repeat steps 11-16 for machine configuration.
Configuring Certificate Services Client - Auto-Enrollment Group Policy
If you are using Group Policy, you must enable Certificate Autoenrollment in Group Policy, otherwise, Group Policy may disable Certificate Autoenrollment. If you are not using Group Policy, Certificate Autoenrollment is enabled on each host by default.
To enable Certificate Autoenrollment using Group Policy
1. On a domain controller running Windows Server 2008 R2 open the Start menu and navigate to Administrative Tools | Group Policy Management.
2. In the console tree, double-click Group Policy Objects in the forest and domain containing the Group Policy Object (GPO) that you want to edit.
3. Right-click the GPO, and click Edit.
Safeguard Authentication Services 5.0.3 Administration Guide
Certificate Autoenrollment124
4. In the Group Policy Object Editor, navigate to User Configuration | Policies | Windows Settings | Security Settings and click Public Key Policies.
5. Double-click Certificate Services Client - Auto-Enrollment.
6. Next to Configuration Model, select Enabled from the drop-down list to enable autoenrollment.
7. Click OK to accept your changes.
8. In the Group Policy Object Editor, navigate to Computer Configuration | Policies | Windows Settings | Security Settings and click Public Key Policies.
9. Repeat steps 5-7 for machine configuration.
Configuring Certificate Templates for autoenrollment
Certificate enrollment is based on templates which define the properties of certificates generated by the Certificate Authority (CA) when clients request certificates.
To create a new certificate template
1. On the server hosting your Enterprise CA, click Start, select Administrative Tools, and click Certification Authority.
2. In the console tree, expand the CA root node, select Certificate Templates, and click Manage.
3. In the Certificate Templates console, select the template that you would like to enable for autoenrollment, or create a new template.
4. Double-click the template to open its properties and select the Security tab.
5. Add the users and machines that you want to automatically enroll for the certificate and select the Autoenroll permission option.
6. Click Apply.
Using Certificate Autoenrollment
Certificate Autoenrollment is an automatic process that runs as-needed on client systems according to Group Policy or according to manual configuration if you are not using Group Policy. Certificate Autoenrollment typically requires no user interaction. After Certificate Autoenrollment is complete, certificates appear in the user's keychain for user-based enrollment or in the system keychain for machine-based enrollment.
Safeguard Authentication Services 5.0.3 Administration Guide
Certificate Autoenrollment125

Certificate Autoenrollment runs when:
l A user logs in
l Group Policy machine processing occurs (at machine startup and periodically thereafter)
l vascert trigger runs manually (for machine-based enrollment)
If Group Policy is in use and a Certificate Services Client - Auto-Enrollment Group Policy indicates that Certificate Autoenrollment should occur, then the Certificate Autoenrollment client runs. The Certificate Autoenrollment client then downloads and evaluates Certificate Autoenrollment policy and uses this information to determine whether any certificates should be enrolled.
The following sections explain how to manually configure Certificate Autoenrollment if you are not using Group Policy. In most cases you will use the /opt/quest/bin/vascert command, the Certificate Autoenrollment processor for Unix and Mac clients.
Configuring Certificate Autoenrollment manually
Once Certificate Autoenrollment is installed, you must configure your machine to use it. If you are using One Identity Safeguard Authentication Services with Group Policy, then skip the manual configuration described in this section as Group Policy performs these tasks automatically.
NOTE: macOS: Group Policy functionality is not available when used with the Apple Directory Services plug-in. When Group Policy is not available, you must manually configure certificate enrollment policy servers and schedule machine certificate enrollment to run on an interval if desired.
Configure a machine for Certificate Autoenrollment
Use the vascert command line utility to configure your machine for Certificate Autoenrollment. Your computer must be joined to the Active Directory domain where your certificate enrollment policy server resides.
NOTE: Unless you are using Group Policy, machine processing must be triggered manually using the vascert trigger command. You can schedule this command to run at an interval.
To configure your machine for Certificate Autoenrollment
l As root (or using sudo), run the following command to configure a machine for Certificate Autoenrollment:
/opt/quest/bin/vascert server add -r <policy server URL>
Safeguard Authentication Services 5.0.3 Administration Guide
Certificate Autoenrollment126
Where <policy server URL> is the actual http URL for your certificate enrollment policy server.
For example: https://example.com/ADPolicyProvider_CEP_Kerberos/service.svc/CEP
NOTE: You can configure more than one certificate enrollment policy server. Certificate Autoenrollment will choose the most appropriate server automatically when performing certificate enrollment.
Configure a user for Certificate Autoenrollment
Use the vascert command line utility to configure a user for Certificate Autoenrollment. The user must be an Active Directory user. Certificate Autoenrollment is not supported for local users. Your computer must be joined to the Active Directory domain where your certificate enrollment policy server resides.
NOTE: macOS: Certificate Autoenrollment will run automatically when users log in based on the /Library/LaunchAgents/com.quest.qcert.UserApply.plist file. You can change this behavior by modifying this file.
To configure a user for Certificate Autoenrollment
l As root (or using sudo), run the following command to configure a user for Certificate Autoenrollment:
/opt/quest/bin/vascert server add -u <username> -r <policy server URL>
Substitute the actual http URL for your certificate enrollment policy server for example:
https://example.com/ADPolicyProvider_CEP_Kerberos/service.svc/CEP
NOTE: You can configure more than one certificate enrollment policy server. Certificate Autoenrollment will choose the most appropriate server automatically when performing certificate enrollment.
Trigger machine-based Certificate Autoenrollment
Normally Group Policy triggers Certificate Autoenrollment. If you are not using Group Policy, use the vascert command line utility to manually trigger Certificate Autoenrollment processing for the machine. This will result in certificates being added to the System.keychain according to enrollment policy. You can schedule this command to run periodically if desired.
Safeguard Authentication Services 5.0.3 Administration Guide
Certificate Autoenrollment127
To manually trigger Certificate Autoenrollment
l As root (or using sudo), run the following command to manually trigger Certificate Autoenrollment:
/opt/quest/bin/vascert trigger
Certificate Autoenrollment will proceed in the background. When complete, newly enrolled certificates will be installed in the System.keychain automatically. To troubleshoot Certificate Autoenrollment, run the vascert pulse command as root.
Troubleshooting Certificate Autoenrollment
To help you troubleshoot Certificate Autoenrollment, One Identity recommends the following resolutions to some of the common errors, and methods for finding and correcting configuration problems.
Certificate Autoenrollment process exited with an error
As mentioned in the Certificate Autoenrollment on UNIX and Linux section, some important Certification Autoenrollment commands, such as vascert pulse, will NOT work until the necessary platform-specific functionality has been implemented in certstore-DEV.sh. For more information on modifying certstore-DEV.sh and a simple example script, see the Examples and further explanation for modifying certstore-DEV.sh on Linux and Unix (284711) KB article.
Until the certstore-DEV.sh script is modified, the following issues will happen when running vascert pulse:
<VASCERT PULSE COMMAND>
$ vascert pulse
vascert: One Identity Certificate Autoenrollment version 1.1.0.750
Copyright 2017 Quest Software Inc. ALL RIGHTS RESERVED.
Processing enrollment policy: dc1.domain.com
Process exited with an error (Exit value: 1), command was: [/var/opt/quest/vascert/script/certstore.sh, export-machine-certs, /tmp/6353628018779558796pk12, mdzDFXBD7znDYDO8B]
</VASCERT PULSE COMMAND>
Safeguard Authentication Services 5.0.3 Administration Guide
Certificate Autoenrollment128
The output shows which script vascert ran and the parameters passed to the script. As previously mentioned, certstore.sh calls (on all platforms other than macOS) certstore-DEV.sh. In the example above, certstore.sh calls into certstore-DEV.sh's exportMachineCerts function. By default, that function only returns a 1 indicating an error as shown here:
exportMachineCerts()
{
echo "=== UNIMPLEMENTED exportMachineCerts'()' ==="
exit 1
}
See the Examples and further explanation for modifying certstore-DEV.sh on Linux and Unix (284711) KB article for a deeper understanding of that function, expected parameters, and an example for using that function. As long as that function returns '1', autoenrollment will cease at this point and vascert will not enroll for a new certificate. Because this is the first step of many, see the KB article for other functions that need to be modified and examples on how to do so.
Enable full debug logging
You can enable full debug logging for all Certificate Autoenrollment components using the vascert command line utility.
macOS: If debug logging is configured, Group Policy extensions, the vascert tool, and launchd write log files in /Library/Preferences/com.quest.X509Enrollment/log for machine enrollment and ~/Library/Preferences/com.quest.X509Enrollment/log for user enrollment. You can enable debug logging for all of these components.
UNIX/Linux: If debug logging is configured, the vascert tool writes files in /var/opt/quest/vascert/.com.quest.X509Enrollment/log for machine enrollment and ~/.com.quest.X509Enrollment/log for user enrollment. You can enable debug logging for all of these components.
To enable debug logging
1. As root, run the following command to configure debug logging for all users:
/opt/quest/bin/vascert configure debug
2. To configure debug logging for a specific user, log in as that user and run the same command.
NOTE: Enabling debug logging causes the vascert command to write debug messages to a file in addition to stdout. Even after you enable debug logging, you must set the debug level using the -d command line option when running vascert commands manually.
3. When you are finished debugging, run the following command as root to turn off debug logging for all users. One Identity recommends that you turn off debug logging
Safeguard Authentication Services 5.0.3 Administration Guide
Certificate Autoenrollment129

to improve performance and conserve disk space.
/opt/quest/bin/vascert unconfigure debug
4. To turn off debug logging for a specific user, log in as that user and run the same command.
Pulse Certificate Autoenrollment processing
Use the vascert command line utility to manually perform Certificate Autoenrollment.
To perform Certificate Autoenrollment processing manually
1. Decide whether you want to pulse Certificate Autoenrollment for the machine or a specific user.
2. To pulse Certificate Autoenrollment for the machine, run the following command as root (or using sudo):
/opt/quest/bin/vascert pulse
NOTE: macOS: To pulse certificate enrollment for the machine, you must run the command with root privileges. This is mostly useful for troubleshooting. In some cases (such as when logging in by means of SSH), this will not result in successful certificate enrollment because the System.keychain cannot export existing private keys required for certificate renewal processing. If you just want to run Certificate Autoenrollment processing for the machine and you are not interested in the output, use vascert trigger instead.
3. To pulse Certificate Autoenrollment for a specific user, log in as that user and run the following command:
/opt/quest/bin/vascert pulse
NOTE: macOS: Use the GUI to log in as the user. This ensures that the user's keychain is unlocked so that enrolled certificates can be exported and imported. Logging in by other means, such as SSH, is generally not sufficient and may lead to errors when the certstore-mac.sh script invokes the /usr/bin/security tool.
Manually apply Group Policy
If you are using One Identity Authentication Services 4.1 (or later), Certificate Autoenrollment is configured automatically by Group Policy. Use the vgptool command line utility to manually apply Group Policy.
Safeguard Authentication Services 5.0.3 Administration Guide
Certificate Autoenrollment130
To manually apply Group Policy
1. Decide whether you want to apply machine policy or user policy.
NOTE: Machine policy affects the entire system; User policy only affects the specified user.
2. To apply machine policy, enter the following command as root (or using sudo):
/opt/quest/bin/vgptool apply
The terminal displays policy processing results.
3. To apply user policy, enter the following command as root (or using sudo):
/opt/quest/bin/vgptool apply -u <username>
The terminal displays policy processing results.
Command line tool
vascert is the Certificate Autoenrollment command line tool for certificate enrollment. With vascert you can configure various aspects of Certificate Autoenrollment. You can manually trigger certificate enrollment processing. vascert is also helpful for troubleshooting various network and authentication problems that may occur.
This command reference details the command line usage for vascert.
vascert command reference
vascert is the Certificate Autoenrollment processor.
Name
vascert
Synopsis
vascert [-d <debug level [1-6]>] [-b] [-h <command>] <command [command options]>
Overview
vascert is the Certificate Autoenrollment processor for Unix clients.
Commands
To run vascert, specify one or more general options, then specify a specific command which may have further options and arguments.
Safeguard Authentication Services 5.0.3 Administration Guide
Certificate Autoenrollment131
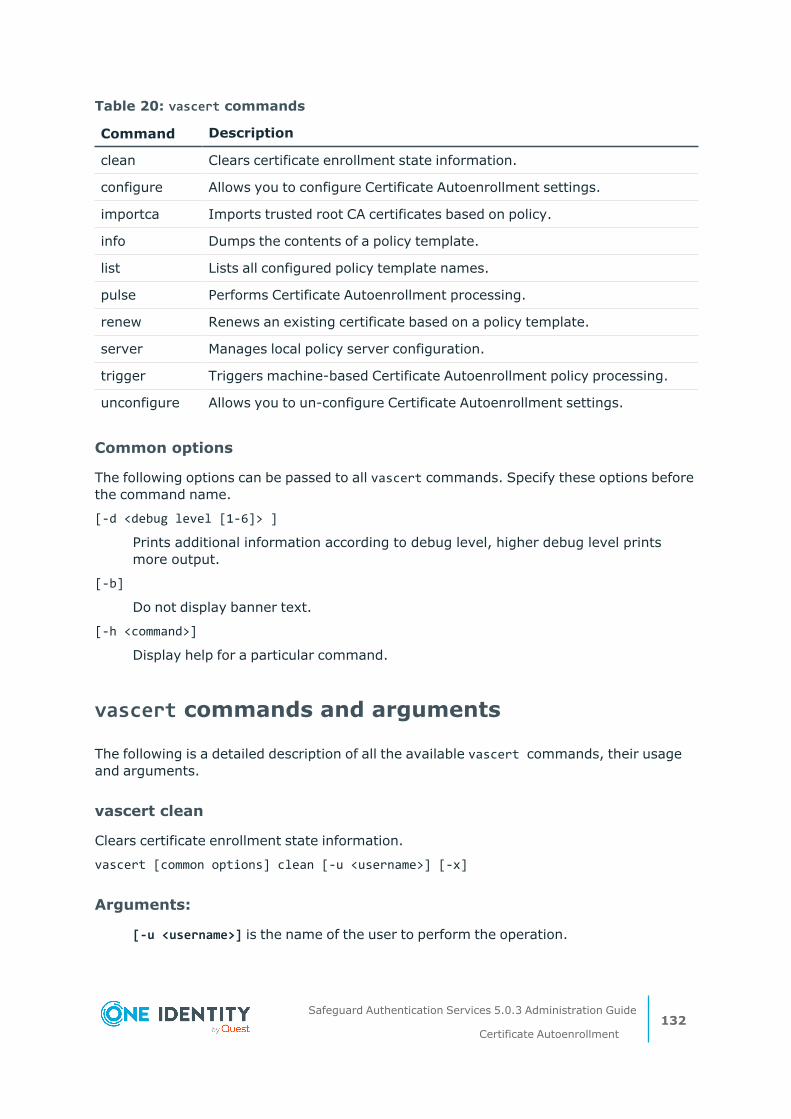
Command Description
clean Clears certificate enrollment state information.
configure Allows you to configure Certificate Autoenrollment settings.
importca Imports trusted root CA certificates based on policy.
info Dumps the contents of a policy template.
list Lists all configured policy template names.
pulse Performs Certificate Autoenrollment processing.
renew Renews an existing certificate based on a policy template.
server Manages local policy server configuration.
trigger Triggers machine-based Certificate Autoenrollment policy processing.
unconfigure Allows you to un-configure Certificate Autoenrollment settings.
Table 20: vascert commands
Common options
The following options can be passed to all vascert commands. Specify these options before the command name.
[-d <debug level [1-6]> ]
Prints additional information according to debug level, higher debug level prints more output.
[-b]
Do not display banner text.
[-h <command>]
Display help for a particular command.
vascert commands and arguments
The following is a detailed description of all the available vascert commands, their usage and arguments.
vascert clean
Clears certificate enrollment state information.
vascert [common options] clean [-u <username>] [-x]
Arguments:
[-u <username>] is the name of the user to perform the operation.
Safeguard Authentication Services 5.0.3 Administration Guide
Certificate Autoenrollment132
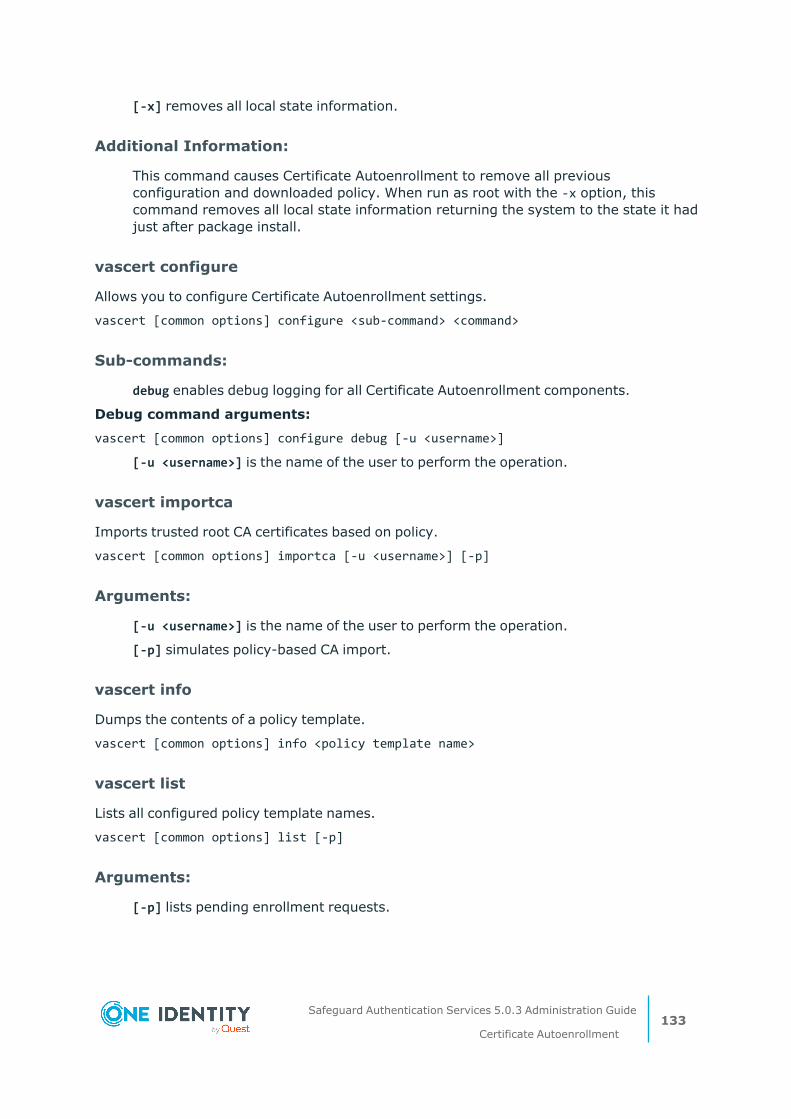
[-x] removes all local state information.
Additional Information:
This command causes Certificate Autoenrollment to remove all previous configuration and downloaded policy. When run as root with the -x option, this command removes all local state information returning the system to the state it had just after package install.
vascert configure
Allows you to configure Certificate Autoenrollment settings.
vascert [common options] configure <sub-command> <command>
Sub-commands:
debug enables debug logging for all Certificate Autoenrollment components.
Debug command arguments:
vascert [common options] configure debug [-u <username>]
[-u <username>] is the name of the user to perform the operation.
vascert importca
Imports trusted root CA certificates based on policy.
vascert [common options] importca [-u <username>] [-p]
Arguments:
[-u <username>] is the name of the user to perform the operation.
[-p] simulates policy-based CA import.
vascert info
Dumps the contents of a policy template.
vascert [common options] info <policy template name>
vascert list
Lists all configured policy template names.
vascert [common options] list [-p]
Arguments:
[-p] lists pending enrollment requests.
Safeguard Authentication Services 5.0.3 Administration Guide
Certificate Autoenrollment133
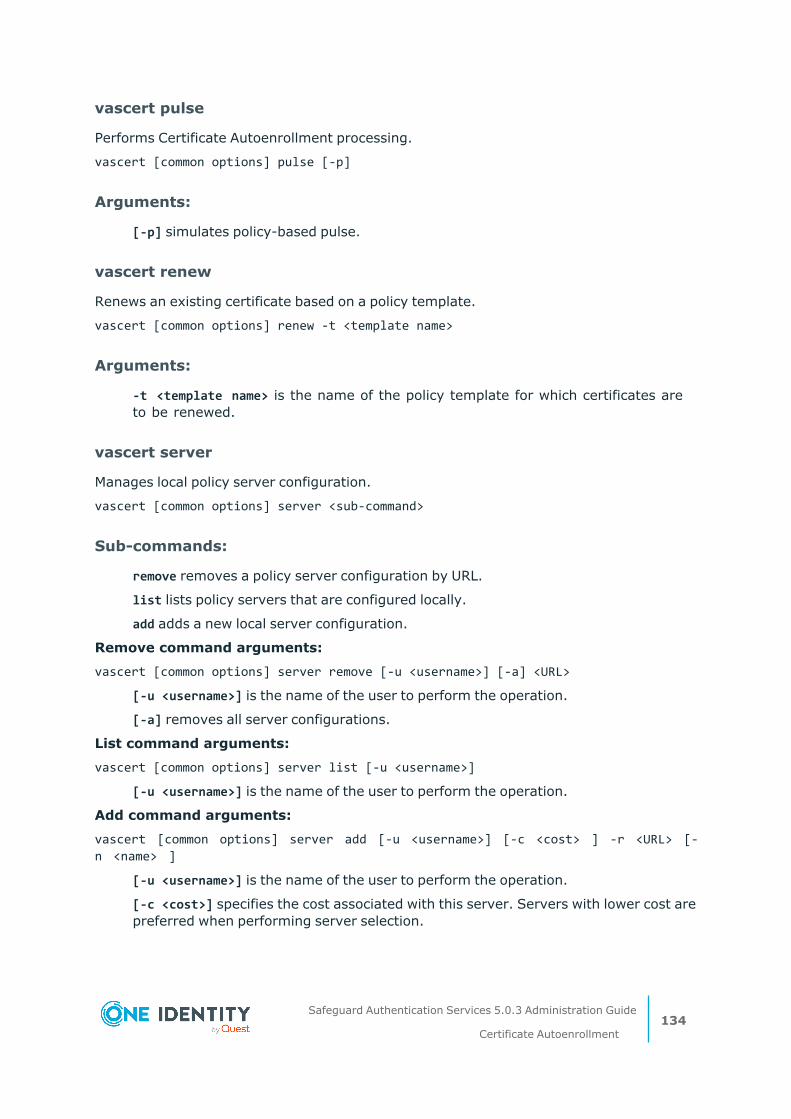
vascert pulse
Performs Certificate Autoenrollment processing.
vascert [common options] pulse [-p]
Arguments:
[-p] simulates policy-based pulse.
vascert renew
Renews an existing certificate based on a policy template.
vascert [common options] renew -t <template name>
Arguments:
-t <template name> is the name of the policy template for which certificates are to be renewed.
vascert server
Manages local policy server configuration.
vascert [common options] server <sub-command>
Sub-commands:
remove removes a policy server configuration by URL.
list lists policy servers that are configured locally.
add adds a new local server configuration.
Remove command arguments:
vascert [common options] server remove [-u <username>] [-a] <URL>
[-u <username>] is the name of the user to perform the operation.
[-a] removes all server configurations.
List command arguments:
vascert [common options] server list [-u <username>]
[-u <username>] is the name of the user to perform the operation.
Add command arguments:
vascert [common options] server add [-u <username>] [-c <cost> ] -r <URL> [-n <name> ]
[-u <username>] is the name of the user to perform the operation.
[-c <cost>] specifies the cost associated with this server. Servers with lower cost are preferred when performing server selection.
Safeguard Authentication Services 5.0.3 Administration Guide
Certificate Autoenrollment134
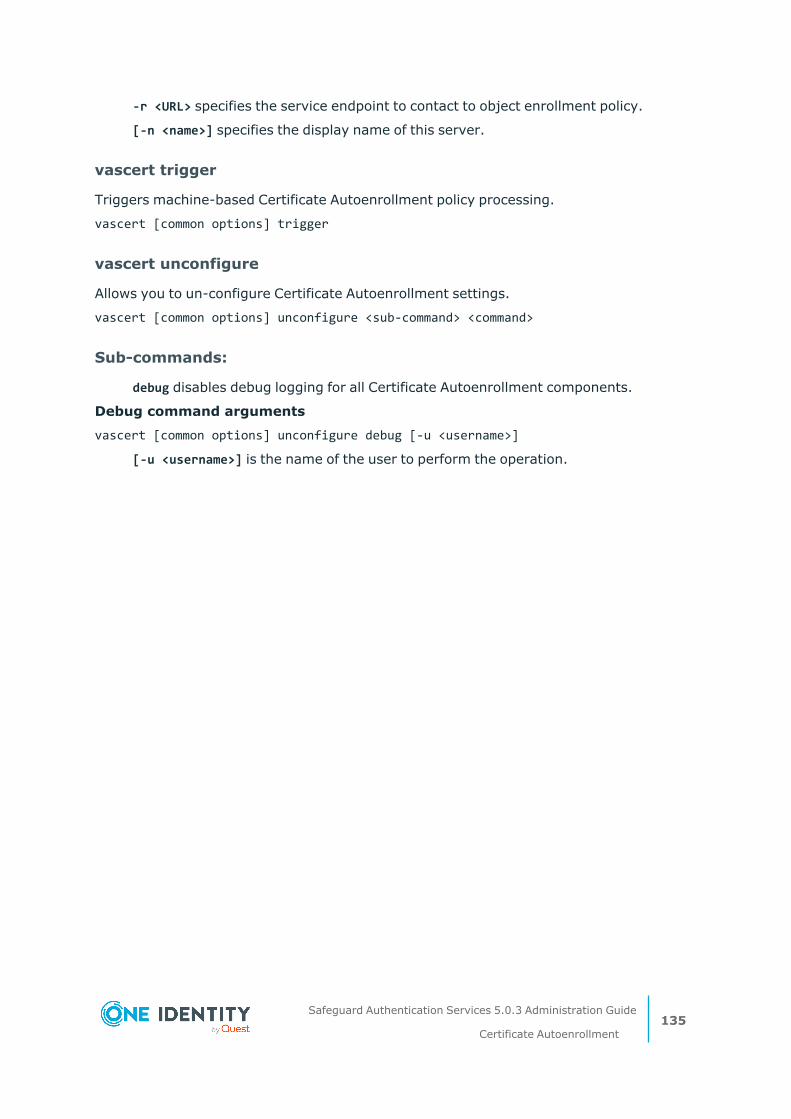
-r <URL> specifies the service endpoint to contact to object enrollment policy.
[-n <name>] specifies the display name of this server.
vascert trigger
Triggers machine-based Certificate Autoenrollment policy processing.
vascert [common options] trigger
vascert unconfigure
Allows you to un-configure Certificate Autoenrollment settings.
vascert [common options] unconfigure <sub-command> <command>
Sub-commands:
debug disables debug logging for all Certificate Autoenrollment components.
Debug command arguments
vascert [common options] unconfigure debug [-u <username>]
[-u <username>] is the name of the user to perform the operation.
Safeguard Authentication Services 5.0.3 Administration Guide
Certificate Autoenrollment135
9
Integrating with other applications
Safeguard Authentication Services integrates with the following products.
l InSync
l One Identity™ Active Roles
l One Identity™ Defender®
l One Identity™ Privilege Manager for Unix
l One Identity™ Starling Two-Factor Authentication
l Quest® Change Auditor
l Quest® Enterprise Reporter
l Quest® InTrust®
l Quest® Recovery Manager for Active Directory
This section includes instructions for integrating Starling Two-Factor Authentication, Defender, and Change Auditor with Safeguard Authentication Services.
NOTE: See the One Identity website for information related to the integration of Safeguard Authentication Services with other products.
One Identity Starling integration
One Identity Starling Two-Factor Authentication is a SaaS solution that provides two-factor authentication on a product enabling organizations to quickly and easily verify a user's identity. This service is provided as part of the One Identity Starling cloud platform. Joining Safeguard Authentication Services to One Identity Starling allows you to take advantage of these companion features from Starling services. For more information on Starling, see the One Identity Starling User Guide.
In order to use Starling 2FA with Safeguard Authentication Services, you must join Safeguard Authentication Services to Starling. This is done from the Preferences | Starling Two-Factor Authentication pane in the Control Center. From this pane, you can also configure Starling to use a proxy server and customize the attributes to be used in push notifications.
Safeguard Authentication Services 5.0.3 Administration Guide
Integrating with other applications136
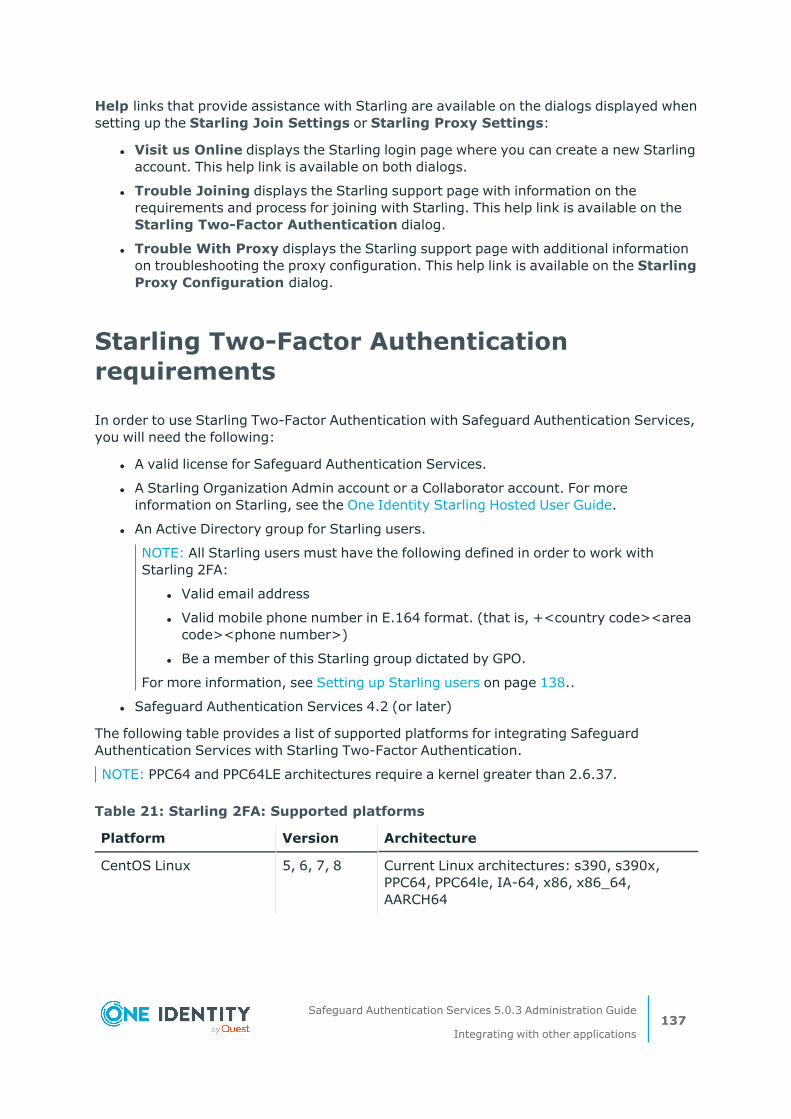
Help links that provide assistance with Starling are available on the dialogs displayed when setting up the Starling Join Settings or Starling Proxy Settings:
l Visit us Online displays the Starling login page where you can create a new Starling account. This help link is available on both dialogs.
l Trouble Joining displays the Starling support page with information on the requirements and process for joining with Starling. This help link is available on the Starling Two-Factor Authentication dialog.
l Trouble With Proxy displays the Starling support page with additional information on troubleshooting the proxy configuration. This help link is available on the Starling Proxy Configuration dialog.
Starling Two-Factor Authentication requirements
In order to use Starling Two-Factor Authentication with Safeguard Authentication Services, you will need the following:
l A valid license for Safeguard Authentication Services.
l A Starling Organization Admin account or a Collaborator account. For more information on Starling, see the One Identity Starling Hosted User Guide.
l An Active Directory group for Starling users.
NOTE: All Starling users must have the following defined in order to work with Starling 2FA:
l Valid email address
l Valid mobile phone number in E.164 format. (that is, +<country code><area code><phone number>)
l Be a member of this Starling group dictated by GPO.
For more information, see Setting up Starling users on page 138..
l Safeguard Authentication Services 4.2 (or later)
The following table provides a list of supported platforms for integrating Safeguard Authentication Services with Starling Two-Factor Authentication.
NOTE: PPC64 and PPC64LE architectures require a kernel greater than 2.6.37.
Platform Version Architecture
CentOS Linux 5, 6, 7, 8 Current Linux architectures: s390, s390x, PPC64, PPC64le, IA-64, x86, x86_64, AARCH64
Table 21: Starling 2FA: Supported platforms
Safeguard Authentication Services 5.0.3 Administration Guide
Integrating with other applications137
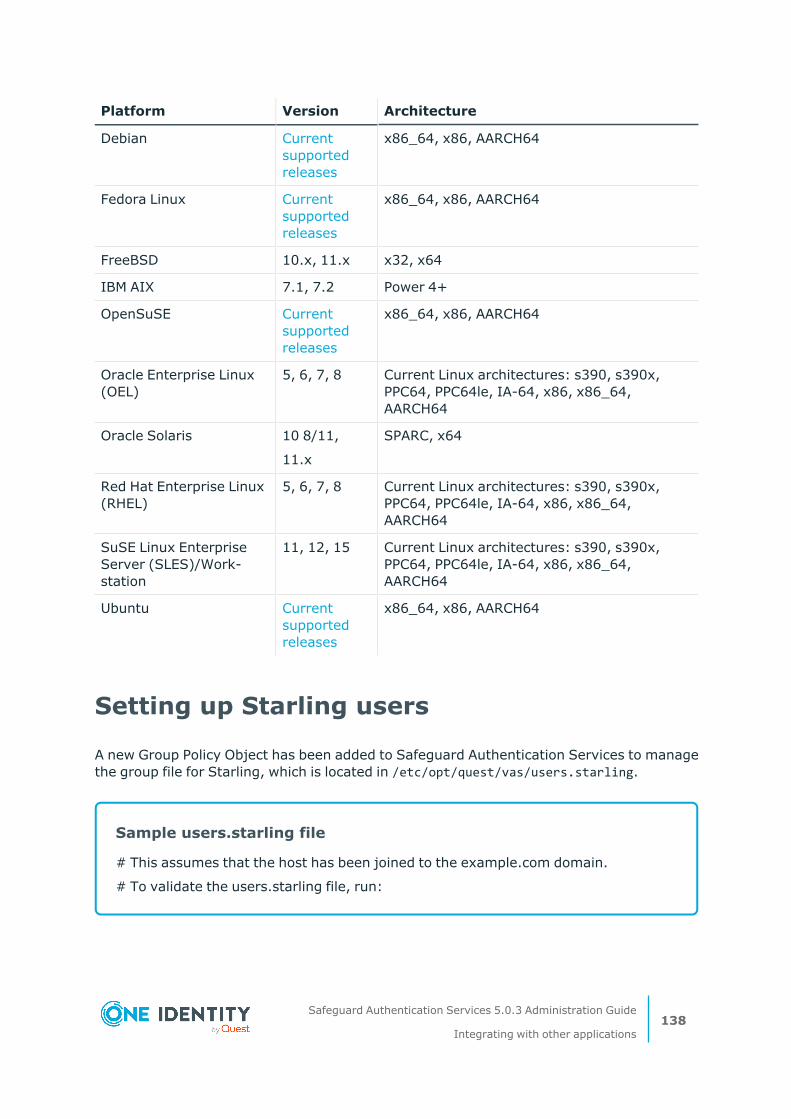
Platform Version Architecture
Debian Current supported releases
x86_64, x86, AARCH64
Fedora Linux Current supported releases
x86_64, x86, AARCH64
FreeBSD 10.x, 11.x x32, x64
IBM AIX 7.1, 7.2 Power 4+
OpenSuSE Current supported releases
x86_64, x86, AARCH64
Oracle Enterprise Linux (OEL)
5, 6, 7, 8 Current Linux architectures: s390, s390x, PPC64, PPC64le, IA-64, x86, x86_64, AARCH64
Oracle Solaris 10 8/11,
11.x
SPARC, x64
Red Hat Enterprise Linux (RHEL)
5, 6, 7, 8 Current Linux architectures: s390, s390x, PPC64, PPC64le, IA-64, x86, x86_64, AARCH64
SuSE Linux Enterprise Server (SLES)/Work-station
11, 12, 15 Current Linux architectures: s390, s390x, PPC64, PPC64le, IA-64, x86, x86_64, AARCH64
Ubuntu Current supported releases
x86_64, x86, AARCH64
Setting up Starling users
A new Group Policy Object has been added to Safeguard Authentication Services to manage the group file for Starling, which is located in /etc/opt/quest/vas/users.starling.
Sample users.starling file
# This assumes that the host has been joined to the example.com domain.
# To validate the users.starling file, run:
Safeguard Authentication Services 5.0.3 Administration Guide
Integrating with other applications138

# vastool info acl
#
# This file controls which user's have Starling appled to them during login based
# on group membership.
# For entries:
# If DOMAIN is omitted ( simple name given )it is assumed to be the joined domain.
# Entries are case insensitive.
# DOMAIN can be either long(fqdn) or short(netbios).
# Apply Starling to members of the sales and engineering groups.
# The entry DOMAIN\SamAccountName format is preferred.
EXAMPLE\sales
engineering
This file can be manually created or set using the GPO.
To enable Starling for users using the GPO
1. Open your Group Policy management system.
2. Select the applicable group policy.
3. Navigate to Computer configuration | Unix Settings | Starling.
4. Double-click users.starling.
5. Add the groups that contain the users to be enabled to use Starling 2FA.
It may take up to 90 minutes to apply this configuration change. Use vgptool apply to apply the changes quicker.
Joining Safeguard Authentication Services with Starling
Joining Safeguard Authentication Services to Starling allows you to use features from Starling Two-Factor Authentication.
To join Safeguard Authentication Services with Starling
1. From the Control Center, navigate to Preferences | Starling Two-Factor Authentication.
2. In the Join to Starling and enable Two-Factor Authentication pane, click Starling Join Settings.
Safeguard Authentication Services 5.0.3 Administration Guide
Integrating with other applications139
3. On the Starling Two-Factor Authentication dialog, use the Product TIMs drop-down to select a valid Safeguard Authentication Services license.
NOTE: The other fields on this dialog are read-only and contain the following inform-ation after you successfully join to Starling:
l Product Name: Displays Safeguard Authentication Services.
l Product Instance: Displays the unique identifier for Starling.
4. Click Join to Starling.
NOTE: The following additional information may be required:
l If you do not have an existing session with Starling, you will be prompted to authenticate.
l If your Starling account belongs to multiple organizations, you will be prompted to select which organization Safeguard Authentication Services will be joined with.
After the join has successfully completed, you will be returned to the Safeguard Authentication Services Control Center and the Join to Starling and enable Two-Factor Authentication pane will display the following:
l Product Instance: Displays the unique identifier for Starling. You can click the Copy button to the right of this field to copy the product instance identifier to your desktop.
l Starling Join State: Displays either Joined or Unjoined.
Configuring Starling to use a proxy server
The Starling Proxy Settings must be configured if your company policies do not allow devices to connect directly to the web. Once configured, Safeguard Authentication Services uses the configured proxy server for outbound web requests to Starling.
NOTE: One Identity recommends you use an automatic configuration script (proxy PAC file). To specify a previously configured PAC file, select the Use automatic config-uration script check box and enter the address of the proxy.pac file.
To configure Starling to use a proxy server
1. From the Control Center, navigate to Preferences | Starling Two-Factor Authentication.
2. In the Starling Proxy Configuration pane, click Starling Proxy Settings.
3. On the Starling Proxy Configuration dialog, enter the following information about the proxy server to be used:
To specify a previously configured PAC file (recommended):
l Use automatic configuration script: Select this check box.
l Address: Enter the address of the proxy.pac file.
Safeguard Authentication Services 5.0.3 Administration Guide
Integrating with other applications140
To use username/password to specify the proxy server:
l Address: Enter the URL for the proxy server.
l Port: Enter the port number to be used.
l Username: Enter the user name of a service account that is to be used to access the proxy server.
l Password: Enter the password associated with the user name specified. The password will be displayed in clear text.
4. Click OK to save your selections.
Starling Attributes: Configure LDAP attributes for use with push notifications
You can specify the user mobile number and user email address attributes to be used by the Starling push notifications.
Modifications to the Starling schema attributes configuration are global and apply to all Safeguard Authentication Services clients in the forest. For users configured to use Starling, this could cause user logins to fail.
To configure custom LDAP attributes for use with Starling push notifications
1. From the Control Center, navigate to the Starling Attributes in one of the following two ways:
l Preferences | Starling Two-Factor Authentication and click the Starling Attributes link.
l Preferences | Schema Attributes
2. Click the Unix Attributes link in the upper right to display the Customize Schema Attributes dialog.
3. Enter the LDAP display name for one or both of the Starling attributes used by the Starling push notifications:
l User Mobile Number
l User Email Address
4. Click OK.
5. Click Yes to confirm that you want to modify the Starling schema attributes configuration.
6. Back on the Starling Two-Factor Authentication preference pane, the Starling attributes to be used are displayed.
Safeguard Authentication Services 5.0.3 Administration Guide
Integrating with other applications141
Logging in with Starling Two-Factor Authentication
Once Starling Two-Factor Authentication is enabled (that is, Safeguard Authentication Services is joined to Starling and users are authorized to use Starling Two-Factor Authentication), anytime an authorized user attempts to log in to an integrated Unix-based host, they will see an additional login screen informing them that an additional authentication step is required.
The default prompt contains the following:
Enter a token or select one of the following options:
1. Starling Push
2. Phone call
3. Send an SMS
Token or option (1-3) [1]: <Token or option number>
This default prompt can be modified in vas.conf.
vas.conf example:
[STARLING] OPTIONS
The behavior of QAS Starling can be modified by using the following options in the [starling] section.
[starling]
prompt = <boolean>
prompt = <message-text>
Default value: "Enter a token or select one of the following options:\n\n 1. Starling Push\n 2. Phone
call\n 3. Send an SMS\n \nToken or option (1-3)[1]: "
This is the message that is initially displayed during a Starling authentication.
This prompt can span multiple lines, line separation is specified by adding \n to the prompt string.
NOTE: Changing the prompt will not change what is accepted as input.
[starling]
prompt = "Enter 1 for a push request, 2 for a phone call, 3 for a txt, or enter a token.\n "
NOTE: In order to display the prompts, the application must be able to handle pam conversations, such as sshd(keyboard-interactive). If the application can not handle pam
Safeguard Authentication Services 5.0.3 Administration Guide
Integrating with other applications142
conversations, such as sshd(password), a push authentication is sent instead of a prompt.
Unjoining from Starling
Unjoining Safeguard Authentication Services from Starling disables Starling Two-Factor Authentication in Safeguard Authentication Services.
To unjoin Safeguard Authentication Services from Starling
1. From the Control Center, navigate to Preferences | Starling Two-Factor Authentication.
2. In the Join to Starling and enable Two-Factor Authentication pane, click Starling Join Settings.
3. On the Starling Two-Factor Authentication dialog, click Unjoin Starling.
A Starling Organization Admin account or Collaborator account can rejoin Safeguard Authentication Services at any time.
Disabling Starling 2FA for a specific PAM service
To disable Starling 2FA for a specific PAM service, edit the PAM configuration file (/etc/pam.conf or /etc/pam.d/<service>). Modify the auth pam_vas line for the desired service.
To disable Starling 2FA for a specific PAM service
1. As root, add the following line to the PAM configuration file, on the first auth pam_vas line for the service:
disable_starling
Defender integration
Defender provides strong authentication capabilities.
Why is strong authentication an important part of an Active Directory bridge solution?
When Safeguard Authentication Services integrates Unix with Active Directory, it provides centralized access control and password policy enforcement. However, there are situations where security policies dictate a stronger level of authentication. Safeguard Authentication Services addresses this need with optional strong authentication capabilities. Customers
Safeguard Authentication Services 5.0.3 Administration Guide
Integrating with other applications143
now can use the same solution for integrated Active Directory authentication and strong authentication. Organizations that have tight security requirements will no longer be forced to purchase and implement a third-party solution.
How is strong authentication used with an Active Directory bridge solution?
An organization may have many Unix systems deployed in a traditional, highly secure perimeter network environment. As they are integrated with Active Directory, they will require an Active Directory credential to authenticate. Now, an additional layer of authentication can be added for administrators accessing these systems, using either a hardware or software token.
If an organization has integrated hundreds or thousands of Unix systems with Active Directory, a system administrator can now use the same Active Directory credential to access all of them. An additional level of security can be easily added by requiring the system administrator to use one-time password (OTP) in additional to the Active Directory credential.
How do Safeguard Authentication Services’ strong authentication capabilities compare to other Active Directory bridge solutions?
Strong authentication combined with an Active Directory bridge is a unique and critical differentiator for One Identity. No other Active Directory bridge vendor offers strong authentication as an integrated part of its solution, and no strong authentication vendor offers Unix coverage and Active Directory integration.
Is there an additional charge for strong authentication with Safeguard Authentication Services 4.x?
There is no additional cost for strong authentication with Safeguard Authentication Services 4.x; it is a new feature available to new and upgrading customers.
Safeguard Authentication Services provides strong authentication for up to 25 users at no additional cost through included licenses and tokens for Safeguard Authentication Services Defender. These licenses will cover and secure 25 of an organization‘s Unix system administrators. Strong authentication support for additional end-users is available at an additional per-user cost.
How does strong authentication with Safeguard Authentication Services 4.x work?
Safeguard Authentication Services:
l Includes strong authentication modules and native packages for all supported platforms (100+).
l Remotely deploys and installs the strong authentication module.
l Provides hardware and software tokens for one-time passwords.
l Enables policy-based configuration of strong authentication through Active Directory Group Policy.
The following figure describes the flow of events that occur during a Unix or Linux login after both Safeguard Authentication Services Defender and Safeguard Authentication Services are configured according to this guide.
Safeguard Authentication Services 5.0.3 Administration Guide
Integrating with other applications144

Figure 2: Defender Integration
Defender installation prerequisites
Before you install Safeguard Authentication Services Defender on your host, ensure that you have:
1. Installed a Defender security server in your Active Directory domain.
2. Installed the Defender Microsoft Management Console (MMC) snap-in.
3. Installed Safeguard Authentication Services on your Unix or Linux machine.
Installing Defender
In order to use strong authentication, you must download and install Safeguard Authentication Services Defender. See the Defender Installation Guide to obtain detailed steps for installing Safeguard Authentication Services Defender.
Safeguard Authentication Services 5.0.3 Administration Guide
Integrating with other applications145

NOTE: Defender installation requires a license file. A fully-functional 25-user license for it is included with Safeguard Authentication Services.
The following steps outline the basic procedure for installing Defender. See the
To install Defender
1. Insert the Safeguard Authentication Services distribution media.
The Autorun Home page displays.
NOTE: If the Autorun Home page does not display, navigate to the root of the distribution media and double-click autorun.exe.
2. From the Home page, click the Setup tab.
3. From the Setup tab, click One Identity Defender.
The One IdentityDefender web page opens.
4. Click the Download on the left navigation panel.
5. Follow the online instructions to gain access to the Trial Download page.
6. From the Trial Download: Defender page, click the Defender Documentation Archive link.
7. Once you have installed One Identity Defender, see the One Identity Defender Integration Guide for detailed configuration instructions about integrating Safeguard Authentication Services Defender with Safeguard Authentication Services.
Change Auditor for Authentication Services integration
Change Auditor for Authentication Services provides auditing, alerting, and change tracking capabilities.
Change Auditor provides the ability to capture Safeguard Authentication Services events for both Active Directory and Group Policy.
Why is auditing, alerting, and change tracking important?
When organizations make the key decision to integrate Unix with Active Directory, they expand Active Directory's scope and strategic importance. As a result, it is critical to provide visibility into the Unix-centric data, which is now managed by Active Directory. Safeguard Authentication Services addresses this challenge by delivering the ability to audit, alert, and show detailed change history of Unix-centric information now managed by Active Directory.
Without these capabilities, Active Directory bridge administrators are blind to any changes made to Unix-centric information managed by Active Directory and may be forced to purchase and implement a third-party solution.
Who needs the Change Auditor functionality in Safeguard Authentication Services?
Safeguard Authentication Services 5.0.3 Administration Guide
Integrating with other applications146

An organization using the Active Directory Group Policy features of Safeguard Authentication Services to manage Unix systems may have a group policy that grants a Unix system administrator the right to authenticate to every Unix machine. If an administrator edits this group policy and grants additional users the same access, Safeguard Authentication Services now provides immediate visibility into these changes. An alert will be generated and the organization will know who made the change, when, and from where. A detailed history of the policy will also be provided.
To achieve and maintain compliance with regulations and policy, an organization must be able to prove it has control over its Unix-centric data in Active Directory. With Safeguard Authentication Services, an organization will now be alerted to events, such as when Unix systems are joined to Active Directory, when Active Directory users or groups are "Unix enabled," or changes to NIS data stored in Active Directory. This information will be available for audit and will show the change history.
How does Safeguard Authentication Services’ audit capabilities compare to other Active Directory bridge solutions?
The audit, alerting, and change tracking capabilities of Safeguard Authentication Services are unique, and a critical differentiator for One Identity. Only One Identity can offer these benefits as an integrated and included component of its Active Directory bridge solution.
Is there an additional charge for Safeguard Authentication Services 4.x audit capabilities?
There is no additional cost for Safeguard Authentication Services audit, alerting, and change tracking capabilities; they are considered new features and are available to new customers, as well as to existing customers that upgrade as part of their active relationship with One Identity.
How does Safeguard Authentication Services integrate with Change Auditor?
Safeguard Authentication Services includes a special license key for Change Auditor for Authentication Services that unlocks a number of unique, Safeguard Authentication Services-specific events. These Active Directory events can be monitored using the Change Auditor console, as illustrated in the following table.
Change Auditor Safeguard Authentication Services event
Description
NIS Object Added Created when an NIS object is added to Active Directory.
NIS Object Attribute Changed Created when the data stored in an NIS object in Active Directory is changed.
NIS Object Deleted Created when an NIS object is deleted from Active Directory.
NIS Object Moved Created when an NIS object is moved within Active Directory.
NIS Object Renamed Created when an NIS object is renamed within Active
Table 22: Events for Authentication Services
Safeguard Authentication Services 5.0.3 Administration Guide
Integrating with other applications147
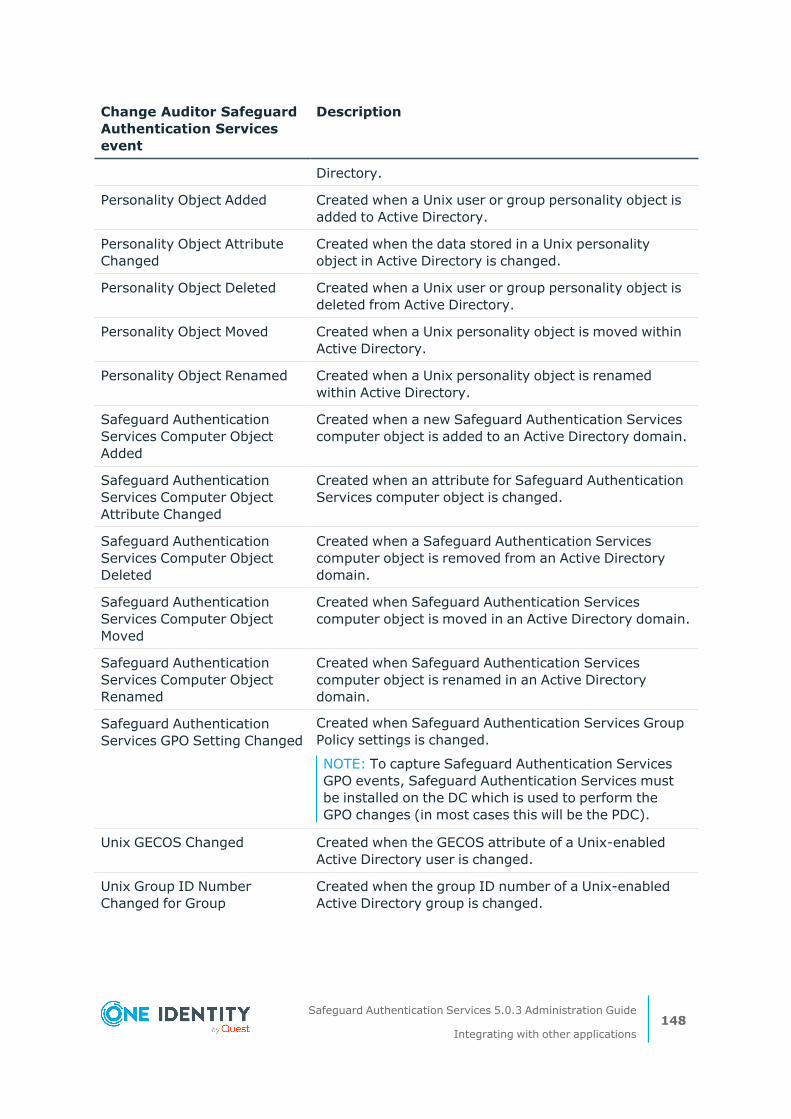
Change Auditor Safeguard Authentication Services event
Description
Directory.
Personality Object Added Created when a Unix user or group personality object is added to Active Directory.
Personality Object Attribute Changed
Created when the data stored in a Unix personality object in Active Directory is changed.
Personality Object Deleted Created when a Unix user or group personality object is deleted from Active Directory.
Personality Object Moved Created when a Unix personality object is moved within Active Directory.
Personality Object Renamed Created when a Unix personality object is renamed within Active Directory.
Safeguard Authentication Services Computer Object Added
Created when a new Safeguard Authentication Services computer object is added to an Active Directory domain.
Safeguard Authentication Services Computer Object Attribute Changed
Created when an attribute for Safeguard Authentication Services computer object is changed.
Safeguard Authentication Services Computer Object Deleted
Created when a Safeguard Authentication Services computer object is removed from an Active Directory domain.
Safeguard Authentication Services Computer Object Moved
Created when Safeguard Authentication Services computer object is moved in an Active Directory domain.
Safeguard Authentication Services Computer Object Renamed
Created when Safeguard Authentication Services computer object is renamed in an Active Directory domain.
Safeguard Authentication Services GPO Setting Changed
Created when Safeguard Authentication Services Group Policy settings is changed.
NOTE: To capture Safeguard Authentication Services GPO events, Safeguard Authentication Services must be installed on the DC which is used to perform the GPO changes (in most cases this will be the PDC).
Unix GECOS Changed Created when the GECOS attribute of a Unix-enabled Active Directory user is changed.
Unix Group ID Number Changed for Group
Created when the group ID number of a Unix-enabled Active Directory group is changed.
Safeguard Authentication Services 5.0.3 Administration Guide
Integrating with other applications148

Change Auditor Safeguard Authentication Services event
Description
Unix Group ID Number Changed for User
Created when the primary group ID number of a Unix-enabled Active Directory user is changed.
Unix Group Name Changed Created when the Unix name of a Unix-enabled Active Directory group is changed.
Unix Home Directory Changed Created when the Unix home directory of a Unix-enabled Active Directory user is changed.
Unix Login Name Changed Created when the Unix login name of a Unix-enabled Active Directory user is changed.
Unix Login Shell Changed Created when the Unix login shell of a Unix-enabled Active Directory user is changed.
Unix User ID Number Changed Created when the user ID number of a Unix-enabled Active Directory user is changed.
Unix-Enabled Changed for Group
Created when the Unix attributes of an Active Directory group are changed such that it no longer exists on a Unix or Linux system.
Installing Change Auditor for Authentication Services
The following steps outline the basic procedure for installing Change Auditor for Authentication Services. See the Change Auditor Installation Guide to obtain detailed steps for installing Change Auditor for Authentication Services.
To install Change Auditor for Authentication Services
1. Insert the Safeguard Authentication Services distribution media.
The Autorun Home page displays.
NOTE: If the Autorun Home page does not display, navigate to the root of the distribution media and double-click autorun.exe.
2. Click the Setup tab and select Change Auditor for Authentication Services.
The Change Auditor for Authentication Services for Active Directory web page opens.
3. Click Download on the left navigation panel.
4. Follow the online instructions to gain access to the Trial Download page.
5. From the Trial Download: Change Auditor for Active Directory page, click the Installation Guide link.
Safeguard Authentication Services 5.0.3 Administration Guide
Integrating with other applications149
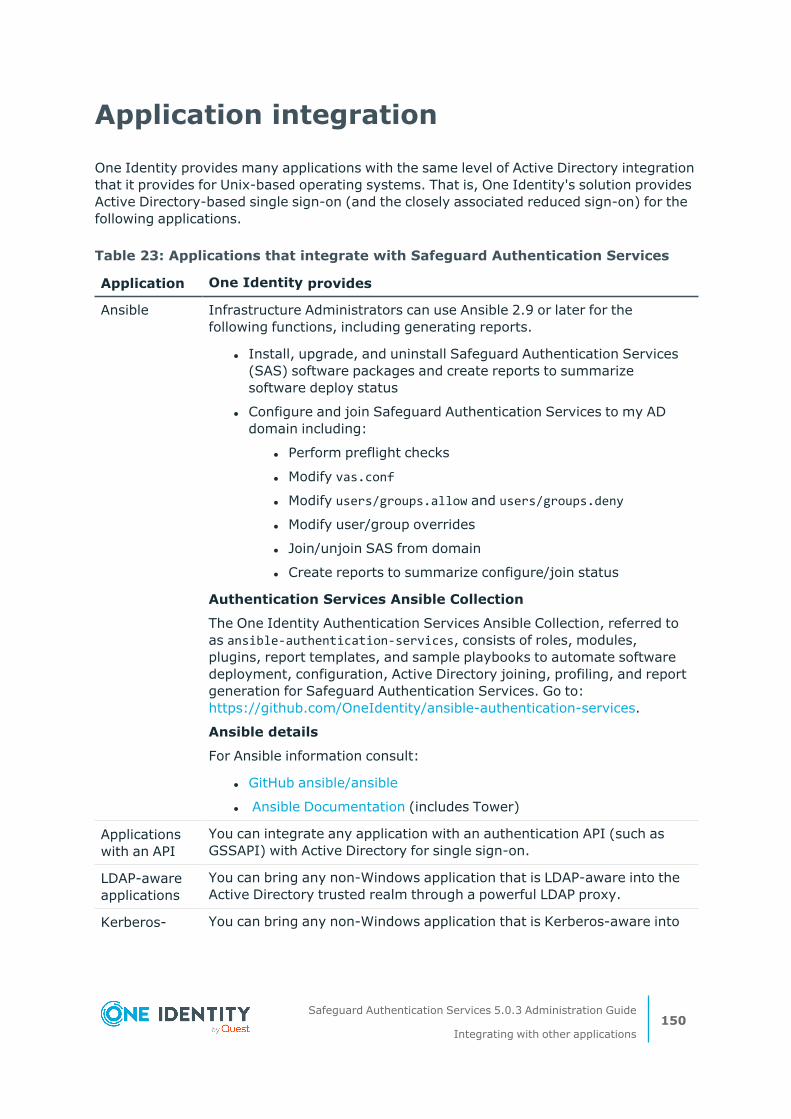
Application integration
One Identity provides many applications with the same level of Active Directory integration that it provides for Unix-based operating systems. That is, One Identity's solution provides Active Directory-based single sign-on (and the closely associated reduced sign-on) for the following applications.
Application One Identity provides
Ansible Infrastructure Administrators can use Ansible 2.9 or later for the following functions, including generating reports.
l Install, upgrade, and uninstall Safeguard Authentication Services (SAS) software packages and create reports to summarize software deploy status
l Configure and join Safeguard Authentication Services to my AD domain including:
l Perform preflight checks
l Modify vas.conf
l Modify users/groups.allow and users/groups.deny
l Modify user/group overrides
l Join/unjoin SAS from domain
l Create reports to summarize configure/join status
Authentication Services Ansible Collection
The One Identity Authentication Services Ansible Collection, referred to as ansible-authentication-services, consists of roles, modules, plugins, report templates, and sample playbooks to automate software deployment, configuration, Active Directory joining, profiling, and report generation for Safeguard Authentication Services. Go to: https://github.com/OneIdentity/ansible-authentication-services.
Ansible details
For Ansible information consult:
l GitHub ansible/ansible
l Ansible Documentation (includes Tower)
Applications with an API
You can integrate any application with an authentication API (such as GSSAPI) with Active Directory for single sign-on.
LDAP-aware applications
You can bring any non-Windows application that is LDAP-aware into the Active Directory trusted realm through a powerful LDAP proxy.
Kerberos- You can bring any non-Windows application that is Kerberos-aware into
Table 23: Applications that integrate with Safeguard Authentication Services
Safeguard Authentication Services 5.0.3 Administration Guide
Integrating with other applications150
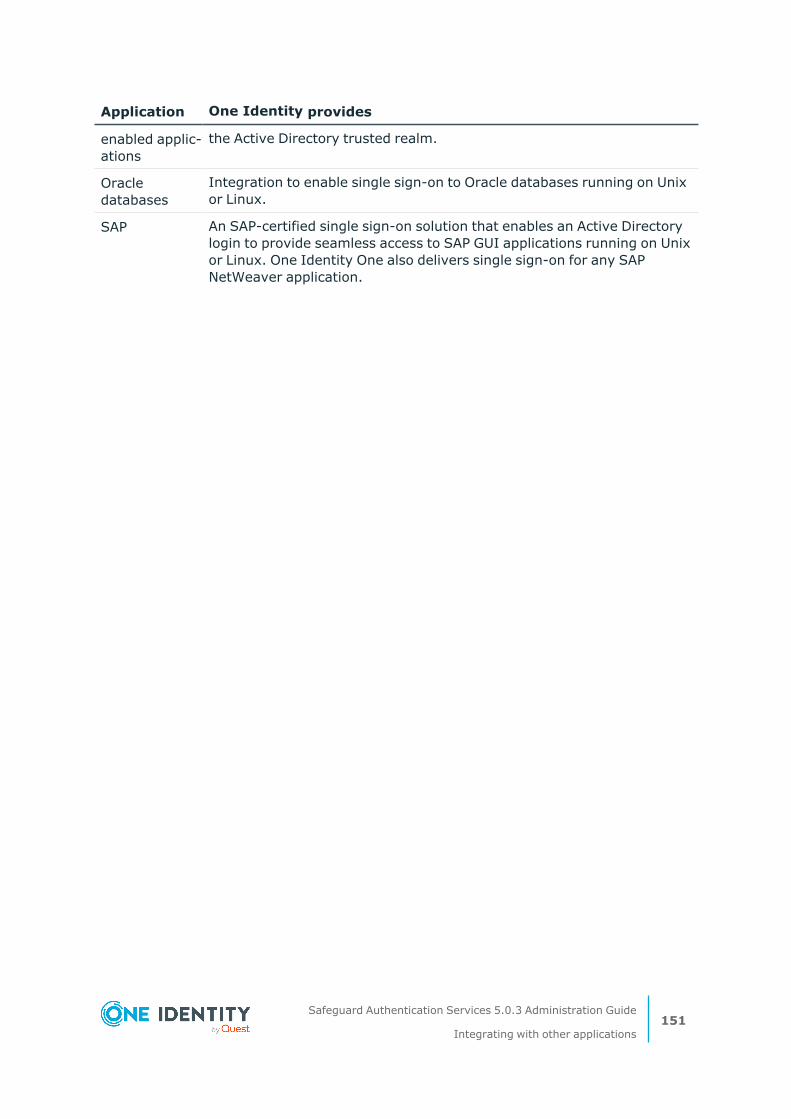
Application One Identity provides
enabled applic-ations
the Active Directory trusted realm.
Oracle databases
Integration to enable single sign-on to Oracle databases running on Unix or Linux.
SAP An SAP-certified single sign-on solution that enables an Active Directory login to provide seamless access to SAP GUI applications running on Unix or Linux. One Identity One also delivers single sign-on for any SAP NetWeaver application.
Safeguard Authentication Services 5.0.3 Administration Guide
Integrating with other applications151
10
Managing Unix hosts with Group Policy
Safeguard Authentication Services extends Group Policy to Unix, Linux and macOS. Safeguard Authentication Services Group Policy provides policies to manage a wide array of configuration settings, files, scripts and applications.
NOTE: For more information about managing your macOS clients with Group Policy, see the Safeguard Authentication Services macOS Administration Guide.
Safeguard Authentication Services Group Policy
The Microsoft Group Policy management solution is included as an integral part of the Microsoft Windows Server and allows administrators to define configurations for both Windows servers and desktops. Windows Administrators can use Group Policy to set policies that apply across a given site, domain, or range of organizational units (OUs) in Active Directory.
Group Policy allows administrators to use Microsoft Group Policy to manage configuration settings for non-Windows operating systems and applications. Safeguard Authentication Services allows Group Policy to become a single integrated tool for managing resource configuration in your enterprise, Windows and non-Windows alike.
Group Policy
Microsoft Group Policy provides excellent policy-based configuration management tools for Windows. Group Policy allows you to manage Unix resources in much the same way. Group Policy allows you to consolidate configuration management tasks by using the Group Policy functionality of Microsoft Windows Server to manage Unix operating systems and Unix application settings.
Safeguard Authentication Services 5.0.3 Administration Guide
Managing Unix hosts with Group Policy152
To open Group Policy, click Group Policy on the left navigation panel of the Safeguard Authentication Services Control Center.
Administrative interface
In order to achieve seamless integration with the Group Policy user interface, the Group Policy interface is written as a Microsoft Management Console (MMC) snap-in extension. It is specifically designed to transparently plug into the Group Policy Object Editor (GPOE) console. The policies necessary to provide Unix management from the GPOE are integrated into the existing GPOE policy namespace.
With Group Policy, administrators use the same familiar tools (the GPOE) to manage Unix group policies as they use to manage Windows group policies. Because Group Policy adheres to the same Group Policy association and application rules, administrators are able to quickly generate useful policies for management of Unix configuration settings without significant user interface training.
Unix agent technology
In order to deliver the expected Group Policy functionality for Unix, the Group Policy client-side components for Unix are designed to mirror the functionality of the Microsoft Group Policy client-side components for Windows. Specifically, Group Policy provides an extensible infrastructure for writing Unix client-side extensions (CSEs). The flexibility of Group Policy's client-side components allows Group Policy to offer a limitless resource for creating configuration management strategies.
Group Policy ships with several client-side extensions that provide the basis for managing many aspects of Unix operating systems and applications. Developers can extend Group Policy by adding CSEs. Administrators can use Administrative Template (ADM) files to add custom Unix policy settings.
Group Policy uses the same Group Policy object processing model that is used by the Windows winlogon service including scoping and filtering of Group Policy objects. Policy settings applied through Group Policy are "non-tattooing." The Group Policy agent also provides tools for calculating the Resultant Set of Policy (RSoP) before and after policy application.
Concepts
Group Policy consists of both agent and server software. You install the agent software on Unix computers and use it to apply Group Policy settings. The server software extends existing Microsoft frameworks for managing Group Policy. After installing the Group Policy agent-side extensions, administrators interact mostly with the server-side extensions which enable Unix policy configuration.
Safeguard Authentication Services 5.0.3 Administration Guide
Managing Unix hosts with Group Policy153
How Safeguard Authentication Services Group Policy works
Safeguard Authentication Services Group Policy is a built-in component of Safeguard Authentication Services. After joining the domain, Unix hosts display as computer objects in Active Directory just like Windows servers and workstations. Group Policy Objects link to Unix computer objects in the same way as they link to Windows computer objects.
Group Policy allows Unix hosts to participate in the Windows Group Policy infrastructure. Group Policy uses the Kerberos and LDAP infrastructure provided by Safeguard Authentication Services to implement Group Policy on Unix in a way that mirrors the Windows Group Policy implementation.
Group Policy framework for Unix
Group Policy consists of server-side extensions to the Group Policy Object Editor and Unix client-side software. Using the Group Policy extensions to the Group Policy Object Editor (GPOE), administrators can create and edit Unix policies. The Group Policy agent is responsible for reading policy configuration data and applying policies to Unix hosts.
Server-side extensions
Server-side extensions are software packages that extend the functionality of existing Microsoft Group Policy management tools. Group Policy provides one extension for the Group Policy Object Editor (GPOE):
l Namespace extensions
Group Policy extends the namespace of the Group Policy Object Editor: that is, Group Policy adds several Unix-specific nodes to the scope and resultant views of the Group Policy Object Editor.
vgptool
The vgptool command-line utility provides the same functionality as winlogon.exe. vgptool collects policy information by querying Active Directory for the SYSVOL path of GPOs, based on the location of the Unix host object in Active Directory. Once it collects the policy information, vgptool follows the same rules and standards of Group Policy application as Microsoft Group Policy, including enforced links, block inheritance, non-tattooing of policy settings, enabled or disabled links, link order, ACL filtering, and enabled/disabled GPOs. Safeguard Authentication Services also supports loopback policy processing.
Like gpupdate.exe, vgptool invokes client-side extension plug-ins to apply policy settings. You can register new client-side extensions with vgptool Refer to the vgptool man page for
Safeguard Authentication Services 5.0.3 Administration Guide
Managing Unix hosts with Group Policy154
details. vgptool runs only when invoked from the Unix command line or when it is run by the Safeguard Authentication Services service as part of a policy refresh event.
Client-side extensions
Group Policy processes the policy settings information in GPOs by delegating to client-side extensions (CSEs). The /opt/quest/lib/cse_mod directory stores the client-side extensions to the Group Policy framework. Several default CSEs come ready to process GPOs immediately after installing Group Policy. Group Policy provides the following CSEs:
l Licensing Extension
Provides support for licensing policies.
l Safeguard Authentication Services Configuration Extension
Provides support for the Safeguard Authentication Services-related policies.
l Microsoft Security Extension
Provides support for some Windows security settings.
l Macintosh Settings Extension
Provides support for macOS management settings.
l Sudo Extension
Provides support for sudo policy option.
l Dynamic File Copy Extension
Provides support for dynamic file copy.
l Unix Settings Extension
Provides support for the Unix file and script policies.
l SSH Extension
Provides support for OpenSSH.
l Samba Extension
Provides support for Samba.
l One Identity Defender Extension
Provides support for One Identity Defender policies.
l One Identity Privilege Manager for Unix
Provides support for One Identity Privilege Manager for Unix policies.
l Administrative Templates Extension
Provides support for Administrative Templates.
l Group Policy Extension
Provides support for the Group Policy-related policies.
Safeguard Authentication Services 5.0.3 Administration Guide
Managing Unix hosts with Group Policy155
Administrative templates on Unix
In Windows-only environments, administrators extend Group Policy through Administrative Templates. Administrative Templates provide policy description information as well as information used to build a graphical user interface to manage those policies. Group Policy stores this information in human-readable text-file format with an ADM extension.
Once you load the Administrative Templates into the Group Policy Object Editor (GPOE), the GPOE namespace is extended with new Unix-specific nodes.
On Unix, ADM policies are supported using Perl scripts that translate Windows registry.pol files into Unix configuration file settings. Group Policy refers to the translator scripts as xlators.
You can write custom xlator scripts in any language.
Apply mode
Some policies support the concept of an Apply mode. The Apply mode affects the way settings defined by policy are combined with local settings. There are two possible Apply modes:
l Replace
Settings defined in policy replace all local settings or configuration files.
l Merge
Settings defined by policy are merged with settings defined locally. For any conflicting settings the policy settings take precedence. Merge is the default for most policies that support Apply mode.
Configured policies that support Apply mode display the mode in the Apply Mode column in the Group Policy Object Editor.
Setting policy apply mode
To set the Group Policy Apply mode
1. In Group Policy Object Editor, select a policy.
2. To set the Apply Mode to Replace, open the Action menu and select the Remove local configuration option.
NOTE: You can also right-click the policy to choose the Remove local configuration option from the context menu.
3. To reset the Apply Mode to Merge, open the Action menu and select the Remove local configuration option again.
NOTE: The policy must be configured in order to change the Apply mode. If the policy is not configured, the Remove local configuration option is not enabled on the Action menu.
Safeguard Authentication Services 5.0.3 Administration Guide
Managing Unix hosts with Group Policy156
NOTE: Some policies, such as scripts, do not support Apply mode. If the policy does not support Apply mode, the Remove local configuration item in the Action menu is not available and the Apply Mode column in Group Policy Object Editor is blank.
Unix policies
The Unix Settings node is installed by the Safeguard Authentication Services Group Policy Microsoft Management Console (MMC) Snap-In. Group Policy defines Unix-specific policies that manage various Unix system settings. Policy items contained in this node are specific to Unix operating systems. You can configure Unix settings through Group Policy.
To open the Unix Settings node in the Group Policy Management Editor
1. From the Control Center Group Policy link, select a GPO Name and click Edit GPO.
2. Navigate to either Computer Configuration or User Configuration | Policies | Unix Settings.
Scripts
You can configure scripts to run automatically on Unix systems either at startup or when Group Policy is refreshed. Startup scripts run each time the Safeguard Authentication Services service starts. Refresh scripts run each time the policy refresh threshold is met (every 90-120 minutes by default). In addition you can mark scripts as "run-once", indicating that the script should only run the first time.
NOTE: Un-apply the policy or modify the script to reset the "run-once" property.
Group Policy copies scripts added to the policy to the Group Policy Template (GPT). When the Group Policy agent executes the script, Group Policy passes all command line parameters to the script. The Group Policy agent executes scripts in the order listed. Use the Up and Down buttons in the script Properties dialog to reorder the scripts.
Unix Script policies cannot be overridden. You can block and enforce Unix Script policies with the block inheritance option and enforce links. You can also filter Script policies using ACL filtering. In all other cases, Group Policy executes all Unix Script policies linked to the host in the order they are encountered during Group Policy processing.
Refresh Scripts policy
The Refresh Scripts policy manages the script that is run each time policy is applied on the Unix host.
Safeguard Authentication Services 5.0.3 Administration Guide
Managing Unix hosts with Group Policy157
Configuring a refresh script
To configure a refresh script
1. Start Group Policy Editor.
2. Expand the Unix Setting | Scripts node.
3. Double click Refresh Scripts.
The Refresh Script Properties dialog opens.
4. Click Add.
The New Script dialog opens.
NOTE: Typically, you write and test the script on the target platform.
5. Click Import.
A file browse dialog appears.
6. Select the script file and click Open.
The script you choose automatically displays in the Name field.
NOTE: If you do not have a script to import, add a name for the script, select it on the property page and click Edit Script. Group Policy opens a text editor to allow you to create it "on the fly".
7. In the Parameters field, enter any parameters to pass to the script on the command line.
8. Select Options:
l Run As User: Check this box and enter a user name to force the script to run as a specific user on the Unix host.
l Run once: Check this box to prohibit the script from running more than one time on the Unix host.
9. Click Add.
The new script displays in the list of configured scripts for this policy.
10. Select the script in the list.
The Script Preview pane displays the read-only contents of the script.
11. Click Edit Script to edit the contents of configured scripts.
Your text editor launches with the contents of the script so that you can edit and save the script.
12. Close the text editor and save the contents.
The Script Preview pane displays the updated script contents.
Startup Scripts policy
The Startup Scripts policy manages the scripts that run each time the Unix agent starts up.
Safeguard Authentication Services 5.0.3 Administration Guide
Managing Unix hosts with Group Policy158
Configure a startup script
To configure a startup script
1. Start Group Policy Editor.
2. Expand the Unix Setting | Scripts node.
3. Double click Startup Scripts.
The Startup Script Properties dialog opens.
4. Click Add.
The New Script dialog opens.
NOTE: Typically, you write and test the script on the target platform.
5. Click Import.
A file browse dialog appears.
6. Select the script file and click Open.
The script you choose automatically displays in the Name field.
NOTE: If you do not have a script to import, add a name for the script, select it on the property page and click Edit Script. Group Policy allows you to create it "on the fly".
7. In the Parameters field, enter any parameters to pass to the script on the command line.
8. Select Options:
l Run As User: Check this box and enter a user name to force the script to run as a specific user on the Unix host.
l Run once: Check this box to prohibit the script from running more than one time on the Unix host.
9. Click Add.
The new script displays in the list of configured scripts for this policy.
10. Select the script in the list.
The Script Preview pane displays the read-only contents of the script.
11. Click Edit Script to edit the contents of configured scripts.
Your text editor launches with the contents of the script so that you can edit and save the script.
12. Close the text editor and save the contents.
The Script Preview pane displays the updated script contents.
Cron policy
The Cron policy manages the Unix cron daemon. cron is the Unix process scheduler. Administrators can specify a set of "crontab" entries that define the behavior and
Safeguard Authentication Services 5.0.3 Administration Guide
Managing Unix hosts with Group Policy159
scheduling of the Unix cron daemon.
cron entries are "append only" and cannot be overridden. However, if there is more than one of the same entry, the entry is only added once to the user's crontab file.
For details, refer to the cron man page. See Using manual pages (man pages) on page 36 for information about accessing the cron man page.
Creating or modifying a crontab file
To create or modify a crontab file
1. Start Group Policy Editor.
2. Select the Unix Settings | Authentication Services | Client Configuration node.
3. Double-click Cron in the results pane.
The Cron Properties dialog opens.
4. Click the Add button.
The Crontab Entry Data dialog opens.
5. Click OK to save this new configuration for the crontab file.
Configuring a crontab entry
When you click Add on the Cron Properties dialog, the Crontab Entry Data dialog opens and allows you to configure a crontab entry.
To configure a crontab entry
1. In the Unix Command field, enter either the full path to the command you want to run or just the command name if it is in the path of the specified user.
2. In the Username field, enter the login name of the user whose crontab you want to modify.
3. Under Scheduling Rules, enter the following:
Minutes: Enter a number from 0 to 59, a comma-separated list of numbers, or a dash-separated range, such as 15-20,59.
Hours: Enter a number from 0 to 23, a comma-separated list of numbers, or a dash-separated range, such as 18-23,5.
Day of Month: Enter a number from 1 to 31, a comma-separated list of numbers, or a dash-separated range, such as 14-20,31.
Month: Enter a number from 1 to 12, a comma-separated list of numbers, or a dash-separated range, such as 1-6,12.
Day of Week: Enter a number from 0 to 6, a comma-separated list of numbers, or a dash-separated range, such as 6,1-4. Sunday is 0.
4. Click OK to close the dialog.
Safeguard Authentication Services 5.0.3 Administration Guide
Managing Unix hosts with Group Policy160
Files policy
The Files policy allows you to add, edit, or remove file settings. You can also edit a specific file listed in the File Path field.
The Files policy allows administrators to specify a list of files to copy to Unix hosts. When you add files to the Files policy, Group Policy copies the specified source files to the GPT on SYSVOL. Unix agents download the files from SYSVOL when they apply policy.
You can specify the target path, ownership, and permissions for each file. File policies provide all of the advantages of Group Policy's built-in undo mechanism. When you unlink or delete file policies, it deletes the associated files on the host or replaces it with the previous file contents, unless you select the Copy Files Permanently option. If no source is specified, the Group Policy agent searches for the target file and sets the specified ownership and permissions. The ownership and permissions are restored when the policy is un-applied.
Files policies can be overridden. If there are multiple policies affecting the same file entry, the permissions, ownership, and contents of the file are dictated by the lowest policy in the hierarchy affecting that file or the highest enforced policy affecting that file in the hierarchy.
Files policy supports non-tattooing, block inheritance, ACL filtering, and enforced settings. Multiple entries with the same target are resolved according to the Group Policy Conflict Resolution rules.
Configuring a Files policy
You can configure the Files policy to copy a standard /etc/hosts file to a Unix agent using the Group Policy Object Editor (GPOE).
To configure the Files policy
1. Create the hosts file that you would like to distribute through Safeguard Authentication Services.
Ensure that the file is accessible from your Windows computer.
2. Start the Group Policy Editor.
3. Navigate to and select Unix Settings | Authentication Services | Client Configuration node in the left-hand results pane.
4. Double-click Files in the results pane.
The Files Properties dialog opens.
5. Click Add.
The File Settings dialog opens.
6. In the Target File Path field, type the full path for the target file in Unix path format.
The path must start with a "/", for example: /etc/hosts
Safeguard Authentication Services 5.0.3 Administration Guide
Managing Unix hosts with Group Policy161

7. In the User Name field, type name of the user that will own this file.
If the user does not exist on the Unix host, this defaults to root.
NOTE: Typically /etc/hosts is owned by root.
8. In the Group Name field, type the name of the group that will own this file.
If the group does not exist on the Unix host, this defaults to root (or system on AIX).
9. Click the Set User Rights option to indicate you want to explicitly specify the permissions for the user that owns the file.
NOTE: If this option is not set, the permissions default to the permissions for the target file on the target machine. If the file does not already exist on the target machine, the permissions on the new file default to read/write for the user.
10. Click the Set Group Rights option to indicate that you would like to explicitly specify the permissions for the group that owns the file.
NOTE: If this option is not set, the permissions default to the permissions on the existing file. If the file does not exist, the permissions default to none.
11. Click the Set Other Rights option to indicate you want to explicitly specify the permissions for everyone.
NOTE: If this option is not set, the permissions default to the permissions on the existing file. If the file does not exist, the permissions default to none.
12. Click Browse to select a source file.
13. Select the file you created in Step 1.
14. Select the Copy File Permanently option to permanently copy the file.
By default, Safeguard Authentication Services removes copied files when the policy no longer applies. If the policy overwrote an existing file, it will be restored when policy is un-applied.
15. Click OK.
The file you just configured displays in the list of files to copy.
16. Select the Copy As User Applying Policy option to copy the file as the user applying policy.
By default, Safeguard Authentication Services removes copied files when the policy no longer applies.
17. Click OK.
The file you just configured displays in the list of files to copy.
Text Replacement Macros
The Text Replacement Macros tab allows policies to be dynamically adjusted as policy is being applied on the Unix host. Any text specified in the policy either directly by the user or in files that are placed on the target system can be aliased to a command or environment variable.
Safeguard Authentication Services 5.0.3 Administration Guide
Managing Unix hosts with Group Policy162
For example, you might have a policy that uses the hostname as part of a policy setting. You can create a Text Replacement Macro called %%HOSTNAME%% and specify that this macro text be replaced by the output of the /bin/hostname command. This makes it possible for a single GPO to serve as a template on a wide range of Unix systems.
Specifying a text replacement macro
To specify a text replacement macro
1. Select the Text Replacement Macro tab.
2. Click Add.
The Text Replacement Settings dialog opens.
3. In the Find Text field, type the text that you want to find.
4. In the Replace With field, type an environment variable or command.
5. Specify if you want to replace the text with a Command Result or the value of an Environment Variable.
l Command Result: The replacement text specifies a Unix command.
NOTE: You must enter the full path to the file.
l Environment Variable: The replacement text specifies an environment variable.
6. Click OK to close the dialog and save the changes.
Group Policy makes these replacements when it applies the policy.
NOTE: You should test the target systems to ensure that the commands and environment variables can resolve.
Dynamic File Copy policy
The Dynamic File Copy policy allows you to specify a network file that will be pulled down by Group Policy agents. In contrast to the Files policy, the Dynamic File Copy policy specifies network files that are not stored in the Group Policy Template on SYSVOL. This allows an administrator to set special permissions on the files in order for Unix administrators to update the file contents without requiring full rights to Group Policy.
You can specify the target path, ownership, and permissions for each file. Each time the Group Policy agent applies policy, it copies the file from the specified source network share to the target location on the local host.
Dynamic File Copy policies provide all of the advantages of Group Policy's built-in undo mechanism. When you unlink or delete file policies, it deletes the associated files on the host or replaces it with the previous file contents, unless you select the Copy Files Permanently option. If no source is specified, the Group Policy agent searches for the target file and sets the specified ownership and permissions. The ownership and permissions are restored when the policy is un-applied.
Safeguard Authentication Services 5.0.3 Administration Guide
Managing Unix hosts with Group Policy163
Dynamic File Copy policy only supports Kerberos for authentication. Machine Dynamic File Copy policy always uses the host keytab credential. User Dynamic File Copy policy always uses the Kerberos credential of the user that is logging on. In order to use a CIFS share for Dynamic File Copy policy, you must configure it to support Kerberos authentication (GSSAPI/SPNEGO). Dynamic File Copy policy does not support NTLM.
Dynamic File Copy policies can be overridden. If there are multiple policies affecting the same file entry, the permissions, ownership, and contents of the file are dictated by the lowest policy in the hierarchy affecting that file or the highest enforced policy affecting that file in the hierarchy.
Dynamic File Copy supports non-tattooing, block inheritance, ACL filtering, and enforced settings. Multiple entries with the same target are resolved according to the Group Policy Conflict Resolution rules.
After you copy a file, you can customize it using the Text Replacement Macros on page 162 tab which allows you to find and replace portions of the file's content.
Login Prompt policy
The Login Prompt policy allows administrators to configure the /etc/issue and /etc/issue.net files. These files define the welcome messages displayed to users logging in. Login Prompt policies can be overridden. If there are multiple Login Prompt policies, contents of /etc/issue is dictated by the lowest Login Prompt policy in the hierarchy or the highest enforced Login Prompt policy in the hierarchy.
Setting the Login Prompt policy
To set the Login Prompt policy
1. Start Group Policy Editor.
2. Select Unix Settings | Authentication Services | Client Configuration in the scope view.
3. Double click Login Prompt (/etc/issue).
The Login Prompt Properties dialog opens.
4. Type the text of the message into the text box or click Import to import the contents of a local or remote file.
5. Click OK.
Message of the Day policy
The Message of the Day policy displays a message to users logging in to a Unix workstation. This policy allows administrators to configure the /etc/motd file. Message of the Day policies can be overridden. If there are multiple Message of the Day policies, contents of
Safeguard Authentication Services 5.0.3 Administration Guide
Managing Unix hosts with Group Policy164
/etc/motd is dictated by the lowest Message of the Day policy in the hierarchy or the highest enforced Message of the Day in the hierarchy.
Setting the Message of the Day policy
To set the Message of the Day policy
1. Start Group Policy Editor.
2. Select Unix Settings | Authentication Services | Client Configuration in the scope view.
3. Double click Message Of the Day.
The Message Of the Day Properties dialog opens.
4. Type the text of the message into the text box or click Import to import the contents of a local or remote file.
5. Click OK.
Samba Configuration policy
Samba is a Unix implementation of the Microsoft Windows network file system protocol (CIFS/SMB). Samba allows you to access Unix file systems from Windows and vice versa. The Samba Configuration policy allows you to set the options in the smb.conf file using Group Policy.
Samba Configuration policy settings are organized into four sections: global, homes, printers, and shares. A setting is either a global setting or a service setting.
Global settings are only specified in the global section. Global settings affect the general operation of Samba.
Service settings are specified in all sections. Only service settings can be specified in the homes, printers and shares sections. Service settings specified in the global group act as defaults for all sections.
For details on how to integrate Samba and Safeguard Authentication Services, see Knowledge Base article 316264.
Symbolic Link policy
A symbolic link is a pointer to another file or directory. This policy manages symbolic links (symlinks) on Unix. Administrators can configure a set of symlinks that are created when policy is applied. Symbolic link entries are append only and cannot be overridden. However, if there is more than one of the exact same entry, the link will be created only once.
Symbolic links can be used to simplify other policies where file locations may differ from system to system. You can use the Symbolic Link policy to create a more uniform file system environment for running commands or modifying files. Be sure that the Unix
Safeguard Authentication Services 5.0.3 Administration Guide
Managing Unix hosts with Group Policy165
Settings Extension is processed before any other CSEs that might need symlink functionality. You can control this with the Client-Side Extensions policy on page 173.
Setting a new symbolic link
To set a new symbolic link
1. Start Group Policy Editor.
2. Select Unix Settings | Authentication Services | Client Configuration in the scope view.
3. Double click Symbolic Links.
The Symbolic Links Properties dialog opens.
4. Click Add.
The Symbolic Link dialog opens.
5. In the Existing File field, type the full Unix path to the file or directory to link to.
6. In the Symbolic Link field, type the full Unix path where you want to create the link.
NOTE: If the link target does not exist on the Unix host, it does not create the symbolic link.
7. Click OK.
Safeguard Authentication Services 5.0.3 Administration Guide
Managing Unix hosts with Group Policy166
Syslog policy
You can configure which entries go into the Unix syslog configuration file. Syslog entries are appended to the log and cannot be overridden. However, if there is a duplicate entry, it is only added once to /etc/syslog.conf.
Adding a syslog entry
To add a syslog entry
1. Start Group Policy Editor.
2. Select Unix Settings | Authentication Services | Client Configuration in the scope view.
3. Double click Syslog.
The Syslog Configuration Properties dialog opens.
4. Click Add.
The Syslog Rule dialog opens.
5. In the Action field, type the syslog action target; enter a file path, a user list, or a host name depending on the type of action you select.
l Regular File: Enter the absolute Unix file path to the syslog.conf file. The path must start with a "/".
l Remote Host: Enter a host name to send the data remotely over to the syslog daemon running on the other machine.
l User List: Enter a comma delimited list of users. When you select the User List option, it enables the Find button. Click Find to open the Active Directory Select Users dialog.
6. Select the type of action: Regular File, Remote Host, or User List.
7. In the Selector section:
l Choose a facility.
The Facility is the type of message you want to log.
l Choose a priority.
When you select a syslog Priority, it selects that priority plus all priorities listed below it.
NOTE: To log to a specific priority only on a Linux platform, click Edit and add "=" before the priority name.
l Click Insert to append these selections to the rule.
8. Append additional facilities and priorities, as necessary.
9. Click OK to return to the Syslog Configuration Properties dialog.
Safeguard Authentication Services 5.0.3Administration Guide
167
10. Check the Remove local configuration option if you want to replace the syslog file with the new settings. If you leave this option deselected, the new settings are appended to the current syslog file.
NOTE: If you select the Remove local configuration option, it backs up the old configuration file before it deletes it and applies the new policy.
11. Click OK.
Sudo policy
Sudo allows certain users to get elevated access to certain commands even if they do not have root access. The sudoers file contains a list of rules that control the behavior of sudo. The Sudo policy controls the rules defined in the sudoers file.
The Sudo policy allows you to add, edit, remove and re-order sudo rules. A sudo rule consists of three parts:
1. The command or commands to run.
2. The user the command should be 'run as'. Typically this is the root user.
3. A list of users or groups that the rule applies to.
To use Active Directory groups in sudo rules, select the Resolve Active Directory group names in /etc/sudoers option. This option requires Sudo 1.8 on the Unix host.
NOTE: The Sudo policy does not support all possible sudo configurations. If you need to handle more advanced scenarios you can use a file copy policy to place your base sudoers file and use a script policy to customize it.
Adding a Sudo rule
To add a Sudo rule
1. Start Group Policy Editor.
2. Select Unix Settings | Authentication Services | Client Configuration in the scope view.
3. Double-click Sudo.
The Sudo Properties dialog opens.
4. Click the Add or Edit button.
The Sudo Rule dialog opens.
5. In the Unix Command group box, select All Commands if you want this rule to apply to all commands. Otherwise, specify the full Unix path to the command. For security reasons, relative paths are not allowed. To deny access to the command, click the Disallow the specified command option and the user will be unable to execute the command with sudo.
Safeguard Authentication Services 5.0.3Administration Guide
168
6. In the Run as User field, enter the Unix name of a user. The command will run in the security context of the specified user. The default user is root. Select the Password required option if you want sudo to prompt the user for his password when the command is executed.
7. In the Apply to Users and Groups box, specify the users and groups to which the rule will apply.
If you want the rule to apply to all users, select the Allow all users to run this command option.
Otherwise, enter a user or group name and select either User or Group to indicate whether the name is for a user or a group and click Insert. You can specify groups with Text Replacement Macros on page 162 in the name. For example sudo-group-%%HOSTNAME%%. By defining a text replacement macro for %%HOSTNAME%% you can create one policy which will dynamically adjust the name on each machine when policy is applied.
Or, click Browse to find an Active Directory user or group. The standard Select Users or Groups dialog opens. You can search for multiple objects by separating each name with a semicolon.
8. Click OK to return to the Sudo Properties dialog.
9. You can optionally specify the Path to visudo. Group Policy uses visudo to validate that the sudoers file can be parsed correctly by sudo. If visudo cannot validate the sudoers file, the policy is not applied. If you do not specify the path to visudo, Group Policy attempts to locate it automatically by searching in common locations. If it can not locate visudo, it can not apply the policy.
10. Click OK to save this new configuration for the sudoers file.
One Identity policies
One Identity policies manage products such as Safeguard Authentication Services as well as Quest-modified versions of Quest source projects like Samba and OpenSSH.
Quest OpenSSH Configuration policy
OpenSSH provides password-less (by means of GSSAPI), secure, encrypted remote login and file transfer services.
The Quest OpenSSH Configuration policy allows you to manage the OpenSSH server configuration file (sshd.conf) by means of Group Policy. Settings are divided into two sections. The first section contains general SSH server settings. The second section contains settings that are specific to or important for the Quest OpenSSH distribution.
For more detail on specific settings, refer to the sshd-config.conf man page.
Safeguard Authentication Services 5.0.3Administration Guide
169
Licensing policy
You can maintain and distribute license files through Safeguard Authentication Services Group Policy using the Licensing Policy. This policy is retained for backward compatibility. Alternatively, in Safeguard Authentication Services 5.0.1 and above, you can use the Safeguard Authentication Services Control Center to manage licenses.
The Safeguard Authentication Services Licensing policy allows you to specify a set of license files. The next time the Group Policy agent does a policy refresh, Group Policy distributes the license files to the Unix system and performs any additional actions that may be necessary to load the license file information.
Safeguard Authentication Services Licensing entries are append only and cannot be overridden. However, if there is more than one license file with the same serial number, the file is only installed once.
Adding a license file
To add an Safeguard Authentication Services license file
1. Start Group Policy Editor.
2. Select Unix Settings | Authentication Services | Client Configuration in the scope view.
3. Double-click Licensing.
The Licensing Properties dialog opens.
4. Click Browse.
5. Navigate to the license file.
6. Select the license file and click OK.
7. Click OK to save settings and close the Licensing Properties dialog.
Defender Settings policy
Defender Settings policy provides one-time password authentication. Install Defender on Unix or Linux to use two-factor authentication to secure critical resources. In order to access a host running Defender, you must enter a one-time password in addition to the account password.
Configure the Defender Settings policy to enable PAM authentication. The Group Policy agent on Unix configures Defender based on the existing Defender access nodes in Active Directory. This allows you to configure which users to prompt for a one-time password as well as which Defender server the agents can communicate with. For more information on configuring Defender access nodes, refer to the One Identity Defender documentation.
Safeguard Authentication Services 5.0.3Administration Guide
170
Enabling one-time password authentication for Unix
To enable one-time password authentication for Unix
1. In the Group Policy Object Editor, navigate to Unix Settings | Quest Defender.
2. Double-click the Defender Settings policy in the right-hand pane.
3. Click Enable Defender PAM authentication.
4. Configure Defender to require a one-time password for specific login services, or all login services.
A login service is any process that authenticates a user to a Unix host. You configure login services for PAM in the pam.conf file. By default, sshd and ssh are automatically configured since this is the most typical scenario. You can specify additional services. The name of the service must correspond to the service name in PAM.conf. On some platforms the service names may differ, in that case, specify all service names for all platforms where you have installed Defender.
l To prompt for a one-time password for all services, select Require Defender PAM authentication for all services.
5. Click OK to save your settings and close the Defender Settings Properties dialog.
Privilege Manager for Unix policy
Privilege Manager for Unix controls which users are able to gain root access on Unix hosts. It is similar to sudo with more advanced features and functionality. You can use Group Policy to control Privilege Manager for Unix settings on hosts that are also running Safeguard Authentication Services.
Privilege Manager for Unix policy files
One Identity Privilege Manager for Unix uses policy files to define the rules governing which users are able to run which commands as root. The policy files are defined using syntax defined by Privilege Manager for Unix. When the policy files are applied on the Unix host, the Group Policy agent validates the new set of policy rules to ensure that there are no syntax or logical errors in the rules. If the policy rules do not validate, the Group Policy agent logs an error and does not apply the policy files. This ensures that an oversight or other error does not break the security infrastructure already in place.
BEST PRACTICE: As a best practice, always test your policy configuration prior to applying it by means of Group Policy.
If you add a file named pm.conf, this file overrides the default root policy file. The Group Policy agent updates the list of files included from the root policy file to included all of the configured files. If the validation step fails after updating the included files, the policy is not applied.
For more information about the syntax of Privilege Manager for Unix policy files, refer to the documentation included with One Identity Privilege Manager for Unix.
Safeguard Authentication Services 5.0.3Administration Guide
171

Configuring Privilege Manager policy files
To configure Privilege Manager policy files
1. In the Group Policy Object Editor, navigate to Unix Settings | Quest Privilege Manager.
2. Double-click Privilege Manager Policy Files.
The Privilege Manager Policy Files Properties dialog opens.
3. Click Add to browse for a Privilege Manager policy file. You can browse the local host or a remote host running SSH.
4. Once you have added all of the policy files, you can reorder them using the Up and Down buttons.
5. You can edit the contents of the policy file directly by either double-clicking the item in the list or clicking Edit File.
Privilege Manager policy files are evaluated when group policy is applied. If a Privilege Manager policy file contains errors it is not applied.
6. Click OK to save settings and close the Privilege Manager Policy Files Properties dialog.
Privilege Manager Configuration policy
The Privilege Manager Configuration policy manages the pm.settings file, which contains configuration options for One Identity Privilege Manager for Unix. The Group Policy agent applies the configuration to the pm.settings file.
Since the Group Policy agent is based on Active Directory and Kerberos, setting the Kerberos setting to "yes" causes the Group Policy agent to fully configure all other Kerberos settings automatically. For this reason, the additional Kerberos-related settings are not displayed in the Settings dialog.
For more information about the Privilege Manager configuration settings, refer to the documentation included with One Identity Privilege Manager for Unix.
Configuring Privilege Manager configuration settings
To configure Privilege Manager configuration settings
1. In the Group Policy Object Editor, navigate to Unix Settings | Quest Privilege Manager.
2. Double-click Privilege Manager Configuration.
The Privilege Manager Configuration Properties dialog opens.
3. Locate the setting you want to configure.
Browse the list or type the setting name (or part of the name) in the search box and click Search.
Safeguard Authentication Services 5.0.3Administration Guide
172

4. Enter the desired value for the setting.
It displays additional information related to the setting in a help box at the bottom of the dialog. The help box is re-sizable using the splitter bar between the settings list and the help text.
5. Click OK to save the settings and close the dialog.
Safeguard Authentication Services group policies
The Group Policy Configuration policy manages the vgp.conf file so that you can centrally manage the configuration options of your Group Policy agents.
Group Policy Configuration policy
The Group Policy Configuration policy allows you to manage the options that control the Unix Group Policy agent. On Unix these options are stored in the /etc/opt/quest/vgp/vgp.conf file.
Group Policy Configuration policies support non-tattooing, block inheritance, ACL filtering, and enforced settings. Policies applied later do not override enforced settings. When you unlink all Group Policy Configuration policies, the next GPO processing event restores the configuration file to its previous state.
Configuring Group Policy options
To configure Group Policy options
1. Start Group Policy Editor.
2. Navigate to the Unix Settings | Authentication Services | Client Configuration node.
3. Double-click Group Policy Configuration in the results view to open the Group Policy Configuration Properties dialog.
The Properties dialog contains a list of configuration settings.
4. Enter the configuration settings. Detailed help text is available for each setting. You can resize the help window using the splitter control between the settings and the help text.
5. Click OK.
NOTE: Options that are not set (blank) use the default value defined by Group Policy. Any options that are set in the policy override local settings stored in the configuration file.
Client-Side Extensions policy
The Client-Side Extensions policy determines which Client-Side Extensions (CSEs) apply policy and in what order.
Safeguard Authentication Services 5.0.3Administration Guide
173
To determine policy processing order, check the Define this policy option in the Client-side Extensions Properties dialog. Click Add, Edit, Remove, Move Up, Move Down, or Reset to change the policy processing configuration.
For security reasons the following extensions cannot be removed from policy processing:
l Licensing Extension
l Safeguard Authentication Services Configuration Extension
l Microsoft Security Extension
l Macintosh Settings Extension
Safeguard Authentication Services policies
One goal of Group Policy is to simplify and centralize Safeguard Authentication Services configuration data. Use Safeguard Authentication Services Policies to configure everything from basic settings to advanced host access control and account override information.
Configuration policy
The Safeguard Authentication Services Configuration policy manages runtime configuration settings stored in the Safeguard Authentication Services configuration file (vas.conf) located in /etc/opt/quest/vas/.
Safeguard Authentication Services Configuration policies support non-tattooing, block inheritance, ACL filtering, and enforced settings. Policies applied later do not override enforced settings. When you unlink all Safeguard Authentication Services Configuration policies, the next GPO processing event restores the Safeguard Authentication Services configuration file to its previous state.
Mapped User policy
The Mapped User policy controls the mapping between local users and Active Directory users. The Mapped User policy is under Unix Settings | Quest Safeguard Authentication Services | Identity Mapping in the Group Policy Object Editor (GPOE). When a local user is mapped to an Active Directory user, that user specifies his local account user name but is prompted for the Active Directory password of the mapped account. The local account password is no longer used. Unix identity for the local user comes from the /etc/passwd file as usual.
The Mapped User policy allows you to manage user mappings. You can load a list of users from a file in /etc/passwd format. You can load files from the local machine or from a remote Unix host over SSH. When you specify a mapping you can browse Active Directory for a user object.
Service Access Control policy
The Service Access Control policies control which applications a user can log in with.
Safeguard Authentication Services 5.0.3Administration Guide
174
Service Access Control entries are "append-only" and cannot be overridden. However, if there is duplicate entry, the entry is only added once to the service Allow or Deny file.
Typical services include ftpd, sshd, and login.
NOTE: telnet uses the login service.
To configure a Service Allow Entry
1. Start Group Policy Editor.
2. Navigate to Unix Settings | Authentication Services | Access Control | Service Access.
3. Right-click Service Access and select New | Service.
The New Service dialog opens.
4. Enter ftp and click OK.
The ftp Configuration item now appears in the results pane.
5. Double-click ftp Configuration to open the service Configuration Properties dialog.
6. Click the ftp.allow Configuration tab:
l Click Browse AD to add a container. User objects under this container are allowed to log in by means of ftp unless a deny rule prevents it. Other users are not allowed to log in by means of ftp unless another allow rule allows it.
l Click Add Group to add groups to the <service>.allow file. Members of the specified groups are allowed to log in by means of ftp unless a deny rule prevents it. Other users are not allowed to log in by means of ftp unless another allow rule allows it.
l Click Add User to locate specific users to add to the <service>.allow file. The specified users are allowed to log in by means of ftp unless a deny rule prevents it. Other users are not allowed to log in by means of ftp unless another allow rule allows it.
l Click Add Domain to select the domain to add to the <service>.allow file. All users in the specified domain are allowed to log in by means of ftp unless a deny rule prevents it. Other users are not allowed to log in by means of ftp unless another allow rule allows it.
7. Click OK to save settings and close the dialog.
To configure a service deny entry
1. Start Group Policy Editor.
2. Navigate to Unix Settings | Authentication Services | Access Control | Service Access.
3. Right-click Service Access and select New | Service.
The New Service dialog opens.
4. Enter ftp and click OK.
The ftp Configuration item now appears in the results view.
Safeguard Authentication Services 5.0.3Administration Guide
175
5. Double-click ftp Configuration to open the Service Configuration Properties dialog.
6. Click the ftp.deny Configuration tab:
l Click Browse AD to add a container name to deny. User objects under this container are denied log in by means of ftp.
l Click Add Group to locate groups to deny. Members of specified groups are denied log in by means of ftp.
l Click Add User to locate specific users to deny. These users are denied log in by means of ftp.
l Click Add Domain to select the domain to deny. Users in the specified domain are denied log in by means of ftp.
7. Click OK to save settings and close the dialog.
Account Override policies
Group Policy provides policies to manage the user-override and group-override files. The user-override file allows you to override certain user attributes such as the login shell or home directory. The group-override file allows you to override certain group attributes such as group name and group membership list.
Account Override policies support non-tattooing, block inheritance, ACL filtering, and enforced settings. If an Account Override policy is enforced, then entries in that policy cannot be overridden. When there are no Account Override policies associated with the Unix agent, a Group Policy refresh returns the local override files to their original states.
If there are multiple policies affecting the same override entry, then the user or group override is dictated by the lowest policy in the hierarchy affecting that user or group or the highest enforced policy affecting that user or group in the hierarchy.
Group Policy creates the user-override and group-override files on the system if they do not already exist. It merges the policy-defined entries with the existing local entries and prunes the duplicates. The policy settings override local settings.
User Account Override policy
The User Account Override policy allows administrators to add users to the override list and selectively set account attributes for those users. This policy manages the Safeguard Authentication Servicesuser-override file, which allows specified users to take on a different identity on a per-machine basis.
To add a user override entry
1. Start Group Policy Editor.
2. Navigate to the Unix Settings | Authentication Services | Identity Mapping node.
3. Double-click User Account Override to open the User Account Override Properties dialog.
Safeguard Authentication Services 5.0.3Administration Guide
176
4. Click Add.
The User Account Override dialog opens initially with all fields disabled except the Apply To field.
5. Enter the specific DOMAIN\sAMAccountName or a * in the Apply To field.
NOTE:
l A * indicates all Safeguard Authentication Services users.
l Safeguard Authentication Services ignores a non-existent user in the Apply To field.
Thus, only the Primary GID, Home Directory, and Login Shell fields are valid. All other fields are disabled.
6. Click Browse.
The Select User or Group dialog opens.
7. Enter a user or group name to select. Or, type the first letter of a name and click Check Names for Group Policy to find Safeguard Authentication Services-enabled users in Active Directory. Once you locate the names, click OK and return to the User Account Override dialog.
8. Enter override values for the Primary GID, Home Directory, and Login Shell user attributes and click OK.
The entry displays in the list of account override settings. Scroll the list or adjust column widths to view all of the account settings.
9. Click OK to save settings and close the dialog.
Group Account Override policy
By using Group Account Override, you can add local users to Active Directory groups. The Group Account Override policy allows administrators to append a group membership list to the list stored in Active Directory. You can also override the group name and GID (group ID) fields.
To add a group override entry
1. Start Group Policy Editor.
2. Navigate to the Unix Settings | Authentication Services | Identity Mapping node.
3. Double-click Group Account Override to open the Group Account Override Properties dialog.
4. Click the ... button next to the Windows Group box.
The Select Group dialog displays.
5. Enter a group name and click OK.
6. Enter a new Unix Group Name. The group will have this name on all Unix agents linked to this policy. Leave this field blank if you do not want to override the group name.
Safeguard Authentication Services 5.0.3Administration Guide
177

7. Under Members, type a user name in the User field and click Insert.
Group Policy adds the local user name you specify to the group membership list.
8. Click OK to return to the Group Account Override Properties dialog.
9. Click OK to save settings and close the dialog.
Host Access Control policy
The Host Access Control policies give you fine-grained control over which users are allowed to log into the Unix host.
Safeguard Authentication Services supports host access control through the users.allow and users.deny files. Safeguard Authentication Services consults these files to determine whether or not to allow access to a particular user. This is an effective way to restrict access to sensitive computers on the network when using decentralized user accounts such as Active Directory. Group Policy defines policies for management of the access control files.
Host access control entries are "append only" and cannot be overridden. However, if there is a duplicate entry, the entry is only added once to the access control files.
Configuring a User Allow Entry policy
The Configure a User Allow Entry policy manages the Safeguard Authentication Services users.allow file. This file controls which users are allowed to log in to the host machine. If any allow rules are set, then a user must be allowed access through one of the configured allow rules or the user is denied.
To set up an allow entry
1. Navigate to the Unix Settings | Authentication Services | Access Control | node.
2. Double-click users.allow Configuration in the result pane to open the users.allow Configuration Properties dialog:
l Click Browse AD to add a container. All users under the specified container are allowed to log in unless a deny rule prevents it. All other users are denied login access unless another allow rule allows it.
l Click Add Group to add a group. All group members are allowed to log in unless a deny rule prevents it. All other users are denied log in unless another allow rule allows it.
l Click Add User to add a specific user. The specified user is allowed to log in unless a deny rule prevents it. All other users are denied log in unless another allow rule allows it.
l Click Add Domain to add a domain. All users in the domain are allowed to log in unless a deny rule prevents it. All other users are denied log in unless another allow rule allows it.
l Click Add Custom to add an item manually. You must specify the correct type for the item. All users associated with the specified item are allowed to log in
Safeguard Authentication Services 5.0.3Administration Guide
178
unless a deny rule prevents it. All other users are denied log in unless another allow rule allows it.
3. Click OK to save settings and close the dialog.
Configure a User Deny Entry policy
The Configure a User Deny Entry policy manages the Safeguard Authentication Services users.deny file. This file dictates users and groups that are explicitly denied access to the machine. Deny rules take precedence over allow rules.
To setup a users deny policy
1. Navigate to the Unix Settings | Authentication Services | Access Control | node.
2. Double-click users.deny Configuration in the result pane to open the users.deny Configuration Properties dialog.
l Click Browse AD to add a container. All users under this container are denied access.
l Click Add Group to add a group. All members of the specified group are denied access.
l Click Add User to add a specific user. The specified user is denied access.
l Click Add Domain to add a domain. All users in the specified domain are denied access.
l Click Add Custom to add an item manually. You must specify the correct type for the item. All users associated with the item are denied access.
3. Click OK to save settings and close the dialog.
Safeguard Authentication Services 5.0.3Administration Guide
179
11
Display specifiers
Display specifiers are Active Directory objects that provide information about how other objects in the directory display in client applications.
NOTE: The Register Display Specifiers link only displays in the Control Center when display specifiers are not already registered with Active Directory. If the display specifiers are registered, Control Center does not display the link.
Registering display specifiers
Because it is common to use the Find dialog in ADUC to manage users and groups, One Identity recommends that you register display specifiers with Active Directory. Registering display specifiers provides the following benefits:
l Unix Account properties appear in ADUC Find dialog results.
l Unix Personality objects are displayed correctly in ADUC. This only applies if the Unix Personality schema has been installed.
NOTE: You must have Enterprise Administrator rights to register display specifiers.
You can inspect exactly which changes are made during the display specifier registration process by viewing the DsReg.vbs script found in the Safeguard Authentication Services installation directory. You can use this script to unregister display specifiers at a later time.
To register display specifiers with Active Directory
1. From a Windows management workstation with Safeguard Authentication Services installed, navigate to Start | Quest Software | Authentication Services | Control Center.
2. Click Preferences on the left navigation panel.
3. Expand the Display Specifiers section.
NOTE: The Register Display Specifiers link only displays in the Control Center when display specifiers are not already registered with Active Directory. If the display specifiers are registered, Control Center does not display the link.
Safeguard Authentication Services 5.0.3 Administration Guide
Display specifiers180
4. Click the Register Display Specifiers link to register display specifiers with Active Directory.
While it is registering the display specifiers with Active Directory, Control Center displays a progress indicator. When the process is complete, Control Center indicates that display specifiers are registered.
Alternatively, you can register display specifiers from the command line, as follows:
a. Log in as a user with Enterprise Administrator rights.
b. Open a command prompt, navigate to the Safeguard Authentication Services installation directory, and run this command:
DsReg.vbs /add
NOTE: To register One Identity Active Roles Server display specifiers with One Identity Active Roles Server, navigate to the installed location for Safeguard Authentication Services and run the following command:
DsReg.vbs /add /provider:EDMS
You must install the One Identity Active Roles Server management package locally or DsReg.vbs returns an "Invalid Syntax" error.
To see all the DsReg.vbs options, run the following command:
DsReg.vbs /help
Unregistering display specifiers
NOTE: You must have Enterprise Administrator rights to unregister display specifiers.
To unregister display specifiers in Active Directory
1. Log in as a user with Enterprise Administrator rights.
2. Open a command prompt and navigate to the Safeguard Authentication Services installation directory.
3. Run the DsReg.vbs script with the /remove option:
DsReg.vbs /remove
NOTE: To unregister display specifiers with One Identity Active Role, run the following command:
DsReg.vbs /remove /provider:EDMS
To see all the DsReg.vbs options, run the following command:
Safeguard Authentication Services 5.0.3 Administration Guide
Display specifiers181
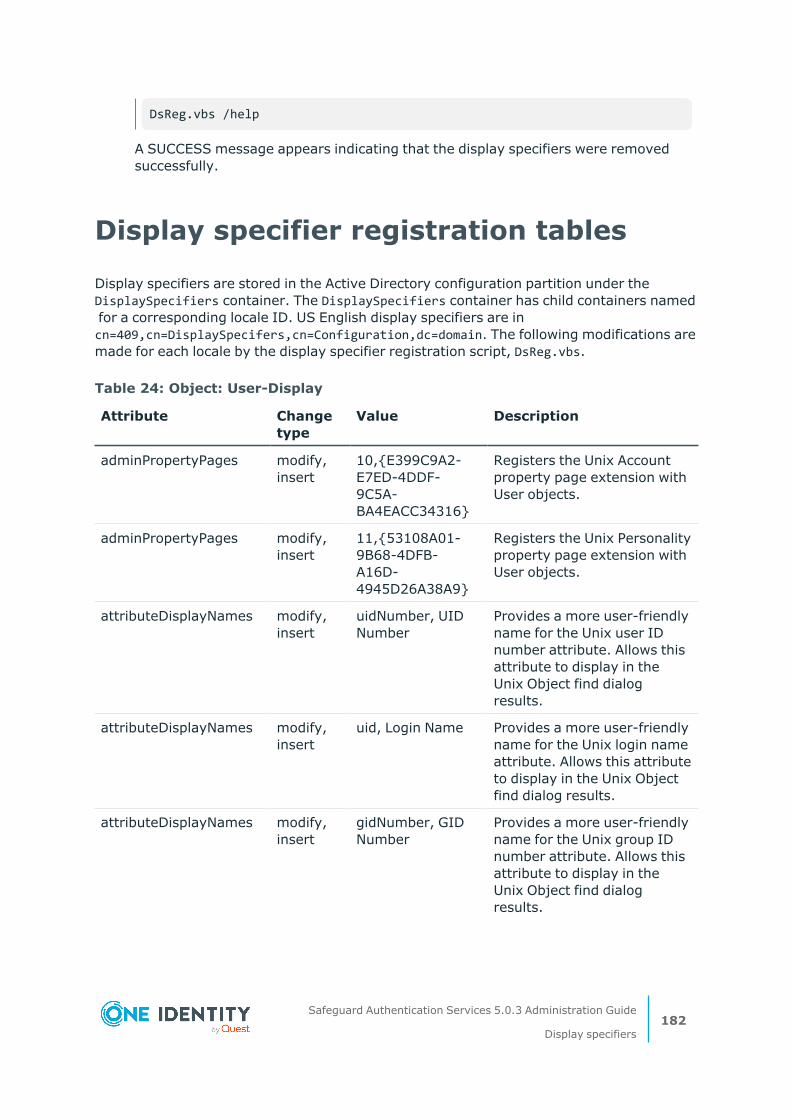
DsReg.vbs /help
A SUCCESS message appears indicating that the display specifiers were removed successfully.
Display specifier registration tables
Display specifiers are stored in the Active Directory configuration partition under the DisplaySpecifiers container. The DisplaySpecifiers container has child containers named for a corresponding locale ID. US English display specifiers are in cn=409,cn=DisplaySpecifers,cn=Configuration,dc=domain. The following modifications are made for each locale by the display specifier registration script, DsReg.vbs.
Attribute Change type
Value Description
adminPropertyPages modify, insert
10,{E399C9A2-E7ED-4DDF- 9C5A-BA4EACC34316}
Registers the Unix Account property page extension with User objects.
adminPropertyPages modify, insert
11,{53108A01-9B68-4DFB- A16D-4945D26A38A9}
Registers the Unix Personality property page extension with User objects.
attributeDisplayNames modify, insert
uidNumber, UID Number
Provides a more user-friendly name for the Unix user ID number attribute. Allows this attribute to display in the Unix Object find dialog results.
attributeDisplayNames modify, insert
uid, Login Name Provides a more user-friendly name for the Unix login name attribute. Allows this attribute to display in the Unix Object find dialog results.
attributeDisplayNames modify, insert
gidNumber, GID Number
Provides a more user-friendly name for the Unix group ID number attribute. Allows this attribute to display in the Unix Object find dialog results.
Table 24: Object: User-Display
Safeguard Authentication Services 5.0.3 Administration Guide
Display specifiers182
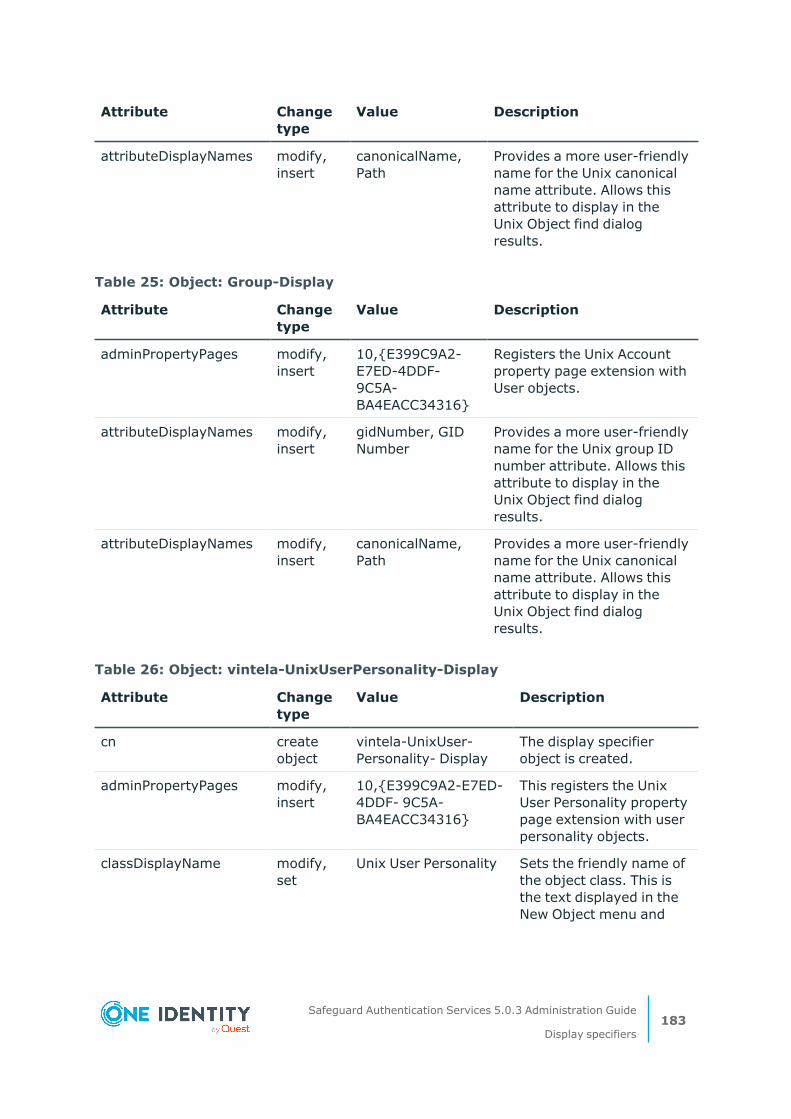
Attribute Change type
Value Description
attributeDisplayNames modify, insert
canonicalName, Path
Provides a more user-friendly name for the Unix canonical name attribute. Allows this attribute to display in the Unix Object find dialog results.
Attribute Change type
Value Description
adminPropertyPages modify, insert
10,{E399C9A2-E7ED-4DDF- 9C5A-BA4EACC34316}
Registers the Unix Account property page extension with User objects.
attributeDisplayNames modify, insert
gidNumber, GID Number
Provides a more user-friendly name for the Unix group ID number attribute. Allows this attribute to display in the Unix Object find dialog results.
attributeDisplayNames modify, insert
canonicalName, Path
Provides a more user-friendly name for the Unix canonical name attribute. Allows this attribute to display in the Unix Object find dialog results.
Table 25: Object: Group-Display
Attribute Change type
Value Description
cn create object
vintela-UnixUser-Personality- Display
The display specifier object is created.
adminPropertyPages modify, insert
10,{E399C9A2-E7ED-4DDF- 9C5A-BA4EACC34316}
This registers the Unix User Personality property page extension with user personality objects.
classDisplayName modify, set
Unix User Personality Sets the friendly name of the object class. This is the text displayed in the New Object menu and
Table 26: Object: vintela-UnixUserPersonality-Display
Safeguard Authentication Services 5.0.3 Administration Guide
Display specifiers183
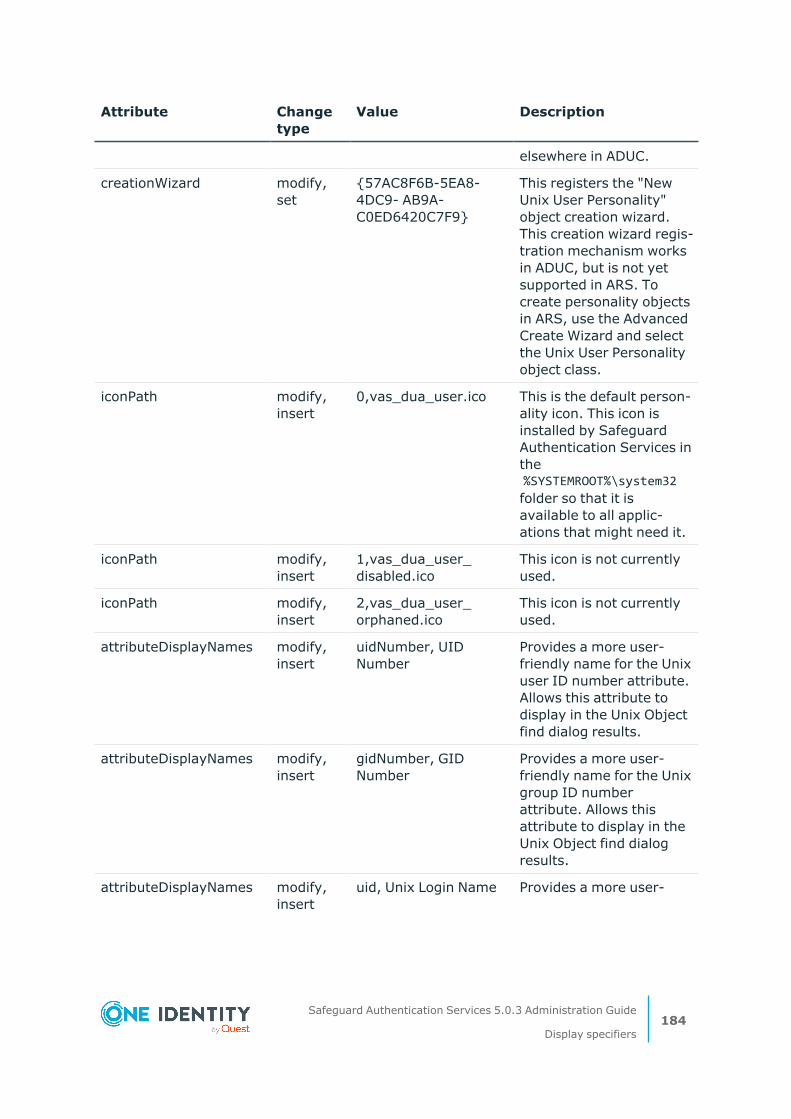
Attribute Change type
Value Description
elsewhere in ADUC.
creationWizard modify, set
{57AC8F6B-5EA8-4DC9- AB9A-C0ED6420C7F9}
This registers the "New Unix User Personality" object creation wizard. This creation wizard regis-tration mechanism works in ADUC, but is not yet supported in ARS. To create personality objects in ARS, use the Advanced Create Wizard and select the Unix User Personality object class.
iconPath modify, insert
0,vas_dua_user.ico This is the default person-ality icon. This icon is installed by Safeguard Authentication Services in the %SYSTEMROOT%\system32 folder so that it is available to all applic-ations that might need it.
iconPath modify, insert
1,vas_dua_user_disabled.ico
This icon is not currently used.
iconPath modify, insert
2,vas_dua_user_orphaned.ico
This icon is not currently used.
attributeDisplayNames modify, insert
uidNumber, UID Number
Provides a more user-friendly name for the Unix user ID number attribute. Allows this attribute to display in the Unix Object find dialog results.
attributeDisplayNames modify, insert
gidNumber, GID Number
Provides a more user-friendly name for the Unix group ID number attribute. Allows this attribute to display in the Unix Object find dialog results.
attributeDisplayNames modify, insert
uid, Unix Login Name Provides a more user-
Safeguard Authentication Services 5.0.3 Administration Guide
Display specifiers184
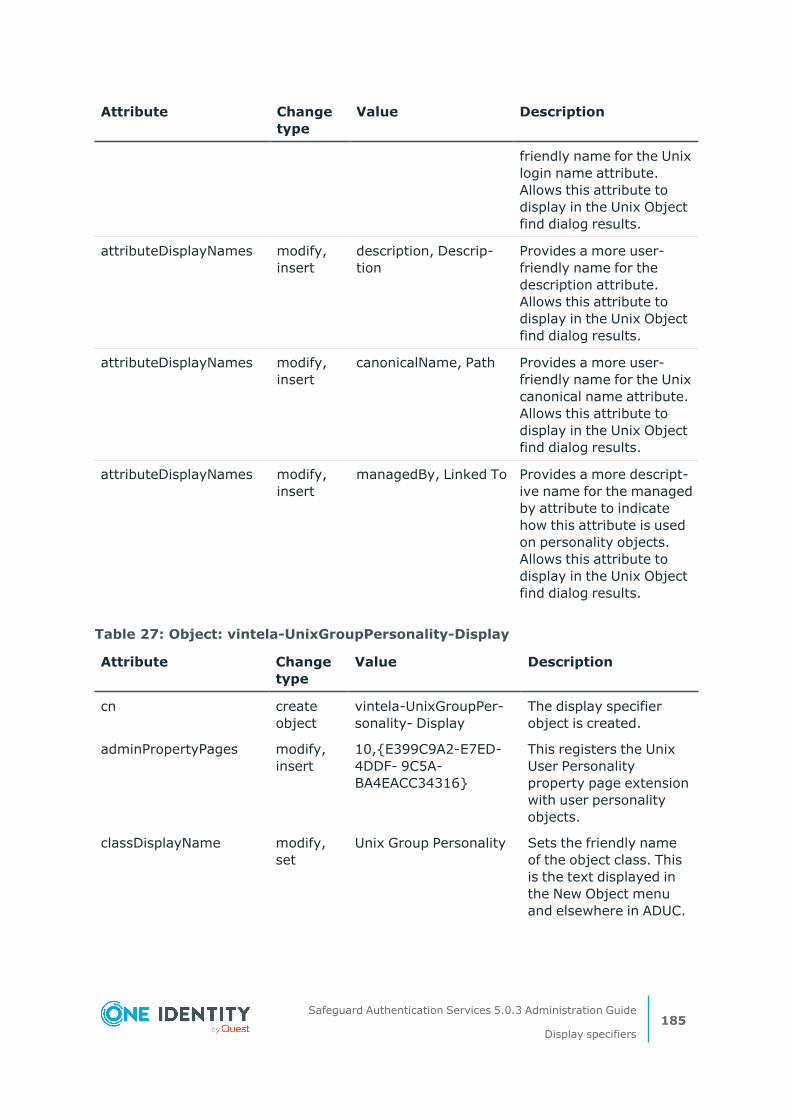
Attribute Change type
Value Description
friendly name for the Unix login name attribute. Allows this attribute to display in the Unix Object find dialog results.
attributeDisplayNames modify, insert
description, Descrip-tion
Provides a more user-friendly name for the description attribute. Allows this attribute to display in the Unix Object find dialog results.
attributeDisplayNames modify, insert
canonicalName, Path Provides a more user-friendly name for the Unix canonical name attribute. Allows this attribute to display in the Unix Object find dialog results.
attributeDisplayNames modify, insert
managedBy, Linked To Provides a more descript-ive name for the managed by attribute to indicate how this attribute is used on personality objects. Allows this attribute to display in the Unix Object find dialog results.
Attribute Change type
Value Description
cn create object
vintela-UnixGroupPer-sonality- Display
The display specifier object is created.
adminPropertyPages modify, insert
10,{E399C9A2-E7ED-4DDF- 9C5A-BA4EACC34316}
This registers the Unix User Personality property page extension with user personality objects.
classDisplayName modify, set
Unix Group Personality Sets the friendly name of the object class. This is the text displayed in the New Object menu and elsewhere in ADUC.
Table 27: Object: vintela-UnixGroupPersonality-Display
Safeguard Authentication Services 5.0.3 Administration Guide
Display specifiers185
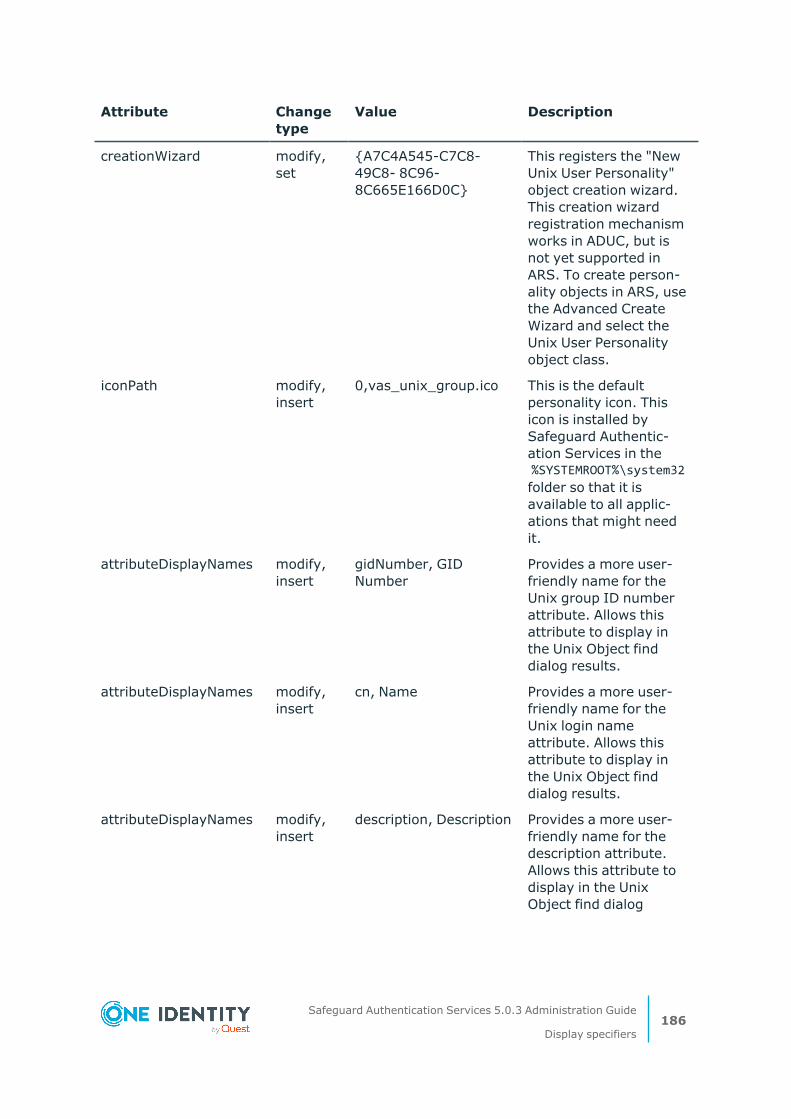
Attribute Change type
Value Description
creationWizard modify, set
{A7C4A545-C7C8-49C8- 8C96-8C665E166D0C}
This registers the "New Unix User Personality" object creation wizard. This creation wizard registration mechanism works in ADUC, but is not yet supported in ARS. To create person-ality objects in ARS, use the Advanced Create Wizard and select the Unix User Personality object class.
iconPath modify, insert
0,vas_unix_group.ico This is the default personality icon. This icon is installed by Safeguard Authentic-ation Services in the %SYSTEMROOT%\system32 folder so that it is available to all applic-ations that might need it.
attributeDisplayNames modify, insert
gidNumber, GID Number
Provides a more user-friendly name for the Unix group ID number attribute. Allows this attribute to display in the Unix Object find dialog results.
attributeDisplayNames modify, insert
cn, Name Provides a more user-friendly name for the Unix login name attribute. Allows this attribute to display in the Unix Object find dialog results.
attributeDisplayNames modify, insert
description, Description Provides a more user-friendly name for the description attribute. Allows this attribute to display in the Unix Object find dialog
Safeguard Authentication Services 5.0.3 Administration Guide
Display specifiers186
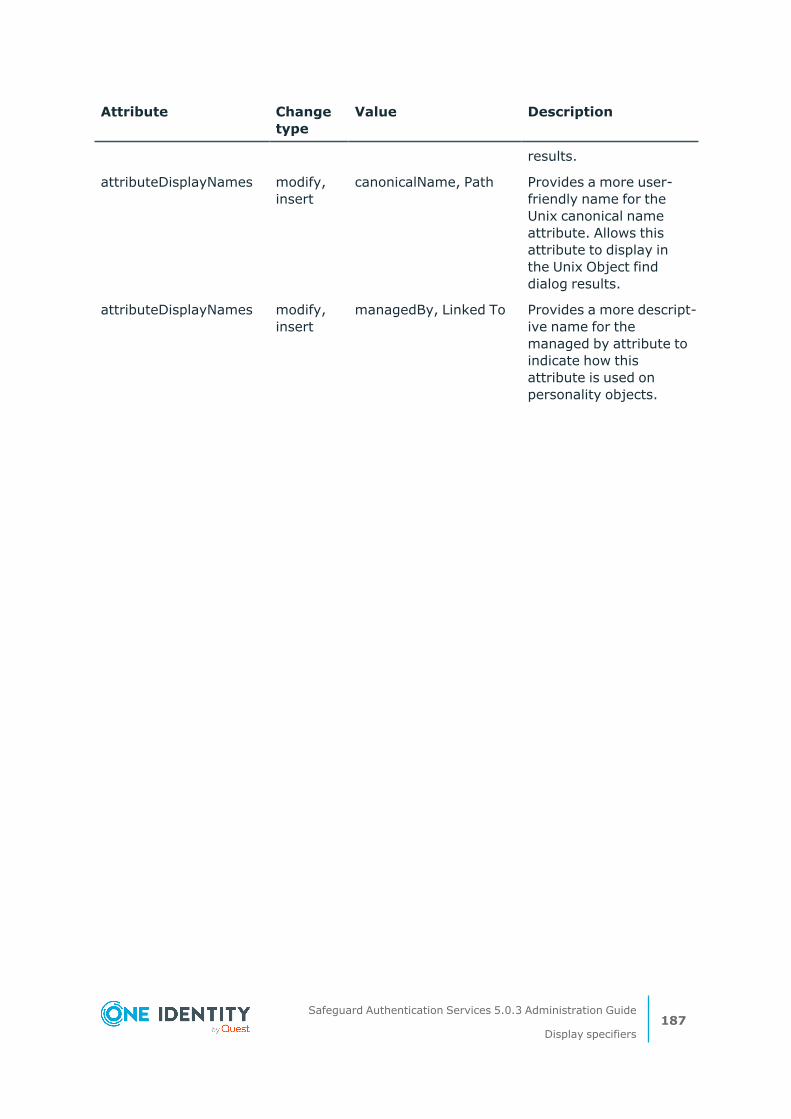
Attribute Change type
Value Description
results.
attributeDisplayNames modify, insert
canonicalName, Path Provides a more user-friendly name for the Unix canonical name attribute. Allows this attribute to display in the Unix Object find dialog results.
attributeDisplayNames modify, insert
managedBy, Linked To Provides a more descript-ive name for the managed by attribute to indicate how this attribute is used on personality objects.
Safeguard Authentication Services 5.0.3 Administration Guide
Display specifiers187
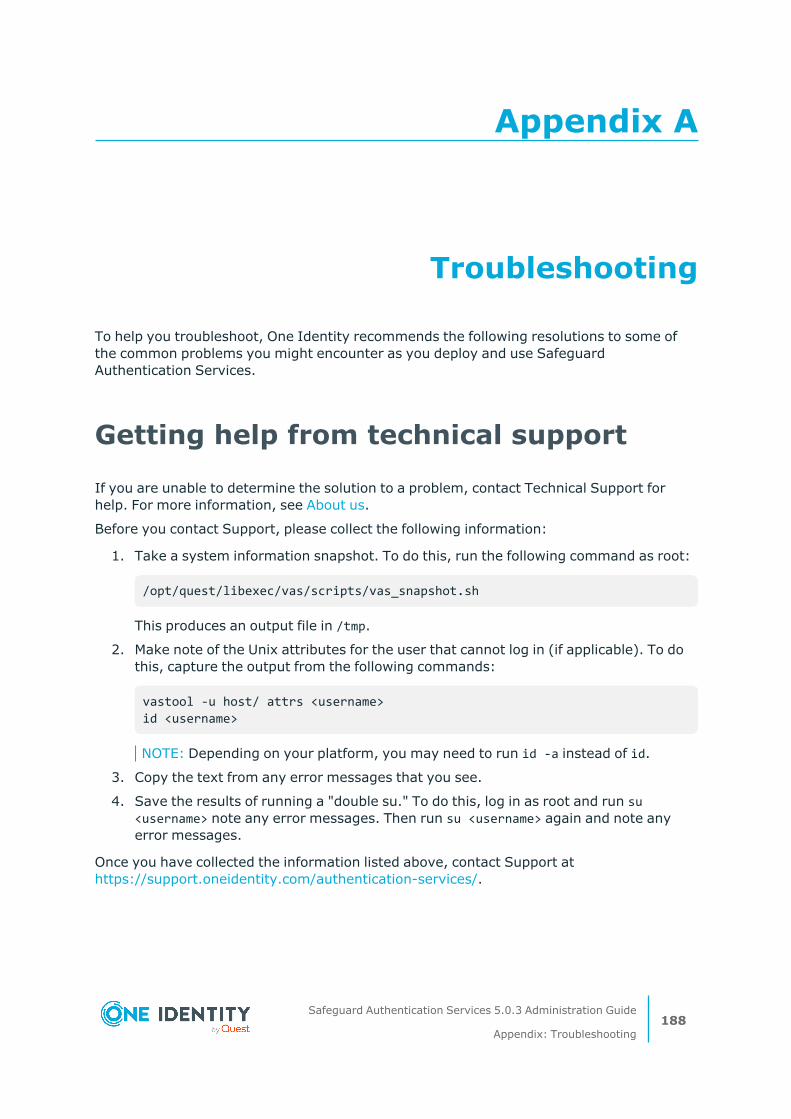
Appendix A
Appendix: Troubleshooting
To help you troubleshoot, One Identity recommends the following resolutions to some of the common problems you might encounter as you deploy and use Safeguard Authentication Services.
Getting help from technical support
If you are unable to determine the solution to a problem, contact Technical Support for help. For more information, see About us.
Before you contact Support, please collect the following information:
1. Take a system information snapshot. To do this, run the following command as root:
/opt/quest/libexec/vas/scripts/vas_snapshot.sh
This produces an output file in /tmp.
2. Make note of the Unix attributes for the user that cannot log in (if applicable). To do this, capture the output from the following commands:
vastool -u host/ attrs <username> id <username>
NOTE: Depending on your platform, you may need to run id -a instead of id.
3. Copy the text from any error messages that you see.
4. Save the results of running a "double su." To do this, log in as root and run su <username> note any error messages. Then run su <username> again and note any error messages.
Once you have collected the information listed above, contact Support at https://support.oneidentity.com/authentication-services/.
Safeguard Authentication Services 5.0.3 Administration Guide
Appendix: Troubleshooting188

Disaster recovery
Since Safeguard Authentication Services relies on Active Directory, follow Microsoft’s best practices for keeping the database highly available. The Management Console for Unix and other administration tools, are not critical to the operation of Safeguard Authentication Services and can quickly be reinstalled from scratch if needed.
Long startup delays on Windows
You may experience long delays (over a minute) when starting the Safeguard Authentication Services Windows installer or certain Windows management tools such as Control Center. All Safeguard Authentication Services Windows binaries are Authenticode-signed so that you can be sure that the binaries are authentic and have not been tampered with.
This problem occurs when the .NET runtime attempts to verify the Authenticode signature by checking against certificate revocation lists (CRLs) at crl.microsoft.com. If this site cannot be reached, the .NET framework check will time out (up to 60 seconds). This timeout occurs every time a signed assembly is loaded which can lead to very long load times. You can fix this problem by allowing access to crl.microsoft.com.
If the computer is not connected to the internet, you can disable CRL checks for the entire system in Internet Explorer. Go to Options, select the Advanced tab, and under Settings clear the Check for publisher's certification revocation option.
It is also possible to specify a generatePublisherEvidence element in an <app>.exe.config that will disable CRL checks for the specific application that you are running. Keep in mind that if you are using Safeguard Authentication Services components in PowerShell or MMC, you will need to add this configuration for the powershell.exe.config and/or mmc.exe.config. Refer to <generatePublisherEvidence> Element for details.
Pointer Record updates are rejected
If Pointer Record (PTR) updates are being rejected, it may be because the DHCP server is doing the update already. Refer to the documentation for the DHCP server used in your environment. The Microsoft DHCP server does updates on behalf of the host and this is controlled by the FQDN option. Please refer to the Microsoft Active Directory DNS/DHCP documentation.
Safeguard Authentication Services 5.0.3 Administration Guide
Appendix: Troubleshooting189
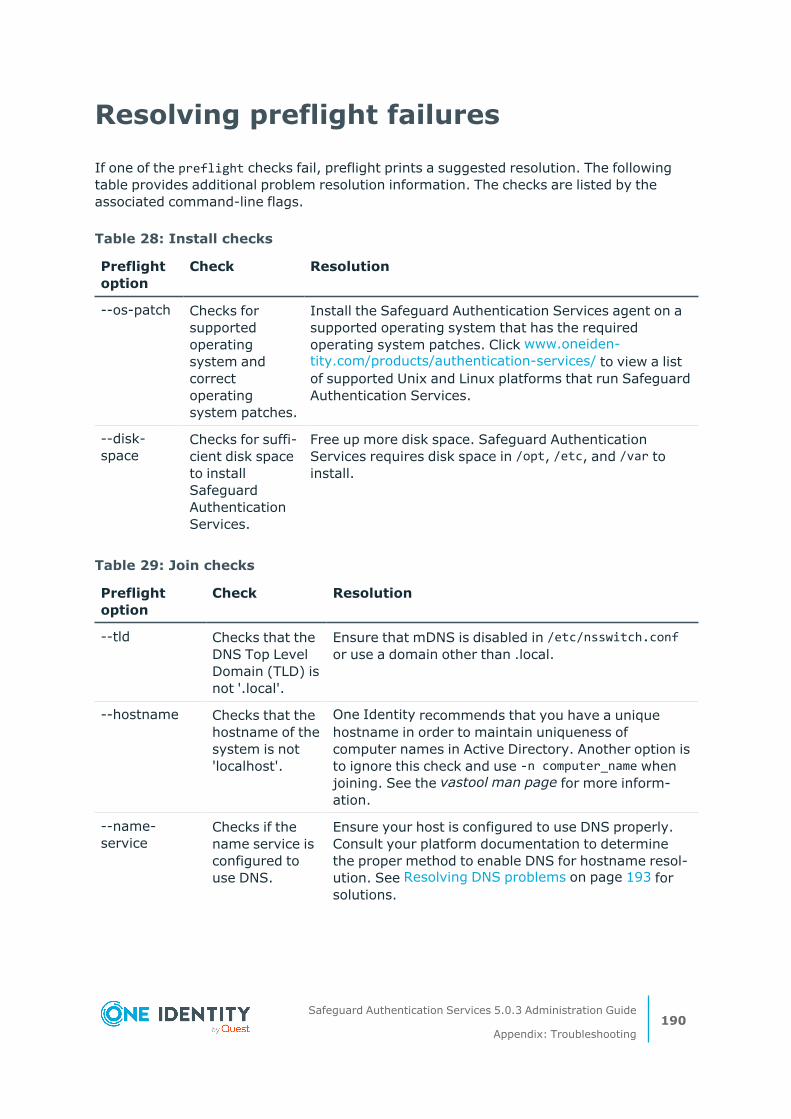
Resolving preflight failures
If one of the preflight checks fail, preflight prints a suggested resolution. The following table provides additional problem resolution information. The checks are listed by the associated command-line flags.
Preflight option
Check Resolution
--os-patch Checks for supported operating system and correct operating system patches.
Install the Safeguard Authentication Services agent on a supported operating system that has the required operating system patches. Click www.oneiden-tity.com/products/authentication-services/ to view a list of supported Unix and Linux platforms that run Safeguard Authentication Services.
--disk-space
Checks for suffi-cient disk space to install Safeguard Authentication Services.
Free up more disk space. Safeguard Authentication Services requires disk space in /opt, /etc, and /var to install.
Table 28: Install checks
Preflight option
Check Resolution
--tld Checks that the DNS Top Level Domain (TLD) is not '.local'.
Ensure that mDNS is disabled in /etc/nsswitch.conf or use a domain other than .local.
--hostname Checks that the hostname of the system is not 'localhost'.
One Identity recommends that you have a unique hostname in order to maintain uniqueness of computer names in Active Directory. Another option is to ignore this check and use -n computer_name when joining. See the vastool man page for more inform-ation.
--name-service
Checks if the name service is configured to use DNS.
Ensure your host is configured to use DNS properly. Consult your platform documentation to determine the proper method to enable DNS for hostname resol-ution. See Resolving DNS problems on page 193 for solutions.
Table 29: Join checks
Safeguard Authentication Services 5.0.3 Administration Guide
Appendix: Troubleshooting190
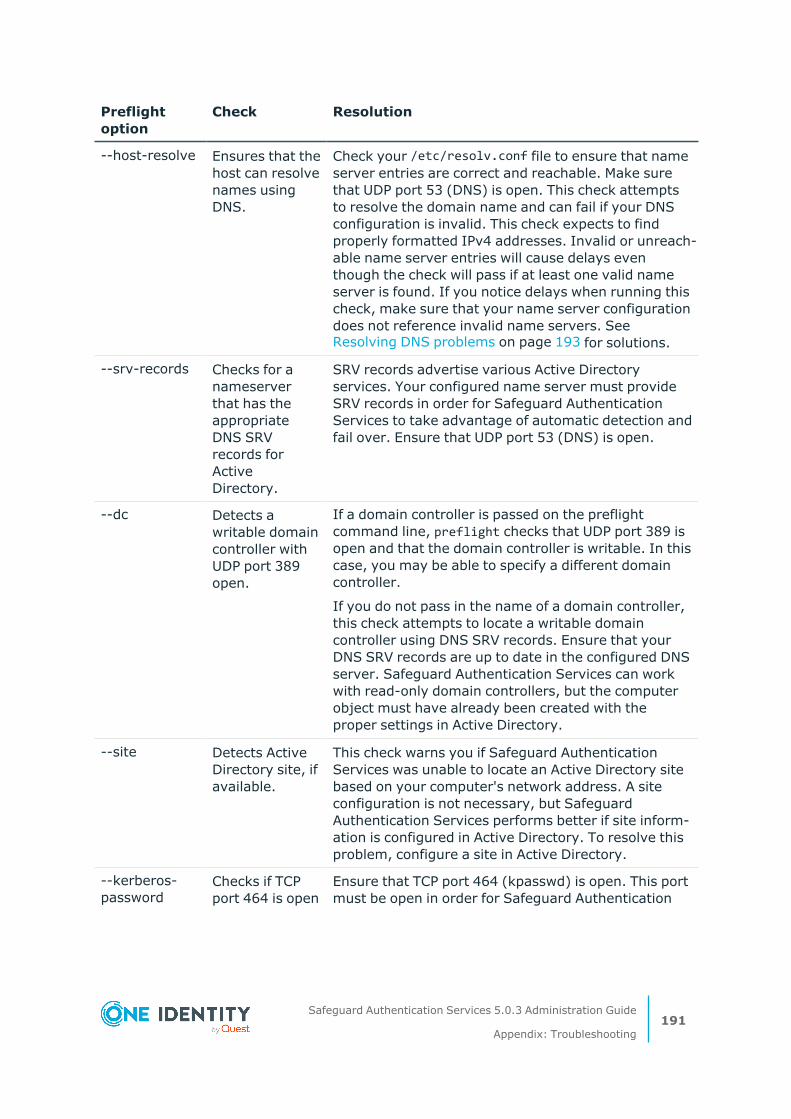
Preflight option
Check Resolution
--host-resolve Ensures that the host can resolve names using DNS.
Check your /etc/resolv.conf file to ensure that name server entries are correct and reachable. Make sure that UDP port 53 (DNS) is open. This check attempts to resolve the domain name and can fail if your DNS configuration is invalid. This check expects to find properly formatted IPv4 addresses. Invalid or unreach-able name server entries will cause delays even though the check will pass if at least one valid name server is found. If you notice delays when running this check, make sure that your name server configuration does not reference invalid name servers. See Resolving DNS problems on page 193 for solutions.
--srv-records Checks for a nameserver that has the appropriate DNS SRV records for Active Directory.
SRV records advertise various Active Directory services. Your configured name server must provide SRV records in order for Safeguard Authentication Services to take advantage of automatic detection and fail over. Ensure that UDP port 53 (DNS) is open.
--dc Detects a writable domain controller with UDP port 389 open.
If a domain controller is passed on the preflight command line, preflight checks that UDP port 389 is open and that the domain controller is writable. In this case, you may be able to specify a different domain controller.
If you do not pass in the name of a domain controller, this check attempts to locate a writable domain controller using DNS SRV records. Ensure that your DNS SRV records are up to date in the configured DNS server. Safeguard Authentication Services can work with read-only domain controllers, but the computer object must have already been created with the proper settings in Active Directory.
--site Detects Active Directory site, if available.
This check warns you if Safeguard Authentication Services was unable to locate an Active Directory site based on your computer's network address. A site configuration is not necessary, but Safeguard Authentication Services performs better if site inform-ation is configured in Active Directory. To resolve this problem, configure a site in Active Directory.
--kerberos-password
Checks if TCP port 464 is open
Ensure that TCP port 464 (kpasswd) is open. This port must be open in order for Safeguard Authentication
Safeguard Authentication Services 5.0.3 Administration Guide
Appendix: Troubleshooting191
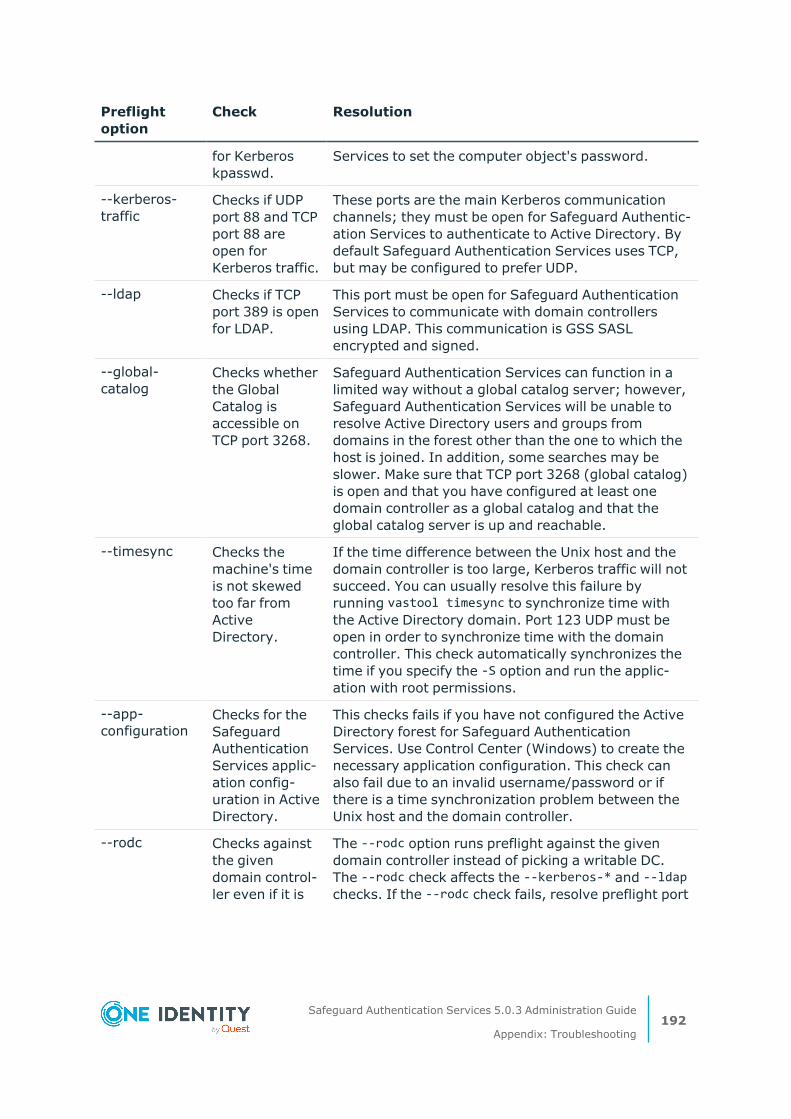
Preflight option
Check Resolution
for Kerberos kpasswd.
Services to set the computer object's password.
--kerberos-traffic
Checks if UDP port 88 and TCP port 88 are open for Kerberos traffic.
These ports are the main Kerberos communication channels; they must be open for Safeguard Authentic-ation Services to authenticate to Active Directory. By default Safeguard Authentication Services uses TCP, but may be configured to prefer UDP.
--ldap Checks if TCP port 389 is open for LDAP.
This port must be open for Safeguard Authentication Services to communicate with domain controllers using LDAP. This communication is GSS SASL encrypted and signed.
--global-catalog
Checks whether the Global Catalog is accessible on TCP port 3268.
Safeguard Authentication Services can function in a limited way without a global catalog server; however, Safeguard Authentication Services will be unable to resolve Active Directory users and groups from domains in the forest other than the one to which the host is joined. In addition, some searches may be slower. Make sure that TCP port 3268 (global catalog) is open and that you have configured at least one domain controller as a global catalog and that the global catalog server is up and reachable.
--timesync Checks the machine's time is not skewed too far from Active Directory.
If the time difference between the Unix host and the domain controller is too large, Kerberos traffic will not succeed. You can usually resolve this failure by running vastool timesync to synchronize time with the Active Directory domain. Port 123 UDP must be open in order to synchronize time with the domain controller. This check automatically synchronizes the time if you specify the -S option and run the applic-ation with root permissions.
--app-configuration
Checks for the Safeguard Authentication Services applic-ation config-uration in Active Directory.
This checks fails if you have not configured the Active Directory forest for Safeguard Authentication Services. Use Control Center (Windows) to create the necessary application configuration. This check can also fail due to an invalid username/password or if there is a time synchronization problem between the Unix host and the domain controller.
--rodc Checks against the given domain control-ler even if it is
The --rodc option runs preflight against the given domain controller instead of picking a writable DC. The --rodc check affects the --kerberos-* and --ldap checks. If the --rodc check fails, resolve preflight port
Safeguard Authentication Services 5.0.3 Administration Guide
Appendix: Troubleshooting192

Preflight option
Check Resolution
read-only, instead of selecting another domain controller.
check failures.
NOTE: If you get a message that says Unable to locate Safeguard Authentication Services Application Configuration, you can ignore that error and proceed with the Safeguard Authentication Services installation. The Safeguard Authentication Services Active Directory Configuration Wizard starts automatically to help you configure Active Directory for Safeguard Authentication Services the first time you start the Control Center.
Preflight option
Check Resolution
--ms-cifs Checks if TCP port 445 is open for Microsoft Directory Services CIFS traffic.
In order to use Group Policy on Unix, this port must be open to allow Safeguard Authentication Services to use the CIFS protocol to download Group Policy objects from domain controllers.
Table 30: Post-join checks
Resolving DNS problems
It is imperative that DNS is correctly configured. Safeguard Authentication Services relies on DNS in order to locate domain controllers. Follow these steps to verify that domain controllers can be located using DNS:
1. Use dig to test whether your DNS configuration can locate a domain controller. Enter the following at the Unix command prompt, replacing <DNS Domain Name> with your Active Directory DNS domain name:
dig -t any _ldap._tcp.dc._msdcs.<DNS Domain Name>
If DNS is configured correctly, you will see a list of domain controllers for your domain. If not, work with your DNS administrator to resolve the issue.
2. Use dig to test whether you can locate a domain controller in your site. Enter the following at the Unix command prompt, replacing <Site Name> with the name of your Active Directory site and <DNS Domain Name> with your Active Directory DNS domain name.
Safeguard Authentication Services 5.0.3 Administration Guide
Appendix: Troubleshooting193
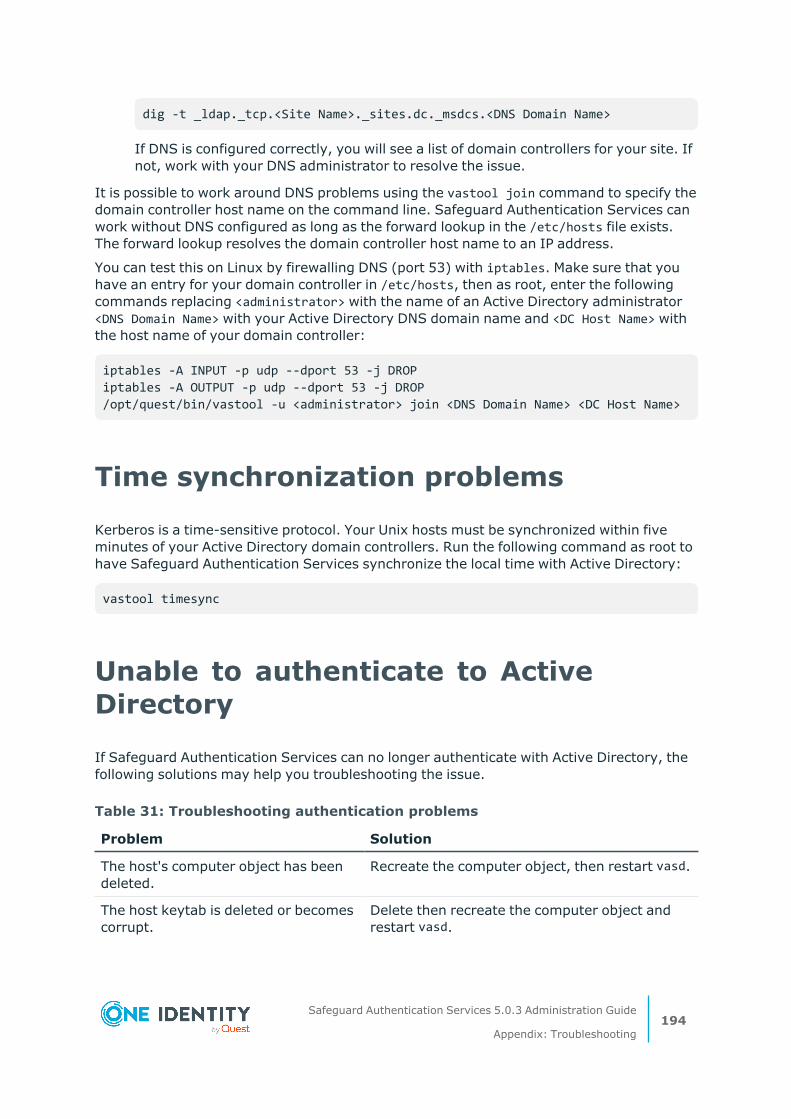
dig -t _ldap._tcp.<Site Name>._sites.dc._msdcs.<DNS Domain Name>
If DNS is configured correctly, you will see a list of domain controllers for your site. If not, work with your DNS administrator to resolve the issue.
It is possible to work around DNS problems using the vastool join command to specify the domain controller host name on the command line. Safeguard Authentication Services can work without DNS configured as long as the forward lookup in the /etc/hosts file exists. The forward lookup resolves the domain controller host name to an IP address.
You can test this on Linux by firewalling DNS (port 53) with iptables. Make sure that you have an entry for your domain controller in /etc/hosts, then as root, enter the following commands replacing <administrator> with the name of an Active Directory administrator <DNS Domain Name> with your Active Directory DNS domain name and <DC Host Name> with the host name of your domain controller:
iptables -A INPUT -p udp --dport 53 -j DROP iptables -A OUTPUT -p udp --dport 53 -j DROP /opt/quest/bin/vastool -u <administrator> join <DNS Domain Name> <DC Host Name>
Time synchronization problems
Kerberos is a time-sensitive protocol. Your Unix hosts must be synchronized within five minutes of your Active Directory domain controllers. Run the following command as root to have Safeguard Authentication Services synchronize the local time with Active Directory:
vastool timesync
Unable to authenticate to Active Directory
If Safeguard Authentication Services can no longer authenticate with Active Directory, the following solutions may help you troubleshooting the issue.
Problem Solution
The host's computer object has been deleted.
Recreate the computer object, then restart vasd.
The host keytab is deleted or becomes corrupt.
Delete then recreate the computer object and restart vasd.
Table 31: Troubleshooting authentication problems
Safeguard Authentication Services 5.0.3 Administration Guide
Appendix: Troubleshooting194
Unable to install or upgrade
The most common installation or upgrade failure is that the Unix host cannot read the Safeguard Authentication Services application configuration in Active Directory. Ensure that you have followed the instructions in the Configure Active Directory for Safeguard Authentication Services section of the Safeguard Authentication Services Installation Guide and that the configuration has been created successfully.
During an upgrade, you may see an error that Safeguard Authentication Services cannot upgrade because the application configuration cannot be located. If you previously joined to a specific domain controller, Safeguard Authentication Services disabled DNS SRV record lookups. This means that Safeguard Authentication Services cannot resolve other domains in the forest and may be unable to locate the application configuration. In this case, you must ensure that the domain controller you specified is a global catalog. Otherwise, you must create the Safeguard Authentication Services application configuration in the domain that you join or you must properly configure DNS to return SRV records and join normally, rather than specifying a domain controller when you join.
For more information, see the About Active Directory Configuration section in the Safeguard Authentication Services Installation Guide.
Unable to join the domain
If you are unable to join the domain, run the preflight utility to validate your environment.
For more information, see The Safeguard Authentication Services Pre-Installation Diagnostic Tool in the Safeguard Authentication Services Installation Guide .
Then, verify the following:
l Check that the Active Directory account specified during join has rights to join the computer to the domain.
l Check that the Unix host is able to properly resolve the domain name through DNS.
If you are joining to a specific domain controller you must ensure that Safeguard Authentication Services can locate and read the configuration information in Active Directory. You should do one of the following:
l Make sure the domain controller you specify is a global catalog.
l Create the Safeguard Authentication Services application configuration in the domain to which you are joining.
For more information, see the About Active Directory Configuration section in the Safeguard Authentication Services Installation Guide.
l Properly configure DNS to return srv-records and avoid joining to a specific domain controller.
Safeguard Authentication Services 5.0.3 Administration Guide
Appendix: Troubleshooting195
Unable to log in
If you are unable to log in as an Active Directory user after installing, check the following:
1. Log in as root on the Unix host.
2. Check the status of the Safeguard Authentication Services subsystems. To do this, run the following command:
vastool status
Correct any errors reported by the status command, then try logging in again.
3. Ensure the user exists locally and is allowed to log in. To check this, run the following command:
vastool user checklogin <username>
The output displays whether the user is a known Active Directory user. If not, you may need to map the user to an Active Directory account or Unix-enable the Active Directory account. If the user is known, an access control rule may prevent them from logging in. The output of the command displays which access control rules are in effect for the user.
You may need to restart window managers such as gdm in order for the window manager to reload NSS modules. Until the window manager reloads the NSS configuration, you will be unable to log in with an Active Directory user. Other services such as cron may also be affected by NSS changes. If you are unsure which services need to be reloaded, reboot the system.
NOTE:
If you are configuring Safeguard Authentication Services on VMwareESX Server vSphere (ESX 4.0) the reason you can not log in may be related to access control issues. For more information, see Configuring access control on ESX 4 on page 104..
Unix Account tab is missing in ADUC
If the Unix Account tab is missing when viewing the properties of a user or group in Active Directory Users and Computers, the most likely cause is that the extension module (AducExtensions.dll) was unable to load. Typically this is due to an invalid or corrupt installation. To resolve this issue, check the following:
l Ensure that Safeguard Authentication Services has been installed on the local computer.
l Ensure that you are logged in as a domain user or that ADUC is running as a domain user.
Safeguard Authentication Services 5.0.3 Administration Guide
Appendix: Troubleshooting196
l The Safeguard Authentication Services installation may have become corrupted. Remove and re-install Safeguard Authentication Services.
l Certain software is required in order for the Unix Account tab to load. If any of the following software has been removed, please re-install it:
l Windows PowerShell
l VisualStudio C++ Runtime
l .NET Framework v4.5
l If you are working with One Identity Active Roles Server MMC Console, ensure that display specifiers have been installed and that you have restarted the Active Roles Service. Until you do this, the Unix Account tab will not appear in Active Roles Server MCC Console.
l If the Unix Account tab still does not appear, open Control Center and enable debug logging from the Preferences. Attempt to load the Unix Account tab, then send the generated log files to VARcompany.support.
vasypd has unsatisfied dependencies
If you receive the following error message while installing the Safeguard Authentication Services vasypd Unix component, the rpcbind service may not be enabled.
svcadm: Instance "svc:/quest/vas/vasypd:default" has unsatisfied dependencies. Error 4 starting vasypd
To enable the rpcbind service
1. Check the dependencies of vasypd:
# svcs -d quest/vas/vasypd STATE STIME FMRI disabled Sep_14 svc:/network/rpc/bind:default online Sep_14 svc:/milestone/single-user:default online Sep_14 svc:/system/filesystem/local:default
2. If rpcbind is disabled, run this command to enable it:
# /usr/sbin/svcadm enable -s /network/rpc/bind
3. Run the following command to start vasypd:
# /etc/init.d/vasypd start
Safeguard Authentication Services 5.0.3 Administration Guide
Appendix: Troubleshooting197

About us
About us
One Identity solutions eliminate the complexities and time-consuming processes often required to govern identities, manage privileged accounts and control access. Our solutions enhance business agility while addressing your IAM challenges with on-premises, cloud and hybrid environments.
Contacting us
For sales and other inquiries, such as licensing, support, and renewals, visit https://www.oneidentity.com/company/contact-us.aspx.
Technical support resources
Technical support is available to One Identity customers with a valid maintenance contract and customers who have trial versions. You can access the Support Portal at https://support.oneidentity.com/.
The Support Portal provides self-help tools you can use to solve problems quickly and independently, 24 hours a day, 365 days a year. The Support Portal enables you to:
l Submit and manage a Service Request
l View Knowledge Base articles
l Sign up for product notifications
l Download software and technical documentation
l View how-to videos at www.YouTube.com/OneIdentity
l Engage in community discussions
l Chat with support engineers online
l View services to assist you with your product
Safeguard Authentication Services 5.0.3 Administration Guide
About us198
Glossary
A
access controlA set of procedures performed by hardware, software, and administrators to monitor access, identify users requesting access, record access attempts, and grant or deny access. Compare with authorization. See also ACL.
Access Control List (ACL)A set of data that informs a computer's operating system which permissions, or access rights, that each user or group has to a specific system object, such as a directory or file. Each object has a unique security attribute that identifies which users have access to it, and the ACL is a list of each object and user access privileges such as read, write, or execute.
ACEAcronym for Access Control Entry.
ACLAcronym for Access Control List.
ACL FilteringAccess Control Lists can be applied to Group Policy objects that determine whether or not the policy will be applied on a system.
Active DirectoryMicrosoft's network directory service for computers.
ADAMActive Directory Application Mode, a Windows 2003 service in which LDAP runs as a user service rather than as a system service.
ADSIActive Directory Services Interface, an editor (browser), scripting language, and so on.
ADUCActive Directory Services Interface, an editor (browser), scripting language, and so on.
affinityWith respect to a directory, the organization of the accounts relies on properties they have in common. This similarity may be due to departmental structure or
Safeguard Authentication Services 5.0.3 Administration Guide
Glossary199
Glossary
geographical location of the people that use the accounts.
ARC4See RC4.
ARCFOURSee RC4.
ARSActiveRoles Server is a product installed on a Windows server that uses SQL Server for configuring data and publishing itself as a connection point object within Active Directory. It is a cross-platform, roles-based provisioning system that allows additional attributes to be stored for an object. For example, ARS can put a newly hired engineer into all the appropriate groups on all platforms relevant to their job description.
authenticationAuthentication is the process of determining whether someone or something is, in fact, who or what it is declared to be. In private and public computer networks (including the Internet), authentication is commonly done through the use of logon passwords. Knowledge of the password is assumed to guarantee that the user is authentic. Each user registers initially (or is registered by someone else), using an assigned or self-declared password. On each subsequent use, the user must know and use the previously declared password. The weakness in this system for transactions that are significant (such as the exchange of money) is that passwords can often be stolen, accidentally revealed, or forgotten. Logically, authentication precedes authorization (although they may often seem to be combined).
authoritative sourceIn migrating identities from disparate NIS domains, identities from the first source repository are migrated without any changes to their internal identity (ID) and the first repository becomes the authoritative source. In case of ID conflict or mismatch, IDs in all remaining sources are changed to match those in the first source.
authorizationAuthorization is the process of giving someone permission to do or have something. In multi-user computer systems, a system administrator defines for the system which users are allowed access to the system and what privileges of use (such as access to which file directories, hours of access, amount of allocated storage space, and so on). Assuming that someone has logged in to a computer operating system or application, the system or application may want to identify what resources the user can be given during this session. Thus, authorization is sometimes seen as both the preliminary setting up of permissions by a system administrator and the actual checking of the permission values that have been set up when a user is getting access. Logically, authorization is preceded by authentication.
Safeguard Authentication Services 5.0.3 Administration Guide
Glossary200

B
Block InheritanceWhen Block Inheritance is set on a GPO link, all GPOs above the link level are excluded from GPO processing unless the GPO is enforced.
C
CACCommon Access Card, a smart card issued by the United States Department of Defense (DoD) for active-duty military, civilian employees and contractors.
Cadence[[[Undefined variable TemplateGuideVariables.OneIdentityNameShort]]] font that contains standard icons used in the user interfaces for various [[[Undefined variable TemplateGuideVariables.OneIdentityNameShort]]] products.
canonical nameEssentially the distinguished name in reverse; generally, a software-internal representation, such as acme.com/engineering/jim.
CIFSCommon Internet File System, a Microsoft technology. See also SMB.
CNCommon Name, a component of a distinguished name (DN).
COMComponent Object Model, a Microsoft technology that enables components to communicate, used by developers to create reusable software components, link components together to build applications, and take advantage of Windows services like Active Directory.
credentialA proof of qualification or competence attached to a user or session, an object verified during an authentication transaction. In Kerberos parlance, a message containing the random key along with a service name and the user's long-term key.
D
DCDomain Controller.
DESData Encryption Standard is a cypher selected as an official Federal Information Processing Standard (FIPS) for the United States in 1976. It is characterized by a relatively short key length (56 bits) and is considered less secure for many application environments than some alternatives.
Safeguard Authentication Services 5.0.3 Administration Guide
Glossary201
disconnected authenticationProvisory authentication based on prior login and used in case of network failure. The maximum duration of a stored password hash is configurable.
DNDistinguished Name.
domainIn Active Directory, a centrally-managed group of computers.
domain controller (DC)The server that responds to security authentication requests in the Active Directory domain.
Drop-downFlare default style, that can be used to group content within a topic. It is a resource to structure and collapse content especially in non-print outputs.
DSEDirectory-specific entry in an LDAP environment.
E
EnforcedIf a GPO is enforced, then it will be applied regardless of block inheritance settings.
F
firewallA piece of hardware, software, or both that sets rules about what network traffic can cross it. These rules can focus on the protocols used by the traffic and ports in use. Authentication Services, for instance, requires a set of ports by which it implements its services. Those ports must not be blocked. However, if a host has access to Active Directory, to its domain controllers, and so on, then the ports needed by Authentication Service are open. For Authentication Services specifically, this means 88 (TCP/UDP for Kerberos ticket services), 389 (LDAP queries and ping), 464 (TCP/UDP for Kerberos passwords), and 3268 (TCP for Global Catalog access); optionally, 53 (UDP for DNS SRV records) and 123 (UDP for time-synchronization with Active Directory). For Authentication Services Group Policy, port 445 (TCP for Microsoft DS).
forestThe collection of all objects and their attributes and rules in Active Directory. It is named "forest" because it holds one or more trust-linked trees, allowing users in one domain to access resources in another domain.
FQDNFully Qualified Domain Name; a domain name specified exhaustively, such as CN=jim,OU=engineering,DC=acme,DC=com.
Safeguard Authentication Services 5.0.3 Administration Guide
Glossary202
FSMOFlexible Single Master Operations; a multi-master-enabled database such as Active Directory that provides the flexibility of allowing changes at any domain controller in the enterprise, but also gives rise to the possibility of conflicts and the need to resolve them, especially for certain tasks. Collectively, FSMO tasks are used where standard data transfer and update methods on multiple peer domain controllers are ill-adapted to multi-master replication, for example: schema update and modification domain naming (addition or removal of domains in the forest), relative ID assignment (including SIDs), infrastructure (security) maintenance (including GUIDs, SIDs, and reference object DN in cross-domain references), and <a href="#PDC">PDC</a> emulation. These tasks are handled in a single master model by Windows 2000/2003.
G
GCGlobal Catalog.
GECOS(also in lower case) A field in the Unix /etc/passwd file that contains general information about the user including things like full name, telephone number, and so on, depending completely on the host implementation.
gidgroup identity, standard C library object, represented by gid_t, identifying a group.
GIDGroup identity; broad term referring to the underlying number that identifies a group of users or other objects in a directory service.
GlossaryList of short definitions of product specific terms.
GPMCGroup Policy Management Console; a Microsoft tool.
GPOGroup Policy Object; an actual directory object tied to system volume instance. The group policy object is a collection of settings that define what a system looks like and how it behaves for a defined group of users. A GPO is created, using the Group Policy Management Console when there are such settings. GPOs are associated with a container such as a site, domain, or organizational unit (OU). GPOs are very powerful and can be used to distribute software and updates such as Tivoli (IBM). See also group policy.
group policyA Microsoft technology that reduces the cost of supporting Windows users by providing centralized management of computers and user in Active Directory. Group Policy controls various aspects of an object including security policy,
Safeguard Authentication Services 5.0.3 Administration Guide
Glossary203
software installation, login, folder redirection, and software settings. Such policies are stored on group policy objects (GPOs).
GSSGeneric Security Service; security services provided atop underlying, alternative cryptographic mechanisms such as Kerberos. According to RFC 2744, the GSS API allows a caller application to authenticate a principal identity associated with a peer application to delegate rights to another peer, and to apply security services such as confidentiality and integrity on a per-message basis.
GUIDGlobally Unique Identifier; a number, address, or other cookie used to represent an object uniquely in a directory service, file system, and so on. In Active Directory, the GUID is a unique, unchanging 128-bit string used for search and replication.
J
joiningDescribes the action of a Unix or Linux workstation being incorporated into an Active Directory domain by means of the vastool join command.
K
KDCThe Key Distribution Center in Kerberos. Part of a cryptosystem to reduce the intrinsic risk of exchanging keys, basically consisting of the authentication server (AS) and the ticket-granting server (TGS).
Kerberized applicationA software application that requires or performs Kerberos authentication.
KerberosA computer network authentication protocol that proves the identity of intercommunicating points on an insecure network like a LAN or the Internet in a secure manner. Guards against eavesdropping and replay attacks. There are different Kerberos encryptions including DES and ARC4, the latter being more secure as well as the default in Authentication Services since release 2.6 SP4.
Kerberos authenticationAn authentication system developed at the Massachusetts Institute of Technology (MIT). Kerberos is designed to enable two parties to exchange private information across an otherwise open network. It works by assigning a unique key, called a ticket, to each user that logs on to the network. The ticket is then embedded in messages to identify the sender of the message.
keytabA file containing authentication credentials used, usually in place of a password, for authentication.
Safeguard Authentication Services 5.0.3 Administration Guide
Glossary204
L
LAMLoadable Authentication Module, IBM's precursor to PAM on the AIX (Unix) operating system. Authentication Services provides a LAM-based implementation on AIX. LAMs are configured in /usr/lib/security/methods.cfg.
LDAPLightweight directory access protocol, a networking protocol for working with a directory service running over TCP/IP. Such a directory service would usually adhere to X.500, a tree of entries each possessing attributes and values for those attributes. LDAP deployments typically use DNS for simple structure most useful for casual access, but full-scale directory services are more complex with hierarchical organizational units and wide-ranging services from printers and documents themselves to groups of people, company divisions, groups, etc.
LDIFLDAP Data Interchange Format. See also Lightweight Directory Access Protocol (LDAP).
libvasPrefix associated with Authenticaiton Services runtime libraries and interfaces.
Lightweight Directory Access Protocol (LDAP)A software protocol for enabling anyone to locate organizations, individuals, and other resources such as files and devices in a network, whether on the public Internet or on a corporate intranet. LDAP is a "lightweight" version of Directory Access Protocol (DAP), which is part of X.500, a standard for directory services in a network. Netscape includes it in its latest Communicator suite of products. Microsoft includes it as part of what it calls Active Directory in a number of products including Outlook Express. The Novell NetWare Directory Services inter-operates with LDAP. Cisco also supports it in its networking products.
M
Mapped UsersMapped User allows Authentication Services to authenticate against Active Directory while taking identity and Unix attributes from local files. It is implemented by replacing the 'x' placeholder in /etc/passwd with the user principal name (UPN) (Linux and Unix only), or by creating a local-to-AD user map file and specifying the location of that file in /etc/opt/quest/vas/vas.conf (Linux, Unix, or Mac).
MIISMicrosoft Identity Integration Server; a server that manages the flow of data between all connected data sources and automates the process of updating identity information (for example, of employees, and so on) in the implementing environment.
Safeguard Authentication Services 5.0.3 Administration Guide
Glossary205
MMCMicrosoft Management Console, for which Authentication Services has a snap-in used when browsing users or groups and getting their properties.
N
NASNetwork-Attached Storage; file-level data storage connected, often remote, but not appearing as a local volume/disk. This is in opposition to SAN.
Native ModeNative Active Directory mode refers to a network being serviced completely by either Windows 2000 or Windows 2003 servers, but not both. If servers from both versions are present, the services offered can only be a common subset of the two. If all servers are running Windows 2003 Server, then all the features that this operating system offers over its predecessor are available. Not being in native mode has ramifications for various components, that is, local groups are not added to the PAC of the Kerberos ticket; group membership is not available.
NISNetwork Information Services; a Unix client-server directory service protocol, originally Sun Microsystems' "Yellow Pages." It provides centralized control over many types of network objects including users, groups, and network services like printers. NIS arose as a solution to each Unix host having its own /etc/passwd and groups files as the resident authority on users and groups when these notions needed to be extended over a network. NIS domains are flat (no hierarchy), use no authentication and the NIS map files are limited to 1024 bytes in size.
NoteCircumstance, that needs special attention.
nscdName service caching daemon; provides a cache for the most common name service request on Linux and Unix from the passwd, group, and hosts databases through standard C library interfaces including getpwnam, getpwuid, getgrnam, getgrgid, gehostbyname, and others. The configuration file is /etc/nscd.conf.
NSSName Service Switch; interface to nsswitch.conf that controls how look-ups are done for users (/etc/passwd), groups (/etc/grps), hosts (/etc/hosts), and so on. For example, getpwnam goes through NSS, which is extensible and configurable (just as is PAM), to reach variably passwd, vasd, NIS, or LDAP.
NTPNetwork Time Protocol, as implemented by a server that keeps time on the network and is accessible to other nodes for the purpose of all keeping the same notion of time.
Safeguard Authentication Services 5.0.3 Administration Guide
Glossary206
O
Organizational Unit (OU)An Active Directory container object used within domains. An organizational unit is a logical container into which users, groups, computers, and other organizational units are placed. It can contain objects only from its parent domain. An organizational unit is the smallest scope to which a group policy object can be linked, or over which administrative authority can be delegated.
OUOrganization Unit. See also Personality container.
OverrideIf a GPO specifies a policy and another GPO further down in the GPO application chain is allowed to overwrite the previously specified policy, then the policy supports override.
P
PACPrivileged Attribute Certificates, used by Kerberized applications for fine-grained access control to services, a feature of Microsoft's Kerberos implementation.
PAMPluggable Authentication Module; an architecture and shared libraries created by Sun Microsystems for the Solaris operating system that permits intervention into and specialization of the authentication process. PAMs are configured in /etc/pam.conf or in individual files off /etc/pam.d/.
PDCPrimary Domain Controller; an NT concept, emulated on Windows 2000/2003, that performs a number of crucial tasks in an enterprise including time synchronization, password replication, recording of password failures, account lock-out, and modification or creation of GPOs.
Personality containerAn Active Directory organization unit (OU) designated to contain user and group personalities. Unix clients specify a Unix personality container (vastool join -p) in order to join the domain in Unix Personality Management (UPM) mode.
Personality scopeConsists of a primary Personality container, along with any secondary Personality containers. Only the Personalities, Active Directory users, and Active Directory groups that reside within that Personality scope will be usable on the Unix system.
PKIPublic Key Infrastructure; a way to ensure secure transactions over the wire; an arrangement providing for third-party vetting of user identities typically placing
Safeguard Authentication Services 5.0.3 Administration Guide
Glossary207
any keys within a certificate. Not yet a standard; there are myriad implementations.
POSIXPortable Operating System Interface; the open operating interface standard accepted worldwide. It is produced by IEEE and recognized by ISO and ANSI.
principalIn Kerberos, this is basically a simple account including name, password, and other information stored in the database and encrypted using a master key.
provisioningThe process of providing customers or clients with accounts, the appropriate access to those accounts, all the rights associated with those accounts, and all of the resources necessary to manage the accounts. When used in reference to a client, provisioning can be thought of as a form of customer service.
Q
QASQuest Authentication Services.
R
RC4(pronounced "arcfour") The most widely used stream cipher in such popular protocols as secure sockets layer (SSL). RC4 generates a pseudo random stream of bits XOR'd with the clear-text password, for example. RC4 is more secure than DES.
realmA Kerberos term that usually maps to an Active Directory domain, not because they are the same thing, but because for implementation, it is a natural alignment.
S
SaaSSoftware-as-a-Service.
SambaA free software implementation of Microsoft's networking protocol that runs on *nix systems and is capable of integrating with an Active Directory (Windows) domain as either a primary domain controller or as a domain member. See also SMB.
SANStorage Area Network; an architecture for attaching remote storage devices (disk arrays, tape libraries, optical jukeboxes, and so on) to servers in such a way that to
Safeguard Authentication Services 5.0.3 Administration Guide
Glossary208
the operating system these appear as locally attached. This is in opposition to NAS where it is clear that the storage is remote.
Sarbanes Oxley Act (SOX)Reference to legislation enacted in response to recent and spectacular financial scandals, to protect shareholders and the general public from accounting errors and fraudulent practices. The act is administered by the Securities and Exchange Commission, which sets deadlines for compliance and publishes rules on requirements. SOX defines which records are to be stored and for how long. It also affects IT departments whose job it is to store electronic records.
schema masterA domain controller that holds the schema operations master role in Active Directory. The schema master performs write operations to the directory schema and replicates updates to all other domain controllers in the forest. At any time, the schema master role can be assigned to only one domain controller in the forest.
Secure Sockets Layer (SSL)The Secure Sockets Layer (SSL) is a commonly used protocol for managing the security of message transmission on the Internet. SSL uses a program layer located between the Internet's Hypertext Transfer Protocol (HTTP) and Transport Control Protocol (TCP) layers. SSL is included as part of both the Microsoft and Netscape browsers and most web server products. Developed by Netscape, SSL also gained the support of Microsoft and other Internet client/server developers, becoming the de facto standard until evolving into Transport Layer Security (TLS). The sockets part of the term refers to the sockets method of passing data back and forth between a client and a server program in a network or between program layers in the same computer. SSL uses the public/private key encryption system from RSA, which also includes the use of a digital certificate.
security principalAn entity that can be positively identified and verified by means of a technique known as authentication.
Simple and Protected GSS-API Negotiation Mechanism (SPNEGO)A GSSAPI mechanism that allows the secure negotiation of the mechanism to be used by two different GSSAPI implementations. In essence, SPNEGO defines a universal but separate mechanism, solely for the purpose of negotiating the use of other security mechanisms. SPNEGO itself does not define or provide authentication or data protection, although it can allow negotiators to determine if the negotiation has been subverted, once a mechanism is established.
Single Sign-On (SSO)An authentication process in a client/server relationship where the user, or client, can enter one name and password and have access to more than one application or access to a number of resources within an enterprise. Single sign-on removes the need for the user to enter further authentications when switching between applications.
Safeguard Authentication Services 5.0.3 Administration Guide
Glossary209
SkinUsed to design the online output window.
SMBServer Message Block; a protocol that exists primarily for trust relationships, the concept upon which NetBIOS is based and hence, used by DOS and Windows. The message format is used for sharing files, directories and devices. CIFS (Common Internet File System) is a synonym for SMB. See also Samba.
SnippetFlare file type that can be used to reuse content. The One Identity Safeguard Authentication Services contains various default snippets.
T
TattooingWhen files or settings are left on the system after group policy has been un-applied, the files and settings are said to be tattooed. Unless otherwise documented a policy should remove all associated settings and files when the policy is unlinked. A policy that supports non-tattooing will not leave any files or settings behind after it is un-applied.
TGSTicket-granting server, part of a key-distribution server (KDC).
TGTTicket-granting ticket, the initial ticket given by the Kerberos authentication server permitting the TGS to be contacted
TicketA voucher that isn't easily forged and proves that the bearer has properly applied for authentication to a service. In Kerberos parlance, a message containing a random key, the same one that was passed in the credential, plus the user's name, the whole being encrypted using the service's long-term key. Tickets obviate the inconvenience of using a password in that they can be supplied to different services rather than performing separate authentication of the password with each service. See credential.
TipAdditional, usefull information.
U
UIDUser identity, broad term referring to the underlying number that identifies a user in a directory.
Safeguard Authentication Services 5.0.3 Administration Guide
Glossary210
V
VASVintela Authentication Services.
vas.confConfiguration file on the path /etc/opt/quest/vas/vas.conf that is Authenticaiton Services' equivalent (and more) to Kerberos' krb5.conf.
vasdThe name of the Autentication Service daemon.
VGPQuest Group Policy, Unix group policy product.
Safeguard Authentication Services 5.0.3 Administration Guide
Glossary211
Index
A
access control 99
configuring 101
setting up 101
sudo 105
account associations 82
account matching rules 82
Account Override policies
defined 176
Active Directory configuration
changing configuration settings 15
determines schema mappings 18
moving the configuration data 18
purpose defined 18
updating 18
validates license information 18
Active Directory Group Information file 114
Active Directory User Information file 113
ActiveRoles Server option
not available if ActiveRoles Server agent is not installed 17
AD optimization 58
Administrative Template
defined 156
Group Policy extension 154
Administrative Template (ADM files) 153, 156
AIX
Configuring 42
AIX user attribute 78
allow file conflicts
resolving 102
anonymous LDAP searches 52
application configuration
overriding requirement 20
running Safeguard Authentication Services without 20
application integration 150
Change Auditor 146
installing Change Auditor 149
installing Defender 145
list of products 136
One Identity Starling 136
Apply mode 156
B
Best Practice:
add all Unix identity attributes to the global catalog 58
do not install or run Windows compon-ents on AD domain controllers 14
do not modify computer object default permissions 38
minimize Size of user cache 83
optimize AD 58
test your policy configuration prior to applying it 171
Version 3 Compatibility Mode 20
Blackout Period
configuring 48
Safeguard Authentication Services 5.0.3 Administration Guide
Index212
Index

C
Can't Login to Safeguard Authentication Services on ESX 4 104
certificate autoenrollment 119
requirements 120
setup 120
certificate distribution policy 106
change Active Directory configuration settings 18
Change Auditor integration 146
installing 149
Client-side Extension (CSEs) 153
defined 155
Client-Side Extensions policy
defined 173
Configure a User Allow Entry policy
defined 178
Configure a User Deny Entry policy
defined 179
Cron policy
defined 159
cross-domain search
performing 111
cross-forest authentication 50
Cross-forest login requirements 37
customize the schema mapping 57
D
debug logging
enabling 129
Defender
installing 145
Defender Settings policy
defined 170
Defender Settings properties 171
deny file conflicts
resolving 102
disable nss caching 40
disconnected mode 49
Display specifiers
defined 180
domain controllers
read-only 50
Dynamic File Copy policy
defined 163
E
enable debug logging 129
enterprise deployments 83
ESX 4
Access Control 104
extended attributes for AIX users
removing 78
setting 78
viewing 78
F
file ownership
Changing to match active directory 107
file transfer services
Quest OpenSSH 169
Files policy
configuring 161
defined 161
Files to Exclude List file 117
Files to Process 117
Safeguard Authentication Services 5.0.3 Administration Guide
Index213

G
GID Number 78
global settings 165
group-override file
defined 176
group-search-path 83
Group Account Override policy
defined 177
group map 96
Group Map File 115-116
Group Policy
how it works 154
Group Policy Configuration Policy
defined 173
Group Policy framework for Unix
described 154
Group Policy Object Editor (GPOE) 153, 156
Group Policy Template (GPT) 157
H
home directory
create 41
disable 41
Host Access Control 99
Host Access Control policies
defined 178
I
identity management 55
Import Source Selection 80
import Unix account data into Active Directory 80
installing
OAT 109
installing NIS components 87
installing Unix agents 87
integration with other applications 150
IPv6
support 54
J
join domain in Version 3 Compatibility Mode 20
Join to Starling 139
joining domain
determining if joined 31
joining the AD domain 32-34
K
Kerberos ticket caches 42
Keytab Files
defined 38
L
LAM module 78
LDAP BindResponse error 52
LDAP Proxy (vasproxy)
installing 52
LDAP Proxy (vasproxyd)
configuring 53
LDAP simple bind 52
legacy LDAP applications
support 52
license
adding using Group Policy utilities 170
Safeguard Authentication Services 5.0.3 Administration Guide
Index214
Any VAS 3.x or higher license is valid for 4.x. 13
installing 13
updating in the console 13
Licensing policy 170
Limitations
Microsoft does not support (GPMC) on 64-bit platforms of Windows 14
Limitations:
Kerberos ticket caches 42
RFC 2307 87
user name length 38
Loadable Authentication Module (LAM)
configuration 42
local account migration to AD 78
local cache update
causes 48
local file permissions
managing 107
logging
Unix 44
Login Prompt policy
defined 164
Logon To attribute 100-101
loopback interface 52
loopback policy processing 154
M
man pages
using 36
management console
requirements 28
managing NIS data 85
map the user name 38
Mapped User policy
defined 174
mapping local users to AD users 68
Message of the Day policy
defined 164
Microsoft Group Policy 152
Microsoft Management Console (MMC) 153
Migrating from NIS 85
N
name length limits 38
name service
increase efficiency 40
name service module
configure 46
force lowercase 40
namespace
Group Policy extension 154
nested groups 74
netgroup cache
loading 46
maintaining 98
netgroup data
accessing 46
resolving 46
Netgroup Support
Removing 47
netid map 96
network load
reducing during import 82
network traffic and load
minimize 48
NIS Client Install
AIX 92
Safeguard Authentication Services 5.0.3 Administration Guide
Index215
HP-UX 91
Linux 88
Solaris 89
NIS components
installing 87
NIS environment components 93
NIS Map Command Line Administration Utility 95
NIS Map data
managing 96
NIS Map Import Wizard
starting 93
NIS map objects
importing directly from local files 94
importing from an existing NIS server 93, 95
NIS Map Search Locations 93
NIS maps 96
NIS protocol 85
NIS proxy agent 87
NIS server
stop command 91
nisedit command options 95
nscd daemon configuration 40
NSS
configure 39
O
OAT (Ownership Alignment Tool)
defined 107
installing 109
OAT file formats 113
OAT man page
described 109
OAT match scripts
defined 111
oat_adlookup 110, 112
oat_changeowner 110, 112
rolling back changes 111
oat_match 110, 112
performing a cross-domain search 111
Offline Domain Join (ODJ) 33
one-way trust
configuring 51
OpenSSH
described 169
OpenSSH Configuration policy
defined 169
optimize AD 58
Organizational Unit (OU) 52
override user name length limit 38
Ownership Alignment Tool (OAT)
when to run 108
P
PAM authentication
enable 171
login service
defined 171
pam_defender debug
setting up 128
passwd (system utility) 67
passwd map 96
password change 66-67
password management 66
passwords
changing 66
patch level requirements 21
Safeguard Authentication Services 5.0.3 Administration Guide
Index216
Permissions
required 15, 23
personalities 72
Personality containers 72
Pluggable Authentication Module (PAM)
defined 40
Policy
OpenSSH Configuration 169
Privilege Manager Defender Settings 170
policy files
how to define 171
Policy:
Account Override 176
Client-Side Extensions 173
Configure a User Allow Entry 178
Configure a User Deny Entry 179
cron 159
Dynamic File Copy 163
Files 161
Group Account Override 177
Group Policy Configuration Policy 173
Host Access Control 178
Login Prompt 164
Mapped User 174
Message of the Day 164
Privilege Manager for Unix 171
Safeguard Authentication Services Configuration 174
Samba Configuration 165
Service Access Control 174
Sudo 168
Symbolic Link 165
Syslog 167
User Account Override 176
PowerShell 63, 76
PowerShell cmdlets 64
prerequisites 145
Privilege Manager for Unix
defined 171
Privilege Manager for Unix Policy Files 171
Processed Files List 118
PTR updates are rejected 189
R
Read-only Domain Controllers (RODCs) 50
Refresh Scripts policy
defined 157
register display specifiers 180
reload configuration settings 70
required rights 18
Requirements:
encryption types 27
network ports 29
Permissions 23
Windows Management Tools 14
Windows Permissions 15
reset computer object password 38
restart services 70
restart the LDAP Proxy service 53
restrict access to computers on the network
how to 178
Resultant Set of Policy (RSoP) 153
RFC 2307 limitation 87
RFC 2307 schema 86
RFC Classes and Attributes 86
rollback oat_changeowner changes 111
runtime configuration settings 174
Safeguard Authentication Services 5.0.3 Administration Guide
Index217
S
Safeguard Authentication Services Configuration policy
defined 174
Samba Configuration policy
defined 165
schema configuration 57
schema mappings
customizing
index and replicate GUI and UID attributes to global catalog 57
security 85
security consideration 52
self enrollment
enabling 69
SELinux
configuring 43
dependencies 43
Server-side extensions
defined 154
Service Access Control 104
Service Access Control policies
defined 174
service configuration properties 174
service settings 165
settings
global 165
service 165
Starling Two-Factor Authentication 136, 142
configuring custom LDAP attributes 141
configuring to use a proxy server 140
default prompt 142
disabling 2FA for specific PAM service 143
joining Authentication Services with Starling 139
logging in with Starling 2FA 142
requirements 137
setting up Starling users 138
unjoining 143
Startup Scripts policy
defined 158
strong authentication 143
Sudo
Access Control 105
adding Sudo rule 168
Sudo policy
defined 168
symbolic link
policy 165
Syslog
adding syslog entry 167
Syslog policy
defined 167
T
Text Replacement Macros 162-163
Ticket Granting Ticket (TGT) 42
troubleshooting 188
Troubleshooting:
changes made to NSS libraries 70
compromised host.ketab file 38
determine if joined to AD 31
Getting Help from Support 188
Long Startup Delays on Windows 189
rejected PTR updates 189
Resolving DNS Problems 193
Safeguard Authentication Services 5.0.3 Administration Guide
Index218
Resolving Preflight Failures 190
Safeguard Authentication Services can no longer authenticate with AD 49
Time Synchronization Problems 194
unable to authenticate to AD 194
Unable to Install or Upgrade 195
Unable to Join the Domain 195
Unable to Log In 196
Unix Account Tab is Missing in ADUC 196
vasypd has unsatisfied dependencies 197
U
UID Number 78
Unix Account Import Wizard 80
Unix account migration tool 80
Unix agent
requirements 21
Unix Groups 74
Unix Login Syntax 37
Unix or Linux login
flow 143
Unix Personality Management (UPM)
defined 72
Schema Extension 72
Unix Personality Mode
joining the domain 73
Unix personality objects 72
Unix Users 59, 70
Unjoin Starling 143
unregister display specifiers 181
UPM schema 72
user-override 73, 77
user-override file
defined 176
user-search-path 83
User Account Override policy
defined 176
user deployment scenarios 55
User Map File 115-116
user name
map to AD gecos attribute 38
users.allow file
configuring 178
users.deny file
configuring 179
host access control 178
users.starling file 138
V
vas daemon
re-starting 48
vas.conf
defined 37
vas_oneway_setup.sh 51
vascert 131
vasd
restart 70
vasjoin Script
using 34
vasjoin.sh
using 31
vasproxyd 52
vastool 62, 75
configure AIX 42
configure PAM 41
configure SELinux 43
passwd 66
Safeguard Authentication Services 5.0.3 Administration Guide
Index219
vastool join
Offline Domain Join 33
using 32
vasyp
start command 88-89
vasyp daemon
defined 96
vasypd 87
Version 3 Compatibility Mode 20
vgptool command
defined 154
W
workstation mode 83
Y
ypbind
restart command 89
start command 88-89
stop command 89
ypserv
stop command 89
Safeguard Authentication Services 5.0.3 Administration Guide
Index220