Veritas NetBackup™ Appliance Administrator's Guide
331
Veritas NetBackup™ Appliance Administrator's Guide Release 2.7.2 NetBackup 52xx and 5330
-
Upload
khangminh22 -
Category
Documents
-
view
3 -
download
0
Transcript of Veritas NetBackup™ Appliance Administrator's Guide

Veritas NetBackup™Appliance Administrator'sGuide
Release 2.7.2
NetBackup 52xx and 5330

Veritas NetBackup™ Appliance Administrator's GuideDocumentation version: 2.7.2
Legal NoticeCopyright © 2016 Veritas Technologies LLC. All rights reserved.
Veritas, the Veritas Logo, and NetBackup are trademarks or registered trademarks of VeritasTechnologies LLC or its affiliates in the U.S. and other countries. Other names may betrademarks of their respective owners.
This product may contain third party software for which Veritas is required to provide attributionto the third party (“Third Party Programs”). Some of the Third Party Programs are availableunder open source or free software licenses. The License Agreement accompanying theSoftware does not alter any rights or obligations you may have under those open source orfree software licenses. Please see the Third Party Legal Notice Appendix to this Documentationor TPIP ReadMe File accompanying this product for more information on the Third PartyPrograms.
The product described in this document is distributed under licenses restricting its use, copying,distribution, and decompilation/reverse engineering. No part of this document may bereproduced in any form by any means without prior written authorization of Veritas TechnologiesLLC and its licensors, if any.
THE DOCUMENTATION IS PROVIDED "AS IS" AND ALL EXPRESS OR IMPLIEDCONDITIONS, REPRESENTATIONS AND WARRANTIES, INCLUDING ANY IMPLIEDWARRANTY OF MERCHANTABILITY, FITNESS FOR A PARTICULAR PURPOSE ORNON-INFRINGEMENT, ARE DISCLAIMED, EXCEPT TO THE EXTENT THAT SUCHDISCLAIMERS ARE HELD TO BE LEGALLY INVALID. VERITAS TECHNOLOGIES LLCSHALL NOT BE LIABLE FOR INCIDENTAL OR CONSEQUENTIAL DAMAGES INCONNECTION WITH THE FURNISHING, PERFORMANCE, OR USE OF THISDOCUMENTATION. THE INFORMATION CONTAINED IN THIS DOCUMENTATION ISSUBJECT TO CHANGE WITHOUT NOTICE.
The Licensed Software and Documentation are deemed to be commercial computer softwareas defined in FAR 12.212 and subject to restricted rights as defined in FAR Section 52.227-19"Commercial Computer Software - Restricted Rights" and DFARS 227.7202, et seq."Commercial Computer Software and Commercial Computer Software Documentation," asapplicable, and any successor regulations, whether delivered by Veritas as on premises orhosted services. Any use, modification, reproduction release, performance, display or disclosureof the Licensed Software and Documentation by the U.S. Government shall be solely inaccordance with the terms of this Agreement.

Veritas Technologies LLC500 E Middlefield RoadMountain View, CA 94043
http://www.veritas.com
Technical SupportTechnical Support maintains support centers globally. Technical Support’s primaryrole is to respond to specific queries about product features and functionality. TheTechnical Support group also creates content for our online Knowledge Base. TheTechnical Support group works collaboratively with the other functional areas withinthe company to answer your questions in a timely fashion.
Our support offerings include the following:
■ A range of support options that give you the flexibility to select the right amountof service for any size organization
■ Telephone and/or Web-based support that provides rapid response andup-to-the-minute information
■ Upgrade assurance that delivers software upgrades
■ Global support purchased on a regional business hours or 24 hours a day, 7days a week basis
■ Premium service offerings that include Account Management Services
For information about our support offerings, you can visit our website at the followingURL:
www.veritas.com/support
All support services will be delivered in accordance with your support agreementand the then-current enterprise technical support policy.
Contacting Technical SupportCustomers with a current support agreement may access Technical Supportinformation at the following URL:
www.veritas.com/support
Before contacting Technical Support, make sure you have satisfied the systemrequirements that are listed in your product documentation. Also, you should be atthe computer on which the problem occurred, in case it is necessary to replicatethe problem.
When you contact Technical Support, please have the following informationavailable:
■ Product release level
■ Hardware information
■ Available memory, disk space, and NIC information

■ Operating system
■ Version and patch level
■ Network topology
■ Router, gateway, and IP address information
■ Problem description:
■ Error messages and log files
■ Troubleshooting that was performed before contacting Technical Support
■ Recent software configuration changes and network changes
Licensing and registrationIf your product requires registration or a license key, access our technical supportWeb page at the following URL:
www.veritas.com/support
Customer serviceCustomer service information is available at the following URL:
www.veritas.com/support
Customer Service is available to assist with non-technical questions, such as thefollowing types of issues:
■ Questions regarding product licensing or serialization
■ Product registration updates, such as address or name changes
■ General product information (features, language availability, local dealers)
■ Latest information about product updates and upgrades
■ Information about upgrade assurance and support contracts
■ Advice about technical support options
■ Nontechnical presales questions
■ Issues that are related to CD-ROMs, DVDs, or manuals

Support agreement resourcesIf you want to contact us regarding an existing support agreement, please contactthe support agreement administration team for your region as follows:
[email protected] (except Japan)

Technical Support ............................................................................................ 4
Chapter 1 Overview .............................................................................. 12
About NetBackup appliances .......................................................... 12About the Master Server role .......................................................... 17About the Media Server role ........................................................... 17About accessing the NetBackup Appliance Web Console ..................... 17
Web browsers supported by Appliance ....................................... 18Disabling the Untrusted Connection page in Mozilla Firefox ............. 19
About the NetBackup Appliance Shell Menu ...................................... 20About Appliance console components .............................................. 21
About using the links on the title bar ........................................... 21Accessing and using help ........................................................ 22About using Web browser bookmarks ......................................... 24Avoiding CSRF (Cross Site Request Forgery) ............................. 24
About the NetBackup Appliance Web Console login page ..................... 25NetBackup Appliance home page .................................................... 30Common tasks in Appliance ........................................................... 32About the NetBackup Appliance documentation .................................. 33
Chapter 2 Monitoring the NetBackup appliance ........................... 36
About monitoring the NetBackup Appliance ....................................... 36About hardware monitoring and alerts ............................................... 37
Monitor > Hardware options ...................................................... 37About Email notification from a NetBackup appliance ..................... 46
About Symantec Data Center Security on the NetBackupappliance .............................................................................. 47Monitor > SDCS Events ........................................................... 49Viewing SDCS audit log details ................................................. 51Filtering SDCS audit logs ......................................................... 53Setting the SDCS audit log retention specification ......................... 53About Symantec Data Center Security Downloads ........................ 55Connecting to the SDCS server ................................................. 58Revert SDCS to unmanaged mode on a NetBackup
appliance ........................................................................ 58
Contents

Implementing third-party SSL certificates ..................................... 59
Chapter 3 Managing a NetBackup appliance from theNetBackup Appliance Web Console ...................... 61
About the Manage views ................................................................ 61About storage configuration ............................................................ 64
Manage > Storage .................................................................. 68Checking partition details ......................................................... 75Resizing a partition ................................................................. 77Resize dialog ........................................................................ 79Troubleshooting resize-related issues ......................................... 80Moving a partition ................................................................... 81Move <partition> dialog ........................................................... 81Moving the MSDP partition from a base disk to an expansion disk
for optimum performance ................................................... 82Scanning storage devices from the NetBackup Appliance Web
Console ......................................................................... 85Adding the storage space from a newly available disk .................... 86Removing an existing storage disk ............................................. 87Monitoring the progress of storage manipulation tasks ................... 89Scanning storage devices using the NetBackup Appliance Shell
Menu ............................................................................. 89About Copilot functionality and share management ....................... 92About viewing storage space information using the Show command
................................................................................... 103About storage email alerts ...................................................... 115
About appliance supported tape devices ......................................... 116Adding external robots to the NetBackup appliance ..................... 116
About configuring Host parameters for your appliance ........................ 117Manage > Host > Data Buffer options ....................................... 117Configuring data buffer parameters .......................................... 119Manage > Host > Lifecycle options ........................................... 119Configuring lifecycle parameters .............................................. 123About configuring deduplication solutions .................................. 123About BMR integration ........................................................... 126Manage > Host > IPMI options ................................................ 127
Manage > Appliance Restore ........................................................ 128About creating an appliance checkpoint .................................... 129About rollback to a checkpoint ................................................. 138About NetBackup appliance factory reset ................................... 149
Manage > License ..................................................................... 161Managing license keys on the NetBackup appliance .................... 162
8Contents

Adding a permanent license key if an evaluation license keyexpires ......................................................................... 164
About the Migration Utility ............................................................. 165Selection Criteria .................................................................. 167Migration Job Status .............................................................. 171Policy Conversion ................................................................. 174Best practices to run a migration job ......................................... 177
Software release updates for NetBackup Appliances .......................... 178Manage > Software Updates ................................................... 179Methods for downloading appliance software release
updates ........................................................................ 181Installing a NetBackup appliance version 2.7.x software update
using the NetBackup Appliance Web Console ...................... 187Installing a NetBackup appliance version 2.7.x software update
using the NetBackup Appliance Shell Menu ......................... 191Appliance servers to upgrade .................................................. 193Software Updates Installation Status ......................................... 194About installing an EEB .......................................................... 195About installing NetBackup Administration Console and client
software ........................................................................ 197Manage > Additional Servers ........................................................ 202
Managing additional servers to the appliance ............................. 202Manage > Certificates ................................................................. 203
Chapter 4 Managing NetBackup appliance using theNetBackup Appliance Shell Menu ........................ 205
Expanding the bandwidth on the NetBackup appliance ....................... 205About configuring the maximum transmission unit size ....................... 206About OpenStorage plugin installation ............................................. 207
Installing OpenStorage plugin .................................................. 209Uninstalling OpenStorage plugin .............................................. 210
About mounting a remote NFS ...................................................... 211Mounting an NFS remote drive ................................................ 212Unmounting an NFS drive ...................................................... 214
About running NetBackup commands from the appliance .................... 215About NetBackup administrator capabilities ................................ 216Creating NetBackup administrator user accounts ........................ 221Deleting NetBackup administrator user accounts ........................ 225Viewing NetBackup administrator user accounts ......................... 225
About Auto Image Replication between appliances ............................ 226About Auto Image Replication between NetBackup
appliances .................................................................... 226
9Contents

About Auto Image Replication between NetBackup appliancesand deduplication appliances ............................................ 231
Chapter 5 Understanding the NetBackup appliancesettings .......................................................................... 232
About modifying the appliance settings ............................................ 232Settings > Notifications ................................................................ 234
Settings > Notifications > Alert Configuration ............................. 234Settings > Notification > Registration ........................................ 245
Settings > Network ...................................................................... 249VLAN configuration for NetBackup Appliances ............................ 249Settings > Network > Network Settings ...................................... 250Settings > Network > Fibre Transport ........................................ 266Settings > Network > Host ...................................................... 269About IPv4-IPv6-based network support .................................... 271
Settings > Date and Time ............................................................ 272Settings > Authentication .............................................................. 273
About configuring user authentication ....................................... 274About authorizing NetBackup appliance users ............................ 277Settings > Authentication ....................................................... 280Settings > Authentication > LDAP ............................................ 280Settings > Authentication > Active Directory ............................... 289Settings > Authentication > Kerberos-NIS .................................. 292Settings > Authentication > User Management ............................ 294
Settings > Password Management ................................................. 300
Chapter 6 Troubleshooting ................................................................ 302
Troubleshooting and tuning appliance from the Appliance DiagnosticsCenter ................................................................................ 302
Viewing log files using the Support command ................................... 307Where to find NetBackup appliance log files using the Browse
command ............................................................................ 309About password recovery ............................................................. 310About disaster recovery ............................................................... 310Gathering device logs with the DataCollect command ........................ 311Setting a NetBackup 5330 storage shelf component to the Service
Allowed mode ...................................................................... 314
10Contents

Chapter 7 Deduplication pool catalog backup andrecovery ........................................................................ 319
Deduplication pool catalog backup policy ......................................... 319Automatic configuration of the deduplication pool catalog backup
policy ................................................................................. 320Manually configuring the deduplication pool catalog backup
policy ................................................................................. 323Manually updating the deduplication pool catalog backup policy ........... 324Recovering the deduplication pool catalog ....................................... 325
Index .................................................................................................................. 327
11Contents

OverviewThis chapter includes the following topics:
■ About NetBackup appliances
■ About the Master Server role
■ About the Media Server role
■ About accessing the NetBackup Appliance Web Console
■ About the NetBackup Appliance Shell Menu
■ About Appliance console components
■ About the NetBackup Appliance Web Console login page
■ NetBackup Appliance home page
■ Common tasks in Appliance
■ About the NetBackup Appliance documentation
About NetBackup appliancesNetBackup appliances provide a simplified solution for NetBackup configurationand the daily management of your backup environment. The goal is to provide asolution that eliminates the need to provide dedicated individuals to manage theirbackup environment.
The appliances are rack-mount servers that run on the Linux operating system.NetBackup Enterprise Server software is already installed and configured to workwith the operating system, the disk storage units, and the robotic tape device.
You can determine what role you want to configure the appliance to perform. Youcan choose to configure a 52xx appliance as follows:
1Chapter

■ As a master server appliance
■ As a media server for use with an existing master server appliance
■ As a media server for use in an existing NetBackup environment
With each of these 52xx configurations, you get the added benefit of internal diskstorage.
A 5330 appliance is configured as a media server by default. You can choose toconfigure a 5330 appliance as follows:
■ As a media server for use with an existing master server appliance
■ As a media server for use in an existing NetBackup environment
Note: The 5330 appliance does not have internal disk space available for backupsor storage. The space available from the Primary Storage Shelf and up to twoExpansion Storage Shelves can be used for backups.
This appliance version allows for easy expansion of existing NetBackupenvironments that have NetBackup 7.7.2 or greater installed. The appliance alsoincludes its own browser-based interface. This interface is used for localadministration of the network, internal disk storage, tape libraries and much more.
NetBackup appliances support the following features:
■ Two interfaces for appliance configuration and management:
■ The NetBackup Appliance Web Console is a web-based graphical userinterface. This interface is compatible with Internet Explorer versions 9.0 andlater, and Mozilla Firefox versions 21.0 and later.
■ The NetBackup Appliance Shell Menu is a command line driven interface.For a complete description of all appliance commands, refer to the followingdocument:NetBackup Appliance Command Reference Guide
■ Copilot enables Oracle database administrators to work with NetBackupappliance administrators to perform a streamlined backup and restore processof Oracle databases.See “About Copilot functionality and share management” on page 92.
■ The NetBackup 5330 Appliance now supports a second Expansion StorageShelf. You can add a second shelf to a new or an existing system.Refer to the NetBackup 5330 Appliance Hardware Installation Guide forinstructions on how to install a second shelf.
13OverviewAbout NetBackup appliances
■ The Primary Storage Shelf and the Expansion Storage Shelf now support 6TBdisks, an enhancement over the previous 3TB disks.
Note: Individual storage shelves contain either the 3TB disks or the 6TB disks,but not both.
For more information on the hardware enhancements, refer to the NetBackup5330 Appliance Product Description Guide.
■ Starting with NetBackup appliance version 2.7.1, you can use the fully qualifieddomain name (FQDN) as the appliance host name.
■ Media Server Deduplication Pool (MSDP) is supported on all 52xx and 5330appliances. MSDP offers up to the maximum available capacity on a 52xx and5330 appliance.
■ Starting with NetBackup appliance version 2.7.1, NetBackup appliances supportNetBackup Cloud Storage for data backups and restores from cloud servicevendors.For complete details, refer to the NetBackup Cloud Administrator's Guide
■ Backup of VMware virtual machines. NetBackup appliance supports directbackup of VMware virtual machines. The appliance can back up virtual machineswithout a separate Windows system as backup host.
■ Symantec Data Center Security (SDCS) integration. The SDCS agent is installedand configured when you initially configure your appliance. By default, SDCSoperates in unmanaged mode and helps secure the appliance using host-basedintrusion prevention and detection technology. In managed mode, this agentensures that the appliance audit logs are sent to an external SDCS server tobe validated and verified.
■ BMR integration. When the appliance is configured as a master server, you canenable Bare Metal Restore (BMR) from the NetBackup Appliance Web Console.
■ IPv4-IPv6 network support. The NetBackup appliances are supported on a dualstack IPv4-IPv6 network. The NetBackup appliance can communicate with, backup, and restore an IPv6 client. You can assign an IPv6 address to an appliance,configure DNS, and routing to include IPv6 based systems. The NetBackupAppliance Web Console can be used to enter information about both IPv4 andIPv6 addresses.
■ ACSLS Support. This feature facilitates configuration of NetBackup ACS roboticson the NetBackup appliance. The appliance administrator can change the ACSLSentries in the vm.conf file on the local appliance.
14OverviewAbout NetBackup appliances

■ NetBackup SAN Client and Fibre Transport. SAN Client is a NetBackup optionalfeature that provides high-speed backups and restores of NetBackup clients.Fibre Transport is the name of the NetBackup high-speed data transport methodthat is part of the SAN Client feature. The backup and restore traffic occurs overa SAN, and NetBackup server and client administration traffic occurs over theLAN.
■ NetBackup preinstalled. Simplifies the deployment and integration into an existingNetBackup environment.
■ Tape out option. The appliance includes a gigabit, dual-port Fibre Channel hostbus adapter (HBA).Multiple FC ports can be used for tape out, as long as they are solely dedicatedto the tape out function. For more information, refer to the Veritas NetBackupAppliance Network Ports Reference Guide.
■ Hardware component monitoring. The appliance can monitor key hardwarecomponents such as the CPU, disks, memory, power supply modules, and fans.In addition, the appliance provides an optional Call Home feature that allowsproactive monitoring and messaging of these NetBackup components.
■ The NetBackup appliances support the core NetBackup software agents. TheNetBackup agents optimize the performance of critical databases andapplications.See the NetBackup Administrator's Guide Volume I for more information aboutthe policy types that are supported for each software agent. And for the latestNetBackup appliance compatibility information, refer to the HardwareCompatibility List on the Support website.www.netbackup.com/compatibility
■ Flexible hardware configuration. The appliance can be ordered in a variety ofconfigurations to provide the necessary Ethernet ports. Along with the built-inEthernet ports on the motherboard, expansion cards can be specified to provideadditional 1 GB or 10 GB Ethernet ports. Dual-port and quad-port expansioncards are supported.
For more information about hardware configuration, refer to theNetBackup HardwareInstallation Guide and NetBackup Appliance and Storage Shelf Product Descriptionfor the appropriate platform.
The following describes how you can incorporate this appliance into your currentNetBackup environment:
Replace an existing media server that runs on a platform thatis not supported in NetBackup 7.7.2.
Replace unsupported mediaservers
15OverviewAbout NetBackup appliances

■ Add the appliance to an existing NetBackup environmentor replace an existing media server that does not supportdeduplication.
■ Configure MSDP partition on the Appliance fordeduplication capability.
Add deduplication capability
■ AdvancedDisk can provide faster restore operation but isnot space-optimized like MSDP. This is a good solutionfor backups that include strict tape out schedules.Backups can be expired after duplication to MSDP andspace on AdvancedDisk freed up for next day backups.
Use AdvancedDisk fornon-deduplicated backups
■ Built-in appliance disk storage for 52xx appliancesThe internal disks can be used for additional backupstorage on a 52xx appliance.
Note: The 5330 appliance does not have internal diskspace available for backups or storage. The spaceavailable from the Primary Storage Shelf and up to twoExpansion Storage Shelves can be used for storage.
■ Additional external storageThe Storage Shelf is an external unit that providesadditional disk storage space. You can add up to four ofthese units to a NetBackup 5220 or 5230 appliance.For a NetBackup 5220 appliance, a factory matchedStorage Shelf must be connected to the appliance. TheNetBackup 5230 or 5330 appliances do not require amatched Storage Shelf.When you purchase a 5220 appliance and a StorageShelf together, the units are matched at the factory foroptimum performance. For example, if you purchase a5220 appliance with two Storage Shelf units, thefactory-matched unit must be physically connected to theappliance. The second (unmatched) unit must beconnected to the first unit, not to the 5220 appliance.If you need or want to add a Storage Shelf to an existingor an operational NetBackup appliance, your appliancemay first require a hardware and/or a memory upgrade.For more information, please contact your NetBackupappliance representative about your expansion needs.
Add more storage capability
The appliance includes a Fibre Channel host bus adaptercard for a TLD tape storage device for archive support.
Tape backup
16OverviewAbout NetBackup appliances

About the Master Server roleA NetBackup 52xx series appliance can be configured as a master server with itsown internal disk storage. You configure and use this appliance much like you woulduse a regular NetBackup master server. You can schedule backups or start a backupmanually. Users with the appropriate privileges can perform restores.
Note: The NetBackup 5330 appliance is a media server by default and is notsupported for the master server role configuration.
This appliance role provides a simplified administrative interface for the local network,disk, and storage unit management. However, the majority of NetBackupadministration such as backup management must be performed through thetraditional NetBackup Administration Console.
For complete NetBackup administration information, see the NetBackupAdministrator's Guide for UNIX and Linux, Volume I and Volume II.
About the Media Server roleIn this role, a NetBackup 52xx series appliance operates as a media server with itsown internal disk storage.
A NetBackup 5330 appliance is a media server by default. The internal storage ina 5330 appliance cannot be used for storing any data or taking any backups. Theinternal storage is used for storing the operating system, checkpoints, and logs.
Media server appliances use a simplified administrative interface for the localnetwork and for disk storage management. However, the majority of NetBackupadministration such as backup management is performed on the master server.
When you perform the initial configuration on the appliance, you specify theassociated master server:
■ For use with a traditional NetBackup master server
■ Specify master server
About accessing the NetBackup Appliance WebConsole
On a system that has a network connection to the Appliance, start a Web browser.
In the Web browser address bar, enter the following: https://host.domain
17OverviewAbout the Master Server role

host.domain is the fully qualified domain name (FQDN) of the Appliance and canalso be an IP address.
Note: The NetBackup Appliance Web Console is available only over HTTPS onthe default port 443; port 80 over HTTP has been disabled.
You must supply login credentials on the Appliance login page. For an administratorinitial login, the user name is admin and the password is P@ssw0rd or any custompassword that you chose during the initial configuration.
Note: The NetBackup Appliance Web Console and the IPMI console cannot beaccessed from an IPv6 address.
Web browsers supported by ApplianceYou can use a Web browser to access the NetBackup Appliance Web Console orthe IPMI console. The following requirements and recommendations should beconsidered for the Web browser:
■ The NetBackup Appliance Web Console and the IPMI console use pop-upmenus. If you use pop-up blockers with your Web browser, some of these menusmay not display properly. You must disable pop-up blocking or add the ApplianceWeb address to the list of acceptable sites in your browser.
■ The Web browser should have active scripting (ActiveX and JavaScript) enabled.
■ On some server-class systems, an enhanced security configuration can causesome pages to not display properly in Internet Explorer. If you encounter thisissue, add the Appliance Web Console to the Trusted-sites list and lower thesecurity setting. To resolve this issue, open Internet Explorer and select Tools> Internet Options > Security to configure the Trusted-sites list and lower thesecurity level.
■ If you use Internet Explorer 10.0 or above to access the Appliance Web console,security certificate warnings appear when you access a pop-up menu. SelectContinue to this web site (not recommended) to log on to the appliance.Once you select this option, the security certificate warnings do not appear onthe pop-up menus.
■ The NetBackup Appliance Web Console is best viewed with 1280 * 1024 or ahigher screen resolution.
Table 1-1 lists the Web browsers that Appliance supports.
18OverviewAbout accessing the NetBackup Appliance Web Console

Table 1-1 Web browsers supported by Appliance
NotesSupported VersionsWeb browser
IE 10.0 and later versions maydisplay a security certificatewarning page when you accessthe NetBackup Appliance WebConsole. SelectContinue to thiswebsite (not recommended) toaccess the console.
The Appliance Web Consolecannot be viewed on InternetExplorer 10 or later in acompatible mode. From yourbrowser, use the Tools >Compatibility View Settingsmenu and uncheck Display allwebsites in Compatibility viewto see the Appliance WebConsole.
10.0 and higher
Note: IE 8.x and 9.x are notsupported. If you are using IE 8.xor 9.x to access NetBackup, youmust upgrade to IE 10.0 or higher.
Microsoft InternetExplorer
Mozilla Firefox may display anUntrusted Connection pagewhen you access the NetBackupAppliance Web Console.
See “Disabling the UntrustedConnection page in MozillaFirefox” on page 19.
21.0 and higher
Note: If you try to access theNetBackup Appliance using earlierversions of Firefox and reset thepassword using Settings >Password, the page may hang.
Mozilla Firefox
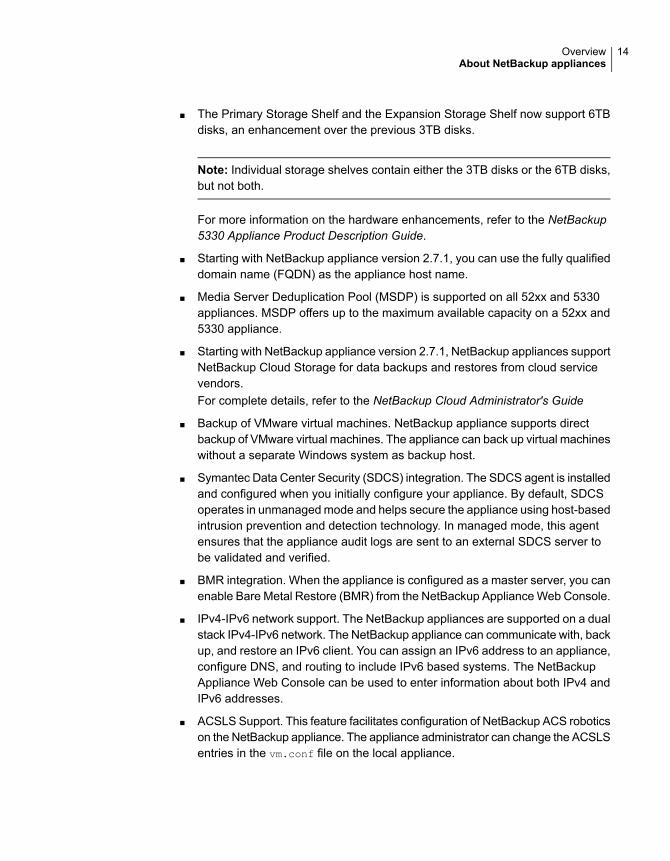
Disabling the Untrusted Connection page in Mozilla FirefoxWhen you access the NetBackup Appliance Web Console in Mozilla Firefox, youmay see the following Untrusted Connection page.
19OverviewAbout accessing the NetBackup Appliance Web Console
Your choice is either to click Get me out of here, which takes you to the MozillaFirefox start page, or click Add Exception (when you expand the I Understandthe Risks section) and permanently disable the page.
Note: If these options do not appear, consult the browser help on how to viewsecure websites.
To disable the Untrusted Connection page in Mozilla Firefox
1 On the Untrusted Connection page, expand I Understand the Risks sectionand click Add Exception.
2 In the Add Security Exception dialog box, click Get Certificate.
3 To make this exception permanent, make sure that the Permanently storethis exception option is checked. This option is checked by default.
4 Click Confirm Security Exception.
5 Restart your browser for the changes to take effect.
About the NetBackup Appliance Shell MenuNote the following about the NetBackup Appliance Shell Menu interface:
■ The NetBackup Appliance Shell Menu user interface cannot input or modifymulti-byte characters, and they are not localized to any language for this release.
■ Non-English characters are not shown on the NetBackup Appliance Shell Menuuser interface after you finish appliance configuration. This issue occurs whenyou use the NetBackup Appliance Web Console during the initial configuration
20OverviewAbout the NetBackup Appliance Shell Menu

of a NetBackup appliance. When you input non-English characters to registeryour appliance on the Registration page, the non-English characters cannot beshown on the shell menu interface.
■ Due to the introduction of the Red Hat Enterprise Linux (RHEL) Operating Systemin release 2.7.1, Secure Shell(SSH) sessions now have a limited idle time.Although the change to the RHEL operating system adds security by honoringthe current session time limit, you may experience the following issues:
■ The user is logged out automatically if the SSH session remains idle up tothe current session time limit.
■ Commands fail to complete if they require more time than the current sessiontime limit. One example where you may experience this issue is when youadd a large number of LDAP or AD users and user groups.
To help avoid these issues, keep the session alive for a longer duration byincreasing the session time limit in the SSH client. For detailed configurationinstructions, refer to your SSH client documentation.
About Appliance console componentsThis section provides information on the panes and navigation features availablein the Appliance console. You can view the console by using a Web browser.
About using the links on the title barOn the title bar of the NetBackup Appliance Web Console, theConnected To valueshows the name of the appliance, the platform like 5200, 5220, or 5230 and therole in which it has been configured. In case the appliance is configured as a mediaserver, the master server that it is connected to is also displayed.
Example: Connected To: Master 5220: nb-appliance
Here the hostname of the appliance is nb-appliance and it is a 5220 appliance thathas been configured as a master server.
Example: Connected To: Media 5230: nb-appliance | Master: app-master
Here the hostname of the appliance is nb-appliance and it is a 5230 appliance thathas been configured as a media server. It is connected to a master server namedapp-master.
On the right-side of the title bar, you may see text like Welcome [admin]. Hereadmin is the user name that is logged on to the NetBackup Appliance Web Console.
Use the links available in the title bar at the top of the console for the followingtasks:
21OverviewAbout Appliance console components

■ To access online help, click ?. An enhanced context-sensitive help systemnamed Symantec Help Center is available with the Appliance. Symantec HelpCenter is a browser-based Help delivery system with advanced search,autosuggest, and filtering capabilities. Symantec Help Center lets you searchfrom a much larger Appliance content set. Additionally you can search from theNetBackup documentation from the same Help window.More information about online Help is available.See “Accessing and using help” on page 22.
■ To disconnect from the NetBackup Appliance Web Console and to end yoursession, click Logout.
■ To see Appliance product version and copyright information, click About.
Accessing and using helpAn enhanced context-sensitive help system named Symantec Help Center is shippedwith the NetBackup Appliance. Symantec Help Center is a browser-based Helpdelivery system with advanced search, autosuggest, and filtering capabilities.
Symantec Help Center offers the following advantages over traditional Help systems:
■ Symantec Help Center lets you search from a much larger Appliance contentset. Symantec Help Center includes content from the NetBackup ApplianceAdministrator's Guide, the Troubleshooting Guide, and the Commands Guide.This means that you can search content from the NetBackup ApplianceAdministrator's Guide, the Troubleshooting Guide, and the Commands Guidecontent from one SymHelp Search window.
■ In addition to the Appliance content, Symantec Help Center lets you searchcontent from the NetBackup Administration Console Help. By default, you canview and search the Appliance content.
Figure 1-1 shows a sample view of Symantec Help Center and how you can searchAppliance and NetBackup content from Symantec Help Center.
22OverviewAbout Appliance console components

Figure 1-1 Sample view of Symantec Help Center
Enter text in theSearch box
Select the productfilters – Applianceand NetBackup
Search results fromAppliance andNetBackup contentare displayed.
Figure 1-2 Browse functionality in Symantec Help Center
The Table of Contents forAppliance and NetBackupare displayed.
Click Browse
To access and use Symantec Help Center
1 Click ? on the upper-right corner of the NetBackup Appliance Web Console.This opens a new browser window that displays context-sensitive help for thespecific page.
2 You can type the text or phrase that you want to search for, in the text box.You can also type in a query like 'About Appliance', ‘configuring NetBackupAppliance’ etc.
23OverviewAbout Appliance console components

3 To view the updated documentation content that is posted online, you must beconnected to the Internet and check Include online search.
4 You can view and search the Appliance content by default. To be able to searchNetBackup content, select NetBackup Administration Console Help from theProduct Filters section. You can then type in your NetBackup related searchquery in the search toolbar.
You can also click Browse on the left-hand side to see the table of contentsfor Appliance and NetBackup.
About using Web browser bookmarksUse your Web browser to add a bookmark for any view in the Appliance consoleand return to it as needed.
You can use the bookmark to return to the same view when you log onto the consoleagain.
Avoiding CSRF (Cross Site Request Forgery)Veritas NetBackup Appliance is introducing various features to improve the securityof your appliance. One such feature implemented from version 2.6.0.2 is to preventCSRF (Cross Site Request Forgery) in NetBackup Appliance Web Console by usingSynchronizer Token Patterns. Each request made to display a webpage in theNetBackup Appliance Web Console is protected by a unique CSRF Security token.
Which means that each time you logon to the NetBackup Appliance Web Console,a new session is created and correspondingly a new security token gets associatedwith that session. If there is any discrepancy with the security token, the followingCSRF error page is displayed:
For security reasons, access to the appliance page destination
is denied.
Access is not allowed from an external link or from a bookmarked URL.
To access the appliance page, you must first log out of the appliance and
then log in again.
Click ? for more information.
■ If you are currently logged on to the NetBackup Appliance Web Console andtry to start a new session from a new tab, only the new session is consideredas current and active. Any task you perform in the older session may displaythe CSRF error page.
■ If you try to access any page with an incorrect security token, a bookmarkedold token, or a modified token that does not match the server-side token for thesame session, the CSRF error page is displayed.
24OverviewAbout Appliance console components

See “About the NetBackup Appliance Web Console login page” on page 25.
About the NetBackup Appliance Web Consolelogin page
The login page provides the fields to enter your login credentials and also includesthe following links and information:
DescriptionSection
This section provides the following links where you canaccess NetBackup appliance information and documentation:
■ What is new in Version 2.7.2?■ Release Notes■ Administrator's Guide■ Hardware Installation and Initial Configuration Guide■ View Compatibility Lists■ View Symantec Operational Readiness Tools (SORT)
Product Information
25OverviewAbout the NetBackup Appliance Web Console login page

DescriptionSection
This section indicates whether there are NetBackup clientpackages stored on the appliance that can be installed onclients. Client packages also include the NetBackupAdministration Console. You can select to install all listedclient packages or select a specific package to install.
Note the following important points about downloading clientpackages:
■ Starting with appliance version 2.6.0.2, NetBackup clientsare no longer included with NetBackup appliance releaseupdates. If you want to store clients on the appliance, aseparate client package is available to download. Theclient packages are posted on the same Support sitewhere the appliance update releases are also posted.Client versions that are stored on the appliance do nothave to match the NetBackup version that is currentlyinstalled on the appliance.If a client package does not exist on the appliance, thefollowing message appears when you select to downloadit:
No packages found.
To download the client packages and store them on theappliance, see the NetBackup Appliance Administrator'sGuide. Refer to the topic "Downloading client packagesto a NetBackup appliance:
■ To install the NetBackup Administration Console client,you must first download the Windows client package.This client is required to access the NetBackupAdministration Console.
■ You can install the vCentre Plug-in to use vSphere Clientto monitor virtual machine backups and recover a virtualmachine from a backup.
Download Packages
26OverviewAbout the NetBackup Appliance Web Console login page

DescriptionSection
This section verifies and displays a confirmation if theNetBackup Appliance Web Console supports your browser.
The NetBackup Appliance Web Console supports InternetExplorer versions 10.0 and later, and Mozilla Firefox versions21.0 and later.
Note: Even though IE 9.x is not a supported browser, theNetBackup Appliance Web Console may flag IE 9.x as asupported browser. If you are using IE 8.x or 9.x to accessthe NetBackup Appliance Web Console, you must upgradeto IE 10.0 or higher.
Note: The NetBackup Appliance Web Console cannot beviewed on Microsoft Internet Explorer 10 or later in acompatible mode. From your browser, use the Tools >Compatibility View Settings menu to clear Display allwebsites in Compatibility view selection and view theNetBackup Appliance Web Console.
Browser Recommendation
To log on to the NetBackup Appliance Web Console
1 Enter the following URL in the web browser:
https://ip|hostname/appliance
In the URL use the IP or hostname of your appliance. The hostname is thelabel that is assigned to your appliance to identify the device in your network.
Note: If you use Internet Explorer 10.0 or higher to access the NetBackupAppliance Web Console, security certificate warnings appear when you accessa pop-up menu. Select Continue to this website (not recommended) to loginto the appliance. Once you select this option, the security certificate warningsdo not appear on the pop-up menus.
The browser displays the NetBackup Appliance Web Console login page.
Note: If the initial configuration for an appliance is in progress, do not try torun a new instance of the NetBackup Appliance Web Console. You cannot logon to the appliance thus causing an unsuccessful login.
2 Enter your user name in the Username field. The default user name is admin.
27OverviewAbout the NetBackup Appliance Web Console login page

3 Enter your password in the Password field. The default user password isP@ssw0rd, where 0 is the number zero.
Note: After the new appliance is configured and you have been registered asa user, the user name and password are sent to your registered email ID.
4 Select your preferred language from the Language drop-down list. Based onthe language you select, the labels on the NetBackup Appliance Web Consoleare displayed in that language.
English, Japanese, and Simplified Chinese web user interfaces are availablefor this release. Veritas recommends that the language that you select in theNetBackup Appliance Web Console is the same as your system locale. If thelanguage that you want to select in the NetBackup Appliance Web Console isnot the same as your system locale, you should first change the locale in thefollowing manner:
DetailsTo change the systemlocale
Log on to the shell menu and run Settings>SystemLocale List language_code.
Example: Run Settings> SystemLocale List jato browse the available locales in Japanese language.
The following locales can be displayed:
■ ja_JP.UTF-8■ ja_JP.eucJP■ ja_JP.eucjp■ ja_JP.shiftjisx0213■ ja_JP.sjis■ ja_JP.utf8
1. Browse the locales onyour system
Run Settings > SystemLocale Setlanguage_code command.
Example: Run Settings> SystemLocale Setja_JP.UTF-8 to set the ja_JP.UTF-8 locale to theAppliance.
2. Set the preferred localealong with its format
28OverviewAbout the NetBackup Appliance Web Console login page
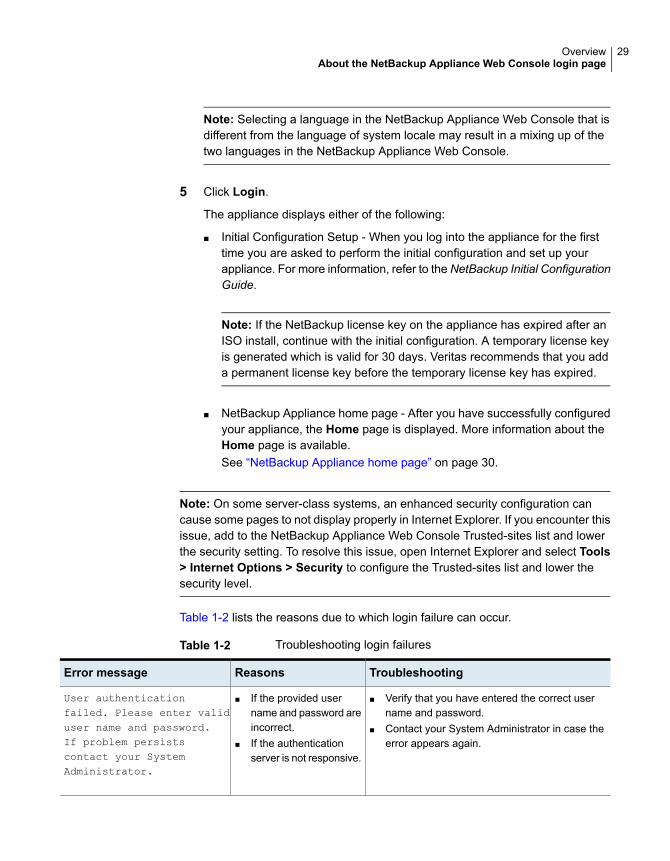
Note: Selecting a language in the NetBackup Appliance Web Console that isdifferent from the language of system locale may result in a mixing up of thetwo languages in the NetBackup Appliance Web Console.
5 Click Login.
The appliance displays either of the following:
■ Initial Configuration Setup - When you log into the appliance for the firsttime you are asked to perform the initial configuration and set up yourappliance. For more information, refer to the NetBackup Initial ConfigurationGuide.
Note: If the NetBackup license key on the appliance has expired after anISO install, continue with the initial configuration. A temporary license keyis generated which is valid for 30 days. Veritas recommends that you adda permanent license key before the temporary license key has expired.
■ NetBackup Appliance home page - After you have successfully configuredyour appliance, the Home page is displayed. More information about theHome page is available.See “NetBackup Appliance home page” on page 30.
Note: On some server-class systems, an enhanced security configuration cancause some pages to not display properly in Internet Explorer. If you encounter thisissue, add to the NetBackup Appliance Web Console Trusted-sites list and lowerthe security setting. To resolve this issue, open Internet Explorer and select Tools> Internet Options > Security to configure the Trusted-sites list and lower thesecurity level.
Table 1-2 lists the reasons due to which login failure can occur.
Table 1-2 Troubleshooting login failures
TroubleshootingReasonsError message
■ Verify that you have entered the correct username and password.
■ Contact your System Administrator in case theerror appears again.
■ If the provided username and password areincorrect.
■ If the authenticationserver is not responsive.
User authenticationfailed. Please enter validuser name and password.If problem persistscontact your SystemAdministrator.
29OverviewAbout the NetBackup Appliance Web Console login page
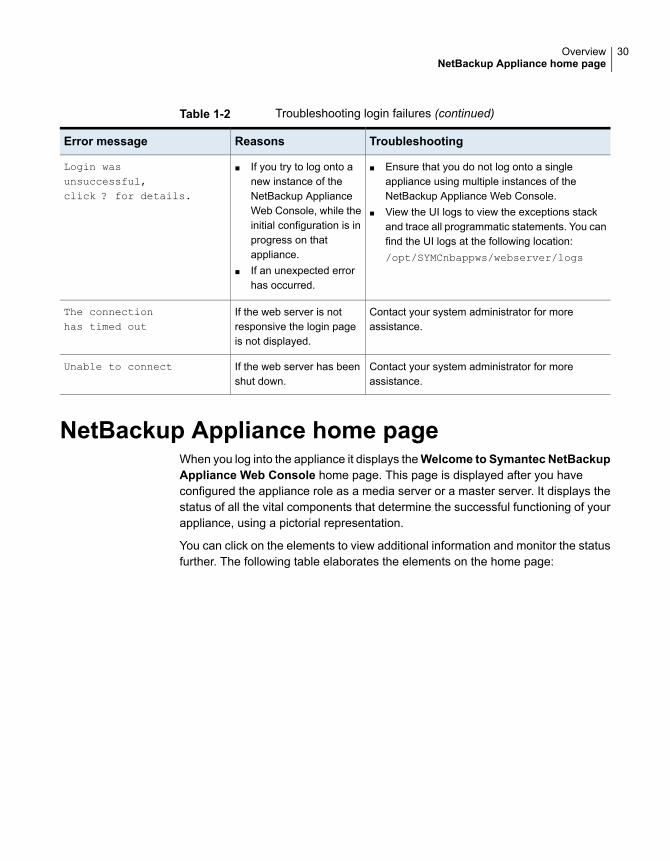
Table 1-2 Troubleshooting login failures (continued)
TroubleshootingReasonsError message
■ Ensure that you do not log onto a singleappliance using multiple instances of theNetBackup Appliance Web Console.
■ View the UI logs to view the exceptions stackand trace all programmatic statements. You canfind the UI logs at the following location:/opt/SYMCnbappws/webserver/logs
■ If you try to log onto anew instance of theNetBackup ApplianceWeb Console, while theinitial configuration is inprogress on thatappliance.
■ If an unexpected errorhas occurred.
Login wasunsuccessful,click ? for details.
Contact your system administrator for moreassistance.
If the web server is notresponsive the login pageis not displayed.
The connectionhas timed out
Contact your system administrator for moreassistance.
If the web server has beenshut down.
Unable to connect
NetBackup Appliance home pageWhen you log into the appliance it displays theWelcome to Symantec NetBackupAppliance Web Console home page. This page is displayed after you haveconfigured the appliance role as a media server or a master server. It displays thestatus of all the vital components that determine the successful functioning of yourappliance, using a pictorial representation.
You can click on the elements to view additional information and monitor the statusfurther. The following table elaborates the elements on the home page:
30OverviewNetBackup Appliance home page

Table 1-3 Home page description
Links to thepage
Helps toDisplaysElement
Manage > Storage
For moreinformation See“Manage > Storage”on page 68.
Determine the available storagespace. It enables you to take therequired steps if the storage spacehas been used to the maximum.
Displays the used storage space acrossthe appliance. The information isdynamically updated to display the currentstorage utilization.
It displays theUsed andAvailable spacewithin your storage system and iscalculated as follows:
■ Available = Sum of available spaceon all configured partitions.
■ Used = Sum of used space on allconfigured partitions.
When you log into the appliance the homepage displays the status of the Used andAvailable storage space.
Storage
This element is notlinked to anyspecific page. Forinformation on howto set thededuplicationparameters See“About configuringdeduplicationsolutions”on page 123.
Determine the quality of the databacked-up using deduplication. Lowerthe ratio, lower is the amount of databeing stored using Deduplication.
Deduplication ratio = total number ofbytes backed up (withoutDeduplication) / number of byteschanged and backed up (withDeduplication)
Displays the current deduplication ratiopertaining to all the backups taken so faracross all the media servers.
DeduplicationSummary
Monitor >Hardware
For moreinformation See“Monitor >Hardware options”on page 37.
Determine if the hardware is runningand a failure has been detected.
An error message is displayed, incase a hardware componentmalfunctions.
Displays the performance of all themonitored hardware devices.
Hardware
31OverviewNetBackup Appliance home page
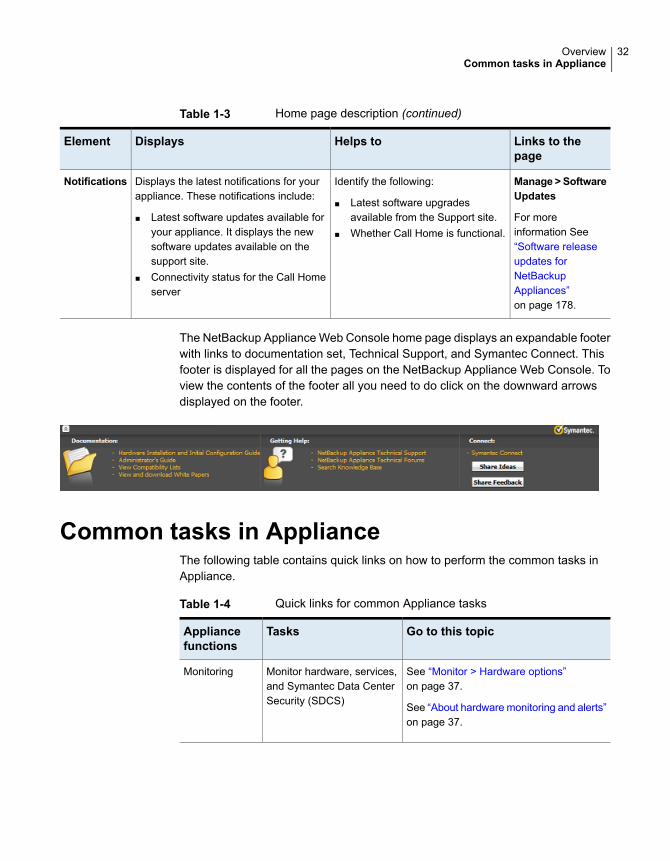
Table 1-3 Home page description (continued)
Links to thepage
Helps toDisplaysElement
Manage >SoftwareUpdates
For moreinformation See“Software releaseupdates forNetBackupAppliances”on page 178.
Identify the following:
■ Latest software upgradesavailable from the Support site.
■ Whether Call Home is functional.
Displays the latest notifications for yourappliance. These notifications include:
■ Latest software updates available foryour appliance. It displays the newsoftware updates available on thesupport site.
■ Connectivity status for the Call Homeserver
Notifications
The NetBackup Appliance Web Console home page displays an expandable footerwith links to documentation set, Technical Support, and Symantec Connect. Thisfooter is displayed for all the pages on the NetBackup Appliance Web Console. Toview the contents of the footer all you need to do click on the downward arrowsdisplayed on the footer.
Common tasks in ApplianceThe following table contains quick links on how to perform the common tasks inAppliance.
Table 1-4 Quick links for common Appliance tasks
Go to this topicTasksAppliancefunctions
See “Monitor > Hardware options”on page 37.
See “About hardware monitoring and alerts”on page 37.
Monitor hardware, services,and Symantec Data CenterSecurity (SDCS)
Monitoring
32OverviewCommon tasks in Appliance

Table 1-4 Quick links for common Appliance tasks (continued)
Go to this topicTasksAppliancefunctions
See “About configuring deduplicationsolutions” on page 123.
See “Configuring data buffer parameters”on page 119.
See “About the Migration Utility”on page 165.
See “Manage > Software Updates”on page 179.
Configure data buffer anddeduplication settings of theAppliance
Add or remove license keys
Run migration utility
Manage software updates
Managing theAppliance
See “About storage configuration”on page 64.
See “Manage > Storage” on page 68.
Resize or move partitions
View disk status and add orremove disks
View the partition distributionon a disk
Storagemanagement
See “ Manage > Appliance Restore”on page 128.
Create a checkpoint
Rollback to a checkpoint
Perform Factory Reset
Restoring anAppliance
See “About modifying the appliancesettings” on page 232.
Alert and Call Home
Network
Date and Time
User authentication andmanagement
User management
Password management
ConfiguringAppliancesettings
See “Troubleshooting and tuning appliancefrom the Appliance Diagnostics Center”on page 302.
Troubleshoot Applianceissues
Troubleshooting
About the NetBackup Appliance documentationThe following documents help to ensure that you can successfully install, configure,and use your appliance. All these documents are posted on the Support websiteat the following URL:
33OverviewAbout the NetBackup Appliance documentation
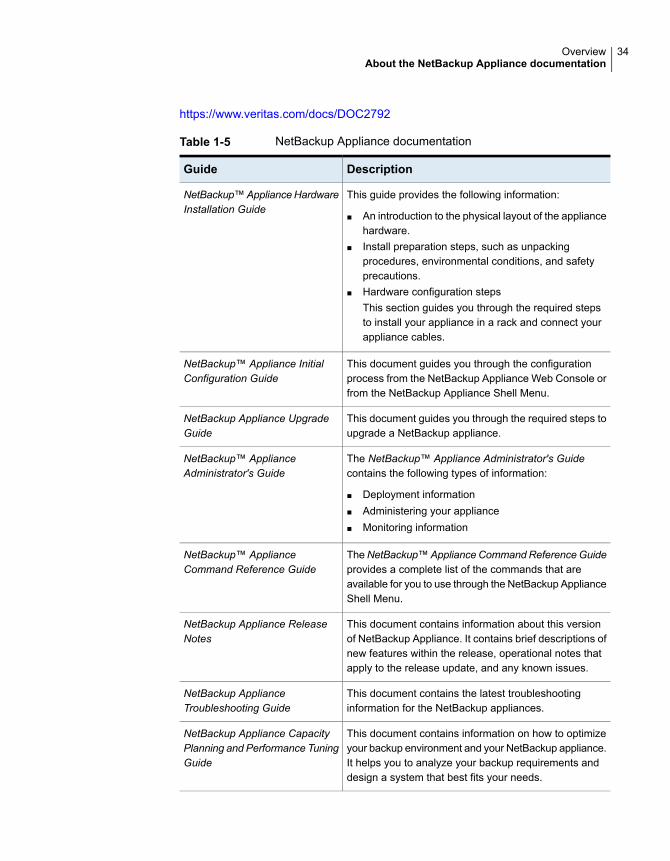
https://www.veritas.com/docs/DOC2792
Table 1-5 NetBackup Appliance documentation
DescriptionGuide
This guide provides the following information:
■ An introduction to the physical layout of the appliancehardware.
■ Install preparation steps, such as unpackingprocedures, environmental conditions, and safetyprecautions.
■ Hardware configuration stepsThis section guides you through the required stepsto install your appliance in a rack and connect yourappliance cables.
NetBackup™ApplianceHardwareInstallation Guide
This document guides you through the configurationprocess from the NetBackup Appliance Web Console orfrom the NetBackup Appliance Shell Menu.
NetBackup™ Appliance InitialConfiguration Guide
This document guides you through the required steps toupgrade a NetBackup appliance.
NetBackup Appliance UpgradeGuide
The NetBackup™ Appliance Administrator's Guidecontains the following types of information:
■ Deployment information■ Administering your appliance■ Monitoring information
NetBackup™ ApplianceAdministrator's Guide
TheNetBackup™Appliance CommandReferenceGuideprovides a complete list of the commands that areavailable for you to use through the NetBackup ApplianceShell Menu.
NetBackup™ ApplianceCommand Reference Guide
This document contains information about this versionof NetBackup Appliance. It contains brief descriptions ofnew features within the release, operational notes thatapply to the release update, and any known issues.
NetBackup Appliance ReleaseNotes
This document contains the latest troubleshootinginformation for the NetBackup appliances.
NetBackup ApplianceTroubleshooting Guide
This document contains information on how to optimizeyour backup environment and your NetBackup appliance.It helps you to analyze your backup requirements anddesign a system that best fits your needs.
NetBackup Appliance CapacityPlanning and Performance TuningGuide
34OverviewAbout the NetBackup Appliance documentation

Table 1-5 NetBackup Appliance documentation (continued)
DescriptionGuide
This document describes the security features inNetBackup Appliance and how to use those features toensure that your appliance environment is secure.
NetBackup Appliance SecurityGuide
This document describes the supported Fibre Channel(FC) capabilities and configurations for NetBackupappliances.
NetBackup Appliance FibreChannel Guide
This document describes how to decommission andreconfigure a NetBackup appliance.
NetBackup ApplianceDecommissioning andReconfiguration Guide
This document provides a complete list of the NetBackupAppliance SNMP traps. It describes what each trapmeans and the recommended actions for when an erroroccurs.
NetBackup Appliance SNMPTrapReference Guide
This document outlines how to configure Copilot usingNetBackup and the NetBackup Appliance.
NetBackup Copilot for OracleConfiguration Guide
The NetBackup Appliance Third-party Legal Noticesdocument lists the third-party software that is includedin this product, and it contains attributions for thethird-party software.
This document is available from the following website:
https://www.veritas.com/about/legal/license-agreements
NetBackup Appliance Third-partyLegal Notices
For additional information about the appliance hardware, refer to the followingdocuments:
■ NetBackup 5220 Appliance and Storage Shelf Product Description
■ NetBackup 5230 Appliance and Storage Shelf Product Description
■ NetBackup 5330 Appliance and Storage Shelf Product Description
■ NetBackup 52xx and 5330 Appliance and Storage Shelf Safety andMaintenanceGuide
35OverviewAbout the NetBackup Appliance documentation

Monitoring the NetBackupappliance
This chapter includes the following topics:
■ About monitoring the NetBackup Appliance
■ About hardware monitoring and alerts
■ About Symantec Data Center Security on the NetBackup appliance
About monitoring the NetBackup ApplianceAfter you have successfully configured your appliance, you can use any of the twouser interfaces – NetBackup Appliance Web Console or the appliance shell menuto monitor the NetBackup Appliance. You can use the Monitor menu in theNetBackup Appliance Web Console to view and monitor the following componentsof your appliance.
Table 2-1 describes the components that you can monitor using the Monitormenu:
Table 2-1 Monitor tab
TopicLets you...Monitor
See “About hardwaremonitoring and alerts”on page 37.
Monitor the hardware, the storage devices,and all the components that are associatedwith them.
Hardware
2Chapter

Table 2-1 Monitor tab (continued)
TopicLets you...Monitor
See “About Symantec DataCenter Security on theNetBackup appliance”on page 47.
Monitor the Symantec Data Center Security(SDCS) events that occur on the appliance.The SDCS agent is installed and configuredwhen you initially configure your appliance.This agent operates in unmanaged mode bydefault, but can be connected to an externalSDCS server to validate and verify yourappliance's audit logs.
SDCS Events
About hardware monitoring and alertsThe appliance has the ability to monitor itself for hardware problems. If it detects aproblem that needs attention, it uses the following notification mechanisms:
■ Hardware monitoring and alerting from the NetBackup Appliance Web Console.See “Monitor > Hardware options” on page 37.
■ Sending an email to the local administrator.See “About Email notification from a NetBackup appliance” on page 46.
■ Sending an alert to the SNMP manager.See “About SNMP” on page 239.
■ Sending a notification to Veritas using Call Home.See “About Call Home” on page 240.
We recommend that you enable Call Home so that when a problem occurs, asupport case is automatically generated, and the hardware diagnostic data is sent.These actions enable faster problem resolution.
You can also check the hardware health details of the appliance by running theMonitor > Hardware ShowHealth command using the NetBackup Appliance ShellMenu.
Monitor > Hardware optionsMonitoring the hardware components of your appliance is important for correctfunctioning of the appliance.
The Monitor > Hardware page on the NetBackup Appliance Web Console lets youmonitor the hardware, the storage devices, and all of the components that areassociated with them. If Call Home is enabled, this information is also automaticallysent to Veritas Support in the case of a serviceable event. The hardware monitoring
37Monitoring the NetBackup applianceAbout hardware monitoring and alerts

information allows Veritas to provide proactive service and helps lead to a fasterresolution of any hardware issues.
Using hardware monitoring, you can monitor the appliance hardware and storagecomponents that are listed in the following tables:
Table 2-2 Hardware components monitored in 52xx appliances
Disk,RAID, Fan,Power Supply,CPU, Temperature, Fibre ChannelHBA, PCI, Network Card, Adapter
Appliance
Disk, Fan, Power Supply, TemperatureStorage shelf
Figure 2-1 Hardware components monitored in 52xx series appliances
Table 2-3 Hardware components monitored in the 5330 appliance
Disk,RAID, Fan,Power Supply,CPU, Temperature, Fibre ChannelHBA, PCI, Network Card, Storage Connections
Appliance
Disk, Fan, Battery Backup Unit (BBU), Controller, Volume,Volume Group, Power Supply, Temperature
Primary storage shelf
Disk, Fan, Power Supply, TemperatureExpansion storageshelf
38Monitoring the NetBackup applianceAbout hardware monitoring and alerts

Figure 2-2 Hardware components monitored in the 5330 appliance
The left pane of the Monitor > Hardware page lists Appliance and Storage. Theright pane displays the Summary of components for the appliance and for theattached storage. The storage devices can include a 52xx storage shelf, a 5330primary storage shelf, or a 5330 expansion storage shelf. Click on any of thecomponents for further information, including health status and any errors orwarnings.
The information that is displayed is generated from the last Call Home heartbeat.You can click the refresh icon to get the latest hardware information:
Interpreting errors or warningsWhen any of the hardware components in the appliance report errors or warnings,the component icon is highlighted and marked with a number. If the hardware iconis highlighted in red, it denotes an error state and if it is highlighted in yellow, it
39Monitoring the NetBackup applianceAbout hardware monitoring and alerts

denotes a warning. The number denotes the number of errors or warnings that thehardware component encounters.
To get more information about the hardware health status, click the hardwarecomponent icon. Clicking a hardware component opens a pop-up window thatdisplays information about the health status of the hardware component.
Monitoring storage connectionsOn a 5330 appliance, you can view the connections between hardware componentsto check the connection status. Click on Storage Connections under Summaryof components for appliance. The following pop-up window appears:
Click on the cables between the hardware components to see an overview of theconnections between the appliance, the primary shelf, and the expansion shelf.
You can find more information on cable connections in the NetBackup ApplianceHardware Installation Guide.
Flashing a beaconOn a 52xx appliance, the Disk component for the appliance and the storage shelfincludes an option to flash a beacon. The beacon helps to locate a disk within theappliance or the storage shelf and can be used to identify a disk that requiresreplacement.
40Monitoring the NetBackup applianceAbout hardware monitoring and alerts

Note: The beacon option is not currently available for the 5330 appliance.
To flash a beacon from the Hardware > Monitor page
1 Click on the Disk icon under Summary of components for appliance orSummary of components for storage shelf.
2 In the pop-up window that appears, select the disk ID that you want to flashand click Beacon.
To flash multiple beacons at once, hold down the Shift and the Ctrl keys onthe keyboard and click on each of the disks that you want to locate. When allof your chosen disks are highlighted, click Beacon.
3 A pop-up window appears with the following message:
Enter the duration (from 1 to 300) for which the disk drive
light should flash: (in minutes)
Provide the duration for which you want the disk to flash the beacon light. Afteryou have entered the duration (in minutes), click OK.
The selected beacon flashes for the specified time. When the action is complete,the Beacon pop-up window updates with the result.
Hardware components that are monitoredThe following tables list the hardware components and their attributes that aremonitored in the appliance and in the attached storage.
Table 2-4 NetBackup 52xx and 5330 Appliance hardware that is monitored
Data collectedHardware monitored
■ 52xx: Status, Voltage, Low watermark, Highwatermark
■ 5330: Status, Voltage, Low watermark, Highwatermark, BIOS firmware version
CPU
41Monitoring the NetBackup applianceAbout hardware monitoring and alerts

Table 2-4 NetBackup 52xx and 5330 Appliance hardware that is monitored(continued)
Data collectedHardware monitored
■ 52xx: Beacon, Slot number, Status, Foreign state,Firmware version, Serial number, Capacity, Type,Enclosure ID
■ 5330: Slot number, Status, Foreign state, Firmwareversion, Serial number, Capacity, Type, EnclosureID
Note: The 5330 appliance includes two hot spares forthe OS RAID volumes. When you receive your 5330appliance, the disks that are located in slot 2 and slot5 are configured as hot spares. However, if a disk ineither RAID volume experiences a hardware error, theappliance uses one of the hot-spare disks to rebuild theRAID volume. When the faulty disk is replaced, thereplacement disk becomes the new hot spare. TheDiskicon on theMonitor > Hardware page of the NetBackupAppliance Web Console and the Monitor >Hardware ShowHealth Appliance Diskcommand in the NetBackup Appliance Shell Menu showwhich of the disks are currently configured as the hotspares. You can also use theRAID icon on theMonitor> Hardware page or the Monitor > HardwareShowHealth Appliance RAID command to checkif all hot spares are available.
Disk
■ Name, Status, Speed, Low watermarkFan
■ Status, Wattage, High watermarkPower Supply
■ WWID, Name, Status, Capacity, Type, Disks, Writepolicy, Enclosure ID, Hotspare availability
Note: The WWID in the RAID table is a unique device IDof the disk. Clicking a WWID in the RAID table directs youto the Disk tab on the Manage > Storage page of theNetBackup Appliance Web Console. The console highlightsthe disk that corresponds to the WWID that is clicked.Clicking the highlighted Disk ID (or the WWID) on theManage > Storage page opens a RAID status detailswindow. The RAID details window provides statusinformation about the RAID and the highlighted storagedisk.
RAID
42Monitoring the NetBackup applianceAbout hardware monitoring and alerts
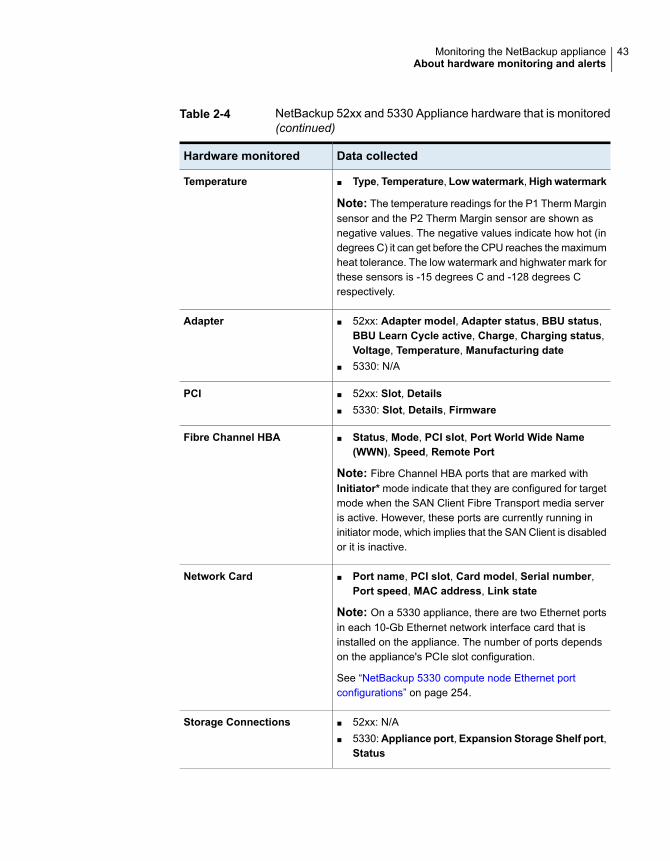
Table 2-4 NetBackup 52xx and 5330 Appliance hardware that is monitored(continued)
Data collectedHardware monitored
■ Type, Temperature, Lowwatermark,Highwatermark
Note: The temperature readings for the P1 Therm Marginsensor and the P2 Therm Margin sensor are shown asnegative values. The negative values indicate how hot (indegrees C) it can get before the CPU reaches the maximumheat tolerance. The low watermark and highwater mark forthese sensors is -15 degrees C and -128 degrees Crespectively.
Temperature
■ 52xx: Adapter model, Adapter status, BBU status,BBU Learn Cycle active, Charge, Charging status,Voltage, Temperature, Manufacturing date
■ 5330: N/A
Adapter
■ 52xx: Slot, Details■ 5330: Slot, Details, Firmware
PCI
■ Status, Mode, PCI slot, Port World Wide Name(WWN), Speed, Remote Port
Note: Fibre Channel HBA ports that are marked withInitiator* mode indicate that they are configured for targetmode when the SAN Client Fibre Transport media serveris active. However, these ports are currently running ininitiator mode, which implies that the SAN Client is disabledor it is inactive.
Fibre Channel HBA
■ Port name, PCI slot, Card model, Serial number,Port speed, MAC address, Link state
Note: On a 5330 appliance, there are two Ethernet portsin each 10-Gb Ethernet network interface card that isinstalled on the appliance. The number of ports dependson the appliance's PCIe slot configuration.
See “NetBackup 5330 compute node Ethernet portconfigurations” on page 254.
Network Card
■ 52xx: N/A■ 5330:Appliance port, Expansion Storage Shelf port,
Status
Storage Connections
43Monitoring the NetBackup applianceAbout hardware monitoring and alerts

Table 2-4 NetBackup 52xx and 5330 Appliance hardware that is monitored(continued)
Data collectedHardware monitored
■ 52xx: N/A■ 5330: Status
Note: TheStorage Status component monitors the healthof the storage array as a whole. If a Storage Status erroror warning message appears, the error cannot beacknowledged to suppress notifications. If you have CallHome enabled, Veritas is notified of the error, and aSupport ticket is opened on your behalf. Veritas Supportcontacts you shortly afterward.
If you do not have Call Home enabled and you receive aStorage Status error, contact Veritas Support forassistance.
Storage Status*
■ Partition, Total size, Used percentage, Status
Note: In the MSDP partition, the value that is displayedfor theUsed space may be different from the backup spacethat is available or used on the MSDP partition. The backupspace statistics for the MSDP partition can be obtained bychecking the MSDP disk pool sizes from the NetBackupAdministration Console.
Partition Information*
■ Queue size, Oldest tlog creation dateMSDP*
*This option is only available in the NetBackup Appliance Shell Menu, with the Main
> Monitor > Hardware commands. See the NetBackup Appliance CommandReference Guide for more information.
Table 2-5 52xx Veritas Storage Shelf hardware that is monitored
Data collectedHardware monitored
■ Beacon, Slot number, Status, Foreign state,Firmware version, Serial number, Capacity, Type,Storage shelf ID
Disk
■ Status, Speed, Low watermarkFan
■ StatusPower Supply
44Monitoring the NetBackup applianceAbout hardware monitoring and alerts

Table 2-5 52xx Veritas Storage Shelf hardware that is monitored (continued)
Data collectedHardware monitored
■ Type, Temperature, High watermark
Temperature monitoring includes the following temperaturesensors that are located on the storage shelf:
■ I/O Module1 (1)■ I/O Module1 (2)■ I/O Module2 (1)■ I/O Module2 (2)■ Backplane1■ Backplane2■ PSU1 (1)■ PSU1 (2)■ PSU2 (1)■ PSU2 (2)
Temperature
Table 2-6 5330 Primary Storage Shelf hardware that is monitored
Data collectedHardware monitored
■ Location, Status, Capacity, Associated VolumeGroup, Firmware version, Serial number
Disk
■ Location, StatusFan
■ ID, Location, StatusPower Supply
■ Location, StatusTemperature
■ Location, StatusBBU
■ Location, StatusController
■ LUN, Status, Associated Volume Group, WWID,Capacity
Volume
■ Volume Group name, Status, Associated VolumeGroup, RAID level, Capacity, Disks
Volume Group
45Monitoring the NetBackup applianceAbout hardware monitoring and alerts

Table 2-6 5330 Primary Storage Shelf hardware that is monitored(continued)
Data collectedHardware monitored
■ Primary Storage Shelf port,ExpansionStorage Shelfport, Status
Note: This option is only displayed under the PrimaryStorage Shelf from the NetBackup Appliance Shell Menu.On the NetBackup Appliance Web Console, theconnections information is included in the StorageConnections icon under the appliance.
Storage Connections
Table 2-7 5330 Expansion Storage Shelf hardware that is monitored
Data collectedHardware monitored
■ Location, Status, Capacity, Associated VolumeGroup, Firmware version, Serial number
Disk
■ Location, StatusFan
■ Location, StatusPower Supply
■ Location, StatusTemperature
About Email notification from a NetBackup applianceA NetBackup Appliance has the ability to send an email to a local administratorwhen a hardware failure is detected. You can use the Settings > Notification >Alert Configuration page of the NetBackup Appliance Web Console to configurethe email address that you want to use for hardware failure notifications. You canalso use the command from the NetBackup Appliance Shell Menu. The contentsof the email identifies the type of hardware failure that occurred and the status ofthe failure.
For complete information about how to configure email addresses using theNetBackup Appliance Shell Menu, refer to the NetBackup™ Appliance CommandReference Guide.
The following is an example of an email notification that is sent in case of anyhardware failures.
46Monitoring the NetBackup applianceAbout hardware monitoring and alerts

About Symantec Data Center Security on theNetBackup appliance
Note: In previous appliance releases, Symantec Data Center Security (SDCS) wasknown as Symantec Critical System Protection (SCSP). As part of the upgrade toNetBackup Appliance 2.7.1 and newer, the appliance SDCS agent is set tounmanaged mode. If an appliance was running in managed mode before upgrade,make sure to reset that appliance back to managed mode after the upgradecompletes.
You must also update the appliance IPS and IDS policies on your SDCSmanagement server. You cannot use the older policies to manage an appliancethat is running software version 2.7.1 or newer. The new policies can be downloadedfrom the Monitor > SDCS Events page of the NetBackup Appliance Web Console.Also note that any custom rules or support exceptions you might have for the IPSand IDS policies are not available after an upgrade to NetBackup Appliance 2.7.1.
Symantec Data Center Security: Server Advanced (SDCS) is a security solutionoffered by Symantec to protect servers in data centers. The SDCS software isincluded on the appliance and is automatically configured during appliance softwareinstallation. SDCS offers policy-based protection and helps secure the applianceusing host-based intrusion prevention and detection technology. It uses theleast-privileged containment approach and also helps security administrators
47Monitoring the NetBackup applianceAbout Symantec Data Center Security on the NetBackup appliance

centrally manage multiple appliances in a data center. The SDCS agent runs atstartup and enforces the customized NetBackup appliance intrusion preventionsystem (IPS) and intrusion detection system (IDS) policies. The overall SDCSsolution on the appliance provides the following features:
■ Hardened Linux OS componentsPrevents or contains malware from harming the integrity of the underlying hostsystem as a result of OS vulnerabilities.
■ Data protectionTightly limits appliance data access to only those programs and activities thatneed access, regardless of system privileges.
■ Hardened appliance stackAppliance application binaries and configuration settings are locked down suchthat changes are tightly controlled by the application or trusted programs andscripts.
■ Expanded detection and audit capabilitiesProvides enhanced visibility into important user or system actions to ensure avalid and complete audit trail that addresses compliance regulations (such asPCI) as a compensating control.
■ Centralized managed mode operationsLets you use a central SDCS manager for an integrated view of security acrossmultiple appliances as well as any other enterprise systems managed by SDCS.
The SDCS implementation on the appliance can operate in an unmanaged modeor a managed mode. By default, SDCS operates in an unmanaged mode and helpssecure the appliance using host-based intrusion prevention and detection technology.The NetBackup appliance is in unmanaged mode, when it is not connected to theSDCS server. In unmanaged mode, you can monitor SDCS events from theNetBackup Appliance Web Console. Use the Monitor > SDCS Events page, tomonitor the events logged. The events are monitored using the NetBackup applianceIDS and IPS policies. These policies are automatically applied at the time of initialconfiguration. Click Filter Logs to filter and view specific events.
In managed mode, the SDCS agent on the appliance continues to protect theappliance while also connecting to an external SDCS server for centralizedmanagement and log analysis. In managed mode, the appliance is connected tothe SDCS server and the events are monitored using the SDCS managementconsole. Using this mode multiple appliances can be monitored using a single SDCSserver. SDCS agents are configured with each NetBackup appliance that are usedto send events to the SDCS server.
Figure 2-3 illustrates SDCS in managed mode.
48Monitoring the NetBackup applianceAbout Symantec Data Center Security on the NetBackup appliance

Figure 2-3 SDCS implementation in managed mode
SDCS agent SDCS agent SDCS agent
11
1
2
To set up managed mode, you can install the SDCS server and managementconsole and then connect the appliance to an SDCS server.
Use Monitor > SDCS Events page to:
■ Download SDCS server and console
■ Install the server and console
■ Download NetBackup Appliance IPS and IDS policies
■ Apply these polices using the SDCS management console
■ Connect the NetBackup appliances with the server
■ Monitor events for all the NetBackup appliances connected to this server.
Use Monitor > SDCS Events > Connect to SDCS server to:
■ Add SDCS server details
■ Download authentication certificate
■ Connect to the SDCS server
For complete information about the SDCS implementation on the appliance, referto the NetBackup Appliance Security Guide.
Monitor > SDCS EventsYou can use the Monitor > SDCS Events menu to monitor the Symantec DataCenter Security (SDCS) agent and event logs.
49Monitoring the NetBackup applianceAbout Symantec Data Center Security on the NetBackup appliance

The SDCS agent is installed and configured when you initially configure yourappliance. This agent ensures that your appliance's audit logs are sent to the SDCSserver to be validated and verified.
The Monitor > SDCS Events page displays the following:
■ Filter Logs - Filter the SDCS audit logs that get displayed on the SDCS Eventspage.
■ Current Log Retention - Displays the current log retention level. When theappliance is configured in a managed mode, the status is set to Not Applicableas the audit logs are monitored using the SDCS server.
■ Set Log Retention - Set the SDCS log retention by period days or number oflog files.
■ Connect to SDCS server - Connect to an SDCS server to configure theappliance in managed mode.
■ Symantec Data Center Security Downloads - Download the SDCS serverand console, and the IPS and IDS policies.
Note: You can manually implement third-party certificates on web service supportusing the Java keystore repository of security certificates. For more information,See “Implementing third-party SSL certificates” on page 59.
Table 2-8 describes the event attributes for each sortable column of the SDCSevent viewer.
Table 2-8 SDCS event attributes
DescriptionColumns
The ID generated for each event log. The event ID can be used tosearch the event logs.
Event ID
The date and time for each event log.Date and Time
The event type for each event log. For example, if the event typeis Server Error, it denotes that a server error has occurred and isrecorded in the event logs.
Event Type
50Monitoring the NetBackup applianceAbout Symantec Data Center Security on the NetBackup appliance

Table 2-8 SDCS event attributes (continued)
DescriptionColumns
The severity of each event in the log. For example, an event likethe Server Error would be of Critical severity.
The following severity types are displayed:
■ Information - Information about normal system operation.■ Notice - Information about normal system operation.■ Warning - Unexpected activity or problems that have already
been handled by SDCS. These events might indicate that aservice or application on a target computer is functioningimproperly with the applied policy. After investigating the policyviolations, you can configure the policy and allow the service orapplication to access the specific resources if necessary.
■ Major - Activity with more effect than Warning and less effectthan Critical.
■ Critical - Indicates activity or problems that might requireadministrator intervention to correct.
Severity
The message that describes the logged event.Message
Details of each logged event. Click the Log Details pop-up windowicon to view the details of the logged event. For a list of all thepossible details that can be deisplayed, refer to the SDCSdocumentation.
Details
Viewing SDCS audit log detailsYou can view the detailed information for each Symantec Data Center Security(SDCS) logged event using the SDCS Events page. Click the Log Details pop-upwindow icon to view the details of the logged event. Table 2-9 describes the variousdetails that displayed in the Log Details pop-up window.
51Monitoring the NetBackup applianceAbout Symantec Data Center Security on the NetBackup appliance

Table 2-9 SDCS log details description
DescriptionDetail
The severity of the logged event.
The following severity types are displayed:
■ Information - Information about normal system operation.■ Notice - Information about normal system operation.■ Warning - Unexpected activity or problems that have already
been handled by SDCS. These events might indicate that aservice or application on a target computer is functioningimproperly with the applied policy. After investigating the policyviolations, you can configure the policy and allow the service orapplication to access the specific resources if necessary.
■ Major - Activity with more effect than Warning and less effectthan Critical.
■ Critical - Indicates activity or problems that might requireadministrator intervention to correct.
Event Severity
The ID assigned to the process.Process ID
The name of the policy rule that generated the event.Rule Name
The name of the policy applied to the agent that triggered the event.Process
The date and time (YYYY-MM-DD HH:MM:SS) that the eventoccurred.
Event Date
The event type for the logged event. For a detailed list of all theevent types and their descriptions, refer to the SDCS documentation.
Event Type
The sequence number of the logged event.Sequence Number
The priority (0-100) assigned to the event.Event Priority
The login mechanism for the event.Facility
The detailed or consolidated description of the event.Description
The name of the user that was logged in when the event took place.User Name
The path and name of the affected file.File Name
The size of the affected file after the logged event.New Size
The size of the affected file before the logged event.Old Size
The type of operation that was performed on the affected file.Operation
52Monitoring the NetBackup applianceAbout Symantec Data Center Security on the NetBackup appliance

Filtering SDCS audit logsThe following procedure describes how to filter the SDCS audit logs displayed onthe Monitor > SDCS Events page of the NetBackup Appliance Web Console.
To filter SDCS audit logs
1 Log in to the NetBackup Appliance Web Console.
2 Click Monitor > SDCS Events.
The Monitor > SDCS Events page contains an event viewer that displays theaudit logs for the last 6 hours.
3 Click the Filter Logs button.
The Filters dialog box is displayed.
4 Use the following fields to enter the filter criteria:
ExampleDescriptionField
Outbound connectionsEnter a search string to filteraudit logs using the parametersmentioned in the string.
Search String
1375524Enter the event ID to filter auditlogs by ID number.
Event Id
IDS AuditSelect an event type from thedrop-down list to filter the auditlogs by event type.
Events
CriticalSelect a severity type for thelogs to be filtered anddisplayed.
Severities
03/10/2011, 14.19.01 to04/10/2011, 14.19.01
Select the From and To dateand time. The appliancedisplays the audit logs for theselected time period.
From Date FromTime
To DateTo Time
5 Click the Apply button to apply the filter.
The appliance displays the relevant logs in the audit log viewer.
Setting the SDCS audit log retention specificationWhen your appliance is not connected to a Symantec Data Center Security (SDCS)server, the SDCS logs are still stored locally on the appliance. The following
53Monitoring the NetBackup applianceAbout Symantec Data Center Security on the NetBackup appliance

procedure describes how to set the audit log retention using the NetBackupAppliance Web Console.
Note: When the appliance is configured in a managed mode, the status is set toNot Applicable and the Set Log Retention button is disabled. That is becausethe audit logs are monitored using the connected SDCS server.
To set the audit log retention
1 Log in to the NetBackup Appliance Web Console.
2 Click Monitor > SDCS Events.
3 The Monitor > SDCS Events page contains an event viewer that displays theaudit logs for the last 6 hours.
Note: If the appliance is running in managed mode the SDCS events viewerdoes not display the audit logs.
4 Click on the Set Log Retention button, to set the retention period or log filenumber.
The appliance displays the Retention Settings dialog box.
54Monitoring the NetBackup applianceAbout Symantec Data Center Security on the NetBackup appliance

5 You can set the retention using the following fields:
DescriptionField
Select this radio button to set the log retention in number ofdays.
The retention period setting considers the date on which a logfile is modified over the date on which the file is created. Forexample, if the retention period is set to two days. The filesthat have been modified in the last two days will not be pruned,even though their creation data is older than two days.
Period
Enter the number of days. The appliance stores the SDCSaudit logs for the specified number of days. This field isenabled, when you select the Period radio button.
Days
Select this radio button to enter the number of log files to beretained.
Number of Logs
Set the audit number of files. Size of each file is 10 MB.FileNumber
6 Click OK to set the retention specifications.
The appliance applies the retention specifications and stores the logsaccordingly.
About Symantec Data Center Security DownloadsBy default, SDCS operates in an unmanaged mode and helps secure the applianceusing host-based intrusion prevention and detection technology. In managed mode,the SDCS agent on the appliance continues to protect the appliance while alsoconnecting to an external SDCS server for centralized management and log analysis.The unmanaged mode lets you segregate the tasks of a backup administrator anda security administrator, where in a security administrator is provided with the abilityto monitor and manage the security options for all of the NetBackup appliancesincluded in a large enterprise.
The following are required to run the appliance in unmanaged mode:
■ A management server running the Symantec Data Center Security: ServerAdvanced 6.5 or later.
■ A computer running the Symantec Data Center Security: Server Advancedmanagement console. (The SDCS management console is required to applythe IPS and IDS policies.)
55Monitoring the NetBackup applianceAbout Symantec Data Center Security on the NetBackup appliance

The SDCS server and console software as well as the appliance IPS and IDSpolicies can be downloaded from the Monitor > SDCS Events page of theNetBackup Appliance Web Console.
Warning: You must apply the downloaded IPS and IDS policies as soon as youconnect the appliance to the SDCS server. Without applying the policies, therewon’t be any intrusion prevention and intrusion detection policies on the system tobe enforced by the SDCS agent.
Downloading the SDCS server and console software fromthe NetBackup applianceThe following procedure describes how to download the SDCS server and consolesoftware packages from the SDCS Events page.
To download the SDCS server and console:
1 Log in to the NetBackup Appliance Web Console.
2 Click Monitor > SDCS Events.
3 Under Symantec Data Center Security Downloads, click SDCS Server andConsole to download the installation packages for the SDCS server andconsole.
The sdcs_server.zip file is downloaded to your local computer.
4 Extract the contents from the sdcs_server.zip file.
The SDCSInstall folder contains the following:
■ server.exe - used to install the Symantec Data Center Security: ServerAdvanced management server.An installation wizard is used to help you install the management server.For more information about installing the SDCS management server, referto the Symantec Data Center Security Installation Guide available at thefollowing location: http://www.symantec.com/docs/DOC7979.
■ console.exe - used to install the Symantec Data Center Security: ServerAdvanced management console.An installation wizard is used to help you install the management console.For more information about installing the SDCS management console, referto the Symantec Data Center Security Installation Guide available at thefollowing location: http://www.symantec.com/docs/DOC7979.
56Monitoring the NetBackup applianceAbout Symantec Data Center Security on the NetBackup appliance

Downloading the IPS and IDS policies from the NetBackupapplianceThe following procedure describes how to download the NetBackup appliance IPSand IDS policies for using Symantec Data Center Security (SDCS) in unmanagedmode.
To download NetBackup appliance IPS and IDS policies:
1 Log in to the NetBackup Appliance Web Console.
2 Click Monitor > SDCS Events.
3 Under Symantec Data Center Security Downloads, click NetBackupAppliance IPS and IDS Policies to download the IDS and IPS policies.
The SDCSSPolicies.zip file is downloaded to your local folders.
4 Extract the contents from the SDCSSPolicies.zip file.
The SDCSSPolicies folder contains the following:
■ NetBackup Appliance Detection Policy.zip - contains the IDS policy.This policy is an “after-the-fact” IDS for monitoring important significantevents and optionally taking remediation actions on events of interest.
■ NetBackup Appliance Prevention Policy.zip - contains the IPS policy.This policy is an “in-line” IPS that can proactively block unwanted resourceaccess behaviors before they can be acted upon by the operating system.
Note: These policies help to validate the events that take place on applianceand can be monitored by either using the Monitor > SDCS Events page in anunmanaged mode or the SDCS management console.
5 After you have set up the SDCS server and connected the appliance to it, usethe SDCS management console to apply the IPS and IDS policies.
See “Connecting to the SDCS server” on page 58.
For instructions on how to apply policies using the SDCS management console,refer to the Symantec Data Center Security: Server Advanced Administrator'sGuide at the following location: http://www.symantec.com/docs/DOC7979
Warning: You must apply the downloaded IPS and IDS policies as soon asyou connect the appliance to the SDCS server. Without applying the policies,there won’t be any intrusion prevention and intrusion detection policies on thesystem to be enforced by the SDCS agent.
57Monitoring the NetBackup applianceAbout Symantec Data Center Security on the NetBackup appliance

Connecting to the SDCS serverThe following procedure describes how to connect to the Symantec Data CenterSecurity (SDCS) server from the SDCS Events page of the NetBackup ApplianceWeb Console.
Note: You cannot connect to an SDCS server without providing its authenticationcertificate. You can either download the certificate from the site or point to adownloaded certificate earlier, from your local folders.
To connect an SDCS server
1 Log in to the NetBackup Appliance Web Console.
2 Click SDCS Events.
3 Under Connect to SDCS server, click Connect.
The Connect to SDCS Server dialog box appears.
4 Enter a valid host name or IP address of the SDCS server in the Host Name/ IP field.
5 Enter the port number of the SDCS server in the Port field.
6 Select either Download authentication certificate from the SDCS serveror Provide the location for the existing certificate.
The appliance displays the certificate details.
7 Click on Accept Certificate to accept the certificate.
The appliance displays the Certificate issued message.
8 Click Connect to connect to the SDCS server.
The appliance has connected to the SDCS server successfully when thefollowing message appears:
Connected successfully to SDCS server.
Revert SDCS to unmanaged mode on a NetBackup applianceIf you have set up an appliance to operate in managed mode, you can use thefollowing procedure to revert it back to unmanaged mode and disconnect it fromthe SDCS server:
58Monitoring the NetBackup applianceAbout Symantec Data Center Security on the NetBackup appliance

To revert the NetBackup appliance from managed mode back to unmanagedmode
1 Log in to the NetBackup Appliance Web Console.
2 Click Monitor > SDCS Events.
3 Under Connect to SDCS server, click Connect.
The Connect to SDCS Server dialog box appears.
4 Enter 127.0.0.1 or localhost in the Host Name / IP field.
5 Enter the port number of the appliance in the Port field.
6 Click Connect.
The appliance reverts to the unmanaged mode.
Implementing third-party SSL certificatesYou can manually add and implement third-party certificates for the web servicesupport. The appliance uses the Java KeyStore as the repository of securitycertificates. A Java KeyStore (JKS) is a repository of security certificates, like theauthorization certificates or the public key certificates that are used for instance inSSL encryption. If you want to implement third-party certificates, use the followingprocedure:
To implement third-party SSL certificates:
1 Prepare keystore file for web services. The procedure varies with the type ofPKCS (Public-key Cryptography Standards) you use, the following tabledescribes the steps to use PKCS# 7 and PKCS# 12 standard formats
Preparing keystore filesPKCS format
You can use the following link:https://knowledge.verisign.com/support/ssl-certificates-support/index.html
PKCS#7 or X.509format
59Monitoring the NetBackup applianceAbout Symantec Data Center Security on the NetBackup appliance

Preparing keystore filesPKCS format
1 Convert PEM formatted x509 Cert and Key to a PKCS# 12,using the following commands:
openssl pkcs12 export -in server.crt -inkeyserver.key -out server.p12 -name some-alias-CAfile ca.crt -caname root
For more information on openssl usage, refer tohttp://www.openssl.org/.
Note: Ensure that you put a password on the PKCS #12 file.When the password is not applied to the file, you may get anull reference exception when you try to import the file
2 Convert the pkcs12 file to a Java Keystore using the followingcommands:
keytool -importkeystore -deststorepasschangeit -destkeypass changeit -destkeystoreserver.keystore -srckeystore server.p12-srcstoretype PKCS12 -srcstorepass some-password -alias some-alias
For more information on keytool usage, refer tohttp://docs.oracle.com/javase/6/docs/technotes/tools/solaris/keytool.html
PKCS#12 format
2 Shutdown web service using the following command:
/etc/init.d/nbappws stop
3 Replace the existing keystore file with your new keystore file. The default filename is /opt/SYMCnbappws/Security/keystore.
4 Correct the following information in the configuration files:
■ Change the keystoreFile and keystorePass settings in the/opt/SYMCnbappws/config/server.xml.
■ Change the keystoreFile and keystorePass settings in the/opt/SYMCnbappws/webserver/conf/server.xml.
■ Change the javax.net.ssl.trustStore andjavax.net.ssl.trustStorePassword settings in the/opt/SYMCnbappws/bin/startgui.sh.
5 Startup web service using the following command:
/etc/init.d/nbappws start
60Monitoring the NetBackup applianceAbout Symantec Data Center Security on the NetBackup appliance

Managing a NetBackupappliance from theNetBackup Appliance WebConsole
This chapter includes the following topics:
■ About the Manage views
■ About storage configuration
■ About appliance supported tape devices
■ About configuring Host parameters for your appliance
■ Manage > Appliance Restore
■ Manage > License
■ About the Migration Utility
■ Software release updates for NetBackup Appliances
■ Manage > Additional Servers
■ Manage > Certificates
About the Manage viewsThe NetBackup Appliance enables you to use the NetBackup Administration Consoleto manage your clients, create policies, run backups, and perform other
3Chapter
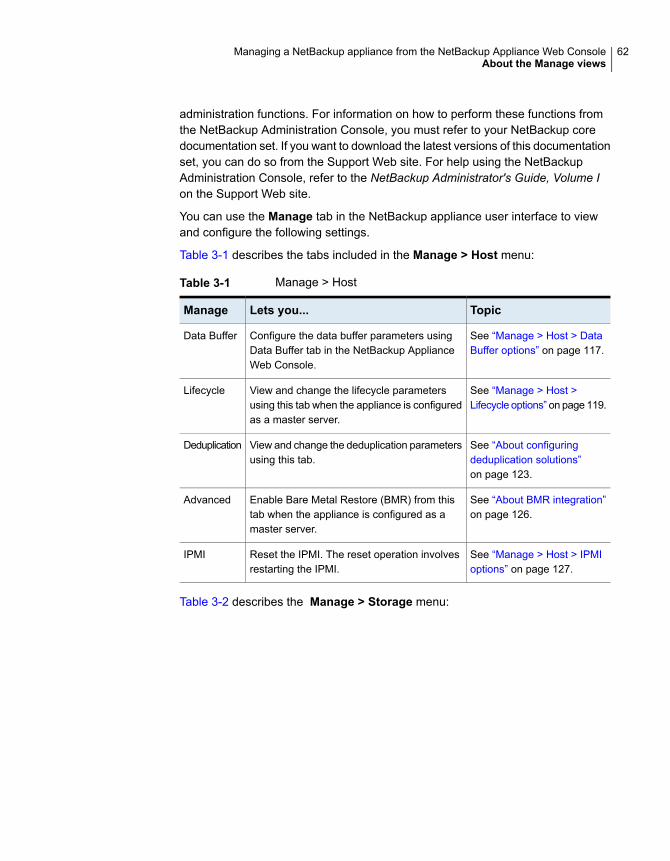
administration functions. For information on how to perform these functions fromthe NetBackup Administration Console, you must refer to your NetBackup coredocumentation set. If you want to download the latest versions of this documentationset, you can do so from the Support Web site. For help using the NetBackupAdministration Console, refer to the NetBackup Administrator's Guide, Volume Ion the Support Web site.
You can use the Manage tab in the NetBackup appliance user interface to viewand configure the following settings.
Table 3-1 describes the tabs included in the Manage > Host menu:
Table 3-1 Manage > Host
TopicLets you...Manage
See “Manage > Host > DataBuffer options” on page 117.
Configure the data buffer parameters usingData Buffer tab in the NetBackup ApplianceWeb Console.
Data Buffer
See “Manage > Host >Lifecycle options” on page 119.
View and change the lifecycle parametersusing this tab when the appliance is configuredas a master server.
Lifecycle
See “About configuringdeduplication solutions”on page 123.
View and change the deduplication parametersusing this tab.
Deduplication
See “About BMR integration”on page 126.
Enable Bare Metal Restore (BMR) from thistab when the appliance is configured as amaster server.
Advanced
See “Manage > Host > IPMIoptions” on page 127.
Reset the IPMI. The reset operation involvesrestarting the IPMI.
IPMI
Table 3-2 describes the Manage > Storage menu:
62Managing a NetBackup appliance from the NetBackup Appliance Web ConsoleAbout the Manage views

Table 3-2 Manage > Storage
TopicLets you...Manage
See “Manage > Storage”on page 68.
View a graphical representation of the storagepartitions within your appliance. The donutchart shows the storage partitions that areconfigured.
CapacityDistributionsection
View an overview of storage capacity usageranges for specific periods of time.
CapacityChartsection
View details about all the partitions that areconfigured on the Appliance.
Partitionssection
View a tabular representation of the storagedisks that comprise your appliance and thestorage shelves that are attached to it.
Diskssection
Table 3-3 describes the tabs included in the Manage > Migration Utility menu:
Table 3-3 Manage > Migration Utility
TopicLets you...Manage
See “Policy Conversion”on page 174.
Select the start time, the migration window(duration), the source disk pool where thecurrent backup images reside, and thedestination (target) disk pool where you wantthe images migrated.
PolicyConversion
See “Selection Criteria”on page 167.
Change the policy that you want to use for thebackups that are now targeted for thedestination disk pool.
SelectionCriteria
See “Migration Job Status”on page 171.
View the status and the result of all thescheduled migration jobs.
MigrationJob Status
Table 3-4 describes the individual following sub-menus under the Manage menu:
63Managing a NetBackup appliance from the NetBackup Appliance Web ConsoleAbout the Manage views

Table 3-4 Manage > Appliance Restore, License, Software Updates,Additional Servers
TopicLets you...Manage
See “ Manage > ApplianceRestore” on page 128.
Reset the appliance to a specific state. Thatstate can be an original factory state or a statethat is determined through the use ofcheckpoints.
ApplianceRestore
See “Manage > License ”on page 161.
Review, add, and delete license keys throughthe administrative Web UI.
NetBackupLicense
See “Software releaseupdates for NetBackupAppliances” on page 178.
View, install, or delete a software update onyour appliance. This screen contains two tablesthat show the software updates that areavailable for you to download for your applianceand the software updates that you can chooseto install or delete. This screen also displaysthe NetBackup Appliance software version thatis currently installed on your appliance.
SoftwareUpdates
See “Manage > AdditionalServers” on page 202.
Add or delete additional servers. This tab letsyou add an entry to the NetBackup bp.conf file.The bp.conf file allows communication to occurbetween the appliance and the WindowsNetBackup Administration Console, so you canmanage your appliance through that console.
Note: This tab is only displayed for anappliance configured as a master server.
AdditionalServers
About storage configurationThe NetBackup Appliance Web Console enables you to manage the storageconfiguration. You can use the Manage > Storage pane to manage the storagespace.
The NetBackup 5220 and 5230 appliance is available for use with up to four storageshelves. The storage shelves provide you with additional disk storage space. Afteryou have physically connected the storage shelves, use the NetBackup ApplianceWeb Console to manage the storage space.
The NetBackup 5330 appliance must be connected to one Primary Storage Shelf.The storage space can be expanded by using up to two Expansion Storage Shelves.After you have physically connected the Expansion Storage Shelf, use theNetBackup Appliance Web Console to manage the storage space.
64Managing a NetBackup appliance from the NetBackup Appliance Web ConsoleAbout storage configuration

Note: The 5330 appliance (base unit) does not have internal disk space availablefor backups or storage. It only stores the OS, logs, checkpoints etc. The spaceavailable from the Primary Storage Shelf and the Expansion Storage Shelf can beused for backups.
If you have a NetBackup 5330 Appliance with an Expansion Storage Shelf, thefollowing restrictions apply:
■ Moving an Expansion Storage Shelf from one 5330 appliance to another 5330appliance is not supported.
■ Moving disk drives within an Expansion Storage Shelf is not supported.
Figure 3-1 provides a bird's-eye view of how storage space is configured withinyour 52xx appliance.
Figure 3-2 provides a bird's-eye view of how storage space is configured withinyour 5330 appliance.
Figure 3-1 NetBackup 52xx Appliance storage space
Storage Partitions
NetBackup 52xx Appliance Storage
Disks
NetBackup 52xx Appliance
System Disk(OS, logs etc.)
You canconnect up tofour storage
shelves for 5220 and5230 platforms.
For a 5200 appliance, the storage is available on theAppliance base unit only and cannot be expandedusing storage shelves.For 5220 and 5230 appliances, the storage can beexpanded by using storage shelves.
Base Disk
ExpansionDisk 1
StorageSpace
ExpansionDisk 2
AdvancedDisk
NetBackup Catalog(Master appliance only)
Configuration
MSDP
UnallocatedExpansion
Disk 3Expansion
Disk 4
MSDP Catalog
Share
65Managing a NetBackup appliance from the NetBackup Appliance Web ConsoleAbout storage configuration

Figure 3-2 NetBackup 5330 Appliance storage space
Storage Partitions
NetBackup 5330 Appliance Storage
NetBackup 5330 Appliance
A 5330 appliance musthave one PrimaryStorage Shelf. You canconnect up to twoExpansionStorage Shelves(optional).
PrimaryStorage
Shelf
StorageSpace
ExpansionStorageShelf
(optional)
6 DataDisks
1 MetaDisk
6 DataDisks
1 MetaDisk
2 System Disks(OS, logs etc.)
6 DataDisks
Advanced Disk
MSDP Catalog(resides on MetaDisk)
Configuration
MSDP
Unallocated
1 MetaDisk
ExpansionStorageShelf
(optional)
6 DataDisks
Share
Figure 3-3 lists the tasks that you can perform on the appliance storage space.
66Managing a NetBackup appliance from the NetBackup Appliance Web ConsoleAbout storage configuration

Figure 3-3 Storage operations
Storage Operations
ScanRefreshes the storage disks and devices information.Command - Scan
Tasks performed on Storage Disks Tasks performed on Storage Partitions
Show DistributionShows the distribution of partitions on a disk.Command - Show Distribution
RemoveRemoves disk space from the unallocated space.Command - Remove <Disk ID>
Show DiskShows the disk’s total and unallocated storagecapacity and status.Command - Show Disk
Tasks Common to Disks and partitions
AddAdds a disk in the New Available state. Adds disk space tothe unallocated storage.Command - Add <Disk ID>
MonitorDisplays progress of storage management taskslike Add, Remove, and so on.Command - Monitor
ResizeCreate, resize, or delete a partition. You candelete a partition if Appliance is in a factorystate (not configured as a master or media server).Command - Resize <Partition> <Size> <Unit>
To perform the tasks listed below:- Go to Manage > Storage > Partitions in theAppliance console.
- Use the Manage > Storage shell menu
MoveMoves the partition from one disk to another.Command - Move <Partition> <SourceDisk><TargetDisk> [Size] [Unit]
Show PartitionShows the partition’s total, available, and usedstorage capacity. You can also view configurationand usage information for all partitions or specificpartitions.Command - Show Partition<All/Configuration/Usage> [PartitionType]
To perform the tasks listed below:- Go to Manage > Storage > Disks in the Applianceconsole.- Use the Manage > Storage shell menu
CreateCreates a share partition only.Command - Create Share
DeleteDeletes a share partition only.Command - Delete Share <ShareName>
EditEdits the description and client details of a share.Command - Edit Share <Details> <ShareName>
67Managing a NetBackup appliance from the NetBackup Appliance Web ConsoleAbout storage configuration

All the tasks that can be performed on the NetBackup Appliance Web Console canalso be performed by using the Manage > Storage shell menu.
For more information about Main > Manage > Storage commands, refer toNetBackup™ Appliance Command Reference Guide.
Manage > StorageThe Manage > Storage menu enables you to manage the storage configuration.Use the Capacity Distribution section to quickly view the storage configuration.From the Partitions and Disks sections, you can manage this storage space.
Figure 3-4 shows a sample view of Manage > Storage page for a 5330 appliance.
Figure 3-4 Manage > Storage page for a 5330 appliance
CapacityDistribution
Capacity Chart
Legend
DoughnutChart
PartitionsSection
DisksSection
68Managing a NetBackup appliance from the NetBackup Appliance Web ConsoleAbout storage configuration

The Capacity Distribution section provides a graphical representation of thestorage partitions within your appliance. The doughnut chart shows the storagepartitions that are configured. It also shows how each partition is sized. The legendthat adjacent to the doughnut chart displays the color and size of each partition.Only the configured partitions display as links in the legend and can be clicked.
TheCapacity Chart section provides an overview of storage capacity usage rangesfor specific periods of time. You can select one week to one year from the drop-downlist. When you select Trend from the drop-down list, Netbackup Appliance analyzesthe past storage capacity usage, and calculates when the available storage is fullyused.
Appliance collects the capacity usage data at 1:00 AM (server time) everyday andupdates the capacity chart several minutes later. It indicates that the display of thecapacity chart is not real time but has one-day delay. For example, to check thecapacity usage by 2015-10-10, you need to wait until 1:05 AM on 2015-10-11.
Depending on your appliance platform, the appliance storage is divided using thefollowing storage partitions:
AdvancedDisk enables you to back up and restore data at a faster rate. Itdoes not involve any deduplication.
AdvancedDisk
This partition contains metadata for NetBackup which includes informationregarding backups, storage devices, and configuration. The NetBackupCatalog partition is only supported on an appliance master server.
The NetBackup Catalog is always located on a Base disk on a 52xx appliance.
NetBackupCatalog
A storage partition that stores configuration information.Configuration
The allocated space for Media Server Deduplication (or MSDP) on yourappliance.
On a 5220 or 5230 appliance, the MSDP partition should reside on anexpansion disk for optimum performance.
See “Moving the MSDP partition from a base disk to an expansion disk foroptimum performance” on page 82.
MSDP
This partition contains metadata for MSDP which includes informationregarding MSDP backups.
On the 52xx appliances, the MSDP Catalog partition can either exist on theBase or the Expansion disk. On a 5330 appliance, the MSDP Catalog partitionis located on a dedicated disk that called the Metadisk. The Metadisk containsthe MSDP Catalog partition only.
MSDPCatalog
This partition contains all of the shares that have been allocated for databasebackups.
Share
69Managing a NetBackup appliance from the NetBackup Appliance Web ConsoleAbout storage configuration

The storage space that has not been allocated to the other partitions (includesall partitions that are displayed except Unallocated). When you expand thestorage space for partitions like MSDP, AdvancedDisk, it is used from theUnallocated space.
When you add a disk, the size of the Unallocated space increases. The sizeof the MSDP, AdvancedDisk, and any other partition remains the same.
Unallocated
See the NetBackup documentation for more information on partitions.
Table 3-5 lists the supported sizes and platforms for each partition.
Table 3-5 Appliance storage partitions
SupportedPlatformsMaximumsupportedsize
Minimumsupported size
PartitionName
5200, 5220, 5230
5330
Maximum availablecapacity
1 GBAdvancedDisk
5200, 5220, 5230
(master server only)
4 TB (Master server)250 GB (Masterserver)
NetBackupCatalog
5200, 5220, 5230
5330
500 GB25 GBConfiguration
5200, 5220, 5230
5330
Maximum availablecapacity
5 GBMSDP
5200, 5220, 5230, 533025 TB5 GBMSDPCatalog
5230, 5330Maximum availablecapacity
The limit for eachindividual share is 250TB
5 GBShare(Copilot)
The Partitions section displays details about all the partitions that are configuredon the Appliance. The following columns are displayed in the Partitions table:
70Managing a NetBackup appliance from the NetBackup Appliance Web ConsoleAbout storage configuration

DescriptionColumn Name
Displays the name of the partition.Example: AdvancedDisk
Clicking the partition name opens another page that shows detailsabout the specific partition and also lets you resize and move thepartition.
Checking partition details lists details about the partition.
Partition
Displays the status of the partition.
Example: Optimal
Table 3-6 describes each partition status.
Status
Displays the used space within a partition.
Example: 13.70 GB
Used
Displays the free space within a partition.
Example: 1.62 TB
Available
Displays the total space within the partition.
Example: 1.63 TB
Total
Displays the percentage of used space in the partition.
Example: 2%
Used Percentage
Note: The sizes that are displayed for the MSDP partition on theManage > Storagepage or by using the Manage > Storage > Show command on the NetBackupAppliance Shell Menu may not be the full space that is available or used by theMSDP partition. This is because space is reserved by the file system and also byMSDP. The file system reserves space for it's own use. In addition, MSDP reserves4 percent of the storage space for the deduplication database and transaction logs.For more information, see the NetBackup Deduplication Guide
Check the MSDP disk pool sizes displayed on the NetBackup Administration Consoleto know the MSDP statistics.
Table 3-6 describes the various partition status that is displayed next to the partitiontype.
71Managing a NetBackup appliance from the NetBackup Appliance Web ConsoleAbout storage configuration

Table 3-6 Partition Type Status
DescriptionStatus
The storage partition is accessible and the entire capacity isavailable for backups.
Optimal
The entire storage capacity of the partition is not available in thisstate. Only a limited storage capacity of the partition is available.
Degraded
The entire storage capacity of the partition is not available so notasks can be performed.
Not Accessible
Storage is not configured or imported for the storage partition.Not Configured
Click any partition from the Partition section to go to the partition detail page. Formore information about partition details page, see Checking partition details
Table 3-7 describes the various partition states.
Table 3-7 Partition Name Status
DescriptionStatus
The partition is currently mounted.Mounted
The partition is not currently mounted. If the partition is notmounted, the status can either be Degraded or Not Accessible.See Table 3-6 for more information.
Not Mounted
There is an I/O error with the partition. If the partition has an I/Oerror, the status can either be Degraded or Not Accessible. SeeTable 3-6 for more information.
I/O Error
The Disks section provides a tabular representation of the storage disks thatcomprise your appliance and the storage shelves that are attached to it.
You must scan for new disks when you connect new storage. You must also scanto refresh the storage information when you disconnect and reconnect storage tothe Appliance.
Click Scan to scan for new disks and then click OK to confirm the prompt.
72Managing a NetBackup appliance from the NetBackup Appliance Web ConsoleAbout storage configuration

Note: If you are scanning the 5330 appliance for the first time, disk initializationmay take some time. The disk initialization happens in the background and maytake up to 56 hours depending on the system load. The estimated time is up to 28hours for a Primary Storage Shelf and up to 28 hours for an Expansion StorageShelf. You can continue to use the appliance during this time. However, if one ormore of the new disks are used by partitions during the disk initialization process,the performance of backup and restore operations on the specific disks degradesby up to 30%.
If you want to expand storage and attach a Storage Shelf or an expansion systemto an appliance, see the NetBackup Appliance Hardware Installation Guide for theappropriate platform. Once these Storage Shelves or expansion systems are properlyconnected to the Appliance, you must scan for the newly available disks from theDisks section. The new disks have the New Available status. Once the newlyavailable disks are displayed, these disks must be added so the additional spacecan be used.
See “Adding the storage space from a newly available disk” on page 86.
The following columns are displayed in the table:
DescriptionColumn names
Displays the ID that is associated with the disk.
Example: 50001FAFA000000F5B0519CB4
Disk
Displays the type of disk.
Example: Base
Table 3-8 describes each disk type.
Type
Displays the status of the disk.
Example: In Use
Table 3-9 describes each status.
Status
Lists the partitions that exist on each disk. Also lists the sizeof each partition.
Example: AdvancedDisk: 18 TB
Allocations
Displays the available space within the disks that has not beenallocated.
Example: 1.9172 GB
Unallocated
73Managing a NetBackup appliance from the NetBackup Appliance Web ConsoleAbout storage configuration

DescriptionColumn names
Displays the total storage space within the disk.
Example: 4.5429 TB
Total
Table 3-8 lists the disk types that can appear depending on your Appliance platform.
Table 3-8 Disk Types
Supported PlatformsDescriptionType
5200, 5220, 5230
5330
This category tells you the storage that is occupiedby the appliance operating system, logs etc.
System
5200, 5220, 5230This category tells you the storage that is availablewith the appliance base unit.
Base
5220, 5230A storage shelf that is connected to a 5220 or 5230appliance.
Expansion
5330All partitions, except MSDP Catalog, exist on theData disk. Examples of partitions that exist on thedata disks are MSDP, AdvancedDisk, Configurationetc. There can be six data disks for a PrimaryStorage Shelf and six for an Expansion StorageShelf.
Data
5330The MSDP Catalog partition exists only on the Metadisk. There can be one Meta disk for a PrimaryStorage Shelf and one for an Expansion StorageShelf.
Meta
Not ApplicableThis category appears when appliance cannotdetermine the disk type like when the disk is notaccessible.
Unknown
Table 3-9 describes the various status that is displayed in the Status field.
74Managing a NetBackup appliance from the NetBackup Appliance Web ConsoleAbout storage configuration

Table 3-9 Disk Status
DescriptionStatus
Denotes that the disk has storage configuration information, and may containdata.
The Remove link is displayed next to all Foreign disks. You can remove anypre-existing data from a Foreign disk. After you remove a Foreign disk, thestatus of the disk is New Available.
Disk status is displayed as Foreign, when:
■ A disk that was In Use was physically disconnected, later reconnected.In this case, restarting the appliance would bring the disk status back toits previous state.
■ A disk that was In Use was physically disconnected. The Appliance wasreimaged and reconfigured and the disk is connected back.Or
■ A disk that was connected to another system still has configurationinformation of the old system
Foreign
Denotes that the disk is currently in use.
The Remove link is displayed if the disk does not have any partition.
In Use
Denotes that no commands or operations can be performed on disks withthis status.
An example of a disk that has n/a status is System.
An example of a disk that has n/a status is Operating System.
n/a
Denotes that the disk is available to be added to the storage space. The Addlink is displayed to add the storage disk to the storage space.
NewAvailable
Storage disk that was In Use is not accessible any more.NotAccessible
Note: You can use the Datacollect command from the Main > Support shellmenu to gather storage disk logs. You can share these disk logs with the Supportteam to resolve disk-related issues. More information about the Main > Support
> Datacollect menu is available.
Checking partition detailsFigure 3-5 shows a sample view of partition details page for a 5330 appliance.
75Managing a NetBackup appliance from the NetBackup Appliance Web ConsoleAbout storage configuration

Figure 3-5 Partition details page for a 5330 appliance
CapacityDistribution
PartitionDistribution
on Disk
CapacityChart
TheCapacity Distribution section provides a graphical representation of a specificstorage partition within your appliance. The doughnut chart shows the storagepartition that is configured. It also shows how the specific partition is sized. Thelegend that adjacent to the doughnut chart displays the color and size of the partition.Only the configured partitions display as links in the legend and can be clicked.
TheCapacity Chart section provides an overview of storage capacity usage rangesfor specific periods of time. You can select one week to one year from the drop-downlist. When you select Trend from the drop-down list, Netbackup Appliance analyzesthe past storage capacity usage, and calculates when the available storage is fullyused.
The Partition Distributions on Disk section shows where a specific partitionresides. It also shows the disk type and size.
It also shows the partition number that resides on the disk. This can help withtroubleshooting issues when a partition status is degraded or the disk fails.
Table 3-10 lists the operations that can be performed, on a partition, using theNetBackup Appliance Shell Menu and the NetBackup Appliance Web Console.
76Managing a NetBackup appliance from the NetBackup Appliance Web ConsoleAbout storage configuration

Table 3-10 Operations to manage the appliance storage partitions
PartitionDescriptionOperation
■ AdvancedDisk■ Configuration■ MSDP■ Share (NetBackup
Appliance Shell Menuonly)
■ MSDP Catalog■ NetBackup Catalog
Creates, resizes, or deletes a selectedpartition. Review the followingconsiderations:
■ You can create a partition using Resizeonly if the Appliance is configured as amaster or a media server.
■ You can resize a partition to a higheror lower value depending on the typeof partition. The size is expanded byusing the unallocated space.
■ You can delete a partition using Resizeonly if the Appliance is in a factory state(when it is not configured as a masterserver or a media server).
See “Resizing a partition” on page 77.
See “Resize dialog” on page 79.
Resize
■ AdvancedDisk■ Configuration■ MSDP■ Share (NetBackup
Appliance Shell Menuonly)
■ MSDP Catalog
Note: The NetBackupCatalog partition cannotbe moved.
Note: On a 5330appliance, the MSDPCatalog partition exists onits own metadisk and canonly be moved betweenmetadisks (if applicable).
Moves the selected partition from a sourcedisk to the destination disk.
See “Moving a partition” on page 81.
Move
Resizing a partitionA partition can be resized to a higher or lower value. You can also create or deletea partition by resizing a partition.
77Managing a NetBackup appliance from the NetBackup Appliance Web ConsoleAbout storage configuration

You can create data partitions like AdvancedDisk or MSDP using Resize only if theAppliance is configured as a master server or a media server.
When you create an MSDP partition, a backup policy to protect the MSDP Catalogis automatically created.
You can delete a partition using Resize only if the Appliance is in a factory state(when it is not configured as a master server or a media server).
Note: You cannot delete Configuration or NetBackup Catalog partitions even if theAppliance is in a factory state.
Note: A share partition cannot be created or deleted using the Resize command.
Review the following points before you resize a storage partition:
■ The AdvancedDisk, Configuration, MSDP, MSDP Catalog, and the NetBackupCatalog partitions can be resized to a higher or a lower value. To resize, entervalues in increments of 1 GB.
■ Each partition has a minimum and maximum supported size. Ensure that youresize a partition within these values.
Note: Resizing a partition may take a significant amount of time depending on theconfiguration of the system and how much data is present. In some instances, theoperation may appear to hang while running. Allow the operation time to fullycomplete.
The following procedure describes how to resize partitions.
To resize a storage partition
1 Log on to the NetBackup Appliance Web Console.
2 Click Manage > Storage .
3 In the Partitions section, click the partition that you want to resize. The partitiondetails page opens.
4 In the Partition Distributions on Disk section, click Resize.
78Managing a NetBackup appliance from the NetBackup Appliance Web ConsoleAbout storage configuration

5 Enter appropriate values for the parameters on the Resize <partition> dialog.Click Resize to resize the partition.
See “Resize dialog” on page 79.
6 The progress details are displayed when you resize a partition.
Click OK once the operation is complete. The partition details page isautomatically refreshed.
Resize dialogReview the following points before you resize a storage partition:
■ The AdvancedDisk, Configuration, NetBackup Catalog, MSDP, and the MSDPCatalog partitions can be resized to a higher or a lower value. To resize, entervalues in increments of 1 GB.
■ Each partition has a minimum and maximum supported size. Ensure that youresize a partition within these values.
The following parameters are displayed on the Resize dialog:
DescriptionParameter
The Used Size is displayed when you resize AdvancedDisk, Configuration,MSDP, MSDP Catalog, and the NetBackup Catalog partitions. For thesepartitions, you cannot enter a value that is lower than the Used Size of thepartition.
Used Size
Displays the available space on the appliance.UnallocatedSize
Displays the total size of the partition.Current Size
The storage unit name appears only if you create AdvancedDisk or MSDPpartition (Current Size is 0). You can assign a different storage unit name,other than the default.
The storage unit name can contain any letters, numbers, or specialcharacters. The name can include up to 256 characters.
Note: The name should not start with the minus (-) character and spacesshould not be used anywhere in the name.
Storage UnitName
79Managing a NetBackup appliance from the NetBackup Appliance Web ConsoleAbout storage configuration

DescriptionParameter
The Disk Pool Name appears only if you create AdvancedDisk or MSDPpartition (Current Size is 0). You can assign a different disk pool name, otherthan the default.
The disk pool name can contain any letters, numbers, or special characters.The name can include up to 256 characters.
Note: The name should not start with the minus (-) character and spacesshould not be used anywhere in the name.
Disk PoolName
Enter a value in the text box and select the appropriate unit. You can alsodrag the slider to the new size. (in GB, TB, or PB). You can also click onthe bar up to the new size.
Only an absolute value is supported if the unit is GB. Absolute and decimalvalues are supported if the units are TB or PB.
The maximum value on the slider displays the partition size that you canscale up to. For AdvancedDisk and MSDP partitions, the maximum valueis the sum of Current Size and Unallocated Size.
For other partitions like Configuration and NetBackup Catalog, the maximumvalue on the slider is the lower value when you compare the following values:
■ Sum of Current Size and Unallocated Size■ Maximum supported size of the partition
For example, consider a NetBackup Catalog partition with a Current size of300 GB and an Unallocated Size of 6 GB. The maximum supported size fora NetBackup Catalog partition is 4 TB. Since the maximum supported sizefor NetBackup Catalog (4 TB) is greater than 306 GB (Current Size (300GB) + Unallocated Size (6 GB)), the Maximum Size is displayed as 306 GB.
New Size
Troubleshooting resize-related issuesThe following sample error message may appear when you resize a partition:
[Error] Failed to resize the 'MSDP' partition '2' because the partition is eitherfragmented or busy. Retrying the operation after sometime may resolve the issue.Contact Technical Support if the issue persists.
This message appears if the specific partition is being used or is fragmented. Forexample, the resize operation may fail when backup and restore operations arereading or writing data to the partition. In this scenario, you can retry resizing thepartition after some time.
The message may also appear if the partition is fragmented. Contact TechnicalSupport for further assistance.
80Managing a NetBackup appliance from the NetBackup Appliance Web ConsoleAbout storage configuration
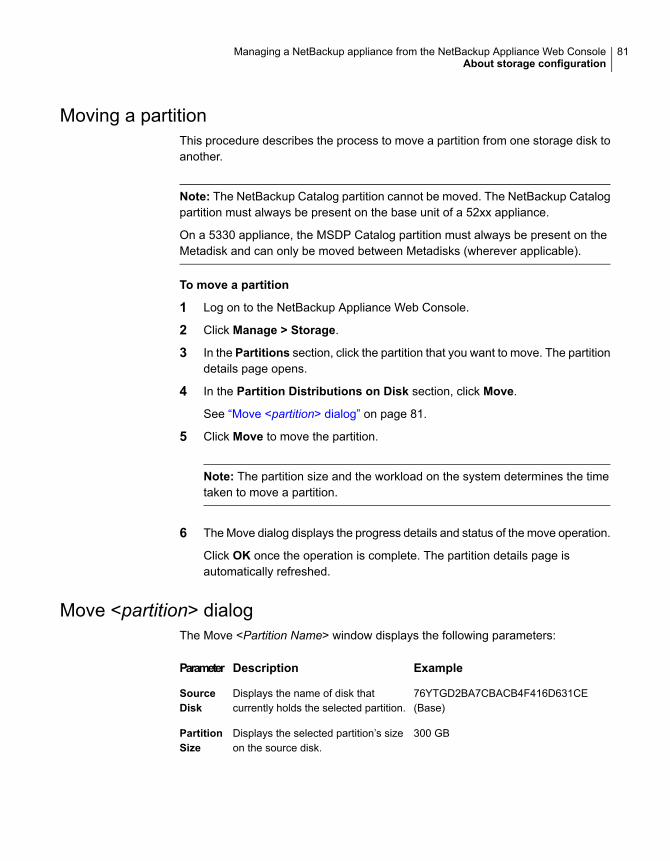
Moving a partitionThis procedure describes the process to move a partition from one storage disk toanother.
Note: The NetBackup Catalog partition cannot be moved. The NetBackup Catalogpartition must always be present on the base unit of a 52xx appliance.
On a 5330 appliance, the MSDP Catalog partition must always be present on theMetadisk and can only be moved between Metadisks (wherever applicable).
To move a partition
1 Log on to the NetBackup Appliance Web Console.
2 Click Manage > Storage.
3 In the Partitions section, click the partition that you want to move. The partitiondetails page opens.
4 In the Partition Distributions on Disk section, click Move.
See “Move <partition> dialog” on page 81.
5 Click Move to move the partition.
Note: The partition size and the workload on the system determines the timetaken to move a partition.
6 The Move dialog displays the progress details and status of the move operation.
Click OK once the operation is complete. The partition details page isautomatically refreshed.
Move <partition> dialogThe Move <Partition Name> window displays the following parameters:
ExampleDescriptionParameter
76YTGD2BA7CBACB4F416D631CE(Base)
Displays the name of disk thatcurrently holds the selected partition.
SourceDisk
300 GBDisplays the selected partition’s sizeon the source disk.
PartitionSize
81Managing a NetBackup appliance from the NetBackup Appliance Web ConsoleAbout storage configuration

ExampleDescriptionParameter
9DB0FD2BA7CBACB4F416D631CE(Expansion)
Click the drop-down list and select thetarget disk to which you want to movethe partition.
Note: The Target disk must bedifferent from the Source disk.
TargetDisk
100 GBDisplays the unallocated size on thetarget device.
UnallocatedSize
35 GBType the storage size in GB, TB, orPB that you want to move from thecurrent disk to the new disk.
Note: It is an optional field. If the sizeis not specified, the appliance movesthe entire partition.
Note: The size to be moved cannotbe greater than the Unallocated Sizeon the target disk.
Size
Moving the MSDP partition from a base disk to an expansion diskfor optimum performance
If all or a part of your Media Server Deduplication Pool (MSDP) partition resides onthe appliance base unit (base disk), it is recommended that you move the MSDPpartition to an expansion disk. This recommendation applies to 5220 and 5230appliances and is needed for optimum performance.
The following procedures explain how to move the MSDP partition from a base diskto an expansion disk. The base disk resides on the appliance base unit. Theexpansion disk resides on a storage shelf that is attached to the appliance. A 5220or a 5230 appliance can have up to two expansion disks.
Consider the following scenarios:
■ Scenario 1 - The MSDP and AdvancedDisk partitions are configured on thebase disk. The expansion units are physically attached to the appliance buthave not been added yet.
■ Scenario 2 - The MSDP partition exists on the base disk. The expansion unitsare configured and partitions exist on them.
Select the scenario that applies to you and follow the appropriate procedure outlinedbelow.
82Managing a NetBackup appliance from the NetBackup Appliance Web ConsoleAbout storage configuration

Scenario 1 - To move the MSDP partition from a base disk to an expansiondisk
1 Log on to the NetBackup Appliance Web Console.
2 Click Manage > Storage and go to Disks section. Check the partitions thatare on the Base disk. Suppose that you have MSDP, AdvancedDisk, Catalog,and Configuration partitions on the base disk as shown below.
3 Ensure that the base disk is fully allocated by resizing the non-MSDP partitions(like AdvancedDisk). To ensure that the base disk is full, resize theAdvancedDisk partition to a value that is just below the maximum valuedisplayed in the slider.
In the Partitions section, click AdvancedDisk partition to open the partitiondetails page. On the partition details page, click Resize in the PartitionDistributions on Disk section. Enter a size in the New Size field that is slightlybelow the maximum value.
Click Resize to resize.
Click OK after the resize operation is complete. The page is refreshedautomatically and reflects the updated size.
4 In the Disks section, click the Add link next to the expansion unit. Click Yesto confirm the addition and OK when it finishes. Repeat this process for thesecond expansion unit.
Note that the Unallocated space increases.
5 Check the space occupied by MSDP partition.
In the Partitions section, click theMSDP link to open the MSDP partition detailspage. Check the Partition Distributions on Disk section.
Note that the expansion disk must have at least 260 GB of unallocated spacewhen you move the MSDP partition to the expansion disk at a later point.
6 On the MSDP partition details page, clickResize in the Partition Distributionson Disk section. Enter a value that is slightly below the Unallocated Size.Ensure that the Unallocated size that remains must be more than the MSDPsize on the base disk.
Click Resize to resize.
Click OK after the resize operation is complete. The page is refreshedautomatically and reflects the updated size.
83Managing a NetBackup appliance from the NetBackup Appliance Web ConsoleAbout storage configuration

7 Check how the MSDP partition is distributed across disks.
On the MSDP partition details page, check the Partition Distributions onDisk section. In this example, a part of the MSDP partition resides on the basedisk.
8 Click Move in the Partition Distributions on Disk section.
9 Move the MSDP partition from the base disk to the expansion disk.
In the Move <MSDP> window, select the expansion disk that has enoughUnallocated size as the Target disk.
10 Click Move to move the partition.
Note: The partition size and the workload on the system determine the time ittakes to move a partition.
11 TheMove dialog displays the progress details and status of the move operation.Click OK once the operation is complete. The MSDP partition details page isautomatically refreshed.
12 On the MSDP partition details page, check the Partition Distributions onDisk section. The MSDP partition resides on the expansion disks.
The following procedure explains how to move the MSDP partition from a base diskto an expansion disk when the expansion disk has partitions configured on it.
Scenario 2 - To move the MSDP partition from a base disk to an expansiondisk
1 Log on to the NetBackup Appliance Web Console.
2 Click Manage > Storage and go to Partitions section.
3 Check if the MSDP partition is located on the base disk.
In the Partitions section, click MSDP partition to open the MSDP partitiondetails page.
4 On the MSDP partition details page, check the Partition Distributions onDisk section.
If the Type is Base for any of the disks, all or a part ouf the MSDP partitionresides on the base disk. In this example, the MSDP partition is located on thebase disk as well as the Expansion disk.
If the type is Expansion for all the disks, the MSDP partition doesn’t exist onthe base disk. In this case, you do not need to move the MSDP partition. Youcan ignore the rest of the procedure.
84Managing a NetBackup appliance from the NetBackup Appliance Web ConsoleAbout storage configuration

5 Click Move in the Partition Distributions on Disk section.
6 On the Move <MSDP> window, click the drop-down list and select the targetdisk to which you want to move the partition. The target disk must be anexpansion disk.
7 Click Move to move the partition.
Note: The partition size and the workload on the system determine the time ittakes to move a partition.
8 TheMove dialog displays the progress details and status of the move operation.Click OK once the operation is complete. The MSDP partition details page isautomatically refreshed.
Scanning storage devices from the NetBackup Appliance WebConsole
The following procedure describes how to scan the connected storage devices fromManage > Storage > Disks. Whenever a storage device is connected, use Scanto detect the storage device or refresh its status. If the Scan does not display theupdated storage device information, then restart the appliance to refresh the storagedevice information.
Note: If you want to expand storage and attach a Storage Shelf or an expansionsystem to an appliance, see the NetBackup Appliance Hardware Installation Guidefor the appropriate platform. Once these Storage Shelves or expansion systemsare properly connected to the Appliance, you must scan the devices from theDiskssection. Once the newly available disks are displayed, these disks must be addedso the additional space can be used. The new disks have theNewAvailable status.
To scan storage devices from the NetBackup Appliance Web Console
1 Log on to the NetBackup Appliance Web Console.
2 Click Manage > Storage > Disks.
3 Click Scan.
85Managing a NetBackup appliance from the NetBackup Appliance Web ConsoleAbout storage configuration

4 You are prompted for confirmation. Click Yes to confirm. The scan starts.
Note: If you are scanning the 5330 appliance for the first time, disk initializationmay take some time. The disk initialization happens in the background andmay take up to 56 hours depending on the system load. The estimated timeis up to 28 hours for a Primary Storage Shelf and up to 28 hours for anExpansion Storage Shelf. You can continue to use the appliance during thistime. However, if one or more of the new disks are used by partitions duringthe disk initialization process, the performance of backup and restore operationson the specific disks degrades by up to 30%
5 When the scan is complete, click OK. The Disks section refreshesautomatically. If a new storage shelf is detected on a 52xx appliance, a newdisk ID appears in the Disks section.
For 52xx appliances, the new entry should have the following attributes:
■ Type = Expansion
■ Status = New Available
For 5330 appliances, 6 Data disks and 1 Meta disk are displayed for a PrimaryStorage Shelf or an Expansion Storage Shelf. For a 5330 appliance that hasa Primary Storage Shelf and an Expansion Storage Shelf, 12 Data disks and2 Metadisks appear in the Disks section. The status for these disks is NewAvailable.
You can now add this disk to the Unallocated space.
See “Adding the storage space from a newly available disk” on page 86.
Adding the storage space from a newly available diskThe following procedure describes how to add space from a newly available diskinto the unallocated space.
If you want to attach a Storage Shelf or an expansion system to an appliance, seethe NetBackup Appliance Hardware Installation Guide for the appropriate platform.Once these Storage Shelves are properly connected to the Appliance, you mustscan for the newly available disks from the Disks section. The new disks have theNew Available status. Once the newly available disks are displayed, these disksmust be added so the additional space can be used.
To add the storage space from a newly available disk
1 Log on to the NetBackup Appliance Web Console.
2 Click Manage > Storage and go to the Disks section
86Managing a NetBackup appliance from the NetBackup Appliance Web ConsoleAbout storage configuration

3 The Disks section displays all the disks. Only disks that have the Status asNew Available can be added. The Add link is displayed next to such disks.
Note: If the disk status is Foreign, click Remove so that data is removed andthe disk status becomesNewAvailable. Contact Support if you want to recoverthis data.
4 Click Add to add the disk.
A dialog box displays the following message:
This operation will add the disk to the Unallocated storage. Do you wantto continue?
Click Yes.
5 The system displays the following message:
Adding disk <disk ID>
Succeeded.
ClickOK to exit. The Manage > Storage > Disks page is automatically refreshed.
When you add the disk, the appliance updates its Status to In Use. This changeis also reflected in the Partitions section. The Unallocated space is increased andthe additional storage space is displayed in the Partitions graph and table.
Removing an existing storage diskThe following procedure describes how to remove an existing storage disk.
Note: Ensure that you move all the partitions from the disk to other disks, beforeremoving a disk with status In Use. You can view the partitions on each disk fromthe Allocations column in Manage > Storage > Disks.
Note: You can use the beacon feature to identify the expansion disk, whiledisconnecting it. You can also use the beacon feature to identify the base disk.
To remove an existing disk
1 Log on to the NetBackup Appliance Web Console.
2 Go to Manage > Storage > Disks.
87Managing a NetBackup appliance from the NetBackup Appliance Web ConsoleAbout storage configuration

3 The Status column in the Disks table displays the Remove link. It appearsfor disks with status In Use that do not contain any partitions. It also appearsfor disks with status Foreign.
Note: If a disk with status In Use has partitions and you want to remove it, youmust first move the partition to other disks. You can view the partitions on eachdisk from the Allocations column in Manage > Storage > Disks.
4 Click the Remove link, to remove the disk.
A dialog box displays the following message:
This operation will remove the disk <disk ID>. Do you want to continue?
Click Yes to continue.
If you remove a disk with status Foreign that has data, the following messageis displayed:
This operation will remove the disk <disk ID>. Any backup data presentin the <disk ID> disk will be deleted. Do you want to continue?
Click Yes to continue.
Note: A disk with status Foreign may have data. If you try to remove such adisk, any data present on it is also removed.
5 The system displays the following message:
Removing disk <disk ID>
Succeeded.
ClickOK to exit. The Manage > Storage > Disks page is automatically refreshed.
When you remove the disk, the appliance updates the Status of this disk toNew Available. This change is also reflected in the Partitions section. TheUnallocated space is decreased and displayed accordingly in the Partitionsgraph and table.
Note: When you physically attach or disconnect a storage shelf from the 5220appliance, you must update the boot order, reboot the storage shelf, and finallyreboot your appliance. Also, if you disconnect one of the two connected storageshelves, you need to reboot the appliance.
88Managing a NetBackup appliance from the NetBackup Appliance Web ConsoleAbout storage configuration

Warning: After physically disconnecting a storage shelf, if the 5220 appliancereboots it can hang and display the Boot splash screen. Press the ESC key toproceed. The RAID contoller firmware provides step-by-step instructions to helpyou boot the appliance.
Monitoring the progress of storage manipulation tasksThe following procedure describes how to use the Monitor command, using theNetBackup Appliance Shell Menu.
To monitor storage tasks
1 Log on to the NetBackup Appliance Shell Menu.
2 Go to the Manage > Storage menu by using the following command:
Main > Manage > Storage
3 Enter the Monitor command to view the current progress of the storagemanagement tasks being performed.
The appliance displays the task progress as shown in the following example:
Storage > Monitor
>>>>> Press 'CTRL + C' to quit. <<<<<
Resizing the AdvancedDisk storage partition...
The estimated time to resize the partition is 2 to 5 minutes.
Stopping NetBackup processes... (2 mins approx)
Scanning storage devices using the NetBackup Appliance ShellMenu
The following procedure describes how to scan the connected storage devices toyour appliance, through the NetBackup Appliance Shell Menu. You can also scanstorage devices from Manage > Storage > Disks.
89Managing a NetBackup appliance from the NetBackup Appliance Web ConsoleAbout storage configuration

Note:Whenever a storage device is connected or disconnected, use this commandto detect the storage device or refresh its status. If the Scan command does notdisplay the updated storage device information, then restart the appliance to refreshthe storage device information.
90Managing a NetBackup appliance from the NetBackup Appliance Web ConsoleAbout storage configuration

To scan the storage devices connected to your appliance
1 Log on to the NetBackup Appliance Shell Menu.
2 Go to the Manage > Storage menu by using the following command:
Main > Manage > Storage
The appliance displays all the sub-tasks in the storage menu.
3 Enter the Scan command to scan the storage devices.
For 52xx appliances, the connected devices are scanned and the followingoutput is displayed:
Storage> Scan
- [Info] Refreshing the storage devices...
- [Info] Succeeded.
NOTE: If you run the 'Manage->Storage->Show Disk' command and the device information does not appear in the output,
run the 'Manage->Storage->Scan' command to import and refresh the device information. If the device information still does not
appear, restart the appliance to refresh the device information.
For 5330 appliances, the connected devices are scanned and the followingoutput may be displayed:
Storage> Scan
- [Info] Performing sanity check on disks and partitions...
(5 mins approx)
- [Info] The scan operation can take up to 15 minutes to complete.
- [Info] Refreshing the storage devices...
- [Info] Created 14 new disks (RAID groups) on External Storage.
- [Info] Succeeded.
- [Info] The new disks are being initialized. The disk initialization
happens in the background and may take up to 56 hours depending on the
system load. You can continue to use the appliance during this time.
However, if one or more of the new disks are used by partitions during
the disk initialization process, the performance of backup and restore
operations on the specific disks degrades by up to 30%.
NOTE: If you run the 'Manage->Storage->Show Disk' command and the device
information does not appear in the output, run the 'Manage->Storage->Scan'
to import and refresh the device information. If the device information
still does not appear, restart the appliance to refresh the device
information.
91Managing a NetBackup appliance from the NetBackup Appliance Web ConsoleAbout storage configuration

About Copilot functionality and share managementCopilot integrates with native Oracle tools and processes to give database backupadministrators more control, visibility, and the ability to recover their databasebackups. Backup administrators can then manage policies, move the data to differentstorage types, and create off-site backup copies of the database backups.
Additionally, Copilot features NetBackup Accelerator technology to boost Oraclebackup and restore performance. NetBackup Accelerator integrates with Oracle’sincremental merge capabilities to eliminate the need for full backups and allow newfull database images to be synthesized on backup storage post-process.
Copilot lets you create shares on the appliance for Oracle backup and recoveryand create further protection policies in NetBackup for advanced data protectionfeatures like long-term retention, replication, and NetBackup Oracle Acceleratortechnology. Copilot is exclusive to the appliance but requires additional configurationsteps within NetBackup software.
To configure Copilot functionality, the following steps need to be completed:
■ Create a share on the appliance using the NetBackup Appliance Shell Menu.
■ Mount the appliance share on the Oracle server.
■ Configure a Storage Lifecycle Policy (SLP) and Oracle Intelligent Policy (OIP)using NetBackup.
Refer to the NetBackup Copilot for Oracle Configuration Guide for the entireconfiguration process.
Share partitions can be created, modified, viewed, and deleted through the use ofthe NetBackup Appliance Shell Menu. Use the following topics as a guide tomanaging your share partitions.
■ See “Creating a share from the NetBackup Appliance Shell Menu” on page 93.
■ See “Viewing share information from the NetBackup Appliance Shell Menu”on page 95.
■ See “Editing a share from the NetBackup Appliance Shell Menu” on page 97.
■ See “Resizing a share from the NetBackup Appliance Shell Menu” on page 100.
■ See “Moving a share from the NetBackup Appliance Shell Menu” on page 101.
■ See “Deleting a share from the NetBackup Appliance Shell Menu” on page 102.
Refer to the NetBackup Appliance Commands Reference Guide for more specificdetails about each command.
Refer to the NetBackup™ for Oracle Administrator's Guide for more information onCopilot in NetBackup software.
92Managing a NetBackup appliance from the NetBackup Appliance Web ConsoleAbout storage configuration

Creating a share from theNetBackupAppliance Shell MenuThe following procedure explains how to create a share from the NetBackupAppliance Shell Menu.
To create a new share from the NetBackup Appliance Shell Menu:
1 Open an SSH session to log on to the appliance as an administrator.
2 Enter Main_Menu > Manage > Storage > Create Share. The commandguides you through the process of configuring a new share.
3 Enter the share name, for example share_1.
4 Enter a short description for the share, for example Test for share_1.
5 Enter the allocated capacity for the share, for example 5GB.
6 Enter a comma-separated list of Oracle server clients that can access theshare, for example 10.100.0.2, 10.100.0.3.
7 Enter the NFS export options for each of the Oracle clients. You are promptedto enter options for each client you added in the previous step.
See “NFS export options” on page 103.
93Managing a NetBackup appliance from the NetBackup Appliance Web ConsoleAbout storage configuration

8 Once you have entered the NFS export options, the following information isdisplayed:
- [Info] Summary:
Name : share_1
Description : Testing share_1
Allocated Capacity : 5GB
Clients :
10.100.0.2(rw,no_root_squash)
>> Continue? ['yes', 'no']
9 Enter yes to continue.
The following information is displayed:
- [Info] Creating Share share_1
- [Info] 'Share' storage partition does not exist. Creating it now...
- [Info] The estimated time to create the 'Share' partition can range from 0 hours, 2 minutes
to 0 hours, 5 minutes depending on the system load. The greater the system load
the longer it takes to complete the resize operation.
- [Info] Creating the 'Share' partition 'share_1'...
- [Info] Mounting the 'Share' partition 'share_1'...
- [Info] Exporting Share 'share_1' at mount point '/shares/share_1'
- [Info] Share share_1 created successfully
- [Info] NOTES:
Share exported at '10.132.1.237:/shares/share_1'.
Please create a mount point with this export path for all Database
Servers that need access to this Share.
See the NetBackup Appliance Administrator's guide for more detailed
mount instructions.
See “About Copilot functionality and share management” on page 92.
Refer to the NetBackup™ Copilot™ for Oracle Configuration Guide for moreinformation on configuring Oracle database backups.
Refer to the NetBackup™ for Oracle Administrator's Guide for more information onCopilot in NetBackup software.
94Managing a NetBackup appliance from the NetBackup Appliance Web ConsoleAbout storage configuration

Viewing share information from the NetBackup ApplianceShell MenuThe following procedure explains how to view share partition information using theNetBackup Appliance Shell Menu.
95Managing a NetBackup appliance from the NetBackup Appliance Web ConsoleAbout storage configuration

To view share partition information using the NetBackup Appliance ShellMenu
1 Open an SSH session to log on to the appliance as an administrator.
2 Enter Main_Menu > Manage > Storage > Show Partition All Share.
The following is an example output displaying share information:
Storage> Show Partition ALL share
---------------------------------------------------------------------------------------
Partition | Total | Available | Used | %Used | Status
---------------------------------------------------------------------------------------
Share | 10 GB | 9.89 GB | 116.45 MB | 2 | Optimal
Share
-------------------------------------------------------------------
Partition | Total | Available | Used | %Used | Status
-------------------------------------------------------------------
share1 | 5 GB | 4.94 GB | 58.23 MB | 2 | Mounted
share2 | 5 GB | 4.94 GB | 58.23 MB | 2 | Mounted
Share - share1
-------------------------------------------
Description:
test share
-------------------------------------------
Clients | Options
-------------------------------------------
10.80.100.12 | no_root_squash, rw, secure
-------------------------------------------
Share - share2
-------------------------------------------
Description:
test share 2
-------------------------------------------
Clients | Options
-------------------------------------------
10.80.112.14 | no_root_squash, rw, secure
-------------------------------------------
Instructions to use a share:
On UNIX systems, a share can be mounted using nb-appliance:/shares/<Name>.
96Managing a NetBackup appliance from the NetBackup Appliance Web ConsoleAbout storage configuration

Refer to the NetBackup Appliance Commands Reference Guide for more specificdetails about the command.
See “About Copilot functionality and share management” on page 92.
See “About viewing storage space information using the Show command ”on page 103.
Editing a share from the NetBackup Appliance Shell MenuShares can be edited using the Manage > Storage > Edit Share command. Youcan edit the following details of the share:
■ Share description
■ Add, update, or delete clients.
The following procedure explains how to edit a share description from the NetBackupAppliance Shell Menu.
To edit a share description
1 Open an SSH session to log on to the appliance as an administrator.
2 Enter Main_Menu > Manage > Storage > Edit Share Description
<ShareName>.
3 Enter a new share description, then press Enter.
The following is an example output:
Manage > Storage > Edit Share Description share_1
- [Info] Old Description :
test share
>> Enter a new short description: (None) new test share
- [Info] Summary:
Name : share_1
Description : new test share
>> Continue? ['yes', 'no'] yes
- [Info] Updating Share share_1
- [Info] Updating Share partition 'share_1'
- [Info] Share share_1 updated successfully
The following procedure explains how to add a client to a share from the NetBackupAppliance Shell Menu.
97Managing a NetBackup appliance from the NetBackup Appliance Web ConsoleAbout storage configuration
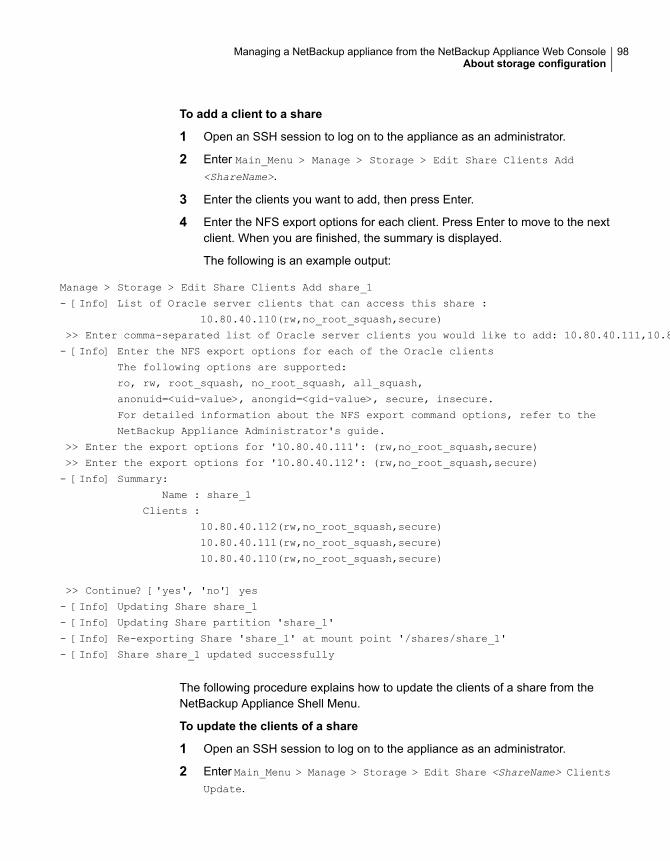
To add a client to a share
1 Open an SSH session to log on to the appliance as an administrator.
2 Enter Main_Menu > Manage > Storage > Edit Share Clients Add
<ShareName>.
3 Enter the clients you want to add, then press Enter.
4 Enter the NFS export options for each client. Press Enter to move to the nextclient. When you are finished, the summary is displayed.
The following is an example output:
Manage > Storage > Edit Share Clients Add share_1
- [Info] List of Oracle server clients that can access this share :
10.80.40.110(rw,no_root_squash,secure)
>> Enter comma-separated list of Oracle server clients you would like to add: 10.80.40.111,10.80.40.112
- [Info] Enter the NFS export options for each of the Oracle clients
The following options are supported:
ro, rw, root_squash, no_root_squash, all_squash,
anonuid=<uid-value>, anongid=<gid-value>, secure, insecure.
For detailed information about the NFS export command options, refer to the
NetBackup Appliance Administrator's guide.
>> Enter the export options for '10.80.40.111': (rw,no_root_squash,secure)
>> Enter the export options for '10.80.40.112': (rw,no_root_squash,secure)
- [Info] Summary:
Name : share_1
Clients :
10.80.40.112(rw,no_root_squash,secure)
10.80.40.111(rw,no_root_squash,secure)
10.80.40.110(rw,no_root_squash,secure)
>> Continue? ['yes', 'no'] yes
- [Info] Updating Share share_1
- [Info] Updating Share partition 'share_1'
- [Info] Re-exporting Share 'share_1' at mount point '/shares/share_1'
- [Info] Share share_1 updated successfully
The following procedure explains how to update the clients of a share from theNetBackup Appliance Shell Menu.
To update the clients of a share
1 Open an SSH session to log on to the appliance as an administrator.
2 Enter Main_Menu > Manage > Storage > Edit Share <ShareName> Clients
Update.
98Managing a NetBackup appliance from the NetBackup Appliance Web ConsoleAbout storage configuration

3 Enter the clients you want to update, then press Enter.
4 Enter the NFS export options for each updated client. Press Enter to move tothe next client. When you are finished the summary is displayed.
The following is an example output:
Manage > Storage > Edit Share Clients Update share_1
- [Info] List of Oracle server clients that can access this share :
10.80.40.112(rw,no_root_squash,secure)
10.80.40.111(rw,no_root_squash,secure)
10.80.40.110(rw,no_root_squash,secure)
>> Enter comma-separated list of Oracle server clients you would like to update: 10.80.40.112
- [Info] Enter the NFS export options for each of the Oracle clients
The following options are supported:
ro, rw, root_squash, no_root_squash, all_squash,
anonuid=<uid-value>, anongid=<gid-value>, secure, insecure.
For detailed information about the NFS export command options, refer to the
NetBackup Appliance Administrator's guide.
>> Enter the export options for '10.80.40.112': (rw,no_root_squash,secure) rw
- [Info] Summary:
Name : share_1
Clients :
10.80.40.112(rw)
10.80.40.111(rw,no_root_squash,secure)
10.80.40.110(rw,no_root_squash,secure)
>> Continue? ['yes', 'no'] yes
- [Info] Updating Share share_1
- [Info] Updating Share partition 'share_1'
- [Info] Re-exporting Share 'share_1' at mount point '/shares/share_1'
- [Info] Share share_1 updated successfully
The following procedure explains how to delete clients from a share from theNetBackup Appliance Shell Menu.
99Managing a NetBackup appliance from the NetBackup Appliance Web ConsoleAbout storage configuration
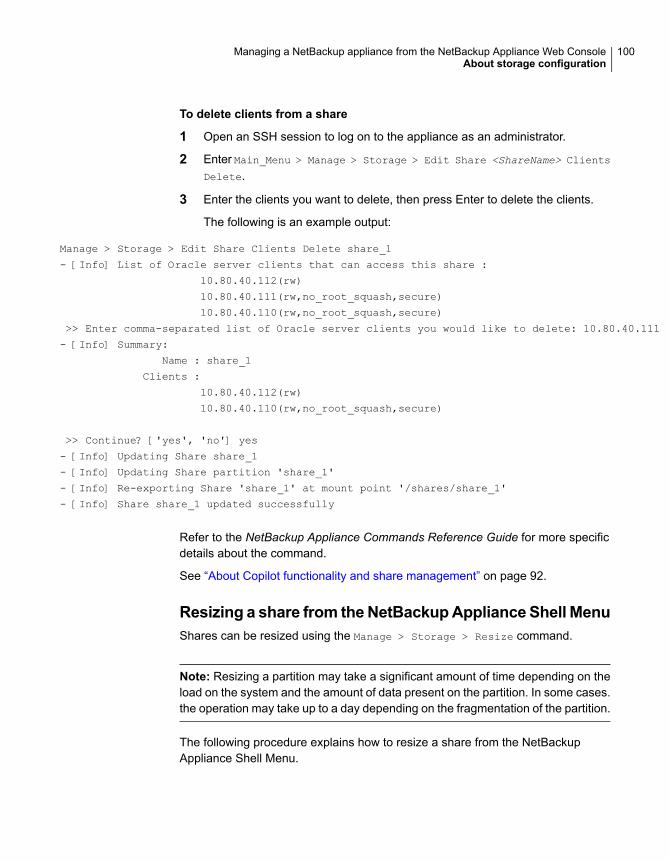
To delete clients from a share
1 Open an SSH session to log on to the appliance as an administrator.
2 Enter Main_Menu > Manage > Storage > Edit Share <ShareName> Clients
Delete.
3 Enter the clients you want to delete, then press Enter to delete the clients.
The following is an example output:
Manage > Storage > Edit Share Clients Delete share_1
- [Info] List of Oracle server clients that can access this share :
10.80.40.112(rw)
10.80.40.111(rw,no_root_squash,secure)
10.80.40.110(rw,no_root_squash,secure)
>> Enter comma-separated list of Oracle server clients you would like to delete: 10.80.40.111
- [Info] Summary:
Name : share_1
Clients :
10.80.40.112(rw)
10.80.40.110(rw,no_root_squash,secure)
>> Continue? ['yes', 'no'] yes
- [Info] Updating Share share_1
- [Info] Updating Share partition 'share_1'
- [Info] Re-exporting Share 'share_1' at mount point '/shares/share_1'
- [Info] Share share_1 updated successfully
Refer to the NetBackup Appliance Commands Reference Guide for more specificdetails about the command.
See “About Copilot functionality and share management” on page 92.
Resizing a share from theNetBackupAppliance Shell MenuShares can be resized using the Manage > Storage > Resize command.
Note: Resizing a partition may take a significant amount of time depending on theload on the system and the amount of data present on the partition. In some cases.the operation may take up to a day depending on the fragmentation of the partition.
The following procedure explains how to resize a share from the NetBackupAppliance Shell Menu.
100Managing a NetBackup appliance from the NetBackup Appliance Web ConsoleAbout storage configuration

To resize a share
1 Open an SSH session to log on to the appliance as an administrator.
2 Enter Main_Menu > Manage > Storage > Resize Share [Size] [Unit]
<ShareName> then press Enter.
Note: The share is resized to the new size that you enter. It is not added orsubtracted from the current size.
3 Type yes, then press Enter to complete the resize operation.
The following is an example output:
Storage > Resize Share 1 TB share1
- [Info] Performing sanity check on disks and partitions...(5 mins approx)
- [Info] The estimated time to resize the partition can range from
0 hours, 2 minutes to 0 hours, 5 minutes depending on the system load.
The greater the system load the longer it takes to complete the
resize operation.
Do you want to continue? (yes/no) yes
- [Info] Shrinking the 'Share' storage partition...
- [Warning] No recipients are configured to receive software notifications.
Use Main > Settings > Email Software Add command to configure the
appropriate email address.
- [Info] Succeeded.
Refer to the NetBackup Appliance Commands Reference Guide for more specificdetails about the command.
See “About Copilot functionality and share management” on page 92.
Moving a share from the NetBackupAppliance Shell MenuThe following procedure explains how to move a share using the NetBackupAppliance Shell Menu.
101Managing a NetBackup appliance from the NetBackup Appliance Web ConsoleAbout storage configuration

To move a share using the NetBackup Appliance Shell Menu
1 Open an SSH session to log on to the appliance as an administrator.
2 Enter Main_Menu > Manage > Storage > Move Share <Share_Name>
<SourceDiskID> <TargetDiskID> [Size] [Unit]
3 Enter yes to move the share.
The following is an example output:
Storage > Move Share share_1 unit_1 unit_2 5 GB
- Moving the partition would approximately take 0 hours, 2 minutes.
Do you want to continue? (yes/no)
Moving part '1/1' disk... Done
- Succeeded
Refer to the NetBackup Appliance Commands Reference Guide for more specificdetails about the command.
See “About Copilot functionality and share management” on page 92.
Deleting a share from the NetBackupAppliance Shell MenuThe following procedure explains how to delete a share using the NetBackupAppliance Shell Menu.
To delete a share using the NetBackup Appliance Shell Menu
1 Open an SSH session to log on to the appliance as an administrator.
2 Enter Main_Menu > Manage > Storage > Delete Share <ShareName>.
3 Enter yes to delete the share.
The following is an example output:
Manage > Storage > Delete Share share_2
>> Caution: Make sure all data has been backed up before deleting the Share.
Are you sure you want to delete Share 'share_2'? ['yes', 'no'] yes
- [Info] Deleting Share share_2
- [Info] Unexporting Share partition 'share_2' at mount point '/shares/share_2'
- [Info] Unmounting the 'Share' partition 'share_2'...
- [Info] Deleting the 'Share' partition 'share_2'...
- [Info] Share share_2 deleted successfully
Refer to the NetBackup Appliance Commands Reference Guide for more specificdetails about the command.
See “About Copilot functionality and share management” on page 92.
102Managing a NetBackup appliance from the NetBackup Appliance Web ConsoleAbout storage configuration

NFS export optionsThe following table describes the export options available for share creation ormodification.
DescriptionOption
Allows only read requests on the Share.ro
Allows both read requests and write requests on the Share.rw
Disables all root squashing.
Allows root account on client to access export share on server as the rootaccount.
no_root_squash
Maps requests from UID and GID 0 to the anonymous UID and GID.root_squash
Maps all UIDs and GIDs to the anonymous user account.
By default, the NFS server chooses a UID and GID of 65534 for squashedaccess. These values can be overridden by using the anonuid andanongid options.
all_squash
Sets the uid of the anonymous user account.
This option forces all anonymous connections to a predefined UID on aserver.
anonuid
Sets the gid of the anonymous account.
This option forces all anonymous connections to a predefined GID on aserver.
anongid
Requires that requests originate from an Internet port less thanIPPORT_RESERVED (1024).
secure
Disables the requirement that requests originate from an Internet port lessthan IPPORT_RESERVED (1024).
insecure
See “Creating a share from the NetBackup Appliance Shell Menu” on page 93.
See “About Copilot functionality and share management” on page 92.
About viewing storage space information using the Show commandThis section describes the Show [Type] commands and their usage in theNetBackup Appliance Shell Menu. These commands can be accessed fromMain_Menu > Manage > Storage.
The[Type] parameter is required when using the Show command.
103Managing a NetBackup appliance from the NetBackup Appliance Web ConsoleAbout storage configuration

The following Show [Type] commands are described::
■ Show [ALL] - to view Disk, Partition, and Distribution information together.See “Viewing all storage information” on page 104.
■ Show [Disk] - to view total capacity, unallocated storage capacity, and currentstatus of a disk.See “Viewing disk information” on page 107.
■ Show [Distribution] - to view the distribution of partitions on a disk.See “Viewing the partition distribution on disks” on page 112.
Note: The Available and Used Size values displayed for the MSDP partition on theManage > Storage > Partitions page or by using the Manage > Storage > Showcommand on the NetBackup Appliance Shell Menu may not be the full spaceavailable or used by the MSDP partition. This is because space is reserved by thefile system and also by MSDP. The file system reserves space for it's own use. Inaddition, MSDP reserves 4 percent of the storage space for the deduplicationdatabase and transaction logs.
Check the MSDP disk pool sizes displayed on the NetBackup Administration Consoleto know the MSDP statistics.
Viewing all storage informationThe following procedure describes how to use the Show All command, using theNetBackup Appliance Shell Menu:
To view all storage information
1 Log on to the NetBackup Appliance Shell Menu.
2 Open the Storage menu. To open the storage menu, use the followingcommand:
Main > Manage > Storage
The appliance displays all the sub-tasks in the storage menu.
3 Enter the Show All command to view device information.
For a 5330 platform, the appliance displays the storage information as shown inthe following example:
- [Info] Performing sanity check on disks and partitions... (5 mins approx)
-----------------------------------------------------------------------
Disk ID | Type | Total | Unallocated | Status
-----------------------------------------------------------------------
104Managing a NetBackup appliance from the NetBackup Appliance Web ConsoleAbout storage configuration

5E000000000000000000000000 | System | 930.39 GB | - | n/a
7A30D550001B22423721D79081 | Base | 13.64 TB | 10.84 TB | In Use
7A30D550001B22423721D79081 (Base)
---------------------------------
AdvancedDisk : 500 GB
- 0 : 500 GB
Configuration : 25 GB
- 0 : 25 GB
MSDP : 1 TB
- 0 : 1 TB
MSDP Catalog : 43 GB
- 0 : 43 GB
NetBackup Catalog : 250 GB
- 0 : 250 GB
Share : 1 TB
- s1 : 1 TB
---------------------------------------------------------------------------------------
Partition | Total | Available | Used | %Used | Status
---------------------------------------------------------------------------------------
AdvancedDisk | 500 GB | 495.81 GB | 4.19 GB | 1 | Optimal
Configuration | 25 GB | 21.52 GB | 3.48 GB | 14 | Optimal
MSDP | 1 TB | 1015.6 GB | 8.36 GB | 1 | Optimal
MSDP Catalog | 43 GB | 42.59 GB | 414.99 MB | 1 | Optimal
NetBackup Catalog | 250 GB | 247.62 GB | 2.38 GB | 1 | Optimal
Share | 1 TB | 1015.6 GB | 8.34 GB | 1 | Optimal
Unallocated | 10.84 TB | - | - | - | -
AdvancedDisk
-------------------------------------------------------------------
Partition | Total | Available | Used | %Used | Status
-------------------------------------------------------------------
0 | 500 GB | 495.81 GB | 4.19 GB | 1 | Mounted
Configuration
-------------------------------------------------------------------
Partition | Total | Available | Used | %Used | Status
-------------------------------------------------------------------
0 | 25 GB | 21.52 GB | 3.48 GB | 14 | Mounted
MSDP
-------------------------------------------------------------------
105Managing a NetBackup appliance from the NetBackup Appliance Web ConsoleAbout storage configuration

Partition | Total | Available | Used | %Used | Status
-------------------------------------------------------------------
0 | 1 TB | 1015.6 GB | 8.36 GB | 1 | Mounted
MSDP Catalog
-------------------------------------------------------------------
Partition | Total | Available | Used | %Used | Status
-------------------------------------------------------------------
0 | 43 GB | 42.59 GB | 414.99 MB | 1 | Mounted
NetBackup Catalog
-------------------------------------------------------------------
Partition | Total | Available | Used | %Used | Status
-------------------------------------------------------------------
0 | 250 GB | 247.62 GB | 2.38 GB | 1 | Mounted
Share
-------------------------------------------------------------------
Partition | Total | Available | Used | %Used | Status
-------------------------------------------------------------------
s1 | 1 TB | 1015.6 GB | 8.34 GB | 1 | Mounted
AdvancedDisk
------------------------------------
Disk Pool (DP) | Storage Unit (STU)
------------------------------------
dp_adv_nbapp2br | stu_adv_nbapp2br
MSDP
-------------------------------------
Disk Pool (DP) | Storage Unit (STU)
-------------------------------------
dp_disk_nbapp2br | stu_disk_nbapp2br
Share - s1
--------------------------------------------
Description:
None
--------------------------------------------
Clients | Options
--------------------------------------------
appesx30-vm13 | no_root_squash, rw, secure
--------------------------------------------
106Managing a NetBackup appliance from the NetBackup Appliance Web ConsoleAbout storage configuration

You cannot issue commands for disks with the status 'n/a'.
The sizes that are displayed here for the MSDP partition are different
from the MSDP disk pool sizes. See the NetBackup Appliance
Administrator's Guide for more information.
Instructions to use a share:
On UNIX systems, a share can be mounted using nbapp2br.engba.symantec.com:/shares/<Name>.
Viewing disk informationThe following procedure describes how to use the Show Disk command, using theNetBackup Appliance Shell Menu.
107Managing a NetBackup appliance from the NetBackup Appliance Web ConsoleAbout storage configuration

To view disk information
1 Log on to the NetBackup Appliance Shell Menu.
2 Open the Storage menu. To open the storage menu, use the followingcommand:
Main > Manage > Storage
The appliance displays all the sub-tasks in the storage menu.
108Managing a NetBackup appliance from the NetBackup Appliance Web ConsoleAbout storage configuration

3 Enter the Show Disk command to view disk information.
The appliance displays the disk information as shown in the following example:
Storage> Show Disk
- [Info] Performing sanity check on disks and partitions..(5 mins approx)
--------------------------------------------------------------------
Disk ID | Type | Total |Unallocated|Status
--------------------------------------------------------------------
50001FD36800000796537BB10F|Operating|930.39 TB| - | n/a
System
50001FD36800000790537BB0FA|Base | 2.24 TB| 300 GB | In Use
50001FEE6C00000A36537BB0CB|Expansion|4.5421 TB| 840.92 GB| In Use
You cannot issue commands for devices with the status 'n/a'.
Storage> Show Disk
- [Info] Performing sanity check on disks and partitions..(5 mins approx)
--------------------------------------------------------------------
Disk ID | Type | Total |Unallocated|Status
--------------------------------------------------------------------
5E000000000000000000000000|System |930.39 TB| - | n/a
50001FD36800000790537BB0FA|Base | 2.24 TB| 300 GB | In Use
50001FEE6C00000A36537BB0CB|Expansion|4.5421 TB| 840.92 GB| In Use
You cannot issue commands for devices with the status 'n/a'.
For a 5330 platform, the appliance displays the disk information as shown inthe following example:
Storage> Show Disk
- [Info] Performing sanity check on disks and partitions..(5 mins approx)
---------------------------------------------------------------------------------
Disk ID |Type | Total |Unallocated| Status
---------------------------------------------------------------------------------
5E000000000000000000000000|System | 2.73 TB | - | n/a
5E000000000001000000000000|System | 2.73 TB | - | n/a
50001FD36800000796537BB10F|Meta | 5.46 TB | 5.46 TB | In Use
50001FEE6C00000A38537BB0D5|Meta | 5.46 TB | 5.37 TB | In Use
50001FD3680000078A537BB0DC|Data | 19.10 TB |19.10 TB | In Use
50001FD3680000078C537BB0E4|Data | 19.10 TB |19.10 TB | In Use
50001FD3680000078E537BB0EC|Data | 19.10 TB | 0 GB | In Use
50001FD36800000790537BB0FA|Data | 19.10 TB | 7.30 TB | In Use
50001FD36800000792537BB102|Data | 19.10 TB |19.08 TB | In Use
50001FD36800000794537BB10B|Data | 19.10 TB | 0 GB | In Use
109Managing a NetBackup appliance from the NetBackup Appliance Web ConsoleAbout storage configuration

50001FEE6C00000A32537BB0B4|Data | 19.10 TB |19.10 TB | In Use
50001FEE6C00000A34537BB0C3|Data | 19.10 TB |19.10 TB | In Use
50001FEE6C00000A36537BB0CB|Data | 19.10 TB |18.20 TB | In Use
50001FEE6C00000A3A537BB0D8|Data | 19.10 TB | 0 GB | In Use
50001FEE6C00000A3C537BB0E1|Data | 19.10 TB |19.10 TB | In Use
50001FEE6C00000A3E537BB0EA|Data | 19.10 TB |19.10 TB | In Use
You cannot issue commands for disks with the status 'n/a'.
Table 3-11 lists the disk types that can appear depending on your Appliance platform.
Table 3-11 Disk Type
Supported PlatformsDescriptionType
5200, 5220, 5230
5330
This category tells you the storage thatis occupied by the Appliance operatingsystem, logs etc.
System
5200, 5220, 5230This category tells you the storage thatis available with the Appliance base unit.
Base
5220, 5230A storage shelf that is connected to a5220 or a 5230 appliance appears as asingle expansion disk.
Expansion
5330All partitions, except MSDP Catalog, existon the 5330 Data disk. Examples ofpartitions that exist on the data disks areMSDP, AdvancedDisk, Configuration etc.There can be six data disks for a PrimaryStorage Shelf and six for an ExpansionStorage Shelf.
Data
5330The MSDP Catalog partition exists onlyon the Meta disk. There can be one Metadisk for a Primary Storage Shelf and onefor an Expansion Storage Shelf.
Meta
Not ApplicableThis category appears when appliancecannot determine the disk type like whenthe disk is not accessible.
Unknown
110Managing a NetBackup appliance from the NetBackup Appliance Web ConsoleAbout storage configuration

Viewing partition informationThe Show Partition command includes a few different options for view the storageinformation on the appliance. Options include:
■ All [PartitionType]
■ Configuration [PartitionType]
■ Usage [PartitionType]
Replace [PartitionType] with AdvancedDisk, All, MSDP, or Share.
The following procedure describes how to use the Show Partition Configuration
command to view configuration information for a share, using the NetBackupAppliance Shell Menu:
To view partition configuration for a share
1 Log on to the NetBackup Appliance Shell Menu.
2 Open the Storage menu. To open the storage menu, use the followingcommand:
Main > Manage > Storage
The appliance displays all the sub-tasks in the storage menu.
3 Enter the Show Partition Configuration Share command to view thepartition information for a share.
4 For 52xx platforms, the appliance displays the partition information as shownin the following example:
- [Info] Performing sanity check on disks and partitions... (5 mins approx)
Share - s1
--------------------------------------------
Description:
None
--------------------------------------------
Clients | Options
--------------------------------------------
appesx30-vm13 | no_root_squash, rw, secure
--------------------------------------------
Instructions to use a share:
On UNIX systems, a share can be mounted using nbapp2br.engba.symantec.com:/shares/<Name>.
111Managing a NetBackup appliance from the NetBackup Appliance Web ConsoleAbout storage configuration

Viewing the partition distribution on disksThe following procedure describes how to use the Show Distribution command,using the NetBackup Appliance Shell Menu:
112Managing a NetBackup appliance from the NetBackup Appliance Web ConsoleAbout storage configuration

To view the partition distribution on a disk
1 Log on to the NetBackup Appliance Shell Menu.
2 Open the Storage menu. To open the storage menu, use the followingcommand:
Main > Manage > Storage
The appliance displays all the sub-tasks in the storage menu.
113Managing a NetBackup appliance from the NetBackup Appliance Web ConsoleAbout storage configuration

3 Enter the Show Distribution command to view distribution of partitions on adisk.
The following example displays the initiated procedure when you run the Show
[Distribution] command on a 5330 appliance:
Show Distribution
5000294D6C0000214253716C3C (Data)
---------------------------------
Configuration : 25 GB
- 0 : 25 GB
5000294D6C0000214553716C47 (Data)
---------------------------------
MSDP : 19.10 TB
- 3 : 19.10 TB
5000294D6C0000214853716C4E (Data)
---------------------------------
AdvancedDisk : 19.10 TB
- 1 : 19.10 TB
5000294D6C0000214B53716C54 (Meta)
---------------------------------
MSDP Catalog : 5.46 TB
- 0 : 5.46 TB
5000294D6C0000214E53716C59 (Data)
---------------------------------
AdvancedDisk : 1.80 TB
- 2 : 1.80 TB
5000294D6C0000215453716C68 (Data)
---------------------------------
MSDP : 19.10 TB
- 0 : 19.10 TB
5000294D8000001E0741ECBEBD (Data)
---------------------------------
MSDP : 19.10 TB
- 2 : 19.10 TB
5000294D8000001E0A41ECBEC3 (Data)
---------------------------------
114Managing a NetBackup appliance from the NetBackup Appliance Web ConsoleAbout storage configuration
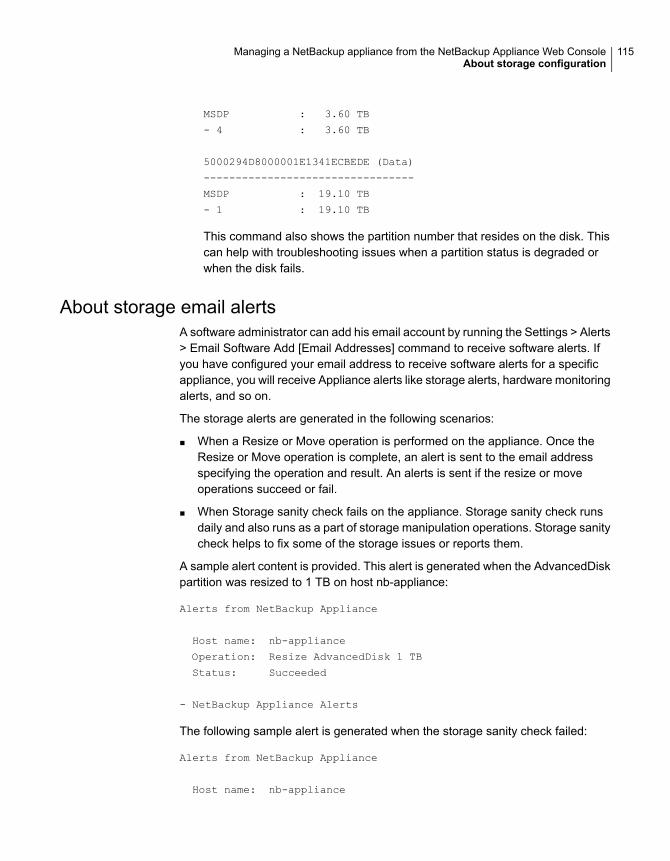
MSDP : 3.60 TB
- 4 : 3.60 TB
5000294D8000001E1341ECBEDE (Data)
---------------------------------
MSDP : 19.10 TB
- 1 : 19.10 TB
This command also shows the partition number that resides on the disk. Thiscan help with troubleshooting issues when a partition status is degraded orwhen the disk fails.
About storage email alertsA software administrator can add his email account by running the Settings > Alerts> Email Software Add [Email Addresses] command to receive software alerts. Ifyou have configured your email address to receive software alerts for a specificappliance, you will receive Appliance alerts like storage alerts, hardware monitoringalerts, and so on.
The storage alerts are generated in the following scenarios:
■ When a Resize or Move operation is performed on the appliance. Once theResize or Move operation is complete, an alert is sent to the email addressspecifying the operation and result. An alerts is sent if the resize or moveoperations succeed or fail.
■ When Storage sanity check fails on the appliance. Storage sanity check runsdaily and also runs as a part of storage manipulation operations. Storage sanitycheck helps to fix some of the storage issues or reports them.
A sample alert content is provided. This alert is generated when the AdvancedDiskpartition was resized to 1 TB on host nb-appliance:
Alerts from NetBackup Appliance
Host name: nb-appliance
Operation: Resize AdvancedDisk 1 TB
Status: Succeeded
- NetBackup Appliance Alerts
The following sample alert is generated when the storage sanity check failed:
Alerts from NetBackup Appliance
Host name: nb-appliance
115Managing a NetBackup appliance from the NetBackup Appliance Web ConsoleAbout storage configuration

Operation: Storage sanity check
Status: Failed
Reason: Failed to mount the 'AdvancedDisk' partition '0'. A full file
system check (fsck) needs to be performed on this partition.
- NetBackup Appliance Alerts
About appliance supported tape devicesThe following describes the tape device support for the NetBackup appliance:
The NetBackup appliance supports backup to the tape libraries thatare of NetBackup type TLD (tape library DLT). DLT is an acronym fordigital linear tape.
For the TLD types that NetBackup supports, see the HardwareCompatibility List at the following URL:
www.netbackup.com/compatibility
Tape library
The NetBackup appliance supports writing to the tape devices that arecapable of SCSI T10 encryption to ensure that the tape media that ismoved off-site is secure. Tape encryption requires configuration of theNetBackup Key Management Service (KMS) feature. To know moreabout KMS support and the list of the tape drives supported with KMS,see the Hardware Compatibility List at the following URL:
www.netbackup.com/compatibility
Tape drives
Tapes with the barcode prefix of CLN are treated as cleaning tapes.
Tapes with any other barcode prefix are treated as normal tapes.
Tape usage
Starting with appliance version 2.5, NetBackup appliances support theNetBackup type ACS libraries and the configuration of NetBackup ACSrobotics on the NetBackup appliance. Appliance administrators canchange the ACS entries in the vm.conf file on the local appliance.
For complete details about the ACS commands that can be used tomodify the vm.conf file, see the NetBackup Appliance CommandReference Guide.
NetBackup ACSlibraries
See “Adding external robots to the NetBackup appliance” on page 116.
Adding external robots to the NetBackup applianceAfter the Fibre Channel HBA card has been installed, you can add external robotsto the appliance.
116Managing a NetBackup appliance from the NetBackup Appliance Web ConsoleAbout appliance supported tape devices

Use the following procedure to add robots to the appliance.
To add an external robot to the appliance
1 Set any physical address switches to the appropriate setting as described inthe instructions from the vendor.
2 Connect the robot to the HBA card as described in the instructions from thevendor.
3 Install and configure the robot software so that the robot works with theoperating system, as described in the instructions from the vendor. Theoperating system must be able to recognize the robot before you can configureit to work with the appliance. (This is an optional step.)
4 Configure the added robot for backups as follows:
Use the NetBackup Administration Console.
See to "Configuring robots and drives" in the NetBackupAdministrator's Guide, Volume I.
For NetBackup 52xx mediaserver appliances:
See “About appliance supported tape devices” on page 116.
About configuring Host parameters for yourappliance
The Settings > Host menu enables you to view and edit the following NetBackupsettings for your appliance:
■ Specify Data Buffer parametersSee “Configuring data buffer parameters” on page 119.
■ Specify Lifecycle parametersSee “Configuring lifecycle parameters” on page 123.
■ Specify Deduplication parametersSee “Configuring deduplication parameters” on page 125.
■ Enable or disable BMR as a server recovery optionSee “About BMR integration” on page 126.
Manage > Host > Data Buffer optionsYou can configure the parameters for the data buffer shared with NetBackup usingthe Manage > Host > Data Buffer tab in the appliance NetBackup Appliance Web
117Managing a NetBackup appliance from the NetBackup Appliance Web ConsoleAbout configuring Host parameters for your appliance

Console. The Data Buffer Parameters tab enables you to enter the count and sizeof the following data buffer storage:
■ Data buffer tapes
■ Data buffer on disks
■ Data buffer using Fibre Transport
■ Data buffer restore
■ Data buffer for NDMP (Network Data Management Protocol)
■ Data buffer for multiple copies
The following data buffer parameters can be updated using the appliance NetBackupAppliance Web Console:
Table 3-12 Data Buffer parameters
Description for the Count fieldFields
Enter the total number of shared data buffer tapes used byNetBackup. The default value is 30.
Data buffer tapes -Count
Enter the size of each shared data buffer tape in Bytes. The defaultvalue is 262144 Bytes.
Data buffer tapes -Size
Enter the number of shared data buffer disks used by NetBackup.The default value is 30.
Data buffer on disks -Count
Enter the size of each shared data buffer disks in Bytes. The defaultvalue is 262144 Bytes.
Data buffer on disks -Size
Enter the number of shared data buffer FT storage used byNetBackup. The default value is 16.
Data buffer FT - Count
Enter the size of each shared data buffer FT storage in Bytes. Thedefault value is 262144 Bytes.
Data buffer FT - Size
Enter the number of shared data buffer restore storage used byNetBackup. The default value is 30.
Data buffer restore -Count
Enter the size of each shared data buffer NDMP (Network DataManagement Protocol) storage in Bytes. The default value is262144 Bytes.
Data buffer NDMP -size
Enter the size of each shared data buffer storage restored in Bytes.The default value is 262144 Bytes.
Data buffer multiplecopies - Size
You can view and change the data buffer parameters using this tab.
118Managing a NetBackup appliance from the NetBackup Appliance Web ConsoleAbout configuring Host parameters for your appliance

Configuring data buffer parametersYou can set the data buffer parameters using the Manage > Host menu in theNetBackup Appliance Web Console. The Host menu displays the Data Buffer tab.You can view and change the data buffer parameters using this tab. The followingprocedure describes how to view and update your data buffer parameters usingthe NetBackup Appliance Web Console.
You can also update these parameters using the appliance shell menu. For details,see the NetBackup 52xx Series Command Reference Guide.
To configure data buffer parameters
1 Log on to the NetBackup Appliance Web Console.
2 Select Manage > Host > Data Buffer.
The system displays theData Buffer tab with the default NetBackup data bufferparameters.
3 Enter the data buffer parameters in the provided fields. A description of thedata buffer parameters is available.
See “Manage > Host > Data Buffer options” on page 117.
4 Click Save, to save the updated parameters.
Manage > Host > Lifecycle optionsYou can set the lifecycle parameters using the Manage > Host menu in theNetBackup Appliance Web Console. The Host page displays the Lifecycle tab.You can view and change the lifecycle parameters using this tab.
Table 3-13 describes the lifecycle parameters that are displayed.
119Managing a NetBackup appliance from the NetBackup Appliance Web ConsoleAbout configuring Host parameters for your appliance

Table 3-13 Lifecycle parameters
DescriptionField
Enter the time interval after which the deleted life cycle policiesshould be cleaned up. The default value is 24 .hours.
Select the unit to measure the time from the drop-down list. Youcan select from the following options:
■ Hour(s)■ Second(s)■ Minute(s)■ Day(s)■ Week(s)■ Month(s)■ Year(s)
Cleanup sessioninterval
Enter the duplication group criteria that is used to define how batchesare created. The default value is 1.
Duplication groupcriteria
Enter the interval period till NetBackup waits before an image copyis added to the next duplication job. The default value is 2 hours.
Select the unit to measure the time from the drop-down list. Youcan select from the following options:
■ Hour(s)■ Second(s)■ Minute(s)■ Day(s)■ Week(s)■ Month(s)■ Year(s)
Image extended retryperiod
120Managing a NetBackup appliance from the NetBackup Appliance Web ConsoleAbout configuring Host parameters for your appliance

Table 3-13 Lifecycle parameters (continued)
DescriptionField
Set the frequency of job submission for all operations. The defaultvalue is 5 minutes.
By default, all jobs are processed before more jobs are submitted.Increase this interval to allow NetBackup to submit more jobs beforeall jobs are processed.
Select the unit to measure the time from the drop-down list. Youcan select from the following options:
■ Hour(s)■ Second(s)■ Minute(s)■ Day(s)■ Week(s)■ Month(s)■ Year(s)
Job submissioninterval
Enter the maximum size up to which the batch of images is allowedto grow. The default value is 100 GB.
Select the unit to measure the size from the drop-down list. Youcan select from the following options:
■ Byte(s)■ KB■ MB■ GB■ TB■ PB
Max size perduplication job
Enter the time to determine how old any image in a group canbecome before the batch is submitted as a duplication job. Thedefault value is 30 minutes.
Select the unit to measure the time from the drop-down list. Youcan select from the following options:
■ Hour(s)■ Second(s)■ Minute(s)■ Day(s)■ Week(s)■ Month(s)■ Year(s)
Force interval forsmall jobs
121Managing a NetBackup appliance from the NetBackup Appliance Web ConsoleAbout configuring Host parameters for your appliance

Table 3-13 Lifecycle parameters (continued)
DescriptionField
Enter the minimum size up to which the batch of images shouldreach before a duplication job is run for the entire batch. The defaultvalue is 8 GB.
Select the unit to measure the size from the drop-down list. Youcan select from the following options:
■ Byte(s)■ KB■ MB■ GB■ TB■ PB
Min size perduplication job
Enter the number of days after which the Import Manager stopstrying to import the image. The default value is 0 hours.
Select the unit to measure the time from the drop-down list. Youcan select from the following options:
■ Hour(s)■ Second(s)■ Minute(s)■ Day(s)■ Week(s)■ Month(s)■ Year(s)
Replica metadatacleanup timer
Enter the multiplier for the number of concurrently active duplicationjobs that can access a single storage unit. The default value is 2.
Tape resourcemultiplier
Enter the number of hours to determine how much time must passsince an inactive version was the active version. The default valueis 14 days.
Select the unit to measure the time from the drop-down list. Youcan select from the following options:
■ Hour(s)■ Second(s)■ Minute(s)■ Day(s)■ Week(s)■ Month(s)■ Year(s)
Version cleanupdelay
122Managing a NetBackup appliance from the NetBackup Appliance Web ConsoleAbout configuring Host parameters for your appliance

Note: The Import Extended Retry Session Timer, Import Session Timer, andDuplication Session Interval parameters have been removed in Appliance 2.6.A new parameter named Job Submission Interval has been introduced.
Configuring lifecycle parametersYou can set the lifecycle parameters using the Manage > Host menu in theNetBackup Appliance Web Console. The Host menu displays the Lifecycle tab.You can view and change the lifecycle parameters using this tab. The followingprocedure describes how to view and update your lifecycle parameters using theNetBackup Appliance Web Console.
You can also update these parameters using the appliance shell menu. For details,see the NetBackup 52xx Series Command Reference Guide.
To configure lifecycle parameters
1 Log on to the NetBackup Appliance Web Console.
2 Select Manage > Host > Lifecycle.
The system displays the Lifecycle tab with the default lifecycle parameters. Adescription of the lifecycle parameters is available.
See “Manage > Host > Lifecycle options” on page 119.
3 Click Save to save the updated parameters.
About configuring deduplication solutionsNetBackup appliance is available with two types of storage solutions. Based on thetype of NetBackup hardware appliance you can choose from the following two typesof deduplication solutions:
Table 3-14 Deduplication solutions and appliance matrix
Deduplication solutionapplicable
NetBackupApplianceSeries
Media serverMaster Server
Media ServerDeduplication Option(MSDP)
Media Server DeduplicationOption (MSDP)
NetBackup Appliance 5220 Series
Media ServerDeduplication Option(MSDP)
Media Server DeduplicationOption (MSDP)
NetBackup Appliance 5230 Series
123Managing a NetBackup appliance from the NetBackup Appliance Web ConsoleAbout configuring Host parameters for your appliance

Adding the deduplication solution to a 5230 mediaapplianceYou can configure the deduplication solution for your NetBackup Appliance 5230Series media appliance using the following two pages:
■ Intial Configuration - You can select the deduplication solution at the time ofinitial configuration of your appliance.
■ Manage > Storage > Resize - If you have not configured a deduplication solutionat the time of initial configuration you can configure it using the Resize optionfrom the Manage > Storage menu.See “Resizing a partition” on page 77.
Manage > Host > DeduplicationYou can set the Media Server deduplication parameters using the Manage > Host> Deduplication menu in the NetBackup Appliance Web Console. The Host pagedisplays the Deduplication tab. You can view and change the deduplicationparameters using this tab.
Manage > Host > Deduplication describes the deduplication parameters that aredisplayed on the Deduplication Settings tab.
Table 3-15 Deduplication parameters
DescriptionFields
Select the amount of information to be written to the log file.You can select from the values 0 to 10, with 10 being themaximum information that can be logged.
Note: Change this value only when directed to do so by aVeritas representative.
Log verbosity level
Enter the maximum size of the log file in megabytes.Debug log file maximumsize
Enter the IP address or range of addresses of the local networkInterface Card (NIC) for maintaining backups and restores.
NICs for backup andrestore
124Managing a NetBackup appliance from the NetBackup Appliance Web ConsoleAbout configuring Host parameters for your appliance

Table 3-15 Deduplication parameters (continued)
DescriptionFields
Enter the maximum bandwidth that is allowed when backingup or restoring data between the media server and thededuplication pool.
You cannot configure bandwidth throttling using the NetBackupAppliance Web Console. From the NetBackup Appliance ShellMenu use the Main_Menu > Settings > Deduplication > Tuneview option to configure OPTDUP_BANDWIDTH . For moreinformation, refer to the "Settings > Deduplication" topic in theNetBackup Appliance Command Reference Guide.
Maximum bandwidth
Select to compress optimized duplication data. By default, thefiles are not compressed.
Compression
Select the check-box to encrypt the data. By default, files arenot encrypted. When you select the check-box the data isencrypted during transfer and on the storage.
Encryption
Enter the maximum backup image fragment size in megabytes.
Note: Change this value only when directed to do so by aVeritas representative.
Maximum image fragmentsize
Enter the number of retries that can be attempted in case theWeb service fails out or times out.
Note: This parameter applies to the PureDisk DeduplicationOption only. It does not affect NetBackup deduplication.
Web services retry count
Enter the parameter to increase or decrease the timeout valuefor Web service calls made from NetBackup media servers toPureDisk storage units.
Note: This parameter applies to the PureDisk DeduplicationOption only. It does not affect NetBackup deduplication.
Web service call timeout
Select the check-box to ignore the server settings and uselocal pd.conf settings. By default this check-box is not selected.
Use local pd.conf settings
Enter the suffixes for log files. The files with these suffice willnot be segmented.
File segment exceptions
Configuring deduplication parametersYou can set the deduplication parameters using the Manage > Host menu in theNetBackup Appliance Web Console. The Host menu displays the Deduplication
125Managing a NetBackup appliance from the NetBackup Appliance Web ConsoleAbout configuring Host parameters for your appliance
tab. You can view and change the MSDP parameters using this tab. The followingprocedure describes how to view and update your deduplication parameters usingthe NetBackup Appliance Web Console.
You can also update these parameters using the appliance shell menu. For details,see the NetBackup 52xx Series Command Reference Guide.
To configure deduplication parameters
1 Log on to the NetBackup Appliance Web Console.
2 Select Manage > Host > Deduplication.
The system displays the Deduplication tab with the default deduplicationparameters.
3 Enter the MSDP parameters. For more information about these parameters.
See “Manage > Host > Deduplication” on page 124.
4 Click Save, to save the updated parameters.
About BMR integrationBare Metal Restore (BMR) is the Server Recovery option of NetBackup. BMRautomates and streamlines the server recovery process, making it unnecessary tomanually reinstall Operating Systems or configure hardware. With simple commands,complete server restores can be accomplished in a fraction of the time withoutextensive training or tedious administration.
BMR allows the recovery of:
■ Windows systems to completely different hardware (Dissimilar System Recoveryor DSR)
■ UNIX/Linux systems to disks of varying geometry (Dissimilar Disk Recovery orDDR)
See the BMR Administrator’s Guide for more information.
Note: A NetBackup appliance cannot be used as a BMR boot server. Thisconvention is unlike NetBackup, where you can use any master server, mediaserver, or client as a BMR boot server. Your boot server can be any non-applianceNetBackup platform with the same operating system as the hosts that are to berecovered.
See “Enabling BMR from the NetBackup Appliance Web Console” on page 127.
126Managing a NetBackup appliance from the NetBackup Appliance Web ConsoleAbout configuring Host parameters for your appliance

Manage > Host > Advanced optionsYou can now enable Bare Metal Restore (BMR) from Manage > Host > Advancedin the NetBackup Appliance Web Console when the appliance is configured as amaster server. If you want to disable BMR on the appliance, you must run theappropriate NetBackup commands. Note that BMR is disabled by default.
The following option appears on Manage > Host > Advanced:
Enable BMR on this Appliance
You can enable BMR by using this option.
See “Enabling BMR from the NetBackup Appliance Web Console” on page 127.
You cannot enable or disable BMR from the appliance shell menu.
BMR configuration is not required when an appliance is configured as a mediaserver. The Manage > Host > Advanced tab does not appear when the applianceis configured in a media server role.
EnablingBMR from theNetBackupApplianceWebConsoleYou can enable Bare Metal Restore (BMR) from Manage > Hosts > Advanced inthe NetBackup Appliance Web Console when the appliance is configured as amaster server.
If you want to disable BMR on the appliance, you must run the appropriateNetBackup commands. Note that BMR is disabled by default.
To enable BMR from the NetBackup Appliance Web Console
1 Log on to the NetBackup Appliance Web Console. Note that the appliancemust be configured as a master server.
2 Select Manage > Host > Advanced tab.
3 Check Enable BMR on this appliance to enable BMR on the appliance.
4 Click Save.
Manage > Host > IPMI optionsYou can reset the IPMI from the Manage > Host > IPMI tab in the NetBackupAppliance Web Console. The IPMI must be reset only if the IPMI interface hangsor stops responding. The IPMI reset operation involves restarting the IPMI.
Refer to the following link for the procedure on how to reset the IPMI.
See “Resetting the IPMI” on page 128.
127Managing a NetBackup appliance from the NetBackup Appliance Web ConsoleAbout configuring Host parameters for your appliance
Note: You can also reset the IPMI from NetBackup Appliance Shell Menu by usingthe Support > IPMI Reset command. See the NetBackup Appliance CommandsGuide for more details.
Resetting the IPMIUse the following procedure to reset the IPMI. The IPMI must be reset only if theIPMI console hangs or stops responding.
To reset the IPMI
1 Log on to NetBackup Appliance Web Console.
2 Go to Manage > Host > IPMI.
3 Click Reset IPMI.
4 The following warning appears:
Resetting the IPMI disconnects all current IPMI users. Are you sure youwant to reset the IPMI?
Click Yes to continue.
5 The IPMI is reset. Veritas recommends that you wait for 2 minutes and thenattempt to reconnect to the IPMI console.
6 In case you cannot access the IPMI console, the appliance must be shut downand then restarted. Perform the following steps:
■ Schedule a convenient time for the appliance shutdown and alert all users.
■ Shut down the appliance.
■ Disconnect all appliance power cables.
■ Wait for 15 seconds and then reconnect the cables.
■ Turn on power to the appliance.
Manage > Appliance RestoreAppliance Restore implies that you want to restore the appliance to a specific state.That state can be an original factory state or a state that is determined through theuse of checkpoints. Starting with v2.6, you can create a checkpoint, rollback theappliance to a checkpoint that you choose, or initiate a factory reset.
From this page, you can click one of the following buttons to begin the process thatyou want:
■ Create Appliance Checkpoint
128Managing a NetBackup appliance from the NetBackup Appliance Web ConsoleManage > Appliance Restore

Click this icon to create a user-directed checkpoint on your appliance.
■ Appliance RollbackClick this icon to roll back the appliance to a checkpoint that you select.
■ Launch Appliance Factory ResetClick this icon to reset your appliance to its original default state.
The following list describes the four different types of checkpoints:
■ A factory reset checkpoint. This checkpoint is created during the installation ofeach new appliance.
■ A pre-upgrade checkpoint is created before you install a software upgrade. Youcan use this type of checkpoint as a rollback checkpoint in case a softwareupgrade fails.
■ A post-upgrade checkpoint is created after an appliance has been upgraded toa new software version.
■ A user-directed checkpoint is a checkpoint that you create at any point in timeusing the application user interface or the appliance shell menu. If an existinguser-directed checkpoint already exists it is replaced by any new checkpointthat you create.
See “About creating an appliance checkpoint” on page 129.
See “Creating an appliance checkpoint” on page 133.
See “About appliance rollback ” on page 139.
See “About NetBackup appliance factory reset” on page 149.
About creating an appliance checkpointYou can use checkpoints to save a snapshot of the current state of the applianceand then use it to Restore your appliance from that point in case of a future failure.
129Managing a NetBackup appliance from the NetBackup Appliance Web ConsoleManage > Appliance Restore
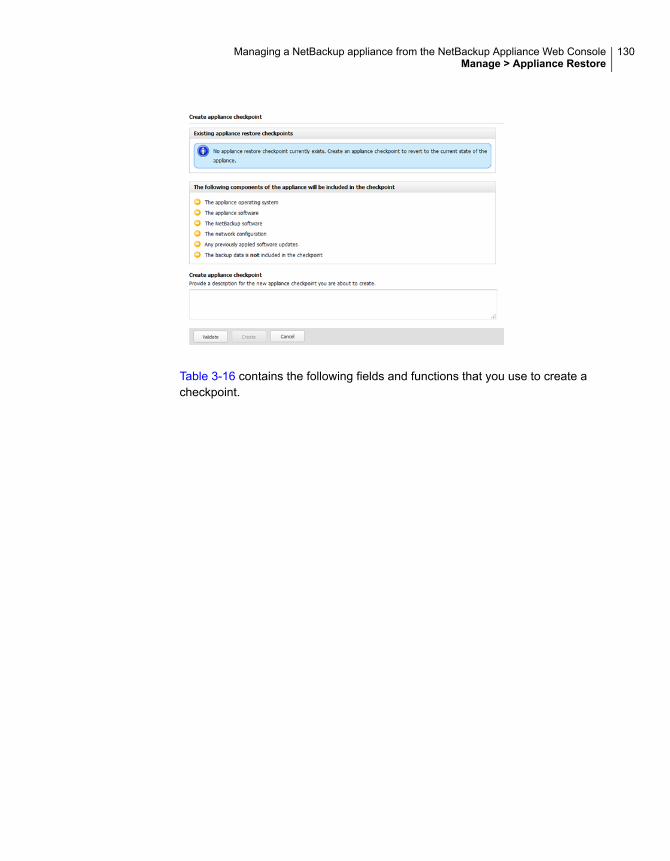
Table 3-16 contains the following fields and functions that you use to create acheckpoint.
130Managing a NetBackup appliance from the NetBackup Appliance Web ConsoleManage > Appliance Restore
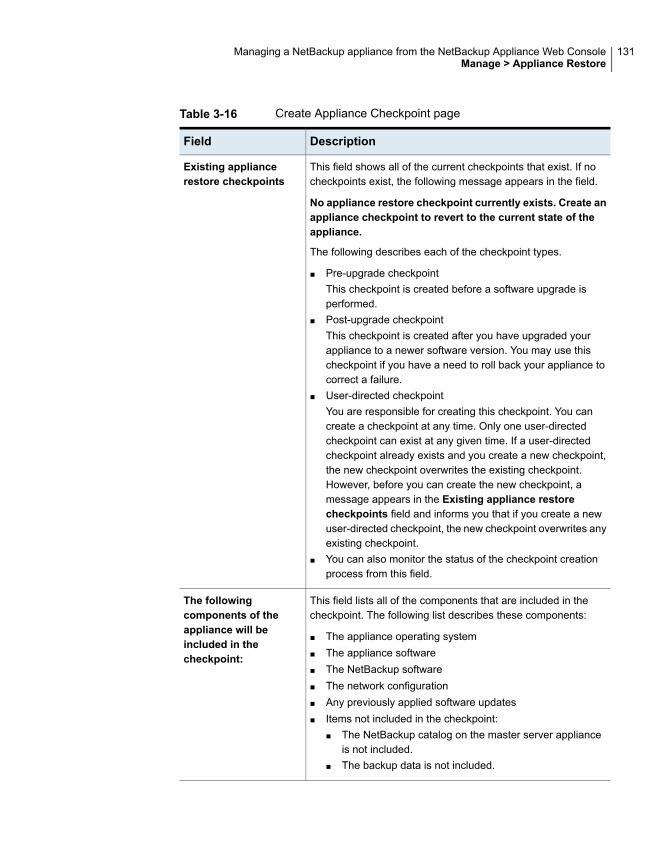
Table 3-16 Create Appliance Checkpoint page
DescriptionField
This field shows all of the current checkpoints that exist. If nocheckpoints exist, the following message appears in the field.
No appliance restore checkpoint currently exists. Create anappliance checkpoint to revert to the current state of theappliance.
The following describes each of the checkpoint types.
■ Pre-upgrade checkpointThis checkpoint is created before a software upgrade isperformed.
■ Post-upgrade checkpointThis checkpoint is created after you have upgraded yourappliance to a newer software version. You may use thischeckpoint if you have a need to roll back your appliance tocorrect a failure.
■ User-directed checkpointYou are responsible for creating this checkpoint. You cancreate a checkpoint at any time. Only one user-directedcheckpoint can exist at any given time. If a user-directedcheckpoint already exists and you create a new checkpoint,the new checkpoint overwrites the existing checkpoint.However, before you can create the new checkpoint, amessage appears in the Existing appliance restorecheckpoints field and informs you that if you create a newuser-directed checkpoint, the new checkpoint overwrites anyexisting checkpoint.
■ You can also monitor the status of the checkpoint creationprocess from this field.
Existing appliancerestore checkpoints
This field lists all of the components that are included in thecheckpoint. The following list describes these components:
■ The appliance operating system■ The appliance software■ The NetBackup software■ The network configuration■ Any previously applied software updates■ Items not included in the checkpoint:
■ The NetBackup catalog on the master server applianceis not included.
■ The backup data is not included.
The followingcomponents of theappliance will beincluded in thecheckpoint:
131Managing a NetBackup appliance from the NetBackup Appliance Web ConsoleManage > Appliance Restore

Table 3-16 Create Appliance Checkpoint page (continued)
DescriptionField
This field is optional. It enables you to provide a label ordescription for the checkpoint. What you enter in this field helpsyou identify the new checkpoint.
Create appliancecheckpoint
Validate
■ When you click the Validate button you initiate a validationprocess that ensures the server is running and in a state tocreate a new checkpoint.
■ A message appears after the validation is run that informsyou whether the validation was successful or not.■ If the validation process is successful the following occurs:
■ The Create button becomes active.■ The following message appears:
Checkpoint validation is complete. Click Create tocreate the new checkpoint.
■ If the validation process is not successful the following occurs:■ The following message appears:
Checkpoint validation was unsuccessful. Thecheckpoint cannot be created. Click here for moreinformation.
■ You can click a link within the message to view moreinformation about the error details.
Create
■ The Create button becomes active after the checkpointvalidation completes successfully. Click Create to begin thecheckpoint process.
■ When you create this checkpoint, it replaces any currentuser-directed checkpoint if one exists.
Cancel
This button cancels the create appliance checkpoint process.
Action buttons on thispage
See “Creating an appliance checkpoint” on page 133.
See “Checkpoint creation status” on page 136.
See “Creating an appliance checkpoint from the appliance shell menu” on page 137.
See “ Manage > Appliance Restore” on page 128.
132Managing a NetBackup appliance from the NetBackup Appliance Web ConsoleManage > Appliance Restore

Creating an appliance checkpointYou begin the process of creating a user-directed checkpoint from the CreateAppliance Checkpoint page on the NetBackup Appliance Web Console. The firsttwo fields on this page do not require any input from you. The first field is theExisting appliance restore checkpoints field. That field displays the checkpointsthat currently exist. The second field shows the components within the appliancethat are included in the checkpoint.
Note: If a user-directed checkpoint already exists, the checkpoint that you are aboutto create replaces the existing checkpoint. Only one user-directed checkpoint canexist at any given time.
To create a new checkpoint from the NetBackup Appliance Web Console
1 Select Manage > Appliance Restore.
2 Click Create Appliance Checkpoint.
If any checkpoints already exist, those checkpoint appear on the page. Inaddition, if a user-directed checkpoint already exists, the new checkpoint willreplace the old checkpoint.
133Managing a NetBackup appliance from the NetBackup Appliance Web ConsoleManage > Appliance Restore

3 Enter a description in the Create Appliance Checkpoint description field atthe bottom of the page. This description is a way by which you can identify thenew checkpoint.
4 Click Validate.
A window appears and shows a validation check is in progress. The validateprocess ensures that all of the media servers are up and running. A statusmessage appears on the page letting you know whether the checkpointvalidation is complete and successful. If the validation is successful and youwant to proceed, click Create.
If the checkpoint validation was unsuccessful, a status message appears onthe page letting you know that the checkpoint cannot be created. A link in themessage is provided that you can select to view more information about themedia server that is not operational. You should correct that issue and clickValidate again. Once the validation is successful, click Create.
134Managing a NetBackup appliance from the NetBackup Appliance Web ConsoleManage > Appliance Restore

5 TheCreate Appliance Checkpoint pop-up appears. If no checkpoint currentlyexists and you want to proceed, click Yes. If a user-directed checkpoint alreadyexists and you want to overwrite that checkpoint, click Yes. Otherwise, clickNo.
Note: Once you begin the checkpoint creation process, you cannot performany other functions on the NetBackup Appliance Web Console until theoperation completes.
The Create Appliance Checkpoint page refreshes and displays a status ofthe checkpoint progress for each media server or server. To see moreinformation on the status of the checkpoint creation progress, click the Detailslink.
See “Checkpoint creation status” on page 136.
6 After the checkpoint creation completes the Create appliance checkpointpage displays a status summary that provides the following information:
■ Host name is the IP address of the appliance or appliances that receivethe checkpoint.
■ Current NetBackup and appliance software versions installed
■ Progress of the checkpoint creation.
■ Status of the checkpoint.
■ Details of the checkpoint
Click Finish to complete the procedure and return to the Appliance Restorepage.
135Managing a NetBackup appliance from the NetBackup Appliance Web ConsoleManage > Appliance Restore

See “About creating an appliance checkpoint” on page 129.
See “ Manage > Appliance Restore” on page 128.
Checkpoint creation statusWhen you begin the user-directed checkpoint process the checkpoint is createdfor the appliance. Each of the systems is listed in the Checkpoint creation statustable. This table provides the following information about each system.
Table 3-17 Checkpoint creation status
DescriptionField
The IP address of the appliance that is about toreceive the new checkpoint.
Host name
The versions of the NetBackup software and appliancesoftware that are currently installed on the appliance.
Current versions
Displays the percentage of completion for eachappliance.
Progress
Displays whether the checkpoint operation completedsuccessfully or not. A possible status for this field is:SUCCESS, FAILED, Timed-out.
Status
This field contains a link labeled Details. Click thislink to view more detailed information about the statusof the create checkpoint operation.
Details
See “Creating an appliance checkpoint” on page 133.
See “About creating an appliance checkpoint” on page 129.
See “ Manage > Appliance Restore” on page 128.
136Managing a NetBackup appliance from the NetBackup Appliance Web ConsoleManage > Appliance Restore

Creating an appliance checkpoint from the appliance shellmenuUse the following procedure to create a user-directed checkpoint from the applianceshell menu.
Note: If a user-directed checkpoint already exists, the checkpoint that you are aboutto create replaces the existing checkpoint. Only one user-directed checkpoint canexist at any given time.
To create a new checkpoint from the appliance shell menu
1 Log on to the appliance as an administrator an open the appliance shell menu.
2 Enter the following command to
Main_Menu > Support > Checkpoint Create
The following interactive process begins. The shell menu informs you of anyexisting checkpoints before you can create a new checkpoint. In the followingexample, no existing checkpoints exist.
Creating an Appliance Checkpoint allows the user to easily
rollback the entire system back to a point-in-time to undo any
misconfiguration or system failure that might have occured. An
Appliance Checkpoint captures the following components:
1) Appliance Operating System
2) Appliance Software
3) NetBackup Software
4) Tape media configuration on the master server
5) Networking Configuration
6) LDAP configuration if any exists
7) Fibre channel configuration
8) Any previously applied patches
9) NetBackup catlog on the master server is not
included
10) Backup data is not included
There are no checkpoints in the system. Please continue to create
a user checkpoint
>> Would you like to proceed? (yes/no) yes
3 Enter Yes to proceed with the creation of the new checkpoint.
137Managing a NetBackup appliance from the NetBackup Appliance Web ConsoleManage > Appliance Restore

4 Enter a description for your checkpoint. That is an optional field.
5 Enter Yes to begin the Create checkpoint process.
- [Info] Deleting checkpoint: USER
- [Info] CREATING USER CHECKPOINT
- [Info] Creating checkpoint. This operation can take 10 to
15 minutes.
Please wait...
- [Info] Appliance Checkpoint creation was successful
Note: Once you begin the checkpoint creation process, you are still able to use theNetBackup Appliance Web Console.
See “Checkpoint creation status” on page 136.
See “About creating an appliance checkpoint” on page 129.
See “ Manage > Appliance Restore” on page 128.
About rollback to a checkpointAfter you have installed a software update or EEB you may determine that youneed to revert back to the previously installed version. This process is referred toas a Rollback operation and it is installed on your appliance by the update process.Roll back to an appliance checkpoint restores the system to the checkpoint'spoint-in-time image. That version may be a previous General Availability (GA)version of the software.
When you want to roll back the appliance, you can choose from the following threetypes of checkpoints.
■ Pre-upgrade checkpointThis checkpoint is created before a software upgrade is performed.
■ Post-upgrade checkpointThis checkpoint is created after you have upgraded your appliance to a newerversion. You may use this checkpoint if you have a need to roll back yourappliance to correct a failure.
■ User-directed checkpointA checkpoint that you created.
The following is a list of general guidelines to consider when you revert to acheckpoint:
138Managing a NetBackup appliance from the NetBackup Appliance Web ConsoleManage > Appliance Restore

■ Only valid checkpoints are displayed for you to select.
■ During a rollback operation you cannot run any user-initiated operations suchas backups, restores, or configuration and maintenance operations.
■ When you begin a rollback operation from the NetBackup Appliance WebConsole, you cannot perform any other functions on the console until the rollbackoperation completes. That is only true when you perform the operation fromtheNetBackup Appliance Web Console and not the appliance shell menu.
See “About appliance rollback ” on page 139.
See “About appliance rollback validation” on page 141.
See “About checkpoint rollback status” on page 145.
About appliance rollbackYou can roll back your appliance to an existing restore checkpoint usingtheNetBackup Appliance Web Console, or the NetBackup Appliance Shell Menu.This ability enables you to address any mis-configuration or system failure issuesthat may have occurred.
To roll back your appliance using the NetBackup Appliance Web Console, openthe Manage > Appliance Restore page and select Rollback Appliance. If nocheckpoints exist, a message stating that no checkpoints exist appears on the page.You can return to the Manage > Appliance Restore page and select CreateAppliance Checkpoint and create a user-directed checkpoint.
If checkpoints already exist, they are shown in the Rollback Appliance page.
139Managing a NetBackup appliance from the NetBackup Appliance Web ConsoleManage > Appliance Restore

Table 3-18 contains the following fields and functions:
Table 3-18 Rollback Appliance page
DescriptionField
This field shows the available checkpoints that you can useto revert your appliance. The available checkpoints can be:
■ Pre-upgrade checkpointA checkpoint that is created before you perform a softwareupgrade.
■ Post-upgrade checkpointA checkpoint that is created after you have upgraded yourappliance to a newer software version.
■ User-directed checkpointA checkpoint that you created.
Select an appliancecheckpoint, to rollback theappliance to a specificcheckpoint
You can elect to automatically restart the appliances after therollback operation completes.
Select the additionalactions to be performedduring the rollback process
140Managing a NetBackup appliance from the NetBackup Appliance Web ConsoleManage > Appliance Restore

Table 3-18 Rollback Appliance page (continued)
DescriptionField
If checkpoints exists, you see the table. If no checkpointsexist, this table is not shown. The table provides the followinginformation:
■ Host NameThe IP address of the master or media server appliance.
■ Current versionsThe NetBackup and appliance software versions currentlyinstalled before the rollback operation begins.
■ Versions after rollbackThe NetBackup and appliance software versions that areinstalled after the rollback operation succeeds.
Version information
The Preview icon provides you with the ability to preview theappliance(s) to ensure that a rollback operation can proceed.If an appliance is not up and running, a message appearsthat identifies the appliance, so that you can make anynecessary adjustments.
The Preview icon cancels the rollback operation.
Action icons
See “About appliance rollback validation” on page 141.
See “About checkpoint rollback status” on page 145.
About appliance rollback validationThis page displays a list of the appliance configuration components that are rolledback.
Note: During a rollback process, all appliance functions are suspended.
Rolling back to an appliance checkpoint reverts the following components:
■ The appliance operating system
■ The appliance software
■ The NetBackup software
■ The network configuration
■ Any previously applied software updates
■ Items not included in the checkpoint:
141Managing a NetBackup appliance from the NetBackup Appliance Web ConsoleManage > Appliance Restore
The NetBackup catalog on the master server appliance is not included.■
■ The backup data is not included.
After you have reviewed the list of actions, click Validate to continue with the rollbackoperation.
The Rollback Appliance pop-up window appears. This pop-up informs you thatonce you start the rollback process, it is irreversible. Click Yes to proceed with therollback operation. Click No to stop the rollback process.
See “About appliance rollback ” on page 139.
See “About checkpoint rollback status” on page 145.
See “About appliance rollback ” on page 139.
Rollback to an appliance checkpoint from the NetBackupAppliance Web ConsoleYou can rollback an appliance to a checkpoint that you choose from the NetBackupAppliance Web Console or the appliance shell menu. The following proceduresdescribe these procedures.
To roll back to an existing checkpoint from the NetBackup Appliance WebConsole
1 Select Manage > Appliance Restore.
2 Click Appliance Rollback.
3 Select an available checkpoint from the Select an appliance checkpoint torollback the appliance to a specific checkpoint list.
The list contains only those checkpoints that exist. At most, there can be threecheckpoints. A pre-upgrade checkpoint, a post-upgrade checkpoint, and auser-directed checkpoint.
4 Determine if you want to restart the appliance automatically after the rollbackoperation completes. If you do, check the Restart appliance automaticallyafter rollback check box.
142Managing a NetBackup appliance from the NetBackup Appliance Web ConsoleManage > Appliance Restore

5 Click Preview.
The Rollback Appliance page updates and shows a the components that arerolled back during the operation. In addition, the appliances that are going tobe rolled back are also displayed on the page.
6 Click Validate.
The validation check ensures that all media servers are up and running. If allmedia servers are running, click Start to roll back to the selected checkpoint.
If the checkpoint validation was unsuccessful, you are not able to start therollback operation. A link is provided that you can select to view moreinformation about the cause of the issue. You can then, correct that issue, andclick Validate. If the validation is successful, click Start.
143Managing a NetBackup appliance from the NetBackup Appliance Web ConsoleManage > Appliance Restore

7 The Rollback Appliance pop-up appears. This pop-up informs you that onceyou start the rollback process, it is irreversible. Click Yes to proceed with therollback operation. Click No to stop the rollback process.
Note: Once you begin the rollback process, you cannot perform any otherfunctions on the NetBackup Appliance Web Console until the operationcompletes.
8 TheRollback Appliance status page appears so you can monitor the successof the rollback operation for the appliance.
9 After the rollback operation completes the compute appliance must be restarted:
■ If you chose to automatically restart the appliance after the rollbackcompletes, a Restart in progress... pop-up appears. This pop-up windowreminds you that the network was reset and connectivity was lost duringthe Restore process. You must use the remote management port toreconfigure the network settings and reconnect to the NetBackup ApplianceWeb Console.
■ If you did not choose to automatically restart the appliance after the rollbackcompletes, a Restart Now! window appears. This window prompts you torestart each of the servers that were selected to be rolled back. Click OKto restart the appliance to complete the rollback operation.
See “Rollback to an appliance checkpoint from the appliance shell menu”on page 145.
See “ Manage > Appliance Restore” on page 128.
144Managing a NetBackup appliance from the NetBackup Appliance Web ConsoleManage > Appliance Restore

About checkpoint rollback statusWhen you begin the checkpoint Rollback process each system is rolled back at thesame time to ensure that all systems are at the same software version level. Eachof the systems is listed in theCheckpoint Rollback status table. This table providesthe following information about each system.
Table 3-19 Checkpoint Rollback status
DescriptionField
The IP address of the appliances that are about to berolled back.
Host name
The version NetBackup software that is currentlyinstalled on the appliance.
Current versions
The version of appliance software that is installed onthe appliance after the rollback is complete.
Verison after rollback
Displays the percentage of completion for eachappliance.
Progress
Displays whether the checkpoint operation completedsuccessfully or not. Possible status for this field:Success, Failed, Completed, Timed-out.
State
This field contains a link labeled Details. Click this linkto view more detailed information about the status ofthe appliance rollback operation.
Details
This page also displays the steps of the revert process once a rollback has beenstarted. The field titled, Following steps will be performed, shows the appliancename(s) that must be rolled back to a checkpoint and then restarted.
See “About appliance rollback validation” on page 141.
See “About appliance rollback ” on page 139.
Rollback to an appliance checkpoint from the applianceshell menuThe following procedure describes how to roll back an appliance to a checkpointfrom the appliance shell menu.
145Managing a NetBackup appliance from the NetBackup Appliance Web ConsoleManage > Appliance Restore

To roll back to an existing checkpoint from the appliance shell menu
1 Log on to the appliance as an administrator and open the appliance shell menu.
2 Enter the following command:
Main_Menu > Support > Checkpoint Rollback
The following interactive process begins. The shell menu informs you of thecomponents that are reverted during this process. It also lists all of the existingcheckpoints.
Rolling back to an Appliance Checkpoint will restore the
system back to the checkpoint's point-in-time. This can help
undo any misconfiguration or system failures that might have
occured.
Rolling back to an Appliance Checkpoint will revert the following
components:
1) Appliance Operating System
2) Appliance Software
3) NetBackup Software
4) Networking Configuration
5) Any previously applied patches
6) Backup data is not reverted
The existing Appliance Checkpoints in the system are:
------------------------------------------------------------
(1) Checkpoint Name: User directed checkpoint
Date Created: Fri Oct 5 09:27:32 2012
Description: User checkpoint after configuring network
------------------------------------------------------------
Please enter the checkpoint to rollback to (Available
options: 1 only):
3 Enter the number of the checkpoint that you want to use for the Rollbackoperation.
146Managing a NetBackup appliance from the NetBackup Appliance Web ConsoleManage > Appliance Restore

4 Enter Yes, if you want to automatically restart all appliances after the rollbackcompletes.
A reboot of the appliance is required to complete the
checkpoint rollback. Reboot automatically after rollback (yes/no)?
Automatically rebooting the appliance after the rollback will not
provide you with an opportunity to review the progress/final
status of the rollback. Are you sure you would like to automatically
reboot the appliance (yes/no) yes
147Managing a NetBackup appliance from the NetBackup Appliance Web ConsoleManage > Appliance Restore

5 Enter Yes a second time to confirm that you want to restart the applianceautomatically after the rollback operation completes.
----------------------------
ROLLBACK OPTIONS AND SUMMARY
----------------------------
Rollback to checkpoint name : [User directed checkpoint]
Auto reboot after rollback? : [YES]
The rollback reverts the entire system to the following versions:
+------------------------------------------------------+
| Appliance | Current Version | Reverted Version |
|-----------------+-----------------+------------------|
|app1.Veritas.com|NetBackup 7.6 |NetBackup 7.6 |
| |Appliance 2.6 |Appliance 2.6 |
|-----------------+-----------------+------------------|
|app2.Veritas.com|NetBackup 7.6 |NetBackup 7.6 |
| |Appliance 2.6 |Appliance 2.6 |
+------------------------------------------------------+
6 Enter Yes to begin the rollback to a checkpoint operation.
The following status is provided once the rollback operation is started.
Rollback to checkpoint? (yes/no) yes
- [Info] Stopping NetBackup Services...please wait.
- [Info] PERFORMING REVERT TO USER CHECKPOINT
- [Info] This takes approx. 15 to 20 mins. Please wait...
- [Info] Rollback to Appliance Checkpoint (User directed
checkpoint) successful.
A reboot of the appliance is required to complete the
checkpoint rollback. Reboot now? (Type REBOOT to continue) REBOOT
Rebooting the appliance now...
- [Info] Rebooting app2.Veritas.com
Please reconnect to the appliance shell menu to continue
using this appliance.
The system is going down for reboot NOW!
See “Checkpoint creation status” on page 136.
See “About creating an appliance checkpoint” on page 129.
148Managing a NetBackup appliance from the NetBackup Appliance Web ConsoleManage > Appliance Restore

See “ Manage > Appliance Restore” on page 128.
About NetBackup appliance factory resetThe purpose of an appliance factory reset is to return your appliance to a clean,unconfigured, and factory state. By default, a factory reset discards all storageconfiguration and backup data. However, before you initiate the factory reset, youcan elect to retain the storage configuration, network configuration and backup dataif any currently exists. In addition, you can elect to restart the appliance after thereset completes.
The purpose of an appliance factory reset is to return your appliance to a clean,unconfigured, and factory state. By default, a factory reset discards all storageconfiguration and backup data. However, before you initiate the factory reset, youcan elect to retain the storage configuration, network configuration and backup dataif any currently exists. In addition, you can elect to restart the appliance after thereset completes.
Note: If you run a factory reset of the appliance, note the following:
A factory reset disables WAN optimization for all network interface bonds if youretain your network configuration (Manage > Appliance Restore > Retain networkconfiguration). After the factory reset completes, you can then enable WANoptimization again for the network interface bonds.
If you do not retain your network configuration, all network interface bonds are lostduring the factory reset. After the reset completes, the appliance automaticallyenables WAN optimization for all network interface ports, including those thatcomprised the bonds.
From the Manage > Appliance Restore page on the NetBackup Appliance WebConsole you can click LaunchAppliance Factory Reset to begin the reset process.Record your network configuration information before you begin a factory reset.After the reset operation completes the appliance is restarted, either automaticallyor manually. You may need the configuration information to log into the appliance.
149Managing a NetBackup appliance from the NetBackup Appliance Web ConsoleManage > Appliance Restore

The field, Select the additional actions to be performed during the factory resetprocess contains the following:
■ Retain storage configuration and backup dataSelect this option to save your storage configuration and all backup data on thestorage partitions and any connected expansion units.
If you do not select this option, the following occurs:
■ All the images on the AdvancedDisk and deduplication storage pools areremoved.
■ All backup data on the storage partitions and any connected expansion unitsare reset.
■ Retain network configurationSelect this option if you want to retain the network configuration of the appliance.If you do not select this option, all network configuration settings will be reset.
■ Restart host(s) automatically after resetSelect this option if you want to have the appliance restarted automatically afterthe factory reset completes.
Table 3-20 describes the remaining fields that are contained in the ApplianceFactory Reset page.
150Managing a NetBackup appliance from the NetBackup Appliance Web ConsoleManage > Appliance Restore

Table 3-20 Appliance factory reset features
DescriptionFields
This part of the Appliance Factory Reset displays all ofthe areas of your appliance that are reset once you startthe factory reset operation.
A factory reset operation resets the entire system, whichincludes resetting the following:
■ Appliance operating system■ Appliance software■ NetBackup software■ Tape media configuration on the master server■ Networking configuration (optionally retain)■ Storage configuration and backup data (optionally retain)
A factory reset operationresets the entire system, thatincludes the followingactions
The following action buttons are available at the bottom ofthis page:
■ Start - Begin the factory reset operation.■ Cancel - resets the current page.
Action buttons
This field appears after you have clicked Validate. Itprovides you with the following information:
■ Current Versions - This field displays the NetBackupand appliance software versions that are currentlyinstalled on each appliance.
■ Versions after reset - This field displays the NetBackupand appliance software versions that are installed afterthe factory reset operation completes successfully.
Versions information
Note: Image imports after a factory reset, reimage, or during data migration fromone master server to another may span from several hours to multiple days tocomplete depending on the size and number of the images to be imported.
See “Starting a factory reset from the NetBackup Appliance Web Console”on page 153.
See “About factory reset status” on page 156.
See “ Manage > Appliance Restore” on page 128.
About factory reset best practicesThis topic contains best-practice information about factory reset operations.
151Managing a NetBackup appliance from the NetBackup Appliance Web ConsoleManage > Appliance Restore

■ Factory Reset operations are not supported if a 52xx master server or mediaserver has been upgraded to version 2.6.0.1 or later. Factory Reset is onlysupported after a clean installation of version 2.6.0.1 or later on a 52xx appliance,or if a 52xx appliance is reimaged to version 2.6.0.1 or later
■ If you manually configure Nirvanix on an appliance after the initial configurationis complete, then you must first manually unconfigure and delete the Nirvanixconfiguration. The factory reset process does not clean the Nirvanix configuration.
■ When performing a factory reset to a previous software version it isrecommended to also reset the storage. The storage will be inaccessible afteryou perform a factory reset to a previous version on the appliance.If you perform a factory reset without resetting the storage, you need to applya patch to update your appliance to the version it was at before you performedthe factory reset. You must apply the patch before performing any otheroperations on the Appliance.
■ If you choose the Storage Reset option during a factory reset, the data or storagemay not be deleted. This situation happens if one or more partitions are in useor some processes continue to access the partition. To remove the storage inthis scenario, run the Support > Storage Reset command after performing afactory reset.The following is an example of an error message that is displayed when storageis not reset:- [Error] Failed to unmount the 'Configuration' partition '0'
because the partition is currently in use. Restarting the appliance
and retrying the operation may help to resolve the issue. Contact
Veritas Technical Support if the issue persists.
Note: The Storage Reset command is only available when the appliance is ina factory state.
■ If you remove attached storage disks before performing a factory reset, youneed to clear the preserved cache of the RAID controller.See "Discard RAID preserved cache after performing a factory reset" in theNetBackup Appliance Troubleshooting Guide for more information.
■ If you remove a storage unit shelf during a factory reset, the factory resetoperation can fail. Veritas recommends that you leave all storage unit shelvesattached during a factory reset.
■ Make sure to stop all running backup, duplication, or restore jobs beforeperforming a Factory Reset. NetBackup storage objects, storage units, diskpools, and storage servers on the master server that belong to the media server
152Managing a NetBackup appliance from the NetBackup Appliance Web ConsoleManage > Appliance Restore

appliance are not cleaned up if a Factory Reset operation is performed whilebackup, duplication or restore jobs are still in progress.
Starting a factory reset from the NetBackup ApplianceWeb ConsoleThe following procedure describes how to start a factory reset operation from theNetBackup Appliance Web Console.
Note: Factory reset operations are not supported if a 52xx master server or mediaserver has been upgraded to version 2.6.0.1. Factory reset is only supported aftera clean installation of version 2.6.0.1 on a 52xx appliance, or if a 52xx appliance isreimaged to version 2.6.0.1.
Note: A factory reset operation returns the password to the original, default value.
To begin a factory reset from the NetBackup Appliance Web Console
1 Open the Manage > Appliance Restore page.
2 Click Launch Appliance Factory Reset.
3 Determine if you want to retain the storage configuration and backup data. Ifyou do, check theRetain storage configuration and backup data check box.
Determine if you want to retain the network configuration. If you do, check theRetain network configuration check box.
Determine if you want to restart host(s) automatically after the reset completes.If you do, check the Restart Host(s) automatically after reset check box.
4 Click Validate.
153Managing a NetBackup appliance from the NetBackup Appliance Web ConsoleManage > Appliance Restore

After you click Validate a pop-up appears to remind you that the validation isin process.
The following results can occur from the validation operation:
■ If the validation process completes successfully, a validation completemessage appears and you can proceed to Step 6.
5 Click Start.
6 An Appliance Factory Reset pop-up window appears. This window informsyou that the factory reset operation is irreversible once it is started.
■ Click Yes to start the factory reset.
Note: Once you begin the factory reset, you cannot perform any otherfunctions on the NetBackup Appliance Web Console until the operationcompletes.
■ Click No to stop the process of performing a factory reset and return theprevious page.
After you click Yes, the Appliance Factory Reset refreshes and displaysstatus summary information. This page shows the progress of the factory resetoperation for the appliance. This page shows the following information:
■ The name of the appliance to be reset.
■ The current version of software that is installed on the appliance before thereset begins.
■ The software version that is installed after the reset completes.
■ A progress bar that displays a percentage of completion.
154Managing a NetBackup appliance from the NetBackup Appliance Web ConsoleManage > Appliance Restore

The Details link in the Status Summary page enables you to view the detailsof the factory reset for the host that corresponds to the link that you selected.
See “About factory reset status” on page 156.
7 After the reset operation completes, the storage reset operation begins if youdid not elect to retain your storage configuration and backup data at thebeginning of this procedure.
A storage reset message appears.
Click on the word here to view the details of the storage reset operation.
8 After the storage reset operation completes the appliance must be restarted:
■ If you chose to automatically restart the appliance after the reset completes,a Restart in progress... pop-up appears. The contents of that pop-upreminds you that the network was reset and connectivity was lost duringthe reset process. You must use the remote management remotemanagement port to reconfigure the network settings and reconnect to theNetBackup Appliance Web Console.
■ If you did not choose to automatically restart the appliance after the resetcompletes, a Restart Now! window appears. This window prompts you to
155Managing a NetBackup appliance from the NetBackup Appliance Web ConsoleManage > Appliance Restore

restart the appliance. Click OK to restart the appliance to complete thefactory reset operation.
9 You must use the remote management port to reconfigure the network settingsand reconnect to the NetBackup Appliance Web Console. Perform the followingsteps:
■ When the appliance restarts and you see the keyboard prompts at the topof the screen, Hit the F2 function key on the keyboard.
■ Use the left arrow and the right arrow on your keyboard to navigate to theServer Management menu.
■ Use the up and down arrows on your keyboard to navigate to theBaseboardLAN configuration section.
■ Select the RMM4 LAN Configuration section.
■ Enter the network configuration information, such as the IP source [Static],IP, Subnet mask, and Gateway IP addresses.
■ You can now connect to the appliance NetBackup Appliance Web Console.
See “About NetBackup appliance factory reset” on page 149.
See “Starting a factory reset from the appliance shell menu” on page 157.
See “About factory reset status” on page 156.
About factory reset statusThis page displays the status of your factory reset operation. The table on this pageprovides the following information:
Table 3-21
DescriptionField name
Name of the appliance that is about to be reset.Host name
The version NetBackup software that is currently installedon the appliance.
Current version
The version of appliance software that is installed on theappliance after the reset is complete.
Version after reset
Displays the percentage of completion for each appliance.Progress
Displays whether the checkpoint operation completedsuccessfully or not. A possible status for this field is:Active, Failed, Success, Timed-out.
Status
156Managing a NetBackup appliance from the NetBackup Appliance Web ConsoleManage > Appliance Restore
Table 3-21 (continued)
DescriptionField name
This field contains a link labeled Details. Click this linkto view more detailed information about the status of thecreate checkpoint operation.
Details
See “About NetBackup appliance factory reset” on page 149.
See “ Manage > Appliance Restore” on page 128.
Starting a factory reset from the appliance shell menuThe following procedure describes how to start a factory reset operation from theappliance shell menu.
Note: Factory reset operations are not supported if a 52xx master server or mediaserver has been upgraded to version 2.6.0.1. Factory reset is only supported aftera clean installation of version 2.6.0.1 on a 52xx appliance, or if a 52xx appliance isreimaged to version 2.6.0.1.
Note: A factory reset operation returns the password to the original, default value.
Note: Image imports during a Factory Reset, reimage or moving data from onemaster server to another may take a considerable amount of time on the NetBackup5330 Appliance. This is due to the underlying storage layout in the 5330 hardware.
157Managing a NetBackup appliance from the NetBackup Appliance Web ConsoleManage > Appliance Restore

To begin a factory reset from the appliance shell menu
1 Log on to the appliance as an administrator an open the appliance shell menu.
2 Enter Main_Menu > Support > FactoryReset. This command shows thefollowing messages and requires you to answer the following questions beforethe factory reset begins.
Appliance factory reset will reset the entire system
to the factory installed image. The appliance will have the following components
reset to the factory restored settings/image:
1) Appliance Operating System
2) Appliance Software
3) NetBackup Software
4) Tape media configuration on the master server
5) Networking configuration (optionally retain)
6) Storage configuration and backup data (optionally retain)
- [Info] Running factory reset validation...please wait (approx 2 mins)
- [Info] Factory reset validation successful.
RESET NETWORK CONFIGURATION [Optional]
-- Resets the IP and routing configuration.
-- Resets the DNS configuration.
>> Do you want to reset the network configuration? [yes/no] (yes) no
RESET STORAGE CONFIGURATION and BACKUP DATA [Optional]
-- Removes all the images on the AdvancedDisk and MSDP storage pools.
-- Resets the storage partitions.
-- Resets storage expansion units, if any.
>> Do you want to delete images and reset backup data? [yes/no] (yes)
>> Resetting the storage configuration will remove all backup
data on the storage partitions and any connected expansion
units. This is not reversible. Are you sure you want to
reset storage configuration? [yes/no] (yes)
>> A reboot of the appliance is required to complete the factory reset.
Reboot automatically after reset? [yes/no] (no) yes
>> Automatically rebooting after the reset will not provide you with an
opportunity to review the progress/final status of the reset. Are you sure
you would like to automatically reboot? [yes/no] (no) yes
158Managing a NetBackup appliance from the NetBackup Appliance Web ConsoleManage > Appliance Restore

3 After you respond to these questions, the Factory Reset Summary is shown.The following is an example of the summary:
FACTORY RESET SUMMARY
---------------------
Reset Appliance OS, software configuration : [YES]
Reset Appliance network configuration : [NO]
Reset Appliance storage configuration (REMOVE DATA) : [YES]
Auto reboot after reset? : [YES]
Appliance will make the following version changes:
+------------------------------------------------------------------------------+
| Appliance | Current Version | Reverted Version |
|------------+--------------------------------+--------------------------------|
|v49 |NetBackup 7.6.0.2 Appliance |NetBackup 7.6.0.2 Appliance |
| |2.6.0.2 |2.6.0.2 |
+------------------------------------------------------------------------------+
159Managing a NetBackup appliance from the NetBackup Appliance Web ConsoleManage > Appliance Restore

4 The following warning appears. If you want to begin the factory reset operation,enter Yes.
WARNING: An Appliance Factory reset cannot be reversed!
Continue with factory reset?? (yes/no) yes
The following summary messages appear as the factory reset continues:
- [Info] PERFORMING APPLIANCE RESET TO FACTORY STATE ON : app2.Veritas.com
- [Info] Delete checkpoints (type: NON_FACT) succeeded
- [Info] Reset of the appliance to FACTORY STATE successful.
- [Info] Stopping NetBackup processes... (6 mins approx)
- [Info] Moving NetBackup Appliance Directory to ce-win21-urmi1...
- [Info] Acquired lock on the storage.
- [Info] Resetting the storage configuration...
- [Info] Checking whether the 'MSDP' storage partition exists...
- [Info] Initiating deletion of 'MSDP' storage partition...
- [Info] Unmounting the 'MSDP' partition '0'...
- [Info] Deleting the 'MSDP' partition '0'...
- [Info] Checking whether the 'Catalog' storage partition exists...
- [Info] Initiating deletion of 'Catalog' storage partition...
- [Info] Unmounting the 'Catalog' partition '0'...
- [Info] Deleting the 'Catalog' partition '0'...
- [Info] Checking whether the 'Configuration' storage partition exists...
- [Info] Initiating deletion of 'Configuration' storage partition...
- [Info] Unmounting the 'Configuration' partition '0'...
- [Info] Deleting the 'Configuration' partition '0'...
- [Info] Checking whether the 'AdvancedDisk' storage partition exists...
- [Info] Initiating deletion of 'AdvancedDisk' storage partition...
- [Info] Unmounting the 'AdvancedDisk' partition '0'...
- [Info] Deleting the 'AdvancedDisk' partition '0'...
- [Info] Removing the storage configuration...
- [Warning] Failed to query SCSI device '/dev/system/root'.
- [Warning] Failed to query SCSI device '/dev/system/root'.
>> A reboot of the appliance is required to complete the factory reset.
Reboot now?[yes/no] (no)yes
Rebooting the appliance now...
- [Info] Rebooting app2.Veritas.com...
Broadcast message from root (Mon Nov 25 11:56:39 2013):
The system is going down for reboot NOW!
160Managing a NetBackup appliance from the NetBackup Appliance Web ConsoleManage > Appliance Restore

- [Info] Rebooting appliance to complete the reset.
Please reconnect to the Appliance shell menu to continue using this appliance
5 You must use the remote management remote management port to reconfigurethe network settings and reconnect to the NetBackup Appliance Web Console.Perform the following steps:
■ When the appliance restarts and you see the keyboard prompts at the topof the screen, Hit the F2 function key on the keyboard.
■ Use the left arrow and the right arrow on your keyboard to navigate to theServer Management menu.
■ Use the up and down arrows on your keyboard to navigate to theBaseboardLAN configuration section.
■ Select the RMM4 LAN Configuration section.
■ Enter the network configuration information, such as the IP source [Static],IP, Subnet mask, and Gateway IP addresses.
■ You can now connect to the appliance NetBackup Appliance Web Console.
See “About NetBackup appliance factory reset” on page 149.
See “Starting a factory reset from the NetBackup Appliance Web Console”on page 153.
See “About factory reset status” on page 156.
Manage > LicenseYou can review, add, and delete license keys for your appliance through theNetBackup Appliance Web Console using the Manage > License page.
The following describes the license key information that is displayed on theManage> License page:
■ KeyShows all of the installed license keys.
■ TypeDescribes the license type.
■ Expiry DateIndicates when the license expires.
License Key table
161Managing a NetBackup appliance from the NetBackup Appliance Web ConsoleManage > License

■ Feature IDIdentifies the feature number that is associated with theselected license key.
■ Feature NameIdentifies the feature name that is associated with theselected license key.
Feature Details table
See “Managing license keys on the NetBackup appliance” on page 162.
See “Adding a permanent license key if an evaluation license key expires”on page 164.
Managing license keys on the NetBackup applianceThe following procedures describe how to view, add, and delete NetBackup optionlicense keys through the appliance user interface or the NetBackup Appliance ShellMenu
To add license keys through the NetBackup Appliance Web Console
1 Log in to the NetBackup Appliance Web Console.
2 Click Manage > License
All installed license keys, associated feature IDs, and associated feature namesare displayed.
3 To add new license keys, do the following:
■ Click Add. The following warning message is displayed:
This operation restarts NetBackup processes after the
licenses have been added successfully. The NetBackup domain does not
run any job during this time. Are you sure you want to proceed?
Click Yes.
■ In the Add License Key dialog box, enter the license key in the Key fieldfor the selected server.
■ Click OK.
To delete a license key through the NetBackup Appliance Web Console
1 Log on to the NetBackup Appliance Web Console.
2 Click Manage > License.
All installed license keys, associated feature IDs, and associated feature namesare displayed.
162Managing a NetBackup appliance from the NetBackup Appliance Web ConsoleManage > License

3 In the Key column, select the license keys that you want to delete by selectingthe check box next to the license key number.
4 Click Delete.
The following message is displayed:
Deleting the selected license(s) will disable related
features in NetBackup. This operation restarts NetBackup processes
after the licenses have been deleted successfully. The NetBackup domain
does not run any job during this time. Are you sure you want to proceed?
5 Click Yes to confirm the deletion.
To view, add, and delete license keys through the NetBackup Appliance ShellMenu
1 To view a list of all installed license keys or view the details of each key, enterone of the following commands:
■ Main_Menu > Manage > License > List
A complete list of installed license keys appears.
■ Main_Menu > Manage > License > ListInfo
The associated feature IDs and feature names appear.
2 To add license keys, do the following:
■ Enter Main_Menu > Manage > License > Add.
■ Enter the license key for the option that you want to install. Then pressEnter.
■ To add another license key, press y.
■ Repeat the previous step or press n to exit.
3 To delete license keys, do the following:
■ Enter Main_Menu > Manage > License > Remove.
■ Enter the license key for the option that you want to remove. Then pressEnter.
■ To remove another license key, press y.
■ Repeat the previous step or press n to exit.
163Managing a NetBackup appliance from the NetBackup Appliance Web ConsoleManage > License
Adding a permanent license key if an evaluation license key expiresIf your evaluation license key expires, you may encounter problems if you need toinstall or configure your appliance. You can avoid future issues if you add apermanent license key before the evaluation key expires.
The following list identifies some symptoms that you may encounter if the evaluationkey has expired and if you have not added a permanent key:
■ A fully configured NetBackup appliance stops working.
■ A new installation of this release using a USB drive may appear to hang whenyou configure NetBackup.
■ An attempt to run a factory reset fails.
■ You are unable to complete an initial configuration of a preinstalled, NetBackupappliance.
■ Unable to upgrade from a previous version to this version of the appliance.
■ You may even observe the following issues with a preinstalled NetBackupappliance that does not have permanent keys installed.
■ System self-test fails.
■ Backup and restore jobs fail.
■ The user interface does not load.
■ A forced, factory reset appears to hang while configuring NetBackup.
To install a permanent license key on a preinstalled NetBackup appliancewith an expired evaluation key
1 Log on to NetBackup Appliance Shell Menu. Use admin as the user name andP@ssw0rd as the password.
2 Enter Main_Menu > Manage > License > Add.
3 Enter yes when prompted to continue.
4 Enter a valid evaluation or production NetBackup license key when promptedfor a NetBackup license key.
5 Enter n when prompted to add an additional license key.
6 Stop the NetBackup processes.
Main_Menu > Support > Processes > NetBackup Stop
7 Start NetBackup processes.
Main_Menu > Support > Processes > NetBackup Start
See “Manage > License ” on page 161.
164Managing a NetBackup appliance from the NetBackup Appliance Web ConsoleManage > License

See “Managing license keys on the NetBackup appliance” on page 162.
About the Migration UtilityThe Migration Utility lets you move copies of backup images from the source diskpool to the destination disk pool. It enables you to:
■ Migrate (copy) images from source storage to destination storage to seed thedestination storage client backup history
■ Convert policies so new backups go to the new destination storage
■ Accomplish this without impacting existing backup schedules
■ Eventually decommission or repurpose the source storage
For v2.6.x the Migration Utility feature is applicable with the following conditions:
■ Images available for migration are the “latest complete backup picture” for aspecific policy/client pair. Which means that it is the last FULL backup for thespecific policy/clientFor policy types which do not follow the FULL backup convention, other imagesare included in the migration. The Migration Utility tries to include everythingrequired to represent the latest complete backup picture.
■ The latest complete backup picture only includes complete images and imageswhich are “storage lifecycle complete”.
■ The migration is not performed using Fibre Channel, this is because data transferbetween the following is not supported for v2.6.x:
■ From NetBackup PureDisk to a Media Server Deduplication Pool (MSDP)through a Fibre Channel cable
■ From an MSDP to another MSDP through a Fibre Channel cable
Note: You must make sure that you have the proper credentials to schedule andcomplete a migration job. To ensure that you have the proper credentials, go to theMedia and Device Management > Credentials > Storage Servers > MediaServers window in the NetBackup Administration Console. Ensure that the checkboxes next to the media servers to be used for your migration job have beenselected. Only when these selections have been made can you perform a migrationjob.
The following diagram provides a brief overview of the Migration Utility feature:
165Managing a NetBackup appliance from the NetBackup Appliance Web ConsoleAbout the Migration Utility
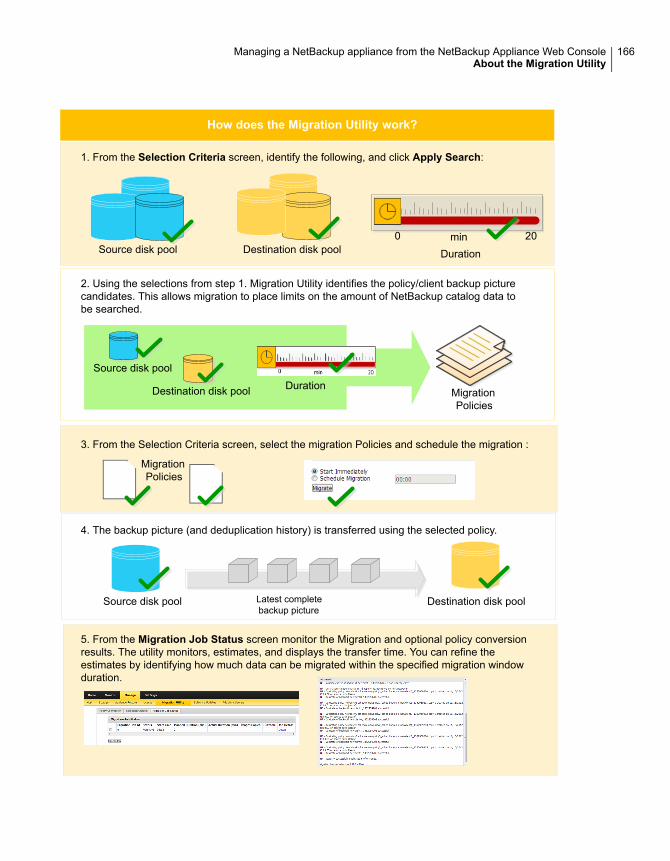
How does the Migration Utility work?
Source disk pool Destination disk pool
Latest completebackup picture
1. From the Selection Criteria screen, identify the following, and click Apply Search:
2. Using the selections from step 1. Migration Utility identifies the policy/client backup picturecandidates. This allows migration to place limits on the amount of NetBackup catalog data tobe searched.
Source disk pool Destination disk pool
20min0
Duration
Source disk pool
Destination disk pool DurationMigrationPolicies
3. From the Selection Criteria screen, select the migration Policies and schedule the migration :
MigrationPolicies
4. The backup picture (and deduplication history) is transferred using the selected policy.
5. From the Migration Job Status screen monitor the Migration and optional policy conversionresults. The utility monitors, estimates, and displays the transfer time. You can refine theestimates by identifying how much data can be migrated within the specified migration windowduration.
166Managing a NetBackup appliance from the NetBackup Appliance Web ConsoleAbout the Migration Utility

The utility provides the ability to automate the migration jobs by letting you schedulewhen the migrations run. The utility also tracks the images that have been migrated.Multiple migrations can be scheduled so that they do not interfere with normalbackups and duplications.
When you click Manage > Migration Utility, the following tabs appear:
■ Selection CriteriaUse this tab to select the start time, the migration window (duration), the sourcedisk pool where the current backup images reside, and the destination (target)disk pool where you want the images migrated.When you click Apply Search Criteria, the tab is refreshed with a list of all thefiles on the source disk pool that match the search criteria.
■ Policy ConversionUse this tab to change the policy that you want to use for the backups that arenow targeted for the destination disk pool.Once an image has been migrated to the destination disk pool, select the policyname and the policy type on this tab so that backups and duplications for thatimage are targeted for the destination disk pool.
■ Migration Job StatusUse this tab to view the status and the result of all the scheduled migration jobs.The most recent job appears at the top of the list.
See “Selection Criteria” on page 167.
See “Selecting the search criteria and scheduling the migration job” on page 170.
See “Policy Conversion” on page 174.
See “Setting-up a policy conversion map” on page 176.
See “Migration Job Status” on page 171.
See “Viewing migration job status and details” on page 174.
See “Best practices to run a migration job” on page 177.
Selection CriteriaWhen you navigate to Manage > Migration page, the appliance displays theSelection Criteria tab. You can use this tab to perform the following tasks:
■ Apply the search criteria by selecting the appropriate source disk pool, destinationdisk pool, and policy types
■ View the estimated transfer time to run the migration job
■ Schedule the migration job
167Managing a NetBackup appliance from the NetBackup Appliance Web ConsoleAbout the Migration Utility
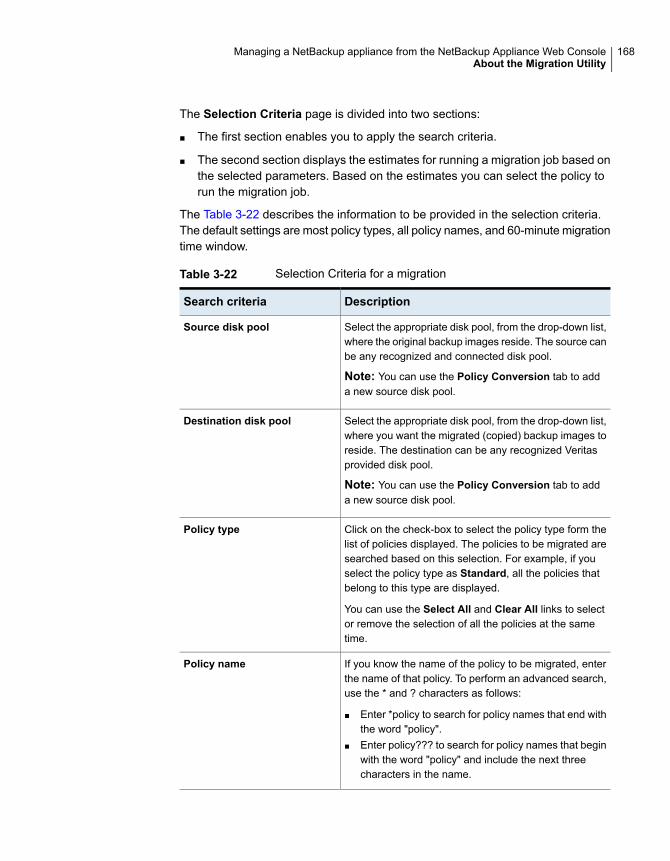
The Selection Criteria page is divided into two sections:
■ The first section enables you to apply the search criteria.
■ The second section displays the estimates for running a migration job based onthe selected parameters. Based on the estimates you can select the policy torun the migration job.
The Table 3-22 describes the information to be provided in the selection criteria.The default settings are most policy types, all policy names, and 60-minute migrationtime window.
Table 3-22 Selection Criteria for a migration
DescriptionSearch criteria
Select the appropriate disk pool, from the drop-down list,where the original backup images reside. The source canbe any recognized and connected disk pool.
Note: You can use the Policy Conversion tab to adda new source disk pool.
Source disk pool
Select the appropriate disk pool, from the drop-down list,where you want the migrated (copied) backup images toreside. The destination can be any recognized Veritasprovided disk pool.
Note: You can use the Policy Conversion tab to adda new source disk pool.
Destination disk pool
Click on the check-box to select the policy type form thelist of policies displayed. The policies to be migrated aresearched based on this selection. For example, if youselect the policy type as Standard, all the policies thatbelong to this type are displayed.
You can use the Select All and Clear All links to selector remove the selection of all the policies at the sametime.
Policy type
If you know the name of the policy to be migrated, enterthe name of that policy. To perform an advanced search,use the * and ? characters as follows:
■ Enter *policy to search for policy names that end withthe word "policy".
■ Enter policy??? to search for policy names that beginwith the word "policy" and include the next threecharacters in the name.
Policy name
168Managing a NetBackup appliance from the NetBackup Appliance Web ConsoleAbout the Migration Utility

Table 3-22 Selection Criteria for a migration (continued)
DescriptionSearch criteria
Enter the expected time duration to run the migration jobthat allows migration to place limits on the amount ofNetBackup catalog data which must be searched. Thisduration helps you to minimize the effect on NetBackupand avoid returning unwanted information. Searching forimages to migrate is a time consuming process, thereforethe search process is bounded by theMigrationWindowDuration.
Duration of migration window
Click to search for the policies that match the selectioncriteria.
Apply search criteria
The migration utility begins searching for images matching the criteria. Based onthe size of the image(s), destination's transfer rate, and the transfer time the policy’simages are added to the Possible Selections section. You can use this retrievedinformation to run the migration job. The Table 3-23 describes the PossibleSelections section:
Note: Images that are not SLP (Storage Lifecycle Policy) complete are not copied,therefore these images are not included in the Possible Selections section.
Table 3-23 Possible Selections
DescriptionColumnheading
Based on the policy name selected this bar graph is update to display theestimated utilization of the migration window. The bar graph is uses percentagesand minutes to depict the estimated utilization of the migration windows.
Estimatedtime torun themigrationjob(minutes)
Displays a check box and the name of the policies retrieved based on thesearch criteria. Select the check-box next to the policy you want to migrate.The bar graph is updated according to the policy selected.
Policy
Displays the estimated time to transfer the data when you run the migrationjob.
Estimatedtransfertime
Displays the estimated size of the data that will be transferred when you runthe migration job.
Size
169Managing a NetBackup appliance from the NetBackup Appliance Web ConsoleAbout the Migration Utility

Table 3-23 Possible Selections (continued)
DescriptionColumnheading
Displays the policy type of the policies retrieved based on the search criteria.PolicyType
Displays the number of clients in the first row, followed by the client names inthe remaining rows.
Number ofclients/Clientnames
Displays the date on which the data was last backed up for the correspondingclient name.
ImageDate
After you have evaluated the possible selections, use the following radio buttonsto schedule the migration job:
■ Start Immediately to run the migration job at the current time.■ ScheduleMigration to enter the run the migration job based on the specified
time.
ScheduleMigration
You can now navigate to the following tabs:
■ Schedule migrationThe migration job is scheduled and you can view the status of the migration jobwhen you click the Migration Job Status tab.See “Migration Job Status” on page 171.
■ Policy Conversion tab.Click this tab to change the policy that you want to use for the backups that arenow targeted for the destination disk pool.See “Policy Conversion” on page 174.
See “Selecting the search criteria and scheduling the migration job” on page 170.
See “About the Migration Utility” on page 165.
See “Best practices to run a migration job” on page 177.
Selecting the search criteria and scheduling themigrationjobThis section provides the procedure to select the search criteria using the Manage> Migration Utility > Selection Criteria tab.
170Managing a NetBackup appliance from the NetBackup Appliance Web ConsoleAbout the Migration Utility

To select the search criteria and schedule a migration job:
1 Log on to the NetBackup Appliance Web Console.
2 Click Manage > Migration Utility > Selection Criteria.
The appliance displays the Selection Criteria tab.
3 Enter the selection criteria in the provided fields. A description of the selectioncriteria is available at Selection Criteria.
4 ClickApply Search Criteria, to set the search criteria for scheduling a migrationjob.
Based on the search criteria, the appliance displays the available migrationpolicies and the estimated time to migrated the backed up data using thesepolicies. A description of the possible selections is available at Selection Criteria.
5 Select one or more policies whose image(s) for the listed client(s) should becopied from the source storage to the destination storage.
Based on policy name selected the Estimated time to run the migration job(minutes) bar graph is update to display the estimated utilization of themigration window.
6 To run the migration job you can select from the following two approaches:
Click Start Immediately to run the migration job at the current time.
Or
Enter the start time and click Schedule Migration.
7 Click Migrate to run the migration job.
The appliance runs the migration job. You can view the details of the migration jobusing the Migration Job Status tab.
See “Selection Criteria” on page 167.
See “About the Migration Utility” on page 165.
See “Best practices to run a migration job” on page 177.
Migration Job StatusThe Migration Job Status tab provides a convenient way to coordinate migrationjobs, to cancel jobs, to review rolled up migration results, and reports status. Thistab lets you view the status and the result of all the scheduled migration jobs. Themost recent job appears at the top of the list. Only a single job can be QUEUED orRUNNING at any time
Table 3-24 describes the status and the result conditions that are reported.
171Managing a NetBackup appliance from the NetBackup Appliance Web ConsoleAbout the Migration Utility
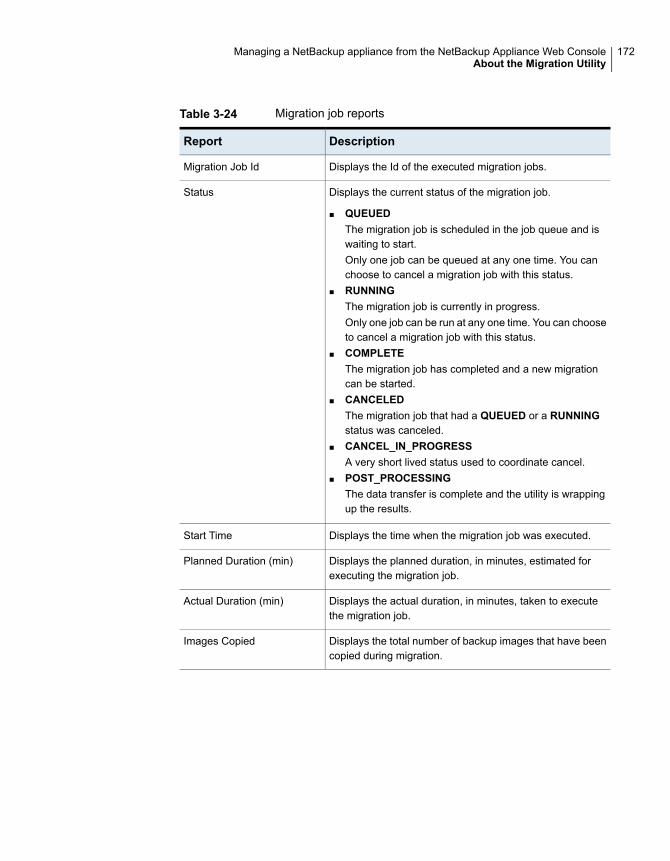
Table 3-24 Migration job reports
DescriptionReport
Displays the Id of the executed migration jobs.Migration Job Id
Displays the current status of the migration job.
■ QUEUEDThe migration job is scheduled in the job queue and iswaiting to start.Only one job can be queued at any one time. You canchoose to cancel a migration job with this status.
■ RUNNINGThe migration job is currently in progress.Only one job can be run at any one time. You can chooseto cancel a migration job with this status.
■ COMPLETEThe migration job has completed and a new migrationcan be started.
■ CANCELEDThe migration job that had a QUEUED or a RUNNINGstatus was canceled.
■ CANCEL_IN_PROGRESSA very short lived status used to coordinate cancel.
■ POST_PROCESSINGThe data transfer is complete and the utility is wrappingup the results.
Status
Displays the time when the migration job was executed.Start Time
Displays the planned duration, in minutes, estimated forexecuting the migration job.
Planned Duration (min)
Displays the actual duration, in minutes, taken to executethe migration job.
Actual Duration (min)
Displays the total number of backup images that have beencopied during migration.
Images Copied
172Managing a NetBackup appliance from the NetBackup Appliance Web ConsoleAbout the Migration Utility

Table 3-24 Migration job reports (continued)
DescriptionReport
Displays the final outcome of how the migration job wasexecuted.
■ SUCCESSThe migration job has completed successfully with noerrors. That is N of N images were successfully copied.To see a list of the job details, click on the associatedlink for that job.
■ SUCCESS*The migration job has completed successfully with noerrors. That is N of N images were successfully copied.The * next to the outcome signifies that you shouldexamine the job details.To see a list of the job details, click on the associatedlink for that job.
■ PARTIALThe migration job is either in progress or it was not ableto migrate all of the files in the job. That is a subset of Nimages were successfully copied.To see a list of the job details, click on the associatedlink for that job.
■ FAILEDThe migration job was not able to migrate any of the filesin the job. That is zero images were successfully copied.To see a list of the job details, click on the associatedlink for that job.
Outcome
Displays theDetails link. Click to view the log of the migrationjob executed. It displays the NetBackup image copy detailsand the migration transfer rate information
Job Details
This button can be used to cancel a migration job that iscurrently being executed.
Cancel Job
See “Viewing migration job status and details” on page 174.
See “Selection Criteria” on page 167.
See “Policy Conversion” on page 174.
See “About the Migration Utility” on page 165.
See “Best practices to run a migration job” on page 177.
173Managing a NetBackup appliance from the NetBackup Appliance Web ConsoleAbout the Migration Utility
Viewing migration job status and detailsThis section provides the procedure to view the details of the migration job and tocancel a migration job, using the Manage > Migration Utility > Migration JobStatus tab.
To view the details of the migration job:
1 Log on to the NetBackup Appliance Web Console.
2 Click Manage > Migration Utility > Migration Job Status.
The appliance displays the Migration Job Status tab. It lists all the migrationjobs executed using the Selection Criteria tab.
3 Click on the Details link to view the details of how the migration job wasexecuted.
The appliance displays the details of the migration job.
The following procedure describes how to cancel a migration job.
To cancel a migration job:
1 Log on to the NetBackup Appliance Web Console.
2 Click Manage > Migration Utility > Migration Job Status.
The appliance displays the Migration Job Status tab. It lists all the migrationjobs executed using the Selection Criteria tab.
3 Select the check box next to the migration job you want to cancel.
Note: You can cancel only those jobs with the status as Scheduled or Inprogress.
4 Click Cancel.
The Cancel operation is recorded in the job details of the migration job.
See “Migration Job Status” on page 171.
See “About the Migration Utility” on page 165.
See “Best practices to run a migration job” on page 177.
Policy ConversionThe Policy Conversion tab is an important operation, however, it is an optionaloperation. That is why the default landing page for the migration utility is theSelection Criteria tab. The Policy Conversion tab enables you to perform thefollowing tasks:
174Managing a NetBackup appliance from the NetBackup Appliance Web ConsoleAbout the Migration Utility

■ Add new source and destination disk pools by mapping them to your existingsource disk pools and destination disk pools.
■ Updates the NetBackup policies over to using the new destination storage forbackups, post successful migration.
■ Policy conversion is configured by a policy conversion map. Each source storagehas its own unique map.
The Policy Conversion tab includes two sections:
■ Select Policy Conversion map
■ Policy Conversion map details
Table 3-25 describes the information you must enter to Select Policy Conversionmap section.
Table 3-25 Select Policy Conversion map fields and buttons
DescriptionFields andbuttons
Select a policy conversion map from the drop-down list. There is a policyconversion map for every possible source storage in the NetBackup domain.
SourceStorage / Mapname
Click to load the current map for the selected source storage.Load andActivate map
The Policy Conversion map details is split in two columns Storage LifecyclePolicies and Storage Units. When you visit the Policy Conversion tab for thefirst no map exists, so the utility locates all Storage Lifecycle Policies (SLPs) andStorage Units (STUs) that reference the given source disk pool and displays themin the respective columns. Table 3-26 describes the information you must enter tochange the source disk pools and the destination disk pools.
Table 3-26 Policy Conversion map details data entry fields and options
DescriptionField
Select the current SLP, to be mapped, thatreferences to the given source disk pool.
Storage Lifecycle Policies (SLP) -Current
Enter the name of the new SLP to be mappedto the current SLP.
Storage Lifecycle Policies (SLP) - New
Select the current STU, to be mapped, thatreferences to the given source disk pool.
Storage Units (STU) - Current
175Managing a NetBackup appliance from the NetBackup Appliance Web ConsoleAbout the Migration Utility

Table 3-26 Policy Conversion map details data entry fields and options(continued)
DescriptionField
Enter the name of the new STU to be mappedto the current STU.
Storage Units (STU) - New
Click to save and active the mapping. If SLPsor STUs are added, removed, or modified inNetBackup, the Current columns areautomatically modified to match the latestsystem state. If SLPs or STUs are added,removed, or modified in NetBackup, theStorageLifecycle Policies (SLP) - Current andStorage Lifecycle Policies (SLP) - Newcolumns are automatically modified to matchthe latest system state.
Comit new map
See “Setting-up a policy conversion map” on page 176.
See “Selection Criteria” on page 167.
See “Migration Job Status” on page 171.
See “About the Migration Utility” on page 165.
See “Best practices to run a migration job” on page 177.
Setting-up a policy conversion mapThis section provides the procedure to set up a policy conversion map. In yourmigration policies, you add new source and destination disk pools by mapping themto your existing source disk pools and destination disk pools. The migration utilityupdates the policy such that new backups use the new destination storage in placeof the old source storage.
To set up a policy conversion map:
1 Log on to the NetBackup Appliance Web Console.
2 Click Manage > Migration Utility > Policy Conversion.
The appliance displays the Policy Conversion tab.
3 Select a policy conversion map from the Source Storage / Map name thedrop-down list.
176Managing a NetBackup appliance from the NetBackup Appliance Web ConsoleAbout the Migration Utility

4 Click Load and Activate map.
When you visit the Policy Conversion tab for the first time no map exists, sothe utility locates all Storage Lifecycle Policies (SLPs) and Storage Units (STUs)that reference the given source disk pool and displays them in the respectivecolumns.
5 From the Policy Conversion map details section, select the current SLP, tobe mapped, that references to the given source disk pool in the StorageLifecycle Policies (SLP) - Current field.
6 Enter the name of the new SLP to be mapped to the current SLP in the StorageLifecycle Policies (SLP) - New field.
7 From the Policy Conversion map details section, select the current STU, tobe mapped, that references to the given source disk pool in the Storage Unit(STU) - Current field.
8 Enter the name of the new STU to be mapped to the current STU in the StorageUnit (STU) - New field.
9 Click Commit new map to map and activate the SLPs and STUs.
The appliance uses the information to map the SLPs and STUs. If the actionis successful the SLPs or STUs are added, removed, or modified in NetBackup,the Storage Lifecycle Policies (SLP) - Current and Storage LifecyclePolicies (SLP) - New columns are automatically modified to match the latestsystem state.
See “Policy Conversion” on page 174.
See “About the Migration Utility” on page 165.
See “Best practices to run a migration job” on page 177.
Best practices to run a migration jobThe following best practices should be kept in mind while run a migration job, usingthe migration utility:
■ Do not run multiple instances of the Migration Utility concurrently on the sameappliance nor anywhere within the NetBackup domain.
■ When you attempt to run multiple instances on the same appliance can causethe utility to generate incorrect estimates in the Possible Selections section.
■ When you attempt to run multiple instances within the NetBackup domainfor the same source and destination combination can cause the utility togenerate incorrect estimates in the Possible Selections section.
177Managing a NetBackup appliance from the NetBackup Appliance Web ConsoleAbout the Migration Utility

■ Select one appliance in the NetBackup domain to be the “Migration UtilityAppliance” and only run the utility from that appliance. The utility saves jobinformation on the appliance and can be accessed from the given appliance.
■ If your master server is an appliance select the master server appliance to bethe “Migration Utility Appliance.” As the migration utility requires access to theNetBackup domain (for example, policy, storage, and catalog) information, usinga master server provides a better performance in generating the list of PossibleSelections.
■ The migration utility supports only a single job to be QUEUED or RUNNING atone time. No other Migration Utility activity is supported until the job reachesCOMPLETE or CANCELLED.
■ After you have made the selection and click Migrate, refresh the PossibleSelections section, using the Apply search criteria button. When a job isQUEUED or RUNNING the utility will return immediately with 0 possibleselections.
■ Do not attempt to reuse the options from thePossible Selections across multiplemigrations. The list of Possible Selections must be brought up to date usingthe Apply search criteria button, once the previous job completes.
See “Selection Criteria” on page 167.
See “About the Migration Utility” on page 165.
See “Policy Conversion” on page 174.
See “Migration Job Status” on page 171.
Software release updates for NetBackupAppliances
Veritas provides bundled, release-update packages for the appliance that you candownload from the Support website. From the NetBackup Appliance Web Consoleor the NetBackup Appliance Shell Menu, you can check the Support website anddetermine if a software update is available.
The bundled packages include updates for the following appliance softwareapplications:
■ Linux operating system
■ NetBackup server
■ NetBackup Appliance Web Console
178Managing a NetBackup appliance from the NetBackup Appliance Web ConsoleSoftware release updates for NetBackup Appliances

Starting with NetBackup appliance version 2.6.0.2, NetBackup clients are no longerincluded with NetBackup appliance release updates. If you want to store clients onthe appliance, a separate client package is available to download. The client packageis available from the same location as the server release updates and includes theNetBackup Administration Console.
Note: Client versions that are stored on the appliance do not have to match theNetBackup version that is currently installed on the appliance.
To access available appliance software release updates, refer to the followingtopics:
Manage > Software UpdatesUse the Manage > Software Updates tab to view and initiate the installation of asoftware upgrade on your appliance.
The Software Update page displays the following sections:
■ Downloaded Software Updates - This section displays:
■ The current software version that is installed on your appliance.
■ The downloaded software updates (packages) that can be installed on yourappliance
■ Online Software Updates - This section displays the software updates availablefor downloading and then installing on your appliance.
Table 3-27 displays the fields and buttons from theDownloaded Software Updatessection.
Table 3-27 Downloaded Software Updates
DescriptionField name
Shows the name and the version of the appliancesoftware updates that are already downloaded andavailable to install.
Available Software Update
Shows the version of NetBackup Appliancesoftware that is available for installation.
Version
Shows the version of NetBackup software that isincluded with that version of the appliance softwareupdate.
NetBackup Version
179Managing a NetBackup appliance from the NetBackup Appliance Web ConsoleSoftware release updates for NetBackup Appliances

Table 3-27 Downloaded Software Updates (continued)
DescriptionField name
Shows the size of the software update to help youensure that you have enough space on theappliance to accommodate the installation.
Size
Click Details to view additional information aboutthe software update.
Details
Selected a software update to install and clickInstall to start the upgrade process.
Certain software updates may displaypre-installation pop-up windows that require userinputs before you proceed further. You may berequired to:
■ Answer the questions that appear in eachpop-up window.After all questions are answered, the serverupgrade list is displayed with the names of theservers that you have selected to upgrade.
■ Click Next.When the Confirmation Required windowappears, enter your user name and password.The upgrade process begins and the progressis shown in the NetBackup Appliance WebConsole.
Install
If you determine that you do not need or want toinstall a downloaded software update, remove itfrom the list as follows:
■ Click the radio box next to the downloadedsoftware update that you want to delete.
■ Click Delete.
To obtain a software update that was deleted,download it again from the Online SoftwareUpdates table.
Delete
Table 3-28 displays the fields and buttons from the Online Software Updatessection. This table remains visible throughout the upgrade process.
180Managing a NetBackup appliance from the NetBackup Appliance Web ConsoleSoftware release updates for NetBackup Appliances

Table 3-28 Online Software Updates
DescriptionField name
This column displays the version of the appliancesoftware update that you can select to downloadto the appliance.
Online Software Update
Shows the version of NetBackup Appliancesoftware that is available for installation.
Version
This column displays the version of NetBackupsoftware that is included with the version of theappliance software that you can select todownload.
Size
This column displays the progress of the softwaredownload. For example, 2.2G/2.9G downloading.
Download Progress
After you have selected a software update version,click Download to start the download process.
The table refreshes to show the status of thedownload. If you decide to cancel the download,click the red X next to the selected software updateon the right side of the table.
Download
Methods for downloading appliance software release updatesNetBackup appliance software release updates are available from the Veritassupport website. Appliance software and client packages can be downloadedthrough the NetBackup Appliance Web Console or the NetBackup Appliance ShellMenu. Updates must first be downloaded onto the appliance before you can initiatean upgrade.
The following describes the methods you can use to download appliance softwarerelease updates:
■ See “Downloading software updates to a NetBackup appliance using theNetBackup Appliance Web Console” on page 182.
■ See “Downloading software updates directly to a NetBackup appliance”on page 182.
■ See “Downloading software updates to a NetBackup appliance using a clientshare” on page 183.
181Managing a NetBackup appliance from the NetBackup Appliance Web ConsoleSoftware release updates for NetBackup Appliances

Downloading software updates to a NetBackup applianceusing the NetBackup Appliance Web ConsoleUse the following procedure to download a software release update to an applianceusing the NetBackup Appliance Web Console.
To download a software release update onto the appliance using theNetBackup Appliance Web Console
1 Open a web browser and log on to the appliance through the NetBackupAppliance Web Console.
2 Select Manage > Software Updates.
3 On the Software Updates page, in theDownloaded Software Updates table,check to make sure that the software update has not already been downloaded.
■ If the table contains the software update that you want to install, proceedto software installation as follows.
■ If the table does not contain a software update that you want to install,proceed to the next step.
4 In the Online Software Updates table on the page, select a software updateand click Download.
The Download Progress column shows the download status. After thedownload has completed successfully, the software update appears in theAvailable Software Updates column of the Downloaded Software Updatestable.
Proceed to software installation as described in the previous step.
Downloading software updates directly to a NetBackupapplianceTo use this method, the appliance requires Internet access to download the filesor packages from the Veritas Support website.
To download software release updates directly onto the appliance
1 Open an SSH session and log on to the appliance as an administrator usingthe NetBackup Appliance Shell Menu.
2 To determine if a software update is available from the Veritas Support website,enter the following command:
Main_Menu > Manage > Software > List AvailablePatch
3 To download an available software update or a client package, enter theappropriate command as follows:
182Managing a NetBackup appliance from the NetBackup Appliance Web ConsoleSoftware release updates for NetBackup Appliances

■ For appliance server updates:Main_Menu > Manage > Software > Download
SYMC_NBAPP_update-<release-version>.x86_64.rpm
Where release is the software release number and version is the versionnumber of the software release. For example:Main_Menu > Manage > Software > Download
SYMC_NBAPP_update-2.7.1-1.x86_64.rpm
■ For a UNIX client package:Main_Menu > Manage > Software > Download
SYMC_NBAPP_addon_nbclient_<platform>-<release>-<date>.x86_64.rpm
Where <platform> is the client platform operating system, <release> is thesoftware release number, and <date> is the NetBackup client package date.For example:Main_Menu > Manage > Software > Download
SYMC_NBAPP_addon_nbclient_Solaris-7.7.1-20150910.x86_64.rpm
■ For a Windows client package:Main_Menu > Manage > Software > Download
SYMC_NBAPP_addon_nbwin-<release>-<date>.x86_64.rpm
Where <release> is the software release number and <date> is theNetBackup client package date.For example:Main_Menu > Manage > Software > Download
SYMC_NBAPP_addon_nbwin-7.7.1-20150910.x86_64.rpm
4 To verify that the rpm has downloaded successfully, enter the followingcommand:
Main_Menu > Manage > List Downloaded
See “Downloading software updates to a NetBackup appliance using the NetBackupAppliance Web Console” on page 182.
Downloading software updates to a NetBackup applianceusing a client shareUse this procedure to download the software release updates or client packagesto an appliance using a CIFS or an NFS client share.
Note: If downloading the software updates directly to the appliance fails, use thismethod to download the appliance software release update or client package ontothe appliance.
183Managing a NetBackup appliance from the NetBackup Appliance Web ConsoleSoftware release updates for NetBackup Appliances

Perform this method from a computer that is connected to the appliance and thatalso has Internet access. Internet access is needed to download the files orpackages from the Veritas Support website to the appliance.
To download software release updates or client packages to the applianceusing a CIFS or an NFS client share:
1 Open an SSH session and log on to the appliance as an administrator usingthe NetBackup Appliance Shell Menu.
2 To open an NFS or a CIFS share, enter the following command:
Main_Menu > Manage > Software > Share Open
3 Map or mount the appliance share directory as follows:
■ Windows CIFS share\\<appliance-name>\incoming_patches
■ UNIX NFS sharemkdir -p /mount/<appliance-name>
mount <appliance-name>:/inst/patch/incoming
/mount/<appliance-name>
4 This step describes the package file names for the release update packagesand the client packages. After reviewing the names, continue with the remainingsteps to download the files.
■ Release updatesNB_Appliance_N_<release-version>.x86_64-tar-split.1of3NB_Appliance_N_<release-version>.x86_64-tar-split.2of3NB_Appliance_N_<release-version>.x86_64-tar-split.3of3Where <release> is the software release number and <version> is theversion number of the software release. For example: 2.7.2-1.To verify that the downloaded release update packages have the sameMD5 or SHA1 checksums as those posted on the Veritas Support web site,do the following:
■ Enter the following URL for the Veritas Support site where the releaseupdates and the client packages are posted:https://www.veritas.com/content/support/en_US/58991.html
■ In the How to... section, click the download link for the posted softwareupdate.
■ On the README page, in the right column, click Attachments.
■ Verify that the checksums shown in the pop-up window match thedownloaded file checksums.
184Managing a NetBackup appliance from the NetBackup Appliance Web ConsoleSoftware release updates for NetBackup Appliances

■ Client packagesSYMC_NBAPP_addon_nbwin_<release>-<date>.x86_64.rpm orSYMC_NBAPP_addon_nbclient_<platform>-<release>-<date>.x86_64.rpm
Where <platform> is the client platform operating system, <release> is thesoftware release number, and <date> is the NetBackup client package date.For example:SYMC_NBAPP_addon_nbclient_HP-UX-IA64-release-20150910.x86_64.rpm
5 Use one of the following commands to join (and extract) the release update.rpm files:
■ For Windows:copy /b NB_Appliance_N_<release-version>.x86_64-tar-split.1of3+
NB_Appliance_N_<release-version>.x86_64-tar-split.2of3+
NB_Appliance_N_<release-version>.x86_64-tar-split.3of3+
NB_Appliance_N_<release-version>.tar
Note: This command must be entered as one string. Make sure that theonly space in the name is after .3of3. In addition, <release> is the softwareversion number and <version> is the posted version number.
Use Windows WinRAR utilities to uncompress theNB_Appliance_N_<release-version>.tar file. The resulting files are asfollows:
■ SYMC_NBAPP_update-<release-version>.x86_64.rpm
■ update.rpm.md5_checksum
■ update.rpm.sha1_checksum
■ For UNIX:cat
NB_Appliance_N_<release-version>.x86_64-tar-split.1of3<space>
NB_Appliance_N_<release-version>.x86_64-tar-split.2of3<space>
NB_Appliance_N_<release-version>.x86_64-tar-split.3of3 | tar
xvf -
Where release is the software release number and version is the versionnumber of the software release. For example: 2.7.x-1.
Note: This command is one string. In this example, there is one spacebetween each split package that is identified with a "<space>".
The resulting files are as follows:
185Managing a NetBackup appliance from the NetBackup Appliance Web ConsoleSoftware release updates for NetBackup Appliances
■ SYMC_NBAPP_update-<release-version>.x86_64.rpm
■ update.rpm.md5_checksum
■ update.rpm.sha1_checksum
Note: To extract packages on UNIX systems, Veritas recommends that youuse GNU tar version 1.16 or higher instead of tar. See the following Technotefor more information about extracting images:
https://www.veritas.com/docs/TECH154080
6 For UNIX systems, run one of the following commands to compute thechecksum value for the .rpm file:
md5sum SYMC_NBAPP_update-<release-version>.x86_64.rpm or sha1sumSYMC_NBAPP_update-<release-version>.x86_64.rpm.
Verify that the checksum value matches the content of theupdate.rpm.md5_checksum file or the update.rpm.sha1_checksum file.
7 Copy this release update or client package .rpm to the mounted share.
Note: During the copy process, do not run any commands on the appliance.Doing so can cause the copy operation to fail.
8 After you have successfully copied the release update or client package .rpm
into the mounted share, unmap or unmount the shared directory.
9 On the appliance, enter the following command to close the NFS and the CIFSshares:
Main_Menu > Manage > Software > Share Close
If you run any of the following commands before you close the share, thedownloaded release update or client package is moved from the share directorylocation to its proper location. However, you must still run the Share Close
command to ensure that the NFS and the CIFS shares are closed.
Note: For upgrades from 2.6.1 or 2.6.1.x, the release update or the clientpackage cannot be verified and moved unless the Symantec Critical SystemProtection (SCSP) scanning is complete. For upgrades from 2.7.1, the releaseupdate or the client package cannot be verified and moved unless the SymantecData Center Security (SDCS) scanning is complete.
186Managing a NetBackup appliance from the NetBackup Appliance Web ConsoleSoftware release updates for NetBackup Appliances

■ List Version
■ List Details All
■ List Details Base
■ Share Open
■ Share Close
10 To list the available release updates or client packages on the appliance, enterthe following command and note the name of the downloaded files:
Main_Menu > Manage > Software > List Downloaded
Running this command validates and moves the release update or the clientpackage from the share directory to its proper location. You are not notifiedthat this move has occurred.
See “Downloading software updates to a NetBackup appliance using the NetBackupAppliance Web Console” on page 182.
Installing a NetBackup appliance version 2.7.x software update usingthe NetBackup Appliance Web Console
After you have performed the items in the pre-upgrade checklist, use the followingprocedure to start the appliance upgrade.
To install a downloaded release update using the NetBackup Appliance WebConsole
1 Check to make sure that the following pre-upgrade tasks have been performed:
■ All jobs have been stopped or suspended and all SLPs have been paused.
■ The Support > Test Software command has been run and returned aPass result.
■ All of the necessary RHEL plug-in packages have been copied into theappropriate location.
2 Open a web browser and log on to the appliance using the NetBackup ApplianceWeb Console.
3 Select Manage > Software Updates.
4 From the Software Updates page, locate the appropriate software update inthe Downloaded Software Updates table.
■ If the table contains the software update that you want to install, proceedto the next step.
187Managing a NetBackup appliance from the NetBackup Appliance Web ConsoleSoftware release updates for NetBackup Appliances

■ If the table does not contain a software update that you want to install, referto the following topics:See “Downloading software updates to a NetBackup appliance using theNetBackup Appliance Web Console” on page 182.See “Downloading software updates directly to a NetBackup appliance”on page 182.See “Downloading software updates to a NetBackup appliance using aclient share” on page 183.
5 Select the check box that is associated with the software update that you wantto install and click Install.
The following events occur after you click Install:
■ The Software Updates page refreshes and presents a table that displaysthe server (master or media) that is to be upgraded. The table also showsthe name and version of the software update.
Note: If you plan to upgrade more than one media server, you must runthis upgrade procedure on each media server.
■ An interactive, pre-installation check window appears.You must provide answers to the pre-installation questions. Then selectFinish to close the pre-installation check window.
6 On the Downloaded Software Updates table, click Next.
7 The Confirm pop-up window displays the server (master or media) that youare about to upgrade.
If this information is correct, click Next. If the information is not correct, clickCancel.
8 ClickNext to open aConfirmation Required pop-up window. An administratormust enter a user name and a password as a final step before the softwareinstallation or the upgrade begins. After you enter these credentials, clickConfirm. If you want to stop or exit the installation, click Cancel.
The Software Updates page refreshes and updates the information that isdisplayed in the Downloaded Software Updates table. This table displaysthe progress of the upgrade, starting with the pre-flight check.
9 Monitor the pre-flight check and watch for anyCheck failedmessages. Proceedas follows:
■ If noCheck failedmessages appear, you are prompted to start the upgrade.Proceed to the next step.
188Managing a NetBackup appliance from the NetBackup Appliance Web ConsoleSoftware release updates for NetBackup Appliances

■ If any Check failed messages appear, the upgrade is not allowed. Youmust resolve the reported failures, then launch the upgrade script again sothat the pre-flight check can verify that the failures have been resolved.
■ If any Check failed messages indicate that a RHEL version third-partyplug-in was not found, you must obtain the plug-in from the appropriatevendor. Refer to the following topic for installation details:
10 The system may restart several times during the upgrade process. After thefirst restart, the NetBackup Appliance Web Console and any SSH-basedconnections to the server are unavailable until the restart process hascompleted. This condition may last two hours or more, depending on thecomplexity of the appliance configuration. It is important that you do not attemptto restart the appliance during this time. You can use the Symantec RemoteManagement interface (IPMI) to view the system restart status. In addition,you may view the logs under /log or wait for the appliance to send an emailupon completion of the upgrade process.
11 After the status of the server reaches 100%, the information in the title line ofthe table indicates whether the upgrade was successful. The following statuscan occur depending on whether the upgrade was successful:
■ The appliance version is <the target version> and not in upgrade state.If the target (or new) version appears, the upgrade was successful. ClickFinish to complete the process.
■ The appliance version is <the original version> and not in upgradestate. If the original (or pre-upgrade) version appears, the upgrade hasfailed, and an automatic rollback has taken place. The rollback returns theserver back to the original version.
■ Failed to create the PRE_UPGRADE checkpoint, please resolve thisissue firstA checkpoint creation process is performed automatically before the upgradeoperation begins. This checkpoint is used to enable the server to roll backto it, if the upgrade fails. If the failure message appears, it indicates thatthe creation of the checkpoint failed, and the upgrade operations were notperformed. You must determine what caused the issue and resolve it beforeyou can attempt the upgrade again.
■ Self-Test failed on <nodename >, please resolve the issue first. Theself-test operation is executed automatically before the upgrade completes.If the self-test fails, you are prompted to either roll back or retry the self-test
189Managing a NetBackup appliance from the NetBackup Appliance Web ConsoleSoftware release updates for NetBackup Appliances
after you have investigated the problem using the NetBackup ApplianceShell Menu.
12 Complete this step only if your backup environment includes SAN clientcomputers.
The Fibre Channel (FC) ports must be re-scanned to allow any SAN clientcomputers to reconnect to the Fibre Transport (FT) devices. The rescan mustbe done from the NetBackup CLI view on the appliance.
To re-scan the FC ports:
■ Enter the following command to see a list of NetBackup user accounts:Manage > NetBackupCLI > List
■ Log on to this appliance as one of the listed NetBackup users.
■ Run the following command to rescan the FC ports:nbftconfig -rescanallclients
■ If any SAN clients still do not work, run the following commands on eachof those clients in the order as shown:On UNIX clients:/usr/openv/netbackup/bin/bp.kill_all
/usr/openv/netbackup/bin/bp.start_all
On Windows clients:<install_path>\NetBackup\bin\bpdown
<install_path>\NetBackup\bin\bpup
■ If any SAN clients still do not work, you must manually initiate a SCSI devicerefresh at the OS level. The method to accomplish the refresh actiondepends on the operating system that the client is running. Once the refreshhas completed, attempt the nbftconfig -rescanallclients commandagain.
■ If any SAN clients still do not work, restart those clients.
Note: If you have any SLES 10 or SLES 11 SAN clients that still do notwork, Veritas recommends that you upgrade the QLogic driver on thoseclients. For the affected SLES 10 clients, upgrade to version8.04.00.06.10.3-K. For the affected SLES 11 clients, upgrade to version8.04.00.06.11.1.
190Managing a NetBackup appliance from the NetBackup Appliance Web ConsoleSoftware release updates for NetBackup Appliances

Installing a NetBackup appliance version 2.7.x software update usingthe NetBackup Appliance Shell Menu
After you have performed the items in the pre-upgrade checklist, use the followingprocedure to start the appliance upgrade.
To install a downloaded release update using the NetBackup Appliance ShellMenu
1 Check to make sure that the following pre-upgrade tasks have already beenperformed:
■ All jobs have been stopped or suspended and all SLPs have been paused.
■ The Support > Test Software command has been run and returned aPass result.
■ All of the necessary RHEL plug-in packages have been copied into theappropriate location.
2 Open an SSH session and log on to the appliance using the NetBackupAppliance Shell Menu.
3 To install the software release update, run the following command:
Main_Menu > Manage > Software > Install patch_name
Where patch_name is the name of the release update to install. Make surethat this patch name is the one that you want to install.
4 Monitor the pre-flight check and watch for anyCheck failedmessages. Proceedas follows:
■ If no Check failed messages appear, you are prompted to continue to thenext step to start the upgrade.
■ If any Check failed messages appear, the upgrade is not allowed. Youmust resolve the reported failures, then launch the upgrade script again sothat the pre-flight check can verify that the failures have been resolved.
■ If any Check failed messages indicate that a RHEL version third-partyplug-in was not found, you must obtain the plug-in from the appropriatevendor. Refer to the following topic for installation details:
5 Watch the onscreen progress of the upgrade to see an estimated completiontime. To see the current status of the upgrade, enter the following command:
Main_Menu > Manage > Software >UpgradeStatus
191Managing a NetBackup appliance from the NetBackup Appliance Web ConsoleSoftware release updates for NetBackup Appliances

6 The upgrade may force the appliance to restart several times.
After the upgrade has completed and the disk pools are back online, theappliance runs a self-diagnostic test. Refer to the following file for the testresults:
/log/selftest_report_<appliance_serial>_<timedate>.txt
If SMTP is configured, an email notification that contains the self-test result issent.
Note: For upgrades from 2.6.1 or 2.6.1.x, the system may restart several timesduring the upgrade process. After the first restart, the NetBackup ApplianceWeb Console and any SSH-based connections to the server are unavailableuntil the restart process has completed. This condition may last two hours ormore, depending on the complexity of the appliance configuration. It is importantthat you do not attempt to restart the appliance during this time. You can usethe Symantec Remote Management interface (IPMI) to view the system restartstatus. In addition, you may view the logs under /log or wait for the applianceto send an email upon completion of the upgrade process.
7 Complete this step only if your backup environment includes SAN clientcomputers.
The Fibre Channel (FC) ports must be re-scanned to allow any SAN clientcomputers to reconnect to the Fibre Transport (FT) devices. The re-scan mustbe done from the NetBackup CLI view on the appliance.
To re-scan the FC ports:
■ Enter the following command to see a list of NetBackup user accounts:Manage > NetBackupCLI > List
■ Log on to this appliance as one of the listed NetBackup users.
■ Run the following command to rescan the FC ports:nbftconfig -rescanallclients
■ If any SAN clients still do not work, run the following commands on eachof those clients in the order as shown:On UNIX clients:/usr/openv/netbackup/bin/bp.kill_all
/usr/openv/netbackup/bin/bp.start_all
On Windows clients:<install_path>\NetBackup\bin\bpdown
<install_path>\NetBackup\bin\bpup
192Managing a NetBackup appliance from the NetBackup Appliance Web ConsoleSoftware release updates for NetBackup Appliances

■ If any SAN clients still do not work, manually initiate a SCSI device refreshat the OS level. The refresh method depends on the operating system ofthe client. Once the refresh has completed, attempt the nbftconfig
-rescanallclients command again.
■ If any SAN clients still do not work, restart those clients.
Note: If you have SLES 10 or SLES 11 SAN clients that still do not work,Veritas recommends upgrading the QLogic driver on those clients. For theaffected SLES 10 clients, upgrade to version 8.04.00.06.10.3-K. For theaffected SLES 11 clients, upgrade to version 8.04.00.06.11.1.
Appliance servers to upgradeAfter you click Install to install a software update, theManage > Software Updatespage refreshes and displays the following tables:
■ Install Software UpdateThis table displays the servers that are to be upgraded with the software updatethat you selected to install.
■ Online Software Updates AvailableThis table remains visible throughout the upgrade process. It shows the availablesoftware updates that are applicable to your appliance that you can download.
Table 3-29 Servers identified for the software update
DescriptionField name
The name of the server that is currently configuredin your master server environment. In a clusterconfiguration, multiple media servers are displayed.
Server
The name of the software update that you haveselected for installation.
Software Update Name
The new version of the appliance software on theserver after the software is updated successfully.
Software Update Version
193Managing a NetBackup appliance from the NetBackup Appliance Web ConsoleSoftware release updates for NetBackup Appliances

Table 3-29 Servers identified for the software update (continued)
DescriptionField name
Click Next to continue with the upgrade processafter selecting the servers to upgrade. After youclick Next, a pop-up window appears that lists theselected servers.
To continue, do the following:
■ Confirm that the server upgrade list is correct.■ When the Confirmation Required window
appears, enter your user name and password.That is the final confirmation step before theupgrade operation begins.
Next
ClickCancel to cancel or exit the upgrade process.
The Next and Cancel buttons are located on thetop-right corner of the table.
Cancel
See “Software Updates Installation Status” on page 194.
See “Manage > Software Updates” on page 179.
Software Updates Installation StatusAfter you enter your user name and password and click Confirm to confirm thesoftware installation, theManage > Software Updates page refreshes and displaysthe following two tables:
■ Install Software UpdateThis table lets you view the progress and the status of the software installationas it applies to each server that you selected to upgrade.After the upgrade has completed on all servers, click Finish.
■ Online Software Updates AvailableThis table remains visible throughout the upgrade process. It shows the availablesoftware updates that are applicable to your appliance that you can download.See “Manage > Software Updates” on page 179.
Table 3-30 describes the information about the installation status of the softwareupdate.
194Managing a NetBackup appliance from the NetBackup Appliance Web ConsoleSoftware release updates for NetBackup Appliances

Table 3-30 Software update installation status
DescriptionField name
The servers that were selected for the softwareupdate installation.
Server
Displays whether each server is online or offline.Status
Shows the progress (in percent) of installation andfor each server. For example, "15%".
Installation Progress
Displays the status of the installation. For example,"The appliance is running self-test on<appliancename>...".
Installation Status
Note: The installation of the software update requires the NetBackup ApplianceWeb Console temporarily owing to the upgrade of certain web console components.To monitor the installation status, log on to the NetBackup Appliance Shell Menuand run the Manage > Software > UpgradeStatus command.
See “Appliance servers to upgrade” on page 193.
See “Manage > Software Updates” on page 179.
About installing an EEBEmergency engineering binaries are provided to customer on an individual basisto meet specific needs for that customer. If you have one or more EEBs that youwant to install you should store them locally so that you can upload them to theappliance using the NetBackup Appliance Shell Menu.
See “Installing an EEB” on page 195.
Installing an EEBYou install an emerency engineering binary (EEB) the same way as you wouldinstall a software update. You can use the appliance shell menu to install an EEBon an appliance. When you install an EEB you must be logged into the appliancewhere you intend to install the binary. You should also contact Technical Supportto obtain the EEB that you need to install and store it locally on your computer. Inaddition, If you have multiple EEBs to install, you can only install one EEB at a time.
To install an EEB using the NetBackup Appliance Web Console, refer to the followingsection.
195Managing a NetBackup appliance from the NetBackup Appliance Web ConsoleSoftware release updates for NetBackup Appliances

To upload and install an appliance emergency engineering binary using theNetBackup Appliance Shell Menu
1 You should perform this procedure from a computer that is connected to theappliance as well as to the Internet.
2 Open an SSH session and log on to the appliance as an administrator.
3 Enter the following command to open the NFS and the CIFS shares:
Main_Menu > Manage > Software > Share Open
4 Map or mount the appliance share directory as follows:
Map the following appliance CIFS share:Windows systems
Mount the following appliance NFS share:
<appliance-name>:/inst/patch/incoming
UNIX systems
Note that on Windows systems, you are prompted to provide the user name,admin, and its corresponding password.
5 Copy the EEB from your local computer to this mapped directory.
You should have already obtained the EEB from Technical Support.
6 Unmap or unmount the directory after you have successfully downloaded theEEB.
7 From the appliance, enter the following command to close the NFS and theCIFS shares:
Main_Menu > Manage > Software > Share Close
Once the EEB is downloaded on to the share directory that you defined in Step3, it is moved to the proper location. You are not notified that this move hasoccurred.
If you run the List EEBs command before you run the Share Close command,the update is still moved from the share directory location to its proper location.Make sure that you have run the Share Close command to ensure that youclose the NFS and the CIFS shares.
196Managing a NetBackup appliance from the NetBackup Appliance Web ConsoleSoftware release updates for NetBackup Appliances

8 Enter the following command to list the EEBs that are available for downloading
Main_Menu > Manage > Software > List Downloaded
9 Enter the following command to install the release update.
Main_Menu > Manage > Software > Install patch_name
Where patch_name is the name if the EEB to install. You must make sure thatthe name you enter matches the EEB name that you uploaded on the appliance.
Before you proceed with the installation of the EEB, ensure that there are nojobs running on the appliance
See “About installing an EEB” on page 195.
About installing NetBackup Administration Console and clientsoftware
You can use two different methods to install the NetBackup client software on theclients that you want to backup. You can install NetBackup client software on clientsas follows:
■ Use CIFS and NFS shares and run scripts to install the software silently.Depending on the operating system, you run the quickinstall.exe script orthe unix-client-install script. This is a silent install. The scripts do notprompt you for any user-related questions. They automatically update theNetBackup configuration on client with the appliance server name as the Masterserver.
■ Select a link on the appliance login page to download the packages and installthe software.On the appliance login page, you can click on the Software link to download apackage that contains the NetBackup Administration Console and the NetBackupclient software.You can also elect to download and install the NetBackup AdministrationConsole. To download and install the client software, you perform the followingfunctions:
■ Choose the client type that you want to install.
■ Select the software package to download.
■ Unzip or untar the package.
■ Run the install (UNIX) or setup.exe (Windows) script.
■ Update the NetBackup configuration on client with the Master Serverinformation (for example, bp.conf on UNIX systems).
197Managing a NetBackup appliance from the NetBackup Appliance Web ConsoleSoftware release updates for NetBackup Appliances

Downloading NetBackup client packages to a client froma NetBackup applianceYou can download NetBackup client software from a NetBackup appliance to anyclient that you want to back up. The NetBackup Appliance Web Console logon pageprovides a Download Packages section to download the client packages.
The packages are listed by operating system type in a drop-down box as follows:
■ All
■ Windows
■ Linux
■ Solaris
■ AIX
■ HP
■ BSD
■ Mac OS
■ VMware vCenter Plug-in
Note: If you download Linux, UNIX, Solaris, AIX, or BSD packages, Veritasrecommends GNU tar version 1.16 or higher to extract the .tar packages.
For more information, see the following Technote on the Veritas Support website:
https://www.veritas.com/support/en_US/article.TECH154080
In addition to the downloading instructions, this procedure also includes the stepsto extract and install the downloaded files on to the client.
To download NetBackup client packages from a NetBackup appliance to aclient
1 Log in to the client that you want to back up.
2 Open a browser window and enter the appliance URL.
3 In the middle of the landing page, in the section Download Packages, clickon the drop-down box to see the list of packages.
4 Right-click the selected package and specify the location to download it ontothe client.
Example locations are as follows:
■ On Windows platforms, download the package to C:\temp or to the desktop.
198Managing a NetBackup appliance from the NetBackup Appliance Web ConsoleSoftware release updates for NetBackup Appliances
To determine the type of hardware on your Windows system, right-click MyComputer and select Properties.
■ On Linux or UNIX platforms, download the package to /tmp.
Note: If the messageNo packages found appears after you make a selection,that client package is not currently installed on the appliance. Refer to thefollowing topic to download client packages on to the appliance:
5 Unzip or untar the package.
6 Install the client software as follows:
■ Windows systemsClick the setup.exe file.
■ UNIX systemsRun the .install script.
7 After you have successfully installed the client software, add the appliancemaster server name to the client as follows:
199Managing a NetBackup appliance from the NetBackup Appliance Web ConsoleSoftware release updates for NetBackup Appliances

UNIX systemsWindows systems
■ On the client, navigate to the followinglocation:cd /usr/openv/netbackup
■ Enter ls to see the contents of thedirectory.
■ Open the bp.conf file in a text editor.■ Enter the fully qualified host name of
the appliance master server.■ Save the changes and close the file.
■ After NetBackup has been installed onthe client, open the Backup, Archive,and Restore interface.Start > All Programs > SymantecNetBackup > Backup, Archive, andRestore
■ From the Backup, Archive, and Restoreinterface, select File > SpecifyNetBackup Machines and PolicyType...
■ From the Specify NetBackupMachines and Policy Type dialog,enter the server name in the fieldServer to use for backups andrestores. Then click Edit Server Listand click OK.
■ In the dialog box that appears, enterthe fully qualified host name of theappliance master server and click OK.
■ Close the Backup, Archive, andRestore interface.
■ Restart the NetBackup Client Servicesby opening a Windows Commandprompt. Then, enter services.mscand press Enter.
See “Downloading the NetBackup Administration Console to a Windows computerfrom a NetBackup appliance” on page 200.
Downloading the NetBackup Administration Console to aWindows computer from a NetBackup applianceYou can download the NetBackup Administration Console software from aNetBackup appliance to a Windows computer that you want to use to access theappliance. The Windows computer does not require NetBackup installation to usethe administration console. The logon page of the NetBackup Appliance WebConsole provides a Download Packages section to download the NetBackupAdministration Console package.
In addition to the downloading instructions, this procedure also includes the stepsto extract and install the downloaded files on to the client.
200Managing a NetBackup appliance from the NetBackup Appliance Web ConsoleSoftware release updates for NetBackup Appliances

To download the NetBackup Administration Console package from aNetBackup appliance to a Windows computer
1 Log into the Windows computer that you want to use for appliance access.
2 Open a browser window and enter the appliance URL.
3 In the middle of the landing page, in the section Download Packages, clickon the drop-down box and select Windows.
4 When the package file name appears under the drop-down box, right-click onit and select either Download Linked File or Download Linked File As, thenspecify the location to download the package onto the Windows computer.
For example, download the package to C:\temp or to the desktop.
5 Unzip the package.
6 Install the administration console software as follows:
■ On the client, navigate to the Addons/JavaInstallFiles directory.
■ Click on the setup.exe file.
See “Downloading NetBackup client packages to a client from a NetBackupappliance” on page 198.
Troubleshooting the NetBackup-Java AdministrationConsole on a non-English Windows systemIf you install the NetBackup-Java Administration Console on a non-English Windowssystem to administer the NetBackup server inside a NetBackup appliance, theconsole can hang when you attempt to log in to the NetBackup server. To avoidthis issue, use the following workaround:
■ Modify the install_path\Java\setconf.bat file on the Windows system where theNetBackup-Java Administration Console is installed and set theNBJAVA_FILE_ENCODING parameter with the proper encoding. Use the sameencoding as you previously set on the appliance system with the SystemLocalecommand.To determine the coding name, refer to the Canonical Name for java.nio APIand java.lang API column in the Supported Encodings document on thefollowing website:Oracle Supported Encodings DocumentationFor example, if you set a UTF-8 locale like zh_CN.utf8 or ja_JP.utf8 on yourappliance system, the canonical name for java.nio API and java.lang API isUTF8. Uncomment the SET NBJAVA_FILE_ENCODING parameter in theinstall_path\Java\setconf.bat file, and specify UTF8 (in this example) as follows:
201Managing a NetBackup appliance from the NetBackup Appliance Web ConsoleSoftware release updates for NetBackup Appliances

REM SET NBJAVA_FILE_ENCODING= becomes: SETNBJAVA_FILD_ENCODING=UTF8For more information on the SystemLocale command, refer to the followingsection:See “About the NetBackup Appliance Web Console login page” on page 25.
You can also find this information in the NetBackup Appliance Command ReferenceGuide.
Manage > Additional ServersFrom the Manage > Additional Servers page you can add or delete additionalservers. This tab lets you add an entry to the NetBackup bp.conf file. The bp.conf
file allows communication to occur between the appliance and the WindowsNetBackup Administration Console, so you can manage your appliance throughthat console. You must add the host name of a media server to the additional serversbefore configuring the media server.
See “Managing additional servers to the appliance” on page 202.
Managing additional servers to the applianceThe following procedures enable you to add or delete servers from the AdditionalServers page on the NetBackup Appliance Web Console.
Use the following procedure to add additional servers to the appliance.
To add an additional server:
1 Log on to the NetBackup Appliance Web Console.
2 Click Manage > Additonal Servers.
3 Click the Add button.
The Add Additional Server dialog box is displayed.
4 In the Server Name field, enter the name of the server that you want to add,and then click OK.
Note: You can add multiple server name entries separated using a comma(,).
The appliance displays the following message:
Additional server(s) added successfully.
5 Click Cancel to exit the Add Additional Server dialog box.
202Managing a NetBackup appliance from the NetBackup Appliance Web ConsoleManage > Additional Servers

Use the following procedure to delete servers from the appliance.
To delete an additional server
1 Log on to the NetBackup Appliance Web Console.
2 Click Manage > Additional Servers.
TheAdditional Servers page displays a list of all the additional servers addedto your appliance.
3 Select the check box against the server that you want to delete, and then clickthe Delete button.
4 The following warning is displayed:
Are you sure you want to proceed?
5 Click Yes to delete the selected server. The following message is displayed:
Additional server(s) deleted successfully.
6 To delete all the servers from the appliance, select the Server Name checkbox, and click Delete.
See “Manage > Additional Servers” on page 202.
Manage > CertificatesUse the Manage > Certificates page to generate a new certificate from theNetBackup Appliance Web Console. The certificate is an authentication token whichused by the NetBackup plug-in. It is downloaded automatically to your local directoryas a .pem file.
NetBackup appliance supports the generation of the following certificate types:
■ vCenter
■ SCVMM
To generate the certificates for your client
1 Log in to the NetBackup Appliance Web Console.
2 Go to the Manage > Certificates page.
3 In the Client Hostname text box, enter the client hostname.
4 Click Generate.
The certificate <hostname>.zip has been generated and downloaded to thelocal directory that you selected.
203Managing a NetBackup appliance from the NetBackup Appliance Web ConsoleManage > Certificates

For more information about vCenter and SCVMM clients, refer to the followingdocuments:
NetBackup™Plug-in for Microsoft SCVMM Console Guide
NetBackup™Plug-in for VMware vSphere Web Client Guide
See “Manage > Additional Servers” on page 202.
204Managing a NetBackup appliance from the NetBackup Appliance Web ConsoleManage > Certificates
Managing NetBackupappliance using theNetBackup ApplianceShell Menu
This chapter includes the following topics:
■ Expanding the bandwidth on the NetBackup appliance
■ About configuring the maximum transmission unit size
■ About OpenStorage plugin installation
■ About mounting a remote NFS
■ About running NetBackup commands from the appliance
■ About Auto Image Replication between appliances
Expanding the bandwidth on the NetBackupappliance
The NetBackup appliance has the capability to provide link aggregation. Linkaggregation increases the bandwidth and availability of the communications channelbetween the appliance and other devices. Link aggregation is enabled by defaultwhen you perform the initial network configuration from the NetBackup ApplianceWeb Console or the NetBackup Appliance Shell Menu.
4Chapter
You can use the NetBackup Appliance Shell Menu to enable or disable linkaggregation, as well as view the status of the link aggregation.
Use the following commands to enable, disable, and view the status of linkaggregation:
■ To enable the network link aggregation:Main_Menu > Network > LinkAggregation Enable
■ To disable the network link aggregation:Main_Menu > Network > LinkAggregation Disable
■ To show the status of the network link aggregation:Main_Menu > Network > LinkAggregation Status
About configuring the maximum transmissionunit size
The MTU property controls the maximum transmission unit size for an Ethernetframe. The standard maximum transmission unit size for Ethernet is 1500 bytes(without headers). In supported environments, the MTU property can be set to largervalues up to 9000 bytes. Setting a larger frame size on an interface is commonlyreferred to as using jumbo frames. Jumbo frames help reduce fragmentation asdata is sent over the network and in some cases, can also provide better throughputand reduced CPU usage. To take advantage of jumbo frames, the Ethernet cards,drivers, and switching must all support jumbo frames. Additionally, each serverinterface that is used to transfer data to the appliance must be configured for jumboframes.
Veritas recommends that if you configure the MTU property of an interface to valueslarger than 1500 bytes, make sure that all systems that are connected to theappliance on the specific interface have the same maximum transmission unit size.Such systems include but are not limited to NetBackup clients and remote desktops.Also verify the network hardware, OS, and driver support on all systems before youconfigure the MTU property.
You can configure the MTU property for an interface by using the SetProperty
command in the NetBackup Appliance Shell Menu.
See the SetProperty command in the NetBackup Appliance Command ReferenceGuide.
206Managing NetBackup appliance using the NetBackup Appliance Shell MenuAbout configuring the maximum transmission unit size

About OpenStorage plugin installationYou can install and open an OpenStorage (OST) plugin on the NetBackupAppliance using the NetBackup Appliance Shell Menu. The OST plugins enableyou to install multiple plugins to communicate with their corresponding storagesystems.
The following diagram illustrates the process to install the OpenStorage plugin.
207Managing NetBackup appliance using the NetBackup Appliance Shell MenuAbout OpenStorage plugin installation

Figure 4-1 OpenStorage plugin installation process
1.2 Open the shareddirectory on appliance
1.3 Copy the plugin ontothe mounted share and
close the share
3.1 Untar the tar.gz fileand extract its contents
3.2 Check if the pluginexists in the install
directory
3.3 Check if the plugindirectory path exists (/usr/
openv/lib/ost-plugins)
3.5 Copy libstspi*.so and libstspi*MT.so intoplugin directory (/usr/openv/lib/ost-plugins)
* - Vendor name for example libstspiDataDomain.so
3.6 Restart thenbrmms process
4.1 Enter commandOpenStorage > Installplugin_name.tar.gz
4.1 Follow the instructions till theShell menu displays
INSTALL COMPLETED SUCCESSFULLY
2.1 List all the OSTplugins that havebeen downloaded
2.2 List the OST pluginthat has been installed
3.4 Check ifnbrmms isrunning
4 Install theOpenStorage plugin
1. Copy andShare theOpenStorageplugin
2. List theplug-ins on theappliance
3 Check ifnbrmms isrunning andterminate theprocess
1.1 Download OSTplugin in a shared
directory
See “Installing OpenStorage plugin” on page 209.
See “Uninstalling OpenStorage plugin” on page 210.
208Managing NetBackup appliance using the NetBackup Appliance Shell MenuAbout OpenStorage plugin installation

For more information about Main > Manage > OpenStorage commands refer toNetBackup™ Appliance Command Reference Guide.
Installing OpenStorage pluginThe following procedure describes how to install the OpenStorage (OST) pluginthrough the NetBackup Appliance Shell Menu.
To install the OpenStorage plugin
1 Log on to the NetBackup Appliance Shell Menu.
2 Download the latest version of the OST plugin from the required vendor'ssupport Website.
3 Open the shared directory. To open the shared directory on the appliancechoose from the following commands:
■ Main Menu > Manage > OpenStorage > Share Open
The appliance displays the following message:
The CIFS share \\nbapphostname\incoming_plugins
and the NFS share nbapphostname:/inst/plugin/incoming
have been opened on this appliance.
4 Copy the OST plugin using CIFS or NFS share.
5 Close the shared directory. To close the shared directory use the followingcommand:
■ MainMenu > Manage > OpenStorage > Share Close
6 After the plugin is downloaded on the appliance, you can use the list commandsto view the plugin details. To view the details of the downloaded plugins choosefrom the following commands:
■ OpenStorage > List Available
Displays a list of all the downloaded plugins and not yet applied.
■ OpenStorage > List Installed
Displays a detailed list of all the installed plugins on the appliance.
7 Install the downloaded plugin. To install the downloaded plugin, choose fromthe following commands based on the appliance you use:
■ OpenStorage > Install plugin_name to install the OST plugin on mediaand master appliances.
The appliance initiates the installation process as displayed in the followingexample:
209Managing NetBackup appliance using the NetBackup Appliance Shell MenuAbout OpenStorage plugin installation

Welcome to the installation of plugin_name.tar.gz
- [Info] Checking if upgrade is running from the console...failed
WARNING: Symantec recommends that this upgrade is run from
the appliance console.
>> Are you sure you want to continue? (yes/no) yes
- [Info] Extracting the contents of the tar file ok
- [Info] Terminating the nbrmms process before proceeding
with the installation. ok
- [Info] Executing the install script
- [Info] Install script exited successfully!
- [Info] Restarting nbrmms ok
- Successfully installed the plugin plugin_name.tar.gz
See “About OpenStorage plugin installation” on page 207.
See “Uninstalling OpenStorage plugin” on page 210.
Uninstalling OpenStorage pluginThe following procedure describes how to uninstall the OpenStorage (OST) pluginthrough the appliance shell menu.
210Managing NetBackup appliance using the NetBackup Appliance Shell MenuAbout OpenStorage plugin installation

To uninstall a OpenStorage plugin
1 To uninstall the OST plugin use the following command:
OpenStorage > Uninstall plugin_name
Uninstalls the OST plugin on media and master appliances.
The appliance initiates the process to uninstall the OST plugin as displayedusing the following example:
- [Info] Checking for the installed OpenStorage plugin ...
>> The plugin package plugin_name.tar.gz is currently installed
on the system. Do you want to continue uninstalling it? (yes/no)
2 Type yes to continue and uninstall the plugin.
The appliance displays the following message:
There might be some existing backups on the storage server.
Are you sure you want to continue uninstalling the plugin? (yes/no)
3 Type yes to continue and uninstall the plugin.
The appliance continues the uninstall process and displays the following:
- Uninstalling the plugin plugin_name.tar.gz ok
- Successfully uninstalled the plugin plugin_name.tar.gz
See “About OpenStorage plugin installation” on page 207.
See “Installing OpenStorage plugin” on page 209.
About mounting a remote NFSYou can use the NetBackup Appliance Shell Menu, to mount a remote NetworkFile System (NFS) onto the appliance server. You can now mount NFS using asimpler interface through the Manage > MountPoints menu. To work with the NFSdrive, you can use the following commands in the NetBackup Appliance Shell Menu.
Table 4-1 Commands to work with NFS drive
DescriptionsCommand
Use the Mount command to mount an NFS drive.Mount
211Managing NetBackup appliance using the NetBackup Appliance Shell MenuAbout mounting a remote NFS

Table 4-1 Commands to work with NFS drive (continued)
DescriptionsCommand
Use the List command to list all the existing mount points on yourappliance.
List
Use the Unmount command to un-mount a previously mountedNFS drive.
Unmount
See “Mounting an NFS remote drive” on page 212.
See “Unmounting an NFS drive” on page 214.
In certain circumstances, you may find that a NetBackup Appliance NFS share isnot accessible. If this issue occurs, use the NetBackup Appliance Shell Menu torestart the NFS server. Use the following command:
Support > Service Restart nfsserver
Once you have restarted the server, try again to access the NFS share.
For more information about Main > Manage > MountPoints commands refer toNetBackup™ Appliance Command Reference Guide
Mounting an NFS remote driveThis procedure describes how to mount your remote NFS drive.
To mount an NFS remove drive
1 Log in to the NetBackup Appliance Shell Menu using your administrator'scredentials.
2 Type the Main > Manage> MountPoints
The appliance lists all the commands under in the MountPoints menu.
3 To mount your remote NFS drive, type the following command:
4 Mount RemotePath MountPoint [FileSystemType] [options]
This command includes the following parameters:
212Managing NetBackup appliance using the NetBackup Appliance Shell MenuAbout mounting a remote NFS

[Options][FileSystemType]MountPointRemotePath
Specify anyadditionaloptions to bepassed to theappliancealong with theMountcommand.
Specify the typeof the device tobe mounted.
Provide the name ofthe directory wherethe NFS drive shouldbe mounted.
Note: An error isdisplayed in case ofthe followingsituations:
■ If the directoryname is incorrect.
■ If the directorywith given namedoes not exist, adirectory iscreated.
■ If the directorywith given nameis alreadymounted at amount point.
Provide theaddress of adevice or adirectory to bemounted on toyour appliance.
Description
You can onlyuse optionsspecific formounting theNFS drive.
The directory namemust start with / andmust have the correctdirectory name.
HOST:DIRECTORYFormat
OptionalOptionalMandatoryMandatoryParametertype
ro is used tomount thedevice as readonly.
NFSv3 or anyother supportedtype by theunderlyingMountcommand.
/mymounts/moun1suryan.
engba.
symantec.com
:/build1
Example
5 The appliance mounts your remote NFS drive.
Note: If you mount a remote share and then restart the appliance, the mountis re-established on the next boot. The mount points are persistent across allthe restart and there is no exception to this rule.
213Managing NetBackup appliance using the NetBackup Appliance Shell MenuAbout mounting a remote NFS

To list and view the mounted devices
1 Log in to the NetBackup Appliance Shell Menu using your administratorcredentials.
2 Type the Main > Manage > MountPoints
The appliance lists all the commands under the MountPoints menu.
3 To view the list of mounted devices use the following command:
List [Type]
When you specify the value for the [Type] parameter as [All], the appliancedisplays all the available mount points along with the NFS drives. If thisparameter is not provided, this command lists all the NFS mount points.
Note: In certain circumstances, you may find that a NetBackup Appliance NFSshare is not accessible. If this issue occurs, use the NetBackup Appliance ShellMenu to restart the NFS server.
Use the following command: Support > Service Restart nfsserver
Once you have restarted the server, try to access the NFS share again.
See “About mounting a remote NFS” on page 211.
Unmounting an NFS driveThis procedure describes how to unmount an NFS drive.
To unmount an NFS drive
1 Log in to the NetBackup Appliance Shell Menu using your administratorcredentials.
2 Type the Main > Manage > MountPoints
The appliance lists all the commands under the MountPoints menu.
3 To unmount a drive, use the following command:
Unmount MountPoint [force].
The following options are used to identify the NFS drive to be unmounted.
214Managing NetBackup appliance using the NetBackup Appliance Shell MenuAbout mounting a remote NFS

[force]MountPoint
Specify this parameter tounmount the NFS forcibly.
Provide the name of the directory thatis to be un-mounted.
Note: An error is displayed in caseof the following situations:
■ If the directory name is incorrect.■ If the directory with the given name
does not exist.
Description
The directory name must start with /and must have the correct directoryname.
Note: If the specified directory is avalid mount directory, it is unmounted.
Format
OptionalMandatoryParameter type
/mymounts/moun1Example
4 If the directory name is specified correctly the following process takes place:
■ The NFS is unmounted successfully.
■ The directory is removed from the file system.
■ In case the directory is on a nested path, only that directory is removed.
See “About mounting a remote NFS” on page 211.
See “About mounting a remote NFS” on page 211.
About running NetBackup commands from theappliance
The NetBackup command-line shell feature enables NetBackup administrators toexecute NetBackup commands with superuser privileges. These privileges enableNetBackup administrators to execute the commands that support full NetBackuplogging as well as develop and use scripts and automation.
NetBackup Appliance administrators can provide access for multiple NetBackupadministrators and audit the activity of these administrators. In addition, NetBackupAppliance administrators can manage the NetBackup administrator accounts fromthe Main > Manage > NetBackupCLI view within the NetBackup Appliance ShellMenu. From the NetBackupCLI view, a NetBackup Appliance administrator can
215Managing NetBackup appliance using the NetBackup Appliance Shell MenuAbout running NetBackup commands from the appliance

create, delete, and list NetBackup administrator accounts as well as manage theiruser account passwords.
See “About NetBackup administrator capabilities” on page 216.
See “Creating NetBackup administrator user accounts ” on page 221.
See “Managing NetBackup administrator user account passwords” on page 223.
See “Auditing NetBackup Administrator accounts” on page 224.
See “Deleting NetBackup administrator user accounts ” on page 225.
See “Viewing NetBackup administrator user accounts” on page 225.
About NetBackup administrator capabilitiesNetBackup administrators have superuser privileges and share a common homedirectory within a restricted shell. From this restricted shell, the NetBackupadministrators can do the following:
■ Use a base command name, an absolute or a relative path, or a shell script asa way to execute NetBackup commands.
■ Have full NetBackup logging capabilities.
The following list shows the NetBackup commands that a NetBackup administratorcan run with superuser privileges and the directories that contain the NetBackupcommands.
■ /usr/openv/netbackup/bin/*
■ /usr/openv/netbackup/bin/admincmd/*
■ /usr/openv/netbackup/bin/goodies/*
■ /usr/openv/volmgr/bin/*
■ /usr/openv/volmgr/bin/goodies/*
■ /usr/openv/pdde/pdag/bin/mtstrmd
■ /usr/openv/pdde/pdag/bin/pdcfg
■ /usr/openv/pdde/pdag/bin/pdusercfg
■ /usr/openv/pdde/pdconfigure/pdde
■ /usr/openv/pdde/pdcr/bin/*
Note: Because there are NetBackup commands on a NetBackup appliance, it ispossible that some of the command arguments are not supported.
216Managing NetBackup appliance using the NetBackup Appliance Shell MenuAbout running NetBackup commands from the appliance

The following list shows the commands and scripts that you cannot run from thedirectories:
■ Library files - The files that end with the .so or .so64 extensions.
■ Notify scripts - Scripts that contain notify string within the file name.
■ File list files - The files that end with the .filelist extension.
See “About running NetBackup commands from the appliance” on page 215.
See “About running NetBackup commands” on page 217.
See “Creating NetBackup administrator user accounts ” on page 221.
See “Deleting NetBackup administrator user accounts ” on page 225.
See “Viewing NetBackup administrator user accounts” on page 225.
About running NetBackup commandsNetBackup administrators can use multiple methods to execute NetBackupcommands from the restricted NetBackup Appliance shell. NetBackup administratorscan use a base command name, an absolute or a relative path, or executecommands from shell scripts.
The following are examples of how a NetBackup administrator can run NetBackupcommands from the restricted NetBackup Appliance shell:
■ Using a base command name. For example,
■ # bpps
■ # nbemmcmd –listhosts
■ Using an absolute or a relative path. You must specify sudo before the commandin this case. For example,
■ # sudo /usr/openv/netbackup/bin/bpps
■ # sudo /usr/openv/netbackup/bin/admincmd/nbemmcmd -listhosts
■ Execute from shell scripts. You must specify sudo before you use a command.That applies to a base command name, an absolute path, or a relative path.
See “About creating a NetBackup touch file” on page 218.
See “About operating systems commands” on page 220.
See “About best practices” on page 220.
See “About known limitations” on page 221.
217Managing NetBackup appliance using the NetBackup Appliance Shell MenuAbout running NetBackup commands from the appliance

About creating a NetBackup touch fileA NetBackup administrator can use the cp-nbu-config command to create andedit a NetBackup touch configuration file in any of the following directories:
■ /usr/openv/netbackup
■ /usr/openv/netbackup/bin
■ /usr/openv/netbackup/bin/snapcfg
■ /usr/openv/netbackup/db/config
■ /usr/openv/netbackup/db/event
■ /usr/openv/netbackup/db/images
■ /usr/openv/netbackup/db/media
■ /usr/openv/netbackup/ext/db_ext
■ /usr/openv/netbackup/ext/db_ext/db2
■ /usr/openv/lib/ost-plugins
■ /usr/openv/volmgr
■ /usr/openv/volmgr/database
■ /usr/openv/var
For example, to create a touch file called DEFERRED_IMAGE_LIMIT in the/usr/openv/netbackup/db/config directory, use the following steps:
■ Create a file with that name in the NetBackup administrator home directory ora subdirectory.
■ Use the cp-nbu-config configuration-file target-directory commandto add the desired content to the touch file. For example:cp-nbu-config DEFERRED_IMAGE_LIMIT /usr/openv/netbackup/db/config
See “About running NetBackup commands” on page 217.
See “About operating systems commands” on page 220.
See “About best practices” on page 220.
See “About known limitations” on page 221.
Loading the NetBackup notify scriptsThe cp-nbu-notify utility is similar to cp-nbu-config utility that is added to theNetBackup Appliance to modify the NetBackup notify scripts, like the start andexit notification scripts to be run after each job.
218Managing NetBackup appliance using the NetBackup Appliance Shell MenuAbout running NetBackup commands from the appliance
The NetBackup CLI users can modify the notify scripts from the following scriptlocations:
■ /usr/openv/netbackup/bin
■ /usr/openv/volmgr/bin
Note: The cp-nbu-notify assumes that the notify script pre-exists either in theactual location as a sample file or its goodies directory as a template. If a sampleor template notify script does not exist in these directories, then the script that youmay try to load is not considered valid.
To install or edit the notify scripts:
1 Login to the appliance as a NetBackupCLI user and then create the notify scriptin the home directory.
2 Enter cp-nbu-notify command to install the script:
cp-nbu-notify <notify-script>
The appliance displays the following messages:
NetBackup Appliance admin must review and
approve this operation.
Enter admin password:
3 When the command prompts for admin password, enter the Appliance adminpassword (not the NetBackupCLI password). The password is needed forsecurity purpose to make sure that the notify script is approved by the Applianceadmin.
When the password is successfully verified the notify script is automaticallyloaded in the right location.
Note: The source notify script must exist in the home directory or itssubdirectory.
Caution: You can only copy the notify scripts. Not any other scripts in the NetBackupinstall path. Execution of any external script through the notify script can lead to asecurity issue.
219Managing NetBackup appliance using the NetBackup Appliance Shell MenuAbout running NetBackup commands from the appliance

About operating systems commandsThe following rules apply to the operating system commands:
■ The following commands were available in the previous releases are stillavailable:awk, bash, cat, clear, cut, grep, head, ls, rm, sudo, uname, vi
■ The commands that are useful for scripting :date, mkdir, rmdir, touch, whoami, hostname, and so forth
■ A NetBackup administrator can use the passwd command to change theirpassword.
■ To perform a host name lookup you must use the host command. The nslookup
command is not supported.
See “About running NetBackup commands” on page 217.
See “About creating a NetBackup touch file” on page 218.
See “About best practices” on page 220.
See “About known limitations” on page 221.
About best practicesThe following list provides examples of how you, a NetBackup administrator, canconfigure an appliance so you can run NetBackup commands from the restrictedshell.
■ You can only create files and directories in user home directory and thesubdirectories.
■ An auto-generated alias file is created in the user home directory that containsa sudo alias for all the NetBackup commands. Thus, when you use a basecommand name you do not need to specify sudo when you run the command.
■ The alias file is not honored when you run a command in a script. You mustspecify sudo before you can use the command.
■ You can create a file that contains variables for all NetBackup commands withsudo prefix. The variable can be used in the automation scripts to avoid use ofsudo for every NetBackup command invocation. The variable file can be sourcedin the scripts. For example:
■ The following command enables you to use the variable ${bpps}.bpps=”sudo /usr/openv/netbackup/bin/bpps”
■ The following command enables you to use the variable ${nbemmcmd}.nbemmcmd=”sudo /usr/openv/netbackup/bin/admincmd/nbemmcmd”
220Managing NetBackup appliance using the NetBackup Appliance Shell MenuAbout running NetBackup commands from the appliance

■ A cdnbu alias is available for you to use to change directory to a NetBackupinstall path. That alias takes you to the /usr/openv/ directory.
See “About running NetBackup commands” on page 217.
See “About operating systems commands” on page 220.
See “About best practices” on page 220.
See “About known limitations” on page 221.
About known limitationsThe following list identifies the known limitations that a NetBackup administratorshould understand before they use this feature:
■ You cannot edit the bp.conf file directly using an editor. To edit the bp.conf
file you must use the bpsetconfig command to set an attribute within the file.
■ You cannot modify or create NetBackup notify scripts.
■ The nslookup command is not supported.
■ You cannot use the man command. To see the usage of a command, use thehelp option that is provided with the command.
■ The operating system commands that are used to perform appliancemanagement are not supported.
See “About running NetBackup commands” on page 217.
See “About creating a NetBackup touch file” on page 218.
See “About operating systems commands” on page 220.
See “About best practices” on page 220.
Creating NetBackup administrator user accountsNetBackup Appliance administrators can use the following procedure to create newNetBackup administrator user accounts. These user accounts have permissionsto log on to the appliance and run NetBackup commands with superuser privileges.
To create a NetBackup administrator user account
1 Open an SSH session on the appliance.
2 Log on as admin.
221Managing NetBackup appliance using the NetBackup Appliance Shell MenuAbout running NetBackup commands from the appliance

3 Enter the following command to create a NetBackup administrator user account:
Main > Manage > NetBackupCLI > Create UserName
Where UserName is the name that you designate for the new user. In addition,you can only create one user account at a time.
4 You must then enter a new password for the new user account.
Veritas recommends that the new password is a mix of upper and lowercaseletters, digits, and other characters to increase the strength of the password.In addition, you are asked to enter the password a second time for validationpurposes.
After the new user account is created, a confirmation message appears statingthe new user account was created successfully.
See theNetBackup Appliance Command Reference Guide for additional informationabout this command and its use.
See “About running NetBackup commands from the appliance” on page 215.
See “About NetBackup administrator capabilities” on page 216.
See “Managing NetBackup administrator user account passwords” on page 223.
See “Auditing NetBackup Administrator accounts” on page 224.
See “Deleting NetBackup administrator user accounts ” on page 225.
See “Viewing NetBackup administrator user accounts” on page 225.
Logging on as a NetBackup administratorAfter a NetBackup administrator account has been created for you, you can logonto the appliance using the new account credentials.
Logging onto an appliance as a NetBackup administrator
1 Open an SSH session on the appliance.
2 Enter the user name and password that was created for your NetBackupadministrator account to log on to the appliance.
The following welcome message appears after you have successfully loggedinto the appliance as a NetBackup administrator.
Welcome NetBackup CLI Administrator to the NetBackup Appliance
3 To leave the session, type exit and press Return.
See “About NetBackup administrator capabilities” on page 216.
See “Creating NetBackup administrator user accounts ” on page 221.
222Managing NetBackup appliance using the NetBackup Appliance Shell MenuAbout running NetBackup commands from the appliance

See “Managing NetBackup administrator user account passwords” on page 223.
See “Auditing NetBackup Administrator accounts” on page 224.
See “Deleting NetBackup administrator user accounts ” on page 225.
See “Viewing NetBackup administrator user accounts” on page 225.
Managing NetBackup administrator user accountpasswordsAfter the NetBackup Appliance administrator has created a NetBackup administratoraccount, the appliance administrator can manage the password of that accountthrough the NetBackup Appliance Shell Menu.
Table 4-2 describes the functions that you can perform as you manage your accountpasswords.
Table 4-2 Managing NetBackup administrator user account passwords
CommandFunction
Main > Manage > NetBackupCLI > PasswordExpiry AgeUserName Days
You use the Days variable to set the number of days the password isvalid. In addition, you use the UserName variable to specify the user orusers. Enter All to apply this setting to all users. You can also enterDefault to apply this setting to all new users accounts that were createdlater.
The NetBackup Appliance administratorcan specify a maximum number of daysthat a password is valid for a user or users.
Main > Manage > NetBackupCLI > PasswordExpiry NowUserName
You use the UserName variable to specify the user or users. Enter Allto expire the password for all users.
The NetBackup Appliance administratorcan force a password to expire immediatelyfor one or more users.
Main > Manage > NetBackupCLI > PasswordExpiry ShowUserName
You use the UserName variable to specify the user or users. Enter Allto expire the password for all users. You can also enter Default to viewthe default settings.
The NetBackup Appliance administratorcan view the password expiry information.
223Managing NetBackup appliance using the NetBackup Appliance Shell MenuAbout running NetBackup commands from the appliance

Table 4-2 Managing NetBackup administrator user account passwords(continued)
CommandFunction
Main > Manage > NetBackupCLI > PasswordExpiry WarnUserName Days
You use the Days variable to set the number of days or warning beforethe password expires. In addition, you use the UserName variable tospecify the user or users who receive the warning. Enter All to apply thesetting to all users. You can also enter Default to specify the defaultsettings.
The NetBackup Appliance administratorcan configure a warning period in whichyou receive a warning before the passwordexpires. You can also configure one ormore users to receive the warning.
See “About running NetBackup commands from the appliance” on page 215.
See “About NetBackup administrator capabilities” on page 216.
See “Logging on as a NetBackup administrator” on page 222.
See “Creating NetBackup administrator user accounts ” on page 221.
See “Auditing NetBackup Administrator accounts” on page 224.
See “Deleting NetBackup administrator user accounts ” on page 225.
See “Viewing NetBackup administrator user accounts” on page 225.
Auditing NetBackup Administrator accountsNetBackup Appliance administrators can monitor the activity of each NetBackupadministrator account. That means a NetBackup Appliance administrator can monitorthe NetBackup commands that a NetBackup administrator executes. To audit thatactivity from the NetBackup Appliance Shell Menu, the NetBackup Applianceadministrator can run the following command.
Main > Support > Logs > Browse > cd OS > less messages.
If you run that command, an output similar to the following is shown. The followingexample shows the NetBackup administrator, nbadmin, executed a bpps commandon an appliance named, nbappliance.
Aug 24 23:10:28 nbappliance sudo: nbadmin : TTY=pts/1 ;
PWD=/home/nbusers ; USER=root ; COMMAND=/usr/openv/netbackup/bin/bpps
See “Creating NetBackup administrator user accounts ” on page 221.
See “Managing NetBackup administrator user account passwords” on page 223.
See “Deleting NetBackup administrator user accounts ” on page 225.
See “Viewing NetBackup administrator user accounts” on page 225.
224Managing NetBackup appliance using the NetBackup Appliance Shell MenuAbout running NetBackup commands from the appliance

Deleting NetBackup administrator user accountsNetBackup Appliance administrators can use the following procedure to deleteNetBackup administrator user accounts.
To delete a NetBackup administrator user account
1 Open an SSH session on the appliance.
2 Log on as admin.
3 Enter the following command to delete a user account:
Main > Manage > NetBackupCLI > Delete UserName
Where UserName is the name of an existing user account. In addition, youcan only delete one user account at a time.
After the user account is deleted, a confirmation message appears that statesthe user account was deleted successfully.
See theNetBackup Appliance Command Reference Guide for additional informationabout this command and it's use.
See “About running NetBackup commands from the appliance” on page 215.
See “About NetBackup administrator capabilities” on page 216.
See “Creating NetBackup administrator user accounts ” on page 221.
See “Managing NetBackup administrator user account passwords” on page 223.
See “Auditing NetBackup Administrator accounts” on page 224.
See “Viewing NetBackup administrator user accounts” on page 225.
Viewing NetBackup administrator user accountsNetBackup Appliance administrators can use the following procedure to view a listof NetBackup administrator user accounts.
To view the current list of NetBackup administrator user accounts
1 Open an SSH session on the appliance.
2 Log on as admin.
3 Enter the following command to view the existing user accounts:
Main > Manage > NetBackupCLI > List
All of the existing user account names appear.
See theNetBackup Appliance Command Reference Guide for additional informationabout this command and it's use.
225Managing NetBackup appliance using the NetBackup Appliance Shell MenuAbout running NetBackup commands from the appliance
See “About running NetBackup commands from the appliance” on page 215.
See “About NetBackup administrator capabilities” on page 216.
See “Creating NetBackup administrator user accounts ” on page 221.
See “Managing NetBackup administrator user account passwords” on page 223.
See “Auditing NetBackup Administrator accounts” on page 224.
See “Deleting NetBackup administrator user accounts ” on page 225.
About Auto ImageReplication between appliancesAuto Image Replication is the ability to replicate backups that are generated in oneNetBackup domain to storage in other NetBackup domains, often across variousgeographical sites.
You can perform Auto Image Replication between appliances in the followingmanner:
■ Auto Image Replication between NetBackup appliancesMore information on how to perform Auto Image Replication between NetBackupappliances is available.See “About Auto Image Replication between NetBackup appliances” on page 226.
■ Auto Image Replication between NetBackup appliances and deduplicationappliancesMore information on how to perform Auto Image Replication between aNetBackup appliance and a deduplication appliance is available.See “About Auto Image Replication between NetBackup appliances anddeduplication appliances” on page 231.
About Auto Image Replication between NetBackup appliancesThe backups that are generated in one NetBackup domain can be replicated tostorage in one or more NetBackup domains. This process is referred to as AutoImage Replication. You can configure Auto Image Replication between twoNetBackup appliances.
To configure Auto Image Replication between two NetBackup appliances, you needto perform the following tasks:
ReferenceTaskStepNo.
See “Adding a trusted master server”on page 227.
Establish trust between the twomaster servers
1.
226Managing NetBackup appliance using the NetBackup Appliance Shell MenuAbout Auto Image Replication between appliances

ReferenceTaskStepNo.
See “Prerequisites for Auto Image Replication”on page 228.
Review the prerequisites for AutoImage Replication.
2.
See “Configuring a replication target”on page 228.
Configure the replication target3.
See the section named 'Creating a storagelifecycle policy' in NetBackup Administrator'sGuide, Volume I.
Configure storage lifecycle policy onsource and target domains
4.
Adding a trusted master serverYou can configure a trust relationship between multiple NetBackup domains. Todo so, in a source domain you specify the remote master servers with which youwant to add a trust relationship. Use the following procedure in the source domainto add a remote master server as a trusted master server.
A trust relationship between domains helps with replication operations.
Note: If either the source or remote master server is clustered, you must enableinter-node communication on all of the nodes in the cluster. Do so before you addthe trusted master server.
To add a trusted master server
1 In theNetBackupAdministrationConsole, expandNetBackupManagement> Host Properties > Master Servers in the left pane.
2 In the right pane, select the master server.
3 On the Actions menu, click Properties.
4 In the properties dialog box left pane, select Servers.
5 In the Servers dialog box, select the Trusted Master Servers tab.
227Managing NetBackup appliance using the NetBackup Appliance Shell MenuAbout Auto Image Replication between appliances
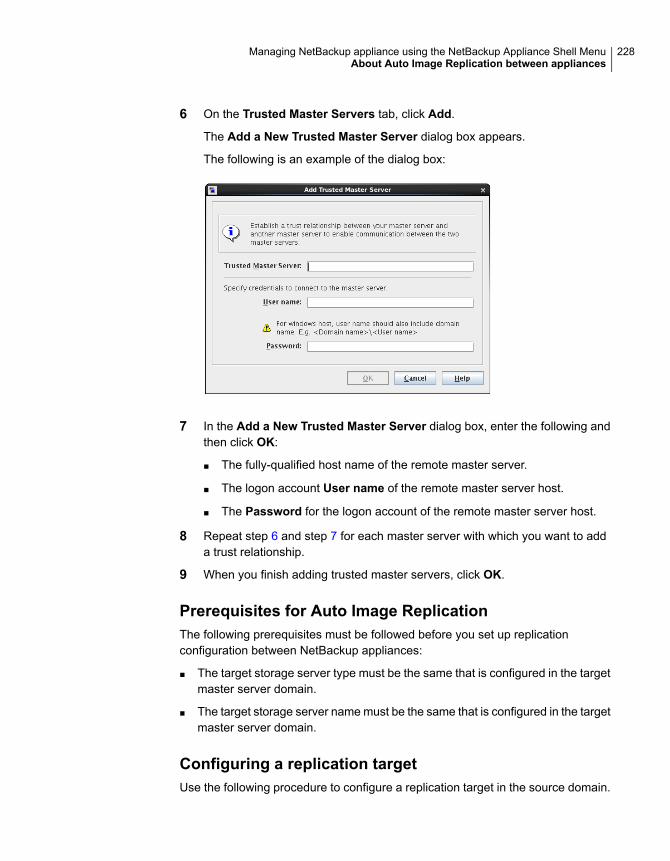
6 On the Trusted Master Servers tab, click Add.
The Add a New Trusted Master Server dialog box appears.
The following is an example of the dialog box:
7 In the Add a New Trusted Master Server dialog box, enter the following andthen click OK:
■ The fully-qualified host name of the remote master server.
■ The logon account User name of the remote master server host.
■ The Password for the logon account of the remote master server host.
8 Repeat step 6 and step 7 for each master server with which you want to adda trust relationship.
9 When you finish adding trusted master servers, click OK.
Prerequisites for Auto Image ReplicationThe following prerequisites must be followed before you set up replicationconfiguration between NetBackup appliances:
■ The target storage server type must be the same that is configured in the targetmaster server domain.
■ The target storage server name must be the same that is configured in the targetmaster server domain.
Configuring a replication targetUse the following procedure to configure a replication target in the source domain.
228Managing NetBackup appliance using the NetBackup Appliance Shell MenuAbout Auto Image Replication between appliances

To configure a replication target
1 In the NetBackup Administration Console in the source NetBackup domain,expand Media and Device Management > Credentials > Storage Server.
2 Select the source storage server.
3 On the Edit menu, select Change.
4 In the Change Storage Server dialog box, select the Replication tab.
5 Select a trusted master server and a replication target.
In the Target Master Server drop-down list, select the master server of thedomain to which you want to replicate data. All trusted master servers are inthe drop-down list.
6 In the Storage Server Type drop-down list, select the type of target storageserver. All available target types are in the drop-down list.
The target storage server type must be the same that is configured in the targetmaster server domain.
7 In the Storage Server Name field, enter the shortname of the target storageserver.
You must enter the target storage server name that is configured in the targetmaster server domain.
8 In the Deduplication Server Name field, enter the name of the deduplicationserver.
Note: The Deduplication Server Name and User Name fields may bepre-populated in some scenarios.
9 Enter the User name and Password for the the target appliance's deduplicationstorage server.
Password: appliance dedupe password
Use the following procedure to determine the Appliance deduplication password.
See “Determining the appliance deduplication password” on page 230.
229Managing NetBackup appliance using the NetBackup Appliance Shell MenuAbout Auto Image Replication between appliances

10 Click Add. You can now see the new replication target in the ReplicationTargets section at the top.
Click OK.
11 You must refresh the disk pool after setting up a replication target. In theNetBackup Administration Console, in the left pane, expand Media andDevice Management Devices > Disk Pools. In the right pane, select the diskpool you want to update. In the Change Disk Pool dialog box, click Refreshto configure the replication settings for the disk pool.
Once you have configured a replication target, you can configure storage lifecyclepolicies on source and target domains. For more information about configuringstorage lifecycle policies, refer to the section named 'Creating a storage lifecyclepolicy' in NetBackup Administrator's Guide, Volume I for UNIX, Windows, and Linux.
Determining the appliance deduplication passwordThe following credentials are required to configure Auto Image Replication betweenappliances.
■ username: user_name
■ password: appliance dedupe password
To determine the appliance deduplication password
1 Log on to the target appliance and enter into the appliance shell menu.
2 From the Main_Menu prompt, enter the following:
Appliance > ShowDedupPassword
This command shows the password for the deduplication solution that isconfigured on the appliance. The deduplication password appears on thescreen.
Note: If you changed the deduplication password, the appliance shell menu doesnot display the new password. The ShowDedupPassword option only displays theoriginal password that was created during the installation process.
Note: If your configuration has an appliance master server and one or moreappliance media servers, the deduplication password is the same for all servers.In this case, use the appliance master server’s shell menu to retrieve thededuplication password.
230Managing NetBackup appliance using the NetBackup Appliance Shell MenuAbout Auto Image Replication between appliances

For more information about Auto Image Replication, refer to the NetBackup™Administrator's Guide, Volume I for UNIX and Linux or the NetBackup™Administrator's Guide, Volume I for Windows.
About Auto Image Replication between NetBackup appliances anddeduplication appliances
The backups that are generated in NetBackup appliances can be replicated to thestorage pools in one or more deduplication appliances. You can configure AutoImage Replication from a NetBackup appliance on one domain to a deduplicationappliance on another domain.
To configure Auto Image Replication from a NetBackup appliance to a deduplicationappliance, you are required to enter the user name and password for the targetdeduplication appliance.
The following credentials are required to configure Auto Image Replication from aNetBackup appliance to a deduplication appliance:
■ username: root
■ password: P@ssw0rd or a custom password that you have configured for theSPA (Storage Pool Authority)
For more information about Auto Image Replication, refer to the NetBackup™Administrator's Guide, Volume I for UNIX, Windows and Linux.
231Managing NetBackup appliance using the NetBackup Appliance Shell MenuAbout Auto Image Replication between appliances

Understanding theNetBackup appliancesettings
This chapter includes the following topics:
■ About modifying the appliance settings
■ Settings > Notifications
■ Settings > Network
■ Settings > Date and Time
■ Settings > Authentication
■ Settings > Password Management
About modifying the appliance settingsAfter you have successfully configured your appliance you can use the NetBackupAppliance Web Console and the NetBackup Appliance Shell Menu to change varioussettings for your appliance. You can use the Settings tab in the NetBackupAppliance Web Console to view and configure the following settings.
Table 5-1 describes the settings that are available from Settings > Configurationmenu:
5Chapter
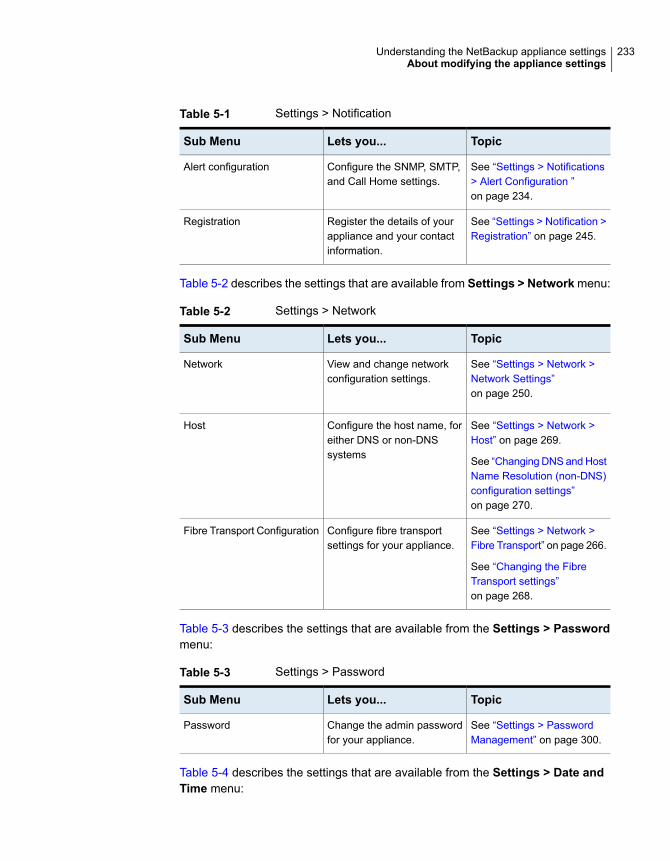
Table 5-1 Settings > Notification
TopicLets you...Sub Menu
See “Settings > Notifications> Alert Configuration ”on page 234.
Configure the SNMP, SMTP,and Call Home settings.
Alert configuration
See “Settings > Notification >Registration” on page 245.
Register the details of yourappliance and your contactinformation.
Registration
Table 5-2 describes the settings that are available from Settings > Network menu:
Table 5-2 Settings > Network
TopicLets you...Sub Menu
See “Settings > Network >Network Settings”on page 250.
View and change networkconfiguration settings.
Network
See “Settings > Network >Host” on page 269.
See “Changing DNS and HostName Resolution (non-DNS)configuration settings”on page 270.
Configure the host name, foreither DNS or non-DNSsystems
Host
See “Settings > Network >Fibre Transport” on page 266.
See “Changing the FibreTransport settings”on page 268.
Configure fibre transportsettings for your appliance.
Fibre Transport Configuration
Table 5-3 describes the settings that are available from the Settings > Passwordmenu:
Table 5-3 Settings > Password
TopicLets you...Sub Menu
See “Settings > PasswordManagement” on page 300.
Change the admin passwordfor your appliance.
Password
Table 5-4 describes the settings that are available from the Settings > Date andTime menu:
233Understanding the NetBackup appliance settingsAbout modifying the appliance settings

Table 5-4 Settings > Date and Time
TopicLets you...Sub Menu
See “Settings > Date andTime ” on page 272.
Change the date and time onyour appliance.
Date and Time Configuration
Table 5-5 describes the settings that are available from Settings > Authenticationmenu:
Table 5-5 Setting > Authentication
TopicLets you...Sub Menu
See “Settings >Authentication ” on page 280.
Manage the following threetypes of user authentication:
■ LDAP■ Active Directory■ Kerberos-NIS
Authentication
See “Settings >Authentication > UserManagement” on page 294.
Add new local users andcreate user groups foraccessing your appliance.
User Management
Settings > NotificationsThe Settings > Notifications menu displays the following tabs:
■ Alert Configuration - enables you to provide the SMTP, SNMP, and Call Homesettings. See “Settings > Notifications > Alert Configuration ” on page 234.
■ Registration - enables you to register the appliance and your contact information.See “Settings > Notification > Registration” on page 245.
Settings > Notifications > Alert ConfigurationThe Settings > Notifications > Alert Configuration page provides you with onelocation from where you can enable SNMP, SMTP, and Call Home alert notifications.The page is divided into three sections each dedicated to enable and provide detailsfor SNMP, SMTP, and Call Home.
Under Alert Configuration is the Notification Interval field. You must enter thetime interval in minutes between two subsequent notifications for the SNMP andthe SMTP configurations. The time interval should be in multiples of 15 and it shouldnot be zero.
234Understanding the NetBackup appliance settingsSettings > Notifications

Configuring SNMPTable 5-6 lists the fields from the SNMP (Simple Network Management Protocol)section.
Table 5-6 SNMP Server Configuration settings
DescriptionFields
Select this check box to enable SNMP alert configuration.Enable SNMP Alert
Enter the SNMP Server host name. You can enter a host name oran IP address to define this computer. The IP address can be anIPv4 or IPv6 address. Only global-scope and unique-local IPv6addresses are allowed.
Notification of the alerts or traps that are generated in Applianceare sent to this SNMP manager.
Note: The NetBackup Appliance supports all the SNMP servers inthe market. However, the ManageEngine™ SNMP server and theHP OpenView SNMP server are tested and certified for version 2.6.
See “About IPv4-IPv6-based network support” on page 271.
SNMP Server
Enter the SNMP Server port number. If you do not enter anythingfor this variable, then the default port is 162.
Note: Your firewall must allow access from the appliance to theSNMP server through this port.
SNMP Port
Enter the community to which the alerts or traps are sent. Forexample, Backup Reporting Department.
You can enter a value that you configured on your SNMP server.For example, you can enter a company name or a name like,admin_group, public, or private. If you do not enter anything,then the default value is public.
SNMP Community
The SNMP MIB file serves as a data dictionary that is used to assemble and interpretSNMP messages. If you configure SNMP, you must import the MIB file into themonitoring software so that the software can interpret the SNMP traps. You cancheck the details of the MIB file from the SNMP Server Configuration pane. Tocheck details about the SNMP MIB file, click View SNMP MIB file. An SNMP MIBfile opens.
For information on how to send a test SNMP trap after configuration, see thefollowing tech note on the Veritas Support website:
www.veritas.com/docs/TECH208354
235Understanding the NetBackup appliance settingsSettings > Notifications

Configuring SMTPThe SMTP mail server protocol is used for outgoing Email. You can configure SMTPfrom the NetBackup Appliance Web Console (Settings > Alert Configuration >SMTP Server Configuration).
You can also use the following command in the NetBackup Appliance Shell Menuto configure the SMTP server and add a new Email account:
Main_Menu > Settings > Alerts > Email SMTP Add Server [Account]
[Password], where Server is the host name of the target SMTP server that is usedto send emails. [Account] and [Password] are optional parameters to identify thename of the account and the account password if authentication is required.
For more information, see the NetBackup Appliance Command Reference Guide.
Table 5-7 lists the fields from the SMTP section of the NetBackup Appliance WebConsole.
Table 5-7 SMTP Server Configuration settings
DescriptionFields
Enter the SMTP (Simple Mail Transfer Protocol) Server host name.Notifications of the alerts that are generated in Appliance are sentusing this SMTP server. The IP address can be an IPv4 or IPv6address. Only global-scope and unique-local IPv6 addresses areallowed.
See “About IPv4-IPv6-based network support” on page 271.
SMTP Server
Enter the Email ID of the software administrator, to receive softwarealerts that are specific to the Veritas NetBackup Appliance software.This Email ID that you designate receives alerts for the followingsoftware conditions:
■ Host information such as:■ Disk information.■ Overall backup status.■ Results of last seven backups for each client.
■ An Email of your catalog backup disaster recovery file.■ A patch installation success report.
SoftwareAdministrator Email
Enter the Email ID of the hardware administrator, to receivehardware alerts that are specific to the Veritas NetBackup HardwareAppliance. For example, [email protected]
See “About Email notification from a NetBackup appliance”on page 46. for more information about potential hardware alerts.
HardwareAdministrator Email
236Understanding the NetBackup appliance settingsSettings > Notifications

Table 5-7 SMTP Server Configuration settings (continued)
DescriptionFields
Enter the Email ID to receive any replies to the alerts or the reportsthat are sent by the Appliance.
Sender Email
Enter the user name to access the SMTP account.
Note: You maybe asked to enter a user name as some SMTPservers may require user name and password credentials to sendan email.
SMTP Account
Enter the password for the above mentioned SMTP user account.
Note: You maybe asked to enter a password as some SMTPservers may require user name and password credentials to sendan email.
Password
You can configure this server to send email reports to a proxy server or to theVeritas Call Home server.
The following describes the supported proxy servers:
■ Squid
■ Apache
■ TMG
Note: NTLM authentication in the proxy configuration is also supported.
Starting with NetBackup Appliance 2.6.1.1, all email notifications that get generatedby the appliance use the same SMTP settings. These emails include hardwaremonitoring notifications and NetBackup job notifications. The configuration settingsare located under Settings > Notification > Alert Configuration in the NetBackupAppliance Web Console or Main_Menu > Settings > Alerts in the NetBackupAppliance Shell Menu. These settings override any previous SMTP setup you mayhave previously used to send NetBackup job notifications.
Note: If you had already configured the appliance SMTP settings before youupgraded to NetBackup Appliance 2.6.1.1, you may need to re-save the configurationin order for NetBackup to use it. In the NetBackup Appliance Web Console, go toSettings > Notification > Alert Configuration and click Save. Or in the NetBackupAppliance Shell Menu, go to Main_Menu > Settings > Alerts and resubmit theSMTP and SenderID settings.
237Understanding the NetBackup appliance settingsSettings > Notifications

Configuring Call HomeTable 5-8 lists the fields from the Call Home Configuration section.
Table 5-8 Call Home Configuration settings
DescriptionFields
Select this check box to enable Call Home alert configuration.Enable Call Home
Select this check box to enable proxy.Enable Proxy Server
Select this check box if your proxy server supports SSL tunneling.Enable ProxyTunneling
Enter the name of the proxy server.Proxy Server
Enter the port number of the proxy server.Proxy Port
Enter the user name to log into the proxy server.Proxy Username
Enter the password for the user name to log into the proxy server.Proxy Password
When Call Home is enabled, you can test whether or not Call Home is workingcorrectly by clicking the Test Call Home option that is available below the CallHome configuration settings.
Note: The Test Call Home option is active on the NetBackup Appliance WebConsole only when Call Home is enabled.
Configuring Alert Configuration settingsThis section provides the procedure to configure the SNMP, SMTP, and Call Homeserver settings using the Settings > Notification > Alert Configuration page.
To configure the SNMP, SMTP, and Call Home server settings
1 Log on to the NetBackup Appliance Web Console.
2 Click Settings > Notification > Alert Configuration.
The system displays the Alert Configuration page.
The Alert Configuration page is divided into three sections to enable andprovide details for SNMP, SMTP, and Call Home.
3 In the Notification Interval field enter the time interval in minutes betweentwo subsequent notifications, for SNMP, SMTP, and Call Home alertconfigurations.
238Understanding the NetBackup appliance settingsSettings > Notifications

4 Enter the SNMP settings in the provided fields. A description of the SNMPparameters is available in Table 5-6.
5 Enter the SMTP settings in the provided fields. A description of the SMTPparameters is available in Table 5-7.
The appliance uses the global server settings to send email notifications to theSMTP server that you specify.
6 Enter the Call Home settings in the provided fields. A description of the CallHome parameters is available in Table 5-8.
7 Click Save, to save the SNMP, SMTP, and Call Home settings.
About SNMPThe Simple Network Management Protocol (SNMP) is an application layer protocolthat facilitates the exchange of management information between network devices.It uses either the Transmission Control Protocol (TCP) or the User DatagramProtocol (UDP) for transport, depending on configuration. SNMP enables networkadministrators to manage network performance, find and solve network problems,and plan for network growth.
SNMP is based on the manager model and agent model. This model consists of amanager, an agent, a database of management information, managed objects, andthe network protocol.
The manager provides the interface between the human network manager and themanagement system. The agent provides the interface between the manager andthe physical devices being managed.
The manager and agent use a Management Information Base (MIB) and a relativelysmall set of commands to exchange information. The MIB is organized in a treestructure with individual variables, such as point status or description, beingrepresented as leaves on the branches. A numeric tag or object identifier (OID) isused to distinguish each variable uniquely in the MIB and in SNMP messages.
NetBackup Appliance 2.7.2 supports SNMP v2.
About the Management Information Base (MIB)Each SNMP element manages specific objects with each object having specificcharacteristics. Each object and characteristic has a unique object identifier (OID)that is associated with it. Each OID consists of the numbers that are separated bydecimal points (for example, 1.3.6.1.4.1.2682.1).
These OIDs form a tree. A MIB associates each OID with a readable label andvarious other parameters that are related to the object. The MIB then serves as a
239Understanding the NetBackup appliance settingsSettings > Notifications

data dictionary that is used to assemble and interpret SNMP messages. Thisinformation is saved as a MIB file.
You can check the details of the SNMP MIB file from the Settings > Notifications> Alert Configuration page of the NetBackup Appliance Web Console. To configurethe appliance SNMP manager to receive hardware monitoring related traps, clickView SNMP MIB file in the SNMP Server Configuration pane.
You can also view the SNMP MIB file with the Settings > Alerts > SNMP ShowMIB
command in the NetBackup Appliance Shell Menu.
About Call HomeYour appliance can connect with a Veritas AutoSupport server and upload hardwareand software information. Veritas support uses this information to resolve any issuesthat you might report. The appliance uses the HTTPS protocol and uses port 443to connect to the Veritas AutoSupport server. This feature of the appliance is referredto as Call Home. It is enabled by default.
AutoSupport in appliance uses the data that is gathered by Call Home to provideproactive monitoring for the appliance. If Call Home is enabled, the applianceuploads hardware and software information (or the Call Home data) to VeritasAutoSupport server periodically at an interval of 24 hours by default.
If you determine that you have a problem with a piece of hardware, you might wantto contact Veritas support. The Technical Support engineer uses the serial numberof your appliance and assesses the hardware status from the Call Home data. Toknow the serial number of your appliance from theNetBackup Appliance WebConsole, go to the Monitor > Hardware > Health details page. To determine theserial number of your appliance using the shell menu, go to the Monitor > Hardware
commands. For more information about the Monitor > Hardware commands, referto the NetBackup Appliance Command Reference Guide.
Use the Settings > Notification page to configure Call Home from the NetBackupAppliance Web Console. Click Alert Configuration and enter the details in theCall Home Configuration pane.
Table 5-9 describes how a hardware failure is reported when the feature is enabledor disabled.
240Understanding the NetBackup appliance settingsSettings > Notifications

Table 5-9 What happens when Call Home is enabled or disabled
Hardware failure routineMonitoring status
When a hardware failure occurs, the following sequence ofalerts occur:
■ The appliance uploads all the monitored hardware andsoftware information to a Veritas AutoSupport server. Thelist following the table contains all the relevant information.
■ The appliance generates 3 kinds of email alerts to theconfigured email address.■ An error message by email to notify you of the
hardware failure once an error is detected.■ A resolved message by email to inform you of any
hardware failure once an error is resolved.■ A 24-hour summary by email to summarize all of the
currently unresolved errors in the recent 24 hours.■ The appliance also generates an SNMP trap.
Call Home enabled
No data is sent to the Veritas AutoSupport server. Yoursystem does not report hardware errors to Veritas to enablefaster problem resolution.
Call Home disabled
The following list contains all the information that is monitored and sent to VeritasAutoSupport server for analysis.
■ CPU
■ Disk
■ Fan
■ Power supply
■ RAID group
■ Temperatures
■ Adapter
■ PCI
■ Fibre Channel HBA
■ Network card
■ Partition information
■ MSDP statistics
■ Storage connections
241Understanding the NetBackup appliance settingsSettings > Notifications

■ Storage status
■ 52xx Storage Shelf - Status of disk, fan, power supply, and temperature
■ 5330 Primary Storage Shelf - Status of disk, fan, power supply, temperature,battery backup unit (BBU), controller, volume, and volume group
■ 5330 Expansion Storage Shelf - Status of disk, fan, power supply, andtemperature
■ NetBackup Appliance software version
■ NetBackup version
■ Appliance model
■ Appliance configuration
■ Firmware versions
■ Appliance, storage, and hardware component serial numbersSee “Hardware components that are monitored” on page 41.
See “Settings > Notifications > Alert Configuration ” on page 234.
See “Configuring Call Home from the NetBackup Appliance Shell Menu” on page 242.
See “About AutoSupport ” on page 247.
See “Monitor > Hardware options” on page 37.
Configuring Call Home from the NetBackup Appliance Shell MenuYou can configure the Call Home details from the Settings > Notification page.
You can configure the following Call Home settings from the NetBackup ApplianceShell Menu:
■ Enabling and disabling Call Home from the NetBackup Appliance Shell Menu
■ Configuring a Call Home proxy server from the NetBackup Appliance Shell Menu
■ Testing whether or not Call Home works correctly by running the Settings >
Alerts > CallHome > Test command.
If you enable Call Home, you can use the Settings > Alerts > CallHome
Registration command to configure the contact details for your appliance byentering the following information:
■ The name of the person who is the first point of contact and responsible for theappliance.
■ The address of the contact person.
■ The phone number of the contact person.
242Understanding the NetBackup appliance settingsSettings > Notifications

■ The email address of the contact person.
To learn more about the Main > Settings > Alerts > CallHome commands,refer to theNetBackup Appliance Command Reference Guide.
For a list of the hardware problems that cause an alert, see the following topics:
See “Monitor > Hardware options” on page 37.
See “About Call Home” on page 240.
See “About Email notification from a NetBackup appliance” on page 46.
Enabling and disabling Call Home from the NetBackupAppliance ShellMenuYou can enable or disable Call Home from both, the NetBackup Appliance WebConsole and the NetBackup Appliance Shell Menu. Call Home is enabled by default.
To enable or disable Call Home from the NetBackup Appliance Shell Menu
1 Log on to the NetBackup Appliance Shell Menu.
2 To enable Call Home, run the Main > Settings > Alerts > CallHome
Enable command.
3 To disable Call Home, run the Main > Settings > Alerts > CallHome
Disable command.
For more information on Main > Settings > Alerts > CallHome commands,refer to the NetBackup Appliance Command Reference Guide.
Configuring a Call Home proxy server from the NetBackup ApplianceShell MenuYou can configure a proxy server for Call Home, if required. If the applianceenvironment has a proxy server between the environment and external Internetaccess, you must enable the proxy settings on the appliance. The proxy settingsinclude both a proxy server and a port. The proxy server must accept httpsconnections from the Veritas AutoSupport server. This option is disabled by default.
To add a Call Home proxy server from the NetBackup Appliance Shell Menu
1 Log on to NetBackup Appliance Shell Menu.
2 To enable proxy settings, run the Main > Settings > Alerts > CallHome
Proxy Enable command.
3 To add a proxy server, run the Main > Settings > Alerts > CallHome
Proxy Add command.
243Understanding the NetBackup appliance settingsSettings > Notifications

■ You are prompted to enter the name of the proxy server. The proxy servername is the TCP/IP address or the fully qualified domain name of the proxyserver.
■ After you have entered a name for the proxy server, you are prompted toenter the port number for the proxy server.
■ Further, you are required to answer the following:
Do you want to set credentials for proxy server? (yes/no)
■ On answering yes, you are prompted to enter a user name for the proxyserver.
■ After you have entered the user name, you are prompted to enter apassword for the user. On entering the required information, the followingmessage is displayed:
Successfully set proxy server
4 To disable proxy settings, run the Main > Settings > Alerts > CallHome
Proxy Disable command.
Further, you can also use the NetBackup Appliance Shell Menu to enable or disableproxy server tunneling for your appliance. To do so, run the Main > Settings >
CallHome Proxy EnableTunnel and Main > Settings > Alerts > CallHome
Proxy DisableTunnel commands. Proxy server tunneling lets you provide a securepath through an untrusted network.
Understanding the Call Home workflowThis section explains the mechanism that Call Home uses to upload data from yourappliance to the Veritas AutoSupport server.
Call Home uses HTTPS (secure and encrypted protocol) with port number 443 forall communication with Veritas AutoSupport servers. For Call Home to work correctly,ensure that your appliance has Internet access either directly, or through a proxyserver to reach the Veritas AutoSupport servers. AutoSupport, a mechanism thatmonitors the appliance proactively, uses the Call Home data to analyze and resolveany issues that the appliance may encounter.
All communications are initiated by the appliance. Your appliance needs access tohttps://receiver.appliance.veritas.com.
The appliance Call Home feature uses the following workflow to communicate withAutoSupport servers:
■ Access a port to https://receiver.appliance.veritas.com every 24 hours.
244Understanding the NetBackup appliance settingsSettings > Notifications

■ Perform a self-test operation to https://receiver.appliance.veritas.com.
■ If the appliance encounters an error state, all hardware logs from past threedays are gathered along with the current log.
■ The logs are then uploaded to the Veritas AutoSupport server for further analysisand support. These error logs are also stored on the appliance. You can accessthese logs from /log/upload/<date> folder.
■ If the error state persists three days later, the logs will be re-uploaded.
See “About Call Home” on page 240.
See “About AutoSupport ” on page 247.
About the Product Improvement ProgramThe NetBackup Appliance Product Improvement Program uses Call Home to captureinstallation deployment and product usage information. The information that Veritasreceives becomes part of a continuous quality improvement program that helpsunderstand how customers configure, deploy, and use the product. This informationis then used to help Veritas identify improvements in product features, testing,technical support, and future requirements.
You can enable or disable the Product Improvement Program from the NetBackupAppliance Shell Menu. This option is not available from the NetBackup ApplianceWeb Console.
The Product Improvement Program is enabled by default. However, if you havedisabled Call Home, the Product Improvement Program is also disabled. You cannotenable the Product Improvement Program without Call Home.
To enable or disable the Product Improvement Program from the NetBackupAppliance Shell Menu
1 Log on to the NetBackup Appliance Shell Menu
2 To enable the Product Improvement Program, run the Main > Settings >
Alerts > CallHome NBInventory Enable command.
3 To disable the Product Improvement Program, run the Main > Settings >
Alerts > CallHome NBInventory Disable command.
For more information on the Main > Settings > Alerts > CallHome commands,refer to the NetBackup Appliance Command Reference Guide.
Settings > Notification > RegistrationYou can register an appliance and enter your contact information from theRegistration tab that is available under the Settings > Notification menu.
245Understanding the NetBackup appliance settingsSettings > Notifications

Registration of your NetBackup appliance helps to make sure that you are alertedto product updates and other important information about your appliance.
You may also complete the registration while configuring your appliance or inadvance of installation from the MyAppliance portal athttps://my.appliance.veritas.com. The MyAppliance portal offers more detail andcontact information options than the other registration methods. Visit the portal foradditional information.
This topic provides the necessary data entry fields to register an appliance withVeritas from the Registration tab of the NetBackup Appliance Web Console.
Table 5-10 describes the data entry fields that are related to specific informationsections and the type of information to enter in the fields.
Table 5-10 Data entry fields for the appliance registration
DescriptionSection and related field name
Provide the appliance name that we can refer to in our communications with you.
Enter a name for the appliance.Appliance Name
Provide the details of the physical location of the appliance.
Enter your company name.Company Name
Enter the name of the street, where the applianceis located.
Street
Enter the name of the city, where the applianceis located.
City
Enter the name of the state, where the applianceis located.
State or Province
Enter the ZIP Code.Zip or Postal Code
Enter the name of the country, where theappliance is located.
Country
Provide the contact details of the official point of contact.
Enter the name of the primary contact in regardto your appliance or your backup environment.
Contact Name
Enter the primary phone number for the contactname. This number should be the one that is mostlikely to reach the contact person.
Contact Number
246Understanding the NetBackup appliance settingsSettings > Notifications

Table 5-10 Data entry fields for the appliance registration (continued)
DescriptionSection and related field name
Enter the business email address for theContactName that you identified earlier.
Contact Email
If your appliance is provisioned and has Internet connectivity, the registration detailspopulate automatically. If the appliance is not provisioned, the message to verifyand update the appliance registration information is displayed.
You can also register your appliance using the Main > Settings > Alerts >
CallHome Registration commands under the NetBackup Appliance Shell Menu.For more information, refer to the NetBackup Appliance Command ReferenceGuide.
Moving an appliance from one physical location to anotherTo move an appliance from one physical location to another, consider the followingpoints to ensure continuance of maintenance and support coverage
■ Certain locations or regions of the world may not be enabled or set up to handlefield service calls for parts replacement.
■ Certain locations or regions may not be able to meet the defined Service LevelAgreement (SLA) contract(s) to which the appliance may be associated with.
■ Customers should not move an appliance to another country.
■ If it is imperative to move the appliance, you must contact your account accessteam at Veritas to understand the ramifications or impact (if any) to the Serviceagreements associated with the appliance.
■ After you have moved the appliance, it is critical to update your registrationdetails such as contact details and location information on the appliance toensure continuance of coverage.
See “About AutoSupport ” on page 247.
See “Settings > Notifications > Alert Configuration ” on page 234.
About AutoSupportThe AutoSupport feature lets you register the appliance and your contact detailsat the Veritas support website . Veritas support uses this information to resolve anyissue that you report. The information allows Veritas support to minimize downtimeand provide a more proactive approach to support.
Provide the registration details for your appliance using one of the followingprovisions:
247Understanding the NetBackup appliance settingsSettings > Notifications

■ The MyAppliance portal before you install the appliance
■ The appliance initial configuration on the Registration page
■ The NetBackup Appliance Web Console by navigating toSettings > Notification> Registration page
■ The NetBackup Appliance Shell Menu by running the Settings > Alerts >
CallHome Registration command. For more information about this command,refer to the NetBackup Appliance Command Reference Guide.
You can register by entering the following basic information:
■ Name: Your name, company name
■ Address, where the appliance is physically located: City, street, state, ZIP Code
■ Contact information: Phone number, email address
The support infrastructure is designed to allow Veritas support to help you in thefollowing ways:
■ Proactive monitoring lets Veritas support to automatically create cases, fix issues,and dispatch any appliance parts that might be at risk.
■ The AutoSupport infrastructure within Veritas analyzes the Call Home data fromappliance. This analysis provides proactive customer support for hardwarefailures, reducing the need for backup administrators to initiate support cases.
■ With AutoSupport ability, Veritas support can begin to understand how customersconfigure and use their appliances, and where improvements would be mostbeneficial.
■ Send and receive status and alert notifications for the appliance.
■ Receive hardware and software status using Call Home.
■ Provide more insight into the issues and identify any issues that might furtheroccur as a result of the existing issue.
■ View reports from the Call Home data to analyze patterns of hardware failure,and see usage trends. The appliance sends health data every 30 minutes.
The information that you provide for appliance registration helps Veritas support toinitiate resolution of any issue that you report. However, if you want to provideadditional details such as a secondary contact, phone, rack location, and so on,you can visit https://my.veritas.com.
See “Settings > Notification > Registration” on page 245.
248Understanding the NetBackup appliance settingsSettings > Notifications

Settings > NetworkThe Settings > Network menu displays the following tabs:
■ Network Settings - enables you to configure network and routing settings foryour appliance.See “Settings > Network > Network Settings” on page 250.
■ Host - enables you to reconfigure your appliance's host settings.See “Settings > Network > Host” on page 269.
■ Fibre Transport - enables you to reconfigure the Fibre Transport settings.See “Settings > Network > Fibre Transport” on page 266.
You can also configure the network settings using the Main_Menu > Network
commands from the NetBackup Appliance Shell Menu. For more information referto the NetBackup Appliance Command Reference Guide.
VLAN configuration for NetBackup AppliancesStarting with NetBackup Appliance version 2.6.0.3, you can configure VLANs inyour existing network environments.
The concept of a Virtual Local Area Network (VLAN) is devised to logically partitiona physical network for creating multiple distinct broadcast domains. These broadcastdomains can be segmented on the basis of organization functions, teams within afunction, or applications. Although the properties of VLANs are same as those ofLANs, VLANs have pivotal advantages over the traditional LANs in the followingways:
■ Allows the formation of virtual workgroups.
■ Enhances network performance.
■ Simplifies network administration.
■ Provides better security.
■ Reduces the overall costs of network management.
To configure VLAN for your appliance from the NetBackup Appliance Web Console,use the Network tab on the Settings > Network page.
To configure VLAN from the NetBackup Appliance Shell Menu, run the Main_Menu>
Network > VLAN command.
See “Settings > Network > Network Settings” on page 250.
249Understanding the NetBackup appliance settingsSettings > Network

Settings > Network > Network SettingsThe Settings > Network menu directs you to its default Network Settings page.The Network Settings page enables you to configure and update the networksettings for your appliance. These network settings are applied at the time of initialconfiguration.
The Network Settings page is divided into two panes. The first pane contains theInterface Properties and Routing Properties tabs. The second pane containsNetwork Configuration pane.
The taskbar underneath the Interface Properties tab enables you to complete thefollowing tasks:
Table 5-11 Taskbar elements under the Interface Properties tab
Lets you...This function...
Filter the network interface by its name. If you enter the name ofa physical interface in the field, the resultant displays informationfor the physical interface along with information of any bond thatis created over the physical interface. For example, if eth2 is a partof bond1, then the filter criteria for eth2 displays information forbond1 too.
Filter by NetworkInterface
250Understanding the NetBackup appliance settingsSettings > Network
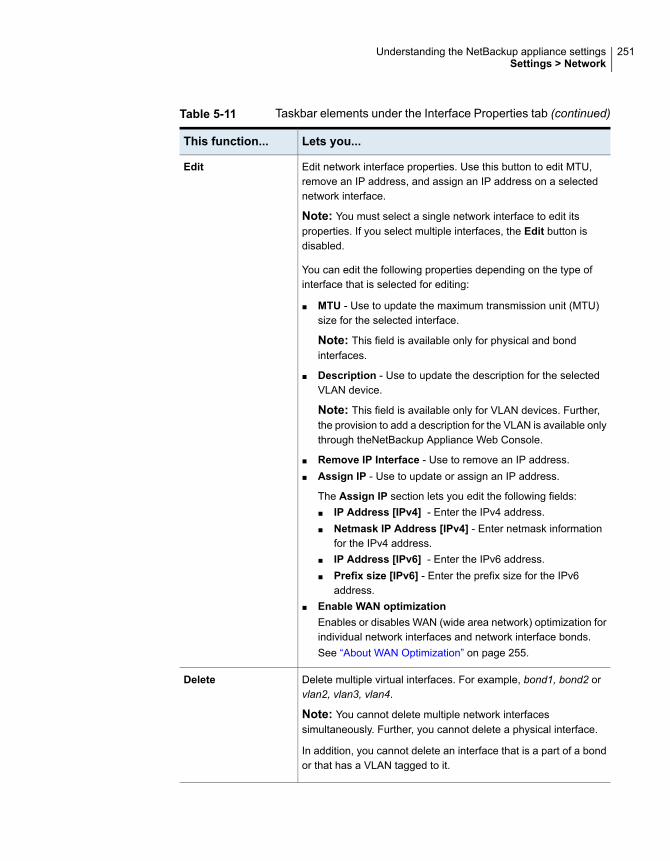
Table 5-11 Taskbar elements under the Interface Properties tab (continued)
Lets you...This function...
Edit network interface properties. Use this button to edit MTU,remove an IP address, and assign an IP address on a selectednetwork interface.
Note: You must select a single network interface to edit itsproperties. If you select multiple interfaces, the Edit button isdisabled.
You can edit the following properties depending on the type ofinterface that is selected for editing:
■ MTU - Use to update the maximum transmission unit (MTU)size for the selected interface.
Note: This field is available only for physical and bondinterfaces.
■ Description - Use to update the description for the selectedVLAN device.
Note: This field is available only for VLAN devices. Further,the provision to add a description for the VLAN is available onlythrough theNetBackup Appliance Web Console.
■ Remove IP Interface - Use to remove an IP address.■ Assign IP - Use to update or assign an IP address.
The Assign IP section lets you edit the following fields:■ IP Address [IPv4] - Enter the IPv4 address.■ Netmask IP Address [IPv4] - Enter netmask information
for the IPv4 address.■ IP Address [IPv6] - Enter the IPv6 address.■ Prefix size [IPv6] - Enter the prefix size for the IPv6
address.■ Enable WAN optimization
Enables or disables WAN (wide area network) optimization forindividual network interfaces and network interface bonds.See “About WAN Optimization” on page 255.
Edit
Delete multiple virtual interfaces. For example, bond1, bond2 orvlan2, vlan3, vlan4.
Note: You cannot delete multiple network interfacessimultaneously. Further, you cannot delete a physical interface.
In addition, you cannot delete an interface that is a part of a bondor that has a VLAN tagged to it.
Delete
251Understanding the NetBackup appliance settingsSettings > Network
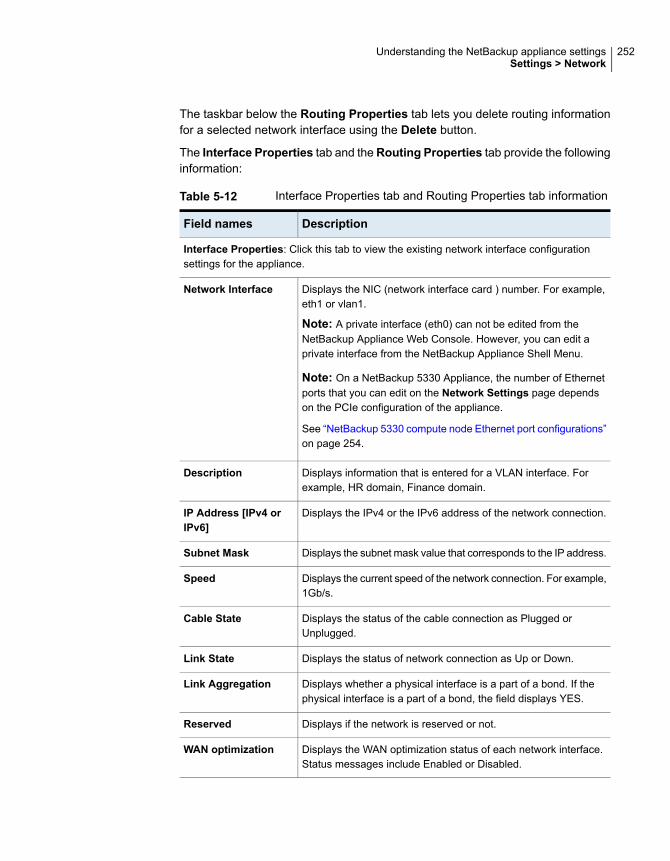
The taskbar below the Routing Properties tab lets you delete routing informationfor a selected network interface using the Delete button.
The Interface Properties tab and theRouting Properties tab provide the followinginformation:
Table 5-12 Interface Properties tab and Routing Properties tab information
DescriptionField names
Interface Properties: Click this tab to view the existing network interface configurationsettings for the appliance.
Displays the NIC (network interface card ) number. For example,eth1 or vlan1.
Note: A private interface (eth0) can not be edited from theNetBackup Appliance Web Console. However, you can edit aprivate interface from the NetBackup Appliance Shell Menu.
Note: On a NetBackup 5330 Appliance, the number of Ethernetports that you can edit on the Network Settings page dependson the PCIe configuration of the appliance.
See “NetBackup 5330 compute node Ethernet port configurations”on page 254.
Network Interface
Displays information that is entered for a VLAN interface. Forexample, HR domain, Finance domain.
Description
Displays the IPv4 or the IPv6 address of the network connection.IP Address [IPv4 orIPv6]
Displays the subnet mask value that corresponds to the IP address.Subnet Mask
Displays the current speed of the network connection. For example,1Gb/s.
Speed
Displays the status of the cable connection as Plugged orUnplugged.
Cable State
Displays the status of network connection as Up or Down.Link State
Displays whether a physical interface is a part of a bond. If thephysical interface is a part of a bond, the field displays YES.
Link Aggregation
Displays if the network is reserved or not.Reserved
Displays the WAN optimization status of each network interface.Status messages include Enabled or Disabled.
WAN optimization
252Understanding the NetBackup appliance settingsSettings > Network

Table 5-12 Interface Properties tab and Routing Properties tab information(continued)
DescriptionField names
Display whether a VLAN is tagged to a network interface. If a VLANis tagged to a network interface the field displays YES.
VLAN
Routing Properties: Click this tab to view the existing routing configuration settings for theappliance.
Displays the NIC (network interface card ) number. For example,eth1.
Network Interface
Displays the network IP address of a destination network.Destination IP
Displays the subnet value that corresponds to the IP address.Destination SubnetMask
Displays the address of the network point that acts as an entranceto another network.
Gateway
In addition, the network interfaces that you find in the Interface Properties tab andtheRouting Properties tab also provide links to access detailed network properties.Clicking a network interface opens a properties window for the selected networkinterface. The window provides information about the selected network interface.
The following table describes the type of network configurations that you canperform.
Table 5-13 Network Configuration pane options
DescriptionOperation
Provides the data entry fields to create a network bond.
See “Creating a bond” on page 262.
Create Bond
Provides the data entry fields to tag a VLAN over a networkinterface.
See “Tagging VLAN” on page 263.
Tag VLAN
Provides the data entry fields to add network routing information.
See “Adding static route” on page 265.
Add Static Route
See “VLAN configuration for NetBackup Appliances” on page 249.
253Understanding the NetBackup appliance settingsSettings > Network

NetBackup 5330 compute node Ethernet portconfigurationsThe rear panel of the NetBackup 5330 compute node contains six PCIe slots, whichare populated according to five different supported configurations. The PCIe slotconfiguration determines the number of Ethernet ports that are available.
Note the locations of each Ethernet port that is located on the rear panel of thecompute node.
eth0 eth1 eth2 eth3 eth4 eth5
eth9 eth8
eth7 eth6 eth13 eth12
eth11 eth10
All NetBackup 5330 Appliances include the following ports, which are built in alongthe base of the rear panel:
■ 1-GbE ports: eth0, eth1, eth2, and eth3
■ 10-GbE ports: eth4 and eth5
The 10-Gb Ethernet network interface cards that are installed in the PCIe slotscontain additional ports. The number of ports depends on the PCIe slot configurationof your compute node.
Table 5-14 shows the available Ethernet ports for each PCIe slot configuration.
Table 5-14 NetBackup 5330 compute node PCIe Ethernet port configurations
Slot and Ethernet port numbersOption
■ Slot 2: eth8 (right), eth9 (left)■ Slot 3: eth6 (right), eth7 (left)■ Slot 5: eth10 (right), eth11 (left)■ Slot 6: eth12 (right), eth13 (left)
A (four 10-Gb Ethernet cards)
■ Slot 2: eth8 (right), eth9 (left)■ Slot 3: eth6 (right), eth7 (left)■ Slot 5: eth10 (right), eth11 (left)
B (three 10-Gb Ethernet cards)
254Understanding the NetBackup appliance settingsSettings > Network
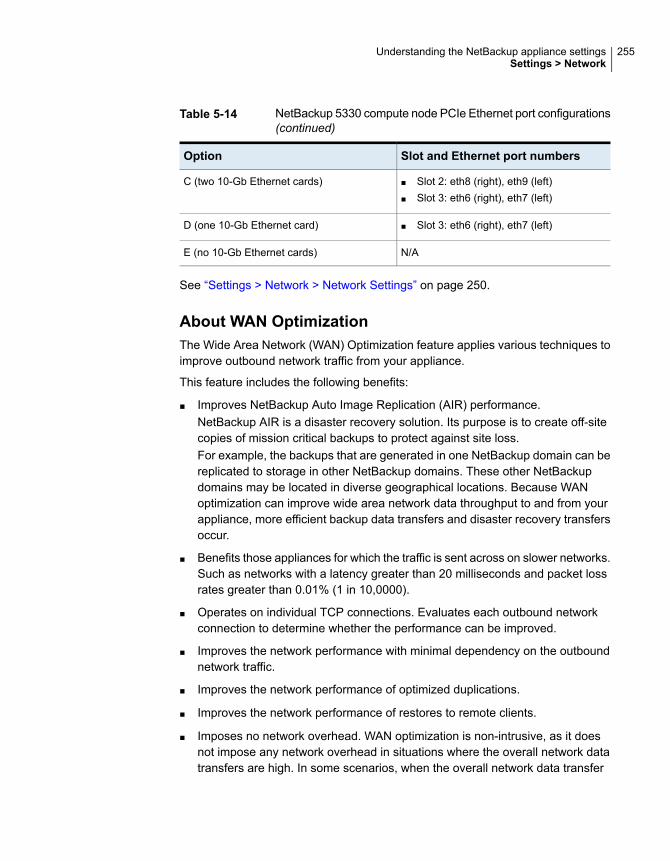
Table 5-14 NetBackup 5330 compute node PCIe Ethernet port configurations(continued)
Slot and Ethernet port numbersOption
■ Slot 2: eth8 (right), eth9 (left)■ Slot 3: eth6 (right), eth7 (left)
C (two 10-Gb Ethernet cards)
■ Slot 3: eth6 (right), eth7 (left)D (one 10-Gb Ethernet card)
N/AE (no 10-Gb Ethernet cards)
See “Settings > Network > Network Settings” on page 250.
About WAN OptimizationThe Wide Area Network (WAN) Optimization feature applies various techniques toimprove outbound network traffic from your appliance.
This feature includes the following benefits:
■ Improves NetBackup Auto Image Replication (AIR) performance.NetBackup AIR is a disaster recovery solution. Its purpose is to create off-sitecopies of mission critical backups to protect against site loss.For example, the backups that are generated in one NetBackup domain can bereplicated to storage in other NetBackup domains. These other NetBackupdomains may be located in diverse geographical locations. Because WANoptimization can improve wide area network data throughput to and from yourappliance, more efficient backup data transfers and disaster recovery transfersoccur.
■ Benefits those appliances for which the traffic is sent across on slower networks.Such as networks with a latency greater than 20 milliseconds and packet lossrates greater than 0.01% (1 in 10,0000).
■ Operates on individual TCP connections. Evaluates each outbound networkconnection to determine whether the performance can be improved.
■ Improves the network performance with minimal dependency on the outboundnetwork traffic.
■ Improves the network performance of optimized duplications.
■ Improves the network performance of restores to remote clients.
■ Imposes no network overhead. WAN optimization is non-intrusive, as it doesnot impose any network overhead in situations where the overall network datatransfers are high. In some scenarios, when the overall network data transfer
255Understanding the NetBackup appliance settingsSettings > Network

is high, the connection speed may not be optimized despite this feature beingenabled.
You can enable or disable WAN Optimization for individual network interfaces andnetwork interface port bonds from Settings > Network > Interface Properties tabin the NetBackup Appliance Web Console. You can also use the NetBackupAppliance Shell Menu.
For more information about using WAN Optimization commands in the NetBackupAppliance Shell Menu, refer to NetBackup™ Appliance Commands ReferenceGuide.
Table 5-15 WAN Optimization operations
NetBackupAppliance WebConsole
NetBackupAppliance ShellMenu
DescriptionOperation
YesYesThe Enablecommand is used toenable the WANoptimization settings.The WANoptimization feature isenabled by default.
See “How to enableWAN optimization fora network interfaceport or a networkinterface port bond”on page 257.
Enable
YesYesThe Disablecommand is used todisable the WANoptimization settings.You can disable thissetting using theNetBackup ApplianceWeb Console or theNetBackup ApplianceShell Menu.
See “How to disableWAN optimization fora network interfaceport or a networkbond” on page 258.
Disable
256Understanding the NetBackup appliance settingsSettings > Network

Table 5-15 WAN Optimization operations (continued)
NetBackupAppliance WebConsole
NetBackupAppliance ShellMenu
DescriptionOperation
YesYesThe Statuscommand is used toview WANoptimization reports.
See “Viewing theWAN optimizationstatus” on page 259.
Status
See “Settings > Network > Fibre Transport” on page 266.
See “Settings > Network > Host” on page 269.
How to enable WAN optimization for a network interface port or anetwork interface port bondUse the following procedure to enable WAN optimization for a network interfaceport or a network interface port bond.
To enableWAN optimization for a network interface port or a network interfaceport bond
1 Log on to the NetBackup Appliance Web Console.
2 Click Settings > Network.
3 On the Network Settings page, under the Interface Properties tab, select anetwork interface.
4 Click Edit.
The Edit Network Interface Properties dialog box appears.
257Understanding the NetBackup appliance settingsSettings > Network

5 To enable WAN optimization, select Enable WAN optimization.
6 Click Save.
The following message appears while the appliance enables WAN optimizationfor the selected network interface:
Updating network configuration...
After the appliance successfully enables WAN optimization, the followingmessage appears under the Network Settings page name:
WAN optimization for [selected eth port or bond] was enabled
successfully.
In addition, the status of the selected network interface changes to Enabledin the WAN optimization column of the Interface Properties tab.
Note: If you run a factory reset of the appliance, note the following:
A factory reset disables WAN optimization for all network interface port bonds whenyou retain your network configuration. To retain your network configuration, youcan selectRetain network configuration in the NetBackup Appliance Web Console(Manage > Appliance Restore > Retain network configuration). After the factoryreset completes, you can then enable WAN optimization again for the networkinterface port bonds.
If you choose not to retain your network configuration, all network interface portbonds are lost during the factory reset. After the reset completes, the applianceautomatically enables WAN optimization for all network interface ports, includingthose that comprised the bonds.
How to disable WAN optimization for a network interface port or anetwork bondUse the following procedure to disable WAN optimization for a network interfaceport or a network bond.
To disable WAN optimization for a network interface port or a network bond
1 Log on to the NetBackup Appliance Web Console.
2 Click Settings > Network.
3 On the Network Settings page, under the Interface Properties tab, select anetwork interface.
4 Click Edit.
The Edit Network Interface Properties dialog box appears.
258Understanding the NetBackup appliance settingsSettings > Network
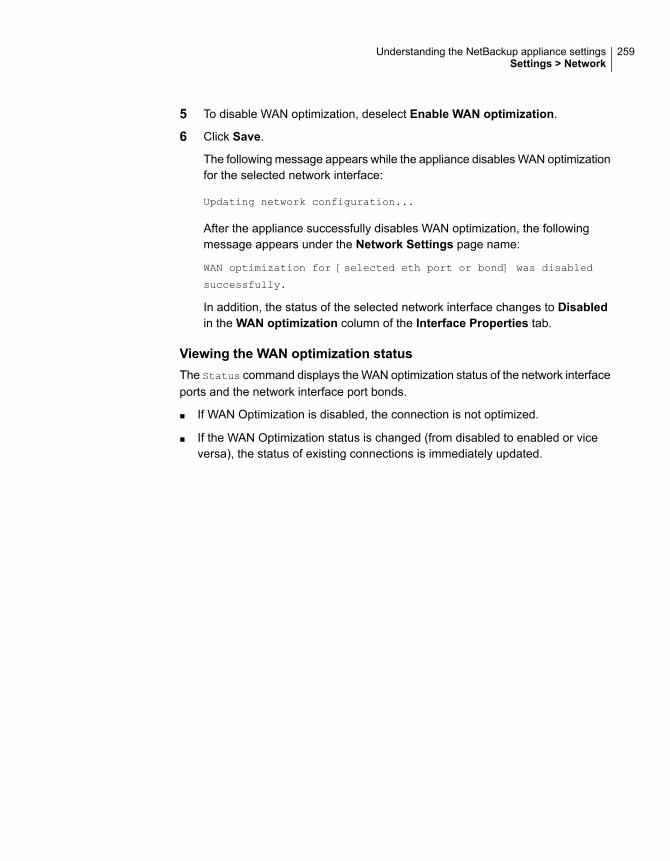
5 To disable WAN optimization, deselect Enable WAN optimization.
6 Click Save.
The following message appears while the appliance disables WAN optimizationfor the selected network interface:
Updating network configuration...
After the appliance successfully disables WAN optimization, the followingmessage appears under the Network Settings page name:
WAN optimization for [selected eth port or bond] was disabled
successfully.
In addition, the status of the selected network interface changes to Disabledin the WAN optimization column of the Interface Properties tab.
Viewing the WAN optimization statusThe Status command displays the WAN optimization status of the network interfaceports and the network interface port bonds.
■ If WAN Optimization is disabled, the connection is not optimized.
■ If the WAN Optimization status is changed (from disabled to enabled or viceversa), the status of existing connections is immediately updated.
259Understanding the NetBackup appliance settingsSettings > Network

To view the WAN optimization status
1 Log in to the NetBackup Appliance Shell Menu.
2 To view the WAN Optimization option, type the following command:
Main_Menu > Network > WANOptimization
All of the options for the WAN Optimization command appear.
3 To view the WAN optimization status, type the following command:
status
The appliance displays the WAN optimization status in a table that resemblesthe following example:
WAN OptimizationIP addressStateInterfaceBond
DisabledPlugged
Plugged
eth4
eth5
bond0
Enabled192.168.00.00Unpluggedeth0
Disabled10.200.00.00Pluggedeth1
EnabledPluggedeth2
EnabledPluggedeth3
Network and VLAN configuration guidelinesTo facilitate network configuration and administration, it is recommended that youfollow certain guideline to configure or update your network settings.
Guidelines for creating a network interface bond (NICbond):■ Ensure that the network interfaces that participate in bond formation have the
same port speed (i.e. either 1GB or 100GB).
■ At least one of the network interfaces that participates in bond formation mustbe plugged.
■ Ensure that none of the network interfaces that are selected for creating thebond have any VLANs tagged to them.
260Understanding the NetBackup appliance settingsSettings > Network

■ Verify that any of the selected network interfaces are not already part of anotherbond.
Note: When configuring multiple network interfaces as a NIC bond, use theNetBackup Appliance Shell Menu or the NetBackup Appliance Web Console toconfigure the bond. NIC bonds that are configured with tools other than therecommended appliance tools appear as Disabled when you run the WANoptimization Status command. They also appear as Disabled when you view themin the NetBackup Appliance Web Console.
Use either the NetBackup Appliance Shell Menu or the NetBackup Appliance WebConsole to enable these NIC bonds.
Guidelines for tagging a VLAN:■ Ensure that the selected interface or ethernet device is plugged.
■ Verify that the selected interface is not a part of a bond.
■ The selected interface must not have an IP address configured to it. If theselected interface is configured with an IP adress, you must first remove the IPaddress and then tag a VLAN to it.
To remove an IP address from the NetBackup Appliance Web Console
■ Log on to the NetBackup Appliance Web Console.
■ Go to the Setting > Network menu. The appliance displays the defaultNetwork Settings page.
■ From the Interface Properties tab, select the interface for which you wantto remove the IP address.
■ Click the Edit button that is located below on the Interface Properties tab.The appliance displays the editable fields for the selected interface.
■ Select the check box against Remove IP Interface.
■ Click OK to save the changes.
To remove an IP address from the NetBackup Appliance Shell Menu
■ Log on to the NetBackup Appliance Shell Menu.
■ Run the Network > Unconfigure InterfaceName [IPAddress] command.
■ Enter the name of the interface for which you want to unconfigure the IPaddress. In addition, you may also provide the IP address to be unconfigured.
261Understanding the NetBackup appliance settingsSettings > Network

Creating a bondUse the following procedure to create a bond between two or more networkinterfaces.
To create a bond
1 Log on to the NetBackup Appliance Web Console.
2 Click Settings > Network tab. The appliance displays the default NetworkSettings page.
3 Click Create Bond.
4 In theNetwork Configuration section, enter the network interface informationthat is required to create a bond using the following fields:
DescriptionField name
Select the interface or the device name between which youwant to create the bond.
To bond multiple Network Interface Cards (NICs), considerthe following guidelines:
■ The Network Interface drop-down list shows applianceEthernet ports available for creating a bond. Select two ormore interfaces to create a bond. To deselect an interface,click it again.
■ You can enter either an IPv4 address or an IPv6 address.Multiple or duplicate IP addresses are not excepted for aNIC or bond.
■ Only NICs of the same type and speed can be bonded.
See “Network and VLAN configuration guidelines” on page 260.for additional guidelines on creating a bond.
Select Interface
262Understanding the NetBackup appliance settingsSettings > Network

DescriptionField name
Select the bond mode to configure bonding.
The eight available modes are:
■ balance-rr■ active-backup■ balance-xor■ broadcast■ 802.3ad■ balance-tlb■ balance-alb
The default mode is balance-alb. Some bond modes requireadditional configuration on the switch or the router. You shouldtake additional care when you select a bond mode.
For more information about bond modes, see the followingdocumentation:
http://www.kernel.org/doc/Documentation/networking/bonding.txt
Bond Mode
Enter the IPv4 or the IPv6 address to be used for thisappliance. Only global-scope and unique-local IPv6 addressesare allowed.
IP Address [IPv4 orIPv6]
Enter the subnet mask value that corresponds to the IPaddress.
Subnet Mask
5 To add the network configuration details for creating the bond, click Add.
The new entries are configured on the appliance and are listed automatically in theread-only fields of the Interface Properties tab.
To create a bond using the NetBackup Appliance Shell Menu, run the Main_Menu
> Network > LinkAggregation Create command. For detailed information onthe LinkAggregation Create command, refer to the NetBackup ApplianceCommand Reference Guide.
See “Tagging VLAN” on page 263.
See “Adding static route” on page 265.
Tagging VLANUse the following procedure to tag VLAN into your existing network environment.
263Understanding the NetBackup appliance settingsSettings > Network

To tag VLAN
1 Log on to the NetBackup Appliance Web Console.
2 Click Settings > Network tab. The appliance displays the default NetworkSettings page.
3 In theNetwork Configuration section, expand the Tag VLAN option and enterthe network information that is required to tag a VLAN using the following fields:
DescriptionField Name
Select the network interface or the device name towhich you want to tag the VLAN.
See “Network and VLAN configuration guidelines”on page 260. for additional guidelines on tagging aVLAN.
Select Interface
Enter a description for the VLAN. For example,Finance or Human Resource.
Description
Enter a numeric identifier for the VLAN. For example,1 or 10.
VLAN Id
Enter the IPv4 or the IPv6 address to be used for thisappliance.
IP Address [IPv4 or IPv6]
Enter the subnet mask value that corresponds to theIP address.
Subnet Mask
4 Click Add to add the configuration information for tagging VLAN into to yourexisting network environment.
5 To enter information for tagging additional VLANs, click the + sign to add arow. To remove any of the rows, click the - sign that is adjacent to the SubnetMask field.
The new entries are configured on the appliance and are listed automatically in theread-only fields of the Interface Properties tab.
To tag VLAN from the NetBackup Appliance Shell Menu, run the Main_Menu >
Network > VLAN Tag command. For detailed information on the VLAN Tag
command, refer to the NetBackup Appliance Command Reference Guide.
See “Creating a bond” on page 262.
See “Adding static route” on page 265.
264Understanding the NetBackup appliance settingsSettings > Network

Adding static routeUse the following procedure to add or update the network routing information foryour appliance.
To add network routing information for your appliance
1 Log on to the NetBackup Appliance Web Console.
2 Click Settings > Network > Network tab. The appliance displays theNetworkSettings page.
3 In the Network Configuration section, expand the Add Static Route optionand enter the network interface information that is required to add routinginformation using the following fields:
DescriptionField Name
Enter the network IP address of a destinationnetwork.
Enter the network IP address of a destinationnetwork. For the initial appliance configuration,this field contains a default value that cannot bechanged. When you configure another destinationIP, you must enter the appropriate address.
Destination IP
Enter the subnet value that corresponds to theIP address.
Enter the subnet value that corresponds to theIP address. For the initial appliance configuration,this field contains a default value that cannot bechanged. When you configure another route, youmust enter the appropriate value.
Destination Subnet Mask
Enter the address of the network point that actsas an entrance to another network.
Gateway
The appliance can use multiple network interfacecards (NICs). This column displays the networkdevice name. for example, eth0 or bond0 or vlan1.
Network Interface
4 Click Add to add the network routing information for your appliance.
The new entries are configured on the appliance and are listed automatically in theread-only fields of the Routing Properties tab.
See “Creating a bond” on page 262.
See “Tagging VLAN” on page 263.
265Understanding the NetBackup appliance settingsSettings > Network

Settings > Network > Fibre TransportThe Fibre Transport (FT) options let you set up the appliance for FT use with SANClients or NetBackup deduplication appliances. By default, the FT options aredisabled and the configuration of one option does not affect the other one.
The Fibre Transport (FT) options let you set up the appliance for FT use with SANClients or NetBackup Appliances. By default, the FT options are disabled and theconfiguration of one option does not affect the other one.
The following describes the FT options:
266Understanding the NetBackup appliance settingsSettings > Network

Table 5-16 FT option descriptions
DescriptionFT option
This option lets you change the port configuration of applianceFibre Channel (FC) HBA cards for SAN Client FT use.
The following describes the FC HBA cards that are affected:
■ NetBackup 5220 - FC HBA cards in slots 2 and 4■ NetBackup 5230 and NetBackup 5330 - FC HBA cards in slots
5 and 6
By default, the option is disabled and all ports are in the initiatormode.
When the option is enabled and 2 target port Fibre Channelconnection is selected, Port 1 on all affected FC HBA cards isset to the target mode. The appliance can now use these portsfor deduplicated backups with the use of FT.
When the option is enabled and 4 target port Fibre Channelconnection is selected, Port 1 and Port 2 on all affected FC HBAcards are set to the target mode. The appliance can now use theseports for deduplicated backups with the use of FT.
Before you enable this option, be aware of the followingrequirements and behavior:
■ To use this option, a SAN Client license key must reside onthe master server that is associated with this appliance. If FTis not currently used and you want to use the SAN Clientfeature, you must first obtain a SAN Client license key. Toobtain the appropriate license key, contact Veritas TechnicalSupport. Once you have the license key, you must add it tothe master server.
■ When this option is enabled or changed, a warning appearsto alert you that the appliance requires a restart. Before youenable this option, it is recommended that you first suspendor cancel all jobs.
Enable SANClient Fibre Transport on theMediaServer (use FT for backups to this appliance)
■ 2 target port Fibre Channel connection■ 4 target port Fibre Channel connection
267Understanding the NetBackup appliance settingsSettings > Network
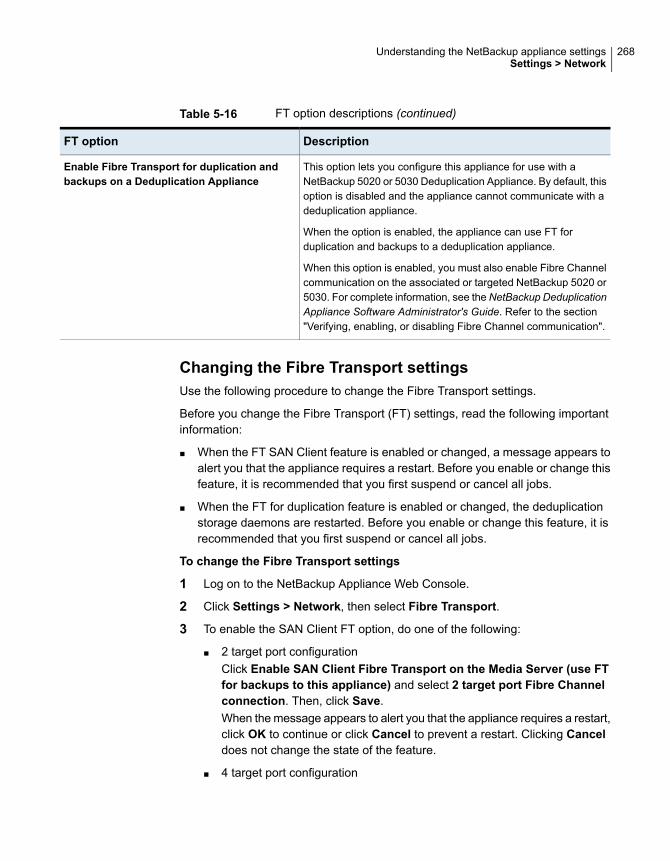
Table 5-16 FT option descriptions (continued)
DescriptionFT option
This option lets you configure this appliance for use with aNetBackup 5020 or 5030 Deduplication Appliance. By default, thisoption is disabled and the appliance cannot communicate with adeduplication appliance.
When the option is enabled, the appliance can use FT forduplication and backups to a deduplication appliance.
When this option is enabled, you must also enable Fibre Channelcommunication on the associated or targeted NetBackup 5020 or5030. For complete information, see the NetBackup DeduplicationAppliance Software Administrator's Guide. Refer to the section"Verifying, enabling, or disabling Fibre Channel communication".
Enable Fibre Transport for duplication andbackups on a Deduplication Appliance
Changing the Fibre Transport settingsUse the following procedure to change the Fibre Transport settings.
Before you change the Fibre Transport (FT) settings, read the following importantinformation:
■ When the FT SAN Client feature is enabled or changed, a message appears toalert you that the appliance requires a restart. Before you enable or change thisfeature, it is recommended that you first suspend or cancel all jobs.
■ When the FT for duplication feature is enabled or changed, the deduplicationstorage daemons are restarted. Before you enable or change this feature, it isrecommended that you first suspend or cancel all jobs.
To change the Fibre Transport settings
1 Log on to the NetBackup Appliance Web Console.
2 Click Settings > Network, then select Fibre Transport.
3 To enable the SAN Client FT option, do one of the following:
■ 2 target port configurationClick Enable SAN Client Fibre Transport on the Media Server (use FTfor backups to this appliance) and select 2 target port Fibre Channelconnection. Then, click Save.When the message appears to alert you that the appliance requires a restart,click OK to continue or click Cancel to prevent a restart. Clicking Canceldoes not change the state of the feature.
■ 4 target port configuration
268Understanding the NetBackup appliance settingsSettings > Network

Click Enable SAN Client Fibre Transport on the Media Server (use FTfor backups to this appliance) and select 4 target port Fibre Channelconnection. Then, click Save.When the message appears to alert you that the appliance requires a restart,click OK to continue or click Cancel to prevent a restart. Clicking Canceldoes not change the state of the feature.
4 To enable FT for duplication and backups to a NetBackup 5020 or 5030, clickEnable the Fibre Transport to a Deduplication appliance (for duplicationor backups). Then, click Save.
Note: To use this feature with a NetBackup Deduplication Appliance, you mustalso enable Fibre Channel communication on the associated NetBackup 5020or 5030. For complete information, see theNetBackup Deduplication ApplianceSoftware Administrator's Guide. Refer to the section "Verifying, enabling, ordisabling Fibre Channel communication".
5 To disable either one of the FT options, deselect the option to clear the checkmark. Then, click Save.
If you selected to disable the FT SAN Client feature, an alert appears to informyou that the appliance requires a restart. Click OK to continue or click Cancelto prevent a restart. Clicking Cancel does not change the state of the feature.
If you selected to disable the FT for duplication feature, an alert appears toinform you that the deduplication storage daemons require a restart. Click OKto continue or click Cancel to prevent a restart. Clicking Cancel does notchange the state of the feature.
6 After the appliance has been restarted, verify the FT settings that you selectedas follows:
■ Log on to the NetBackup Appliance Web Console.
■ Click Settings > Network, then select Fibre Transport.
■ Verify that the settings are correct.
See “Settings > Network > Fibre Transport” on page 266.
Settings > Network > HostThe Settings > Network > Host tab enables you to configure the DNS configurationsettings for DNS systems and the Host Name Resolution settings for non-DNSsystems.
The Settings > Network > Host tab displays the Host name of your appliance.
269Understanding the NetBackup appliance settingsSettings > Network

Note: The host name can only be set during an initial configuration session. Afterthe initial configuration has completed successfully, you can re-enter initialconfiguration by performing a factory reset on the appliance.
See “About NetBackup appliance factory reset” on page 149.
The remaining part of the Settings > Network > Host tab is divided into the followingtwo sections:
■ Domain Name System displays the fields for entering DNS configuration details.
■ Host Name Resolution displays the fields for configuring systems that use thehost name (non-DNS) details.
Changing DNS and Host Name Resolution (non-DNS)configuration settingsUse the following procedure to change or add the DNS and Host Name Resolution(non-DNS) configuration settings.
To change the DNS configuration settings
1 Log on to the NetBackup Appliance Web Console.
2 Click Settings > Network > Host tab.
3 Enter the appropriate information in the DNS data entry fields as follows:
DescriptionFields
Enter the IP address of the DNS server. To enter multiple DNSserver names, use a comma character as the delimiter betweeneach name.
The address can be either IPv4 or IPv6. Only global-scope andunique-local IPv6 addresses are allowed.
See “About IPv4-IPv6-based network support” on page 271.
DNS IPAddress(es)
Enter the suffix name of the DNS server.Domain NameSuffix
You can enter one or more DNS search domain names to searchwhen an unqualified host name is given. To enter multiple searchdomain names, use a comma character as the delimiter betweeneach name.
SearchDomain(s)
4 Click Save.
270Understanding the NetBackup appliance settingsSettings > Network

To change the Host Name Resolution (non-DNS) configuration settings
1 Log on to the NetBackup Appliance Web Console.
2 Click Settings > Network > Host tab.
3 Enter theHost Name Resolution configuration information using the followingfields:
DescriptionFields
Enter the IP address of the appliance.
The address can be either IPv4 or IPv6. Only global-scope andunique-local IPv6 addresses are allowed.
See “About IPv4-IPv6-based network support” on page 271.
IP Address
Enter the Fully Qualified Host Name (FQHN) of the appliance.Fully qualified hostname
Enter the short name of the appliance.
After you enter all of the necessary information in these fields,you must click Add.
Short host name
4 Click Save.
About IPv4-IPv6-based network supportNetBackup appliances are supported on a dual stack IPv4-IPv6 network and cancommunicate with IPv6 clients for backups and restores. You can assign an IPv6address to an appliance, configure DNS, and configure routing to include IPv6based systems.
Either the NetBackup Appliance Web Console or the NetBackup Appliance ShellMenu can be used to enter the IPv4 and IPv6 address information.
Review the following considerations for IPv6 addresses:
■ NetBackup appliances do not support a pure IPv6 network. An IPv4 addressmust be configured for the appliance, otherwise the initial configuration (whichrequires the command hostname set) is not successful. For this command towork, at least one IPv4 address is required.For example, suppose that you want to set the hostname of a specific host tov46. To do that, first make sure that the specific host has at least one IPv4address and then run the following command:Main_Menu > Network > Hostname set v46
271Understanding the NetBackup appliance settingsSettings > Network

■ Only global addresses can be used, not addresses with link-local or node-localscope. Global-scope and unique-local addresses are both treated as globaladdresses by the host.Global-scope IP addresses refer to the addresses that are globally routable.Unique-local addresses are treated as global.
■ You cannot use both an IPv4 and an IPv6 address in the same command. Forexample, you cannot use Configure 9ffe::9 255.255.255.0 1.1.1.1. Youshould use Configure 9ffe::46 64 9ffe::49 eth1.
■ Embedding the IPv4 address within an IPv6 address is not supported. Forexample, you cannot use an address like 9ffe::10.23.1.5.
■ You can add an appliance media server to the master server if the IPv6 addressand the host name of the appliance media server are available.For example, to add an appliance media server to the master server, enter theIPv6 address of the appliance media server as follows:Example:Main > Network > Hosts add 9ffe::45 v45 v45
Main > Appliance > Add v45 <password>
You do not need to provide the IPv4 address of the appliance media server.
■ A pure IPv6 client is supported in the same way as in NetBackup.
■ You can enter only one IPv4 address for a network interface card (NIC) or bond.However, you can enter multiple IPv6 addresses for a NIC or bond.
■ Network File System (NFS) or Common Internet File System (CIFS) protocolsare supported over an IPv4 network on appliance. NFS or CIFS are not supportedon IPv6 networks.
■ The NetBackup client can now communicate with the media server applianceover IPv6.
■ The Main_Menu > Network > Hosts command supports multiple IPv6 addressesto be assigned to the same host name having one network interface card (NIC).However, only one IPv4 address can be assigned to a specific host name havingone NIC using this command.
■ You can add an IPv6 address of a network interface without specifying a gatewayaddress.For more details, see the NetBackup Appliance Command Reference Guide.
Settings > Date and TimeOn the Settings > Date and Time page, you can change the date, the time, andthe time zone parameters that are added at the time of initial configuration.
272Understanding the NetBackup appliance settingsSettings > Date and Time

Use the following procedure to change the date and time settings post-configuration.
To change the date, the time, and the time zone configuration
1 Log on to the NetBackup Appliance Web Console.
2 Click Settings > Date and Time.
3 Enter the appropriate information in the fields:
To assign a time zone to the appliance, click on the Timezone drop-down box and select the appropriate region,country, and time zone.
Select Time Zone
You can select any one of the following options to set thedate and the time for the appliance.
■ Use NTP server date and time settings - Use this optionto synchronize the appliance with an NTP server. In theServer IP or Host name field, specify the IP address orthe host name of the NTP server
■ Specify date and time - Use this option to manuallyspecify the date and time. In the Date field, click thecalendar to select the appropriate date (in month, date,and year or the mm/dd/yyyy format). In the Time field,enter the time in hh:mm:ss format.
Set Date and Time
4 Click Save.
You can also configure the Date and Time settings using the Main > Network
> Date commands under the NetBackup Appliance Shell Menu. For moreinformation on the Date command refer to the NetBackup Appliance CommandReference Guide.
Settings > AuthenticationThe NetBackup appliance provides you authentication and authorization functionsto help provide controlled user access to various administration interfaces. You canmanage users both by GUI and NetBackup CLI.
■ The Authentication feature lets you configure the appliance to authenticatevarious types of users so that they can access and manage the appliance.
■ TheAuthorization feature lets you grant various types of users and user groupswith specific access privileges on the NetBackup appliance. See “Settings >Authentication > User Management” on page 294.
273Understanding the NetBackup appliance settingsSettings > Authentication

For more information about the Authentication and Authorization commands,refer to the NetBackup Appliance Command Reference Guide.
About configuring user authenticationTable 5-17 describes the options that are provided in the NetBackup ApplianceWeb Console and NetBackup Appliance Shell Menu for configuring the applianceto authenticate various types of users and grant them access privileges.
Table 5-17 User authentication management
NetBackup Appliance Shell MenuNetBackup Appliance Web ConsoleUser type
The following commands and options areavailable under Settings > Security >
Authentication > LocalUser:
■ Clean - Delete all of the local users.■ List - List all of the local users that have
been added to the appliance.■ Password - Change the password of a local
user.■ Users - Add or remove one or more local
users.
Use the Settings > Authentication > UserManagement tab in the NetBackup ApplianceWeb Console to add local users.
See “About authorizing NetBackup applianceusers” on page 277.
Local (native user)
274Understanding the NetBackup appliance settingsSettings > Authentication
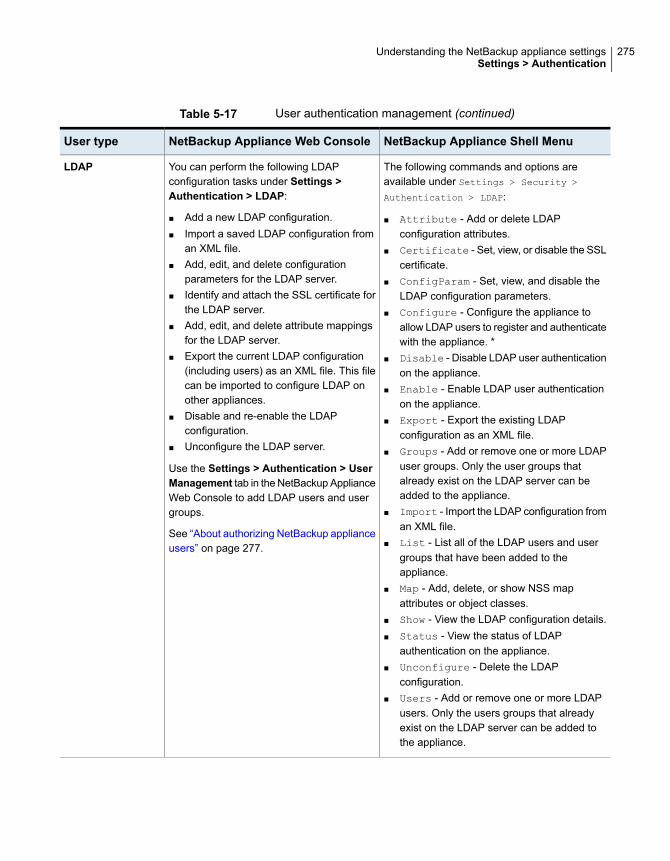
Table 5-17 User authentication management (continued)
NetBackup Appliance Shell MenuNetBackup Appliance Web ConsoleUser type
The following commands and options areavailable under Settings > Security >
Authentication > LDAP:
■ Attribute - Add or delete LDAPconfiguration attributes.
■ Certificate - Set, view, or disable the SSLcertificate.
■ ConfigParam - Set, view, and disable theLDAP configuration parameters.
■ Configure - Configure the appliance toallow LDAP users to register and authenticatewith the appliance. *
■ Disable - Disable LDAP user authenticationon the appliance.
■ Enable - Enable LDAP user authenticationon the appliance.
■ Export - Export the existing LDAPconfiguration as an XML file.
■ Groups - Add or remove one or more LDAPuser groups. Only the user groups thatalready exist on the LDAP server can beadded to the appliance.
■ Import - Import the LDAP configuration froman XML file.
■ List - List all of the LDAP users and usergroups that have been added to theappliance.
■ Map - Add, delete, or show NSS mapattributes or object classes.
■ Show - View the LDAP configuration details.■ Status - View the status of LDAP
authentication on the appliance.■ Unconfigure - Delete the LDAP
configuration.■ Users - Add or remove one or more LDAP
users. Only the users groups that alreadyexist on the LDAP server can be added tothe appliance.
You can perform the following LDAPconfiguration tasks under Settings >Authentication > LDAP:
■ Add a new LDAP configuration.■ Import a saved LDAP configuration from
an XML file.■ Add, edit, and delete configuration
parameters for the LDAP server.■ Identify and attach the SSL certificate for
the LDAP server.■ Add, edit, and delete attribute mappings
for the LDAP server.■ Export the current LDAP configuration
(including users) as an XML file. This filecan be imported to configure LDAP onother appliances.
■ Disable and re-enable the LDAPconfiguration.
■ Unconfigure the LDAP server.
Use the Settings > Authentication > UserManagement tab in the NetBackup ApplianceWeb Console to add LDAP users and usergroups.
See “About authorizing NetBackup applianceusers” on page 277.
LDAP
275Understanding the NetBackup appliance settingsSettings > Authentication

Table 5-17 User authentication management (continued)
NetBackup Appliance Shell MenuNetBackup Appliance Web ConsoleUser type
The following commands and options areavailable under Settings > Security >
Authentication > ActiveDirectory:
■ Configure - Configure the appliance toallow AD users to register and authenticatewith the appliance.
■ Groups - Add or remove one or more ADuser groups. Only the user groups thatalready exist on the AD server can be addedto the appliance.
■ List - List all of the AD users and usergroups that have been added to theappliance.
■ Status - View the status of ADauthentication on the appliance.
■ Unconfigure - Delete the AD configuration.■ Users - Add or remove one or more AD
users. Only the users that already exist onthe AD server can be added to the appliance.
You can perform the following ADconfiguration tasks under Settings >Authentication > Active Directory:
■ Configure a new Active Directoryconfiguration.
■ Unconfigure an existing Active Directoryconfiguration.
Use the Settings > Authentication > UserManagement tab in the NetBackup ApplianceWeb Console to add Active Directory usersand user groups.
See “About authorizing NetBackup applianceusers” on page 277.
Active Directory
The following commands and options areavailable under Settings > Security >
Authentication > Kerberos:
■ Configure - Configure the appliance toallow NIS users to register and authenticatewith the appliance.
■ Groups - Add or remove one or more NISuser groups. Only the user groups thatalready exist on the NIS server can be addedto the appliance.
■ List - List all of the NIS users and usergroups that have been added to theappliance.
■ Status - View the status of NIS andKerberos authentication on the appliance.
■ Unconfigure - Delete the NIS and Kerberosconfiguration.
■ Users - Add or remove one or more NISusers. Only the users that already exist onthe NIS server can be added to the appliance.
You can perform the following Kerberos-NISconfiguration tasks under Settings >Authentication > Kerberos-NIS :
■ Configure a new Kerberos-NISconfiguration.
■ Unconfigure an existing Kerberos-NISconfiguration.
Use the Settings > Authentication > UserManagement tab in the NetBackup ApplianceWeb Console to add Kerberos-NIS users anduser groups.
See “About authorizing NetBackup applianceusers” on page 277.
Kerberos-NIS
276Understanding the NetBackup appliance settingsSettings > Authentication
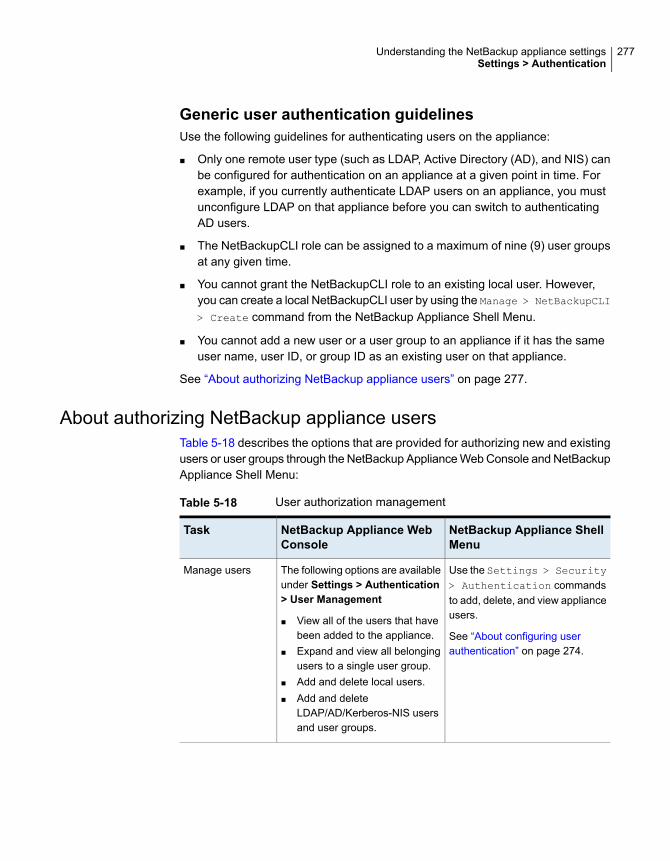
Generic user authentication guidelinesUse the following guidelines for authenticating users on the appliance:
■ Only one remote user type (such as LDAP, Active Directory (AD), and NIS) canbe configured for authentication on an appliance at a given point in time. Forexample, if you currently authenticate LDAP users on an appliance, you mustunconfigure LDAP on that appliance before you can switch to authenticatingAD users.
■ The NetBackupCLI role can be assigned to a maximum of nine (9) user groupsat any given time.
■ You cannot grant the NetBackupCLI role to an existing local user. However,you can create a local NetBackupCLI user by using the Manage > NetBackupCLI
> Create command from the NetBackup Appliance Shell Menu.
■ You cannot add a new user or a user group to an appliance if it has the sameuser name, user ID, or group ID as an existing user on that appliance.
See “About authorizing NetBackup appliance users” on page 277.
About authorizing NetBackup appliance usersTable 5-18 describes the options that are provided for authorizing new and existingusers or user groups through the NetBackup Appliance Web Console and NetBackupAppliance Shell Menu:
Table 5-18 User authorization management
NetBackup Appliance ShellMenu
NetBackup Appliance WebConsole
Task
Use the Settings > Security> Authentication commandsto add, delete, and view applianceusers.
See “About configuring userauthentication” on page 274.
The following options are availableunder Settings > Authentication> User Management
■ View all of the users that havebeen added to the appliance.
■ Expand and view all belongingusers to a single user group.
■ Add and delete local users.■ Add and delete
LDAP/AD/Kerberos-NIS usersand user groups.
Manage users
277Understanding the NetBackup appliance settingsSettings > Authentication

Table 5-18 User authorization management (continued)
NetBackup Appliance ShellMenu
NetBackup Appliance WebConsole
Task
The following commands andoptions are available under Main> Settings > Security >
Authorization:
■ Grant
Grant the Administrator andNetBackupCLI roles to specificusers and users groups thathave been added to theappliance.
■ List
List all of the users and usergroups that have been addedto the appliance, along withtheir designated roles.
■ Revoke
Revoke the Administrator andNetBackupCLI roles fromspecific users and usersgroups that have been addedto the appliance.
■ SyncGroupMembers
Synchronize members ofregistered user groups.
The following options are availableunder Settings > Authentication> User Management:
■ Grant and revoke theAdministrator role for users anduser groups.
■ Grant and revoke theNetBackupCLI role for usersand user groups.
■ Synchronize members ofregistered user groups withAdministrator role.
Manage userpermissions (roles)
Notes about user management■ You cannot grant the NetBackupCLI role to an existing local user. However,
you can create a local NetBackupCLI user by using the Manage > NetBackupCLI
> Create command from theNetBackup Appliance Shell Menu.
■ The NetBackupCLI role can be assigned to a maximum of nine (9) user groupsat any given time.
■ Active Directory (AD) user groups and user names support the use of a hyphencharacter in those names. The hyphen must appear between the first and thelast character of a user name or a user group name. AD user names and usergroup names cannot begin or end with a hyphen.
278Understanding the NetBackup appliance settingsSettings > Authentication

■ You can list all users of a group that has maximum to 2000 users fromtheNetBackup Appliance Web Console. To list all of a group that has more than2000 users, use the List command from theNetBackup Appliance Shell Menu.
NetBackup appliance user role privilegesUser roles determine the access privileges that a user is granted to operate thesystem or to change the system configuration. The user roles that are described inthis topic are specific to LDAP, Active Directory (AD), and NIS users.
The following describes the appliance user roles and their associated privileges:
Table 5-19 User roles and privileges
PrivilegesUser role
Users can only access the NetBackup CLI.NetBackupCLI
Users can access the following:
■ NetBackup Appliance Web Console■ NetBackup Appliance Shell Menu■ NetBackup Administration Console
Administrator
A role can be applied to an individual user, or it can be applied to a group thatincludes multiple users.
A user cannot be granted privileges to both user roles. However, a NetBackupCLIuser can also be granted access to the NetBackup Appliance Shell Menu in thefollowing scenarios:
■ The user with the NetBackupCLI role is also in a group that is assigned theAdministrator role.
■ The user with the Administrator role is also in a group that is assigned theNetBackupCLI role.
Note: When granting a user to have privileges to the NetBackupCLI and theNetBackup Appliance Shell Menu, an extra step is required. The user must enterthe switch2admin command from the NetBackup CLI to access the NetBackupAppliance Shell Menu.
Granting privileges to users and user groups can be done as follows:
■ From the NetBackup Appliance Web Console, on theSettings > Authentication> User Management page, click on the Grant Permissions link.
279Understanding the NetBackup appliance settingsSettings > Authentication

■ From the NetBackup Appliance Shell Menu, use the following commands in theSettings > Security > Authorization view:Grant Administrator Group
Grant Administrator Users
Grant NetBackupCLI Group
Grant NetBackupCLI Users
See “About configuring user authentication” on page 274.
See “About authorizing NetBackup appliance users” on page 277.
Settings > AuthenticationThe NetBackup appliance uses the built-in Pluggable Authentication Module (PAM)plug-in to support various authentication methods. The following directory serviceusers can be configured and registered to log on to the appliance:
■ Lightweight Directory Access Protocol (LDAP)
■ Active Directory (AD)
■ Kerberos-Network Information Service (Kerberos-NIS)
Settings > Authentication > LDAPYou can use the Settings > Authentication page of the NetBackup Appliance WebConsole to configure the appliance to use LDAP server as a directory source toaccess user information and authenticate the users and user groups to access theappliance. But, only one authentication type can be configured in this appliance atone time. You can also import or export the LDAP configuration settings betweenmultiple appliances.
Prerequisites
■ You must have NetBackup Appliance 2.6 or higher installed to configure LDAPuser authentication.
■ LDAP schema must be RFC 2307 or RFC 2307bis compliant.
■ The following firewall ports must be open:
■ LDAP 389
■ LDAP OVER SSL/TLS 636
■ HTTPS 443
■ Ensure that the LDAP server is available and is set up with the users and usergroups that you want to register with the appliance.
280Understanding the NetBackup appliance settingsSettings > Authentication
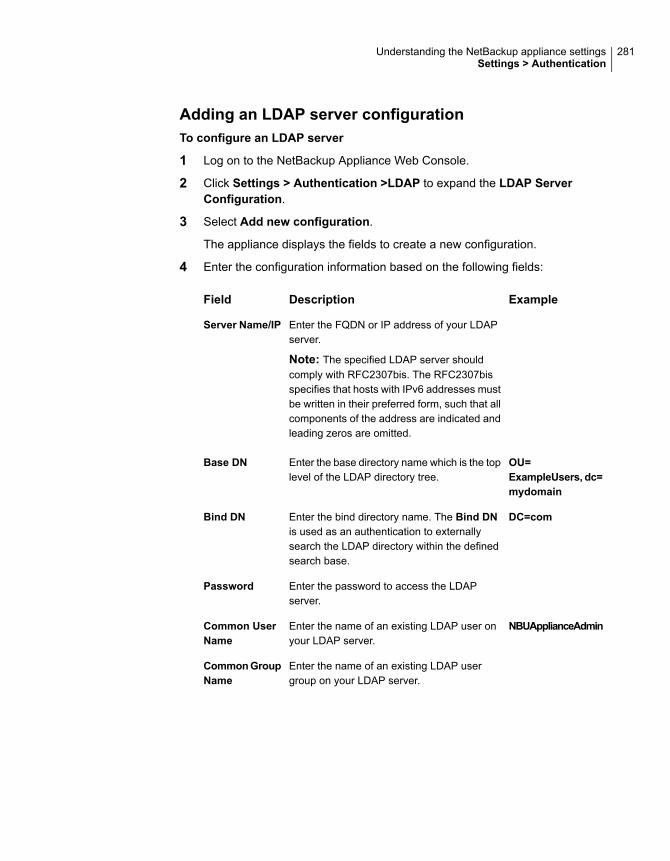
Adding an LDAP server configurationTo configure an LDAP server
1 Log on to the NetBackup Appliance Web Console.
2 Click Settings > Authentication >LDAP to expand the LDAP ServerConfiguration.
3 Select Add new configuration.
The appliance displays the fields to create a new configuration.
4 Enter the configuration information based on the following fields:
ExampleDescriptionField
Enter the FQDN or IP address of your LDAPserver.
Note: The specified LDAP server shouldcomply with RFC2307bis. The RFC2307bisspecifies that hosts with IPv6 addresses mustbe written in their preferred form, such that allcomponents of the address are indicated andleading zeros are omitted.
Server Name/IP
OU=ExampleUsers, dc=mydomain
Enter the base directory name which is the toplevel of the LDAP directory tree.
Base DN
DC=comEnter the bind directory name. The Bind DNis used as an authentication to externallysearch the LDAP directory within the definedsearch base.
Bind DN
Enter the password to access the LDAPserver.
Password
NBUApplianceAdminEnter the name of an existing LDAP user onyour LDAP server.
Common UserName
Enter the name of an existing LDAP usergroup on your LDAP server.
CommonGroupName
281Understanding the NetBackup appliance settingsSettings > Authentication
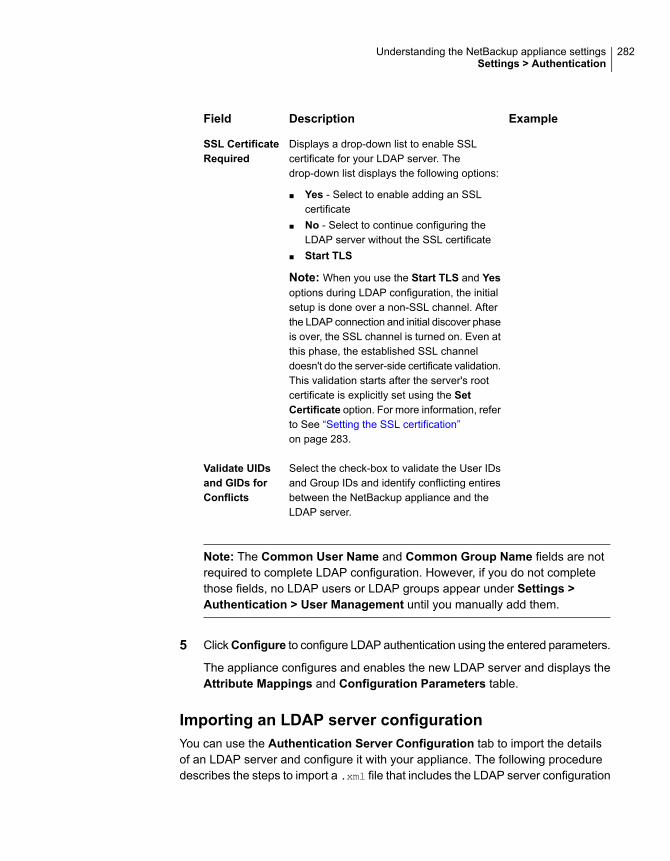
ExampleDescriptionField
Displays a drop-down list to enable SSLcertificate for your LDAP server. Thedrop-down list displays the following options:
■ Yes - Select to enable adding an SSLcertificate
■ No - Select to continue configuring theLDAP server without the SSL certificate
■ Start TLS
Note: When you use the Start TLS and Yesoptions during LDAP configuration, the initialsetup is done over a non-SSL channel. Afterthe LDAP connection and initial discover phaseis over, the SSL channel is turned on. Even atthis phase, the established SSL channeldoesn't do the server-side certificate validation.This validation starts after the server's rootcertificate is explicitly set using the SetCertificate option. For more information, referto See “Setting the SSL certification”on page 283.
SSL CertificateRequired
Select the check-box to validate the User IDsand Group IDs and identify conflicting entiresbetween the NetBackup appliance and theLDAP server.
Validate UIDsand GIDs forConflicts
Note: The Common User Name and Common Group Name fields are notrequired to complete LDAP configuration. However, if you do not completethose fields, no LDAP users or LDAP groups appear under Settings >Authentication > User Management until you manually add them.
5 ClickConfigure to configure LDAP authentication using the entered parameters.
The appliance configures and enables the new LDAP server and displays theAttribute Mappings and Configuration Parameters table.
Importing an LDAP server configurationYou can use the Authentication Server Configuration tab to import the detailsof an LDAP server and configure it with your appliance. The following proceduredescribes the steps to import a .xml file that includes the LDAP server configuration
282Understanding the NetBackup appliance settingsSettings > Authentication
details. The NetBackup appliance configures and connects to the LDAP serverusing these details.
Note: The .xml file must be saved and made available in the/inst/patch/incoming directory on the appliance.
To import an LDAP server configuration
1 Log on to the NetBackup Appliance Web Console.
2 Click Settings > Authentication >LDAP to expand the LDAP ServerConfiguration.
3 Select the Import existing configuration option.
The appliance displays the File Name field.
4 Enter the absolute path to the .xml file in the File Name field.
The .xml file must be saved and made available in the /inst/patch/incoming
directory on the appliance.
5 Click Import.
The appliance imports the .xml file. The appliance configures and connectsto the LDAP server using the XML details.
Setting the SSL certificationYou can use the Authentication Server Configuration tab to import and set theSSL certificate for your LDAP server. The following procedure describes the stepsto set the SSL certification for your LDAP server.
Note: The Set SSL certificate option is enabled only after the LDAP server isconfigured. The SSL certificate must be saved and made available in the/inst/patch/incoming directory on the appliance.
To set the SSL certificate
1 Log on to the NetBackup Appliance Web Console.
2 Click Settings > Authentication.
The appliance displays the Authentication Server Configuration tab withthe details of the configured LDAP server.
283Understanding the NetBackup appliance settingsSettings > Authentication

3 Click on the Set Certificate option that is displayed at the end of the tab.
The appliance displays a pop-up box to enter the path to the SSL certificate.
Note: The LDAP validation starts only after the server's root certificate isexplicitly set using the Set Certificate option.
4 Enter the absolute path to the SSL certificate file in the File Path field.
The SSL certificate must be saved and made available in the/inst/patch/incoming directory on the appliance.
5 Click OK.
The appliance imports the SSL certificate and is used to authenticate the LDAPServer.
Exporting an LDAP configurationYou can use the Authentication Server Configuration tab to export the currentLDAP configuration to an XML file. This file can be used to save the LDAP serverconfiguration details and export them to other appliances. The following proceduredescribes the steps to export the configuration details of your LDAP server into a.xml file.
Note: The Export option is enabled only after the LDAP server is configured.
To export the configuration file
1 Log on to the NetBackup Appliance Web Console.
2 Click Settings > Authentication.
The appliance displays the Authentication Server Configuration tab withthe details of the configured LDAP server.
3 Click on the Export option that is displayed at the end of the tab.
The appliance displays a pop box to enter the path for exporting the .xml file.
4 Enter a name for the .xml file.
You can only save the .xml file to the /inst/patch/incoming directory on theappliance.
5 Click OK.
The appliance converts the configuration details into an .xml file and exportsit to the specified location.
284Understanding the NetBackup appliance settingsSettings > Authentication

Unconfiguring LDAP user authenticationYou can use the Authentication Server Configuration tab to unconfigure LDAPuser authentication. The following procedure describes the steps to unconfigurethe LDAP server configuration.
Note: Before you unconfigure the LDAP server, you must revoke the roles from allof the LDAP users that have been added to the appliance. Otherwise the operationfails.
Warning:Unconfiguring LDAP user authentication disables and deletes the currentLDAP configuration. The LDAP users are deleted from the appliance, but not fromthe LDAP server.
To unconfigure an LDAP server
1 Log on to the NetBackup Appliance Web Console.
2 Click Settings > Authentication.
The appliance displays the Authentication Server Configuration tab withthe details of the configured LDAP server.
3 Click on the Unconfigure option that is displayed at the end of the tab.
The appliance displays the following message:
Do you want to unconfigure the LDAP server?
4 Click OK to continue unconfiguring the LDAP server.
The appliance deletes the LDAP settings.
Enabling the LDAP server configurationYou can use the Authentication Server Configuration tab to enable the disabledLDAP configuration. The following procedure describes the options to enable theLDAP configuration for user authentication.
Note: When you first configure the LDAP server, it is enabled by default.
285Understanding the NetBackup appliance settingsSettings > Authentication
To enable the configured server
1 Log on to the NetBackup Appliance Web Console.
2 Click Settings > Authentication.
The appliance displays the Authentication Server Configuration tab withthe details of the configured LDAP server.
If the LDAP configuration is disabled, the following message is displayed onthe Server Configuration tab next to the Enable option:
LDAP authentication is disabled.
3 Click on the Enable option.
The appliance displays the following message:
Are you sure you want to enable the configuration?
4 Click OK to enable the LDAP configuration.
The appliance enables the LDAP Server.
Disabling the LDAP server configurationYou can use the Authentication Server Configuration tab to disable LDAPauthentication without unconfiguring it. The following procedure describes theoptions to disable LDAP user authentication.
To disable the configured server
1 Log on to the NetBackup Appliance Web Console.
2 Click Settings > Authentication.
The appliance displays the Authentication Server Configuration tab withthe details of the configured LDAP server.
If the LDAP configuration is enabled, the following message is displayed onthe Server Configuration tab next to the Disable option.
LDAP authentication is enabled.
286Understanding the NetBackup appliance settingsSettings > Authentication

3 Click on the Disable option.
The appliance displays the following message:
Are you sure you want to disable the LDAP server?
4 Click OK to disable the LDAP server.
The appliance disables the LDAP server.
Deleting LDAP configuration parametersWhen you configure LDAP user authentication, the server configuration parametersthat you added or imported are displayed in the Configuration Parameters tableon theAuthentication Server Configuration tab. The following procedure describesthe steps to delete LDAP configuration parameters.
To delete a configuration parameter
1 Log on to the NetBackup Appliance Web Console.
2 Click Settings > Authentication.
The appliance displays the Authentication Server Configuration tab withthe details of the configured LDAP server in the Configuration Parameterstable.
3 Select the configuration parameter you want to delete.
4 Click the Delete option that is displayed at the top of the ConfigurationParameters table.
The appliance displays the following message:
Are you sure you want to delete the configuration parameter?
5 Click Yes to proceed.
The deleted configuration parameter is removed from the ConfigurationParameters table.
Adding LDAP configuration parametersWhen you configure LDAP user authentication, the server configuration parametersthat you added or imported are displayed in the Configuration Parameters tableon theAuthentication Server Configuration tab. The following procedure describesthe steps to delete LDAP configuration parameters.
287Understanding the NetBackup appliance settingsSettings > Authentication

To add a configuration parameter
1 Log on to the NetBackup Appliance Web Console
2 Click Settings > Authentication.
The appliance displays the Authentication Server Configuration tab withthe details of the configured LDAP server in the Configuration Parameterstable.
3 Click the Add option that is displayed at the top of the ConfigurationParameters table.
The appliance displays a new row in theConfiguration Parameters table withthe Update and Cancel options.
4 Enter the name of the new configuration parameter in the Name field.
5 Enter the value of the configuration parameter in the Value field.
6 Click Update.
The new configuration parameter is added to the Configuration Parameterstable.
Adding an LDAP attribute mappingWhen you add a new LDAP configuration, its attribute mappings are added orimported and displayed in the Attribute Mappings table on the AuthenticationServer Configuration tab. The following procedure describes the steps to add anew attribute mapping to the LDAP server configuration.
To add an attribute mapping
1 Log on to the NetBackup Appliance Web Console.
2 Click Settings > Authentication.
The appliance displays the Authentication Server Configuration tab withthe details of the configured LDAP server in the Attribute Mappings table.
3 Click the Add option that is displayed at the top of the Attribute Mappingstable.
The appliance displays a new row in the Attribute Mappings table with theUpdate and Cancel options.
4 Enter the mapping type in the Map Type field.
5 Enter the NSS value in the NSS Value field.
288Understanding the NetBackup appliance settingsSettings > Authentication

6 Enter the LDAP value for the attribute in the LDAP Value field.
7 Click Update.
The new attribute mapping is added to the Attribute Mappings table.
Deleting an LDAP attribute mappingWhen you add a new LDAP configuration, its attribute mappings are added orimported and displayed in the Attribute Mappings table on the AuthenticationServer Configuration tab. The following procedure describes the steps to deletean attribute mapping from the LDAP server configuration.
To delete an attribute mapping
1 Log on to the NetBackup Appliance Web Console.
2 Click Settings > Authentication.
The appliance displays the Authentication Server Configuration tab withthe details of the configured LDAP server in the Attribute Mappings table.
3 Select the attribute mapping you want to delete in the Attribute Mappingstable.
4 Click the Delete option that is displayed at the top of the Attribute Mappingstable.
The appliance displays the following message:
Are you sure you want to delete the configuration parameter?
5 Click Yes to proceed.
The deleted attribute mapping is removed from the Attribute Mappings table.
Settings > Authentication > Active DirectoryYou can use the Settings > Authentication page of the NetBackup Appliance WebConsole to configure the appliance to use Active Directory (AD) server as a directorysource to access user information and authenticate the users and user groups toaccess the appliance. But, only one authentication type can be configured in thisappliance at one time.
Prerequisites
■ You must have NetBackup Appliance 2.6.0.3 or higher installed to configure ADuser authentication.
■ Ensure that the AD service is available and is set up with the users and usergroups that you want to register with the appliance.
289Understanding the NetBackup appliance settingsSettings > Authentication
■ Ensure that the authorized domain user credentials are used to configure theAD server with the appliance.
■ Configure the NetBackup appliance with a DNS server that can forward DNSrequests to an AD DNS server. Alternatively, configure the appliance to use theAD DNS server as the name service data source.
Adding an Active Directory server configurationYou can use the Authentication tab to add the details of an Active Directory (AD)server and configure it with your appliance. The Active Directory server enablesyou to access the directory information services for your appliance. The followingprocedure describes the steps to configure Active Directory user authentication.
To configure an Active Directory server
1 Log on to the NetBackup Appliance Web Console.
2 Click Settings > Authentication.
Three types of authentication server appear.
3 Click Active Directory to expend the Active Directory configuration list.
Note: Before you configure a new Active Directory authentication, verify theDNS of appliance directs to the Active Directory server or Active Directory DNSserver.
290Understanding the NetBackup appliance settingsSettings > Authentication

4 Enter the following parameters:
ExampleDescriptionField
10.200.210.229Enter the Active Directoryserver name or IP address.The recommended methodis to use the Fully QualifiedDomain Name (FQDN) forthe Active Directory server.
Server Name or IP
adminEnter the username of theAD server Administrator.
Username
P@ssw0rdEnter the password of theAD server Administrator..
Password
Note: Do not use space as the first character for the Server Name or IP,Username, and Password fields.
5 Click Configure to apply the Active Directory authentication parameters to theappliance.
You can check the authentication status when the configuration process iscomplete.
Unconfiguring the Active Directory user authenticationYou can stop authenticating the AD user from the appliance. The following proceduredescribes the steps to unconfigure the Active Directory server configuration.
Note: To unconfigure the Active Directory authentication from the appliance, youmust have the Administrator authority on the AD server.
Note: You must remove the roles of all Active Directory users and user groupsbefore the unconfigure process begins.
To unconfigure an Active Directory server
1 Log on to the NetBackup Appliance Web Console.
2 Click Settings > Authentication.
The details of the configured Active Directory server are displayed.
291Understanding the NetBackup appliance settingsSettings > Authentication

3 Enter the Username and Password of an administrator on Active Directoryserver.
4 Click Unconfigure.
A warning dialog box pops up.
5 Click Yes to continue with the unconfigure process.
Click No to cancel the unconfigure process.
Settings > Authentication > Kerberos-NISYou can use the Settings > Authentication page of the NetBackup Appliance WebConsole to configure the appliance to use NIS server as a directory source for usersand user groups to access the appliance. The appliance requires that NIS usersauthenticate using Kerberos.
Prerequisites
■ You must have NetBackup Appliance 2.6.1.1 or higher installed to configureKerberos-NIS user authentication.
■ Ensure that the NIS domain is available and is set up with the users and usergroups that you want to register with the appliance.
■ Ensure that the Kerberos server is available and properly configured tocommunicate with the NIS domain.
■ Due to the strict time requirements of Kerberos, Veritas strongly recommendsthat you use an NTP server to synchronize time between the appliance, the NISserver, and the Kerberos server.
Adding a Kerberos-NIS authentication configurationYou can use theAuthentication tab to add the details of a NIS server with Kerberosauthentication and configure it with your appliance. The Kerberos and NIS serversenable you to access the directory information services for your appliance. Thefollowing procedure describes the steps to configure Kerberos-NIS userauthentication.
To configure a Kerberos-NIS authentication
1 Log on to the NetBackup Appliance Web Console.
2 Click Settings > Authentication.
Three types of authentication server appear.
3 Click Kerberos-NIS to expand the Kerberos-NIS configuration list.
292Understanding the NetBackup appliance settingsSettings > Authentication
4 Enter the following parameters:
ExampleDescriptionField
BCFTNIS or10.200.38.222
Enter the NIS server name or IP address. Werecommend that you use the Fully QualifiedDomain Name(FQDN) for the NIS server.
NIS ServerName or IP
BCFTNISEnter the domain for the NIS server.NIS Domain
BCFTKBR or10.200.38.225
Enter the Kerberos server name or IP address.We recommend that you use the Fully QualifiedDomain Name(FQDN) for the NIS server.
KerberosServerName or IP
BCFTKBREnter the realm for the Kerberos server.KerberosRealm
BCFTEnter the domain for the Kerberos server.KerberosDomain
5 Click Configure to apply the Kerberos-NIS authentication using the enteredparameters.
The configured parameters display in the Configuration Parameters whenthe authentication configuration process is completed successfully.
Unconfiguring the Kerberos-NIS user authenticationYou can stop authenticating the Kerberos-NIS users from the appliance. Thefollowing procedure describes the steps to unconfigure the Kerberos-NIS serverauthentication.
Note: Make sure that you have deleted all Kerberos-NIS users and user groupsbefore the unconfigure process starts.
To unconfigure a Kerberos-NIS authentication
1 Log on to the NetBackup Appliance Web Console.
2 Click Settings > Authentication.
The Configuration Parameters table with the details of the configuredKerberos-NIS authentication shows in the Authentication ServerConfiguration tab.
293Understanding the NetBackup appliance settingsSettings > Authentication

3 Click Unconfigure.
A warning dialog box pops up.
4 Click Yes to apply the unconfigure process.
Click No to cancel the unconfigure process.
Settings > Authentication > User ManagementYou can use the Settings > Authentication > User Management page of theNetBackup Appliance Web Console to do the following tasks:
■ View all of the users that have been added to the appliance.
■ Expand and view all of the users belonging to a single user group.
■ Add and delete local users.
■ Add and delete LDAP users and user groups.
■ Grant Administrator user permissions to local, LDAP, AD, and Kerberos-NISusers.
■ Grant Administrator user permissions to LDAP, AD, and Kerberos-NIS usergroups.
■ Grant NetBackupCLI user permissions to LDAP, AD, and Kerberos-NIS users.
■ Grant NetBackupCLI user permissions to LDAP, AD, and Kerberos-NIS usergroups.
■ Revoke Administrator user permissions from local, LDAP, AD, and Kerberos-NISusers.
■ Revoke Administrator user permissions from LDAP, AD, and Kerberos-NIS usergroups.
■ Revoke NetBackupCLI user permissions from LDAP, AD, and Kerberos-NISusers.
■ Revoke NetBackupCLI user permissions from LDAP, AD, and Kerberos-NISuser groups.
■ Sync group members with the Administrator role.
Note: Kerberos-NIS users and user groups are displayed as Kerberos in the Typecolumn.
294Understanding the NetBackup appliance settingsSettings > Authentication

Adding appliance usersYou can use the User Management tab to add new users to the NetBackupappliance. The following procedure describes how to add new users.
To add new users
1 Log on to the NetBackup Appliance Web Console
2 Click the Settings > Authentication > User Management tab.
The appliance displays the User Management tab.
3 Click on the Add User option that is displayed at the end of the UserManagement tab.
The appliance displays the Add User pop-up dialog box.
4 Select the type of user from the User Type drop-down list. The drop-down listdisplays the following options depending on your configuration:
■ Local - Select this option to add a local user to the appliance database.
■ LDAP - Select this option to register a user that is already present on theLDAP server that you have configured with your appliance.
Note: If you do not register (add) a remote (LDAP, etc.) user with the appliance,that user cannot access the appliance.
5 Enter the name of the user in the User Name field.
Note: Do not use non-alphanumeric characters (special characters: !, $, #, %,etc.) for the User Name field.
6 If you selected a Local user type from the User Type drop-down list, enter apassword for the new user in the Password field. Valid passwords must includethe following:
■ Eight or more characters
■ At least one lowercase letter
■ At least one number (0-9)
Uppercase letters and special characters can be included, but they are notrequired.
The following describes password restrictions:
■ Dictionary words are considered weak passwords and are not accepted.
295Understanding the NetBackup appliance settingsSettings > Authentication
■ The last seven passwords cannot be reused, and the new password cannotbe similar to previous passwords.
You or the new user can change their password at a later time on the Settings> Password > Password Management page.
7 Reenter the password in the Confirm Password field.
8 Click Save.
The appliance adds the new user and displays the following message:
User added successfully.
9 Click OK to continue.
The new user is added to the list of users on the User Management tab.
Deleting appliance usersAs a matter of best practice, you should delete a registered user or user group fromthe NetBackup appliance before deleting it from the LDAP server, Active Directory(AD) server, or NIS server. If a user is removed from the remote directory first (andnot removed from appliance), the user is listed as an authorized user but can't logon.
You can use the User Management tab to delete users from the NetBackupappliance. The following procedure describes how to delete existing users.
To delete existing users
1 Log on to the NetBackup Appliance Web Console.
2 Click the Settings > Authentication > User Management tab.
The appliance displays the User Management tab.
3 Select the user that you want to delete.
4 Click on the Delete User option that is displayed at the end of the UserManagement tab.
The appliance displays the following message:
User Deleted Successfully
5 Click OK to continue.
The selected user is deleted from the appliance and removed from the UserManagement tab.
296Understanding the NetBackup appliance settingsSettings > Authentication

Adding appliance user groupsYou can use the User Management tab to add new user groups to the NetBackupappliance from a registered directory service, such as LDAP. The following proceduredescribes how to add new user groups.
To add user group
1 Log on to the NetBackup Appliance Web Console.
2 Click the Settings > Authentication > User Management tab.
The appliance displays the User Management tab.
3 Click on the Add Group option that is displayed at the end of the UserManagement tab.
The appliance displays the Add Group pop-up dialog box.
4 Enter the name of the user group in the Group Name field.
Note: If you do not register (add) a remote (LDAP, etc.) user group with theappliance, the users belonging to that user group cannot access the appliance.
5 Click Save.
The appliance adds the new user group and displays the following message:
Group Added Successfully
6 Click OK to continue.
The user group is added to the list of users and user groups on the UserManagement tab.
Deleting appliance user groupsAs a matter of best practice, you should delete a registered user or user group fromthe NetBackup appliance before deleting it from the LDAP server, Active Directory(AD) server, or NIS server. If a user is removed from the remote directory first (andnot removed from appliance), the user is listed as an authorized user but can't logon.
You can use the User Management tab to delete user groups from the NetBackupappliance. The following procedure describes how to delete existing user groups.
297Understanding the NetBackup appliance settingsSettings > Authentication

To delete user groups:
1 Log on to the NetBackup Appliance Web Console.
2 Click the Settings > Authentication > User Management tab.
The appliance displays the User Management tab.
3 Select the user group that you want to delete.
4 Click on the Delete Group option that is displayed at the end of the UserManagement tab.
5 Click OK to continue.
The appliance displays the following message:
Group Deleted Successfully
The selected user group is deleted from the appliance and removed from theUser Management tab.
Granting roles to users and user groupsYou can use the User Management tab to grant roles to appliance users and usergroups that grant them different types of permissions to access the appliance. Thefollowing procedure describes how to grant roles to existing users and user groups.
To grant administrative roles to users and user groups
1 Log on to the NetBackup Appliance Web Console.
2 Click the Settings > Authentication > User Management tab.
The appliance displays the User Management tab.
3 Select a user or user group that has NoRole displayed in the Role column.
4 Click on the Grant Permission option that is displayed at the end of the UserManagement tab.
Depending on your configuration, the appliance displays theGrant Permissionspop-up dialog box:
■ Select the Administrator option to grant the Administrator user role to theselected user or user group.
■ Select the NetBackupCLI option to grant the NetBackupCLI user role tothe selected user or user group.
298Understanding the NetBackup appliance settingsSettings > Authentication

Note: You cannot grant the NetBackupCLI role to an existing local user.However, you can create a local NetBackupCLI user by using the Manage
> NetBackupCLI > Create command from the NetBackup Appliance ShellMenu.
5 Click OK to continue.
The term Administrator or NetBackupCLI is displayed in the Role columnfor the selected user.
Revoking roles from users and user groupsYou can use the User Management tab to revoke roles from appliance users anduser groups to limit their permissions to access the appliance. The followingprocedure describes how to revoke roles from existing users and user groups.
To revoke roles
1 Log on to the NetBackup Appliance Web Console.
2 Click the Settings > Authentication > User Management tab.
The appliance displays the User Management tab.
3 Select a user or user group that has the Administrator or NetBackupCLI roledisplayed in the Role column.
4 Click on the Revoke Permission option that is displayed at the end of theUser Management tab.
5 Click OK to continue.
The appliance displays the following message:
User Un-authorized Successfully
The term NoRole is displayed in the Role column for the selected user or usergroup.
Synchronizing the user groupsYou can use the User Management tab to synchronize the user group members.The following procedure describes how to synchronize the user groups betweenthe appliance and the servers for LDAP, AD, and NIS.
Also you can schedule a sync start time by using the Settings > Security >
Authorization > SyncGroupMembers command in the NetBackup Appliance ShellMenu. For more information, refer to theNetBackup Appliance Command ReferenceGuide.
299Understanding the NetBackup appliance settingsSettings > Authentication

To sync the user groups
1 Log on to the NetBackup Appliance Web Console.
2 Click the Settings > Authentication > User Management tab.
The appliance displays the User Management tab.
3 Select a user group from the list.
4 Click on the Sync Group Members option that is displayed on the right topcorner of the User Management tab.
5 Click Sync to sync user group members immediately.
Settings > Password ManagementAfter the initial configuration, you can change the appliance user password fromthe Settings > Password > Password Management page.
Note: For maximum security, Veritas recommends that you set a regular schedulefor password changes and keep a record of all passwords in a secure location.
When the password is changed here, it is also updated for use with thecommand-line interface. If you change this password from the command-lineinterface, the new password is also used to log on to the appliance user interface.
Table 5-20 describes the data entry fields on the Password Management page.
Table 5-20 Data entry fields for administrator password change
DescriptionField
Enter your current user name.User Name
Enter the current password.
If the current password is the factory default password,enter P@ssw0rd.
Old Password
300Understanding the NetBackup appliance settingsSettings > Password Management

Table 5-20 Data entry fields for administrator password change (continued)
DescriptionField
Enter the new password.
Valid passwords must include the following:
■ Eight or more characters■ At least one lowercase letter■ At least one number (0-9)
Uppercase letters and special characters can beincluded, but they are not required.
The following describes password restrictions:
■ Dictionary words are considered weak passwordsand are not accepted.
■ The last seven passwords cannot be reused, andthe new password cannot be similar to previouspasswords.
New Password
Re-enter the new password for confirmation.Confirm New Password
Click this item to commit the password change.Reset Password
Click this item to remove the data from all fields and startover.
Clear Fields
You can also configure the Password settings using the Main > Settings >
Password commands under the shell menu. For more information refer to theNetBackup Appliance Command Reference Guide.
See “About modifying the appliance settings” on page 232.
301Understanding the NetBackup appliance settingsSettings > Password Management

TroubleshootingThis chapter includes the following topics:
■ Troubleshooting and tuning appliance from the Appliance Diagnostics Center
■ Viewing log files using the Support command
■ Where to find NetBackup appliance log files using the Browse command
■ About password recovery
■ About disaster recovery
■ Gathering device logs with the DataCollect command
■ Setting a NetBackup 5330 storage shelf component to the Service Allowedmode
Troubleshooting and tuning appliance from theAppliance Diagnostics Center
You can troubleshoot multiple failures and resolve issues in the NetBackup applianceby using some interactive self-repair wizards in the Appliance Diagnostics Center.Each wizard helps you perform specific diagnostic tasks. Some of the wizards alsoguide you through system optimization and tuning. These wizards can be accessedby clicking the Appliance Diagnostics Center icon on the NetBackup Appliance WebConsole. The icon is located on the upper-right corner of the NetBackup ApplianceWeb Console and looks like the following:
6Chapter

When you click this icon, the Appliance Diagnostics Center page appears whereyou can see the Available and the Running Wizard Jobs tab. You can return tothe NetBackup Appliance Web Console by closing this page.
All the troubleshooting wizards are listed under the Available tab.
Figure 6-1 shows a sample view of the Available tab.
Figure 6-1 Available tab
The Running Wizard Jobs tab lists the wizards that were started but are notcomplete yet. If you close a wizard without completing it (using the cross icon) orleave it unfinished, it is listed under theRunningWizard Jobs tab. You can resumeor delete these active wizards by clicking the respective icons from the Resume orDelete columns.
Figure 6-2 shows a sample view of the Running Wizard Jobs tab.
Figure 6-2 Running Wizard Jobs tab
You can do the following to run the wizards from the Available tab:
303TroubleshootingTroubleshooting and tuning appliance from the Appliance Diagnostics Center

Use this wizard to troubleshoot disk storage issues, tuning, andavailability. The wizard checks the storage partitions likeAdvancedDisk, etc., and does the following:
■ Checks if the storage paths are mounted. If they are not mounted,it provides an option for you to mount them.
■ Checks if the disk pool and disk volumes are up and running. Ifthey are not running, the wizard provides an option for you toreset them.
■ Checks if PureDisk services are up and running. If they are notrunning, the wizard helps to start these services.
Click Check DiskConfiguration
Use this wizard to collect log files from an Appliance.
The wizard lets you collect different types of log files like NetBackup,Appliance, operating system, PureDisk, GUI, NBSU (NetBackupSupport Utility), DataCollect etc. Note that it may take severalminutes to collect the NetBackup logs.
Table 6-1 lists details about the log files that are collected by thewizard.
You can choose to email the log files to recipients, download to yourcomputer, or upload them to Veritas Support.
Review the following points if you want to email the log files:
■ SMTP must be configured for emailing the logs. You canconfigure SMTP from Settings > Notification > AlertConfiguration in the NetBackup Appliance Web Console.
■ To email the logs, the collected log size must be 10 MB or less.
ClickCollect Log files
Use this wizard to perform a hardware health check of yourenvironment. The wizard helps you determine if hardwarecomponents like CPU, Disk, Fan, RAID, are working fine.
Click Perform ahardware healthcheck
Use this wizard to check the network connectivity of your Appliancewith the master server, media servers, storage servers, and clients.The wizard helps you to quickly test and diagnose network-relatedissues.
Click Test anddiagnose networkissues
Table 6-1 lists the log files that are collected by the Collect Log Files Wizard. Thelogs are collected based on the log type that you specify. If you are collectingNetBackup logs, you can also specify the time frame for which you want to collectthe logs.
304TroubleshootingTroubleshooting and tuning appliance from the Appliance Diagnostics Center

Table 6-1 Log files collected by the Collect Logs Wizard
What is collected?Log Type
Logs created by the NetBackup Copy Logs tool (nbcplogs). These includethe following:
■ NetBackup legacy logs■ NetBackup VxUL (Unified) logs■ NetBackup OpsCenter logs■ NetBackup PureDisk logs■ Windows Event logs (Application, System, Security)■ PBX logs■ NetBackup database logs■ NetBackup database error logs■ NetBackup database trylogs■ Vault session logs■ Volume Manager debug logs■ VxMS logs, if enabled
Note: The legacy logs and the VXlogs are collected based on the timeframe that you specify.
NetBackup
305TroubleshootingTroubleshooting and tuning appliance from the Appliance Diagnostics Center

Table 6-1 Log files collected by the Collect Logs Wizard (continued)
What is collected?Log Type
Appliance logs including upgrade, hardware, event logs and so on. Thefollowing Appliance logs are collected:
■ hostchange.log, selftest_report*■ Logs created by the CallhomeDataGather utility.■ config_nb_factory.log, iso_postinstall.log, sf.log■ patch_*, upgrade_* logs
■ NetBackup Appliance VxUL (Unified) logs, which include:■ All
■ CallHome
■ Checkpoint
■ Common
■ Config
■ Database
■ Hardware
■ HWMonitor
■ Network
■ RAID
■ Seeding
■ SelfTest
■ Storage
■ SWUpdate
■ Commands
■ CrossHost
■ Trace
Note: The NetBackup Appliance unified logs are not the same as theNetBackup unified logs, such as nbpem or nbjm. NetBackup Appliancehas its own set of unified logs. To collect the NetBackup unified logs,select NetBackup in the Collect Logs Wizard.
Appliance
Operating system logs that include the following:
■ boot.log
■ boot.msg
■ boot.omsg
■ messages
Operatingsystem
306TroubleshootingTroubleshooting and tuning appliance from the Appliance Diagnostics Center

Table 6-1 Log files collected by the Collect Logs Wizard (continued)
What is collected?Log Type
All logs related to Media Server Deduplication Pool (MSDP) are collectedunder the following directories:
<DIR> PD
■ /var/log/puredisk
■ /msdp/data/dp1/pdvol/log
Deduplication(Media ServerDeduplicationPool orPureDisk)
All logs related to NetBackup Appliance Web Console logs are collectedunder the following directories:
/log/webgui
NetBackupApplianceWeb Console
Diagnostic information about NetBackup and the operating system.NetBackupsupport utility(nbsu)
Hardware and storage device logs. The logs created by the DataCollectutility are collected.
DataCollect
Viewing log files using the Support commandYou can use the following section to view the log file information.
To view logs using the Support > Logs > Browse command:
1 Enter browse mode using the Main_Menu > Support > Logs followed by theBrowse command in the NetBackup Appliance Shell Menu. The LOGROOT/>
prompt appears.
2 To display the available log directories on your appliance, type ls at LOGROOT/>prompt.
3 To see the available log files in any of the log directories, use the cd commandto change directories to the log directory of your choice. The prompt changesto show the directory that you are in. For example, if you changed directoriesto the GUI directory, the prompt appears as LOGROOT/GUI/>. From that promptyou can use the ls command to display the available log files in the GUI logdirectory.
4 To view the files, use the less <FILE> or tail <FILE> command. Files aremarked with <FILE> and directories with <DIR>.
See “Where to find NetBackup appliance log files using the Browse command”on page 309.
307TroubleshootingViewing log files using the Support command

To view NetBackup Appliance unified (VxUL) logs using the Support > Logs
command:
1 You can view the NetBackup Appliance unified (VxUL) logs with the Support
> Logs > VXLogView command. Enter the command into the shell menu anduse one of the following options:
■ Logs VXLogView JobID job_id
Use to display debug information for a specific job ID.
■ Logs VXLogView Minutes minutes_ago
Use to display debug information for a specific timeframe.
■ Logs VXLogView Module module_name
Use to display debug information for a specific module.
2 If you want, you can copy the unified logs with the Main > Support > Share
Open command. Use the desktop to map, share, and copy the logs.
Note: The NetBackup Appliance unified logs are not the same as the NetBackupunified logs, such as nbpem or nbjm. NetBackup Appliance has its own set of unifiedlogs. To collect the NetBackup unified logs, use the Collect Logs Wizard and selectNetBackup.
See “Troubleshooting and tuning appliance from the Appliance Diagnostics Center”on page 302.
You can also use the Main_Menu > Support > Logs commands to do the following:
■ Upload the log files to Veritas Technical Support.
■ Set log levels.
■ Export or remove CIFS and NFS shares.
Note: The NetBackup Appliance VxUL logs are no longer archived by a cron job,or a scheduled task. In addition, log recycling has been enabled, and the defaultnumber of log files has been set to 50.
Refer to theNetBackup Appliance Command Reference Guide for more informationon the above commands.
308TroubleshootingViewing log files using the Support command
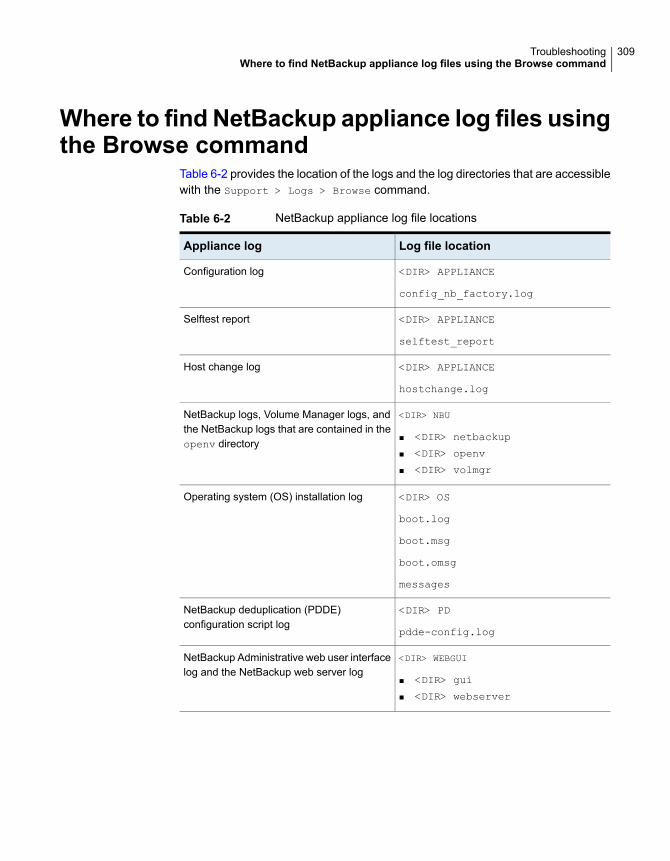
Where to find NetBackup appliance log files usingthe Browse command
Table 6-2 provides the location of the logs and the log directories that are accessiblewith the Support > Logs > Browse command.
Table 6-2 NetBackup appliance log file locations
Log file locationAppliance log
<DIR> APPLIANCE
config_nb_factory.log
Configuration log
<DIR> APPLIANCE
selftest_report
Selftest report
<DIR> APPLIANCE
hostchange.log
Host change log
<DIR> NBU
■ <DIR> netbackup
■ <DIR> openv
■ <DIR> volmgr
NetBackup logs, Volume Manager logs, andthe NetBackup logs that are contained in theopenv directory
<DIR> OS
boot.log
boot.msg
boot.omsg
messages
Operating system (OS) installation log
<DIR> PD
pdde-config.log
NetBackup deduplication (PDDE)configuration script log
<DIR> WEBGUI
■ <DIR> gui
■ <DIR> webserver
NetBackup Administrative web user interfacelog and the NetBackup web server log
309TroubleshootingWhere to find NetBackup appliance log files using the Browse command

Table 6-2 NetBackup appliance log file locations (continued)
Log file locationAppliance log
/tmp/DataCollect.zip
You can copy the DataCollect.zip toyour local folders using the Main >Support > Logs > Share Opencommand.
Device logs
About password recoveryVeritas understands that there may be situations where you need to recover youradministrator (admin) password. For example, an employee that maintains thepassword may leave the company, or you may lose or forget the password.
If any of these situations occur, refer to the following tech note on the Supportwebsite:
http://www.veritas.com/docs/TECH189518
About disaster recoveryNumerous situations can cause fatal conditions and result in the need for disasterrecovery. In a disaster recovery situation, it is critical to determine the cause of thedisaster and recover as much data from the appliance as possible. Therefore, beforeyou attempt to recover your appliance, contact Technical Support.
The environment that you have configured around your appliance plays an importantrole on the level of recovery you can achieve. An environment that consists of astandalone primary (master server) appliance offers the least amount of recoverysolutions. A failure that is severe enough to bring your appliance down, may meanthat it is impossible to recover the data on the system. Veritas support engineerswork with you to determine whether they can recover your appliance. If yourappliance is not recoverable, then Support may suggest that you rebuild yourappliance. If that option is not feasible, then you may need to replace your appliancecompletely.
However, an appliance that is configured with one or more secondary appliances,or configured with a tape storage unit, there is a much better chance that its datacan be recovered.
You can also configure Auto Image Replication between appliances.
See “About Auto Image Replication between appliances” on page 226.
310TroubleshootingAbout password recovery

Veritas recommends that you review the following sections from within theNetBackup documentation before you operate the appliance:
■ NetBackup Administration Guide, Volume I
■ In Section 5, “Configuring Backups", review the following topics:- "Creating backup policies"- "Protecting the NetBackup Catalog"- "Strategies that ensure successful NetBackup catalog backups"
■ Review the topics within Section 3, “Configuring Storage".
■ NetBackup Troubleshooting GuideReview Chapter 8, "Disaster Recovery" for help with understanding disasterrecovery fundamentals.The Troubleshooting Guide is located at the following location:http://www.veritas.com/docs/DOC5332
Gathering device logs with the DataCollectcommand
You can use the DataCollect command from the Main > Support shell menu togather device logs. You can share these device logs with the Veritas Support teamto resolve device-related issues.
Along with the operating system, IPMI, and storage logs, the DataCollect commandnow collects the following logs as well:
■ Patch logs
■ File System logs
■ Test hardware logs
■ CPU information
■ Disk performance logs
■ Memory information
■ Hardware information
311TroubleshootingGathering device logs with the DataCollect command

To gather device logs with the DataCollect command
1 Log on to the administrative NetBackup Appliance Shell Menu.
2 Open the Support menu. To open the support menu, use the followingcommand:
Main > Support
The appliance displays all the sub-tasks in the support menu.
312TroubleshootingGathering device logs with the DataCollect command

3 Enter the DataCollect command to gather storage device logs.
The appliance initiates the following procedure:
appliance123.Support > DataCollect
Gathering release information
Gathering dmidecode logs
Gathering ipmitool sel list logs
Gathering fwtermlog logs
Gathering AdpEventLog logs
Gathering smartctl logs
Gathering disk performance logs
Gathering ipmiutil command output
Gathering cpu information
Gathering memory information
Gathering sdr logs
Gathering adpallinfo logs
Gathering encinfo logs
Gathering cfgdsply logs
Gathering ldpdinfo logs
Gathering pdlist logs
Gathering fru logs
Gathering adpbbucmd logs
Gathering os logs
Gathering adpalilog logs
Gathering dfinfo logs
Gathering vxprint logs
Gathering Test Hardware logs
Gathering patch logs
All logs have been collected in /tmp/DataCollect.zip
Log file can be collected from the appliance shared folder
- \\appliance123\logs\APPLIANCE
Share can be opened using Main->Support->Logs->Share Open
=======================End of DataCollect==================
All logs have been collected in /tmp/DataCollect.zip
The appliance generates the device log in the /tmp/DataCollect.zip file.
313TroubleshootingGathering device logs with the DataCollect command

4 Copy the DataCollect.zip to your local folders using the Main > Support
> Logs > Share Open command.
5 You can send the DataCollect.zip file to the Veritas Support team to resolveyour issues.
Setting a NetBackup 5330 storage shelfcomponent to the Service Allowed mode
Before service or replacement can be performed on a Primary Storage Shelf or anExpansion Storage Shelf, the specific component of the unit must be set to theService Allowed mode.
Typically, a failure automatically sets the component of the affected unit to theService Allowed mode. When a warning of an impending failure occurs, thecomponent is not automatically set to the Service Allowed mode. For this situation,you must set the component to the Service Allowed mode manually, by using theNetBackup Appliance Shell Menu.
In the Main_Menu > Support view, two main commands are available:
■ ServiceAllowed Set PrimaryShelf
This command is used with options to set the appropriate Primary Storage Shelfcomponent to the Service Allowed mode.
■ ServiceAllowed Set ExpansionShelf
This command is used with options to set the appropriate Expansion StorageShelf component to the Service Allowed mode.
The following describes the available command options for setting a Primary StorageShelf component or an Expansion Storage Shelf component to the Service Allowedmode.
314TroubleshootingSetting a NetBackup 5330 storage shelf component to the Service Allowed mode

Table 6-3 Service Allowed command options
Command optionsStorage unit
■ Controller
Set the Service Allowed flag for a Primary Shelf Controller. When you enter this option, youmust also identify the controller location (A/B). The following shows the complete command:ServiceAllowed Set PrimaryShelf Controller A/B On/Off
■ FanCanister
Set the Service Allowed flag for a Primary Shelf fan canister. When you enter this option, youmust also identify the fan canister location (Left/Right).The following shows the completecommand:ServiceAllowed Set PrimaryShelf FanCanister Left/Right On/Off
■ HDD
Set the Service Allowed flag for a Primary Shelf hard disk drive. When you enter this option,you must also identify the drawer location (DrawerID) and the disk drive location (SlotNo).The following shows the complete command:ServiceAllowed Set PrimaryShelf HDD DrawerID SlotNo On/Off
Note: Before you run this command, first run the Monitor > Hardware ShowHealthPrimaryShelf RAID command. Refer to the "Precautions and guidelines" section for moreinformation.
■ PowerCanister
Set the Service Allowed flag for a Primary Shelf power canister. When you enter this option,you must also identify the power canister location (Top/Bottom). The following shows thecomplete command:ServiceAllowed Set PrimaryShelf PowerCanister Top/Bottom On/Off
Primary StorageShelf
315TroubleshootingSetting a NetBackup 5330 storage shelf component to the Service Allowed mode
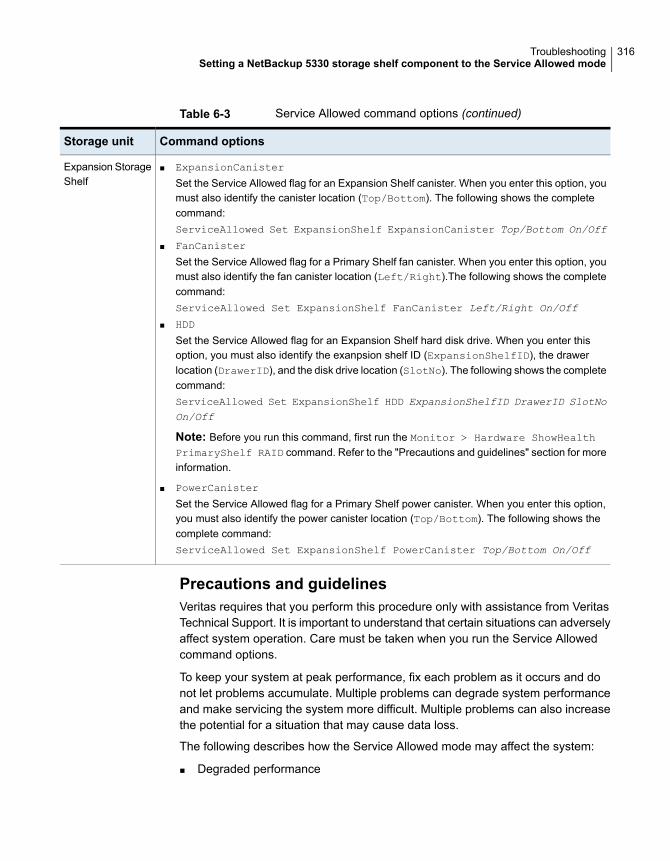
Table 6-3 Service Allowed command options (continued)
Command optionsStorage unit
■ ExpansionCanister
Set the Service Allowed flag for an Expansion Shelf canister. When you enter this option, youmust also identify the canister location (Top/Bottom). The following shows the completecommand:ServiceAllowed Set ExpansionShelf ExpansionCanister Top/Bottom On/Off
■ FanCanister
Set the Service Allowed flag for a Primary Shelf fan canister. When you enter this option, youmust also identify the fan canister location (Left/Right).The following shows the completecommand:ServiceAllowed Set ExpansionShelf FanCanister Left/Right On/Off
■ HDD
Set the Service Allowed flag for an Expansion Shelf hard disk drive. When you enter thisoption, you must also identify the exanpsion shelf ID (ExpansionShelfID), the drawerlocation (DrawerID), and the disk drive location (SlotNo). The following shows the completecommand:ServiceAllowed Set ExpansionShelf HDD ExpansionShelfID DrawerID SlotNoOn/Off
Note: Before you run this command, first run the Monitor > Hardware ShowHealthPrimaryShelf RAID command. Refer to the "Precautions and guidelines" section for moreinformation.
■ PowerCanister
Set the Service Allowed flag for a Primary Shelf power canister. When you enter this option,you must also identify the power canister location (Top/Bottom). The following shows thecomplete command:ServiceAllowed Set ExpansionShelf PowerCanister Top/Bottom On/Off
Expansion StorageShelf
Precautions and guidelinesVeritas requires that you perform this procedure only with assistance from VeritasTechnical Support. It is important to understand that certain situations can adverselyaffect system operation. Care must be taken when you run the Service Allowedcommand options.
To keep your system at peak performance, fix each problem as it occurs and donot let problems accumulate. Multiple problems can degrade system performanceand make servicing the system more difficult. Multiple problems can also increasethe potential for a situation that may cause data loss.
The following describes how the Service Allowed mode may affect the system:
■ Degraded performance
316TroubleshootingSetting a NetBackup 5330 storage shelf component to the Service Allowed mode

In some situations, setting a component to the Service Allowed mode can causedegraded performance. A message appears to alert you of this possibility beforeyou proceed. For example, when you use the Controller option for the PrimaryShelf, the following message appears:
Support> ServiceAllowed Set PrimaryShelf Controller A on
Service allowed flag is used for component replacement. Setting
this flag may cause performance degradation due to write cache
being turned off.
>> Do you want to continue? (yes, no):
■ RAID volume status in Degraded stateWhen you use the HDD option to set a hard disk drive to the Service Allowedmode, the following message appears:
Support> ServiceAllowed Set PrimaryShelf HDD 1 2 on
Service allowed flag is used for component replacement. Before
you set this flag, run the
'Monitor->Hardware ShowHealth PrimaryShelf RAID' command to
make sure that this Hard Disk Drive (HDD) is in a RAID volume
with a status of Optimal. If the RAID volume status is not Optimal,
executing this command creates a RISK OF POTENTIAL DATA LOSS.
>> Do you want to continue? (yes, no): no
In this situation, the best practice is to enter no. Then you must resolve thecurrent RAID volume issue to return it to Optimal status. Only then can youproceed with setting the affected hard disk drive to the Service Allowed mode.Veritas recommends that before you attempt to set any hard disk drive to theService Allowed mode, first run the Monitor > Hardware ShowHealth
PrimaryShelf RAID command. Check to make sure that the hard disk drivethat you want to set to the Service Allowed mode is in a RAID volume withOptimal status.
Warning: Make sure that you contact and work with Veritas Technical Supportfor guidance to avoid any situation that may cause the potential for data loss.
The following procedure describes how to set a Primary Storage Shelf or anExpansion Storage Shelf component to the Service Allowed mode.
317TroubleshootingSetting a NetBackup 5330 storage shelf component to the Service Allowed mode

To set a Primary Storage Shelf or an Expansion Storage Shelf component tothe Service Allowed mode
1 Contact Veritas Technical Support and inform the representative that you needto set a storage shelf component to the Service Allowed mode.
Allow the representative to assist you with the remaining steps that follow.
2 Log in to the NetBackup Appliance Shell Menu.
3 Enter Main_Menu > Support.
4 From the list of commands in Table 6-3, enter the appropriate command.
Note: Before you attempt to set a hard disk drive to the Service Allowed mode,first run the Monitor > Hardware ShowHealth PrimaryShelf RAID command.Refer to the "Precautions and guidelines" section for more information.
5 Verify that the component is in the Service Allowed mode by checking that theblue Service Action Allowed LED on the affected storage shelf is on.
6 Perform the necessary work on the affected unit.
After the work has been completed and the unit has been restored to normaloperation, the Service Allowed mode is cleared automatically.
318TroubleshootingSetting a NetBackup 5330 storage shelf component to the Service Allowed mode

Deduplication pool catalogbackup and recovery
This chapter includes the following topics:
■ Deduplication pool catalog backup policy
■ Automatic configuration of the deduplication pool catalog backup policy
■ Manually configuring the deduplication pool catalog backup policy
■ Manually updating the deduplication pool catalog backup policy
■ Recovering the deduplication pool catalog
Deduplication pool catalog backup policyCreating a backup of the deduplication pool catalog is a very important step inprotecting your data in the event of a disaster. The NetBackup Applianceautomatically creates a policy to backup the deduplication pool catalog. In rarecases where a policy cannot be created, manual intervention may be necessary.
Caution: Veritas recommends that you contact your Veritas Support representativebefore you recover the deduplication pool catalog. The Support representative canhelp you determine if you need to recover the catalog or if other solutions areavailable.
The following topics provide more information about the deduplication pool catalogbackup policy and the recovery process:
See “Automatic configuration of the deduplication pool catalog backup policy”on page 320.
7Chapter

See “Manually configuring the deduplication pool catalog backup policy” on page 323.
See “Manually updating the deduplication pool catalog backup policy” on page 324.
See “Recovering the deduplication pool catalog” on page 325.
Automatic configuration of the deduplication poolcatalog backup policy
A policy is automatically created to protect the deduplication storage pool. Thededuplication pool catalog can then be recovered in the event of a disaster. Thededuplication pool catalog backup policy is automatically created in the followingscenarios:
■ When a deduplication storage pool is created during the initial configuration ofthe appliance.
■ When Manage>Storage>Resize MSDP is run when a deduplication storage pooldid not exist.
■ When upgrading an appliance that had a deduplication storage pool alreadyconfigured.
The deduplication pool catalog backup policy can be viewed once it is created byone of the above scenarios. Veritas recommends that you activate this policy toprotect the deduplication pool catalog. Protecting the deduplication pool catalogcan prove beneficial in a disaster recovery situation.
If a policy to backup the deduplication storage pool catalog already exists, theconfiguration of this policy is updated.
When configuring the deduplication storage pool backup policy, take the followinginto consideration:
■ The residence must be set and should not be local to the appliance.
■ You can adjust properties such as schedules, frequency, and backup window.
■ Do not modify the policy type, client name, or backup selection in the policyproperties.
■ The policy must be activated manually.
The name of this policy is SYMC_NBA_Dedupe_Catalog_<appliance-short-name>
where <appliance-short-name> is the short name you have given to yourappliance.
320Deduplication pool catalog backup and recoveryAutomatic configuration of the deduplication pool catalog backup policy

Note: If MSDP storage is not configured during initial configuration, the policy isnot created.
The creation of the policy is automatic so be sure to check the output messages tomake sure that the policy has been successfully created.
Email notifications are sent to the email addresses that have been configured toreceive software alerts. These email addresses are configured through theNetBackup Appliance Web Console or by running the following command:Settings>Alerts>Email Software Add.
Table 7-1 Deduplication storage pool catalog backup policy successmessages
DefinitionMessage
This message is displayed in the followingscenarios:
■ The deduplication pool catalog backuppolicy did not exist and was createdsuccessfully.
■ The deduplication pool catalog backuppolicy has existed and was updatedsuccessfully.
A backup policy, <policy-name>, has beenconfigured to protect the deduplication poolcatalog. Review the policy configuration andmake changes to its schedules, backupwindow, and residence as required. Makesure to activate the policy to protect thecatalog. For more information, refer to theNetBackup Appliance Administrator's Guide.
The policy type of the pre-existingdeduplication pool policy has been updatedto standard. The policy type was set to<previous policy type>. Review the policyconfiguration and make sure that the previousbackup configuration is not affected.
An existing backup policy, <policy-name>,has been found that conflicts with the requireddeduplication pool backup policy. The policytype has been updated to 'Standard' to protectthe deduplication pool catalog. The policytype was set to <previous-policy-type> beforethis update.
Table 7-2 Deduplication storage pool catalog backup policy failuremessages
DefinitionMessage
The deduplication pool catalog backup policydid not exist and the policy creation has failed.
To protect the deduplication pool catalog, youneed to configure the backup policy manually.
See “Manually configuring the deduplicationpool catalog backup policy” on page 323.
Failed to create a deduplication pool catalogbackup policy. The policy is required toprotect the deduplication pool catalog andrecover it in case of disaster. Refer to theNetBackup Appliance Administrator's Guidefor how to configure the policy manually.
321Deduplication pool catalog backup and recoveryAutomatic configuration of the deduplication pool catalog backup policy

Table 7-2 Deduplication storage pool catalog backup policy failuremessages (continued)
DefinitionMessage
This message is displayed in the followingscenarios:
■ The policy already exists and the policytype is not set to Standard.
■ The operation has failed to update thepolicy type to Standard.
To protect the deduplication pool catalog, youneed to change the policy type manually.
See “Manually updating the deduplicationpool catalog backup policy” on page 324.
Failed to update deduplication pool catalogbackup policy, '<policy-name>', type to'Standard.' An existing backup policy hasbeen found that conflicts with the requireddeduplication pool catalog backup policy.Make sure to update the policy type to'Standard' manually to protect thededuplication pool catalog. Refer to theNetBackup Appliance Administrator's Guidefor how to configure the policy manually.
The deduplication pool catalog backup policypre-exists but the operation has failed toupdate the policy properties, which includeClient and Backup Selection.
To protect the deduplication pool catalog, youneed to update the Client and Backupselection manually.
See “Manually updating the deduplicationpool catalog backup policy” on page 324.
Failed to update the client and the backupselection properties of the deduplication poolcatalog backup policy <policy-name>. Referto the NetBackup Appliance Administrator'sGuide for how to configure the policymanually.
Caution: Veritas recommends that you contact your Veritas Support representativebefore you recover the deduplication pool catalog. The Support representative canhelp you determine if you need to recover the catalog or if other solutions areavailable.
See “Manually configuring the deduplication pool catalog backup policy” on page 323.
See “Manually updating the deduplication pool catalog backup policy” on page 324.
See “Recovering the deduplication pool catalog” on page 325.
322Deduplication pool catalog backup and recoveryAutomatic configuration of the deduplication pool catalog backup policy

Manually configuring the deduplication poolcatalog backup policy
The following procedure is provided in case the deduplication pool catalog backuppolicy is not automatically created. Creating a backup policy to protect thededuplication pool catalog is critical in protecting your data in the event of a disaster.
Manually configuring the deduplication pool catalog backup policy
1 Log in to the Appliance with a NetBackupCLI user account.
See “Creating NetBackup administrator user accounts ” on page 221.
2 Enter the following command to create the deduplication pool catalog backuppolicy:
# drcontrol --new_policy --policy <policy-name> --hardware
<appliance model> --OS 'NetBackup-Appliance' --log_file ~/<log
file name>
■ Replace <policy-name> with:SYMC_NBA_Dedupe_Catalog_<appliance-short-name> where<appliance-short-name> is the short name you have given to yourappliance.
■ Replace <appliance model> with the model of the Appliance. For example,5220, 5230 or 5330.
■ Replace <log file name> with the name of the log file thedrcontrol toolcreates.
Note: If the drcontrol tool is run without the log file option the tool createsa file that is not accessible to the NetBackupCLI user. Make sure to choosea directory accessible by the NetBackupCLI user, such as the home directoryof the NetBackupCLI user.
See “Automatic configuration of the deduplication pool catalog backup policy”on page 320.
See “Manually updating the deduplication pool catalog backup policy” on page 324.
See “Recovering the deduplication pool catalog” on page 325.
323Deduplication pool catalog backup and recoveryManually configuring the deduplication pool catalog backup policy

Manually updating the deduplication pool catalogbackup policy
The following procedure is provided in case the deduplication pool catalog backuppolicy is not automatically updated. Creating a backup policy to protect thededuplication pool catalog is critical in protecting your data in the event of a disaster.
Manually updating the deduplication pool catalog backup policy
1 Log in to the Appliance with a NetBackupCLI user account.
See “Creating NetBackup administrator user accounts ” on page 221.
2 Update the policy type. Enter the following command to update the policy typeto Standard:
# bpplinfo <policy-name> -modify -pt Standard
Replace <policy-name> withSYMC_NBA_Dedupe_Catalog_<appliance-short-name> where<appliance-short-name> is the short name you have given to your appliance.
3 Identify the client name:
■ Determine if the appliance is added as a client by entering the followingcommand:# bpplclients <policy-name> -l
■ If the client has not been added, run the following command to identify theclient name:# bpgetconfig CLIENT_NAME | cut -f3 -d' '
4 Update the client and the backup selection by entering the following command:
# drcontrol --update_policy --policy <policy name> --client
<client name> --hardware <appliance model> --OS
'NetBackup-Appliance' --log_file ~/<log file name>
■ Replace <client name> with the name of the client that is identified in theprevious step.
■ Replace <appliance model> with the model of the Appliance. For example,5220, 5230 or 5330.
■ Replace <log file name> with the name of the log file thedrcontrol toolcreates.
324Deduplication pool catalog backup and recoveryManually updating the deduplication pool catalog backup policy

Note: If the drcontrol tool is run without the log file option the tool createsa file that is not accessible to the NetBackupCLI user. Make sure to choosea directory accessible by the NetBackupCLI user, such as the home directoryof the NetBackupCLI user.
See “Automatic configuration of the deduplication pool catalog backup policy”on page 320.
See “Manually configuring the deduplication pool catalog backup policy” on page 323.
See “Recovering the deduplication pool catalog” on page 325.
Recovering the deduplication pool catalogThis section outlines how to recover the deduplication pool catalog in the event ofa disaster.
Caution: Veritas recommends that you contact your Veritas Support representativebefore you recover the deduplication pool catalog. The Support representative canhelp you determine if you need to recover the catalog or if other solutions areavailable.
Recovering the deduplication pool catalog
1 Log in to the Appliance with a NetBackupCLI user account
See “Creating NetBackup administrator user accounts ” on page 221.
2 Enter the following command to identify the space requirements:
# drcontrol --print_space_required --policy <policy-name>
--log_file ~/<log file name>
Replace <log file name> with the name of the log file thedrcontrol toolcreates.
Note: If the drcontrol tool is run without the log file option the tool creates afile that is not accessible to the NetBackupCLI user. Make sure to choose adirectory accessible by the NetBackupCLI user, such as the home directory ofthe NetBackupCLI user.
3 Log in to the Appliance as an Appliance Administrator.
4 Run hardware monitoring commands to make sure that there are no errors.
325Deduplication pool catalog backup and recoveryRecovering the deduplication pool catalog

5 Run hardware self-test to make sure that all hardware components are in placeand functioning correctly.
6 Run Manage > Storage > Show to make sure that all the storage componentsare in place and functional. Also verify that the deduplication pool catalogpartition size meets the space requirements.
7 If the size requirement is not met, run Manage > Storage Resize MSDPCatalog
to expand the partition.
8 Log in to the Appliance with a NetBackupCLI user account.
9 Perform the catalog recovery using drcontrol and other tools as documentedin the MSDP catalog recovery section of the NetBackup Deduplication Guide.
Note: If the drcontrol tool is run without the log file option the tool creates afile that is not accessible to the NetBackupCLI user. Make sure to choose adirectory accessible by the NetBackupCLI user, such as the home directory ofthe NetBackupCLI user.
See “Automatic configuration of the deduplication pool catalog backup policy”on page 320.
See “Manually configuring the deduplication pool catalog backup policy” on page 323.
See “Manually updating the deduplication pool catalog backup policy” on page 324.
326Deduplication pool catalog backup and recoveryRecovering the deduplication pool catalog
Symbols5330 storage shelf component
set to Service Allowed mode 314
Aabout
appliance restore 128checkpoint creation status 136creating appliance checkpoint 129, 133Email notification from NetBackup appliance 46factory reset 149license key management 161master server role 17media server role 17NetBackup appliances 12NetBackup documentation 33rollback to checkpoint 138supported tape devices and tapes 116
About BMR 126Active Directory
authentication 289user management 294
Active Directory userconfigure authentication 276
add external robots 116add user
Active Directory 295LDAP 295local 295NIS 295
add user groupActive Directory 297LDAP 297NIS 297
alert notificationcall home 234SMTP 234SNMP 234
Appliance consoledescription 21
Appliance Diagnostics Center 302
appliance log filesBrowse command 309
appliance passwordchange after intial configuration 300
appliance registrationinitial configuration for 245
Appliance Restoremanagement on the NetBackup appliance 128
appliance server or client packagedownload directly 182
Appliance Web Consoleenable BMR 127
Auto Image Replication 226between appliances and deduplication
appliances 231AutoSupport
customer registration 247
Bbandwidth
expanding on NetBackup appliance 205BMR
enable 127option 127
bondcreate 262
bookmarksusing with Appliance 24
Browse commandappliance log files 309
CCall Home
alerts 240workflow 244
Call Home proxy serverconfiguring 243
changeDate and Time Configuration 272
change appliance password 300change FT settings 268
Index

change settingsfor DNS Configuration 270
changing host configuration 269Check Disk Configuration wizard 302client share
download software updates 183Collect Log files wizard 302collect logs
commands 307datacollect 311log file location 307types of logs 307
common tasksAppliance 32
configurationof maximum transmission unit size 206
Ddashboard 30data buffer
parameters 119datacollect
device logs 311Date and Time Configuration
change 272deduplication
parameters 125solutions 123
deduplications 5230 123delete user
Active Directory 296LDAP 296local 296NIS 296
delete user groupActive Directory 297LDAP 297NIS 297
disable security warningson Mozilla 19
disk informationviewing 107
disksstorage 68
DNS Configurationchange settings 270
documentation 33download directly
appliance server or client package 182
download methodsrelease updates 181
download NetBackup client packages from NetBackupappliance 198
download software updatesfrom NetBackup Appliance Web Console 182Manage > Software Updates tab 179using client share 183
EEmail notification
from NetBackup appliance 46Ethernet ports
NetBackup 5330 configurations 254expand bandwidth
on NetBackup appliance 205external robots
adding to the NetBackup 5200 116
FFibre Transport
option descriptions 266FT settings
change 268
Ggrant permissions 298guidelines
VLAN configuration 260
Hhardware
monitoring 41monitoring and alerts on the appliance 37
hardware monitoring and alerts 37home page 30host
IPMI 127host reconfiguration 269
Iinitial configuration
for appliance registration 245install
openstorage plugin 209install software updates
Manage > Software Updates tab 179
328Index

install update from NetBackup Appliance Shell Menuversion 2.7.x 191
install update from NetBackup Appliance Web Consoleversion 2.7.x 187
IPv4 and IPv6 support 271
LLDAP
authentication 280user management 294
LDAP userconfigure authentication 275
license keymanagement on the NetBackup appliance 161
lifecycleparameters 119, 123
local userconfigure authentication 274user management 294
login pageNetBackup Appliance Web Console 25
MManage
license keys 164manage
appliance restore 129, 133, 136–139, 141–142, 145, 149, 153, 156–157
license keys 162Management Information Base (MIB) 239master server
about role 17maximum transmission unit size
about configuration for 206media server role 17Microsoft Internet Explorer 18migration
check job status 171Policy Conversion tab 174Selection Criteria tab 167
Migration Job Status tab 171Migration Utility
about 165monitor
hardware summary 37NetBackup 52XX configuration 36
montior storage tasks 89
move dialogstorage 81
Mozilla Firefox 18
NNetBackup
about documentation for 33NetBackup 5200
adding external robots 116NetBackup Adminstration Console
download to Windows computer from NetBackupappliance 200
NetBackup applianceabout appliance restore 128about Email notification 46about license key management 161appliance factory reset 153, 157appliance rollback validation 141checkpoint rollback status 145expanding bandwidth on 205factory reset status 156managing appliance restore 129managing license keys 162monitoring and alerts 37rollback appliance 139, 142, 145
NetBackup Appliance Web Consolelogin page 25
NetBackup Appliance Web Console login page 25NetBackup client packages
download from NetBackup appliance 198NetBackup commands
Auditing accounts 224Best practices 220Creating touch files 218creating users 221deleting users 225Known limitations 221Logging in as administrator 222manage users 215Managing passwords 223OS commands 220Running commands 217viewing current users 225
NetBackup parameters 117network
VLAN 250NFS mount
mount a remote NFS drive 212mount list 211
329Index

NFS mount (continued)unmount 211Unmount a remote NFS drive 214
NISauthentication 292user management 294
NIS userconfigure authentication 276
notifications 240
Oopenstorage plugin 207
installing plugins 209uninstalling plugins 210
option descriptionsfor Fibre Transport 266
OST plugininstalling plugins 209uninstalling plugins 210
Pparameters
data buffer 119deduplication 125lifecycle 123
partition distributionon disks 112
partitionsdetails 75storage 68
Policy Conversionchange policy for migration 174
privilegesuser role 279
Rremove
storage disk 87resize dialog
storage 79revoke permissions 299role
about master server 17about media server 17
Sscan
storage device 89
Selection Criteria tabmigration 167
self-repair wizards 302Service Allowed mode
5330 storage shelf component 314settings
network 250share
creating 93deleting 102editing 97moving 101resizing 100
showdisks 103distribution 103partitions 103
Simple Network Management Protocol (SNMP) 239SNMP server options 238
options 238software updates
download from NetBackup Appliance WebConsole 182
Manage > Software Updates tab 179storage 37
viewing 104storage configuration
about 64storage device
scan 89storage disk
removing 87storage partition
moving 81resizing 77
storage partitionsviewing 111
Symantec Data Center Securityabout 47administration 49connecting to server 58filtering audit logs 53log retention 53managed mode 47, 55–58policy downloads 55, 57server and console downloads 55–56unmanaged mode 47, 58view log details 51
Sync member groups 299
330Index
Ttag
VLAN 263tape devices and tapes
about appliance supported 116Test and diagnose network issues wizard 302third party SSL certificates 59trusted master servers
adding 227
Uuninstall
openstorage plugin 210user
Active Directory 276add 277authorize 277Kerberos-NIS 276LDAP 275local 274manage role
permissions 278user authentication
configure 274guidelines 277
user groupadd 277manage role
permissions 278user role privileges
NetBackup appliance 279
VvCenter
credentials 203version 2.7.x
install update from NetBackup Appliance ShellMenu 191
install update from NetBackup Appliance WebConsole 187
VLANtagging 249
WWAN optimization
about 255disable 255, 258enable 255, 257
WAN optimization (continued)status 255, 259
web browserbook marks 24support 18
331Index