Jamf Pro Administrator's Guide
608
Jamf Pro Administrator's Guide Version 10.28.0
-
Upload
khangminh22 -
Category
Documents
-
view
0 -
download
0
Transcript of Jamf Pro Administrator's Guide

Jamf Pro Administrator's GuideVersion 10.28.0

© copyright 2002-2021 Jamf. All rights reserved.
Jamf has made all efforts to ensure that this guide is accurate.
Jamf 100 Washington Ave S Suite 1100 Minneapolis, MN 55401-2155 (612) 605-6625
Under the copyright laws, this publication may not be copied, in whole or in part, without the written consent of Jamf.
The CASPER SUITE, COMPOSER®,the COMPOSER Logo®, Jamf, the Jamf Logo, JAMF SOFTWARE®, the JAMF SOFTWARE Logo®, RECON®, and the RECON Logo® are registered or common law trademarks of JAMF SOFTWARE, LLC in the U.S. and other countries.
ADmitMac is a registered trademark of Thursby Software Systems, Inc.
Adobe, Adobe AIR, Adobe Bridge, Adobe Premier Pro, Acrobat, After Effects, Creative Suite, Dreamweaver, Fireworks, Flash Player, Illustrator, InDesign, Lightroom, Photoshop, Prelude, Shockwave, and all references to Adobe software are either registered trademarks or trademarks of Adobe Systems Incorporated in the United States and/or other countries.
Amazon, Amazon CloudFront, Amazon RDS, Amazon S3, and Amazon Web Services are trademarks of Amazon.com, Inc. or its affiliates in the United States and/or other countries.
Apple, the Apple logo, Apple Configurator 2, Apple Remote Desktop, Apple TV, AirPlay, Finder, FileVault, FireWire, iBeacon, iBooks, iPad, iPhone, iPod touch, iTunes, Keychain, Mac, MacBook, MacBook Pro, MacBook Air, macOS,OS X, and Safari are trademarks of Apple Inc., registered in the United States and other countries. AppleCare, App Store, iBooks Store, iCloud, and iTunes Store are service marks of Apple Inc., registered in the United States and other countries.
Centrify is a registered trademark of Centrify Corporation in the United Statesand/or other countries.
Chrome and Google are trademarks or registered trademarks of Google Inc.
Cisco and IOS are trademarks or registered trademarks of Cisco in the United States and other countries.
Intel and McAfee Endpoint Protection are either registered trademarks or trademarks of the Intel Corporation in the United States and other countries.
Likewise is a trademark of Likewise Software.
Linux is a registered trademark of Linus Torvalds in the United States and other countries.
Microsoft, Microsoft Edge, Microsoft Intune, Active Directory, Azure, Excel, OneNote, Outlook, PowerPoint, Silverlight, Windows, Windows Server, and all references to Microsoft software are either registered trademarks or trademarks of Microsoft Corporation in the United States and/or other countries.
Mozilla and Firefox are registered trademarks of the Mozilla Foundation.
NetIQ is a trademark or registered trademark of NetIQ Corporation in the United States.
Java, MySQL, and all references to Oracle software are either registered trademarks or trademarks of Oracle and/or its affiliates. Other names may be trademarks of their respective owners.
The Skype name, associated trademarks and logos, and the "S" logo are trademarks of Skype or related entities.
Sophos is a trademark or registered trademark of Sophos Ltd.
Tomcat is a trademark of the Apache Software Foundation.
Ubuntu is a registered trademark of Canonical Ltd.
All other product and service names mentioned herein are either registered trademarks or trademarks of their respective companies.
Contents

3
Contents
13 Preface14 About This Guide
15 Additional Resources15 Jamf Nation16 Other Resources
17 Overview of Technologies18 Applications and Utilities18 Administrator Applications20 Client Applications22 Utilities
24 Security24 Passwords24 Communication Protocols24 Public Key Infrastructure26 Signed Applications26 Related Information
27 Jamf Pro System Requirements
28 Computer Management Capabilities28 Management Capabilities for Computers
32 Components Installed on Managed Computers32 Jamf Components Installed on Computers34 Removing Jamf Components from Computers
36 Mobile Device Management Capabilities36 Management Capabilities for Mobile Devices40 Management Capabilities for tvOS Devices
42 Components Installed on Mobile Devices
43 Before You Begin44 Setting Up Jamf Pro44 Related Information
45 The Jamf Pro Dashboard46 Adding Items to the Jamf Pro Dashboard
47 Jamf Pro Objects47 Cloning a Jamf Pro Object47 Editing a Jamf Pro Object47 Deleting a Jamf Pro Object47 Viewing the History of a Jamf Pro Object
49 Jamf Pro System Settings50 Jamf Pro User Accounts and Groups

4
50 General Requirements51 Creating a Jamf Pro User Group51 Creating a Jamf Pro User Account52 Configuring Account Preferences53 Configuring the Password Policy53 Unlocking a Jamf Pro User Account54 Related Information
55 Integrating with LDAP Directory Services56 Adding an LDAP Server Using the LDAP Server Assistant56 Manually Adding an LDAP Server56 Testing LDAP Attribute Mappings57 Related Information
58 Cloud Identity Providers58 Cloud Identity Providers Integration59 Google Secure LDAP Integration61 Azure AD Integration63 Testing Attribute Mappings
64 Single Sign-On64 Single Sign-On and LDAP64 Single Logout65 Identity Provider Configuration Settings65 Enabling Single Sign-On in Jamf Pro68 Related Information
69 Integrating with an SMTP Server69 Configuring the SMTP Server Settings69 Testing the SMTP Server Settings70 Related Information
71 Email Notifications72 Enabling Email Notifications73 Related Information
74 Activation Code74 Updating the Activation Code
75 Change Management75 General Requirements75 Configuring the Change Management Settings for On-Premise Environments76 Viewing Change Management Logs in Jamf Pro76 Related Information
77 SSL Certificate77 Creating or Uploading an SSL Certificate77 Related Information
78 Flushing Logs78 Scheduling Log Flushing79 Manually Flushing Logs79 Related Information
80 Maintenance Pages

5
80 Maintenance Pages80 Creating a Maintenance Page Configuration
81 Jamf Pro Summary82 Viewing the Jamf Pro Summary82 Sending the Jamf Pro Summary to Jamf83 Related Information
84 Jamf Pro Server Logs84 Viewing and Downloading the Jamf Pro Server Log84 Viewing and Downloading the Volume Purchasing Log85 Related Information
86 Jamf Pro Health Check Page86 Using the Jamf Pro Health Check Page
87 Global Management Settings88 Push Certificates88 General Requirements88 Creating a Push Certificate89 Uploading a Push Certificate (.p12)89 Renewing the Push Certificate90 Deleting the Push Certificate90 Related Information
91 Jamf Push Proxy91 Requesting or Renewing a Proxy Server Token92 Related Information
93 GSX Connection93 Configuring the GSX Connection Settings94 Testing the GSX Connection95 Renewing the Apple Certificate95 Related Information
96 Inventory Preload98 Example Workflow98 Validation99 Users99 When Data is Applied100 Extension Attributes100 Uploading a CSV File Using Inventory Preload
103 User-Initiated Enrollment Settings103 Management Account Creation During Computer Enrollment104 Enrollment of Personally Owned Mobile Devices104 General Requirements105 Configuring the User-Initiated Enrollment Settings107 Related Information
108 Integrating with Automated Device Enrollment108 Downloading a Public Key108 Obtaining the Server Token File

6
109 Uploading the Server Token File to Configure Automated Device Enrollment110 Replacing a Server Token File to Renew an Automated Device Enrollment Instance111 Related Information
112 Enrollment Customization Settings112 PreStage Panes115 Settings for Branding116 General Requirements116 Creating an Enrollment Customization Configuration117 Related Information
118 Apple Education Support Settings118 General Requirements118 Shared iPad and Apple's Classroom App Support119 User Images121 Related Information
122 Integrating with Apple School Manager122 Class Naming and Description Format124 Apple School Manager Sync Time125 Matching Criteria for Importing Users from Apple School Manager125 Configuring an Instance of Apple School Manager127 Forcing an Apple School Manager Sync128 Related Information
129 Re-enrollment Settings131 General Requirements131 Configuring the Re-enrollment Settings131 Related Information
132 Jamf Pro URL132 Viewing or Configuring the Jamf Pro URLs132 Related Information
133 MDM Profile Settings133 Configuring MDM Profile Renewal for Computers or Mobile Devices
134 PKI Certificates134 Viewing and Exporting Certificates135 The Built-in CA138 Third-Party CAs139 External CAs141 Related Information
142 Integrating with Volume Purchasing142 Volume Purchase Location Considerations143 Adding a Location144 Adding Volume Purchasing Notifications145 Related Information
146 Categories146 Adding a Category to Jamf Admin

7
146 Adding a Category to Jamf Pro147 Editing or Deleting a Category in Jamf Admin
148 Event Logs148 Viewing Event Logs149 Related Information
150 Webhooks150 Configuring a Webhook
151 AirPlay Permissions151 Creating an AirPlay Permission
152 Conditional Access152 General Requirements153 Manually Configuring the macOS Intune Integration154 Configuring the macOS Intune Integration using the Cloud Connector156 Testing the macOS Intune Integration156 Related Information
157 Cloud Services Connection157 Icon Service157 Jamf Platform Integration Service158 Enabling the Cloud Services Connection158 Related Information
159 Device Compliance159 Requirements160 Procedure
162 Jamf Application Integrations163 Jamf Parent Integration with Jamf Pro163 General Requirements163 Integrating Jamf Parent with Jamf Pro164 Jamf Parent Experience168 Related Information
169 Jamf Teacher Integration with Jamf Pro169 Integrating Jamf Teacher with Jamf Pro170 Configuring and Distributing the Jamf Teacher App171 Related Information
172 Jamf Protect Integration with Jamf Pro172 Registering your Jamf Protect Tenant in Jamf Pro174 Jamf Protect Plans in Jamf Pro176 Related Information
177 Jamf Self Service178 Jamf Self Service for macOS178 About Jamf Self Service for macOS179 Jamf Self Service for macOS Installation Methods181 Jamf Self Service for macOS User Login Settings183 Jamf Self Service for macOS Configuration Settings

8
185 Jamf Self Service for macOS Notifications186 Jamf Self Service for macOS Branding Settings187 Bookmarks188 Items Available to Users in Jamf Self Service for macOS191 Jamf Self Service for macOS URL Schemes
193 Jamf Self Service for Mobile Devices193 About Jamf Self Service for Mobile Devices195 Jamf Self Service for iOS199 Jamf Self Service for iOS Branding Settings200 Self Service Web Clip202 App Request206 Jamf Self Service for iOS URL Schemes
207 Server Infrastructure208 About Distribution Points210 Related Information
211 File Share Distribution Points211 Adding a File Share Distribution Point212 Replicating Files to a File Share Distribution Point212 Related Information
213 Cloud Distribution Point213 General Requirements214 Configuring the Cloud Distribution Point214 Testing the Cloud Distribution Point215 Replicating Files to the Cloud Distribution Point215 Related Information
216 Software Update Servers216 Adding a Software Update Server216 Related Information
217 Jamf Infrastructure Manager Instances217 Managing a Jamf Infrastructure Manager Instance218 Related Information
219 Healthcare Listener219 Healthcare Listener Rules221 General Requirements221 Setting up the Healthcare Listener222 Adding a Healthcare Listener Rule223 Related Information
224 LDAP Proxy224 Network Communication224 Configuring the LDAP Proxy225 Related Information
226 Organizing Your Network227 Buildings and Departments

9
227 Adding a Building or Department
228 Network Segments228 Adding a Network Segment228 Related Information
229 iBeacon Regions229 General Requirements230 Adding an iBeacon Region230 Related Information
231 Sites231 Creating a Site231 Adding Objects to a Site
234 Network Integration234 General Requirements235 Adding a Network Integration Instance235 Related Information
236 Scope236 Configuring Scope
241 Managing Computers242 Building the Framework for Managing Computers242 Recurring Check-in Frequency243 Startup Script244 Login and Logout Hooks245 Security Settings
248 Enrollment of Computers248 Computer Enrollment Methods250 Computer PreStage Enrollments259 User-Initiated Enrollment for Computers262 User-Initiated Enrollment Experience for Computers270 QuickAdd Packages Created Using Recon273 Network Scanner278 Remote Enrollment Using Recon281 Local Enrollment Using Recon284 MDM-Enabled Local User Accounts
287 Inventory for Computers287 Computer Inventory Information289 Computer Inventory Information Reference298 Computer Inventory Collection300 Computer Inventory Collection Settings304 Computer Extension Attributes309 Computer Inventory Display Settings310 Simple Computer Searches313 Advanced Computer Searches315 Computer Reports318 Mass Actions for Computers320 Computer Management Information

10
322 Computer History Information324 Renaming a Computer327 Deleting a Computer from Jamf Pro
328 Policies328 About Policies331 Policy Management335 Policy Payload Reference338 User Interaction with Policies
340 Packages340 About Packages341 Package Management347 Package Deployment
350 Patch Management350 About Patch Management352 Patch Sources355 Patch Management Software Titles358 Patch Reporting361 Patch Policies365 Running Software Update
367 Settings and Security Management for Computers367 Computer Configuration Profiles373 Remote Commands for Computers379 Scripts385 Printers390 Dock Items393 Local Accounts395 Management Accounts397 Directory Bindings399 Disk Encryption Configurations405 Setting or Removing an EFI Password407 Screen Sharing
410 License Management410 About Licensed Software411 Licensed Software Records415 License Compliance416 Viewing License Usage417 Application Usage for Licensed Software
418 Usage Management418 Application Usage420 Computer Usage421 Restricted Software
423 Managing Mobile Devices424 Enrollment of Mobile Devices424 Mobile Device Enrollment Methods426 Mobile Device PreStage Enrollments

11
433 User-Initiated Enrollment for Mobile Devices436 User-Initiated Enrollment Experience for Institutionally Owned Mobile Devices450 User Enrollment for Personally Owned Mobile Devices452 User Enrollment Experience for Personally Owned Mobile Devices463 Apple Configurator Enrollment Settings466 Supervision Identities469 Enrollment Profiles
471 Inventory for Mobile Devices471 Mobile Device Inventory Information473 Mobile Device Inventory Information Reference481 Mobile Device Inventory Collection Settings482 Mobile Device Extension Attributes485 Mobile Device Inventory Display Settings486 Simple Mobile Device Searches489 Advanced Mobile Device Searches491 Mobile Device Reports494 Mass Actions for Mobile Devices497 Mobile Device Management Information499 Mobile Device History Information501 Deleting a Mobile Device from Jamf Pro
502 Settings and Security Management for Mobile Devices502 Mobile Device Configuration Profiles508 Remote Commands for Mobile Devices
524 Managing Users525 About User Management
526 Inventory for Users526 User Inventory Information527 User Inventory Information Reference530 User Assignments532 User Extension Attributes534 Simple User Searches536 Advanced User Searches538 User Reports539 Mass Actions for Users541 Manually Adding a User to Jamf Pro542 Importing Users to Jamf Pro from Apple School Manager545 Deleting a User from Jamf Pro
546 Group Management547 About Groups
548 Smart Groups548 General Requirements548 Creating a Smart Group549 Viewing Smart Group Memberships

12
550 Related Information
551 Static Groups551 Creating a Static Group551 Viewing Static Group Memberships552 Related Information
553 Classes553 Class Payloads554 Apple's Classroom App Class Configuration554 Classes Imported from Apple School Manager555 General Requirements556 Configuring a Class557 Related Information
558 Content Distribution559 Content Distribution Methods in Jamf Pro560 Related Information
561 Managed Content in Jamf Pro561 Managed Apps562 Managed Books
564 Volume Content564 About Volume Content566 Device-Assigned Managed Distribution567 User-Assigned Managed Distribution568 User-Assigned Volume Purchasing Registration573 User-Assigned Volume Assignments577 VPP Codes578 Apps Purchased in Volume585 App Store App Update Settings587 Books Purchased in Volume589 Simple Volume Content Searches592 Advanced Volume Content Searches594 Volume Content Reports
595 In-House Content595 About In-House Content596 JSON Web Token for Securing In-House Content598 Provisioning Profiles for In-House Apps600 In-House Apps604 In-House App Maintenance Settings606 In-House Books

13
Preface

14
About This Guide
This guide contains overviews about Jamf Pro features and instructions for performing administrative tasks using Jamf Pro. It does not prescribe administrative workflows or strategies but is intended to be used as a reference.
Before using the instructions in this guide:
If hosted on-premise, the Jamf Pro server must be installed.
If hosted in Jamf Cloud, your cloud instance must be set up and accessible.
To learn about the other Jamf Pro-related documentation, see .Additional Resources

15
Additional Resources
Jamf Nationhttps://www.jamf.com/jamf-nation/The Jamf Nation website allows you to communicate with other Jamf Pro administrators via discussions, submit feature requests, and access several different types of resources related to Jamf Pro.
Knowledge Base
https://www.jamf.com/jamf-nation/articlesThe Knowledge Base contains hundreds of articles that address frequently asked questions and common issues.
Product Documentation
To access the following product documentation for a specific Jamf Pro version, log in to Jamf Nation and go to:https://www.jamf.com/jamf-nation/my/products
Jamf Pro Release NotesThe release notes include information on new features and enhancements, system requirements, functionality changes, and bug fixes.
Jamf Pro installation and configuration guidesThese guides provide information on installing and configuring Jamf Pro on supported Mac, Linux, and Windows platforms. They also explain how to perform advanced configuration and troubleshooting tasks. The guides for Linux and Windows include instructions for performing a manual installation of Jamf Pro on those platforms.
In addition, you can search Jamf Nation to find best practice workflows, technical papers, and documentation for other Jamf Pro apps.

16
Other Resources
For access to other Jamf Pro-related resources, visit the following webpages:
Resources on jamf.comThe Resources area on the Jamf website gives you access to product documentation, best practice workflows, technical papers, and more.
Jamf 100 CourseThe Jamf 100 Course offers a self-paced introduction to Jamf Pro and an enterprise-focused foundation of the macOS, iOS, and tvOS platforms.
Jamf Online Training CatalogThe Jamf Online Training catalog provides self-paced modules to help you learn Apple device management with Jamf Pro. This resource is available for free to all Jamf customers.
Jamf Knowledge Base VideosThe Jamf YouTube channel features Knowledge Base videos and troubleshooting tips on managing computers and mobile devices with Jamf Pro.
Jamf MarketplaceThe Jamf Marketplace is a central location for you to find, learn about, and utilize valuable tools to integrate with and extend the Jamf platform.

17
Overview of Technologies

18
Applications and Utilities
This section provides an overview of the applications and utilities that make up Jamf Pro.
Administrator ApplicationsThe administrator applications, excluding the Jamf Pro web app, are installed with the Jamf Pro DMG.
Jamf Pro Web Application
The Jamf Pro web application is the administrative core of Jamf Pro. The Jamf Pro web app allows you to perform inventory, remote management, and configuration tasks on enrolled computers and mobile devices. All other administrator applications in Jamf Pro communicate with the Jamf Pro server.
Composer
The Composer application allows you to build and edit packages of software, applications, preference files, or documents. Building a package involves the following:
Creating a package source—You can create a package source that contains the files you want to package or convert an existing package to a source to edit the package contents.
Building a package—You can build a PKG or a DMG from a package source.
You can also do the following with Composer:
Build a DMG of an operation system (OS).
Monitor the installation of software packages.
Add or edit localization files.
Create package manifests and import or upload package manifests with Jamf Nation.
For more information, see the .Composer User Guide
Jamf Admin
The Jamf Admin application is a repository that allows you to add and manage the following items for computers:
Packages
Scripts
Printers
Categories
Dock items

19
Jamf Admin also allows you to create configurations (images) using these items and replicate files to distribution points.
For more information about tasks you can perform with Jamf Admin, see the following:
Package Management
Scripts
Printers
Dock Items
Categories
File Share Distribution Points
Jamf Imaging
The Jamf Imaging application allows you to image computers by deploying configurations to them.
Disclaimer: Jamf Imaging is included with the Jamf Pro DMG, but imaging workflows are no longer recommended or documented in the . Apple does not recommend Jamf Pro Administrator's Guideor support monolithic system imaging as an installation method because of recent improvements in macOS security, hardware, management, and deployment. Apple encourages IT administrators to convert from device imaging to Automated Device Enrollment (formerly DEP) workflows. For more information on supported methods of installing macOS, see in Apple's Deployment models
. For more information about enrolling and deploying computers Deployment Reference for Macusing Automated Device Enrollment and a PreStage enrollment configured in Jamf Pro, see
. For legacy documentation about Jamf Imaging, see version Computer PreStage Enrollments10.23.0 or earlier of the .Jamf Pro Administrator's Guide
Jamf Remote
The Jamf Remote application allows you to immediately perform remote management tasks on computers, such as installing packages, running scripts, and binding to directory services. While policies in Jamf Pro can automate these tasks to run on a schedule, Jamf Remote allows you to perform them immediately over a Secure Shell (SSH) connection.
Disclaimer: Jamf Remote is included with the Jamf Pro DMG, but remote management workflows are no longer recommended or documented in the . Because of Jamf Pro Administrator's Guideincreased user data protections with macOS 10.14 or later, you cannot enable remote management remotely using the SSH protocol. To enable remote management on computers with macOS 10.14, the user must select the checkbox in System Preferences. For legacy Screen Sharingdocumentation about Jamf Remote, see version 10.23.0 or earlier of the Jamf Pro Administrator's
.Guide

20
Jamf Pro Server Tools
Jamf Pro Server Tools allows you to perform, schedule, and restore database backups, as well as manage settings for the database connection, Apache Tomcat, and MySQL. You can also use Jamf Pro Server Tools to convert the MySQL database storage engine from MyISAM to InnoDB.
Jamf Pro Server Tools is installed automatically when you run the Jamf Pro installer. In addition, you can download the latest version using other methods, including package managers.
Jamf Pro Server Tools is available as a command-line interface and a GUI. The following components are included:
jamf-pro—The command-line interface for executing command-based tasks.
server-tools.jar—The GUI to .jamf-pro
For more information, see the following Knowledge Base articles:
Jamf Pro Server Tools Overview
Using the Jamf Pro Server Tools Command-Line Interface
Recon
The Recon application allows you to enroll computers with Jamf Pro. When computers are enrolled, administrators can use Jamf Pro to collect computer inventory information and manage computers.
Client ApplicationsThe client applications can be distributed to users using Jamf Pro.
Jamf Self Service for macOS
Jamf Self Service for macOS allows users to browse and install configuration profiles, Mac App Store apps, and books. Users can also run policies and third-party software updates via patch policies, as well as access webpages using bookmarks.
Jamf Pro allows you to manage every aspect of Self Service, including its installation, user authentication, and the items available to users. In addition, you can configure how Self Service is displayed to users by replacing the default Self Service application name, icon, and header image with custom branded elements to present users with a familiar look and feel.
You can make any configuration profile, policy, software update (via patch policy), Mac App Store app, or book available in Self Service and customize how it is displayed to users. This includes displaying an icon and description for the item, adding the item to the in relevant categories, and displaying item-specific notifications. You can also specify which computers display the item in Self Service and which users can access it.
For more information, see .Jamf Self Service for macOS

21
Jamf Self Service for Mobile Devices
Jamf Self Service allows users to browse and install mobile device configuration profiles, apps, and books on managed mobile devices. Users can tap their way through Self Service using an intuitive interface.
Jamf Pro allows you to manage every aspect of Self Service, including its installation, authentication, and the items available to users.
There are two kinds of Self Service for mobile devices:
Jamf Self Service for iOS—You can use Jamf Pro to group configuration profiles, apps, and books in categories, which makes those items easier to locate in Self Service. If iBeacon monitoring is enabled in your environment, Self Service is the component that detects when a mobile device enters or exits an iBeacon region. In addition, you can send notifications to mobile devices with Self Service installed. Notifications are displayed to users in the following ways:
The Self Service app icon displays a badge with the number of notifications that have not been viewed by the user.In Self Service, the button displays a badge with the number of notifications that Notificationshave not been viewed by the user. Items are listed in the Notifications area of the app as they are added.(Optional) Each notification can be configured to also display an alert and appear in Notification Center. This requires a proxy server token in Jamf Pro.
The latest version of the Self Service app available in the App Store requires devices with iOS 11 or later, or iPadOS 13 or later. For more information on the Self Service levels of compatibility, see
.Jamf Self Service for iOSJamf Self Service for iOS is available for free from the App Store.
Self Service web clip—In addition to configuration profiles, apps, and books, you can use the Self Service web clip to distribute updated MDM profiles to mobile devices for users to install.
For more information, see .Jamf Self Service for Mobile Devices
Jamf Setup
Jamf Setup is a mobile device app that enables end users to quickly setup and configure a mobile device. You can configure and customize Jamf Setup using Jamf Pro with Managed App Configuration. Users can then select a configuration without having to log in or contact IT.
Jamf Reset
Jamf Reset is a mobile device app that enables users to quickly reset a device to the original factory settings using Jamf Pro. This process simplifies the necessary steps to wipe a device and logs each time a device is wiped in Jamf Pro.

22
UtilitiesThe utilities are installed on enrolled computers and perform management tasks and background processes. Computers in your environment will receive a specific version of the following utilities based on the computer's macOS version:
jamf agent
Jamf Application Bundle (Jamf.app)
jamf binary
Jamf Helper
Jamf Management Action
Depending on what level of compatibility the macOS version of the computer falls under, the following Jamf Pro utility versions will be installed:
macOS Version Jamf Pro Utilities Version Installed
macOS 10.13 or later Latest version
macOS 10.12 10.21.0
macOS 10.11 10.14.1
macOS 10.10 10.9.0
jamf agent
The jamf agent collects application usage data and restricts software on enrolled computers.
The jamf agent is installed and updated on enrolled computers automatically. It is installed in the following location:
/usr/local/jamf/bin/jamfAgent
Jamf Application Bundle
The Jamf application bundle contains the following management framework components:
JamfDaemon—Background process that runs continuously and handles various administrative functions
JamfAAD (Azure Active Directory)—Integrates Jamf Pro with Microsoft Azure to grant conditional access
JamfManagementService—Executes external commands, such as policies
The Jamf application bundle is installed, updated, and run on enrolled computers automatically. It is stored in the following location on enrolled computers:
/Library/Application Support/JAMF/Jamf.app

23
jamf binary
The jamf binary is a command-line application that executes most Jamf Pro tasks. The app is installed, updated, and run on enrolled computers automatically, and you can also use it to manually execute commands. It is stored in the following location on computers:
/usr/local/jamf/bin/jamf
To learn about commands you can execute with the jamf binary, execute the following command:
jamf -help
Jamf Helper
The Jamf Helper displays messages to users. It is stored in the following location on enrolled computers:
/Library/Application Support/JAMF/bin/
Jamf Management Action
The Jamf Management Action application displays policy User Interaction messages in the Notification Center. It is stored in the following location on enrolled computers:
/Library/Application Support/JAMF/bin/

24
Security
This section explains the primary security measures in Jamf Pro:
Passwords
Communication protocols
Public key infrastructure
Signed applications
PasswordsJamf Pro allows you to store individual accounts for managed computers and reset the passwords if necessary.
Passwords stored in the database are encrypted using a standard 256-bit AES encryption algorithm.
Communication ProtocolsJamf Pro has security built into its design. Connections between the Jamf Pro server, the other Jamf Pro apps, and mobile devices take place over Secure Sockets Layer (SSL) using Transport Layer Security (TLS).
The Jamf Remote application and the network scanner in the Recon application connect to computers over Secure Shell (SSH), or Remote Login.
Secure Shell (SSH)
SSH is a network security protocol built into macOS. For more information, go to:http://openssh.com/
Transport Layer Security (TLS)
TLS is a security protocol for Internet communication. For more information, go to:http://tools.ietf.org/html/rfc5246
Public Key InfrastructureA public key infrastructure (PKI) is the design by which digital certificates are obtained, managed, stored, and distributed to ensure a secure exchange of data over a public network.

25
Certificate Authority
A certificate authority (CA) is a trusted entity that signs and issues the certificates required for certificate-based authentication. It is the central component of the PKI.
In Jamf Pro, you can choose to use a built-in CA, integrate with a trusted third-party CA (DigiCert or Active Directory Certificate Services), or configure your own PKI if you have access to an external CA
The certificate authorities can be that supports the Simple Certificate Enrollment Protocol (SCEP). used to issue certificates to both computers and mobile devices.
Note: An external CA can also be used to issue certificates to computers, but this is not enabled by default. For more information, contact your Jamf account representative.
For more information on certificate authorities in Jamf Pro, see .PKI Certificates
Simple Certificate Enrollment Protocol
Simple Certificate Enrollment Protocol (SCEP) obtains certificates from the CA and distributes them to managed mobile devices, providing a simplified way of handling large-scale certificate distribution. If you do not want computers or mobile devices to communicate directly with a SCEP server, you can configure settings that enable Jamf Pro to proxy the communication between a SCEP server and the computers and mobile devices in your environment. This allows Jamf Pro to communicate directly with a SCEP server to obtain certificates and install them on the device. For more information, see the
technical paper.Enabling Jamf Pro as SCEP Proxy
The CA hosted by Jamf Pro (the “built-in CA”) supports SCEP. If you plan to use an external CA hosted by your organization or by a third-party vendor, this CA must support SCEP as well.
Certificates
Jamf Pro uses the following certificates to ensure security:
SSL Certificate—Jamf Pro requires a valid SSL certificate to ensure that computers and mobile devices communicate with the Jamf Pro server and not an imposter server. The SSL certificate that you can create from the built-in CA secures communication using a 2048-bit RSA encryption.
Device Identity Certificates—Device identity certificates allow Jamf Pro to verify the identity of computers and mobile devices each time they communicate with the Jamf Pro server.
Device Certificates—Device certificates are stored in the that is used by the Jamf JAMF.keychainmanagement framework to secure communication between Jamf Pro and a managed computer.
CA Certificate—This certificate establishes trust between the CA and computers, and between the CA and mobile devices.
Signing Certificate—This certificate is used to sign messages passed between the Jamf Pro server and Mac computers, and between the Jamf Pro server and mobile devices.
26
Push Certificate—Jamf Pro requires a valid push certificate to communicate with Apple Push Notification service (APNs).
Anchor Certificate—This certificate allows mobile devices and computers to trust the SSL certificate.
Signed ApplicationsThe following applications are signed by Jamf:
Composer
Jamf Admin
jamf binary
Jamf Helper
Jamf Imaging
Jamf Remote
Jamf Self Service
Recon
Related InformationFor related information, see the following Knowledge Base article:
Network Ports Used by Jamf ProLearn about the network ports used by Jamf Pro.

27
Jamf Pro System Requirements
For system requirements information, see "Jamf Pro System Requirements" in the Jamf Pro Release for your version of Jamf Pro.Notes
28
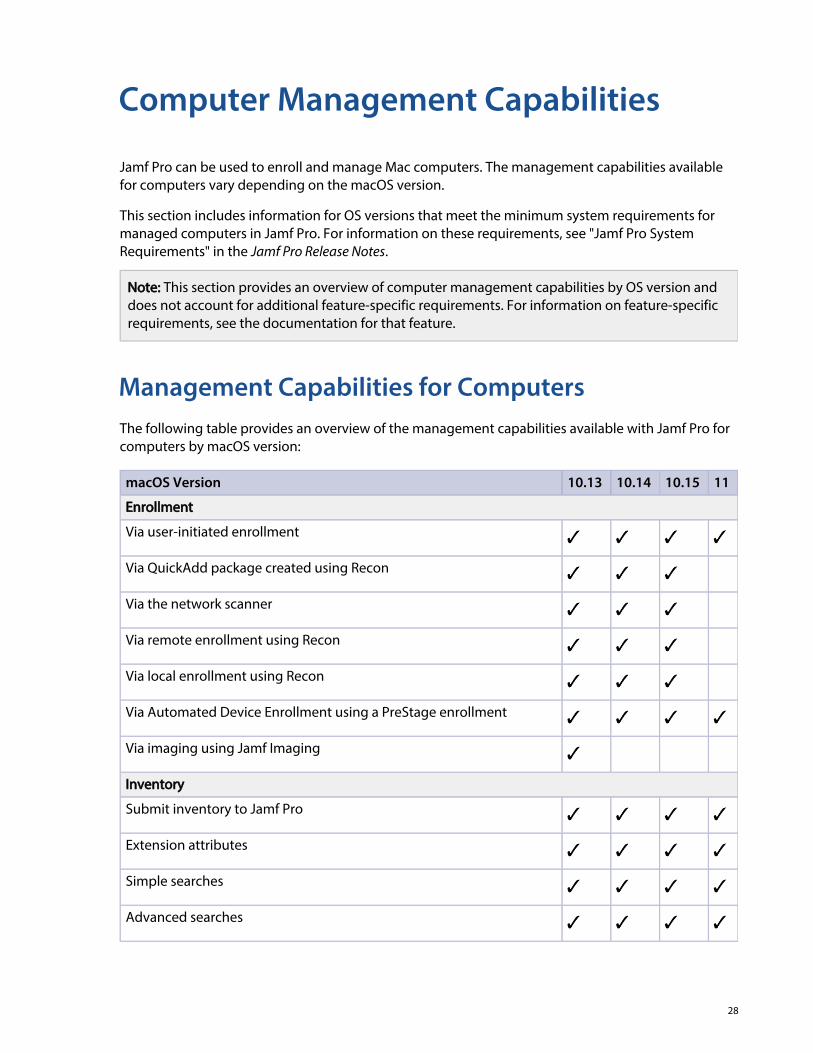
Computer Management Capabilities
Jamf Pro can be used to enroll and manage Mac computers. The management capabilities available for computers vary depending on the macOS version.
This section includes information for OS versions that meet the minimum system requirements for managed computers in Jamf Pro. For information on these requirements, see "Jamf Pro System Requirements" in the .Jamf Pro Release Notes
Note: This section provides an overview of computer management capabilities by OS version and does not account for additional feature-specific requirements. For information on feature-specific requirements, see the documentation for that feature.
Management Capabilities for ComputersThe following table provides an overview of the management capabilities available with Jamf Pro for computers by macOS version:
macOS Version 10.13 10.14 10.15 11
Enrollment
Via user-initiated enrollment
Via QuickAdd package created using Recon
Via the network scanner
Via remote enrollment using Recon
Via local enrollment using Recon
Via Automated Device Enrollment using a PreStage enrollment
Via imaging using Jamf Imaging
Inventory
Submit inventory to Jamf Pro
Extension attributes
Simple searches
Advanced searches

29
macOS Version 10.13 10.14 10.15 11
Computer reports
Mass actions
Computer Groups
Static groups
Smart groups
Self Service
Install Self Service
Display badges for available software updates on the Dock icon
Software Distribution
Managed distribution for computers
Managed distribution for users
Mac App Store apps
Install packages
Remote Control
Screen sharing
Configuration
macOS configuration profiles
Run scripts
Administer printers
Administer Dock items
Administer local accounts
Administer the management account
Bind to directory services
Deploy disk encryption configuration

30
macOS Version 10.13 10.14 10.15 11
Issue a new FileVault 2 recovery key
Administer open Firmware or EFI passwords1
Perform an authenticated restart on FileVault 2-enabled computers
Remote Commands for Computers
Lock computer
Remove MDM profile
Renew MDM profile
Wipe computer
Send blank push
Download/Download and Install Updates2
Unlock User2
Remove User2
Enable/Disable Bluetooth
Enable/Disable Remote Desktop
Allow/disallow Activation Lock2
Usage Management
View Application Usage logs
View Computer Usage logs
Restrict software
Book Distribution
Managed distribution for users
Install ePub file
Install iBooks file
Install PDF

31
Notes: 1. Intel processors only2. Requires supervision or enrollment via a PreStage enrollment
32
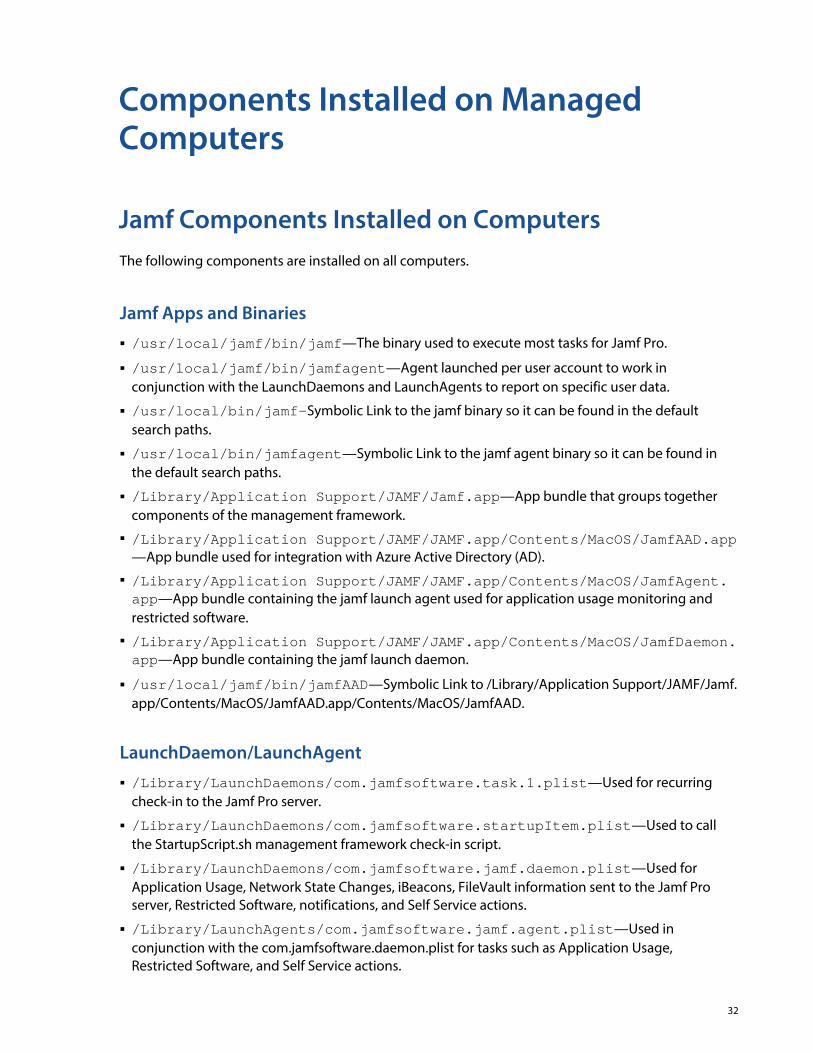
Components Installed on Managed Computers
Jamf Components Installed on ComputersThe following components are installed on all computers.
Jamf Apps and Binaries
/usr/local/jamf/bin/jamf—The binary used to execute most tasks for Jamf Pro.
/usr/local/jamf/bin/jamfagent—Agent launched per user account to work in conjunction with the LaunchDaemons and LaunchAgents to report on specific user data.
/usr/local/bin/jamf—Symbolic Link to the jamf binary so it can be found in the default search paths.
/usr/local/bin/jamfagent—Symbolic Link to the jamf agent binary so it can be found in the default search paths.
/Library/Application Support/JAMF/Jamf.app—App bundle that groups together components of the management framework.
/Library/Application Support/JAMF/JAMF.app/Contents/MacOS/JamfAAD.app—App bundle used for integration with Azure Active Directory (AD).
/Library/Application Support/JAMF/JAMF.app/Contents/MacOS/JamfAgent.app—App bundle containing the jamf launch agent used for application usage monitoring and restricted software.
/Library/Application Support/JAMF/JAMF.app/Contents/MacOS/JamfDaemon.app—App bundle containing the jamf launch daemon.
/usr/local/jamf/bin/jamfAAD—Symbolic Link to /Library/Application Support/JAMF/Jamf.app/Contents/MacOS/JamfAAD.app/Contents/MacOS/JamfAAD.
LaunchDaemon/LaunchAgent
/Library/LaunchDaemons/com.jamfsoftware.task.1.plist—Used for recurring check-in to the Jamf Pro server.
/Library/LaunchDaemons/com.jamfsoftware.startupItem.plist—Used to call the StartupScript.sh management framework check-in script.
/Library/LaunchDaemons/com.jamfsoftware.jamf.daemon.plist—Used for Application Usage, Network State Changes, iBeacons, FileVault information sent to the Jamf Pro server, Restricted Software, notifications, and Self Service actions.
/Library/LaunchAgents/com.jamfsoftware.jamf.agent.plist—Used in conjunction with the com.jamfsoftware.daemon.plist for tasks such as Application Usage, Restricted Software, and Self Service actions.

33
/Library/LaunchDaemons/com.jamf.management.daemon.plist—Launchd file used to start the JamfDaemon.app process.
/Library/LaunchAgents/com.jamf.management.agent.plist—Launchd file used to start the JamfAgent.app process.
/Library/LaunchAgents/com.jamf.management.jamfAAD.agent.plist—Launchd file only present when macOS Intune Integration is enabled on the server; used to start the JamfAAD.app process.
/Library/Preferences/com.jamf.management.jamfAAD.plist—Stores a user's Azure AD preferences.
/Library/LaunchAgents/com.jamf.management.jamfAAD.clean.agent.plist—Used to delete an Azure AD ID token from the user’s login keychain and a user's Azure AD preferences for users that are not currently logged in to the computer.
Property Lists
/Library/Preferences/com.jamfsoftware.jamf.plist—Defines the Jamf Pro server URL, Management Framework Change ID and security settings such as SSL verification, clock skew, and package validation.
/var/root/Library/Preferences/com.apple.loginwindow.plist—Used to store the defined login/logout hooks for the system.
Jamf Application Support Directory
/Library/Application Support/JAMF/.blacklist.xml—Contains list of Restricted Software for clients using a 10.13.0 or earlier version of the Jamf Pro binary.
/Library/Application Support/JAMF/.jmf_settings.json—Contains a list of Restricted Software for clients using a 10.14.0 or later version of the Jamf Pro binary.
/Library/Application Support/JAMF/.userdelay.plist—Contains policies that have been deferred.
/Library/Application Support/JAMF/bin/jamfHelper.app—Application used to display messages to an end user.
/Library/Application Support/JAMF/bin/Management Action.app—Application used to display messages to an end user in the macOS Notification Center.
/Library/Application Support/JAMF/Composer/—Contains working directory for Composer to save package sources.
/Library/Application Support/JAMF/Config/—Contains Jamf Pro server defined iBeacons.
/Library/Application Support/JAMF/Downloads/—Temporary storage for downloaded packages.
/Library/Application Support/JAMF/JAMF.keychain—Enables certificate based authentication with the Jamf Pro server.

34
1.
2.
3.
4.
/Library/Application Support/JAMF/ManagementFrameworkScripts/StartupScript.sh—Script that is called by the com.jamfsoftware.startupItem.plist to enable a check-in to the Jamf Pro server at startup.
/Library/Application Support/JAMF/ManagementFrameworkScripts/loginhook.sh—Script that is called by the com.apple.loginwindow.plist to enable a check-in to the Jamf Pro server at login.
/Library/Application Support/JAMF/ManagementFrameworkScripts/logouthook.sh—Script that is called by the com.apple.loginwindow.plist to enable a check-in to the Jamf Pro server at logout.
/Library/Application Support/JAMF/Offline/—Contains the contents of the policies marked to be Available Offline.
/Library/Application Support/JAMF/Receipts/—Contains receipts for all packages installed by Jamf Pro.
/Library/Application Support/JAMF/run/—Temporary Storage for FileVault key prior to submission.
/Library/Application Support/JAMF/Self Service/—Contains Self Service plugins.
/Library/Application Support/JAMF/tmp/—Contains temporary storage for logs and other files.
/Library/Application Support/JAMF/Usage/—Contains the application usage data to be sent to the Jamf Pro server.
/Library/Application Support/JAMF/Waiting Room/—Contains temporary storage for Cached Packages.
Jamf Client Log
/var/log/jamf.log—Contains a record of what the jamf binary does.
Removing Jamf Components from ComputersThis removes all Jamf-related components from computers that have been managed by Jamf Pro and all package sources created with Composer.
Removing Jamf Components from Computers Enrolled Using a PreStage Enrollment
Log in to Jamf Pro.
Click at the top of the page.Computers
Perform a simple or advanced computer search.For more information, see or .Simple Computer Searches Advanced Computer Searches

35
4.
5.
6.
7.
1.
2.
Click the computer you want to send the remote command to.
If you performed a simple search for an item other than computers, you must click next to Expand an item to view the computers related to that item.
Click the tab, and then click .Management Remove MDM Profile
Open Terminal on the computer you want to remove the components from.
Execute the following command:/usr/local/bin/jamf removeFramework
All Jamf-related components are removed from the computer.
Removing Jamf Components from Computers Without an MDM Profile
Open Terminal on the computer you want to remove the components from.
Execute the following command:/usr/local/bin/jamf removeFramework
All Jamf-related components are removed from the computer.

36
Mobile Device Management Capabilities
Jamf Pro can be used to enroll and manage the following devices:
iOS devices
iPadOS devices
tvOS devices
Personally owned iOS devices
The management capabilities available for a particular device vary depending on the device ownership type, device type, and OS version.
This section includes information for OS versions that meet the minimum system requirements for managed mobile devices in Jamf Pro. For information on these requirements, see "Jamf Pro System Requirements" in the .Jamf Pro Release Notes
Note: This section provides an overview of mobile device management capabilities by OS version and does not account for additional feature-specific requirements. For information on feature-specific requirements, see the documentation for that feature.
Management Capabilities for Mobile DevicesThe following table provides an overview of the management capabilities available with Jamf Pro for iPad, iPhone, and iPod touch devices by iOS version:
iOS Version 11 12 131 141Personally Owned iOS Device Support
Enrollment
Via user-initiatedenrollment
Via an enrollmentprofile and AppleConfigurator
Via an enrollmentprofile and AppleConfigurator 2
Via Automated Device Enrollment using a PreStage enrollment
Via Automated Device Enrollment using a PreStage enrollment and Apple Configurator 2

37
iOS Version 11 12 131 141Personally Owned iOS Device Support
Via AppleConfigurator 2using an enrollment URL
Inventory
Submit inventory toJamf Pro
2
Extension attributes
Simple searches
Advanced searches
Mobile device reports
Mass actions 3
Device Groups
Static groups 4
Smart groups 4
Configuration
iOS configuration profiles 4
Note: You cannot apply profiles that require supervision to devices enrolled using User Enrollment. For more information on the payloads that can be configured for devices enrolled using User Enrollment, see User Enrollment
payload list in Apple’s Mobile Device Management
.Settings

38
iOS Version 11 12 131 141Personally Owned iOS Device Support
Remote Commands5
Update inventory
Lock device
Clear passcode
Update passcode lock grace period
Clear Screen Time Passcode(This command was previously called "Clear Restrictions".)
Wipe device
Set Shared iPad User Space(This command was previously called "Set Storage Quota Size")
Unmanage device
Wipe institutional data
Send blank push
Set wallpaper
Enable/disable voice or data roaming
Update iOS version via mass action
Log out user (Shared iPad only)
Enable/disable Lost Mode
Update location
Enable/disable diagnostic and usage reporting (Shared iPad only)
Enable/disable app analytics (Shared iPad only)
Shut down device (Shared iPad only)
Restart device
Enable/disable Bluetooth

39
iOS Version 11 12 131 141Personally Owned iOS Device Support
Set Activation Lock
Enable/disable Personal Hotspot
Manage Jamf Parent
Remove restrictions set by Jamf Teacher
Refresh Cellular Plans
Renew MDM Profile
Set Time Zone
Jamf Self Service for iOS
Jamf Self Service app 6
iBeacon region monitoring
Self Service web clip
App Distribution
Managed apps
Managed distribution for mobile devices
Managed distribution for users
In-house apps 7
App Store apps 7
Book Distribution
Managed books
Managed distribution
Install ePub file
Install iBooks file (iPad only)
Install PDF

40
Notes: 1. Also applies to iPadOS.2. A limited subset of inventory information is collected for personal devices. For more information, see .Mobile Device Inventory Information Reference3. Lock Device and Update Inventory are the only remote commands that can be sent via mass action to personally owned devices.4. Only applies to devices enrolled using User Enrollment.5. This table does not account for additional requirements like supervision or enrollment using a PreStage enrollment. For information on specific device requirements for each command, see
.Remote Commands for Mobile Devices6. Devices with iOS 13 or later, or iPadOS 13 or later that were enrolled using User Enrollment; manual installation method only7. Only managed apps can be distributed to personal devices. App Store apps must be assigned to users (user-based assignment) before distributing them to devices enrolled using User Enrollment. For more information, see .User-Assigned Volume Assignments
Management Capabilities for tvOS DevicesThe following table provides an overview of the management capabilities available with Jamf Pro for institutionally owned Apple TV devices by tvOS version:
tvOS Version 11 12 13 14
Enrollment
Via an enrollment profile and Apple Configurator
Via an enrollment profile and Apple Configurator 2
Via Automated Device Enrollment using a PreStage enrollment
Via Automated Device Enrollment using a PreStage enrollment and Apple Configurator 2
Inventory
Submit inventory to Jamf Pro
Device Groups
Static groups
Smart groups
Configuration
Mobile device configuration profiles
Remote Commands
Update inventory

41
tvOS Version 11 12 13 14
Unmanage device
Wipe device
Send blank push
Restart device
Set Time Zone
App Distribution
In-house apps
App Store apps

42
Components Installed on Mobile Devices
The following components are installed on mobile devices during enrollment:
MDM Profile—This profile includes a SCEP enrollment request and an MDM enrollment request.
Trust Profile—This profile contains the CA certificate. The CA certificate establishes trust between the certificate authority (CA) and mobile devices. If you enrolled mobile devices using a PreStage enrollment, or using Apple Configurator and an enrollment URL, the Trust Profile is not a separate profile and it is contained within the MDM Profile.
Device certificate—This certificate verifies the identity of managed mobile devices each time they communicate with Jamf Pro.
Jamf Self Service for iOS—Jamf Self Service for iOS allows you to distribute iOS configuration profiles, apps, and books to mobile devices for users to install. Users tap the app to browse and then install items using an interface similar to the App Store.
Note: Jamf Self Service for iOS is not installed on Apple TV devices or personally owned devices.

43
Before You Begin

44
Setting Up Jamf Pro
The first time you connect to the Jamf Pro server, the Jamf Pro Setup Assistant guides you through the following setup tasks:
Accept the license agreement.
Enter your activation code.
Create your first Jamf Pro user account.
Enter your Jamf Pro URL.The Jamf Pro URL is the URL that client applications, computers, and mobile devices will connect to when communicating with the Jamf Pro server.
After you complete the Jamf Pro Setup Assistant, you can click the setup tips that are displayed onscreen to start configuring commonly used settings.
You may also want to make changes to the following preconfigured settings to ensure they meet the needs of your organization. These settings are important because over time, they can significantly affect the size of your database and your levels of network traffic:
“Update Inventory” policy—Determines how often computers submit inventory to Jamf Pro.For more information, see .Computer Inventory Collection
Recurring check-in frequency—Determines the interval at which computers check in with Jamf Pro for available policies.For more information, see .Recurring Check-in Frequency
Mobile device inventory collection frequency—Determines how often mobile devices submit inventory to Jamf Pro.For more information, see .Mobile Device Inventory Collection Settings
Related InformationFor related information, see the following Knowledge Base article:
Network Ports Used by Jamf ProLearn about the network ports that you may need to configure when setting up Jamf Pro.

45
The Jamf Pro Dashboard
The Jamf Pro Dashboard allows you to monitor the status of commonly viewed items in Jamf Pro, such as smart groups, policies, configuration profiles, patch reports and licensed software—all in one central location.
You can access the Dashboard by clicking the icon in the top-left corner of the page.Jamf Pro
Note: Until you add one or more items to the Jamf Pro Dashboard, it displays setup tips that you can use to configure commonly used settings.
46
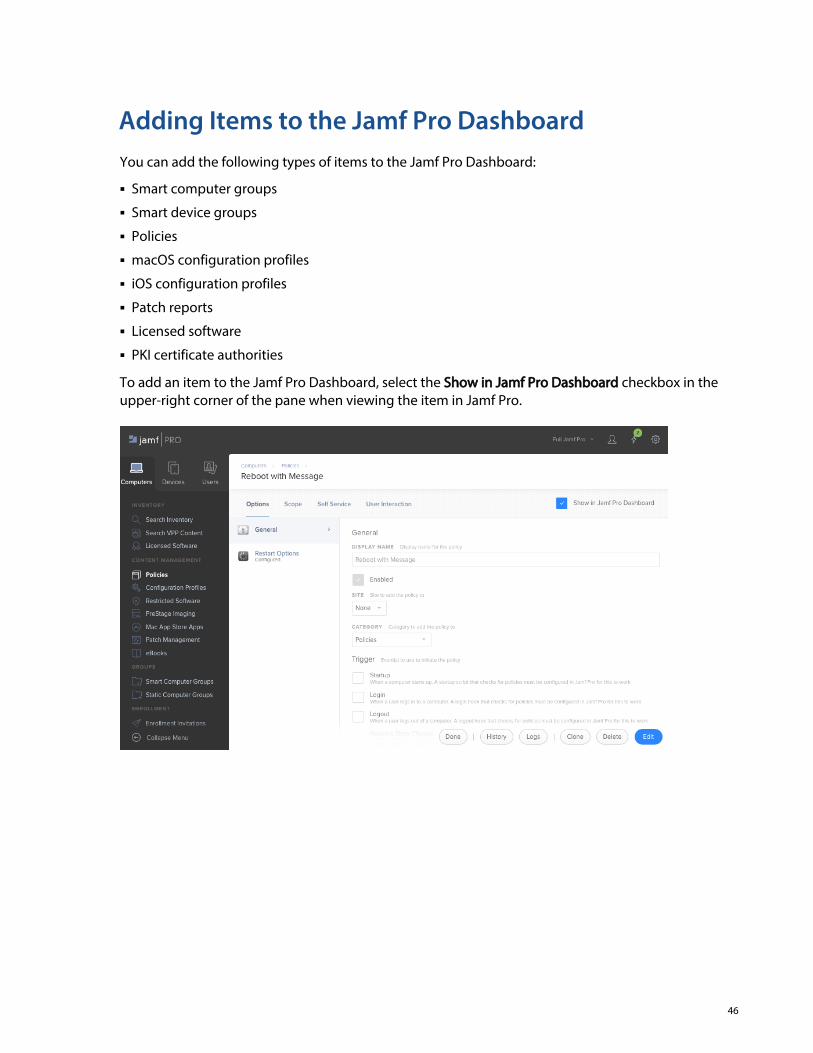
Adding Items to the Jamf Pro DashboardYou can add the following types of items to the Jamf Pro Dashboard:
Smart computer groups
Smart device groups
Policies
macOS configuration profiles
iOS configuration profiles
Patch reports
Licensed software
PKI certificate authorities
To add an item to the Jamf Pro Dashboard, select the checkbox in the Show in Jamf Pro Dashboardupper-right corner of the pane when viewing the item in Jamf Pro.

47
1.
2.
3.
4.
1.
2.
3.
4.
1.
2.
3.
4.
Jamf Pro Objects
Jamf Pro objects provide the foundation for performing administrative and management tasks using Jamf Pro. Examples of Jamf Pro objects include policies, configuration profiles, and network segments.
For detailed information about a specific Jamf Pro object, including instructions for navigating to the Jamf Pro object, see the appropriate section in this guide. Common actions that can be taken on Jamf Pro objects are cloning, editing, deleting, and viewing history.
Note: Available actions are dependent on the particular Jamf Pro object. (For example, a package cannot be cloned, so the Clone button is not displayed for the Packages object.) In addition, an action will not be available if the required privileges have not been granted for that Jamf Pro object.
Cloning a Jamf Pro ObjectLog in to Jamf Pro.
Navigate to the Jamf Pro object you want to clone.
Click and make changes as needed.Clone
Click .Save
Editing a Jamf Pro ObjectLog in to Jamf Pro.
Navigate to the Jamf Pro object you want to edit.
Click and make changes as needed.Edit
Click .Save
Deleting a Jamf Pro ObjectLog in to Jamf Pro.
Navigate to the Jamf Pro object you want to delete.
Click .Delete
Click again to confirm.Delete
Viewing the History of a Jamf Pro Object

48
1.
2.
3.
4.
5.
Viewing the History of a Jamf Pro ObjectJamf Pro allows you to view the history of each Jamf Pro object. The information you can view includes:
The date/time the Jamf Pro object was created or edited
The username of the administrator who made the change
Notes associated with the changes
Details about a change
Note: This information is displayed for any Jamf Pro object changes made using 9.31 or later.
Log in to Jamf Pro.
Navigate to the Jamf Pro object you want to view the history of.
Click .History
(Optional) Click to add a note to the history record.Add Note
(Optional) Click to view details about a change.Details

49
Jamf Pro System Settings

50
Jamf Pro User Accounts and Groups
Jamf Pro is a multi-user application. Jamf Pro user accounts and groups allow you to grant different privileges and levels of access to each user.
When configuring a Jamf Pro user account or group, you can grant access to the full Jamf Pro or to a specific site. You can grant privileges by choosing one of the following privilege sets:
Administrator—Grants all privileges.
Auditor—Grants all read privileges.
Enrollment Only—Grants all privileges required to enroll computers and mobile devices.
Note: This includes privileges to do the following:
Log in to the Jamf Pro interfaceRead, create, and delete enrollment invitationsRead and delete computer and mobile device records via the Jamf Pro API
Custom—Requires you to grant privileges manually. For a Custom user account or group to have access to a particular function, privileges may need to be granted for multiple objects. For example, to create a mobile device configuration profile, the user needs privileges for both “Mobile Devices” and “Mobile Device Configuration Profiles”.
If there are multiple users that should have the same access level and privileges, you can create a group with the desired access level and privileges and add accounts to it. Members of a group inherit the access level and privileges from the group. Adding an account to multiple groups allows you to grant a user access to multiple sites.
There are two ways to create Jamf Pro user accounts and groups: you can create standard accounts or groups, or you can add them from an LDAP directory service.
Important: It is recommended that you have at least one account that is not from an LDAP directory service in case the connection between the Jamf Pro server and the LDAP server is interrupted.
The Jamf Pro User Accounts and Groups settings also allow you to do the following:
Configure account preferences for each Jamf Pro user account.
Configure the password settings in the Password Policy for all standard Jamf Pro user accounts.
Unlock a Jamf Pro user account that is locked.
General RequirementsTo add accounts or groups from an LDAP directory service, you need an LDAP server set up in Jamf Pro. (For more information, see .)Integrating with LDAP Directory Services

51
1.
2.
3.
4.
5.
6.
7.
8.
9.
1.
2.
3.
4.
5.
6.
7.
Creating a Jamf Pro User GroupLog in to Jamf Pro.
In the top-right corner of the page, click .Settings
Click .System Settings
Click .Jamf Pro User Accounts & Groups
Click .New
Do one of the following:
To create a standard Jamf Pro user group, select and click .Create Standard Group Next
To add a Jamf Pro user group from an LDAP directory service, select and click Add LDAP Group Next. Then follow the onscreen instructions to search for and add the group.
Use the Group pane to configure basic settings for the group.
If you chose “Custom” from the pop-up menu, click the tab and select the Privilege Set Privilegescheckbox for each privilege that you want to grant the group.
Click .Save
Creating a Jamf Pro User AccountLog in to Jamf Pro.
In the top-right corner of the page, click .Settings
Click .System Settings
Click .Jamf Pro User Accounts & Groups
Click .New
Do one of the following:
To create a standard Jamf Pro user account, select and click .Create Standard Account Next
To add a Jamf Pro user account from an LDAP directory service, select and click Add LDAP Account. Then follow the onscreen instructions to search for and add the account.Next
On the Account pane, enter information about the account as needed.

52
8.
9.
10.
1.
2.
3.
4.
5.
6.
Choose an access level from the pop-up menu:Access Level
To grant full access to Jamf Pro, choose “Full Access”.
To grant access to a site, choose “Site Access”.
Note: The “Site Access” option is only displayed if there are sites in Jamf Pro.
To add the account to a standard group, choose “Group Access”.
Note: The “Group Access” option is only displayed if there are standard groups in Jamf Pro.
Do one of the following:
If you granted the account full access or site access, choose a privilege set from the Privilege Setpop-up menu. Then, if you chose “Custom”, click the tab and select the checkbox for Privilegeseach privilege that you want to grant the account.
If you added the account to a group, click the tab and select the group or Group Membershipgroups you want to add the account to.
Click .Save
Configuring Account PreferencesYou can configure language & region, search, and interface preferences for each Jamf Pro user account. Language & region preferences allow you to configure settings such as date format and time zone. Search preferences allow you to configure settings for computer, mobile device, and user searches. Interface preferences allow you to configure whether or not Jamf Pro alerts you when navigating away from unsaved changes.
Log in to Jamf Pro.
At the top of the page, click the account settings icon and then click .Account Preferences
Click the tab and use the pop-up menus to configure language and region Language & Regionpreferences.
Click the tab and use the pop-up menus to configure search preferences.Search Preferences
Note: The default search preference is “Exact Match”. For most items, the option can be changed to either “Starts with” or “Contains”.
Click the tab and use the checkbox to configure the unsaved changes alert Interface Preferencespreference.
Click .Save

53
1.
2.
3.
4.
5.
6.
7.
8.
Configuring the Password PolicyThe Password Policy in Jamf Pro allows you to configure the password settings. The Password Policy applies to all standard Jamf Pro user accounts. You can configure the following password settings:
Number of login attempts allowed before a Jamf Pro user is locked out of the account
Password length and age
Password reuse limitations
Password complexity
Settings to allow a user to unlock their own account
Note: The settings configured in the Password Policy do not apply to Jamf Pro user accounts added from an LDAP directory service.
Log in to Jamf Pro.
In the top-right corner of the page, click .Settings
Click .System Settings
Click .Jamf Pro User Accounts & Groups
Click .Password Policy
Click .Edit
Use the settings on the pane to specify the password settings.
Click .Save
The settings are applied immediately.
Unlocking a Jamf Pro User AccountA Jamf Pro user could be locked out of their account if they exceed the specified number of allowed login attempts. If the Password Policy is configured to allow the user to unlock their account, the user can reset their password to unlock their account. In this case, an email is immediately sent to the email address associated with the account in Jamf Pro allowing the user to unlock their account by resetting their password. In addition, a Jamf Pro user account that is locked can be manually unlocked from Jamf Pro by another Jamf Pro user with the Administrator privilege set.
The access status of the account is displayed as “Disabled” in Jamf Pro until the account is unlocked.

54
1.
2.
3.
4.
5.
6.
7.
8.
Requirements
For a password reset email to be sent to locked accounts, an SMTP server must be set up in Jamf Pro. For more information, see .Integrating with an SMTP Server
Procedure
Log in to Jamf Pro.
In the top-right corner of the page, click .Settings
Click .System Settings
Click .Jamf Pro User Accounts & Groups A list of Jamf Pro user accounts and groups is displayed.
Click the Jamf Pro user account that has an access status of “Disabled”, which means the account is locked.
Click .Edit
Choose “Enabled” from the pop-up menu to unlock the account.Access Status
Click .Save
The Jamf Pro user account is unlocked immediately.
Related InformationFor related information, see the following section in this guide:
SitesLearn about sites and how to add them to Jamf Pro.

55
Integrating with LDAP Directory Services
Integrating with an LDAP directory service allows you to do the following:
Look up and populate user information from the directory service for inventory purposes.
Add Jamf Pro user accounts or groups from the directory service.
Require users to log in to Self Service or the enrollment portal using their LDAP directory accounts.
Require users to log in during mobile device setup using their LDAP directory accounts.
Base the scope of remote management tasks on users or groups from the directory service.
Note: Jamf Pro may experience performance issues if too many LDAP groups are included in the scope of an object. If you need to use multiple LDAP criteria within a scope, consider creating a smart group with those criteria, and then scope to that smart group instead.
To integrate with an LDAP directory service, you need to add the LDAP server to Jamf Pro. There are two ways to add LDAP servers to Jamf Pro: using the LDAP Server Assistant or manually.
The LDAP Server Assistant guides you through the process of entering information about the LDAP server and ensuring that LDAP attributes are mapped properly. It allows you to integrate with the following directory services:
Apple’s Open Directory
Microsoft’s Active Directory
NetIQ eDirectory
Note: When your configuration uses SSL, the LDAP server must be configured to issue the server certificate when Jamf Pro requests an SSL connection. If the server certificate is not natively trusted, in Jamf Pro, you need to add the trusted root certificate of the CA that issued the server certificate.
Manually adding an LDAP server involves entering detailed information about the LDAP server and manually configuring attribute mappings. This allows you to integrate with additional directory services.

56
1.
2.
3.
4.
5.
6.
1.
2.
3.
4.
5.
6.
7.
8.
9.
Adding an LDAP Server Using the LDAP Server AssistantLog in to Jamf Pro.
In the top-right corner of the page, click .Settings
Click .System Settings
Click .LDAP Servers
Click .New
Follow the onscreen instructions to add the LDAP server.
Manually Adding an LDAP ServerBefore manually adding an LDAP server, it is important that you are familiar with search bases, object classes, and attributes. If you are not familiar with these concepts, use the LDAP Server Assistant to ensure that attributes are mapped correctly.
Log in to Jamf Pro.
In the top-right corner of the page, click .Settings
Click .System Settings
Click .LDAP Servers
Click .New
Select and click . Configure Manually Next
Use the Connection pane to configure how Jamf Pro connects to the LDAP server.
Use the Mappings pane to specify object class and search base data, and map attributes.
Click .Save
Testing LDAP Attribute MappingsYou can test the following LDAP attribute mappings:
User mappings
User group mappings
User group membership mappings

57
1.
2.
3.
4.
5.
6.
7.
8.
If Jamf Pro returns the appropriate information, the attributes are mapped correctly.
Log in to Jamf Pro.
In the top-right corner of the page, click .Settings
Click .System Settings
Click .LDAP Servers
Click the LDAP server you want to test.
Click .Test
Click the appropriate tab and enter information in the fields provided.
Click again.Test
Related InformationFor related information, see the following sections in this guide:
Cloud Identity Providers IntegrationFind out how to integrate with a Cloud Identity Provider (e.g., Google Secure LDAP Service).
LDAP ProxyFind out how to configure an LDAP Proxy after you have configured an LDAP directory service in Jamf Pro.
For related information, see the following Knowledge Base articles:
Configuring Jamf Pro to Use LDAP Over SSL When Authenticating with Active DirectoryFind out how to configure Jamf Pro to perform authentication with Active Directory using LDAP over SSL (LDAPS).
LDAP Attribute Mappings ReferenceExplains the manual configuration settings of an Active Directory LDAP server.

58
Cloud Identity Providers
Cloud Identity Providers IntegrationIntegrating Jamf Pro with a cloud identity provider allows you to access user data stored in the provider's configuration in an easy and secure way. You can do the following:
Look up and populate user information for inventory purposes.
Add Jamf Pro user accounts or groups from the cloud identity provider.
Require users to log in to Self Service or the enrollment portal using their directory accounts.
Require users to log in during mobile device setup using their directory accounts.
Base the scope of remote management tasks on users or groups from the cloud identity provider.
For information about integrating with a specific cloud identity provider supported by Jamf Pro, see the following sections of this guide:
Google Secure LDAP Integration
Azure AD Integration
Related Information
For related information, see the following sections in this guide:
Jamf Pro User Accounts and GroupsFind out how to add Jamf Pro user accounts or groups from an LDAP directory service.
Jamf Self Service for macOS User Login SettingsFind out how to require users to log in to Jamf Self Service for macOS using their LDAP directory accounts.
Jamf Self Service for iOSFind out how to require users to log in to Jamf Self Service for iOS using their LDAP directory accounts.
ScopeLearn how to configure scope based on users or groups from an LDAP directory service.

59
1.
2.
3.
4.
5.
6.
7.
8.
Google Secure LDAP IntegrationWhen integrating Jamf Pro with Google's Secure LDAP, consider the following:
Jamf Pro allows you to integrate with Google's secure LDAP service that is a part of G Suite Enterprise and Cloud Identity Premium. The service can be used with Jamf Pro for user authentication and group syncing. Cloud Identity Free or G Suite Basic/Business assigned users display in user lookup results and you can add them as Jamf Pro LDAP accounts.
Note: Users assigned to Cloud Identity Free or G Suite Basic/Business licenses are not allowed to authenticate in Jamf Pro. When such a user tries to authenticate, the INSUFFICIENT_ACCESS_RIGHTS (50) error code is displayed in Jamf Pro logs. For information on Secure LDAP service error codes, see the following documentation from Google: https://support.
.google.com/a/answer/9167101
Google's secure LDAP service requires a different configuration than standard LDAP servers. For instructions about how to add Jamf Pro as an LDAP client to the secure LDAP service, configure access permissions, and download the generated certificate, see the following documentation from Google: https://support.google.com/cloudidentity/answer/9048516
After you have added Jamf Pro as an LDAP client, you need to generate the .p12 keystore file. For more information, see the Generating the PKCS12 Keystore File When Integrating Google Cloud
Identity Provider with Jamf Pro Knowledge Base article.
Configuring a Google Identity Provider Connection
When a server connection is added, it is enabled by default. You can configure multiple connections and choose which configuration to use. Disabling the connection prevents Jamf Pro from querying data from this server. This means you can add a different configuration without deleting the current connection. To disable the connection, use the switch.
Log in to Jamf Pro.
In the top-right corner of the page, click .Settings
Click .System Settings
Click Cloud Identity Providers .
Click .New
Choose Google from the identity provider list and click .Next
Configure the settings on the tab. Consider the following limitations:
The display name for the configuration must be unique.
The Domain name value automatically populates the Search Base dc values on the User Mappings and User Groups Mapping tabs.

60
8.
9.
Use the tab to specify object class and search base data, and map attributes. When Mappingsconfiguring the search base, structure the server query in the order that reflects the hierarchical structure of your directory tree to ensure the search returns correct results.
Click .Save
Saving a server connection triggers automatic verification of the hostname, port, and domain. The verification process must succeed before the connection is ready to use.
Important: In large environments, the verification process for valid configurations may fail. Ensure the values in the form are correct and try saving the configuration again.
After your configuration is saved, you can test the mappings. For more information, see Testing .Attribute Mappings
To troubleshoot a failed connection, navigate to in your Google Admin console, and check Reportsthe LDAP audit log.

61
Azure AD IntegrationIntegrating Jamf Pro with Azure AD as an identity provider allows for the following LDAP workflows without the need to configure Azure AD Domain Services:
Look up all users and groups for inventory purposes
Performing user membership lookups and use them to map privileges to relevant accounts in Jamf Pro
Configuring user authentication and scoping
Important: If Jamf Pro already integrates with an Azure Active Directory Domain Services or Microsoft’s Active Directory LDAP configuration that you plan to migrate to an Azure AD instance, do not add this Azure AD instance as a cloud identity provider in Jamf Pro. To ensure your existing LDAP workflows (e.g., scoping or user accounts and groups) continue to work correctly, you will need to migrate your configuration when the migration assistant is available in a future release of Jamf Pro. Adding the Azure AD integration prior to migration may break your environment.
When integrating Jamf Pro with Azure AD, consider the following:
Your Jamf Pro instance needs to be hosted in Jamf Cloud.
Your Azure AD privileges (e.g., Global Administrator) allow you to manage consent requested by the Jamf Pro Azure AD Connector app.
User groups added in Jamf Pro have the same name as groups configured in Azure. Accounts and groups added in Jamf Pro must be the standard type.
When working with LDAP-specific workflows, (e.g., adding scope limitations and exclusions), Azure AD cloud identity items are listed under the LDAP headings.
Single sign-on (SSO) with Azure must be configured in Jamf Pro to use authentication workflows (e.g., user-initiated enrollment and logging in to Jamf Pro). For information on how to configure SSO in Jamf Pro, see .Single Sign-On
Note: When Azure AD with multi-factor authentication enabled is added as the cloud identity provider, authentication workflows in Jamf Pro (e.g., Self Service and user-initiated enrollment) do not work for Azure AD user groups and accounts.

62
1.
2.
3.
4.
5.
6.
7.
8.
9.
10.
Configuring an Azure AD Identity Provider Connection
When a server connection is added, it is enabled by default. You can configure multiple connections and choose which configuration to use. Disabling the connection prevents Jamf Pro from querying data from this server. This means you can add a different configuration without deleting the current connection. To disable the connection, use the switch.
Log in to Jamf Pro.
In the top-right corner of the page, click Settings .
Click System Settings.
Click Cloud Identity Providers .
Click New .
Choose and click . You are redirected to the administrator consent page in Microsoft.Azure Next
Enter your Microsoft Azure credentials and follow the onscreen instructions to grant the permissions requested by the Jamf Pro Azure AD Connector application.
After the request completes, in Jamf Pro configure the settings on the Server Configuration tab. Consider the following:
The display name for the configuration must be unique.
The Tenant ID value is pre-populated with information from Microsoft.
When single sign-on (SSO) with Azure is configured in Jamf Pro, select to Transitive groups for SSOenforce transitive membership lookups in the user and group directory. This ensures that all Azure groups that a group is a member of are included in a directory lookup. There is no need to run recursive queries to list groups for which a user is a member of.
Use the Mappings tab to specify user attribute mappings and group attribute mappings.
Click Save .
Saving a server connection triggers an automatic verification process. After your configuration is saved, you can test the mappings. For more information, see .Testing Attribute Mappings

63
1.
2.
3.
4.
5.
6.
7.
8.
Testing Attribute MappingsYou can test the following attribute mappings:
User mappings
User group mappings
User group membership mappings
If Jamf Pro returns the appropriate information, the attributes are mapped correctly.
Testing Attribute Mappings
Log in to Jamf Pro.
In the top-right corner of the page, click .Settings
Click .System Settings
Click .Cloud Identity Providers
Click the instance name you want to test.
Click .Test
Click the appropriate tab and enter information in the fields provided.
Click again.Test
Related Information
For related information, see the following Knowledge Base article:
Configuring Cloud Identity Provider Attribute Mappings Using Jamf Pro API
Learn how to configure attribute mappings for your cloud identity provider instance using Jamf Pro API.

64
Single Sign-On
You can integrate with a third-party identity provider (IdP) to enable single sign-on (SSO) for portions of Jamf Pro. When SSO is configured and enabled, users are automatically redirected to your organization's IdP login page. After authentication, users obtain access to the resource they were attempting to access.
SSO with Jamf Pro can be enabled for the following:
Jamf Pro server—Every time an unauthenticated user attempts to access the Jamf Pro server, they will be redirected to the IdP login page unless the Allow users to bypass the Single Sign-On authentication checkbox is selected in Jamf Pro's Single Sign-On settings.
User-Initiated Enrollment (iOS and macOS)—Users must authenticate with an IdP to complete User-initiated Enrollment. The username entered during SSO authentication will be used by Jamf Pro to populate the Username field in the User and Location category during an inventory update.
Jamf Self Service for macOS—Users must authenticate with an IdP to access Self Service. The username entered during SSO authentication will be used by Jamf Pro for scope calculations. Self Service is able to access any existing usernames from the IdP.
Notes:
Using SSL (HTTPS) endpoints and the POST binding for transmission of the SAML protocol is recommended.
When configuring your IdP settings, using a SHA-256 or higher signatures for SAML assertions is recommended.
Single Sign-On and LDAPIf LDAP is also integrated with Jamf Pro, keep the following in mind when configuring SSO:
If using LDAP users or groups for SSO, they should first be added as standard Jamf Pro users or groups in the Jamf Pro User Accounts and Groups settings.
If LDAP is integrated with Jamf Pro, LDAP limitations and exclusions can be used. They will be calculated by matching the username entered into the IdP during Self Service user login with the LDAP username.
If LDAP is not integrated with Jamf Pro, targets and exclusions for a username will be calculated by matching the username entered into the IdP during Self Service user login with Jamf Pro users accounts and groups.
Single LogoutJamf Pro uses IdP-initiated SAML Single Logout (SLO) during enrollment to ensure users can end all sessions started with Jamf Pro and the IdP. Afters users complete the enrollment process, a Logout button is available. Use the Messaging pane in User-Initiated Enrollment settings to customize the text displayed during the enrollment experience.

65
SLO is not available in the following scenarios:
Your IdP does not provide any SLO endpoints in the metadata.
A Jamf Pro Signing Certificate is not set up.
When SLO is not available, a message stating that the IdP session may still be active is displayed to users. This is important for Jamf Pro administrators who cannot completely log out after performing the enrollment process for other users.
Note: To support uncommon IdP configurations, the GET binding (less secure than POST) can be used for SAML Single Logout.
Identity Provider Configuration SettingsTo implement single sign-on (SSO) with Jamf Pro, you must configure settings in your identity provider's console, portal, or a similar tool. Configuring settings in an IdP usually must be completed before you enable SSO in Jamf Pro, and some commonly used IdPs have pre-configured SSO settings specific to Jamf Pro.
Important: Depending on your IdP, setting up SSO may require simultaneous configuration between your IdP and Jamf Pro to ensure some settings are mapped correctly. Additional settings or steps may also be required.
For IdP-specific instructions for configuring SSO, see the following Knowledge Base articles:
Configuring Single Sign-On with Okta
Configuring Single Sign-On with Active Directory Federation Services
Configuring Single Sign-On with Shibboleth
Configuring Single Sign-On with OneLogin
Configuring Single Sign-On with Ping Identity
Configuring Single Sign-On with G Suite (Google Apps)
Configuring Single Sign-On with Centrify
Azure AD For information on configuring SSO with , see the following documentation from Microsoft: .https://docs.microsoft.com/azure/active-directory/saas-apps/jamfprosamlconnector-tutorial
Enabling Single Sign-On in Jamf Pro
Requirements
To enable single sign-on (SSO) in Jamf Pro, you need the following:
Integration with an identity provider (IdP) that supports SAML 2.0 protocols
Jamf Pro user accounts or groups with matching IdP usernames or groups
Administrator privileges to Jamf Pro and your IdP

66
1.
2.
3.
4.
5.
6.
7.
8.
9.
10.
11.
a.
b.
c.
Procedure
Note: Enabling SSO for Jamf Pro services and applications prevents users from authenticating with all other user credentials.
Log in to Jamf Pro.
In the top-right corner of the page, click .Settings
Click .System Settings
Click .Single Sign-On
Click .Edit
Select the checkbox.Enable Single Sign-On Authentication
Note: Copy the and save it to a secure location.Failover Login URL
Choose your IdP from the pop-up menu. If your IdP is not available in the pop-up Identity Providermenu, choose "Other".
The is pre-populated by default (e.g., "https://instancename.jamfcloud.com/saml Entity ID/metadata") in Jamf Pro.
Note: This value usually must match the Audience URI value in your IdP configuration settings.
Choose "Metadata URL" or "Metadata File" from the pop-up menu. Identity Provider Metadata SourceThis value is obtained from your IdP's configuration settings.
Enter a value in minutes in the field. This value determines the amount of time Token Expirationbefore the SAML token expires and is pre-populated depending on your IdP.
Important: Make sure this value matches the token expiration settings configured in your IdP. If the values are different, users may encounter a single sign-on error when attempting to log in.
Configure User Mapping settings:
Select which attribute from the SAML token should be mapped to Jamf Pro users. is NameIDselected by default. If you select , define a custom attribute that is included in the Custom AttributeSAML token sent from the IdP.
Note: To complete the information exchange between Jamf Pro and the IdP, the SAML token sent by the IdP must include the attribute for both options.NameID
Select or to determine how users in your IdP will be mapped to Jamf Pro users. B Username Email y default, Jamf Pro gets information about the user from the IdP and matches it with existing Jamf Pro user accounts. If the incoming user account does not exist in Jamf Pro, then group name matching occurs.

67
11.
c.
d.
12.
13.
Enter the SAML token attribute that defines users in the IdP in the Identity Provider Group field. Jamf Pro matches each group from the Jamf Pro database and compares Attribute Name
group names. Users will be granted access privileges from all of the groups in the same manner as a local Jamf Pro user would. strings may be formatted as multiple strings or a AttributeValuesingle string or semicolon-separated values.
Example: http://schemas.xmlsoap.org/claims/Group
(Optional) Use the setting to extract the name of the group from strings RDN Key For LDAP Groupsent in LDAP format, Distinguished Names (DN). Jamf Pro will search the incoming string for a Relative Distinguished Name (RDN) with the specified key and use the value of the RDN Key as an actual name of the group.
Note: If the LDAP directory service string contains several RDN parts with the same key (i.e., CN=Administrators, CN=Users, O=YourOrganization), then Jamf Pro will extract group names from the left-most RDN Key (CN=Administrators). If the RDN Key for LDAP Group field is left blank, Jamf Pro will use the entire LDAP format string.
(Recommended) Choose an option from the to secure SAML Jamf Pro Signing Certificatecommunication with a digital signature. If uploading the Jamf Pro Signing Certificate, upload a signing certificate keystore (.jks or .p12) with a private key to sign and encrypt SAML tokens, enter the password to the KeyStore file, select a private key alias, and then enter the password for this key.
Configure one or more of the following SSO Options for Jamf Pro:
Select to allow users to sign in in to Jamf Allow users to bypass the Single Sign-On authenticationPro without SSO, if they directly navigate to the Jamf Pro URL. When a user tries to access Jamf Pro via your IdP, SSO authentication and authorization still occurs.
Select to allow users to log in to Self Service via Enable Single Sign-On for Self Service for macOSthe IdP login page. Self Service is able to access any existing usernames from the IdP.
Notes:
If selected, Login settings in Self Service for macOS will automatically change Self Service User Login settings to use to Single Sign-On.
Disabling SSO for Self Service automatically changes the Self Service User Login settings back to "Allow users to log in to view items available to them using an LDAP account or Jamf Pro user account".

68
13.
14.
15.
Select to allow users to enroll with Jamf Pro via Enable Single Sign-On for User-Initiated Enrollmentthe IdP login page. When enabled, the username at the IdP login page will be the username Jamf Pro uses for the Username field in the User and Location category during an inventory update for a computer or mobile device. You can allow access to all users in your IdP or to restrict access to only a select group of users.
Notes:
If LDAP is integrated with Jamf Pro, the User and Location information will be fully populated using a lookup from Jamf Pro to LDAP.
If LDAP is not integrated with Jamf Pro, the Username field will be the only item populated in the User and Location category. User lookup will not work during enrollment.
Click . Save
(Optional) Download the Jamf Pro Metadata file.
Users will now be automatically redirected to your organization's IdP login page to access configured portions of Jamf Pro.
To test SSO authentication settings, log out of Jamf Pro and your IdP, and then navigate to your Jamf Pro URL in a web browser. Your IdP login page should display and successfully redirect you to the Jamf Pro dashboard after authentication.
Related InformationFor related information, see the following sections in this guide:
Integrating with LDAP Directory Services Find out how to add an LDAP server and test LDAP attribute mappings.
User-Initiated Enrollment for ComputersFind out where to set the logout message text.
Enrollment Customization SettingsFind out to use Enrollment Customization settings to configure a Single Sign-On Authentication PreStage Pane.
For related information about how to resolve common errors that users might experience while using SSO, see the Knowledge Base article.Troubleshooting Single Sign-On in Jamf Pro

69
1.
2.
3.
4.
5.
6.
7.
1.
2.
3.
4.
5.
6.
Integrating with an SMTP Server
Integrating with an SMTP server allows you to do the following:
Send email notifications to Jamf Pro users when certain events occur.
Send enrollment invitations via email.
Send mass emails to end users.
To integrate with an SMTP server, you need to configure the SMTP Server settings in Jamf Pro.
Configuring the SMTP Server SettingsLog in to Jamf Pro.
In the top-right corner of the page, click .Settings
Click .System Settings
Click .SMTP Server
Click .Edit
Configure the settings on the pane.
Click .Save
Testing the SMTP Server SettingsOnce the SMTP Server settings are configured, you can send a test email from Jamf Pro.
Log in to Jamf Pro.
In the top-right corner of the page, click .Settings
Click .System Settings
Click .SMTP Server
Click Test .
Enter a test email address and click again.Test
A message displays, reporting whether or not the email was sent successfully.

70
Related InformationFor related information, see the following sections in this guide:
Email NotificationsLearn about the different email notifications that can be sent to Jamf Pro users.
User-Initiated Enrollment for ComputersFind out how to send computer enrollment invitations via email.
User-Initiated Enrollment for Mobile DevicesFind out how to send mobile device enrollment invitations via email.
Sending a Mass Email to Computer UsersFind out how to send a mass email to computer users.
Sending a Mass Email to Mobile Device UsersFind out how to send a mass email to mobile device users.

71
Email Notifications
Jamf Pro can send email notifications when the following events occur:
A computer is enrolled using an Imaging PreStage.
An error occurs during imaging.
An error occurs while a policy is running.
A restricted software violation occurs.
Note: For this to work, email notifications must also be enabled for the individual restricted software records.
The license limit for a licensed software record is exceeded.
Note: For this to work, email notifications must also be enabled for the individual licensed software records.
One or more Memcached Endpoint(s) are not reachable.
Smart computer group membership changes.
Smart device group membership changes.
Smart user group membership changes.
SSL certificate verification is disabled.
Tomcat is started or stopped.
The database is backed up successfully.
A database backup fails.
Jamf Pro account is locked out because of excessive failed login attempts.
Jamf Pro fails to add a file to the cloud distribution point.
An instance of the Jamf Pro web app in a clustered environment fails.
An updated patch reporting software title is available.
Note: You can choose to be notified of available software title updates via email or a Jamf Pro notification, or both. The Jamf Pro notification option displays a pop-up dialog to the user in Jamf Pro when a new software title update is available. You can also receive notifications for a specific software title. If you disable this notification, you do not receive notifications for any specific software titles that have Patch Notifications enabled.

72
1.
2.
3.
4.
The volume purchasing (formerly VPP) service token for a location is approaching its expiration date.
Note: The first email notification is sent 31 days before the token expires. Email notifications are sent once a week until the token is 7 days from its expiration date. When the expiration date is less than 7 days, they are sent every day until the token expires. After the token has expired, no email notifications are sent.
A Jamf Infrastructure Manager instance has not checked in with Jamf Pro.
Note: An email notification is sent if the Infrastructure Manager fails to check in with Jamf Pro after three attempts. Only one notification is sent for this event.
The Jamf Pro JSS Built-in Certificate Authority (CA) is approaching its expiration date or has already expired.
The Jamf Pro JSS Built-in Certificate Authority (CA) renewal process succeeded or failed.
Enabling Email NotificationsJamf Pro allows you to enable email notifications for specific events.
Note: Some essential notifications, such as certificate authority (CA) expiration emails, are enabled by default and cannot be disabled.
Requirements
An SMTP server set up in Jamf Pro (For more information, see .)Integrating with an SMTP Server
An email address specified for the Jamf Pro user account you want to enable email notifications for (For more information, see .)Jamf Pro User Accounts and Groups
Procedure
Log in to Jamf Pro.
At the top of the page, click the account settings icon, and then click Notifications.
Note: The Notifications option is not displayed if your Jamf Pro user account is associated with an LDAP group.
Select the checkbox for each event that you want to receive email notifications for.
Click .Save
73
Related InformationFor related information, see the following section in this guide:
Integrating with Apple's Volume PurchasingFind out how to configure email notifications for locations.
Restricted SoftwareFind out how to enable email notifications for individual restricted software records.
Licensed Software RecordsFind out how to enable email notifications for individual licensed software records.
Patch Management Software TitlesFind out how to enable email notifications for specific patch software titles.

74
1.
2.
3.
4.
5.
6.
7.
Activation Code
The Activation Code settings in Jamf Pro allow you to update the activation code for your license. You can also change the organization name associated with the license and view licensing information.
Updating the Activation CodeEvery time you receive a new activation code, it must be updated in Jamf Pro.
Log in to Jamf Pro.
In the top-right corner of the page, click .Settings
Click .System Settings
Click .Activation Code
Click .Edit
Enter the new activation code.
Click .Save

75
1.
2.
3.
4.
5.
6.
Change Management
Change Management allows you to track the changes that happen in Jamf Pro, such as the creation of a Jamf Pro user account. The Change Management settings in Jamf Pro allow you to log those changes to a log file (JAMFChangeManagement.log) on the Jamf Pro host server and log the changes to a syslog server.
The Change Management logs can also be viewed in Jamf Pro. The information displayed includes:
Date/time the change took place
Username of the administrator who made the change
Object type (such as a Jamf Pro user account)
Object name (such as the username of a Jamf Pro user account)
Action (such as “Created”)
Details about the change
In addition, you can view the changes to a specific object in that object’s history.
Note: The option to log changes to a log file or a syslog server is only available for on-premise environments. If your environment is hosted in Jamf Cloud, changes are automatically displayed in the Change Management settings and cannot be exported.
General RequirementsTo log changes to a log file, the account used to run Tomcat must have write permissions for the directory where the file is located.JAMFChangeManagement.log
Configuring the Change Management Settings for On-Premise EnvironmentsThe option to configure the Change Management settings is only available for on-premise environments. If your environment is hosted in Jamf Cloud, changes are automatically displayed in the Change Management settings.
Log in to Jamf Pro.
In the top-right corner of the page, click .Settings
Click .System Settings
Click .Change Management
Click .Edit

76
6.
7.
1.
2.
3.
4.
5.
Configure the settings on the pane.
Click .Save
Viewing Change Management Logs in Jamf ProLog in to Jamf Pro.
In the top-right corner of the page, click .Settings
Click .System Settings
Click .Change Management The Change Management logs are displayed on the pane.
Do one of the following:
To view the object associated with a change, click the object in the Object Name column.
To view details about the change, click in the Details column.Details
Related InformationFor related information, see the following section:
Jamf Pro ObjectsFind out how to view the history of a Jamf Pro object.

77
1.
2.
3.
4.
5.
6.
7.
8.
SSL Certificate
Jamf Pro requires a valid SSL certificate to ensure that computers and mobile devices communicate with the Jamf Pro server and not an imposter server.
The Apache Tomcat settings in Jamf Pro allow you to create an SSL certificate from the certificate authority (CA) that is built into Jamf Pro. You can also upload the certificate keystore for an SSL certificate that was obtained from an internal CA or a trusted third-party vendor.
Note: If your environment is hosted in Jamf Cloud, the Apache Tomcat settings are managed by Jamf Cloud and are not accessible.
Creating or Uploading an SSL Certificate
Requirements
To create or upload an SSL certificate, Jamf Pro must be installed as the “ROOT” web app, and the user running the Tomcat process must have read/write access to Tomcat’s file.server.xml
Procedure
Log in to Jamf Pro.
In the top-right corner of the page, click .Settings
Click .System Settings
Click .Apache Tomcat Settings
Click .Edit
Select and click .Change the SSL certificate used for HTTPS Next
Follow the onscreen instructions to upload or create an SSL certificate.
Restart Tomcat for the changes to take effect.For instructions, see the Knowledge Base article.Starting and Stopping Tomcat
Related InformationFor related information, see the following Knowledge Base article:
Using OpenSSL to Create a Certificate Keystore for TomcatFind out how to use OpenSSL to create a certificate keystore that you can upload to Jamf Pro.

78
1.
2.
3.
4.
5.
6.
7.
8.
Flushing Logs
Flushing logs reduces the size of the database and can speed up searches. You can flush the following types of logs:
Application Usage logs
Computer Usage logs
Policy logs
Jamf Remote logs
Screen sharing logs
Jamf Imaging logs
Computer and mobile device management history
Computer inventory reports (computer inventory information from past inventory submissions)
Mobile device inventory reports (mobile device inventory information from past inventory submissions)
Jamf Pro access logs
Change Management logs
Event logs
User and Location History
User Reports
You can schedule log flushing to take place daily, or you can manually flush logs as needed. You can also choose to flush logs that are older than a certain number of days, weeks, or months.
Scheduling Log FlushingLog in to Jamf Pro.
In the top-right corner of the page, click .Settings
Click .System Settings
Click .Log Flushing
Click .Edit
Use the pop-up menus to choose the number of days, weeks, or months after which each type of log should be flushed.
Choose a time of day from the pop-up menu.Time to Flush Logs Each Day
Click .Save

79
1.
2.
3.
4.
5.
6.
7.
8.
Manually Flushing LogsLog in to any of the Jamf Pro web apps.
In the top-right corner of the page, click .Settings
Click .System Settings
Click .Log Flushing
Click .Flush
Select the checkbox for each type of log you want to flush.
From the pop-up menu, choose the number of days, weeks, or months after Flush Logs Older Thanwhich logs should be flushed.
Click .Flush
A message displays, reporting the success or failure of the flush.
Related InformationFor related information, see the following sections in this guide:
Viewing and Flushing Policy Logs for a ComputerFind out how to view and flush policy logs for a computer.
Viewing and Flushing Logs for a PolicyFind out how to view and flush logs for a policy.
Computer History InformationFind out how to view the logs and the management history for a computer.
Mobile Device History InformationFind out how to view the management history for a mobile device.
For related information, see the following Knowledge Base article:
Data and Tables Affected by Log FlushingLearn about the types of data flushed with each log and the database tables affected.

80
1.
2.
3.
4.
5.
6.
7.
8.
Maintenance Pages
The Maintenance Pages setting allows you to create a custom maintenance page for each language used in your environment.
The maintenance page is displayed to users when Jamf Pro is starting up or being upgraded under the following conditions:
When using the Self Service web clip
During enrollment
A maintenance page configuration is preconfigured in Jamf Pro for each of the following languages: English, French, German, Japanese, and Spanish. When a computer or mobile device has a preferred language set on it, it displays the maintenance page configuration that corresponds with that language. The English version of the maintenance page is displayed if the computer or mobile device does not have a preferred language set on it.
In addition to the language, the message and the graphic displayed on the maintenance page can be customized. The preconfigured maintenance page message is “We’ll be back.” You can use Markdown to format the maintenance page message and image.
Creating a Maintenance Page ConfigurationThe Maintenance Pages setting allows you to create a custom maintenance page for each language used in your environment.
Log in to Jamf Pro.
In the top-right corner of the page, click .Settings
Click .System Settings
Click .Maintenance Pages
Click and then use the pop-up menu to specify the language that will be New , Languagecontained within the message. Computers and mobile devices with a preferred language that matches the specified language will display this version of the maintenance page.
Use the field to customize the message displayed during the Jamf Pro Maintenance Page Messagemaintenance process.For information about how to use Markdown to customize the message, see the Using Markdown to
Knowledge Base article.Format Text
Click .Save
Repeat this process as needed for other languages.

81
Jamf Pro Summary
The Jamf Pro Summary is a custom report that can be useful for troubleshooting Jamf Pro issues, and for providing information to Jamf for purposes of support or license renewal.
By default, the Jamf Pro Summary includes the following information:
Number of managed and unmanaged computers
Number of managed mobile devices
Operating system on the Jamf Pro host server
Path to the Jamf Pro web app
Apache Tomcat version
Information about the version of Java installed on the Jamf Pro host server
Information about the MySQL connection and configuration
You can also add information to the Jamf Pro Summary from the following categories as needed:
Computers
Mobile Devices
Users
System Settings
Server Infrastructure
Global Management
Computer Management
Computer Management–Management Framework
Mobile Device Management
User Management
Network Organization
Database
You can view the Jamf Pro Summary in a browser window or send the Jamf Pro Summary to Jamf.

82
1.
2.
3.
4.
5.
6.
7.
1.
2.
3.
4.
5.
6.
7.
Viewing the Jamf Pro SummaryLog in to Jamf Pro.
In the top-right corner of the page, click .Settings
Click .Jamf Pro Information
Click .Jamf Pro Summary
Select the checkboxes next to the items you want to include.
Click .CreateThe Jamf Pro Summary displays in a browser window.
Click the button in the web browser to return to the Jamf Pro Summary pane.Back
Sending the Jamf Pro Summary to Jamf
Requirements
To send the Jamf Pro Summary to Jamf, you need a valid Jamf Nation account.
To create a Jamf Nation account, go to: https://www.jamf.com/jamf-nation/users/new
Procedure
Log in to Jamf Pro.
In the top-right corner of the page, click .Settings
Click .Jamf Pro Information
Click .Jamf Pro Summary
Select the checkboxes next to the items you want to include.
Click .Send Summary to Jamf
Enter your Jamf Nation credentials, and then click .Send
The Jamf Pro Summary is sent to Jamf via Jamf Nation.

83
Related InformationFor related information about Customer Experience Metrics (CEM), see the following Knowledge Base article:
Customer Experience MetricsLearn about Customer Experience Metrics and how to configure the setting in your Jamf Pro environment.
For related information about Customer Experience Metrics, visit the following webpage:https://www.jamf.com/products/jamf-pro/customer-experience-metrics/

84
1.
2.
3.
4.
5.
6.
7.
8.
1.
2.
3.
4.
5.
6.
Jamf Pro Server Logs
The Jamf Pro Server Logs settings allow you to view and download the Jamf Pro server log and volume purchasing logs from the Jamf Pro web app. You can also use the Jamf Pro Server Logs settings to do the following:
Jamf Pro—You can enable debug mode and statement logging for the Jamf Pro server.
Volume purchasing—You can enable debug mode and traffic logging for volume purchasing. Traffic logging allows you to view the communication between the Jamf Pro server and Apple.
Viewing and Downloading the Jamf Pro Server LogLog in to Jamf Pro.
In the top-right corner of the page, click .Settings
Click .Jamf Pro Information
Click .Jamf Pro Server Logs
Click .Edit
Configure the options on the screen.
Click .Save The Jamf Pro server log displays on the page.
(Optional) Click to download the log.Download The is downloaded immediately.JAMFSoftwareServer.log
Viewing and Downloading the Volume Purchasing LogLog in to Jamf Pro.
In the top-right corner of the page, click .Settings
Click .Jamf Pro Information
Click .Jamf Pro Server Logs
Select the tab and clickVolume Purchasing .Edit
Configure the options on the screen.

85
7.
8.
Click .Save The volume purchasing server log displays on the page.
(Optional) Click to download the log.Download The is downloaded immediately.JAMFProVPP.log
Related InformationFor related information, see the following Knowledge Base article:
Enabling Debug ModeFind out how to enable debug mode for several Jamf products, as well as where to view logs from your Apple devices so that you can troubleshoot on a deeper level.

86
Jamf Pro Health Check Page
The Jamf Pro health check page allows you to view the status of your environment. This can be useful for identifying performance and configuration issues. For example, you can use the Jamf Pro health check page to ensure all instances of the Jamf Pro web app in a clustered environment are running without error.
Note: The Jamf Pro health check page is not the same as the Jamf Pro Health Check service offered by Jamf Professional Services.
The following table lists the possible status the Jamf Pro health check page may return:
Status Description
[{"healthCode":1,"httpCode":503,"description":"DBConnectionError"}]
An error occurred while testing the database connection.
[{"healthCode":2,"httpCode"200:,"description":"SetupAssistant"}]
The Jamf Pro Setup Assistant was detected.
[{"healthCode":3,"httpCode":503,"description":"DBConnectionConfigError"}]
A configuration error occurred while attempting to connect to the database.
[{"healthCode":4,"httpCode":503,"description":"Initializing"}]
The Jamf Pro web app is initializing.
[{"healthCode":5,"httpCode":503,"description":"ChildNodeStartUpError"}]
An instance of the Jamf Pro web app in a clustered environment failed to start.
[{"healthCode":6,"httpCode":503,"description":"InitializationError"}]
A fatal error occurred and prevented the Jamf Pro web app from starting.
[ ] The Jamf Pro web app is running without error.
Using the Jamf Pro Health Check PageTo navigate to the Jamf Pro health check page, append "healthCheck.html" to your Jamf Pro URL. For example:
https://instancename.jamfcloud.com/healthCheck.html (hosted in Jamf Cloud)
https://jamf.instancename.com:8443/healthCheck.html (hosted on-premise)
The status of your environment displays on the screen.
Once you have identified the status of your environment, you can take steps to resolve any issues that were found.

87
Global Management Settings

88
1.
2.
3.
1.
2.
3.
4.
Push Certificates
Jamf Pro requires a valid push certificate to communicate with Apple Push Notification service (APNs). This communication is required to do the following:
Send macOS configuration profiles and macOS remote commands to computers.
Distribute Mac App Store apps to computers.
Enroll and manage iOS devices.
An assistant in Jamf Pro guides you through the following steps to create a new push certificate (.pem) and upload it to Jamf Pro:
Obtain a signed certificate signing request (CSR) from Jamf Nation.
Create the push certificate in Apple’s Push Certificates Portal by logging into the portal, uploading the signed CSR obtained from Jamf Nation, and downloading the resulting push certificate.
Upload the push certificate to Jamf Pro.
If you have a push certificate in .p12 format, you do not have to create a new one. You can simply upload the .p12 file to Jamf Pro.
You can also use Jamf Pro to renew your push certificate when needed.
Note: Uploading a push certificate to Jamf Pro automatically enables the Enable Push Notificationssetting in Jamf Pro's Security settings.
General RequirementsTo create or renew a push certificate, you need:
A valid Jamf Nation accountTo create a Jamf Nation account, go to:https://www.jamf.com/jamf-nation/users/new
A valid Apple ID (A corporate Apple ID is recommended.)If you are renewing a push certificate that was originally obtained from Apple’s iOS Developer Program (iDEP), you must use the Apple ID for the iDEP Agent account used to obtain the certificate.
Creating a Push CertificateLog in to Jamf Pro.
In the top-right corner of the page, click .Settings
Click .Global Management

89
4.
5.
6.
1.
2.
3.
4.
5.
6.
7.
1.
2.
3.
4.
5.
Click .Push Certificates
Click and do one of the following:New
If the server hosting Jamf Pro has an outbound connection, select Download signed CSR from Jamf .Nation
Jamf Pro connects to Jamf Nation over port 443 and obtains the signed CSR.
If the server hosting Jamf Pro does not have an outbound connection, select Download CSR and .sign later using Jamf Nation
Follow the onscreen instructions to create and upload the push certificate (.pem).
Uploading a Push Certificate (.p12)If you have a push certificate that’s in .p12 format, you can upload it to Jamf Pro.
Note: You will only have a push certificate in .p12 format if the CSR used to create the certificate was not issued by Jamf Pro.
Log in to Jamf Pro.
In the top-right corner of the page, click .Settings
Click .Global Management
Click .Push Certificates
Click .New
Select .Upload push certificate (.p12)
Follow the onscreen instructions to upload the push certificate.
Renewing the Push CertificateImportant: It is recommended that you do not delete the existing push certificate from Jamf Pro when renewing a push certificate.
Log in to Jamf Pro.
In the top-right corner of the page, click .Settings
Click .Global Management
Click .Push Certificates
Click the push certificate, and then click .Renew

90
6.
7.
1.
2.
3.
4.
5.
Choose a method for renewing the push certificate:
If the server hosting Jamf Pro has an outbound connection, select Download signed CSR from Jamf .Nation
Jamf Pro connects to Jamf Nation over port 443 and obtains the signed CSR.
If the server hosting Jamf Pro does not have an outbound connection, select Download CSR and .sign later using Jamf Nation
If you have a new push certificate in .p12 format, select .Upload push certificate (.p12)
Follow the onscreen instructions to renew the push certificate.
Deleting the Push CertificateDeleting the push certificate from Jamf Pro disables communication between Jamf Pro and APNs. This prevents Jamf Pro from sending macOS configuration profiles and macOS remote commands to computers, and managing iOS devices. In addition, without a push certificate, Mac App Store apps cannot be distributed to computers. To restore these capabilities, you must create a new push certificate, and then re-enroll your computers and mobile devices with Jamf Pro.
Log in to Jamf Pro.
In the top-right corner of the page, click .Settings
Click .Global Management
Click .Push Certificates
Click the push certificate and click . Then click again to confirm.Delete Delete
Related InformationFor related information, see the following Jamf Knowledge Base videos:
Generating an APNs Certificate with Jamf Pro
Renewing an APNs Certificate with Jamf Pro
For related information, see the following Knowledge Base articles:
Network Ports Used by Jamf ProFind out which ports Jamf Pro uses to communicate with APNs.
Supporting Apple Push Notification Service (APNs) Over HTTP/2Find out about supporting APNs connections over the HTTP/2 protocol.
For information about how to enable certificate-based authentication and push notifications so you can send macOS configuration profiles and macOS remote commands to managed computers, see
.Security Settings

91
Jamf Push Proxy
The Jamf Push Proxy enables communication between the Jamf Pro server and devices with Jamf Self Service installed. This communication allows you to send Notification Center notifications to computers and mobile devices with Self Service installed.
Jamf Pro requires a valid proxy server token to authenticate to the Jamf Push Proxy. An assistant in Jamf Pro guides you through the process to request a new proxy server token from the Jamf Authorization Server and upload it to Jamf Pro. The following diagram illustrates the communication between the Jamf Push Proxy and the Apple Push Notification service (APNs), Jamf Pro, and devices in your environment:
Requesting or Renewing a Proxy Server Token
Requirements
To request or renew a proxy server token, you need a valid Jamf Nation account.
To create a Jamf Nation account, go to:https://www.jamf.com/jamf-nation/users/new

92
1.
2.
3.
4.
5.
a.
b.
6.
Procedure
Log in to Jamf Pro.
In the top-right corner of the page, click .Settings
Click .Global Management
Click .Push Certificates
To request and upload a new token, do the following:
Click and select .New Get proxy server token from Jamf Authorization Server
Follow the onscreen instructions to get the proxy server token and upload it to Jamf Pro.
To renew a token, select the existing push proxy, and then click Renew.
Note: The proxy server token will be renewed automatically, however, you can manually renew it for troubleshooting purposes.
Related InformationFor information about the port and protocol used by the Jamf Push Proxy, see the Network Ports
Knowledge Base article.Used by Jamf Pro

93
1.
2.
3.
4.
5.
6.
GSX Connection
The GSX Connection settings allow you to integrate Jamf Pro with Apple's Global Service Exchange (GSX) to look up and populate the following purchasing information for computers and mobile devices:
Purchase date
Warranty expiration date
Note: GSX may not always return complete purchasing information. Only the information found in GSX is returned.
To integrate Jamf Pro with GSX, you must first create a GSX account and obtain a certificate from Apple. Then you can configure the GSX Connection settings in Jamf Pro, which involves entering GSX account information, retrieving an API token from Apple, and uploading the Apple certificate.
You can also use Jamf Pro to test the GSX connection and upload a renewed Apple certificate when needed.
Configuring the GSX Connection Settings
Requirements
To configure the GSX Connection settings, you need:
A GSX account with the “Manager” role, access to Web Services, and access to coverage/warranty information
An Apple certificate (.pem or .p12)
For instructions on creating a GSX account and obtaining an Apple certificate, see the Integrating with Apple’s Global Service Exchange (GSX) Knowledge Base article.
Procedure
Log in to Jamf Pro.
In the top-right corner of the page, click .Settings
Click .Global Management
Click .GSX Connection
Click .Edit
Select .Enable Connection to GSX

94
6.
7.
8.
a.
b.
c.
d.
9.
10.
11.
12.
1.
2.
3.
4.
5.
6.
Note: This setting and others on this pane may already be configured if Jamf Pro was used to generate a CSR.
Enter the username and account number, including the leading zeros, for the GSX account.
Provide your API token in the field by doing the following:API Token
Click the “Log in to your Apple GSX account” link below the field.API Token
Log in to your Apple GSX account.
Click to copy your API Token.Copy to clipboard
In Jamf Pro, paste your API Token into the field.API Token
Note: The API token is not displayed after you finish configuring the GSX connection or when you edit an existing GSX connection. This is because the API token changes with every request and will always be different.
In the Certificate-based Authentication section, click .Upload
The field will be populated automatically.URI
Follow the onscreen instructions to upload the Apple certificate (.pem or .p12).
Click .Save
Testing the GSX ConnectionAfter the GSX Connection settings are configured, you can test the connection to verify it works.
Log in to Jamf Pro.
In the top-right corner of the page, click .Settings
Click .Global Management
Click .GSX Connection
Click .Test
Click again.Test
A message displays, reporting the success or failure of the connection.

95
1.
2.
3.
4.
5.
6.
7.
A successful connection will display information similar to the following:
[Accept: application/json, Content-Type: application/json, X-Apple-SoldTo: 0000000000, X-Apple-ShipTo: 0000000000] GET https://partner-connect.apple.com/gsx/api/authenticate/check HTTP/1.1
Response: OK
Renewing the Apple CertificateYou can use Jamf Pro to upload a renewed Apple certificate without removing the existing certificate so the connection with GSX is not lost. A notification is displayed 31 days prior to the expiration date of the Apple certificate.
Log in to Jamf Pro.
In the top-right corner of the page, click .Settings
Click .Global Management
Click .GSX Connection
Click Edit .
Click .Renew
Follow the onscreen instructions to upload a renewed Apple certificate.
Related Information
For related information, see the following sections in this guide:
Mass Actions for ComputersFind out how to mass look up and populate purchasing information for computers from GSX.
Mass Actions for Mobile DevicesFind out how to mass look up and populate purchasing information for mobile devices from GSX.
Computer Inventory InformationYou can look up and populate purchasing information for a single computer by editing the computer’s inventory information in Jamf Pro.
Mobile Device Inventory InformationYou can look up and populate purchasing information for a single mobile device by editing the device’s inventory information in Jamf Pro.

96
Inventory Preload
The Inventory Preload setting allows you to upload computer and mobile device inventory data before devices are enrolled. The preloaded data will be applied to computers and mobile devices when inventory is collected based on a matching serial number. User data will be applied immediately when the CSV file is uploaded.
Data from the uploaded CSV file takes precedence over existing Jamf Pro data according to the following priorities:
The data will overwrite any existing active data records when duplicate serial numbers are found.
The data takes precedence over LDAP device data if LDAP is configured.
The preloaded data is used on an ongoing basis to update device inventory records in Jamf Pro when inventory is collected. For example, device inventory records are updated during the following events:
When uploading a CSV file with a unique device and set of device data. The next time inventory is collected and the specified device is updated in Jamf Pro, the inventory is updated with the Inventory Preload data.
When uploading a subsequent CSV for the same unique device with a different set of device data. The next time inventory is collected and the specified device is updated in Jamf Pro, the inventory is updated with the Inventory Preload data.
The inventory collection process runs following enrollment or according to the frequency in the Inventory Collection settings. For more information, see the following sections in this guide:
Computer Inventory Collection Settings
Mobile Device Inventory Collection Settings
Important: When using Inventory Preload, any manual edits or mass action updates to computer and mobile device inventory details within Jamf Pro will be overwritten by the Inventory Preload data when inventory collection runs.
Following are the valid fields for Inventory Preload CSV upload:
Field ComputersMobile Devices
Serial Number (required)
Device Type (required)
Note: Only two values are valid: "Computer" or "Mobile Device"
Username
Full Name

97
Field ComputersMobile Devices
Email Address
Phone Number
Position
Department
Building
Room
PO Number
PO Date
Warranty Expiration
AppleCare ID
Purchase Price
Life Expectancy
Purchasing Account
Purchasing Contact
Lease Expiration
Bar Code 1
Bar Code 2
Asset Tag
Vendor
Extension attributes (For more information, see the “Extension Attributes" section below.)
The CSV template available for download from the Inventory Preload page contains all supported fields.

98
1.
2.
3.
4.
5.
Example WorkflowThe following example describes how data for a mobile device can be uploaded using Inventory Preload, how it updates Jamf Pro inventory records, and how inventory details can be updated by uploading subsequent CSV files.
A CSV file with the following contents is uploaded using Inventory Preload:
Serial Number Device Type Username Building Department
C8PLK8CLFM Mobile Device wcrandall Hopkins Hall Psychology
When mobile device serial number "C8PLK8CLFM" is enrolled, the following happens:
The mobile device is assigned to user "wcrandall".
The Building field for the mobile device is updated to be "Hopkins Hall".
The Department field for the mobile device is updated to be "Psychology".
The CSV file is revised to specify mobile device serial number "C8PLK8CLFM" is in building "Smith Hall".
The revised CSV file is uploaded to Jamf Pro using Inventory Preload.
The next time mobile device "C8PLK8CLFM" updates its inventory, the Building field will be updated to "Smith Hall".
ValidationUploading a CSV file that contains building and department data requires the building and department to exist in Jamf Pro. If the building and department do not exist in Jamf Pro, the upload will fail.

99
UsersWhen a CSV file is uploaded, the CSV data is compared to the Jamf Pro inventory database to determine if new users need to be created or if the information for existing users will be updated.
The following fields are required in the CSV file for users to be created or updated in Jamf Pro:
New Update
Username
Email address
If the CSV file contains a new username and an email address is provided, the new user is created in Jamf Pro.
If the CSV file contains an existing username, the following user-related fields are updated in Jamf Pro:
Full Name
Email Address
Phone Number
Position
When Data is AppliedData from the uploaded CSV file is applied in Jamf Pro at different times depending on the data type.
User-related data, including the following fields, is applied immediately when the CSV file is uploaded:
Username
Full Name
Email Address
Phone Number
Position
Computer and mobile device data, including the device location, is applied on an ongoing basis each time inventory is collected.

100
1.
2.
3.
4.
5.
6.
7.
8.
9.
10.
11.
Extension AttributesExtension attributes are not provided in the CSV template since they vary by each configuration, but you can add them if needed. Extension attributes are dynamically mapped using the "EA " prefix in the column header (note the space after "EA"). For example, if the CSV data contains a column named "EA Memo1", the inventory preload update process will map the value in that column to an existing extension attribute in Jamf Pro named "Memo1".
Uploading a CSV File Using Inventory Preload
Requirements
To upload a CSV file, you need:
A Jamf Pro user account with all privileges for Inventory Preload Records
A Jamf Pro user account with Create and Update privileges for Users
For more information, see .Jamf Pro User Accounts and Groups
Procedure
Log in to Jamf Pro.
In the top-right corner of the page, click .Settings
Click .Global Management
Click .Inventory Preload
To download a CSV file template and prepare the data, click .Download CSV template
Prepare the CSV file using an editor of your choice.
Important: If you edit the CSV file using Microsoft Excel on Windows, you must save the file using the file type, "CSV UTF-8 (Comma delimited)(*.csv)". If you saved the CSV file as an XLSX file, you can convert the file to "CSV UTF-8 (Comma delimited)(*.csv)" by using the command and Save Aschanging the file type. However, data may be lost depending on how your data was formatted.
Click .Edit
Click .Upload Resource File
Follow the onscreen instructions to upload the CSV file to Jamf Pro.
Click and wait for the uploading process to complete.Save
The uploaded file metadata will be displayed in the History table.

101
1.
2.
3.
4.
5.
6.
7.
1.
2.
3.
4.
5.
6.
7.
Viewing and Downloading Active Data
View the active data in Jamf Pro or download it as a CSV file.
Log in to Jamf Pro.
In the top-right corner of the page, click .Settings
Click .Global Management
Click .Inventory Preload
To download the active data, including all data types, click . The downloaded file Download as CSVwill be named "active-data-(date).csv".
To view the active data in Jamf Pro, click .View Active Data
To download the active data that is currently displayed onscreen, click . The Download as CSVdownloaded file will be named "active-data-filtered-(date).csv".
Note: Extension attributes are not displayed when you view active data onscreen. To view extension attributes, click . The dowloaded active data file includes extension Download as CSVattributes.
Deleting Active Data
You can delete all active data that was previously uploaded to Inventory Preload. Deleting the active data effectively disables the Inventory Preload update process since no preloaded data will exist when inventory is collected.
All inventory details in Jamf Pro that were updated using Inventory Preload will remain intact.
Log in to Jamf Pro.
In the top-right corner of the page, click .Settings
Click .Global Management
Click .Inventory Preload
Click .Edit
Click , and then click .Delete Active Data DeleteAll data that was previously uploaded is deleted immediately.
Click .Save

102
1.
2.
3.
4.
5.
6.
Viewing Upload History
View the history of all uploaded resource files, including the filename, the name of the user who uploaded the file, and the date the file was uploaded.
Log in to Jamf Pro.
In the top-right corner of the page, click .Settings
Click .Global Management
Click .Inventory Preload
Click .History A list of all uploaded resource files is displayed.
To add comments for records in the history list, click , enter a note, and then click Add Note Add Noteagain to save the note.
Related Information
For information about how to use Inventory Preload via the Jamf Pro API, see the Jamf developer resources:https://www.jamf.com/developers/apis/

103
User-Initiated Enrollment Settings
Enrollment is the process of adding computers and mobile devices to Jamf Pro. This establishes a connection between the computers and mobile devices and the Jamf Pro server. User-initiated enrollment allows users to initiate the enrollment process on their own by navigating to an enrollment URL. For example:
https://instancename.jamfcloud.com/enroll (hosted in Jamf Cloud)
https://jss.instancename.com:8443/enroll (hosted on-premise)
Note: Users must use Safari to access the enrollment URL on mobile devices.
Users can enroll the following:
Mac computers
Institutionally owned iOS and iPadOS devices
Personally owned iOS and iPadOS devices
Management Account Creation During Computer EnrollmentWhen you enroll computers, you can specify a local administrator account called the “management account” that you will use to manage them. The management account can be used to perform the following tasks on the computer:
Screen sharing
Enable FileVault using a policy (when SecureToken is enabled on the management account)
Add or remove users from FileVault using a policy (when SecureToken is enabled on the management account)
Generate a personal recovery key using a policy (when SecureToken is enabled on the management account)
Perform authenticated restarts using a policy (when SecureToken is enabled on the management account)
To enable the management account, you must enable user-initiated enrollment, and then configure the management account username and password. It is recommended that you choose the "Randomly generate passwords" option for maximum security. You can see if a computer is managed by the management account by viewing the Managed attribute field in the computer inventory information.

104
Enrollment of Personally Owned Mobile DevicesPersonally owned mobile devices can be enrolled using User Enrollment. User Enrollment is designed to keep corporate data safe on devices with iOS 13.1 and iPadOS 13.1 or later while protecting users' privacy. User Enrollment keeps personal and institutional data separate by associating a personal Apple ID with personal data and a Managed Apple ID with corporate data. This allows for a limited management of devices using a set of configurations that associate management with the user, not the entire device. The user can access their corporate data without the administrator erasing, modifying, or viewing personal data. This separation allows users to keep their personal data protected and intact once the device is removed from Jamf Pro, while the corporate data is deleted. For more information on User Enrollment management capabilities, see Mobile Device Management
.Capabilities
To create Managed Apple IDs, you must either use federated authentication to link Apple School Manager or Apple Business Manager to your instance of Microsoft Azure Active Directory (AD) or create them manually in Apple School Manager or Apple Business Manager. For more information, see the following Apple documentation:
Intro to federated authentication with Apple School Manager in the Apple School Manager User Guide
Intro to federated authentication with Apple Business Manager in the Apple Business Manager User Guide
Create Managed Apple IDs in Apple School Manager in the Apple School Manager User Guide
Create Managed Apple IDs in Apple Business Manager in the Apple Business Manager User Guide
Disclaimer: Personal device profiles have been deprecated and are no longer recommended as a method of enrolling personally owned devices. User Enrollment is the Apple-preferred method for enrolling personally owned devices in a Bring Your Own Device (BYOD) program. For information on enrolling personally owned iOS or iPadOS devices with Jamf Pro, see the Building a BYOD
Program with User Enrollment and Jamf Pro technical paper. For legacy documentation about .Personal Device Profiles, see version 10.27.0 or earlier of the Jamf Pro Administrator's Guide
General RequirementsFor computers with macOS 10.12.6 or earlier, if you choose to sign the QuickAdd package, you need:
An installer certificate (.p12) from Apple. For instructions on how to obtain an installer certificate, see the Knowledge Base article. Obtaining an Installer Certificate from Apple
A certification authority intermediate certificate from Apple in the System keychain in Keychain Access on computers. For instructions on how to obtain this certificate and import it to the System keychain, see the following topics in Apple's :Keychain Access User Guide
Request a certificate from a certificate authority in Keychain Access on MacAdd certificates to a keychain using Keychain Access on Mac

105
1.
2.
3.
4.
5.
6.
7.
a.
b.
c.
d.
e.
f.
Configuring the User-Initiated Enrollment SettingsLog in to Jamf Pro.
In the top-right corner of the page, click .Settings
Click .Global Management
Click .User-Initiated Enrollment
Click .Edit
Use the General pane to configure settings as needed for restricting re-enrollment, skipping certificate installation, or uploading a third-party signing certificate to be used during enrollment.
Note: The certificate installation step is skipped by default.
On the Messaging pane, do the following to customize the text displayed on devices during the enrollment experience and add languages:
Do one of the following:
To add a language, click and then choose the language from the Language pop-up Add menu.
Note: English is the default language if the device does not have a preferred language set on it.
To customize the text for a language already listed, click next to the language.Edit
In the field, enter a page title to display at the top of all enrollment pages.Page Title for Enrollment
On the tab, use the fields provided to customize how you want the Login page to be Logindisplayed to users.
(Mobile devices only) Click the tab and use the fields provided to customize the Device Ownershiptext that is displayed to users based on their device ownership type. The text displayed and the enrollment page on which the text displays depends on the enrollment options that you enable:
If you are enabling user-initiated enrollment for both institutionally owned and personally owned mobile devices—Customize the text that prompts users to choose the appropriate device ownership type, and customize the device management description that explains the IT management capabilities for each device ownership type. When users select the personal or institutional device ownership type, the respective device management description is displayed.
If you user-initiated enrollment for personally owned devices onlyare enabling —Customize the device management description that explains the IT management capabilities for personal
device ownership. This description is accessible to users by tapping the icon Information displayed on the Personal MDM Profile page during enrollment.
Click the tab and use the fields provided to specify an End User End User License AgreementLicense Agreement (EULA) for personally owned devices. If the EULA fields are left blank, a EULA page is not displayed to users during enrollment.

106
7.
f.
g.
h.
i.
j.
k.
l.
m.
8.
9.
10.
Click the tab and use the fields provided to customize the message that prompts users to Siteschoose a site.If a user logs in with a Jamf Pro user account, they can assign an LDAP user to the computer or mobile device.If you have more than one site in Jamf Pro and have entered information on the Messaging Pane in Personal Device Profiles in Jamf Pro, this information is displayed to users when they are prompted to choose a site.
Note: This setting does not apply to User Enrollment.
(Mobile devices only) Click the tab and use the fields provided to customize the Certificatemessage that prompts users to install the CA certificate for mobile devices to trust at enrollment.
(Institutionally owned devices only) Click the tab and use the Institutional Device MDM Profilefields provided to customize the message that prompts users to install the MDM profile for institutionally owned devices.
(Personally owned devices only) Click the tab and use the fields provided to Personal MDM Profilecustomize the message that prompts users to install the MDM profile for devices enrolled using Personal Device Profiles.
(User Enrollment only) Click the tab and use the fields provided to User Enrollment MDM Profile customize the message that prompts users to install the MDM profile, including guidance for users on what to enter for their Managed Apple ID.
(Computers only) Click the tab and use the fields provided to customize the QuickAdd Packagemessage that prompts users to download and install the QuickAdd package.
Click the tab and use the fields provided to customize the messages that are displayed Completeto users if enrollment is successful or fails.
Click .Save
Use the Platforms pane to enable user-initiated enrollment and configure the enrollment settings for each platform as needed.
Note: If you have personally owned devices currently enrolled in Jamf Pro using a Personal Device Profile, enabling User Enrollment does not remove them from management.
Use the Access pane to specify whether an LDAP group has access to enroll mobile devices using an enrollment URL without an invitation. When sites are defined in Jamf Pro, you can choose a site to display to LDAP user groups during enrollment.
Note: If an LDAP user belongs to more than one LDAP user group in Jamf Pro, the user will have the option to select the sites you assign to each group that user belongs to.
Click .Save

107
Related InformationFor related information, see the following sections in this guide:
User-Initiated Enrollment for ComputersFind out how to allow users to enroll computers.
User-Initiated Enrollment for Mobile DevicesFind out how to allow users to enroll mobile devices.
User Enrollment for Personally Owned Mobile DevicesFind out how to allow users to enroll personally owned mobile devices.
For related information on User Enrollment, see in Apple's User Enrollment into MDM Deployment Reference for iPhone and iPad.

108
1.
2.
3.
1.
2.
3.
4.
5.
Integrating with Automated Device Enrollment
Enrollment is the process of adding computers and mobile devices to Jamf Pro. This establishes a connection between the computers and mobile devices and the Jamf Pro server. The Automated Device Enrollment settings allow you to integrate Jamf Pro with Automated Device Enrollment (formerly DEP). This is the first step to enrolling a device with Jamf Pro using a PreStage enrollment. After Jamf Pro is integrated with Automated Device Enrollment, you can use Jamf Pro to configure enrollment and device setup settings. You can also use the Automated Device Enrollment settings to renew an Automated Device Enrollment instance.
To integrate Jamf Pro with Automated Device Enrollment, you need to do the following:
Download a public key (.pem) from Jamf Pro.
Obtain a server token file (.p7m) from Apple.
Upload the server token file to Jamf Pro to configure an Automated Device Enrollment instance.
Jamf Pro automatically refreshes information every two minutes in the Automated Device Enrollment instance. If information in Apple School Manager or Apple Business Manager is updated, this information is displayed in Jamf Pro. There can be up to a two minute delay on the information refresh, which can result in outdated information displayed in Jamf Pro. In addition, environment-specific factors can affect the refresh of information.
Note: Deleting an Automated Device Enrollment instance removes the instance from Jamf Pro but does not delete the settings in Apple School Manager or Apple Business Manager.
Downloading a Public KeyBefore you can obtain the server token file from Apple, you need to download a public key from Jamf Pro.
Log in to Jamf Pro.
In the top-right corner of the page, click .Settings
Click .Global Management
Click .Automated Device Enrollment
Click to download the public key.Public Key
The public key (.pem) is downloaded immediately.
Obtaining the Server Token File

109
1.
2.
3.
4.
5.
6.
7.
8.
1.
2.
3.
4.
Obtaining the Server Token File
Requirements
To obtain the server token file from Apple, you need an Apple School Manager or Apple Business Manager account and the Administrator or Device Manager role assigned.
For more information about Automated Device Enrollment, accounts, and roles, see the following Apple documentation:
Apple School Manager User Guide
Apple Business Manager User Guide
Note: It is recommended that you only use one Apple School Manager or Apple Business Manager account to integrate with Automated Device Enrollment. Using more than one account makes it difficult to isolate the account causing the issues when troubleshooting.
Procedure
To download the server token file, you need to upload your public key to the Automated Device Enrollment instance.
or Log in to Apple School Manager Apple Business Manager .
(Optional) Follow the onscreen instructions to verify your identity.
Click at the bottom of the sidebar, and then click .Settings Device Management Settings
Click .Add MDM Server
In the field, enter the name for your server.MDM Server Name
Click , and then upload the public key (.pem) you downloaded from Jamf Pro. Choose File
Click .Save
Click to download the server token file (.p7m).Download Token
Uploading the Server Token File to Configure Automated Device EnrollmentThis process creates one Automated Device Enrollment instance in Jamf Pro. To meet the needs of your organization, you can repeat the process to create multiple instances.
Log in to Jamf Pro.
In the top-right corner of the page, click .Settings
Click .Global Management

110
4.
5.
6.
7.
8.
9.
10.
1.
2.
3.
4.
5.
6.
7.
8.
9.
10.
Click .Automated Device Enrollment
Click .New
Enter a display name for the Automated Device Enrollment instance.
Click to upload the server token file (.p7m) you downloaded from Apple. Upload Server Token FileThis creates one Automated Device Enrollment instance in Jamf Pro.The information contained in the server token file is displayed.
Note: A server token is valid for one year after the token is uploaded and saved in Jamf Pro.
(Optional) Choose a supervision identity to associate with the Automated Device Enrollment instance. For information on how to create, upload, and download a supervision identity for use with Apple Configurator 2, see .Supervision Identities
Click .Save
To configure another instance, repeat steps 5-9.
Replacing a Server Token File to Renew an Automated Device Enrollment InstanceIf your Automated Device Enrollment server token has expired or needs to be replaced, you must download a new token from Apple School Manager or Apple Business Manager and upload it to Jamf Pro.
Note: If you are uploading a new server token file (.p7m) to renew an expired Automated Device Enrollment instance, it is recommended that you do not delete the expired instance from Jamf Pro before uploading the new server token file.
or .Log in to Apple School Manager Apple Business Manager
Click at the bottom of the sidebar.Settings
Click to select your Jamf Pro MDM server, and then click . The generated server Download Tokentoken file (.p7m) is downloaded to your computer.
Log in to Jamf Pro.
In the top-right corner of the page, click .Settings
Click .Global Management
Click .Automated Device Enrollment
Select the Automated Device Enrollment instance you want to renew and click .Edit
Click to upload the server token file (.p7m) you downloaded from Apple. Upload Server Token FileThe information contained in the server token file is displayed.
Click .Save

111
Related InformationFor related information, see the following Jamf Knowledge Base videos:
Integrating Jamf Pro with Apple's Device Enrollment
Renewing a Device Enrollment Server Token File
For related information, see the following sections in this guide:
Mobile Device PreStage EnrollmentsFind out how to enroll mobile devices using a mobile device PreStage enrollment.
Computer PreStage EnrollmentsFind out how to enroll Mac computers using a computer PreStage enrollment.

112
Enrollment Customization Settings
The Enrollment Customization settings in Jamf Pro allow you to further customize the experience for a user when they enroll their computer or mobile device with Jamf Pro via a PreStage enrollment. For example, you can display an End User License Agreement (EULA) during enrollment or other custom messaging as the user advances through the Setup Assistant. The Enrollment Customization settings also allow you to apply branding to display a familiar look and feel—such as your company's colors or logos—to users.
Configuring the Enrollment Customization settings creates an Enrollment Customization configuration that you can add to a Computer or Mobile Device PreStage enrollment.
Creating an Enrollment Customization configuration involves configuring the following:
PreStage Panes—PreStage Panes are groups of settings that allow you to customize how the screens display to users during the Setup Assistant. You can configure authentication screens and custom text screens.
Settings for Branding—You can configure settings that allow you to customize how the Enrollment Customization configuration is displayed by adding an icon and configuring colors to present users with a familiar look and feel.
PreStage PanesA PreStage Pane is a group of settings that allow you to customize the screens that are displayed to the user during enrollment with Jamf Pro. The PreStage Panes are displayed to the user as screens during the Setup Assistant and are presented after the user chooses a Wi-Fi Network or other connection to the Internet.
The following table describes the types of PreStage Panes that you can configure and how the panes are displayed to the user:
Type of PreStage Pane Description User Experience
Single Sign-On Authentication
If you have Single Sign-On enabled in Jamf Pro, configuring this pane automatically applies the settings configured in the Single Sign-On settings to enable the user to authenticate with your Identity Provider (IdP) using SSO. You can choose to allow access to any Identity Provider user or to allow access to only a select group of users in your IdP.
Note: You can only allow access to one group.
This automatically assigns the user to their device in Jamf Pro. If LDAP is integrated with Jamf Pro, the User and Location information will be fully populated using a lookup from Jamf Pro to LDAP. If LDAP is not integrated
A screen is presented to the user that displays your IdP's login screen prompting the user to authenticate.

113
Type of PreStage Pane Description User Experience
with Jamf Pro, the Username field will be the only item populated in the User and Location category, and user lookup will not work during enrollment.If your environment uses Jamf Connect, you can enable Jamf Pro to pass user information to Jamf Connect. This allows Jamf Pro to pass the Account Name (the username that was used to authenticate with your IdP) and the Account Full Name (the full name of the user) to Jamf Connect. For example, if Samantha Johnson authenticates with your IdP, Jamf Pro passes both the username (e.g., samantha.johnson) and the Account Full Name (e.g., Samantha Johnson) to Jamf Connect. This creates the local account on the computer with the user's Account Full Name. The user can log in to their computer with the Account Name.In addition, you can map the Account Name and the Account Full Name to the fields that your IdP uses to define these attributes. For example, if your IdP uses "Short Name" for the Account Name, you can map "Short Name" to Account Name in Jamf Pro.Jamf Pro creates a profile with this information and distributes the profile to the computer during enrollment. This information remains on the computer for up to one hour.
Note: You can only add one Single Sign-on Authentication PreStage Pane to an Enrollment Customization configuration, and you cannot add a Single Sign-On Authentication pane if there is an LDAP Authentication pane currently added.
If a user is not part of a group that was given access, an "Access Denied" message is displayed to the user after they authenticate with your IdP.If you enabled Jamf Pro to pass user information to Jamf Connect, the user is presented with the Jamf Connect Login screen after authenticating to your IdP. At this screen, they must re-enter their password to continue with enrollment.The Setup Assistant automatically proceeds after the user authenticates.
Note: If a user is unable to authenticate using their IdP credentials at the Single Sign-On Authentication screen, the enrollment process cannot continue until the correct credentials are entered.

114
Type of PreStage Pane Description User Experience
Text This pane allows you to enter custom text to display to the user during enrollment, such as a EULA. You can also enter text for a title of the page and text to label the navigational buttons to guide the user through each screen.You can enter text in plain text format or you can customize the text displayed to the user by using Markdown in the text field for the body of the pane. See the Knowledge Base Using Markdown to Format Textarticle for information on limitations to the Markdown syntax that can be used in this pane.
Note: This pane does not support HTML.
You can configure as many Text PreStage Panes that fit your environment.After you add a Text pane, you can preview the user experience in Jamf Pro.
A screen is displayed with the text and navigational buttons you configured in Jamf Pro. If you added a title to the pane, the title is displayed as a heading.If you add multiple Text PreStage Panes, the user transitions to each screen by clicking or tapping the navigational buttons. The Setup Assistant automatically proceeds after the user transitions through the last screen you configured.
LDAP Authentication
If you have an LDAP server set up in Jamf Pro, configuring this pane enables the user to authenticate using their LDAP credentials during enrollment. You must enter text for a title of the page, text for the username and password fields, and text to label the navigational buttons to guide the user through the login screen.In addition, you can restrict enrollment access to only a select LDAP group or groups. Only the selected LDAP group is allowed to enroll devices using the PreStage enrollment. You can add as many LDAP groups to the pane as your environment requires.This automatically assigns the user to their device in Jamf Pro. The User and Location information will be fully populated using a lookup from Jamf Pro to LDAP.
A screen is presented to the user that displays a login screen prompting the user to authenticate with their LDAP credentials.The Setup Assistant automatically proceeds after the user authenticates.

115
Type of PreStage Pane Description User Experience
Note: You can only add one LDAP Authentication PreStage Pane to an Enrollment Customization configuration, and you cannot add an LDAP Authentication pane if there is a Single Sign-On Authentication pane currently added.
You can drag-and-drop PreStage Panes in the order you want them displayed to the user. If you added a Single Sign-On Authentication PreStage Pane and a Text PreStage Pane, the transition between each type of pane is accomplished when the user authenticates in the IdP login screen or uses the navigational buttons.
Settings for BrandingJamf Pro allows you to configure settings that customize elements within the Enrollment Customization configuration to present end users with a familiar look and feel. You can customize the elements in the Text and LDAP Authentication PreStage Panes.
You can upload an icon that displays at the top of all Text and LDAP Authentication PreStage Panes throughout the enrollment process. When uploading an icon, it is required that you use a file with the GIF or PNG format and recommended that the size is 180x180 pixels.
The following elements can be customized by entering a six digit hexadecimal color code or by using the color picker:
Body Text Color—This color is applied to the text in the pane.
Button Color—This color is only applied to the navigational button the allows users to move forward in the enrollment process.
Button Text Color—This color is only applied to the text on the navigational button that allows users to move forward in the enrollment process.
Background Color—This color is displayed in the background, behind the panes during the enrollment process.
The preview field to the right of the Branding settings automatically displays your changes so you can finalize your configuration before saving.
Note: The preview functionality for a Single Sign-On Authentication PreStage Pane is a generic authentication preview. This user experience is dependent on your Identity Provider.

116
1.
2.
3.
4.
5.
6.
7.
8.
a.
b.
c.
General RequirementsTo add a Single Sign-On Authentication PreStage Pane, you must have Single Sign-on enabled in Jamf Pro. For more information, see .Single Sign-On
Enabling Jamf Pro to pass user information to Jamf Connect requires Jamf Connect 1.12.0 or later. In addition, you must ensure Jamf Connect is configured appropriately. For more information, see
for the IdP your environment integrates with in the Configuring Jamf Connect Login Jamf Connect .Administrator's Guide
To add an LDAP Authentication PreStage Pane, you need an LDAP server set up in Jamf Pro. For more information, see .Integrating with LDAP Directory Services
The Enrollment Customization settings apply to the following:
Mobile devices with iOS 13 or later, and iPadOS 13 or later
Computers with macOS 10.15 or later
Creating an Enrollment Customization ConfigurationLog in to Jamf Pro.
In the top-right corner of the page, click .Settings
Click .Global Management
Click .Enrollment Customization
Click .New
Enter a display name and description for the Enrollment Customization configuration.
Choose a site to add the Enrollment Customization configuration to from the pop-up menu.SiteAdding an Enrollment Customization configuration to a site allows you to add the configuration to a PreStage enrollment in that same site.
Note: If you have site access only, the profile is assigned to the applicable site automatically and the Site pop-up menu is not displayed.
Add PreStage Panes to display screens to the end user:
Click .Add Pane
In the Add Pane dialog, enter a display name for the pane that will identify it in the list of PreStage Panes.
Choose the type of PreStage Pane you want to add from the pop-up menu.Pane Type

117
8.
d.
e.
9.
10.
11.
Configure the settings for the PreStage Pane.
Notes:
If you are configuring a Text PreStage Pane as the first screen presented to the user in the configuration, the button for navigating back in the enrollment process is not displayed. If the pane is the last screen in the configuration, the button to navigate forward initiates the enrollment process.
If you enable Jamf Pro to pass user information to Jamf Connect, you can map the attributes of your Identity Provider to Account Name and Account Full Name. For example, if your IdP uses "Short Name" for the Account Name, you can type "Short Name" in the Account Name field so when the user enters their username (Account Name) during enrollment, Jamf Connect maps the Account Name to the "Short Name" in the IdP.Values entered in the Account Name and Full Account Name fields must be entered exactly as they appear in your IdP.
Click Apply.
Repeat step 8 to add additional PreStage Panes to the Enrollment Customization configuration.
Click the tab to customize the enrollment experience and configure the Branding and Previewsettings on the page.Once a change is made, it automatically displays in the preview field.
Click .Save
After you create an Enrollment Customization configuration, you can add the configuration to a PreStage enrollment.
Note: You cannot delete an Enrollment Customization configuration if the configuration has been added to a PreStage enrollment. To delete the configuration, you must first remove it from the PreStage.
Related InformationFor related information, see the following sections in the guide:
Computer PreStage EnrollmentsLearn how to add an Enrollment Customization configuration to a Computer PreStage enrollment.
Mobile Device PreStage EnrollmentsLearn how to add an Enrollment Customization configuration to a Mobile Device PreStage enrollment.

118
Apple Education Support Settings
The Apple Education Support settings in Jamf Pro allow you to do the following:
Enable support for Shared iPad and Apple's Classroom app—You can allow computers and iPads to be added to Classes in Jamf Pro for use with Apple's Classroom app. In addition, this setting allows iPads to be added to Classes in Jamf Pro as Shared iPad for use with Apple's Classroom app.
Enable user images—Enabling user images allows an image or student photo to be displayed in the Classroom app and on the login screen for Shared iPads. The user image is also displayed in the inventory information for each user.
I —Integrating Jamf Pro with Apple School Manager allows ntegrate with Apple School Manageryou to import students, teachers, and classes from Apple School Manager. This automatically creates new users and classes in Jamf Pro for use with Apple's Classroom app.
General RequirementsSupport for Apple’s Classroom app applies to the following devices:
Supervised iPads with iOS 9.3 or later
Teacher computers with macOS 10.14 or later
Student computers with macOS 10.14.4 or later
Note: When assigning a student or teacher to a computer in Jamf Pro, you must ensure that the username in Jamf Pro matches the username of the MDM-enabled user on the computer. For more information about enabling MDM for users, see the following:
MDM-Enabled Local User Accounts
Managing User Approved MDM with Jamf Pro
In addition, support for Shared iPad for use with Apple's Classroom app applies to supervised iPads with iOS 9.3 or later.
To enable user images, you need the following:
Images hosted on a distribution point with an enabled web serverIt is recommended that you disable directory index browsing for your distribution point to ensure that the image files on the server are secure.
Note: It is recommended that the user images are in PNG format and are 256x256 pixels.
A CA certificate (.pem) downloaded from Jamf Pro is needed to establish a secure connection between the Jamf Pro server and the distribution point so that the user images are populated for each user in Jamf Pro. For more information about CA certificates, see .PKI Certificates
In addition, you need a valid push certificate in Jamf Pro. For more information, see .Push Certificates
Shared iPad and Apple's Classroom App Support

119
1.
2.
3.
4.
5.
6.
7.
Shared iPad and Apple's Classroom App SupportWhen you enable the Apple Education Support settings, Jamf Pro generates an EDU profile that is installed on an iPad or computer when the device is added to a Class in Jamf Pro for use with Apple's Classroom app. The EDU profile configures the device with user and class information. For information about enabling Shared iPad during enrollment, see .Mobile Device PreStage Enrollments
For more information about Shared iPad, see in Apple's Shared iPad in Apple device deployments.Education Deployment Guide
Supporting Shared iPad and Apple's Classroom App
Log in to Jamf Pro.
In the top-right corner of the page, click .Settings
Click .Global Management
Click .Apple Education Support
Click .Edit
Select the checkbox.Enable Apple Education Support
Click .Save
Jamf Pro generates an EDU Profile that is installed on devices when they are added to a Class in Jamf Pro.
iPads that are enrolled with Jamf Pro using a PreStage enrollment that has Shared iPad enabled are enabled as Shared iPad for use with Apple's Classroom app when they are added to a Class in Jamf Pro.
User ImagesYou can enable user images as a part of Apple Education Support. When you enable user images, you allow an image or student photo to be displayed in the Classroom app and on the login screen for Shared iPads. The user image is also displayed in the inventory information for each user.
User images must be hosted on a distribution point with an enabled web server. The URL for that distribution point must be specified in Jamf Pro when you enable user images.
When setting up the distribution point URL, it is recommended that you use a variable in the URL and name the image files so that they function with the variable you choose. For example, if the distribution point URL is https://www.mycompany.com/$USERNAME.png, the username in Jamf Pro for each user will be inserted into the URL in place of the variable. If you name each $USERNAMEimage file using the username in Jamf Pro for each user, the correct image will be displayed for each user.

120
1.
2.
3.
4.
5.
6.
7.
8.
9.
10.
11.
You can use the following variables in the distribution point URL for user images:
$USERNAME
$FULLNAME
$REALNAME
$PHONE
$POSITION
$EXTENSIONATTRIBUTE_<#>
Note: Once you have specified a distribution point URL for user images, you can choose to specify a custom URL for a single user's image from the inventory information for a user. The custom URL overrides the specified distribution point URL. For more information about specifying a custom URL, see .User Inventory Information Reference
For step-by-step instructions on preparing to use user images, see the Integrating with Apple School technical paper.Manager to Support Apple's Education Features Using Jamf Pro
Enabling User Images
Log in to Jamf Pro.
In the top-right corner of the page, click .Settings
Click .Global Management
Click .Apple Education Support
Click .Edit
If you have not enabled Apple Education Support, select the Enable Apple Education Supportcheckbox.
Select the checkbox.Enable User Images
Enter a distribution point URL for user images.
Important: Editing the distribution point URL for user images causes existing EDU profiles to be redistributed. This can increase network traffic.
If you have not already downloaded the CA certificate (.pem), click to download the Downloadcertificate, and then save the certificate in the appropriate location dictated by your web server vendor.
(Optional) If your web server uses a self-signed certificate or a certificate signed by an internal CA, you must upload an additional certificate (.p12 or .pem) from your web server to the Jamf Pro server to establish trust between the Jamf Pro server and the web server hosting the user images.

121
11.
12.
Click .Save
(Optional) Use the button to ensure that the user images on your distribution point are Testaccessible.
Due to caching, user images may not appear immediately on devices. You may need to restart the device or the Classroom app in order for user images to appear.
Related InformationFor related information, see the following sections in this guide:
ClassesFind out how to create Classes in Jamf Pro for use with Apple's Classroom app.
Integrating with Apple School ManagerFind out how to use the Apple Education Support settings integrate Jamf Pro with Apple School Manager.
For related information, see the following technical papers:
Supporting Apple’s Classroom App and Shared iPad Using Jamf ProGet step-by-step instructions on how to support Shared iPad and Apple's Classroom app.
Integrating with Apple School Manager to Support Apple's Education Features Using Jamf ProGet step-by-step instructions on how to integrate with Apple School Manager to support Apple's education features using Jamf Pro.

122
Integrating with Apple School Manager
The Apple Education Support settings allow you to integrate Jamf Pro with Apple School Manager. Integrating with Apple School Manager allows you to do the following:
Specify a class naming format. This is applied to all classes imported from Apple School Manager.
Specify a class description format. This is applied to all classes imported from Apple School Manager. The description is displayed in Apple's Classroom app.
Sync Jamf Pro with Apple School Manager to automatically update user and class information in Jamf Pro at a scheduled time. You can also force Jamf Pro to sync immediately with Apple School Manager.
Choose user criteria for matching imported users from Apple School Manager with existing users in Jamf Pro. Imported user information is appended to the Roster category of user inventory information for the existing user in Jamf Pro.
Automatically create new users in Jamf Pro by importing users from Apple School Manager.
Automatically create classes in Jamf Pro by importing classes from Apple School Manager.
Note: It is recommended that you only use one Apple School Manager account to integrate with Jamf Pro. Using more than one account makes it difficult to isolate the account causing the issues when troubleshooting.
Integrating Jamf Pro with Apple School Manager creates one instance of Apple School Manager in Jamf Pro. To integrate with Apple School Manager, you need to associate an Automated Device Enrollment (formerly DEP) instance with the Apple School Manager instance. You can associate one Automated Device Enrollment instance with one Apple School Manager instance.
Class Naming and Description FormatWhen you integrate with Apple School Manager, you choose variables in Jamf Pro that match values for class information in Apple School Manager. Jamf Pro allows you to specify variables that apply to a class name and class description when the class is imported from Apple School Manager to Jamf Pro. You can specify variables for the following settings:
Class Naming Format—When a class is imported, the variables are applied to the display name of the class in the order you select. For example, if you select "Course Name" and "Class Source ID", the class is imported to Jamf Pro with a name like "Biology12345".The default values for the class naming format are "Course Name" and "Class Source ID".
Class Description Format—When a class is imported, the variables are applied to the description of the class in the order you select. For example, if you select "Location" and "Instructor", the class is imported to Jamf Pro with a description like "EauClaireSamanthaJohnson".This setting overwrites existing class descriptions the next time Jamf Pro syncs with Apple School Manager for classes that have already been imported.
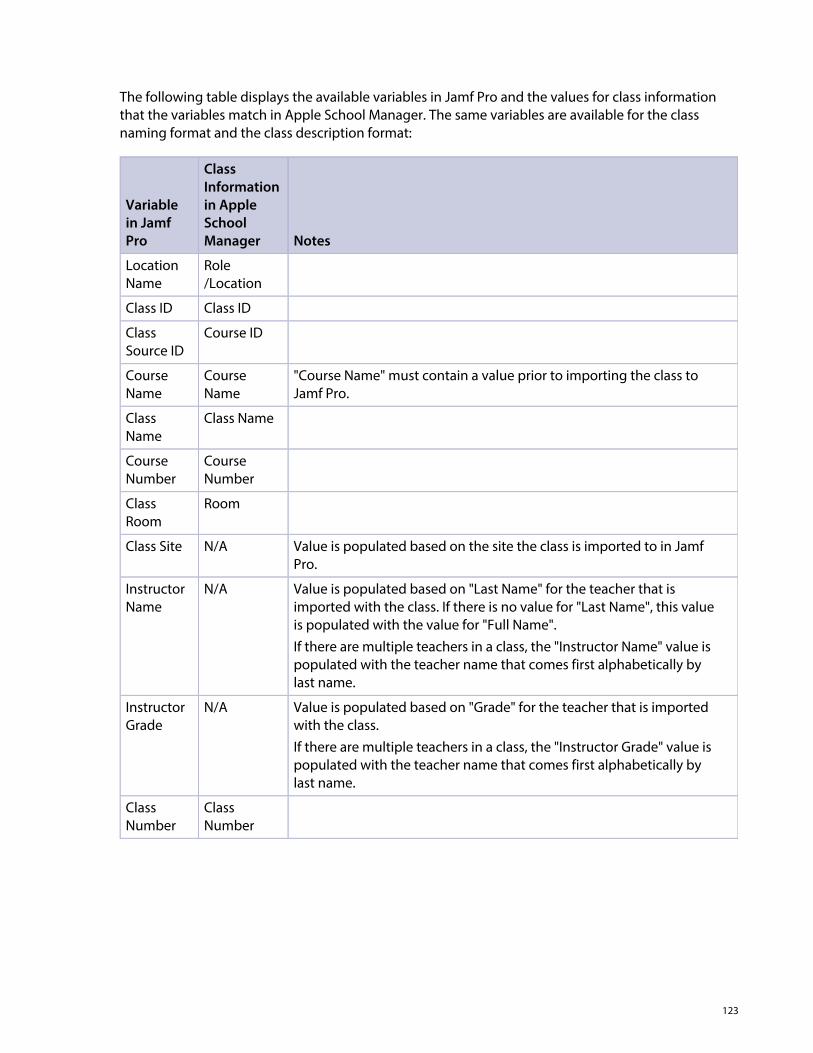
123
The following table displays the available variables in Jamf Pro and the values for class information that the variables match in Apple School Manager. The same variables are available for the class naming format and the class description format:
Variable in Jamf Pro
Class Information in Apple School Manager Notes
Location Name
Role/Location
Class ID Class ID
Class Source ID
Course ID
Course Name
Course Name
"Course Name" must contain a value prior to importing the class to Jamf Pro.
Class Name
Class Name
Course Number
Course Number
Class Room
Room
Class Site N/A Value is populated based on the site the class is imported to in Jamf Pro.
Instructor Name
N/A Value is populated based on "Last Name" for the teacher that is imported with the class. If there is no value for "Last Name", this value is populated with the value for "Full Name".If there are multiple teachers in a class, the "Instructor Name" value is populated with the teacher name that comes first alphabetically by last name.
Instructor Grade
N/A Value is populated based on "Grade" for the teacher that is imported with the class.If there are multiple teachers in a class, the "Instructor Grade" value is populated with the teacher name that comes first alphabetically by last name.
Class Number
Class Number
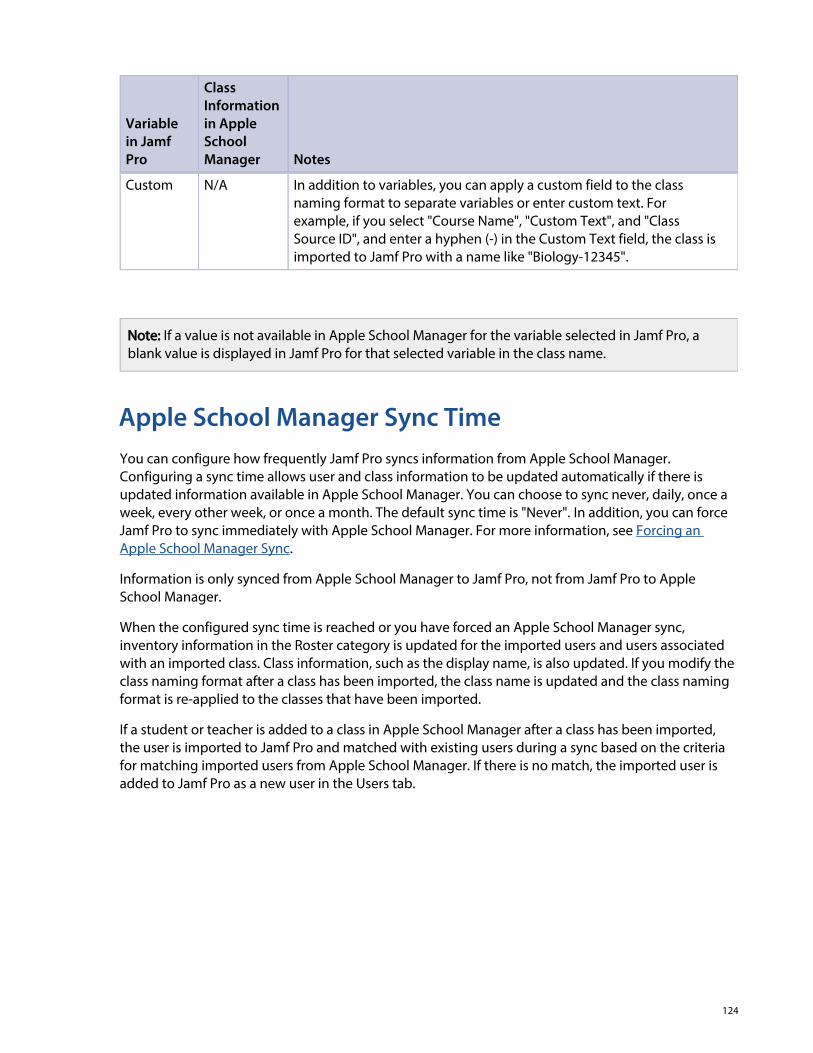
124
Variable in Jamf Pro
Class Information in Apple School Manager Notes
Custom N/A In addition to variables, you can apply a custom field to the class naming format to separate variables or enter custom text. For example, if you select "Course Name", "Custom Text", and "Class Source ID", and enter a hyphen (-) in the Custom Text field, the class is imported to Jamf Pro with a name like "Biology-12345".
Note: If a value is not available in Apple School Manager for the variable selected in Jamf Pro, a blank value is displayed in Jamf Pro for that selected variable in the class name.
Apple School Manager Sync TimeYou can configure how frequently Jamf Pro syncs information from Apple School Manager. Configuring a sync time allows user and class information to be updated automatically if there is updated information available in Apple School Manager. You can choose to sync never, daily, once a week, every other week, or once a month. The default sync time is "Never". In addition, you can force Jamf Pro to sync immediately with Apple School Manager. For more information, see Forcing an
.Apple School Manager Sync
Information is only synced from Apple School Manager to Jamf Pro, not from Jamf Pro to Apple School Manager.
When the configured sync time is reached or you have forced an Apple School Manager sync, inventory information in the Roster category is updated for the imported users and users associated with an imported class. Class information, such as the display name, is also updated. If you modify the class naming format after a class has been imported, the class name is updated and the class naming format is re-applied to the classes that have been imported.
If a student or teacher is added to a class in Apple School Manager after a class has been imported, the user is imported to Jamf Pro and matched with existing users during a sync based on the criteria for matching imported users from Apple School Manager. If there is no match, the imported user is added to Jamf Pro as a new user in the Users tab.

125
1.
2.
3.
4.
If you have not yet imported users or classes from Apple School Manager when the configured sync time is reached, information is synced at the time configured and stored in the Jamf Pro database for the class or user until they are imported.
Note Jamf Pro performs one sync at a time.:
Matching Criteria for Importing Users from Apple School ManagerWhen you integrate Jamf Pro with Apple School Manager, you choose Jamf Pro user criteria to match with Apple School Manager user criteria. Users that are imported to Jamf Pro are matched to existing users in Jamf Pro based on the selected user criteria.
The following table displays the criteria you can use to match imported users from Apple School Manager to existing users in Jamf Pro:
Jamf Pro User Criteria Apple School Manager User Criteria
Email (Jamf Pro server) Email
Email (Jamf Pro server) Managed Apple ID
Username (Jamf Pro server) Source System Identifier
Source System Identifier Username
User Extension Attributes
Managed Apple ID (Jamf Pro server) Managed Apple ID
The default criteria matches "Email (Jamf Pro)" with "Managed Apple ID" from Apple School Manager and an operator of "equals".
Configuring an Instance of Apple School Manager
Requirements
To integrate with Apple School Manager, you need to integrate Jamf Pro with Automated Device Enrollment. For more information, see .Integrating with Automated Device Enrollment
Procedure
Log in to Jamf Pro.
In the top-right corner of the page, click .Settings
Click .Global Management

126
4.
5.
6.
7.
8.
9.
10.
11.
12.
13.
14.
a.
b.
Click .Apple Education Support
Click .Edit
Click the tab.Apple School Manager
Select the checkbox.Enable Apple School Manager Integration
Click .Add If you have not integrated Jamf Pro with Automated Device Enrollment (formerly DEP), click the
link.Automated Device Enrollment settings
Enter a display name for the Apple School Manager instance.
Choose an Automated Device Enrollment instance from the Automated Device Enrollment Instancepop-up menu.
Use the options to select a variable to apply to the name of a class when Class Naming Formatimporting the class from Apple School Manager. To add more variables, click and select Add"Variable" or "Custom Text".To remove a variable, click the "X" next to the variable field.
(Optional) Use the options to select a variable to apply to the description of Class Description Formata class when importing the class from Apple School Manager. To add more variables, click and Addselect "Variable" or "Custom Text".To remove a variable, click the "X" next to the variable field.
(Optional) To select a time that Jamf Pro should sync with Apple School Manager, choose a time interval from the pop-up menu, and then configure the days and Apple School Manager Sync Timetime to sync.The time zone that is displayed is the time zone that is configured in System Preferences.
Note: It is recommended that you choose to sync with Apple School Manager at a time other than when you choose to flush logs or back up your database.
Choose criteria to use for matching imported users from Apple School Manager with existing users in Jamf Pro using the options:Matching Criteria for Importing Users
Select Jamf Pro or Apple School Manager user criteria from the pop-up menu on the User Criterialeft.
Choose an operator from the pop-up menu.Operator
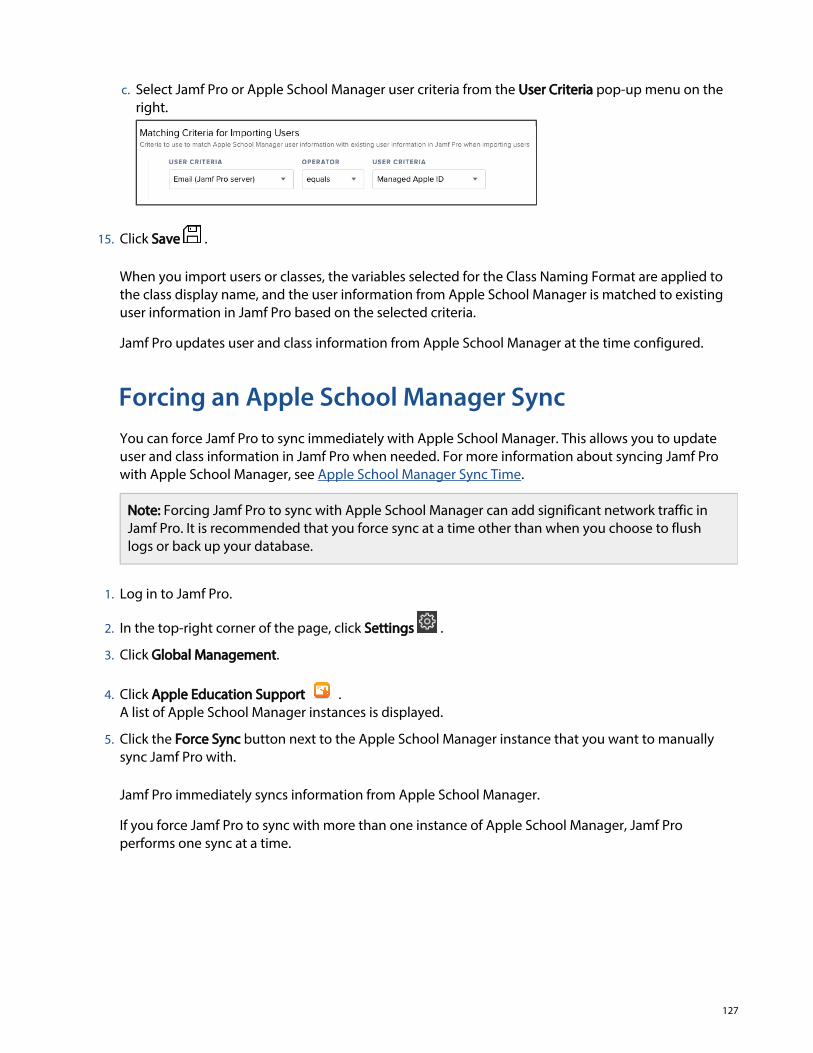
127
14.
c.
15.
1.
2.
3.
4.
5.
Select Jamf Pro or Apple School Manager user criteria from the pop-up menu on the User Criteria right.
Click .Save
When you import users or classes, the variables selected for the Class Naming Format are applied to the class display name, and the user information from Apple School Manager is matched to existing user information in Jamf Pro based on the selected criteria.
Jamf Pro updates user and class information from Apple School Manager at the time configured.
Forcing an Apple School Manager SyncYou can force Jamf Pro to sync immediately with Apple School Manager. This allows you to update user and class information in Jamf Pro when needed. For more information about syncing Jamf Pro with Apple School Manager, see .Apple School Manager Sync Time
Note: Forcing Jamf Pro to sync with Apple School Manager can add significant network traffic in Jamf Pro. It is recommended that you force sync at a time other than when you choose to flush logs or back up your database.
Log in to Jamf Pro.
In the top-right corner of the page, click .Settings
Click .Global Management
Click .Apple Education Support A list of Apple School Manager instances is displayed.
Click the button next to the Apple School Manager instance that you want to manually Force Syncsync Jamf Pro with.
Jamf Pro immediately syncs information from Apple School Manager.
If you force Jamf Pro to sync with more than one instance of Apple School Manager, Jamf Pro performs one sync at a time.
128
Notes:
Deleting an Apple School Manager instance removes the information in the Roster category of user inventory information that is imported from Apple School Manager. This disables Shared iPad for users.
Deleting an Apple School Manager instance does not remove the users or classes that have been imported from Apple School Manager.
Related InformationFor related information, see the following sections in this guide:
ClassesFind out how to create Classes in Jamf Pro for use with Apple's Classroom app.
Apple Education Support SettingsFind out how to enable support for Shared iPad for use with Apple's Classroom app.
Importing Users to Jamf Pro from Apple School Manager Find out how to automatically create new users in Jamf Pro from the users in Apple School Manager or append information to existing users in Jamf Pro.
For related information, see the following technical paper:
Integrating with Apple School Manager to Support Apple's Education Features Using Jamf ProGet step-by-step instructions on how to integrate with Apple School Manager to support Apple's education features with Jamf Pro.
For more information, see the .Apple School Manager User Guide

129
Re-enrollment Settings
The Re-enrollment settings in Jamf Pro allow you to clear certain information from inventory for a computer or mobile device when it is re-enrolled with Jamf Pro.
The Re-enrollment settings are applied to computers and mobile devices when they are re-enrolled with Jamf Pro via the following enrollment methods:
Automated Device Enrollment
Device Enrollment
User Enrollment (personally owned mobile devices only)
The following table lists the settings that you can apply to inventory information during re-enrollment:
Setting Description
Clear user and location information on mobile devices and computers
This setting clears all information from the User and Location category on the tab in computer and mobile device inventory information during re-Inventory
enrollment with Jamf Pro. When devices are re-enrolled, the user and location fields display a blank value.Information is not cleared, however, when the following happens:
If a user logs in to the enrollment portal using an LDAP directory account, or a Jamf Pro user logs in and assigns an LDAP user to the device, then the user and location information associated with the LDAP account is assigned to the device during re-enrollment. If the user chooses a site at enrollment, the device is associated with the selected site.If there is an extension attribute displayed on the User and Location category on the tab, the value for the extension attribute is not cleared Inventoryduring re-enrollment.If a PreStage enrollment is used to enroll devices and the Use existing location
option is selected, the user and location information information, if applicableof the user logging in is populated in the device's inventory information.
For more information about user and location information, see Computer and Inventory Information Reference Mobile Device Inventory Information
.Reference
Clear user and location history information on mobile devices and computers
This setting clears all information from the User and Location History category on the tab in computer and mobile device inventory information during Historyre-enrollment with Jamf Pro.For more information about user and location history information, see
and .Computer History Information Mobile Device History Information

130
Setting Description
Clear policy logs on computers
This setting clears all information from the Policy Logs category on the Historytab in computer inventory information during re-enrollment with Jamf Pro.In addition, this setting clears the logs for a policy for re-enrolled computers that have run the policy.When the computer is re-enrolled with Jamf Pro, any policies that the computer is in the scope of are re-run on the computer at the policy's next trigger.
Clear extension attribute values on computers and mobile devices
This option clears all values for extension attributes that are populated by the following input types:
Text fieldPop-up menuScript (computers only)LDAP Attribute Mapping
Note: Values for extension attributes that are populated by scripts and LDAP Attribute Mappings are cleared during re-enrollment, but are then re-populated the next time computers and mobile devices check in with Jamf Pro.
This option does not remove the extension attribute from Jamf Pro.For more information about extension attributes, see Computer Extension
and .Attributes Mobile Device Extension Attributes
Clear management history on mobile devices and computers
This setting clears all information from the Management History category on the tab in computer and mobile device inventory information during re-Historyenrollment with Jamf Pro.You can clear the following information:
Completed, pending, and failed commandsPending and failed commandsFailed commandsNothing
The default setting is to clear pending and failed commands.
Note: If there are pending commands at the time of re-enrollment, these commands are cleared.

131
1.
2.
3.
4.
5.
6.
General RequirementsTo re-enroll a device, you must send the Remove MDM Profile remote command to the device before re-enrolling it. For more information about how to send a remote command, see Remote Commands
and .for Computers Remote Commands for Mobile Devices
Configuring the Re-enrollment SettingsLog in to Jamf Pro.
In the top-right corner of the page, click .Settings
Click .Global Management
Click .Re-enrollment
Choose the settings that you want to apply to device inventory information during re-enrollment.
Click .Save
When computers and mobile devices are re-enrolled with Jamf Pro, the settings are applied to inventory information.
Related InformationFor related information, see the following sections in this guide:
User-Initiated Enrollment for ComputersFind out how to allow users to enroll their own computers by having them log in to an enrollment portal.
Computer PreStage EnrollmentsFind out how to enroll Mac computers using a PreStage enrollment.
User-Initiated Enrollment for Mobile DevicesFind out how to allow users to enroll mobile devices by having them log in to an enrollment portal.
Mobile Device PreStage EnrollmentsFind out how to enroll mobile devices using a PreStage enrollment.
Apple Configurator Enrollment SettingsFind out how to enable Apple Configurator enrollment so you can enroll mobile devices using Apple Configurator and an enrollment URL.

132
1.
2.
3.
4.
5.
a.
b.
c.
Jamf Pro URL
The Jamf Pro URL is the URL that client applications, computers, and mobile devices connect to when communicating with the Jamf Pro server. You can view and configure the Jamf Pro URL in Jamf Pro if you are hosting your own Jamf Pro server. It is recommended that you configure the Jamf Pro URL to include the correct protocol, fully qualified domain name (FQDN), and port of the server.
Important: In general, you should not change the Jamf Pro URL in a production environment with managed computers and mobile devices. If the Jamf Pro URL is incorrect or not specified, client applications, computers, and mobile devices are unable to connect to the server. If you are considering making a change to your Jamf Pro URL, contact your Jamf account representative.
You can also view or configure the Jamf Pro URL that’s used for enrolling mobile devices with an enrollment profile and Apple’s iPhone Configuration Utility (iPCU).
Note: If your environment is hosted in Jamf Cloud, the Jamf Pro URL setting is managed by Jamf Cloud and is not accessible.
Viewing or Configuring the Jamf Pro URLsLog in to Jamf Pro.
In the top-right corner of the page, click .Settings
Click .Global Management
Click .Jamf Pro URL The Jamf Pro URLs are displayed on the pane.
To configure the Jamf Pro URLs:
Click .Edit
Enter the new URLs in the fields on the pane.
Click .Save
Related InformationFor related information, see the following section in this guide:
Enrollment ProfilesFind out how to create and download enrollment profiles so you can enroll mobile devices by connecting them to a computer via USB.
133
1.
2.
3.
4.
5.
6.
7.
MDM Profile Settings
The MDM Profile Settings allow you to configure when the MDM profile will be automatically renewed for computers and mobile devices. The MDM profile contains the device identity certificate, which is also renewed for a duration of two years when the MDM profile is renewed.
Configuring MDM Profile Renewal for Computers or Mobile DevicesLog in to Jamf Pro.
In the top-right corner of the page, click Settings .
Click .Global Management
Click .MDM Profile Settings
Click .Edit
Configure when MDM profiles are automatically renewed for computers and mobile devices using the following settings:
When the built-in certificate authority is renewed—By default, the MDM profile and device identity certificate on all computers or mobile devices will be renewed when Jamf Pro's built-in certificate authority is renewed.
days before the MDM profile expires—This option allows you to specify the number of days before the MDM profile expires to renew it. To change the number of days, choose 90, 120, or 180 from the pop-up menu. The default is 180 days.
Click .Save
Note: The automatic renewal of the MDM profile will occur when the next MDM command is issued or when the computer or mobile device next checks in to Jamf Pro, as specified in the Mobile Device or Computer Inventory settings. For more information about renewing Jamf Pro's built-in certificate authority, see the Knowledge Renewing Jamf Pro JSS Built-In Certificate Authority (CA)Base article.

134
1.
2.
3.
4.
5.
6.
7.
PKI Certificates
The PKI Certificates settings allow you to manage the public key infrastructure needed to establish communication between computers and mobile devices and certificate authorities (CA). Jamf Pro requires a PKI that supports certificate-based authentication.
The PKI must include the following components:
A certificate authority (CA). You can use the built-in CA, a trusted third-party CA, or an external CA that supports SCEP.
A certificate authority (CA) certificate
A signing certificate
Viewing and Exporting CertificatesYou can view the following information for a certificate:
Subject name
Serial number
Device name associated with the certificate
Username associated with certificate
CA configuration name
Date/time issued
Expiration date/time
Status (Active or Inactive)
State (Issued, Expiring, Expired, or Revoked)
Configuration profiles associated with a third-party certificate
When you are viewing a list of certificates, you can export the list to a .csv, .txt, or XML file.
Log in to Jamf Pro.
In the top-right corner of the page, click .Settings
Click .Global Management
Click .PKI Certificates A list of CAs will be displayed with the number of expiring, active, inactive, or all certificates for each CA.
Click a number in the Expiring, Active, Inactive, or All column.A list of corresponding certificates will be displayed.
Click a certificate subject to view more details about a specific certificate.If applicable, the certificate details will include the revoked date. For third-party CA certificates, any c onfiguration profiles associated with the certificate are also displayed.

135
7.
a.
b.
c.
d.
e.
1.
2.
3.
4.
5.
6.
(Optional) If you want to export the list of certificates displayed in step 5:
Click Export.
Select a file format for the exported file.
Click .Next
The export begins immediately.
Click .Done
The Built-in CANo configuration is necessary to use Jamf Pro's built-in CA. The built-in CA is used by default to issue certificates to computers and mobile devices. The CA certificate and signing certificate are created and stored for you automatically. When a device checks in with Jamf Pro, it communicates with the SCEP server to obtain the CA certificate.
Note: If you do not want computers or mobile devices to communicate directly with a SCEP server and you are using the built-in CA, you can enable Jamf Pro as SCEP Proxy to issue device certificates via configuration profiles. For more information, see the Enabling Jamf Pro as SCEP
technical paper.Proxy
Downloading the Built-in CA Certificate
The downloaded built-in CA certificate (.pem) can be used to establish trust with other servers or services. For example, you can establish trust for IIS on Windows servers for HTTPS distribution points. For more information, see the Using IIS to Enable HTTPS Downloads on a Windows Server
Knowledge Base article.2016 or 2019 File Share Distribution Point
Log in to Jamf Pro.
In the top-right corner of the page, click .Settings
Click .Global Management
Click .PKI Certificates
Click the tab, and then click .Management Certificate Template Built-in CA
Click . The certificate file (.pem) will download.Download CA Certificate
The certificate issued by the built-in CA is also stored in the System keychain in Keychain Access on Mac computers as "JAMF Software JSS Built-in Certificate Authority".

136
1.
2.
3.
4.
5.
6.
7.
8.
1.
2.
3.
4.
5.
6.
Revoking a Certificate from the Built-in CA
Warning: Revoking a certificate stops communication between Jamf Pro and the computer or mobile device that the certificate was issued to. To restore the communication, re-enroll the computer or mobile device.
Log in to Jamf Pro.
In the top-right corner of the page, click .Settings
Click .Global Management
Click .PKI Certificates A list of CAs will be displayed with the number of expiring, active, inactive, or all certificates for each CA.
Click a number in the Expiring, Active, Inactive, or All column.A list of corresponding certificates will be displayed.
Click a certificate subject to view more details about a specific certificate.
To revoke the certificate, click .Revoke
Click again to confirm.RevokeThe status of the certificate is changed to "Inactive", and the state is changed to "Revoked".
Note: You can also view a record of revoked certificates in the file. jamfsoftwareserver.logFor more information, see in this guide.Jamf Pro Server Logs
Creating a Built-in CA Certificate from a CSR
Depending on your environment, you may need to create a certificate from a certificate signing request (CSR). For example, you may need to do this if you have a clustered environment with Tomcat configured to work behind a load balancer.
Note: The certificate created from the CSR is intended solely for purposes of communication between Jamf Pro and a managed computer or mobile device.
To create a certificate from a CSR, you need a request in Base64-encoded PEM format.
Log in to Jamf Pro.
In the top-right corner of the page, click .Settings
Click .Global Management
Click .PKI Certificates
Click the tab, and then click .Management Certificate Template Built-in CA
137
6.
7.
8.
9.
1.
2.
3.
4.
5.
6.
7.
8.
1.
2.
3.
4.
5.
6.
7.
Click .Create Certificate from CSR
In the field, paste the CSR.CSRThe request must begin with----BEGIN CERTIFICATE REQUEST----and end with----END CERTIFICATE REQUEST----
Select a certificate type.
Click .CreateThe certificate file (.pem) will download immediately.
Creating a Backup of the Built-in CA Certificate
It is recommended that you create a password-protected backup of the CA certificate issued by the built-in CA and store it in a secure location.
Log in to Jamf Pro.
In the top-right corner of the page, click .Settings
Click .Global Management
Click .PKI Certificates
Click the tab, and then click .Management Certificate Template Built-in CA
Click .Create CA Backup
Create and verify a password to secure the backup of the built-in CA certificate.You will need to enter this password to restore the certificate backup.
Click .Create BackupThe backup file (.p12) will download immediately.
Renewing the Built-in CA
When the CA expires, some critical Jamf Pro flows do not work. For example, enrolling computers or mobile devices when the CA is expired prevents them from being managed. It is recommended to renew the built-in CA before the expiration date.
Log in to Jamf Pro.
In the top-right corner of the page, click .Settings
Click .Global Management
Click .PKI Certificates
Click a number in the All column.A list of corresponding certificates will be displayed.
Click the certificate with "Certificate Authority" in the subject to view the certificate details.

138
7.
8.
9.
Click and confirm the renewal.Renew
(Optional) Verify the new expiration date.
Refresh the page. The renewal status is displayed in Jamf Pro Notifications. Additionally, an email with the renewal process status is sent if email notifications are configured for your account.
When the built-in CA is renewed, its expiration date is extended by 10 years. All signing certificates issued by the built-in CA are automatically renewed.
Note: After the built-in certificate authority (CA) renewal succeeds, t he MDM profile for computers The next time computers and mobile and mobile devices is automatically queued for renewal.
devices check in to Jamf Pro, the MDM profile will be renewed, and the MDM Profile Expiration Datefield value in the inventory will show the new expiration date. The device identity certificates will expire in two years. To monitor which MDM profiles are not renewed, you can create a smart computer or mobile device group and set the search criteria value to MDM Profile Renewal Needed"Yes".
Consider the following:
Renewing the built-in CA may affect integrations that use the built-in CA itself or certificates created from a CSR that was signed by the CA. These certificates may need to be re-issued.The affected integrations may include:
HTTPS file share distribution point configurationSigning custom configuration profilesSCCM (System Center Configuration Manager) plug-in
When Apple Education Support is enabled in your environment, renewing the built-in CA causes existing EDU profiles to be redistributed. This may increase network traffic.
Important: If the built-in CA renewal fails, do not trigger the process again. If the expiration date is not extended or you notice issues with the renewed CA, e.g., Jamf Pro cannot communicate with managed computers or mobile devices, contact Jamf Support.
Third-Party CAsYou can integrate Jamf Pro with trusted third-party CAs, including DigiCert, Venafi, or Active Directory Certificate Services (AD CS). These integrations allow an organization to have a CA that controls all of the identity certificates across all devices. Using a third-party CA will allow for unified reporting on all certificates for IT teams.
DigiCert—DigiCert certificates are managed in Jamf Pro using the DigiCert PKI Platform service. After communication between Jamf Pro and the DigiCert PKI Platform is established, you can deploy certificates to computers or mobile devices. For more information, see the Integrating with
technical paper.DigiCert Using Jamf Pro
Venafi—Venafi certificates are managed in Jamf Pro using Venafi Trust Protection Platform. After communication between Jamf Pro and Venafi Trust Protection Platform is established, you can deploy certificates to computers or mobile devices. For more information, see the Integrating with
technical paper.Venafi Using Jamf Pro

139
1.
2.
3.
4.
5.
6.
7.
AD CS—After communication with the PKI provider is successfully established, you can deploy certificates via configuration profiles using AD CS as the CA. You can also distribute in-house apps developed with the Jamf Certificate SDK to establish identities to support certificate-based authentication to perform Single Sign-On (SSO) or other actions specific to your environment. For more information, see the Integrating with Active Directory Certificate Services (AD CS) Using Jamf
technical paper.Pro
External CAsIf you are using an organizational or third-party CA that supports SCEP, you can use it to issue management certificates to computers and mobile devices. When a device checks in with Jamf Pro, the device communicates with the SCEP server to obtain the certificate.
Note: If you do not want computers or mobile devices to communicate directly with a SCEP server and you are using an external CA, you can use Jamf Pro to obtain management certificates from the SCEP server and install them on devices during enrollment. You can also enable Jamf Pro as SCEP Proxy to issue device certificates via configuration profiles. For more information, see the
technical paper.Enabling Jamf Pro as SCEP Proxy
Integrating an external CA with Jamf Pro involves the following steps:
Specifying SCEP parameters for the external CA
Uploading a signing certificate and CA certificate for the external CA
Note: If you need to make changes to your organizational or third-party CA in Jamf Pro, it is recommended that you contact your Jamf account representative. Changes to the PKI settings may require re-enrollment of mobile devices in your environment to restore trusted communication between the Jamf Pro server and mobile devices required for Mobile Device Management (MDM). Preparing for a change to PKI settings for computer management or restoring trusted communication between the Jamf Pro server and managed computers after a change is made to PKI settings in Jamf Pro may be possible using policy features available in Jamf Pro. Policies can be used to update trusted certificate settings on managed computers required for MDM.
Specifying SCEP Parameters for an External CA
Log in to Jamf Pro.
In the top-right corner of the page, click .Settings
Click .Global Management
Click .PKI Certificates
Click the tab, and then click .Management Certificate Template External CA
Click .Edit
Use the External CA pane to specify SCEP parameters.

140
8.
9.
Choose the type of challenge password to use from the pop-up menu:Challenge Type
Static—If you want all computers and mobile devices to use the same challenge password, choose “Static” and specify a challenge password. The challenge password will be used as the pre-shared secret for automatic enrollment.
Dynamic—If you are using a non-Microsoft CA and you want each computer and mobile device to use a unique challenge password, choose “Dynamic”. The Dynamic challenge type requires use of the Classic API and membership in the Jamf Developer Program. The Dynamic challenge uses the "Fingerprint" or "Thumbprint" to authenticate the user instead of a username and password. The Thumbprint hash value for the field in Jamf Pro can be found on the profile you receive. FingerprintBefore selecting this option, contact your Jamf account representative to learn more about the Jamf Developer Program and the additional steps you need to take to use this option.
Note: The "Dynamic” challenge type requires you to use user-initiated enrollment to enroll computers and mobile devices so that a unique challenge password is used for each device. For more information, see and User-Initiated Enrollment for Computers User-Initiated Enrollment for
.Mobile Devices
Dynamic-Microsoft CA—If you are using a Microsoft CA and you want each computer and mobile device to use a unique challenge password, choose “Dynamic-Microsoft CA”.
Note: The “Dynamic-Microsoft CA” challenge type requires you to use user-initiated enrollment to enroll computers and mobile devices so that a unique challenge password is used for each device. For more information, see and User-Initiated Enrollment for Computers User-Initiated
.Enrollment for Mobile Devices
Dynamic-Entrust—If you are using an Entrust CA, choose "Dynamic-Entrust".
Note: If you enable Jamf Pro as SCEP Proxy and you are integrating with an Entrust CA, additional steps are needed to distribute certificates via configuration profiles. For more information, see the technical paper.Enabling Jamf Pro as SCEP Proxy
Click .Save
141
1.
2.
3.
4.
5.
6.
7.
Uploading Signing and CA Certificates for an External CA
To integrate an external CA with Jamf Pro, you must provide the signing and CA certificates for the external CA. This is done by uploading a signing certificate keystore (.jks or .p12) that contains both certificates to Jamf Pro. For information about how to obtain and download a SCEP Proxy signing certificate from a Microsoft CA, see the following Knowledge Base articles:
Obtaining a SCEP Proxy Signing Certificate from a Microsoft CA Using Terminal and Uploading the Certificate to Jamf Pro
Obtaining a SCEP Proxy Signing Certificate from a Microsoft CA Using Command Prompt and Uploading the Certificate to Jamf Pro
Note: By default, Jamf Pro uses the signing and CA certificates for the Jamf Pro built-in CA. You must replace these certificates with the ones for the external CA when you initially set up the integration.
Log in to Jamf Pro.
In the top-right corner of the page, click .Settings
Click .Global Management
Click .PKI Certificates
Click the tab, and then click .Management Certificate Template External CA
At the bottom of the External CA pane, click .Change Signing and CA Certificates
Follow the onscreen instructions to upload the signing and CA certificates for the external CA.
Related InformationFor related information, see the following sections in this guide:
SecurityFind out about the PKI and its components.
JSON Web Token for Securing In-House ContentLearn how to use the PKI Certificates settings to configure a JSON Web Token to secure downloads of iOS and tvOS in-house apps and books.
For related information, see the following Knowledge Base articles:
Certificate-Based Authentication for Mac ComputersLearn how Jamf Pro uses certificate-based authentication to verify the identity of Mac computers.
Using OpenSSL to Create a Certificate Keystore for TomcatFind out how to use OpenSSL to create a certificate keystore that you can upload to Jamf Pro.

142
Integrating with Volume Purchasing
Integrating with volume purchasing (formerly VPP) is the first step to using managed distribution. To distribute apps and books purchased in volume, you must first add one or more locations to Jamf Pro.
When you add a location to Jamf Pro, you upload the service token that you obtained from Apple, and specify the country associated with the location. You can also specify other information about the account, such as the contact person and Apple ID.
In addition, you can specify that all content purchased in volume is populated in the app and eBook catalogs.
Volume Purchase Location ConsiderationsConsider the following when adding locations to volume purchasing in Jamf Pro:
To avoid issues with content scoping and renewal dates, it is recommended that you do not configure multiple locations for the same distribution content.
Each service token for the specific distributed content should only be allocated once. For example, if the service token you want to upload already exists in Apple's Profile Manager, delete the service token from Apple's Profile Manager before uploading it to Jamf Pro. This limitation includes a single server instance.
If you upload a new token file to renew distributed content licenses, it is recommended that you do not delete the expired location from Jamf Pro before uploading the new server token file.
If you configured a location for your distributed content licenses and later integrated your environment with Apple School Manager or Apple Business Manager, it is recommended that you do not add a separate location for these licenses.Use the "Renew Service Token" button on the location tab to upload the new tokenDetails(.vpptoken) that you acquired from Apple School Manager or Apple Business Manager. This will allow Location to display for your Apple School Manager token in Jamf Pro. When prompted, reclaim the service token to use it with your Jamf Pro instance.For information on how to obtain the token file, see the following Apple documentation:
Apple School Manager User GuideApple Business Manager User Guide
Note: It is recommended that you only use one Apple School Manager or Apple Business Manager account to integrate with volume purchasing. Using more than one account makes it difficult to isolate the account causing the issues when troubleshooting.
Deleting a location removes the instance from Jamf Pro but does not delete the settings in Apple School Manager or Apple Business Manager.

143
1.
2.
3.
4.
5.
6.
7.
8.
9.
10.
11.
12.
13.
Adding a Location
Requirements
To add a location to Jamf Pro, you need a service token (.vpptoken) from Apple.
Procedure
Log in to Jamf Pro.
In the top-right corner of the page, click .Settings
Click .Global Management
Click . Volume Purchasing
Click .New
Enter a display name for the location.
Note: If you configure email notifications for the location, this name will be displayed in the email body.
Click and upload the service token (.vpptoken) for the location.Upload Service Token
Note: Each service token should only exist in one location at a time. If the service token you want to upload already exists in Apple's Profile Manager, delete the service token from Apple's Profile Manager before uploading it to Jamf Pro.
Choose the country that is associated with the account.
(Optional) Select if you want content purchased in Automatically Populate Purchased Content volume to be populated in the app and eBook catalogs.
(Optional) Select if you want to send a Notify users when an app is no longer assigned to themnotification to users when an app is revoked.
(Optional) If your environment integrates with Apple School Manager and you do not want the users that have Managed Apple IDs to receive an invitation or get prompted to register with volume purchasing, select .Automatically register with volume purchasing if users have Managed Apple IDs
Note: For users that have Managed Apple IDs to be automatically registered with volume purchasing, you need to create an invitation that includes the users in the scope and configure the invitation to automatically register the users. For more information, see User-Assigned Volume
.Purchasing Registration
(Optional) Enter additional information about the account, including the contact person and Apple ID.

144
13.
1.
2.
3.
4.
5.
6.
7.
8.
a.
b.
9.
Click .Save
Adding Volume Purchasing NotificationsTo make the managed distribution content management more efficient, you can enable a volume purchasing notification. This allows Jamf Pro to send you a daily email after the predefined condition is triggered. You can also specify the recipients to send the notification to. To properly configure a notification, at least one location must exist in Jamf Pro, and you must be logged in with a Jamf Pro user account that has full access or site access and an email address configured.
Requirements
To add volume purchasing notifications, you need:
An SMTP server set up in Jamf Pro (For more information, see .)Integrating with an SMTP Server
At least one location configured in Jamf Pro
Email notifications enabled for Jamf Pro user accounts (For more information, see Email .)Notifications
Procedure
Log in to Jamf Pro.
.In the top-right corner of the page, click Settings
Click .Global Management
.Click Volume Purchasing
Click .Notifications
.Click New
Use the pane to configure the settings for the notification, New Volume Purchasing Subscription including the display name, the trigger, and tokens that you want to monitor.
Note: Jamf Pro users with the "Volume Purchasing Admin Accounts" privilege that have site access are allowed to manage notifications in the context of the site.
Click the tab and configure the scope of the notification by adding recipients:Scope
Click to add recipients of the notification. You can select the existing Jamf Pro user Addaccounts, or manually add external recipients that are not registered in Jamf Pro.
Click in the top-right corner of the pane.Done
Click .Save
After adding a volume purchasing notification, you must enable it.

145
Related InformationFor related information, see the following Jamf Knowledge Base videos:
Integrating Jamf Pro with Apps and Books
Renewing a Managed Distribution Token with Jamf Pro
For related information, see the following section in this guide:
About Volume ContentLearn about volume content and managed distribution types.
For related information, see the following Knowledge Base article:
Recently Purchased Volume Content is not Displayed in Jamf ProThe Content tab for a location can be used when content recently purchased from volume purchasing fails to display in Jamf Pro. The functionality available in that tab allows you to pull that content into Jamf Pro.

146
1.
2.
3.
4.
1.
2.
3.
4.
5.
Categories
Categories are organizational components that allow you to group policies, packages, scripts, and printers in Jamf Admin and Jamf Pro. You can also use categories to group policies, configuration profiles, apps, and books in Jamf Self Service. This makes these items easier to locate.
You can add categories to Jamf Admin or Jamf Pro. When you add, edit, or delete a category in Jamf Admin, the changes are reflected in Jamf Pro and vice versa.
After you add a category to Jamf Admin or Jamf Pro, you can add items to the category when configuring them in Jamf Admin or Jamf Pro.
Adding a Category to Jamf AdminOpen Jamf Admin and authenticate to the Jamf Pro server.
Click .New Category
Enter a display name and choose a priority for the category.
Note: Priority is used for displaying the category in Self Service (e.g., A category with a priority of “1” is displayed before other categories).
Click .OK
Adding a Category to Jamf ProLog in to Jamf Pro.
In the top-right corner of the page, click .Settings
Click .Global Management
Click .Categories
Click .New
147
6.
7.
1.
2.
3.
Enter a display name and choose a priority for the category.
Note: Priority is used for displaying the category in Self Service.
Click .Save
Editing or Deleting a Category in Jamf AdminOpen Jamf Admin and authenticate to the Jamf Pro server.
In the "Categories" list above the main repository, select the category you want to edit or delete.
Do one of the following:
To edit the category, double-click it and change the display name and priority as needed. Then click .OK
To delete the category, click and then click again to confirm.Delete , Delete

148
1.
2.
3.
Event Logs
Jamf Pro records events in the form of logs. You can view the status of these events using the Event Logs.
The Event Logs pane displays the following information:
Date/time the status was last updated for an event
Name of the device that is in the scope of an event
Object type (such as “macOS Configuration Profile” or “Jamf Imaging”)
Object name associated with an event (such as the name of a configuration profile or “Standard Imaging”)
Action of the event (such as “Install” or “Imaging”)
Status of the event (such as “Started” or “Completed”)
Event logs can be viewed for macOS configuration profiles and iOS configuration profiles. As of Jamf Pro 9.7, event logs can also be viewed for imaging.
Depending on your system configuration:
Some historical event logs data may not be available for macOS configuration profiles and iOS configuration profiles installed using 9.63 or earlier.
Some historical event logs data may not be available for imaging performed using Jamf Imaging 9.66 or earlier.
Viewing Event Logs
Requirements
To access Event Logs, a Jamf Pro user account or group must have the Administrator or Auditor privilege set. For more information, see .Jamf Pro User Accounts and Groups
Procedure
Log in to Jamf Pro.
In the top-right corner of the page, click .Settings
Click .Global Management

149
4.
5.
Click .Event Logs The event logs are displayed on the pane.
“Standard Imaging” includes Target Mode Imaging (TMI) events.
Note: All migrated imaging events will be displayed as “Standard Imaging”.
“Autorun Imaging” represents events that include Autorun data.
“PreStage Imaging” represents events that include PreStage data.
Do one of the following:
To view details about a particular device, click a device in the Device Name column.
(Configuration profiles only) To view the object associated with an event, click an object in the Object Name column.
To view log details, click a status in the Status column.
Related InformationFor related information, see the following sections in this guide:
Computer Configuration ProfilesLearn about macOS configuration profiles, including how to view the status and the logs of a macOS configuration profile.
Mobile Device Configuration ProfilesLearn about iOS configuration profiles, including how to view the status and the logs of an iOS configuration profile.

150
1.
2.
3.
4.
5.
6.
7.
8.
9.
10.
11.
12.
13.
Webhooks
The Webhooks setting in Jamf Pro allows you to create outbound webhooks for any event in the Events API. In conjunction with the Events API, webhooks allow you to use real-time events from Jamf Pro to build custom workflows on-demand using the programming language of your choice. For example, you could configure a webhook to send an event to an instant message plug-in you have written that will notify a chatroom when a third-party macOS software title in Jamf Pro has been updated.
Configuring a WebhookLog in to Jamf Pro.
In the top-right corner of the page, click .Settings
Click .Global Management
Click .Webhooks
Click .New
Enter a display name for the webhook.
Enter a URL for the webhook to post to.
Choose the type of authentication required to connect to the webhook.
Enter the connection timeout for the webhook.
Enter the read timeout for the webhook.
Choose either "XML" or "JSON" as the format for sending the webhook information.
Choose the event that will trigger the webhook.
Click .Save
For information on supported webhooks, see the Jamf developer resources:https://www.jamf.com/developers/webhooks/

151
1.
2.
3.
4.
5.
6.
7.
8.
9.
10.
AirPlay Permissions
AirPlay Permissions allow you to map one or more mobile devices to an AirPlay destination, such as an Apple TV, so that those mapped mobile devices can be automatically paired with the AirPlay destination. When a mobile device is mapped to an AirPlay destination via AirPlay Permissions, you can also choose to automatically give the mobile device the password for the AirPlay destination, or to make only the permitted AirPlay destinations available to that device.
When configuring AirPlay Permissions, you must choose a mobile device inventory field to use to map devices to permitted AirPlay destinations. The inventory field you choose is automatically mapped to an AirPlay destination when the value in that field is the same for both the mobile device and the AirPlay destination device.
Creating an AirPlay Permission
Requirements
To use AirPlay Permissions, you need:
Mobile devices with iOS 8 or later
Apple TV devices enrolled with Jamf Pro
Procedure
Log in to Jamf Pro.
In the top-right corner of the page, click .Settings
Click .Global Management
Click .AirPlay Permissions
Click .New
Enter a display name for the AirPlay Permission.
Select the inventory field from the pop-up menu.Mapping Field
(Optional) Enable settings for restricting AirPlay destinations and automating passwords, as needed.
Click .Save
Repeat this process for each new AirPlay Permission you want to create.
The mobile devices and AirPlay destinations that share the selected inventory field are mapped immediately.

152
Conditional Access
Microsoft Intune (via Conditional Access) allows organizations to ensure that only trusted users from compliant macOS computers, using approved applications, are accessing company resources.
Integrating Jamf Pro with Microsoft Intune allows you to do the following:
Share Jamf Pro computer inventory information with Microsoft Intune.
Enforce compliance policies defined in Microsoft Intune on computers managed by Jamf Pro.
Restrict access to applications set up with Azure Active Directory (Azure AD) authentication (e.g., Office 365).
Feature policies for users in the Compliance category in Jamf Self Service for macOS.
Create a policy registering user computers with Azure AD.
View the Conditional Access Inventory State for a computer in Jamf Pro.
There are two ways to connect Jamf Pro and Microsoft Intune:
Cloud Connector—(Jamf Cloud-hosted environments only) The Cloud Connector simplifies the process of configuring the communication between Jamf Pro and Microsoft Azure by automating the creation of the Jamf Pro application in Azure. In addition, the Cloud Connector allows you to connect multiple Jamf Pro instances to a single Azure AD tenant.
Manual connection
For step-by-step instructions on how to integrate with Microsoft Intune, including information on the workflows listed above, see the following technical paper:Integrating with Microsoft Intune to Enforce Compliance on Macs Managed by Jamf Pro
General RequirementsTo configure the Intune integration, you need:
(Manual connection only) The Jamf Pro application added in Microsoft Azure (For more information, see the Integrating with Microsoft Intune to Enforce Compliance on Macs Managed by
technical paper)Jamf Pro
(Cloud Connector only) A Jamf Pro instance hosted in Jamf Cloud
A Jamf Pro user account with Conditional Access privileges
Microsoft Enterprise Mobility + Security (specifically Microsoft AAD Premium and Microsoft Intune)
Microsoft Intune Company Portal app for macOS v1.1 or later
In addition, the macOS Intune Integration requires computers with macOS 10.11 or later that are using a local or mobile account. Network accounts are not supported for the macOS Intune Integration.

153
1.
2.
3.
4.
5.
6.
7.
8.
9.
10.
11.
12.
13.
Note: When configuring the connection between Jamf Pro and Microsoft Intune, you must use the Microsoft Azure website (portal.azure.com) and not the Microsoft Azure portal desktop app.
Manually Configuring the macOS Intune IntegrationThe Conditional Access settings allow you to set up the connection to Microsoft Intune in Jamf Pro. When the connection is saved, Jamf Pro shares computer inventory information with Microsoft Intune and applies compliance policies configured in Microsoft Intune to computers.
Log in to Jamf Pro.
In the top-right corner of the page, click .Settings
Click .Global Management
Click .Conditional Access
Navigate to the tab, and then click .macOS Intune Integration Edit
Select the checkbox.Enable Intune Integration for macOS
Note: When this setting is selected, Jamf Pro sends inventory updates to Microsoft Intune. Deselect the checkbox if you want to disable the connection but save your configuration.
(Cloud-hosted instances only) Select "Manual" under Connection Type.
Note: This setting does not display for instances hosted on-premise.
Select the location of your Sovereign Cloud from Microsoft.
Click and follow the onscreen prompts to allow the Jamf Native Open administrator consent URLmacOS Connector app to be added to your Azure AD tenant.
Add the from Microsoft Azure. Azure AD Tenant Name
Add the and (previously called Application Key) for the Jamf Pro Application ID Client Secretapplication from Microsoft Azure.
Select one of the following landing page options for computers that are not recognized by Microsoft Azure:
The Default Jamf Pro Device Registration page
Note: Depending on the state of the computer, this option redirects users to either the Jamf Pro device enrollment portal (to enroll with Jamf Pro) or the Company Portal app (to register with Azure AD).
The Access Denied page
A custom webpage

154
13.
1.
2.
3.
4.
5.
6.
7.
8.
Click . Jamf Pro tests the configuration and report the success or failure of the connection.Save
When the connection between Jamf Pro and Microsoft Intune is successfully established, Jamf Pro sends inventory information to Microsoft Intune for each computer that has been registered with Azure AD (registering with Azure AD is an end user workflow). You can view the Conditional Access Inventory State (previously called Azure Active Directory ID information) for a user and a computer in the Local User Account category of a computer’s inventory information in Jamf Pro. For detailed information on Azure AD device registration and inventory information sent to Microsoft Intune, see the technical Integrating with Microsoft Intune to Enforce Compliance on Macs Managed by Jamf Propaper.
Configuring the macOS Intune Integration using the Cloud ConnectorThe Cloud Connector simplifies the process of connecting a cloud-hosted Jamf Pro instance with Microsoft Intune by automating many of the steps needed to configure the macOS Intune Integration. When the connection is saved, Jamf Pro sends computer inventory information to Microsoft Intune and applies compliance policies to computers.
You can also use the Cloud Connector to connect multiple Jamf Pro instances to a single Azure AD tenant.
Log in to Jamf Pro.
In the top-right corner of the page, click .Settings
Click .Global Management
Click .Conditional Access
Navigate to the tab, and then click .macOS Intune Integration Edit
Select the checkbox.Enable Intune Integration for macOS
Note: When this setting is selected, Jamf Pro sends inventory updates to Microsoft Intune. Deselect the checkbox if you want to disable the connection but save your configuration.
(Cloud-hosted instances only) Select "Cloud Connector" under Connection Type.
Note: This setting does not display for instances hosted on-premise.
Select the location of your Sovereign Cloud from Microsoft.

155
9.
10.
11.
12.
13.
14.
15.
16.
Select one of the following landing page options for computers that are not recognized by Microsoft Azure:
The Default Jamf Pro Device Registration page
Note: Depending on the state of the computer, this option redirects users to either the Jamf Pro device enrollment portal (to enroll with Jamf Pro) or the Company Portal app (to register with Azure AD).
The Access Denied page
A custom webpage
Click . You are redirected to the application registration page in Microsoft.Connect
Enter your Microsoft Azure credentials and follow the onscreen instructions to grant the permissions requested by Microsoft.After permissions have been granted for the Cloud Connector and the Cloud Connector user registration app, you are redirected to the Application ID page.
Click . A new tab opens to the in Microsoft Copy and open Intune Partner device management bladeAzure.
Paste the Application ID into the field.Specify the Azure Active Directory App ID for Jamf
Click .Save
Navigate back to the original tab and click . You are redirected back to Jamf Pro.ConfirmJamf Pro completes and tests the configuration. The success or failure of the connection displays on the Conditional Access settings page.
(Optional) Repeat this process to connect additional Jamf Pro instances to the same Azure AD tenant.
When the connection between Jamf Pro and Microsoft Intune is successfully established, Jamf Pro sends inventory information to Microsoft Intune for each computer that is registered with Azure AD (registering with Azure AD is an end user workflow). You can view the Conditional Access Inventory State (previously called Azure Active Directory ID information) for a user and a computer in the Local User Account category of a computer’s inventory information in Jamf Pro. For detailed information on Azure AD device registration and inventory information sent to Microsoft Intune, see the
technical Integrating with Microsoft Intune to Enforce Compliance on Macs Managed by Jamf Propaper.

156
1.
2.
3.
4.
5.
Testing the macOS Intune IntegrationIf you connected Jamf Pro to Microsoft Intune using the manual connection method, you can test the connection to Microsoft Intune at any time.
Note: This option does not display if you used the Cloud Connector to connect Jamf Pro to Microsoft Intune.
Log in to Jamf Pro.
In the top-right corner of the page, click .Settings
Click .Global Management
Click .Conditional Access
Navigate to the tab, and then click .macOS Intune Integration Run Test
A message displays, reporting the success or failure of the connection.
Related InformationFor related information, see the following sections in this guide:
Computer Inventory InformationFind out more about the Conditional Access Inventory State displayed in the Local User Account category of a computer’s inventory information.
Computer History InformationFind out how to view inventory data sent to Microsoft Intune for each username associated with a computer.

157
Cloud Services Connection
You can automatically connect your Jamf Pro instance with available Jamf-hosted services by enabling the Cloud Services Connection. The following services are available:
Icon Service
Jamf Platform Integration Service
Icon ServiceWhen you enable the Cloud Services Connection, your Jamf Pro instance is automatically connected to the Icon Service. After enabling the connection, new icons uploaded to Jamf Pro are stored in the Icon Service rather than in the Jamf Pro database. This removes the work of storing, moving, and displaying icons for items made available in Self Service and helps you save on database storage and memory usage.
Note: The Icon Service uses the following hosted data regions:
us-east-1
us-west-2
Jamf Platform Integration ServiceWhen you enable the Cloud Services Connection, your Jamf Pro instance is automatically connected to the Jamf Platform Integration Service. After enabling the connection, Jamf Pro will allow you to complete a one-time registration process to integrate Jamf Protect with Jamf Pro. This allows you to download the latest version of the Jamf Protect package and configure scope for Jamf Protect plan configuration profiles directly from Jamf Pro.
Note: You must have a valid Jamf Protect subscription to use this integration.

158
1.
2.
3.
4.
5.
6.
Enabling the Cloud Services Connection
Requirements
To enable the Cloud Services Connection, you need a Jamf Nation account with a valid Jamf Pro subscription.
To create a Jamf Nation account, go to:https://www.jamf.com/jamf-nation/users/new
Procedure
Log in to Jamf Pro.
In the top-right corner of the page, click .Settings
Click .Global Management
Click Cloud Services Connection .
Enter your Jamf Nation credentials.
Click .Save
A message displays, reporting the success or failure of the connection. After you have successfully enabled the Cloud Services Connection, your environment is automatically connected to the Icon Service.
Related InformationFor related information about integrating Jamf Protect with Jamf Pro, see the Jamf Protect
section of this guide.Integration with Jamf Pro
For related information about which ports Jamf Pro uses to communicate with the Cloud Services Connection, see the Knowledge Base article.Network Ports Used by Jamf Pro

159
Device Compliance
Microsoft Endpoint Manager (via Device Compliance) allows organizations to ensure that only trusted users from compliant iOS and iPadOS devices can access company resources. Integrating Jamf Pro with Microsoft Endpoint Manager allows you to monitor and report on the compliance status of institutionally owned mobile devices in your environment.
Note: This integration is not available for personally owned devices.
For step-by-step instructions on how to integrate with Microsoft Endpoint Manager, see the Integrating with Microsoft Endpoint Manager to Enforce Compliance on Mobile Devices Managed by
technical paper.Jamf Pro
Before configuring the integration, you should do the following:
Create a smart device group for devices you want to make the Register with Microsoft object available to in Jamf Self Service for iOS.
Create a smart device group for devices you want to monitor for compliance.
Note: When creating the smart device group, add the criteria you want compliant devices to have. For example, you may want to include the following criteria:
iOS VersionJailbreak DetectedLast BackupPasscode Status
For more information on creating smart device groups, see .Smart Groups
RequirementsTo configure the Microsoft Endpoint Manager integration with Jamf Pro, you need the following:
Jamf Pro 10.25.0 or later hosted in Jamf Cloud
A Jamf Pro user account with Conditional Access privileges
Microsoft Enterprise Mobility + Security (specifically Microsoft AAD Premium and Microsoft Intune)
Devices you want to monitor for compliance must have the following:
iOS 11 or later, or iPadOS 13 or later
The Microsoft Authenticator app. Microsoft Authenticator is available from the App Store.
Jamf Self Service for iOS 10.10.3 or later (For more information, see .)Jamf Self Service for iOS

160
1.
2.
3.
4.
5.
6.
7.
8.
9.
10.
11.
12.
13.
14.
15.
16.
17.
18.
19.
20.
ProcedureLog in to Jamf Pro.
In the top-right corner of the page, click .Settings
Click .Global Management
Click .Device Compliance
Click .Edit
Use the switch to enable the integration.
Choose the location of your Sovereign Cloud from Microsoft.
Choose the smart device group you want Jamf Pro to use to monitor device compliance.
Choose the smart device group you want to make the Register with Microsoft object available to in Jamf Self Service for iOS.
Note: Jamf Self Service and Microsoft Authenticator must both be installed on the device in order for the user to register with Microsoft.
Click . You are redirected to the application registration page in Microsoft.Connect
Enter your Azure AD credentials and follow the onscreen instructions to grant the permissions requested by Microsoft.After permissions have been granted for the Cloud Connector for Device Compliance app and the User registration app for Device Compliance, you are redirected to the Configure Compliance Partner page.
Click . A new tab opens to the Open Microsoft Endpoint Management Partner compliance in Microsoft Azure.management blade
Click .Add compliance partner
Choose "Jamf Device Compliance" from the pop-up menu.Compliance partner
Choose "iOS" from the pop-up menu and click .Platform Next
Select "Selected Groups" from the pop-up menu.Assign to
Important: Do not select "All users" from the pop-up menu. Selecting this option will Assign to prevent the integration from working.
Click and select the Azure AD groups you want to use. For more information Select groups to include on creating groups in Azure AD, see the following documentation from Microsoft: Create a basic group and add members using Azure Active Directory
Click and then click .Select Next
Review your configuration and then click .Create

161
20.
21.
Navigate back to the previous tab and click .ConfirmYou are redirected back to Jamf Pro. Jamf Pro completes and tests the configuration. The success or failure of the connection displays on the Device Compliance settings page.
(Optional) To connect additional Jamf Pro instances to the same Azure AD tenant, configure the Device Compliance settings for each instance and grant the requested permissions for the Cloud Connector for Device Compliance and the User registration app for Device Compliance. You do not need to add Jamf as a compliance partner again.
Once the connection is successfully enabled, Jamf Pro sends the compliance status to Microsoft for each mobile device that is registered with Azure AD (registering with Azure AD is an end user workflow). You can view the compliance status of the device in Azure AD.

162
Jamf Application Integrations

163
1.
2.
3.
4.
5.
6.
Jamf Parent Integration with Jamf Pro
Jamf Parent is a free app parents can download from the App Store on their iOS devices. If parents have an Apple Watch paired with their iPhone, the Jamf Parent app installs on their Apple Watch as well.
When integrated with Jamf Pro, Jamf Parent allows parents to have limited management of their children's school-issued devices. Using Jamf Parent, parents can restrict and allow apps and apply Device Rules on their children's devices. Parents can add their children's devices to Jamf Parent by scanning the QR code in Jamf Self Service for iOS on their child's device.
You can limit management by Jamf Parent by configuring days and times to restrict Jamf Parent usage. Parents can only manage their children's devices with Jamf Parent during the time periods specified in Jamf Pro. If a Jamf Pro administrator and Jamf Parent both set restrictions on the same student's device, the student's device will accept the most restrictive settings. Restrictions are set via mobile device configuration profiles created in Jamf Pro.
You can also remove restrictions set by Jamf Parent and Jamf Parent management capabilities from student devices by using a mass action or remote command.
General RequirementsA Jamf Pro user account with read and update privileges for Jamf Parent and read privileges for smart device groups and static device groups
(On-premise only) A valid SSL certificate obtained from a third-party vendor For more information, see .SSL Certificate
(On-premise only) Allow secure inbound connections from "student-api.services.jamfcloud.com"
Supervised student devices with Jamf Self Service for iOS 10.9.0 or later
Note: You cannot use the Self Service web clip to add student devices to Jamf Parent.
To use Jamf Parent, parents need their own mobile device with iOS 10.2 or later with the Jamf Parent app installed on it.
Integrating Jamf Parent with Jamf ProLog in to Jamf Pro.
In the top-right corner of the page, click .Settings
Click . Jamf Applications
Click .Jamf Parent
Click .Edit

164
6.
7.
8.
9.
10.
1.
Select .Allow limited management of students' devices by Jamf Parent
From the pop-up menu, choose the smart or static device group of student Student Device Groupdevices you want Jamf Parent to manage.The devices in the selected device group will display a QR code in Self Service that will be used to add the student device to Jamf Parent.
Choose days and times to restrict Jamf Parent app usage from the pop-up Jamf Parent Restrictionsmenus.
Choose the time zone to use for the Jamf Parent time restrictions from the pop-up menu.Time Zone
Click .Save
The QR code is made available in Self Service to devices in the selected student device group.
Jamf Parent ExperienceParents use instructions provided by the school to open Self Service on the student's school-issued device. Then, they add the devices to Jamf Parent by scanning the QR code in Self Service using a device with iOS 10.2 or later with the Jamf Parent app installed on it.
To help parents get started with Jamf Parent, you can provide them with the Jamf Parent Guide for guide.Jamf Pro Parents
The parent opens Self Service on the student's device, and then taps the Jamf Parent icon in the top-right corner of the page.

165
2. The parent downloads Jamf Parent from the App Store on their own iOS device.

166
3. The parent opens Jamf Parent, and then taps .Get Started

167
4. The parent taps to scan the QR code in Self Service, and then taps to add the Scan QR Code Confirm student's device to Jamf Parent.
Note: Only parents with children in schools that use Jamf School can use credentials to sign in to Jamf Parent.
The student device is paired with Jamf Parent. Parents can repeat this process for any other student devices they want to manage with Jamf Parent. To view the number of devices with Jamf Parent that are managing a student device, you can use the "Jamf Parent Pairings" smart device group criteria.
If two or more parents want to manage the same child's device with Jamf Parent, they must close and reopen the QR code in Self Service before scanning the QR code on the second device with Jamf Parent.
To prevent students from managing other students' school-issued devices with Jamf Parent, you can distribute a configuration profile that restricts the Jamf Parent app on student devices. Enforcing a passcode on student devices is also recommended. For more information about enforcing restrictions on devices, see the .Restricting iOS Apps Best Practice Workflow for Jamf Pro

168
Related InformationFor related information, see the following section in the :Jamf Parent Guide for Parents
Getting Started with Jamf ParentProvides information for parents on how to use features in Jamf Parent.
Note: The location feature is not currently supported in Jamf Parent for schools that use Jamf Pro.
For related information, see the following sections of this guide:
Remote Commands for Mobile Devices and Mass Actions for Mobile DevicesLearn how to send remote commands and mass actions to devices.
Mobile Device Configuration ProfilesLearn how to distribute configuration profiles to devices.

169
1.
2.
3.
4.
Jamf Teacher Integration with Jamf Pro
Jamf Teacher is a free mobile device app that allows teachers to have limited management of student's school-issued devices. The following is a complete list of features available in the Jamf Teacher app for teachers when integrated with Jamf Pro:
Manage administrator-created classes
Clear a student's device passcode in a class
In a class, lock students into specific apps and websites and restrict device functionality like the camera or spell check
In a teacher-created lesson, lock students into specific apps and websites and restrict device functionality like the camera or spell check
Administrators can limit the management capabilities of Jamf Teacher by doing the following:
Configure how long Jamf Teacher restrictions can be set on student devices
Configure the time at which restrictions applied by Jamf Teacher end
Remove restrictions set by Jamf Teacher using the "Remove restrictions set by Jamf Teacher" mass action or remote command.
If a Jamf Pro administrator and Jamf Teacher both set restrictions on the same student's device, the student's device will accept the most restrictive settings. Restrictions are set via mobile device configuration profiles created in Jamf Pro.
Integrating Jamf Teacher with Jamf Pro
Requirements
A Jamf Pro user account with read and update privileges for Jamf Teacher
(On-premise only) A valid SSL certificate obtained from a third-party vendorFor more information, see .SSL Certificate
(On-premise only) Allow secure inbound connections from "student-api.services.jamfcloud.com"
Students and teachers assigned to supervised devices
Classes created in Jamf ProFor more information, see .Classes
Procedure
Log in to Jamf Pro.
In the top-right corner of the page, click .Settings
Click . Jamf Applications

170
4.
5.
6.
7.
8.
a.
b.
9.
1.
2.
3.
4.
5.
6.
7.
8.
Click .Jamf Teacher
Click .Edit
Select .Allow limited management of students' devices by Jamf Teacher
(Optional) Choose how long teachers can restrict student devices from the Maximum Restriction Timepop-up menus.
(Optional) Choose the time at which all restrictions set by Jamf Teacher are cleared from student devices from the pop-up menus, and then do the following:Restrictions End Time
Choose the region in which Jamf Teacher time restrictions are cleared from the pop-up Regionmenu.
Choose the time zone in which Jamf Teacher time restrictions are cleared from the pop-Time Zoneup menu.
Click .Save
Configuring and Distributing the Jamf Teacher AppTo distribute the Jamf Teacher app to teachers, you must create a managed app configuration. The managed app configuration allows teachers to use the app without logging in.
Requirements
To use Jamf Teacher, teachers need a mobile device with iOS 10.11 or later.
Procedure
Log in to Jamf Pro.
Click at the top of the page. Devices
Click .Mobile Device Apps
Click .New
Select and click .App Store app or apps purchased in volume Next
Enter the name of the app, choose an App Store country and click . Then click for the app Next Addyou want to add.
On the General tab, ensure that the Make app managed when possible checkbox is selected.
Use the Scope, Self Service, and Managed Distribution tabs to configure app distribution settings as needed.

171
9.
10.
Click the tab and App Configuration enter the following in the Preferences field:
<dict><key>action</key><string>updateToken</string><key>device</key><dict><key>UDID</key><string>$UDID</string></dict><key>apiUrl</key><string>$DAS_URL</string><key>jamfProAuth</key><dict><key>jamfProUrl</key><string>$JPS_URL</string><key>authCode</key><string>$OAUTH_AUTH_CODE</string><key>appConfigReinstallCode</key><string>$APP_CONFIG_REINSTALL_CODE</string></dict></dict>
Click .Save
The app is distributed the next time mobile devices in the scope contact Jamf Pro. If users were added as targets to the scope, the app is distributed to the devices those users are assigned to the next time the devices contact Jamf Pro.
Note: If the user assignment is changed on a device with Jamf Teacher installed on it, you must redistribute the app to that device with Jamf Pro.
Related InformationFor related information about the Jamf Teacher user experience, see Getting Started with Jamf
in the .Teacher Jamf Teacher Guide for Teachers
For related information, see the following sections of this guide:
Apps Purchased in VolumeLearn how to distribute apps purchased in volume.
Remote Commands for Mobile Devices and Mass Actions for Mobile DevicesLearn how to send remote commands and mass actions to devices.
Mobile Device Configuration ProfilesLearn how to distribute configuration profiles to devices.

172
1.
2.
1.
2.
3.
4.
Jamf Protect Integration with Jamf Pro
Jamf Protect is an enterprise endpoint security solution for Mac computers. With Jamf Protect, you can create custom detections that protect computers with real-time monitoring for suspicious and unwanted activities, while measuring computers against the Center for Internet Security (CIS) benchmarks with security insights. Jamf Protect runs without using kernel extensions to support continuous macOS updates and preserve the Apple user experience.
Integrating Jamf Protect allows you to do the following from Jamf Pro:
Enable automatic package deployment.
Download the Jamf Protect package.
Sync Jamf Protect plan configuration profiles.
To integrate Jamf Pro with your Jamf Protect tenant, you must do the following:
Create an API Client in Jamf Protect—Create an API Client to generate configuration and endpoint information required by Jamf Pro.
Register your Jamf Protect tenant in Jamf Pro—Register your Jamf Protect tenant to establish a secure connection between Jamf Pro and Jamf Protect.
Registering your Jamf Protect Tenant in Jamf Pro
Requirements
Cloud Connection Services enabledFor instructions, see .Cloud Services Connection
An API Client created in Jamf ProtectFor instructions, see the section in the .API Overview Jamf Protect Administrator's Guide
The following Jamf Pro user account privileges:
Category Privilege
Jamf Pro Server Settings Jamf Protect (Read and Update)
Cloud Services Connection (Read)
Jamf Pro Server Actions Read and Download Jamf Application Assets
Procedure
Log in to Jamf Pro.
In the top-right corner of the page, click .Settings
Click . Jamf Applications

173
4.
5.
6.
7.
8.
Click .Jamf Protect
Click . Begin Registration
Enter your Jamf Protect API endpoint in the field.Jamf Protect API URL
Enter your API Client configuration information in the and fields.Client ID Password
Click .Register
Your Jamf Protect tenant is integrated with your Jamf Pro instance and a package download and list of plans should display.

174
Jamf Protect Plans in Jamf ProIf you have a Jamf Protect subscription and registered your Jamf Protect tenant with Jamf Pro, plans from your Jamf Protect tenant are available as computer configuration profiles in Jamf Pro. You can configure the scope of plan configuration profiles to deploy them to target computers.
Keep the following in mind when configuring scope for plan configuration profiles:
If you select the checkbox in the Jamf Automatically deploy the Jamf Protect PKG with plansProtect Deployment section, the Jamf Protect PKG is automatically deployed to computers in the scope of a plan that have not yet installed the Jamf Protect PKG.
If you delete plan configuration profiles from Jamf Protect, the plans will re-appear without a scope the next time Jamf Pro syncs with Jamf Protect (every six hours).
You cannot edit the settings in a Jamf Protect plan from Jamf Pro. To edit a plan, navigate to the plan in your Jamf Protect tenant. Changes to a plan on computers are applied the next time the computer checks in with Jamf Protect.
If the Jamf Protect PKG is deployed without a plan configuration profile, computers will not check in with the Jamf Protect Cloud and the agent will not successfully monitor for threats. Configuring scope for your plans before deploying the Jamf Protect PKG is recommended.
To help you find plan configuration profiles synced from Jamf Protect on the computer configuration profiles pane, "Jamf Protect Configuration" is appended to each profile name that is synced.
Important: Plans that are manually uploaded to Jamf Pro will not appear in the Jamf Protect section of Jamf Pro. Deleting these plans configuration profiles and re-applying their scope to plans synced from Jamf Protect is recommended. This ensures you do not have duplicate versions of a plan in Jamf Pro and that scope is accurately configured. For more information about switching from manually uploaded plans to plans that are synced between Jamf Pro and Jamf Protect, see the
Knowledge Switching from Manually Uploaded Jamf Protect Plans to Synced Plans in Jamf ProBase article.
Configuring Scope for Jamf Protect Plans
You can configure the scope of available plan configuration profiles to deploy them to target computers.
Requirements
A Jamf Protect subscription
One or more plans in Jamf ProtectFor more information, see the section in the .Creating a Plan Jamf Protect Administrator's Guide
Registration of your Jamf Protect tenant in Jamf Pro
Procedure

175
1.
2.
3.
4.
5.
6.
7.
8.
9.
Procedure
Log in to Jamf Pro.
In the top-right corner of the page, click .Settings
Click . Jamf Applications
Click .Jamf Protect
In the Jamf Protect Plans table, click on the plan configuration profile you want to configure in the column.Profile
Note: You can click to manually check Jamf Protect for plan updates. Jamf Pro automatically Syncsyncs with Jamf Protect every six hours.
Click .Edit
Click the tab.Scope
Configure the scope of your plan configuration profile.
Click .Save
The plan configuration profile is distributed to target computers the next time they check in with Jamf Pro, and the scope also displays in the Scope column on the Jamf Protect page in Jamf Pro. If you selected the checkbox in the Jamf Protect Automatically deploy the Jamf Protect PKG with plansDeployment section, the Jamf Protect PKG is automatically deployed to computers in the scope that have not yet installed the Jamf Protect PKG.

176
Related InformationFor related information about deploying Jamf Protect using Jamf Pro, see the Deploying Jamf
technical paper.Platform Products Using Jamf Pro to Connect, Manage, and Protect Mac Computers
For related information about Jamf Protect, see the the following sections in the Jamf Protect Administrator's Guide:
Plans Learn more about security settings in Jamf Protect plans.
Remediating Detections with Jamf Pro Learn how to remediate threats found by Jamf Protect with Jamf Pro.

177
Jamf Self Service

178
Jamf Self Service for macOS
About Jamf Self Service for macOSJamf Self Service for macOS allows users to browse and install configuration profiles, Mac App Store apps, and books. Users can also run policies and third-party software updates via patch policies, as well as access webpages using bookmarks.
Jamf Pro allows you to manage every aspect of Self Service, including its installation, user authentication, and the items available to users. In addition, you can configure how Self Service is displayed to users by replacing the default Self Service application name, icon, and header image with custom branded elements to present users with a familiar look and feel.
You can make any configuration profile, policy, software update (via patch policy), Mac App Store app, or book available in Self Service and customize how it is displayed to users. This includes displaying an icon and description for the item, adding the item to the in relevant categories, and displaying item-specific notifications. You can also specify which computers display the item in Self Service and which users can access it.
Related Information
For related information, see the following sections in this guide:
Jamf Self Service for macOS Installation MethodsFind out how to install Self Service on managed computers.
Jamf Self Service for macOS User Login SettingsFind out how to require or allow users to log in to Self Service.
Jamf Self Service for macOS Configuration SettingsFind out how to customize aspects of the Self Service user experience
Jamf Self Service for macOS Branding SettingsFind out how to customize how Self Service is displayed to users.
Items Available to Users in Jamf Self Service for macOSLearn about the items you can make available in Self Service
BookmarksFind out how to add bookmarks to Self Service

179
1.
2.
3.
4.
5.
6.
7.
8.
1.
Jamf Self Service for macOS Installation MethodsThere are two ways to install Jamf Self Service on managed computers. You can install Self Service automatically using the settings in Jamf Pro, or you can install Self Service using a policy. Installing Self Service using a policy gives you more control over the installation.
General Requirements
Jamf Self Service 10.10.0 or later can run on macOS 10.11.x or later.
If Self Service is configured to install automatically, computers in your environment will install the version of Self Service that is compatible with the computer's macOS version:
macOS Version Self Service Version Installed
macOS 10.13 or later Latest Version
macOS 10.12 Self Service 10.21.0
macOS 10.11 Self Service 10.14.1
macOS 10.10 Self Service 10.8.0
Installing Self Service for macOS Automatically
Log in to Jamf Pro.
In the top-right corner of the page, click .Settings
Click .Self Service
Click .macOS
Click .Edit
Select the checkbox.Install Automatically
(Optional) Configure the installation location for Self Service.
Click .Save
Self Service is installed on all managed computers the next time they check in with Jamf Pro. It is also installed on computers as they are newly enrolled.
Installing Self Service for macOS Using a Policy
You can download the latest version of Self Service for manual installation using a policy on computers with 10.13 or later.

180
1.
2.
3.
4.
5.
6.
7.
8.
9.
Log in to Jamf Pro.
In the top-right corner of the page, click .Settings
Click .Self Service
Click .macOS
Click .Download The file is downloaded immediately.Self Service.tar.gz
Note: To download earlier versions of Self Service for manual installation, append one of the following to your Jamf Pro URL:
macOS 10.12: /bin/level2/SelfService.tar.gz
macOS 10.11: /bin/level3/SelfService.tar.gz
macOS 10.10: /bin/level4/SelfService.tar.gz
For example: https://instancename.jamfcloud.com/bin/level2/SelfService.tar.gz
Double-click the file to decompress it.
Use Composer or another package-building tool to package the Self Service application included in the file. For information on building packages using Composer, see the .Composer User Guide
Add the package to Jamf Admin or Jamf Pro. For more information, see .Package Management
Create a policy to install Self Service. For detailed instructions, see .Package Deployment

181
1.
2.
3.
4.
5.
6.
7.
8.
9.
10.
Jamf Self Service for macOS User Login SettingsThe Self Service User Login settings allow you to configure the method for logging in to Jamf Self Service for macOS. Self Service User Login is disabled by default. After enabling Self Service User Login, you must select a login method and authentication type.
There are two login methods you can choose from:
Allow users to log in to view items available to them
Require login
After selecting a login method, you must select one of the following authentication methods:
LDAP account or Jamf Pro user accountTo require or allow users to log in using an LDAP account or Jamf Pro user account, you need an LDAP server set up in Jamf Pro or you must create a Jamf Pro user account for that user.
Single Sign-OnTo require or allow a user to log in using single sign-on, you must enable single sign-on for Self Service for macOS.
Configuring Jamf Self Service for macOS User Login
Log in to Jamf Pro.
In the top-right corner of the page, click .Settings
Click .Self Service
Click . macOS
Click .Edit
From the tab, select the checkbox.Configuration Enable Self Service User Login
Select a login method from the pop-up menu.Login Method
(Optional) If you want the checkbox to display on the Self Service Login page, select Remember Me the checkbox.Allow users to store their login credentials in Keychain Access
Select an authentication type.
Click .Save
The settings are applied the next time computers check in with Jamf Pro.

182
Related Information
For related information, see the following sections in this guide:
Integrating with LDAP Directory ServicesFind out how to add an LDAP server and test LDAP attribute mappings.
Jamf Pro User Accounts and GroupsLearn more about configuring user accounts or groups in Jamf Pro.
Single Sign-OnLearn more about how to enable single sign-on for Self Service for macOS.

183
1.
2.
3.
4.
5.
6.
7.
8.
Jamf Self Service for macOS Configuration SettingsYou can use the Self Service Configuration settings in Jamf Pro to do the following:
Automatically install Self Service on managed computers and customize the installation location.
Configure the user login method.
Enable Self Service notifications.
Enable the User Approved MDM Profile notification.
Select the category that displays on the Home page when users launch Self Service.
Customize the bookmarks display name in Self Service. The bookmarks display name is populated with "Bookmarks" by default, but you can change it to meet the needs of your organization (e.g., "Websites" or "Resources").
Configuring Jamf Self Service for macOS
Log in to Jamf Pro.
In the top-right corner of the page, click .Settings
Click .Self Service
Click . macOS
Click .Edit
Click the tab.Configuration
Configure the settings on the pane.
Click .Save
The settings are applied the next time computers check in with Jamf Pro.
Related Information
For related information ,see the following sections in this guide:
Jamf Self Service for macOS Installation MethodsLearn more about the different options for installing Self Service for macOS.
Jamf Self Service for macOS User Login SettingsLearn more about configuring the User Login settings for Self Service for macOS.
Jamf Self Service for macOS NotificationsLearn more about configuring notifications for Self Service for macOS.
BookmarksLearn more about configuring bookmarks to display in Self Service for macOS.

184
For additional information, see the following Knowledge Base article:
Managing User Approved MDM with Jamf ProLearn more about User Approved MDM management in Jamf Pro.

185
1.
2.
3.
4.
5.
6.
7.
8.
Jamf Self Service for macOS NotificationsYou can enable Self Service notifications using the Self Service Configuration settings. After enabling Self Service notifications, item-specific notification options are made available in Jamf Pro when adding or editing items. These settings allow you to add a notification for the item or software title update to Self Service only, or to both Self Service and Notification Center.
Notifications in Self Service display in the Notifications list in the Self Service toolbar. A badge appears on the icon when new items or software updates are added to Self Service.Notifications
You can also display notifications in Notification Center as banners or alerts in macOS. Users can then click the notification to open the item in Self Service.
General Requirements
To display Self Service notifications in Notification Center, you need the following:
A push certificate in Jamf Pro (For more information, see .)Push Certificates
The checkbox selected in Jamf Pro (For more information, see Enable push notifications Security .)Settings
A valid proxy server token uploaded to Jamf Pro (For more information, see .)Jamf Push Proxy
Enabling Self Service Notifications
Log in to Jamf Pro.
In the top-right corner of the page, click .Settings
Click .Self Service
Click . macOS
Click .Edit
Click the tab.Configuration
Select the checkboxEnable Self Service Notifications
Click .Save
Once saved, the option to display notifications for items made available in Self Service is made available when configuring those items. For more information on which items can be made available in Self Service, see .Items Available to Users in Jamf Self Service for macOS
186
1.
2.
3.
4.
5.
6.
7.
8.
Jamf Self Service for macOS Branding SettingsYou can customize how Self Service displays to your end users by configuring the following settings:
Icon—The branding icon displays on the Self Service Login page, in the branding header in Self Service, and as the Self Service icon in the Finder and the Dock. You can customize the branding icon by replacing the default Self Service logo with your organization's logo or another icon of your choice. It is recommended that you use a GIF or PNG file that is 180x180 pixels.
Branding Header—The branding header displays across the top of Self Service. You can customize the branding header image by replacing the default image with an image of your choosing. It is recommended that you use a GIF or PNG file that is 1000x335 pixels.
Branding Name—The branding name displays on the Self Service Login page and in the branding header in Self Service. By default, "Self Service" is displayed as the branding name. You can customize the branding name by modifying the and text fields.Main Header Secondary Header
Application Name—The application name displays in the Finder, the Dock, and in the app title bar and menu. By default, "Self Service" is displayed as the application name. You can customize the application name by modifying the text field.Application Name
Configuring the Branding Settings
Log in to Jamf Pro.
In the top-right corner of the page, click .Settings
Click .Self Service
Click Branding .
Click the default macOS branding configuration.
Click Edit .
Configure the settings on the pane.Once a change is made, it automatically appears in the Branding Preview field at the top of the page.
Click .Save
The branding configuration is displayed in Self Service the next time computers check in with Jamf Pro.

187
1.
2.
3.
4.
5.
6.
7.
8.
9.
BookmarksYou can use bookmarks to give your users easy access to specified webpages directly from Jamf Self Service for macOS.
When you make a bookmark available in Self Service, you can customize how the bookmark is displayed to users. This includes uploading an icon for the bookmark, and specifying whether the bookmarked webpage opens in Self Service or in a web browser. You can also specify which computers display the bookmark in Self Service and which users can access it (called "scope").
Configuring a Bookmark
Log in to Jamf Pro.
In the top-right corner of the page, click .Settings
Click .Self Service
Click .Bookmarks
Click .New
Enter a display name and description, and then choose a priority for the bookmark.
Configure the bookmark using the options on the pane.
Click the tab and configure the scope of the bookmark. For more information, see .Scope Scope
Click .Save
The bookmark is available in Self Service on computers in the scope the next time they check in with Jamf Pro.

188
Items Available to Users in Jamf Self Service for macOSYou can make the following items available in Jamf Self Service for macOS for users to install on their computers:
Configuration profiles
Policies
Mac App Store apps
Books
Third-party software updates (via patch policies)
It is up to you to determine which items are appropriate for Self Service. For example, it may be helpful to make a policy available in Self Service that users can run to map printers to their computers.
To make a policy available in Self Service, select the checkbox Make the policy available in Self Servicewhen configuring the policy.
To make a configuration profile, app, book, or patch policy available in Self Service, choose "Make Available in Self Service" from the pop-up menu when configuring it in Jamf Pro. Distribution Method
You can customize how items available in Self Service are displayed to users. The following table shows the customization options for each item:
Option DescriptionConfiguration Profiles Policies
Mac App Store Apps Books
Patch Policies
Customize the Self Service Display Name
You can customize the name for the item that displays in Self Service. For example, if you create a policy with the name “Install Office 2011 with Service Pack 3”, you may want an abbreviated name to display in Self Service (such as “Office 2011”).
Note If this field is left :blank, the item name you entered on the General payload displays in Self Service.
In-house books only

189
Option DescriptionConfiguration Profiles Policies
Mac App Store Apps Books
Patch Policies
Customize the action button
You can customize the name for the button that users click to initiate the item (e.g., "Install").
Customize the secondary action button
You can customize the name for the button that users click to initiate the item again (e.g., "Reinstall").
Customize the item description
You can enter a description that users can view to get more information.In addition, you can customize the text displayed in the description by using Markdown in the
field. For more Descriptioninformation, see the Using
Markdown to Format TextKnowledge Base article.
Display notifications for the item
You can add a notification to Self Service and Notification Center when a new item is added to Self Service for macOS.When configuring a notification, you can specify subject and message text. All notifications are required to have a subject. If subject text is not specified, the item name is displayed in the subject line by default.In addition, you can customize the text displayed in the message by using Markdown in the
field.Message

190
Option DescriptionConfiguration Profiles Policies
Mac App Store Apps Books
Patch Policies
Upload an icon
You can upload an icon to display for the item. It is recommended that you use a file with the GIF or PNG format that is 512 x 512 pixels.
Display in the "Featured" category
You can configure an item to display in the "Featured" category in Self Service.
Display or feature in one or more categories
You can configure an item to display or be featured in one or more categories in Self Service.
Related Information
For related information, see the following sections in this guide:
Computer Configuration ProfilesLearn how to make computer configuration profiles available in Self Service.
Policy ManagementLearn how to make policies available in Self Service.
Apps Purchased in VolumeLearn how to display or feature App Store apps in Self Service.
In-House BooksLearn how to display or feature in-house books in Self Service.
Books Purchased in VolumeLearn how to display or feature Book Store books in Self Service.
Patch PoliciesLearn how to make patch policies available in Self Service.
Jamf Self Service for macOS Configuration SettingsLearn how to customize aspects of the user experience.

191
Jamf Self Service for macOS URL SchemesURL schemes provide a way to directly reference resources within Jamf Self Service for macOS. You can configure URL schemes to do the following actions in Self Service:
Install an item made available in Self Service
Direct users to the description of an item made available in Self Service
Direct users to specific Self Service categories
Direct users to the History or Notifications tabs
Direct users to the Compliance Remediation page
Once configured, you can provide the URL schemes to your users (e.g., via email or a webpage). Clicking the URL scheme on a computer prompts Self Service to open.
You can create as many URL schemes as needed using the templates in the table below:
URL Scheme Type Description URL Template
Install item Install an item by replacing "<content_type>" with the type of item (policy, app, configprofile, or ebook) and replace "<content_id>" with the item ID found in the item URL in Jamf Pro. Users may need to log in to Self Service in order to complete the installation. This is not available for patch policies.
Note: The URL for an item is also available on the Self Service tab of that item. You can copy the item URL from
Jamf Pro by clicking the button.Clipboard
jamfselfservice://content?entity=<content_type>&id=<content_id>&action=executeExample: jamfselfservice://content?entity=configprofile&id=40&action=execute
Open item description
Direct users to the description of an item by replacing "<content_type>" with the type of item (policy, app, configprofile, or ebook) and replace "<content_id>" with the item ID found in the item URL in Jamf Pro. This is not available for patch policies.
Note: The URL for an item description is also available on the Self Service tab of that item. You can copy the item
URL from Jamf Pro by clicking the button.Clipboard
jamfselfservice://content?entity=<content_type>&id=<content_id>&action=viewExample: jamfselfservice://content?entity=configprofile&id=40&action=view

192
URL Scheme Type Description URL Template
Open category Direct users to a specific category in Self Service by replacing "<category_ID> with the category ID found in the category URL in Jamf Pro or use one of the following IDs for the default categories:
-1 for the All category-2 for the Featured category-3 for the Bookmarks category-4 for the Compliance category
Note: The macOS Intune Integration must be enabled for the Compliance category to be made available in Self Service.
jamfselfservice://content?action=category&id=<category_id>Example: jamfselfservice://content?action=category&id=-1
Open History tab Direct users to the History tab jamfselfservice://content?action=history
Open Notifications tab
Direct users to the Notifications tab jamfselfservice://content?action=notifications
Open Compliance Remediation page
Direct users to the Compliance Remediation page
Note: The macOS Intune Integration must be enabled for the Compliance Remediation page to be made available in Self Service.
jamfselfservice://remediate

193
Jamf Self Service for Mobile Devices
About Jamf Self Service for Mobile DevicesJamf Self Service allows users to browse and install mobile device configuration profiles, apps, and books on managed mobile devices. Users can tap their way through Self Service using an intuitive interface.
Jamf Pro allows you to manage every aspect of Self Service, including its installation, authentication, and the items available to users.
There are two kinds of Self Service for mobile devices:
Jamf Self Service for iOS—You can use Jamf Pro to group configuration profiles, apps, and books in categories, which makes those items easier to locate in Self Service. If iBeacon monitoring is enabled in your environment, Self Service is the component that detects when a mobile device enters or exits an iBeacon region. In addition, you can send notifications to mobile devices with Self Service installed. Notifications are displayed to users in the following ways:
The Self Service app icon displays a badge with the number of notifications that have not been viewed by the user.In Self Service, the button displays a badge with the number of notifications that Notificationshave not been viewed by the user. Items are listed in the Notifications area of the app as they are added.(Optional) Each notification can be configured to also display an alert and appear in Notification Center. This requires a proxy server token in Jamf Pro.
The latest version of the Self Service app available in the App Store requires devices with iOS 11 or later, or iPadOS 13 or later. For more information on the Self Service levels of compatibility, see
.Jamf Self Service for iOSJamf Self Service for iOS is available for free from the App Store.
Self Service web clip—In addition to configuration profiles, apps, and books, you can use the Self Service web clip to distribute updated MDM profiles to mobile devices for users to install.
Related Information
For related information, see the following sections in this guide:
Self Service Web ClipLearn about the Self Service web clip.
Mass Actions for Mobile DevicesFind out how to send a mass notification to mobile devices.
Apps Purchased in VolumeFind out how to make App Store apps available in Self Service.
In-House AppsFind out how to make in-house apps available in Self Service.

194
Books Purchased in VolumeFind out how to make Book Store books available in Self Service.
In-House BooksFind out how to make in-house books available in Self Service.
iBeacon RegionsLearn what iBeacon regions can be used for and how you can add them to Jamf Pro.

195
Jamf Self Service for iOSThe Jamf Self Service for iOS settings allow you to do the following:
Install or uninstall Self Service on managed mobile devices.
Require or allow users to log in to Self Service with an LDAP directory account or Jamf Pro user account.To require or allow users to log in using an LDAP account or Jamf Pro user account, you must have an LDAP server set up in Jamf Pro or you must create a Jamf Pro user account for that user.
Display in-house app updates in Self Service.
The Self Service app can be automatically installed on all managed mobile devices with iOS 7 or later except Apple TV devices and personally owned devices.
Starting with Self Service 10.10.1, you can manually install the Self Service app on personally owned devices with iOS 13 or later, or iPadOS 13 or later that were enrolled using User Enrollment.
Note: If you do not want users to be prompted to enter an Apple ID when Self Service is being installed on their device, you must distribute Self Service using device-based volume assignment. For more information, see .Content Distribution Methods in Jamf Pro
General Requirements
Self Service can run on mobile devices with iOS 7 or later that are managed by Jamf Pro 9.4 or later. The latest version of the Self Service app available in the App Store requires devices with iOS 11 or later, or iPadOS 13 or later.
If Self Service is configured to install automatically, devices in your environment will install the version of the Self Service app that is compatible with the device's iOS version:
iOS Version iPadOS Version Self Service Version Installed
iOS 11 or later iPadOS 13 or later Latest version
iOS 10 Self Service 10.9.1
iOS 8 or 9 Self Service 10.4.0
iOS 7 Self Service 9.98.1
Note: For manual installations, devices with iOS 11 or later must use Self Service 9.101.0 or later. Earlier versions of Self Service will not work on devices with iOS 11 or later.

196
1.
2.
3.
4.
5.
6.
7.
8.
1.
2.
3.
4.
5.
6.
7.
8.
9.
10.
11.
12.
13.
14.
15.
Automatically Installing Self Service for iOS
Log in to Jamf Pro.
In the top-right corner of the page, click .Settings
Click .Self Service
Click .iOS
Click .Edit
Select "Automatically install Self Service app" from the pop-up menu.Installation Method
(Optional) Click the tab and configure the User Login setting.App Options
Click .Save
Users are prompted to install the app from the App Store the next time the device checks in with Jamf Pro. Users are also prompted to install the app from the App Store on mobile devices as they are newly enrolled.
Manually Installing Self Service for iOS
Log in to Jamf Pro.
In the top-right corner of the page, click .Settings
Click .Self Service
Click .iOS
Click .Edit
On the General pane, choose "Manually install Self Service app" from the pop-up Installation Method menu.
(Optional) Click the tab and configure the preferences as needed.App Options
Click .Save
Click at the top of the page.Devices
Click .Mobile Device Apps
Click .New
Select and click .App Store app Next
Add Jamf Self Service from the App Store catalog.
On the General pane, select "Install Automatically/Prompt Users to Install" from the Distribution pop-up menu, and configure any additional settings.Method

197
15.
16.
17.
Click the tab and configure the scope of the app.Scope
On the tab, add the following lines to the field:App Configuration Preferences <dict><key>INVITATION_STRING</key><string>$MOBILEDEVICEAPPINVITE</string><key>JSS_ID</key><string>$JSSID</string><key>SERIAL_NUMBER</key><string>$SERIALNUMBER</string><key>DEVICE_NAME</key><string>$DEVICENAME</string><key>MAC_ADDRESS</key><string>$MACADDRESS</string><key>UDID</key><string>$UDID</string><key>JSS_URL</key> <string>$JPS_URL</string></dict>
Important: To install Self Service Self Service 10.10.1 or later on personally owned devices with iOS 13 or later or iPadOS 13 or later that were enrolled using User Enrollment, include the following in the app configuration:<key>MANAGEMENT_ID</key><string>$MANAGEMENTID</string>
Click .Save
Self Service is distributed to mobile devices in the scope the next time they check in with Jamf Pro.

198
Installation Experience
If you did not distribute the Self Service app using device-based volume assignment, users may be prompted to enter an Apple ID before Self Service installs on their device.
On devices with iOS 10.x or earlier, users are prompted to download an older version of the Self Service app. The user must tap to install the last compatible version of the Self Service Downloadapp.
Related Information
For related information, see the following sections in this guide:
Integrating with LDAP Directory ServicesFind out how to add an LDAP server and test LDAP attribute mappings.
Jamf Pro User Accounts and GroupsLearn more about configuring user accounts or groups in Jamf Pro.

199
1.
2.
3.
4.
5.
6.
7.
Jamf Self Service for iOS Branding SettingsThe Branding settings allow you to customize elements within the Jamf Self Service for iOS app in order to present your end users with a familiar look and feel. You can customize Self Service by configuring the following settings:
Icon—The icon displays in the header in the Self Service app. When uploading a custom icon, it is recommended that you use a file with the GIF or PNG format that is 180x180 pixels.
Branding Name—The branding name displays in the header in the Self Service app. By default, "Self Service" is displayed as the branding name .
Status Bar Color—The status bar appears above the header in the Self Service app and displays information about the device's current state (e.g., the time, cellular carrier, battery level). You can choose to display the status bar as either light or dark.
The following elements can be customized by entering a six digit hexadecimal color code or by using the color picker:
Branding Name ColorHeader Background Color—The header displays across the top of the Self Service app.Menu Icon Color—The menu icon displays in the header in the Self Service app.
Note: Customizing the icon or branding name does not change the app icon or app name as it displays on the Home Screen of a device. The Self Service icon and name cannot be changed outside of the app.
The preview field to the right of the Branding settings automatically displays your changes so you can finalize your branding configuration before deploying it to end users.
Configuring the Branding Settings
Log in to Jamf Pro.
In the top-right corner of the page, click .Settings
Click .Self Service
Click .Branding
Click .New
Configure the settings on the page.
Click .Save
The settings are applied the next time mobile devices check in with Jamf Pro. You can only have one Self Service for iOS branding configuration in Jamf Pro at a time. To modify or delete your existing configuration, click the configuration's name in the Branding settings.

200
1.
2.
3.
4.
5.
6.
7.
8.
1.
2.
3.
Self Service Web ClipThe Self Service web clip allows you to distribute mobile device configuration profiles, apps, books, and updated MDM profiles to mobile devices for users to install.
You can use the Self Service settings in Jamf Pro to do the following:
Install or uninstall the Self Service web clip on managed mobile devices.
Require users to log in to the Self Service web clip with an LDAP directory account.
Display or hide the button for in-house apps.Install All
Display the following updates in the Self Service web clip:
MDM profile updatesApp Store app updatesIn-house app updates
Installing the Self Service Web Clip
Log in to Jamf Pro.
In the top-right corner of the page, click .Settings
Click .Self Service
Click .iOS
Click .Edit
Select “Automatically install Self Service web clip” from the pop-up menu and Install Automaticallyconfigure the settings on the pane.
(Optional) Click the tab and configure the settings on the pane.Web Clip Options
Click .Save
The changes are applied the next time mobile devices check in with Jamf Pro.
Distributing Updated MDM Profiles
You can distribute an updated MDM profile to devices using the Self Service web clip.
Note: Mobile devices that were enrolled using an enrollment profile cannot obtain an updated MDM profile via the Self Service web clip.
Log in to Jamf Pro.
In the top-right corner of the page, click .Settings

201
3.
4.
5.
6.
7.
8.
Click .Self Service
Click .iOS
Click .Edit
Click the tab.Web Clip Options
Select the checkbox.MDM profile updates
Click .Save
Related Information
For related information, see the following section in this guide:
Integrating with LDAP Directory ServicesFind out how to add an LDAP server and test LDAP attribute mappings.
For additional information, see the following Knowledge Base article:
Customizing the Self Service Web Clip IconFind out how to display a custom icon for the Self Service web clip.

202
1.
2.
3.
App RequestApp Request allows you to enable a select group of users to request iPad apps directly from Jamf Self Service for iOS. This is useful for environments such as schools, where you may want to empower teachers to request educational apps on behalf of the students in their classrooms.
Before you enable App Request, make sure you do the following:
Determine who can submit app requests—After your organization has identified the users who should have access to the App Request feature in Self Service, you must create a static user group that includes those users. The users you want to enable as requesters must be able to log in to Self Service.
Determine who should review and approve app requests—Your organization should determine who should approve app requests and how that approval should be submitted. After a request is submitted, an email containing the request details and a link to the app information in the App Store is automatically sent to the email addresses to specified when configuring App Requests. The email addresses you add as reviewers do not need to match a user in Jamf Pro.
After you determine who should be added as requesters and approvers, you are ready to enable App Request. You can specify how the App Request form displays in Self Service by configuring up to five text fields. The customizable labels allow you to specify what information is needed from requesters when they submit a request. For example, you may want to include fields similar to the following:
Reason for Request
Quantity Needed
Intended Users
Training Details
Configuring App Request
Requirements
To enable App Request, you need:
An SMTP server set up in Jamf Pro (For more information, see .)Integrating with an SMTP Server
A static user group that contains the users you want to enable as requesters (For more information, see .)Static Groups
To access App Request, requesters must be using an iPad with Self Service 10.9.0 or later installed. In addition, requesters must be logged in to Self Service to submit requests.
Procedure
Log in to Jamf Pro.
In the top-right corner of the page, click .Settings

203
3.
4.
5.
6.
7.
8.
9.
10.
11.
12.
Click .Self Service
Click .App Request
Click .Edit
From the tab, select the checkbox.App Request Form Enable App Request in Self Service for iOS
Select the App Store you want Self Service to use.
Note: "User's Location" is selected by default.
Configure up to five text fields to display in the App Request form in Self Service.
Note: Each field you configure requires user input before the App Request form can be submitted. You must configure at least one field in order to save the App Request configuration.
Click the tab.Requesters and Approvers
From the pop-up menu, select the static group you want to enable as requesters.Requesters
In the field, enter the emails of those you want to enable as approvers.Approver Email Addresses
Click .Save
The "Request App" option is made available in Self Service the next time the Self Service app is refreshed on the device.

204
App Request User Experience
When a requester performs a search, Self Service searches the App Store in addition to the content available in Self Service. When the requester taps on an App Store result, they are presented with the app details.

205
When the requester taps , a form similar to the following displays:Request App
Note: All fields require user input before the button is activated.Submit
When a request is submitted, an email containing the request details is automatically sent to approvers. After all approvals are given, you can use Jamf Pro to either automatically install the app on the devices included in the request or make the app available in Self Service for users to install themselves. For more information, see .Content Distribution Methods in Jamf Pro

206
Jamf Self Service for iOS URL SchemesYou can use URL Schemes to automatically install apps on a mobile device through Jamf Self Service for iOS. This allows you to quickly set up a new mobile device without users having to search for multiple apps in Self Service.
After you have configured a URL scheme, you can provide it to your users (e.g., via email or a webpage). Tapping the URL on a mobile device prompts Self Service to open. Users may need to log in to Self Service in order to complete the installation.
Note: This does not work for app installations that redirect users to the App Store (e.g., apps without volume purchasing licenses available).
To configure a URL scheme, copy the following URL and replace "listOfApps" with the bundle identifiers of the mobile device apps you wish to install:selfserviceios://appInstall?apps=listOfApps
To locate the app's bundle identifier, navigate to the app in Jamf Pro. The Bundle Identifier field is located on the General pane of the app.
For example, the following URL scheme will automatically install the "Dropbox", "Adobe Photoshop Express", and "Numbers" apps on a mobile device: selfserviceios://appInstall?apps=com.getdropbox.Dropbox,com.adobe.PSMobile,com.apple.Numbers
You can also provide the URL scheme to your users using a third-party app. To configure this, add the following code snippet to the app and replace the example URL with your URL scheme:
Let URLString = “selfserviceios://appInstall?apps=listOfApps"if let url = URL(string: URLString) { if UIApplication.shared.canOpenURL(url) { UIApplication.shared.open(url, options: [:], completionHandler: nil) }}In addition, if you have the Microsoft Endpoint Manager integration enabled, you can direct your users to the Register with Microsoft object in Self Service 10.10.5 or later using the following URL scheme:selfserviceios://registerdc

207
Server Infrastructure

208
About Distribution Points
Distribution points are servers used to host files for distribution to computers and mobile devices. The following types of files can be distributed from a distribution point using Jamf Pro:
Packages
Scripts
In-house apps
In-house books
Jamf Pro supports two types of distribution points:
File share distribution points
A cloud distribution point
You can use any combination of these types of distribution points.
By default, the first distribution point you add to Jamf Pro is the principal distribution point. The principal distribution point is used by all other distribution points as the authoritative source for all files during replication. You can change the principal distribution point at any time.
Note: On computers with macOS 10.15 or later that do not have an MDM profile, you must use an HTTP, HTTPS, or cloud distribution point to install packages.
When planning your distribution point infrastructure, it is important to understand the differences between each type of distribution point. The following table explains the key differences:
File Share Distribution Point Cloud Distribution Point
Description Standard server that is configured to be a distribution point
Distribution point that uses one of the following content delivery networks (CDNs) to host files:
Rackspace Cloud FilesAmazon Web ServicesAkamaiJamf Cloud Distribution Service (JCDS)
Maximum Number per Jamf Pro Instance
Unlimited One

209
File Share Distribution Point Cloud Distribution Point
Server/Platform Requirements
Any server with an Apple Filing Protocol(AFP) or Server Message Block (SMB) share
Note: File share distribution points cannot be mounted and hosted on the same server.
None
Protocol AFP, SMB, HTTP, or HTTPS HTTPS
Ports AFP: 548SMB: 139HTTP: 80HTTPS: 443
443
Authentication Options
AFP or SMB:No authenticationUsername and password
HTTP or HTTPS:No authenticationUsername and password
None
Files that Can Be Hosted
Packages PackagesIn-house appsIn-house books
Parent-Child Capabilities
No No
File Replication Method
Replication to file share distribution points must be initiated from Jamf Admin.
Replication to a cloud distribution point must be initiated from Jamf Admin.
Selective Replication
Not available when replicating to file share distribution points.
Available when replicating to a cloud distribution point if the principal distribution point is a file share distribution point.The files for replication must be specified in Jamf Pro and the replication initiated from Jamf Admin.

210
Related InformationFor related information, see the following sections in this guide:
File Share Distribution PointsFind out how to manage file share distribution points in Jamf Pro.
Cloud Distribution PointFind out how to manage the cloud distribution point.
211
1.
2.
3.
4.
5.
6.
7.
8.
9.
File Share Distribution Points
A server with an AFP or SMB share can be used as a file share distribution point. Before you can use a file share distribution point with Jamf Pro, you must set up the distribution point and add it to Jamf Pro.
Note: A server with an AFP share cannot share files on the Apple File System (APFS), which is the default file system for computers with macOS 10.13 or later. Computers with macOS 10.13 or later that are HFS+ formatted can still support AFP. If you need a file share distribution point for APFS formatted computers, SMB is an option.
When you add a file share distribution point to Jamf Pro, you can do the following:
Make it the principal distribution point.
Choose a failover distribution point.
Configure HTTP downloads.
Adding a File Share Distribution Point
Requirements
To add a file share distribution point to Jamf Pro, you must set up a file share distribution point. For more information, see the Knowledge Base article.Setting Up a File Share Distribution Point
Procedure
Log in to Jamf Pro.
In the top-right corner of the page, click .Settings
Click .Server Infrastructure
Click .File Share Distribution Points
Click .New
Use the General pane to configure basic settings for the distribution point.
Click the tab and enter information about the AFP or SMB share.File Sharing
(Optional) Click the tab and configure HTTP downloads.HTTP
Click .Save

212
1.
2.
3.
Replicating Files to a File Share Distribution PointDuring replication, all files on the principal distribution point are replicated to the file share distribution point that you choose.
Open Jamf Admin and authenticate to the Jamf Pro server.
In the sidebar, select the file share distribution point you want to replicate files to.
Click .Replicate
Related InformationFor related information, see the following section in this guide:
Network SegmentsYou can use network segments to ensure that computers and mobile devices use the closest distribution point by default.
For related information, see the following Knowledge Base articles:
Setting Up a File Share Distribution Point on Linux Using SambaFind out how to use Samba to set up a file share distribution point with an SMB share on a Linux server.
Using Apache HTTP Server to Enable HTTP Downloads on a Linux File Share Distribution PointFind out how to use Apache HTTP Server to enable HTTP downloads on a Linux file share distribution point.
Using IIS to Enable HTTPS Downloads on a Windows Server 2016 or 2019 File Share Distribution PointFind out how to activate Internet Information Services (IIS) and use it to enable HTTPS downloads on a Windows Server 2016 or 2019 file share distribution point.
For related information about APFS and SMB, see Apple's .Deployment Reference for Mac

213
Cloud Distribution Point
The cloud distribution point uses a content delivery network (CDN) to host packages, in-house apps, and in-house books. Jamf Pro supports the following content delivery services:
Rackspace Cloud Files
Amazon S3 or Amazon CloudFront
Akamai NetStorage
Jamf Cloud Distribution Service (JCDS)
When you configure the cloud distribution point in Jamf Pro, you can choose to make it the principal distribution point. You can also choose whether to replicate specific files or the entire contents of the principal distribution point if the principal distribution point is a file share distribution point.
Note: If you plan to use the JCDS for your cloud distribution point, it is recommended that you do not attempt to upload files larger than 20 GB. Due to the file size download limit set by Amazon CloudFront, files larger than 20 GB may not download successfully. For more information, see the following website:https://docs.aws.amazon.com/AmazonCloudFront/latest/DeveloperGuide/cloudfront-limits.html
Jamf Pro supports the use of signed URLs created with Amazon CloudFront. It also supports Akamai Remote Authentication. For more information about Akamai Remote Authentication, contact your Akamai Account Manager.
If your Jamf Pro server is hosted in Jamf Cloud and you have the subscription-based option, you can use JCDS as your cloud distribution point. For more information about pricing, contact your Jamf account representative.
General RequirementsIf you plan to use Akamai for your cloud distribution point, Akamai must be configured to use File Transfer Protocol (FTP).
Note: If you have upgraded from Jamf Pro 8.x, you must migrate the scripts and packages on your principal distribution point before configuring the cloud distribution point. For more information, see the Knowledge Base article.Migrating Packages and Scripts
Files that are uploaded to a cloud distribution point cannot have filenames that include the following characters:
/ : ? < > \ * | ” [ ] @ ! % ^ #

214
1.
2.
3.
4.
5.
6.
7.
8.
1.
2.
3.
4.
5.
6.
Configuring the Cloud Distribution PointLog in to Jamf Pro.
In the top-right corner of the page, click .Settings
Click .Server Infrastructure
Click .Cloud Distribution Point
Click .Edit
Choose a content delivery network from the pop-up menu.Content Delivery Network
Configure the settings on the pane.
Click .Save
Testing the Cloud Distribution PointOnce the cloud distribution point is configured, you can test the connection to the content delivery network.
Log in to Jamf Pro.
In the top-right corner of the page, click .Settings
Click .Server Infrastructure
Click .Cloud Distribution Point
Click .Test
Click again.Test
A message displays, reporting the success or failure of the connection.

215
1.
2.
3.
Replicating Files to the Cloud Distribution PointDuring replication, files on the principal distribution point are replicated to the cloud distribution point via Jamf Admin. The files that are replicated depend on whether the cloud distribution point is configured to replicate specific files or the entire contents of the principal distribution point.
Open Jamf Admin and authenticate to the Jamf Pro server.
In the sidebar, select the cloud distribution point you want to replicate files to.
Click .Replicate
Related InformationFor related information, see the following section in this guide:
Network SegmentsYou can use network segments to ensure that computers and mobile devices use the closest distribution point by default.
For related information, see the following Knowledge Base article:
Information Required to Configure a Cloud Distribution Point in Jamf Pro Learn about the information that must be obtained from your cloud services provider to configure the cloud distribution point in Jamf Pro.
For related information, see the following from the :Amazon CloudFront Developer Guide
Using signed URLsFind out how to use signed URLs with Amazon CloudFront.
For more information about content delivery services, visit the following websites:
Rackspace Cloud Files http://www.rackspace.com/cloud/files/
Amazon S3 http://aws.amazon.com/s3/
Amazon CloudFront http://aws.amazon.com/cloudfront/
Akamai NetStorage http://www.akamai.com/html/solutions/netstorage.html
Jamf Cloud Distribution Servicehttp://www.jamfsoftware.com/products/jamf-cloud/

216
1.
2.
3.
4.
5.
6.
7.
Software Update Servers
Adding an internal software update server to Jamf Pro is the first step to running Software Update from an internal software update server using a policy.
Using an internal software update server allows you to reduce the amount of bandwidth used when distributing software updates from Apple. Instead of each computer downloading updates from Apple’s Software Update server, updates are only downloaded from Apple once per server.
Using an internal software update server also allows you to control and approve updates before you make them available.
Adding a Software Update ServerLog in to Jamf Pro.
In the top-right corner of the page, click .Settings
Click .Server Infrastructure
Click .Software Update Servers
Click .New
Configure the settings on the pane.
Click .Save
Related InformationFor related information, see the following sections in this guide:
Running Software UpdateFind out how to run Software Update using a policy.
For related information, see the following:
NetBoot/SUS ApplianceFind out how to host an internal software update server on Linux.

217
1.
2.
3.
4.
5.
Jamf Infrastructure Manager Instances
A Jamf Infrastructure Manager instance is a service that is managed by Jamf Pro. It can be used to host the following:
LDAP Proxy—This allows traffic to pass securely between Jamf Pro and an LDAP directory service. The Infrastructure Manager and the LDAP Proxy typically reside within the DMZ.The LDAP Proxy requires integration with an LDAP directory service.
Healthcare Listener—This allows traffic to pass securely from a healthcare management system to Jamf Pro.
When you install an instance of the Infrastructure Manager, Jamf Pro allows you to enable the LDAP Proxy or the Healthcare Listener. Infrastructure Manager instances can be installed on Linux and Windows.
Managing a Jamf Infrastructure Manager InstanceYou can use Jamf Pro to edit or delete an Infrastructure Manager instance. When editing an Infrastructure Manager instance, only the display name and recurring check-in frequency can be changed.
Note: The default check-in frequency at which the Infrastructure Manager instance checks in with Jamf Pro is 30 seconds.
Jamf Pro also displays the following inventory information for each Infrastructure Manager instance:
Last Check-in
IP Address at Last Check-in
Operating System
Operating System Version
Log in to Jamf Pro.
In the top-right corner of the page, click .Settings
Click Server Infrastructure.
Click .Infrastructure Managers A list of Infrastructure Manager instances is displayed along with the services that are installed on each instance.
Click the Infrastructure Manager instance you want to manage.

218
5.
Notes:
An Infrastructure Manager instance cannot be deleted if there are dependencies for the Infrastructure Manager. For example, an Infrastructure Manager cannot be deleted if there is an LDAP Proxy hosted on it. To delete the Infrastructure Manager, you must first disable the LDAP Proxy.
If a Healthcare Listener is hosted on the Infrastructure Manager, the Healthcare Listener is deleted when the Infrastructure Manager is deleted.
Related InformationFor related information, see the following sections:
Email NotificationsLearn how to enable an email notification in the event that an Infrastructure Manager instance does not check in with Jamf Pro.
LDAP ProxyFind out how to configure an LDAP Proxy.
Healthcare ListenerFind out how to set up Healthcare Listener.
For related information, see the .Jamf Infrastructure Manager Installation Guide
For related information about network communication and the connections initiated between the Infrastructure Manager and Jamf Pro, see the Knowledge Base Network Ports Used by Jamf Proarticle.

219
Healthcare Listener
The Healthcare Listener is a service that receives ADT messages from a healthcare management system and allows traffic to pass securely from the healthcare management system to Jamf Pro. When the Healthcare Listener receives an ADT message, Jamf Pro interprets the message to automatically send remote commands to mobile devices based on rules you configure.
For example, you could configure a rule so that when the Healthcare Listener receives a "Patient Discharge" ADT message, Jamf Pro sends a Wipe Device command to the device assigned to the patient room.
When you configure the Healthcare Listener, you must do the following:
Specify IP addresses or a range of IP addresses to accept incoming messages from
Note: The Healthcare Listener is compatible with IPv4 and IPv6 connection methods.
Specify a port number
Note: The default port value is 8080. This should be changed to the port number that the Healthcare Listener uses to receive healthcare management system communications.
Add rules by configuring settings that enable Jamf Pro to send commands to devicesYou can also enable email notifications in the event that a command is not sent.
In addition, email notifications can be sent from Jamf Pro when a remote command fails to send or remains in a pending state. For more information, see "Email Notifications" in the table below.
The Healthcare Listener is hosted by the Jamf Infrastructure Manager, a service that is managed by Jamf Pro. After you install an instance of the Infrastructure Manager, Jamf Pro allows you to enable the Healthcare Listener.
Healthcare Listener RulesConfiguring a rule enables Jamf Pro to send remote commands to devices when the Healthcare Listener receives an ADT message. If you want to send more than one type of command or use more than one type of ADT message, you must configure a separate rule for each. You can configure as many rules as your organization requires.

220
The following table provides an overview of the settings you must configure for each rule:
Setting Description
Operating System
This setting allows you to apply the rule to either iOS devices or tvOS devices. For example, you can choose to wipe only the tvOS devices in your environment.
Note: For tvOS, the Wipe Device remote command is the only option available.
Remote Command
This setting allows you to specify which command you want sent from Jamf Pro when the Healthcare Listener receives an ADT message. You can choose from the following commands:
Wipe Device(Optional) You can also choose to suppress Proximity Setup for mobile devices with iOS 11.3 or later.
Note: If a mobile device has Activation Lock enabled, the Activation Lock is cleared when the device is wiped.
Lock DeviceClear PasscodeEnable Lost ModeChoosing Enable Lost Mode requires you to configure custom messaging.Disable Lost Mode
ADT Message
For Jamf Pro to send commands to devices, the Healthcare Listener must receive an ADT message. You can choose from the following ADT message types:
Admit/Visit Notification (ADT-A01)Patient Transfer (ADT-A02)Patient Discharge (ADT-A03)Cancel Admit/Visit Notification (ADT-A11)Cancel Transfer (ADT-A12)Cancel Discharge/End Visit (ADT-A13)
Mapping Fields
ADT messages contain multiple fields of information that the Healthcare Listener can extract. You can choose which ADT message field to extract, and then map that field to an attribute from user and location information in device inventory. For example, you can choose the field that returns "bed number" and map that field to the "Room" attribute in a device's inventory information. The command you specify is then sent to devices that match the inventory attribute you select.You can choose from the following ADT message fields:
Patient Visit - Person Location - Bed (PV1-3-3)Patient Visit - Prior Person Location - Bed (PV1-3-6)
In addition, you can use an alternative field from the ADT message.You can also create an extension attribute for a specific inventory attribute that fits your environment. After you create the extension attribute, it is available as an option.

221
1.
2.
3.
4.
5.
6.
7.
8.
9.
a.
b.
Setting Description
Email Notifications (Optional)
Email notifications can be sent from Jamf Pro to specified users for the following events:
A command fails to send or is in a pending state after a specified amount of time.A command is sent to a device that does not meet the requirements for the command.
General RequirementsTo configure the Healthcare Listener and take full advantage of its latest features and enhancements in Jamf Pro, you must install the latest version of the Jamf Infrastructure Manager that hosts the Healthcare Listener. For complete instructions on installing and configuring the Healthcare Listener, see the technical paper.Installing and Configuring the Healthcare Listener
In addition, you need to ensure that your healthcare management system is compliant with Health Level Seven (HL7) messaging and that it communicates the version of HL7 protocol. For more information about HL7 messaging, see .www.hl7.org
(Optional) To enable email notifications, you need an SMTP server set up in Jamf Pro. For more information, see .Integrating with an SMTP Server
Setting up the Healthcare ListenerLog in to Jamf Pro.
In the top-right corner of the page, click .Settings
Click .Server Infrastructure
Click .Infrastructure Manager Instances A list of Infrastructure Manager instances is displayed along with the services that are installed on each instance.
Click the Infrastructure Manager instance with the Healthcare Listener that you want to configure.
Click .Edit
Select the checkbox.Enable Healthcare Listener
Enter a display name for the Healthcare Listener.This is the name that is displayed for the Healthcare Listener on the Infrastructure Manager.
To specify the IP addresses to accept incoming ADT messages from, do one of the following:
Select to accept incoming messages from any IP address.All IP addresses
Select to specify the IP addresses to accept incoming Single IP address or Range of IP addressesADT messages from, and do the following:
To specify a single IP address, click the button for Single and enter the IP address.(+) Add

222
9.
b.
10.
11.
1.
2.
3.
4.
5.
6.
7.
8.
9.
10.
11.
a.
b.
c.
12.
To specify a range of IP addresses, click the button for Range and enter the starting and (+) Addending IP addresses.
Enter the port number of your healthcare management system.
Click .Save
After the Healthcare Listener is set up, you can add rules. Adding a rule enables Jamf Pro to send remote commands to devices.
Adding a Healthcare Listener RuleLog in to Jamf Pro.
In the top-right corner of the page, click .Settings
Click .Server Infrastructure
Click .Infrastructure Manager InstancesA list of Infrastructure Manager instances is displayed along with the services that are installed on each instance.
Click the Infrastructure Manager instance with the Healthcare Listener that you want to add a rule to.
Click , and then click the button.Edit Add (+)
Select the operating system you want to apply the rule to.
Choose the remote command you want Jamf Pro to send to devices when the Healthcare Listener receives an ADT message.
Note: If you edit or delete a rule that has a remote command in a pending state, the pending command is still sent to devices regardless of editing or deleting the rule.
Choose which ADT message the Healthcare Listener can receive.
Use the options to map a field from the ADT message to an attribute of inventory Field Mappinginformation.If you want to use an alternative field from the ADT message, choose "Other" from the ADT Message
pop-up menu, and then type the field.Field
(Optional) To enable email notifications, click the tab, and do the following:Notifications
Select the events that you want to send an email notification for.
Enter an email address or multiple email addresses separated by a line break or a comma.
Use the pop-up menu to choose how many minutes to wait when a command is Email Delaypending before sending an email to specified email addresses.
Click .Save
When the Healthcare Listener receives an ADT command, Jamf Pro sends the specified command to devices that are mapped to the field in the ADT message.
223
Note: If the Healthcare Listener cannot communicate with Jamf Pro (e.g., during a Jamf Pro upgrade), any ADT messages that the Healthcare Listener receives during that time are saved and then processed once communication is re-established.
Related InformationFor related information, see the following sections in this guide:
Viewing Audit Logs for a Mobile DeviceFind out how you can view the date/time of the remote command that was sent to a specific mobile device in the device's inventory information.
Change ManagementFind out how to view Healthcare Listener changes that happen in Jamf Pro.
Mobile Device Extension AttributesFind out how to create a mobile device extension attribute for a specific inventory attribute to use for mapping fields.
For related information about the communication process of the Healthcare Listener, see the technical paper.Installing and Configuring the Healthcare Listener

224
LDAP Proxy
Jamf Pro allows you to enable an LDAP Proxy. Enabling an LDAP Proxy creates a secure tunnel to allow traffic to pass between Jamf Pro and an LDAP directory service. For example, if your environment uses a firewall, an LDAP Proxy can be used to allow a directory service on an internal network to pass information securely between the directory service and Jamf Pro.
The LDAP Proxy is hosted by the Infrastructure Manager, a service that is managed by Jamf Pro. After you install an instance of the Infrastructure Manager, Jamf Pro allows you to enable an LDAP Proxy if you have an LDAP server set up in Jamf Pro.
Note: The LDAP Proxy that is hosted on the Infrastructure Manager is not the same service as the open source NetBoot/SUS/LP server. For more information about the open source NetBoot/SUS/LP server, see the following webpage: https://github.com/jamf/NetSUS/tree/master/docs .
Network CommunicationWhen using the LDAP Proxy, the Jamf Infrastructure Manager can be customized for incoming TCP access on any available port. For Linux, port 1024 or greater must be used because lower-numbered ports are reserved for root services. The port used must be opened, inbound, both on your firewall and on the computer on which the Infrastructure Manager is installed. Configure inbound firewall rules on your connection and the Jamf Infrastructure Manager host's operating system to allow connections on this port only from Jamf Pro. For Jamf Cloud-hosted environments, limit the source IP addresses to the list for their hosting region.
Note: The Infrastructure Manager does not currently respect network proxy settings configured in the host operating system or in Java. Therefore, the Infrastructure Manager must be enrolled with Jamf Pro and receive its initial configuration on a network that does not require connection via an outbound proxy. Unless a firewall rule is created to allow the Infrastructure Manager to connect to Jamf Pro without using an outbound proxy, the Infrastructure Manager will not receive LDAP configuration updates or be able to notify Jamf Pro that it is operational. It will still be able to receive the inbound LDAP lookup requests from Jamf Pro, however.
For communication between the Infrastructure Manager and an LDAP directory service, your LDAP server’s regular incoming port is used. This port is specified in the LDAP server’s configuration in Jamf Pro. The most common configurations are port 389 for LDAP and port 636 for LDAPS. This communication occurs between the Infrastructure Manager in the DMZ and an internal LDAP directory service only.
Note: Internal domain addresses (for example, .local, .company, or .mybiz) are not supported at this time. The Infrastructure Manager must be resolvable to the external Jamf Pro server.
Configuring the LDAP Proxy

225
1.
2.
3.
4.
5.
6.
7.
8.
9.
10.
Configuring the LDAP Proxy
Requirements
To configure an LDAP Proxy, you need the following:
An Infrastructure Manager instance installed and configured (For more information, see the Jamf .)Infrastructure Manager Installation Guide
An LDAP server configured in Jamf Pro (For more information, see Integrating with LDAP Directory .)Services
Procedure
Log in to Jamf Pro.
In the top-right corner of the page, click .Settings
Click System Settings.
Click .LDAP Servers
Click the LDAP Server to which you want to assign an LDAP Proxy.
Click .Edit
Select the checkbox.Enable LDAP Proxy
Select the proxy server to use.The proxy binding address is automatically populated based on the server you select.
Enter a port number.
Click .Save
Related InformationFor related information, see the following section in this guide:
Jamf Infrastructure Manager InstancesLearn more about the Jamf Infrastructure Manager.

226
Organizing Your Network

227
1.
2.
3.
4.
5.
6.
7.
Buildings and Departments
Buildings and departments are organizational components that allow you to group computers and mobile devices by physical location and organizational infrastructure. You can use them to perform inventory searches, create smart groups, and configure the scope of remote management tasks.
Adding a Building or DepartmentLog in to Jamf Pro.
In the top-right corner of the page, click .Settings
Click .Network Organization
Click or .Buildings Departments
Click .New
Enter a display name for the building or department.
Click .Save

228
1.
2.
3.
4.
5.
6.
7.
Network Segments
A network segment is a range of IP addresses that can be used to group computers and mobile devices based on their network location. Network segments can be class B or class C subnets, or any IP range therein.
Adding network segments to Jamf Pro allows you to do the following:
Ensure that computers and mobile devices use the closest distribution point by default.
Ensure that computers use the closest NetBoot server by default.
Specify a software update server for computers to use by default.
Automatically update the building and department to which computers and mobile devices belong.
Base the scope of remote management tasks on network segments.
If a computer belongs to multiple network segments, Jamf Pro uses and updates both IP addresses to distribute content.
Adding a Network SegmentLog in to Jamf Pro.
In the top-right corner of the page, click .Settings
Click .Network Organization
Click .Network Segments
Click .New
Configure the network segment using the settings on the pane.
Click .Save
Related InformationFor related information, see the following Knowledge Base articles:
Using the Jamf Pro Subnet ImporterFind out how to use Jamf Pro Subnet Importer to import a CSV file that contains network segment information into Jamf Pro.
Collecting the IP Address and Reported IP Address in Jamf ProFind out about how IP addresses are collected and network segments are calculated.

229
iBeacon Regions
Jamf Pro allows you to utilize Apple’s iBeacon technology to monitor when computers and mobile devices enter or exit an iBeacon region. This allows you to ensure that configuration profiles and policies are only installed on a device when the device is in the specified region.
You can use iBeacon regions as the basis for the following:
The scope of a configuration profile
The scope of a policy (This initiates the policy the first time that a computer checks in to Jamf Pro while in the specified region.)
A custom trigger for a policy (The event name for initiating a policy when an iBeacon region change occurs is “beaconStateChange”. This initiates the policy immediately when a computer enters the specified region.)
If you have an iBeacon device in your environment, you can add that device to Jamf Pro as an iBeacon region. Jamf Pro can then detect when computers and mobile devices enter or exit the region.
General RequirementsTo monitor an iBeacon region for computers, you need:
One or more iBeacon devices in your environment
Computers that are Bluetooth Low Energy capable and have Bluetooth turned on
The Computer Inventory Collection settings configured to monitor iBeacon regions (For more information, see .)Computer Inventory Collection Settings
To monitor an iBeacon region for mobile devices, you need:
One or more iBeacon devices in your environment
Mobile devices with:
iOS 7 or laterBluetooth Low Energy capabilityBluetooth turned onJamf Self Service for iOS installed (For more information, see .)Jamf Self Service for iOSLocation Services enabled for Jamf Self Service for iOS
The Mobile Device Inventory Collection settings configured to monitor iBeacon regions (For more information, see .)Mobile Device Inventory Collection Settings
Note: iBeacon region monitoring is not available for personally owned devices.

230
1.
2.
3.
4.
5.
6.
7.
8.
Adding an iBeacon RegionLog in to Jamf Pro.
In the top-right corner of the page, click .Settings
Click .Network Organization
Click .iBeacons
Click .New
Enter a display name for the iBeacon region.
Define the iBeacon region using the settings on the pane.
Click .Save
Related InformationFor related information, see the following Knowledge Base article:
Smart Group and Advanced Search Criteria for iBeacon RegionsLearn about the smart group and advanced search criteria available for iBeacon regions.
For additional information, see the following documentation from Apple:
Getting Started with iBeaconLearn more about iBeacon devices and iBeacon regions

231
1.
2.
3.
4.
5.
6.
7.
Sites
Sites are components that Jamf Pro administrators can create to determine which objects (for example, computers, mobile devices, or apps) Jamf Pro users can view and manage. Sites and the objects within sites do not have to be organized based on physical location. For example, a Jamf Pro administrator in a school system could create sites for K-2, 3-5, 6-8, and 9-12 and then delegate control of each site to a specific Jamf Pro user.
Sites are only necessary when full Jamf Pro administrators need to allow specific users to manage a subset of objects. If all Jamf Pro users should have access to all objects, do not configure sites.
When a user logs in to a Jamf Pro user account with site access, the user can view and edit only the objects within that site. If the user has access to multiple sites, a menu is displayed at the top of the page, allowing the user to switch between sites.
Creating a SiteLog in to Jamf Pro.
In the top-right corner of the page, click .Settings
Click .Network Organization
Click .Sites
Click .New
If prompted, choose a method for adding sites:
To add sites manually, select and click .Add sites manually Next
To create a site for each existing building, select and click .Create sites from buildings Next
To create a site for each existing department, select and click .Create sites from departments Next
If prompted, enter a display name for the site and click .Save
Note: You can only create sites from buildings or departments if you are adding sites for the first time and have buildings or departments set up in Jamf Pro.
Adding Objects to a SiteThe following objects can be added to a site:
Computers
Mobile devices
Users
Enrollment invitations

232
Enrollment profiles
Advanced searches
Smart groups
Static groups
Self Service bookmarks
Policies
Configuration profiles
Imaging PreStage
Restricted software records
Licensed software records
Classes
Apps
Books
Automated device enrollment (formerly DEP) instances
PreStage enrollments
Volume purchasing (formerly VPP) locations
Network integration instances
Patch management software titles
There are several ways to add computers to a site:
Create sites from existing buildings and departments. This automatically adds computers to the site that corresponds with the building or department they belong to.
Enroll computers using one of the following methods:
Provide an enrollment URL to users for user-initiated enrollment. If using an enrollment invitation, computers will be added to the site specified in the invitation. If an enrollment URL is provided to users via a different method, users are prompted to select a site during enrollment.Use a Recon QuickAdd package.Use the network scanner.Run Recon remotely on a single computer.Run Recon locally.
Mass edit the field for computers that are already enrolled with Jamf Pro. For more information, Sitesee .Mass Actions for Computers
Manually edit the field for individual computers that are already enrolled with Jamf Pro.Site

233
There are several ways to add mobile devices to a site:
Create sites from existing buildings and departments. This automatically adds mobile devices to the site that corresponds with the building or department they belong to.
Enroll mobile devices using one of the following methods:
Provide an enrollment URL to users for user-initiated enrollment. If using an enrollment invitation, mobile devices will be added to the site specified in the invitation. If an enrollment URL is provided to users via a different method, users are prompted to select a site during enrollment.Apply an enrollment profile to a mobile device using Apple Configurator 2.
Mass edit the field for mobile devices that are already enrolled with Jamf Pro. For more Siteinformation, see .Mass Actions for Mobile Devices
Manually edit the field for individual mobile devices that are already enrolled with Jamf Pro.Site
There are several ways to add users to a site:
Add the user to a computer or mobile device that belongs to a site.
Add a computer or mobile device with a user assigned to it to a site.
Mass add users to a site for users in Jamf Pro. For more information, see .Mass Actions for Users
Manually add users to a site for individual users in Jamf Pro.
To add other objects to a site, choose a site from the pop-up menu when configuring the objects Sitein Jamf Pro.

234
Network Integration
Jamf Pro can be integrated with a network access management service, such as Cisco Identity Services Engine (ISE). Network integration allows the service to communicate with Jamf Pro to verify that the computers and mobile devices on your network are compliant with your organization’s standards. With information from Jamf Pro, the service can determine the level of network access to grant to a computer or mobile device, provide messaging to end users, and refer end users to enroll their computers and mobile devices to Jamf Pro to become compliant.
Note: When the network access management service refers end users to enroll their computer or mobile device with Jamf Pro, an enrollment URL is provided to the user in a webpage when they access the Internet. The end user can then access the enrollment URL to enroll with Jamf Pro via user-initiated enrollment.
Network integration can also allow the network access management service to send remote commands to computers and mobile devices via Jamf Pro, including passcode lock and wipe commands.
Creating a network integration instance in Jamf Pro prepares Jamf Pro to integrate with a network access management service. This allows you to do the following:
When sites are defined in Jamf Pro, select the site to add the network integration instance to.
Select the saved advanced computer search and advanced mobile device search to be used by the network access management service to verify computers and mobile devices that are compliant with your organization’s standards. Computers and mobile devices that appear in the search results are reported as compliant to the network access management service.
Specify compliance verification failure and compliance remediation messaging that can be displayed to end users via the network access management service.
Configure the passcode to be used when remotely locking or wiping computers via the network access management service.
After saving the network integration instance, view the network integration URL to be used by the network access management service to communicate with the specific Jamf Pro network integration instance.
Important: When using network integration on a per-site basis in Jamf Pro, ensure that any site-specific configuration profiles and policies in Jamf Pro do not conflict with computer and mobile device compliance verification performed through network integration.
General RequirementsFor more information and requirements for configuring your network access management service to communicate with an MDM server, see your vendor’s documentation.

235
1.
2.
3.
4.
5.
6.
7.
To allow the network access management service to send remote commands via Jamf Pro, your environment must meet the requirements for sending remote commands to computers and mobile devices. For more information, see and Remote Commands for Computers Remote Commands for
.Mobile Devices
Adding a Network Integration InstanceLog in to Jamf Pro.
In the top-right corner of the page, click .Settings
Click .Network Organization
Click .Network Integration
Click .New
Note: Only one network integration instance can be added per site in Jamf Pro. If all sites already have a network integration instance, you will not be able to add a new one.
Configure the network integration instance using the settings on the pane, including the site, the advanced computer search and advanced mobile device search to be used for compliance verification, compliance messaging to be displayed to users, and the remote lock and wipe passcode setting for computers.
Note: If you select the “Create Random Passcode” option for the passcode assignment method for computers, to identify the passcode used for a remote lock or wipe on a specific computer, you will need to view the management history for the computer in Jamf Pro. For more information, see
.Computer History Information
Click .Save After saving the network integration instance, a unique network integration URL appears at the bottom of the pane. This URL will be used by the network access management service to communicate with the specific Jamf Pro network integration instance.
Related InformationFor related information, see the following sections in this guide:
SitesLearn about sites and how to add them to Jamf Pro.
Advanced Computer SearchesLearn how to create and save an advanced computer search.
Advanced Mobile Device SearchesLearn how to create and save an advanced mobile device search.

236
Scope
Scope gives you granular control over which computers, mobile devices, and users receive remote management tasks. For example, you can use scope to ensure that a policy to install desktop publishing software only runs on computers in the Design department, or that a book is only distributed to students in a particular class.
Scope can be based on the following items:
Individual computers, mobile devices, or users
Computer, mobile device, or user groups
Departments
Buildings
LDAP or local users
LDAP user groups
Note: Jamf Pro may experience performance issues if too many LDAP groups are included in the scope of an object. If you need to use multiple LDAP criteria within a scope, consider creating a smart group with those criteria, and then scope to that smart group instead.
Network segments
Classes
iBeacon regions
The items available vary depending on the remote management task you are configuring the scope for. For example, only book scope can be based on classes.
Note: Scope cannot be based on personally owned mobile devices.
Configuring ScopeFor most remote management tasks, configuring the scope involves adding targets, limitations, and exclusions. (The process varies depending on the remote management task you are configuring the scope for.)
Adding Targets
Targets make up the initial pool of computers, mobile devices, or users that receive the remote management task. You can add all computers, mobile devices, or users, or you can add a combination of specific items (e.g., computers, groups, buildings).

237
1.
2.
a.
b.
c.
On the Targets pane, use the pop-up menus to choose items to add to the scope.
Note: All computers, mobile devices, and users selected from the pop-up menus will be added to the scope. One pop-up menu selection does not override another. For example, selecting "All Computers" and "Specific Users" as targets to the scope of a book will cause the book to be distributed to all mobile devices, as well as any computers or mobile devices that the chosen user or users are assigned to.
If you chose to add specific items:
Click .Add
On each tab, click for the items you want to add.Add
Click in the top-right corner of the pane.DoneThe items you added are displayed in a list on the Targets pane.

238
1.
2.
Adding Limitations
Adding limitations to the scope of a remote management task allows you to do the following:
Limit the task to specific users in the target. For example, if you want a certain application to open at login for specific users regardless of the computer they use, you can use all computers as the target and add specific users as limitations.
Limit the task to specific network segments in the target. For example, if you want each computer in a department to install a package but only while on the company’s production network, you can use the department as the target and add a specific network segment as a limitation.
Limit policies and configuration profiles to devices in the target when the devices are in a specific iBeacon region. For example, if you want to install a configuration profile on mobile devices when they are in a specific iBeacon region, you can add the iBeacon region as a limitation.
On the Limitations pane, click .Add
On each tab, add items as needed.To add a network segment, click the tab, and then click for the network Network Segments Addsegment.
To add an LDAP or local user, click the tab. Then enter the username in the search LDAP/Local Usersfield and click .Add

239
2.
3.
1.
2.
To add an LDAP user group, click the tab, enter the name of the group in the LDAP User Groupssearch field and click . Then click for the group you want to add.Search Add
Click in the top-right corner of the pane.Done The items you added are displayed in a list on the Limitations pane.
Adding Exclusions
Adding exclusions to the scope of a remote management task allows you to exclude specific computers or mobile devices, groups, buildings, departments, users, user groups, or network segments. For example, if you want to restrict an application for everyone except the head of the department, you can add them as an exclusion.
You can also add iBeacon regions as exclusions to the scope of policies and configuration profiles. For example, if you want to prevent a mobile device from having a configuration profile installed when it is in a specific iBeacon region, you can add the iBeacon region as an exclusion.
On the exclusions pane, click .Add
On each tab, add items as needed.To add an LDAP or local user, click the tab. Then enter the username in the search LDAP/Local Usersfield and click .Add

240
2.
3.
To add an LDAP user group, click the tab, enter the name of the group in the LDAP User Groupssearch field and click . Then click for the group you want to add.Search Add
To add another type of item, click the appropriate tab and then click for the item you want to Addadd.
Click in the top right-corner of the pane.Done The items you added are displayed in a list on the Exclusions pane.
Removing Targets
For most remote management tasks, removing a target from the scope also removes the remote management task from the device the next time the device checks in with Jamf Pro. However, some remote management tasks—such as policies or PreStage enrollment—are not removed from the device after the target is removed from the scope.
For information on how a feature behaves when a target is removed from the scope, see the documentation for that feature.

241
Managing Computers

242
1.
2.
3.
4.
5.
6.
7.
Building the Framework for Managing Computers
Recurring Check-in FrequencyThe recurring check-in frequency is the interval at which computers check in with Jamf Pro for available policies.
By default, the recurring check-in frequency is set to “Every 15 Minutes”.
Configuring the Recurring Check-in Frequency
Log in to Jamf Pro.
In the top-right corner of the page, click .Settings
Click .Computer Management
In the “Computer Management–Management Framework” section, click .Check-In
Click .Edit
Configure the recurring check-in frequency using the pop-up menu on the pane.
Click .Save
Each computer checks in at the specified interval, starting at the time the setting is applied to the computer. This means that check-in times will vary across computers.
Related Information
For related information, see the following sections in this guide:
Policy ManagementYou can create policies that are triggered at the recurring check-in frequency.
Components Installed on Managed ComputersFind out where the files that control the recurring check-in frequency are stored on computers.

243
1.
2.
3.
4.
5.
6.
7.
Startup ScriptThe Startup Script settings in Jamf Pro allow you to create a startup script on computers and use it to perform the following actions at startup:
Log Computer Usage information (date/time of startup).
Check for policies triggered at startup.
Ensure SSH (Remote Login) is enabled on computers.
Configuring the Startup Script
Log in to Jamf Pro.
In the top-right corner of the page, click .Settings
Click .Computer Management
In the “Computer Management–Management Framework” section, click .Check-In
Click .Edit
Configure the startup script settings using the checkboxes on the pane.
Click .Save
Related Information
For related information, see the following sections in this guide:
Computer UsageFind out how to view Computer Usage information logged at startup.
Policy ManagementYou can create policies that are triggered at startup.
Components Installed on Managed ComputersFind out where the startup script is stored on computers.

244
1.
2.
3.
4.
5.
6.
7.
Login and Logout HooksThe Login/Logout Hooks settings in Jamf Pro allow you to create login and logout hooks on computers and use them to perform the following actions:
Log Computer Usage information (username and date/time) at login and logout.
Check for policies triggered at login or logout.
Hide the Restore partition at login.
Warning: Creating login and logout hooks with Jamf Pro can disable existing login and logout hooks.
Configuring Login and Logout Hooks
Log in to Jamf Pro.
In the top-right corner of the page, click .Settings
Click .Computer Management
In the “Computer Management–Management Framework” section, click .Check-In
Click .Edit
Configure the login/logout hooks settings using the checkboxes on the pane.
Click .Save
Related Information
For related information, see the following sections in this guide:
Computer UsageFind out how to view Computer Usage information logged at login and logout.
Policy ManagementYou can create policies that are triggered at login or logout.
Components Installed on Managed ComputersFind out where login/logout hooks are stored on computers.

245
Security SettingsThe Security settings in Jamf Pro allow you to do the following:
Enable certificate-based authentication.
Enable push notifications.
Automatically install the Privacy Preferences Policy Control profile.
Automatically install a Jamf Notifications profile.
Configure SSL certificate verification.
Specify the condition under which the checksum will be used to validate packages. If you choose to validate packages, the validation occurs after the package is downloaded.
Specify a maximum clock skew between managed computers and the Jamf Pro host server.
Require login authentication when retrieving PreStage imaging and Autorun imaging information.
When a Mac computer attempts to communicate with the Jamf Pro server and the security requirements specified in Jamf Pro are not met, communication is blocked.
Automatically Installing the Privacy Preferences Policy Control Profile
When you enroll a computer with Jamf Pro, the computer automatically becomes managed by Jamf Pro. This allows you to perform remote management tasks on the computer. To perform some tasks on computers with macOS 10.14 or later, you must allow the Jamf management framework to access the target computer's system files and processes by installing the Privacy Preferences Policy Control profile.
Note: The Privacy Preferences Policy Control profile is part of a security feature introduced in macOS 10.14. For more information about the Privacy Preferences Policy Control profile, see
in Apple's Privacy Preferences Policy Control MDM payload settings for Apple devices Mobile Device .Management Settings
This option is enabled by default and allows Jamf Pro to automatically install the Privacy Preferences Policy Control profile on computers with macOS 10.14 or later that have a User Approved MDM status. This allows the Jamf management framework to be installed on computers to access the necessary system files and processes for managing computers and performing the remote management tasks on the computers.
The and settings must be enabled Enable certificate-based authentication Enable push notificationsto access this feature.
For more information about the contents of the Privacy Preferences Policy Control profile, see the "Privacy Preferences Policy Control Profile Contents" section of the Preparing your Organization for
Knowledge Base article.User Data Protections on macOS 10.14

246
Automatically Installing a Jamf Notifications Profile
Configuring the setting in Jamf Pro automatically Automatically install a Jamf Notifications profileenables notifications from the Jamf management framework and Jamf Self Service for macOS. End users are not prompted to allow notifications the first time they log in to Self Service.
This option is enabled by default and allows Jamf Pro to automatically install the Notifications profile on computers with macOS 10.15 or later.
The and settings must be enabled Enable certificate-based authentication Enable push notificationsto access this feature.
Configuring SSL Certificate Verification
Configuring the SSL Certificate Verification setting in Jamf Pro ensures that computers only communicate with a host server that has a valid SSL certificate. This prevents computers from communicating with an imposter server and protects against man-in-the-middle attacks.
Consider the following when configuring SSL certificate verification:
If you are using the self-signed certificate from Apache Tomcat that is built into Jamf Pro, you must select "Always except during enrollment".
If you are using an SSL certificate from an internal CA or a trusted third-party vendor, select either "Always" or "Always except during enrollment". It is recommended that you use "Always" if computers in your environment are configured to trust the certificate before they are enrolled.
For more information, see the following Knowledge Base articles:
Safely Configuring SSL Certificate Verification
Change to the SSL Certificate Verification Setting in Jamf Pro 9.98 or Later
247
1.
2.
3.
4.
5.
6.
7.
Configuring Security Settings
Requirements
To enable push notifications, you must have a push certificate in Jamf Pro. For more information, see .Push Certificates
Procedure
Log in to Jamf Pro.
In the top-right corner of the page, click .Settings
Click .Computer Management
In the ”Computer Management–Management Framework” section, click .Security
Click .Edit
Configure the settings on the pane.
Click .Save
Related Information
For related information, see the following sections in this guide:
CertificatesLearn about device certificates and the SSL certificate.
SSL CertificateFind out how to create or upload an SSL certificate that Mac computers can use to verify the identity of the Jamf Pro server.
Package ManagementLearn about using the checksum to validate a package and how to manually calculate the value.
For related information, see the following Knowledge Base article:
Certificate-Based Authentication for Mac ComputersLearn how Jamf Pro uses certificate-based authentication to verify the identity of Mac computers.

248
Enrollment of Computers
Computer Enrollment MethodsEnrollment is the process of adding Mac computers to Jamf Pro. When computers are enrolled, inventory information for the computers is submitted to Jamf Pro.
Enrolling computers makes them managed by Jamf Pro. This allows you to perform inventory tasks, remote management, and configuration tasks on the computers.
There are two types of computer enrollment, with various methods to enroll a computer using that type:
Automated Device Enrollment allows organizations to configure Automated Device Enrollment—and manage devices from the moment the devices are removed from the box (known as zero-
can be configured to touch deployment). These devices become supervised, and the MDM profile be unremovable by the user. Automated Device Enrollment is designed for devices owned by the
see in Apple's organization. For more information, Automated Device Enrollment into MDM.Deployment Reference for Mac
Device Enrollment allows organizations to manually enroll devices and Device Enrollment—manage many different aspects of device use, including the ability to erase the device. If a user removes the MDM profile, all settings and apps that are being managed by the MDM solution are
see in Apple's removed. For more information, Device Enrollment into MDM Deployment Reference .for Mac
Automated Device Enrollment for Computers
The only method you can use to enroll devices with Automated Device Enrollment and Jamf Pro is a PreStage enrollment. You can use a PreStage enrollment to customize the computer enrollment experience. For more information, see .Computer PreStage Enrollments
This method is one way to achieve a User Approved MDM status. For more information about User Approved MDM and Jamf Pro, see the Knowledge Base Managing User Approved MDM with Jamf Proarticle.
Note: This enrollment method requires an Apple School Manager or Apple Business Manager account. For more information, see .Integrating with Automated Device Enrollment

249
Device Enrollment for Computers
There are several methods you can use to enroll computers with Device Enrollment and Jamf Pro:
(Recommended) —User-initiated enrollment You can use the User-Initiated Enrollment settings to customize the enrollment experience for users, including the messaging that displays for each step of the enrollment process. Users can then enroll their own computers by logging in to a web-based enrollment portal and following the onscreen instructions. During enrollment, users are prompted to download either an MDM profile or QuickAdd package based on the computer's macOS version. The MDM profile method is one way to achieve a User Approved MDM status. For more information about User Approved MDM and Jamf Pro, see the Managing User Approved MDM with Jamf ProKnowledge Base article.
—Use a QuickAdd package created with Recon You can use Recon to create a QuickAdd package that enrolls computers when it is installed. This type of QuickAdd package can be deployed using almost any deployment tool, such as Apple Remote Desktop or Jamf Pro. You can also give the QuickAdd package to users to install on their own.
—Use the network scanner You can remotely enroll multiple computers in specified IP ranges by using the network scanner in Recon. Recon scans the specified IP ranges and enrolls any computers that it can connect to over SSH (Remote Login).
—Run Recon remotely on a single computer If you know the IP address of the computer that you want to enroll and SSH (Remote Login) is enabled on the computer, you can enroll the computer by running Recon remotely.
Note: Because of increased user data protections with macOS 10.14 or later, you cannot enable remote management remotely using the SSH protocol. To enable remote management on computers with macOS 10.14 or later, the user must select the checkbox in Screen SharingSystem Preferences.
—Run Recon locally If you have physical access to the computer that you want to enroll, you can run Recon locally on the computer.
Related Information
For related information, see the following section in this guide:
Components Installed on Managed ComputersSee a list of the components installed on managed computers and find out how to remove them.

250
Computer PreStage EnrollmentsA PreStage enrollment allows you to create enrollment configurations and sync them to Apple. This enables you to enroll new computers with Jamf Pro, reducing the amount of time and interaction it takes to prepare computers for use.
Creating a PreStage enrollment allows you to configure the enrollment settings and customize the user experience of the Setup Assistant. You can also specify the computers that should be enrolled using the PreStage enrollment and automatically add computers newly associated with the Device Enrollment instance to the PreStage Enrollment. Only computers with macOS 10.10 or later that are associated with the Automated Device Enrollment instance can be enrolled with Jamf Pro using a PreStage enrollment.
If user-initiated enrollment is enabled for macOS in Jamf Pro, computers with macOS 10.10 or later enrolled using a PreStage enrollment are automatically managed and the User-Initiated Enrollment settings are applied to the PreStage. For more information, see .User-Initiated Enrollment Settings
Jamf Pro automatically refreshes information about the computers in the PreStage enrollment. If there is updated information about the computers in Automated Device Enrollment, this information is displayed in Jamf Pro. This information is automatically refreshed every two minutes.
Note: There can be up to a two minute delay on the information refresh which can result in outdated information displayed in Jamf Pro. In addition, environment-specific factors can affect the refresh of information.
A PreStage enrollment is one of the methods that result in a User Approved MDM state for eligible computers. This state is required for managing certain security and privacy settings on macOS. For more information about User Approved MDM and Jamf Pro, see the Managing User Approved MDM
Knowledge Base article.with Jamf Pro

251
Computer PreStage Enrollment Settings
When you create a PreStage enrollment, you use a payload-based interface to configure settings to apply to devices during enrollment. The following table displays the enrollment settings available in a PreStage enrollment:
Payload Description
General This payload allows you to configure basic settings for the PreStage enrollment, specify authentication and management requirements, add an Enrollment Customization configuration, and customize the Setup Assistant experience.
Account Settings
You can use the Account Settings payload to specify account information for the user account created in the Setup Assistant. This payload also can define a managed administrator account to be created at setup.
Configuration Profiles
You can use the Configuration Profiles payload to select profiles to distribute to computers during enrollment. This allows the profiles to be installed on computers before the user completes the Setup Assistant.
User and Location
You can use the User and Location payload to specify user and location information to store in Jamf Pro for each computer enrolled using a PreStage enrollment.
Note: Using Inventory Preload or authentication during enrollment can automatically populate this information for computers.
This information is stored in Jamf Pro for each computer enrolled using a PreStage enrollment.
Passcode (deprecated)
The Passcode payload is only displayed for existing PreStage enrollments that were configured using this payload in Jamf Pro 10.9.0 or earlier.To specify passcode requirements for computers during enrollment using Jamf Pro 10.10.0 or later, create a configuration profile with a Passcode payload configured, and then add that profile to a PreStage enrollment using the Configuration Profiles payload.
Purchasing You can use the Purchasing payload to specify purchasing information for the computers.This information is stored in Jamf Pro for each computer enrolled using a PreStage enrollment.
Attachments You can use the Attachments payload to upload attachments to store for computers.This information is stored in Jamf Pro for each computer enrolled using a PreStage enrollment.

252
Payload Description
Certificates You can use the Certificates payload to establish trust during enrollment if your Jamf Pro instance uses an SSL certificate that is not natively trusted by Apple products. The computer attempts a secure connection with Jamf Pro using only this certificate to enroll.For more information about the certificates that are trusted by Apple, see Availabl
from Apple's support e trusted root certificates for Apple operating systemswebsite.
Note: If your Jamf Pro instance uses an SSL certificate that was created by the Jamf Pro built-in CA, an anchor certificate for enrollment is automatically added to this payload.
If your Jamf Pro server URL ends with "jamfcloud.com" you should not configure this payload.
Directory (deprecated)
The Directory payload is only displayed for existing PreStage enrollments that were configured using this payload in Jamf Pro 10.9.0 or earlier.To choose a directory server for computers during enrollment using Jamf Pro 10.10.0 or later, create a configuration profile with a Directory payload configured, and then add that profile to a PreStage enrollment using the Configuration Profiles payload.
Enrollment Packages
You can use the Enrollment Packages payload to choose packages to deploy to computers during enrollment. Installation commands for the selected packages are deployed to computers before the user completes the Setup Assistant.
Enrollment Experience Customization
You can customize the enrollment experience for the user with the following features in the PreStage enrollment:
Enrollment Customization configurations—You can use the General payload to add an Enrollment Customization configuration to the PreStage enrollment. For example, you can add an Enrollment Customization configuration to display an End User License Agreement (EULA) during enrollment or other custom messaging as the user advances through the Setup Assistant. For more information, see .Enrollment Customization SettingsTo add an Enrollment Customization configuration to the PreStage enrollment, you must have at least one configuration in the Enrollment Customization settings. Enrollment Customization configurations are applied to computers with macOS 10.15 or later only.

253
Configuration profiles—You can use the Configuration Profiles payload to distribute profiles that define settings and restrictions for computers during enrollment. This allows the profiles to be installed on computers before the user completes the Setup Assistant, enabling the user to access resources on your network immediately after their computer is enrolled with Jamf Pro. For example, you can distribute a profile that enables a user to automatically join your network during enrollment. To add configuration profiles to the Configuration Profiles payload, you must create the profile prior to configuring the PreStage enrollment. For more information, see Computer Configuration
. In addition, when you create the computer configuration profile, you must ensure that the Profilesscope of the profile contains the computers that are in the scope of the PreStage enrollment.
Note: Configuration profiles that contain payload variables are not replaced with the attribute values for the variable. If you want to distribute profiles that contain payload variables, it is recommended that you distribute the profile after the computer is enrolled with Jamf Pro.
Enrollment packages—You can add as many packages to the Enrollment Packages payload per PreStage enrollment instance that fits your environment (multiple packages apply to computers with macOS 10.14.4 or later). This enables you to install packages that are needed in your provisioning workflow (e.g., Jamf Connect).
Setup Assistant steps—You can use the General payload to select Setup Assistant screens that you want the user to skip during enrollment (e.g., Apple ID login). When you select a step, that screen is not presented to the user during enrollment. For more information about the screens that can be skipped during enrollment, see Setup Assistant pane options in Apple devices in Apple's Mobile
.Device Management Settings
Account creation—You can create a local administrator account and specify the type of account for the user to create on the computer during enrollment. You can pre-fill and lock the account information so when a user enrolls their computer, the Full Name and Account Name will be pre-populated in the Account Creation screen of the Setup Assistant.
Enrollment Packages
You can use the Enrollment Packages payload to choose packages to deploy to computers during enrollment. You can install software on the computer that is critical to the enrollment workflow before the user completes the Setup Assistant or before the jamf binary is installed during enrollment with Jamf Pro.

254
Consider the following when configuring the Enrollment Packages payload:
Signed distribution packages—You must upload a signed distribution package to Jamf Pro prior to configuring the PreStage enrollment. You can use Composer or a third-party packaging tool to build a signed PKG. For more information about building packages using Composer, see the
. After building a PKG, you must sign and convert it to a distribution package.Composer User Guide
Note: Packages must be signed using a certificate that is trusted by the device at the time of enrollment. It is recommended that the package is signed with a certificate generated from either the Jamf Pro built-in CA or from an Apple Developer Program account. For more information, see the following Knowledge Base articles:
Creating a Signing Certificate Using Jamf Pro's Built-in CA to Use for Signing Configuration Profiles and PackagesCreating a Signed Distribution Packages with an Apple Developer Certificate
Multiple packages—You can add multiple packages to the Enrollment Packages payload to be deployed to computers with macOS 10.14.4 or later. Order of package installation is determined by the package priority. If multiple packages have the same priority, packages are installed in alphabetical order based on the package name. Earlier versions of macOS can only install one package and will install the package with the lowest priority number. For example, a package with a priority of "1" is installed instead of the package with a priority of "5". These packages are installed on the computer during the Setup Assistant process and larger packages (e.g., Microsoft Office) may slow the enrollment process.
Package hosting—To deploy an enrollment package to computers using a distribution point other than a cloud distribution point, the distribution point must use HTTPS and cannot use any authentication. You can also secure the download of the enrollment package from an external distribution server using a JSON Web Token (JWT) in Jamf Pro. This ensures that enrollment packages are downloaded securely to users' computers from external distribution servers. For more information, see .JSON Web Token for Securing In-House Content
Custom manifest file—Packages must have a corresponding manifest file (XML plist format) that contains the URL to download the package from an HTTPS server and other required information for the package. By default, Jamf Pro creates this file when you upload it directly to Jamf Pro or add it to Jamf Admin. If your environment uses an HTTPS server that is not a Jamf Pro HTTPS-capable distribution point to host your packages, you can create a custom manifest file and upload it along with the package to Jamf Pro. To use a custom manifest file, ensure that you upload the file when you upload the package. For more information about uploading packages to Jamf Pro, see Package
.ManagementFor more information about creating and hosting a manifest file, see the Preparing to distribute in-
house macOS apps in Apple's .Deployment Reference for Mac
Setup Assistant Steps
You can select Setup Assistant screens that you want the user to skip during enrollment. When you select a step, that screen is not presented to the user during enrollment.
When enrolling computers with macOS 11 or later, you can allow users to automatically advance through the Setup Assistant. This option prevents any of the Setup Assistant screens from being displayed to the user during enrollment. When advancing through the Setup Assistant, the computer

255
defaults to Pacific Time Zone (PT) after it enrolls with Jamf Pro. If you automatically advance through the Setup Assistant, you can configure the language and region so the locale on the computer is automatically configured.
Note: It is recommended that computers are connected to a power source and Ethernet when allowing users to automatically advance through the Setup Assistant.
For more information about the screens that can be skipped during enrollment, see Setup Assistant in Apple's .pane options in Apple devices Mobile Device Management Settings
Account Creation
You can use the Account Settings payload to create a managed administrator account and specify the type of local user account to create for computers with macOS 10.10 or later enrolled via the PreStage enrollment. You can also pre-fill and lock the account information for the user during the Account Creation screen of the Setup Assistant for computers with macOS 10.15 or later.
Note: A managed administrator created is eligible to receive a SecureToken when it logs in to a computer with macOS 10.15 or later if a Bootstrap Token has been escrowed to Jamf Pro. For more information about Bootstrap Token, see in Apple's Using Bootstrap Token Deployment Reference for
.Mac
For more information about how to manually create and escrow the Bootstrap Token on the computer and to allow Jamf Pro to store the token, see the Manually Leveraging Apple's Bootstrap
Knowledge Base article.Token Functionality
You can create the following settings:
Create a local administrator account—When you create a local administrator account, you enter the username and password. You can choose to hide this account from the user. If you do not enter information for this account, Jamf Pro automatically populates this information from the User-Initiated Enrollment settings; however, you can edit the information.
Create a local user account—You can choose the following types of local user accounts you want the user to create during enrollment:
Administrator Account—This option makes the user the administrator for the computer.Standard Account—This option makes the user a standard user for the computer. You must create the local administrator account when choosing this option.Skip Account Creation—The user does not create an account during enrollment. You must create the local administrator account when choosing this option and the local administrator is the only user on the computer.
When you create the local user account, you can pre-fill and lock the primary account information on computers during enrollment. When users enroll their computers, the Full Name and Account Name will be pre-populated in the Account Creation screen during the Setup Assistant. If you lock the account information, users cannot change it during the Account Creation screen in the Setup Assistant.

256
You can choose the following options to pre-fill this information:
Custom Details—This option allows you to enter the account full name and the account name for the computer. This information is applied to all computers enrolled via the PreStage.
Device Owner's Details—This option sets the account name and account full name based off of the Username and Full Name values in the computer's inventory information at the time of enrollment. If authentication is required during enrollment, the user's information is associated with the device using a lookup from Jamf Pro to LDAP.
Note: If you add an Enrollment Customization configuration that uses a Single Sign-On Authentication PreStage Pane and an LDAP directory lookup is not available, Jamf Pro will be informed of only the Username and will not be able to define a Full Name for the Setup Assistant user's account creation. The username information from your identity provider (IdP) is populated by the `NameID` attribute defined within your IdP's SAML application. Check with your IdP for options to customize this value.
If your environment has an LDAP server set up, you can enter user variables in the Account Full Name and Account Name fields when configuring the Pre-Fill Primary Account settings. This allows the user variables to populate with the value for the LDAP attribute during the account creation screen in the Setup Assistant. To enable the user variables to populate with the value for the LDAP attribute, you need an LDAP server set up in Jamf Pro. For more information, see Integrating with LDAP Directory
.Services
You can enter the following variables:
$USERNAME
$FULLNAME
$REALNAME
$PHONE
$POSITION
$ROOM
$EXTENSIONATTRIBUTE_#
Note: If a blank value is returned for the user variable, locking primary account information is ignored. Users can edit the account fields during account creation in the Setup Assistant.

257
Computer Management Capability Settings
You can use the General payload to enable additional management capabilities. The following do not impact the user's enrollment experience, but do offer you additional remote management when applied:
User Authentication—To increase the security of sensitive user information, it is recommended that you require users to authenticate during computer setup using an LDAP directory account or a Jamf Pro user account. If users authenticate with an LDAP directory account, user and location information is submitted during enrollment.To require LDAP users or Jamf Pro users to authenticate during setup, you need an LDAP server set up in Jamf Pro. For more information, see .Integrating with LDAP Directory ServicesIf an Enrollment Customization configuration is added to this PreStage, this setting is ignored for computers with macOS 10.15 or later.
MDM Profile—The MDM Profile enables you to remotely manage computers using Jamf Pro. Users are automatically required to apply the MDM profile on computers with macOS 10.15 or later during enrollment with Jamf Pro. If the MDM profile is removed, you can no longer send remote commands or distribute configuration profiles to the computer. You can use Jamf Pro to prevent a user from removing this profile after enrollment.
Activation Lock functionality—You can prevent a user from enabling Activation Lock for compatible computers with macOS 10.15 or later during enrollment. When computers are enrolled with Jamf Pro, the user cannot enable Activation Lock on the computer if they enable the Find My Mac service.For more information about Activation Lock and macOS compatibility, see About Activation Lock
from Apple's support website.on your Mac
Configuring a Computer PreStage Enrollment
Requirements
Before you can use a PreStage enrollment, you must do the following:
Integrate Jamf Pro with Automated Device Enrollment (formerly DEP). This creates an Automated Device Enrollment instance in Jamf Pro.For more information, see .Integrating with Automated Device Enrollment
Enable user-initiated enrollment for macOS in Jamf ProFor more information, see .User-Initiated Enrollment Settings
To deploy packages during enrollment, it is recommended that the package is signed with a certificate generated from either the Jamf Pro built-in CA or from an Apple Developer Program account. For more information, see the following Knowledge Base articles:
Creating a Signing Certificate using Jamf Pro’s Built-in Certificate Authority
Creating Signed Distribution Packages for Computer PreStage Enrollments

258
1.
2.
3.
4.
5.
6.
7.
8.
Procedure
Log in to Jamf Pro.
Click at the top of the page.Computers
Click .PreStage Enrollments
Click .New
Use the General payload to configure basic settings for the PreStage enrollment. In addition, you can do the following on the General pane:
To require that users authenticate with their username and password, select the Require checkbox.Authentication
Note: The checkbox is only displayed if an LDAP server has been set up in Require AuthenticationJamf Pro.
To customize the user experience of the Setup Assistant, do the following:
Choose an Enrollment Customization configuration to apply to computers.
Select which steps you want to skip in the Setup Assistant. If you choose to skip steps, the user can enable these settings after the computer is configured unless otherwise restricted.
Note: The computer must be connected to the Internet during the Setup Assistant.
Configure additional payloads as needed based on the goals you are trying to achieve with the PreStage.
Click the tab and configure the scope of the PreStage enrollment by selecting the checkbox Scopenext to each computer you want to add to the scope.The computers listed on the Scope tab are the computers that are associated with the Automated Device Enrollment instance (formerly DEP) via the server token file (.p7m) you downloaded from Apple. If you clone a PreStage enrollment, computers in the scope of the original PreStage enrollment are not included in the scope of the cloned PreStage enrollment.You can use the button to add all associated computers to the scope. This adds all Select Allcomputers associated with Automated Device Enrollment via the server token file regardless of any results that have been filtered using the search field. The button removes Filter Results Deselect Allall associated computers from the scope.
Note: If you want to add computers to the scope automatically as they become associated with the Automated Device Enrollment instance, select the checkbox in Automatically assign new devicesthe General payload.
Click .Save

259
User-Initiated Enrollment for ComputersYou can allow users to enroll their own computers by having them log in to an enrollment portal where they follow the onscreen instructions to complete the enrollment process.
User-initiated enrollment is one of the methods that results in a User Approved MDM state for eligible computers. This state is required for certain performance and security enhancements, like managing kernel extensions. For more information about User Approved MDM and Jamf Pro, see the
Knowledge Base article.Managing User Approved MDM with Jamf Pro
Users will be prompted to download either an MDM profile or QuickAdd package during user-initiated enrollment based on the version of macOS on their computer. The following are the different types of user-initiated enrollment:
User-initiated enrollment with an MDM profile (macOS 10.13 or later)—The user will be prompted to download and install a CA certificate and MDM profile during the user-initiated enrollment process. Users must manually return to the enrollment portal webpage after CA certificate installation to install the MDM profile and complete the enrollment process. The jamf binary is installed automatically after MDM enrollment is complete.
Note: If user-initiated enrollment settings are configured to skip certificate installation during enrollment, users will only be prompted to download the MDM profile.
User-initiated enrollment with a QuickAdd package (macOS 10.12.6 or earlier)—The user will be prompted to download and install a QuickAdd package during the user-initiated enrollment process.
General Requirements
To allow computers to be enrolled with user-initiated enrollment, you need:
User-initiated enrollment enabled (For more information, see .)User-Initiated Enrollment Settings
The user-initiated enrollment QuickAdd package configured in Jamf Pro (For more information, see .)User-Initiated Enrollment Settings
If the QuickAdd package is signed, target computers must have a CA intermediate certificate from Apple in the System keychain in Keychain Access.
(LDAP log in only) An LDAP server set up in Jamf Pro (For more information, see Integrating with .)LDAP Directory Services
Providing an Enrollment URL to Users
To direct users to the enrollment portal, you need to provide them with the enrollment URL. The enrollment URL is the full URL for the Jamf Pro server followed by “/enroll”. For example:
https://instancename.jamfcloud.com/enroll (hosted in Jamf Cloud)
https://jamf.instancename.com:8443/enroll (hosted on-premise)

260
1.
2.
3.
4.
5.
1.
2.
3.
4.
5.
You can provide the enrollment URL to users in the way that best fits your environment.
Users can log in to the enrollment portal using an LDAP directory account or a Jamf Pro user account. When a user logs in with an LDAP directory account, user and location information is submitted to Jamf Pro during enrollment. When a user logs in with a Jamf Pro user account, it allows an LDAP user to be assigned to the computer.
Sending a Computer Enrollment Invitation
You can send an email invitation that contains the enrollment URL from Jamf Pro to one or more users. Users click the enrollment URL in the email message to access the enrollment portal. Enrollment invitations give you more control over user access to the enrollment portal by allowing you to do the following:
Set an expiration date for the invitationRequire users to log in to the portalAllow multiple uses of the invitationAdd the computer to a site during enrollmentView the status of the invitation
Requirements
To send a computer enrollment invitation, you need an SMTP server set up in Jamf Pro (For more information, see .)Integrating with an SMTP Server
Procedure
Log in to Jamf Pro.
Click at the top of the page.Computers
Click .Enrollment Invitations
Click .New
Follow the onscreen instructions to send the enrollment invitation.
An enrollment invitation is immediately sent to the email addresses you specified.
You can view the status of the enrollment invitation in the list of invitations.
Viewing Computer Enrollment Invitation Usage
Log in to Jamf Pro.
Click at the top of the page.Computers
Click .Enrollment Invitations
Click the enrollment invitation you want to view usage for.

261
5. Click .View Enrolled Computers A list of computers enrolled with the invitation is displayed.
Related Information
For related information, see the following section in this guide:
User-Initiated Enrollment Experience for ComputersLearn about the steps users take to enroll computers.

262
1.
2.
User-Initiated Enrollment Experience for ComputersWhen a user accesses the enrollment URL, they are guided through a series of steps to enroll the computer. The steps vary depending on the version of macOS installed on the computer being enrolled. The text in the images may vary depending on if the text or languages are customized in the User-Initiated Enrollment settings. For more information, see .User-Initiated Enrollment Settings
Enrollment Experience for macOS 10.13 or Later
The user is prompted to enter credentials for an LDAP directory account, single sign-on (SSO) credentials, Cloud Identity Provider, or Jamf Pro user account with user-initiated enrollment privileges, and then they must click .Log inTo allow users to use SSO credentials, you must integrate a third-party Identity Provider (IdP) and select the setting. For more information, see Enable Single Sign-On for User-Initiated Enrollment
.Single Sign-OnThe login prompt is not displayed if the enrollment portal was accessed via an enrollment invitation in which the option is disabled. For more information about enrollment invitations, see Require Login
.User-Initiated Enrollment for Computers

263
2. (Optional) When prompted, the user must choose the site that they are associated with.If the user is associated with multiple sites, they must select the site that will assign the appropriate settings to the computer.If the user signed in with a Jamf Pro user account, they can assign an LDAP user to the computer at this time.

264
2.
3.
4.
(Optional) If the user signed in with an LDAP directory account and the text for an End User License Agreement (EULA) was entered in Jamf Pro, the user must accept the EULA to continue.
(Optional) When prompted, the user must download and install the configuration profile containing the CA certificate.
Note: Users must manually return to the enrollment portal webpage after CA certification installation to install the MDM profile and complete the enrollment process.

265
5.
6.
When prompted, the user must download and install the MDM profile.
Note: For computers with macOS 11 or later, the user is notified in the Notification Center that a profile was downloaded and must navigate to > > select the MDM System Preferences Profilesprofile > to finish the profile installation. Users are then prompted for local administrator Installaccount password. If the user does not click within eight minutes of downloading the MDM Installprofile, they must double-click the downloaded profile to start the installation process again.
When the installation is complete, an enrollment complete message is displayed in the enrollment portal.
The computer is enrolled with Jamf Pro.

266
1.
Enrollment Experience for macOS 10.12.6 or Earlier
The user is prompted to enter credentials for an LDAP directory account, single sign-on (SSO) credentials, Cloud Identity Provider, or Jamf Pro user account with user-initiated enrollment privileges, and then they must click .Log inTo allow users to use SSO credentials, you must integrate a third-party Identity Provider (IdP) and select the setting. For more information, see Enable Single Sign-On for User-Initiated Enrollment
.Single Sign-OnThe login prompt is not displayed if the enrollment portal was accessed via an enrollment invitation in which the option is disabled. For more information about enrollment invitations, see Require Login
.User-Initiated Enrollment for Computers

267
1.
2. (Optional) When prompted, the user must choose the site that they are associated with.If the user is associated with multiple sites, they must select the site that will assign the appropriate settings to the computer.If the user signed in with a Jamf Pro user account, they can assign an LDAP user to the computer at this time.

268
2.
3.
4.
5.
(Optional) If the user signed in with an LDAP directory account and the text for an End User License Agreement (EULA) was entered in Jamf Pro, the user must accept the EULA to continue.
When prompted, the user must download the QuickAdd package.
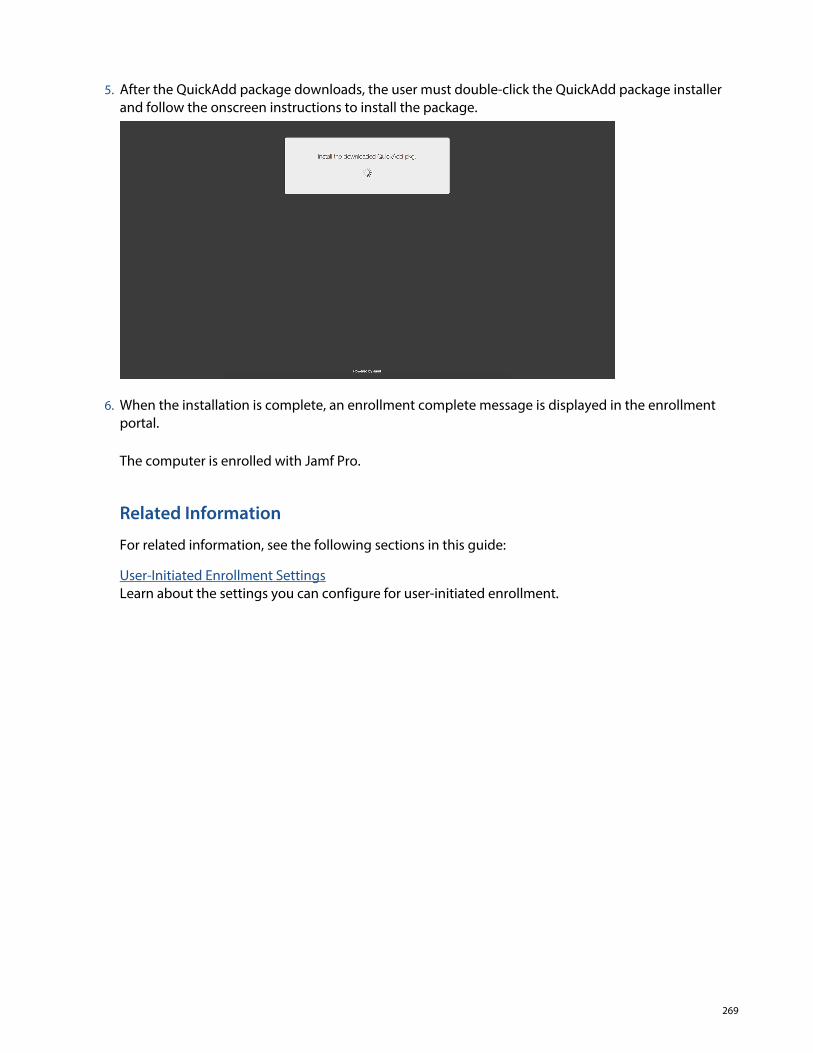
269
5.
6.
After the QuickAdd package downloads, the user must double-click the QuickAdd package installer and follow the onscreen instructions to install the package.
When the installation is complete, an enrollment complete message is displayed in the enrollment portal.
The computer is enrolled with Jamf Pro.
Related Information
For related information, see the following sections in this guide:
User-Initiated Enrollment SettingsLearn about the settings you can configure for user-initiated enrollment.

270
QuickAdd Packages Created Using ReconYou can use Recon to create a QuickAdd package that enrolls macOS 10.15 or earlier computers when it is installed. This type of QuickAdd package can be deployed using almost any deployment tool, such as Apple Remote Desktop or Jamf Pro. You can also give the QuickAdd package to users to install.
When you create a QuickAdd package using Recon, you can do the following:
Specify that the management account password be randomly generated.
Create the management account during enrollment and configure settings for the account.
Ensure that SSH (Remote Login) gets enabled on computers that have it disabled.
Ensure that computers launch Self Service after they are enrolled.
Ensure that computers that already belong to a site will retain existing site membership.
Sign the QuickAdd package.
Choose a site to add computers to during enrollment.
To install a QuickAdd package, you double-click it and then follow the onscreen instructions.
Note: Due to security changes, enrolling computers with macOS 11 or later in Jamf Pro using a QuickAdd package is not supported. Consider the following:
macOS 11 or later does not permit the installation of an MDM profile by a script or remote commands as previously initiated by the Jamf Management Framework or QuickAdd package.
Running a QuickAdd package on computers with macOS 11 or later attempts to install the Jamf management framework. This allows for policy communication but does not enable MDM communication, preventing configuration profiles and remote commands from working.
A CA certificate is no longer downloaded and installed when performing enrollment using a QuickAdd package.
It is recommended to use an MDM-first enrollment workflow. This includes Automated Device Enrollment or user-initiated enrollment. In these workflows, an MDM profile is installed first, and later Jamf Pro automatically installs the Jamf Management Framework using an MDM command.
Signing a QuickAdd Package
Signing a QuickAdd package ensures that it appears as verified to users that install it. It also allows users to install the QuickAdd package on computers that have Apple’s Gatekeeper feature set to only allow applications downloaded from the Mac App Store and identified developers.
Requirements
To sign a QuickAdd package, the computer running Recon must have:
macOS 10.7 or later

271
1.
2.
3.
4.
5.
6.
7.
An installer certificate (.p12) from Apple in the System keychain in Keychain Access (For more information, see the Knowledge Base article.)Obtaining an Installer Certificate from Apple
To install a signed QuickAdd package, computers must have a Certification Authority intermediate certificate from Apple in the System keychain in Keychain Access.
Creating a QuickAdd Package Using Recon
Open Recon and authenticate to the Jamf Pro server.
Select in the sidebar.QuickAdd Package
Enter credentials for a local administrator account.This account is used as the management account.To randomly generate a management account password, choose "Randomly generate password" from the Method for Setting Password pop-up menu.The randomly generated password will contain eight characters by default.
Note: If you choose to randomly generate passwords and create the management account during enrollment, the and Hide management account Allow SSH for management account onlycheckboxes are not available by default. To make these options available, you need to first select the checkbox, and then select the Create management account if it does not exist Randomly
method for setting the management account password.generate password
If the management account you specified is a new account, select the Create management account if checkbox and configure additional settings for the management account as needed.it does not exist
To enable SSH on computers that have it disabled, select the checkbox.Ensure SSH is enabled
To launch Self Service on computers immediately after they are enrolled, select the Launch Self checkbox.Service when done

272
7.
8.
9.
10.
To sign the QuickAdd package, select the checkbox and choose an installer certificate from Sign withthe pop-up menu.Installer certificates that are located in the login keychain in Keychain Access are displayed in the pop-up menu.
Note: The pop-up menu also displays application certificates that are located in the login keychain in Keychain Access. It is important that you choose an installer certificate, not an application certificate, to sign QuickAdd packages.
To add the computers to a site, choose a site from the pop-up menu.Site
To ensure that computers that already belong to a site will retain their existing site membership, select the checkbox.Use existing site membership, if applicable
Click and save the package.Create
After creating the QuickAdd package, you can deploy it using a deployment tool or give the package to users to install. When the QuickAdd package is installed on computers, they are enrolled with Jamf Pro.
Related Information
For related information, see the following section in this guide:
Package DeploymentFind out how to install a QuickAdd package using a policy.
273
1.
2.
3.
Network ScannerThe network scanner in Recon allows you to remotely enroll multiple Mac computers. It scans specified IP ranges and enrolls any computers that it can connect to over SSH (Remote Login).
There are two ways to specify the IP ranges you want to scan: choose network segments that are set up in Jamf Pro, or manually specify IP ranges. If you manually specify the IP ranges, you can choose a building, department, and site to add computers to during enrollment.
Note: Because of increased user data protections with macOS 10.14 or later, you cannot enable remote management remotely using the SSH protocol. To enable remote management on computers with macOS 10.14, the user must select the checkbox in System Screen SharingPreferences.
Enrolling Computers Using the Network Scanner
Requirements
To enroll computers using the network scanner, SSH must be enabled on the computers.
Procedure
Open Recon and authenticate to the Jamf Pro server.
Select in the sidebar.Network Scanner
Specify the IP ranges you want to scan:

274
3.
To choose network segments that are set up in Jamf Pro, click below the list of Network SegmentsIP ranges and select the network segment you want to scan. Repeat as needed.

275
3.
To specify IP ranges manually, click below the list of IP ranges and specify information Add (+)about the IP range you want to scan. Click and repeat as needed.OK

276
3.
4.
a.
b.
c.
d.
5.
6.
7.
8.
Specify one or more local administrator accounts that have SSH access to computers in the IP range.When the network scanner finds a computer on the network, it tries each account until it finds one that can be used to connect to the computer over SSH. The first valid account is used as the management account.
Click below the list of accounts.Add (+)
Enter credentials for a local administrator account that has SSH access to computers.
Click .OK
If there is more than one administrator account in the specified IP ranges, repeat steps a through c as needed.
To ignore computers that are already enrolled with Jamf Pro, select the Ignore IP addresses of checkbox.computers already in Jamf Pro
To continuously scan for new computers, use the pop-up menu to specify how Rescan IP Ranges often Recon should rescan.
To create a .recon file that contains the network scanner settings you just configured, click . Save AsThen specify a name and location for the file.Double-clicking the file opens Recon (if it is not already open) and populates the network scanner settings.You can open the file at any time to have Recon automatically configure the network scanner settings.

277
8. Click Scan.Recon scans the specified IP ranges and enrolls any computers that it can connect to over SSH. The progress of the scan is displayed on the Current Activity pane. The results of the scan are displayed on the Enrolled, Not Found, and Problems panes.

278
8.
1.
2.
3.
Remote Enrollment Using ReconIf you know the IP address of the Mac computer you want to enroll and SSH (Remote Login) is enabled on the computer, you can enroll the computer by running Recon remotely. This allows you to submit detailed inventory information for the computer. It also allows you to add computers to a site during enrollment.
Enrolling a Computer by Running Recon Remotely
Requirements
To enroll a computer by running Recon remotely, you need:
The IP address of the computer
SSH (Remote Login) enabled on the computer
Procedure
Open Recon and authenticate to the Jamf Pro server.
Select in the sidebar.Remote Enrollment
Enter the IP address of the computer you want to enroll.

279
4.
5.
Enter credentials for a local administrator account that has SSH access.This account is used as the management account.
(Optional) Select User and Location and specify user and location information for the computer.If an LDAP server is set up in Jamf Pro, click to populate information from the LDAP server. Search This assigns the user to the computer during enrollment.If you specified a username that matches an existing username in Jamf Pro, the user is assigned to the computer during enrollment. If you specified a username that does not match an existing username in Jamf Pro, the user is created and assigned to the computer during enrollment.

280
6.
7.
8.
(Optional) Select and specify purchasing information for the computer.PurchasingIf a GSX connection is set up in Jamf Pro, click to populate information from Apple’s Global Search Service Exchange (GSX). For more information on setting up a GSX connection, see .GSX Connection
(Optional) Select and specify information as needed.Extension Attributes
Click .Enroll
Related Information
For related information, see the following section in this guide:
Integrating with LDAP Directory ServicesFind out how to add an LDAP server and test LDAP attribute mappings.

281
1.
2.
3.
Local Enrollment Using ReconIf you have physical access to the Mac computer that you want to enroll, you can run Recon locally on the computer. This allows you to submit detailed inventory information for the computer. It also allows you to add computers to a site during enrollment.
Enrolling a Computer by Running Recon Locally
On the computer you want to enroll, open Recon and authenticate to the Jamf Pro server.
(Optional) Enter an asset tag or use a bar code scanner to enter bar codes.The computer name is populated by default.
Enter credentials for a local administrator account that you want to use to manage computers.This can be an existing or new account. If the account does not already exist, Recon creates it.
Note: If the account you specify does not have SSH (Remote Login) access to the computer, Recon enables SSH during enrollment.

282
3.
4.
5.
(Optional) Select and specify user and location information for the computer.User and LocationIf an LDAP server is set up in Jamf Pro, click to populate information from the LDAP server. Search This assigns the user to the computer during enrollment.If you specified a username that matches an existing username in Jamf Pro, the user is assigned to the computer during enrollment. If you specified a username that does not match an existing username in Jamf Pro, the user is created and assigned to the computer during enrollment.
(Optional) Select and specify purchasing information for the computer.PurchasingIf a GSX connection is set up in Jamf Pro, click to populate information from Apple’s Global Search Service Exchange (GSX). For more information on setting up a GSX connection, see .GSX Connection

283
5.
6.
7.
(Optional) Select and specify information as needed.Extension Attributes
Click .Enroll
Related Information
For related information, see the following section in this guide:
Integrating with LDAP Directory ServicesFind out how to add an LDAP server and test LDAP attribute mappings.

284
MDM-Enabled Local User AccountsUser accounts on computers can be MDM-enabled (formerly MDM-capable) to allow an MDM solution to manage certain user-specific management settings. You need MDM-enabled users to do the following:
Deploy user-level configuration profiles.
Receive the EDU profile via the user channel for managed classes.For more information, see .Classes
In most Jamf Pro enrollment scenarios, the primary user account is enabled for MDM when an MDM profile is installed and the computer is enrolled. User accounts on a computer are considered MDM-enabled in Jamf Pro if they are listed in the MDM Capable Users criteria in the computer inventory record.
When the primary user on the computer is not MDM-enabled, administrators can modify which user is MDM-enabled after computer enrollment using the jamf agent. The jamf agent can interact with the binary to re-enroll the MDM profile to enable the primary user. This modification profilesmethod is not possible in the following scenarios:
The MDM profile was set to be non-removable by deselecting the Allow MDM Profile Removalcheckbox in the computer PreStage Enrollment settings.
The computer has macOS 11 or later. Computers with macOS 11 or later cannot silently install or reinstall MDM profiles using the binary.profiles
To enable a different user account for MDM on computers enrolled using these methods, a full unenroll and re-enroll with Jamf Pro is required.
Enrollment Methods that Enable MDM for Users
The following table explains several methods that enable a user for MDM in Jamf Pro:
MethodOS Requirement Description
Computer PreStage enrollment
N/A When enrolling a computer via a PreStage enrollment using Automated Device Enrollment (formerly DEP), users created during the Setup Assistant will be MDM-enabled.The local user account will not be MDM-enabled if at least one of the following is true:
The checkbox is selected in Skip Account Creationthe PreStage enrollment and the local user account was created via a policy or Jamf Connect Login.(Jamf Pro 10.24.0 or later, macOS 11 or later) The Make the local administrator account MDM-enabledcheckbox is selected in the Account Settings payload of the PreStage enrollment.

285
MethodOS Requirement Description
User-initiated enrollment N/A By default, the logged-in user on the computer will be MDM-enabled after enrollment.
Agent-based enrollment with a QuickAdd.pkg or the Jamf management framework
macOS 10.15.7 or earlier
The logged-in user will be MDM-enabled.
User-level configuration profile installation through Self Service for macOS
macOS 10.15.7 or earlier
Self Service will attempt to enable the logged-in user for MDM if the user is not already MDM-enabled and the computer has a removable MDM profile.
Notes:
Network and mobile user accounts are MDM-enabled by default in Jamf Pro, no matter the enrollment method that was used.
For computers with macOS 10.12 or later, only one local user account can be MDM-enabled on a computer at a time. If a second local user account becomes MDM-enabled on the computer, the first local user account will no longer be MDM-enabled.
MDM-Enabled User Modification
If you want to enable a different local user account for MDM, you can execute the following command to enable MDM for the currently logged-in user on computers with macOS 10.15.7 or earlier and a removable MDM profile:
sudo jamf mdm -userLevelMdm
Note: For computers with macOS 10.13.2–10.15.7, this command will set the User Approved MDM status to “No” in the Jamf Pro inventory record. To re-enable User Approved MDM status, see the
Knowledge Base article. If you use this command as Managing User Approved MDM with Jamf Proa part of existing workflows, you should evaluate the impact of these changes.
To change the MDM-enabled user on a computer with macOS 11 or later, you must completely unenroll and then re-enroll the computer in Jamf Pro by doing one of the following:
Computers with a removable MDM profile—Execute the sudo jamf removeframeworkcommand. After the computer is unenrolled, you can re-enroll it using a PreStage enrollment or user-initiated enrollment.
Computers with an unremovable MDM profile—Execute the sudo jamf removeframeworkcommand and then send the Remove MDM Profile remote command using Jamf Pro. After the computer is unenrolled, you can re-enroll it using a PreStage enrollment or user-initiated enrollment.

286
Related Information
For related information, see the following section in this guide:
Computer Configuration ProfilesFind out how to distribute computer configuration profiles to MDM-enabled users.
Computer PreStage EnrollmentsFind out how to re-enroll computers using a PreStage enrollment to enable the user for MDM in Jamf Pro.
User-Initiated Enrollment for ComputersFind out how to re-enroll computers using user-initiated enrollment to enable the user for MDM in Jamf Pro.

287
1.
2.
3.
4.
5.
6.
7.
Inventory for Computers
Computer Inventory InformationJamf Pro stores detailed inventory information for each computer. You can view and edit this information in Jamf Pro. By default, basic inventory information—such as hardware, operating system, storage, and applications—is collected based on the preconfigured “Update Inventory” policy that is created automatically when you install Jamf Pro. This information is submitted after computers enroll with Jamf Pro and is updated each time the computer checks in and runs the "Update Inventory" policy. Other inventory information is updated by MDM commands.
Viewing and Editing Inventory Information
Log in to Jamf Pro.
Click at the top of the page.Computers
Perform a simple or advanced computer search.For more information, see or .Simple Computer Searches Advanced Computer Searches
Note: You can quickly search for all computer records in Jamf Pro without entering a query by clicking .Search
computer you want to view information for.Click the
If you performed a simple search for an item other than computers, you must click next to Expand an item to view the computers related to that item. The computer's inventory information is displayed.
To make changes to an editable inventory field, select the category that contains the information you want to edit, click , and make changes as needed.EditIf you are editing user and location information, the changes are applied in the tab. This Usersspecified information is also applied in the inventory information for mobile devices and other computers that the user is assigned to. For information on assigning a user to a computer or removing a user assignment, see .User Assignments
(Optional) To populate computer purchasing information from Apple’s Global Service Exchange (GSX), click to look up and populate information from GSX.Search
Note: The Search button is only displayed if you have a GSX connection set up in Jamf Pro.
Click .Save

288
Related Information
For related information, see the following sections in this guide:
Recurring Check-in FrequencyFind out how to configure the frequency at which computers check in to Jamf Pro and submit inventory information.
Computer Inventory Collection Settings.Find out how to configure Jamf Pro to collect additional inventory information.
Re-enrollment SettingsFind out how to clear or change the information that Jamf Pro retains for computers that are re-enrolled.
Computer PreStage EnrollmentsFind out how to specify the information that is submitted by computers enrolled via a PreStage enrollment.
Renaming a ComputerFind out how to rename a computer in Jamf Pro.
Deleting a Computer from Jamf ProFind out how to delete a computer from Jamf Pro.

289
Computer Inventory Information ReferenceThis section lists the inventory attributes you can view for a computer. Inventory attributes with a minimum macOS version requirement are noted in the Jamf Pro interface. Some attributes are editable.
The following categories of inventory information are only displayed if the Computer Inventory Collection settings are configured to collect them:
Local User AccountsFor more information, see "Local User Accounts Category" below.
Printers
Active services
Last backup date/time for managed mobile devices that are synced to computers
User and location from an LDAP directory service (only available if an LDAP server is set up in Jamf Pro)
Package receipts
Available software updates
Application usage information
Fonts
Plug-ins
iBeacon regions
General Category
The following table lists the General category inventory attributes that you can view for a computer:
Inventory Attribute Notes
Computer Name
Site
Last Inventory Update
Last Check-in
IP Address To learn how these inventory attributes are collected and how you can manually retrieve the reported IP address, see the Collecting the IP Address and Reported
Knowledge Base article.IP Address in Jamf ProReported IP Address
jamf binary Version
Platform

290
Inventory Attribute Notes
Managed
Supervised
Enrollment Method
Last Enrollment
MDM Capability
Enrolled via Automated Device Enrollment
Displays whether a computer was enrolled via Automated Device Enrollment.
User Approved MDM
Displays the status of User Approved MDM enrollment. For information about User Approved MDM and Jamf Pro, see the Managing User Approved MDM with
Knowledge Base article.Jamf Pro
Jamf Pro Computer ID
Asset Tag
Bar Code 1
Bar Code 2
Bluetooth Low Energy Capability
Supports iOS and iPadOS App Installations
Logged in to the App Store
This value reports as “Active” when a user-level configuration profile is installed from Self Service using MDM-enabled credentials.
Management Account Username
Management Account Password
Hardware Category
The Hardware category allows you to view the following information for a computer:
Make

291
Model
Model Identifier
UDID
Serial Number
Processor Speed
Number of Processors
Number of Cores
Processor Type
Architecture Type
Bus Speed
Cache Size
Primary MAC Address
Primary Network Adapter Type
Secondary MAC Address
Secondary Network Adapter Type
Total RAM
Note: Capacity is reported using the decimal system (base 10), which calculates 1GB as 1 billion bytes.
Available RAM Slots
Battery Capacity
SMC Version
NIC Speed
Optical Drive
Boot ROM
Operating System Category
The Operating System category allows you to view the following information for a computer:
Operating System
Operating System Version
Operating System Build
Active Directory Status
Master Password Set
FileVault Users
Service Pack

292
User and Location Category
All User and Location category inventory attributes are editable and can be populated automatically by assigning a user to a computer. For more information, see . The User and User AssignmentsLocation category allows you to view the following information for a computer:
Username
Full Name
Email Address
Position
Department
Building
Room
Notes:
To collect User and Location information for computers, the Collect User and Location setting must be enabled in the Computer Inventory Collection settings. Information from LDAP
For more information, see .Computer Inventory Collection Settings
If the computer is re-enrolled via a PreStage enrollment, there are settings that can affect the user and location information for that computer. For more information, see Computer PreStage
and .Enrollments Re-enrollment Settings
Security Category
The Security category allows you to view the following information for a computer:
System Integrity Protection
Gatekeeper
XProtect Definitions Version
Disable Automatic Login
Remote Desktop Enabled
Secure Boot Level
Note: This attribute displays whether the computer allows or disallows booting from external media. It is only collected on compatible computers with macOS 10.15 or later. For information on compatibility, see from Apple's support website.About Secure Boot
Bootstrap Token Allowed (macOS 11 or later)
For more information about the reporting capabilities for some attributes in the Security category, see the Knowledge Base article.Jamf Pro Reporting Capabilities for Apple's macOS Security Features

293
Purchasing Category
You can look up and populate purchasing information from Apple’s Global Service Exchange (GSX) if you have a GSX connection set up in Jamf Pro. For more information, see . The GSX ConnectionPurchasing category allows you to view the following information for a computer:
Purchased or Leased
PO Number
PO Date
Vendor
Warranty Expiration
AppleCare ID
Lease Expiration
Purchase Price
Life Expectancy
Purchasing Account
Purchasing Contact
Extension Attributes Category
This category displays a list of custom data fields collected using extension attributes.
Note: Extension attributes are displayed in computer inventory information in the category in which they are configured to display.
Storage Category
The Storage category allows you to view the following information for a computer:
Model
Revision
Serial Number
Drive Capacity
S.M.A.R.T. Status
Number of Partitions
Note: The value for the FileVault 2 State of a partition will be reported as “Unknown” if inventory was not updated since the last Jamf Pro upgrade or if Jamf Pro is unable to detect encryption status due to an error.

294
Disk Encryption Category
This category displays disk encryption information for partitions on a computer. These are the inventory attributes that you can view for each partition of a computer:
Inventory Attribute Notes
Name
Last Inventory Update
FileVault 2 Partition Encryption State
This value will be reported as “Unknown” if inventory has not been updated since the last Jamf Pro upgrade or if Jamf Pro is unable to detect encryption status due to an error.
Personal Recovery Key Validation
Displays whether the personal (also known as "individual") recovery key on a computer matches the personal recovery key escrowed for that computer in Jamf Pro. This value will be reported as “Unknown” when any of the following conditions are met:
macOS version is 10.8 or earlierThere is no recovery key in Jamf Pro to validate againstInventory has not been updated since the last Jamf Pro upgrade
Personal Recovery Key
To view the recovery key, click .Show Key
Device Recovery Key
To view the recovery key, click .Show Key
Disk Encryption Configuration
Displays the name of the disk encryption configuration if the computer is encrypted via policy. If the computer is encrypted via configuration profile or locally on the computer, this field is left blank.
FileVault 2 Enabled Users

295
Local User Accounts Category
This category displays a list of local user accounts and information about them. You can access commands to remotely unlock a local user account, or remotely remove a local or mobile user account by clicking for a user. For more information, see .Manage Remote Commands for Computers
This information is only displayed if the Computer Inventory Collection settings are configured to collect it. For more information, see . The following table lists Computer Inventory Collection Settingsthe Local User Accounts category inventory attributes that you can view for a computer:
Inventory Attribute Notes
UID
Username
Password Type
Only displayed if Jamf Pro can identify the user account type (e.g., “Local", “LDAP", or "Mobile LDAP")Requires macOS 10.10 or laterMinimum
Passcode LengthMaximum Passcode Age
Minimum Number of Complex Characters
Password History
Full Name
Admin
Home Directory
Legacy FileVault Enabled
FileVault 2 Enabled
User Azure Active Directory ID
Unique identifier within Microsoft Azure for users that registered their computers with Azure AD. If the user registers many local accounts or multiple computers, their User Azure Active Directory ID is always the same.
Computer Azure Active Directory ID

296
Inventory Attribute Notes
Unique identifier within Microsoft Azure for the computer local account. The Computer Azure Active Directory ID is unique across each computer and each local user account. Every time a user registers a computer with Azure AD that local account will be given a unique identifier.
Conditional Access Inventory State (previously named "Azure Active Directory ID")
Displays one of the following values when the macOS Intune Integration is enabled:
"Activated"—Computer is registered with Azure AD and regularly checks in with Jamf Pro."Unresponsive"—Computer has not checked in with Jamf Pro in the last 24 hours using the standard Jamf Pro check-in process, or the computer has not checked in with Microsoft Intune in the last 24 hours. Unresponsive devices are marked "non-compliant" after the validity period passes. (The validity period is specified in the "Compliance status validity period (days)" setting in Microsoft Intune. Default is 30 days.)"Deactivated"—Computer is no longer registered with Azure AD
Attachments Category
You can upload and delete attachments to the inventory record using this category. To upload an attachment, click . To delete an attachment, click .Upload Delete
Content Caching Category
The Content Caching category is only collected for computers with macOS 10.15.4 or later. For more information on content caching reporting capabilities, see .Apple's documentation
The Content Caching category allows you to view the following information for a computer:
Activated
Active
Actual Cache Used
Alerts
Cache Details
Cache Free
Cache Limit
Cache Status
Cache Used
Data Migration Completed
Data Migration Error
Data Migration Progress
Max Cache Pressure in Last Hour

297
Parents
Personal Cache Free
Personal Cache Limit
Personal Cache Used
Port
Public Address
Registration Error
Registration Response Code
Registration Started
Registration Status
Restricted Media
Server GUID
Startup Status
Tetherator Status
Total Bytes are Since
Total Bytes Dropped
Total Bytes Imported
Total Bytes Returned to Children
Total Bytes Returned to Clients
Total Bytes Returned to Peers
Total Bytes Returned from Origin
Total Bytes Returned from Parents
Total Bytes Returned from Peers
Related Information
For related information, see the following section in this guide:
Computer Inventory CollectionFind out what information Jamf Pro collects via MDM Commands.

298
Computer Inventory CollectionBy default, inventory is collected from computers using the “Update Inventory” policy that is created automatically when you install Jamf Pro. This policy collects inventory from all computers once every week.
You can make changes to the default inventory collection policy at any time. In addition, if you want more control over inventory collection, you can create additional inventory collection policies as needed.
Computer Inventory Information Collected by MDM Commands
While the majority of computer inventory information is collected by the Jamf management framework, MDM commands are also used to collect additional inventory information and populate other inventory fields. MDM commands are typically issued immediately after Jamf management framework inventory commands are executed. This information can help when troubleshooting issues with certain fields failing to update or populate. You can view the sent MDM commands by navigating to the Management History category in the History tab of the computer inventory information.
Note: Jamf Pro also sends additional MDM commands that do not impact inventory information that may display in the Management History category.
The following table lists the inventory information which Jamf Pro collects by MDM commands:
Inventory Fields Collected
macOS Versions Affected MDM Command Used
Bootstrap Token Allowed macOS 11 or later
BootstrapTokenAllowed
Activation Lock
Note: Collected for compatible computers with macOS 10.15 or later only. For more information on macOS compatibility, see About Activation Lock on your Macfrom Apple's support website.
10.15 or later
DeviceInformation
Enrolled via Automated Device Enrollment 10.13.4 or later
SecurityInfo
External Boot Level 10.15 or later
SecurityInfo
Secure Boot Level 10.15 or later
SecurityInfo

299
Inventory Fields Collected
macOS Versions Affected MDM Command Used
Supervised 10.15 or later
DeviceInformation
Remote Desktop Enabled 10.14.4 or later
SecurityInfo
User Approved MDM 10.13.4 or later
SecurityInfo
Logged in to the App Store N/A iTunes Account Status
In addition to the MDM commands used to collect inventory field information, the following MDM commands are used to populate inventory information categories:
ProfileList command—Populates the Profiles category
UserList command—(Computers with macOS 10.13 or later enrolled via Automated Device Enrollment) Populates the Local User Accounts category
Note: The Local User Accounts category information is populated by the jamf binary if computers do not meet these requirements.
CertificateList command—Populates the Certificates category
ContentCachingInformation command—Populates the Content Caching category
Related Information
For related information, see the following sections in this guide:
Policy ManagementFind out how to create and edit policies.
Policy Payload ReferenceLearn about each payload in the policy interface.
For related information, see the following Knowledge Base article:
Collecting the IP Address and Reported IP Address in Jamf ProLearn how the IP address and reported IP address computer inventory items are collected and how you can manually retrieve the reported IP address.

300
Computer Inventory Collection SettingsComputers can submit many types of inventory information to Jamf Pro. Basic inventory information—such as hardware, operating system, user and location information, storage, and applications—is collected automatically.
The Computer Inventory Collection settings in Jamf Pro allow you to collect the following additional items:
Local user accounts, with the option to include home directory sizes and hidden system accounts
Printers
Active services
Last backup date/time for managed mobile devices that are synced to computers
User and location from an LDAP directory service (only available if an LDAP server is set up in Jamf Pro)
Package receipts
Available software updates
Application usage information
Fonts
Plug-ins
iBeacon regions
For descriptions of the information collected for each of these items, as well as information on the items that are collected automatically, see .Computer Inventory Information Reference
You can also use the Computer Inventory Collection settings to do the following:
Specify custom search paths to use when collecting applications, fonts, and plug-ins.
Monitor iBeacon regions so that computers submit information to Jamf Pro when they enter or exit a region.
Note: By default, Jamf Pro uses Unix user paths to save space in the application details database table. To manage this feature, navigate to > > Settings Computer Management Inventory
> .Collection Software
Time and Traffic Estimates for Collecting Additional Items
Collecting additional inventory items may add reporting time and network traffic to the inventory process.
The following table provides estimates of how much time and traffic may be added when collecting user home directory sizes, available software updates, fonts, and plug-ins. These estimates are based on a MacBook Pro with approximately 300 GB of user home directories, 100 applications, 300 fonts, and 900 plug-ins.

301
Additional Inventory Item Time (Seconds) Traffic (KB)
(No additional items) 9 102
Home directory sizes 25 104
Available software updates 110 104
Fonts 10 128
Plug-ins 13 248
The following table provides estimates of how much time and traffic may be added when collecting Application Usage information. These estimates are based on a MacBook Pro with eight applications used per day, one week between inventory reports, and one computer user.
Additional Inventory Item Time (Seconds) Traffic (KB)
(No additional items) 16 24
Application Usage information 17 48
Search Paths for Collecting Applications, Fonts, and Plug-ins
The following table lists the default search paths that are used when collecting applications, fonts, and plug-ins from computers.
Collected Item Default Search Paths
Applications(and Application Usageinformation, if collecting)
/Applications/
Fonts /Library/Fonts//System/Library/Fonts//Library/Application Support/Adobe/Fonts/~/Library/Fonts/
(collected at the user level for each account)
Plug-ins /Library/Internet Plug-Ins/
If you store these items in locations not listed in the table, you can use the Computer Inventory Collection settings to specify custom search paths for those locations.

302
1.
2.
3.
4.
5.
6.
7.
a.
b.
c.
d.
8.
a.
b.
c.
d.
9.
a.
b.
c.
d.
10.
Configuring the Computer Inventory Collection Settings
Log in to Jamf Pro.
In the top-right corner of the page, click .Settings
Click .Computer Management
In the ”Computer Management–Management Framework” section, click . Inventory Collection
Click .Edit
On the General pane, select the checkbox for each inventory item you want to collect.
To collect Application Usage information or add custom paths in which to search for applications, do the following:
Click the tab, and then click .Software Applications
To collect Application Usage information, select the Collect Application Usage Information checkbox.
To add a custom search path, click . Then enter the full path for the location you want to Addsearch and the platform to which it applies.
Repeat step c to specify additional custom search paths as needed.
To collect fonts and add custom paths in which to search for fonts, do the following:
Click the tab, and then click .Software Fonts
Select the checkbox.Collect Fonts
To add a custom search path, click . Then enter the full path for the location you want to Addsearch and the platform to which it applies.
Repeat step c to specify additional custom search paths as needed.
To collect plug-ins and add custom paths in which to search for plug-ins, do the following:
Click the tab, and then click .Software Plug-ins
Select the checkbox.Collect Plug-ins
To add a custom search path, click . Then enter the full path for the location you want to Addsearch and the platform to which it applies.
Repeat step c to specify additional custom search paths as needed.
Click .Save

303
Related Information
For related information, see the following sections in this guide:
Viewing the Application Usage Logs for a ComputerFind out how to view Application Usage logs for a computer.
iBeacon RegionsLearn what iBeacon regions can be used for and how you can add them to Jamf Pro.

304
Computer Extension AttributesExtension attributes allow you to collect extra inventory information. Extension attribute values are populated using an input type, which can be any of the following:
Text field
Pop-up menu
Script
LDAP attribute mapping
In Jamf Pro, you can create extension attributes manually, from an available template in Jamf Pro, or by uploading an extension attribute from Jamf Nation. You can also create extension attributes programmatically via the Jamf Pro API.
Examples:
A text field input can collect the retire date of a computer.
A script input can collect data about your company's antivirus software on a computer.
Extension attributes can be used as criteria in a smart group or as a variable in a configuration profile, which allows you to administer dynamic management workflows and tasks based on the data collected with extension attributes.
Note: Depending on the input type and data type (string, integer, date), extension attributes may add time and network traffic to the inventory collection process.
Extension Attribute Input Types
Extension attributes collect inventory data by using an input type. You can configure the following input types:
Text Fields
You can display a text field in inventory information or Recon to collect inventory data. You can enter a value in the field during enrollment with Recon or anytime using Jamf Pro.
Note: Text fields can only be configured by a manually created extension attribute or programmatically via the Jamf Pro API.

305
Pop-up Menus
You can display a pop-up menu in inventory information or Recon to collect inventory data. You can choose a value from the pop-up menu when enrolling a computer using Recon or any time using Jamf Pro.
Note: Pop-up menus can only be configured by a manually created extension attribute or programmatically via the Jam Pro API.
Scripts
You can run a script that returns a data value each time a computer submits inventory to Jamf Pro. You can write your own extension attribute script or create one from a template in Jamf Pro.
Keep the following in mind when writing extension attribute scripts:
Scripts can be written in any language that has an interpreter installed. The most common interpreters are Bash, Perl, and Python.
When an extension attribute is populated by a script, the text between the <result></result>tag is stored in Jamf Pro.
You can temporarily disable extension attributes to troubleshoot processes.
The following example script collects the hostname from Mac computers:
#!/bin/bash
echo "<result>`hostname 2>&1`</result>"
LDAP Attribute Mapping
You can use an LDAP attribute mapping to populate an extension attribute. Extension attributes can be populated by multiple-value attributes from an LDAP server, such as "memberOf". The multiple values can later be used when creating smart groups and advanced searches with the extension attribute criteria and the “has" or "does not have” operators.
Keep the following limitations in mind when using LDAP multiple-value extension attributes:
When creating smart groups and advanced searches, the criteria value must accurately reflect the value returned in the computer inventory. To ensure you use the correct value, copy the extension attribute inventory value, and paste it in the criteria value field.
Multiple-value attribute mapping will not work with nested groups. Only the groups directly listed on the User record will be displayed in the mapped LDAP extension attribute.
For the extension attributes to work correctly, values returned from the LDAP server cannot contain the sequence of repeating vertical-bar characters (ASCII code 124, HTML entity = |).

306
1.
2.
3.
4.
5.
Extension Attribute IDs and Variables
Creating a computer extension attribute generates a variable that can be used to populate configuration profile settings. The variable is $EXTENSIONATTRIBUTE_#, where # is the extension attribute ID.
For information about using payload variables for configuration profiles, see Computer Configuration .Profiles
For extension attributes that use a text field, pop-up menu, or script input type, the ID number is found in the extension attribute URL. In the example URL below, "id=2" indicates the extension attribute ID number:
Example: https://instancename.jamfcloud.com/computerExtensionAttributes.html?id=2&o=r
For extension attributes with the LDAP attribute mapping input type, the ID number is displayed in the LDAP Attribute Variable field after you save the extension attribute.
Manually Creating a Computer Extension Attribute
Requirements
If you are creating a computer extension attribute with the “LDAP Attribute Mapping” input type, you need the following:
An LDAP server configured in Jamf Pro (For more information, see Integrating with LDAP Directory .)Services
The Computer Inventory Collection settings configured to collect user and location information from LDAP (For more information, see .)Computer Inventory Collection Settings
Procedure
Log in to Jamf Pro.
In the top-right corner of the page, click .Settings
Click .Computer Management
In the ”Computer Management–Management Framework” section, click .Extension Attributes
Click .New

307
6.
a.
b.
c.
d.
e.
7.
1.
2.
3.
4.
5.
6.
7.
8.
1.
2.
3.
4.
Configure the following settings:
Name your extension attribute.
(Optional) Enter a description.
Choose the type of data being collected from the pop-up menu.Data Type
Choose a category in which to display the extension attribute in Jamf Pro from the Inventory pop-up menu.Display
Choose an input type to populate your extension attribute from the pop-up menu.Input Type
Click .Save
Creating a Computer Extension Attribute from a Template
Jamf Pro has built-in templates for many commonly used extension attributes.
Log in to Jamf Pro.
In the top-right corner of the page, click .Settings
Click .Computer Management
In the ”Computer Management–Management Framework” section, click .Extension Attributes
Click .New From Template
Click the extension attribute template you want to use.
(Optional) Make changes to the settings as needed.
Click .Save
Uploading a Template for a Computer Extension Attribute
You can create an extension attribute by uploading an extension attribute template obtained from Jamf Nation. Extension attribute templates are available in Jamf Nation at:https://www.jamf.com/jamf-nation/third-party-products/files/extension-attributes
Log in to Jamf Pro.
In the top-right corner of the page, click .Settings
Click .Computer Management
In the ”Computer Management–Management Framework” section, click .Extension Attributes

308
5.
6.
7.
1.
2.
3.
4.
5.
6.
7.
8.
9.
Click and upload the extension attribute template.Upload
(Optional) Make changes to the settings as needed.
Click .Save
Disabling a Computer Extension Attribute
To troubleshoot workflows, you can temporarily disable extension attributes with the script input type. You can also choose whether to retain or delete data collected by that extension attribute.
Log in to Jamf Pro.
In the top-right corner of the page, click .Settings
Click .Computer Management
In the "Computer Management–Management Framework" section, click .Extension Attributes
Select the extension attribute you want to disable.
Note: Only extension attributes with the script input type can be disabled.
Click .Edit
Deselect the checkbox.Enabled (script input type only)
Click .Save
Use the pop-up dialog to choose one of the following:
To retain data collected by the extension attribute, select , and then click .Retain Existing Data Save
Note: All settings and computers using data collected by disabled extension attributes will display or use the last value collected by the extension attribute before it is disabled.
To delete data collected by the extension attribute, select , and then click .Delete Existing Data Save
Note: If smart computer groups or other settings are using the extension attribute data, deleting existing data may prevent those items from functioning correctly.
Related Information
For related information, see the following section in this guide:
Smart GroupsFind out how to create smart computer groups based on extension attributes
For related information on creating extension attributes programmatically via the Jamf Pro API, see in the Jamf developer resources.The Jamf APIs

309
1.
2.
3.
4.
5.
6.
Computer Inventory Display SettingsThe Computer Inventory Display settings allow each Jamf Pro user to choose which attribute fields to display in the results of a simple computer search.
Configuring the Computer Inventory Display Settings
Log in to Jamf Pro.
In the top-right corner of the page, click .Settings
Click .Computer Management
In the “Computer Management–Management Framework” section, click .Inventory Display
On each pane, select or deselect the checkbox for each attribute field you want to display or remove.
Click .Save

310
Simple Computer SearchesA simple computer search functions like a search engine, allowing you to quickly search the items in your inventory for a general range of results.
The following table shows the items that you can search by and the attributes on which you can base each search:
Inventory Item Searchable Attributes
Computers(This includes both managedand unmanaged computers.)
Computer nameMAC addressBar codeIP addressAsset tagSerial numberUsernameFull nameEmail addressPhone numberPositionDepartmentBuildingRoom
Applications Application name
Local User Accounts Username
Application Usage Application name
Fonts Font name
Package Receipts Package receipt name
Plug-ins Plug-in name
Printers Printer name
Services Service name
Software Updates Software update nameSoftware update version
Note: Computers and applications are searchable by default. The other items are searchable if Jamf Pro is configured to collect them as inventory.

311
1.
2.
3.
4.
5.
6.
Search Syntax
This section explains the syntax to use for search functions. In general, searches are not case-sensitive.
Note: The default search preference is “Exact Match”. For most items, the option can be changed to either “Starts with” or “Contains”. For more information about configuring account preferences, see
.Jamf Pro User Accounts and Groups
The following table explains the syntax you can use for search functions:
Search Function Usage Example
Return all Results
Use an asterisk (*) without any other characters or terms, or perform a blank search.
Perform a search for “*” or leave the search field empty to return all results.
Perform Wildcard Searches
Use an asterisk after a search term to return all results with attributes that begin with that term.
Perform a search for “key*” to return all results with names that begin with “key”.
Use an asterisk before a search term to return all results with attributes that end with that term.
Perform a search for “*note” to return all results with names that end with “note”.
Use an asterisk before and after a search term to return all results that include that term.
Perform a search for “*ABC*” to return all results that includes “ABC”.
Include Multiple Search Terms
Use multiple search terms separated by a comma (,) to return all results that include those search terms.
Perform a search for “key*, *note” to return all results that begins with “key” and ends with “note”.
Exclude a Search Term
Use a hyphen (-) before a search term to exclude results that include the term.
Perform a search for “ABC*, -*note” to return all results with names that begin with “ABC” except for those that end with “note”.
Performing a Simple Computer Search
Log in to Jamf Pro.
Click at the top of the page.Computers
Click .Search Inventory
Choose an item from the pop-up menu.Search
Enter one or more search terms in the fields provided.
Press the Enter key.The list of search results is displayed.

312
If you searched for an item other than computers, you can view the computers associated with a
result by clicking next to the result. You can also change the item on which the results are Expand based by choosing an item from the pop-up menu at the top of the page.
Related Information
For related information, see the following sections in this guide:
Computer Inventory InformationFind out how to view and edit inventory information for a computer.
Computer Inventory Collection SettingsFind out how to configure what inventory information Jamf Pro collects.
Advanced Computer SearchesFind out how to create an advanced search using detailed criteria.
Computer ReportsFind out how to export the data in your search results to different file formats.
Mass Actions for ComputersFind out how to perform actions on the results of a computer search.
Computer Inventory Display SettingsFind out how to change the attribute fields displayed in the results of a simple computer search.

313
1.
2.
3.
4.
5.
6.
a.
b.
c.
d.
e.
7.
8.
Advanced Computer SearchesAdvanced computer searches allow you to use detailed search criteria to search the managed and unmanaged computers in Jamf Pro. These types of searches give you more control over your search by allowing you to do the following:
Generate specific search results.
Specify which attribute fields to display in the search results.
Save the search.
Creating an Advanced Computer Search
Log in to Jamf Pro.
Click at the top of the page.Computers
Click .Search Inventory
Click .New
Use the Search pane to configure basic settings for the search.To save the search, select the checkbox.Save this Search
Click the tab and add criteria for the search:Criteria
Click .Add
Click for the criteria you want to add.Choose
Note: Only your 30 most frequently used criteria are listed. To display additional criteria, click .Show Advanced Criteria
Choose an operator from the pop-up menu.Operator
Enter a value in the field or browse for a value by clicking .Value Browse
Repeat steps a through d to add criteria as needed.
Choose an operator from the pop-up menus to specify the relationships between criteria.And/Or
To group criteria and join multiple operations, choose parentheses from the pop-up menus around the criteria you want to group.

314
8.
9.
10.
11.
12.
Operations in the search take place in the order they are listed (top to bottom).
Click the tab and select the attribute fields you want to display in your search results.Display
Click .Save
To view the search results, click .View The results of a saved search are updated each time you view the membership.
(Optional) To export the search results, click and follow the on-screen instructions.Export
Related Information
For related information, see the following sections in this guide:
Computer Inventory InformationFind out how to view and edit inventory information for a computer.

315
1.
2.
Computer ReportsData displayed in smart and static groups or computer search results can be downloaded from Jamf Pro. You can also email reports for advanced computers searches.
The following file formats are available for downloading or email reporting:
Comma-separated values file (.csv)
Tab-separated Values (.tsv)
XML file
You can organize the data by basing the report on any of the following inventory items:
Computers
Applications
Fonts
Plug-ins
Packages installed by Jamf Pro
Packages installed by Installer.app/Software Update
Cached packages
Local user accounts
Mapped printers
Available software updates
Running services
Computer groups
Licensed software
Certificate name
The data is displayed in alphanumeric order by the selected inventory item.
General Requirements
To email a saved advanced computer search report, an SMTP server must be set up in Jamf Pro. (For more information, see .)Integrating with an SMTP Server
Creating Reports for Smart and Static Groups or Simple Computer Searches
Log in to Jamf Pro.
Click at the top of the page.Computers

316
3.
4.
5.
1.
2.
3.
4.
5.
6.
7.
1.
2.
3.
4.
Do one of the following:
View computer group memberships. For more information, see or Smart Groups Static Groups
View simple or advanced computer search results. For more information, see Simple Computer or .Searches Advanced Computer Searches
Note: You can only create a report from a simple computer search if you searched by computers.
View license usage matches. For more information, see .Viewing License Usage
At the bottom of the list, click .Export
Follow the onscreen instructions to export the data. The report downloads immediately.
Creating Reports for Advanced Computer Searches
You can download unsaved and saved advanced computer search reports. Advanced computer search reports can also be emailed instantly or on a defined schedule.
Downloading an Advanced Computer Search Report
Log in to Jamf Pro.
Click at the top of the page. Computers
Do one of the following:
Select the saved advanced computer search for which you want to create a report.
Click , and then use the Criteria and Display panes to configure your search.New
Click the tab.Reports
Select a file format for the report.
Select the inventory item on which to base the report results.
Click . The report downloads immediately.Download Report
Emailing an Advanced Computer Search Report
Note: To email reports from newly created advanced searches, you must select Save this searchand complete the field in the Search Pane.Display Name
Log in to Jamf Pro.
Click at the top of the page. Computers
Do one of the following:
Select the advanced computer search for which you want to create a report.
Click , and then use the Search, Criteria, and Display panes to configure your search.New

317
4.
5.
6.
7.
8.
9.
1.
2.
3.
4.
5.
6.
7.
8.
9.
10.
11.
Click the tab.Reports
Select a file format.
Select the inventory item on which to base the report results.
In the Email Reporting section, enter email addresses, a subject for the email, and the body text for the email.
Click . The report is sent immediately.Send Email Report
To set up another email report, click the button, and then repeat the process.
Scheduling Email Reports for Saved Advanced Computer Searches
You can email saved advanced computer search reports according to a defined schedule.
Log in to Jamf Pro.
Click at the top of the page.Computers
Select the advanced computer search for which you want to create a report.
Click the tab.Reports
Select a file format for the report.
Select the inventory item on which to base the report results.
In the Email Reporting section, enter email addresses, a subject for the email, and the body text for the email.
Select .Schedule automatic email reports
Set the frequency and interval schedule that you want to email the report.
Click . The reports will be emailed on the specified schedule.Save
To set up another email report, click the button, and then repeat the process.

318
Mass Actions for ComputersMass actions allow you to perform potentially tedious tasks for multiple computers at the same time. Mass actions can be performed on smart or static group membership lists, computer search results, or lists of license usage matches. The following table explains the mass actions you can perform using Jamf Pro:
Mass Action Description
Edit the building or department
Mass editing the building or department for computers allows you to add the computers to a building or department or change the building or department they belong to. This option is only displayed if there are one or more buildings or departments in Jamf Pro. For more information, see
.Buildings and Departments
Edit the site Mass editing the site for computers allows you to add the computers to a site or change the site they belong to. When computers are added to a site, any users assigned to those computers are also added to that site. This option is only displayed if there are one or more sites in Jamf Pro. For more information, see .Sites
Edit the management account
Mass editing the management account for computers allows you to change the username and password for the computers’ management accounts. This can be useful when the management account is from a directory service and has been changed.Mass editing the management account updates the username and password in Jamf Pro, not on the computers.
Important: When configuring the management account password settings, it is recommended that you randomly generate the password for maximum security.
Look up and populate purchasing information from Apple's Global Service Exchange (GSX)
You can mass look up purchasing information from Apple’s Global Service Exchange (GSX) and populate the information in Jamf Pro if desired. This requires a GSX connection set up in Jamf Pro. For more information, see GSX
.Connection
Note: GSX may not always return complete purchasing information. Only the information found in GSX is returned.
Send a mass email to users
You can send a mass email to users associated with the computers in Jamf Pro. The email is sent to the email address associated with each computer. This requires an SMTP server set up in Jamf Pro. For more information, see
.Integrating with an SMTP Server
Edit Autorun data You can mass edit Autorun data for computers.
Delete Autorun data
You can mass delete Autorun data for computers.

319
1.
2.
3.
4.
5.
6.
Mass Action Description
Delete the computers from Jamf Pro
You can mass delete computers from Jamf Pro.
Send remote commands
You can mass send remote commands to computers. The remote commands available for a particular computer vary depending on the computer's OS version. For more information, see Remote Commands for
and .Computers Computer Management Capabilities
Cancel management commands
You can mass cancel all pending or failed management commands.
Performing Mass Actions for Computers
Log in to Jamf Pro.
Click at the top of the page.Computers
Do one of the following:
View computer group memberships. For more information, see or .Smart Groups Static Groups
View simple or advanced computer search results. For more information, see Simple Computer or .Searches Advanced Computer Searches
Note: You can only perform mass actions from a simple computer search if you searched by computers.
View license usage matches. For more information, see .Viewing License Usage
At the bottom of the list, click .Action
Select the mass action you want to perform from the list of mass actions.
Follow the onscreen instructions.
Related Information
For related information, see the following sections in this guide:
Computer Inventory InformationFind out how to edit the building, department, site, purchasing information, or management account for a single computer.
Components Installed on Managed ComputersFind out how to remove all Jamf Pro-related components from computers that have been deleted from Jamf Pro.

320
1.
2.
3.
Computer Management InformationJamf Pro allows you to view management information for each computer, such as group memberships and Jamf Pro objects that have the computer in scope. The following table lists the management information you can view for a computer:
Category Notes
Management Commands
To view pending management commands for a computer, the computer and Jamf Pro must meet the requirements for sending a remote command or installing a computer configuration profile. For more information, see Remote
or .Commands for Computers Computer Configuration ProfilesTo cancel a pending management command, click next to the Cancelcommand.You cannot view pending management commands if the MDM profile has been removed from the computer.
Policies --
eBooks --
App Store Apps
--
Configuration Profiles
This list of profiles does not take into account users assigned to the computer or user actions taken on the computer.
Activation Lock Bypass
For information about what the Activation Lock bypass code can be used for, see the Knowledge Base Leveraging Apple’s Activation Lock Feature with Jamf Proarticle.
Restricted Software
--
Computer Groups
--
Patch Management
Patch management software titles in Jamf Pro are third-party macOS software titles that can be used for patch reporting and patch notifications. For more information on patch management for third-party updates, see About Patch
.ManagementTo view the software titles that are on the latest version, click .Latest VersionA list of software titles on the latest version is displayed.To view the software titles that are on a version other than the latest, click
.Other VersionA list of software titles on a version other than the latest is displayed.
Viewing Management Information for a Computer
Log in to Jamf Pro.
Click at the top of the page.Computers

321
3.
4.
5.
6.
Perform a simple or advanced computer search.For more information, see or .Simple Computer Searches Advanced Computer Searches
Click the computer you want to view management information for.
If you performed a simple search for an item other than computers, you must click next to Expand an item to view the computers related to that item.
Click the tab, and then click the category you want to view management information Managementfor.A list of results is displayed.
(Optional) Some categories allow you to filter results for specific users on the computer. To view results for a specific user, enter the username in the field and click .Username UpdateA list of results for the user is displayed.
Related Information
For related information, see the following sections in this guide:
Smart GroupsFind out how to view all group memberships for a smart group.
Static GroupsFind out how to view all group memberships for a static group.

322
Computer History InformationJamf Pro allows you to view history information for each computer, such as logs of computer usage and management actions. You can also flush policy logs for a computer. The following table lists the history information you can view for a computer:
Category Notes
Application Usage Logs
Computer Inventory Collection settings must be configured to collect Application Usage information. For more information, see Computer Inventory
. Collection SettingsTo view application usage logs for a specific date range, specify the starting and ending dates using the pop-up menus on the pane. Then click Date Range
.UpdateComputer Usage Logs
A startup script or login/logout hooks must be configured to log Computer Usage information. For more information, see and Startup Script Login and Logout
. Hooks
Audit Logs --
Policy Logs --
Patch Management Logs
--
Jamf Remote Logs
--
Screen Sharing Logs
--
Jamf Imaging Logs
--
Management History
To cancel a pending management command, click next to the command.Cancel
Hardware and Software History
Computer Inventory Collection settings must be configured to collect applications, fonts, or plug-ins. For more information, see Computer Inventory
.Collection SettingsTo view hardware/software history for a different date range, specify the starting and ending dates using the pop-up menus on the pane. Date RangeThen click .UpdateInventory report listings that show a change in a computer’s hardware are displayed in red.
User and Location History
A record of the current information is added to the list whenever changes are made to the User and Location category in the computer’s inventory information.
App Store Apps
To cancel a pending App Store app installation, click next to the app.Cancel

323
1.
2.
3.
4.
5.
Category Notes
macOS Intune Integration Logs
To view inventory data for a username, click the button.View Data SentYou can manually trigger an update of inventory to be sent to Microsoft Intune. This allows Jamf Pro to send computer inventory attributes to Microsoft Intune outside of the standard communication schedule.
Viewing History Information for a Computer
Log in to Jamf Pro.
Click at the top of the page.Computers
Perform a simple or advanced computer search.For more information, see or .Simple Computer Searches Advanced Computer Searches
Click the computer you want to view history for.
If you performed a simple search for an item other than computers, you must click next to Expand an item to view the computers related to that item.
Click the tab, and then click the category for the type of history information you want to view.History
Related Information
For related information, see the following section in this guide:
Flushing LogsFind out how to schedule automatic log flushing or manually flush logs.

324
1.
2.
3.
1.
2.
3.
4.
5.
6.
7.
Renaming a ComputerAdministrators can edit the inventory name of a managed computer in Jamf Pro. To rename the remote computer to match the inventory name in Jamf Pro, you can use a policy When changing . the remote computer name, it is best practice to match the hostname and the local hostname of the computer by running a script with a policy. This allows other computers in the network to discover and connect to the computer in the DNS.
This procedure involves the following steps:
Editing the Computer Name in Jamf Pro
Changing the Computer Name Using a Policy
Updating the Hostname and Local Hostname Using a Policy
Editing the Computer Name in Jamf Pro
To rename the computer in Jamf Pro, you must edit the computer name in the inventory.
Note: Before editing the computer name in Jamf Pro, verify that the current computer name matches the inventory name in Jamf Pro. The computer name can be found by navigating to the
.Apple menu > System Preferences > Sharing > Computer Name
Log in to Jamf Pro.
Click at the top of the page.Computers
Click .Search Inventory
In the Search field, enter the computer name that you want to change. For more information, see .Simple Computer Searches
Click the computer name, and click .Edit
Enter the new computer name in the field.Computer Name
Click .Save
Changing the Computer Name Using a Policy
Requirements
To use a policy to change the computer name, you need a Jamf Pro user account with privileges to create or update policies.

325
1.
2.
3.
4.
5.
6.
7.
8.
Procedure
Log in to Jamf Pro.
Click at the top of the page.Computers
Click .Policies
Click .New
Use the General payload to configure basic settings for the policy, including the trigger and execution frequency.
Use the Maintenance payload to choose basic settings for the policy, including the Reset Computer checkbox.Names
Note: Enabling this setting resets the computer's name to the name that is specified in the inventory record. If a policy submits inventory prior to running this policy, the name will change back to what the computer is currently set to.
Click the tab and configure the scope of the policy.Scope
Click .Save
The policy runs on computers in the scope the next time they check in with Jamf Pro and meet the criteria in the General payload.
Note: You can verify that the computer name was changed by reviewing the policy log.
Updating the Hostname and the Local Hostname Using a Policy
To update the hostname, computer name, and the local hostname, you need to create a script that includes the new computer name. Then, you can run the script using a policy. The command used in this script can update computers dynamically when DNS services are configured on the network.
When updating the hostname and the local hostname, use the following guidelines:
Use a hyphen instead of spaces.
The only special character you can use is a hyphen.
Case is not sensitive.
Non-alphanumeric characters are ignored.
You can also add the following options to the command used in the script:
-target <target volume>—Sets the name when the computer is booted to the specified target volume
-name <name>—The new name for the computer
-useMACAddress—Changes the name to the primary MAC address
-useSerialNumber—Changes the name to the serial number

326
1.
2.
3.
4.
5.
6.
7.
8.
-suffix <suffix>—Adds this suffix to the MAC address or serial number. For example: sudo jamf setComputerName -useMACAddress -suffix '-example'
-prefix <prefix>—Adds this prefix to the MAC address or serial number. For example: sudo jamf setComputerName -useMACAddress -prefix '-example'
-fromFile <file path>—The path to a CSV file containing the computer's MAC address or serial number, followed by the new name. For example: sudo jamf setComputerName -fromFile '/file/path' -useSerialNumber
Log in to Jamf Pro.
In the top-corner of the page, click .Settings
Click .Computer Management
Click .Scripts
Click .New
Use the General pane to configure basic settings for the script, including the display name and category.
Note: If you do not add the script to a category, Jamf Admin displays the script in blue text in the Unknown category.
Click the tab and enter the following in the script editor, modifying it for your environment:Scriptsudo jamf setComputerName
Click .Save
You can now run the script by creating a policy with the script added to the Scripts payload.
Related Information
For related information, see the following sections in this guide:
Jamf Pro User Accounts and Groups Find out how to create a Jamf Pro user account and configure privileges.
ScriptsFind out how to run scripts using a policy.
Policy ManagementFind out how to view policy logs.

327
1.
2.
3.
4.
5.
6.
Deleting a Computer from Jamf ProYou can remove a computer from your inventory by deleting it from Jamf Pro.
Note: The files and folders installed during enrollment are not removed from the computer when it is deleted from Jamf Pro.
Log in to Jamf Pro.
Click at the top of the page.Computers
Click .Search Inventory
Perform a simple or advanced computer search.For more information, see or Simple Computer Searches Advanced Computer Searches .
Click the computer you want to delete.If you performed a simple search for an item other than computers, such as computer applications,
you must click next to an item name to view the computers related to that item.Expand
Click , and then click again to confirm.Delete Delete
Related Information
For related information, see the following section in this guide:
Mass Actions for ComputersFind out how to mass delete computers from Jamf Pro.
Components Installed on Managed ComputersFind out how to remove components installed on managed computers.

328
Policies
About PoliciesPolicies allow you to remotely automate common management tasks on managed computers. Using a policy, you can run scripts, manage accounts, and distribute software. When you create a policy, you specify the tasks you want to automate, how often it should run (“execution frequency”), when the policy should run (“trigger”), and the users and computers for which it should run (“scope”). You can also make policies available in Self Service for users to run on their computers as needed.
Note: Removing a target from the scope of a policy does not remove the settings applied by the policy if it has already run on the computer.
Execution Frequency for Policies
A policy can run at one of the following frequencies:
Once per computer—This policy runs on any computer in the current scope one time only. If the checkbox is enabled, you can configure the policy to retry up Automatically re-run policy on failure
to 10 times after a policy fails. If a log entry exists for a given computer in the policy's history, the policy will not run again for that computer until the log is flushed.
Once per user per computer—This policy runs once per distinct username per distinct computer. If Self Service has user logins enabled, the policy will run once through Self Service on each computer the user logs in to.
Once per user—This policy runs only once per distinct username. It runs through Self Service as long as Self Service has user logins enabled. The policy will only run once per username in the scope, not once per username per computer.
Once every day—This policy runs if the scoped computer has not submitted a policy log to Jamf Pro in the past day (24 hours).
Once every week—This policy runs if the scoped computer has not submitted a policy log to Jamf Pro in the past seven days (168 hours).
Once every month—This policy runs if the scoped computer has not submitted a policy log to Jamf Pro in the past 30 days (720 hours).
Ongoing—This policy runs each time the specified trigger takes place.

329
Important: When using an ongoing execution frequency with a recurring check-in trigger, policies will run during every check-in. This may negatively impact server and client performance.
Triggers for Policies
Triggers are events that initiate a policy. When you create a policy, you can choose one or more pre-defined triggers, or you can choose a custom trigger.
You can use the following pre-defined triggers to run a policy:
Startup—When a computer starts up. The startup script must be enabled in the Check-In section of Computer Management Settings.
Login—When a user logs in to a computer. Login hooks must be enabled in the Check-In section of Computer Management Settings.
Logout—When a user logs out of a computer. Logout hooks must be enabled in the Check-In section of Computer Management Settings.
Network State Change—When a computer’s network state changes (for example, when the network connection changes, when the computer name changes, or when the IP address changes)
Enrollment Complete—Immediately after a computer completes the enrollment process
Recurring Check-in—At the recurring check-in frequency configured in Jamf Pro
Note: On computers with macOS 10.15 or later, Jamf Pro must be safelisted in the Privacy Preferences Policy Control payload to run policies that access data on a network volume at recurring check-in. By default, Jamf Pro is automatically safelisted in the Privacy Preferences Policy Control payload.
Custom—Initiate the policy manually using the binary command. For an jamf policy -eventiBeacon region change event, use beaconStateChange
Execution Order of Policies
If multiple policies are triggered at the same time, the policies will run based on their name in alphanumeric order. Policies with names beginning with a number will run before policies that do not.
Policies can be renamed to ensure that they run on a device in a specific order. This is useful when an application needs to first be uninstalled before installing a newer version. The uninstall policy can be renamed to ensure that it runs prior to the install policy.
For example, if policies “Alpha” and “Beta” are triggered at the same time, “Alpha” will run first. However, if it would be preferable for “Beta” to run first, "Beta" should be renamed to “1Beta”.

330
Related Information
For related information, see the following sections in this guide:
Policy ManagementFind out how to create policies, view the plan and status for a policy, and view and flush policy logs.
Policy Payload ReferenceLearn about each payload in the policy interface.

331
1.
2.
3.
4.
5.
6.
7.
8.
9.
10.
Policy ManagementWhen you create a policy, you use a payload-based interface to configure settings for the policy and add tasks to it. For more information on the settings you can configure, see .Policy Payload Reference
After you create a policy, you can view the plan, status, and logs for the policy. You can also flush policy logs.
Note: To run a policy on a computer, the checkbox Allow Jamf Pro to perform management tasksmust be selected in the computer inventory information to enable the management account. For more information about the management account, see .Computer Enrollment Methods
Creating a Policy
Log in to Jamf Pro.
Click at the top of the page.Computers
Click .Policies
Click .New
Use the General payload to configure basic settings for the policy, including the trigger and execution frequency.
Use the rest of the payloads to configure the tasks you want to perform.
Click the tab and configure the scope of the policy.Scope
(Optional) Click the tab and make the policy available in Self Service.Self Service
Note: On computers with macOS 10.15 or later, if Jamf Pro is not safelisted in the Privacy Preferences Policy Control payload, users are prompted when policies that access data on a network volume are run through Self Service. By default, Jamf Pro is automatically safelisted in the Privacy Preferences Policy Control payload.
(Optional) Click the tab and enter messages to display to users or allow users to defer User Interactionthe policy.
Click .Save
The policy runs on computers in the scope the next time they check in with Jamf Pro and meet the criteria in the General payload.
Running a Policy
There are two ways to run a policy with a pre-defined trigger. You can run a policy using the following methods:

332
1.
2.
3.
4.
Wait until the configured trigger event occurs.
Manually trigger the policy using the jamf binary.
To manually trigger the policy using the jamf binary, execute the following command on managed computers:
sudo jamf policy -event <triggerName> -verbose
If the policy has a pre-defined trigger, replace with the appropriate value. The <triggerName>following is a list of pre-defined triggers:
Startup—startup
Login—login
Logout—logout
Network State Change—networkStateChange
Enrollment Complete—enrollmentComplete
Recurring Check-in—None (execute )sudo jamf policy -verbose
If the policy has a custom trigger, replace with the custom trigger name specified <triggerName>in the policy.
Note: A policy with a custom trigger must be run manually using the jamf binary.
Viewing the Plan for a Policy
The plan for a policy includes the following information:
An indicator light that shows whether the policy is enabled.
The execution frequency.
The triggers.
The scope.
The site that the policy belongs to.
A list of actions for the policy .
Log in to Jamf Pro.
Click at the top of the page.Computers
Click .PoliciesA list of policies and their plans are displayed.
To view the actions for a policy, click for the policy.Expand

333
1.
2.
3.
4.
1.
2.
3.
4.
5.
6.
7.
8.
Viewing the Status of a Policy
For each policy, you can view a pie chart that shows the number of computers for which the policy has completed, failed, and is still remaining.
Log in to Jamf Pro.
Click at the top of the page.Computers
Click .Policies
Click at the top of the list.Grid View
Viewing and Flushing Logs for a Policy
The logs for a policy include a list of computers that have run the policy and the following information for each computer:
The date/time that the policy ran on the computer
The status
The actions logged
Log in to Jamf Pro.
Click at the top of the page.Computers
Click .Policies
Click the policy you want to view logs for.
Click .Logs
To view the actions logged for a computer, click for the computer.DetailsTo hide the information when you are done viewing it, click .Hide
To flush a policy log for a single computer, click for the computer.Flush
To flush all logs for the policy, click at the bottom of the pane.Flush All

334
Related Information
For related information, see the following sections in this guide:
Viewing and Flushing Policy Logs for a ComputerFind out how to view and flush policy logs for a single computer.
Flushing LogsFind out how to flush all policy logs.
User Interaction with PoliciesFind out how to configure user interaction with policies.
Items Available to Users in Jamf Self Service for macOSFind out how to make items available to users in Jamf Self Service for macOS.

335
Policy Payload ReferenceWhen creating or editing a policy, you use a payload-based interface to configure settings for the policy and add tasks to it. This section provides an overview of each payload.
Payload Description
General This payload allows you to do the following:Enable or disable the policy. (For example, if you need to take the policy out of production temporarily, you may want to disable it.)Add the policy to a site.Add the policy to a category.Choose one or more triggers.Choose the execution frequency.Retry the policy if it fails. (This only works with the "Once per computer" execution frequency.)Make the policy available offline. (This only works with the "Ongoing" execution frequency.)Specify the drive on which to run the policy.Specify server-side and client-side limitations for the policy. (For example, you can specify an expiration date/time for the policy, or ensure that the policy does not run on weekends.)
Packages This payload allows you to perform the following software distribution tasks:Install packagesCache packagesInstall cached packages
Note: To install all cached packages, use the Maintenance payload.
Uninstall packagesThis payload also allows you to do the following when installing packages:
Specify the distribution point computers should download the packages from.Add the packages to the Autorun data of each computer in the scope.
For complete instructions on managing packages, see .Package Deployment
Software Updates
This payload allows you to run Apple’s Software Update and choose the software update server that you want computers to install updates from. For complete instructions on creating a policy to run Software Update, see Running Software
.Update
Scripts This payload allows you to run scripts and choose when they run in relation to other tasks in the policy. You can also enter values for script parameters. For complete instructions on running scripts using a policy, see .Scripts
Printers This payload allows you to map and unmap printers. You can also make a printer the default. For complete instructions on administering printers using a policy, see .Printers

336
Payload Description
Disk Encryption
This payload allows you to enable FileVault on computers with macOS 10.8 or later by distributing disk encryption configurations.This payload also allows you to issue a new FileVault recovery key for computers with macOS 10.9 or later.For complete instructions on enabling FileVault, see Disk Encryption
.Configurations
Dock Items This payload allows you to add and remove Dock items. When you add Dock items, you can also choose to add them to the beginning or end of the Dock. For complete instructions on administering Dock items, see .Dock Items
Local Accounts
This payload allows you to create and delete local accounts, and reset local account passwords. When you create an account, you can do the following:
Specify a location for the home directory.Configure the account picture.Allow the user to administer the computer.Enable the account for FileVault 2 on computers with macOS 10.9 or later.
This payload also allows you to disable an existing local account for FileVault on computers with macOS 10.9 or later.For complete instructions on administering local accounts, see .Local Accounts
Management Account
This payload allows you to reset the management account password. You can choose to specify the new password or randomly generate it.This payload also allows you to enable or disable the management account for FileVault on computers with macOS 10.9 or later.
Important: When configuring the management account password settings, it is recommended that you select the "Randomly generate new password" option for maximum security.
For complete instructions on administering the management account, see Management Accounts
Directory Bindings
This payload allows you to bind computers to a directory service.For complete instructions on binding to a directory service, see Directory Bindings.
EFI Password This payload allows you to set or remove an Open Firmware or EFI password.For complete instructions on administering Open Firmware and EFI passwords, see .Setting or Removing an EFI Password

337
Payload Description
Note: Only computers with Intel processors have a configurable EFI password. On Mac computers with Apple silicon, enable FileVault to require users to enter a password on start up from macOS recovery or a different startup disk.
Restart Options
This payload allows you to restart computers after the policy runs and do the following:
Specify the disk to restart computers from, such as a NetBoot image.Specify criteria for the restart depending on whether or not a user is logged in.Configure a restart delay.Perform an authenticated restart on computers with macOS 10.8.2–10.12.x, or macOS 10.14 or later that are FileVault 2 enabled.
Note: For this to work on computers with FileVault 2 activated, the enabled FileVault 2 user must log in after the policy runs for the first time and the computer has restarted.
Configure the restart timer to start immediately without requiring the user to acknowledge the restart message.
You can also display a message to users before a policy restarts computers. For more information, see .User Interaction with Policies
Maintenance This payload allows you to perform the following maintenance tasks:Update inventory.Reset computer names.Install all cached packages.Fix disk permissions (macOS 10.11 or earlier).Fix ByHost files.Flush caches.Verify the startup disk.
For complete instructions on installing all cached packages, see Package .Deployment
Files and Processes
This payload allows you to search computers for specific files and processes, and use policy logs to log when they are found. You can kill processes that are found and delete files that are found when searching by path.This payload also allows you to execute commands.
Microsoft Intune Integration
This payload allows you to register computers with Azure Active Directory (Azure AD) using the Company Portal app for macOS from Microsoft. End users need to launch the Company Portal app through Jamf Self Service for macOS to register their devices with Azure AD as a computer managed by Jamf Pro. It is recommended that you notify end users to let them know they will be prompted to take action prior to deployment.The payload also automatically triggers an inventory submission from the computer to Jamf Pro.For complete instructions on using the Microsoft Intune Integration payload, see the Integrating with Microsoft Intune to Enforce Compliance on Macs Managed
technical paper.by Jamf Pro

338
User Interaction with PoliciesUser Interaction allows you to display custom messages to users about the policies that run on their computers and allow users to defer policies. You can display these messages to users before and after a policy runs and before a policy restarts computers.
When allowing users to defer a policy, you can specify a date and time, or number of days after the user is first prompted by the policy at which to prohibit further deferral (called the “deferral limit”). This allows you to give users more control over when the policy runs while ensuring that the policy eventually runs.
Before a policy runs on a computer, the user is prompted to choose to have the policy run immediately or to defer the policy for one of the following:
1 hour
2 hours
4 hours
1 day
The amount of time until the deferral limit is reached
If the user chooses to defer the policy, they are prompted with the original message after the chosen amount of time. When the deferral limit is reached, a message is displayed to notify the user, and the policy runs immediately.
To avoid policy deferment issues and excessive re-runs, the deferment must not exceed the execution frequency configured for the policy.
Note: When a policy fails and is made available in Self Service with an execution frequency of "Once per computer" and is configured to automatically retry, the policy will still display in Self Service so users can retry it. If the user does not re-run the policy using Self Service, the jamf binary will automatically re-run it on the next configured trigger.
339
1.
2.
3.
4.
5.
Configuring User Interaction for a Policy
Log in to Jamf Pro.
Create or edit a policy.For more information, see .Policy Management
Click the tab.User Interaction
Configure the settings on the pane.
Note: When configuring User Interaction messages for computers with macOS 10.8 or later, most messages are displayed in Notification Center in a category called “Management”. Otherwise, messages are displayed using the Jamf Helper utility.
When you are done configuring the policy, click .Save

340
Packages
About PackagesA package is a self-contained group of files that can be deployed to remote computers or as part of the imaging process. You can use Composer or a third-party packaging tool to build packages of software, applications, preference files, or documents. For more information about building packages using Composer, see the .Composer User Guide
You can use Jamf Pro and Jamf Admin to manage packages you plan to deploy to computers in your environment. Managing packages involves adding the package to your distribution point and to Jamf Pro, and configuring settings for the package.
After a package is added to the distribution point and Jamf Pro, you can deploy the package to computers using a policy in Jamf Pro.
Related Information
For related information, see the following sections in this guide:
Package ManagementLearn how to use Jamf Pro and Jamf Admin to manage the packages you plan to deploy to computers in your environment.
Package DeploymentLearn how to use a policy in Jamf Pro to deploy a package to computers.

341
Package ManagementYou can use Jamf Pro and Jamf Admin to manage packages you plan to deploy to computers in your environment. Managing packages involves adding the package to your distribution point and to Jamf Pro, and configuring settings for the package.
Before you can deploy packages to remote computers, you must have a distribution point set up in Jamf Pro. For more information, see .About Distribution Points
Package Upload Methods
You can add the package to your distribution point using the following methods:
Jamf Pro—You can upload the package directly to Jamf Pro. This adds the package to the principal distribution point and Jamf Pro.
Jamf Admin—The Jamf Admin application is a repository that allows you to add and manage packages. It also allows you to create configurations (images) using these items and replicate files to distribution points. Adding a package to Jamf Admin automatically adds the package to the principal distribution point and Jamf Pro.To add a package to Jamf Admin, the file must be in one of the following formats:
Disk Image (.dmg)Installer Package (.pkg)Metapackage (.mpkg)Compressed archive (.zip)Application (.app)
Depending on the type of distribution point in your environment, you can use the following methods for adding packages to your distribution point and Jamf Pro:
Distribution Point Method Description
Any Distribution Point
Add the package to Jamf Admin
This method adds the package to the principal distribution point and Jamf Pro. You can then add the package to other distribution points via replication.
Cloud Distribution Point
Upload the package directly to Jamf Pro
This method adds the package to the principal distribution point and Jamf Pro. You can then add the package to other distribution points via replication.
File Share Distribution Point
Manually This method involves manually copying the package to the distribution point and then entering information about the package in Jamf Pro.
Note: On computers with macOS 10.15 or later that do not have an MDM profile, you must use an HTTP, HTTPS, or cloud distribution point to install packages.

342
Package Settings
When you add a package to a distribution point and Jamf Pro, you can configure settings for the package, such as choosing a priority for the package installation. Adding, editing, or deleting a package in Jamf Admin is reflected in Jamf Pro and vice versa. Some settings are only available when using Jamf Admin to manage the package.
The following table explains the different settings you can configure for packages:
SettingJamf Pro
Jamf Admin Description
Category You can add the package to a category, an organizational component that allows you to group the package in Jamf Admin and Jamf Pro. Before you can add a package to a category, you must add the category to Jamf Admin or Jamf Pro.
Priority You can choose a priority for deploying or uninstalling the package. Consider the following when configuring priority:
Packages with higher priority install first.Package priority defaults to "10".A package with a priority of "1" is deployed or uninstalled before other packages.Multiple packages with the same priority install in alphabetical order based on the package name.
Fill User Templates (FUT)
You can fill user templates with the contents of the home directory in the package's Users folder. This setting applies to DMGs only.
Fill Existing User Home Directories (FEU)
You can fill existing user home directories with the contents of the home directory in the package’s Users folder. This setting applies to DMGs only.
Index Packages
Indexing a package creates a log of all the files contained within the package. This allows you to uninstall the package and view the contents of the package from Jamf Pro. The time it takes to index a package depends on the amount of data in the package.
Allow Package to be Uninstalled
You can allow the package to be uninstalled. You must index a package using Jamf Admin before you can uninstall it.
Require Restart
You can specify whether computers must be restarted after installing the package.
Install on boot drive after imaging
You can choose whether the package must be installed on the boot drive after imaging.

343
1.
2.
3.
4.
5.
SettingJamf Pro
Jamf Admin Description
Operating System requirements
You can specify operating system and architecture type requirements for deploying the package. For example, if you enter "10.13", packages are only installed on computers with macOS 10.13.
Install Only if Available in Software Update
You can choose to install the package only if there is an available update. The display name of the package must match the name in the command-line version of the Software Update. This setting applies to PKGs only.
Limit Architecture Type
You can choose to deploy the packages to computers that meet specific architecture types only. For example, you can specify "PowerPC" as a requirement. You can also specify a previously configured package as a substitute package to deploy to computers that do not have the required architecture type.
Adding a Package to Jamf Admin
Open Jamf Admin and authenticate to the Jamf Pro server.
Drag the package to the main repository in Jamf Admin.The package is displayed in blue text in the Unknown category until you add it to a category.
Double-click the package in the main repository.
Click the tab and configure basic settings for the package, including the display name and Generalcategory.

344
5.
6.
1.
2.
3.
4.
5.
6.
7.
8.
Click the tab and configure additional settings for the package, including the priority, and Optionsoperating system and architecture type requirements.
Note: Package Limitations options do not apply when installing a package during imaging.
Click .OK
Uploading a Package to Jamf Pro
To upload a package to Jamf Pro, your principal distribution point must be a cloud distribution point.
Log in to Jamf Pro.
In the top-right corner of the page, click .Settings
Click .Computer Management
In the “Computer Management” section, click .Packages
Click .New
Use the General pane to configure basic settings for the package, including the display name and category.
Note: If you do not add the package to a category, Jamf Admin displays the package in blue text in the Unknown category.
Click and upload the package.Upload Package

345
8.
9.
10.
11.
1.
2.
3.
4.
5.
6.
7.
8.
9.
10.
1.
2.
3.
(Optional) If you are uploading an enrollment package, you can upload a custom manifest file by clicking the button. You can remove the file by clicking the Upload Manifest File Delete Manifest Filebutton.
Click the tab and configure additional settings for the package, including the priority.Options
(Optional) Click the tab and configure limitations for the package, including operating Limitationssystem and architecture type requirements.
Click .Save
Manually Adding a Package to a Distribution Point and Jamf Pro
Copy the package to the Packages folder at the root of the file share on the distribution point.
Log in to Jamf Pro.
In the top-right corner of the page, click .Settings
Click .Computer Management
In the “Computer Management” section, click .Packages
Click .New
Use the General pane to configure basic settings for the package, including the display name, category, and filename.
Note: If you do not add the package to a category, Jamf Admin displays the package in blue text in the Unknown category.
Click the tab and additional settings for the package, including the priority.Options
(Optional) Click the tab and configure limitations for the package, including operating Limitationssystem and architecture type requirements.
Click .Save
Editing or Deleting a Package Using Jamf Admin
Open Jamf Admin and authenticate to the Jamf Pro server.
In the main repository, select the package you want to edit or delete.
Do one of the following:
To edit the package, double-click it and make changes as needed. Click . Then click > .OK File Save
To delete the package, click and then click again to confirm.Delete Delete
The edit or delete action is applied immediately on the principal distribution point. The action is applied to your other distribution points when replication occurs.
Indexing a Package

346
1.
2.
3.
4.
1.
2.
3.
4.
5.
6.
1.
2.
3.
Indexing a Package
Indexing a package creates a log of all the files contained within the package. This allows you to uninstall the package and view the contents of the package from Jamf Pro. The time it takes to index a package depends on the amount of data in the package.
Packages can be indexed using Jamf Admin only.
Open Jamf Admin and authenticate to the Jamf Pro server.
In the main repository, select the package you want to index and click at the bottom of the Indexpane.
If prompted, authenticate locally.
Save the changes by clicking > .File Save
When the indexing process is complete, Jamf Admin defaults back to the main repository.
Viewing the Contents of an Indexed Package
Log in to Jamf Pro.
In the top-right corner of the page, click .Settings
Click .Computer Management
In the “Computer Management” section, click .Packages
Click the package you want to view the contents of.
Click .Contents
A table that contains the package contents is displayed.
Calculating a Checksum
The checksum is calculated when a package is uploaded to Jamf Pro. The checksum ensures authenticity when the package is downloaded.
The checksum can also be calculated manually using Jamf Admin:
Open Jamf Admin and authenticate to the Jamf Pro server.
In the main repository, select the package you want to calculate checksum for.
Control-click (or right-click) and select .Calculate Selected Package Checksum(s)

347
Package DeploymentYou can use a policy in Jamf Pro to deploy a package. Policies allow you to remotely install packages on managed computers. You can automate package installation so that it runs at a specified frequency.
When you configure a policy, you can do the following for each package you add to the policy:
Fill user templates
Fill existing user home directories
You can choose the following actions you want computers to take when running the policy:
Action Description
Install This option enables computers to install the package when they run the policy. To install a package on computers, the package must exist on the distribution point you plan to deploy it from and in Jamf Pro.
Cache This option enables computers to download a cached package without installing it right away. To cache a package on computers, the package must exist on the distribution point you plan to deploy it from and in Jamf Pro.
Install Cached
This option enables computers to install one or more of the cached packages. To install a specific cached package, the package must exist on the distribution point you plan to deploy it from and in Jamf Pro.
Uninstall This option enables computers to uninstall a package.To uninstall the package from computers, you need the following:
The package indexed in Jamf AdminThe package configured so that it can be uninstalled
Note: If the package is an Adobe CS3/CS4 installation, it does not need to be indexed or configured so that it can be uninstalled.
Packages must be in one of the following formats to deploy them to computers:
DMG
PKG
MPKGThe MPKG format may not always work natively with policies. This is because permissions that are embedded in the files within the MPKG may conflict with the privileges used by the distribution point read/write user. It is recommended that you deploy the MPKG file to a test computer first. If the deployment does not install successfully, use Composer to make a DMG package for distribution with a policy. Composer will not convert the MPKG to DMG format, but you can use the Snapshot or the Pre-installed method to create a DMG package. Composer can be used to convert DMG and PKG packages. For more information, see the .Composer User Guide

348
1.
2.
3.
4.
5.
6.
7.
8.
9.
10.
11.
12.
13.
14.
15.
Deploying a Package Using a Policy
To deploy a package using a policy, you must add the package to a distribution point and Jamf Pro.
Log in to Jamf Pro.
Click at the top of the page.Computers
Click .Policies
Click .New
Use the General payload to configure basic settings for the policy, including the trigger and execution frequency.
Select the Packages payload and click .Configure
Click for the package you want to install.Add
Depending on the action you want computers to take, choose an action from the pop-up Actionmenu.
Configure the settings for the package.
If you are installing a package on computers or caching a package, specify a distribution point for computers to download the package from.
Use the Restart Options payload to configure settings for restarting computers.
Click the tab and configure the scope of the policy.Scope
(Optional) Click the tab and make the policy available in Self Service.Self Service
(Optional) Click the tab and configure messaging and deferral options.User Interaction
Click .Save
The policy runs on computers in the scope the next time they check in with Jamf Pro and meet the criteria in the General payload.

349
Related Information
For related information, see the following sections in this guide:
Package ManagementFind out how to manage packages.
Policy Payload ReferenceFind out more information about policy payloads.
Items Available to Users in Jamf Self Service for macOSFind out how to make items available to users in Jamf Self Service for macOS.
User Interaction with PoliciesFind out how to configure user interaction with policies.
JSON Web Token for Securing In-House Content
Find out how to use the JSON web token (JWT) to secure packages.

350
Patch Management
About Patch ManagementYou can manage the software updates in your environment using the built-in functionality in Jamf Pro. Managing software updates allows you to ensure that the software in your environment is up to date on target computers, and allows you to update the software if it is currently out of date.
You can manage both third-party macOS software updates and Apple Updates using the following methods available in Jamf Pro:
Patch Management—You can use the Patch Management workflow and other technologies available with Jamf Pro to manage the third-party macOS software updates in your environment. This method offers the capabilities to view the software currently installed on the computers in your environment, to notify when new software is available, and to distribute the new software to target computers.
Software Update—You can use Jamf Pro for Apple Updates by running Software Update on computers. This method allows you to install all updates available from Apple.
Related Information
For related information, see the following Jamf Knowledge Base video:
Patch Reporting & Patch Policies in Jamf Pro
For related information, see the following sections in this guide:
Package ManagementYou can add packages to a category.
Package DeploymentFind out how to install a QuickAdd package using a policy.
Patch SourcesLearn about Patch Sources and how to integrate Jamf Pro with a Patch External Source.
Patch Management Software TitlesLearn about the third-party macOS software titles in Jamf Pro that can be used for patch reporting and patch notifications.

351
For related information, see the following:
Composer User GuideLearn how to use the Composer application to build packages of software, applications, preference files, or documents.
NetBoot/SUS ApplianceFind out how to host an internal software update server on Linux.
For related information, see the following technical paper:
Deploying macOS Upgrades and Updates with Jamf ProGet step-by-step instructions for deploying upgrades and updates for macOS 10.13.4 and later.

352
1.
2.
3.
4.
5.
Patch SourcesA Patch Source allows you to view the software currently installed on the computers in your environment, to notify when new software is available, and to distribute the new software to target computers. When software titles are configured and available, they are hosted on a Patch Source. This allows you to distribute the title to the computers in your environment. There are two types of Patch Sources:
Patch Internal Source—The Patch Internal Source is configured for you by Jamf Pro and hosts the software title definitions that are provided by Jamf Pro. For the list of software titles provided by Jamf Pro, see the documentation.Patch Management Software Titles
Patch External Source—Jamf Pro provides a framework for integrating with a Patch External Source. You can use a server application in your environment or connect to a source hosted by the community. Integrating with a Patch External Source involves adding the server information(hostname or IP address for the server application) to Jamf Pro. You can add as many Patch External Sources that fit your environment.
You can use both Patch Sources to customize a solution for your specific environment.
General Requirements
The server application you use for your Patch External Source must meet the requirements in the Knowledge Base article to enable Jamf Pro to properly Jamf Pro External Patch Source Endpoints
generate a list of software titles hosted on the source, check for updates, and download the software title definition.
Adding a Patch External Source to Jamf Pro
Log in to Jamf Pro.
In the top-right corner of the page, click Settings .
Click .Computer Management
In the “Computer Management” section, click Patch Management .
To add a Patch External Source, click .New

353
6.
7.
1.
2.
3.
4.
5.
6.
Configure the settings on the pane.Depending on your environment, the following settings may be applicable:
Enabled—This setting enables Jamf Pro to generate the list of software titles hosted on the Patch Source and allows the title to be automatically updated.
Use SSL—This setting must be enabled if your environment is configured with a TLS certificate and is sending traffic over HTTPS from your Patch External Source.
Validate Software Title Definitions—This setting ensures that software titles are signed by a publicly trusted certificate before they are downloaded from the server.
Note: If this setting is enabled and a software title is not signed, Jamf Pro does not download the title.
Click .Save
After the Patch External Source is added to Jamf Pro, Jamf Pro can download and display the software titles available on the source.
Testing a Patch External Source Connection
Log in to Jamf Pro.
In the top-right corner of the page, click Settings .
Click .Computer Management
In the “Computer Management” section, click Patch Management .
Click the Patch External Source you want to test the connection for, and then click .Test
Click again.Test
Jamf Pro communicates with the server hosting the External Patch Server to return status information about the server and validate the connection to the server endpoints.

354
Related Information
For related information, see the following sections in this guide:
Patch Management Software TitlesLearn about the third-party macOS software titles in Jamf Pro that can be used for patch reporting and patch notifications.
Email NotificationsLearn how to configure patch notifications of third-party macOS software title updates that have been added to Jamf Pro.
Patch ReportingLearn how to create a patch report for a third-party macOS software title.
Patch PoliciesLearn how to create a patch policy to automate the distribution of a third-party macOS software update.

355
1.
2.
3.
4.
5.
6.
7.
Patch Management Software TitlesJamf Pro includes many third-party macOS software titles that can be used for patch reporting, patch notifications, and patch policies. These third-party software titles represent software that is not available in the App Store. In addition, Jamf Pro includes the macOS title. For the list of software titles provided in Jamf Pro, see the documentation.Patch Management Software Titles
When you configure a patch management software title, you are able to receive a notification when an update has been released by the vendor and added to Jamf Pro. In addition, you can generate reports for the software titles in your environment which allows you to identify the titles that need to be patched.
Different software titles have different requirements for updating them. For example, some software titles must have additional apps installed for the title to be updated. Because these requirements are in Jamf Pro, you save time by not having to track down the required information.
General Requirements
To configure patch management software titles and enable them to automatically update, the Jamf Pro server must have outbound access to port 443 to access the patch server and the software title definitions which are hosted on Amazon CloudFront.
To initially configure a software title that requires an extension attribute, you must use a Jamf Pro user account that has full access. A Jamf Pro user account with site access only will not be able to configure a software title that requires an extension attribute.
Configuring a Patch Management Software Title
Log in to Jamf Pro.
Click at the top of the page.Computers
Click .Patch Management
Click .New
Choose a software title.
Note: You cannot configure a patch management software title if it uses an extension attribute that has the same name as an existing extension attribute. You must first rename the existing extension attribute so that you can save the new one.
Use the Software Title Settings tab to configure basic settings for the software title, including whether to receive a Jamf Pro notification or email when an updated software title is available.
Note: This setting is then applied for this specific software title for all Jamf Pro users who configure their personal notification preferences. For more information, see .Email Notifications

356
7.
8.
9.
1.
2.
3.
4.
5.
6.
7.
8.
9.
If you are configuring a software title that uses an extension attribute, you must click the Extension tab and accept the terms.Attributes
(Optional) Click the tab to review information about the supported software title versions Definitionand attributes about each version.
Click .Save
After a software title is configured, you can add packages to the title. Adding a package is a requirement for creating a patch policy.
Adding a Package to a Patch Management Software Title
To create a patch policy, you need a patch management software title version associated with a package.
Note: The patch policy does not verify the package contents before distribution; ensure that the package contains the intended version of the software update. For more information, see Patch
.Policies
Log in to Jamf Pro.
Click at the top of the page.Computers
Click .Patch Management
Click the software title you want to add a package to.
Click .Edit
Click the tab.Definition
Click next to the version you want to add a package to.Add
Click .
Click .Save

357
Related Information
For related information, see the following sections in this guide:
About Patch ManagementLearn about patch management for Apple Updates and for third-party updates.
Patch SourcesLearn about Patch Sources and how to integrate Jamf Pro with a Patch External Source.
Patch ReportingLearn how to create a patch report for a macOS software title.
Package ManagementYou can add packages to a category.
For related information, see the following Knowledge Base articles:
Jamf Process for Updating Patch Management Software TitlesLearn about the contents of a software definition file in Jamf Pro and the process used by Jamf to add software title updates to Jamf Pro.
Jamf Pro External Patch Source EndpointsLearn about the endpoints required by Jamf Pro to host an external patch source in your environment.

358
Patch ReportingThe patch reporting area of Jamf Pro can be used to easily configure third-party macOS software titles used in your environment. This provides you with a process to:
Generate reports for third-party macOS software titles that you have configured in your environment
Identify which third-party macOS software titles in your environment need to be updated
Determine which computers have software titles that need to be updated
You can use the patch reporting features alone, or combine them with the following additional searching and reporting features in Jamf Pro based on your needs:
Advanced computer searches—There are several benefits to using advanced computer searches to produce a list of computers in Jamf Pro:
The ability to display all application titles; the list is not limited to the third-party macOS software titles provided in the patch reporting area.The ability to combine patch-related criteria with other criteria. Patch-related criteria includes features to report on Apple operating systems and third-party macOS software titles. When creating an advanced computer search and selecting Patch Reporting Software Title, you can use "greater than" and "less than" operators, and "Latest Version" as a value to ensure the search will remain current as new versions are released. For example, this criteria can be used to create a general compliance report that includes encryption, or whether computers are on a specific version of an operating system, etc.
Smart computer groups—Smart computer groups offer the same patch reporting functionality as advanced computer searches. In addition, you can view the status of smart groups on the Jamf Pro Dashboard. You can also get notifications when the membership of a smart group changes.

359
1.
2.
3.
Patch Reports
For each software title, you can view the latest version number as well as the percentage of computers in your environment that are on the latest version. In addition, you can view the number of computers that are on the latest version and the number that are on another version.
From the report, you can view when each computer last checked in and the version of the software title installed on the computer.
The data displayed in a patch report can be exported from Jamf Pro to the following file formats:
Comma-separated values file (.csv)
Tab delimited text file (.txt)
General Requirements
To configure third-party macOS software titles and enable them to automatically update, the Jamf Pro server must have outbound access to port 443 to access the patch server and the software title definitions which are hosted on Amazon CloudFront.
Creating a Patch Report for a macOS Software Title
For each macOS software title, you can view the number of computers on the latest version of the software title or on a different version of the software title.
Log in to Jamf Pro.
Click at the top of the page.Computers
Click .Patch Management

360
4.
5.
A list of configured macOS software titles is displayed.
To view a list of computers that are on the latest version of a particular software title, click the number displayed in the On Latest Version column.
To view a list of computers that are on another version of a particular software title, click the number displayed in the On Other Version column.A report that shows additional details is displayed.
Note: You can also access the report by choosing a specific software title.
At the bottom of the report, click and choose "Comma-Separated Values file (.csv)" or "Tab ExportDelimited Text file (.txt)".
Note: The data will be exported as it is currently filtered.
Related Information
For related information, see the following sections in this guide:
About Patch ManagementLearn about patch management for Apple Updates and for third-party updates.
Patch SourcesLearn about Patch Sources and how to integrate Jamf Pro with a Patch External Source.
Patch Management Software TitlesLearn about the third-party macOS software titles in Jamf Pro that can be used for patch reporting and patch notifications.
Patch PoliciesLearn how to create a patch policy to automate the distribution of a third-party macOS software update.

361
Patch PoliciesPatch policies allow you to perform updates of previously installed third-party macOS software titles. After you have configured a patch management software title, you can create a patch policy to automate the distribution of software updates. You can configure the patch policy to be installed automatically or make the policy available in Self Service for users to run on their computers.
When you create a patch policy, you specify information that enables Jamf Pro to automatically generate a list of eligible computers that need the software update. Jamf Pro continuously keeps this list updated as computers meet or fail to meet the specified conditions. You can also specify the following information for user interaction:
Whether to display notifications about the update (in Self Service, or in Self Service and Notification Center)
Whether to send users reminders that a software update is available
The amount of time to wait after the software title update is available before an update is automatically performed (called "update deadline")
After you create a patch policy, you can view the status and logs for the policy.
If a computer is in the scope of multiple patch policies for the same software title, only one policy is run for a specific title based on the following priority:
The policy with the latest software title version takes precedence.
If multiple policies are associated with the same software title version, the policy with the greater ID number will take precedence.
For example, if a computer is in scope of both of the following, only the policy with "id=3" will run:https://instancename.jamfcloud.com/patchDeployment.html?softwareTitleId=1&id=3&o=rhttps://instancename.jamfcloud.com/patchDeployment.html?softwareTitleId=1&id=2&o=r
Variables for Grace Period Messages
There are several variables that you can use to populate the grace period message displayed to users before a software title is updated.
To use a grace period variable, enter the variable into the Message field on the User Interaction tab when creating a patch policy in Jamf Pro. When the patch policy is run on a computer, the variable is replaced with the value of the corresponding attribute in Jamf Pro.
Variable Computer Information
$APP_NAMES Name of the app that must quit before the software title can be updated.
$DELAY_MINUTES Amount of time to wait before automatically quitting the app that cannot be open when a software title is updated.
$SOFTWARE_TITLE Software Title Name
Creating a Patch Policy

362
1.
2.
3.
4.
5.
6.
7.
8.
9.
Creating a Patch Policy
Requirements
To create a patch policy, you need a patch management software title version associated with a package. For more information, see .Patch Management Software Titles
Procedure
Log in to Jamf Pro.
Click at the top of the page.Computers
Click and select the software title for which you want to create a patch policy.Patch Management
Click the tab.Patch Policies
Click .New
Use the General pane to configure basic settings for the patch policy, including the display name and whether to distribute the policy by installing it automatically or by making it available in Self Service.
Note: While users can search Self Service for items to install on their computers, patch policies will not be included in the search results.
The following settings enable Jamf Pro to automatically generate the list of eligible computers:
Target Version—Choosing a target version of the software title allows Jamf Pro to add computers that have an earlier version of the targeted title installed to the list of eligible computers.
Allow Downgrade—This enables an earlier version of the software title to be installed on computers. Jamf Pro adds the computers with a later version of the targeted title installed to the list of eligible computers.
Patch Unknown Versions—This enables the targeted version of the software title to be installed on computers that have unknown versions of the title currently installed. Jamf Pro adds these computers to the list of eligible computers.
Click the tab and configure the scope of the patch policy.ScopeYou can view the list of computers that are eligible for the patch policy by clicking the eligible
link. If you add a computer that is not in the list of eligible computers, it does not receive computersthe policy until it meets the conditions defined on the General tab.
Note: For a computer to be eligible to receive a software title update, it must have the software title installed and meet the conditions on the General tab.
(Optional) Click the tab to configure the amount of time to wait before quitting apps User Interactionautomatically, and enter messages to display to users.In addition, you can customize the text displayed in the description for the policy in Self Service by using Markdown in the field (requires Self Service 10.0.0 or later).DescriptionFor information about Markdown, see the Knowledge Base article.Using Markdown to Format Text
Click .Save

363
1.
2.
3.
4.
1.
2.
3.
4.
5.
1.
2.
3.
4.
Viewing the Status of a Patch Policy
For each patch policy, you can view a list that shows the number of computers for which the policy has completed, failed, and is still remaining.
Log in to Jamf Pro.
Click at the top of the page.Computers
Click and select the software title for which you want to see the patch policy Patch Managementstatus.
Click .Patch Policies
Viewing Logs for a Patch Policy
The logs for a patch policy include a list of computers in scope of the policy and the following information for each computer:
The date/time that the log was created or updated
The status of the patch policy
The actions logged for the patch policy
Log in to Jamf Pro.
Click at the top of the page.Computers
Click and select the software title for which you want to see the patch policy logs.Patch Management
Click and select the policy you want to view logs for.Patch Policies
Click .Logs
Resetting the Retries Value
The Patch Management Retries setting allows you to customize the number of times Jamf Pro will try to deploy a patch policy if the initial attempt fails. The default value is "3" retries.
Note: This setting does not apply to patch policies made available in Self Service.
Log in to Jamf Pro.
In the top-right corner of the page, click .Settings
Click .Computer Management
In the “Computer Management” section, click .Patch Management

364
5.
6.
Click and make changes as needed.Edit
Click .Save
Related Information
For related information, see the following sections in this guide:
About Patch ManagementLearn about patch management for Apple Updates and for third-party updates.
Patch SourcesLearn about Patch Sources and how to integrate Jamf Pro with a Patch External Source.
Patch Management Software TitlesLearn about the third-party macOS software titles in Jamf Pro that can be used for patch reporting and patch notifications.
Items Available to Users in Jamf Self Service for macOSLearn about which items can be made available to users in Self Service for macOS.
365
1.
2.
3.
4.
5.
6.
7.
8.
9.
10.
11.
12.
Running Software UpdateWhen you run Software Update on computers, you can choose whether updates are installed from Apple’s Software Update server or an internal software update server.
You can run Software Update on computers by using a policy.
Note: Computers with Apple silicon (i.e., M1 chip) cannot be updated using a policy if a restart is required. Use the remote command to update the Download/Download and Install Updatescomputer. For more information, see .Remote Commands for Computers
General Requirements
To have computers install updates from an internal software update server, the software update server must be in Jamf Pro. For more information, see .Software Update Servers
Running Software Update Using a Policy
Log in to Jamf Pro.
Click at the top of the page.Computers
Click .Policies
Click .New
Use the General payload to configure basic settings for the policy, including the trigger and execution frequency.
Select the Software Updates payload and click .Configure
Specify a server for computers to install software updates from.
Use the Restart Options payload to configure settings for restarting computers.
Click the tab and configure the scope of the policy.Scope
(Optional) Click the tab and make the policy available in Self Service.Self Service
(Optional) Click the tab and configure messaging and deferral options.User Interaction
Click .Save
The policy runs on computers in the scope the next time they check in with Jamf Pro and meet the criteria in the General payload.

366
Related Information
For related information, see the following sections in this guide:
About PoliciesLearn the basics about policies.
Policy ManagementFind out how to create policies, view the plan and status for a policy, and view and flush policy logs.
Items Available to Users in Jamf Self Service for macOSFind out how to make items available to users in Jamf Self Service for macOS.
User Interaction with PoliciesFind out how to configure user interaction with policies.
For related information, see the following :Best Practice Workflow for Jamf Pro
Updating macOS Find out how to update macOS on computers by sending an MDM command to computers using a mass action.

367
Settings and Security Management for Computers
Computer Configuration ProfilesConfiguration profiles are XML files (.mobileconfig) that provide an easy way to define settings and restrictions for devices, computers, and users.
You can use Jamf Pro to create a configuration profile or you can upload a configuration profile that was created using third-party software, for example, Apple's Profile Manager or Apple Configurator.
Before creating a configuration profile, you should have basic knowledge of configuration profile payloads and settings. For more information, see the following Apple documentation:
Mobile Device Management Settings
Profile-Specific Payload Keys
Some configuration profile payloads and settings available in Jamf Pro may differ from their implementation in Apple’s tools. For more information on these settings, see the Configuration
Knowledge Base article.Profile Payload Settings Specific to Jamf Pro
When you create a computer configuration profile, you must specify the level at which to apply the profile—computer level or user level. Each level has a unique set of payloads and a few that are common to both.
There are two different ways to distribute a configuration profile: install it automatically (requires no interaction from the user) or make it available in Self Service. You can also specify the computers and users to which the profile should be applied (called “scope”).
Note: Removing a computer from the scope of a computer-level profile prompts Jamf Pro to remove the settings applied by the profile the next time the computer checks in with Jamf Pro. Removing a computer from the scope of a user-level profile prompts Jamf Pro to remove the settings applied by the profile the next time the computer checks in with Jamf Pro while that user is logged in.
Payload Variables for Configuration Profiles
There are several payload variables that you can use to populate settings in a configuration profile with attribute values stored in Jamf Pro. This allows you to create payloads containing information about each mobile device, computer, and user to which you are distributing the profile.
To use a payload variable, enter the variable into any text field when creating a configuration profile in Jamf Pro. When the profile is installed, the variable is replaced with the value of the corresponding attribute in Jamf Pro.

368
Variable Inventory Information
$COMPUTERNAME Computer Name
$SITENAME Site Name
$SITEID Site ID
$UDID UDID
$SERIALNUMBER Serial Number
$USERNAME Username associated with the computer in Jamf Pro(computer-level profiles only)Username of the user logging in to the computer(user-level profiles only)
$FULLNAME or $REALNAME Full Name
$EMAIL Email Address
$PHONE Phone Number
$POSITION Position
$DEPARTMENTNAME Department Name
$DEPARTMENTID Department ID
$BUILDINGNAME Building Name
$BUILDINGID Building ID
$ROOM Room
$MACADDRESS MAC Address
$JSSID Jamf Pro ID
$PROFILEJSSID Jamf Pro ID of the Configuration Profile
$EXTENSIONATTRIBUTE_# Extension Attribute ID Number
Note: The ID number is found in the extension attribute URL. In the example URL below, "id=2" indicates the extension attribute ID number:https://instancename.jamfcloud.com/computerExtensionAttributes.html?id=2&o=rFor more information, see .Computer Extension Attributes

369
1.
2.
3.
4.
5.
6.
7.
8.
9.
General Requirements
To install a configuration profile on a computer, you need:
A push certificate in Jamf Pro. For more information, see .Push Certificates
The and settings configured in Enable certificate-based authentication Enable push notificationsJamf Pro. For more information, see .Security Settings
(User-level profiles only) Computers that are bound to a directory service or local user accounts that have been MDM-enabled. For information, see and Directory Bindings MDM-Enabled Local User
.Accounts
Manually Creating a Configuration Profile
You can create a configuration profile using Jamf Pro.
Beginning with Jamf Pro 10.17.0, you can configure some payloads using a redesigned flow. Use switches to include the settings that will be sent to deployment targets. In the summary view, only the included or configured settings are displayed in the Jamf Pro interface. The operating system manages settings on the computer level. Some enforced settings that do not change default values will not be visible on the computer. For more information on the default settings, see this
from the Apple Developer website.documentation
Note: When upgrading to Jamf Pro 10.17.0 or later, any previously configured payloads that have been redesigned are automatically migrated. Review the settings in the Jamf Pro user interface. The migrated payloads are not redeployed to deployment targets.
Log in to Jamf Pro.
Click at the top of the page.Computers
Click .Configuration Profiles
Click .New
Use the General payload to configure basic settings, including the level at which to apply the profile and the distribution method.Only payloads and settings that apply to the selected level are displayed for the profile.To distribute the profile during enrollment using a computer PreStage enrollment, ensure you create a computer-level configuration profile.
Use the rest of the payloads to configure the settings.
Click the tab and configure the scope of the profile.ScopeTo distribute the profile during enrollment using a computer PreStage enrollment, ensure the scope of the profile contains the computers that are in the scope of the PreStage enrollment.
(Optional) If you chose to make the profile available in Self Service, click the tab to Self Serviceconfigure Self Service settings for the profile.
Click .Save

370
1.
2.
3.
4.
5.
6.
7.
8.
9.
1.
2.
3.
The profile is distributed to the deployment targets in the scope the next time they contact Jamf Pro.
Uploading a Configuration Profile
You can create a configuration profile by uploading a profile that was built using Apple’s software, for .example, Profile Manager or Apple Configurator
Note: Some payloads and settings configured with third-party are not displayed in Jamf software Pro. Although you cannot view or edit these payloads, they are still applied to the deployment targets.
Log in to Jamf Pro.
Click at the top of the page.Computers
Click .Configuration Profiles
Click and upload the configuration profile (.mobileconfig).Upload
Use the General payload to change or configure basic settings for the profile, including a distribution method.
Use the rest of the payloads to configure or edit settings as needed.
Click the tab and configure the scope of the profile.Scope
(Optional) If you chose to distribute the profile in Self Service, click the tab to configure Self ServiceSelf Service settings for the profile.
Click .Save
Downloading a Configuration Profile
If you want to view the contents of a configuration profile for troubleshooting purposes, you can download the profile (.mobileconfig) from Jamf Pro.
Log in to Jamf Pro.
Click at the top of the page.Computers
Click .Configuration Profiles

371
4.
5.
1.
2.
3.
4.
5.
6.
Click the configuration profile you want to download.
Click .Download
The profile downloads immediately.
Viewing the Status of a Configuration Profile
For each configuration profile, you can view the number of the deployment targets with a status of Complete, Remaining, or Failed for the profile installation.
Note: Depending on your system configuration, status data may not be available for profiles installed using Jamf Pro 9.63 or earlier.
Log in to Jamf Pro.
Click at the top of the page.Computers
Click .Configuration ProfilesA list of configuration profiles is displayed.For each profile, you can view the number of the deployment targets for which the profile installation has a Completed, Remaining, or Failed status.
Note: If a computer becomes unmanaged after a profile is successfully distributed to it, the profile will continue to be displayed in the Completed column.
To view a list of deployment targets with a status of Complete, Remaining, or Failed for the profile
installation, click the number displayed in the corresponding column. Then click in the top-Backleft corner of the pane.
To view logs for a configuration profile, click in the corresponding row. For a different date Viewrange, specify the starting and ending dates using the pop-up calendars.Date Range
Click in the top-left corner of the pane.Back
Troubleshooting a Failed Status of a Configuration Profile
If a profile fails to install on a compatible computer, Jamf Pro will automatically retry the deployment every six hours. To manually force the attempt, use the “Send blank push” management command. To access this feature, navigate to the tab in the inventory of a computer and click Management
.Management Commands
If a profile fails to install on an incompatible computer (e.g., when the profile includes settings that require User Approved MDM), the computer must first meet the profile requirements for the retry attempt to happen.

372
Related Information
For related information, see the following sections in this guide:
Viewing the Pending Management Commands for a ComputerFind out how to view and cancel pending computer configuration profile installations and removals for a computer.
Computer History InformationFind out how to view all completed, pending, and failed computer configuration profile installations and removals for a computer.
Viewing Configuration Profiles for a ComputerFind out how to view the computer configuration profiles in the scope for a computer.
Items Available to Users in Jamf Self Service for macOSLearn about which items can be made available to users in Self Service for macOS.
Computer PreStage EnrollmentsLearn how to distribute configuration profiles during enrollment.
For related information about uploading custom configuration profiles, see the Deploying Custom Knowledge Base article.Configuration Profiles using Jamf Pro
For related information about distributing certificates via a configuration profile, see the Enabling technical paper.Jamf Pro as SCEP Proxy
https://www.jamf.com/jamf-nation/articles/648/deploying-custom-configuration-profiles-using-jamf-pro

373
Remote Commands for ComputersThe remote commands available in Jamf Pro allow you to remotely perform tasks on computers.
You can send a remote command to a single computer. Some commands can also be sent to multiple computers at once using mass actions. For more information, see Mass Actions for
.Computers
Note: The remote commands available for a particular computer vary depending on the computer's OS version. For more information, see .Computer Management Capabilities
The following table describes the remote commands that you can send from Jamf Pro:
Remote Command Description
Available as a Mass Action Requirements
Lock Computer
Logs the user out of the computer, restarts the computer, and then locks the computer(Optional) Displays a message on the computer when it locksTo unlock the computer, the user must enter the passcode that you specified when you sent the Lock Computer command.
Note: On computers with Apple silicon (i.e., M1 chip), the passcode configured in the "Lock computer" command is not set. The computer reboots to the Activation screen in macOS Recovery with the options to restart, shutdown, activate, or erase the computer. To activate the computer, the user must authenticate with an administrator account that has a SecureToken. If there are no administrators with a SecureToken, activation cannot complete and the computer must be erased. This activation step requires an internet connection. For more information, see Remote wipe
from Apple's and remote locksupport website.
--

374
Remote Command Description
Available as a Mass Action Requirements
Remove MDM Profile
Removes the MDM profile from the computer, along with any configuration profiles that were distributed with Jamf ProIf the MDM profile is removed, you can no longer send remote commands or distribute configuration profiles to the computer.
Note: Removing the MDM profile from a computer does not remove the computer from Jamf Pro or change its inventory information.
--
Renew MDM Profile
Renews the MDM profile on the computer, along with the device identity certificate. The device identity certificate has a default expiration period of two years.
Note: The Renew MDM Profile remote command is automatically issued when the built-in CA is renewed. The MDM profile will be renewed during the next computer check-in. For more information, see "Renewing the Built-in CA" in PKI
.Certificates
--

375
Remote Command Description
Available as a Mass Action Requirements
Wipe Computer
Permanently erases all the data on the computer, and sets a passcode when required by the computer hardware type.
Note: When the Wipe Computer command is sent to a computer with macOS 10.15 or later with an Apple T2 Security Chip, or a computer with Apple silicon (i.e., M1 chip), the computer will be erased and no passcode will be set.
Before macOS can be reinstalled, the user must enter the passcode that was specified with the Wipe Computer command, if required. The passcode is saved in the computer's Management Command history for reference.To reinstall macOS, methods may vary depending on the hardware types. For detailed information, see the following articles from Apple's support website:
About macOS Recovery on Intel-based Mac computersUse macOS Recovery on Apple siliconRevive or restore a Mac with Apple silicon with Apple Configurator 2
Note: Wiping a computer does not remove the computer from Jamf Pro or change its inventory information. After the command is acknowledged by the computer, the computer will report in the inventory as unmanaged.
--
Send Blank Push
Sends a blank push notification, prompting the computer to check in with Apple Push Notification service (APNs)
--

376
Remote Command Description
Available as a Mass Action Requirements
Download/Download and Install Updates
Updates the OS version and built-in apps on the computerYou can choose to download the update for users to install, or to download and install the update and restart computers after installation.
Notes:When sending the command via a mass action, the Update OS
option version and built-in appsmust be selected.On computers with Apple silicon (i.e., M1 chip), users may be prompted to authenticate before an update can be installed.
macOS 10.11 or laterSupervised or enrolled via a PreStage enrollment
Note: There are additional requirements for computers with Apple silicon (i.e., M1 chip) if you want the update to be installed automatically without user authentication:
Bootstrap token for target computers escrowed with Jamf ProThe Allow remote management of kernel extensions and automatic
software updatesoption enabled in the Startup Security Utility (in macOS Recovery)For more information about how to enable this setting, see Change startup disk security settings on a Mac
with Apple siliconfrom Apple's support website.Alternatively, enrolling computers with Jamf Pro via a PreStage enrollment can automatically enable this setting.
Unlock User Unlocks a local user account that has been locked due to too many failed password attempts
macOS 10.13 or laterSupervised or enrolled via a PreStage enrollment

377
Remote Command Description
Available as a Mass Action Requirements
Remove User
Removes a user that has an active account on the computer
Note: The Remove User command cannot remove a user if they are the last user with a SecureToken granted.
macOS 10.13 or laterSupervised or enrolled via a PreStage enrollment
Enable/Disable Bluetooth
Enables/disables Bluetooth on the computer
Note: When sending the command via a mass action, the Set Bluetoothoption must be selected.
macOS 10.13.4 or later
Enable/Disable Remote Desktop
Enables/disables Remote Desktop on the computer
Note: When sending the command via a mass action, the Set Remote
option must be selected.Desktop
macOS 10.14.4 or later
Set Activation Lock
Allow user to enable Activation Lock directly on the computerDisable and prevent Activation LockFor more information, see theLeveraging Apple's Activation Lock
Knowledge Base Feature with Jamf Proarticle.
Supervised computers with the Apple T2 Security Chip or Apple silicon (i.e., M1 chip)In Apple School Manager or Apple Business Manager
For more information on macOS compatibility, see the following articles from Apple's support website:
About Activation Lock on your MacUsing Activation Lock for Apple devices

378
1.
2.
3.
4.
5.
Sending a Remote Command to a Computer
Requirements
A push certificate in Jamf ProFor more information, see .Push Certificates
The and settings configuredEnable certificate-based authentication Enable push notificationsFor more information, see .Security Settings
Procedure
Log in to Jamf Pro.
Click at the top of the page.Computers
Perform a simple or advanced computer search.
Click the computer you want to send the remote command to.
If you performed a simple search for an item other than computers, you must click next to Expand an item to view the computers related to that item.
Click the tab, and then click the button for the remote command that you want to Managementsend.
Note: To send the Unlock User or Remove User remote command, navigate to the Local User Accounts category in inventory information for the computer and click for a user.Manage
Depending on the command selected, additional options may be available.
The remote command runs on the computer the next time the computer checks in with Jamf Pro.
After the command is sent, you can do the following on the tab:History
To view the status of a remote command, use the Management History pane to view completed, pending, or failed commands.
To cancel a remote command, click . Find the command you want to cancel, Pending Commandsand click .Cancel
Troubleshooting a Failed Status of a Remote Command
If a remote command reported a failed status, Jamf Pro will automatically resend the command every six hours for the compatible computers. To manually force the attempt, use the “Send blank push” management command. To access this feature, navigate to the tab in the inventory of a Managementcomputer and click .Management Commands

379
1.
2.
3.
4.
5.
ScriptsYou can manage and run scripts in your environment by using Jamf Pro or Jamf Admin.
When you add a script to Jamf Pro or Jamf Admin, you can configure the following script settings:
Add the script to a category. For more information, see .Categories
Choose a priority for running the script during imaging.
Enter parameter labels.
Specify operating system requirements for running the script.
When you add, edit, or delete a script in Jamf Admin, the changes are reflected in Jamf Pro and vice versa.
Script Storage
How you manage your scripts depends on where they are stored. Consider the following storage options:
As data in the Jamf Pro database—Before you can run a script in this type of environment, the script must exist in the database. Scripts are automatically added to the database after they are added to Jamf Pro or Jamf Admin.
As files on your distribution points—Before you can run a script in this type of environment, the script must exist on the distribution point you plan to deploy it from and in Jamf Pro. You can add the script to the principal distribution point by adding it to Jamf Admin. Then you can add the script to other distribution points via replication.
For more information about migrating the scripts on your principal distribution point, see the Knowledge Base article.Migrating Packages and Scripts
Adding a Script to Jamf Pro
If your environment is one in which scripts are stored in the Jamf Pro database, you can add a script to Jamf Pro using the script editor.
Log in to Jamf Pro.
In the top-right corner of the page, click .Settings
Click .Computer Management
In the “Computer Management” section, click .Scripts
Click .New

380
6.
7.
8.
9.
10.
Use the General pane to configure basic settings for the script, including the display name and category.
Note: If you do not add the script to a category, Jamf Admin displays the script in blue text in the Unknown category.
Click the tab and enter the script contents in the script editor. You can use the settings on the Scripttab to configure syntax highlighting and theme colors in the script editor.
Click the tab and configure additional settings for the script, including the priority.Options
(Optional) Click the tab and configure operating system requirements for the script.Limitations
Click .Save
Adding a Script to Jamf Admin
Requirements
To add a script to Jamf Admin, the script file must be non-compiled and in one of the following formats:
Perl (.pl)
Bash (.sh)
Shell (.sh)
Non-compiled AppleScript (.applescript)
C Shell (.csh)
Zsh (.zsh)
Korn Shell (.ksh)
Tool Command Language (.tcl)
Hypertext Preprocessor (.php)
Ruby (.rb)
Python (.py)
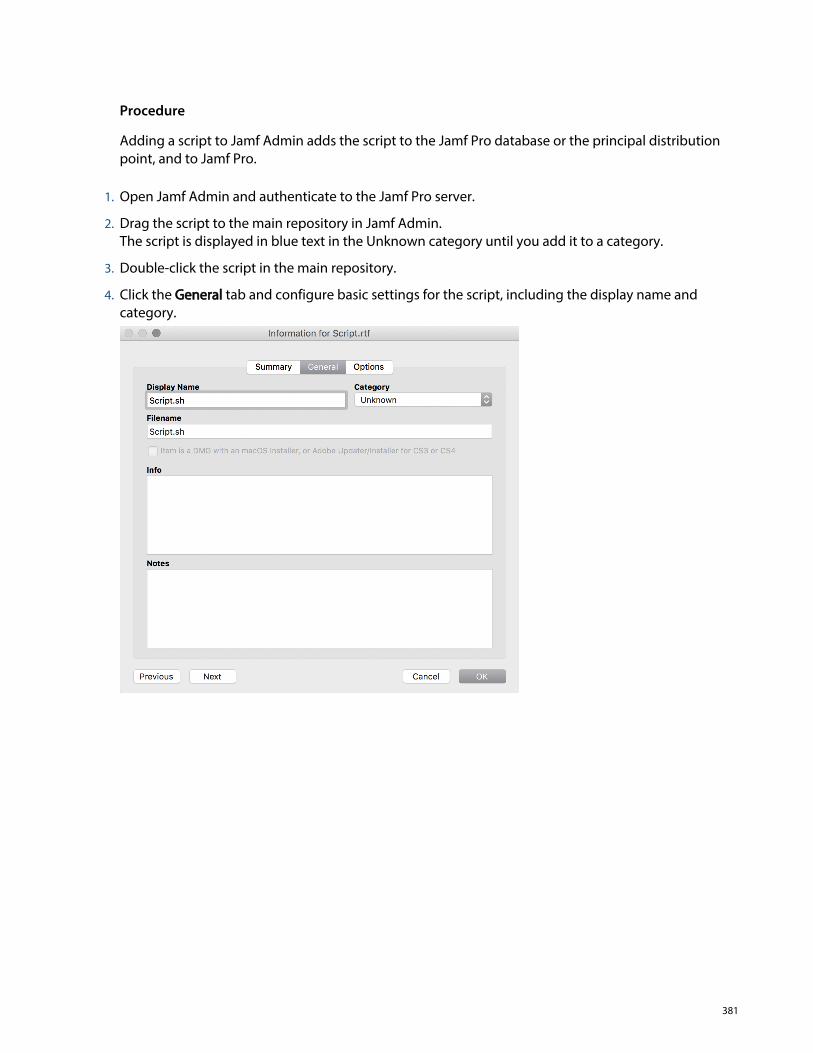
381
1.
2.
3.
4.
Procedure
Adding a script to Jamf Admin adds the script to the Jamf Pro database or the principal distribution point, and to Jamf Pro.
Open Jamf Admin and authenticate to the Jamf Pro server.
Drag the script to the main repository in Jamf Admin.The script is displayed in blue text in the Unknown category until you add it to a category.
Double-click the script in the main repository.
Click the tab and configure basic settings for the script, including the display name and Generalcategory.

382
5.
6.
1.
2.
3.
Click the tab and configure additional settings for the script, including the priority and Optionsparameter labels.
Click .OK
The script is now added to Jamf Pro and the Jamf Pro database or the principal distribution point.
Editing or Deleting a Script Using Jamf Admin
Open Jamf Admin and authenticate to the Jamf Pro server.
In the main repository, select the script you want to edit or delete.
Do one of the following:
To edit the script, double-click it and make changes as needed. Then click .OK
To delete the script, click , and then click again to confirm.Delete Delete
If the script is stored in the Jamf Pro database, the edit or delete action is applied immediately.
If the script is stored on your distribution points, the edit or delete action is applied immediately on the principal distribution point. The action is applied to your other distribution points when replication occurs.

383
1.
2.
3.
4.
5.
6.
7.
8.
9.
10.
11.
12.
13.
Running Scripts Using a Policy
When you run a script, you can choose a priority for running the script. You can also enter parameter values for the script.
Note: When running a script that contains HTML tags in the output, the tags are not rendered in policy logs.
Requirements
To run a script on computers, the script must be stored on the distribution point you plan to deploy it from and in Jamf Pro, or in the Jamf Pro database.
Procedure
Log in to Jamf Pro.
Click the tab at the top of the page.Computers
Click .Policies
Click .New
Use the General payload to configure basic settings for the policy, including the trigger and execution frequency.
Select the Scripts payload and click .Configure
Click for the script you want to run.Add
Configure the settings for the script.
Use the Restart Options payload to configure settings for restarting computers.
Click the tab and configure the scope of the policy.Scope
(Optional) Click the tab and make the policy available in Self Service.Self Service
(Optional) Click the tab and configure messaging and deferral options.User Interaction
Click .Save
The policy runs on computers in the scope the next time they check in with Jamf Pro and meet the criteria in the General payload.

384
Related Information
For related information, see the following sections in this guide:
About PoliciesLearn the basics about policies.
Policy ManagementFind out how to create policies, view the plan and status for a policy, and view and flush policy logs.
Making Items Available to Users in Jamf Self Service for macOSLearn how to make scripts available to users in Self Service for macOS.

385
1.
2.
3.
4.
5.
PrintersYou can manage printers in your environment by adding them to Jamf Pro or Jamf Admin.
When adding a printer, you can configure the following settings:
Add the printer to a category.
Choose whether or not the printer is set as the default when mapped during imaging.
Specify an operating system requirement for mapping the printer.
Keep the following in mind:
When you add a printer to Jamf Pro, you manually specify information about the printer, such as the CUPS name and device URI.
When you add a printer to Jamf Admin, you choose from a list of printers that are on the computer running Jamf Admin.
When you add, edit, or delete a printer in Jamf Admin, the changes are reflected in Jamf Pro and vice versa.
Best Practice: Deploying Printers
Best practice workflows cover common scenarios; however, the following recommendations may not apply in your environment.
On an enrolled computer that has the Jamf Admin application installed, download and install the drivers for the printer you want to deploy.
Use > to add and configure the printer, including any System Preferences Printers & Scannerssettings you want to deploy to the target computers (e.g., a descriptive name, a subnet, or additional software to be used with the printer).
Use Jamf Admin to add the printer to Jamf Pro.
Use Jamf Admin to upload the printer driver to Jamf Pro. If your main distribution point is a cloud distribution point, you can also upload the printer using the Jamf Pro web interface >
> .Settings PackagesThe printer driver must be a PKG file. You may need to extract the PKG file from the DMG Note:
file.
In Jamf Pro, create a policy to deploy the printer by doing the following:
In the Packages payload, select the printer driver PKG file uploaded in step 4.
In the Printers payload, select the printer added in step 3.
Configure the General payload and the Scope tab as needed.
The policy will run on computers in the scope when they meet the specified conditions, and the printer will be installed.

386
1.
2.
3.
4.
5.
6.
7.
8.
9.
1.
2.
3.
4.
Adding a Printer to Jamf Pro
Log in to Jamf Pro.
In the top-right corner of the page, click .Settings
Click .Computer Management
In the “Computer Management” section, click .Printers
Click .New
Use the General pane to configure basic settings for the printer, including the display name and category.
Click the tab and specify information about the printer, including the CUPS name and Definitiondevice URI.
(Optional) Click the tab and specify an operating system requirement.Limitations
Click .Save
Adding a Printer to Jamf Admin
Requirements
To add a printer to Jamf Admin, the printer must be installed on the computer using Jamf Admin.
Procedure
Open Jamf Admin and authenticate to the Jamf Pro server.
Click .Add Printers
If prompted, authenticate locally.
Select the checkbox next to each printer you want to add.

387
4.
5.
6.
7.
8.
9.
10.
(Optional) Choose a category to add printers to.
Click .Add
Select the printer in the main repository and double-click it.
Click the tab and configure basic settings for the printer, including the display name and Generalcategory.
Click the tab.Options
Choose whether or not the printer is set as the default when mapped during imaging, and configure the operating system requirement.

388
10.
11.
1.
2.
3.
Click .OK
Editing or Deleting a Printer in Jamf Admin
Open Jamf Admin and authenticate to the Jamf Pro server.
In the main repository, select the printer you want to edit or delete.
Do one of the following:
To edit the printer, double-click it and make changes as needed. Then click .OK
To delete the printer, click and then click again to confirm.Delete , Delete
You can map or unmap printers on computers by using a policy.
When you map a printer, you can choose whether or not to make the printer the default.
Mapping or Unmapping a Printer Using a Policy
Requirements
To map or unmap a printer, the printer must be added to Jamf Admin or Jamf Pro.

389
1.
2.
3.
4.
5.
6.
7.
8.
9.
10.
11.
12.
13.
14.
Procedure
Log in to Jamf Pro.
Click at the top of the page.Computers
Click .Policies
Click .New
Use the General payload to configure basic settings for the policy, including the trigger and execution frequency.
Select the Printers payload and click .Configure
Click across from the printer you want to map or unmap.Add
Choose "Map" or "Unmap" from the pop-up menu.Action
(Optional) If you are mapping the printer, make it the default printer by selecting the Set as Defaultcheckbox.
Use the Restart Options payload to configure settings for restarting computers.
Click the tab and configure the scope of the policy.Scope
(Optional) Click the tab and make the policy available in Self Service.Self Service
(Optional) Click the tab and configure messaging and deferral options.User Interaction
Click .Save
The policy runs on computers in the scope the next time they check in with Jamf Pro and meet the criteria in the General payload.
Related Information
For related information, see the following sections in this guide:
Smart GroupsYou can create smart computer groups based on mapped printers.
About PoliciesLearn the basics about policies.
Policy ManagementFind out how to create policies, view the plan and status of a policy, and view and flush policy logs.
Making Items Available to Users in Jamf Self Service for macOSLearn how to make printers available to users in Self Service for macOS.
For related information about packaging printer drivers, see the Knowledge Packaging Printer DriversBase article.

390
1.
2.
3.
4.
5.
6.
7.
1.
2.
Dock ItemsYou can manage Dock items on computers by adding them to Jamf Pro or Jamf Admin.
Keep the following in mind:
When you add a Dock item to Jamf Admin, you choose from a list of Dock items that are on the computer running Jamf Admin.
When you add a Dock item to Jamf Pro, you manually specify information about the Dock item.
When you add, edit, or delete a Dock item in Jamf Admin, the changes are reflected in Jamf Pro and vice versa.
Adding a Dock Item to Jamf Pro
Log in to Jamf Pro.
In the top-right corner of the page, click .Settings
Click .Computer Management
In the “Computer Management” section, click .Dock Items
Click .New
Configure the Dock item using the settings on the pane.
Click .Save
Adding a Dock Item to Jamf Admin
Requirements
To add a Dock item to Jamf Admin, the Dock item must exist on the computer using Jamf Admin.
Procedure
Open Jamf Admin and authenticate to the Jamf Pro server.
Click .Add Dock Items

391
3.
4.
1.
2.
3.
1.
2.
Select the checkbox next to each Dock item you want to add.
Click .Add
Deleting a Dock Item in Jamf Admin
Open Jamf Admin and authenticate to the Jamf Pro server.
In the main repository, select the Dock item you want to delete.
Click , and then click again to confirm.Delete Delete
Adding or Removing a Dock Item from Computers Using a Policy
You can add or remove Dock items on computers by using a policy.
When you add a Dock item on computers, you can choose whether to add it to the beginning or the end of the Dock.
Requirements
To add or remove a Dock item on computers, the Dock item must be added to Jamf Admin or Jamf Pro.
Procedure
Log in to Jamf Pro.
Click at the top of the page.Computers

392
3.
4.
5.
6.
7.
8.
9.
10.
11.
12.
13.
Click .Policies
Click .New
Use the General payload to configure basic settings for the policy, including the trigger and execution frequency.
Select the Dock Items payload and click .Configure
Click for the Dock item you want to add or remove.Add
Choose "Add to Beginning of Dock", "Add to End of Dock", or "Remove from Dock" from the Actionpop-up menu.
Use the Restart Options payload to configure settings for restarting computers.
Click the tab and configure the scope of the policy.Scope
(Optional) Click the tab and make the policy available in Self Service.Self Service
(Optional) Click the tab and configure messaging and deferral options.User Interaction
Click .Save
The policy runs on computers in the scope the next time they check in with Jamf Pro and meet the criteria in the General payload.
Related Information
For related information, see the following sections in this guide:
About PoliciesLearn the basics about policies.
Policy ManagementFind out how to create policies, view the plan and status of a policy, and view and flush policy logs.
Making Items Available to Users in Jamf Self Service for macOSLearn how make Dock items available to users in Self Service for macOS.

393
1.
2.
3.
4.
5.
6.
7.
8.
Local AccountsYou can use a policy to perform the following local account management tasks:
Create a new account.
Delete an existing account.
Reset the password for an existing account.
Disable an existing account for FileVault.
When you create a new account, you can also do the following:
Specify the password and password hint.
Specify a location for the home directory.
Configure the account picture.
Give the user administrator privileges to the computer.
Enable the account for FileVault.
When you delete an existing account, you can permanently delete the home directory or specify an archive location.
Administering Local Accounts Using a Policy
Requirements
(macOS 10.14 or later only) To reset an existing account password, the SecureToken for the account must be disabled.
(macOS 10.13 or later only) To enable the account for FileVault, a valid management account with a SecureToken is required to add the new user.
For more information on SecureToken, see in Apple's Using SecureToken Deployment Reference for .Mac
Procedure
Log in to Jamf Pro.
Click at the top of the page.Computers
Click .Policies
Click .New
Use the General payload to configure basic settings for the policy, including the trigger and execution frequency.
Select the Local Accounts payload and click .Configure
Choose an action from the pop-up menu.Action

394
8.
9.
10.
11.
12.
13.
Configure the action using the options on the pane.
Use the Restart Options payload to configure settings for restarting computers.
Click the tab and configure the scope of the policy.Scope
(Optional) Click the tab and make the policy available in Self Service.Self Service
(Optional) Click the tab and configure messaging and deferral options.User Interaction
Click .Save
The policy runs on computers in the scope the next time they check in with Jamf Pro and meet the criteria in the General payload.
Related Information
For related information, see the following sections in this guide:
Smart GroupsYou can create smart computer groups based on local user accounts.
About PoliciesLearn the basics about policies.
Policy ManagementFind out how to create a policy, view the plan and status of a policy, and view and flush policy logs.
Management AccountsFind out how to change or reset the management account password, and enable or disable the management account for FileVault.
For related information about creating local accounts using Jamf Connect, see the Account Creationsection of the .Jamf Connect Administrator's Guide

395
1.
2.
3.
4.
5.
Management AccountsYou can use a policy to administer the management account.
Using a policy to administer the management account allows you to do the following:
Change the account password—This option changes the management account's password, as well as the account's password and FileVault password. It is recommended that you use this option if the management account's login keychain password matches the account password stored in Jamf Pro.
Reset the account password—This option only changes the management account's password. This option does not change the management account's login keychain password or FileVault password. For computers with macOS 10.14 or later, you must disable the management account SecureToken to reset the password. For more information on SecureToken, see Using SecureTokenin Apple's Deployment Reference for Mac.
Note: If the management account's login keychain password does not match the account password stored in Jamf Pro, you must use the option when Reset Account Passwordadministering the management account using a policy or the policy will fail.
Enable the user for FileVault
Note: For computers with macOS 10.13 or later, the computer must have a valid personal (also known as "individual") recovery key that matches the recovery key escrowed in Jamf Pro.
Disable the user for FileVault
Important: When configuring the management account password settings, selecting the "Randomly generate new password" option for maximum security is recommended.
Administering the Management Account Using a Policy
You can change or reset the management account password using a policy. You can also enable or disable the management account for FileVault.
Log in to Jamf Pro.
Click the tab at the top of the page.Computers
Click .Policies
Click New .
Use the General payload to configure basic settings for the policy, including the trigger and execution frequency.

396
6.
7.
8.
9.
10.
11.
Select the Management Account payload and select an action using the options on the pane.
Important: When configuring the management account password settings, selecting the "Randomly generate new password" option for maximum security is recommended.
Use the Restart Options payload to configure settings for restarting computers.
Click the tab and configure the scope of the policy.Scope
(Optional) Click the tab and make the policy available in Self Service.Self Service
(Optional) Click the tab and configure messaging and deferral options.User Interaction
Click .Save
The policy runs on computers in the scope the next time they check in with Jamf Pro and meet the criteria in the General payload.
Related Information
For related information, see the following sections in this guide:
About PoliciesLearn the basics about policies.
Policy ManagementFind out how to create a policy, view the plan and status of a policy, and view and flush policy logs.
Computer Enrollment MethodsFind out how to create the management account and what tasks the management account performs.

397
1.
2.
3.
4.
5.
6.
7.
8.
9.
Directory BindingsYou can add and manage the following types of directory bindings using Jamf Pro:
Microsoft's Active Directory
Apple's Open Directory
PowerBroker Identity Services (formerly called “Likewise”)
ADmitMac
Centrify
Adding a Directory Binding
Log in to Jamf Pro.
In the top-right corner of the page, click .Settings
Click .Computer Management
In the “Computer Management” section, click .Directory Bindings
Click .New
Choose the type of directory binding you want to add and click .Next
Configure the directory binding using the tabs and options provided.The tabs and options provided match the ones in the third-party directory service software.
(Active Directory and ADmitMac only) To create an account for users to log into their computer when it is connected to another network, select the checkbox.Create mobile account at login
Note: An account synchronization tool such as Jamf Connect, NoMAD Pro, or Apple’s Enterprise Connect can be used to sync computers with the directory. For more information about Jamf Connect, see the .Jamf Connect Administrator's Guide
Click .Save

398
1.
2.
3.
4.
5.
6.
7.
8.
9.
10.
11.
12.
Binding Computers to a Directory Service Using a Policy
You can bind computers to a directory service using a policy or a PreStage enrollment. For more information about how to bind a computer to a directory service using a PreStage enrollment, see
.Computer PreStage Enrollments
Requirements
To bind computers to a directory service, you need a directory binding in Jamf Pro.
Procedure
Log in to Jamf Pro.
Click at the top of the page.Computers
Click .Policies
Click .New
Use the General payload to configure basic settings for the policy, including the trigger and execution frequency.
Select the Directory Bindings payload and click .Configure
Click for the directory service you want to bind to.Add
Use the Restart Options payload to configure settings for restarting computers.
Click the tab and configure the scope of the policy.Scope
(Optional) Click the tab and make the policy available in Self Service.Self Service
(Optional) Click the tab and configure messaging and deferral options.User Interaction
Click .Save
The policy runs on computers in the scope the next time they check in with Jamf Pro and meet the criteria in the General payload.
Related Information
For related information, see the following sections in this guide.
About PoliciesLearn the basics about policies.
Policy ManagementFind out how to create a policy, view the plan and status of a policy, and view and flush policy logs.

399
Disk Encryption ConfigurationsYou can use disk encryption configuration in Jamf Pro to manage and enable FileVault on computers.
You can set the following with a disk encryption configuration:
The type of recovery key to use for recovering encrypted data. There are three recovery key options you can choose from:
Individual (also known as “Personal”)—Uses a unique alphanumeric recovery key for each computer. The personal recovery key is generated on the computer and sent back to Jamf Pro to be escrowed when the encryption takes place.Institutional—Uses a shared recovery key. This requires you to create the recovery key with Keychain Access and upload it to Jamf Pro for storage.Individual and Institutional—Uses both types of recovery keys.
The user for which to enable FileVault. You can use one of the following options:
Management Account—Makes the management account on the computer the enabled FileVault user.
Note: The management account cannot be used to enable FileVault for computers with macOS 10.13 or later if the account was created with Jamf Pro due to the lack of a SecureToken.
If you make the management account the enabled FileVault user on computers with macOS 10.9–10.12.x, or macOS 10.14 or later, you will be able to issue a new recovery key to those computers later if necessary.Current or Next User—Makes the user that is logged in to the computer when the encryption takes place the enabled FileVault user. If no user is logged in, the next user to log in becomes the enabled FileVault user.
The event that activates FileVault depends on the enabled FileVault user specified in the disk encryption configuration. Consider the following scenarios:
If the enabled user is , FileVault is activated on a computer the next time the Management Accountcomputer restarts.
If the enabled user is , FileVault is activated on a computer the next time the Current or Next Usercurrent user logs out or the computer restarts. You can also configure the policy to defer FileVault enablement until after multiple user logins have occurred.

400
1.
2.
3.
4.
5.
6.
7.
Bootstrap Tokens on macOS 11 or Later
If you are using Jamf Pro to escrow a Bootstrap Token on computers with macOS 11 or later, all account types can receive a SecureToken the first time a user logs in. This allows you to enable FileVault for any account type.
For more information about escrowing a Bootstrap Token with Jamf Pro, see the Manually Knowledge Base article.Leveraging Apple's Bootstrap Token Functionality
For more information about Bootstrap Token and SecureToken on macOS, see Using Secure and in Apple's .Bootstrap tokens in deployments Deployment Reference for Mac
Creating a Disk Encryption Configuration
Requirements
To use either the “Institutional” recovery key or the “Individual and Institutional” recovery key options in the disk encryption configuration, you must first create and export a recovery key using Keychain Access. For more information, see the in the Creating and Exporting an Institutional Recovery Key
technical paper.Administering FileVault on macOS 10.14 or Later with Jamf Pro
Procedure
Log in to Jamf Pro.
In the top-right corner of the page, click .Settings
Click .Computer Management
In the “Computer Management” section, click .Disk Encryption Configurations
Click .New
Configure the disk encryption configuration using the fields and options on the pane.
Click .Save
Your disk encryption configuration can now be deployed to computers.

401
1.
2.
3.
4.
5.
6.
7.
8.
9.
10.
11.
12.
13.
14.
Deploying a Disk Encryption Configuration Using a Policy
Requirements
To enable FileVault on a computer, the computer must be running macOS 10.8 or later and have a “Recovery HD” partition.
Procedure
Log in to Jamf Pro.
Click at the top of the page.Computers
Click .Policies
Click .New
Use the General payload to configure basic settings for the policy, including the trigger and execution frequency.
Select the Disk Encryption payload and click .Configure
Choose "Apply Disk Encryption Configuration" from the pop-up menu.Action
Choose the disk encryption configuration you want to deploy from the Disk Encryption Configurationpop-up menu.
Note: Options are only displayed in the Disk Encryption Configuration pop-up menu if one or more configurations are configured in Jamf Pro.
Choose an event from the pop-up menu to specify when users must enable disk Require FileVault2encryption.
Use the Restart Options payload to configure settings for restarting computers.
Click the tab and configure the scope of the policy.Scope
(Optional) Click the tab and make the policy available in Self Service.Self Service
(Optional) Click the tab and configure messaging and deferral options.User Interaction
Click .Save
The policy is deployed to computers the next time they check-in with Jamf Pro. FileVault will be enabled for the user selected in the disk encryption configuration.
Issuing a New FileVault Recovery Key Using a Policy
You can use a policy to issue a new FileVault recovery key to computers with macOS 10.9–10.12.x, or macOS 10.14 or later that are FileVault-enabled.
This allows you to do the following:

402
Update the recovery key on computers on a regular schedule, without needing to decrypt and then re-encrypt the computers.
Replace a personal (also known as "individual") recovery key that has been reported as invalid and does not match the recovery key escrowed in Jamf Pro.
Note: You can create a smart group to verify the recovery key on computers on a regular basis. For information on FileVault smart group criteria, see the Smart Group and Advanced Search Criteria
Knowledge Base article.for FileVault 2 and Legacy FileVault

403
1.
2.
3.
4.
5.
6.
7.
8.
Requirements
To issue a new personal recovery key to a computer, the computer must have the following:
macOS 10.9–10.12.x or macOS 10.14 or later
A “Recovery HD” partition
FileVault enabled
One of the following two conditions met:
The management account configured as the enabled FileVault userAn existing, valid personal recovery key that matches the key stored in Jamf Pro
To issue a new institutional recovery key to a computer, the computer must have the following:
macOS 10.9–10.12.x
A “Recovery HD” partition
FileVault enabled
The management account configured as the enabled FileVault user
Procedure
Log in to Jamf Pro.
Click at the top of the page.Computers
Click .Policies
Click .New
Use the General payload to configure basic settings for the policy, including the trigger and execution frequency.
Select the Disk Encryption payload and click .Configure
Choose "Issue New Recovery Key" from the pop-up menu.Action
Select the type of recovery key you want to issue:
Individual—A new personal (also known as "individual") recovery key is generated on each computer and then submitted to Jamf Pro for storage.
Institutional—A new institutional recovery key is deployed to computers and stored in Jamf Pro.To issue a new institutional recovery key, you must choose the disk encryption configuration that contains the institutional recovery key you want to use.
Individual and Institutional—Issues both types of recovery keys to computers.

404
9.
10.
11.
12.
13.
Use the Restart Options payload to configure settings for restarting computers.
Click the tab and configure the scope of the policy.Scope
(Optional) Click the tab and make the policy available in Self Service.Self Service
(Optional) Click the tab and configure messaging and deferral options.User Interaction
Click .Save
Related Information
For related information, see the following sections in this guide:
Viewing the FileVault 2 Recovery Key for a ComputerFind out how to view the FileVault recovery keys for a computer.
Smart GroupsYou can create smart computer groups based on criteria for FileVault.
About PoliciesLearn the basics about policies.
Policy ManagementFind out how to create a policy, view the plan and status of a policy, and view and flush policy logs.
For related information about smart group and advanced search criteria related to FileVault, see the Knowledge Base Smart Group and Advanced Search Criteria for FileVault 2 and Legacy FileVault
article.
For related information about administering FileVault, see the Administering FileVault on macOS technical paper.10.14 or Later with Jamf Pro

405
1.
2.
3.
4.
5.
6.
7.
8.
9.
10.
11.
12.
Setting or Removing an EFI PasswordTo ensure the security of managed computers, you can use a policy to set or remove an Open Firmware/EFI password.
Requirement
Target computers with an Intel processor.
Note: On Mac computers with Apple silicon, enable FileVault to require users to enter a password on start up from macOS recovery or a different startup disk.
Procedure
Log in to Jamf Pro.
Click at the top of the page.Computers
Click .Policies
Click .New
Use the General payload to configure basic settings for the policy, including the trigger and execution frequency.
Select the EFI Password payload and click .Configure
Do one of the following:
To set an Open Firmware/EFI password, select , and then enter and verify the Set Passwordpassword.
To remove an Open Firmware/EFI password, select , and then enter and verify Remove Passwordthe current password.
Use the Restart Options payload to configure settings for restarting computers.
Click the tab and configure the scope of the policy.Scope
(Optional) Click the tab and make the policy available in Self Service.Self Service
(Optional) Click the tab and configure messaging and deferral options.User Interaction
Click .Save
The policy runs on computers in the scope the next time they check in with Jamf Pro and meet the criteria in the General payload.
Related Information
For related information, see the following sections in this guide:

406
About PoliciesLearn the basics about policies.
Policy ManagementFind out how to create a policy, view the plan and status of a policy, and view and flush policy logs.
For related information about firmware passwords on Intel-based Mac computers, see the Set a article from Apple's support website.firmware password on your Mac

407
1.
2.
3.
4.
5.
6.
Screen SharingScreen sharing allows you to remotely view and control the screen of another computer. You can allow the end user to see the screen sharing session, or you can hide the screen sharing session so that the user is not interrupted.
General Requirements
To initiate screen sharing from Jamf Remote, you need to do the following:
Enable remote management by having users select the checkbox in System Screen SharingPreferences.
Note: Because of increased user data protections with macOS 10.14 or later, you cannot enable remote management remotely using the SSH protocol.
Ensure the computer running Jamf Remote and the computer being remotely managed are on the same network.
How Screen Sharing Works
Jamf Pro uses the management account to screen share with Jamf Remote. When a screen sharing session is initiated from Jamf Remote, the following steps are performed to start the screen sharing session:
Jamf Remote creates an SSH connection to the target computer.
Jamf Remote checks the target computer for the most current version of the jamf binary.If the jamf binary is out of date or missing, Jamf Remote installs the most current version over SCP or HTTP, depending on the way the Jamf Remote preferences are configured.
Jamf Remote checks the target computer for the following file and verifies that it contains the correct information:/Library/Preferences/com.jamfsoftware.jss.plistIf the file does not exist or contains incorrect information, Jamf Remote automatically creates or overwrites the file.
The jamf binary checks if the Jamf Pro user who initiated the screen sharing session has the "Screen Share with Remote Computers" and "Screen Share with Remote Computers without Asking" privilege.
If the Jamf Pro user does not have the "Screen Share with Remote Computers without Asking" privilege, the end user is prompted to allow the screen sharing session to take place.
Jamf Pro logs the connection.
408
7.
8.
1.
2.
On the target computer, Jamf Remote starts the Screen Sharing service that is built into macOS.
On the target computer, Jamf Remote creates a temporary account with limited privileges and uses it for the screen sharing session.
When the Screen Sharing window is closed, Jamf Remote deletes the temporary account, stops the Screen Sharing service, and logs out of the SSH connection. If the SSH connection is terminated unexpectedly, a launch daemon deletes the temporary account and stops the Screen Sharing service within 60 seconds of the SSH connection being terminated.
Sharing the Screen of Another Computer
Requirements
To share the screen of another computer, you need the following:
A management account (For more information on the management account, see Computer .)Enrollment Methods
SSH (Remote Login) enabled on the target computer
(macOS 10.10 or later only) Screen Sharing enabled on the computer
Procedure
Open Jamf Remote and authenticate to the Jamf Pro server.
Click and choose a site.Site This determines which items are available in Jamf Remote.
Note: This button is only displayed if you have a site configured in Jamf Pro and are logged in with a Jamf Pro user account that has full access or access to multiple sites.

409
2.
3.
4.
5.
In the list of computers, select the computer that you want to screen share with.
Click .Screen Share
When prompted, choose a screen sharing option:
To allow the end user to see the screen sharing session, choose "Share Display" (macOS 10.8 or later) or "Ask to share the display" (macOS 10.7).
To hide the screen sharing session, choose "Log In" (macOS 10.8 or later) or "Connect to a virtual display" (macOS 10.7).
If you do not have the “Screen Share Remote Computers Without Asking” privilege, the end user is prompted to allow the screen sharing session to take place.

410
License Management
About Licensed SoftwareLicensed software allows you to store and track licenses for the software in your environment so you can easily access license and purchasing information and monitor license compliance.
For each software product that you want to track licenses for, you must create a licensed software record in Jamf Pro. These records allow you to store information about the licenses owned and the software titles that count toward each license (called “software definitions”).
Each time a computer submits inventory to Jamf Pro, the software on the computer is compared to the software definitions in the licensed software records. If they match, the computer counts toward the number of licenses in use.
After creating licensed software records, you can use Jamf Pro to evaluate and monitor license compliance, view and report on the licenses in use, and view Application Usage information for the software you’re tracking licenses for.
Related Information
For related information, see the following sections in this guide:
Licensed Software RecordsFind out how to create licensed software records to store and track license information.
License ComplianceFind out how to evaluate license compliance by viewing the licensed software records in Jamf Pro.
Viewing License UsageFind out how to view the computers on which licenses are in use.
Application Usage for Licensed SoftwareFind out how frequently the licensed software in your environment is being used.

411
Licensed Software RecordsFor each software application you want to track licenses for, you must create a licensed software record in Jamf Pro. These records allow you to store the number of licenses owned and the software titles that count toward each license (called “software definitions”). They also allow you to store detailed license and purchasing information in Jamf Pro and determine whether a license supersedes or is superseded by another license in Jamf Pro.
Each time a computer submits inventory to Jamf Pro, the software titles on the computer are compared to the software definitions in each record. If they match, the computer counts toward the number of licenses in use.
There are several ways to create a licensed software record in Jamf Pro. You can manually create the record, use a licensed software template available in Jamf Pro, or upload a licensed software template obtained from Jamf Nation. All licensed software templates have predefined software definitions.
Software definitions can be based on one of two items: the name and version number of each application, font, and plug-in, or the software identification (SWID) tags associated with each software title. For more information on SWID tags and how they are useful for tracking licensed software with Jamf Pro, see the Software Identification Tags and Tracking Licensed SoftwareKnowledge Base article.
General Requirements
To create a licensed software record based on SWID tags, the software you want to track must have a SWID tag associated with it and the SWID tag must be in the Jamf Pro database.
Note: Jamf Pro collects SWID tags from a computer each time the computer submits inventory. SWID tags are not listed in a computer’s inventory information in Jamf Pro, but they are stored in the Jamf Pro database for use with licensed software.
To monitor license compliance on an ongoing basis, you can enable email notifications for a licensed software record. This allows email notifications to be sent to Jamf Pro users when the number of licenses in use exceeds the number of licenses owned. To enable email notifications, you need:
An SMTP server set up in Jamf Pro (For more information, see .)Integrating with an SMTP Server
Email notifications enabled in Jamf Pro (For more information, see .)Email Notifications

412
1.
2.
3.
4.
5.
6.
a.
b.
c.
d.
e.
f.
7.
8.
a.
b.
c.
d.
e.
9.
a.
b.
c.
d.
10.
Manually Creating a Licensed Software Record
Log in to Jamf Pro.
Click at the top of the page.Computers
Click .Licensed Software
Click .New
Use the General pane to configure basic settings for the licensed software record.To enable email notifications, select the checkbox.Send email notification on violation
Click the tab and add license and purchasing information:Licenses
Click .Add
Specify information about the license, including the license type and license count.
(Optional) Click the tab and enter purchasing information.Purchasing Information
(Optional) Click the tab and click to upload an attachment.Attachments Upload
Click .Save
Repeat steps a through e to add more license and purchasing information as needed.
Click the tab.Software Definitions
To specify software definitions based on applications, fonts, and plug-ins, do the following:
Choose “Applications, Fonts, and Plug-ins” from the pop-up menu.Software Definitions Type
Click for the item you want to add.Add
Specify a name, connector (“is” or “like”), and version number using the fields and pop-up menu provided.
Click .Save
Repeat steps a through d to specify additional software definitions as needed.The items you added are displayed in a list.
To specify software definitions based on SWID tags, do the following:
Choose “Software ID Tags” from the pop-up menu.Software Definitions Type
Browse for and choose a reg ID.
Add a SWID tag by clicking . Then browse for and choose the SWID tag you want to add.Add
Select the activation statuses you want to include in the software definitions.
Click .Save

413
1.
2.
3.
4.
5.
6.
7.
a.
b.
c.
d.
e.
f.
8.
9.
1.
2.
3.
4.
5.
Creating a Licensed Software Record From a Template
Log in to Jamf Pro.
Click at the top of the page.Computers
Click .Licensed Software
Click .New From Template
Click the licensed software template you want to use.
Use the General pane to change or configure basic settings for the licensed software record.To enable email notifications, select the checkbox.Send email notification on violation
Click the tab and add license and purchasing information:Licenses
Click .Add
Enter information about the license, including the license type and license count.
(Optional) Click the tab and enter purchasing information.Purchasing Information
(Optional) Click the tab and click to upload an attachment.Attachments Upload
Click .Save
Repeat steps a through e to add more license and purchasing information as needed.
To view or edit software definitions, click the tab and make changes as needed.Software Definitions
Click .Save
Uploading a Licensed Software Template
You can create a licensed software record by uploading a licensed software template obtained from Jamf Nation. Licensed software templates are available in Jamf Nation at:
https://www.jamf.com/jamf-nation/third-party-products/files/licensed-software-templates
Log in to Jamf Pro.
Click at the top of the page.Computers
Click .Licensed Software
Click and upload the licensed software template.Upload
Use the General pane to change or configure basic settings for the licensed software record.To enable email notifications, select the checkbox.Send email notification on violation

414
5.
6.
a.
b.
c.
d.
e.
f.
7.
8.
Click the tab and add license and purchasing information:Licenses
Click .Add
Enter information about the license, including the license type and license count.
(Optional) Click the tab and enter purchasing information.Purchasing Information
(Optional) Click the tab and click to upload an attachment.Attachments Upload
Click .Save
Repeat steps a through e to add more license and purchasing information as needed.
To view or edit software definitions, click the tab and make changes as needed.Software Definitions
Click .Save
Related Information
For related information, see the following sections in this guide:
License ComplianceFind out how to evaluate license compliance by viewing the licensed software records in Jamf Pro.
Viewing License UsageFind out how to view the computers on which licenses are in use.
Application Usage for Licensed SoftwareFind out how frequently the licensed software in your environment is being used.
Smart GroupsYou can create smart computer groups based on licensed software.

415
1.
2.
3.
License ComplianceYou can evaluate license compliance by viewing the licensed software records in Jamf Pro and comparing the number of licenses in use to the number of licenses owned.
You can also monitor software compliance by allowing email notifications to be sent to Jamf Pro users each time a license limit is exceeded. For more information see, .Licensed Software Records
Evaluating License Compliance
Log in to Jamf Pro.
Click at the top of the page.Computers
Click .Licensed Software
A list of licensed software records is displayed along with the number of licenses in use and the number of licenses owned for each record.

416
1.
2.
3.
4.
5.
Viewing License UsageIf you are using licensed software records to track software licenses, you can view a list of computers with the licenses in use (called “license usage matches”).
Viewing License Usage Matches
Log in to Jamf Pro.
Click at the top of the page.Computers
Click .Licensed Software
Click the licensed software record you want to view license usage matches for.
Click .View Matches
Note: This button is only displayed if the licenses associated with the record are in use on managed computers.
A list of license usage matches is displayed.
Related Information
For related information, see the following sections in this guide:
Computer ReportsFind out how to export the data in a list of license usage matches to different file formats.
Mass Actions for ComputersFind out how to perform mass actions for a list of license usage matches.
Computer Inventory Information ReferenceYou can view the licensed software in use on a computer by viewing the computer’s inventory information in Jamf Pro.

417
1.
2.
3.
4.
5.
Application Usage for Licensed SoftwareYou can find out how frequently licensed software is being used by viewing the Application Usage logs for a licensed software record. This allows you to view the amount of time that the software was open in the foreground on computers.
Viewing Application Usage Logs for a Licensed Software Record
Requirements
To view Application Usage logs for a licensed software record, the Computer Inventory Collection settings must be configured to collect Application Usage information. For more information, see
.Computer Inventory Collection Settings
Procedure
Log in to Jamf Pro
Click at the top of the page.Computers
Click .Licensed Software
Click the licensed software record you want to view Application Usage logs for.
Click .View Logs
Note: This button is only displayed if the licenses associated with the record are in use on managed computers.
Application Usage logs for the record are displayed.

418
1.
2.
3.
4.
5.
6.
1.
2.
Usage Management
Application UsageApplication Usage logs allow you to monitor how frequently applications are used on computers and track usage behaviors. You can view the Application Usage logs for a computer or licensed software record.
Computers submit Application Usage information to Jamf Pro each time they submit inventory.
General Requirements
To view Application Usage logs, the Computer Inventory Collection settings must be configured to collect Application Usage information. For more information, see Computer Inventory Collection
.Settings
Viewing Application Usage Logs for a Computer
The Application Usage logs for a computer consist of a pie chart that shows the amount of time each application was in the foreground on the computer during a specified date range.
Log in to Jamf Pro.
Click at the top of the page.Computers
Perform a simple or advanced computer search.For more information, see or . Simple Computer Searches Advanced Computer Searches
Click the computer you want to view Application Usage logs for.
If you performed a simple search for an item other than computers, you must click next to Expand an item to view the computers related to that item.
Click the tab.HistoryApplication Usage logs for the computer are displayed.
To view Application Usage logs for a different date range, specify the starting and ending dates using the pop-up menus. Then click .Date Range Update
Viewing Application Usage Logs for a Licensed Software Record
The Application Usage logs for a licensed software record allow you to view the amount of time that the software was open in the foreground on computers.
Log in to Jamf Pro.

419
2.
3.
4.
5.
Click at the top of the page.Computers
Click .Licensed Software
Click the licensed software record you want to view Application Usage logs for.
Click .View Logs
Note: This button is only displayed if the licenses associated with the record are in use on managed computers.
Application Usage logs for the record are displayed.
Related Information
For related information, see the following section in this guide:
Flushing LogsFind out how to schedule automatic log flushing or manually flush logs.

420
1.
2.
3.
4.
5.
Computer UsageComputer Usage logs allow you to monitor how frequently each computer is used and track usage behaviors. The following information is included in Computer Usage logs:
Startup dates/times
Login and logout dates/times
Usernames used to log in and out of the computer
Viewing Computer Usage Logs for a Computer
Requirements
To view Computer Usage logs, a startup script or login/logout hooks must be configured to log Computer Usage information. For more information, see and .Startup Script Login and Logout Hooks
Procedure
Log in to Jamf Pro.
Click at the top of the page.Computers
Perform a simple or advanced computer search.For more information, see or .Simple Computer Searches Advanced Computer Searches
Click the computer you want to view Computer Usage logs for.
If you performed a simple search for an item other than computers, you must click next to Expand an item to view the computers related to that item.
Click the tab, and then click the category.History Computer Usage LogsComputer Usage logs for the computer are displayed.
Related Information
For related information, see the following section in this guide:
Flushing LogsFind out how to schedule automatic log flushing or manually flush logs.

421
1.
2.
3.
4.
5.
6.
7.
Restricted SoftwareRestricted software allows you to prevent users or groups of users from accessing certain applications. For instance, you might want to prevent all users from accessing a peer-to-peer file sharing application, restrict everyone except the IT staff from accessing common administrative utilities, or restrict users from installing a software beta version.
For each application that you want to restrict, you must create a restricted software record. This allows you to specify the users to which the restriction applies and control what happens when the application is opened by those users. For instance, you can kill the restricted process, delete the application, and even display a message to the user.
General Requirements
You can configure email notifications for a restricted software record so that Jamf Pro users are notified each time a violation occurs. To enable email notifications for a restricted software record, you need:
An SMTP server set up in Jamf Pro (For more information, see .)Integrating with an SMTP Server
Email notifications enabled in Jamf Pro (For more information, see .)Email Notifications
Creating a Restricted Software Record
Log in to Jamf Pro.
Click at the top of the page.Computers
Click .Restricted Software
Click .New
Enter a display name in the field.Display Name
In the field, enter the exact name of the file you want to restrict.Process Name
Note: It is recommended that you restrict the name of the application bundle when restricting a process in an application bundle. For example: "Chess.app".
Configure the restricted software record using the fields and options on the pane.To enable email notifications, select the checkbox.Send email notification on violation
Note: For most environments, it is recommended to select the checkbox at a minimum Kill Processto ensure that the process is terminated when it is found.

422
7.
8.
9.
Click the tab and configure the scope of the restricted software record.Scope
Click .Save
The restriction is applied to computers in the scope the next time they check in with Jamf Pro.
Related Information
For related information, see the following section in this guide:
Viewing Restricted Software for a ComputerFind out how to view the restricted software for a computer.
For related information, see the following :Best Practice Workflow for Jamf Pro
Deferring a macOS UpdateFind out how to defer a macOS update.
For related information, see the following Knowledge Base article:
Finding the Name of Processes When Configuring Restricted SoftwareLearn how to find the exact name of the process you want to create restricted software for.

423
Managing Mobile Devices

424
Enrollment of Mobile Devices
Mobile Device Enrollment MethodsEnrollment is the process of adding iOS, iPadOS, and tvOS devices to Jamf Pro. Enrolling devices allows you to perform inventory, configuration, security management, and distribution tasks on the devices. When enrolled, inventory information for the devices is submitted to Jamf Pro.
The following explains the different types of enrollment methods:
Automated Device Enrollment allows organizations to configure Automated Device Enrollment—and manage devices from the moment the devices are removed from the box (known as zero-touch deployment). These devices become supervised, and the MDM profile cannot be removed by the user. Automated Device Enrollment is designed for devices owned by the organization. For
see in Apple's more information, Automated Device Enrollment into MDM Deployment Reference for .iPhone and iPad
Device Enrollment allows organizations to manually enroll institutionally Device Enrollment—owned devices and manage many different aspects of device use, including the ability to erase the device. If a user removes the MDM profile, all settings and apps that are being managed by the
see in Apple's MDM solution are removed. For more information, Device Enrollment into MDM.Deployment Reference for iPhone and iPad
User Enrollment is designed for BYOD—or Bring Your Own Device User Enrollment—deployments—where the user, not the organization, owns the device. User Enrollment also
see in Apple's requires Managed Apple IDs. For more information, User Enrollment into MDM.Deployment Reference for iPhone and iPad
Automated Device Enrollment for Mobile Devices
The only method you can use to enroll devices with Automated Device Enrollment and Jamf Pro is a PreStage enrollment. PreStage enrollments are a recommended method of enrollment. You can use a PreStage enrollment to configure basic device settings and customize the Setup Assistant experience. You can also use Apple Configurator 2 and a PreStage enrollment to enroll devices with Jamf Pro, supervise them, and configure device setup. For more information, see Mobile Device
.PreStage Enrollments
Note: This enrollment method requires an Apple School Manager or Apple Business Manager account. For more information, see .Integrating with Automated Device Enrollment

425
Device Enrollment for Mobile Devices
There are several methods you can use to enroll mobile devices with Device Enrollment and Jamf Pro:
(Recommended) —User-initiated enrollment You can use the User-Initiated Enrollment settings to customize the enrollment experience for users, including the messaging that displays for each step of the enrollment process. Users can then enroll their own devices by logging in to a web-based enrollment portal and following the onscreen instructions. You can provide this URL by sending it in an email or SMS invitation from Jamf Pro, or through any other means that fit your environment. User-initiated enrollment is the only method that can be used to enroll personally owned devices using Device Enrollment.
—Use an enrollment profile You can create an enrollment profile using Jamf Pro and install it on devices by connecting them to a computer via USB. This enrollment method requires Apple Configurator 2.
—Use Apple Configurator enrollment You can enroll devices with Jamf Pro by connecting them to a computer via USB and using an enrollment URL with Apple Configurator 2.
User Enrollment for Mobile Devices
The only method you can use to enroll personally owned iOS and iPadOS devices with User Enrollment and Jamf Pro is user-initiated enrollment. You can use the User-Initiated Enrollment settings to customize the enrollment experience for users, including the messaging that displays for each step of the enrollment process. Users can then enroll their own devices by logging in to a web-based enrollment portal and following the onscreen instructions. You can provide this URL by sending it in an email or SMS invitation from Jamf Pro, or through any other means that fit your environment. For more information, see and User Enrollment for Personally Owned Mobile Devicesthe technical paper.Building a BYOD Program with User Enrollment and Jamf Pro
Related Information
For related information, see the following section in this guide:
Components Installed on Mobile DevicesLearn about the components installed on mobile devices during enrollment.
For related information, see the following technical papers:
Deploying iOS and tvOS Devices Using Apple Configurator 2 and Jamf ProGet step-by-step instructions on how to deploy iOS devices using Apple Configurator 2.

426
Mobile Device PreStage EnrollmentsA PreStage enrollment allows you to create enrollment configurations and sync them to Apple. This enables you to enroll new iOS, iPadOS, and tvOS devices with Jamf Pro, reducing the amount of time and interaction it takes to prepare mobile devices for use. For tvOS devices, this includes supervising devices, requiring users to apply the MDM profile for enrollment, and auto advancing through the Setup Assistant with optional settings to skip selected items during enrollment.
Creating a PreStage enrollment allows you to configure the enrollment settings and customize the user experience of the Setup Assistant. You can also specify the devices that should be enrolled using the PreStage enrollment and automatically add devices newly associated with the Device Enrollment instance to the PreStage Enrollment.
Jamf Pro automatically refreshes information about the mobile devices in the PreStage enrollment. If there is updated information about the devices in Automated Device Enrollment (formerly DEP), this information is displayed in Jamf Pro. This information is automatically refreshed every two minutes.
Note: There can be up to a two minute delay on the information refresh which can result in outdated information displayed in Jamf Pro. In addition, environment-specific factors can affect the refresh of information.

427
Mobile Device PreStage Enrollment Settings
When you create a PreStage enrollment, you use a payload-based interface to configure settings to apply to devices during enrollment. The following table displays the enrollment settings available in a PreStage enrollment:
Payload Description
General This payload allows you to configure basic settings for the PreStage enrollment, specify authentication and management requirements, add an Enrollment Customization configuration, and customize the Setup Assistant experience.
Mobile Device Names
This payload allows you to choose a method for assigning names to mobile devices. This information is stored in Jamf Pro for each mobile device enrolled using a PreStage enrollment.
User and Location
You can use the User and Location payload to specify user and location information for the mobile devices.
Note: Using Inventory Preload or authentication during enrollment can automatically populate this information for devices.
This information is stored in Jamf Pro for each mobile device enrolled using a PreStage enrollment.
Purchasing You can use the Purchasing payload to specify purchasing information for the mobile devices.This information is stored in Jamf Pro for each mobile device enrolled using a PreStage enrollment.
Attachments You can use the Attachments payload to upload attachments to store for mobile devices.This information is stored in Jamf Pro for each mobile device enrolled using a PreStage enrollment.
Certificates You can use the Certificates payload to establish trust during enrollment if your Jamf Pro instance uses an SSL certificate that is not natively trusted by Apple products. The device attempts a secure connection with Jamf Pro using only this certificate to enroll.For more information about the certificates that are trusted by Apple, see the
from Apple's Available trusted root certificates for Apple operating systemssupport website.
Note: If your Jamf Pro instance uses an SSL certificate that was created by the Jamf Pro built-in CA, an anchor certificate for enrollment is automatically added to this payload.
If your Jamf Pro server URL ends with "jamfcloud.com" you should not configure this payload.

428
Enrollment Experience Customization
You can customize the enrollment experience for the user with the following in the PreStage enrollment:
Enrollment Customization configurations—You can use the General payload to add an Enrollment Customization configuration to the PreStage enrollment. For example, you can add an Enrollment Customization configuration to display an End User License Agreement (EULA) during enrollment or other custom messaging as the user advances through the Setup Assistant. For more information, see .Enrollment Customization SettingsTo add an Enrollment Customization configuration to the PreStage enrollment, you must have at least one configuration in the Enrollment Customization settings. Enrollment Customization configurations are applied to mobile devices with iOS 13 or later only.
Configuration profiles—You can use the General payload to distribute configuration profiles that This allows the profiles to be define settings and restrictions for mobile devices during enrollment.
installed on devices before the user completes the Setup Assistant, enabling the user to access resources on your network immediately after their mobile device is enrolled with Jamf Pro. For example, you can distribute a profile that enables a user to automatically join your network during enrollment. To distribute configuration profiles during enrollment, you must create the profile prior to configuring the PreStage enrollment. For more information, see Mobile Device Configuration
. All configuration profiles that the device falls into the scope of will be distributed to the Profilesdevice during enrollment.
Note: Configuration profiles that contain payload variables may not replaced with the attribute values for the variable. If you want to distribute profiles that contain payload variables, it is recommended that you distribute the profile after the device is enrolled with Jamf Pro.
Time Zone—You can use the General payload to set the time zone on mobile devices during enrollment with Jamf Pro. This allows all devices with iOS 14 or later in the scope of the PreStage to have the Time Zone automatically configured for the user. After a device is enrolled with Jamf Pro, the user can reset the Time Zone on their device.
Setup Assistant steps—You can use the General payload to select Setup Assistant screens that you want the user to skip during enrollment (e.g., Apple ID login). When you select a step, that screen is not presented to the user during enrollment. For more information about the screens that can be skipped during enrollment, see Setup Assistant pane options in Apple devices in Apple's Mobile
.Device Management Settings

429
Setup Assistant Steps
You can select Setup Assistant screens that you want the user to skip during enrollment. When you select a step, that screen is not presented to the user during enrollment.
When enrolling tvOS devices, you can also choose to automatically advance through the Setup Assistant. This option prevents the any of the Setup Assistant screens from being displayed to the user during enrollment. When advancing through the Setup Assistant, the device defaults to Pacific Time Zone (PT) after it enrolls with Jamf Pro. If you automatically advance through the Setup Assistant, you can configure the language and region so the locale on the device is automatically configured.
For more information about the screens that can be skipped during enrollment, see Setup Assistant in Apple's .pane options in Apple devices Mobile Device Management Settings
Mobile Device Management Capability Settings
You can enable additional management capabilities. The following do not impact the user's enrollment experience, but do offer you additional remote management when applied:
User authentication—To increase the security of sensitive user information, it is recommended that you require users to authenticate during mobile device setup using an LDAP directory account or a Jamf Pro user account. If users authenticate with an LDAP directory account, user and location information is submitted during enrollment. Authentication requires mobile devices with iOS 7.1 or later, or Apple TV devices with tvOS 10.2 or later.To require LDAP users or Jamf Pro users to authenticate during setup, you need an LDAP server set up in Jamf Pro. For more information, see .Integrating with LDAP Directory ServicesIf you add an Enrollment Customization configuration to the PreStage, this setting is ignored for devices with iOS 13 or later, and iPadOS 13 or later.
MDM Profile—The MDM Profile enables you to remotely manage mobile devices using Jamf Pro. Users are automatically required to apply the MDM profile on mobile devices with iOS 13 or later, or iPadOS 13 or later during enrollment with Jamf Pro.If the MDM profile is removed, you can no longer send remote commands or distribute configuration profiles to the mobile device. You can use Jamf Pro to prevent a user from removing this profile after enrollment.
Mobile device names—You can enable Jamf Pro to take action on mobile device names during enrollment.

430
Device Supervision—Choosing to supervise devices during enrollment offers you the following extended device management functionality:
Pairing—You can allow a mobile device to connect to Mac computers via USBShared iPad settings—You can allow devices with iPadOS 9.3 or later to be shared and configure additional functionality, such as the number of users or amount of storage to allocate to each user of the iPad.Activation Lock functionality—You can enable Activation Lock for a device with iOS 12 or later without requiring user interaction. When the device is enrolled with Jamf Pro, Activation Lock is automatically enabled.You can also prevent a user from enabling Activation Lock for the mobile device during enrollment. When devices are enrolled with Jamf Pro, the user cannot enable Activation Lock on the device if they enable the Find My service.For more information about Activation Lock, see in Using Activation Lock for Apple devicesApple's .Mobile Device Management Settings
Mobile Device Names
You can use the Mobile Device Names payload to choose a method for assigning names to mobile devices. This information is stored in Jamf Pro for each mobile device enrolled using a PreStage enrollment.
This payload is not required to configure a PreStage enrollment; however, choosing to configure the payload enables Jamf Pro to take action on device names during enrollment. The following options are available to use as the method for naming devices during enrollment:
Default Names—Depending on the enrollment status of the device, the following can happen when this option selected:
If the device is being re-enrolled with Jamf Pro, the value of the Mobile Device Name attribute field in the device's inventory information in Jamf Pro is assigned to the device at enrollment.If the device is being enrolled for the first time with Jamf Pro, the current name of the device persists after enrollment.
Serial Numbers—The serial number of the device becomes the device's name during enrollment. You can add a suffix or a prefix to the serial number.
List of Names—You can enter names separated by a comma to assign to the devices during enrollment.
Single Names—You can enter a single name that is assigned to all devices during enrollment.
If this payload is not configured, Jamf Pro does not take action on mobile device names during enrollment. The name of the device at the time of enrollment persists after enrollment.

431
1.
2.
3.
4.
5.
Shared iPad Settings
You can use the General payload to enable Shared iPad and configure the following settings:
Number of Users—You can enter the maximum number of users that can be stored with the iPad. You can specify up to 99 users. This limits the number of user accounts that can be stored locally on the iPad.
Storage Quota Size—You can specify the maximum amount of storage (MB) allocated for each user on devices with iPadOS 13.4 or later. This overrides the maximum number of users. If the scope of the PreStage contains devices with iPadOS 13.3 or earlier, the device defaults to the maximum number of users.
If you add an Enrollment Customization configuration, the configuration is only applied once during the initial enrollment with Jamf Pro.
Note: You can enhance Shared iPad workflows in your environment by distributing configuration profiles directly to a user that logs in to the iPad. For more information, see Mobile Device
.Configuration Profiles
For more information about Shared iPad, see in Apple's Shared iPad overview Mobile Device .Management Settings
Configuring a Mobile Device PreStage Enrollment
Log in to Jamf Pro.
Click at the top of the page. Devices
Click .PreStage Enrollments
Click .New
Use the General payload to configure basic settings for the PreStage enrollment. In addition, you can do the following on the General pane:
To require that users authenticate with their username and password, select the Require checkbox.Credentials for Enrollment
Note: The checkbox is only displayed if an LDAP server has Require Credentials for Enrollmentbeen set up in Jamf Pro.
To enable Shared iPad during enrollment, select and then select Supervise Devices Enable Shared . You must enter a maximum number of user accounts that can be stored with Shared iPad iPad
using the text field. For devices with iPadOS 13.4 or later, you can use the storage Number of Usersquota size instead of the number of users.

432
5.
6.
7.
8.
To enable Activation Lock directly on a device without requiring end user interaction, select , and then select .Prevent user from enabling Activation Lock Enable Activation Lock on the device
To customize the user experience of the Setup Assistant, you can do the following:
Choose an Enrollment Customization configuration to apply to devices.
Select which steps you want to skip in the Setup Assistant. If you choose to skip steps, the user can enable these settings after the device is configured unless otherwise restricted. For Apple TV devices, Ethernet connection is required.
Configure additional payloads as needed based on the goals you are trying to achieve with the PreStage.
Click the tab and configure the scope of the PreStage enrollment by selecting the checkbox Scopenext to each mobile device you want to add to the scope.The mobile devices listed on the Scope tab are the mobile devices that are associated with Automated Device Enrollment (formerly DEP) via the server token file (.p7m) you downloaded from Apple. If you clone a PreStage enrollment, mobile devices in the scope of the original PreStage enrollment are not included in the scope of the cloned PreStage enrollment.You can use the button to add all associated devices to the scope. This adds all devices Select Allassociated with Automated Device Enrollment via the server token file regardless of any results that have been filtered using the search field. The button removes all associated Filter Results Deselect Alldevices from the scope.
Note: If you want to add mobile devices to the scope automatically as the devices become associated with the Automated Device Enrollment instance, select the Automatically assign new
checkbox in the General payload.devices
Click .Save
Related Information
For related information, see the following section in this guide:
Components Installed on Mobile DevicesLearn about the components installed on mobile devices during enrollment.
For related information, see the following Knowledge Base articles:
Leveraging Apple's Activation Lock Feature with Jamf ProLearn about how you can use Jamf Pro to leverage Activation Lock in your environment.
For related information, see the following technical paper:
Deploying iOS and tvOS Devices Using Apple Configurator 2 and Jamf ProGet step-by-step instructions on how to deploy iOS devices using Apple Configurator 2 and a PreStage enrollment.

433
User-Initiated Enrollment for Mobile DevicesYou can allow users to enroll mobile devices by having them log in to an enrollment portal where they are prompted to install the MDM profile and certificates. You can either choose to provide users with an enrollment URL in the way that best fits your environment or send an enrollment invitation to users.
General Requirements
To allow mobile devices to be enrolled with user-initiated enrollment, you need:
A push certificate in Jamf Pro (For more information, see .)Push Certificates
User-initiated enrollment enabled (For more information, see .)User-Initiated Enrollment Settings
(User Enrollment only) Mobile devices with iOS 13.1 or later, or iPadOS 13.1 or later
(LDAP log in only) An LDAP server set up in Jamf Pro (For more information, see Integrating with .)LDAP Directory Services
Note: For mobile devices with iOS 10.3 or later, Apple has enabled an important security enhancement that requires untrusted root certificates installed manually on unsupervised iOS devices to be manually trusted in Certificate Trust Settings during user-initiated enrollment, or installation of the MDM profile will fail. For more information, see the Changes in User-Initiated
Enrollment with Untrusted Certificate Authority (CA) Signed SSL Certificates in iOS 10.3 and LaterKnowledge Base article.
Providing an Enrollment URL to Users
To direct users to the enrollment portal, you need to provide them with the enrollment URL. The enrollment URL is the full URL for the Jamf Pro server followed by “/enroll”. For example:
https://instancename.jamfcloud.com/enroll (hosted in Jamf Cloud)
https://jamf.instancename.com:8443/enroll (hosted on-premise)
You can provide the enrollment URL to users in the way that best fits your environment.
Note: Users must use Safari to access the enrollment URL.
Users can log in to the enrollment portal using an LDAP directory account or a Jamf Pro user account. When a user logs in with an LDAP directory account, user and location information is submitted to Jamf Pro during enrollment. When a user logs in with a Jamf Pro user account, it allows an LDAP user to be assigned to the mobile device.

434
1.
2.
3.
4.
5.
6.
1.
2.
3.
Sending a Mobile Device Enrollment Invitation for User-Initiated Enrollment
You can send an email or SMS invitation that contains the enrollment URL from Jamf Pro to one or more users enrolling institutionally owned mobile devices. Users tap the enrollment URL in the email or SMS message to access the enrollment portal. Enrollment invitations give you more control over user access to the enrollment portal by allowing you to do the following:
Set an expiration date for the invitation
Require users to log in to the portal
Allow multiple uses of the invitation
Add the mobile device to a site during enrollment
View the status of the invitation
Before you configure the invitation, make sure you have the email addresses or phone numbers of the users you want to send the invitation to.
Note: You cannot enroll personally owned devices with an enrollment invitation. You must provide the enrollment URL to those users by some other means.
Requirements
To send an enrollment invitation to mobile devices, you need an SMTP server set up in Jamf Pro. (For more information, see .)Integrating with an SMTP Server
Procedure
Log in to Jamf Pro.
Click at the top of the page. Devices
Click .Enrollment Invitations
Click .New
Select as the enrollment method.User-Initiated Enrollment
Follow the onscreen instructions to send the enrollment invitation.
An enrollment invitation is immediately sent to the email addresses or phone numbers you specified.
You can view the status of the enrollment invitation in the list of invitations.
Viewing Mobile Device Enrollment Invitation Usage
You can view a list of mobile devices that were enrolled with a specific enrollment invitation.
Log in to Jamf Pro.
Click at the top of the page. Devices

435
3.
4.
5.
Click .Enrollment Invitations
Click the enrollment invitation you want to view usage for.
Click .View Enrolled Mobile Devices
A list of mobile devices enrolled with the invitation is displayed.
Related Information
For related information, see the following sections in this guide:
User-Initiated Enrollment Experience for Institutionally Owned Mobile DevicesLearn about the steps users take to enroll mobile devices.
Components Installed on Mobile DevicesLearn about the components installed on mobile devices during enrollment.

436
1.
User-Initiated Enrollment Experience for Institutionally Owned Mobile DevicesWhen a user accesses the enrollment URL from an institutionally owned iOS or iPadOS device using Safari, they are guided through a series of steps to enroll the device.
Note: Personally owned devices must be enrolled using User Enrollment. For information, see User .Enrollment for Personally Owned Mobile Devices
The following workflow describes how user-initiated enrollment can be used to enroll institutionally owned mobile devices:
The user is prompted to enter credentials for an LDAP directory account, single sign-on (SSO) credentials, or Jamf Pro user account with user-initiated enrollment privileges, and then they must tap .Log inTo allow users to use SSO credentials, you must integrate a third-party Identity Provider (IdP) and select the setting. For more information, see Enable Single Sign-On for User-Initiated Enrollment
.Single Sign-On
Note: If notified that the device cannot verify the identity of the Jamf Pro server when navigating to the enrollment URL, the user must proceed to the website to log in to the enrollment portal. This notification only appears if the Jamf Pro server uses an untrusted SSL certificate.

437
2. The user is prompted to enter credentials for an LDAP directory account or a Jamf Pro user account with user-initiated enrollment privileges, and then they must tap .EnrollThe login prompt is not displayed if the enrollment portal was accessed via an enrollment invitation for which the "Require Login" option is disabled. For more information about enrollment invitations, see .User-Initiated Enrollment for Mobile Devices

438
3. The user is prompted to enroll the device as a personally owned device or an institutionally owned device.This step is only displayed if both institutionally owned device enrollment and personally owned device enrollment are enabled in Jamf Pro.

439
3.
You can display a description to users who enroll an institutionally owned device. For more information, see .User-Initiated Enrollment Settings

440
4. When prompted, the user must choose the site that they are associated with.If the user is associated with multiple sites, they must select the site that will assign the appropriate settings to the device.If the user signed in with a Jamf Pro user account, they can assign an LDAP user to the device at this time.
Note: To assign a user to a device, the Jamf Pro user account must have the "Assign Users to Mobile Devices" privilege.

441
5. The user is prompted to continue to the CA certificate installation.
Note: For mobile devices with iOS 11 or later, a pop-up window will display the following message: “This website is trying to open Settings to show you a configuration profile. Do you want to allow this?” The user must tap . For devices with iOS 12.2 or later, the following additional message Allowis displayed: "Complete installation of this profile in the Settings app." The user must tap , and Closethen navigate to the Settings app to complete the installation.

442
5.
6. The user must tap to continue.Install
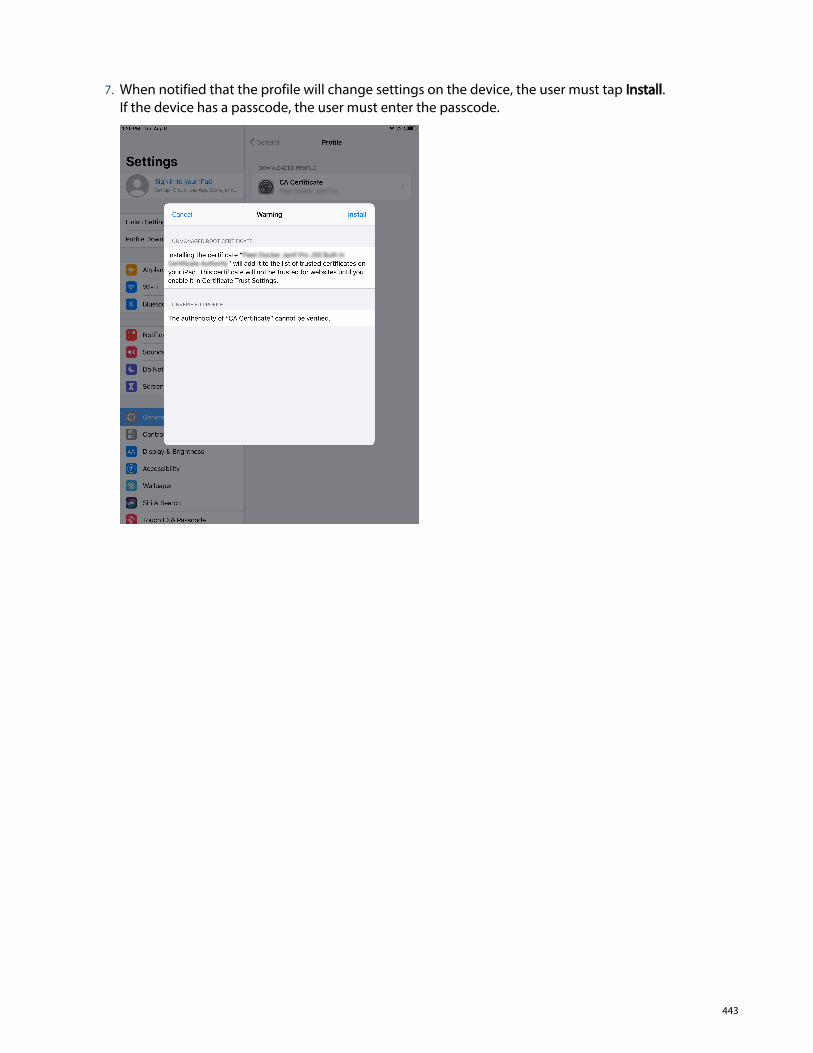
443
6.
7. When notified that the profile will change settings on the device, the user must tap .InstallIf the device has a passcode, the user must enter the passcode.

444
7.
8. To complete the installation, the user must tap .Done

445
8.
9. The user is prompted to continue to the MDM profile installation.Information about enrollment can be accessed by tapping the Information icon.
Note: For mobile devices with iOS 11 or later, a pop-up window will display the following message: “This website is trying to open Settings to show you a configuration profile. Do you want to allow this?” The user must tap . For devices with iOS 12.2 or later, the following additional message Allowis displayed: "Complete installation of this profile in the Settings app." The user must tap , and Closethen navigate to the Settings app to complete the installation.

446
9.
10.
11.
The user must tap to continue.Install
When notified that installing the profile will change settings on the device, the user must tap .InstallIf the device has a passcode, the user must enter the passcode.

447
11.
12. When notified that installing the profile will allow an administrator to remotely manage the device, the user must tap .Install

448
13.
14.
To complete the enrollment process, the user must tap .Done
When the enrollment is complete, the device is enrolled with Jamf Pro.

449
14.
If you chose to install Self Service for iOS, users are prompted to install the app from the App Store.
Note: Apple has enabled an important security enhancement beginning with iOS 10.3. This security enhancement requires untrusted root certificates installed manually on unsupervised iOS devices to be manually trusted in Certificate Trust Settings during user-initiated enrollment, or installation of the MDM profile will fail. For more information, see the Changes in User-Initiated Enrollment
Knowledge with Untrusted Certificate Authority (CA) Signed SSL Certificates in iOS 10.3 and LaterBase article.

450
User Enrollment for Personally Owned Mobile DevicesYou can allow users to enroll personally owned mobile devices by having them log in to an enrollment portal where they are prompted to install the MDM profile and certificates.
Disclaimer: Personal device profiles have been deprecated and are no longer recommended as a method of enrolling personally owned devices. User Enrollment is the Apple-preferred method for enrolling personally owned devices in a Bring Your Own Device (BYOD) program. For information on enrolling personally owned iOS or iPadOS devices with Jamf Pro, see the Building a BYOD
Program with User Enrollment and Jamf Pro technical paper. For legacy documentation about .Personal Device Profiles, see version 10.27.0 or earlier of the Jamf Pro Administrator's Guide
Providing an Enrollment URL to Users
You can provide the enrollment URL to users in the way that best fits your environment.
Requirements
To allow personally owned mobile devices to be enrolled with user-initiated enrollment, you need:
.)A push certificate in Jamf Pro (For more information, see Push Certificates
User-initiated enrollment enabled (For more information, see .)User-Initiated Enrollment Settings
Mobile devices with iOS 13.1 or later, or iPadOS 13.1 or later
(LDAP log in only) An LDAP server set up in Jamf Pro (For more information, see Integrating with .)LDAP Directory Services
Note: For mobile devices with iOS 10.3 or later, Apple has enabled an important security enhancement that requires untrusted root certificates installed manually on unsupervised iOS devices to be manually trusted in Certificate Trust Settings during user-initiated enrollment, or installation of the MDM profile will fail. For more information, see the Changes in User-Initiated
Enrollment with Untrusted Certificate Authority (CA) Signed SSL Certificates in iOS 10.3 and LaterKnowledge Base article.
Procedure
To direct users to the enrollment portal, you need to provide them with the enrollment URL. The enrollment URL is the full URL for the Jamf Pro server followed by “/enroll”. For example:
https://instancename.jamfcloud.com /enroll (hosted in Jamf Cloud)
https://jamf.instancename.com:8443/enroll (hosted on-premise)
You can provide the enrollment URL to users in the way that best fits your environment.
Note: Users must use Safari to access the enrollment URL.

451
Users can log in to the enrollment portal using an LDAP directory account or a Jamf Pro user account. When a user logs in with an LDAP directory account, user and location information is submitted to Jamf Pro during enrollment. When a user logs in with a Jamf Pro user account, it allows an LDAP user to be assigned to the mobile device.
Related Information
For related information, see the following sections in this guide:
User Enrollment Experience for Personally Owned Mobile DevicesLearn about the steps users take to enroll mobile devices using User Enrollment.
Components Installed on Mobile DevicesLearn about the components installed on mobile devices during enrollment.
For related information, see the following sections in Apple's :Mobile Device Management Settings
User Enrollment payload listFind out which payload settings can be applied to devices enrolled using User Enrollment.
User Enrollment restrictionsFind out which restrictions can be applied to devices enrolled using User Enrollment.

452
1.
User Enrollment Experience for Personally Owned Mobile DevicesWhen a user accesses the enrollment URL from a personally owned mobile device using Safari, they are guided through a series of steps to enroll the device. iOS and iPadOS devices can be enrolled using User Enrollment as personally owned devices.
Note: If you are re-enrolling a device that was enrolled using a Personal Device Profile, it is recommended that you remove the device's previous record from Jamf Pro. For more information about how to re-enroll a device enrolled using a Personal Device Profile, see "Migrating Devices from Personal Device Profiles to User Enrollment" in the Building a BYOD Program with User
technical paper.Enrollment and Jamf Pro
The user is prompted to enter credentials for an LDAP directory account, single sign-on (SSO) credentials, or Jamf Pro user account with user-initiated enrollment privileges, and then they must click .Log inTo allow users to use SSO credentials, you must integrate a third-party Identity Provider (IdP) and select the setting. For more information, see Enable Single Sign-On for User-Initiated Enrollment
.Single Sign-On
Note: If notified that the device cannot verify the identity of the Jamf Pro server when navigating to the enrollment URL, the user must proceed to the website to log in to the enrollment portal. This notification only appears if the Jamf Pro server uses an untrusted SSL certificate.

453
2. The user is prompted to enroll the device as a personally owned device or an institutionally owned device.This step is only displayed if both institutionally owned device enrollment and personally owned device enrollment are enabled in Jamf Pro.

454
2.
You can display a description to users who enroll a personally owned device. For more information, see .User-Initiated Enrollment Settings

455
3. The user is prompted to continue to the CA certificate installation.
Note: For mobile devices with iOS 11 or later, a pop-up window will appear notifying users, “This website is trying to open Settings to show you a configuration profile. Do you want to allow this?” The user must tap . For devices with iOS 12.2 or later, an additional message is displayed Allownotifying users, "Complete installation of this profile in the Settings app." The user must tap , Closeand then navigate to the Settings app to complete the installation.

456
4.
5.
The user must tap to continue.Install
When notified that the profile will change settings on the device, the user must tap .InstallIf the device has a passcode, the user must enter the passcode.

457
6.
7.
To complete the installation, the user must tap .Done
The user is prompted to enter their Managed Apple ID to install the MDM profile.

458
7.
8. The user is prompted to continue to the MDM profile installation.Information about enrollment can be accessed by tapping the icon.Information
Note: For mobile devices with iOS 11 or later, a pop-up window will appear notifying users, “This website is trying to open Settings to show you a configuration profile. Do you want to allow this?” The user must tap . For devices with iOS 12.2 or later, an additional message is displayed Allownotifying users, "Complete installation of this profile in the Settings app." The user must tap , Closeand then navigate to the Settings app to complete the installation.

459
9.
10.
The user taps or to continue.Enroll My iPad Enroll My iPhoneFor more information on the sign-in process for User Enrollment, see in User Enrollment into MDMApple's .Deployment Reference for iPhone and iPad

460
10. The user taps to proceed to the Managed Apple ID sign in page. The user is then prompted Continueto enter the password for their Managed Apple ID.

461
11. When the enrollment is complete, the device is enrolled with Jamf Pro.

462
11.
If you chose to install Self Service for iOS, users are prompted to install the app from the App Store.
Note: Apple has enabled an important security enhancement beginning with iOS 10.3. This security enhancement requires untrusted root certificates installed manually on unsupervised iOS devices to be manually trusted in Certificate Trust Settings during user-initiated enrollment, or installation of the MDM profile will fail. For more information, see the Changes in User-Initiated Enrollment
Knowledge with Untrusted Certificate Authority (CA) Signed SSL Certificates in iOS 10.3 and LaterBase article.
463
1.
2.
3.
4.
5.
6.
7.
Apple Configurator Enrollment SettingsThe Apple Configurator Enrollment settings allow you to enroll mobile devices with Jamf Pro using Apple Configurator 2 and an enrollment URL. This involves enabling Apple Configurator enrollment in Jamf Pro, and then connecting devices to a computer via USB to enroll them using Apple Configurator 2 and an enrollment URL.
You can enable one or both of the following types of Apple Configurator enrollment URL:
Static URL – Using a static URL allows you to manually provide the URL to the person that operates the Apple Configurator workstation in the way that best fits your environment. The static URL cannot expire and does not allow you to enroll devices into sites as a part of the enrollment process.The static enrollment URL for Jamf Pro is the URL for the Jamf Pro server followed by“/configuratorenroll”. For example:
https://instancename.jamfcloud.com (hosted in Jamf Cloud)https://jamf.instancename.com:8443 (hosted on-premise)
Dynamic URL – Using a dynamic URL allows you to view a randomly generated enrollment URL in Jamf Pro or send that URL to the person that operates the Apple Configurator workstation via an enrollment invitation, allowing for a more secure enrollment experience. When you view or send a dynamic URL via an enrollment invitation, you can set the expiration date for the URL and choose a site to add devices to during enrollment.
General Requirements
Apple Configurator enrollment only applies to mobile devices with iOS 9 or later. In addition, you need Apple Configurator 2.0 or 2.1.
Enabling Apple Configurator Enrollment via Static URL
Before you can enroll mobile devices using Apple Configurator and a static URL, you must enable Apple Configurator enrollment in Jamf Pro.
Log in to Jamf Pro.
In the top-right corner of the page, click .Settings
Click .Mobile Device Management
Click .Apple Configurator Enrollment
Click the tab, and then click Edit.Enrollment
Select .Enable Apple Configurator Enrollment via Static URL
Click .Save
You can now use the static URL with your Apple Configurator workstation.

464
1.
2.
3.
4.
5.
6.
7.
1.
2.
3.
4.
5.
6.
Enabling Apple Configurator Enrollment via Dynamic URL
Before you can enroll mobile devices using Apple Configurator and a dynamic URL, you must enable Apple Configurator enrollment in Jamf Pro.
Log in to Jamf Pro.
In the top-right corner of the page, click .Settings
Click .Mobile Device Management
Click .Apple Configurator Enrollment
Click the tab, and then click .Enrollment Edit
Select Enable Apple Configurator Enrollment via Dynamic URL .
Click .Save
Dynamic URLs can now be viewed in Jamf Pro or sent to the person that operates the Apple Configurator workstation via an enrollment invitation.
Viewing or Sending a Dynamic Apple Configurator Enrollment URL via a Mobile Device Enrollment Invitation
You can view the dynamic Apple Configurator enrollment URL or send an email or SMS invitation that contains the URL from Jamf Pro to the person that operates the Apple Configurator workstation. The enrollment URL is used with Apple Configurator to enroll mobile devices with Jamf Pro.
Before you configure the invitation, make sure you have the email address or phone number of the person you want to send the invitation to.
Log in to Jamf Pro.
Click at the top of the page. Devices
Click .Enrollment Invitations
Click .New
Select as the enrollment method.Apple Configurator Enrollment
Follow the onscreen instructions to view or send the enrollment invitation.
If you chose to view the enrollment URL, it is displayed in Jamf Pro. If you chose to send the enrollment URL, an enrollment invitation containing the dynamic URL is sent to the email addresses or phone numbers you specified.
You can view the status of the enrollment invitation in the list of invitations.

465
1.
2.
3.
4.
5.
Viewing Mobile Device Enrollment Invitation Usage
You can view a list of mobile devices that were enrolled with a specific enrollment invitation.
Log in to Jamf Pro.
Click at the top of the page. Devices
Click .Enrollment Invitations
Click the enrollment invitation you want to view usage for.
Click .View Enrolled Mobile Devices
A list of mobile devices enrolled with the invitation is displayed.
Related Information
For related information, see the following section in this guide:
Supervision IdentitiesFind out how to create, upload, and download a supervision identity for use with Apple Configurator 2.
Components Installed on Mobile DevicesLearn about the components installed on mobile devices during enrollment.
For related information, see the following technical paper:
Deploying iOS and tvOS Devices Using Apple Configurator 2 and Jamf ProGet step-by-step instructions on how to deploy iOS devices using Apple Configurator 2 and an enrollment URL.

466
1.
2.
3.
4.
5.
6.
7.
Supervision IdentitiesIf you plan to supervise devices and deploy them using Apple Configurator 2 and Jamf Pro, you can use a supervision identity to pair supervised devices with multiple Apple Configurator 2 workstations that have the same supervision identity. A supervision identity can be applied to a device by pairing the device with an Apple Configurator 2 workstation or by enrolling the device with Jamf Pro using a PreStage enrollment configured with an Automated Device Enrollment (formerly DEP) instance that has a supervision identity.
A supervision identity certificate (.p12 file) can be created in Jamf Pro or created in Apple Configurator 2 and then uploaded to Jamf Pro. The identity can then be stored in Jamf Pro until you need to download it and add it to other Apple Configurator 2 workstations, or add it to an Automated Device Enrollment instance for use with a PreStage enrollment.
Note: To ensure devices are paired securely with each Apple Configurator 2 workstation, the workstations you are using must have matching supervision identities. If the wrong identity is applied to a device, the device must be wiped, re-supervised, and re-enrolled to change the identity.
For more information about supervision identities, see Apple's Configurator 2 Help documentation at:https://support.apple.com/guide/apple-configurator-2/welcome
For step-by-step instructions on how to use supervision identities while deploying mobile devices using Apple Configurator 2, see the Deploying iOS and tvOS Devices with Apple Configurator 2 and
technical paper.Jamf Pro
General Requirements
To use supervision identities, you need:
Supervised devices with iOS 9 or later, or tvOS 10.2 or later
Apple Configurator 2.0 or 2.1
Creating a Supervision Identity
You can create a supervision identity in Jamf Pro for use with Apple Configurator 2.
Log in to Jamf Pro.
In the top-right corner of the page, click .Settings
Click .Mobile Device Management
Click .Apple Configurator Enrollment
Click the tab, and then click .Supervision Identities Edit
Click .New

467
7.
8.
1.
2.
3.
4.
5.
6.
7.
8.
9.
1.
2.
3.
4.
5.
6.
7.
8.
Configure the supervision identity using the fields on the pane.
Click .Save
Uploading a Supervision Identity
If you created a supervision identity using Apple Configurator 2, you can upload that identity to Jamf Pro so it can be accessed from other Apple Configurator 2 workstations or added to a Device Enrollment instance.
Log in to Jamf Pro.
In the top-right corner of the page, click Settings .
Click .Mobile Device Management
Click Apple Configurator Enrollment .
Click the tab, and then click .Supervision Identities Edit
Click .Upload
Click and upload the supervision identity (.p12).Upload Supervision Identity
Configure the supervision identity using the fields on the pane.
Click .Save
Downloading a Supervision Identity
You can download a supervision identity from Jamf Pro and add it to the Apple Configurator 2 workstations that you want your devices with the same supervision identity to trust.
Log in to Jamf Pro.
In the top-right corner of the page, click .Settings
Click .Mobile Device Management
Click Apple Configurator Enrollment .
Click the tab.Supervision Identities
Click next to the supervision identity you want to download.View
Click .Download
Click .Done
468
1.
2.
3.
4.
5.
6.
7.
8.
Adding a Supervision Identity to an Automated Device Enrollment Instance
When you add a supervision identity to an Automated Device Enrollment (formerly DEP) instance, that identity is applied to all devices enrolled using a PreStage enrollment that is configured with the Device Enrollment instance.
Note: Devices that are already enrolled with Jamf Pro and associated with an Automated Device Enrollment instance need to be re-enrolled to become associated with the supervision identity for that Automated Device Enrollment instance.
Log in to Jamf Pro.
In the top-right corner of the page, click Settings .
Click .Global Management
Click Device Enrollment .
Click the Automated Device Enrollment instance you want to add a supervision identity to.
Click .Edit
Select the supervision identity you want to add from the Supervision Identity for Use with Apple pop-up menu.Configurator
Click .Save
Related Information
For related information, see the following sections in this guide:
Integrating with Automated Device EnrollmentFind out how to configure an Automated Device Enrollment (formerly DEP) instance.
Mobile Device PreStage EnrollmentsFind out how to enroll mobile devices using a PreStage Enrollment.

469
1.
2.
3.
4.
5.
6.
7.
8.
9.
1.
2.
3.
Enrollment ProfilesEnrollment profiles are .mobileconfig files that allow you to enroll mobile devices with Jamf Pro. This involves creating an enrollment profile, connecting the devices to a computer via USB, and installing the enrollment profile using Apple Configurator.
When you create an enrollment profile using Jamf Pro, you can specify user and location information, purchasing information, and a site for mobile devices enrolled using the profile. To enroll mobile devices using Apple Configurator, you must download both the enrollment profile and its Trust Profile from Jamf Pro and import both profiles to Apple Configurator.
For information on how to install enrollment profiles using Apple Configurator, see the Installing Knowledge Base article.Enrollment Profiles Using Apple Configurator
Note: You cannot distribute an updated MDM profile via the Self Service web clip to mobile devices enrolled using an enrollment profile. For information on updating an MDM profile, see Self Service
.Web Clip
Creating an Enrollment Profile for Use with Apple Configurator
Log in to Jamf Pro.
Click at the top of the page. Devices
Click .Enrollment Profiles
Click .New
Use the General pane to configure basic settings for the enrollment profile.
(Optional) Click the tab and specify user and location information for User and Location Informationthe devices.
(Optional) Click the tab and specify purchasing information for the devices.Purchasing Information
(Optional) Click the tab and click to upload an attachment.Attachments Upload
Click .Save
Downloading an Enrollment Profile
You need to download the enrollment profile (.mobileconfig) from Jamf Pro before using it to enroll mobile devices using Apple Configurator.
Log in to Jamf Pro.
Click at the top of the page. Devices
Click . Enrollment Profiles

470
3.
4.
5.
1.
2.
3.
4.
5.
Click the enrollment profile you want to download.
Click .Download On macOS 10.7 or later, you may be prompted to install the profile. Click to decline.Cancel
The enrollment profile downloads immediately as a .mobileconfig file.
Downloading a Trust Profile
The Trust Profile contains the CA certificate that establishes trust between the certificate authority (CA) and mobile devices.
When you create an enrollment profile for use with Apple Configurator, Jamf Pro automatically creates an associated Trust Profile. You need to download the Trust Profile (Trust Profile.
) from Jamf Pro so that you can import it to Apple Configurator along with the mobileconfigenrollment profile.
Log in to Jamf Pro.
Click at the top of the page. Devices
Click .Enrollment Profiles
Click the enrollment profile for which you want to download a Trust Profile.
Click .Trust Profile On macOS 10.7 or later, you may be prompted to install the profile. Click to decline.Cancel
The Trust Profile downloads immediately with the filename .Trust Profile.mobileconfig
When the Trust Profile is imported to Apple Configurator, it displays in the Profiles list with a name that identifies it as the CA certificate profile.
Related Information
For related information, see the following section in this guide:
Components Installed on Mobile DevicesLearn about the components installed on mobile devices during enrollment.
For related information, see the following technical paper:
Deploying iOS and tvOS Devices Using Apple Configurator 2 and Jamf ProGet step-by-step instructions on how to deploy iOS devices using Apple Configurator 2 and an enrollment profile.

471
1.
2.
3.
4.
5.
6.
7.
Inventory for Mobile Devices
Mobile Device Inventory InformationJamf Pro stores detailed inventory information for each managed device. You can view and edit this information in Jamf Pro. Basic inventory information—such as hardware, OS version, storage, and apps—is generally available for all devices while the availability of other information depends on the device ownership type, device type, and OS version.
Note: Extension attributes are displayed in mobile device inventory information in the category in which they are configured to display.
Viewing and Editing Inventory Information
Log in to Jamf Pro.
Click at the top of the page.Devices
Perform a simple or advanced mobile device search.For more information, see or .Simple Mobile Device Searches Advanced Mobile Device Searches
Note: You can quickly search for all device records in Jamf Pro without entering a query by clicking .Search
Click the device you want to view information for.
If you performed a simple search for an item other than mobile devices, you must click Expand next to an item to view the mobile devices related to that item.The device's inventory information is displayed.
To make changes to an editable inventory field, select the category that contains the information you want to edit, click , and make changes as needed.EditIf you are editing user and location information, the changes are applied in the tab. This Usersspecified information is also applied in the inventory information for mobile devices and other computers that the user is assigned to. For information on assigning a user to a computer or removing a user assignment, see .User Assignments
(Optional) To populate computer purchasing information from Apple’s Global Service Exchange (GSX), click to look up and populate information from GSX.Search
Note: The Search button is only displayed if you have a GSX connection set up in Jamf Pro.
Click .Save
Related Information

472
Related Information
For related information, see the following sections in this guide:
Mobile Device Management CapabilitiesFind out what Jamf Pro's management capabilities are per device and operating system version.
Re-enrollment SettingsFind out how to clear or change the information that Jamf Pro retains for devices that are re-enrolled.
Mobile Device PreStage EnrollmentsFind out how to specify the information that is submitted by devices enrolled via a PreStage enrollment.

473
Mobile Device Inventory Information ReferenceThis section lists the inventory information you can view for a device. Some attributes are editable.
General Category
The following table lists the General category inventory attributes that you can view for each device. Attributes that Jamf Pro collects for personally owned iOS devices are indicated with an asterisk(*).
Field Notes
Mobile Device Name*
Editable only for supervised devices with iOS 8 or when Enforce Mobile Device later Name is configured. When Enforce Mobile Device Name is configured, Jamf Pro enforces the name in one of two ways:
If the enforced device name differs from the device name in the most recent inventory record for the device, Jamf Pro sends an MDM command that renames the device.If the end user changes the device name to something different than what Jamf Pro is set to enforce, the next time the device submits its inventory, Jamf Pro sends an MDM command to rename the device.
Jamf Pro Mobile Device ID*
Asset Tag
Site*
Last Inventory Update*
iOS Version*
For Apple TV devices prior to tvOS 10.2, the iOS version is equivalent to the OS build version on which the Apple TV software is based. The Apple TV software version is not collected.For Apple TV devices with tvOS 10.2 or later, the tvOS version is displayed.
iOS Build*
IP Address*
Managed*
Supervised
Shared iPad Displays whether Shared iPad has been enabled on the iPad. (This only displays for supervised iPads with iOS 9.3 or later.)
Diagnostics and Usage Reporting
Only displayed for iPads that have Shared iPad enabled.

474
Field Notes
App Analytics
Only displayed for iPads that have Shared iPad enabled.
Number of Users
Displays the number of user accounts cached on the deviceOnly displayed for iPads that have Shared iPad enabled.
Storage Quota Size
Only displayed for iPads that have Shared iPad enabled. A value is returned for iPads with iOS 13.4 or later.
Maximum Shared iPad Users Stored
Displays the maximum number of user accounts that can be stored with Shared iPad
Device Ownership Type*
Enrollment Method*
Last Enrollment*
MDM Profile Expiration Date*
Device Locator Service
Displays whether Find my iPhone/iPad has been enabled on the mobile device
Do Not Disturb
iCloud Backup
Last iCloud Backup
Bluetooth Low Energy Capability*
To detect Bluetooth Low Energy capability, the mobile device must have Jamf Self Service for iOS installed. If Self Service has never been launched on the device, this value will be reported as “Not Capable/Unknown”.
Location Services For Self Service*
Displays whether Location Services has been enabled on the mobile device for the Jamf Self Service appTo detect if Location Services has been enabled for Self Service, the device must have Jamf Self Service for iOS installed. If Self Service has never been launched on the device, or if Self Service has not been launched since the initial iBeacon region was added to Jamf Pro, this value will be reported as “Not Enabled/Unknown”.
Logged in to the App Store*

475
Field Notes
Exchange Device ID*
Tethered Status*
Time Zone
AirPlay Password
Apple TV only
Locales Apple TV only
Languages Apple TV only
Hardware Category
The Hardware category allows you to view the following information for a mobile device. Attributes that Jamf Pro collects for personally owned iOS devices are indicated with an asterisk (*).
Note: Devices enrolled using User Enrollment do not report any persistent device identities, such as Serial Number, UDID, Wi-Fi MAC Address, or Bluetooth MAC Address.
Capacity*
Available Space*
Used Space*
Internal Capacity
Internal Available Space
Internal Used Space
External Capacity
External Available Space
External Used Space
Battery Level*
Serial Number*
UDID*
Wi-Fi MAC Address*
Bluetooth MAC Address*
Modem Firmware Version*
Model*
Model Identifier*
Model Number*
Manufacturer

476
User and Location Category
You can assign a user to a mobile device and populate user information from the Users tab. For more information, see .User Assignments
Note: To assign a user to a device, the Jamf Pro user account must have the "Assign Users to Mobile Devices" privilege.
The User and Location category allows you to view the following information for a mobile device. Attributes that Jamf Pro collects for personally owned iOS devices are indicated with an asterisk(*).
Username*
Managed Apple ID*
Note: The Managed Apple ID only displays for devices enrolled using User Enrollment.
Full Name
Email Address
Phone Number
Position
Department
Building
Room
Note: If the device is re-enrolled via a PreStage enrollment, there are settings that can affect the user and location information for that computer. For more information, see Mobile Device
.PreStage Enrollments
Shared iPad Users Category
The Shared iPad category displays a list of the Managed Apple IDs of the users that logged in to the iPad, along with each user's logged in status. This category is only displayed for iPads that have Shared iPad enabled. For more information, see .Mobile Device PreStage Enrollments
You can remove individual users or all users from the iPad. The status of user removal is displayed in the list of pending management commands. For more information, see Viewing the Pending
. Users must be logged out of the device to remove Management Commands for a Mobile Devicethem. You can use the "Log Out User" remote command to log out a currently logged in user. For more information about the Log Out User remote command, see Remote Commands for Mobile
.Devices
If a user is logged out of the device but has a pending sync, you can use a force remove option. This action immediately removes the user from the device.
A timestamp of when the information was last refreshed is displayed above the list of users. You can refresh this information by clicking the button next to the Last Status Check timestamp.Refresh

477
Purchasing Category
You can look up and populate purchasing information from Apple’s Global Service Exchange (GSX) if you have a GSX connection set up in Jamf Pro. For more information, see . The GSX ConnectionPurchasing category allows you to view the following information for a mobile device:
Purchased or Leased
PO Number
PO Date
Vendor
Warranty Expiration
AppleCare ID
Lease Expiration
Purchase Price
Life Expectancy
Purchasing Account
Purchasing Contact
Extension Attributes Category
This category displays a list of custom data fields collected using extension attributes.
Note: Extension attributes are displayed in mobile device inventory information in the category in which they are configured to display.
Security Category
The following table lists the Security category inventory attributes you can view for a mobile device. Attributes that Jamf Pro collects for personally owned iOS devices are indicated with an asterisk (*).
Field Notes
Data Protection*
Hardware Encryption*
Passcode Status*
Block Encryption Capability*

478
Field Notes
File Encryption Capability*
Passcode Compliance*
Passcode Compliance with Config Profile*
Activation Lock*
Jailbreak Detected*
To detect jailbreak status, the mobile device must have Jamf Self Service for iOS installed. Jamf Pro will receive an updated Jailbreak Detected value each time Self Service is launched. If Self Service has never been launched on the device, this value will be reported as “Not Reported”.
Lost Mode (supervised only)
You can play a sound on the device when Lost Mode is enabled by clicking the button.Play Sound
Always enforce Lost Mode
Lost Mode Message
Lost Mode Phone Number
Lost Mode Footnote
Last Location Update
Displays the last time Global Positioning System (GPS) data was collected for the device when Lost Mode is enabled
Approximate Location
Displays coordinates for the approximate location of the device when Lost Mode is enabled. To collect GPS data for a device, the device must have a network connection.
Horizontal Accuracy
Vertical Accuracy
Altitude
Speed
Course
Timestamp

479
Field Notes
Personal Device Profile Status*
Displays whether the most up-to-date profile has been installed on the mobile device.
Apps Category
The Apps category displays a list of apps installed on a device. This information is collected for personally owned iOS devices as well as institutionally owned iOS devices.
Note: Jamf Pro only collects information on managed apps unless configured to collect information on unmanaged apps as well. For more information, see Mobile Device Inventory
.Collection Settings
Managed eBooks Category
The Managed eBooks category displays a list of managed books installed on a device. This information is not collected for personally owned iOS devices.
Network Category
The Network category allows you to view the following information for a mobile device:
Home Carrier Network
Current Carrier Network
Carrier Settings Version
Cellular Technology
Phone Number
IMEI
MEID
ICCID
Current Mobile Country Code
Current Mobile Network Code
Home Mobile Country Code
Home Mobile Network Code
Voice Roaming
Data Roaming Status
Roaming Status
Personal Hotspot Status

480
iBeacon Regions Category
The iBeacon Regions category displays a list of iBeacon regions that the mobile device is currently in.
Note: This category is only displayed if the Mobile Device Inventory Collection settings are configured to monitor iBeacon regions. For more information, see Mobile Device Inventory
.Collection Settings
Certificates Category
The Certificates category displays a list of certificates installed on the mobile device. This information is collected for personally owned iOS devices as well as institutionally owned iOS devices.
Profiles Category
The Profiles category displays a list of profiles installed on the mobile device. This information is collected for personally owned iOS devices as well as institutionally owned iOS devices.
Note: Only personally owned devices enrolled using User Enrollment display a list of installed profiles.
Provisioning Profiles Category
The Provisioning Profiles category displays a list of provisioning profiles installed on the mobile device. This information is collected for personally owned iOS devices as well as institutionally owned iOS devices.
Attachments Category
You can upload and delete attachments to the inventory record using this category. To upload an attachment, click . To delete an attachment, click .Upload Delete

481
1.
2.
3.
4.
5.
6.
7.
Mobile Device Inventory Collection SettingsThe Mobile Device Inventory Collection settings allow you to do the following:
Configure the frequency at which inventory is collected from mobile devices.
Collect unmanaged apps (does not apply to personally owned devices).
Collect user and location from an LDAP directory service (only available if an LDAP server is set up in Jamf Pro).
Monitor iBeacon regions so that mobile devices with Jamf Self Service for iOS installed submit information to Jamf Pro when they enter or exit a region.
By default, mobile devices submit inventory to Jamf Pro once every day.
Configuring the Mobile Device Inventory Collection Settings
Log in to Jamf Pro.
In the top-right corner of the page, click .Settings
Click .Mobile Device Management
Click .Inventory Collection
Click .Edit
Configure the settings on the pane.
Click .Save
Related Information
For related information, see the following sections in this guide:
Simple Mobile Device SearchesLearn how to quickly search the items in your inventory for a general range of results.
Advanced Mobile Device SearchesLearn how to create and save an advanced mobile device search.
iBeacon RegionsLearn what iBeacon regions can be used for and how you can add them to Jamf Pro.

482
Mobile Device Extension AttributesExtension attributes allow you to collect extra inventory information. Extension attribute values are populated by using an input type, which can be any of the following:
Text field
Pop-up menu
LDAP attribute mapping
In Jamf Pro, you can create extension attributes manually.
Examples:
A pop-up menu can collect the role selected by a user in the Jamf Setup app.
A text field input can collect the retire date of a mobile device.
Extension attributes can also be used as criteria in a smart group or as a variable in a configuration profile, which allows you to administer dynamic management workflows and tasks based on the data collected with extension attributes.
Notes:
Mobile device extension attributes do not apply to personally owned mobile devices.
Depending on the input type and data type (string, integer, date), extension attributes may add time and network traffic to the inventory collection process.
Extension Attribute Input Types
Extension attributes collect inventory data by using an input type. You can configure the following input types:
Text Fields
You can display a text field in inventory information. You can enter a value in the field anytime using Jamf Pro.
Pop-up Menus
You can display a pop-up menu in inventory information. You can choose a value from the pop-up menu anytime using Jamf Pro.

483
LDAP Attribute Mapping
You can use an LDAP attribute mapping to populate an extension attribute. Extension attributes can be populated by multiple-value attributes from an LDAP server, such as "memberOf". The multiple values can later be used when creating smart groups and advanced searches with the extension attribute criteria and the “has" or "does not have” operators.
Keep the following limitations in mind when using LDAP multiple-value extension attributes:
When creating smart groups and advanced searches, the criteria value must accurately reflect the value returned in inventory. To ensure you use the correct value, copy the extension attribute inventory value, and paste it in the criteria value field.
Multiple-value attribute mapping will not work with nested groups. Only the groups directly listed on the User record will be displayed in the mapped LDAP extension attribute.
For the extension attributes to work correctly, values returned from the LDAP server cannot contain the sequence of repeating vertical-bar characters (ASCII code 124, HTML entity = |).
Extension Attribute IDs and Variables
Creating an extension attribute generates a variable that can be used to populate configuration profile settings. The variable is $EXTENSIONATTRIBUTE_#, where # is the extension attribute ID.
For information about using payload variables for configuration profiles, see Mobile Device .Configuration Profiles
For extension attributes that use a text field, pop-up menu, or script input type, the ID number is found in the extension attribute URL. In the example URL below, "id=2" indicates the extension attribute ID number:
Example: https://instancename.jamfcloud.com/mobileDeviceExtensionAttributes.html?id=2&o=r
For extension attributes with the LDAP attribute mapping input type, the ID number is displayed in the LDAP Attribute Variable field after you save the extension attribute.
Creating a Mobile Device Extension Attribute
Requirements
If you are creating an extension attribute with the “LDAP Attribute Mapping” input type, you need the following:
An LDAP server set up in Jamf Pro (For more information, see Integrating with LDAP Directory .)Services
The Mobile Device Inventory Collection settings configured to collect user and location information from LDAP (For more information, see .)Mobile Device Inventory Collection Settings

484
1.
2.
3.
4.
5.
6.
a.
b.
c.
d.
e.
7.
Procedure
Log in to Jamf Pro.
In the top-right corner of the page, click .Settings
Click .Mobile Device Management
Click .Extension Attributes
Click .New
Configure the following settings:
Name your extension attribute.
(Optional) Enter a description.
Choose the type of data being collected from the pop-up menu.Data Type
Choose a category in which to display the extension attribute in Jamf Pro from the Inventory pop-up menu.Display
Choose an input type to populate your extension attribute from the pop-up menu.Input Type
Click .Save
Related Information
For related information, see the following section in this guide:
Smart GroupsYou can create smart device groups based on extension attributes.

485
1.
2.
3.
4.
5.
6.
Mobile Device Inventory Display SettingsThe Mobile Device Inventory Display settings allow each Jamf Pro user to choose which attribute fields to display in the results of a simple mobile device search.
Configuring the Mobile Device Inventory Display Settings
Log in to Jamf Pro.
In the top-right corner of the page, click .Settings
Click .Mobile Device Management
Click .Inventory Display
On each pane, select the checkbox for each attribute field you want to display.
Click .Save
Related Information
For related information, see the following section in this guide:
Simple Mobile Device SearchesLearn how to quickly search the items in your inventory for a general range of results.

486
Simple Mobile Device SearchesA simple mobile device search functions like a search engine, allowing you to quickly search the items in your inventory for a general range of results.
The following table shows the items that you can search by and the attributes on which you can base each search:
Inventory Item Searchable Attributes
Mobile devices Mobile device nameWi-Fi MAC addressBluetooth MAC addressUDIDSerial numberUsernameFull nameEmail addressPhone numberPositionDepartmentBuildingRoom
Mobile device apps Application name
You can also create an advanced search using detailed search criteria. These types of searches give you more control over your search. For more information, see .Advanced Mobile Device Searches

487
1.
2.
3.
4.
5.
6.
Search Syntax
This section explains the syntax to use for search functions. In general, searches are not case-sensitive.
Note: The default search preference is “Exact Match”. For most items, the option can be changed to either “Starts with” or “Contains”. For more information about configuring account preferences, see
.Jamf Pro User Accounts and Groups
The following table explains the syntax you can use for search functions:
Search Function Usage Example
Return all Results
Use an asterisk (*) without any other characters or terms, or perform a blank search.
Perform a search for “*” or leave the search field empty to return all results.
Perform Wildcard Searches
Use an asterisk after a search term to return all results with attributes that begin with that term.
Perform a search for “key*” to return all results with names that begin with “key”.
Use an asterisk before a search term to return all results with attributes that end with that term.
Perform a search for “*note” to return all results with names that end with “note”.
Use an asterisk before and after a search term to return all results that include that term.
Perform a search for “*ABC*” to return all results that includes “ABC”.
Include Multiple Search Terms
Use multiple search terms separated by a comma (,) to return all results that include those search terms.
Perform a search for “key*, *note” to return all results that begins with “key” and ends with “note”.
Exclude a Search Term
Use a hyphen (-) before a search term to exclude results that include the term.
Perform a search for “ABC*, -*note” to return all results with names that begin with “ABC” except for those that end with “note”.
Performing a Simple Mobile Device Search
Log in to Jamf Pro.
Click at the top of the page. Devices
Click .Search Inventory
Choose an item from the pop-up menu.Search
Enter one or more search terms in the fields provided.
Press the Enter key.

488
The list of search results is displayed.
If you searched for an item other than mobile devices, you can view the devices associated with a
result by clicking next to the result. You can also change the item on which the results are Expand based by choosing an item from the pop-up menu at the top of the page.
Related Information
For related information, see the following sections in this guide:
Mobile Device Inventory InformationFind out how to view and edit inventory information for a mobile device.
Mobile Device ReportsFind out how to export the data in your search results to different file formats.
Mass Actions for Mobile DevicesFind out how to perform mass actions on the results of a mobile device search.
Mobile Device Inventory Display SettingsFind out how to change the attribute fields displayed in the results of a simple mobile device search.
489
1.
2.
3.
4.
5.
6.
a.
b.
c.
d.
e.
7.
8.
Advanced Mobile Device SearchesAdvanced mobile device searches allow you to use detailed search criteria to search for devices in Jamf Pro. These types of searches give you more control over your search by allowing you to do the following:
Generate specific search results.
Specify which attribute fields to display in the search results.
Save the search.
Creating an Advanced Mobile Device Search
Log in to Jamf Pro.
Click at the top of the page. Devices
Click .Search Inventory
Click .New
Use the Search pane to configure basic settings for the search.To save the search, select the checkbox.Save this Search
Click the tab and add criteria for the search:Criteria
Click .Add
Click for the criteria you want to add.Choose
Note: Only your 30 most frequently used criteria are listed. To display additional criteria, click .Show Advanced Criteria
Choose an operator from the pop-up menu.Operator
Enter a value in the field or browse for a value by clicking .Value Browse
Repeat steps a through d to add criteria as needed.
Choose an operator from the pop-up menus to specify relationships between criteria.And/Or
To group criteria and join multiple operations, choose parentheses from the pop-up menus around the criteria you want to group.

490
8.
9.
10.
11.
12.
Operations in the search take place in the order they are listed (top to bottom).
Click the tab and select the attribute fields you want to display in your search results.Display
Click .Save
To view search results, click .View The results of a saved search are updated each time mobile devices contact Jamf Pro and meet or fail to meet the specified search criteria.
(Optional) To export the search results, click and follow the on-screen instructions.Export
Related Information
For related information, see the following sections in this guide:
Mobile Device Inventory InformationFind out how to view and edit inventory information for a mobile device.
Simple Mobile Device SearchesLearn how to quickly search the items in your inventory for a general range of results.

491
1.
2.
3.
4.
5.
Mobile Device ReportsThe data displayed in smart and static groups or mobile device search results can be downloaded from Jamf Pro. You can also email reports for advanced mobile device searches.
The following file formats are available for downloading or email reporting:
Comma-separated values file (.csv)
Tab-Separated Values (.tsv)
XML file
You can organize the data by basing the report on any of the following inventory items:
Mobile devices
Device groups
Apps
Configuration profiles
Certificates
Provisioning profiles
The data is displayed in alphanumeric order by the selected inventory item.
General Requirements
To email a saved advanced mobile device search report, an SMTP server must be set up in Jamf Pro. (For more information, see .)Integrating with an SMTP Server
Creating Reports for Smart and Static Groups or Simple Mobile Device Searches
Reports for smart and static groups or simple mobile device searches can be exported.
Log in to Jamf Pro.
Click at the top of the page. Devices
Do one of the following:
View mobile device group memberships. For more information, see or .Smart Groups Static Groups
View simple mobile device search results. For more information, see Simple Mobile Device Searches.
Note: You can only create a report from a simple mobile device search if you searched by devices.
At the bottom of the list, click .Export
Follow the onscreen instructions to export the data. The report downloads immediately.

492
1.
2.
3.
4.
5.
6.
7.
1.
2.
3.
4.
5.
6.
7.
Creating Reports for Advanced Mobile Device Searches
You can download unsaved and saved advanced mobile device search reports. Advanced mobile device search reports can also be emailed instantly or on a defined schedule.
Downloading an Advanced Mobile Device Search Report
Log in to Jamf Pro.
Click at the top of the page. Devices
Do one of the following:
Select the saved advanced mobile device search for which you want to create a report and view the results.
Click , and then use the Criteria and Display panes to configure your search.New
Click the tab.Reports
Select a file format for the report.
Select the inventory item on which to base the report results.
Click . The report downloads immediately.Download Report
Emailing an Advanced Mobile Device Search Report
Note: To email reports from newly created advanced searches, you must select Save this searchand complete the field in the Search pane.Display Name
Log in to Jamf Pro.
Click at the top of the page.Devices
Do one of the following:
Select the advanced mobile device search for which you want to create a report and view the results.
Click , and then use the Search, Criteria, and Display panes to configure your search.New
Click the tab.Reports
Select a file format.
Select the inventory item on which to base the report results.
In the Email Reporting section, enter email addresses, a subject for the email, and the body text for the email.

493
8.
9.
1.
2.
3.
4.
5.
6.
7.
8.
9.
10.
11.
Click . The report is sent immediately.Send Email Report
To set up another email report, click the button and repeat the process.
Scheduling Email Reports for Saved Advanced Mobile Device Searches
You can email saved advanced mobile device search reports according to a schedule that you define.
Log in to Jamf Pro.
Click at the top of the page.Devices
Select the advanced mobile device search for which you want to create a report, and view the results.
Click the tab.Reports
Select a file format for the report.
Select the inventory item on which to base the report results.
In the Email Reporting section, enter email addresses, a subject for the email, and the body text for the email.
Click .Schedule automatic email reports
Set the frequency and interval schedule that you want to email the report.
Click . Reports will be emailed on the specified schedule.Save
To set up another email report, click the button and repeat the process.
Related Information
For related information see the following sections of this guide:
Advanced Mobile Device SearchesFind out how to create an advanced mobile device search.
Simple Mobile Device SearchesFind out how to create a simple mobile device search.

494
Mass Actions for Mobile DevicesMass actions allow you to perform potentially tedious tasks for multiple mobile devices at the same time. Mass actions can be performed on static or smart group membership lists or mobile device search results. The following table explains the mass actions you can perform using Jamf Pro:
Mass Action Description
Edit the building or department
Mass editing the building or department for mobile devices allows you to add the mobile devices to a building or department or change the building or department they belong to. This option is only displayed if there are one or more buildings or departments in Jamf Pro. For more information, see
.Buildings and Departments
Edit the site Mass editing the site for mobile devices allows you to add the devices to a site or change the site they belong to. When mobile devices are added to a site, any users assigned to those mobile devices are also added to that site. This option is only displayed if there are one or more sites in Jamf Pro. For more information, see .Sites
Look up and populate purchasing information from Apple's Global Service Exchange (GSX)
You can mass look up purchasing information from Apple’s Global Service Exchange (GSX) and populate the information in Jamf Pro if desired. This requires a GSX connection set up in Jamf Pro. For more information, see GSX
.Connection
Note: GSX may not always return complete purchasing information. Only the information found in GSX is returned.
Send a mass email to users
You can send a mass email to users associated with the mobile devices in Jamf Pro. The email is sent to the email address associated with each device. This requires an SMTP server set up in Jamf Pro. For more information, see
.Integrating with an SMTP Server
Send a mass notification to mobile devices with Jamf Self Service for iOS installed
You can send a mass notification to mobile devices.This requires mobile devices with Jamf Self Service for iOS installed. For more information, see .Jamf Self Service for iOS
Delete the mobile devices from Jamf Pro
You can mass delete mobile devices from Jamf Pro.
Send remote commands
You can mass send remote commands to mobile devices from Jamf Pro. The remote commands available for a particular device vary depending on the device ownership type, device type, and OS version. For more information, see
and Remote Commands for Mobile Devices Mobile Device Management .Capabilities

495
1.
2.
3.
4.
5.
6.
Mass Action Description
Cancel management commands
You can mass cancel all pending or all failed management commands on mobile devices from Jamf Pro.
Remove restrictions set by Jamf Parent
After enabling Jamf Parent to manage a group of student devices, you can remove app restrictions set by Jamf Parent on that group of devices. This option is only displayed if Jamf Parent is enabled on the devices in the search or group.To remove restrictions, you need a Jamf Pro user account with the "Remove restrictions set by Jamf Parent" privilege.
Remove Jamf Parent management capabilities
After enabling Jamf Parent to manage a group of student devices, you can remove Jamf Parent management capabilities and student device restrictions set by Jamf Parent on that group of devices. If management capabilities are removed, parents must rescan the QR code in Self Service to add the student device back to Jamf Parent.To remove management capabilities, you need a Jamf Pro user account with the "Remove Jamf Parent management capabilities" privilege.
Remove restrictions set by Jamf Teacher
After enabling Jamf Teacher to manage a group of student devices, you can remove restrictions set by Jamf Teacher on students' school-issued devices. This option is only displayed if Jamf Teacher is enabled in the Jamf Teacher settings. To remove Jamf Teacher restrictions on student devices, you need a Jamf Pro user account with the "Remove restrictions set by Jamf Teacher" privilege.For more information about how to enable Jamf Teacher, see Jamf Teacher
.Integration with Jamf Pro
Performing Mass Actions for Mobile Devices
Log in to Jamf Pro.
Click at the top of the page. Devices
Do one of the following:
View device group memberships. For more information, see or .Smart Groups Static Groups
View simple or advanced mobile device search results. For more information, see Simple Mobile or .Device Searches Advanced Mobile Device Searches
Note: You can only perform mass actions from a simple mobile device search if you searched by devices.
At the bottom of the list, click .Action
Select the mass action you want to perform from the list of mass actions.
Follow the onscreen instructions.
Related Information

496
Related Information
For related information, see the following section in this guide:
Mobile Device Inventory InformationFind out how to view and edit inventory information for a single mobile device.

497
1.
2.
3.
4.
5.
Mobile Device Management InformationJamf Pro allows you to view management information for each mobile device, including group memberships, Jamf Pro objects that have the mobile device in scope, and more. The following table lists what management information you can view for a mobile device:
Category Notes
Management Commands
To cancel a pending management command, click next to the Cancelcommand.If your environment uses the Healthcare Listener, "Healthcare Listener" is displayed as the value in the Username column for the remote command that is automatically sent to the mobile device. For more information about the Healthcare Listener, see .Healthcare Listener
Configuration Profiles
If your environment uses Shared iPad, you can view a list of configuration profiles for a specific user on that device.
Activation Lock Bypass
To display the Activation Lock bypass code on the screen, click Get Activation .Lock Bypass Code
For information about what the Activation Lock bypass code can be used for, see the Knowledge Leveraging Apple’s Activation Lock Feature with Jamf ProBase article.
Apps --
eBooks --
Mobile Device Groups
--
Note: The management information available for a particular device varies depending on the device ownership type, device type, and iOS version. For more information, see Mobile Device
.Management Capabilities
Viewing Management Information for a Mobile Device
Log in to Jamf Pro.
Click at the top of the page.Devices
Perform a simple or advanced mobile device search.
Click the device you want to view management information for.
If you performed a simple search for an item other than mobile devices, you must click Expand next to an item to view the devices related to that item.
Click the tab, and then click the category you want to view management information Managementfor.A list of results is displayed.

498
Related Information
For related information about managing mobile devices, see the following sections in this guide:
Group ManagementLearn how to use smart or static groups to manage mobile devices.
Simple Mobile Device SearchesLearn how to find management information using simple mobile device searches.
Advanced Mobile Device SearchesLearn how to find management information using advanced mobile device searches.

499
1.
2.
3.
4.
5.
Mobile Device History InformationJamf Pro allows you to view history information for each mobile device, such as logs of deployment and management actions. The following table lists what history information you can view for a mobile device:
Category Notes
Management History
To cancel a pending management command, click next to the command.Cancel
Audit Logs If your environment uses the Healthcare Listener, "Healthcare Listener" is displayed as the value in the Username column for the remote command that is automatically sent to the mobile device. For more information, see Healthcare
.Listener
User and Location History
A record of the current information is added to the list whenever changes are made to the User and Location category in the mobile device’s inventory information.
Apps To cancel a pending app installation, click next to the app.Cancel
Managed eBooks
To cancel a pending installation, clicking next to the book.CancelTo cancel a failed installation, click next to the book.Cancel
Note: The management history available for a particular device varies depending on the device ownership type, device type, and iOS version. For more information, see Mobile Device
.Management Capabilities
Viewing History Information for a Mobile Device
Log in to Jamf Pro.
Click at the top of the page.Devices
Perform a simple or advanced mobile device search.
Click the mobile device you want to view history for.
If you performed a simple search for an item other than mobile devices, you must click Expand next to an item to view the mobile devices related to that item.
Click the tab, and then click the category for the type of history information you want to view.History
Related Information
For related information about managing mobile devices, see the following sections in this guide:
Group ManagementLearn how to use smart or static groups to manage mobile devices.

500
Simple Mobile Device SearchesLearn how to find history information using simple mobile device searches.
Advanced Mobile Device SearchesLearn how to find history information using advanced mobile device searches.

501
1.
2.
3.
4.
5.
6.
Deleting a Mobile Device from Jamf ProYou can remove a mobile device from your inventory by deleting it from Jamf Pro.
Note: The components installed during enrollment are not removed from the mobile device when it is deleted from Jamf Pro. It is recommended that you unmanage the device before deleting it.
Log in to Jamf Pro.
Click at the top of the page. Devices
Click .Search Inventory
Perform a simple or advanced mobile device search. or For more information, see Simple Mobile Device Searches Advanced Mobile Device Searches .
Click the mobile device you want to delete.
If you performed a simple search for mobile device applications, you must click next to an Expand item name to view the mobile devices related to that item.
Click , and then click again to confirm.Delete Delete
Related Information
For related information, see the following sections in this guide:
Mass Deleting Mobile DevicesFind out how to mass delete mobile devices from Jamf Pro.
Remote Commands for Mobile DevicesFind out how to unmanage a mobile device.

502
Settings and Security Management for Mobile Devices
Mobile Device Configuration ProfilesConfiguration profiles are XML files (.mobileconfig) that provide an easy way to define settings and restrictions for devices, computers, and users.
You can use Jamf Pro to create a configuration profile or you can upload a configuration profile that was created using third-party software, for example, Apple's Profile Manager or Apple Configurator.
Before creating a configuration profile, you should have basic knowledge of configuration profile payloads and settings. For more information, see the following Apple documentation:
Mobile Device Management Settings
Profile-Specific Payload Keys
Some configuration profile payloads and settings available in Jamf Pro may differ from their implementation in Apple’s tools. For more information on these settings, see the Configuration
Knowledge Base article.Profile Payload Settings Specific to Jamf Pro
When you create a mobile device configuration profile, you must specify the level at which to apply the profile—device level or user level. Each level has a unique set of payloads and a few that are common to both.
Note: User-level profiles apply to iPads enabled as Shared iPad only.
There are two different ways to distribute a configuration profile to an iOS device—install it automatically (requires no interaction from the user) or make it available in Jamf Self Service. For tvOS devices, configuration profiles must be distributed by installing automatically. You can also specify the mobile devices and users to which the profile should be applied (called “scope”).
Note: Removing a device from the scope of the profile also removes the settings applied by the profile the next time the device checks in with Jamf Pro. For user-level profiles, you can remove the profile from the iPad for each user by removing the device from the scope of the profile or deleting the profile from Jamf Pro. Each user must log in to the iPad for the profile to be removed from the device for that user.

503
A configuration profile will deploy containing both the iOS and tvOS selected options to all devices in scope. Devices will ignore the options that do not pertain to their device type.
Note: Mobile device configuration profiles cannot be distributed to personally owned mobile devices enrolled using a Personal Device Profile.
User-Level Profiles for Shared iPad
You can apply mobile device configuration profiles at the user level for iPads enrolled with Jamf Pro with Shared iPad enabled. This feature enhances Shared iPad workflows in your environment by enabling you to distribute configuration profiles directly to a user that logs in to the iPad. For example, you can create a configuration profile with a Web Clip payload that enables users to access a specific webpage. When each user logs in to the iPad, the profile is installed on the device for that user allowing the user to access the webpage directly from their Home Screen. User-level profiles can only be distributed using the “Install Automatically” method and cannot be made available in Self Service.
iPads must be enrolled with Jamf Pro and have Shared iPad enabled. You can use a Mobile Device PreStage enrollment to enable Shared iPad during enrollment. For more information, see Mobile
.Device PreStage Enrollments
Note: The following payloads are available to apply at the user level as of Jamf Pro 10.24.1:
Single Sign-On Extensions
Web Clip
After the profile is installed on the iPad, you can view the Managed Apple ID for each user that the profile was installed for. This information is available in the Profile category in the mobile device inventory information. For more information, see .Mobile Device Inventory Information Reference
Note: When you redistribute a user-level profile to a user that is currently logged in to their device, the user must log out and log back in to the iPad to have the profile re-installed on their device. For profiles that were created using Jamf Pro 10.24.1-10.25.0, you must edit and re-save the profile to redistribute it to users.
Payload Variables for Configuration Profiles
There are several payload variables that you can use to populate settings in a configuration profile with attribute values stored in Jamf Pro. This allows you to create payloads containing information about each mobile device, computer, and user to which you are distributing the profile.

504
To use a payload variable, enter the variable into any text field when creating a profile in Jamf Pro. When the profile is installed, the variable is replaced with the value of the corresponding attribute in Jamf Pro.
Variable Inventory Information
$DEVICENAME Mobile Device Name
$ASSET_TAG Asset Tag
$SITENAME Site Name
$SITEID Site ID
$SERIALNUMBER Serial Number
$UDID UDID
$USERNAME Username
$FULLNAME or $REALNAME Full Name
$EMAIL Email Address
$PHONE Phone Number
$ROOM Room
$POSITION Position
$DEPARTMENTNAME Department Name
$DEPARTMENTID Department ID
$BUILDINGNAME Building Name
$BUILDINGID Building ID
$MACADDRESS MAC Address
$JSSID Jamf Pro ID
$PROFILEJSSID Jamf Pro ID of the Configuration Profile
$EXTENSIONATTRIBUTE_# Extension Attribute ID Number
Note: The ID number is found in the extension attribute URL. In the example URL below, "id=2" indicates the extension attribute ID number:https://instancename.jamfcloud.com/mobileDeviceExtensionAttributes.html?id=2&o=rFor more information, see .Mobile Device Extension Attributes
General Requirements
To install a configuration profile on a device, you need a push certificate in Jamf Pro. For more information, see .Push Certificates

505
1.
2.
3.
4.
5.
6.
7.
8.
9.
Manually Creating a Configuration Profile
You can create a configuration profile using Jamf Pro.
Beginning with Jamf Pro 10.13.0, you can configure some payloads using a redesigned flow. Use switches to include the settings that will be sent to deployment targets. In the summary view, only the included or configured settings are displayed in the Jamf Pro interface. The operating system manages settings on the device level. Some enforced settings that do not change default values will not be visible on the device. For more information on the default settings, see this documentationfrom the Apple Developer website.
Note: When upgrading to Jamf Pro 10.13.0 or later, any previously configured payloads that have been redesigned are automatically migrated. Review the settings in the Jamf Pro user interface. The migrated payloads are not redeployed to deployment targets.
Log in to Jamf Pro.
Click at the top of the page. Devices
Click .Configuration Profiles
Click .New
Use the General payload to configure basic settings for the profile, including the level at which to apply the profile and the distribution method. If you chose to make the profile available in Jamf Self Service, choose a setting.SecurityOnly payloads and settings that apply to the selected level are displayed for the profile.
Use the rest of the payloads to configure the settings.
Click the tab and configure the scope of the profile.ScopeTo distribute user-level profiles, ensure you add iPads to the scope that have Shared iPad enabled. This allows the profile to be installed on the device for each potential user of that device. When each user logs in, the profile is then installed on the device.
Notes:
If a user is logged in to an iPad prior to a profile being saved in Jamf Pro, the user must log out and log back in to the iPad for the profile to be installed on the device.
For limitations or exclusions to be based on LDAP users or LDAP user groups, the Username field must be populated in the mobile device's inventory.
(Optional) If you chose to make the profile available in Self Service, click the tab to Self Serviceconfigure Self Service settings for the profile.
Click .Save
The profile is distributed to deployment targets in the scope the next time they contact Jamf Pro.
Uploading a Configuration Profile

506
1.
2.
3.
4.
5.
6.
7.
8.
9.
1.
2.
3.
4.
5.
Uploading a Configuration Profile
You can create a configuration profile by uploading a profile that was built using Apple’s software, for .example, Profile Manager or Apple Configurator
Note: Some payloads and settings configured with third-party software are not displayed in Jamf Pro. Although you cannot view or edit these payloads, they are still applied to the deployment targets.
Log in to Jamf Pro.
Click at the top of the page. Devices
Click .Configuration Profiles
Click and upload the configuration profile (.mobileconfig).Upload
Use the General payload to configure basic settings for the profile, including a distribution method. If you chose to make the profile available in Jamf Self Service, choose a setting.Security
Use the rest of the payloads to configure or edit settings as needed.
Click the tab and configure the scope of the profile.Scope
Note: For limitations or exclusions to be based on LDAP users or LDAP user groups, the Username field must be populated in the mobile device's inventory.
(Optional) If you chose to distribute the profile in Self Service, click the tab to configure Self ServiceSelf Service settings for the profile.
Click .Save
The profile is distributed to deployment targets in the scope the next time they contact Jamf Pro.
Downloading a Configuration Profile
If you want to view the contents of a configuration profile for troubleshooting purposes, you can download the profile (.mobileconfig) from Jamf Pro.
Log in to Jamf Pro.
Click at the top of the page. Devices
Click .Configuration Profiles
Click the configuration profile you want to download.
Click .Download
The profile downloads immediately.

507
1.
2.
3.
4.
5.
6.
Viewing the Status of a Configuration Profile
For each configuration profile, you can view the number of the deployments targets with a status of Complete, Remaining, or Failed for the profile installation.
Note: Depending on your system configuration, status data may not be available for profiles installed using Jamf Pro 9.63 or earlier.
Log in to Jamf Pro.
Click at the top of the page. Devices
Click .Configuration ProfilesA list of configuration profiles is displayed.For each profile, you can view the number of the deployment targets for which the profile installation has a Completed, Remaining, or Failed status.
Note: If a device becomes unmanaged after a profile is successfully distributed to it, the profile will continue to be displayed in the Completed column.
To view a list of deployment targets with a status of Complete, Remaining, or Failed for the profile installation, click the number displayed in the corresponding column. Then click in the top-Back left corner of the pane.
To view logs for a configuration profile, click in the corresponding row. For a different date Viewrange, specify the starting and ending dates using the pop-up calendars.Date Range
Click in the top-left corner of the pane.Back
Related Information
For related information, see the following sections in this guide:
Viewing the Pending Management Commands for a Mobile DeviceFind out how to view and cancel pending mobile device configuration profile installations and removals for a mobile device.
Viewing Configuration Profiles for a Mobile DeviceFind out how to view the mobile device configuration profiles in the scope for a mobile device.
Mobile Device History InformationFind out how to view all completed, pending, and failed mobile device configuration profile installations and removals for a mobile device.
ScopeLearn how to configure scope for configuration profiles.
For related information about distributing certifications via configuration profiles, see the Enabling technical paper.Jamf Pro as SCEP Proxy

508
Remote Commands for Mobile DevicesThe remote commands available in Jamf Pro allow you to remotely perform tasks on a mobile device.
You can send a remote command to a single mobile device. Some commands can also be sent to multiple devices at once using mass actions. For more information, see Mass Actions for Mobile
.Devices
Note: The remote commands available for a particular device vary depending on the device ownership type, device platform, device type, and OS version. For more information, see Mobile
.Device Management Capabilities
The following table describes the remote commands that you can send from Jamf Pro:
Remote Command Description
Available as a Mass Action
iOS Device Requirements
Personally Owned iOS Device Support
Update Inventory
Prompts the mobile device to contact Jamf Pro and update its inventory
--
Lock Device Locks the mobile deviceIf the mobile device has a passcode, the user must enter it to unlock the device.(Optional) Displays a message on the mobile device when it locks. This message is only sent if the mobile device has a passcode.(Optional) Displays a phone number on the mobile device when it locks. The phone number is only displayed if the mobile device has a passcode.
--

509
Remote Command Description
Available as a Mass Action
iOS Device Requirements
Personally Owned iOS Device Support
Clear Passcode Removes the passcode from the mobile deviceIf a configuration profile with a Passcode payload is installed on the device, the user is prompted to create a new passcode.
Important: If a device in Lost Mode shuts down or restarts and the passcode is not cleared, you must put the device in DFU mode to disable Lost Mode.
-- --
Clear Screen Time Passcode(This command was previously called Clear
.)Restrictions
Removes the Screen Time passcode from a device
iOS 8 or laterSupervised
Update Passcode Lock Grace Period
Sets the amount of time that a device's screen can be locked before requiring a passcode to unlock it
iOS 9.3 or laterEnrolled via a PreStage enrollment with Shared iPad enabled
--

510
Remote Command Description
Available as a Mass Action
iOS Device Requirements
Personally Owned iOS Device Support
Unmanage Device
Stops communication between the mobile device and the Jamf Pro server, which means you can no longer perform management tasks on the deviceWhen you unmanage a device, the following items are removed from the device:
MDM profileDevice certificateSelf ServiceAny configuration profiles that were distributed with Jamf ProAny managed apps that were distributed with the Remove app when MDM profile is
checkbox removedselected
Note: Although an unmanaged device will no longer submit inventory, its inventory record remains in Jamf Pro.
-- --
Note: Only personally owned mobile devices enrolled using User Enrollment can execute the Unmanage Device command.

511
Remote Command Description
Available as a Mass Action
iOS Device Requirements
Personally Owned iOS Device Support
Wipe Device Permanently erases all data on the device and deactivates the device. This command is available for both iOS and Apple TV devices (tvOS 10.2 or later).Optionally, you can:
Clear Activation Lock on the deviceRetain cellular data plans (iOS 11 or later)Suppress Proximity Setup on the device (iOS 11.3 or later)
Note: Wiping a device does not remove the device from Jamf Pro or change its inventory information.
To restore the device to the original factory settings, you must manually reactivate the device.
-- --
Set Shared iPad User Space(This command was previously called Set Storage Quota
)Size
Sets the Shared iPad user space on each iPad. You can set the following:
Number of Users—You can enter the maximum number of users that can be stored with the iPad. You can specify up to 99 users. This limits the number of user accounts that can be stored locally on the iPad.Storage Quota Size—You can specify the maximum amount of
iPadOS 13.4 or laterSupervisedEnrolled via a PreStage enrollment with Shared iPad enabled
--

512
Remote Command Description
Available as a Mass Action
iOS Device Requirements
Personally Owned iOS Device Support
storage (MB) allocated for each user on devices with iPadOS 13.4 or later. This overrides the maximum number of users. Quota size is dependent on the device's storage capacity and must meet the following limitations:
Devices with a storage capacity of 64 GB or greater must have 2048 MB or greater entered for storage space.Devices with a storage capacity of 32 GB or greater must have 1024 MB or greater entered for storage space.
All users must be logged out and removed from the device before this command can be sent.
Note: If devices are upgraded to iPadOS 13.4 or later, it is recommended that the device is wiped before setting the storage quota size.
Restart Device Restarts a device. This command is available for both iOS and Apple TV devices (tvOS 10.2 or later).(Optional) Clears the passcode on the device. If this option is chosen,
iOS 10.3 or laterSupervised
--

513
Remote Command Description
Available as a Mass Action
iOS Device Requirements
Personally Owned iOS Device Support
the Clear Passcode command is sent to the device before the device is restarted.
Important: If a device in Lost Mode shuts down or restarts and the passcode is not cleared using the Clear Passcode command, you must put the device in DFU mode to disable Lost Mode.
Send Blank Push
Sends a blank push notification, prompting the device to check in with Apple Push Notification service (APNs)
--
Set Wallpaper Sets an image or photo as wallpaper for the Lock screen, Home screen, or both screens on a supervised deviceYou can upload an image file or choose an existing image file.
iOS 7 or laterSupervised
--

514
Remote Command Description
Available as a Mass Action
iOS Device Requirements
Personally Owned iOS Device Support
Enable/Disable Voice RoamingEnable/Disable Data Roaming
Enables/disables voice or data roaming on the device
Note: Disabling voice roaming automatically disables data roaming.
iOS 5 or laterCellular capability
--
Update OS Version
Updates the OS version on supervised devicesYou can update the OS version for iOS or tvOS devices using the following options:
Target Version—You can choose to update the OS version to the latest version based on device eligibility or you can update to a specific version.
Note: Updating to a specific OS version requires iOS 12 or later and tvOS 12.2 or later.
iOS Update Action—You can choose to download the update for users to install, or to download and install the update and restart devices after installation.
Note: This option applies to iOS devices only.
This command is only available as a mass action.
iOS 9 or latertvOS 12 or laterSupervisedEnrolled via a PreStage enrollment (devices with iOS 9-10.2)No set passcode
--

515
Remote Command Description
Available as a Mass Action
iOS Device Requirements
Personally Owned iOS Device Support
For more information, see the Updating iOS BestPractice Workflow for
.Jamf Pro
Log Out User Logs out the currently logged in user for Shared iPad only
iOS 9.3 or laterSupervisedEnrolled via a PreStage enrollment with Shared iPad enabled
--
Enable/Disable Lost Mode
Enables/disables Lost Mode on the deviceLost Mode locks the device and displays your custom messaging on the device's Lock screen. Global Positioning System (GPS) coordinates for the device's approximate location are also displayed in the inventory information for the device.
Important: If a device in Lost Mode shuts down or restarts and the passcode is not cleared using the Clear Passcode command, you must put the device in DFU mode to disable Lost Mode.
iOS 9.3 or laterSupervised
--

516
Remote Command Description
Available as a Mass Action
iOS Device Requirements
Personally Owned iOS Device Support
(Optional) Always enforces Lost Mode on the device. This option ensures Lost Mode is enabled after an enrollment event has completed. When selected, Lost Mode can be only disabled in Jamf Pro.(Optional) Plays a sound on the lost device.
Important: If a device in Lost Mode shuts down or restarts and the passcode is not cleared using the Clear Passcode command, you must put the device in DFU mode to disable Lost Mode.
iOS 10.3 or laterSupervisedLost Mode enabled
--
Update Location
Updates the GPS coordinates collected for a mobile device in Lost Mode
iOS 9.3 or laterSupervisedLost Mode enabled
--

517
Remote Command Description
Available as a Mass Action
iOS Device Requirements
Personally Owned iOS Device Support
Enable/Disable Diagnostic and Usage ReportingEnable/Disable App Analytics
Enables/disables the sending of diagnostic and usage data to AppleEnables/disables the sending of app analytics data to Apple
Note: Disabling diagnostic and usage reporting automatically disables app analytics.
iOS 9.3 or laterSupervisedEnrolled via a PreStage enrollment with Shared iPad enabled
--
Shut Down Device
Shuts down the device(Optional) Clears the passcode on the device. If this option is chosen, the Clear Passcode command is sent to the device before the device is shutdown.
Important: If a device in Lost Mode shuts down or restarts and the passcode is not cleared using the Clear Passcode command, you must put the device in DFU mode to disable Lost Mode.
iOS 10.3 or laterSupervised
--
Enable/Disable Bluetooth
Enables/disables Bluetooth on the device
iOS 11.3 or laterSupervised
--

518
Remote Command Description
Available as a Mass Action
iOS Device Requirements
Personally Owned iOS Device Support
Set Activation Lock
Enable Activation Lock directly on a deviceAllow user to enable Activation Lock on the device
Note: If Activation Lock is enabled on the device when this command is sent, Jamf Pro automatically clears the Activation Lock before allowing the user to re-enable it.
Disable and prevent Activation LockFor more information, see the Leveraging Apple's Activation Lock
Feature with Jamf ProKnowledge Base article.
SupervisedIn Apple School Manager or Apple Business Manager
--
Enable/Disable Personal Hotspot
Enables/disables the Personal Hotspot on the device
iOS 7 or later --

519
Remote Command Description
Available as a Mass Action
iOS Device Requirements
Personally Owned iOS Device Support
Manage Jamf Parent
Allows you to remove app restrictions set by Jamf Parent on students' school-issued devices or remove Jamf Parent management capabilities. Removing Jamf Parent management capabilities prevents Jamf Parent from managing the student device until the parent scans the QR code again. To remove Jamf Parent restrictions on student devices, you need a Jamf Pro user account with the "Remove restrictions set by Jamf Parent" privilege.For more information, see Jamf Parent Integration with Jamf Pro.
Note: This remote command is available as the following separate mass actions:
Remove restrictions set by Jamf ParentRemove Jamf Parent management capabilities
Supervised --

520
Remote Command Description
Available as a Mass Action
iOS Device Requirements
Personally Owned iOS Device Support
Remove restrictions set by Jamf Teacher
Allows you to remove restrictions set by Jamf Teacher on students' school-issued devices. This option is only displayed if Jamf Teacher is enabled in the Jamf Teacher settings. To remove Jamf Teacher restrictions on student devices, you need a Jamf Pro user account with the "Remove restrictions set by Jamf Teacher" privilege.For more information about how to enable Jamf Teacher, see Jamf Teacher Integration with
.Jamf Pro
iOS 10.11 or laterSupervised
--
Refresh Cellular Plans
Refreshes a device’s cellular plan by querying a carrier URL for active eSIM cellular plan profiles
Note: The device and carrier must support eSIM. For more information, see Find wireless carriers that
offer eSIM service from Apple's support website.
iOS 13 or later --

521
Remote Command Description
Available as a Mass Action
iOS Device Requirements
Personally Owned iOS Device Support
Renew MDM Profile
Renews the MDM profile on the mobile device, along with the device identity certificate. The device identity certificate has a default expiration period of two years.
Note: The Renew MDM Profile remote command is automatically issued when the built-in CA is renewed. The MDM profile will be renewed during the next mobile device check-in. For more information, see "Renewing the Built-in CA" in PKI
.Certificates
--
Set Time Zone Sets a time zone on a device
iOS 14 or latertvOS 14 or laterSupervised
--

522
Remote Command Description
Available as a Mass Action
iOS Device Requirements
Personally Owned iOS Device Support
Personal Device Profiles Only (Deprecated)
Wipe Institutional Data
Disclaimer: Personal device profiles have been deprecated. User Enrollment is the Apple-preferred method for enrolling personally owned devices in a Bring Your Own Device (BYOD) program. For information on enrolling personally owned iOS or iPadOS devices with Jamf Pro, see the Building a BYOD Program with User Enrollment and
technical Jamf Propaper. For legacy documentation about Personal Device Profiles, see version 10.27.0 or earlier of the Jamf Pro
.Administrator's Guide
Permanently erases institutional data and settings on the deviceOn a personal mobile device, the following items are removed:
MDM profilePersonal Device Profile, including any institutional settings and managed appsDevice certificate
On personal mobile devices, the Wipe Institutional Data command makes the device unmanaged. This
--
Note: Only personally owned mobile devices enrolled using Personal Device Profiles can run the Wipe Institutional Data command.

523
1.
2.
3.
4.
5.
Remote Command Description
Available as a Mass Action
iOS Device Requirements
Personally Owned iOS Device Support
stops communication between the device and the Jamf Pro server, which means you can no longer perform management tasks on the device.
Note: Although an unmanaged device will no longer submit inventory, its inventory record remains in Jamf Pro.
Sending a Remote Command to a Mobile Device
Log in to Jamf Pro.
Click at the top of the page. Devices
Perform a simple or advanced mobile device search.
Click the mobile device you want to send the remote command to.
If you performed a simple search for an item other than mobile devices, you must click Expand next to an item to view the devices related to that item.
Click the tab, and then click the button for the remote command that you want to send.ManagementDepending on the command selected, additional options may be available.
The remote command runs on the mobile device the next time the device contacts Jamf Pro.
After the command is sent, you can do the following on the tab:History
To view the status of a remote command, use the Management history pane to view completed, pending, or failed commands.
To cancel a remote command, click . Find the command you want to cancel, Pending Commandsand click across from it.Cancel
Related Information
For related information about performing mobile device searches, see the Simple Mobile Device or sections of this guide.Searches Advanced Mobile Device Searches

524
Managing Users

525
About User Management
User management with Jamf Pro allows you to distribute the following items to users:
Mac App Store apps
In-house apps
App Store apps
In-house books
Book Store books
iOS configuration profiles
macOS configuration profiles
Policies

526
1.
2.
3.
4.
5.
6.
Inventory for Users
User Inventory InformationJamf Pro stores detailed inventory information for each user. You can view and edit this information from Jamf Pro.
Viewing and Editing Inventory Information
Log in to Jamf Pro.
Click at the top of the page.Users
Perform a simple or advanced user search.For more information, see or .Simple User Searches Advanced User Searches
Note: You can quickly search for all users in Jamf Pro without entering a query by clicking .Search
Click the user you want to view information for.The user's inventory information is displayed.
To make changes to an editable inventory field, select the category that contains the information you want to edit, click , and make changes as needed.Edit
Click .Save
Changes to a user’s site are only applied in the tab. All other changes to a user’s inventory Usersinformation are applied in the tab and also in the inventory information for computers, and Usersmobile devices that the user is assigned to.
Note: Removing a user from a site removes the user assignment from all computers and mobile devices that belong to that site.
Related Information
For related information, see the following section in this guide:
SitesFind out how to make changes to a user’s site.

527
User Inventory Information ReferenceThis section lists the inventory attributes you can view for a user. Some attributes are editable.
General Category
The General category allows you to view the following information for a user:
User Image
Notes:
Shared iPad onlyDisplays only when user images are enabled and the requirements for enabling Apple Education Support are metYou can edit the URL for the user image by selecting the checkbox. This Custom Image URLallows you to overwrite the existing distribution point URL for a single user image.
Username
Full Name
Email Address
Phone Number
Position
Extension Attributes
Site
Extension attributes are also displayed in the General category of user inventory information.
For more information about enabling user images as a part of Apple Education Support, see Apple .Education Support Settings
Roster Category
The Roster category of inventory attributes only displays if your environment is integrated with Apple School Manager. The following table lists the inventory attributes you can view for a user:
Field Notes
Last Sync
Status
User Number
Full Name from Roster
First Name

528
Field Notes
Middle Name
Last Name
Managed Apple ID
Managed Apple ID uses federated authentication
This field displays whether or not a user's Managed Apple ID uses federated authentication. This enables Microsoft Azure Active Directory (AD) credentials to be leveraged as the user's Managed Apple ID. For more information about federated authentication, see Intro to federated authentication with Apple
from the .School Manager Apple School Manager User Guide
Grade
Password Policy
The following options are available for the Password Policy:4-Digit6-DigitStandard (8 or more numbers and letters)
Shared iPad only
Mobile Devices Category
The Mobile Devices category displays a list of mobile devices that the user is assigned to.
Computers Category
The Computers category displays a list of computers that the user is assigned to.
eBooks Category
The eBooks category displays a list of books distributed to the user.
Volume Assignments Category
The Volume Assignments category displays a list of content assigned to the user via volume assignments.
VPP Codes Category
The VPP Codes category displays a list of VPP codes redeemed by the user.

529
Related Information
For related information, see the following sections in this guide:
Computer Inventory InformationFind out how to view and edit user inventory information from the inventory information for a computer that the user is assigned to.
Computer Inventory Information ReferenceFind out what information Jamf Pro collects for computers.
Mobile Device Inventory InformationFind out how to view and edit user inventory information from the inventory information for a mobile device that the user is assigned to.
Mobile Device Inventory Information ReferenceFind out what information Jamf Pro collects for mobile devices.
For related information, see the following Knowledge Base article:
Redoing Volume Purchasing User Registration for an Unintended Apple IDFind out how to redo the registration for a user that registered with volume purchasing using an unintended Apple ID.

530
1.
2.
3.
4.
User AssignmentsJamf Pro allows you to assign LDAP users to computers and mobile devices. Assigning a user to a device in Jamf Pro creates a user assignment that can be added as a target user to the scope of remote management tasks. For example, if you assign the user "samantha.johnson" to a device, you can then add that user to the scope of a configuration profile. All devices assigned to "samantha.johnson" install the profile. Assigning a user to a device also allows the user to receive email or SMS messages on the device to which they are assigned.
There are two ways to assign a user to a computer or mobile device:
Manually (Requires the device to be enrolled with Jamf Pro)
During user-initiated enrollment (LDAP users only)
In addition, Jamf Pro allows you to remove user assignments.
This section explains how to manually assign a user to a device, and how to remove a user assignment.
General Requirements
To assign a user to a mobile device, you need a Jamf Pro user account with the "Assign Users to Mobile Devices" privilege.
To assign an LDAP user to a device, you need an LDAP server set up in Jamf Pro. For more information, see .Integrating with LDAP Directory Services
Manually Assigning a User to a Computer or Mobile Device
Log in to Jamf Pro.
Click or at the top of the page.Computers Devices
Perform a simple or advanced search.For more information on computer searches, see or Simple Computer Searches Advanced Computer
.Searches or For more information on mobile device searches, see Simple Mobile Device Searches Advanced
.Mobile Device Searches
Click the computer or mobile device you want to assign a user to.

531
5.
6.
1.
2.
3.
4.
5.
6.
Select the category and click .User and Location Edit
Do one of the following:
To assign an existing user, enter the user’s partial or full username in the field and click Usernamethe button. Click across from the user you want to assign, and then click .Search Choose SaveThe , , , and fields are populated automatically.Full Name Email Address Phone Number Position
To assign and create a new user, enter information about the user and click .Save
Removing a User Assignment from a Computer or Mobile Device
Log in to Jamf Pro.
Click or at the top of the page.Computers Devices
Perform a simple or advanced search.For more information on computer searches, see or Simple Computer Searches Advanced Computer
.SearchesFor more information on mobile device searches, see or Simple Mobile Device Searches Advanced
.Mobile Device Searches
Click the computer or mobile device you want to remove a user assignment from.
Select the category and click .User and Location Edit
Remove the username from the field and click .Username SaveThe information in the , , , and fields is removed Full Name Email Address Phone Number Positionautomatically.
Related Information
For related information, see the following Knowledge Base article:
Migrating UsersIf you have upgraded from Jamf Pro 9.2x or earlier and have not migrated users in Jamf Pro, you must complete the migration process to create user inventory from existing user information in computer and mobile device inventory.

532
1.
2.
3.
4.
5.
User Extension AttributesExtension attributes allow you to collect extra inventory information. Extension attribute values are populated by using an input type, which can be any of the following:
Text field
Pop-up menu
In Jamf Pro, you can create extension attributes manually. They are displayed in the General category of user inventory information.
Note: Depending on the input type and data type (string, integer, date), extension attributes may add time and network traffic to the inventory collection process.
Extension Attribute Input Types
Extension attributes collect inventory data by using an input type. You can configure the following input types:
Text Fields
You can display a text field in inventory information. You can enter a value in the field anytime using Jamf Pro.
Pop-up Menus
You can display a pop-up menu in inventory information. You can choose a value from the pop-up menu anytime using Jamf Pro.
Creating a User Extension Attribute
Log in to Jamf Pro.
In the top-right corner of the page, click .Settings
Click .User Management
Click .Extension Attributes
Click .New

533
6.
a.
b.
c.
d.
7.
Configure the following settings:
Name your extension attribute.
(Optional) Enter a description.
Choose the type of data being collected from the pop-up menu.Data Type
Choose an input type to populate your extension attribute from the pop-up menu.Input Type
Click .Save
Related Information
For related information, see the following sections in this guide:
User Inventory InformationYou can view the extension attributes collected from a user and edit extension attribute values for that user.
Smart GroupsYou can create smart user groups based on extension attributes.

534
Simple User SearchesA simple user search functions like a search engine, allowing you to quickly search the users in your inventory for a general range of results.
You can base searches on any of the following attributes:
Username
Full name
Email address
Search Syntax
This section explains the syntax to use for search functions. In general, searches are not case-sensitive.
Note: The default search preference is “Exact Match”. For most items, the option can be changed to either “Starts with” or “Contains”. For more information about configuring account preferences, see
.Jamf Pro User Accounts and Groups
The following table explains the syntax you can use for search functions:
Search Function Usage Example
Return all Results
Use an asterisk (*) without any other characters or terms, or perform a blank search.
Perform a search for “*” or leave the search field empty to return all results.
Perform Wildcard Searches
Use an asterisk after a search term to return all results with attributes that begin with that term.
Perform a search for “key*” to return all results with names that begin with “key”.
Use an asterisk before a search term to return all results with attributes that end with that term.
Perform a search for “*note” to return all results with names that end with “note”.
Use an asterisk before and after a search term to return all results that include that term.
Perform a search for “*ABC*” to return all results that includes “ABC”.
Include Multiple Search Terms
Use multiple search terms separated by a comma (,) to return all results that include those search terms.
Perform a search for “key*, *note” to return all results that begins with “key” and ends with “note”.
Exclude a Search Term
Use a hyphen (-) before a search term to exclude results that include the term.
Perform a search for “ABC*, -*note” to return all results with names that begin with “ABC” except for those that end with “note”.

535
1.
2.
3.
4.
5.
Performing a Simple User Search
Log in to Jamf Pro
Click at the top of the page.Users
Click .Search Users
Enter one or more search terms in the field provided.
Press the Enter key.
The list of search results is displayed.
Related Information
For related information, see the following section in this guide:
User Inventory InformationFind out how to view and edit inventory information for a user.

536
1.
2.
3.
4.
5.
6.
a.
b.
c.
d.
e.
7.
8.
9.
Advanced User SearchesAdvanced user searches allow you to use detailed search criteria to search for users in Jamf Pro. These types of searches give you more control over your search by allowing you to do the following:
Generate specific search results.
Specify which attribute fields to display in the search results.
Save the search.
Creating an Advanced User Search
Log in to Jamf Pro.
Click at the top of the page.Users
Click .Search Users
Click .New
Use the Search pane to configure basic settings for the search.To save the search, select the checkbox.Save this Search
Click the tab and add criteria for the search:Criteria
Click .Add
Click for the criteria you want to add.Choose
Choose an operator from the pop-up menu.Operator
Enter a value in the field or browse for a value by clicking .Value Browse
Repeat steps a through d to add criteria as needed.
Choose an operator from the pop-up menus to specify the relationships between criteria.And/Or
To group criteria and join multiple operations, choose parentheses from the pop-up menus around the criteria you want to group.
Operations in the search take place in the order they are listed (top to bottom).

537
9.
10.
11.
12.
Click the tab and select the attribute fields you want to display in your search results.Display
Note: Some criteria cannot be viewed in advanced search results in Jamf Pro. These criteria can be selected for export from the Export Only pane.
Click .Save
To view the search results, click .View The results of a saved search are updated each time user information is modified and users meet or fail to meet the specified search criteria.
(Optional) To export the search results, click and follow the on-screen instructions.Export
Related Information
For related information, see the following section in this guide:
User Inventory InformationFind out how to view and edit inventory information for a user.

538
1.
2.
3.
4.
5.
User ReportsThe data displayed in smart or static group membership lists or user search results can be exported from Jamf Pro to the following file formats:
Comma-separated values file (.csv)
Tab delimited text file (.txt)
XML file
Creating User Reports
Log in to Jamf Pro.
Click at the top of the page.Users
Do one of the following:
View user group memberships. For more information, see or .Smart Groups Static Groups
View simple or advanced user search results. For more information, see or Simple User Searches.Advanced User Searches
At the bottom of the list, click .Export
Follow the onscreen instructions to export the data.
The report downloads immediately.

539
1.
2.
3.
4.
5.
6.
1.
2.
Mass Actions for UsersMass actions allow you to perform potentially tedious tasks for multiple users at the same time. You can use Jamf Pro to perform the following mass actions:
Add users to a site.
Delete users from Jamf Pro.
Mass actions can be performed on static or smart group membership lists or user search results.
Adding Multiple Users to a Site
You can use Jamf Pro to add multiple users to a site from static or smart group membership lists or user search results. When you add multiple users to a site, those users retain previous site memberships.
You can only add multiple users to a site if there are one or more sites in Jamf Pro.
Log in to Jamf Pro.
Click at the top of the page.Users
Do one of the following:
View user group memberships. (For more information, see or .)Smart Groups Static Groups
View simple or advanced user search results. (For more information, see or Simple User Searches.)Advanced User Searches
At the bottom of the list, click .Action
Select .Add Users to a Site
Follow the onscreen instructions to add users to a site.
Mass Deleting Users
You can mass delete users from Jamf Pro.
If you have site access only and you mass delete users that belong to the site, the users are deleted from the full Jamf Pro (not just the site).
A user cannot be deleted from Jamf Pro if there are dependencies for the user. For example, a user cannot be deleted if the user is assigned to a mobile device.
Log in to Jamf Pro.
Click at the top of the page.Users

540
3.
4.
5.
6.
Do one of the following:
View user group memberships. (For more information, see or .)Smart Groups Static Groups
View simple or advanced user search results. (For more information, see or Simple User Searches.)Advanced User Searches
At the bottom of the list, click Action .
Select .Delete UsersA list of dependencies is displayed if you cannot delete users. The number of users is displayed next to the dependency.
Follow the onscreen instructions to delete users.
Related Information
For related information, see the following sections in this guide:
SitesFind out how to create a site.
User Inventory InformationFind out how to edit the site for a single user.

541
1.
2.
3.
4.
5.
6.
7.
Manually Adding a User to Jamf ProYou can manually add a user to Jamf Pro.
Log in to Jamf Pro.
Click at the top of the page.Users
Click .Search Users
Leave the search field blank and press the Enter key.
Click .New
Enter information about the user.
Click .Save
Related Information
For related information, see the following sections in this guide:
User AssignmentsFind out how to assign a user to a computer or mobile device in inventory.
Importing Users to Jamf Pro from Apple School ManagerFind out how to create or update users in Jamf Pro by importing users from Apple School Manager.

542
Importing Users to Jamf Pro from Apple School ManagerYou can import users to Jamf Pro from Apple School Manager. This allows you to automatically create new users in Jamf Pro from the users in Apple School Manager or append information to existing users in Jamf Pro.
When you import users from Apple School Manager, the following fields are populated in the Roster category of the user's inventory information:
Last Sync
Status
User Number
Full name from Roster
First Name
Middle Name
Last Name
Managed Apple ID
Grade
Password Policy
An assistant in Jamf Pro guides you through the process of importing all users or a subset of users from Apple School Manager. If you choose to import a subset of users, you need to choose the criteria and values for the users you want to import. For example, you could import the students from an "Addition & Subtraction" course or an "Algebra" course only.

543
1.
2.
3.
You can select from the following options when importing users from Apple School Manager:
Match to an existing user in Jamf Pro —Imported users are matched to existing users in Jamf Pro based on the criteria selected when integrating Jamf Pro with Apple School Manager. Jamf Pro displays potential existing users in Jamf Pro that match the specified criteria. When you select an existing user in Jamf Pro to match the imported user to, information is populated in the Roster category of the user's inventory information. If this information existed prior to matching the imported user with the existing user, the information is updated.
Create a new user in Jamf Pro —If you choose to create a new user, the imported user is automatically added to Jamf Pro in the Users tab and inventory information is entered in the Roster category of the user's inventory information.
Note: The number of users you can import and match varies depending on your environment. Importing a large number of users at once may affect performance. You may need to perform more than one import to import all users to Jamf Pro from Apple School Manager.
After users are imported, if an Apple School Manager Sync Time is configured for the Apple School Manager instance, user information is updated automatically based on the scheduled frequency and time.
Importing Users from Apple School Manager
Requirements
To import users to Jamf Pro from Apple School Manager, you need the following:
Jamf Pro integrated with Apple School Manager (For more information, see Integrating with Apple .)School Manager
A Jamf Pro user account with the "Users" privilege
Procedure
Log in to Jamf Pro.
Click at the top of the page.Users

544
3.
4.
5.
6.
Click .Search Users
Leave the search field blank and press the Enter key.
Click .ImportIf you choose to import a subset of users, choose the criteria, operator, and values to use to define the subset of users to import.
Note: When importing a subset of users based on multiple criteria, choose "or" from the And/Orpop-up menus if the criteria are the same.
Follow the onscreen instructions to import users.
Note: If you are importing a large number of users (e.g., 10,000), a progress bar is displayed in the assistant during the import process. You can click and perform other management tasks Donewhile the import takes place.
User information is imported to Jamf Pro and applied in the Users tab.
If you have site access only, users are imported to your site only.
Related Information
For related information, see the following sections in this guide:
Integrating with Apple School ManagerFind out how to integrate Jamf Pro with Apple School Manager and configure the Apple School Manager Sync Time.
ClassesFind out how to create classes in Jamf Pro for use with Apple's Classroom app.
For related information, see the following technical paper:
Integrating with Apple School Manager to Support Apple's Education Features Using Jamf ProGet step-by-step instructions on how to integrate with Apple School Manager to support Apple's education features with Jamf Pro.

545
1.
2.
3.
4.
5.
6.
Deleting a User from Jamf ProYou can remove a user from your inventory by deleting it from Jamf Pro.
Log in to Jamf Pro.
Click at the top of the page.Users
Click .Search Users
Perform a search for the user you want to delete.For more information, see .Simple User Searches
Click the user.
Click , and then click again to confirm.Delete Delete

546
Group Management

547
About Groups
You can create groups in Jamf Pro to organize computers, mobile devices, or users that share similar attributes. You can use these groups as a basis for performing advanced searches and configuring the scope of remote management tasks, such as adding them to Classes for use with Apple's Classroom app or performing mass actions.
You can create smart groups and static groups for computers, mobile devices, or users. Smart groups are based on criteria and have dynamic memberships. Static groups have fixed memberships that you manually assign.
Note: Personally owned mobile devices cannot be included in device group memberships.

548
1.
2.
3.
4.
5.
6.
a.
b.
c.
d.
Smart Groups
Jamf Pro allows you to create smart groups for managed computers, mobile devices, or users. You can create smart groups based on one or more inventory attributes.
For more information about inventory attributes that you can base smart groups on, see the following sections:
Computer Inventory Information Reference
Mobile Device Inventory Information Reference
User Inventory Information Reference
After creating a smart group, you can view its memberships.
General RequirementsYou can enable email notifications to be sent to Jamf Pro users each tie a group membership changes. To enable email notifications, you need:
An SMTP server set up in Jamf Pro (For more information, see .)Integrating with an SMTP Server
Email notifications enabled in Jamf Pro (For more information, see .)Email Notifications
Creating a Smart GroupLog in to Jamf Pro.
Click , , or at the top of the page.Computers Devices Users
Click , , or .Smart Computer Groups Smart Device Groups Smart User Groups
Click and configure basic settings for the group.New
To enable email notifications, select the checkbox.Send email notification on membership change
Click the tab and add criteria to the group:Criteria
Click .Add
Click for the criteria you want to add.Choose
Note: Only your 30 most frequently used criteria are listed. To display additional criteria, click .Show Advanced Criteria
Choose an operator from the pop-up menu.Operator
Enter a value in the field or browse for a value by clicking .Value Browse

549
6.
e.
7.
8.
9.
10.
1.
2.
3.
4.
Repeat steps a through d to add criteria as needed.
Note: Creating a smart group with no criteria will cause all managed computers, mobile devices, or users to be included in the group's membership.
Choose an operator from the pop-up menus to specify the relationship between criteria.And/Or
To group criteria and join multiple operations, choose parentheses from the pop-up menus around the criteria you want to group.
(Optional) If you are creating a smart device group, you can configure the group to send remote commands to mobiles devices when the devices become members of that group. For example, the Set Wallpaper remote command can be configured to automatically set the wallpaper on devices when they become members of the smart group. Click the tab and Automated Managementconfigure remote commands to send to devices that are members of the group.
Click , and then click .Save View
Operations in the group take place in the order they are listed (top to bottom).
Group memberships are updated each time the following happens:
Computers submit inventory to Jamf Pro and meet or fail to meet the specified criteria.
Note: Some inventory attributes are updated when computers check in rather than when they submit inventory (e.g., Last Check-in). Smart groups containing criteria based on these attributes update memberships each time computers check in.
Mobile devices contact Jamf Pro and meet or fail to meet the specified criteria.
User information is edited.
Viewing Smart Group MembershipsLog in to Jamf Pro.
Click , , or at the top of the page.Computers Devices Users
Click , , or .Smart Computer Groups Smart Device Groups Smart User Groups

550
4.
5.
Click the smart group you want to view memberships for.
Click .View
A list of group memberships is displayed.
Related InformationFor related information, see the following sections in this guide:
Computer ReportsFind out how to export the data in group membership lists to different file formats.
Mass Actions for ComputersFind out how to perform mass actions on group memberships.
Mobile Device ReportsFind out how to export the data in group membership lists to different file formats.
Mass Actions for Mobile DevicesFind out how to perform mass actions on group memberships.
ScopeLearn how to configure scope based on computer, mobile device, or user groups.

551
1.
2.
3.
4.
5.
6.
1.
2.
3.
4.
5.
Static Groups
Static groups give you a way to organize computers, mobile devices, or users by assigning them to a group. These groups have fixed memberships that must be changed manually.
After creating a static computer group, you can view its memberships.
Creating a Static GroupLog in to Jamf Pro.
Click , , or at the top of the page.Computers Devices Users
Click , , or .Static Computer Groups Static Device Groups Static User Groups
Click and configure basic settings for the group.New
Click the tab and select the checkbox for each computer, device, or user you want to Assignmentsadd.
Click , and then click .Save View
Computers become members of the group the next time they check in with Jamf Pro.
Mobile devices become members of the group the next time they contact Jamf Pro.
Viewing Static Group MembershipsLog in to Jamf Pro.
Click , , or at the top of the page.Computers Devices Users
Click , , or .Static Computer Groups Static Device Groups Static User Groups
Click the static group you want to view memberships for.
Click .View
A list of group memberships is displayed.

552
Related InformationFor related information, see the following sections in this guide:
Computer ReportsFind out how to export the data in group membership lists to different file formats.
Mass Actions for ComputersFind out how to perform mass actions on group memberships.
Mobile Device ReportsFind out how to export the data in group membership lists to different file formats.
Mass Actions for Mobile DevicesFind out how to perform mass actions on group memberships.
ScopeLearn how to configure scope based on computer groups.

553
Classes
Jamf Pro allows you to create classes for use with Apple’s Classroom app and Jamf Teacher. When you create a class in Jamf Pro, you use a payload-based interface to configure settings to apply to teacher and student computers and iPads. These settings are then applied to the devices in a class for use with Apple’s Classroom app and Jamf Teacher.
In addition, you can use an assistant in Jamf Pro to import classes created in Apple School Manager and configure them to be used with Apple's Classroom app and Jamf Teacher. When you import a class to Jamf Pro, you also import the users associated with the class.
Class PayloadsThe payloads you choose to configure for the class depend on if your environment uses Shared iPad. The following table explains the payloads you can configure in Classes:
Payload Description
General This payload allows you to enter a display name and description for a class.
Students This payload allows you to add students to a class.
Student User Groups
This payload allows you to add student user groups to a class.
Teachers This payload allows you to add teachers to a class.
Teacher User Groups
This payload allows you to add teacher user groups to a class.
Mobile Device Groups
This payload allows you to add mobile device groups to a class.
App Usage Restrictions
This payload allows you to restrict which apps are available to a student.Shared iPad only
Home Screen Layout
This payload allows you to configure the layout of the Dock and the pages on the student iPad.Shared iPad only

554
Apple's Classroom App Class ConfigurationWhen creating a class for Apple's Classroom app, you can configure settings for the following environments:
Environment with Shared iPad—In this environment, you add a student user group that contains students with Managed Apple IDs to a class. You also add a mobile device group that contains Shared iPad devices. You assign the teacher to an iPad or computer in Jamf Pro, and then add the teacher to the class (either as an individual user or as a user group).In addition, you can include app usage restrictions and Home screen layout settings to customize the student experience on the iPad.
Environment without Shared iPad—In this environment, you assign each student to an iPad in Jamf Pro. Then, you add the students (either as individual users or as a user group) to a class. You assign the teacher to an iPad or computer in Jamf Pro, and then add the teacher to the class (either as an individual user or as a user group).
Environment with computers—In this environment, you assign a student to a computer in Jamf Pro. Then, you add the students to a class (either as individual users or as a user group). You assign the teacher to an iPad or computer in Jamf Pro, and then add the teacher to the class (either as an individual user or as a user group).
Note: When assigning a student or teacher to a computer in Jamf Pro, you must ensure that the username in Jamf Pro matches the username of the MDM-enabled user on the computer.
When you create a class for use with Apple's Classroom app, Jamf Pro automatically installs an the teacher and student devices. This profile allows student and teacher associated EDU profile on
devices to communicate. It also ensures that students can log in to a Shared iPad device if Shared iPad has been enabled on the iPad.
Classes Imported from Apple School ManagerYou can automatically create classes in Jamf Pro by importing classes from Apple School Manager. When you integrate with Apple School Manager, you configure a class naming format by choosing variables that are applied to the display name for all imported classes. In addition, the Students payload and Teachers payload for imported classes are automatically populated with the information imported from Apple School Manager.

555
An assistant in Jamf Pro guides you through the process of importing classes from Apple School Manager. It allows you to choose the class you want to import from a list of classes in Apple School Manager. When you import a class, you also import the users associated with the class. This automatically creates new users in Jamf Pro and appends inventory information to existing users. For information about users imported from Apple School Manager, see Importing Users to Jamf Pro from
.Apple School Manager
Note: If a user is added to a class in Apple School Manager after the class has been imported, the user is imported to Jamf Pro and matched with existing users at the configured sync time based on the criteria for matching imported users from Apple School Manager. If there is no match, the imported user is added to Jamf Pro as a new user in the Users tab.
After a class is imported, class information is updated automatically based on the Apple School Manager Sync Time.
For more information about class naming, matching criteria for importing users, and Sync Time, see .Integrating with Apple School Manager
General RequirementsIf you are creating a class to work with Apple's Classroom app and Jamf Teacher, you need the following:
Apple Education Support enabled in Jamf Pro. (For more information, see Apple Education Support .)Settings
Teacher assigned to an iPad or computer in Jamf Pro. If using student computers in a class, the student must be assigned to the computer. (For more information, see .)User Assignments
Note: When assigning a student or teacher to a computer in Jamf Pro, you must ensure that the username in Jamf Pro matches the username of the MDM-enabled user on the computer. For more information about enabling MDM for users, see the following:
MDM-Enabled Local User AccountsManaging User Approved MDM with Jamf Pro
In addition, you must ensure that teacher and student devices meet the minimum device requirements for use with Apple’s Classroom app. For more information about device requirements, see in Apple's .Classroom requirements Classroom User Guide
To import class information from Apple School Manager, you need the following:
Jamf Pro integrated with Apple School Manager (For more information, see Integrating with Apple .)School Manager
A Jamf Pro user account with the "Users" and "Classes" privileges

556
1.
2.
3.
4.
a.
b.
c.
5.
a.
b.
c.
6.
Configuring a ClassLog in to Jamf Pro.
Click , , or at the top of the page.Computers Devices Users
Click .Classes
To create a new class, click and do the following:New
Use the General payload to enter a display name and description for the class.If you specify a Class Description Format when integrating with Apple School Manager, the Description field is not editable.
Note: The description for the class is not synced from Jamf Pro to Apple School Manager.
Add students to the class using the Students payload or the Student User Groups payload.
Add teachers to the class using the Teachers payload or the Teacher User Groups payload.
To import class information from Apple School Manager, click and do the following:Import
Follow the onscreen instructions to import class information.
Note: If you are importing a large number of classes (e.g., 10,000), a progress bar is displayed in the assistant during the import process. You can click and perform other management Donetasks while the import takes place.
If you import users from Apple School Manager that match current users in Jamf Pro, you can choose to match the imported user with the current user, or create a new user in Jamf Pro with the information imported from Apple School Manager.
Click .DoneClass information is imported to Jamf Pro, and user information is applied in the Users tab.If you have site access only, classes are imported to your site only.
Click the class you imported, and then click to add devices and optional Shared iPad payloads Editto the class.
Add computers or mobile devices to the class by doing the following:
Add mobile device groups to the class using the Mobile Device Groups payload.
Add computers to the class by adding students that are assigned to computers.

557
7.
a.
b.
8.
(Optional) If your environment uses Shared iPad, do the following:
Use the App Usage Restrictions payload to restrict which apps are available to users on Shared iPad.
Use the Home Screen Layout payload to configure the layout of the Dock and the pages on the iPad.
Click .Save
Note:
If you change the site of a class, devices in the class are removed from the class. Users that are not already added to the new site are also removed from the class.
Deleting a class also deletes the EDU profile from devices in the class.
Related InformationFor related information, see the following sections in this guide:
Mobile Device PreStage EnrollmentsFind out how to enable Shared iPad when enrolling an iPad with Jamf Pro.
About GroupsYou can create smart or static device groups based on Shared iPad or Managed Apple IDs.
Jamf Teacher Integration with Jamf ProFind out how to integrate Jamf Teacher with Jamf Pro.
For related information, see the following technical papers:
Supporting Apple’s Classroom App and Shared iPad Using Jamf ProGet step-by-step instructions on how to support Apple's Classroom app and Shared iPad with Jamf Pro.
Integrating with Apple School Manager to Support Apple's Education Features Using Jamf ProGet step-by-step instructions on how to integrate with Apple School Manager to support Apple's education features with Jamf Pro.

558
Content Distribution

559
Content Distribution Methods in Jamf Pro
Jamf Pro provides the following two distribution methods for distributing apps and books to computers and mobile devices:
Make Available in Jamf Self Service—When you distribute content using this method, it is made available in Self Service for users to install. You can choose whether or not to make the content managed when possible.
Install Automatically/Prompt Users to Install—This method can either install the content on computers and mobile devices automatically, or it can prompt the user to install the content. This method automatically makes a mobile device app and book managed when possible.The outcome of this installation method is dependent on whether the app is free or paid for by the organization using volume purchasing. The content is installed automatically if the following conditions of the device are met:
Content Type Device Conditions
Free apps or apps distributed via managed distribution by assigning the app to users (user-assigned managed distribution)
The device has iOS 7 or later.The device is supervised.The user is signed in to the App Store on the device.
Apps distributed via managed distribution by assigning the app directly to mobile devices (device-assigned managed distribution)
The device has iOS 9 or later.The device is supervised.

560
Content Type Device Conditions
Books The device has iOS 8 or later.The device is supervised.The user is signed in to the App Store on the device.The Book Store has not been disabled on the device.The device is not configured to require an Apple ID password for all purchases.If the book wasn't assigned to the user for managed distribution, the user has recently authorized an App Store purchase on the device, or the user's Apple ID has previously been used to install the book.If managed book requirements are not met, the book is made available in Self Service for users to install.
If these conditions are not met, users are prompted to install the content.
Note: If a user is in the scope of a book and the managed book requirements are met, the book will be installed automatically on all iOS devices that the user is assigned to in Jamf Pro. On other iOS devices that do not meet managed book requirements or computers assigned to the same user, the book will be made available in Self Service.
Related InformationFor related information, see the following sections in this guide:
Items Available to Users in Jamf Self Service for macOSLearn more about which items can be made available in Self Service for macOS.
Managed Content in Jamf ProLearn more about the benefits of managed content.

561
Managed Content in Jamf Pro
Managing content using Jamf Pro allows you to have more control over the distribution and removal of apps and books, as well as the backup of data and options for updating the content.
Managed AppsThere are two factors that determine whether an app can be managed by Jamf Pro:
The app must be free or purchased in volume. For more information on volume purchasing, see the following Apple documentation:
Apple School Manager User GuideApple Business Manager User Guide
Mobile devices must have iOS 5 or later, or tvOS 10.2 or later and an MDM profile that supports managed apps.Mobile devices with iOS 5 or later that are enrolled with Jamf Pro automatically obtain an MDM profile that supports managed apps. For instructions on distributing an updated MDM profile that supports managed apps, see .Self Service Web Clip
The following table provides more detail about managed apps:
Unmanaged apps Managed apps
Distribution Methods
Make available in Jamf Self Service
Prompt users to install
Removal Options
Remove from Jamf Self Service
Remove from mobile devices
Remove when MDM profile is removed
Backup of App Data
Prevent backup of app data
App Update Options
Schedule automatic app updates
Force an app update
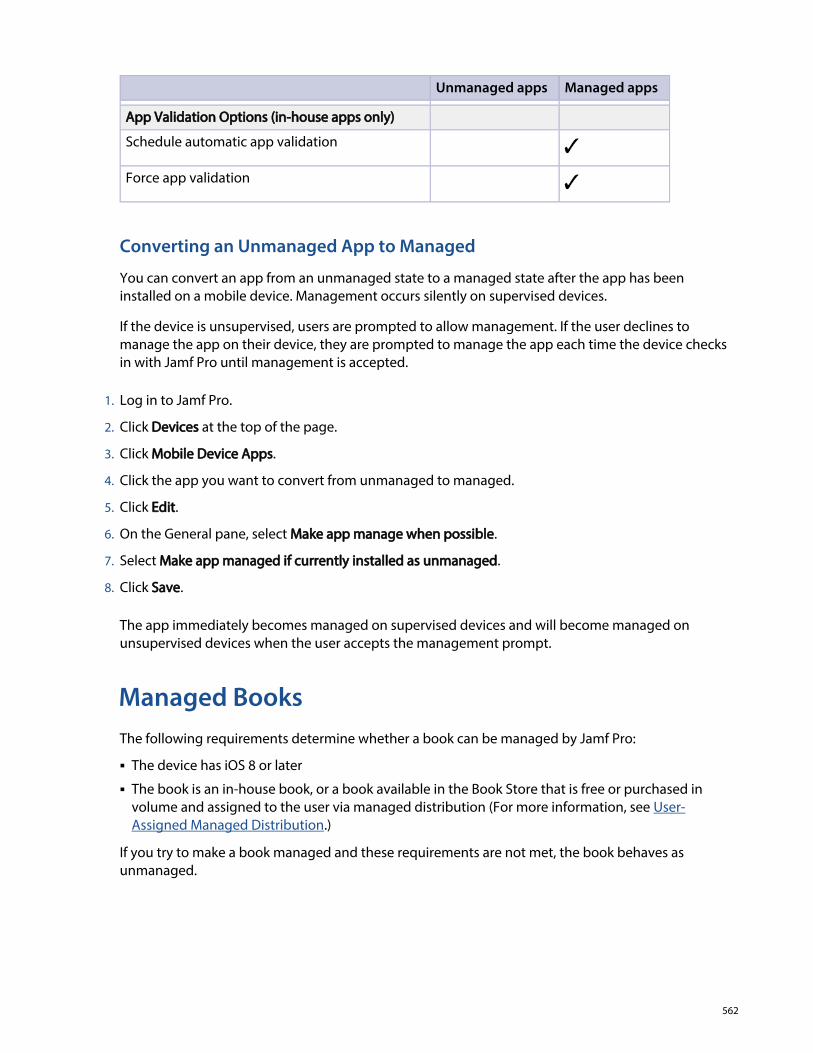
562
1.
2.
3.
4.
5.
6.
7.
8.
Unmanaged apps Managed apps
App Validation Options (in-house apps only)
Schedule automatic app validation
Force app validation
Converting an Unmanaged App to Managed
You can convert an app from an unmanaged state to a managed state after the app has been installed on a mobile device. Management occurs silently on supervised devices.
If the device is unsupervised, users are prompted to allow management. If the user declines to manage the app on their device, they are prompted to manage the app each time the device checks in with Jamf Pro until management is accepted.
Log in to Jamf Pro.
Click at the top of the page.Devices
Click .Mobile Device Apps
Click the app you want to convert from unmanaged to managed.
Click .Edit
On the General pane, select .Make app manage when possible
Select .Make app managed if currently installed as unmanaged
Click .Save
The app immediately becomes managed on supervised devices and will become managed on unsupervised devices when the user accepts the management prompt.
Managed BooksThe following requirements determine whether a book can be managed by Jamf Pro:
The device has iOS 8 or later
The book is an in-house book, or a book available in the Book Store that is free or purchased in volume and assigned to the user via managed distribution (For more information, see User-
.)Assigned Managed Distribution
If you try to make a book managed and these requirements are not met, the book behaves as unmanaged.

563
The following table provides more detail about managed books:
Unmanaged Books(iOS and macOS)
Managed Books(iOS only)
Distribution Methods
Make available in Jamf Self Service
Install automatically/prompt users to install
Removal Options
Remove from Jamf Self Service
Remove in-house books from mobile devices
Remove from computers
Remove in-house books when MDM profile is removed
When managed book requirements are met, the book is installed on iOS devices and users can view it with Apple Books. If you try to make an app managed but these requirements are not met, the app behaves as unmanaged.

564
Volume Content
About Volume ContentWith managed distribution for computers and mobile devices, you can use Jamf Pro to fully control your apps. Jamf Pro can be used to automatically update apps in Jamf Pro and on devices on a schedule, and force app updates at any time.
Jamf Pro allows you to distribute App Store apps and apps purchased in volume directly to computers and mobile devices for managed distribution. Because managed distribution for computers and mobile devices is device-based, user registration with volume purchasing is not required and users do not need to provide an Apple ID. Apps distributed directly to devices do not appear in the user's own App Store purchase history and cannot be updated by users. For more information, see .Device-Assigned Managed Distribution
Jamf Pro also allows you to distribute App Store apps and books to users for managed distribution. Because managed distribution for users is user-based, it involves user registration and user assignments. For more information, see .User-Assigned Managed Distribution
Managed Distribution Types
After Jamf Pro is integrated with Apple School Manager or Apple Business Manager, you can use Jamf Pro to distribute content via managed distribution by assigning content to users (user assignment), or directly to computers or mobile devices (device assignment). The following table describes the managed distribution types:
Managed Distribution Type Applies to Requirements Basic Procedure
Managed distribution for computers
Mac App Store apps Computers with macOS10.11 or later
Managed distribution for computers involves the following steps:1. Add a location to Jamf Pro. For more information, see Integrating with Volume
.Purchasing2. Configure device assignments when distributing a Mac App Store app. For information, see Apps Purchased in Volume.

565
Managed Distribution Type Applies to Requirements Basic Procedure
Managed distribution for mobile devices
App Store appsApps purchased in volume (including custom apps)
Mobile devices with iOS 9 or later
Managed distribution for mobile devices involves the following steps:1. Add a location to Jamf Pro. For more information, see Integrating with Volume
.Purchasing2. Configure device assignments when distributing an App Store app or app purchased in volume. For information, see
.Apps Purchased in Volume
Managed distribution for users
App Store appsApps purchased in volume (including custom apps for iOS devices)Mac App Store appsBooks
Mobile devices with iOS 7 or laterComputers with macOS 10.9 or laterValid, personal Apple ID
Managed distribution for users involves the following steps:1. Add a location to Jamf Pro.2. Invite users to register with volume purchasing. For information, see User-
.Assigned Volume Purchasing Registration3. Create user assignments in Jamf Pro. For information, see User-Assigned Volume
.Assignments

566
Device-Assigned Managed DistributionYou can distribute App Store apps, and apps (including custom apps and apps offered as a Universal Purchase) and books purchased in volume to computers or mobile devices for managed distribution.
For more information about purchasing apps and books in volume, see the following Apple documentation:
Apple School Manager User Guide
Apple Business Manager User Guide
Jamf Pro allows you to distribute App Store apps, and apps and books purchased in volume directly to computers or mobile devices for managed distribution. Because managed distribution for computers and mobile devices is device-based, user registration with volume purchasing is not required and users do not need to provide an Apple ID.
With device-based managed distribution, you can use Jamf Pro to fully control your content. Jamf Pro can be used to automatically update apps in Jamf Pro and on computers or mobile devices on a schedule, and app updates can be forced at any time. Apps distributed directly to computers or mobile devices do not appear in the user's own App Store purchase history and the apps cannot be updated by users.
Device-based managed distribution requires the following:
Computers with macOS 10.11 or later
Mobile devices with iOS 9 or later
A volume purchasing location set up Jamf Pro. For more information, see Integrating with Volume .Purchasing
When you configure settings for the app, you choose the location that purchased the app for managed distribution. For more information, see .Apps Purchased in Volume
Note: If you have apps that were distributed with user-based volume assignments and the apps are device-assignable, you can move to device-based managed distribution for the apps. For more information, see the Moving from User- to Device-based Volume Purchasing AssignmentsKnowledge Base article.

567
User-Assigned Managed DistributionJamf Pro allows you to distribute App Store apps, and apps and books purchased in volume to users for managed distribution. Because managed distribution for users is user-based, it involves user registration and user assignments. For more information, see User-Assigned Volume Purchasing
and .Registration User-Assigned Volume Assignments
Managed distribution for users requires computers with macOS 10.9 or later and mobile devices with iOS 7 or later. If a computer does not have macOS 10.9 or later and the “Install Automatically/Prompt Users to Install” distribution method is selected, the app will instead be made available in Self Service.
Note: Jamf Pro allows you to distribute apps directly to computers or mobile devices with device-assigned managed distribution. For more information, see . Device-Assigned Managed DistributionIf you have apps that were distributed with user-assigned managed distribution and the apps are device-assignable, you can move to device-assigned managed distribution for the apps. For more information, see the Moving from User- to Device-based Volume Purchasing AssignmentsKnowledge Base article.

568
User-Assigned Volume Purchasing RegistrationBefore you can assign content purchased through volume purchasing (formerly VPP) to users for user-assigned managed distribution, users must register with volume purchasing by accepting an invitation.
The following table describes the different methods you can use to distribute invitations:
Distribution Method
User Experience on macOS User Experience on iOS Notes
Send the invitation via email
The user clicks the URL in the email invitation and, if prompted, enters credentials for their LDAP directory account or a Jamf Pro user account. The user then connects to the App Store where they enter their Apple ID and complete the registration process.
Prompt the user to accept the invitation, and make the invitation available in Self Service for macOS
A notification appears on the user's computer prompting them to register with volume purchasing. Users can also access the invitation in Self Service for macOS by clicking the icon in Notificationsthe Self Service toolbar.After clicking the invitation, the user connects to the App Store where they enter their Apple ID and complete the registration process.
A notification appears on the user's mobile device prompting them to register with volume purchasing. The user then connects to the App Store where they enter their Apple ID and complete the registration process.
The user only needs to accept the invitation on one device, even if the invitation is shown on multiple devices.

569
Distribution Method
User Experience on macOS User Experience on iOS Notes
Make the invitation available in Self Service only
The user can access the invitation in Self Service for macOS by clicking the icon in Notificationsthe Self Service toolbar.After clicking the invitation, the user connects to the App Store where they enter their Apple ID and complete the registration process.
The user can access the invitation in the Self Service app by clicking
. The VPP Invitationsuser then connects to the App Store where they enter their Apple ID and complete the registration process.
The user only needs to accept the invitation on one device, even if the invitation is shown on multiple devices.
Automatically register only users with Managed Apple IDs and skip invitation
Only users that are in the scope of the invitation and have Managed Apple IDs are automatically registered with volume purchasing. The users do not receive an invitation and are not prompted to register with volume purchasing.Users that are in the scope of the invitation and do not have Managed Apple IDs do not receive an invitation and are not registered with volume purchasing.
To configure automatic registration options for the invitation, the Automatically register with volume purchasing if users
have Managed Apple IDsoption must be enabled for the location. For more information, see Integrating with Volume
.Purchasing
After an invitation is sent using a Self Service method, it is available in Self Service on any computer or mobile device that the user is assigned to. If the user has more than one invitation, they must accept each invitation individually. If the user does not accept the invitation and attempts to install an app or book assigned through volume purchasing, they are prompted to accept the invitation before the app or book is installed.
After the user has accepted an invitation, content can be assigned to them for managed distribution. For more information, see .User-Assigned Volume Assignments
Note: Jamf Pro also supports device-based managed distribution, which allows distributing App Store apps directly to computers and mobile devices. Volume purchasing user registration is not required for device-based distribution. For more information, see Device-Assigned Managed
.Distribution
General Requirements
To register users with volume purchasing, you must first add a location in Jamf Pro. (For more information, see .)Integrating with Volume Purchasing
To send an invitation via email, you need an SMTP server set up in Jamf Pro. (For more information, see .)Integrating with an SMTP Server

570
1.
2.
3.
4.
5.
6.
If you send an invitation via email and require users to log in, users must log in to a registration page with an LDAP directory account or a Jamf Pro user account. For users to log in with their LDAP directory account, you need an LDAP server set up in Jamf Pro. (For more information, see Integrating
.)with LDAP Directory Services
To send an invitation by prompting users, you need:
Computers with macOS 10.9 or later that are bound to a directory service or mobile devices with iOS 7.0.4 or later (For more information, see .)Directory Bindings
A push certificate in Jamf Pro (For more information, see .)Push Certificates
To configure automatic registration options for the invitation, the Automatically register with volume option must be enabled on the location. (For more purchasing if users have Managed Apple IDs
information, see .)Integrating with Volume Purchasing
Sending an Invitation
Log in to Jamf Pro.
Click at the top of the page.Users
Click .Invitations
Click .New
Use the General pane to configure basic settings for the invitation, including the location and the method to use for sending the invitation.
Note: The invitation is automatically added to the site that the location belongs to.
(Optional) To automatically register users in the scope of the invitation that have Managed Apple IDs and send an invitation to the users that do not have Managed Apple IDs, select the Automatically
checkbox.register with volume purchasing if users have Managed Apple IDsUsers that have Managed Apple IDs are automatically registered with volume purchasing and do not receive an invitation or get prompted to register with volume purchasing. Users that do not have Managed Apple IDs receive the invitation via the method selected from the pop-Distribution Methodup menu.
Note: This checkbox is only displayed if the Automatically register with volume purchasing if users option is enabled for the location. For more information, see have Managed Apple IDs Integrating
.with Volume Purchasing

571
7.
8.
1.
2.
3.
4.
5.
6.
1.
2.
3.
4.
5.
Click the tab and configure the scope of the invitation.Scope
Note: If the site of the location is changed at any point, users that do not belong to that location's site are removed from the scope of the invitation.
Click .Save
An invitation is immediately sent to the users you specified. You can view the status of the invitation in the list of invitations.
Viewing Invitation Usage
Log in to Jamf Pro.
Click at the top of the page.Users
Click .Invitations
Click the invitation you want to view usage for.
Click .Usage Basic invitation usage information is displayed, such as the status and last action.
To view additional details such as the date sent and the invitation ID, click the username for that item.
Resending an Invitation
Jamf Pro allows you to resend invitations to users that have not yet registered with volume purchasing.
Log in to Jamf Pro.
Click at the top of the page.Users
Click .Invitations
Click the invitation you want to resend.
Click .Resend
An invitation is immediately sent to users in the scope that have not yet registered with volume purchasing.

572
1.
2.
3.
4.
5.
Redoing User Registration for an Unintended Apple ID
You can redo the registration for a user that registered using an unintended Apple ID. This process temporarily revokes the apps assigned to the user and then reassigns the apps after the user accepts the new invitation. Depending on your environment, this process may take awhile.
Note: Books assigned to the user remain associated with the unintended Apple ID.
Log in to the Jamf Pro with a web browser.
Click at the top of the page.Users
Perform a simple or advanced user search. For more information, see the or Simple User Searches.Advanced User Searches
Click the user you want to redo the volume purchasing registration for.
Click .Redo
A new invitation is immediately sent to the user.

573
1.
2.
3.
4.
5.
6.
User-Assigned Volume AssignmentsJamf Pro allows you to assign App Store apps and books purchased in volume to users for user-assigned managed distribution. After apps have been assigned to users, you can also use Jamf Pro to revoke them from users. Books cannot be revoked.
To assign content purchased in volume to users, you need a location set up in Jamf Pro. For more information, see . This allows you to choose a location when Integrating with Volume Purchasingcreating a volume assignment in Jamf Pro. All content purchased for managed distribution using that location is automatically available. You can then specify the content that you want to assign, and the users you want to assign it to (called "scope"). Users must be registered with volume purchasing to assign the content purchased in volume to them. For more information, see User-Assigned Volume
.Purchasing Registration
Note: Jamf Pro also supports device-based managed distribution, which allows you to distribute App Store apps directly to computers and mobile devices. For device-based distribution, user assignments are not required. For more information, see .Device-Assigned Managed Distribution
For more information on purchasing and distributing apps and books in volume, see the following Apple documentation:
Apple School Manager User Guide
Apple Business Manager User Guide
User assignments require computers with macOS 10.9 or later and mobile devices with iOS 7 or later.
Creating a Volume Assignment
Log in to Jamf Pro.
Click at the top of the page.Users
Click .Volume Assignments
Click .New
Use the General payload to configure basic settings for the volume assignment, including the location.
Note: The assignment is automatically added to the site that the location belongs to.
Use the Apps and eBooks payloads to select the checkbox for each app and book you want to assign.If a recently purchased app or book is not displayed in the list, follow the steps in the Recently
Knowledge Base article to add that app or Purchased Volume Content is not Displayed in Jamf Probook to the list.

574
7.
8.
1.
2.
3.
4.
5.
6.
7.
Click the tab and configure the scope of the assignment.Scope
Note: If the site of the location is changed at any point, users that do not belong to that location site are removed from the scope of the invitation. For more information, see .Scope
Click .Save
Revoking Apps from Users
To revoke specific apps from all users in the scope of a volume assignment, you remove the apps from the volume assignment.
To revoke all the apps in a volume assignment from specific users, you remove the users from the scope.
Log in to Jamf Pro.
Click at the top of the page.Users
Click .Volume Assignments
Click the volume assignment you want to revoke.
Select the payload and remove apps from the assignment as needed.Apps
Click the tab and remove users from the scope as needed.ScopeFor more information, see .Scope
Click .Save
If the checkbox is selected for the location, a Notify users when an app is no longer assigned to themnotification is sent to users.

575
1.
2.
3.
4.
5.
6.
1.
2.
3.
4.
5.
6.
1.
2.
3.
4.
Revoking All Apps from Users
For each location, you can revoke all apps that have been assigned to users.
Log in to Jamf Pro.
In the top-right corner of the page, click .Settings
Click .Global Management
Click .Volume Purchasing
Click the location for which you want to revoke all apps.
Click , and then click to confirm.Revoke All OK
If the checkbox is selected for the location, a Notify users when an app is no longer assigned to themnotification is sent to users.
Viewing Content Associated with a Volume Assignment
For each volume assignment, you can view the apps or books in the App Catalog or eBook Catalog in Jamf Pro. This allows you to modify the scope of the content to redistribute it.
Log in to Jamf Pro.
Click at the top of the page.Users
Click .Volume Assignments
Click a volume assignment to view the content.
Select the or payload.Apps eBooksA list of content is displayed.
If the app or book has been added to the App Catalog or eBook Catalog in Jamf Pro, click the link next to the app or book to view the content.
The content is displayed in the App Catalog or eBook Catalog, and you can modify the scope to redistribute the content.
Adding Content Associated with a Volume Assignment
For each volume assignment, you can add the assigned apps and books to the App Catalog or eBook Catalog in Jamf Pro.
Log in to Jamf Pro.
Click at the top of the page.Users
Click .Volume Assignments

576
4.
5.
6.
1.
2.
3.
4.
5.
6.
Click the volume assignment for the content you want to add to the App Catalog or eBook Catalog.
Select the or payload.Apps eBooksA list of content is displayed.
If the app or book has not been added to the App Catalog or eBook Catalog in Jamf Pro, click the button next to the app or book to add it.
The content is displayed in the App Catalog or eBook Catalog, and you can add the content to the catalog for distribution.
Viewing the Users that Volume Purchasing Content is Assigned To
For each volume assignment, you can view the users that content purchased in volume is assigned to.
Log in to Jamf Pro.
Click at the top of the page.Users
Click .Volume Assignments
Click the volume assignment for which you want to view the users that the content is assigned to.
Select the or payload.Apps eBooksA list of content is displayed.For each app or book, you can view the number of users that the content is assigned to in the In Use column.
To view the users that the content is assigned to, click the number displayed in the In Use column.
Related Information
For related information, see the following sections in this guide:
Apps Purchased in VolumeFind out how to distribute apps available in the App Store.
Books Purchased in VolumeFind out how to distribute books available in the Book Store.

577
VPP CodesJamf Pro allows you to distribute App Store apps and books purchased in volume to computers and mobile devices by distributing redeemable VPP codes. When you distribute App Store apps and books, and associate VPP codes with the app or book, you can track VPP code redemption.
To distribute an app or book to computers or mobile devices using VPP codes, you need an Excel spreadsheet (.xls) that contains VPP codes for the app or book.
For more information on purchasing apps and books in volume, see the following Apple documentation:
Apple School Manager User Guide
Apple Business Manager User Guide
Note: As an alternative to VPP code distribution, Jamf Pro also supports device-assigned managed distribution for computers and mobile devices and user-assigned managed distribution for users. For more information, see and Device-Assigned Managed Distribution User-Assigned Managed
.Distribution
For information on distributing App Store apps using redeemable VPP codes, see Apps Purchased in .Volume
For information on distributing books to computers or mobile devices using redeemable VPP codes, see .Books Purchased in Volume

578
Apps Purchased in VolumeJamf Pro allows you to distribute App Store apps and apps purchased in volume (including custom apps and apps offered as a Universal Purchase) to computers, mobile devices, and users. After an app has been distributed, you can use Jamf Pro to update apps that have been installed by Jamf Pro.
Jamf Pro provides two distribution methods for apps:
Install the app automatically/prompt users to install the app
Make the app available in Self Service
When you distribute an app, you add it to Jamf Pro and configure settings for the app, such as the distribution method. Then, you specify the computers, mobile devices, and users that should receive it (called “scope”).
You can distribute App Store apps and apps purchased in volume to computers, mobile devices, or users using managed distribution. For more information, see .Device-Assigned Managed Distribution
As an alternative to managed distribution, Jamf Pro also supports distributing App Store apps and apps purchased in volume using redeemable VPP codes. For more information, see .VPP Codes
App Store apps for computers that are distributed with user-based assignments or with VPP codes are not managed by Jamf Pro. Users can update apps using the App Store or uninstall apps from their computers.
Apps are enabled by default when added to Jamf Pro. This means you can edit the app details and assign licenses. Based on the selected distribution method, the app will be either displayed in Self Service or installed on computers or mobile devices. When an app is disabled, the app's subsequent installations are stopped and it is not displayed in Self Service. You cannot edit the app details if it is disabled.
An app will be automatically disabled in Jamf Pro if it is a managed distribution item that has been removed from the App Store. You will not be able to assign licenses, and the installation commands will not be sent. The app will not be displayed in Self Service. An automatically disabled managed distribution item will not be removed from computers or mobile devices that already have this item installed.
Managed App Configuration
You can use Jamf Pro to configure settings for a managed app before distributing it to mobile devices.
Note: Managed App Configuration only applies to mobile devices with iOS 7 or later, or Apple TV devices with tvOS 10.2 or later.
There are also several variables that you can use to populate settings in a managed app with attribute values stored in Jamf Pro. This allows you to create preferences containing information about each user and mobile device to which you are distributing the app.

579
When the app is installed on a mobile device, the variable is replaced with the value of the corresponding attribute in Jamf Pro.
Variable Mobile Device Information
$DEVICENAME Mobile Device Name
$SERIALNUMBER Serial Number
$UDID UDID
$USERNAME Username
$FULLNAME or $REALNAME Full Name
$EMAIL Email Address
$PHONE Phone Number
$ROOM Room
$POSITION Position
$MACADDRESS MAC Address
$JSSID Jamf Pro ID
$APPJSSID Jamf Pro ID of the App
$SITEID Site ID
$SITENAME Site Name
$BUILDINGNAME Building Name
$BUILDINGID Building ID
$DEPARTMENTID Department ID
$DEPARTMENTNAME Department Name
$JPS_URL Jamf Pro URL
Note: An $EXTENSIONATTRIBUTE_<#> variable is generated each time you create a mobile device extension attribute. For more information, see .Mobile Device Extension Attribute Input Types
General Requirements
The requirements for distributing an App Store app or an app purchased in volume vary for computers and mobile devices.
For computers, you need the following:
To allow users to install App Store apps from Self Service via MDM, or to allow App Store apps to be installed automatically you need the following:
A push certificate in Jamf Pro (For information, see .)Push CertificatesThe Enable certificate-based authentication and Enable push notifications settings configured in Jamf Pro (For information, see .)Security Settings

580
1.
2.
3.
4.
5.
Computers that are bound to a directory service or local user accounts that have been MDM-enabled (For information, see and .)Directory Bindings MDM-Enabled Local User Accounts
Note: On computers with macOS 10.10 or later and Jamf Pro 9.64 or later, the local user account is automatically MDM-enabled the first time a Mac App Store app is installed automatically or via Self Service, or a user-level configuration profile is installed via Self Service. With PreStage enrollment, the first local user account that is created is made MDM-enabled.
Apps assigned to computers or users via managed distribution (For more information, see Device- and .)Assigned Managed Distribution User-Assigned Managed Distribution
To allow users to install apps from the Mac App Store (linked from Self Service), you need the following:
Computers with macOS 10.7 or laterComputers that are bound to a directory service or local user accounts that have been MDM-enabled (For information, see and .)Directory Bindings MDM-Enabled Local User AccountsUsers may be prompted to enter an Apple ID
Per-App VPN connections are only applied to computers with macOS 11 or later. (For more information about how create a computer configuration profile with a Per-App VPN connection, see .)Computer Configuration Profiles
For mobile devices, you need the following:
To install an App Store app, an app purchased in volume, or an update, users may be prompted to enter an Apple ID.
Apps assigned to mobile devices or users via managed distribution (For more information, see and .)Device-Assigned Managed Distribution User-Assigned Managed Distribution
Per-App VPN connections are only applied to mobile devices with iOS 7 or later. (For more information about how create a mobile device configuration profile with a Per-App VPN connection, see .)Mobile Device Configuration Profiles
Distributing an App Store App or App Purchased in Volume
Log in to Jamf Pro.
(Computers only) Click at the top of the page, and then click . Computers Mac App Store Apps
(Mobile devices only) Click at the top of the page, and then click .Devices Mobile Device Apps
Click .New
(Mobile devices only) Select and click .App Store app or apps purchased in volume Next

581
6.
7.
8.
9.
10.
a.
b.
c.
d.
11.
a.
b.
Do one of the following:
To add the app by browsing the App Store or apps purchased in volume, enter the name of the app, choose an App Store country and click . Then click for the app you want to add.Next Add
To add the app by uploading a VPP code spreadsheet, click and upload the Excel Choose Filespreadsheet (.xls) that contains VPP codes for the app.
To add the app by manually entering information about it, click .Enter Manually
Use the General pane to configure settings for the app, including the distribution method.If you are distributing the app to mobile devices, you can choose whether to make the app managed.You can also enable automatic app updates.
Note: Beginning with device to have a tethered network iOS 10.3, you can require a mobile connection to download the app. A tethered network connection requires a computer with macOS 10.12.4 or later that is connected to the Internet via Ethernet with Wi-Fi turned off. Portable computers must be plugged in to a power source because the tethered caching service prevents computers from going to sleep. Select the Require tethered network connection for app
checkbox. This checkbox is only displayed if "Install Automatically/Prompt Users to installation Install" is chosen in the pop-up menu. App updates will not require tethering; Distribution Methodthis setting is for initial installations of an app only.
Click the tab and configure the scope of the app.ScopeFor more information, see .Scope
(Optional) Click the tab and configure the way the app is displayed in Self Service. You Self Service can customize the text displayed in the description for the app in Self Service by using Markdown in the Description field.For information about Markdown, see the Knowledge Base article.Using Markdown to Format Text
Note: The tab is only displayed if "Make Available in Self Service" is chosen in the Self Service pop-up menu.Distribution Method
(Optional) If you want to distribute the app directly to computers or mobile devices via managed distribution, do the following:
Click the tab, and then click the tab.Managed Distribution Device Assignments
(Computers only) Select the checkbox.Assign Volume Content
(Mobile devices only) Select the checkbox.Assign Content Purchased in Volume
Choose the location that has purchased the app.
(Optional) If you want to associate VPP codes with the app and have not already uploaded a VPP code spreadsheet, do the following:
Click the tab, and then click the tab.Managed Distribution VPP Codes
Upload the Excel spreadsheet (.xls) that contains VPP codes for the app.

582
12.
13.
1.
2.
3.
4.
5.
(Optional for mobile devices only) Click the tab and configure the preferences as App Configurationneeded.
Note: The tab is only displayed if the App Configuration Make App Managed when possiblecheckbox is selected.
For help generating the preferences, click the link. The AppConfig Generator AppConfig Generatorenables you to generate the PLIST file to enter in the field. For more information about PreferencesAppConfig, see the AppConfig Community website:https://www.appconfig.org
Click .Save
Updating an App Store App or App Purchased in Volume
Jamf Pro allows you to update an individual App Store app or an app purchased in volume in the following ways:
Schedule automatic app updates—This automatically updates the app description, icon, and version in Jamf Pro and on computers and mobile devices. This update happens once a day depending on the time of day you specify.
Automatically force an app to update—You can automatically force an App Store app or an app purchased in volume to update on computers and mobile devices. This update happens automatically every time computers or mobile devices check in with Jamf Pro.
Manually force an app to update—You can force an app to update immediately on mobile devices if there are updates available in Jamf Pro. This update only applies to managed apps on mobile devices. For more information, see .Managed Content in Jamf Pro
Distribute an app update—You can distribute an update for an App Store app by manually updating the version number and URL for the app in Jamf Pro. The update is distributed to computers or mobile devices the next time they contact Jamf Pro.
Note: Jamf Pro also allows you to enable automatic updates for all App Store apps or apps purchased in volume, or force all App Store apps and apps purchased in volume to update immediately. For more information, see .App Store App Update Settings
Log in to Jamf Pro.
(Computers only) Click at the top of the page, and then click .Computers Mac App Store Apps
(Mobile devices only) Click at the top of the page, and then click . Devices Mobile Device Apps
Click the app you want to update.
Click Edit .

583
5.
6.
a.
b.
c.
d.
e.
a.
b.
a.
b.
a.
b.
Do one of the following:
Schedule automatic app updates:
Select .Schedule Jamf Pro to automatically check the App Store for app updates
Click .Edit
Choose a country or region to use when syncing apps with the App Store from the App Store pop-up menu.Country or Region
Set the time of day to sync apps with the App Store using the pop-up App Store Sync Time menus.
Click .Save The app is updated in Jamf Pro and on computers or mobile devices in the scope based on the time you configure the app to sync with the App Store.
Automatically force an app update:
Select .Automatically Force App Updates
Click . Save The app is updated automatically on computers or mobile devices in the scope each time they check in with Jamf Pro.
(Mobile devices only) Manually force an app update:
Click .Force Update
Click .Save The app is updated immediately on computers or mobile devices in the scope if an update is available in Jamf Pro.
Distribute an app update:
Enter the new version number and URL.
Important: Do not change the bundle identifier. Jamf Pro uses the existing bundle identifier to distribute the update.
Click Save .The update is distributed the next time computers or mobile devices in the scope contact Jamf Pro.

584
Removing an App Store App or an App Purchased in Volume
You can use Jamf Pro to remove an app from a computer or mobile device. Removing an app from both a computer or mobile device involves removing targets from the scope of the app. For more information, see .Scope
For computers, removing targets from the scope of the app revokes the app license (if applicable) but does not remove the app from the computer. To completely remove the app from the computer, the app must be manually dragged to the Trash on the target computer.
For mobile devices, after removing targets from the scope of the app, the app is removed the next time the device contacts Jamf Pro.
Related Information
For related information, see the following sections in this guide:
Content Distribution Methods in Jamf ProLearn about your options for distributing content.
Items Available to Users in Jamf Self Service for macOSLearn about which items can be made available to users in Self Service for macOS.
Computer History InformationFind out how to view and cancel pending App Store app installations for a computer.
Mobile Device Management InformationFind out how to view and cancel pending app installations and removals for a mobile device.
Mobile Device History InformationFind out how to view the completed, pending, and failed app installations for a mobile device. Also, find out how to cancel pending app installations.
For related information, see the following :Best Practice Workflows for Jamf Pro
Controlling Distribution of iOS and tvOS AppsFind out how to restrict iOS and tvOS apps using Jamf Pro.

585
1.
2.
3.
4.
5.
a.
b.
c.
d.
App Store App Update SettingsJamf Pro allows you to configure settings to update all App Store apps and apps purchased in volume (including custom apps and apps offered as a Universal Purchase) in Jamf Pro, and on computers and mobile devices. You can use the App Updates settings (for computers) and the App Maintenance settings (for mobile devices) in Jamf Pro to do the following:
Schedule automatic app updates—You can schedule automatic app updates for all App Store apps and apps purchased in volume. This automatically updates app descriptions, icons, and versions in Jamf Pro. This update happens once a day depending on the time of day you specify.
Automatically force apps to update—You can automatically force all App Store apps and apps purchased in volume to update on devices. This update happens automatically every time computers check in with Jamf Pro. You can also automatically update apps installed via Jamf Self Service if you made apps available in Self Service for users to install.
Manually force apps to update—You can manually force all App Store apps and apps purchased in volume to update immediately on devices if there are updates available in Jamf Pro.For mobile device apps, this update applies to managed apps only. For more information, see
.Managed Content in Jamf Pro
Note: Jamf Pro also allows you to enable an automatic app update and force an update for an individual App Store app or apps purchased in volume. For more information, see Apps Purchased
.in Volume
Configuring App Store App Update Settings
Log in to Jamf Pro.
In the top-right corner of the page, click .Settings
(Computers only) Click , and then click .Computer Management App Updates
(Mobile devices only) Click , and then click Mobile Device Management App Maintenance . Ensure you are on the pane App Updates .
Click and do one of the following: Edit
Schedule automatic app updates
Select .Schedule Jamf Pro to automatically check the App Store for app updates
Choose a country or region to use when syncing apps with the App Store from the App Store pop-up menu.Country or Region
Set the time of day to sync apps with the App Store with the pop-up App Store Sync Timemenus.
Click .Save Apps are updated in Jamf Pro based on the time you configure apps to sync with the App Store.

586
5.
a.
b.
a.
b.
Automatically force an app update:
Click .Automatically Force App UpdatesIf you made apps available in Self Service for users to install, select Automatically update apps
to update the apps installed on computers without requiring end user installed via Self Serviceintervention.
Click .Save App Store apps and apps purchased in volume are updated automatically on computers and mobile devices each time they check in with Jamf Pro.
Manually force an app update:
Click .Force Updates
Click .Save App Store apps and apps purchased in volume are updated immediately on computers and mobile devices if there are updates available in Jamf Pro.

587
1.
2.
3.
4.
5.
Books Purchased in VolumeJamf Pro allows you to distribute books that are available in the Book Store to computers, mobile devices, and users. Jamf Pro provides two distribution methods for Book Store books:
Install the book automatically/prompt users to install the book (iOS only)
Make the book available in Self Service.
After a book is installed, users can view it using the Books app.
Note: Books available in the Book Store cannot be distributed to personally owned mobile devices.
When you distribute a book available in the Book Store, you add it to Jamf Pro and configure settings for the book. Then, you specify the computers, mobile devices, and users that should receive it (called “scope”).
Note: Removing a target from the scope of a book does not revoke the book license from the user it was assigned to and does not remove the book from any device it was installed on.
Books are enabled by default when added to Jamf Pro. This means you can edit the book details and assign licenses, and the book will be displayed in Self Service or installed on computers and mobile devices based on the selected distribution method.
A book will be automatically disabled in Jamf Pro if it is a managed distribution item that has been removed from the Book Store. You will not be able to assign licenses, and the installation commands will not be sent. The book will not be displayed in Self Service. An automatically disabled managed distribution item will not be removed from computers or mobile devices that already have this item installed.
For more information on purchasing books in volume, see the following Apple documentation:
Apple School Manager User Guide
Apple Business Manager User Guide
Distributing a Book Purchased in Volume
Log in to Jamf Pro.
Click , , or at the top of the page.Computers Devices Users
Click .eBooks
Click .New
Select and click .eBook available in the iBooks Store Next

588
6.
7.
8.
9.
10.
11.
Do one of the following:
To add the book by browsing the Book Store, enter the name of the book, choose a Book Store country and click . Then click for the book you want to add.Next Add
To add the book by uploading a VPP code spreadsheet, click and upload the Excel Choose Filespreadsheet (.xls) that contains VPP codes for the book.
To add the book by manually entering information about it, click .Enter Manually
Note: iBooks files (.ibooks) may need to be added manually.
Use the General pane to configure settings for the book, including the display name and distribution method.You can disable a book by deselecting the checkbox. This stops the book's subsequent Enableinstallations and prevents it from displaying in Self Service. You cannot edit book details if it is disabled.
Click the tab and configure the scope of the book.ScopeFor more information, see .Scope
(Optional) Click the tab and configure the way the book is displayed in Self Service. You Self Servicecan customize the text displayed in the description for the book in Self Service by using Markdown in the Description field.For information about Markdown, see the Knowledge Base article.Using Markdown to Format Text
(Optional) If you have not already uploaded a VPP code spreadsheet, click the tab and VPP Codesupload the Excel spreadsheet (.xls) that contains VPP codes for the book.
Note: The tab is only displayed if the checkbox is not selected.VPP Codes Free
Click .Save
For books set to the “Install Automatically” distribution method, books are installed the next time mobile devices in the scope check in with Jamf Pro. Users can view installed books with the Books app.
For books set to the ”Make Available in Self Service” distribution method and books that cannot be installed automatically, books are available in Self Service for users to install the next time Self Service is launched.
Related Information
For related information, see the following sections in this guide:
Computer Management InformationFind out how to view the books in the scope of a computer.
Mobile Device Management InformationFind out how to view the books in the scope of a mobile device, and how to view and cancel a pending book installation and removal.

589
Simple Volume Content SearchesA simple volume purchasing content search functions like a search engine, allowing you to quickly search the apps and books in Jamf Pro for a general range of results.
Volume purchasing content searches are based on the name of the app or book you are searching for and display the following information:
Content Name—Name of the app or book
Location—Volume purchasing location used to purchase the content
Content Type—Type of content
Total Content—Total content that has been purchased with the volume purchasing location
In Use—Number of apps or books assigned to computers, mobile devices, or users
Volume Assignments—Number of volume assignments that the content is associated with
As an alternative, you can create an advanced volume content search that uses detailed search criteria. Advanced volume content searches can be saved for later use. For more information, see
.Advanced Volume Content Searches
Search Syntax
This section explains the syntax to use for search functions. In general, searches are not case-sensitive.
Note: The default search preference is “Exact Match”. For most items, the option can be changed to either “Starts with” or “Contains”. For more information about configuring account preferences, see
.Jamf Pro User Accounts and Groups
The following table explains the syntax you can use for search functions:
Search Function Usage Example
Return all Results
Use an asterisk (*) without any other characters or terms, or perform a blank search.
Perform a search for “*” or leave the search field empty to return all results.
Perform Wildcard Searches
Use an asterisk after a search term to return all results with attributes that begin with that term.
Perform a search for “key*” to return all results with names that begin with “key”.
Use an asterisk before a search term to return all results with attributes that end with that term.
Perform a search for “*note” to return all results with names that end with “note”.
Use an asterisk before and after a search term to return all results that include that term.
Perform a search for “*ABC*” to return all results that includes “ABC”.

590
1.
2.
3.
4.
5.
1.
2.
3.
4.
5.
6.
1.
2.
3.
Search Function Usage Example
Include Multiple Search Terms
Use multiple search terms separated by a comma (,) to return all results that include those search terms.
Perform a search for “key*, *note” to return all results that begins with “key” and ends with “note”.
Exclude a Search Term
Use a hyphen (-) before a search term to exclude results that include the term.
Perform a search for “ABC*, -*note” to return all results with names that begin with “ABC” except for those that end with “note”.
Performing a Simple Volume Purchasing Content Search
Log in to Jamf Pro.
Click , , or at the top of the page.Computers Devices Users
Click .Search Volume Content
Enter one or more search terms in the field provided.
Press the Enter key.The list of search results is displayed.
Viewing Where Content is Assigned
You can view the computers, mobile devices, or users that content is assigned to.
Log in to Jamf Pro.
Click , , or at the top of the page.Computers Devices Users
Click .Search Volume Content
Enter one or more search terms in the field provided.
Press the key.EnterA list of content is displayed.
To view where the content is assigned, click the number displayed in the In Use column.Computers that have the content assigned to them are listed on the Computers pane.Mobile devices that have the content assigned to them are listed on the Mobile Devices pane.Users that have the content assigned to them are listed on the Users pane.
Viewing the Volume Assignments that Content is Associated With
You can view the volume assignments that content is associated with.
Log in to Jamf Pro.
Click , , or at the top of the page.Computers Devices Users
Click . Search Volume Content
591
4.
5.
6.
Enter one or more search terms in the field provided.
Press the Enter key.A list of content is displayed.
To view the Volume assignments that the content is assigned to, click the number displayed in the Volume Assignments column.
Related Information
For related information, see the following sections in this guide:
Volume Content ReportsFind out how to export the data in your search results to different file formats.
User-Assigned Volume AssignmentsFind out how to assign content to users for managed distribution.
Device-Assigned Managed DistributionFind out how to assign content to computers and mobile devices for managed distribution.

592
1.
2.
3.
4.
5.
6.
a.
b.
c.
d.
e.
7.
Advanced Volume Content SearchesAdvanced volume purchasing content searches allow you to use detailed search criteria to search apps and books in Jamf Pro. These types of searches give you more control over your search by allowing you to do the following:
Generate specific search results.
Specify which attribute fields to display in the search results.
Save the search.
As an alternative, you can quickly search volume content for a general range of results. For more information, see .Simple Volume Content Searches
Creating an Advanced Volume Purchasing Content Search
Log in to Jamf Pro.
Click , , or at the top of the page.Computers Devices Users
Click .Search Volume Content
Click .New
Use the Search pane to configure basic settings for the search.To save the search, select the checkbox.Save this Search
Click the tab and add criteria for the search:Criteria
Click .Add
Click for the criteria you want to add.Choose
Choose an operator from the pop-up menu.Operator
Enter a value in the field or browse for a value by clicking .Value Browse
Repeat steps a through d to add criteria as needed.
Choose an operator from the pop-up menus to specify the relationships between criteria.And/Or

593
8.
9.
10.
To group criteria and join multiple operations, choose parentheses from the pop-up menus around the criteria you want to group.
Click the tab and select the attribute fields you want to display in your search results.Display
Click .Save
Operations in the search take place in the order they are listed (top to bottom).
The results of a saved search are updated each time content is modified and meets or fails to meet the specified search criteria.
To view the search results, click . You can export the data in your search results to different View file formats. For more information, see .Volume Content Reports

594
1.
2.
3.
4.
5.
6.
Volume Content ReportsThe data displayed in volume purchasing content search results can be exported from Jamf Pro to the following file formats:
Comma-separated values file (.csv)
Tab delimited text file (.txt)
XML file
Creating Volume Purchasing Content Reports
Log in to Jamf Pro.
Click , , or at the top of the page.Computers Devices Users
Click .Search Volume Content
View simple or advanced volume purchasing content search results. For more information, see and .Simple Volume Content Searches Advanced Volume Content Searches
At the bottom of the list, click .Export
Follow the onscreen instructions to export the data.
The report downloads immediately.

595
In-House Content
About In-House ContentJamf Pro allows you to distribute in-house apps and books directly to computers, mobile devices, and users. In-house apps are enterprise apps developed through the Apple Developer Enterprise Program and books that are not available in the Book Store. You can use Jamf Pro to configure settings for the content, such as the hosting location, distribution method, whether to make the content managed, and which computers, mobile devices, and users should receive it (called "scope").
For more information about in-house content, see and .In-House Apps In-House Books
Hosting Locations
Before you distribute in-house content, it is important to consider where the content will be hosted. There are three hosting locations that you can use:
Distribution points—This hosting location is only available if your principal distribution point is the cloud distribution point. To use this hosting location, you upload the content to the principal distribution point when configuring settings for the content in Jamf Pro.
Note: Content cannot be replicated to file share distribution points.
Web server—This hosting location is always available, regardless of what type of distribution point the principal is. To use this hosting location, the content must be hosted on a web server before you distribute it. Then, when you distribute the content, you specify the URL where it is hosted. If your principal distribution point is a file share distribution point, it is recommended that you host large apps or books on a web server.Jamf Pro also allows you to configure a JSON Web Token (JWT) to control the distribution of iOS and tvOS in-house apps from a web server. In-house apps downloaded from the Jamf Pro database are automatically secured with JWT. For more information see JSON Web Token for Securing In-
.House Content
jamfsoftware database (in-house apps only)—If your principal distribution point is a file share distribution point, you can use Jamf Pro to upload the app and host it in the jamfsoftware database.
596
1.
2.
3.
4.
5.
6.
7.
8.
a.
b.
9.
JSON Web Token for Securing In-House ContentYou can configure a JSON Web Token (JWT) in Jamf Pro to secure downloads of packages, in-house apps, and in-house books hosted on a web server. After the JWT is configured, packages, in-house apps, and books can only be downloaded on managed computers and mobile devices and within the time period you specify.
Note: Packages, in-house apps, and books must be hosted on the web same server that is configured for JWT authentication.
The JWT is generated using the RS256 algorithm, is signed with the RSA private key provided in the configuration, and has the following claims:
"sub" (subject) of "AppManifest"
"iss" (issuer) of "JSS"
"exp" (expiration) configurable in the JSON Web Token Configuration settings
After configuring the JWT, the administrator of the web server must perform further setup to ensure the server validates the request using the JWT "token" query parameter.
Important: Until the web server validates the requests, unsecured downloads of in-house apps and books may still be possible.
Configuring a JSON Web Token
Log in to Jamf Pro.
Click .Settings
Click .Global Management
Click .PKI Certificates
Click the tab.JSON Web Token Configuration
Click .New
Enter a display name for the token.
Select one of the following encryption key options:
Choose , then enter the RSA private encryption key in the Paste or Type Encryption Key Paste the field.Encryption Key Below
Choose , then click to upload a .pem file containing the RSA Upload Encryption Key File Choose Fileprivate encryption key.
Note: To generate the private encryption key file on a Mac, open Terminal and execute the following command: openssl genrsa -out key.pem 2048

597
9.
10.
From the pop-up menu, select a time period during which in-house apps and books can Token Expiry be downloaded. After the specified time period, in-house apps and books can no longer be downloaded.
Click .Save
When Jamf Pro sends the device a command to install an in-house app or ebook, a new JWT is generated and added to the download URL as a "token" query parameter.
For example, https://example.com/download/example_app.ipa
becomes
https://example.com/download/example_app.ipa?token=eyJhbGciOiJSUzI1NiJ9.eyJzdWIiOiJBcHBNYW5pZmVzdCIsImlzcyI6IkpTUyIsImV4cCI6MTUwMzMyNDMxNH0.SeoxBY0EaCf4KV3UOyDMmu.

598
1.
2.
3.
4.
5.
6.
1.
2.
3.
4.
5.
Provisioning Profiles for In-House AppsProvisioning profiles (.mobileprovision) authorize the use of in-house apps. For an in-house app to work, the provisioning profile that authorizes it must be installed on mobile devices.
If the provisioning profile that authorizes an in-house app is not bundled in the app archive (.ipa) file, you must upload the profile to Jamf Pro before distributing the app.
If a provisioning profile expires, you can edit the provisioning profile record in Jamf Pro and replace the existing profile with the new version to allow continued use of the app.
Deleting a provisioning profile from Jamf Pro removes it from mobile devices that have it installed.
Uploading a Provisioning Profile
Log in to Jamf Pro.
Click at the top of the page. Devices
Click .Provisioning Profiles
Click and upload the provisioning profile.Upload
Enter a display name for the profile.
Click .Save
Downloading a Provisioning Profile
If you no longer have access to the original (.mobileprovision) file for a provisioning profile in Jamf Pro, you can download it from Jamf Pro.
Log in to Jamf Pro.
Click at the top of the page. Devices
Click .Provisioning Profiles
Click the provisioning profile you want to download.
Click .Download
The profile is downloaded immediately.

599
Related Information
For related information, see the following sections in this guide:
In-House AppsLearn how to distribute an in-house app and its provisioning profile.
Mobile Device Inventory InformationYou can view the provisioning profiles installed on a mobile device by viewing the device's inventory information in Jamf Pro.
Mobile Device Management InformationFind out how to view and cancel pending provisioning profile installations and removals for a mobile device.
Mobile Device History InformationFind out how to view the completed, pending, and failed provisioning profile installations and removals for a mobile device.

600
In-House AppsIn-house apps are enterprise apps developed through the Apple Developer Enterprise Program. Jamf Pro allows you to distribute in-house apps to users, iOS devices, iPadOS devices, and Apple TV devices with tvOS 10.2 or later. After an app has been distributed, you can also use Jamf Pro to update or remove the app from mobile devices.
Jamf Pro provides two distribution methods for in-house apps:
Install the app automatically/prompt users to install the app
Make the app available in Self Service
For more information on the Apple Developer Enterprise Program or to register, see this documentation from the Apple Developer website.https://developer.apple.com/programs/enterprise/
When you distribute an in-house app, you configure settings for the app, such as the hosting location, distribution method, whether to make the app managed, and which users and devices should receive it (called "scope").
Managed in-house apps that have been distributed to mobile devices can be validated using the app validation settings. For more information, see .In-House App Maintenance Settings
Managed App Configuration
You can use Jamf Pro to configure settings for a managed app before distributing it to mobile devices.
Note: Managed App Configuration only applies to mobile devices with iOS 7 or later, or Apple TV devices with tvOS 10.2 or later.
There are also several variables that you can use to populate settings in a managed app with attribute values stored in Jamf Pro. This allows you to create preferences containing information about each user and mobile device to which you are distributing the app.
When the app is installed on a mobile device, the variable is replaced with the value of the corresponding attribute in Jamf Pro.
Variable Mobile Device Information
$DEVICENAME Mobile Device Name
$SERIALNUMBER Serial Number
$UDID UDID
$USERNAME Username
$FULLNAME or $REALNAME Full Name
$EMAIL Email Address

601
1.
2.
3.
4.
5.
Variable Mobile Device Information
$PHONE Phone Number
$ROOM Room
$POSITION Position
$MACADDRESS MAC Address
$JSSID Jamf Pro ID
$APPJSSID Jamf Pro ID of the App
$SITEID Site ID
$SITENAME Site Name
$BUILDINGNAME Building Name
$BUILDINGID Building ID
$DEPARTMENTID Department ID
$DEPARTMENTNAME Department Name
$JPS_URL Jamf Pro URL
Note: An $EXTENSIONATTRIBUTE_<#> variable is generated each time you create a mobile device extension attribute. For more information, see .Mobile Device Extension Attributes
General Requirements
To distribute an in-house app, you need the following:
Bundle identifier for the app (located in the PLIST file for the app)
Archived app file (.ipa) or the URL where the app is hosted on a web server
Note: If you are hosting the app from a web server, the MIME type for the archived app file must be "/application/octet-stream".
Distributing an In-House App
Log in to Jamf Pro.
Click at the top of the page. Devices
Click .Mobile Device Apps
Click .New
Select and click .In-house app Next

602
6.
7.
8.
9.
10.
1.
2.
3.
4.
Use the General pane to configure settings for the app, including the distribution method and hosting location.If you choose "Distribution Points" or "jamfsoftware database" from the pop-up Hosting Locationmenu, be sure to upload the archived app file.
Note: Beginning with device to have a tethered network iOS 10.3, you can require a mobile connection to download the app. A tethered network connection requires a computer with macOS 10.12.4 or later, and must be connected to the Internet via Ethernet and have Wi-Fi turned off. Portable computers must be plugged in to a power source because the tethered caching service prevents computers from going to sleep. Select the Require tethered network connection for app
checkbox. This checkbox is only displayed if "Install Automatically/Prompt Users to installation Install" is chosen in the pop-up menu. App updates will not require tethering; Distribution Methodthis setting is for initial installations of an app only.
Click the tab and configure the scope of the app.ScopeFor more information, see .Scope
(Optional, iOS and iPadOS only) Click the tab and configure the way the app is displayed Self Service in Self Service. You can customize the text displayed in the description for the app in Self Service by using Markdown in the Description field.For information about Markdown, see the Knowledge Base article.Using Markdown to Format Text
Note: The tab is only displayed if "Make Available in Self Service" is chosen in the Self Service pop-up menu.Distribution Method
(Optional) Click the tab and configure the preferences as needed.App Configuration
Note: The tab is only displayed if the App Configuration Make App Managed when possiblecheckbox is selected.
For help generating the preferences, click the link. The AppConfig Generator AppConfig Generatorenables you to generate the PLIST file to enter in the field. For more information about PreferencesAppConfig, see the AppConfig Community website:https://www.appconfig.org
Click .Save
The app is distributed the next time mobile devices in the scope check in with Jamf Pro. If users were added as targets to the scope, the app is distributed to the devices those users are assigned to the next time the devices check in with Jamf Pro.
Distributing an In-House App Update
Log in to Jamf Pro.
Click at the top of the page. Devices
Click .Mobile Device Apps
Click the app you want to update.

603
5.
6.
7.
Do one of the following:
To distribute an update for an in-house app that is hosted on a web server, upload the new archived app file to the web server and update app URL.
To distribute an update for an in-house app that is hosted on distribution points or in the jamfsoftware database, upload the new archived app file using Jamf Pro.
Enter the new version number for the app.
Important: Do not change the bundle identifier. Jamf Pro uses the existing bundle identifier to distribute the update.
Click .Save
The update is distributed the next time mobile devices in the scope contact Jamf Pro.
Related Information
For related information, see the following sections in this guide:
Mobile Device Management InformationFind out how to view the apps in the scope of a mobile device, and how to view and cancel pending app installations and removals.
Mobile Device History InformationFind out how to view the completed, pending, and failed app installations for a mobile device. Also, find out how to cancel pending app installations.
Mobile Device Configuration ProfilesYou can create a mobile device configuration profile with a Per-App VPN connection.
For related information, see the following Knowledge Base article:
Hosting In-House Books and Apps on a Tomcat InstanceFind out how to host in-house apps on the Tomcat instance that hosts Jamf Pro.

604
1.
2.
3.
4.
5.
6.
7.
1.
2.
3.
4.
In-House App Maintenance SettingsYou can use the App Maintenance settings in Jamf Pro to perform the following maintenance for in-house apps:
Automatic Updates—You can enable Jamf Pro to automatically update all in-house apps that are installed on mobile devices for the apps that were made available in Jamf Self Service for iOS. This allows you to update the apps without user interaction.
App Validation—App validation is the process of ensuring that the provisioning profile associated with an in-house app is still authorizing the use of the app. You can automatically validate all managed in-house apps on mobile devices by customizing how frequently Jamf Pro performs app validation.You can also manually force all devices to check in with Apple to validate installed in-house apps. This is useful if you know that devices may be offline for an extended period of time and you want to validate apps before the device is offline.The validation status for a managed in-house app on a mobile device is collected each time inventory information for the device is reported to Jamf Pro, and is displayed in the inventory information for that device. If an app cannot be validated, the validation status is reported as "not validated", and the app will not open until a successful validation occurs. For information about the situations in which an app may be reported as "not validated", see the Cannot Validate a Managed
Knowledge Base article.In-House App
Enabling Automatic App Updates
Log in to Jamf Pro.
In the top-right corner of the page, click .Settings
Click .Mobile Device Management
Click .App Maintenance
Click the tab, and then click .In-House Apps Edit
Select .Automatically update apps installed via Self Service
Click Save .
Configuring App Validation
Log in to Jamf Pro.
In the top-right corner of the page, click .Settings
Click .Mobile Device Management

605
4.
5.
6.
a.
b.
7.
8.
Click .App Maintenance
Click the tab, and then click .In-House Apps Edit
To enable automatic app validation, do the following:
Select .Automatically validate all managed in-house apps
Specify how often Jamf Pro attempts to validate apps using the pop-up Validation Frequencymenu.You can choose to validate apps every week, every two weeks, every four weeks, or every eight weeks. The default validation frequency is "every week”.
To force app validation, click .Force Validation
Click .Save

606
1.
2.
3.
4.
5.
6.
7.
In-House BooksIn-house books are books that are not available in the Book Store. Jamf Pro allows you to distribute in-house books to computers, mobile devices, and users. Jamf Pro provides two distribution methods for in-house books:
Install the book automatically/prompt users to install the book (iOS only)
Make the book available in Self Service
After a book is installed, users can view it using the Books app.
When you distribute an in-house book, you configure settings for the book. Then, you specify the computers, mobile devices, and users that should receive it (called “scope”).
Note: In-house books cannot be distributed to personally owned mobile devices.
Distributing an In-House Book
Requirements
To distribute an in-house book, the book must be one of the following types of files:
ePub file (.epub)
iBooks file (.ibooks)
Procedure
Log in to Jamf Pro.
Click , , or at the top of the page.Computers Devices Users
Click .eBooks
Click .New
Select and click .In-house eBook Next
Use the General pane to configure settings for the book, including the display name and distribution method.
Note: If you choose "Make Available in Self Service" as the distribution method, the Make eBook checkbox is selected by default. However, in-house books distributed to managed when possible
computers cannot be managed. For more information, see .Managed Content in Jamf Pro
If your principal distribution point is the cloud distribution point and you choose "Distribution Points" from the pop-up menu, be sure to upload the book file. For more information about Hosting Locationhosting locations, see .About In-House Content

607
7.
8.
9.
1.
2.
3.
4.
5.
6.
Click the tab and configure the scope of the book.ScopeFor more information, see .Scope
(Optional) Click the tab and configure the way the book is displayed in Self Service. You Self Servicecan customize the text displayed in the description for the book in Self Service by using Markdown in the Description field.For information about Markdown, see the Knowledge Base article.Using Markdown to Format Text
Note: The tab is only displayed if “Make Available in Self Service” is chosen in the Self Service pop-up menu.Distribution Method
Click .Save
For books set to the “Install Automatically” distribution method, books are installed the next time mobile devices in the scope check in with Jamf Pro. Users can view installed books with the Books app.
For books set to the ”Make Available in Self Service” distribution method and books that cannot be installed automatically, books are available in Self Service for users to install the next time Self Service is launched.
Removing a Managed In-House Book from Mobile Devices
To remove a managed in-house book from one or more devices, you remove the mobile device or devices from the scope.
Log in to Jamf Pro.
Click , , or at the top of the page.Computers Devices Users
Click .eBooks
Click the book you want to remove.
Click the tab and remove mobile devices from the scope as needed.ScopeFor more information, see .Scope
Click .Save
The book is removed the next time the mobile devices check in with Jamf Pro.

608
Related Information
For related information, see the following sections in this guide:
Computer Inventory InformationFind out how to view the books in the scope of a computer.
Mobile Device Inventory InformationFind out how to view the books in the scope of a mobile device.
Mobile Device Management InformationFind out how to view and cancel pending book installations and removals for a mobile device.
For related information, see the following Knowledge Base article:
Hosting In-House Books and Apps on a Tomcat InstanceFind out how to host in-house books on the Tomcat instance that hosts Jamf Pro.