Analyzer 7.2 Administrator's Guide - Oceanet Technology
246
Analyzer 7.2 Administrator’s Guide
-
Upload
khangminh22 -
Category
Documents
-
view
1 -
download
0
Transcript of Analyzer 7.2 Administrator's Guide - Oceanet Technology

| 1
Analyzer 7.2Administrator’s Guide
2 | Dell SonicWALL Analyzer 7.2 Administrator’s Guide
Notes, Cautions, and Warnings
© 2014 Dell Inc.
Trademarks: Dell™, the DELL logo, SonicWALL™, SonicWALL GMS™, SonicWALL ViewPoint™, SonicWALL Analyzer™, and all other SonicWALL product and service names and slogans are trademarks of Dell Inc.
2014 – 10 P/N 232-002284-00 Rev. C
NOTE: A NOTE indicates important information that helps you make better use of your system.
CAUTION: A CAUTION indicates potential damage to hardware or loss of data if instructions are not followed.
WARNING: A WARNING indicates a potential for property damage, personal injury, or death.

Table of Contents
Chapter 1. Introduction to Analyzer . . . . . . . . . . . . . . . . . . . . . . . . . . . . . . . . . . . . . .9
Overview . . . . . . . . . . . . . . . . . . . . . . . . . . . . . . . . . . . . . . . . . . . . . . . . . . . . . . . . . . . 9
New Features in Analyzer 7.2 . . . . . . . . . . . . . . . . . . . . . . . . . . . . . . . . . . . . . . . 10
Deployment Requirements . . . . . . . . . . . . . . . . . . . . . . . . . . . . . . . . . . . . . . . . . . . . 11
Operating System Requirements . . . . . . . . . . . . . . . . . . . . . . . . . . . . . . . . . . . . 11
Hardware for Windows Server. . . . . . . . . . . . . . . . . . . . . . . . . . . . . . . . . . . . . . . 11
Virtual Appliance Requirements . . . . . . . . . . . . . . . . . . . . . . . . . . . . . . . . . . . . . 12
MySQL Requirements . . . . . . . . . . . . . . . . . . . . . . . . . . . . . . . . . . . . . . . . . . . . . 13
Microsoft SQL Server Requirements. . . . . . . . . . . . . . . . . . . . . . . . . . . . . . . . . . 13
Java Requirements . . . . . . . . . . . . . . . . . . . . . . . . . . . . . . . . . . . . . . . . . . . . . . . 13
Browser Requirements . . . . . . . . . . . . . . . . . . . . . . . . . . . . . . . . . . . . . . . . . . . . 13
Network Requirements . . . . . . . . . . . . . . . . . . . . . . . . . . . . . . . . . . . . . . . . . . . . 14
Dell SonicWALL Appliance and Firmware Support . . . . . . . . . . . . . . . . . . . . . . . 14
Dell SonicWALL Analyzer Installation . . . . . . . . . . . . . . . . . . . . . . . . . . . . . . . . . . . . 15
License and Registration Requirements . . . . . . . . . . . . . . . . . . . . . . . . . . . . . . . 15
Accessing the Correct Management Interface . . . . . . . . . . . . . . . . . . . . . . . . . . . . . 16
Switching Between Management Interfaces . . . . . . . . . . . . . . . . . . . . . . . . . . . . 16
Login to Analyzer. . . . . . . . . . . . . . . . . . . . . . . . . . . . . . . . . . . . . . . . . . . . . . . . . . . . 17
Navigating the Analyzer User Interface . . . . . . . . . . . . . . . . . . . . . . . . . . . . . . . . . . . 18
Firewall Panel . . . . . . . . . . . . . . . . . . . . . . . . . . . . . . . . . . . . . . . . . . . . . . . . . . . 18
SRA Panel . . . . . . . . . . . . . . . . . . . . . . . . . . . . . . . . . . . . . . . . . . . . . . . . . . . . . . 20
CDP Panel. . . . . . . . . . . . . . . . . . . . . . . . . . . . . . . . . . . . . . . . . . . . . . . . . . . . . . 21
Console Panel . . . . . . . . . . . . . . . . . . . . . . . . . . . . . . . . . . . . . . . . . . . . . . . . . . . 21
Analyzer Views and Status . . . . . . . . . . . . . . . . . . . . . . . . . . . . . . . . . . . . . . . . . . . . 22
Understanding Analyzer Icons . . . . . . . . . . . . . . . . . . . . . . . . . . . . . . . . . . . . . . . . . 23
Using the Analyzer TreeControl Menu . . . . . . . . . . . . . . . . . . . . . . . . . . . . . . . . . . . 24
Chapter 2. Provisioning and Adding Dell SonicWALL Appliances . . . . . . . . . . . . .25
Provisioning Dell SonicWALL Appliances . . . . . . . . . . . . . . . . . . . . . . . . . . . . . . . . . 25
Provisioning a Dell SonicWALL Firewall Appliance . . . . . . . . . . . . . . . . . . . . . . . 26
Provisioning a Dell SonicWALL SRA SMB Appliance . . . . . . . . . . . . . . . . . . . . . 27
Provisioning a Dell SonicWALL E-Class SRA Series Appliance . . . . . . . . . . . . . 28
Provisioning a Dell SonicWALL CDP Appliance . . . . . . . . . . . . . . . . . . . . . . . . . 28
Adding Dell SonicWALL Appliances to Dell SonicWALL Analyzer . . . . . . . . . . . . . . 29
Adding Dell SonicWALL Appliances . . . . . . . . . . . . . . . . . . . . . . . . . . . . . . . . . . 29
Modifying Dell SonicWALL Appliance Settings . . . . . . . . . . . . . . . . . . . . . . . . . . 30
Deleting Dell SonicWALL Appliances from Analyzer. . . . . . . . . . . . . . . . . . . . . . 31
Table of Contents | 3

Chapter 3. Using the Dashboard Panel . . . . . . . . . . . . . . . . . . . . . . . . . . . . . . . . . .33
Using the Universal Scheduled Reports Application . . . . . . . . . . . . . . . . . . . . . . . . . 34
Using the Manage Templates Component . . . . . . . . . . . . . . . . . . . . . . . . . . . . . 34
Adding a Scheduled Report Component . . . . . . . . . . . . . . . . . . . . . . . . . . . . . . . 40
Managing the Scheduled Reports Component . . . . . . . . . . . . . . . . . . . . . . . . . . 53
Chapter 4. Overview of Reporting . . . . . . . . . . . . . . . . . . . . . . . . . . . . . . . . . . . . . .59
Dell SonicWALL Analyzer Reporting Overview . . . . . . . . . . . . . . . . . . . . . . . . . . . . . 59
Viewing Reports . . . . . . . . . . . . . . . . . . . . . . . . . . . . . . . . . . . . . . . . . . . . . . . . . 60
Navigating Dell SonicWALL Analyzer Reporting . . . . . . . . . . . . . . . . . . . . . . . . . . . . 63
Global Views . . . . . . . . . . . . . . . . . . . . . . . . . . . . . . . . . . . . . . . . . . . . . . . . . . . . 63
Unit View . . . . . . . . . . . . . . . . . . . . . . . . . . . . . . . . . . . . . . . . . . . . . . . . . . . . . . . 64
Layout of Reports Display . . . . . . . . . . . . . . . . . . . . . . . . . . . . . . . . . . . . . . . . . . 66
The Date Selector . . . . . . . . . . . . . . . . . . . . . . . . . . . . . . . . . . . . . . . . . . . . . . . . 68
Export Results . . . . . . . . . . . . . . . . . . . . . . . . . . . . . . . . . . . . . . . . . . . . . . . . . . . 71
The Filter Bar. . . . . . . . . . . . . . . . . . . . . . . . . . . . . . . . . . . . . . . . . . . . . . . . . . . . 72
Adding Filters. . . . . . . . . . . . . . . . . . . . . . . . . . . . . . . . . . . . . . . . . . . . . . . . . . . . 72
Scheduling Reports . . . . . . . . . . . . . . . . . . . . . . . . . . . . . . . . . . . . . . . . . . . . . . . 75
Report Data Container . . . . . . . . . . . . . . . . . . . . . . . . . . . . . . . . . . . . . . . . . . . . . . . 76
Layout of the Data Container. . . . . . . . . . . . . . . . . . . . . . . . . . . . . . . . . . . . . . . . 76
Viewing Syslog Data of Generated Reports . . . . . . . . . . . . . . . . . . . . . . . . . . . . 77
Drilling Down . . . . . . . . . . . . . . . . . . . . . . . . . . . . . . . . . . . . . . . . . . . . . . . . . . . . 77
Custom Reports . . . . . . . . . . . . . . . . . . . . . . . . . . . . . . . . . . . . . . . . . . . . . . . . . . . . 83
Troubleshooting Reports . . . . . . . . . . . . . . . . . . . . . . . . . . . . . . . . . . . . . . . . . . 83
Managing Dell SonicWALL Analyzer Reports on the Console Panel . . . . . . . . . . . . 84
Chapter 5. Viewing Firewall Reports . . . . . . . . . . . . . . . . . . . . . . . . . . . . . . . . . . . .85
Firewall Reporting Overview . . . . . . . . . . . . . . . . . . . . . . . . . . . . . . . . . . . . . . . . . . . 85
Benefits of Firewall Reporting . . . . . . . . . . . . . . . . . . . . . . . . . . . . . . . . . . . . . . . 85
Firewall Reports Tab . . . . . . . . . . . . . . . . . . . . . . . . . . . . . . . . . . . . . . . . . . . . . . 86
Viewing Available Firewall Report Types . . . . . . . . . . . . . . . . . . . . . . . . . . . . . . 86
How to View Firewall Reports . . . . . . . . . . . . . . . . . . . . . . . . . . . . . . . . . . . . . . . . . . 89
Viewing Global Summary Reports. . . . . . . . . . . . . . . . . . . . . . . . . . . . . . . . . . . . 89
Viewing Data Usage Reports . . . . . . . . . . . . . . . . . . . . . . . . . . . . . . . . . . . . . . . 91
Using the Log Analyzer . . . . . . . . . . . . . . . . . . . . . . . . . . . . . . . . . . . . . . . . . . . . . . 100
Configuration Settings . . . . . . . . . . . . . . . . . . . . . . . . . . . . . . . . . . . . . . . . . . . . . . . 103
Setting Up Currency Cost for Summarizer . . . . . . . . . . . . . . . . . . . . . . . . . . . . 104
Adding Syslog Exclusion Filters . . . . . . . . . . . . . . . . . . . . . . . . . . . . . . . . . . . . 105
Custom Reports . . . . . . . . . . . . . . . . . . . . . . . . . . . . . . . . . . . . . . . . . . . . . . . . . . . 106
Chapter 6. Viewing SRA Reports . . . . . . . . . . . . . . . . . . . . . . . . . . . . . . . . . . . . . . 107
SRA Reporting Overview . . . . . . . . . . . . . . . . . . . . . . . . . . . . . . . . . . . . . . . . . . . . 107
SRA Reports Tab . . . . . . . . . . . . . . . . . . . . . . . . . . . . . . . . . . . . . . . . . . . . . . . 107
What is SRA Reporting? . . . . . . . . . . . . . . . . . . . . . . . . . . . . . . . . . . . . . . . . . . 108
4 | Dell SonicWALL Analyzer 7.2 Administrator’s Guide

Benefits of SRA Reporting. . . . . . . . . . . . . . . . . . . . . . . . . . . . . . . . . . . . . . . . . 108
How Does SRA Reporting Work? . . . . . . . . . . . . . . . . . . . . . . . . . . . . . . . . . . . 108
Using and Configuring SRA Reporting . . . . . . . . . . . . . . . . . . . . . . . . . . . . . . . . . . 109
Viewing Available SRA Report Types . . . . . . . . . . . . . . . . . . . . . . . . . . . . . . . . 109
Configuring SRA Scheduled Reports . . . . . . . . . . . . . . . . . . . . . . . . . . . . . . . . 110
Navigating Through Detailed SRA Reports . . . . . . . . . . . . . . . . . . . . . . . . . . . . 110
Viewing SRA Summary Reports . . . . . . . . . . . . . . . . . . . . . . . . . . . . . . . . . . . . . . . 111
Viewing SRA Unit-Level Reports. . . . . . . . . . . . . . . . . . . . . . . . . . . . . . . . . . . . . . . 112
Viewing Unit-Level Data Usage Reports . . . . . . . . . . . . . . . . . . . . . . . . . . . . . . 112
Viewing SRA Top Users Reports . . . . . . . . . . . . . . . . . . . . . . . . . . . . . . . . . . . 113
Viewing Access Method Reports. . . . . . . . . . . . . . . . . . . . . . . . . . . . . . . . . . . . 114
Viewing SRA Authentication User Login Report . . . . . . . . . . . . . . . . . . . . . . . . 117
Viewing SRA Authentication Failed Login Report . . . . . . . . . . . . . . . . . . . . . . . 118
Viewing Web Application Firewall (WAF) Reports. . . . . . . . . . . . . . . . . . . . . . . 119
Viewing Connection Reports . . . . . . . . . . . . . . . . . . . . . . . . . . . . . . . . . . . . . . . 127
Viewing SRA Analyzer Logs . . . . . . . . . . . . . . . . . . . . . . . . . . . . . . . . . . . . . . . . . . 129
Syslog Exclusion Filter . . . . . . . . . . . . . . . . . . . . . . . . . . . . . . . . . . . . . . . . . . . 131
Custom Reports . . . . . . . . . . . . . . . . . . . . . . . . . . . . . . . . . . . . . . . . . . . . . . . . . . . 132
Chapter 7. Viewing CDP Reports . . . . . . . . . . . . . . . . . . . . . . . . . . . . . . . . . . . . . . 133
CDP Reporting Overview . . . . . . . . . . . . . . . . . . . . . . . . . . . . . . . . . . . . . . . . . . . . 133
CDP Reports Tab . . . . . . . . . . . . . . . . . . . . . . . . . . . . . . . . . . . . . . . . . . . . . . . 133
What is CDP Reporting? . . . . . . . . . . . . . . . . . . . . . . . . . . . . . . . . . . . . . . . . . . 133
How to View CDP Reports . . . . . . . . . . . . . . . . . . . . . . . . . . . . . . . . . . . . . . . . . . . 134
Viewing the Capacity Summary Report. . . . . . . . . . . . . . . . . . . . . . . . . . . . . . . 135
Viewing Unit Backup Activity . . . . . . . . . . . . . . . . . . . . . . . . . . . . . . . . . . . . . . . 136
Chapter 8. Configuring User Settings . . . . . . . . . . . . . . . . . . . . . . . . . . . . . . . . . . 141
Configuring User Settings . . . . . . . . . . . . . . . . . . . . . . . . . . . . . . . . . . . . . . . . . . . . 141
Chapter 9. Configuring Log Settings . . . . . . . . . . . . . . . . . . . . . . . . . . . . . . . . . . . 143
Configuring Log Settings . . . . . . . . . . . . . . . . . . . . . . . . . . . . . . . . . . . . . . . . . . . . . 143
Configuring Log View Search Criteria . . . . . . . . . . . . . . . . . . . . . . . . . . . . . . . . . . . 144
Chapter 10. Configuring Console Management Settings . . . . . . . . . . . . . . . . . . . . 147
Configuring Management Settings . . . . . . . . . . . . . . . . . . . . . . . . . . . . . . . . . . . . . 147
Configuring Email Settings . . . . . . . . . . . . . . . . . . . . . . . . . . . . . . . . . . . . . . . . 148
Configuring System Debug Level . . . . . . . . . . . . . . . . . . . . . . . . . . . . . . . . . . . 148
Enforcing Password Security. . . . . . . . . . . . . . . . . . . . . . . . . . . . . . . . . . . . . . . 149
Show Legacy (pre Analyzer 7.2) Reports . . . . . . . . . . . . . . . . . . . . . . . . . . . . . 149
Synchronizing Model Codes . . . . . . . . . . . . . . . . . . . . . . . . . . . . . . . . . . . . . . . 149
Configuring Management Alert Settings . . . . . . . . . . . . . . . . . . . . . . . . . . . . . . . . . 150
Configuring Management Sessions . . . . . . . . . . . . . . . . . . . . . . . . . . . . . . . . . . . . 151
Managing Sessions . . . . . . . . . . . . . . . . . . . . . . . . . . . . . . . . . . . . . . . . . . . . . . 151
Table of Contents | 5

Chapter 11. Managing Reports in the Console Panel . . . . . . . . . . . . . . . . . . . . . . . 153
Summarizer . . . . . . . . . . . . . . . . . . . . . . . . . . . . . . . . . . . . . . . . . . . . . . . . . . . . . . . 153
About Summary Data in Reports. . . . . . . . . . . . . . . . . . . . . . . . . . . . . . . . . . . . 153
Summarizer Settings and Summarization Interval for CDP. . . . . . . . . . . . . . . . 154
Configuring the Data Deletion Schedule Settings . . . . . . . . . . . . . . . . . . . . . . . 156
Configuring Data Storage . . . . . . . . . . . . . . . . . . . . . . . . . . . . . . . . . . . . . . . . . 157
Configuring Hostname Resolution. . . . . . . . . . . . . . . . . . . . . . . . . . . . . . . . . . . 158
NMM Configuration . . . . . . . . . . . . . . . . . . . . . . . . . . . . . . . . . . . . . . . . . . . . . . 159
Syslog Exclusion Filter . . . . . . . . . . . . . . . . . . . . . . . . . . . . . . . . . . . . . . . . . . . . . . 159
Email/Archive . . . . . . . . . . . . . . . . . . . . . . . . . . . . . . . . . . . . . . . . . . . . . . . . . . . . . 160
Configuring Email/Archive Settings . . . . . . . . . . . . . . . . . . . . . . . . . . . . . . . . . . 160
Managing Legacy Reports . . . . . . . . . . . . . . . . . . . . . . . . . . . . . . . . . . . . . . . . . . . 162
Chapter 12. Using Diagnostics . . . . . . . . . . . . . . . . . . . . . . . . . . . . . . . . . . . . . . . . 165
Configuring Debug Log Settings . . . . . . . . . . . . . . . . . . . . . . . . . . . . . . . . . . . . . . . 166
Summarizer Status . . . . . . . . . . . . . . . . . . . . . . . . . . . . . . . . . . . . . . . . . . . . . . . . . 167
Chapter 13. Granular Event Management . . . . . . . . . . . . . . . . . . . . . . . . . . . . . . . . 173
Granular Event Management Overview . . . . . . . . . . . . . . . . . . . . . . . . . . . . . . . . . 173
What is Granular Event Management? . . . . . . . . . . . . . . . . . . . . . . . . . . . . . . . 174
How Does Granular Event Management Work? . . . . . . . . . . . . . . . . . . . . . . . . 174
Using Granular Event Management . . . . . . . . . . . . . . . . . . . . . . . . . . . . . . . . . . . . 174
About Alerts . . . . . . . . . . . . . . . . . . . . . . . . . . . . . . . . . . . . . . . . . . . . . . . . . . . . 175
Configuring Granular Event Management . . . . . . . . . . . . . . . . . . . . . . . . . . . . . . . . 176
Configuring Events on the Console Panel. . . . . . . . . . . . . . . . . . . . . . . . . . . . . 176
Chapter 14. Using Analyzer Help . . . . . . . . . . . . . . . . . . . . . . . . . . . . . . . . . . . . . . 185
About Analyzer . . . . . . . . . . . . . . . . . . . . . . . . . . . . . . . . . . . . . . . . . . . . . . . . . . . . 185
Tips and Tutorials . . . . . . . . . . . . . . . . . . . . . . . . . . . . . . . . . . . . . . . . . . . . . . . . . . 186
Chapter 15. Using the UMH System Interface . . . . . . . . . . . . . . . . . . . . . . . . . . . . 187
Overview of the UMH System Interface . . . . . . . . . . . . . . . . . . . . . . . . . . . . . . . . . 188
Switching to the Application Interface . . . . . . . . . . . . . . . . . . . . . . . . . . . . . . . . 188
Viewing Online Help and Tips . . . . . . . . . . . . . . . . . . . . . . . . . . . . . . . . . . . . . . 188
Logging Out of the UMH System Interface . . . . . . . . . . . . . . . . . . . . . . . . . . . . 189
Configuring UMH System Settings . . . . . . . . . . . . . . . . . . . . . . . . . . . . . . . . . . . . . 189
Viewing System Status . . . . . . . . . . . . . . . . . . . . . . . . . . . . . . . . . . . . . . . . . . . 190
Managing System Licenses. . . . . . . . . . . . . . . . . . . . . . . . . . . . . . . . . . . . . . . . 190
Configuring System Time Settings (Virtual Appliance) . . . . . . . . . . . . . . . . . . . 200
Configuring System Administration Settings . . . . . . . . . . . . . . . . . . . . . . . . . . . 201
Managing System Settings . . . . . . . . . . . . . . . . . . . . . . . . . . . . . . . . . . . . . . . . 201
Using System Diagnostics. . . . . . . . . . . . . . . . . . . . . . . . . . . . . . . . . . . . . . . . . 202
Using System File Manager (Virtual Appliance) . . . . . . . . . . . . . . . . . . . . . . . . 204
Using System Backup/Restore . . . . . . . . . . . . . . . . . . . . . . . . . . . . . . . . . . . . . 205
Using System Shutdown (Virtual Appliance) . . . . . . . . . . . . . . . . . . . . . . . . . . . 205
6 | Dell SonicWALL Analyzer 7.2 Administrator’s Guide

Configuring UMH Network Options (Virtual Appliance) . . . . . . . . . . . . . . . . . . . . . . 206
Configuring Network Settings (Virtual Appliance) . . . . . . . . . . . . . . . . . . . . . . . 206
Configuring Network Routes (Virtual Appliance) . . . . . . . . . . . . . . . . . . . . . . . . 207
Configuring UMH Deployment Options . . . . . . . . . . . . . . . . . . . . . . . . . . . . . . . . . . 207
Configuring the Deployment Role . . . . . . . . . . . . . . . . . . . . . . . . . . . . . . . . . . . 208
Configuring Deployment Settings . . . . . . . . . . . . . . . . . . . . . . . . . . . . . . . . . . . 209
Configuring Web Server Settings . . . . . . . . . . . . . . . . . . . . . . . . . . . . . . . . . . . 210
Configuring SMTP Settings . . . . . . . . . . . . . . . . . . . . . . . . . . . . . . . . . . . . . . . . 210
Configuring SSL Access . . . . . . . . . . . . . . . . . . . . . . . . . . . . . . . . . . . . . . . . . . 211
Controlling Deployment Services . . . . . . . . . . . . . . . . . . . . . . . . . . . . . . . . . . . 211
Appendix A. Upgrading . . . . . . . . . . . . . . . . . . . . . . . . . . . . . . . . . . . . . . . . 213Upgrading SonicWALL ViewPoint 6.0 to Analyzer 7.2 . . . . . . . . . . . . . . . . . . . . . . 213
Upgrading from Analyzer to GMS . . . . . . . . . . . . . . . . . . . . . . . . . . . . . . . . . . . . . . 215
Enabling the GMS Free Trial from Analyzer . . . . . . . . . . . . . . . . . . . . . . . . . . . 215
Enabling the GMS Free Trial from the UMH Interface. . . . . . . . . . . . . . . . . . . . 217
Completing the Free Trial Upgrade . . . . . . . . . . . . . . . . . . . . . . . . . . . . . . . . . . 218
Configuring Appliances for GMS Management . . . . . . . . . . . . . . . . . . . . . . . . . 221
Purchasing a SonicWALL GMS Upgrade . . . . . . . . . . . . . . . . . . . . . . . . . . . . . 222
Miscellaneous Procedures and Tips . . . . . . . . . . . . . . . . . . . . . . . . . . . . . . . . . . . . 224
Miscellaneous Procedures . . . . . . . . . . . . . . . . . . . . . . . . . . . . . . . . . . . . . . . . 224
Appendix B. License Agreements . . . . . . . . . . . . . . . . . . . . . . . . . . . . . . . 227End User Software License Agreement . . . . . . . . . . . . . . . . . . . . . . . . . . . . . . . . . 227
Apache Licensing Agreement . . . . . . . . . . . . . . . . . . . . . . . . . . . . . . . . . . . . . . . . . 234
How to apply the Apache License to your work. . . . . . . . . . . . . . . . . . . . . . . . . 237
Table of Contents | 7

8 | Dell SonicWALL Analyzer 7.2 Administrator’s Guide

Chapter 1
Introduction to Analyzer
This chapter provides an overview of the Dell SonicWALL Analyzer and information about the user interface. See the following sections:
• Overview on page 9
– New Features in Analyzer 7.2 on page 10
• Deployment Requirements on page 11
• Dell SonicWALL Analyzer Installation on page 15
• Accessing the Correct Management Interface on page 16
• Login to Analyzer on page 17
• Navigating the Analyzer User Interface on page 18
• Analyzer Views and Status on page 22
• Understanding Analyzer Icons on page 23
• Using the Analyzer TreeControl Menu on page 24
OverviewMonitoring critical network events and activity, such as security threats, inappropriate Web use, and bandwidth levels, is an essential component of network security. Dell SonicWALL Analyzer Reporting complements SonicWALL's network security offerings by providing detailed and comprehensive reports of network activity.
The Analyzer Reporting Module is a software application that creates dynamic, Web-based network reports. The Analyzer Reporting Module generates both real-time and historical reports to offer a complete view of all activity through SonicWALL network security appliances. With Analyzer Reporting, you can monitor network access, enhance security, and anticipate future bandwidth needs. The Analyzer Reporting Module:
• Displays bandwidth use by IP address and service
• Identifies inappropriate Web use
• Provides detailed reports of attacks
• Collects and aggregates system and network errors
• Shows VPN events and problems
• Presents visitor traffic to your Web site
• Provides detailed daily logs to analyze specific events.
| 9

New Features in Analyzer 7.2
The following features were introduced in Analyzer 7.2:
• IPv6 Support — IPv6 is supported in Analyzer 7.2, allowing the user to:
– Install Analyzer in an IPv6 network environment. Analyzer can now access various Network Elements using IPv6 addresses, such as: Firewalls, SMTP servers, RADIUS/LDAP Authentication Servers, SNMP Managers, WebServices, and so on.
– Access Analyzer web interfaces on an IPv6 network.
– Generate IPv6 based reports.
• Scheduled Reports Permission Management — In 7.1, scheduled reports created by an end user can only be viewed and configured by the creator and Administrator. 7.2 gives the scheduled report creator the ability to manage permissions of the scheduled reports so other users in the deployment can view and configure the report.
• Intrusion Reporting Enhancements — Two new reports are added at root level to the Intrusion reports:
– Reports > Intrusions > Details
– Reports > Intrusions > Alerts
• Syslogs Sent by Appliances that are not under Reporting or Management— Some of the units that are no longer managed by Analyzer send syslogs that create NMM files that impact performance. In 7.2, the user is notified if this occurs and they can make the unit stop sending syslog messages.
• Application Level Data Archiving and Aging — In 7.1 data was not deleted from the application table, such as logs and meta data tables, causing the number of rows to grow quickly in the tables, affecting overall performance of the application. In 7.2 the console logs and application meta data tables are aged and archived to fix this issue.
• Localization — Support for the Korean language is included in 7.2.
• Disable Archiving of Syslogs to File System— Added the option to disable storing of archived syslogs.
• Reverse DNS Support — This feature enhances the quality of data by performing a reverse lookup on the private IP addresses (LAN Side) with a missing hostname sent by the firewall. The reverse lookup is performed by logging into the DNS server on the LAN side of the firewall. This functionality requires the Analyzer to be installed on the LAN side of the firewall, to be able to access the DNS Server.
• Log Analyzer Enhancements — The Log Analyzer interface is customizable to allow expansion and easy distribution of columns for ease of navigation.
10 | Dell SonicWALL Analyzer 7.2 Administrator’s Guide

Deployment RequirementsThe Dell SonicWALL Analyzer comes with a base license to manage either 5, 10, or 25 nodes. You can purchase additional licenses on MySonicWALL. For more information on licensing additional nodes, visit: http://www.sonicwall.com/us/Products_Solutions.html
Note Analyzer is not supported on laptops or tablets.
Before installing, review the requirements in the following sections:
Operating System Requirements
The Dell SonicWALL Analyzer supports the following operating systems:
• Windows Server 2012 Standard 64-bit
• Windows Server 2012 R2 Standard 64-bit (Japanese Language Version)
• Windows Server 2012 R2 Datacenter
• Windows Server 2008 R2 Datacenter
• Windows Server 2008 SBS R2 64-bit
• Windows Server 2008 R2 Standard 64-bit
• Windows Server 2008 SP2 64-bit
• Windows Server 2003 32-bit and 64-bit (SP2)
• Windows 8 32-bit and 64-bit
• Windows 7 64-bit
These Windows systems can either run in physical standalone hardware platforms, or as a virtual machine under Hyper-V or ESXi.
Tip For best performance and scalability, it is recommended to use a 64-bit Windows operating system. Bundled databases run in 64-bit mode on 64-bit Windows operating systems. All listed operating systems are supported in both virtualized and non-virtualized environments. In a Hyper-V virtualized environment, Windows Server is a guest operating system running on Hyper-V. Analyzer is then installed on the Windows Server virtual machine that is layered over Hyper-V.
Hardware for Windows Server
Use the Capacity Calculator 2 to determine the hardware requirements for your deployment.
Note A Windows 64-bit operating system with at least 8GB of RAM is highly recommended for better performance of reporting modules. Read the “Capacity Planning and Performance Tuning” appendix in the GMS Administrator’s Guide.
| 11

Virtual Appliance Requirements
The elements of basic VMware structure must be implemented prior to deploying the Analyzer Virtual Appliance. The Virtual Appliance runs on the following VMware platforms:
• ESXi 4.0 Update 1 (Build 208167 and newer)
• ESXi 4.1
• ESXi 5.0
• ESXi 5.1
• ESXi 5.5
• ESX 4.1
• ESX 4.0 Update 1 (Build 208167 and newer)
Use the following client applications to import the image and configure the virtual settings:
• VMware vSphere – Provides infrastructure and application services in a graphical user interface for ESX/ESXi, included with ESX/ESXi. Allows you to specify Thin or Thick (Flat) provisioning when deploying the Virtual Appliance.
• VMware vCenter Server – Centrally manages multiple VMware ESX/ESXi environments. Provides Thick provisioning when deploying the Virtual Appliance.
Deployment Considerations:
• All modules are 64-bit.
• Analyzer management is not supported on Apple MacOS.
• Use the Capacity Calculator 2 to determine the hardware requirements for your deployment.
• In GMS 7.2 the Virtual Appliances are 64-bit, that take advantage of additional RAM available to it. A minimum of 4GB RAM is required. However, at least 8GB of RAM is highly recommended for better performance of reporting modules.
• The performance of Analyzer Virtual Appliance depends on the underlying hardware. It is highly recommended to dedicate all the resources that are allocated to the Virtual Appliance, especially the hard-disk (datastore). In environments with high volumes of syslogs or AppFlow (IPFIX), you must dedicate local datastores to the Virtual Appliance.
• When using Thick, or Flat, provisioning as the storage type option, the entire amount of disk space is allocated when you import and deploy the Virtual Appliance file. When using Thin provisioning, the initial size is very small and grows dynamically as more disk space is needed by the application, until the maximum size is reached. After allocated, the size does not shrink if the application space requirements are subsequently reduced.
Additional disk space provided to the Virtual Appliance in the virtual environment, beyond the respective limits of 250GB or 950GB is not utilized.
ESX/ESXi can be configured with datastores of varying block sizes. The 4 or 8MB requirement for the 950GB deployment is because the block size determines the largest virtual disk that can be deployed, as shown in the table:
Block Size of Datastore Largest Virtual Disk
1MB 256GB
2MB 512GB
4MB 1TB
8MB 2TB
12 | Dell SonicWALL Analyzer 7.2 Administrator’s Guide

MySQL Requirements
Dell SonicWALL Analyzer automatically installs MySQL as part of the base installation package. Separately installed instances of MySQL are not supported with Analyzer 7.2 Software.
Microsoft SQL Server Requirements
For SQL Server deployments in countries in which English is not the default language, set the default language to English in the Login Properties of the Analyzer database user in the SQL Server configuration.
The following SQL Server versions are supported:
• SQL Server 2012
• SQL Server 2008
• SQL Server 2005
Java Requirements
Download and install the latest version of the Java 7 plug-in on any system that accesses the GMS management interface. This can be downloaded from:
www.java.com
or
http://www.oracle.com/technetwork/java/javase/downloads/index.html
Browser Requirements
Dell SonicWALL Analyzer uses advanced browser technologies such as HTML5 that are supported in most recent browsers. Dell SonicWALL recommends using the latest Chrome, Firefox, Internet Explorer, or Safari browsers for administration of the Dell SonicWALL Analyzer.
This release supports the following Web browsers:
• Google Chrome 18.0 or higher (recommended browser for dashboard real-time graphics display)
• Mozilla Firefox 16.0 or higher
• Microsoft Internet Explorer 8.0 or higher (Do not use Compatibility Mode)
Note Internet Explorer version 10.0 in Metro interfaces of Windows 8 is currently not supported.
Mobile device browsers are not recommended for Dell SonicWALL Analyzer system administration.
| 13

Network Requirements
To complete the Analyzer deployment process documented in this guide, the following network requirements must be met:
• The Dell SonicWALL Analyzer server must have access to the Internet
• The Dell SonicWALL Analyzer server must have a static IP address
• The Dell SonicWALL Analyzer server’s network connection must be able to accommodate at least 1KB/s for each device under management. For example, if Global Management System is monitoring 100 SonicWALL appliances, the connection must support at least 100 KB/s.
Note Depending on the configuration of Dell SonicWALL log settings and the amount of traffic handled by each device, the network traffic can vary dramatically. The 1KB/s for each device is a general recommendation. Your installation requirements might vary.
Dell SonicWALL Appliance and Firmware Support
Note Dell SonicWALL Analyzer 7.2 supports firewall App Control reporting. Refer to the SonicOS documentation for information on the supported SonicOS firmware versions.
Appliances running firmware newer than this Analyzer release can still be managed and reports can still be generated. However, the new features in the firmware release will be supported in an upcoming release of Analyzer.
Legacy SonicWALL XPRS/XPRS2, SonicWALL SOHO2, SonicWALL Tele2, and
Dell SonicWALL Platforms Dell SonicWALL Firmware Version
Firewall / VPN
SuperMassive 10000 Series SonicOS 6.0 or newer: Note: Only partial reporting support is currently available. Contact your Dell SonicWALL Sales representative for more information.
SuperMassive 9000 Series SonicOS 6.1 or newer
NSA Series SonicOS Enhanced 5.0 or newer
TZ Series SonicOS Enhanced 3.2 or newer SonicOS Standard 3.1 or newer
PRO Series SonicOS Enhanced 3.2 or newer
CSM Series SonicOS CF 2.0 or newer
Secure Remote Access
SMB SRA Series SonicOS SSL-VPN 2.0 or newer (management)SonicOS SSL-VPN 2.1 or newer (reporting)
E-Class SRA Series SRA 9.0 or newer
Backup and Recovery
CDP Series CDP 2.3 or newer (management)CDP 5.1 or newer (reporting)
14 | Dell SonicWALL Analyzer 7.2 Administrator’s Guide

SonicWALL Pro/Pro-VX models are not supported for Dell SonicWALL Analyzer reporting. Appliances running SonicWALL legacy firmware including SonicOS Standard 1.x and SonicWALL legacy firmware 6.x.x.x are not supported for SonicWALL Analyzer reporting.
Dell SonicWALL Analyzer can be connected to SSL-VPN 2000 and 4000 appliances. Use the Log > ViewPoint page to set up the Analyzer connection (in addition to the configuration changes made on the Analyzer). In Dell SonicWALL SRA SSL-VPN 5.5 or later firmware versions, a Log > Analyzer page is provided for configuration of Analyzer settings.
Dell SonicWALL Analyzer InstallationAnalyzer can be installed as a fresh install or as an upgrade to Analyzer 7.2. Beginning in SonicWALL ViewPoint 5.1, all software components related to Dell SonicWALL Analyzer and SonicWALL Global Management System (GMS), including the MySQL database, executable binary files for all services, and other necessary files, are installed using the Universal Management Suite (UMS) single-binary installer. All SonicWALL Analyzer and SonicWALL GMS files are installed as part of the Universal Management Suite, but no distinction is made between SonicWALL Analyzer and SonicWALL GMS during the installation. The initial installation phase takes just a few minutes for any type of installation, such as a SonicWALL Analyzer server, a SonicWALL GMS server, a database server, or any other role.
To install the Universal Management Suite from the single binary installer, refer to the Dell SonicWALL Analyzer Getting Started Guide.
License and Registration Requirements
SonicWALL Analyzer is registered and licensed from the Windows server on which it is installed. Dell SonicWALL Analyzer registration is performed using the SonicWALL Universal Management Host system interface.
Refer to the Dell SonicWALL Analyzer Getting Started Guide for detailed instructions on registering and licensing Analyzer on your system.
On Dell SonicWALL appliances that send reporting data to the Analyzer, Analyzer is licensed and activated separately from the Dell SonicWALL appliances. MySonicWALL provides a way to associate Dell SonicWALL appliances with the Analyzer instance installed on the Windows system. Licensing your Analyzer application on a Dell SonicWALL appliance requires:
• A MySonicWALL account. A MySonicWALL account allows you to manage your SonicWALL products and purchase licenses for various services. Creating a MySonicWALL account is fast, simple, and free. Simply complete an online registration form directly from your SonicWALL security appliance management interface. Your MySonicWALL account is also accessible at <https://www.mysonicwall.com> from any Internet connection with a Web browser. After you have an account, you can purchase SonicWALL Analyzer and other licenses for your registered SonicWALL security appliances.
• A registered SonicWALL security appliance with active Internet connection. You need to register your SonicWALL security appliance to activate SonicWALL Analyzer. Registering your SonicWALL security appliance is a simple procedure done directly from the management interface. After your SonicWALL security appliance is registered, you can activate SonicWALL Analyzer by using an activation key or by synchronizing with mysonicwall.com.
| 15

Accessing the Correct Management InterfaceDell SonicWALL Analyzer includes two separate management interfaces:
• SonicWALL Universal Management Host (UMH) System Management Interface – Used for system management of the Dell SonicWALL Analyzer instance, including registration and licensing, setting the admin password, creating backups, restarting the system, configuring network settings, selecting the deployment role, and configuring other system settings.
Access the system management interface with the URL:http://<IP_address>:<port_number>/appliance/
If you are using the standard HTTP port, 80, it is not necessary to append the port number to the IP address. If you are accessing the interface from the same system on which it is installed, use the following URL:http://localhost/appliance/
• Dell SonicWALL Analyzer Management Interface – Used to access the Dell SonicWALL Analyzer application that runs on the system. This interface is used to configure and view Dell SonicWALL Analyzer reporting on SonicWALL appliances and for configuring Dell SonicWALL Analyzer administrative settings. Access the Dell SonicWALL Analyzer management interface with one of the following URLs:http://<IPaddress>:<port_number>/sgms/http://localhost/sgms/
Switching Between Management Interfaces
You can easily switch between the SonicWALL UMH system management interface and the Dell SonicWALL Analyzer application management interface.
One method is to change the URL by adding /sgms for the Analyzer application interface or adding /appliance for the UMH interface.
A second method involves clicking the Switch icon. While logged into either interface, you can switch to the login page of the other interface by clicking Switch in the top right corner of the page.
16 | Dell SonicWALL Analyzer 7.2 Administrator’s Guide

Login to AnalyzerAfter registering your SonicWALL Analyzer product, to log in to the SonicWALL Analyzer management interface, either double-click on the SonicWALL Analyzer icon on your desktop, or from a remote system, access the following URL from a web browser:
http://<IP_address>:<port_number>
The Dell SonicWALL Analyzer login page appears by default in English. To change the language setting, click your language of choice at the bottom of the login page. The available language choices for SonicWALL Analyzer include English, Japanese, Simplified Chinese, and Tradition Chinese.
Step 1 Enter the SonicWALL user ID (default: admin) and password (default: password). Select ‘Local Domain’ as the domain (default).
Step 2 Click Submit. The Dell SonicWALL Analyzer management interface displays.
Note For more information on installation, login procedures, and registration of your SonicWALL Analyzer installation, refer to the appropriate Getting Started Guide, available at: http://www.sonicwall.com/us/support.html
| 17

Navigating the Analyzer User InterfaceThis section describes the Firewall, SRA, and Console panels in the SonicWALL Analyzer user interface. For information about the Dashboard panel, see the Using the Universal Scheduled Reports Application on page 34.
Firewall Panel
The Firewall Panel is an essential component of network security that is used to view and schedule reports about critical network events and activity, such as security threats, inappropriate Web use, and bandwidth levels. To open the Firewall Panel, click the Firewall tab at the top of the Analyzer user interface.
From the Firewall Panel, you can view the following for connected SonicWALL appliances:
• View general unit status, license status, and syslog settings.
• View the SonicWALL security dashboard. Dashboard reports display an overview of bandwidth, uptime, intrusions and attacks, and alerts for connected SonicWALL firewall appliances. The Security Dashboard report provides data about worldwide security threats that can affect your network. The Dashboard also displays data about threats blocked by the SonicWALL security appliance.
• View custom reports of Internet activity or Website filtering at the unit level. Custom reports filter raw syslog data and you can specify start and end dates or a date range such as “Week to date.” You can filter by user, domain, protocol, traffic, and full URL categories, depending on the type of custom report. The search template can be saved for use again later with the same appliance.
• View general bandwidth usage. These reports include a daily bandwidth summary report, a top users of bandwidth report, and over-time summary and top users reports.
• View a services report. This report includes information about events and usage of protocols and megabytes.
• View Web bandwidth usage. These reports include a daily bandwidth summary report, a top visited sites report, a top users of Web bandwidth report, a report that contains the top sites of each user, and a weekly summary report.
• View the number of attempts that users made to access blocked websites. These reports include a daily summary report, a top blocked sites report, a top users report, a report that contains the top blocked sites of each user, and a weekly summary report.
18 | Dell SonicWALL Analyzer 7.2 Administrator’s Guide

• View file transfer protocol (FTP) bandwidth usage. These reports include a daily FTP bandwidth summary report, a top users of FTP bandwidth report, and a weekly summary report.
• View mail bandwidth usage. These reports include a daily mail summary report, a top users of mail report, and a weekly summary report.
• View VPN usage. These reports include a daily VPN summary report, a top users of VPN bandwidth report, and a weekly summary report.
• View reports on attempted attacks and errors. The attack reports include a daily attack summary report, an attack by category report, a top sources of attacks report, and a weekly attack summary report. The error reports include a daily error summary report and a weekly error summary report.
• View reports on attempted virus attacks. Virus attacks reports are available for appliances that are licensed for SonicWALL Gateway Anti-Virus. These reports include the most frequent virus attack attempts, virus attacks by top destinations, virus attacks over time, virus attacks over a period of time, and virus attacks by top destinations over time.
• View reports on attempted spyware attacks. Anti-spyware reports are available for appliances that are licensed for SonicWALL Anti-Spyware. These reports include spyware attacks by category, spyware attacks over time, and spyware attacks by category over time.
• View reports on attempted intrusion attacks. Intrusion prevention reports are available for appliances that are licensed for SonicWALL Intrusion Prevention Service. These reports include intrusion attacks by source IP address, intrusion attacks by category, intrusion attacks over time, and intrusion attacks by category over time.
• View reports on traffic triggering Application Firewall policies. Application Firewall reports are available for SonicWALL firewall appliances that are licensed for SonicWALL Application Firewall. These reports include summary, over time, top applications, top users, and top policies.
• View successful and unsuccessful user and administrator authentication attempts. These reports include a user authentication report, an administrator authentication report, and a failed authentication report.
• View detailed logging information. The detailed logging information contains each transaction that occurred on the SonicWALL appliance.
• View current alerts and access alert settings.
| 19

SRA Panel
The SRA panel provides access to SSL VPN appliances and is similar to the Firewall panel. It is used to view and schedule reports about critical network events and activity, such as security threats, inappropriate Web use, and bandwidth levels. To open the SRA Panel, click the SRA tab at the top of the Analyzer user interface.
From the SRA Panel, you can view the following for connected SonicWALL SSL VPN appliances:
• View general unit status, license status, and syslog settings.
• View general bandwidth usage. These reports include a daily bandwidth summary report, a top users of bandwidth report, and over-time summary and top users reports.
• View custom reports of custom reports of resource activity at the unit level. Custom reports filter raw syslog data and you can specify start and end dates or a date range such as “Week to date.” You can filter by user, protocol, destination IP, and source IP categories. The search template can be saved for use again later with the same appliance.
• View a resources report. This report includes information about connections and the resource used to connect, such as HTTPS or NetExtender.
• View successful and unsuccessful user authentication attempts. These reports include a user authentication report and a failed authentication report.
• View detailed logging information. The detailed logging information contains each transaction that occurred on the SonicWALL appliance.
20 | Dell SonicWALL Analyzer 7.2 Administrator’s Guide

CDP Panel
The CDP panel provides access to CDP appliances and is similar to the SRA panel. It is used to view and schedule reports about storage capacity, used quota, and free quota. To open the CDP Panel, click the CDP tab at the top of the Analyzer user interface.
Console Panel
The Console Panel is used to configure Dell SonicWALL Analyzer settings, view pending tasks, view the log, manage licenses, and configure alerts. To open the Console Panel, click the Console tab at the top of the Dell SonicWALL Analyzer user interface.
From the Console Panel, you can do the following:
• Change the Dell SonicWALL Analyzer password, adjust the amount of inactive time before the user is automatically logged out of Analyzer, and set the maximum number of rows displayed on paginated screens.
• Configure Web sites and Web users that are excluded from Web usage reports.
• View the Dell SonicWALL Analyzer log and delete old log messages. The Dell SonicWALL Analyzer log contains information on alert notifications, failed Dell SonicWALL Analyzer login attempts, and other events that apply to Dell SonicWALL Analyzer.
| 21

• Manage SMTP settings, system email addresses, archive report settings, debug level for logs, and password security settings. You can set the schedule and server settings, and the email alert recipient schedule and preferred format.
• Manage login sessions. You can view the status of user sessions and, if necessary, end them.
• Configure report settings for sort options and maximum units with Log Viewer enabled. Enabling Log Viewer allows custom reports for the system, but is resource intensive.
• Control summarizer settings, syslog and summarized data deletion schedules, and host name resolution settings.
• Configure email archive settings and search settings for scheduled reports, and manage data archiving.
• View summarizer diagnostics, useful for capacity planning.
• Configure granular event management report settings, including threshold, schedule, and alert settings.
• Configure Web services deployment settings and view Web services status.
• View the version number, serial number, and database information for SonicWALL Analyzer, and access links to all available tips and video tutorials.
Analyzer Views and Status SonicWALL Analyzer allows you to view status and reports for all appliances at once using GlobalView, or for a single unit at a time with the Unit view. Analyzer provides status information on the General > Status page of the Firewall, SRA, or CDP panel.
GlobalView is a grouping of all the appliances you are monitoring with Analyzer. From the GlobalView of the Firewall, SRA, or CDP panel, Summary and Over Time reports are available for all SonicWALL appliances monitored by SonicWALL Analyzer.
To open the My Reports view, click the GlobalView icon at the top of the left pane. To display the global status page, navigate to General > Status.
22 | Dell SonicWALL Analyzer 7.2 Administrator’s Guide
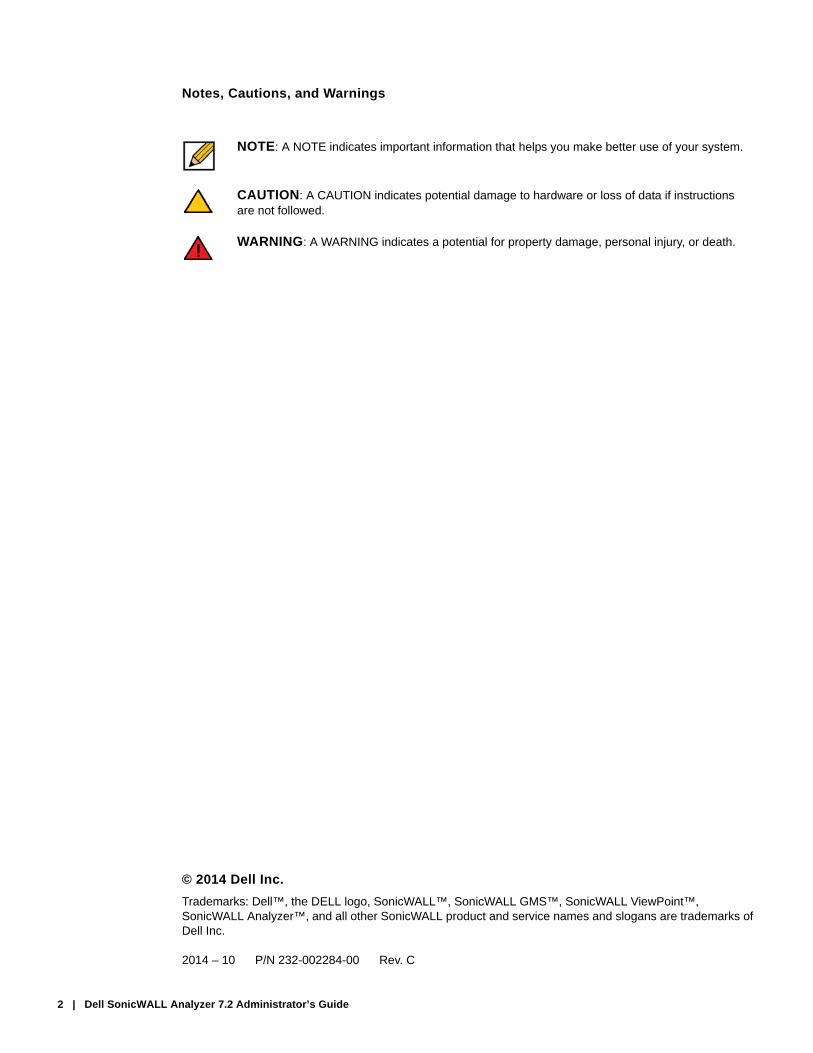
From the Unit view, reports contain detailed data for the selected SonicWALL appliance. To specify the unit view, click any unit in the left pane. To display the unit status page, navigate to General > Status on the Firewall, SRA, or CDP panel.
Understanding Analyzer IconsThis section describes the meaning of icons that appear next to managed appliances listed in the left pane of the Analyzer management interface.
Appliance Status Description
One blue box indicates that the appliance is operating normally. The appliance is accessible from the Dell SonicWALL Analyzer, and no tasks are pending or scheduled.
Three blue boxes indicate that all appliances in the global group of this type (Firewall/SRA/CDP) are operat-ing normally.
| 23

Using the Analyzer TreeControl MenuThis section describes the content of the TreeControl menu within the Dell SonicWALL Analyzer user interface.
You can control the display of the TreeControl pane by selecting one of the appliance tabs at the top of the main window. For example, when you click the Firewall tab, the TreeControl pane displays all the connected SonicWALL firewall appliance units. The two appliance tabs can display the following appliance types when Analyzer is monitoring these device types:
• SonicWALL firewall appliances
• SRA and EX-Series SRA appliances
You can hide the entire TreeControl pane by clicking the sideways arrow icon, and redisplay the pane by clicking it again. This is helpful when viewing some reports or other extra-wide screens.
To open a TreeControl appliance menu, right-click GlobalView or a Unit icon.
The following options are available in the right-click menu:
• Find – Opens a Find dialog box that allows you to search for units.
• Refresh – Refreshes the Analyzer UI display.
• Rename Unit – (unit view only) Renames the selected SonicWALL appliance.
• Add Unit – Add a new unit to the Analyzer view. Requires unit IP and login information.
• Modify Unit – (unit view only) Change basic settings for the selected unit, including unit name, IP and login information, and serial number.
• Delete – Delete the selected unit
• Login to Unit – (unit view only) Log in to the selected unit using HTTP or HTTPS protocols.
24 | Dell SonicWALL Analyzer 7.2 Administrator’s Guide

Chapter 2
Provisioning and Adding Dell SonicWALLAppliances
This chapter describes how to provision and add Dell SonicWALL appliances to the Dell SonicWALL Analyzer. All Dell SonicWALL appliances must be provisioned before adding them to the Dell SonicWALL Analyzer.
This chapter contains the following sections:
• Provisioning a Dell SonicWALL Firewall Appliance on page 26
• Provisioning a Dell SonicWALL SRA SMB Appliance on page 27
• Provisioning a Dell SonicWALL E-Class SRA Series Appliance on page 28
• Provisioning a Dell SonicWALL CDP Appliance on page 28
• Adding Dell SonicWALL Appliances to Dell SonicWALL Analyzer on page 29
Provisioning Dell SonicWALL AppliancesThis section describes how to configure Dell SonicWALL appliances to support Dell SonicWALL Analyzer.
Note Prior to adding a unit to Analyzer, the provisioned Dell SonicWALL appliance needs to be registered with License Manager. And during registration, make sure the provisioned Dell SonicWALL appliance has a valid Analyzer license—one Analyzer license for each Dell SonicWALL appliance.
| 25

Provisioning a Dell SonicWALL Firewall Appliance
To provision a Dell SonicWALL firewall appliance for Dell SonicWALL Analyzer, complete the following:
Step 1 Log in to the firewall appliance. Navigate to the Log > Syslog page.
Step 2 In Syslog Servers, click Add.
Step 3 Enter the Analyzer IP address to start sending syslogs. The Analyzer service should be activated. Set the log in UTC format and log category.
Step 4 Navigate to the System > Time page, and enable Display UTC in logs (instead of local time).
26 | Dell SonicWALL Analyzer 7.2 Administrator’s Guide

Provisioning a Dell SonicWALL SRA SMB Appliance
To provision a Dell SonicWALL SRA SMB appliance for Dell SonicWALL Analyzer, complete the following:
Step 1 Log in to the SRA SMB appliance. Navigate to the Log > Analyzer page.
Step 2 In Analyzer Settings, click Enable Analyzer.
Step 3 Click Add to add the Analyzer IP address, this starts sending syslogs.
Step 4 Navigate to the System > Time page, and enable Display UTC in logs (instead of local time).
| 27

Provisioning a Dell SonicWALL E-Class SRA Series Appliance
Currently there is no Analyzer settings implementation in SonicWALL E-Class SRA series appliances. To add Analyzer reporting support, use the Additional ViewPoint settings in the General Settings > Configure Centralized Management screen, and enter the Analyzer IP address and port number to start sending syslog.
Provisioning a Dell SonicWALL CDP Appliance
Currently there is no Analyzer settings implementation in Dell SonicWALL CDP appliances. To add Analyzer reporting support, use the Analyzer settings in the Settings > SMB screen. In Active Report, select Enable, and enter the Analyzer IP address and port number to start sending CDP syslog.
28 | Dell SonicWALL Analyzer 7.2 Administrator’s Guide

Adding Dell SonicWALL Appliances to Dell SonicWALL Analyzer
Dell SonicWALL Analyzer checks with the Dell SonicWALL licensing server when you add an appliance, so it is important that Dell SonicWALL Analyzer has Internet access to the server.
Dell SonicWALL Analyzer can communicate with Dell SonicWALL appliances through HTTP or HTTPS.
Note A SonicWALL appliance might already be registered to a different MySonicWALL account, in this case the “Register to MySonicWALL.com” task cannot be executed, and remain in the scheduled tasks queue. To take full advantage of Analyzer managed appliances, it is important that either the managed appliance is not registered when it is added into Analyzer, or it is registered to the same MySonicWALL.com account as the Analyzer system that is managing the appliance.
For information on adding, modifying, and deleting units, refer the following sections:
• Adding Dell SonicWALL Appliances on page 29
• Modifying Dell SonicWALL Appliance Settings on page 30
• Deleting Dell SonicWALL Appliances from Analyzer on page 31
Adding Dell SonicWALL Appliances
To add a Dell SonicWALL appliance using the Dell SonicWALL Analyzer management interface, complete the following:
Step 1 Click the appliance tab that corresponds to the type of appliance that you want to add:
– Firewall
– SRA
– CDP
Step 2 Expand the Dell SonicWALL Analyzer tree and select the group to which you are adding the Dell SonicWALL appliance. Then, right-click the group and select Add Unit from the pop-up menu. To not specify a group, right-click an open area in the left pane (TreeControl pane) of the Dell SonicWALL Analyzer management interface and select Add Unit or click the Add Unit icon in the tool bar.
| 29

The Add Unit dialog box appears:
Step 3 Enter a descriptive name for the Dell SonicWALL appliance in the Unit Name field.Do not enter the single quote character (‘) in the Unit Name field.
Step 4 Enter the serial number of the Dell SonicWALL appliance in the Serial Number field.
Step 5 Enter the IP address of the Dell SonicWALL appliance in the IP Address field.
Step 6 Enter the administrator login name for the Dell SonicWALL appliance in the Login Name field.
Step 7 Enter the password used to access the Dell SonicWALL appliance in the Password field.
Step 8 For Access Mode, select from the following:
Step 9 The Dell SonicWALL appliance is connected with HTTPS by default.
Step 10 Enter the port used to connect to the Dell SonicWALL appliance in the Management Port field (default port for is HTTPS: 443).
Step 11 Click OK. The new Dell SonicWALL appliance appears in the Analyzer management interface. It has a yellow icon that indicates it has not yet been successfully acquired.
Step 12 Analyzer then attempts to set up an HTTPS connection to access the appliance. Analyzer then reads the appliance configuration and acquires the SonicWALL appliance for reporting. This might take a few minutes.
After the Dell SonicWALL appliance is successfully acquired, its icon turns blue, its configuration settings are displayed at the unit level, and its settings are saved to the database.
Modifying Dell SonicWALL Appliance Settings
If you make a mistake or need to change the settings of an added Dell SonicWALL appliance, you can manually modify its settings or how it is managed.
To modify a Dell SonicWALL appliance, complete the following steps:
Step 1 Right-click the appliance name in the left pane of the Analyzer UI and select Modify Unit from the pop-up menu. The Modify Unit dialog box appears.
Step 2 The Modify Unit dialog box contains the same options as the Add Unit dialog box. For descriptions of the fields, see Adding Dell SonicWALL Appliances to Dell SonicWALL Analyzer on page 29.
When you have finished modifying options, click OK. The Dell SonicWALL appliance settings are modified.
30 | Dell SonicWALL Analyzer 7.2 Administrator’s Guide

Deleting Dell SonicWALL Appliances from Analyzer
To delete a Dell SonicWALL appliance from Dell SonicWALL Analyzer, complete the following steps:
Step 1 Right-click on a Dell SonicWALL appliance in the left pane and select Delete from the pop-up menu.
Step 2 In the warning message that displays, click Yes. The SonicWALL appliance is deleted from SonicWALL Analyzer.
After the deleting the Dell SonicWALL appliance from Analyzer, unprovision the unit as a best practice. To unprovision the unit, log in to the Dell SonicWALL appliance and disable Analyzer management to avoid sending unnecessary syslogs to the Analyzer host.
| 31

32 | Dell SonicWALL Analyzer 7.2 Administrator’s Guide

Chapter 3
Using the Dashboard Panel
The Dashboard control bar provides top-of-the page menu items for customizing the settings of this page. When the Dashboard loads after SonicWALL Analyzer login, the control bar is displayed and then becomes hidden until you place your mouse cursor at the top of the page as shown in the following image. You can lock the control bar by clicking on the “pin the control bar” icon.
The Dashboard control bar provides the following components:
• Universal Scheduled Reports—Includes Universal Scheduled Reports Wizard to create report templates.
• Switch to Full Screen—The four arrows in four corners icon enables the page into full-screen mode.
• Pin Control Bar—The pin icon allows you to keep the Dashboard control bar always on.
| 33

Using the Universal Scheduled Reports ApplicationScheduled Reporting has been an essential reporting component since the initial release of the Dell SonicWALL Analyzer product. It provides management interfaces to let the user setup schedules and configure reports to be exported in a periodic fashion and in various report formats. A typical scheduled report configuration is broken down by functionality and by nodes. Users need to navigate to separate tabs to configure scheduled reports for different nodes. The Universal Scheduled Reporting application streamlines the configuration processes to unify and enhance the existing functionality to the system-wide usage patterns. This allows the user to collect report data from multiple appliances and create a single global report.
To configure the Universal Scheduled Reports application, refer to the following sections:
• Using the Manage Templates Component on page 34
• Adding a Scheduled Report Component on page 40
• Managing the Scheduled Reports Component on page 53
Using the Manage Templates Component
Manage Templates are used to create a template that makes up the list of reports at group level or unit level. The list of available reports for each of the product types are abstract, so all the available reports in system are presented here. The report list contains the appliance firmware and shows all the available reports in Dell SonicWALL Analyzer for the appliance. This decision on which report is applicable to a particular firmware version (for example, Application Intelligence is for SonicOS 5.8 and above) is made at run time when the scheduled report engine is ready to create the report. The schedule report creation and the template usage is detailed in this section.
34 | Dell SonicWALL Analyzer 7.2 Administrator’s Guide

Adding a Template
To add a template using the Template Manager, complete the following steps:
Step 1 Navigate to the Universal Scheduled Report > Manage Templates page.
Step 2 Choose the tab for the appliance to which you wish to add a template.
Step 3 Select the option for either a unit or group template.
Step 4 Click Add Template.
Step 5 Enter a name for your template.
Step 6 Visible To Non-Administrators is disabled by default, select the check box to enable this option. This allows the end users to view list of all the report templates at a read-only level.
Step 7 Select the check box next to the Reports you wish to use for this template.
Step 8 Select the check box next to the Policies you wish to use for this template.
Step 9 Click Add.
| 35

The configured template is now populated in the Template Manager list.
Editing an Existing Template
This section details the configuration procedures for editing an existing template. The Universal Scheduled Report > Template Manager allows you to filter the template list by Name, Level, Owner, and Last Update. To use the search option to find and edit an existing template, complete the following steps:
Searching for an Existing Template
Step 1 Navigate to the Universal Scheduled Reports > Manage Template page.
Step 2 Click the search text field, then enter your search criteria.
A pull-down appears under the search text field.
Step 3 Select a filter for your search criteria by clicking Name, Level, Owner, or Last Update from the search pull-down list. In this example, we are entering “unit” for the search criteria and filtering the search results by level.
36 | Dell SonicWALL Analyzer 7.2 Administrator’s Guide

The Template Manager window displays the latest search results. Notice the template list now only shows report templates for level: units.
Note To clear your search results and return the reports template list back to default, click Clear.
Editing an Existing Template
Now that you found an existing template using the search filter, it is time to use the edit option.
Warning Editing an existing template also changes the associated scheduled reports (if applicable).
Step 1 Click the Edit icon for the report you wish to edit.
| 37

The Edit Template window displays.
Step 2 Edit the name for your template.
Step 3 Visible To Non-Administrators is disabled by default, select the check box to enable this option. This allows the end users to view list of all the report templates at a read-only level.
Step 4 Select the check box next to the Reports you wish to use for this template.
Step 5 Select the check box next to the Polices you wish to use for this template.
Step 6 Click Update.
The configured template is now populated in the Template Manager list.
Deleting a Template
The Template Manager offers three different ways to delete a template: deleting a single template, deleting multiple templates, or deleting all templates. Use the section Searching for an Existing Template on page 36 to search for templates to delete. complete the following steps to delete a Universal Scheduled Report Template(s):
Warning Deleting a template(s) creates a cascading task to remove it from the Scheduled Reports
used in this template.
38 | Dell SonicWALL Analyzer 7.2 Administrator’s Guide

Deleting a Single Template
Step 1 Navigate to the Universal Scheduled Reports > Manage Template page.
Step 2 Click the Trash icon for the template you wish to delete from the Template Manager list.
Deleting Multiple Templates
Step 1 Navigate to the Universal Scheduled Reports > Manage Template page.
Step 2 Click the check boxes for the templates you wish to delete.
Step 3 Click Delete Selected. This button is grayed out by default until a check box is selected.
| 39

Deleting all Templates
Step 1 Navigate to the Universal Scheduled Reports > Manage Template page.
Step 2 Select Name, this selects all templates in the list.
Step 3 Click Delete Selected. This button is grayed out by default until a check box is selected.
Adding a Scheduled Report Component
Using Universal Scheduled Reports gives you the ability to schedule reporting for multiple appliances at once, combined into a single report. The Scheduled Reporting is a wizard based tool that guides you through the steps for creating a scheduled report by manually selecting reports from the report listing or picking a template created in the section Using the Manage Templates Component on page 34, selecting a theme (cover logos, font colors, title, sub title), reporting properties (out put format, language), scheduling a type (weekly, monthly), and choosing a destination (up to five email addresses can be added for a single report). This section contains the following subsections:
• Searching for a Group or Device on page 40
• Creating a Universal Scheduled Report on page 43
Searching for a Group or Device
The Search option allows you to filter the Group/Device list by manually entering a device in the search text field and selecting it from the search pull-down list. You can further filter the Group/Device list by clicking the View pull-down and selecting a view type. The following example guides you through the Device List search process, detailing the versatility of the Universal Scheduled Reports > Configuration Manager search options.
40 | Dell SonicWALL Analyzer 7.2 Administrator’s Guide

Example
In this example we are using the Configuration Manager search options to find a SonicWALL TZ 210 wireless-N device in the Device List.
Step 1 Navigate to Universal Scheduled Reports > Add A Scheduled Report. Note: The Monitor tab is only available for SonicWALL GMS.
Step 2 Select the Firewall tab, located at the top of the Configuration Manager window.
Step 3 Click the View pull-down, then select a view type from the list. In this example we are selecting Model View (Global View is selected by default), because we are searching for an exact appliance model. You can also filter the Device List by Firmware View, Global View, Instance View, Status View, or Gateway.
The Device List now displays all the appliance models.
| 41

Step 4 Select the Model: TZ 210 wireless-N.
A list of devices for that appliance model displays.
Note Notice that the search history bar populates each time you filter the list. You can use this to navigate back to previous search results.
You can also click the Search text-box (if you know the exact name of the device), then manually enter the device name or select the device from the pull-down list.
Step 5 Click the Arrow icon to schedule a report for that appliance. Refer to Creating a Universal Scheduled Report on page 43 for configuration procedures.
42 | Dell SonicWALL Analyzer 7.2 Administrator’s Guide

Creating a Universal Scheduled Report
The Universal Scheduled Reports > Configuration Manager allows you to create a single report for multiple appliance models/devices at a group and unit level. The following example guides you through the report configuration process, including: Selecting Reports, General Information, and Theme Information, detailing the versatility of Universal Scheduled Reporting.
In this example we are using the Configuration Manager to schedule a single report for a Firewall appliance model (group level) and SRA devices (unit level).
Selecting Reports
Step 1 Navigate to Universal Scheduled Reports > Add a Scheduled Report.Note: The Monitor tab is only available for SonicWALL GMS.
Step 2 Select the Firewall tab, located at the top of the Configuration Manager window.
Step 3 Search for the TZ 210 wireless-N model group. Refer to steps 1-3 in the section Searching for a Group or Device on page 40.
Step 4 Click the Arrow icon for the Model: TZ 210 wireless-N.
| 43

The Reports tab displays in the Reports List.
Step 5 Click the Reports tab, then select the check boxes for reports you wish to include or click Use Templates to choose a template you created.
Note When you select reports in the Reports and Policies tabs, they populate in the list of Selected Reports located on the right side of the Configuration Manager page. The Selected Reports panel allows you to organize the list by dragging and dropping reports/devices, collapse the reports lists for each device (clicking the arrow next to the device name), and add a note to a report/device.
Step 6 Click the Policies tab, then select the check boxes for the policies you wish to include or click Use Templates to choose a template you created.
The reports for the Firewall model group are now selected, next is choosing reports for the SRA device.
44 | Dell SonicWALL Analyzer 7.2 Administrator’s Guide
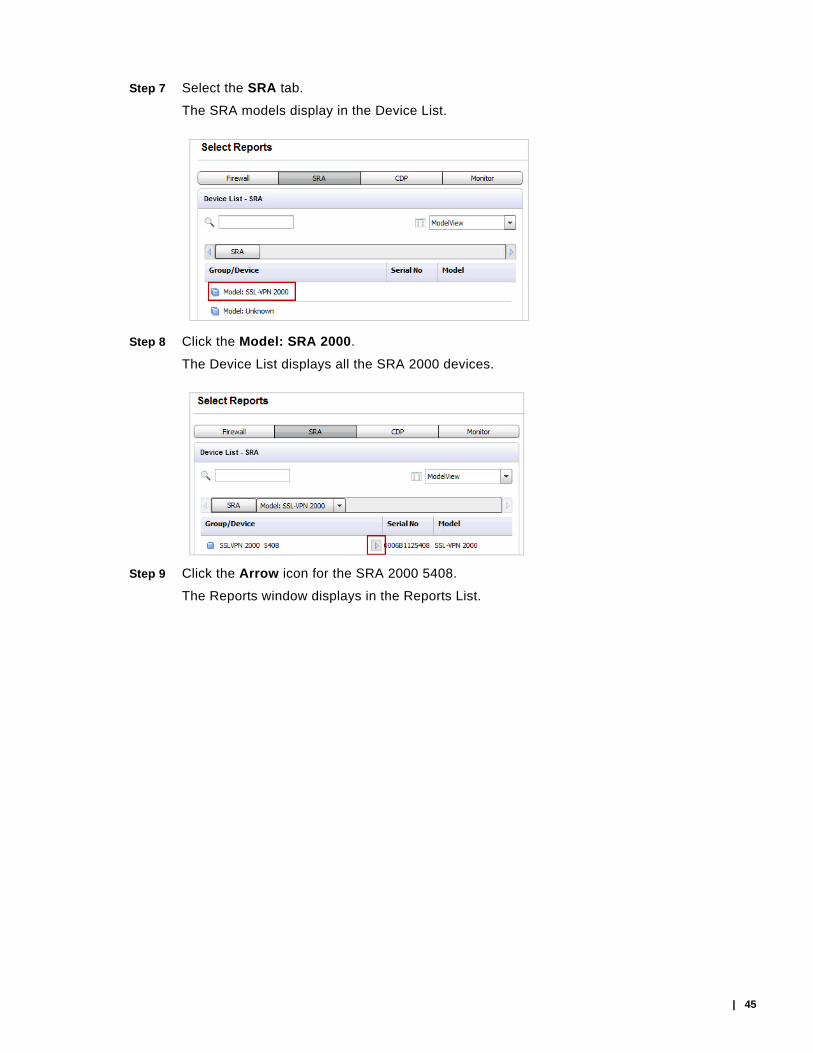
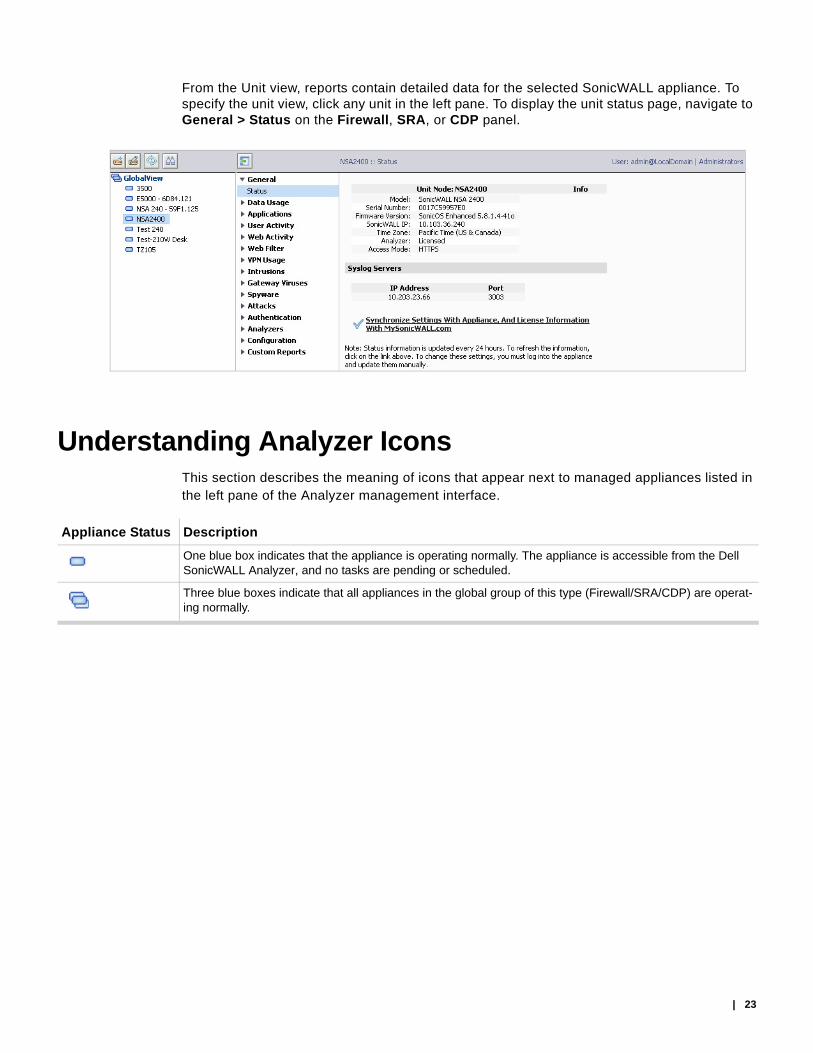
Step 7 Select the SRA tab.
The SRA models display in the Device List.
Step 8 Click the Model: SRA 2000.
The Device List displays all the SRA 2000 devices.
Step 9 Click the Arrow icon for the SRA 2000 5408.
The Reports window displays in the Reports List.
| 45

Step 10 Select the check boxes for the reports you wish to include or click Use Templates to choose a created template.
Note The SRA only offers a Reports tab (no Policies tab).
Step 11 Click Next.
46 | Dell SonicWALL Analyzer 7.2 Administrator’s Guide

General Information
The General Information page displays.
Note The settings entered in the Task Info, Format/Settings, and Email/Archive Info sections, populate in the Configurations panel located on the right side of the General Information page.
Step 12 Enter the following in the Task Info panel:
– Task Name: Example Report 1
– Task Description: This is an example for configuring a Universal Scheduled Report
Step 13 Select the following in the Format/Settings panel:
– Report Type: Daily, Weekly, or Monthly
– Report Format: PDF or XML If XML is selected, the following changes to the management interface occur:
| 47

• The Single XML per Report radio buttons display. If you select Yes, one XML file per report is generated. In this scenario, the number of XML files created is equal to the number of reports chosen.
• The ZIP Password Protection option is grayed out.
– Report Language: English, Japanese, Chinese (Simplified), Chinese (Traditional), or Spanish
– Report Rows Display: 20, 50, 100
– Disable the Report: Yes or No
– Zip the Report: Yes or No
– PDF Password Protect: Yes or No (If Yes is selected, a pop-up window appears and prompts you to enter the Password)
Step 14 Click the archive check box to save a PDF report to a new folder.
Step 15 Complete the following in the Email / Archive Info panel:
– Click E-mail to send a PDF report to an email account or alias.
The Email configuration options display.
• Click the E-Mail Destination pull-down, then select an Administrator, Appliance User, or Enter multiple Adhoc Users.
• Click Add after each selected destination.
48 | Dell SonicWALL Analyzer 7.2 Administrator’s Guide

The E-Mail Destination populates in the list.
Note Multiple destinations can be sent in a single E-mail.
• Enter the E-mail Subject: Weekly Firewall and SRA Report
• Enter the E-Mail Body: This Universal Scheduled Report contains the SonicWALL TZ 210 wireless-N group and SRA 2000 unit
– Click Archive to save a PDF report to a new folder.
• Archive Folder: Test Archive Folder 1
Step 16 Click Next.
| 49

Theme Information
The Theme Information page displays. If XML is selected from the General Information page, the Theme Information page is not displayed.
Note The settings entered in the Cover Page and Report Page panels automatically update in the image located on the right side of the Theme Information page. To preview the cover / report pages, select the Cover Page or Report Page tab.
Step 17 Select / Enter the following in the Cover Page panel:
– Cover Logo: Select a logo (click the pull-down and select a cover logo image) or Upload a logo (click Browse and Preview to upload a logo)
– Cover Title: Enter a name (Weekly Data Usage Report) for your Universal Scheduled Report, then select or enter the foreground and background colors
– Cover Subtitle: Enter a subtitle (U.S Engineering Department) for your Universal Scheduled Report, then select or enter the foreground and background colors
50 | Dell SonicWALL Analyzer 7.2 Administrator’s Guide

Step 18 Select or enter the following in the Report Page panel:
– Report Title: Foreground and Background colors
– Report Description: Foreground and Background colors
Step 19 Click the Cover Page and Report Page tabs to preview your Universal Scheduled Report.
Step 20 Click Next to manage permissions. Continue to the next step.
OR
Click Finish to complete the report. The report is now scheduled and can be found in the Universal Scheduled Report > Manage Scheduled Reports page.
Note When the Universal Scheduled Report PDF is exported, a table of contents is created. This allows you to quickly browse through your scheduled reports.
| 51

Step 21 In the Users panel, select users that you want to give permission to resend or manage this scheduled report. The selected users populate in the Selected Users panel.
Note —Only the Schedule Report Creator can assign permission resend and manage privileges to other users.
—If the Scheduled Report contains reports for multiple units and multiple reports, then the grantee should have permissions to the units and reports that are included for the scheduled report.
—Users under the Administrators group have access to all the schedule reports.
Step 22 In the Action Permissions panel, click the check box for the type of permissions to give the selected user:
– Resend—users with permissions to resend can only run the report.
– Manage Scheduled Report—users with manage permissions can run and edit (manage) the report.
Step 23 Click Finish to complete the report. The report is now scheduled and can be found in the Universal Scheduled Report > Manage Scheduled Reports page.
52 | Dell SonicWALL Analyzer 7.2 Administrator’s Guide

Managing the Scheduled Reports Component
Managing Scheduled Reports is used to manage the scheduled report task inventory by resending, Emailing / archiving now, editing, and deleting scheduled reports.
Resending a Scheduled Report
To resend a scheduled report, complete the following steps:
Step 1 Navigate to the Universal Scheduled Reports > Manage Scheduled Reports page.f
Step 2 Use the filter options to search for a report in the Scheduled Report Management list, select the check box of the report you wish to resend.
Step 3 Click Resend for Data Range.
The Select Data Range pop-up window displays.
Step 4 Enter the Start / End dates by clicking the Calender icon and selecting the dates.
Step 5 Click Re-send.
| 53

The Info pop-up window displays, confirming the schedule resend is complete.
Step 6 Click OK.
Emailing / Archiving Now
To Email / Archive a Universal Scheduled Report before its scheduled sending date, complete the following steps:
Step 1 Navigate to the Universal Scheduled Reports > Manage Scheduled Reports page.
Step 2 Use the filter options to search for a report to Email /Archive in the Scheduled Report Management list.
Step 3 Select the check box next to the report name.
Step 4 Click Email/Archive Now.
The Info pop-up window displays, confirming the immediate processing of Email / Archive.
Step 5 Click OK.
Your Scheduled report is now Emailed and Archived.
54 | Dell SonicWALL Analyzer 7.2 Administrator’s Guide

Editing a Scheduled Report
Complete the following steps to edit an existing scheduled report.
Step 1 Navigate to the Universal Scheduled Reports > Manage Scheduled Reports page.
Step 2 Use the filter options to search for a report in the Scheduled Report Management list, click the Edit icon for that Report.
Step 3 To edit the Scheduled Report, use the same configuration procedure shown in Creating a Universal Scheduled Report on page 43.
Disabling a Scheduled Report
To disable a scheduled report, complete the following steps:
Step 1 Navigate to the Universal Scheduled Report > Manage Scheduled Reports page.
Step 2 Click on the Edit icon for the report you wish to disable.
| 55

The Universal Scheduled Reports - Configuration Manager window displays.
Step 3 Click Next.
The General Information Page displays.
Step 4 In the Format / Settings panel, navigate to the Disable the Report option and click Yes.
Note To enable the scheduled report, repeat steps 1-3, then click No.
56 | Dell SonicWALL Analyzer 7.2 Administrator’s Guide

Deleting a Scheduled Report
To delete an existing Universal Scheduled Report, complete the following steps:
Step 1 Navigate to the Universal Scheduled Report > Manage Scheduled Reports page.
Step 2 Use the filter options to search for a report in the Scheduled Report Management list, select the check boxes for the reports you want to delete.
Step 3 Click Delete Selected.
The selected reports are now deleted.
Note You can also use the Trash icon to delete a specific Scheduled Report.
| 57

58 | Dell SonicWALL Analyzer 7.2 Administrator’s Guide

Chapter 4
Overview of Reporting
This chapter describes how to use Dell SonicWALL Analyzer reporting, including the type of information that can appear in reports. A description of the available features in the user interface is provided.
This chapter includes the following sections:
• Dell SonicWALL Analyzer Reporting Overview on page 59
• Navigating Dell SonicWALL Analyzer Reporting on page 63
• Report Data Container on page 76
• Custom Reports on page 83
• Managing Dell SonicWALL Analyzer Reports on the Console Panel on page 84
Dell SonicWALL Analyzer Reporting OverviewAn essential component of network security is monitoring critical network events and activity, such as security threats, inappropriate Web use, and bandwidth levels. Dell SonicWALL Analyzer Reporting complements SonicWALL's Internet security offerings by providing detailed and comprehensive reports of network activity.
The Dell SonicWALL Analyzer Reporting Module creates dynamic, Web-based network reports from the reporting database.
The Analyzer software application generates both real-time and historical reports to offer a complete view of all activity through SonicWALL Internet security appliances. With Analyzer Reporting, you can monitor network access, enhance security, and anticipate future bandwidth needs.
You can create Custom reports by using the report filter bar, available in most report screens in the Analyzer UI. The report Filter Bar provides filters to allow customized reporting, including pre-populated quick settings for some filter fields. A Date Selector allows paging forward and backward in time, or selecting a particular time period for viewing, through a pull-down calendar. The search operator field offers a comprehensive list of search operators that varies depending on the search field that can be either text-based or numeric. Refer to Layout of Reports Display on page 66 to see these items in the context of the Report page.
You can search all columns of report data except columns that contain computed values, such as %, Cost, or Browse Time. Dell SonicWALL Analyzer waits until you click Go before it begins building the new report.
| 59

The Dell SonicWALL Analyzer Reporting Module provides an interactive interface that:
• Displays bandwidth use by IP address and service
• Identifies inappropriate Web use
• Provides detailed reports of attacks
• Collects and aggregates system and network errors
• Shows VPN events and problems
• Tracks Web usage by users and by Web sites visited
• Provides detailed daily firewall logs to analyze specific events.
Viewing Reports
The Analyzer Reports view under the Firewall, SRA and CDP tabs is divided into three panes, as shown in the following image: the TreeControl Pane, the middle pane with the Policies and Reports tabs, and the Reports pane.
• TreeControl Pane: A list of individual units referred to as the TreeControl. In the left pane, you can select the top level view or a unit to display reports that apply to the selected view or unit The top level view is GlobalView.
• List of Reports: The middle pane provides two tabs: Policies and Reports. The Reports tab contains a list of available reports that changes according to your selection in the TreeControl pane: GlobalView provides a general summary of various functions, and unit view provides specific details. The reports are divided into categories. You can click on the top level report in a category to expand it to view the list of reports in that category, then click on an individual report name to view that report. To keep a category in expanded view, click on the category while pressing the Ctrl key. Otherwise, the expanded entry collapses when the next entry is expanded.
60 | Dell SonicWALL Analyzer 7.2 Administrator’s Guide

• The Reports Pane: The right pane displays the report that you selected in the middle pane for the view or unit that you selected in the TreeControl. For most reports, a search bar is provided at the top of the pane. Above the search bar, a time bar is provided. You can view the report for a particular time by clicking right and left arrows, or clicking on the center field to get a pull-down menu with more options. Click on icons in the upper left corner to send the report to a PDF or UDP file. These files can then be printed for reference. A quick link to the Universal Scheduled Reports menu is also provided, allowing you to set up scheduling and other functions.
The SonicWALL Analyzer reporting module provides the following configurable reports under the Firewall and SRA tabs:
Table 1 Firewall Reports
Data Usage* Provides an overall data usage report.
User Activity Reports Produces a Detail report of user activity.
Applications* Provides information on application access and firewall reports
Web Activity* Provides Web usage reports, including initiators and sites.
Web Filter* Provides web filter event reports, including by initiators, by sites, and by category.
VPN Usage* Provides VPN usage reports on policies, services, and initiators.
Threats (Summary Only)
Access attempts by appliance.
| 61

Note All reports displayed in the Firewall > Reports tab are also available in the Universal Scheduled Reports. However, the By Initiator and By Site reports related to Web Activity are available only as Scheduled Reports and are not displayed in the Firewall > Reports tab.
Table 2 SRA Reports
Intrusions Provides event reports about intrusion prevention, targets, initiators, as well as detailed timelines.
GAV Provides reporting on virus attacks blocked.
Anti-Spyware Provides reporting on attempts to install spyware.
Attacks Provides event reports about attacks, targets, and initiators,
Authentication Provides login reports.
Analyzers Provides a detailed analysis of logs or activities.
Configuration Configures settings for Summarizer and Log Analyzers.
Events Creates, configures, and displays alerts.
Custom Report Provides Internet Activity and Website Filtering reports with details from raw dataCustom Reports are only available at the unit level.
* Multi-Unit Report Available
Provides a high-level activity summary for multiple units.
General Provides general unit and license status.
Data Usage* Provides an overall data usage report.
User Activity Reports Produces a Detail report of user activity.
Access Method Provides information on application access and firewall reports
Authentication Provides login reports.
WAF* Provides Web Application Usage (WAF) usage reports.
Connections* Provides web filter event reports.
Analyzers Provides a detailed analysis of logs or activities.
Events Used to configure and view Alerts.
Custom Report Provides Internet Activity and Website Filtering reports with details from raw dataCustom Reports are only available at the unit level.
* Multi-Unit Report Available
Provides a high-level activity summary for multiple units.
62 | Dell SonicWALL Analyzer 7.2 Administrator’s Guide

Table 3 CDP Reports
Navigating Dell SonicWALL Analyzer ReportingDell SonicWALL Analyzer Reporting is a robust and powerful tool you can use to view detailed reports for individual SonicWALL appliances.
This section describes each view and what to consider when making changes. It also describes the Search Bar and display options for interactive reports, as well as other enhancements provided in Dell SonicWALL Analyzer. See the following sections:
• Global Views on page 63
• Unit View on page 64
• Layout of Reports Display on page 66
• Setting a Date or Date Range on page 68
• Adding Filters on page 72
• Report Data Container on page 76
• Drilling Down on page 77
• Scheduling Reports on page 75
Global Views
From the Global view of the Firewall Panel, Summary reports are available for all SonicWALL appliances connected to Dell SonicWALL Analyzer. The Summary provides a high level report for all appliances. More detail is available from the Unit view.
To open the Global view, click the My Reports view icon in the upper-left corner of the left pane.
General Provides general unit and license status.
Multi-unit Summary Reports
Provide a high-level summary of disk capacity.
Capacity Provides a report on disk capacity for an individual appliance.
Backup Activity Provides a report on backup activity, including top agents and top file extensions backed up.
| 63

Summary pages are available for the major functions on the middle pane. By default, they display both the Chart View and Grid View. You can use the toggle buttons to the right to display either view, or both.
Note The selected Chart of Grid view remains in effect only for the specified screen. Changing screens defaults back to the Chart and Grid View.
Unit View
The Unit view provides a detailed report for the selected SonicWALL appliance.
Dell SonicWALL Analyzer provides interactive reports that create a clear and visually pleasing display of information. You can control the way the information is displayed by adjusting the settings through toggles that allow you to display a graphical chart, a grid view containing the information in tabular format, or both (default). Reports are scheduled and configured in the Universal Scheduled Reports settings. For more information, refer to Using the Universal Scheduled Reports Application on page 34.
The Reports tab provides a list of available Reports. Click on the type of report to expand the list items and view the available reports in that screen group.
Tip At times, you might wish to see multiple screen groups at the same time. Ctrl-click to keep a previously-expanded topic from collapsing when you select a new report category. For example, you might want to view Data Usage, Applications, and Intrusions simultaneously, to see what detail sections are available. Control-click on these entries to see all the screen groups under these entries simultaneously.
64 | Dell SonicWALL Analyzer 7.2 Administrator’s Guide

The reports available are usually the reports that appear as sections in the Details view. The Details entry is a shortcut to a view of all the available reports.
To access the Reports, use the following steps:
Step 1 Click on the desired tab at the top of the Dell SonicWALL Analyzer interface.
Step 2 To open the Unit view, click on a device in the TreeControl pane.
Step 3 Click on the desired report in the list of reports in the middle pane.
| 65

The default view of a root-level report always shows the chart and grid view of the report. The Sections displayed in the Grid View depend on the Report item selected and the filters applied to it. Additional information can be displayed by mousing over certain elements of the Report.
Note As you navigate the Firewall panel with a single SonicWALL appliance selected and apply filter settings, your filter settings remain in effect throughout the session. To remove filter settings, click Remove Filters on the Search bar. (Refer to the graphic in Layout of Reports Display on page 66.)
Layout of Reports Display
The Report Display is comprised of the following areas:
• The Filter Bar area that includes the Time Bar, Export buttons and Custom Reports buttons, and data filter functions
• Report Data Container, containing the Chart and/or Grid Views
66 | Dell SonicWALL Analyzer 7.2 Administrator’s Guide

The figure that follows shows the layout of the Report.
The Report contains the following areas:
• The Date Selector Bar
• The Filter Bar
• Export Options, including:
– Schedule Report Button: brings up the Universal Scheduled Reports menus
– Export to CSV
– Export to PDF
• Save button
• Load Custom Report button
| 67

• Report Data Container. The Report Data Container consists of the Chart View and the Grid View, the Show Chart, Show Grid, and Show Chart and Grid toggle buttons, and the Reload Data button.
Note The Chart view is clickable. You can drill down to Detail sections simply by clicking on areas of interest in the bar-chart or pie-chart.
The Date Selector
The Date Selector allows you to generate a report for only a specific date and time range. Use the right and left quick-link arrows to move backward and forward in time, a day at a time. Clicking the time field on the Date Selector brings up a pull-down menu that allows you to customize your time and date ranges.
Setting a Date or Date Range
By default, summary reports display only information for a single date. However, by using the Time Selector pull-down menu, you can fine-tune the time, date, or range of times and dates you want to see. Over-time reports display information over a date range.
Selecting a Date and Time
The Time Selector allows you to specify any time or date interval desired, whether by day, or in hour/minute intervals. To select a single date for a report, either use the Date Selector bar and the left and right arrows to page through reports by date, or click on the displayed date field in the Time Selector to display the pull-down schedule menu.
You can select from:
• Last 1 hour
• Last 6 hours
• Last 12 hours
• Today - 00:00 to 23:59
68 | Dell SonicWALL Analyzer 7.2 Administrator’s Guide

• Yesterday - 00:00 to 23:59
• Last Week - the previous 7 days, from 00:00 to 23:59
• Custom - a custom time and date range
In the pull-down schedule menu, you can specify a recent time snapshot, or click Custom to select the starting and ending dates and times. The Custom option allows you to select a specific time and date or range from the Interval menu.
Step 1 To set up a custom time range, click in the Time Selector Bar. The Interval pull-down menu appears.
In the Interval menu, you can either set the date manually or by using the pull-down calendar. In the calendar, you can set the month by clicking the desired dates. If no data is available for a specific date, that date is not available (grayed out).
Step 2 Set a specific start and ending time by specifying hours and minutes you want to monitor. The default for a date is an interval starting at hour 0 minute 0 (midnight) and ending at 23:59 (11:59 PM).
Step 3 The Interval menu also lets you set how many lines of information appears in the graph view. Click the date, and when the Interval pull-down appears, specify the number of rows. Select 5, 10, 20, 50, or 100 from the Rows pull-down list to limit the display to a the specified number of lines, for easier viewing.
Step 4 Click OK to generate the report.
Report data is sorted and ranked according to how many rows are displayed. By specifying a limited number of rows to be displayed in the graph section of the Report, rankings applies only to the data in those rows. If you reverse the sort order by clicking on the column bar, only the displayed items are re-sorted.
To re-sort according to all collected data in the database, click Enable Server Side Sort on the pull-down menu. The ranking of the grid items then reflects all data from the total entries.
| 69

By default, the Client-side Sort is used that sorts only the currently viewable data that was retrieved the first time the data base was clicked on.
For example, the snapshot that follows shows data displayed only as it pertains to ten rows.
If you re-rank the column to see the lowest number of hits, it ranks only the items displayed in the ten rows you selected.
70 | Dell SonicWALL Analyzer 7.2 Administrator’s Guide

Use Enable Server Side Sort to sort data based on all underlying data records, not the client-side sort. Server side Sort retrieves current data from the back end database. Client-side sort merely rearranges the data already retrieved. You can still constrain your display to 10 rows, but the display are re-sorted based on the total data collected in the back-end database, and not just on the data previously displayed.
Export Results
The Export Results icons allow you to save a report in either PDF or Excel format.
These buttons provide the following export options:
• Export to PDF: This button allows you to save the displayed report data to a PDF file. The PDF can export a maximum of 2500 rows.
• Export to CSV: This button allows you to send the report to a file in Microsoft Excel Comma Separated Value (CSV) format. Excel can export a maximum of 10,000 rows.
To print a report, export it to PDF, using Export to PDF, then print out the PDF file.
If a very large Report file, such as a system log, is being exported, the number of lines that can be saved is limited. When you click the icon, a message like the following appears:
Select whether to print only the currently-displayed screen, or the maximum number of rows.
| 71

The Filter Bar
The Filter Bar provides filtering functions to narrow search results, to view subsets of report data.
The Filter Bar is at the top of the Report. It contains Add Filter (+) for adding filters and Go to apply filters, as well as Clear Filter to clear all filters.
Using the Filter Bar allows you to view subsets of the report data, based on a set of pre-defined filters.
Adding Filters
Filters can be added in two ways, either explicitly through the Filter Bar, or implicitly by clicking on the hyperlinks in the grid sections of a displayed report. As hyperlinks are clicked, those link criteria are added to the Filter bar as if it was added explicitly. Refer to Adding Filters Implicitly on page 74 for more information.
Use the Filter Bar to add pre-defined filters from a pull-down menu and to specify parameters for those filters. Filter values are matched in the database during report generation.
Click Add Filter (+) on the left to display a pull-down menu that can then be used to fine-tune the report data by selecting categories.
Filters can also be added by right-clicking on a column entry and selecting the Filter option from the pull-down menu.
Filter criteria are context-dependant, meaning that Dell SonicWALL Analyzer finds the specific filter operators applicable to the entry. Many filter operators are used in connection with a text string or numeric filter input value that determines what data to include in the report. This control uses auto-complete to suggest a set of candidate values, or you can manually enter a different value. Manually-entered values should be checked for blanks, illegal characters, and so on.
72 | Dell SonicWALL Analyzer 7.2 Administrator’s Guide

Operators are specified by clicking on the default operator to bring up the pull-down menu of available operators.
Depending on the selected field type, text string or numeric, several filter operators are available. The filter operators are used with a filter input value to restrict the information displayed in the Detail report.
The operators are defined as shown in Table 4.
Table 4 Filter Operators
You can also use wild-cards (*) in filters to match anything. For instance, you might want to match a User name. You would select LIKE as the operator, and use * in connection with a string. For example, “joh*” would match all users starting with “joh,” such as John, Johnny, Johan, and so on.
Using the Filter Bar
Use the Filter Bar to manually (explicitly) add filters.
Step 1 To add a filter, click on the Add Filter (+) menu and select a filter from the pull-down menu. Available Filter categories might differ, depending on the report, and might require parameters.
Operator Definition
= Only data that exactly matches the filter input numerical value is included in the report.
!= Data values that are not equal to the input numerical value are included in the report.
> Data values that are greater than the input value are included in the report.
>= Data values that are greater than or equal to the input value are included in the report.
< Data values that are less than the input value are included in the report.
<= Data values that are less than or equal to the input value are included in the report.
IN Data values that are in the input value are included in the report.
NOT IN Data values that are not in the input value are included in the report.
LIKE Data values that are like the input value are included in the report.
NOT LIKE Data values that are not like the input value are included in the report.
IS Data values that are between the input values are included in the report. Separate the vales by using a hyphen with a space on either side, such as “172.30.72.16 - 172.30.72.19”.
IN RANGE Subnet data that is in the specified range is included in the report.
NOT IN RANGE Subnet data that is not in the specified range is included in the report.
| 73

Some filter fields use operators with text or numeric values. Others might have pre-filled values. For example, the Initiator Country filter displays a pull-down list, allowing you to display results based on a selected country.
Step 2 Click Go (right arrow) to add a filter. Each filter must be applied by clicking Go before you can select and apply the next filter. The filter bar shows all filters added, whether added from the menu bar or pull-down menu.
As filters are added, items that have been filtered out disappear from the listings, reappearing only when the associated filter, or all filters, are removed.
Step 3 To remove a filter, click the + next to the filter in the menu bar and click Go (right arrow). To clear all filters, click the Clear Filter (x) next to the filter fields.
Adding Filters Implicitly
Dell SonicWALL Analyzer also allows adding filters directly to a drillable (hypertext-linked) column to create a “criteria control,” where you can set a value for the filter. Adding a filter to a column allows you to restrict the display to view only the data related to the entry of interest.
In second-level reports with multiple subsections, filters can be added simply by clicking on the hyperlinked data in the report section.
Step 1 To add a filter to a “drillable” column containing hypertext links, right-click on a hypertext column cell and select Add Filter from the resulting pull-down context menu.
Because the filter is context-sensitive, it might suggest a set of candidate values, or you can manually enter a different value. A new filter is automatically added to the filter bar, and the report is updated accordingly.
After added, the filter is added to the filter area of the Search Bar and no longer appears in the pull-down list. The report displays only results restricted by that filter.
Step 2 To remove the filter, click the X next to that filter, or clear all filters by clicking the red X to the right of the field.
74 | Dell SonicWALL Analyzer 7.2 Administrator’s Guide

Saving/Viewing a Filtered Report
The Save Report pop-up menu allows you to save the currently-displayed report with a specified name of no more than 20 characters. You can also overwrite an already-saved report with the current report or overwrite the report to show a new date range.
Saved reports, even if created for a specific unit, are available for all units of that appliance type. For example, if a report for the X1 interface was created for a specific unit, this report is available from any unit: there is no need to create a X1 report for different units.
Note Custom Reports created by a specific user are viewable by that user, and no one else. Domain Administrators can view all available reports.
Step 1 To save a report, along with its filter criteria, click the Save Report icon.
Step 2 Assign it a file name for later reference.
Step 3 To view a saved Custom Report, click Custom Reports to bring up a menu that contains a list of all saved Custom reports available for viewing. Selecting a Custom Report from this pull-down loads data for the selected report into the Report Data Container.
Step 4 You can also load a saved report from the Report tab on the middle bar menu. Click Custom Reports on the Reports tab and select the desired report to load it into the Data Container.
Step 5 Click on the appropriate Export Results icon to save a report to a PDF file or Excel spreadsheet. To print a copy of the report, click on the PDF icon and save it to a file, then print the PDF file.
Tip Saved Reports can be modified or deleted by clicking on Custom > Manage Reports.
Scheduling Reports
You can schedule a report to be created and sent to you in email, using the Universal Scheduled Reports function.
The Schedule Reports icon is located to the right side of the toolbar above Load Custom Reports.Click this icon to bring up the Universal Scheduled Report Configuration Manager.
When the Configuration Manager menu comes up, it is pre-filled with the information about the current Reports page. Using this report, you can set up specific tasks, chose the format for the report, and other options. For more information on using Universal Scheduled Reports, refer to the section: Universal Scheduled Reports.
| 75

Report Data ContainerThe Report Data Container is the screen space where the report data is displayed.
Dell SonicWALL Analyzer provides interactive reporting to create a clear and visually pleasing display of information in the Report Data Container. The Root-level baseline report shows the Chart View, usually containing a timeline or a pie chart and a Graph View.
You can control the way the information is displayed by adjusting the settings through toggles or by configuring reports in the dashboard interface.
Reports have a Date Selector and Filter Bar at the top, with the Report Data Container below it.
Detail-level reports are available either by “drilling down” on hyperlinks in the Root-level view, or, for some types of Reports, as a shortcut on the Report tab.
Note Cell data in the report container can be copied by right-clicking the cell and selecting Copy Cell Data from the pull-down menu.
Layout of the Data Container
The Report Data Container is comprised of a number of Sections. Sections are usually arranged vertically stacked on top of each other. Each section has a “Title Bar” that contains the “Section” title on the left and a group of buttons on the right. The Report itself might contain one or more Sections of data that are different facets of the report data.
Note Root level reports available in the Reports panel usually contain only one section.
76 | Dell SonicWALL Analyzer 7.2 Administrator’s Guide

The Report Data Container sections either appear as a chart view, a grid view, or both.
The default display mode is Show Chart and Grid. In this mode, the data is available for viewing as both a ‘Chart’ and a ‘Grid.’ This layout can be controlled by switching between three display mode options, any of which can be turned on/off at any time, using the utility toggle button group on the Section Title Bar.
The display modes available on this layout are:
• Show Chart: In this mode only the chart is visible and takes up all the available space inside the section container. Charts show a timeline or pie chart.
• Show Grid: In this mode only the Grid is visible.The Grid Display might contain more than one Section,
• Show Chart and Grid: In this mode both the chart and the grid are visible and are vertically stacked.
Switching between these modes is handled through the utility toggle buttons.
Only one mode can be active at a time.
‘Reload Data’ is present on the title bar in all the layouts described previously. Clicking this button instructs the application to refresh the section data.
You can determine if you have reached the final section in a multi-section Grid View by checking if there is a message about the relevant time-zone at the bottom left of the report. If this message is present, there are no more Grid sections available.
Viewing Syslog Data of Generated Reports
Different types of section data are available under the root-level report. The section level reports are available through the Details entry on the middle pane Reports tab, for some Reports. You can also drill down from the root level report to the second level Detail views, containing multiple subsections, by right-clicking a hyperlink and selecting “Drilldown” from the pull-down menu. The syslog fields corresponding to the applied filter come up.
Drilling Down
Sections in the Grid display might contain drillable columns, containing hypertext links to bring up a Detail Report. A ‘drillable’ column appears as a column in the data grid, where the child values appear underlined and in blue, and act as a hyperlink to additional information. Click on any of these values to drill down to another report, using the value on which drill-down has been executed as a filter. When you click on a drillable link, this filter is added to the Filter Bar.
Drilling down navigates to a new Detail report, filtered by the data on which the drill-down was executed. Drillable reports can display multiple grid sections in the sub-reports, or bring up a System Analyzer view, depending on the item selected.
| 77

The following example illustrates how you can drill down through the Data Usage Report by clicking on a drillable entry to gain more information and filter the results.
Step 1 Click on an appliance, then click Data Usage on the Reports tab. A timeline showing the connections appears.
Step 2 Click on a hyperlinked Time to go to the Detail view of the Report. The Detail view contains multiple sections, including Initiators, Responders, Service types, Initiator Countries, and Responder Countries. Depending on the number of entries, you might need to scroll down to see all the sections.
Note You can also apply a filter through the Filter Bar or by right-clicking the entry. Select the filter and click Go. The Report shows the detail view applicable to that filter.
78 | Dell SonicWALL Analyzer 7.2 Administrator’s Guide

| 79

Step 3 To further filter the output, to view only tcp/https usage, click the tcp/https entry under Services. A Detail report, filtered to show only usage of tcp/https, comes up. Notice that a Service entry has been added to the Filter Bar.
80 | Dell SonicWALL Analyzer 7.2 Administrator’s Guide

Notice that the Report now focuses on the filter constraint from the drilled-down column.
Because this report also contains drill-down areas, you can drill down even further to add additional constraints to the results.
Note Many report categories contain a Details item in the list of reports. This link provides a shortcut directly to the Detail view of all sub-sections of the report. You can apply filters directly to the Detail view to further constrain the displayed information.
The Log Analyzer provides the most detailed Report information.
Step 4 To view the Log Analyzer, go to the Reports tab after you have drilled down to the desired level of detail and click Analyzers > Log Analyzer.
Note Because Log Analyzer Reports can contain a very large amount of data, you might wish to limit the amount of data displayed on the page. The amount of data in the report can also affect the loading speed.
| 81

The Log Analyzer contains information about each connection, including port and interface information, number of Bytes sent, and so on.
You can drill down through the Log Analyzer Report as well. Clicking on a column item adds an additional filter and narrows down your results, allowing you to zoom in on specific instances.
Some Log Analyzer reports can be reached as the final step of a drill down process.
Click on a row to expand the log, additional information can be viewed here:
The bottom bar of the Log Analyzer contains a page bar that allows you to navigate through the report by paging forward and backward, or going to the specific page of interest.
82 | Dell SonicWALL Analyzer 7.2 Administrator’s Guide

Custom ReportsSpecific customized reports can be generated and saved by means of the Save icon. Click Save to bring up a drop-down allowing you to save a custom report.
This menu is pre-filled with a name reflecting the report it was based on. If an earlier report with this name was generated, you can choose to overwrite it or save a new copy, or assign it a different name.
The new Custom report is added to the pull-down menu accessed when you click Load Custom Report. It is also added to the Reports Tab list under Custom. When a specific Custom report is selected on the Load Custom Report pull-down menu, the button reflects the name of that report.
Custom Reports can also be accessed or deleted by going to Reports > Custom > Manage Reports.
Troubleshooting Reports
One of the most common reasons when a report does not display is that no data is available for the selected appliance. There are several reasons why you might see this error. Analyzer displays the most likely reason(s) and gives you instructions for ways to resolve the problem.
The most common examples are shown in the following paragraphs.
Appliance is in a Provisioned State:
Analyzer is waiting for a handshake response signal from the appliance. Generally, the TreeControl menu also flags the appliance with a lightning bolt on a yellow background.
Appliance is Down
Report Could Not Be Generated
| 83

There might be no data available for a variety of reasons. The most common causes are listed in this message, along with actions to take.
Managing Dell SonicWALL Analyzer Reports on the Console Panel
There are management settings for the Analyzer Reporting Module on the Analyzer Console panel. A Reports selection is available on the left menu bar that allows you to set up certain tasks in the right Management pane that contains limited configuration screens, used for managing scheduled email report configuration, system debug-level logging, and shows legacy reports.
In this pane, you can set CDP Summarizer parameters and schedule emailing or archiving of reports.
Data deletion or storage specified in these menus takes place after completion of the current reports run.
Reports generated by pre 7.2 releases of Dell SonicWALL Analyzer can still be viewed, but require specific configuration. See Show Legacy (pre Analyzer 7.2) Reports on page 149.
84 | Dell SonicWALL Analyzer 7.2 Administrator’s Guide

Chapter 5
Viewing Firewall Reports
This chapter describes how to generate reports using the SonicWALL Analyzer Reporting Module. The following section describes how to configure the settings for viewing reports:
• Firewall Reporting Overview on page 85
• How to View Firewall Reports on page 89
• Using the Log Analyzer on page 100
Firewall Reporting OverviewThe Reports available under the Firewall tab provide specific information on data gathered by the Dell SonicWALL Analyzer interface.
For a general introduction to reporting, see Dell SonicWALL Analyzer Reporting Overview on page 59.
The Firewall reports display either summary or unit views of connections, bandwidth, uptime, intrusions and attacks, and SRA usage, displayed in a Data Container. Information can be viewed in either chart (timeline or pie chart) form, or tabular (grid) format. The list of available reports allows you to navigate to a high-level or specific view.
All of the reports in Analyzer report on data gathered on a specific date or range of dates. Data can be filtered by time constraints and data filters.
Benefits of Firewall Reporting
Firewall Reports allow you to access both real-time and historical reports and view all activity on SonicWALL Internet security appliances. By monitoring network access, logins, and sites accessed, you can enhance system security, monitor Internet usage, and anticipate future bandwidth needs.
You can gain more information from the display, simply by hovering the mouse pointer over certain sections. Additionally, by clicking on selected sections of a pie chart or bar-graph timeline view, you can view more information or view different aspects of the information presented.
| 85

Firewall Reports Tab
The Firewall tab gives you access to the Firewall’s reports section of the Dell SonicWALL Analyzer management interface. Reporting supports both graph and non-graph reports, and allows you to filter data according to what you wish to view. It supports multiple product-licensing models.
Firewall Reports provide the following features:
• Clickable reports with drill-down support on data rows
• Report data filtering through the Search Bar
• Log Analyzer
You can view Reports either as Summary reports for all or selected units on the Dell SonicWALL Analyzer network, or view detailed reports for individual units.
Viewing Available Firewall Report Types
To view the available types of reports for the Firewall appliances, complete the following steps:
Step 1 Log in to your Analyzer management console.
Step 2 Click the Firewall tab.
Step 3 Select an appliance or global view from the TreeControl.
Step 4 Expand the desired selection on the Reports list and click on it.
Note All Reports show a one-day period unless another interval is specified in the Time Bar.
The following types of reports are available:
Global Level Reports:
• Data Usage
– Summary: connections, listed by appliance, for one day (default)
• Applications
– Summary: connections, listed by application, for one day (default)
• Web Activity
– Summary: hits, listed by appliance, for one day (default)
• Web Filter
– Summary: access attempts, listed by appliance, for one day (default)
• VPN Usage
– Summary: VPN connections, listed by appliance, for one day (default)
• Threats
– Summary: connection attempts, listed by appliance, for one day (default)
Note Summary Reports are not drillable and no Detail view is available.
86 | Dell SonicWALL Analyzer 7.2 Administrator’s Guide

Unit Level Reports
Detail views are available for all Report items unless otherwise noted.
• Data Usage
– Timeline: connections for one day (default)
– Initiators: Top Initiators, listed by IP IS address, Initiator Host, User, and Responder, displayed as a pie chart
– Responders: Top Responders, listed by IP address, Responder Host, and Initiator, displayed as a pie chart
– Services: connections, listed by service protocol, displayed as a pie chart
– Details: provides a shortcut to the Detail view normally reached by drilling down. Detail sections include: Initiators, Services, Responders, Initiator Countries, and Responder Countries. Additional filtering/drilldown takes you to the Log Analyzer
• Applications
– Data Usage connections, listed by application and threat level
– Detected: events, listed by application and threat level
– Blocked: blocked events, listed by application and threat level
– Categories: types of applications attempting access
– Initiators: events displayed by Initiator IP and Initiator host
– Timeline: events over one day
• User Activity
– Details: a detailed report of activity for the specified user
• Web Activity
– Category: hits and browse time listed by information category
– Sites: sites visited by IP, name, and category, with hits and browse time
– Initiators: Initiator host and IP with category and user
– Timeline: site hits with time of access and browse time
– Details: provides a shortcut to an access timeline and Detail view normally reached by drilling down. Detail sections include: Categories, Sites, and Initiators.
• Web Filter
– Category: hits and browse time listed by information category
– Sites: sites visited by IP, name, and category, with hits and browse time
– Initiators: Initiator host and IP with category and user
– Timeline: site hits with time of access and browse time
– Details: provides a shortcut to an access timeline and Detail view normally reached by drilling down. Detail sections include: Categories, Sites, and Initiators.
• VPN Usage
– Policies: lists connections by VPN Policy
– Initiators: Initiator host and IP with category and user
– Services: Top VPN Services by Service Protocol
– Timeline: VPN connections over a one day period
| 87

• Intrusions
– Detected: number of intrusion events by category
– Blocked: blocked intrusions and number of attempts at access
– Targets: number of intrusion events by target host and IP
– Initiators: Initiator host and IP with category and use
– Timeline: intrusions listed by time of day
– Details: provides a shortcut to an access timeline and Detail view normally reached by drilling down. Detail sections include: Categories, Sites, and Initiators.
– Alerts: provides a list of intrusion alerts
• Gateway Viruses
– Blocked: blocked virus attacks and number of attempts at access
– Targets: targeted hosts and IP addresses
– Initiators: initiating users, hosts, and IP addresses of the virus attack
– Timeline: times when the virus attempted to gain access, displayed over time
• Spyware
– Detected: spyware detected by the firewall
– Blocked: spyware blocked by the firewall
– Targets: targeted hosts and IP addresses
– Initiators: initiating users, hosts, and IP addresses of spyware download
– Timeline: times when the spyware accessed the system, displayed over time
• Attacks
– Attempts: type of attack and times access was attempted
– Targets: host and IP address, and number of times access was attempted
– Initiators: top attack initiators by IP and host
– Timeline: time and number of attempts at access, displayed over time
• Authentication: authenticated users, their IP addresses, and type of login/logout
– User Login
– Admin Login
– Failed Login
• Custom Reports: allows access to saved custom reports
• Analyzers
– Log Analyzer: provides a detailed event-by event listing of all activity. The Log Analyzer is drillable, but no Detail sections are available.
The Report contains a filter bar at the top, plus the actual Data Container. The default Data Container contains an interactive chart view that contains either a grid view, containing a text version of the information. One or more sections might be present in the grid view. Toggle buttons allow you to display the Chart view, Grid view, or Chart and Grid view.
Grid sections are arranged in columns. Columns can be rearranged to view them from the top down or bottom up, by clicking the up and down arrows in the column headings. You can narrow results by applying a filter to a column: right-click on a column heading and click Add Filter.
Hypertext-linked columns are drillable, meaning you can click on the hypertext entry to bring up a Detail view with more information on the desired entry. Detail views might have multiple sections.
88 | Dell SonicWALL Analyzer 7.2 Administrator’s Guide

The Detail views are usually reflected in the sub-headings under the Reports list that provides a shortcut directly to the Detail Report. To go to the full Detail view, click the Details entry in the Reports list. From the Detail view, you can access the system logs, for event-by-event information, or further filter the results. For more information on using the Log Analyzer to view and filter syslog reports, see Using the Log Analyzer on page 100.
Details views can contain multiple sections. To determine if you have reached the end of the list of sections, check for the time zone message that indicates the end of the Detail View.
Reports with hyperlinked columns can be filtered on the column or by drilling down on the hyperlinked entry.
You can also get to a filtered Detail view by clicking the section representing the desired information in the pie chart.
To save a filtered view for later viewing, click on the Save icon on the Filter Bar. The saved view now appears under Custom Reports.
To learn more about Custom reports, see Custom Reports on page 106
How to View Firewall Reports
The sections contain the following information:
• Node information—Information on the firewall(s) is displayed at the global or unit level.
• Syslog Categories—The types of syslog data selected to be collected for the selected appliance.
• Syslog Servers—The IP address and Port number of the syslog servers configured to collect data from the selected appliance.
– Synchronize Appliance Information with Analyzer—Click Synchronize Appliance Information Now to refresh status data about the monitored appliances. This status information is normally updated every 24 hours.
• Getting Started With Analyzer—Click Open Getting Started Instructions In New Window to open the Analyzer installation and initial configuration instructions in a separate window.
The Firewall Summary reports display an overview of bandwidth, uptime, intrusions and attacks, and SRA usage for managed SonicWALL Firewall appliances. The security summary report provides data about worldwide security threats that can affect your network. The summaries also display data about threats blocked by the SonicWALL security appliance.
Viewing Global Summary Reports
Summary reports for data usage, applications, web usage and filtering, VPN usage, and threats for managed SonicWALL appliances are available at the global level, through the TreeControl menu. Summary reports are available for:
• Data Usage
• App Control
• Web Usage
• Web Filtering
• VPN Usage
• Threats
Group-level Summary reports provide an overview of information for all Firewalls under the group node for the specified period. The report covers the connections and transfers by appliance for Data Usage, App Control, and VPN Usage, For Web Usage and Web Filters, hits
| 89

are also included. Web filters and Threats list attempts at connection. Unless specified differently in the Date Selector, the Summary report covers a single day. Global Summary reports are not drillable.
The Dashboard Summary report displays statistics, alerts, graphical summary reports, and a list of available custom report templates. Displayed statistics can include total bandwidth, total attacks and other measurable information. The alerts list is displayed when the configured threshold has been reached. A wide range of graphical reports are also available for display.
You can configure the Dashboard > Summary report contents in the Firewall > Configuration > Settings page.
To view the Summary report, complete the following steps:
Step 1 Click the Firewall tab.
Step 2 Select the global icon.
Step 3 Click Data Usage > Summary.
The timelines at the top of the page display the totals, and the grid section sorts the information by appliance or applications.
Unit level reports display status for an individual SonicWALL appliance.
90 | Dell SonicWALL Analyzer 7.2 Administrator’s Guide

Viewing Data Usage Reports
Step 1 Click the Firewall tab.
Step 2 Select the global icon or a SonicWALL appliance.
Step 3 Click Data Usage > Timeline. (This is the default view when the Firewall Report interface comes up.)
Viewing User Activity Logs
Web User Activity logs allow you to filter results to view only the activity of a specific user.
The User Activity Analyzer provides a detailed report listing activity filtered by user. If a user report has been saved previously, bringing up the User Activity Analyzer displays a list of saved reports under the Filter Bar.
If you wish to create a new report, use the Filter Bar to create a new report.
Step 1 Click the Firewall tab.
Step 2 Select a SonicWALL appliance.
| 91

Step 3 Click User Activity > Details to bring up the User Activity Analyzer. The User Activity Analyzer generates a Detail report based on the user name.
If no user activity reports were saved, only the Filter Bar displays, with the User filter pre-selected. You can enter a specific user name, or use the LIKE operator wildcards (*) to match multiple names.
Step 4 Enter the name of the user into the field and click Go (arrow) to generate the report.
The customized User Activity Details report displays a timeline of events, Initiators, Responders, Services, Applications, Sites visited, Blocked site access attempted, VPN access policy in use, user authentication, Intrusions, Initiator Countries, and Responder Countries associated with that particular user.
Data for a particular user might not be available for all of these categories.
Viewing Applications Reports
Application Reports provide details on the applications detected and blocked by the firewall, and their associated threat levels.
Step 1 Click the Firewall tab.
Step 2 Select a SonicWALL appliance.
Step 3 Click Application > Data Usage.
92 | Dell SonicWALL Analyzer 7.2 Administrator’s Guide

The Applications Report displays a pie chart with the application and threat level it poses.
You can drill down for additional Details views on connections over time (Timeline view), Data Usage, Detected applications, Blocked applications, Categories of applications, top initiators.
Viewing Web Activity Reports
Web Activity Reports provide detailed reports on browsing history.
Step 1 Click the Firewall tab.
Step 2 Select a SonicWALL appliance.
Step 3 Click Web Activity > Categories.
The Web Activity Report displays a pie chart with the Top Categories of type of access, total browse time, and hits.
You can drill down for additional Details views on connections over time (Timeline view), Sites visited, Categories of sites, and Top Initiators. A Details entry links directly to the details view of all entries.
Viewing Web Filter Reports
Web Filter Reports provide detailed reports on attempts to access blocked sites and content.
Step 1 Click the Firewall tab.
Step 2 Select the global icon or a SonicWALL appliance.
Step 3 Click Web Filter > Categories.
| 93

The Web Filter Report displays a pie chart with the Top Categories of blocked access and total attempts to access.
You can drill down for additional Details views on connections over time (Timeline view), Sites visited, Categories of sites, and Top initiators. A Details entry links directly to the details view of all entries.
94 | Dell SonicWALL Analyzer 7.2 Administrator’s Guide

Viewing VPN Usage Reports
VPN usage reports provide details on the services and policies used by users of virtual private networks.
Step 1 Click the Firewall tab.
Step 2 Select a SonicWALL appliance.
Step 3 Click VPN Usage > Policies.
The VPN Usage Report displays total connections for each VPN Policy item as a pie chart and tabular grid view.
You can drill down for additional Details views on Service protocols and Top initiators.
| 95

Viewing Intrusions Reports
Intrusion Reports provide details on types of intrusions and blocked access attempts.
Step 1 Click the Firewall tab.
Step 2 Select a SonicWALL appliance.
Step 3 Click Intrusions > Detected.
The Attacks report provides a pie chart and a list of the initiating IP addresses, hosts, and users, with number of attempts for each.
Drill down for additional Detail views of Intrusion Categories, Targets, Initiators, Ports affected, Target Countries, and Initiator Countries.
96 | Dell SonicWALL Analyzer 7.2 Administrator’s Guide

Viewing Gateway Viruses Reports
The Gateway Viruses reports provide details on the Top Viruses that were blocked when attempting to access the firewall.
Step 1 Click the Firewall tab.
Step 2 Select a SonicWALL appliance.
Step 3 Click Gateway Viruses > Blocked.
The Top Viruses report appears.
The report provides details on the viruses blocked, the targets, initiators, and a timeline of when they attempted access.
Drilling down provides a list of virus identity, Targets, Initiators, Target Countries, and Initiator Countries.
Viewing Spyware Reports
The Spyware report gives details of the spyware that was detected and/or blocked, the targets, initiators, and a timeline of when they attempted access.
Step 1 Click the Firewall tab.
Step 2 Select a SonicWALL appliance.
Step 3 Click Spyware > Detected.
The report provides details on the types of spyware detected and blocked, targets.
Drilling down provides a list of virus identity, Targets, Initiators, Target Countries, and Initiator Countries. Drilling down lists countries of origin, and target countries.
| 97

Viewing Attacks Report
The Attacks report lists attempts to gain access, target systems, initiators, and a timeline of when the attack occurred.
Step 1 Click the Firewall tab.
Step 2 Select a SonicWALL appliance.
Step 3 Click Attacks > Attempts.
The Attacks report provides a pie chart and a list of the initiating IP addresses and hosts.
Drill down for additional Detail views of Intrusion Categories, Targets, Initiators, Ports affected, Target Countries, and Initiator Countries.
Viewing Authentication Reports
Authentication reports provide information on users attempting to access the Firewall.
Step 1 Click the Firewall tab.
Step 2 Select a SonicWALL appliance.
Step 3 Click Authentication > User Login.
The Authentication report displays a list of authenticated users, their IP addresses, service, time they were logged in, and type of login/logout. Additional Reports are available for Administrator logins and failed login attempts.
98 | Dell SonicWALL Analyzer 7.2 Administrator’s Guide

Clicking on hyperlinks provides additional filtering for the reports.
You can filter on the Service to view SRA and other appliances by drilling down to the syslog.
Step 1 Go to the filter bar and click on the + and select Service from the pull-down menu. Click on the = operator, and click on the field next to it to bring up the pull-down menu. Select SSLVPN from the pull-down list
Step 2 Click Go to view a report for that Service.
Note For the Duration and Service categories to be present, the Firewall appliance firmware must be at least version 5.6.0.
| 99

Using the Log AnalyzerThe Log Analyzer allows advanced users to examine raw data for status and troubleshooting. The Analyzer logs contain detailed information from the system logs on each transaction that occurred on the specified SonicWALL appliance. These logs can be filtered or drilled down to further narrow the focus of the information, allowing analysis of data about alerts, interfaces, bandwidth consumption, and so on. The Log Analyzer is only available at the individual unit level.
Because of space constraints, some column items, particularly the log event messages, might not be fully visible in the Reports pane. To view the full report, export the report to an Excel spreadsheet to view, sort, or organize messages.
Log information can be saved for later analysis and reloaded from Custom Reports.
To load a report for viewing, either:
• Click Load Custom Report and select from the pull-down list of saved Custom Reports.
• Click on Analyzers > Log Analyzer to view the current log.
Note The Log Analyzer entries display raw log information for every connection. Depending on the amount of traffic, this can quickly consume a large amount of space in the database. It is highly recommended to be careful when choosing the number of days of information to be stored.
Viewing the Log Analyzer
The log displays information specific to either a particular report or overall system information, depending on the path used to reach the log, either from the individual report level or from the Log Analyzer entry on the Reports tab. Entries in the Analyzer log vary, according to the relevant report type. You can customize the log entries by using the following options:
Show/Hide Log Columns
Use the Show/Hide Columns function to hide columns that you do not want to display in the Analyzer Log. Just click the Configure the Log Analyzer icon, then select the columns that you want to display and deselect the ones that you do not want to display. By configuring the displayed columns, the Log Analyzer gives a more clean, concise, and meaningful way to view the logs, instead of displaying unnecessary columns that take up valuable real estate.
100 | Dell SonicWALL Analyzer 7.2 Administrator’s Guide

Note “Serial number” column and “Time” column are not part of the list to be configured because they are necessary for any displays.
Row-Based Expansion
Instead of showing all the column information at once, the row-based expansion simplifies the screen and gives on-demand information through a single click.
Click on each row to drop-down the hidden column information.
Note This feature is only available after you sort the columns using the show/hide function.
Full Screen Mode
Switch to full screen mode by clicking the Full Screen Mode toggle icon. This populates the entire browser screen with the Log Analyzer page, hiding the tree control and reports panels.
Session-Based Configurations
All column configurations for the Log Analyzer are recorded in each session. This is so that within the session, users can have the desired/configured tabular view of the Log Analyzer at all times.
Priority
The log event messages are color-keyed according to priority. Red is the highest priority, followed by yellow for Alerts. Messages without color keys are informational, only. The color categories are:
• Alert: Yellow
• Critical: Red
| 101

• Debug: White
• Emergency: Red
• Error: White
• Info: White
• Notice: White
• Warning: White
Color keys allow you to immediately focus on the priority level of the message, and filter data accordingly.
Filtering the Analyzer Log
The Log Analyzer allows you to add filters to view user-or incident-specific data. The Log analyzer can be reached either by drilling down in individual reports, or from the Analyzers item under the Reports tab.
To view the Analyzer Log, complete the following steps:
Step 1 Select a SonicWALL appliance from the TreeControl pane.
Step 2 Click to expand the Analyzer tree and click on Log Analyzer. The saved Log Analyzer report page displays.
Note Because system logs have a large number of entries, it is advisable to constrain the number of entries displayed on the page. Saved system logs are limited in the number of rows that are saved. If saving to PDF, a maximum of 2500 rows are saved. If saving to Excel, a maximum of 10,000 rows are saved.
Step 3 To add a filter, click the + in the Filter Bar and specify the desired filter item and parameters.
Available filters include filters for Application, Category, DST Interface, DST Port, Duration, Initiator Country, Host, or IP address, Interface, Message, Priority, Responder country, IP, or Name, Service, Session, Src Interface, Src Port, URL, User, or VPN Policy. This full list is available from the Log Analyzer Entry.
If you are viewing the log in the Log Analyzer view for a specific application entry, only those filters specific to that entry are available.
102 | Dell SonicWALL Analyzer 7.2 Administrator’s Guide

Log views are drillable, and adds filters as column entries are drilled. Click on an entry of interest to add a filter and further constrain the information displayed.
Log Analyzer Use Case
In the following use case, we sort and filter the captured event information to evaluate threats targeted toward the X0 default interface.
On the Reports tab, click on Analyzers > Log Analyzers.
Step 1 In the Log Analyzer, click the + to add a filter, and select the Interface filter.
Step 2 Type in X1 to specify the default interface filter.
Step 3 Click Go.
The Log Analyzer is filtered on the X1 port interface.
This allows you to begin debugging, or further investigate use of the database.
More information can also be found by using Universal Scheduled Reports.
Configuration SettingsConfiguration settings allow you to set up certain parameters for how data is displayed in Reports. You can set up currency cost per Megabyte for the Summarizer, or add filters for the Log Analyzer reports.
| 103

Setting Up Currency Cost for Summarizer
The Data Usage page contains a Cost per connection entry. You can set what currency and the cost per Megabyte.
Step 1 Click Configuration > Settings on the Reports tab.
Step 2 Select the currency of the desired country and the cost per MB.
Step 3 Click Update. The cost is immediately reflected on the Data Usage page.
104 | Dell SonicWALL Analyzer 7.2 Administrator’s Guide

Adding Syslog Exclusion Filters
Exclusion Filters restrict what information is used to generate Reports. This is achieved by filtering out syslogs (based on the criteria specified in the Syslog Filter screen) from being uploaded to the Reports database. These filtered syslogs are, however, stored in the file system and archived, thus ensuring that all syslogs are available for audit trailing purposes. Excluding data from being uploaded to the Reporting database in this way can be useful in maintaining confidentiality regarding use history, or eliminating data corresponding to certain users who are not of interest. For instance, you might use an Exclusion Filter to eliminate data from the company CEO. This screen is used to specify syslog filters for the unit selected in the TreeControl. A similar screen exists for system wide syslog filtering, in the Console Panel’s Reports > Syslog Filter screen
Step 1 To add an Exclusion filter, click on Configuration > Filters.
The Syslog Exclusion Filter page comes up. This page allows you to view what filters are currently applied, add filters, or remove filters.
Step 2 To configure and add an Exclusion Filter, click Add Filter. The Add Filter menu comes up.
Step 3 Specify the field you want to modify, and select an operator and value. Click Update.
The Reports are now filtered according to the selected criteria. Exclusion Filter settings are picked up by the Summarizer at specified regular intervals.
| 105

Custom ReportsYou can configure a report with customized filters, then save it for later viewing and analysis. Saving a Report allows you to view it later, by loading it through the Custom Reports interface. Custom Reports can either be saved directly, or configured through Universal Scheduled Reports. You can either load the report through the Custom Report pull-down on the Search Bar, or click Reports > Custom and choose from the list of saved Custom reports.
Regularly scheduled Custom Reports can be configured through the Universal Scheduled Reports interface, accessible through the Custom Reports icon in the upper right corner. These reports can be set up to be emailed to you on a regular schedule.
Custom Reports are available at the unit level for all appliances visible on the Firewall tab. The Log Analyzer must be enabled for the appliance.
The Manage Reports screen (Custom Reports > Manage Reports) allows you to view what Custom Reports are available and delete reports from the system.
For more information on configuring and scheduling custom Reports refer to the Universal Scheduled Reports section.
106 | Dell SonicWALL Analyzer 7.2 Administrator’s Guide

Chapter 6
Viewing SRA Reports
This chapter describes how to view SonicWALL Analyzer Secure Remote Access Reports. SRA reporting includes reports for the Web Access Firewall (WAF) and summarization for SRA appliances using Secure Remote Access (SRA).
This chapter contains the following sections:
• SRA Reporting Overview on page 107
• Using and Configuring SRA Reporting on page 109
• Viewing SRA Unit-Level Reports on page 112
• Viewing SRA Analyzer Logs on page 129
SRA Reporting OverviewThis section provides an introduction to the Secure Remote Access reporting feature. SonicWALL SRA appliances are protected by the user portal on the Web Application Firewall (WAF).This section contains the following subsections:
• SRA Reports Tab on page 107
• What is SRA Reporting? on page 108
• Benefits of SRA Reporting on page 108
• How Does SRA Reporting Work? on page 108
After reading the Analyzer SRA Reporting Overview section, you should understand the main steps to be taken in order to create and customize reports successfully.
For a general introduction to reporting, see Dell SonicWALL Analyzer Reporting Overview on page 59.
SRA Reports Tab
The SRA tab gives you access to the Secure Remote Access (SRA) Reports section of the Analyzer management interface. Reporting supports both graph and non-graph reports, and allows you to filter data according to what you wish to view.
| 107

What is SRA Reporting?
Secure Remote Access (SRA) reporting allows you to configure and design the way you view your reports and the manner in which you receive them. This feature offers various types of static and dynamic reporting in which you can customize the way information is reported.
SonicWALL Analyzer SRA reporting provides a visual presentation of User connectivity activity, Up_Down status, and other reports related to remote access. With SRA reporting, you are able to view your reports in enhanced graphs, create granular, custom reports, create scheduled reports, and search for reports using the search bar tool.
Custom reports are also available in SRA reporting. SonicWALL appliances managed with SRA provide Resource Activity reports for tracking the source, destination, and other information about resource activity passing through a SonicWALL SRA device that can then be saved as a Custom report, for later viewing.
Custom Reports can be created through an intuitive, responsive interface for customizing the report layout and configuring content filtering prior to generating the report. Two types of reports are available: Detailed Reports and Summary Reports. Both provide detailed information, but are formatted to meet different needs. A Detailed Report displays the data in sortable, resizable columns, while a Summary Report provides top level information in graphs that you can click to drill down for detailed information. By customizing the report, you can then save it for later viewing and analysis.
After you set up a Custom Report that meets your needs, you can save the report for later viewing, then manage it through the Custom Reports Manage Reports entry, or export the report as a PDF or CSV (Excel) file.
Benefits of SRA Reporting
SRA reports provide visibility into the resource use by logged in users, leading to policies that enhance the user experience and the productivity of employees. The following capabilities contribute to the benefits of the SRA reporting feature:
• SRA Detail Level Reports can track events to the minute or second of the day for forensics and troubleshooting
• Interactive charts allow drill-down into specific details
• Table structure with ability to adjust column width of data grid
• Improved report navigation
• Report search
• Scheduled reports
How Does SRA Reporting Work?
Syslog information for SonicWALL remote appliances is sent to the Analyzer syslog collector and uploaded to the Reports Database by the summarizer. The frequency of upload is nearly real-time: data is uploaded to the Reports database as soon as the Syslog Collector closes the file. The file is closed and ready for upload as soon as it reaches 10,000 MB per file or if the file has been open for three minutes, whichever comes first.
This database is saved using a date/time suffix, and contains tables full of data for each appliance. All the syslog data received by SonicWALL Analyzer is available in the database.
SRA Reporting supports scheduled reports to be sent on a daily, weekly, or monthly basis to any specified email address.
108 | Dell SonicWALL Analyzer 7.2 Administrator’s Guide
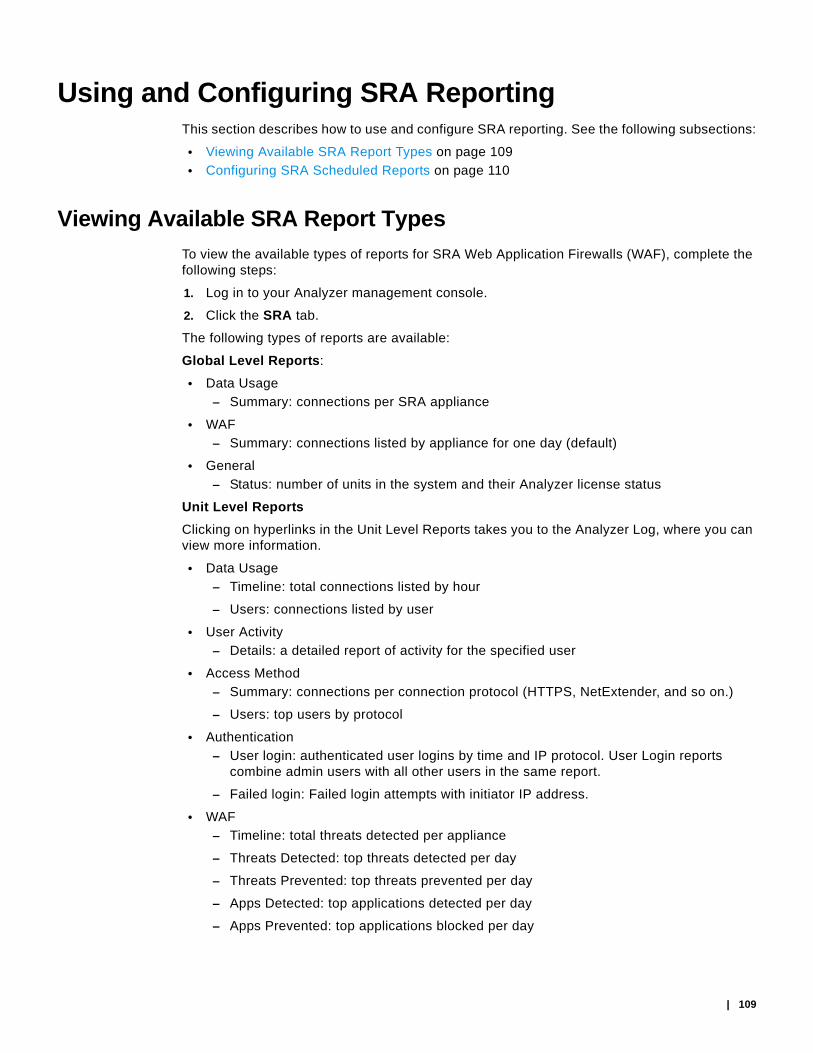
Using and Configuring SRA ReportingThis section describes how to use and configure SRA reporting. See the following subsections:
• Viewing Available SRA Report Types on page 109
• Configuring SRA Scheduled Reports on page 110
Viewing Available SRA Report Types
To view the available types of reports for SRA Web Application Firewalls (WAF), complete the following steps:
1. Log in to your Analyzer management console.
2. Click the SRA tab.
The following types of reports are available:
Global Level Reports:
• Data Usage
– Summary: connections per SRA appliance
• WAF
– Summary: connections listed by appliance for one day (default)
• General
– Status: number of units in the system and their Analyzer license status
Unit Level Reports
Clicking on hyperlinks in the Unit Level Reports takes you to the Analyzer Log, where you can view more information.
• Data Usage
– Timeline: total connections listed by hour
– Users: connections listed by user
• User Activity
– Details: a detailed report of activity for the specified user
• Access Method
– Summary: connections per connection protocol (HTTPS, NetExtender, and so on.)
– Users: top users by protocol
• Authentication
– User login: authenticated user logins by time and IP protocol. User Login reports combine admin users with all other users in the same report.
– Failed login: Failed login attempts with initiator IP address.
• WAF
– Timeline: total threats detected per appliance
– Threats Detected: top threats detected per day
– Threats Prevented: top threats prevented per day
– Apps Detected: top applications detected per day
– Apps Prevented: top applications blocked per day
| 109

– Users Detected: number of concurrent users per day
– Users Prevented: number of blocked users prevented per day
• Connections
– Timeline: a summary of offloaded connections under the group node per SRA appliance, listed for one day.
– Applications: offloaded connections by application
– Users: offloaded connections by user
• Analyzers
– Log Analyzer: logs of all activity
• Configuration: menus allow setting Report display options
– Log Analyzer Filter: applies filters to the system logs uploaded to the reporting database
• Events: these menus allow setting options
– Alert Settings: provides search functions, adding or removing Alerts
– Current Alerts: displays current applicable Alerts.Custom
Note You can use the Date Selector to select reports covering other intervals than those listed here.
Configuring SRA Scheduled Reports
SRA reports are scheduled through the Universal Scheduled Reports interface. Additionally, you can configure alerts and filter the syslog.
To configure SRA scheduled reports and summarization, click on the Schedule Report icon. The Universal Schedule Report menu comes up. For more information on scheduling and configuring reports, refer to the section on Universal Scheduled Reports.
Navigating Through Detailed SRA Reports
SRA reports display either summary or unit views, displayed in a Data Container. Information can be viewed in either chart (timeline or pie chart) form, or tabular (grid) format. The list of available reports allows you to navigate to a high-level or specific view. Data can be filtered by time constraints or data filters.
Drillable reports give access to additional information by clicking on hyperlinks to go to the Detail view. For some reports, you can go directly to the detail views by clicking Details in the Policies/Reports pane.
Data filtering can be applied either by using the Filter Bar, drilling down through hyperlinked data, or applying a filter to a drillable data column.
110 | Dell SonicWALL Analyzer 7.2 Administrator’s Guide

Viewing SRA Summary ReportsThe SRA group level Summary report displays all SRA interfaces under that group level node, along with the total number of threats detected on the specified day.
The SRA Summary report is available for Data Usage, Web Application Firewall (WAF), and Connections. It shows the number of connections handled by the SRA appliances on the specified day or interval. The grid-level reports lists each appliance by name, along with the number of connections. To view the Data Usage Summary report, complete the following steps:
Step 1 Click the SRA tab.
Step 2 Select the global icon.
Step 3 Expand the Data Usage, WAF, or Connections tree and click Summary. The Summary page displays.
For more information, click on an individual appliance in the TreeControl menu. More settings, as well as more detailed information, is available at the Unit View level.
| 111

Viewing SRA Unit-Level ReportsUnit View reports provide detail about Data Usage, Access Method, Authentication, WAF Access, Connections, and Uptime and Downtime. You can also view the results from the Analyzers or saved Custom Reports.
Viewing Unit-Level Data Usage Reports
Step 1 Click the SRA tab.
Step 2 Select the desired Unit.
Step 3 Expand the Data Usage entry and click Timeline to display the Report.
Step 4 The graph displays the number of connections to the selected SRA appliance during the desired interval. The current 24 hours is displayed by default.
The timeline contains the following information:
• Hour—when the sample was taken.
• Connections—number of connections to the SRA appliance
Step 5 To change the interval of the report, use the left arrow to click back a day at a time, or click on the Time Bar to access the Interval menu pull-down calendar.
Step 6 After selecting a date, click Search. The Analyzer Reporting Module displays the report for the selected day.
Note The date setting stays in effect for all similar reports during your active login session.
112 | Dell SonicWALL Analyzer 7.2 Administrator’s Guide

Viewing SRA Top Users Reports
The Top Users report displays the users who used the most connections on the specified date.
To view the Top Users report, complete the following steps:
Step 1 Click the SRA tab.
Step 2 Select the SRA appliance.
Step 3 Expand the Data Usage tree and click Users. The Top Users page displays.
Step 4 The pie chart displays the percentage of connections used by each user.
The table contains the following information for all users:
• Users—the user name
• Connections—number of connection events or “hits”
By default, the Analyzer Reporting Module shows yesterday’s report, a pie chart for the top six users, and a table for all users. To change the date of the report, click the Start field to access the pull-down calendar.
Step 5 To display a limited number of users, use the Search Bar fields.
Note This report allows you to drill down by user. Clicking on a user in either the chart or grid view takes you to the Log Analyzer.
| 113

Viewing User Activity Logs
Web User Activity logs allow you to filter results to view only the activity of a specific user.
The User Activity Analyzer provides a detailed report listing activity filtered by user. If a user report has been saved previously, bringing up the User Activity Analyzer displays a list of saved reports under the Filter Bar.
If you wish to create a new report, use the Filter Bar to create a new report.
Step 1 Click the Firewall tab.
Step 2 Select a SonicWALL appliance.
Step 3 Click on User Activity > Details to bring up the User Activity Analyzer. The User Activity Analyzer generates a Detail report based on the user name.
If no user activity reports were saved, only the Filter Bar displays, with the User filter preselected. You can enter a specific user name, or use the LIKE operator wildcards (*) to match multiple names.
Step 4 Enter the name of the user into the field and click Go (arrow) to generate the report.
The customized User Activity Details report displays a timeline of events, Initiators, Responders, Services, Applications, Sites visited, Blocked site access attempted, VPN access policy in use, user authentication, Intrusions, Initiator Countries, and Responder Countries associated with that particular user.
Data for a particular user might not be available for all of these categories.
Viewing Access Method Reports
Access Methods provide an overview of the protocols used to access the net. They are available as a summary pie chart or in a Top User report, both of which provide additional information on the access protocol of the specified user through the Log Analyzer.
114 | Dell SonicWALL Analyzer 7.2 Administrator’s Guide

Viewing the Access Summary Report
The Access Summary report provides an overview of the types of access protocols used. Clicking on a hyperlinked protocol entry takes you to the Log Analyzer view for more details.
To view the Summary Report:
Step 1 Click the SRA tab.
Step 2 Select a SRA appliance.
Step 3 Expand the Access Method tree and click Summary. The Access Method Summary page appears.
Step 4 Click on a section of the pie chart to obtain more details, or hover the mouse over an item on the Protocol column and right click Add Filter to narrow the results to a particular access protocol. The results display in the Log Analyzer report.
| 115

Viewing the Top Users Access Report
Step 1 Click the SRA tab.
Step 2 Select a SRA appliance.
Step 3 Expand the Access Method tree and click Users. The Top Users report appears.
In the chart view, you can click on either the pie chart or user list to obtain more information from the Log Analyzer. Results are filtered by user, and the settings added to the filter bar.
Alternatively, you can hover your mouse over a user in the User column of the grid view, then right click to filter results. For full details on that user, drill down by clicking on the user name in the column.
116 | Dell SonicWALL Analyzer 7.2 Administrator’s Guide

Viewing SRA Authentication User Login Report
The Authentication Summary report shows an overview of user logins and login attempts and disconnections by time, user, IP address, type of connection/disconnection, and amount of time the connection was established. Authentication reports are only available at the unit level.
Step 1 Click the SRA tab.
Step 2 Select a SRA appliance.
Step 3 Expand the Authentication tree and click User Login. The Authenticated User Login report appears.
Note All reports appear in the appliance’s time zone.
The user login report shows the login for users that logged on to the SRA appliance during the specified day.
The Report contains the following information:
• Time—the time that the user logged in
• User—the user name
• Initiator IP—the IP address of the user’s computer
• Message—the type of connection/disconnect
• Duration—the duration of the user login session
| 117

Viewing SRA Authentication Failed Login Report
The Authentication Failed Login report shows an overview of user logins and login attempts and disconnections by time, user, IP address, type of connection/disconnection, and amount of time the connection was established. Authentication reports are only available at the unit level.
Step 1 Click the SRA tab.
Step 2 Select a SRA appliance.
Step 3 Expand the Authentication tree and click User Login. The Authenticated User Login report appears.
Note All reports appear in the appliance’s time zone.
The failed login report shows the login attempts for users that attempted to log on to the SRA appliance during the specified day.
The Report contains the following information:
• Time—the time that the user logged in
• User—the user name
• Initiator IP—the IP address of the user’s computer
• Message—about the type of failed attempt
118 | Dell SonicWALL Analyzer 7.2 Administrator’s Guide

Viewing Web Application Firewall (WAF) Reports
The Web Application Firewall (WAF) Summary report contains information on the number of connections incurring Application Firewall activity logged by a SonicWALL appliance during each hour of the specified day, or at the global level, for all SonicWALL appliances for the day.
The Web Application Firewall provides the following Reports:
• Timeline
• Threats Detected
• Threats Prevented
• Apps Detected
• Apps Prevented
• Users Detected
• Users Prevented
Clicking on hyperlinks in these reports take you to the Log Analyzer view, for more details.
To view reports:
Step 1 Click on the SRA tab and either GlobalView for the group or by individual appliance in the TreeControl view on the left tab of the interface.
Step 2 Click Reports on the middle tab.
Step 3 Select the WAF entry to expand it and click on the Report you want to view.
| 119

Viewing Connections Timeline
The WAF Connections timeline displays connections to the web firewall over time. To view the Web Application Firewall Summary report, complete the following steps:
Step 1 Click the SRA tab.
Step 2 Select a SonicWALL appliance.
Step 3 Click Connections > Timeline
The Timeline displays the unit level summary report containing Offloaded Connections information for an individual SRA system.
Click on the hyperlinks available in this report to go to the Log Analyzer.
120 | Dell SonicWALL Analyzer 7.2 Administrator’s Guide

Viewing WAF Top Threats Detected
The Threats Detected report displays the threats detected, according to signature, classification, and severity. To view the Web Application Firewall Top Threats Detected report, complete the following steps:
Step 1 Click the SRA tab.
Step 2 Select a SonicWALL appliance.
Step 3 Click on the Reports tab.
Step 4 Click WAF > Threats Detected.
The Top Threats Detected screen shows the top threats detected by the firewall, and gives details on the Threat Signature, Threat Classification, Threat Severity, in addition to total threats detected.
Click on the hyperlinks available in this report to go to the Log Analyzer.
| 121

Viewing WAF Top Threats Prevented
To view the Web Application Firewall Top Threats Prevented report, complete the following steps:
Step 1 Click the SRA tab.
Step 2 Select a SonicWALL appliance.
Step 3 Click on the Reports tab.
Step 4 Click WAF > Threats Prevented.
The Top Threats Prevented view shows Top Threats detected and prevented by the web firewall, with details on the Threat Signature, Threat Classification, Threat Severity, in addition to total threats detected.
122 | Dell SonicWALL Analyzer 7.2 Administrator’s Guide

Viewing WAF Top Applications Detected
To view the Web Application Firewall Top Applications Detected report, complete the following steps:
Step 1 Click the SRA tab.
Step 2 Select a SonicWALL appliance.
Step 3 Click on the Reports tab.
Step 4 Click WAF > Applications Detected.
The Top Applications Detected report lists applications with the most number of threats detected by the WAF process. It displays the Application IP, URI and the Detections in order of the number of detections.
Click the hyperlinks available in this report to go to the Log Analyzer.
| 123

Viewing WAF Top Applications Prevented
To view the Web Application Firewall Top Applications Detected report, complete the following steps:
Step 1 Click the SRA tab.
Step 2 Select a SonicWALL appliance.
Step 3 Click on the Reports tab.
Step 4 Click WAF > Applications Detected.
The Top Applications Prevented report lists applications with the most number of threats prevented by the Web Application Firewall. It displays the Application IP, URI and the preventions in order of the number of threats prevented by the firewall.
Click the hyperlinks available in this report to go to the Log Analyzer.
Viewing WAF Top Users Detected
The Top Users Detected report lists the top authenticated users from whom threats have been detected by the Web firewall. It displays the User Name, User Agent and the Detections in order of the number of detections.
The Top Users report displays the users who made the most VPN connections on the specified date.
To view the Top Users report, complete the following steps:
Step 1 Click the SRA tab.
Step 2 Select a SonicWALL appliance.
Step 3 Click on the Reports tab.
124 | Dell SonicWALL Analyzer 7.2 Administrator’s Guide

Step 4 Click WAF > Users Detected. The Top Users page displays.
Step 5 The pie chart displays the VPN connections for the top VPN users.
Step 6 The table contains the following information by default:
– Users—the user’s login. You can drill down to learn the IP address of the user.
– Agent—the user agent and version being used.
– Detections—the number of VPN connections in order of number of detections.
– MBytes—the number of megabytes transferred.
Step 7 By default, the Analyzer Reporting Module shows yesterday’s report, a pie chart, and the ten top users. To change the date of the report, use the Search Bar and click the Start or End field to access the pull-down calendar, or click More Options for report display settings.
| 125

Viewing WAF Top Users Prevented
To view the Web Application Firewall Top Users Prevented report, complete the following steps:
Step 1 Click the SRA tab.
Step 2 Select a SonicWALL appliance.
Step 3 Click the Reports tab.
Step 4 Click WAF > Users Prevented.
The Top Users Prevented report lists the top authenticated users from whom threats have been prevented by the SonicWALL web firewall. It displays their user name, user agent, and preventions, in order of the number of preventions.
Click the hyperlinks available in this report to go to the Log Analyzer.
126 | Dell SonicWALL Analyzer 7.2 Administrator’s Guide

Viewing Connection Reports
Connection reports show the number of connections, as well as throughput data, application and user data.
Viewing the Offloaded Connection Timeline
The Offloaded Connection Summary report lists the total connections made for all offloaded applications for one day, displayed per hour per day. The grid section displays peak connections per second, peak throughput, average connections per second, and average throughput per hour.
To view the Offloaded Connections Timeline report, complete the following steps:
Step 1 Click the SRA tab.
Step 2 Select a SonicWALL appliance.
Step 3 Click the Reports tab.
Step 4 Click Connections > Timeline.
The Offloaded Connections Summary report displays.
Viewing the Offloaded Connections Top Applications Report
The Top Applications report lists those applications having the most offloaded connections, as well as information about the application and throughput.
To view the report:
Step 1 Click the SRA tab.
Step 2 Select a SonicWALL appliance.
| 127
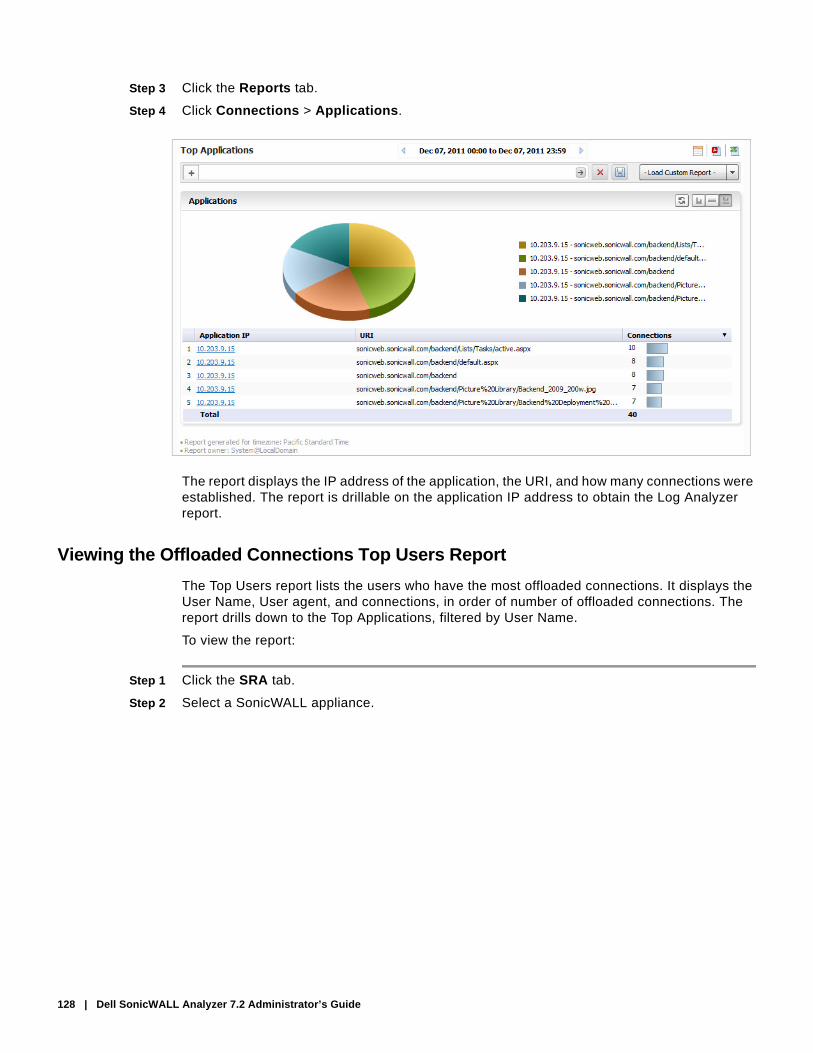
Step 3 Click the Reports tab.
Step 4 Click Connections > Applications.
The report displays the IP address of the application, the URI, and how many connections were established. The report is drillable on the application IP address to obtain the Log Analyzer report.
Viewing the Offloaded Connections Top Users Report
The Top Users report lists the users who have the most offloaded connections. It displays the User Name, User agent, and connections, in order of number of offloaded connections. The report drills down to the Top Applications, filtered by User Name.
To view the report:
Step 1 Click the SRA tab.
Step 2 Select a SonicWALL appliance.
128 | Dell SonicWALL Analyzer 7.2 Administrator’s Guide

Step 3 Click the Reports tab.
Step 4 Click Connections > Users.
The report drills down to the Top Applications, filtered by the User Name.
Viewing SRA Analyzer LogsAnalyzer logs contain detailed information from the system logs on each transaction that occurred on the SRA appliance.
The Log Analyzer allows advanced users to examine raw data for status and troubleshooting information. The Analyzer logs contain detailed information from the system logs on each transaction that occurred on the specified SonicWALL appliance. These logs can be filtered or drilled down to further narrow the focus of the information, allowing analysis of data about alerts, traffic, bandwidth consumption, and so on. The Log Analyzer is only available at the individual unit level.
The SRA Log Analyzer contains information about Initiator and Responder IP addresses, Status Messages, User and Services used, as well as the time and duration of the session.
You can filter the log on IP address, Message, User, or Service.
Clicking hyperlinks on SRA Reports takes you the Analyzer Log view of the information. Log information can be saved by using the Save icon on the Filter Bar for a specific report. This report then appears in the list of Custom Reports.
For more information on the Log Analyzer, refer to Using the Log Analyzer on page 100.
| 129

Saving System Log Reports
To load the report for later viewing, either:
• Click Load Custom Report and select from the pull-down list of saved Custom reports.
• Click on Analyzers > Log Analyzer
Note The Log Analyzer entries display raw log information for every connection. Depending on the amount of traffic, this can quickly consume a large amount of space in the database. It is highly recommended to be careful when choosing the number of days of information that are stored. For more information, see Configuring SRA Scheduled Reports on page 110 and Universal Scheduled Reports.
You can also click on the print icon to save a log to PDF of Excel format.
Note Saved system logs are limited in the number of rows that are saved. If saving to PDF, a maximum of 2500 rows are saved. If saving to Excel, a maximum of 10,000 rows are saved.
Viewing the Analyzer Log for a SRA Appliance
To view the Log, complete the following steps:
Step 1 Click the SRA tab.
Step 2 Select a SRA appliance.
Step 3 Expand the Analyzer tree and click on Log Analyzer. The saved Log report page displays.
130 | Dell SonicWALL Analyzer 7.2 Administrator’s Guide

Syslog Exclusion Filter
Filters allow you to fine-tune what information is displayed in Reports. Filters allow you to narrow search results and view subsets of report data.
Use this screen to manage the volume of syslog uploaded to the reporting database. The factory default filters are configured to upload only the syslog needed to generate the reports. This can be fine tuned further, but it required advanced knowledge of the syslog and consequently should only be completed by experts. Adding a wrong filter could lead to receiving a Report Could Not Be Generated message.
Step 1 To add a filter, click on Configuration > Filters.
The Syslog Exclusion Filter page comes up. This page allows you to view filters currently applied, add filters, or remove filters.
Step 2 To configure and add a filter, click Add Filter. The Add Filter menu appears.
Step 3 Specify the field you want to modify, and select an operator and value. Click Update.
| 131

Custom ReportsYou can configure a report with customized filters, then save it for later viewing and analysis. Saving a Report allows you to view it later, by loading it through the Custom Reports interface. Custom Reports can either be saved directly, or configured through the Universal Scheduled Reports. You can either load the report through the Custom Report pull-down on the Search Bar, or click Reports > Custom and choose from the list of saved Custom reports.
Custom Reports are available at the unit level for all appliances visible on the SRA tab. The Log Analyzer must be enabled for the appliance.
The Manage Reports screen (Custom Reports > Manage Reports) allows you to view what Custom Reports are available and delete reports from the system.
For more information on Custom Reports, refer to Custom Reports on page 106.
132 | Dell SonicWALL Analyzer 7.2 Administrator’s Guide

Chapter 7
Viewing CDP Reports
This chapter describes how to generate and view Continuous Data Protection (CDP) Reports on the SonicWALL Analyzer. CDP is a secure backup solution that runs continuously, backing up data from assigned agents, such as servers, laptops, and PCs.
This chapter contains the following sections:
• CDP Reporting Overview on page 133
• How to View CDP Reports on page 134
CDP Reporting OverviewThis section provides an introduction to the CDP reporting feature. This section contains the following subsections:
• CDP Reports Tab on page 133
• What is CDP Reporting? on page 133
After reading the Analyzer CDP Reporting Overview section, you should understand the main steps to be taken in order to create and customize reports successfully.
For a general introduction to reporting, see Dell SonicWALL Analyzer Reporting Overview on page 59.
CDP Reports Tab
The CDP tab gives you access to the Continuous Data Protection (CDP) Reports section of the Dell SonicWALL Analyzer management interface. Reporting supports both graph and non-graph reports, and allows you to filter data according to what you wish to view. It supports multiple product-licensing models.
What is CDP Reporting?
Reports on SonicWALL Continuous Data Protection (CDP) appliances allows administrators to monitor online status and disk space usage, either globally within a network, or by appliance. CDP reporting also provides detailed backup reports for individual appliances.
| 133

The Filter Bar provides an intuitive, responsive interface for customizing the CDP report layout and configuring content filtering to focus on specific times and/or details. Hyperlinks allow access to additional reports data, by clicking on column entries to drill down to the desired detail view. By using these functions, you can:
• Track events to the minute or second of the day for forensics and troubleshooting
• Drill-down to find specific details
• Track appliance activity
How to View CDP ReportsTo view the available types of reports for CDP, complete the following steps:
1. Log in to your Dell SonicWALL Analyzer management console.
2. Click the CDP tab.
The following types of reports are available:
Global Level Reports:
• Capacity
– Summary: disk capacity listed by appliance for one day (default)
Unit Level Reports
• Backup Activity
– Top Agents: total connections listed by hour
– Top File Extensions: connections listed by user
– Backup Details
– User Backup Activity
Drilling down through the Group Level Capacity Summary report by appliance takes you to the Unit Level Summary Report. By drilling down through hypertext links in the Summary, you access the Detail-level reports.
Click Backup Activity > Backup Details to go directly to the Detail report.
For more information on how to navigate through the Reports, refer to Navigating Dell SonicWALL Analyzer Reporting on page 63.
134 | Dell SonicWALL Analyzer 7.2 Administrator’s Guide

Viewing the Capacity Summary Report
The Capacity report provides an overview of disk usage, either for multiple devices through the Global View, or by individual unit, broken down by appliance or agent. Clicking on an appliance link in the global summary takes you to a Summary report for the agents of that appliance.
To view the Capacity report:
Step 1 Click the CDP tab.
The report includes the used and free quotas of the capacity for each appliance, as well as what percentage of that capacity is free.
| 135

Step 2 To view the Capacity Summary for an individual unit, click on the unit in the TreeControl panel.
A detailed view of the agents and quotas for the unit appears.
Click the agent name to add a filter and obtain a Detail view of the backup information.
Viewing Unit Backup Activity
You can view backups for Top Agents and Top File Extensions for a system. These files are drillable. You can also Click Backup Details to go directly to a Detail report.
136 | Dell SonicWALL Analyzer 7.2 Administrator’s Guide

Viewing the Top Agents Report
The Top Agents report lists the name of the agent, backup size, size of the compressed disk file in KB, and policy. The agents are displayed as a pie chart.
To view the Top Agents report, complete the following steps:
Step 1 Click the CDP tab.
Step 2 Click the entry for the desired SonicwALL appliance.
Step 3 Click on Backup Activity > Top Agents.
Drilling down takes you to the Detail level report, listing the backed up appliance and listing its backed up files and folders. The Detail report also provides status on whether the backup operation was successful. You can shortcut to an unfiltered version of the Detail report by clicking Backup Details.
| 137

Top File Extensions
The Top File Extensions report lists the extension, backup size, size of the compressed disk file in KB, and number of backed up files.
Step 1 Click the CDP tab.
Step 2 Click the entry for the desired SonicWALL appliance.
Step 3 Click on Top File Extensions on the Reports tab.
Drilling down takes you to the Detail level report, listing the backed up appliance and its files and folders
Viewing the Detail View Report
SonicWALL GMS provides a shortcut to the Detail view of CDP reports. The Detail view includes: what appliances were backed up and when, whether the operation was successful, the agent for the appliance, and the file and folder names backed up, with respective sizes of both original files and folders and backed up files and folders.
To see the Detail view:
Step 1 Click the CDP tab.
Step 2 Click on the entry for the desired SonicwALL appliance.
Step 3 Click Backup Details on the Reports tab.
138 | Dell SonicWALL Analyzer 7.2 Administrator’s Guide

A detailed view, similar to what you might see in the Log Analyzer, appears. The CDP detail view is not organized into graph and grid view sections like the Firewall and SRA views. However, by clicking the links, you can filter results.
If desired, the Detail view of backup activity can be saved. It then appears under Custom Reports, and in the Manage Reports list.
For more information on Custom reports, refer to Custom Reports on page 83.
| 139

Viewing the User Backup Report
Viewing User Backup Reports takes you to the Detail view of the Backup report. The Detail view includes: what appliances were backed up and when, whether the operation was successful, the agent for the appliance, and the file and folder names backed up, with respective sizes of both original files and folders and backed up files and folders.
To see the Detail view:
Step 1 Click the CDP tab.
Step 2 Click on the entry for the desired SonicWALL appliance.
Step 3 Click Backup > User Backups on the Reports tab.
You can save the User Backup Report as a Custom report, for later viewing. For more information on Custom reports, refer to Custom Reports on page 83.
140 | Dell SonicWALL Analyzer 7.2 Administrator’s Guide

Chapter 8
Configuring User Settings
Configuring User SettingsThis chapter describes how to configure the user settings that are available in the Console panel on the User Settings > General page that provides a way to change the Analyzer administrator password, the Analyzer inactivity Timeout, and pagination settings.
To configure the user settings that are available in the Console panel on the User Settings > General page, complete the following steps:
Step 1 Enter the existing Dell SonicWALL Analyzer password in the Current Password field.
Step 2 Enter the new Dell SonicWALL Analyzer password in the New Password field.
Step 3 Reenter the new password in the Confirm New Password field.
Note Password fields are grayed out for users on a Remote Domain.
Step 4 The Inactivity Timeout period specifies how long Dell SonicWALL Analyzer waits before logging out an inactive user. To prevent someone from accessing the Dell SonicWALL Analyzer UI when Dell SonicWALL Analyzer users are away from their desks, enter an appropriate value in the Inactivity Timeout field. You can disable automatic logout completely by entering a “-1” in this field. The minimum is five minutes and the maximum is 120 minutes.
| 141

Step 5 Select a value between 10 and 100 in the Max Rows Per Screen field. This value applies only to non-reporting related paginated screens.
Step 6 When you are finished, click Update. The settings are changed. To clear all screen settings and start over, click Reset.
Note The maximum size of the Dell SonicWALL Analyzer User ID is 24 alphanumeric characters. The password is one-way hashed and any password of any length can be hashed into a fixed 32 character long internal password.
142 | Dell SonicWALL Analyzer 7.2 Administrator’s Guide

Chapter 9
Configuring Log Settings
This section describes how to configure Log Settings. This includes adjusting settings on deleting log messages after a certain period of time, and setting criteria for viewing logs.
This chapter includes the following sections:
• Configuring Log Settings on page 143
• Configuring Log View Search Criteria on page 144
Configuring Log SettingsIn the Log > Configuration screen, you can delete or archive Analyzer log messages. The Archive process archives the data to the “archivedLogs” directory as per the Archive Log Schedule, before the data is deleted from the database.
To configure Log settings, select between the following options:
• Delete Log Messages Older Than — Select the month, day, and year, and then click the Delete link.
• Enable Archive — Select this check box to enable Analyzer log message archiving.
• Archive Analyzer log messages for — Select the number of months to archive log messages.
| 143

• Max Num of Log Message Files — Select the maximum number of monthly archive files kept in the achivedLogs folder.
• Delete Data Every — Select a reoccurring day and time to delete data.
• Archive Format — Select the type of format to archive the Analyzer log messages. Choose between CSV or HTML.
• Update — Click Update after your settings are selected.
Note The archive process first archives the data to archivedLogs directory as per the “Archive Log Schedule” and then the data is deleted from the database.
For UMA deployments, to offload the archived log files to local drive, navigate to /appliance interface > Systems > File Manager page.
Configuring Log View Search CriteriaThe Dell SonicWALL Analyzer log keeps track of changes made within the Dell SonicWALL Analyzer UI, logins, failed logins, logouts, password changes, scheduled tasks, failed tasks, completed tasks, raw syslog database size, syslog message uploads, and time spent summarizing syslog data. To view the Dell SonicWALL Analyzer log, complete the following steps:
Step 1 Click the Console tab, expand the Log tree, and click View Log. The View Log page displays.
Step 2 Each log entry contains the following fields:
– #—specifies the number of the log entry.
– Date—specifies the date of the log entry.
– Message—contains a description of the event.
– Severity—displays the severity of the event (Alert, Warning, or FYI).
144 | Dell SonicWALL Analyzer 7.2 Administrator’s Guide

– SonicWALL—specifies the name of the SonicWALL appliance that generated the event (if applicable).
– User@IP—specifies the user name and IP address.
Step 3 To narrow the search, configure some of the following criteria:
Tip You can press Enter to navigate from one form element to the next in this section.
– Select Time of logs—displays all log entries for a specified range of dates.
– SonicWALL Node—displays all log entries associated with the specified SonicWALL appliance.
– Analyzer User—displays all log entries with the specified user.
– Message contains—displays all log entries that contain the specified text. This input field provides an auto-suggest functionality that uses existing log message text to predict what you want to type. It fills in the field with the suggested text and you can either press Tab to accept it or keep typing. Different suggestions appear as you continue to type when the log messages match your input.
– Severity—displays log entries with the matching severity level:
• All (Alert, Warning, and FYI)–where FYI mean “For Your Information”
• Alert and Warning
• Alert
– Select Match case to make the SonicWALL Node, User, and Message contains search fields case sensitive.
– Select one of Exact Phrase, All Words, or Any Word.
• Exact Phrase matches a log entry that contains exactly what you typed in the Message contains field
• All Words matches a log entry that contains all the words you typed in the Message contains field, but the words can be non-consecutive or in any order
• Any Word matches a log entry that contains any of the words you typed in the Message contains field
Step 4 To view the results of your search criteria, click Start Search. To clear all values from the input fields and start over, click Clear Search. To save the results as an HTML file on your system, click Export Logs and follow the on-screen instructions.
Step 5 To configure how many messages are shown per screen, enter a new value between 10 and 100 in the Show Messages Per Screen field. (default: 10). Click Next to display the next page, or click Previous to display the preceding page.
| 145

146 | Dell SonicWALL Analyzer 7.2 Administrator’s Guide

Chapter 10
Configuring Console ManagementSettings
This chapter describes the settings available on the Console panel in the Management section. The following sections are found in this chapter:
• Configuring Management Settings on page 147
• Configuring Management Alert Settings on page 150
• Configuring Management Sessions on page 151
Configuring Management Settings On the Console > Management > Settings page, you can configure email settings, set the system debug level, synchronize model codes information, and configure password security settings.
This section describes the following Settings topics:
• Configuring Email Settings on page 148
• Configuring System Debug Level on page 148
• Enforcing Password Security on page 149
• Synchronizing Model Codes on page 149
| 147

Configuring Email Settings
An SMTP server and an email address are required for sending Analyzer reports.
If the Mail Server settings are not configured correctly, you will not receive important email notifications, such as:
• System alerts for your Dell SonicWALL Analyzer deployment performance
• Availability of product updates, hot fixes, or patches
• Scheduled Reports
To configure these email settings:
Step 1 Click the Console tab.
Step 2 Expand the Management tree and click Settings. The Settings page displays.
Step 3 Type the IP address of the Simple Mail Transfer Protocol (SMTP) server into the SMTP Server field. This server can be the same one that is normally used for email in your network. Type in the SMTP Port number to use for email service.
Step 4 Enter the email account name and domain that appears in messages sent from the Dell SonicWALL Analyzer into the Sender e-Mail Address field.
Step 5 Enter the email account name and domain that appears in messages sent from the Dell SonicWALL Analyzer into the Administrator e-Mail Address field. You can use User Authentication for this user by checking the box.
Step 6 When finished in the Settings page, click Update. To clear the screen settings and start over, click Reset.
Configuring System Debug Level
Dell SonicWALL Analyzer provides the System Debug level option to control the debug messages sent to the log file.
To configure this setting:
Step 1 Select a debug level from the System Debug level drop-down list. The range is 0-3 where a level of 0 provides no debug log messages and a level of 3 provides the maximum number of debug messages.
Step 2 When finished in the Settings page, click Update. To clear the screen settings and start over, click Reset.
148 | Dell SonicWALL Analyzer 7.2 Administrator’s Guide

Enforcing Password Security
Dell SonicWALL Analyzer supports enforced password rotation for enhanced security compliance.
To enable and configure enforced password rotation:
Step 1 Select Enforce Password Security.
Step 2 In the Number of days to force password change field, enter a value. The default is 90. Dell SonicWALL Analyzer prompts the administrator to change the admin account password after the specified number of days.
Step 3 When finished in the Settings page, click Update. To clear the screen settings and start over, click Reset.
Show Legacy (pre Analyzer 7.2) Reports
After the upgrade to Analyzer 7.2 new reports can only be generated using the new Analyzer reporting infrastructure. Old Viewpoint reports can be viewed under legacy reports session (it is not possible to view both 7.2 and pre-7.2 reports in the same session). Reports generated by pre-7.2 releases of SonicWALL Analyzer are still available for viewing. Analyzer 7.2 Reporting is not compatible with earlier versions, but reports generated by earlier versions are still accessible under the Analyzer reporting Infrastructure.
To view legacy reports, complete the following steps:
Step 1 Select Show Legacy (pre Analyzer 7.2) Reports.
Step 2 Log out of SonicWALL Analyzer.
Step 3 Log back in to SonicWALL Analyzer using administrator credentials.
Synchronizing Model Codes
The Sync Model Codes feature accommodates new SonicWALL product introductions without the need for Analyzer update. When SonicWALL updates the corporate server (MySonicWALL) with a new product code, it then becomes available to Analyzer. The task is scheduled to run every 24 hours and is also available manually.
To synchronize model codes immediately:
Step 1 On the Console > Management > Settings page, click Sync Model Codes information now.
Step 2 A short time later the page is updated to display the synchronization status at the top.
| 149

Configuring Management Alert SettingsThe Alert Settings page specifies which email addresses receive email alerts and notifications during specific times.
To configure the alert notification settings, complete the following steps:
Step 1 Click the Console tab, expand the Management tree and click Alert Settings. The Alert Settings page displays.
Step 2 Configure the email address(es) that will receive notifications and the times they are to receive them:
– Schedule 1—Specifies who receives notifications during the first weekday schedule. Enter one or more email addresses (separated by commas) and specify the start and end time for the shift.
– Schedule 2—Specifies who receives notifications during the second weekday schedule. Enter one or more email addresses (separated by commas) and specify the start and end time for the shift.
– Schedule 3—Specifies who receives notifications during the third weekday schedule. Enter one or more email addresses (separated by commas) and specify the start and end time for the shift.
– Saturday—Specifies who receives notifications on Saturday. Enter one or more email addresses (separated by commas) and specify the start and end time for the shift.
– Sunday—Specifies who receives notifications on Sunday. Enter one or more email addresses (separated by commas) and specify the start and end time for the shift.
Step 3 Select whether the email alert are to be sent as HTML, Plain Text, or Plain Text (Pager). The Pager setting sends a very short email to ensure that the email is not cut off by the character limits of some pagers.
Step 4 When you are finished, click Update. The settings are saved.
150 | Dell SonicWALL Analyzer 7.2 Administrator’s Guide

Configuring Management Sessions The Sessions page of the Management section of the Console allows you to view session statistics for currently logged in users and to end selected sessions.
Managing Sessions
On occasion, it might be necessary to log off other user sessions. To do this, complete the following steps:
Step 1 Click the Console tab, expand the Management tree and click Sessions. The Sessions page displays.
Step 2 When more than one session is active, a check box is displayed next to each row. Select the check box of each user to log off and click End selected sessions. The selected users are logged off.
| 151

152 | Dell SonicWALL Analyzer 7.2 Administrator’s Guide

Chapter 11
Managing Reports in the Console Panel
This section describes how to configure reporting settings on the Console panel. These include how often the summary information is updated, the number of days that summary information is stored, and the number of days that raw data is stored.
The following sections are included in this chapter:
• Summarizer on page 153
• Syslog Exclusion Filter on page 159
• Email/Archive on page 160
SummarizerThis section contains the following subsections:
• About Summary Data in Reports on page 153
• Summarizer Settings and Summarization Interval for CDP on page 154
• Configuring the Data Deletion Schedule Settings on page 156
• Configuring Data Storage on page 157
• Configuring Hostname Resolution on page 158
About Summary Data in Reports
These reports are constructed from the most current available summary data. In order to create summary data, the Analyzer Reporting Module must parse the raw data files.
When configuring Analyzer Reporting using the screens on the Console panel under Reports, you can select the amount of summary information to store. These settings affect the database size, be sure there is adequate disk space to accommodate the settings you choose.
Additionally, you can select the number of days that raw syslog data is stored. The raw data is made up of information for every connection. Depending on the amount of traffic, this can quickly consume an enormous amount of space in the database. Analyzer creates a new 2GB database for raw syslog data everyday. Be very careful when selecting how much raw information to store.
| 153

Summarizer Settings and Summarization Interval for CDP
SonicWALL CDP appliances send their syslog packets to Dell SonicWALL Analyzer through UDP packets. When summarization is enabled, the Summarizer processes those files and stores the data in the summary databases at the interval you specify.
See the following sections:
• Enabling Report Summarization for CDP Appliances on page 154
• Setting the Reports Data Summarization Interval on page 154
• Using Summarize Now on page 155
Enabling Report Summarization for CDP Appliances
To globally enable the summarization of report data that is necessary for viewing reports, complete the following:
Step 1 On the Console panel, navigate to Reports > Summarizer.
Step 2 Under Summarizer Settings, select Enable Report Summarization.
Step 3 Click Update.
Setting the Reports Data Summarization Interval
The Summarizer processes syslog data sent from SonicWALL CDP appliances and stores the processed data in the summary databases at the interval you specify. When a CDP appliance is configured to communicate with Analyzer, you need to verify that the summarizer is scheduled to collect and process data for this unit at an appropriate interval.
To configure the summarization interval, complete the following steps:
Step 1 Click the Console tab, expand the Reports tree and click Summarizer. The CDP Summarizer page displays.
Step 2 Under Reports Data Summarization Interval, important information about the Summarizer is displayed. Use the Summarize every pull-down lists to specify how often in hours and minutes the Analyzer Reporting Module should process syslog data and update summary information.
Step 3 Click Update to the right of this field.
Step 4 To specify the next summarization time, enter a date in the form mm/dd/yyyy in the Next Scheduled Run Time field, and select the hour and minute values from the pull-down lists.
Step 5 Click Update to the right of this field.
154 | Dell SonicWALL Analyzer 7.2 Administrator’s Guide

To update the summary information now, click Summarize Now. Dell SonicWALL Analyzer automatically processes the latest information and makes it available for immediate viewing.
For more information about using and verifying the Summarize Now option, see Using Summarize Now on page 155.
Note This does not affect the normally scheduled summarization updates on Analyzer.
Using Summarize Now
The Summarize Now feature allows the administrator to create instant summary reports without affecting the regularly scheduled summary reports. You can use Summarize Now to test that the Summarizer is gathering data for a managed unit. The SonicWALL Analyzer Summarize Now feature is located in the Console tab under Reports > Summarizer. The SonicWALL Analyzer Summarizer creates summary reports by default every eight hours. Summary reports can be configured by the administrator to occur every 15 minutes to every 24 hours.
To use the Summarize Now feature, complete the following tasks:
Step 1 Click the Console tab, expand the Reports tree and click Summarizer. Click Summarize Now to summarize data immediately.
Step 2 You should see a pop-up window verifying that you want to summarize the data now. Summarizing data using Summarize Now is a one-time action and does not affect the scheduled summary. Click OK to continue.
Step 3 To verify summarization, navigate to Log > View Log in the left pane. Search for the message Report Data Summarized to verify that the Summarize Now action has completed.
Step 4 When Summarize Now has completed, click the Firewall tab at the top of the screen. In the left pane, click GlobalView or click an appliance.
Note You might see incomplete data if you view the Summary section of a selected report before the Summarize Now process is complete. Wait for the Report Data Summarized message to be displayed in Log > View Log.
| 155

Step 5 In the center pane, click a report to expand it, then click Summary underneath it. For example, click Capacity, then click Summary to review the summarized CDP capacity usage data.
Step 6 Navigate to the Summary section of other reports in the center pane to see other summarized data.
Configuring the Data Deletion Schedule Settings
Syslog files sent from SonicWALL appliances are stored on the system, and are consolidated into the syslog database. The Summarizer processes the syslog data and stores the processed data in the summary database. After the configured period of syslog storage, the syslog data can be periodically deleted from the system. This is necessary, as the syslog files and database can consume a lot of space on the file system.
This section of the Summarizer page also provides a way to delete summarized data for a certain date. For example, if summarized data is kept for a long time, such as 90 days, then you could use this option to remove some summarized data from a particular date within the 90 day period if the stored data was becoming too large.
Tip Run your database maintenance jobs soon after the completion of the scheduled tasks
configured on this page for summarizing data and deleting old syslog data.
Analyzer requires large amounts of disk space for raw data storage. In previous versions, the maximum raw syslog database size was 2GB. Analyzer now provides enhanced database capacity by creating a new 2GB database everyday. Each file name includes the date it was created for easy reference. Raw syslog data is used to create Custom Reports for Firewall, SRA, and CDP appliances.
156 | Dell SonicWALL Analyzer 7.2 Administrator’s Guide

To configure the syslog and summarized data deletion settings, complete the following:
Step 1 On the Console panel, navigate to Reports > Summarizer.
Step 2 Under Data Deletion Schedule, select the day and time for deletion in the hour and minute widget. Syslog data is deleted at this time only after being stored for the number of days configured. You specify how long to keep the date in Data Storage Configuration. This field allows you to specify the data address of the Summarizer, how long to keep reporting data (in months), and how long to keep the raw syslog data (in months).
Step 3 Click Update to the right of this field.
Configuring Data Storage
Sets the amount of time that reporting data and raw syslog data is stored.
Step 1 Click Summarizer at: drop-down menu, then select the desired summarizer IP address.
Step 2 Click Keep Reporting Data drop-down menu, then select the number of months to archive the data. Reporting data can be archived for a minimum of one month and a maximum of 36 months.
Step 3 Click Keep Raw Syslog Data Files drop-down menu, then select the number of months to archive the data files. To disable the archiving of raw syslog data files, set the value to zero. The maximum amount of time to store raw syslog data files is 36 months.
Tip If you would like to store data for longer than 36 months, you can create scheduled scripting
to move data that has been processed and stored in “//syslog/ArchivedSyslog/*.zip …” to a
mapped network share for long-term storage.
| 157

Configuring Hostname Resolution
Hostname Resolution in the Reports > Summarizer page is configured for source IP addresses with missing hostnames while inserting the data in the database. This means that the reports show both the initiator IP address and the initiator hostname in the reports whenever applicable.
• Enabled Reverse Hostname Resolution — Reverse hostname resolution is disabled by default. Enable this option for Analyzer to lookup for missing hostnames.
Note Enabling hostname lookup increases the time taken to process syslogs. All syslogs that need resolution are processed separately in parallel to normal syslog processing. This might slow down the summarizer, increase the memory, and consume more CPU cycle. Also, the memory and CPU are impacted further by changing the default configurations of the Lookup thread count, Scan every, Refresh Resolved Hostname Cache every.
Any changes to the Hostname Resolution Configuration take effect during the next summarizer run.
• Lookup thread count — Signifies how many threads are processing the lookup in parallel. The larger the number, the faster the processing.
Note Increasing this number also increases the load on the summarizer instance.
• Scan Every — Analyzer dumps syslogs with missing hostnames to a particular folder. This time indicates how long it waits to scan the folder for new files.
• Refresh Resolved Hostname Cache every — The hostname that is looked up for an IP address is cached. This time indicates how long the hostname is kept in the cache, after that it again looks up the hostname for that IP address.
• Update — Click this button when you are finished configuring the settings.
• Enable Public IP Host-name Resolution — Public IP hostname resolution is disabled by default, enable this option for Analyzer to lookup for missing public IP hostnames.
• Time out value for resolution — Select the timeout period (in milliseconds) if the hostname is not resolved.
158 | Dell SonicWALL Analyzer 7.2 Administrator’s Guide

NMM Configuration
When the NMM option is enabled, the GMS creates NMM files that are sent with the syslog messages.
Syslog Exclusion FilterThe Syslog Exclusion Filter allows you to select what fields and operators to use for filtering the syslog database. It is picked up by the Summarizer every 15 minutes and applied to the global syslog settings.
The Syslog Exclusion Filters function in a manner similar to applying an exclusion filter to a single Firewall or SRA appliance, but are applied to all GMS appliances, or all appliances in a Firewall or SRA group.
1. To add a filter, click Reports > Syslog Filter.
2. Click Add a Filter. The Add Filter menu comes up.
| 159

3. Select the syslog field name, and an operator and value, for the field you wish to exclude. Then select the level of Deployment: Appliance, Agent, or full Deployment.
If you select Appliance, you are prompted for the type of appliance: Firewall, SRA, or CDP. If you select Agent, you are prompted to select from a list of SGMS agents.
4. Click Update.
You can also click on the pencil in the Configure column to edit an existing filter setting. If no values appear in the Configure column, the filter is a default system filter. These defaults cannot be configured or deleted.
Syslogs are stored in the database without filtering, so the filters in the Syslog Exclusion Filter apply only to values displayed in Reports.
Email/Archive The Console > Reports > Email/Archive page provides global options for setting the time and interval for emailing/archiving scheduled reports, and global settings for the Web server, logo, and PDF sorting options.
Configuring Email/Archive Settings
To configure Email/Archive and Web server settings, complete the following steps:
Step 1 Click the Console tab, expand the Reports tree and click Email/Archive. The Email/Archive page displays.
Step 2 To set the next archive time, enter the date and time in the Next Scheduled Email/Archive Time fields and click Update.
Step 3 To specify the day to send weekly reports, select the day from the Send Weekly Reports Every list box and click Update.
160 | Dell SonicWALL Analyzer 7.2 Administrator’s Guide

Step 4 To specify the date to send monthly reports, select the date from the Send Monthly Reports Every list box and click Update.
Step 5 If the Web server address, port, or protocol has changed since SonicWALL Analyzer was installed, the new values automatically appear in the Email/Archive Configuration section. These settings can be modified on the System Interface, and cannot be modified here.
Step 6 Under Logo Settings, you can select a logo to be used on reports. By default, the SonicWALL logo is used. To select another logo, click Browse next to the Logo File field or type the path and filename into the field, and then click Update.
Step 7 Under Storage Configuration, select how many days to store Universal Scheduled Reports (USR) then click Update.
USR schedules are managed under the Dashboard Tab. For more information on USR scheduling, refer to Using the Universal Scheduled Reports Application on page 34.
Note High-traffic systems can generate reports that consume large amounts of memory, disk space and CPU time. Set your Number of Days to Archive and Scheduled Archive Time accordingly.
| 161

Managing Legacy ReportsReports generated by pre-7.2 releases of Dell SonicWALL Analyzer are still available for viewing, but require careful management. Dell SonicWALL Analyzer 7.2 Reporting is not compatible with earlier versions, but reports generated by earlier versions are still accessible under the current reporting structure.
Because it is not possible to view both 7.2 and pre-7.2 reports in the same session, we advise creating a separate Log in for accessing Legacy reports. This allows switching back and forth, as you can only view 7.2 or pre 7.2 reports in a session. By creating a separate login, you can switch between viewing modes.
Step 1 Create a new User or Administrator login. An Administrator login (with a name like Admin_Legacy) is recommended, as this login has full privileges. For more information on configuring Legacy reports for new user, refer to the Console Management section.
Step 2 Log in to the Management > Users > Action Permissions tab.
Step 3 Set flag in the check box for Show Legacy (pre GMS 7.2) Reports.
Note This check box is only available if SonicWALL Analyzer 7.0 Reports exist in the system.
Step 4 Log out, log back in using the new Login created in Step 1.
162 | Dell SonicWALL Analyzer 7.2 Administrator’s Guide

If Legacy Reports are no longer needed, you can delete them.
Step 1 Go to Reports > Summarizer.
Step 2 Under the Data Deletion Schedule, see a box for Delete 7.0 Reporting Data Immediately. Click Delete to delete the Legacy reports.
Note If you delete pre-7.2 reporting data, the Legacy data check boxes under the Action Permissions and Summarizer tabs are longer available, going forward.
| 163

164 | Dell SonicWALL Analyzer 7.2 Administrator’s Guide

Chapter 12
Using Diagnostics
This chapter describes the diagnostic information that SonicWALL Analyzer provides and summarizer status information.
This chapter includes the following sections:
• Configuring Debug Log Settings on page 166
• Summarizer Status on page 167
| 165

Configuring Debug Log SettingsSetting debug levels allows for faster troubleshooting of potential application issues. This action creates debug log files on all the systems in this deployment and could hamper application performance and also fill up disk space. You should reset to “No Debug” for normal operation as soon as the potential issue has been resolved.
Note The debug level should only be set based on guidance from Dell SonicWALL Technical Support.
The higher the debug level, the more the system resources that is used up to generate debug data and in turn lower the overall system performance.
When instructed by SonicWALL Technical Support, complete the following steps to set the debug level:
Step 1 Click Console, expand the Diagnostics tree and click Debug Log Settings. The Debug Log Settings page displays.
Step 2 Click the System Debug Level drop-down, then select one of the following:
– Level 1 (Codepath)
– Level 2 (Simple)
– Level 3 (Logic)
– Level 4 (Detailed)
– Level 5 (Highly Detailed)
Step 3 Click Update.
166 | Dell SonicWALL Analyzer 7.2 Administrator’s Guide

Summarizer StatusThe Summarizer Status page displays overall summarizer utilization information for the deployment including database and syslog file statistics, and details on the current status of the summarizer.
The Summarizer Status screen provides performance metrics for your network administrator to plan, design, and expand your Analyzer server deployment. This feature has information on the Syslog Collector and Summarizer metrics. The metrics displayed are daily averages collected over the last seven days.
You can receive alert emails when Summarizer Status shows any abnormalities.
To reach the Summarizer Status screen, navigate to the Console panel of Analyzer and then to Diagnostics > Summarizer Status.
The Summarizer Status page is divided into a section showing the overall deployment-wide summarizer status and sections with details for each summarizer. See the following sections:
• Summarizer Status Over 7 Days on page 168
• Details for Summarizer at <IP Address> on page 169
• Syslogs sent by appliances that are not under Reporting and Management on page 171
| 167

Summarizer Status Over 7 Days
The Summarizer Status Over 7 Days section displays overall summarizer utilization information for the deployment including database and syslog file statistics. Results are calculated over the last seven days.
Summarizer Utilization
The top Summarizer Utilization section shows the average utilization of the summarizer over the applicable time period. The Dial Charts show the percent of total capacity used by the Summarizer. The following metrics are also displayed in the Summarizer Utilization section:
• Summarizer: Displays the IP address of the Summarizer.
• Estimated Capacity (million syslog/day): The estimated capacity of the system. This is calculated by taking the (average load per day) and dividing it by the (time spent), assuming that the Summarizer was to constantly summarize 24 hours (as in the case of a dedicated Summarizer).
• Average Load (million syslog/day): The number of incoming syslogs per day.
• Reporting Database Size: Displays the size of the reporting database in gigabytes.
• Raw Data Directory Size: Displays the size of the raw syslog directory in gigabytes.
• Estimated Cache Size: Displays the estimated size of the cache in gigabytes.
• Backup Directory Size: Displays the size of the backup directory in gigabytes.
• Status: Displays the status of the Summarizer. There are three different status notifications:
– OK: The system is operating normally.
– High Capacity: The average load is greater than 90 percent of capacity.
– Low Disk Space: There is less that 5GB of space left on the disk.
Deployment Status
The Deployment Status tells the user how the deployment should be sized if it is not performing well. The user might need to reassign some units to a different agent, add another agent, or add more disk space
168 | Dell SonicWALL Analyzer 7.2 Administrator’s Guide

Details for Summarizer at <IP Address>
This sections details the Summarizer Utilization for the applicable IP address.
Summarizer Utilization
The Summarizer Utilization section for a specific summarizer shows not only the information at deployment level, but also provides granular details of the summarizer’s operation and current status for each individual summarizer.
• Average Summarizer Utilization: The average percentage of Summarizer utilization.
• Peak Summarizer Utilization: The percentage of peak Summarizer utilization.
• Estimated Capacity (million syslog/day): The estimated capacity of the system. This is calculated by taking the (average load per day) and dividing it by the (time spent), assuming that the Summarizer was to constantly summarize 24 hours (as in the case of a dedicated Summarizer).
• Average Load (million syslog/day): The number of incoming syslogs per day.
• Average Run Time Per Day: The total amount of time spent generating summarization statistical data and results over the time period of one day.
• Average Syslog Summarized (million/day): The total number of syslogs summarized, displayed in millions per day.
• Average Syslog Summarized per minute: The average number of syslogs summarized per minute over the applicable time period.
Note Not all syslogs are summarized. Some syslogs are discarded based on criteria defined at the Console > Reports > Syslog Filter and Unit > Reports > Configuration > Syslog Filter pages.
Data File Information
This section displays syslog file details for the selected summarizer.
The Data File Information table is divided into three columns:
• Data File Type: The type of files being reported on.There are five main data file types:
– Reporting Database Files: The files in the reporting database.
– Backup Files: The backup snapshot.
– Unprocessed Files: The data files in the summarizer’s processing queue.
| 169

– Archived Files: The processed data files.
– Bad Files: Data files with processing errors.
• File Stats: The number of syslog files in the category and their size in Megabytes.
• Oldest: The date and time on the oldest file in the category.
Summarizer Process Details
The Summarizer Process Details section shows what tasks the summarizer is performing at the moment the Console > Diagnostics > Summarizer Status page displays. Refresh your browser display or leave the page and return to it to update the information.
If the summarizer is currently running, the page displays the thread, appliance identifier, file being used, and state of the summarizer.
If the summarizer is currently idle, the page displays the last run time and next run time.
170 | Dell SonicWALL Analyzer 7.2 Administrator’s Guide

Syslogs sent by appliances that are not under Reporting and Management
Appliances that are no longer managed by Analyzer might still send syslog messages, impacting the performance of the summarizer. The syslogs from such appliances are dropped and not stored in archivedSyslogs or badSyslogs folders.
This feature displays a list (refreshed every 12 hours) of the appliances that are still sending syslogs messages even though they are no longer managed Analyzer, as well as appliances that are incorrectly configured:
If your Analyzer has a list of appliances in these fields, try the following to correct the issue:
• Log in to the appliance and disable the syslogs.
• If you do not have access to the appliance, use the rules to the gateway to block the serial numbers.
• To fix the misconfigured appliances, log in to the appliance and change the Analyzer settings.
| 171

172 | Dell SonicWALL Analyzer 7.2 Administrator’s Guide

Chapter 13
Granular Event Management
This chapter describes how to configure and use the Granular Event Management (GEM) feature in a Analyzer environment.
This chapter contains the following sections:
• Granular Event Management Overview on page 173
• Using Granular Event Management on page 174
• Configuring Granular Event Management on page 176
• Viewing Current Alerts on page 184
Granular Event Management OverviewGranular Event Management (GEM) provides a customized and controlled manner in which events are managed and alerts are customized and enabled. On the Console panel, GEM allows you to systematically configure each sub-component of your alert in order for the alert to best accommodate your needs.
The GEM alert has multiple sub-components, some of which have further subcomponents. It is not necessary to configure all sub-components prior to creating an alert.
• Thresholds: A threshold defines the condition that must be matched to trigger an event and send an alert. Each threshold is associated with a Severity to tag the generated alert as critical, warning, or information.
One or more threshold elements are defined within a threshold. Each threshold includes the following elements:an Operator, a Value, and a Severity. When a value is received for an alert type, the GEM framework examines threshold elements to find a match for the specified condition. If a match is found (one or more conditions match), the threshold with the highest severity containing a matching element is used to trigger an event.
• Schedules: You can use Schedules to specify the day(s) and time (intervals) in which to generate an alert. You can also invert a schedule that means that the schedule is the opposite of the time specified in it. For example:
– Generate an alert during weekdays only, or weekends only, or only during business hours.
– Do not generate an alert during a time period when the unit, network, or database are down for maintenance.
| 173

What is Granular Event Management?
The purpose of Granular Event Management is to provide all the event handling and alerting functionality for Analyzer. The Analyzer management interface provides screens for centralized event management on the Console panel, including screens for Events > Threshold, Schedule, and Alert Settings. The panel also provides an Events > Alert Settings screen where you can enable or disable alerts.
You can enable or disable an alert at the global or unit level in Analyzer. At the global level, the alert is then applied to all units. Whenever you add a new unit to Analyzer, the alerts set at the global level are applied to the new unit.
How Does Granular Event Management Work?
The Granular Event Management framework provides customized event handling for specific alerts about database and database log size, and security service subscription licenses. For a list of the predefined alerts, see Using Granular Event Management on page 174.
Using Granular Event ManagementFor convenience and usability, a number of default settings are predefined for severities, schedules, thresholds, and alerts. You can edit the predefined values to customize the settings for thresholds and schedules. The predefined defaults for the Console panel are as follows:
Table 5 GEM Predefined Default Objects
Panel Screens Predefined Default Objects
Console Events > Schedule Schedule Groups:
• 24x7
• Weekdays 24 hours
• 8x5
• Weekend
• Schedules:
• Schedule: admin
• Database Backup
• Monday 24 hours
• Monday business hours
• Tuesday 24 hours
• Tuesday business hours
• Wednesday 24 hours
• Wednesday business hours
• Thursday 24 hours
174 | Dell SonicWALL Analyzer 7.2 Administrator’s Guide

About Alerts
The Events > Alert Settings screens are available in the Console and Firewall panels. You can enable or disable alerts on these screens.
The GEM framework provides different types of alert types for the respective areas of the Analyzer application:
• Firewall panel: Alert settings for Reporting
• Console panel: Alert settings for the Analyzer application
Table 6 GEM Alert Types
• Thursday business hours
Console Events > Alert Settings Database Info
• Database Size Status
• System Files Backed-Up Status
• Disk Space Utilization Status
Panel Screens Predefined Default Objects
Panel location Available Alert Types
Console Backed up Syslog Files
New Firmware Availability
Bandwidth Usage (Billing Cycle)
Bandwidth Usage (Daily)
Firewall Anti Virus License
CFS License
Warranty License
Anti Spyware License
Intrusion License
VPN Tunnel Status
Agent Quota Reached
Agent Unsuccessful Backups
Appliance Capacity Status
CPU Status
| 175

Configuring Granular Event ManagementTo set up the GEM environment after installing Analyzer, start with the Events screens on the Console panel. You should examine the Threshold and Schedule screens and make any necessary configuration changes. Then you can enable alerts in the Events screens on the Console panel and Firewall panel.
See the following section:
• Configuring Events on the Console Panel on page 176
Configuring Events on the Console Panel
In the Events screens on the Console panel, you can configure the frequency of subscription expiration and task failure notifications, as well as severities, thresholds, schedules, and alerts for handling events.
See the following sections:
• Configuring Event Thresholds on page 176
• Configuring Event Schedules on page 178
• Enabling or Disabling Alerts on the Console Panel on page 181
Configuring Event Thresholds
In the Events > Threshold screen, you can view existing event thresholds and configure their elements, and add custom thresholds. A threshold defines the condition for which an event is triggered. Predefined thresholds have names similar to predefined Alert Types. Each threshold can contain one or more threshold elements. An element consists of an Operator, a Value, and a Severity.
The following tasks are described in this section:
• Editing an Threshold Element on page 176
• Enabling/Disabling Thresholds and Threshold Elements on page 177
Editing an Threshold Element
To edit an existing element of a Threshold, complete the following steps:
Step 1 On the Events > Threshold screen, click Edit located in the Configure column in the element row.
The Edit Threshold pop-up window displays:
176 | Dell SonicWALL Analyzer 7.2 Administrator’s Guide

Step 2 In the Operator field, select from the drop-down menu the type of operator to apply to your threshold element.
Step 3 In the Value field, enter the value for your threshold element.
Step 4 In the Description field, enter the description for your threshold element.
Step 5 In the Severity field, select the severity priority from the drop-down menu. These are color coded for your easy reference on the Events > Threshold screen.
Step 6 To disable the threshold element, click Disable. See Enabling/Disabling Thresholds and Threshold Elements on page 177.
Step 7 Click Update.
Enabling/Disabling Thresholds and Threshold Elements
The GEM feature provides Disable that allows you to disable or enable thresholds or individual elements within that threshold. If it is needed again, you can simply enable it.
You can disable a threshold by disabling all its elements. You can also disable individual elements within a threshold.
To enable or disable Thresholds and/or their elements, complete the following tasks:
Step 1 On the Console panel, navigate to the Events > Threshold screen. On this screen, you are able to view existing Thresholds. You can also view existing elements within those thresholds by clicking Expand by a threshold. You have the following two options for the enabling/disabling feature:
– You can enable or disable a Threshold by disabling/enabling all the elements that exist within it.
– You can enable/disable the individual elements within a Threshold.
Step 2 To enable or disable a threshold and/or elements, click Edit that is on the element level.
| 177

Step 3 Select Disable to disable the element or deselect Disable to enable the element.
Step 4 Click Update.
Configuring Event Schedules
The next component on the Console panel is Events > Schedule. In this screen, you can add, delete, or configure schedules and schedule groups.
Schedule groups are one or more schedules grouped within an object. Administrators and Owners can edit these objects. Other users should be able to view or use them only if Visible to Non-Administrators is selected.
The following tasks are described in this section:
• Adding an Event Schedule on page 178
• Editing an Event Schedule on page 179
• Adding an Event Schedule Group on page 179
• Deleting a Schedule or Schedule Group on page 180
Adding an Event Schedule
In Events > Schedules you can add, delete, or configure schedules. See your schedules and schedule groups, their descriptions, and whether they are enabled. You can also individually delete one schedule or schedule group at a time by selecting the trash-icon on the right side for each row. For quick reference, you can hover your mouse over the descriptions to quickly view the type of schedule and the days and times when it is active.
To add an event schedule, complete the following steps:
Step 1 On the Events > Schedules screen, click Add Schedule.
Step 2 In the Name field, enter a name for the schedule.
Step 3 In the Domain field, click the pull-down list and select a name. This function is for Super Admins only.
Step 4 In the Description field, add a description for the schedule.
Step 5 Select Visible to Non-Administrators if you want the schedule to be visible and usable by non-administrators.
Step 6 To temporarily disable a schedule, select Disable.
Step 7 Click Invert to create a schedule that is “off” during the dates and times that you specify.
178 | Dell SonicWALL Analyzer 7.2 Administrator’s Guide

Step 8 In the Schedule field, you can create one or more schedules. For each schedule, configure either:
– One Time Occurrence
• Fill in the Date and Time fields.
– Recurrence
• Fill in Days, Start Time, and End Time fields.
Step 9 Click Add to add this schedule to the Schedule List text box.
Step 10 To delete an entry from the Schedule List text box, select the entry that you want to delete, and then click Delete. Click Delete All to delete all entries.
Step 11 Click Update when you are finished.
Editing an Event Schedule
To edit an existing schedule, click the Edit icon on the right side of the Events > Schedule screen. The screen and procedure for editing are the same as those for adding a schedule. See Adding an Event Schedule on page 178.
Adding an Event Schedule Group
You can combine several schedules into a schedule group on the Events > Schedule screen. To add a schedule group, complete the following steps:
Step 1 On the Events > Schedule screen, click Add Schedule Group.
Step 2 Enter the name of your schedule group in the Name field.
Step 3 Enter a description of your schedule group in the Description field.
Step 4 Click Visible to Non-Administrators to allow this schedule group to be viewed and used by non administrators.
| 179

Step 5 Click Disable to temporarily disable the schedule group.
Step 6 In the Schedules field, select the schedule(s) to add to your schedule group, and then use the arrow buttons to move the selected schedule into or out of the group. To move multiple schedule groups and/or schedules at the same time, hold CTRL on your keyboard while making your selections.
Step 7 Click Update.
Editing an Event Schedule Group
To edit an existing schedule group, click the Edit icon on the right side of the Events > Schedule screen. The screen and procedure for editing are the same as those for adding a event schedule group. See Adding an Event Schedule Group on page 179.
Deleting a Schedule or Schedule Group
You can delete schedules or schedule groups, or you can remove schedules from schedule groups.
Note Deleting a Schedule or Schedule Group that is in use is not permitted. A warning message displays when this action is executed.
To delete an event schedule, schedule group, or remove a schedule from a schedule group:
Step 1 Navigate to the Events > Schedule screen.
Step 2 Click the check boxes of the schedule groups or schedules that you want deleted. When you click Schedule Group, the schedules within that schedule group are deleted as well.
Step 3 To remove a schedule from a schedule group, click Expand on the schedule group, and select the schedules you wish to remove within that group.
Step 4 To delete the selected schedule group(s) or remove the selected schedules from a group, click Delete Schedule Group(s)/Remove Schedules from Group.
Step 5 To delete the selected schedule(s), click Delete Schedule(s).
180 | Dell SonicWALL Analyzer 7.2 Administrator’s Guide

Enabling or Disabling Alerts on the Console Panel
The Console > Events > Alert Settings screen provides predefined alerts that apply to Analyzer as a whole. You can hover your mouse over these to display information about them or click the arrow to display more information about the alert. You can enable or disable these alerts by selecting or clearing the check box in the Enable column for the alert, then clicking the Enable/Disable Alert(s) link.
Add Alert
In the Add Alert panel you can enter an alert name and description, select the options for visible to non-administrators and disable, and enter the polling interval. complete the following steps to add an alert:
Step 1 Navigate to the Events > Alert Settings page.
Step 2 Click Add Alert.
Step 3 Enter a name and description for your alert.
Step 4 Enable Visible to Non-Administrators if you want your Alert to be visible to non-administrators.
Step 5 Enable Disable to disable this Alert.
Step 6 Enter a Polling Interval value (in seconds: 60-86400)
Alert Type
In the Alert Type panel you can select an alert type from the provided list and view the definitions of each alert type.
To configure an Alert Type, complete the following steps:
Step 1 Click the Alert Type pull-down list and select an alert type.
Most of the Alert Types require you to edit content. Editing Contents allows the user to pick additional information, in a granular fashion, on which the alerting has to be executed.
Note When an alert type is selected, a description for that alert is displayed in the Alert Type panel.
| 181

Step 2 Click Edit Content. The Edit Contents for Alert Type Unit Status pop-up window displays.
Step 3 Click the Threshold pull-down list and select a threshold.
Note You can create a new threshold on-the-fly by clicking the icon. Only one new threshold can be created in this feature.
Step 4 Click Update. To reset the settings, click Reset.
Destination / Schedule
In the Destination / Schedule panel you can add up to five destinations and set a schedule for each.
To add a destination and set a schedule, complete the following steps:
Note Every selected destination is required to have a schedule set.
Step 1 Click the Add Destination link under the Destination/Schedule section. The Destination field designates where you want alerts to be sent. You have a maximum number of five destinations.
Step 2 Click the Schedule pull-down list, then select a schedule type. The Schedule field designates the frequency of when you want alerts to be sent to the destination(s).
Step 3 Click Update to finish adding an alert.
182 | Dell SonicWALL Analyzer 7.2 Administrator’s Guide

Enabling/Disabling Alerts
To enable and disable an alert, complete the following steps:
Enabling a Alert
Step 1 Select Enabled for the alert(s) you wish to enable.
Step 2 Click Enable/Disable Alert(s). A confirmation window displays. Click OK to enable/disable.
Disabling an Alert
Step 1 Deselect Enabled on the alert(s) you wish to disable.
Step 2 Click Enable/Disable Alert(s). A confirmation window displays. Click OK to enable/disable.
Deleting Alerts
To delete an alert, complete the following steps:
Step 1 Select the check box(s) of the Alert(s) you wish to delete.
Step 2 Click Delete Alert. A confirmation window displays.
Step 3 Click OK to delete.
Note You can also delete an alert by clicking the Delete icon under the Configure section of the alert you wish the delete.
Editing Alerts
After an alert is created, you can go back and edit it at any time.
| 183

To edit an alert, complete the following steps:
Step 1 Click the Configure icon of the alert you wish to edit.
The Edit Alert page displays.
Step 2 Refer to the section Add Alert on page 181 and follow the configuration procedures to edit your existing Alert.
Viewing Current Alerts
You can view a list of current alerts on the Events > Current Alerts page of the panel. Select a global view or unit to view current alerts for your selection.
184 | Dell SonicWALL Analyzer 7.2 Administrator’s Guide

Chapter 14
Using Analyzer Help
To access the Analyzer online help, click Help in the top-right corner of the Analyzer user interface.
The Dell SonicWALL Analyzer online help provides context-sensitive conceptual overviews, configuration examples, and trouble shooting tips.
About Analyzer The Console > Help > About page displays the version of Analyzer being run, who the Analyzer is licensed to, database information, and the serial number of the Analyzer.
To access the Analyzer online help, click Help in the top-right corner of the Analyzer user interface.
| 185

Tips and TutorialsTips and tutorials are available in some pages of the user interface, and are denoted by a “Light bulb” icon:
To access tips and tutorials:
Step 1 Navigate to the page where you need help.
Step 2 If available, click the Light bulb icon in the upper right corner of the window. Tips, tutorials, and online help are displayed for this topic.
186 | Dell SonicWALL Analyzer 7.2 Administrator’s Guide

Chapter 15
Using the UMH System Interface
This chapter content describes the Universal Management Host system interface, one of the two management interfaces available for Dell SonicWALL Analyzer. The Dell SonicWALL Analyzer UMH system interface contains similar configuration settings for Microsoft Windows and Virtual Appliance deployments.
The Dell SonicWALL Analyzer Virtual Appliance UMH interface contains the following settings that are not applicable to Windows deployments:
• System > Time
• System > File Manager
• System > Shutdown
• Network > Settings
• Network > Routes
Note Microsoft Windows deployments can skip these settings as they only apply to Virtual Appliance deployments
This section includes the following subsections:
• Overview of the UMH System Interface on page 188
• Configuring UMH System Settings on page 189
• Configuring UMH Network Options (Virtual Appliance) on page 206
• Configuring UMH Deployment Options on page 207
| 187

Overview of the UMH System InterfaceThe Dell SonicWALL Analyzer UMH system interface is used for system management of the Dell SonicWALL Analyzer instance, including registration and licensing, setting the administrator password, configuring network and database settings, selecting the deployment role, and configuring other system settings.
When installing SonicWALL Universal Management Suite on a host, a Web server is installed to provide the system management interface. The system interface is available by default at http://localhost/appliance/ after restarting the system.
Switching to the Application Interface
To switch between the System interface and the Dell SonicWALL Analyzer application interface, click Switch in the top right corner of the interface.
Viewing Online Help and Tips
To display context sensitive help for the current page, click Help in the top right corner of the interface.
Help can change to Tips if the current page has any context sensitive tips or video tutorials.
188 | Dell SonicWALL Analyzer 7.2 Administrator’s Guide

Clicking Tips displays dynamic links for white papers, videos, knowledge base articles, other references, and online help.
Logging Out of the UMH System Interface
To log out of the Dell SonicWALL Analyzer UMH system interface, click Logout in the top right corner of the interface.
Configuring UMH System SettingsThis section describes the tasks you can do on the System pages of the Dell SonicWALL Analyzer UMH system interface. The Dell SonicWALL Analyzer UMH system interface contains similar configuration settings for Microsoft Windows and Virtual Appliance deployments. The Dell SonicWALL Analyzer Virtual Appliance UMH interface contain the following settings that are not applicable to Windows deployments. Microsoft Windows deployments can skip these settings as they only apply to Virtual Appliance deployments:
• System > Time
• System > File Manager
• System > Shutdown
See the following sections:
• Viewing System Status on page 190
• Managing System Licenses on page 190
• Configuring System Time Settings (Virtual Appliance) on page 200
• Configuring System Administration Settings on page 201
• Managing System Settings on page 201
• Using System Diagnostics on page 202
• Using System File Manager (Virtual Appliance) on page 204
• Using System Backup/Restore on page 205
• Using System Shutdown (Virtual Appliance) on page 205
| 189

Viewing System Status
The System > Status page provides the general information about the installation, including the name that identifies the system as a SonicWALL Universal Management Host, the serial number of the Dell SonicWALL Analyzer instance, the software version, licensing status, and the system role. For Dell SonicWALL Analyzer, the role is always “Analyzer.”
Under System, the host name of the computer is listed, along with the time and other information about the host computer.
At the bottom of the page, a link is provided to access the Getting Started Guide that takes you to the online help table of contents.
Managing System Licenses
The System > Licenses page provides buttons for managing, refreshing, and uploading licenses. The page displays the status of Analyzer and Global Management System licenses. The Global Management System license status shows the status of your SonicWALL GMS Free Trial, if activated. If you choose to upgrade to SonicWALL GMS, this page shows the Global Management System as fully licensed.
The value in the Count column indicates the number of appliances for which this SonicWALL Analyzer or SonicWALL GMS instance is licensed for reporting or management. For Dell SonicWALL Analyzer, this value is usually “unlimited,” but for SonicWALL GMS, the base license is either for 10 nodes or 25 nodes, and additional node licenses can be purchased in various increments.
190 | Dell SonicWALL Analyzer 7.2 Administrator’s Guide

The Expiration column indicates the expiration date of the license. If no date is shown, the license is perpetual, and does not expire.
To display the MySonicWALL login page, click Manage Licenses. You can purchase licenses and obtain license keysets on MySonicWALL.
Click Refresh Licenses to refresh the license status on this page.
To upload a new license, click Upload Licenses and browse to a license file on your computer.
Upgrading from Analyzer to GMS
SonicWALL Analyzer installations have the option of upgrading to SonicWALL GMS without reinstalling. You can start a 30-day Free Trial of SonicWALL GMS by clicking a button or link in either the Analyzer or Universal Management Host interface and following a simple procedure. When you are ready to finalize the upgrade, your SonicWALL reseller can provide you with the license key for a seamless transition to SonicWALL GMS.
When five or more registered devices are connected to SonicWALL Analyzer reporting, Try GMS Free - 30 Days appears next to the tabs at the top of the SonicWALL Analyzer management interface.
| 191

You can also start the Free Trial by clicking Manage Licenses on the System > Licenses page of the Universal Management Host interface, and then clicking the Try link.
For details on enabling the SonicWALL GMS Free Trial and purchasing the SonicWALL GMS upgrade license, see the following sections:
• Enabling the GMS Free Trial from Analyzer on page 192
• Enabling the GMS Free Trial from the UMH Interface on page 194
• Completing the Free Trial Upgrade on page 195
• Configuring Appliances for GMS Management on page 197
• Purchasing a SonicWALL GMS Upgrade on page 199
Enabling the GMS Free Trial from Analyzer
When five or more devices are connected to SonicWALL Analyzer reporting, Try GMS Free - 30 Days appears next to the tabs at the top of the SonicWALL Analyzer management interface.
To find out how many devices your SonicWALL Analyzer installation is handling, log in to MySonicWALL and navigate to the My Products page. Click the link for your SonicWALL Analyzer installation to get to the Service Management page, and scroll to the bottom. See a list of appliances under Associated Products.
To enable the 30-day SonicWALL GMS Free Trial from the SonicWALL Analyzer management interface, complete the following steps:
Step 1 In the SonicWALL Analyzer management interface, click Try GMS Free - 30 Days next to the tabs at the top of the page.
192 | Dell SonicWALL Analyzer 7.2 Administrator’s Guide

Step 2 The Analyzer Upgrade Tool launches and guides you through the process of installing the Free Trial or Upgrade. The tool displays the Upgrade Requirements – Licensing screen. Before migrating to GMS, ensure that all appliances under Analyzer reporting are registered to the same MySonicWALL account. Follow the steps provided in the screen, and then click Proceed.
Step 3 The Upgrade Requirements – System screen displays the recommended operating system, database, and hardware system requirements. Click Proceed.
| 193

Step 4 The Analyzer Upgrade Tool displays the login screen for MySonicWALL. Enter your MySonicWALL credentials and click Submit.
Step 5 In the next Analyzer Upgrade Tool page, click Try in the Free Trial column for Global Management System.
Step 6 From this point, the upgrade process continues with the same steps for access from either the SonicWALL Analyzer interface or the Universal Management Host interface. To continue the procedure, complete the steps in the Completing the Free Trial Upgrade on page 195.
Enabling the GMS Free Trial from the UMH Interface
To enable the 30-day Free Trial of SonicWALL GMS from the Universal Management Host interface on your SonicWALL Analyzer system, complete the following steps:
Step 1 In the Universal Management Host interface, navigate to the System > Licenses page and click Manage Licenses.
Step 2 If you are not already logged into MySonicWALL, the MySonicWALL login screen is displayed. Enter your MySonicWALL credentials in the appropriate fields and log in.
194 | Dell SonicWALL Analyzer 7.2 Administrator’s Guide

Step 3 On the next page, click Try in the Free Trial column for Global Management System.
Step 4 From this point, the upgrade process continues with the same steps for access from either the SonicWALL Analyzer interface or the Universal Management Host interface. To continue the procedure, complete the steps in Completing the Free Trial Upgrade on page 195.
Completing the Free Trial Upgrade
This procedure provides the common upgrading steps for access from either the SonicWALL Analyzer interface or the Universal Management Host interface. To get to this point in the process, follow the steps described in one of the two preceding sections:
• Enabling the GMS Free Trial from Analyzer on page 192
• Enabling the GMS Free Trial from the UMH Interface on page 194
To continue the upgrade, complete the following steps:
Step 1 In the Analyzer Upgrade Tool page, click Continue.
Step 2 The next screen provides a summary of GMS and Analyzer status. Verify that the Try link for the Free Trial is gone and only the Upgrade link remains. The Expiration column displays the expiration date of your Free Trial. You can click Upgrade at any time during the Free Trial to purchase the SonicWALL GMS upgrade. Click Proceed.
| 195

Step 3 In the next Analyzer Upgrade Tool page, you begin the configuration for SonicWALL GMS instep 2 of the upgrade process. This page displays two sections:
Automatic Configuration – Contains a list of SonicWALL firewall or CSM appliances in your Analyzer installation. These appliances are automatically configured for SonicWALL GMS management.
Manual Configuration – Contains a list of SonicWALL Aventail, SSL-VPN, or CDP appliances in your Analyzer installation. You must manually configure these appliances for SonicWALL GMS management. See the Configuring Appliances for GMS Management on page 197 for detailed instructions on enabling SonicWALL GMS management on these appliances.
Step 4 When ready, click Proceed.
Step 5 When the configuration finishes, the Analyzer Upgrade Tool displays the completion dialog box. Click Close to log out of the console and restart the system.
196 | Dell SonicWALL Analyzer 7.2 Administrator’s Guide

Step 6 The GMS login page appears and requests that you reboot the system. Reboot the system. If a reboot is not done, you might encounter problems with the correct IP Address appearing.
Step 7 After rebooting, log in with your Analyzer credentials.
When you log in, you should see a button displaying the number of days left in your Free Trial at the top of the page.
Step 8 On the System > Status page for connected appliances, you can view the log entries for task synchronization and automatic addressing mode, related to the GMS configuration.
Configuring Appliances for GMS Management
To manually configure the appliances listed in the Manual Configuration section of the Analyzer Upgrade Tool page (see Step 3 on page 196), complete the following steps for each appliance:
Step 1 In the SonicWALL GMS management interface, click the tab at the top of the page that corresponds to the type of appliance, such as SSL-VPN or CDP.
Step 2 In the left pane, right-click one of the listed appliances and select Modify Unit.
| 197

Step 3 In the Modify Unit screen in the right pane, copy the appliance IP address in the Managed Address section to your clipboard, or make a note of it.
Step 4 Click Cancel.
Step 5 In the left pane, right-click the same appliance and select Login to Unit > Using HTTPS.
Step 6 In the appliance management interface, navigate to the System > Administration page.
Step 7 Under GMS Settings, select Enable GMS Management, or verify that it is selected.
198 | Dell SonicWALL Analyzer 7.2 Administrator’s Guide

Step 8 In the GMS Host Name or IP Address field, paste or type the appliance IP address that you obtained from the Modify Unit screen in Step 3.
Step 9 Click Accept at the top of the appliance interface screen.
Step 10 Click Logout in the top right corner of the appliance interface screen.
Step 11 Repeat these steps for each appliance listed in the Manual Configuration section of the Analyzer Upgrade Tool page.
Purchasing a SonicWALL GMS Upgrade
You can purchase an upgrade to SonicWALL GMS at any time during the 30-day Free Trial.
To purchase the SonicWALL GMS license, complete the following steps:
Step 1 In the SonicWALL GMS interface, click GMS Free Trial X Days Left, where X is the number of days left in the Free Trial.
Step 2 In the Buy GMS page, click I want to upgrade to GMS now.
Step 3 The Console > Licenses > Product Licenses page is displayed. Click Manage Licenses.
Step 4 In the next page, in the Manage Service column for Global Management System, click Upgrade.
| 199

Step 5 The next page has Serial Number and Authentication Code fields for SonicWALL GMS. You must contact your SonicWALL reseller to complete the purchase and obtain the 12-character serial number and authentication code. Type in the values to the Serial Number and Authentication Code fields.
Step 6 Enter a descriptive name for the SonicWALL GMS installation into the Friendly Name field. This name appears in your MySonicWALL account.
Step 7 If your SonicWALL Analyzer installation currently handles more than 10 appliances, when you upgrade to SonicWALL GMS you must purchase additional SonicWALL GMS license(s) to manage the extra appliances. The standard “10-node” SonicWALL GMS license provided with the Free Trial supports up to 10 managed appliances. Enter the license keys for any additional SonicWALL GMS licenses into the GMS upgrade keys text box, one key per line.
Step 8 Click Submit. The License page is displayed, showing that SonicWALL GMS is now licensed.
Configuring System Time Settings (Virtual Appliance)
The System > Time page allows you to automatically configure the date and time using NTP servers.
To manually select the time, under Systems Time select the time, date, and timezone.
To automatically set the time using an NTP server, select the Set time automatically using the NTP check box. Next, select the Add NTP Server icon, and enter the IP address or domain name of the NTP server. Click Update to submit your system time configuration changes. Alternatively, click Reset to reset the system time to factory defaults.
200 | Dell SonicWALL Analyzer 7.2 Administrator’s Guide

Configuring System Administration Settings
The System > Administration page allows you to configure the system behavior for administrative login sessions.
Under Host Settings, enter the number of minutes of inactivity allowed before the session is logged out. A setting of -1 allows an unlimited amount of inactivity without being logged out.
Under Enhanced Security Access, you can configure the number of failed login attempts before the admin account is locked out, and the number of minutes that the lockout lasts. You can also configure the number of days before the admin account password must be changed.
Under Administrator Password, you can change the administrator password for the Dell SonicWALL Analyzer application. Enter the current password for the system administrator (or root) account into the Current Password field, and then enter the new password into both the New Password and Confirm Password fields.
After making any changes on this page, click Update. To revert the fields on the page to their default settings, click Reset.
Managing System Settings
The System > Settings page provides a way to upload new Dell SonicWALL Analyzer software or service packs to the system. Click Browse to browse to the file you wish to upload, and then click Apply.
| 201

The page shows the current version of SonicWALL UMS, and provides a History link that displays the history of all hot fixes and firmware updates that were applied to the system.
The Reinitialize Appliance to Factory Settings section allows the administrator to reset all UMH system settings to factory defaults. Click Reinitialize to reset to factory defaults. A pop-up warning message displays for the administrator to confirm this process.
Click OK, the system reboots and the reinitialization process takes 10-15 minutes to complete. After the reinitialization process is complete, the administrator needs to log back in to the management interface to confirm the system settings are now restored to factory defaults.
Using System Diagnostics
The System > Diagnostics page is used to set log levels, test connectivity to servers, generate Tech Support Reports, and to search and download system log files.
Under Debug Log Settings, select the log level from the System Debug Level drop-down list. Select from the following system debug verbosity levels:
• No Debug
• Level 1 (Codepath)
• Level 2 (Simple)
• Level 3 (Logic)
• Level 4 (Detailed)
• Level 5 (Highly Detailed)
The No Debug level setting provides no debug information, and the Level 5 (Highly Detailed) setting provides the maximum debug information.
202 | Dell SonicWALL Analyzer 7.2 Administrator’s Guide

In the Test Connectivity section, select one of the following radio buttons and then click Test to verify connectivity to that server:
• Database Connectivity – Tests connectivity to the database server configured on the Deployment > Roles page.
• License Manager Connectivity – Type the host name or IP address into the License Manager Host field and click Test to test connectivity to that server.
• SMTP Server Connectivity – Tests connectivity to the SMTP server configured on the Deployment > Settings page.
In the Download System/Log Files section, you can enter a filter, or search value, into either of the Search Filter fields, and then press Enter, to locate log entries of interest. Click Export Logs to save the log files to a file on your computer.
To generate a TSR (Technical Support Report), select Technical Support Report (TSR), and then click Export Logs.
| 203

Using System File Manager (Virtual Appliance)
The System > File Manager page provides access to the file system. Copy files or export files to these folders. Administrators often use this page to export system settings preference files (etc/prefs) to another directory location for backup archiving.
To complete a file set export, select a folder from the pull-down menu. The page refreshes and displays the contents of the selected folder. Individual files can be exported or deleted. Click Selected Folder to select all the files for this folder. For managing a batch of files, select multiple files from the list and click Export or Delete.
Administrators can also use the file manager to import files, such as, third-party MIB files to the directory folder for multiple-vendor solution interoperability. To import or to upload a file, select a folder from the pull-down menu. The page refreshes and displays the contents of the selected folder. In the top-right corner of the page, click the plus icon to upload a file. Next, click Choose File to open the file management dialog box. In the file management dialog box, navigate to the file you would like to upload and click Open. The selected file is now displayed next to Choose File. Click Upload to complete the file manager import.
204 | Dell SonicWALL Analyzer 7.2 Administrator’s Guide

Using System Backup/Restore
The System > Backup/Restore page helps you schedule and create immediate snapshots of configuration and data on your system. Note that a minimum of 10GB of free disk space is required to do a backup/restore operation. Navigate to the System > Status page to verify available disk space.
You can also offload the backup/reporting data through web services by downloading a Java-based UI tool. This tool helps you setup configurations that can be used to automatically download backup snapshots to a remote location in a reoccurring schedule.
Using System Shutdown (Virtual Appliance)
The System > Shutdown page allows you to restart or shut down the appliance. Click Restart to reboot the system. To stop all the services and database processing, click Shutdown.
| 205

Configuring UMH Network Options (Virtual Appliance)This section describes the tasks you can do on the Network pages of the Dell SonicWALL Analyzer UMH system interface.
See the following sections:
• Configuring Network Settings (Virtual Appliance) on page 206
• Configuring Network Routes (Virtual Appliance) on page 207
Configuring Network Settings (Virtual Appliance)
This section provides network settings configuration procedures for host, networking, and search suffixes. To configure host settings, enter host and domain name information. To configure networking settings, enter host IP address, subnet mask, default gateway, and optionally enter DNS server IP addresses. Click Update to apply the host and networking settings changes. Click Reset to restore these settings to factory defaults.
Search suffixes provide the ability to automatically append a DNS suffix. For example, when you ping “sonicwall” it automatically goes to “sonicwall.engineering.” To configure Search Suffixes, click Add to include multiple search suffixes, and to remove Search Suffixes, click the check box next to the Search Suffixes list, and click Delete.
206 | Dell SonicWALL Analyzer 7.2 Administrator’s Guide

Configuring Network Routes (Virtual Appliance)
This section provides configuration procedures to add network routes. To add a network route, enter a destination network IP address, network mask, and gateway, and click Add. To edit the default network route, click the configure icon. When multiple network routes are added to the list, selecting the check box at the top-left corner of the page selects all the added network routes. Click Delete to remove a network route from the list.
Note The default network route cannot be deleted.
Configuring UMH Deployment OptionsThis section describes the tasks you can do on the Deployment pages of the Dell SonicWALL Analyzer UMH system interface.
See the following sections:
• Configuring the Deployment Role on page 208
• Configuring Deployment Settings on page 209
• Controlling Deployment Services on page 211
| 207

Configuring the Deployment Role
In a Dell SonicWALL Analyzer installation, the Deployment > Roles page provides a way to configure the syslog port and the database settings, and to test database connectivity.
To set the syslog port, enter the port number into the Syslog Server Port field.
Under Database Configuration, to provide credentials with which Dell SonicWALL Analyzer accesses the database, enter the account user name into the Database User field, and enter the account password into both the Database Password and Confirm Database Password fields. Additionally, you can enter a Database Driver file name and the Database URL for an explicit directory path location.
To test connectivity to the database server, click Test Connectivity. A pop-up message displays the database connectivity status.
When finished, click Update to apply the changes. To revert the fields on the page to their default settings, click Reset.
208 | Dell SonicWALL Analyzer 7.2 Administrator’s Guide

Configuring Deployment Settings
This section describes the UMH/UMA Deployment > Settings page, used for Web port, SMTP, and SSL access configuration.
The Deployment > Settings page is identical in both the UMH and UMA management interfaces, except for the left navigation pane that shows the Network menu item on the UMA.
See the following sections:
• Configuring Web Server Settings on page 210
• Configuring SMTP Settings on page 210
• Configuring SSL Access on page 211
| 209

Configuring Web Server Settings
Web Server Settings configuration is largely the same on any role:
Step 1 Navigate to Deployment > Settings > Web Server Settings in the /appliance management interface.
Step 2 To use a different port for HTTP access to the SonicWALL Analyzer, type the port number into the HTTP Port field. The default port is 80.
If you enter another port in this field, the port number must be specified when accessing the appliance management interface or SonicWALL GMS management interface. For example, if port 8080 is entered here, the appliance management interface would be accessed with the URL: http://<IP Address>:8080/appliance/.
Step 3 To use a different port for HTTPS access to the SonicWALL Analyzer, type the port number into the HTTPS Port field. The default port is 443.
If you enter another port in this field, the port number must be specified when accessing the appliance management interface or SonicWALL GMS management interface. For example, if port 4430 is entered here, the appliance management interface would be accessed with the URL: https://<IP Address>:4430/appliance/.
Step 4 Click Enable HTTPS Redirection to redirect HTTP to HTTPS when accessing the Analyzer management interface.
Step 5 In the Public IP text-field, enter the public IP or FQDN of the outside web services.
Step 6 When you are finished configuring the Web Server Settings, click Update.
Configuring SMTP Settings
The SMTP Configuration section allows you to configure an SMTP server name or IP address, a sender email address, and an administrator email address. You can test connectivity to the configured server.
To configure SMTP settings:
Step 1 Navigate to the Deployment > Settings page under the SMTP Configuration section.
Step 2 Type the FQDN or IP address of the SMTP server into the SMTP server field.
Step 3 If the SMTP server in your deployment is set to use authentication, click Use Authentication. This option is necessary for all outgoing Analyzer emails to properly send to the intended recipients. Enter the username in the User field, and enter/confirm the password in the Password and Confirm Password fields. This is the username/password that is used to authenticate against the SMTP server.
Step 4 Type the email address from which mail will be sent into the Sender address field.
Step 5 Type the email address of the system administrator into the Administrator address field.
Step 6 To test connectivity to the SMTP server, click Test Connectivity.
Step 7 To apply your changes, click Update.
210 | Dell SonicWALL Analyzer 7.2 Administrator’s Guide

Configuring SSL Access
The SSL Access Configuration section allows you to configure and upload a custom Keystore/Certificate file for SSL access to the GMS appliance, or select the default local keystore.
To configure SSL access, complete the following steps:
Step 1 Navigate to the Deployment > Settings page under SSL Access Configuration section.
Step 2 Select Default to keep, or revert to, the default settings, where the default GMS Web Server certificate with 'gmsvpserverks' keystore is used.
Step 3 Select Custom to upload a custom keystore certificate for GMS SSL access.
Step 4 In the Keystore/Certificate file field, click Browse to select your certificate file.
Note Your custom file is renamed to ‘gmsvpservercustomks’ after upload.
Step 5 Type the password for the keystore certificate into the Keystore/Certificate password field.
Step 6 Click View to display details about your keystore certificate.
Step 7 Click Update to submit your changes.
Controlling Deployment Services
The Deployment > Services page provides a list of the services that are running on your system as part of Dell SonicWALL Analyzer. It also provides a way to stop or start any of the services.
To stop a service that is currently Enabled, select the check box for that service and then click Disable/Stop.
To start a service that is currently Disabled, select the check box for that service and then click Enable/Start.
To restart a service that is either Enabled or Disabled, select the check box for that service and then click Restart.
| 211

212 | Dell SonicWALL Analyzer 7.2 Administrator’s Guide

Appendix A
Upgrading
This appendix is designed to help you upgrade Dell SonicWALL Analyzer. If you have not used Dell SonicWALL Analyzer before, you might want to familiarize yourself with Dell SonicWALL Analyzer concepts and features.
This appendix contains the following sections:
• Upgrading SonicWALL ViewPoint 6.0 to Analyzer 7.2 on page 213
• Upgrading from Analyzer to GMS on page 215
• Miscellaneous Procedures and Tips on page 224
Upgrading SonicWALL ViewPoint 6.0 to Analyzer 7.2The Dell SonicWALL Analyzer cannot be directly upgraded from ViewPoint 6.0 to Analyzer 7.2, but it can be upgraded from Analyzer 7.0. To upgrade the Dell SonicWALL Analyzer from a version earlier than 7.0, you need to upgrade to major versions of Analyzer until you reach 7.0, then you can upgrade to 7.2. To upgrade major versions of Dell SonicWALL Analyzer, use the Universal Management Suite installer and complete the following:
Step 1 Log on to your Dell SonicWALL Analyzer management computer as administrator (Windows). Launch the SonicWALL Universal Management Suite installer, by double-clicking the file sw_gmsvp_win_eng_x.x.xxxx.xxxx.exe (where “xxxx” represent the exact version numbers). It can take several seconds for the InstallAnywhere self-extractor to initialize.
Step 2 In the Introduction screen, click Next.
Step 3 In the License Agreement screen, select the radio button next to I accept the terms of the License Agreement. Click Next.
Step 4 When the installer detects that a previous version of Analyzer/ViewPoint is currently installed on the system, a notification is displayed. Click Install to continue the upgrade.
Step 5 The installer begins installing the files, using the existing installation folder, IP address to which Dell SonicWALL Services bind for capturing syslog and SNMP packets, and Web port settings.
| 213

Step 6 The Installer displays the installation progress during the few minutes required. Upon completion, whether or not the system has Windows Firewall enabled, a dialog is displayed notifying you to either disable the firewall or manually open the syslog and SNMP ports, and to ensure that these ports are open on your network gateway or firewall. Click OK.
Step 7 The Important Registration Information screen provides the URL for access to the Dell SonicWALL Analyzer Universal Management Host system interface after upgrade completion, as well as information about registration.
The default URL for accessing the interface from the local system is:http://localhost:80/
The default credentials are: User name – adminPassword – password
Note To register for a Dell SonicWALL Analyzer installation, log in to the Universal Management Host system interface, then click Register in the top-right corner. The License Management page displays, enter the word “ANALYZER” in the Serial Number field and leave the Authentication Code fields blank. Enter a name into the Friendly Name field, then click Submit. For complete instructions, refer to the latest Analyzer Getting Started Guide for your deployment.
Step 8 Click Next.
Step 9 The final installer screen contains the path of the installation folder, and warns you that the Universal Management Suite Web page is launched next. Click Done.
In the Dell SonicWALL Analyzer login page, enter the same credentials for User and Password that you had in your earlier version prior to the upgrade.
214 | Dell SonicWALL Analyzer 7.2 Administrator’s Guide

Upgrading from Analyzer to GMSDell SonicWALL Analyzer installations have the option of upgrading to Dell SonicWALL GMS without reinstalling. You can start a 30-day Free Trial of Dell SonicWALL GMS by clicking a button or link in either the Analyzer or Universal Management Host interface and following a simple procedure. When you are ready to finalize the upgrade, your Dell SonicWALL reseller can provide you with the license key for a seamless transition to Dell SonicWALL GMS.
When five or more registered devices are connected to Dell SonicWALL Analyzer reporting, Try GMS Free - 30 Days appears next to the tabs at the top of the Analyzer management interface.
You can also start the Free Trial by clicking Manage Licenses on the System > Licenses page of the Universal Management Host interface, and then clicking Try.
For details on enabling the Dell SonicWALL GMS Free Trial and purchasing the Dell SonicWALL GMS upgrade license, see the following sections:
• Enabling the GMS Free Trial from Analyzer on page 215
• Enabling the GMS Free Trial from the UMH Interface on page 217
• Completing the Free Trial Upgrade on page 218
• Configuring Appliances for GMS Management on page 221
• Purchasing a SonicWALL GMS Upgrade on page 222
Enabling the GMS Free Trial from Analyzer
When five or more devices are connected to Dell SonicWALL Analyzer reporting, Try GMS Free - 30 Days appears next to the tabs at the top of the Analyzer management interface.
To find out how many devices your Dell SonicWALL Analyzer installation is handling, log in to MySonicWALL and navigate to the My Products page. Click the link for your Dell SonicWALL Analyzer installation to get to the Service Management page, and scroll to the bottom. See the list of appliances under Associated Products.
To enable the 30-day Dell SonicWALL GMS Free Trial from the Analyzer management interface, complete the following steps:
Step 1 In the Analyzer management interface, click Try GMS Free - 30 Days next to the tabs at the top of the page.
| 215

Step 2 The Analyzer Upgrade Tool launches and guides you through the process of installing the Free Trial or Upgrade. The tool displays the Upgrade Requirements – Licensing screen. Before migrating to GMS, ensure that all appliances under Analyzer reporting are registered to the same MySonicWALL account. Follow the steps provided in the screen, and then click Proceed.
Step 3 The Upgrade Requirements – System screen displays the recommended operating system, database, and hardware system requirements. Click Proceed.
216 | Dell SonicWALL Analyzer 7.2 Administrator’s Guide

Step 4 The Analyzer Upgrade Tool displays the login screen for MySonicWALL. Enter your MySonicWALL credentials and click Submit.
Step 5 In the next Analyzer Upgrade Tool page, click Try in the Free Trial column for Global Management System.
Step 6 From this point, the upgrade process continues with the same steps for access from either the Analyzer interface or the Universal Management Host interface. To continue the procedure, complete the steps in Completing the Free Trial Upgrade on page 218.
Enabling the GMS Free Trial from the UMH Interface
To enable the 30-day Free Trial of Dell SonicWALL GMS from the Universal Management Host interface on your Dell SonicWALL Analyzer system, complete the following steps:
Step 1 In the Universal Management Host interface, navigate to the System > Licenses page and click Manage Licenses.
Step 2 If you are not already logged into MySonicWALL, the MySonicWALL login screen is displayed. Enter your MySonicWALL credentials in the appropriate fields and log in.
| 217

Step 3 On the next page, click Try in the Free Trial column for Global Management System.
Step 4 From this point, the upgrade process continues with the same steps for access from either the Analyzer interface or the Universal Management Host interface. To continue the procedure, complete the steps in Completing the Free Trial Upgrade on page 218.
Completing the Free Trial Upgrade
This procedure provides the common upgrading steps for access from either the Dell SonicWALL Analyzer interface or the Universal Management Host interface. To get to this point in the process, follow the steps described in one of the two preceding sections:
• Enabling the GMS Free Trial from Analyzer on page 215
• Enabling the GMS Free Trial from the UMH Interface on page 217
To continue the upgrade, complete the following steps:
Step 1 In the Analyzer Upgrade Tool page, click Continue.
Step 2 The next screen provides a summary of GMS and Analyzer status. Verify that the Try link for the Free Trial is gone and only the Upgrade link remains. The Expiration column displays the expiration date of your Free Trial. You can click Upgrade at any time during the Free Trial to purchase the Dell SonicWALL GMS upgrade. Click Proceed.
218 | Dell SonicWALL Analyzer 7.2 Administrator’s Guide

Step 3 In the next Analyzer Upgrade Tool page, you begin the configuration for GMS in step 2 of the upgrade process. This page displays two sections:
Automatic Configuration – Contains a list of Dell SonicWALL firewall or CSM appliances in your Analyzer installation. These appliances are automatically configured for GMS management.
Manual Configuration – Contains a list of Dell SonicWALL Aventail, SSL-VPN, or CDP appliances in your Analyzer installation. You must manually configure these appliances for GMS management. See Configuring Appliances for GMS Management on page 221 for detailed instructions on enabling GMS management on these appliances.
When ready, click Proceed.
Step 4 When the configuration finishes, the Analyzer Upgrade Tool displays the completion dialog box. Click Close to log out of the console and restart the system.
| 219

Step 5 The GMS login page appears and requests that you reboot the system. Reboot the system. If a reboot is not done, you might encounter problems with the correct IP Address appearing.
Step 6 After rebooting, log in with your Analyzer credentials.
When you log in, you should see a button displaying the number of days left in your Free Trial at the top of the page.
Step 7 On the System > Status page for connected appliances, you can view the log entries for task synchronization and automatic addressing mode, related to the GMS configuration.
220 | Dell SonicWALL Analyzer 7.2 Administrator’s Guide

Configuring Appliances for GMS Management
To manually configure the appliances listed in the Manual Configuration section of the Analyzer Upgrade Tool page (see Step 3 on page 219), complete the following steps for each appliance:
Step 1 In the GMS management interface, click the tab at the top of the page that corresponds to the type of appliance, such as SSL-VPN or CDP.
Step 2 In the left pane, right-click one of the listed appliances and select Modify Unit.
Step 3 In the Modify Unit screen in the right pane, copy the appliance IP address in the Managed Address section to your clipboard, or make a note of it.
Step 4 Click Cancel.
Step 5 In the left pane, right-click the same appliance and select Login to Unit > Using HTTPS.
| 221

Step 6 In the appliance management interface, navigate to the System > Administration page.
Step 7 Under GMS Settings, select Enable GMS Management, or verify that it is selected.
Step 8 In the GMS Host Name or IP Address field, paste or type the appliance IP address that you obtained from the Modify Unit screen in Step 3
Step 9 Click Accept at the top of the appliance interface screen.
Step 10 Click Logout in the top right corner of the appliance interface screen.
Step 11 Repeat these steps for each appliance listed in the Manual Configuration section of the Analyzer Upgrade Tool page.
Purchasing a SonicWALL GMS Upgrade
You can purchase an upgrade to Dell SonicWALL GMS at any time during the 30-day Free Trial.
To purchase the SonicWALL GMS license, complete the following steps:
Step 1 In the GMS interface, click GMS Free Trial X Days Left, where X is the number of days left in the Free Trial.
Step 2 In the Buy GMS page, click I want to upgrade to GMS now.
222 | Dell SonicWALL Analyzer 7.2 Administrator’s Guide

Step 3 The Console > Licenses > Product Licenses page is displayed. Click Manage Licenses.
Step 4 In the next page, in the Manage Service column for Global Management System, click Upgrade.
Step 5 The next page has Serial Number and Authentication Code fields for GMS. You must contact your Dell SonicWALL reseller to complete the purchase and obtain the 12-character serial number and authentication code. Type in the values to the Serial Number and Authentication Code fields.
Step 6 Enter a descriptive name for the GMS installation into the Friendly Name field. This name appears in your MySonicWALL account.
Step 7 If your Analyzer installation currently handles more than 10 appliances, when you upgrade to GMS you must purchase additional GMS license(s) to manage the extra appliances. The standard “10-node” GMS license provided with the Free Trial supports up to 10 managed appliances. Enter the license keys for any additional GMS licenses into the GMS upgrade keys text box, one key per line.
Step 8 Click Submit. The License page is displayed, showing that GMS is now licensed.
| 223

Miscellaneous Procedures and TipsThis section contains miscellaneous Global Management System procedures and troubleshooting tips.
Miscellaneous Procedures
This section contains information on procedures you might do. Select from the following:
• It is highly recommended that you regularly back up the Dell SonicWALL Analyzer data. For more information, see Backing up Dell SonicWALL Analyzer Data on page 224.
• Dell SonicWALL Analyzer requires Mixed Mode authentication when using SQL Server 2000. To change the authentication mode, see Changing the SQL Server Authentication Mode on page 224.
• If you are reinstalling Dell SonicWALL Analyzer, preserving the previous configuration settings can save a lot of time. To reinstall Dell SonicWALL Analyzer using an existing Dell SonicWALL Analyzer database, see Reinstalling Dell SonicWALL Analyzer Using an Existing Database on page 225.
• If you need to uninstall Dell SonicWALL Analyzer from a server, it is important to do it correctly. To uninstall Dell SonicWALL Analyzer, see Uninstalling SonicWALL Universal Management Suite and Its Database on page 225.
Backing up Dell SonicWALL Analyzer Data
Dell SonicWALL Analyzer stores its configuration data in the SGMSDB database. It is important to back up this database and the individual Dell SonicWALL Analyzer databases (sgmsvp_yyyy_mm_dd) on a regular basis.
The Console > Management > Database Maintenance page provides the necessary support for backing up and restoring the MySQL database that is bundled with SonicWALL UMS.
If you are using SQL Server, this can be accomplished by backing up the entire SQL Server using the database backup tool. When using this tool, there is no need to stop the Dell SonicWALL Analyzer services for database backup. However, make sure that the backup occurs when Dell SonicWALL Analyzer activity is the lowest and that the backup operation schedule does not clash with the Dell SonicWALL Analyzer scheduler.
Note It is also recommended to regularly back up the entire contents of the Dell SonicWALL Analyzer directory, the sgmsConfig.xml file.
Changing the SQL Server Authentication Mode
Dell SonicWALL Analyzer requires the Mixed Mode authentication mode. To change the authentication mode from Windows Mode to Mixed Mode, follow these steps:
Step 1 Start the Microsoft SQL Server Enterprise Manager.
Step 2 Right-click the appropriate SQL Server Group and select Properties from the pop-up menu.
Step 3 Click the Security tab.
Step 4 Change the Authentication mode from Windows only to SQL Server and Windows.
Step 5 Click OK.
224 | Dell SonicWALL Analyzer 7.2 Administrator’s Guide

Reinstalling Dell SonicWALL Analyzer Using an Existing Database
If you need to reinstall Dell SonicWALL Analyzer, but want to preserve the settings in an existing Dell SonicWALL Analyzer database, follow these steps:
Step 1 Install a new database, using the same username and password that you used for the existing Dell SonicWALL Analyzer database.
Step 2 Install Dell SonicWALL Analyzer using this new database.
Step 3 Stop all Dell SonicWALL Analyzer services.
Step 4 Open the sgmsConfig.xml and web.xml files with a text editor. Change the values for the dbhost and dburl parameters to match the existing Dell SonicWALL Analyzer database.
Step 5 Restart the Dell SonicWALL Analyzer services.
Step 6 Uninstall the new database.
Uninstalling SonicWALL Universal Management Suite and Its Database
This section describes how to uninstall SonicWALL Universal Management Suite and its components. Select from the following:
• To uninstall SonicWALL Universal Management Suite on the Windows platform, see Windows on page 225.
• To uninstall SonicWALL Universal Management Suite databases from Microsoft SQL Server 2000, see MS SQL Server 2000 on page 225.
Windows
To uninstall SonicWALL Universal Management Suite from a Windows system, follow these steps:
Step 1 Click Start, point to Settings, and click Control Panel.
Step 2 Double-click Add/Remove Programs. The Add/Remove Programs Properties window displays.
Step 3 Select SonicWALL Universal Management Suite and click Change/Remove. The SonicWALL Universal Management Suite Uninstall program starts.
Step 4 Follow the on-screen prompts.
Step 5 Restart the system. SonicWALL Universal Management Suite is uninstalled.
MS SQL Server 2000
To uninstall or remove the SonicWALL Universal Management Suite databases in the MS SQL Server 2000, you can execute the following DOS command from any SonicWALL Universal Management Suite server:
osql -U username -P password -S dbHost_IP -q "drop database SGMSDB"
osql -U username -P password -S dbHost_IP -q "drop database sgmsvp_yyyy_mm_dd"
Or you can use the MS SQL Server's Enterprise Manager and delete the SGMSDB and sgmsvp_ databases.
| 225

226 | Dell SonicWALL Analyzer 7.2 Administrator’s Guide

Appendix B
License Agreements
You can view the End User License Agreement and all Third-Party Product Licenses in the Console > Help > About screen of the Analyzer user Interface.
This appendix details the following licensing agreements:
• End User Software License Agreement on page 227
• Apache Licensing Agreement on page 234
End User Software License AgreementPLEASE READ THIS AGREEMENT CAREFULLY BEFORE USING THE SONICWALL PRODUCT. BY INSTALLING OR USING THE SONICWALL PRODUCT, YOU (AS THE CUSTOMER, OR IF NOT THE CUSTOMER, AS A REPRESENTATIVE/AGENT AUTHORIZED TO BIND THE CUSTOMER) INDICATE ACCEPTANCE OF AND AGREE TO THE TERMS AND CONDITIONS OF THIS AGREEMENT FOR AND ON BEHALF OF THE CUSTOMER. IF YOU DO NOT AGREE TO THE TERMS AND CONDITIONS OF THIS AGREEMENT, THEN DO NOT USE THE PRODUCT AND RETURN IT TO THE PLACE OF PURCHASE WITH PROOF OF PURCHASE WITHIN THIRTY (30) DAYS OF PURCHASE FOR A REFUND. IF YOU DO PROCEED TO INSTALL OR USE THE SONICWALL PRODUCT, YOU WILL HAVE INDICATED ACCEPTANCE AND AGREEMENT WITH THE TERMS AND CONDITIONS HEREIN. NOTWITHSTANDING THE FOREGOING, THIS AGREEMENT SHALL NOT SUPERSEDE ANY OTHER SIGNED AGREEMENT BETWEEN YOU AND SONICWALL THAT EXPRESSLY GOVERNS USE OF THE SONICWALL PRODUCT. IN INSTANCES WHERE YOU PURCHASE THROUGH A RESELLER OR DISTRIBUTOR, FINAL PRICES AND TERMS AND CONDITIONS OF SALE, INCLUDING WITHOUT LIMITATION ANY TERMS REGARDING PAYMENT OR RETURNS, WILL BE AS AGREED BETWEEN YOU AND THE THIRD-PARTY FROM WHICH YOU MAKE SUCH PURCHASES; HOWEVER, THE TERMS SET FORTH HEREIN REGARDING YOUR USE OF THE SOFTWARE REMAIN APPLICABLE.
"Product" means the SonicWALL labeled hardware and related documentation ("Hardware") and/or proprietary SonicWALL labeled software, firmware and related documentation ("Software") purchased by you (“Customer” or “you”) either directly from SonicWALL or a Reseller. “Services” means the Support Services described as follows and any other services provided with or for the Products directly by SonicWALL or its agents. “Reseller” shall mean those entities to which SonicWALL or SonicWALL’s authorized distributors distribute the Products for resale to end users. Except as otherwise agreed upon by the parties, this
| 227

Agreement will also cover any updates and upgrades to the Products provided to Customer by SonicWALL directly or through a Reseller (except as may be otherwise indicated, such updates and upgrades shall be deemed Products).
1. LICENSE(S) AND RESTRICTIONS
a. Licenses—Subject to the terms and conditions of this Agreement, SonicWALL grants to Customer, and Customer accepts from SonicWALL, a nonexclusive, non-transferable (except as otherwise set forth herein) and non-sublicensable license (“License”) to: (i) execute and use the Software on the Hardware with which the Software is provided (pre-installed) in accordance with the applicable Documentation; and, (ii) for Software provided in standalone form (without Hardware), install, execute and use the Software on the Hardware or hardware device(s) on which it is intended to be used in accordance with the applicable Documentation and the License purchased. If Customer purchased multiple copies of standalone Software, Customer’s License to such standalone Software includes the right to install, use and execute up to the number of copies of Software Licenses purchased.
In addition, the License includes the right to (x) make a reasonable number of additional copies of the Software to be used solely for non-productive archival purposes, and (y) make and use copies of the end user documentation for Hardware and/or Software provided with the Products (“Documentation”) as reasonably necessary to support Customer’s authorized users in their use of the Products.
b. License Limitations—Order acknowledgments, Documentation and/or the particular type of the Products/Licenses purchased by Customer may specify limits on Customer’s use of the Software, and which limits apply to the License(s) granted hereunder for such Software. Such limits may consist of limiting the number of copies of the Software, the term of the License, or the number or amount of nodes, storage space, sessions, calls, users, subscribers, clusters, devices, ports, bandwidth, throughput or other elements, and/or require the purchase of separate Licenses to use or obtain particular features, functionalities, services, applications or other items. Use of the Software shall be subject to all such limitations.
c. For Customer’s Internal Business—Each License shall be used by Customer solely to manage its own internal business operations as well as the business operations of its Affiliates. Notwithstanding the foregoing, if Customer is in the regular business of providing firewall, VPN or security management for a fee to entities that are not its Affiliates (“MSP Customers”), Customer may use the Products for its MSP Customers provided that either (i) Customer, and not MSP Customers, maintain control and possession of the Products, and (ii) MSP Customers do not use the Software. If MSP Customers have possession and/or control of Products in whole or in part, this Agreement must be provided to MSP Customers and they must agree that their use of the Products is subject to the terms and conditions of this Agreement. Customer will not provide, make available to, or permit use of the Software in whole or in part by, any third-party, including MSP Customers and contractors, without SonicWall's prior written consent, unless such use by the third-party is solely on Customer’s behalf, is strictly in compliance with the terms and conditions of this Agreement, and Customer is liable for any breach of this Agreement by such third-party. Customer agrees to indemnify and hold SonicWALL harmless from and against any claims by MSP Customers against SonicWALL relating to the Products and/or Customer’s services for MSP Customers. “Affiliate” means any legal entity controlled by a party to this Agreement, but only for so long as such control relationship exists.
d. Evaluation License—If the Software is provided by SonicWALL or a Reseller at no charge for evaluation purposes, then Section 1(a) above shall not apply to such Software and instead Customer is granted a non-production License to use such Software and the associated documentation solely for Customer’s own internal evaluation purposes for an evaluation period of up to thirty (30) days from the date of
228 | Dell SonicWALL Analyzer 7.2 Administrator’s Guide

delivery of the Software, plus any extensions granted by SonicWALL in writing (the "Evaluation Period"). There is no fee for Customer’s use of the Software for nonproduction evaluation purposes during the Evaluation Period, however, Customer is responsible for any applicable shipping charges or taxes which may be incurred, and any fees which may be associated with usage beyond the scope permitted herein. NOTWITHSTANDING ANYTHING OTHERWISE SET FORTH IN THIS AGREEMENT, CUSTOMER UNDERSTANDS AND AGREES THAT EVALUATION SOFTWARE IS PROVIDED “AS IS” AND THAT SONICWALL DOES NOT PROVIDE A WARRANTY OR MAINTENANCE SERVICES FOR EVALUATION LICENSES, AND SONICWALL BEARS NO LIABILITY FOR ANY DIRECT, INDIRECT, INCIDENTAL, PUNITIVE, SPECIAL OR CONSEQUENTIAL DAMAGES RESULTING FROM USE (OR ATTEMPTED USE) OF THE EVALUATION SOFTWARE THROUGH AND AFTER THE EVALUATION PERIOD AND HAS NO DUTY TO PROVIDE SUPPORT TO CUSTOMER.
e. Restrictions—Customer may not (i) modify, translate, localize, adapt, rent, lease, loan, create or prepare derivative works of, or create a patent based on the Software or any part thereof, (ii) make copies except as expressly authorized under this Agreement, (iii) copy the Software onto any public or distributed network, (iv) modify or resell the Software, use the Software in connection with the operation of any nuclear facilities, or use for purposes which are competitive to SonicWALL, or (v) except as expressly authorized in Section 2(c) above, operate the Software for use in any time-sharing, outsourcing, service bureau or application service provider type environment. Unless and except to the extent authorized in the applicable Documentation, Software provided with and/or as the Product, in part or whole, is licensed for use only in accordance with the Documentation as part of the Product, and Software components making up a Product may not be separated from, nor used on a separate or standalone basis from the Product. Each permitted copy of the Software and Documentation made by Customer hereunder must contain all titles, trademarks, copyrights and restricted rights notices as in the original. Customer understands and agrees that the Products may work in conjunction with third-party products and Customer agrees to be responsible for ensuring that it is properly licensed to use such third-party products. Any Software provided in object code form is licensed hereunder only in object code form. Except to the extent allowed by applicable law if located in the European Union, and then only with prior written notice to SonicWALL, Customer shall not disassemble, decompile or reverse engineer the Software in whole or in part or authorize others to do so. Customer agrees not to use the Software to perform comparisons or other “benchmarking” activities, either alone or in connection with any other software or service, without SonicWALL’s written permission; or publish any such performance information or comparisons.
f. Third-Party Software—There may be certain third-party owned software provided along with, or incorporated within, the Products (“Third-Party Software”). Except as set forth in the paragraphs that follow, such Third-Party Software shall be considered Software governed by the terms and conditions of this Agreement. However, some Products may contain other Third-Party Software that is provided with a separate license agreement, in which case such Third-Party Software will be governed exclusively by such separate license agreement (“Third-Party License”) and not this Agreement. Any such Third-Party Software that is governed by a Third-Party License, and not this Agreement, will be identified on the applicable Product page on SonicWALL’s website and/or in a file provided with the Product. Except as SonicWALL may otherwise inform Customer in writing, the Third-Party License gives Customer at least the license rights granted above, and may provide additional license rights as to the Third-Party Software, but only with respect to the particular Third-Party Software to which the Third-Party License applies. SUCH THIRD-PARTY SOFTWARE UNDER A THIRD-PARTY LICENSE IS PROVIDED WITHOUT ANY WARRANTY FROM
| 229

SONICWALL AND ITS SUPPLIERS, INCLUDING BUT NOT LIMITED TO WARRANTIES OF MERCHANTABILITY, FITNESS FOR A PARTICULAR PURPOSE AND NON-INFRINGEMENT. Notwithstanding the foregoing, SonicWALL shall honor its warranty, maintenance and support obligations in respect to the SonicWALL Products regardless of whether the warranty, maintenance or support issue is caused in whole or in part by the Third-Party Software provided by SonicWALL with the Product.
g. Updates/Upgrades—If Customer purchases or otherwise is eligible to receive a Software update or upgrade, you must be properly licensed to use the Product identified by SonicWALL as being eligible for the update/upgrade in order to install and use the Software update/upgrade. A Software update/ upgrade replaces and/or supplements the Software Product that formed the basis for your eligibility for the update/upgrade, and does not provide you an additional License (copy) of the Software to use separately from the Software Product to be updated/upgraded. You may use the resulting updated/upgraded Product only in accordance with the terms of this Agreement.
h. Activation Keys May Expire—Certain Products, including Security Services that provide regular ongoing updates for Software (such as, Security Service consisting of anti-virus signature updates), may come with an activation key or license key (a key that must be entered to activate the Product, “Activation Key”). If the Activation Key for a Product is not activated within five (5) years from the date of issuance by SonicWALL, such Activation Key(s) may expire and no longer activate the Product. Products that come with an expiring Activation Key will operate for the contracted term of the License (or purchased Security Service), so long as the Activation Key is activated within five (5) years from SonicWALL’s date of issuance.
2. OWNERSHIP
SonicWALL and its licensors are the sole and exclusive owners of the Software, and all underlying intellectual property rights in the Hardware. All rights not expressly granted to Customer are reserved by SonicWALL and its licensors.
3. TERMINATION OF LICENSE(S)
All licenses to the Software hereunder shall terminate if Customer fails to comply with any of the provisions of this Agreement and does not remedy such breach within thirty (30) days after receiving written notice from SonicWALL. Customer agrees upon termination to immediately cease using the Software and to destroy all copies of the Software which may have been provided or created hereunder.
4. SUPPORT SERVICES
SonicWALL’s current Support Service offerings (“Support Services”) and the terms and conditions applicable to such Support Services are set forth in SonicWALL’s Support Services Terms located http://www.sonicwall.com/us/support/Services.html and are incorporated herein by reference. Support Services may require an additional fee. Unless otherwise agreed to in writing, SonicWALL’s Support Services are subject to SonicWALL’s Support Services Terms which are in effect at the time the Support Services are purchased by Customer, and these terms and conditions will be incorporated herein by reference at that time. SonicWALL reserves the right to change the Support Services Terms from time to time by posting such changes on its website, which shall apply to any Support Services purchased on or after the date of such posting.
5. SONICWALL WARRANTY
a. Warranty—SonicWALL warrants to Customer (original purchaser Customer only) that for the applicable warranty period (“Warranty Period”) the Hardware will be free from any material defects in materials or workmanship and the Software, if any, will substantially conform to the Documentation applicable to the Software and the License purchased (“Limited Warranty”). Except as may indicated otherwise in writing by
230 | Dell SonicWALL Analyzer 7.2 Administrator’s Guide

SonicWALL, the Warranty Period for Hardware is one year from the date of registration of the Hardware Product (or if sooner, seven days after initial delivery of the Hardware Product to Customer), and the applicable warranty period for Software is ninety days from the date of registration of the Software Product (or if sooner, seven days after initial delivery/download) of the Software Product to/by Customer. SonicWALL does not warrant that use of the Product(s) will be uninterrupted or error free nor that SonicWALL will correct all errors. The Limited Warranty shall not apply to any non-conformance (i) that SonicWALL cannot recreate after exercising commercially reasonable efforts to attempt to do so; (ii) caused by misuse of the Product or by using the Product in a manner that is inconsistent with this Agreement or the Documentation; (iii) arising from the modification of the Products by anyone other than SonicWALL; or (iv) caused by any problem or error in third-party software or hardware not provided by SonicWALL with the Product regardless of whether or not the SonicWALL Product is designed to operate with such third-party software or hardware. SonicWALL's sole obligation and Customer's sole and exclusive remedy under any express or implied warranties hereunder shall be for SonicWALL to use commercially reasonable efforts to provide error corrections and/or, if applicable, repair or replace parts in accordance with SonicWALL’s Support Services Terms. Customer shall have no rights or remedies under this Limited Warranty unless SonicWALL receives Customer’s detailed written warranty claim within the applicable warranty period.
b. Disclaimer—EXCEPT FOR THE EXPRESS WARRANTIES SET FORTH ABOVE, TO THE MAXIMUM EXTENT PERMITTED BY APPLICABLE LAW SONICWALL HEREBY DISCLAIMS ON BEHALF OF ITSELF, ITS SUPPLIERS, DISTRIBUTORS AND RESELLERS ALL WARRANTIES, EXPRESS, STATUTORY AND IMPLIED, APPLICABLE TO THE PRODUCTS, SERVICES AND/OR THE SUBJECT MATTER OF THIS AGREEMENT, INCLUDING, BUT NOT LIMITED TO, ANY WARRANTY OF MERCHANTABILITY, NON-INFRINGEMENT OR FITNESS FOR A PARTICULAR PURPOSE.
6. LIMITATION OF LIABILITY
The Products are not designed, manufactured, authorized or warranted to be suitable for use in any system where a failure of such system could result in a situation that threatens the safety of human life, including without limitation any such medical, life support, aviation or nuclear applications. Any such use and subsequent liabilities that may arise from such use are totally the responsibility of Customer, and all liability of SonicWALL, whether in contract, tort (including without limitation negligence) or otherwise in relation to the same is excluded. Customer shall be responsible for mirroring its data, for backing it up frequently and regularly, and for taking all reasonable precautions to prevent data loss or corruption. SonicWALL shall not be responsible for any system downtime, loss or corruption of data or loss of production. NOTWITHSTANDING ANYTHING ELSE IN THIS AGREEMENT OR OTHERWISE, TO THE MAXIMUM EXTENT PERMITTED BY APPLICABLE LAW, IN NO EVENT SHALL SONICWALL, ITS SUPPLIERS, DISTRIBUTORS OR RESELLERS BE LIABLE FOR ANY INDIRECT, INCIDENTAL, SPECIAL, PUNITIVE OR CONSEQUENTIAL DAMAGES, LOST OR CORRUPTED DATA, LOST PROFITS OR SAVINGS, LOSS OF BUSINESS, REPUTATION, GOODWILL OR OTHER ECONOMIC LOSS OR COSTS OF PROCUREMENT OF SUBSTITUTE GOODS OR SERVICES, ARISING OUT OF OR RELATED TO THIS AGREEMENT, THE PRODUCTS OR THE SERVICES, WHETHER OR NOT BASED ON TORT, CONTRACT, STRICT LIABILITY OR ANY OTHER LEGAL THEORY AND WHETHER OR NOT SONICWALL HAS BEEN ADVISED OR KNEW OF THE POSSIBILITY OF SUCH DAMAGES. TO THE MAXIMUM EXTENT PERMITTED BY APPLICABLE LAW, SONICWALL'S MAXIMUM LIABILITY TO CUSTOMER ARISING FROM OR RELATING TO THIS AGREEMENT SHALL BE LIMITED TO THE AMOUNTS RECEIVED BY SONICWALL FOR THE PRODUCTS AND THE SERVICES PURCHASED BY CUSTOMER, PROVIDED THAT WHERE ANY CLAIM AGAINST SONICWALL RELATES TO PARTICULAR PRODUCTS AND/OR SERVICES, SONICWALL'S MAXIMUM
| 231

LIABILITY SHALL BE LIMITED TO THE AGGREGATE AMOUNT RECEIVED BY SONICWALL IN RESPECT OF THE PRODUCTS AND/OR SERVICES PURCHASED BY CUSTOMER AFFECTED BY THE MATTER GIVING RISE TO THE CLAIM. (FOR MAINTENANCE SERVICES OR A PRODUCT SUBJECT TO RECURRING FEES, THE LIABILITY SHALL NOT EXCEED THE AMOUNT RECEIVED BY SONICWALL FOR SUCH MAINTENANCE SERVICE OR PRODUCT PURCHASED BY CUSTOMER DURING THE TWELVE (12) MONTHS PRECEDING THE CLAIM).
CUSTOMER EXPRESSLY AGREES TO THE ALLOCATION OF LIABILITY SET FORTH IN THIS SECTION, AND ACKNOWLEDGES THAT WITHOUT ITS AGREEMENT TO THESE LIMITATIONS, THE PRICES CHARGED FOR THE PRODUCTS AND SERVICES WOULD BE HIGHER.
7. GOVERNMENT RESTRICTIONS
Customer agrees that the Products provided under this Agreement, which may include technology and encryption, are subject to the customs and export control laws and regulations of the United States, may be rendered or performed either in the U.S., in countries outside the U.S., or outside of the borders of the country in which Customer or Customer’s system is located, and may also be subject to the customs and export laws and regulations of the country in which the Products are rendered or received. Customer agrees to abide by those laws and regulations. Customer agrees that it will not export or re-export the Products without SonicWALL's prior written consent, and then only in compliance with all requirements of applicable law, including but not limited to U.S. export control regulations. Customer has the responsibility to obtain any required licenses to export, re-export or import the Products. Customer shall defend, indemnify and hold SonicWALL and its suppliers harmless from any claims arising out of Customer’s violation of any export control laws relating to any exporting of the Products. By accepting this Agreement and receiving the Products, Customer confirms that it and its employees and agents who may access the Products are not listed on any governmental export exclusion lists and will not export or re-export the Products to any country embargoed by the U.S. or to any specially denied national (SDN) or denied entity identified by the U.S. Applicable export restrictions and exclusions are available at the official web site of the U.S. Department of Commerce Bureau of Industry and Security (www.bis.doc.gov). For purchase by U.S. governmental entities, the technical data and computer software in the Products are commercial technical data and commercial computer software as subject to FAR Sections 12.211, 12.212, 27.405-3 and DFARS Section 227.7202. The rights to use the Products and the underlying commercial technical data and computer software is limited to those rights customarily provided to the public purchasers as set forth in this Agreement. The Software and accompanying Documentation are deemed to be “commercial computer software” and “commercial computer software documentation,” respectively, pursuant to DFAR Section 227.7202 and FAR Section 12.212, as applicable. Any use, modification, reproduction, release, performance, display or disclosure of the Software and accompanying Documentation by the United States Government shall be governed solely by the terms of this Agreement and shall be prohibited except to the extent expressly permitted by the terms of this Agreement.
8. GENERAL
a. Governing Law and Venue—This Agreement shall be governed by and construed in accordance with the laws of the State of California, without giving effect to any conflict of laws principles that would require the application of laws of a different state. The parties agree that neither the United Nations Convention on Contracts for the International Sale of Goods, nor the Uniform Computer Information Transaction Act (UCITA) shall apply to this Agreement, regardless of the states in which the parties do business or are incorporated. Any action seeking enforcement of this Agreement or any provision hereof shall be brought exclusively in the state or federal courts located in the County of Santa Clara, State of California, United States of America. Each party hereby
232 | Dell SonicWALL Analyzer 7.2 Administrator’s Guide
agrees to submit to the jurisdiction of such courts. Notwithstanding the foregoing, SonicWALL is entitled to seek immediate injunctive relief in any jurisdiction in the event of any alleged breach of Section 1 and/or to otherwise protect its intellectual property.
b. Assignment—Except as otherwise set forth herein, Customer shall not, in whole or part, assign or transfer any part of this Agreement or any rights hereunder without the prior written consent of SonicWALL. Any attempted transfer or assignment by Customer that is not permitted by this Agreement shall be null and void. Any transfer/assignment of a License that is permitted hereunder shall require the assignment/transfer of all copies of the applicable Software along with a copy of this Agreement, the assignee must agree to all terms and conditions of this Agreement as a condition of the assignment/transfer, and the License(s) held by the transferor Customer shall terminate upon any such transfer/assignment.
c. Severability—If any provision of this Agreement shall be held by a court of competent jurisdiction to be contrary to law, such provision will be enforced to the maximum extent permissible and the remaining provisions of this Agreement will remain in full force and effect.
d. Privacy Policy—Customer hereby acknowledges and agrees that SonicWALL’s performance of this Agreement may require SonicWALL to process or store personal data of Customer, its employees and Affiliates, and to transmit such data within SonicWALL or to SonicWALL Affiliates, partners and/or agents. Such processing, storage, and transmission may be used for the purpose of enabling SonicWALL to perform its obligations under this Agreement, and as described in SonicWALL’s Privacy Policy (www.SonicWALL.com/us/Privacy_Policy.html, “Privacy Policy”) and may take place in any of the countries in which SonicWALL and its Affiliates conduct business. SonicWALL reserves the right to change the Privacy Policy from time to time as described in the Privacy Policy.
e. Notices—All notices provided hereunder shall be in writing, delivered personally, or sent by internationally recognized express courier service (such as, Federal Express), addressed to the legal department of the respective party or to such other address as may be specified in writing by either of the parties to the other in accordance with this Section.
f. Disclosure of Customer Status—SonicWALL may include Customer in its listing of customers and, upon written consent by Customer, announce Customer's selection of SonicWALL in its marketing communications.
g. Waiver—Performance of any obligation required by a party hereunder may be waived only by a written waiver signed by an authorized representative of the other party, which waiver shall be effective only with respect to the specific obligation described therein. Any waiver or failure to enforce any provision of this Agreement on one occasion will not be deemed a waiver of any other provision or of such provision on any other occasion.
h. Force Majeure—Each party will be excused from performance for any period during which, and to the extent that, it is prevented from performing any obligation or service as a result of causes beyond its reasonable control, and without its fault or negligence, including without limitation, acts of God, strikes, lockouts, riots, acts of war, epidemics, communication line failures, and power failures.
i. Audit—Customer shall maintain accurate records to verify compliance with this Agreement. Upon request by SonicWALL, Customer shall furnish (a copy of) such records to SonicWALL and certify its compliance with this Agreement.
| 233

j. Headings—Headings in this Agreement are for convenience only and do not affect the meaning or interpretation of this Agreement. This Agreement will not be construed either in favor of or against one party or the other, but rather in accordance with its fair meaning. When the term “including” is used in this Agreement it will be construed in each case to mean “including, but not limited to.”
k. Entire Agreement—This Agreement is intended by the parties as a final expression of their agreement with respect to the subject matter hereof and may not be contradicted by evidence of any prior or contemporaneous agreement unless such agreement is signed by both parties. In the absence of such an agreement, this Agreement shall constitute the complete and exclusive statement of the terms and conditions and no extrinsic evidence whatsoever may be introduced in any judicial proceeding that may involve the Agreement. This Agreement represents the complete agreement and understanding of the parties with respect to the subject matter herein. This Agreement may be modified only through a written instrument signed by both parties.
Apache Licensing AgreementThis product may include Apache Tomcat, licensed under the Apache License Version 2.0. Version 2.0, January 2004
http://www.apache.org/licenses/
TERMS AND CONDITIONS FOR USE, REPRODUCTION, AND DISTRIBUTION
1. Definitions:
– License—shall mean the terms and conditions for use, reproduction, and distribution as defined by Sections 1 through 9 of this document.
– Licensor—shall mean the copyright owner or entity authorized by the copyright owner that is granting the License.
– Legal Entity—shall mean the union of the acting entity and all other entities that control, are controlled by, or are under common control with that entity. For the purposes of this definition, “control” means (i) the power, direct or indirect, to cause the direction or management of such entity, whether by contract or otherwise, or (ii) ownership of fifty percent (50 percent) or more of the outstanding shares, or (iii) beneficial ownership of such entity.
– You (or Your)—shall mean an individual or Legal Entity exercising permissions granted by this License.
– Source—form shall mean the preferred form for making modifications, including but not limited to software source code, documentation source, and configuration files.
– Object—form shall mean any form resulting from mechanical transformation or translation of a Source form, including but not limited to compiled object code, generated documentation, and conversions to other media types.
– Work—shall mean the work of authorship, whether in Source or Object form, made available under the License, as indicated by a copyright notice that is included in or attached to the work (an example is provided in the Appendix that follows).
– Derivative Works—shall mean any work, whether in Source or Object form, that is based on (or derived from) the Work and for which the editorial revisions, annotations, elaborations, or other modifications represent, as a whole, an original work of authorship. For the purposes of this License, Derivative Works shall not include works that remain separable from, or merely link (or bind by name) to the interfaces of, the Work and Derivative Works thereof.
234 | Dell SonicWALL Analyzer 7.2 Administrator’s Guide

– Contribution—shall mean any work of authorship, including the original version of the Work and any modifications or additions to that Work or Derivative Works thereof, that is intentionally submitted to Licensor for inclusion in the Work by the copyright owner or by an individual or Legal Entity authorized to submit on behalf of the copyright owner. For the purposes of this definition, “submitted” means any form of electronic, verbal, or written communication sent to the Licensor or its representatives, including but not limited to communication on electronic mailing lists, source code control systems, and issue tracking systems that are managed by, or on behalf of, the Licensor for the purpose of discussing and improving the Work, but excluding communication that is conspicuously marked or otherwise designated in writing by the copyright owner as “Not a Contribution.”
– Contributor—shall mean Licensor and any individual or Legal Entity on behalf of whom a Contribution has been received by Licensor and subsequently incorporated within the Work.
2. Grant of Copyright License—Subject to the terms and conditions of this License, each Contributor hereby grants to You a perpetual, worldwide, non-exclusive, no-charge, royalty-free, irrevocable copyright license to reproduce, prepare Derivative Works of, publicly display, publicly perform, sublicense, and distribute the Work and such Derivative Works in Source or Object form.
3. Grant of Patent License—Subject to the terms and conditions of this License, each Contributor hereby grants to You a perpetual, worldwide, non-exclusive, no-charge, royalty-free, irrevocable (except as stated in this section) patent license to make, have made, use, offer to sell, sell, import, and otherwise transfer the Work, where such license applies only to those patent claims licensable by such Contributor that are necessarily infringed by their Contribution(s) alone or by combination of their Contribution(s) with the Work to which such Contribution(s) was submitted. If You institute patent litigation against any entity (including a cross-claim or counterclaim in a lawsuit) alleging that the Work or a Contribution incorporated within the Work constitutes direct or contributory patent infringement, then any patent licenses granted to You under this License for that Work shall terminate as of the date such litigation is filed.
4. Redistribution—You may reproduce and distribute copies of the Work or Derivative Works thereof in any medium, with or without modifications, and in Source or Object form, provided that You meet the following conditions:
a. You must give any other recipients of the Work or Derivative Works a copy of this License; and
b. You must cause any modified files to carry prominent notices stating that You changed the files; and
c. You must retain, in the Source form of any Derivative Works that You distribute, all copyright, patent, trademark, and attribution notices from the Source form of the Work, excluding those notices that do not pertain to any part of the Derivative Works; and
d. If the Work includes a “NOTICE” text file as part of its distribution, then any Derivative Works that You distribute must include a readable copy of the attribution notices contained within such NOTICE file, excluding those notices that do not pertain to any part of the Derivative Works, in at least one of the following places: Within a NOTICE text file distributed as part of the Derivative Works; within the Source form or documentation, if provided along with the Derivative Works; or, within a display generated by the Derivative Works, if and wherever such third-party notices normally appear. The contents of the NOTICE file are for informational purposes only and do not modify the License. You may add Your own attribution notices within Derivative Works that You distribute, alongside or as an addendum to the NOTICE text from the Work, provided that such additional attribution notices cannot be construed as modifying the License.
| 235

You may add Your own copyright statement to Your modifications and may provide additional or different license terms and conditions for use, reproduction, or distribution of Your modifications, or for any such Derivative Works as a whole, provided Your use, reproduction, and distribution of the Work otherwise complies with the conditions stated in this License.
5. Submission of Contributions—Unless You explicitly state otherwise, any Contribution intentionally submitted for inclusion in the Work by You to the Licensor shall be under the terms and conditions of this License, without any additional terms or conditions. Notwithstanding the above, nothing herein shall supersede or modify the terms of any separate license agreement you may have executed with Licensor regarding such Contributions.
6. Trademarks—This License does not grant permission to use the trade names, trademarks, service marks, or product names of the Licensor, except as required for reasonable and customary use in describing the origin of the Work and reproducing the content of the NOTICE file.
7. Disclaimer of Warranty—Unless required by applicable law or agreed to in writing, Licensor provides the Work (and each Contributor provides its Contributions) on an "AS IS" BASIS, WITHOUT WARRANTIES OR CONDITIONS OF ANY KIND, either express or implied, including, without limitation, any warranties or conditions of TITLE, NON-INFRINGEMENT, MERCHANTABILITY, or FITNESS FOR A PARTICULAR PURPOSE. You are solely responsible for determining the appropriateness of using or redistributing the Work and assume any risks associated with Your exercise of permissions under this License.
8. Limitation of Liability—In no event and under no legal theory, whether in tort (including negligence), contract, or otherwise, unless required by applicable law (such as deliberate and grossly negligent acts) or agreed to in writing, shall any Contributor be liable to You for damages, including any direct, indirect, special, incidental, or consequential damages of any character arising as a result of this License or out of the use or inability to use the Work (including but not limited to damages for loss of goodwill, work stoppage, computer failure or malfunction, or any and all other commercial damages or losses), even if such Contributor has been advised of the possibility of such damages.
9. Accepting Warranty or Additional Liability—While redistributing the Work or Derivative Works thereof, You may choose to offer, and charge a fee for, acceptance of support, warranty, indemnity, or other liability obligations and/or rights consistent with this License. However, in accepting such obligations, You may act only on Your own behalf and on Your sole responsibility, not on behalf of any other Contributor, and only if You agree to indemnify, defend, and hold each Contributor harmless for any liability incurred by, or claims asserted against, such Contributor by reason of your accepting any such warranty or additional liability.
END OF TERMS AND CONDITIONS
236 | Dell SonicWALL Analyzer 7.2 Administrator’s Guide

How to apply the Apache License to your work.
To apply the Apache License to your work, attach the following boilerplate notice, with the fields enclosed by brackets "[]" replaced with your own identifying information. (Don't include the brackets!) The text should be enclosed in the appropriate comment syntax for the file format. We also recommend that a file or class name and description of purpose be included on the same “printed page” as the copyright notice for easier identification within third-party archives.
Copyright [yyyy] [name of copyright owner]
Licensed under the Apache License, Version 2.0 (the “License”); you may not use this file except in compliance with the License. You may obtain a copy of the License at: http://www.apache.org/licenses/LICENSE-2.0
Unless required by applicable law or agreed to in writing, software distributed under the License is distributed on an “AS IS” BASIS, WITHOUT WARRANTIES OR CONDITIONS OF ANY KIND, either express or implied. See the License for the specific language governing permissions and limitations under the License.
APACHE TOMCAT SUBCOMPONENTS:
Apache Tomcat includes a number of subcomponents with separate copyright notices and license terms. Your use of these subcomponents is subject to the terms and conditions of the following licenses.
For the Eclipse JDT Java compiler:
Eclipse Public License - v 1.0
THE ACCOMPANYING PROGRAM IS PROVIDED UNDER THE TERMS OF THIS ECLIPSE PUBLIC LICENSE (“AGREEMENT”). ANY USE, REPRODUCTION OR DISTRIBUTION OF THE PROGRAM CONSTITUTES RECIPIENT'S ACCEPTANCE OF THIS AGREEMENT.
1. DEFINITIONS
Contribution—means:
a. in the case of the initial Contributor, the initial code and documentation distributed under this Agreement, and
b. in the case of each subsequent Contributor: i) changes to the Program, and ii) additions to the Program; where such changes and/or additions to the Program originate from and are distributed by that particular Contributor. A Contribution 'originates' from a Contributor if it was added to the Program by such Contributor itself or anyone acting on such Contributor's behalf. Contributions do not include additions to the Program which: (i) are separate modules of software distributed in conjunction with the Program under their own license agreement, and (ii) are not derivative works of the Program.
– Contributor—means any person or entity that distributes the Program.
– Licensed Patents—mean patent claims licensable by a Contributor which are necessarily infringed by the use or sale of its Contribution alone or when combined with the Program.
– Program—means the Contributions distributed in accordance with this Agreement.
– Recipient—means anyone who receives the Program under this Agreement, including all Contributors.
| 237

2. GRANT OF RIGHTS
a. Subject to the terms of this Agreement, each Contributor hereby grants Recipient a non-exclusive, worldwide, royalty-free copyright license to reproduce, prepare derivative works of, publicly display, publicly perform, distribute and sublicense the Contribution of such Contributor, if any, and such derivative works, in source code and object code form.
b. Subject to the terms of this Agreement, each Contributor hereby grants Recipient a non-exclusive, worldwide, royalty-free patent license under Licensed Patents to make, use, sell, offer to sell, import and otherwise transfer the Contribution of such Contributor, if any, in source code and object code form. This patent license shall apply to the combination of the Contribution and the Program if, at the time the Contribution is added by the Contributor, such addition of the Contribution causes such combination to be covered by the Licensed Patents. The patent license shall not apply to any other combinations which include the Contribution. No hardware per se is licensed hereunder.
c. Recipient understands that although each Contributor grants the licenses to its Contributions set forth herein, no assurances are provided by any Contributor that the Program does not infringe the patent or other intellectual property rights of any other entity. Each Contributor disclaims any liability to Recipient for claims brought by any other entity based on infringement of intellectual property rights or otherwise. As a condition to exercising the rights and licenses granted hereunder, each Recipient hereby assumes sole responsibility to secure any other intellectual property rights needed, if any. For example, if a third-party patent license is required to allow Recipient to distribute the Program, it is Recipient's responsibility to acquire that license before distributing the Program.
d. Each Contributor represents that to its knowledge it has sufficient copyright rights in its Contribution, if any, to grant the copyright license set forth in this Agreement.
3. REQUIREMENTS
A Contributor may choose to distribute the Program in object code form under its own license agreement, provided that:
a. it complies with the terms and conditions of this Agreement; and
b. its license agreement: i) effectively disclaims on behalf of all Contributors all warranties and conditions, express and implied, including warranties or conditions of title and non-infringement, and implied warranties or conditions of merchantability and fitness for a particular purpose; ii) effectively excludes on behalf of all Contributors all liability for damages, including direct, indirect, special, incidental and consequential damages, such as lost profits; iii) states that any provisions which differ from this Agreement are offered by that Contributor alone and not by any other party; and iv) states that source code for the Program is available from such Contributor, and informs licensees how to obtain it in a reasonable manner on or through a medium customarily used for software exchange.
When the Program is made available in source code form:
a. it must be made available under this Agreement; and
b. a copy of this Agreement must be included with each copy of the Program.
Contributors may not remove or alter any copyright notices contained within the Program.
Each Contributor must identify itself as the originator of its Contribution, if any, in a manner that reasonably allows subsequent Recipients to identify the originator of the Contribution.
238 | Dell SonicWALL Analyzer 7.2 Administrator’s Guide

4. COMMERCIAL DISTRIBUTION
Commercial distributors of software may accept certain responsibilities with respect to end users, business partners and the like. While this license is intended to facilitate the commercial use of the Program, the Contributor who includes the Program in a commercial product offering should do so in a manner which does not create potential liability for other Contributors. Therefore, if a Contributor includes the Program in a commercial product offering, such Contributor (“Commercial Contributor”) hereby agrees to defend and indemnify every other Contributor (“Indemnified Contributor”) against any losses, damages and costs (collectively “Losses”) arising from claims, lawsuits and other legal actions brought by a third-party against the Indemnified Contributor to the extent caused by the acts or omissions of such Commercial Contributor in connection with its distribution of the Program in a commercial product offering. The obligations in this section do not apply to any claims or Losses relating to any actual or alleged intellectual property infringement. In order to qualify, an Indemnified Contributor must: a) promptly notify the Commercial
Contributor in writing of such claim, and b) allow the Commercial Contributor to control, and cooperate with the Commercial Contributor in, the defense and any related settlement negotiations. The Indemnified Contributor may
participate in any such claim at its own expense.
For example, a Contributor might include the Program in a commercial product offering, Product X. That Contributor is then a Commercial Contributor. If that Commercial Contributor then makes performance claims, or offers warranties related to Product X, those performance claims and warranties are such Commercial Contributor's responsibility alone. Under this section, the
Commercial Contributor would have to defend claims against the other Contributors related to those performance claims and warranties, and if a court requires any other Contributor to pay any damages as a result, the Commercial Contributor must pay those damages.
5. NO WARRANTY
EXCEPT AS EXPRESSLY SET FORTH IN THIS AGREEMENT, THE PROGRAM IS PROVIDED ON AN “AS IS” BASIS, WITHOUT WARRANTIES OR CONDITIONS OF ANY KIND, EITHER EXPRESS OR IMPLIED INCLUDING, WITHOUT LIMITATION, ANY WARRANTIES OR CONDITIONS OF TITLE, NON-INFRINGEMENT, MERCHANTABILITY OR FITNESS FOR A PARTICULAR PURPOSE. Each Recipient is solely responsible for determining the appropriateness of using and distributing the Program and assumes all risks associated with its exercise of rights under this Agreement , including but not limited to the risks and costs of program errors, compliance with applicable laws, damage to or loss of data, programs or equipment, and unavailability or interruption of operations.
6. DISCLAIMER OF LIABILITY
EXCEPT AS EXPRESSLY SET FORTH IN THIS AGREEMENT, NEITHER RECIPIENT NOR ANY CONTRIBUTORS SHALL HAVE ANY LIABILITY FOR ANY DIRECT, INDIRECT, INCIDENTAL, SPECIAL, EXEMPLARY, OR CONSEQUENTIAL DAMAGES (INCLUDING WITHOUT LIMITATION LOST PROFITS), HOWEVER CAUSED AND ON ANY THEORY OF LIABILITY, WHETHER IN CONTRACT, STRICT LIABILITY, OR TORT (INCLUDING NEGLIGENCE OR OTHERWISE) ARISING IN ANY WAY OUT OF THE USE OR DISTRIBUTION OF THE PROGRAM OR THE EXERCISE OF ANY RIGHTS GRANTED HEREUNDER, EVEN IF ADVISED OF THE POSSIBILITY OF SUCH DAMAGES.
7. GENERAL
If any provision of this Agreement is invalid or unenforceable under applicable law, it shall not affect the validity or enforceability of the remainder of the terms of this Agreement, and without further action by the parties hereto, such provision shall be reformed to the minimum extent necessary to make such provision valid and enforceable.
| 239

If Recipient institutes patent litigation against any entity (including a cross-claim or counterclaim in a lawsuit) alleging that the Program itself (excluding combinations of the Program with other software or hardware) infringes such Recipient's patent(s), then such Recipient's rights granted under Section 2(b) shall terminate as of the date such litigation is filed.
All Recipient's rights under this Agreement shall terminate if it fails to comply with any of the material terms or conditions of this Agreement and does not cure such failure in a reasonable period of time after becoming aware of such noncompliance. If all Recipient's rights under this Agreement terminate, Recipient agrees to cease use and distribution of the Program as soon as reasonably practicable. However, Recipient's obligations under this Agreement and any licenses granted by Recipient relating to the Program shall continue and survive.
Everyone is permitted to copy and distribute copies of this Agreement, but in order to avoid inconsistency the Agreement is copyrighted and may only be modified in the following manner. The Agreement Steward reserves the right to publish new versions (including revisions) of this Agreement from time to time. No one other than the Agreement Steward has the right to modify this Agreement. The Eclipse Foundation is the initial Agreement Steward. The Eclipse Foundation may assign the responsibility to serve as the Agreement Steward to a suitable separate entity. Each new version of the Agreement will be given a distinguishing version number. The Program (including Contributions) may always be distributed subject to the version of the Agreement under which it was received. In addition, after a new version of the Agreement is published, Contributor may elect to distribute the Program (including its Contributions) under the new version. Except as expressly stated in Sections 2(a) and 2(b)
above, Recipient receives no rights or licenses to the intellectual property of any Contributor under this Agreement, whether expressly, by implication,
estoppel or otherwise. All rights in the Program not expressly granted under this Agreement are reserved.
This Agreement is governed by the laws of the State of New York and the intellectual property laws of the United States of America. No party to this Agreement will bring a legal action under this Agreement more than one year after the cause of action arose. Each party waives its rights to a jury trial in any resulting litigation.
For the Windows Installer component:
– All NSIS source code, plug-ins, documentation, examples, header files and graphics, with the exception of the compression modules and where otherwise noted, are licensed under the zlib/libpng license.
– The zlib compression module for NSIS is licensed under the zlib/libpng license.
– The bzip2 compression module for NSIS is licensed under the bzip2 license.
– The lzma compression module for NSIS is licensed under the Common Public License version 1.0.
zlib/libpng license
This software is provided 'as-is', without any express or implied warranty. In no event will the authors be held liable for any damages arising from the use of this software.
Permission is granted to anyone to use this software for any purpose, including commercial applications, and to alter it and redistribute it freely, subject to the following restrictions:
1. The origin of this software must not be misrepresented; you must not claim that you wrote the original software. If you use this software in a product, an acknowledgment in the product documentation would be appreciated but is not required.
240 | Dell SonicWALL Analyzer 7.2 Administrator’s Guide

2. Altered source versions must be plainly marked as such, and must not be misrepresented as being the original software.
3. This notice may not be removed or altered from any source distribution.
bzip2 license
Redistribution and use in source and binary forms, with or without modification, are permitted provided that the following conditions are met:
1. Redistributions of source code must retain the above copyright notice, this list of conditions and the following disclaimer.
2. The origin of this software must not be misrepresented; you must not claim that you wrote the original software. If you use this software in a product, an acknowledgment in the product documentation would be appreciated but is not required.
3. Altered source versions must be plainly marked as such, and must not be misrepresented as being the original software.
4. The name of the author may not be used to endorse or promote products derived from this software without specific prior written permission.
THIS SOFTWARE IS PROVIDED BY THE AUTHOR ``AS IS AND ANY EXPRESS OR IMPLIEDWARRANTIES, INCLUDING, BUT NOT LIMITED TO, THE IMPLIED WARRANTIES OF MERCHANTABILITY AND FITNESS FOR A PARTICULAR PURPOSE ARE DISCLAIMED. IN NO EVENT SHALL THE AUTHOR BE LIABLE FOR ANY DIRECT, INDIRECT, INCIDENTAL, SPECIAL, EXEMPLARY, OR CONSEQUENTIAL DAMAGES (INCLUDING, BUT NOT LIMITED TO, PROCUREMENT OF SUBSTITUTE GOODS OR SERVICES; LOSS OF USE, DATA, OR PROFITS; OR BUSINESS INTERRUPTION) HOWEVER CAUSED AND ON ANY THEORY OF LIABILITY, WHETHER IN CONTRACT, STRICT LIABILITY, OR TORT (INCLUDING NEGLIGENCE OR OTHERWISE) ARISING IN ANY WAY OUT OF THE USE OF THIS SOFTWARE, EVEN IF ADVISED OF THE POSSIBILITY OF SUCH DAMAGE.
Julian Seward, Cambridge, UK.
Common Public License version 1.0
THE ACCOMPANYING PROGRAM IS PROVIDED UNDER THE TERMS OF THIS COMMON PUBLIC LICENSE (“AGREEMENT”). ANY USE, REPRODUCTION OR DISTRIBUTION OF THE PROGRAM CONSTITUTES RECIPIENT'S ACCEPTANCE OF THIS AGREEMENT.
1. DEFINITIONS
Contribution—means:
a. in the case of the initial Contributor, the initial code and documentation distributed under this Agreement, and:
a. in the case of each subsequent Contributor: i) changes to the Program, and ii) additions to the Program; where such changes and/or additions to the Program originate from and are distributed by that particular Contributor. A Contribution 'originates' from a Contributor if it was added to the Program by such Contributor itself or anyone acting on such Contributor's behalf. Contributions do not include additions to the Program which: (i) are separate modules of software distributed in conjunction with the Program under their own license agreement, and (ii) are not derivative works of the Program.
– Contributor—means any person or entity that distributes the Program.
– Licensed Patents—means patent claims licensable by a Contributor which are necessarily infringed by the use or sale of its Contribution alone or when combined with the Program.
| 241

– Program—means the Contributions distributed in accordance with this Agreement.
– Recipient—means anyone who receives the Program under this Agreement, including all Contributors.
2. GRANT OF RIGHTS
b. Subject to the terms of this Agreement, each Contributor hereby grants Recipient a non-exclusive, worldwide, royalty-free copyright license to reproduce, prepare derivative works of, publicly display, publicly perform, distribute and sublicense the Contribution of such Contributor, if any, and such derivative works, in source code and object code form.
c. Subject to the terms of this Agreement, each Contributor hereby grants Recipient a non-exclusive, worldwide, royalty-free patent license under Licensed Patents to make, use, sell, offer to sell, import and otherwise transfer the Contribution of such Contributor, if any, in source code and object code form. This patent license shall apply to the combination of the Contribution and the Program if, at the time the Contribution is added by the Contributor, such addition of the Contribution causes such combination to be covered by the Licensed Patents. The patent license shall not apply to any other combinations which include the Contribution. No hardware per se is licensed hereunder.
d. Recipient understands that although each Contributor grants the licenses to its Contributions set forth herein, no assurances are provided by any Contributor that the Program does not infringe the patent or other intellectual property rights of any other entity. Each Contributor disclaims any liability to Recipient for claims brought by any other entity based on infringement of intellectual property rights or otherwise. As a condition to exercising the rights and licenses granted hereunder, each Recipient hereby assumes sole responsibility to secure any other intellectual property rights needed, if any. For example, if a third-party patent license is required to allow Recipient to distribute the Program, it is Recipient's responsibility to acquire that license before distributing the Program.
e. Each Contributor represents that to its knowledge it has sufficient copyright rights in its Contribution, if any, to grant the copyright license set forth in this Agreement.
3. REQUIREMENTS
A Contributor may choose to distribute the Program in object code form under its own license agreement, provided that:
a. it complies with the terms and conditions of this Agreement; and
b. its license agreement: i) effectively disclaims on behalf of all Contributors all warranties and conditions, express and implied, including warranties or conditions of title and non-infringement, and implied warranties or conditions of merchantability and fitness for a particular purpose; ii) effectively excludes on behalf of all Contributors all liability for damages, including direct, indirect, special, incidental and consequential damages, such as lost profits; iii) states that any provisions which differ from this Agreement are offered by that Contributor alone and not by any other party; and iv) states that source code for the Program is available from such Contributor, and informs licensees how to obtain it in a reasonable manner on or through a medium customarily used for software exchange.
When the Program is made available in source code form:
a. it must be made available under this Agreement; and
b. a copy of this Agreement must be included with each copy of the Program.
Contributors may not remove or alter any copyright notices contained within the Program.
242 | Dell SonicWALL Analyzer 7.2 Administrator’s Guide

Each Contributor must identify itself as the originator of its Contribution, if any, in a manner that reasonably allows subsequent Recipients to identify the originator of the Contribution.
4. COMMERCIAL DISTRIBUTION
Commercial distributors of software may accept certain responsibilities with respect to end users, business partners and the like. While this license is intended to facilitate the commercial use of the Program, the Contributor who includes the Program in a commercial product offering should do so in a manner which does not create potential liability for other Contributors. Therefore, if a Contributor includes the Program in a commercial product offering, such Contributor (“Commercial Contributor”) hereby agrees to defend and indemnify every other Contributor (“Indemnified Contributor”) against any losses, damages and costs (collectively “Losses”) arising from claims, lawsuits and other legal actions brought by a third-party against the Indemnified Contributor to the extent caused by the acts or omissions of such Commercial Contributor in connection with its distribution of the Program in a commercial product offering. The obligations in this section do not apply to any claims or Losses relating to any actual or alleged intellectual property infringement. In order to qualify, an Indemnified Contributor must: a) promptly notify the Commercial Contributor in writing of such claim, and b) allow the Commercial Contributor to control, and cooperate with the Commercial Contributor in, the defense and any related settlement negotiations. The Indemnified Contributor may participate in any such claim at its own expense.
For example, a Contributor might include the Program in a commercial product offering, Product X. That Contributor is then a Commercial Contributor. If that Commercial Contributor then makes performance claims, or offers warranties related to Product X, those performance claims and warranties are such Commercial Contributor's responsibility alone. Under this section, the
Commercial Contributor would have to defend claims against the other Contributors related to those performance claims and warranties, and if a court requires any other Contributor to pay any damages as a result, the Commercial Contributor must pay those damages.
5. NO WARRANTY
EXCEPT AS EXPRESSLY SET FORTH IN THIS AGREEMENT, THE PROGRAM IS PROVIDED ON AN “AS IS” BASIS, WITHOUT WARRANTIES OR CONDITIONS OF ANY KIND, EITHER EXPRESS OR IMPLIED INCLUDING, WITHOUT LIMITATION, ANY WARRANTIES OR CONDITIONS OF TITLE, NON-INFRINGEMENT, MERCHANTABILITY OR FITNESS FOR A PARTICULAR PURPOSE. Each Recipient is solely responsible for determining the appropriateness of using and distributing the Program and assumes all risks associated with its exercise of rights under this Agreement, including but not limited to the risks and costs of program errors, compliance with applicable laws, damage to or loss of data, programs or equipment, and unavailability or interruption of operations.
6. DISCLAIMER OF LIABILITY
EXCEPT AS EXPRESSLY SET FORTH IN THIS AGREEMENT, NEITHER RECIPIENT NOR ANY CONTRIBUTORS SHALL HAVE ANY LIABILITY FOR ANY DIRECT, INDIRECT, INCIDENTAL, SPECIAL, EXEMPLARY, OR CONSEQUENTIAL DAMAGES (INCLUDING WITHOUT LIMITATION LOST PROFITS), HOWEVER CAUSED AND ON ANY THEORY OF LIABILITY, WHETHER IN CONTRACT, STRICT LIABILITY, OR TORT (INCLUDING NEGLIGENCE OR OTHERWISE) ARISING IN ANY WAY OUT OF THE USE OR DISTRIBUTION OF THE PROGRAM OR THE EXERCISE OF ANY RIGHTS GRANTED HEREUNDER, EVEN IF ADVISED OF THE POSSIBILITY OF SUCH DAMAGES.
7. GENERAL
If any provision of this Agreement is invalid or unenforceable under applicable law, it shall not affect the validity or enforceability of the remainder of the terms of this Agreement, and without further action by the parties hereto, such
| 243

provision shall be reformed to the minimum extent necessary to make such provision valid and enforceable.
If Recipient institutes patent litigation against a Contributor with respect to a patent applicable to software (including a cross-claim or counterclaim in a lawsuit), then any patent licenses granted by that Contributor to such Recipient under this Agreement shall terminate as of the date such litigation is filed. In addition, if Recipient institutes patent litigation against any entity
(including a cross-claim or counterclaim in a lawsuit) alleging that the Program itself (excluding combinations of the Program with other software or hardware) infringes such Recipient's patent(s), then such Recipient's rights granted under Section 2(b) shall terminate as of the date such litigation is filed.
All Recipient's rights under this Agreement shall terminate if it fails to comply with any of the material terms or conditions of this Agreement and does not cure such failure in a reasonable period of time after becoming aware of such noncompliance. If all Recipient's rights under this Agreement terminate, Recipient agrees to cease use and distribution of the Program as soon as
reasonably practicable. However, Recipient's obligations under this Agreement and any licenses granted by Recipient relating to the Program shall continue and survive.
Everyone is permitted to copy and distribute copies of this Agreement, but in order to avoid inconsistency the Agreement is copyrighted and may only be modified in the following manner. The Agreement Steward reserves the right to publish new versions (including revisions) of this Agreement from time to time. No one other than the Agreement Steward has the right to modify this Agreement. IBM is the initial Agreement Steward. IBM may assign the responsibility to serve as the Agreement Steward to a suitable separate entity. Each new version of the Agreement will be given a distinguishing version number. The Program (including Contributions) may always be distributed subject to the version of the Agreement under which it was received. In addition, after a new version of the Agreement is published, Contributor may elect to distribute the Program (including its Contributions) under the new version. Except as expressly stated in Sections
2(a) and 2(b) above, Recipient receives no rights or licenses to the intellectual property of any Contributor under this Agreement, whether expressly, by implication, estoppel or otherwise. All rights in the Program not expressly granted under this Agreement are reserved.
This Agreement is governed by the laws of the State of New York and the intellectual property laws of the United States of America. No party to this Agreement will bring a legal action under this Agreement more than one year after the cause of action arose. Each party waives its rights to a jury trial in any resulting litigation.
Special exception for LZMA compression module
Igor Pavlov and Amir Szekely, the authors of the LZMA compression module for NSIS, expressly permit you to statically or dynamically link your code (or bind by name) to the files from the LZMA compression module for NSIS without subjecting your linked code to the terms of the Common Public license version 1.0. Any modifications or additions to files from the LZMA compression module for NSIS, however, are subject to the terms of the Common Public License version 1.0.
244 | Dell SonicWALL Analyzer 7.2 Administrator’s Guide

| 245

246 | Dell SonicWALL Analyzer 7.2 Administrator’s Guide


![7.2 - The Iron Curtain Descends [ANSWER KEY]](https://static.fdokumen.com/doc/165x107/63157307c72bc2f2dd04b5ce/72-the-iron-curtain-descends-answer-key.jpg)