Administrator's Guide - Kerio Software Archive
412
Kerio Connect Administrator’s Guide Kerio Technologies
-
Upload
khangminh22 -
Category
Documents
-
view
0 -
download
0
Transcript of Administrator's Guide - Kerio Software Archive

Kerio ConnectAdministrator’s Guide
Kerio Technologies

Kerio Technologies s.r.o. All rights reserved.
This guide provides detailed description on Kerio Connect, version 7.1. All additional
modifications and updates reserved.
For current versions of the product and related manuals, check
http://www.kerio.com/connect/download/.
Information regarding registered trademarks and trademarks are provided in appendix A.

3
Contents
1 Introduction . . . . . . . . . . . . . . . . . . . . . . . . . . . . . . . . . . . . . . . . . . . . . . . . . . . . . . . . . . . . . . . . . . 10
1.1 New Features and Enhancements . . . . . . . . . . . . . . . . . . . . . . . . . . . . . . . . . . . . . . . . . 10
1.2 Additional documentation . . . . . . . . . . . . . . . . . . . . . . . . . . . . . . . . . . . . . . . . . . . . . . . 10
1.3 Quick Checklist . . . . . . . . . . . . . . . . . . . . . . . . . . . . . . . . . . . . . . . . . . . . . . . . . . . . . . . . . . 11
2 Installation . . . . . . . . . . . . . . . . . . . . . . . . . . . . . . . . . . . . . . . . . . . . . . . . . . . . . . . . . . . . . . . . . . . . 13
2.1 System requirements . . . . . . . . . . . . . . . . . . . . . . . . . . . . . . . . . . . . . . . . . . . . . . . . . . . . 13
2.2 Conflicting software . . . . . . . . . . . . . . . . . . . . . . . . . . . . . . . . . . . . . . . . . . . . . . . . . . . . . 14
2.3 Firewall configuration . . . . . . . . . . . . . . . . . . . . . . . . . . . . . . . . . . . . . . . . . . . . . . . . . . . . 14
2.4 Installation . . . . . . . . . . . . . . . . . . . . . . . . . . . . . . . . . . . . . . . . . . . . . . . . . . . . . . . . . . . . . . 15
2.5 Configuration Wizard . . . . . . . . . . . . . . . . . . . . . . . . . . . . . . . . . . . . . . . . . . . . . . . . . . . . 23
2.6 Upgrade and Uninstallation . . . . . . . . . . . . . . . . . . . . . . . . . . . . . . . . . . . . . . . . . . . . . . 25
3 Kerio Connect components . . . . . . . . . . . . . . . . . . . . . . . . . . . . . . . . . . . . . . . . . . . . . . . . . . . . 29
3.1 Kerio Connect Monitor . . . . . . . . . . . . . . . . . . . . . . . . . . . . . . . . . . . . . . . . . . . . . . . . . . . 29
3.2 Standalone processes of the server . . . . . . . . . . . . . . . . . . . . . . . . . . . . . . . . . . . . . . . 32
4 Kerio Connect administration . . . . . . . . . . . . . . . . . . . . . . . . . . . . . . . . . . . . . . . . . . . . . . . . . 33
4.1 Kerio Connect Administration . . . . . . . . . . . . . . . . . . . . . . . . . . . . . . . . . . . . . . . . . . . . 33
5 Product Registration and Licensing . . . . . . . . . . . . . . . . . . . . . . . . . . . . . . . . . . . . . . . . . . . . 37
5.1 Product registration at the website . . . . . . . . . . . . . . . . . . . . . . . . . . . . . . . . . . . . . . . 37
5.2 Registration with the administration interface . . . . . . . . . . . . . . . . . . . . . . . . . . . . 37
5.3 License information and import of the license key . . . . . . . . . . . . . . . . . . . . . . . . 41
5.4 Licensing policy . . . . . . . . . . . . . . . . . . . . . . . . . . . . . . . . . . . . . . . . . . . . . . . . . . . . . . . . . 43
6 Services . . . . . . . . . . . . . . . . . . . . . . . . . . . . . . . . . . . . . . . . . . . . . . . . . . . . . . . . . . . . . . . . . . . . . . . 44
6.1 Service Parameter Settings . . . . . . . . . . . . . . . . . . . . . . . . . . . . . . . . . . . . . . . . . . . . . . . 46
6.2 Troubleshooting . . . . . . . . . . . . . . . . . . . . . . . . . . . . . . . . . . . . . . . . . . . . . . . . . . . . . . . . . 49
7 Domain and its settings . . . . . . . . . . . . . . . . . . . . . . . . . . . . . . . . . . . . . . . . . . . . . . . . . . . . . . . 51
7.1 Initial settings . . . . . . . . . . . . . . . . . . . . . . . . . . . . . . . . . . . . . . . . . . . . . . . . . . . . . . . . . . . 52
7.2 Definition of Domains . . . . . . . . . . . . . . . . . . . . . . . . . . . . . . . . . . . . . . . . . . . . . . . . . . . 53
7.2.1 Primary Domain . . . . . . . . . . . . . . . . . . . . . . . . . . . . . . . . . . . . . . . . . . . . . . . . . . 53
7.3 Footer settings . . . . . . . . . . . . . . . . . . . . . . . . . . . . . . . . . . . . . . . . . . . . . . . . . . . . . . . . . . 54
7.4 Restoring deleted items . . . . . . . . . . . . . . . . . . . . . . . . . . . . . . . . . . . . . . . . . . . . . . . . . . 55
7.5 Automated items clean-out . . . . . . . . . . . . . . . . . . . . . . . . . . . . . . . . . . . . . . . . . . . . . . . 56
7.6 Domain alias . . . . . . . . . . . . . . . . . . . . . . . . . . . . . . . . . . . . . . . . . . . . . . . . . . . . . . . . . . . . 59
7.7 Authentication of domain users . . . . . . . . . . . . . . . . . . . . . . . . . . . . . . . . . . . . . . . . . . 60
7.8 Rename Domain . . . . . . . . . . . . . . . . . . . . . . . . . . . . . . . . . . . . . . . . . . . . . . . . . . . . . . . . . 63

4
7.9 Deleting of domains . . . . . . . . . . . . . . . . . . . . . . . . . . . . . . . . . . . . . . . . . . . . . . . . . . . . . 64
7.10 A company with multiple sites . . . . . . . . . . . . . . . . . . . . . . . . . . . . . . . . . . . . . . . . . . . 65
7.11 Setting up the backup mail server . . . . . . . . . . . . . . . . . . . . . . . . . . . . . . . . . . . . . . . . 68
8 Users . . . . . . . . . . . . . . . . . . . . . . . . . . . . . . . . . . . . . . . . . . . . . . . . . . . . . . . . . . . . . . . . . . . . . . . . . 71
8.1 Administrator account . . . . . . . . . . . . . . . . . . . . . . . . . . . . . . . . . . . . . . . . . . . . . . . . . . . 71
8.2 Creating a user account . . . . . . . . . . . . . . . . . . . . . . . . . . . . . . . . . . . . . . . . . . . . . . . . . . 72
8.3 Editing User Account . . . . . . . . . . . . . . . . . . . . . . . . . . . . . . . . . . . . . . . . . . . . . . . . . . . . 81
8.4 Editing multiple users . . . . . . . . . . . . . . . . . . . . . . . . . . . . . . . . . . . . . . . . . . . . . . . . . . . 82
8.5 Removing user accounts . . . . . . . . . . . . . . . . . . . . . . . . . . . . . . . . . . . . . . . . . . . . . . . . . 83
8.6 Search . . . . . . . . . . . . . . . . . . . . . . . . . . . . . . . . . . . . . . . . . . . . . . . . . . . . . . . . . . . . . . . . . . . 84
8.7 Statistics . . . . . . . . . . . . . . . . . . . . . . . . . . . . . . . . . . . . . . . . . . . . . . . . . . . . . . . . . . . . . . . . 84
8.8 Administration of mobile devices . . . . . . . . . . . . . . . . . . . . . . . . . . . . . . . . . . . . . . . . . 85
8.9 Import Users . . . . . . . . . . . . . . . . . . . . . . . . . . . . . . . . . . . . . . . . . . . . . . . . . . . . . . . . . . . . 87
8.10 Exporting domain users to CSV files . . . . . . . . . . . . . . . . . . . . . . . . . . . . . . . . . . . . . . 94
8.11 User Account Templates . . . . . . . . . . . . . . . . . . . . . . . . . . . . . . . . . . . . . . . . . . . . . . . . . 95
9 User groups . . . . . . . . . . . . . . . . . . . . . . . . . . . . . . . . . . . . . . . . . . . . . . . . . . . . . . . . . . . . . . . . . . . 98
9.1 Creating a User Group . . . . . . . . . . . . . . . . . . . . . . . . . . . . . . . . . . . . . . . . . . . . . . . . . . . 98
9.2 Exporting group members . . . . . . . . . . . . . . . . . . . . . . . . . . . . . . . . . . . . . . . . . . . . . 102
10 Mapping users from directory services . . . . . . . . . . . . . . . . . . . . . . . . . . . . . . . . . . . . . . . 104
10.1 Active Directory . . . . . . . . . . . . . . . . . . . . . . . . . . . . . . . . . . . . . . . . . . . . . . . . . . . . . . . 104
10.1.1 Setting mapping in the administration interface . . . . . . . . . . . . . . . . . . . 105
10.1.2 Kerio Active Directory Extension . . . . . . . . . . . . . . . . . . . . . . . . . . . . . . . . . 107
10.2 Apple Open Directory . . . . . . . . . . . . . . . . . . . . . . . . . . . . . . . . . . . . . . . . . . . . . . . . . . 111
10.2.1 Setting mapping in the administration interface . . . . . . . . . . . . . . . . . . . 112
10.2.2 Kerio Open Directory Extension . . . . . . . . . . . . . . . . . . . . . . . . . . . . . . . . . . 115
11 Distributed domain . . . . . . . . . . . . . . . . . . . . . . . . . . . . . . . . . . . . . . . . . . . . . . . . . . . . . . . . . . 117
11.1 Recommendations . . . . . . . . . . . . . . . . . . . . . . . . . . . . . . . . . . . . . . . . . . . . . . . . . . . . . 117
11.2 Distributed domain setting . . . . . . . . . . . . . . . . . . . . . . . . . . . . . . . . . . . . . . . . . . . . . 118
11.3 Disconnecting server from distributed domain . . . . . . . . . . . . . . . . . . . . . . . . . . 119
11.4 User accounts in distributed domains . . . . . . . . . . . . . . . . . . . . . . . . . . . . . . . . . . 120
11.5 Migration of user mailboxes in distributed domains . . . . . . . . . . . . . . . . . . . . . 120
12 Sending and Receiving Mail . . . . . . . . . . . . . . . . . . . . . . . . . . . . . . . . . . . . . . . . . . . . . . . . . . 123
12.1 Mail Delivery over the Internet . . . . . . . . . . . . . . . . . . . . . . . . . . . . . . . . . . . . . . . . . 123
12.2 SMTP server . . . . . . . . . . . . . . . . . . . . . . . . . . . . . . . . . . . . . . . . . . . . . . . . . . . . . . . . . . . 128
12.3 Aliases . . . . . . . . . . . . . . . . . . . . . . . . . . . . . . . . . . . . . . . . . . . . . . . . . . . . . . . . . . . . . . . . 134
12.4 remote POP3 mailboxes . . . . . . . . . . . . . . . . . . . . . . . . . . . . . . . . . . . . . . . . . . . . . . . . 137
12.5 Receiving Email Using ETRN Command . . . . . . . . . . . . . . . . . . . . . . . . . . . . . . . . . 142
12.6 Internet Connection . . . . . . . . . . . . . . . . . . . . . . . . . . . . . . . . . . . . . . . . . . . . . . . . . . . 144
12.7 Scheduling . . . . . . . . . . . . . . . . . . . . . . . . . . . . . . . . . . . . . . . . . . . . . . . . . . . . . . . . . . . . 145
12.8 Advanced Options . . . . . . . . . . . . . . . . . . . . . . . . . . . . . . . . . . . . . . . . . . . . . . . . . . . . . 148

5
13 Antispam control of the SMTP server . . . . . . . . . . . . . . . . . . . . . . . . . . . . . . . . . . . . . . . . . 159
13.1 Spam Rating tab . . . . . . . . . . . . . . . . . . . . . . . . . . . . . . . . . . . . . . . . . . . . . . . . . . . . . . . 160
13.2 Blacklists tab . . . . . . . . . . . . . . . . . . . . . . . . . . . . . . . . . . . . . . . . . . . . . . . . . . . . . . . . . . 163
13.3 Custom Rules . . . . . . . . . . . . . . . . . . . . . . . . . . . . . . . . . . . . . . . . . . . . . . . . . . . . . . . . . 166
13.4 SpamAssassin . . . . . . . . . . . . . . . . . . . . . . . . . . . . . . . . . . . . . . . . . . . . . . . . . . . . . . . . . 171
13.5 Email policy records check . . . . . . . . . . . . . . . . . . . . . . . . . . . . . . . . . . . . . . . . . . . . . 173
13.6 Spam repellent . . . . . . . . . . . . . . . . . . . . . . . . . . . . . . . . . . . . . . . . . . . . . . . . . . . . . . . . 177
13.7 Recommended configuration of antispam tests . . . . . . . . . . . . . . . . . . . . . . . . . 178
13.8 Monitoring of spam filter’s functionality and efficiency . . . . . . . . . . . . . . . . . . 182
14 Antivirus Control of Email And Attachment Filtering . . . . . . . . . . . . . . . . . . . . . . . . . 185
14.1 Integrated Sophos Anti-Virus . . . . . . . . . . . . . . . . . . . . . . . . . . . . . . . . . . . . . . . . . . . 186
14.2 Choosing an external module for an antivirus program . . . . . . . . . . . . . . . . . . 186
14.3 Configuration of external antivirus modules . . . . . . . . . . . . . . . . . . . . . . . . . . . . 187
14.4 Server responses to detection of a virus or a damaged/encrypted
attachment . . . . . . . . . . . . . . . . . . . . . . . . . . . . . . . . . . . . . . . . . . . . . . . . . . . . . . . . . . . . 188
14.5 Filtering Email Attachments . . . . . . . . . . . . . . . . . . . . . . . . . . . . . . . . . . . . . . . . . . . . 189
14.6 Antivirus control statistics . . . . . . . . . . . . . . . . . . . . . . . . . . . . . . . . . . . . . . . . . . . . . 190
15 Email archiving and backup . . . . . . . . . . . . . . . . . . . . . . . . . . . . . . . . . . . . . . . . . . . . . . . . . . 191
15.1 Archiving . . . . . . . . . . . . . . . . . . . . . . . . . . . . . . . . . . . . . . . . . . . . . . . . . . . . . . . . . . . . . . 191
15.2 Back-up of user mailboxes and basic server configuration . . . . . . . . . . . . . . . 194
15.3 Data recovery from back-up . . . . . . . . . . . . . . . . . . . . . . . . . . . . . . . . . . . . . . . . . . . . 199
16 Server’s Certificates . . . . . . . . . . . . . . . . . . . . . . . . . . . . . . . . . . . . . . . . . . . . . . . . . . . . . . . . . . 207
16.1 Kerio Connect certificate . . . . . . . . . . . . . . . . . . . . . . . . . . . . . . . . . . . . . . . . . . . . . . . 207
16.2 Install certificates on client stations . . . . . . . . . . . . . . . . . . . . . . . . . . . . . . . . . . . . 210
17 Kerio WebMail customization . . . . . . . . . . . . . . . . . . . . . . . . . . . . . . . . . . . . . . . . . . . . . . . . 215
17.1 Skins . . . . . . . . . . . . . . . . . . . . . . . . . . . . . . . . . . . . . . . . . . . . . . . . . . . . . . . . . . . . . . . . . . 215
17.2 Logo . . . . . . . . . . . . . . . . . . . . . . . . . . . . . . . . . . . . . . . . . . . . . . . . . . . . . . . . . . . . . . . . . . 215
17.2.1 Setting the global logo . . . . . . . . . . . . . . . . . . . . . . . . . . . . . . . . . . . . . . . . . . . 215
17.2.2 Domain logo customization . . . . . . . . . . . . . . . . . . . . . . . . . . . . . . . . . . . . . . 217
17.3 Language . . . . . . . . . . . . . . . . . . . . . . . . . . . . . . . . . . . . . . . . . . . . . . . . . . . . . . . . . . . . . . 218
17.4 Keeping sessions between Kerio Connect and Kerio WebMail secure . . . . . . 219
17.4.1 Setting session protection . . . . . . . . . . . . . . . . . . . . . . . . . . . . . . . . . . . . . . . . 220
18 Limits and quotas . . . . . . . . . . . . . . . . . . . . . . . . . . . . . . . . . . . . . . . . . . . . . . . . . . . . . . . . . . . . 222
18.1 Message size limits . . . . . . . . . . . . . . . . . . . . . . . . . . . . . . . . . . . . . . . . . . . . . . . . . . . . 222
18.1.1 Setting limit for messages delivered via SMTP . . . . . . . . . . . . . . . . . . . . . 222
18.1.2 Setting limit for messages sent by a particular user . . . . . . . . . . . . . . . 222
18.1.3 Setting limit for messages sent from a domain . . . . . . . . . . . . . . . . . . . . 223
18.1.4 Size limit for Kerio WebMail . . . . . . . . . . . . . . . . . . . . . . . . . . . . . . . . . . . . . . 223

6
19 Tools . . . . . . . . . . . . . . . . . . . . . . . . . . . . . . . . . . . . . . . . . . . . . . . . . . . . . . . . . . . . . . . . . . . . . . . . 225
19.1 IP Address Groups . . . . . . . . . . . . . . . . . . . . . . . . . . . . . . . . . . . . . . . . . . . . . . . . . . . . . 225
19.2 Time Ranges . . . . . . . . . . . . . . . . . . . . . . . . . . . . . . . . . . . . . . . . . . . . . . . . . . . . . . . . . . 226
19.3 Setting Remote Administration . . . . . . . . . . . . . . . . . . . . . . . . . . . . . . . . . . . . . . . . . 229
20 LDAP server . . . . . . . . . . . . . . . . . . . . . . . . . . . . . . . . . . . . . . . . . . . . . . . . . . . . . . . . . . . . . . . . . 230
20.1 LDAP server configuration . . . . . . . . . . . . . . . . . . . . . . . . . . . . . . . . . . . . . . . . . . . . . 230
20.2 Global Address (Contact) List . . . . . . . . . . . . . . . . . . . . . . . . . . . . . . . . . . . . . . . . . . . 230
20.3 Configuring Email Clients . . . . . . . . . . . . . . . . . . . . . . . . . . . . . . . . . . . . . . . . . . . . . . 231
21 Mailing Lists . . . . . . . . . . . . . . . . . . . . . . . . . . . . . . . . . . . . . . . . . . . . . . . . . . . . . . . . . . . . . . . . . 236
21.1 User Classification . . . . . . . . . . . . . . . . . . . . . . . . . . . . . . . . . . . . . . . . . . . . . . . . . . . . . 236
21.2 Creating a Mailing List . . . . . . . . . . . . . . . . . . . . . . . . . . . . . . . . . . . . . . . . . . . . . . . . . 237
21.3 Posting rules . . . . . . . . . . . . . . . . . . . . . . . . . . . . . . . . . . . . . . . . . . . . . . . . . . . . . . . . . . 241
21.4 Moderators and Members . . . . . . . . . . . . . . . . . . . . . . . . . . . . . . . . . . . . . . . . . . . . . . 243
21.5 Mailing list archiving . . . . . . . . . . . . . . . . . . . . . . . . . . . . . . . . . . . . . . . . . . . . . . . . . . . 248
21.6 Server Reports . . . . . . . . . . . . . . . . . . . . . . . . . . . . . . . . . . . . . . . . . . . . . . . . . . . . . . . . . 249
21.7 How to use Mailing Lists . . . . . . . . . . . . . . . . . . . . . . . . . . . . . . . . . . . . . . . . . . . . . . . 249
22 Resource scheduling . . . . . . . . . . . . . . . . . . . . . . . . . . . . . . . . . . . . . . . . . . . . . . . . . . . . . . . . . 251
22.1 Resource scheduling principle . . . . . . . . . . . . . . . . . . . . . . . . . . . . . . . . . . . . . . . . . . 251
22.2 Creating resources . . . . . . . . . . . . . . . . . . . . . . . . . . . . . . . . . . . . . . . . . . . . . . . . . . . . . 253
23 Status Information . . . . . . . . . . . . . . . . . . . . . . . . . . . . . . . . . . . . . . . . . . . . . . . . . . . . . . . . . . . 255
23.1 Message Queue . . . . . . . . . . . . . . . . . . . . . . . . . . . . . . . . . . . . . . . . . . . . . . . . . . . . . . . . 255
23.2 Message queue processing . . . . . . . . . . . . . . . . . . . . . . . . . . . . . . . . . . . . . . . . . . . . . 257
23.3 Active Connections . . . . . . . . . . . . . . . . . . . . . . . . . . . . . . . . . . . . . . . . . . . . . . . . . . . . 258
23.4 Opened Folders . . . . . . . . . . . . . . . . . . . . . . . . . . . . . . . . . . . . . . . . . . . . . . . . . . . . . . . . 261
23.5 Traffic Charts . . . . . . . . . . . . . . . . . . . . . . . . . . . . . . . . . . . . . . . . . . . . . . . . . . . . . . . . . . 261
23.6 Statistics . . . . . . . . . . . . . . . . . . . . . . . . . . . . . . . . . . . . . . . . . . . . . . . . . . . . . . . . . . . . . . 263
24 Logs . . . . . . . . . . . . . . . . . . . . . . . . . . . . . . . . . . . . . . . . . . . . . . . . . . . . . . . . . . . . . . . . . . . . . . . . . 265
24.1 Log settings . . . . . . . . . . . . . . . . . . . . . . . . . . . . . . . . . . . . . . . . . . . . . . . . . . . . . . . . . . . 265
24.2 Config . . . . . . . . . . . . . . . . . . . . . . . . . . . . . . . . . . . . . . . . . . . . . . . . . . . . . . . . . . . . . . . . . 268
24.3 Mail . . . . . . . . . . . . . . . . . . . . . . . . . . . . . . . . . . . . . . . . . . . . . . . . . . . . . . . . . . . . . . . . . . . 269
24.4 Security . . . . . . . . . . . . . . . . . . . . . . . . . . . . . . . . . . . . . . . . . . . . . . . . . . . . . . . . . . . . . . . 271
24.5 Warning . . . . . . . . . . . . . . . . . . . . . . . . . . . . . . . . . . . . . . . . . . . . . . . . . . . . . . . . . . . . . . . 274
24.6 Operations . . . . . . . . . . . . . . . . . . . . . . . . . . . . . . . . . . . . . . . . . . . . . . . . . . . . . . . . . . . . 274
24.7 Error . . . . . . . . . . . . . . . . . . . . . . . . . . . . . . . . . . . . . . . . . . . . . . . . . . . . . . . . . . . . . . . . . . 275
24.8 Spam . . . . . . . . . . . . . . . . . . . . . . . . . . . . . . . . . . . . . . . . . . . . . . . . . . . . . . . . . . . . . . . . . . 276
24.9 Debug log . . . . . . . . . . . . . . . . . . . . . . . . . . . . . . . . . . . . . . . . . . . . . . . . . . . . . . . . . . . . . 277
24.10 Performance Monitor (under Windows) . . . . . . . . . . . . . . . . . . . . . . . . . . . . . . . . . 281

7
25 Folder Administration . . . . . . . . . . . . . . . . . . . . . . . . . . . . . . . . . . . . . . . . . . . . . . . . . . . . . . . . 283
25.1 Public folders . . . . . . . . . . . . . . . . . . . . . . . . . . . . . . . . . . . . . . . . . . . . . . . . . . . . . . . . . . 283
25.1.1 Global versus Domain folders . . . . . . . . . . . . . . . . . . . . . . . . . . . . . . . . . . . . 284
25.1.2 Creating public folders . . . . . . . . . . . . . . . . . . . . . . . . . . . . . . . . . . . . . . . . . . . 284
25.1.3 Assigning rights for public folders . . . . . . . . . . . . . . . . . . . . . . . . . . . . . . . 285
25.2 Viewing public folders in individual account types . . . . . . . . . . . . . . . . . . . . . . 285
26 Kerberos Authentication . . . . . . . . . . . . . . . . . . . . . . . . . . . . . . . . . . . . . . . . . . . . . . . . . . . . . 286
26.1 Kerio Connect on Windows . . . . . . . . . . . . . . . . . . . . . . . . . . . . . . . . . . . . . . . . . . . . . 287
26.2 Kerio Connect on Linux . . . . . . . . . . . . . . . . . . . . . . . . . . . . . . . . . . . . . . . . . . . . . . . . 289
26.3 Kerio Connect on Mac OS X . . . . . . . . . . . . . . . . . . . . . . . . . . . . . . . . . . . . . . . . . . . . 293
26.4 Starting Open Directory and Kerberos settings . . . . . . . . . . . . . . . . . . . . . . . . . . 303
27 NTLM authentication settings . . . . . . . . . . . . . . . . . . . . . . . . . . . . . . . . . . . . . . . . . . . . . . . . 306
27.1 Setting NTLM in MS Outlook extended by the Kerio Outlook Connector . . 309
28 Kerio Connect Environment . . . . . . . . . . . . . . . . . . . . . . . . . . . . . . . . . . . . . . . . . . . . . . . . . . 311
28.1 Configuring Email Clients . . . . . . . . . . . . . . . . . . . . . . . . . . . . . . . . . . . . . . . . . . . . . . 311
28.2 Web browsers . . . . . . . . . . . . . . . . . . . . . . . . . . . . . . . . . . . . . . . . . . . . . . . . . . . . . . . . . 312
28.3 Firewall . . . . . . . . . . . . . . . . . . . . . . . . . . . . . . . . . . . . . . . . . . . . . . . . . . . . . . . . . . . . . . . 313
29 Deployment Examples . . . . . . . . . . . . . . . . . . . . . . . . . . . . . . . . . . . . . . . . . . . . . . . . . . . . . . . 315
29.1 Persistent Internet Connection . . . . . . . . . . . . . . . . . . . . . . . . . . . . . . . . . . . . . . . . . 315
29.2 Dial-up Line + Domain Mailbox . . . . . . . . . . . . . . . . . . . . . . . . . . . . . . . . . . . . . . . . . 316
29.3 Dial-up Line + ETRN . . . . . . . . . . . . . . . . . . . . . . . . . . . . . . . . . . . . . . . . . . . . . . . . . . . 318
30 Troubleshooting in Kerio Connect . . . . . . . . . . . . . . . . . . . . . . . . . . . . . . . . . . . . . . . . . . . . 320
30.1 Reindexing mail folders . . . . . . . . . . . . . . . . . . . . . . . . . . . . . . . . . . . . . . . . . . . . . . . . 320
30.2 Moving configuration and data to another computer . . . . . . . . . . . . . . . . . . . . 321
31 Kerio Outlook Connector . . . . . . . . . . . . . . . . . . . . . . . . . . . . . . . . . . . . . . . . . . . . . . . . . . . . . 322
31.1 Kerio Outlook Connector (Offline Edition) . . . . . . . . . . . . . . . . . . . . . . . . . . . . . . . 322
31.1.1 Manual installation on a user’s workstation . . . . . . . . . . . . . . . . . . . . . . . 323
31.1.2 User profile creator — automatic installation and configuration
of user profiles . . . . . . . . . . . . . . . . . . . . . . . . . . . . . . . . . . . . . . . . . . . . . . . . . . 328
31.1.3 Notes regarding installation and upgrade on the terminal server . . . 334
31.1.4 Automatic updates . . . . . . . . . . . . . . . . . . . . . . . . . . . . . . . . . . . . . . . . . . . . . . 334
31.1.5 The Online/Offline mode . . . . . . . . . . . . . . . . . . . . . . . . . . . . . . . . . . . . . . . . . 334
31.2 Kerio Outlook Connector . . . . . . . . . . . . . . . . . . . . . . . . . . . . . . . . . . . . . . . . . . . . . . . 337
31.2.1 Installation and configuration without the migration tool . . . . . . . . . . 339
31.2.2 Upgrade of the Kerio Outlook Connector . . . . . . . . . . . . . . . . . . . . . . . . . 347

8
32 Support for iCalendar . . . . . . . . . . . . . . . . . . . . . . . . . . . . . . . . . . . . . . . . . . . . . . . . . . . . . . . . 348
32.1 Web calendars in MS Outlook 2007 . . . . . . . . . . . . . . . . . . . . . . . . . . . . . . . . . . . . . 348
32.2 Windows Calendar . . . . . . . . . . . . . . . . . . . . . . . . . . . . . . . . . . . . . . . . . . . . . . . . . . . . . 349
32.3 Apple iCal . . . . . . . . . . . . . . . . . . . . . . . . . . . . . . . . . . . . . . . . . . . . . . . . . . . . . . . . . . . . . 349
33 CalDAV support . . . . . . . . . . . . . . . . . . . . . . . . . . . . . . . . . . . . . . . . . . . . . . . . . . . . . . . . . . . . . . 352
33.1 Configuration of CalDAV accounts . . . . . . . . . . . . . . . . . . . . . . . . . . . . . . . . . . . . . 352
33.2 CalDAV account in Apple iCal . . . . . . . . . . . . . . . . . . . . . . . . . . . . . . . . . . . . . . . . . . 353
33.2.1 Automatic configuration of CalDAV accounts . . . . . . . . . . . . . . . . . . . . . 353
34 CardDAV support . . . . . . . . . . . . . . . . . . . . . . . . . . . . . . . . . . . . . . . . . . . . . . . . . . . . . . . . . . . . 355
34.1 Automatic configuration of CardDAV accounts . . . . . . . . . . . . . . . . . . . . . . . . . . 355
35 Support for ActiveSync . . . . . . . . . . . . . . . . . . . . . . . . . . . . . . . . . . . . . . . . . . . . . . . . . . . . . . 357
35.1 Synchronization methods . . . . . . . . . . . . . . . . . . . . . . . . . . . . . . . . . . . . . . . . . . . . . . 357
35.2 Supported versions of ActiveSync and mobile devices . . . . . . . . . . . . . . . . . . . 360
35.3 RoadSync . . . . . . . . . . . . . . . . . . . . . . . . . . . . . . . . . . . . . . . . . . . . . . . . . . . . . . . . . . . . . 362
35.4 SSL encryption . . . . . . . . . . . . . . . . . . . . . . . . . . . . . . . . . . . . . . . . . . . . . . . . . . . . . . . . . 362
35.5 Remote deletion of the device data (Wipe) . . . . . . . . . . . . . . . . . . . . . . . . . . . . . . 365
35.6 Removing a device from the administration of mobile devices . . . . . . . . . . . 367
35.7 Synchronization logs . . . . . . . . . . . . . . . . . . . . . . . . . . . . . . . . . . . . . . . . . . . . . . . . . . 367
35.8 Troubleshooting . . . . . . . . . . . . . . . . . . . . . . . . . . . . . . . . . . . . . . . . . . . . . . . . . . . . . . . 369
36 Support for BlackBerry devices . . . . . . . . . . . . . . . . . . . . . . . . . . . . . . . . . . . . . . . . . . . . . . 372
36.1 NotifySync . . . . . . . . . . . . . . . . . . . . . . . . . . . . . . . . . . . . . . . . . . . . . . . . . . . . . . . . . . . . 372
36.2 AstraSync . . . . . . . . . . . . . . . . . . . . . . . . . . . . . . . . . . . . . . . . . . . . . . . . . . . . . . . . . . . . . 372
37 Kerio Connector for BlackBerry . . . . . . . . . . . . . . . . . . . . . . . . . . . . . . . . . . . . . . . . . . . . . . 373
37.1 System requirements . . . . . . . . . . . . . . . . . . . . . . . . . . . . . . . . . . . . . . . . . . . . . . . . . . 373
37.2 Installation . . . . . . . . . . . . . . . . . . . . . . . . . . . . . . . . . . . . . . . . . . . . . . . . . . . . . . . . . . . . 374
37.2.1 Kerio Connector for BlackBerry installation . . . . . . . . . . . . . . . . . . . . . . . 374
37.2.2 BlackBerry Enterprise Server installation . . . . . . . . . . . . . . . . . . . . . . . . . . 375
37.3 Licensing Policy . . . . . . . . . . . . . . . . . . . . . . . . . . . . . . . . . . . . . . . . . . . . . . . . . . . . . . . 375
37.4 Starting to work with BlackBerry Enterprise Server (Express) . . . . . . . . . . . . . 376
37.4.1 Creating users on the BES server . . . . . . . . . . . . . . . . . . . . . . . . . . . . . . . . . 376
37.4.2 Activating BlackBerry devices . . . . . . . . . . . . . . . . . . . . . . . . . . . . . . . . . . . . 376
37.5 Using BlackBerry Enterprise Sever . . . . . . . . . . . . . . . . . . . . . . . . . . . . . . . . . . . . . . 377
37.5.1 Accessing the BlackBerry Administration Service . . . . . . . . . . . . . . . . . . 377
37.5.2 Accessing the BlackBerry Web Desktop Manager . . . . . . . . . . . . . . . . . . 377
37.5.3 Checking Server Routing Protocol (SRP) and setting SRP ID . . . . . . . . 378
37.5.4 Activating S/MIME messages . . . . . . . . . . . . . . . . . . . . . . . . . . . . . . . . . . . . . 378
37.5.5 Selecting email folders for synchronization with a BlackBerry
device . . . . . . . . . . . . . . . . . . . . . . . . . . . . . . . . . . . . . . . . . . . . . . . . . . . . . . . . . . 378
37.5.6 Selecting contact folders for synchronization with a BlackBerry
device . . . . . . . . . . . . . . . . . . . . . . . . . . . . . . . . . . . . . . . . . . . . . . . . . . . . . . . . . . 379

9
37.5.7 Synchronizing deleted messages from the device to the server . . . . . 379
38 MS Entourage support . . . . . . . . . . . . . . . . . . . . . . . . . . . . . . . . . . . . . . . . . . . . . . . . . . . . . . . . 380
38.1 Automatic configuration of Exchange accounts . . . . . . . . . . . . . . . . . . . . . . . . . . 381
39 Apple Address Book Support . . . . . . . . . . . . . . . . . . . . . . . . . . . . . . . . . . . . . . . . . . . . . . . . . 383
40 Kerio Sync Connector for Mac . . . . . . . . . . . . . . . . . . . . . . . . . . . . . . . . . . . . . . . . . . . . . . . . 385
40.1 Installation . . . . . . . . . . . . . . . . . . . . . . . . . . . . . . . . . . . . . . . . . . . . . . . . . . . . . . . . . . . . 386
40.2 Synchronization troubleshooting . . . . . . . . . . . . . . . . . . . . . . . . . . . . . . . . . . . . . . . 386
41 Support for Apple Mail . . . . . . . . . . . . . . . . . . . . . . . . . . . . . . . . . . . . . . . . . . . . . . . . . . . . . . . 389
42 Apple iPhone Support . . . . . . . . . . . . . . . . . . . . . . . . . . . . . . . . . . . . . . . . . . . . . . . . . . . . . . . . 391
42.1 Apple iPhone OS 2.0 and higher . . . . . . . . . . . . . . . . . . . . . . . . . . . . . . . . . . . . . . . . 392
43 Technical support . . . . . . . . . . . . . . . . . . . . . . . . . . . . . . . . . . . . . . . . . . . . . . . . . . . . . . . . . . . . 393
43.1 Kerio Connect Administration . . . . . . . . . . . . . . . . . . . . . . . . . . . . . . . . . . . . . . . . . . 393
A Legal Notices . . . . . . . . . . . . . . . . . . . . . . . . . . . . . . . . . . . . . . . . . . . . . . . . . . . . . . . . . . . . . . . . . 398
B Used open-source libraries . . . . . . . . . . . . . . . . . . . . . . . . . . . . . . . . . . . . . . . . . . . . . . . . . . . 400
Glossary of terms . . . . . . . . . . . . . . . . . . . . . . . . . . . . . . . . . . . . . . . . . . . . . . . . . . . . . . . . . . . . 404
Index . . . . . . . . . . . . . . . . . . . . . . . . . . . . . . . . . . . . . . . . . . . . . . . . . . . . . . . . . . . . . . . . . . . . . . . . 408

10
Chapter 1
Introduction
Kerio Connect is the successor of the successfull application Kerio MailServer. Kerio Connect
is a modern multiplatform mailserver which supports variety of communication protocols.
These protocols allow using of any email clients including those which are supported by
mobile devices. The mailserver also allows direct access to mailboxes via a proprietary web
interface.
Kerio Connect uses mailboxes to store various data types. Besides email messages, calendars,
notes, contacts and tasks are kept in mailboxes. Calendars and tasks offer also task and
meeting planning. These features make Kerio Connect a complex groupware enterprise
solution.
1.1 New Features and Enhancements
For Kerio Connect 7.1, Kerio Technologies has set up the following features:
Sophos — newly integrated antivirus engine
Since 7.1, Kerio Connect includes a new integrated antivirus engine, Sophos. For more
information on the settings, see chapter 14
Kerio Connector for BlackBerry
Since version 7.1, Kerio Connect includes a special tool, the Kerio Connector for BlackBerry
module, allowing to synchronize data with BlackBerry devices. For more information, refer to
chapter 37
Exporting users to CSV files
Do you need to get a list of domain users, mailing list members or members of individual
groups? In the Kerio Connect Administration interface you can now easily export lists to CVS
files. For detailed information, refer to the corresponding chapters (8.10, 21.4 or 9.2).
1.2 Additional documentation
In addition to this very document (Kerio Connect 7, Administrator’s Guide), other documents
are also available for Kerio Connect, namely Kerio Connect 7, Step-by-Step Guide (information
on server installation and basic configuration) and Kerio Connect 7, User’s guide (detailed

1.3 Quick Checklist
11
information on configuration and use of client applications and the web interface used for
connection to the server).
Besides the documentation, you can also target various issues by referring to:
• Product forum — in this discussion, you can encounter experience and problems of
other administrators using the same product. You may find a working solution for
your issues here.
• Knowledge Base — here you can find a set of articles troubleshooting particular
problems.
1.3 Quick Checklist
This chapter gives you a basic step-by-step guide to quickly set up Kerio Connect so that it can
function as a mail server for your company immediately. All that you need is basic knowledge
of TCP/IP and of the principles of Internet mail protocols, and some information from your
ISP: the type of connection and the way email is delivered for your domain.
If you are unsure about any element of Kerio Connect, simply look up an appropriate chapter
in the manual. If you do not know how and/or where email is delivered for your domain,
please contact your ISP.
1. Install Kerio Connect and make the required settings using the configuration wizard
(create the primary domain as well as username and password for the user Admin). Log
into the Kerio Connect Console program.
By default, Kerio Connect is installed to the following directories:
• Mac OS X
/usr/local/kerio/mailserver
• Linux
/opt/kerio/mailserver
• MS Windows
C:\Program Files\Kerio\MailServer
2. Set up the services you are planning to use. If you would like to run a web server on
the same machine, for example, stop the HTTP/Secure HTTP service, change its port or
reserve one IP address for the service’s default port. For more details refer to chapter 6.1.
3. Create local domains. The primary domain must be created first (configuration guide).
After you create other domains, you can set any of them as primary. If you are not sure as
to which domain should be primary, choose the domain that contains the most users. Do
not forget to fill in the DNS name of the SMTP server. For more information see chapter 7.

Introduction
12
4. Create user accounts for individual domains. Account names should correspond with the
users’ primary email addresses. We do not recommend using special characters for name
definitions. You can also import users from external sources. See chapter 8 for more
details.
5. If necessary, create groups (to create group addresses, for instance) and assign users to
them. For more information refer to chapter 9.
6. Define aliases for users and user groups if necessary. More details can be found in
chapter 12.3.
7. Set the type of Internet connection: Online for leased line, cable modems and ADSLs and
Offline for any kind of dial-up connection. More details can be found in chapter 12.6.
8. If the modem is installed on the same computer as Kerio Connect, choose the correct RAS
line. More details can be found in chapter 12.6.
9. If the Internet connection type is Offline, set Scheduling. If the type is Online, only set
scheduling if you would like to retrieve email from remote POP3 accounts or receive email
using ETRN command. More details can be found in chapter 12.7.
10. If you would like to retrieve email from remote POP3 accounts or domain accounts, create
corresponding accounts in POP3 Download. If email from these accounts is to be sorted
into local accounts, also define the sorting rules. Refer to chapter 12.4.
11. If email for certain domains should be received from a secondary server using ETRN
command, define corresponding accounts in ETRN Download. See chapter 12.5 for details.
12. Set up antivirus control in Antivirus. Choose a plug-in module for the antivirus program
that you have installed. Choose the action that should be performed in case an infected
attachment is found. You can also choose to filter certain types of attachments (e.g.
executables). Refer to chapter 14 for more information.
13. If Kerio Connect is running behind a firewall, map appropriate ports. See chapter 28.3 for
more information.
14. If the SMTP server is accessible from the Internet, set up Anti-spam protection, to prevent
misuse of the mail server for sending spam email. You can also protect yourself from
receiving such email from other servers. For more information, see chapter 13.
15. Set up email backup/archiving of mail folders and configuration files if necessary. See
chapter 15.2 for details.
16. Create a certificate for the mail server for secure communication, or ask a commercial
certification authority to do this. For more information, see chapter 16.

13
Chapter 2
Installation
2.1 System requirements
The minimum hardware configuration recommended for Kerio Connect (basic license for 20
users):
• CPU 1 GHz,
• 512 MB RAM,
• 50 MB free disk space (for the installation),
• 40 GB free disk space for user mailboxes and backups,
• For maximum protection of the installed product (particularly its configuration files),
it is recommended to use the NTFS file system.
Recommended hardware configuration of the computer where Kerio Connect will be running:
For 20 — 100 active users
• CPU 2 GHz,
• 2 GB RAM,
• 160 GB free disk space for user mailboxes and backups.
For 100 and more active users
• CPU 2.8 GHz Dual (Quad) Core,
• 4 GB RAM,
• 200 GB and more free disk space for user mailboxes and backups.
Note:
• An active user is a user that uses the Kerio Connect services multiple times a day (e.g.
mail services, calendar, tasks, etc.).
• These recommendations apply only in case the computer is used only as a mailserver
(Kerio Connect, antivirus, anti-spam).

Installation
14
2.2 Conflicting software
Kerio Connect runs on the application layer and there are not any known low-level conflicts
with other software, operating system components or device drivers (except the antivirus that
is used to open files). If a received email message includes an infected attachment, the mail
server stores it into a temporary file on the disk. Antivirus might damage the disk or the
system. To prevent your computer from such failure, configure your antivirus to not scan the
folder (or the disk) where Kerio Connect data is kept (refer to chapter 14).
A possible conflict is a port clash (if all services are running in Kerio Connect, these TCP
ports are used: 25, 80, 110, 119, 143, 443, 465, 563, 587, 993 and 995). It is therefore not
recommended that users run other mail, LDAP or web server software on the same computer.
If this is necessary, the system administrator must ascertain that there will be no port clashes.
For example, if Kerio Connect is running on a computer together with a web server, we
recommend changing the HTTP service port or disabling the service and only enabling its
secured version — Secure HTTP. Another alternative is to reserve one or more IP addresses for
ports at which Kerio Connect services are listening. For detailed information on services and
port settings, see chapter 6.
If Kerio Connect is run on a firewall or on a secured local network behind a firewall, the
firewall will affect the mail server’s behavior to a certain extent (e.g. accessibility of some or
all services). When configuring the firewall take into consideration which services should be
accessible from the Internet or the local network and enable communication on appropriate
ports (see above or chapters 6 and 28.3 for more detail).
2.3 Firewall configuration
Kerio Connect is usually installed in a local network behind a firewall. In addition to the
mailserver’s configuration, it is also necessary to perform corresponding additional settings
of the firewall.
If the mailserver is to be accessible from the Internet, certain ports have to be opened (mapped)
in the firewall. Each mapped port might introduce security problems. Therefore, map ports
only for those services which you want to make available from the Internet.
If server is supposed to deliver email directly by DNS MX records, it is necessary to map port
25 (standard port for SMTP service). This setting is required for cases where an MX record for
the particular domain is addressed to the server. Any SMTP server on the Internet can connect
to your SMTP server to send email to one of its domains.
Now, it is necessary to map ports that will be used for connections out of the local network.
Since the security risk is higher here, it is recommended to map only SSL/TLS-secured services.
Settings are shown in table 2.1.

2.4 Installation
15
Service (default port) Outgoing connection Incoming connection
SMTP (25) allow allow
SMTPS (465) allow allow
SMTP Submission
(587)a
allow allow
POP3 (110) allow deny
POP3S (995) allow allow
IMAP (143) allow deny
IMAPS (993) allow allow
NNTP (119) allow deny
NNTPS (563) allow allow
LDAP (389) allow deny
LDAPS (636) allow allow
HTTP (80) allow deny
HTTPS (443) allow allow
It is necessary that this service is enabled in case that you use distributed domain.a
Table 2.1 Services to be allowed on the firewall
2.4 Installation
Kerio Connect can be installed on one of these operating systems:
Microsoft Windows
Kerio Connect supports the following versions of Microsoft Windows operating systems:
• Windows 2000 (SP4)
• Windows XP (SP3 or SP2)
• Windows Server 2003 (SP2)
• Windows Server 2008
• Windows Server 2008 R2
• Windows Vista (Business, Enterprise or Ultimate edition)
• Windows 7
It is necessary that Kerio Connect is installed under a user with administration rights for the
system.

Installation
16
Kerio Connect is installed by using the Windows Installer. Once the installation program is
launched, a guide will take you through setting the basic server parameters. For details about
this wizard, refer to chapter 2.5.
By default, Kerio Connect is installed to the following directory:
C:\Program Files\Kerio\MailServer
This setting can be changed during the installation process if necessary (see below).
For better reference when solving any problems, the Kerio Connect installation process is
logged in a special file (kerio-connect.setup.log) located in folder %TEMP%. You can use
this file to trace back roots of problems or installation failure.
To install Kerio Connect, follow these instructions:
1. Double-click on the Kerio Connect’s installation file run it. This file can be downloaded at
the Kerio Technologies website at http://www.kerio.com/connect/download.
2. The installer asks user to select the installation language. These settings applies to
installation only. Language version of the interface used for administration of Kerio Con-
nect can be selected after the installation.
3. When the installation process is started, a welcome page is displayed. When the welcome
page is opened, the installer scans the disk automatically to find out whether there is
enough space for the installation on the target drive. To install Kerio Connect, click Next.
4. In the following dialog, all important changes and news since the last version of Kerio
Connect are listed. When you finish reading the news, continue by clicking on the Next
button.
5. In the next page, confirm license agreement, otherwise the product installation gets stuck
at this stage. Once the terms are accepted, click Next.
6. The next dialog allows selection of an installation type, as follows:
• Complete — all parts and modules of Kerio Connect including the product guide
in two language versions will be installed.
This option is recommended especially to users who are installing Kerio Connect
for the first time.
• Custom — allows to choose optional components.
7. The following dialog is opened only if the Custom installation was selected. If you selected
the Complete option, skip reading this section.
In the Custom installation, it is possible to choose which Kerio Connect components will
be installed.

2.4 Installation
17
Figure 2.1 Custom installation
Components to be installed:
• Connect — the executive core of the program (the Kerio Connect Engine) which
provides all services and functions. It runs as a background application (as
a service on Windows 2000, Windows XP or Windows Vista, or as a daemon on
Unix-based systems).
Along with the Kerio Connect Engine, it is recommended to install the following
components:
• Engine Monitor — to get more information about this component, see
chapter 3.1.
• Performance Monitor Support — to get more information about this
component, see chapter 24.10.
8. In the next step, select a directory where Kerio Connect will be installed. By default, it is
installed in:
C:\Program Files\Kerio\
Select a folder where the program will be installed and click on Next.
9. At this moment, the wizard is started where basic server parameters can be set (see
section 2.5). Be really attentive while setting these parameters.

Installation
18
10. Status of the installation process is showed during the installation. Please be patient, the
installation may take several minutes.
11. Once the settings in the configuration wizard are done, the final dialog of the installation
wizard is opened. Save the installation settings by the Finish button.
Kerio Connect Engine, which is the mail server’s core, running as a service, will be started
immediately after the installation is complete.
Figure 2.2 Kerio Connect Monitor on Windows
Protection of the installed product
In order to ensure the maximum security of the mailserver, it is necessary to disallow
unauthorized access to the application files (in particular to the configuration files). If the
NTFS file system is used, the system resets the access rights to the directory where Kerio
Connect is installed (including all subdirectories — even if the path has changed) upon
the first startup after each upgrade or installation: the read and write access is allowed
only for members of the Administrators group and the local system account (SYSTEM );
no one else is allowed to access the system files.
Warning:
If the FAT32 file system is used, it is not possible to protect Kerio Connect in the
above way. Thus, we strongly recommend to install Kerio Connect only on NTFS
disks.
Linux — RPM
Kerio Connect supports the following distributions of the Linux operating system:
• Red Hat Enterprise Linux 4.8 and higher
• openSUSE 11.0 — 11.2 and SUSE Linux Enterprise 10 and 11
• CentOS Linux 5.2, 5.3, 5.4 and 5.5
Warning:
For installations, Kerio Connect uses the RPM application. All functions are available except
the option of changing the Kerio Connect location.
The installation must be performed by a user with root rights. Kerio Connect Engine is
installed to the /opt/kerio/mailserver directory.

2.4 Installation
19
New installation
Start installation using this command:
# rpm -i <installation_file_name>
Example:
# rpm -i kerio-connect-7.1.0-1270.linux.rpm
In case of the recent versions of the distributions, problems with package dependencies
might occur. If you cannot install Kerio Connect, download and install the
compat-libstdc++ package.
It is recommended to read carefully the LINUX-README file immediately upon the
installation. The file can be found in
/opt/kerio/mailserver/doc
When the installation is completed successfully, run the configuration wizard to set the
domain and the administrator’s account:
/opt/kerio/mailserver
./cfgwizard
Warning:
The Kerio Connect Engine must be stopped while the configuration wizard is
running.
Starting and stopping the server
Once all settings are finished successfully in the configuration wizard, Kerio Connect is
ready to be started.
Within the installation, the kerio-connect script is created in the /etc/init.d
directory which provides automatic startup of the daemon (i.e. Connect Engine) upon
a reboot of the operating system. This script can also be used to start or stop the daemon
manually, using the following commands:
sudo /etc/init.d/kerio-connect start
sudo /etc/init.d/kerio-connect stop
sudo /etc/init.d/kerio-connect restart
Kerio Connect must be running on the root account.
Administration
Kerio Connect provides full web administration. You can access the administration
interface by using this URL in your web browser: http://mail.firma.cz/admin (you
will be automatically redirected to the secured address on port 4040).

Installation
20
Linux — DEB
Kerio Connect supports the following distributions of the Linux operating system:
• Debian 5.0
• Ubuntu 8.04 LTS and 10.04 LTS
Requires: libstdc++5
Warning:
The installation must be performed by a user with root rights.
Kerio Connect Engine is installed to the /opt/kerio/mailserver directory.
New installation
To install either of the installation packages, double-click on its icon or use for example
the following command in the terminal:
# dpkg -i <installation_file_name.deb>
Example:
# dpkg -i kerio-connect-7.1.0-1270.linux.i386.deb
It is recommended to read carefully the DEBIAN-README file immediately upon the
installation. The file can be found in
/opt/kerio/mailserver/doc
When the installation is completed successfully, run the configuration wizard to set the
domain and the administrator’s account:
/opt/kerio/mailserver
./cfgwizard
Starting and stopping the server
Once all settings are finished successfully in the configuration wizard, Kerio Connect is
ready to be started.
Within the installation, the kerio-connect script is created in the /etc/init.d
directory which provides automatic startup of the daemon (i.e. Connect Engine) upon
a reboot of the operating system. This script can also be used to start or stop the daemon
manually, using the following commands:
/etc/init.d/kerio-connect start
/etc/init.d/kerio-connect stop
/etc/init.d/kerio-connect restart
Kerio Connect must be running on the root account.

2.4 Installation
21
Administration
Kerio Connect provides full web administration. You can access the administration
interface by using this URL in your web browser: http://mail.firma.cz/admin (you
will be automatically redirected to the secured address on port 4040).
Mac OS X
Kerio Connect supports Mac OS X systems on both PowerPC and Intel processors. The Kerio
Connect’s installation package is a universal binary file which can be run on both platforms.
The product supports the following systems:
• Mac OS X 10.4 Tiger
• Mac OS X 10.5 Leopard
• Mac OS X 10.6 Snow Leopard
Recommended: G5, 2GB RAM; Mac Intel Solo or Duo, 2GB RAM
kerio-connect-7.1.0-1270.mac.dmg
1. Double-click on the package icon to open the kerio-connect-7.1.0-1270.mac.dmg
installation package.
2. This opens the Finder where the installation package is opened as a disk and where
the Kerio Connect Installer executable is available. Click on it to run the installer (see
figure 2.3).
Figure 2.3 Kerio Connect Installer

Installation
22
3. Kerio Connect can be installed only by a user with administration rights for the system.
To start the installation, username and password is required in a special dialog. Enter
the username and password for a user who has administration rights for the system.
Only users with appropriate rights (members of the Admins group) are allowed to install
applications in the system.
Administrators can allocate any users with these rights under System Preferences → Ac-
counts.
4. The installation wizard is opened upon a successful authentication.
5. At the start, license terms are displayed. Click on Continue and confirm the terms by the
Agree button.
6. Once license terms are accepted, a dialog is opened where an installation type can be
selected:
• Easy Install — preset installation, all components will be installed automatically
by the installer.
• Custom Install — you can select individual components that you would like to
install (Kerio Connect Engine and Administrator’s Guide are available).
• Uninstall — this options uninstalls Kerio Connect.
Select an installation type (the Easy Install option will install all available components) and
click on Install.
Figure 2.4 Installation — custom install
7. Now, the wizard runs the installation.
By default, Kerio Connect is installed under /usr/local/kerio/mailserver.
The complete version of Kerio Connect will be installed (Kerio Connect Engine and Admin-
istrator’s Guide).

2.5 Configuration Wizard
23
8. Once the installation is completed, the configuration wizard is opened automatically. Set
the primary domain name and the admin password which will be used for login to the
Kerio Connect’s administration interface (see chapter 2.5).
9. When the configuration wizard is finished, the final dialog of the installer is displayed.
Finish the installation by the Quit button.
Click OK to open the Kerio Connect folder which includes the administrator’s guide (Adminis-
trator’s Guide) in PDF and Configuration Wizard (refer to chapter 2.5).
Kerio Connect will be run automatically after the operating system is booted. However, users
must run Kerio Connect Monitor (System Preferences → Other → Kerio Connect Monitor).
Username which must belong to the Admins group and password is required for stopping or
running of the service. Once authenticated, clicking Stop Kerio Connect or Start Kerio Connect
is sufficient.
You can also stop, start or restart the Kerio Connect through Terminal or a SSH client with the
following commands with root access.
Mac OS X 10.4 Tiger :
Stopping the Kerio Connect Engine
sudo launchctl stop com.kerio.mailserver
Running the Kerio Connect Engine
sudo launchctl start com.kerio.mailserver
Restarting the Kerio Connect Engine
sudo launchctl restart com.kerio.mailserver
Mac OS X 10.5 Leopard and Mac OS X 10.6 Snow Leopard:
Stopping the Kerio Connect Engine
sudo /usr/local/kerio/mailserver/KerioMailServer stop
Running the Kerio Connect Engine
sudo /usr/local/kerio/mailserver/KerioMailServer start
Restarting the Kerio Connect Engine
sudo /usr/local/kerio/mailserver/KerioMailServer restart
If possible, it is recommended to stop/start the service by using the button in System Prefer-
ences → Others → Kerio Connect Monitor (see figure 3.3).
2.5 Configuration Wizard
The installation program for Windows and Mac OS X operating systems automatically runs
a wizard that helps to set the basic parameters for Kerio Connect and creates special files
where the server configuration is saved. If you do not use the configuration wizard, it will not
be possible to login to the Kerio Connect’s administration interface.

Installation
24
The wizard can be also run on Linux. When a corresponding package is installed, user will be
informed that the wizard is available. This information is also provided by the daemon if it
detects that the wizard has not been used yet. To run the wizard use the following command:
/opt/kerio/mailserver
./cfgwizard
Warning:
Kerio Connect must be stopped while settings are changed in the configuration wizard.
After running the wizard, existing configuration files will be deleted.
Settings
Use the wizard to set the following:
• Create a domain — to enable creating user accounts (or groups) in Kerio Connect, at
least one local domain must be created. The first local domain created is the primary
domain. Unlike in the other local domains, users can login by their usernames (In the
other domains, it is necessary to use the full email address. For detailed information
on domains, see chapter 7).
• Create an administration account which then will be used for login to the Kerio Con-
nect’s administration interface — a crucial operation for your server’s security is
setting of the administration password. Blank password is not accepted. For security
reasons passwords should consist at least of six characters.
• Setting of the DNS name of the Kerio Connect host — the Internet hostname entry
should show internet DNS name of the computer where Kerio Connect is running
(typically name of the computer with the primary domain name). Server names are
used for server identification while establishing SMTP traffic.
Warning:
If Kerio Connect is running behind NAT, enter the Internet hostname
that can be converted to the IP address of the sending server, i.e. the
Internet hostname of the firewall.
• Select a data store for the server — Kerio Connect stores a relatively large amount of
data (email messages, information about user folders, records, etc.). The administrator
can select a different location to store data (e.g. another disk partition, RAID etc.). The
store directory can be changed anytime later through the administration interface (for
more information, see chapter 12.8). If the location is changed then it is necessary to
move the files located in this directory to the new location. Prior to this potentially
very time-consuming operation, the Kerio Connect Engine must be stopped. It is

2.6 Upgrade and Uninstallation
25
therefore recommended to specify an appropriate data store directory within the
installation process already.
Configuration files
The wizard creates the following configuration files:
users.cfg
The users.cfg file is an XML file that includes information about user account, groups
and aliases.
Administration name and password was written in this file by the configuration wizard.
mailserver.cfg
mailserver.cfg is an XML file containing any other parameters of Kerio Connect, such
as configuration parameters of domains, back-ups, antispam filter, antivirus, etc.
In this file, the local primary domain just created, Internet name of the server as well as
the location of the message store was written.
Information on these two files are saved in the XML format. They can be therefore
modified by hand or re-generated by your applications. Backups or transfers of these
files can be easily performed by simple copying.
Warning:
On Mac OS X and Linux systems, files can be maintained only if the user is logged
in as the root user.
2.6 Upgrade and Uninstallation
Windows Operating Systems
Simply run the installation package of a new version to upgrade WinRoute (i.e. get a new release
from the Kerio web pages — http://www.kerio.com/). The installation program will detect the
directory where the older version is installed, stop running components (Kerio Connect Engine
and Kerio Connect Monitor) and replace appropriate files with new ones automatically. All
settings and all stored messages will be available in the new version. We recommend not
changing the installation directory!
When upgrading Kerio Connect, follow the same scheme as for the first installation of Kerio
Connect (see chapter 2.4).
Once the product is upgraded successfully, a backup of the configuration files of the previous
Kerio Connect version is saved in the directory where Kerio Connect is installed (C:\Program
Files\Kerio by default), under the UpgradeBackups directory.

Installation
26
Kerio Connect can be uninstalled by using Uninstall from the Start menu using the
Add/Remove Programs in the Control Panels:
1. Under Add or remove programs, select Kerio Connect and click on Remove.
2. This runs the Microsoft Installer installation wizard.
3. In the first dialog, it is possible to choose whether Kerio Connect will be removed
completely, including the data store and configuration files (see figure 2.5):
Figure 2.5 Removal of the data store and configuration files
• Remove message store — check this option to remove Kerio Connect’s data store
including the archiving and the backup store.
• Remove configuration files — if this option is enabled, configuration files
(mailserver.cfg and users.cfg) as well as the license file, SSL certificates,
statistics and logs will be removed.
When sure that the settings are finished, continue by clicking on the Next button.
4. Progress of the uninstallation process is showed on the status bar. Please be patient, the
process may take several minutes.

2.6 Upgrade and Uninstallation
27
Linux Operating System — RPM
Upgrade
To upgrade, use the following command:
# rpm -U <installation_file_name>
Example:
# rpm -U kerio-connect-7.1.0-1270.linux.i386.rpm
Fix installation of the current version
To fix the current installation, use the following command:
# rpm -U --force <installation_file_name>
Example:
# rpm -U --force kerio-connect-7.1.0-1270.linux.i386.rpm
Uninstallation
To uninstall Kerio Connect, use the following commands:
# rpm -e <package_name>
This means:
# rpm -e kerio-mailserver
During the uninstallation process, only the files that have been included in the former
installation package and that have not been edited will be removed. Configuration,
messages in the mailboxes, etc. will be retained. Such files may be deleted manually
or kept for further installations.
Note: RPM allows using additional, advanced parameters. For description of these parameters,
see the RPM guidance page. To open this page, use the following command: man rpm
Linux Operating System — DEB
Upgrade
To upgrade Kerio Connect, follow the same steps as for a new installation (see 2.4).
Uninstallation
To uninstall Kerio Connect, use the following command:
# apt-get remove <installation_package_name>
This means:
# apt-get remove kerio-connect
or for full removal of Kerio Connect along with all configuration files:
# apt-get remove --purge kerio-connect

Installation
28
Mac OS X
Upgrade
Simply run the installation package of a new version to upgrade WinRoute (i.e. get a new
release from the Kerio web pages — http://www.kerio.com/). The installation program
will detect the directory where the older version is installed, stop running components
(Kerio Connect Engine and Kerio Connect Monitor) and replace appropriate files with new
ones automatically. All settings and all stored messages will be available in the new
version. We recommend not changing the installation directory!
Uninstallation
You can also use the Kerio Connect’s installation program to uninstall this product.
Simply click on the icon of the currently installed Kerio Connect’s installation package
to run the installation and select Uninstall as the installation type.

29
Chapter 3
Kerio Connect components
Kerio Connect consists of the following components:
Kerio Connect Engine
is the core of the program that provides all services and functions. It runs as
a background application (as a service on Windows, or as a daemon on UNIX-like systems).
The Kerio Connect Engine also includes the avserver and spamserver processes which
run separately that maintain the antivirus plug-in and theSpamAssassin antispam module
(details in section 3.2).
Kerio Connect Monitor
With this application you can monitor the Engine and Monitor applications, you can
switch the engine’s on/off status, edit startup preferences or launch the administration
interface. Details can be found in chapter 3.1.
This module is available only on MS Windows and Mac OS X.
Note: Kerio Connect Monitor is an application completely independent of the Kerio Con-
nect Engine (it is running in background or as a service).
Performance Monitor
This component allows for real time system performance monitoring of Kerio Connect
components. For more details, see chapter 24.10.
This module is available only on MS Windows.
3.1 Kerio Connect Monitor
Kerio Connect Monitor is a utility used to control and monitor the Connect Engine status. This
component is available only under Windows and Mac OS X.
Windows Operating Systems
In Windows, Kerio Connect Monitor is displayed as an icon in the System Notification Area.
Figure 3.1 Kerio Connect Monitor

Kerio Connect components
30
If the Kerio Connect Engine is stopped, a red mark appears over the icon. Starting or stopping
the service can take several seconds. During this time the icon is grey and inactive.
On Windows, left double-clicking on this icon runs the Kerio Connect Administration login
page (described later). Right-clicking on this icon displays the following menu.
Figure 3.2 Kerio Connect Monitor — menu
Start-up Preferences
Options for running Kerio ConnectServer and Kerio Connect Monitor automatically at
system start-up. Both options are enabled by default.
Administration
This option runs the Kerio Connect Administration program (this can also be achieved by
double-clicking the Kerio Connect Monitor icon).
Start/Stop Kerio Connect
Start or stop the Connect Engine (Start or Stop is displayed according to the Engine status).
Exit Engine Monitor
Exits the Kerio Connect Monitor. This option does not stop the Connect Engine. The user
is informed about this fact by a warning window.
Mac OS X
On Mac OS X, the Kerio Connect Monitor is displayed in a new window (see figure 3.3) which can
be opened from the Other section of System Preferences. The window includes the following
options:
• About Kerio Connect — the button opens the About window providing basic
information on the product and its version number.
• Stop/Start Server — the button starts/stops the Kerio Connect Engine.
Username which must belong to the Admins group and password is required for
stopping or running of the service.
• Configure Server — the button runs the Kerio Connect Administration.
You can also stop, start or restart the Kerio Connect Monitor through Terminal or a SSH client
with the following commands with root access:
Mac OS X 10.4 Tiger :

3.1 Kerio Connect Monitor
31
Figure 3.3 Kerio Connect Monitor
Stopping the Kerio Connect Engine
sudo SystemStarter stop KerioMailServer
Running the Kerio Connect Engine
sudo SystemStarter start KerioMailServer
Restarting the Kerio Connect Engine
sudo SystemStarter restart KerioMailServer
Mac OS X 10.5 Leopard and Mac OS X 10.6 Snow Leopard:
Stopping the Kerio Connect Engine
sudo /usr/local/kerio/mailserver/KerioMailServer stop
Running the Kerio Connect Engine
sudo /usr/local/kerio/mailserver/KerioMailServer start
Restarting the Kerio Connect Engine
sudo /usr/local/kerio/mailserver/KerioMailServer restart
If possible, it is recommended to stop/start the service by using the button in System Prefer-
ences → Others → Kerio Connect Monitor (see figure 3.3).
Linux
Installation packages for Linux do not include Kerio Connect Monitor. Kerio Connect Engine
can be started by the following command:
sudo /etc/init.d/kerio-connect [start | stop]

Kerio Connect components
32
3.2 Standalone processes of the server
In addition to the main process mailserver.exe, there are other two stand-alone processes
avserver.exe (antivirus plugins) and spamserver.exe (SpamAssassin) running in Kerio Con-
nect that serve applications developed outside Kerio Technologies.
The mailserver.exe process is located in the directory where Kerio Connect is installed
(Kerio\MailServer\mailserver.exe or Kerio/mailserver/mailserver.exe).
The other two processes are represented by executables located in the directory
where Kerio Connect is installed (\Kerio\MailServer\plugins on Windows,
/Kerio/mailserver/plugins on Unix-based systems).
Whenever a problem occurs regarding any of the plug-ins (e.g. when connection is closed
improperly or if connection “freezes”), automatic restart is initiated by the corresponding
process. Initiation of the application’s restart also generates and saves a crashdump log that
might help discover the problem’s cause. Then, when an administrator connects to Kerio
Connect, a Kerio Assist dialog asks them to decide whether the crashdump log would be sent
to Kerio Technologies for analysis.
Warning:
Any information recorded in the log are used only to solve problems associated with usage
of Kerio Technologies products. No information including the sender’s email address will be
misused in any way.

33
Chapter 4
Kerio Connect administration
Kerio Connect — has a modern web interface. Its major advantage is the ability to
administer Kerio Connect from any place with Internet connection without having to install
the application.
4.1 Kerio Connect Administration
Web browsers
New versions of all commonly used browsers that support JavaScript and cascading
stylesheets (CSS) can be used to access Kerio Connect Administration. The following browsers
are supported:
• Internet Explorer 7 and 8
• Firefox 3 or higher
• Safari 4
To use the secured access to the Kerio Connect Administration interface (by HTTPS protocol),
the browser must support SSL encryption. If it can be configured (e.g. in Microsoft Internet
Explorer), it is recommend to enable support for SSL 3.0 and TLS 1.0 versions.
Users logged in
To access the HTTP service using a web browser, insert the IP address (or the name if it is
contained in DNS) of the computer where Kerio Connect is running. The URL also requires
specification of the HTTPS protocol for SSL-secured connection. Kerio Connect Administration
runs on port 4040. The URL will be for example https://192.168.1.1:4040/admin nebo
https://mail.company.com:4040/admin.
Note: If you use URL without the HTTPS and 4040 substrings, Kerio Connect will be directed
to the secured protocol and port 4040 automatically.
If the URL has been entered correctly, a login page will be displayed in the browser. Enter the
username on this page (if the user does not belong to the primary domain, a username with
domain name must be entered, for example name@domain) and password.

Kerio Connect administration
34
Figure 4.1 Web Administration Login
Log out
It is recommended to log out after finishing work in Web Administration. To log out, click
the Logout button in the upper right corner. After logout, users get disconnected from Kerio
Connect, which prevents misuse of such connection. If Kerio Connect Administration is inactive
for 40 minutes, it will be automatically disconnected for security reasons.
Setting access rights to the web interface
As mentioned above, access to Kerio Connect Administration is ensured by special access
rights. These rights establish two essential roles for server access:
• Domain administrator — can administer accounts, groups, aliases, mailing lists and
resources in their own domain. This access is suitable for larger companies or Internet
service providers because it enables the server administrator to delegate the basic
administration to domain owners (see figure 4.2).
• Server administrator — can administer all domains and server configuration.

4.1 Kerio Connect Administration
35
Figure 4.2 Server and domain administration
Kerio Connect Administration access rights can be set as follows:
1. Log in to the web administration using the name and password of the primary
administrator (the name and password you created during the installation of Kerio Con-
nectu).
2. In the administration interface, open the Accounts → Users section.
3. Use the mouse pointer to select a user to whom the rights will be assigned.
4. Click on Edit to open the Edit User dialog and go to the Rights tab.
Figure 4.3 Setting user access rights for Kerio Connect Administration
Kerio Connect administration
36
5. On this tab, check <company.cz> accounts for the domain administrator (see figure 4.3) or
Whole server read/write for server administrator.
6. Click OK to confirm changes.

37
Chapter 5
Product Registration and Licensing
Once purchased, Kerio Connect must be registered. Registration may be performed in the
Kerio Connect’s administration interface (see chapter 5.2) or at Kerio Technologies website
(refer to chapter 5.1).
If Kerio Connect is not registered, it behaves like a trial version. The trial version of Kerio
Connect is not limited in functionality, it only expires after a certain period of time. After
30 days from the installation, Kerio Connect Engine is disabled.
This means that the trial version differs from the registered (full) version only in time of
functionality. This should be sufficient time (30 days) to test the product in the regular
environment. It is not necessary to reinstall or reconfigure Kerio Connect after registration.
5.1 Product registration at the website
Web registration can be performed at the Kerio Technologies website
(https://secure.kerio.com/reg), in the Support → License registration menu. This registration
method is useful especially when Kerio Connect cannot access the Internet.
Against the registration, you will receive a license key (the license.key file including the
corresponding certificate) which must be imported to Kerio Connect. For detailed information
on the import of the license key, refer to chapter 5.3.
Note: The trial version of Kerio Connect cannot be registered via the website.
5.2 Registration with the administration interface
In the Kerio Connect Administration interface, the product can be registered at the main page
of Kerio Connect (see figure 5.5). The Kerio Connect main page is opened upon each login to
the administration. It can be also displayed by clicking on Kerio Connect in the sections list
provided in the tree (see chapter 4.1).
Warning:
If Kerio Connect is protected by a firewall, it is necessary to allow outgoing HTTPS traffic for
Kerio Connect at port 443. Unless HTTPS traffic is allowed, Kerio Connect cannot use the
port to connect to the Kerio Technologies registration server.
When installed, the product can be registered as trial or as a full version:

Product Registration and Licensing
38
Why should I register the trial version?
The trial version is intended to allow the customer to become familiar with the product’s
features and configuration. Once you register the trial version, you will be provided free Kerio
Technologies technical support during the entire trial period (up to 30 days).
Immediately upon authentication to the Kerio Connect Administration, a box is opened
informing the administrator about options of purchasing the product or registrating full or
trial version (see chapter 5.1). To register the trial version, click on Become a registered trial
user of Kerio Connect here or on the product’s main page (see figure 5.5). Fill in the fields in
the registration wizard.
Figure 5.1 The product’s welcome page
You should pay careful attention during step five where a special identification code called
Trial ID is generated. This ID is later required when contacting the technical support. After
a successful registration, Trial ID can be found in the license information in the administration
interface.
Note: If you intend to reinstall Kerio Connect or to move it to another working station in the
registered trial period, it is recommended to back-up the mailserver.cfg configuration file
first (besides another information, your trial ID is included in this file).
If the registration is completed successfully, a confirmation message will be sent to your email
address provided.

5.2 Registration with the administration interface
39
Registration of full version
To run the process of full version registration, click on the Register product link provided at
the main page of the administration interface (see figure 5.5):
• Base product — in step one, enter the license number you acquired upon purchasing
the product (License number).
Figure 5.2 License number
License number
Enter your license number for the product.
Security code
Copy the security code provided in the picture. The code is a part of the
protection against license number generators.
The code is not case-sensitive.
Click Next to make Kerio Connect establish a connection to the registration server and
check validity of the number entered. If the number is invalid, the registration cannot
be completed.
• Subscription — In this dialog you can specify add-ons and/or subscriptions numbers.
If you have purchased only the base license so far (usually when registrating the
product for the first time), skip this step.
Subscription and add-on licensing policies are described in detail at the Kerio Tech-
nologies webpage — http://www.kerio.com/support/subscription-policy/.

Product Registration and Licensing
40
Figure 5.3 Subscriptions and add-ons numbers
You can add one or more license numbers acquired upon purchasing a subscription
or an add-on license. Numbers provided in the list can also be edited or removed. To
register all numbers specified, click Next.
• Details — at this page, registration information identifying the company (organization)
to which the product is registered is required.
Figure 5.4 Registration form

5.3 License information and import of the license key
41
The red entries marked with an asterisk are required, The other ones are optional.
• Summary — in the last dialog, the data specified in the wizard is summarized.
Information of expiration date is provided (the latest date when the product can be
updated for free).
Kerio Connect connects to the registration server, checks whether the data inserted is
correct and downloads automatically the license key (digital certificate).
Click Finish to close the wizard.
5.3 License information and import of the license key
License information is provided at the main page of Kerio Connect. The Kerio Connect main
page is opened upon each startup of the Kerio Connect Administration. It can be also displayed
by clicking on Kerio Connect in the sections list provided in the tree (see chapter 4.1).
Figure 5.5 Viewing license information

Product Registration and Licensing
42
To run a full version of Kerio Connect, a license key is required. A license key is a special
file that must be imported to the product. Three methods can be applied to obtain the key
(depending on the type of the product’s registration and on the fact whether the product was
registered in time):
• The license key is imported automatically during the product’s registration in the
administration interface (see chapter 5.2).
• Import using the link on the main page — click on the Install license link (see figure 5.5).
A standard file-opening dialog is displayed where the license key can be browsed and
imported. If the import is successful, information about the new license is provided
at the main page.
If the new license increases number of licensed users, the Kerio Connect Engine must
be restarted upon the successful installation.
• Adding the license key file in the license directory manually — it is possible to copy
the license.key file manually to the license subdirectory under the directory where
Kerio Connect is installed.
If the file must be imported manually, it is necessary to stop the Kerio Connect Engine
before the import process is started.
License ID
License number of the product.
Subscription expiration date
The latest date when the product can be updated for free.
Product functionality expiration date
The date when the product expires and stops functioning (only for trial versions and
special licenses).
Number of licensed users
Number of users allowed by the license. Number in parenthesis refers to total number of
email accounts used in the Kerio Connect. The number includes both mailboxes created
locally as well as accounts mapped from a directory service.
If number of active mailboxes exceeds number of licensed users, the Number of active
mailboxes line is coloured by red to alert user.
Number of active mailboxes
Number of users connected since the last restart of Kerio Connect. This number includes
all local users, all mailing lists (each mailing list stands for 1 licence) as well as all users
mapped from the directory service.
Once the number of licensed users is exceeded no other users will be allowed to connect
to their accounts.

5.4 Licensing policy
43
Company
Name of the company (or a person) to which the product is registered.
Operational system
Name and version of the operating system on which Kerio Connect is installed.
5.4 Licensing policy
Number of users is counted by email mailboxes/accounts created in the Kerio Connect or
imported from the domain. Number of maling lists, resources, aliases and domains is not
limited.
In case of users mapped from the LDAP database of the directory service, all users created in
this database are counted as individual licences (all active users).
Once the number of licensed users is exceeded no other users will be allowed to connect to
their accounts.
Subscription
Subscription and add-on licensing policies are described in detail at the Kerio Technologies
webpage — http://www.kerio.com/support/subscription-policy/.
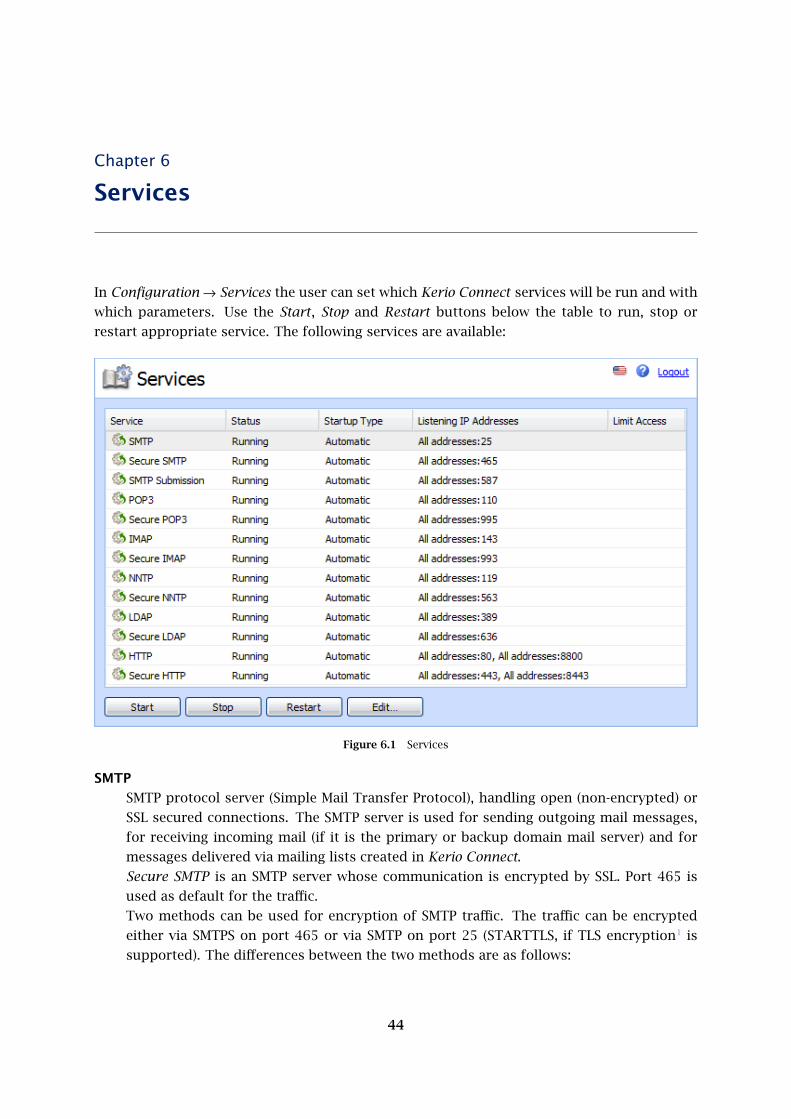
44
Chapter 6
Services
In Configuration → Services the user can set which Kerio Connect services will be run and with
which parameters. Use the Start, Stop and Restart buttons below the table to run, stop or
restart appropriate service. The following services are available:
Figure 6.1 Services
SMTP
SMTP protocol server (Simple Mail Transfer Protocol), handling open (non-encrypted) or
SSL secured connections. The SMTP server is used for sending outgoing mail messages,
for receiving incoming mail (if it is the primary or backup domain mail server) and for
messages delivered via mailing lists created in Kerio Connect.
Secure SMTP is an SMTP server whose communication is encrypted by SSL. Port 465 is
used as default for the traffic.
Two methods can be used for encryption of SMTP traffic. The traffic can be encrypted
either via SMTPS on port 465 or via SMTP on port 25 (STARTTLS, if TLS encryption1 is
supported). The differences between the two methods are as follows:
45
• SMTP on port 25 with STARTTLS — traffic on port 25 is started as unencrypted.
If both sides support TLS, TLS is started via STARTTLS. Otherwise, the traffic is
held unencrypted.
• SMTP with SSL/TLS on port 465 — the traffic is encrypted right from the start.
Warning:
If traffic between Kerio Connect and mail client is running on port 25, a problem
might occur with email sending. Since public WiFi networks often do not support
traffic on unencrypted protocols, SMTP on port 25 can be blocked. In such case
users cannot send email out of the network. However, SMTPS on port 465 is
usually allowed. Therefore, it is recommended to keep SMTPS connection enabled
so that notebook and Apple iPhone users can use this port to connect to the server.
It is also necessary that users’ email clients (SMTPS encryption and traffic port) are
set correctly.
SMTP Submission is a special type of communication which enables the mail sent by
an authenticated user to be delivered immediately without antispam control. SMTP
Submission is used for sending mail among servers connected in the distributed domain.
This service is necessary for example when you use distributed domain (for more details,
see chapter 11).
POP3
POP3 protocol server (Post Office Protocol). This server allows users — clients to retrieve
messages from their accounts. It is also often referred to as the incoming mail server.
Secure POP3 is a POP3 server whose communication is encrypted by SSL. The encryption
prevents the communication from being tapped.
IMAP
IMAP protocol server (Internet Message Access Protocol). This server also allows users to
access their messages. With this protocol, messages stay in folders and can be accessed
from multiple locations at any given time.
Secure IMAP is an IMAP server whose communication is encrypted by SSL.
NNTP
NNTP protocol (News Network Transfer Protocol) — transfer protocol for newsgroups
over the Internet. The service allows users use messages of the news type and use the
protocol to view public folders.
Public folders cannot be viewed via NNTP protocol if its name include a blank space or
the . sign (dot).
Secure NNTP is the NNTP server version whose communication is encrypted by SSL.
LDAP
Simple LDAP server that enables users to access centrally managed contacts. The LDAP
server provides read-only access to the information; you are not allowed to create nor
edit the existing ones.
TLS is follower of the SSL protocol, it is actually SSL version 3.11

Services
46
Secure LDAP is an LDAP server whose communication is encrypted by SSL.
If Kerio Connect is installed on a server which is used as a domain controller (in Active
Directory), it is necessary to run LDAP and LDAPS services on a non-standard port or to
disable them.
HTTP
The HTTP protocol is used for:
• accessing user mailboxes via Kerio WebMail,
• accessing mail using Microsoft Entourage mail client (see chapter 38),
• accessing the Free/Busy server,
• automatic upgrades of new versions of the Kerio Outlook Connector and the Kerio
Outlook Connector (Offline Edition).
• for synchronization via the ActiveSync protocol.
• for BlackBerry synchronization via NotifyLink.
• for publishing of calendars as iCal
Secure HTTP is an encrypted version of this protocol (HTTPS — SSL or TLS encrypted).
HTTPS is used especially for the following purposes:
• accessing the user administration via the Kerio Connect Administration interface
(see chapter 4.1). The services gets redirected to port 4040 automatically.
• for secured access to WebMail.
Upon the first startup of Kerio Connect, all the services listed above are running on their
default (standard) ports.
Note: If you are sure that some services will not be used, it is recommended to disable them
(for security reasons).
If any service provided also by Kerio Connect is already running on the server, it is necessary
to change traffic port for one of the services. To change a port of a Kerio Connect’s service,
follow the instructions in section 6.1.
6.1 Service Parameter Settings
The service list (see figure 6.1) includes the following information:
• Service — includes protocol name and an icon informing whether the service is
running or stopped.
• Status (running/stopped) — this item shows whether the service is running or stopped.
• Startup (Manual/Automatic) — information whether Kerio Connect is started
automatically or it must be run manually upon its restart.
• IP addresses — this item shows all IP addresses and ports used for traffic by the
particular Kerio Connect’s service.

6.1 Service Parameter Settings
47
• Limit Access — Kerio Connect allows narrowing access rights to a certain group of
IP addresses which will be allowed to use the particular service (usually, unsecured
services are accessible from the local network only).
The parameters of a selected service can be changed. To do this, use the Edit button. The
button opens the Service dialog (see figure 6.2). The dialog consists of the following tabs:
Features
This tab allows setting of startup type and of a TCP port for traffic.
Figure 6.2 Service Parameters
Name
Type of service.
Startup
Kerio Connect allows two startup modes:
• Automatically — the service will be run automatically upon Kerio Connect’s
startup.
• Manually — when the server is started, the service is stopped and it must be run
by the administrator if desirable.
Listen IP Addresses and Ports
By default, Kerio Connect listens at all default ports at all IP addresses of the its host.
The Ports dialog enables to assign particular IP address to the port where the service is
running.
Assignment of an IP address to a standard port of a service running in Kerio Connect may
be helpful in the case that Kerio Connect and another application using the same services
(e.g. another LDAP server, webserver or mail server) are installed at the same host. In

Services
48
such a case, it is possible to reserve only one IP address for each service of Kerio Connect
so that port collisions are avoided.
This means that two different web servers may use port 80 at two different IP addresses.2
Warning:
Assignment of IP addresses to ports is not recommended if IP addresses are
reserved dynamically, e.g. using DHCP.
Click Add to bind the IP address to the port.
Figure 6.3 Ports
Most services use standard ports and it is not recommended to change them unless
necessary (e.g. in case of conflict with another application of the same type). Click Default
to restore the default settings.
Access
The Access tab allows setting limits for access to the particular service. The following
parameters can be set:
Figure 6.4 Limiting access to service
Indeed, it is necessary to reserve an IP address for the same service in another application, that is not used by Kerio2
Connect.

6.2 Troubleshooting
49
Allow access only from...
Allows access to a selected service to be limited to certain IP addresses only (defined in the
selected group). The IP address group can be defined in the Configuration → Definitions
→ IP Address Groups section or directly in this dialog window by pressing the Edit button.
Detailed access policy for the SMTP service can be set in the Configuration → SMTP server
section.
Allow anonymous access
This option relates only to the NNTP(S) service, therefore it is not contained in other
dialog windows of other services. This option allows unauthenticated access to the NNTP
server. This means that everyone can register to a mailing list with anonymous access.
Maximum number of concurrent connections
This option limits the number of concurrent connections to the selected service. Too
many concurrent connections may cause the server overload which can subsequently
lead to its failure. This is the principal of so called DoS (Denial of Service) attack. Setting
the limit for the number of connections therefore helps to prevent the DoS attacks against
your server.
Warning:
When you plan to limit the number of connections, consider the number of server
users.
For unlimited number of connections set the value to 0.
6.2 Troubleshooting
When solving problems regarding services, logs of the traffic between the server and clients
might be helpful. To log relevant information, enable a corresponding option under Logs →
Debug in the Kerio Connect Administration:
1. In the Kerio Connect Administration, go to the Logs section and select the Debug log.
2. Right-click on the log pane to open a context menu, and select Messages.
3. In the Logged Information dialog just opened, enable logging for the particular service (see
figure 6.5).
4. Confirm changes by OK.
The following types of services are associated with the Debug log options:
SMTP
If any problems arise in the communication between the SMTP server and a client, it is
possible to use the SMTP Server and SMTP Client options.

Services
50
Figure 6.5 The Debug log settings
POP3
When problems with POP3 server arise, enabling the POP3 Server option might be helpful.
IMAP
When problems with IMAP server arise, enabling of the IMAP server logging might be
helpful.
IMAP Server .
NNTP
When problems with NNTP server arise, a log that can be enabled by the NNTP Server
option might help.
LDAP
When problems with LDAP server arise, a log that can be enabled by the LDAP Server
option might help.
HTTP
• HTTP Server — this option enables logging of HTTP traffic on the server’s side.
• WebDAV Server Request — this option enables logging of queries sent from the
WebDAV server. It can be used in MS Entourage or Apple Mail where problems
with Exchange accounts arise.
• PHP Engine Messages — the log may be helpful when solving problems with the
Kerio WebMail web interface.
Once your problems are solved, it is recommended to disable the logging.
To read more on the Debug log and its options, see chapter 24.9.

51
Chapter 7
Domain and its settings
A domain is a unique identificator for a host or a computer network. Email domain is a unique
domain identificator which is used to recognize to which server mail should be delivered. In
email addresses, the domain identificator follows the "at" symbol (@).
Email domain might be (and often is) different from the name of the server where Kerio
Connect is installed and running. The server name can be for example mail.company.com
where the email domain name is company.com. Users in this domain will use email addresses
following the pattern [email protected].
Figure 7.1 Domains
Kerio Connect can include any number of email domains (see figure 7.1). Various parameters
can be defined for each domain and its users. The only condition is that one of the domains
must be set as primary. For details on setting of primary domain and its use, refer to
section 7.2.1.
Warning:
User accounts are defines separately in each domain. Therefore, domains must be have been
defined before accounts are created.

Domain and its settings
52
7.1 Initial settings
All basic settings for email domains can be found in the Kerio Connect’s administration
interface, section Configurations → Domains (see figure 7.1):
Setting server’s Internet name
To make email deliverable to mail domains, Kerio Connect requires specification of a DNS
name of the host where the server is running (typically, it is the name of the host
complemented with the primary domain name — this server name is generated automatically
by the installation wizard).
Domains are defined in the Configuration → Domains section. Server names are used for
server identification while establishing SMTP traffic.
Upon initializing SMTP communication, the EHLO command is used for retrieving reverse DNS
record. The server that communicates with Kerio Connect can perform checks of the reverse
DNS record.
Warning:
If Kerio Connect is running behind NAT, enter the Internet hostname that can be converted
to the IP address of the sending server, i.e. the Internet hostname of the firewall.
To set the hostname, follow these guidelines:
1. In the administration interface, go to Configuration → Domains.
2. In the dialog opened by clicking on the Internet hostname button set the DNS name of the
host.
Sharing public folders across domains
Basic settings of the domain system in Kerio Connect include also the option of3 sharing
of public folders across all created domains or creating of public folders separately for each
folder. This can be set in Configuration → Domains by the Public folders button (see figure 7.2).
Figure 7.2 Advanced domain settings
Public folders are folders which can be read by any users within the domain or any users in Kerio Connect. They are3
created and managed by a user with administration rights for public folders. Public folders can be helpful for sharing
contacts or calendar with company events across the company, for example.

7.2 Definition of Domains
53
To read more on public folders and their settings, refer to chapter 25.
7.2 Definition of Domains
Creating domains in Kerio Connect is simple:
1. Click on Add in Configuration → Domains.
2. This opens the Domain dialog; on the General tab, enter the domain name and description
(description is not obligatory but it is recommended in case you would create multiple
domains).
3. Recommendation for ISP: On the General tab, set a limit for number of users in the domain
so that exceeding of number of license users is avoided (see figure 7.3). .
The limit sets maximum number of users who can be connected to Kerio Connect at a time.
Note: For better reference, number of users gets red any time the limit is exceeded.
Figure 7.3 Domain settings — basic parameters
7.2.1 Primary Domain
In addition to definition of a name, each domain can be set as primary or secondary. Only one
domain can be set as primary, as the other ones are set as secondary automatically.
In Kerio Connect, one domain is always set as Local (primary). By default, this is the first
domain created. When further domains are added, any of the domains can be set as primary.
Users log into the primary domain with their usernames only, whereas they have to log into
all other domains using their full email addresses. This is again best shown on an example:
The domain company.com has been set as the primary domain. A user is defined in both
domains with the name user. The user will log into the domain company.com with the name
user, whereas for the second domain the user will have to use [email protected] as
a username.

Domain and its settings
54
Note: Users in the primary domain can also authenticate to the server using their complete
email address.
This implies that unless a serious reason to set a particular domain as primary occurs,
a domain which includes the highest number of users should be set as primary. That will
make it simpler for as many users as possible to specify their usernames when connecting to
the server.
Setting a domain as primary
Primary domain can be changed as follows:
1. In the administration interface, go to Configuration → Domains.
2. Use the cursor to select a domain which you want to set as primary.
3. Click on the Set as primary button in the lower right corner.
7.3 Footer settings
Kerio Connect enables to append a preset footer (the footer will be added to each message
where sender’s address includes the domain) to email messages sent from a particular domain.
Footers for email sent from the domain can be set in domain settings under Configuration →
Domains, namely the Footers tab (see figure 7.4).
Figure 7.4 Domain settings — footers

7.4 Restoring deleted items
55
Note: The HTML format cannot be used for the footer text. Only plain text is displayed in the
message footer.
Since it might be irrelevant to append footers to messages delivered within Kerio Connect, it
is possible to allow footers only for messages which are not delivered locally. This can be set
by using the Don’t append the footer to messages addressed to internal recipients option.
7.4 Restoring deleted items
Recovery of deleted items is a comfortable tool allowing to restore all items in the mailbox
accidentally deleted. The items are email messages, events, contacts, notes and tasks.
This feature works as follows: deleted items of each user of the particular domain are kept for
certain time. If desirable, any kept items of a user can be recovered (all items not older than
the set date). Recovered items are then moved and can be later found in the Deleted Items
folder.
Enabling of deleted items recovery applies automatically to all users of the particular domain.
Setting deleted items recovery
Setting of deleted items recovery is very simple and it can be done in domain settings under
Configuration → Domains:
1. Open settings of the domain you want to enable the recovery for.
2. On the Messages tab, check Keep deleted items for .
3. Set time how long deleted items will be kept on the disk for. Any length can be set,
depending on the free disk space available for this purpose. The maximal value is 365
days. If this value is exceeded, the domain settings cannot be saved.
Recovery of a user’s deleted items
To recover deleted items, follow this guidelines:
1. In the administration interface, open the Accounts → Users section.
2. Use the mouse pointer to select a user whose items should be recovered.
3. Click on More actions → Recover deleted items.
If the Recover deleted items button is not active, deleted items recovery is not enabled for the
particular domain. In such a case, the given deleted item can be looked up in the archive if
archiving has been used.

Domain and its settings
56
7.5 Automated items clean-out
Kerio Connect includes an option of setting a special rule for automatic deletion of all items
older than a defined number of days.
This rule is useful especially if users are not disciplined enough to delete their messages on
their own from time to time and thus free disk space for other purposes or newer email.
TIP:
To optimize results, it is recommended to combine this rule with quotas for mailbox size
and with deleted items recovery (see section 7.4). Users can then view in Kerio WebMail or
in MS Outlook how much space is still available for their email.
If anyone loses an important message which is accidentally moved to a folder which is
cleaned up automatically, deleted messages can be simply recovered before the store with
deleted items is completely cleared out (with the deleted items recovery option).
Auto delete can be applied to:
• Deleted Items folder,
• Junk E-Mail folder,
• Sent Items folder,
• All folders except contacts and notes.
The check for items ready for clean-out is run approximately every 6 hours (depending on the
store directory size).
In folders, such items will be deleted where date of creation would not have been modified for
the previous X days/years (defined in settings). Date of creation is changed in the following
cases:
• The message is delivered to Inbox or Deleted Items.
• The item is moved to Inbox or Deleted Items.
To avoid the server’s overload, up to 1000 items is deleted from each folder within one
clean-out.
Junk E-mail, Deleted Items, Sent Items
If there are subfolders in Junk E-Mail and/or Deleted Items, the items inside them will
be deleted in dependence on the set time limit. If a subfolder is empty, it is deleted
automatically (the time limit does not apply here).
All folders except contacts and notes
Whole message store delete can be set in years. Delete period can be set from 1 to 50
years. Items in the following folder and subfolders will be deleted:
• Inx , Deleted Items, Junk E-mail, Drafts, Sent Items;
• Calendar , Tasks;

7.5 Automated items clean-out
57
• Public Folders, mailing lists archive;
• all user created folders.
No items will be deleted in:
• contact folders,
• public contact folders,
• notes folder,
• unfinished tasks
• unfinished events and events with no end date,
• empty subfolders.
If your public folders are common for all domains, auto delete uses the mildest setting.
• Domain1 is set to 3 years, domain2 is set to 5 yeas — global public folders delete
is set to 5 years.
• Whole store delete is turned off in domain1 and set to 2 years in domain2 —
global public folders delete is turned off.
More information on public folders, see chapter 25.
Note: If you switch the Keep deleted items option (see chapter 7.4), the items deleted from
the whole store (except the Public folders and mailing list archives) will also be kept for
the time set.
Items clean-out can be applied either in a batch on all users of the particular domain or on
selected users.
Setting automatic items clean-out for a domain
Automatic clear-out of items accounts of all users of a particular domain (in a batch) can be
set under Configuration → Domains:
1. Open the domain settings dialog where automatic clear-out will be set.
2. Switch to the Email tab.
3. In the Items clean-out section, select folders for automatic clean-out and set their
clean-out timeout.
The All folders except contacts and notes option requires confirmation.

Domain and its settings
58
Figure 7.5 Domain Settings — Messages
Setting of automatic clear-out for particular users
Automatic email clear-out for particular users can be set under Accounts → Users:
1. Open the dialog with settings for the particular user to set automatic clean-out.
2. Go to the Messages tab (see figure 7.6).
3. In the Items clean-out section, select which folders you want to clean out automatically
and set timeout for the clean-out.
The All folders except contacts and notes option requires confirmation.

7.6 Domain alias
59
Figure 7.6 Setting of automatic clear-out for particular users
7.6 Domain alias
It is possible to define any number of virtual domains (aliases) for the each email domain.
Virtual domains are alternative names (aliases) for a particular domain. Names of the virtual
domains can be specified in the Aliases section. Email addresses within the virtual domains are
identical (delivery is performed to the identical mailboxes). If this option is used, individual
user accounts can belong to multiple domains.
Usage of domain aliases will be better understood through the following example:
A company uses two domains: company.us and company.com. The company.us domain
is was set as a mail domain in Kerio Connect. Email addresses of the domain users are
[email protected]. If we create the company.com domain alias for the company.us domain, it
is also possible to use the [email protected] for identical users. It does not matter, whether
the [email protected] or the [email protected] is used. In both cases, the mail is delivered
to the same user.

Domain and its settings
60
Warning:
Unless this is a local alias (virtual domain), corresponding MX records must be defined in
DNS for each of such domains. A simple definition of the domain as an alias of another
domain does not make the alias exist in the Internet.
Domain aliases can be used only for email delivery. It is not possible to use them for user
authentication at Kerio Connect or to view the Free/Busy server. Domain aliases cannot be
used for administration purposes.
Settings of a domain alias
To set a domain alias in Kerio Connect, follow these guidelines:
Figure 7.7 Domain settings — equivalent domains (aliases)
1. Open the administration interface and go to Configuration → Domains.
2. Open settings of the domain which the alias will be set for and go to the Aliases tab.
3. To set a new alias, click on Add (see figure 7.7).
7.7 Authentication of domain users
Authentication of users belonging to a particular domain can be set under Domains in the
administration interface. On the Advanced tab in domain settings, parameters for user
authentication can be set. When creating a user account you can choose how the given user
will be authenticated (see chapter 8.2). Different users can be authenticated using different
methods in a single email domain.
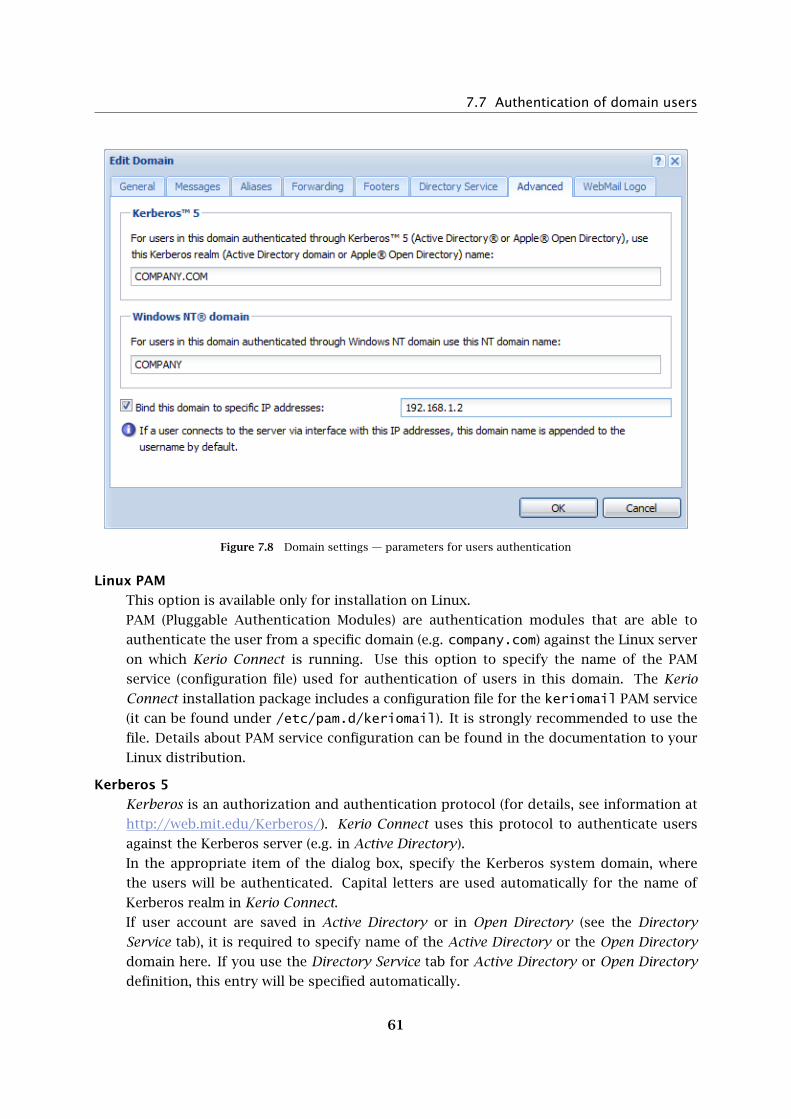
7.7 Authentication of domain users
61
Figure 7.8 Domain settings — parameters for users authentication
Linux PAM
This option is available only for installation on Linux.
PAM (Pluggable Authentication Modules) are authentication modules that are able to
authenticate the user from a specific domain (e.g. company.com) against the Linux server
on which Kerio Connect is running. Use this option to specify the name of the PAM
service (configuration file) used for authentication of users in this domain. The Kerio
Connect installation package includes a configuration file for the keriomail PAM service
(it can be found under /etc/pam.d/keriomail). It is strongly recommended to use the
file. Details about PAM service configuration can be found in the documentation to your
Linux distribution.
Kerberos 5
Kerberos is an authorization and authentication protocol (for details, see information at
http://web.mit.edu/Kerberos/). Kerio Connect uses this protocol to authenticate users
against the Kerberos server (e.g. in Active Directory).
In the appropriate item of the dialog box, specify the Kerberos system domain, where
the users will be authenticated. Capital letters are used automatically for the name of
Kerberos realm in Kerio Connect.
If user account are saved in Active Directory or in Open Directory (see the Directory
Service tab), it is required to specify name of the Active Directory or the Open Directory
domain here. If you use the Directory Service tab for Active Directory or Open Directory
definition, this entry will be specified automatically.

Domain and its settings
62
Warning:
Warning: If you use Open Directory or a stand-alone Kerberos server, check
thoroughly that the Kerberos realm specified on the Advanced tab matches the
name of Kerberos realm in the file
/Library/Preferences/edu.mit.Kerberos
In particular, it must match the default_realm value in this file. By result, the
line may be for example default_realm = COMPANY.COM
Authentication settings for the individual platforms are described in chapter 26.
Windows NT domain
The NT domain in which all users will be authenticated. The computer which Kerio Con-
nect is running on must be a part of this domain.
Example:
For the company.com domain, the NT domain is COMPANY.
Bind this domain to specific IP address
Users can use any interface for connection to Kerio Connect. However, each domain
can be bound with one IP address. Binding of an IP address with a domain saves users
connecting from such an IP address from the necessity of including domain in username
(e.g. [email protected]) for each login attempt. This implies that such users can use
separate user name (e.g. jsmith) as if connecting to the primary domain.
Correct functionality of binding of domains with an IP address requires at most one
domain to be bound to each IP address. Otherwise the server would not recognize to
which domain the username with no domain defined belongs.
Example: Kerio Connect host uses two interfaces. 192.168.1.10 is deployed to
the network of the company called Company and 192.168.2.10 is deployed to the
network of AnotherCompany. A new user account called smith is added to the
anothercompany.com domain (this domain is not primary).
The anothercompany.com is bound to the IP address 192.168.2.10. Users of this
domain will not need to specify their domain name while connecting to Kerio Connect.
Note: On the other hand, primary domain users have to specify their complete email
addresses to connect to this interface.
Troubleshooting of external authentication issues
If a problem arises with any of the authentication methods, in Kerio Connect, it is possible to
enable logging of external user authentication:
1. Go to section Logs and select Debug.
2. Right-click on the log pane to open a context menu, and select Messages.
3. In the Logging messages dialog box, select User Authentication.
4. Confirm changes by OK.

7.8 Rename Domain
63
Once your problems are solved, it is recommended to disable the logging.
7.8 Rename Domain
If need be, Kerio Connect enables you to rename your domain in a simple way.
Warning:
Ensure that you have purchased a domain from your provider and that its name is registered
in DNS records. Test your domain first.
Make a full backup of your message store before and after the renaming process (how to
run a new backup, refer to chapter 15.2).
Renaming of the domain will take effect upon the server restart. Before the restart, all
operations will be performed using the original name.
The domain configuration will not change after renaming.
During the server restart, the original domain name will automatically be replaced with the
new name in the configuration files. The original name will become an alias (see table 7.1).
Original Server restart
domain name old_domain.com new_domain.com
aliases alias.com old_domain.com
alias.com
Table 7.1 Rename Domain
Warning:
Any events created before renaming will not be available for editing or removing after
aplication of the new name.
Settings
To rename domain, go to Configuration → Domains.
1. Select a domain to get renamed. Use the Edit button to open a dialog box.
2. On the General tab, click on Rename and confirm action.
3. In the Domain entry, specify a new domain name and confirm settings with OK (see
figure 7.9).
4. Information about the renaming action is then showed in the domain list (see figure7.10).
5. Restart the server.

Domain and its settings
64
Figure 7.9 Rename Domain
Figure 7.10 Renamed domain
Note:
• If a user user’s mail filters include addresses of users from the renamed domain, they
need to change the rules.
• If you wish to cancel the domain rename action, you can do that under Configuration
→ Domains → Edit before the next server restart. For this purpose, use the Cancel
Rename button.
• Before renaming a distributed domain, disconnect all servers, rename domains
separately and then reconnect them to the distributed domain.
7.9 Deleting of domains
Use the Remove button under Configuration → Domains to remove selected domains (either
local or distributed). A domain cannot be deleted if:
• user accounts or groups have been already defined within the domain. All accounts
must be deleted first (for details, see chapter 8.5).

7.10 A company with multiple sites
65
• the aliases are defined in it. First, delete all the aliases (for details, see chapter 12.3).
• it is the primary domain. However, you can create another domain and define it as
primary. Then, the former domain can be deleted.
7.10 A company with multiple sites
For a company with multiple sites, we recommend you use the distributed domain
configuration (for detailed information refer to chapter 11).
Information and Requirements
The company in our example uses the only domain called company.com. Supposing
a company has its headquarters in New York and a branch office in Paris. Kerio Connect
is installed both at the headquarters and the branch office (two separate licenses). The
headquarters’ server uses DNS name fr.company.com. The branch office’s server uses DNS
name mail-fr.company.com.
We want the email transferred among local users in the branch office to be delivered locally,
while the email addressed to users in the headquarters is really sent to the headquarters. The
same thing should be guaranteed for the communication in the other direction — messages
sent from the headquarters to the branch office must be delivered to the branch office’s server.
Figure 7.11 A company with multiple sites

Domain and its settings
66
Note: To keep the example as simple as possible, suppose that users boss and secretary
work in the headquarters and users technician and programmer work in the branch office.
The following description is focused on these special requirements — it does not include
detailed configuration of the SMTP server, remote administration, etc.
Implementation
Headquarters (configuration at the primary server mail-us.company.com)
1. In the company’s headquarters (at the primary server mail.company.com) in Kerio Con-
nect, set the company.com domain as the local primary domain.
2. In this domain, accounts of local users are defined (of those who work in the
headquarters).
3. If Kerio Connect is behind the firewall, it is necessary to make port 25 available for the
SMTP service.
4. Create the fr.company.com domain where no users and aliases will be defined. Set the
Forwarding tab under Domains in a way that email for the fr.company.com domain is
forwarded to the mail-fr.company.com server of the branch office (see figure 7.12).
Figure 7.12 Forwarding settings

7.10 A company with multiple sites
67
5. Next, set aliases for all users at the branch office (Accounts → Aliases), in this case for the
users technician and programmer. These aliases provide that email for corresponding
users is delivered to domain fr.company.com.
Figure 7.13 Alias settings
Branch office (configuration at the server mail-fr.company.com)
1. Create a local primary domain company.com with the alias fr.company.com.
2. In the local primary domain, create accounts for all users in this branch office (for those
who will have local mailboxes at the other site).
3. Set that email addressed to the domain company.com is forwarded to the headquarters’
server mail.company.com, while messages with the domain alias in the recipient’s
address are not forwarded. This option guarantees that messages where username or
its alias is not specified correctly in the recipient’s address are caught.
Figure 7.14 Anti-Loop settings
Notes:
• Set a secondary DNS MX record for the filial’s server. This will help you avoid problems
in case of the headquarters’ primary server’s failure.
• The wildcard alias should not be used in branch office’s server’s, otherwise the email
for the headquarters will not be forwarded.
• If users want to access their email remotely (e.g. using Kerio WebMail), they will
always connect to the server where their local accounts are created (i.e. users in
Domain and its settings
68
the headquarters will connect to mail.company.com and users in the branch office
connect to the server mail-fr.company.com).
• The Free/Busy calendar will display only information regarding local users of the
particular server.
7.11 Setting up the backup mail server
Information and Requirements
1. A company has own company.com domain, the primary MX record points to the
computer where primary mailserver is installed. The primary mail server’s DNS name
is mail1.company.com.
2. Create the backup server for the primary mailserver (its DNS name will be
mail2.company.com). A basic version of Kerio Connect can be used, because in this case
there is no need to create user accounts.
Implementation
1. Create the secondary MX record (with lower priority) in DNS for the company.com mail
domain for (mail2.company.com) backup server.
2. After the backup of Kerio Connect is installed, create a primary domain in the
configuration wizard and assign it the same name as the primary mailserver, i.e.
company.com.
3. No user accounts are set up in this domain.
4. In Configuration → Domains section of the Kerio Connect administration interface, specify
message forwarding to the mail1.company.com primary mailserver (see picture 7.15).
There are multiple ways of forwarding messages:
• The best way of setting up forwarding from the backup server is to set the primary
server in the way that it queries the secondary server regularly using the ETRN
command. This procedure saves time because the servers are not connected
to an unavailable primary server. The primary server must support the ETRN
command.
Kerio Connect supports using the ETRN command for requesting emails (see
chapter 12.5). If you use Kerio Connect as a primary mailserver, we recommend
this option. Kerio Connect also sends the ETRN command to different servers
upon each server startup and thus all mail is downloaded to the server in the
shortest possible time after failure.

7.11 Setting up the backup mail server
69
If you want to use this method of email forwarding, allow the Offline delivery —
delivery is triggered by ETRN command from remote host option (see figure 7.15)
the company.com domain on the backup server in the administration interface
(Configuration → Domains).
Figure 7.15 Setting up the backup server — the ETRN command
It is also necessary to enable using the ETRN command in the primary mailserver
(see chapter 12.5) and schedule sending the ETRN command (see chapter 12.7).
• Another possibility is setting up the rules for outgoing messages (see
chapter 12.2). However, in case of unavailability of the primary server, the server
will repeatedly attempt to deliver emails, until the primary server is up and
running again, which can occasionally cause overloading of the primary server.
If you prefer this method of setting the secondary SMTP server, we recommend
to extend the interval for message resending. This can be set in Configuration →
SMTP Server , on the Queue Options tab.
Figure 7.16 Setting up the backup server — mail
delivery follows rules for queue of outgoing messages
In the domain configuration window, it is necessary to set name or address of
the primary server, traffic port and the Online delivery — deliver the messages
immediately (see figure 7.16).
• The last method is to set up the scheduler so that it adjusts the intervals for
sending emails. This setting is similar to the previous one, because the server
again uses the rules for the outgoing message queue. However, in this case, the
interval is adjusted by a scheduler, where more convenient schedule can be set.

Domain and its settings
70
In the Configuration → Domains menu, the Forwarding tab of the domain
company.com, you must enable the option The forward host is offline, delivery
is triggered by scheduler (see figure 7.17; for details on scheduler’s settings, refer
to chapter 12.7).
Figure 7.17 Setting up the backup server —
mail delivery is controlled by the scheduler
5. If Kerio Connect is used as a primary mailserver, we recommend to add the server address
to the list of ignored servers that are not restricted by the settings in the Configuration →
SMTP server menu of the Security options tab (for more information, see chapter 12.2).

71
Chapter 8
Users
User accounts in Kerio Connect represent physical email boxes. Users access mailboxes
through user name and password authentication. Since Kerio Connect can serve several
independent domains, the user accounts are not valid globally but are only valid for
a particular domain. This implies that domains must be defined before user accounts are
created (for details, see chapter 7).
User accounts can be located as follows:
1. locally — user mailboxes are located in Kerio Connect and any management of user
accounts is performed in Kerio Connect (see chapter 8.2),
2. in the LDAP database — accounts are just mapped to Kerio Connect. Mapping of user
accounts is available from the Active Directory and/or from the Apple Open Directory
(refer to chapter 10).
Each domain may include local accounts as well as accounts saved in a directory service (e.g.
Microsoft Active Directory). The list of users of the particular domain includes both types of
accounts. However, only local accounts can be added (accounts for directory services must be
created with the respective administration tools, e.g. Active Directory Users and Computers).
Some of the features of accounts within a directory service can be edited.
User accounts can be simply imported to Kerio Connect from another user database, as
follows:
• import from the Novell eDirectory (more information in chapter 8.9),
• import from the NT domain (see chapter 8.9),
• import from the Active Directory domain (refer to chapter 8.9),
• imported from a text file.
8.1 Administrator account
Apart from mailbox access, a user account can also be used for access to Kerio Connect
administration, provided that the user has such rights. The basic administrator account is
created during the installation process. It has the same properties as other user accounts and
can be deleted by any user with read/write access rights.

Users
72
The default administration account can create and manage:
• public folders — for details on purpose and behaviour of these folders, refer to
section 25.1;
• archive folders — for details on purpose and behaviour of these folders, refer to
section 15.1.
The default administrator account also manages archive folders (if archiving is enabled — see
chapter 15.2). Any message which passed through Kerio Connect can be found in the archive.
Administrator can make archive folders shared with other users. However, since messages
of all users are archived, only a confidential administrator (or a tiny group of confidential
persons) should be allowed to access these folders.
Warning:
Passwords for those user accounts that have full administration rights should be kept close
so that they cannot be misused by an unauthorized user.
8.2 Creating a user account
New local user accounts can be defined in the Accounts → Users section.
Figure 8.1 Users
First, choose a local domain in the Domain field, in which the accounts will be defined. Each
domain may include local accounts as well as accounts saved in a directory service (e.g. Mi-
crosoft Active Directory). The list of users of the particular domain includes both types of
accounts. However, only local accounts can be added (accounts for directory services must be
created with the respective administration tools, e.g. Active Directory Users and Computers).
Some of the features of accounts within a directory service can be edited.

8.2 Creating a user account
73
Warning:
If an account mapped from the directory service is deleted in the administration interface,
the account is disabled in Kerio Connect.
The roles of each column of this window will be better understood through the following
descriptions. The only exception — the Data source column — displays account types:
• Internal — the account is stored in the internal user database.
• LDAP — the account is saved in a directory service (Active Directory, Apple Open
Directory).
To create a new user account, click on Add.
Template
If at least one template has been created for generating of new accounts, select whether to add
a local user or use a template. To create a new template for user accounts, go to Configuration
→ Definitions → User Templates. The template is useful especially for creating multiple user
accounts at once that have some parameters in common (e.g. authentication type, quotas,
etc.). When all these common parameters are entered in a template, it can save a lot of time.
Figure 8.2 New user addition — a template
For information about creation of a new template, refer to chapter 8.11.

Users
74
Basic information
Login name
User login name (note: the domain must be the local primary domain; otherwise enter
the full email address, e.g. [email protected], not only user).
The username is not case-sensitive.
Figure 8.3 New user addition — basic data
In login name, diacritics as well as some special symbols are not supported and are
therefore not allowed in this entry.
Full name
A full name of the user (usually first name and surname). This option is required, if the
user data from this account are to be exported to a public contacts folder.
Description
User description (e.g. a position in a company). The Description entry is for informative
purposes only. They can contain any type of information or they can be left blank.
Authentication
Possible authentication methods:
• Internal user database
Users are only authenticated within Kerio Connect. In this case a password must
be entered in the Password and Confirm Password fields (the user can then change

8.2 Creating a user account
75
his/her password in the Kerio WebMail interface).
Warning:
Passwords may contain printable symbols only (letters,
numbers, punctuation marks). Password is case-sensitive.
• Windows NT domain
Users are authenticated in a Windows NT domain. The NT domain name must
be entered in the email domain properties (Windows NT domain in the Advanced
tab). This authentication method can be used only if Kerio Connect is running on
Windows 2000/XP/2003. For details, see chapter 7.7.
• Kerberos 5
Users are authenticated in the Kerberos 5 authentication system.
• PAM service
Authentication using the PAM service (Pluggable Authentication Module),
available only in the Linux operating system.
• Apple Open Directory
Authentication against Apple Open Directory database (only for mailservers
installed on a Macintosh). The option can be selected only if the user is mapped
from Apple Open Directory.
Password / Confirm Password
Only the local user password can be entered or changed. We strongly recommend to
change the password immediately after the account is created.
If the password contains special (national) characters, users of some mail clients will not
be able to log in to Kerio Connect. It is therefore recommend to use only ASCII characters
for passwords.
Account is enabled
Unchecking this option allows you to temporarily disable an account without deleting it.
This feature is not identical with account blocking set under Configuration → Advanced
Options, on the Security Policy tab (see section 12.8). If the user enters an invalid
password too many times in row and the limit set on the Security Policy tab is reached, the
account is blocked automatically. To unblock the accounts, use the Unlock all accounts
now button on the Security Policy tab.
Enable a default spam filter ...
Upon creating a new user account, check this option to set the antispam rule. All
incoming emails marked as spam will be automatically moved to the Junk mail folder.
The rule can be set up only during the process of user account creation. Filtering and
rules for incoming email is addressed in Kerio Connect, User’s Guide.
Warning:
It is not recommended to create this rule when the user accesses emails via POP3.
In such case, only the INBOX folder is downloaded to the local client and the user
is not able to check if the emails moved to the Spam folder are really spam emails.

Users
76
Publish in Global Address List
The user’s full name and address will be published in the default public Contacts folder
which is used as an internal source of company contacts (full names and email addresses).
The contact is added to the public folder only if Full Name is specified.
If users are mapped from Active Directory or Apple Open Directory, the entire LDAP
database is synchronized every hour automatically. If you do not wish to synchronize
a user to public contacts, uncheck this option.
Store password in high secure SHA format (recommended)
By default, user passwords are encrypted by DES. The Store password in highly secure
SHA format allows for a more secure encryption (SHA string). This option has one
disadvantage — some methods of Kerio Connect access authentication (APOP, CRAM-MD5
and Digest-MD5) cannot be applied. The only methods available for this option are LOGIN
and PLAIN (it is highly recommended to use only SSL connection for authentication).
If this option is enabled, it is necessary to change the user password. This can be done
either by administrator or the user (e.g. by Kerio WebMail).
Mail Addresses
In this step, all required email addresses of the user can be defined. The other addresses are
called aliases. The other addresses are called aliases. These can be defined either during the
user definition or in Accounts → Aliases. We recommend to use the first alternative — it is
easier and the aliases are available through Active Directory.
Figure 8.4 New user addition — email addresses

8.2 Creating a user account
77
If user accounts are maintained in Active Directory (see chapter 10.1), their aliases can be
defined in Active Directory Users and Computers. Global aliases (in Accounts → Aliases) cannot
be defined this way.
Forwarding messages to other addresses
Messages for a user can be forwarded to other email accounts if defined. If the Deliver mes-
sages to... button is activated, messages will be saved in the local account and forwarded to
the addresses defined by user (if not, messages will be forwarded only, not saved).
Figure 8.5 New user addition — forwarding messages to other addresses
Note: The same functionality can be achieved by aliases; however, setting this within the user
definition dialog is smoother and easier to follow.
Groups
In this dialog window, you can add or remove groups of which the user is a member. Groups
must be created first in the Accounts → Groups section. You can add users to groups during
definition of groups. Therefore, it is not important which is created first — users or groups.

Users
78
Figure 8.6 New user addition — groups
Access rights settings
Each user must be assigned one of the following three levels of access rights.
No rights
The user will not be granted any administration rights
<your.domain> accounts
The user will be granted administration rights for user accounts, groups, aliases, mailing
lists and resource in the domain their account belongs to. For more information refer to
section 4.1.
Whole server read only
The user will be granted access rights to all accounts on the server without being allowed
to edit them.
Whole server read/write
The user will be granted administration access rights to all accounts created in Kerio
Connect
Independently from the server administration rights, it is possible to use corresponding
options to set rights for administration of Public Folders and Archive Folders.
User quota settings
You can set limits for each user’s mailbox.
Limit disk space
The maximum space for a mailbox. For greater ease in entering values you can choose
between kilobytes (kB), megabytes (MB) or gigabytes (GB).
Limit item count
The maximum number of messages in the mailbox.

8.2 Creating a user account
79
Figure 8.7 New user addition — quota
The value of either of these items can be set to 0 (zero), which means that there is no limit set
for the mailbox.
The user quota prevents cluttering of the server disk. If either of the limits is reached, any
new messages will be refused by the server.
When the quota is reached, the user will receive a warning message including recommendation
on deleting some messages. It is also not important if the quota was exceeded by number of
messages or by the reserved disk space capacity. The quota is reached at the moment when
an incoming message (or an event, a contact or a task) exceeds one of these limits.
The treshold of 90 per cent of the quota value is set (90 per cent of the limit set for the
number of messages or 90 per cent of the disk space reserved). When this treshold is reached,
an informative message is send to the particular user. This value can be edited manually in
the Kerio Connect’s configuration file, as follows:
1. Stop the Kerio Connect Engine.
2. In the directory where Kerio Connect is installed, search the mailserver.cfg file
If the file is being edited on Mac OS X or Linux operating systems, login to the system as
the root user (a special user with full access rights to the system).
3. Open the mailserver.cfg file and look up the QuotaWarningThreshold value. The line
is as follows:
<variable name="QuotaWarningThreshold">90</variable>
4. Change the value as needed and save the file.
5. Run Kerio Connect.
These warning messages are sent maximally each 24 hours (not more frequently). Even if
a user removes messages to get under the quota treshold and then exceeds it again, the next
informative message will be sent after 24 hours from the previous informatory message.

Users
80
Note: When solving any problems regarding quota settings arise, information obtained in the
Debug log might help. The Debug log can be found in the Logs → Debug section of the
administration interface. To log information on the quota’s behaviour, enable the Quota and
Login Statistics option (see chapter 24.9 for details).
Messages
This user can send/receive...
Using this option, the administrator of Kerio Connect can limit communication of the
user to traffic on the local domain level. This feature may help solve issues of internal
traffic in companies. By checking this domain, a particular user will not be allowed to
send and/or receive messages from external domains.
Figure 8.8 Creating a new user — other user account settings
Maximum message size
Use this option to set the size limit for outgoing messages. The size limit can be either
set for each user separately, or globally for the whole domain (see chapter 7.1). If no size
limit is specified for the whole domain, it is recommended to set this option.
By setting the size limit, you can prevent the internet connection from being overloaded
by emails with large attachments.
If both limits are set to 0, Kerio Connect behaves the same way as if no limit was specified.
Limit set for a specific user has higher priority than limits applied to the entire domain.

8.3 Editing User Account
81
Items clean-out
Kerio Connect includes an option of setting a special rule for automatic deletion of all
items older than a defined number of days (for a mailbox, or for an entire domain in
domain settings). This rule applies to folders Junk E-mail, Deteled Items, Sent Items and
All folders except contacts and notes.
For more information on this feature, read section 7.5.
8.3 Editing User Account
The Edit button opens a dialog window where you can edit the parameters of the user account.
Figure 8.9 Editing User Account
This dialog consists of the same items as above. Current usage of this quota can be viewed in
the Quota tab. Percent usage is not displayed unless the quota is defined (limited).
Figure 8.10 Quota is not defined
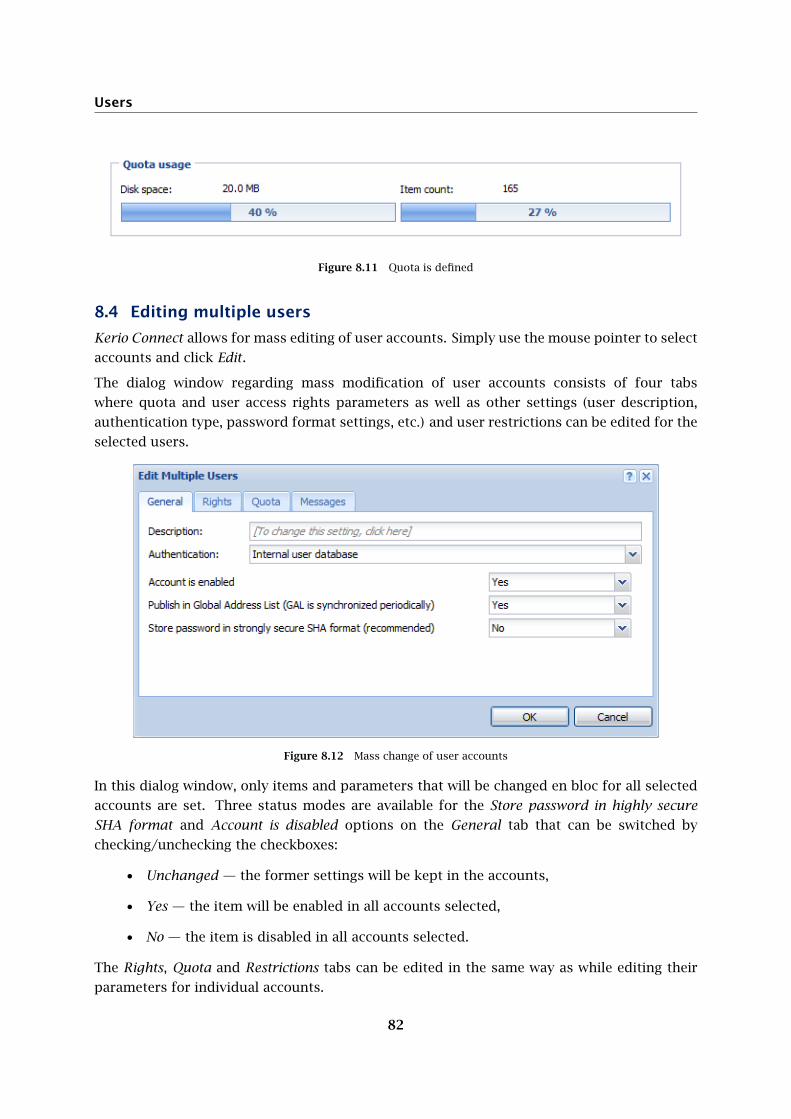
Users
82
Figure 8.11 Quota is defined
8.4 Editing multiple users
Kerio Connect allows for mass editing of user accounts. Simply use the mouse pointer to select
accounts and click Edit.
The dialog window regarding mass modification of user accounts consists of four tabs
where quota and user access rights parameters as well as other settings (user description,
authentication type, password format settings, etc.) and user restrictions can be edited for the
selected users.
Figure 8.12 Mass change of user accounts
In this dialog window, only items and parameters that will be changed en bloc for all selected
accounts are set. Three status modes are available for the Store password in highly secure
SHA format and Account is disabled options on the General tab that can be switched by
checking/unchecking the checkboxes:
• Unchanged — the former settings will be kept in the accounts,
• Yes — the item will be enabled in all accounts selected,
• No — the item is disabled in all accounts selected.
The Rights, Quota and Restrictions tabs can be edited in the same way as while editing their
parameters for individual accounts.

8.5 Removing user accounts
83
Example:
One of the typical cases where mass change is helpful is setting maximal size of
outgoing/incoming mail. The Kerio Connect administrator set maximal size of outgoing mail
(for one message) for the company.com to 20 MB. However, some users need to send larger
attachments.
Kerio Connect enables selecting users of the domain by Ctrl and the mouse pointer. Simply
select accounts of the company.com domain and set a new value for the outgoing mail on the
Restrictions tab.
8.5 Removing user accounts
Click the Remove button to delete a user account. With the original user account in Kerio
Connect, many actions can be performed. Once an account is selected and the Remove button
is clicked, one of the following actions can be selected. In the dialog box you can set the
account to be removed or moved to another user or simply to be kept in the store directory.
Figure 8.13 Removing a user account
Move user’s message folder to an account of another user
The entire folder will be moved as a subfolder of the selected account’s root folder. The
folder name will follow this pattern: Deleted mailbox — user_name@domain. This folder
will include all original folders of the deleted mailbox.
This option is useful especially when another user needs to work with messages, events
and tasks from this folder.

Users
84
Note: If any problem arises during moving of the a user account, details are recorder in
the Warning log (see chapter 24.5).
Do not delete user’s message folder
The folder will be kept in the store directory.
Delete user’s message folder
Use this option if there is no item in the folder that should be kept for any reason.
Note: The following accounts cannot be deleted:
• your own account,
• users with full rights for Kerio Connect,
• user accounts mapped from a directory service.
8.6 Search
The Search option makes looking up items in the users list easier. Insert a string in the Search
field to list only items containing the string specified.
8.7 Statistics
User statistics are recorded immediately after Kerio Connect is installed. To store the statistics
even when the server is off, each user’s data is saved into the stats.usr file under its parent
directory.
Use the More actions → User Statistics button in the Accounts → Users section to open the table
of statistics that contains selected user accounts, services to which the statistics refer to, last
login (day and time of the most recent user authentication to the service) and login count (total
number of authentications of individual users).
The Kerio Connect administrator can customize the way information is displayed in individual
sections. After clicking on the arrow to the right of the column name in the Statistics window,
you can select which columns will be displayed.
The user statistics can be exported in two formats: XML and CSV (the comma-separated
values). The export button is located under the statistics.
Note: If you use MS Excel to display and work with statistics, problems with text separator
might arise. In CSV formats, commas are usually used as text separators. However, in some
localizations MS Outlookrequires the semi-colon to be used for this purpose (e.g. the Czech
localization of MS Office). To prevent yourself from collisions which would cause incorrect
printing of the statistics in the table, do the following:
1. Select data for the statistics and click on Export → Export to CSV .
2. In the standard saving dialog box, enter a name for the file and select a directory to save
it in.
3. Open MS Excel.
4. In the Data menu, click on Import external data → Import data.
5. The Select data source dialog box is opened where you can look up the statistics file.

8.8 Administration of mobile devices
85
6. This opens the Text import wizard. Switch to the Delimited mode (otherwise, individual
items of the statistics will not be displayed in columns).
7. Click on Next.
8. In the next dialog, select comma as a delimiter.
9. Click on Finish.
8.8 Administration of mobile devices
Users can connect to Kerio Connect from various mobile devices (PDAs or so called “smart”
phones). Connections between mobile devices and Kerio Connect are allowed by support
of the ActiveSync protocol (for detailed information on this protocol and its usage, refer to
chapter 35).
The administration interface includes tools for administration of mobile devices that can be
used by the Kerio Connect administrator to overview devices currently used by individual
users.
Figure 8.14 User’s pop-up menu — Mobile Devices
The mobile device administration tools can be found in Accounts → Users. In this section,
simply select a user who uses a mobile device to connect to the server. Click on More actions
and select the Mobile Devices option in the menu (see figure 8.14). The Mobile Devices dialog
is opened which shows all devices used by the user to connect to the server. Several buttons
are available below the device list:
• Remove — removes selected devices from the list. This option is helpful especially
when a device is not used (for details on this option, see chapter 35.6).
• Wipe — this option allows remote removal of user data from the selected device (see
chapter 35.5).

Users
86
• Refresh — the button refreshes information on status of connected devices.
• Details — use this button to view details on a selected device. Click the button
to display another section including details on the device connected as well as on
synchronization. The section consists of two parts (see figure 8.15). The first part,
providing information about the device connected and about the synchronization, is
called Details:
Figure 8.15 A mobile device — details
Operating system and OS type
The first line includes an icon of the device reflecting its real appearance. Type of
the operating system installed on the device is provided next to the icon, as well
as information about the device type (PDA or Smartphone).
Protocol version
ActiveSync version.
Device ID
Serial number of the device.
Device Registered
The date when the user specified server info in ActiveSync and established the
first connection.

8.9 Import Users
87
Last Synchronization
Date and time of the last synchronization.
Status
Synchronization status. This item provides synchronization status information,
i.e. whether the process was completed successfully, if any problems arose, etc.
Remote Host
IP address assigned to the device’s network adapter.
The Synchronized Folders section lists all synchronized folders. Older device types
usually support only synchronization of email, calendars and contacts, whereas newer
devices support also synchronization of tasks.
Below the pane where folders are overviewed, an information addressing solution of
synchronization collisions is provided. A collision is detected if the same data items
are changed both on the server and on the device.
• Server wins — if there is a collision, data saved on the server overwrite the
data stored in the device.
• Client wins — if there is a collision, data saved on the device overwrite the
data stored on the server.
8.9 Import Users
User accounts can be either defined manually or they can be imported from other sources:
• from CSV files,
• NT domains,
• Active Directory,
• Novell eDirectory.
If you use a Windows 2000 or windows 2003 domain (Active Directory), it is easier to set Kerio
Connect so that it cooperates directly with the Active Directory database (see chapter 10.1).
When users are imported, local accounts are created in Kerio Connect. Therefore, when you
are editing Active Directory (removing or adding users), the Kerio Connect configuration must
also be edited (new user import or deleting an account).
Warning:
It is recommended to enable the Directory Service Lookup option in the Debug log (for more
information, see chapter 24.9) before starting the import process. Logged information about
the import process might help you where troubleshooting is necessary.
Users
88
The Import and Export button located below the user list is also a menu. This menu includes
options of import from a directory service (NT domain, Active Directory, Novell eDirectory) or
import/export from/to a CSV file. Select an option to open the user import dialog:
Import from a file
There is an option to import user accounts from CSV files. Data in the file must follow certain
rules. Headlines of individual columns must correspond with Kerio Connect’s items. The
following items are supported:
• Name — username (e.g. jwayne). Required.
• Password — user password. Optional.
• FullName — user’s full name (e.g. John Wayne). Optional.
• MailAddress — user’s email address. Only the part preceding the at-sign should be
inserted. Any number of email addresses is accepted (e.g. jwayne, wayne, john,
john.wayne). Optional.
• Groups — groups where the user is subscribed. Multiple groups are allowed. Optional.
• Description — user’s description. Optional.
Columns can be ordered as wish, there are no rules to be followed. It is also possible to leave
some of them out (except the Name item).
When creating a file to be imported, bear in mind it is important that individual data items
are separated by commas (,) or semicolons (;). If semicolons are used, the process is simpler.
Create a table where standard item names (see above) are in caption and add corresponding
data. Multiple items can be included in MailAddress and Groups. Individual email addresses
and/or groups must be separated by commas (see table 8.1).
Name Password FullName Description MailAddress Groups
wsmith VbD66op1 Winston Smith Developer wsmith read-only,all
wsmith Ahdpppu4 Winston Smith Sales wsmith,smith sales, all
amonroe SpoiuS158 Ada Monroe GM’s Assistant amonroe,ada.monroe all
psycho pfgzInI1 Peter Sycho General Manager psycho,sycho all,sales
Table 8.1 Imported data — items separated by semicolons
If commas are used as separators, additional separators must be used for MailAddress and
Groups items since commas used there as separators might collide with the other comma
separators. Quotes ("...") or apostrophes (’...’) can be used as separators. In table 8.2,
quotes are used.

8.9 Import Users
89
Name Password FullName Description MailAddress Groups
wsmith VbD66op1 Winston Smith Developer wsmith "read, all"
wsmith Ahdpppu4 Winston Smith Sales "wsmith,smith" "sales, all"
amonroe SpoiuS158 Ada Monroe GM’s Assistant "amonroe,ada.monroe" "all"
psycho pfgzInI1 Peter Sycho General Manager "psycho,sycho" "all,sales"
Table 8.2 Imported data — items separated by commas
Once a CSV file is created, follow these instructions:
1. Login to the Kerio Connect Administration.
2. In Accounts → Users, click on Import and Export and select the Import from CSV file option.
3. In the opened dialog, enter the file path (see figure 8.16).
Figure 8.16 Import from a file — file selection
4. Click on OK and wait until the file is uploaded. The User import dialog is opened providing
a list of all users defined in the CSV file (see figure 8.17).
If problems occur regarding the upload, it might be caused by the following reasons:
• The file is not saved in the CSV format.
• Columns in the file are not labeled correctly. CSV file needs to include a line with
captions including column names, otherwise Kerio Connect cannot read the data.
Correct version:
Name;Password;FullName;MailAddress
silly;VbD66op1;Stephen Illy;silly
ewood;Ahdpppu4; Edward Wood;ewood,wood
Wrong version:
silly;VbD66op1;Stephen Illy;silly
ewood;Ahdpppu4; Edward Wood;ewood,wood
• Separators are not used properly. Proper way of how to use separators is
described above.

Users
90
Figure 8.17 Import from a file — imported users
5. Check all users to be imported. Where many users are imported, the Check selected and
Uncheck selected buttons might be helpful.
• Check selected — all users marked by the mouse pointer (using the Shift and
Ctrl keys) will be checked.
• Uncheck selected — clears selection.
6. Templates for email accounts can be selected and set in the Template menu. If there is no
template to be set, keep the default settings.
For detailed information on templates and their application, see section 8.11.
7. Confirm selection by clicking on OK .
Windows NT domain
Use the Import users from option to select a source from which users will be imported.
Windows NT Domain is used in this case.
In this case, the only required parameter is the NT domain name. The computer which Kerio
Connect is running on must be a part of this domain.
Do NOT import users this way if the domain controller runs on Windows 2000, Windows Server
2003 or Windows Server 2008! In such a case, import them from the Active Directory — see
below.
Warning:
Import of NT domain users works only if Kerio Connect is installed on the MS Windows
platform.

8.9 Import Users
91
Figure 8.18 Import users from NT Domain
Within the import of user accounts from the LDAP database with Kerio Connect, sensitive data
may be transmitted (such as user passwords). It is possible to secure the communication by
using an SSL encryption.
Active Directory
Use the Import users from option to select a source from which users will be imported. Active
Directory is used in this case.
To import users from Microsoft Active Directory, you need to specify the following
information:
• Active Directory domain name — the name of the domain users will be imported from
(the format is as in DNS domain — e.g. domain.com)
• Import from server — the name of the server, on which Active Directory for this
domain is running.
If a special port is specified for the LDAP(S) service, the port number can be added to
the server name (e.g.: mail1.company.com:12345).
• Login as user , Password — the username and password of the user who has an account
open in the domain. Write access rights are not required for saving and changing
settings.
• LDAP filter — this item is available upon clicking on Advanced. This option allows to
modify the request for LDAP server users will be imported from. It is recommended
that only experienced programmers use this option. For details about the query
syntax, see the instruction manual to your LDAP server.
• Within the import of user accounts from the LDAP database with Kerio Connect,
sensitive data may be transmitted (such as user passwords). It is possible to secure
the communication by using an SSL encryption.

Users
92
Figure 8.19 Import users from Active Directory
Novell eDirectory
Use the Import users from option to select a source from which users will be imported. Novell
eDirectoryis used in this case.
To import users from Novell eDirectory, specify the following items:
• NDS organization — the name of the organization users will be imported from
• Import from server — the name or the IP address of the server, on which the service
for this domain is running.
If a special port is specified for the LDAP(S) service, the port number can be added
to the server name (e.g.: mail1.company.com:12345). Only Mac OS X includes the
Secure connection (LDAPS) option.
• Login as user , Password — the username and password of the user who has an account
open in the domain. Write access rights are not required for saving and changing
settings.
• LDAP filter — this item is available upon clicking on Advanced. This option allows to
modify the request for LDAP server users will be imported from. It is recommended
that only experienced programmers use this option. For details about the query
syntax, see the instruction manual to your LDAP server.
• Within the import of user accounts from the LDAP database with Kerio Connect,
sensitive data may be transmitted (such as user passwords). It is possible to secure
the communication by using an SSL encryption.

8.9 Import Users
93
Figure 8.20 Import users from Novell eDirectory
User selection
Once all conditions are met (valid login data has been entered, the server is available, etc.),
click OK to view user list (see figure 8.21):
Figure 8.21 Users selection for import
1. Check users to be imported into Kerio Connect.
2. Templates for email accounts can be selected and set in the Template menu. If there is no
template to be set, keep the default settings.
For detailed information on templates and their application, see section 8.11.
3. Click on OK .

Users
94
Note:
• If the users are imported from Active Directory, the platform on which Kerio Connect
is running is not important.
• Authentication type will be set for the users in accordance with where they were
imported from: Windows NT Domain for the NT Domain users and Kerberos 5 for
the Active Directory users.
8.10 Exporting domain users to CSV files
You may need quickly get a list of a particular domain users. To make your work comfortable,
Kerio Connect allows administrators (with read and write rights or with read rights only) to
export users to CSV files.
The data in the CSV file will be organized as follows:
• individual items will be separated by semicolons,
• multiple information within individual items will be separated by comas.
If you wish to export domain users, follow these instructions:
1. Go to Accounts → Users.
2. In the domain list, select a domain to export users from:
3. Click on the Import and Export button and select option Export to a CSV file (see
figure 8.22).
Figure 8.22 Import and export

8.11 User Account Templates
95
4. In the dialog just opened, select between opening and saving the file. The file name will
be created by the following pattern:
users_DomainName_date.CSV
Note: The CSV file can now be opened in a spreadsheet or text editor.
8.11 User Account Templates
Templates simplify creation of a large number of user accounts (typically for users of one
domain). In a template you can define all account parameters except the user name and
password (if internal authentication is used). User accounts can be defined using a created
template by simply filling in the Name, Full Name and Description fields (plus perhaps Pass-
word and Confirm Password). The Full Name and Description fields are not obligatory. In the
simplest case you only need to fill in one field — the user name.
Defining a Template
You can define a template in the Configuration → Definitions → User Templates section. The
dialog window for creating or editing a template is almost identical to the dialog window for
creating a user account.
Figure 8.23 Defining a template

Users
96
Name
Name of the template (unique name used for the template identification).
Description
This field has two meanings. First, it is the template’s description that will be displayed
next to its name in the template list and, second, it is copied to the Description field in
the user account created with this template.
Authentication
The authentication method to be performed (for details, see chapter 8).
Domain
Selection of the domain for which the template will be used. Here you can choose one of
the local domains defined in Kerio Connect or you can decide not to specify any domain.
If no domain is specified, the template can be used for creating and editing user accounts
in any domain (general template).
Enable adefault spam filter...
Check this option to move all recognized spam messages to the junk email folder.
Publish in Global Address List
The user’s full name and address will be published in the default public Contacts folder
which is used as an internal source of company contacts (full names and email addresses).
The contact is added to the public folder only if Full Name is specified.
If users are mapped from Active Directory or Apple Open Directory, the entire LDAP
database is synchronized every hour automatically. If you do not wish to synchronize
a user to public contacts, uncheck this option.
Store password in highly secure SHA format...
By default, user passwords are encrypted by DES. The Store password in highly secure
SHA format allows for a more secure encryption (SHA string). This option has one
disadvantage — some methods of Kerio Connect access authentication (APOP, CRAM-MD5
and Digest-MD5) cannot be applied. The only methods available for this option are LOGIN
and PLAIN (it is highly recommended to use only SSL connection for authentication).
If this option is enabled, it is necessary to change the user password. This can be done
either by administrator or the user (e.g. by Kerio WebMail or by another email client).
The other fields in the dialog window are the same as the fields in the user account dialog
window. The values entered here will be automatically entered into corresponding fields in
the created account. For details, see chapter 8.2.
Using the Template
A created template can be used immediately for creation of a user account in the Accounts →
Users section. If at least one template has been defined, then, upon clicking on Add, you can
choose whether to use a template or add a local user.
Only templates created for the particular domain or templates with an unspecified domain
(general domains) will be offered.

8.11 User Account Templates
97
Once you choose a template a user account creation guide will be opened where appropriate
values will be entered into individual fields. For details, see chapter 8.2.

98
Chapter 9
User groups
User accounts within each domain can be sorted into groups. The main reasons for creating
user groups are as followed:
• Group addresses can be created for certain groups of users with aliases — mail sent
to this address will be delivered to all members of the group.
• Specific access rights can be assigned to a group of users. These rights complement
rights of individual users.
You can define user groups in the Accounts → Groups section.
Figure 9.1 Groups
The Search field can be used in the same way as in the Users section. To read more about this
function, refer to chapter 8.6.
9.1 Creating a User Group
Create a new group by clicking on the Add button. A guide for user group creation will be
opened.

9.1 Creating a User Group
99
Group name and description
Name
Unique name of the group.
Figure 9.2 Creating a group — basic data
Description
Description of the group; may be left blank.
Publish in Global Address List
Name and address of the group will be published in the public Contact folder used as the
company’s internal address book.
If user accounts and groups are mapped from Active Directory or Apple Open Directory,
the entire LDAP database is synchronized every hour automatically. If you do not wish to
synchronize a user to public contacts, uncheck this option.
Note: Pressing the OK button the dialog window can be closed and saved anytime. The group
will be created and the “skipped” fields will be filled with default values.
Mail Addresses
This step defines all desired email accounts (aliases) of the group. There might be no address
assigned to the group (unlike user accounts, the group address is not created automatically
from the group name and domain where the group is defined).
The group addresses can be added either directly during the group definition or in the Ac-
counts → Aliases section. The first method is recommended — it is easier.

User groups
100
Figure 9.3 Creating a group — e-mail address
Note: If user accounts are maintained in Active Directory (see chapter 10.1), their aliases can
be defined in Active Directory Users and Computers. Global aliases (in Accounts → Aliases)
cannot be defined this way.
Group members
Using the Add and Remove buttons you can add or remove users to/from the group. If there
are no user accounts created, a group may remain empty and users will be assigned to it when
their user accounts are defined (see chapter 8.2).

9.1 Creating a User Group
101
Figure 9.4 Creating a group — users addition
Access rights settings
The group must be assigned one of the following three levels of access rights:
No rights
The users in the group will not be granted any administration rights
<your.domain> accounts
The user will be granted administration rights for user accounts, groups, aliases, mailing
lists and resource in the domain their account belongs to. For more information refer to
section 4.1.
Whole server read only
All users in the group will be granted access rights to all accounts on the server without
being allowed to edit them.
Whole server read/write
All users in the group will be granted administration access rights to all accounts created
in Kerio Connect
This group can send/receive email from...
This option allows the Kerio Connect administrator to narrow traffic of this group’s
members to the local domain level. This feature may help solve issues of internal traffic
in companies. If this option is enabled, no user of the particular group will be allowed to
send or receive messages from external domains.

User groups
102
Group access rights are combined with user access rights. This implies that resulting
user rights correspond either with their own rights or with rights of the appropriate group
according to which ones have higher priority.
9.2 Exporting group members
To make your work comfortable, Kerio Connect allows administrators (with read and write
rights or with read rights only) to export group users to CSV files.
The data in the CSV file will be organized as follows:
• individual items will be separated by semicolons,
• multiple information within individual items will be separated by comas.
If you wish to export group users, follow these instructions:
1. Go to Accounts → Groups.
2. Select the group users of which will be imported and double-click on it (or click on Edit).
3. In the Edit Group dialog go to the Users tab and click on Export (see figure 9.5).
Figure 9.5 Exporting group members
4. In the dialog just opened, select between opening and saving the file.
The file name will be created by the following pattern:
users_DomainName_date.CSV.

9.2 Exporting group members
103
Note: The CSV file can now be opened in a spreadsheet or text editor.

104
Chapter 10
Mapping users from directory services
Kerio Connect can also work with accounts or groups that are managed through an LDAP
database (currently, the Microsoft Corporation´sActive Directory as well as Apple OpenDirec-
tory database are supported). The benefits are as follows:
• user accounts can be managed from one location which reduces possible errors and
simplifies administration,
• access of Kerio Connect users to the Global Address List (GAL) of the directory service
from their mailboxes.
• the option of sharing information across multiple servers involved in the distributed
domain (for details, see chapter 11).
Example: A company uses a Windows 2000 domain as well as Kerio Connect. A new employee
was introduced to the company. This is what has been done until now:
1. A new account has been created in Active Directory.
2. The user has been imported to Kerio Connect (or an account using the same name has
been created and this name was verified by the Kerberos system).
3. Within the user creation or later, user information (full name and email address) has been
added to the public contact folder.
If LDAP database is used, only the step 1 would be followed.
Note: Kerio Connect allows internally managed user accounts (stored in LDAP database) to be
added within the same domain. This can be helpful when creating an administrator account
that will be available even when the directory server cannot be accessed.
10.1 Active Directory
Practically, mapping accounts from Active Directory provides the following benefits:
Easy account administration
Kerio Connect can (apart from its internal user account database) use also accounts and
groups saved in the LDAP database (in Microsoft Active Directory). Using LDAP, user
accounts can be managed from one location. This reduces possible errors and simplifies
administration.

10.1 Active Directory
105
Central contact management
All domain or the entire Kerio Connect users (depending on settings) will be allowed to
access the public Contacts folder where all Active Directory user contacts can be found.
Note: If there are users not supposed to be shown in the public contact folder, then go to
the Kerio Connect’s section Accounts → Users and uncheck the Publish in Global Address
List option.
Online cooperation of Kerio Connect with Microsoft Active Directory
Additions, modifications or removals of user accounts/groups in the Microsoft Active
Directory database are applied to Kerio Connect immediately.
Warning:
• Accounts created in Kerio Connect Administration will be created only locally —
such accounts will not be copied into the Active Directory database.
• If the Active Directory server is not available it will not be possible to access Kerio
Connect. It is therefore recommended to create at least one local account with
read/write permissions.
• When creating a user account, ASCII must be used to specify username. If the
username includes special characters or symbols, it might happen that the user
cannot log in.
To make account mapping work, you will need to enable mapping in the administration
interface and to install the special module Kerio Active Directory Extension on the domain
server. Guidelines for these settings are provided in the following sections.
10.1.1 Setting mapping in the administration interface
In the Kerio Connect’s administration interface, go to Domains, select a corresponding domain
and open its settings. Now go to the Directory Service tab:
Map user accounts and groups...
Use this option to enable/disable cooperation with the LDAP database (if this option is
inactive, only local accounts can be created in the domain).
Type
Type of LDAP database that will be used by this domain (Active Directory).
Hostname
DNS name or IP address of the server where the LDAP database is running.
For communication, the LDAP service uses port 389 as default (port 636 is used as default
for the secured version). If a non-standard port is used for communication of Kerio
Connect with the LDAP database, it is necessary to add it to the DNS name or the IP
address of the server (e.g. mail1.company.com:12345 or 212.100.12.5:12345).

Mapping users from directory services
106
Figure 10.1 Domain settings — Active Directory
Note: If the secured version of LDAP service is used for connection, it is necessary to
enter also the DNS name to enable the SSL certificate’s verification.
Username
Name of the user that has read rights for the LDAP database in the following form:
Password
Password of the user that have read rights for the LDAP database.
Secured connection (LDAPS)
Within the communication of the LDAP database with Kerio Connect, sensitive data may
be transmitted (such as user passwords). For this reason, it is recommended to secure
such traffic by using SSL. To enable LDAPS in Active Directory, it is necessary to run
a certification authority on the domain controller that is considered as trustworthy by

10.1 Active Directory
107
Kerio Connect.
Warning:
SSL encryption is demanding in respect of connection speed and processor
operation. Especially when too many connections are established between the
LDAP database and Kerio Connect or a great amount of users are included in the
LDAP database, the traffic might be slow. If the SSL encryption overloads the
server, it is recommended to use the non-secured version of LDAP.
Backup directory server
DNS name or IP address of the backup server with the same LDAP database.
If the secured version of LDAP service is used for connection, it is necessary to enter also
the DNS name to enable the SSL certificate’s verification.
Warning:
If the domain has also an alternate directory sever, it is necessary to open the
Kerberos configuration file (krb5.conf or edu.mit.Kerberos) and define another
KDC record.
Active Directory domain name
If the domain name differs from the name defined in Active Directory, match this option
and insert a corresponding name into the Different from this mail domain name text field.
Click the Test connection button to check the defined parameters. The test is performed on the
server name and address (if it is possible to establish a connection with the server), username
and password (if authentication can be performed) and if Kerio Active Directory Extension are
installed on the server with Active directory (see chapter 10.1.2).
Note: Cooperation with the LDAP database that has been described above has nothing to do
with the built-in LDAP server. The built-in LDAP server is used to access contact lists from mail
clients (for details refer to the chapter 20). If Kerio Connect is installed on the same computer
as the Active Directory, it is necessary to avoid collisions by changing a port number for the
LDAP service (Configuration → Services).
10.1.2 Kerio Active Directory Extension
Kerio Active Directory Extension is an extension to the Microsoft Active Directory service (Active
Directory from now on) with items that include specific information for Kerio Connect. By
installation of the extension you can integrate part of Kerio Connect into Active Directory.
This will simplify actions related to user administration.

Mapping users from directory services
108
Installation
Use the wizard to install Kerio Active Directory Extension. After you confirm the licensing
policy, select a destination directory. In the next step a window showing the installation
process will be displayed. At the left bottom corner you will find buttons that can be used
either to view the installation log (the View Log button) or to save the log to file (the Save Log
to File button).
Figure 10.2 Installation process
Note:
1. According to the version of Microsoft Internet Explorer that you use, installation of the
Microsoft XML Parser component may be required. If the installation is required you
must install Microsoft XML Parser first, otherwise the Kerio Active Directory Extension
installation cannot be finished.
2. Only the English version of Kerio Active Directory Extension is available.
System requirements
Kerio Active Directory Extension in Windows 2000 Server supports both Active Directory NT
compatible and 2000 native types. In Windows 2003, Active Directory 2000 native and Active
Directory 2003 are supported.
Active Directory
Active Directory is a service that stores information about objects (users, groups, hosts, etc.) in
Microsoft Networks. Applications that support Active Directory use the service to learn about
parameters and rights of the objects. Active Directory is based on a structured database.
Users and groups in the domain are connected to the LDAP Active Directory database. Using
LDAP, user accounts can be managed from one location. This reduces possible errors and

10.1 Active Directory
109
simplifies administration. To add users and groups, use MMC (Microsoft Management Console).
New users or groups added to the domain connected to Active Directory with Kerio Connect
Administration will be stored into the local database of Kerio Connect only.
Run MMC from the menu Start → Settings → Control Panel → Administrative tools → Active
Directory Users And Computers.
User Account Definition
In Active Directory Users And Computers select the Users section. Choose the New → User
option to run the wizard for creating a new account.
Warning:
When creating a user account, ASCII must be used to specify username. If the username
includes special characters or symbols, it might happen that the user cannot log in.
The standard version of the wizard is extended with a folder that will be used to create a new
account within Kerio Connect.
Figure 10.3 Kerio Connect account configuration
Now, check the Create a Kerio Connect mailbox option to create in the database all items
that Kerio Connect will need to work with. Define the basic email address of a user with
the Alias item (the user login name defined during the first step of the wizard will be used
automatically).
Other account parameters may be defined in Properties. Click on the new user account with
the right mouse button and select Properties in the context menu. Open the Kerio Connect
Account folder. This folder provides the following options:
Mail Account Enabled
Activating this option you will allow the email account to be available in Kerio Connect. If
the option is off, the user account will be ignored by Kerio Connect.
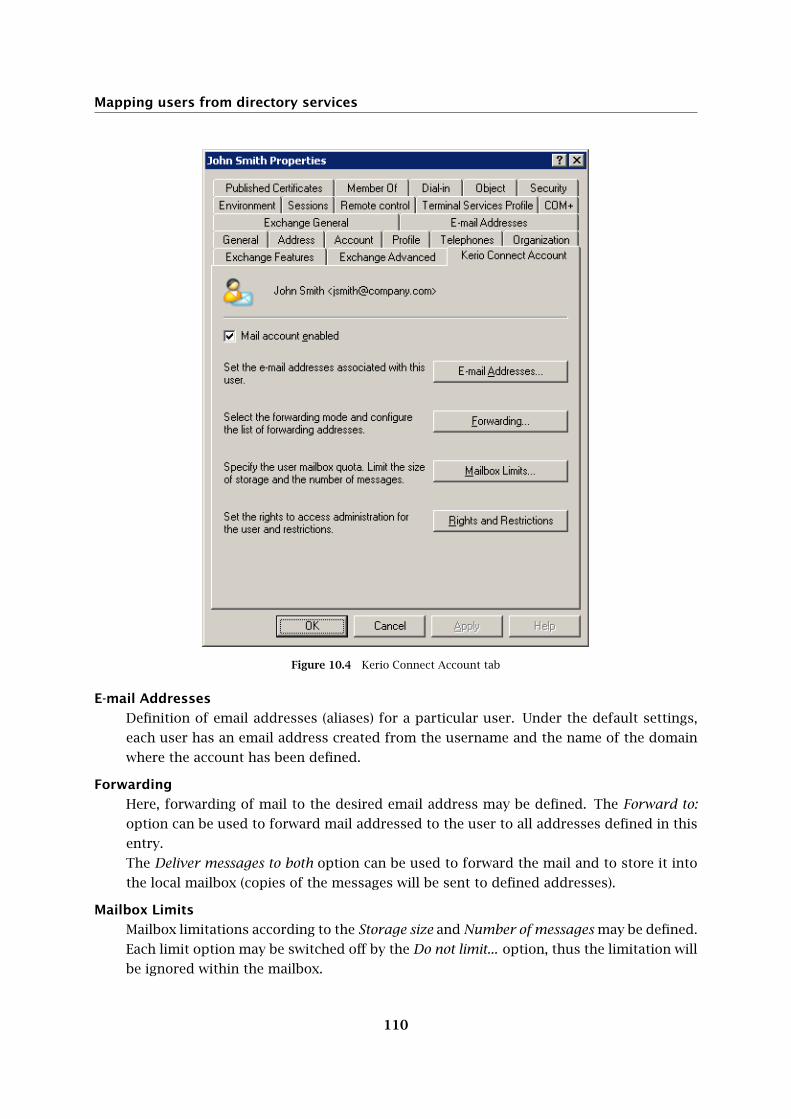
Mapping users from directory services
110
Figure 10.4 Kerio Connect Account tab
E-mail Addresses
Definition of email addresses (aliases) for a particular user. Under the default settings,
each user has an email address created from the username and the name of the domain
where the account has been defined.
Forwarding
Here, forwarding of mail to the desired email address may be defined. The Forward to:
option can be used to forward mail addressed to the user to all addresses defined in this
entry.
The Deliver messages to both option can be used to forward the mail and to store it into
the local mailbox (copies of the messages will be sent to defined addresses).
Mailbox Limits
Mailbox limitations according to the Storage size and Number of messages may be defined.
Each limit option may be switched off by the Do not limit... option, thus the limitation will
be ignored within the mailbox.

10.2 Apple Open Directory
111
Figure 10.5 Mailbox Limits
Administration Rights
Definition of Kerio Connect administration rights. The menu provides the following
options to select from:
• No access to administration — no access the administration. This option is
used by default. We recommend creating a local account for the Kerio Con-
nect administration (see chapter 8). In case the Active Directory server is not
accessible, administration of Kerio Connect will still be possible if the account is
managed locally in Kerio Connect.
• Read only access to administration — user is allowed to access the administration
only to read it. User can login to the server administration and view settings but
is not allowed to make any changes.
• Read/write access to administration — full access to the administration. User is
allowed to read and write in the administration. As few users as possible should
be granted these rights for security reasons.
Group Definition
Within Kerio Active Directory Extension, group definition is almost identical to user account
definition; however, the wizard for creating new groups is extended by one step. This step
enables the administrator to define a primary email address that will be used by the group.
The Kerio Connect Account bookmark allows the administrator to define email addresses of the
group (the E-Mail Addresses button) as well as access rights to Kerio Connect administration
(the Administration Rights button).
10.2 Apple Open Directory
Mapping of accounts from the Apple Open Directory provides you with the benefit of
working interlinking of Kerio Connect and Apple Open Directory. Additions, modifications
or removals of user accounts/groups in the Open Directory database are applied to Kerio Con-
nect immediately.

Mapping users from directory services
112
Warning:
• If an account is created in the Kerio Connect’s administration interface, it will be
created only locally, it will not be copied into Open Directory database.
• If the Open Directory server is not available it will not be possible to access Kerio
Connect. It is therefore recommended to create at least one local account with
read/write permissions.
• When creating a user account in Apple Open Directory, ASCII must be used to specify
username. If the username includes special characters or symbols, it might happen
that the user cannot log in.
To make account mapping work, you will need to enable mapping in the administration
interface and to install the special module Kerio Open Directory Extension on the domain
server. Guidelines for these settings are provided in the following sections.
10.2.1 Setting mapping in the administration interface
In the Kerio Connect’s administration interface, go to Domains, select a corresponding domain
and open its settings. Now go to the Directory Service tab:
Map user accounts and groups...
Use this option to enable/disable cooperation with the LDAP database (if this option is
inactive, only local accounts can be created in the domain).
Type
Type of LDAP database that will be used by this domain. There are two alternatives
of mapping of Apple Open Directory accounts that differ in authentication method.
authentication against the password server and Kerberos authentication.
The first method (authentication against the password server) provides the following
benefit. It is not necessary to perform any special settings at the server where Kerio
Connect is installed. However, there are also certain disadvantages:
• This authentication method is obsolete and less secure.
• Users are not allowed to change their user passwords on their own (in the Kerio
WebMail interface).
• The Apple company has ended support for this authentication method.
• This authentication method is enabled only if Kerio Connect is installed on Mac
OS X.
Still, authentication against the Kerberos server is more modern and secure. On the other
hand, this authentication method requires additional settings at the server where Kerio
Connect is installed. For detailed information on these settings, see chapter 26.
It should be also remembered that in the domain settings on the Advanced tab under
Configuration → Domains in the Kerio Connect’s administration interface, name of the

10.2 Apple Open Directory
113
Figure 10.6 Domain settings — Apple Open Directory
Kerberos area must be specified against which the mailserver will be authenticated.
It is necessary that the name matches the name of Kerberos area specified in
the /Library/Preferences/edu.mit.Kerberos file, otherwise the settings will not
function properly. For detailed description on authentication against the Kerberos server
on Mac OS X operating systems, see chapter 26.3).
Hostname
DNS name or IP address of the server where the LDAP database is running.
For communication, the LDAP service uses port 389 as default (port 636 is used as default
for the secured version). If a non-standard port is used for communication of Kerio
Connect with the LDAP database, it is necessary to add it to the DNS name or the IP
address of the server (e.g. mail1.company.com:12345 or 212.100.12.5:12345).
Note: If the secured version of LDAP service is used for connection, it is necessary to
enter also the DNS name to enable the SSL certificate’s verification.
Username
Name of the user that have read rights for the LDAP database, either of the root user or
of the Open Directory administrator (admin for Mac OS X 10.3 or diradmin for Mac OS

Mapping users from directory services
114
X 10.4 and higher). In case that the administrator’s username is used, it is necessary to
make sure the user is an OpenDirectory Administrator, not just a local administrator on
the OpenDirectory computer.
To connect to the Apple OpenDirectory database insert an appropriate username in the
following form:
uid=xxx,cn=xxx,dc=xxx
• uid — username that you use to connect to the system.
• cn — name of the users container (typically the users file).
• dc — names of the domain and of all its subdomains (i.e. mail.company.com →
dc=mail1,dc=company,dc=com)
Password
Password of the user that have read rights for the LDAP database.
Secured connection (LDAPS)
Within the communication of the LDAP database with Kerio Connect, sensitive data may
be transmitted (such as user passwords). It is possible to secure the communication by
using an SSL tunnel.
Warning:
SSL encryption is demanding in respect of connection speed and processor
operation. Especially when too many connection are established between the
LDAP database and Kerio Connect or when too many users are included in
the LDAP database, the communication might get slow. If the SSL encryption
overloads the server, it is recommended to use the non-secured version of LDAP.
Domain controller failover
DNS name or IP address of the backup server with the same LDAP database.
If the secured version of LDAP service is used for connection, it is necessary to enter also
the DNS name to enable the SSL certificate’s verification.
LDAP search suffix
If the Apple OpenDirectory option is selected in the Directory service type entry, insert
a suffix in the following form: dc=subdomain,dc=domain.
Click the Test connection button to check the defined parameters. The test is performed on
the server name and address (if it is possible to establish a connection with the server) as well
as the username and password (if authentication can be performed).
Note: Cooperation with the LDAP database that has been described above has nothing to do
with the built-in LDAP server. The built-in LDAP server is used to access contact lists from
mail clients (for details refer to the chapter 20). However, if the Kerio Connect is installed on
an Apple Open Directory server the LDAP listening port in Configuration → Services must be
changed to an alternate port to avoid a port conflict.

10.2 Apple Open Directory
115
10.2.2 Kerio Open Directory Extension
Kerio Open Directory Extension is an extension to Apple Open Directory service that allows
mapping of the accounts to Kerio Connect (Kerio Connect items are added to the LDAP
database scheme). When user accounts are created, edited or deleted in Apple Open Direc-
tory database, the changes are also made in Kerio Connect. In addition to that, Kerio Connect
users can access Apple Open Directory LDAP database contacts from their mailboxes (via the
public Contacts folder).
Installation
The installation package with Kerio Open Directory Extension can be downloaded from product
web pages of Kerio Technologies.
A standard wizard is used for installation of Kerio Open Directory Extension.
Warning:
When using configurations of Mac OS X servers of Master/Replica type, Kerio Open Directory
Extension must be installed to the master server, as well as to all replica servers, otherwise
the account mapping will not work.
If the configuration is as follows:
• you use Kerio Open Directory Extension 6.6 and higher,
• servers run on OS X 10.5.3 and higher,
• Replica servers were created after installation of Kerio Open Directory Extension on
the Master server,
then Replica servers download the extension automatically from the Master server during
the creation process.
If you install Kerio Open Directory Extension on Replica servers by hand, the configuration
will not be affected.
System requirements
Kerio Open Directory Extension can be installed to Mac OS X 10.3 Tiger and later versions.
Apple Open Directory
Apple Open Directory is a directory service shipped with Mac OS X Server systems. This
directory service is an equivalent to Active Directory created by Microsoft. As in Active Direc-
tory, it allows to store object information in a network (about users, groups, workstations,
etc.), authenticate users, etc.
Mapping users from directory services
116
The information about users and groups in Apple Open Directory are stored in Open LDAP
database. When mapping accounts to Kerio Connect, all user accounts are stored in one place
and it is not necessary to import and administer them in both Apple Open Directory and Kerio
Connect. Only definitions of mailbox-specific configurations have to be done in Kerio Connect
(see chapter 8).
Warning:
When creating a user account in Apple Open Directory, ASCII must be used to specify
username. If the username includes special characters or symbols, it might happen that
the user cannot log in.
User accounts mapping in Kerio Connect
In Mac OS X Server, no other settings than Kerio Open Directory Extension installation are
usually necessary. It is only necessary to save usernames in ASCII. If the username includes
special characters or symbols, it might happen that the user cannot log in.
In Kerio Connect the following settings must be specified:
1. Mapping of user accounts from Apple Open Directory must be enabled and defined in
domain settings.
2. User authentication via Kerberos must be set in domain settings (for more information,
see chapter 7.7).
3. User authentication via Kerberos must be set in user settings (for more information, see
chapter 8.2).
4. If a contact is supposed not to be shown in the public Contacts folder, then go to the user
settings in Kerio Connect’s section Accounts → Users and uncheck the Publish in Global
Address List option.

117
Chapter 11
Distributed domain
If your company uses more Kerio Connect servers physically scattered (located in different
cities, countries, continents), you can now connect them together and move all users across
all servers involved into a single email domain (distributed domain).
The only prerequisite for the correct function of the distributed domain is user mapping from
a directory service.
After the distributed domain is configured, the users will be able:
• to be members of common user groups,
• to access shared contacts (Global Address List),
• to reserve common resources,
• to plan meetings for all users in the distributed domain.
Distributed domain does not support:
• load balancing,
• folder sharing (including public folders),
• sharing of local users and user groups (users and groups that are not mapped from
the directory service).
The setting and administration of distributed domains is only possible through Kerio Connect
Administration.
Distributed domain is a complex feature of Kerio Connect. For that reason, only basic
configuration is described in this manual. Configuration details and examples are described
in a standalone document — Kerio Connect 7, Distributed Domain.
11.1 Recommendations
Hardware configuration
• Adapt each server to your number of users (see chapter 2.1).
• Configuration of master server must be adapted to total number of users on all
involved servers.

Distributed domain
118
Licensing Policy
• Each server needs to have a separate license for the corresponding number of users
installed.
• For licensing information, refer to chapter 5.4
11.2 Distributed domain setting
The Kerio Connect’s distributed domain works on the master/slave basis. Simply said, select
one server for master (e.g. the server at your headquarters office) and connect the other servers
(slave servers) to it.
The master server will perform the following tasks, for example:
• control outgoing and incoming traffic,
• provide antivirus and antispam check.
Make sure that a domain with identical name is used on all servers.
If not, create a new identical local domain (see chapter 7.2) or rename the existing domain (see
chapter 7.8).
The apply the following settings to all your Kerio Connect slave servers:
1. Go to Configuration → Domains.
2. Click on Distributed domains the wizard’s first page providing information on how to
proceed: Click on Next.
Figure 11.1 Connection to distributed domain

11.3 Disconnecting server from distributed domain
119
3. Enter DNS name of the master server and username and password of a user with admin
rights for the master server (see figure 11.1).
4. The server will connect to the distributed domain. For immediate verification, click on the
Distributed Domains button again to open a list of all servers connected to the distributed
domain (see figure 11.3).
Note: The connection of a new domain will take effect on all servers in 5 minutes.
5. The network should use a directory service (Active Directory, Apple Open Directory or
other).
All servers added to the distributed domain need to be able to connect to the server
where the identical directory service is running (for information on how to map users
from directory service, see chapter 10).
6. Local domains are marked by a blue icon next to their names. If the distributed domain is
set correctly, the icon is red (see figure 11.2).
Figure 11.2 List of domains with a distributed domain
Warning:
Upon connection, slave servers inherit all domain settings of the distributed domain
(including settings of shared folders) from the master server.
Note: For other scenarios of distributed domain configuration, see the standalone document
Kerio Connect 7, Distributed Domain.
11.3 Disconnecting server from distributed domain
To disconnect a server from the distributed domain, use the Distributed domains button in
section Configuration → Domains. In the dialog just opened, click on Disconnect this server
from master (see figure 11.3).

Distributed domain
120
Note: The domain can be disconnected only through its own administration interface. If you
are connected to a different server, click on its name in Configuration → Domains → Distributed
Domains.
Figure 11.3 Disconnection from the master server
11.4 User accounts in distributed domains
If you use the distributed domain, you administer all users in a directory service. To add
a new account to the distributed domain, it is necessary to map it from a directory service (for
details, see Kerio Connect 7, Administrator’s Guide). To remove a user from the distributed
domain, follow the standard procedure (see Kerio Connect 7, Administrator’s Guide).
For administration of domain aliases, mailing lists and resources, please use always the
administration interface on the home server.
Warning:
Even though you can keep creating and administrating local items in distributed domain, it
is strongly recommended not to do that. However, it can be beneficial to have one local
administation account to which it will be possible to connect in case that for example
a directory service server is not available.
11.5 Migration of user mailboxes in distributed domains
Kerio Connect allows you to move a mailbox physically from one server in distributed domain
to another one (this option is useful when an employee is moving to a different company
branch).

11.5 Migration of user mailboxes in distributed domains
121
Warning:
The migration does not require stopping the servers but we recommend that you perform
a full back-up of the message store (see chapter 15.2).
It is recommended to perform migration either overnight or over a weekend.
Settings
Perform migration on the server to which you want to move the user accounts. Log in the
Kerio Connect Administration interface as an administrator.
1. Under Accounts → Users, select one or more users for migration.
2. Clicking on Migrate here in More actions starts migration of mailboxes to the target server.
Mailboxes will be moved one by one.
The Home server column shows migration status of the accounts (see figure 11.4):
Figure 11.4 User migration
Migration can be cancelled by the Cancel migration button, if necessary. All temporary files
will be removed and the mailbox will stay unchanged on the original server.
After the migration of each account, the administrator gets a message with information about:
migration result, its duration and size of the migrated mailbox.
To see which users (either local of from a directory service) have their account physically on
the current server, check Show only users from this server on the right side of the distributed
domain in the upper section of Accounts → Users.

Distributed domain
122
Warning:
If the migrated user shares any folders with local users (users that are not members of the
distributed domain), they will not be able to “see” from the new server.

123
Chapter 12
Sending and Receiving Mail
12.1 Mail Delivery over the Internet
Understanding the basic principles of mail delivery over the Internet will help you correctly
set your mailserver. This chapter gives a brief overview of the most important information on
this topic. Experienced network administrators can skip this chapter.
MX Records
Appropriate records must be entered into the DNS (DNS is a world-wide distributed database
of domain names) for each Internet domain (for example company.com). One of these records
is called a MX record (Mail eXchanger or the mailserver). An MX record for the domain
company.com might look like this:
company.com MX 10 mail.company.com
MX 20 smtp.provider.com
mail.company.com A 215.75.128.33
smtp.provider.com A 215.75.128.1
These records indicate that the mailserver with a preference of 10 is a computer
named mail.company.com and the server with a preference of 20 is a computer named
smtp.isp.com. Preference means value of the server. The lower the preference the higher
the priority of that server — this implies that the server mail.company.com is the highest
priority mail server for the domain company.com and the server smtp.isp.com is the second
highest priority mail server for the domain. Arbitrary number of MX records can be defined
for the given domain. If two or more records have the same priority, then one of these servers
is chosen randomly (load balancing).
The other two records are A type (Address). These tell us which IP address is assigned to
a given computer (a MX record can only be assigned to a DNS name, but not an IP address).
Email Delivery
How does an email travel from the sender to the addressee?
The sender’s mail client sends the email to its SMTP server. The server checks the recipient’s
address and if the domain contained within the address is qualified as local the email is saved
directly into the appropriate mailbox. If the domain is not local, the SMTP server finds the
name of the primary mailserver (SMTP) for the target domain from the DNS (by sending a DNS
request) and sends the email to this server. This saves it to a mailbox from which the recipient
downloads it using his/her email client.

Sending and Receiving Mail
124
If the primary mailserver for the target domain is not accessible, the sending SMTP server tries
to contact the secondary server (the server with the next priority) and send the email there. If
no server listed in the MX record for the target domain is accessible the SMTP server will try to
send the mail again repeatedly in defined intervals. If it does not succeed after a certain time
the email is returned to the sender as undeliverable.
If, for example, only the secondary server is accessible the email is sent to this secondary
server. In principle, any SMTP server can function as a secondary (tertiary, etc.) server for
a domain.
Sending Email via a Different SMTP Server (Relaying)
There is also another way email can be delivered to addressees. The client sends the email
message to its SMTP server. This server forwards it to another SMTP server which delivers it
to the target domain as described above. This method of delivering email is known as relaying
(passing to the relay server).
The advantage of this relaying is that sending email is an on-off action. Furthermore, email
can be placed in a queue and sent in defined time intervals. The sending SMTP server does
not need to ask the DNS about the target domains’ mailservers or try to send the email again
if the target servers are inaccessible. This is important mainly for slow or dial-up Internet
connections and it can significantly decrease costs of such connections.
Most SMTP servers on the Internet are protected against relaying to prevent misuse of servers
for sending spam email. If you wish to send email via a different SMTP server, you should
contact the server’s administrator and ask them that relaying be enabled for you (usually
based on checking your IP address or using username/password authentication).
ETRN Command
ETRN is a command of SMTP protocol. It serves for requesting emails stored on another SMTP
server. Typically, it is used in the following situations:
1. The client has its own domain (e.g. company.com) and his server is connected to the
Internet via a dial-up line. Dial-up must have a fixed IP address. The primary MX record
for the domain company.com is directed to the ISP’s SMTP server (e.g. smtp.isp.com).
When it is connected to the Internet, the client’s SMTP server sends an ETRN command
that informs that it is online and ready to receive mail. If the primary server has some
emails for the given domain, then it sends them. If not, it can send a negative response
or it need not reply at all. That’s why the client’s server must have the timeout to specify
how long it will wait for the response from the primary server.
Note: The primary server will create a new connection to the client’s server after the ETRN
command reception. This connection is used for mail transmission. If the client’s server
is protected by firewall, TCP port 25 must be accessible (open) to the Internet.
2. Let’s suppose that the domain company.com has a primary server smtp.company.com
and a secondary server smtp2.company.com. Both servers are permanently connected

12.1 Mail Delivery over the Internet
125
to the Internet. Under normal circumstances, all messages for this domain are sent
to the primary server smtp.company.com. If failure of this server occurs (overloading,
disconnected line etc.), all messages are sent to the secondary server smtp2.company.com.
When the primary server becomes available it can send an ETRN command to the
secondary server to request stored mails. Communication is the same as in the previous
example (for detailed description of secondary SMTP server settings, see chapter 7.11).
Mail delivery is faster and more reliable in this way than waiting till the secondary server
sends the mails itself (see section Email Delivery). In addition, the ETRN command can be
used also for dial lines.
domain mailbox
The domain’s primary mailserver does not always need to be the server where user mailboxes
are stored. If the company to which the domain is registered connects to the Internet via
a dial-up line, it can have a Domain Mailbox at its ISP. A domain mailbox is an account where
mail for the entire domain is stored. The company’s mailserver can retrieve mail from this
mailbox (in certain time intervals) and sort the email into individual user mailboxes. The ISP’s
SMTP server, where the domain mailbox is stored, is listed as the primary mailserver for the
company’s domain in the MX records.
Domain mailbox receives the messages via SMTP protocol. Each message therefore contains
the body as well as the SMTP envelope. Only the body of the message is downloaded to the
domain mailbox. The envelope information is copied to a message header (depending on the
domain mailbox settings).
Kerio Connect performs authentication to the domain mailbox. Then it downloads messages
via POP3 and sorts them according to the rules specified in Kerio Connect. In order for the rule
to be sorted properly, it must contain the recipient information (either in any of the special
message headers or in the To or Cc fields). If there is no information about the recipient
contained in the message, the system returns it to the sender. However, if a special sorting
rule is created in Kerio Connect (see chapter 12.4), the messages without any recipient data
will be stored in a predefined user mailbox.
Note: It is recommended to specify a special X-Envelope-To: header for message sorting,
because it contains information about recipients. This helps you avoid situations where
a message addressed to multiple users is delivered several times according to the number
of recipients.
Access of email clients to user accounts
User can use various methods to access their email accounts:
POP3
POP3 (Post Office Protocol version 3) is an Internet protocol used for downloading of
email from a server to another server (see the Domain Mailbox section) or to an email
client. POP3 protocol is defined in RFC 1939.

Sending and Receiving Mail
126
POP3 protocol works on client-to-server basis. Connection is always established by the
client, then requests and responses of the client and of the server take regular turns
until the connection is closed. As soon as the client initializes the connection and is
successfully authenticated by name and password, it is possible to work with the email
(download it to the client, delete it, etc.).
Under usual circumstances, Kerio Connect works as a server. If, however, it downloads
email from remote POP3 accounts, it can also work as a client.
POP3 protocol is quite obsolete. The protocol can download email to a client application
and can work with merely one folder (INBOX). This means that any message moved to
another folder would disappear since moved out of the only folder available. And the
other way round. If a user can access multiple folders and moves a message from Inbox
to another one, the message cannot be uploaded to the client application. Therefore, it is
generally recommended to use IMAP, a more modern protocol. Advantages of the IMAP
protocol can be seen in the comparative table 12.1.
The only advantage of this protocol might be low demands on server’s disk space. Users
download their email to their local disks and there it is possible to sort messages in
folders, remove items, etc. Therefore, POP3 accounts are used especially for freemail
services where users have mailboxes with capacity of a few megabytes and download their
email to their local disks regularly. Another advantage is the good availability of offline
transactions which can be used if connection to the Internet is time-limited. Nowadays,
however, most of email clients work well in their offline modes both with POP3 and with
IMAP accounts.
IMAP
IMAP (Internet Mail Access Protocol) is an Internet protocol used for connections to
email servers, as well as for reading of messages and for other email transactions. IMAP
protocol is defined in RFC 3501.
In addition to downloading email to users’ local hosts, IMAP protocol enables
administration of email account on the server. It is, therefore, possible to access email
accounts from various client stations. Unlike POP3, IMAP protocol allows keeping email
on the server and handling it there (reading, removing, sorting to folders). It is also
possible to keep the email stored in the email client. This solution is helpful especially
if users have a time-limited Internet connection or can be connected to the server only
temporarily or irregularly and need to work with their email offline. Once reconnected to
the network, folders on the server and on the client are synchronized.
Another difference is that in case of IMAP protocol, email can be handled while items are
downloaded to the local store. In case of IMAP protocol, email headers are downloaded
first and user can select any of them to be opened as the first. When the message is
selected, it will be considered as a high-priority item and it can be read, moved to another
folder or otherwise manipulated while the other email is being downloaded.
Access via the MAPI interface (MS Outlook)
Kerio Connect enables access to email via the MAPI interface. MAPI (Messaging
Application Programming Interface) is a versatile interface for email transmission,

12.1 Mail Delivery over the Internet
127
POP3 IMAP
both secured and unencrypted (POP3S) both secured and unencrypted (IMAPS)
enables authorization enables authorization
works with a single folder only allows manipulations with folders (e.g.
moving messages between folders), all folders
are created and stored on the server
downloads entire messages (messages are
displayed one by one as downloaded from
the server)
downloads email headers first, message
bodies later
synchronous (it is not possible to handle
email while it is being downloaded, one must
wait until the email is available on the local
disk)
asynchronous (individual messages can be
handled while email is being downloaded)
only one client can be connected to the
account
multiple clients can be connected to the
account
Table 12.1 POP3 and IMAP comparison
developed by Microsoft. It is a software interface that enables any MAPI client to
communicate with any mailserver (MS Outlook and Kerio Connect in this case).
To enable traffic via the MAPI interface, Kerio Technologies developed Kerio Outlook Con-
nector, a special application which is installed on a client and work as an MS Outlook
extension. MS Outlook extended by Kerio Outlook Connector handles email in the same
manner as the IMAP protocol, and it even allows additional options.
Thanks to this modification, MS Outlook is able to work with groupware data (contacts,
calendar, tasks, notices) stored in Kerio Connect. The main benefit of the shared data
store is that the data is available via the Internet anywhere necessary. To access the data,
you’ll need just an Internet connection and a web browser (the Kerio WebMail interface),
MS Outlook with the Kerio Outlook Connector.
MS Outlook with the Kerio Outlook Connector also enables better scheduling of meetings
and tasks (the Free/Busy calendar) as well as sharing of various types of data (shared and
public folders).
For more information on Kerio Outlook Connector, see chapter 31.2.
Access via the WebDAV interface (MS Entourage)
Kerio Connect supports the WebDAV interface (Web Distribution Authoring and
Versioning) which can also be used for accessing email accounts. Using WebDAV, users
can group-edit and organize files located on servers.
Support for the WebDAV interface in Kerio Connect enables connection of MS Entourage.
MS Entourage is an MS Office 2004 for Mac email client which can use POP3, IMAP
protocols and the WebDAV interface to connect to email servers.
Users who want to use MS Entourage to connect to Kerio Connect can use a special

Sending and Receiving Mail
128
interface originally developed for communication with MS Exchange. In MS Entourage,
the interface is represented as an Exchange account and it is based on WebDAV traffic.
The WebDAV interface in MS Entourage provides similar options as the Kerio Outlook
Connector. This implies that, in addition to email manipulation, it enables working also
with groupware data (email, calendars, contacts, public folders), it supports Free/Busy
server, etc.
In older versions, IMAP protocol was used to access email and the WebDAV interface was
used for other folder types. MS Entourage 2004, however, uses WebDAV also to access to
email folders.
Cooperation of Kerio Connect with MS Entourage is supported directly. This means that
no extension is required to be installed at client stations. It is only necessary to set
correctly the basic parameters for an Exchange account.
To learn more on MS Entourage and its correct settings, see chapter 38.
12.2 SMTP server
SMTP server settings protect the server on which Kerio Connect is running from misuse.
Protection of the SMTP server enables users to define who will be allowed to use this server
and what actions he/she can perform. This way, the server is protected from being misused. If
the SMTP server is available from the Internet (anytime when at least one MX record is directed
to it and the port 25 is available for access), any client can connect and use the server to send
an email message. Thus the server can be misused to send spam messages. Recipients of such
email messages will see your SMTP server as the sender in the source text and might block
receiving messages sent from this server. Thus your company might be considered a spam
sender and your server can be added to a database of spam servers.
Kerio Connect provides a protection system that enables users to define who will be allowed
to send email via this server and where. Anyone can connect to the SMTP server to send
messages to local domains. However, only authorized users will be allowed to send email to
other domains.
In this section, the delivery parameters can be also set:
Relay Control Tab
Use the Relay control tab to set groups of allowed IP addresses and/or user authentication
against SMTP server.
Allow relay only for
Use this option to activate user authentication by IP addresses or usernames and
passwords (see below). Generally, authenticated senders can use email messages to any
domain via this server, whereas unauthorized users can send messages only to local
domains.
Also add all trustworthy servers to this IP group. These servers will not be checked by
the SPF and Caller ID modules (for details, see chapter 13.5). Trusted servers will not be
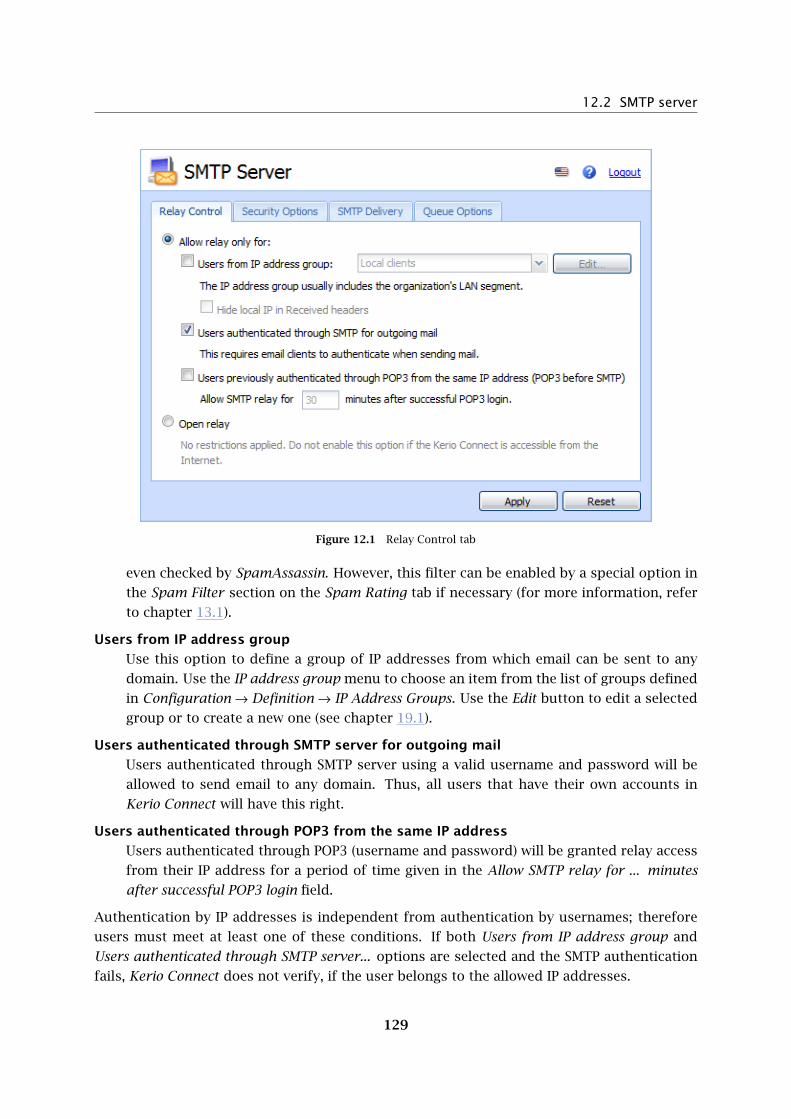
12.2 SMTP server
129
Figure 12.1 Relay Control tab
even checked by SpamAssassin. However, this filter can be enabled by a special option in
the Spam Filter section on the Spam Rating tab if necessary (for more information, refer
to chapter 13.1).
Users from IP address group
Use this option to define a group of IP addresses from which email can be sent to any
domain. Use the IP address group menu to choose an item from the list of groups defined
in Configuration → Definition → IP Address Groups. Use the Edit button to edit a selected
group or to create a new one (see chapter 19.1).
Users authenticated through SMTP server for outgoing mail
Users authenticated through SMTP server using a valid username and password will be
allowed to send email to any domain. Thus, all users that have their own accounts in
Kerio Connect will have this right.
Users authenticated through POP3 from the same IP address
Users authenticated through POP3 (username and password) will be granted relay access
from their IP address for a period of time given in the Allow SMTP relay for ... minutes
after successful POP3 login field.
Authentication by IP addresses is independent from authentication by usernames; therefore
users must meet at least one of these conditions. If both Users from IP address group and
Users authenticated through SMTP server... options are selected and the SMTP authentication
fails, Kerio Connect does not verify, if the user belongs to the allowed IP addresses.
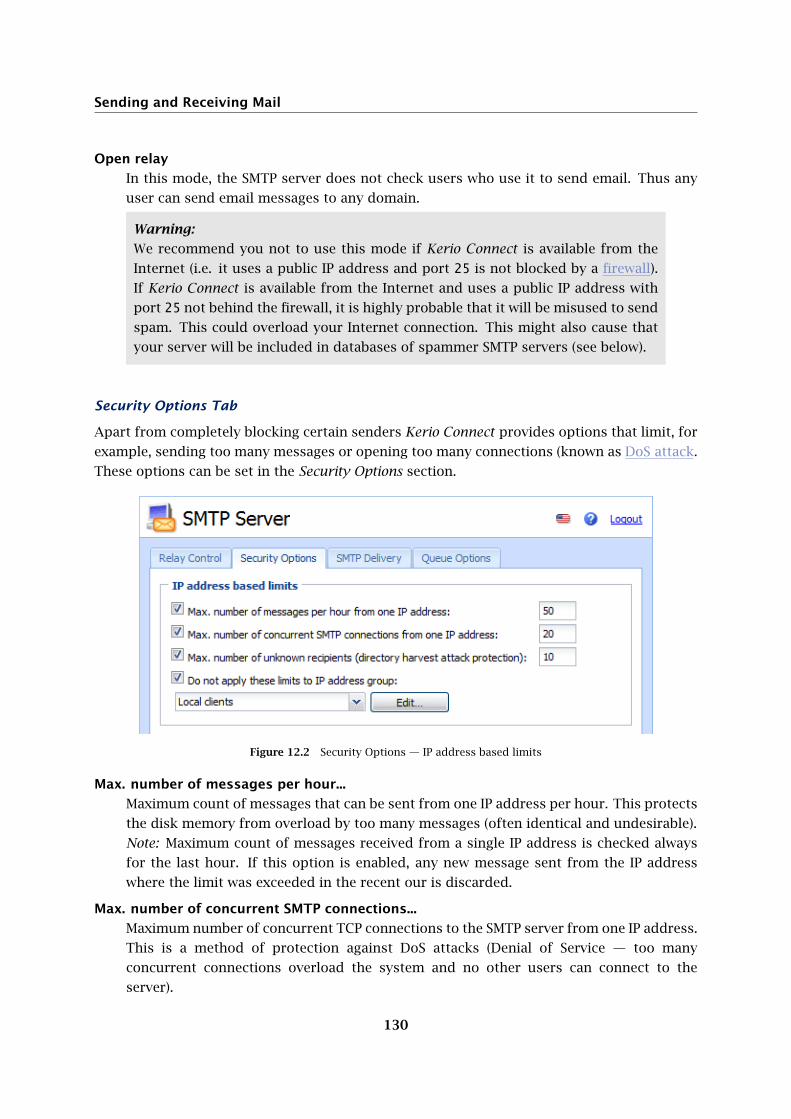
Sending and Receiving Mail
130
Open relay
In this mode, the SMTP server does not check users who use it to send email. Thus any
user can send email messages to any domain.
Warning:
We recommend you not to use this mode if Kerio Connect is available from the
Internet (i.e. it uses a public IP address and port 25 is not blocked by a firewall).
If Kerio Connect is available from the Internet and uses a public IP address with
port 25 not behind the firewall, it is highly probable that it will be misused to send
spam. This could overload your Internet connection. This might also cause that
your server will be included in databases of spammer SMTP servers (see below).
Security Options Tab
Apart from completely blocking certain senders Kerio Connect provides options that limit, for
example, sending too many messages or opening too many connections (known as DoS attack.
These options can be set in the Security Options section.
Figure 12.2 Security Options — IP address based limits
Max. number of messages per hour...
Maximum count of messages that can be sent from one IP address per hour. This protects
the disk memory from overload by too many messages (often identical and undesirable).
Note: Maximum count of messages received from a single IP address is checked always
for the last hour. If this option is enabled, any new message sent from the IP address
where the limit was exceeded in the recent our is discarded.
Max. number of concurrent SMTP connections...
Maximum number of concurrent TCP connections to the SMTP server from one IP address.
This is a method of protection against DoS attacks (Denial of Service — too many
concurrent connections overload the system and no other users can connect to the
server).

12.2 SMTP server
131
Max. number of unknown recipients
Also known as a Directory harvest attack, this condition is met when an application that
guesses common usernames of recipients’ fails up to the number of allowed unknown
recipients. If this type of protection is enabled, the server sending messages to an
unknown recipient is blocked for an hour.
Do not apply these limits to IP address group
Group of IP addresses on which the limitations will not be applied. This rule is often used
for groups of local users (see the Relay Control tab). These users send all their outgoing
mail through Kerio Connect — the count of messages sent by these users to this server is
therefore much higher than the number of messages sent by external users (servers) that
use it only to deliver mail to local domains.
It is also recommended to include the secondary SMTP server to the list of allowed IP
addresses, because in some cases, its behavior can be similar to that of an attacking
server.
Figure 12.3 Security Options — Advanced options
Block if sender’s mail domain was not found in DNS
When a message is received Kerio Connect checks whether the sender’s domain has
a record in DNS. If not, the message will be rejected. This feature protects from senders
with fictional email addresses.
Note: This function may slow down Kerio Connect (responses of DNS servers may take
up to several seconds).
Max. number of recipients in a message
Maximum number of message recipients that will be accepted (in number of Rcpt
commands in the SMTP envelope).
Max. number of failed commands...
Spam is often sent by special applications that connect to SMTP servers and ignore its
error reports. If this option is enabled, Kerio Connect will close the SMTP connection
automatically after the defined number of failed commands has been expired.

Sending and Receiving Mail
132
Limit maximum incoming SMTP message size to
Maximum size of a message that will be accepted by the SMTP server. This protects the
server from being overloaded by large messages, therefore we strongly recommend to
activate this option. The 0 value means that no limitation is set. For easy definition you
can switch between kilobytes (kB) and megabytes (MB).
Maximum number of accepted Received headers (hops)
This parameter helps the server block messages that have been trapped in a loop.
SMTP Delivery tab
In this section, the delivery parameters can be also set:
Figure 12.4 SMTP Delivery tab
Deliver directly using DNS MX records
Mail will be delivered directly to destination domains using MX records.
Use relay SMTP server
All outgoing mail will be sent via another relay SMTP server.

12.2 SMTP server
133
SMTP server
DNS name or IP address of relay SMTP server.
Relay server port
Port where the relay SMTP is running. Typically the standard port 25 is used (this value
is also set as Default).
Relay server requires authentication
Use this option if relay server requires authentication of sender (Kerio Connect) using
username and password. Specify the User and Password entries.
Authentication
A method used for authentication at the parent server: SMTP AUTH Command or POP3
before SMTP .
First, the user authenticates to the POP3 account at the server. After this authentication
the user is known already and they can send email via the SMTP server. Username and
password used here will be used to login to the mailbox and no messages can be read.
Therefore you do not need to define mailbox in Configuration → Delivery → POP3 Down-
load to send an email message.
Use SSL if supported by remote SMTP server...
When sending a message, SMTP server attempts to use encrypted connection first (SSL). If
SSL connection is not supported, unencrypted connection will be used. Thus the maximal
possible security of sent messages is ensured.
Queue Options
In this tab, mail queue can be set. It can be viewed in
Status → Mail Queue.
Maximum number of delivery threads
Maximum number of delivery threads that will send messages from the queue (maximum
count of messages sent at one moment). The value should be chosen with respect to
processor capacity and to speed of the Internet connection.
Delivery retry interval
Interval that will be used for repeated retry attempts for sending an email message.
Bounce the message to sender if not delivered in...
If the message is not delivered in the time defined, it will be discarded and its header
including DSN will bounce to the sender. It will be also automatically removed from the
queue and no more delivery attempts will be taken by the server.
You can also use preset time units (minutes, hours, days) to specify the interval.
However, these time units will not be considered if the messages are delivered via relay SMTP
server.
Send warning to sender...
If the message could not be delivered by expiration of this period, sender will be sent
a warning (server will continue in sending attempts).

Sending and Receiving Mail
134
Figure 12.5 Queue Options
Report language
Language that will be used for error, warning and informative reports (such as
information about non-delivered messages, viruses found, subscribing/unsubscribing
to/from mailing lists).
Note: Reports are stored in the reports subdirectory of the directory where Kerio Con-
nect is installed (UTF-8 coding is used). Administrator can modify individual reports or
add a new language report version.
12.3 Aliases
Use aliases to create virtual email addresses. The principle of virtual addresses is best
understood through examples:
1. Mr. Smith would like all his messages sent to [email protected] to be stored to the Info
public folder. This can be achieved by the following alias:
info → #public/Info
2. Messages sent to invalid addresses (addresses in which the part before @ does not
correspond with any user account nor alias) can be delivered to a specified user (typically
to the administrator). Use the following alias to achieve this:
* → Admin
If this (or the next) alias is not defined, Kerio Connect returns such messages to their
senders as undeliverable.
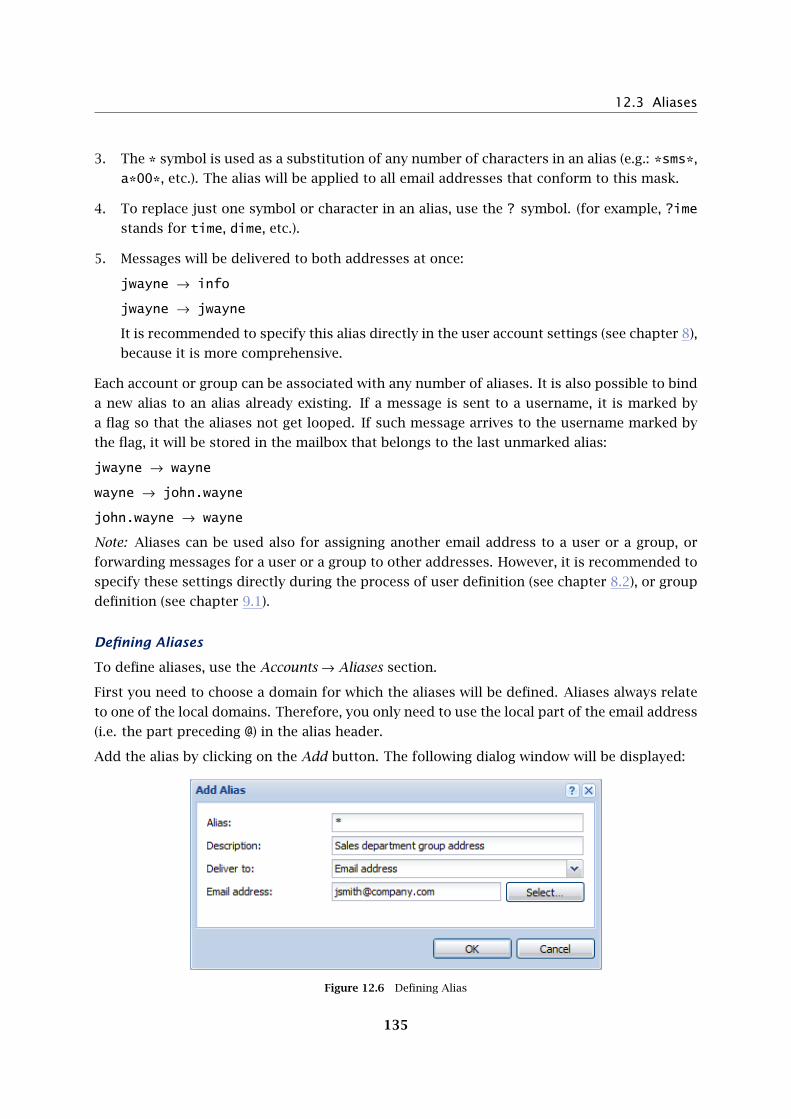
12.3 Aliases
135
3. The * symbol is used as a substitution of any number of characters in an alias (e.g.: *sms*,
a*00*, etc.). The alias will be applied to all email addresses that conform to this mask.
4. To replace just one symbol or character in an alias, use the ? symbol. (for example, ?ime
stands for time, dime, etc.).
5. Messages will be delivered to both addresses at once:
jwayne → info
jwayne → jwayne
It is recommended to specify this alias directly in the user account settings (see chapter 8),
because it is more comprehensive.
Each account or group can be associated with any number of aliases. It is also possible to bind
a new alias to an alias already existing. If a message is sent to a username, it is marked by
a flag so that the aliases not get looped. If such message arrives to the username marked by
the flag, it will be stored in the mailbox that belongs to the last unmarked alias:
jwayne → wayne
wayne → john.wayne
john.wayne → wayne
Note: Aliases can be used also for assigning another email address to a user or a group, or
forwarding messages for a user or a group to other addresses. However, it is recommended to
specify these settings directly during the process of user definition (see chapter 8.2), or group
definition (see chapter 9.1).
Defining Aliases
To define aliases, use the Accounts → Aliases section.
First you need to choose a domain for which the aliases will be defined. Aliases always relate
to one of the local domains. Therefore, you only need to use the local part of the email address
(i.e. the part preceding @) in the alias header.
Add the alias by clicking on the Add button. The following dialog window will be displayed:
Figure 12.6 Defining Alias

Sending and Receiving Mail
136
Alias
A virtual address (e.g. sales or john.wayne).
Character type Description
a-z all lower-case letters except special characters (diacritics)
A-Z all upper-case letters except special characters (diacritics)
0-9 all numbers
. dot
- dash
_ underscore
? question mark
* asterisk
Table 12.2 Symbols allowed in alias name
Description
Text description of the alias. May be left blank.
Deliver To
Where messages to this address will be sent to. Select the place where the messages will
be stored:
• Email address — an email address. Click Select to select a user or a group from
the list.
• Public folder — name of the public folder in this format: #public/Folder. This
item is active only in case at least one public folder of Mail type has been created.
The same dialog window will be displayed by clicking on the Edit button. Remove the alias
using the Remove button.
Alias Check
When creating more complex aliases (multiple aliases), it is easy to make mistakes (e.g. by
mistyping a name). Kerio Connect has an Alias Check feature that displays a list of local
accounts and external addresses to which the email will be delivered.
Use the Zkontrolovat adresu button to check aliases. Enter the address that you would like to
run a check on (if an alias is selected in a list, it will be displayed as a choice). After the check
has been performed, the result is displayed (i.e. the list of addresses to which the alias will
deliver messages).

12.4 remote POP3 mailboxes
137
Figure 12.7 Check Address
12.4 remote POP3 mailboxes
Kerio Connect can retrieve messages from POP3 boxes at different mailservers and deliver
them to local mailboxes or send them to different email addresses.
Retrieving POP3 mailboxes is controlled only by a scheduler (see chapter 12.7). It is important
to realize that mail will not be downloaded from remote POP3 accounts automatically when
a client connects to his/her Kerio Connect mailbox or sends an email.
Downloading of POP3 accounts disables antispam features which depend on reception of email
by SMTP (typically DNS blacklists and check of Caller ID and SPF sender servers. Configuration
and features of antispam filters are focused in chapter 13.
Defining Remote Mailboxes
Remote mailboxes from which email should be retrieved can be defined in the Configuration
→ Delivery → POP3 Download section using the Accounts section.
Figure 12.8 Remote POP3 download
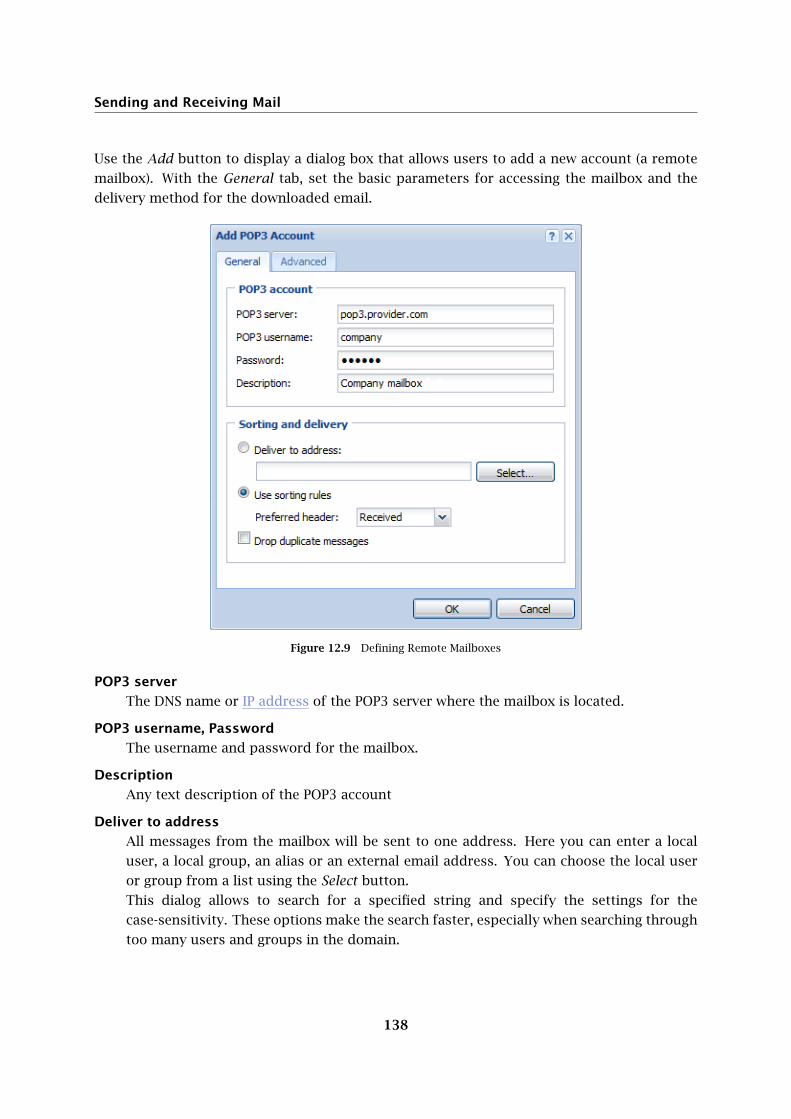
Sending and Receiving Mail
138
Use the Add button to display a dialog box that allows users to add a new account (a remote
mailbox). With the General tab, set the basic parameters for accessing the mailbox and the
delivery method for the downloaded email.
Figure 12.9 Defining Remote Mailboxes
POP3 server
The DNS name or IP address of the POP3 server where the mailbox is located.
POP3 username, Password
The username and password for the mailbox.
Description
Any text description of the POP3 account
Deliver to address
All messages from the mailbox will be sent to one address. Here you can enter a local
user, a local group, an alias or an external email address. You can choose the local user
or group from a list using the Select button.
This dialog allows to search for a specified string and specify the settings for the
case-sensitivity. These options make the search faster, especially when searching through
too many users and groups in the domain.

12.4 remote POP3 mailboxes
139
Use sorting rules
Messages from this mailbox will be sorted according to the sorting rules (see below).
Preferred header
The primary header entry that will be used for sorting. Here you can specify
a header entry (the name of the header without a colon) or choose one from the list
(X-Envelope-To, Received or Delivered-To). If the entry is not found in the mail
header or no address complies with any rule, other header entries are searched —
Resent-To and Resent-Cc, To and Cc. If an address is not found in these entries
the message will be delivered according to an implicit rule (described below) or will be
discarded.
Drop duplicate messages
If this option is enabled, and identical copies of one message are stored on a remote
mailbox, only one copy will be downloaded (the others will be dropped).
Messages are duplicated when a message with more recipients (included in the domain) in
the header is delivered into the domain mailbox. In such a case, the message is delivered
to the mailbox that many times how many recipients were originally specified. These
messages differ only in their SMTP envelope. However, the envelope is cut out when
the message is saved in the mailbox. All copies of a message stored in the mailbox will
be identical. During standard POP3 sorting each recipient receives all the messages as
his/her address is included (this means that each recipient receives the same number of
copies as number of recipients). Dropping duplicate messages ensures that each recipient
receives one of the copies only.
You can define the following parameters with the Advanced tab:
Use SSL
The connection with the POP3 server will be secured (encrypted) by SSL.
SSL Mode
The security method for communication with the POP3 server. Options: Special port (the
SSL connection will be established on a port different from a standard POP3 port) or STLS
command (first, a non-encrypted connection will be made and once it is established it will
be switched to an encrypted mode using the STLS command). Contact the POP3 server
administrator for more information about securing communication with the POP3 server.
POP3 authentication
The POP3 server authentication method: Plain (the password is sent in its normal form)
or APOP (the password is encrypted to prevent tapping and misuse). Contact the POP3
server administrator for more information.
Per Session Download Limits
• Total message size — this entry enables specification of a maximal total size of
messages downloaded within one POP3 session. The zero value means that no
limit has been set.
• Max message count — The maximum number of messages that will be
downloaded during one connection (if there are more messages at the server

Sending and Receiving Mail
140
Figure 12.10 More detailed settings for downloading POP3 mailboxes
they will be downloaded in the next session). The zero value means that no limit
has been set.
The total message size limit protects the user from repeated downloads of identical
messages in cases where POP3 session was interrupted.
The main reason is the principle of POP3 protocol. On the server, messages to be deleted
are not physically removed until a successful disconnection by the QUIT command. If the
POP3 session is interrupted, messages are not removed and the server downloads them
again within the following POP3 session. Setting of these limits therefore helps to control
of data flowing in repeated sessions.
Retention policy
By default, messages downloaded via POP3 get deleted on the server. To keep them on
the server, check option Leave a copy of messages on the server .
You can also define for how long copies of downloaded messages will be kept on the
server.
For temporary remove of appropriate rules use matching fields next to the rule definitions.
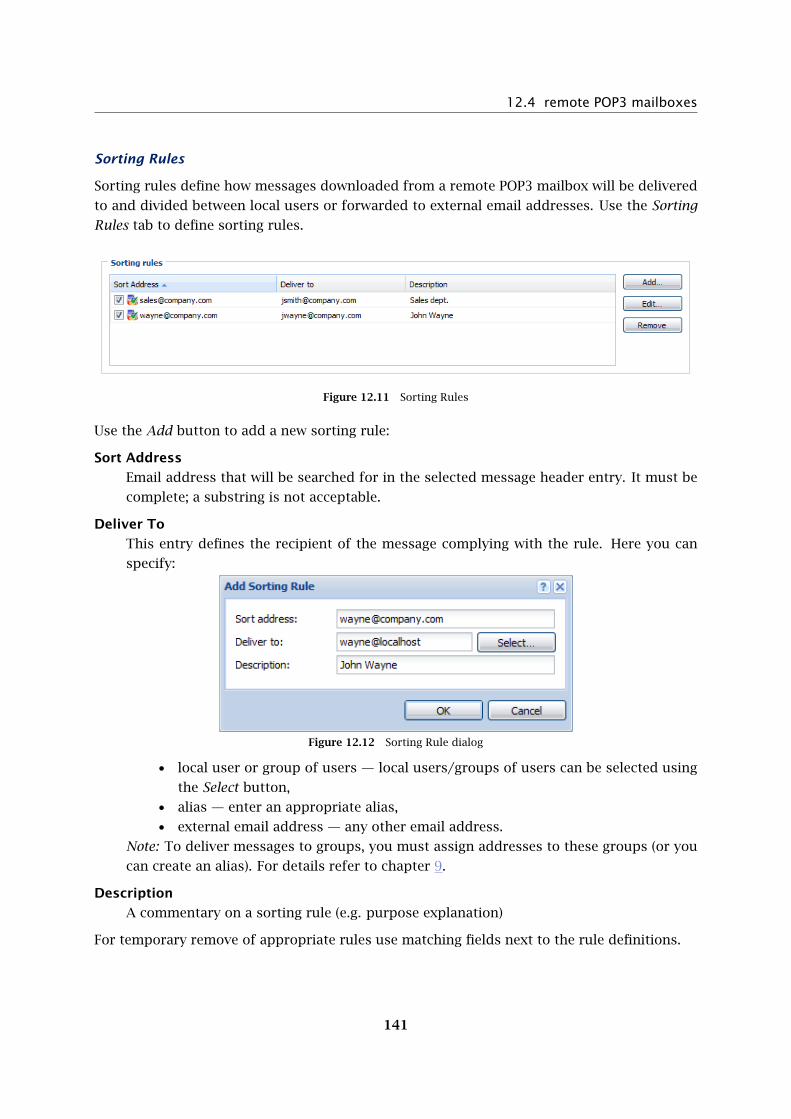
12.4 remote POP3 mailboxes
141
Sorting Rules
Sorting rules define how messages downloaded from a remote POP3 mailbox will be delivered
to and divided between local users or forwarded to external email addresses. Use the Sorting
Rules tab to define sorting rules.
Figure 12.11 Sorting Rules
Use the Add button to add a new sorting rule:
Sort Address
Email address that will be searched for in the selected message header entry. It must be
complete; a substring is not acceptable.
Deliver To
This entry defines the recipient of the message complying with the rule. Here you can
specify:
Figure 12.12 Sorting Rule dialog
• local user or group of users — local users/groups of users can be selected using
the Select button,
• alias — enter an appropriate alias,
• external email address — any other email address.
Note: To deliver messages to groups, you must assign addresses to these groups (or you
can create an alias). For details refer to chapter 9.
Description
A commentary on a sorting rule (e.g. purpose explanation)
For temporary remove of appropriate rules use matching fields next to the rule definitions.

Sending and Receiving Mail
142
Special Sorting Rules
In sorting rules you can also define rules in this format:
• * → address (implicit rule) Email messages not complying with any rule will be
delivered to this user (group). If this rule is not defined, such messages will be
discarded.
• *@domain.com → *@anotherdomain.com All messages containing the specified
domain will be forwarded to another specified domain.
No other usage of the asterisk character (e.g. for completing a part of an address) is allowed.
Example of wildcard usage
In this section you will find examples of how wildcard can be used for the simplest
settings of sorting rules. The configuration consists of the following rules:
• The first rule sorts messages by alias settings and by addresses of user accounts.
*@company.com → *@company.com
• The second rule sorts messages which, by any reason, cannot be sorted to any
particular user account.
Note: If any other rule is placed above these rules, it will be processed before them. Rules
are always processed in the following order:
1. address@domain
2. *@domain
3. *
12.5 Receiving Email Using ETRN Command
In the Configuration → Delivery → ETRN Download section you can define SMTP servers from
which email will be downloaded using the ETRN command (usually these will be the domain’s
secondary or tertiary servers).
Use the Add button to add a new server:
Server
The DNS name or IP address of the server.
Domain(s)
A list of domains for which the server stores email. Separate individual domains using
a semi-colon (;).

12.5 Receiving Email Using ETRN Command
143
Figure 12.13 ETRN Download
Figure 12.14 Setting parameters for accessing the server
Description
A commentary on the ETRN server definition. May be left blank.
Authentication is required
Enable this option if the server requires username/password authentication.
User, Password
Appropriate user name and password
Use the Edit button to change the settings for server access. Remove servers using the Remove
button. For temporary removal of this server, use matching fields next to the server definition.
The Options tab allows users to set the maximum delay time of dial-up line response.

Sending and Receiving Mail
144
12.6 Internet Connection
To set the Internet connection type go to Configuration → Delivery → Internet Connection.
Kerio Connect can either be installed on a computer that has a permanent connection to the
Internet (leased line, wireless connection, cable modem, xDSL, etc.) or on a computer with
a dial-up connection (analog or ISDN modem). Using the built-in scheduler you can set when
the mailserver will automatically dial out a connection and perform a mail exchange.
Figure 12.15 Internet Connection tab
Online
Kerio Connect is permanently connected to the Internet. Outgoing mail is sent
immediately.
Offline
The server is not permanently connected to the Internet. Outgoing mail is stored in
a queue and is sent in time intervals set in the Scheduler.
Offline
Check the Use RAS to connect to Internet option if you intend to let the line dial within the
scheduled time intervals. Dial-up connection is available only on MS Windows. This option
is not supported in Linux and Mac OS X systems. Dial-up entries created in Windows
are offered in the Select RAS line menu. Kerio Connect can use the username and the
password which have been assigned to the appropriate dial-up connection by a user (the
Use user and password specified in system option) or you can enter the username and
password directly into this dialog (the Specify user and password option).

12.7 Scheduling
145
Warning:
The dial-up connection must be created for all users within the system (this can
be defined within definition of an appropriate connection).
Allow to establish the dial-up connection...
This option allows automatic initiation of a dial-up connection in case that the
server received a high-priority message. This configuration specifies that every time
a high-priority message is received and added to the queue, the connection gets dialed
and the queue gets sent immediately upon the successful connection.
Note:
• The Offline option can also be used when Use RAS to Connect to Internet is not checked.
Kerio Connect can run on a computer within a local network connected to the Internet
by a dial-up line. In the Online mode frequent and uncontrollable requests for dial-out
will be made. In the Offline mode Kerio Connect will request a dial-out only in the time
intervals set in the scheduler, which helps optimize connection costs.
• Kerio Connect uses the system telephone connection phone list (rasphone.pbk). No
other phone list can be used.
• The Online option does not switch off the scheduler. Although outgoing mail is sent
immediately, the mailserver can retrieve messages from remote POP3 accounts in
regular intervals. For details, see chapter 12.4.
• Details about setting the scheduler can be found in chapter 12.7.
12.7 Scheduling
Kerio Connect contains a built-in scheduler that can perform three types of actions:
Retrieve mail from remote POP3 mailboxes
— always if at least one POP3 account is defined
Send the ETRN command to defined servers
Use this option if at least one ETRN server is defined.
Send mail from the mail queue
Use this option if the Kerio Connect host is not permanently connected to the Internet. In
all above cases, Kerio Connect can dial out a connection (if the settings indicate that the
computer where Kerio Connect is installed is not permanently connected to the Internet
— see chapter 12.6).
Setting Up the Scheduler
The scheduler is set in the Configuration → Delivery → Scheduling section.

Sending and Receiving Mail
146
Figure 12.16 Scheduling
Use the Add, Edit and Remove buttons to add, edit or remove an item in the list of scheduled
tasks. When adding a new item or editing an existing one a dialog window with the following
parameters will be displayed:
Figure 12.17 Scheduled Action

12.7 Scheduling
147
Time condition — when the task is to be performed:
Every or At
Once in an interval (Every) or at a certain time (At). For example Every 10 Minutes or At
12:00 every day.
Valid only at time
Scheduled action is valid only in a selected time interval. All defined time intervals are
displayed in the window; you can edit an interval (by clicking on Edit) or create a new one.
See chapter 19.2 for details.
Action — what task is to be performed:
Send messages from the outgoing queue
Send all queued messages (enable this option if Offline mode is set in Configuration →
Delivery → Internet Connection).
Download messages from POP3 mailboxes
Retrieve mail from remote POP3 mailboxes (only valid if at least one remote mailbox is
defined in the Configuration → Delivery → POP3 Download section). The same scheduling
applies to all POP3 mailboxes.
Invoke mail transfer by sending ETRN...
Receive email using the ETRN command (only valid if there is at least one SMTP server
defined in the Configuration → Delivery → ETRN Download section). The same scheduling
applies to all SMTP servers.
Optional parameters:
Allow to establish dial-up connection...
Dials out a connection if the line is currently down. If this option is not ticked, the task
will only be performed when the line is dialed out.
Optimal Scheduling
Optimal scheduling settings depend on the way the incoming mail is received and on the
Internet connection type available to Kerio Connect.
• If the computer with Kerio Connect is permanently connected to the Internet (Online)
and all incoming email is received using the SMTP protocol (MX records for all local
domains point to the computer where Kerio Connect is installed and there is no remote
POP3 account or ETRN server) there is no need to set up any scheduling.
• If a permanent connection to the Internet is available and at least one POP3 account is
defined or mail reception is conducted using the ETRN command, scheduling must be
set.

Sending and Receiving Mail
148
In this case intervals between individual actions can be quite short (e.g. 5 minutes)
as the number of connections does not influence the cost and there is no need to
consider the time needed for dialing.
• If Kerio Connect is connected to the Internet via a dial-up line, it is not permanently
accessible from the Internet and mail reception is conducted using the ETRN command
or from remote POP3 mailboxes. In this case it is necessary to set up scheduling to
enable Kerio Connect to dial out, send mail from the queue and receive email when
needed.
In all of the above examples where scheduling is recommended, all options in the Action
field can be selected (Send mail in outgoing queue and Invoke mail transfer by sending ETRN
command to configured SMTP servers). If the mail queue is empty or no POP3 account is
defined, Kerio Connect will automatically move on to the next task.
12.8 Advanced Options
In the Configuration → Advanced Options section you can set several advanced parameters for
the mailserver.
Miscellaneous tab
Figure 12.18 Miscellaneous tab
Log hostnames for incoming connections
Convert IP addresses of remote clients and servers connecting to Kerio Connect to DNS
names (using reverse DNS requests). This makes logs more comprehensible but it can
also decrease the performance of Kerio Connect.

12.8 Advanced Options
149
Show program name and version...
Disable this option if you do not wish to reveal the version and name of the mailserver
application for this domain.
Warning:
To activate or disable the option, restart of Kerio Connect is required.
Insert X-Envelope-To header...
Defines if the X-Envelope-To entry will be inserted into the header of messages delivered
locally. X-Envelope-To is the original recipient address based on the SMTP envelope.
This option is useful especially if there is a domain mailbox in Kerio Connect.
Enable decoding of TNEF messages
TNEF (Transport Neutral Encapsulation Format) is a Microsoft’s, proprietary format used
to send messages with format extensions from MS Outlook. The winmail.dat file is
attached to any message sent in this format. It contains a complete copy of the message
in RTF along with all attachments. This implies that if a user does not access their email
via MS Outlook and an email message with an attachment in this format will be delivered
to their mailbox, the attachment cannot be opened.
The TNEF decoder built-in Kerio Connect decodes TNEF messages at the server’s side in
the standard MIME format and helps avoid winmail.dat attachment difficulties.
Use this option if users do not access their email only by MS Outlook.
Note: If any problems regarding message decoding occur, the Debug log may help
where it is necessary to enable the Message decoding option. See chapter 24.9 for more
information.
Enable conversion of uuencoded messages to MIME
Uuencode (Unix-to-Unix Encoding) is an encoding method used for sending of files by
email. It encodes binary data to a text format so that the data can be inserted directly
to message bodies. The main problem is that some email clients may miss a special
decoder which decodes the encoded files and transforms them to their original format.
Therefore, Kerio Connect includes a built-in Uudecode decoder (Unix-to-Unix decoding).
Email messages are decoded to the standard MIME format on the server’s side so that
users do not have to worry about this topic.
It is recommended to enable the Enable conversion of uuencoded messages to MIME option
especially if users use Kerio WebMail and MS Outlook with Kerio Outlook Connector to
access their mailboxes.
Note: If any problems regarding message decoding occur, the Debug log may help
where it is necessary to enable the Message decoding option. See chapter 24.9 for more
information.

Sending and Receiving Mail
150
Security Policy tab
Kerio Connect allows setting of security policies, i.e. the minimum required security level.
These settings can be established in the Configuration → Advanced Options section in the
Security policy tab (see picture 12.19).
Figure 12.19 Security Policy tab
The menu at the top of the page allows you to choose from one of these policies:
No restrictions
Self explanatory.
Require secure authentication
Kerio Connect will always require secure user authentication. This implies that the
authentication must be performed by using one of these methods — CRAM-MD5,
DIGEST-MD5, NTLM, or the user must use an SSL tunnel (by enabling SSL traffic in their
email clients).
If users access their email by Kerio WebMail where no one of the authentication methods
can be applied, the SSL-secured HTTP protocol is used automatically.
Once the secured authentication is set, it is possible to allow non-secured connections
from a specified IP group. This group can be either selected from existing groups or
changed by clicking on Edit or a new one can be created.
Warning:
Do not apply this method if users use saving passwords on the server in SHA
format.
12.8 Advanced Options
151
Require encrypted connection
When this option is activated, client applications will be able to connect to any service
using an encrypted connection (the communication cannot be tapped).
SSL traffic must be allowed to all protocols at all client stations. The secured connection
is set automatically upon a successful connection to Kerio WebMail.
The only exception from this restriction is the SMTP protocol. Due to the plenty of SMTP
servers which do not support SMTPS and STARTTLS, it is not possible to allow the secure
version of the protocol only. To still provide sufficient security, the SMTP server requires
secure password authentication for the SMTP protocol upon enabling the Require en-
crypted connection option. Name and password are still sent by one of the supported
secure authentication methods.
After the security policy is defined, you can create an exception for a group of IP
addresses for which the secured connection will not be required. This group can be
either selected from existing groups or changed by clicking on Edit or a new one can be
created.
If you decide for this communication protection method, make sure that all users have
a valid authentication certificate installed on their client stations (for more information,
see chapter 16).
Permitted authentication methods
Kerio Connect supports the following methods of user authentication:
• CRAM-MD5 — password authentication method (using MD5 digests). This method is
quite common and many email clients provide support for it.
• DIGEST-MD5 — password authentication method (using MD5 digests).
• LOGIN — user passwords are completely unprotected during transfer. If this method
is used, it is strongly recommended to enable SSL tunnel connection.
• NTLM — this method can be used only in case users are authenticated against an Active
Directory domain. It is applicable only to the user accounts that were imported from
Active Directory. Configuration of NTLM authentication is addressed in chapter 27.
• PLAIN — user passwords are completely unprotected during transfer. If this method
is used, it is strongly recommended to enable SSL tunnel connection.
• APOP — the authentication method is not displayed in the list, Kerio Connect uses it
automatically to download POP3 accounts.
The server provides all the above mentioned authentication methods. They are ordered the
same way as in the table below (from CRAM-MD5). If the selected method is supported by the
client, the other methods will not be used. However, a problem may occur if the password is
stored in the secure format (SHA1). If this encryption method is used, only LOGIN and PLAIN
authentication methods can be used. If you select the secure CRAM-MD5 and DIGEST-MD5

Sending and Receiving Mail
152
methods, the system selects one of the secure authentication methods and it will be impossible
to log in to Kerio Connect. If the password is stored in the SHA format, disable all methods
but LOGIN and PLAIN.
Operational
system
Authentication
against Active
Directory
Authentication
against Open
Directory
User mailboxes
are stored
locally and
passwords are
secured by DES
encryption
User mailboxes
are stored
locally and
passwords are
secured by SHA
encryption
MS Windows NTLM
LOGIN
PLAIN
LOGIN
PLAIN
CRAM-MD5
DIGEST-MD5
LOGIN
PLAIN
LOGIN
PLAIN
LINUX LOGIN
PLAIN
LOGIN
PLAIN
CRAM-MD5
DIGEST-MD5
LOGIN
PLAIN
LOGIN
PLAIN
Mac OS X LOGIN
PLAIN
LOGIN
PLAIN
CRAM-MD5
DIGEST-MD5
LOGIN
PLAIN
LOGIN
PLAIN
Table 12.3 Authentication methods
Further recommendations:
• If a client authentication method fails, it is recommended to disable it in Kerio Connect
(uncheck it in the Enabled authentication methods list).
• For all authentication methods, it is recommended to enable SSL login to the mail
clients.
Check Allow NTLM authentication for users with Kerberos authentication to allow users from
Active Directory to authenticate when attempting to log in to Kerio Connect. In order for the
NTLM authentication to be functional, both the computer as well as the user account have to
be parts of the domain used for authentication. The NTLM (SPA) authentication must be also
enabled in users’ mail clients.
To see what is necessary to be set in Kerio Connect to make NTLM authentication work
smoothly, refer to chapter 27.
In the Account lockout section the following parameters can be defined (see figure 12.20):
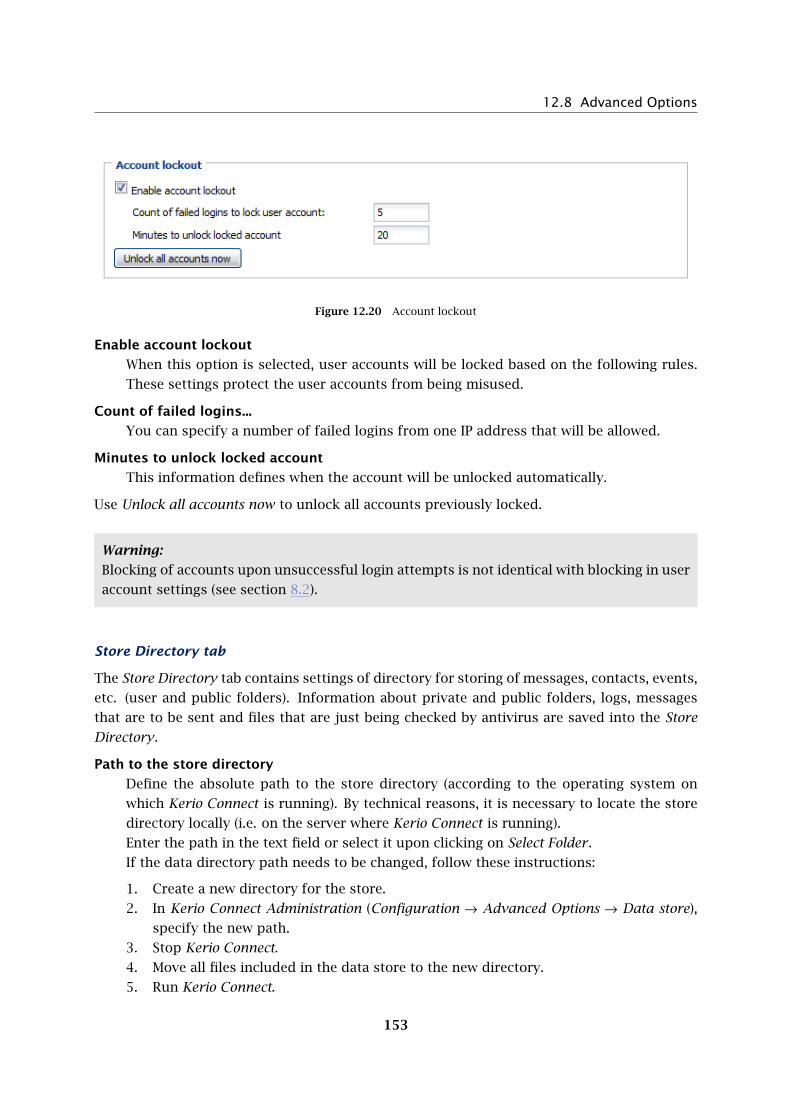
12.8 Advanced Options
153
Figure 12.20 Account lockout
Enable account lockout
When this option is selected, user accounts will be locked based on the following rules.
These settings protect the user accounts from being misused.
Count of failed logins...
You can specify a number of failed logins from one IP address that will be allowed.
Minutes to unlock locked account
This information defines when the account will be unlocked automatically.
Use Unlock all accounts now to unlock all accounts previously locked.
Warning:
Blocking of accounts upon unsuccessful login attempts is not identical with blocking in user
account settings (see section 8.2).
Store Directory tab
The Store Directory tab contains settings of directory for storing of messages, contacts, events,
etc. (user and public folders). Information about private and public folders, logs, messages
that are to be sent and files that are just being checked by antivirus are saved into the Store
Directory.
Path to the store directory
Define the absolute path to the store directory (according to the operating system on
which Kerio Connect is running). By technical reasons, it is necessary to locate the store
directory locally (i.e. on the server where Kerio Connect is running).
Enter the path in the text field or select it upon clicking on Select Folder .
If the data directory path needs to be changed, follow these instructions:
1. Create a new directory for the store.
2. In Kerio Connect Administration (Configuration → Advanced Options → Data store),
specify the new path.
3. Stop Kerio Connect.
4. Move all files included in the data store to the new directory.
5. Run Kerio Connect.

Sending and Receiving Mail
154
Warning:
It is not allowed to specify the Path to the store directory entry by a UNC path.
Watchdog Soft Limit
If the value specified is reached, Kerio Connect will automatically warn users about this
fact upon each login to the administration interface. After the limit is reached, it will be
recorded in the Error log (for more information, see chapter 24.7).
Watchdog Hard Limit
If this limit is reached, Kerio Connect Engine and Kerio Connect Monitor will be
stopped. However, ity is possible to login to the Kerio Connect Administration interface.
Immediately after login, the critical limit error message is displayed. This information is
also recorded into the Error log (for more information, see chapter 24.7).
Figure 12.21 Store Directory tab
Warning:
Do not set the hard limit for 0, otherwise an error message or warning will be displayed
when a new mail is delivered.
Changes in the paths are effective only after restarting the Kerio Connect Engine. If you don’t
change these settings immediately after the Kerio Connect installation, you will need to first
stop the Engine and then move files from the old location to the new one and then start the
service again.

12.8 Advanced Options
155
Master Authentication tab
Master authentication password is a special password. It can be used by specific applications
to access Kerio Connect accounts without knowing individual corresponding passwords.
Warning:
The Master Password cannot be used to access user accounts from email clients or via
Kerio WebMail. It is not a versatile administrator password (it is not possible to use it for
authentication to Kerio Connect administration).
Master authentication settings can be defined on the eponymous tab under Advanced Options:
Figure 12.22 Master Authentication tab
Enable Master authentication
This option enables/disables Kerio Connect master authentication. It is recommended to
enable Master authentication only if this option is expected to be used effectively.
Allow master authentication only from IP address group
Select or create an IP address group where master authentication will be exclusively
allowed. For security reasons, it is not possible to allow Master authentication from any
IP address. This group can be either selected from existing groups or changed by clicking
on Edit or a new one can be created.
Master Password
Define a password that will be used for access to all accounts. This password should be
known by as few persons as possible. If the Master Password arrives to an unauthorized
person, privacy of all user accounts on the server can be broken!
Confirm password
The password confirmation is required to eliminate typos.

Sending and Receiving Mail
156
HTTP Proxy
If Kerio Connect runs on a host behind a firewall, it can be connected to the Internet via a proxy
server. This feature can be useful for example for upgrade downloads or/and for searching
for new versions of Kerio Connect or antivirus application.
Figure 12.23 HTTP Proxy tab
Use HTTP proxy for...
Insert HTTP proxy address and port on which the service is running.
Proxy server requires authentication
Username and password must be specified if the proxy server requires authentication.
Username
Insert your user name to connect to the particular proxy server.
Password
Insert your password to connect to the proxy server.
Update Checker tab
The tab defines updates of new versions of Kerio Connect and automatic updates of the Kerio
Outlook Connector and the Kerio Outlook Connector (Offline Edition):
Last update check performed...
Time since the last update check. The system checks for new versions of the product
every 24 hours.
Click the Check now button to check for the new version. When the new version is found,
the user can download it. If no new version is available, the user is notified.
Automatically check for new versions
This option enables the feature of automatic checking whether there is a new version of
Kerio Connect available at the Kerio Technologies website.
If a new version was released by Kerio Technologies, the Update tab will contain link to
the download web page.

12.8 Advanced Options
157
Check also for beta versions
This option enables informing users that a new betaversion of Kerio Connect is available.
Figure 12.24 Update Checker tab
Warning:
If you want to participate in beta version testing, enable the Check also beta ver-
sions option. If the Kerio Connect is used in production, the beta versions are not
recommended — do not enable this option.
The installation package includes also automatic installations of the Kerio Outlook Connector,
the Kerio Outlook Connector (Offline Edition) and the Kerio Sync Connector for Mac.
The Current version available for clients field displays the information about the module
versions currently used (including build numbers).
• Kerio Outlook Connector — the package is updated for all users immediately upon
update of the server.
• Kerio Outlook Connector (Offline Edition) — the package is updated for all users
immediately upon update of the server.
• Kerio Sync Connector — users on client stations will be informed about available
updates for the Kerio Sync Connector. If they conform the dialog, the program gets
updated.
Kerio Connect performs automatic update checks for the Kerio Outlook Connector and the
Kerio Outlook Connector (Offline Edition). The update checks help avoid problems caused by
Sending and Receiving Mail
158
incompatibility of older server and newer plug-in versions or, vice versa, of newer server and
older plug-in versions. In case that there is a collision detected, users are informed that the
plug-in should be upgraded/downgraded. The correct version is installed upon confirmation.
If a user rejects to install a new version, it depends whether the server version differs in the
version number or in the build number only:
1. Build numbers are different — plug-in is started along with the MS Outlook. Before each
startup of the MS Outlook, alert is displayed informing that the plug-in should be updated.
2. Version numbers are different — the plug-in refuses to connect to the server until it is
updated.
New versions of Kerio Outlook Connector, Kerio Outlook Connector (Offline Edition) and Kerio
Sync Connector are stored in the directory
Kerio\MailServer\webmail\download
Warning:
Update of plug-ins requires the HTTP or the HTTPS service to be running.
A server certificate can also be created in the Kerio Connect’s administration interface. For
detailed instructions, see chapter 16.
Note: If any problems regarding the update occur, enable the Update Checker Activity option
(detailed information can be found in chapter 24.9) in the Debug log settings. Logged
information might help you where any problems to be solved occur.

159
Chapter 13
Antispam control of the SMTP server
Antispam control of SMTP server protects users from spam. Spam is an unwanted, usually
advertisement email. Spam are usually sent in bulk and the recipient addresses are obtained
by illegal means (e.g. by tapping the network communication).
Kerio Connect includes many options and features to dispose of spam. These features include
various filters, testing and monitoring technologies which help distinguish quite precisely
spam messages from desirable email.
To detect and eliminate spam, Kerio Connect uses the following methods and tests:
• SpamAssassin (detailed information on its features and settings, see section 13.4).
• Black/White lists (detailed information on their features and settings, see section 13.2).
• Proprietary filtering rules (detailed information on their features and settings, see
section 13.3).
• Caller ID (detailed information on its features and settings, see section 13.5).
• SPF (detailed information on its features and settings, see section 13.5).
• Delayed response to SMTP greeting (detailed information on their features and
settings, see section 13.6).
Each test can be used separately or combined with the others. To achieve better efficiency, it
is recommended to combine as many antispam features as possible. The more tests are used,
the denser is the antispam filter and the less spam will be delivered to user’s mailbox. Also
the spam detection will be more successful which will reduce number of messages marked as
spam by mistake (so called “false positives”).
Each testing type uses specific methods to detect spam. There is, however, a feature most of
the tests have in common. For all methods except the Delayed response to SMTP greeting,
two actions can be set of what how spam messages would be handled. One action is denial of
such messages. The other is to raise the so called spam score (for details, see chapter 13.1).
Messages with a score too high awarded by multiple tests are discarded (individual scores are
summed). The first alternative may help reduce load on the server, the second one eliminates
better possible “false positives”.

Antispam control of the SMTP server
160
Warning:
When Kerio Connect is connected offline, efficiency of the antispam filter decreases
dramatically.
To set Kerio Connect’s spam filter, go to Configuration → Content Filter → Spam Filter .
13.1 Spam Rating tab
The Spam Rating tab enables/disables spam rating and defines criteria for spam to be blocked
in case that the method of spam score raised by multiple tests is used:
Figure 13.1 Spam Rating tab

13.1 Spam Rating tab
161
Enable spam rating
Individual spam tests may rate each incoming message by a value. The higher the result
number is, the more probably the message is a spam. The spam rating awarded by
antispam tests is called spam score. If a message is tested by multiple tests, spam
scores are summed and the result is recorded in X-Spam-Status, a special header of
the message.
If the spam rating is off, messages are rated anyway. The results, however, are ignored by
the spam filter. However, only such tests where message blocking is set will be applied
to tested messages.
Enable rating of messages received from ...
Turns the scanning of messages sent by local (authenticated) users on/off. Groups of
trustworthy IP addresses can be defined in Configuration → SMTP Server → Relay Control
(for detailed information, refer to chapter 12.2).
This option is not applied to checking of “email policy” records (see section 13.5) and to
“black/white lists” (see section 13.2).
Spam rating limits
Once a message is tested by all enabled tests and filters, it is rated by the result spam
score. Kerio Connect then marks the message as spam or delivers it as a legitimate
message. The Spam rating limits scale allows set manually the limit where messages are
already marked as spam and where the spam score is so high that there is no doubt it is
a spam and can be blocked:
• Tag score
If the rating reaches or exceeds the value set, the message is marked as spam.
Kerio Connect appends a special X-Spam-Flag header to the message that
informs the email client that the message is a spam.
Use the entry or the scale to specify a number from 0.0 to 10.0 (the lower the
number is, the more spam messages will be eliminated).
We recommend you to use the 5.0 value — statistics claim that 91.12 per cent of
spam do not pass through this filter or will be marked as spam. Other 0.62 per
cent of legitimate messages, however, will also be marked as spam. If you set the
score higher (i.e. to 8.0), the probability that correct messages will be blocked is
lower (0.04%) and the efficiency of spam filtering is also lower (74.36%).
Warning:
1. If the value you set will be too low, every message will be
considered as a spam.
2. If efficiency of the spam filter declines, do not lower the
tag score or the block score. Better involve multiple tests
in the spam filter.
• Block score
If the rating reaches or exceeds the value set, the message is discarded.

Antispam control of the SMTP server
162
If the value is too low, legitimate messages might be discarded along with spam.
Therefore, it is recommended to use the Forward the message to quarantine ad-
dress option when testing and optimizing the spam filter and specify an account
where copies of all blocked messages will be delivered and stored. Copy of any
message having reached or exceeded the Block score limit will be sent to the
specified mailbox. From time to time, simply scan discarded messages to check
that there is no legitimate message trapped.
Maximal block score allowed is 9.9. If the value is set to 10, the blocking is
disabled, so that messages are marked as spam but never blocked.
Note: If values for marking and blocking of the message are equal, all messages marked
as spam are discarded automatically.
Reached Tag score limit action
The X-Spam-Flag header is appended to the message and the message is delivered to the
recipient.
In addition to marking spam messages by the special header, it is possible to prepend
message’s subject with a text which will inform user or a sieve rule that the message is
a spam (such a rule can be created within creation of user accounts in the administration
interface — for details, see chapter 8.2).
The **SPAM** string is used as a default text. The string can be modified in the Mark the
message as spam section (for details, see below).
TIP:
If you use the [%s] referent for the Prepend message’s Subject with text entry
specification, the score evaluation (represented by asterisks) assigned by the
antispam protection system is inserted into this textfield. This implies that users
can define one of more custom antispam rules (depending on the number of
asterisks) in their mail server or in the Kerio WebMail interface.
Send bounce message to the sender
The server returns the sender a DSN message informing that the email message cannot
be delivered.
It is not recommended to use this option since most of spam message use false sender
addresses. This implies that the denial message cannot be delivered (the address to which
the DNS message is sent might not exist). Messages with the information about their
rejection are then kept in the queue where they must be removed manually. Otherwise,
the server attempts to deliver them in intervals set in the queue settings (every 30 minutes
for five days, by default). Undeliverable messages are discarded.
Forward the message to quarantine address
Enter an address to which blocked messages will be forwarded (regardless of other
settings of the antispam filter). Headers of such messages include information on tests
having been applied to the message along with score set by individual tests. If a legitimate
message blocked by the tests is included in the box, it is possible to use the information
to optimize the tests.

13.2 Blacklists tab
163
For this purposes, it is recommended to create a special email account (e.g.
[email protected]) where copies of spam messages will be delivered and stored.
13.2 Blacklists tab
Kerio Connect can also block incoming messages from servers that are considered as spam
servers. For this purpose, it uses public databases of these servers located in the Internet or
its proprietary database.
To define these parameters go to the Blacklists tab in Configuration → Spam Filter section.
Figure 13.2 Blacklists tab
List of trustworthy IP addresses (whitelist)
So called blacklists, i.e. spammer databases, can occasionally include servers which
send legitimate mail. This may occur for example when an SMTP server is not secure
enough and it is misused for spam sending. Therefore, Kerio Connect includes a list of
trustworthy IP addresses (so called whitelist). In this list, IP addresses considered by
the mailserver as spammers can be added. In future, these addresses will be considered
as trustworthy, even though they may be included in a blacklist used by Kerio Connect.
Messages from the servers included in the whitelist are not tested against blacklists and
they are let in automatically. Other types of antispam tests, however, will not apply to
them.
To create a whitelist, a new IP group must be defined. To define a new IP group, click Edit.
This opens a dialog, where a custom IP group of SMTP servers (or users) can be created.
All IP ranges reserved for private networks are added to the whitelist automatically.
127.0.0.1
10.0.0.0/8
172.16.0.0/12

Antispam control of the SMTP server
164
192.168.0.0/16
This applies to the following IP ranges: However, all IP addresses, though included in the
whitelist, are verified in the blacklist (Custom blacklist of spammer IP addresses). This
may be helpful when it is necessary to block any of these addresses.
Custom blacklist of spammer IP addresses
In this section, it is possible to define a custom group of IP addresses of SMTP servers (or
users) known as spammers. Click Edit to edit the selected group or to create a new one.
Any messages sent from any SMTP server included in the blacklist can be blocked or its
spam rating value can be increased:
• Block the message
The message will be blocked on the SMTP level and the sender will be informed
that the message cannot be delivered.
• Add this value to the spam score:
Set spam score will be added to the message’s score.
In case of blacklist, the recommended score value is from 1 to 4 points.
Internet databases
Kerio Connect can use various spammer databases (free or paid) available in the Internet.
Spammer databases include list of SMTP servers which are known as spam senders. There
are multiple online spammer databases available. Some of them are free and some of
them must be purchased. Generally, quality of services provided by paid databases is
higher and their blacklists of SMTP servers are more reliable.
Online spammer databases work separately and they can be combined.
By default, Kerio Connect contains a few databases which can be downloaded from the
Internet for free. It is also possible to define any other databases. This can be done in
the Internet Blacklist dialog (see figure 13.4) which can be opened by clicking on the Add
button located below the list of databases. The dialog allows setting of the following
options:
Figure 13.3 Internet databases

13.2 Blacklists tab
165
DNS suffix
Enter name of the DNS server used by Kerio Connect.
Description
Optional entry, for reference only.
Block the message
In this mode, connections from servers included in the blacklist will be blocked.
Message(s) will be rejected by Kerio Connect. Senders will be informed that their
messages cannot be delivered.
Figure 13.4 Database parameters
Add this value to the spam score
The value set here will be added to any message accepted from any server included
in the blacklist.
In case of this blacklist, the recommended score value is from 1 to 3 points.
The value of the score added depends on level of trustworthiness of a particular
database. Generally, paid spammer databases examines more thoroughly SMTP
servers to find out whether they really are spam senders or not. Therefore, if you
use paid databases, it is possible and even more efficient to set higher scores than
in case of free databases. This is, however, only a general knowledge which cannot
be applied without exceptions. If you are familiar with a free database and you are
sure that it would be efficient, you can set higher scores for them as well.
If you combine multiple spammer databases, set lower spam scores since individual
SMTP servers may be included in multiple databases and their scores are summed.
Ask the DNS blacklist server directly
using of this option is recommended in cases where Kerio Connect uses a paid
spammer database where the license is associated with a particular IP address.
Queries are sent directly to the database, parent DNS servers will not be used for
the delivery.
Note: Any time a delivered message is sent from an address which matches a blacklist
item, the information is recorded in the Security log (for details, see chapter 24.4).
Therefore, to test reliability of a new blacklist, include it to the list and set the Add spam

Antispam control of the SMTP server
166
score to the message option to 0. Email will not be affected and each message matching
with the blacklist will be listed in the Security log.
Supported databases
SORBS
Spam and Open Relay Blocking System (SORBS) creates and maintains set of databases
of spammer IP addresses and domain names. By default, Kerio Connect includes two
aggregate zones of spammer databases containing all basic partial databases addressing
certain types of spammer servers:
• SORBS-DNSBL — database of spammer IP addresses.
• SORBS-DNSBL — database of spammer domain names.
For more information on SORBS, refer to http://www.de.sorbs.net/
SpamCop
Kerio Connect supports SpamCop, a database of spammer IP addresses. For more
information on SpamCop, refer to http://www.spamcop.net/
SpamHaus SBL-XBL
The SpamHaus SBL-XBL database combines a database of spammer IP addresses with
a database of illegal exploits performed by third parties:
• Spamhaus Block List — SBL is a database of IP addresses of proved spammers.
These servers are verified to prove that they really are spammers.
• Spamhaus Exploit Block List — XBL is a database of IP addresses of illegal exploits
performed by third parties, including open proxy servers, worms and viruses
carrying harmful executable codes and other types of Trojan horse.
For more information on SpamHAUS SBL-XBL, refer to http://www.spamhaus.org/
Weighted Private Block List
Weighted Private Block List (WPBL) is a database of spammer IP addresses maintained by
a committee scanning for and rating spammer servers. The database is available for free.
For more information on WPBL, refer to http://www.wpbl.info/
13.3 Custom Rules
If Kerio Connect’s internal antispam features do not satisfy your needs, it is possible to
manually customize rules to create a suitable filter which would complement the internal
system and increase the antispam efficiency. These rules can be defined on the Custom Rules
tab.
The tab consists of two sections. One contains list of rules and their definition tools. The
latter covers settings of how messages blocked by server-defined rules would be handled.

13.3 Custom Rules
167
Figure 13.5 Custom Rules
Rule Definition
On the tab, each filtering rule is represented by one line (see figure 13.5). Using matching
fields on the left you can activate or disable individual rules. This way you can switch the
rules temporarily on and off without the need to remove them and add them again.
When creating rules, bear in mind that their order in the list is very important. Individual rules
are processed in the same order as listed, downwards. Rules in the list can be reordered by
the arrow buttons on the right. Simply select a rule in the list and click the arrows to move it
up or down.
Rules can also be moved by the Drag and Drop method, i.e. by dragging and moving rules by
mouse.
It is essential to consider twice especially location of denial and allowance rules since once
these rules are processed, no other rules are applied. After rules where only score points
are added or taken off, other rules are processed unless all of them are applied or unless the
message matches a permission/denial rule.
Note: Rules tested against From and To headers have a peculiarity which might be beneficial.
If these rules go before the others, they will be tested on level of SMTP traffic. In case of
denial rules, messages matching such a rule are blocked even before accepted to the queue
of incoming messages. This decreases the load on the server. It helps the server avoid taking
several actions and using of several tools such as antispam tests and antivirus control which is
applied once a message is accepted to the queue of incoming messages. In case of permission
rules, no other rules are applied if they are tested on level of SMTP traffic. For detailed
description on testing of headers, see below (the Headers section).
Click the Remove and Remove unused buttons to delete rules from the list.
Use the Add button (or Edit) to open a dialog where rules can be defined or modified.
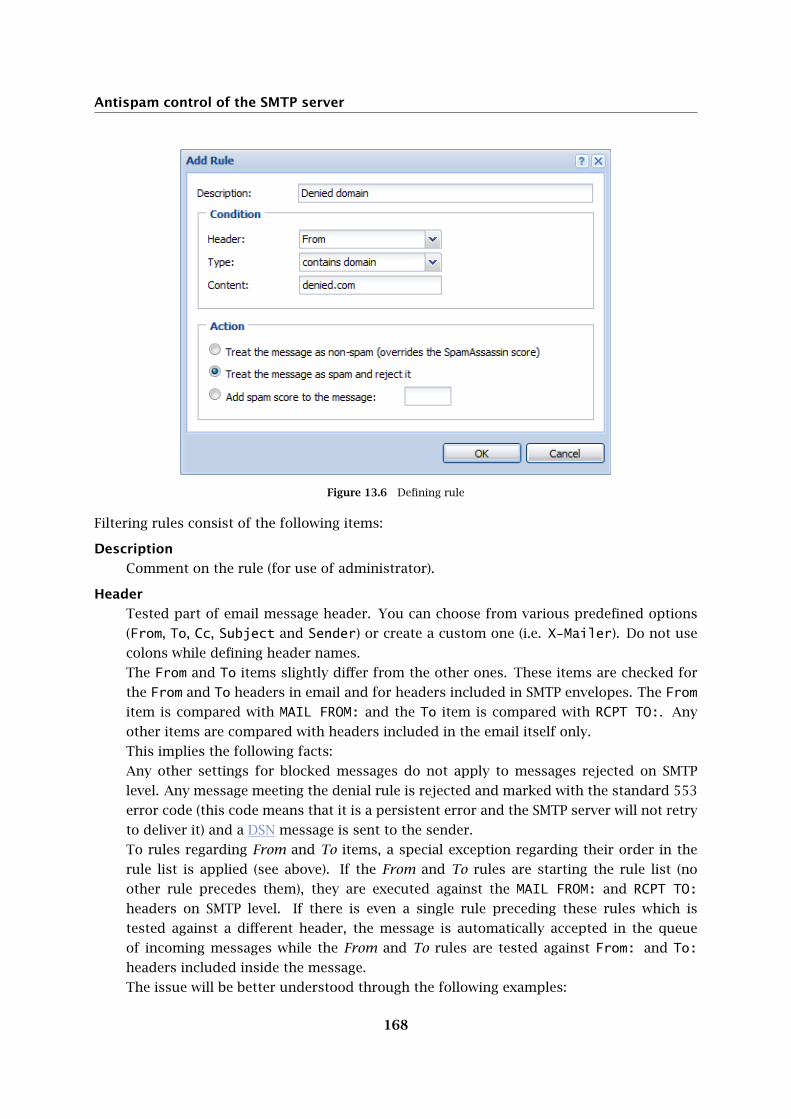
Antispam control of the SMTP server
168
Figure 13.6 Defining rule
Filtering rules consist of the following items:
Description
Comment on the rule (for use of administrator).
Header
Tested part of email message header. You can choose from various predefined options
(From, To, Cc, Subject and Sender) or create a custom one (i.e. X-Mailer). Do not use
colons while defining header names.
The From and To items slightly differ from the other ones. These items are checked for
the From and To headers in email and for headers included in SMTP envelopes. The From
item is compared with MAIL FROM: and the To item is compared with RCPT TO:. Any
other items are compared with headers included in the email itself only.
This implies the following facts:
Any other settings for blocked messages do not apply to messages rejected on SMTP
level. Any message meeting the denial rule is rejected and marked with the standard 553
error code (this code means that it is a persistent error and the SMTP server will not retry
to deliver it) and a DSN message is sent to the sender.
To rules regarding From and To items, a special exception regarding their order in the
rule list is applied (see above). If the From and To rules are starting the rule list (no
other rule precedes them), they are executed against the MAIL FROM: and RCPT TO:
headers on SMTP level. If there is even a single rule preceding these rules which is
tested against a different header, the message is automatically accepted in the queue
of incoming messages while the From and To rules are tested against From: and To:
headers included inside the message.
The issue will be better understood through the following examples:

13.3 Custom Rules
169
• Example 1:
In Example 1 (see table 13.1), rules are ordered so that messages sent from
[email protected] are accepted by Kerio Connect, while any other messages
from the domain.com domain are blocked on SMTP level. The third rule allows
any messages delivered to the local domain company.com on SMTP level.
Warning:
The following testing methods are applied prior to custom
rules:
• Spam repellent
• Caller ID and SPF
• Whitelists/Blacklists
This, however, implies that every message including the [email protected]
address as a sender is tested. If not blocked by the tests listed and having
reached custom rules, the permission rule is applied and no additional tests will
be applied to the message (actually, they will, but their result scores will be set to
0 points).
Header Type Content Action
From Address [email protected] Allow
From Domain domain.com Reject
To Domain company.com Allow
Table 13.1 Example 1:
• Example 2
In the second example, all email for [email protected] will be rejected at the
SMTP server level (see table 13.2). The next rule blocks any email from the
spam.com domain except messages where the test string is included in the
Subject header.
Header Type Content Action
To Address [email protected] Reject
Subject Substring test Allow
From Domain spam.com Reject
Table 13.2 Example 2

Antispam control of the SMTP server
170
Warning:
The examples imply that, when creating rules, it is also necessary to avoid
situations where one rule is unexpectedly influenced by another. This might
happen for example when users are subscribed in mailing lists and addresses
in MAIL FROM: and RCPT TO: do not match addresses in From and To headers
inside the message.
Type
Type of condition under which the entry will be tested. Available types:
• Is empty — the item is empty
• Is missing — the message does not contain the specified message header
• Contains address — the item contains a specific email address
• Contains address with domain — the item contains all email addresses from this
domain. Enter the mail domain, i.e. the second part of the email address right
from the @ character, in this field.
• Contains substring — the item contains specific string of characters (a word,
a piece of text, a number, etc.).
• Contains binary data — using this condition, the above-mentioned specific
characters as well as binary data that may be contained in spam messages can
be recognized. Binary data are characters that have a different meaning in each
character set (e.g. specific national characters).
Content
Required entry content (according to the selected type).
Once a rule is set, select one of the following actions:
Treat the message as non-spam
Messages treated as spam may be accepted as non-spam using this option.
Treat the message as spam and reject it
Email message matching this rule will be marked as spam, regardless of the spam filter.
It will use settings from the Custom Rules tab, from section If the message was rejected
by a custom spam rule (described below).
Add this value to the spam score
Define score value for SpamAssassin (the higher the value, the lower is the possibility that
a message passes through the filter). Value that you match with messages meeting this
rule will be added to the corresponding SpamAssassin evaluation (negative values protect
messages from being considered as spam).
In case of this blacklist, the recommended score value is from 1 to 3 points.
Examples:
1. Suppose that you want that the server blocks all email sent from [email protected].
Define a rule where the From entry will be tested. Choose the contains address condition
type (particular email address) and specify the Content entry using the email address

13.4 SpamAssassin
171
([email protected]). In the Score entry specify a value — this should be equal or
higher than the value set in the Action tab.
2. A user has demanded regular messages with current special offers. These messages are
sent from [email protected] and they are treated as spam by SpamAssassin. To override
this denial, we will create the following custom rule:
• Header — use the From selection
• Type — select the Contains address option
• Content — insert [email protected]
• Add spam score to the message — set a negative value that will decrease the
total score. You can also use the Treat the message as non-spam (overrides the
SpamAssassin score) option.
Custom message rule action
The settings are applied only to custom rules where the Treat the message as spam and reject
it option is set:
Send bounce message to the sender
The server returns the sender a DSN message informing that the email message cannot
be delivered.
It is not recommended to use this option since most of spam message use false sender
addresses. This implies that the denial message cannot be delivered (the address to which
the DNS message is sent might not exist). Messages informing about denial of the original
messages are then waiting in a queue where there must be physically removed, otherwise,
the server attempts to send them every 30 minutes and discards the messages after two
or three days.
Forward the message to quarantine address
The address to which messages will be forwarded and where administrator or another
authorized person can check whether there are or there are not legitimate messages
included in the spam. Using this option is recommended since it helps you avoid losing
of non-spam email without any notification.
13.4 SpamAssassin
To face spam, Kerio Connect uses SpamAssassin, a famous antispam filter. SpamAssassin
consists of several testing methods:
• filter based on statistical evaluation of message content
• Bayesian filter
• SURBL (Spam URI Realtime Blocklist) — this method tests links to websites possibly
included inside email against special online databases.
Antispam control of the SMTP server
172
Note: For easier solution of problems regarding SpamAssassin that might arise, enable the
SpamAssassin Processing option in the Debug log settings. To read more on the Debug log, see
chapter 24.9.
Content evaluation
Content evaluation is based on statistical filtering using the message’s contents (keywords,
number of capital letters, message format, etc.). Each incoming message is assigned a numeric
score according to the number of characters significant for spam messages. A higher score
indicates a higher probability of spam.
Bayesian filter
Another module involved is the Bayesian filter. It is a special antispam filter which is able to
“learn” to recognize spam messages. This filter compares the individual spam characteristics
with actual messages. The method consists of two concurrent modes:
• “Autolearn” — the filter learns by itself.
• “Learn” — users are involved in the learning process. Users have to reassign the
incorrectly evaluated messages to correct types (spam / non-spam) so that the filter
learns to recognize them in the future.
200 unique spams and 200 unique hams (legitimate messages) must be collected to make the
filter work. This means that such messages must vary. Each spam message is involved only
once. Other occurrences of an identical message will be ignored.
Bayesian filter sums spams and hams learned by the learn and autolearn methods. The
SpamAssassin tab contains statistics that monitor how many messages have been marked
as spam or ham and whether the filter is already active or has not learn enough spam and
ham messages yet. Once activated, the learning process keeps on introducing new items in
the database.
Note: SpamAssassin checks only messages which do not exceed the size of 128 kB since spam
messages are mostly not so large and checking of large messages might overload or slow down
the server’s performance.
Since individual users must check the messages in the “Learn” mode, the spam evaluation
tools must be embedded in mail clients. By default, these tools include only MS Outlook with
the Kerio Outlook Connector and the Kerio WebMail interface. Users can click special buttons
in the toolbar to mark an incorrectly evaluated message as non-spam.
For email clients with IMAP accounts as well as for MS Entourage (for IMAP and Exchange
accounts), there is another method of how to teach the Bayesian filter. These users can mark
incorrectly classified messages by moving them to appropriate folders. If users want to mark
a message as spam, they can move such messages to Junk E-mail. To mark a message as not
spam, they can move it to Inbox.

13.5 Email policy records check
173
TIP:
To use this method as efficiently as possible, set users a spam rule (either when creating
user accounts in Kerio Connect or by defining a corresponding sieve rule for incoming mail).
Any messages marked by Kerio Connect as spam will be automatically moved to the Junk
E-Mail folder. Messages that are incorrectly marked as spam can be moved to Inbox by hand.
Spam messages let in by mistake can be moved to the Spam folder manually. This ensures
proper and efficient learning and improvement of the Bayesian filter.
Online SURBL database
This part of the filter tests contents of messages (links to websites possibly included in
message bodies) against special online databases.
SpamAssassin can use multiple online databases. In Kerio Connect, it, however, uses only the
SURBL database since the other databases are already used for other tests.
13.5 Email policy records check
Many spam emails are sent from a fake sender email address. Checking “email policy” records
is used for filtering such messages.
The check verifies whether IP addresses of the remote SMTP server are authorized to send
emails to the domain specified. Spammers thus have to use their real addresses and the
unsolicited emails can be recognized quickly using different blacklists.
There are two similar technologies available for performing “email policy” records check in
Kerio Connect. The first one is Caller ID created by Microsoft, the other one is a project named
SPF (Sender Policy Framework). Both technologies provide explicit verification of message
senders. During this verification process, the IP addresses of SMTP servers that send mail
from the specific domain are published. For each domain that supports at least one of the
above technologies, a TXT record is stored in DNS with a list of IP addresses that send email
from the specific domain. Kerio Connect then compares the IP address of the SMTP server with
IP addresses contained in this DNS record. This method guarantee verification of sender’s
trustworthiness for each message. If the DNS record does not contain the IP address the
message was sent from, such message has a falsified address and it is considered as spam.
This way, it is quite easy to distinguish, whether the message is spam or not.
Messages received from server that has no IP address list in the DNS record will be always
delivered. For the “email policy” purposes, these emails will not be considered.
To set Caller ID and SPF in Kerio Connect, use the tabs in Caller ID (Spam filter → Caller ID)
and SPF (Spam filter → SPF ) menu.

Antispam control of the SMTP server
174
Warning:
SPF and Caller ID can be applied only to email delivered by SMTP. If email is downloaded
from the domain mailbox by POP3 protocol, email policy logs will not work.
Caller ID
The Caller ID tab enables users to configure basic settings:
Figure 13.7 Caller ID tab
Check the Caller ID of every incoming message...
This option enables/disables Caller ID.
On the Relay Control tab in the SMTP server section, it is possible to define a group of
trustworthy IP addresses. Caller ID will not be checked in case of messages sent from
trustworthy IP addresses (for details, see chapter 12.2).
Only log this to the security log
All messages of this type will be logged to the Security log. Messages with invalid Caller ID
will be delivered to the addressee.
13.5 Email policy records check
175
Block the message
Message including invalid Caller ID will be blocked on SMTP level. Senders are informed
that their message cannot be delivered.
Add this value to the spam score
The value set here will be added to message’s total score (see section 13.1).
In case of the Caller ID method, it is recommended to use value from 1 to 3 points.
Apply this policy also to testing Caller ID records...
Currently the Caller ID technology has not been widely adopted. Therefore, it is often
used by domains in testing mode only (the XML script’s header in the corresponding DNS
record includes the testing flag). For this reason, we recommend enabling this option.
If the option is not enabled, the configuration will not be considered (as if the DNS record
does not include the appropriate XML script).
Warning:
With this option enabled, do not set the Block the message option for messages
with an invalid Caller ID.
Don’t check Caller ID from...
Use this option especially for specifying backup servers. If a message is sent through
a backup server, the IP address of the server does not match the ones allowed for the
domain. Therefore the messages from these addresses should not be checked.
Warning:
To guarantee full functionality of Caller ID, do not set any other servers than the
backup ones as those not to be checked.
Check my email policy DNS records
Click the link to Kerio Technologies web pages where the email policy DNS record for
a domain can be checked.
For detailed instructions on proper configuration of DNS entry settings for Caller ID, see the
official Microsoft web pages.
SPF
SPF is an open source equivalent to Caller ID developed by Microsoft. Both technologies can
be used simultaneously in Kerio Connect.
In the SPF tab, the following options are available:
Enable SPF check of every incoming message
Enable/disable use of SPF.
On the Relay Control tab in the SMTP server section, it is possible to define a group
of trustworthy IP addresses. SPF check will not be applied to messages sent from
trustworthy IP addresses (for details, see chapter 12.2).

Antispam control of the SMTP server
176
Figure 13.8 SPF
Only log this to the security log
Messages with an invalid SPF record will be only added to the Security log.
Block the message
Message including invalid SPF will be blocked on SMTP level. Senders are informed that
their message cannot be delivered.
Add this value to the spam score
The value set here will be added to message’s total score (see section 13.1).
In case of the SPF method, it is recommended to use value from 1 to 3 points.
Don’t check SPF from this IP address group
Use this option especially for specifying backup servers. If a message is sent through
a backup server, the IP address of the server does not match the ones allowed for the
domain. Therefore the messages from these addresses should not be checked.
Warning:
To guarantee full functionality of SPF, do not set any other servers than the backup
ones as those not to be checked.
Details about the SPF check are displayed in the Debug log, after the appropriate settings are
specified (for more information, see chapter 24.9).
13.6 Spam repellent
177
13.6 Spam repellent
Kerio Connect is able to check the delay of reply to SMTP greeting.
Kerio Connect requests communication according to RFC which defines SMTP traffic. Most
of the spam distributing applications do not follow RFC. Thus, Kerio Connect is able to
distinguish them from legitimate SMTP servers.
Kerio Connect uses two SMTP connection errors to recognize spam servers. These violations
occur while establishing SMTP connection. The server that initializes the SMTP communication
should according to the corresponding RFC wait for the reply for at least 5 minutes.
Applications that send spam automatically do not wait for that long since they need to send
email messages as fast as possible to send as many spam messages as they can. It would hold
these applications too much to keep waiting the whole period. Therefore, spammer servers
behave in one of the following two predictable ways if Kerio Connect does not answer to the
SMTP greeting for a certain period (i.e. delay is set for answers). In one case, the spammer
server gives up the connection to Kerio Connect and tries elsewhere. In the other case, it
starts to send email to Kerio Connect immediately, without receiving the SMTP greeting (in
such a case, Kerio Connect interrupts the connection immediately).
Benefits of the SMTP delay are as follows:
1. Reception of spam by Kerio Connect is eliminated by 60 — 70 per cent. This also decreases
the load on the server since spam testing is very demanding.
2. The method has no so called false positives as there is no influence to the email which is
delivered legitimately. Settings
SMTP delay settings
You can set either the SMTP greeting delay in the Spam repellent tab of Kerio Connect (Config-
uration → Content filtering → Spam filter):
Delay SMTP greeting by
Use this option to set the SMTP delay. The optimal delay value is between 25 and 30
seconds. Shorter delay might not be enough (the spam sending applications use 10-20
sec), longer time would impede the communication.
Do not apply delay for connections from...
Spam repellent settings apply to all incoming SMTP communication events, i.e. also to
messages from local network, backup servers, etc. It is therefore recommended to add all
trustful IP addresses and networks to this IP address group, so that the communication
is not blocked, if the messages are apparently non-spam.
Report the spam attack to security log
Check this option to record all recognized spam attacks to the Security log (for more
information, see chapter 24.4).
If many emails go through Kerio Connect, there are usually also many spam attack
attempts, which can cause security log overflow. In such case, disable this setting.

Antispam control of the SMTP server
178
Figure 13.9 Spam repellent
Note: The settings in this tab apply only to the unsecured SMTP communication. The spam
distributing programs do not use the secured SMTP protocol for communication.
13.7 Recommended configuration of antispam tests
This section is helpful for anyone who is not sure about proper configuration of antispam
filters. The example describes optimal settings of scores for individual types of antispam
tests. Notice that almost never the message blocking is not preferred to increasing of spam
score:
Spam Rating tab
The essential setting is configuration of the Spam Rating tab (for details, see section 13.1). It
is recommended to leave most of the settings as predefined by default:
1. Make sure that the Enable Spam Filter Rating option is enabled. If the option is inactive,
enable it.
This option makes the filter consider and apply results of individual evaluations (spam
scores).
2. Make sure that the Enable rating of messages sent from trustworthy relay agents defined in
SMTP relay options option is inactive (unless you wish to check even messages sent from
trustworthy addresses).
3. Follow these instructions to set resolution of the spam filter scale:
• Tag score — set the value to 5 points.
• Block score — set this value to 9.9 points. This will ensure that only
“hundred-percent” spam messages are discarded by the server since users are not

13.7 Recommended configuration of antispam tests
179
even notified that such messages would have been blocked (unless at least one
of the Send bounce message to the sender or Forward the message to quarantine
address options are enabled).
Note: If you do not wish to block any messages no matter what the score is, set
the value to 10.0 points. This disables blocking of messages and keeps active only
the feature of marking as spam.
4. Make sure that the Send bounce message to the sender option is disabled.
Since spammers generally use invalid sender addresses in their headers, we will keep this
option disabled. It would be impossible to deliver responses to such messages and they
would be kept in the queue of outgoing email.
5. Finally, enable the Forward the message to quarantine address option and enter an email
address where all messages with the score higher than 10 points will be forwarded.
The option is helpful especially when setting and fine-tuning the antispam system. If
there are legitimate messages with their score too high, it will be discovered during an
opportune check of the mailbox where spam copies are delivered and stored. Later, this
option can be disabled and the mailbox removed.
Blacklists tab
Once the general configuration is completed, it is necessary to set individual testing methods.
The first test can be set on the Blacklist tab (for details, see section 13.2). The following
parameters are to be set here:
1. Custom whitelist of IP addresses — this option enables definition of servers to be excluded
from the antispam control. For this example, we will make out a business partner whose
SMTP server has been included in online spammer databases by mistake. Since we need
to communicate with this partner by email, it is necessary to include the address of their
SMTP server in the whitelist — at least for the time until the address is left out of the
databases:
• In Custom whitelist of IP addresses, create a new IP group called Whitelist. To
find out how IP groups are created, see section 19.1.
• Add the IP address of the corresponding SMTP server included in a spammer
database to the new IP group and save these settings. Messages sent from this
SMTP server will not be checked by any antispam control.
Warning:
Make sure that is no spammer SMTP server is included in the whitelist.
2. Custom blacklist of spammer IP addresses — the settings are similar as for whitelists, with
reversed reasons and results. Create an IP group where you involve all spammer SMTP

Antispam control of the SMTP server
180
servers you know. This option is helpful especially for cases where antispam tests are not
able to recognize these servers.
At this moment, define actions that will apply to messages sent from SMTP servers
included in the custom blacklist:
• Two options are available on the Blacklists tab. Such messages may be blocked
or their spam score may be increased. In this example, the second option was
selected and 3 points will be added to the spam score. Three points are enough
to learn whether the message really is a spam since the message is evaluated by
multiple tests and other points would be added to the score.
3. Internet blacklists — check all databases available. Use the Edit button to open individual
databases and set spam score to 2 points (see figure 13.4).
Recommendation: Do not set message blocking for Internet blacklists, especially for the
free ones. These databases may be updated quite rarely or slowly and the information
involved might be unreliable. The lists might include non-spammer servers. Therefore,
use these databases better to add spam score to suspicious messages.
Custom Rules
Another test for incoming email is a set of custom rules (for details, see section 13.3). Custom
rules can be created as needed:
1. Define corresponding rules for SMTP servers. If possible, set addition of only two or three
points for all spam rules. Since there are multiple rules defined, each test adds a score if
the message is considered a spam.
2. If there is a rule which blocks spam messages, set an address where copies of blocked
messages will be sent (see figure 13.10). The best way to do it is to create a special user
mailbox (for detailed information on creating of user accounts, refer to chapter 8).
Figure 13.10 Forward the message to quarantine address
SpamAssassin
It is not necessary to apply any special settings to the SpamAssassin filter. Any definitions of
the filter may be done on the SpamAssassin tab (for details, see section 13.4).

13.7 Recommended configuration of antispam tests
181
The only setting that needs to be changed on the tab is enabling of the Check every incoming
message in Spam URI Realtime Blocklist (SURBL) database option.
Caller ID tab
To read more on the Caller ID technology, see chapter 13.5. If you decide to use this
technology, it is strongly recommended to set the tab as follows:
1. Open the Caller ID tab under Configuration → Content Filtering → Spam Filter).
2. Enable the Check Caller ID of every incoming message option.
3. In the If the message has invalid Caller ID, then section, set spam rating to 3 points
(as explained above, spam messages are tested and scored by multiple tests so it is not
recommended to block it or to set individual scores too high).
4. It is also recommended to enable the Apply this policy also to the testing Caller ID records
option since most servers which employ the Caller ID technology use its testing mode so
far.
5. If you use an alternative (backup) SMTP server, specify its address in the Don’t check Caller
ID from IP address group entry.
SPF
For closer description of the SPF technology, refer chapter 13.5. Recommended settings of the
SPF test is almost identical with the Caller ID settings. It is as follows:
1. Open the SPF tab under Configuration → Content Filtering → Spam Filter).
2. Enable the SPF check of every incoming message option.
3. In the If the message has invalid Caller ID, then section, set spam rating to 3 points
(as explained above, spam messages are tested and scored by multiple tests so it is not
recommended to block it or to set individual scores too high).
4. If you use a backup SMTP server, enter its address in Don’t check SPF from IP address
group.
It is also recommended to support SPF by adding a record regarding SMTP servers which are
allowed to send email from your domains to your DNS records.

Antispam control of the SMTP server
182
Spam repellent
Detailed information on Kerio Connect’s Spam repellent technology, refer to chapter 13.6. This
technology is not involved in spam rating and it is therefore only mentioned in this section.
The technology usually sorts out large volume of spam even before it is accepted in Kerio
Connect and thus decrease the load on the antispam tests and on the mailserver in particular.
The optimal settings of Spam repellent are as follows:
1. Open the Spam Repellent tab under Configuration → Content Filtering → Spam Filter).
2. Enable the Delay SMTP greeting by ... seconds option and set the value to 25 seconds.
3. Enable the Do not apply delay for connection from option and select the local private
network as the IP group. This setting helps avoid delays of email sent from local user
accounts and delivery of internal messages.
4. Leave the Report the spam attack to the Security log option disabled (unless there is
a special reason to enable it). Records pointing at interruptions of SMTP connections
would otherwise make a large part of the log.
13.8 Monitoring of spam filter’s functionality and efficiency
Kerio Connect includes several options of how to monitor spam filter’s functionality.
Spam Filter statistics
Kerio Connect maintain spam filter’s statistics. The statistics can be found in the Status →
Statistics section (refer to chapter 23.6).
Spam filter’s statistics enable find out the proportion of ham (legitimate email) and spam
coming in Kerio Connect. The statistics help you recognize whether individual antispam
methods are set properly. It is apparent from the facts whether too much spam leaks in
user mailboxes and whether too many legitimate messages are marked as spam.
The statistics covers the following items:
Figure 13.11 Spam Filter statistics

13.8 Monitoring of spam filter’s functionality and efficiency
183
Messages checked
Total number of all messages that have passed through the antispam filter (messages
sent form whitelist domains, for example, are not counted since they are not tested).
Spams detected (tagged)
All messages detected and tagged as spam.
Spams detected (rejected)
All messages blocked by the spam filter.
Messages marked by users as spam
All messages considered by the filter as not spam which were later marked as spam by
users (manually, by clicking on Spam or by moving it to the Spam folder).
Messages marked by users as not spam
Legitimate messages detected by the antispam filter improperly as spam— so called “false
positives”.
Graphical overviews
Kerio Connect also uses traffic charts to trace certain values regarding spam email. There are
several spam-related traffic charts which can be found in the Status → Traffic Charts section
(see chapter 23.5).
The following graphs focus on spam:
Connections/Rejected SMTP
The chart displays number of attempts of SMTP connection were rejected by the Spam
repellent tool in certain time period.
Messages/Spam
With time dependence, the chart displays how large amount of spam is delivered to Kerio
Connect and when.
Logs
Problems that occur regarding the antispam filter might be solved with help of Kerio Connect’s
logs. In detail, logs are focused in chapter 24.
The following logs might be helpful:
Spam
All messages marked as spam are recorded in this log (for details, see chapter 24.8).

Antispam control of the SMTP server
184
Debug log
Logging of particular information can be performed by this special log. Spam issues may
be worked out by using of the following information:
• Spam Filter — the option logs spam rating of each message which passed through
the Kerio Connect’s antispam filter.
• SPF Record Lookup — the option gathers information of SPF queries sent to SMTP
servers. It can be used for solving problems with SPF check.
• SpamAssassin Processing — the option enables tracing of processes occurred
during SpamAssassin antispam tests.
To learn where and how to set logging of particular information in the Debug log, refer
to chapter 24.9.

185
Chapter 14
Antivirus Control of Email And Attachment Filtering
In Kerio Connect, you can check all incoming emails for viruses. The control can be performed
by using two combinable methods. For this purpose, you can use either the internal Sophos
antivirus, or any of the external supported antiviruses.
Immediately after the installation of Kerio Connect, the internal Sophos antivirus is started. It
is possible to support it by enabling any other of the supported external antivirus applications.
Both antivirus programs can run concurrently. This provides for reliable protection of
your local network, since the virus databases updates will be performed faster (one of the
antiviruses can react to a new virus occurrence a couple of hours sooner than the other). The
update speed is a key element of the protection against new viruses.
Both antiviruses can be also switched off, but it is not recommended, because users are not
protected against infected emails.
Kerio Connect checks (independently of the antivirus) JPEG attachments for corruption and
presence of GDI+ exploit (a malicious code, usually with a virus, that can run the exploit upon
system breakdown). All messages with such attachment will be deleted automatically.
Figure 14.1 Antivirus
Besides cooperation with an antivirus program, Kerio Connect allows you to filter certain file
types from email attachments (using file extension or MIME type), regardless of whether they
are infected by a virus or not. To specify these options, go to the Configuration → Attachment
filtering section.

Antivirus Control of Email And Attachment Filtering
186
14.1 Integrated Sophos Anti-Virus
Check Scan mail using Sophos Anti-virus engine in the Antivirus tab of the internal version.4
Check for update every
Interval for automatic update of the antivirus database and of the antivirus itself (in
hours). Information about updates can be found in the Security log (see chapter 24.4).
To enable automatic updates well-working connection to the Internet must be provided.
Automated dialing is not supported. In case of dial-ups we recommend you to perform
updates by hand (see below).
Virus definition updates are downloaded via HTTP. If the Kerio Connect is behind
a firewall you must allow for outbound communication over an appropriate TCP port
(port 80 by default).
Click Update now to start the update of the virus database and antivirus software
manually. When this button is pressed, the update progress window is displayed.
Note: The update progress window can be closed anytime by pressing the OK button (it
is not necessary to wait until the update is finished).
Current virus database was updated before
The time that has elapsed since the last successful update of the virus database (with an
accuracy of minutes).
Last update check performed ... ago
The time elapsed from the last successful update attempt. The fact whether a new version
has been available on the server is irrelevant.
Warning:
If the time is significantly (several times) greater than the interval set for automatic
update, then the automatic updates are not working correctly. In this case we
recommend updating the database manually and to inspect the Error and Security
logs for a failure explanation.
14.2 Choosing an external module for an antivirus program
Parameters for antivirus control are set in Configuration → Content Filter → Antivirus. To use
an external antivirus program, check Use external antivirus. This menu shows the antivirus
software which can be used for email scanning. The antivirus software must be installed prior
to making a selection (we recommend stopping the Kerio Connect Engine before the antivirus
installation).
The installed antivirus may not be run automatically. In such case, use the Options button to
specify advanced settings of the external antivirus program.
The external Sophos Anti-Virus is not supported by Kerio Connect.4

14.3 Configuration of external antivirus modules
187
Warning:
If the external Symantec Antivirus Scan Engine is selected, it is necessary to define the IP
address and port of the computer used by the antivirus in the Options dialog box.
The following conditions must be met so that the antivirus is properly run:
• The antivirus must be installed on the same computer where Kerio Connect is running.
• The antivirus license must meet the conditions of the producer (usually the same or
higher number of users of the licensed version of Kerio Connect or a special server
license).
The interface between Kerio Connect and an antivirus program consists of special modules
(one for each antivirus). The mailserver administrator must select the appropriate module
for the antivirus to be used. If a module is selected and the corresponding antivirus is not
installed of does not work properly, Kerio Connect does not allow saving these settings. The
message stating that the antivirus control is not functional appears in the Error log.
Note: There are two exceptions to this behavior: incorrectly transferred configuration of Kerio
Connect (for more information, see chapter 30.2), or less licenses of antivirus than the licenses
of Kerio Connect. In such cases, Kerio Connect will work normally, but it will not be able to
send messages. This is because Kerio Connect wants to perform an antivirus check after
receipt, but the antivirus does not work. The message stating that the antivirus control is not
functional appears in the Error log.
In order for Kerio Connect and antivirus program to cooperate properly, specify an exception
for the store directory (or also for the *.eml files in case of older versions of some
antiviruses), so that the messages are not checked by the antivirus engine.
If the resident shield was set incorrectly, a dialog box is opened. The resident shield also
detects the eicar.com file (a testing antivirus generated by Kerio Connect to check for proper
settings of an exception in the resident shield).
14.3 Configuration of external antivirus modules
Kerio Connect supports various external third party antivirus programs for Windows, Mac
OS X and Linux (to see the up-to-date list of antiviruses, go to www.kerio.com). For the
most current list of supported antivirus vendors refer to the Kerio Technologies website at
http://www.kerio.com/.
For information on configuration of individual plugins, see the Kerio Technologies
technical support website.

Antivirus Control of Email And Attachment Filtering
188
14.4 Server responses to detection of a virus or a damaged/encrypted
attachment
The Kerio Connect administrator can set a detailed course of action for the mailserver if a virus
or a damaged attachment is detected in an email. Use the Action tab to set this.
Figure 14.2 Server responses to detection of a virus or a damaged/encrypted attachment
Discard the message
The message will be removed.
Deliver the message with the attachment removed
The message will be delivered to the recipient but without the attachment. Instead,
a server message will be attached saying that the attachment has been removed.
Forward the original message to...
The message will be forwarded (intact — with possibly infected or forbidden attachment)
to the email address specified. It is not important whether the address is local or remote.
Forward the filtered message to administrator address...
The message without an infected or prohibited attachment will be (apart from the actions
selected below) forwarded to the specified email address as well. This can be used for
verification of proper functionality of the antivirus and/or attachment filter.
If an attachment cannot be scanned...
This section defines actions to be taken if one or multiple files attached to a message
cannot be scanned for any reason (e.g. password-protected archives). The following
actions can be taken:
• Append a warning to the message — the message (or attachment) will be delivered
unchecked. The user will be warned that the message may still contain viruses.
• Reject the message — the system will react the same way as when a virus
was detected (i.e. the message will be delivered without any attachment or
rejected). This option is safe, but sending password-protected archives is
virtually impossible.

14.5 Filtering Email Attachments
189
Each message is evaluated first by an antispam system, then by antivirus. This saves computer
time, since the antispam check is considerably less demanding than the antivirus check. If the
messages marked as spam are set to be discarded automatically (in the Spam Filter section),
all spam messages containing viruses will be discarded as well.
14.5 Filtering Email Attachments
The attachment filter can be set in the Attachment Filter tab. If the message is captured by
this filter, it will be delivered to the recipient without the attachment.
Figure 14.3 Attachment Filter
Enable attachment filter
Switches the attachment filter on or off.
Send a warning to sender ...
The sender will receive a warning from Kerio Connect, that he/she has sent a message
with a virus or blocked attachment.
Forward the original message to an address
The message will be forwarded (intact — with possibly infected or forbidden attachment)
to the email address specified. It is not important whether the address is local or remote.
Forward the filtered message to an address
The message without an infected or prohibited attachment will be (apart from the actions
selected below) forwarded to the specified email address as well. This can be used for
verification of proper functionality of the antivirus and/or attachment filter.
Filter rules
Displays individual filters. To the left of each filter there is a checkbox that you can use
to enable or disable the filter. Use these checkboxes to switch filters off without the need
to remove them.
After the Kerio Connect installation, there is a list of several predefined filters. All filters
are turned off and the administrator can choose to enable or remove them. This way for
example executables (.com and .exe), Visual Basic scripts (.vbs), etc. can be filtered.

Antivirus Control of Email And Attachment Filtering
190
Use the Add button to add a new filter:
Description
Text description of defined filter.
Filter type (MIME type/File name)
Defines if attachments will be filtered based on file names or MIME type (Multi-purpose
Internet Mail Extension).
Filename or file type specification
Enter either the file name (you can use the asterisk convention for e.g. filtering
files with a certain extension — e.g. *.exe) or the MIME type name (for example
application/x-msdownload or application/*). You can also choose one of the pre-set
or MIME types.
Block the attachment...
An action will be performed as defined above the list of disabled attachments (described
above).
Accept the attachment
Attachments will not be removed from messages and no other rules will be applied.
Enable filter rule
Check if you want to enable this option. You can enable or disable this option later in the
rule list in the Type column.
14.6 Antivirus control statistics
Kerio Connect maintains statistics of virus detection in email. The statistics can be found in
the Status → Statistics section (refer to chapter 23.6).
Statistics of the antivirus control enable monitor how many infected messages come in Kerio
Connect.
The statistics covers the following items:
Figure 14.4 Antivirus filter statistics
• Attachments checked — total number of email messages with attachments checked
by an antivirus.
• Viruses found — number of detected viruses.
• Prohibited filenames/MIME types found — total number of forbidden attachments (see
chapter 14.5).

191
Chapter 15
Email archiving and backup
15.1 Archiving
Kerio Connect can store copies of all messages (or only messages sent to the Internet) in
special archiving folders or re-send them to another SMTP server. This makes it possible to
keep archived email for a situation where it would be necessary to look up a particular message
or deleted messages (these can be reused by using so called email recovery which can be set
in the domain settings — for details, see chapter 7.4).
To configure backups, go to the Archiving tab under Configuration → Archiving and Backup:
Figure 15.1 Archiving tab
Enable mail archiving
This option enables/disables mail archiving. If archiving is enabled and appropriate
parameters are set on the Archiving tab, an archive folder with a name derived of the
interval in which folders are created (daily, weekly, monthly) is created when the first
message is delivered. The interval also can be set on the tab.
Anytime Kerio Connect is restarted, a new archive folder is created (upon receiving the
first message). Then, the archiving cycle follows settings defined on the Archiving section.

Email archiving and backup
192
Path to the archive directory
The full path to the archive directory (in accordance with conventions of the operating
system on which Kerio Connect is running). By technical reasons, it is necessary to locate
the archiving directory locally (i.e. on the server where Kerio Connect is running).
Enter the path in the text field or select it upon clicking on Select Folder .
Warning:
UNC path is not allowed as path specification.
Archive to remote email address
Email will be re-sent to this remote email address.
Archive to local folder
Copies of email messages will be stored in local folders, created automatically in the
name space #archive (on the disk, it appears in the mail/archive folder in the directory
where Kerio Connect is installed) according to a defined format.
Interval used for creating...
A suitable interval for creating archive folders can be set in this option. The names of the
archive folders reflect the interval settings:
2005-Jan — a monthly archive format. The name contains the year and month during
which the messages were archived. Every thirty days, a new folder is created (upon
reception of the first message after the server’s midnight time).
2005-W03 — a weekly archive format. The name includes year and week number. The
week number count starts on January 1 of the particular year. This implies that the count
does not necessarily match with the usual calendar week count (if January 1 is included
in the 52nd week, the week counts may collide). Every seven days, a new folder is created
(upon reception of the first message after the server’s midnight time).
2005-Jan-12 — a daily archive format. The name contains the year, day and month
during which the messages were archived. Every day, a new folder is created (upon
reception of the first message after the server’s midnight time).
Note: The interval for creating new archiving folders (implied from the name format)
is up to the Kerio Connect administrator. We recommend bearing in mind the number
of messages passing through the mailserver (or the number of local users). A greater
number of folders containing smaller numbers of messages are faster to access and easier
to comprehend.
Compress old archive folders
Use this option to compress the archive except for the current folder (the last folder
created). However, it is not possible to browse through the compressed folders via email
clients.
The first compression of the archive folder is performed upon Kerio Connect’s startup.
Each 24 hours since creation of a new folder, a new compression is performed.

15.1 Archiving
193
Local messages (local sender, local recipient)
All local messages (messages sent from the local domain) will be archived.
Incoming messages (remote sender, local recipient)
All incoming messages will be archived (from remote senders to local recipients).
Outgoing messages (local sender, remote recipient)
All outgoing messages will be archived (from local senders to remote recipients).
Relayed messages (remote sender, remote recipient)
All messages forwarded to a relay server will be archived (from remote senders to remote
recipients).
Archive messages before...
This option enables archiving of all messages before the antivirus check is started. All
messages will be stored intact (including viruses) in these files.
By default, archive folders are available to the admin of the primary domain (see chapter 8.1).
The Admin can also assign access rights to archive folders for other users. This may be done in
Kerio WebMail (refer to the Kerio WebMail user guide) or in MS Outlook supported by the Kerio
Outlook Connector. However, since messages of all users are archived, only a confidential
administrator (or a tiny group of confidential persons) should be allowed to access these
folders.
Viewing of archive folders
These folders are available to users with corresponding rights only. By default, only the
admin of the primary domain is allowed to access the folders (the first account created in
the configuration wizard during the installation of Kerio Connect).
Figure 15.2 Archive folders in the Kerio WebMail interface

Email archiving and backup
194
Archive folders can also be made available for other users. The sharing is the same as for
other folder types. However, since messages of all users are archived, only a confidential
administrator (or a tiny group of confidential persons) should be allowed to access these
folders.
15.2 Back-up of user mailboxes and basic server configuration
Kerio Connect supports back-up of the following items:
• user mailboxes,
• public folders,
• mailing lists,
• the users.cfg and mailserver.cfg configuration files,
• licenses,
• SSL certificates,
• SpamAssassin database.
For this purposes, any removable or network disk can be used.
Backups of user folders include various settings. To configure backups, go to the Backup tab
under Configuration → Archiving and Backup:
Figure 15.3 Backup of user folders

15.2 Back-up of user mailboxes and basic server configuration
195
Enable message store and configuration recovery backup...
This option allows backup and its configuration.
If you do not wish to use Kerio Connect’s backup functions, disable the Enable message
store and recovery backup option. If you remove all items in the backup schedule and
leave the option active, the default backup schedule is downloaded and applied upon
a Kerio Connect’s restart.
Backup Schedule
On the Backup tab, backups can be scheduled in details. Two backup types can be scheduled:
• Full backup — full backup of all files.
• Differential backup — a partial backup, including all new files and files changed
since the last backup. These backups are not so bulky. Typically, partial backups
complement a full backup. If multiple differential backups in row are scheduled,
the newest backup always rewrites the previous one. This means that at most one
differential backup can be saved on the backup disk besides the full backup.
Note: If the method of differential backups is used, the most recent full and differential
should be used in case that a backup recovery is performed.
The backup schedule is defined by backup tasks. Each task includes settings for time when
the particular backup will be performed and selection of a backup type (see above). To add
anew backup task to the schedule, click on
Add. A backup schedule definition window is opened (see figure 15.4) that includes the
following setting options:
Figure 15.4 A backup task

Email archiving and backup
196
Description
This is an optional item, it is used for better reference.
Schedule
The box includes two entries where day and time are selected for the backup. It is
recommended to perform backups at night (especially full backups) since backups might
overload the mailserver.
Backup type
Selection of either the full or differential backup type.
The Add button opens a definition of a new backup task. You can also click theEdit button to
edit a corresponding task or Remove to remove a task from the schedule.
Both backup types can be combined by using multiple tasks. Any number of backup tasks can
be defined. This depends on the user. Number of backup tasks may depend on:
1. Size of the data store which influences how long each backup takes and on its size. Both
problems might be easily solved by using differential backups.
2. Importance of data which might be lost. This implies that backups are typically more
frequent in companies where email communication and message storing is important. If
backups are performed frequently, minimum of data is lost in case of the server’s failure.
Click Advanced for advanced settings (see figure 15.5):
Figure 15.5 Backup advanced options
File settings
Backups are saved in compressed files (.zip) where the maximal size of 2 GB is allowed.
This box enables you to split the backup to several files of smaller size. The maximal file
size for splitting is set to 2 GB by default. If a file exceeds the value set in the dialog, the
file is not backed up.

15.2 Back-up of user mailboxes and basic server configuration
197
Rotation
Each backup of user folders is very space-demanding and it might be desirable to often
remove these backups. It is possible to set rotation where old backups are removed
automatically. Just specify number of backups to be kept in the Keep at most ... complete
backups. Whenever the number is exceeded, the oldest backup is rewritten by the new
one.
Other settings
Backup directory
The full path to the backup directory (in accordance with conventions of the operating
system on which Kerio Connect is running).
Enter the path in the text field or select it upon clicking on Select Folder .
The default backup store is in the directory where Kerio Connect is installed:
Kerio\MailServer\store\backup
Figure 15.6 Backup directory specification
Warning:
It is recommended to change the backup directory by setting the path to the
corresponding removable disk or another media where the backup will be stored
if available.
If Kerio Connect is running on Windows, the path must be specified as UNC (see
figure 15.6).
If Kerio Connect is running on Linux or Mac OS X, the following options are allowed:
• Connect the backup server as a directory and specify the path to this directory in
the Backup Directory entry. Here is an example of a result:
/mnt/server-backup
• Save the backup in a local directory and then, send it to the server (e.g. by using
the rsync synchronization utility). Here is an example of a result:
/backup/kms/backup

Email archiving and backup
198
Network disk authentication
In addition to saving backups to removable media it is also possible to store save backups
to a network disk. If access to the disk is secured, authentication by username and
password must be enabled (a user with access rights to the network location must be
used).
Username and password for authentication to the network disk can be used only if Kerio
Connect is installed on MS Windows.
Figure 15.7 Network disk authentication
Warning
Specify an email address where notifications about the backup status will be sent by Kerio
Connect.
In addition to backups set in the schedule, it is also possible to make so called backup copies.
The copy is a kind of full backup. The copy can be enabled by the Start now button. The
current status of the backup process appears next to the button. In case of a backup recovery,
the copy is considered as a standard full backup and it is used for the recovery if it is the most
recent copy performed.
Troubleshooting
For cases when a problem regarding backups occurs and needs to be solved, Kerio Connect
allows logging of backups:
1. Go to section Logs and select Debug.
2. Right-click on the log pane to open a context menu, and select Messages.
3. In the Logging messages dialog box, select Store Backup.
4. Confirm changes by OK.
Once your problems are solved, it is recommended to disable the logging.

15.3 Data recovery from back-up
199
15.3 Data recovery from back-up
A special tool called Kerio Connect Recover is used for recovery of the backup data. The
tool extracts the back-up and saves the data in their original location in the Kerio Connect
hierarchy.
To launch Kerio Connect Recover, run the kmsrecover command from the directory where
Kerio Connect is installed.
Usage:
kmsrecover [options] <directory_name>|<file_name>
On Mac OS X and Linux it is necessary to enter a command on the following format, unless
having already been introduced in the file of the path system variable:
./kmsrecover [options] <directory_name>|<file_name>
This means that it is necessary to add the ./ string before the utility name that will inform
the system that the command to be used is in the current directory.
You can also see these details and examples to individual attributes, by running the following
command.
kmsrecover -h or kmsrecover --help
Warning:
• Kerio Connect must be installed on the computer which the kmsrecover tool is
launched from.
• It is necessary to stop the Kerio Connect Engine prior to the recovery.
• If Kerio Connect Recover is run without advanced parameters specified otherwise, all
items in the Kerio Connect’s data store, such as configuration files, licenses, mailing
lists and data, will be overwritten.
The Kerio Connect Recover tool allows setting of many advanced options for back-up data
recovery, as follows:
Backup recovery will be better understood through these simple examples:

Email archiving and backup
200
Abbreviation Full option Mask Description
-d --domain Recovers (or lists with parameter -l) all backed-up data
for the specified domain..
-u --user Recovers (or lists with parameter -l) data of the
specified user.
-f --folder This option recovers the specified folder of the user
(this option requires setting of the -d and -u options).
-s --store This option sets where SpamAssassin databases,
mailing lists and emails (including events, notes,
contacts, etc.) would be unpacked and stored. By
default, the store on the Kerio Connect from which
kmsrecover was launched is used.
-c --cfgdir This option sets a directory where configuration files,
SSL certificates and licenses would be stored. By
default, the current folder from which the kmsrecover
command was started is used.
-m --mask This option allows to set which parts of the back up
would be recovered. It requires setting of mask with -m
<value> or--mask=<value>. <value> stands for any
combination mentioned below. Example: -m
cfg,license,sslca,sslcert — this command
recovers license, SSL certificates and configuration files.
cfg This argument recovers only configuration files
mailserver.cfg and users.cfg where server
configurations are defined.
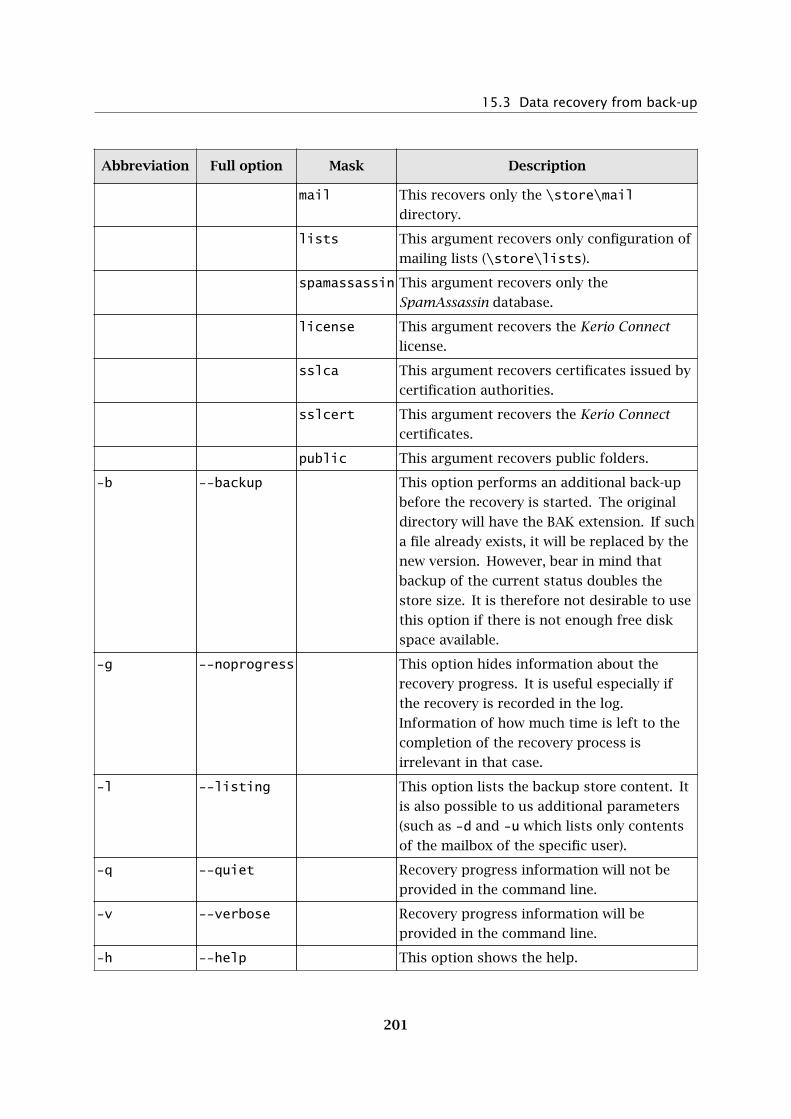
15.3 Data recovery from back-up
201
Abbreviation Full option Mask Description
mail This recovers only the \store\mail
directory.
lists This argument recovers only configuration of
mailing lists (\store\lists).
spamassassin This argument recovers only the
SpamAssassin database.
license This argument recovers the Kerio Connect
license.
sslca This argument recovers certificates issued by
certification authorities.
sslcert This argument recovers the Kerio Connect
certificates.
public This argument recovers public folders.
-b --backup This option performs an additional back-up
before the recovery is started. The original
directory will have the BAK extension. If such
a file already exists, it will be replaced by the
new version. However, bear in mind that
backup of the current status doubles the
store size. It is therefore not desirable to use
this option if there is not enough free disk
space available.
-g --noprogress This option hides information about the
recovery progress. It is useful especially if
the recovery is recorded in the log.
Information of how much time is left to the
completion of the recovery process is
irrelevant in that case.
-l --listing This option lists the backup store content. It
is also possible to us additional parameters
(such as -d and -u which lists only contents
of the mailbox of the specific user).
-q --quiet Recovery progress information will not be
provided in the command line.
-v --verbose Recovery progress information will be
provided in the command line.
-h --help This option shows the help.

Email archiving and backup
202
Examples for Windows
Full backup recovery
The directory with configuration data is stored at the default location (as set as default
during the installation), the store directory is located on a separate disk (RAID or a faster
disk) of the same computer where the configuration directory, and the backup directory
is located on an exchangeable disk. For backup recovery, use full backup.
Conditions:
1. The configuration data is stored under
C:\Program Files\Kerio\MailServer
2. The store directory is located in
D:\store
3. For security purposes, the backup directory is stored on the removable disk
E:\backup
Solution:
The command must be run from the directory where Kerio Connect is installed. In this
case, the directory is
C:\Program Files\Kerio\MailServer
At this point, two command formats can be used:
1. We want to recover the last complete backup (the most recent full and differential
backups or the most recent backup copy). The command will be as follows:
kmsrecover E:\backup
2. To recover a particular backup (except the last one), use the following format:
kmsrecover E:\backup\F20051009T220008Z.zip
The kmsrecover detects the path to the store (D:\store) automatically in the Kerio Con-
nect’s configuration file and uses it.
Warning:
If the parameter contains a space in a directory name, it must be closed in quotes.
For example:
kmsrecover "E:\backup 2"
Recovery of a single user’s mailbox
• The directory with the backup is stored on an external disk E,
• we need to get a single user’s mailbox from the backup,
• the entire mailbox and its content will be saved out of the Kerio Connect’s store
(folder \tmp).
kmsrecover -d company.com -u smith

15.3 Data recovery from back-up
203
-s D:\tmp E:\backup\F20051009T220008Z.zip
Recovery of a single folder of a user
• The directory with the backup is stored on an external disk E,
• one specific folder of the user mailbox must be gained from the backup (Sent
Items in this case),
• the command is run in the verbose mode (parameter -v) which allows to monitor
the recovery process.
kmsrecover -v -d company.com -u smith -f "Sent Items"
E:\backup\F20051009T220008Z.zip
Recovery of public folders of a particular domain
• The directory with the backup is stored on an external disk E,
• it is now necessary to recover the domain’s public folders (the public mask will
be used here),
• and the original public folders will be kept at the same time (status before using
Kerio Connect Recover). This will be done simply by using the -b parameter.
kmsrecover -b -d company.com -m public E:\backup
Examples for Mac OS X
Full backup recovery
The directory with configuration data is stored at the default location (as set as default
during the installation), the store directory is located on a separate disk of the same
computer where the configuration directory, and the backup directory is located on an
exchangeable disk. For backup recovery, use the most recent full backup.
Conditions:
1. The configuration data is stored under
/usr/local/kerio/mailserver
2. The store directory is located in
/store
3. For security purposes, the backup directory is stored on the removable disk
/Volumes/backup
Solution:
The command must be run from the directory where Kerio Connect is installed.
Therefore, it is necessary to go to the directory:
/usr/local/kerio/mailserver
We want to recover the last complete backup (the most recent full and differential
backups or the most recent backup copy). Now, the command pattern depends on the

Email archiving and backup
204
fact whether the path to the Kerio Connect directory is included in the path variable or
not. If the path is not set there, the command will be as follows:
./kmsrecover /Volumes/backup
Otherwise, it will be like this:
kmsrecover /Volumes/backup
The kmsrecover detects the path to the store (/store) automatically in the Kerio Con-
nect’s configuration file and uses it.
Recovery of a single user’s mailbox
• The directory with the backup is stored on an external disk,
• we need to get a single user’s mailbox from the backup,
• the entire mailbox and its content will be saved out of the Kerio Connect’s store
(folder /Temp).
./kmsrecover -d company.com -u wsmith -s /Volumes/Temp
/Volumes/backup/F20051009T220008Z.zip
Recovery of a single folder of a user
• The directory with the backup is stored on an external disk,
• one specific folder of the user mailbox must be gained from the backup (Sent
Items in this case),
• the command is run in the verbose mode (parameter -v) which allows to monitor
the recovery process.
./kmsrecover -v -d company.com -u wsmith -f "Sent Items"
/Volumes/backup/F20051009T220008Z.zip
Recovery of public folders of a particular domain
• The directory with the backup is stored on an external disk,
• it is now necessary to recover the domain’s public folders (the public mask will
be used here),
• and the original public folders will be kept at the same time (status before using
Kerio Connect Recover). This will be done simply by using the -b parameter.
./kmsrecover -b -d company.com -m public /Volumes/backup
The backup structure
Each archive consists of backup type and date when it was created:
• Full backup — F20060118T220007Z.zip
F — full backup
2006 — year
01 — month

15.3 Data recovery from back-up
205
18 — day
T220007Z — GMT timestamp (22:00:07);it always starts with T and ends with Z.
• Differential backup — I20060106T220006Z.zip
I — differential backup
2006 — year
01 — month
06 — day
T220006Z — GMT timestamp (22:00:06);it always starts with T and ends with Z.
• Backup copy (manual back up startup) — C20060117T084217Z.zip
2006 — year
01 — month
17 — day
T084217Z — GMT timestamp (08:42:17);it always starts with T and ends with Z.
Each backup includes the following files and directories:
• .version.txt — the file is created at the start of the backup creation process and it
includes the following information:
• started — date of the start of the backup creation in pattern YYYY-MM-DD
hh:mm:ss.
• version — version of the backup tool.
• hostname — DNS name of the Kerio Connect host which the backup was
created for.
• @backup — the main directory of the backup. This directory includes the following
items.
• license — license backup
• sslca — backup of certification authorities’ certificates.
• sslcert — backup of Kerio Connect’s SSL certificates.
• store — backup of the data store
• mailserver.cfg — a file with the Kerio Connect configuration. All settings done in
the administration interface are saved in mailserver.cfg.
Email archiving and backup
206
• users.cfg — a file with user configuration. It involves all users and their parameters
set in the Kerio Connect’s administration interface.
• .summary.txt — the file is created at the end of the backup creation process and it
includes the following information:
• started — date of the start of the backup creation in pattern YYYY-MM-DD
hh:mm:ss.
• finished — date of the backup completion in pattern YYYY-MM-DD
hh:mm:ss.
• count_files — number of backed-up files.
• total_size — total size of the files (in bytes) which are backed-up in the
interval between creation of files .version.txt and .summary.txt.
• duration — total time of the backup creation process in pattern
hh:mm:ss:msms

207
Chapter 16
Server’s Certificates
The principle behind secure services in Kerio Connect (services encrypted by SSL — e.g. HTTPS,
IMAPS, POP3S, etc.) is that all communication between the client and the server is encrypted
to protect it from tapping and to prevent it from misuse of transmitted information. The
SSL encryption protocol used for this purpose uses an asymmetric cipher first to exchange
a symmetric key.
The asymmetric cipher uses two keys: a public one for encrypting and a private one for
decrypting. As their names suggest, the public (encrypting) key is available to anyone wishing
to establish a connection with the server, whereas the private (decrypting) key is available only
to the server and must remain secret. The client, however, also needs to be able to identify
the server (to find out if it is truly the server and not an impostor). For this purpose there is
a certificate, which contains the public server key, the server name, expiration date and other
details. To ensure the authenticity of the certificate it must be certified and signed by a third
party, the certification authority.
Communication between the client and server then follows this scheme: the client generates
a symmetric key and encrypts it with the public server key (obtained from the server
certificate). The server decrypts it with its private key (kept solely by the server). This method
ensures that the symmetric key is known only to the server and client.
Note: To provide maximum security for Kerio Connect, allow only SSL-secured traffic. This can
be set either by stopping all unencrypted services (see chapter 6) or by setting appropriate
security policy (refer to chapter 12.8). Once the server is configured, it is necessary to install
a certificate (even a self-signed one) or certificates on clients of all users using Kerio Connect’s
services.
16.1 Kerio Connect certificate
To find out how these principles work in practice, look at Secure HTTP. Web browsers can
display certificate information, as opposed to other services, where such information will not
be revealed.
When Kerio Connect is run for the first time, it generates the self-signed certificate
automatically. It is saved in the server.crt file in the sslcert folder where Kerio Connect
is installed. The second file in this directory, server.key, contains the server’s private key.
If you attempt to access the Secure HTTP service immediately after installing Kerio Con-
nect a security warning will be displayed with the following information (depending on your
browser, name of the computer, etc.):
• The certificate was not issued by a company defined as trustworthy in your
configuration. This is caused by the fact that the certificate is self-signed. This warning

Server’s Certificates
208
will not be displayed if you install the certificate (you can do this because you know
the certificate’s origin).
• The certificate date is valid (the certificate is valid for a certain limited period, usually
1-2 years).
• The name of the certificate does not correspond with the name of the server. The
certificate is issued for a certain server name (e.g. mail.company.com), which you
must also use in the client (this certificate has been issued for a fictitious name
keriomail).
Now, there are two options. One is to keep in Kerio Connect the self-signed certificate
generated during the mailserver’s installation, the other option is to get a certificate authorized
by a certification authority. It should be possible to install both types of certificates on client
stations. In both cases, it is necessary that the certificate is maintained in the Kerio Connect’s
Configuration → SSL certificates section (see figure 16.1).
Figure 16.1 SSL Certificates
In SSL certificates, it is possible to create certificates, generate certificate demands for
certification authorities as well as export certificates. Here is an overview of all options:
New...
Click on New to specify information about your server and your company. When
confirmed, the server.crt and server.key files are created under sslcert.
The certificate you create will be original and will be issued to your company by your
company (self-signed certificate). This certificate ensures security for your clients as
it explicitly shows the identity of your server. The clients will be notified by their
web browsers that the certification authority is not trustworthy. However, since they
know who created the certificate and for what purpose, they can install it. Secure
communication is then ensured for them and no warning will be displayed again because
your certificate has all it needs.
If you wish to obtain a “full” certificate you must contact a public certification authority
(e.g. Verisign, Thawte, SecureSign, SecureNet, Microsoft Authenticode, etc.). The process
of certification is quite complex and requires a certain expertise. Kerio Connect enables
certification request that can be exported and the file can be delivered to a certification
authority.

16.1 Kerio Connect certificate
209
Attention: A new certificate will be used the next time Kerio Connect Engine is started. If
you wish to use it immediately, stop the Engine and then start it again.
The New button can be used to create a new certificate (the New certificate option) or to
demand on a new certificate (New certificate request). You will be asked to specify entries
in the Generate Certificate dialog. The Hostname and Country entries are required fields.
Figure 16.2 Certificate Creation
• Organization Name — name of your organization.
• Hostname — name of the host on which Kerio Connect is running.
• Organization Unit — will be used only if the organization consists of more than
one unit.
• City — city where the organization’s office is located.
• State or Province — state or province where your organization has its office(s).
• Country — this entry is required.
• Valid for — select the period for which the certificate will be valid.
Show Details
Select a certificate and click on the Show details button to get details about the selection.
Import
Use this button to import a certificate, regardless if new or certified by a certification
authority.
Export...
Use this button to export an active certificate, a certification request or a private key.
Using this option you can send an exported certificate request to a certification authority.
Remove
Using this button you can remove a selection (a certificate or a certification request).
Set as active
Use this button to set the selected certificate as active.

Server’s Certificates
210
Intermediate certificates
Kerio Connect allows authentication by so called “intermediate” certificate. To make
authentication by these certificates work, it is necessary to add the certificates to Kerio Connect
by using any of the following methods:
Locally
Add the “intermediate” certificate file to the /sslca directory and copy the server’s
certificate with the private key to the /sslcert directory. Both directories can be found
in the directory where Kerio Connect is installed.
Remotely
Certificates can be imported via the administration interface.
1. Open the server’s certificate and the “intermediate” certificate in any text editor.
2. In the “intermediate” certificate, select the certificate’s string and copy it to the server
certificate file next to the string of the server certificate. The certificate file should
then be as follows:
-----BEGIN CERTIFICATE-----
MIIDOjCCAqOgAwIBAgIDPmR/MA0GCSqGSIb3DQEBBAUAMFMxCzAJBgNVBAYTAl
MSUwIwYDVQQKExxUaGF3dGUgQ29uc3VsdGluZyAoUHR5KSBMdGQuMR0wGwYDVQ
..... this is a server SSL certificate ...
ukrkDt4cgQxE6JSEprDiP+nShuh9uk4aUCKMg/g3VgEMulkROzFl6zinDg5grz
QspOQTEYoqrc3H4Bwt8=
-----END CERTIFICATE-----
-----BEGIN CERTIFICATE-----
MIIDMzCCApygAwIBAgIEMAAAATANBgkqhkiG9w0BAQUFADCBxDELMAkGA1UEBh
WkExFTATBgNVBAgTDFdlc3Rlcm4gQ2FwZTESMBAGA1UEBxMJQ2FwZSBUb3duMR
..... this is an intermediate SSL certificate which
signed the server certificate...
5BjLqgQRk82bFi1uoG9bNm+E6o3tiUEDywrgrVX60CjbW1+y0CdMaq7dlpszRB
t14EmBxKYw==
-----END CERTIFICATE-----
3. Save the certificate.
4. In the administration interface, open the SSL Certificates section.
5. Import the server’s certificate by using the Import → Import new certificate option.
16.2 Install certificates on client stations
Only in the following cases it is necessary to install certificate on the client station:
• If MS Outlook extended by the Kerio Outlook Connector is used on the station and
secured HTTP traffic is desired between the server and the client (typically when the
Free/Busy server is used). In such a case, it is necessary to install the certificate,
otherwise the communication will not work.

16.2 Install certificates on client stations
211
• If MS Entourage is used and its services are planned to be secured by SSL encryption.
In such a case, it is necessary to install the certificate, otherwise the communication
will not work.
• For connections to Kerio WebMail over HTTPS. If the certificate is not installed, an alert
is displayed upon each login informing you of this issue.
The simplest way to install a certificate is to use a web browser.
Installation in Internet Explorer
Internet Explorer is helpful where the certificate is to be installed to the MS Outlook store
(Internet Explorer and MS Outlook share the same certificate store) or where connection to
Kerio WebMail is to be performed over HTTPS.
To install a certificate, follow these instructions:
1. Run Internet Explorer and specify the corresponding URL to login to Kerio WebMail.
SSL-secured protocol must be used for the connection to the server. This implies that
the URL should start with https:// (example: https://mail.company.com/).
2. This opens the Security Alert dialog box. In this dialog, click on View certificate.
3. In the dialog with certificate details displayed, click on the Install certificate button.
4. A certificate installation wizard is opened. There is nothing to be set in the wizard. Simply
confirm all settings and close the wizard to install the certificate.
Installation in Safari
SSL certificate is required whenever applications are to communicate with Kerio Connect by
SSL-secured services. The Kerio Connect certificate can be installed by using the Safari browser
(simply connect to the Kerio WebMail interface via https://):
1. Run Safari and specify the corresponding URL to login to Kerio WebMail. SSL-secured
protocol must be used for the connection to the server. This implies that the URL should
start with https:// (example: https://mail.company.com/).
2. Before the Kerio WebMail’s login page is opened, an alert is displayed informing that the
system is not able to authorize the server to which you are connecting since the certificate
is authorized by an unknown authority (see figure 16.3).
3. The alert dialog contains the Show certificate button. Click on it to show the certificate
(see figure 16.4).
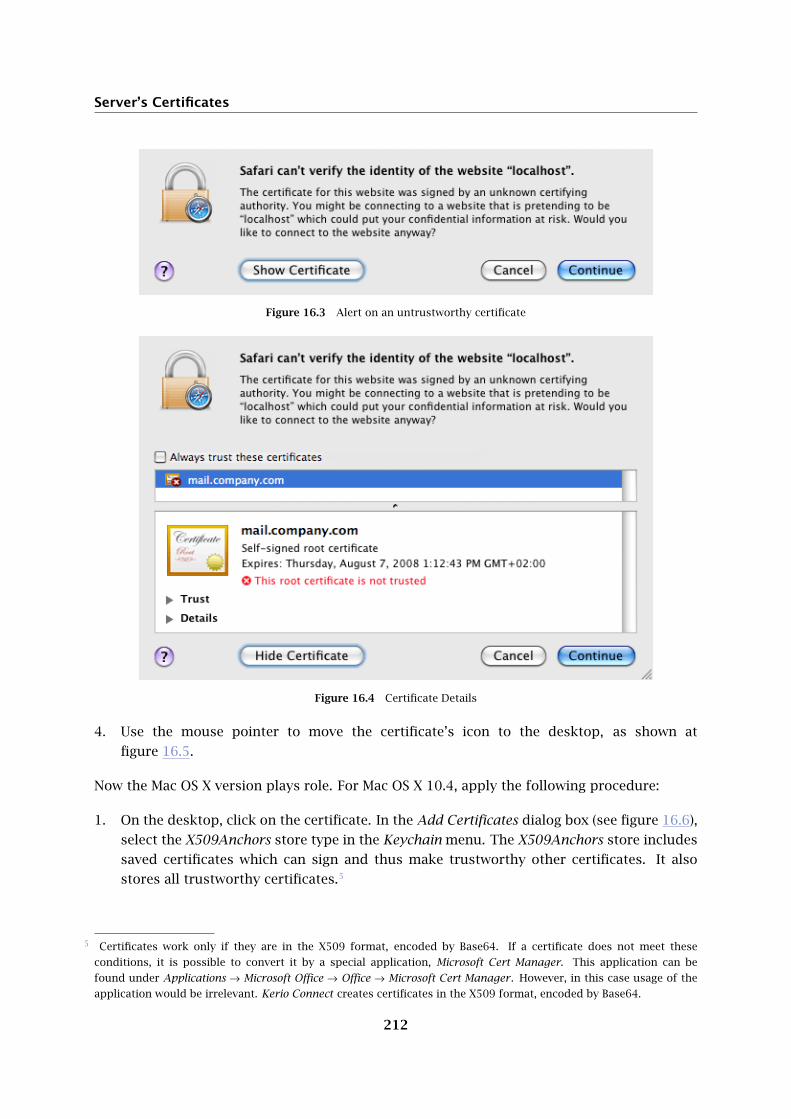
Server’s Certificates
212
Figure 16.3 Alert on an untrustworthy certificate
Figure 16.4 Certificate Details
4. Use the mouse pointer to move the certificate’s icon to the desktop, as shown at
figure 16.5.
Now the Mac OS X version plays role. For Mac OS X 10.4, apply the following procedure:
1. On the desktop, click on the certificate. In the Add Certificates dialog box (see figure 16.6),
select the X509Anchors store type in the Keychain menu. The X509Anchors store includes
saved certificates which can sign and thus make trustworthy other certificates. It also
stores all trustworthy certificates.5
Certificates work only if they are in the X509 format, encoded by Base64. If a certificate does not meet these5
conditions, it is possible to convert it by a special application, Microsoft Cert Manager. This application can be
found under Applications → Microsoft Office → Office → Microsoft Cert Manager . However, in this case usage of the
application would be irrelevant. Kerio Connect creates certificates in the X509 format, encoded by Base64.

16.2 Install certificates on client stations
213
Figure 16.5 Moving the certificate to the desktop
Figure 16.6 The Add Certificates dialog box
2. Administration password is required if you are not logged in as a root user or as an
administrator.
3. Along with the Add Certificates dialog, the Keychain Access store is opened. If not, it can
be found in Applications → Utilities → Keychain Access.
4. In the Keychain Access application, switch to the Certificates tab.
5. Check that the certificate has appeared in the certificate list.
For Mac OS X 10.5 Leopard and higher, follow these instructions:
1. On the desktop, click on the certificate. In the Add Certificates window (see figure 16.7),
select the System option in the Keychain menu (all system users will be allowed to use the

Server’s Certificates
214
certificate) or Login (only authenticated users will be allowed to use the certificate). Click
OK to confirm changes.
Figure 16.7 The Add Certificates dialog box
2. The Keychain Access application is started, asking for confirmation that you really want
to install the certificate. Confirm the dialog by entering username and password for an
account with administration rights.
Installation on mobile devices
To install SSL certificate on mobile devices, use Internet Explorer. Import and installation
processes vary, depending on a device type. Instructions on installation of SSL-certificates for
all supported devices can be found in chapter 35.4.

215
Chapter 17
Kerio WebMail customization
This chapter describes how to customize Kerio WebMail. You can customize a significant part
of the product. For example, the Kerio Connect 7 logo can be substituted by your company
logo and/or add your own localization file.
For detailed information on the Kerio WebMail interface, refer to
Kerio Connect 7, User’s Guide.
17.1 Skins
Kerio WebMail contains a couple of default skins (skin = Kerio WebMail appearance). These
skins are stored in the following directory:
Kerio\MailServer\web\custom\webmail\skins
Skins consist of cascading stylesheets (CSS) and images. Cascading stylesheets (CSS) enable
users to customize the appearance of web pages (colors, fonts, object offset, etc.). If a user
is able to work with cascading stylesheets and images, he/she can customize the most of the
Kerio WebMail interface. Users can either edit the default skins or create one’s own. The new
skin must be stored in
\Kerio\MailServer\web\custom\webmail\skins\xyz
where xyz stands for the name of the new skin.
17.2 Logo
At the top of each page of the Kerio WebMail interface, Kerio Technologies logo is displayed.
You can replace it with your own logo or any other image.
The logo can be changed either globally (it applies to all domains in Kerio Connect) or
individually for each domain.
If both domain as well as individual logos are set, the logos for the individual domains will be
of higher priority.
17.2.1 Setting the global logo
The recommended parameters of the logo:
• Format: GIF
• Size: 200x40 pixels

Kerio WebMail customization
216
To change the logo of the default WebMail skin, follow these instructions:
1. In the administration interface, open the Configuration → Advanced Options section.
2. On the WebMail tab, check option Use custom logo in WebMail (see figure 17.1).
3. Click on Select and browse to set a path to the folder where the logo is saved.
Figure 17.1 Kerio WebMail logo customization
Setting a custom logo for all Kerio Connect’s skins is a bit more difficult. The logo must be
copied manually to individual skins, as described below (for MS Windows):
1. Go to folder \Kerio\MailServer\web\custom\webmail\skins\xyz where xyz is name
of the corresponding skin.
2. Rename your logo file to customlogo.gif and copy it to the folder.
3. To get the logo to all Kerio Connect skins, repeat the procedure separately for each skin.

17.2 Logo
217
17.2.2 Domain logo customization
The recommended parameters of the logo:
• Format: GIF
• Size: 200x40 pixels
To change the logo of the default WebMail skin for all domain users, follow these instructions:
1. In the administration interface, open the Configuration → Domains section.
2. Open domain settings edit dialog box and go to the WebMail Logo tab.
3. Check option Use custom logo for this domain in WebMail (see figure 17.2).
4. Click on Select and browse to set a path to the folder where the logo is saved.
Figure 17.2 Setting of custom Kerio WebMail logo for the domain
Setting a custom logo for all Kerio Connect’s skins is a bit more difficult. The logo must be
copied manually to individual skins, as described below (for MS Windows):
1. Go to folder \Kerio\MailServer\web\custom\webmail\skins\xyz where xyz is name
of the corresponding skin.
2. Rename your logo file to logo_domain.gif and copy it to the folder.
3. To get the logo to all Kerio Connect skins, repeat the procedure separately for each skin.
Note: If there is at least one of the files logo_domain.gif and logo.gif in the skin folder,
none of the global logos will be used. If the skin currently in use contains both the domain
logos as well as the individual ones, the domain logos will be used by default.

Kerio WebMail customization
218
17.3 Language
Currently, Kerio WebMail includes the following language versions:
English Dutch Hungarian Russian
Czech Croatian German Slovak
Chinese Italian Polish Spanish
French Japanese Portuguese Swedish
Custom language version
If Kerio WebMail does not include the language localization you need, it is possible to create
a custom language version.
All language texts displayed in the Kerio WebMail interface are saved in separate localization
files. Localization XML files are stored in subdirectory /translations (in the directory where
Kerio Connect is installed). UTF-8 encoding is used.
The name of each file is created from the language abbreviation (e.g. de for German, en for
English etc.) and the suffix .def. Another language can be added anytime by creating the
relevant definition file. The administrator of Kerio Connect can therefore create a custom
language version by simply copying one of the definition files in a file with a new name and
translating the texts contained within.
XML format is delimited by <translation> tag. The individual rows must have the following
form:
<text id="head-user">User</text>
Procedure for creating a custom localization file for a new language:
1. Copy the localization file from the source language (from which we will translate) to the
file named according to the new language.
2. Translate all texts on individual lines in the file.
Opening of a new localization file requires restart of Kerio Connect.
Spellcheck and dictionaries
The spellcheck in Kerio WebMail is based on comparing the phrases with the dictionary,
and it is therefore available only for the language versions available in the folder where
language databases for Kerio Connect are stored. These files can be found in under
the myspell folder where Kerio Connect is installed. The default language versions for
the spellcheck dictionaries are English and Czech. The other language versions can be
copied in the myspell folder. In order for the dictionaries to work properly, they must
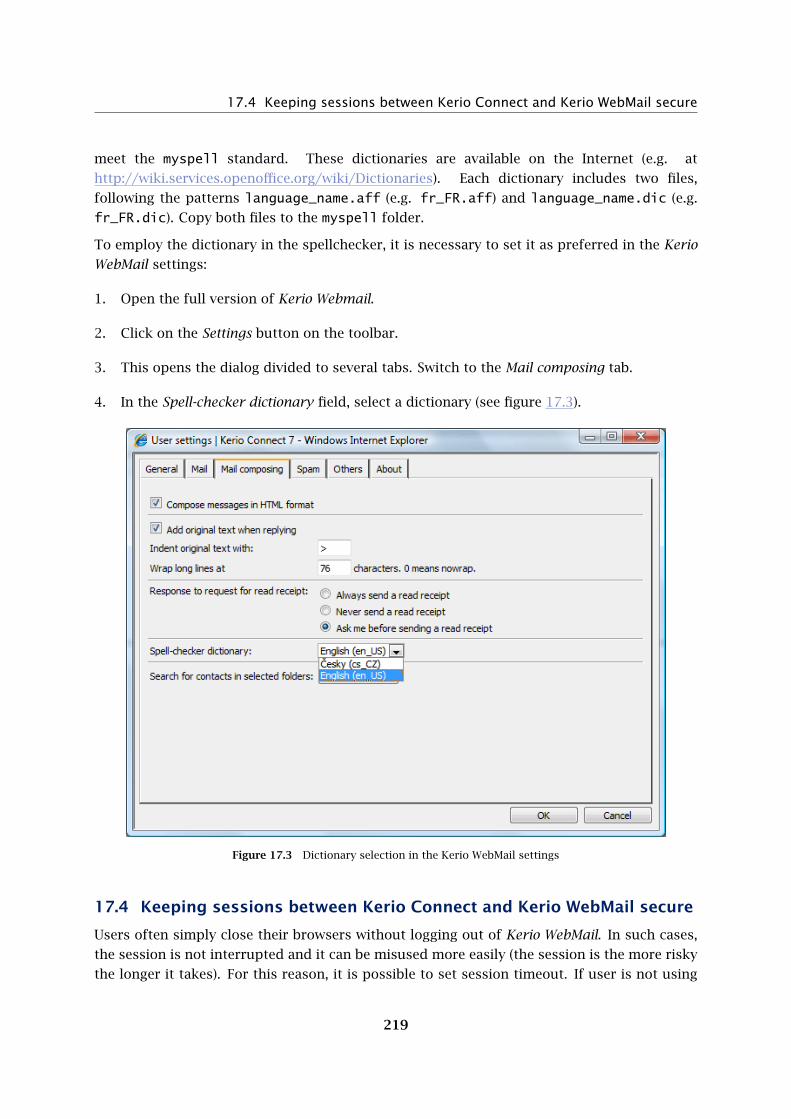
17.4 Keeping sessions between Kerio Connect and Kerio WebMail secure
219
meet the myspell standard. These dictionaries are available on the Internet (e.g. at
http://wiki.services.openoffice.org/wiki/Dictionaries). Each dictionary includes two files,
following the patterns language_name.aff (e.g. fr_FR.aff) and language_name.dic (e.g.
fr_FR.dic). Copy both files to the myspell folder.
To employ the dictionary in the spellchecker, it is necessary to set it as preferred in the Kerio
WebMail settings:
1. Open the full version of Kerio Webmail.
2. Click on the Settings button on the toolbar.
3. This opens the dialog divided to several tabs. Switch to the Mail composing tab.
4. In the Spell-checker dictionary field, select a dictionary (see figure 17.3).
Figure 17.3 Dictionary selection in the Kerio WebMail settings
17.4 Keeping sessions between Kerio Connect and Kerio WebMail secure
Users often simply close their browsers without logging out of Kerio WebMail. In such cases,
the session is not interrupted and it can be misused more easily (the session is the more risky
the longer it takes). For this reason, it is possible to set session timeout. If user is not using

Kerio WebMail customization
220
the session at this time (the session is idle),6then the connection with the server gets lost upon
expiration of the idleness timeout. By default, the timeout is set for two hours.
Maximum time can also be set for sessions in addition to the session’s expiration time. The
maximum session time means the time since user’s connection. If users use the Kerio WebMail
interface as the main connection to their mailboxes, set the time at least to a value between 8
and 10 hours. Too short interval might cause inappropriate closure of a session (while a user
is editing a message, for example). This is not desirable.
Note: If the user has started composing a message and has not finished it yet and the
session expires, user authentication will be required for reconnection. After successful
re-authentication, the message can be finished and sent.
Another option of protection is to use automatic logout from Kerio WebMail upon change of
the client’s IP address. It might happen that a session of one user is hijacked by an attacker
(especially if SSL-secured HTTP is not used) to access the server. Connection of an attacker to
the session changes the client’s IP address.
Warning:
• The “anti-hijack” protection must be disabled if Kerio Connect users share their
accounts. The option disallows connection to a single account from multiple hosts
(IP addresses) at a time.
• The “anti-hijack” protection also cannot be applied if your ISP changes IP addresses
during the connection (e.g. in case of GPRS or WiFi connections).
17.4.1 Setting session protection
To set session protection, follow these guidelines:
1. In the administration interface, go to Configuration → Advanced Options.
2. Open the WebMail tab (see figure 17.4).
3. Set session’s expiration timeout.
4. Set maximal session time length — this time depends on frequency of use of the WebMail
interface. The default value is appropriate if WebMail is used as the main tool for accessing
email mailboxes.
5. If you do not connect via an ISP which changes IP addresses within sessions, it is
recommended to enable also the Force WebMail logout if user’s IP address changes option.
Idleness is when no request is sent to the server including autorefresh requests. This implies that the timeout is6
applied only if user closes the Kerio WebMail interface without having logged out of it or if they simply go to another
page by rewriting the URL on the corresponding browser’s tab.

17.4 Keeping sessions between Kerio Connect and Kerio WebMail secure
221
Figure 17.4 Securing of the connection between the server and the Kerio WebMail interface

222
Chapter 18
Limits and quotas
Kerio Connect offers a number of mechanisms which can be used to avoid cluttering of Kerio
Connect’s disk space and receiving/sending of email with extremely large attachments (video
and audio files, pictures, etc.) which might choke up your internet line.
Kerio Connect includes special settings for limits for outgoing/incoming email and messages
from Kerio WebMail. It is also possible to set user quotas for mailbox size and number of
messages that can be included in the mailbox.
18.1 Message size limits
Various limits for message size which will be accepted by Kerio Connect can be set. All in all,
the server includes three limit types.
The first is a limit for SMTP server that applies to all messages delivered via SMTP. This rule
applies to messages forwarded from other SMTP servers as well as to messages from SMTP
clients (this implies that the limit applies also to too large messages sent from Kerio Connect
where sending through SMTP protocol is set).
Another type is a limit for sent messages. This limit can be either set for a particular user
(such a user who overloads the line by sending too large messages) or for an entire domain.
This limit type does not apply only to messages delivered to the server via SMTP protocol, but
also to all outgoing messages (i.e. it applies also to WebDAV interface, etc.).
The third limit type applies to messages sent from the Kerio WebMail interface. The purpose
of this limit is focused in section 18.1.4.
18.1.1 Setting limit for messages delivered via SMTP
To set size limit for email received by the SMTP server, go to the administration interface:
1. Open the Configuration → SMTP server section.
2. Go to the Security options tab.
3. Check and set the Max. number of failed commands in SMTP session: option.
18.1.2 Setting limit for messages sent by a particular user
To set a limit for a particular user, use the Kerio Connect’s administration console:
1. In Accounts → Users, open the dialog for change of user parameters.
2. Switch to the Email tab.
3. Check the Limit outgoing message size to option and set a size limit.

18.1 Message size limits
223
If the limit is set to 0, Kerio Connect behaves the same way as if no limit was set.
18.1.3 Setting limit for messages sent from a domain
To set a limit for a particular domain, use the Kerio Connect’s administration console:
1. In Configuration → Domains, open the domain selection dialog.
2. Switch to the Email tab.
3. Check the Limit outgoing message size to option and set a maximal size limit (in MB).
If the limit is set to 0, Kerio Connect behaves the same way as if no limit was set.
18.1.4 Size limit for Kerio WebMail
Setting of maximum message size can be used for the following purposes:
• to limit size of attachments sent to Kerio WebMail by an HTTP POST request,
• to set maximum size of memory allocated in Kerio Connect to each HTTP POST
request.
Warning:
Maximal value of the limit is 128 MB.
For better understanding of the limit, here is an explanation of how a message written in Kerio
WebMail is sent to Kerio Connect. Each new message composed in the web interface is sent
by a browser via HTTP protocol using an HTTP POST request to Kerio WebMail. The interface
receives the message and processes it so that Kerio Connect can send it to the addressee by
SMTP protocol.
Each HTTP POST request contains one message including a message body, all headers and
attachments. The limit set by this option narrows size of any HTTP POST request directed
from the Kerio WebMail interface to Kerio Connect. This means that any limit set for requests
also limits size of email messages.
Size limit set for HTTP POST requests is applied to any files sent from Kerio WebMail to Kerio
Connect and it is applied to all Kerio Connect users. The default value for maximum size of
messages sent from Kerio WebMail is 20 MB. This limit should be generally satisfactory for
these purposes.
The minimum value for the limit is 2 MB. If a lower limit is set, Kerio Connect sets the value
back to 2 MB automatically.
If a message includes any attachments, they are encrypted by the Base64 method. This type
of encoding is able to increase the size of transmitted data even by one third (in case of binary

Limits and quotas
224
data). This means that, for example, the minimum 2 MB limit might also allow just 1 — 1,5 MB
attachments.
It is necessary that a memory allocation value is specified in Kerio Connect for HTTP POST
requests. The more bulky the request is the more memory must be allocated. This implies
that the size of the allocated memory changes according to changes in the size limit.
Warning:
Any time the limit is changed, it is necessary to restart Kerio Connect since the memory
allocation is changed as well.
Setting limit for Kerio WebMail
To set limit for email sent via Kerio WebMail, open the Kerio Connect’s administration interface:
1. Open the Configuration → Advanced Options section.
2. Switch to the WebMail tab.
3. In the Maximum size of a message that can be sent from the WebMail interface entry, set
a limit for messages sent from WebMail.

225
Chapter 19
Tools
19.1 IP Address Groups
IP address groups help easily define who has access to certain services (e.g. remote
administration, anti-spam, etc.). When setting access rights a group name is used. The group
itself can contain any combination of computers (IP addresses), IP address ranges, subnets or
other groups.
Creating and Editing IP Address Groups
You can define IP address groups in Configuration → Definitions → IP Address Groups section.
Group of IP addresses of local ranges is entered automatically. This group can be edited,
removed or otherwise manipulated as well as other IP groups.
Figure 19.1 IP Address Groups

Tools
226
Click on Add to add a new group (or an item to an existing group) and use Edit or Delete to
edit or delete a selected group or item.
The following dialog window is displayed when you click on the Add button:
Figure 19.2 IP Address Groups Creation
Add to a group
You can enter a new name (create a new group) or enter or select an existing one — this
adds the new item to an existing group.
Type
The type of new item. The options are as follows:
• a single IP address (Host),
• Rozsah IP adres,
• net with corresponding mask (Net / mask),
• another IP address group (IP address group). This implies that address groups
are cascadable.
IP address
Parameters of new item (dependent on selected type).
Description
Commentary for the IP address group. This helps guide the administrator.
19.2 Time Ranges
Time intervals in Kerio Connect restrict all scheduled tasks to certain time ranges. They are not
intervals in the true meaning of the word. They are a group containing any number of single
or repeating time ranges. Time intervals can be defined in the Configuration → Definitions →
Time Ranges section.

19.2 Time Ranges
227
Figure 19.3 Time Ranges
Validity of Time Intervals
When defining a time interval three types of time ranges (subintervals) can be used:
Absolute
— interval has explicit start and end dates, it does not repeat
Weekly
— interval repeats every week (on selected days)
Daily
— interval repeats every day (in selected hours)
If a certain time interval consists of multiple ranges of different types, it is valid in the time
defined by the intersection of absolute ranges with the union of daily and weekly ranges. In
symbols:
(d1 | d2 | w1 | w2) & (a1 | a2)
where
d1, d2 — daily ranges
w1, w2 — weekly ranges
a1, a2 — absolute ranges
Defining Time Intervals
You can create, edit or delete time intervals in Configuration → Definitions → Time Ranges
section.
Clicking on the Add button will display the following dialog window:

Tools
228
Figure 19.4 Defining Time Interval
Add to a group
Name (identification) of the time interval. You can enter a new name (create a new
interval) or select an existing one and add a new item to it.
Description
A text description (for informative purposes only).
Time Range Type
The type of interval: Daily, Weekly or Absolute — beginning and ending with specific time.
From, To
The beginning and the end of the time range. Here you can enter the start and end time,
a day of the week or a date (depending on the interval type).
Valid on
The day of the week on which the interval will be valid. You can select certain days
(Selected days) or use one of the pre-set items (All days, Weekdays — Monday to Friday,
Weekend — Saturday and Sunday).

19.3 Setting Remote Administration
229
Time intervals cannot be cascaded.
19.3 Setting Remote Administration
If you wish to administer Kerio Connect from a different computer than the one on which it is
installed, you need to enable remote administration. You can set remote administration in the
Configuration → Administration Settings section.
Figure 19.5 Remote Administration
The port used for communication between the Kerio Connect Administration and the Kerio
Connect Engine is 4040.
Allow administration from remote host
Enables remote administration (if this option is not selected, you can only administer
Kerio Connect from the computer it is installed on).
Only from this IP address group
The traffic between Kerio Connect and the Kerio Connect Administration is protected by
SSL encryption. As a result, remote administration is secure and the data transmitted
cannot be tapped and misused. Access to the administration should be always allowed
against a valid password only (it is not recommended to use blank passwords for
administration accounts).
To even increase security, remote administration can be enabled only for exclusive IP
addresses. The menu allow to select an IP address group to define addresses from which
web administration will be allowed and it is also possible to add an address group or edit
an existing one upon clicking on Edit.

230
Chapter 20
LDAP server
The built-in LDAP server enables access to public and private contacts (you can use either
the secured or the unencrypted access — for detail see chapter 6) stored in KMS for email
client programs supporting the LDAP protocol (Lightweight Directory Access Protocol). This
protocol is supported by all commonly used email clients. This protocol is supported by all
most common email clients.
LDAP server can enable users to access their personal contacts (i.e. contacts saved in their
own Contacts folder) and contacts in all subscribed public folders of the Contacts type.
20.1 LDAP server configuration
Usage of the LDAP service in Kerio Connect is easy. Simply, the following two conditions must
be met:
• At least one LDAP service or Secure LDAP must be run in Kerio Connect.
• The user must have his/her contacts defined in the contacts folder or must have
subscribed at least one public or shared contact. No contacts will be found unless
this condition is met.
Note: If Kerio Connect is protected by a firewall and the LDAP service is intended to be
available, the appropriate ports must be open (389 for the LDAP service and 636 for Secure
LDAP). You should use the encrypted LDAP version.
20.2 Global Address (Contact) List
Global Address List (referred as GAL) is used for synchronization of all internal company
contacts. If you use an external LDAP database outside Kerio Connect (e.g. an LDAP database
in Active Directory or Apple Open Directory), it can be subscribed to Kerio Connect and then its
contacts can be synchronized to the Global Contacts public folder in a single direction. Thus,
users can access, in addition to all domain and Kerio Connect user contacts, also contacts of
any users from the external LDAP server.
Adding users and groups to the GAL
To add a user or a group to the global public contact folder, go to the Kerio Connect’s
administration interface, section Users or Groups:

20.3 Configuring Email Clients
231
Figure 20.1 User edit dialog — publishing to the public directory
1. Open the user/group edit dialog.
2. Go to the General tab (see figure 20.1).
3. Check the Publish in Global Address List option.
Details, such as address, phone numbers and birthdays can be edited directly in email clients
(Kerio Connect WebMail, MS Entourage, MS Outlook, etc.).
Warning:
If you uncheck option Publish in Global Address List and then enable it again, no change
performed before unchecking will take effect after reactivation of the option.
20.3 Configuring Email Clients
The following information should be considered to enable a mail client to access contacts
stored in Kerio Connect by the LDAP protocol.
LDAP server
DNS name (e.g. mail.company.com) or IP address (e.g.192.168.1.10) of the host that
Kerio Connect is running on.

LDAP server
232
User name and password
This data is used by users to log into the LDAP server (equal to the name and password for
user login to mailboxes). The LDAP server in Kerio Connect does not support anonymous
logins — the user login is always required.
Security, Port
Select, whether the secure or non-secure version of LDAP protocol should be used. If you
do not use standard port insert a corresponding port number.
Note: TLS protocol (i.e. switching to secured mode by the STARTTLS command) is not
supported.
Search base
If you want to access all private and subscribed shared and public folders, leave the entry
blank or enter
fn=ContactRoot
Specify appropriate branch of the LDAP database in more details to limit access only to
certain folders. To better understand various alternatives, read the following examples:
• [email protected],fn=ContactRoot
— it will be searched only through contact files of the user [email protected]
• fn=personal,fn=ContactRoot — it will be searched only through contact files
of users that are logged into the LDAP server. This option is identical with the
previous one, however, it is not necessary to specify username (or email address)
of the user. This feature can be used for example for configuration of more
clients, etc.
• fn=public,fn=ContactRoot
it will be searched only through public contact files
• fn=Contacts,[email protected],fn=ContactRoot
— it will be searched only through the Contacts folder of the user
• fn=PublicContacts,fn=public,fn=ContactRoot
— it will be searched through the public PublicContacts folder only
Example of Configuration — Outlook Express
The client configuration for enabling the search of contacts through LDAP is explained in the
following example using Microsoft Outlook Express.
The LDAP account is defined in the Tools → Accounts → Directory Service menu. New accounts
can be added by wizards. However, only basic parameters can be defined there. Therefore,
it is possible to set detailed parameters by selecting a corresponding account and clicking on
Properties.
General folder:

20.3 Configuring Email Clients
233
Figure 20.2 LDAP server settings — General tab
Name of the account
Name of the account, used for reference only.
Server Name
DNS name or IP address of the host where Kerio Connect is running (e.g.
mail.company.com or 192.168.1.10).
This server requires me to log on
It is necessary that this option is checked since the LDAP server in Kerio Connect does
not allow anonymous access.
Account name, Password
Insert your username and your password for login to the server (identical with your name
and password for login to your mailbox).
Log on using Secure Password Authentication
When this option is enabled, passwords will be sent securely through NT domain
authentication (SPA/NTML). This authentication method is not supported by the LDAP
server in Kerio Connect therefore it must be disabled.
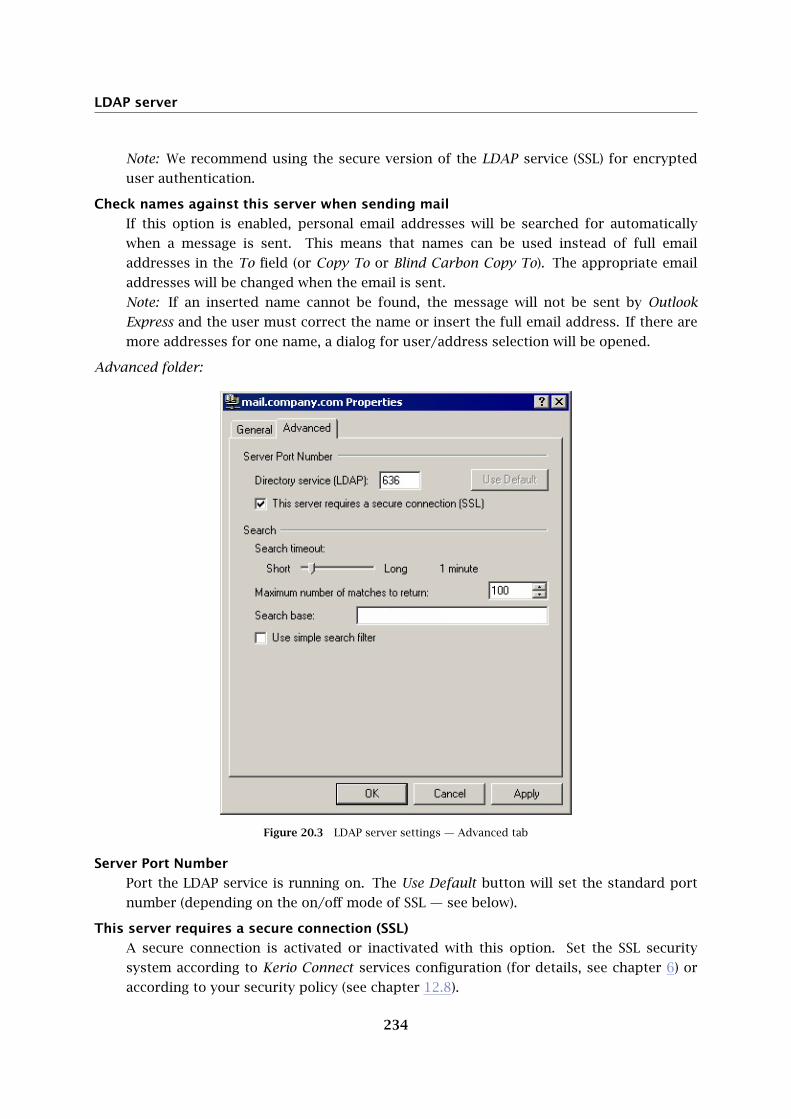
LDAP server
234
Note: We recommend using the secure version of the LDAP service (SSL) for encrypted
user authentication.
Check names against this server when sending mail
If this option is enabled, personal email addresses will be searched for automatically
when a message is sent. This means that names can be used instead of full email
addresses in the To field (or Copy To or Blind Carbon Copy To). The appropriate email
addresses will be changed when the email is sent.
Note: If an inserted name cannot be found, the message will not be sent by Outlook
Express and the user must correct the name or insert the full email address. If there are
more addresses for one name, a dialog for user/address selection will be opened.
Advanced folder:
Figure 20.3 LDAP server settings — Advanced tab
Server Port Number
Port the LDAP service is running on. The Use Default button will set the standard port
number (depending on the on/off mode of SSL — see below).
This server requires a secure connection (SSL)
A secure connection is activated or inactivated with this option. Set the SSL security
system according to Kerio Connect services configuration (for details, see chapter 6) or
according to your security policy (see chapter 12.8).

20.3 Configuring Email Clients
235
Search timeout
If there is a large LDAP database or the connection is slow, the search can take a long time.
This option defines the maximum length of time for searching through the database.
When this time expires, the searching is stopped, regardless whether any record has been
found or not.
Note: If the LDAP server is located within the same local network as the client, the search
should take almost no time.
Maximum number of matches to return
If the specifications of the item searched are too broad (e.g. most of the recipient’s name
is not included), the search may result in many items found. Limiting the maximum
number of matches can reduce the search time as well as line traffic. If a large number
of items are returned, a new search should be performed using more narrowly defined
specifications.
Search base
Specify a location of contacts in the LDAP database (see above). If you leave this entry
blank, all subscribed folders will be scanned (public and shared).
Use simple search filter
This option reduces the number of database items that will be searched. This will make
the search faster, however, the search potential will be reduced. We recommend not to
use this option.

236
Chapter 21
Mailing Lists
Kerio Connect allows for any number of mailing lists to be defined within each local domain.
Mailing lists are based on an email address shared by all users included in the group —
messages sent to the address are distributed to all members of the corresponding mailing
list. In addition to functions of simple user group, the following functions are available in
mailing lists:
• dynamic user logins and logouts to/from mailing lists,
• mailing list moderating (moderators conduct users’ subscription/unsubscription,
participation and message postings),
• automatic modifications of message body or subject (by adding predefined text to
each message),
• header substitution (hides sender’s email address),
• disallowing messages that contain certain features (e.g. messages where subject is not
defined).
All actions are executed by sending emails to special accounts. Mailing lists must be created in
the Kerio Connect Administration. All other actions may be taken by email sent and delivered
via SMTP.
Warning:
If POP3 access is used, it is not recommended to process messages from mailing lists. If you
plan to run mailing lists, the MX record for your server is required.
If any problems regarding mailing lists occur, the Debug log may be helpful (see chapter 24.9).
To obtain appropriate information, enable the Mailing Lists Processing log.
21.1 User Classification
Users of mailing lists may have the following roles:
Administrator
User with Kerio Connect administration rights (read/write access — see chapter 8.1).
Administrator creates mailing lists and sets their parameters (moderators, policy, etc.).
For details, see chapter 21.2).

21.2 Creating a Mailing List
237
Moderator
Each mailing list should have at least one moderator. Moderators are allowed to take the
following actions:
• confirm or refuse a user login (if required by the mailing list policy),
• allow or deny postings to the mailing list (if required by the mailing list policy),
• receive error reports (e.g. reports about emails that could not be delivered),
• can be addressed by
<mailinglist_name>-owners@<domain>
Member
Any user subscribed to the mailing list is a member. Their email addresses may belong to
any domain — mailing lists are not limited only to the domain where they were created.
Mailing list members have the following rights:
• subscribe/unsubscribe (if the member is subscribed, he/she receives all messages
sent to the mailing list address)
• ask for help
• send messages to the mailing list (if required by the mailing list policy, each
message sent to the mailing list must be approved by a moderator)
Note: Each user may have more than one role (e.g. a moderator can be a member as well, etc.)
21.2 Creating a Mailing List
Mailing lists are defined in Accounts → Mailing Lists. Only administrators (users with both
read and write rights) are allowed to create new mailing lists.
Before adding a mailing list make sure you have selected the correct domain from the drop
down menu at the top of the Mailing Lists dialog. Use the Add button to define a new mailing
list.
Basic Parameters — General
Name
Name of the mailing list. This name will be used as the email address of this mailing list
within the particular domain.
Example: There is a mailing list called discussion in the company.com domain which
will have the address [email protected].

Mailing Lists
238
Figure 21.1 Creating a mailing list — basic parameters
Warning:
• Names of mailing lists should not include suffixes (expressions starting
with a dash) because they are used for special functions (e.g. -subscribe
as the suffix is used to subscribe mailing lists). For details, see
chapter 21.7, section Aliases within Mailing Lists.
• The name of the mailing list must not include the . symbol (dot) since it
is used for other purposes in NNTP mailing lists. Though such a mailing
list can be created, it is not possible to read it using the NNTP service.
• ?The mailing list name must be different from the usernames or aliases in
the same domain. Otherwise, the alias is preferred and messages will not
be delivered to the mailing list at all.
Description
A commentary on the mailing list.
Language
Selection of a language that will be used for displaying informative and error reports
related to the mailing list. Thanks to this option, it is possible to create mailing lists in
various languages on one server. Message templates for individual languages are kept in
the reports subdirectory where Kerio Connect is installed. The UTF-8 encoding is used
for the files. Administrator can modify individual reports or add anew language report
version.

21.2 Creating a Mailing List
239
Comment
Figure 21.2 Creating a mailing list — comments
In the Comment tab, any text can be entered that will be delivered to every member newly
subscribed in the mailing list (upper entry). In the lower part, text that will be added as
a footer to each email sent to the mailing list can be specified. These fields may be left blank.
Note: A welcome message is sent only to those new members that have subscribed to the list
via email (for details, see section21.7). Members added to the mailing list through the Kerio
Connect Administration will not receive the welcome message.
Subscription
Rules for subscription of new members can be defined on the Subscription tab.
Note: To see details about subscription go to chapter 21.7.
Subscription to the list by email
New members can subscribe to the list by sending an email to a special account. The
menu provides the following options to select from:
• Allowed — user that has sent an email to the subscription address will be
subscribed automatically.

Mailing Lists
240
Figure 21.3 Creating a mailing list — subscription
• Moderator must approve — a new member’s subscription request is forwarded
to the moderator(s) of the mailing list. The subscription must be confirmed by
a moderator first. If the moderator denies the subscription or no moderator
answers the request in seven days, the user will not be subscribed and will receive
an informative message.
• Denied — subscription via email is not available. Members must be defined by
the administrator within this dialog (see below).
Notify user that the request will be reviewed by a moderator
User requesting subscription will be informed that the request has been forwarded to the
list moderator(s). This message will be delivered to them immediately after the request
reception. If this option is disabled, the message will be delivered when the request is
either accepted or denied.
Notify moderator about user subscription/unsubscription
If this option is enabled, moderators will be informed about each user
subscription/unsubscription.
This can be especially helpful if automatic subscriptions are allowed (otherwise
moderators receive a request). Since each unsubscription is automatic, this feature may
provide moderators with important information.
Note: If a user is added to or removed from the list through the Kerio Connect Adminis-
tration, the moderators will not be informed of this fact.
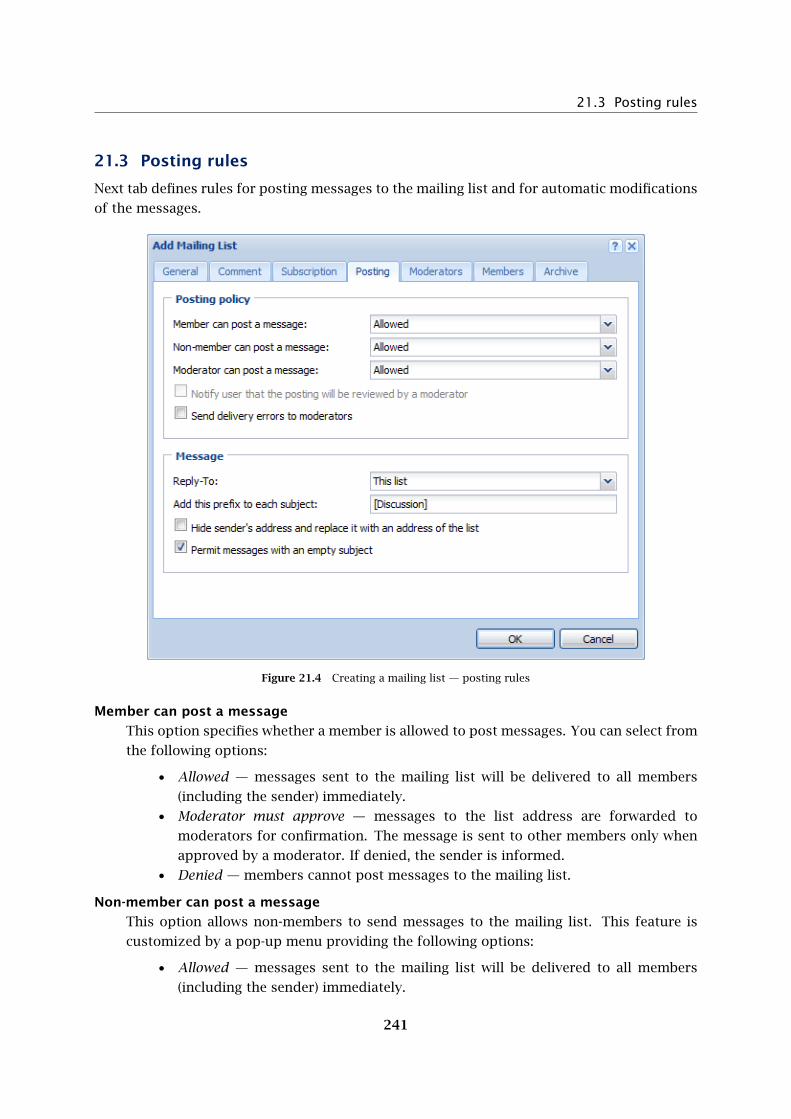
21.3 Posting rules
241
21.3 Posting rules
Next tab defines rules for posting messages to the mailing list and for automatic modifications
of the messages.
Figure 21.4 Creating a mailing list — posting rules
Member can post a message
This option specifies whether a member is allowed to post messages. You can select from
the following options:
• Allowed — messages sent to the mailing list will be delivered to all members
(including the sender) immediately.
• Moderator must approve — messages to the list address are forwarded to
moderators for confirmation. The message is sent to other members only when
approved by a moderator. If denied, the sender is informed.
• Denied — members cannot post messages to the mailing list.
Non-member can post a message
This option allows non-members to send messages to the mailing list. This feature is
customized by a pop-up menu providing the following options:
• Allowed — messages sent to the mailing list will be delivered to all members
(including the sender) immediately.

Mailing Lists
242
• Moderator must approve — messages to the list address are forwarded to
moderators for confirmation. The message is sent to other members only when
approved by a moderator. If denied, the sender is informed.
• Denied — members cannot post messages to the mailing list.
Note: The message will not be sent to the sender as he/she is not a member of the list.
Moderator can post a message
This option defines whether and how moderators can send messages to the mailing list.
It covers the following options:
• Allowed — use this option to deny members and non-members access for security
reasons. Thus only moderators can send messages to the mailing list.
• Moderator must approve — this option has similar function as the previous one
but it provides higher security. If a sender tries to break the denial rule by using
the moderator’s address, the message will not be sent into the mailing list but it
will be forwarded to the moderator.
• Use rules for members/non-members — This option assigns the moderator rules
for members/non-members (according to the fact whether the moderator is
a member of the mailing list or not).
Notify server about sending...
Users that send messages to the list will be informed that their requests were forwarded
to the list moderators. This message will be delivered to them immediately after the
request reception. If this option is disabled, users will receive the report when the request
is denied or when the timeout expires.
Send delivery errors to moderators
If this option is enabled, all error reports related to the mailing list will be delivered to
moderators. Otherwise, only the sender of the email message will receive the error report.
An example of such a report is a notification that an invalid request was sent or that an
email account of a mailing list member has exceeded the disk quota set in Kerio Connect
and the message sent to the mailing list could not be delivered to the member’s mailbox.
Reply-To
This item specifies which address will be used in the messages as the address for replies
(the Reply-To: item in email headers):
• Sender — the address of the original sender will be kept in the header. Responses
will be sent to the original sender only. If this alternative is chosen, the message
sent to the list will not be modified.
• This list — the address of the original sender will be substituted by the list
address. This means that the responses will be sent to all list members.
• Other addresses — the address of the original sender will be substituted by a user
defined email address. Responses to the messages can be sent to a particular
person, another mailing list, etc.
• Sender + this list — this setting enables delivery of email replies to users who are
not members of the mailing lists. Two situations may arise:

21.4 Moderators and Members
243
1. The user is a member of the mailing list — the reply will be delivered to the
mailing list’s address. The sender will obtain only one copy of the reply.
2. The sender is not a member of the mailing list — the reply will be delivered
both to the mailing list and to the sender’s mailbox. Otherwise, the sender
(non-member) would not receive the reply at all.
As implied, the option is beneficial if the mailing list is available both to members
and non-members.
Note: Do not combine this option with the Hide sender’s address and replace it
with an address on the list option. The combination would be pointless and Kerio
Connect would not allow saving it.
Add this prefix to each subject
Prefix that will be added to subjects of each message sent to this list. When a new list is
opened, its name inserted in square brackets is entered to this item automatically. The
item content can be edited and it can be left blank (if it is empty, there will be no prefix
added to the subject).
Note: Prefix is not added to the subject if it is already included there — for example, in
responses to mailing list messages, subject usually follows this pattern:
Re: [name of the mailing list] the original subject
— if this option is disabled, the [name of the mailing list] prefix would be doubled.
Hide sender’s address and...
If this function is enabled, the sender’s address (the From item ) will be substituted for
the list address in each email sent to the list. If the sender does not enter his/her name,
the messages will be anonymous.
Note: If this option is enabled, the This list or Other address must be set in the Reply-To
item.
Permit messages with an empty subject
If this option is disabled, only messages with a non-blank Subject are accepted. The
decision whether to allow messages with blank subjects depends on the administrator.
21.4 Moderators and Members
In these two sections, moderators and mailing list members can be defined. The same method
is used to add moderators and members.
Any user can be either a moderator or a mailing list member — the specified email address
does not have to belong to any of the domains defined in Kerio Connect. In this dialog box,
only the administrator is allowed to appoint moderators. Mailing list members may be added
either by the administrator or they can subscribe via email (if the list policy allows this option
— see above).
New moderators/members can be added manually or by selection from the list (see
figure 21.5):

Mailing Lists
244
Figure 21.5 Creating a mailing list — adding the mailing list moderators
Adding moderators/members manually
To add a moderator/member manually, follow these instructions:
Figure 21.6 Adding moderators/members manually
1. Click on the arrow next to the Add button.
2. Select Enter manually...
3. A dialog is opened where you can specify email address and user’s full name (this item
is optional). Users that belong to a local domain can be found using the Find user dialog
which can be opened by the Select button.
4. Click OK . to confirm changes.

21.4 Moderators and Members
245
Adding a moderator/member by selection from the list
This option is recommended in cases where there are multiple users added with their accounts
in a local domain.
To add a mailing list moderator/member by selection from the list, follow these instructions:
1. Click on Add.
2. Select Enter manually... (see figure 21.5).
3. The Find user dialog is opened which includes list of domains and users. Multiple users
can be selected for a domain by using the default Ctrl key (where Kerio Connect is running
on Mac OS X, use the Command key).
If the user you are searching cannot be found or the user list is to long, the Show only
entries containing substring entry can be used.
4. Click OK . to confirm changes.
Importing users from a CSV file
As already mentioned, even users that have not accounts in Kerio Connect can became
members of mailing lists. Users can subscribe to mailing lists by themselves by sending
a subscription email message or they can be added manually by the administrator or they
can be imported from a file (the latest option may be helpful especially when multiple users
are added).
The following technical conditions must be met to enable importing from files:
1. The file including the users must be saved in CSV format (such files can be created in any
spreadsheet program).
2. Commas ( , ) or semicolons ( ; ) must be used as data separators.
3. Headlines of individual columns must correspond with Kerio Connect’s items. The
following items are supported:
• Email — user’s email address. Required.
• FullName — user’s full name. Optional.
Email FullName
[email protected] Mary King
[email protected] Allan Fieldfare
[email protected] Oliver Possum
[email protected] Elizabeth Tea
Table 21.1 Example of a CSV file

Mailing Lists
246
Columns can be ordered as wish, there are no rules to be followed. It is also possible to specify
only Email. Specification of FullName is optional.
Once the file is properly created and saved, you may continue creating the mailing list or, if
the mailing list has already been created and saved, you can open it by clicking on the Edit
button and switch to the Members tab:
1. Click on Add and in the button’s menu select the Import from CSV file (see figure 21.7).
Figure 21.7 Creating a mailing list — adding members to a mailing list
2. In the opened dialog, enter the file path (see figure 21.8).
Figure 21.8 Import from a file — file selection
3. Click on OK to copy users to the mailing list’s user list.
If problems occur regarding the upload, it might be caused by the following reasons:
• The file is not saved in the CSV format.
• Columns in the file are not labeled correctly. CSV file needs to include a line with
captions including column names, otherwise Kerio Connect cannot read the data.

21.4 Moderators and Members
247
Correct version:
Email;FullName
[email protected];Peter Sycho
[email protected];Maude Int
Wrong version:
[email protected];Peter Sycho
[email protected];Maude Int
• Another separator than comma ( , ) or semicolon ( ; ) is used as data separator.
Exporting mailing list members to CSV files
As well as you can import mailing list members from CSV files, it is also possible to export
them. To export users, you need administrator account (with read and write or at least read
rights).
The data in the CSV file will be organized as follows:
• individual items will be separated by semicolons,
• multiple information within individual items will be separated by comas.
If you wish to export mailing list members, follow these instructions:
1. Go to Accounts → Mailing Lists.
2. Select the group users of which will be imported and double-click on it (or click on Edit).
3. In the Edit mailing list dialog go to the Members tab and click on Export (see figure 21.9).
Figure 21.9 Exporting mailing list members

Mailing Lists
248
4. In the dialog just opened, select between opening and saving the file. The file name will
be created by the following pattern:
users_domainName_mailingListName_date.CSV.
Note: The CSV file can now be opened in a spreadsheet or text editor.
21.5 Mailing list archiving
In the last step, the settings for message archiving can be defined. An archive is a special
folder that can be accessed via NNTP.
Figure 21.10 Creating a mailing list — maintain archiving
Maintain archive of this mailing list
Use this option to enable mailing list archiving. The archive of the conference can be
accessed by all members of the corresponding mailing list
The archive of this mailing list can be read by any user of this server
If this option is enabled, all users with accounts in Kerio Connect have read rights for the
archive.

21.6 Server Reports
249
Allow these authenticated users to read the archive
The mailing list archive can be read only by users included in the list.
If an anonymous access is allowed for the NNTP service (see chapter 6), any user can read the
archive (even if they have no account in Kerio Connect).
21.6 Server Reports
In mailing lists, there are many automatically generated messages (informative messages, error
reports, requests to moderators, etc.). In each list, language for these reports can be chosen
(you can select from a few predefined language alternatives). Message templates are kept in
the reports subdirectory where Kerio Connect is installed. The reports directory includes
other subdirectories according to languages (e.g. de for German, en for English, etc.). Language
templates are included in these subdirectories.
Message templates may be edited in any editor that supports UTF-8 encoding. The Kerio Con-
nect administrator can modify these messages and reports or create a new language version
following the guide that is included.
21.7 How to use Mailing Lists
Member Subscription/Unsubscription
If allowed by the list policy (see chapter 21.2), members may subscribe to the list via email.
The subscription is done by sending any message (even with blank message body) to the list
address of the following form:
<name_mailinglist>-subscribe@<domain>.
Example: A user wants to subscribe to a list called discussion in the company.com domain.
He/she sends a message with an empty message body from his/her email account to the
address
After sending this message the user will receive an email requesting confirmation of the
subscription. Once the user sends a response to this message, the user’s request will be
accepted. This response system guarantees the authenticity of the user.
According to the mailing list policy, the user will be either subscribed or will have to wait
for confirmation of a list moderator. If subscribed successfully, the new member will receive
a welcome message.
Members can unsubscribe by email at any time. The unsubscription can be done by sending
an email message with any content in the message body (it can be left empty) to the address
of the following form:
<name_mailinglist>-unsubscribe@<domain>.

Mailing Lists
250
Example: A user intends to unsubscribe from the discussion mailing list in the company.com
domain. He/she sends a message with an empty message body from his/her email account to
the address
After sending this message the user will receive an email requesting confirmation of the
unsubscription. Once the user sends a response to this message, the user’s request will be
accepted. After a response to the request is received, the user will receive a report regarding
his/her unsubscription.
Message posting
If a user intends to send a message to the mailing list, he/she must send it to the list address
(e.g. [email protected]). According to the policy, the message will be either delivered
to each list member (including the sender if he/she belongs to list members) or forwarded
to list moderators for approval. If the message is forwarded to a moderator, a report will be
delivered to the sender (if defined — see chapter 21.2) and the message will be sent to the list
when allowed by a moderator. If the message is denied or not allowed by a moderator within
7 days, the sender will receive a report as well.
Aliases within Mailing Lists
In each mailing list, special email addresses are generated automatically. These addresses are
used for special functions, such as member login, contact addresses of the list moderators,
etc. Each of these addresses has the following form:
<mailinglist>-<suffix>@<domain>
(e.g. to send a request to the discussion mailing list help within the company.com domain,
users will send a message to: [email protected]
Here the suffixes that can be used in the list address are listed:
• subscribe — a request for login to the mailing list,
• unsubscribe — a request for logout from the mailing list,
• help — a request for help for the mailing list usage,
• owner, owners — sending a message to the list moderators (there is no need to know
their email addresses),

251
Chapter 22
Resource scheduling
Kerio Connect includes a tool for sharing and booking of resources available in your company.
Resources are meeting rooms and other facilities, such as conference rooms, meeting rooms,
cars, etc.
Users can book resources by using calendar clients which can handle events and invitations.
The following clients are officially supported:
• MS Outlook extended by the Kerio Outlook Connector — settings are focused in the
user’s guide.
• Kerio WebMail — settings are addressed in the user’s guide.
• Microsoft Entourage
• Apple iCal
In email clients, resources can be scheduled through creating new events in calendars. It
works in the same way as meeting planning. In addition to adding participants to a meeting,
it is now possible to add also any resource available in the Kerio Connect’s resource list. For
more detailed guidelines for resource scheduling, refer to the user’s guide.
Resource scheduling would not be of any help if the user could not have viewed whether
the resource was free or booked for the supposed time. This is possible with the Free/Busy
calendar which is used for meeting scheduling. A calendar is needed for each resource to make
reservation in the Free/Busy calendar work. For this reason, support for resources and their
management is built in Kerio Connect. The administration interface includes section Resources
where it is necessary to add all resources of your company.
22.1 Resource scheduling principle
Creation of a new resource in Kerio Connect creates a new account which includes calendar
of the resource. This calendar will reflect all reservations.
Upon creating the first resource, a new contact folder called Resources is created. This folder
will include individual resources. An email address is generated for each resource, consisting
of its name and the domain (e.g. [email protected]). The Resources public folder
is used especially to avoid that users would have to remember names of the resources. Thanks
to this feature, users simply select resources from the list.
Resource scheduling is based on a working Free/Busy calendar in the user’s email client.
Thanks to Free/Busy, it is clear at the moment of creation of an event whether the resource is

Resource scheduling
252
available for the scheduled time or has been booked already. If users miss a working Free/Busy
calendar, they can subscribe shared or delegated folders to access resource calendars. Users
with rights for reservation of a particular resource can subscribe the calendar with read-only
rights so that they can see in their mailboxes when the resource is free or booked.
Reservation manager
As described above, the resource scheduling is outlined so that resources are managed
separately in the system. Moreover, there is a user with special rights called resource manager
in the system who can access resource calendars and change their events, move them, remove
them or create new ones. The main role of the resource manager is to solve possible collisions
and decide on priorities.
Setting a resource temporarily unavailable
Resources can be also temporarily disabled in the system without the need to remove it for
good. This option is helpful especially when a resource is temporarily unavailable for any
reason (e.g. a car in servicing). Disabling of a resource results in the following consequences:
• users will not see the resource in the Resources public folder,
• the calendar of the resource will not be available for subscription or delegation,
• calendars already subscribed will be disconnected from user mailboxes automatically,
• in the Free/Busy calendar, the resource is showed as long-term busy,
• if a user reserves a disabled resource anyway, a DNS message will inform them that
the reservation cannot be delivered.
Resource details
By default, resource calendars do not show possible notes and message subject. If you wish
that resource calendars showed such information, follow these instructions:
1. Stop Kerio Connect.
2. Go to the directory where Kerio Connect is installed (Kerio\MailServer) and open the
mailserver.cfg file.
3. In the configuration file, find the resource for which you wish the details to be shown.
4. Set the ClearEventSubject variable to 0 and save changes.
5. Run Kerio Connect.

22.2 Creating resources
253
22.2 Creating resources
To define resources, go to Accounts → Resources:
1. Click on Add.
2. In the dialog on the General tab, enter a name for the resource (see figure 22.1). Bear in
mind that the name will be used as the part of the email address preceding the at sign (the
local part). Therefore, diacritics, blanks and special symbols are disallowed.
3. In the Type entry, select one of the options (room or equipment).
Resources are divided in rooms and devices. In Kerio WebMail, rooms can be selected as
Location for events and appointments. Therefore, respect this system and set all rooms
and locations as rooms and any other facilities (e.g. overhead projectors, whiteboards,
microphones, cars, etc.) as devices.
Figure 22.1 Definition of a new resource — the General tab
4. Go to the Permissions tab and add all users who will be allowed to book the particular
resource item (see figure 22.2). These users will be allowed to view the item in their
clients and book them in scheduling dialogs.
Permissions can be assigned to the following subjects:
• Anyone — any user can book the item.
• All users from the server — any user with an email account in the particular Kerio
Connect can book the item.
• All users from the domain — any user of the specified email domain is allowed to
book the item.

Resource scheduling
254
• Group — the item can be booked by any member of the specified group (to define
new groups, go to Accounts → Groups in the administration interface).
• User — the specified user can book the item.
Figure 22.2 Definition of a new resource — the Permission tab
5. Set a reservation manager. This user is allowed to operate with the resource calendar. The
resource manager can delete or move reservations.
The default reservation manager is the domain administrator. If you want that resources
are managed by anyone else, set them as the reservation manager (by using the Select
button).
Note: In addition of creating and removing, resource items can also be put out of the list of
resource items (e.g. when a facility needs servicing). This can be done in the particular item’s
edt dialog box by checking the Resource is available option on the General tab.

255
Chapter 23
Status Information
Kerio Connect allows the administrator (or any other person) to view its activities in great
detail. Three kinds of information are available: status, logs and statistics.
• You can view the status of the mail queue, delivery tasks and connections to particular
Kerio Connect services.
• Logs are files where information about certain events (e.g. error and warning reports,
debugging information, etc.) are recorded. For detailed information on logs, see
chapter 24.
• Statistics contain detailed information about individual Kerio Connect services usage
such as received and refused messages, errors etc. Kerio Connect can also show
graphically the number of connections to individual services as well as the number
of processed messages for a given period.
The following chapters describe what information can be viewed and how its viewing can be
changed to accommodate the user’s needs.
23.1 Message Queue
All email processed by Kerio Connect is stored in the mail queue. Physically, this is the folder
store/queue in the directory where Kerio Connect is installed. All messages are added to this
queue as two files:
• The file with the .eml extension is the message itself
• The file with the .env extension is the message’s SMTP envelope. This is used only for
communication between SMTP servers and is discarded when the message is saved to
the target mailbox.
Both files have identical names.
A message is sent from the mail queue either after it reaches the queue or in a time period
defined in the scheduler — see chapter 12.7 for details. If the SMTP server sends messages
straight to the target domains (i.e. no relay SMTP server is used) a situation can arise in which
the message cannot be sent (no server for the target domain is available). In this case the
message returns to the queue and is sent again later.

Status Information
256
Note: If the server is in Offline mode, the message returns to the queue and the server attempts
to send it again in a time specified in the scheduler (Next Try is only set in Online mode). If the
server is in Offline mode (usually dial-up lines) then it is better to send messages via a relay
SMTP server.
Viewing the Mail Queue
You may wish to check the mail queue if you suspect that messages are not leaving the server.
Viewing the queue directly on the disk is not very easy, and is actually impossible if you
administer Kerio Connect remotely. For this reason it is possible to view the mail queue
directly in the Kerio Connect Administration in the Status → Message Queue section.
In addition to message queue, the tab includes also statistical data regarding current number
of messages in the queue and their total size.
Figure 23.1 Message Queue
Each line of this window contains information about one message in the queue. The columns
contain the following information:
ID queues
Unique message identifier. This identifier also represents the file names under which the
message is saved in the mail/queue folder.
Created
Date and time when the message entered the queue.
Next Try
Date and time of the next attempt to send the message (you can set the attempts
interval and the number of attempts in the Configuration → SMTP Server section — see
chapter 12.2). ASAP stands for As Soon As Possible. This way sending messages that are
queued for the first time — in the Online mode they are sent immediately, in the Offline
they are queued and they are sent in scheduled time.

23.2 Message queue processing
257
Size
The size of the message (excluding the envelope).
From, To
The sender’s and recipient’s email addresses If the From field is empty, it is a DSN
message sent by Kerio Connect.
Status
Status of the message (reason why the message has not been sent) is described in this
column.
Manipulating Messages in the Mail Queue
You can take the following actions using the buttons under the Mail Queue window:
Refresh
The Mail Queue window is refreshed whenever a change occurs in the queue. You can
also use the Refresh button to do this manually.
Remove messages
Removes the selected message from the queue. Click this button to display a menu to
select messages to be deleted from the queue. You can delete only selected messages, all
messages or messages that meet specific criteria.
Try to send now
Attempts to send the selected message immediately.
Send messages from the outgoing queue
Starts sending messages from the queue.
23.2 Message queue processing
When processing the Message Queue Kerio Connect creates a new process for each message
that reports all actions (delivery to a local mailbox or a remote SMTP server, antivirus control,
etc.) and then terminates. Several such processes can run simultaneously — that means that
Kerio Connect can send more messages at one time. The maximum number of delivery tasks
can be set in the Configuration → SMTP server section, the Queue Options tab, Maximum
number of delivery threads parameter (the default value is 32).
In the Status → Message Queue section on the Message Queue Processing tab you can view
the active processes (when the process was created, which message is being processed, which
SMTP server it is being sent to, etc.) and check their status (antivirus control, sending, local
delivery, etc.).
The individual columns have the following meaning:
ID
A unique message identifier (corresponds with the message ID in the mail queue and the
filename in the mail/queue directory).
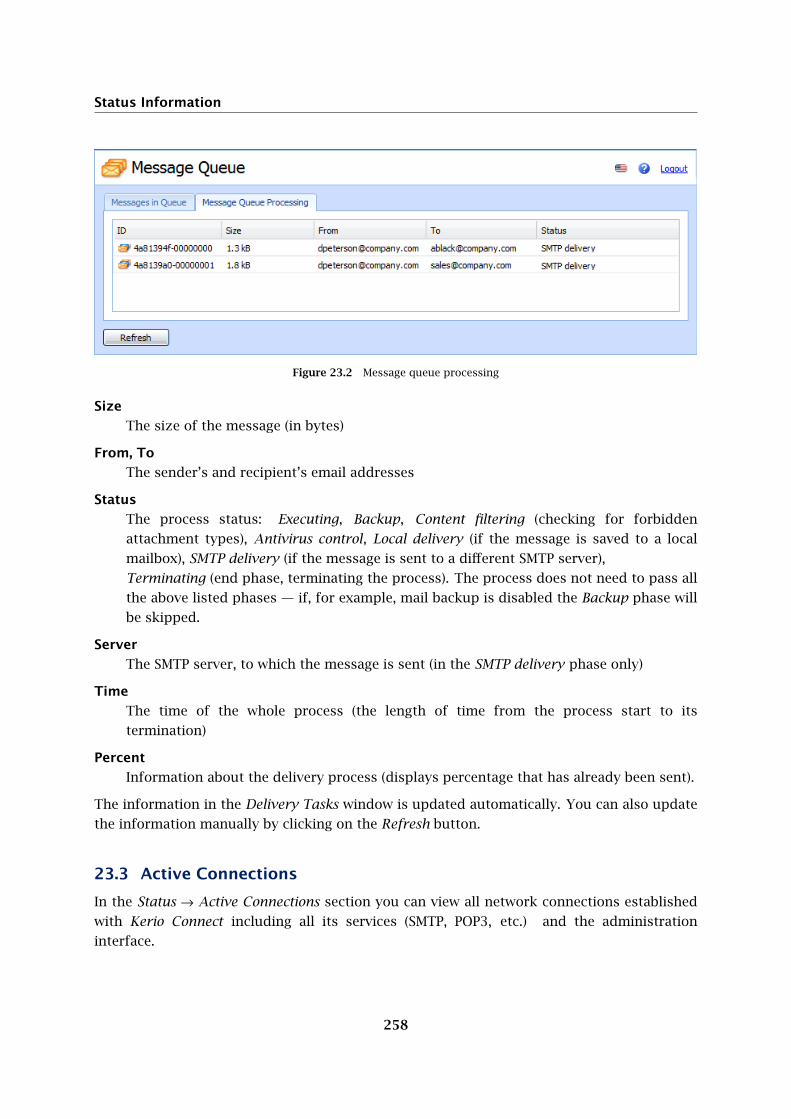
Status Information
258
Figure 23.2 Message queue processing
Size
The size of the message (in bytes)
From, To
The sender’s and recipient’s email addresses
Status
The process status: Executing, Backup, Content filtering (checking for forbidden
attachment types), Antivirus control, Local delivery (if the message is saved to a local
mailbox), SMTP delivery (if the message is sent to a different SMTP server),
Terminating (end phase, terminating the process). The process does not need to pass all
the above listed phases — if, for example, mail backup is disabled the Backup phase will
be skipped.
Server
The SMTP server, to which the message is sent (in the SMTP delivery phase only)
Time
The time of the whole process (the length of time from the process start to its
termination)
Percent
Information about the delivery process (displays percentage that has already been sent).
The information in the Delivery Tasks window is updated automatically. You can also update
the information manually by clicking on the Refresh button.
23.3 Active Connections
In the Status → Active Connections section you can view all network connections established
with Kerio Connect including all its services (SMTP, POP3, etc.) and the administration
interface.

23.3 Active Connections
259
Active Connections
Each line of this tab contains information about one connection. These are network
connections, not user connections (each client program can establish more than one
connection at one time in order to receive or send more messages at once). The columns
contain the following information:
Figure 23.3 Active Connections
Protocol
The protocol type that the client is using (or service to which it is connected). Names
correspond with the names of services in the Configuration/Services section. ADMIN
means connection to the Kerio Connect Administration program.
Extensions
Information whether the connected user connects by any special module.
Secure
Defines whether or not the connection will be secured by SSL (technical note: remote
administration allows secured connection only.
Time
How long the client has been connected. The timeout is used for certain services (i.e.
if there is no data flowing through the connection for a certain period of time, the
connection is terminated).
From
IP address from which the client is connected. The DNS name of the client can be
displayed here if the option Enable reverse DNS lookup for incoming connection is enabled
in the Configuration → Advanced Options section (see chapter 12.8). We recommend you
to enable this option only if you intend to monitor where clients connect from since
reverse DNS queries slow down traffic on the server.

Status Information
260
User
The name of the connected user. In some cases the name is not displayed (for example
connections to the SMTP server — if user authentication is not required, the user remains
anonymous).
Info
More information about the connection (e.g. IMAP folder, administration program
version, etc.).
Information in the Connections window is refreshed automatically or can be refreshed
manually using the Refresh button.
Active Web Sessions
The table on this tab lists all users connected to the Kerio WebMail interface. Each row of the
table contains information about a user (his/her email address), IP address used for connection
to Kerio Connect and the time when the connection ends.
Figure 23.4 Active Web Sessions
User
A user connected via Kerio WebMail to Kerio Connect.
Client address
IP address of the computer used for connection to Kerio Connect.
Expires
After a certain time of inactivity (1 hour), Kerio WebMail logs out users automatically for
security reasons.
Component
Three different components can be used to connect to the server: Kerio Web-
Mail (WebMail), Kerio WebMail Mini (WebMail Mini) and Kerio Connect Administration
(Administration).

23.4 Opened Folders
261
Protocol
Type of protocol used for the connection — HTTP or HTTPS.
23.4 Opened Folders
The Status → Opened Folders include all users who have any folders open in their email clients.
This section provides the following information:
Figure 23.5 Opened Folders
Name
Name of the user folder following the ~user_name@domain/folder name pattern
Users
All users whose folder is currently opened are involved. Multiple users can be listed in
case of public or shared folders.
Reference count
Total number of users whose folder is currently opened. Multiple users can be listed in
case of public or shared folders. It is also possible that a folder is opened more than once
by a user.
Index loaded
This item informs if the index.fld file has been uploaded by the server. This file allows
various additional information display properly (flags, read-unread information, etc.).
You can use the Refresh button to manually refresh the page listing open folders.
23.5 Traffic Charts
In the Status → Traffic Charts section of the Kerio Connect Administration you can view (in
graphical format) the number of connections to individual services of Kerio Connect and the
number of processed messages (both incoming and outgoing) for a given period.

Status Information
262
Figure 23.6 Kerio Connect Charts
The graph allows the following parameter settings:
Monitored parameter
Use the first field to choose the monitored parameter:
• Connections / HTTP — the number of connections to the HTTP service
• Connections/IMAP — the number of connections to the IMAP service
• Connections / LDAP — the number of connections to the LDAP service
• Connections / NNTP — the number of connections to the NNTP service
• Connections / Outgoing SMTP — the number of outgoing connections of the SMTP
service
• Connections / Rejected SMTP — number of rejected connections to the SMTP
service (connections blocked by the Spammer repellent filter)
• Connections/POP3 — the number of connections to the POP3 service
• Connections/SMTP — the number of connections to the SMTP service
• Messages / Received — the number of messages processed by the mailserver (the
total of outgoing and incoming SMTP messages and messages downloaded from
remote POP3 mailboxes)
• Messages / Spam — number of messages marked as spam by the antispam filter

23.6 Statistics
263
Time range
In the second field you can choose the time range you wish to monitor (the range can be
from 2 hours to 30 days). The selected time range is always understood as the time until
now (“last 2 hours”, “last 30 days”, etc.).
The legend below the graph shows the sampling interval (i.e. the time for which a sum of
connections or messages is counted and is displayed in the graph).
Example: If 2 hours is selected as the time range the sampling frequency is 20 seconds. This
means that a number of connections and/or messages is counted for the last 20 seconds and
is written into the graph.
You can use the Refresh button to update the chart.
23.6 Statistics
Statistical data is displayed using the Status → Statistics section. Statistics are divided into
groups for better readability (e.g. “Storage Occupied”, “Messages sent to parent SMTP server”,
“Client POP3 statistics”, etc.). In each table, data of the same topic are gathered.
The Statistics section includes several buttons:
Figure 23.7 Statistics
Refresh
This button refreshes data provided in the statistics.

Status Information
264
Basic/Advanced mode
The statistics work in two modes:
• Basic mode — this mode involves only four most popular statistics — Server
Status, Storage Occupied, Antivirus Statistics and Spam Filter Statistics.
• Advanced mode — includes all statistics.

265
Chapter 24
Logs
Logs are files where information about certain events (e.g. error and warning reports,
debugging information, etc.) are recorded. Each item is represented by one row starting
with a timestamp (date and time of the event). Events reported are in English only (they are
generated by the Kerio Connect Engine).
24.1 Log settings
When you right-click inside any log window, a context menu will be displayed where you can
choose several functions or change the log’s parameters (view, logged information).
Figure 24.1 Context menu
Save log
The Save log option enables saving of the entire log or its selected part in any file on the
disk.
The dialog options are as follows:
Figure 24.2 Save log
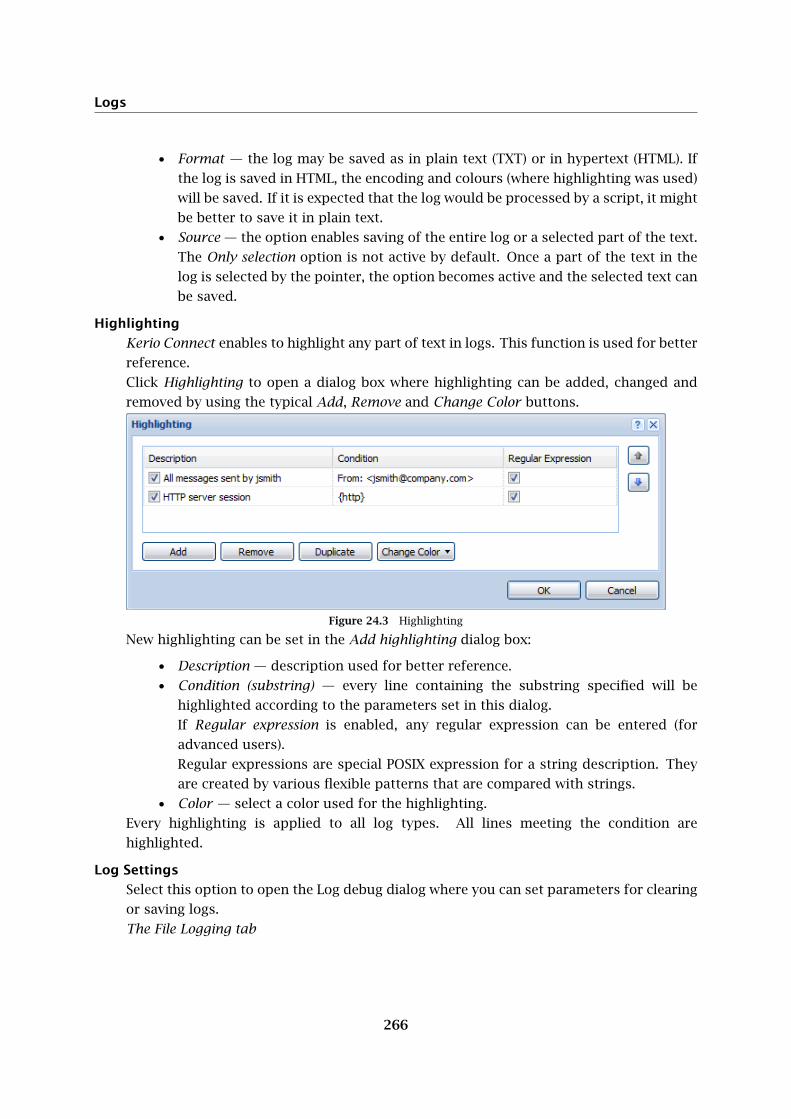
Logs
266
• Format — the log may be saved as in plain text (TXT) or in hypertext (HTML). If
the log is saved in HTML, the encoding and colours (where highlighting was used)
will be saved. If it is expected that the log would be processed by a script, it might
be better to save it in plain text.
• Source — the option enables saving of the entire log or a selected part of the text.
The Only selection option is not active by default. Once a part of the text in the
log is selected by the pointer, the option becomes active and the selected text can
be saved.
Highlighting
Kerio Connect enables to highlight any part of text in logs. This function is used for better
reference.
Click Highlighting to open a dialog box where highlighting can be added, changed and
removed by using the typical Add, Remove and Change Color buttons.
Figure 24.3 Highlighting
New highlighting can be set in the Add highlighting dialog box:
• Description — description used for better reference.
• Condition (substring) — every line containing the substring specified will be
highlighted according to the parameters set in this dialog.
If Regular expression is enabled, any regular expression can be entered (for
advanced users).
Regular expressions are special POSIX expression for a string description. They
are created by various flexible patterns that are compared with strings.
• Color — select a color used for the highlighting.
Every highlighting is applied to all log types. All lines meeting the condition are
highlighted.
Log Settings
Select this option to open the Log debug dialog where you can set parameters for clearing
or saving logs.
The File Logging tab

24.1 Log settings
267
Figure 24.4 File Logging
• Enable logging to file — enables logging to a specified file. Use the File name entry
to specify a path where logs will be saved.
• Rotate regularly— select one of the following options:
• Every hour — log is saved once an hour and a new log file is started.
• Every day — log is rotated once a 24 hours.
• Every week — log is rotated once a week.
• Every month — log is rotated once a month.
• Rotate when file exceeds size — set maximum log file size (in kBs) in Max log file
size.
• Keep at most ... log file(s) — define how many log files will be stored. The oldest
file will be cleared after each rotation.
The External Logging tab
Open the External Logging dialog to set logging to a Syslog server or to a file. The three
options can be combined.
• Enable Syslog logging — use this option to enable logging to a Syslog server
• Syslog server — DNS name or IP address of the particular Syslog server.
• Facility — this entry helps Kerio Connect recognize where a log came from (Syslog
server can receive logs from various sources).
• Severity — set how important the log is (Syslog enables filtering of logs with
respect to their severity).
Clear log
Clears the log window (information is also removed from the appropriate file).

Logs
268
Figure 24.5 Storing logs on Syslog server
Messages
Advanced parameters for the logs can be set using this option (for details, see below).
Available only in the Debug section.
24.2 Config
The Config log keeps complete history of configuration changes — this log tells us which user
performed individual administration tasks and when.
The Config window contains three log types:
Information about logging in to Kerio Connect administration
Example:
[30/Jun/2004 09:09:18] Admin - session opened for host 127.0.0.1
• [30/Jun/2004 09:09:18] — the date and time of the log creation
• Admin — the name of the user logged in for Kerio Connect administration.
• session opened for host 127.0.0.1 — information about session opening
and IP address of the user logged in
Changes in the configuration database
Changes performed in the Kerio Connect configuration. Let’s take new user account
creation as an example:
[30/Jun/2004 13:09:48] Admin - insert User set
Name=’tjones’, Domain=’company.com’, Account_enabled=’1’,
Auth_type=’0’, Password=xxxxxx, Rights=’1’,
ForwardMode=’0’, Qstorage=’10485760’, Qmessage=’5000’
• [30/Jun/2004 13:09:48] — the date and time when the log was created
• Admin — the name of the user logged in for Kerio Connect administration.

24.3 Mail
269
• insert User set Name=’jwayne’... — parameters that were specified for the
new account
Other changes in configuration
A typical example is the backup cycle. After the Use button in Configuration / Backup
section is pressed, the time and date of each backup is inserted into the Config log.
[30/Jun/2004 09:29:08] Admin - Store backup started
• [30/Jun/2004 09:29:08] — date and time when the backup was started
• Admin — the name of the user logged in for Kerio Connect administration.
• Store backup started — information that the backup was started
24.3 Mail
The Mail log contains information about individual messages processed by Kerio Connect. The
log includes all message types:
• incoming messages,
• outgoing messages,
• mailing list messages,
• DSN (Delivery Status Notification).
Incoming and outgoing messages
All messages received via SMTP or HTTP protocols or downloaded via POP3. Here is an
example of two log lines associated with one message as well as description of individual
items:
[30/Nov/2005 17:57:14] Recv: Queue-ID: 438dd9ea-00000000,
[30/Nov/2005 17:57:14] Recv: Queue-ID: 438dd9ea-00000000,
Service: SMTP, From: <[email protected]>, To: <[email protected]>,
Size: 1229, User: [email protected], Sender-Host: 195.39.55.2,
SSL: yes
[30/Nov/2005 17:57:15] Sent: Queue-ID: 438dd9ea-00000000,
Recipient: <[email protected]>, Result: delivered, Status: 2.0.0
• [30/Nov/2005 17:57:14] — the date and time when the message was delivered
or sent.
• Recv/Sent — this section provides information whether the server has already
received the message or the message is just being sent. The status can therefore
be Sent or Recv (i.e. Received).
• Queue-ID: 438d6fb6-00000003 — the number generated by the server in the
queue of outgoing messages. It is an identifier which uses identical numbers for
all log lines associated with one messages. Each message is first received by the

Logs
270
server, then it is sent. This implies that at least two log lines must belong to each
message (for reception and sending). Moreover, each message can be delivered
to multiple users (each addressee has a special log line).
• Service: HTTP — protocol, that has been used by the server to receive the
message (HTTP, SMTP). This information is included in incoming messages only.
The information is not displayed for outgoing messages, it would be meaningless.
All outgoing messages are sent by SMTP.
• From: <[email protected]> — email address of the sender.
• To: <[email protected]> — email address of the recipient.
• Size: 378 — size of the message in bytes.
• User: [email protected] — user account from which the message was sent.
• Sender-Host: 195.39.55.2 — IP address of the computer from which the
message has been sent.
• SSL: yes — informs whether the connection is SSL-secured (displayed for SMTP
only).
• Recipient: <[email protected]> — email address of the addressee.
• Result: delivered — information about the result of the delivery process.
• Status: 2.0.0 — code of the SMTP response (for detailed information, see
RFC 821 and 1893). If the code starts with the 2 digit, the message was delivered
successfully. If the code starts with the 4 or the 5 digit, the message delivery
failed.
Server-generated messages
Messages of this type are usually generated by Kerio Connect. If the delivery fails, the
sender receives a delivery status notification (DSN).
[30/Nov/2005 15:31:40] Recv: Queue-ID: 438db7cc-00000000,
Service: DSN, From: <>, To: <[email protected]>, Size: 1650,
Report: failed
• [30/Nov/2005 15:31:40] — the date and time when the message was generated
• Recv: — this section provides information whether the server has already
received the message or the message is just being sent. The status can therefore
be Sent or Received.
• Queue-ID: 438db7cc-00000000 — the number generated by the server in the
queue of outgoing messages.
• Service: DSN — Delivery Status Notification; messages generated by Kerio Con-
nect.
• From: <> — this item is empty because the message was generated by the mail
server.
• To: <[email protected]> — email address of the recipient.
• Size: 1650 — message size in bytes.
• Report: failed — the type of notification.

24.4 Security
271
Mailing list messages
The Mail log contains all mailing list messages. The individual postings, as well as mailing
list control messages are logged
[30/Nov/2005 19:09:11] Recv: Queue-ID: 438deac7-00000009,
Service: List, From: <[email protected]>, To:
<[email protected]>, Size: 3302, Answer: subscribe response
• [30/Nov/2005 19:09:11] — date and time when the message was received.
• Recv: — this section provides information whether the server has already
received the message or the message is just being sent. The status can therefore
be Sent or Received.
• Queue-ID: 438deac7-00000009 — the number generated by the server in the
queue of outgoing messages.
• Service: List — mailing list flag.
• <[email protected]> — email address of the sender.
• To: <[email protected]> — email address of the recipient.
• Size: 1397 — size of the message in bytes.
• Answer: subscribe response — type of message.
Sieve
Messages generated by a user filter (e.g. autoreply).
24.4 Security
The Security log contains information related to Kerio Connect’s security. It also contains
records about all messages that failed to be delivered. The security log contains the following
types of events:
Viruses and forbidden attachments detected
Example: a message that contains a virus:
[16/Jun/2004 18:37:17] Found virus in mail from
<[email protected]> to <[email protected]>:
W32/Netsky.p@MM
• [16/Jun/2004 18:37:17] — the date and time when the virus was detected.
• Found virus in mail — action performed (information that the virus was
found).
• from <[email protected]> — email address of the sender.
• to <[email protected]> — email address of the recipient.
• W32/Netsky.p@MM — the type of virus contained in the message.
Messages rejected by spam filter
A message with high spam score:
[16/Jun/2004 18:37:17] Message from <[email protected]>
to <[email protected]> rejected by spam filter: score 9.74,

Logs
272
threshold 5.00
• [16/Jun/2004 18:37:17] — the date and time when the message was rejected.
• from <[email protected]> — email address of the sender.
• to <[email protected]> — email address of the recipient.
• rejected by spam filter — action performed (rejection by spam filter).
• score 9.74, threshold 5.00 — SpamAssassin evaluation.
Failed login attempts
This log contains information about invalid login attempts. These are usually caused by
an invalid username/password or blocked IP address. The reason for a specific failed
login can be found also in the Warning log (see chapter 24.5).
[13/Apr/2004 17:35:49] Failed IMAP login from 192.168.36.139,
missing parameter in AUTHENTICATE header
• [13/Apr/2004 17:35:49] — the date and time of the failed login.
• Failed IMAP login — action performed (failed login attempt).
• from 192.168.36.139 — IP address of the computer used for login attempt.
There are several possible reasons for login failure:
• missing parameter in AUTHENTICATE header — an incorrect or invalid
header with login data has been sent,
• authentication method PLAIN is disabled — the authentication method is
disabled in Kerio Connect,
• authentication method CRAM_MD5 is invalid or unknown — Kerio Con-
nect is unable to perform authentication using this method,
• error during authentication with method CRAM-MD5 — an error occurred
during authentication, e.g. during communication with the authentication server,
• authentication with method CRAM-MD5 cancelled by user — the
authentication was cancelled by the user (client),
• (Failed IMAP login from 127.0.0.1), authentication method PLAIN —
the authentication of the user failed (the user does not exist, the password is
incorrect, the user account in Kerio Connect is disabled or the authentication
couldn’t be performed due to the lack of authentication data in Active Directory).
Server misuse attempts (relaying)
An example of relaying attempt:
[11/Jun/2004 00:36:07] Relay attempt from IP address
61.216.46.197, mail from <[email protected]> to
<[email protected]> rejected
• [11/Jun/2004 00:36:07] — the date and time.
• Relay attempt — action performed (failed relaying attempt).
• 61.216.46.197 — IP address of the computer used for relaying attempt.
• from <[email protected]> — email address of the sender.

24.4 Security
273
• to <[email protected]> — email address of the recipient.
• rejected — action performed (the message was rejected).
Antibombing
Server overload protection — see chapter 12.2, section Security Options.
[16/Jun/2004 18:53:43] Directory harvest attack from
213.7.0.87 detected
• [16/Jun/2004 18:53:43] — the date and time of the failed attack.
• Directory harvest attack — type of attack.
• from 213.7.0.87 — IP address of the computer used for the attempt.
• detected — action performed (detected and blocked).
If the sender was found in databases of blacklisted servers
The sender was found in a blacklist database (ORDB, own IP address group).
[13/Apr/2004 17:44:02] IP address 212.76.71.93 found in DNS
blacklist ORDB, mail from <[email protected]> to
• [13/Apr/2004 17:44:02] — the date and time when the message was received.
• 212.76.71.93 — IP address used for sending the message.
• found in DNS blacklist ORDB — type of action (the address was found in
a database of blacklisted servers).
• from <[email protected]> — email address of the sender.
• to <[email protected]> — email address of the recipient.
Wipe
User’s mobile device got lost or stolen and the administrator wiped all user data out of
the device (for details, see section 35.5).
Three types of records regarding wipe are used in the Security log. The first record
informs about initiation of the wipe process. This record is always included. At this stage,
the wipe process can be stopped. The second record type appears if the wipe process
is stopped and cancelled. The third record is logged if the wipe process is completed
successfully. The wipe is applied upon the next connection of the device to the server.
• An example of a record of an initiation of the wipe process is provided below:
[22/Aug/2006 12:30:23] Device with id
C588E60FCF2FB2C107FBF2ABE09CA557(user: [email protected])
will be wiped out by request Admin
• An example of a record of a cancellation of the wipe process is provided below:
[22/Aug/2006 12:36:51] Wiping out of the device
C588E60FCF2FB2C107FBF2ABE09CA557 (user: [email protected])
has been cancelled by Admin
• The third example shows information about successful wipe-out of the data on

Logs
274
the device:
[22/Aug/2006 12:31:11] Device C588E60FCF2FB2C107FBF2ABE09CA557
(user: [email protected]), connected from: 192.168.44.178
has been irrecoverable wiped out
24.5 Warning
The Warning log displays warning messages about errors of little significance. Typical
examples of such warnings are messages stating that a user with administrator rights has
a blank password, that a user account of a given name does not exist or that a remote POP3
server is unavailable.
Events causing display of warning messages in this log do not greatly affect Kerio Connect’s
operation. They can, however, indicate certain (or possible) problems. The Warning log can
help if for example a user is complaining that certain services are not working.
24.6 Operations
The Operations log gathers information about removed and moved items (messages, contacts,
events, tasks and notes) in user mailboxes. It is helpful especially if a user does not manage to
find a particular message in their mailbox. The log tells us whether the desired message has
not been removed.
In addition to the items related information, the log also includes information about removing
and moving any folders in mailboxes.
Besides removals, the log also gathers information about moving folders (it treats them as
subfolders removed from the particular folder). Moving of folders is marked by a special flag.
The information is recorded following this pattern:
Removed (moved) item
[07/Aug/2008 11:07:02] {DELETE} Protocol: HTTP/WebMail, User:
[email protected], IP: 127.0.0.1, Folder: [email protected]/Deleted
Items, From: "Winston Smith" <[email protected]>, Subject:
"Vacations", Delivered: 07/Aug/2008 11:05:27, Size: 1320
• [07/Aug/2008 11:07:02] — date and time of the operation (moving or
removing of an item).
• {DELETE} — operation type. The item was removed or moved.
• Protocol — type of protocol used for removal or moving of the item. The
protocol type tells us by which email client the user accessed the server
(examples: HTTP/WebMail — the Kerio WebMail interface, SYSTEM — automatic
deletion of items, HTTP/WebDAV — MS Outlook extended with Kerio Outlook
Connector or MS Entourage).
• User — user mailbox where the operation took place.

24.7 Error
275
• IP — IP address of the computer which the operation was executed from.
• Folder — the folder where the operation took place.
• Subject — subject of the item.
• Delivered — date of delivery of the item in case of emails.
• Size — size of the item.
Folder removal
[07/Aug/2008 12:14:57] {DELETE_FOLDER} Folder:
[email protected]/Deleted Items/Work deleted
• [07/Aug/2008 12:14:57] — date and time of the operation (removal of the
folder).
• {DELETE_FOLDER} — operation type. The folder was removed.
• Folder — name of the deleted folder.
• deleted — operation.
Folder movement
[07/Aug/2008 12:14:26] {MOVE_FOLDER} Protocol: HTTP/WebMail,
User: [email protected], IP: 127.0.0.1, Old location:
[email protected]/INBOX/Work&AO0-, New location:
[email protected]/Deleted Items/Work, Items count: 3
• [07/Aug/2008 12:14:26] — date and time of the operation (movement of the
folder).
• {MOVE_FOLDER} — operation type. The folder was moved.
• Protocol — type of protocol used for movement of the item. The protocol type
tells us which email client the user accessed the server from.
• User — the user who moved the folder.
• IP — IP address of the computer which the operation was executed from.
• Old location — the original location of the folder.
• New location — the new location of the folder.
• Items count — number of items (e.g. emails) included in the folder.
24.7 Error
In contrast to the Warning log, the Error log displays errors of great significance that usually
affect the mailserver’s operation. The Kerio Connect administrator should check this log
regularly and try to eliminate problems found here. If this is not done, users are in danger
of not being able to use certain (or even all) services. They may also lose their messages or
security problems may occur (the mailserver can for example be misused to send spam email
or virus-infected email).
Typical error messages displayed in the Error log pertain to: service initiation (usually due to
port conflicts), disk space allocation, antivirus check initialization, improper authentication of
users, etc.

Logs
276
24.8 Spam
The Spam log displays information about all spam emails stored in Kerio Connect. Information
about individual spam messages are displayed in rows. The logs differ according to the mode
of spam detection. The Spam log lists also messages that have been marked as spam by Kerio
Connect, but the user marked them as regular messages.
Spam message detected by filter
The message was marked as spam by Kerio Connect filter:
[06/Sep/2004 08:43:17] Message marked as spam with score:
8.00, To: [email protected], Message size: 342,
From: [email protected], Subject:
• [06/Sep/2004 08:43:17] — date and time when the spam was detected.
• Message marked as spam with score: 8.00 — type of action (the message
was marked as spam because the score evaluated by spam filter was too high).
• To: [email protected] — email address of the recipient.
• Message size: 342 — message size in bytes.
• From: [email protected] — email address of the sender.
• Subject: — the subject of the message (empty in this case).
Spam message detected by user
The message was marked as spam by user:
[06/Sep/2004 08:40:39] User [email protected] marked a message
as spam, Folder: [email protected]/INBOX, Size: 462,
From: "John Wayne" <[email protected]>, Subject: Hallo
• [06/Sep/2004 08:40:39] — date and time when the message was marked as
spam.
• User [email protected] — email address of the recipient.
• marked a message as spam — type of action (the message was marked as spam
by user).
• Folder: [email protected]/INBOX — the folder where the message is
stored
• Size: 462 — message size in bytes.
• From: "Winston Smith" <[email protected]> — email address of the
sender.
• Subject: Hallo — the subject of the message.
The message is not spam
The message was marked as not spam by a user:
[06/Sep/2004 08:43:32] User [email protected] marked a message
as not spam, Folder: [email protected]/Junk E-mail, Size: 500,
From: "Winston Smith" <[email protected]>, Subject: *SPAM*

24.9 Debug log
277
• [06/Sep/2004 08:43:32] — date and time when the message was marked as
not spam.
• User: [email protected] — email address of the recipient.
• marked a message as not spam — type of action (the message was marked as
not spam by user).
• Folder: [email protected]/Junk E-mail — the folder where the
message is stored (in this case, the folder for spam messages is required).
• Size: 500 — message size in bytes.
• From: "Winston Smith" <[email protected]> — email address of the
sender.
• Subject: **SPAM** — the subject of the message.
24.9 Debug log
Debug (debug information) is a special log which can be used to monitor certain kinds of
information, especially for problem-solving. As default, it displays information relating to
starting and stopping of Kerio Connect, lists the services and the addresses and ports used for
connection. Other information relates to services and processes used to operate the server.
The other information describe services and processes which handle the server. Too much
information could be confusing and impractical if displayed all at the same time. Usually, you
only need to display information relating to a particular service or function.
Warning:
In addition, displaying too much information slows Kerio Connect’s performance. We
recommend that you only display information that you are interested in and only when
necessary.
Debug log settings
For the above reasons the Debug log allows you to define what information it will display.
To do this, use the Messages option in the Debug window’s context pop-up dialog (the menu
opened upon right-clicking at the log area).
The Logged messages dialog box where several options to enable particular logs are available:
Services
The Services section allow logging any information associated with services started in
Kerio Connect:
• SMTP Server — detailed information about communication between clients and
the SMTP server. This log can be helpful when you experience problems with MX
records.
• IMAP Server — detailed information about communication between clients and
the IMAP server. The log also provides information on communication via the
MAPI interface.

Logs
278
Figure 24.6 Debug log settings
• POP3 Server — detailed information about communication between clients and
the POP3 server. Together with IMAP server session and HTTP server session)
helps to solve problems with retrieving email from the mailboxes.
• IMAP Server — communication between clients and the HTTP server for the Kerio
WebMail interface.
• LDAP Server — detailed monitoring of communication between clients and the
LDAP server, and search for contacts in the database.
• NNTP Server — detailed information about communication between clients and
the news server.
Message Delivery
The Message Delivery section provides options for logging while message delivery is in
progress:
• Queue Processing — processing of the Mail Queue (sending and receiving
messages, re-scheduling, etc.)
• Remote POP3 Download — retrieval of remote POP3 mailboxes (Kerio Connect
in the role of a POP3 client) and sorting rules (when a message is received or
downloaded from a remote POP3 mailbox). The Remote POP3 download log
together with Alias Expansion can be helpful when you experience problems with
24.9 Debug log
279
domain mailbox.
• SMTP Client — sending outgoing mail (communication between Kerio Connect
and the relay SMTP server or the target domain’s server). The log includes
commands and responses of the client and the server ordered by time when
individual events happened. Therefore, this log can be very helpful for resolving
problems regarding email sending.
• Mailing List Processing — mailing lists monitoring (logins, logouts, message
sending, moderators performance, etc.).
• Alias Expansion — processing of aliases (during reception of a message or its
download from a remote POP3 mailbox). The Alias processing log is used together
with Remote POP3 download to solve problems with domain mailbox sorting.
• Sieve Filters — filtering messages according to user filters.
Content Filters
The Content Filters section includes options for enabling/disabling logs tracing antivirus
and antispam control:
• Antivirus Checking — communication with the antivirus program, processing of
individual message attachments. This log can be used if the infected messages
are not detected by an antivirus program and are delivered to users.
• Spam Filter — the option logs spam rating of each message which has passed
through the Kerio Connect’s antispam filter.
• SPF Record Lookup — the option gathers information of SPF queries sent to SMTP
servers. It can be used for solving problems with SPF check.
• SpamAssassin Processing — the option enables tracing of processes occurred
during SpamAssassin antispam tests.
Message Store
The Message Store section enables logging of operations associated with data store,
searching, backups, etc.:
• Message Folder Operation — operations with user and public folders (opening,
saving messages, closing)
This log can be used for example to resolve problems regarding mapping of
public folders.
• Searching and Sorting — this log includes operations that server performs while
searching in email, calendars, contacts and tasks folders. Also operations
performed during sorting (e.g. alphabetical sorting of email messages, sorting
by date of reception, etc.) are logged.
• Quota and Login Statistics— the log may be helpful especially where a problem
regarding user quotas and related issues occurs.
• Store Backup — the report lists the backup process, browsing and backing up of
all folders. Use this report to be sure if the backup process is correct and if it
was not interrupted.
• Messages decoding — this log may be helpful where problems regarding decoding
of TNEF or uuencode messages occur.

Logs
280
• Items clean-out — this log helps scrutinize issues regarding automatic clean out
of messages in the Junk E-Mail and Deleted Items folders.
HTTP Server Modules
The HTTP Server Modules provides options that enable logging information regarding
traffic over an HTTP interface:
• WebDAV Server Requests — the log lists all operations related to the WebDAV
interface. It is useful especially for solving communication issues between Kerio
Connect and MS Entourage, NotifyLink, Kerio Sync Connector and iCal clients.
• PHP Engine Messages — the log gathers information related to the Kerio WebMail
interface. This information is an extension to the Error log and it can be used for
troubleshooting of Kerio WebMail issues.
• ActiveSync Synchronization — this log lists ActiveSync traffic performed between
mobile devices and Kerio Connect.
• KOC Offline Requests — this log helps shoot down issues that might occur in
communication between the Kerio Outlook Connector (Offline Edition) and Kerio
Connect.
• Kerio Blackberry Connector — this log helps to shoot problems with data
synchronization between Kerio Connector for BlackBerry and Kerio Connect
Auxiliary Modules
The Auxiliary Modules section provides the following logging options:
• User Authentication — external authentication of users (NT domain, Kerberos,
PAM)
• Network Connections and SSL — establishing connections to remote servers (on
the TCP level), DNS requests, SSL encrypting, etc.
• DNS Resolver— finding target domain SMTP servers through DNS MX record
lookup
• Directory Service Lookup — queries to the internal user database (Active Direc-
tory). This log can be used in case of problems with import of users from local
domains.
• Update Checker Activity — monitors communication with the update.kerio.com
server where new versions of Kerio Connect are stored.
• Thread Pool Activity — describes establishing, progress and closing of any
threads processed by Kerio Connect.
• Administration Console Connections — logs connections and activity of the Kerio
Administration Console.
• Domain rename — the log records events associated with domain renaming
processes.
• Connection Pool — the log records information about active and inactive HTTP
connections of Kerio Connect.
• Crash Management Activity — this option is shown only if Kerio Connect is
installed on Mac OS X. The log monitors the Mac Assist utility which gathers
information on failure of the spamserver, avserver or mailserver process and

24.10 Performance Monitor (under Windows)
281
sends it to Kerio Technologies for further analysis.
Local Services
The Local Services section controls local services of Kerio Connect:
• Service Manager — it can help you target local services in general (message queue,
resource scheduling issues, etc.).
• Resource Service — it helps you target resource scheduling issues.
• GAL Service — this option may help you shoot down issues regarding contact
synchronization with the Global Address List.
• Distributed Domain Service — allows recording of all operations associated with
the distributed domain.
24.10 Performance Monitor (under Windows)
If Kerio Connect is installed under the Windows 2003, 2000, or XP operating system, the
optional component Performance Monitor can be installed (for details, see chapter 2.4). Perfor-
mance Monitor is a plug-in for the Performance system tool that is included in Administrative
Tools.
In Performance Monitor, open the System Monitor section. To add new objects for monitoring,
open the dialog window by clicking on the + button.
Figure 24.7 Performance Monitor

Logs
282
In Performance object select the Kerio Connect item. In the left button at the bottom select
statistics that you want to monitor. You can use any of the statistics offered by Kerio Connect
(see chapter 23.6, or the Status → Statistics section in the administration interface). Click on
the Explain button to get more information about the selected object.
Note:
• If the Kerio Connect item is not displayed in the Performance object field in the
object list, the Performance Monitor plug-in is not installed or it is incomplete. We
recommend running the Kerio Connect installation program again (see chapter 2.4).
• For detailed information about Performance Monitor see Help in Windows.
283
Chapter 25
Folder Administration
Kerio Connect supports the following folder types:
• mail folders
• contacts
• calendars
• tasks
• notes
It depends on the email client whether all folder types can be used. Kerio Connect officially
supports MS Outlook and MS Entourage, and both of these clients support all listed folder
types. All folders can be also accessed also from the Kerio WebMail interface and some of the
supported mobile devices.
Besides the folder types listed above, folders can be either personal or public. Personal folders
can be managed, viewed, created and deleted by a particular user in his/her own mailbox.
Public folders, on the other hand, can be created and managed by special access right, while
viewed by any user. Detailed description on public folders is provided in the following section.
25.1 Public folders
Public folders are special folders available to all users in the domain or all users of the Kerio
Connect (by default, public folders are created separately for each domain).
By default (upon their creation), public folders are available to all users in the read only mode.
It is naturally possible to change their access rights as in case of other folders.
And what are public folders for? Above all, they can help share information across the
company. The most frequently used public folder is the contact folder including all contacts
in the company. This folder can be also generated automatically of the Kerio Connect’s user
accounts. Another well understandable example is a special calendar where all company
events, trainings and resource reservations (bookings of OHPs, meeting rooms, etc.) are
scheduled.
Public folders can be created only by users with appropriate access rights. By default, these
rules are assigned to the administrator of the Kerio Connect’s primary domain (the special

Folder Administration
284
administration account and its facilities are focused in section 8.1). This person can then
assign rights to any other users.
25.1.1 Global versus Domain folders
As mentioned above, it is possible to decide whether public folders would be created
separately for each domain or globally for all Kerio Connect users. To set this, follow these
instructions:
1. In the administration interface, go to Configuration → Domains.
2. Click on the Public Folders button located in the right bottom corner of the window.
3. This opens a dialog where you can select one of the options (see figure 25.1).
Figure 25.1 Advanced settings for public folders
Caution:
If you need to change this option when the system of public folders has already
been created, bear in mind that public folders will not show when viewed by users
and it will be necessary to create new ones.
25.1.2 Creating public folders
Public folders can be created either in MS Outlook (extended with the Kerio Outlook Connector)
or in the Kerio WebMail interface or in MS Entourage.
In either case, new public folders are created by the same method as private folders. Check
the following example:
1. Open MS Outlook extended with working Kerio Outlook Connector or Kerio WebMail as an
administrator of the primary domain or as a user with rights for creation of public folders
(rights and their settings are described in section 25.1.3).
2. In the folder tree, select the Public folders root and create a new folder as if you created
a private folder (using the context menu).
3. Once the folder is created, all users have the read only access to it automatically. If
you want to assign improved privileges to any user, follow the standard sharing settings
(details are provided in Kerio Connect 7, User’s Guide).

25.2 Viewing public folders in individual account types
285
Public folders will be shared automatically with all selected users as subfolders of the Public
folders root.
25.1.3 Assigning rights for public folders
Rights for public folders can be assigned by any user with Kerio Connect administration rights:
1. In the administration interface, open the Accounts → Users section.
2. Use the cursor to select the user to assign rights to and open the settings dialog (e.g. by
the Edit button).
3. In the dialog, go to the Rights tab and enable option This user has the administrator rights
to the public folders.
25.2 Viewing public folders in individual account types
The table shows which public folders can be viewed by a particular user, depending on the
email account type or client.
Account Email Contacts Calendar Tasks Notes
Kerio Outlook Connector
(Offline Edition)
YES YES YES YES YES
Kerio Outlook Connector YES YES YES YES YES
Kerio WebMail YES YES YES YES YES
an account of the
Exchange in MS Entourage
type
YES YESa YESa NO NO
an account of the
Exchange in Apple Mail
typeb
YES YES YES YES YES
IMAP (any client that
supports the IMAP
protocol)
YES (if the client can show
them)
NO NO NO NO
POP3 (any client that
supports the POP3
protocol)
NO NO NO NO NO
Only for MS Entourage 2004 SP2.a
Only if the full support for IMAP is set in the Kerio Connect’s configuration file (for details, see chapter 41).b
Table 25.1 Viewing public folders in individual account types

286
Chapter 26
Kerberos Authentication
This chapter provides simple and well-organized guidelines to configuration of user
authentication at Kerberos.
Kerberos is a client-to-server system which enables authentication and authorization of users
to increase security while using network resources. Kerberos is described by IETF RFC 4120.
Kerio Connect includes support for Kerberos V5.
The following logs may be helpful while solving configuration issues:
• MS Windows — logs are located in the Start → Settings → Control Panel → Administra-
tive Tools → Event Viewer menu
• Linux — logs can be found in the default directory /var/log/syslog
However, this applies only to the Kerberos client. Logging of traffic at the server’s side
can be performed by adding the following configuration into the /etc/krb5.conf file:
[logging]
default = FILE:/var/log/krb5libs.log
kdc = FILE:/var/log/krb5kdc.log
admin_server = FILE:/var/log/kadmind.log
Note: Settings of logging at the server’s side is regards Kerberos MIT (US
implementation of Kerberos applied in the Active Directory and the Apple Open Di-
rectory). Setting of Kerberos Heimdal logging (European implementation of Kerberos
which can be found in several Linux distributions) may be different.7
• Mac OS X Server — logs in the Server Admin application (see chapter 26.4)
• Kerio Connect — logs can be found in the Logs section of the administration interface.
In this case, the Warning, Error and Debug logs are to be considered (User Authentica-
tion must be running). For detailed description on individual logs, refer to chapter 24.
The Kerberos Heimdal’s client is also included in the Linux installation packages of Kerio Connect. It is, however, not7
important which version is used on the server (Key Distribution Center) and which is used at the client (Kerio Connect
in this case) since the protocol is the same and no problems should occur in the cooperation of the server and the
client side.

26.1 Kerio Connect on Windows
287
26.1 Kerio Connect on Windows
Authentication against Active Directory
For authentication at the Active Directory, it is necessary to specify the Active Directory’s
domain name in Kerio Connect. This can be set under domain settings in the Kerio Connect
Administration (see figure 26.1).
Figure 26.1 Setting the Active Directory domain in Kerio Connect
Specify the domain name in the Advanced dialog (see figure 26.1) and ensure that:
1. Kerio Connect is a member of the domain to be authenticated against. If Kerio Connect is
not the domain member, the Kerberos system will not be working and the users will have
to use a local password, i.e. different from the password for the domain.
2. Kerio Connect uses Active Directory Controller as the primary DNS server — this should
be done automatically by adding the host in the domain (see item 1).
If the network configuration requires authentication against multiple domain controllers
at a time, add all domain controllers where Kerio Connect will be authenticated as DNS

Kerberos Authentication
288
servers. In this case, however, a special configuration of DNS servers is required. Either it
is necessary to set DNS servers to forward queries to each other (if the query is not found
in the proper database, it is forwarded to the domain controller) or all DNS servers must
share the same primary parent DNS server.
3. time of Kerio Connect and Active Directory is synchronized — this should be done
automatically by adding a host to the domain (see item 1).
Authentication against Open Directory
For authentication with Open Directory, Kerio Connect’s Kerberos realm must be specified (see
figure 26.1).
Specify the Open Directory domain name (Kerberos realm) in Kerio Connect and ensure that:
1. Kerio Connect is a member of the Apple Open Directory domain to be authenticated
against. If Kerio Connect is not the domain member, the Kerberos system will not be
working and the users will have to use a local password, i.e. different from the password
for the domain.
2. DNS server (IP address or DNS name of the computer where Apple Open Directory is
running) is set correctly at the computer with Kerio Connect.
3. time of Kerio Connect and Open Directory is synchronized — this should be done
automatically by adding a host to the domain (see item 1).
Authentication against a stand-alone Kerberos server
To use authentication against a stand-alone Kerberos server (Key Distribution Center), it is
necessary to maintain the username and password database both in Key Distribution Center
and in Kerio Connect.
Specify the Kerberos area (Kerberos realm) name in Kerio Connect (see figure 26.1) and make
sure that:
1. Kerio Connect is a member of the Kerberos area to be authenticated against. Usernames
and passwords of all users created in Kerio Connect must be defined in the Key Distribution
Center (required for authentication in Kerberos).
2. DNS server must be set correctly at Kerio Connect’s host (Key Distribution Center uses DNS
queries).
3. Time of Kerio Connect and Key Distribution Center (all hosts included in the Kerberos
area) must be synchronized.
Using the Kerbtray utility, it is possible to test whether Kerio Connect is able to authenticate
against the Key Distribution Center.

26.2 Kerio Connect on Linux
289
This can be checked from the computer where Kerio Connect will be installed. To check
authentication from MS Windows, use the Kerbtray utility (see figure 26.2) which can be
downloaded for free at the Microsoft’s website. If no allocated tickets are found by Kerbtray,
authentication does not work and it is necessary to enable it in KDC and start it.
Figure 26.2 Kerberos tickets displayed in Kerbtray
When the previous steps are followed successfully, set authentication in Kerio Connect on the
Advanced tab under Configuration → Domains, (see chapter 7.7.
26.2 Kerio Connect on Linux
Authentication against Active Directory
Before setting Kerberos user authentication at Linux, it is recommended to check that
authentication against the domain functions correctly (check this by logging in the system
using an account defined in the Active Directory).
It is also necessary to ensure the following:
1. Kerio Connect’s host uses the domain controller of the Active Directory domain as the
primary DNS server.

Kerberos Authentication
290
If the network configuration requires authentication against multiple domain controllers
at a time, add all domain controllers where Kerio Connect will be authenticated as DNS
servers.
2. Time of the Kerio Connect host and the Active Directory must be synchronized.
For proper authentication, define the /etc/krb5.conf file.
Example of krb5.conf file’s configuration:
[logging]
default = FILE:/var/log/krb5libs.log
kdc = FILE:/var/log/krb5kdc.log
admin_server = FILE:/var/log/kadmind.log
[libdefaults]
ticket_lifetime = 24000
default_realm = COMPANY.COM
dns_lookup_realm = false
dns_lookup_kdc = yes
[realms]
COMPANY.CZ = {
kdc = server.company.com
admin_server = server.company.com
default_domain = company.com
}
[domain_realm]
.company.com = COMPANY.COM
company.com = COMPANY.COM
[kdc]
profile = /var/kerberos/krb5kdc/kdc.conf
[appdefaults]
pam = {
debug = false
ticket_lifetime = 36000
renew_lifetime = 36000
forwardable = true
krb4_convert = false
}
If authentication against the Kerberos server works in full functionality, it is possible to set
authentication at Kerio Connect. To set this, go to the Directory Service a Advanced tabs in

26.2 Kerio Connect on Linux
291
Configuration → Domains.
Authentication against Open Directory
Before setting Kerberos user authentication at Linux, it is recommended to check that
authentication against the domain functions correctly (check this by logging in the system
using an account defined in the Open Directory). If the attempt fails, check out the following
issues:
1. Kerio Connect must belong to the Kerberos area (Open Directory domain) against which it
authenticates. If Kerio Connect is not the area member, the Kerberos system will not be
working and the users will have to use a local password, i.e. different from the password
for the domain.
2. The DNS service must be set correctly on the Kerio Connect’s host.
3. Time of the Kerio Connect host and the Open Directory must be synchronized.
For proper authentication, define the /etc/krb5.conf file.
Example of krb5.conf file’s configuration:
[logging]
default = FILE:/var/log/krb5libs.log
kdc = FILE:/var/log/krb5kdc.log
admin_server = FILE:/var/log/kadmind.log
[libdefaults]
ticket_lifetime = 24000
default_realm = COMPANY.COM
dns_lookup_realm = false
dns_lookup_kdc = yes
[realms]
COMPANY.CZ = {
kdc = server.company.com
admin_server = server.company.com
default_domain = company.com
}
[domain_realm]
.company.com = COMPANY.COM
company.com = COMPANY.COM
[kdc]
profile = /var/kerberos/krb5kdc/kdc.conf

Kerberos Authentication
292
[appdefaults]
pam = {
debug = false
ticket_lifetime = 36000
renew_lifetime = 36000
forwardable = true
krb4_convert = false
}
If authentication against the Kerberos server works in full functionality, it is possible to set
authentication at Kerio Connect. To set this, go to the Directory Service a Advanced tabs in
Configuration → Domains.
Authentication against a stand-alone Kerberos server (KDC)
To use authentication against a stand-alone Kerberos server (Key Distribution Center), it is
necessary to maintain the username and password database both in Key Distribution Center
and in Kerio Connect.
Before setting Kerberos user authentication at Linux, it is recommended to check that
authentication against the Kerberos area functions correctly (check this by logging in the
system using an account defined in the Key Distribution Center). If the attempt fails, check out
the following issues:
1. Kerio Connect is a member of the Kerberos area to be authenticated against:
• the Kerberos client must be installed on the computer,
• usernames and passwords of all users created in Kerio Connect must be defined
in the Key Distribution Center (required for authentication in Kerberos).
2. The DNS service must be set correctly at Kerio Connect’s host (Key Distribution Center uses
DNS queries).
3. Time on the Kerio Connect host must be synchronized with time at the Key Distribution
Center (all hosts included in the Kerberos area needs synchronized time).
For proper authentication, define the /etc/krb5.conf file.
Example of krb5.conf file’s configuration:
[logging]
default = FILE:/var/log/krb5libs.log
kdc = FILE:/var/log/krb5kdc.log
admin_server = FILE:/var/log/kadmind.log
[libdefaults]
ticket_lifetime = 24000

26.3 Kerio Connect on Mac OS X
293
default_realm = COMPANY.COM
dns_lookup_realm = false
dns_lookup_kdc = yes
[realms]
COMPANY.CZ = {
kdc = server.company.com
admin_server = server.company.com
default_domain = company.com
}
[domain_realm]
.company.com = COMPANY.COM
company.com = COMPANY.COM
[kdc]
profile = /var/kerberos/krb5kdc/kdc.conf
[appdefaults]
pam = {
debug = false
ticket_lifetime = 36000
renew_lifetime = 36000
forwardable = true
krb4_convert = false
}
Using the kinit utility, it is possible to test whether Kerio Connect is able to authenticate
against the Key Distribution Center Simply open the prompt line and use the following
command:
kinit -S host/server_name@KERBEROS_REALM user_name
for example:
kinit -S host/[email protected] wsmith
If the query was processed correctly, you will be asked to enter password for the particular
user. Otherwise, an error will be reported.
Then, perform corresponding settings in Kerio Connect (see chapter 7.7).
26.3 Kerio Connect on Mac OS X
Authentication against Active Directory
If Kerio Connect is installed on Mac OS X and user accounts are mapped from the Active
Directory, perform the following settings:

Kerberos Authentication
294
DNS configuration
To ensure that Mac OS X can access the Active Directory, enable resolving of DNS name from
Active Directory. For this reason, it is also necessary to set Active Directory as the primary
DNS server:
Figure 26.3 DNS configuration
1. Open the System Preferences application and click on Network (see figure 26.3)
2. to open the Network dialog box. On the TCP/IP tab, specify the IP address of the Active
Directory server in the DNS servers entry.
If the network configuration requires authentication against multiple domain controllers
at a time, add all domain controllers where Kerio Connect will be authenticated as DNS
servers.
Connection of the Kerio Connect host to the Active Directory domain

26.3 Kerio Connect on Mac OS X
295
To connect the computer to the Active Directory domain, use the Directory Access utility (Appli-
cations → Utilities) which is included in all basic Apple Mac OS X systems. For the configuration,
follow these instructions:
1. Run the Directory Access application and enable the Active Directory service in the Services
section (see figure 26.4). Enter authentication name and password. The user who makes
changes in the application needs administration rights for the system.
Figure 26.4 Directory Access — Services
2. Enable the service, click on Configure and specify the Active Directory domain name (see
figure 26.5).
3. Click on Bind and set username and password for the Active Directory, administrator.
The administrator will be allowed to add computers to the Active Directory domain (see
figure 26.6).
If all settings are done correctly, it will take only a few seconds to connect the computer to the
domain.
Kerberos settings
Once Mac OS X is successfully connected to the Active Directory domain, the special
edu.mit.Kerberos file is created in the /Library/Preferences/ directory. Make sure that
the file has been created correctly. You can use the following example for comparison:

Kerberos Authentication
296
Figure 26.5 Directory Access — configuration
Figure 26.6 Directory Access — specification of administrator’s login data
# WARNING This file is automatically created by Active Directory
# do not make changes to this file;
# autogenerated from : /Active Directory/company.com
# generation_id : 0
[libdefaults]
default_realm = COMPANY.COM
ticket_lifetime = 600
dns_fallback = no
[realms]
COMPANY.CZ = {
kdc = server.company.com. :88
admin_server = server.company.com.
}
Using the kinit utility, it is possible to test whether Kerio Connect is able to authenticate
against the Active Directory Simply open the prompt line and use the following command:
kinit -S host/server_name@KERBEROS_REALM user_name

26.3 Kerio Connect on Mac OS X
297
for example:
kinit -S host/[email protected] wsmith
If the query was processed correctly, you will be asked to enter password for the particular
user. Otherwise, an error will be reported.
Authentication against Open Directory
Kerio Connect can either be installed on the server with the Apple Open Directory directory
service or on another server.
If Kerio Connect is installed on the same server as Open Directory, it is not necessary to
perform any additional configuration besides installation of the Kerio Open Directory Extension
installation. If it is installed on another computer, external authentication through Kerberos
to Open Directory must be set.
Kerio Connect can be installed on servers with Mac OS X 10.3 and higher. The settings are
similar for both versions. The following description applies to configuration on Mac OS X
10.4, any discrepancies will be mentioned.
External authentication is configured with a special application, Directory Access. The
application can be found under Applications → Utilities → Directory Access. This application
is used to create the special edu.mit.Kerberos authentication file which is located
under /Library/Preferences. The following settings must be performed to make the
authentication work properly:
1. Start the Directory Access application.
2. On the Services tab, check the LDAPv3 item (see figure 26.7).
3. On the Services tab, use the mouse pointer to park the DAPv3 item and click on Configure.
4. In the next dialog, click New.
5. This will open a dialog box where IP address and name of the server can be specified. Enter
IP address or DNS name of the server where the Apple Open Directory service is running.
Once the server is specified, click on the Manual button (not necessary in the Mac OS X
10.3 version) and enter a name in the Configuration name text box (this item is used for
reference only).
6. Save the configuration and select Open Directory Server in the LDAP Mappings menu.
7. Once Open Directory Server is selected, the dialog for specification of the search suffix
is opened (Search Base Suffix). The suffix must be entered as shown in the example in
figure 26.8:
od.company.com → dc=od,dc=company,dc=com

Kerberos Authentication
298
Figure 26.7 Directory Access — checking LDAP
The figure implies that the suffix must be specified as follows: dc=subdomain,dc=domain.
Number of subdomains in the suffix must meet the number of subdomains in the server’s
name.
8. Now, authentication will be set for the Open Directory server. Switch to the Authentication
tab (see figure 26.9).

26.3 Kerio Connect on Mac OS X
299
Figure 26.8 Directory Access — configuration of the Open Directory server

Kerberos Authentication
300
Figure 26.9 Directory Access — Authentication settings
9. In the Search menu, it is necessary to select Custom path.
10. Enter the name of the Open Directory server to the Directory Domains list. Click on Add.
The Directory Access application automatically enters the Open Directory name specified
on the previous tab. Simply confirm the offer.
11. Save the settings by the Apply button.
Directory Access creates the edu.mit.Kerberos file in the /Library/Preferences directory.
Check if the file includes correct data. The following parameters should be included:
# WARNING This file is automatically created by Open Directory
# do not make changes to this file;
# autogenerated from : /Open Directory/company.com
# generation_id : 0
[libdefaults]
default_realm = COMPANY.COM
ticket_lifetime = 600
dns_fallback = no
[realms]

26.3 Kerio Connect on Mac OS X
301
COMPANY.CZ = {
kdc = server.company.com. :88
admin_server = server.company.com.
}
Using the kinit utility, it is possible to test whether Kerio Connect is able to authenticate
against Kerberos. Simply open the prompt line and use the following command:
kinit -S host/server_name@KERBEROS_REALM user_name@REALM
for example:
kinit -S host/[email protected] [email protected]
If the query was processed correctly, you will be asked to enter password for the particular
user. Otherwise, an error will be reported.
Now, simply change configuration in Kerio Connect:
• In the Domains section in the Kerio Connect’s administration interface, specify
parameters on the Directory Service and the Advanced tabs (the Apple Open Direc-
tory realm must be specified in the Kerberos 5 entry)
Warning:
Kerberos realm specified on the Advanced tab must be identical with
the name of the Kerberos realm specified in the file
/Library/Preferences/edu.mit.Kerberos
In particular, it must match the default_realm value in this file. By
result, the line may be for example default_realm = COMPANY.COM
• In the Kerio Connect’s administration interface, the Apple Open Directory
authentication type must be set for user accounts.
Authentication against a stand-alone Kerberos server (KDC)
To use authentication against a stand-alone Kerberos server (Key Distribution Center), it is
necessary to maintain the username and password database both in Key Distribution Center
and in Kerio Connect.
Before setting Kerberos user authentication at Kerio Connect, it is recommended to check
that authentication against the Kerberos area functions correctly (check this by logging in the
system using an account defined in the Key Distribution Center at the host where Kerio Connect
will be installed). If the attempt fails, check out the following issues:
1. Kerio Connect is a member of the Kerberos area to be authenticated against:
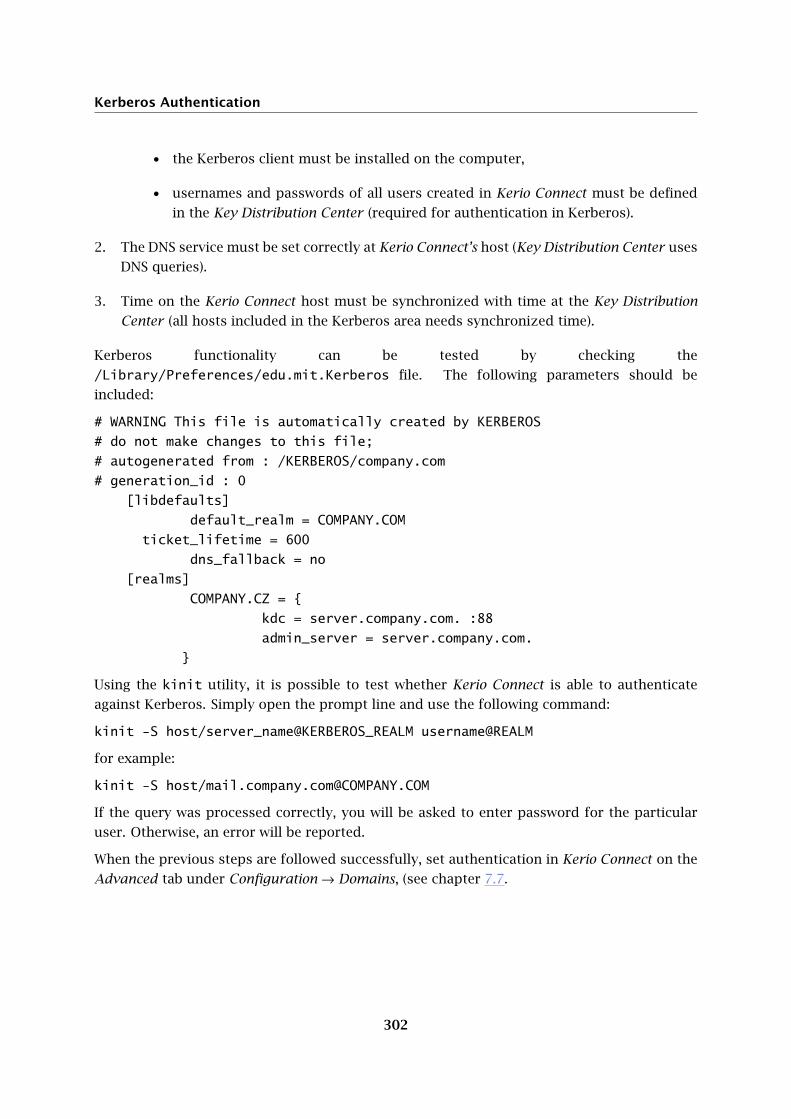
Kerberos Authentication
302
• the Kerberos client must be installed on the computer,
• usernames and passwords of all users created in Kerio Connect must be defined
in the Key Distribution Center (required for authentication in Kerberos).
2. The DNS service must be set correctly at Kerio Connect’s host (Key Distribution Center uses
DNS queries).
3. Time on the Kerio Connect host must be synchronized with time at the Key Distribution
Center (all hosts included in the Kerberos area needs synchronized time).
Kerberos functionality can be tested by checking the
/Library/Preferences/edu.mit.Kerberos file. The following parameters should be
included:
# WARNING This file is automatically created by KERBEROS
# do not make changes to this file;
# autogenerated from : /KERBEROS/company.com
# generation_id : 0
[libdefaults]
default_realm = COMPANY.COM
ticket_lifetime = 600
dns_fallback = no
[realms]
COMPANY.CZ = {
kdc = server.company.com. :88
admin_server = server.company.com.
}
Using the kinit utility, it is possible to test whether Kerio Connect is able to authenticate
against Kerberos. Simply open the prompt line and use the following command:
kinit -S host/server_name@KERBEROS_REALM username@REALM
for example:
kinit -S host/[email protected]
If the query was processed correctly, you will be asked to enter password for the particular
user. Otherwise, an error will be reported.
When the previous steps are followed successfully, set authentication in Kerio Connect on the
Advanced tab under Configuration → Domains, (see chapter 7.7.

26.4 Starting Open Directory and Kerberos settings
303
26.4 Starting Open Directory and Kerberos settings
In Open Directory, it is possible to authenticate users against the password server (refer to
chapter 10) or the Kerberos server (for details, see chapter 26). As mentioned in chapter 10,
authentication against the password server does not require any additional settings, while
Kerberos authentication might be quite difficult to configure. This chapter therefore focuses
on correct setting of the authentication against the Kerberos server in Open Directory.
After Mac OS X Server’s startup, make sure that both the Open Directory service and the
Kerberos server are running. This can be done in the Server Admin application (Applications
→ Server → Server Admin).
The welcome dialog of Server Admin consists of two basic sections. The left one includes
a list of hosts and services which are running at these hosts. This section also includes the
host where the Open Directory service is supposed to be started. If the service is already
running, it is bold and marked with a green symbol (see figure 26.10).
Figure 26.10 The Open Directory service
The right section usually includes information about the selected service, its logs and settings.
The directory service should be started automatically by the first startup of the Mac OS X
Server. If it is not running, mark it by the mouse pointer and click the Start Service button
at the toolbar. In the right section of the window, find out which Open Directory services are
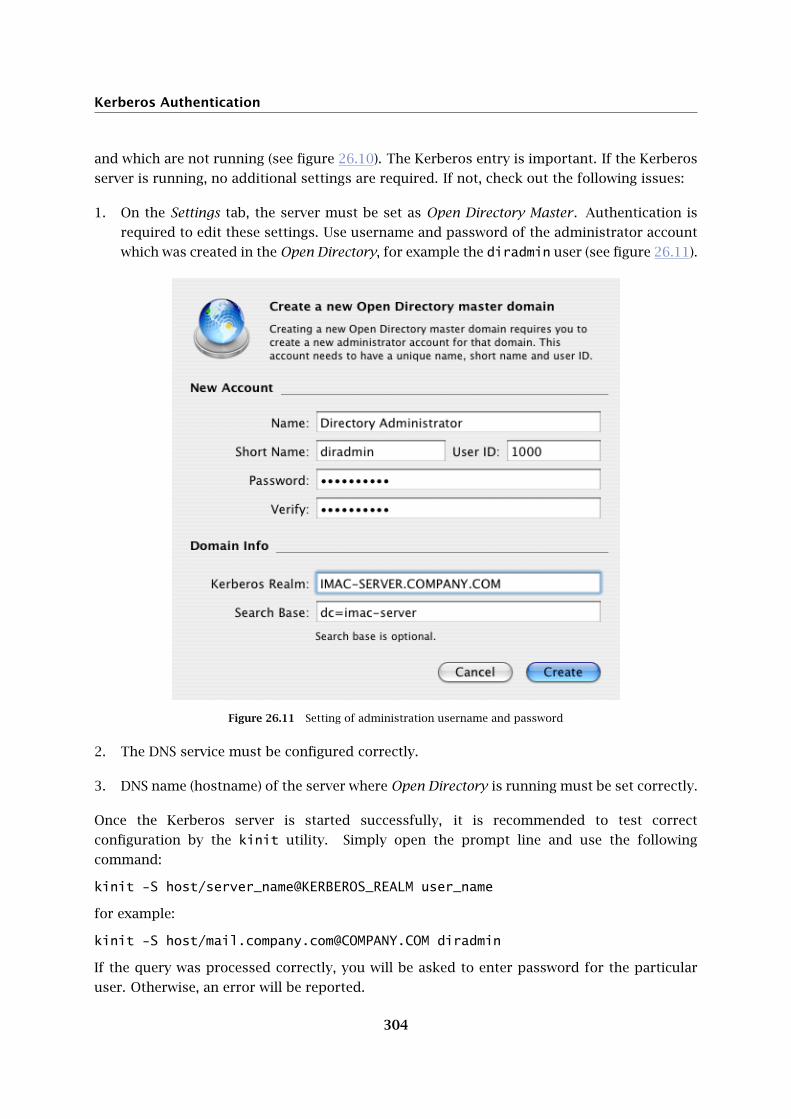
Kerberos Authentication
304
and which are not running (see figure 26.10). The Kerberos entry is important. If the Kerberos
server is running, no additional settings are required. If not, check out the following issues:
1. On the Settings tab, the server must be set as Open Directory Master . Authentication is
required to edit these settings. Use username and password of the administrator account
which was created in the Open Directory, for example the diradmin user (see figure 26.11).
Figure 26.11 Setting of administration username and password
2. The DNS service must be configured correctly.
3. DNS name (hostname) of the server where Open Directory is running must be set correctly.
Once the Kerberos server is started successfully, it is recommended to test correct
configuration by the kinit utility. Simply open the prompt line and use the following
command:
kinit -S host/server_name@KERBEROS_REALM user_name
for example:
kinit -S host/[email protected] diradmin
If the query was processed correctly, you will be asked to enter password for the particular
user. Otherwise, an error will be reported.

26.4 Starting Open Directory and Kerberos settings
305
Note: Logs available on the Logs tab can be helpful for troubleshooting.
306
Chapter 27
NTLM authentication settings
NTLM (NT LAN Manager) is an authentication type used on Windows for authentication against
an Active Directory (or NT) domain.
First, the following conditions must be met:
• NTLM authentication can be used only in case users are authenticated against an Active
Directory domain. It is applicable only to the user accounts that were imported from
Active Directory (see chapters 10 and 8.9).
• In order for the NTLM authentication to be functional, both computers as well as user
accounts have to belong to the domains used for authentication.
• To make NTLM relevant it is necessary that users use clients with support for NTLM
(SPA) authentication (e.g. MS Outlook).
NTLM authentication in Kerio Connect must be set correctly, as follows:
1. In the administration interface, go to Domains (Configuration → Domains). Open the
dialog with domain settings details and switch to the Advanced tab (see figure 27.1). Use
the Windows NT Domain entry to specify NT domain name (the name usually matches the
Active Directory domain name without the first level domain — NET, COM, etc.).
2. In the administration interface, go to Configuration → Advanced Options and enable the Al-
low NTLM authentication for users with Kerberos authentication (for Active Directory users)
option on the Security Policy tab. Enable this option to allow Active Directory domain users
to authenticate at Kerio Connect upon their logon.

307
Figure 27.1 Setting Windows NT domain name

NTLM authentication settings
308
Figure 27.2 Enabling the Allow NTLM authentication for users with Kerberos authentication option
3. In the administration interface, open the Accounts → Users section and set the Windows
NT Domain option for user authentication. These parameters can be set on the General
tab (see figure 27.3).

27.1 Setting NTLM in MS Outlook extended by the Kerio Outlook Connector
309
Figure 27.3 User authentication settings
27.1 Setting NTLM in MS Outlook extended by the Kerio Outlook Connec-
tor
It is also necessary to enable NTLM (SPA) authentication in email clients. These settings are
generally performed in user’s email account configuration. The following section provides
instructions on how to set for example MS Outlook extended by the Kerio Outlook Connector :
1. In Tools → Account Settings, open the E-mail tab.
2. Select a Kerio Connect (MAPI) account and click on Change (see figure 27.4).
3. In the account settings just opened, go to the Account tab and enable the Secure Password
Authentication option (see figure 27.5).

NTLM authentication settings
310
Figure 27.4 Editing an e-mail account
Figure 27.5 NTLM authentication settings

311
Chapter 28
Kerio Connect Environment
28.1 Configuring Email Clients
This chapter contains basic information about how to set email clients (i.e. programs used
to read and write email messages). It does not focus on particular client software but gives
you general advice that you should follow in order for the client to work properly with Kerio
Connect.
Configuring an Email Account
An email account is a group of parameters describing the incoming and outgoing mail servers
and the conditions for their use. Most email clients allow switching between multiple accounts.
Let’s create a new account that will be used for retrieving and sending messages via Kerio
Connect.
Note: The following description of settings was created using the MS Outlook Express 6.0 email
client. However, basic account settings are very similar in all email clients.
Outgoing (personal) email address
This address should consist of the name of the user and the domain as it is set in Kerio
Connect, e.g. [email protected].
Name of the user
This can be anything as it is only displayed in the message header. Using special
characters (typically in non-English versions) might cause problems.
It does not relate to the full name or description in Kerio Connect. A decent user sends
messages using his/her own name!
Outgoing mail server (SMTP)
DNS name or IP address of the host where Kerio Connect is running (e.g.
mail.company.com or 192.168.1.10).
Incoming mail server
Also DNS name or IP address of the host where Kerio Connect is running (e.g.
mail.company.com or 192.168.1.10).
Incoming mail server type
POP3 or IMAP. If both services run on Kerio Connect the user can choose whichever suits
him/her best. The protocol type cannot be altered later. It is important to realize that
if the user accessed the account using the IMAP protocol and now he/she wishes to use
POP3, he/she will only be able to download messages from the INBOX folder.

Kerio Connect Environment
312
User name and password
The name and password for the Kerio Connect user account. If the account is not in the
primary domain a full email address must be used for the user name.
Authentication on the outgoing (SMTP) server
This needs to be set if anti-spam protection is enabled in Kerio Connect (see chapter 13)
as well as relay control — sending email to any domain is not permitted from the client’s
IP address (see chapter 13). If this is not set the user will only be able to send email within
the local domains.
Server requires secure communication
These options define whether a non-encrypted or an SSL-encrypted connection should be
used during sending or receiving of email. With Kerio Connect you can use a secured
connection in both cases (if appropriate services are running), which is recommended.
Secure password authentication (SPA/NTLM)
This function can be used if a user logs into an NT domain and the user’s account in
the Kerio Connect is set to authenticate the user in the NT domain. This allows the client
software to use the same authentication credentials as the ones for logging into a domain.
Directory Service
You can use the Kerio Connect LDAP server as a directory service (for details refer to
chapter 20)
IMAP Folders Administration
After creating a mail account using the IMAP protocol the client will download a list of folders
from the server and display it. The user can choose the folders that are to be displayed (this
can be changed later). In the client software the user can create, rename or delete folders in
the same way as in the Kerio WebMail interface. It is important to note that these folders are
stored at the server and not locally as with POP3 protocol.
It is important to ensure that the email client and the Kerio WebMail interface use the same
folder names for sent mail (Sent Items) and draft messages (Drafts).
The email client can set synchronization for each folder. If a folder is synchronized with
the server, each new message will be immediately displayed in the client software. This
requires a permanent connection to the server. If the client is connected using a dial-up line,
synchronization can only be performed manually or in defined time intervals.
28.2 Web browsers
Recommended browsers for the full version of Kerio WebMail are as follows:
• Internet Explorer 6, 7 and 8
• Firefox 3 or higher

28.3 Firewall
313
• Safari 4
• Safari on Apple iPhone
From technical reasons, in older versions of the browsers and the types not listed, it is not
possible to run the full version of Kerio WebMail. However, it is possible to use its simplified
version, Kerio WebMail Mini. Kerio WebMail Mini is run automatically in older versions of
browsers, in text-based browsers such as Lynx or Links, on PDA devices, on cellular phones,
etc. Kerio WebMail Mini does not use CSS and JavaScript.
To use the secured access to the Kerio WebMail interface (by HTTPS protocol), the browser
must support SSL encryption. If this can be configured (e.g. in MS Internet Explorer) we
recommend enabling support for SSL 3.0 and TLS 1.0.
28.3 Firewall
Quite often, Kerio Connect is installed on a local network protected by a firewall or directly
on the firewall host. To assure connectivity the system administrator then has to set several
settings.
Ports
If the mailserver is to be accessible from the Internet, certain ports have to be opened (mapped)
in the firewall. Generally, any open port means a security hole; therefore, the less mapped
ports you have the better.
When mapping ports for Kerio Connect the following rules should be followed:
• Port 25 must be mapped if you would like the SMTP server to be accessible from the
Internet. This must be done if an MX record for the given domain (or more domains)
points to the mailserver. In this case it is necessary to enable antispam protection
(see chapter 13) and relay control (see chapter 12.2), so that the mailserver cannot be
misused. Any SMTP server on the Internet can connect to your SMTP server to send
email to one of the local domains. For this reason access must not be restricted to
a selected IP address group.
If all incoming mail is to be downloaded from remote POP3 mailboxes, port 25 does
not need to be opened.
• Ports for other services (POP3, IMAP, HTTP, LDAP and Secure LDAP) need to be opened
if clients wish to access their mailboxes from locations other than the protected local
network (typically notebook users). In this case we strongly recommend using only
secure versions of all services and opening only the appropriate ports on the firewall
(i.e. 636, 443, 993, 995).
• If subnets or IP address ranges from which remote clients connect can be defined, we
recommend allowing access to ports only from these addresses. This is not possible

Kerio Connect Environment
314
if the user travels world-wide and connects to the Internet randomly using many
different ISPs.
Dial-up Connection
If Kerio Connect and a firewall run on the same machine that is connected to the Internet via
a dial-up line, a request may arise asking that the mailserver use a different dial-up connection
(e.g. via a different ISP) than the firewall for accessing the Internet. The firewall then has to
know both of these connections or it will block the packets going through the connection used
by the mailserver (no unknown packet is allowed to pass the firewall — neither outgoing or
incoming).

315
Chapter 29
Deployment Examples
This chapter shows how to set Kerio Connect in different conditions. Each example is
essentially an applied Quick Checklist (see chapter 1.3) for a given situation. These examples
should help you set up Kerio Connect quickly and easily for your company.
29.1 Persistent Internet Connection
Information and Requirements
1. The company has the domain company.com and a primary MX record points to the
computer where Kerio Connect will be installed (the name of the computer in DNS is
mail.company.com) .
2. The computer is connected to the Internet via a leased line.
3. There is no relay SMTP server.
4. The company uses the NT domain DOMAIN and users will be authenticated in this domain.
5. The production department will have an address [email protected] and the sales
department will have the address [email protected]
6. Some users would like Kerio Connect to download messages from their mailboxes on the
Internet and deliver them to their local mailboxes
7. AVG 7.0 antivirus program will be used for checking mail for viruses and no EXE, COM, BAT
and VBS attachments can be sent.
8. Remote administration of Kerio Connect will only be allowed from the IP address
67.34.112.2 (external administrator).
Implementation
1. In the Configuration → Domains section, create the primary local domain company.com
and enter the server’s DNS name mail.company.com. In the Authentication tab enter the
name of the NT domain DOMAIN.
2. In the Accounts → Users section, use the Import and Export button to import all users from
the domain. This way the users will not have to be added manually.

Deployment Examples
316
3. In the Accounts → Groups section, create the groups Production and Sales and add
appropriate users to them.
4. In the Accounts → Aliases section, define the aliases production and sales to be delivered
to the corresponding user groups.
5. The Internet connection is permanent. In the Configuration → Delivery → Internet Con-
nection section, select the Online option.
6. Outgoing mail will be sent directly to the target domains. On the SMTP delivery tab in
the Configuration → SMTP server section, select the Deliver directly using DNS MX records
option.
7. In the Configuration → Delivery → POP3 Download section, define retrieval of email from
requested external mailboxes. For each mailbox, select a user to whom messages from the
mailbox will be delivered.
8. Set up scheduling for downloading of mail from the remote mailboxes. The leased line is
fast and is connected permanently so messages from the mailboxes can be downloaded
quite often. Set scheduling every 10 minutes (Every 00:10). Outgoing mail is sent
immediately and no mail is received using ETRN — only tick Receive POP3 mailboxes.
9. In the Configuration → Content Filter → Antivirus section, enable antivirus control and
choose the AVG 7.0 module. In Configuration → Content Filter — Attachment Filter , enable
filtering and set forbidden files, i.e. *.exe, *.com, *.bat and *.vbs.
10. In the Configuration → Definitions → IP Address Groups section, create a group named
Remote administration and assign it a single IP address (host) 67.34.112.2.
11. In the Configuration → Remote Administration section, tick Enable administration from
network and Only from this IP address group. Choose the created group Remote adminis-
tration here.
29.2 Dial-up Line + Domain Mailbox
Information and Requirements
1. The company uses the domain othercompany.com and all messages sent to this address
are stored in a domain mailbox entitled other company at the server pop3.isp.com with
the username othercompany and password password
2. The computer is connected to the Internet via a dialed line.
3. The ISP enables sending outgoing email via their server
smtp.isp.com,

29.2 Dial-up Line + Domain Mailbox
317
if the user authenticates by username and password (the same situation as in case of
POP3).
4. During working hours (Mon-Fri 8:00-17:00) mail will be downloaded every hour and after
working hours at 20:00, 0:00 and 5:00
Implementation
1. In the Configuration → Domains section, create the primary local domain
othercompany.com and set the Internet name of the server mail.othercompany.com
(this is more or less fictitious but it contains the domain name). The domain is defined as
local, which means that mail sent between local users will not be sent to the Internet and
downloaded back again.
2. In the Accounts → Users section, create user accounts for all local users.
3. The server will connect to the Internet using a dial-up connection (that already exists in
the system). In the Configuration → Delivery → Internet Connection section, choose the
Offline option, tick the field Use RAS to connect to Internet, choose the requested RAS
connection and enter the appropriate username and password.
4. All outgoing mail will be sent to a relay SMTP server. On the SMTP Delivery tab in
the Configuration → SMTP server section, select Use relay SMTP server and enter its
name — smtp.isp.com. The server requires authentication — enable the option Relay
server requires authentication and fill in the appropriate username and password. Set the
authentication type to SMTP AUTH Command.
5. In the Configuration → Delivery → POP3 Download section, Accounts tab, define
downloading of the domain mailbox othercompany at the server pop3.isp.com. Mail
from this mailbox will be delivered using sorting rules — select Use sorting rules. It is
recommended to consult selection of a preferred header with the administrator of the
server where the mailbox is located. The default Received header should be suitable in
most of situations.
6. In the Configuration → Delivery → POP3 Download section, Sorting Rules tab, set sorting
rules for individual users’ email addresses.
7. In the Configuration → Definitions → Time Ranges section, create a time interval Working
hours, containing the range 8:00:00-17:00:00 valid from Monday through Friday, to be
used in scheduling.
8. Set up scheduling for message retrieval from the POP3 box and sending of messages from
the mail queue. Add scheduling for every hour (Every 1:00) valid at the time interval
Working hours and three schedulings for certain times (At) that will be valid all the time.
For all schedulings check the
Deployment Examples
318
Receive POP3 mailboxes but also Send mail in mail queue, so that all possible outcoming
messages get sent.
29.3 Dial-up Line + ETRN
Information and Requirements
1. The company uses the domain thirdcompany.com and the primary MX record points to
the computer where Kerio Connect is installed (its DNS name is mail.thirdcompany.com).
2. The secondary MX record is directed to the SMTP server.
etrn.isp.com,
which supports the ETRN command and requires authentication by username and
password.
3. The computer is connected to the Internet via a dial-up line (a static IP is assigned, to
which the DNS name mail.thirdcompany.com is assigned).
4. The ISP enables sending outgoing email via their server
smtp.isp.com,
if the user authenticates by username and password.
5. During working hours (Mon-Fri 8:00-17:00) mail will be downloaded every hour and after
working hours at 20:00, 0:00 and 5:00
Implementation
1. In the Configuration → Domains section, create the primary local domain
thirdcompany.com and enter the DNS name of the server mail.thirdcompany.com.
When the line is up Kerio Connect will function as the primary server for this domain.
While the line is down email will be sent to a secondary server.
2. In the Accounts → Users section, create user accounts for all local users.
3. The server will connect to the Internet using a dial-up connection (that already exists in
the system). In the Configuration → Delivery → Internet Connection section, choose the
Offline option, tick the field Use RAS to connect to the Internet, choose the requested RAS
connection and enter the appropriate username and password.
4. All outgoing mail will be sent to a relay SMTP server. On the SMTP Delivery tab in
the Configuration → SMTP server section, select Use relay SMTP server and enter its
name — smtp.isp.com. The server requires authentication — enable the option Relay

29.3 Dial-up Line + ETRN
319
server requires authentication and fill in the appropriate username and password. Set the
authentication type to SMTP AUTH Command.
5. Under Configuration → Delivery → ETRN Download, define the following information:
server: etrn.isp.com,
domain: thethirdparty.com,
Server requires authentication, enter username and password.
6. In the Configuration/Definitions/Time Ranges section, create a time interval Working
hours, containing the range 8:00:00-17:00:00 valid from Monday through Friday, to be
used in scheduling.
7. Set up scheduling for sending and downloading of messages. Add scheduling for every
hour (Every 1:00) valid at the time interval Working hours and three schedulings for certain
times (At) that will be valid all the time. For all schedulings tick the On-demand mail relay
option (i.e. receiving mail using ETRN) but also Send mail in mail queue.

320
Chapter 30
Troubleshooting in Kerio Connect
30.1 Reindexing mail folders
Problem description
User’s folder or even his/her entire mailbox is not displayed correctly. The damaged folder
seems to be empty or some messages are missing.
This problem might be caused by discrepancies between the index.fld special file and the
#msgs directory in a Kerio Connect’s mail folder.
For better understanding, let us explain how Kerio Connect handles messages. Email messages,
contacts, events, tasks and notes are saved to a store as a folder tree. This store is represented
by the \store directory which is further divided to domains, user mailboxes and folders
included in these mailboxes. Each folder contains several directories and files where email
messages as well as information regarding these messages are stored.
We will focus on the #msgs directory where messages in the format of .eml files are stored
and on the special index.fld file which is used by Kerio Connect to orientate in the #msgs
directory while communicating with email clients. This file is created for each mail folder
upon the first startup of Kerio Connect.
The index.fld file includes list of messages contained in the folder as well as specific
information regarding these messages. Each line of the file represents record of one email
message stored in the folder.
The index.fld file and the #msgs directory are saved in every folder created in each user
account. The following path can be used as an example:
\Kerio\MailServer\store\mail\company.com\nmandela\INBOX
Solution
The solution might be easy:
1. Stop the Kerio Connect Engine.
2. Under the store directory in the Kerio Connect’s store, find the domain of the users who
have problems with their folders. Find the user’s folder labeled by their username. In this
folder, the entire email account of the particular user is saved. User-created subfolders
are included in main folders — they are ordered in the same way as displayed in Kerio
WebMail.
30.2 Moving configuration and data to another computer
321
3. Select the problematic folder, open it and change the filename from index.fld to
index.bad
4. Run Kerio Connect Engine.
The file is automatically regenerated upon the first logon of the user to their mailbox — this
happens in accordance with the current status of the folder and the file also takes over any
flags (marks that inform form example whether the message was marked as deleted or if it
was removed) from the original file renamed to index.bad.
Upon starting Kerio Connect, the following record is written in the Error log:
[23/Jun/2005 12:12:47] mail_folder.cpp: Folder
[email protected]/Contacts has corrupted status and index files,
going to restore them. Some flag information may be lost
30.2 Moving configuration and data to another computer
This section describes situation where it is necessary to reinstall the operating system on
the computer where Kerio Connect is hosted or to move data and configuration of theKerio
Connect to another computer physically.
The simplest way to transfer data and configuration files to a new store is to perform a full
back up of the entire Kerio Connect and then use it in the new Kerio Connect store. The full
back up involves all data (the store folder) and configuration files including licenses and used
SSL certificates (see section 15.2).
Recovery of backed up server’s data and configuration
To prepare conditions for transfer of Kerio Connect’s data and configuration to a new host,
follow these guidelines:
1. Execute a full back up of the original Kerio Connect (see chapter 15.2).
2. Install the new Kerio Connect.
3. Stop the Kerio Connect Engine of the new Kerio Connect.
4. Use the Kerio Connect Recover tool to unpack the backup to the new Kerio Connect store.
5. Optionally (but it is recommended), make backups of the myspell folder and copy it to the
new store if other than default dictionaries are used for spellcheck in the Kerio WebMail
interface (for details on this topic, see section 17.3).
6. Run Kerio Connect Engine.

322
Chapter 31
Kerio Outlook Connector
Kerio Outlook Connector is a special module for MS Outlook extending cooperation between
Kerio Connect and MS Outlook. This module helps keep data which must be available to users
saved on the server. This data include email folders, calendars, tasks, contacts, notes as well
as public folders.
In addition to the standard Kerio Outlook Connector, Kerio Technologies has also developed
a new tool, Kerio Outlook Connector (Offline Edition). Kerio Outlook Connector (Offline Edition)
brings many advantages lacked in Kerio Outlook Connector. As suggested by the name of the
module, the main advantage of Kerio Outlook Connector (Offline Edition) is working offline in
MS Outlook, most useful probably for notebook users. Other advantages are searching through
message bodies and so called grouping. For more information on Kerio Outlook Connector, see
section 31.1.
31.1 Kerio Outlook Connector (Offline Edition)
Kerio Outlook Connector (Offline Edition) — referred as Kerio Outlook Connector — an MS Out-
look extension allowing strong cooperation of the Kerio Connect with MS Outlook. This
cooperation provides the following options:
• Email, events, notes, contacts and tasks are stored in Kerio Connect. Therefore, they
are available via the Internet from anywhere. You can connect either by MS Outlook,
by Kerio WebMail or via another email client.
• MS Outlook can be switched to offline mode. This implies that you can manage your
email items also from home or on your business trips. This means that your email
can be managed even there where the Internet connection is too slow or there is no
connection at all. After reconnection to the Internet (switching to online mode), Kerio
Outlook Connector synchronizes all changes with the mailserver and sends mail from
Outbox.
• Kerio Outlook Connector supports folder management.
• In calendars, meeting scheduling and, in task folders, assigning of tasks to other
persons are supported.
• Kerio Outlook Connector allows setting of rules for incoming email. These rules are
stored at the server, so they are applied globally — i.e. mail will be sorted in the same
way in Kerio WebMail and other email clients.

31.1 Kerio Outlook Connector (Offline Edition)
323
• Along with Kerio Connect, Kerio Outlook Connector provides a proprietary antispam
strategy.
• Kerio Outlook Connector allows searching in message bodies.
• Kerio Outlook Connector provides support for message grouping.
Note: This guide provides detailed description on:
• such MS Outlook settings that are related to Kerio Outlook Connector. For
information on MS Outlook features and settings, refer for example to
http://www.microsoft.com/office/2007-rlt/en-US/Outlook.
• settings in MS Outlook 2007. It can, therefore, slightly differ on older versions of
MS Outlook.
For correct functioning of the module, the HTTP(S) service must be running in Kerio Connect
— this protocol is used for any traffic from and to Kerio Connect.
Kerio Outlook Connector is localized for the languages listed in table 31.1.
English Dutch Hungarian Russian
Czech Croatian German Slovak
Chinese Italian Polish Spanish
French Japanese Portuguese Swedish
Table 31.1 Supported languages
Language of the Kerio Outlook Connector is set automatically in accordance with the language
version set in MS Outlook. If a language set MS Outlook is not available in the Kerio Outlook
Connector, English is used automatically.
Specific options and settings in MS Outlook are focused in the Kerio Connect 7, User’s Guide).
31.1.1 Manual installation on a user’s workstation
Kerio Outlook Connector can be installed at the following operating systems:
• Windows XP
• Windows Vista (32 and 64 bits) with the recent Service Pack installed
• Windows 7
Installation of the Kerio Outlook Connector can be run with the following versions of MS Out-
look:
• Outlook XP with the most recent update of Service Pack.
• Outlook 2003 with the most recent update of Service Pack.

Kerio Outlook Connector
324
• Outlook 2007 with the most recent update of Service Pack.
• Outlook 2010.
Kerio Outlook Connector (Offline Edition) requires Internet Explorer 6.0 or higher.
Warning:
Kerio Outlook Connector (Offline edition) communicates with the server via the MAPI based
on HTTP(S) protocol. Therefore, it is necessary to run HTTP(S) service on the server and map
the corresponding port(s) on the firewall protecting the server.
To get the Kerio Outlook Connector installation package, follow these guidelines:
1. In your browser, enter your mailserver’s URL address following the pattern
http://server_name/ (e.g.http://mail.company.com/).
2. If the address is correct, the Kerio WebMail login page is opened. Click on the Integration
with Windows link displayed at the bottom of the login dialog.
3. This opens the Integration with Windows page. Simply click on Download Kerio Outlook
Connector .
Installation wizard is used for the Kerio Outlook Connector installation. Once the installation
is completed, it is necessary to set a profile and an email account explicitly.
Warning:
• MS Outlook must be installed and at least once started on the computer prior to the
Kerio Outlook Connector (Offline Edition) installation, otherwise the application will
not function properly.
• When the upgrade or downgrade of MS Outlook is performed, Kerio Outlook Connec-
tor must be reinstalled manually.
• If you have used another mailserver (e.g. Exchange) and now you are switching to
Kerio Connect, it is necessary to create a new profile in MS Outlook.
Installation on computers where Kerio Outlook Connector has been installed
In the majority of cases, upgrade from Kerio Outlook Connector to Kerio Outlook Connector
(Offline Edition) is smooth. At the beginning of the installation, a convertor is started which
converts all Kerio profiles of the particular user to profiles for Kerio Outlook Connector. If
the station is connected to the Kerio Connect, the Kerio Outlook Connector’s local database is
created automatically and updated..

31.1 Kerio Outlook Connector (Offline Edition)
325
Special cases:
One workstation is shared by multiple users
If a workstation is used by multiple users, install the program once and then run the
convertor (Start → Programs → Kerio → Outlook Profile Conversion Utility) for each user.
Kerio Outlook Connector is installed without connection to Kerio Connect
In such cases profiles are converted, but they must be finished upon connecting to the
server:
1. In the profiles dialog (Start → Settings → Control Panel → Mail → View Profiles), select
the Kerio profile and click on Properties.
2. In the wizard, click on User Accounts.
3. On the following page, double-click on the Kerio account and confirm settings by
the OK button. Conversion to Kerio Outlook Connector profile is then finished
automatically.
This procedure must be taken for each profile with Kerio account.
Profile and Email account settings
In MS Outlook, any number of user profiles can be created. Using of multiple user profiles is
essential especially in the following situations: either the computer is accessed by multiple
users and each of them needs his/her own email address or a user can access multiple
mailboxes and wants to use different settings for each of them. In other cases, one profile
for one or more email accounts is sufficient.
Settings for a new profile can be configured in the Start → Settings → Control Panel → Mail
menu:
1. In the Email Settings dialog, select the Show Profiles button.
2. Click on the Add button to create a new profile and enter its name. Any name can be used.
3. This opens the email account wizard, where a new account can be created. In the dialog,
simply enable the Manually configure server settings or additional server types option.
4. In the Choose e-mail service dialog, select the Other option and enable Kerio Connect (KOC
Offline Edition) (see figure 31.1). Click on Next.
5. On the Accounts tab set basic parameters for connection to the mailserver (see figure 31.2):

Kerio Outlook Connector
326
Figure 31.1 New account settings — e-mail service selection

31.1 Kerio Outlook Connector (Offline Edition)
327
Figure 31.2 New account settings
Server Name
DNS name or IP address of the mailserver (for help, contact your network
administrator).
Secure password verification
This option allows using the NTLM authentication. When checked, users are not
required to set usernames and passwords — authentication against domain will be
used instead.
To make the SPA authentication work, both the computer as well as the user account
have to be parts of the domain used for authentication.
Username
Username used for logging to the mailserver. If the user does not belong
to the primary domain, a full user name including domain is required
Password
Enter your username.

Kerio Outlook Connector
328
Save password
If you check this option, MS Outlook will remember your password and you will not
be asked to enter it again from that time on. If there are multiple persons that access
the computer, it is not recommended to check the option for security reasons.
Press the Retrieve Info button to test if correct user data has been specified and if
the connection to Kerio Connect works properly. If the test is finished successfully,
a corresponding User Name and Email Address are automatically filled in.
6. By default, any traffic between Kerio Connect and MS Outlook is secured by SSL. If there are
no problems encountered regarding encrypted traffic, it is recommended to keep settings
unchanged.
31.1.2 User profile creator — automatic installation and configuration of user profiles
Kerio Technologies have developed ProfileCreator, a special tool allowing to create user email
profiles on client stations automatically.
The main benefit of this tool is that, by using a simple script, user profiles can be created in
batches. Guidelines for ProfileCreator are provided in the following sections.
ProfileCreator is a tool for Windows started from the command line. It is located in the
directory where the Kerio Outlook Connector is installed. It can be started by command
ProfileCreator.exe. When the command is used, guidelines for Profile Creator are
displayed.
ProfileCreator can be run in two basic modes different in authentication type:
• Authentication by username and password:
PROFILECREATOR /profile=<profile> /host=<host> /user=<user>
[/password=<password>] [/port=<port>] [/tlimit=<tlimit>]
[/quiet] [/nossl] [/nocompression] [/offline] [/rename]
• Authentication by SPA (Secure Password Authentication):
PROFILECREATOR /profile=<profile> /host=<host> /spa
[/port=<port>] [/tlimit=<tlimit>] [/quiet] [/nossl]
[/nocompression] [/offline] [/rename]
Note:
• Options in square brackets are optional.
• Parameter /password is obligaotory for online mode. To add your password later, use
the /offline option (you can enter the password when MS Outlook is launched).
Table 31.2 provides brief guidelines for the tool’s options.

31.1 Kerio Outlook Connector (Offline Edition)
329
Option Description
/help The option show the help.
/profile Name of the profile to set.
/host DNS name of the computer where the Kerio Connect is running.
/user Username used in Kerio Connect.
/password Password used in Kerio Connect.
/port This option should be used if the HTTP(S) protocol is running on
a non-standard port.
/tlimit This option sets a timeout for the HTTP session. It is recommended to
increase the value in case your connection is slow. The 180 ms value is
used as default.
/quiet This option suppresses any reports in the command line.
/nossl This option denies secured SSL.
/nocompression This option disallows compression of HTTP data.
/offline During creation of the profile, MS Outlook will not attempt to connect to
Kerio Connect. It attempts to connect upon its first startup. This option is
recommended especially if you are not sure whether your Kerio Connect is
available during the configuration.
/rename By default, the username of the particular user is used for profile name.
The /rename option allows its change.
/spa This option can be used if the user of the client host authenticates to NT
domain. This allows the client software to use the same authentication
credentials as the ones for logging into a domain.
Table 31.2 ProfileCreator options
Use of ProfileCreator will be better understood through the following examples:
Automatic local profile configuration
MS Outlook is installed on client stations. A user installs the Kerio Outlook Connector and runs
ProfileCreator in order to create an email profile and set the initial configuration of the Kerio
account. To get and start ProfileCreator, follow these guidelines:
1. In your browser, enter your mailserver’s URL address following the pattern
http://server_name/ (e.g.http://mail.company.com/).
2. If the address is correct, the Kerio WebMail login page is opened. Click on the Integration
with Windows link displayed at the bottom of the login dialog.

Kerio Outlook Connector
330
3. In the Integration with Windows page just opened, click on Click here to auto-configure
Kerio Outlook Connector .
4. Depending on your browser and its settings, the tool gets downloaded and launched
automatically or it only gets downloaded and you can run it by double-clicking on the
tool’s icon.
5. The script now creates a new profile and pre-configures your Kerio account.
6. Click on Retrieve Info in the configuration to check whether the password is correct and
whether the login data can be used for connection to the server.
Remote configuration of a profile on multiple user workstations
No MS Outlook or Kerio Outlook Connector is installed on user workstations. Everything will
be installed remotely by using Active Directory services.
This option is useful for companies which use Active Directory, map user accounts from the
directory service to Kerio Connect and want to install the Kerio Outlook Connector (Offline
Edition) as an MSI package remotely on user workstations. This is a standard option provided
by Microsoft Corporation’s servers. Upon completion of installation of both applications, it
is possible to set a new profile in MS Outlook and preset the Kerio account remotely. Then,
users can simply authenticate by the password for their Kerio Connect mailbox (unless NTLM
authentication is used) within their first connection, without the need to enter their username
or Kerio Connect address.
How to prepare distribution of MSI packages
Before you start distributing your MSI packages, prepare the following:
1. The Kerio Outlook Connector (Offline Edition) MSI package.
2. MS Outlook installed on user workstations. If users have not started using MS Outlook
yet, they can also install it remotely, following the guidelines for installation of the
Kerio Outlook Connector.
3. User accounts must be located in the Active Directory.
If you want to create your own script, the conditions listed above will be sufficient. If you
want to use our script, you will need to set also the following conditions:
1. On the domain server, installed the Kerio Active Directory Extension if not installed
yet.
2. It is required that a working Kerio Connect is installed in the network and
user accounts are mapped there from the Active Directory domain (for detailed
information on mapping, see chapter 10).
The following text describes a widespread way of MSI package distribution. If you have
already done this and you are sure in how to install files on user workstations remotely,
you can skip this section.

31.1 Kerio Outlook Connector (Offline Edition)
331
Warning:
The guidelines provided below will help you to install both MS Outlook and the
Kerio Outlook Connector. If you want to install both packages, bear in mind that
MS Outlook must be installed on the computer prior to the Kerio Outlook Connec-
tor.
1. On any computer available through a network, create a new directory. Set access
rights to this directory so that all domain users have read only rights (right-click to
open the context menu, select the Share option and set rights on the Sharing and
Security tabs).
2. Copy or move the Kerio Outlook Connector MSI package to the new directory.
3. Check availability of the package from any client computer.
4. On the domain server, go to Start → Control Panels → Administrative Tools → Active
Directory Users and Computers.
5. In that menu, set policy for MSI package installation. The policy can be set either for
the entire domain or it is possible to create an organization unit for selected users.
Note: To create a new organization item, follow these instructions:
a. Right-click on the domain name and select New → Organization Unit in the
context menu.
b. Enter a name for the new organization item and save it by clicking on OK .
6. Right-click on the domain name or on the new organization item and select the Prop-
erties option in the menu. In the dialog just opened, switch to the Group Policy tab.
Click on New and enter a name for the new group policy (see figure 31.3).
7. Click on Edit (the new item must be selected) to open the group policy editor.
8. Go to the new group policy under User Configuration → Software Settings → Software
installation.
9. Right-click on Software Installation and select the New → Package option.
10. Enter the UNC path to the package (e.g. \\server_name\share\koff-6.7.0.msi).
11. Select a deployment method (see figure 31.4). You can use any of the offered options,
but it is recommended to select
Assigned.

Kerio Outlook Connector
332
Figure 31.3 The Group Policy dialog
Figure 31.4 The Deployment Method dialog
Note:
• Published — user can decide on whether to install the program or not.
Installation of the application is offered automatically.
• Assigned — the installation is started automatically upon the first logon..
User profiles configuration
After installation of the Kerio Outlook Connector from the MSI package, user profiles and
Kerio accounts must be created for each user. As this cannot be done immediately upon
the installation, it is necessary to create a user logon script along with the installation:
1. Go to the policy section of the group which was created for the Kerio Outlook Con-

31.1 Kerio Outlook Connector (Offline Edition)
333
nector installation and select option User Configuration → Windows Settings → Script
(Logon/Logoff). Double-click on the Logon.
2. Click on Add and then on Browse in the next dialog.
3. Right-click in the window to display the context menu and select New → Text Docu-
ment (see figure 31.5).
Figure 31.5 Creating the configuration script
4. Rename the file, using the .BAT extension (e.g. ProfileCreator.bat).
5. Check that all Active Directory users have read rights (right-click on the file and click
on Properties and in the Security dialog add the domain user group).
6. Right-click on the file and select Edit in the context menu.
7. This opens the Notepadwhere you can prepare the configuration script. If you are not
sure how to make such a script, read the reference script example provided below.
8. Once you make the script, save it and click on Open.
Note: If you the reference script, in Script Parameters enter the address where your
Kerio Connect is running. This address will be used for the /host=%1 parameter.
9. Confirm settings and close the Active Directory console.
Configuration test
1. To test the configuration, in the Active Directory create a new user in the organization
unit for which group policy for the Kerio Outlook Connector installation was set.
2. Use this user to connect from the client host.
3. Upon successful connection, installation wizard is opened, a profile is created and
then MS Outlook is started. In the dialog just opened, simply enter user password.
Both MS Outlook and the Kerio account should now work.

Kerio Outlook Connector
334
Warning:
If this procedure fails, please check whether the MSI package and the profile
creator script are available from all client computers and that appropriate rights
are set.
Note: A useful example of the script is available at http://server/integration (e.g.
http://mail.company.com/integration). On the Integration with Windows page, you
will find a download link for the script ready for automatic configuration of a profile on
a workstation. Before you create a custom script, it is recommended to study this version.
31.1.3 Notes regarding installation and upgrade on the terminal server
• Installation on the terminal server is allowed to be done only by an administrator.
• Anytime an upgrade of Kerio Connect is performed, it is necessary that the
administrator manually performs an upgrade of the Kerio Outlook Connector on the
terminal server. Otherwise, users would not be able to connect to their Kerio accounts.
• User email profiles are always stored locally, on their workstations.
31.1.4 Automatic updates
Upgrades of Kerio Outlook Connector are performed automatically. If a new version of Kerio
Outlook Connector is available, the module is updated immediately upon the startup of MS Out-
look.
Warning:
When the update is completed, MS Outlook is restarted automatically.
The update process and the restart takes up to two minutes.
The automatic update includes check of versions of Kerio Connect and the Kerio Outlook
Connector. If versions of the server and the client do not match, the user is informed that
a different version of Kerio Connect is installed on the server and that the client should be
updated. Upon confirmation, the version is upgraded/updated immediately (or downgraded).
Note: If the server and client differ only in their build numbers (numbers in the notification are
the same), the client will work even if the update is rejected. If, however, version numbers are
different (for example 6.7.0 versus 6.7.1), Kerio Outlook Connector cannot be started unless
updated.
31.1.5 The Online/Offline mode
Kerio Outlook Connector supports both modes, online and offline. Online mode is the standard
MS Outlook mode which requires connection to Kerio Connect. Offline mode allows running

31.1 Kerio Outlook Connector (Offline Edition)
335
of MS Outlook and working there without connection to Kerio Connect. This requires all
email, events, tasks, etc. being stored in the local message store on the client station. Upon
connection to Kerio Connect, it is possible to synchronize changes with the corresponding
account in Kerio Connect.
The offline mode is helpful especially for users with notebooks who make frequent business
trips and need their email accounts even when they are not currently connected to the Internet.
Upon switching to online mode, all new messages, events and tasks are synchronized with the
server’s store automatically.
Kerio Outlook Connector informs of switching between online and offline modes and about
current synchronization progress and status by a special icon in the systray’s notification area
(see figure 31.6). The icon informs about the following situations:
Figure 31.6 Status — online / synchronization / offline
• Syncronization in progress — a blue right-pointing arrow is displayed at the icon.
• MS Outlook is running in the offline mode — red down-arrow is displayed at the icon.
Offline mode settings
By default, the online mode is set in MS Outlook. To switch to the offline mode, click on Work
offline in the File menu available on the main toolbar.
If MS Outlook loses connection to Kerio Connect, it is automatically switched to the offline
mode.
If you closeMS Outlook in the offline mode, it will be opened in offline mode next time it is
started. If you want to change this, disable the offline mode manually in the File menu.
Synchronization
Upon startup of MS Outlook, the currently opened folder is primarily synchronized.
Any folder saved in Kerio Connect can be synchronized in any of these two modes:
• Full synchronization of the folder.
• Synchronization of header and message body in plain text — this option concerns
synchronization of smaller data volume. However, it is necessary to decide whether
you will not miss possible attachments in your email. When connected online again,
the attachments are included in corresponding messages anyway.

Kerio Outlook Connector
336
In default mode, synchronization of Kerio Connect and the Kerio Outlook Connector works as
follows:
• Inbox — whole messages are synchronized.
• Other email folders — only message headers and body in plain text are synchronized.
• Events — whole events are synchronized.
• Contacts — whole contacts are synchronized.
• Tasks — whole tasks are synchronized.
• Notes — whole notes are synchronized.
Default synchronization mode can be changed (adjusted) in properties of individual folders:
1. Right-click the selected folder and choose Properties from the pop-up menu.
2. In the Properties window switch to the Folder Synchronization tab (see figure 31.7).
Figure 31.7 Folder synchronization settings
Warning:
If you do not wish to synchronize the folder, disable the Enable synchronization of the folder
option. However, any items already included in the folder will be kept synchronized.
Conflicts
Synchronization conflict occurs when a message, event or any other item is chenged both
on the server and in Kerio Outlook Connector in the time between synchronizations. In such
cases, the Kerio Outlook Connector is not capable of recognizing which change is the wanted
(later) one.

31.2 Kerio Outlook Connector
337
If a conflict occurs during the synchronization, the item saved on the server beats the other
one. The winning item is saved in the corresponding folder. The beaten item is saved in
a special folder called Conflicts. This folder is available only in MS Outlook. This implies that
it is not available in Kerio WebMail or another email client.
Both items can be compared to select the correct one. If the server have primarily selected the
wrong version (the older one), it is possible to move it from the
Conflicts folder to the correct directory manually and simply remove the other version.
Each conflict is announced by a special message sent to MS Outlook. Its subject is Message in
conflict!. Conflict information includes name of the message, event, contact or another item in
conflict and its location in mailbox (folder). Local version of the item is moved to the Conflicts
folder. If this version is up-to-date, exchange it with the version in the particular folder.
31.2 Kerio Outlook Connector
Kerio Outlook Connector provides the following features:
• Email, events, notes, contacts and tasks are stored in Kerio Connect. Therefore, they
are available via the Internet from anywhere. You can connect either by MS Outlook,
by Kerio WebMail or via another email client.
• Kerio Outlook Connector supports folder management. In MS Outlook, it is possible
to create hierarchized folder trees of any depth. Folder sharing, viewing of shared
folders and other features are also supported.
• In calendars, meeting scheduling and, in task folders, assigning of tasks to other
persons are supported.
• Kerio Outlook Connector allows setting of rules for incoming email. These rules are
stored at the server, so they are applied globally — i.e. mail will be sorted in the same
way in Kerio WebMail and other email clients.
• Kerio Outlook Connector provides a proprietary antispam strategy.
Warning:
Kerio Outlook Connector cannot be used on the terminal server.
Kerio Outlook Connector also includes Help which can be triggered from the MS Outlook’s
toolbar (Help → Kerio Outlook Connector Help).
Kerio Connect, MS Outlook and Kerio Outlook Connector communicate via Microsoft’s open
MAPI interface. MAPI (Messaging Application Programming Interface) is a versatile interface
for email transmission. It is a software interface that enables any MAPI client to communicate
with any mailserver (MS Outlook and Kerio Connect in this case). MAPI is used especially for
writing of various modules for MS Outlook.

Kerio Outlook Connector
338
For proper functionality of the Kerio Outlook Connector, the following services must be
running in Kerio Connect:
• HTTP(S) — the protocol is used for automatic updates of the Kerio Outlook Connector
and also for communication with the Free/Busy server.
• IMAP(S) — the MAPI interface uses the IMAP protocol in Kerio Connect.
• SMTP(S) — the protocol is used for email sending.
Warning:
In addition to the services listed above, it is also necessary to map corresponding ports on
the firewall protecting the server. Otherwise, services will not be available from the Internet
(for details, see section 2.3).
Installation of the Kerio Outlook Connector can be run under Windows 2000 Professional
(version Service Pack 4), XP (version Service Pack 1 or Service Pack 2) and Windows Vista
(Home, Business, Enterprise or Ultimate editions).
The Windows OS must include Internet Explorer 6.0 or higher.
Kerio Outlook Connector supports the following email clients:
• MS Outlook XP + version Service Pack 3 (the version of Outlook XP must have this
format: 10.0.6515.xyz).
• MS Outlook 2000 + Service Pack 3 (if the service pack is not installed, Kerio Outlook
Connector installation cannot be started)
• MS Outlook 2007 + Service Pack 1
Note:
• All settings relate to Windows XP and MS Outlook 2003.
• Kerio Outlook Connector provides support for digital signatures. The function and
settings for digital signatures are described in standard MS Outlook help.
Specific options and settings of the Kerio Outlook Connector on the client side are focused in
the Kerio Connect 7, User’s Guide).
TIP:
If you need to work with your email also offline, replace the standard Kerio Outlook Connec-
tor by the Kerio Outlook Connector (Offline Edition) (see chapter 31.1).
Kerio Outlook Connector is localized for the languages listed in table 31.3.

31.2 Kerio Outlook Connector
339
English Dutch Hungarian Russian
Czech Croatian German Slovak
Chinese Italian Polish Spanish
French Japanese Portuguese Swedish
Table 31.3 Supported languages
Language of the Kerio Outlook Connector is set automatically in accordance with the language
version set in MS Outlook. If a language set MS Outlook is not available in the Kerio Outlook
Connector, English is used automatically.
31.2.1 Installation and configuration without the migration tool
Manual installation of the Kerio Outlook Connector for Kerio Connect is performed by the
installation wizard. Once the installation is completed, it is necessary to set a profile and an
email account explicitly.
Warning:
• MS Outlook must be installed on the computer prior to the Kerio Outlook Connector
installation, otherwise the application will not function properly.
• When the upgrade or downgrade of MS Outlook is performed, Kerio Outlook Connec-
tor must be reinstalled manually.
Profile creation
The user profile is a file where personal information in MS Outlook is stored. The profile is
essential in the following situations: either the computer is accessed by multiple users and
each of them needs his/her own email address and personal settings or a user can access
multiple mailboxes and wants to use different personal settings for each of them. Settings for
a new profile can be configured in the Start → Settings → Control Panel → Mail menu:
1. In the just opened Mail Setup — Outlook dialog, click on Show Profiles (see figure 31.8).
2. The Mail dialog is opened (see figure 31.9) where profiles and user accounts may be
administered.

Kerio Outlook Connector
340
Figure 31.8 Profile setup
Figure 31.9 Creation of a profile
3. Click on Add. A dialog box is opened with a blank entry for specification of the new
profile’s name. Any string is allowed as the name.
4. The new profile is empty (i.e. no email account is created in it). Therefore, the wizard
where a new account can be created is started automatically once a new profile is created.

31.2 Kerio Outlook Connector
341
Figure 31.10 Account settings — creation of new account
Email accounts or an address book can be added or changed in the first dialog of the
wizard. Once you create an account, select — Add a new email account (see figure 31.10).
5. In dialog two, select the Additional server types option (see figure 31.11) and click on Next.
6. The next step allows selection of a server type. Select Kerio Connect.
7. In the next step, the settings for Kerio Outlook Connector are defined. This can be done
using two tabs in the Kerio Outlook Connector window:

Kerio Outlook Connector
342
Figure 31.11 Account settings — server type selection
Figure 31.12 Account settings — connection settings
Server Name
DNS name or IP address of the mailserver.

31.2 Kerio Outlook Connector
343
Secure Password Authentication
This option allows using the NTLM authentication. When checked, users are not
required to set usernames and passwords — the authentication against the Active Di-
rectory domain will be used instead authentication through username and password.
In order for the NTLM authentication to be functional, both the computer as well as
the user account have to be parts of the domain used for authentication.
Warning:
NTLM (SPA) can be used only if Kerio Connect is installed on Windows
operating systems.
Username
Username used for logging to the mailserver. If the user does not belong to the
primary domain, a complete email address is required ([email protected]).
Password
User password.
Press the Check connection button to test if correct user data has been specified and
if the connection to Kerio Connect works properly. If the test is finished successfully,
a corresponding User Name and Email Address are automatically filled in.
Figure 31.13 Account settings — ports

Kerio Outlook Connector
344
Use the Advanced Settings tab to change some of the communication settings.
IMAP and SMTP port
Port used for communication with the server by IMAP and SMTP protocols. The port
numbers must be the same as the port numbers set in Kerio Connect.
HTTP port
The HTTP(S) protocol uses the Free/Busy calendar and applications for automatic
updates of Kerio Outlook Connector. Port number must be identical with the port
number for the HTTP(S) service used by Kerio Connect.
Timeout
Time spent by the application waiting for a response from Kerio Connect.
Secured Connection (SSL)
This option enables the SSL-encrypted communication using IMAP, SMTP and HTTP.
The Default Values button changes all settings to their default values.
Connection name
Kerio Outlook Connector Store is used by default. This name can be changed.
Name and its visibility, email address and a Reply-To address can be set in the Name tab.
Figure 31.14 Account settings — sender information settings
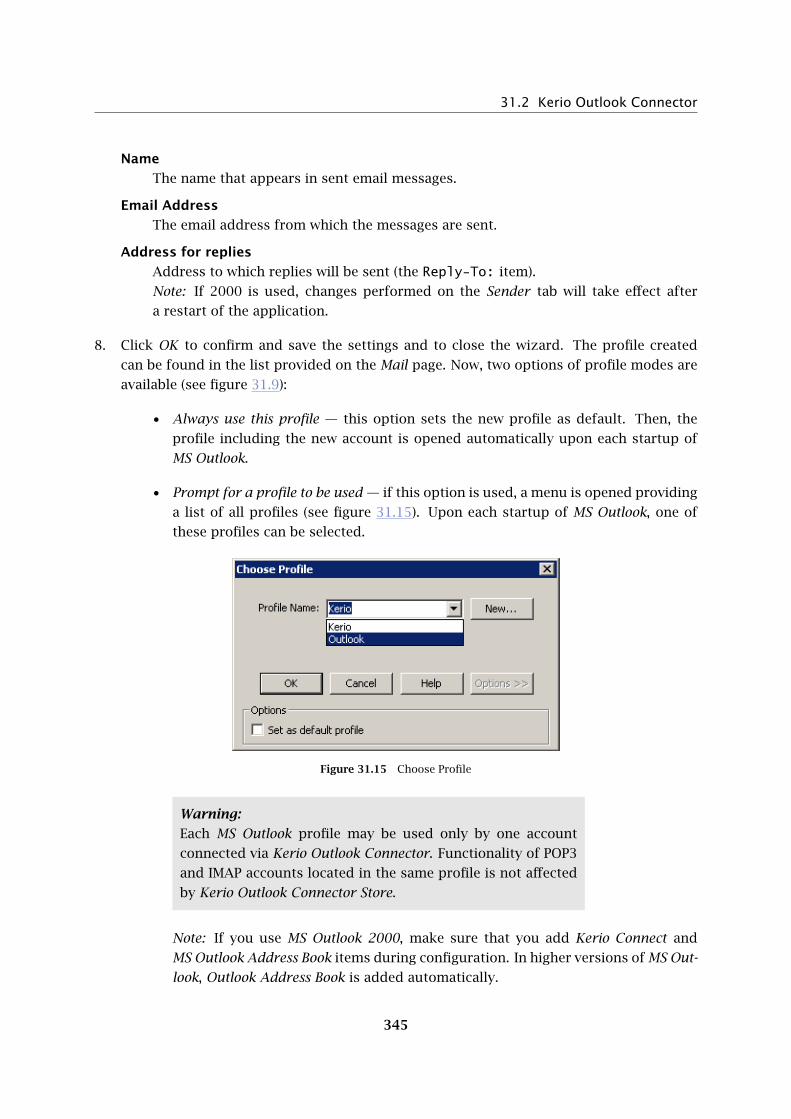
31.2 Kerio Outlook Connector
345
Name
The name that appears in sent email messages.
Email Address
The email address from which the messages are sent.
Address for replies
Address to which replies will be sent (the Reply-To: item).
Note: If 2000 is used, changes performed on the Sender tab will take effect after
a restart of the application.
8. Click OK to confirm and save the settings and to close the wizard. The profile created
can be found in the list provided on the Mail page. Now, two options of profile modes are
available (see figure 31.9):
• Always use this profile — this option sets the new profile as default. Then, the
profile including the new account is opened automatically upon each startup of
MS Outlook.
• Prompt for a profile to be used — if this option is used, a menu is opened providing
a list of all profiles (see figure 31.15). Upon each startup of MS Outlook, one of
these profiles can be selected.
Figure 31.15 Choose Profile
Warning:
Each MS Outlook profile may be used only by one account
connected via Kerio Outlook Connector. Functionality of POP3
and IMAP accounts located in the same profile is not affected
by Kerio Outlook Connector Store.
Note: If you use MS Outlook 2000, make sure that you add Kerio Connect and
MS Outlook Address Book items during configuration. In higher versions of MS Out-
look, Outlook Address Book is added automatically.

Kerio Outlook Connector
346
Data file settings
In order for Kerio Outlook Connector to work properly, it is necessary to set the [Kerio Outlook
Connector Store] as the default data file. If the file has not been selected automatically before,
it can be specified in theTools → Email Accounts→ View or Change Existing Email Accounts
menu. The Email Accounts window contains the Deliver new email to the following location
option, where Kerio Outlook Connector Store can be selected.
Figure 31.16 Data file settings
Kerio Outlook Connector can also check whether the Kerio Outlook Connector Store is selected
as a default message store. By default, the check is enabled and if the Kerio Outlook Connector
Store is not selected as a default store when MS Outlook is started, a warning is displayed.
Figure 31.17 The store checking option

31.2 Kerio Outlook Connector
347
This option can be enabled/disabled in the Tools → Options → Preferences menu (with the
Kerio Technologies logo).
31.2.2 Upgrade of the Kerio Outlook Connector
Upgrades of Kerio Outlook Connector are performed automatically. If a new version of Kerio
Outlook Connector is available, the module is updated immediately upon the startup of MS Out-
look.
When the update is completed, MS Outlook is restarted automatically. The update process and
the restart takes up to two minutes.
The automatic update includes check of versions of Kerio Connect and the Kerio Outlook
Connector. If versions of the server and the client do not match, the user is informed
that a different version of Kerio Connect is installed on the server and that the client
should be updated (see figure 12.24). Upon confirmation by the YES button, the version is
upgraded/updated immediately (or downgraded).
Figure 31.18 Version collision notification
If the server and client differ only in their build numbers (numbers in the notification are the
same), the client will work even if the update is rejected. If, however, version numbers are
different (for example 6.4.0 versus 6.4.1), Kerio Outlook Connector cannot be started unless
updated.

348
Chapter 32
Support for iCalendar
The support for iCalendar in Kerio Connect enables various applications which can handle
the format (such as MS Outlook 2007, Apple iCal, Mozilla Calendar, Lotus Notes and Ximian
Evolution) to publish and subscribe to calendars via Kerio Connect.
By default, Kerio Connect supports calendars in MS Outlook 2007, Windows Calendar on
Windows Vista and Apple iCal on Apple Mac OS X.
32.1 Web calendars in MS Outlook 2007
MS Outlook 2007 allows sharing of calendars via the Internet. Calendars are available through
subscription and publishing:
• Calendar subscription — calendar subscription downloads the particular calendar
from a web server to a local store.
• Calendar publishing — calendar publishing is uploading of a calendar to a web store.
For manipulation with calendars, MS Outlook 2007 uses iCalendar (iCal), a standard format for
exchange of calendar data.
Kerio Connect supports the iCal format and it is, therefore, possible to subscribe calendars
stored on Kerio Connect in MS Outlook as well as to publish calendars at Kerio Connect’s
accounts. In addition to subscription to their own calendars, users can also subscribe to
calendars shared by other users.
Warning:
In MS Outlook, subscribed calendars are available only in the read-only mode. Published
calendars are available on the server for reading only (this implies that it is not edit
published calendars when accessed by Kerio WebMail, for example).
After authentication, the traffic is performed by the HTTP protocol. Therefore, the service
must be running in Kerio Connect. In addition to this, it is also necessary to map the
corresponding port on the firewall protecting the server. Otherwise, the service will not be
available from the Internet (for details, see section 2.3).
Subscription and publishing of calendars may be useful especially to view calendars of users
who do not have an account in Kerio Connect or to publish calendar in the Internet.
Specific options and settings in MS Outlook are focused in the Kerio Connect 7, User’s Guide).

32.2 Windows Calendar
349
32.2 Windows Calendar
Windows Calendar is a Microsoft Corporation’s application used for calendar management
on Windows Vista. This application enables to view events of multiple calendars in a single
schedule and thus quickly identify conflicts in the time schedule. Calendars may be either
stored on the disk or it is possible to subscribe for calendars stored at the web server. It is
also possible to publish calendars on the web server.
Kerio Connect supports publishing of calendars in user email accounts on the server and
subscription of calendars stored in the mailbox from the Windows Calendar. In addition to
subscription to their own calendars, users can also subscribe to calendars shared by other
users.
Warning:
In Windows Calendar, subscribed calendars are available only in the read-only mode.
Published calendars are available on the server for reading only (this implies that it is not
edit published calendars when accessed by Kerio WebMail, for example).
Subscription traffic is performed by the HTTP or the HTTPS protocol. Publishing of calendars
is performed via HTTPS only. This implies that it is necessary that the service is running in
Kerio Connect and a valid Kerio Connect’s SSL certificate must be installed on the Windows
Calendar host. In addition to this, it is also necessary to map the corresponding port on the
firewall protecting the server. Otherwise, the service will not be available from the Internet
(for details, see section 2.3).
The Windows Calendar application supports iCalendar which is a standard format used for
exchange of calendar data. The iCalendar built in Kerio Connect enables Kerio Connect to
support cooperation with Windows Calendar.
Note: If calendars published as subfolders of the main calendar called Calendar , all events will
also be displayed in the Free/Busy calendar.
Specific options and settings of Windows Calendar are focused in the
Kerio Connect 7, User’s Guide).
32.3 Apple iCal
Developed by Apple Computer, Apple iCal is an application allowing management of calendars
on Mac OS X. The application enables to manage events of multiple calendars in a single
schedule and thus quickly identify conflicts in the time schedule.
Calendars may be either stored on the disk or, with read rights, it is possible to subscribe for
calendars stored at the web server. It is also possible to publish calendars on the web server.
Kerio Connect supports publishing of calendars in user email accounts on the server and
subscription of calendars stored in the mailbox from the Apple iCal. In addition to
subscription to their own calendars, users can also subscribe to calendars shared by other
users.

Support for iCalendar
350
Warning:
In Apple iCal, subscribed calendars are available only in the read-only mode. Published
calendars are available on the server for reading only (this implies that it is not edit
published calendars when accessed by Kerio WebMail, for example).
Since Apple iCal for Mac OS X Tiger, it is possible to synchronize locally stored calendars with
calendars on Kerio Connect. The Kerio Sync Connector (see chapter 40) is required for this
purpose.
Subscription and publishing of calendars are performed by HTTP (in this case, it is not possible
to use HTTPS). Therefore, the HTTP service must be running in Kerio Connect. In addition to
this, it is also necessary to map the corresponding port on the firewall protecting the server.
Otherwise, the service will not be available from the Internet (for details, see section 2.3).
As suggested by the name, the iCalendar (also known as iCal) format is applied to calendar
management. iCal is a standard format used for exchange of calendar data. The iCalendar
built in Kerio Connect enables Kerio Connect to support cooperation with Apple iCal.
Note: If calendars published as subfolders of the main calendar called Calendar , all events will
also be displayed in the Free/Busy calendar.
Specific options and settings in Apple iCal are focused in the Kerio Connect 7, User’s Guide).
Create public calendars
To create a public calendar in Kerio Connect, user needs corresponding access rights. These
rights can be assigned only by the Kerio Connect administrator.
Once you have appropriate rights, you can create a public iCal calendar following the
instructions provided below:
1. Log in the Kerio WebMail interface.
2. In Public folders, create a new calendar folder.
Note: To avoid complications with URL, It is recommended not to use special national
characters in calendar names. Use, for example, the name Calendar, to keep it easy.
3. Read access rights are set automatically for all users under the particular domain and all
Kerio Connect users. These rights can be changed through the context menu of the new
folder (pop-up menu → Access rights).
4. Once a new calendar folder is created, run Apple iCal.
5. Create a new calendar that will be set as public.
6. Publish this calendar to the folder created in Kerio Connect. For publishing, use the
following URL pattern:
http://server_name/ical/public/folder_name

32.3 Apple iCal
351
the URL may be, for example, as follows:
http://mail.company.com/ical/public/Calendar
7. Use your browser to run Kerio WebMail and check whether the publishing has been
completed successfully.

352
Chapter 33
CalDAV support
Kerio Connect supports CalDAV which is an extension for the WebDAV interface designed for
exchange of calendar data. For details on this protocol, see http://www.caldav.org/. CalDAV
standard is defined in RFC 4791.
CalDAV is an HTTP-based protocol. Therefore, the HTTP(S) service is required in Kerio Connect
for its support.
The protocol can be used for synchronization of calendars, scheduling of meetings with
assistance of the Free/Busy server and delegating of calendars to other Kerio Connect users.
33.1 Configuration of CalDAV accounts
To enable the client connection to Kerio Connect, it is necessary to set correct URL address for
the connection.
Apple iCal
http(s)://<servername>/caldav
for example:
http(s)://mail.company.com/caldav
Warning:
If there is no important reason for manual configuration, configure the CalDAV
account with the iCal Config Tool (section 33.2). In addition to the account, this
tool will configure also the Directory Utility where it sets Kerio Connect as an Open
Directory server. This setting will make delegation of calendars fully functioning.
Without this setting, subscription of delegated folders only is available.
Other clients (such as Mozilla Sunbird)
http(s)://<servername>/calendars/<domain>/<user>/<calendarname>
for example:
http(s)://mail.company.com/calendars/company.com/wsmith/Calendar

33.2 CalDAV account in Apple iCal
353
33.2 CalDAV account in Apple iCal
Apple iCal is a utility for management of calendars which allows their synchronization via the
CalDAV protocol.
Apple iCal supports the CalDAV protocol since Mac OS X 10.5 Leopard. Support of Kerio
Connect currently allows:
• synchronization of calendars,
• synchronization of To Do with the Task folder,
• scheduling of meetings,
• delegation of calendars,
• providing Free/Busy information of Kerio Connect users,
• Calendar Availability setting.
• setting of private events in calendars (featured on Apple iCal 3.0.3 and higher).
Warning:
Starting of CalDAV synchronization in Apple iCal automatically disables calendar
synchronization via Kerio Sync Connector. Synchronization of contacts, if defined, is not
interrupted.
33.2.1 Automatic configuration of CalDAV accounts
Kerio Technologies developed the iCal Config Tool which allows automatic configuration of
CalDAV accounts in Apple iCal on Mac OS X 10.5 Leopard and higher.
In addition to configuration of the CalDAV account, the tool sets Kerio Connect as an Open
Directory server in Directory Utility on the client computer. Thanks to this setting, the user
can use full delegation features in their Apple iCal.
Launching iCal Config Tool
1. The tool is available for download and startup on a special page called Integration
with Mac OS X. To open this page, use the following URL address in your browser:
http://server_name/integration (e.g. http://mail.company.com/integration) or
go to the Kerio WebMail’s welcome page and click on the Integration with Mac OS X link.
2. On the Integration with Mac OS X page just opened, click on the Auto-configure iCal link.
The tool gets downloaded to the workstation and the CalDAV account is configured with
the installation wizard.

CalDAV support
354
The wizard will require the following settings:
• username and password for the corresponding account,
• username and password for an account with administration rights for the workstation.
Note: For details on automatic configuration of CalDAV accounts in Apple iCal, refer to the
Kerio Connect 7, User’s Guide.

355
Chapter 34
CardDAV support
Kerio Connect supports the CardDAV protocol developed for the purpose of contact exchange.
CardDAV is an HTTP-based protocol. Therefore, the HTTP(S) service is required in Kerio Con-
nect for its support.
You can use this protocol to synchronize all your contacts. Only automatic configuration is
available. The Auto-configure Address Book option is used for this purpose.
34.1 Automatic configuration of CardDAV accounts
Kerio Technologies have developed Auto-configure Address Book, a special tool for automatic
configuration of CardDAV accounts on Mac OS X 10.6 Snow Leopard.
Warning:
CardDav accounts can be configured only with the autoconfig tool. Manual configuration is
not available.
Warning:
If the user has installed and configured the latest version of Kerio Sync Connector,
synchronization of contacts over Kerio Sync Connector is stopped automatically upon
setting a CardDAV account.
However, it is recommended to uninstall Kerio Sync Connector before running the
autoconfig tool.
1. The tool is available for download and startup on a special page called Integration
with Mac OS X. To open this page, use the following URL address in your browser:
http://server_name/integration (e.g. http://mail.company.com/integration) or
go to the Kerio WebMail’s welcome page and click on the Integration with Mac OS X link.
Warning:
The autoconfiguration tool must be downloaded from the server of the name for
which the SSL certificate is issued.
If you are not sure about this issue, download a new certificate from the
integration page to your workstation first and then install the autoconfig file for
Apple Address Book.
CardDAV support
356
2. On the Integration with Mac OS X page just opened, click on the Auto-configure Address
Book link. The tool gets downloaded to the workstation and the CardDAV account is
configured with the installation wizard.
The wizard will require the following settings:
• username and password for the corresponding account,
• username and password for an account with administration rights for the workstation.
Note: For details on automatic configuration of CardDAV accounts, refer to the
Kerio Connect 7, User’s Guide.
357
Chapter 35
Support for ActiveSync
Support for the ActiveSync protocol allows users to synchronize their email, calendars,
contacts and tasks with mobile devices with Microsoft Windows Mobile, Palm OS, Symbian and
OS X operating systems (for updated list of supported mobile devices, see section 35.2). The
ActiveSync protocol is based on HTTP(S). For network connections, it uses WiFi, GPRS, UMTS
and other technologies.
Kerio Connect includes direct support for the protocol and therefore there is no need to install
any supportive utility if the device also supports ActiveSync. If the device does not support
the protocol, it is necessary to install an application which allows the synchronization on
the device. Descriptions of configuration are provided in manuals of the particular devices,
as well as in the user’s guide chapter Data synchronization with mobile devices where simple
guidelines for setting of synchronization are provided for each device supported.
And also, no settings in Kerio Connect are required for the support. The only requirement
is that the HTTP(S) service must be running on the default port (i.e. port 80 for HTTP and
port 443 for the SSL-secured version). On most of supported mobile devices, ports cannot be
changed to non-standard ports.
Warning:
In addition to running of services on the server, it is also necessary to map corresponding
ports for HTTP and HTTPS on the firewall protecting the server. Otherwise, the service will
not be available from the Internet (for details, see section 2.3).
35.1 Synchronization methods
For synchronization of Kerio Connect data with mobile devices, two methods can be applied:
1. Direct synchronization with the server.
2. Synchronization by using a desktop application installed on the workstation.
The methods can usually also be combined.

Support for ActiveSync
358
Direct synchronization with Kerio Connect
This synchronization method as well as its options and usage is addressed in chapter Support
for ActiveSync.
This synchronization method does not require connection of the device to a desktop computer.
The technology allows to connect over HTTP(S) ActiveSync protocol directly to the mailserver
and synchronize mailbox folders with folders on the mobile device. On devices with an
Internet connection, users can synchronize their data any time and, on newer devices, it is
also possible to perform online synchronizations by using the DirectPush technology.
This synchronization method allows synchronization of the following folder types:
• mail folders,
• contacts,
• calendar,
• tasks — tasks synchronization is available only on devices with Windows Mobile 5.0
and later.
The following parameters must be set for the direct synchronization with the server:
• The HTTP(S) service must be running in Kerio Connect. For connections to the server
from the Internet, it is necessary to enable an appropriate port (usually only for the
HTTPS service) at the firewall behind which Kerio Connect is running.
• It is necessary that network connection is set properly on the device.
• For connections via the HTTPS protocol (recommended for security reasons), it is
necessary to have installed a trustworthy certificate (see chapter 35.4).
• The configuration of the device must allow connection to Kerio Connect. The
configuration requirements depend on device:
Windows Mobile
In Windows Mobile systems, it is necessary to set the ActiveSync application so
that it can connect to the server. The configuration may vary in different versions
of Windows Mobile. It usually works like this: in ActiveSync open Menu and
in the Add Server Source field enter the Kerio Connect’s Internet name along
with username and password for connection to the account. These settings are
addressed in detail in the User’s Guide. The linked page also includes simple
instructions for configuration of the ActiveSync application (for all supported
versions of Windows Mobile).

35.1 Synchronization methods
359
Nokia E-series
Nokia Eseries and some of the Nokia Nseries mobile devices support the Ac-
tiveSync protocol if the Mail For Exchange application (developed by Nokia) is
installed on the device. Installation and settings are addressed in detail in the
User’s Guide.
Mobile devices with RoadSync
The DataViz’s RoadSync application allows synchronization of email, calendars
and contacts over the ActiveSync protocol. The application and the mobile
device’s settings are focused at http://www.dataviz.com/.
Apple iPhone OS 2.0
Apple iPhone 3G 2.0 and 3.0 requires an Exchange account which supports the
ActiveSync 2.5 synchronization protocol.
These settings are addressed in detail in the User’s Guide.
Apple iPhone OS 3.0
Apple iPhone OS 3.0 requires an Exchange account which supports the ActiveSync
12.1 synchronization protocol.
These settings are addressed in detail in the User’s Guide.
Synchronization by the ActiveSync desktop application
This synchronization method is performed out of Kerio Connect and its description can be
found in ActiveSync user’s guides and in device manuals.
Warning:
Settings described here apply only to Windows Mobile.
For successful data synchronization by using the ActiveSync desktop application, the following
conditions must be met:
• The mobile device must include any version of the ActiveSync application (all
supported versions of Windows Mobile operating systems include the application).
• MS Outlook is required on the user’s desktop computer. It is necessary that an account
connected to Kerio Connect is created in MS Outlook (it is recommended to use a Kerio
account extended with Kerio Outlook Connector since this allows also synchronization
of Notes folders).
• The ActiveSync desktop application installed on the user’s desktop computer is
required.
Synchronization with the server via desktop applications is performed in a way that MS Out-
look can access the data on the server (thanks to the connected and authenticated email
account). MS Outlook is synchronized along with the ActiveSync desktop application while

Support for ActiveSync
360
the desktop application can be synchronized with the device upon a connection. The process
also works the other way round. After a successful connection, new data is synchronized
via the ActiveSync desktop application with MS Outlook. This client applies the data in Kerio
Connect folders.
One of the advantages of synchronization via MS Outlook and the desktop application is the
possibility to synchronize all folder types stored at the server (including tasks and notes in
any device versions).
35.2 Supported versions of ActiveSync and mobile devices
Kerio Connect supports the following versions of the ActiveSync protocol:
• ActiveSync 2.5 (Windows Mobile 5.0, Windows Mobile 6.0, Apple iPhone OS 2.0)
• ActiveSync 12 (Windows Mobile 6.0, 6.1 and 6.5, Apple iPhone OS 3.0)
Note: In this case, the number of the ActiveSync version refers to the protocol version, not to
the desktop application.
Kerio Connect supports several mobile devices. Table 35.1 provides a list of supported devices
running on Windows Mobile.
Version Running on Release date:
Windows Mobile 5.0 Windows CE 5.0 May 2005
Windows Mobile 5.0 AKU2 Windows CE 5.1 February 2006
Windows Mobile 6.0 Windows CE 5.2 February 2007
Windows Mobile 6.1 Windows CE 5.2 April 2008
Windows Mobile 6.5 Windows CE 5.2 October 2009
Table 35.1 List of supported devices running on MS Windows Mobile
Note: Kerio Connect supports both Windows Mobile for Pocket PC and the edition for
Smartphone devices (mobile devices without touchscreens).
Detailed information on individual features of the device and its configuration are
provided in guides to particular devices. Configuration of ActiveSync in the device which
allows connection of the device to Kerio Connect and successful data synchronization
is addressed in chapter Synchronization over ActiveSync in Kerio Connect 7, User’s Guide
(Kerio Connect 7, User’s Guide).
Different system versions allow different cooperation options. Older versions of Windows
Mobile do not support all Kerio Connect features. Features available on individual supported
operating systems and their versions are shown in table 35.2.
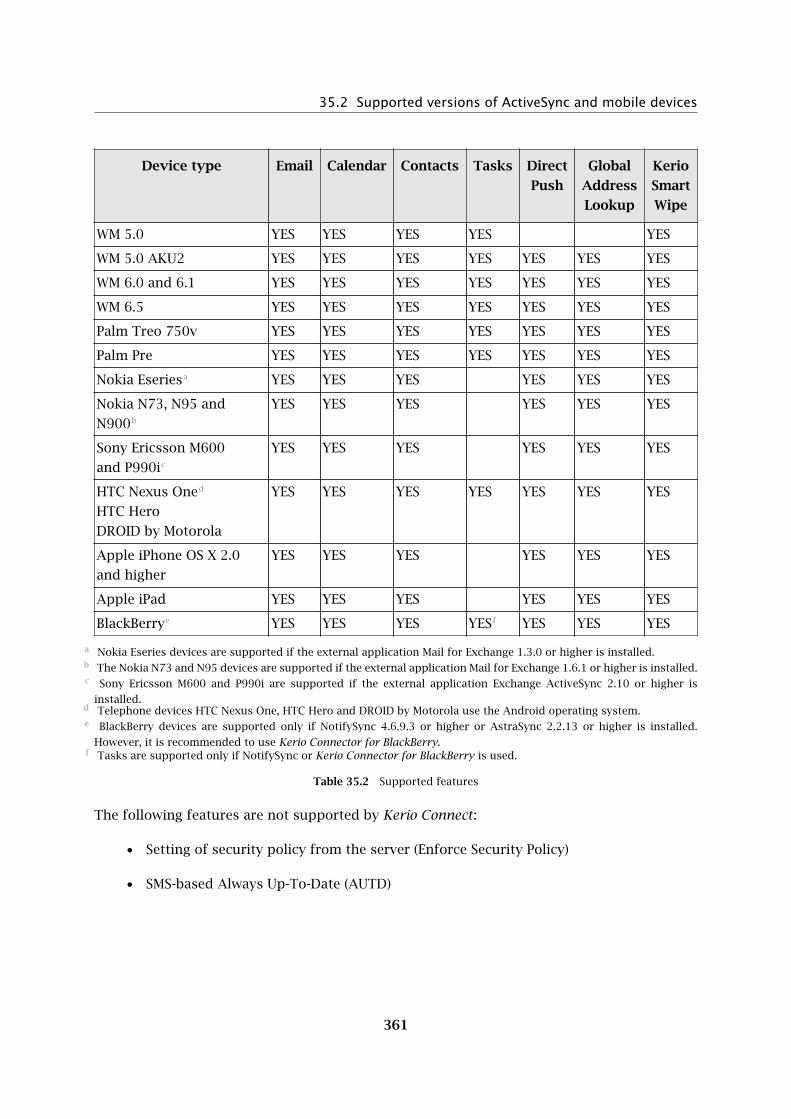
35.2 Supported versions of ActiveSync and mobile devices
361
Device type Email Calendar Contacts Tasks Direct
Push
Global
Address
Lookup
Kerio
Smart
Wipe
WM 5.0 YES YES YES YES YES
WM 5.0 AKU2 YES YES YES YES YES YES YES
WM 6.0 and 6.1 YES YES YES YES YES YES YES
WM 6.5 YES YES YES YES YES YES YES
Palm Treo 750v YES YES YES YES YES YES YES
Palm Pre YES YES YES YES YES YES YES
Nokia Eseriesa YES YES YES YES YES YES
Nokia N73, N95 and
N900b
YES YES YES YES YES YES
Sony Ericsson M600
and P990ic
YES YES YES YES YES YES
HTC Nexus Oned
HTC Hero
DROID by Motorola
YES YES YES YES YES YES YES
Apple iPhone OS X 2.0
and higher
YES YES YES YES YES YES
Apple iPad YES YES YES YES YES YES
BlackBerrye YES YES YES YESf YES YES YES
Nokia Eseries devices are supported if the external application Mail for Exchange 1.3.0 or higher is installed.a
The Nokia N73 and N95 devices are supported if the external application Mail for Exchange 1.6.1 or higher is installed.b
Sony Ericsson M600 and P990i are supported if the external application Exchange ActiveSync 2.10 or higher isc
installed.Telephone devices HTC Nexus One, HTC Hero and DROID by Motorola use the Android operating system.d
BlackBerry devices are supported only if NotifySync 4.6.9.3 or higher or AstraSync 2.2.13 or higher is installed.e
However, it is recommended to use Kerio Connector for BlackBerry.Tasks are supported only if NotifySync or Kerio Connector for BlackBerry is used.f
Table 35.2 Supported features
The following features are not supported by Kerio Connect:
• Setting of security policy from the server (Enforce Security Policy)
• SMS-based Always Up-To-Date (AUTD)

Support for ActiveSync
362
35.3 RoadSync
Kerio Connect supports RoadSync 4.0 and higher developed by DataViz. RoadSync enables
synchronization between Kerio Connect and mobile devices. The synchronization is performed
by the ActiveSync protocol.
RoadSync supports synchronization of the following folder types:
• Email,
• Calendar,
• Contacts,
• Tasks (only Symbian S60),
The RoadSync application can be installed on the following mobile devices:
• Symbian UIQ,
• Symbian S80,
• Symbian S60 3rd Edition,
• Palm OS (synchronization is available for email only),
• Java MIDP 2.0 (synchronization is available for email only),
For details on RoadSync and supported devices, see the DataViz website at
http://www.dataviz.com/.
35.4 SSL encryption
For the traffic, ActiveSync uses the HTTP or the HTTPS protocol.
Warning:
For security reasons, it is recommended to synchronize only by the HTTPS protocol, since
ActiveSync uses only unencrypted user login data for authentication at the server.
For description on encryption of services running in Kerio Connect, see chapter 16. This
method requires a valid SSL certificate installed on the device.
The following conditions must be met to make certificates valid:
• The certificate must be issued by a trustworthy certification authority. Trustworthy
means that the mobile device needs to know the server’s root certificate. Windows

35.4 SSL encryption
363
Mobile includes root certificates of several certification authorities. List of these
authorities can be found at the Microsoft Corporation website.
• Date of the certificate must be valid and correct date and time must be set in the
device.
• The certificate must include a valid name of the email domain for which Kerio Connect
is used.
Valid certificates for encrypted traffic can be either certificates issued by trustworthy
certification authorities (these certificates can be quite expensive, however, they avoid
possible installation difficulties) or a certificate issued by an internal certification authority
or a so-called self-signed certificate generated in Kerio Connect (for details, see chapter 16).
In case of certificates issued by a trusted certification authority, no settings or installations are
required. In cases of internal certificates or self-signed certificates, the root certificate must
be installed on the device.
Windows Mobile requires certificate encoded in the DER X.509 format. The .cer extension is
required. The simpliest method to get and install a certificate is to download it to the device
by a browser.
Kerio Connect’s self-signed certificate in the required format is available at
http://server_name/server.cer
Warning:
Security rules in Smartphone devices with Windows Mobile 2005 forbid installation of new
root certificates. In such cases, it is necessary to enable installation of root certificates in
the device registry first (the instructions are provided below).
Installation of the Kerio Connect’s self-signed certificate
The Kerio Connect’s self-signed certificate can be installed as described below:
1. If you need to install the certificate on Windows Mobile 5.0 Smartphone Edition, it is
necessary to follow instructions provided in section Allowing installation of a root cer-
tificate in WM 5.0 Smartphone Edition. In other cases, start the installation by step 2.
2. On the mobile device, run a web browser.
3. In the URl textfield, enter the server’s address following the pattern
http://server_name/server.cer
(e.g. http://mail.company.com/server.cer)
or
https://server_name/server.cer

Support for ActiveSync
364
(e.g. https://mail.company.com/server.cer)
4. A dialog is displayed asking whether the certificate should be downloaded to the device.
Click OK to confirm the action.
5. Next, you’ll be asked whether the certificate should be installed and used. Again, click on
the OK button.
Now, the certificate is installed.
Allowing installation of a root certificate in WM 5.0 Smartphone Edition
The security policy of Smartphone devices with Windows Mobile 5.0 or Windows Mobile
5.0 AKU2 forbids installation of root certificates issued by other than trusted certification
authorities.
To allow installation of root certificates issued by authorities not supported by the particular
device (an internal certificate or the Kerio Connect’s self-signed certificate), it is necessary
to install a mobile device registry editor on the mobile device and use this editor to allow
installation of untrustworthy root certificates. One of the options is for example application
regeditSTG.zip (24.01 kB).
In this editor, follow these instructions:
1. Find and download regeditSTG.zip (available for free) and unpack it.
2. Move the editor to the mobile phone (e.g. by using the MS ActiveSync desktop application).
Warning:
It is necessary that the file is saved in the phone, not on the memory card.
3. On the telephone, click on the file and run it.
4. Run regeditSTG.exe and find HKLM\Security\Policies\Policies.
5. Change the following registry items:
• 00001001 overwrite the 2 with 1
• 00001005 overwrite the 16 with 40
• 00001017 overwrite the 128 with 144
6. Now, it is possible to download the certificate from the server and install it as described
in section 35.4.

35.5 Remote deletion of the device data (Wipe)
365
Warning:
So called “hard reset” removes the registry changes (it is necessary to repeat the
settings if needed).
SSL encryption in Sony Ericsson devices
If the Kerio Connect’s self-signed certificate is installed, the device does not require
confirmation for each synchronization with the server:
[Security Information ?]
The certificate could not be
verified.
Select ’Certificate details’ to get
more information about the
certificate.
Do you want to accept the
certificate and proceed?
[ Yes ] [ No ] [ Details ]
Therefore, it is recommended to install a certificate signed by a trustworthy certification
authority.
35.5 Remote deletion of the device data (Wipe)
The wipe feature allows the Kerio Connect administrator to remove content of synchronized
folders or even of the whole mobile device (so called hard reset) by a single click. This feature
may be helpful when the device gets lost or stolen. This makes the data stored on the devices
more secure. In addition to data clear-out, this action also disables further connections of the
device to Kerio Connect by disallowing connection of the device to the server by the original
user login data.
Since the device types and operating systems are different, it depends on these conditions
whether it is possible to reset the device completely or only to clear out synchronized folders.
Remote hard restart is supported only by Windows Mobile 5.0 AKU2 and higher. Since older
versions of Windows Mobile do not support this feature, only data synchronized by ActiveSync
can be removed remotely.
Note: It is not possible to use this feature to perform remote memory cards wipes. However,
memory cards usually store also email attachments. ActiveSync supports wipe-out of any
synchronized data, including the attachments. This means that the wipe removes all data on
the device as well as any attachments, including those which are stored on the memory card.
To perform remote wipe-out, go to the Accounts → Users section of the administration
interface:
1. Select the user whose data will be removed from the device.
2. Right-click to open the pop-up menu and select More Actions → Mobile Devices.

Support for ActiveSync
366
3. This opens a dialog where mobile devices of the particular user can be administered (see
figure 35.1).
Figure 35.1 Administration of mobile devices
4. Select the device where the data should be wiped out and click on Wipe.
Warning:
The wipe-out process will be completed upon the next connection of the device to Kerio
Connect. Users who have lost their devices should be informed that they should not run
the synchronization if they find it and they should contact the administrators and ask them
to cancel the wipe-out before the device is used again. The wipe action process can be
cancelled by the Cancel Wipe button which appears when the Wipe button is used.
Details of the wipe process are recorded in the Security log (the Security log is addressed in
section 24.4).
User confirmation of the wipe action
On Windows Mobile operating systems, user confirmation of the synchronizations security
policy is required for wipe actions. In other words, it is necessary that the user agrees that the
administrator performs the wipe action. Therefore, a dialog (see figure 35.2) appears which
must be confirmed by the user during the first data synchronization between the device and
Kerio Connect (usually immediately upon the moment when login data for ActiveSync is set in
Kerio Connect). if not confirmed, it is not possible to complete the synchronization process.
This measure is applied for security reasons.

35.6 Removing a device from the administration of mobile devices
367
Figure 35.2 Wipe confirmation
35.6 Removing a device from the administration of mobile devices
As the time goes on, users often buy new devices. Their older types are still connected to
Kerio Connect. Although these items do not cause any collisions or other problems, it is
recommended to remove unused devices to keep the server well-organized.
Unused mobile devices can be removed as follows:
1. In Accounts → Users, select a user whose devices are not used any longer.
2. Right-click on the account to open a pop-up context menu and select Mobile Devices.
3. This opens a dialog where mobile devices of the user can be administered (see figure 35.1).
4. Select the device where the data should be wiped out and click on Remove.
35.7 Synchronization logs
The entire synchronization process can be monitored and logged by using special tools. These
tools can be found both in the Kerio Connect’s administration interface and in the mobile
device. This section provides description and settings instructions for these tools:
Synchronization logging in Kerio Connect
Kerio Administration Console includes a special option in the Debug log (for details on the
Debug log and its options, see section 24.9). The traffic log can be started as described below:
1. In the Kerio Connect’s administration interface, go to the Logs → Debug section.
2. Right-click on the log window to open the pop-up menu.
3. Click on Messages.
4. In the Logging Messages dialog box, select ActiveSync Synchronization.

Support for ActiveSync
368
Figure 35.3 The Debug log settings
5. Click OK to confirm settings.
Once the log is set, run the synchronization of the device and the server to make the log.
If needed, synchronization log can also be saved, as follows:
1. Logs can be saved in a file in the Logs → Debug section.
2. Right-click on the created log and choose Save log from the pop-up menu.
3. In the Save Log dialog, select a path where the file will be saved, choose a file format (TXT
or HTML) and confirm the dialog (see figure 35.4).
Figure 35.4 Saving a log

35.8 Troubleshooting
369
Logging synchronization on mobile devices
On Windows Mobile, the ActiveSync application includes special logs for each synchronization
performed that can be helpful when solving traffic issues. Logs can be enabled/disabled in the
Advanced section of the ActiveSync application.
Windows Mobile stores logs in \Windows\Activesync. Each synchronization process is saved
in a stand-alone file whereas the three most recent logs are kept in the directory mentioned
above. Names of the log files are:
Exchange Server0.txt
Exchange Server1.txt
Exchange Server2.txt
These logs may be helpful especially when solving issues in cooperation with the Kerio Tech-
nologies technical support.
35.8 Troubleshooting
Problems with synchronization of a single folder on Windows Mobile
Problem description
User’s attempts to synchronize a subscribed folder fail.
Solution
In ActiveSync configuration, perform these settings:
1. In ActiveSync configuration, remove the folder from the list of synchronized folders.
Figure 35.5 Removing a damaged folder from the list of synchronized folders

Support for ActiveSync
370
2. Use so called “soft reset” to reboot the device.
3. Synchronize the device with the server (without the damaged folder).
4. If the synchronization has been completed successfully, add the folder to the list and
repeat the synchronization.
5. If even now the synchronization is not successful, please contact Kerio Technologies
technical support.
Problems with synchronization of all folders on Windows Mobile
Problem description
User’s synchronization of folders subscribed for synchronization fail.
Solution
In ActiveSync configuration, perform these settings:
1. In ActiveSync configuration, remove (uncheck) all folders from the list of
synchronized folders (see figure 35.6) and save settings.
Figure 35.6 Removing all folders from the list of synchronized folders
2. Use so called “soft reset” to reboot the device.
3. Add the removed folders to the list again and repeat the synchronization.
4. If even now the synchronization is not successful, please contact Kerio Technologies
technical support.
Note: Besides this method, it is also possible to remove the entire account in ActiveSync
and configure it again upon the next restart of the devices. Synchronized data will be
removed from the device. When a new account is created this data is usually correct.
Connection of the device to the server fails
Various solutions can be applied. Above all, it is necessary to check if the following conditions
are met:
• It is necessary that Internet connection is set properly on the device so that the device

35.8 Troubleshooting
371
can connect to Kerio Connect.
• In ActiveSync configuration, check that the appropriate login data is used.
• in Kerio Connect, the HTTP(S) service must be enabled on standard ports (most devices
do not support setting of non-standard ports for traffic).
• If the device uses for communication an SSL-secured protocol, it is necessary to check
whether a valid SSL certificate is used (see section 35.4).
• If the user connects to the server from the Internet, it is necessary to check that
standard ports of the HTTP(S) protocol are enabled at the firewall.

372
Chapter 36
Support for BlackBerry devices
36.1 NotifySync
NotifySync is an implementation of ActiveSync for BlackBerry devices that allows to
synchronize:
• email — all personal folders and subfolders are synchronized,
• calendars — only the main personal calendar is synchronized,
• contacts — any folders selected in the configuration can be synchronized,
• tasks — only the main task folder is included in the synchronization,
For more information, see the Notify Technology corporate website.
36.2 AstraSync
AstraSync is an implementation of ActiveSync for BlackBerry devices that allows to
synchronize:
• email — all personal folders and subfolders are synchronized,
• calendars — only the main personal calendar is synchronized,
• contacts — any folders selected in the configuration can be synchronized,
For more information, see the http://www.astrasync.com/ corporate website.

373
Chapter 37
Kerio Connector for BlackBerry
Kerio Connector for BlackBerry is a special module allowing cooperation of Kerio Connect with
BlackBerry devices.
Figure 37.1 Kerio Connector for BlackBerry implementation example
Warning:
Although BlackBerry Enterprise Server, Kerio Connector for BlackBerry and Kerio Connect
can be installed on one computer, for performance and OS-load it is recommended to install
Kerio Connect on another computer.
37.1 System requirements
The recommended minimal configuration of the computer for installation of BlackBerry Enter-
prise Server (BES), Kerio Connector for BlackBerry and possibly also Kerio Connect:
• CPU 2 GHz, 2 GB RAM for Kerio Connector for BlackBerry and for the BES server (if
installed on the same computer as Kerio Connect, see chapter 2.1).
• Server edition of the Microsoft Windows operating system.
• Administration account on this computer (BESadmin). It can also be a local user of
this computer.

Kerio Connector for BlackBerry
374
• Active Directory.
Note: The Active Directory service is required only for BES server installation. No users
are required to be included.
• The BlackBerry Enterprise Server installation package for Exchange in version 5.0 or
the later BlackBerry Enterprise Server Express in version 5.0 or higher and particular
license keys.
The BES Express installation package and license keys are available at:
http://na.blackberry.com/eng/services/business/server/express/
• Kerio Connect in version 7.1.0 or later installed.
• Administrator access to Kerio Connect.
• Installation file of the Kerio Connector for BlackBerry module in the same version as
Kerio Connect.
Note: BlackBerry Enterprise Server and Kerio Connector for BlackBerry do not require a fixed
IP address or port for incoming traffic. Only open outcoming traffic needs to be guaranteed.
37.2 Installation
To get prepared for synchronization of BlackBerry device with Kerio Connect, appropriate
modules must be installed, following this order:
1. Kerio Connect 7.1 (for system requirements and installation information, see chapter 2)
2. Kerio Connector for BlackBerry
Note: As BlackBerry Enterprise Server requires the server edition of Microsoft Windows, it
is necessary to run installation of Kerio Connector for BlackBerry on a server edition of
Microsoft Windows.
3. BlackBerry Enterprise Server
If BlackBerry Enterprise Server has been installed or/and connected to an Exchange server, it
is necessary to uninstall it (including SQL databases).
37.2.1 Kerio Connector for BlackBerry installation
The Kerio Connector for BlackBerry installation package can be downloaded at the Kerio
Technologies website at http://www.kerio.com/connect/download.
To install Kerio Connector for BlackBerry, follow these instructions:
1. Login to a BESadmin administration account (see section 37.1).
2. Run the Kerio Connector for BlackBerry installation and follow these steps:

37.3 Licensing Policy
375
a. Install Microsoft Exchange MAPI redistributable.
b. Enter the password for the BESadmin account.
c. Enter an administrator username and password for Kerio Connect.
Note: the username and password of the Kerio Connect administrator are used for
installation only and are not saved within the installation.
If Kerio Connector for BlackBerry has been installed, install BlackBerry Enterprise Server.
37.2.2 BlackBerry Enterprise Server installation
For detailed information on installation, refer to the BlackBerry website at:
http://docs.blackberry.com/en/admin/deliverables/14347/ (Installing the BlackBerry Enter-
prise Server software)
It is recommended not to change preset values during the installation, save for the following
exceptions:
• If an appropriate MS SQL Server is not installed, install it.
• Create a new configuration database for BlackBerry.
• When a Kerio Connector for BlackBerry settings dialog box opens, use OK for
confirmation — the module has already been configured.
• Create a local account for administration of the BES server.
Warning:
Do not use an account mapped from the Active Directory for connection
to BlackBerry Administration Service.
37.3 Licensing Policy
Installation of BlackBerry Enterprise Server requires a few licensing numbers which you receive
from Research In Motion Limited. Since their names are different in installation, here you can
find their list for better reference:
• CAL Authentication Key = BlackBerry Cal Key
30 characters (5x6): besxxx-xxxxxx-xxxxxx-xxxxxx-xxxxxx
• Serial Number = SRP authentication information / SRP authentication key
9 characters: Sxxxxxxxx
• License Key = SRP authentication information

Kerio Connector for BlackBerry
376
40 characters (4x10): xxxx-xxxx-xxxx-xxxx-xxxx-xxxx-xxxx-xxxx-xxxx-xxxx
37.4 Starting to work with BlackBerry Enterprise Server (Express)
37.4.1 Creating users on the BES server
1. Use Internet Explorer to connect to the BlackBerry Administration Service (see
chapter 37.5.1).
2. Enter the account with the username and password created during the installation (see
section 37.2).
3. Select Create User . Specify criteria to show Kerio Connect users. Select users to add from
the list and click on Continue.
4. Use option Create user with activation password to create a user with activation password.
Create an activation password.
Note: As the activation password is used only to activate the device (i.e. for pairing of
BlackBerry and the BES server and synchronization settings), it is not necessary to use an
extremely strong password.
5. Complete the process by clicking on Create user .
Kerio Connector for BlackBerry receives a pulse from the BES server and downloads the
following folders of the user account:
• Inbox,
• Sent Items,
• Calendar,
• Contacts,
• Tasks,
• Notes.
Processing of the activation request may take a while.
37.4.2 Activating BlackBerry devices
1. In the BlackBerry device, open Options and go to Advanced Options → Enterprise Activa-
tion.
2. Enter the user’s email address, activation password and name of the BES server. Click on
Activate.
37.5 Using BlackBerry Enterprise Sever
377
An email message in a special format is sent to the Kerio Connect’s Inbox. Avoid changing
or deleting this message. The BES server reads this message and starts the activation
process.
Note: Make sure that none of the user email sorting filters does not move the message to
another folder.
For detailed instructions, refer to the website of Research In Motion Limited at:
http://uk.blackberry.com/support/enterpriseactivation/
For description on other activation methods, refer to the following link:
http://docs.blackberry.com/en/admin/deliverables/14334/ (Assigning BlackBerry devices
to users)
37.5 Using BlackBerry Enterprise Sever
37.5.1 Accessing the BlackBerry Administration Service
BlackBerry Administration Service is a web interface for administration of the BES server.
Warning:
Thanks to its support of ActiveX controls, Internet Explorer is the only browser supported.
These controls are necessary in case that the device is connected via a USB cable.
BlackBerry Administration Service is available at:
https://the_BES_server_host:port/webconsole/app/
Example: https://bes-server.kerio.local:3443/webconsole/app/
37.5.2 Accessing the BlackBerry Web Desktop Manager
BlackBerry Web Desktop Manager is a web application allowing users to set device
synchronization..
Warning:
Thanks to its support of ActiveX controls, Internet Explorer is the only browser supported.
These controls are necessary in case that the device is connected via a USB cable.
BlackBerry Web Desktop Manager is available at:
https://the_BES_server_host:port/webdesktop/
Example: https://bes-server.kerio.local:3443/webdesktop/

Kerio Connector for BlackBerry
378
37.5.3 Checking Server Routing Protocol (SRP) and setting SRP ID
Login to the BlackBerry Administration Service interface (see section 37.5.1).
Go to Servers and Components → BlackBerry Solution Topology → Component View → Black-
Berry Enterprise Server → <instance name>.
Checking SRP protocol settings
1. Click on Edit instance.
2. Go to page Instance Information.
3. Make sure that the displayed value of the SRP protocol status is Connected.
If SRP is not connected, no data can be delivered from/to the device.
SRP ID settings
1. Click on Edit instance.
2. Go to page Instance Information.
3. In section SRP Information, enter the SRP ID and Authentication Key information.
4. Click on Save all and save settings.
37.5.4 Activating S/MIME messages
By default, synchronization of S/MIME messages from and to the device is forbidden on the
BES server.
To change these settings, follow these instructions:
1. Login to BlackBerry Administration Service (see section 37.5.1).
2. Go to Servers and Components → BlackBerry Solution Topology → Component View →
Email → <instance name>.
3. Click on Edit instance.
4. In the Messaging page, under Security settings, set the value of the Turn on S/MIME mes-
sage processing option to True.
5. Click on Save all and save settings.
37.5.5 Selecting email folders for synchronization with a BlackBerry device
By default, synchronization involves folders Inbox and Sent Items.
To add folders to synchronization, follow these instructions:
1. Login to BlackBerry Web Desktop Manager (see section 37.5.2).
2. Go to Email Settings → Redirection Folders.

37.5 Using BlackBerry Enterprise Sever
379
3. Select folders to add.
4. Click on Save and save the settings.
37.5.6 Selecting contact folders for synchronization with a BlackBerry device
By default, all contact folders are involved in synchronization.
To add folders to synchronization, follow these instructions:
1. Login to BlackBerry Web Desktop Manager (see section 37.5.2).
2. Go to Email Settings → Contact Folders.
3. Select folders to add.
4. Click on Save and save the settings.
37.5.7 Synchronizing deleted messages from the device to the server
By default, messages deleted in the BlackBerry device is kept intact on the server. To change
these settings, follow these instructions:
1. On the BlackBerry device, go to the Message application.
2. Go to Menu → Options → Emails Reconciliation.
3. Set the value of Delete on to either Mailbox & Handheld or Prompt.
4. Click on Save and save the settings.

380
Chapter 38
MS Entourage support
MS Entourage is a mail client for Mac OS X, supported by Kerio Connect. This support uses the
interface for MS Exchange in Entourage and it includes:
• support for groupware data such as mail, calendars, contacts and public folders,
• Free/Busy server for meetings management,
• connection of various LDAP databases for contact look-up,
• learning of the Bayesian filter by moving folders to Junk E-mail or INBOX (for detailed
information, see chapter 13.1).
Cooperation of Kerio Connect with MS Entourage is supported directly. This means that no
extension is required to be installed at client stations. It is only necessary to set correctly the
basic parameters for an Exchange account.
For proper functionality of Microsoft Entourage, the following services must be running in
Kerio Connect:
• HTTP(S) — Kerio Connect uses this service to communicate with the WebDAV interface
and with the Free/Busy server.
• LDAP(S) — used for searching for contacts in the Kerio Connect’s LDAP database.
Warning:
In addition to configuration of the services on the server, it is also necessary to map
corresponding ports on the firewall protecting the server. Otherwise, services will not be
available from the Internet (for details, see section 2.3).
Kerio Connect supports the following versions of the mail client:
• MS Entourage 2004 and MS Office 2004 for Mac SP2 — 11.3.3 for Mac OS X
• MS Entourage 2008 + MS Office 2008 for Mac SP1 — 12.1 for Mac OS X
Warning:
Kerio Connect does not support the Exchange Web Services protocol.

38.1 Automatic configuration of Exchange accounts
381
MS Entourage must be installed on one of the following versions of Mac OS X:
• Mac OS X 10.3.9 Panther
• Mac OS X 10.4 Tiger
• Mac OS X 10.5 Leopard
• Mac OS X 10.6 Snow Leopard
Support for MS Entourage by Kerio Connect depends on version of MS Entourage. Details are
provided in table 38.1.
Character MS Entourage 2004 MS Entourage 2008
Searching contacts via LDAP YES YES
Free/Busy support YES YES
Delegating folders YES YES
Support for public folders with contacts and
calendars
YES YES
Support for calendar and contact folders in
a single account
YES YES
Support for Out-of-office NO YES
Table 38.1 Supported features
Warning:
Each user profile in MS Entourage can be used for an only Exchange account. Any other
account will be dysfunctional. Functionality of POP3 and IMAP accounts is not affected by
the account settings.
If any problem occurs regarding communication of Kerio Connect and an Exchange account
in MS Entourage, enable the WebDAV Server Requests option in the Debug log (to see where
and how to enable the option, refer to chapter 24.9). The corresponding log may help when
solving any related problems.
Specific options and settings on client side are focused in the Kerio Connect 7, User’s Guide).
38.1 Automatic configuration of Exchange accounts
Kerio Technologies have developed an autoconfig script for MS Entourage. This script sets
email accounts and prepares them so that, after running it, users only fill in their username,
password and email domain where their account is created.
MS Entourage support
382
The configuration script first sets the account so that it communicates only with SSL-encrypted
versions of protocols. For this reason, the utility needs a valid SSL certificate. It therefore
downloads the active SSL certificate from Kerio Connect. To make the certificate work properly,
it must be issued against the DNS name of the Kerio Connect host. Otherwise, the account is
set so that the certificate is not required and unsecured protocols will be used.
Warning:
If the script has already been used and MS Entourage 2008 reports that the traffic would not
be secure because it is not possible to communicate via SSL, please restart MS Entourage.
Upon the restart, the application should work correctly in the secure mode.
To get the autoconfig script, go to the Integration with Mac OS X page. For this purpose, use
this URL: http(s)://server/integration.
These settings are focused in the Kerio Connect 7, User’s Guide.

383
Chapter 39
Apple Address Book Support
Kerio Connect supports standard Mac OS X Apple Address Book. This support includes the
option of searching for contacts in the Kerio Connect’s LDAP database and, since Mac OS X
10.3, also of bi-directional synchronization of contacts with Kerio Connect’s user accounts .
Support for individual options on individual Mac OS X versions is shown in table 39.1.
Kerio Connect supports Apple Address Book for the following versions:
• Apple Address Book for Mac OS X 10.2 Jaguar
• Apple Address Book for Mac OS X 10.3 Panther
• Apple Address Book pro Mac OS X 10.4 Tiger
• Apple Address Book pro Mac OS X 10.5 Leopard
• Apple Address Book pro Mac OS X 10.6 Snow Leopard
OS version Searching in the
Kerio Connect’s
LDAP database
Synchronization
of contacts over
Apple iSync
Synchronization
over the Kerio
Sync Connector
Synchronization
via the
CardDAV
protocol
Mac OS X 10.2 YES NO NO NO
Mac OS X 10.3 YES YES NO NO
Mac OS X 10.4 YES YES YES NO
Mac OS X 10.5 YES YES YES NO
Mac OS X
10.6a
YES YES YES YES
It is recommended to synchronize contacts and calendars with the native protocols iCal (CalDAV) and Address Booka
(CardDAV) instead of Kerio Sync Connectoru.
Table 39.1 Support for Apple Address Book on individual Mac OS X versions
To enable traffic between Kerio Connect and Apple Address Book, the following services must
be running in Kerio Connect (enabled in the administration interface):
• LDAP(S) — this service is required for searching in the Kerio Connect’s LDAP database.
• HTTP(S) — this service is required for synchronization of contacts.

Apple Address Book Support
384
Warning:
In addition to configuration of the services on the server, it is also necessary to map
corresponding ports on the firewall protecting the server. Otherwise, services will not be
available from the Internet (for details, see section 2.3).
Apple Address Book and Kerio Sync Connector settings are described in
Kerio Connect 7, User’s Guide.
385
Chapter 40
Kerio Sync Connector for Mac
Kerio Sync Connector is a special application which enables bi-directional data synchronization
between Kerio Connect and the Apple iCal or the Apple Address Book application:
• Apple iCal — Kerio Sync Connector allows bi-directional synchronization of locally
stored events and To Do items.
• Apple Address Book — Kerio Sync Connector enables bi-directional synchronization of
locally stored contacts.
Warning:
Kerio Sync Connector does not support synchronization of distribution
lists.
The main benefit of Kerio Sync Connector is that the synchronization for both applications
can be set at a single point.
For data synchronization, Kerio Sync Connector uses the WebDAV protocol. Therefore, HTTP
and HTTPS services must be running in Kerio Connect.
Warning:
In addition to configuration of the services on the server, it is also necessary to map
corresponding ports on the firewall protecting the server. Otherwise, services will not be
available from the Internet (for details, see section 2.3).
Specific options for the Kerio Sync Connector are focused in the Kerio Connect 7, User’s Guide.
Recommendation for Mac OS X 10.5 Leopard:
Disable calendar synchronization in the Kerio Sync Connector and use native calendar
synchronization via CalDAV in Apple iCal (see chapter 33).
Recommendation for Mac OS X 10.6 Snow Leopard:
For synchronization of calendars and contacts, use the native calendar synchronization in
Apple iCal via the CalDAV protocol (see chapter 33) and the native contact synchronization
in Apple Address Book via the CardDAV protocol (see chapter 34).

Kerio Sync Connector for Mac
386
40.1 Installation
Kerio Sync Connector can be installed on workstations with operating systems Apple Mac OS X
10.4.11 and higher. The installation is performed with the kerio-ksc-6.7.0-1069.mac.dmg
installation package which is available for free at Kerio Technologies website. Follow these
installation instructions:
1. Double-click on the installation package to open it.
2. The Finder opens the installation package as a disk and offers the Kerio Connect Installer
executable installation file.
3. Standard wizard is used for the installation.
40.2 Synchronization troubleshooting
Kerio Connect and Kerio Sync Connector provide special tools for possible synchronization
troubleshooting, as follows:
Traffic logs
Traffic between Kerio Connect and the Kerio Sync Connector can be logged both at Kerio
Connect or/and at the Kerio Sync Connector :
• Kerio Connect
1. Open the Debug log.
2. Right-click on the log pane to open a context menu, and select Messages.
3. In the Logging Messages box just opened, enable the WebDAV Server Requests
option (see figure 40.1).
Figure 40.1 Debug log settings
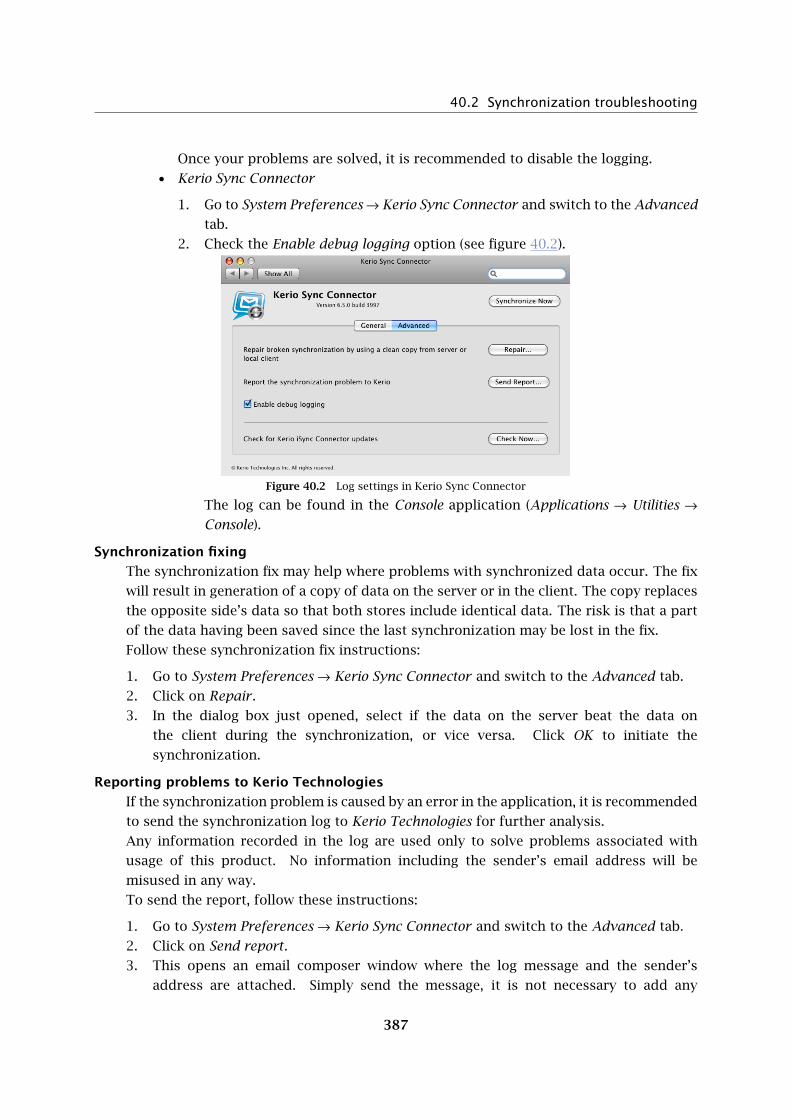
40.2 Synchronization troubleshooting
387
Once your problems are solved, it is recommended to disable the logging.
• Kerio Sync Connector
1. Go to System Preferences → Kerio Sync Connector and switch to the Advanced
tab.
2. Check the Enable debug logging option (see figure 40.2).
Figure 40.2 Log settings in Kerio Sync Connector
The log can be found in the Console application (Applications → Utilities →
Console).
Synchronization fixing
The synchronization fix may help where problems with synchronized data occur. The fix
will result in generation of a copy of data on the server or in the client. The copy replaces
the opposite side’s data so that both stores include identical data. The risk is that a part
of the data having been saved since the last synchronization may be lost in the fix.
Follow these synchronization fix instructions:
1. Go to System Preferences → Kerio Sync Connector and switch to the Advanced tab.
2. Click on Repair .
3. In the dialog box just opened, select if the data on the server beat the data on
the client during the synchronization, or vice versa. Click OK to initiate the
synchronization.
Reporting problems to Kerio Technologies
If the synchronization problem is caused by an error in the application, it is recommended
to send the synchronization log to Kerio Technologies for further analysis.
Any information recorded in the log are used only to solve problems associated with
usage of this product. No information including the sender’s email address will be
misused in any way.
To send the report, follow these instructions:
1. Go to System Preferences → Kerio Sync Connector and switch to the Advanced tab.
2. Click on Send report.
3. This opens an email composer window where the log message and the sender’s
address are attached. Simply send the message, it is not necessary to add any

Kerio Sync Connector for Mac
388
information.

389
Chapter 41
Support for Apple Mail
Kerio Connect supports some groupware features of IMAP and Entourage accounts in Apple
Mail 10.4 and higher. The support enables to display events, contacts and task folders in the
email client.
Cooperation of Kerio Connect with Apple Mail is supported directly. This implies that it is not
necessary to install any extensions to client stations. However, it is necessary to enable the
support in the Kerio Connect’s configuration file:
1. Stop Kerio Connect — before any manual edits in configuration files, it is necessary to stop
Kerio Connect Engine first.
2. In the directory where Kerio Connect is installed, look up the mailserver.cfg file and
open it.
If the file is being edited on Mac OS X or Linux operating systems, login to the system as
the root user (a special user with full access rights to the system).
3. Search the line including the IMAPFullListing value and rewrite the 0 digit with the 1
value.
4. Save the change and start Kerio Connect again.
Setting of the full support for IMAP in Kerio Connect results in the situation where all users
using IMAP to access their email share all types of folders and subfolders (email messages,
calendars. contacts, tasks) in their email clients. However, these folders will be showed
as email folders where any event, contact and task will be displayed as an email message
with an attachment in the .vcf (contact) or .ics (event, task) format. For this reason, it
is recommended to consider carefully whether the full support for IMAP in Kerio Connect is
really efficient.
For proper functionality of Apple Mail accounts, the following services must be running in
Kerio Connect:
• HTTP(S) — applied to Exchange accounts, if used.
• IMAP(S) — used both by IMAP and Exchange accounts.
• SMTP(S) — the protocol is used for email sending.

Support for Apple Mail
390
Warning:
In addition to configuration of the services on the server, it is also necessary to map
corresponding ports on the firewall protecting the server. Otherwise, services will not be
available from the Internet (for details, see section 2.3).
Specific options and settings in Apple Mail are focused in the Kerio Connect 7, User’s Guide).

391
Chapter 42
Apple iPhone Support
Kerio Connect provides support for Apple iPhone 2.0 and higher. Kerio Connect supports lots
of features:
• allows direct ActiveSync synchronization of email, calendars and contacts.
• allows email sending and receiving via IMAP, POP3 and SMTP and synchronization with
desktop applications (Apple Mail and Outlook Express) via Apple iTunes.
• allows synchronization of contacts and calendar with desktop applications via Apple
iTunes. Calendar and contacts can be also synchronized with applications Apple iCal,
Apple Address Book and Microsoft Outlook (XP, 2003 and 2007).
• Safari supports both full version of Kerio WebMail and Kerio WebMail Mini.
Warning:
In full version of Kerio WebMail, it is not possible to edit existing
contacts, events, tasks and notes.
To enable Apple iPhone support in Kerio Connect, installation of iTunes 7.3 or higher on user
stations is required. iTunes is used for synchronization of desktop clients with Apple iPhone.
Synchronization between desktop applications and Apple iPhone requires the following
operating systems:
• Windows XP Service Pack 2 and later,
• Mac OS X 10.4.10 and later.
Warning:
If traffic between Kerio Connect and mail client is running on port 25, a problem might occur
with email sending. Since public WiFi networks often do not support traffic on unencrypted
protocols, SMTP on port 25 can be blocked. In such case users cannot send email out of the
network. However, SMTPS on port 465 is usually allowed. For this reason, it is recommended
to set users’ email clients to SMTPS encryption.
Apple iPhone Support
392
42.1 Apple iPhone OS 2.0 and higher
If users perform synchronization via ActiveSync, the HTTP(S) service must be running in Kerio
Connect.
• Apple iPhone allows direct synchronization of:
• email,
• calendar,
• contacts.
• Apple iPhone fully supports so called “Device Wipe”, the device clean-up feature. In
short, the device can be cleared (for details, see section 35.5) remotely in case that it
gets lost or stolen.
• DirectPush Technology — this technology allows mobile devices to keep open HTTP(S)
connection with the server. Whenever a new item is received or any change is
performed in any folder, changes are synchronized immediately.
• Global Address Lookup — this feature allows look-up of email addressed in contact
folders.
Newly, the following features have been introduced for Apple iPhone OS 3.X :
• CalDAV protocol (allows calendar synchronization),
• standard iCalendar (allows to download shared and public calendars for reading),
• LDAP protocol (allows to access contacts via LDAP),
• CardDAV protocol (allows contacts synchronization).
In addition to features described above, the system introduces other improvements, such as:
• the Copy&Paste method both for text and graphic items during email composition,
• while composing an email message, it is possible to switch the client to the horizontal
position,
• search in emails stored on the server (in ActiveSync accounts),
• notifications of new email delivered to other folders than the Inbox,
• creating and sending invitations from ActiveSync account (including showing of
availability of individual users),
• notes synchronization with desktop applications Apple Mail and MS Outlook via Apple
iTunes.
No special settings are required on the server to allow these features, only make sure that
LDAP(S) and HTTP(S) services are running. For more detailed guidelines for the device settings,
refer to the user’s guide.

393
Chapter 43
Technical support
Kerio Technologies provides free email and telephone support for Kerio Connect to registered
users. For contacts, see the end of this chapter. Our technical support staff is ready to help
you with any problem you might have.
You can also solve many problems alone (and sometimes even faster). Please perform the
following before you decide to contact Kerio Technologies technical support:
• Try to look up the answer in this manual. Its chapters describe the functions of Kerio
Connect and how to use them for optimizing server settings in detail.
• If the answer cannot be found in this manual, refer to:
1. our product pages (http://www.kerio.com/connect/),
2. our technical support website (http://www.kerio.com/support/).
• Another useful information source is the discussion forum of Kerio Connect users
— go to http://forum.kerio.com/ and the knowledge base that can be found at
http://www.kerio.com/support/.
• Specific issues can be asked via a special technical support form at
http://www.kerio.com/support/.
43.1 Kerio Connect Administration
Besides the web form available at http://www.kerio.com/support/, you can contact our
technical support also from the Kerio Connect Administration.
In the lower part of the Kerio Connect Administration’s welcome page you can find buttons
Suggest Idea and Report Problem (see figure 43.1.

Technical support
394
Figure 43.1 The Kerio Connect Administration’s welcome page
Suggest Idea
Kerio Technologies do their best to keep bringing enhancements and improvements to their
products. However, if you miss any feature in Kerio Connect, do not hesitate to contact Kerio
Technologies.
You can use the Suggest Idea button on the Kerio Connect Administration’s welcome page to
open a special dialog box (see figure 43.2) allowing to Create Account by entering your name
and email.
You will be redirected to another page where you can enter any suggestion or remark.
If you specified your name and email address in the Suggest Idea dialog, you will be informed
about your idea process status and any related changes.
You can edit your name and email address any time under Configuration → Administration
Settings in Suggest Idea Account Settings (see figure 43.3).

43.1 Kerio Connect Administration
395
Figure 43.2 Suggest Idea
Figure 43.3 Suggest Idea information edit window
Report Problem
Should you come upon any difficulty while using Kerio Connect, you can use the Report prob-
lem button to contact our technical support. Clicking on the button displays a dialog box (see
figure 43.4) asking you to enter information for our technical support department.

Technical support
396
Figure 43.4 Report Problem
The window already contains predefined information about: your Kerio Connect version,
operating system, language and license number. This information is essential and helps Kerio
Technologies handle your problem in the shortest period possible.
Name and password of the administrator who is now logged in are also already entered. If you
wish that Kerio Technologies contacted you at a different address, you can change it.
Then please specify the other items as clearly as possible:
• Problem summary — for better reference, enter a brief description of the problem.
• Problem description — enter as many details as possible that would help identify and
solve your problem. For easier handling of this point, a few areas are suggested.
397
• Steps to reproduce — describe what operations lead to the problem occurence.
• Expected result — describe what you result had expected to happen before the
problem occured.
• Actual result — describe the result you finally got.
• Used software — list the software you used.
• Click on Report Problem to send the information to Kerio Technologies.
Your problem will be reported to our technical support department and they will contact you.
Warning:
Please use only English for problem reporting.

398
Appendix A
Legal Notices
Microsoft, Windows, Windows NT, Windows Vista, Internet Explorer, Active Directory,
Outlook, ActiveSync, Entourage and Windows Mobile are registered trademarks of
Microsoft Corporation.
Apple, iCal, Mac OS, Safari, Tiger, Panther, Open Directory logo, Leopard and Snow
Leopard are registered trademarks or trademarks of Apple, Inc.
Palm, Treo, Pre and VersaMail are registered trademarks or trademarks of Palm, Inc.
Red Hat and Fedora are registered trademarks or trademarks of Red Hat, Inc.
SUSE, openSUSE and the openSUSE logo are registered trademarks or trademarks of Novell,
Inc.
Mozilla and Firefox are registered trademarks of Mozilla Foundation.
Linux is registered trademark of Linus Torvalds.
Kerberos is trademark of Massachusetts Institute of Technology (MIT).
avast! is registered trademark of ALWIL Software.
Symantec is trademark of Symantec Corporation.
eTrust is trademark of Computer Associates International, Inc.
ClamAV is trademark of Tomasz Kojm.
Cybertrust is registered trademark of Cybertrust Holdings, Inc. and/or their filials.
Thawte is registered trademark of VeriSign, Inc.
Entrust is registered trademark of Entrust, Inc.
Sophos is registered trademark of Sophos Plc.
ESET and NOD32 are registered trademarks of ESET, LLC.
AVG is registered trademark of AVG Technologies.
NotifyLink is registered trademark of Notify Technology Corporation.
BlackBerry is registered trademark of Research In Motion Limited (RIM).
RoadSync is trademark of DataViz Inc.
Nokia and Mail for Exchange are registered trademarks of Nokia Corporation.
Symbian is trademark of Symbian Software Limited.
Sony Ericsson is registered trademark of Sony Ericsson Mobile Communications AB.

399
SpamAssassin is trademark of Apache Software Foundation.
SpamHAUS is registered trademark of The Spamhaus Project Ltd.
Android and Nexus One are trademarks of Google Inc. This trademark can be used only in
accord with Google Permissions.
DROID is trademark of Lucasfilm Ltd. and affiliated companies.
Motorola is registered trademark of Motorola, Inc.

400
Appendix B
Used open-source libraries
This product contains the following open-source libraries:
Berkeley DB
Berkeley DB (BDB) is a computer software library that provides a "high-performance"
embedded database, with bindings in C, C++, Java, Perl, Python, Ruby, Tcl, Smalltalk,
and many other programming languages.
The Regents of the University of California. All rights reserved.
Copyright 1987, 1993 The Regents of the University of California. All rights reserved.
bindlib
DNS resolver library, linked by PHP on Windows.
Copyright 1983, 1993 The Regents of the University of California. All rights reserved.
Portions Copyright 1993 by Digital Equipment Corporation.
Bluff
Bluff is a JavaScript port of the Gruff graphing library for Ruby. The Gruff library is
written in Ruby.
Copyright 2008-2009 James Coglan.
Original Ruby version 2005-2009 Topfunky Corporation.
excanvas
The ExplorerCanvas library allows 2D command-based drawing operations in Internet
Explorer.
Copyright 2006 Google Inc.
Kerio Connect Configuration Wizard for Linux
Kerio Connect Configuration Wizard for Linux is an application helping with initial
configuration of Kerio Connect.
Copyright (c) Kerio Technologies, s.r.o
Kerio Connect Configuration Wizard for Linux is distributed under GNU General Public
License, version 3.
To download the complete source code, please go to http://download.kerio.com/archive/
CppSQLite
A C++ wrapper around the SQLite embedded database library .
Copyright 2004 Rob Groves. All Rights Reserved.
Firebird 2
This software embeds modified version of Firebird database engine distributed under
terms of IPL and IDPL licenses.
All copyright retained by individual contributors — original code Copyright 2000 In-
prise Corporation.

401
The modified source code is available at
http://download.kerio.com/archive/
Heimdal Kerberos
Heimdal Kerberos is used only in Linux-oriented Kerio Connect versions.
Heimdal is an implementation of Kerberos 5, largely written in Sweden. It is freely
available under a three clause BSD style license (but note that the tar balls include
parts of Eric Young’s libdes, which has a different license). Other free implementations
include the one from MIT, and Shishi. Also Microsoft Windows and Sun’s Java come with
implementations of Kerberos.
Copyright 1997-2000 Kungliga Tekniska Hogskolan (Royal Institute of Technology,
Stockholm, Sweden). All rights reserved.
Copyright 1995-1997 Eric Young. All rights reserved.
Copyright 1990 by the Massachusetts Institute of Technology
Copyright 1988, 1990, 1993 The Regents of the University of California. All rights
reserved.
Copyright 1992 Simmule Turner and Rich Salz. All rights reserved.
ICU (International Components for Unicode)
ICU is amature, widely used set of C/C++ and Java libraries providing Unicode and
Globalization support for software applications.
Copyright 1995-2009 International Business Machines Corporation and others
libcurl
Libcurl is a free and easy-to-use client-side URL transfer library. It supports the following
protocols: FTP, FTPS, HTTP, HTTPS, GOPHER, TELNET, DICT, FILE and LDAP.
Copyright 1996-2008, Daniel Stenberg.
libiconv
Libiconv converts from one character encoding to another through Unicode conversion.
Copyright 1999-2003 Free Software Foundation, Inc.
Author: Bruno Haible
Homepage: http://www.gnu.org/software/libiconv/
The libiconv library is distributed and licensed under GNU Lesser General Public License
version 3.
Kerio Connect includes a customized version of this library. Complete source codes of
the customized version of libiconv library are available at:
http://download.kerio.com/archive/
libspf2
libspf2 implements the Sender Policy Framework, a part of the SPF/SRS protocol pair.
libspf2 allows Sendmail, Postfix, Exim, Zmailer and MS Exchange check SPF records. It
also verifies the SPF record and checks whether the sender server is authorized to send
email from the domain used. This prevents email forgery, commonly used by spammers,
scammers and email viruses/worms (for details, see http://www.libspf2.org/).
Copyright 2004 Wayne Schlitt. All rights reserved.

Appendix B Used open-source libraries
402
libstdc++
C++ Standard Library is a collection of classes and functions, which are written in the
core language and part of the C++ ISO Standard itself.
Copyright 2001, 2002, 2004 Free Software Foundation, Inc.
libxml2
XML parser and toolkit.
Copyright 1998-2003 Daniel Veillard. All Rights Reserved.
Copyright 2000 Bjorn Reese and Daniel Veillard.
Copyright 2000 Gary Pennington and Daniel Veillard
Copyright 1998 Bjorn Reese and Daniel Stenberg.
Mail-SpamAssassin
This product includes software developed by the Apache Software Foundation
(http://www.apache.org/).
SpamAssassin is registered trademark of Apache Software Foundation.
myspell
Spellcheck library.
Copyright 2002 Kevin B. Hendricks, Stratford, Ontario, Canada And Contributors. All
rights reserved.
OpenLDAP
Freely distributable LDAP (Lightweight Directory Access Protocol) implementation.
Copyright 1998-2007 The OpenLDAP Foundation
Copyright 1999, Juan C. Gomez, All rights reserved
Copyright 2001 Computing Research Labs, New Mexico State University
Portions Copyright1999, 2000 Novell, Inc. All Rights Reserved
Portions Copyright PADL Software Pty Ltd. 1999
Portions Copyright 1990, 1991, 1993, 1994, 1995, 1996 Regents of the University of
Michigan
Portions Copyright The Internet Society (1997)
Portions Copyright 1998-2003 Kurt D. Zeilenga
Portions Copyright 1998 A. Hartgers
Portions Copyright 1999 Lars Uffmann
Portions Copyright 2003 IBM Corporation
Portions Copyright 2004 Hewlett-Packard Company
Portions Copyright 2004 Howard Chu, Symas Corp.
OpenSSL
An implementation of Secure Sockets Layer (SSL v2/v3) and Transport Layer Security (TLS
v1) protocol.
This product includes software developed by the OpenSSL Project for use in the OpenSSL
Toolkit (http://www.openssl.org/).
This product includes cryptographic software written by Eric Young.
This product includes cryptographic software written by Tim Hudson.

403
PHP
PHP is a widely-used scripting language that is especially suited for Web development
and can be embedded into HTML.
Copyright 1999-2006 The PHP Group. All rights reserved.
This product includes PHP software, freely available from http://www.php.net/software/
php_mbstring
Loadable PHP module used for multibyte string handling.
Copyright 2001-2004 The PHP Group.
Copyright 1998-2002 HappySize, Inc. All rights reserved.
The library is modified by Kerio Technologies Inc. and distributed under GNU Lesser
General Public License version 2.1.
The module is available for download at:
http://download.kerio.com/archive/
sdbm
This product includes software developed by the Apache Software Foundation
(http://www.apache.org/)
zlib
General-purpose library for data compressing and decompressing.
Copyright 1995-2005 Jean-Loup Gailly and Mark Adler.

404
Glossary of terms
DoS attack
DoS (Denial of Service) is a type of attack when too many concurrent requests overload the
system; the server is no more able to respond to the requests of authorized users or fails.
DSN
DSN (Delivery Status Notification) is an information about the email message delivery status.
There are a couple of different types of delivery status notification. Unless otherwise specified,
users receive only the error messages from the mailserver (deferred, failure).
Email address
An email address determines the sender and recipient of a message in electronic
communication. It consists of a local part (before the @ character) and a domain part (after the
@ character). A domain specifies where email be delivered to (a company), a local part specifies
a particular recipient within this domain.
ETRN
If you receive email using the SMTP protocol and your server is not permanently connected to
the Internet, email can be accumulated at another SMTP server (typically a secondary server
for a given domain). When it is connected to the Internet, the SMTP server sends an ETRN
command (command of SMTP protocol) and asks for stored emails to be transmitted.
If the given SMTP server doesn’t have any messages stored, it doesn’t need to reply at all.
That’s why it is necessary to define a timeout period. If the SMTP server doesn’t receive any
emails, it terminates the connection after the specified timeout.
Firewall
Software or hardware device that protects a computer or computer network against attacks
from external sources (typically from the Internet).
Free/Busy
The Kerio Connect’s built-in Free/Busy server is a server using HTTP to provide information
on busyness and free time of other Kerio Connect users without details of individual events
being displayed.
IMAP
Internet Message Access Protocol (IMAP) enables clients to manage messages stored on a mail
server without downloading them to a local computer. This architecture allows the user to
access his/her mail from multiple locations (messages downloaded to a local computer would
not be available from other locations).
It is possible under certain conditions to access the email account using both IMAP and POP3
protocols.

405
IP
IP (Internet Protocol) is a protocol which uses its data part to convey all the other protocols.
The most important information in its header is the source and destination IP address, i.e. by
which host the packet was sent and to which host it should be delivered.
IP address
IP address is a unique 32-bit number used to identify the host in the Internet. It is represented
by four bytes in the decimal system (0-255) separated by dots (e.g. 200.152.21.5). Each
packet includes the information on where the packet was sent from (source IP address) and to
which host it should be delivered (destination IP address).
Kerberos
Protocol for secure user authentication in network environments. It was designed by MIT
(Massachusetts Institute of Technology) within the Athena project. The protocol is based on
such principles where the third side is trustworthy. Users use their passwords to authenticate
to the central server (KDC, Key Distribution Center) and the server sends them encrypted
tickets which can be used to authenticate to various services in the network.
LDAP
LDAP (Lightweight Directory Access Protocol) is an Internet protocol used to access directory
services. Information about user accounts and user rights, about hosts included in the
network, etc. are stored in the directories. Typically LDAP is used by email applications to
search for email addresses and to delivery management (Microsoft Active Directory).
Mailbox Account
A place where email is stored on a server. Clients can download emails from an account (using
POP3 protocol) or work with messages directly at the server (using IMAP or WebMail).
The account is physically represented by a directory on a disk. The directory is created in
the Kerio Connect directory (mail/user_name). Other subdirectories representing individual
folders are created in this directory.
Mailboxes are not created during the definitions of users, the concrete mailbox is created after
the first email to this mailbox is received.
MAPI
MAPI (Messaging Application Programming Interface) is an application programming interface
(API) designed by Microsoft. Any software that supports MAPI can communicate with any
mailserver (Kerio Connect) and send and receive data via this interface regardless of their type
and software provider.
MX Records
One of the record types that might be saved in DNS. It includes the information about the
mailserver for a particular domain (information about which SMTP server email for this
domain should be sent to). Multiple MX records may be defined with different MX preference
values to denote priority.

Glossary of terms
406
NNTP
NNTP (Network News Transfer Protocol) is a simple text protocol that allows for distribution,
retrieval and posting of messages on the Internet.
Notifications
Short message (notification) about a particular event — e.g. new email. It is usually sent as
a text message (SMS) to a cellular phone.
POP3
Post Office Protocol is a protocol that enables users to download messages from a server to
their local computer. It is suitable for clients who don’t have a permanent connection to the
Internet.
Unlike Internet Message Access Protocol (IMAP), POP3 does not allow users to manipulate
messages at the server. Mail is simply downloaded to the client where messages are managed
locally. POP3 enables access only to the INBOX folder and it does not support public and
shared folders.
Port
16-bit number (1-65535) used by TCP and UDP for application (services) identification on
a given computer. More than one application can be run at a host simultaneously (e.g. web
server, mail client, web client — web browser, FTP client, etc.). Each application is identified by
a port number. Ports 1-1023 are reserved and used by well known services (e.g. 80 = WWW).
Ports above 1023 can be freely used by any application.
RFC
RFC (Request For Comments) is a set of deliberately recognized standards. It is a set of indexed
documents where each document focuses a particular area of network communication.
SMTP
Simple Mail Transfer Protocol is used for sending email between mail servers. The SMTP
envelope identifies the sender/recipient of an email.
Spam
Unwanted, usually advertisement email. Spam are usually sent in bulk and the recipient
addresses are obtained by illegal means.
SSL
A protocol used to secure and encrypt the TCP connection. Secure Socket Layer was originally
designed by Netscape to secure transmission of web pages using HTTP protocol. Today it is
supported by almost all standard internet protocols — SMTP, POP3, IMAP, LDAP, etc.
At the beginning of communication, an encryption key is requested and transferred using
asymmetrical encryption. This key is then used to encrypt (symmetrically) the data.
Subnet mask
Subnet mask divides an IP address in two parts: network mask and an address of a host in
the network. The mask has the same format as IP addresses (e.g. 255.255.255.0), but it is
displayed as a 32-bit number with certain number of left-to-right oriented ones and zeros
(mask cannot include other values). Number one in a subnet mask represents a bit of the

407
network address and zero stands for a host’s address bit. All hosts within a particular subnet
must have identical subnet mask and network part of IP address.
TLS
Transport Layer Security. A later version of SSL, in fact it may be considered as SSL version
3.1. This version is standardized by IETF.
WebDAV
Using WebDAV (Web Distributed Authoring and Versioning), users can group-edit and organize
files located on servers.
WebMail
Interface used by Kerio Connect to enable access to email through a web browser. Several user
settings (such as message filtering, password, etc.) can be also changed using Kerio WebMail.

408
Index
A
access rights
groups 98
account settings 341
Active Directory 87
user import 91
Active Directory Extension 107
installation 108
ActiveSync 357
Debug log 367
direct synchronization with the server
358
installation of the SSL certificate 363
installation of the SSL certificate in WM 5.0
364
logging synchronization on mobile devices
369
remote deletion of the device data (Wipe)
365
removing device from the Kerio Connect
administration 367
RoadSync 362
SSL certificates in Sony Ericsson 365
SSL encryption 362
supported mobile devices 360
synchronization with desktop 359
administration of mobile devices 85
remove 85
wipe 85
alias 134
control 136
definition 135
groups 98
of user 76
antivirus 185
attachment filtering 189
Sophos Anti-Virus 185, 186
statistics 190
supported external antivirus programs
187
Apple Address Book 383
Auto-configure Address Book 355
Apple iCal 349
CalDAV 353
iCal Config Tool 353
Apple iPhone 391
Apple iPhone 2.0 392
Apple iPhone 3G 392
Apple iPhone OS 3.0 392
Apple Mail
mailserver.cfg settings 389
support for groupware functions 389
archiving 191
authentication methods 150
Auto-configure Address Book 355
avserver 32
B
back-up 194
kmsrecover 199
recovery 199
BES 373
BlackBerry
AstraSync 372
NotifySync 372
BlackBerry Enterprise Server 373
C
CalDAV 352
Apple iCal 353
CardDAV 355
cleaned items 56
in domain 57
of user 58
settings 57
conflicting software 14

409
D
deployment examples 315
domain mailbox 125
X-Envelope-To: 125
domains
alias 59
footers 54
primary 53
DoS attack 404
DSN 404
E
email address 404
ETRN 124, 142, 147, 404
F
firewall 313, 404
folders
public 283
Free/Busy 404
G
groups
IP address 47, 129, 225, 229
user groups 77, 98
H
HTTP 46
HTTP Proxy 156
I
iCal Config Tool 353
IMAP 45, 311, 312, 313, 404
import
user groups 87
installation 15
Linux DEB 20
Linux RPM 18
Mac OS X 21
MS Windows 15
Internet connection 144
IP 405
IP address 405
K
Kerberos 61, 75, 405
authentication 286
Kerio
Assist 32
Kerio Connect Engine 29
Kerio Connect Monitor 29, 29
Linux 31
Mac OS X 30
Windows 29
Kerio Connector for BlackBerry 373
Kerio Open Directory Extension
authentication settings 112
installation 115
Kerio Outlook Connector 322, 322, 337
automatic update 334, 347
conflict 336
data file settings 346
installation 323, 339
MAPI 337
Offline Edition 322, 322
offline mode 334
online mode 334
profile 325
ProfileCreator 328
synchronization 335
Kerio Sync Connector for Mac 385
Kerio WebMail 215
dictionaries 218
language 218
localizations 218
spellcheck 218
Kerio WebMail logo 215
L
LDAP 104, 405
client settings 231
server 230
service 45
Linux
server’s startup 19, 20
logs 265
Config 268
debug 277

Index
410
error 275
mail 269
operations 274
security 271
settings 265
spam 276
warning 274
M
mailbox account 405
mailing lists 236
administrator 236
aliases 250
archiving 248
member 237
member import 245
moderator 237
new 237
MAPI 405
master authentication
master password 155
messages in queue 255
queue viewing 256
Microsoft Entourage 380
MS Outlook
iCal 348
iCalendar 348
web calendar 348
MX Records 123, 405
N
NNTP 45, 406
notifications 406
NT domain 62
user import 90
NTLM authentication 306
MS Outlook configuration 309
O
Open Directory 115, 297
Kerio Open Directory Extension 115
Open Directory Extension 297
settings 116
P
PAM 61, 75
Performance Monitor 29, 281
POP3 45, 311, 313, 406
port 47, 406
ports 313
product registration 37
at the website 37
importing license key 41
licensing policy 43
registration of the full version 39
registration of the trial version 38
subscription 43
with the administration interface 37
profile
new 339
public folders 283
client support 285
domain 284
global 284
new 284
rights 285
R
RAS 144
reindexing mail folders 320
relaying 124
remote POP3 mailboxes 137
resources 251
administration 252
disabling 252
new 253
resource scheduling 251
restoring deleted items 55
RFC 406
RoadSync 362
S
scheduling 145
time ranges 147, 226, 227
services 44
skins 215
cascading stylesheet 215
SMTP 44, 123, 128, 277, 406

411
Sony Ericsson 365
spam 159, 406
Bayesian filter 172
Caller ID tab 174
custom rules 166
default settings 178
email evaluation 172
email policy 173
graphs 183
internet spammer databases 163
logs 183
rules 167
SMTP greeting delay 177
SORBS 166
SpamAssassin 160, 171
SpamCop 166
SpamHAUS SBL-XBL 166
Spam Rating 160
SPF 175
statistics 182
SURBL 173
WPBL 166
spamserver 32
SSL 207, 406
SSL certificate 207
intermediate 210
Safari 211
store directory 153
Subnet mask 406
system requirements 13
T
technical support 393
TLS 407
TNEF 149
U
Unix-to-Unix decoding 149
Unix-to-Unix encoding 149
update
Kerio Connect 156
Kerio Outlook Connector 156
Kerio Sync Connector 156
user accounts 71
quota 78
templates 95
uudecode 149
uuencode 149
W
Web Administration
access rights 34
supported browsers 33
user login 33
WebDAV 407
WebMail 407
Windows Calendar 349
Windows NT domain 75
X
X-Envelope-To: 149

412